Embed Size (px)
Citation preview
Order Number: 326712-005US
McAfee® Cloud Identity Manager Installation GuideFor McAfee® Cloud Identity Manager v3.1
August 2012

McAfee® Cloud Identity Manager Installation Guide August 20122 Order Number: 326712-005US
COPYRIGHTCopyright © 2012 McAfee, Inc. Do not copy without permission.
TRADEMARK ATTRIBUTIONSMcAfee, the McAfee logo, McAfee Active Protection, McAfee AppPrism, McAfee Artemis, McAfee CleanBoot, McAfee DeepSAFE, ePolicy Orchestrator, McAfee ePO, McAfee EMM, McAfee Enterprise Mobility Management, Foundscore, Foundstone, McAfee NetPrism, McAfee Policy Enforcer, Policy Lab, McAfee QuickClean, Safe Eyes, McAfee SECURE, SecureOS, McAfee Shredder, SiteAdvisor, SmartFilter, McAfee Stinger, McAfee Total Protection, TrustedSource, VirusScan, WaveSecure, and WormTraq are trademarks or registered trademarks of McAfee, Inc. or its subsidiaries in the United States and other countries. Other names and brands may be claimed as the property of others.
LICENSE INFORMATIONLicense AgreementNOTICE TO ALL USERS: CAREFULLY READ THE APPROPRIATE LEGAL AGREEMENT CORRESPONDING TO THE LICENSE YOU PURCHASED, WHICH SETS FORTH THE GENERAL TERMS AND CONDITIONS FOR THE USE OF THE LICENSED SOFTWARE. IF YOU DO NOT KNOW WHICH TYPE OF LICENSE YOU HAVE ACQUIRED, PLEASE CONSULT THE SALES AND OTHER RELATED LICENSE GRANT OR PURCHASE ORDER DOCUMENTS THAT ACCOMPANY YOUR SOFTWARE PACKAGING OR THAT YOU HAVE RECEIVED SEPARATELY AS PART OF THE PURCHASE (AS A BOOKLET, A FILE ON THE PRODUCT CD, OR A FILE AVAILABLE ON THE WEBSITE FROM WHICH YOU DOWNLOADED THE SOFTWARE PACKAGE). IF YOU DO NOT AGREE TO ALL OF THE TERMS SET FORTH IN THE AGREEMENT, DO NOT INSTALL THE SOFTWARE. IF APPLICABLE, YOU MAY RETURN THE PRODUCT TO MCAFEE OR THE PLACE OF PURCHASE FOR A FULL REFUND.
August 2012 McAfee® Cloud Identity Manager Installation GuideOrder Number: 326712-005US 3
Document Revision History
Revision Number Description Release Date
003US McAfee® Cloud Identity Manager Installation Guide v3.0 May 2012
005US McAfee® Cloud Identity Manager Installation Guide v3.1 August 2012

McAfee® Cloud Identity Manager Installation Guide August 20124 Order Number: 326712-005US
August 2012 McAfee® Cloud Identity Manager Installation GuideOrder Number: 326712-005US 5
Contents
1.0 Introduction to McAfee® Cloud Identity Manager ......................................................71.1 Supported Environments ......................................................................................81.2 Supported Browsers ............................................................................................81.3 Available Documentation ......................................................................................91.4 Technical Support................................................................................................91.5 ........................................................................................................................9
2.0 Getting Started........................................................................................................ 112.1 Setting Up a MySQL Database or System File ........................................................ 122.2 Installing McAfee® CIM as a Service .................................................................... 132.3 Administrative Privileges .................................................................................... 142.4 Upgrade Options ............................................................................................... 15
2.4.1 Upgrade Considerations .......................................................................... 152.4.2 Upgrading Clusters ................................................................................. 15
2.5 Access the McAfee® CIM Management Console...................................................... 162.6 Replace the Default SSL Server Certificate with Your Own....................................... 172.7 Locate and Modify an Existing Keystore Alias......................................................... 192.8 Using Your Own JRE .......................................................................................... 20
2.8.1 Configure a Windows Environment for Your JRE.......................................... 212.8.2 Configure a Linux Environment for Your JRE............................................... 222.8.3 Before Starting McAfee® CIM for the First Time .......................................... 22
3.0 Installation Procedures on Windows ....................................................................... 233.1 Install McAfee® CIM on Windows......................................................................... 23
3.1.1 Install McAfee® CIM on Windows — Upgrade Option ................................... 263.1.2 Install McAfee® CIM on Windows — Typical Installation Option ..................... 263.1.3 Install McAfee® CIM on Windows — Custom Installation Option .................... 30
3.2 Start and Stop McAfee® CIM on Windows ............................................................. 403.3 Uninstall McAfee® CIM on Windows ..................................................................... 413.4 Backing Up and Restoring an Installation on Windows ............................................ 42
3.4.1 Back Up an Installation on Windows.......................................................... 423.4.2 Restore a Back Up on Windows ................................................................ 43
4.0 Installation Procedures on Linux ............................................................................. 454.1 Install McAfee® CIM on Linux.............................................................................. 45
4.1.1 Install McAfee® CIM on Linux — Typical Installation Option.......................... 464.1.2 Install McAfee® CIM on Linux — Custom Installation Option ......................... 48
4.2 Start and Stop McAfee® CIM on Linux .................................................................. 524.3 Uninstall McAfee® CIM on Linux .......................................................................... 524.4 Backing Up and Restoring an Installation on Linux ................................................. 54
4.4.1 Back Up an Installation on Linux............................................................... 544.4.2 Restore a Back Up on Linux ..................................................................... 55
5.0 Cluster Management................................................................................................ 575.1 Configure Clustering in McAfee® CIM ................................................................... 57
6.0 Troubleshooting Installation ................................................................................... 616.1 Property soae.user.dir is not set .......................................................................... 616.2 Connection to Management Console Fails from Another Computer............................ 616.3 McAfee® CIM Cannot Connect to the MySQL Server ............................................... 62

McAfee® Cloud Identity Manager Installation Guide August 20126 Order Number: 326712-005US
August 2012 McAfee® Cloud Identity Manager Installation GuideOrder Number: 326712-005US 7
Introduction to McAfee® Cloud Identity Manager
1.0 Introduction to McAfee® Cloud Identity Manager
McAfee® Cloud Identity Manager (McAfee® CIM) simplifies the management and secures the use of cloud, Software as a Service (SaaS), and web applications for companies and large organizations. Service and application providers can also use McAfee® CIM to simplify and improve the authentication process for their customers.
McAfee® CIM provides support for the following features:• Extensible Framework• Web Single Sign On (SSO)• Multiple Authentication Methods• Credential Mapping and User Provisioning• Authorization Policies and Access Control Enforcement• Event Auditing and Monitoring• Connectors for Popular Cloud Services and Applications• Web-based Management Console
McAfee® CIM runs as a stand-alone server and is configured by an administrator using a web-based Management Console accessible from a web browser. For information about installing McAfee® CIM as a stand-alone server or as a cluster of servers, see the McAfee® Cloud Identity Manager Installation Guide. For information about configuring McAfee® CIM in the Management Console, see the McAfee® Cloud Identity Manager Administrator’s Guide.
McAfee® CIM provides connectors for many popular cloud services and applications, including Google Apps* and Salesforce.com*. These connectors are built in to McAfee® CIM and simplify the deployment of the cloud service or application in an organization. Web SSO requires configuration in the Management Console and in the cloud application’s user interface. Instructions for configuring SSO on the cloud application side are included in the documentation set.
For customers who have Java*-based or .NET* web applications that do not support SAML2 authentication, McAfee® CIM provides a custom connector. For information on integrating Java-based and .NET web applications with McAfee® CIM, see the McAfee® Cloud Identity Manager Integration Guide.
For software developers who want to write their own cloud service connectors or authentication modules, McAfee® CIM provides an SDK. For more information about the SDK, see the McAfee® Cloud Identity Manager Developer’s Guide.
Introduction to McAfee® Cloud Identity Manager
McAfee® Cloud Identity Manager Installation Guide August 20128 Order Number: 326712-005US
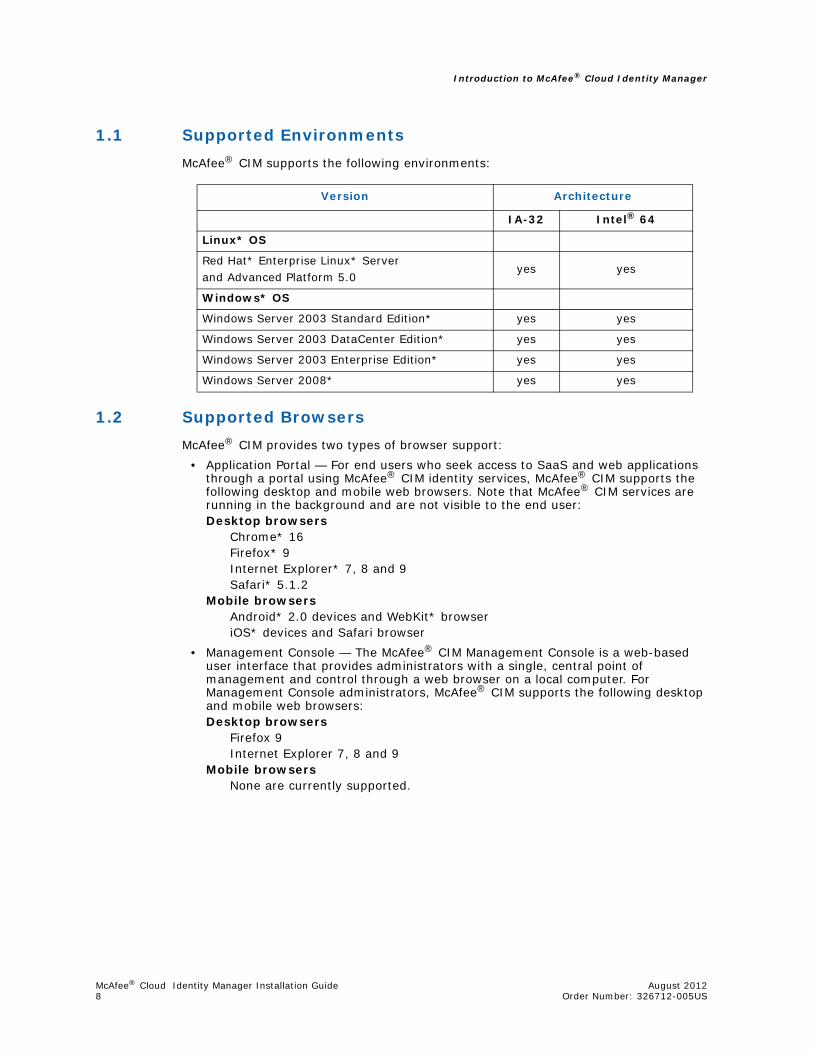
1.1 Supported EnvironmentsMcAfee® CIM supports the following environments:
1.2 Supported BrowsersMcAfee® CIM provides two types of browser support:
• Application Portal — For end users who seek access to SaaS and web applications through a portal using McAfee® CIM identity services, McAfee® CIM supports the following desktop and mobile web browsers. Note that McAfee® CIM services are running in the background and are not visible to the end user:Desktop browsers
Chrome* 16Firefox* 9Internet Explorer* 7, 8 and 9Safari* 5.1.2
Mobile browsersAndroid* 2.0 devices and WebKit* browseriOS* devices and Safari browser
• Management Console — The McAfee® CIM Management Console is a web-based user interface that provides administrators with a single, central point of management and control through a web browser on a local computer. For Management Console administrators, McAfee® CIM supports the following desktop and mobile web browsers:Desktop browsers
Firefox 9Internet Explorer 7, 8 and 9
Mobile browsersNone are currently supported.
Version Architecture
IA-32 Intel® 64
Linux* OS
Red Hat* Enterprise Linux* Serverand Advanced Platform 5.0
yes yes
Windows* OS
Windows Server 2003 Standard Edition* yes yes
Windows Server 2003 DataCenter Edition* yes yes
Windows Server 2003 Enterprise Edition* yes yes
Windows Server 2008* yes yes

August 2012 McAfee® Cloud Identity Manager Installation GuideOrder Number: 326712-005US 9
Introduction to McAfee® Cloud Identity Manager
1.3 Available DocumentationThe McAfee® CIM documentation set includes the following guides:
• McAfee® Cloud Identity Manager Administrator’s Guide — The Administrator’s Guide is a complete guide to the Management Console and covers the configuration tasks needed to administer McAfee® CIM.
• McAfee® Cloud Identity Manager Developer’s Guide — The Developer’s Guide provides information for software developers who want to write custom Java code that extends McAfee® CIM functionality.
• McAfee® Cloud Identity Manager Installation Guide — The Installation Guide includes the tasks and procedures that you need to install and uninstall McAfee® CIM as a stand-alone server on Microsoft Windows and Linux operating system platforms. The guide also includes how to start and stop the McAfee® CIM service after it is installed.
• McAfee® Cloud Identity Manager Integration Guide — The Integration Guide provides instructions on how to integrate Java-based and .NET* web applications that do not support SAML2 authentication with McAfee® CIM.
Note: In addition to these guides, there are separate guides that document how to configure the different Cloud Connectors. For more information, see the McAfee® Cloud Identity Manager Administrator’s Guide.
1.4 Technical SupportFor technical assistance, contact McAfee® Technical Support by one of the following options:
Phone number: 1-800-937-2237
Support portal: https://mysupport.mcafee.com
1.5

Introduction to McAfee® Cloud Identity Manager
McAfee® Cloud Identity Manager Installation Guide August 201210 Order Number: 326712-005US

August 2012 McAfee® Cloud Identity Manager Installation GuideOrder Number: 326712-005US 11
Getting Started
2.0 Getting Started
The McAfee® Cloud Identity Manager-SSO (McAfee® CIM) installation package, which includes Java* Runtime Environment (JRE)* 1.6.0 Update 22, is available in the following formats:
• 32-bit Windows with JVM*• 64-bit Windows with JVM• 32-bit Linux with JVM• 64-bit Linux with JVM
Although McAfee® CIM is installed with JVM, you can use your own JRE. For information on how to configure the environment for your JRE, see section 2.8 Using Your Own JRE.
This guide includes all topics and tasks that you need to get started using the McAfee® CIM service on Microsoft Windows and Linux operating system platforms:
• Setting up a MySQL* database or system file — See section 2.1 Setting Up a MySQL Database or System File.
• Installing McAfee® CIM as a Windows or Linux service — See section 2.2 Installing McAfee® CIM as a Service.
• Administrative Privileges — See section 2.3 Administrative Privileges.• Upgrade options — See section 2.4 Upgrade Options.• Backing up and restoring an installation — See sections 3.4 Backing Up and
Restoring an Installation on Windows and 4.4 Backing Up and Restoring an Installation on Linux.
• Installing, uninstalling, starting, and stopping the McAfee® CIM service on Windows — See section 3.0 Installation Procedures on Windows.
• Installing, uninstalling, starting, and stopping the McAfee® CIM service on Linux — See section 4.0 Installation Procedures on Linux.
• Accessing the Management Console — See section 2.5 Access the McAfee® CIM Management Console.
• Replacing the default SSL server certificate with your own — See section 2.6 Replace the Default SSL Server Certificate with Your Own.
• Locating and modifying an existing key store alias — See section 2.7 Locate and Modify an Existing Keystore Alias.
• Using Your Own JRE — (Optional) See section 2.8 Using Your Own JRE.
Getting Started
McAfee® Cloud Identity Manager Installation Guide August 201212 Order Number: 326712-005US
2.1 Setting Up a MySQL Database or System FileMcAfee® CIM stores runtime data, such as user information and the auditing log, in a system file or a MySQL database. Storing runtime data in a system file is the default option. Storing runtime data in a MySQL database is the recommended option.
You can configure the File or Database setting in the installation wizard or on the Admin tab in the Management Console. For more information about the Management Console, see the McAfee® Cloud Identity Manager Administrator’s Guide.
To download the MySQL database, visit www.mysql.com, where you can also find installation instructions. The database can be installed on the same server as McAfee® CIM or on a separate server. To improve performance when system load is high, install the database on a separate server.
During installation of the MySQL database, you create a root account with a password. Make a note of the root password, because you need it when installing McAfee® CIM later.
After the MySQL database is installed, create a new database for McAfee® CIM in MySQL. To create a database named “eca360db”, open the MySQL client and run the following SQL command:
mysql> create database eca360db;
If database creation is successful, a message like the following is displayed:Query OK, 1 row affected (0.00 sec)
You do not need to create any tables inside eca360db. When McAfee® CIM is installed, it automatically creates all the required tables for you.
August 2012 McAfee® Cloud Identity Manager Installation GuideOrder Number: 326712-005US 13
Getting Started
2.2 Installing McAfee® CIM as a ServiceIn the installation wizard, you can install McAfee® CIM to run as a local service on a Windows or Linux operating system. When McAfee® CIM is installed as a service, the operating system automatically starts the McAfee® CIM service when the system starts and restarts the McAfee® CIM service when it fails because of an error. To minimize down time due to errors, we recommend that you install McAfee® CIM as a service.
Note: Installing McAfee® CIM as a service requires administrative privileges.
When installed as a Windows service, McAfee® CIM can still be started and stopped manually through the Windows Start menu or by navigating to Services through the Control Panel and locating the McAfee® CIM service:
Windows Server 2003 and 2008Control Panel\Administrator Tools\Services
Windows Server 2008 R2Control Panel\System and Security\Administrator Tools\Services
There, you can start and stop the service or view the Properties dialog through the context menu and modify the default settings. For example, you can modify the following default values:
• The Startup type on the General tab is set to Automatic by default.• The recovery actions on the Recovery tab are set to “Restart the Service” by
default.• Restart service after on the Recovery tab is set to 0 minutes by default.
For more information about manually starting and stopping the McAfee® CIM service, see the following sections:
• Windows — See section 3.2 Start and Stop McAfee® CIM on Windows.• Linux — See section 4.2 Start and Stop McAfee® CIM on Linux.
After installing McAfee® CIM as a service, you still need to start the service the first time. You can do this by restarting the operating system, which automatically starts the service, or by manually starting the service as described above. Thereafter, the McAfee® CIM service is automatically started and restarted and under normal conditions, does not need to be manually started again.
Getting Started
McAfee® Cloud Identity Manager Installation Guide August 201214 Order Number: 326712-005US
2.3 Administrative PrivilegesThe following installation options require administrative privileges:
• The program installation and user configuration folders are system folders.• McAfee® CIM is installed as a service.
When you select the typical installation option, McAfee® CIM is installed on Windows or Linux with a default configuration that includes the following system folders and requires administrative privileges.
Default Windows installation foldersProgram installation: %PROGRAMFILES%\McAfee\CIM\SSOUser configuration: %USERPROFILE%\CIM-SSO
Default Linux installation foldersProgram installation: /opt/mcafee/cim/ssoUser configuration: /opt/mcafee/cim/sso/userdir
When administrative privileges are required, you must install, uninstall, start and stop McAfee® CIM from the built-in Windows administrator or Linux superuser (root) account. Alternately, on Windows, you can right-click the program and select “Run as administrator” from the context menu.
We recommend that you install McAfee® CIM from the administrator’s account on Windows and Linux systems. When installing McAfee® CIM for evaluation, however, you can select the custom installation option and configure installation folders that do not require administrative privileges. In this case, you can install, uninstall, start, and stop McAfee® CIM without administrative privileges.

August 2012 McAfee® Cloud Identity Manager Installation GuideOrder Number: 326712-005US 15
Getting Started
2.4 Upgrade OptionsWhen you uninstall an older version of McAfee® CIM and install a newer version, you lose all system configuration information. To avoid having to reconfigure your system when you have an older version of McAfee® CIM installed and you want to install a newer version, you have the following options:
• Upgrade Option — You can upgrade the older McAfee® CIM version to the newer version in the installation wizard.Windows: The Upgrade option is located on the Choose Setup Type step of the installation wizard. Selecting this option adds no complexity to the installation process and is recommended, when available.Linux: To upgrade McAfee® CIM, select the Custom installation option in the installation wizard and specify the same program installation and user configuration folders that the existing version uses.
• Export-Import Option — You can export the existing system configuration in the Management Console, uninstall the older version of McAfee® CIM, install the newer version of McAfee® CIM, and then import the saved system configuration in the Management Console.Note: While the Export-Import advanced configuration option allows you to save and restore the system configuration, it does not save runtime data, such as log files, certificates, and administrator account information, as the back-up and restore utilities do. For more information about these utilities, see sections 3.4 Backing Up and Restoring an Installation on Windows and 4.4 Backing Up and Restoring an Installation on Linux. For more information about the Export-Import option in the Management Console, see the McAfee® Cloud Identity Manager Administrator’s Guide.
2.4.1 Upgrade Considerations
When upgrading McAfee® CIM from an older version to a newer version, please take into account the following important considerations:
• Upgrading from an McAfee® CIM version to a McAfee® CIM version — The name of the installation directory must stay the same.
• Upgrading McAfee® CIM from v2.5 to v3.0 or greater — Before upgrading McAfee® CIM from v2.5 to v3.0 or greater, verify that the McAfee® Provisioning service is stopped. If the service is running during the upgrade, then McAfee® CIM fails to start after the upgrade is complete.
• Upgrading your custom portal configuration — The Upgrade does not include your custom portal configuration. After upgrading, merge your custom login, error, and portal pages with the new version of McAfee® CIM.
2.4.2 Upgrading Clusters
There are two ways to upgrade a cluster of McAfee® CIM instances:• Online upgrade — The online upgrade option is only available when upgrading from
v2.1 to v2.5 or from v3.1 to v3.2 or greater. To upgrade a cluster online, you upgrade one instance in the cluster while all other instances in the cluster are running.Note: To upgrade a cluster from v2.1 to v3.0 or from v3.0 to v3.1, use the offline upgrade option.
• Offline upgrade — To upgrade a cluster from v2.1 to v3.0 or from v3.0 to v3.1, use the offline upgrade option. When you upgrade a cluster offline, you stop the McAfee® CIM service on each node and upgrade each node individually.
Note: For more information about managing clusters, see section 5.0 Cluster Management.

Getting Started
McAfee® Cloud Identity Manager Installation Guide August 201216 Order Number: 326712-005US
2.5 Access the McAfee® CIM Management ConsoleAfter starting the McAfee® CIM service, you can access the Management Console through a web browser. For a list of supported browsers, see section 1.2 Supported Browsers.
When you access the Management Console in your web browser, McAfee® CIM saves the host name or IP address that you enter and uses it to generate all McAfee® CIM service URLs. So that users on other machines can access McAfee® CIM services, we strongly recommend that you take the following steps:1. Install McAfee® CIM on a machine that has a fully qualified domain name (FQDN).2. Specify the FQDN in the Management Console.
Without the FQDN, McAfee® CIM uses a local name for the installation machine when generating the service URLs, and users on other machines may not be able to access McAfee® CIM services. By specifying the FQDN, you ensure that users on other machines can access McAfee® CIM services.
Note: For information about configuring the FQDN in the Management Console, see the McAfee® Cloud Identity Manager Administrator’s Guide.To access the McAfee® CIM Management Console
1. Copy and paste the following URL in your web browser:https://<e360sso-server>:<port_number><e360sso-server>
Specifies the name of the server on which McAfee® CIM is installed.<port_number>
Specifies the port number used by McAfee® CIM.Default: 8443
The McAfee® CIM Login dialog opens.2. Type the following initial values in the fields on the Login dialog, and click Login.
User Name: adminPassword: passwdYou are logged in to the McAfee® CIM Management Console, where you can modify the initial administrator password and create other users.
August 2012 McAfee® Cloud Identity Manager Installation GuideOrder Number: 326712-005US 17
Getting Started
2.6 Replace the Default SSL Server Certificate with Your OwnIn this procedure, you replace the default self-signed certificate installed with McAfee® CIM with a valid certificate signed by a Certificate Authority (CA). McAfee® CIM uses an encrypted Java keystore to store the default certificate and provides a command line tool that allows you to replace the default with your own certificate from a PKCS 12 or JKS keystore. Alternately, you can import your own certificate in the installation wizard.
PKCS is an acronym for the Public Key Cryptography Standards published by RSA Laboratories. PKCS 12 defines a file format for storing X.509 private keys paired with public key certificates. JKS is an acronym for Java Key Store. JKS files, which also store X.509 certificates and private keys, are used by Java-based applications.
Note: If the alias corresponding to your key pair is the hash value of a public key instead of a name, you must locate and modify the alias in the keystore using Java keytool commands. For more information, see section 2.7 Locate and Modify an Existing Keystore Alias.
To replace the default SSL server certificate with your own1. Prepare a PKCS 12 or JKS keystore (with .p12 or .pfx filename extension) which
includes the SSL certificate. You can use OpenSSL to generate a self-signed certificate, or you can use a certificate signed by a trusted certificate authority (CA).
2. Open a command window, and change to the following directory:<install_dir>\current\bin<install_dir>
Specifies the name of the program installation directory.3. Run the following Java program:
java -jar ReplaceSSLCert.jar -keystore <keystore_filename> -storetype <“pkcs12”|“jks”> -storepass <keystore_password> -keypass <certificate_password> -alias <certificate_alias>-keystore <keystore_filename>
Specifies the name of the file that holds the keystore.-storetype <“pkcs12”|“jks”>
Specifies whether the keystore file format is PKCS 12 or JKS.-storepass <keystore_password>
Specifies the password assigned to the keystore.-keypass <certificate_password>
Specifies the password assigned to the key pair.-alias <certificate_alias>
Specifies the name assigned to the key pair when it was created.4. Restart McAfee® CIM.
Getting Started
McAfee® Cloud Identity Manager Installation Guide August 201218 Order Number: 326712-005US
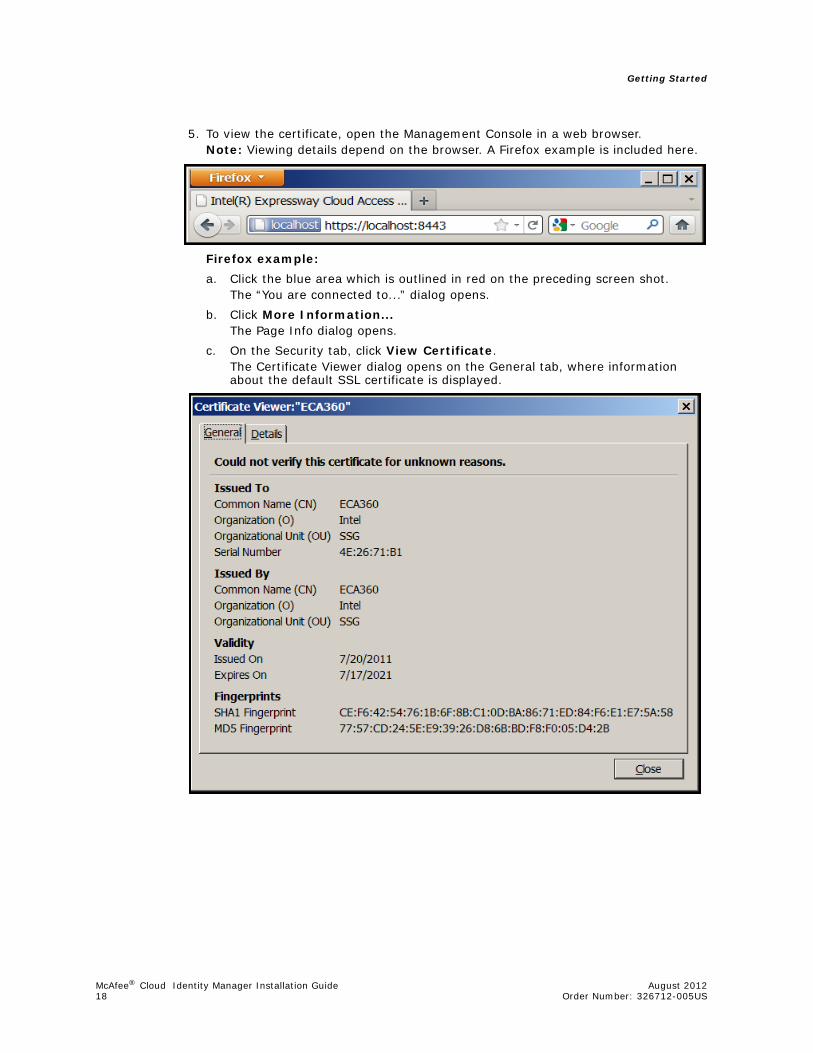
5. To view the certificate, open the Management Console in a web browser.Note: Viewing details depend on the browser. A Firefox example is included here.
Firefox example:a. Click the blue area which is outlined in red on the preceding screen shot.
The “You are connected to...” dialog opens.b. Click More Information...
The Page Info dialog opens.c. On the Security tab, click View Certificate.
The Certificate Viewer dialog opens on the General tab, where information about the default SSL certificate is displayed.
August 2012 McAfee® Cloud Identity Manager Installation GuideOrder Number: 326712-005US 19
Getting Started
2.7 Locate and Modify an Existing Keystore AliasEach key pair in a keystore is identified by a unique alias. If the alias corresponding to your key pair is the hash value of a public key instead of a name, you must locate and modify the alias in the keystore using the following Java keytool commands.1. To locate the alias of your key pair in the keystore file, run the following command:
keytool -list -keystore <keystore_filename> -storetype <“pkcs12”|”jks”>-keystore <keystore_filename>
Specifies the name of the file that holds the keystore.-storetype <“pkcs12”|“jks”>
Specifies whether the keystore file format is PKCS 12 or JKS.Note: When the alias is a hash value instead of a name, it is represented by an index number in the output generated by the -list command.
2. To modify the alias of your key pair in the keystone file, run the following command:keytool -changealias -keystore <keystore_filename> -storetype <“pkcs12”|”jks”> -alias <index_number> -destalias <alias_name>-keystore <keystore_filename>
Specifies the name of the file that holds the keystore.-storetype <“pkcs12”|“jks”>
Specifies whether the keystore file format is PKCS 12 or JKS.-alias <index_number>
Specifies the index number of the alias you want to modify.-destalias <alias_name>
Specifies a “destination alias” or new name for the alias you want to modify.
When you replace the default SSL server certificate with your own, you can now reference your key pair with an alias name rather than a hash value. For more information, see section 2.6 Replace the Default SSL Server Certificate with Your Own.

Getting Started
McAfee® Cloud Identity Manager Installation Guide August 201220 Order Number: 326712-005US
2.8 Using Your Own JREBefore installing McAfee® CIM and using your own JRE, verify that the following requirements are met:1. The Java Cryptography Extension (JCE) Unlimited Strength Jurisdiction Policy is
applied to your JRE.
To securely use your JRE with McAfee® CIM, download and install Java Cryptography Extension (JCE) Unlimited Strength Jurisdiction Policy Files 6. To download the JCE policy files, visit:http://www.oracle.com/technetwork/java/javase/downloads/jce-6-download-429243.html
Note: For instructions on how to install the JAR files, see the README.txt file that is included in the download.2. The environment variables are set on your Windows or Linux operating system
platform. For more information, see the following sections:— Windows — See section 2.8.1 Configure a Windows Environment for Your JRE.— Linux — See section 2.8.2 Configure a Linux Environment for Your JRE.
Note: We recommend that you save a backup copy of your current environment files before altering the path settings.3. Your JDK is 1.6.0 Update 22 or above.
The JAVA_HOME environment variable points to the directory where the correct, supported version of Java is installed. McAfee® CIM requires Oracle JDK 1.6.0 Update 22 or above. If needed, install the JDK now. To download the JDK, visit:http://www.oracle.com/technetwork/java/javase/downloads/index.html
Note: McAfee® CIM comes installed with JVM. Therefore, you do not need to download the JDK or use your own JRE. Using your own JRE and configuring a Windows or Linux environment for your JRE are optional.

August 2012 McAfee® Cloud Identity Manager Installation GuideOrder Number: 326712-005US 21
Getting Started
2.8.1 Configure a Windows Environment for Your JRE
To use your own JRE, set the Windows environment variables and test the settings.
To configure a Windows environment for your JRE1. Go to Start > My Computer > Properties > Advanced > Environment Variables.2. Add the following new system environment variables:
JAVA_HOMESpecifies the installation directory of the JDK on your computer.Example: %PROGRAMFILES%\Java\jdk1.6.0_22Note: JDK is an acronym for Java Development Kit.
JRE_HOMESpecifies the installation directory of the JRE on your computer.Value: %JAVA_HOME%\jreNote: JRE is an acronym for Java Runtime Environment.
3. Update the following system environment variables:PATH
Specifies a semicolon-separated list of paths to search when locating executable files. Add the following value to the PATH variable’s list.Value: %JAVA_HOME%\bin
CLASSPATHSpecifies a semicolon-separated list of paths to search when locating classes that are not Java extensions or part of the Java platform. Add the following value to the CLASSPATH variable’s list.Value: %JAVA_HOME%\lib
4. To test your Java settings, open a new command window, and run the following command at the prompt:C:\>java -versionIf the Java settings are correct, a message like the following is displayed:java version "1.6.0_22"Java(TM) SE Runtime Environment (build 1.6.0_22-b02)Java HotSpot(TM) Server VM (build 1.6.0_22-b02, mixed mode)
The Windows environment is configured for your JRE.
Getting Started
McAfee® Cloud Identity Manager Installation Guide August 201222 Order Number: 326712-005US
2.8.2 Configure a Linux Environment for Your JRE
To use your own JRE, set the Linux environment variables and test the settings. For more information about the environment variables, see section 2.8.1 Configure a Windows Environment for Your JRE.
To configure a Linux environment for your JRE1. Open a terminal window, and enter the following command:
root@server ~ # export JAVA_HOME=<jdk_install_dir><jdk_install_dir>
Specifies the installation directory of the JDK on your computer.Example: /usr/java/jdk1.6.0_22
2. Enter the following commands:root@server ~ # export JRE_HOME=$JAVA_HOME/jreroot@server ~ # export PATH=$JAVA_HOME/bin:$PATH
3. Test your java settings by executing the following command:root@server install # java -versionIf the Java settings are correct, a message like the following is displayed:java version "1.6.0_22"Java(TM) SE Runtime Environment (build 1.6.0_22-b01)Java HotSpot(TM) Server VM (build 14.2-b01, mixed mode)
The Linux environment is configured for your JRE.
2.8.3 Before Starting McAfee® CIM for the First Time
If you are using your own JRE, you need to set the ECA360SSO_JAVA variable in the McAfee® CIM start script file to your JAVA_HOME path. Locate and open the script file, and update the ECA360SSO_JAVA variable setting to equal your JAVA_PATH. The script files are located and named as follows:
Windows: <install_dir>\current\bin\essoenv.cmdLinux: <install_dir>/current/bin/essoenv.sh<install_dir>
Specifies the name of the program installation directory.
August 2012 McAfee® Cloud Identity Manager Installation GuideOrder Number: 326712-005US 23
Installation Procedures on Windows
3.0 Installation Procedures on Windows
This chapter includes procedures related to installing and uninstalling McAfee® CIM on a Windows operating system:
• Install McAfee® CIM on a Windows system — See section 3.1 Install McAfee® CIM on Windows.
• Start and Stop McAfee® CIM on a Windows system — See section 3.2 Start and Stop McAfee® CIM on Windows.
• Uninstall McAfee® CIM on a Windows system — See section 3.3 Uninstall McAfee® CIM on Windows.
• Back up and restore an McAfee® CIM installation on a Windows system — See section 3.4 Backing Up and Restoring an Installation on Windows.
3.1 Install McAfee® CIM on WindowsThe installation package includes all McAfee® CIM services:
• Identity and Single Sign-on (SSO) service• Provisioning service• Built-in OTP server
Note: If administrative privileges are required, you must either log in to the Windows built-in administrator account or run the McAfee® CIM installer “as administrator”. For more information, see section 2.3 Administrative Privileges.
To install McAfee® CIM on Windows1. Download one of the following installers to a download directory, and start the
installer:32-bit Windows: cim_win32_3.1.exe64-bit Windows: cim_win64_3.1.exeNote: CIM is an acronym for Cloud Identity Manager.
The installation wizard opens on the License Agreement step.
Installation Procedures on Windows
McAfee® Cloud Identity Manager Installation Guide August 201224 Order Number: 326712-005US
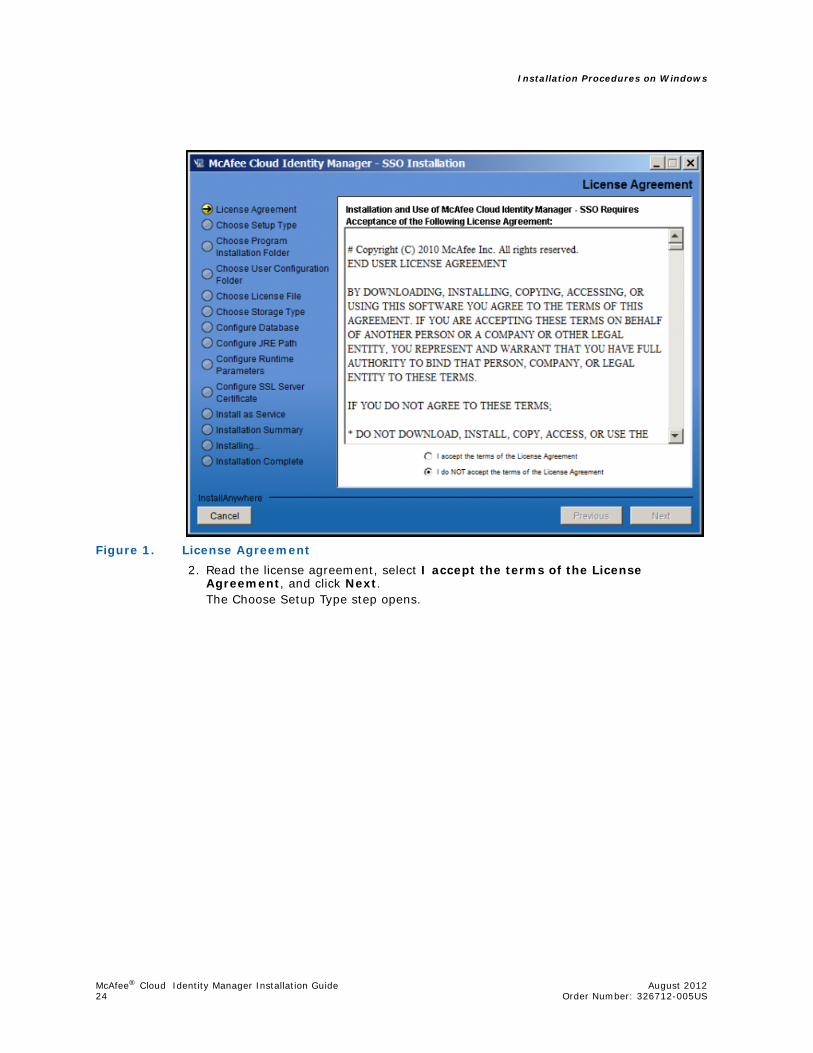
Figure 1. License Agreement2. Read the license agreement, select I accept the terms of the License
Agreement, and click Next.The Choose Setup Type step opens.
August 2012 McAfee® Cloud Identity Manager Installation GuideOrder Number: 326712-005US 25
Installation Procedures on Windows
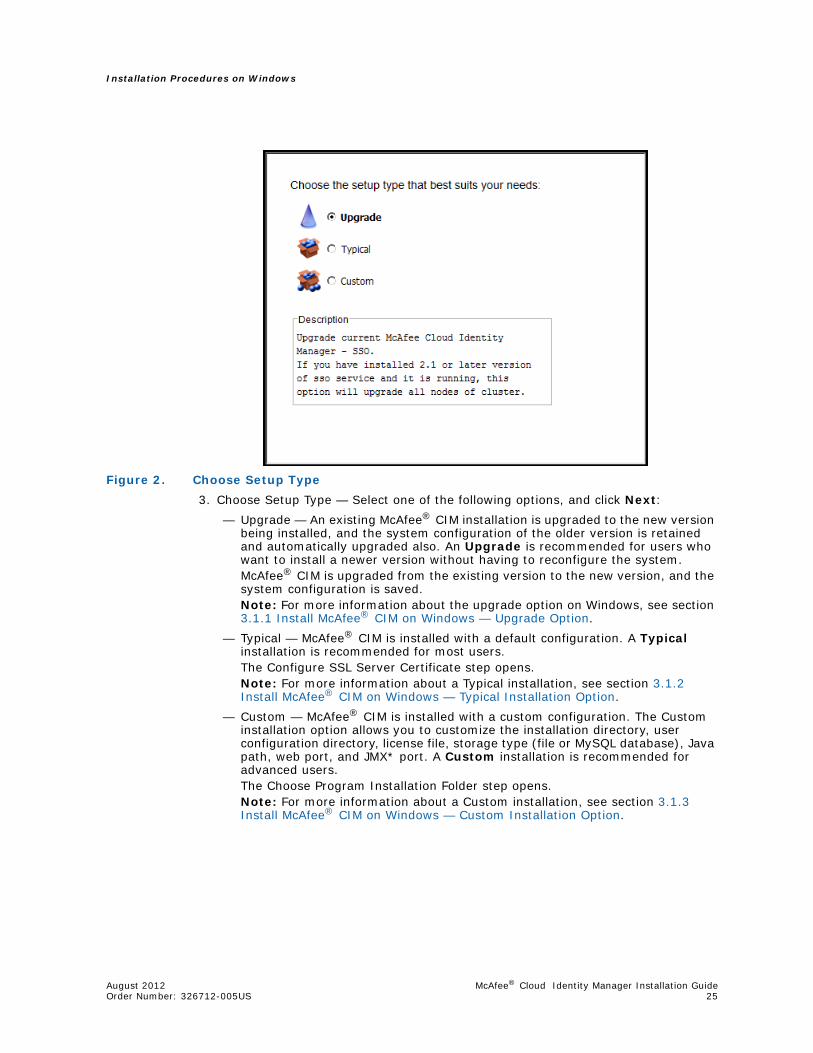
Figure 2. Choose Setup Type3. Choose Setup Type — Select one of the following options, and click Next:
— Upgrade — An existing McAfee® CIM installation is upgraded to the new version being installed, and the system configuration of the older version is retained and automatically upgraded also. An Upgrade is recommended for users who want to install a newer version without having to reconfigure the system.McAfee® CIM is upgraded from the existing version to the new version, and the system configuration is saved.Note: For more information about the upgrade option on Windows, see section 3.1.1 Install McAfee® CIM on Windows — Upgrade Option.
— Typical — McAfee® CIM is installed with a default configuration. A Typical installation is recommended for most users.The Configure SSL Server Certificate step opens.Note: For more information about a Typical installation, see section 3.1.2 Install McAfee® CIM on Windows — Typical Installation Option.
— Custom — McAfee® CIM is installed with a custom configuration. The Custom installation option allows you to customize the installation directory, user configuration directory, license file, storage type (file or MySQL database), Java path, web port, and JMX* port. A Custom installation is recommended for advanced users.The Choose Program Installation Folder step opens.Note: For more information about a Custom installation, see section 3.1.3 Install McAfee® CIM on Windows — Custom Installation Option.
Installation Procedures on Windows
McAfee® Cloud Identity Manager Installation Guide August 201226 Order Number: 326712-005US
3.1.1 Install McAfee® CIM on Windows — Upgrade Option
An upgrade retains the system configuration of the existing installation of McAfee® CIM. Therefore, in the installation wizard, the upgrade option only consists of a few steps:1. License Agreement2. Choose Setup Type3. Install as Service4. Installation Summary5. Installing...6. Installation Complete
Note: For more information about upgrading McAfee® CIM, see section 2.4 Upgrade Options.
3.1.2 Install McAfee® CIM on Windows — Typical Installation Option
A typical installation of McAfee® CIM on Windows involves the following steps:1. License Agreement2. Choose Setup Type3. Configure SSL Server Certificate4. Install as Service5. Installation Summary6. Installing...7. Installation Complete
In this procedure, you have the option of importing your own SSL server X.509 certificate key pair. If you do not import your own SSL certificate in the installation wizard, you can import it later using a command line tool. For more information, see section 2.6 Replace the Default SSL Server Certificate with Your Own.
You then review the installation summary and install McAfee® CIM. For more information about steps 1 and 2, see section 3.1 Install McAfee® CIM on Windows.
August 2012 McAfee® Cloud Identity Manager Installation GuideOrder Number: 326712-005US 27
Installation Procedures on Windows
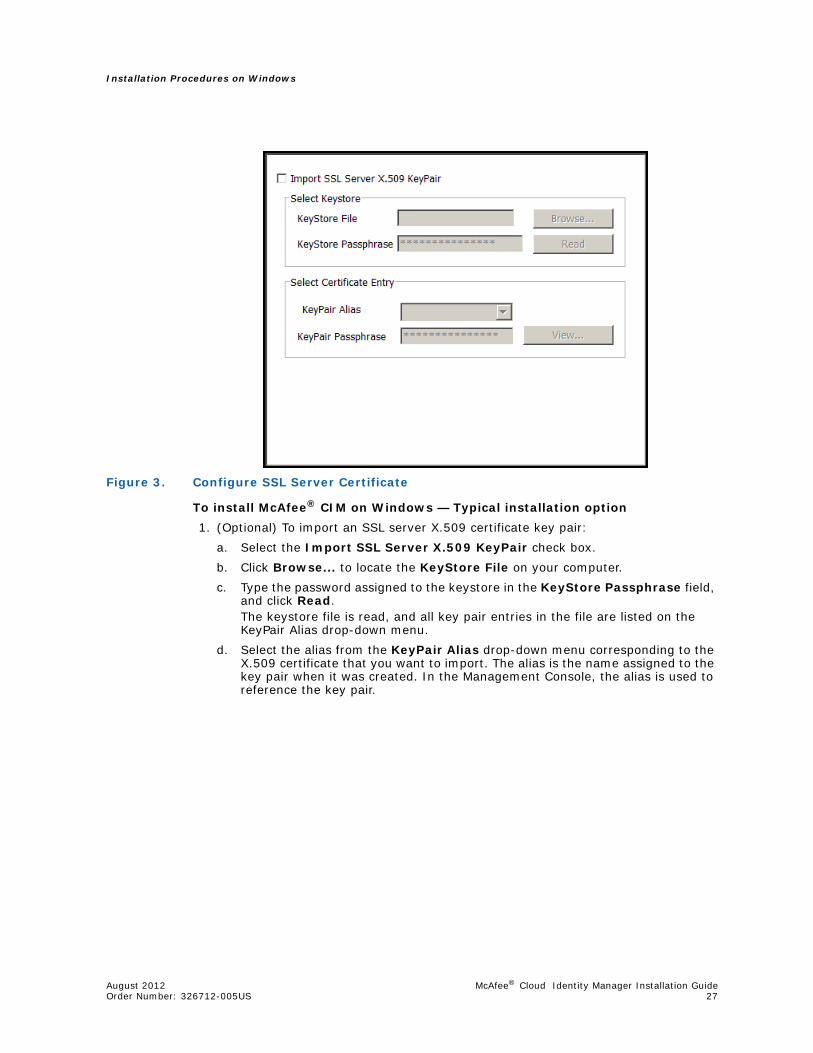
Figure 3. Configure SSL Server Certificate
To install McAfee® CIM on Windows — Typical installation option1. (Optional) To import an SSL server X.509 certificate key pair:
a. Select the Import SSL Server X.509 KeyPair check box.b. Click Browse... to locate the KeyStore File on your computer.c. Type the password assigned to the keystore in the KeyStore Passphrase field,
and click Read.The keystore file is read, and all key pair entries in the file are listed on the KeyPair Alias drop-down menu.
d. Select the alias from the KeyPair Alias drop-down menu corresponding to the X.509 certificate that you want to import. The alias is the name assigned to the key pair when it was created. In the Management Console, the alias is used to reference the key pair.

Installation Procedures on Windows
McAfee® Cloud Identity Manager Installation Guide August 201228 Order Number: 326712-005US
e. Type the password assigned to the selected key pair in the KeyPair Passphrase field, and click View...The SSL Certificate Information pane opens.
f. Click OK.The SSL Certificate Information pane closes.
g. Click Next.The Install as Service step opens.
August 2012 McAfee® Cloud Identity Manager Installation GuideOrder Number: 326712-005US 29
Installation Procedures on Windows
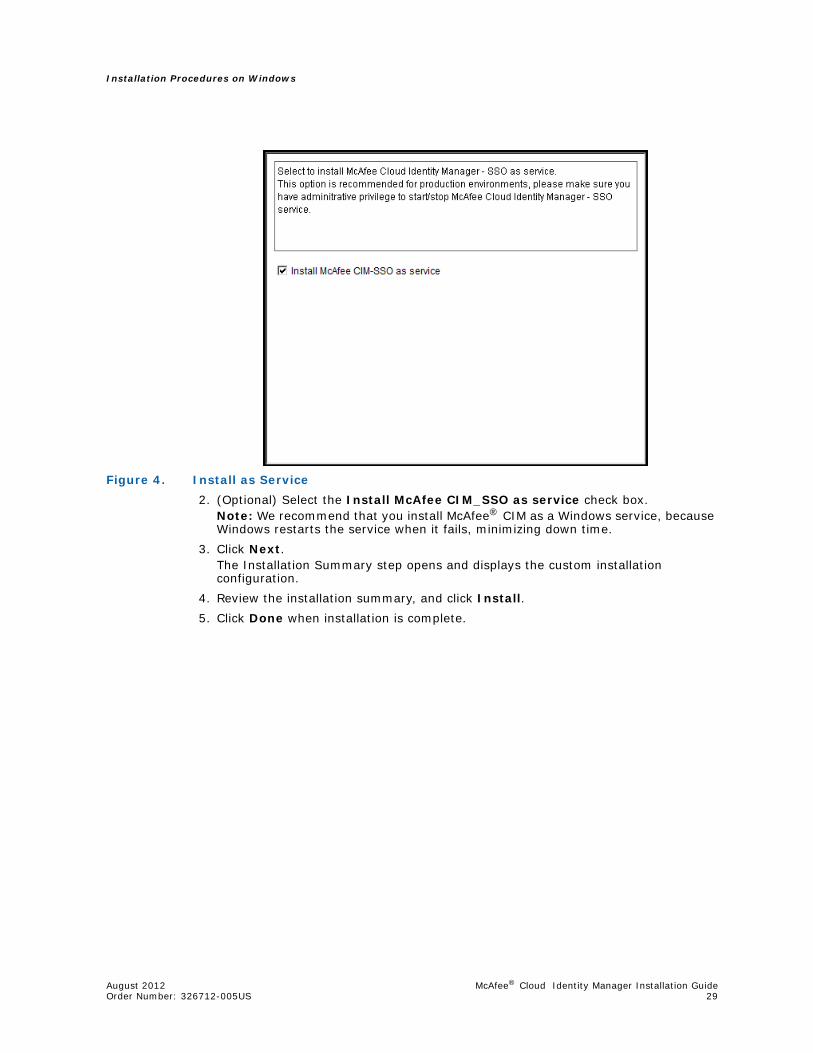
Figure 4. Install as Service2. (Optional) Select the Install McAfee CIM_SSO as service check box.
Note: We recommend that you install McAfee® CIM as a Windows service, because Windows restarts the service when it fails, minimizing down time.
3. Click Next.The Installation Summary step opens and displays the custom installation configuration.
4. Review the installation summary, and click Install.5. Click Done when installation is complete.
Installation Procedures on Windows
McAfee® Cloud Identity Manager Installation Guide August 201230 Order Number: 326712-005US
3.1.3 Install McAfee® CIM on Windows — Custom Installation Option
A custom installation of McAfee® CIM on Windows involves the following steps:1. License Agreement2. Choose Setup Type3. Choose Program Installation Folder4. Choose User Configuration Folder5. Choose Storage Type6. Configure Database7. Configure JRE Path8. Configure Runtime Parameters9. Configure SSL Server Certificate10. Install as Service11. Installation Summary12. Installing...13. Installation Complete
After providing custom settings in this procedure, you have the option of importing your own SSL server X.509 certificate key pair. If you do not import your own SSL certificate in the installation wizard, you can import it later using a command line tool. For more information, see section 2.6 Replace the Default SSL Server Certificate with Your Own.
You then review the installation summary and install McAfee® CIM. For more information about steps 1 and 2, see section 3.1 Install McAfee® CIM on Windows.
August 2012 McAfee® Cloud Identity Manager Installation GuideOrder Number: 326712-005US 31
Installation Procedures on Windows
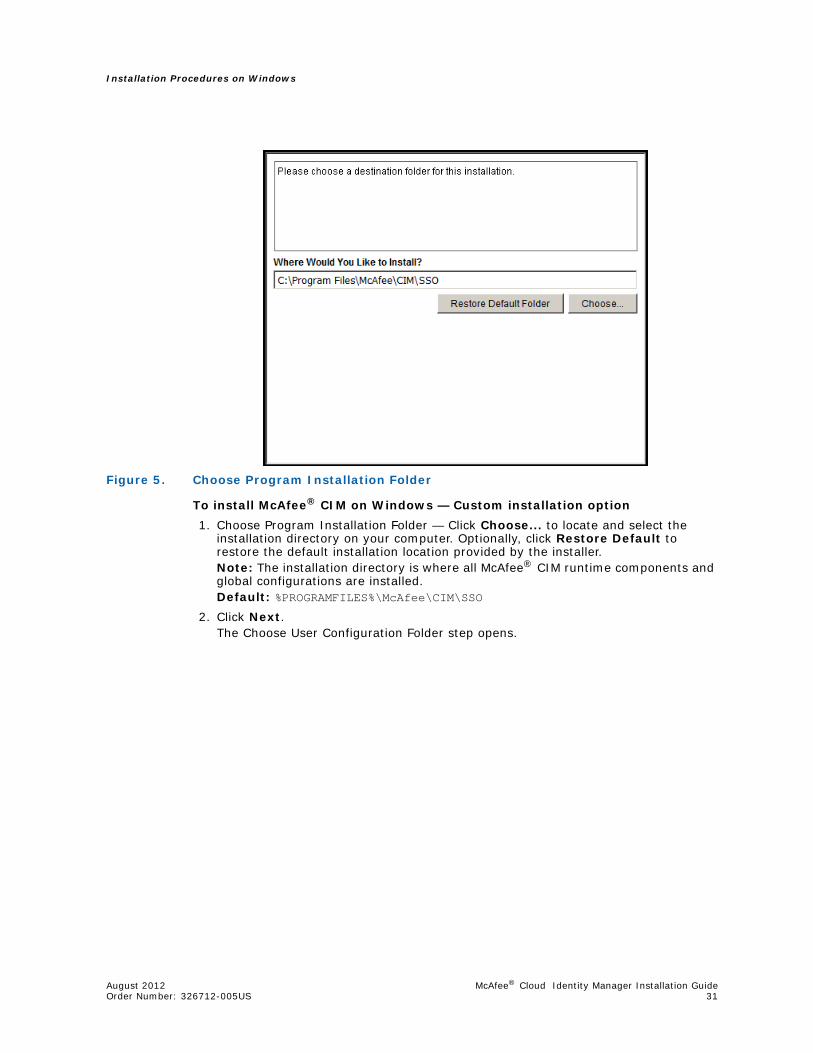
Figure 5. Choose Program Installation Folder
To install McAfee® CIM on Windows — Custom installation option1. Choose Program Installation Folder — Click Choose... to locate and select the
installation directory on your computer. Optionally, click Restore Default to restore the default installation location provided by the installer.Note: The installation directory is where all McAfee® CIM runtime components and global configurations are installed.Default: %PROGRAMFILES%\McAfee\CIM\SSO
2. Click Next.The Choose User Configuration Folder step opens.
Installation Procedures on Windows
McAfee® Cloud Identity Manager Installation Guide August 201232 Order Number: 326712-005US
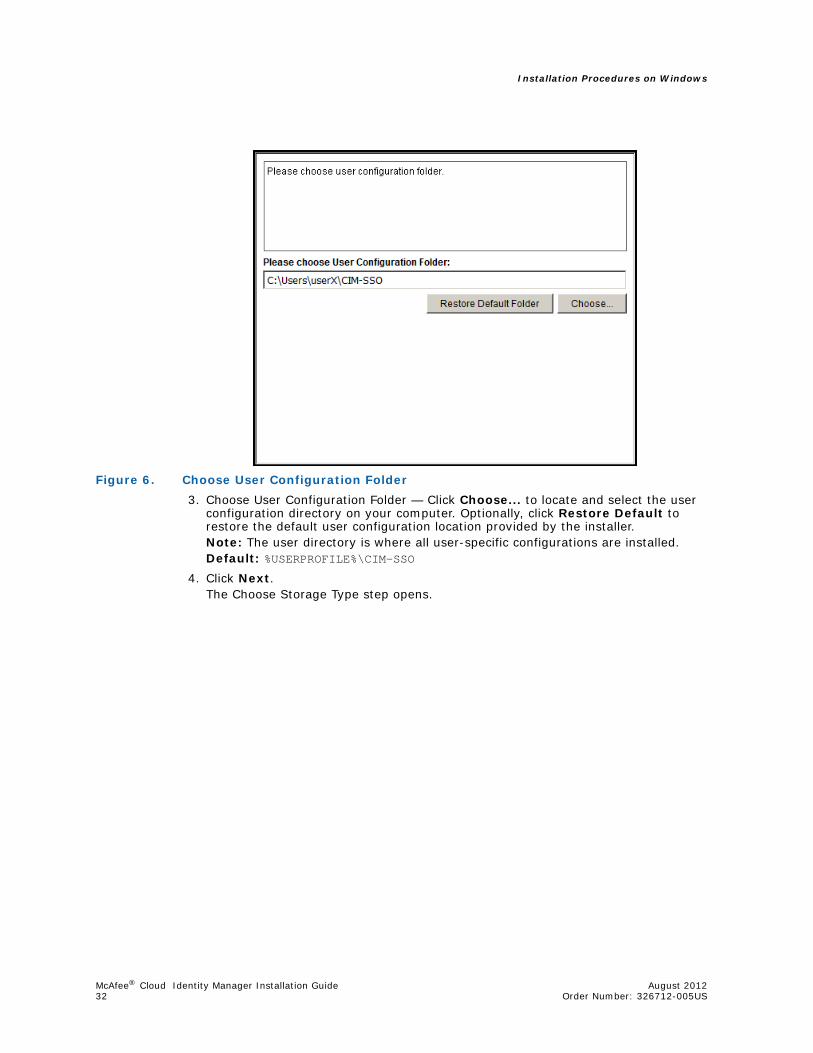
Figure 6. Choose User Configuration Folder3. Choose User Configuration Folder — Click Choose... to locate and select the user
configuration directory on your computer. Optionally, click Restore Default to restore the default user configuration location provided by the installer.Note: The user directory is where all user-specific configurations are installed.Default: %USERPROFILE%\CIM-SSO
4. Click Next.The Choose Storage Type step opens.
August 2012 McAfee® Cloud Identity Manager Installation GuideOrder Number: 326712-005US 33
Installation Procedures on Windows
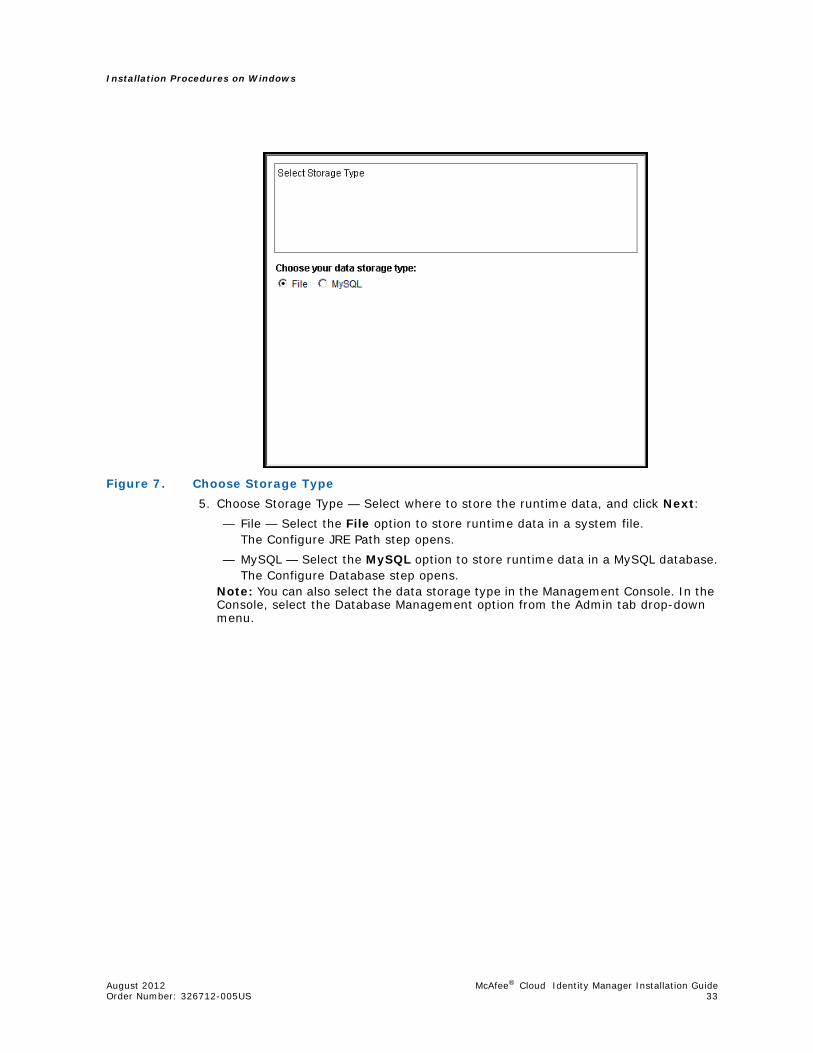
Figure 7. Choose Storage Type5. Choose Storage Type — Select where to store the runtime data, and click Next:
— File — Select the File option to store runtime data in a system file.The Configure JRE Path step opens.
— MySQL — Select the MySQL option to store runtime data in a MySQL database.The Configure Database step opens.
Note: You can also select the data storage type in the Management Console. In the Console, select the Database Management option from the Admin tab drop-down menu.
Installation Procedures on Windows
McAfee® Cloud Identity Manager Installation Guide August 201234 Order Number: 326712-005US
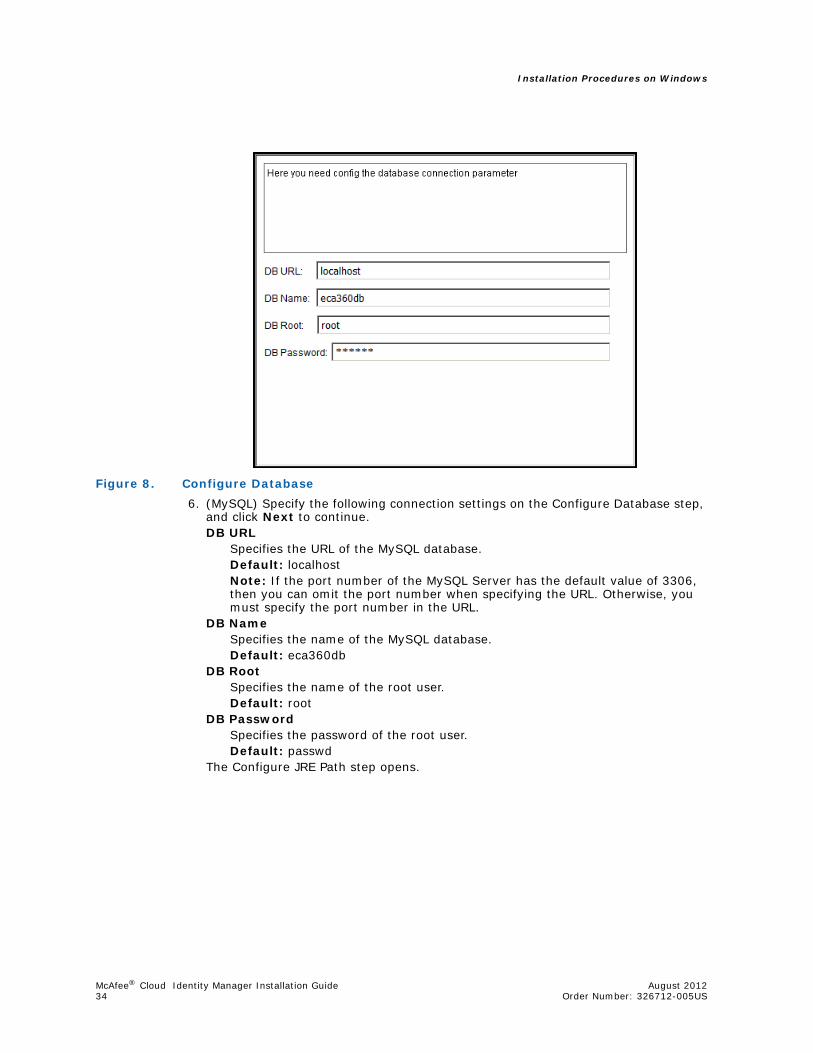
Figure 8. Configure Database6. (MySQL) Specify the following connection settings on the Configure Database step,
and click Next to continue.DB URL
Specifies the URL of the MySQL database.Default: localhostNote: If the port number of the MySQL Server has the default value of 3306, then you can omit the port number when specifying the URL. Otherwise, you must specify the port number in the URL.
DB NameSpecifies the name of the MySQL database.Default: eca360db
DB RootSpecifies the name of the root user.Default: root
DB PasswordSpecifies the password of the root user.Default: passwd
The Configure JRE Path step opens.
August 2012 McAfee® Cloud Identity Manager Installation GuideOrder Number: 326712-005US 35
Installation Procedures on Windows
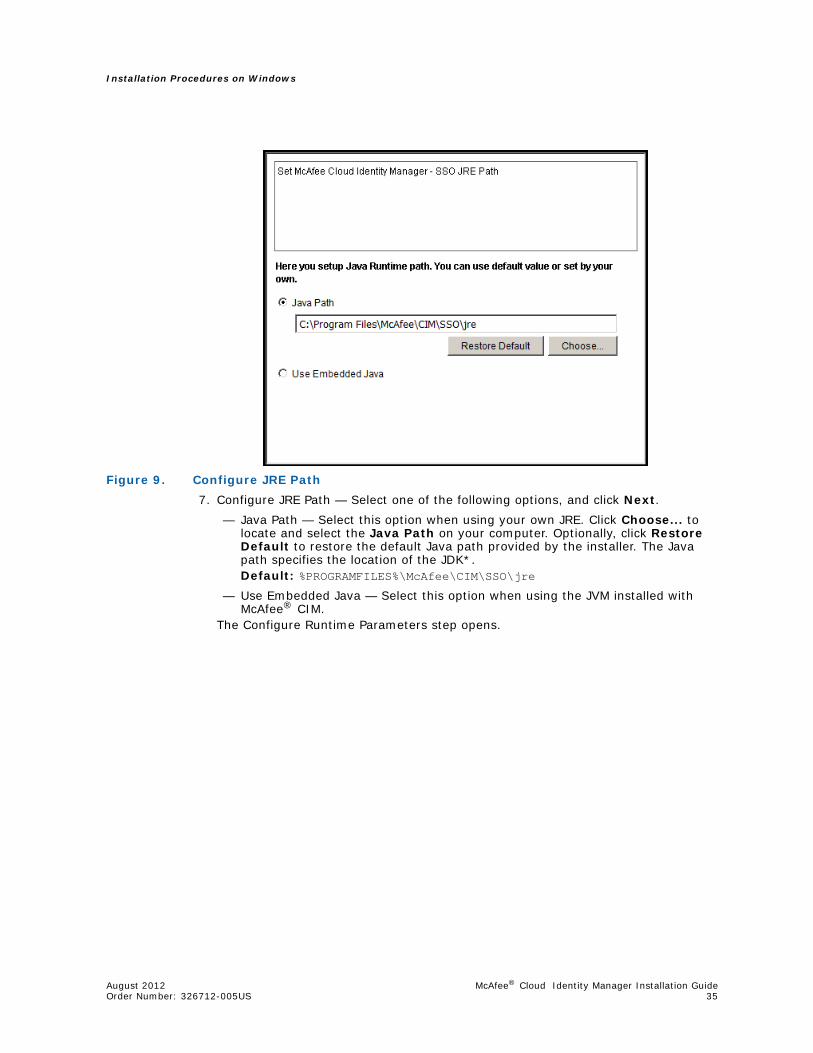
Figure 9. Configure JRE Path7. Configure JRE Path — Select one of the following options, and click Next.
— Java Path — Select this option when using your own JRE. Click Choose... to locate and select the Java Path on your computer. Optionally, click Restore Default to restore the default Java path provided by the installer. The Java path specifies the location of the JDK*.Default: %PROGRAMFILES%\McAfee\CIM\SSO\jre
— Use Embedded Java — Select this option when using the JVM installed with McAfee® CIM.
The Configure Runtime Parameters step opens.
Installation Procedures on Windows
McAfee® Cloud Identity Manager Installation Guide August 201236 Order Number: 326712-005US
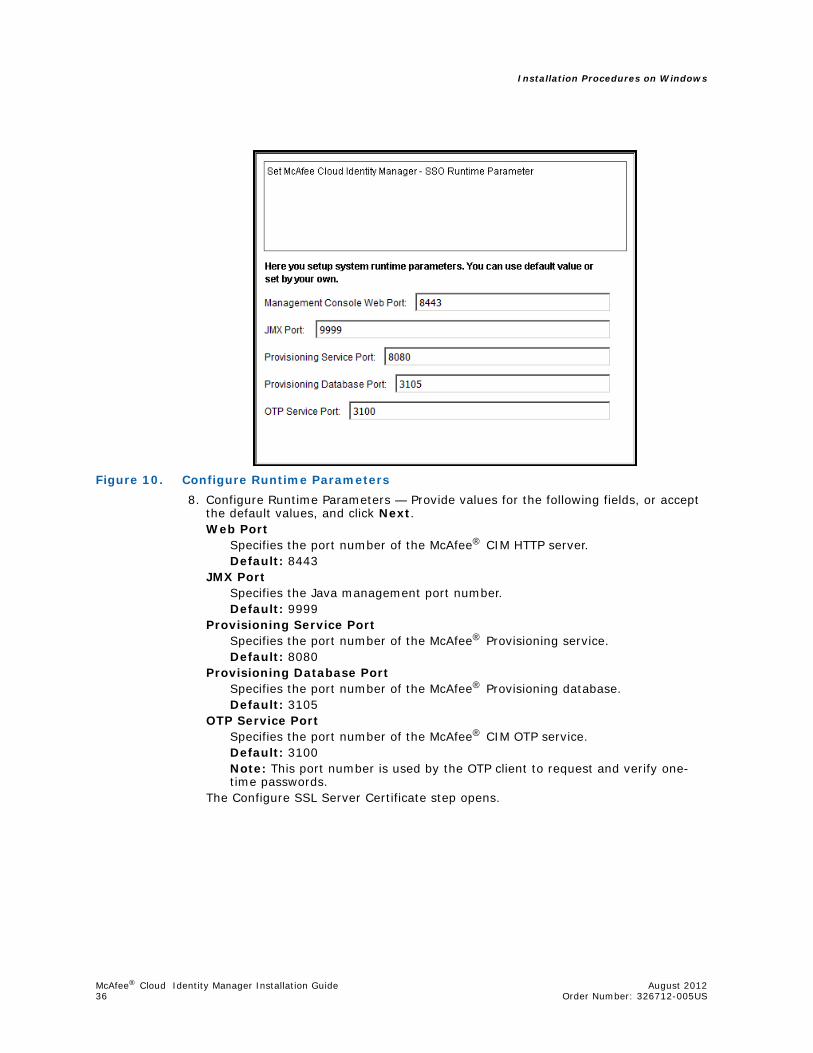
Figure 10. Configure Runtime Parameters8. Configure Runtime Parameters — Provide values for the following fields, or accept
the default values, and click Next.Web Port
Specifies the port number of the McAfee® CIM HTTP server.Default: 8443
JMX PortSpecifies the Java management port number.Default: 9999
Provisioning Service PortSpecifies the port number of the McAfee® Provisioning service.Default: 8080
Provisioning Database PortSpecifies the port number of the McAfee® Provisioning database.Default: 3105
OTP Service PortSpecifies the port number of the McAfee® CIM OTP service.Default: 3100Note: This port number is used by the OTP client to request and verify one-time passwords.
The Configure SSL Server Certificate step opens.
August 2012 McAfee® Cloud Identity Manager Installation GuideOrder Number: 326712-005US 37
Installation Procedures on Windows
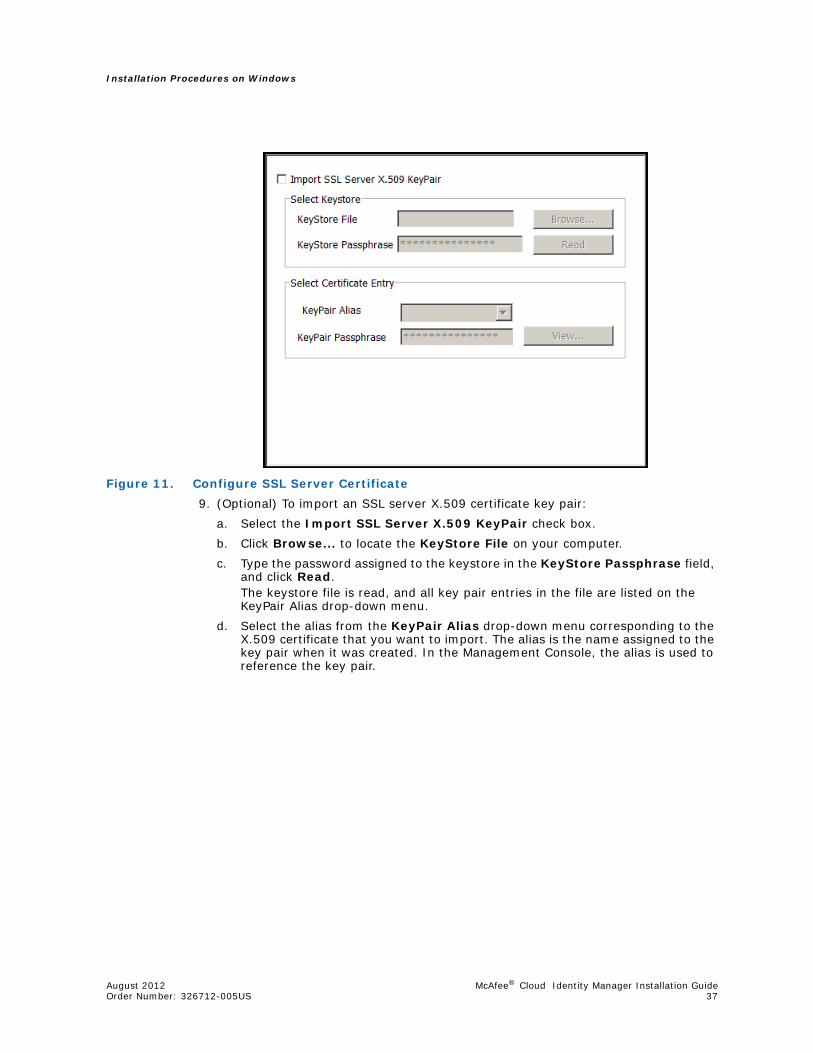
Figure 11. Configure SSL Server Certificate9. (Optional) To import an SSL server X.509 certificate key pair:
a. Select the Import SSL Server X.509 KeyPair check box.b. Click Browse... to locate the KeyStore File on your computer.c. Type the password assigned to the keystore in the KeyStore Passphrase field,
and click Read.The keystore file is read, and all key pair entries in the file are listed on the KeyPair Alias drop-down menu.
d. Select the alias from the KeyPair Alias drop-down menu corresponding to the X.509 certificate that you want to import. The alias is the name assigned to the key pair when it was created. In the Management Console, the alias is used to reference the key pair.
Installation Procedures on Windows
McAfee® Cloud Identity Manager Installation Guide August 201238 Order Number: 326712-005US
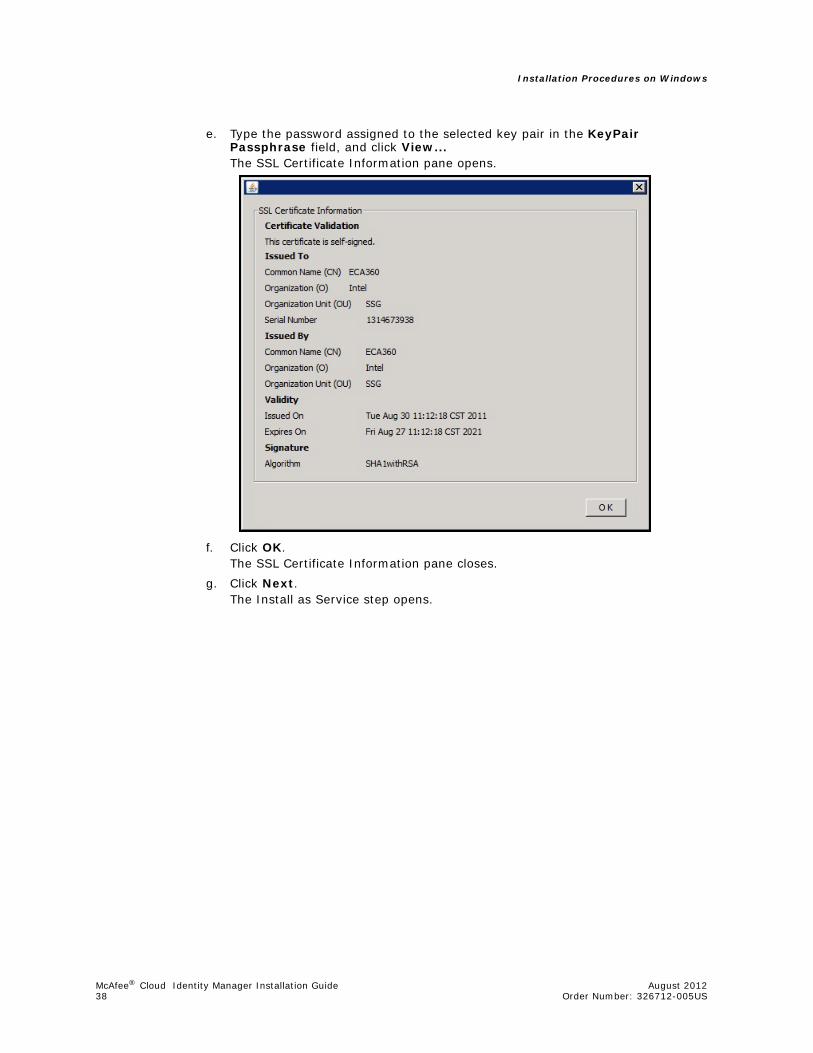
e. Type the password assigned to the selected key pair in the KeyPair Passphrase field, and click View...The SSL Certificate Information pane opens.
f. Click OK.The SSL Certificate Information pane closes.
g. Click Next.The Install as Service step opens.
August 2012 McAfee® Cloud Identity Manager Installation GuideOrder Number: 326712-005US 39
Installation Procedures on Windows
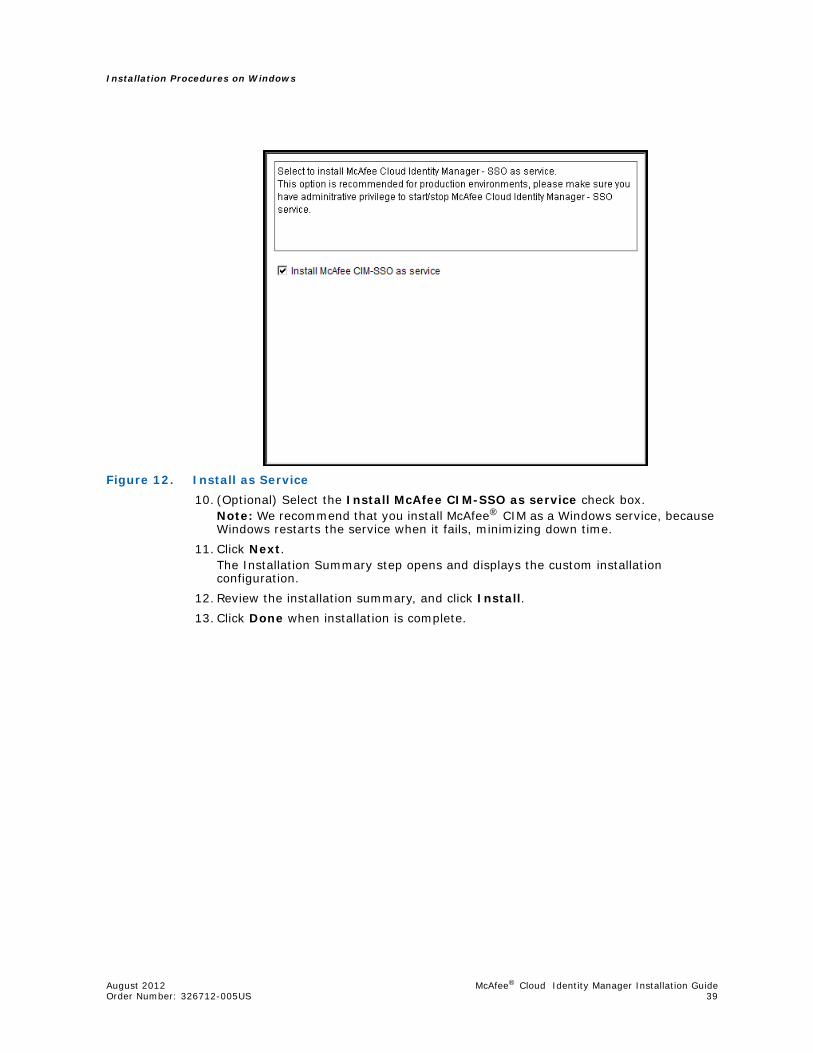
Figure 12. Install as Service10. (Optional) Select the Install McAfee CIM-SSO as service check box.
Note: We recommend that you install McAfee® CIM as a Windows service, because Windows restarts the service when it fails, minimizing down time.
11. Click Next.The Installation Summary step opens and displays the custom installation configuration.
12. Review the installation summary, and click Install.13. Click Done when installation is complete.
Installation Procedures on Windows
McAfee® Cloud Identity Manager Installation Guide August 201240 Order Number: 326712-005US
3.2 Start and Stop McAfee® CIM on WindowsBefore you start or stop the McAfee® CIM service, review the following notes:
• If administrative privileges are required, you must either log in to the Windows built-in administrator account or start and stop McAfee® CIM “as administrator”. For more information, see section 2.3 Administrative Privileges.
• If you are using your own JRE and starting the McAfee® CIM service for the first time, update the McAfee® CIM start script file to use your JAVA_HOME setting. For instructions, see section 2.8.3 Before Starting McAfee® CIM for the First Time.
After you start the McAfee® CIM service, you can open the Management Console.
To start and stop McAfee® CIM on Windows1. Go to Start > All Programs > McAfee > CIM > SSO.2. To start the McAfee® CIM service, click Start Service.
The McAfee® CIM service starts.Note: Alternately, you can enter the following command in the command prompt:<install_dir>\current\bin\eca360sso.cmd start<install_dir>
Specifies the name of the program installation directory.3. To stop the McAfee® CIM service, click Stop Service.
The McAfee® CIM service stops.Note: Alternately, you can enter the following command in the command prompt:<install_dir>\current\bin\eca360sso.cmd stop<install_dir>
Specifies the name of the program installation directory.
August 2012 McAfee® Cloud Identity Manager Installation GuideOrder Number: 326712-005US 41
Installation Procedures on Windows
3.3 Uninstall McAfee® CIM on WindowsBefore you uninstall the McAfee® CIM service, review the following notes:
• If administrative privileges are required, you must either log in to the Windows built-in administrator account or uninstall McAfee® CIM “as administrator”. For more information, see section 2.3 Administrative Privileges.
• The uninstall procedure assumes that McAfee® CIM is installed on Microsoft Windows as detailed in this chapter.
• Before uninstalling McAfee® CIM, stop the McAfee® CIM service, or verify that the service is stopped.
To uninstall McAfee® CIM on Windows1. Go to Start > All Programs > McAfee > CIM > SSO.2. To uninstall the McAfee® CIM service, click Uninstall McAfee® Cloud Identity
Manager.The McAfee® CIM uninstaller wizard opens.
3. Click Next.The Uninstall Options step opens.
4. Select one of the following Uninstall options, and click Next:— Complete Uninstall — Selecting this option removes all features of McAfee®
CIM that were installed by InstallAnywhere. This option does not remove folders and files created after installation.The Remove All User Data step opens.
— Uninstall Specific Features — Selecting this option allows you to specify which features of McAfee® CIM are uninstalled.The Choose Product Features step opens.
5. (Uninstall Specific Features) To confirm that you want to uninstall McAfee® CIM, clear the Application check box, and click Next.The Remove All User Data step opens.
6. Select or clear the Remove license file and user configuration file check box, and click Uninstall.All McAfee® CIM features or specified features are uninstalled, and the Uninstall Complete step opens.
7. Click Done.The uninstallation wizard closes.
Installation Procedures on Windows
McAfee® Cloud Identity Manager Installation Guide August 201242 Order Number: 326712-005US
3.4 Backing Up and Restoring an Installation on WindowsWe recommend that you back up the current installation before upgrading to a new version of McAfee® CIM. The back-up utility saves the McAfee® CIM software and all user configuration and runtime data. In the event that data is lost, it can be restored from the back up. For more information, see the following sections:
• Back Up an Installation on Windows — See section 3.4.1 Back Up an Installation on Windows.
• Restore a Back Up on Windows — See section 3.4.2 Restore a Back Up on Windows.
3.4.1 Back Up an Installation on Windows
To back up the current installation on Windows, follow the steps in this procedure.Note: The Windows back-up utility is supported for McAfee® CIM versions 2.1 and greater.
To back up an installation on Windows1. Log in to Windows as administrator.2. Stop the McAfee® CIM service.3. Open a command window, and change to the following directory:
<install_dir><install_dir>
Specifies the name of the program installation directory.4. Run the Windows back-up command:
current\bin\eca360sso backup -o <backup_dir><backup_dir>
Specifies the user-defined directory where the back up is saved.The installation is saved in the following directory:<backup_dir>\ECA_BACKUP-<date×tamp><date×tamp>
Specifies the date and time that the installation was backed up in the following format: yyyy-mm-dd.hh.mm.

August 2012 McAfee® Cloud Identity Manager Installation GuideOrder Number: 326712-005US 43
Installation Procedures on Windows
3.4.2 Restore a Back Up on Windows
To restore an installation from a back up on Windows, follow the steps in this procedure.
Note: The Windows restore utility is supported for McAfee® CIM versions 2.1 and greater.
To restore a back up on Windows1. Log in to Windows as administrator.2. Stop the McAfee® CIM service.3. Open a command window, and change to the following directory:
<backup_dir>\ECA_BACKUP-<date×tamp><backup_dir>
Specifies the user-defined directory where the back up is located.4. Verify that the back-up directory includes the following files:
.masterdir
.userdircli.jarECA-backup-masterdir.tgzECA-backup-userdir.tgzrestore.cmd
5. Type the Windows restore command at the command prompt: restore.cmdThe installation is restored from the back-up directory.

Installation Procedures on Windows
McAfee® Cloud Identity Manager Installation Guide August 201244 Order Number: 326712-005US
August 2012 McAfee® Cloud Identity Manager Installation GuideOrder Number: 326712-005US 45
Installation Procedures on Linux
4.0 Installation Procedures on Linux
This chapter includes procedures related to installing and uninstalling McAfee® CIM on a Linux operating system:
• Install McAfee® CIM on a Linux system — See section 4.1 Install McAfee® CIM on Linux.
• Start and Stop McAfee® CIM on a Linux system — See section 4.2 Start and Stop McAfee® CIM on Linux.
• Uninstall McAfee® CIM on a Linux system — See section 4.3 Uninstall McAfee® CIM on Linux.
• Back up and restore an McAfee® CIM installation on a Linux system — See section 4.4 Backing Up and Restoring an Installation on Linux.
4.1 Install McAfee® CIM on LinuxThe installation package includes all McAfee® CIM services:
• Identity and Single Sign-on (SSO) service• Provisioning service• Built-in OTP server
If you are using an X Window System* or X11*, the installer runs in GUI mode by default. Otherwise, the installer runs in console mode. To force a start in console mode, use the following command:
32-bit Linux: ./cim_linux32_3.1.bin –i console64-bit Linux: ./cim_linux64_3.1.bin –i console
Note: If administrative privileges are required, you must install McAfee® CIM as superuser (root). For more information, see section 2.3 Administrative Privileges.
To install McAfee® CIM on Linux1. Download one of the following installers to a download directory:
32-bit Linux: cim_linux32_3.1.bin64-bit Linux: cim_linux64_3.1.binNote: CIM is an acronym for Cloud Identity Manager.
2. Start the installer by entering one of the following commands:32-bit Linux:root@server <download_dir> # ./cim_linux32_3.1.bin64-bit Linux:root@server <download_dir> # ./cim_linux64_3.1.bin<download_dir>
Specifies the name of the download directory.The installation wizard opens on the License Agreement step.
Installation Procedures on Linux
McAfee® Cloud Identity Manager Installation Guide August 201246 Order Number: 326712-005US
3. Read the terms of the license agreement, select I accept the terms in the License Agreement, and click Next.The Choose Setup Type step opens.
4. Choose Setup Type — Select one of the following options, and click Next:— Typical — McAfee® CIM is installed with a default configuration. A Typical
installation is recommended for most users.The Configure SSL Server Certificate step opens.Note: For more information about a Typical installation on Linux, see section 4.1.1 Install McAfee® CIM on Linux — Typical Installation Option.
— Custom — McAfee® CIM is installed with a custom configuration. The Custom installation option allows you to customize the installation directory, user configuration directory, license file, storage type (file or MySQL database), Java path, web port, and JMX port. A Custom installation is recommended for advanced users.The Choose Program Installation Folder step opens.Note: For more information about a Custom installation on Linux, see section 4.1.2 Install McAfee® CIM on Linux — Custom Installation Option.
Note: You can upgrade McAfee® CIM from version 2.0 or greater by selecting the Custom installation option in the installation wizard and specifying the same program installation and user configuration folders that the existing version uses.
4.1.1 Install McAfee® CIM on Linux — Typical Installation Option
A typical installation of McAfee® CIM on Linux involves the following steps:1. License Agreement2. Choose Setup Type3. Configure SSL Server Certificate4. Install as Service5. Installation Summary6. Installing...7. Installation Complete
In this procedure, you have the option of importing your own SSL server X.509 certificate key pair. You then review the installation summary and install McAfee® CIM. For more information about steps 1 and 2, see section 4.1 Install McAfee® CIM on Linux.
August 2012 McAfee® Cloud Identity Manager Installation GuideOrder Number: 326712-005US 47
Installation Procedures on Linux
To install McAfee® CIM on Linux — Typical installation option1. (Optional) To import an SSL server X.509 certificate key pair:
a. Select the Import SSL Server X.509 KeyPair check box.b. Click Browse... to locate the KeyStore File on your computer.c. Type the password assigned to the keystore in the KeyStore Passphrase field,
and click Read.The keystore file is read, and all key pair entries in the file are listed on the KeyPair Alias drop-down menu.
d. Select the alias from the KeyPair Alias drop-down menu corresponding to the X.509 certificate that you want to import. The alias is the name assigned to the key pair when it was created. In the Management Console, the alias is used to reference the key pair.
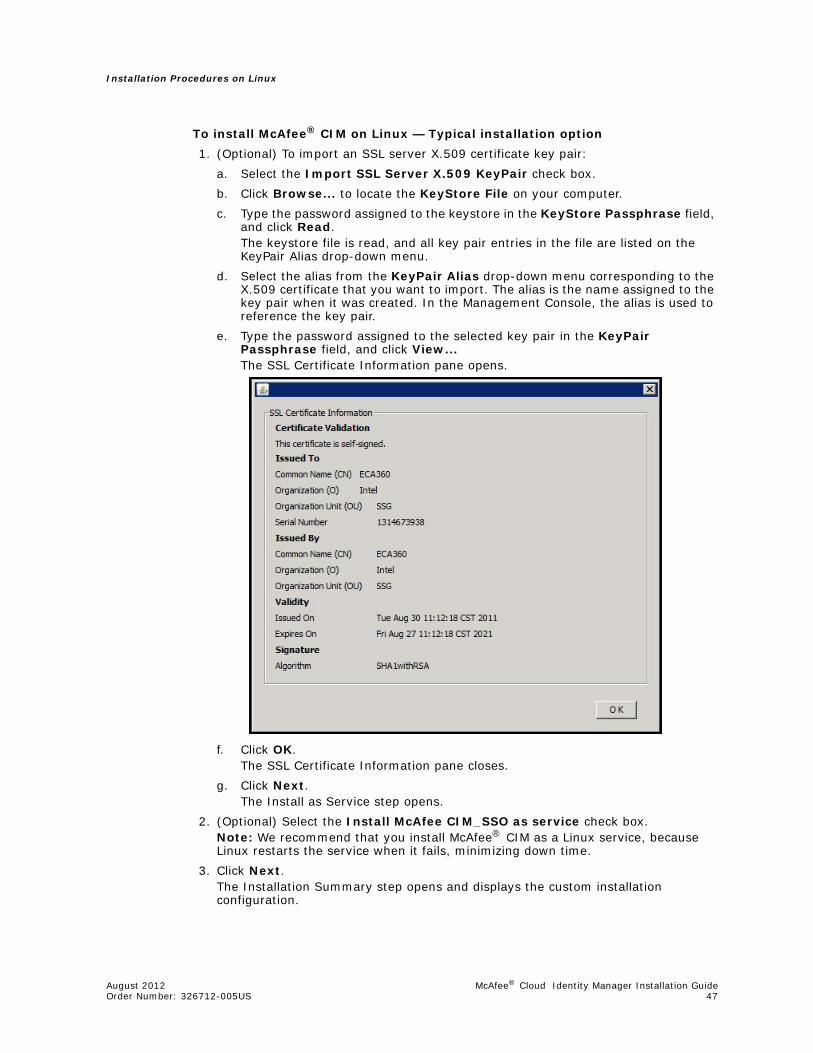
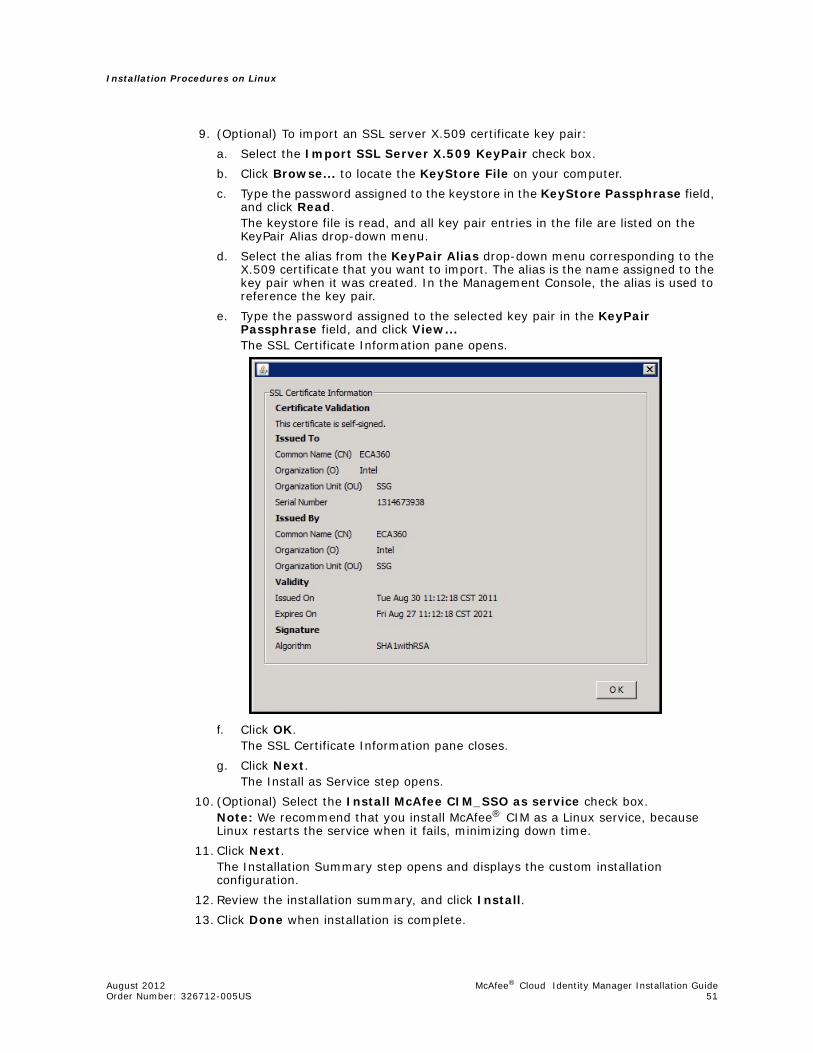
e. Type the password assigned to the selected key pair in the KeyPair Passphrase field, and click View...The SSL Certificate Information pane opens.
f. Click OK.The SSL Certificate Information pane closes.
g. Click Next.The Install as Service step opens.
2. (Optional) Select the Install McAfee CIM_SSO as service check box.Note: We recommend that you install McAfee® CIM as a Linux service, because Linux restarts the service when it fails, minimizing down time.
3. Click Next.The Installation Summary step opens and displays the custom installation configuration.
Installation Procedures on Linux
McAfee® Cloud Identity Manager Installation Guide August 201248 Order Number: 326712-005US
4. Review the installation summary, and click Install.5. Click Done when installation is complete.
4.1.2 Install McAfee® CIM on Linux — Custom Installation Option
A custom installation of McAfee® CIM on Linux involves the following steps:1. License Agreement2. Choose Setup Type3. Choose Program Installation Folder4. Choose User Configuration Folder5. Choose Storage Type6. Configure Database7. Configure JRE Path8. Configure Runtime Parameters9. Configure SSL Server Certificate10. Install as Service11. Installation Summary12. Installing...13. Installation Complete
After providing custom settings in this procedure, you have the option of importing your own SSL server X.509 certificate key pair. If you do not import your own SSL certificate in the installation wizard, you can import it later using a command line tool. For more information, see section 2.6 Replace the Default SSL Server Certificate with Your Own.
You then review the installation summary and install McAfee® CIM. For more information about steps 1 and 2, see section 4.1 Install McAfee® CIM on Linux.
Note: To upgrade from the existing version of McAfee® CIM on Linux to the new version, specify the same program installation and user configuration folders that the existing version uses in the custom installation.
To install McAfee® CIM on Linux — Custom installation option1. Choose Program Installation Folder — Click Choose... to locate and select the
installation directory on your computer. Optionally, click Restore Default to restore the default installation location provided by the installer.Note: The installation directory is where all McAfee® CIM runtime components and global configurations are installed.Default: /opt/mcafee/cim/sso
2. Click Next.The Choose User Configuration Folder step opens.
3. Choose User Configuration Folder — Click Choose... to locate and select the user configuration directory on your computer. Optionally, click Restore Default to restore the default user configuration location provided by the installer.Note: The user directory is where all user-specific configurations are installed.Default: /opt/mcafee/cim/sso/userdir
4. Click Next.The Choose Storage Type step opens.

August 2012 McAfee® Cloud Identity Manager Installation GuideOrder Number: 326712-005US 49
Installation Procedures on Linux
5. Choose Storage Type — Select where to store the runtime data, and click Next:— File — Select the File option to store runtime data in a system file.
The Configure JRE Path step opens.— MySQL — Select the MySQL option to store runtime data in a MySQL database.
The Configure Database step opens.Note: You can also select the data storage type in the Management Console. In the Console, select the Database Management option from the Admin tab drop-down menu.
6. (MySQL) Specify the following connection settings on the Database Configuration step, and click Next.DB URL
Specifies the URL of the MySQL database.Default: localhostNote: If the port number of the MySQL Server has the default value of 3306, then you can omit the port number when specifying the URL. Otherwise, you must specify the port number in the URL.
DB NameSpecifies the name of the MySQL database.Default: eca360db
DB RootSpecifies the name of the root user.Default: root
DB PasswordSpecifies the password of the root user.Default: passwd
The Configure JRE Path step opens.

Installation Procedures on Linux
McAfee® Cloud Identity Manager Installation Guide August 201250 Order Number: 326712-005US
7. Configure JRE Path — Select one of the following options, and click Next.— Java Path — Select this option when using your own JRE. Click Choose... to
locate and select the Java Path on your computer. Optionally, click Restore Default to restore the default Java path provided by the installer. The Java path specifies the location of the JDK.Default: /opt/mcafee/cim/sso/jre
— Use Embedded Java — Select this option when using the JVM installed with McAfee® CIM.
The Configure Runtime Parameters step opens.8. Configure Runtime Parameters — Specify values for the following runtime
parameters, or accept the default values, and click Next.Web Port
Specifies the port number of the McAfee® CIM HTTP server.Default: 8443Note: If you do not install McAfee® CIM as superuser (root), then you must specify a value for the Web Port that is greater than 1024. Otherwise, the McAfee® CIM service does not start. This limit is a known restriction on Linux.
JMX PortSpecifies the Java management port number.Default: 9999
Provisioning Service PortSpecifies the port number of the McAfee® Provisioning service.Default: 8080
Provisioning Database PortSpecifies the port number of the McAfee® Provisioning database.Default: 3105
OTP Service PortSpecifies the port number of the McAfee® CIM OTP service.Default: 3100Note: This port number is used by the OTP client to request and verify one-time passwords.
The Configure SSL Server Certificate step opens.
August 2012 McAfee® Cloud Identity Manager Installation GuideOrder Number: 326712-005US 51
Installation Procedures on Linux
9. (Optional) To import an SSL server X.509 certificate key pair:a. Select the Import SSL Server X.509 KeyPair check box.b. Click Browse... to locate the KeyStore File on your computer.c. Type the password assigned to the keystore in the KeyStore Passphrase field,
and click Read.The keystore file is read, and all key pair entries in the file are listed on the KeyPair Alias drop-down menu.
d. Select the alias from the KeyPair Alias drop-down menu corresponding to the X.509 certificate that you want to import. The alias is the name assigned to the key pair when it was created. In the Management Console, the alias is used to reference the key pair.
e. Type the password assigned to the selected key pair in the KeyPair Passphrase field, and click View...The SSL Certificate Information pane opens.
f. Click OK.The SSL Certificate Information pane closes.
g. Click Next.The Install as Service step opens.
10. (Optional) Select the Install McAfee CIM_SSO as service check box.Note: We recommend that you install McAfee® CIM as a Linux service, because Linux restarts the service when it fails, minimizing down time.
11. Click Next.The Installation Summary step opens and displays the custom installation configuration.
12. Review the installation summary, and click Install.13. Click Done when installation is complete.

Installation Procedures on Linux
McAfee® Cloud Identity Manager Installation Guide August 201252 Order Number: 326712-005US
4.2 Start and Stop McAfee® CIM on LinuxBefore you start or stop the McAfee® CIM service, review the following notes:
• If administrative privileges are required, you must start and stop McAfee® CIM as superuser (root). For more information, see section 2.3 Administrative Privileges.
• If you are using your own JRE and starting the McAfee® CIM service for the first time, update the McAfee® CIM start script file to use your JAVA_HOME setting. For instructions, see section 2.8.3 Before Starting McAfee® CIM for the First Time.
After you start the McAfee® CIM service, you can open the Management Console.
To start and stop McAfee® CIM on Linux1. Navigate to the following directory:
<install_dir>Specifies the name of the program installation directory.
2. To start the McAfee® CIM service, execute the following command:root@server <install_dir> # ./current/bin/eca360sso.sh start
3. To stop the McAfee® CIM service, execute the following command:root@server <install_dir> # ./current/bin/eca360sso.sh stop
4.3 Uninstall McAfee® CIM on LinuxBefore you uninstall the McAfee® CIM service, review the following notes:
• If administrative privileges are required, you must uninstall McAfee® CIM as superuser (root). For more information, see section 2.3 Administrative Privileges.
• The uninstall procedure assumes that McAfee® CIM is installed on Linux as detailed in this chapter.
• Before uninstalling McAfee® CIM, stop the McAfee® CIM service, or verify that the service is stopped.
To uninstall McAfee® CIM on Linux1. Navigate to the following directory:
<install_dir>Specifies the name of the program installation directory.
2. If McAfee® CIM is running, run the following command at the prompt:root@server <install_dir> # ./current/bin/eca360sso.sh stopMcAfee® CIM is stopped.
3. When McAfee® CIM is stopped, run the uninstaller:root@server <install_dir> # ./Uninstaller/UninstallThe McAfee® CIM uninstaller wizard opens.
4. Click Next.The Uninstall Options step opens.

August 2012 McAfee® Cloud Identity Manager Installation GuideOrder Number: 326712-005US 53
Installation Procedures on Linux
5. Select one of the following Uninstall options, and click Next:— Complete Uninstall — Selecting this option removes all features of McAfee®
CIM that were installed by InstallAnywhere. This option does not remove folders and files created after installation.The Remove All User Data step opens.
— Uninstall Specific Features — Selecting this option allows you to specify which features of McAfee® CIM are uninstalled and which features remain installed.The Choose Product Features step opens.
6. (Uninstall Specific Features) To confirm that you want to uninstall McAfee® CIM, clear the Application check box, and click Next.The Remove All User Data step opens.
7. Select or clear the Remove license file and user configuration file check box, and click Uninstall.All McAfee® CIM features or the specified features are uninstalled, and the Uninstall Complete step opens.
8. Click Done.The uninstallation wizard closes.

Installation Procedures on Linux
McAfee® Cloud Identity Manager Installation Guide August 201254 Order Number: 326712-005US
4.4 Backing Up and Restoring an Installation on LinuxWe recommend that you back up the current installation before upgrading to a new version of McAfee® CIM. The back-up utility saves the McAfee® CIM software and all user configuration and runtime data. In the event that data is lost, it can be restored from the back up. For more information, see the following sections:
• Back Up an Installation on Linux — See section 4.4.1 Back Up an Installation on Linux.
• Restore a Back Up on Linux — See section 4.4.2 Restore a Back Up on Linux.
4.4.1 Back Up an Installation on Linux
To back up the current installation on Linux, follow the steps in this procedure.Note: The Linux back-up utility is supported for McAfee® CIM versions 2.1 and greater.
To back up an installation on Linux1. Log in to Linux as superuser (root).2. Stop the McAfee® CIM service.3. Navigate to the following directory:
<install_dir><install_dir>
Specifies the name of the program installation directory.4. Execute the Linux back-up command:
current/bin/eca360sso.sh backup -o <backup_dir><backup_dir>
Specifies the user-defined directory where the back up is saved.The installation is saved in the following directory:<backup_dir>/ECA_BACKUP-<date×tamp><date×tamp>
Specifies the date and time that the installation was backed up in the following format: yyyy-mm-dd.hh.mm.

August 2012 McAfee® Cloud Identity Manager Installation GuideOrder Number: 326712-005US 55
Installation Procedures on Linux
4.4.2 Restore a Back Up on Linux
To restore an installation from a back-up directory on Linux, follow the steps in this procedure.
Note: The Linux restore utility is supported for McAfee® CIM versions 2.1 and greater.
To restore a back up on Linux1. Log in to Linux as superuser (root).2. Stop the McAfee® CIM service.3. Navigate to the following directory:
<backup_dir>/ECA_BACKUP-<date×tamp><backup_dir>
Specifies the user-defined directory where the back up is located.4. Verify that the back-up directory includes the following files:
.masterdir
.userdircli.jarECA-backup-masterdir.tgzECA-backup-userdir.tgzrestore.cmd
5. Execute the Linux restore command: restore.shThe installation is restored from the back-up directory.

Installation Procedures on Linux
McAfee® Cloud Identity Manager Installation Guide August 201256 Order Number: 326712-005US
August 2012 McAfee® Cloud Identity Manager Installation GuideOrder Number: 326712-005US 57
Cluster Management
5.0 Cluster Management
Clustering is the grouping of several McAfee® CIM instances, each instance installed on its own server. The instances, which are called nodes, make up a cluster. One node, known as the master node, coordinates the remaining nodes, which are called the slave nodes. All McAfee® CIM configuration is shared across the nodes, so that they function as a single machine.
Clustering supports load balancing and failover:• Load balancing distributes the work across the servers, thus allowing the cluster to
handle larger workloads. The ability to handle larger and larger workloads is called scalability.
• Failover is the ability to switch from one McAfee® CIM server to another when the first server fails. The ability of each server in a cluster to back up the other servers in case of failure makes the cluster highly available and is called availability.
Note: When you have more than one instance of McAfee® CIM, you must configure clustering for the McAfee® CIM SSO and SLO services to function correctly.
5.1 Configure Clustering in McAfee® CIMTo configure clustering for each instance of McAfee® CIM, you install and start the instance, modify the cluster configuration file for that instance, and restart the instance. The first instance that is added to a cluster and restarted becomes the master node. When configuring the second node in the cluster, you modify both the cluster configuration file for the second node and the cluster configuration file for the master node, so that there are two nodes in the node list, as follows:<nodeList>
<node><name>...</name><ipAddress>...</ipAddress></node>
<node><name>...</name><ipAddress>...</ipAddress></node>
</nodeList>
The number of nodes in the node list equals the number of nodes in the existing cluster plus the node that you are adding to the cluster.
Note: For information about upgrading a cluster of McAfee® CIM instances, see section 2.4.1 Upgrade Considerations.
To configure clustering in McAfee® CIM1. Install McAfee® CIM on the server, and start the McAfee® CIM service.2. Locate the cluster configuration file in the following folder:
Default Windows location: %USERPROFILE%\CIM-SSO\default\conf\sys\cluster.xmlDefault Linux location: $USERPROFILE/default/conf/sys/cluster.xml

Cluster Management
McAfee® Cloud Identity Manager Installation Guide August 201258 Order Number: 326712-005US
3. Open the file with an editor, and view the default cluster configuration:<!-- --------------------------------------------------------------- -->
<acf:clusterConfig xmlns:xsi="http://www.w3.org/2001/XMLSchema-instance"
xsi:schemaLocation="http://www.intel.com/soae/acfSchema-2007a.xsd clusterConfig.xsd"
xmlns:acf="http://www.intel.com/soae/acfSchema-2007a.xsd">
<!-- --------------------------------------------------------------- -->
<clusterName>ECA360 Cluster</clusterName>
<clusterPort>9997</clusterPort>
<nodeList>
<node><name>localhost</name><ipAddress>127.0.0.1</ipAddress></node>
</nodeList>
<encryption>basic</encryption>
</acf:clusterConfig>
<!-- --------------------------------------------------------------- -->
4. For the cluster, modify the following values in the file. Only nodes that share a cluster name are added to the cluster.clusterName
Specifies the name of the cluster.Default: ECA360 Cluster
clusterPortSpecifies the number of the port used by the nodes in the cluster to communicate.Default: 9997
5. For the node that you are adding to the cluster, modify the following values in the file:name
Specifies the name of the node. Replace the default value with the fully qualified domain name (FQDN) of the node.Default: localhost
ipAddressSpecifies the IP address of the node. Replace the default value with the IP address that can be accessed by the other nodes in the cluster.Default: 127.0.0.1
6. (Optional) For each node that already exists in the cluster, add one node element to the node list and specify the nodes’s FQDN and IP address, as follows:<nodeList>
...
<node><name>...</name><ipAddress>...</ipAddress></node>
</nodeList>
7. Locate the bootstrap.xml file in the following folder:Default Windows location: %USERPROFILE%\CIM-SSO\default\conf\bootstrap.xmlDefault Linux location: $USERPROFILE/default/conf/bootstrap.xml

August 2012 McAfee® Cloud Identity Manager Installation GuideOrder Number: 326712-005US 59
Cluster Management
8. Open the file with an editor, and replace “127.0.0.1” with the IP address of the node that you are adding to the cluster.
9. Restart the server for the changes in the file to take effect.

Cluster Management
McAfee® Cloud Identity Manager Installation Guide August 201260 Order Number: 326712-005US

August 2012 McAfee® Cloud Identity Manager Installation GuideOrder Number: 326712-005US 61
Troubleshooting Installation
6.0 Troubleshooting Installation
This Troubleshooting Installation chapter is a guide to troubleshooting McAfee® CIM installation.
6.1 Property soae.user.dir is not setSymptom
The following error message is displayed:SOAE start failed with exception
java.lang.Exception: Property soae.user.dir is not set.
Solution
There are two possible reasons for and solutions to this error. Take one or both steps, and try installing again.
• The JAVA_HOME environment variable was not set before the installer was run. Verify that the JAVA_HOME environment variable is set correctly.
• (Windows) The installer was run by a user with administrative privileges instead of from the built-in administrator account. Log in to the built-in administrator account.
6.2 Connection to Management Console Fails from Another ComputerSymptom
McAfee® CIM is installed on a Windows Server. You attempt to access the Management Console on this server from another computer using Internet Explorer, but Internet Explorer fails to connect.
Solution
On the Windows Server where McAfee® CIM is installed, verify that Windows Firewall is disabled. The steps to disable Windows Firewall depend on the version of Windows Server in use. Please refer to Microsoft’s documentation for more information.
Troubleshooting Installation
McAfee® Cloud Identity Manager Installation Guide August 201262 Order Number: 326712-005US
6.3 McAfee® CIM Cannot Connect to the MySQL ServerSymptom
McAfee® CIM cannot connect to the MySQL Server.
Solution
Verify the following:• The MySQL settings, including the port number, are correctly configured in
McAfee® CIM. The MySQL settings are configured on the Configure Database step of the installation wizard or on the Admin tab in the Management Console.
• Verify that TCP/IP connections are enabled in MySQL. This setting is configured in the MySQL Server Instance Configuration Wizard.
• On the Windows Server where McAfee® CIM is installed, verify that Windows Firewall is disabled.


![Journal of Controlled Release3.1. Cationic polymers enhance penetration of the cell membrane Cationic polymers are often used to facilitate siRNA penetration of the cell [55] because](https://img.pdfslide.us/doc/110x75/60124bca796a736b14103b90/journal-of-controlled-31-cationic-polymers-enhance-penetration-of-the-cell-membrane.jpg)


![Identity: n v identity (-ies p) [identity]](https://img.pdfslide.us/doc/110x75/61c6ea26100dbe3ec3259821/identity-n-v-identity-ies-p-identity.jpg)