Embed Size (px)
Citation preview

Users Guide
Last updated: Aug. 1, 2012
For VCM DVD Ver. 2012.9 (IDS-81) or newer
Mazda Modular Diagnostic System

-Contents-
01 Hardware Components .......................................................................... 1
02 Installing, Setting, Running, and Exiting IDS ....................................... 3
02 - 01 Software Installation, Update, Repair and Uninstallation ........................................................... 3 02-01-01 Installing, Updating and Repairing IDS software ................................................................ 3 02-01-02 Installing and Updating Calibration ................................................................................... 11 02-01-03 Uninstalling IDS and Calibration........................................................................................ 15
02 - 02 Configuring Dealer Information and Network Options .............................................................. 18
02 - 03 Configuring PC USB-Ethernet Host Cable, Connecting to VCM .............................................. 20
02 - 04 Configuring Power Options ....................................................................................................... 22
02 – 05 Running/Exiting IDS and Updating VCM Code ...................................................................... 23
02 – 05 – 01 Running/Exiting IDS and Updating VCM-II Code (For VCM) ...................................... 24
02 – 05 – 02 Running/Exiting IDS and Updating VCM-II Code (For VCM-II) ................................... 25
02 - 06 Device Selection ........................................................................................................................ 27
02 - 07 Tabs and initial screens ........................................................................................................... 278
02 - 08 Glossary of Symbols ................................................................................................................. 30
03 IDS Software Update through the Internet ......................................... 33
03 - 01 IDS Update Procedures through Internet Service Provider ...................................................... 34
03 - 02 IDS Update Procedures Using Removable Media .................................................................... 37
04 System Page ................................................................................. 40
04 - 01 System Utilities .......................................................................................................................... 40
04 - 02 System Information ................................................................................................................... 41
04 - 03 User Preferences ...................................................................................................................... 42
05 Vehicle Identification and Session Management ................................ 43
05 - 01 Vehicle Identification ................................................................................................................. 43
05 - 02 Session ...................................................................................................................................... 46
06 Diagnostic Function ........................................................................ 48
06 - 01 Self Test .................................................................................................................................... 48
06 - 02 Datalogger ................................................................................................................................. 53
06 - 03 OBDII Mode ............................................................................................................................... 63
06 - 04 Power Balance Test .................................................................................................................. 66
06 - 05 Relative Compression Test ....................................................................................................... 70
06 - 06 Guided Diagnosis ...................................................................................................................... 72
06 - 07 Network Test ............................................................................................................................. 75
06 - 08 Burglar Service Functions / Burglar Alarm System Operational Record .................................. 76
06 - 09 Meter Warning System Operational Record ............................................................................. 78
06 - 10 Door Lock System Operational Record .................................................................................... 79
06 - 11 TPMS Operational Record ........................................................................................................ 80
07 Module Programming ..................................................................... 81

07 - 01 Configuration (Programmable Module Installation) .................................................................. 83
07 - 02 Module Reprogramming ............................................................................................................ 85
07 - 03 Programmable Parameters ....................................................................................................... 87
07 - 04 PATS (Immobilizer) / Advanced Keyless Functions ................................................................. 88

1
01 Hardware Components
IDS, Integrated Diagnostic Software, need followings to operate.
□ Laptop PC
The laptop PC with IDS enables you to conduct diagnostic and service
operations, such as self-testing, data logging, module programming,
configuration, etc., by communicating with a vehicle through the VCM,
Vehicle Communication Module, and cables.
Do not take the VCM DVD out of the PC when the LED indicator light is
flashing.
The laptop PC communicates with the VCM through the PC USB-Ethernet
host cable connected to the USB port.
All the diagnostic information and vehicle data will be stored in the hard disc on the laptop PC.
Set “Never” for the system standby and disable hibernation in Power Option in Control Panel to avoid
unexpected miscommunications with VCM/vehicle.
□ VCM [0780-04-850]
VCM is an interface to communicate with vehicles. Communication between
the laptop PC and the vehicle is established by connecting the VCM to laptop
PC with the PC USB-Ethernet host cable and to the vehicle with the vehicle
designated DLC, data link cable.
Do not use the VCM power pack, AC adapter, when VCM is connected to a
vehicle. VCM power should be supplied from the vehicle DLC when it is
used on a vehicle. If the AC adapter is connected to a cigarette lighter socket
through an off the shelf DC-AC converter, grounds at the cigarette lighter socket and the DLC creates a
roop and may result in VCM failures and communication errors between vehicle and VCM. The AC
adapter should be used only when you confirm VCM software version and other cases that you use the
VCM at the desk.
VCM Status Indicator LEDs are located under a transparent PCMCIA slot cover and they show VCM
operation status. Refer to the VCM operation manual for details.
VCM software is included in periodically delivered VCM DVDs. VCM software is automatically updated when VCM is connected to the laptop PC with updated IDS software launched.
□ PC Ethernet-USB host cable (For VCM) [A780-06-500] A PC USB-Ethernet host cable is a cable that connects the laptop PC
and the VCM. Connect the USB connector to the USB port and connect the other end to the VCM.
Do not use a commercially available USB extension cables, adapters, or USB hubs. Using such items may reduce communication speed, or even cause miscommunication.
□ 16-Pin Data Link Connector Cable (For VCM) [0780-05-230] A 16-pin data link connector cable is a diagnostic communication cable
for vehicles equipped with diagnosis connector 2s, 16-pin diagnostic connector. All the data needed for diagnosis and service are transferred among the vehicle, VCM and laptop PC through this cable.
□ VCM 17-Pin Data Link Connector Kit (For VCM) [0780-06-330] 17-pin DLC Kit is a diagnostic communication cable kit for
vehicles equipped with Mazda 17-pin connector (Diagnosis
connector mainly located in engine compartments). The kit
consists of 3 components.
- 17-pin DLC Interface Module [0780-06-340]
- 17-pin DLC Adapter [0780-06-350]
- 17-pin DLC Battery Cable [0780-06-360]

2
□ Mazda VCM-II [F-00K-108-821]
VCM-II is an interface to communicate with vehicles. Communication
between the laptop PC and the vehicle is established by connecting the
VCM-II to laptop PC with the USB cable and to the vehicle with the vehicle
designated DLC, data link cable.
VCM software (VCM-II code) is included in periodically delivered VCM
DVDs. VCM-II software is automatically updated when VCM-II is
connected to the laptop PC with updated IDS software launched.
□ USB Cable(3.1m) (For VCM-II) [F-00K-108-653]
A USB cable connects the laptop PC and the VCM-II. Connect the USB
TypeA connector to the USB port and connect the TypeB connector to
the VCM-II.
□ DLC Cable(1.8m) (For VCM-II) [F-00K-108-663]
A 16-pin data link connector cable is a diagnostic communication
cable for vehicles equipped with diagnosis connector 2s, 16-pin
diagnostic connector. All the data needed for diagnosis and service
are transferred among the vehicle, VCM-II and laptop PC through
this cable.
□ 4GB Memory card (For VCM-II) [F-00K-108-664]
This is the micro SD card to preserve VCM-II code.
You need this card when you use the VCM-II. Please do
not remove this card from the VCM-II.
In addition, please note that you cannot use SD card on
the market. This card is formatted for VCM-II specially.
Memory card

3
02 Installing, Setting, Running, and Exiting IDS
02 - 01 Software Installation, Update, Repair and Uninstallation
□ Software Installation
■ Web download
Download IDS.exe from your designated download site to your laptop PC and install
■ DVD
Put IDS DVD into DVD drive in your laptop PC. Select “IDS” on the menu and install
Caution: When you install, set, run, or uninstall the IDS, please close all applications (Excel, Word, Internet
Explorer etc. ).
※ Do not connect the PC USB-Ethernet host cable
before installing IDS. If it is accidentally
connected, wait until a screen on the right appears,
click cancel, and then disconnect the cable before
continuing.
※ To install, update, repair or uninstall, your logon
account need to be in administrators or power
users group. If your account does not have
required privileges, ask your system administrator
to configure your account.
※ “Clean Install” means to install IDS on a PC that
does not have IDS installed. “Update” means to
install newer version without uninstalling older
version. (Usually you cannot update from newer
version to older version.) “Repair” means to re-install the same version without uninstalling the current
version. (Usually you do not need “repair” unless your PC becomes unstable for some reason.)
“Uninstall” means to delete IDS software from your laptop PC.
02-01-01 Installing, Updating and Repairing IDS software
■ Web download
Double click the downloaded IDS.exe to run. Go to step 5.
■ DVD 1. Insert the VCM DVD on DVD-ROM drive. If the dash panel is automatically started in ten seconds or
so, go to step 3.

4
2. If the dash panel does not automatically run, open DVD-ROM drive using Windows Explorer and
run ”VCMDVD.exe”. (The application may appear as “VCMDVD” depending on your computer
environment.)
3. Click “IDS”.
If you are installing IDS for the first time or installing IDS after uninstalling the existing IDS,
follow the following step 4.
4. Select your language and click “Next >”.
5. Wait until setup is prepared.

5
6. If you are repairing (reinstalling the same version without uninstalling current version) the IDS
software, the screen below appears. Select “Repair”, click “Next >” and go to step 10. If you are clean
installing or updating, the screen do not appear. If you are updating the current software, go to step 10.
If you are clean installing the software, go to step 6.
Note: If the warning shown below pops up, this means you are not able to update the software. Click
“OK” to exit and uninstall the previous version prior to installing the newer version. Usually,
software cannot be updated from newer version to older version. Some newer versions may not
be able to be update installed over previous version depending on contents of the newer software.
Below (or similar) window appears if your laptop has RAM smaller than 512MB or your
Windows OS is XP Service Pack 1 (SP1). You must click “No” and install additional RAM if
your RAM is smaller than 512MB. You may click “Yes” and continue if your Windows OS is
XP SP1 but have 512MB or larger RAM.

6
7. When a window shown on the right
appears, close all Windows programs
and click “Yes” to continue. If you
wish to let the programs to continue
their process and install IDS later, click
“No” to abort the installation.

7
8. Click “Next >”.
If you are newly installing the IDS, follow step 9.
9. Read “License Agreement”, select “I accept the terms of the license agreement” and
click “Next >”.
10. Carefully read “IDS and Firewall Compatibility”, select “I have read and understand this firewall
compatibility warning” and click “Next >”. If you are clean installing IDS, go to step 12. If you are
updating the software, go to step 14.

8
If you are clean installing IDS, follow steps 11 and 12.
11. Select a drive to install the IDS and click “Next >”.
12. Click “Install” on below window.
If NET Framework 3.0 has not been installed on your laptop follow steps 13 to 15. Otherwise, go to
step 16.
13. Wait while windows below are displayed.

9
14. Carefully read an End User Licence Agreement, select “Accept (A)”, and then click to
continue.
15. Wait until the installation completes.
16. Please wait until the installation is completed.

10
Note: Windows File Protection window may appear depending on your laptop environment. If
you see a window below, click “Cancel” and then click “Yes” on the next window to continue
installation.
17. If any sessions that have not
been updated for 60 days or
longer, a message shown here
appears. If you wish the
out-of-date sessions be deleted,
click “Yes”. If you wish the
ssessions remain on the laptop
PC, click “No”. For more
information about “Sessions”, refer to section 05-02.
18. The following screen appears at the end of
installation if the latest Calibration Files
are not installed. Check a box next to “I
have read and understand this reminder”
and click “Next >” to continue.
19. At the end of installation, this screen
appears. Clicking on “Reboot” button
automatically reboots the laptop PC. If
any other programs have on-going/unsaved
tasks, click on the button after the task is
finished. If you do not have the latest
Calibration Files installed, update it after
clicking the button and the laptop PC is
rebooted.
Remove any disks from their drives, and then click
Reboot to restart your computer.
Reboot

11
02-01-02 Installing and Updating Calibration
1. If the dash panel appears as shown below, click “Calibration” and go to step 3
2. If the dash panel does not automatically run, open DVD-ROM drive using Windows Explorer and
run ”VCMDVD.exe”. (The application may appear as “VCMDVD” depending on your computer
environment.)
3. If you are repairing the existing Calibration, the following screen appears. Select “Repair”, click
“Next >” and go to step 9. If you are clean installing or updating Calibration, this screen does not
appear. If you are updating Calibration, go to step 8. If you are clean installing Calibration, go to step
4.

12
Note: If the warning shown below pops up, this means you are not able to update the software. Click
“OK” to exit and uninstall the previous version prior to installing the newer version. Usually,
software cannot be updated from newer version to older version. Some newer versions may not
be able to be update installed over previous version depending on contents of the newer software.
If you are clean installing Calibration, follow steps, 4 to 7.
4. Click “Next >” on below screen.
5. Read “License Agreement”, select “I accept the terms of the license agreement” and
click “Next >” when below window appears. (This window may not appear depending
on software being installed and laptop PC environment.)
6. Select a drive to install the Calibration and click “Next >”.
Note: The Calibration needs to be installed in the drive in which the IDS is installed.

13
7. Click “Install” on below window and go to step 9.
8. Click “Next >” on “Welcome to the InstallShield Wizard for Calibration”.
This text is different
depending on whether you
are clean installing or
updating.

14
9. Please wait until the installation is completed.
10. Click “Finish” on below screen.
11. If your laptop PC has not been rebooted after installing IDS, reboot it.

15
02-01-03 Uninstalling IDS and Calibration
※ When IDS operation becomes unstable and it cannot be solved by rebooting your laptop PC, uninstall
and re-install the IDS may solve the issue. Note that uninstalling the IDS will remove the Calibration
Files folder unless it has been installed manually from the VCM DVD.
1. If you are willing to uninstall the IDS, go to step 2. If the “Uninstall IDS” option cannot be found, go
to step 9.
2. Select “Start”, “Settings”, “Control Panel” and then “Add or Remove Programs”.
3. Before uninstalling “Mazda IDS”, you need to uninstall “ETAS VCI Software (Ford)” and “Ford
Motor Company VCM-II Customer Flight Recorder”.
You must be very careful doing this step to avoid uninstalling other necessary software that you are
not willing to uninstall.
4. Please select “Mazda IDS”, and delete it. If you are attempting to uninstall IDS, below window appears.
At normal uninstallation, make sure “Uninstall IDS only” is selected and click “Continue”. If IDS
will not be used on that specific laptop PC and you are willing to delete all IDS related files, select
“Uninstall IDS and remove IDS data files and settings” and click “Continue”.
5. Click “Yes” if below screen is displayed.

16
6. Please wait until the uninstallation is completed.
7. Click “Finish” on below screen.
8. If you need to re-install IDS software, make sure to reboot your laptop PC before installing.
9. When you uninstall Calibration, please select “Start”, “Settings”, “Control Panel” and then “Add or
Remove Programs”.

17
10. Please select “Calibration”, and select “Delete”.
11. Select “Remove” and click “next >” on below screen.
12. Click “Yes” if below screen is displayed.

18
13. Please wait until the uninstallation is completed.
14. Click “Finish” on below screen.
02 - 02 Configuring Dealer Information and Network Options
■Set Dealer Information
Enter at least Dealer Type, Dealer Code, and Country to properly activate IDS.

19
If you do not enter either or all of the information above and click button, a warning pop-up like the right will appear.
If either or all of the information above is not entered when you attempt to launch IDS, a dialog will appear as a topmost window.
1) Select “Mazda” for the Dealer Type. If your dealer is a non-authorized Mazda dealer, select “Non-Dealer”. The Dealer code defaults “0000” and the Dealer code edit box is disabled and greyed out.
2) Enter your dealer code. Dealer code edit box is limited to 10 characters.
3) Select your country. If your country is not
available in the pull-down list, select “Other”.
4) Click button and then IDS will launch.

20
■Network Options
This is to perform comprehensive network test.
Note: IDS automatically connect the network without a unique configuration if your laptop PC is alerady configured to the network.
Click “Start Tests” button. icon will appear for a test passed.
icon will appear for a test failed. And a possible cause will be displayed in the bottom of the window.
Make sure Local Area Connection by involving
your local Dealership Computer Technician.
02 - 03 Configuring PC USB-Ethernet Host Cable, Connecting to VCM
Make sure to configure your PC USB-Ethernet Host Cable following below steps before you firstly use IDS.
The following steps need to be followed after IDS is installed before running IDS.
1. Reboot your laptop PC after installing IDS and Calibrations software. (If your laptop PC has been
shut down, boot the laptop PC.)
2. Connect the PC USB-Ethernet Host Cable to any of USB ports on your laptop PC. The other end
of the cable does not have to be connected to a VCM.
3. You do not need to operate anything while below balloons, or information, is displayed.
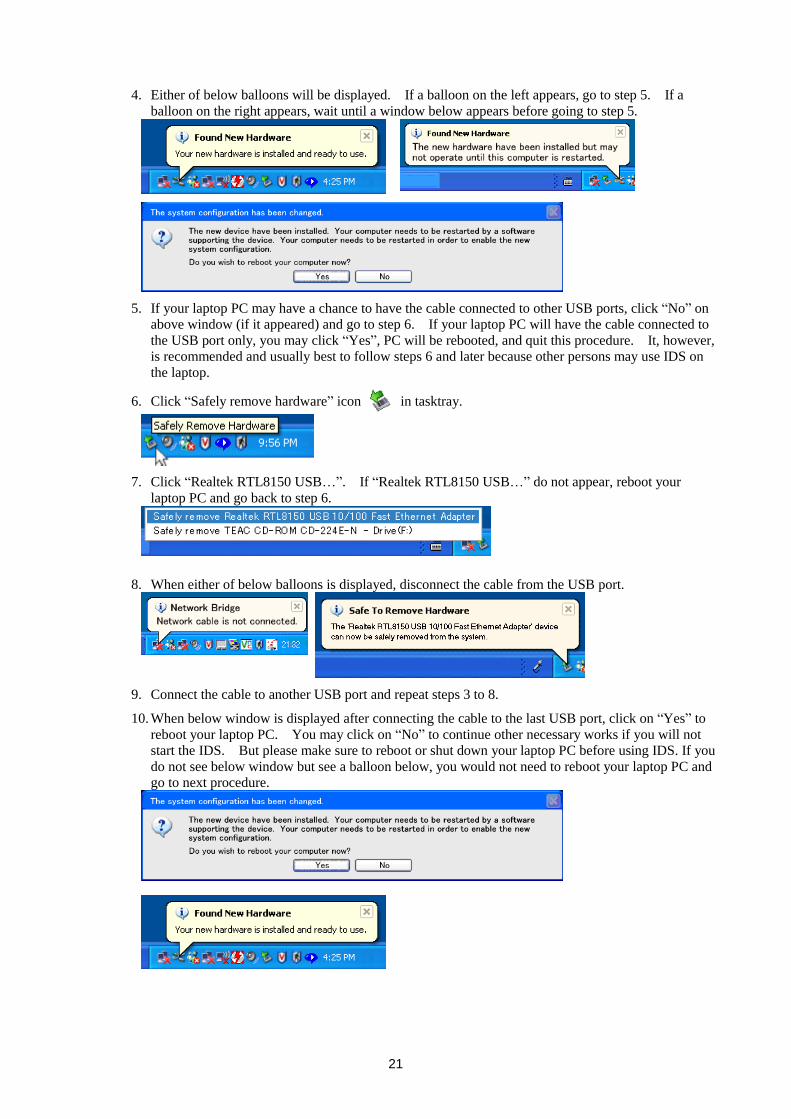
21
4. Either of below balloons will be displayed. If a balloon on the left appears, go to step 5. If a
balloon on the right appears, wait until a window below appears before going to step 5.
5. If your laptop PC may have a chance to have the cable connected to other USB ports, click “No” on
above window (if it appeared) and go to step 6. If your laptop PC will have the cable connected to
the USB port only, you may click “Yes”, PC will be rebooted, and quit this procedure. It, however,
is recommended and usually best to follow steps 6 and later because other persons may use IDS on
the laptop.
6. Click “Safely remove hardware” icon in tasktray.
7. Click “Realtek RTL8150 USB…”. If “Realtek RTL8150 USB…” do not appear, reboot your
laptop PC and go back to step 6.
8. When either of below balloons is displayed, disconnect the cable from the USB port.
9. Connect the cable to another USB port and repeat steps 3 to 8.
10. When below window is displayed after connecting the cable to the last USB port, click on “Yes” to
reboot your laptop PC. You may click on “No” to continue other necessary works if you will not
start the IDS. But please make sure to reboot or shut down your laptop PC before using IDS. If you
do not see below window but see a balloon below, you would not need to reboot your laptop PC and
go to next procedure.

22
02 - 04 Configuring Power Options
To avoid unexpected communication loss with VCM/vehicle, make sure to configure your IDS laptop PC not automatically entering power saving (standby, sleep or hibernation) modes. IDS software do not stop your laptop entering power saving modes and if the laptop PC enters power saving modes while a module is being re-programmed, the module may not be able to be reused due to mis-programming. And since IDS cannot automatically save your recordings and sessions, any recordings that have not been saved are lost when the PC enters the power saving modes.
・ System standby, or speep mode, is a state in which your monitor and hard disks turn off, so that
your laptop PC uses less power. Your Windows desktop is saved to RAM and shuts all power
except necessary power to keep the memory alive. When you need to reuse the laptop PC, it can
be quickly resumed from the standby mode and your desktop is restored as you left it. Though the
mode limits battery discharge to very low amount, it still discharges to keep the memory alive.
Therefore, leaving your laptop PC in this mode for extended period of time may result in losing
your desktop.
・ Hibernation is is a state in which your computer shuts down to save power but first saves
everything on your hard disk drive. There is no battery discharge when the computer is in
hybernation mode and your desktop is restored as you left it when you restart the laptop PC.
The power saving modes should be used only from option in menu
since IDS does not support the modes. Make sure to connect an external power supply, power pack or external battery, immediately after low battery warning/alarm appears. Or save redordings and sessions and then shut the PC down if you do not have access to an external power supply.
1. Select “Start”, “Settings”, “Control Panel”, and then “Power Options.
2. Confirm that “Power Schemes” tab is selected and set everyting at “Turn off hard disks:” or lower to
“Never”.
Note: In order to enable a selection “hibernate” when you shut your PC down, open “Hibernate” tab,
check “Enable hibernation” box, and click “Apply”. If you have enabled the hibernation mode, make
sure to select “Never” at “System hibernates:” on above window.

23
3. Open “Advanced” tab and select “Do nothing” for “When I close the lid of my portable computer: “.
This is to avoid your laptop PC unexpectedly entering power saving modes when you close the lid of
the PC to move your laptop PC to other place or connect cables.
02 – 05 Running/Exiting IDS and Updating VCM Code
When you use VCM, please go to “02-05-01 Running/Exiting IDS and Updating VCM Code (For VCM).
When you use VCM-II, please go to “02-05-02 Running/Exiting IDS and Updating VCM-II Code (For VCM-II).
24
02 – 05 – 01 Running/Exiting IDS and Updating VCM-II Code (For VCM)
IDS can be run from IDS Icon on desktop or in start menu.
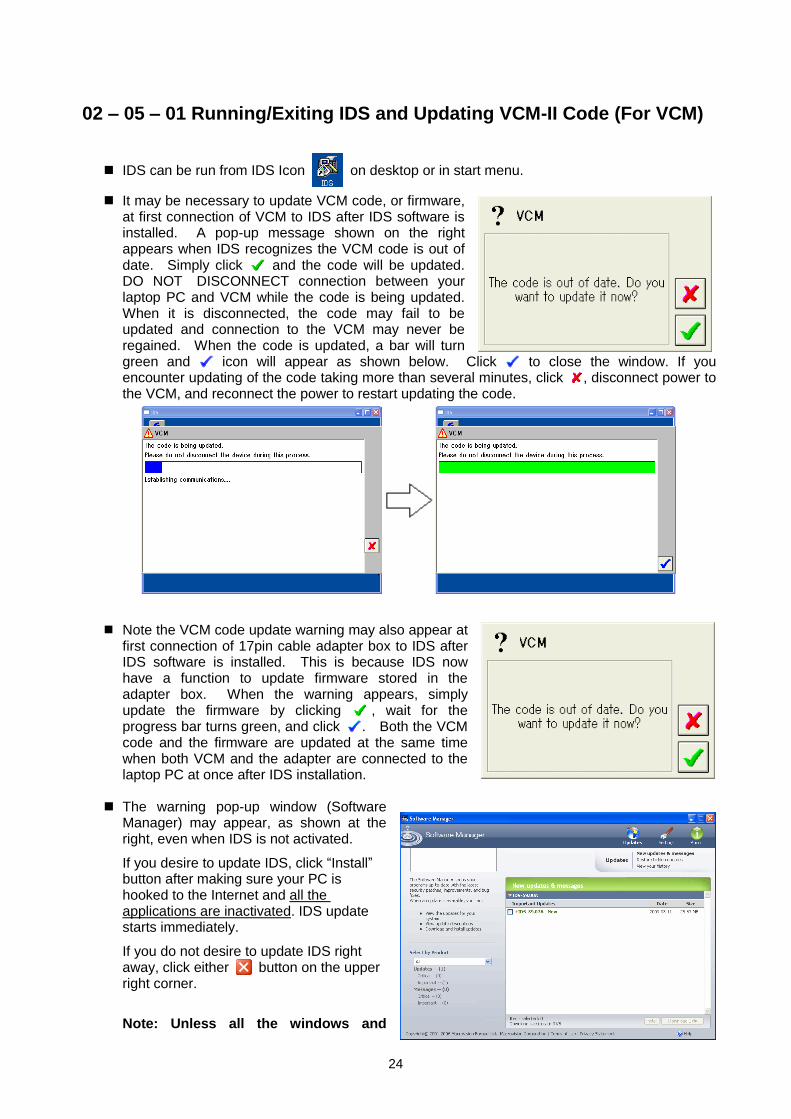
It may be necessary to update VCM code, or firmware, at first connection of VCM to IDS after IDS software is installed. A pop-up message shown on the right appears when IDS recognizes the VCM code is out of date. Simply click and the code will be updated. DO NOT DISCONNECT connection between your laptop PC and VCM while the code is being updated. When it is disconnected, the code may fail to be updated and connection to the VCM may never be regained. When the code is updated, a bar will turn green and icon will appear as shown below. Click to close the window. If you encounter updating of the code taking more than several minutes, click , disconnect power to the VCM, and reconnect the power to restart updating the code.
Note the VCM code update warning may also appear at first connection of 17pin cable adapter box to IDS after IDS software is installed. This is because IDS now have a function to update firmware stored in the adapter box. When the warning appears, simply update the firmware by clicking , wait for the progress bar turns green, and click . Both the VCM code and the firmware are updated at the same time when both VCM and the adapter are connected to the laptop PC at once after IDS installation.
The warning pop-up window (Software Manager) may appear, as shown at the right, even when IDS is not activated.
If you desire to update IDS, click “Install” button after making sure your PC is hooked to the Internet and all the applications are inactivated. IDS update starts immediately.
If you do not desire to update IDS right away, click either button on the upper right corner.
Note: Unless all the windows and

25
applications are closed, DO NOT start installation. Applications in use may be crushed or your PC may freeze.
Refer to “03 IDS software update through the Internet” for the detailed instructions.
VCM icon at below right of IDS window indicates a VCM has been recognized by IDS software. The icon appears shortly after a PC USB-Ethernet Host Cable is connected to your laptop PC and to a powered-up VCM. When the icon is displayed, it is possible to identify a vehicle and diagnose/service the vehicle. The icon, however, do not appear when system tab
is selected.
To exit IDS, click on the upper right corner of the screen.
02 – 05 – 02 Running/Exiting IDS and Updating VCM-II Code (For VCM-II)
IDS can be run from IDS Icon on desktop or in start menu.
VCM-II Software Update: It may be necessary to update VCM-II code, or firmware, at first connection of VCM-II to IDS after IDS software is installed. A pop-up message shown on the right appears when IDS recognizes the VCM-II code is out of date. Simply click and the code will be updated. DO NOT DISCONNECT connection between your laptop PC and VCM-II while the code is being updated. When it is disconnected, the code may fail to be updated and connection to the VCM-II may never be regained. When the code is updated, a bar will turn green and icon will appear as shown below. Click to close the window.
<Trouble shooting>
VCM-II Software update: IDS will notify with the pop-up window shown in the right figure if the VCM-II software version is newer than that required by IDS.
+Select the Tick button and follow the on-screen instructions to update the IDS software. (Recommended)

26
+Select the Cancel button and follow on screen instructions to roll-back VCM-II software.
Part of the rollback process involves a manual reset of the VCM-II. IDS will notify you when to perform the reset. This requires the VCM-II recovery mode switch shown in a below figure. To access the recovery mode switch, remove the rubber boot at the end of the VCM-II where the USB cable is connected.
Note: Do not press the VCM-II recovery mode switch until IDS directs you to do so.
Figure: End view of VCM-II showing the recovery mode switch
The warning pop-up window (Software Manager) may appear, as shown at the right, even when IDS is not activated.
If you desire to update IDS, click “Install” button after making sure your PC is hooked to the Internet and all the applications are inactivated. IDS update starts immediately.
If you do not desire to update IDS right away, click either button on the upper right corner.
Note: Unless all the windows and applications are closed, DO NOT start installation. Applications in use may be crushed or your PC may freeze.
Refer to “03 IDS software update through the Internet” for the detailed instructions.
VCM-II icon at below right of IDS
window indicates a VCM-II has been recognized by IDS software. The icon appears shortly after a USB cable is connected to your laptop PC and to a powered-up VCM-II. When the icon is displayed, it is possible to identify a vehicle and diagnose/service the vehicle. The icon, however, do not appear when
system tab is selected.
To exit IDS, click on the upper right
corner of the screen.
Recovery mode switch
(Plastic tab)

27
02 - 06 Device Selection
The Device Selection tab is available after the IDS application has used a VCM-II at
least once. The Device Selection screen will show a list of available devices.
When you select “Detected” device, and press icon, you can change the device connection.

28
02 - 07 Tabs and initial screens
Upper Tab
Lower Tab
Initial Screen
Function
Systempage Tab
User Preferences sub-tab
User Preferences
・ Add/delete users
・ Edit user preferences
・ Change user
System
Information Sub-Tab
System Information
・ System Time
・ Dealer Information
・ Software
・ Calibration Update
・ VCM
System
Utilities Sub-Tab
System Utilities
・ Set Dealer Information
・ Configure Network Options
・ Update Software
・ Set System Mode
・ Backup / Restore Setting
Toolbox Tab
Select Function
・ Self Test
・ Data Logger
・ Module Programming and Configuration
・ Service Functions

29
Upper Tab
Lower tab
Initioal Screen
Function
Vehicle ID Tab
Vehicle Session Sub-Tab
Vehicle Specification(In Session)
Vehicle Specification (Not in session)
・ View vehicle information
・ Start new session
・ Manage previous sessions
Log Viewer Sub-Tab
Log Viewer
・ View diagnostic records of an open session
Close Session Sub-Tab
Close Session
・ Select options to close sessions.
Upper Right Tab Initial Screen Function
Device Selection Tab
Device Selection Screen
・ Available to configure and manage connection to the VCM and VCM-II.(It appears after the IDS application has used a VCM-II at least once.)

30
02 - 08 Glossary of Symbols
System Tab: Configure system settings, view system information, back-up/restore settings
o User Preferences sub-tab: Add/delete users, set user preferences, and change user.
Add user: Add a new user
Delete user: Delete a user
Change Preferences: Edit user preferences
Set user: Set selected user to the current user
o System Information sub-tab: View system information
o System Utilities sub-tab: Configure system settings and back-up/restore the settings
Vehicle ID tab: Identify a vehicle
o Vehicle Session sub-tab: Identify a vehicle, show vehicle information, or manage
previous sessions
o Log Viewer sub-tab: View recorded diagnostic information
Configure View button: Change the view in the Log Viewer
o Close Session sub-tab: Select options to close sessions and close the session
o In Previous Sessions window:
Multiple selections button: Enalbes/disables selecting multiple sessions
Erase Session button: Erase selected previous vehicle sessions
Sort Sessions button: Sort vehicle sessions by user, model, date, VIN, and RO
Device Selection tab: Available to configure and manage connections to the VCM and VCM-II
Toolbox tab: Lists available diagnostic tools
Module Configuration and Programming tab: Appears when a module is being programmed
Tick icon: Accept a selected item and continue
Cancel icon: Cancel a selecion or close a pop-up window

31
Select System Options icon: Show a pop-up window that contains system options (Printing
options, Log Data, Save Recordings, Exit a tool. Selecting the Log Data option records test result of most of powertrain tools in the toolbox, including datalogger, and the saved result can be browsed using the Log Viewer function.
Information icon: View information related to the current screen
Back button: Back to the previous screen
Battery Status icon: Display the current state of the vehicle’s battery. An icon has
been added to the Status Bar that will indicate the following: Green – indicates that vehicle battery is being charged by either the alternator or by battery charger Gray – indicates that the vehicle battery is not being charged but that the battery voltage is good Red – indicates that the vehicle battery is not being charged and the battery voltage is low.
The following controls are available in Parameter Select window in Datalogger:
Select System Options – button displays a menu that allows selection of Log Data, Print, Capture Setup and Exit functions.
Information icon gives the full name and a brief description of the highlighted parameter.
Save Parameter button archives the currently selected parameters to a group that can be retrieved.
Load Parameter icon retrieves the users saved parameter sets.
Clear icon clears all the currently selected parameters.
Continue button (tick mark) ends the parameter selection and takes the user to the Live Data Display screen. The lower left area of the Parameter Select screen and the Live Data Display screen provide navigation tabs to the main windows of Datalogger. They are as follows from left to right.
System Select tab provides the selection of system and modules.
Parameter Selection tab provides the selection of parameters available for the current module or subsystem.
Live Data Display tab displays vehicle data for all currently selected parameters.
Playback Display tab displays previously captured parameter data for analysis.

32
The following controls are available in Live Data Display window in Datalogger: :
Select System Options displays a menu, which allows selection to Log Data, Print, Capture Setup and Exit. Selecting Log Data option records current PID values and the recorded values can be browsed using the Log Viewer function.
Data Capture starts a capture of data which, when selected, can be viewed in the Playback Display tab.
OSC Mode expands an on/off a step up and a step down control for parameters that the module enables for control. Controllable parameters are denoted by "#" next to their name.
Recording control displays a menu, which allows the user to set the time duration of data, captures and how much of the duration will be pre or post of the trigger.
Plot format, Limits and Range displays a menu, which allows the user to change the display format for the currently highlighted parameter to Digital, XY, Histogram or Bar graph. The screen display for the current parameter is also adjustable. This menu also allows configuration of "auto" triggers, which will initiate a capture or a beep if the user set limit value is reached. Two trigger types are available and are explained in the menus information "i" button.
Move changes the order of parameters When a parameter is highlighted and this button selected, then a second parameter is highlighted and the first parameter will be placed above the second.
Information button gives the full name and a brief description of the highlighted parameter.
Expand Signal View increases the height of XY parameters. When a signal has been expanded a complementary Contract Signal View control will appears, which will reduce the height.
Clear clears all on-screen plot lines of XY parameters.
Indicates that a VMM is required to perform this function.
□ Hotspots
Clicking and holding the icon for a while displays its definition/description on the status bar located at the lower right of the IDS window.
Clicking hotspotted, blue underlined, text shows its definition/description on the status bar.

33
03 IDS Software Update through the Internet
Purpose IDS will be delivered every other month and there are several cases that you are required to use IDS
by timely updating to the latest level until you get the next version of IDS. (Example) - Perform reprogramming to fix vehicle quality issues as per our Service Information - Properly identify newly released vehicle after we fixed the database for the current IDS software. Note:
Calibration files must be loaded via the Internet when required in the actual reprogramming process.
IDS update numbering The version information after update can be viewed on the Information screen. Software updates will be numbered in the following way:
IDS - release number.update number (for example, IDS-60.01) The larger update number represents newer software version.
Precaution before update
Verify that your IDS software version is the same as a release number of the latest release IDS for proper update. Time required for update
It takes approximately 15 – 20 minutes to complete the update. The time varies depending on the capacity of update file, network speed, and the condition of your laptop PC. Note:
In order to shorten the time, we recommend that you periodically perform the clean-up and the defragment of your laptop PC.
Troubleshooting
If you encountered either of the following phenomenona, take actions by referring to the chart below. IDS does not attempt to update for over one week. “Administrator privileges are required to install, please contact system Administrator”
message appeared right after the updated process started. “Administrator privileges are required to install, please contact system Administrator”
message appeared and update process was continued after clicking OK button. And IDS does not indicate correct software number even though IDS reported that the update was
completed successfully. STEP Action required YES NO
1
Is your laptop PC connected to the Internet properly?
Go to step 2. Perform appropriate setting by consulting your Dealership Computer Technician.
2
Is dealer information and network options configured properly?
Go to step 3. Configure Dealer Information and Network Options.
3
Request to your IT engineer so that your IDS PC can access the URL below. http://updates.installshield.com
- -

34
03 - 01 IDS Update Procedures through Internet Service Provider
Note: Set up the dealer information and the network options first. Refer to “02-02 Configuring Dealer
Information and Network Options.” Search for update
Automatic and manual search functionalities are available for the update. Note:
If either of the followings is satisfied, both the automatic and manual searches will not active. Laptop PC does not connect to the Internet. Dealer Information or Network Options is not configured yet. VCM is in lock statement. ( mark is indicated on the lower right corner of the screen.)
Note:
Automatic search is configured internally to search a newer update once a day and you are not able to change the default.
Automatic search
When IDS does not run: The search functionality will start
searching a newer update after approximately 3 minutes when the laptop PC detected the Internet connection
If a newer update is available, a notice screen will appear. If nothing, the notice will not appear.
When IDS is running: The software update will start searching a
newer update after approximately 3 minutes when the laptop PC detected the Internet connection and VCM is in unlock statement. ( mark is not indicated on the lower right corner of the screen.)
When you select ‘Yes’ for update, IDS will shut down in a moment and the update process will start. If you do not want to abort IDS you are working with, select ‘No’.
Note:
DO NOT SHUT DOWN YOUR PC or DO NOT OPEN ANOTHER IDS UNTIL THE UPDATE IS FULLY COMPLETED.
Note:
If VCM is in lock statement when the search is launched, the search will be retried in one hour.

35
Manual search You can start the search at any timing.
Two options to start are available as follows.
a) “System Utilities” “Software Update”
b) “Start” “Program Updates”
a) “System Utilities” “Software Update” If a new update is found: Notice screen like the right appears. Click icon to update. Then IDS shut down once and the update procedures start. Click icon to exit the update.
Note:
DO NOT SHUT DOWN YOUR PC or DO NOT OPEN ANOTHER IDS UNTIL THE UPDATE IS FULLY COMPLETED.
If no update is found: No update message appears.
Note: Error message When you encounter the pop-up window like the right,
configure the dealer information and/or the network options. Refer to “02 – 02 Configuring Dealer Information and Network Options”.
b) “Start” “Program Updates” Software Manager will inform you of the search result.
Search result
Latest update is informed. Update Procedures
1. Click the check box and then click “Install” on the lower right corner.

36
Note:
Refer to “03 – 02 IDS Update Procedures Using Removal Media” regarding how to use the “Download Only” button.
2. Downloading the new update will start.
3. Installation will start. Note:
You cannot abort the procedures after the installation started.
Note: If you encounter the restart message window
before the next screen, select “NO” and click “Finish”.
4. Verify that the installation is completed successfully and then click “Finish”.

37
5. Verify “Status : Completed” and then click
“Close”.
6. Run IDS. Open Information screen and verify that the IDS software version is correct.
Note: Error message Possible cause: Started IDS before the Installation was completed. Counter action:
1) Uninstall IDS including data, session, and initial setting and reinstall IDS.
2) Configure the dealer information and the network options. 3) Retry updating.
03 - 02 IDS Update Procedures Using Removable Media
This method is used only when your laptop PC is not connected to the Internet. You may update your IDS using removable media, such as a memory stick or CD-ROM, and a computer connected to the Internet and installed IDS without the latest update. However removable media used here must be useable both on the laptop PC, which is going to be updated, and the main computer, which is connected to the Internet. 1. Place a removable medium on the main computer and make sure the medium is totally empty. 2. Search update using the main computer. Click the box and then “Download
Only” on the lower right screen.

38
3. Choose the removable medium and click “OK”. 4. Downloading the new update will start. 5. Make sure the download was completed and then
click “Finish”. 6. Make sure “Status : Complete” message on the
screen and then click “Close” on the lower right screen.

39
7. Install update in removable medium into laptop PC. 7-1 Close IDS when it is running. 7-2 Place the removable medium on the laptop PC. 7-3 Click the update icon and installation will start immediately.
8. Make sure update was fully completed (access lamp of hard disk drive on the PC does not flash /
illuminate.) and start IDS.
Note: Information screen which represents the completion of installation does not appear.
9. Start IDS and make sure the IDS is updated to the latest version.

40
04 System Page
When the System Tab at the top of the screen is selected, three sub-tabs appear at the bottom of the screen. These sub-tabs are:
User Preferences – Create and manage unique users System Information – View basic information regarding the hardware and software being used System Utilities – View Help guides and set dealer information
04 - 01 System Utilities
Upper Tab: System Page Tab Lower Tab: System Utility Tab
The System Utilities screen is activated when the System top tab is selected followed by the System Utilities sub-tab. This screen allows the user to:
Set dealer information to be included with each transaction
View the User Guide
View the Release Note that is issued with each software release
Access other utilities
□ Set Up
■Printer Settings
Opens Windows printer settings dialogue.
■Set Dealer Information
Enter at least Dealer Type, Dealer Code, and Country to properly activate IDS.
■Network Options
This is to perform comprehensive network test.
Refer to “02 – 02 Configuring Dealer Information and Network Options” for the details.
□ System IDS conducts self-tests on adapters and cables to make sure all devices and attachments are properly running. These self-tests, however, are related to VMM (hardware for Ford dealers.) So this functionality is not for Mazda dealers.
□ Information Release note for currently installed software and a troubleshooting guide are available.
□ System Mode There are two operational modes, Normal and Training. In the Training Mode, you may simulate IDS in order to learn how to use vehicle-identification function and all kinds of diagnostic functions all by yourself without hooking IDS to actual vehicles. Note:
If IDS is in the Training Mode, the IDS does not work to diagnose actual vehicles. Make sure to set IDS back to the Normal Mode before using it on actual vehicles. Training Mode will not turned back to Normal Mode even if IDS is tuened off.
System Utilities

41
□ Other Functions
■ Update / Special Function
This function is not for Mazda dealers.
■ Backup/Restore Settings
User information in User Preferences and dealer information / Network Options settings in System Utilities can be saved to and restored from preferable destination directory using this function.
■ VDR Information / Update
This function is not for Mazda dealers.
■ Extract Log Files
This function is not for Mazda dealers.
■ Launch Monitor Tool
This function is not for Mazda dealers.
04 - 02 System Information
Upper Tab: System Tab Lower Tab: System Information Tab
Information related to the hardware and software in use can be viewed by selecting the System tab. Information provided includes: System time and date, Dealer Information and Software Release number.
□ System Time Present time and date set on your laptop PC is indicated here.
□ Dealer Information Dealer information set in System Utilities is indicated here.
□ Software Release Number Version information for IDS and Calibration are indicated here. Software updates will be numbered in the following way:
IDS-release number.update number (for example, IDS-60.01) The larger update number represents newer software version.
Calibration will be numbered in the following way: C-release number (for example, C60)
Note: Use your IDS with the latest release number of Release and Calibration for proper IDS operations.
□ Cable Version This information is not for Mazda autholized dealer but for Ford dealers.
System Information

42
□ VCM Information of BCF, PROM, and Bootstrap versions and VCM serial number is indicated here. You will need this information when you contact M-MDS hotline for their support.
□ VCM-II Information of VCM-II Code of PC and VCM-II Hardware, VCM-II serial number and the application which is installed in VCM-II is indicated here. You will need this information when you contact M-MDS hotline for their support.
□ VMM This information is not for Mazda autholized dealer but for Ford dealers.
04 - 03 User Preferences
Upper Tab: System Tab Lower Tab: User Preferences Tab
One or more IDS users can be created under this option. Each user can select display units for various parameters (temperature, pressure, etc.). Initially the list of users only includes "Default User". Other users are added to the list when they have been defined. Selecting the user from the list and clicking "Set the Current User" button on the right side of the screen activates the user.
□ Adding and Removing Users
You are able to add and remove users by pressing the Add User Icon and Delete User Icon respectively.
□ Change Preferences
You are able to change the followings by pressing the Change Preferences Icon. Language: Selectable languages depend on default language of your laptop PC. Test Override: This enables you to determine diagnostic procedures, as you prefer. Measurement unit: Temperature, distance, pressure, mass, and vacuum. Repair Order: Enables/disables “Repair Order” window that appears after a vehicle is
identified.
□ Set the Current User
You are able to set, or change to, the highlighted user by pressing “Set the Current User” Icon.

43
05 Vehicle Identification and Session Management
05 - 01 Vehicle Identification
To conduct various diagnoses/services, you need to make sure letting IDS identify a vehicle first. To identify a vehicle, select “Vehicle Identification” tab at the top of the screen.
□ Outline IDS functions are automatically determined and populated depending on systems equipped on
a vehicle. There are three methods to identify vehicles.
Start New Session (16pin) and 17 Pin: Automatically identify a vehicle (usually used) Manual Vehicle Entry: Manually identify a vehicle Previous Sessions: Recalls previously saved sessions
□ Automatic Vehicle Identification 1. Select a menu depending a vehicle to
identify and click .
Select a menu based on following rules.
Vehicles with a Engine MIL: Select “Start New Session“ Vehicles without the Engine MIL: Select “17 Pin“ > “17 Pin only”
**Please note that 17 Pin vehicles are not supported on VCM-II. How to differentiate 16 Pin and 17 Pin models Some models have both 16 Pin and 17 Pin DLCs. To determine which connector to use, check the Engine MIL in the instrument cluster. If the vehicle is equippet with a MIL, the vehicle is considered as a 16 Pin model, otherwise choose 17 Pin. To conduct Self Test for non serial linked modules (modules that emits one or two digits DTCs when its test terminal in 17 pin DLC is grounded) on vehicles that have the MIL and both 16 Pin and 17 Pin connectors, switch to 17 pin DLC cable as prompted by IDS after identifying a vehicle using 16 pin DLC cable.

44
2. Connect the Data Link Connector cable as the screen instructs, turn ignition switch ON and
click . IDS would automatically retrieve PCM identification number and search for the ID in database.
IDS do not identify a vehicle if:
- The PCM on the vehicle is not communicable. (Some models manufactured in 1997 or earlier)
- Cables are not connected properly. - The PCM is defective. - The room fuse is not installed. - The vehicle is not supported by IDS.
3. If IDS could find the PCM ID number in the database, vehicle information such as model name, engine type, engine capcity, and transmission type are displayed. Confirm the vehicle is correctly identified and click “Yes”.
If the vehicle information is incorrect,
click “No”. Manual Vehicle Identification screen will appear. Enter vehicle information and make IDS to identify the vehicle. If you still have difficulty in vehicle identification, please call or e-mail Mazda Diagnostic Service Planning Group. (Refer to Manual Vehicle Identification section for detail.)
4. On Repair Order screen, enter vehicle information, such as VIN and mileage, and
click .
This information is used as reference when you recall the session in Previous Sessions option. You may not enter this information if unnecessary.
If you would not like to see the Repair order screen any more, you can disable the screen in User Preferences.
□ Manual Vehicle Identification
If IDS is not able to automatically identify a vehicle, the screens below may appear depending on situations. You are able to make IDS to identify the vehicle manually by following instructions on the screen.
For 17Pin connector models:
If the PCM on the vehicle does not respond to IDS serial communication message (some models manufactured in 1997 and before), the screen on the right will be shown. Select the applicable model and click . **Please note that 17 Pin vehicles are not supported on VCM-II.

45
For 16 Pin connector models: When DLC cable is not properly connected or there was no response from the vehicle (PCM), a screen shown on the right appears. You will be asked if you would like to retry or manually select the vehicle. If the DLC cable was not properly connected, connect the cable and click “Yes”.
If you have retried and still receive the
above screen, click “No”. Then select “All other” and click .
When a screen on the right appears, enter
one of the followings listed below and click . You should not be led to this screen normally so when you are lead to the screen, please contact Mazda Diagnostic Service Planning Group with PCM part number and suffix information and the symptom you are facing in order to have the problem be investigated. They would inform you how to enter one of the following numbers described below. You may be asked to conduct some test afterwards.
* PCM Part Number (including suffix)
Refer to As-Built sheet for the PCM part number. Enter first four digits in a box located at the left of “12A650” and enter suffix in a box located at the right of “12A650”. If there is no suffix found on the PCM, leave the box blank.
* Calibration Number This is not usually used in Mazda dealers.
* Tear Tag This is not usually used in Mazda dealers.

46
05 - 02 Session
□ Outline IDS Sessions stands for a series of operations starting from vehicle identification to the end of
various diagnosises/services. You are able to save a session including its recordings and restore the session later for further diagnostic.
□ Log Viewer Following informaiton in the session can be
viewed.
- Vehicle Information: Model, engine
type, engine size, equipment, transmission, PCM part number
- Diagnostic Records: Date/time, functions used, diagnosis results
□ Closing a Session After all diagnostic has been done, a
session can be closed. Thare are three options available:
Hold (Saves Recordings) – Current session including all recording is saved. This option should be chosen when you need to interrupt the diagnosis/service or when you need to save the recordings for future use.
Complete (Deletes Recordings) – Saves a minimal amount of data (only vehicle information).
Delete (Deletes Session) – Currently open session will not be listed on the “Previous Sessions” list. By pressing the “Recycle Bin” button on the “Previous Sessions” screen within 60 days after the session was deleted, the session however can be resumed and be displayed on the list again.

47
□ Restoring a Previous Session To restore 'Hold' or 'Complete' sessions, select the
Vehicle Identification tab at the top and select "Previous Sessions". A list of saved sessions will appear. "Hold" sessions include data recorded in the session. "Completed" sessions include vehicle information but not recordings. A session can be restored by selecting a session and clicking .
Other tools are also provided for managing the saved sessions.
The Select Multiple Sessions button allows the user to select more than one session to be deleted.
The "Erase Selected Sessions" button deletes all highlighted sessions.
The "Sort Sessions" button allows sessions to be sorted by VIN, Vehicle, Repair Order number and/or date.
“Delete Session” deletes the selected sessions from the list. The sessions are not actually deleted from the PC. Sessions deleted from the list in last 60 days can be restored by using the “Restore Session” button.
“Enable Multiple Selection” enables multiple session selection (for deleting session).
“Disable Multiple Selection” disables multiple session selection.
“Sort Sessions” shows a pop-up window that enables sessions be sorted by user, model, date, VIN, and Repair Order.
“Archive Sessions” appears when a session is highlighted. Clicking it will open “Save As...” window and you will be able to compress the session and save it in any local/external drives. The compressed session can be sent to other note PCs via
network/e-mails.
“Restore Sessions” opens a “file open” dialogue. You are able to restore sessions in any local/external drives and open them to see their recordings or logged data. Use this function to restore sessions sent by e-mail. Please note you cannot save any
additional recordings or diagnostic test results in the restored sessions.
“Upload Sessions” button is not for Mazda dealers but for only Ford dealers. The button appears after activating, or enabling, IDS network connection. When the icon is pressed, there will be a pop-up window saying “Data transfer to hotline has completed” and data
is sent to a Ford server. The data to be transferred is dealer code, country, and selected session. Any information except from Ford dealers will be automatically deleted and no hotline people will try to contact you.
“Recycle Bin” button is to list sessions deleted in the last 60 days. Selecting one of the sessions and pressing the button resumes the session to the Previous Sessions list.

48
06 Diagnostic Function
06 - 01 Self Test
Outline When each system on a vehicle detects a problem, Diagnostic Trouble Codes (DTCs) may be
stored in each control module. Selftest is a funciton to retrieve DTCs from the modules. The selftest also provides additional information, such as Freeze Frame Data, to narrow down possible causes .
* To conduct selftest, the vehicle must be identified properly. Refer to section 05-01, “Vehicle Identification”. There are following three selftests. (Some models may not have all three selftests depending on modules.
KOEO On-Demand Self Test
KOER On-Demand Self Test
Retrieve CMDTCs
KOEO / KOER On-Demand Self Test KOEO On-Demand Selftest and KOER On-Demand Selftest are conducted to inspect present conditions of the vehicle sending commands to a module to start pre-programmed diagnostic procedure in the module itself. Systems or compornents exceeding the threshold values will be output separately as KOEO ODDTCs / KOER ODDTCs, other than CMDTCs. ODDTCs are considered as DTCs gained through On-Demand Selftests so they will not be stored in the module. PCM enables you to conduct KOEO On-Demand Selftest and KOER On-Demand Selftest as well as retrieving CMDTCs. When you retrieve CMDTCs on the body, chassis and electric modules, a KOEO On-Demand Selftest will be automatically executed on the modules that support KOEO On-Demand Selftest.
Retrieving CMDTCs
CMDTC Retrieving function enables you to obtain failure codes from the present failures and ones from the past that are stored in the module after the last DTC deletion. (some models may store the present failures code only) If you use this function on powertrain modules, such as PCM and TCM, you may obtain other information, such as pending DTCs and/or Freeze Frame Data as well as CMDTCs. (Information shown on the screen may vary depending on models since every model has different information.)
Pending DTC (Pending Code)
A pending code is a temporary failure code and is retrieved simultaneously during retrieveing CMDTCs for PCM/TCM. IDS doesn’t have an exclusive menu which outputs pending codes only. A pending code is stored without turning on engine check lamp when a fault is detected for the first time. If the same fault is detected in two consective driving cycles, the engine check lamp illuminates and the pending code becomes a CMDTC. The existing pending code will be deleted. If the pending code is not be detected in the next driving cycle, the existing pending code will be deleted. However the definition of pending cord has been changed for PCM/TCM on HS-CAN Protocol communicable models on and after MX-5 (Rordster) Turbo (NB) and MAZDA6 (ATENZA). A pending code will not be deleted until the pending code failure is determined as normal functioning in the last driving cycle regardless of one or two-driving-cycle-detection failure code. For example, if one-driving-cycle-detection failure code is detected, it will be recorded as both of a CMDTC and a pending code. If one-driving-cycle-detection code is not detected in certain driving cycle, it will be recorded as a CMDTC only. No pending code is available. If two-drive-cycle-detection failure code is detected for the first time, it will be recorded as a

49
pending code. Then two-drive-cycle-detection failure is detected in two consective driving cycles, it will be recorded as both of a pending code and a CMDTC. In other words, if the module has a pending code, it means the code is present failure. If the module doesn’t have a pending code, it means the code is a past failure.
Freeze Frame Data Freeze Frame Data is snapshot information/data when PCM/TCM detects failures. Regarding on or after the first generation MAZDA6 which adopts HS-CAN protocol, they have expanded Freeze Frame Data function, which has Freeze Frame Data for multiple CMDTCs and/or pending codes.
Snapshot Data
Snapshot Data is snapshot information/data for not only PCM/TCM but also for other modules. When CMDTCs are stored in the module, snapshot data is also stored in modules.
50
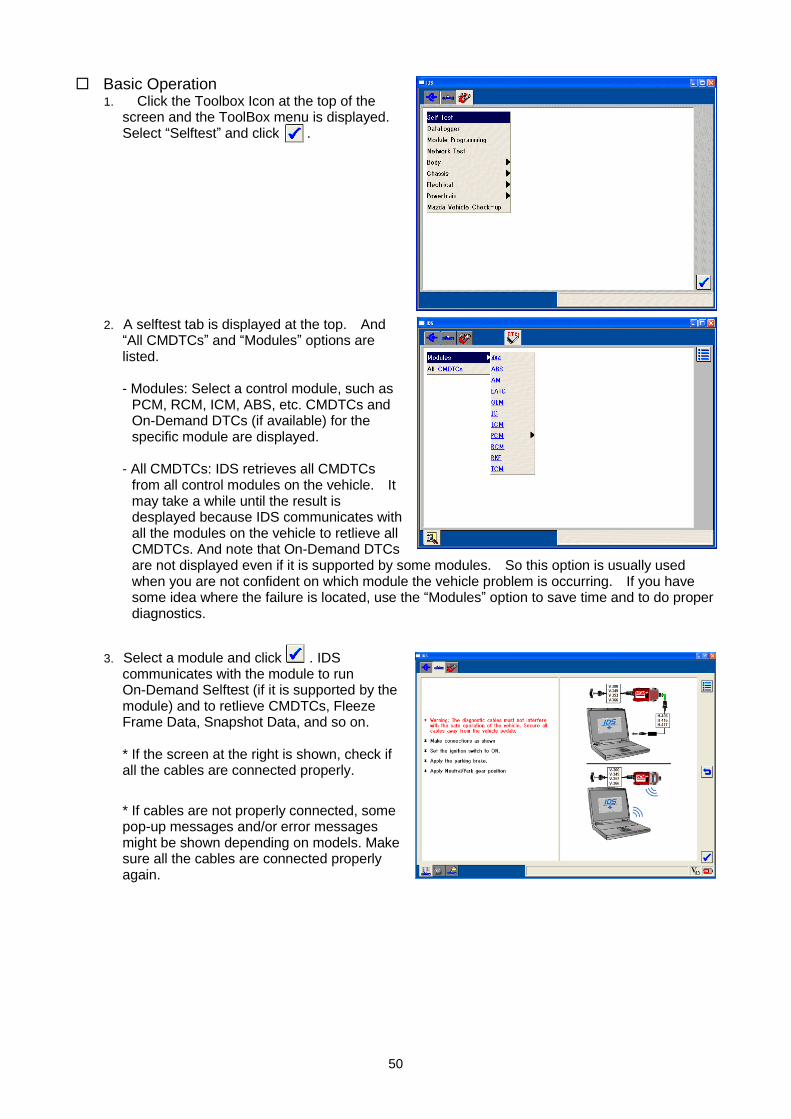
Basic Operation 1. Click the Toolbox Icon at the top of the
screen and the ToolBox menu is displayed. Select “Selftest” and click .
2. A selftest tab is displayed at the top. And “All CMDTCs” and “Modules” options are listed.
- Modules: Select a control module, such as
PCM, RCM, ICM, ABS, etc. CMDTCs and On-Demand DTCs (if available) for the specific module are displayed.
- All CMDTCs: IDS retrieves all CMDTCs
from all control modules on the vehicle. It may take a while until the result is desplayed because IDS communicates with all the modules on the vehicle to retlieve all CMDTCs. And note that On-Demand DTCs are not displayed even if it is supported by some modules. So this option is usually used when you are not confident on which module the vehicle problem is occurring. If you have some idea where the failure is located, use the “Modules” option to save time and to do proper diagnostics.
3. Select a module and click . IDS
communicates with the module to run On-Demand Selftest (if it is supported by the module) and to retlieve CMDTCs, Fleeze Frame Data, Snapshot Data, and so on.
* If the screen at the right is shown, check if all the cables are connected properly.
* If cables are not properly connected, some pop-up messages and/or error messages might be shown depending on models. Make sure all the cables are connected properly again.

51
4. If “PCM” under “Module” is selected, select either CMDTC, KOEO or KOER, and then click .
* If a module that supports either KOEO or KOER On-Demand Selftest is selected, a screen showing necessary vehicle conditions may be displayed. Make sure the vehicle meet the conditions.
5. Detected DTCs are categorized and listed on
the left side of the screen. Selecting and highlighting a DTC will display descriptions of the DTC / failure type, freeze frame data, or snapshot data for the DTCs on the right. "Diagnostic Protocol" information, displayed at the bottom of DTC description screen, is not used for usual diagnosis.
To delete CMDTCs, click “Clear CMDTC Icon”, . To delete ODDTCs on the screen, use retest button to re-run the KOEO/KOER On-Demand Selftest. Note that folloings are required to properly let the module detect faults after CMDTCs are cleared. This is because some modules do not detect failures right after CMDTCs are deleted.
- Turn the ignition key to the Lock position and wait for 5 seconds or so. - Turn the ignition key to the ON position and wait for 5 seconds or so. - Let the vehicle meet the DTC detection conditions for DTCs that were displayed on the
screen (refer to workshop materials for details of the conditions.)
If you click “Retest Icon”, , IDS will execute Selftest again.

52
A question mark and “Pinpoint Sub Icon” may be indicated next to a DTC. The mark indicates there is a diagnostic menu for that particular DTC. To show the diagnostic menu on the screen, click the “Pinpoint Sub Icon” or select the DTC and click .
* For further operation, refer to section 06-06.
Reading Freeze Frame Data / Snapshot Data
When a DTC under Freeze Frame Data / Snapshot Data category is selected, PID values indicating vechile conditions at time of recordiong the DTC is displayed on the right. Functions of PCMs with HS-CAN Protocol may differ between models/engines. There are three types:
- Freeze Frame Data – Mode 2 Freeze Frame Data for a DTC that caused the MIL illumination is displayed. If 2 or more DTCs are stored in the module, Freeze Frame Data for a DTC that effects the emission the most is displayed.
- Freeze Frame Data – Mode 12
Freeze Frame Data for all DTCs that are stored in the module is displayed. Freeze Frame Data – Mode 12 is available on some of PCM, TCM, and 4x4 modules.
- Snapshot Data
This is similar to Freeze Frame Data but also available for some of body/chassis/electric system modules. Snapshot data PIDs displayed for DTCs may be different depending on detected DTC.

53
06 - 02 Datalogger
Outline Datalogger has realtime monitoring (or logging) function to monitor PID (Analog signals, digital
signals, calculated values, system condition information, etc.) values, simulation function to control actuators/solenoids, and capturing function to record PID values for designated period of time.
* To use datalogger function, the vehicle must be identified properly. Refer to section 05-01, “Vehicle Identification”.
Basic Operation – PID Monitoring 1. Select Toolbox tab at the top in order to show a
list of diagnostic/service tools. Then select “Datalogger” and click .
2. A list of modules and systems available for the
identified vehicle will appear. Select a module or system on the menu and click . IDS will communicate with the module and “PIDs selection screen” (a list of available PIDs) will be displayed.
* If there are communication problems with the
module, follow on-screen instructions to make IDS communicate with the module.
Frequently used PIDs are pre-selected and highlighted on the PIDs selection screen. You may select/deselect each selection by clicking each PIDs. To deselect all PIDs, click “Eraser Icon” at the lower right of the screen. PID names are abbreviated on the selection screen. To determine a proper PID name to select, click a PID name box and its description will appear in status bar at the lower right of the screen. PIDs with #s indicate that they have Simulation Functions. Parentheses below PID names indicate display unit. Some PIDs support multiple display units. ETC PID, for example, ETC(TEMP) and ETC(VOLT) appears as an independent PID (TEMP means temperature, VOLT means voltage).
When too many PIDs are selected, the PIDs boxes will turn red. Number of PIDs selectable for the vehicle depends on what protocol is used to communicate with the module. When the PDIs boxes turned red, deselect unnecessary PIDs.

54
3. By clicking when PIDs to display are determined, Live Display Screen that indicates PID values and line plots will be displayed.
Touching a PID value on the screen will display its description in status bar at the bottom right.
PID names in the Live Display Screen are automatically logged and they can be viewed in the Log Viewer.
Clicking the menu icon at top right of the live display screen displays a select option window. By selecting the “Log Data” option
and clicking the tick button, current PID values are logged and the values can be viewered in the Log Viewer.
Simulation Function PIDs with #s have simulation function.
1. Click a PID name followed by “#”, PID value, or PID plotting window to select the PID. The PID selected will be surrounded with a heavy frame.
2. To turn control mode on, click "control mode
icon” on the right. “control item activate
icon” , “up icon” , “down icon” , and
“delete / reset icon” appears below the
"control mode icon” .
3. To control the signal value, click the “control item activate icon” . The “#” next to the PID name will turn to “=” or “@”. If the “#” turns to “!”, this means this PIDS cannot be controlled because vehicle conditions to control the PID is not met. Refer to appropriate workshop material to properly set the vehicle condition.
4. Adjust PID value by clicking either the “up icon”
or “down icon” .
5. To turn the control off, click the “control icon”
. The “=” or “@“ turns back to “#” and the
PID control is returned to the module.
Note: By clicking “delete/reset icon” while the PID is being controlled, all PIDs control is returned to the module.
6. To end control mode, click the “# Icon”.

55
Configuring Live Display Screen Transverse, or x-axis, range is initially set to 15
seconds. It can be adjusted from 1 to 120 seconds by following below steps:
1. Make sure no PIDs are selected. If a PID is selected, click its name to deselect it.
2. Transverse range (x-axis) is initially set to 15
seconds. Click “Zoom In Icon” to zoom-in.
Click “Zoon Out Icon” to zoom-out. The range can be adjusted from the minimum of 1 seconds to the maximum of 120 seconds.
Longitudinal, or y-axis, range can be adjusted by
following below steps:
1. Select a PID that you wish to adjust. (Make sure the PID is surrounded with a heavy frame.)
2. Click the “Expand Signal View Icon” or
“Reduce Signal View Icon” to enlarge or reduce the display size.
PIDs order can be moved by following below steps:
1. Select a PID that you would like to move and click “Move Icon” . 2. Confirm the icon is pressed down and became dark. 3. Touch where to move the selected PID and the PID will be placed at where you pointed. PIDs that
had been placed at the position you pointed or below will be moved down.

56
PID display format including plot format, limits, and range can be changed by following below steps:
1. Select a PID item that you wish to change the display format.
2. Click “format/limit/range icon” on the right side of the screen. A pop-up window appears.
Change Plot format: From plot format selection box at the top of the pop-up window, select either of below formats to show the PID in live display.
X-Y Plot
Histogram
Bar Chart
Digital Box
Set Display Range: From Signal Display Range Box on the left side of the pop-up window, adjust upper and lower limits of the
display range by clicking / icons or
moving arrow.
Set Limits for PIDs that shows values (percentage, RPM, temperature, pressure, and so on): In Set Limits Box on the right side of the pop-up window, select either type of limits listed below. Adjust limit values by clicking / icons or moving /
arrows.
No limits (default)
Upper limit only
Lower limit only
Inside of a range
Outside of a range (set upper and lower limits)
To enable the limits, you need to select “Beep” and “Condition” at the lower end of the pop-up screen and click .
The limits set will appear as red limit lines on live display screen. When PID signal value exceededs or falls below the limits, your laptop PC will beep.

57
Set Limits for PIDs that shows states (On/Off, Lean/Rich, Open Loop/Closed Loop, and so on.): On left side of the pop-up window, select either of listed PID states, select “Beep” and “Condition” at the lower end, and then click .
The PID name box for those limits are set will turn red on live display screen. The PID state box is in green when the PID state does not meet the selected state. When PID signal value meets the selected state, the PID state box turns red and your laptop PC beeps.
Delete Limits: To delete the PID limits, click icon on the pop-up window to set the display
format/range/limit.
Auto Capture Function Auto capture is a function that automatically captures, or records, all selected PIDs data when one
or more preset triggering condition is met.
1. On live display screen, select a PID that you wish to set a trigger, click “format/limit/range icon”
, and then set PID limits.
For PIDs that shows values (percentage, RPM, temperature, pressure, and so on): In Set Limits Box on the right side of the pop-up window, select either type of limits listed below. Adjust limit values by clicking / icons or moving / arrows.
No limits (default)
Upper limit only: Triggered when PID value exceeds the set limit.
Lower limit only: Triggered when PID value falls below the set limit.
Inside of a range: Triggered when PID value enteres between the set range.
Outside of a range (set upper and lower limits): Triggered when PID value exceeds or falls below the set limits.
For PIDs that shows states (On/Off, Lean/Rich, Open Loop/Closed Loop, and so on.): Select either of listed PID state on left side of the pop-up window.
2. Click the “Auto Capture” button to set Auto Capture Mode. If you wish your laptop PC beep when triggered, click and highlight “Beep” button also.
3. Select either one of the following buttons.
“Transition”: If the PID meets the triggering range right after auto capture mode is enabled (when the pop-up window is closed by clicking ), data
capturing will not start. The captureing starts when the PID value goes out of the triggering range and meet the range again.

58
“Condition”: If the signal is in the triggering range, data captureing will start immediately after turning auto capture mode on.
4. Click “Recording Times” icon to open Capture Buffer Setup pop-up window. Set capturing duration, pre trigger and
post trigger using arrows ( , , and ), and then click to confirm the setup. You may also reconfigure these
durations by clicking icon in live display.
5. Click to complete the auto capture settings and to activate the auto capture mode. When the PID meets the condition
you set, “Data Capture” icon is automatically pressed
down ( ) and the PIDs data on live display will be automatically captured.
Shown on the right is an example of captured data.
Triggering condition: Signal: rpm Range: Only upper limit Limit: 1997 rpm Caption time: 15 sec. Pre / post triggers: 9 sec. / 6 sec.
Manual Capture Function
You may manually capture data without setting auto trigger PIDs.
1. Click “Recording Times” icon on the live display screen to open Capture Buffer Setup pop-up.
2. Set capturing duration, pre trigger and post trigger using arrows ( , ,
and ), and then click to confirm the setup.
3. Click “Data Capture” icon on the live display to start capturing data. (The timing you click the icon will be the triggered timing.)
Hitting the space key when IDS window is active, or right clicking any place in a red rectangle shown on the right, can also start captureing data.
While the data is being captured, Capture event (record) number and progress bar appear in the status bar at the bottom.

59
Aborting Auto/Manual Capturing
You may stop capturing data by following below steps.
1. While data is being captured (data capture icon is depressed and progress bar is in the status
bar), click the data capture icon .
2. Click tick icon on a datalogger pop-up window before the progress bar goes to the end. Please note that you cannot abort
the capturing if you do not click the icon before the progress bar goes to the end.
Note: Data captureing cannot be stopped by hitting enter key or right clicking live display area.
Playback Display
Captured data may be replayed by clicking “Playback Display” sub-icon .
If there are two or more captured data, select a recording using “Next/previous recordings” icons ( / ) on the right. Please refer to the status
bar at the bottm to confirm which recording is currently on the screen.
To show only necessary PIDs on the playback display, click “Parameter Selection for Playback Display” icon. By clicking each PID name or
its description, you can select/deselect the PID to show on the display. To diselect all PIDs, click clear icon on the pop-up window. To
reset the select all PIDs, click reset icon.
When necessary selection is made, click to
reflect the changes.

60
Saving Captured Data
You may save captured data in a session file. If the session is set to “hold” and saved, the session mey be reopnened and the recordings may be replayed later. The held and saved session can also be transferred via e-mails.
1. Click “Select system options” icon on live display to open a menu. Select “Exit” and click
to show a keypad window.
* If you wish to save captured data without exiting datalogger, click “Select system options” icon , select “Save recording group”, and
then click in playback display.
2. On a keypad window, enter a file name within 5
characters and click .
* The kaypad window accepts direct typing using the hardware kayboard on your laptop PC.
* Key arrangements for the software kayboard can be changed to the alphabetical order by clicking “Keyboard Setting” button next the space key. By clicking the
button again, the software keyboard becomes to the default arrangements.
* If you entered an existing file name, you will be asked to change the name. Click and enter different name.
3. If necessary, enter file description within 55 characters. The information entered here may be used to identify multiple files in future. The window accepts more than 55 characters but, unfortunately, “Load saved recordings” window only shows the first 55 characters in the file.
4. Click and “Select recordings to save” window appears. Numbers listed indicate captured event numbers. Click to highlight all the recordings that you need to save. And
then click . If you selected “Exit” option in the live display, the datalogger will be closed and IDS returns to the vehicle specification screen. If you selected “Save recording group” in playback display, the pop-up window will be closed and returns to the playback display.

61
Loading Saved Capture Data
You may load and playback previously saved capture data by following below steps.
1. Click “playback display” sub tab in datalogger. If you have just started datalogger to
load/replay a saved recording, go to next step. If datalogger is already open, click “load saved recordings” icon at the right.
2. On “Select recording group to load” window, select a file to load in “Recordings Group” and click . To
determine a file to load, refer to saved date/time information in “Recording” and the description entered in “Description”. Please note that only one file can be selected in this option.
Restriction of Saving Captured Data
Capture data can be saved up to 10.24MB in the one session. If more than this number applies, you will be asked to select capture data when closing session. Click and select your need data in the
following screen. When the select data are done, click .

62
Saving Parameters and Display Settings This function enables to save datalogger parameter settings listed below. PIDs selected: PIDs you selected Live display settings: Display format, range, size, etc. Limits and capture settings: Limits, triggers, duration, pre/post triggers, etc.
1. Set parameters as you prefer and click
“Parameter selection” sub tab to return to the PIDs selecting screen.
2. Click “Save parameters and display settings”
icon and keypad pop-up window appears.
3. Enter a file name within 10 characters and click
.
* The kaypad window accepts direct typing using the hardware kayboard on your laptop PC.
* Key arrangements for the software kayboard can be changed to the alphabetical order by clicking “Keyboard Setting” button next the space key. By clicking the button again, the
software keyboard becomes to the default arrangements.
* If you entered an existing file name, you will be asked to change the name click and enter different name.
4. Enter file description within 40 characters and click .
Loading and Deleting Parameter Settings
Loading an existing parameter setting
1. On PIDs selection screen, click “Load parameters and
display settings” icon and a pop-up window will appear.
2. Select a file to load and click .
Deleting an existing parameter setting
1. On PIDs selection screen, click “Load parameters and
display settings” icon and a pop-up window will appear.
2. Select a file to delete and click .
3. Confirm the file name and click to delete the file.

63
06 - 03 OBDII Mode
On-Board Diagnostic (OBD) Test Mode: On-Board Diagnostic System equipped on vehicles monitors and detects abnormality of emission gas cleaning system, leakage of fuel evaporative emission and other abnormalities. If it detects an abnormality, it warns the driver by turning the engine check lamp and records the failure in its system. The failure records in the vehicle can be retrieved by external scanning devices using the standardized specifications, such as connectors, communication protocols, parameters, DTCs and test methods. 1. Supporting Status
Diagnostic Test Mode
Description Vehicle IDS
Mode1 Requests related to powertrain (PID data monitoring, On-board system readiness test)
Yes Yes
Mode2 Requests related to freeze flame data Yes Yes
Mode3 DTC requests related to emission gas system Yes -
Mode4 Requests related to resetting and failure information on emission gas system (CMDTC, pending codes, freeze flame data, etc)
Yes -
Mode5 Requests related to Oxygen sensor monitoring test - -
Mode6 Requests related to diagnostic monitoring results Yes Yes
Mode7 Requests related to pending codes Yes Yes
Mode8 Requests related to on-board system forced drive Yes (Only for North
America) Yes
Mode9 Requests related to vehicle information Yes Yes
2. Mode 1:
With this mode, you can monitor followings. (1) PID data related to emission gas cleaning
system (2) Completion status of each system monitor (On-Board System Readiness Test) related to emission gas cleaning system.
What is system monitor?
Vehicles with OBD System are able to monitor and detect abnormalities on sensors, such as fuel system, fuel evaporative system, misfire, catalytic converter, EGR system, oxygen sensors, etc. According to North American and European OBD regulations, vehicles must be equipped with this function.
Let’s take EGR System as an example. “Yes” on EGR_SUP PID on IDS indicates EGR system monitor is supported. If EGR_EVAL says “Yes”, evaluation on this system is completed. After completing evaluation, the test results will be retrieved with an external scanning devices using Mode6. This mode is used for repair verification.
After driving on a certain drive mode, you can check if a certain system monitor is completed or not using above system monitor PIDs in Mode1. Then conduct selftest. If no CMDTC or pending code is available, the problem is fixed. If CMDTCs and/or pending codes exist, the problem still exists.
You can retrieve evaluation results of the system monitor using Mode6. 3. Mode 2:
Mode 2 enables you to retrieve the DTC which causes to turn on MIL and freeze frame data at the time that the emission-system-related failure occurred. If CMDTCs are detected during the selftest, automatically this mode is activated to retrieve freeze frame data.

64
Note: Vehicles, which adopt CAN protocol, has an abilty to show additional freeze frame data (including snap shot) for multiple CMDTCs and/or pending codes in addition to freeze frame – Mode2. This data should be used for reproduction of failures and/or to presume causes of the failures.
4. Mode 3: Mode3 enables you to retrieve CMDTCs related to emission gas cleaning system. IDS does not support this mode individually. When you conduct a selftest on IDS and if CMDTCs exist, CMDTCs, including CMDTCs that are not related to emission gas cleaning system, will be automatically retrieved using the alternative mode (that allows to retrieve CMDTCs) for Mode3.
5. Mode 4: Mode4 enables you to delete or reset the failure information related to emission gas cleaning system, such as CMDTC, pending code, freeze frame data, and result of system monitoring. IDS does not support this mode individually but you can conduct the same operation by using the delete button on the selftest.
6. Mode 5: Mode5 enables you to retrieve the results of Oxygen Sensor Monitoring Test. This mode is not supported in both vehicle and IDS since the Oxygen Sensor can be monitored with Mode 6.
7. Mode 6: Mode6 enables you to retrieve threshold values that are stored in the PCM and the monitoring test results of each monitoring system after the drive mode tests conducted on each system.
8. Mode 7: Mode7 is to retrieve pending codes. IDS does not support this mode individually since IDS sends commands to retrieve pending codes automatically.
9. Mode 8: Mode8 is able to force to close the valve (located at the open hole of the canister) that disconnects the air within the fuel gas system and the atmosphere. Only on US models, mode8 has been supported.
10. Mode 9: Mode 9 is to retrieve information, such as VIN information, Calibration ID number, CVN (Calibration Verification Number, and other information. You can use this mode confirm VIN and Calibration ID number before and after reprogramming. Refer to the right screen. Explanations are shown below.

65
VIN: DY5R100007 Vehicle identification number
CAL: ZY18EC000ZYVN0A1
Red portions of the number represent the first four digits of the part number and its suffix. In the case above, “ZY18” is the first four digits of the part number and “C” is the suffix. You can confirm the first 4 digit of PCM part# on Log Viewer, too. Once you finish the session and make IDS to identify the vehicle again. Then go to Log Viewer. Refer to the “Module number”.
It will display “Module Part number: ZY18-C”.
CVN: B552F899
CVN stands for Calibration Verification Number. It is called checksum as well. This number is a characteristic value for Calibration. You may not identify Calibration by CVN at this moment.

66
06 - 04 Power Balance Test
Outline This function enables to monitor fluctuations of crankshaft speed of each cylinder. A live display screen
displays the fluctuation as a chart and helps to determine which cylinder is generating more/less power.
* To conduct Power Balance Test, the vehicle must be identified correctly. During vehicle identification, information, such as number of cylinders, firing order, PCM, etc. will be collected from the vehicle. These pieces of information are necessary to conduct Power Balance Test and obtain accurate results.
Basic Operation 1. Select “toolbox” tab , “Powertrain”, “Power
Balance Test”, and click .
2. Make sure the vehicle conditions meet the conditions listed on IDS screen. Start the
engine and click as the screen instructs.
* If the vehicle condition did not meet or the DLC is not properly connected, a screen on the right appears. Follow the on-screen instruction and retry.
3. The IDS goes into Test Mode and live display screen appears.
A green transverse line indicates the average crancshaft speed. Crancshaft speed fluctuations for each cylinder are plotted as a blue line. Difference in values between cylinders indicates difference in crankshaft speed between cylinders.
It is natural to have some fluctuations for any vehicles. Having some fluctuations does not necessarily means the vehicle has problems. Every engine has its own fluctuation pattern depending on harmonic vibrations that originated from its bore to stroke ratio, number of cylinders, and camshaft characteristics. However engines with the same type/size have similar fluctuation patterns. If you learn the patterns, you are able to diagnose engine failures, with this diagnostic tool, more effectively.

67
Engine failures are indicated as the “deep valley”, (big drop) as shown on the right. You are able to identify the cylinder that has a failure. The failure may be caused by:
Damaged or faulty spark plugs Damaged or faulty high-tension cords Clogged fuel injectors Worned-out or cracked piston rings Worned-out pistons A damaged cylinder head gasket Worned-out or cracked valves Damaged cylinder walls
You may find the same abnormal fluctuations on a pair of cylinders on vehicles equipped with a Multi-Tower Coil Packs. This is because failure to this type of coil results in mis-firing two cylinders.
Capturing Function You may record data by clicking “capture
event” icon on the live display screen. Clicking the icon stores 15 seconds of data (starting from 10 seconds before clicking and 5 seconds after clicking). Click “playback display” sub tab to replay the recording.
Every time you click the “capture event” icon
, captured event numbers and a progress status will appear on status bar at the bottom. When recording is complete, the status bar turns back to normal.
* If “capture event” icon is clicked soon after a recording is made, first part of the second recording may be same to last part of the first recording. This is because recording of a data starts 10 seconds before clicking the “capture event” icon.
Playback Display
Captured data may be replayed by clicking “Playback Display” sub-icon .
If there are two or more captured data, select a recording using “Next/previous recordings” icons ( / ) on the right. Please refer to the
status bar at the bottm to confirm which recording is currently on the screen.
The files are numbered in order. Search the files by clicking the “Arrow Icons” located on the right of the screen to select the file you desire to load.
To scroll the recorded values by step, click “Scroll” icons ( / )at the bottom of the screen. To automatically scroll a recording, click “Auto Scroll” icons ( / ).
Click “clear” icon to make gray tracking line disappear.

68
Saving Captured Data You may save captured data in a session file. If the session is set to “hold” and saved, the session
mey be reopnened and the recordings may be replayed later. The held and saved session can also be transferred via e-mails.
1. Click “select system options” icon in playback display. Select “Save recording group” and
click .
2. On a keypad window, enter a file name within 5 characters
and click .
* The kaypad window accepts direct typing using the hardware kayboard on your laptop PC.
* Key arrangements for the software kayboard can be changed to the alphabetical order by clicking “Keyboard Setting”
button next the space key. By clicking the button again, the software keyboard becomes to the default arrangements.
* If you entered an existing file name, you will be asked to change
the name. Click and enter different name.
3. If necessary, enter file description within 55 characters. The information entered here may be used to identify multiple files in future. The window accepts more than 55 characters but, unfortunately, “Load saved recordings” window only shows the first 55 characters in the file.
4. Click and “Select recordings to save” window appears. Numbers listed indicate captured event numbers. Click to highlight all the recordings that you need to save. And then click . If you selected “Exit” option in the live display, the datalogger will be closed and IDS returns to the vehicle specification screen. If you selected “Save recording group” in playback display, the pop-up window will be closed and returns to the playback display.
* If you exit Power Balance Test without saving recorded data, “Enter Filename” window appears. If you need to save the recordings, follow above procedures to save them as a file.
Loading Captured Data You may load and playback previously saved capture data by following below steps.
1. Select “playback display” sub tab and click
“load saved recordings” icon .
2. On “Select recording group to load” window, select a file to load in “Recordings Group” and
click . To determine a file to load, refer to saved date/time information in “Recording” and the description entered in “Description”. Please note that only one file can be selected in this option.
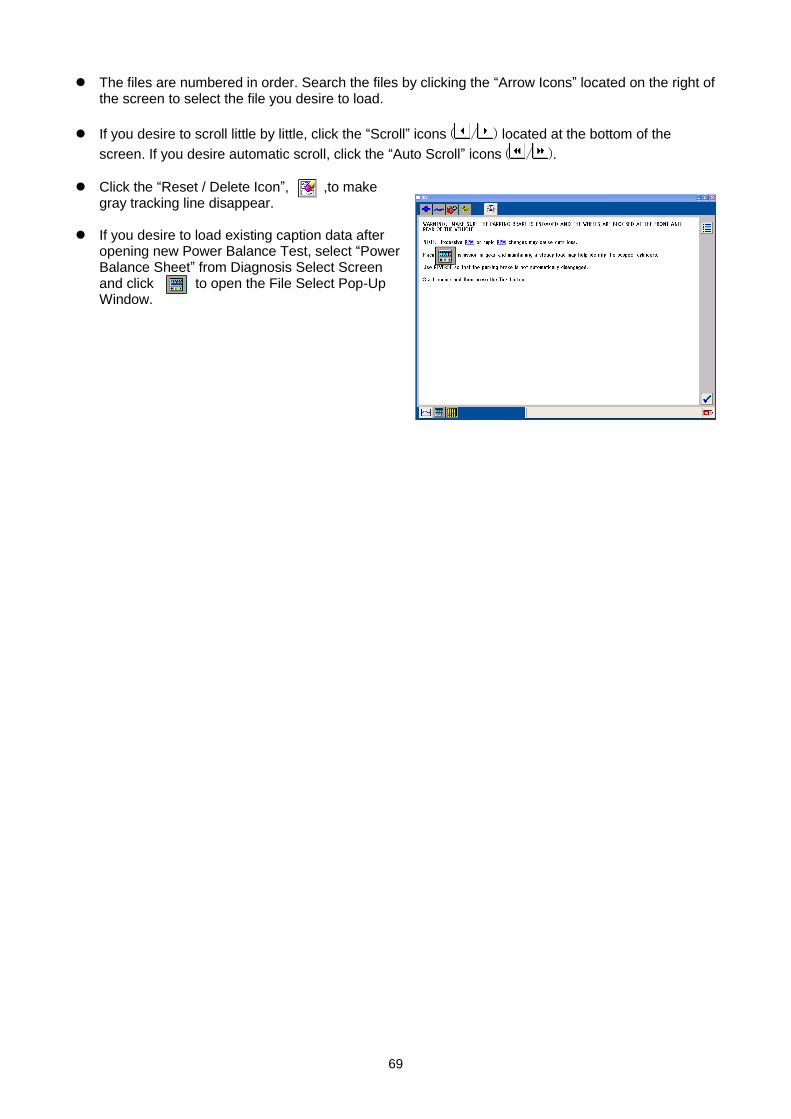
69
The files are numbered in order. Search the files by clicking the “Arrow Icons” located on the right of the screen to select the file you desire to load.
If you desire to scroll little by little, click the “Scroll” icons ( / ) located at the bottom of the
screen. If you desire automatic scroll, click the “Auto Scroll” icons ( / ).
Click the “Reset / Delete Icon”, ,to make gray tracking line disappear.
If you desire to load existing caption data after
opening new Power Balance Test, select “Power Balance Sheet” from Diagnosis Select Screen and click to open the File Select Pop-Up Window.

70
06 - 05 Relative Compression Test
Outline Relative Compression Test is conducted to compare compression pressures of each cylinder relatively by detecting changes of crankshaft speed within the compression strokes. * To conduct Relative Compression Test, the vehicle must be identified correctly. (Refer to Vehicle Identification.) During vehicle identification, information, such as number of cylinders, firing order, PCM, etc. will be collected from the vehicle. These pieces of information are necessary to conduct Power Balance Test and obtain accurate results.
Basic Operation 1. Click the “Toolbox Icon”, , on the upper left
of the screen to show “Diagnosis Function Select Screen”. Select “Powertrain” and “Relative Compression” and click .
2. Connecting Instruction Screen appears. Make sure the vehicle is in the right condition, connect the Data Link Cable, start the engine and click .
When you are asked to keep the throttle fully open during Relative Compression Test, make sure press the throttle pedal all the way in order to prevent the engine from starting during cranking. Fuel injection will stop by doing so. (Dechoke control)
3. When you are instructed to crank the engine on the screen, crank the engine for ten seconds by looking at the countdown clock.
* If the engine is ignited during cranking, conduct the test again to avoid inaccurate measurement that may be caused by ignition.
4. After ten seconds, IDS compares compression pressures for each cylinder relatively.

71
5. To conduct the test again, click the “Retest
Icon” . To end the test, click the Menu Icon. And select “Exit”.
A test result for a six-cylinder engine is shown on the right as an example. The #4 cylinder has much less compression pressure. The #4 cylinder looks like it has 15 % less compression pressure comparing average of other three cylinders but it does not mean actual compression pressure for the #4 cylinder may not be 25 % less than other cylinder. Relative Compression Test merely compares compression pressures of each cylinder relatively and only provides you summary results. If possible failures are detected, you need a commercially available compression gauge to measure the pressures more accurately.
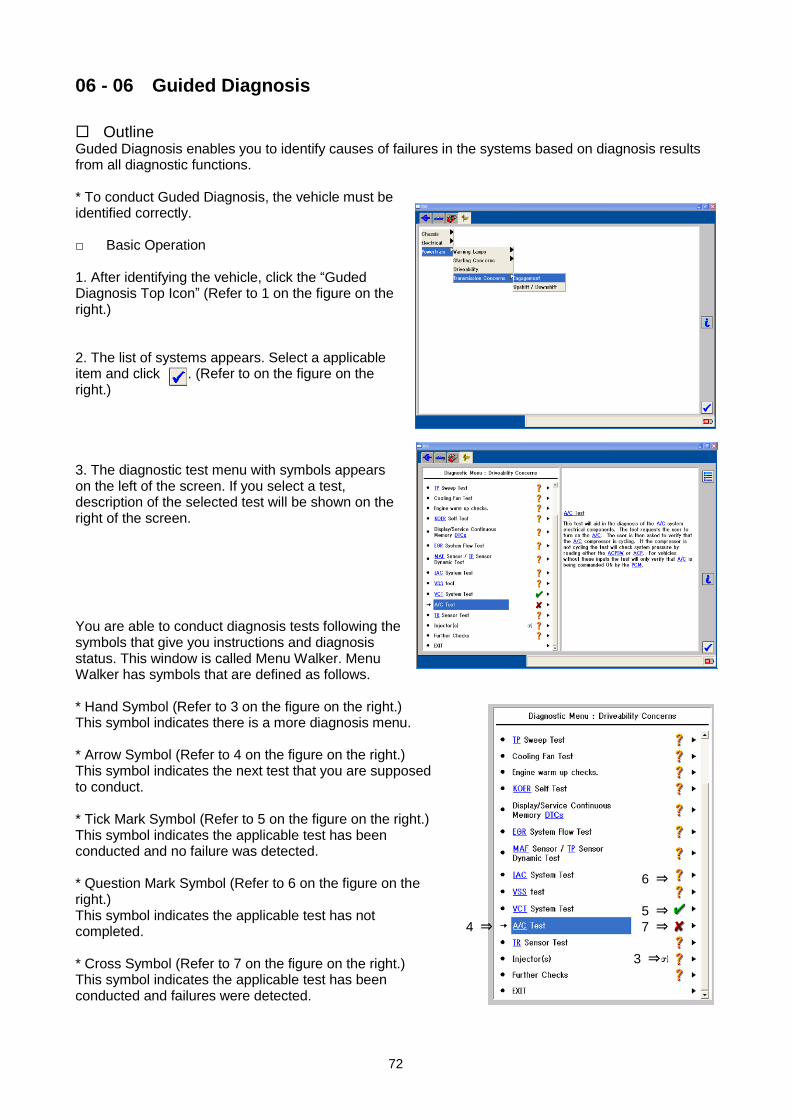
72
06 - 06 Guided Diagnosis
Outline Guded Diagnosis enables you to identify causes of failures in the systems based on diagnosis results from all diagnostic functions. * To conduct Guded Diagnosis, the vehicle must be identified correctly. □ Basic Operation 1. After identifying the vehicle, click the “Guded Diagnosis Top Icon” (Refer to 1 on the figure on the right.) 2. The list of systems appears. Select a applicable item and click . (Refer to on the figure on the right.) 3. The diagnostic test menu with symbols appears on the left of the screen. If you select a test, description of the selected test will be shown on the right of the screen.
You are able to conduct diagnosis tests following the symbols that give you instructions and diagnosis status. This window is called Menu Walker. Menu Walker has symbols that are defined as follows. * Hand Symbol (Refer to 3 on the figure on the right.) This symbol indicates there is a more diagnosis menu. * Arrow Symbol (Refer to 4 on the figure on the right.) This symbol indicates the next test that you are supposed to conduct. * Tick Mark Symbol (Refer to 5 on the figure on the right.) This symbol indicates the applicable test has been conducted and no failure was detected. * Question Mark Symbol (Refer to 6 on the figure on the right.) This symbol indicates the applicable test has not completed. * Cross Symbol (Refer to 7 on the figure on the right.) This symbol indicates the applicable test has been conducted and failures were detected.
3 ⇒
4 ⇒
5 ⇒
6 ⇒
7 ⇒

73
Menu Walker Menu Walker provides an arrow symbols next to the test that you are supposed to conduct next. It
also gives you guidance on the test menu. Other necessary tests will be highlighted too. You may ignore Menu Walker’s instruction and conduct whatever tests you choose. If you select
different test from what Menu Walker suggests, the test you chose will be highlighted. The arrow symbol remains where it is to indicate Menu Walker’s suggestion.
Menu Walker suggests the test that needs to be conducted next according to following priority. A test that would detect failure most A test that does not require part removal A test that does not require engine started A test that does not require engine wormed up If a test is conducted and finds no failure, the next test that Menu Walker suggests will be highlighted. On the other hand, if a test is conducted and finds failures, further detailed test will be suggested. * If failures are detected and they are repaired, Menu Walker indicates to conduct the same test for confirmation.
Function Test Function Test Menu is shown at the initial
diagnosis menu. Here you are able to test vehicle sub-systems, modules and components. (KOEO, KOEO Self Test, MAF Sensor Test, etc.)
You do not need to remove connectors,
components or modules in order to conduct Function Tests since Function Tests is conducted automatically. IDS is able to control particular devices and components automatically. (e.g. Change idling speed) However you may be asked to operate some controller or switch depending on tests.
If a Function Test result is negative, the screen returns to the Diagnosis Menu. This means IDS is
ready to conduct another test. If A Function Test detects failures, a Pinpoint Menu will be on in order to conduct additional tests.
Pinpoint Menu On the Pinpoint Menu following items are shown in order to identify the cause of the failures.
Hint and advice: Here you are able to gain
information on the following test. Data Link Monitor (DLM): This function is similar
to Datalogger. You may monitor systems and components without removing them. This is effective for intermissive failure detection.

74
Data Link Monitor (DLM)
DLM is similar to Datalogger. Primary difference is that data-monitoring item (signal) that is needed for failure diagnosis is pre-selected. You may monitor all necessary signals from components and sub-systems.
If you select DLM on the Pinpoint Menu, an additional explanation will be indicated on the information screen.
Basically you do not need any settings for the DLM screen. Screen settings and capture function operation are same as Datalogger.
Repair completion confirmation If you repair the failures that the Pinpoint Menu
instructs after detecting the failures in the Function Test, select “EXIT” on the Pinpoint Menu. Menu Walker will instruct you to conduct another Function Test to confirm that the failures are properly repaired.
If failures are detected in the Self Test first and
the failures instructed on Menu Walker are repaired, conduct another Self Test to confirm that the failures are properly repaired.
Exiting Guded Diagnosis
To exit from Guded Diagnosis, select “EXIT” on the Diagnosis Menu.
Before exiting, make sure you erase all the
failure codes that stored in the applicable modules during Self Test. (05-02-04) If failures are repaired, its failure codes become invalid. Failure codes may be stored during some tests. They also become invalid. Make sure erase all of them.

75
06 - 07 Network Test
Network test can be used for checking if
modules are connected to CAN BUS correctly or not and this test also shows communication related DTC codes (U****) if modules store them.
Actual operation is that the IDS send signals to all modules through CAN BUS line and try to communicate with each module. For example, if TCM connector is disconnected from the CAN BUS, TCM cannot respond to the IDS. The IDS judges TCM cannot respond so that the IDS shows “Fail” for TCM on its screen. And other modules, which are connected to CAN BUS, also cannot receive signals from TCM (because TCM signals are not on CAN BUS) so that some other modules may store its DTC like U0101 (Lost Communication with TCM) and BUS off DTCs like U0073, U1900 or U2516, too.
Advise: You should confirm vehicle specifications when the IDS shows “Fail” as optional equipped modules, because sometimes optional modules may not be installed in the vehicle being tested. Network test is useful when you suspect there is a problem on CAN BUS line. You can narrow down failures by confirming the results of the network test. You can use the network test even though IDS cannot identify a vehicle automatically if you need to make IDS using manual entry.

76
06 - 08 Burglar Service Functions / Burglar Alarm System Operational Record
At the vehicle which has been fitted with burglar alarm ( contains accessory ), you can use this function. But, at some destination / part, you can't use this function. Burglar service functions retrieve / delete information which is recorded in a BCM (RBCM
[1])
as triggers when alarm sounded. BCM (RBCM
[1]) sends warning request signal and records following informations when received
signal from door latch switch, hood latch switch and the other. - Time
[1]
- Burglar alarm condition - Trigger [1] CX-5 and later vehicles
(Before CX-5) You can always confirm recordes from Toolbox – Body – Burglar Service Functions (VSM Service Functions) – Read FFD.
(CX-5 and later vehicles) You can always confirm recordes from Toolbox – Operational Record – Burglar Alarm System – Read operational record.

77
Advice: When alarm sounds without any abnormal conditions, please check the part which is marked as a trigger.

78
06 - 09 Meter Warning System Operational Record
Meter Warning System Operational Recordes retrieve information which is recorded in a HEC (IC)
when warning lamp went on / flashed. HEC (IC) puts on / flashes warning lamp or indicator lamps and recordes following informations when received request signal from ECU or switch.
[1]
- Time - Kind of warning lamp or indicator lamp
[2]
- Battery voltage
[1] HEC (IC) records these informations when the odometer is over 30km and engine is running over 10 seconds. And, If you connect the M-MDS to vehichle, HEC (IC) prohibit records. In this case, HEC (IC) will resume record after IG-Off.
[2] HEC (IC) does not record about some warning lamp and indicator lamp. We plan to insert object warning lamp and indicator lamp of record in workshop manuals.
You can always confirm records from Toolbox – Operational Record – Meter Warning System – Read operational record.

79
06 - 10 Door Lock System Operational Record
Door Lock System Operational Records retrieve information which is recorded in a RBCM
as triggers when door locked / unlocked. RBCM sends request signal to door lock actuator and records following informations when received lock / unlock signal.
[1]
(We plan to insert the detail of these information in work shop manuals.) - Time - Lock trigger
[2]
- Unlock trigger [2]
- Output status of door lock actuator - Vehicle condition
[1] RBCM may record these informations before lock / unlock completely because door lock actuator take time to lock / unlock.
[2] If you lock / unlock with lock knob, “Lock trigger” and “Unlock trigger” shows “None”.
You can always confirm records from Toolbox – Operational Record – Door Lock System – Read operational record.

80
06 - 11 TPMS Operational Record
TPMS Operational Records retrieve information which is recorded in a DSC CM when TPMS set
switch was pushed or TPMS warning light went on.
1. DSC CM initializes learning value and records following informations when TPMS set switch was pushed. - Time (M-MDS shows elapsed days)
[1]
- Value of odometer
2. DSC CM sends warning request signal and records following informations when DSC CM detects deflation of tire pressure. - Time (M-MDS shows elapsed days)
[1]
- Value of odometer - Vehicle velocity - Maximum vehicle velocity (Maximum vehicle velocity from deflation detection system warning to reset)
[1] The M-MDS will show “65535 days”, if DSC CM has not record these information. It is not failure.
You can always confirm records from Toolbox – Operational Record – TPMS – Read operational record.

81
07 Module Programming
Outline At module programming you are able to conduct followings. - Programmable Module Installation: You are able to transfer the setting data from the old module to
new module when you replace modules. - Module Programming: You are able to update the module with the latest calibrations. - Programmable Parameters: You are able to modify the module settings according to customers’
requests or model spec changes. (e.g. Auto Light Illumination Level Setting, Customized Function Setting Procedure of Advanced Keyless, changing Tire Size, etc.)
* To conduct Module Programming, the vehicle must be identified correctly. (Refer to Vehicle
Identification.) Information collected during vehicle identification is essential for you to provide service using IDS. IDS reads out setting data from all the modules automatically during vehicle identification and these data are stored in IDS.
Basic Operation
1. Click the “Toolbox tab” on the upper left of the screen to show Diagnostic Function menus. Select “Module Programming” and click .
2. Select an operation that you desire to conduct to show modules and systems available based on vehicle data stored in IDS. Select a module or system and click .
3. Follow the instructions on the screen. Instructions may vary depending on functions.
4. To exit from Module Programming during a session, click the “Menu Icon” on the upper right of the screen to open a pop-up window. Select “Exit or Abort” and click .

82
Update Warning If you have not updated your IDS via the Internet for more than 9
days, you may see “The module configuration and programming database may be out of date” (as shown on the right) when you select Module Programming. This warning appears automatically to encourage you to conduct module programming with the latest diagnostic software.
To proceed: (a) Make sure your PC is hooked to the Internet and click . (b) IDS will search latest update available. If it is available, the
warning window (as shown on the right) will appear. Click to proceed.
You can proceed the module programming work without
updating at this time, but Mazda recommends that you abort the work and update your IDS first for Fix it Right First Time.
Note: If IDS does not connect to the Internet, you will encounter the warning window (as shown on the right) after the step (a) above. Connect IDS to the Internet and click .
If you have not updated your IDS via the Internet for more than 31 days, you will see the warning window (as shown on the right) when you select Module Programming.
In this case you will not be able to perform any module programming work until your IDS is updated to the latest level via the Internet.

83
07 - 01 Configuration (Programmable Module Installation)
You need to configure modules that need to be configured at the time of replacement. If you do not configure applicable modules, those modules do not function properly.
* Refer to your workshop manuals for modules that need to be configured.
1. Select “Programmable Module Installation” from Module Programming Menu to show modules on the vehicle that have setting data necessary to be transferred from the old module to new one. Select a applicable module and click .
* Modules shown on the menu may be different
from actual modules on the vehicle depending on settings, such as option settings and specification settings. In such a case, refer to your workshop manuals for actual modules that need to be configured.
2. Instructions, such as “Set ignition switch to ON”, “Set ignition switch to OFF” or “Install a new module in vehicle”, will be shown on the screen continuously.
* Make sure you follow all the instructions correctly. Do not remove modules or do not turn the ignition key on / off unless IDS instructs you to do so. If you conduct some operations that IDS dose not instruct, modules may be programmed improperly or modules may be damaged in the worst case.
If IDS is not able to communicate with the modules due to problems with the old module, problems of the harness on the vehicle or any other problems, As-Built Data will be required. Execute (a) and (b) described on the next page. * On modules that need to be configured, configuration data are written according to vehicle
specifications at the time of factory shipment. These data are stored semi-permanently in Mazda database together with vehicle identification numbers. These data are called “As-Built Data”. If IDS is not able to communicate with the modules due to problems with the old module, problems of the

84
harness on the vehicle or any other problems and if the old is lost or disposed, you need to enter these As-Built Data.
* On the As-Built Data sheet, all the As-Built Data for modules that need to be configured are listed.
(a) Obtain As-Built Data sheet from appropriate website. You will be asked to enter the VIN (vehicle identification number).
(b) Enter applicable data out of the As-Built Data
sheet on IDS screen.
3. After all the procedures, a screen of “Configuration Complete” appears. Return to Module Programming Menu to complete configuration.
FYI PCM: PCM1 through PCM9 ABS: 28-01 RCM (SAS Unit): 58-01 through 58-10 Left HID: 71-01 through 71-07 Right HID: 72-01 through 72-07 IC (Combination Meter): 720-01-01
SAMPLE - As-Built Data Sheet

85
07 - 02 Module Reprogramming
You do not need to remove modules to reprogram them since reprogramming is executed via communication network. Do not execute Module Reprogramming without our Service Information.
1. Select “Module Reprogramming” on the Module Programming Menu to show all the reprogrammable modules. Select a module and click .
2. Follow instructions on the screen. If the module has the latest calibration, a message telling this appears on the screen. In this case, you do not need to proceed further. If there is a new calibaration for the module, a message asking if you want to reprogram the module appears. Select “Yes” to reprogram. If you select “No”, reprogramming will not be performed. * You may see the screen at the right when you
conduct reprogramming after updating IDS with DIF and calibration files. This happens because necessary calibration files are not loaded in the laptop PC. Connect the laptop PC to the internet and click to load necessary Calibration files via the Internet.

86
□ If you have latest VCM DVD *If a message saying “The Diagnostic Tester Needs Update” during reprogramming procedures even though a message saying “A later calibration is available.” is shown, Calibration files may not be loaded at the time of VCM software installation. In this case, load Calibration files on Dash Panel by inserting the VCM DVD on DVD-ROM drive. You may see a screen shown at the right during Reprogramming. This screen merely showing the service technical information number issued for North American and its preferential information and has nothing to do with reprogramming that you are conducting. Select service technical information number to refer to its preferential information, if necessary, or simply click to ignore. You may see a screen asking if a PATS (Immobilizer) is equipped on the vehicle during reprogramming. Select whichever applies. On Mazdas, Reprogramming will be executed correctly even though you make wrong selection. After reprogramming, follow instruction on the screen. Service code deletion process will start.

87
07 - 03 Programmable Parameters
You are able to modify the module settings (parameters), such as Auto Light Illumination Level Setting, Customized Function Setting Procedure, Module Reset, etc. on certain modules without replacing them.
1. Select “Programable Parameters” from Module Programming Menu to show programmable systems. Select a system and click .
2. Select an item to show a list of states. Select a state and click .
* The current setting status will be shown with asterisks (*) with some exceptions. Scroll the screen to view all the settings.
3. Follow the instructions on the screen. At the end of the settings, “Complete” will be indicated.
Return to the Module Programming Menu to complete settings.

88
07 - 04 PATS (Immobilizer) / Advanced Keyless Functions
* To conduct the operations described in this chapter, the vehicle must be identified correctly. Function availabilities may vary depending on models. (Refer to Vehicle Identification.) * To use PATS and Advanced Keyless functions, you need to achieve security first. * To achieve security on Mazda2, Mazda3, Mazda6, RX-8 and other models (Coded Access), enter four digit Incode (combination of numbers and alphabets), which you are able to obtain through your distributor, on items, such as the Outcode, Vehicle Identification Number, PCM Part Number, Serial Number and Error Control. To achieve security on Tribute (Timed Access), just wait for ten minutes.
* IDS automatically identifies a security achievement method. Follow the instructions. * You do not need IDS to conduct immobilizer system reprogram procedure on MPV (LW) etc. Refer to the workshop manual.
1. Select “Body” > “Security” > “PATS Functions”
and click .
2. Follow the instructions on the screen to achieve security.
3. When conducting Coded Access, the Outcode, Vehicle Identification Number, PCM Part Number, Serial Number and Error Control will be indicated on the screen. On the other hand, when conducting Timed Access, just wait ten minutes to achieve security as IDS instruct.

89
4. After achieving security, follow instructions. 5. To exit PATS / Advanced Keyless Functions, select “Exit (From This Menu)” on the menu.
* After erasing and programming key or cardkey data, make sure you confirm that the engine will start with all the keys or cardkeys respectively. To confirm that the engine start-up on vehicles equipped with PATS (Immobilizer) and Advanced Keyless system with an key (immobilizer key), make sure all the cardkeys are outside of the vehicle before starting the engine.
Program Additional Cardkey You are able to register a unregistered cardkey(s) without erasing existing cardkey data registered on the module.
* The existing cardkeys can be used as usual. * You are able to register one cardkey and up to six cardkeys.
1. Get a unregistered cardkey(s). 2. Select “Program Additional card key” from the Advanced Keyless Function Menu and click . 3. Follow the instruction.
Card Key Code Erase You are able to erase all the existing cardkeys and re-register them.
* The engine can be started only with the newly re-registered cardkeys. * You need to prepare the all cardkeys that customer requirs to re-register before conducting this procedure. * It is possible to conduct this procedure if there is at least one cardkey.
1. Select “Card Key Code Erase” from the Advanced Keyless Function Menu and click . 2. Follow the instruction. After erasing the data, Cardkey Registration Screen appears. Register
cardkeys as instructed, if necessary.
Steering Lock Unit Programming You are able to register the cardkey data in the steering lock unit, which is part of Advanced Keyless System.
* To conduct this operation, you need registered cardkey(s). 1. Get at least one registered cardkey. 2. Select “Steering Lock Unit Programming” from the Advanced Keyless Function Menu and
click . 3. Follow the instruction.

90
Program Additional Ignition Key (Immobilizer key) You are able to register additional unregistered key(s) without erasing existing keys registered on the module.
* The existing keys can be used as usual. 1. Get a unregistered key(s). 2. Select “Program additional ignition key” from the PATS Function Menu and click . 3. Follow the instruction.
Ignition Key Code Erase (Immobilizer key) You are able to erase all existing keys and re-register them.
* You need at least two keys to conduct this operation. Make sure you have more than one key before you start this operation.
* The engine can be started only with the newly re-registered keys.
1. Get at least two unregistered key(s) and/or registered key(s). 2. Select “Ignition Key Code Erase” from the PATS Function Menu and click . 3. Follow the instruction. After erasing the data, Key Registration Screen appears. Register at least
two keys as instructed. (The engine would not start unless at least two keys are registered.)
Parameter Reset You are able to set necessary information that needed to make PATS operate accurately on replaced PATS-related modules.
* You may be asked to prepare more than one registered or unregistered key depending on replaced PATS-related modules. Refer to your workshop manual.
1. Get (a) at least two registered or unregistered keys, if needed. 2. Select “Parameter Reset” from the PATS Function Menu and click . 3. Follow the instruction.
Customer Spare Key Programming Enable You are able to enable customers to register spare keys using registered keys without using IDS.
1. Select “Customer Spare Key Programming Enable” from the PATS Function Menu and click . 2. Follow the instruction.
Customer Spare Key Programming Disable You are able to disable customers to register spare keys using registered keys without using IDS.
1. Select “Customer Spare Key Programming Disable” from the PATS Function Menu and click . 2. Follow the instruction.