Embed Size (px)
Citation preview
MaxACD Release 71
All-in-One Deployment Guide for Enterprise Environments
April 24 2019
MaxACD 71 Deployment Guide 42419 Page 2 of 61
NOTICE While every effort has been made to ensure accuracy Altigen Communications Inc will not be liable for technical or editorial errors or omissions contained within the documentation The information contained in this documentation is subject to change without notice
This documentation may be used only in accordance with the terms of the Altigen Communications Inc License Agreement
Altigen Communications Inc 679 River Oaks Parkway San Jose CA 95134 Telephone 888-Altigen (258-4436) | Fax 408-597-9020 E-mail infoaltigencom Web site wwwaltigencom All product and company names herein may be trademarks of their registered owners Copyright copy Altigen Communications Inc 2019 All rights reserved
MaxACD 71 Deployment Guide 1-16-2019 Page 3 of 61
Contents
Introduction 5
Important Hardware Considerations 5
Components of MaxACD 71 5
Component Requirements 5
Client Requirements 6
Cumulative Updates 9
MaxServer Licenses 9
System Architecture 10
MaxACD Installation 10
Step 1 Plan and Prepare 10
Step 2 Create a Trusted Application Pool on the Microsoft Unified Communication Server 13
Step 3 Make the System an Application Server 14
Step 4 Install MaxACD 20
Step 5 Log into the Service Hub and MaxAdmin 24
Step 6 Register the System Key and Load the License File 26
Step 7 Configure Exchange UM for Workgroup Voicemail 28
Step 8 Configure the System 28
Step 9 Configure the MaxACD External Logger Service 29
Step 10 Turn off SIP Refer 33
Enable Windows Authentication for External Logger 33
Federated Deployments 35
dbConnect Service Configuration Deployment Steps 35
Additional Configuration Steps for Federated Users 36
MaxACD Redundancy Installation 36
Redundancy Architecture 37
Switchover Considerations 38
Deploy a Redundant System 38
Configure the Database for Redundancy 42
Change IP Addresses to FQDNs 50
Microsoft UC Paired Pools Deployment 51
Overview of MaxACD Paired Pools Deployment 51
Configuration Procedures 51
How to Fail Over to the Backup Server 53
MaxACD 71 Deployment Guide 42419 Page 4 of 61
Deploying a Stand-alone Web Portal 55
Exchange UM Integration Utility 55
SQL Authentication of External Logger Service 56
Operational Notes 59
Uninstalling MaxACD 60
Altigen Technical Support 60
MaxACD 71 Deployment Guide 1-16-2019 Page 5 of 61
Introduction This guide details the hardware and software requirements and basic configuration steps that are necessary to connect Altigen MaxACD to a Microsoftreg Lynctrade or a Skype for Business Server
If you are upgrading from an earlier version of MaxACD follow the steps in the MaxACD 71 Upgrade Guide instead of the procedures in this guide
This guide does not cover the process of configuring the Web IM Chat feature refer to the MaxACD 71 Web IM Deployment Guide for those instructions
Important Hardware Considerations
Before you deploy MaxACD 71 or migrate from an earlier release make sure that your Skype for Business servers
(including the front-end servers mediation servers and SQL servers) all meet the requirements as published by
Microsoft Most critical are the CPU SSD and memory requirements
For those organizations who may be upgrading from MaxACD Release 658 be aware that Release 658 uses
media resources directly from the HMCP engine that is built in MaxACD MaxACD 71 however utilizes voice media
and conference resources on the Skype front-end and back-end servers In other words MaxACD 71 may have
performance issues if your Skype4Busness Serversrsquo hardware does not meet Microsoftrsquos requirements even though
MaxACD Release 658 performed fine on the same hardware
For more information you can search for ldquoLync 2013 hardware requirementrdquo or ldquoSkype for business hardware
requirementrdquo on the web The following articles may also help clarify Microsoft requirements
httpstechnetmicrosoftcomen-uslibrarygg398835(v=ocs15)aspx
httpstechnetmicrosoftcomen-uslibrarydn951388aspx
Components of MaxACD 71 In this version of MaxACD all of the components are installed on a single machine
bull MaxACD AS ndash The MaxACD Application server which provides IVR and ACD feature services
bull MaxACD Proxy ndash A UCMA-based application service residing in a Trusted Application Pool MaxACD Proxy
provides SIP signaling and media codecs through UCMA The MaxACD Proxy handles calls using the UCMA
API and it interacts with MaxACD AS for Workgroup and IVR call processing
bull Service Hub ndash This component is new in Release 71 the Service Hub provides a single sign-on for customer
who have deployed MaxACD and various add-on applications
bull MaxAdmin ndash A web-based program MaxAdmin is used for feature provisioning and is used by IT administrators
and workgroup MaxGroup supervisors This application obtains company and Skype user information from
Active Directory (AD)
Make sure that your browser has JavaScript enabled so that you can see all of the information in the portal
including the license information
bull Service Hub DB ndash A configuration database hosted by a MS SQL Server or SQL Server Express MaxACD
Proxy MaxACD AS and MaxAdmin all read configuration settings from the Service Hub database
Component Requirements
Minimum requirements for the MaxACD server are as follows
bull Quad-core CPU
bull 4GB memory
MaxACD 71 Deployment Guide 42419 Page 6 of 61
bull 100GB available hard drive disk space
bull SSD or similar performance
The following tables list the requirements for the components of MaxACD 71
Component Requirements
MaxACD Server
bull Windows Server 2012 R2 with SP1 or later bull Net 46 bull IIS 85 bull Chrome Internet Explorer 11 or Edge bull A monitor with at least 1024 x 768 resolution
Service Hub
bull Windows Server 2012 R2 with SP1 or Windows Server 2016 bull Net 46 bull IIS 85
Service Hub Database Internal bull Microsoft SQL Express Server 2014 SP1
Service Hub Database External bull Microsoft SQL Express Server 2014 SP1
MaxACD ProxyRedirector bull Windows Server 2012 R2 with SP1 bull Net 46 bull IIS 85
MaxAdmin
bull Windows Server 2012 R2 with SP1 or Windows Server 2016 bull Net 46 bull IIS 85 bull Internet Explorer 11 and Edge or Chrome
MaxACD CWS DB Internal bull Microsoft SQL Express 2014 SP1 (32-bit)
MaxACD CWS DB External bull Microsoft SQL Server 2014 SP1
External CDR Database bull Microsoft SQL Server 2014 SP1
Email Integration bull Microsoft Exchange Server 2013 2016 and Exchange Online
Microsoft LyncSkype for Business
bull Lync Server 2013 plus the latest CU that has been approved by Altigen
bull Skype for Business 2015 plus the latest CU that has been approved by Altigen
Web Chat Server Note The Web Chat server is not supported on Windows 10
Client Requirements
The following table lists the requirements for the MaxACD client applications
Note For client systems that are not already running NET 46 you must install NET 46 before you
upgrade or install MaxAgent andor MaxSupervisor on those systems
MaxACD 71 Deployment Guide 1-16-2019 Page 7 of 61
Client Requirements
MaxAgent
Supported operating systems
bull Windows 81 (64-bit) bull Windows 10 bull NET Framework 46 bull Outlook 2010
Hardware minimum requirements bull 2GHz CPU bull 5GB available disk space bull 1GB RAM bull SVGA monitor 1024 x 768 with 256-color display bull Keyboard and mouse LyncSkype requirements bull Lync 2013 desktop client bull Skype for Business 20152016 desktop client
MaxSupervisor
Supported operating systems bull Windows 81 (64-bit) bull Windows 10 bull NET Framework 46
Hardware minimum requirements bull 2GHz CPU bull 5GB available disk space bull 1GB RAM bull SVGA monitor 1024 x 768 with 256-color display bull Keyboard and mouse LyncSkype requirements bull Lync 2013 desktop client bull Skype for Business 2015 desktop client
MaxInSight
Supported operating systems bull Windows 81 (64-bit) bull Windows 10
Minimum hardware requirements bull 1GHz CPU bull 5GB disk space bull 1GB RAM bull SVGA monitor 1024 x 768 with 256-color display or better bull Keyboard and mouse
MaxACD 71 Deployment Guide 42419 Page 8 of 61
Client Requirements
VR Manager
A VR Manager license must be installed in MaxAdmin
Supported operating system for the VRM Server bull Windows Server 2012 R2 SP1 bull The installation program will automatically install JAVA JRE
180171 bull VRM Server should be installed on a standalone server not on
the MaxACD server
During a new installation of VRM SQL Express 2014 will
automatically be installed
Minimum hardware requirements for the VRM Server bull 2GHz Quad-core CPU bull For installation 10GB disk space (more space is required for
storing voice files) bull 3GB RAM
Supported operating systems for the VRM Client bull Windows 81 64-bit or Windows 10 bull Net 45
Minimum hardware requirements for the VRM Client bull Intel 2GHz Pentium 4 or equivalent bull 40GB available disk space and 2GB RAM
Advanced Call Router
(must be installed on the same machine as MaxACD Admin)
Supported operating system bull Windows Server 2012 R2 SP1
Minimum hardware requirements bull Intel 2GHz Pentium 4 or equivalent bull 40GB available disk space bull 2GB RAM
MaxReports
Supported operating systems bull Windows Server 2012 R2 with SP1 bull JAVA JRE 180171 bull Tomcat 85 will be automatically installed bull Database with ODBCJDBC Driver SQL Server
Minimum hardware requirements bull 2GHz CPU bull 60GB available disk space bull 3GB RAM
Client system requirements bull Chrome or Internet Explorer 11 or Edge
AltiSDK
Supported operating systems bull Windows Server 2012 R2 with SP1 bull Windows 81 64-bit bull Windows 10
AltiControl Supported operating systems bull Windows 81 64-bit bull Windows 10
MaxACD 71 Deployment Guide 1-16-2019 Page 9 of 61
Cumulative Updates MaxACD is a component of Microsoft UCMA server roles for Skype for Business Server
Important It is important that you check with Altigen before applying a Cumulative Update to make sure that
the CU is supported by Altigen Contact your Altigen representative for a list of approved CU
updates
MaxServer Licenses The following table lists the licenses available for new MaxServer customers
Licenses for MaxACD
MaxServer Base Server License (9Unn0)
This base license enables basic functions for MaxServer
This license does not include MaxGroup or ACD functionality therefore customers must also order one of the following licenses
bull MaxGroups Feature License
bull MaxACD Feature License
MaxGroup Feature License (6MG00) This license enables MaxGroups and AAIVR features the MaxServer Base Server License is required
MaxGroups Seat License (RYnn0)
MaxACD Feature License (6CC00) This license enables workgroup chat and AAIVR features the MaxServer Base Server License is required
Advanced Call Router License (6CR01)
MaxAgent Seat Combo License (9Knn0) This license supports both voice and chat media This license requires a MaxACD Feature License
MaxSupervisor License (RBnn0) This license requires a MaxACD Feature License
Workgroup Recording License (R9nn0) This license requires a MaxACD Feature License
Redundancy License (6RD00) This license requires a MaxACD Feature License
VR Manager (6VM02) This license requires a MaxACD Feature License
Salesforce Integration Seat License (RNnn0) This license requires a MaxACD Feature License
Client SDK Seat License (ACD-CLTSDK)
MaxACD 71 Deployment Guide 42419 Page 10 of 61
System Architecture The following figure illustrates the typical configuration for MaxACD 71 in an Enterprise (on-premise) deployment
The Application server can reside in a different location as long as it is in the same Windows Domain A VPN is
required
MaxACD Installation Follow these instructions to install MaxACD 71
Note To deploy a redundant system review the section MaxACD Redundancy Installation on page 35
Step 1 Plan and Prepare
First plan your MaxACD deployment and make sure that the server has all of the required components
Plan your Deployment
Before you begin carefully plan the following four elements
A A Fully Qualified Domain Name (FQDN) for the Trusted Application Pool for each MaxACD server
This FQDN should not be the same as the MaxCS serverrsquos FQDN even if it points to the same IP
address
Note that in large call center environments (larger than 300 concurrent agents) you may need multiple
MaxACD servers In this case you will need a separate (unique) Trusted Application Pool for each
MaxACD server
B A Lync Trusted Application ID that will be assigned to each MaxACD server
MaxACD 71 Deployment Guide 1-16-2019 Page 11 of 61
Create a unique Application ID for each MaxACD server These are names that you come up with
yourself Each name should be a descriptive name that will be used by Skype for Business to create an
URN (Uniform Resource Name) The URN is used to authenticate the MaxACD server role You will use
these names in Step 2 as Your_ApplicationID
C A Trusted Application Endpoint Prefix for each MaxACD Server
You will need these names during the installation of MaxACD on page 23 In that example we use Corp as the Application Endpoint Prefix These names must be unique for each MaxACD server installed against the same Microsoft Unified Communications (MSUC) instance
D A MaxACD System ID for each MaxACD Server
Each MaxACD server needs a unique MaxACD System ID number for the MaxACD installation (The
reason for the unique MaxACD System ID is that if two or more systems share the same CDR or VR
Manager database then having the same System ID may cause conflicts)
Redundant pairs must have the same ID
This is not the same as the Microsoft Unified Communications Trusted Application ID We
mention this System ID here for planning purposes you will enter this ID in the MaxACD installation
procedures later in this guide
For convenience you can use the space below to note the Application Pool FQDN Application ID and Endpoint
Prefix for each MaxACD server planned for your environment
Server Redundant YN
A FQDN for Trusted Application Pool
B Lync Trusted Application ID
C Trusted Application Endpoint Prefix
D MaxACD System ID
Prepare the MaxACD Server
The next step is to prepare the server for installation It is important that all of the services and components are
installed before you begin your Skype for Business configuration
1 Collect the following
bull MaxACD 71 installation media The CD (or other media) that contains the MaxACD 71 installation
program
bull Software license key A 20-digit key located on the front of the End User License Agreement
2 When you install the Skype for Business Front-end Pool make sure that you install the monitoring feature
If you did not install this tool open Topology Builder right-click on the Front-end Pool choose Edit
Properties gt General and check the option Monitoring (CDR and QoE metrics)
MaxACD 71 Deployment Guide 42419 Page 12 of 61
3 On the server where you will install MaxACD 71 install Windows Server 2012 R2 or Windows Server 2016
4 Join the system to the same domain as your Skype for Business server
5 Perform the following steps (Windows will prompt you if any reboots are required)
a) In Windows 2012 R2 search for ldquoServer Managerrdquo and open it
b) In Server Manager click Add Roles and Features
c) In the Features section check NET Framework 35 Features
Windows will prompt you to add other related features accept all of the related features
d) In NET Framework 45 Features check ASPNET 45 In WCF Services check TCP Port Sharing
e) Make sure that Windows PowerShell is selected
f) In User Interfaces and Infrastructure make sure that Desktop Experience is checked (this applies only
for Windows Server 2012 R2)
g) In Message Queuing make sure that Message Queuing Server is checked
h) Check Windows Identity Foundation 35
6 Click Next and then click Install to install the features you selected Do not close the Add Roles and Features wizard until the installation progress bar shows 100
7 Reboot Windows to finish all pending tasks related to the installation
8 Install Unified Communications Managed API Runtime (UCMARuntimeSetupexe) You can download this
from the Microsoft web site
bull Install version UCMA 40 for Lync 2013 version 5083080
httpswwwmicrosoftcomen-usdownloaddetailsaspxid=34992
bull Install version UCMA 50 for Skype for Business 2015 version 6093190
httpswwwmicrosoftcomen-usdownloaddetailsaspxid=47344
MaxACD 71 Deployment Guide 1-16-2019 Page 13 of 61
Step 2 Create a Trusted Application Pool on the Microsoft Unified
Communication Server
Next you will create a Trusted Application Pool on the front-end server
bull If the Microsoft Unified Communications Server role on the front-end server is Lync 2013 create a 2013
Trusted Application Pool
bull If the role on the front-end server is Skype create a Skype for Business Trusted Application Pool
bull If there are multiple Server roles on the front-end server you must add the Trusted Application Pool to the
Skype server role
The examples in this section use the following placeholder names
bull Lyncdomaincom is used as your LyncSkype domain
bull MaxAcdPoollyncdomaincom is used as the name for the Trusted Application Pool
bull Pool01lyncdomaincom is used as your front-end pool
bull MaxACDAlyncdomaincom is used as a stand-alone or first redundant MaxACD serverrsquos FQDN (fully
qualified domain name)
1 Log into the Skype Front-end server as a Domain user with Administrative privileges
(If this is a redundant system and you are installing the second system the trusted application pool and ID
should have already been created you can skip this step and go to step 3 If this is a stand-alone or the first
redundant system continue with step 2
2 Open the Skype for Business Server Management shell
You will enter four commands in Skype for Business Server Management Shell on the front-end server The
commands in red are single-line commands When you enter them do not separate them into multiple lines
Confirm the Microsoft UC-dependent attributes such as Site ID with your MSUC system administrator
As mentioned on page 10 you should create a unique name for the Application ID This name will be used by Skype for Business to create a Uniform Resource Name
New-CsTrustedApplicationPool -Identity MaxAcdPoollyncdomaincom -Registrar pool01lyncdomaincom -Site ltSite IDgt -ComputerFqdn MaxACDAlyncdomaincom
Enable-CsTopology
New-CsTrustedApplication -ApplicationId Your_ApplicationID -TrustedApplicationPoolFqdn MaxAcdPoollyncdomaincom -Port 7000
Enable-CsTopology
Note YOU MUST USE PORT 7000 for each MaxACD instance Do not use a different port or the
deployment may fail
MaxACD 71 Deployment Guide 42419 Page 14 of 61
3 This step is required if you are adding a second server to configure redundancy If you are not configuring
redundancy skip this step and proceed to Step 3 Make the System an Application Server beginning on
page 14
To add the second server
a) In the front-end server open the Topology Builder and download the current topology
b) Go to the trusted application pool and add the redundant server to the trusted application pool
In this example maxacdalyncdomaincom is the first MaxACD server and maxacdblyncdomaincom is
the second MaxACD server
4 Publish the topology Proceed to the next section
Step 3 Make the System an Application Server
Next you will deploy Skype core components on the system where you will be installing MaxACD 71
3A Install Local Configuration Store
The processes for installing Lync 2013 and Skype for Business are very similar
1 Log in as a user in RTC Universal Server Admins AD group Use your Lync Server or Skype Installation media
and run the Lync Server Deployment Wizard
MaxACD 71 Deployment Guide 1-16-2019 Page 15 of 61
2 On the main page of the wizard choose Install or Update Lync Server System
3 For Step 1 Install Local Configuration Store click Run
MaxACD 71 Deployment Guide 42419 Page 16 of 61
4 In the next panel choose Retrieve directly from the Central Management Store and then click Next When
processing has completed click Finish You return to the main page of the Deployment wizard
3B Set Up Lync Server Components
1 For Step 2 Setup or Remove Lync Server Components click Run and then click Next
2 When processing has completed click Finish You return to the main page of the Deployment wizard
Note In Lync Server 2013 you may not see the green checkmark when Step 2 is complete
MaxACD 71 Deployment Guide 1-16-2019 Page 17 of 61
3C Install and Assign Certificate
Next you will install and assign a certificate
1 For ldquoStep 3 Request Install or Assign Certificatesrdquo click Run
2 Select the default certificate click Request and then click Next
3 In the Certificate Request panel the Lync steps are slightly different from the Skype for Business steps
For Lync 2013 select Send the request immediately to an online certification authority and click Next
Then choose the Certificate Authority (CA) from the list and click Next Continue through the wizard providing
the information requested for the next few panels
MaxACD 71 Deployment Guide 42419 Page 18 of 61
For Skype for Business select the certificate from the list and provide the information as appropriate Click Next
4 When you reach the Certificate Request Summary panel verify that the information on the page is correct If it is
incorrect click Back to correct the details Otherwise click Next
5 When the process has finished click Next
MaxACD 71 Deployment Guide 1-16-2019 Page 19 of 61
6 Check the box Assign this certificate to Lync ServerSkype for Business certificate usages and click
Finish
7 Click Next to assign this certificate
8 In the Summary review the assignment details If there are no changes click Next
MaxACD 71 Deployment Guide 42419 Page 20 of 61
9 When the certificate assignment has finished click Finish Click Close to return to the main page of the
Deployment wizard
Step 4 Install MaxACD
Next you will install MaxACD 71
Environment Checklist
Check the following conditions before you begin
bull Make sure that your current login Windows user account either has Domain Admin privileges or has all of
the following privileges
o RTC Universal Server Admins membership
o Domain Users membership
o Is an Administrator on the local system
bull Confirm that the system has already been joined to the domain where your Skype Server is installed
bull If you are upgrading or re-installing MaxACD 70 make sure that you perform the installation under the same Windows user account as during the initial installation If you do not install under the same user account SQL may fail to install due to insufficient SQL account rights
Note If you are deploying an all-in-one configuration then a SQL 2014 Express server will be automatically
installed to the same MaxACD system If you are deploying a redundant configuration then you must install
the SQL 2014 Express Server or another version of SQL server in a stand-alone machine This SQL system
cannot be on the same server as the two MaxACD systems That system cannot be on the same server as
the two MaxACD systems or else it will defeat the purpose of having a redundant configuration After the
SQL server has been set up make sure that you have the database instance name SQL SA account and
password because they will be used during procedures in this guide
Installation Procedures
1 Check with your Altigen representative to determine which CU (cumulative updates) and other updates may
need to be applied to the Skype Server on the system where you are installing MaxACD Make all required
updates before you proceed
MaxACD 71 Deployment Guide 1-16-2019 Page 21 of 61
2 Close any open Windows applications Log onto the system as a Domain user with Administrative privileges
From your installation media run the setup file in the MaxACD folder
3 On the introductory screen click Next
4 Enter a System ID number This ID number will be used to identify this server and distinguish it from any other
servers in your MaxACD deployment This ID was mentioned earlier in Plan your Deployment on page 10
Observe the following guidelines
bull You cannot change the System ID number later The only way to change a System ID afterwards is
to uninstall MaxACD and then reinstall it
bull Each MaxACD system MUST have a unique ID number except two systems that are a pair in a
redundant configuration
bull If you are deploying a pair of servers in a redundant configuration those two systems must have the
same System ID
5 Choose either Single Server or Redundancy Click Next (Note You can convert a single server system to a redundant system later Refer to the instructions in the separate document MaxACD Conversion to a Redundant System
6 If you chose Single Server skip ahead to step 7
If you chose Redundancy indicate whether you have already deployed the database
a If you chose No enter the database login credentials For a default installation leave the SQL Instance field
blank
bull SQL Server Address ndash The IP Address of your SQL server (use the AlwaysOn Availability Grouprsquos
listener IP address or hostname that resolves to that address)
bull SQL Instance ndash SQL Instance name (leave this field blank for a default installation)
bull SQL Sysadmin Account ndash SQL Login account name this is required for creating the database and
table for MaxACD Admin
bull SQL Sysadmin Password ndash The password for the SQL account
bull Service Hub DB Name ndash Enter a name for the Service Hub
bull Service Hub DB Account ndash The user name for MaxACD modules to access the Service Hub database
MaxACD 71 Deployment Guide 42419 Page 22 of 61
bull Service Hub DB Password ndash When the database is created this password is created for
CWSDBServerUser1 If you donrsquot change the password a hardcoded default password will be used
You can create your own password by changing this password If you do so you must remember this
password for future installations
b If you chose Yes (for a redundant system) enter the details for your SQL server installation
bull SQL Server Address ndash The IP Address of your SQL server
bull SQL Instance ndash SQL Instance name
bull Service Hub DB Name ndash The name for the Service Hub
bull Service HUB DB Password ndash The password for the Service Hub DB account If the password is
incorrect or if the database is not running then the installation process will not continue
7 Choose either Lync 2013 or Skype for Business
You must choose the LyncSkype version that matches the version of the application pool where your MaxACD
server resides If you choose a version that does not match the installation wizard will proceed however the
MaxACD system will not work
8 Accept the license agreement Click Next
9 Enter your name and the name of your company Click Next
10 Accept the random password that was generated for you recording it for future use Click Next
11 Enter a MaxACD system name Click Next
MaxACD 71 Deployment Guide 1-16-2019 Page 23 of 61
12 Specify a drive and folder destination for MaxACD Click Next
13 Choose whether to provide the license file now or register later we recommend that you do this step later Click
Next (If you choose to provide the file now enter the path to that file)
14 Enter the FQDN (Fully Qualified Domain Name) of the Trusted Application Pool that you created in Step 2
Create a Trusted Application Pool on the Microsoft Unified Communication Server Click Next The program will
take a moment to validate that the pool name you entered is valid
15 Enter the MaxACD Trusted Application ID that you created in Step 2 Create a Trusted Application Pool on the
Microsoft Unified Communication Server on page 13 Click Next (For redundancy deployment enter the same
ACD Trusted Application ID for the primary server and the secondary server)
The program again validates that the ID you enter is valid
16 Specify an Application End Point (AEP) prefix (which will be used to precede a portal name viewer name and
dialer name) and enter your SIP domain (SIP domain is the domain where your MaxACD server resides for on-
premise deployments) You planned this prefix back in the section Plan your Deployment on page 10 (For
redundancy deployment enter a different MaxACD Application End Point Prefix name for the primary server and
the secondary server) Click Next
MaxACD 71 Deployment Guide 42419 Page 24 of 61
17 To begin the installation process click Install During installation a window provides the default password
18 Once the installation process has finished select Yes I want to restart my computer now and then click
Finish Your system will restart
Note MaxACD Administrator is installed with HTTP as the default connection You may want to configure IIS to
support an HTTPS connection for this web-based application
19 After your system reboots open the Windows Services page
A new service account was created for MaxACD services
In following example SYMPHONYAlti_COBALT200103 is created as the service account Make sure the account has domain administrator rights so that Exchange can be synchronized If you donrsquot want to assign domain admin rights to that service account then you can change the ldquoAltigen VM Exchange Integration Servicerdquo login account to an account with domain administrator right
In following example AltiServAdminAltigencom has domain administrator rights If this is a redundant system make sure to apply this setting on both the primary and secondary MaxACD servers
20 After you assign those rights start the Altigen VM Exchange Integration Service Wait two minutes and then refresh the Windows Services page confirm that the Altigen VM Exchange Integration Service is running
21 Add the FQDN for the Trusted Application Pool and the FQDN for the Trusted Application Server to the domain
DNS server Confirm that you can ping both of them within the same domain
Step 5 Log into the Service Hub and MaxAdmin
The Service Hub is your starting point you log into the Service Hub and the open your applications and services from
there
To log into the Service Hub
1 In your browser using either the IP address or the FQDN navigate to the directory where the Service Hub is
installed
http[localhost]ServiceHub
For example http1020340ServiceHub
2 The first time you log in use the default user name ldquoadminrdquo and the default password which is 22222 For
security purposes change the password as soon as possible You can do this by clicking your profile button
in the top right toolbar
If the login attempt fails you will need to enter the domain and user ID in the User Name field
MaxACD 71 Deployment Guide 1-16-2019 Page 25 of 61
The Service Hub has a list in the left panel This is a list of your MaxServers in alphabetical order The example in the next figure shows an environment with two MaxServers
In the main panel you see several icons
bull One icon is ldquoService Hub Configurationrdquo You click this to configure options for the Service Hub itself
bull One icon will be for the server that is selected in the left panel When you click a MaxServer icon MaxAdmin opens allowing you to make configuration changes to that server
bull Other icons in that panel represent other services that you have purchased You click one of those icons to configure that service
3 Log into the administrator portal (MaxAdmin) for your portal by clicking its icon in the right panel It will look
something like this with the serverrsquos name
MaxAdmin should open at this point (For future reference to return to the Service Hub configuration panel
click the Applications icon in the top left corner and choosing Settings)
Continue with the next step you will return to MaxAdmin later
MaxACD 71 Deployment Guide 42419 Page 26 of 61
Step 6 Register the System Key and Load the License File
Next download and register the license files
1 Log into your partner account in the Altigen Partner portal (httpsmspartneraltigencom)
If you do not have login permissions on this site please contact your VAR or your Altigen representative to
obtain a license file then skip ahead to step 7 on page 27
2 On the Support menu click MaxACD
3 You can click List View to view any existing MaxACD systems in your account
4 Click Add New System Enter all of the details of this new system and click Submit
5 Click Activate License Enter the appropriate quantities to activate and then click Generate License File
6 After the license file has been generated click Download License File Choose whether to email the
EXCTLDAT file or save it You will need this file in the next step
MaxACD 71 Deployment Guide 1-16-2019 Page 27 of 61
7 On the MaxACD server open the AltiServexe folder and run the executable RegLicenseexe
8 Check the box Use Soft System Key
9 Click Enter the System Key
10 Type the system key into the System Key field
11 Click Load navigate to the EXCTLDAT file you downloaded from the Altigen Partner portal and then click
Open
12 The licenses should now appear in the window The licenses are now loaded You can see these licenses
in MaxAdmin on the License tab
Note If you accidentally load a license file with insufficient licenses for those already assigned to users you will
need to restart the MaxACD services to recover the license assignments
8
9
10
MaxACD 71 Deployment Guide 42419 Page 28 of 61
Step 7 Configure Exchange UM for Workgroup Voicemail
MaxACD uses Exchange Server for voicemail message storage You will add a user account for each workgroup
voicemail
1 Within MaxAdmin configure the client access server address and the Exchange UM subscriber access by
selecting System on the Sidebar then selecting the Server tab
2 Complete the fields and click Update For more about the Exchange UM subscriber refer to page 55
3 If you plan to configure workgroup voicemail add a user account in Skype for Business Server and in the
Exchange server for each workgroup voicemail This can be configured in MaxAdmin by selecting
Workgroup gt General In the next example tso-maxacdaltigencom is the email SIP URI that you
created for the workgroup
Note Use a unique email address for each workgroup Do not use the same email address as another workgroup
on a different MaxACD server The Skype account requires a Skype for Business Enterprise voice feature
license
Step 8 Configure the System
At this point we suggest that you configure system settings and routing rules and then set up users and workgroups
For instructions refer to the MaxACD 71 Administration Manual
Make sure that your browser has JavaScript enabled so that you can see all of the information in the portal If
JavaScript is not enabled you may not be able to view license information
MaxACD 71 Deployment Guide 1-16-2019 Page 29 of 61
See the chapter Getting Started in the MaxACD Administration Manual for an overview of the MaxAdmin Portal
interface and descriptions of the types of configuration you can perform on each tab
Step 9 Configure the MaxACD External Logger Service
Follow these steps to set up the external logger service create an external CDR database and configure
MaxReports
Notes
bull We recommend that you configure these steps on a system other than the MaxACD 71 server
bull If you have already created a new database you can skip the first two steps
These instructions assume that you have a working knowledge of SQL Server Management Studio
1 Create a new DB SQL 2014 on the SQL server to host the external CDR database To do this
a Open SQL Server Management Studio
b Create a new database you will need to provide the name of this database later in step 3
c Create a new SQL login user you will need to provide the name of this database later in step 3
2 Create a new ODBC entry To do this
a Run odbcexe (The default location for this executable file should be in
systemdriveWindowsSysWOW64 ndash the exact location was provided when you installed the
External Logger Service) This must be the 32-bit version the 64-bit version is not supported
b Switch to the System DSN tab and add a new ODBC Data Source
MaxACD 71 Deployment Guide 42419 Page 30 of 61
c Choose either the SQL Server Native Client 100 or 110 driver
d Give the new Data Source a name and choose the instance (the one you created during step 2)
e Set up log in with SQL Server authentication you created at step 1c
f Change the default database to the one you created at step 1b
3 Insert the MaxACD 71 media and run Setupexe in the External Logger Service folder Complete the
installation process
4 After you finish installing External Logger you must run the ELS Configuration tool from the folder where you installed it in the preceding step By default this is Program Files (x86)AltiGenExternal Logger
Service The program is ELSCfgexe
MaxACD 71 Deployment Guide 1-16-2019 Page 31 of 61
a Create a password for the External Logger service
b For Source Name choose the ODBC Data Source you created in step 3 from the dropdown list
c Enter its Login ID and password
d Click Test Click Create Tables in the pop-up window
e Click OK to return to the previous window
f Enter the Skype for Business CDR Database information
bull If you are deploying a Federated system check the option Remote and complete the fields
(the password to the Skype database and the open port that MaxACD listens on) Then after
you have completed the initial deployment follow the steps in the section Federated
Deployments to configure the dbConnect Service
Note If you want to enable Windows authentication follow the steps in the section Enable Windows
Authentication starting on page 33 after you complete the steps in this section
5 Add external logger in MaxACD Administrator To do this
a Log into MaxAdmin (if you did not remain logged in earlier)
b Select System gt Reports
MaxACD 71 Deployment Guide 42419 Page 32 of 61
c Click Add Log Service
d Give the new entry a name and set the Server field to the IP Address of the external logger service
e Set the port to 10027 and enter the password that you created for the External Logger service in
step 4a on page 31
6 To configure SQL Server follow these steps
a Open Microsoft SQL Server 2014 Choose Configuration Tools gt SQL Server Configuration
Manager
b Expand SQL Server Network Configuration (32-bit)
c Click Protocols for SQLCWSDB1 (This is for the CWS database instance name it should not be
the same name as the external logger database If you use the default instance the instance
name should be ldquoMSSQLSERVER)
d Double click TCPIP
e On the Protocol tab make sure that Enabled is set to Yes
f On the IP Addresses tab expand IP All and enter 1433 for TCP Port
g Click Apply and close SQL Server Configuration Manager
7 Restart the SQL Server service
8 Install MaxReports
a From the MaxACD 71 installation media run the Setupexe program in the MaxReports folder and
install the application
b Go to the MaxReports web site (http[machinename]8080MaxReports)
c Log in as the admin (default password is lsquo22222rsquo)
MaxACD 71 Deployment Guide 1-16-2019 Page 33 of 61
d Click CDR Database Registration and then click Register New CDR Database
e Enter a database description
f Choose Microsoft SQL Server as the Database Server Type
g Enter the IP address of SQL server
h Set the Port to 1433
i Enter the user name and password that you created in step 1c
j Enter the database name that you created in step 1b (the default name will be EXTERNAL_CDR)
9 Restart the External logger service
Step 10 Turn off SIP Refer
In order to avoid various call forward or transfer issues Altigen recommends that you set the Skype for Business
Refer Support option (Voice Routing gt Trunk Configuration) to None
Important If you are running both MaxACD 658 and MaxACD 71 in your environment while you upgrade be
careful with the Skype SIP Refer Support option Release 658 trunk configuration needs SIP
Refer Support to be enabled However Release 71 needs SIP Refer Support to be disabled If you
disable the SIP Refer Support option for Release 658 then that service may stop working
Enable Windows Authentication for External Logger Follow these steps to enable Windows authentication for External Logger
1 Run the External Logger Configuration tool (ELSCfgexe) from the folder where you installed it (by default
this is stored in Program Files (x86)AltiGenExternal Logger Service)
2 Near the bottom of the dialog box check the Windows authentication option Click OK
MaxACD 71 Deployment Guide 42419 Page 34 of 61
You will see a message stating that a Windows login account must be assigned to the Lync CDR database
and to the Altigen Direct Call CDR Service You will configure these next Click OK
3 Create a Windows login account that will be used specifically for Windows authentication This account
does not need to be an administrator account but the account must have permission to run services
4 Open the Windows Services panel Right-click the Altigen Direct Call CDR Service and choose
Properties
5 On the General tab set Startup Type to Manual
6 Switch to the Log On tab Select This account and enter the username and password for the Windows login
account that you created in step 3 Click OK
MaxACD 71 Deployment Guide 1-16-2019 Page 35 of 61
7 Open SQL Management Studio for Lync SQL database Add this Windows user account to the Lync SQL
Server Security gt Logins
8 Select the LcsCDR database Add this Windows user account to Security gt Users
Federated Deployments For Federated deployments where MaxACD is stored in the Cloud but Skype for Business is deployed on your local
servers Altigen is providing a new component
This component dbConnect Service runs on your local server Its sole function is to accept SQL commands from the
MaxACD systemrsquos direct call service and return queried data This allows the service to synchronize CDR data in
your Skype for Business system with the MaxACD system
dbConnect Service Configuration Deployment Steps
In order to configure the dbConnect service during your initial deployment you must have chosen Remote in the
procedure in the section Step 9 Configure the MaxACD External Logger Service Otherwise this configuration will
not properly connect your Skype for Business data with MaxACD systems data
To configure this service so that CDR records are accurate
1 On your local Windows server navigate to the Altigen folder dbConnect This folder was stored there during your initial deployment
2 In that folder run the executable file RemoteDatabaseAgentConfiguratorexe
MaxACD 71 Deployment Guide 42419 Page 36 of 61
3 In the configuration tool you can create connections to multiple servers (or multiple databases) as needed Complete the following information for each connection
bull Server ndash Enter the URL and port for the MaxACD Server
bull Password ndash Enter a two-way authentication password
bull SQL Server ndash Enter the IP address for the SQL server
bull Authentication ndash Choose an authentication method (SQL Server or Windows) Windows authentication will use the service account for the dbConnect service
bull Database ndash Enter the database instance
bull SQL User ndash Enter the user account This does not have to be the sa account it must have SQL read-only privileges
bull SQL Password ndash Enter the password for the SQL User account
4 Click the Test buttons to verify the connection If each test completes successfully your configuration is
complete If a test does not pass check the IP Addresses in the External Logger configuration and the fields
that you completed in the dbConnect configuration tool and try again
Additional Configuration Steps for Federated Users
Perform the following one-time steps to prevent Federated users from getting popups when they are in a call or
conference
1 On the MaxACD server open the LyncProxyMaintxt file that is stored under CAcdRootAcdProxylog
2 Search for Viewer in that file You should find a SIP URI xxxViewerxxx
3 Copy that SIP URI
4 For each Federated user add that SIP URI as a contact to the users Skype for Business client Right click that contact and select Change Privacy Relationship Change it to Workgroup
MaxACD Redundancy Installation MaxACD supports system redundancy (a Redundancy license is required)
Two Softswitch servers must be configured When the active server goes down the standby server takes control The
change is transparent to direct connected calls
After you configure redundancy the second server will get the license information from the first server
MaxACD 71 Deployment Guide 1-16-2019 Page 37 of 61
If you did not choose Redundancy during your initial deployment run the MaxACD installation program on the system
again and choose Redundancy instead of Single Server
After deployment within MaxACD Administrator you must enable redundancy You do this on the Redundancy tab of
the System menu
Redundancy Architecture
For a redundant system two MaxACD servers must be installed Each server will have its own Proxy
The two servers connect to a single CWS DB If one server is down an administrator can use the other server to
make any configuration changes
The external SQL Server hosts a single CWS DB to store phrases and configuration settings which allows
concurrent access by both active and standby MaxACD servers
Here is an overview of the automatic switchover process
The ldquoactiverdquo server is the server that is currently in control of operations The active server sends a ldquoheartbeatrdquo to the
CWS DB every few seconds
The standby servers Skype proxy AEP is registered as the will not take call state in the trusted application pool so
that Skype will not route calls to it The standby server keeps a connection with the CWS DB and checks for the
active servers heartbeat
If the standby server does not detect the active serverrsquos heartbeat for 10 seconds the standby server promotes itself
registers Proxy to the ACD Trusted Application Pool and routes AEPs to its own Proxy It will take over control within
approximately 10 seconds When switchover occurs the standby servers Skype proxy becomes the active server
and it will register as the take call state After that all calls can be routed to it
New calls are routed to the newly promoted MaxACD server Active calls which were connected to the failing server
are dropped
The MaxACD client applications use FQDN to get the Application serverrsquos IP address list then try to connect to an
application server one by one Only the active server will accept the connection request Once the connection to the
active server is made the clients save this serverrsquos IP address The clients will try to connect to this server first the
next time they need to reconnect
Administrators can manually switch from the active server to the standby server by clicking the Manual Switchover
button within MaxACD Admin
MaxACD 71 Deployment Guide 42419 Page 38 of 61
Note If the SQL server goes down MaxACD will continue to function normally receiving inbound calls and
sending outbound calls However while the SQL server is unresponsive administrators cannot make
MaxACD configuration changes
Switchover Considerations
When system control switches from the active to the standby server it affects calls in the following ways
bull Current calls will be disconnected Within a few minutes new calls will go through
bull CDRs will be dropped for all calls including connected calls
bull Voicemail recording will stop
bull Daily RTM statistics will be reset
In addition after the service switches to the standby server users who are running client applications will need to log
in again
Note For a redundant system the time among the redundant MaxACD servers and the SQL server that hosts the
database must be synchronized If the time is off by as much as 10 seconds unwanted automatic
switchovers can occur
Deploy a Redundant System
For a redundant system there will be two MaxACD servers and one Service Hub database For example say that the
first serverrsquos computer FQDN is MaxACD1lyncdomaincom and the second one is MaxACD2lyncdomaincom In
DNS server add a new FQDN (for example MaxACDlyncdomaincom) that has the IP address for both MaxACD1
and MaxACD2
MaxACD 71 Deployment Guide 1-16-2019 Page 39 of 61
In DNS Manager of the domain create two entries for MaxACDlyncdomain
If access from the Internet is required work with your ISP to obtain and register both public IP address for
MaxACDlyncdomaincom Certain port-forwarding and network configurations are required to provide access from
the Internet
Later when you log into the MaxAdmin MaxAgent and MaxSupervisor use MaxACDlyncdomaincom instead
MaxACD 71 Deployment Guide 42419 Page 40 of 61
Next follow the procedures listed earlier in this guide for to install MaxACD on both servers During the steps in the
section MaxACD Installation beginning on page 10 choose the following options
1 Install MaxACD on the first server
a For step 5 on page 21 choose Redundancy
b For step 6 on page 21 choose No Then enter the details for your SQL server instance For a default
installation leave the SQL Instance field blank
Note The installation program may remember this password and populate it for you (from your entry on
page 21) If you forget this password you can log into MaxAdmin and retrieve it from the Settings
tab
MaxACD 71 Deployment Guide 1-16-2019 Page 41 of 61
c After you have installed MaxACD on the first system restart it
d Register the system key and load the license file perform the steps in the section Step 6 Register the
System Key and Load the License File starting on page 26
2 Install MaxACD on the second server
a For step 4 on page 21 you must enter the same System ID as you entered when you installed
MaxACD on the first system
b For step 5 on page 21 choose Redundancy
c For step 6 on page 21 choose Yes Then enter the same SQL instance details as you entered for the
first system
d Restart the system
e Register the system key on the second server by following the steps in Step 6 Register the System Key and Load the License File starting on page 26
This step is critical You MUST register the system key on the second server in order to enable redundancy
You should not need to load the license file it should automatically be applied
3 After you have set up both servers enable redundancy within MaxACD Admin To do this log into MaxAdmin and on the System menu switch to the Redundancy tab Select the option Enable
Redundancy
MaxACD 71 Deployment Guide 42419 Page 42 of 61
This tab shows the current state of both servers It also shows the date and time of the most recent switchover and the reason for that switchover For further details see the MaxACD 71 Administration Manual
Configure the Database for Redundancy
This section describes how to configure the database for redundancy
1 First change the database backup model from Simple to Full Databases cannot be added to the recovery
group when the recovery model is Simple which is how the MaxACD installation wizard creates it
A In Microsoft SQL Server Management Studio right click the database and select Properties
MaxACD 71 Deployment Guide 1-16-2019 Page 43 of 61
B Select the Options page and change the Recovery Model setting to Full Click OK
2 Back up the database The database must be backed up prior to adding to the availability group Perform a
full backup
A Right-click the database name on the left and select Tasks gt Backup
B Perform a full backup The location should be a network drive that all of the AlwaysOn Availability
Group replication servers can access
MaxACD 71 Deployment Guide 42419 Page 44 of 61
3 Once this is done add the server to the availability group
A Right-click the AlwaysOn Availability group and select Add Database
MaxACD 71 Deployment Guide 1-16-2019 Page 45 of 61
B On the Introduction page click Next
C Select the database to be added to the group If there are any unmet pre-requisites you must resolve
them before you proceed
MaxACD 71 Deployment Guide 42419 Page 46 of 61
D For the data synchronization options select Full and specify a network location
E You are logged into the primary server to do this configuration To allow the replication log into the
secondary servers as well Click Connecthellip then connect to the server (the account with sysadmin
privileges)
MaxACD 71 Deployment Guide 1-16-2019 Page 47 of 61
F Click Next once the connection is complete
G Let the validation checks run Click Next
H On the Summary page click Finish
I On the Results page all results should say Success
MaxACD 71 Deployment Guide 42419 Page 48 of 61
4 Identify the database owner (the account that MaxACD uses to connect to the database) To find this on the
Database Properties ldquoGeneralrdquo page look at the Owner field Make a note of this because you will need it in
step
5 Create a stored procedure for sp_help_revlogin based on this Microsoft article
httpssupportmicrosoftcomen-uskb918992
MaxACD 71 Deployment Guide 1-16-2019 Page 49 of 61
6 Run sp_help_revlogin on the PRIMARY replication server Use the database owner you identified in
step 4
7 Copy the command that is returned and run it on all secondary replication servers in the availability group
MaxACD 71 Deployment Guide 42419 Page 50 of 61
Change IP Addresses to FQDNs
Perform these additional steps for a redundant system
1 Log into the Service Hub On the MaxServers tab in the MaxServer Admin section check the entry for the Landing Page field If this entry is an IP address then you must change it to a Fully Qualified Domain Name (FQDN)
2 Log into MaxAdmin On the Settings tab in the Single Sign On section check the entry for the Service Hub URL field If this entry is an IP address then you must change it to an FQDN
MaxACD 71 Deployment Guide 1-16-2019 Page 51 of 61
Microsoft UC Paired Pools Deployment This section provides guidelines for setting up a disaster recovery environment for MaxACD Deploying paired pools
will help you to recover quickly in the event of a physical disaster at one location and to retain as much data as
possible
Microsoft recommends deploying pairs of Front End pools across two geographically distant sites Each site has a
Front-End pool Each Front-End pool is paired with a corresponding Front End pool at the other site Both sites are
active and the Backup Service keeps the pools synchronized
This guide assumes that you are have already configured Skype disaster recovery at your sites Configuration steps
for deploying Skype disaster recovery are beyond the scope of this guide refer to the detailed instructions in
httpstechnetmicrosoftcom for those guidelines You may find the following articles useful
bull Deploying paired Front-End pools for disaster recovery in Lync Server 2013rdquo -
httpstechnetmicrosoftcomen-uslibraryjj204773(v=ocs15)aspx
bull Front End pool disaster recovery in Skype for Business Server 2015rdquo - httpstechnetmicrosoftcomen-
uslibraryjj204697aspx
Following is a list of files you will be using to configure paired pools and set up the recovery process These files can
be found in the Altigen Partner Knowledgebase attached to this article
bull copyCWSbat ndash a batch file that copies the backup file to a shared remote folder
bull moveaepps1 ndash a PowerShell script that helps update the Application Endpoints for recovery
bull moveCWSDBsql ndash a SQL script that you can use to update the MaxACD FQDN and address in the DB to the backup ones
Overview of MaxACD Paired Pools Deployment
Altigen recommends that you configure two MaxACD servers at each site and one SQL server at each site
During configuration you will put in place various batch files tasks and processes With these items in place you
can quickly execute a failover if a disaster brings down a site
When disaster incapacitates one site during the recovery process the CWS (Administrator Portal) will be restored to
the most recent MaxACD system backup Assuming that daily backups are being made as recommended then you
will lose only those configuration changes that have been made since the most recent backup (which would be less
than one day
After data from the daily backup has been restored to the backup site the backup MaxACD server will continue
processing activities Agents who are using any client applications will need to use the backup server FQDN in order
to log back in
Configuration Procedures
These instructions refer to a main MaxACD deployment which is the active one and a backup site
1 Deploy the same structure of the main MaxACD system on the backup site server Use the same
configuration as the main MaxACD deployment but use the backup Trusted Application pool
MaxACD 71 Deployment Guide 42419 Page 52 of 61
2 On the main MaxACD server configure a recurring backup Altigen suggests that you schedule the backup
to occur once daily Please note the location of the backup directory ndash you will need that location in a later
step
3 On the main MaxACD server create a backup user in the domain (for example FailOverUser) This user
should be the member of the Domain Admins group
4 Set up a sharing folder on the backup CWS DB system (for example cbackupcws) Grant writemodify
privileges to the backup user that you created in the preceding step Note this sharing path it is needed in
the next step
5 Altigen has provided a template batch file for you to modify copyCWSbat which we have copied here for
your convenience
rem This script is used to copy the CWS DB backup file to a remote sharing folder
rem Please edit it before using
rem Replace the [Source] string in the script with source path Example Ccwsbackup
rem Replace the [Dest] string in the script with destination path Example
1921681231backupcws
MaxACD 71 Deployment Guide 1-16-2019 Page 53 of 61
rem Logs can be found at [Source]logtxt
date t gtgt [Source]logtxt 2gtamp1
time t gtgt [Source]logtxt 2gtamp1
xcopy [Source]cws [Dest] Y gtgt [Source]logtxt 2gtamp1
echo -------------------------------- gtgt [Source]logtxt 2gtamp1
exit
Edit this file as follows
bull Replace [Source] tag with the backup directory path in step 2
bull Replace the [Dest] tag with the network sharing path in step 4
Store this updated batch file on the main system
6 On the main MaxACD CWS DB server create a new task in the Task Scheduler to run the batch file
copyCWSbat
bull Set the Security options to use the backup user
bull Set the Trigger to Daily and set the start time to one hour later than the backup tool start time For
example if the backup file is schedule to run at 1201AM set this task to begin at 101 AM
Run the task and confirm that it works correctly Consult the logtxt file in the main MaxACD backup directory if
the batch file does not work properly
How to Fail Over to the Backup Server
When an emergency takes the main MaxACD server out of production follow these instructions on the backup
MaxACD server to get back on track quickly
Note that you should fail over (and back) Skype for Business before you fail over (and back) the MaxACD server
1 Stop all of the Altigen services on the backup MaxACD server
2 In the Skype for Business Server Management Shell delete the original AEP used by MaxACD Re-create it with the backup trusted application pool You can use the PowerShell script moveaepps1 for this Substitute the actual pool names for our placeholder variables
moveaepps1 ndashappname [trusted application name] ndashapppool [backup trusted application pool]
Each time you run moveaepps1 a csv file will be generated It contains all the AEPs in the trusted application If a problem occurred while moving AEPs you can restore the AEPs with the following command
restoreaepps1 ndashappname [trusted application name] ndashapppool [the pool you would like to
restore back to] -restoreFile [the csv file generated by running moveaepps1]
MaxACD 71 Deployment Guide 42419 Page 54 of 61
3 Run the MaxACD Backup and Restore utility Restore the latest backup file selecting the Restore to new
installation option
4 Open SQL Management Studio Log into the backup CWS DB Update the MaxACD FQDN and address in
the DB to the backup one
You can use the following SQL script with modified data moveCWSDBsql Modify the values in the script
before you run the script
- replace serverAddress with the Backup MaxACD IP Address
- replace ServerFQDN with the Backup MaxACD FQDN
- replace name with the Backup MaxACD machine name
- replace ACDTAPoolFQDN with the Backup Trusted Application pool FQDN
- replace LyncServerRegistrarFQDN with the Backup FE Registrar FQDN
- replace RedirectorTAPoolFQDN with the Backup Redirector Trusted Application pool FQDN
- replace CEMURL with the Backup Service Hub URL It should be
http[Backup MaxACD IP]Servicehub
Open a new query in SQL Management Studio
Replace the Backup MaxACD IP Address in the following script
SELECT TOP 1000 [Id]
[SecurityKey]
[Link]
FROM [SHDB1][dbo][Applications]
Where [Link] should be [Backup MaxACD IP]
Execute this script in the new query window
MaxACD 71 Deployment Guide 1-16-2019 Page 55 of 61
In moveCWSDBsql replace applicationId and applicationSecurity with the Id and SecurityKey just
queried
5 Reboot the MaxACD server It may take 10-15 minutes for the URI routing to take effect
The backup MaxACD server should now be online Your agents should now log into their client applications using the
backup MaxACD FQDN
To switch back to the main server once the site has recovered follow the same process
Deploying a Stand-alone Web Portal When you install MaxACD a default MaxAdmin portal is installed in the same machine
Altigen also provides a stand-alone installation package that you can use to install the MaxAdmin portal on a
separate Windows 2012 R2 or Windows 2016 system
To install a MaxAdmin Portal on a separate server
1 On the installation media open the CWS folder and run setupexe
2 For the System ID field enter 1 unless you have multiple MaxACD systems
3 Proceed through the wizard panels When you reach the panel that requests database information enter the
CWSDB details
bull SQL Server Address ndash The databasersquos SQL IP address
bull SQL Instance ndash The databasersquos SQL Instance name
bull Service Hub DB Account ndash This is an account user name (CWSDBServerUser1) that is used for
MaxACD components to access SQL CWSDB you cannot change this name
bull Service Hub DB Account Password ndash The password for the SQL CWSDB account user name The
installation program may remember this password and populate it for you If the password is incorrect
or if the SQL CWSDB is not running then the installation process will not continue If you forget this
password you can log into MaxAdmin and retrieve it from the Settings tab
4 Submit any additional information requested by the installation wizard After the installation process has
finished confirm that you can log onto MaxAdmin from this system
Exchange UM Integration Utility After successfully running the PowerShell Scripts ExchUCUtilps1 and Get-UCPoolps1 on your Exchange Server
you should be able to run ldquoOcsUmUtilexerdquo on your Skype for Business server The default location is CProgram
FilesCommon FilesSkype for Business Server 2015Support
MaxACD 71 Deployment Guide 42419 Page 56 of 61
SQL Authentication of External Logger Service On the SQL server side follow these steps
1 Select Server Properties gt Security Change the server authentication to SQL Server and Windows
Authentication mode
MaxACD 71 Deployment Guide 1-16-2019 Page 57 of 61
2 Create a new SQL user
3 For this new user assign a user name and a password Change the userrsquos default database to LcsCDR
MaxACD 71 Deployment Guide 42419 Page 58 of 61
4 Map LcsCDR to the new user
5 Grant Select permission of LcsCDR to this user
6 Try to connect to the database as the user that you just created Most SQL policies require users to change
the password after the first login
If the login attempt fails check the user and instance properties
MaxACD 71 Deployment Guide 1-16-2019 Page 59 of 61
7 Configure External Logger service with the new user credentials and test the connection
Operational Notes bull On some systems closing and reopening your Skype for Business client may temporarily disable the Hang Up
button It may also temporarily disable the Attended Transfer feature To resolve this issue exit MaxAgent and
restart it
bull When agents make an outbound workgroup call conference a new member or perform a consultative transfer
the target MUST be either a PSTN number or a Skype user Other types of targets such as a workgroup IVR
voicemail or AEP are not supported
bull Make sure that Skype users set the following option in their Skype client set Options gt Status to I want
everyone to be able to see my presencehellip Otherwise agents may not be able to log into their workgroups
This problem arises because the agentrsquos Skype Presence cannot be detected by MaxACD
bull When a user first opens MaxSupervisor it may take a minute to update an agentrsquos status to Busy when the
agent answers a call This only occurs when MaxSupervisor is opened subsequent agent calls update the
agentrsquos status within seconds
bull If you change to a new ODBC source you must delete and re-enter the log service You can do this in
MaxAdmin by selecting System gt Reports gt Log Service
bull For FTP Server for VR Manager make sure you unblock the firewall for the FTP Server
bull When the browser security is set to High you may have difficulty working with the following MaxAdmin pages
Workgroup User and License pages To avoid this issue enable JavaScript in your browser
bull If you are running MaxAdmin in Internet Explorer 10 add the MaxAdmin URL to the browserrsquos Compatibility View
list (In IE choose Tools gt Compatibility View Settings)
MaxACD 71 Deployment Guide 42419 Page 60 of 61
bull For a redundant system the time among the redundant MaxACD servers and the SQL server that hosts the
database must be synchronized
Uninstalling MaxACD To uninstall MaxACD 71 follow this process
bull Stop all MaxACD 71-related services To do this go to the MaxACD server open Windows and click Start gt
Programs gt All Programs gt MaxACD 71 gt Service Utility
This utility lets you stop the MaxACD system services including the MaxACD Administrator application itself
Use this utility instead of stopping the service through the Windows Services panel (see Warning below)
bull Once the services have all been stopped click Start gt Programs gt Control Panel gt Add Remove Programs
select MaxACD 71 and click Remove
Note The process of uninstalling MaxACD 71 does not remove the AEPs that were created when URI routing
rules were created This is by design
When performing an upgrade or when re-installing MaxACD 71 make sure you install under the same Windows
login account as during the initial installation If you do not install under the same account SQL may fail to install due
to insufficient SQL account rights
Altigen Technical Support Authorized Altigen Partners and distributors and Direct Customers on a Direct Support Plan may contact Altigen technical support by the following methods
bull You may request technical support on Altigenrsquos Partner web site at httpsmspartneraltigencom Open a case
on this site a Technical Support representative will respond within one business day (Tier 1 Direct Customers
must call to open a case)
bull Call 888-ALTIGEN choose option 5 from the IVR or 408-597-9000 option 5 from IVR and follow the prompts
Your call will be answered by one of Altigenrsquos Technical Support Representatives or routed to the Technical
Support Message Center if outside of normal business hours and no one is available to answer your call
Technical support hours are 500 am to 500 pm PST Monday through Friday except holidays If all representatives are busy your call will be returned in the order it was received within four hours under normal circumstances Outside Altigen business hours only urgent calls will be returned on the same day (within one hour) Non-urgent calls will be returned on the next business day Please be ready to supply the following required information when calling in for Support
bull Partner ID
bull Altigen Certified Engineer Tech ID
bull Serial numbers for any applicable hardware (chassis boards and so on)
bull Number and types of boards in the system if applicable
bull MaxACD version number
bull Server model
bull The telephone number where you can be reached
Be prepared to answer the following questions
bull Is this a virtual or a standalone server installation
MaxACD 71 Deployment Guide 1-16-2019 Page 61 of 61
bull If this is a virtual installation it is installed in VMware environment or Hyper-V What is the version number of the virtual server
bull How much memory and how many CPUrsquos are reserved for MaxACD Server use Memory and CPU cores should always be dedicated and reserved for MaxACD Server use exclusively
bull Are SSD drives installed If not be prepared to describe what NAS devices are installed and whether they are shared or dedicated to the MaxACD server
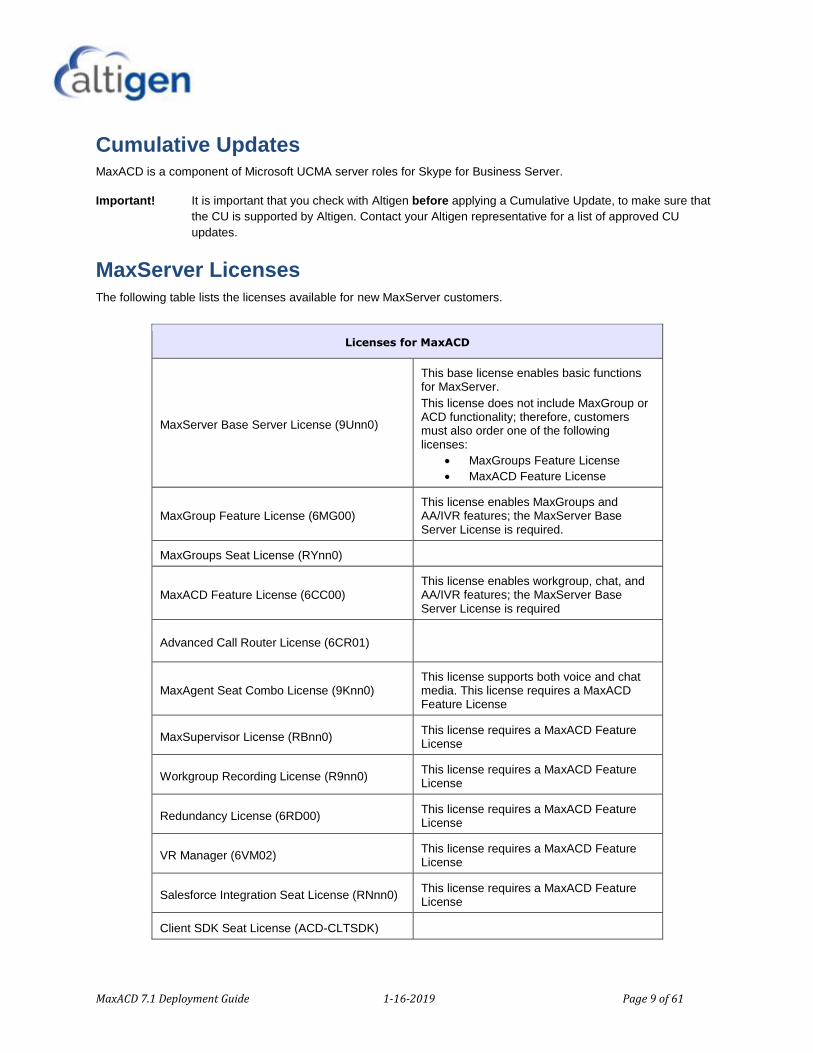
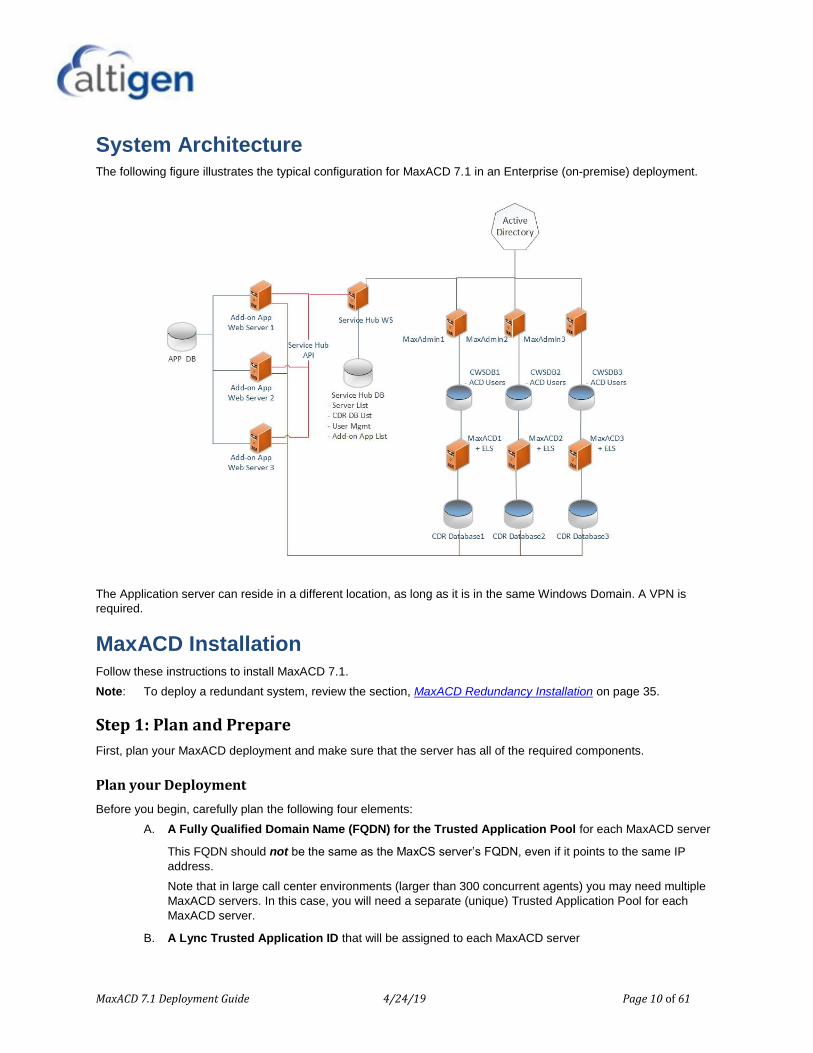
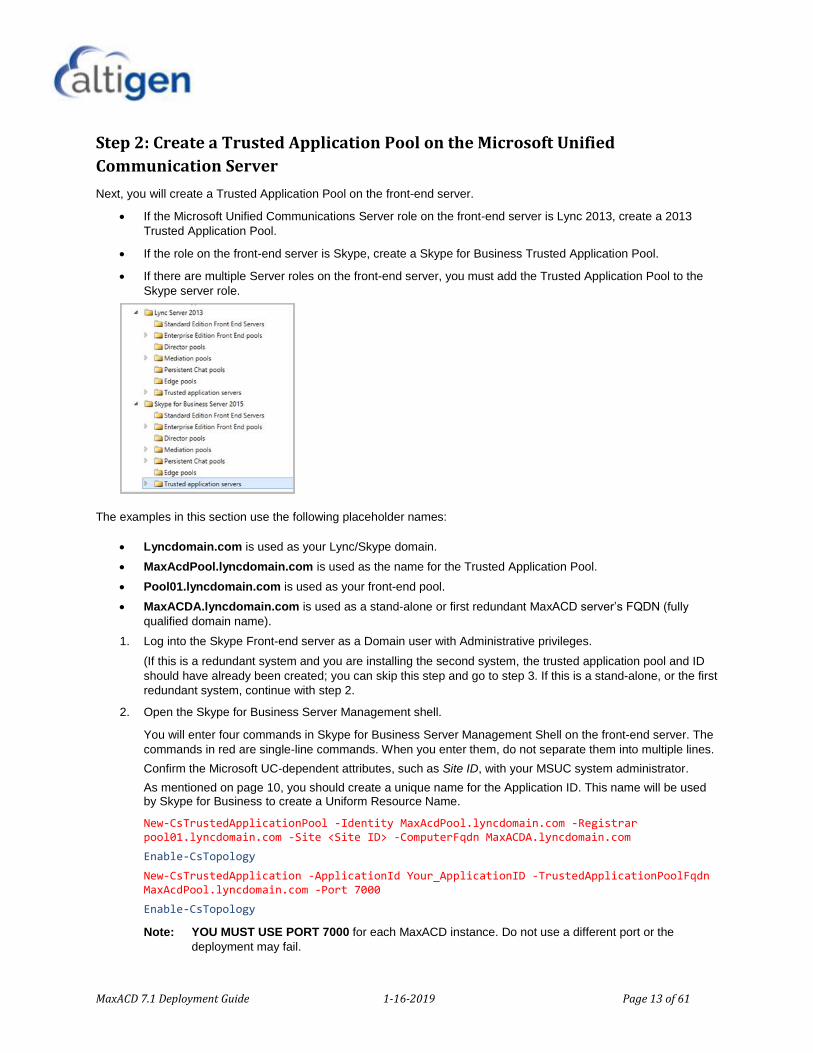
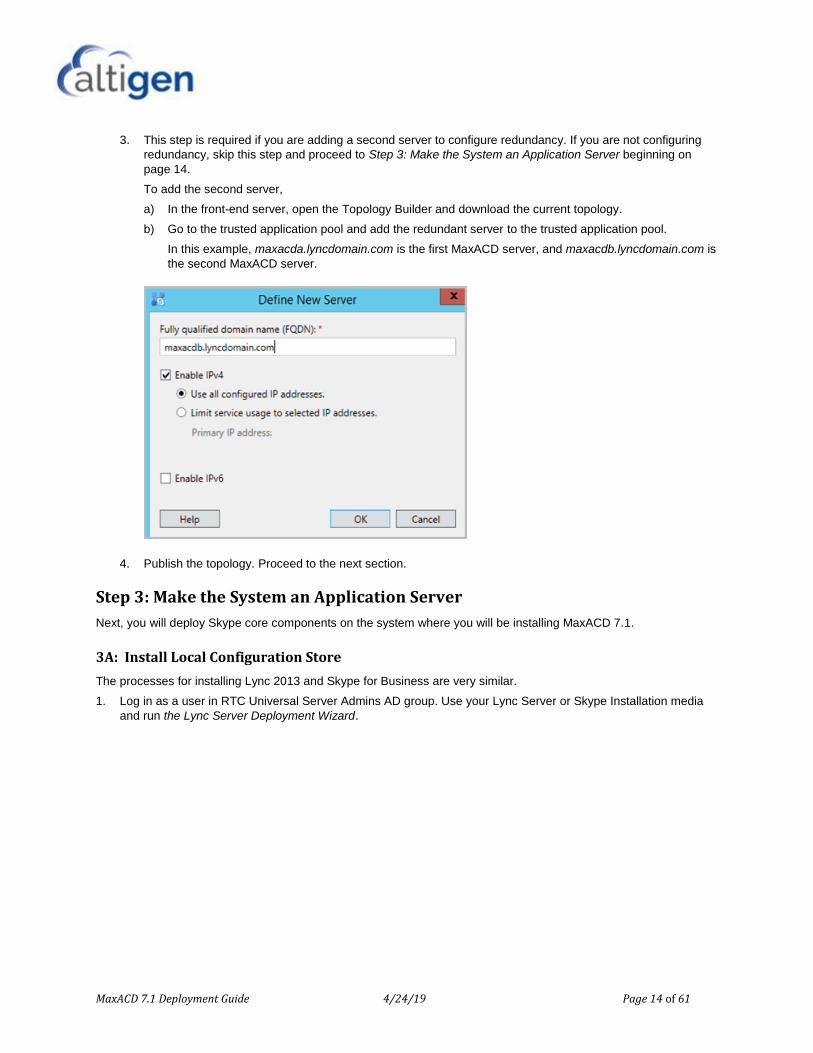
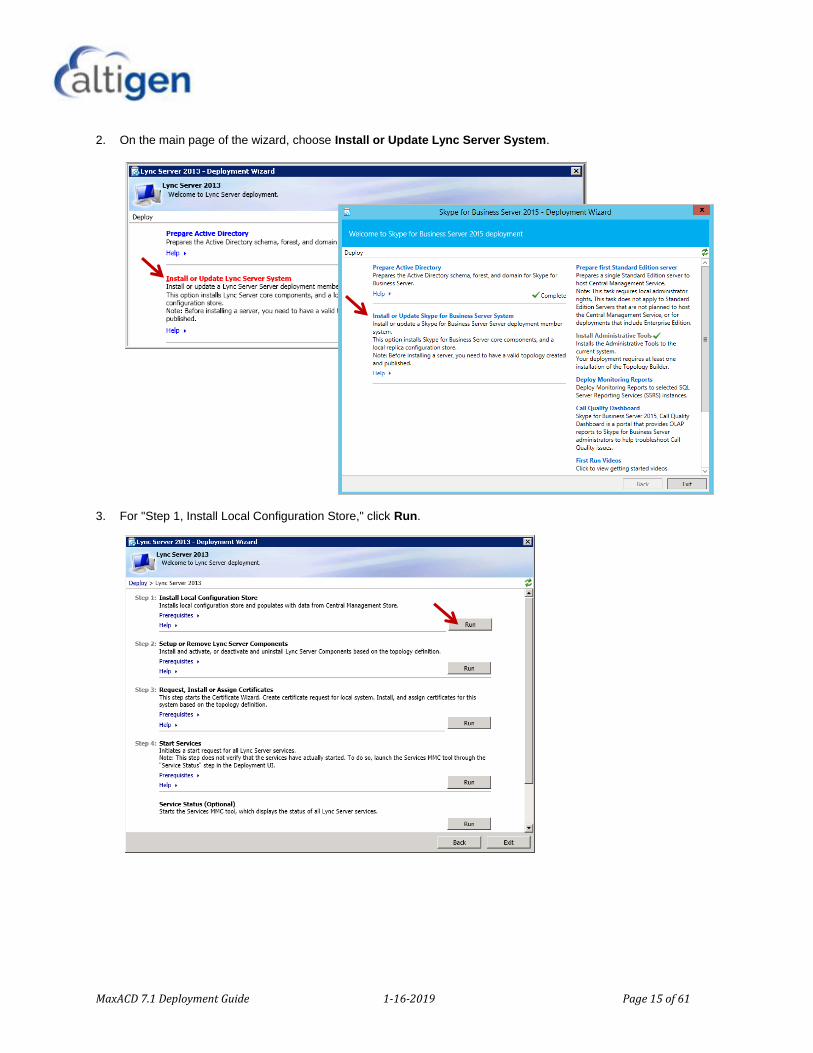
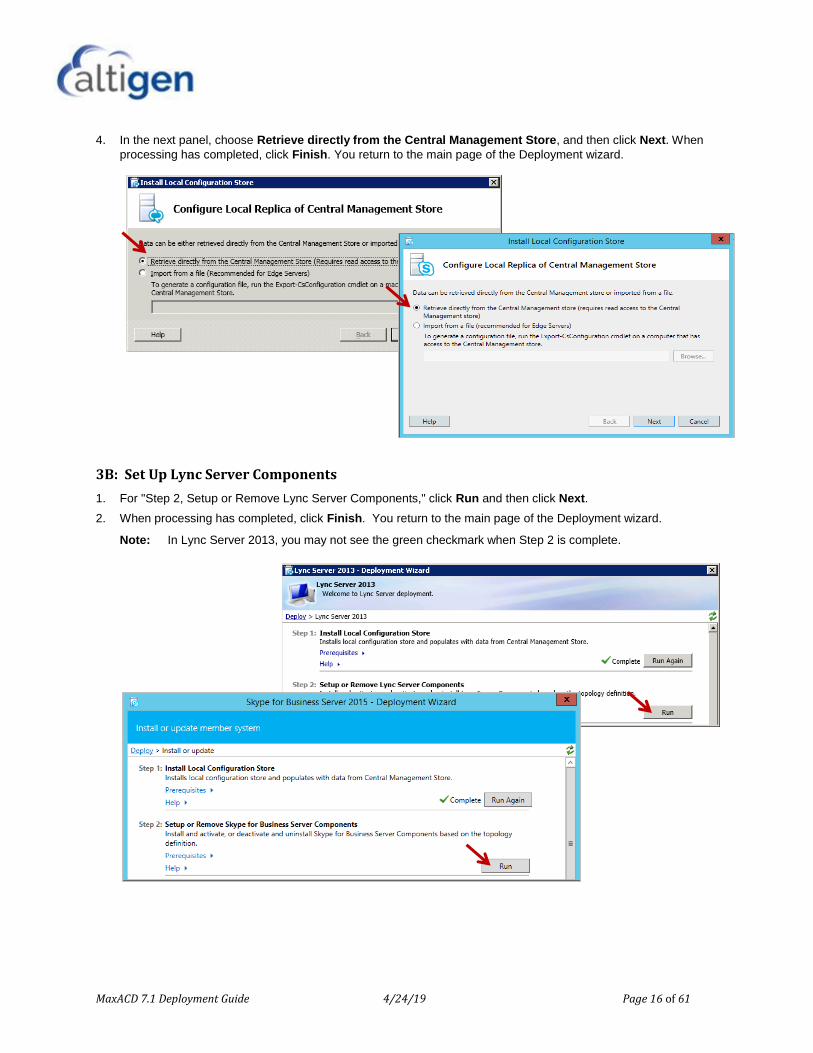
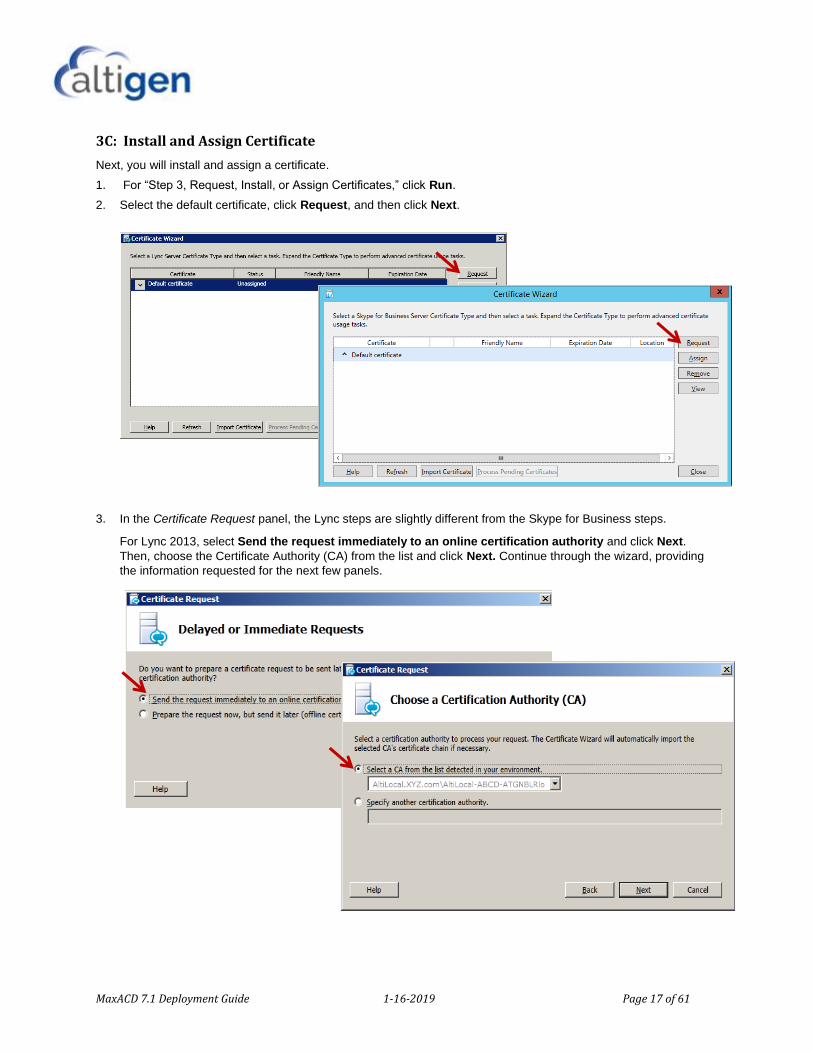
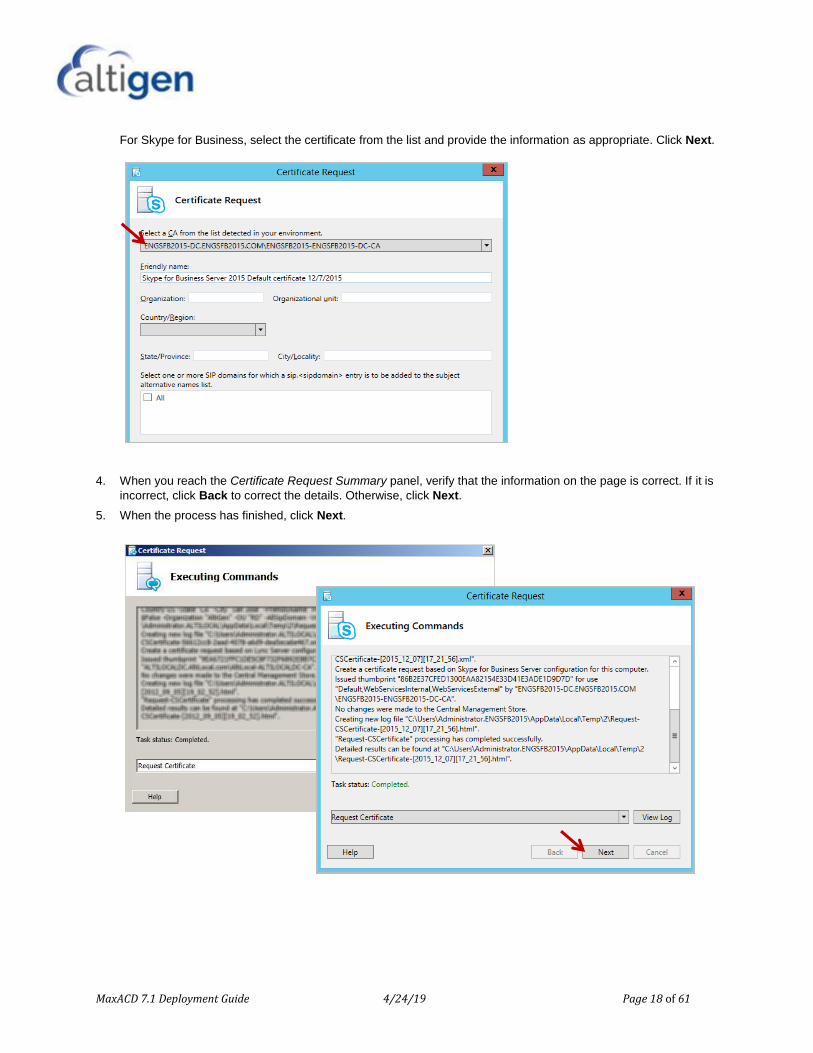
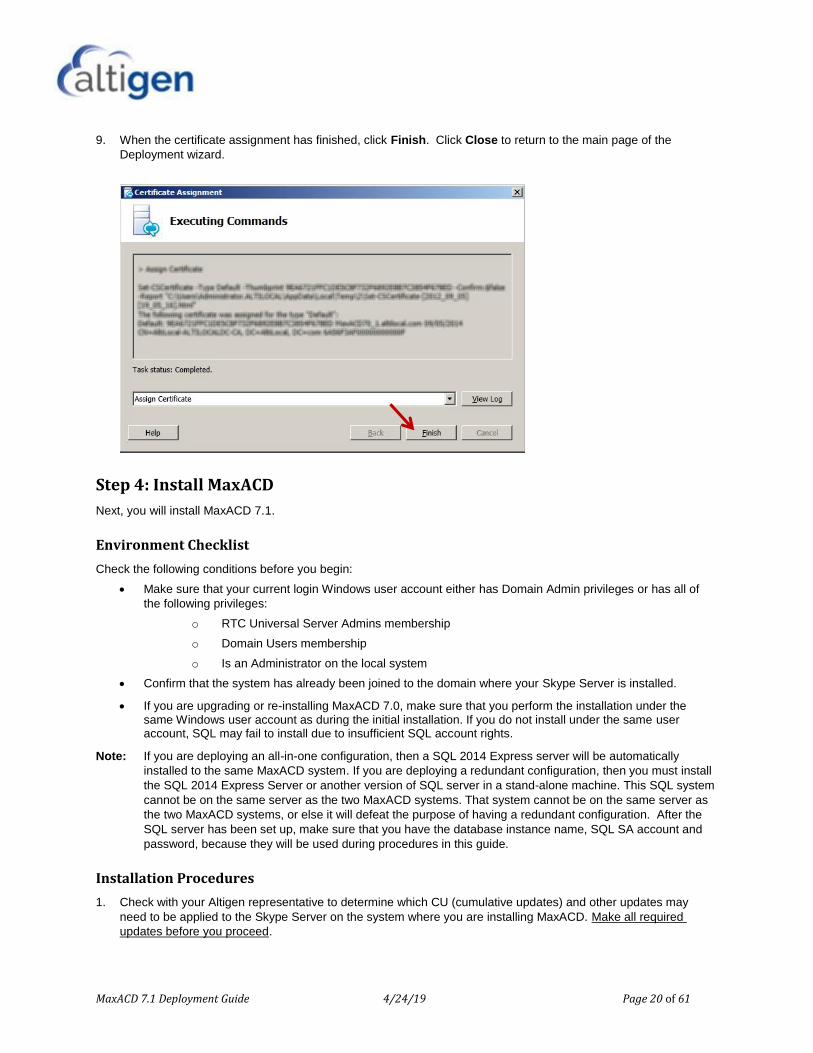
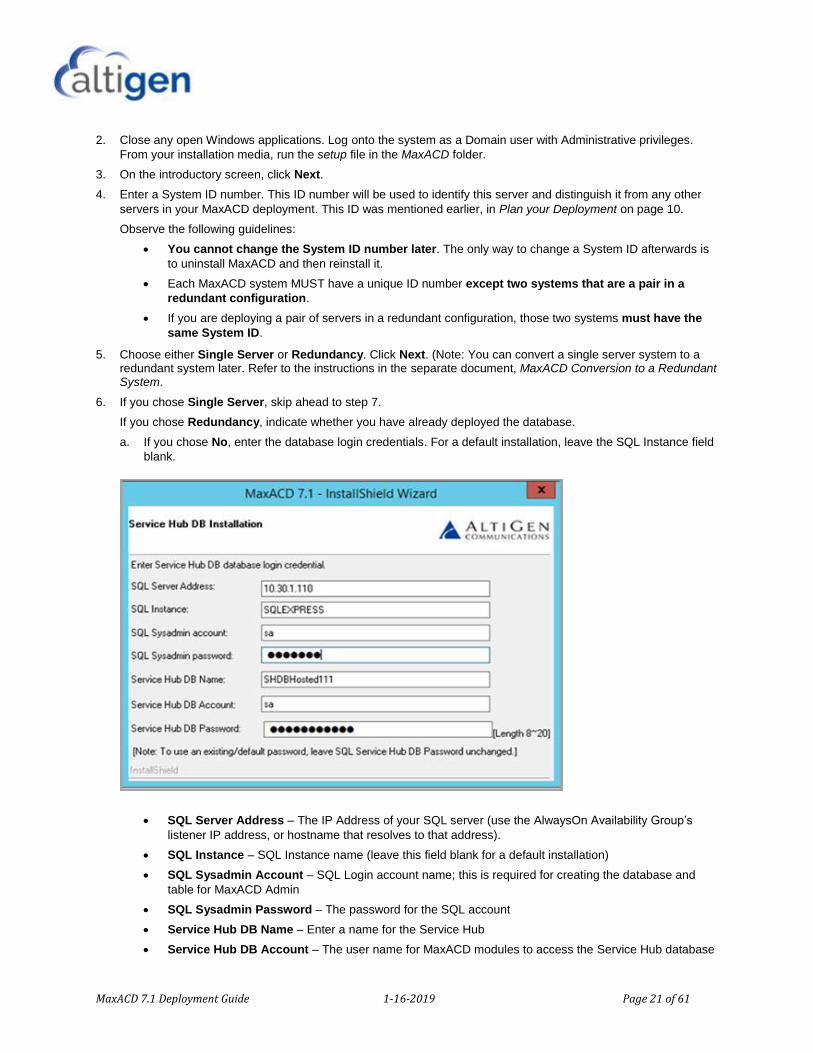
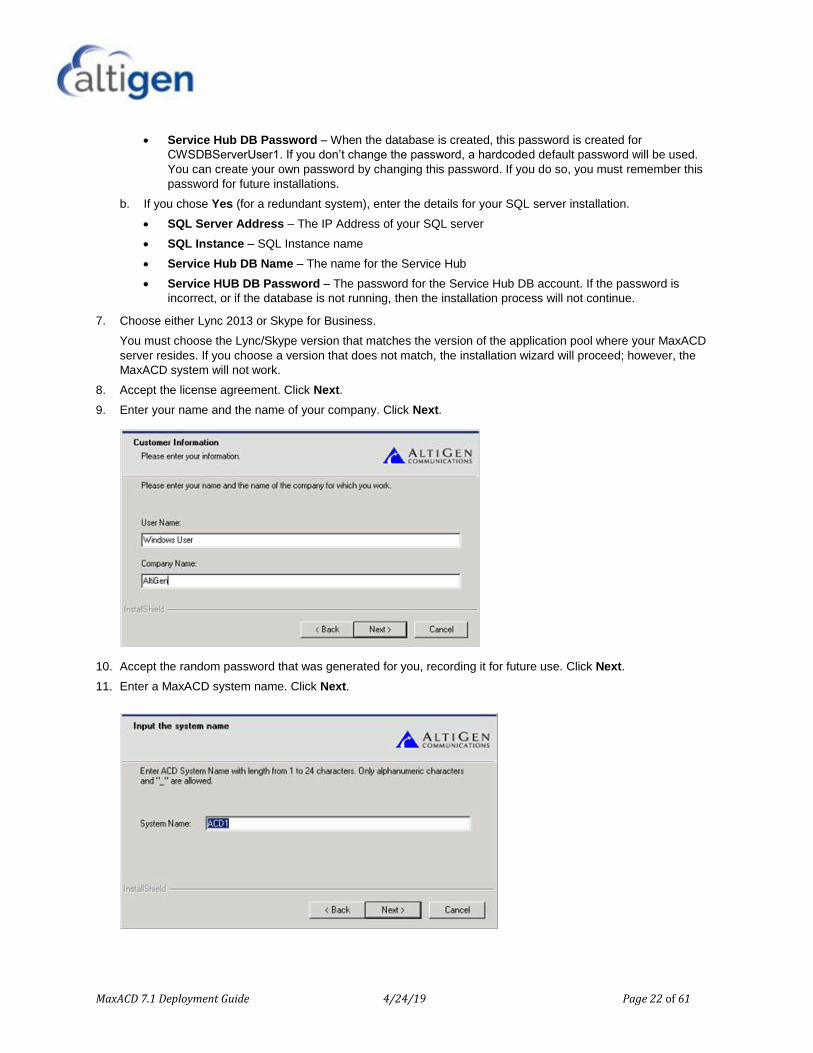
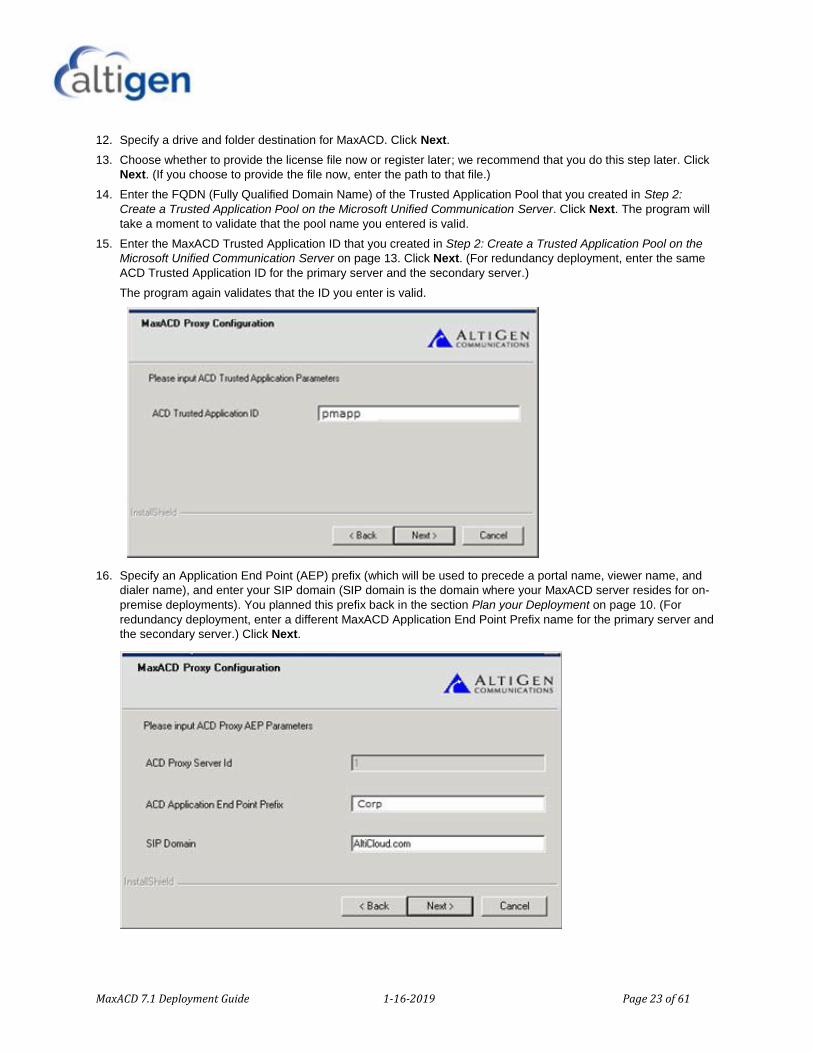
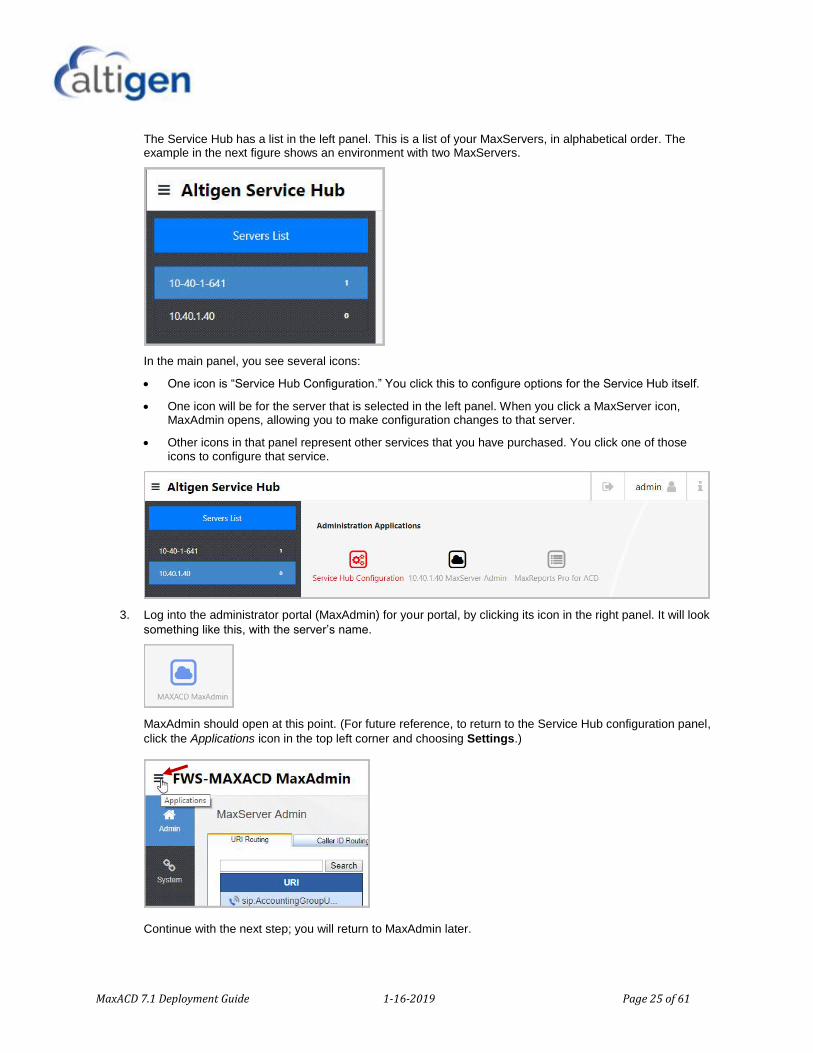
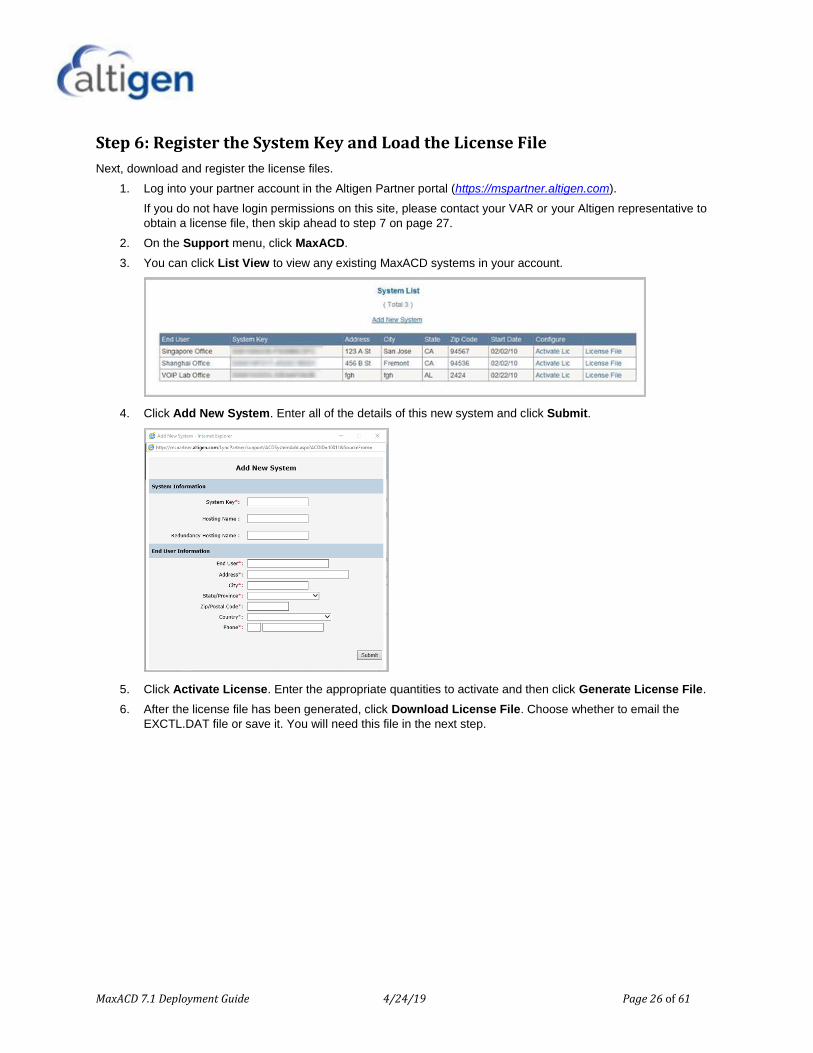
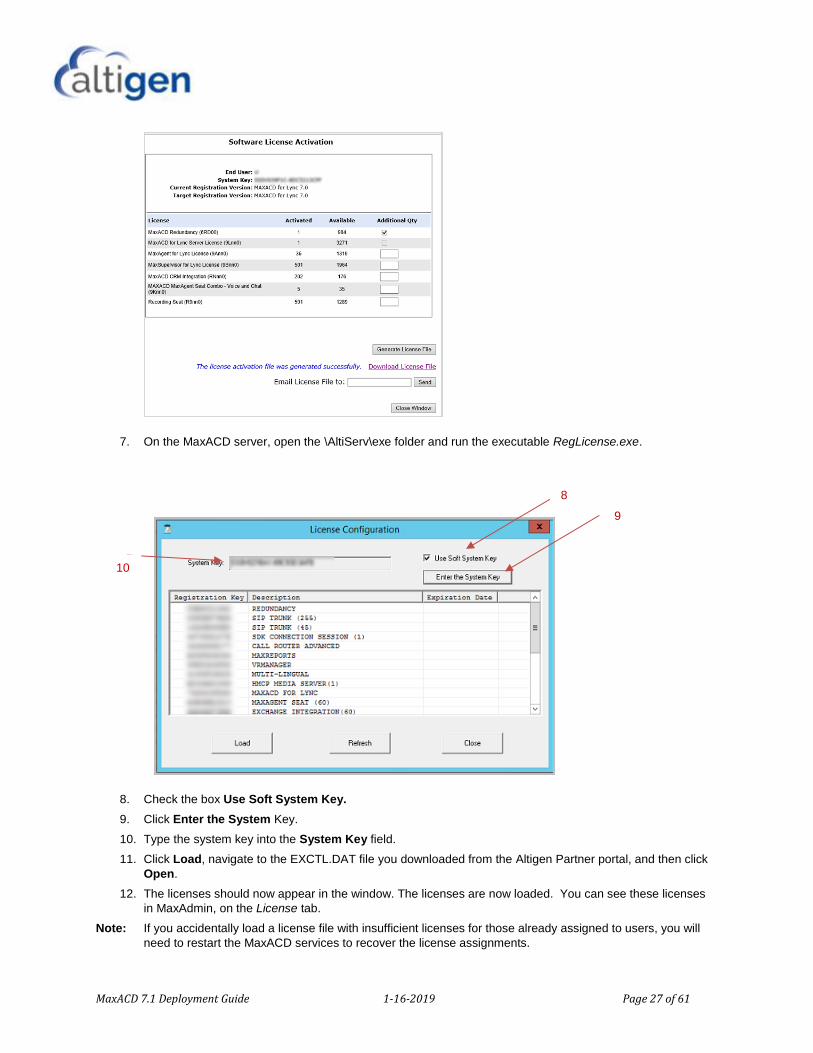
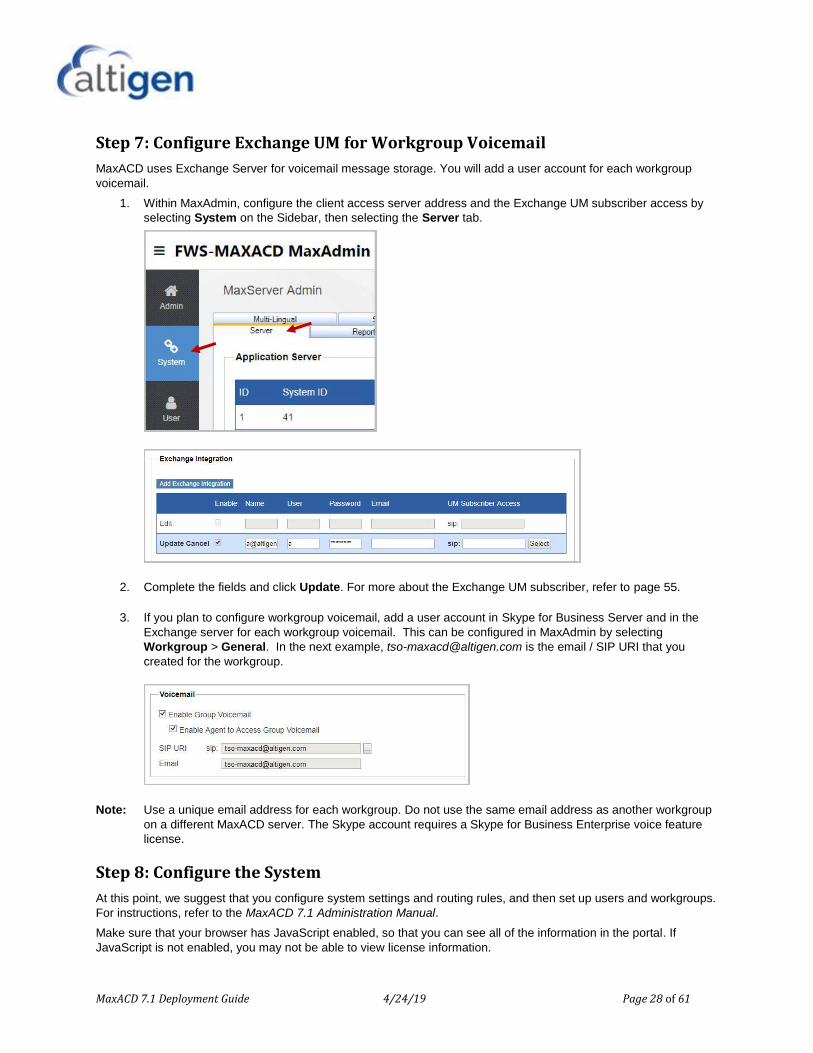
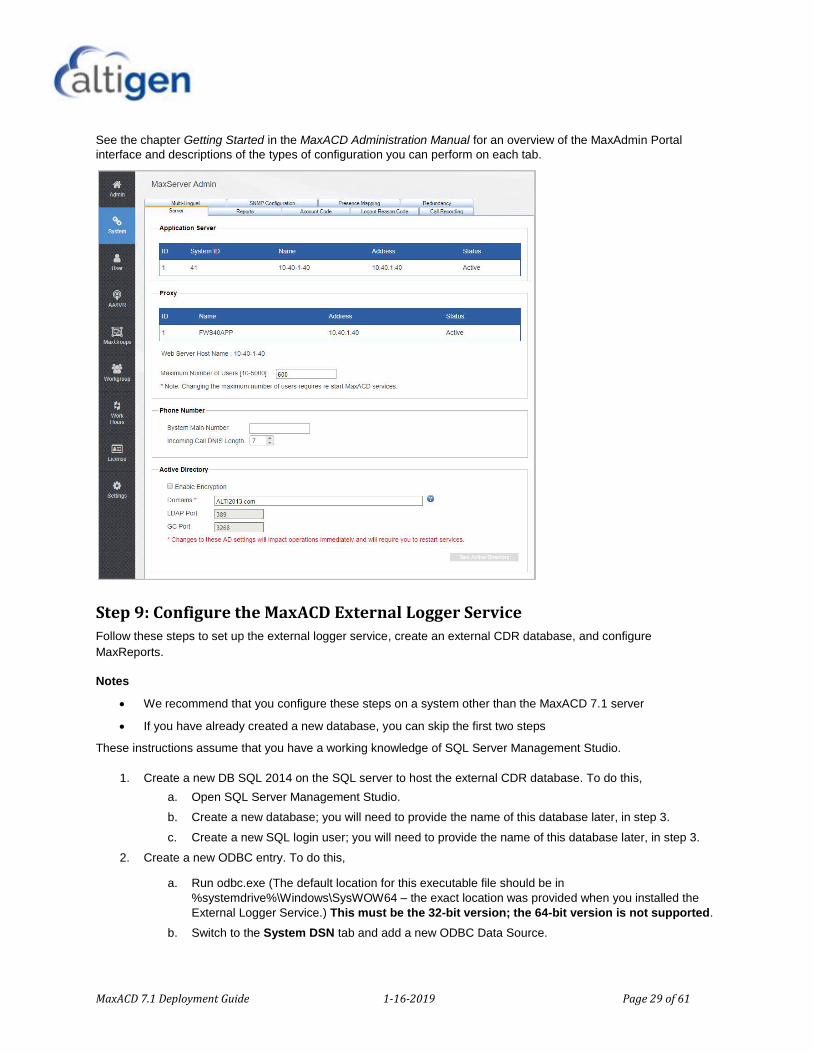
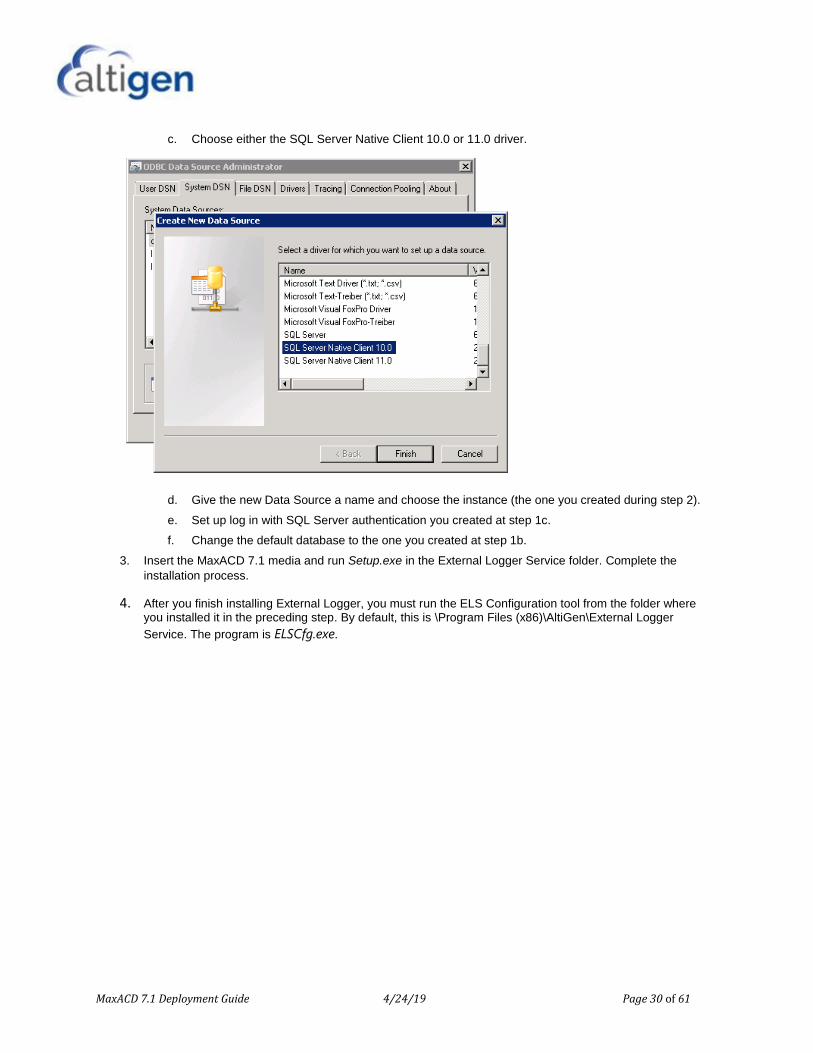
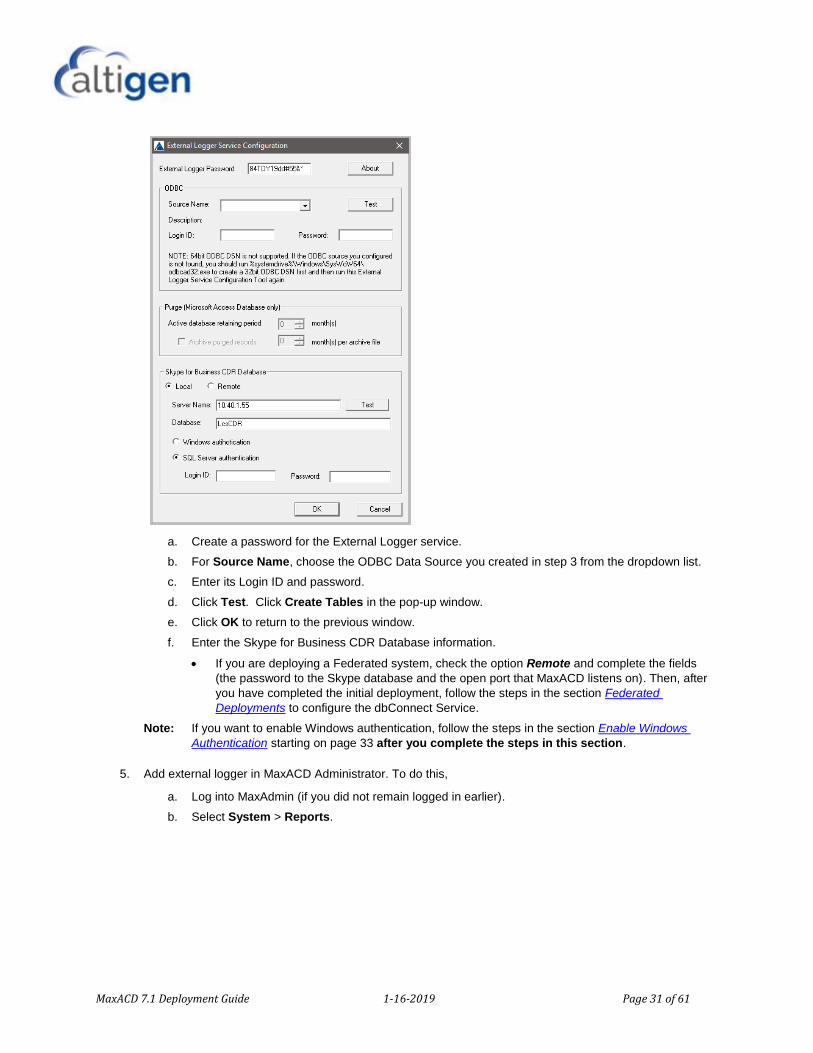
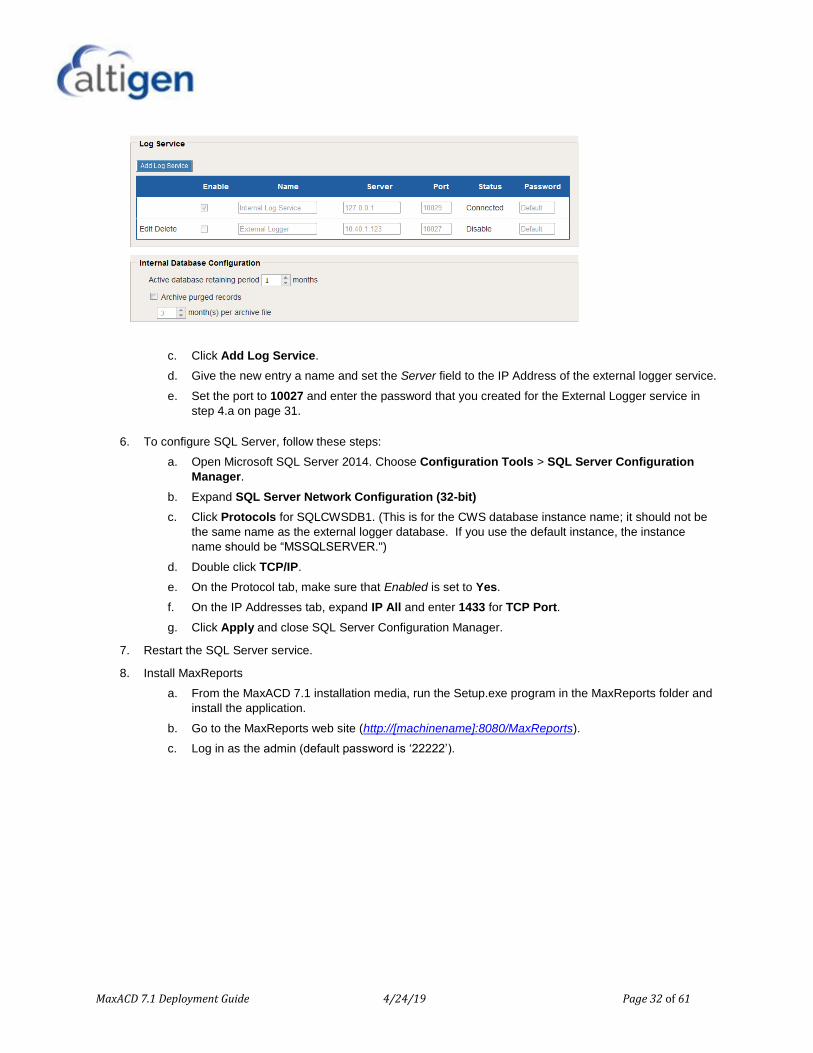
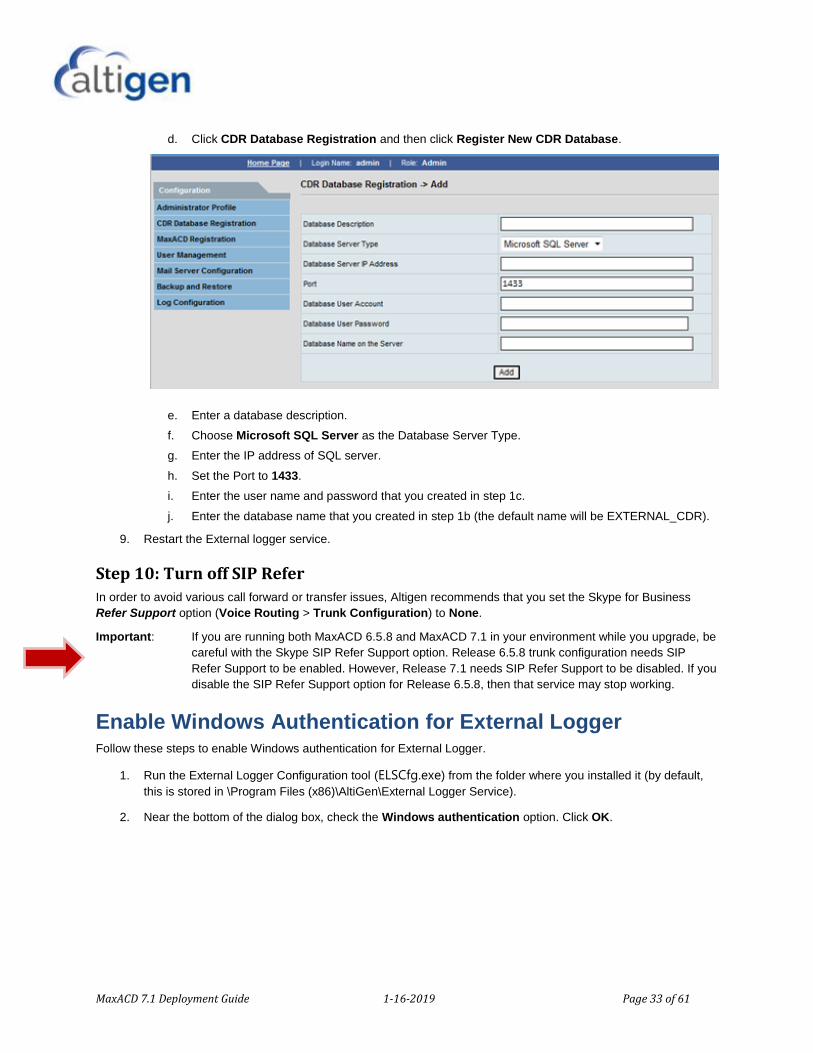
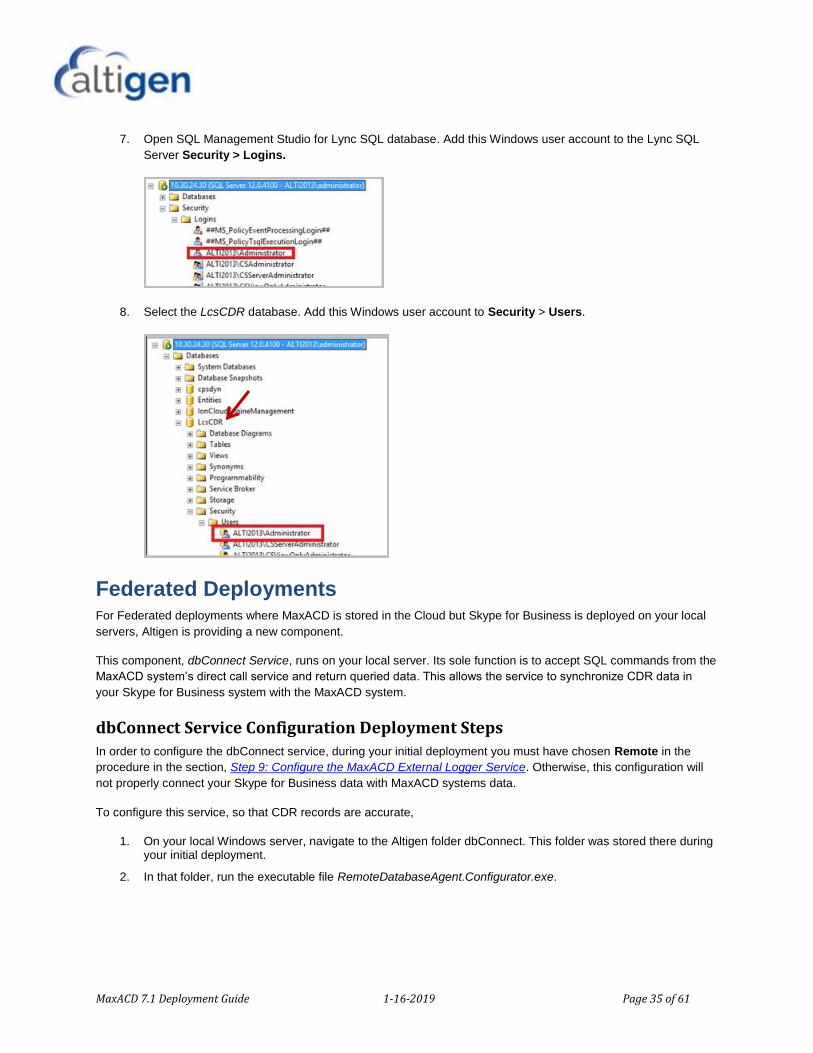
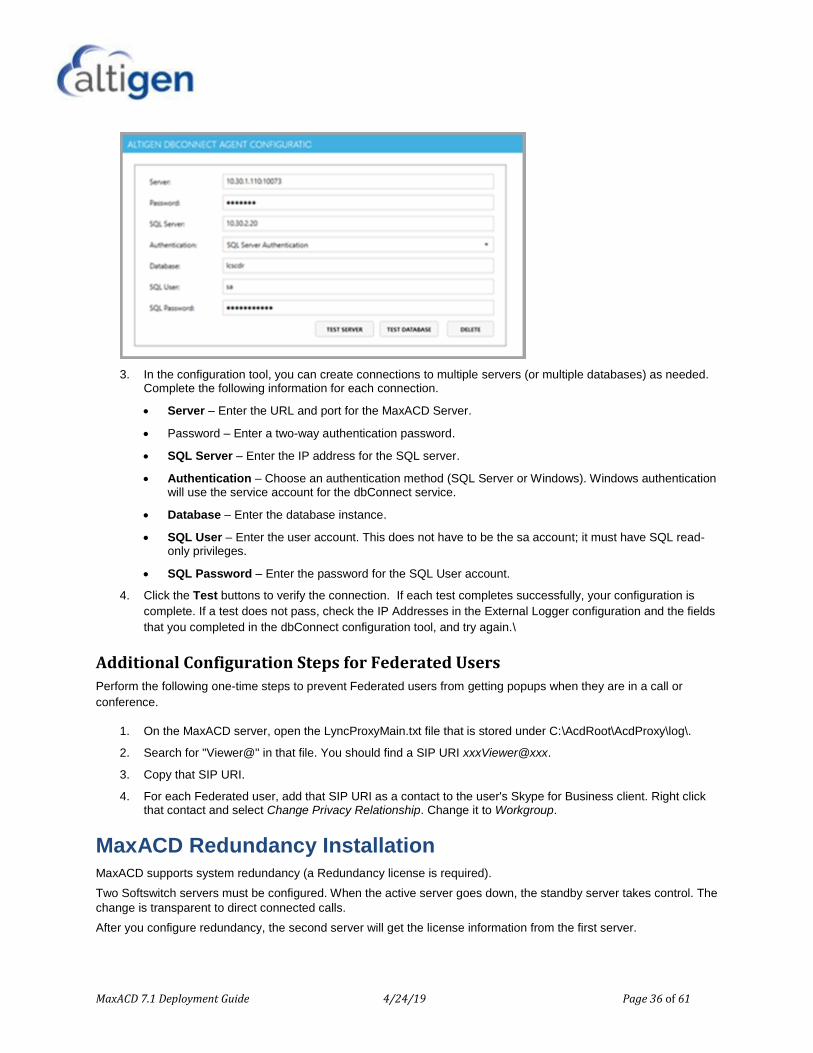
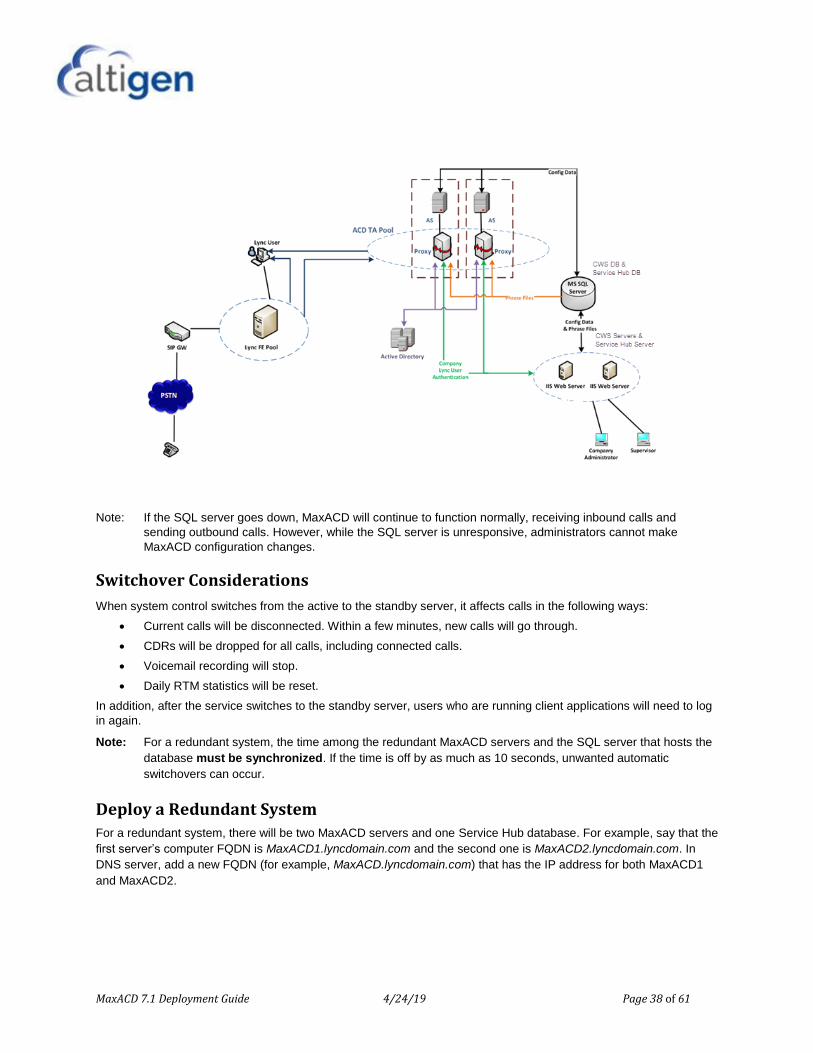
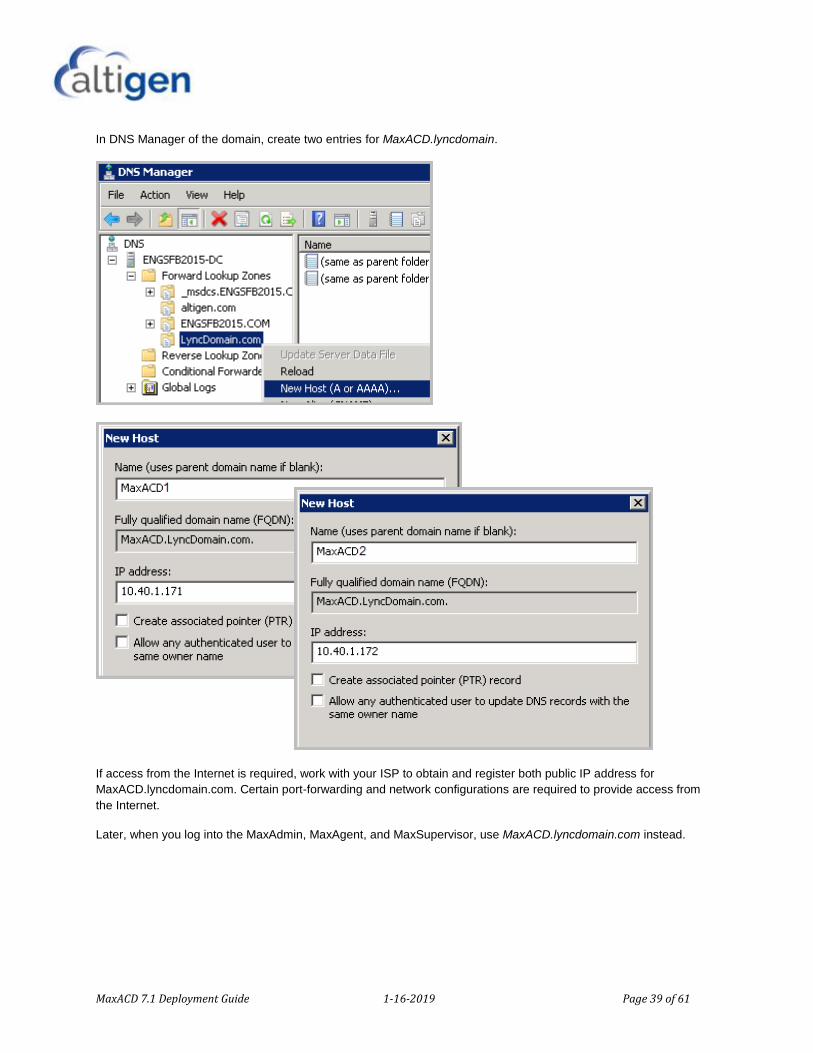
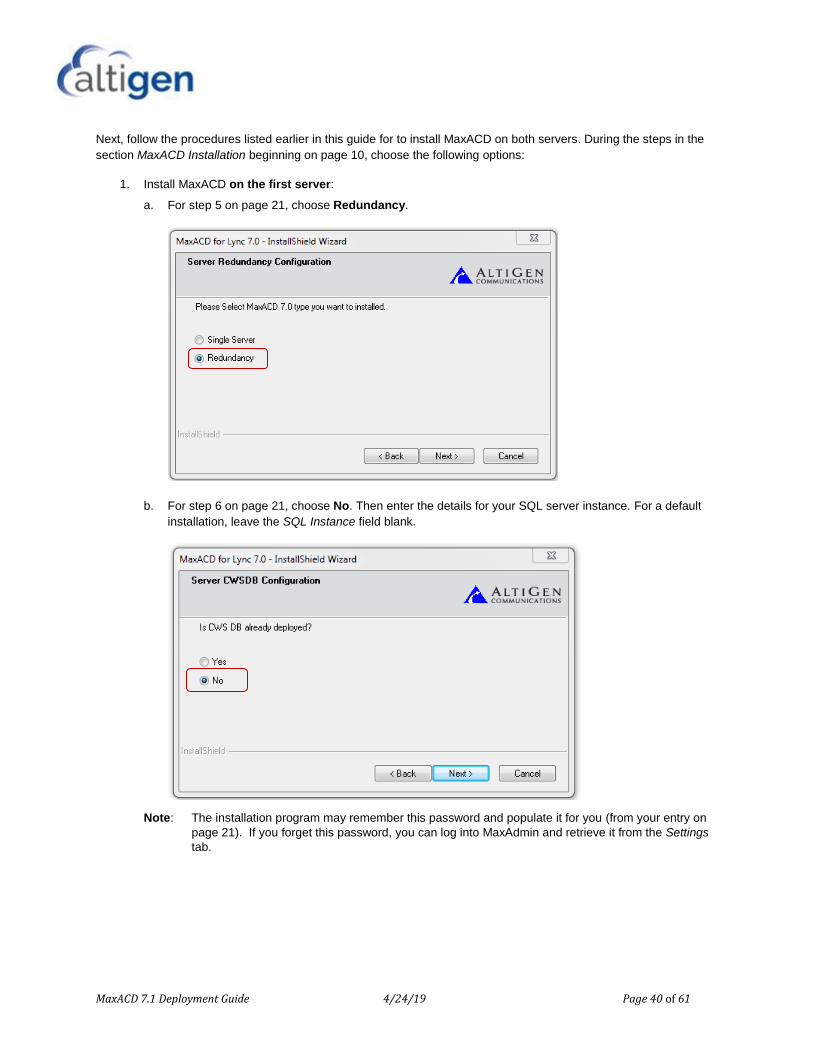
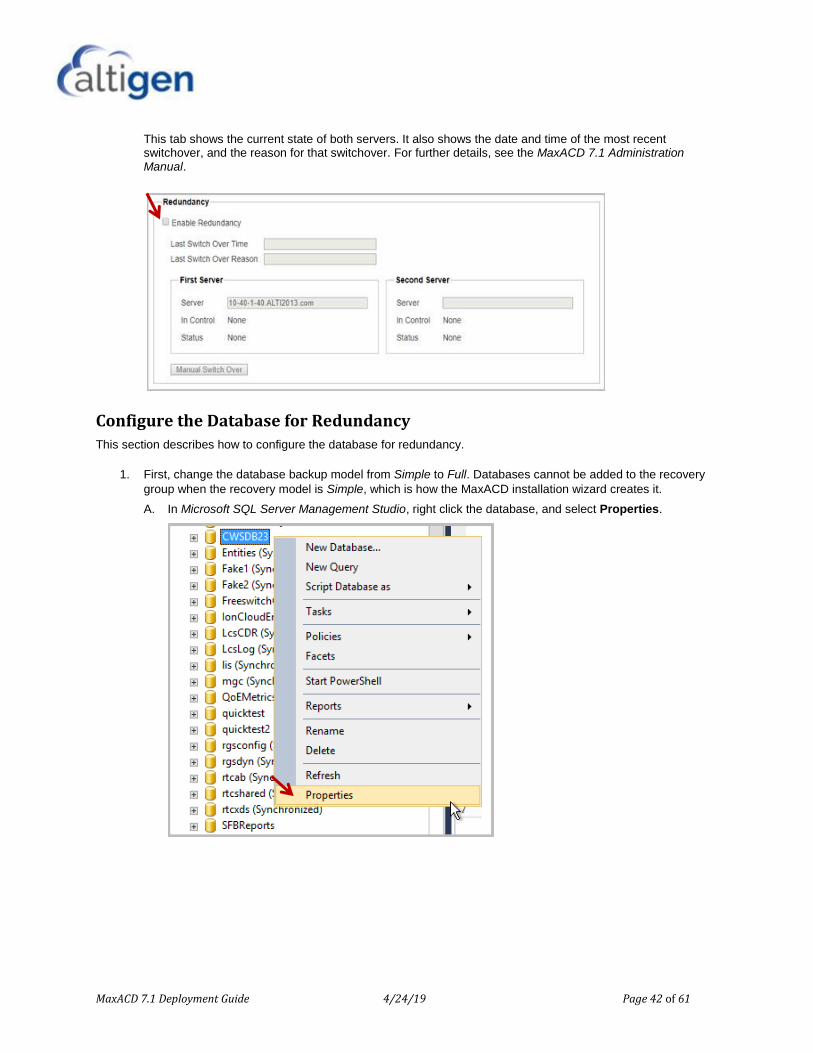
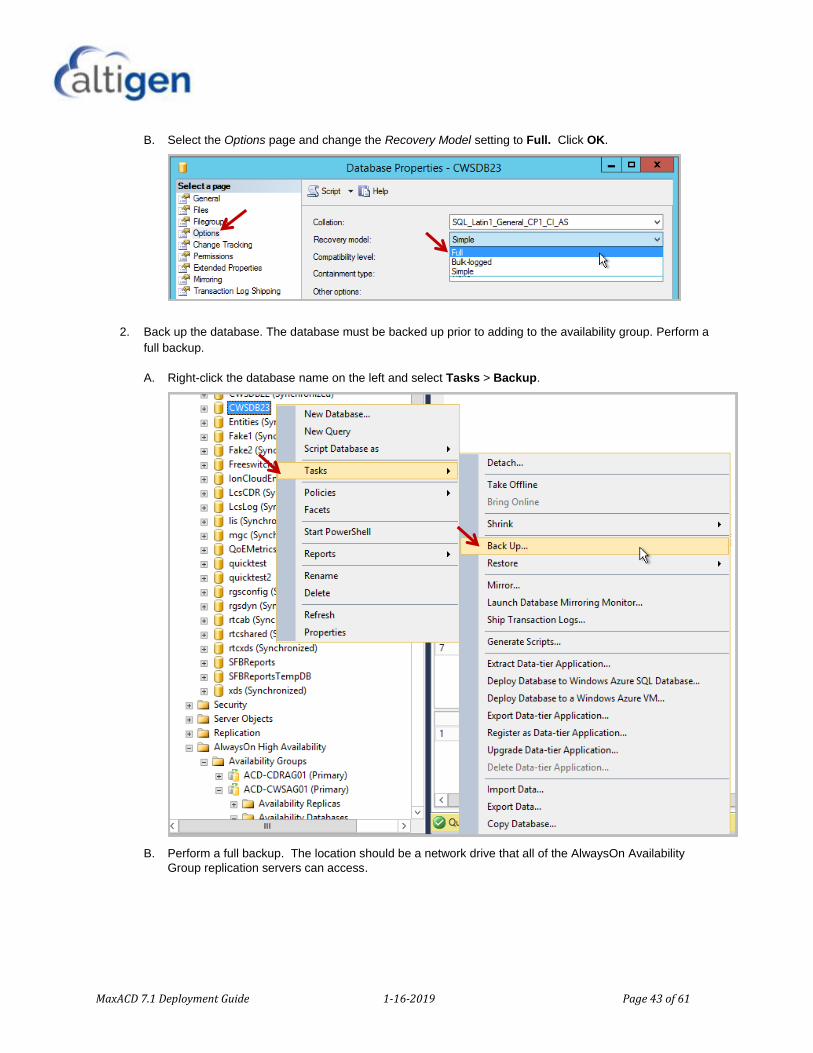
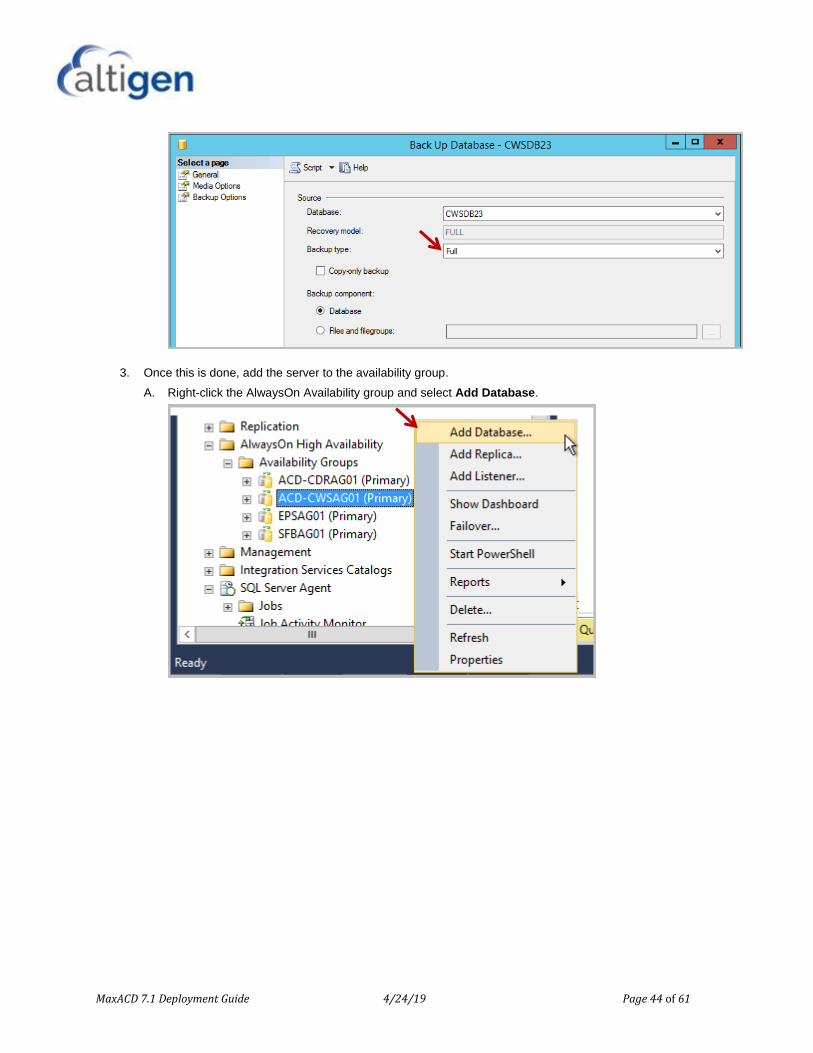
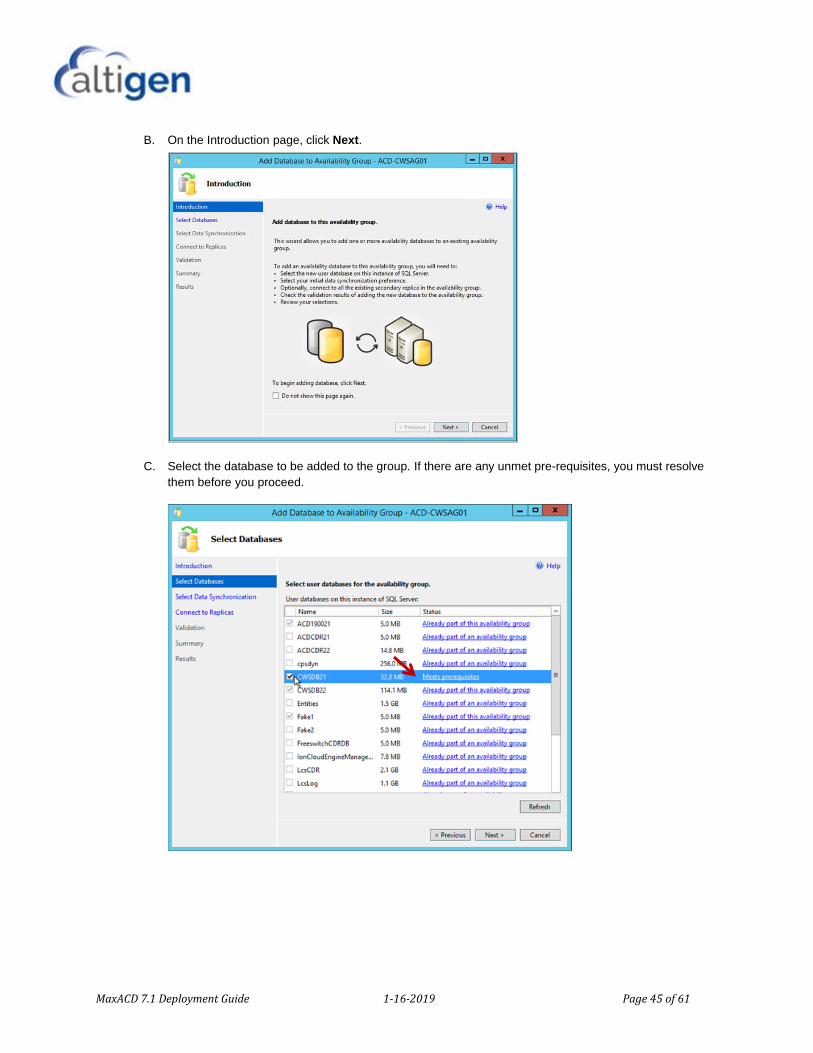
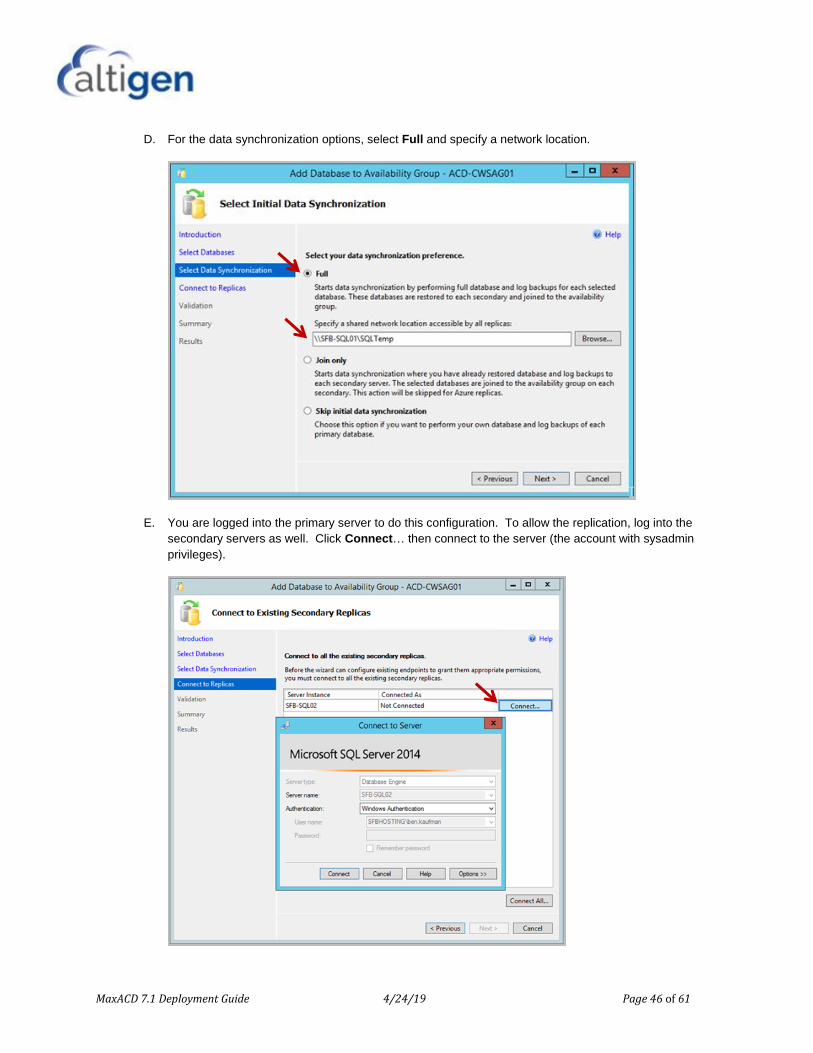
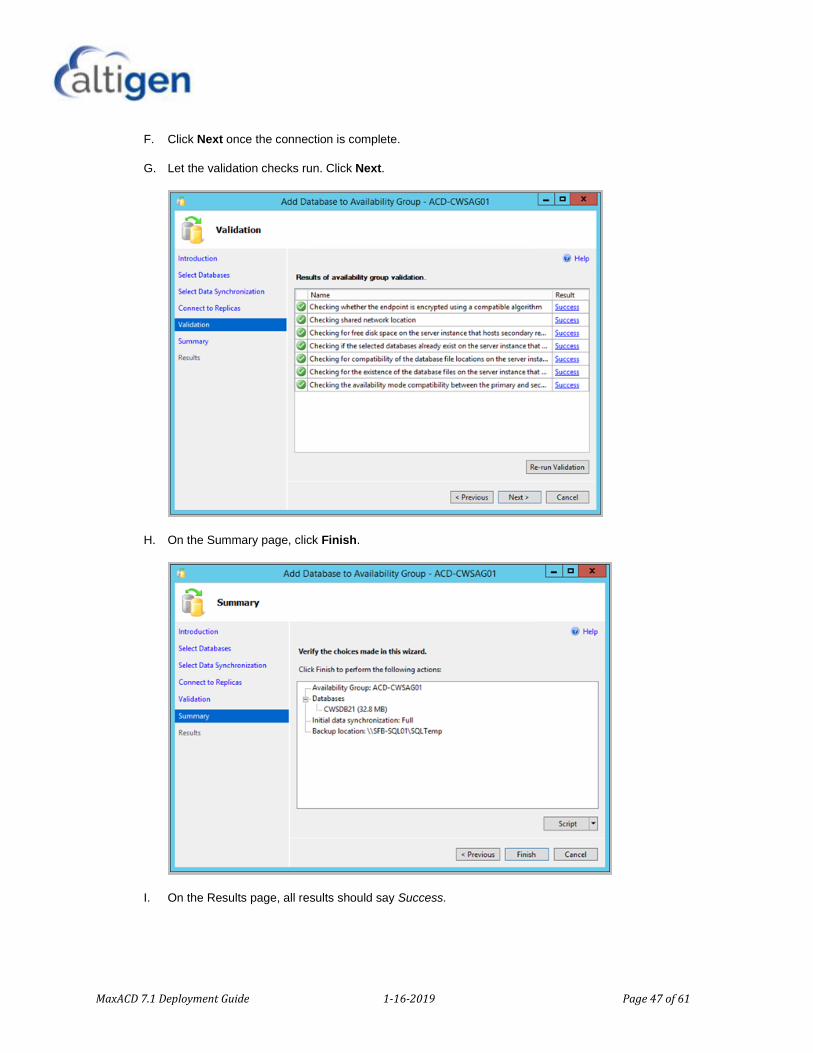
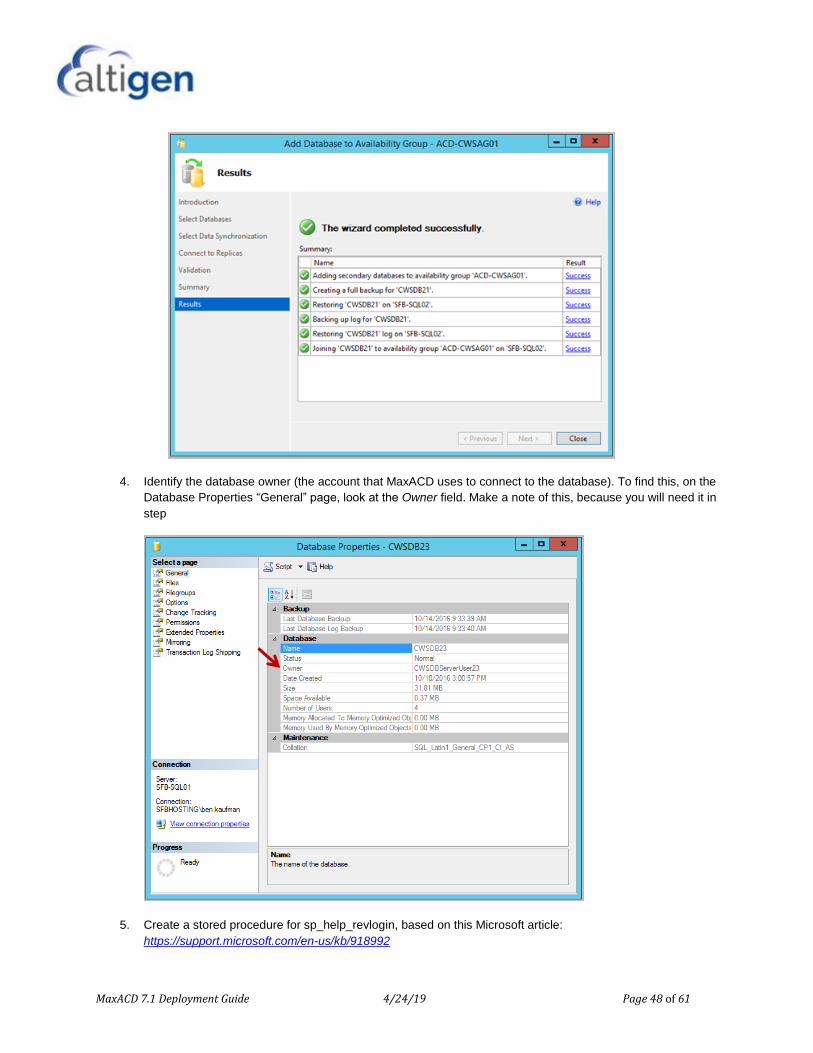
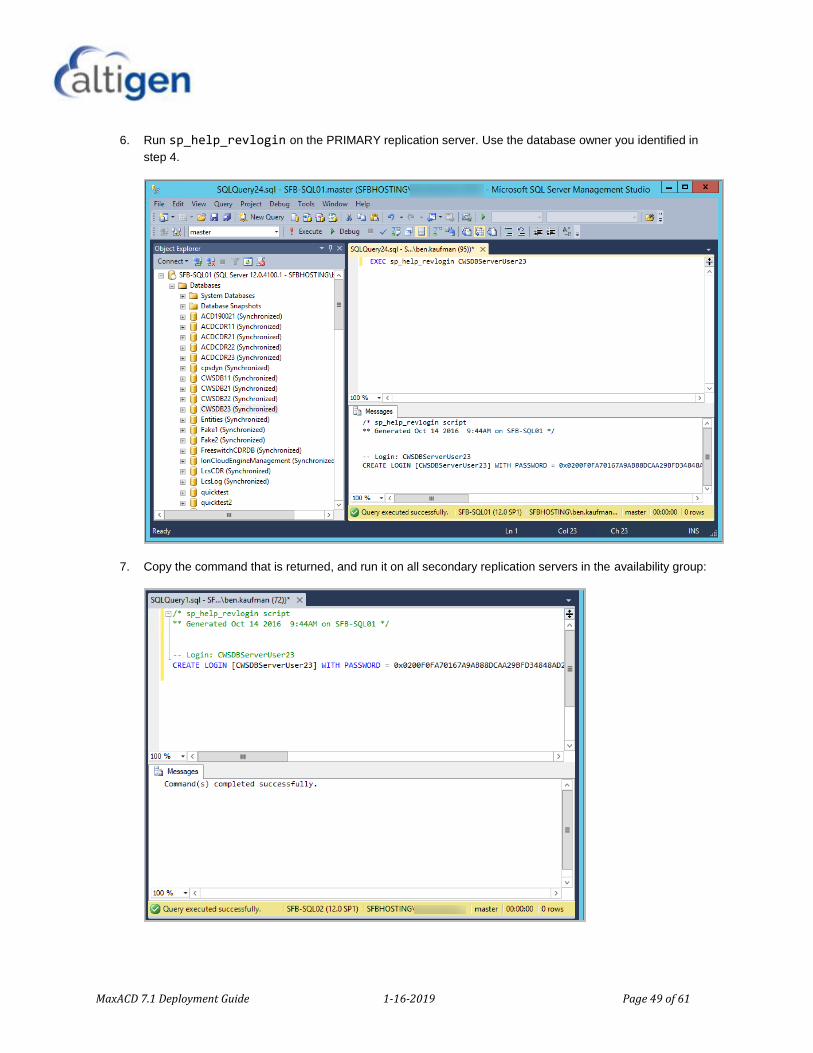
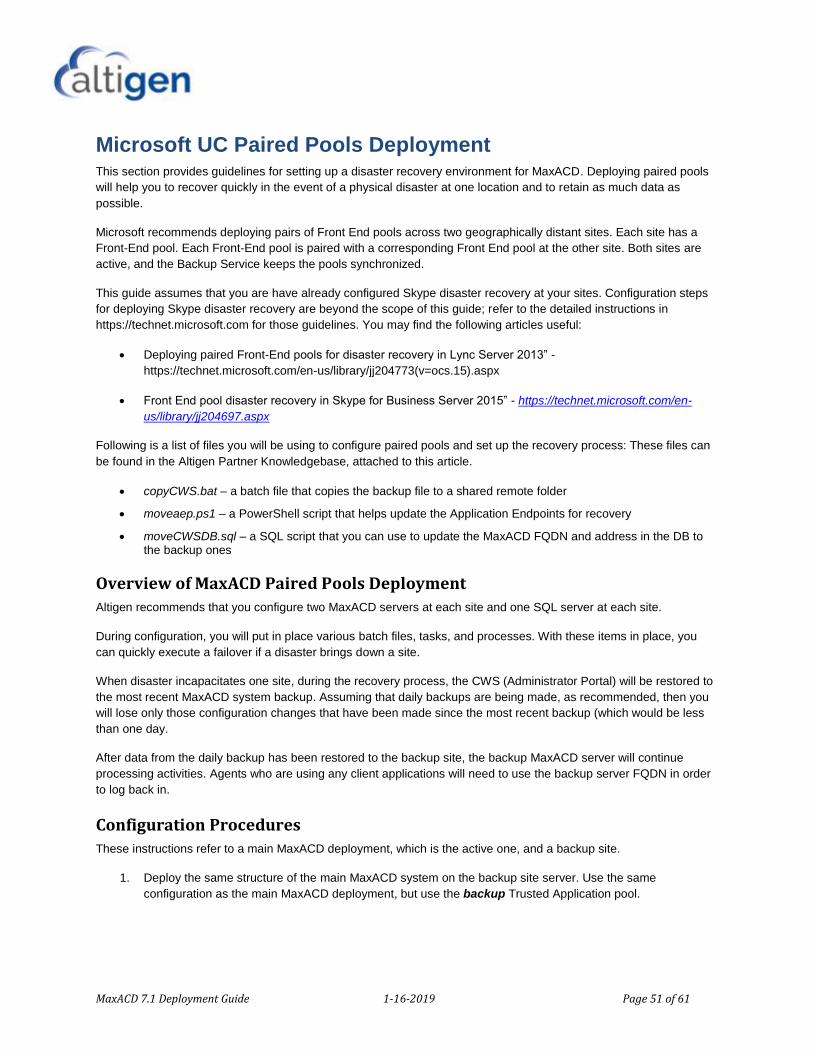
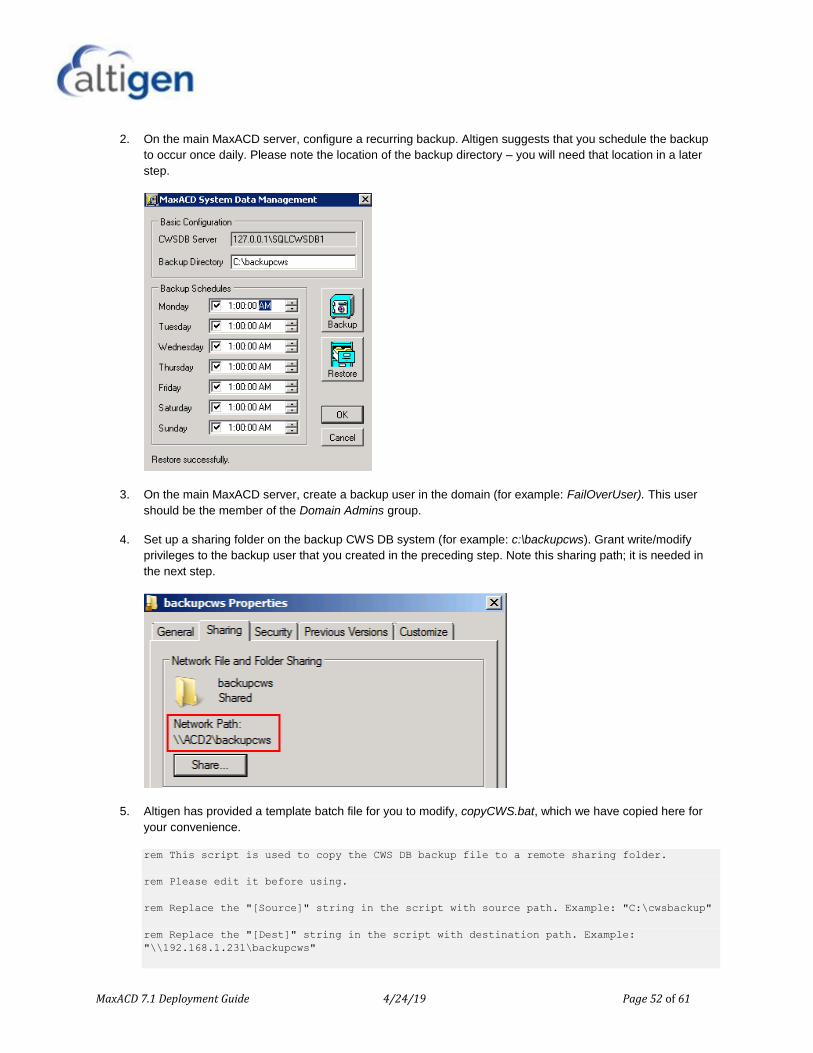
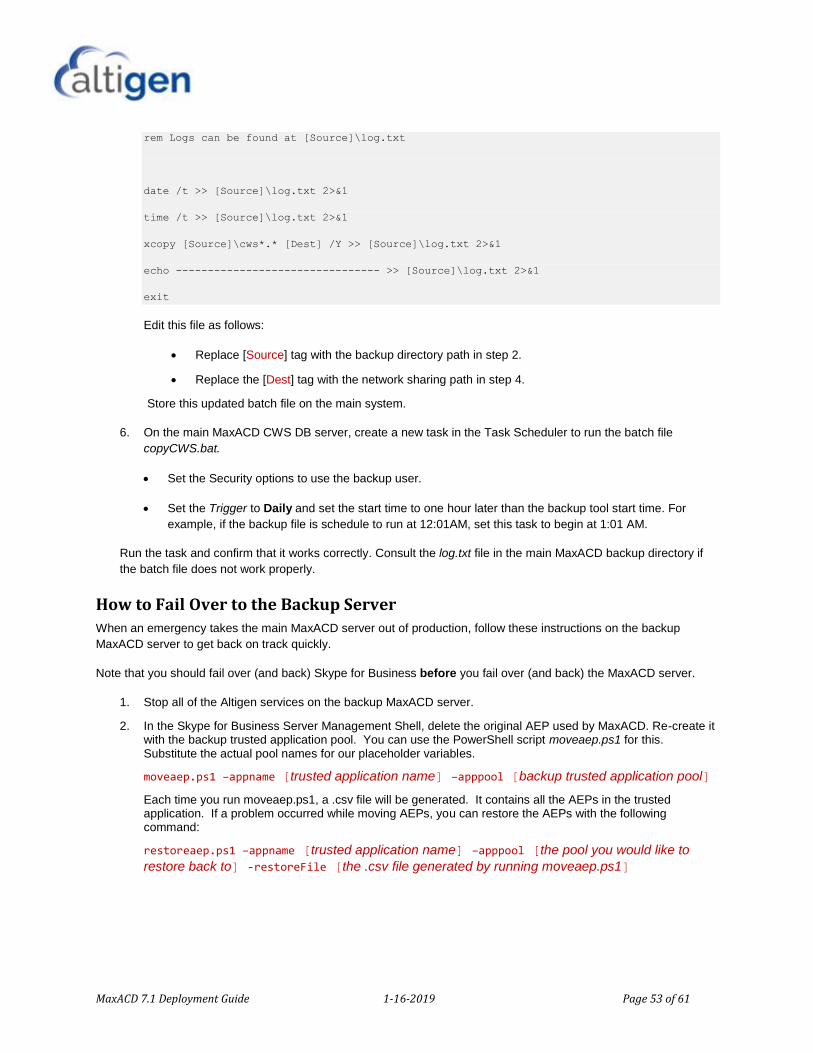
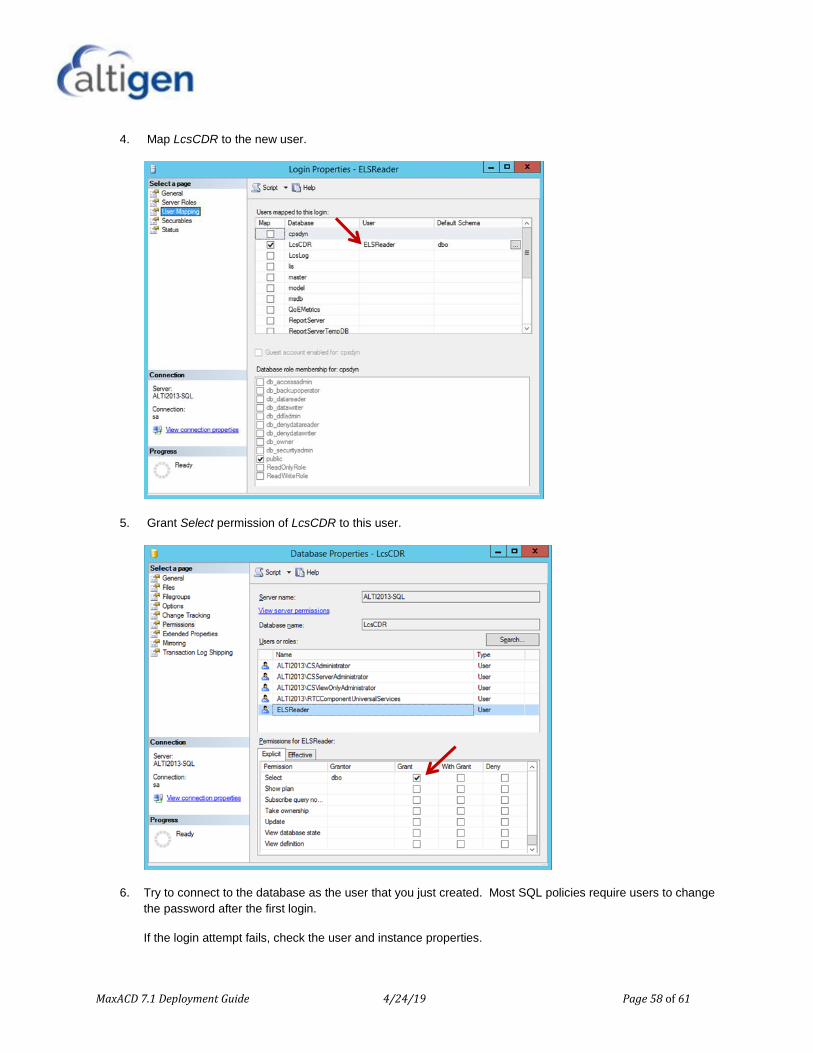


![Content Server 53 SP1 Fundamentals[1]](https://img.pdfslide.us/doc/110x75/54e7080c4a795981528b4884/content-server-53-sp1-fundamentals1.jpg)