Embed Size (px)
Citation preview

Matrix-605WinCE ARM9 Industry Box Computer
User GuideVersion 1.1
Copyright © Artila Electronics Co., Ltd. All Rights Reserved.


Table of Contents
1. Introduction ................................................................................................................ 1
1.1 Features .............................................................................................................................. 1
1.2 Packing List ......................................................................................................................... 1
1.3 Optional Accessory ............................................................................................................. 1
2. Layout ......................................................................................................................... 2
3. Pin Assignment and Definition .................................................................................. 3
3.1 USB Port ............................................................................................................................. 3
3.2 Reset Button ....................................................................................................................... 3
3.3 Ready LED .......................................................................................................................... 3
3.4 LAN1 / LAN2 LED ............................................................................................................... 3
3.5 Serial Port LED ................................................................................................................... 3
3.6 Serial Port ........................................................................................................................... 3
3.7 Serial Console Port (JP1) ................................................................................................... 4
3.8 Power Connector ................................................................................................................ 4
3.9 Ethernet Port ....................................................................................................................... 4
3.10 Factory Default Settings ...................................................................................................... 5
3.11 Power on and System Boot up ........................................................................................... 5
3.12 Initial Table .......................................................................................................................... 5
3.13 Network Settings ................................................................................................................. 6
3.14 Use Account Manager ........................................................................................................ 6
3.15 Telnet Configuration ............................................................................................................ 6
3.16 FTP Configuration ............................................................................................................... 6
3.17 File System ......................................................................................................................... 7
3.18 Serial Ports Configuration ................................................................................................... 7
3.19 Beep .................................................................................................................................... 7
3.20 update ................................................................................................................................. 8
3.21 Web Page Directory ............................................................................................................ 8
3.22 Reboot ................................................................................................................................. 8

3.23 Remote Display Control ...................................................................................................... 8
3.24 ActiveSync .......................................................................................................................... 9
3.25 Install Matrix-605 SDK ........................................................................................................ 9
3.26 Install USB WLAN Dongle ................................................................................................ 10

Matrix-605 User Guide
‧1‧
1. Introduction Matrix-605 is a WinCE ready, ARM9-based embedded computer. Its lower power and robust design
concept makes it an ideal industrial computer platform for harsh environment. The WinCE 6.0 OS is
pre-installed in the on-board Flash memory and the SDK for Microsoft Visual Studio 2005 on Artila FTP
is ready for your application development.
1.1 Features Atmel AT91SAM9G45 400MHz SoC
32-KByte Data Cache and 32-KByte Instruction Cache
128MB DDR2 SDRAM, 256MB NAND Flash on board
Two independent 10/100Mbps Ethernet
Two USB 2.0 high speed (480Mbps) Host Ports
One software configurable RS-232/422/485 port and three RS-232/485 ports
microSD socket (open upper case)
Serial console (open upper case)
9 to 48VDC power input
Pre-installed WinCE 6.0 and file system
SDK available on Artila FTP
Supporting WinCE Remote Display Control
Optional DIN RAIL mounting adaptor
1.2 Packing List Matrix-605
Artila FTP includes SDK, Installation guide and Remote Display Control software and example
programs
1.3 Optional Accessory CB-RJ45F9-150 (91-R45F9-150): Serial Cable (RJ45 to DB9 Female, 150cm)
CB-PHDF9-050 (91-PHDF9-050): Console Cable (Wafer Box to DB9 Female, 50cm)
DK-35A (36-DK35A-000): DIN RAIL Mounting Kit
PWR-12V-1A (31-62100-000): 110~240VAC to 12VDC 1A Power Adaptor

Matrix-605 User Guide
‧2‧
2. Layout
LAN1
USB2.0 Host x2
Reset
9-48VDC Power
LAN2
P1/P2/P3/P4 Serial Ports
USB client
Serial console
microSD socketOpen the upper case to access it

Matrix-605 User Guide
‧3‧
3. Pin Assignment and Definition 3.1 USB Port The USB port is an USB2.0 full speed host port. It can be used to expand the storage of Matrix-605.
USB client can work with ActiveSync to exchange file and data between PC and Matrix-605.
3.2 Reset Button Press the “Reset” button to activate the hardware reset. Please always use “reboot” command to
reset Matrix-605. You should only use this function if the software reboot does not function properly.
3.3 Ready LED After Power ON, Matrix-605 starts booting. Once system is boot up, the Ready LED will show solid
green.
3.4 LAN1 / LAN2 LED When Ethernet port are connected to the network, LAN1 or LAN2 will show solid green and if there is
traffic in the Ethernet, this LED will flash.
3.5 Serial Port LED These four dual color LEDs indicate the data traffic at the serial ports. When RXD line is high then
Green light is ON and when TXD line is high, Yellow light is ON.
3.6 Serial Port The four serial ports can be configured as RS-232, RS-422 or RS-485 by software. They use RJ45
connector and the pin assignment are shown as following table.
Pin RS-232 RS-422 RS-485
1 DSR -- --
2 RTS TXD+ Data+
3 GND GND GND
4 TXD TXD- Data-
5 RXD RXD+ --
6 DCD RXD- --
7 CTS -- --
8 DTR -- --
Port 1: RS-232/422/485
RS-232: RXD, TXD, RTS, CTS, DSR, DTR, DCD, GND
RS-422: TXD+, TXD-, RXD+, RXD-, GND
RS-485: DATA+, DATA-, GND

Matrix-605 User Guide
‧4‧
Port 2/3/4:
RS-232: RXD, TXD, RTS, CTS, GND
RS-485: DATA+, DATA-, GND
3.7 Serial Console Port (JP1)Serial console port is used for locally accessing Matrix-605 system using RS-232 port. The console
port is located inside the box and close to battery. It is a four-pin wafer box header. User can order
wafer console cable to access the serial console port.
Port 0: RS-232: RXD, TXD, GND
Serial Console
Therefore you need to open the upper metal case and prepare or purchase a serial console cable to
use the serial console port.
3.8 Power ConnectorConnect the 9 to 48VDC power line to Matrix-605. If the power is properly supply, the power LED will
show a solid green color.
3.9 Ethernet PortThe Ethernet Port use RJ45 connector.
Pin Signal
1 ETx+
2 ETx-
3 ERx+
6 ERx-
+-
TxDRxDVCC3GND
1234
Matrix-605 User Guide
‧5‧
3.10 Factory Default Settings
LAN 1:
IP setting: DHCP
LAN 2:
IP Address: 192.168.2.127
Serial Console Port:
Baud rate: 115200
Data format: 8 Bits, No Parity, 1 Stop bit (N, 8, 1)
Flow Control: None
Terminal type: VT100
3.11 Power on and System Boot upOnce Matrix-605 is correctly power on, you can see the message prompt from the serial console port.
The system starts from the initial table and a batch file,autoexec.bat which is located at \NandFlash
will follow up. Therefore user can edit the autoexec.bat file or init table for your auto run program.
To skip the autoexec.bat, please repeatedly key $ (shift+4) right after system boot up.
3.12 Initial TableWinCE uses initial table to decide the order of program/service to start after power on. You can use
init command to configure the initial table as follow:
Number 70 is Artila Manager and Number 71 is WinCE remote display control.

Matrix-605 User Guide
‧6‧
3.13 Network SettingsTo configure the network setting by serial console, you can use command ifconfig as followed. To
check current network configuration, you can use command ipconfig.
3.14 Use Account ManagerTo create user group and account, you can use command usrmgr. After user’s account and
password are created, user can add authentication in telnet and ftp function by using telnetdcfg and
ftpdcfg.
3.15 Telnet ConfigurationTelnet is enabled without authentication as factory default. To disable or add authentication, please
use command telnetdcfg as follow:
3.16 FTP ConfigurationFTP is enabled without authentication as factory default. To disable or add authentication, please use
command ftpdcfg as follow:
Matrix-605 User Guide
‧7‧
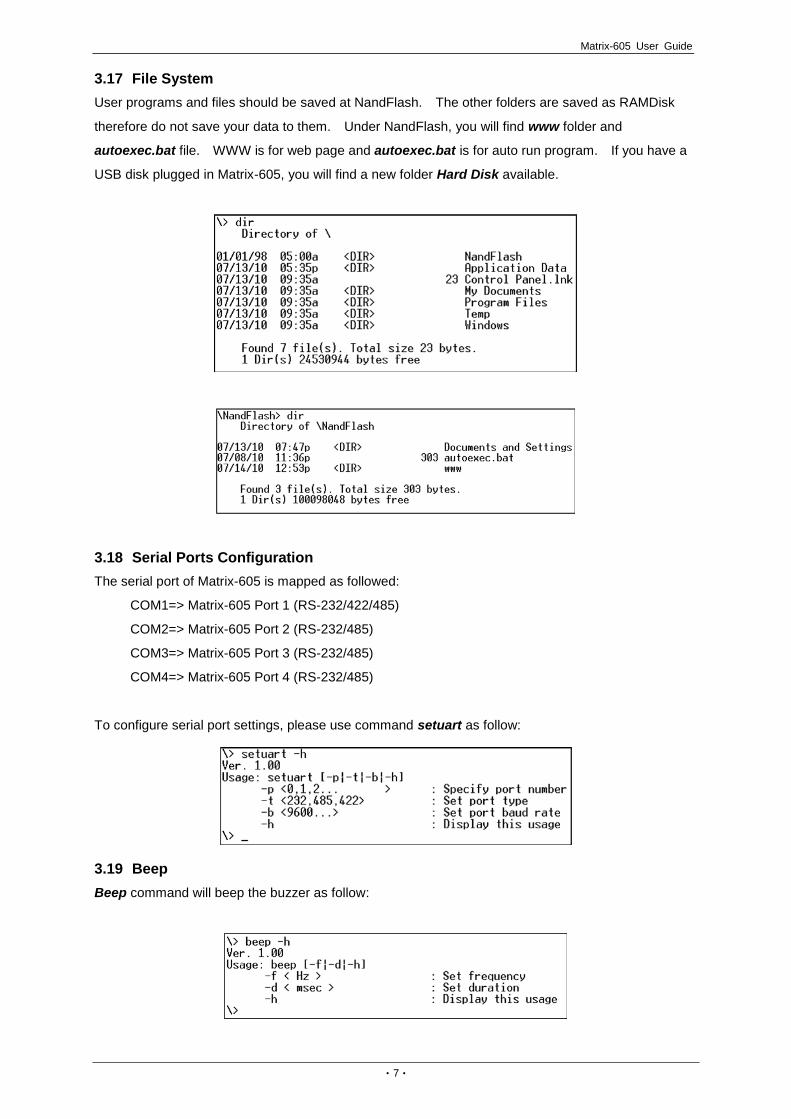
3.17 File SystemUser programs and files should be saved at NandFlash. The other folders are saved as RAMDisk
therefore do not save your data to them. Under NandFlash, you will find www folder and
autoexec.bat file. WWW is for web page and autoexec.bat is for auto run program. If you have a
USB disk plugged in Matrix-605, you will find a new folder Hard Disk available.
3.18 Serial Ports ConfigurationThe serial port of Matrix-605 is mapped as followed:
COM1=> Matrix-605 Port 1 (RS-232/422/485)
COM2=> Matrix-605 Port 2 (RS-232/485)
COM3=> Matrix-605 Port 3 (RS-232/485)
COM4=> Matrix-605 Port 4 (RS-232/485)
To configure serial port settings, please use command setuart as follow:
3.19 BeepBeep command will beep the buzzer as follow:
Matrix-605 User Guide
‧8‧
3.20 updateupdate command is used to update the kernel and loader of WinCE 6.0. Current version of WinCE is
available on Artila FTP.
3.21 Web Page DirectoryThe web pages are placed at /NandFlash/www and the home page name should be index.htm.
3.22 RebootReboot command is used to reboot the system.
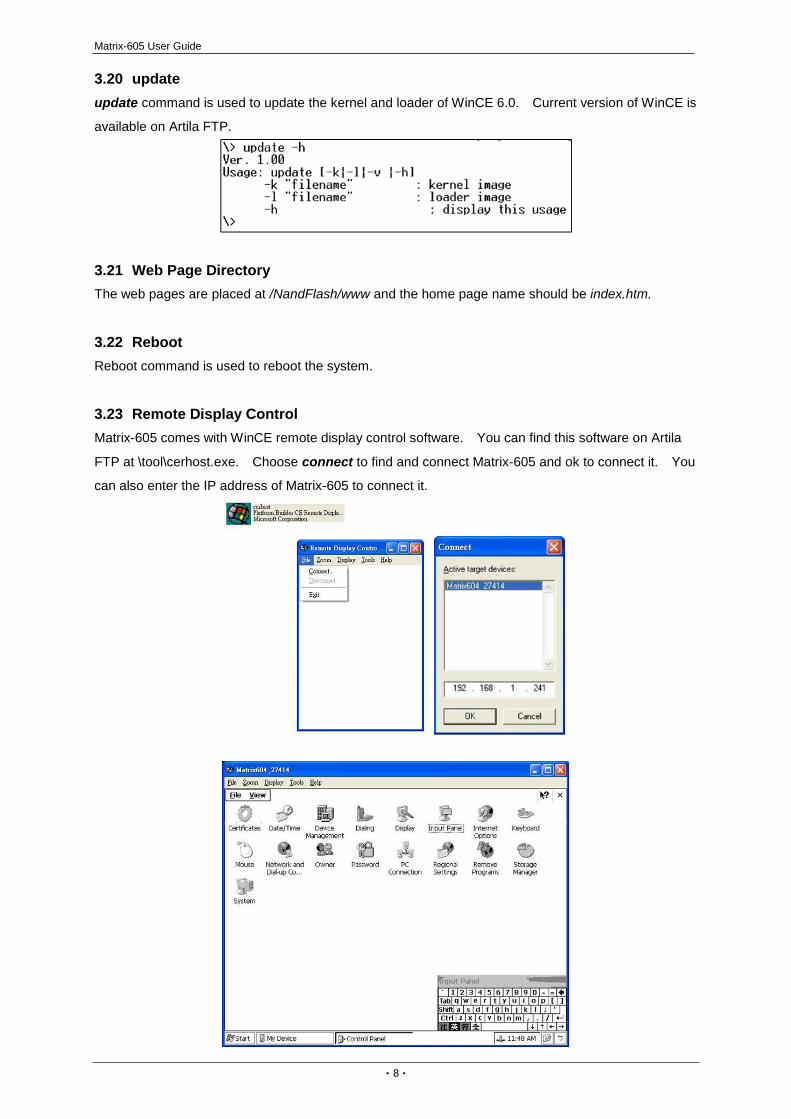
3.23 Remote Display ControlMatrix-605 comes with WinCE remote display control software. You can find this software on Artila
FTP at \tool\cerhost.exe. Choose connect to find and connect Matrix-605 and ok to connect it. You
can also enter the IP address of Matrix-605 to connect it.

Matrix-605 User Guide
‧9‧
3.24 ActiveSync Matrix-605 supports Microsoft ActiveSync via USB client. You can download ActiveSync from
Microsoft web server. ActiveSync provides an easy way to transfer files between PC and Matrix-605.
3.25 Install Matrix-605 SDK Matrix-605 WinCE 6.0 SDK is located on Artila FTP \SDK folder. You need to install Microsoft Studio
2005 before installing Matrix-605 SDK.
Choose Matrix605_CE_SDK for the smart device application and click the device option.

Matrix-605 User Guide
‧10‧
3.26 Install USB WLAN Dongle Matrix-605 supports USB WLAN dongle which uses Ralink RT2870 Wireless LAN controller. While
plug in USB WLAN dongle, you will see the new USB device detected. Follow the screen 1, 2, 3 to
configure the Wireless LAN.
Screen 1
Screen 2

Matrix-605 User Guide
‧11‧
Screen 3


![Survey of Next-Generation Broadband Aggregation Networksjain/cse570-13/ftp/broadba.pdf · The D-Link DIR-605 Fuzion Broadband Aggregation Router [DLink] is Cloud-managed and meant](https://img.pdfslide.us/doc/110x75/5fb9363dda5f062598233973/survey-of-next-generation-broadband-aggregation-networks-jaincse570-13ftp-.jpg)