Embed Size (px)
Citation preview
MATERIALS INFORMATION and TECHNICAL RESOURCES for ARTISTS- Storage, Exhibition, and Handling
STORAGE, EXHIBITION, AND HANDLING TIPS Storage
There are many storage systems for paintings and other types of artwork that can help to minimize potential hazards. The choice of storage system is dependent on the size of the artwork(s) and the resources available. No matter which system is selected, maintaining control of environmental conditions (avoiding rapid fluctuations; keeping humidity between 45-60% and temperature between 60-70 F) and light levels (avoiding exposure to ultraviolet light and not to exceed more than 200 lux…generally 50 lux is sufficient for viewing purposes) will help to preserve any type of artwork. If artists live in or near a flood zone or work in subterranean studio spaces, all storage systems should be at least 4-5 inches off the ground to avoid water-related damage. The storage systems listed below are recommended for studio spaces of all sizes, however artists should heed the following basic rules for general storage procedures:
Avoid horizontally storing/stacking two-dimensional artworks horizontally unless they are in individual storage boxes.
Avoid storing artworks in attics or basements. Avoid storing/hanging paintings against exterior walls (where one
side is exposed to the outer elements). Avoid storing artworks near a/c, heating units, or air vents. Avoid storing artworks in areas that experience moderate to extreme
levels of vibration. Avoid storing artworks near open doors or windows.
Placing artworks on storage shelves or in cabinets - Storage shelves (or storage bins) can be constructed of coated wood, plastic, or metal and can be constructed either horizontally or vertically. If wood is used it is essential that it is coated to minimize potential off-gasing of acidic materials that may cause potential long-term damage to art materials (e.g. acid burn to paper-based materials). Plastic material can also be used but off-gasing may also give rise to long-term problems. It is therefore recommended that more stable grades of plastic are used (e.g. High Density Polyethylene).
Selected rigid materials can also serve as protective dividers if there are multiple paintings and/or framed works that require storage. Artists are advised to vertically stack artworks back-to-back and front-to-front and using dividers such as pieces of heavy-duty, acid-free cardboard or Foam core. Each piece should be larger

than the larger of the two adjacent paintings/framed artworks. Paintings/framed artworks of similar size should also be placed together.
Slotted multi-purpose storage shelves are also easy to assemble and can be made to accommodate different sizes of paintings. If plywood is used, it should be sanded and coated with two coats of high-quality exterior or interior grade acrylic latex paint or acrylic latex varnish. Cushioning material (low pile carpet scraps, Cor-X, felt, etc.) should be secured to the bottom of the shelves to prevent abrasion to frames or outer edges of unframed paintings. For protection from dust, the openings of storage units can also be draped with curtains or polyethylene sheeting Stacking paintings vertically against an interior wall or side of cabinet - Vertically stacking paintings (and framed paper-based artwork) against a wall or cabinet should only be considered a short-term storage option. However, if artists choose this system, pieces of heavy-duty, acid-free cardboard or Foam core (larger than the larger of the two adjacent paintings/framed artworks) should be used as protective dividers. Again artworks should be placed on padded blocks four or more inches high to prevent damage if there is flooding. Hanging artwork from storage screens - Storage screens are usually constructed using sturdy fencing material/rigid wire mesh screen that has been attached to a vertically oriented frame (wood or metal). Two-dimensional artwork (framed and unframed paintings, framed paper-based artwork) can be hung from the screens using rigid, sturdy hooks. Storage screens tend to be used for large studio spaces and/or large collections as they can require a fair amount of space and/or resources to construct. See the instructions below for appropriate hanging procedures. Hanging artwork along the wall - Artists may also consider simply hanging artworks along a wall as a temporary, relatively inexpensive storage system. Artworks should be hung with enough space (at least 2 inches) surrounding them to ensure that they can be safely handled and to prevent possible abrasian. Artists should consider selecting an interior wall (if possible) that does not receive direct sunlight. See the instructions below for appropriate hanging procedures. Instructions for Hanging Framed Artworks - Artists should consider attaching sturdy “D” rings to the frame as opposed to eye-hooks which can work their way out of the frame over time and are not able to withstand as much weight. A sturdy picture wire can then be fastened to one of the “D” rings and then threaded through the opposite “D” ring, allowing just enough slack for hanging purposes. Thread the wire through again, repeating at least 4-5 times. Once the wire has been threaded, through fasten it to the opposite “D” ring. Do not mount hardware into plaster or sheetrock. Concrete walls or studs provides far more support. Ensure that your gallery (or exhibition staff) is using appropriate hardware and hanging procedures. Rolled Storage - This type of storage system is commonly used for large-scale/over-sizes works. If a painting is to be stored rolled onto a tube, it must be flexible enough to withstand rolling without cracking, therefore paintings with little

to no impasto and flexible binders and grounds (e.g. oils, acrylics) may be considered suitable for rolling. If paintings are to be rolled they should be a) sufficiently dry b) rolled with the paint layer facing outward c) rolled with a protective interleafing sheet (e.g. silicone-release Mylar, silicone-coated paper, DupontTM Tyvek paper) over the paint surface (avoid using glassine or wax-coated paper). Once a painting had been rolled, the tube needs to be wrapped and stored appropriately (e.g. horizontally suspended from a pole, bar or cable running thru the center of the tube). Sonotubes® are generally recommended for rolled storage. The acidic paper should be peeled away and they should be covered with soft, acid-free paper (e.g. blotter paper) before use. Your tube should always be 4 inches longer than the shortest side of your painting when laid flat. The diameters of Sonotubes® tend to be wide enough to ensure that your painting can be safely rolled. However, for larger and/or longer works, artists might consider purchasing oversized Sonotubes®.
Individual Storage Containers/Boxes (Courtesy of the Conservation Center for Art & Historic Artifacts)
Individual storage containers can be custom made to fit individual artworks and in some cases can even be used to house artworks during transportation. Boxes allow artworks to be safely stacked in a horizontal manner and can free up potential space in a cluttered studio environment. Storage Boxes - Storage boxes can be prepared from acid-free corrugated cardboard or fiberboard, Foam core, polyethylene, polystyrene, and/or vapor barrier films (e.g. Marvelseal). Simple storage boxes allow artworks to “float” inside while others are completely padded out and constructed from multi-layered, shock absorbing materials. Be sure to label your boxes; some artists use the name of the painting and the date of execution while others print out a small image of the painting and tape it to the outside of the box. While there are numerous ways to construct storage boxes, the following instructions demonstrate how to construct a box out of acid-free carboard.
Constructing a Storage Box:
Materials
Acid-free cardboard single wall
Bone folder
Metal straight edge, non-skid ruler
PVA (polyvinyl Acetate) adhesive (pH neutral)
Scissors or utility knife
Cutting Surface

Procedure
MAKING THE BOX
Determine the size and depth of the box. Add these measurements together to find the outside dimensions of the boards (please refer to the diagram below).
(L= length, W= width, H= height, TH= thickness of the board)
Outside dimensions= L + (H x 2) + (TH x 2) = ______
W + (H x 2) + (TH x 2) = ______
Cut two boards using these dimensions, one for the bottom and one for the lid. Place the smooth side down and mark off the sides using the ruler. With the bone
folder score gently enough to make an impression without breaking the surface. Using scissors or a utility knife cut into the corners of the shortest side (or with
the fluting of the cardboard) making flaps on either side. Remove the corners on one side if you need a drop wall for easy access. You have
the option of keeping the flap and covering the edge of the drop wall similar to the treatment on the other sides.
Insert the bone folder into the flap and peel up the paper cover, loosen the corrugated filler (fluting) with the help of the bone folder and peel back both paper cover flaps.
Using the scissors cut out the fluting, then bring the paper flaps together and cut the corners on a diagonal towards the crease.
Glue up the insides of both flaps. Allow the glue to dry to tacky before folding up the side and attaching the flaps onto the outer and inner edge of the adjoining wall.
MAKING THE LID
To make the lid you must subtract the thickness of the board so measure the sides 3/16” less than the sides on the bottom box. Follow the same procedure as above sealing all four corners.
SEE DIAGRAM BELOW FOR FURTHER INSTRUCTIONS
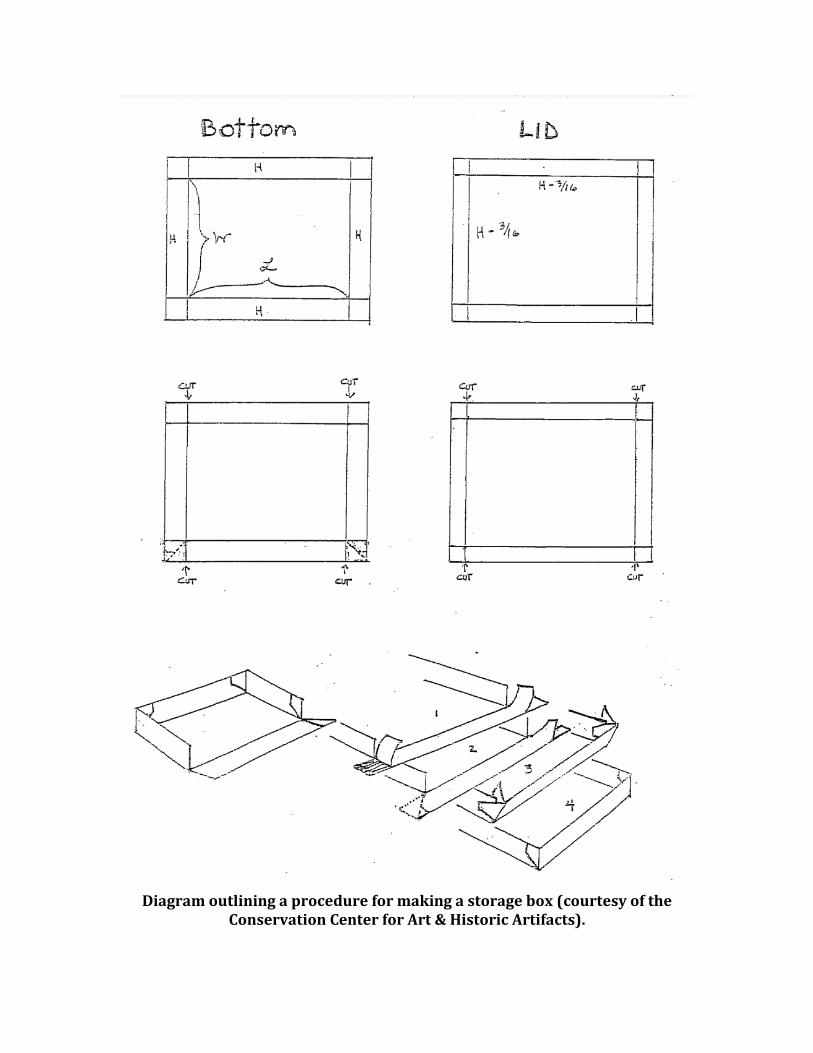
Diagram outlining a procedure for making a storage box (courtesy of the
Conservation Center for Art & Historic Artifacts).
ENVIRONMENTAL CONDITIONS
Controlling the environmental conditions in a storage and/or exhibition area will help to avoid potential damage to artworks. Moderating room temperature and relative humidity (RH) has a significant impact on the life and stability of paintings. The ideal temperature and RH ranges for most two-dimensional artworks are: temperature 64 - 75 degrees Fahrenheit (18 - 24 degrees Celsius) and RH level between 40% - 55%. Moving a painting from a cooler area to a warmer area can cause moisture to condense on its surface. RH levels below 35% can lead to embrittlement of the layers of a painting (which can result in cracking and potential paint loss), while RH levels over 65% can encourage mold growth. Accumulation of dust and dirt can also damage artworks and exposure to direct light can speed up degradation reactions and cause certain colorants to fade. Paintings can be covered with dust cloths or cotton muslin to help avoid some of these problems. Atmospheric Pollutants - Open windows and doors will allow dust and pollen to enter and accumulate in a studio space, so doors, windows, and outside vents should be kept closed whenever possible. Other sources of pollutants include cigarette/cigar/pipe smoke and even certain cleaning products. Pests - Certain types of pests/insects may be attracted to the gelatin in traditional sizing and gesso as well as the egg yolk in tempera paint. Termites and other wood-boring pests can also damage wooden panel paintings, stretchers, and frames while moths, silverfish, and beetles can attack fabric supports. On occasion, rodents have also been known to nibble at artworks. Mold can be encountered in almost any evironment but is more of a concern in humid climates. If your studio space is in a humid environment, a dehumidifier may be necessary to help avoid potential mold growth. Some mold spores can be impossible to remove from artworks (particularly fabric supports) without exercising invasive methods that may damage the artwork.
Light - Natural light (sunlight) and even some types of artificial light can cause certain colorants to fade. Light can also be a catalyst for certain types of degradation reactions. Exposure to light can be reduced by storing paintings away from windows and out of direct sunlight. If your studio space has multiple windows, considering installing shades, blindes or adhering ultraviolet(UV)-absorbing films on the inside of the glass (these films reduce UV levels while helping to maintain overall light levels). For illuminating works of art, avoid light sources with significant output in either the UV or infrared (infrared generates heat, for example those tungsten bulbs that are often seen mounted atop paintings). Check with galleries, museums, and other exhibition spaces to make sure they are using appropriate lighting to illuminate your works.
BACKING BOARDS A backing board will provide additional protection for paintings on canvas as it will prevent the accumulation of dust and dirt along the reverse and from possible physical damage from the back. Backing boards also help to mitigate the negative effects caused by fluctuations in relative humidity and temperature. Backing boards can be constructed from corrugated or fluted plastic (e.g. Coroplast or H-Core), acid-free corrugated board, Foam core or tempered hard-boards (e.g. 3mm or thicker Masonite) although the latter will add significant weight to the artwork and lower quality panels may warp and/gradually emit formaldehyde. Synthetic boards are used more frequently because they are significantly lighter in weight. An excellent resource for detailed directions on how to prepare and attach a backing board can be found at the following website (courtesy of the Canadian Conservation Institute): https://www.cci-icc.gc.ca/resources-ressources/ccinotesicc/10-10_e.pdf
NOTE: While it is possible to attach backing boards while your artwork is positioned vertically it is safer to perform this procedure with the artwork lying flat. You will need to wait until your painting is fully dry and/or your varnish is no longer tacky before following the instruction outlined below.
Constructing and Adhering a Backing Board:
Materials
Acid-free cardboard, Foam core, etc.
Metal straight edge, non-skid ruler
Cutting Surface
Philips screwdriver
Awl
Screws (corrosion resistant) and finishing washers
Foam (Ethafoam) Strips (optional)
Procedure
Locate a flat surface that can safely accommodate the size of your artwork. Prepare a piece of soft blotter/watercolor paper, silicone-coated paper,
Tyvek or another type of acceptable interleaf material by ensuring that it is slightly larger than the size of your artwork. If your artwork is large in scale you can tape several pieces of interleaf material together but make sure that the taped side is never in contact with the face of your artwork and that the sides of the individual sheets are perfectly flush and level so as to avoid creating a seam-mark in your paint and/or varnish.

Place your painting face down on top of the interleaf sheet(s). Cut the board to the required size. Ideally the edges of the backing board
should not be flush with either the outer or inner edges of the stretcher bars but should lie somewhere in between. If painting is very large, cut the board into sections that line up with the crossbars. Archival tape can also be used to attach multiple boards for large-format works without crossbars but be sure to adhere the tape to the outside face of the board, not the side facing the painting.
Foam strips can also be cut and prepared to provide a “sealed microclimate” (please refer to CCI’s website cited above). The strips are placed along the outer edges of the backing board in between the board and the stretcher and are fixed into place when inserting the screws. Another option is to purposely vent the corners thereby allowing a small amount of air flow to prevent the buildup of mold and moisture (paintings on canvas can essentially act as semi-permeable membranes). This is done by simply cutting away a small triangular section from each corner. Foam strips are recommended for paintings residing in colder climates while venting might be considered for paintings residing in warmer, humid climates.
If using corrugated board, position the board so that the corrugations run vertically to prevent the buildup of moisture.
Mark the position of the screws (approximately 1- 2 cm from the edge of the board and no closer than 1 cm from the stretcher’s outer edge).
Do not place screws directly over corner joints in the stretcher. Using an awl, make holes for the screws through the board, gently pressing in
to the stretcher bars. Attach the board to the stretcher using non-corrosive (brass, stainless steel,
or bright-plated) screws of appropriate length and finishing washers. AVOID SCREWING ALL THE WAY THROUGH YOUR STRETCHER BAR INTO THE BACK OF THE CANVAS. When inserting the hardware, take care to not compress the board too tightly.
HANDLING AND TRANSPORTATION
Artists should consider the following when preparing to transport or handle artworks:
Prior to moving an artwork across a short distance, be sure to first locate its final resting place and plan the moving route accordingly.
Avoid touching the face of two-dimensional artworks (framed and unframed) during transportation. If your artwork possess painted edges that are part of the composition, handle edges that are the least exposed to the viewer.
Oils from hands can leave behind imprints and markings. Consider wearing clean, lightweight cotton gloves, latex gloves, or nitrile gloves when moving
artworks. Note that if the outer edges of the artwork (or the frame) is particularly smooth, cotton gloves may not provide enough grip so exercise caution accordingly. Cotton gloves can also “catch” or snag on areas containing prominent impasto or frames with elaborate moldings.
A painting with flaking or loose paint layers should not be moved. If the painting must be moved, it should be carried flat.
Avoid wearing dangling jewelry, button, watches, or other accessories that can potential scratch or damage the surface of the artwork during handling/transportation.
Avoid carrying an artwork by its hanging wires and from the top or corner of its frame. Always use two hands (and two people if necessary) with the face of the artwork in constant view during transportation so that it can be continuously monitored.
If a canvas painting does not have a backing board, do not wedge your fingers between the stretcher and the canvas as this can create planar deformations to the fabric support.
Storage, Packing, and Shipping Materials
Shipping an artwork always increases the likelihood of damage as it can experience sudden dramatic fluctuations in its environment and become subjected to improper handling and/or vibration during transportation. Artworks can be seriously damaged unless proper packing procedures are followed and appropriate shipping materials are used. Artists should consider the artwork’s materials and/or stratigraphy as well as the potential environmental changes that will occure during travel when preparing for shipment. While bubble wrap, foam, Saran wrapTM, tissue paper, glassine, and wax paper are commonly used to package artworks, NONE of these materials are recommended. If appropriate packing materials are chosen they can be re-used (e.g. for taveling exhibitions) but only if they are stored in a clean and stable environment (for recommended materials see below). Artists should consider the following when preparing to ship artworks over a short-or long-term period:
Avoid shipping artworks that are exhibiting flaking or signs of potential delamination. Vibrations during shipping and poor handling can worsen their condition.
Paintings on fabric supports should be fitted with a protective backing board on the reverse (see instructions below).
Paintings on fabric supports that are fairly slack should be re-tensioned by keying out the stretcher to restore planarity. This will help to avoid possible planar deformations during shipping and even potential flaking of the paint/ground layers. Conversely, the painting should not be overtensioned as this can result in splits along the outer edges (tacking margins).
Avoid shipping artworks that are framed behind glass if at all possible. Taping the front of works framed in glass is always recommended
(using artists low-tack tape) but it will not prevent the glass from potentially cracking if an accident should occur during transportation. The tape will, however, help to hold the sherds of glass in plane away from the surface of the artwork until it can be carefully unpacked.
Always remove superficial dust from the surface of the artwork prior to shipping. Avoid using featherdusters as they can scratch the surface. Soft brushes (e.g. badgerhair, soft, white-bristle Japanese brush, sable brushes) and in some cases soft, lint-free clothes are recommended.
Glassine (acid-free) should only ever be used for short-term storage purposes (less than 30 days) and/or when artwork is being shipped to a cooler climate. Glassine can deteriorate quickly when stored in or shipped to environments that are humid and hot. Over long periods of time glassine will deteriorate and adhere to the surface of the artwork, becoming extremely difficult to safely remove. This material should never be used to wrap an artwork if the surface is still slightly tacky or if the artwork has been recently varnished (or recently completed). Bubble-pack (or Bubble-wrap) is plastic sheeting with raised air-filled bubbles that are evenly spaced to provide cushion. This material should NEVER come into direct contact with an art object, as it can create permanent impressions on the surface. An isolating interleaf material should always be used in between the bubble wrap and the art object (with the exposed bubbles facing away from the artwork). Bubble wrap can be used as a padding material to help with shock absorption. Kraft paper is available in several grades, but the most commonly form used for packing/storage purposes is made from wood pulp that undergoes the kraft pulping process, a process that removes most of the lignin present in wood fibers. The kraft process creates paper that is lower in acidity, higher in quality and possesses more strength. Kraft paper is inexpensive, readily available, and also absorbent (no risk for buildup of condensation during storage/transportation). However its absorbency is also a downside, as it is not water-resistant, is prone to tearing, and can develop creases that can create permanent impressions in the surface of the artwork. Kraft paper should not be placed in direct contact with the artwork if it is still tacky and/or if the varnish is not yet dry as it can adhere to the surface and cause potential damage. Kraft paper may be used for short-term storage and/or transportation purposes however artists are advised to tape the paper into place so as to avoid possible creases and tears from forming. DupontTM Tyvek (flashspun nonwoven high denisty polypropylene) paper is an alternative to glassine and is a highly recommended product. It is available in both a soft textile-like finish and a slick, smooth finish. This high-density polyethylene foam can be used for long-term storage (as an interleaf material) and for transportation/packing purposes.
Mylar is a flexible, clear, polyester film that can also be used as an interleaf material (for short- and long-term storage) and for transportation/packing purposes. As Mylar has an electrostatic charge, it should never be used on pastel or charcoal drawings. Silicone release Mylar is polyester film that has been coated with silicone on one or both sides. Single-sided silicone release Mylar is recommended for use when transporting artworks as it can be safely placed in direct contact with an artwork without adhering to, or abrading, the surface. Artists are advised to tape Mylar film in place so it does not create unwanted wrinkles or creases when in contact with the artwork. Polyethylene film is often used for its transparency, smooth texture and its ability to serve as an effective moisture barrier. If effectively taped and sealed, polyethylene film can create a temporary micro-climate for artworks during transportation; however, there is a small risk that condensation can occur if the artwork is packed in an uninsulated case. In general polyethylene film is a recommended material to be used for packing/storage purposes although artists should check on the quality of their film as some brands can possess an oily residue on the surface. Plastic packaging “peanuts” are made of expanded polystyrene and are not recommended for use with art objects as they retain moisture and can cling to surfaces as they can create an electrostatic buildup. Packing peanuts are however relatively inexpensive; if they are to be used as a padding material, they should be encased in polyethylene bags so that they do not come into direct contact with the surface of the artwork. Polyethylene foam (Ethafoam, Volara) are sheets of foam that are light, easy to handle, shock absorbent, chemically inert, and can act as an effective moisture barrier. Sheets can be joined using a heat gun, a glue gun, or double sided tape. The thickness, density, and texture of this type of foam will vary depending on the grade. If this material is to be used for long-term storage purposes, white sheets should be used as opposed colored sheets, as the latter may contain undesirable additives. Polyurethane foam is an excellent cushioning/padding material that can be easily cut to specific shapes and sized. It is recommended for short-term transportation and should be used in conjunction with an interleaf barrier (such as acid-free tissue or Tyvek) to prevent the coarse surface of the foam from coming into direct contact with the artwork’s surface. This material can also be covered with tightly-woven nylon fabric or cotton knit, but these fabrics should not come into direct contact with unstable or delicate surfaces.
WHAT TO INCLUDE ON THE BACK OF YOUR ARTWORK
Artists are highly encouraged to consider documenting their materials and techniques on the reverse of their artworks. Such information can be included in the form of a encapsulated or sealed label (adhered to the stretcher bar, panel support, or backingboard), a clear plastic envelope sheet (adhered to the panel support or backingboard), or even a simple hand-written inscription. Ideally this information should accompany the painting throughout its lifetime and will help to better inform researchers, conservators, art handlers, and other potentially interested parties. If you are using paper ensure that it is acid-free and that any inks used are fairly lightfast. If artists choose to use a pencil, it should leave a legible mark and not be easily smudged. While sharpie markers are often a popular choice, they can fade over time if they are exposed to light. Hand-written inscriptions on rigid supports can also be sealed with a protective varnish coating to provide additional protection. Artists should consider including the following:
Name and contact information of artist (phone number, website, email, etc.) Title and dimensions of painting (HxW) Date completed (and started if possible) All materials used, including manufacturers information:
o Support, ground, medium, colors/pigments, etc. and associated brands if known
o Relevant varnish information as well as the date varnished if known
TYPES OF GLAZING/GLASS FOR FRAMING (Courtesy of the AIC Book and Paper Specialty Group) Glass: Least expensive glazing material; low UV- filtering capacity; edges may be sanded or dulled for safety; non-static; planar stability (does not bend or waffle) but potential for breakage requires careful handling and taping for travel; can be stored standing upright or flat. Old glass can spontaneously shatter. Picture glass may be considered too thin for use in framing and general handling. Single strength glass, may be used up to 30" x 40". Above 30" x 40", double strength glass should be used. For very large works, safety glass or laminated glass may be used. This is tempered so that instead of splintering, it breaks up like a car windshield. It is very heavy and very hard to cut. However, it can be purchased cut to true size of the frame and then tempered. Acrylic Sheeting (Plexiglas): More expensive than glass; non-breakable; UF-4 and OP-2 remove approximately 90% of the UV range and do not have a yellow cast. UF-3 removes 97% of the UV range, has a slight yellow cast and is more expensive. A common misunderstanding about UV-filtering acrylic is that it should be changed. In fact, as it ages and becomes more yellow, it becomes more effective. Plexiglas contracts and expands with changes in temperature and RH. (One must make allowances for this in measuring to fit frames). It is lighter than glass, scratches
more easily and is clouded by solvents. Also available with an abrasion resistant coating. In larger sizes, one must use thicker Plexiglas to minimize bowing (this is less of a problem with glass). Because of static charge which builds up despite initial antistatic cleaning, Plexiglas should not be used on friable media such as powdery pastel, soft graphite, charcoal, flaking paint. Plexiglas may be used on pastel and charcoal at the discretion of a conservator. In individual cases sufficient space may be allowed between the media and the Plexiglas such that the media will not be in danger. Denglas: Expensive; filters UV somewhat better than glass (about 20%); has been problematic to tape surface for travel because removal of tape with a razor blade scrapes surface, however, alcohol can be used to remove residual adhesive: slight purplish reflection. Denglas may diffuse the crispness of the image. Gedolin: A non-glare, UV-filtering acrylic sheeting called Gedolin is also on the market. It is manufactured in Europe and very expensive. Because it is heat-treated, it is less flexible than regular acrylic sheeting and can break more easily on impact. Tends to look yellow with purple reflections. Safety Denglas: Expensive; available in limited precut sizes not larger than 30 x 40 inches (this size costs approximately $1000.00); does not require taping; must be ordered to size much in advance and precut sizes may not be exact. Non-glare glass: In order for the non-glare effect to work, the glass must be placed directly against the object; therefore, non-glare glass is not recommended for paper objects.
ADDITIONAL REFERENCES AND RESOURCES Art in Transit: Handbook for Packing and Transporting Paintings, edited by Merv T. Richard, Marion Mecklenburg, and Ross Merrill (Washington DC: The National Gallery of Art, 1997). https://repository.si.edu/bitstream/handle/10088/8127/mci_Art_in_Transit_Handbook_for_Packing_and_Transporting_Paintings.pdf?sequence=1& The Care and Handling of Art Objects: Practices in the Metropolitan Museum of Art by Marjorie Shelley (New York: The Metropolian Museum of Art, 1987). file:///Users/kristindeghetaldi/Downloads/The_Care_and_Handling_of_Art_Objects_Practices_in_The_Metropolitan_Museum_of_Art.pdf Conservation and Exhibitions: : Packing, Storage, Transport, and Environmental Conditions, by Nathan Stolow (London: Butterworth-Heinemann, 1987).
Matting and Hinging of Works of Art on Paper, by Merrily A. Smith and Margaret P. Brown (New York: Consultant Press, 1991). ”Picture Protection” in The Painter's Handbook: Revised and Expanded by Mark David Gottsegen (New York: Watson-Guptill, 2006), pp. 274-310. Book and Paper Group Wiki (American Institute for Conservation ) – Matting and Framing http://www.conservation-wiki.com/wiki/Matting_and_Framing Will Kemp Art School – Art Studio Lighting Design
http://willkempartschool.com/art-studio-lighting-design/ Canadian Conservation Institute - Basic Handling of Paintings http://canada.pch.gc.ca/eng/1439925170562 Canadian Conservation Institute - Storage and Display Guidelines for Paintings https://www.cci-icc.gc.ca/resources-ressources/ccinotesicc/10-3_e.pdf Canadian Conservation Institute - Backing Boards for Paintings On Canvas http://canada.pch.gc.ca/eng/1439925170525/1439925167388 National Park Service – Museum Handbook Part i: Museum Collections https://www.nps.gov/museum/publications/MHI/mushbkI.html National Park Service - Storage screens for paintings https://www.nps.gov/museum/publications/conserveogram/12-01.pdf Northeast Document Conservation Center – Preservation Leaflets https://www.nedcc.org/free-resources/preservation-leaflets/overview Studio Protector - Keeping Your Artwork Safe & Secure http://www.studioprotector.org/onlineguide/safeguarding/keepingyourartworksafesecure.aspx Agora Gallery - Rolling Paintings and Prints for Storage and Shipping http://www.agora-gallery.com/advice/blog/2015/08/04/shipping-artwork-roll-canvases-or-prints-2/ Northern States Conservation Center - Paintings - Packing and Transport by Victoria Montana Ryan http://www.collectioncare.org/pubs/Aug282013.html
The Conservation Center - The Importance of Packing for Long-Term Storage http://www.theconservationcenter.com/article/676085-the-importance-of-packing-for-long-term
Golden Artists Colors - Safe Handling and Transportation of Acrylic Paintings http://www.justpaint.org/wp-content/uploads/2015/11/jp11.pdf Golden Artists Colors - Unstretching and Re-stretching Canvas Paintings www.justpaint.org/wp-content/uploads/2015/06/NumberSix.pdf Conservation Center for Art & Historic Artifacts - Light Levels for Storage and Exhibition http://ccaha.org/uploads/media_items/hbcu-light-levels-for-storage-and-exhibition.original.pdf Determining the Acceptable Ranges of Relative Humidity and Temperature in Museums and Galleries – Part 1” by Marion Mecklenburg (Washington DC: Smithsonian Conservation Institute, 2007) https://repository.si.edu/bitstream/handle/10088/7056/Mecklenburg-Part1-RH.pdf?sequence=1&isAllowed=y Determining the Acceptable Ranges of Relative Humidity and Temperature in Museums and Galleries - Part 2 by Marion Mecklenburg (Washington DC: Smithsonian Conservation Institute, 2007) https://repository.si.edu/bitstream/handle/10088/7055/Mecklenburg-Part2-Temp.pdf?sequence=1&isAllowed=y