Embed Size (px)
Citation preview

Page 1 of 11
S2000-SSS Armorless joint Detail Sheet
Material Detail No. ABJ-017
Date: 05/04/2018
GENERAL: Do not install this material until all members of your crew have read and understood these instructions as well as allrelevant SDS sheets. If you do not understand any part of these instructions call C.S. Behler Inc. 716-684-6060
a. Substrate Preparation & Installation
Preliminary: Establish block –out for joint header as directed by project Engineer or project plans. Any concrete below or adjacent to the header shall be sound and DRY. Any steel plates or angles in contact with or forming part of the header base or side shall be structurally sound and anchored to the structure. The Project Engineer should determine that the intended joint opening in the structure is adequate for the anticipated movement and is within the movement capability of the Silfoam Plus closed cell foam seal.
All sand blast and air blowing equipment shall be equipped with traps or filters to remove water and oil.
1) Sandblast header block-out bottom and sides. Concrete shall be clean, pitted and DRY. Any steel shall be sandblasted to SPS-10 near white condition.
2) Blow header block-out with filtered air to remove laitance and debris from the sandblasting operation.
3) Mix SILSPEC Primer 2000 according to manufacturer’s directions and apply to surfaces of the block-out that will interface with the SILSPEC2000 Mortar. S2000 Primer 400 mL dual cartridge mix with 6 oz of Acetone and brush or spray into sandblasted cavity. Avoid puddling the prime coat. Allow to become tack free.
4) Cut and install the joint form (extruded polystyrene foam) into the existing joint opening in the structure. The form should be snug in the joint opening and extend from below the bottom of the block-out to just below roadway surface. Small gaps between the side
of the form and the joint face (less than 3/16" wide) may be plugged with open-cell backer rod. Wider gaps may require that the form be extended deeper into the joint opening to block mortar run-down.
5) Mix and install SILSPEC 2000 per manufacturer’s directions. Depending on how much material is needed, SILSPEC 2000 Elastomeric Concrete can be mixed in 6 gallon buckets or 16 gallon tubs. In all cases, the SILSPEC 2000 liquid shall be mixed as directed on the Product Data Sheet before adding the pre-blended aggregate. SILSPEC 2000 liquid is a 2 component product and is combined at a 2:1 (RESIN to ISO) ratio. Cut open the containers and use a heavy duty spatula to remove all of Part A and B. Pour the containers of each liquid component into a clean mixing container. Mix the liquid with a heavy-duty low speed 3/4"drill and mixing paddle. Mix A and B liquid for one minute. If mixing in buckets or tubs, the aggregate can be added directly to the mixing container. Make sure the aggregate component is thoroughly mixed with the SILSPEC 2000 liquid and there are no "dry pockets" of aggregate in the container.
6) a. Pour the SILSPEC 2000 Elastomeric Concrete into the
prepared block-out and begin compacting and finishing. Compact the mix with a trowel or the end of a small 2" X 4". Care should be taken to ensure that the mix is well compacted at both vertical faces of the block-out.
b. Smooth the top of the SILSPEC 2000 with steel trowel and make sure it is a tad lower than the roadway surface. Use a short straight board to "bridge" the block-
Page 2 of 11
S2000-SSS Armorless joint Detail Sheet
Material Detail No. ABJ-017
Date: 05/04/2018
out from side to side to screed the mix level, if the form extends above the road surface, notch the board to allow for the form. Well compacted mortar will appear wet and shiny on top.
7) Silspec 2000 should not be cantilevered over edge of cavity. SSI has down size detail contact project EIC and manufacture rep. for detail.
8) Approach slab/header abutment wall: when approach slab and header abutment wall are two separate structures and Silspec 2000 is poured up against approach slab. SSI recommends Silfoam Plus be installed ½” thick or ½ Styrofoam the width eg. 5” and length of cavity between approach slab and the Silspec 2000. After Silspec cures, install DC 888 or DC 902 ½” thick and 3/8” recess. Consult with EIC on project for approval.
9) After the SILSPEC 2000 Elastomeric Concrete has cured sufficiently to resist dimpling when a blunt pointed tool such as a screw driver is pushed into it, a minimum of 3/8" X 3/8" bevel is ground into the top edges of the joint opening.
10)
The following steps can be accomplished after grinding the bevel edges and before the Traffic Open Time of the mortar.
1) Cut through the full depth of the Styrofoam joint form on both sides adjacent to the SILSPEC 2000 Mortar.
2) Remove the joint form from between the SILSPEC 2000 headers. Care should be taken not to damage or displace the curing Mortar.
3) Sandblast the new joint faces to remove residue from the foam forming material. Blow the joint with filtered air and inspect the faces for traces of foam form that were missed during the sand blast operation. If traces of the foam form are found, re-sandblast and blow the joint again.
4) After the SILSPEC 2000 Elastomeric Concrete has reached its Traffic Open Time, the roadway can be re-opened. There is approximately 30minute wait period for the HSJ as the recess protects it from passing traffic.
a. Hot Shot accelerator can be used to speed the cure time of the S2000 in cold weather
sss Section 1 Equipment & Material Storage In addition to safety equipment required to comply with applicable federal, state and local safety regulations, equipment to prepare and repair the joint faces, as well as normal tools of the trade, the following are required: Equipment Checklist for Installing SILSPEC SSS Seal: ♦ Duct Tape (2 % times the length of joint)- optional- for masking the joint
for drips. ♦ Tape Measure ♦ Sausage caulk guns to hold 20o-oz silicone sausages ♦ Sausage gun nozzles (cones) ♦ Box Knife for cutting seal to length ♦ Speed Square for laying out cuts for vertical curb transitions ♦ Chemical-resistant gloves ♦ Caulk knives for tooling sealant bands ♦ Acetone solvent for cleaning joint profile, caulk knives and mixer tools ♦ Clean lint-free, 100% cotton rags
Material Storage: Store SSS Seal, adhesive and primers inside out of adverse weather conditions and off the floor until ready for use. Primers and adhesive should be stored in a dry location, indoors, out of direct sunlight and between 50°F
(10°C) and 90°F (32°C). Keep from freezing.
Shelf Life- SSS Seal- Indefinite, Adhesive & Primers- 1 year from date of manufacture.
Clean Up: Remove epoxy and silicone sealant from equipment before it cures using acetone* or alternative solvent. Solvents are not effective after the epoxy or silicone has cured. Cured material may be removed by cutting
Page 3 of 11
S2000-SSS Armorless joint Detail Sheet
Material Detail No. ABJ-017
Date: 05/04/2018
it away with sharp tools or grinding. (* Solvents are toxic and flammable. Observe solvent manufacturer's precautions and refer to Material Safety Data Sheets as well as local and federal requirements for safe handling and use.)
Section 2 Repair Spalled Or Damaged Joint Faces Concrete Remove loose particles and weak concrete to ensure sound substrate. Spalls, chipped edges and uneven surfaces must be repaired using suitable patching material and proper patching geometry and techniques. Joint faces must be parallel. Reinforce if needed per normal practice or Engineer's recommendations. Remove all contaminates by sandblasting or grinding to ensure a thoroughly clean and sound substrate for the full sealant depth.
Note: Do not use a wire wheel- this will polish the substrate and cause failure
Repair damaged joint faces. SILSPEC 900PNS or SILSPEC 2000 are excellent choices. Joint faces must be parallel. Metal Sandblast or grind to rough, white metal and solvent wipe immediately prior to applying SSS Adhesive Primer.
DO NOT ALLOW OXIDATION (RUSTING) TO OCCUR BEFORE EPOXY IS APPLIED.
Other Substrates: Contact CSB
Section 3 Correctly size the joint seal Make sure you have the correct size material for the joint. Measure the joint width at the deck surface and below to ensure the joint faces are parallel. Material has been supplied to suit your joint widths at mean temperature based on field-measured information you provided. Widths of material supplied are marked on each roll of material. Compare width of material supplied as marked on each roll against mean joint width.
NOTE: If unsure of correct material selection, consult SSI.
IMPORTANT: Do not unroll the material or install the primer or adhesive until you have read and understood the rest of these instructions.
Section 4 Prepare the joint and SSS Seal Gland ACP Concrete Overlay: Create header block-outs as detailed on the project plans and install SILSPEC® 2000 Polymer Mortar as detailed in MDS# SSI-002. Allow to cure hard per the SILSPEC 2000 Cure Chart before proceeding. Once the material has cured sufficiently for the work to proceed, remove the joint form and sandblast the faces of the header to remove all traces of the form material. Blow the joint opening and surrounding area to remove debris & laitance of the removal/cleaning operation. Concrete: Concrete joint faces should be parallel and vertically plumb. If the faces are spalled or broken they should be repaired with SILSPEC 2000 Polymer Mortar as directed by the Project Engineer or Project Plans. Use a form made from extruded polystyrene (Blue or Pink Board) to block the joint opening and fill any breaks or cavities surrounding the joint with properly prepared and mixed SILSPEC 2000 Mortar. Allow to cure hard per the materials cure chart. Steel: Sandblast the steel joint faces to SPS-10 Near White condition. The cleaning should extend into the joint to a point 1" deeper than the anticipated depth of the adhesive beads required to install the SSS profile. Clean the SSS Seal Gland: Unroll the seal gland and wipe with a clean rag saturated with acetone to clean. Be sure the serrations in the face as well as the end bulbs are free of dirt, powder and other contaminates. Re-roll the gland with the top to the inside of the roll and place on a clean surface till ready to unroll into the joint opening.
Page 4 of 11
S2000-SSS Armorless joint Detail Sheet
Material Detail No. ABJ-017
Date: 05/04/2018
Section Notes: Be sure the joint faces are plumb/parallel and free from any fins or protrusions that would prevent the seal gland from contacting the sides of the joint during installation. Sandblasters and Blow Pipes Shall be equipped with traps to remove oil and moisture from the air-stream for cleaning operations.
BESAFE! Consult the proper information regarding the safe use and handling of equipment and materials/chemicals re- quired for these steps. Refer to equipment use instructions and SDS Sheets as required.
Section 5
Priming Joint Faces:
SILSPEC® 2000:
SILSPEC 2000 does not require the use of primer for DowSil® 995 to adhere to the joint faces.
Concrete Faces: DowSil® Primer P- use a clean cotton wiping rag andapply to the prepared joint faces and allow to dry.
Steel Faces: DowSil® Primer C-OS, apply as Primer P above. If a corrosion resistant primer is desired, SILSPEC Primer 2000 can be used. Primer 2000 is mixed in a 1:1 ratio in a clean marked paint cup. It can be brushed or rolled onto the joint face and allowed to become tacky or dry to the touch. Refer to the SILSPEC Primer 2000 TDS for complete mixing and handling information.
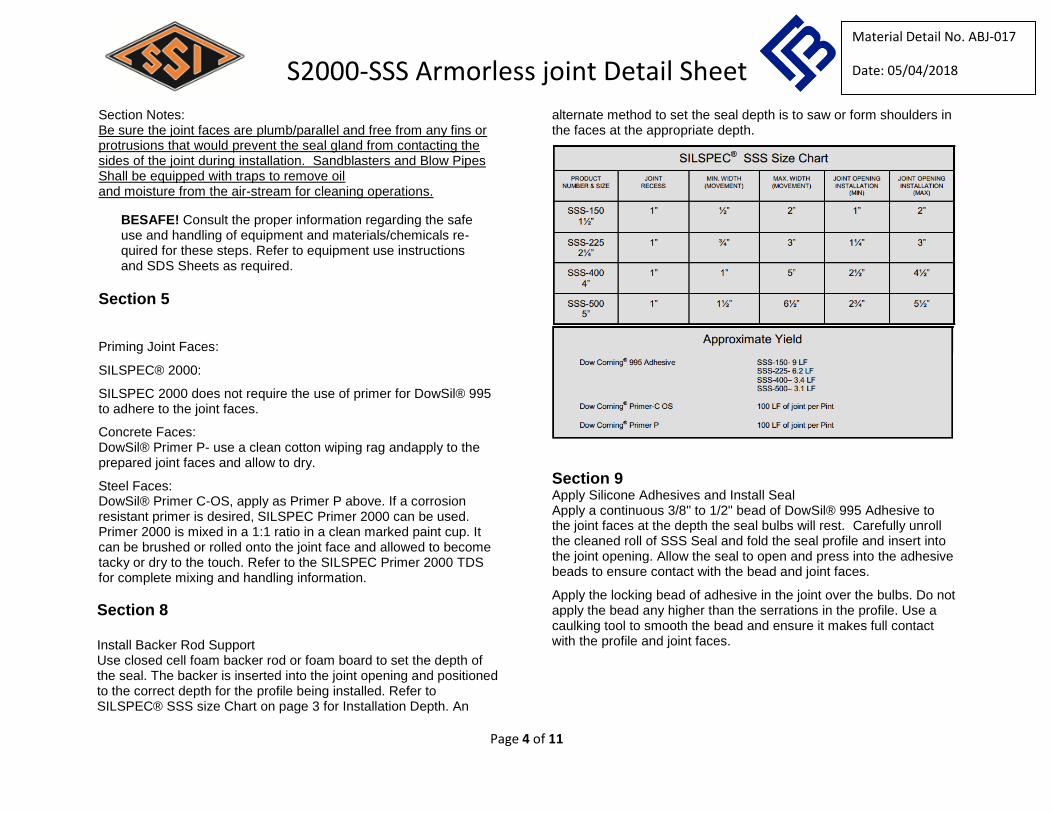
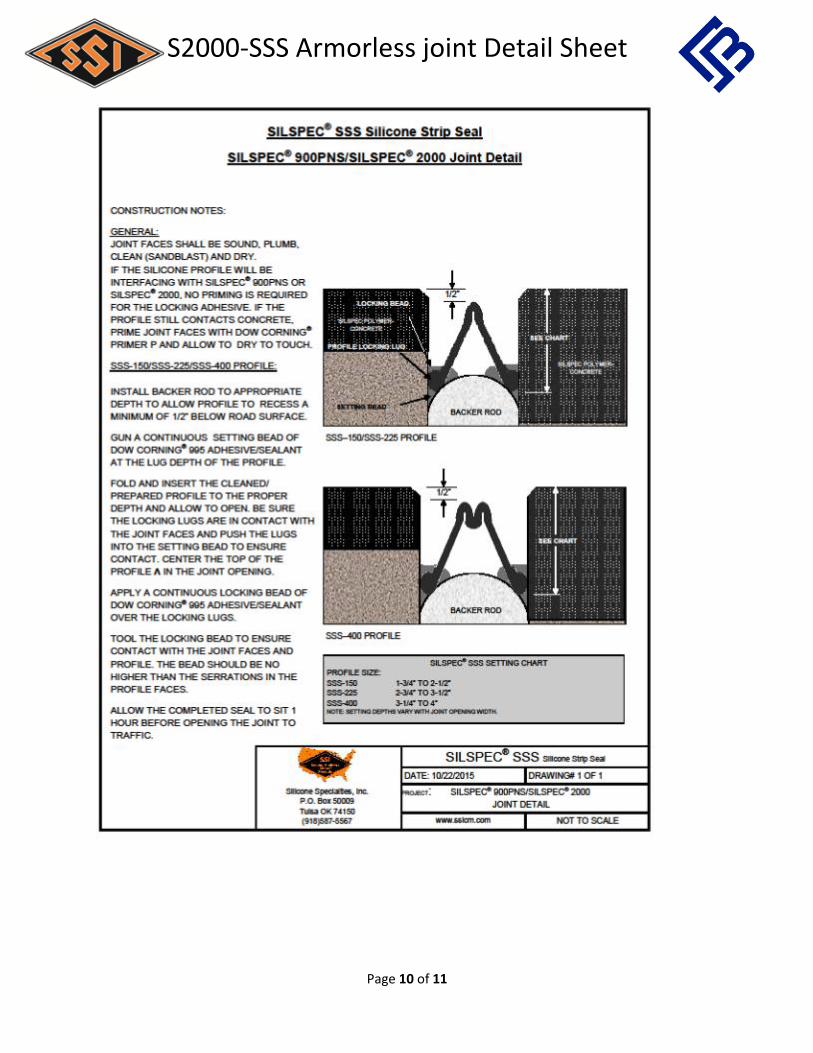
Section 8 Install Backer Rod Support Use closed cell foam backer rod or foam board to set the depth of the seal. The backer is inserted into the joint opening and positioned to the correct depth for the profile being installed. Refer to SILSPEC® SSS size Chart on page 3 for Installation Depth. An
alternate method to set the seal depth is to saw or form shoulders in the faces at the appropriate depth.
Section 9 Apply Silicone Adhesives and Install Seal Apply a continuous 3/8" to 1/2" bead of DowSil® 995 Adhesive to the joint faces at the depth the seal bulbs will rest. Carefully unroll the cleaned roll of SSS Seal and fold the seal profile and insert into the joint opening. Allow the seal to open and press into the adhesive beads to ensure contact with the bead and joint faces.
Apply the locking bead of adhesive in the joint over the bulbs. Do not apply the bead any higher than the serrations in the profile. Use a caulking tool to smooth the bead and ensure it makes full contact with the profile and joint faces.
Page 5 of 11
S2000-SSS Armorless joint Detail Sheet
Material Detail No. ABJ-017
Date: 05/04/2018
Section 10
Opening to Traffic SILSPEC® SSS Seal should be allowed to sit for 1 hour prior to openingto traffic.
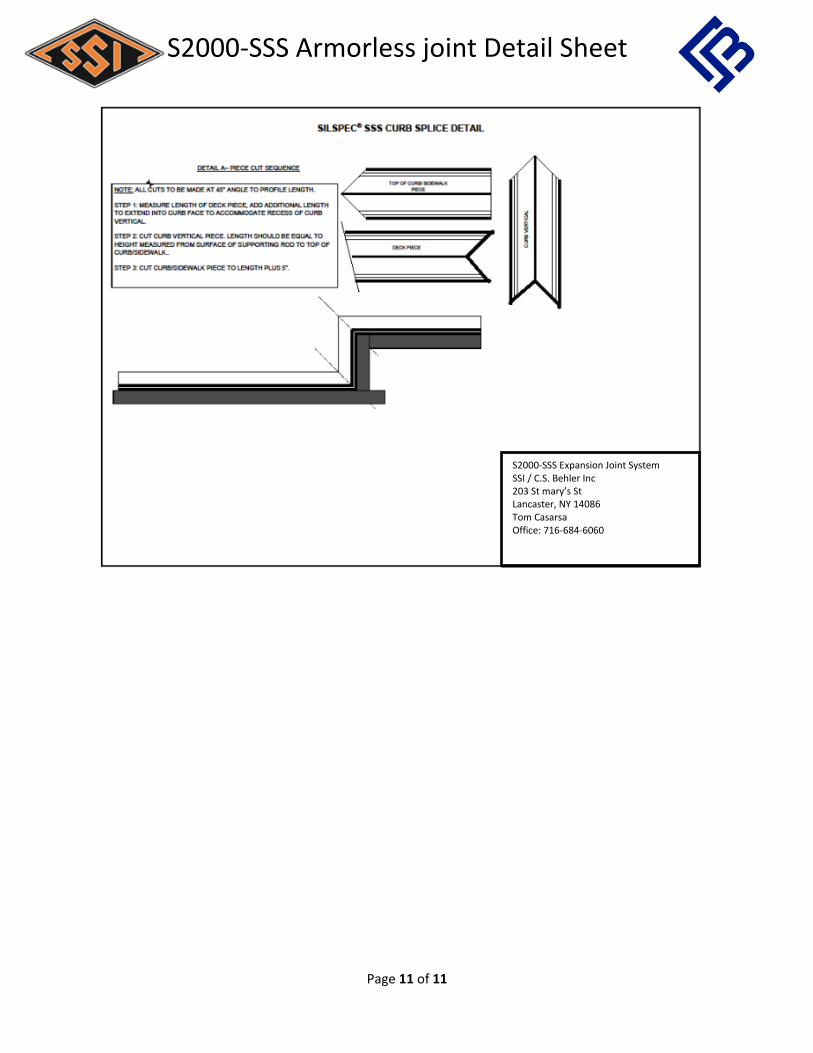
Section 11 Splicing/Repairing SILSPEC® SSS Seal Splicing: While a continuous seal is preferred, SILSPEC® SSS can be field spliced. If splicing mid-joint, simply set the end of the seal into the joint and press into the setting bead of adhesive. Apply a bead of adhesive to the end of the gland. Start unrolling and inserting the succeeding roll of SSS Seal into the joint. Butt the 2 ends together so the adhesive bead is in contact with the ends of both rolls. Use a caulking knife to tool the bead smooth on the face of the SSS Seal Gland. Repairing: If damage occurs to the SSS Seal, the damaged area is cut-out of the joint. A new section is cut to fit the removed seal and Sections 1 through 10 are followed as needed to install a new section of seal in-place.
Page 6 of 11
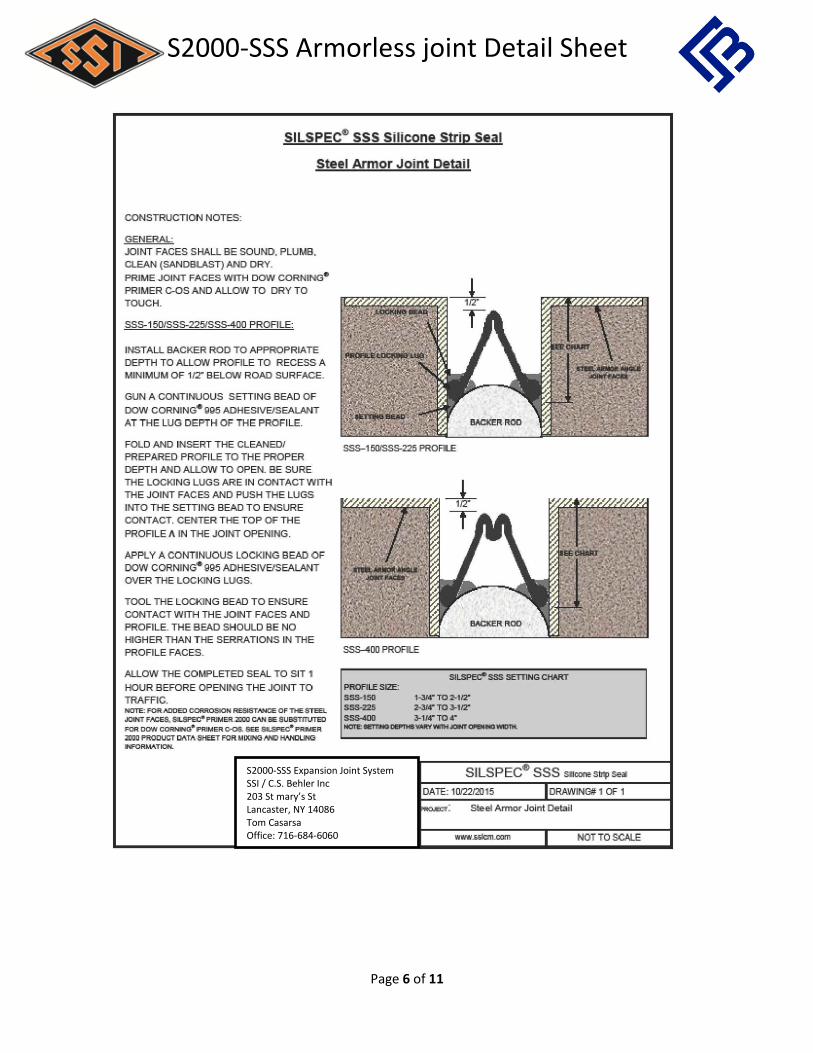
S2000-SSS Armorless joint Detail Sheet
S2000-SSS Expansion Joint System SSI / C.S. Behler Inc 203 St mary’s St Lancaster, NY 14086 Tom Casarsa Office: 716-684-6060
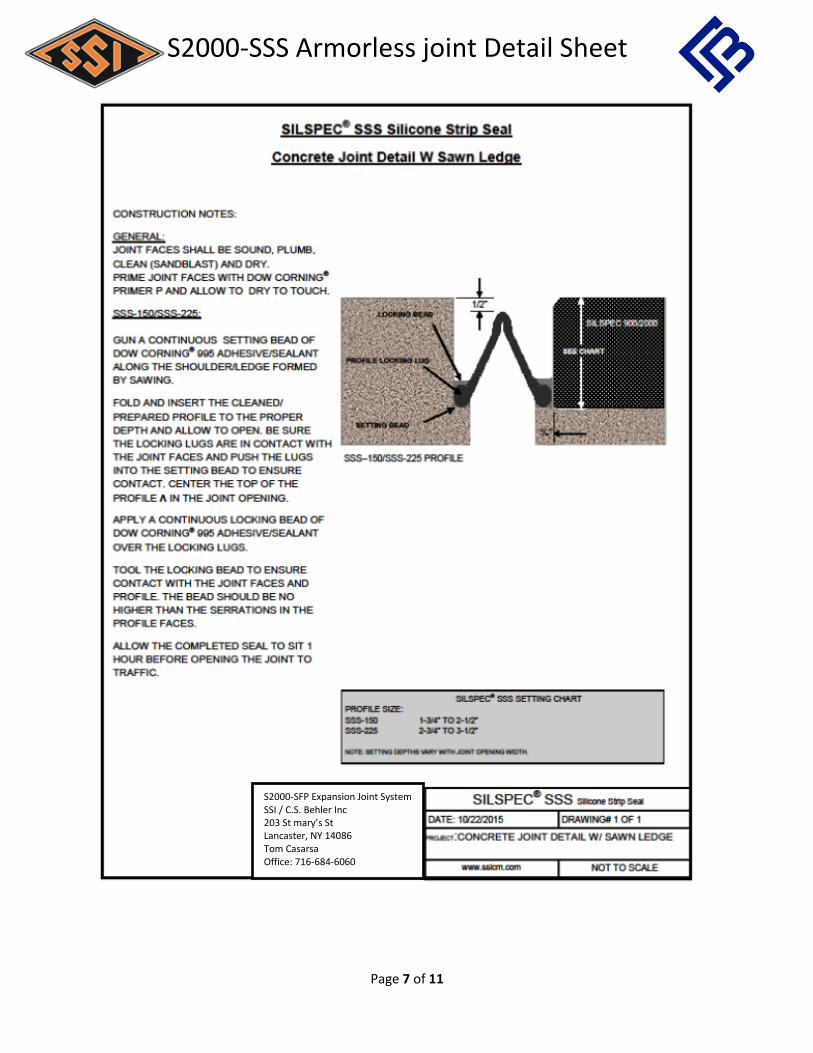
Page 7 of 11
S2000-SSS Armorless joint Detail Sheet
S2000-SFP Expansion Joint System SSI / C.S. Behler Inc 203 St mary’s St Lancaster, NY 14086 Tom Casarsa Office: 716-684-6060
Page 8 of 11
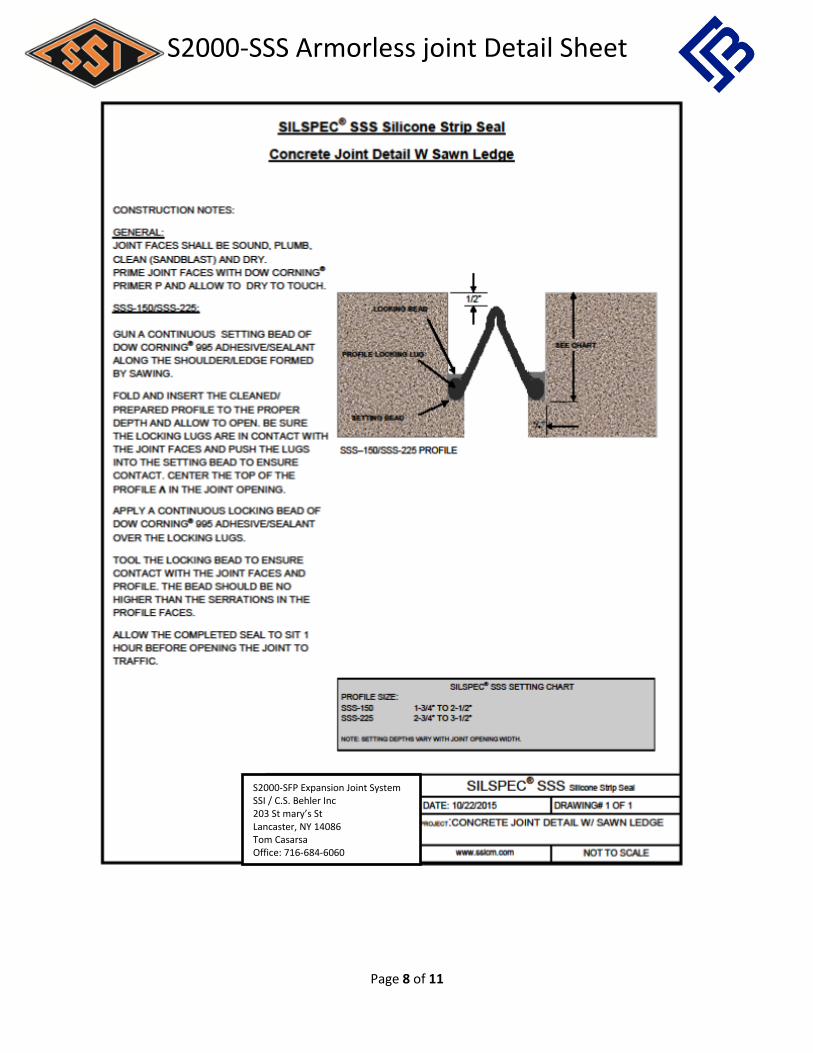
S2000-SSS Armorless joint Detail Sheet
S2000-SFP Expansion Joint System SSI / C.S. Behler Inc 203 St mary’s St Lancaster, NY 14086 Tom Casarsa Office: 716-684-6060
Page 9 of 11
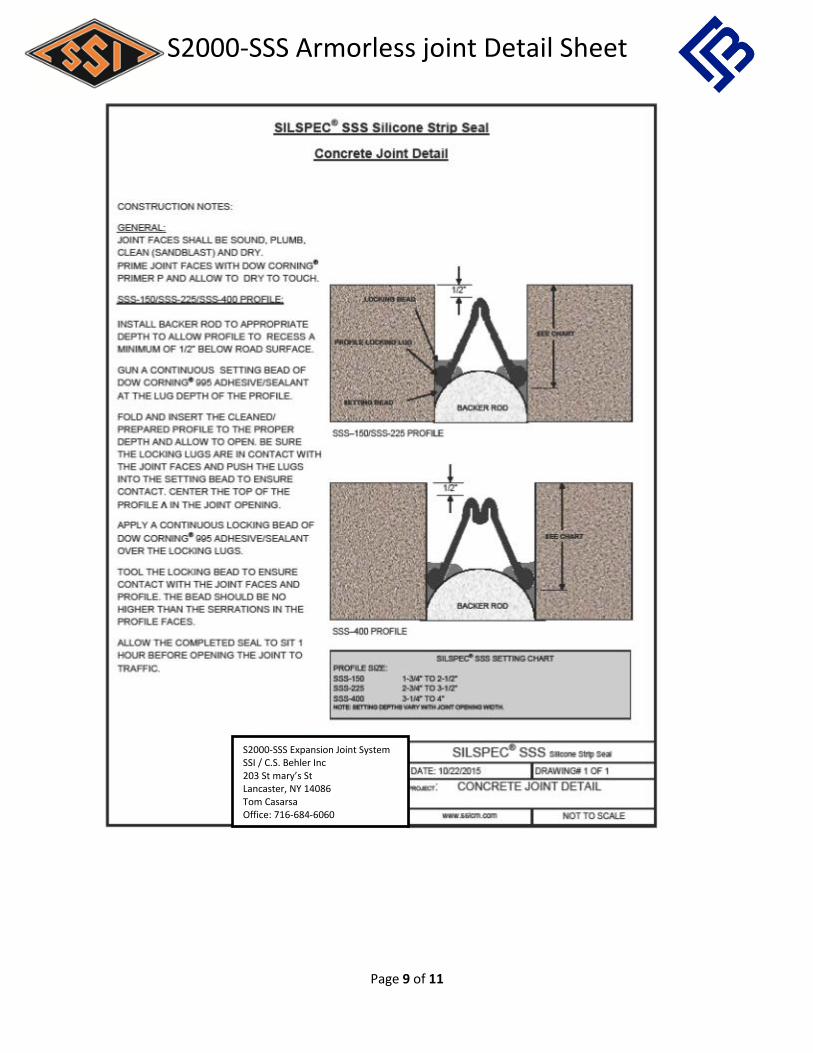
S2000-SSS Armorless joint Detail Sheet
S2000-SSS Expansion Joint System SSI / C.S. Behler Inc 203 St mary’s St Lancaster, NY 14086 Tom Casarsa Office: 716-684-6060
Page 10 of 11
S2000-SSS Armorless joint Detail Sheet
Page 11 of 11
S2000-SSS Armorless joint Detail Sheet
S2000-SSS Expansion Joint System SSI / C.S. Behler Inc 203 St mary’s St Lancaster, NY 14086 Tom Casarsa Office: 716-684-6060