Embed Size (px)
Citation preview

MATCO mfg
Wheels & Brakes
General Information for
Wheel & Brake Assemblies
Technical Service Guide
REV E 3/17
SUBJECT PAGE
A. BRAKE LINING WEAR LIMITS--------------------- 3
B. SWIFTLINE PAD REPLACEMENT----------------- 4
C. BRAKE DISK INSPECTION---------------------------5
D. Brake Lining Installation------------------------------- 7
E. Mounting the Tire & Tube-------------------------------7
F. Tubeless Kit Installation--------------------------------- 8
G. Wheel Assembly Instruction--------------------------- 10
H. Assembly Torque Values------------------------------- 12
I. Caliper Alignment---------------------------------------- 12
J. Bleeding the Brake System----------------------------- 14
K. Conditioning Procedures-------------------------------- 17
L. Maximizing Brake Output ----------------------------- 18
M. Lubricants-------------------------------------------------- 25
N. Technical Assistance-------------------------------------- 26
O. Nordlock washer Technical info----------------------- 27
DRAWINGS
Fig. 1 Wear Limit Indication Drawing------------------- 3
Fig. 2 Brake Disk Inspection------------------------------- 6
Fig. 3 Tubeless Mounting--------------------------------- 9
Fig. 4 Caliper Alignment--------------------------------- 13
Fig. 5 Pressure Bleeding---------------------------------- 15
Fig. 6 Vacuum Bleeding---------------------------------- 16
Dia. 1 Pedal Geometry------------------------------------- 22
Dia. 2 Pedal Geometry ------------------------------------ 22
Dia. 3 Pedal Geometry ------------------------------------ 23
Dia. 4 Pivot Connect Geometry ------------------------- 23
Dia. 5 Heel Brake Geometry ------------------------------ 24
Table of Contents

To eliminate the use of brake linings beyond their design
limitation and reduce possible piston damage or fluid leakage,
the following information is presented.
Matco linings should be replaced when the thickness of the
remaining wear material reaches 0.100 IN. (2.54mm) The
WHLM66-105, WHLLM66-106 and WHLM66-103A
linings have a visible wear notch located on the end of the
lining.
The WHLLM66-1052 wear notch is located at the top of the
lining as noted in (Fig. 1). The inside edge of the notch
indicates min-material condition.
Fig.1
A. BRAKE LINING WEAR LIMITS
-3-
SwiftLine Pad Replacement Program
The Swiftline Pad Replacement program:
Simplifies pad replacement on MATCO mfg brakes
And eliminates the need to rivet linings, saving you
maintenance time and tooling costs.
The Swiftline program gives you a 20 % discount on
all of our reline kits, saving you money.
Enrollment in the Swiftline pad replacement program
entitles the brake owner to obtain the applicable brake
reline kit at a 20% discount. In addition, replacement
stationary and movable brake shoes are included at a 60%
discount. The linings are riveted to the replacement brake
shoes at the factory and sent ready to install.
Upon installation of the new components on the aircraft,
the old stationary and movable brake shoes with worn out
linings, may be sent to the factory and mounted with new
linings, at the same 20% discount.
This second set of brake shoes with linings attached are
returned to the aircraft owner and are ready for use when
needed.
Two sets of brake shoes with factory installed linings,
means always being prepared.
For more information on Swiftline call 801-335-0582
-4-
B. SWIFTLINE PAD REPLACEMENT

The MATCO brake disk should give years of trouble free
service under normal field conditions. Conditions such as
unimproved fields, standing water, industrial pollution, or
frequent use of the aircraft may require more frequent
inspection of the brake system including the disk in order to
prolong the life of the brake linings.
The disk should be checked for wear (See Fig. 2 Dim. “A”)
and for any grooves, deep scratches, excessive pitting or
coning of the brake disk. Although coning is rarely a problem
with the MATCO disk, if it should occur, coning beyond
0.015 inch (0.381mm) in either direction is cause for disk
replacement.
Isolated grooves up to .030 inch (0.76mm) deep should not be
cause for replacement. Any grooving of the disk however,
will reduce the service life of the linings.
The Matco disk is normally plated for rust prevention. Within
a few landings, the plating will wear off where the linings rub
against the disk. The remaining portion of the disk will
remain plated and corrosion free for an extended period of
time under normal use. Nickel plated discs are available from
MATCO for those demanding increased corrosion protection
and wear.
-5-
C. BRAKE DISC INSPECTION
Rust in varying degrees may form on the exposed portion of the disc. If
a powdered rust appears on this surface, one or two braking applications
during taxiing should wipe the disc clear. Rust build up beyond this
point, may require removal of the disc from the wheel to properly clean
both surfaces. A wire brush followed by 220-grit garnet paper should
restore the braking surface adequately. Do not remove plating in areas
that are not contacted by the linings.
Fig. 2
“A”
WHLD Min “A”=Minimum Thickness
allowable thickness
(measure
at 2 or 3 points to get
an average thickness)
BRAKE DISK
MATCO DISK MIN "A" THICKNESS
WHLD4 (ALL) .130''
WHLD5 .200"
WHLD5D .325''
WHLD5ST .325''
WHLD5LSA .130''
WHLD6 .325''
WHLD6HE .450''
WHLD164-017 .130''
BRAKE DISK MINIMUM THICKNESS
-6-

The following instructions offer a guide for properly
removing and replacing Matco brake linings
1. Remove the caliper from the wheel
2. Remove old linings by drilling the crimped side of the rivet (Do not
use a punch & hammer). Using a #25 drill (0.1495 diameter), drill
through rivet taking care to avoid damaging the rivet hole. After
drilling crimped edge off rivets, lift old lining and remaining rivet
pieces from the brake shoe.
3. Inspect the brake shoe for any bending or other damage that may
have occurred during service. A shoe with more than 0.010 bend
should be replaced. Inspect rivet holes to ensure that no damage has
occurred during removal.
4. Using a brake relining tool (MATCO recommends a Threaded Screw
Action such as the W404 from Aircraft Tool Supply Co.) or
pneumatic press, replace the lining using the brass rivets shown on
the illustrated parts list.
Care should be taken to avoid pinching the tube between the wheel
halves when mounting the tire and tube. To avoid this, slightly
inflate tube after placing it in the tire. Tire mounting soap may also help.
A thin strip of cardboard or poster paper wrapped around the wheel
between the mounting half and the tube will help in preventing the tube
from being pinched during assembly if it is unusually tight. Another
method is to use 3 ratcheting bar clamps evenly spaced around the tire
and tube to compress the tire. Compress sufficiently to allow the wheel
halves to be seated against each other at the shiplap without contacting
the tire. The tube can be visibly inspected.
-7-
D. BRAKE LINING INSTALLATION
E. MOUNTING THE TIRE & TUBE
1. Inspect the rim face at the radius where the o-ring will seat, for deep
scratches, nicks or imperfections. Smooth out any imperfections
with a medium grit emery cloth. (Fig. 3)
2. Insert valve stem into the ½” hole and pull through from the inside
of the rim. A rubber lubricant or soap and water solution may make
it easier to install.
3. Take the brake half rim (the one without the valve stem hole) and
insert it through the tire opening that will face towards the landing
gear. Push the large o-ring over the diameter of the rim inside the
tire and roll it back approximately 1 inch from the mating surface of
the rim. Insert the other rim (with the valve stem) in what will be the
outside of the tire assembly. Bolt the rims together with the three
5/16-18x.875 socket head cap screws, washers and nuts supplied
spaced in every other hole.
4. Roll the o-ring to the center of the rim assembly. This is done by
pushing the tire bead down evenly on the brake half side until it
reaches the mating point of the two rim halves. The o-ring will seal
the joint against leaks.
5. Coat the bead mounting areas of the tire and rim with suitable
lubricant and inflate the tire to specification.
6. Install the remaining 5/16-18 nuts and washers on hub bolts and
install the hub.
-8-
F. TUBELESS KIT INSTALLATION
(on MH Series Wheels)

Fig. 3
-9-
ASSEMBLY INSTRUCTIONS FOR MATCO WHEELS:
AXLE NUT TORQUE ON WHEELS WITH
TAPERED ROLLER BEARINGS
If your wheel has Tapered Roller Bearings, the bearings two
piece and are equipped with integrated grease seals on the
bearing cone to ensure the longest possible bearing life. This
is a two piece bearing with the race pressed in to the wheel
and the cone with roller separately removable. The torque
procedure for bearings with this type of seal is different than
for tapered roller bearings without them.
A common torque technique for bearings without seals
is to tighten the axle nut until the wheel stops spinning freely
and then back off to the nearest locking feature.
THIS TECHNIQUE WILL NOT WORK ON BEARINGS
WITH AN INTEGRATED GREASE SEAL
. The reason for the different torque technique, is that the
grease seal produces some drag and makes the wheel feel
somewhat stiff when rotated. Reducing the axle nut torque
until the wheel spins freely will allow the grease seal and the
bearing cone to improperly rotate with the wheel.
NOTE: (the cone must not rotate relative to the axle).
The higher rolling drag is completely normal for this
bearing and allows for longer bearing life since the seal will
keep most contaminants out of the bearing.
-10-
G. WHEEL ASSEMBLY INSTRUCTION

Timken specifications state, for example, that the two 1.25
inch tapered roller bearings used on a Matco WE51 will
produce between 18-26 inch pounds of torque (drag) when
properly installed. A light coating of grease on the seal will
help reduce the drag on initial installation. The drag will also
reduce after the bearings have been installed, and the seal
relaxes in the bore. It is important that the axle torque be
sufficient to keep the seal from rotating with the wheel.
All o-rings in the brake and master cylinder, are Buna Nitrile
and are NOT compatible with automotive glycol based brake
fluids such as DOT 3, DOT 4, and DOT 5.1
The ideal mounting position for the brake caliper is the trailing
side of the wheel with inlet and bleeder in a vertical axis.
However, the caliper may be mounted at any location as long
as the system can be bled of air properly.
When using MATCO mfg. flanged axles, they can be
shimmed for toe-in or toe-out conditions, and spaced out from
the wheel if necessary for the brake disk attachment screws to
clear the landing gear leg. MATCO mfg. steel axle material is
heat treated and cannot be welded.
-11-
NOTE USE ONLY red aircraft fluid (Mil-H-5606) brake
Fluid or its equivalent.
PART NUMBER TORQ / IN LBS
MSC10-24X.62BHCS 80 IN Lbs
MSC10-24X1.75SHCS 50 IN Lbs
MSC10-24NYLOCK 50 IN Lbs
MSC.25-20X1.75HH 99 IN Lbs
MSC.25-20X1.25SHCS 99 IN Lbs
MSC.25-20X1.5HH 99 IN Lbs
MSC.25-28NYLOCK 99 IN Lbs
MSC.31-18NYLOCK 120 IN Lbs
MSC.31-18X1.25SHCS 120 IN Lbs
MSC.31-18NYLOCK 120 IN Lbs
MSCAN4-17A 99 IN Lbs
TORQUE VALUES
Caliper alignment is determined by measuring the maximum
exposed spacer length, as measured on a new set of linings.
(See Fig. 4)
1. Maximum exposed length should be 0.125 inches.
2. Minimum exposed length should be 0.05 inches
3. Adjust the length by moving the plate inboard or outboard
as needed to reach proper measurement.
4. Note that this measurement applies to both single and dual
piston calipers
H. ASSEMBLY TORQUE VALUES
I. CALIPER ALIGNMENT

Fig. 4
-13-
1. Open brake bleeder valve slightly to facilitate the bleeding
of air from the system.
2. Attach a tube from the nozzle of a squirt can of brake
fluid, to the top of the brake bleeder valve. Pump the
handle until oil flows bubble free from service hose before
attaching.
3. Make sure that the master cylinder shaft is fully extended
to open up the internal bypass valve.
4. Inject brake fluid (Mil-H-5606) or equivalent, into the
puck housing and continue injecting until the fluid travels
through the system in to the master cylinder.
5. Air in the system will be pushed up and out in to the
master cylinder ONLY IF the master cylinder or remote
reservoir is at the highest point in the system, and there are
no loops in the brake lines.
6. Fluid should be pushed through the system until it reaches
approximately ¼ inch from the top of the master cylinder
or remote reservoir
7. Close the brake bleeder valve, and remove the service
hose.
8. GENTLY stroke each cylinder. If the brake system is free
of air, the brake pedal should feel firm and not spongy. If
not, repeat steps 1 through 7 until system is free of trapped
air.
9. Fluid leakage from the top of the MCMC-5 / 5A master
cylinder during operation indicates too high a fluid level.
10. Ensure that all drilled bolts are properly safety wired.
NOTE The MCMC-5, 5A, 7 and 7S are
NOT approved for inverted flight.
J. BLEEDING THE BRAKE SYSTEM

Fig. 5
-15-
Fig. 6
-16-

1. After the linings have been installed, apply brake pressure
during high throttle static run-up. Note RPM at creep if any occurs.
2. Perform two or three high speed taxi snubs. Apply firm braking at
30-40 mph down to 5 mph to generate the necessary 300 – 400
degree temperatures at the brake pads. DO NOT bring the aircraft to
a complete stop during taxi runs, and continue to roll aircraft until
reaching the tie down area. Release brake pressure at tie down area
as soon as practical and park with brake pressure released. Allow
brakes to cool for 10-15 minutes.
3. Repeat step one and note RPM at creep if any occurs. There should
be a noticeable increase in holding torque.
4. If properly conditioned, the pads will have a uniform shiny
appearance (glaze) on the surface. Repeat steps 1-3 if necessary to
produce glaze.
Conditioning removes high spots, and creates a layer of glazed material
at the lining surface. Normal braking will produce enough heat to
maintain glazing during the life of the lining. Glazing can be worn off
during light use such as taxiing.
K. CONDITIONING PROCEDURES
NOTE It is important to condition the new linings after
installation to obtain maximum service life and
performance. The procedures below show when and
how this should be done.
NOTE Forward movement of the aircraft during static
runup could be caused by the wheels skidding and
not brake malfunction. Use caution when braking
heavy on aircraft with a tailwheel as it could cause
the tail to lift from the ground.
GETTING YOUR PEDAL GEOMETRY RIGHT
BRAKE SPECIFICATIONS
All MATCO mfg. brakes have two specified ratings. The first is the
energy rating which specifies the energy capacity of the brake. This
value is used in selecting a brake that will be able to absorb the kinetic
energy of the aircraft under the designers specified maximum energy
condition (generally maximum aircraft weight at a velocity above stall
speed). The energy rating is determined by the disc weight. Exceeding
the energy capacity of a braking system leads to excessive disc
temperatures. This can cause low friction coefficients and reduce brake
torque and aircraft deceleration. Permanent damage to the disc can
result in the form of warping or loss of corrosion protection.
BRAKE TORQUE
The second rating is for brake torque. The rated torque value is used to
determine the deceleration and static torque for engine run-up that will
be provided by the brake. A braking system using the same disc can
have one energy rating and several torque ratings. This is possible by
using different caliper configurations on the same disc. For example a
braking system using a single caliper on a disc with a 189K ft-lb rating
may have a torque rating of 1980 in-lb. The same braking system using
two calipers would have the same energy rating of 189K ft-lb but would
have a torque rating of 3960 in-lb. MATCO mfg. offers its customers a
wide range of caliper configurations and disc sizes to allow for meeting
both the energy and torque requirements of their aircraft.
-18-
L. MAXIMIZING BRAKE OUTPUT

GETTING THE RATED TORQUE
The rated torque value assumes a nominally conditioned brake pad (see
pad conditioning procedures), rated pressure applied to the brake, free
floating calipers, and pad contact on both sides of the disc. Brake pad
conditioning allows a glaze to form on the pads and provides the highest
friction coefficient and drag force. MATCO mfg. Brake torque ratings
are based on 450 psi applied pressure. Pressures below this value will
generate proportionally lower torque. Pressures above this value will
provide higher torque although pressures above 600 psi generally cause
caliper deflections that reduce the torque increase. The torque rating
assumes that all caliper force is used to squeeze the brake pads against
the disc. If the caliper does not float freely, it is possible that only one
side of the disc surface may be contacted resulting in 50% loss of
torque.
GET THE PRESSURE RIGHT
Assuming the calipers are properly mounted so that the pads make
contact on both sides of the disc (both new and worn) and are
maintained so that the calipers float freely, the most common reason for
under performance of the brakes is low pressure. MATCO mfg. Brakes
need 450 psi to achieve their rated torque. Additional calipers can be
added to get higher torque at lower pressures, but is often more weight
efficient to modify the hydraulic system pedal geometry to generate
higher pressures. Systems using hand or foot operated master cylinders
require a minimum of 2.5 to 1 mechanical advantage when using master
cylinder, MC, like the MC-4 or MC-5 which have .625 inch diameter
pistons. (Systems using MC-4 or MC-5 with intensifiers have .500-inch
pistons and require a 1.6 to 1 mechanical advantage). Mechanical
advantage, MA, is the ratio of the force applied to the master cylinder
shaft divided by the force applied by the hand or foot. Dia.1 page 20
shows two examples of pedal geometry.
-19-
The first has an MA of 1 to 1 since the distance from the applied load to
the pivot point is the same as the distance to the MC and is undesirable.
The second shows a more favorable configuration that will easily
provide the required pressure to the brakes with moderate toe force.
It is often necessary to keep the foot pedal shorter than that shown in
Dia.1. An alternate geometry is shown in Dia.2. This design would
utilize a fork arrangement on the MC connection to allow clearance of
the MC body and then a short linkage to the MC connect point. A
design common to many aircraft uses linkage as shown in Dia.3. This
design also allows for a shorter brake pedal but has a major
disadvantage. This linkage can be configured to have a proper MA in
the start position (with the master cylinder fully extended). The MA
varies with rotation however, as shown in Fig.2 of Dia.3, a 15 degree
rotation of the linkage reduces the MA at the start position from 1.5 to 1
down to only 1.12 to 1. In actual operation, this has the effect of causing
a nearly constant brake torque even though increasing force is applied.
For example, if the geometry is set for an initial MA 2.5 to 1. In the
start position and the pilot applies pedal force, the MC will begin to
stroke as pressure builds. As the rotation occurs, the MA decreases. If
there is any air in the brake lines or if there are long brake line runs,
hydraulic system expansion will occur as pressure increases requiring
more MC stroke. If the pilot applies more pedal force, more MC stroke
occurs, and the MA decreases further. Even though the pilot has now
increased his pedal force, the force applied to the MC will be only
marginally increased because more rotation will result and cause a
further decrease in MA. A geometry like that in Dia.2 will provide the
same reduced pedal height and is not prone to the effect of rotation since
the MC is essentially connected to the brake pedal pivot. Dia.4
illustrates the benefit of pivot connect geometry during rotation. The
MA remains virtually unchanged for expected rotation angles and
results in a linear pressure increase with applied pedal force.
-20-
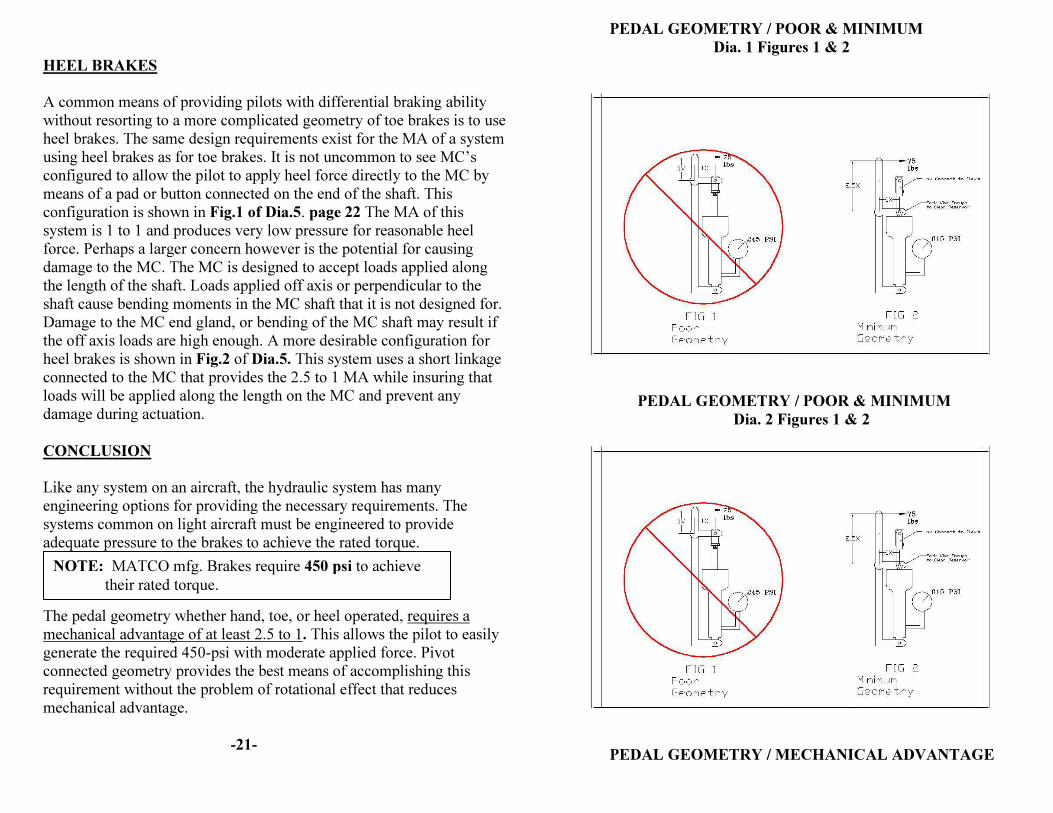
HEEL BRAKES
A common means of providing pilots with differential braking ability
without resorting to a more complicated geometry of toe brakes is to use
heel brakes. The same design requirements exist for the MA of a system
using heel brakes as for toe brakes. It is not uncommon to see MC’s
configured to allow the pilot to apply heel force directly to the MC by
means of a pad or button connected on the end of the shaft. This
configuration is shown in Fig.1 of Dia.5. page 22 The MA of this
system is 1 to 1 and produces very low pressure for reasonable heel
force. Perhaps a larger concern however is the potential for causing
damage to the MC. The MC is designed to accept loads applied along
the length of the shaft. Loads applied off axis or perpendicular to the
shaft cause bending moments in the MC shaft that it is not designed for.
Damage to the MC end gland, or bending of the MC shaft may result if
the off axis loads are high enough. A more desirable configuration for
heel brakes is shown in Fig.2 of Dia.5. This system uses a short linkage
connected to the MC that provides the 2.5 to 1 MA while insuring that
loads will be applied along the length on the MC and prevent any
damage during actuation.
CONCLUSION
Like any system on an aircraft, the hydraulic system has many
engineering options for providing the necessary requirements. The
systems common on light aircraft must be engineered to provide
adequate pressure to the brakes to achieve the rated torque.
The pedal geometry whether hand, toe, or heel operated, requires a
mechanical advantage of at least 2.5 to 1. This allows the pilot to easily
generate the required 450-psi with moderate applied force. Pivot
connected geometry provides the best means of accomplishing this
requirement without the problem of rotational effect that reduces
mechanical advantage.
-21-
NOTE: MATCO mfg. Brakes require 450 psi to achieve
their rated torque.
PEDAL GEOMETRY / POOR & MINIMUM
Dia. 1 Figures 1 & 2
PEDAL GEOMETRY / POOR & MINIMUM
Dia. 2 Figures 1 & 2
PEDAL GEOMETRY / MECHANICAL ADVANTAGE

Dia. 3 Figures 1 & 2
PEDAL GEOMETRY / PIVOT CONNECT
Dia. 4 Figures 1 & 2
-23-
PEDAL GEOMETRY / HEEL BRAKES
Dia. 5 Figures 1 & 2
-24-

ELASTOMERIC COMPOUND LUBRICANTS
HYDRAULICS: MIL-H-5606 / MIL-H-83282
Or equivalent (Red Oils)
PETROLEUM LUBRICANTS WHEEL BEARINGS: MIL-G-81322
MOBIL 28
AEROSHELL 22
MOBIL SHC-100
Or equivalent lubricants
AMPHIBIOUS: HCF Grease P/N 605
BG Products, Wichita, KS.
THREAD SEALANT
TAPERED PIPE THREADS: Locktite 567 or equivalent
-25-
N. TECHNICAL ASSISTANCE
M. LUBRICANTS
NOTE DOT 5.1 brake fluid is NOT compatible with
MATCO mfg brakes, and will damage the Buna-N
o-rings used in the system.
For technical Information, Product Matching, and Helpful Hints, see
our website at:
www.matcomfg.com
E-mail our technical service manager
for specific information at:
TECHNICAL ASSISTANCE
To speak with someone in person about specific products or to
find answers to technical questions, please contact us at our
OR FAX US AT 801-335-0581
Technical Support Disclaimer:
While we at MATCO mfg. strive to ensure that the
advice/information provided through our support is correct,
MATCO mfg. does not accept any responsibility for errors or
omissions. Any advice or information that MATCO mfg. gives you,
via any form of communication is not a guarantee that it will correct
your problem. It is only offered as assistance to you.
MATCO mfg. will not be held responsible for any loss or damage as
a result of our advice or information supplied.
-26-
TECHNICAL HOTLINE
801-335-0582
O. TECHNICAL ASSISTANCE

NORD-LOCK Washers
NORD-LOCK is a pair of washers with a
wedge-locking action meeting DIN
25201 which is a unique method using
tension instead of friction. The rise of
the cams between the NORD-LOCK
washers is greater than the pitch of the
bolt. In addition, there are radial teeth
on the opposite side. The washers are
installed in pairs, cam face to cam face.
When the bolt and/or nut is tightened
the teeth grip and seat the mating
surfaces. The NORD-LOCK washer is
locked in place, allowing movement
only across the face of the cams. Any
attempt from the bolt/nut to rotate
loose is blocked by the wedge effect of
the cams.
Here you see what happens when a bolt
is untightened with a wrench. The pair
of washers expand more than the
corresponding pitch of the thread
allows the bolt/nut to rise.
NORD-LOCK washers positively lock the
fastener in a joint which is subjected to
any kind of vibration or dynamic loads.
REPLACE the NORD-LOCK washers if
the cam surface is worn and corners
are rounded or if the pair does not seat
cleanly against each other
WHEEL INFORMATION SHEET
OWNERS QUICK REFERENCE GUIDE
WHEEL MODEL # _____________________________
BRAKE ASSEMBLY____________________________
BRAKE LININGS -----WHLLM66-_____________
BRAKE FLUID--------MIL-H-5606 or Equivalent______
BRAKE DISC----------WHLD_______________
MIN DISC THICKNESS IS ------- Min__________
-28-