Embed Size (px)
Citation preview
MASTERING LINUX
apcmag.com mastering linux part 71
MASTERING LINUX
apcmag.com mastering linux part 7 2
console networking
Skill levelIntermediate
RequirementsAn installation of Linux (Fedora Core 3 was used in the writing of this article, and can be installed from the APC January cover DVD).
Time to complete3 hours (approx)
Mastering Linux, part 7 In the latest instalment in this series of Workshops, Jarrod Spiga
explains how to use the command line to browse the Web, read and
write email, and use remote shells.
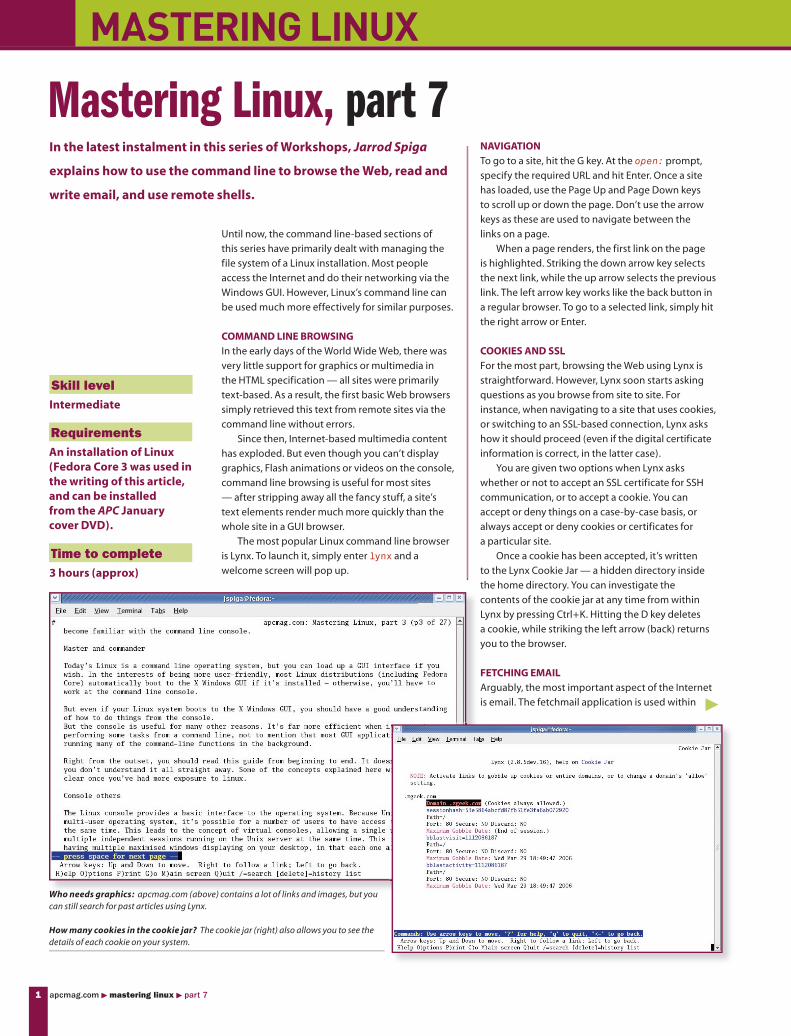
Who needs graphics: apcmag.com (above) contains a lot of links and images, but you can still search for past articles using Lynx.
How many cookies in the cookie jar? The cookie jar (right) also allows you to see the details of each cookie on your system.
Until now, the command line-based sections of
this series have primarily dealt with managing the
file system of a Linux installation. Most people
access the Internet and do their networking via the
Windows GUI. However, Linux’s command line can
be used much more effectively for similar purposes.
COMMAND LINE BROWSINGIn the early days of the World Wide Web, there was
very little support for graphics or multimedia in
the HTML specification — all sites were primarily
text-based. As a result, the first basic Web browsers
simply retrieved this text from remote sites via the
command line without errors.
Since then, Internet-based multimedia content
has exploded. But even though you can’t display
graphics, Flash animations or videos on the console,
command line browsing is useful for most sites
— after stripping away all the fancy stuff, a site’s
text elements render much more quickly than the
whole site in a GUI browser.
The most popular Linux command line browser
is Lynx. To launch it, simply enter lynx and a
welcome screen will pop up.
NAVIGATIONTo go to a site, hit the G key. At the open: prompt,
specify the required URL and hit Enter. Once a site
has loaded, use the Page Up and Page Down keys
to scroll up or down the page. Don’t use the arrow
keys as these are used to navigate between the
links on a page.
When a page renders, the first link on the page
is highlighted. Striking the down arrow key selects
the next link, while the up arrow selects the previous
link. The left arrow key works like the back button in
a regular browser. To go to a selected link, simply hit
the right arrow or Enter.
COOKIES AND SSLFor the most part, browsing the Web using Lynx is
straightforward. However, Lynx soon starts asking
questions as you browse from site to site. For
instance, when navigating to a site that uses cookies,
or switching to an SSL-based connection, Lynx asks
how it should proceed (even if the digital certificate
information is correct, in the latter case).
You are given two options when Lynx asks
whether or not to accept an SSL certificate for SSH
communication, or to accept a cookie. You can
accept or deny things on a case-by-case basis, or
always accept or deny cookies or certificates for
a particular site.
Once a cookie has been accepted, it’s written
to the Lynx Cookie Jar — a hidden directory inside
the home directory. You can investigate the
contents of the cookie jar at any time from within
Lynx by pressing Ctrl+K. Hitting the D key deletes
a cookie, while striking the left arrow (back) returns
you to the browser.
FETCHING EMAILArguably, the most important aspect of the Internet
is email. The fetchmail application is used within
MASTERING LINUX
apcmag.com mastering linux part 71
MASTERING LINUX
apcmag.com mastering linux part 7 2
console networking
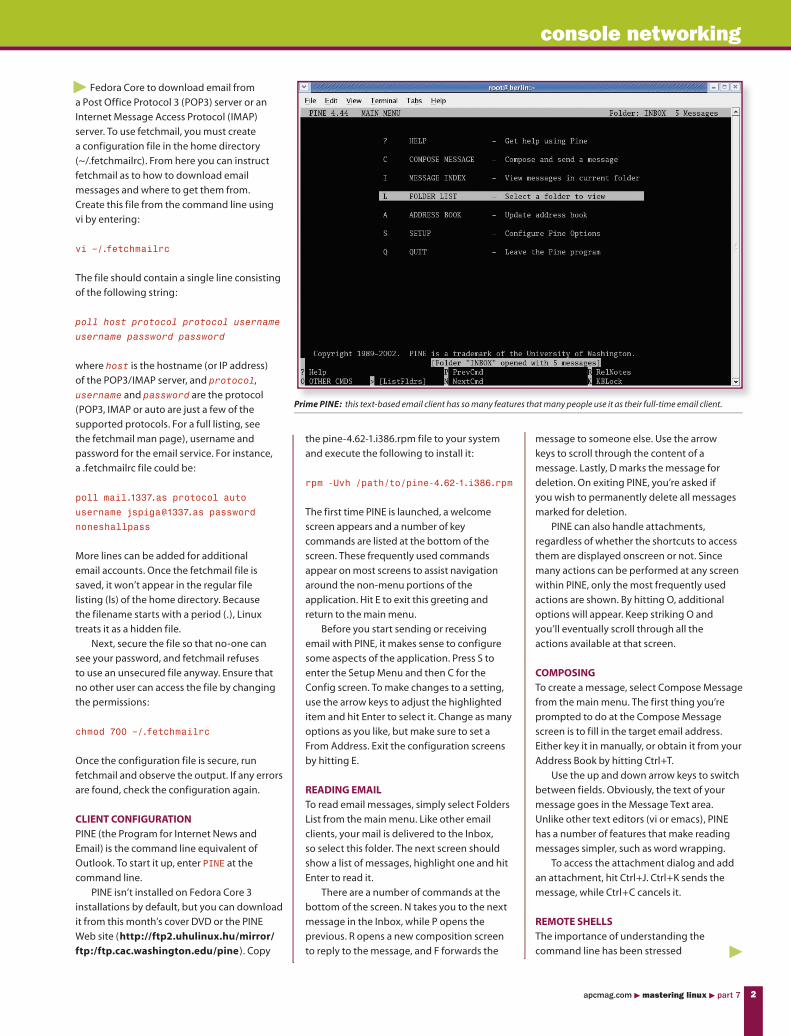
Prime PINE: this text-based email client has so many features that many people use it as their full-time email client.
Fedora Core to download email from
a Post Office Protocol 3 (POP3) server or an
Internet Message Access Protocol (IMAP)
server. To use fetchmail, you must create
a configuration file in the home directory
(~/.fetchmailrc). From here you can instruct
fetchmail as to how to download email
messages and where to get them from.
Create this file from the command line using
vi by entering:
vi ~/.fetchmailrc
The file should contain a single line consisting
of the following string:
poll host protocol protocol username
username password password
where host is the hostname (or IP address)
of the POP3/IMAP server, and protocol,
username and password are the protocol
(POP3, IMAP or auto are just a few of the
supported protocols. For a full listing, see
the fetchmail man page), username and
password for the email service. For instance,
a .fetchmailrc file could be:
poll mail.1337.as protocol auto
username [email protected] password
noneshallpass
More lines can be added for additional
email accounts. Once the fetchmail file is
saved, it won’t appear in the regular file
listing (ls) of the home directory. Because
the filename starts with a period (.), Linux
treats it as a hidden file.
Next, secure the file so that no-one can
see your password, and fetchmail refuses
to use an unsecured file anyway. Ensure that
no other user can access the file by changing
the permissions:
chmod 700 ~/.fetchmailrc
Once the configuration file is secure, run
fetchmail and observe the output. If any errors
are found, check the configuration again.
CLIENT CONFIGURATIONPINE (the Program for Internet News and
Email) is the command line equivalent of
Outlook. To start it up, enter PINE at the
command line.
PINE isn’t installed on Fedora Core 3
installations by default, but you can download
it from this month’s cover DVD or the PINE
Web site (http://ftp2.uhulinux.hu/mirror/ftp:/ftp.cac.washington.edu/pine). Copy
the pine-4.62-1.i386.rpm file to your system
and execute the following to install it:
rpm -Uvh /path/to/pine-4.62-1.i386.rpm
The first time PINE is launched, a welcome
screen appears and a number of key
commands are listed at the bottom of the
screen. These frequently used commands
appear on most screens to assist navigation
around the non-menu portions of the
application. Hit E to exit this greeting and
return to the main menu.
Before you start sending or receiving
email with PINE, it makes sense to configure
some aspects of the application. Press S to
enter the Setup Menu and then C for the
Config screen. To make changes to a setting,
use the arrow keys to adjust the highlighted
item and hit Enter to select it. Change as many
options as you like, but make sure to set a
From Address. Exit the configuration screens
by hitting E.
READING EMAILTo read email messages, simply select Folders
List from the main menu. Like other email
clients, your mail is delivered to the Inbox,
so select this folder. The next screen should
show a list of messages, highlight one and hit
Enter to read it.
There are a number of commands at the
bottom of the screen. N takes you to the next
message in the Inbox, while P opens the
previous. R opens a new composition screen
to reply to the message, and F forwards the
message to someone else. Use the arrow
keys to scroll through the content of a
message. Lastly, D marks the message for
deletion. On exiting PINE, you’re asked if
you wish to permanently delete all messages
marked for deletion.
PINE can also handle attachments,
regardless of whether the shortcuts to access
them are displayed onscreen or not. Since
many actions can be performed at any screen
within PINE, only the most frequently used
actions are shown. By hitting O, additional
options will appear. Keep striking O and
you’ll eventually scroll through all the
actions available at that screen.
COMPOSINGTo create a message, select Compose Message
from the main menu. The first thing you’re
prompted to do at the Compose Message
screen is to fill in the target email address.
Either key it in manually, or obtain it from your
Address Book by hitting Ctrl+T.
Use the up and down arrow keys to switch
between fields. Obviously, the text of your
message goes in the Message Text area.
Unlike other text editors (vi or emacs), PINE
has a number of features that make reading
messages simpler, such as word wrapping.
To access the attachment dialog and add
an attachment, hit Ctrl+J. Ctrl+K sends the
message, while Ctrl+C cancels it.
REMOTE SHELLSThe importance of understanding the
command line has been stressed
MASTERING LINUX
apcmag.com mastering linux part 73
MASTERING LINUX
apcmag.com mastering linux part 7 4
console networking
throughout this series. Command line
expertise allows you to take advantage of
remote shells — that is, to enter commands
on a remote system as if it were in front of
you, even if that system is on the other side
of the world.
The Telnet protocol sends data in plaintext
format across a network. For that reason, it’s
an insecure way to connect to remote hosts
as anyone intercepting the data (including
passwords) from a system or remote host can
easily read and use that information.
Telnet was previously used to bring up
remote shells, but is now disabled on many
Linux servers. Instead, the Secure Shell (SSH)
protocol is used. It behaves in a similar
manner to Telnet, but all data sent between
the remote host and your system is encrypted
using the RSA algorithm. The ssh command is
used to start an SSH session. However, a
couple of arguments need to be specified:
ssh -l username hostname
where username is the username used to log
in to the remote system (the administrator of
the remote system must set up an account
for you to access it) and hostname is the
hostname or IP address of the remote system.
Each time you connect to a remote
server, it sends a copy of its RSA fingerprint,
a seemingly randomly generated sequence
of hexadecimal characters. The first time
a connection is made to a remote host via
SSH, a warning is sent regarding the host’s
authenticity. This is because the local host
hasn’t seen this fingerprint before, but it’s
usually safe to continue with the connection.
If you connect to the same host and the
fingerprint has changed, you’re probably
connecting to a different server.
Most Fedora Core 3 installations should
have an SSH server already installed and
running. A popular SSH client for Windows
(putty) is featured on this month’s cover DVD
for connecting to your Linux PC from any
Windows system on a network.
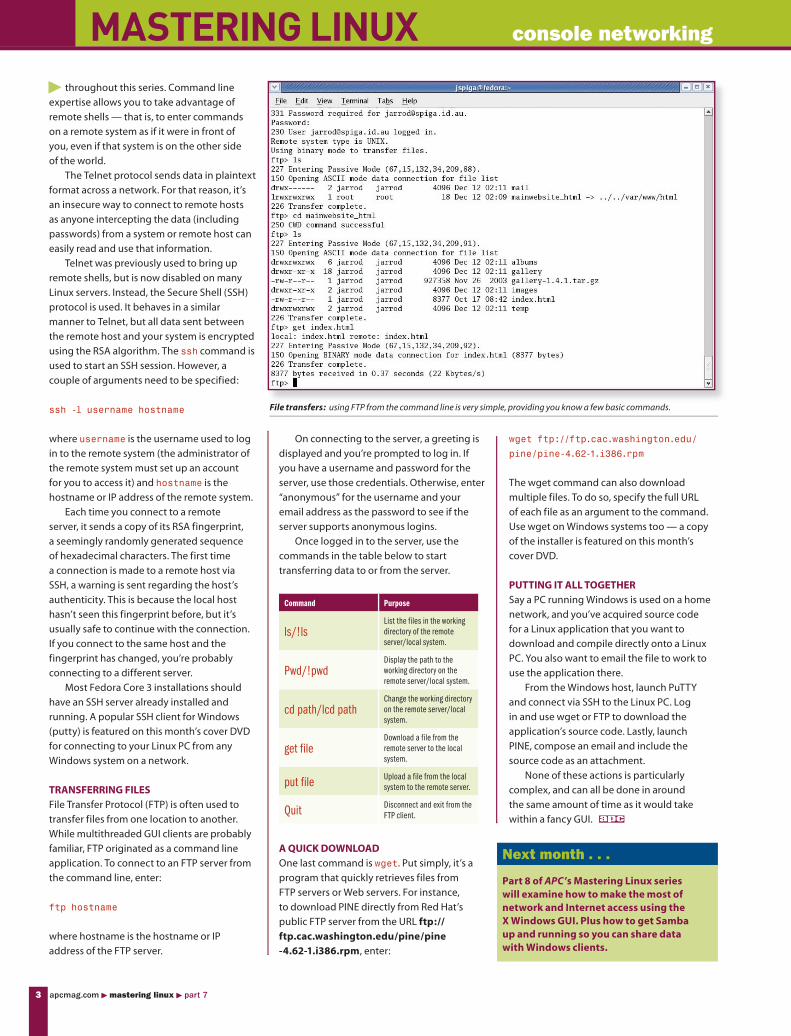
TRANSFERRING FILESFile Transfer Protocol (FTP) is often used to
transfer files from one location to another.
While multithreaded GUI clients are probably
familiar, FTP originated as a command line
application. To connect to an FTP server from
the command line, enter:
ftp hostname
where hostname is the hostname or IP
address of the FTP server.
On connecting to the server, a greeting is
displayed and you’re prompted to log in. If
you have a username and password for the
server, use those credentials. Otherwise, enter
“anonymous” for the username and your
email address as the password to see if the
server supports anonymous logins.
Once logged in to the server, use the
commands in the table below to start
transferring data to or from the server.
Command Purpose
ls/!lsList the files in the working directory of the remote server/local system.
Pwd/!pwdDisplay the path to the working directory on the remote server/local system.
cd path/lcd pathChange the working directory on the remote server/local system.
get fileDownload a file from the remote server to the local system.
put file Upload a file from the local system to the remote server.
Quit Disconnect and exit from the FTP client.
A QUICK DOWNLOADOne last command is wget. Put simply, it’s a
program that quickly retrieves files from
FTP servers or Web servers. For instance,
to download PINE directly from Red Hat’s
public FTP server from the URL ftp://ftp.cac.washington.edu/pine/pine-4.62-1.i386.rpm, enter:
wget ftp://ftp.cac.washington.edu/
pine/pine-4.62-1.i386.rpm
The wget command can also download
multiple files. To do so, specify the full URL
of each file as an argument to the command.
Use wget on Windows systems too — a copy
of the installer is featured on this month’s
cover DVD.
PUTTING IT ALL TOGETHERSay a PC running Windows is used on a home
network, and you’ve acquired source code
for a Linux application that you want to
download and compile directly onto a Linux
PC. You also want to email the file to work to
use the application there.
From the Windows host, launch PuTTY
and connect via SSH to the Linux PC. Log
in and use wget or FTP to download the
application’s source code. Lastly, launch
PINE, compose an email and include the
source code as an attachment.
None of these actions is particularly
complex, and can all be done in around
the same amount of time as it would take
within a fancy GUI.
Next month . . .
Part 8 of APC ’s Mastering Linux series will examine how to make the most of network and Internet access using the X Windows GUI. Plus how to get Samba up and running so you can share data with Windows clients.
File transfers: using FTP from the command line is very simple, providing you know a few basic commands.


![[Srijan Wednesday Webinar] Mastering Drupal 8 Development with Drupal Console](https://img.pdfslide.us/doc/110x75/5875642a1a28abd80a8b4b1d/srijan-wednesday-webinar-mastering-drupal-8-development-with-drupal-console.jpg)

