Embed Size (px)
Citation preview

Mastering HD Video with Your DSLR
Helmut Kraus, Uwe Steinmueller
Helmut Kraus is director of the design agency exclam! and is visiting professor of design at University of Applied Sciences Düsseldorf, where he lectures in the theory and practice of digital photography.
He is the author of many books and articles on the subjects of design and photography and is a pioneering observer of the development of digi-tal communications and productivity tools. He considers the high-speed evolution of the visual media—typi-fied by digital image creation and processing—to be one of the most exciting aspects of life in the early 21st century.
Uwe Steinmueller, a native of Germany, has been a photographer since 1973. His first exhibitions were in 1978 in Bremen, Germany with photos from Venice, South Tirol, Germany, and France. He shares a joint copyright with his wife Bettina.
He moved to California in 1997 and began working seriously in digital photography in 1999. He currently lives in and works as a photographer in San Jose. He has written a number of books, two of which won the pres-tigious “Fotobuchpreis” in 2004/05 in Germany. Uwe is the man behind outbackphoto.com, a popular website covering quality outdoor photogra-phy using digital cameras.
viiContents
2 Foreword 6 Basics
7 Video Formats and Resolution 9 Frame Rates and Refresh
Rates 17 Data Formats and Data
Compression 19 Storage Media 22 Image Sensor Size 28 Types of Sensor
38 Equipment
39 Types of Camera 40 Lenses 53 Using Video Lights and
Reflectors 55 Tripods 58 Using Microphones 59 Other Useful Gadgets 65 Dedicated Video Accessories
for DSLRs
70 Shooting Techniques
71 From Concept to Finished Film
71 Choosing Your Location 73 Selecting Focal Length 84 Aperture and Depth of Field 85 Distance Settings 87 Exposure and White Balance 89 Shutter Speeds 90 Tripod or Handheld? 91 Time-lapse Sequences 93 Stop Motion Sequences 94 Slow Motion 95 Video as an Extension of the
Photographic Medium 101 Avoiding Errors 116 Ten Rules for Shooting Better
Video 119 Legal Issues
Contents
viii Contents ixContents
166 Presenting Your Work
167 Online Presentation 170 Presenting Your Work on Your
own Website 171 Hardware 179 Sound
180 Moving from Still Photography to Video
181 Entering the New World of Video
182 Telling Your Stories 183 Working without a Script 183 Editing 183 Important Technical Issue to
Consider 187 Shooting Clips 194 Overall Workflow 202 Editing Basics 221 Creating Your own Look 222 Adding Sound 222 Export Your Video 224 Post-Processing and Adding
Effects 226 Showing Your Videos 227 Conclusion
228 Useful Links
230 Index
122 Sound
124 Microphones 126 Microphone Technology 129 Microphone Accessories 133 Avoiding Background Noise 137 Dedicated Microphone
Accessories for DSLRs 137 Four Basic Rules for Capturing
Great Sound 138 Dubbing Sound
140 Editing and Post-Processing
143 Mac OS and Windows 144 Editing Software (iMovie &
Co) 146 Preparing Your Material 156 Creating and Editing a
Sequence 161 Using Photos in a Video
Sequence 162 10 Rules for Producing Great
Edits 164 Export Formats
3Foreword
video popular was the increase in speed and capacity (and the decrease in price) of memory media. Video data requires large amounts of mem-ory: one minute of HD video requires between 80 and 150 MB of memory, and a single minute of Full HD foot-age can use as much as 256 MB.
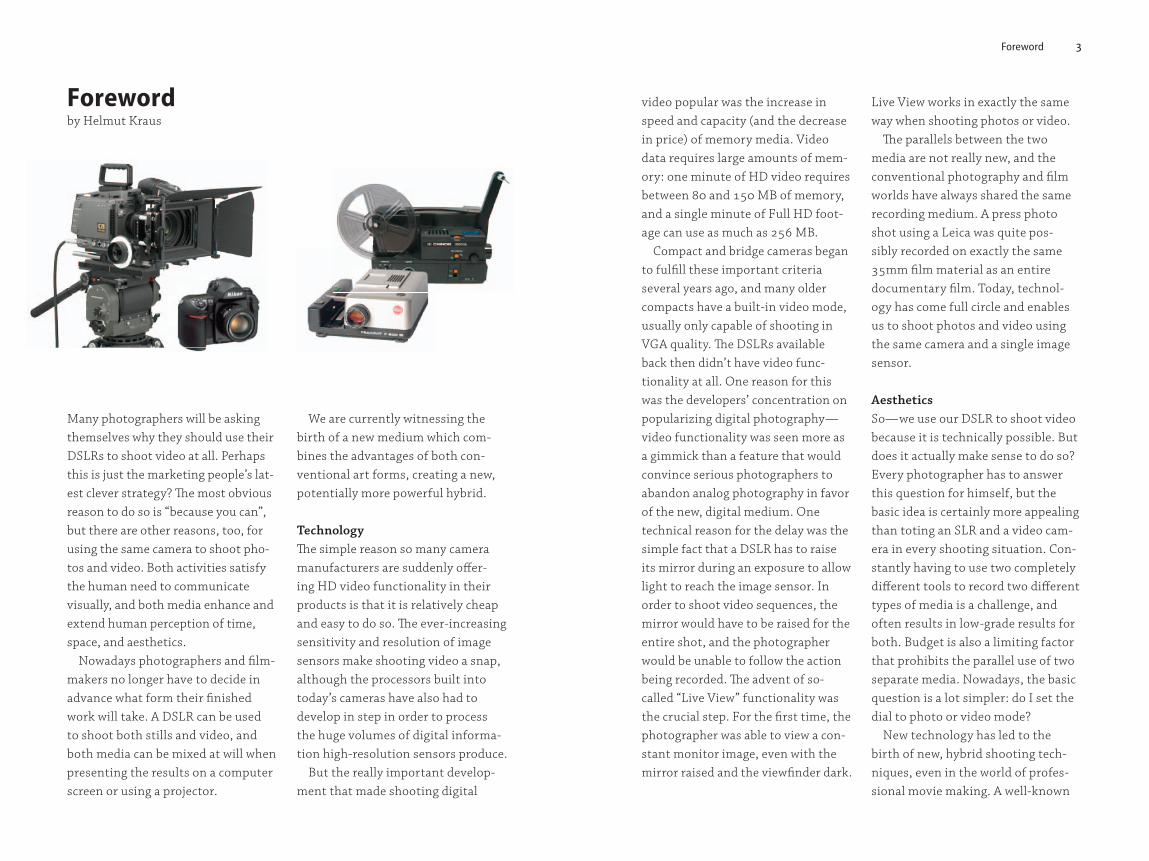
Compact and bridge cameras began to fulfill these important criteria several years ago, and many older compacts have a built-in video mode, usually only capable of shooting in VGA quality. The DSLRs available back then didn’t have video func-tionality at all. One reason for this was the developers’ concentration on popularizing digital photography—video functionality was seen more as a gimmick than a feature that would convince serious photographers to abandon analog photography in favor of the new, digital medium. One technical reason for the delay was the simple fact that a DSLR has to raise its mirror during an exposure to allow light to reach the image sensor. In order to shoot video sequences, the mirror would have to be raised for the entire shot, and the photographer would be unable to follow the action being recorded. The advent of so-called “Live View” functionality was the crucial step. For the first time, the photographer was able to view a con-stant monitor image, even with the mirror raised and the viewfinder dark.
Live View works in exactly the same way when shooting photos or video.
The parallels between the two media are not really new, and the conventional photography and film worlds have always shared the same recording medium. A press photo shot using a Leica was quite pos-sibly recorded on exactly the same 35mm film material as an entire documentary film. Today, technol-ogy has come full circle and enables us to shoot photos and video using the same camera and a single image sensor.
AestheticsSo—we use our DSLR to shoot video because it is technically possible. But does it actually make sense to do so? Every photographer has to answer this question for himself, but the basic idea is certainly more appealing than toting an SLR and a video cam-era in every shooting situation. Con-stantly having to use two completely different tools to record two different types of media is a challenge, and often results in low-grade results for both. Budget is also a limiting factor that prohibits the parallel use of two separate media. Nowadays, the basic question is a lot simpler: do I set the dial to photo or video mode?
New technology has led to the birth of new, hybrid shooting tech-niques, even in the world of profes-sional movie making. A well-known
Forewordby Helmut Kraus
Many photographers will be asking themselves why they should use their DSLRs to shoot video at all. Perhaps this is just the marketing people’s lat-est clever strategy? The most obvious reason to do so is “because you can”, but there are other reasons, too, for using the same camera to shoot pho-tos and video. Both activities satisfy the human need to communicate visually, and both media enhance and extend human perception of time, space, and aesthetics.
Nowadays photographers and film-makers no longer have to decide in advance what form their finished work will take. A DSLR can be used to shoot both stills and video, and both media can be mixed at will when presenting the results on a computer screen or using a projector.
We are currently witnessing the birth of a new medium which com-bines the advantages of both con-ventional art forms, creating a new, potentially more powerful hybrid.
Technology The simple reason so many camera manufacturers are suddenly offer-ing HD video functionality in their products is that it is relatively cheap and easy to do so. The ever-increasing sensitivity and resolution of image sensors make shooting video a snap, although the processors built into today’s cameras have also had to develop in step in order to process the huge volumes of digital informa-tion high-resolution sensors produce.
But the really important develop-ment that made shooting digital
4 Foreword 5Foreword
Although film and photo equipment (and professional training) are still quite different to one another, they are—viewed historically—closely related, and have strongly influenced each other’s development over the years. Photography only became an interesting and affordable hobby when Oskar Barnack came up with the idea of using comparatively cheap 35mm movie film in stills cameras.
We are currently witnessing what could be the start of the total fusion of the film and photo media. We already have the cameras and presen-tation media that can handle both. Now all we have to do is get on with breaking down the existing barriers.
example is the so-called “Matrix Effect” (named after the famous Wachowski Brothers film), in which the camera appears to fly around the scene in extreme slow motion. This effect is produced by setting up a large number of (stills) cameras around the scene and taking a long series of slightly time-delayed shots that are subsequently merged into a single movie sequence.
Every photographer at every level has at some point realized that the limits of the medium have prevented him from achieving his intended result. Newer techniques allow a photographer to circumvent these limits; for example, merging multiple images into a single panorama image can help you to work around the lim-ited angle of view of a conventional lens.
A video-capable DSLR allows you to replace a panorama with a pan, or to capture a moving subject more mean-ingfully than a motion-blurred (or super-sharp) photo can.
But the most convincing reason for using a DSLR to shoot video is prob-ably the ability to shoot video that looks like film. You can now capture video with a photographically broad tonal range, and with equally sharp detail in bright backlit or shadow situations. Videos shot using con-ventional video cameras have much greater contrast, and consequently a much narrower tonal range. Many
video-based filmmakers and artists use this video “look” deliberately. Speaking as a photographer, if I really need to produce a video-style effect, I prefer to generate it using a software-based change in tonal values rather than limiting myself at the shoot-ing stage. Remember, footage shot using video equipment can never be processed to look like film, and tonal values that are not present in the original material cannot be produced artificially later.
PresentationIn the analog world, photos and film were always presented separately. Most photos were either exhibited as prints or published in print media, and slide shows provided a way of presenting still images to a larger audience. Slide and film projectors are completely different devices, and the two media developed largely paral-lel to one another until TV began to merge still and moving images.
The digital age has seen a sig-nificant move from paper-based to monitor-based presentation of pho-tos, whether on a computer, a mobile phone, an iPod, or using the camera itself.
The fact that digital photos and video can be presented using one and the same device is another good rea-son for experimenting with moving pictures shot on your DSLR.
7Video Formats and Resolution
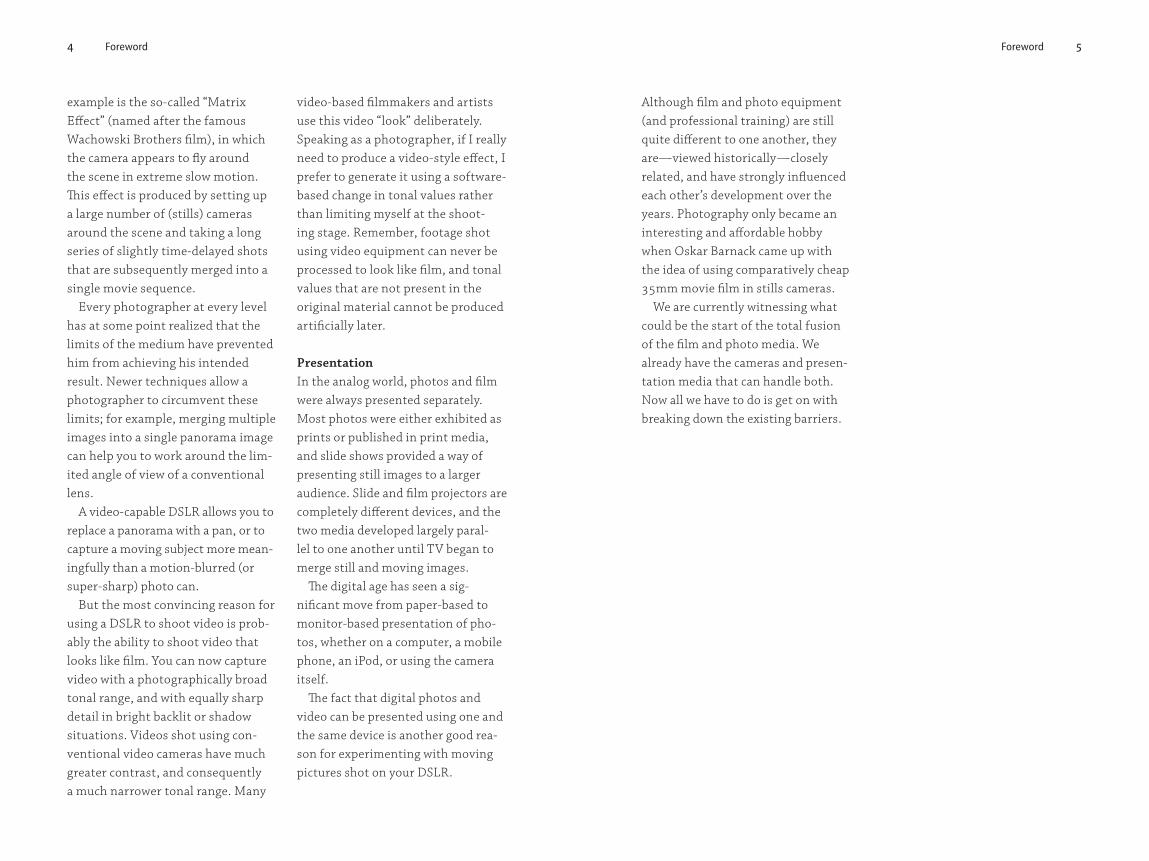
Normal 8, Super 8, 16mm, 35mm,CinemaScope, 70mm, Panavision—these are just some of the huge range of shooting formats available in the analog movie world. Unfortunately, things are just as confusing in the new, digital video world. The resolu-tion and frame rates of digital video formats are more related to those of conventional video and TV formats than to those of their movie coun-terparts. The HD and HDTV labels also come from the world of TV, but don’t really make it clear what level of image quality a device will produce.
The technical quality of digital video is influenced by a large number of factors. In addition to the resolu-tion (i.e., number of pixels) of each individual frame and the frame rate (the number of individual frames shot per second), memory format and data compression also play a significant role in determining the quality of your results. Let’s take a look at the most important factors individually.
Video Formats and Resolution
Just like analog film, digital video is comprised of a sequence of indi-vidual images or “frames”. A digital camera captures these frames with an electronic image sensor and saves them in digital form. Just as different analog film formats (8mm, 16mm,
35mm etc.) produce differing image quality and maximum projection sizes, different digital video formats also produce different results.
It is not long since the first con-sumer-level digital cameras with built-in video modes appeared. This functionality was initially limited to shooting two-minute mini-movies with an image size of 320 × 240 pix-els or less. Movie modes were at first only offered in compact cameras and didn’t become available in profes-sional-level devices for quite a while.
As technology improved, in-camera data processing speeds increased, and faster data transfer rates coupled with larger memory cards made it possible to record longer movies at higher resolutions. The latest digital cameras offer comprehensive video functionality at very high resolutions.
Today’s digital video resolution far exceeds that of traditional NTSC TV pictures, which have a resolution equivalent to approximately 0.34 megapixels. High-resolution video is generally described as being “High Definition” (HD). The term HD is not precisely defined, and is used to describe resolutions of 1280 × 720 as well as 1920 × 1080 pixels. The lat-ter format is often described as “Full HD”, and is already used for many contemporary film productions. In future, all TV pictures will be broad-cast in HD format. Most new TVs are capable of reproducing HD pictures,
Basicsby Helmut KrausBasicsby Helmut Kraus
10 Basics 11Frame Rates and Refresh Rates
individual film frame onto the screen line by line. This process is time-con-suming, and made it impossible for early TVs to refresh each frame the way movie projectors do, causing TV films to flicker noticeably.
The scanning time for each frame had to be reduced to make higher refresh rates possible, and the solu-tion is the so-called interlacing technique. This technique projects every second line of each frame onto the TV screen, using the odd-numbered lines for the first projec-tion and the even-numbered lines for the second. This way, a refresh rate of 60 Hz (equivalent to the frequency of household alternating current) produces 60 half-frames per second instead of 30 full frames. Our eyes convert the jumps from line to line effortlessly into a whole image, resulting in a flicker-free viewing experience. We do not see the dark lines where no image information is projected because conventional CRT screens phosphoresce for a short period after each image line has been projected. The construction of the human retina, with more rods than cones at its edges, makes us more
susceptible to flicker effects at the edges of our field of view. In spite of recent technological advances, TV pictures are still broadcast as half-frames.
Interlacing is also used to shoot video, resulting in each video frame having half the height of the full image. This is why video pictures (especially where horizontal motion is involved) often appear to be covered in horizontal stripes. The individual frames covering the move-ment were actually shot at different points in time and are thus displayed with a slight time lag.
Full-frame or Progressive Scan ProjectionModern TFT/LCD and plasma screens address each individual pixel directly and no longer need to use interlacing techniques to produce flicker-free moving images. The entire picture is always immediately visible, just like the image created by a movie projector. This projec-tion process is called full-frame or progressive scan. Here too, refresh rates are increased by projecting each frame twice, or by projecting interim
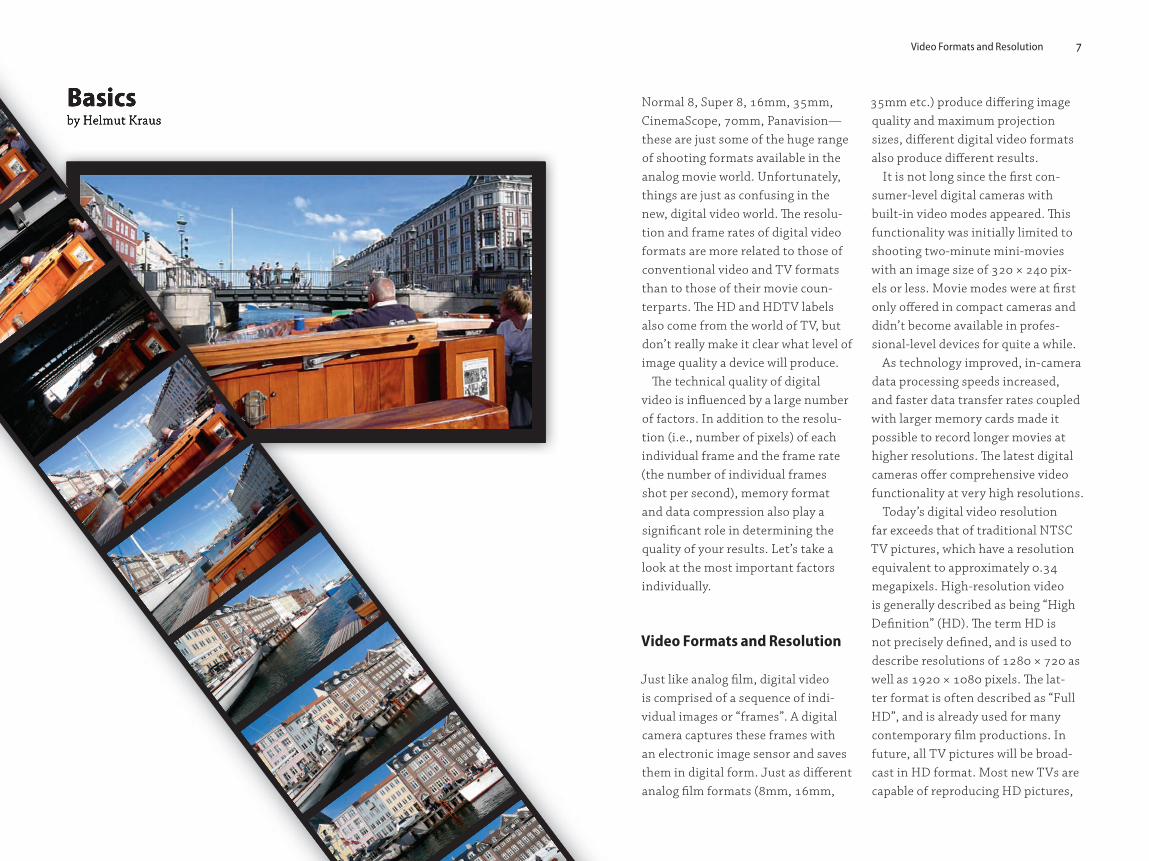
HD: 1280 × 720 pixels
HQ/SD (16:9): 852 × 480 pixels
PAL: 768 × 576 pixels
NTSC: 720 × 480 pixels
HQ/SD (4:3): 640 × 480 pixels
SQ: 480 × 360 pixels
QVGA: 320 × 240 pixels
Full HD: 1920 × 1080 pixels
Digital video formats
Size comparison of the most common formats. Images as the
top and on the left show old and new TV formats, while the
images on the right show video camera formats.
24 Basics 25Image Sensor Size
better results than cameras with smaller sensors (i.e., most video cameras), especially when shooting in weak light. Larger sensors also produce less noise at higher ISO sen-sitivity levels.
The Effects of Sensor Size on Depth of Field The large sensor in a DSLR produces footage with much less depth of field than that produced by a conventional
video camera, making the results very similar in look and feel to those produced by movie cameras. Here, it is possible to use out-of-focus fore-ground and background effects to emphasize the subject or to under-score other spatial characteristics of a scene.
This is the main reason that the movie modes built into many digital cameras are not just another gim-mick, but more of a full-blooded
are more difficult and expensive to manufacture.
Comparing DSLR Sensors with Common Video Formats and Video Camera SensorsShooting video with a DSLR becomes even more interesting when we com-pare the size of a DSLR’s sensor with conventional movie formats or video camera sensors.
Whatever size DSLR sensor we look at, it will always be many times larger than the ones found in professional video cameras. Professional video cameras generally use sensors with a 1/2-inch or 2/3-inch diagonal, while semi-professional and hobby video cameras have sensors that are as small as 1/3-inch or even 1/6-inch. A 1/2-inch sensor with an aspect ratio of 4:3 will physically measure 6.4 × 4.8 mm, while the largest (2/3-inch) professional video sensors currently available measure 8.6 × 6.6 mm. This represents about half the length of a Four Thirds image sensor. Only the digital movie cameras that are starting to replace conventional film-based movie cameras have larger, full-frame sensors.
Sensors such as Nikon’s DX type are only slightly smaller than the effective format of 35mm Academy format film frames, which measure 22 × 16 mm.
Shooting with a full-frame DSLR produces individual frames that are
just as high as a 70mm Panavision Super 70 film frame. However, the Panavision format produces frames that are, at 52 mm, significantly wider than those produced by a full-frame image sensor.
The Effects of Sensor Size on ExposureSo what differences do we encounter when shooting video using sensors that are so much larger than con-ventional video sensors? Let’s take a look at the effect sensor size has on exposure.
If we take a standard 1280 × 720-pixel HD frame as an example, it quickly becomes clear that the indi-vidual sensor elements that record the pixels in a frame are larger in a larger sensor.
Basically, the larger a sensor ele-ment, the more photons will hit it during shooting. So, because the strength of the signal generated by a single sensor element depends on the number of photons reaching it, the signals generated by larger sen-sor elements don’t have to be ampli-fied as much as those generated by smaller sensor elements. The more a sensor signal is amplified, the more image noise is produced as a result, making larger image sensors less subject to noise artifacts than their smaller cousins.
In practice, this means that cam-eras with larger sensors produce
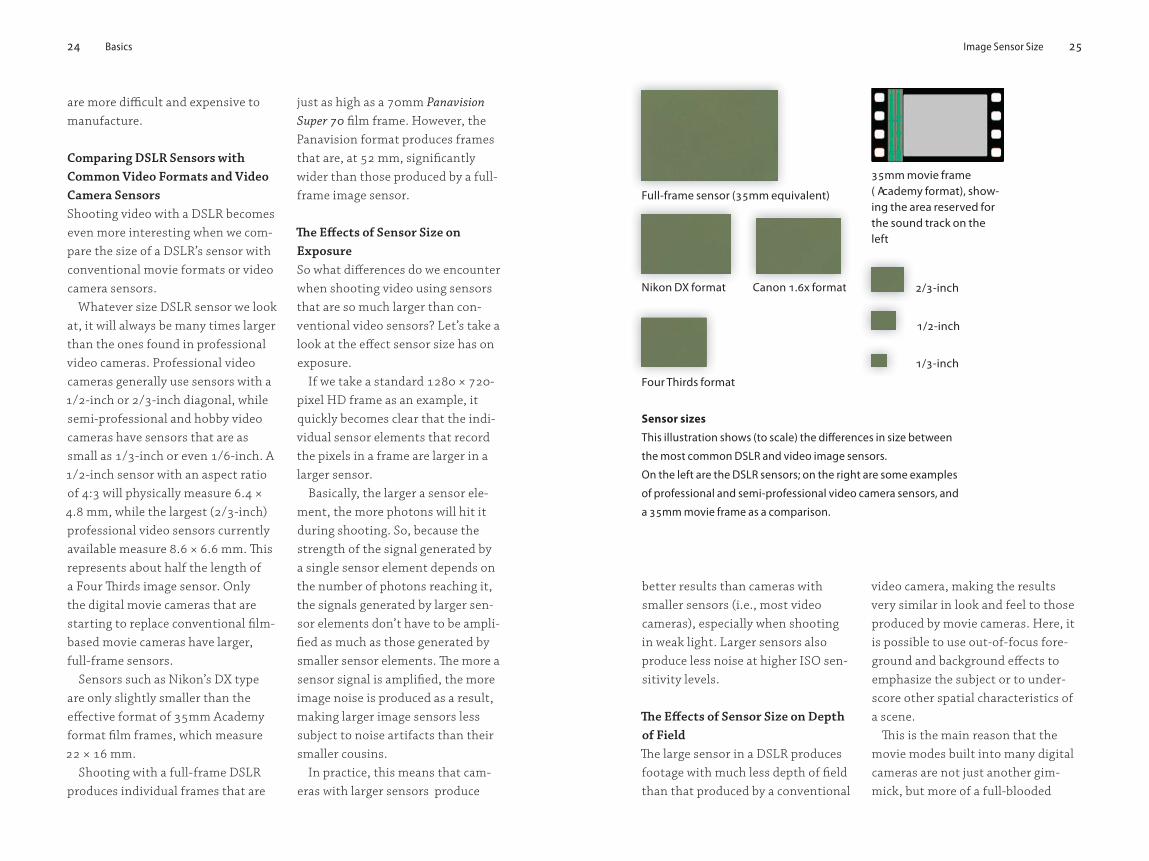
Full-frame sensor (35mm equivalent)
Four Thirds format
Nikon DX format Canon 1.6x format 2/3-inch
1/2-inch
1/3-inch
35mm movie frame ( Academy format), show-ing the area reserved for the sound track on the left
Sensor sizes
This illustration shows (to scale) the differences in size between
the most common DSLR and video image sensors.
On the left are the DSLR sensors; on the right are some examples
of professional and semi-professional video camera sensors, and
a 35mm movie frame as a comparison.
56 Equipment 57Tripods
of system uses the natural shock-absorbing characteristics of the human body to allow you to perform virtually shake-free handheld pans and dolly shots.
The ultimate camera support is a crane and jib system, which allows simultaneous horizontal, vertical, and rotational movements. These systems are available in motorized versions and can be programmed to precisely duplicate particular cam-era movements—a function that is particularly useful when it comes to merging film material with computer
animations at the post-processing stage.
In spite of the huge range of fas-cinating tripod technology avail-able on the market, it can also be an interesting challenge to shoot handheld. Handheld video often has an authentic feel, and it is nowadays possible to perform acceptable hand-held pans with the help of image-stabilized lenses. Remember, it is also possible to use software tools to stabilize shaky footage during post-processing.
The most obvious difference between photo and video tripod sys-tems is the type of damping system used for the major movements. A photo tripod is only moved between shots and requires no special damp-ing mechanism for pan or tilt move-ments, whereas a video tripod head is moved during shooting, making it necessary to keep all pans and tilts as shake-free as possible. High quality video heads are therefore equipped with fluid damping or epicyclic gear-ing systems that make it possible to begin and end all camera movements quickly and smoothly.
In addition to conventional tripod/head combos, there are also a num-ber of alternative camera supports available, including tripods that can be fixed to a vehicle using suction cups and beanbags in many different shapes and sizes.
A steadycam is a more complex video camera support. This type
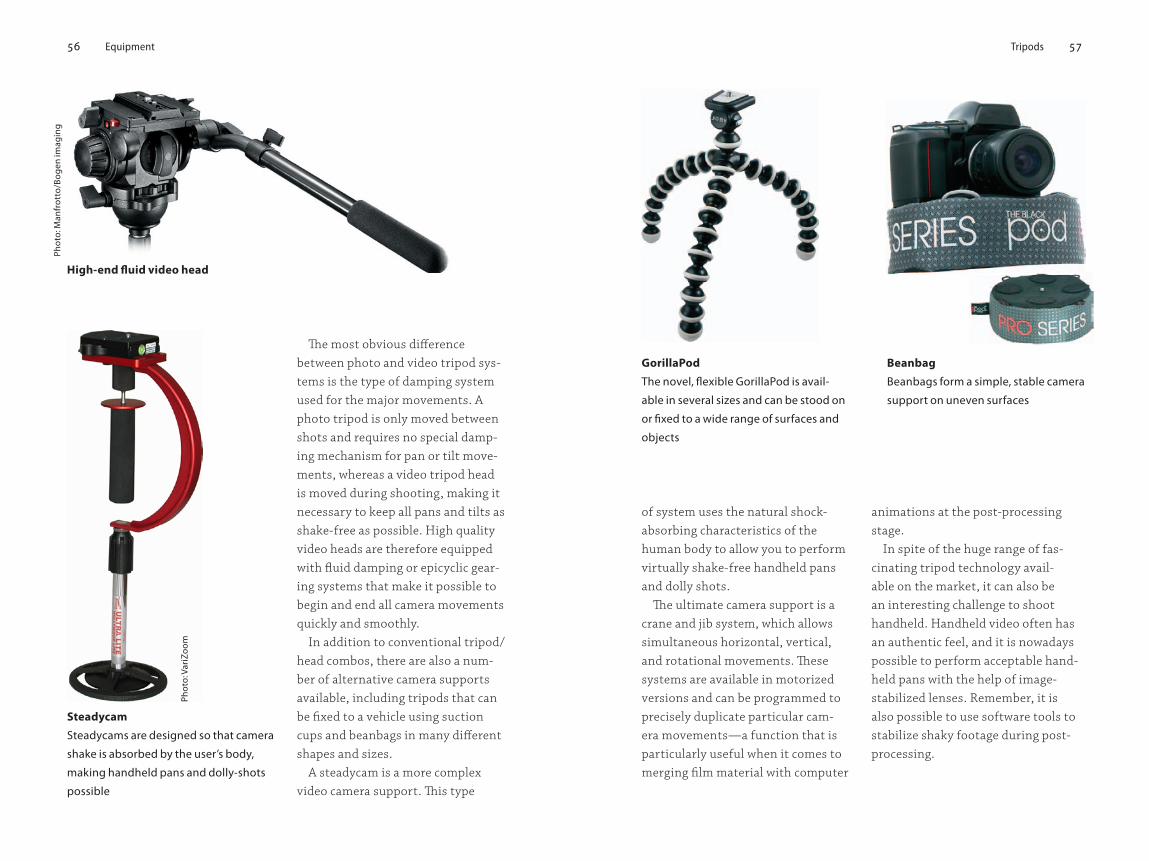
High-end fluid video head
GorillaPod
The novel, flexible GorillaPod is avail-
able in several sizes and can be stood on
or fixed to a wide range of surfaces and
objects
Beanbag
Beanbags form a simple, stable camera
support on uneven surfaces
Pho
to: V
ariZ
oo
m
Steadycam
Steadycams are designed so that camera
shake is absorbed by the user’s body,
making handheld pans and dolly-shots
possible
Pho
to: M
anfr
ott
o/B
og
en im
agin
g
Shooting Techniques82 Selecting Focal Length 83
“perspective” reproduced by the stan-dard lens appears natural and the assumed geometry of the scene rep-resents reality as we see it. The wide-angle view intensifies the normal per-spective with the subject at the rear appearing smaller than it actually is. The telephoto view produces the opposite effect, making the second subject appear larger and closer than is actually the case.
It is difficult to judge the real rela-tive sizes of objects in a wide-angle or telephoto scene. Hollywood directors often use this effect to deliberately fool moviegoers into thinking that film stars are physically bigger than they actually are.
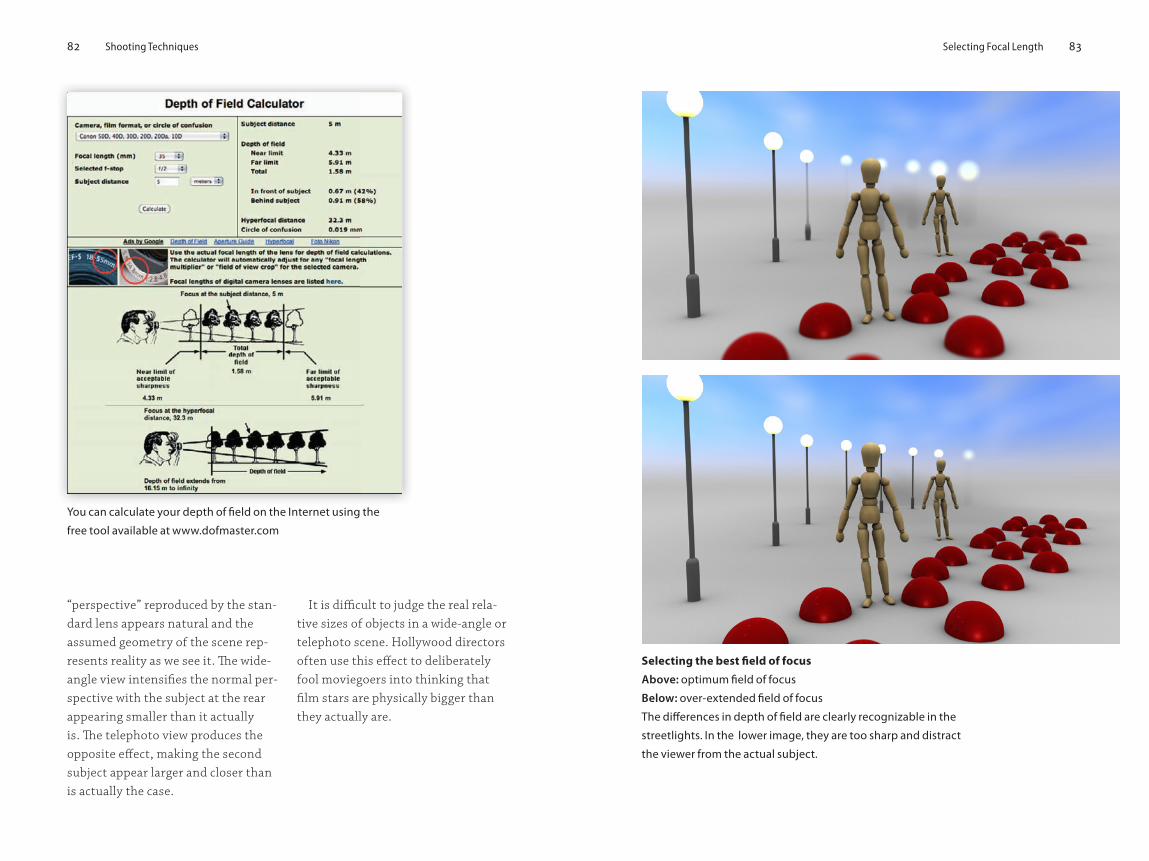
You can calculate your depth of field on the Internet using the
free tool available at www.dofmaster.com
Selecting the best field of focus
Above: optimum field of focus
Below: over-extended field of focus
The differences in depth of field are clearly recognizable in the
streetlights. In the lower image, they are too sharp and distract
the viewer from the actual subject.
Shooting Techniques92 Stop Motion Sequences 93
simply shoot a short test sequence to check your settings in advance.
A sunset is easier to film if you know approximately how long it will be until the sun disappears over the horizon and how long you want your finished sequence to last. If, for example, you want to make a 15-sec-ond sequence out of an hour’s sun-set, you will (at 24 fps) have to shoot 24 × 15 = 360 individual shots to cre-ate your sequence. An hour has 3,600 seconds, so you will need to set your camera to take one shot every 10 sec-onds in order to shoot the required 360 images within the available time.
It is more difficult to work out where the sun will actually cross the horizon, and you will have to rely on either your memory of the day before or a compass and an astronomical program for your computer if you want the sun to disappear exactly in the center of the frame.
It is always better to take too many shots in a time-lapse sequence than too few. If your finished sequence appears too slow, you can always cut out every second shot to speed things up. If, however, your sequence appears to move too fast, it is impos-sible to slow things down without reshooting using a shorter interval.
It is advisable to set your camera to a lower, video-level resolution before shooting in order to avoid having to resample each high-resolution image to a lower resolution before
merging them into the final clip. If your camera can’t shoot at such low resolutions, you will need to use an appropriate tool, such as QuickTime Pro (for Mac) or Adobe Premiere Ele-ments (for Windows) to batch-pro-cess your images before merging.
Stop Motion Sequences
Creative image composition and manual exposure functionality make DSLRs great tools for creating stop motion animations. Stop motion is the oldest of all animation tech-niques, and was used to breathe life into all the earliest movie monsters, from Godzilla to King Kong. The basic principle is the same as that for time-lapse sequences, with individu-ally shot frames being merged into a single, finished clip.
The use of high-end gear (including macro or tilt/shift lenses) makes it possible for today’s DSLR owner to shoot extremely professional-looking animations.
You can also use stop motion tech-niques to give your results a delib-erately trashy look by shooting long sequences of handheld stills at your camera’s highest burst rate. If you then merge the resulting images into a single video sequence, the results end up looking like a deliberately ham-fisted stop motion animation. If you enhance this effect by shooting
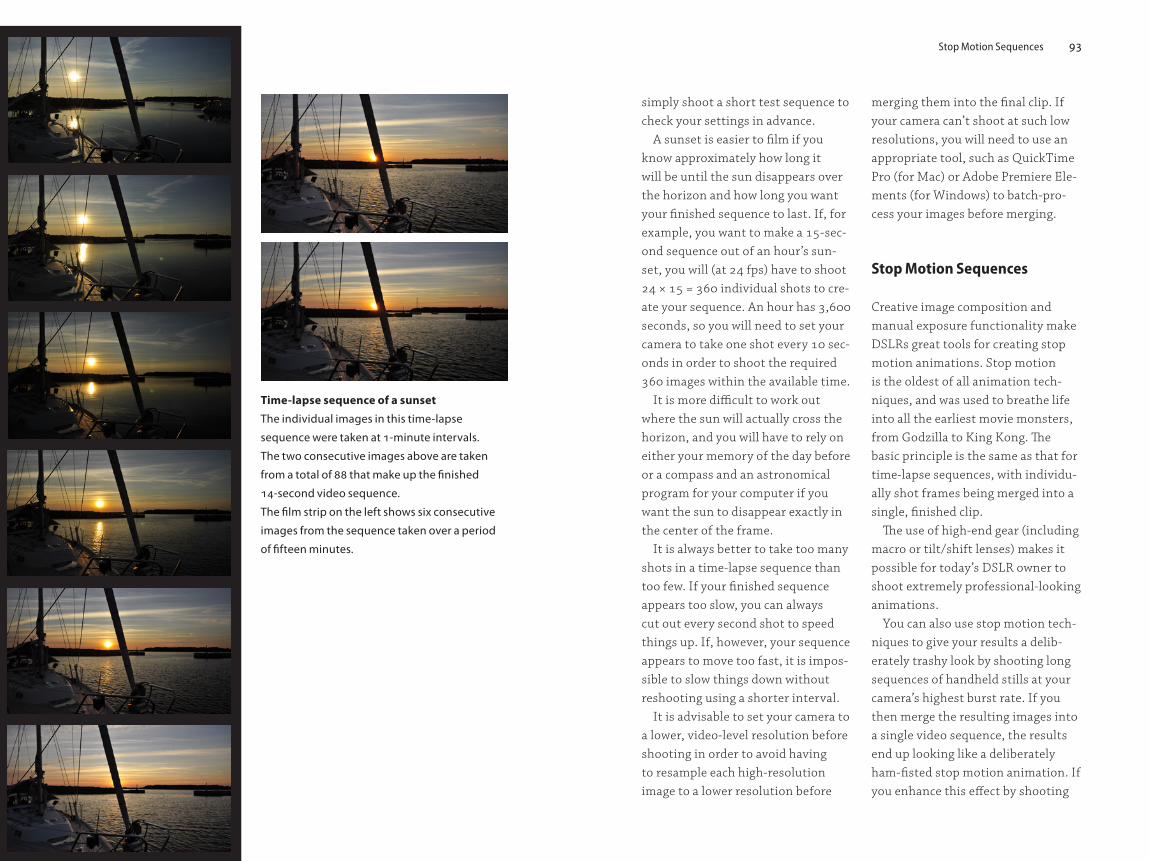
Time-lapse sequence of a sunset
The individual images in this time-lapse
sequence were taken at 1-minute intervals.
The two consecutive images above are taken
from a total of 88 that make up the finished
14-second video sequence.
The film strip on the left shows six consecutive
images from the sequence taken over a period
of fifteen minutes.
130 Sound 131Microphone Accessories
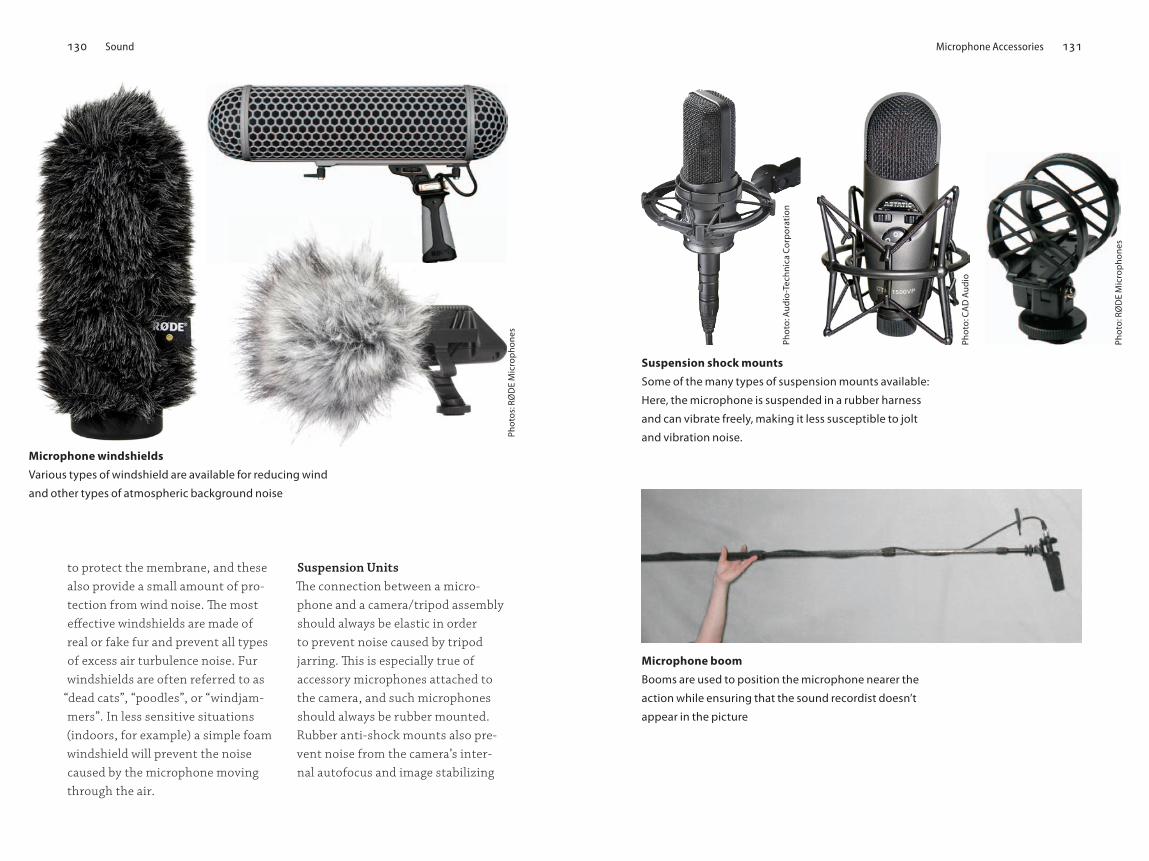
to protect the membrane, and these also provide a small amount of pro-tection from wind noise. The most effective windshields are made of real or fake fur and prevent all types of excess air turbulence noise. Fur windshields are often referred to as
“dead cats”, “poodles”, or “windjam-mers”. In less sensitive situations (indoors, for example) a simple foam windshield will prevent the noise caused by the microphone moving through the air.
Suspension UnitsThe connection between a micro-phone and a camera/tripod assembly should always be elastic in order to prevent noise caused by tripod jarring. This is especially true of accessory microphones attached to the camera, and such microphones should always be rubber mounted. Rubber anti-shock mounts also pre-vent noise from the camera’s inter-nal autofocus and image stabilizing
Microphone windshields
Various types of windshield are available for reducing wind
and other types of atmospheric background noise
Suspension shock mounts
Some of the many types of suspension mounts available:
Here, the microphone is suspended in a rubber harness
and can vibrate freely, making it less susceptible to jolt
and vibration noise.
Microphone boom
Booms are used to position the microphone nearer the
action while ensuring that the sound recordist doesn’t
appear in the picture
Pho
to: R
ØD
E M
icro
ph
on
es
Pho
to: C
AD
Au
dio
Pho
to: A
ud
io-T
ech
nic
a C
orp
ora
tio
n
Pho
tos:
RØ
DE
Mic
rop
ho
nes
158 Editing and Post-Processing 159Creating and Editing a Sequence
should generally fit with the content of the sequence. For example, two peaceful scenes should always be combined using a calm and unobtru-sive transition effect. Many transi-tion effects also move in a particular direction, and these too should fit
in with the action. Never use a verti-cal transition to combine scenes of horizontal movement. “Less is more” is a good basic approach to the use of transitions, and it is generally better to avoid using overbearing transition effects, except where they are used
Legibility is the key to good cred-its and I recommend that you avoid using the complex title effects built into some editing programs.
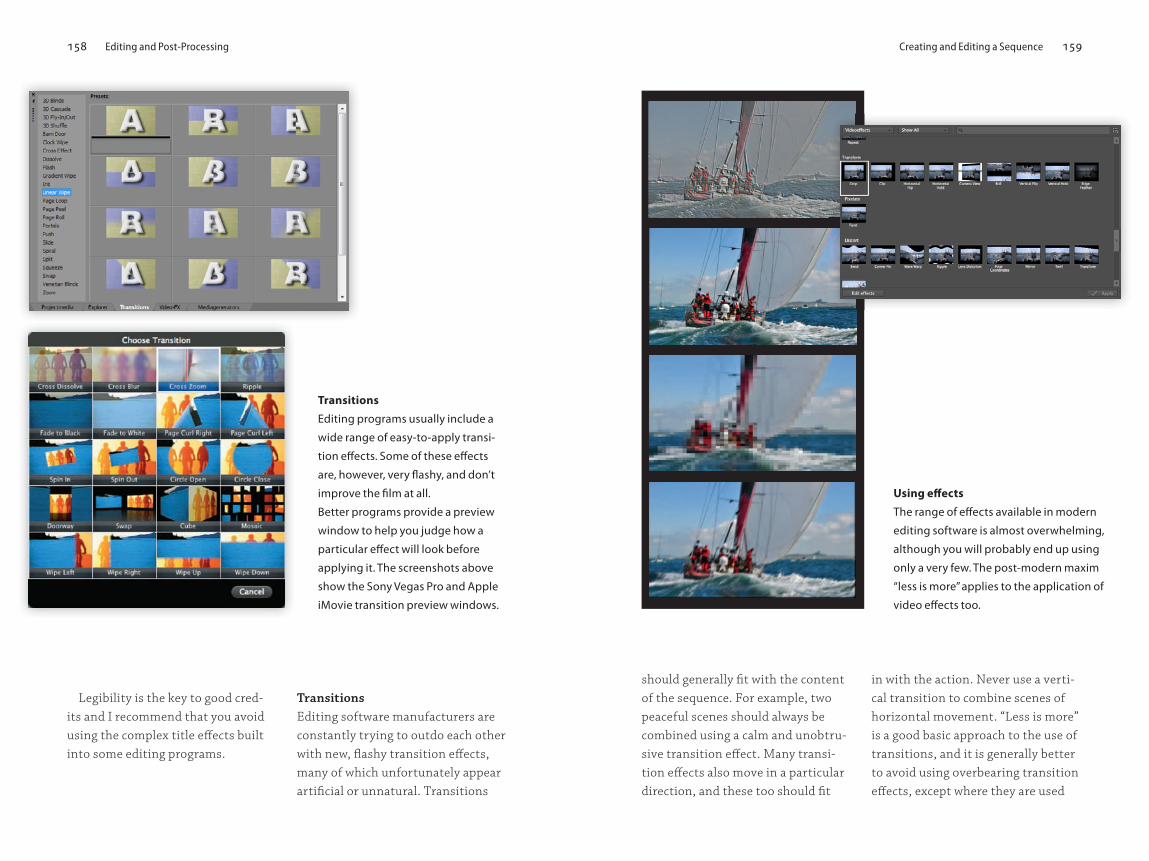
TransitionsEditing software manufacturers are constantly trying to outdo each other with new, flashy transition effects, many of which unfortunately appear artificial or unnatural. Transitions
Using effects
The range of effects available in modern
editing software is almost overwhelming,
although you will probably end up using
only a very few. The post-modern maxim
“less is more” applies to the application of
video effects too.
Transitions
Editing programs usually include a
wide range of easy-to-apply transi-
tion effects. Some of these effects
are, however, very flashy, and don’t
improve the film at all.
Better programs provide a preview
window to help you judge how a
particular effect will look before
applying it. The screenshots above
show the Sony Vegas Pro and Apple
iMovie transition preview windows.
181Entering the New World of Video
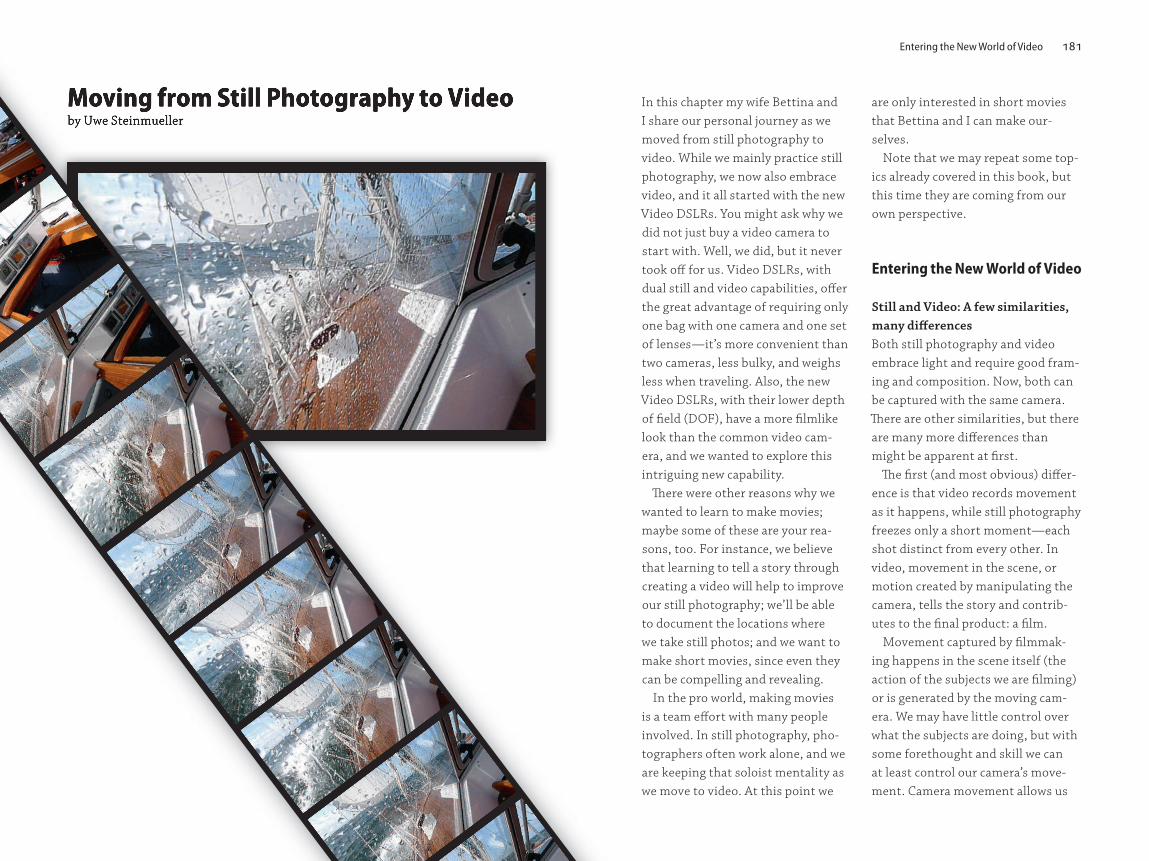
In this chapter my wife Bettina and I share our personal journey as we moved from still photography to video. While we mainly practice still photography, we now also embrace video, and it all started with the new Video DSLRs. You might ask why we did not just buy a video camera to start with. Well, we did, but it never took off for us. Video DSLRs, with dual still and video capabilities, offer the great advantage of requiring only one bag with one camera and one set of lenses—it’s more convenient than two cameras, less bulky, and weighs less when traveling. Also, the new Video DSLRs, with their lower depth of field (DOF), have a more filmlike look than the common video cam-era, and we wanted to explore this intriguing new capability.
There were other reasons why we wanted to learn to make movies; maybe some of these are your rea-sons, too. For instance, we believe that learning to tell a story through creating a video will help to improve our still photography; we’ll be able to document the locations where we take still photos; and we want to make short movies, since even they can be compelling and revealing.
In the pro world, making movies is a team effort with many people involved. In still photography, pho-tographers often work alone, and we are keeping that soloist mentality as we move to video. At this point we
are only interested in short movies that Bettina and I can make our-selves.
Note that we may repeat some top-ics already covered in this book, but this time they are coming from our own perspective.
Entering the New World of Video
Still and Video: A few similarities, many differencesBoth still photography and video embrace light and require good fram-ing and composition. Now, both can be captured with the same camera. There are other similarities, but there are many more differences than might be apparent at first.
The first (and most obvious) differ-ence is that video records movement as it happens, while still photography freezes only a short moment—each shot distinct from every other. In video, movement in the scene, or motion created by manipulating the camera, tells the story and contrib-utes to the final product: a film.
Movement captured by filmmak-ing happens in the scene itself (the action of the subjects we are filming) or is generated by the moving cam-era. We may have little control over what the subjects are doing, but with some forethought and skill we can at least control our camera’s move-ment. Camera movement allows us
Moving from Still Photography to Videoby Uwe SteinmuellerMoving from Still Photography to Videoby Uwe Steinmueller
198 Moving from Still Photography to Video 199Overall Workflow
Bridge only show one frame. This means a seemingly useless clip might have useful material hidden inside. Therefore, it’s best to care-fully review every clip. Also keep in mind that even a short three-to-five-second sequence could be use-ful later during editing.
• Clips that may make it into a movie get rated with three to five stars.
does a good job for transcoding the GH1 AVCHD .MTS files, and per-forming a pulldown from 60i to 24p. It also works fine for the Canon 5D Mark II and 7D.
During transcoding, files easily become four to seven times larger than the original file. That is why we transcode to a temporary folder—we also do this because a lot of our foot-age will be rejected or trimmed during the next step (see below). Still, it’s a good idea to have all the transcoded clips available while we work on a proj-ect, and the temporary folder serves the purpose of corralling all such clips. Some projects may span several
months’ worth of shooting, while oth-ers use clips from just one shoot.
Viewing and Clip RatingOur main video browser is Adobe Bridge CS4, which comes with Photo-shop CS4.
Next, we get ready to view all our clips in QuickTime 7 Pro (launched from Bridge). Each clip gets an initial rating:• Useless clips (e.g., camera run-
ning while we walk) get deleted right away. This is not a critical operation because we can delete these unwanted clips at any time. But remember, we never delete original clips. Video thumbnails in
Note
Mac OS 10.6 (Snow Leopard) comes with
QuickTime 10. You would think this is
an advanced version of QuickTime, but
unfortunately it is not as powerful as QT 7
Pro. On the plus side, Snow Leopard does
allow us to install QT 7 Pro in addition to
its pre-installed QT 10. We have set up
Bridge so that it always opens .MOV vid-
eos in QT 7 Pro.
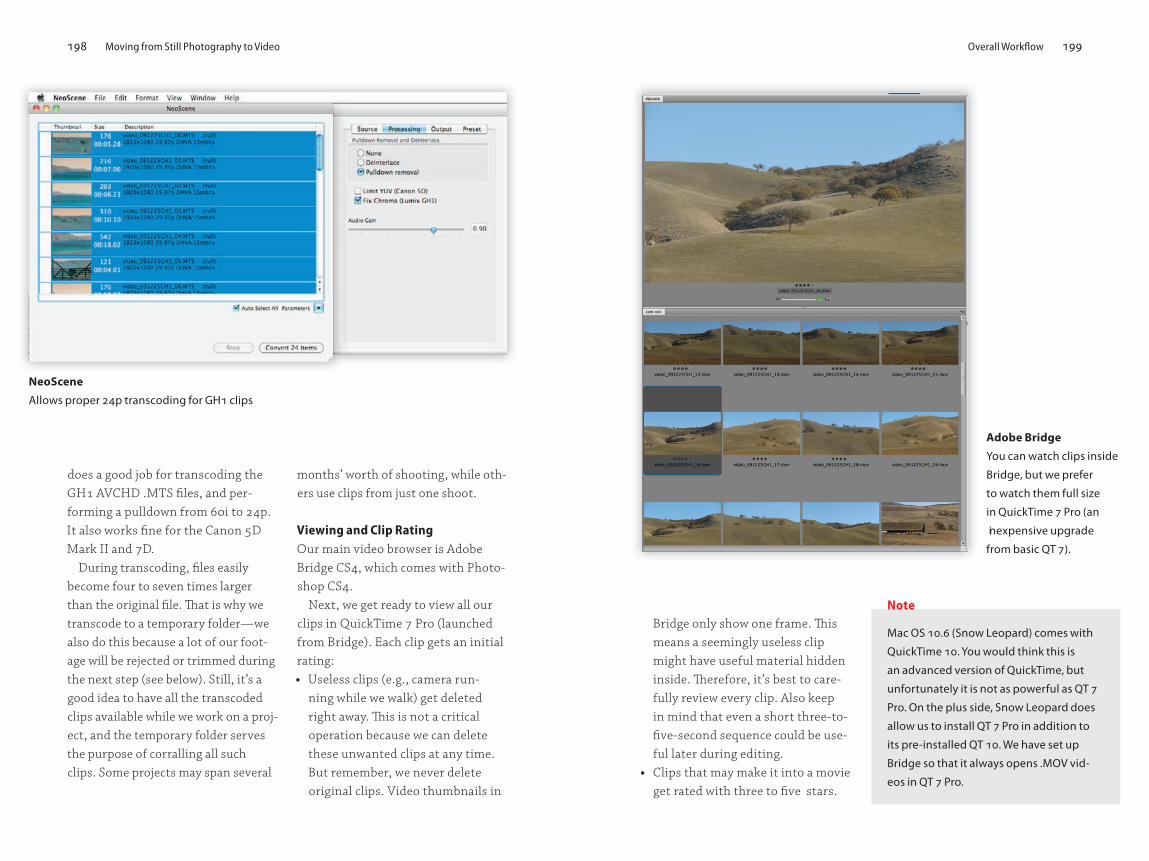
NeoScene
Allows proper 24p transcoding for GH1 clips
Adobe Bridge
You can watch clips inside
Bridge, but we prefer
to watch them full size
in QuickTime 7 Pro (an
inexpensive upgrade
from basic QT 7).