Embed Size (px)
Citation preview

Masterclass
Microsoft® Word Part 3

t : +44 1629 699 100 | e : [email protected] | w : ideagen.com Copyright © 2017 Ideagen plc
1
Table of Contents
Introduction ............................................................................................................................................................. 2
About Ideagen ......................................................................................................................................................... 2
Tips, Tricks and Shortcuts ...................................................................................................................................... 3
Select text ............................................................................................................................................................. 3
Move text .............................................................................................................................................................. 3
Write anywhere ................................................................................................................................................... 4
Filler text ............................................................................................................................................................... 4
Extended clipboard ............................................................................................................................................. 5
Keyboard shortcuts ............................................................................................................................................. 6
Other quick tips ................................................................................................................................................... 7
Fields ......................................................................................................................................................................... 9
Inserting automatic fields................................................................................................................................... 9
Calculations ........................................................................................................................................................ 12
Updating fields ................................................................................................................................................... 12
Locking/Unlocking fields ................................................................................................................................... 12
Displaying field codes ....................................................................................................................................... 13
Customization Features ....................................................................................................................................... 14
Changing the default font ................................................................................................................................ 14
Object Linking and Embedding ........................................................................................................................... 15
What’s the difference? ...................................................................................................................................... 15
Embedding data ................................................................................................................................................ 16
Linking data ........................................................................................................................................................ 18
Document Map ...................................................................................................................................................... 21
t : +44 1629 699 100 | e : [email protected] | w : ideagen.com Copyright © 2017 Ideagen plc
2
Introduction Microsoft® Word is the most widely used word processor and one of the most sophisticated software products in the world. It is very powerful with powerful tools, but that doesn’t mean we know how to use all those tools. In fact it is said that 90% of people only use 10% of the functionality, but of course the 90% don’t all use the same 10%!
If you spend more time in Microsoft Word than any other software application, learning how to use it as efficiently as possible will save you significant time and increase your productivity. This e-book focuses on time saving techniques with tips, shortcuts, ideas and guides helping you to enhance your productivity and become more confident, efficient and effective when producing large, complex Word documents.
This e-book is the third part of our Word Masterclass, which focuses on time saving techniques with tips, shortcuts, ideas and guides that help you to enhance your productivity and become more confident, efficient and effective when producing large, complex Word documents.
Throughout this e-book you will find references to parts 1 and 2 of our Word Masterclass.
• Part 1 provides lots of information on how you can speed up many routine actions, with tips and techniques on tables, styles and macros
• Part 2 concentrates on building templates and has a wealth of information about Word’s ‘auto’ tools that can make developing documents quicker and easier by utilizing Building Blocks, AutoCorrect, and AutoFormat
This e-book is designed for users of Microsoft Word 2013, but much of it can be applied to Word 2016, Word 2010 and, in some cases, Word 2007.
About Ideagen Ideagen plc is a developer of enterprise governance, risk and compliance (GRC) software for organizations operating in highly regulated industries, with operations in the UK, USA, the Middle East and Eastern Europe.
Ideagen PleaseReview delivers a secure, scalable solution for document review, co-authoring and redaction that helps organizations create better quality documents more quickly to very tight deadlines. Launched in 2005, PleaseReview has more than 100,000 users in more than 200 companies across the globe.
Clients range across industry sectors and business disciplines, with the majority operating in regulated and document intensive industries, such as life sciences and defense. It is in these sectors where the creation and review of large, often complex documents is of particular importance due to strict regulatory and corporate compliance requirements and tight deadlines.
So what makes us experts to talk around the subject of Microsoft Word? Our software supports Microsoft Word, Excel, PowerPoint, PDF, source code, text and images. We work with thousands of people who use Microsoft Word every day and therefore see the problems daily – users manually doing the things Word can do, and experiencing formatting and other issues.

t : +44 1629 699 100 | e : [email protected] | w : ideagen.com Copyright © 2017 Ideagen plc
3
Tips, Tricks and Shortcuts Select text Here are a few shortcuts to quickly select text:
• To select a single word, double-click the word.
• To select a line of text, place your cursor at the start of the line and press SHIFT+DOWN ARROW.
• To select a sentence, click anywhere in the sentence while holding the CTRL key down.
• To select a paragraph, make three rapid clicks anywhere in the paragraph. Alternatively, place your cursor at the start of the paragraph, and press CTRL+SHIFT+DOWN ARROW.
• To select all text in a document, press CTRL+A.
Note that you can also select non-adjacent content by holding down the CTRL key whilst selecting the text with your mouse. For example, in the image below, four pieces of non-adjacent text have been selected by triple clicking the paragraph and holding the CTRL key whilst double-clicking each non-
adjacent word.
Move text Instead of using CTRL+X and CTRL+V to cut and paste content, you can move text quickly using drag and drop. Simply select the text you want to move, then click and drag the text to its new location. As you drag the text your cursor will change to an arrow with a small rectangle box below it – this indicates that you are moving text.

t : +44 1629 699 100 | e : [email protected] | w : ideagen.com Copyright © 2017 Ideagen plc
4
To move large sections of text and other content within a document, try using the Document Map.
Write anywhere You can type anywhere in a Microsoft Word document without using the space bar or tab key to position your cursor.
Simply double click anywhere in the document and your cursor will be placed exactly at that place. Word will automatically insert paragraph marks and tabs saving you the trouble.
Filler text Inserting random blocks of filler text is useful when creating templates, testing page formatting and fonts, etc. Here are a couple of text blocks you can use:
• Typing =RAND() and pressing Enter will automatically insert random text from the Word help
menu.
• Typing =LOREM() and pressing Enter will automatically insert the lorem ipsum text.
If you want a specific number of sentences/paragraphs to be inserted, you can type one of the commands shown above and enter the number of required sentences and paragraphs in the brackets. For example, typing =RAND(2,8) results in two paragraphs with eight sentences in each. Typing =LOREM(15) results in fifteen lines of lorem ipsum text.
If you are using Word 2003 or earlier, the filler text from =RAND() is a repetition of the sentence "The quick brown fox jumps over the lazy dog" (more accurately described as a pangram because the sentence uses every letter of the alphabet).
Users of Word 2007 and later can insert the famous pangram by typing =RAND.OLD() and pressing Enter.
Note these features will be disabled when "Replace text as you type" is turned off.

t : +44 1629 699 100 | e : [email protected] | w : ideagen.com Copyright © 2017 Ideagen plc
5
Extended clipboard You may be surprised to learn that you can store more than one piece of selected text/graphic to the clipboard when cutting and pasting content. The clipboard allows you to store up to 24 text and graphical items, and it allows you to arrange the copied items the way that you want them in your document.
To open the clipboard task pane, click the launcher icon in the bottom right corner of the Clipboard section of the ribbon.
As items are added to the clipboard, an entry is displayed in the task pane with the latest entry at the top.
You can then use the clipboard to paste the items into your document either individually or all at the same time.
Simply place your cursor where you want the items to be pasted, then click the item in the clipboard that you want to paste. To paste all the items in the clipboard at the same time, click ‘Paste All’ at the top of the clipboard task pane.

t : +44 1629 699 100 | e : [email protected] | w : ideagen.com Copyright © 2017 Ideagen plc
6
Keyboard shortcuts
CTRL+O Open a document.
CTRL+P Print a document.
CTRL+S Save a document.
CTRL+W Close the document.
CTRL+A Select all content.
CTRL+X Cut selected text/graphic to the clipboard.
CTRL+C Copy selected text/graphic to the clipboard.
CTRL+V Paste content of the clipboard.
CTRL+SHIFT+C Copy formatting of selected text/graphic.
CTRL+SHIFT+V Paste formatting to selected text/graphic.
CTRL+Z Undo an action.
CTRL+Y Redo the last action or repeat an action.
CTRL+B Applies or removes bold formatting.
CTRL+I Applies or removes italic formatting.
CTRL+U Applies or removes underline formatting.
CTRL+E Center text
CTRL+L Left align text
CTRL+R Right align text
CTRL++ Formats a word to subscript.
CTRL+SHIFT++ Formats a word to superscript.
CTRL+SHIFT+A Format all letters as capitals.
CTRL+F Find (opens the search box in the Navigation task pane).
CTRL+H Open Find & Replace dialog box.
CTRL+G Go to a page, bookmark, footnote, table, comment, graphic, or other location.
CTRL+K Insert a hyperlink.
CTRL+F9 Insert a field.
CTRL+F11 Lock a field.
CTRL+SHIFT+F11 Unlock a field.
ALT+CTRL+F Insert a footnote.
ALT+CTRL+D Insert an endnote.
ALT+R+S Spelling & Grammar check.
CTRL+SHIFT+N Apply the Normal style.
ALT+CTRL+1 Apply the Heading 1 style.
ALT+CTRL+2 Apply the Heading 2 style.
ALT+CTRL+3 Apply the Heading 3 style.
SHIFT+ENTER Insert a line break.
CTRL+ENTER Insert a page break.
CTRL+SHIFT+> Increase font size of selected text.
CTRL+SHIFT+< Decrease font size of selected text.

t : +44 1629 699 100 | e : [email protected] | w : ideagen.com Copyright © 2017 Ideagen plc
7
Other quick tips
Showing keyboard shortcuts in ScreenTips If you like using keyboard shortcuts but struggle to remember them, you may find it helpful to make Word display the keyboard shortcuts in ScreenTips. ScreenTips appear when you hover your cursor over a toolbar button on the ribbon.
For example, when you hover your cursor over the ‘Bold’ button on the Home tab of the ribbon, the ScreenTip appears with the words “Bold. Make your text bold.”
You can change this so that the ScreenTip also displays the keyboard shortcut with the words "Bold (CTRL+B). Make your text bold."
To change this setting, open the Word options by selecting ‘Options’ under the File tab of the ribbon. Under the ‘Advanced’ tab of the Word Options dialog box, scroll down to the ‘Display’ section. Find the option for ‘Show shortcut keys in ScreenTips’ and select it.
Click ‘OK’ to close the dialog box.
Now your ScreenTips will display the keyboard shortcuts:

t : +44 1629 699 100 | e : [email protected] | w : ideagen.com Copyright © 2017 Ideagen plc
8
Hide white space between pages To hide the gaps between pages of a Word document, hover over the gap until the cursor changes to a double pointed arrow (as shown below). Double click and the gap will disappear. To restore the gap, double click again.
Draw a horizontal line quickly Rather than use the drawing tools to create a horizontal line, simple type three hyphens and press Enter. Word will automatically replace the hyphens with a solid horizontal line.
Checking spaces between sentences We each have our own preference as to whether there should be one or two spaces between sentences. Unfortunately, there is no setting in Word to automatically apply the number of spaces, however you can configure Word's grammar checker to flag any sentence spacing that doesn't match your preference.
To set this up, open the Word options by selecting ‘Options’ under the File tab. Under the ‘Proofing’ tab of the Word Options dialog box, scroll down to the ‘When correcting spelling and grammar in Word’ section and click the ‘Settings’ button.
The Grammar Settings dialog box will display.
Use the ‘Spaces required between sentences’ drop-down list to select how many spaces you want between sentences.
Click ‘OK’ to close the dialog box and click ‘OK’ again to close the Word Options dialog box.
Now the grammar checker will flag any sentences that don't match your setting. You can then correct these using the standard spell and grammar checker.

t : +44 1629 699 100 | e : [email protected] | w : ideagen.com Copyright © 2017 Ideagen plc
9
Fields Word has a range of fields available that allow you to include dynamic information within your documents. This could be anything from page numbers to calculations.
Inserting automatic fields Perhaps you want to include document information in your headers/footers such as page numbers, document location, etc. or version/document control tables containing information like version number, file name, author, etc. Much of this information can be provided directly by Word as opposed to entering it manually.
There are a considerable number of automatic fields in Word which you can use to automatically insert information for you.
To insert a field, go to the Quick Parts drop-down list on the Insert tab of the ribbon and select ‘Field’. The Field dialog box will open:
All fields are displayed in the list on the left. You can filter the list of fields by using the Categories drop-down list in the top left:

t : +44 1629 699 100 | e : [email protected] | w : ideagen.com Copyright © 2017 Ideagen plc
10
Selecting a field in the list will display additional information depending on the field selected.
In this example, we will insert the Page field and the NumPages field in the footer so that it will display as ‘Page X of Y’.
With the footer of the document open and your cursor in the location where the page numbers are to display, select ‘Field’ from the Quick Parts drop-down list on the Insert tab of the ribbon.
In the Field dialog box, scroll down the field names and select ‘Page’:
Select the required format (if no format is selected, Word will use 1, 2, 3, etc.), and click ‘OK’. The page number field is now in the footer displaying the page number. Place you cursor after the page number field and type the word ‘of’ (or use ‘/’ or other expression if preferred).
Now we need to insert a field to display the total number of pages in the document. With your cursor in the footer after the word ‘of’, select ‘Field’ from the Quick Parts drop-down list on the Insert tab of the ribbon again. In the Field dialog box, scroll down the field names and select ‘NumPages’. Choose the same format as with the page number field and click ‘OK’.
The footer now displays with the page number and number of pages in the document:

t : +44 1629 699 100 | e : [email protected] | w : ideagen.com Copyright © 2017 Ideagen plc
11
If you would like to include a version/document control table containing information like version number, file name, author, etc. in your document, use the fields in the ‘Document Information’ category. Selecting ‘DocProperty’ from the list displays additional fields such as ‘RevisionNumber’.
Note, if you use the ‘FileName’ field, you also have the option to display the file path (where the document is saved). To include the file path, simply select the ‘Add path to filename’ checkbox in the Field dialog box as shown below:
To find out more information about specific fields, click on the question mark icon in the top right corner of the Field dialog box. This will open the Word Help menu with a list of all available fields. Select a field in the list to see detailed information about that field.
t : +44 1629 699 100 | e : [email protected] | w : ideagen.com Copyright © 2017 Ideagen plc
12
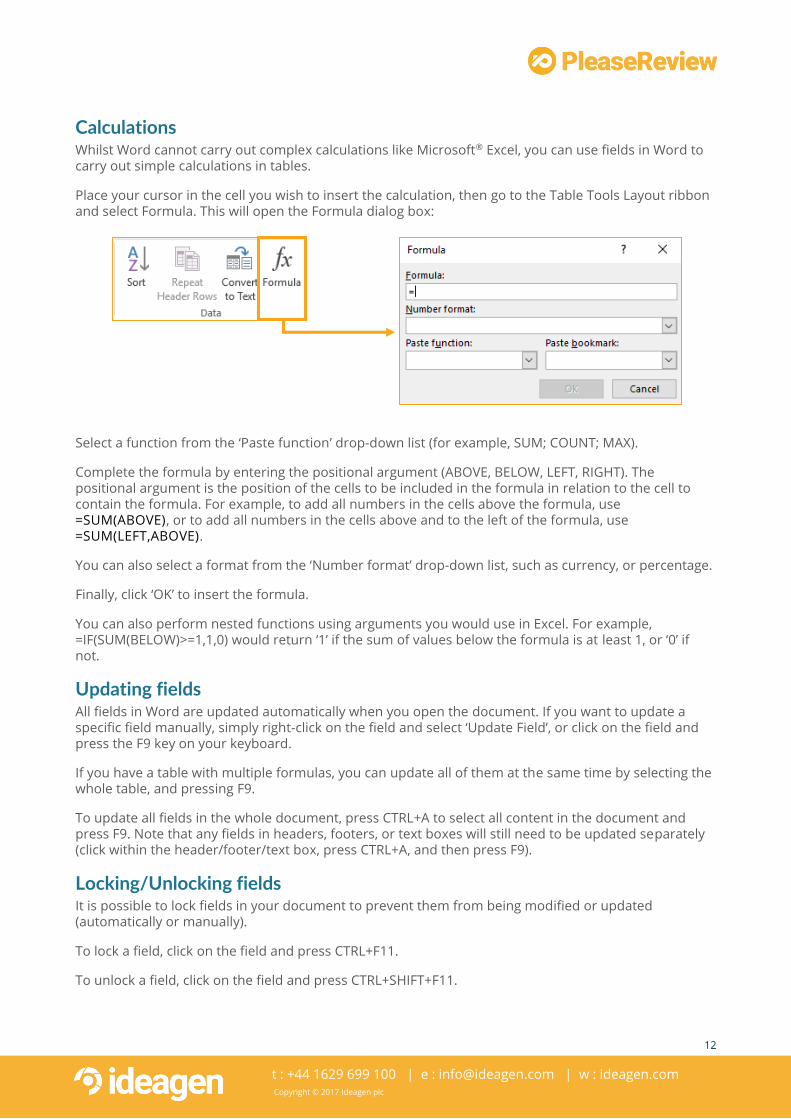
Calculations Whilst Word cannot carry out complex calculations like Microsoft® Excel, you can use fields in Word to carry out simple calculations in tables.
Place your cursor in the cell you wish to insert the calculation, then go to the Table Tools Layout ribbon and select Formula. This will open the Formula dialog box:
Select a function from the ‘Paste function’ drop-down list (for example, SUM; COUNT; MAX).
Complete the formula by entering the positional argument (ABOVE, BELOW, LEFT, RIGHT). The positional argument is the position of the cells to be included in the formula in relation to the cell to contain the formula. For example, to add all numbers in the cells above the formula, use =SUM(ABOVE), or to add all numbers in the cells above and to the left of the formula, use =SUM(LEFT,ABOVE).
You can also select a format from the ‘Number format’ drop-down list, such as currency, or percentage.
Finally, click ‘OK’ to insert the formula.
You can also perform nested functions using arguments you would use in Excel. For example, =IF(SUM(BELOW)>=1,1,0) would return ‘1’ if the sum of values below the formula is at least 1, or ‘0’ if not.
Updating fields All fields in Word are updated automatically when you open the document. If you want to update a specific field manually, simply right-click on the field and select ‘Update Field’, or click on the field and press the F9 key on your keyboard.
If you have a table with multiple formulas, you can update all of them at the same time by selecting the whole table, and pressing F9.
To update all fields in the whole document, press CTRL+A to select all content in the document and press F9. Note that any fields in headers, footers, or text boxes will still need to be updated separately (click within the header/footer/text box, press CTRL+A, and then press F9).
Locking/Unlocking fields It is possible to lock fields in your document to prevent them from being modified or updated (automatically or manually).
To lock a field, click on the field and press CTRL+F11.
To unlock a field, click on the field and press CTRL+SHIFT+F11.

t : +44 1629 699 100 | e : [email protected] | w : ideagen.com Copyright © 2017 Ideagen plc
13
Displaying field codes When you insert a field in Word, it displays the resulting information. You can switch between displaying the field results and the field codes by pressing ALT+F9.
This will display all field codes in your document. Field codes appear between curly braces { } and the code will display the field name, the instruction/variables, and any optional switches (such as formatting). For example, when viewing the field code of a page number field it appears as: { PAGE [\* Format Switch ] }
For example, the image below shows the field codes from the page number and number of pages fields:
The ALT+F9 shortcut functions as a toggle, so when you want to display the field results again, simply use ALT+F9 again.
Using the ALT+F9 shortcut is a very quick way to display all fields in your document. If you wish to toggle just one field, you can right-click on the field and select ‘Toggle Field Codes’ or use the shortcut SHIFT+F9.
Alternatively, if you prefer to display the field codes, you can change this setting in your Word options:
t : +44 1629 699 100 | e : [email protected] | w : ideagen.com Copyright © 2017 Ideagen plc
14
Customization Features There are so many things that you can customize in Word. Many customizable features have been covered in our Masterclass part 1 and part 2 e-books, such as special characters and the Quick Access Toolbar. Here we cover one of the items most frequently asked of us: changing the default font.
Changing the default font Part 1 of our Word Masterclass covers using, creating and modifying Styles, as well as how to reveal and inspect formatting. We won’t cover the same content again. Instead we will cover just one issue that many users face – how to change the default font.
We all have our preferred fonts that we like to use, and sometimes we need to change the fonts to meet corporate requirements, or to make our documents easier for other people to read. If you manually change your default font each time you create a new Word document, then you can save yourself a lot of time by customizing it.
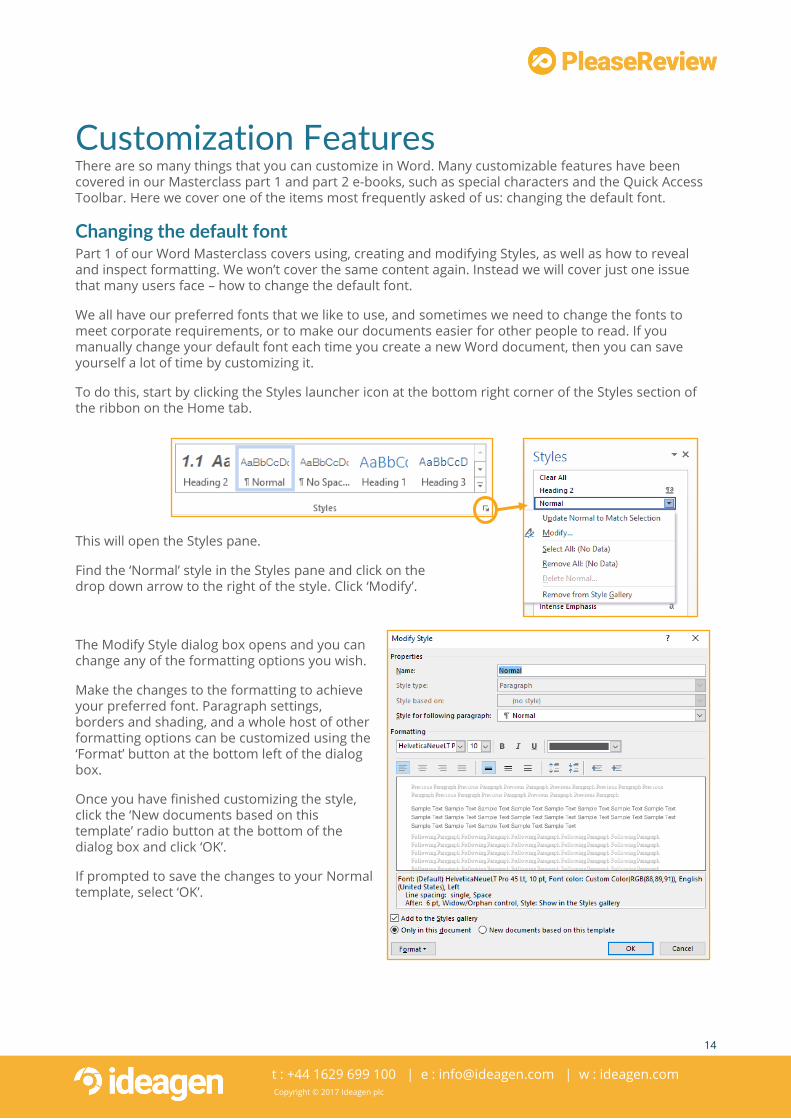
To do this, start by clicking the Styles launcher icon at the bottom right corner of the Styles section of the ribbon on the Home tab.
This will open the Styles pane.
Find the ‘Normal’ style in the Styles pane and click on the drop down arrow to the right of the style. Click ‘Modify’.
The Modify Style dialog box opens and you can change any of the formatting options you wish.
Make the changes to the formatting to achieve your preferred font. Paragraph settings, borders and shading, and a whole host of other formatting options can be customized using the ‘Format’ button at the bottom left of the dialog box.
Once you have finished customizing the style, click the ‘New documents based on this template’ radio button at the bottom of the dialog box and click ‘OK’.
If prompted to save the changes to your Normal template, select ‘OK’.

t : +44 1629 699 100 | e : [email protected] | w : ideagen.com Copyright © 2017 Ideagen plc
15
Object Linking and Embedding Microsoft Word provides some great linking tools, including Hyperlinks, Bookmarks and Cross-references, as described in detail in our Masterclass part 1 e-book. Here, we build on these tools, looking at Object Linking and Embedding (OLE).
Object Linking and Embedding allows you to create dynamic links between the content of your document to content in other Microsoft programs. For example, you can link to the content of an Excel spreadsheet, a PowerPoint presentation or a Visio diagram.
This can also be done with other, non-Microsoft programs which support OLE technology, such as PDF.
When you link or embed the content as an object, you can still work with the data in the original program in which it was created. For example, if you embed an Excel spreadsheet in a Word document, you can double click the spreadsheet and Microsoft Word will run Excel within it with full use of Excel commands.
What’s the difference? The key difference between linked objects and embedded objects is how the data is stored and updated.
Linked objects maintain a connection to the source file (the linked data). If the source file is amended, you can update the link to it in your Word document to display the amended content. The data itself is still stored in the source file. It is simply the location of that source file which is stored in your Word document.
Linking is useful when you need to keep the data in your Word document up to date or when you want to include data that is maintained by someone else.
Embedded objects do not maintain a connection to the source file. If the source file is amended, the information in your Word document doesn’t change. Instead, it becomes part of your Word document as a static copy of the data.
Embedding is useful when you do not want the data in your Word document to reflect changes made to the source file or when you need to share your document and the recipients do not have access to the source file (and therefore would not be able to update links to it).
So which should you use? That depends on a couple of factors… If the source file is likely to be modified regularly and you need to ensure that any changes are reflected in your Word document, then you should link the data. If file size needs to be taken into consideration, you should be mindful that the size of your file will increase significantly when it contains embedded objects. If the source file you are embedding is a large file then you should consider linking to it instead.

t : +44 1629 699 100 | e : [email protected] | w : ideagen.com Copyright © 2017 Ideagen plc
16
Embedding data In this example we embed an existing Excel spreadsheet as an object in a Microsoft Word document.
Place your cursor in the Word document where you wish to embed the spreadsheet. Go to the Insert tab and select Object from the Text section of the ribbon. This will open the Object dialog box:
The Excel file is now embedded in the Word document with the first page of the file displaying. When we double click the spreadsheet, Microsoft Word runs Excel within it with full use of Excel commands. The image below shows the Excel spreadsheet open within Microsoft Word. The ribbon display the Excel commands:
Select the ‘Create from File’ tab to insert an existing file.
Click Browse to select the file to be inserted.
Finally click ‘OK’ to embed the object.

t : +44 1629 699 100 | e : [email protected] | w : ideagen.com Copyright © 2017 Ideagen plc
17
There are alternative options in the Object dialog box. This includes the ability to display the embedded object as an icon whereby the Microsoft Excel icon will display in the Word document instead of the content of the spreadsheet. Using this option will display a clickable icon, which, when double clicked, opens the file in Excel as opposed to within Microsoft Word.
The other option, is the ability to link to the file. This will link the content not embed it (see Linking data).
Embedding specific data As described earlier, when we embed an object, the first page of the embedded file is displayed. If you do not want this behavior, you can embed and display specific content in your document.
To do this, open the file containing the data you want to embed and select the specific data to be used. This may be a specific range of Excel cells or a specific slide in a PowerPoint presentation, for example. Here, we have used the same Excel spreadsheet as the earlier example, but this time we have selected a specific cell range to embed.
Click Copy, or press CTRL+C.
In your Word document, place your cursor where you wish to embed the data and click the drop-down arrow below the Paste icon on the Home tab of the ribbon. Select Paste Special (do not use CTRL+V).
The Paste Special dialog box opens:
The data is now embedded in the Word document with the selected data displaying. Again, when we double-click the embedded data, Microsoft Word runs Excel within it – with full use of Excel commands.
Working with embedded data Once data has been embedded into your Word document, it can be resized either using your mouse or right-click the object and select Format Object.
To edit the information in your embedded object, double-click the object. You can then work with the data in the original program in which it was created. As embedded objects do not maintain a connection to the source file, any changes you make to the embedded data will not impact the original source file.
You can also use the right-click menu to edit the embedded object, open the original source file, or convert the object (for example, to display as an icon).
Select the ‘Microsoft Excel Worksheet Object’ in the ‘As’ list.
If you have copied a slide from a PowerPoint presentation, the option here would be ‘Microsoft PowerPoint Slide Object’, and so on.
Finally click ‘OK’.

t : +44 1629 699 100 | e : [email protected] | w : ideagen.com Copyright © 2017 Ideagen plc
18
Linking data In this example we insert an existing Microsoft Visio diagram as a linked object in a Word document.
Place your cursor in the Word document where you wish to insert the diagram. Go to the Insert tab and select Object from the Text section of the ribbon. This will open the Object dialog box:
The Visio diagram is now a linked object in the Word document with the first page of the file displaying. When we double click the diagram, the original source file is opened in its original program, Visio.
Note – it is also possible to display the linked object as an icon instead of the content of the file by selecting the ‘Display as icon’ checkbox.
Linking specific data When we link or embed an object, the first page of the file is displayed in the Word document. Just as we have the ability to embed and display specific content, we can also link specific content following the same process.
To do this, open the file containing the data you want to embed and select the specific data to be used. Again, this may be a specific range of Excel cells or a specific slide in a PowerPoint presentation, for example. Here, we have used a specific PowerPoint slide.
Click Copy, or press CTRL+C.
In your Word document, place your cursor where you wish to display the data and click the drop-down arrow below the Paste icon on the Home tab of the ribbon. Select Paste Special (do not use CTRL+V). The Paste Special dialog box opens:
Select the ‘Create from File’ tab to insert an existing file.
Click Browse to select the file to be inserted.
Check the ‘Link to file’ checkbox and click ‘OK’.
Select the ‘Paste link’ radio button.
In the ‘As’ list, select ‘Microsoft PowerPoint Slide Object’.
If you have copied a range of cells in an Excel spreadsheet, the option here would be ‘Microsoft Excel Worksheet Object’, and so on.
Finally click ‘OK’.

t : +44 1629 699 100 | e : [email protected] | w : ideagen.com Copyright © 2017 Ideagen plc
19
Working with linked data Linked objects maintain a connection to the source file, so if the source file is edited, you can update the link to the source file in your Word document to display the edited content.
To edit the linked object double-click it to open the source file in its original program. Alternatively, you can use the right-click menu to edit the linked object (select ‘Linked Object’, ‘Open Link’).
The right-click menu also enables you to update the link, edit the link, or convert the object (for example, to display as an icon or as a picture) as shown in the image below:
Note that, by default, linked objects are updated automatically every time you open the Word document. You can change this behavior if required (see Managing links).

t : +44 1629 699 100 | e : [email protected] | w : ideagen.com Copyright © 2017 Ideagen plc
20
Managing links To manage your linked data, right-click your linked object and select ‘Links’. Selecting this option will open the Links dialog box:
The Links dialog box displays a list of all linked data in your document.
When inserting linked objects into your document, the default setting applied is that the object will be updated automatically. This means that every time you open the document, Word updates the links to the source file.
If you do not want your linked objects to update automatically, you can change the settings using the Links dialog box. Select the link(s) you do not want to be updated automatically, and in the ‘Update method for selected link’ section, select the ‘Manual update’ radio button. Using this option means that the linked object will only be updated when you select the object and update it manually.
It is also possible to lock linked objects so that they cannot be updated. To do this, select the link(s) that you want to lock, and select the ‘Locked’ checkbox in the ‘Update method for selected link’ section of the Links dialog box. This action will block automatic and manual updates to that link. To unlock the link, remove the check from the ‘Locked’ checkbox.
You can also break links using the Links dialog box. If you do this, the connection between the linked object and the original source file will be broken, and the object will display as a picture.
t : +44 1629 699 100 | e : [email protected] | w : ideagen.com Copyright © 2017 Ideagen plc
21
Document Map Outline view in Word is one of the most powerful ways to structure and organize complex documents. This is covered in detail in our Masterclass part 1 e-book. Here, we use a different view to make the process of reorganizing large documents not only easy, but also quick and efficient.
You can reorganize your document, without the use of cut and paste, using the navigation pane in Word. The navigation pane also allows you to change heading levels and add new headings and subheadings.
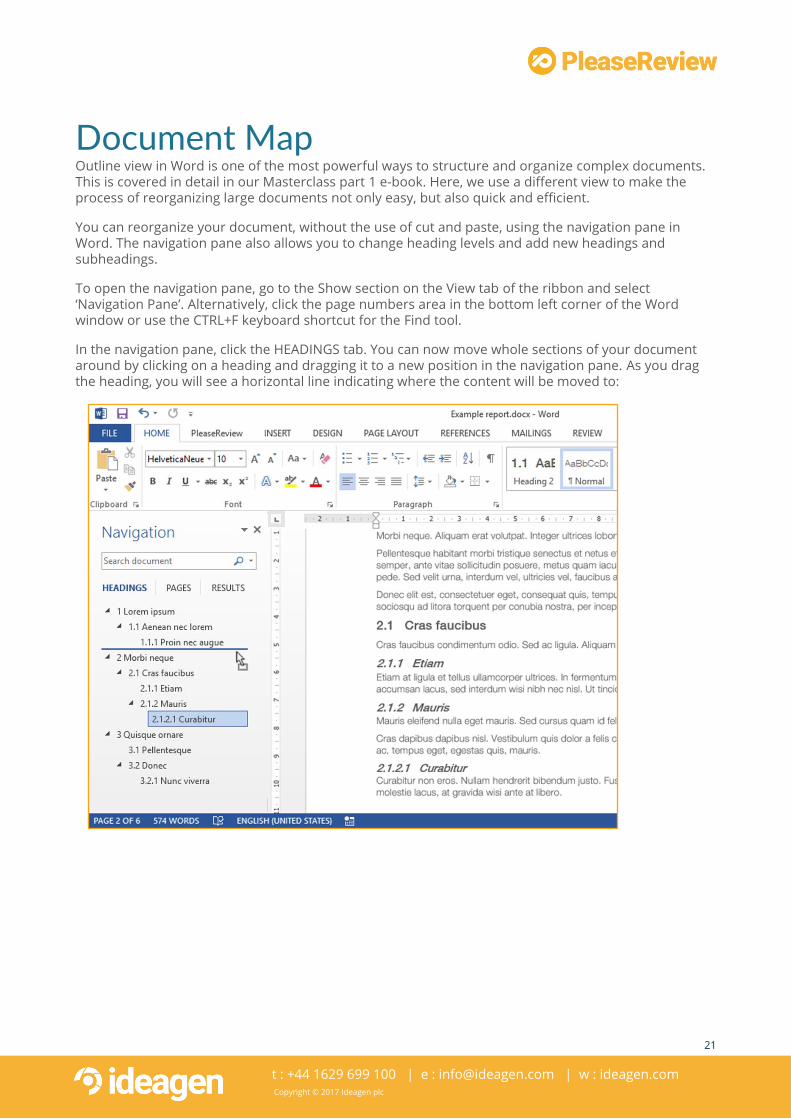
To open the navigation pane, go to the Show section on the View tab of the ribbon and select ‘Navigation Pane’. Alternatively, click the page numbers area in the bottom left corner of the Word window or use the CTRL+F keyboard shortcut for the Find tool.
In the navigation pane, click the HEADINGS tab. You can now move whole sections of your document around by clicking on a heading and dragging it to a new position in the navigation pane. As you drag the heading, you will see a horizontal line indicating where the content will be moved to:

t : +44 1629 699 100 | e : [email protected] | w : ideagen.com Copyright © 2017 Ideagen plc
22
To change the level of a heading, right-click the heading and select either ‘Promote’ to promote the heading to a higher level or ‘Demote’ to demote it to a lower level.
You can also use the right-click menu to add new headings and subheadings, and select and print specific sections of the document.

t : +44 1629 699 100 | e : [email protected] | w : ideagen.com Copyright © 2017 Ideagen plc
23
Parts 1 and 2 of our Word Masterclass provide detailed instructions on just some of these commands. Covering how to add and modify styles, table of contents, table of tables/figures/equations, section breaks, footnotes/endnotes, references and links, and more.
Download Part 1 of our Word Masterclass free today.
Part 3 of this Word Masterclass tutorial has been put together and presented by Ideagen plc, the developers of PleaseReview, the collaborative document review, co-authoring and redaction software.
For more information, please visit www.ideagen.com/pleasereview or email [email protected].
Did you know? Before the launch of autocorrect in
1993 (Word 6.0), users had to correct their own
typing, spelling and grammar mistakes.
That red squiggly line underneath misspelt words
didn’t appear until Word 95.