Embed Size (px)
Citation preview
Setup Guide
The information in this document is subject to change without notice and does not represent acommitment on the part of Native Instruments GmbH. The software described by this docu-ment is subject to a License Agreement and may not be copied to other media. No part of thispublication may be copied, reproduced or otherwise transmitted or recorded, for any purpose,without prior written permission by Native Instruments GmbH, hereinafter referred to as NativeInstruments.
“Native Instruments”, “NI” and associated logos are (registered) trademarks of Native Instru-ments GmbH.
Mac, Mac OS, GarageBand, Logic, iTunes and iPod are registered trademarks of Apple Inc.,registered in the U.S. and other countries.Windows, Windows Vista and DirectSound are registered trademarks of Microsoft Corporationin the United States and/or other countries.All other trade marks are the property of their respective owners and use of them does not im-ply any affiliation with or endorsement by them.
Document authored by: David Gover
Software version: 2.0 (09/2013)
Special thanks to the Beta Test Team, who were invaluable not just in tracking down bugs, butin making this a better product.
Disclaimer
Germany
Native Instruments GmbHSchlesische Str. 29-30D-10997 BerlinGermanywww.native-instruments.de
USA
Native Instruments North America, Inc.6725 Sunset Boulevard5th FloorLos Angeles, CA 90028USAwww.native-instruments.com
Japan
Native Instruments KKYO Building 3FJingumae 6-7-15, Shibuya-ku,Tokyo 150-0001Japanwww.native-instruments.co.jp
© Native Instruments GmbH, 2013. All rights reserved.
Contact
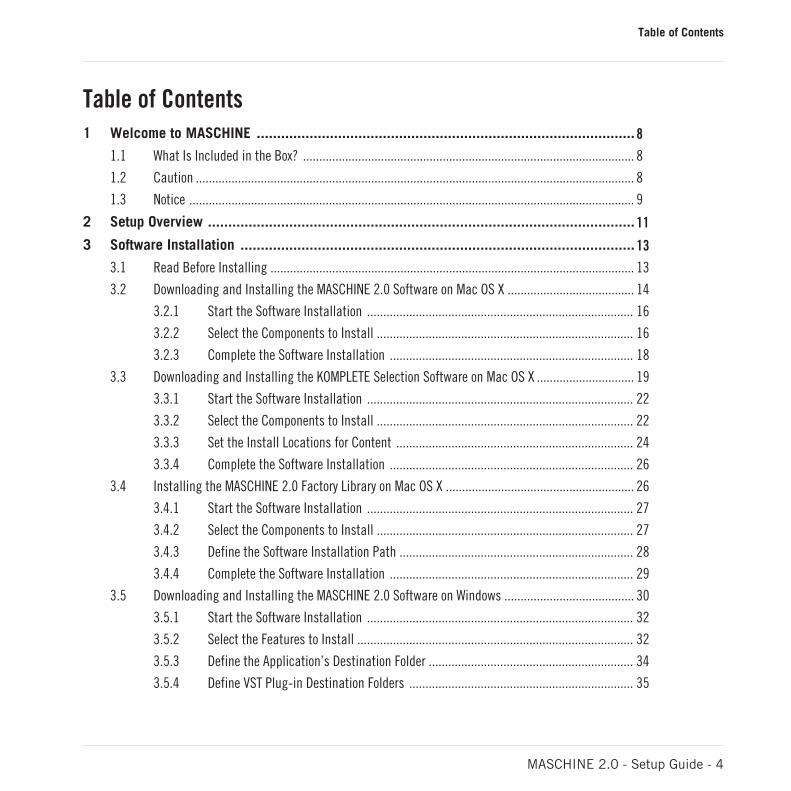
Table of Contents1 Welcome to MASCHINE .............................................................................................8
1.1 What Is Included in the Box? ...................................................................................................... 8
1.2 Caution ....................................................................................................................................... 8
1.3 Notice ......................................................................................................................................... 9
2 Setup Overview .........................................................................................................11
3 Software Installation .................................................................................................13
3.1 Read Before Installing ................................................................................................................ 13
3.2 Downloading and Installing the MASCHINE 2.0 Software on Mac OS X ....................................... 14
3.2.1 Start the Software Installation .................................................................................. 16
3.2.2 Select the Components to Install ............................................................................... 16
3.2.3 Complete the Software Installation ........................................................................... 18
3.3 Downloading and Installing the KOMPLETE Selection Software on Mac OS X .............................. 19
3.3.1 Start the Software Installation .................................................................................. 22
3.3.2 Select the Components to Install ............................................................................... 22
3.3.3 Set the Install Locations for Content ......................................................................... 24
3.3.4 Complete the Software Installation ........................................................................... 26
3.4 Installing the MASCHINE 2.0 Factory Library on Mac OS X .......................................................... 26
3.4.1 Start the Software Installation .................................................................................. 27
3.4.2 Select the Components to Install ............................................................................... 27
3.4.3 Define the Software Installation Path ........................................................................ 28
3.4.4 Complete the Software Installation ........................................................................... 29
3.5 Downloading and Installing the MASCHINE 2.0 Software on Windows ........................................ 30
3.5.1 Start the Software Installation .................................................................................. 32
3.5.2 Select the Features to Install ..................................................................................... 32
3.5.3 Define the Application’s Destination Folder ............................................................... 34
3.5.4 Define VST Plug-in Destination Folders ..................................................................... 35
Table of Contents
MASCHINE 2.0 - Setup Guide - 4
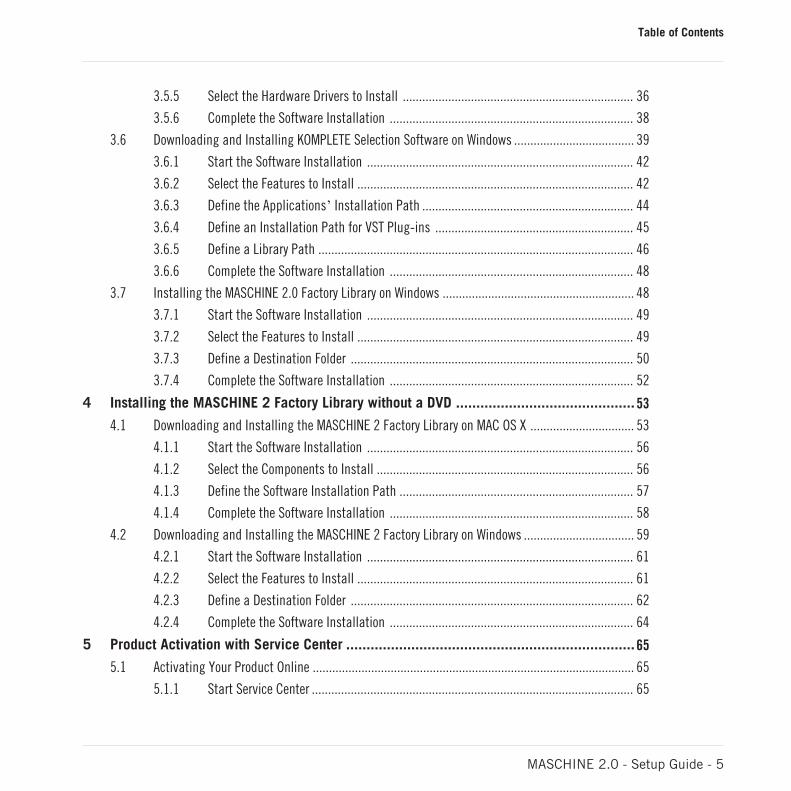
3.5.5 Select the Hardware Drivers to Install ....................................................................... 36
3.5.6 Complete the Software Installation ........................................................................... 38
3.6 Downloading and Installing KOMPLETE Selection Software on Windows ..................................... 39
3.6.1 Start the Software Installation .................................................................................. 42
3.6.2 Select the Features to Install ..................................................................................... 42
3.6.3 Define the Applicationsʼ Installation Path ................................................................. 44
3.6.4 Define an Installation Path for VST Plug-ins ............................................................. 45
3.6.5 Define a Library Path ................................................................................................. 46
3.6.6 Complete the Software Installation ........................................................................... 48
3.7 Installing the MASCHINE 2.0 Factory Library on Windows ........................................................... 48
3.7.1 Start the Software Installation .................................................................................. 49
3.7.2 Select the Features to Install ..................................................................................... 49
3.7.3 Define a Destination Folder ....................................................................................... 50
3.7.4 Complete the Software Installation ........................................................................... 52
4 Installing the MASCHINE 2 Factory Library without a DVD ............................................53
4.1 Downloading and Installing the MASCHINE 2 Factory Library on MAC OS X ................................ 53
4.1.1 Start the Software Installation .................................................................................. 56
4.1.2 Select the Components to Install ............................................................................... 56
4.1.3 Define the Software Installation Path ........................................................................ 57
4.1.4 Complete the Software Installation ........................................................................... 58
4.2 Downloading and Installing the MASCHINE 2 Factory Library on Windows .................................. 59
4.2.1 Start the Software Installation .................................................................................. 61
4.2.2 Select the Features to Install ..................................................................................... 61
4.2.3 Define a Destination Folder ....................................................................................... 62
4.2.4 Complete the Software Installation ........................................................................... 64
5 Product Activation with Service Center .......................................................................65
5.1 Activating Your Product Online ................................................................................................... 65
5.1.1 Start Service Center ................................................................................................... 65
Table of Contents
MASCHINE 2.0 - Setup Guide - 5

5.1.2 Log In to Your User Account ....................................................................................... 66
5.1.3 Activate the Product .................................................................................................. 67
5.1.4 Finish the Online Activation ....................................................................................... 68
5.2 Updating Your Product ............................................................................................................... 69
5.2.1 Select Updates .......................................................................................................... 69
5.2.2 Download the Updates ............................................................................................... 70
5.2.3 Install Your Updates .................................................................................................. 71
5.3 Activating Your Product Offline .................................................................................................. 72
5.3.1 Start the Offline Activation ........................................................................................ 73
5.3.2 Create the Activation Request File ............................................................................. 74
5.3.3 Enter the Serial Number ............................................................................................ 75
5.3.4 Transfer the Activation Request File .......................................................................... 76
5.3.5 Open the Activation Return File ................................................................................. 77
5.3.6 Finish the Offline Activation ...................................................................................... 78
6 Connecting the MASCHINE Controller .........................................................................79
6.1 Connecting the MASCHINE Controller to Your Computer ............................................................. 79
6.2 Connecting MIDI Devices to the MASCHINE Controller ................................................................ 80
6.3 Connecting the Power Supply to the MASCHINE STUDIO Controller ............................................. 82
6.3.1 Before You Begin ....................................................................................................... 82
6.3.2 Assembling and Connection the Power Supply .......................................................... 82
7 Stand-alone Operation ...............................................................................................85
7.1 Selecting an Audio Interface ....................................................................................................... 86
7.2 Optimizing Latency ..................................................................................................................... 87
7.3 Routing Audio Input and Output ................................................................................................. 88
7.4 Setting up MIDI Connections ...................................................................................................... 89
8 Plug-in Operation ......................................................................................................91
9 Other Documentation and Support Resources ..............................................................92
9.1 Further Documentation Resources .............................................................................................. 92
Table of Contents
MASCHINE 2.0 - Setup Guide - 6
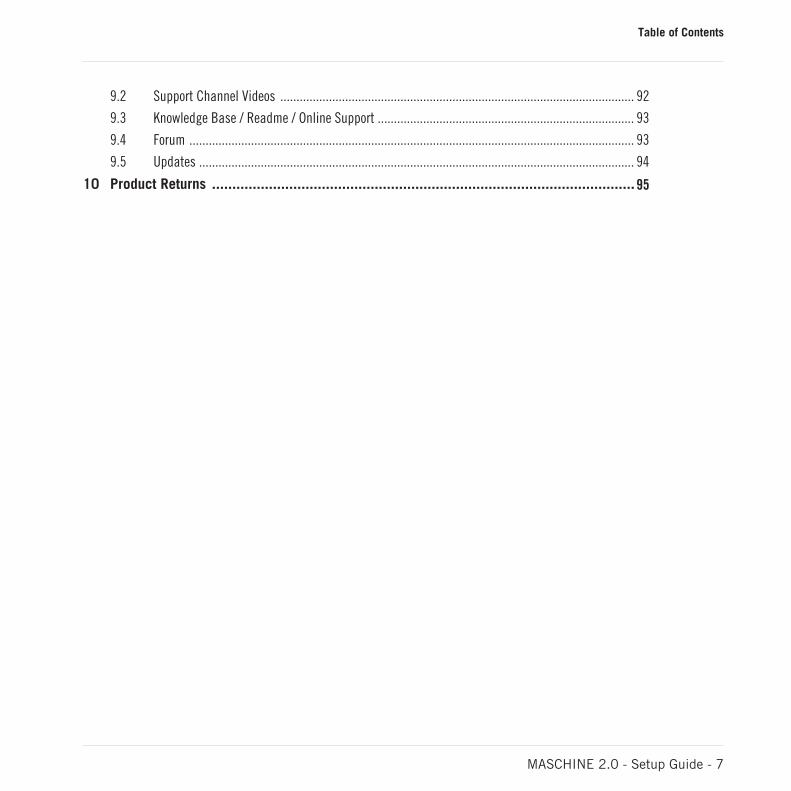
9.2 Support Channel Videos ............................................................................................................. 92
9.3 Knowledge Base / Readme / Online Support ............................................................................... 93
9.4 Forum ......................................................................................................................................... 93
9.5 Updates ...................................................................................................................................... 94
10 Product Returns ........................................................................................................95
Table of Contents
MASCHINE 2.0 - Setup Guide - 7
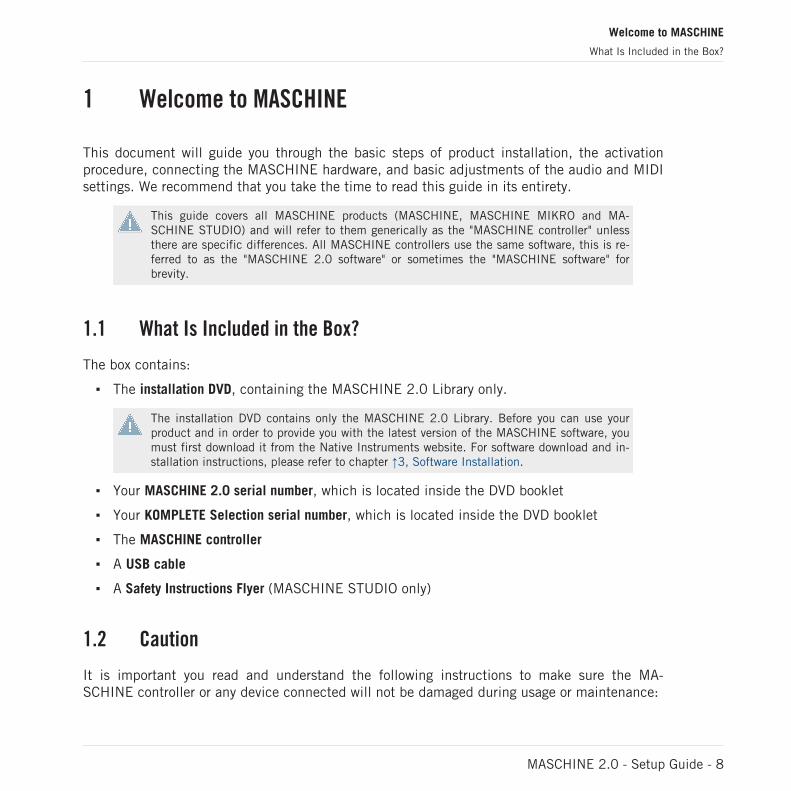
1 Welcome to MASCHINE
This document will guide you through the basic steps of product installation, the activationprocedure, connecting the MASCHINE hardware, and basic adjustments of the audio and MIDIsettings. We recommend that you take the time to read this guide in its entirety.
This guide covers all MASCHINE products (MASCHINE, MASCHINE MIKRO and MA-SCHINE STUDIO) and will refer to them generically as the "MASCHINE controller" unlessthere are specific differences. All MASCHINE controllers use the same software, this is re-ferred to as the "MASCHINE 2.0 software" or sometimes the "MASCHINE software" forbrevity.
1.1 What Is Included in the Box?
The box contains:
▪ The installation DVD, containing the MASCHINE 2.0 Library only.
The installation DVD contains only the MASCHINE 2.0 Library. Before you can use yourproduct and in order to provide you with the latest version of the MASCHINE software, youmust first download it from the Native Instruments website. For software download and in-stallation instructions, please refer to chapter ↑3, Software Installation.
▪ Your MASCHINE 2.0 serial number, which is located inside the DVD booklet
▪ Your KOMPLETE Selection serial number, which is located inside the DVD booklet
▪ The MASCHINE controller
▪ A USB cable
▪ A Safety Instructions Flyer (MASCHINE STUDIO only)
1.2 Caution
It is important you read and understand the following instructions to make sure the MA-SCHINE controller or any device connected will not be damaged during usage or maintenance:
Welcome to MASCHINE
What Is Included in the Box?
MASCHINE 2.0 - Setup Guide - 8
▪ Do not open the MASCHINE controller or attempt to disassemble or modify any internalparts. The MASCHINE controller does not contain any user-serviceable parts. If the deviceappears to be malfunctioning, discontinue use immediately and have the device inspectedby qualified service personnel.
▪ Do not expose the MASCHINE controller to rain, use it near water or in damp or wet con-ditions.
▪ Make sure no objects or liquids of any kind penetrate the unit. When cleaning the MA-SCHINE controller, use a soft, dry cloth. Never use paint thinners, solvents, cleaning flu-ids, or chemical-infused wiping cloths.
▪ Never use or store the MASCHINE controller in areas subject to extreme temperatures(e.g., direct exposure to sunlight in an enclosed vehicle or near heat-generating equip-ment), or high levels of vibration.
▪ Always let the MASCHINE controller adapt to changed room temperature after it has beenstored in a cold environment.
▪ Do not place the MASCHINE controller in an unstable position where it could accidentallyfall.
▪ Before moving the MASCHINE controller, remove all connected cables.
▪ Do not use excessive force on the MASCHINE controller's buttons, knobs, and pads.
▪ Do not place heavy objects on top of the MASCHINE controller.
1.3 Notice
Name Plate Location
The name plate is located on the bottom of the unit. It lists the product model name and othertechnical information.
Serial numbers
This product comes with several serial numbers. The hardware serial number can be found onthe name plate on the bottom of the hardware unit. The serial numbers for the included soft-ware can be found on the DVD case.
Welcome to MASCHINE
Notice
MASCHINE 2.0 - Setup Guide - 9
Disposal of the Product
Should this product become damaged beyond repair, or if you wish to dispose of it, please ob-serve the regulations of your area and country that relate to the disposal of electronic products.
Specifications Subject to Change
The information contained in this manual is believed to be correct at the time of printing ordigital release. However, Native Instruments reserves the right to make changes to the specifi-cations at any time without notice or obligation to update existing units.
Disclaimer
Native Instruments GmbH cannot be held responsible for damage or lost or destroyed datacaused by improper use or modification of the MASCHINE controller hardware or MASCHINEsoftware.
Welcome to MASCHINE
Notice
MASCHINE 2.0 - Setup Guide - 10
2 Setup Overview
This section provides a quick overview of the various steps required to get MASCHINE up andrunning: software installation, product activation and update, hardware installation, and audio andMIDI setup, all of which will be described in greater detail in further chapters of this guide.
▪ Software installation: You must first download and install MASCHINE 2.0 and KOM-PLETE Selection software on your computer. You are then required to install the MA-SCHINE 2.0 Factory Library using the supplied DVD which can be found in the productbox. For detailed instructions on software installation, please proceed to chapter ↑3, Soft-ware Installation.
To provide you with the latest version of the MASCHINE software you must first download itfrom the Native Instruments website before you can use your product. Please follow thedownload and software installation instructions in chapter ↑3, Software Installation.
▪ Installing the MASCHINE 2 Factory Library without a DVD drive: If you have a computer thatdoes not have a DVD drive it is possible to download and install the MASCHINE 2Facto-ry Library on your computer. For detailed instructions on installing MASCHINE 2 FactoryLibrary without a DVD drive please proceed to section ↑4, Installing the MASCHINE 2Factory Library without a DVD.
▪ Product Activation and Update: Activate your products using the Service Center application.Online and Offline activation methods are available. Check for the latest software updatesusing the Service Center application. Then press the install button to install all download-ed updates. For detailed instructions on software installation, please proceed to chapter↑5, Product Activation with Service Center.
Please be sure to update all installed Native Instruments software, including any MA-SCHINE Expansions during the product update and activation update process. This will en-sure better compatibly and integration with MASCHINE 2.0.
▪ Hardware installation: Connect the MASCHINE controller to your computer.For detailed instructions on hardware installation, please proceed to chapter ↑6, Connect-ing the MASCHINE Controller.
Setup Overview
MASCHINE 2.0 - Setup Guide - 11
▪ Audio and MIDI setup: Open MASCHINE for the first time and configure the audio andMIDI settings.For detailed instructions on configuring your audio and MIDI setting, please proceed tochapter ↑7, Stand-alone Operation.
Setup Overview
MASCHINE 2.0 - Setup Guide - 12
3 Software Installation
3.1 Read Before Installing
Before starting the installation process, here are some points to be aware of:
▪ The MASCHINE software must be installed in the following steps.
◦ Step 1: Download and install the MASCHINE 2.0 and KOMPLETE Selection softwareon your computer. The MACHINE 2.0 software is available from the following location:http://www.native-instruments.com/setup-maschine2
◦ Step 2 Insert the MASCHINE 2.0 Factory Library DVD into your computer. Locate thesetup file and double-click it in order to start the installation procedure. Carefully readand follow the on-screen instructions, accept the License Agreements, and enter thepassword for your computer if prompted (Mac OS X only).
If your computer does not have a DVD drive, or in the unlikely event the supplied DVD isfaulty, please download and install the MASCHINE 2 Factory Library from the Native In-struments website. For detailed instructions on installing MASCHINE 2 Factory Librarywithout a DVD please proceed to section ↑4, Installing the MASCHINE 2 Factory Librarywithout a DVD.
▪ Please carefully review the installer screens and the suggested installation paths in order toavoid any unwanted folders being created on your hard disk.
▪ Moving any folders related to Native Instruments software after installation is not recom-mended. Future software updates rely on the directory locations set during initial installa-tion.
▪ Please keep the installation DVD in a safe place for future reference, for example in caseyou need to install the MASCHINE 2.0 Factory Library on a new computer.
Software Installation
Read Before Installing
MASCHINE 2.0 - Setup Guide - 13
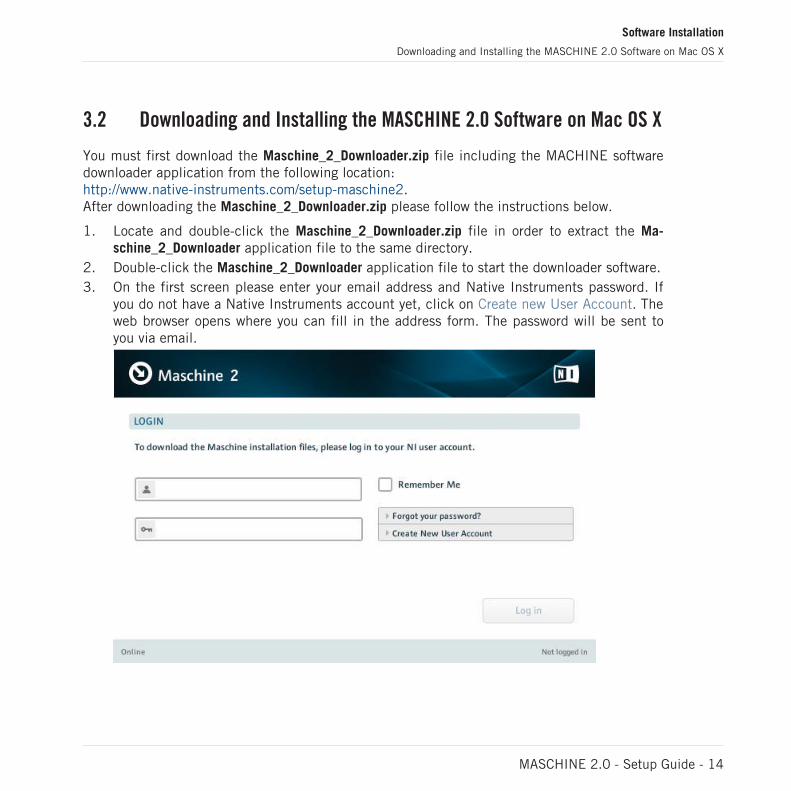
3.2 Downloading and Installing the MASCHINE 2.0 Software on Mac OS X
You must first download the Maschine_2_Downloader.zip file including the MACHINE softwaredownloader application from the following location:http://www.native-instruments.com/setup-maschine2.After downloading the Maschine_2_Downloader.zip please follow the instructions below.
1. Locate and double-click the Maschine_2_Downloader.zip file in order to extract the Ma-schine_2_Downloader application file to the same directory.
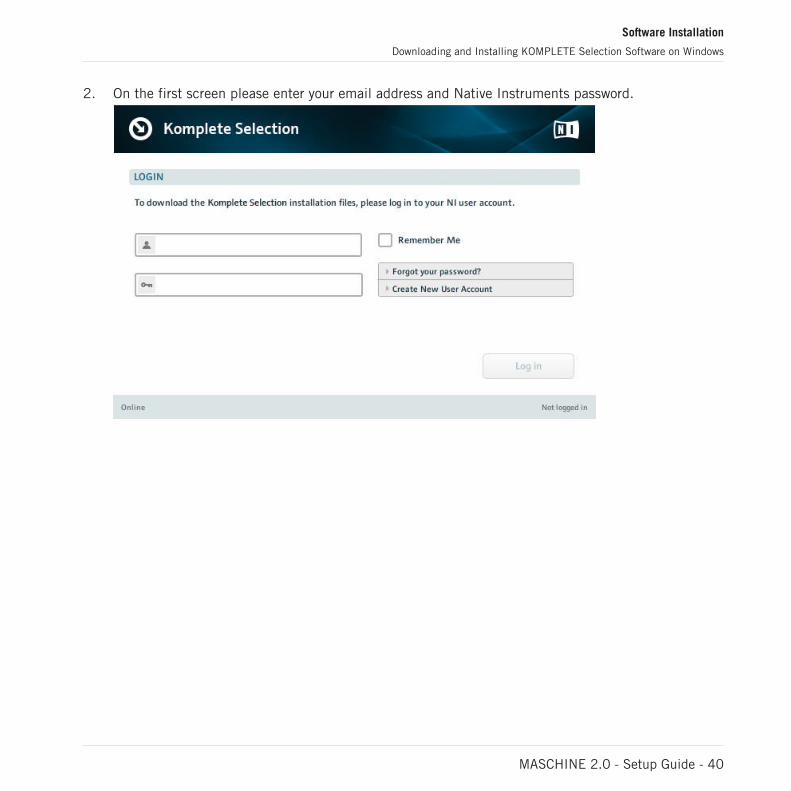
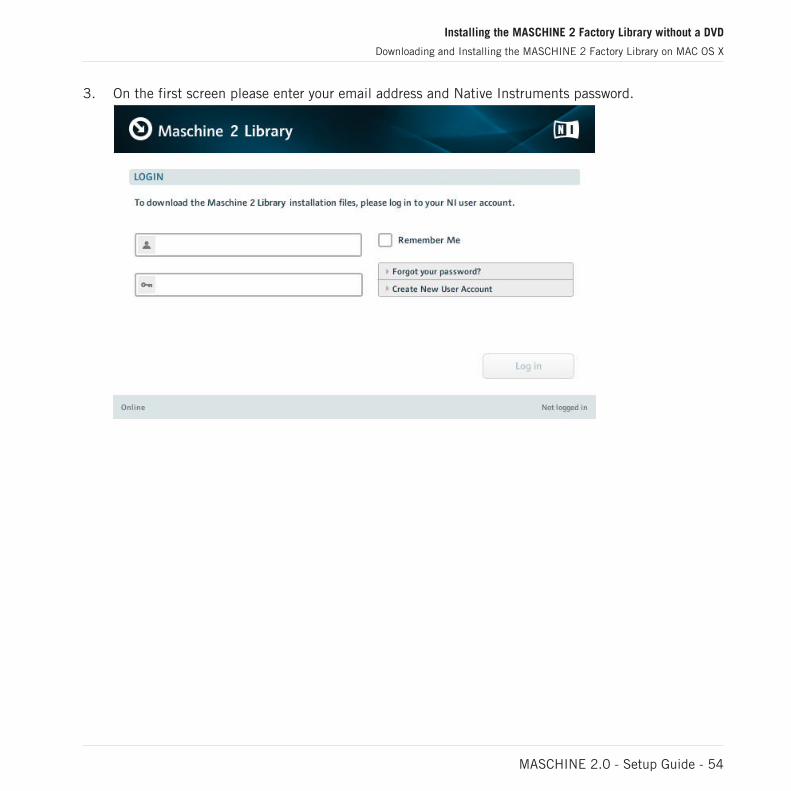
2. Double-click the Maschine_2_Downloader application file to start the downloader software.3. On the first screen please enter your email address and Native Instruments password. If
you do not have a Native Instruments account yet, click on Create new User Account. Theweb browser opens where you can fill in the address form. The password will be sent toyou via email.
Software Installation
Downloading and Installing the MASCHINE 2.0 Software on Mac OS X
MASCHINE 2.0 - Setup Guide - 14

4. Click on Log in to log in with your user account. The download process of the MASCHINEsoftware will start automatically.
Software Installation
Downloading and Installing the MASCHINE 2.0 Software on Mac OS X
MASCHINE 2.0 - Setup Guide - 15
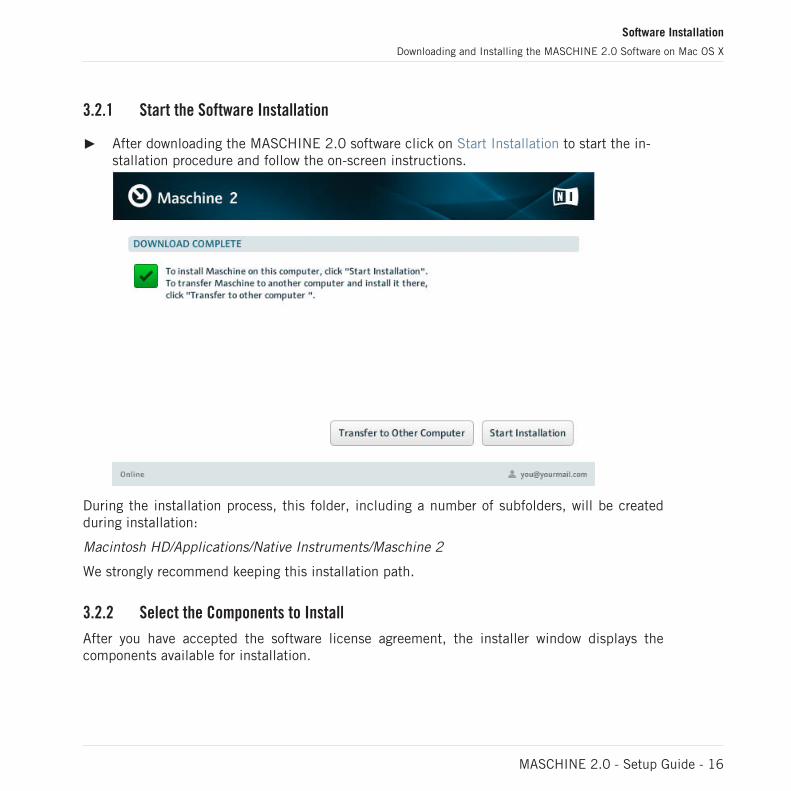
3.2.1 Start the Software Installation
► After downloading the MASCHINE 2.0 software click on Start Installation to start the in-stallation procedure and follow the on-screen instructions.
During the installation process, this folder, including a number of subfolders, will be createdduring installation:
Macintosh HD/Applications/Native Instruments/Maschine 2
We strongly recommend keeping this installation path.
3.2.2 Select the Components to Install
After you have accepted the software license agreement, the installer window displays thecomponents available for installation.
Software Installation
Downloading and Installing the MASCHINE 2.0 Software on Mac OS X
MASCHINE 2.0 - Setup Guide - 16

The components selection screen of the installation program.
It is recommended to keep all features selected unless you have a specific reason to dese-lect a feature (such as if this feature is already installed on your computer).
Basic Installation: This installs the MASCHINE software, along with its documentation. It alsoinstalls the Service Center application (required for activation of the MASCHINE software), andthe Controller Editor application, which allows you to configure the controller’s MIDI assign-ments for using the controller with other applications than the included software.
VST Plug-In, AAX Plug-In, and Audio Unit Plug-In: Specifies the plug-in types (VST, AAX, or Au-dio Unit) to be installed. Select the plug-in type(s) depending on which type is supported byyour sequencer software. Audio Unit is used by many sequencers like Logic, Live, Digital Per-former or Garage Band. VST is used by Cubase, while AAX is the native plug-in format forPro Tools. Leave all plug-in types selected if you are unsure which format is supported by yourhost application.
Software Installation
Downloading and Installing the MASCHINE 2.0 Software on Mac OS X
MASCHINE 2.0 - Setup Guide - 17
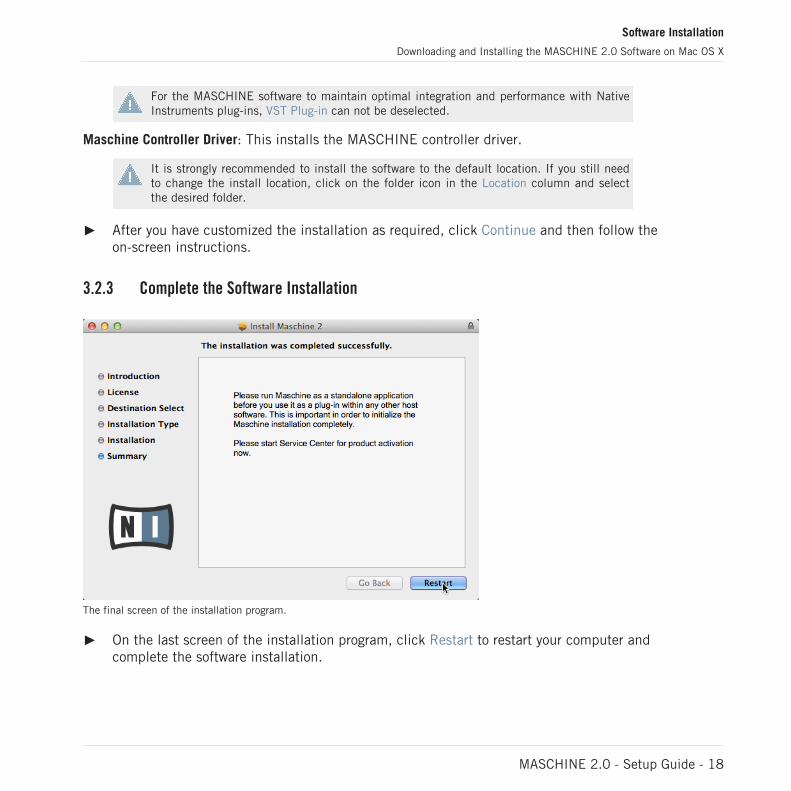
For the MASCHINE software to maintain optimal integration and performance with NativeInstruments plug-ins, VST Plug-in can not be deselected.
Maschine Controller Driver: This installs the MASCHINE controller driver.
It is strongly recommended to install the software to the default location. If you still needto change the install location, click on the folder icon in the Location column and selectthe desired folder.
► After you have customized the installation as required, click Continue and then follow theon-screen instructions.
3.2.3 Complete the Software Installation
The final screen of the installation program.
► On the last screen of the installation program, click Restart to restart your computer andcomplete the software installation.
Software Installation
Downloading and Installing the MASCHINE 2.0 Software on Mac OS X
MASCHINE 2.0 - Setup Guide - 18
► Once your computer has restarted, proceed by installing KOMPLETE Selection and theMASCHINE Library.
Please do not register the MASCHINE software until you have installed KOMPLETE Selec-tion and the MASCHINE 2.0 Factory Library.
3.3 Downloading and Installing the KOMPLETE Selection Software onMac OS X
If you already have KOMPLETE 9 or KOMPLETE 9 ULTIMATE installed on your computeryou can skip the installation of KOMPLETE Selection and continue to install the MA-SCHINE Library in section ↑3.4, Installing the MASCHINE 2.0 Factory Library on MacOS X. To ensure optimal performance and integration with MASCHINE software, pleasemake sure all your KOMPLETE 9 or KOMPLETE 9 ULTIMATE products are up to date afterinstalling the MASCHINE Library.
For the latest information regarding the installation of KOMPLETE Selection, please readthe following Knowledge Base article: http://www.native-instruments.com/knowledge/ques-tions/1734/.
You must first download the Komplete_Selection_Downloader.zip file including the KOM-PLETE Selection software downloader application from the following location:http://www.native-instruments.com/setup-maschine2.After downloading the Komplete_Selection_Downloader.zip please follow the instructions below.
1. Locate and double-click the Komplete_Selection_Downloader.zip file in order to extract theKomplete_Selection_Downloader application file to the same directory.
2. Double-click the Komplete_Selection_Downloader application file to start the downloadersoftware.
Software Installation
Downloading and Installing the KOMPLETE Selection Software on Mac OS X
MASCHINE 2.0 - Setup Guide - 19

3. On the first screen please enter your email address and Native Instruments password.
Software Installation
Downloading and Installing the KOMPLETE Selection Software on Mac OS X
MASCHINE 2.0 - Setup Guide - 20

4. Click on Log in to log in with your user account. The download process of the KOM-PLETE Selection software will start automatically.
Software Installation
Downloading and Installing the KOMPLETE Selection Software on Mac OS X
MASCHINE 2.0 - Setup Guide - 21

3.3.1 Start the Software Installation
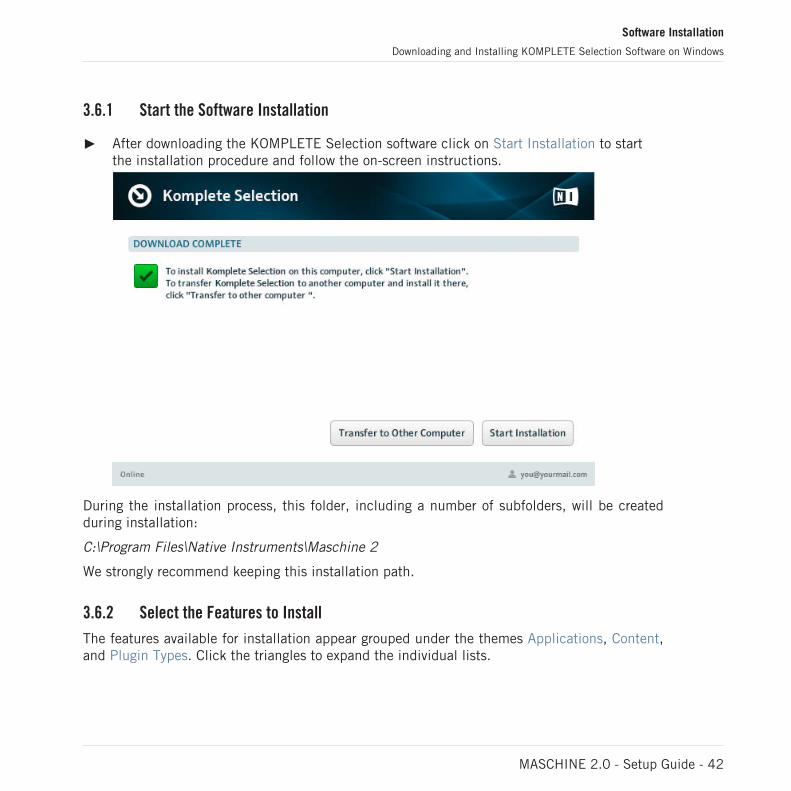
► After downloading the KOMPLETE Selection software click on Start Installation to startthe installation procedure and follow the on-screen instructions.
During the installation process, this folder, including a number of subfolders, will be createdduring installation:
Macintosh HD/Applications/Native Instruments
We strongly recommend keeping this installation path.
3.3.2 Select the Components to Install
The components available for installation appear grouped under the themes Applications, Con-tent, and Plug-In Types. Click the triangles to expand the individual lists.
Software Installation
Downloading and Installing the KOMPLETE Selection Software on Mac OS X
MASCHINE 2.0 - Setup Guide - 22
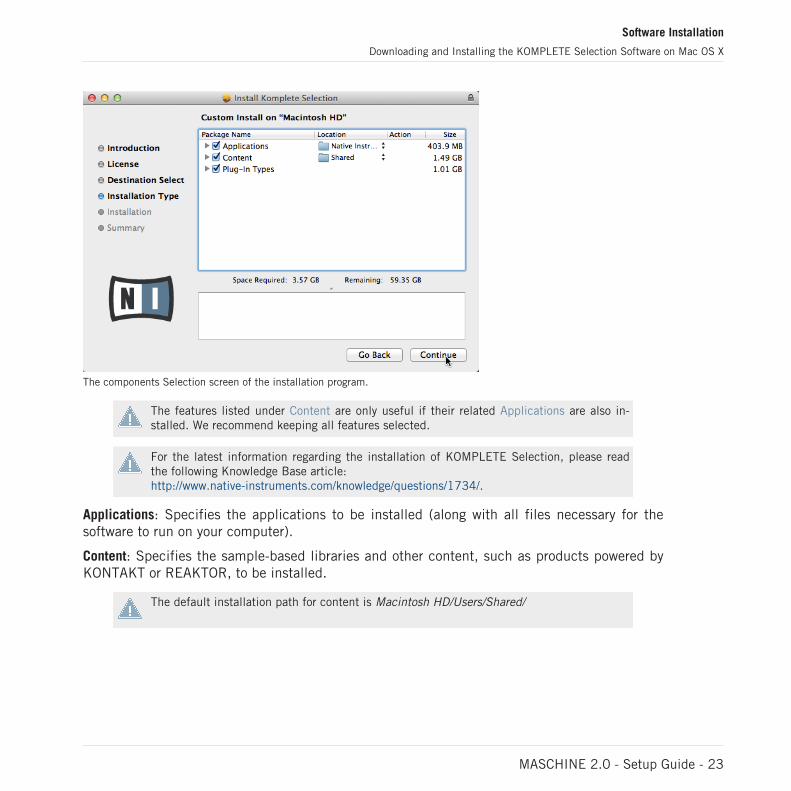
The components Selection screen of the installation program.
The features listed under Content are only useful if their related Applications are also in-stalled. We recommend keeping all features selected.
For the latest information regarding the installation of KOMPLETE Selection, please readthe following Knowledge Base article:http://www.native-instruments.com/knowledge/questions/1734/.
Applications: Specifies the applications to be installed (along with all files necessary for thesoftware to run on your computer).
Content: Specifies the sample-based libraries and other content, such as products powered byKONTAKT or REAKTOR, to be installed.
The default installation path for content is Macintosh HD/Users/Shared/
Software Installation
Downloading and Installing the KOMPLETE Selection Software on Mac OS X
MASCHINE 2.0 - Setup Guide - 23
Plug-In Types: Specifies the plug-in types (VST, Audio Unit, RTAS or AAX) to be installed. Se-lect the plug-in type(s) depending on which type is supported by your sequencer software. Au-dio Unit is used by many sequencers like Logic, Live, Digital Performer or Garage Band. VST isused by Cubase, while RTAS and AAX are the native plug-in formats for Pro Tools. Leave allplug-in types selected if you are unsure which format is supported by your host application.
The Service Center application, which is required for product activation, will always be in-stalled (unless the same or a newer version already exists on your computer).
3.3.3 Set the Install Locations for Content
In the Location column you can select a target folder or volume for the sample-based librariesand other content listed under the Content theme.
Because the content requires a large amount of disk space, it is crucial that you select theinstall location carefully. For optimum performance it is recommended to install the con-tent on a dedicated hard disk.
To change the install location:
Software Installation
Downloading and Installing the KOMPLETE Selection Software on Mac OS X
MASCHINE 2.0 - Setup Guide - 24
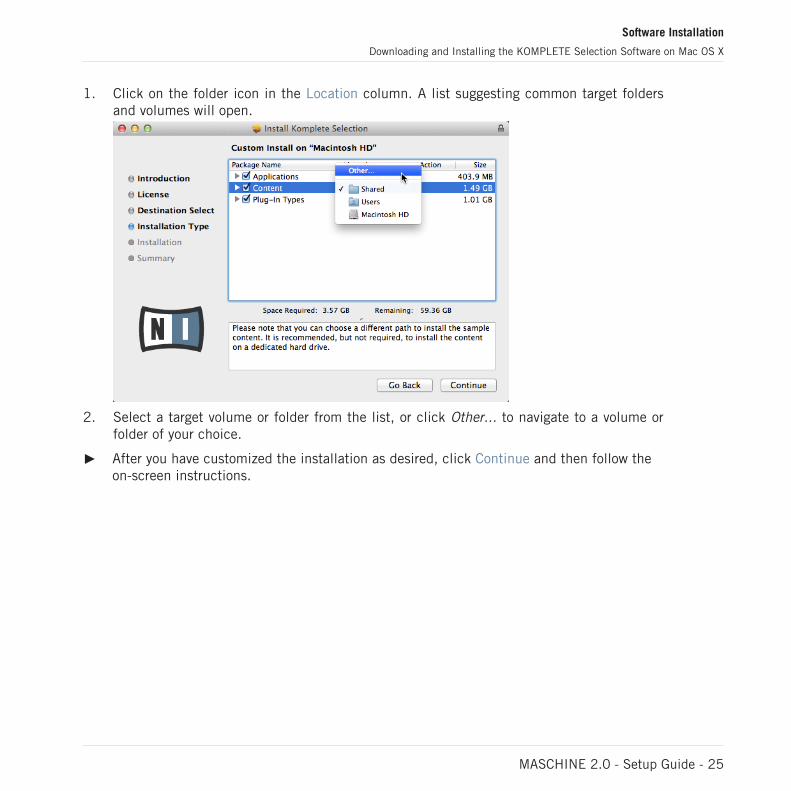
1. Click on the folder icon in the Location column. A list suggesting common target foldersand volumes will open.
2. Select a target volume or folder from the list, or click Other... to navigate to a volume orfolder of your choice.
► After you have customized the installation as desired, click Continue and then follow theon-screen instructions.
Software Installation
Downloading and Installing the KOMPLETE Selection Software on Mac OS X
MASCHINE 2.0 - Setup Guide - 25
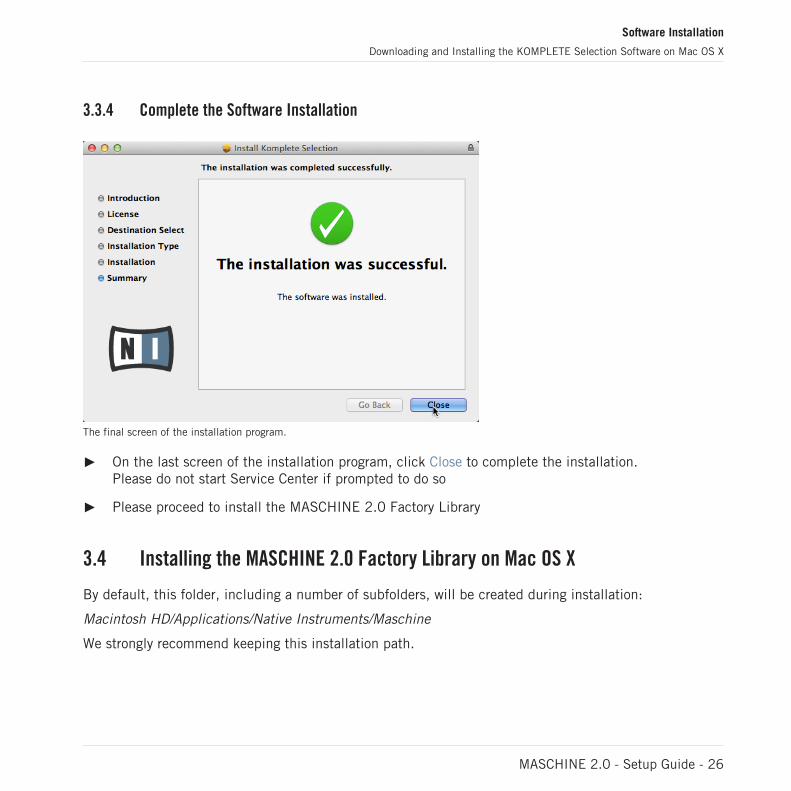
3.3.4 Complete the Software Installation
The final screen of the installation program.
► On the last screen of the installation program, click Close to complete the installation.Please do not start Service Center if prompted to do so
► Please proceed to install the MASCHINE 2.0 Factory Library
3.4 Installing the MASCHINE 2.0 Factory Library on Mac OS X
By default, this folder, including a number of subfolders, will be created during installation:
Macintosh HD/Applications/Native Instruments/Maschine
We strongly recommend keeping this installation path.
Software Installation
Downloading and Installing the KOMPLETE Selection Software on Mac OS X
MASCHINE 2.0 - Setup Guide - 26
If your computer does not have a DVD drive, or in the unlikely event the supplied DVD isfaulty, please download and install the MASCHINE 2 Factory Library from the Native In-struments website. For detailed instructions on installing MASCHINE 2 Factory Librarywithout a DVD on Mac OS X please proceed to section ↑4.1, Downloading and Installingthe MASCHINE 2 Factory Library on MAC OS X.
3.4.1 Start the Software Installation
1. Insert the installation disc into your DVD drive.2. Once the installation DVD icon appears on your Mac OS X desktop, double-click it to re-
veal the content of the DVD.3. Locate the MASCHINE Installer Mac.mpkg file on the installation disc and double-click it in
order to start the installation procedure.4. Follow the on-screen instructions.
3.4.2 Select the Components to Install
After you have accepted the software license agreement, the installer window displays thecomponents available for installation.
You can select a target folder or hard disk for the Maschine Library.
Software Installation
Installing the MASCHINE 2.0 Factory Library on Mac OS X
MASCHINE 2.0 - Setup Guide - 27

The components Selection screen of the installation program.
Maschine 2 Factory Library: This installs the MASCHINE 2.0 Factory Library that contains allcontent like instruments and samples.
It is strongly recommended to install the software to the default location. If you still needto change the install location, click on the folder icon in the Location column and selectthe desired folder.
3.4.3 Define the Software Installation Path
On the same screen, you can select a target folder or hard disk for the MASCHINE 2.0 Facto-ry Library.
Because the sound library requires a large amount of disk space, it is crucial that you se-lect the install location carefully. For optimum performance it is recommended to installthe sound library on a dedicated hard disk.
► After you have customized the installation as desired, click Continue and then follow theon-screen instructions.
Software Installation
Installing the MASCHINE 2.0 Factory Library on Mac OS X
MASCHINE 2.0 - Setup Guide - 28
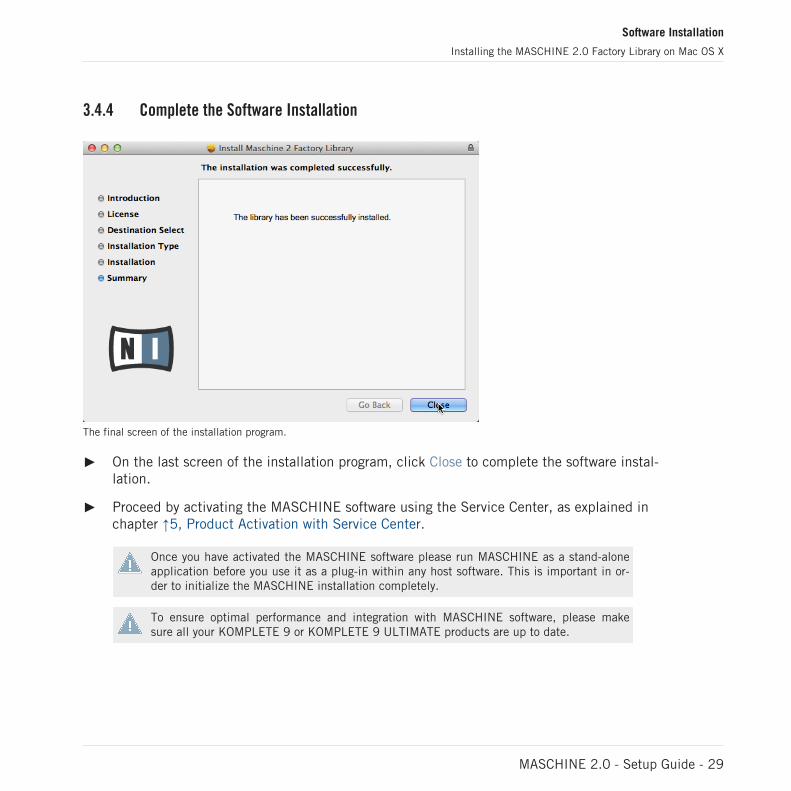
3.4.4 Complete the Software Installation
The final screen of the installation program.
► On the last screen of the installation program, click Close to complete the software instal-lation.
► Proceed by activating the MASCHINE software using the Service Center, as explained inchapter ↑5, Product Activation with Service Center.
Once you have activated the MASCHINE software please run MASCHINE as a stand-aloneapplication before you use it as a plug-in within any host software. This is important in or-der to initialize the MASCHINE installation completely.
To ensure optimal performance and integration with MASCHINE software, please makesure all your KOMPLETE 9 or KOMPLETE 9 ULTIMATE products are up to date.
Software Installation
Installing the MASCHINE 2.0 Factory Library on Mac OS X
MASCHINE 2.0 - Setup Guide - 29
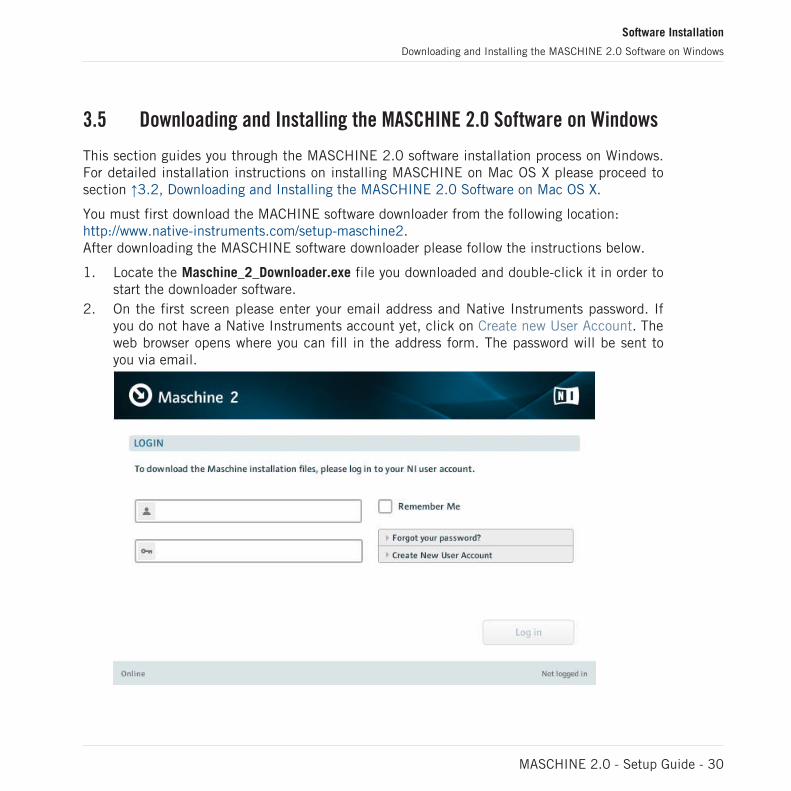
3.5 Downloading and Installing the MASCHINE 2.0 Software on Windows
This section guides you through the MASCHINE 2.0 software installation process on Windows.For detailed installation instructions on installing MASCHINE on Mac OS X please proceed tosection ↑3.2, Downloading and Installing the MASCHINE 2.0 Software on Mac OS X.
You must first download the MACHINE software downloader from the following location:http://www.native-instruments.com/setup-maschine2.After downloading the MASCHINE software downloader please follow the instructions below.
1. Locate the Maschine_2_Downloader.exe file you downloaded and double-click it in order tostart the downloader software.
2. On the first screen please enter your email address and Native Instruments password. Ifyou do not have a Native Instruments account yet, click on Create new User Account. Theweb browser opens where you can fill in the address form. The password will be sent toyou via email.
Software Installation
Downloading and Installing the MASCHINE 2.0 Software on Windows
MASCHINE 2.0 - Setup Guide - 30
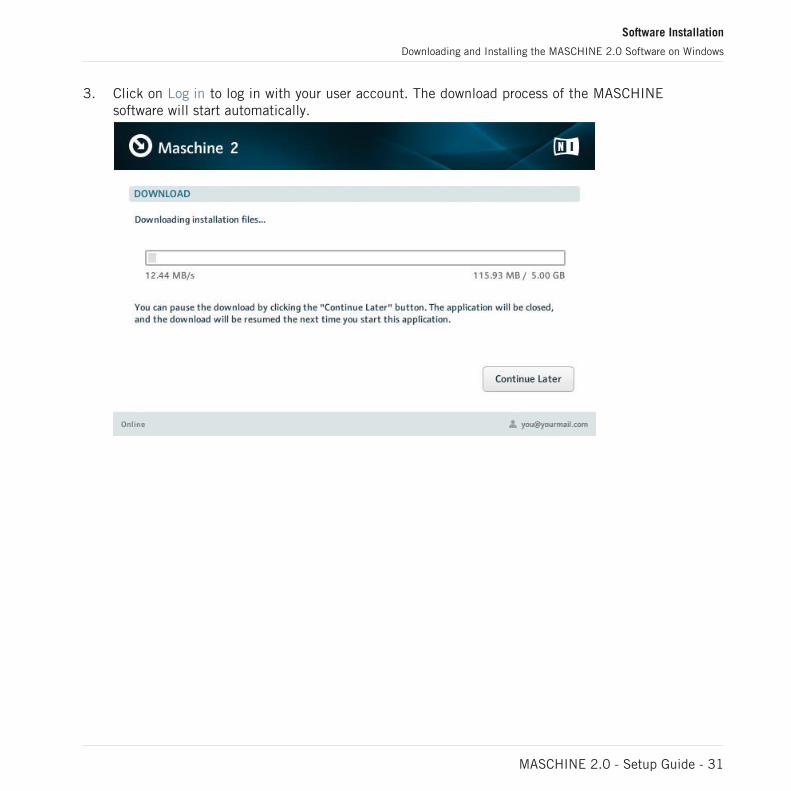
3. Click on Log in to log in with your user account. The download process of the MASCHINEsoftware will start automatically.
Software Installation
Downloading and Installing the MASCHINE 2.0 Software on Windows
MASCHINE 2.0 - Setup Guide - 31
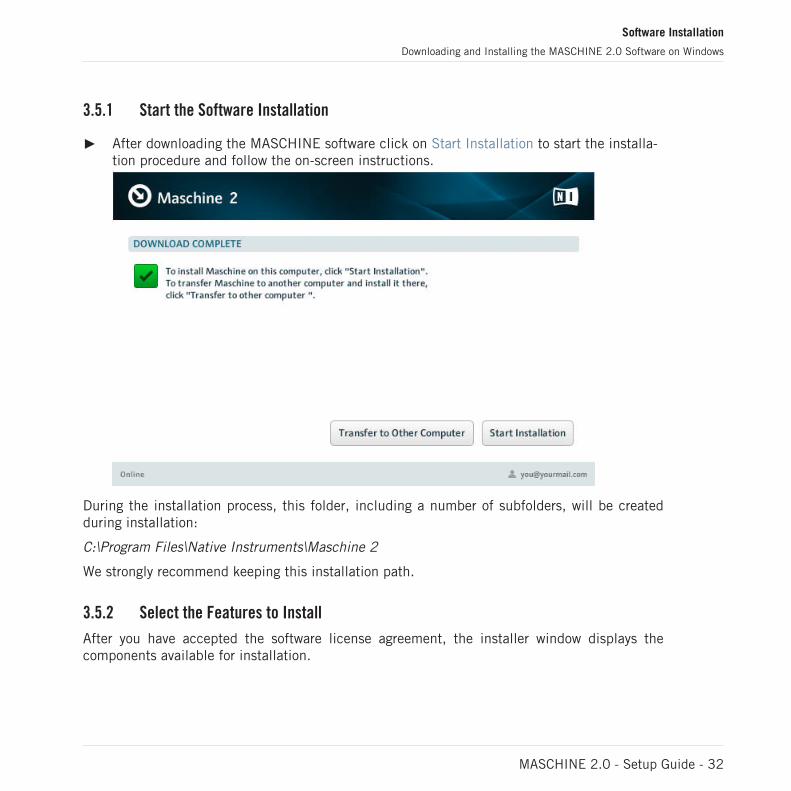
3.5.1 Start the Software Installation
► After downloading the MASCHINE software click on Start Installation to start the installa-tion procedure and follow the on-screen instructions.
During the installation process, this folder, including a number of subfolders, will be createdduring installation:
C:\Program Files\Native Instruments\Maschine 2
We strongly recommend keeping this installation path.
3.5.2 Select the Features to Install
After you have accepted the software license agreement, the installer window displays thecomponents available for installation.
Software Installation
Downloading and Installing the MASCHINE 2.0 Software on Windows
MASCHINE 2.0 - Setup Guide - 32
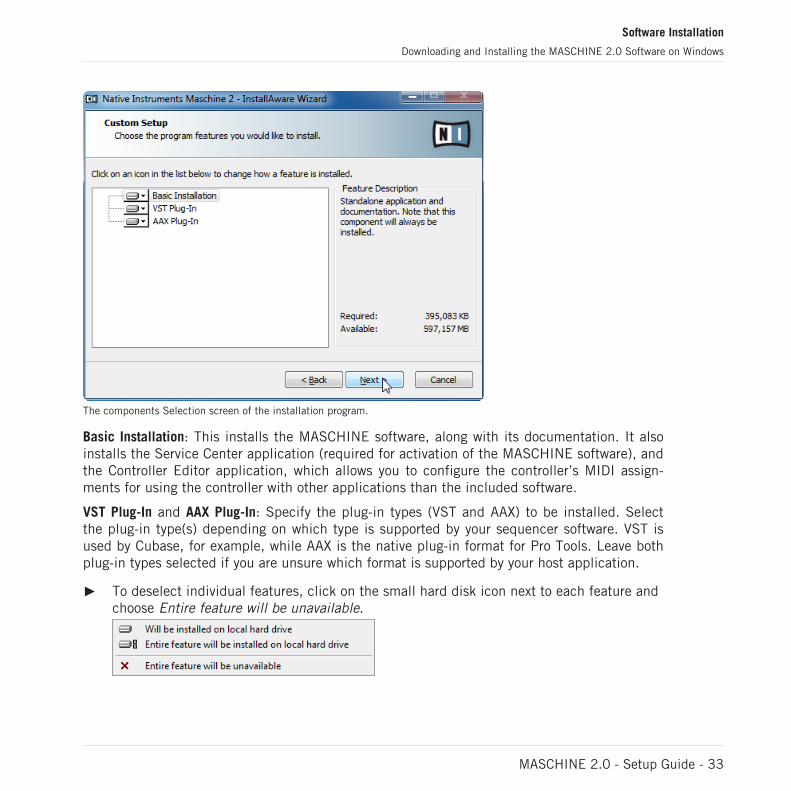
The components Selection screen of the installation program.
Basic Installation: This installs the MASCHINE software, along with its documentation. It alsoinstalls the Service Center application (required for activation of the MASCHINE software), andthe Controller Editor application, which allows you to configure the controller’s MIDI assign-ments for using the controller with other applications than the included software.
VST Plug-In and AAX Plug-In: Specify the plug-in types (VST and AAX) to be installed. Selectthe plug-in type(s) depending on which type is supported by your sequencer software. VST isused by Cubase, for example, while AAX is the native plug-in format for Pro Tools. Leave bothplug-in types selected if you are unsure which format is supported by your host application.
► To deselect individual features, click on the small hard disk icon next to each feature andchoose Entire feature will be unavailable.
Software Installation
Downloading and Installing the MASCHINE 2.0 Software on Windows
MASCHINE 2.0 - Setup Guide - 33

► You can specify which plug-in types you want to install. VST is used by many sequencerslike Cubase, Sonar or Live, while AAX is the native plug-in format for Pro Tools.
It is recommended to keep all features selected unless you have a specific reason to dese-lect a feature (such as if this feature is already installed on your computer). For MASCHINEto maintain optimal performance and integration with Native Instruments plug-ins, VSTPlug-in can not be deselected.
3.5.3 Define the Application’s Destination Folder
The software installation path screen of the installation program.
You will be asked to select and confirm an installation path for the MASCHINE software. Thesubsequent screens will ask you for the MASCHINE Library and plug-insʼ installation paths incase you selected to install them.
Software Installation
Downloading and Installing the MASCHINE 2.0 Software on Windows
MASCHINE 2.0 - Setup Guide - 34
It is strongly recommended to install the MASCHINE software to the default location. If youstill need to change the install location, click Change… to open a Folder Selection dialogand select the desired destination folder.
► Click Next to proceed.
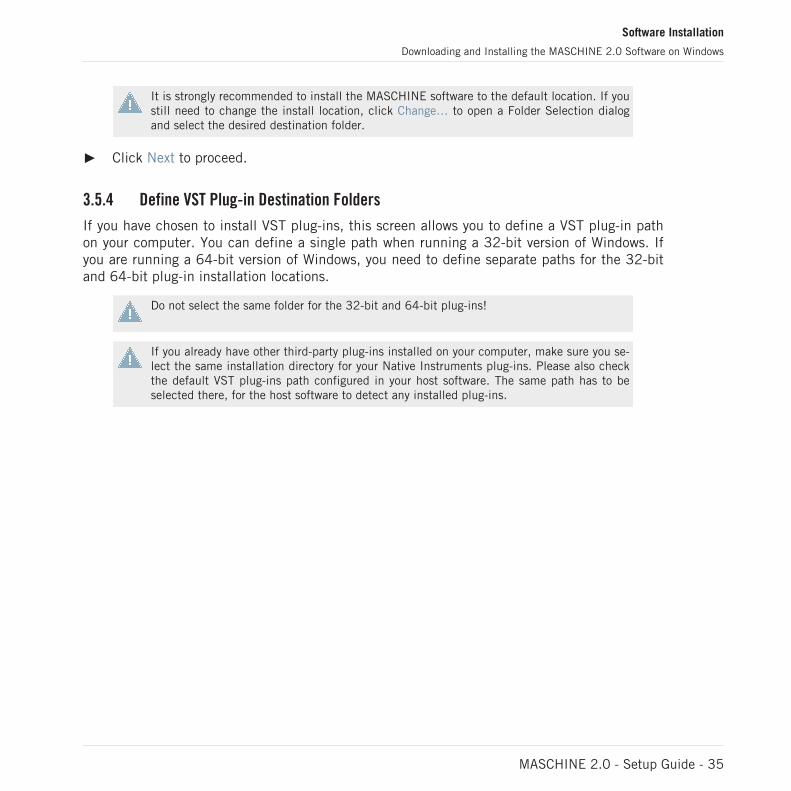
3.5.4 Define VST Plug-in Destination Folders
If you have chosen to install VST plug-ins, this screen allows you to define a VST plug-in pathon your computer. You can define a single path when running a 32-bit version of Windows. Ifyou are running a 64-bit version of Windows, you need to define separate paths for the 32-bitand 64-bit plug-in installation locations.
Do not select the same folder for the 32-bit and 64-bit plug-ins!
If you already have other third-party plug-ins installed on your computer, make sure you se-lect the same installation directory for your Native Instruments plug-ins. Please also checkthe default VST plug-ins path configured in your host software. The same path has to beselected there, for the host software to detect any installed plug-ins.
Software Installation
Downloading and Installing the MASCHINE 2.0 Software on Windows
MASCHINE 2.0 - Setup Guide - 35
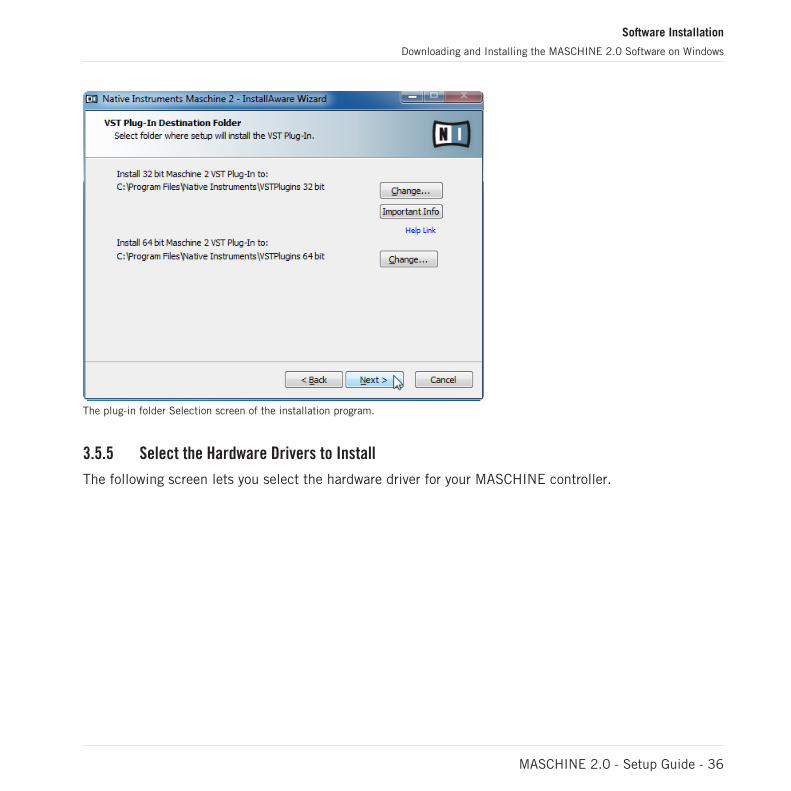
The plug-in folder Selection screen of the installation program.
3.5.5 Select the Hardware Drivers to Install
The following screen lets you select the hardware driver for your MASCHINE controller.
Software Installation
Downloading and Installing the MASCHINE 2.0 Software on Windows
MASCHINE 2.0 - Setup Guide - 36
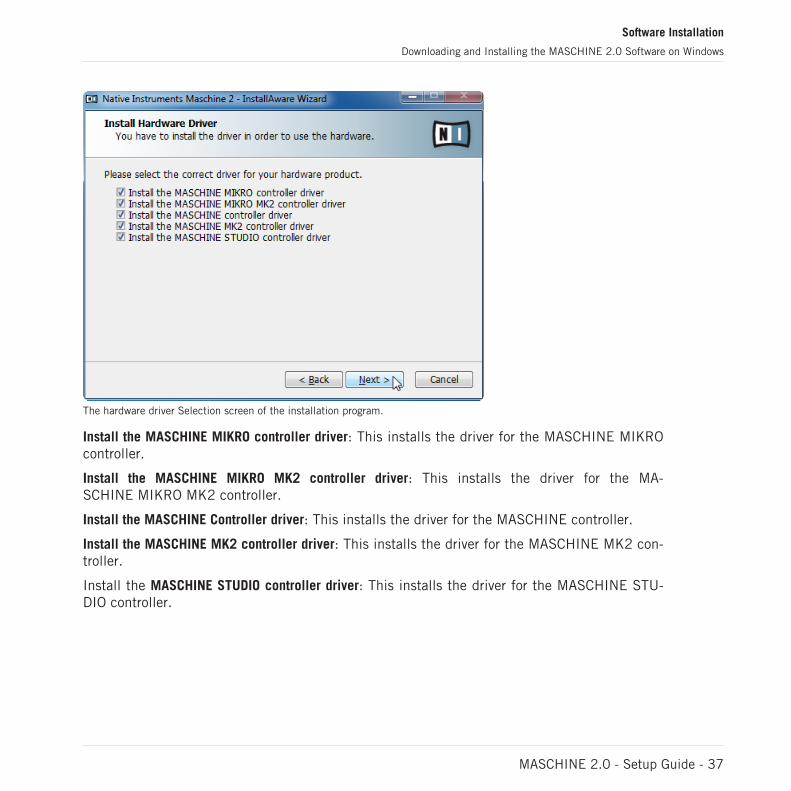
The hardware driver Selection screen of the installation program.
Install the MASCHINE MIKRO controller driver: This installs the driver for the MASCHINE MIKROcontroller.
Install the MASCHINE MIKRO MK2 controller driver: This installs the driver for the MA-SCHINE MIKRO MK2 controller.
Install the MASCHINE Controller driver: This installs the driver for the MASCHINE controller.
Install the MASCHINE MK2 controller driver: This installs the driver for the MASCHINE MK2 con-troller.
Install the MASCHINE STUDIO controller driver: This installs the driver for the MASCHINE STU-DIO controller.
Software Installation
Downloading and Installing the MASCHINE 2.0 Software on Windows
MASCHINE 2.0 - Setup Guide - 37
3.5.6 Complete the Software Installation
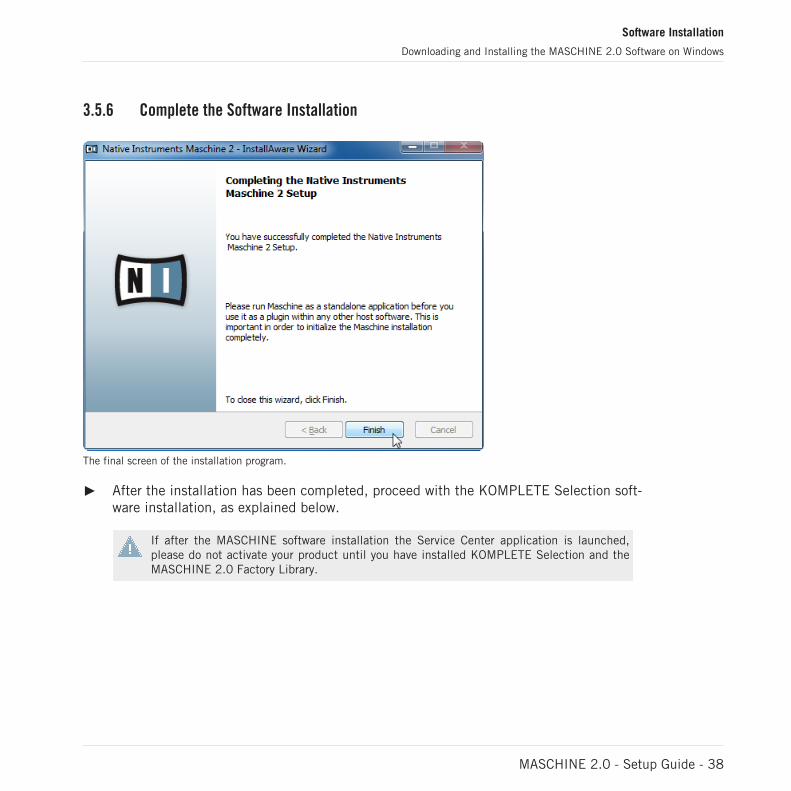
The final screen of the installation program.
► After the installation has been completed, proceed with the KOMPLETE Selection soft-ware installation, as explained below.
If after the MASCHINE software installation the Service Center application is launched,please do not activate your product until you have installed KOMPLETE Selection and theMASCHINE 2.0 Factory Library.
Software Installation
Downloading and Installing the MASCHINE 2.0 Software on Windows
MASCHINE 2.0 - Setup Guide - 38
3.6 Downloading and Installing KOMPLETE Selection Software onWindows
If you already have KOMPLETE 9 or KOMPLETE 9 ULTIMATE installed on your computeryou can skip this installation procedure and continue to install the MASCHINE Library insection ↑3.7, Installing the MASCHINE 2.0 Factory Library on Windows. After installing theMASCHINE Library please make sure all your KOMPLETE 9 or KOMPLETE 9 ULTIMATEproducts are up to date.
For the latest information regarding the installation of KOMPLETE Selection, please readthe following Knowledge Base article: http://www.native-instruments.com/knowledge/ques-tions/1734/
You must first download the KOMPLETE Selection software downloader from the following lo-cation:http://www.native-instruments.com/setup-maschine2.After downloading the KOMPLETE Selection software downloader please follow the instructionsbelow.
1. Locate the Komplete_Selection_Downloader.exe file you downloaded and double-click it inorder to start the downloader software.
Software Installation
Downloading and Installing KOMPLETE Selection Software on Windows
MASCHINE 2.0 - Setup Guide - 39
2. On the first screen please enter your email address and Native Instruments password.
Software Installation
Downloading and Installing KOMPLETE Selection Software on Windows
MASCHINE 2.0 - Setup Guide - 40

3. Click on Log in to log in with your user account. The download process of the KOM-PLETE Selection software will start automatically.
Software Installation
Downloading and Installing KOMPLETE Selection Software on Windows
MASCHINE 2.0 - Setup Guide - 41
3.6.1 Start the Software Installation
► After downloading the KOMPLETE Selection software click on Start Installation to startthe installation procedure and follow the on-screen instructions.
During the installation process, this folder, including a number of subfolders, will be createdduring installation:
C:\Program Files\Native Instruments\Maschine 2
We strongly recommend keeping this installation path.
3.6.2 Select the Features to Install
The features available for installation appear grouped under the themes Applications, Content,and Plugin Types. Click the triangles to expand the individual lists.
Software Installation
Downloading and Installing KOMPLETE Selection Software on Windows
MASCHINE 2.0 - Setup Guide - 42
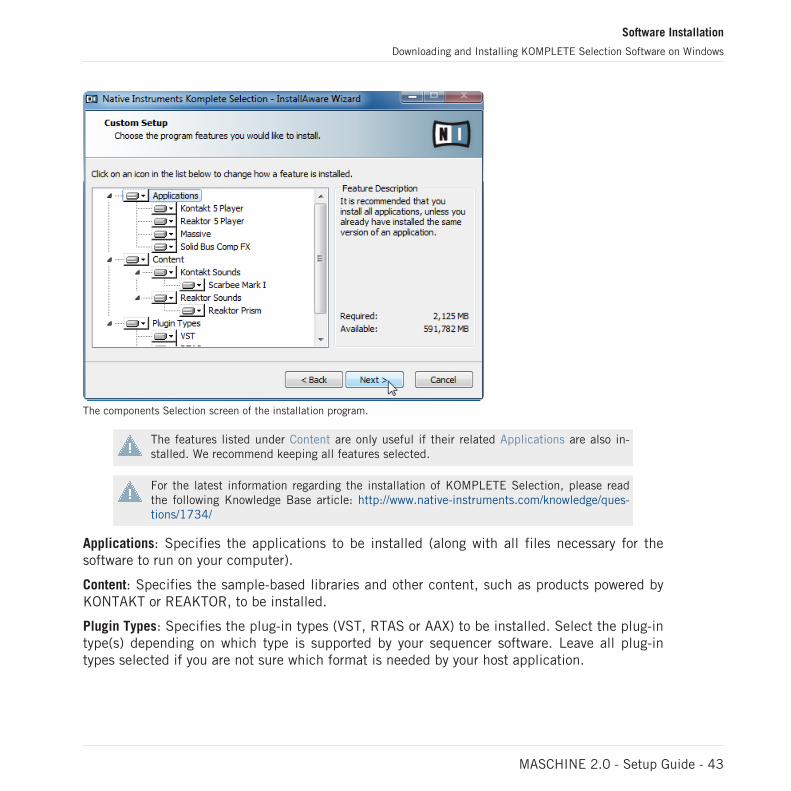
The components Selection screen of the installation program.
The features listed under Content are only useful if their related Applications are also in-stalled. We recommend keeping all features selected.
For the latest information regarding the installation of KOMPLETE Selection, please readthe following Knowledge Base article: http://www.native-instruments.com/knowledge/ques-tions/1734/
Applications: Specifies the applications to be installed (along with all files necessary for thesoftware to run on your computer).
Content: Specifies the sample-based libraries and other content, such as products powered byKONTAKT or REAKTOR, to be installed.
Plugin Types: Specifies the plug-in types (VST, RTAS or AAX) to be installed. Select the plug-intype(s) depending on which type is supported by your sequencer software. Leave all plug-intypes selected if you are not sure which format is needed by your host application.
Software Installation
Downloading and Installing KOMPLETE Selection Software on Windows
MASCHINE 2.0 - Setup Guide - 43
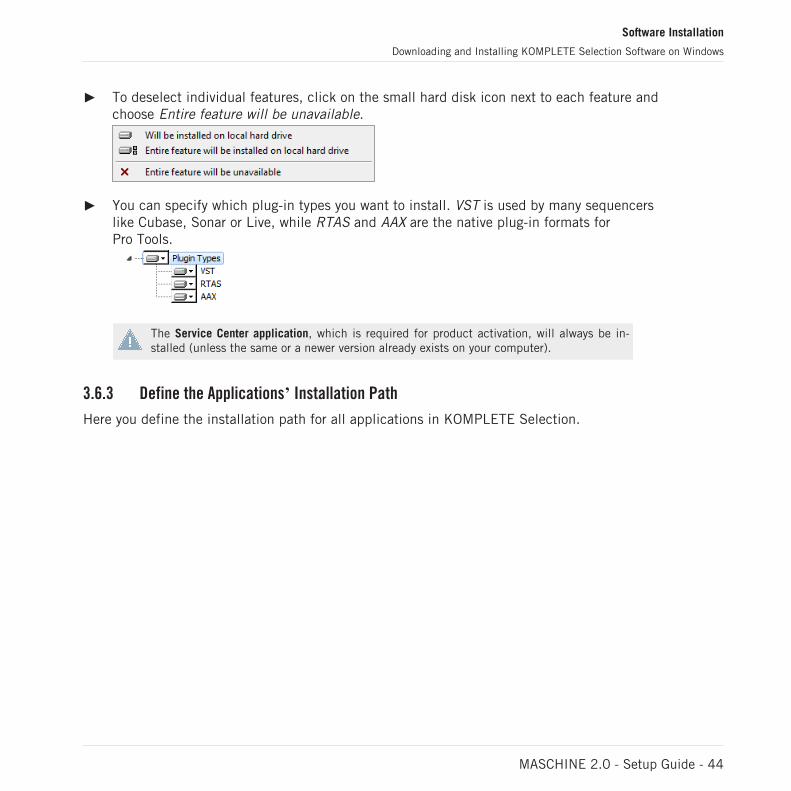
► To deselect individual features, click on the small hard disk icon next to each feature andchoose Entire feature will be unavailable.
► You can specify which plug-in types you want to install. VST is used by many sequencerslike Cubase, Sonar or Live, while RTAS and AAX are the native plug-in formats forPro Tools.
The Service Center application, which is required for product activation, will always be in-stalled (unless the same or a newer version already exists on your computer).
3.6.3 Define the Applicationsʼ Installation Path
Here you define the installation path for all applications in KOMPLETE Selection.
Software Installation
Downloading and Installing KOMPLETE Selection Software on Windows
MASCHINE 2.0 - Setup Guide - 44

The software installation path screen of the installation program.
This installation path is used for the applications and the documentation, not the contentlibraries. You can specify the library path in an upcoming installer screen.
3.6.4 Define an Installation Path for VST Plug-ins
If you have chosen to install VST plug-ins, this screen allows defining a VST plug-in path onyour computer. You can define a single path when running a 32-bit version of Windows. If youare running a 64-bit version of Windows, you need to define separate paths for the 32-bit and64-bit plug-in installation locations.
Do not select the same folder for the 32-bit and 64-bit plug-ins!
Software Installation
Downloading and Installing KOMPLETE Selection Software on Windows
MASCHINE 2.0 - Setup Guide - 45
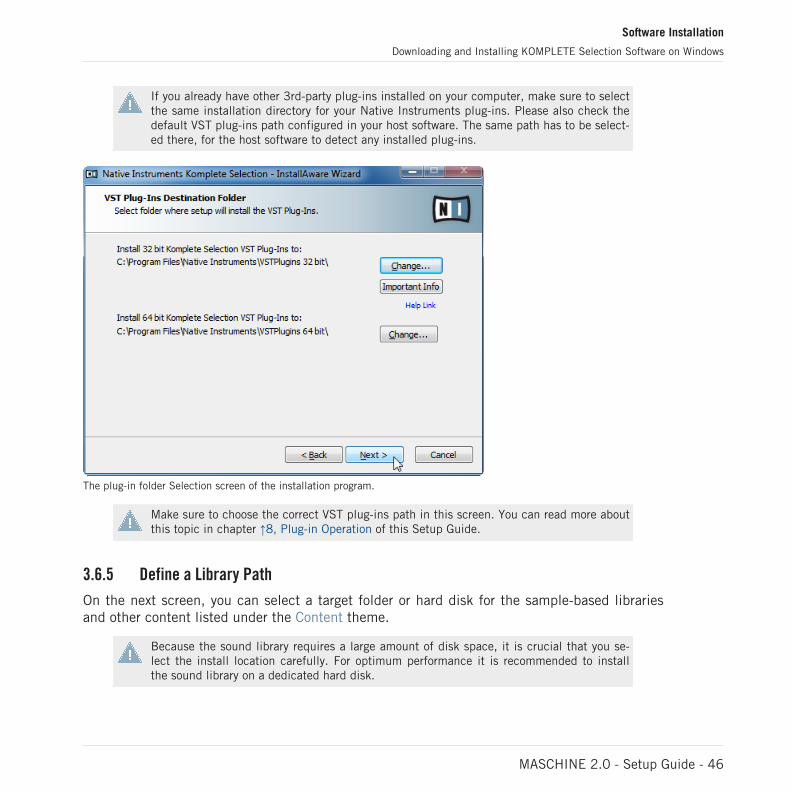
If you already have other 3rd-party plug-ins installed on your computer, make sure to selectthe same installation directory for your Native Instruments plug-ins. Please also check thedefault VST plug-ins path configured in your host software. The same path has to be select-ed there, for the host software to detect any installed plug-ins.
The plug-in folder Selection screen of the installation program.
Make sure to choose the correct VST plug-ins path in this screen. You can read more aboutthis topic in chapter ↑8, Plug-in Operation of this Setup Guide.
3.6.5 Define a Library Path
On the next screen, you can select a target folder or hard disk for the sample-based librariesand other content listed under the Content theme.
Because the sound library requires a large amount of disk space, it is crucial that you se-lect the install location carefully. For optimum performance it is recommended to installthe sound library on a dedicated hard disk.
Software Installation
Downloading and Installing KOMPLETE Selection Software on Windows
MASCHINE 2.0 - Setup Guide - 46
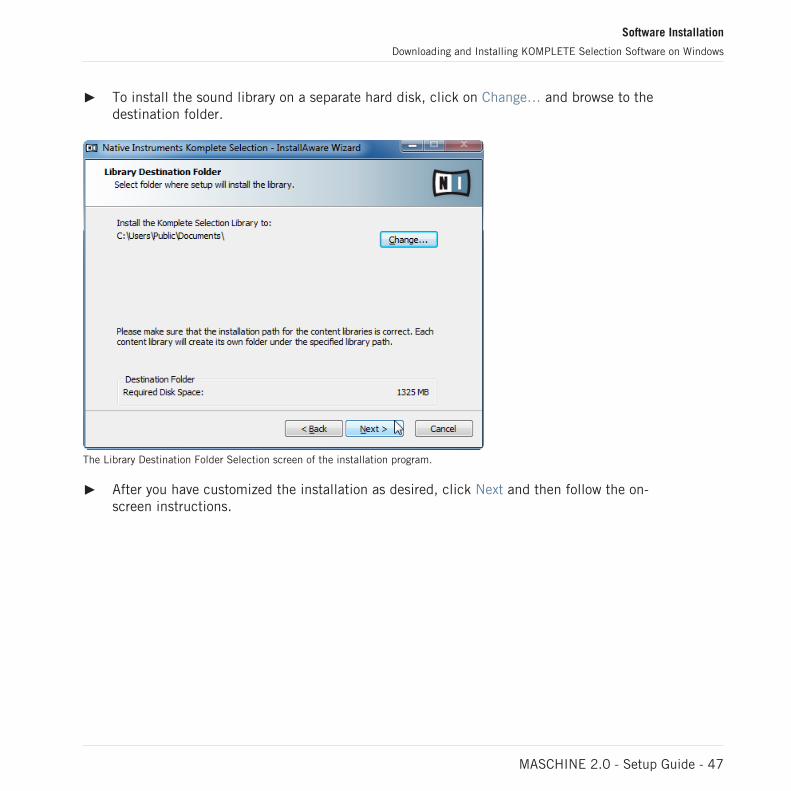
► To install the sound library on a separate hard disk, click on Change… and browse to thedestination folder.
The Library Destination Folder Selection screen of the installation program.
► After you have customized the installation as desired, click Next and then follow the on-screen instructions.
Software Installation
Downloading and Installing KOMPLETE Selection Software on Windows
MASCHINE 2.0 - Setup Guide - 47
3.6.6 Complete the Software Installation
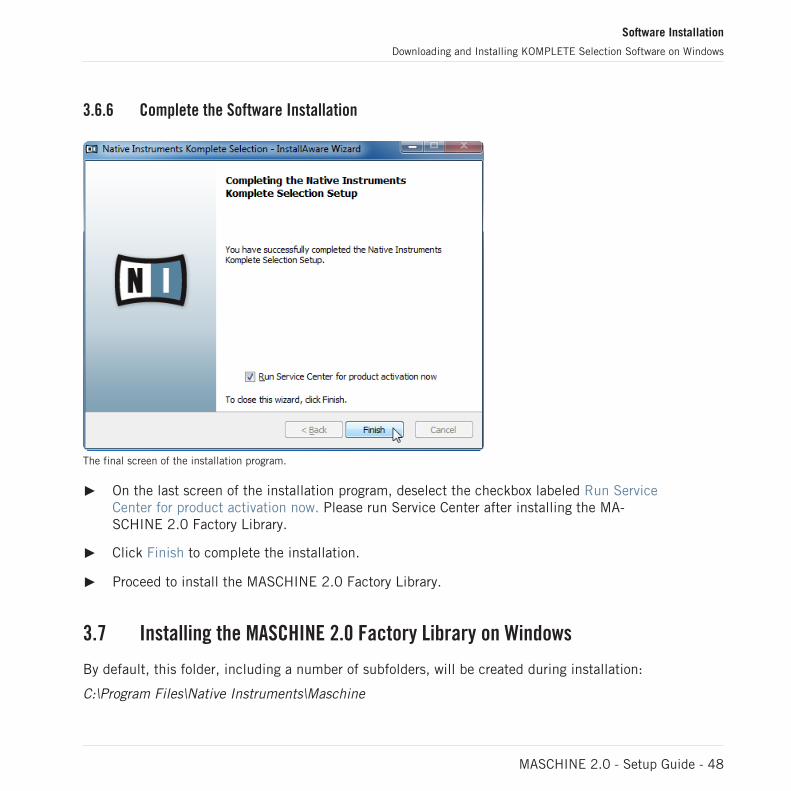
The final screen of the installation program.
► On the last screen of the installation program, deselect the checkbox labeled Run ServiceCenter for product activation now. Please run Service Center after installing the MA-SCHINE 2.0 Factory Library.
► Click Finish to complete the installation.
► Proceed to install the MASCHINE 2.0 Factory Library.
3.7 Installing the MASCHINE 2.0 Factory Library on Windows
By default, this folder, including a number of subfolders, will be created during installation:
C:\Program Files\Native Instruments\Maschine
Software Installation
Downloading and Installing KOMPLETE Selection Software on Windows
MASCHINE 2.0 - Setup Guide - 48
We strongly recommend keeping this installation path.
If your computer does not have a DVD drive, or in the unlikely event the supplied DVD isfaulty, please download and install the MASCHINE 2 Factory Library from the Native In-struments website. For detailed instructions on installing MASCHINE 2 Factory Librarywithout a DVD on Windows please proceed to section ↑4.2, Downloading and Installing theMASCHINE 2 Factory Library on Windows.
3.7.1 Start the Software Installation
1. Insert the MASCHINE 2.0 Factory Library DVD into your DVD drive.2. Once the installation DVD icon is visible in Windows Explorer, double-click it to reveal the
content of the DVD.3. Locate the Maschine 2 Factory Library Setup PC.exe file on the DVD and double-click it in
order to start the installation procedure.4. Follow the on-screen instructions.
3.7.2 Select the Features to Install
After you have accepted the software license agreement, the installer window displays thecomponents available for installation.
Software Installation
Installing the MASCHINE 2.0 Factory Library on Windows
MASCHINE 2.0 - Setup Guide - 49
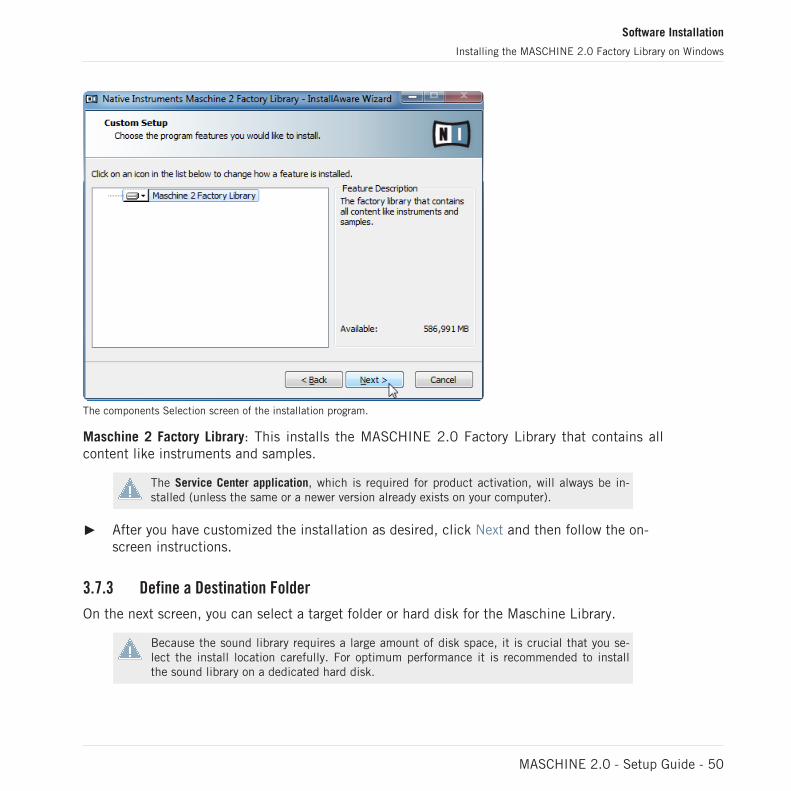
The components Selection screen of the installation program.
Maschine 2 Factory Library: This installs the MASCHINE 2.0 Factory Library that contains allcontent like instruments and samples.
The Service Center application, which is required for product activation, will always be in-stalled (unless the same or a newer version already exists on your computer).
► After you have customized the installation as desired, click Next and then follow the on-screen instructions.
3.7.3 Define a Destination Folder
On the next screen, you can select a target folder or hard disk for the Maschine Library.
Because the sound library requires a large amount of disk space, it is crucial that you se-lect the install location carefully. For optimum performance it is recommended to installthe sound library on a dedicated hard disk.
Software Installation
Installing the MASCHINE 2.0 Factory Library on Windows
MASCHINE 2.0 - Setup Guide - 50
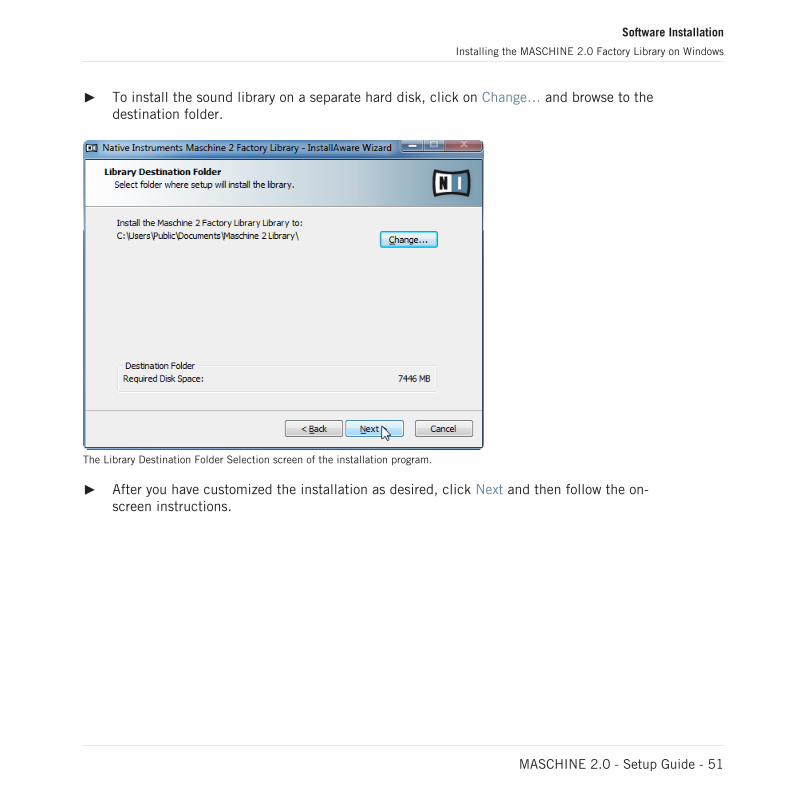
► To install the sound library on a separate hard disk, click on Change… and browse to thedestination folder.
The Library Destination Folder Selection screen of the installation program.
► After you have customized the installation as desired, click Next and then follow the on-screen instructions.
Software Installation
Installing the MASCHINE 2.0 Factory Library on Windows
MASCHINE 2.0 - Setup Guide - 51
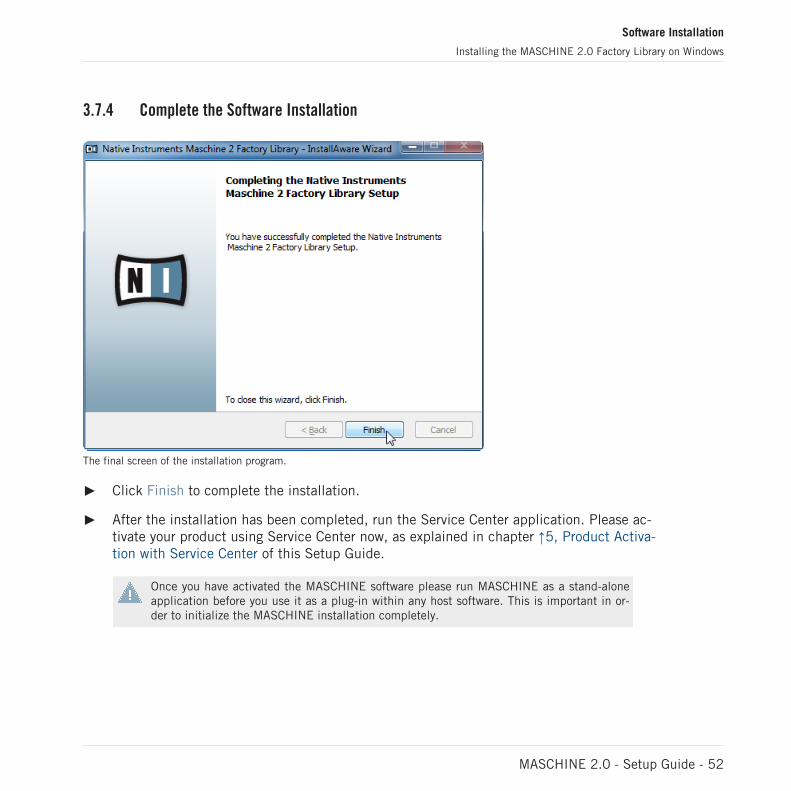
3.7.4 Complete the Software Installation
The final screen of the installation program.
► Click Finish to complete the installation.
► After the installation has been completed, run the Service Center application. Please ac-tivate your product using Service Center now, as explained in chapter ↑5, Product Activa-tion with Service Center of this Setup Guide.
Once you have activated the MASCHINE software please run MASCHINE as a stand-aloneapplication before you use it as a plug-in within any host software. This is important in or-der to initialize the MASCHINE installation completely.
Software Installation
Installing the MASCHINE 2.0 Factory Library on Windows
MASCHINE 2.0 - Setup Guide - 52
4 Installing the MASCHINE 2 Factory Library without a DVD
If you have a computer that does not have a DVD drive it is possible to download and installthe MASCHINE 2 Factory Library. For detailed instructions on installing MASCHINE 2 FactoryLibrary without a DVD drive on Mac OS X please proceed to section ↑4.1, Downloading and In-stalling the MASCHINE 2 Factory Library on MAC OS X, for Windows please proceed to section↑4.2, Downloading and Installing the MASCHINE 2 Factory Library on Windows.
4.1 Downloading and Installing the MASCHINE 2 Factory Library on MACOS X
You must first download the Maschine_2_Factory_Library_Downloader.zip file including the MA-SCHINE 2 Factory Library software downloader application from the following location:http://www.native-instruments.com/setup-maschine2.After downloading the Maschine_2_Factory_Library_Downloader.zip please follow the instruc-tions below.
1. Locate and double-click the Maschine_2_Factory_Library_Downloader.zip file in order to ex-tract the Maschine_2_Factory_Library_Downloader application file to the same directory.
2. Double-click the Maschine_2_Factory_Library_Downloader application file to start thedownloader software.
Installing the MASCHINE 2 Factory Library without a DVD
Downloading and Installing the MASCHINE 2 Factory Library on MAC OS X
MASCHINE 2.0 - Setup Guide - 53
3. On the first screen please enter your email address and Native Instruments password.
Installing the MASCHINE 2 Factory Library without a DVD
Downloading and Installing the MASCHINE 2 Factory Library on MAC OS X
MASCHINE 2.0 - Setup Guide - 54
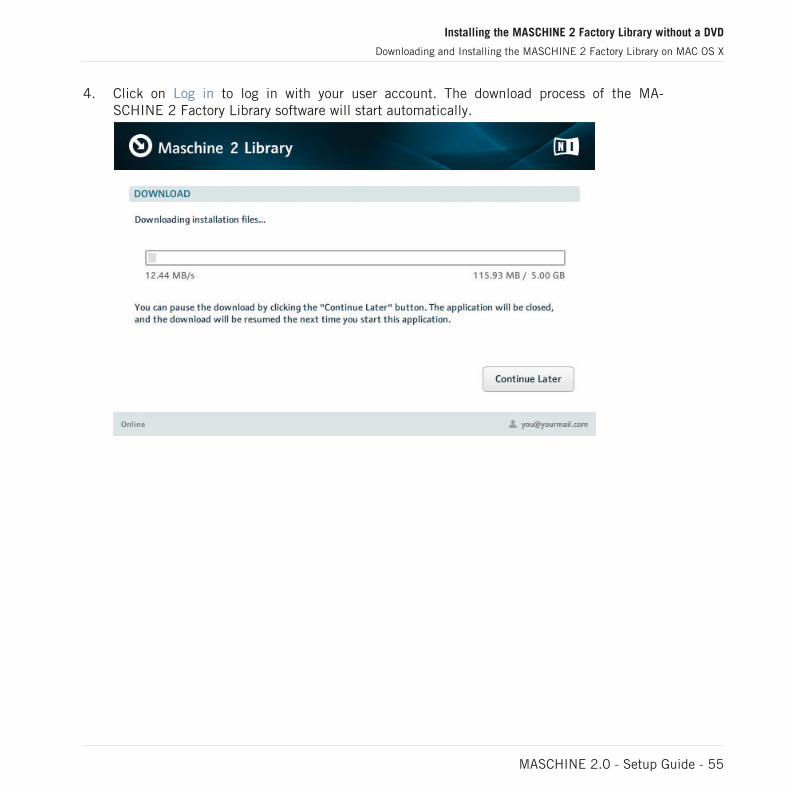
4. Click on Log in to log in with your user account. The download process of the MA-SCHINE 2 Factory Library software will start automatically.
Installing the MASCHINE 2 Factory Library without a DVD
Downloading and Installing the MASCHINE 2 Factory Library on MAC OS X
MASCHINE 2.0 - Setup Guide - 55
4.1.1 Start the Software Installation
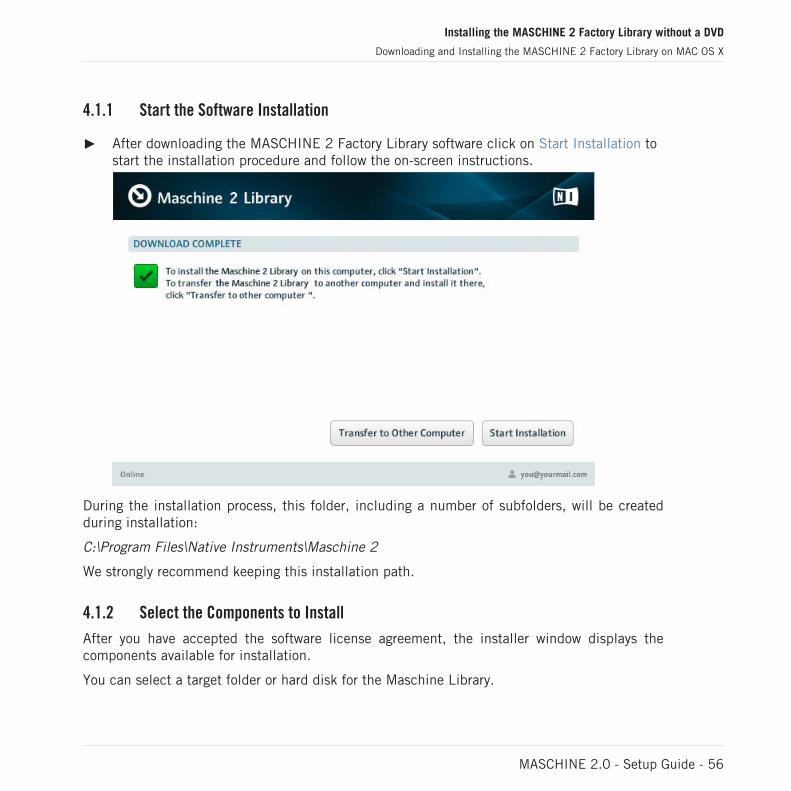
► After downloading the MASCHINE 2 Factory Library software click on Start Installation tostart the installation procedure and follow the on-screen instructions.
During the installation process, this folder, including a number of subfolders, will be createdduring installation:
C:\Program Files\Native Instruments\Maschine 2
We strongly recommend keeping this installation path.
4.1.2 Select the Components to Install
After you have accepted the software license agreement, the installer window displays thecomponents available for installation.
You can select a target folder or hard disk for the Maschine Library.
Installing the MASCHINE 2 Factory Library without a DVD
Downloading and Installing the MASCHINE 2 Factory Library on MAC OS X
MASCHINE 2.0 - Setup Guide - 56
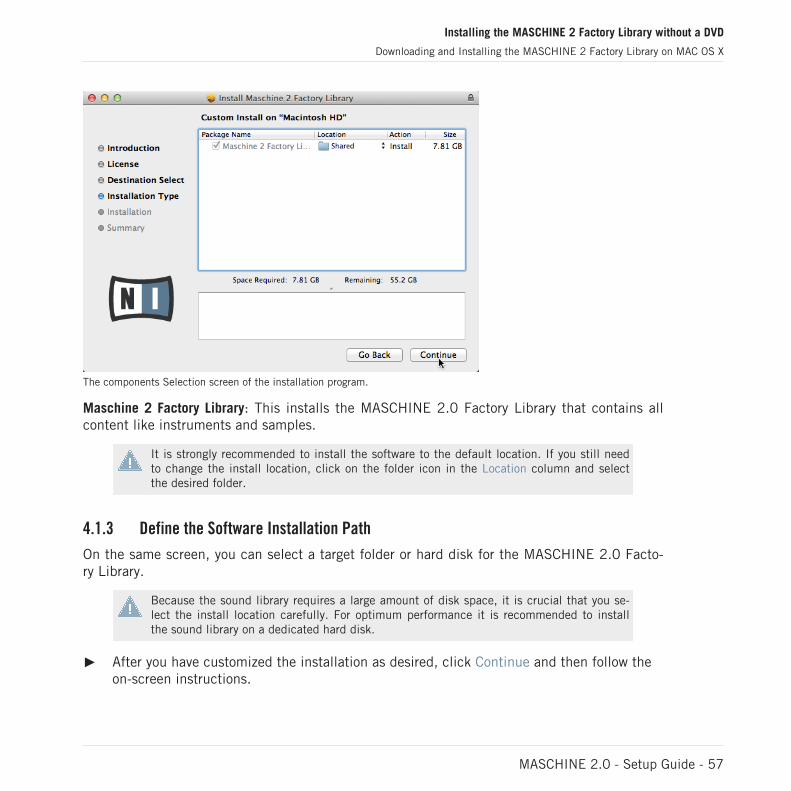
The components Selection screen of the installation program.
Maschine 2 Factory Library: This installs the MASCHINE 2.0 Factory Library that contains allcontent like instruments and samples.
It is strongly recommended to install the software to the default location. If you still needto change the install location, click on the folder icon in the Location column and selectthe desired folder.
4.1.3 Define the Software Installation Path
On the same screen, you can select a target folder or hard disk for the MASCHINE 2.0 Facto-ry Library.
Because the sound library requires a large amount of disk space, it is crucial that you se-lect the install location carefully. For optimum performance it is recommended to installthe sound library on a dedicated hard disk.
► After you have customized the installation as desired, click Continue and then follow theon-screen instructions.
Installing the MASCHINE 2 Factory Library without a DVD
Downloading and Installing the MASCHINE 2 Factory Library on MAC OS X
MASCHINE 2.0 - Setup Guide - 57
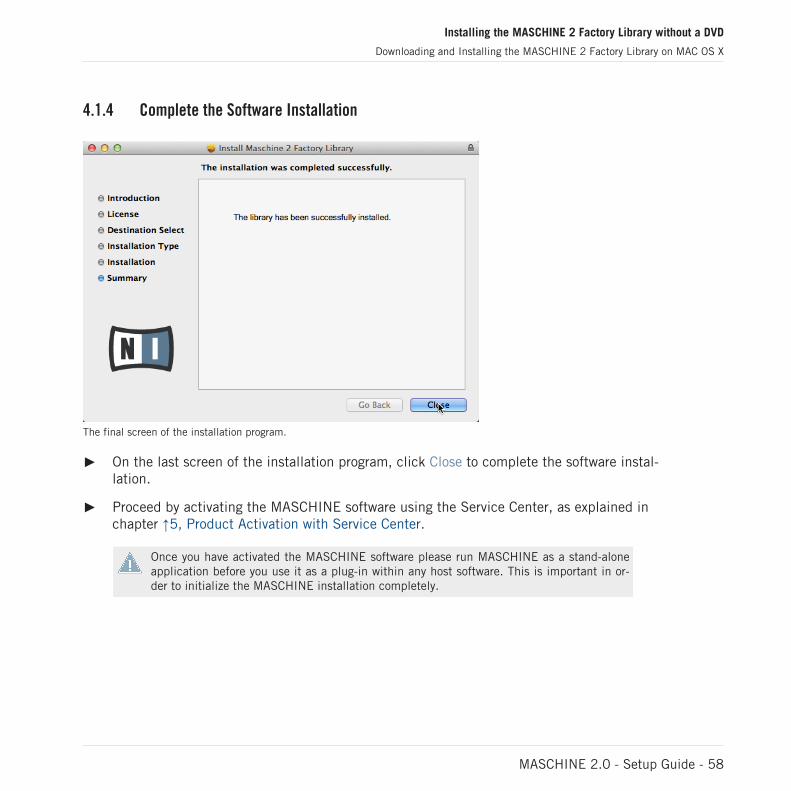
4.1.4 Complete the Software Installation
The final screen of the installation program.
► On the last screen of the installation program, click Close to complete the software instal-lation.
► Proceed by activating the MASCHINE software using the Service Center, as explained inchapter ↑5, Product Activation with Service Center.
Once you have activated the MASCHINE software please run MASCHINE as a stand-aloneapplication before you use it as a plug-in within any host software. This is important in or-der to initialize the MASCHINE installation completely.
Installing the MASCHINE 2 Factory Library without a DVD
Downloading and Installing the MASCHINE 2 Factory Library on MAC OS X
MASCHINE 2.0 - Setup Guide - 58
4.2 Downloading and Installing the MASCHINE 2 Factory Library onWindows
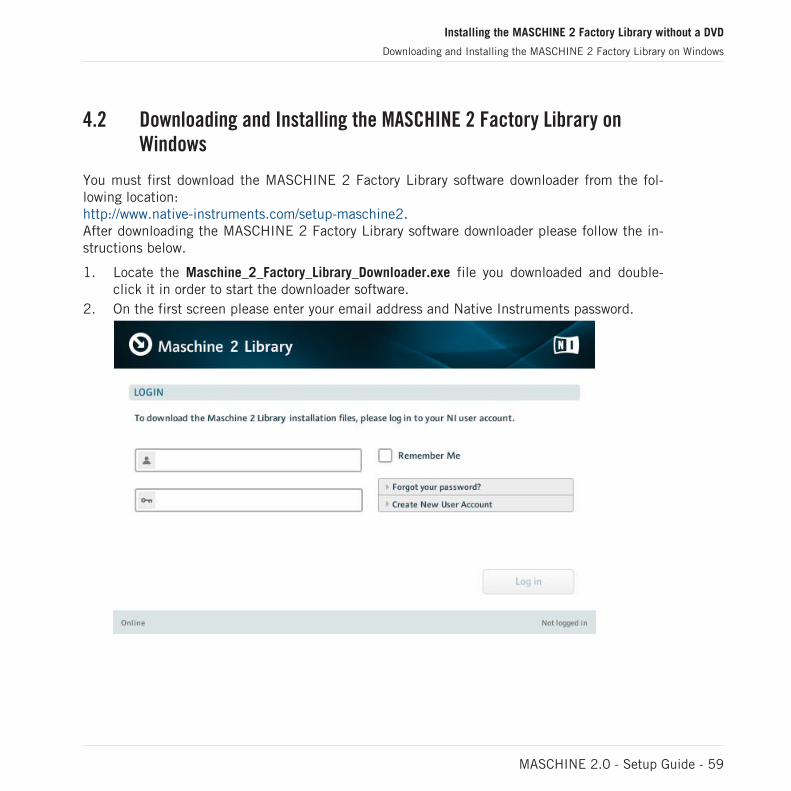
You must first download the MASCHINE 2 Factory Library software downloader from the fol-lowing location:http://www.native-instruments.com/setup-maschine2.After downloading the MASCHINE 2 Factory Library software downloader please follow the in-structions below.
1. Locate the Maschine_2_Factory_Library_Downloader.exe file you downloaded and double-click it in order to start the downloader software.
2. On the first screen please enter your email address and Native Instruments password.
Installing the MASCHINE 2 Factory Library without a DVD
Downloading and Installing the MASCHINE 2 Factory Library on Windows
MASCHINE 2.0 - Setup Guide - 59

3. Click on Log in to log in with your user account. The download process of the MA-SCHINE 2 Factory Library software will start automatically.
Installing the MASCHINE 2 Factory Library without a DVD
Downloading and Installing the MASCHINE 2 Factory Library on Windows
MASCHINE 2.0 - Setup Guide - 60
4.2.1 Start the Software Installation
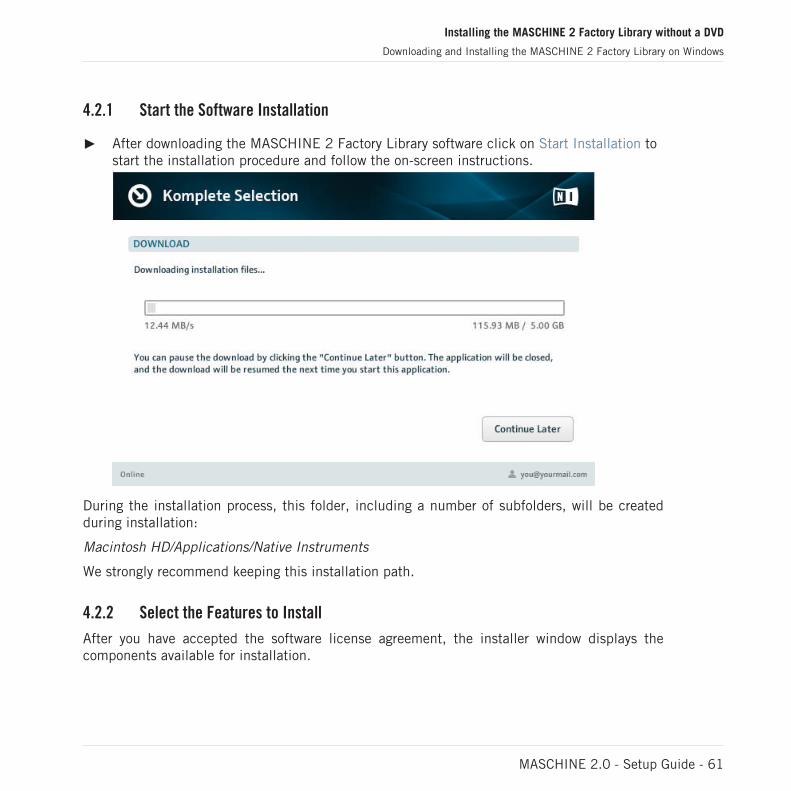
► After downloading the MASCHINE 2 Factory Library software click on Start Installation tostart the installation procedure and follow the on-screen instructions.
During the installation process, this folder, including a number of subfolders, will be createdduring installation:
Macintosh HD/Applications/Native Instruments
We strongly recommend keeping this installation path.
4.2.2 Select the Features to Install
After you have accepted the software license agreement, the installer window displays thecomponents available for installation.
Installing the MASCHINE 2 Factory Library without a DVD
Downloading and Installing the MASCHINE 2 Factory Library on Windows
MASCHINE 2.0 - Setup Guide - 61
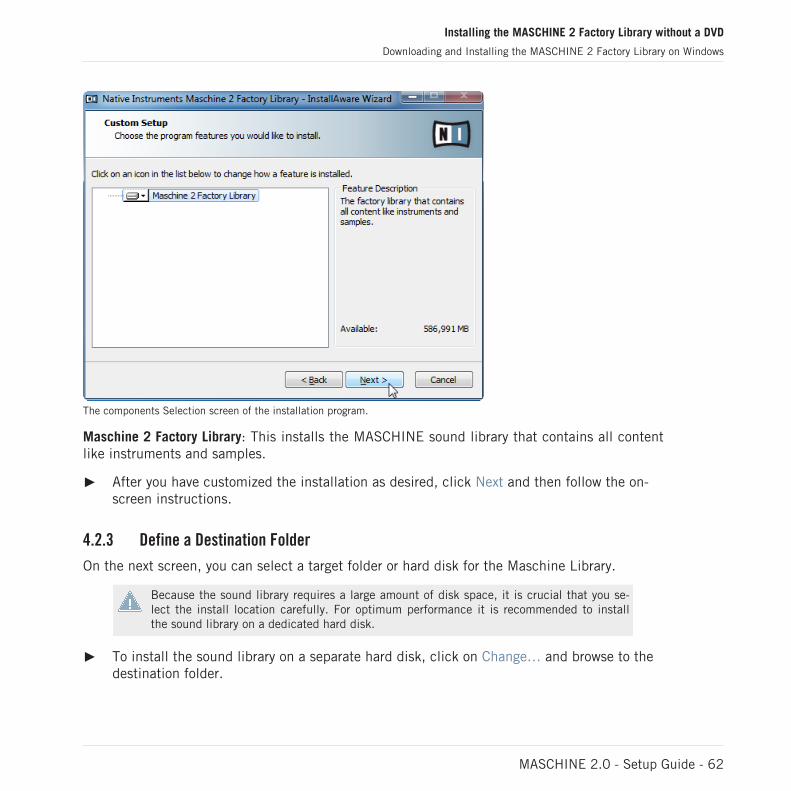
The components Selection screen of the installation program.
Maschine 2 Factory Library: This installs the MASCHINE sound library that contains all contentlike instruments and samples.
► After you have customized the installation as desired, click Next and then follow the on-screen instructions.
4.2.3 Define a Destination Folder
On the next screen, you can select a target folder or hard disk for the Maschine Library.
Because the sound library requires a large amount of disk space, it is crucial that you se-lect the install location carefully. For optimum performance it is recommended to installthe sound library on a dedicated hard disk.
► To install the sound library on a separate hard disk, click on Change… and browse to thedestination folder.
Installing the MASCHINE 2 Factory Library without a DVD
Downloading and Installing the MASCHINE 2 Factory Library on Windows
MASCHINE 2.0 - Setup Guide - 62
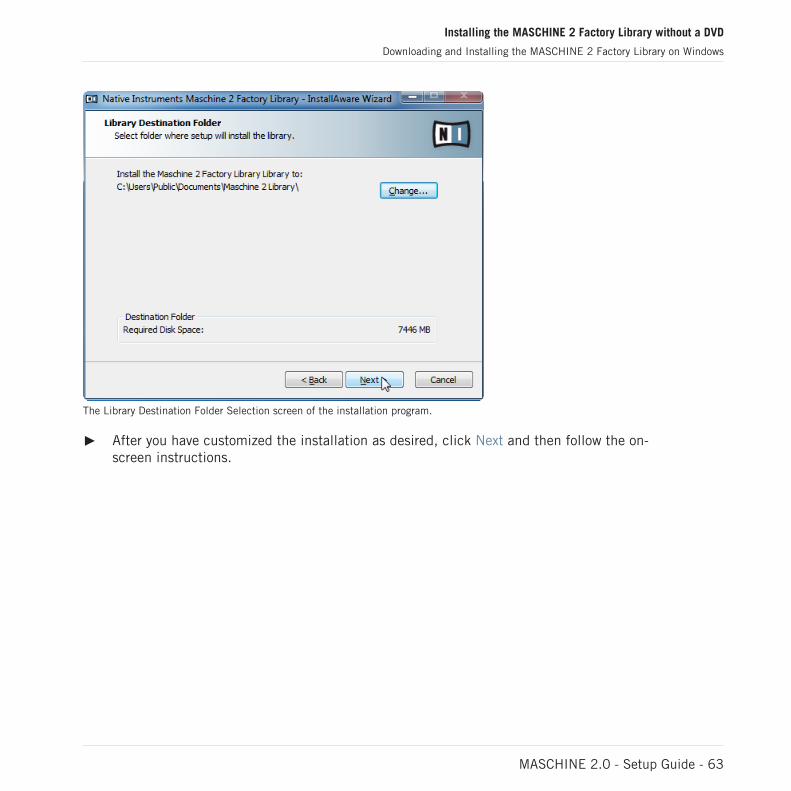
The Library Destination Folder Selection screen of the installation program.
► After you have customized the installation as desired, click Next and then follow the on-screen instructions.
Installing the MASCHINE 2 Factory Library without a DVD
Downloading and Installing the MASCHINE 2 Factory Library on Windows
MASCHINE 2.0 - Setup Guide - 63
4.2.4 Complete the Software Installation
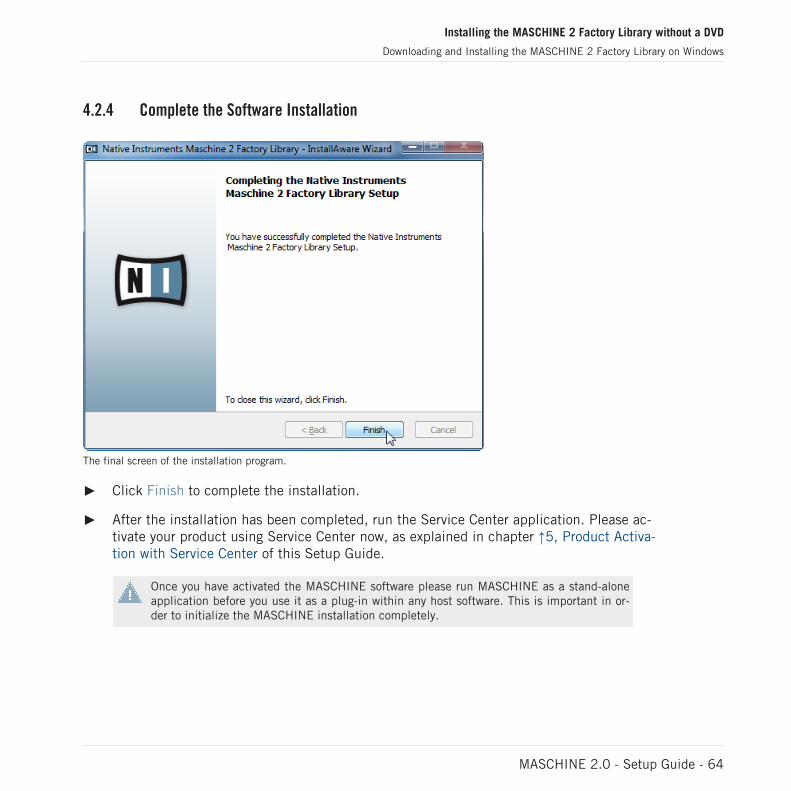
The final screen of the installation program.
► Click Finish to complete the installation.
► After the installation has been completed, run the Service Center application. Please ac-tivate your product using Service Center now, as explained in chapter ↑5, Product Activa-tion with Service Center of this Setup Guide.
Once you have activated the MASCHINE software please run MASCHINE as a stand-aloneapplication before you use it as a plug-in within any host software. This is important in or-der to initialize the MASCHINE installation completely.
Installing the MASCHINE 2 Factory Library without a DVD
Downloading and Installing the MASCHINE 2 Factory Library on Windows
MASCHINE 2.0 - Setup Guide - 64
5 Product Activation with Service Center
This chapter uses a placeholder name (NI Product) on all screenshots. The relevant sectionon your screen will display the name of the Native Instruments product you are activating.
5.1 Activating Your Product Online
Skip to section ↑5.3, Activating Your Product Offline if your computer is not connected tothe Internet.
5.1.1 Start Service Center
1. Locate the Service Center application on your hard disk. During installation, a folder la-beled Native Instruments was created in the Applications (Mac OS X) / Program Files (Win-dows) folder. Within this folder, a subfolder labeled Service Center holds the correspond-ing application.
2. Double-click the Service Center application to start the activation procedure.
It is necessary to activate your Native Instruments product in order to use its full function-ality.
Product Activation with Service Center
Activating Your Product Online
MASCHINE 2.0 - Setup Guide - 65
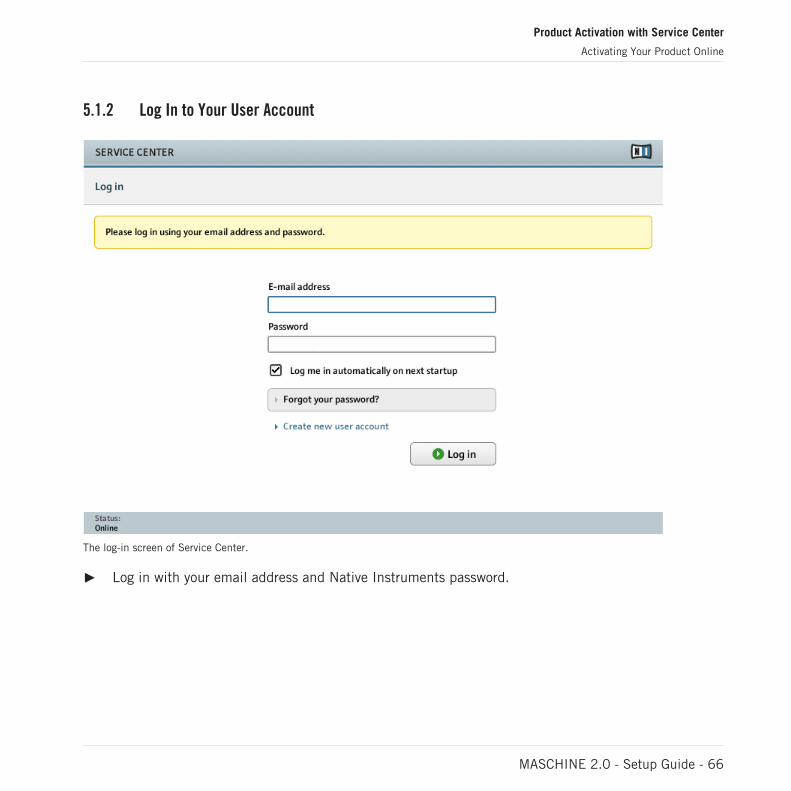
5.1.2 Log In to Your User Account
The log-in screen of Service Center.
► Log in with your email address and Native Instruments password.
Product Activation with Service Center
Activating Your Product Online
MASCHINE 2.0 - Setup Guide - 66
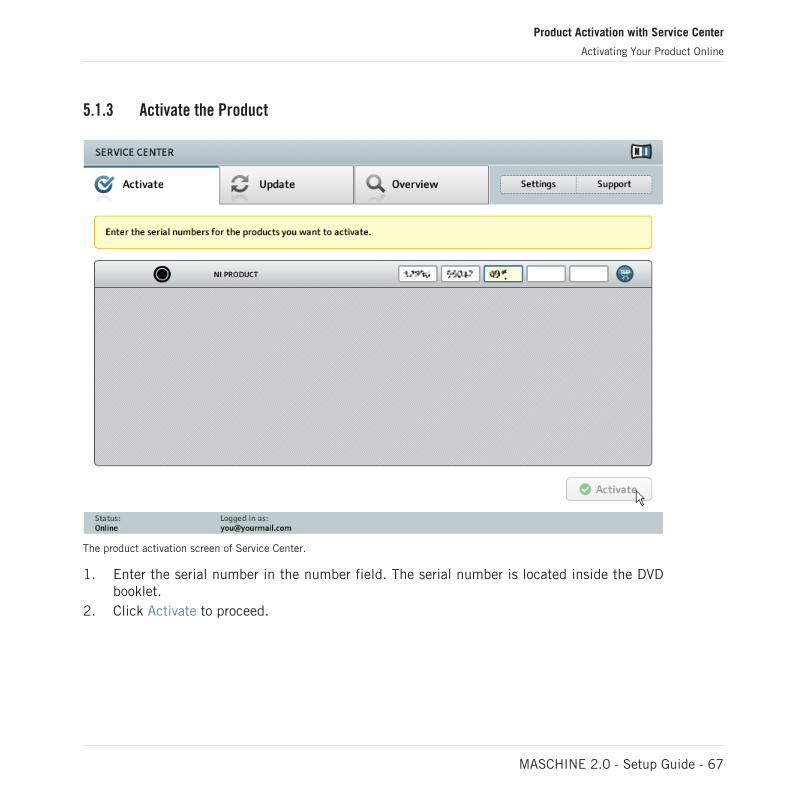
5.1.3 Activate the Product
The product activation screen of Service Center.
1. Enter the serial number in the number field. The serial number is located inside the DVDbooklet.
2. Click Activate to proceed.
Product Activation with Service Center
Activating Your Product Online
MASCHINE 2.0 - Setup Guide - 67
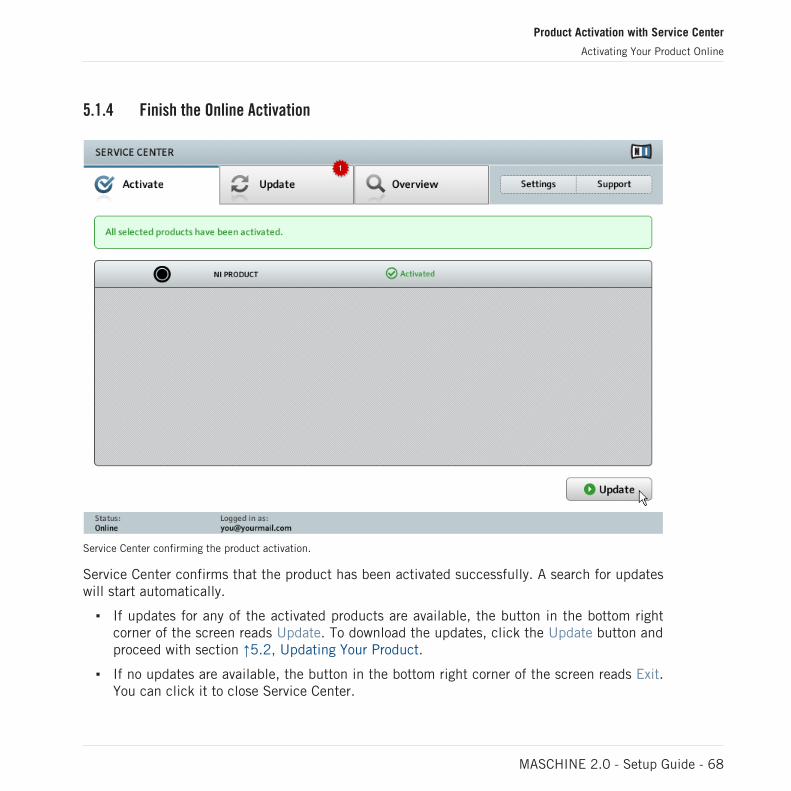
5.1.4 Finish the Online Activation
Service Center confirming the product activation.
Service Center confirms that the product has been activated successfully. A search for updateswill start automatically.
▪ If updates for any of the activated products are available, the button in the bottom rightcorner of the screen reads Update. To download the updates, click the Update button andproceed with section ↑5.2, Updating Your Product.
▪ If no updates are available, the button in the bottom right corner of the screen reads Exit.You can click it to close Service Center.
Product Activation with Service Center
Activating Your Product Online
MASCHINE 2.0 - Setup Guide - 68
5.2 Updating Your Product
5.2.1 Select Updates
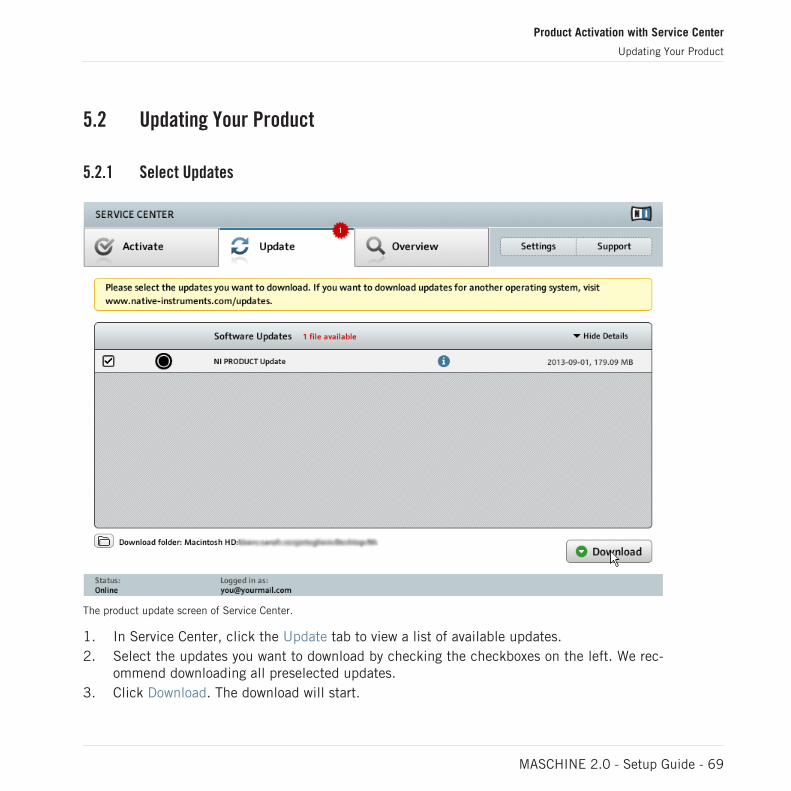
The product update screen of Service Center.
1. In Service Center, click the Update tab to view a list of available updates.2. Select the updates you want to download by checking the checkboxes on the left. We rec-
ommend downloading all preselected updates.3. Click Download. The download will start.
Product Activation with Service Center
Updating Your Product
MASCHINE 2.0 - Setup Guide - 69
5.2.2 Download the Updates
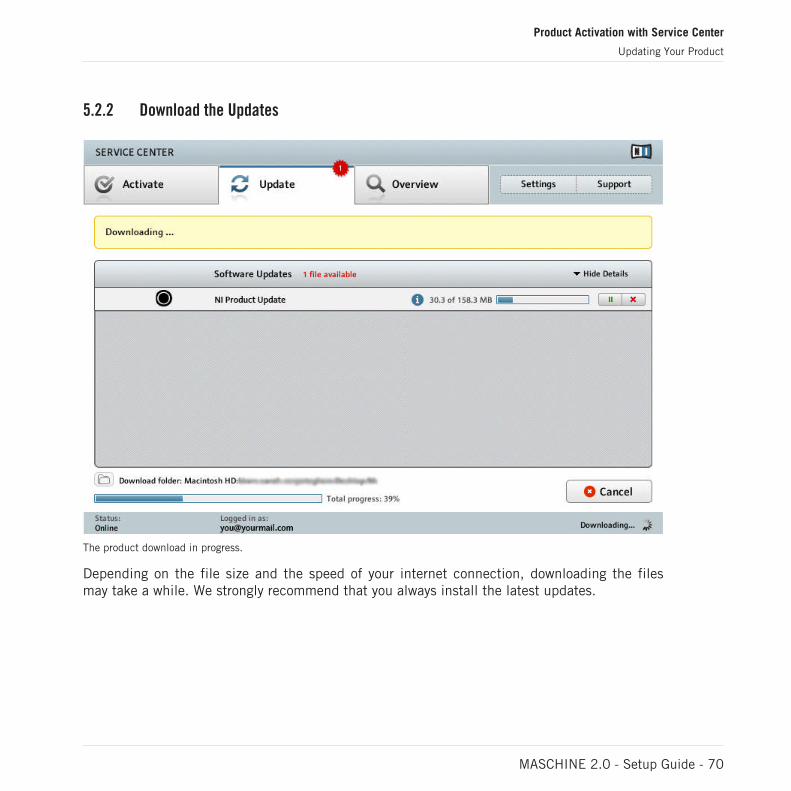
The product download in progress.
Depending on the file size and the speed of your internet connection, downloading the filesmay take a while. We strongly recommend that you always install the latest updates.
Product Activation with Service Center
Updating Your Product
MASCHINE 2.0 - Setup Guide - 70

5.2.3 Install Your Updates
Service Center confirming all updates were downloaded, and offering to install the download file.
After all files have been downloaded successfully, you can directly install the updates from theService Center:
► Click on Install to install your update. This will automatically install your update silently.
► After you have updated software, you can quit Service Center and start the software asusual.
Product Activation with Service Center
Updating Your Product
MASCHINE 2.0 - Setup Guide - 71
Please be sure to update all installed Native Instruments software, including any MA-SCHINE Expansions during the product update and activation update process. This will en-sure better compatibly and integration with MASCHINE 2.0.
5.3 Activating Your Product Offline
If the computer you want to use Native Instruments products on is permanently not connectedto the internet, you can activate the products utilizing the Offline activation procedure. Notethat you will need a second computer that is connected to the internet.
Product Activation with Service Center
Activating Your Product Offline
MASCHINE 2.0 - Setup Guide - 72
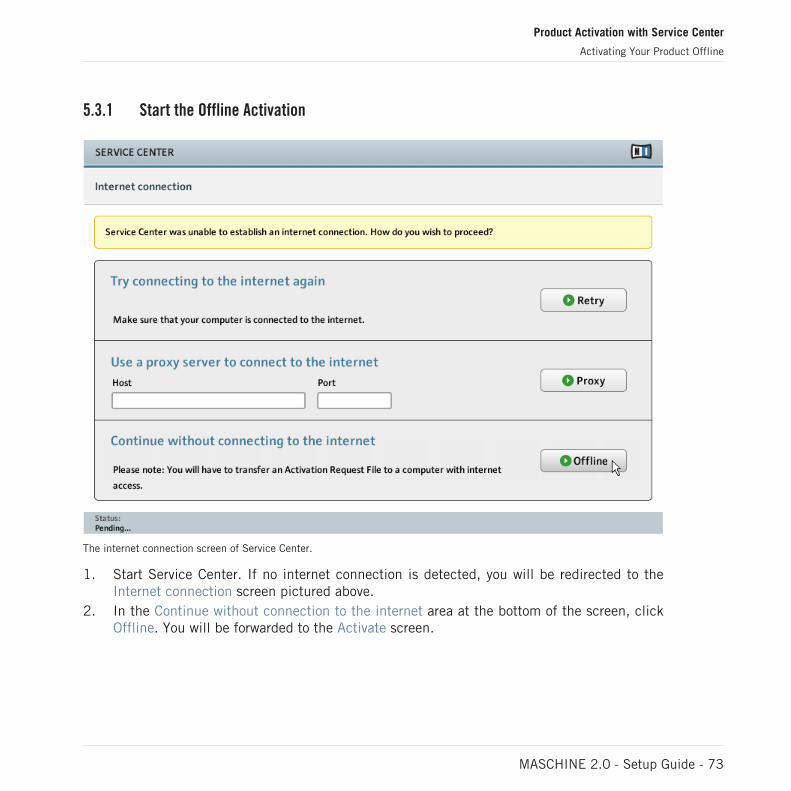
5.3.1 Start the Offline Activation
The internet connection screen of Service Center.
1. Start Service Center. If no internet connection is detected, you will be redirected to theInternet connection screen pictured above.
2. In the Continue without connection to the internet area at the bottom of the screen, clickOffline. You will be forwarded to the Activate screen.
Product Activation with Service Center
Activating Your Product Offline
MASCHINE 2.0 - Setup Guide - 73
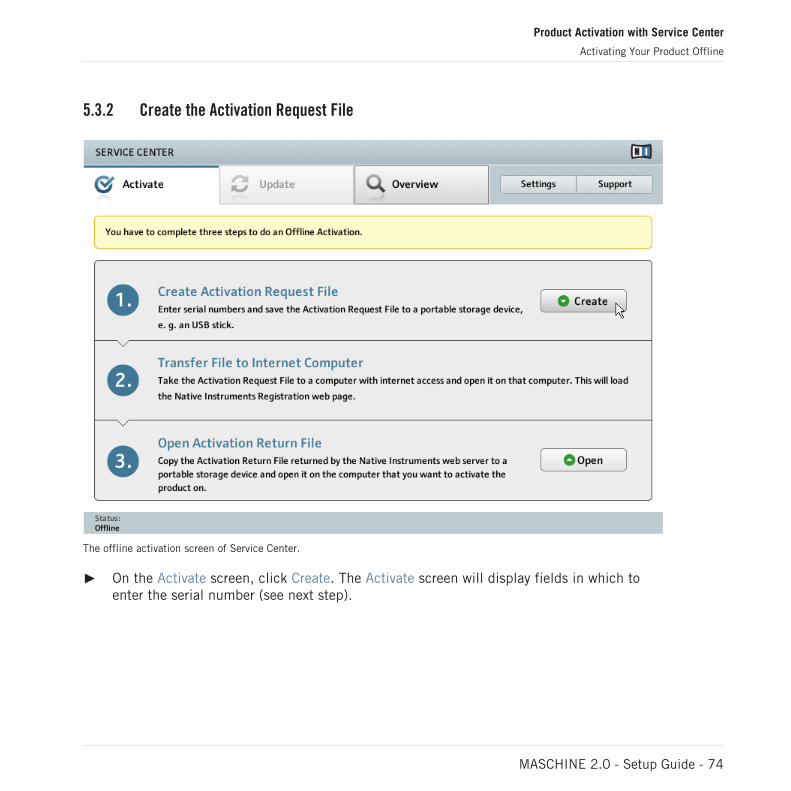
5.3.2 Create the Activation Request File
The offline activation screen of Service Center.
► On the Activate screen, click Create. The Activate screen will display fields in which toenter the serial number (see next step).
Product Activation with Service Center
Activating Your Product Offline
MASCHINE 2.0 - Setup Guide - 74
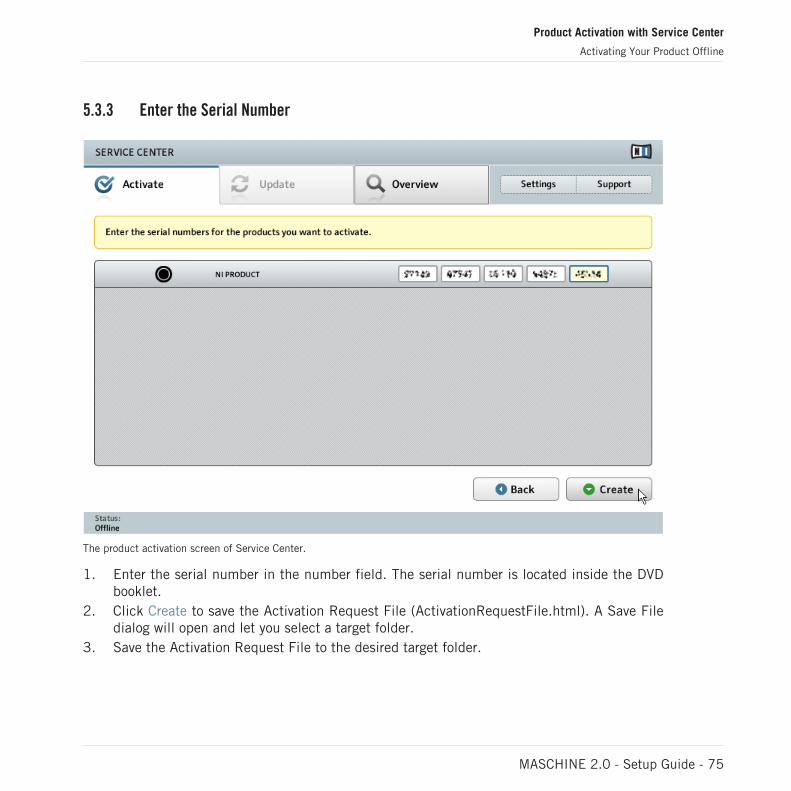
5.3.3 Enter the Serial Number
The product activation screen of Service Center.
1. Enter the serial number in the number field. The serial number is located inside the DVDbooklet.
2. Click Create to save the Activation Request File (ActivationRequestFile.html). A Save Filedialog will open and let you select a target folder.
3. Save the Activation Request File to the desired target folder.
Product Activation with Service Center
Activating Your Product Offline
MASCHINE 2.0 - Setup Guide - 75
5.3.4 Transfer the Activation Request File
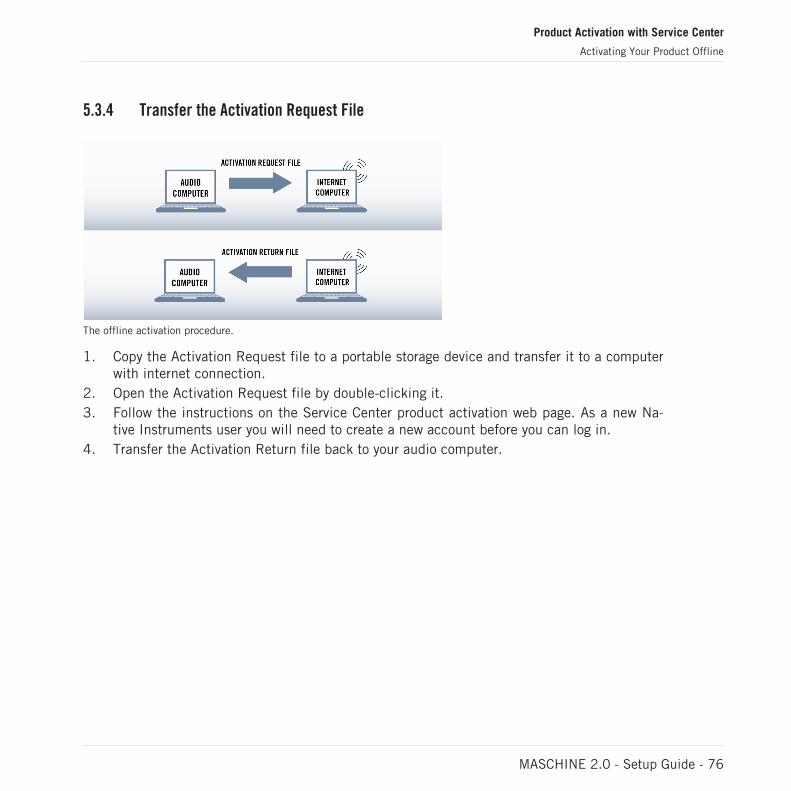
The offline activation procedure.
1. Copy the Activation Request file to a portable storage device and transfer it to a computerwith internet connection.
2. Open the Activation Request file by double-clicking it.3. Follow the instructions on the Service Center product activation web page. As a new Na-
tive Instruments user you will need to create a new account before you can log in.4. Transfer the Activation Return file back to your audio computer.
Product Activation with Service Center
Activating Your Product Offline
MASCHINE 2.0 - Setup Guide - 76
5.3.5 Open the Activation Return File
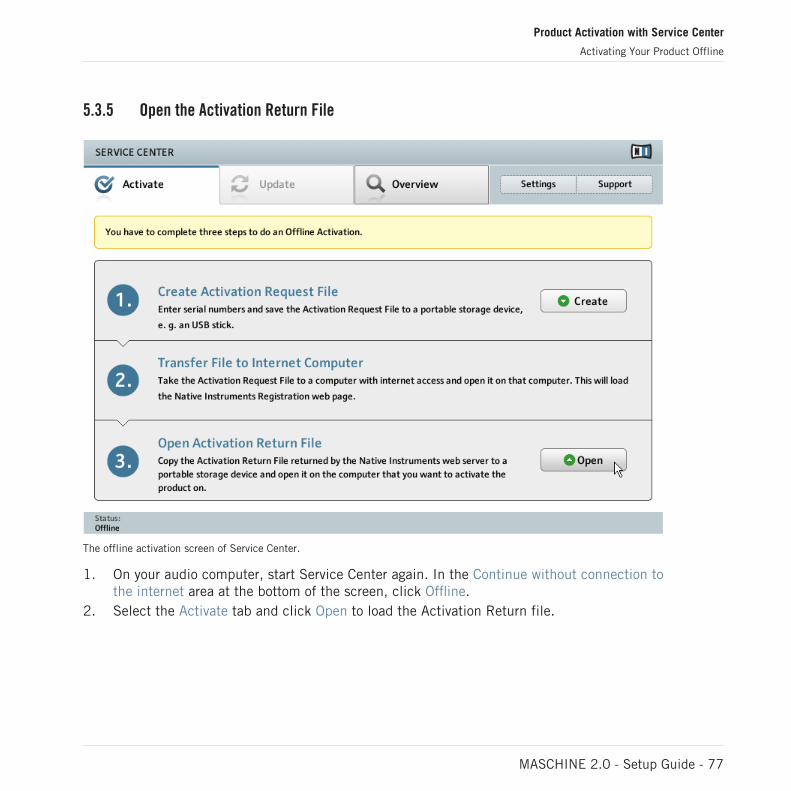
The offline activation screen of Service Center.
1. On your audio computer, start Service Center again. In the Continue without connection tothe internet area at the bottom of the screen, click Offline.
2. Select the Activate tab and click Open to load the Activation Return file.
Product Activation with Service Center
Activating Your Product Offline
MASCHINE 2.0 - Setup Guide - 77
5.3.6 Finish the Offline Activation
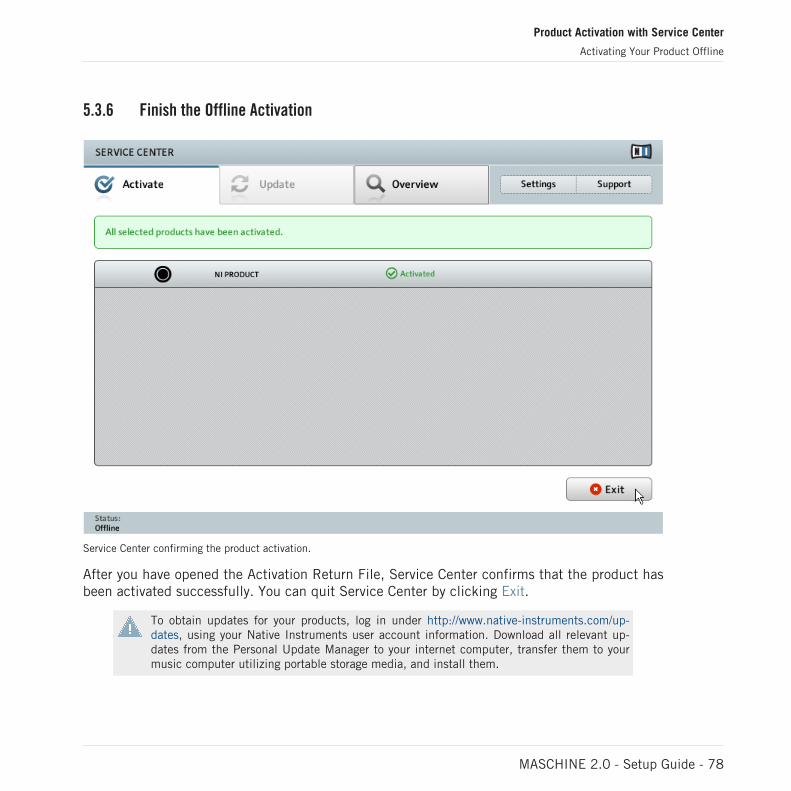
Service Center confirming the product activation.
After you have opened the Activation Return File, Service Center confirms that the product hasbeen activated successfully. You can quit Service Center by clicking Exit.
To obtain updates for your products, log in under http://www.native-instruments.com/up-dates, using your Native Instruments user account information. Download all relevant up-dates from the Personal Update Manager to your internet computer, transfer them to yourmusic computer utilizing portable storage media, and install them.
Product Activation with Service Center
Activating Your Product Offline
MASCHINE 2.0 - Setup Guide - 78

6 Connecting the MASCHINE Controller
This chapter contains a quick walk-through of the basic hardware setups. For more elaborateexplanations, consult the MASCHINE Manual from the MASCHINE documentation folder orNative Instruments website.
► Make sure that you have installed the latest version of the MASCHINE software, includingthe MASCHINE hardware driver, before you connect the controller to your computer! Forthis, please follow the instructions in chapter ↑3, Software Installation.
This guide covers all MASCHINE products and will refer to them generically as the MA-SCHINE controller unless there are specific differences. All MASCHINE controllers use thesame software, this is referred to as the MASCHINE software.
6.1 Connecting the MASCHINE Controller to Your Computer
To connect the MASCHINE controller to your computer:
1. Attach the ‘device end’ of the included USB cable to the USB socket on the rear panel ofthe MASCHINE.
2. Attach the ‘computer end’ of the USB cable to an available USB 2.0 (or later) port onyour computer.
Connecting the MASCHINE Controller
Connecting the MASCHINE Controller to Your Computer
MASCHINE 2.0 - Setup Guide - 79
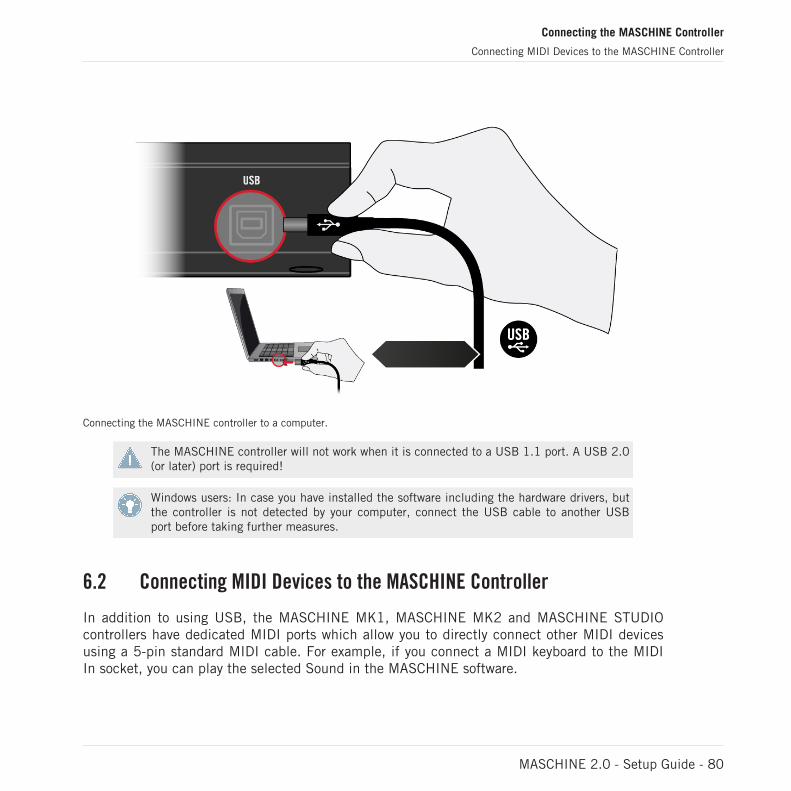
Connecting the MASCHINE controller to a computer.
The MASCHINE controller will not work when it is connected to a USB 1.1 port. A USB 2.0(or later) port is required!
Windows users: In case you have installed the software including the hardware drivers, butthe controller is not detected by your computer, connect the USB cable to another USBport before taking further measures.
6.2 Connecting MIDI Devices to the MASCHINE Controller
In addition to using USB, the MASCHINE MK1, MASCHINE MK2 and MASCHINE STUDIOcontrollers have dedicated MIDI ports which allow you to directly connect other MIDI devicesusing a 5-pin standard MIDI cable. For example, if you connect a MIDI keyboard to the MIDIIn socket, you can play the selected Sound in the MASCHINE software.
Connecting the MASCHINE Controller
Connecting MIDI Devices to the MASCHINE Controller
MASCHINE 2.0 - Setup Guide - 80
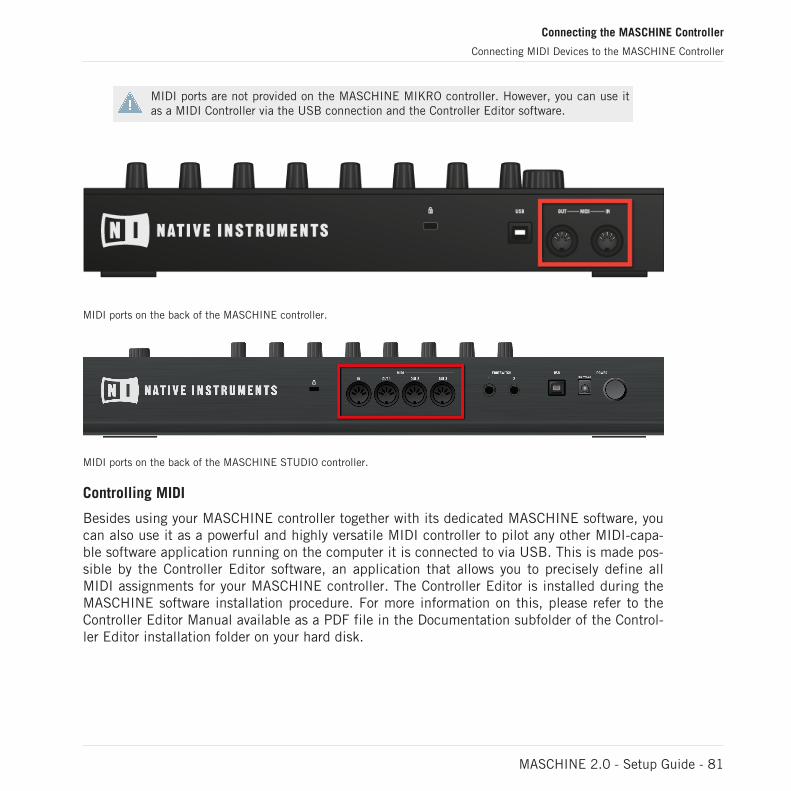
MIDI ports are not provided on the MASCHINE MIKRO controller. However, you can use itas a MIDI Controller via the USB connection and the Controller Editor software.
MIDI ports on the back of the MASCHINE controller.
MIDI ports on the back of the MASCHINE STUDIO controller.
Controlling MIDI
Besides using your MASCHINE controller together with its dedicated MASCHINE software, youcan also use it as a powerful and highly versatile MIDI controller to pilot any other MIDI-capa-ble software application running on the computer it is connected to via USB. This is made pos-sible by the Controller Editor software, an application that allows you to precisely define allMIDI assignments for your MASCHINE controller. The Controller Editor is installed during theMASCHINE software installation procedure. For more information on this, please refer to theController Editor Manual available as a PDF file in the Documentation subfolder of the Control-ler Editor installation folder on your hard disk.
Connecting the MASCHINE Controller
Connecting MIDI Devices to the MASCHINE Controller
MASCHINE 2.0 - Setup Guide - 81
6.3 Connecting the Power Supply to the MASCHINE STUDIO Controller
This section covers how to connect the power supply to your MASCHINE STUDIO controller.
This section is applicable to MASCHINE STUDIO only. In addition to USB the MA-SCHINE STUDIO controller requires the included power supply. All other MASCHINE con-trollers are powered by USB only.
6.3.1 Before You Begin
Before connecting the devices, and setting up your MASCHINE STUDIO, here are some
points to be aware of:
Please carefully read and understand the Safety Instructions flyer provided with MA-SCHINE STUDIO.
▪ Make sure that you have installed the MASCHINE software before you connect the MA-SCHINE STUDIO to your computer! For this, please follow the instructions
specific to your operating system in chapter ↑3, Software Installation.
6.3.2 Assembling and Connection the Power Supply
Before you can use the power supply, you need to attach the adapter plug specific to your re-gion to the base unit of the power supply. Follow these steps to correctly assemble and use thepower supply.
Connecting the MASCHINE Controller
Connecting the Power Supply to the MASCHINE STUDIO Controller
MASCHINE 2.0 - Setup Guide - 82
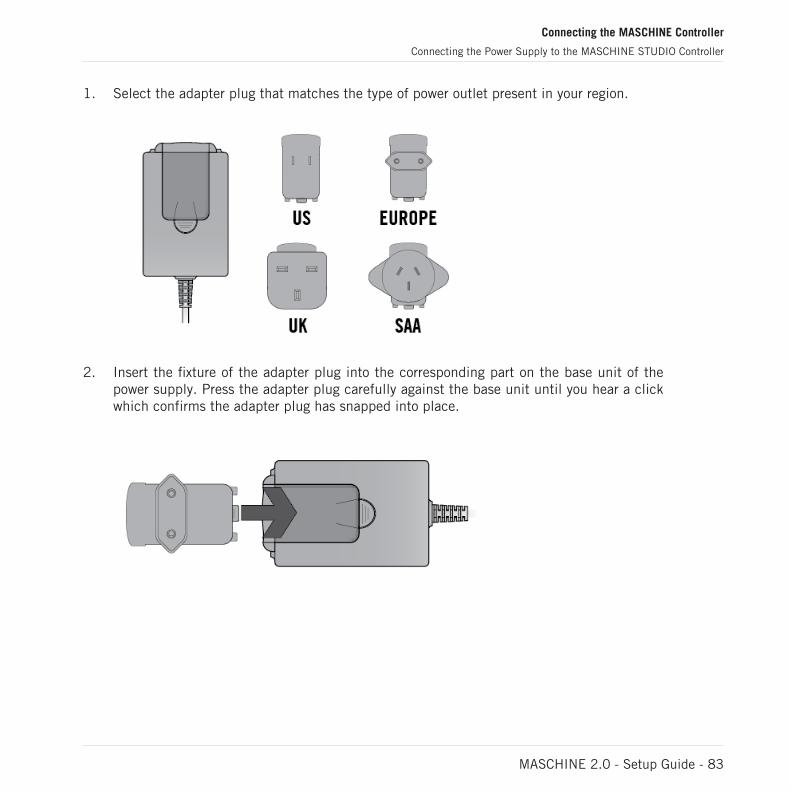
1. Select the adapter plug that matches the type of power outlet present in your region.
2. Insert the fixture of the adapter plug into the corresponding part on the base unit of thepower supply. Press the adapter plug carefully against the base unit until you hear a clickwhich confirms the adapter plug has snapped into place.
Connecting the MASCHINE Controller
Connecting the Power Supply to the MASCHINE STUDIO Controller
MASCHINE 2.0 - Setup Guide - 83
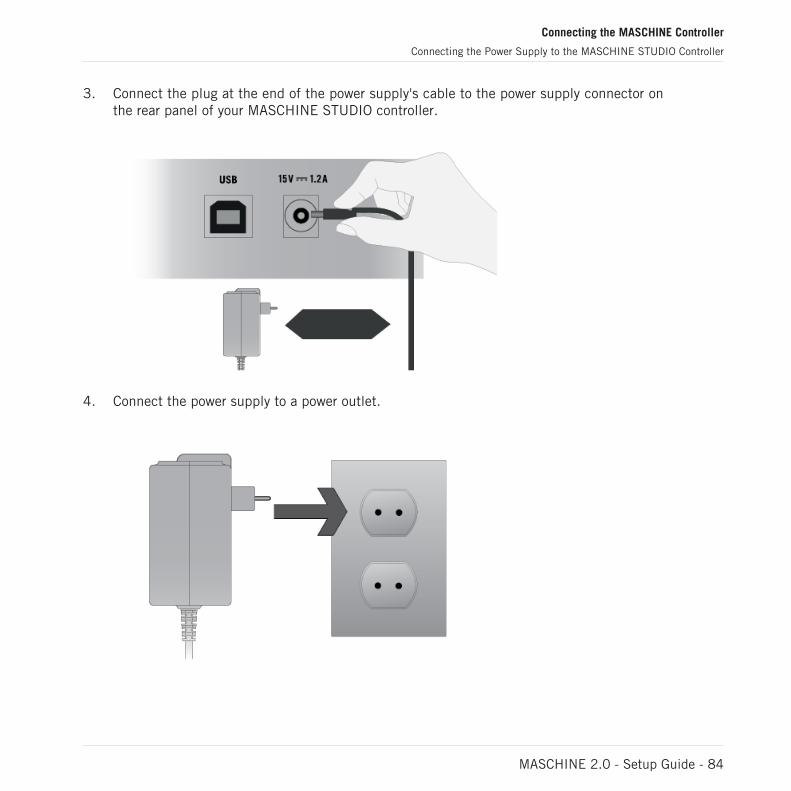
3. Connect the plug at the end of the power supply's cable to the power supply connector onthe rear panel of your MASCHINE STUDIO controller.
4. Connect the power supply to a power outlet.
Connecting the MASCHINE Controller
Connecting the Power Supply to the MASCHINE STUDIO Controller
MASCHINE 2.0 - Setup Guide - 84
7 Stand-alone Operation
When you launch the MASCHINE software from its installation directory, it will start as astand-alone program with its own application menu, just like any other application on yourcomputer.
The Audio and MIDI Settings Dialog
When you start MASCHINE in stand-alone mode for the first time, neither its audio nor MIDIsettings are yet configured. In order to make the application receive MIDI notes from your key-board and play sound through your audio interface, you will first have to tell it which audio andMIDI hardware to use. This is done via the Audio and MIDI Settings dialog, which appears auto-matically upon the first start.
You can open this dialog at any time by clicking on the Audio and MIDI Settings… entry inthe File menu. On Mac OS X, this is located in the main application menu under Preferen-ces….
Stand-alone Operation
MASCHINE 2.0 - Setup Guide - 85
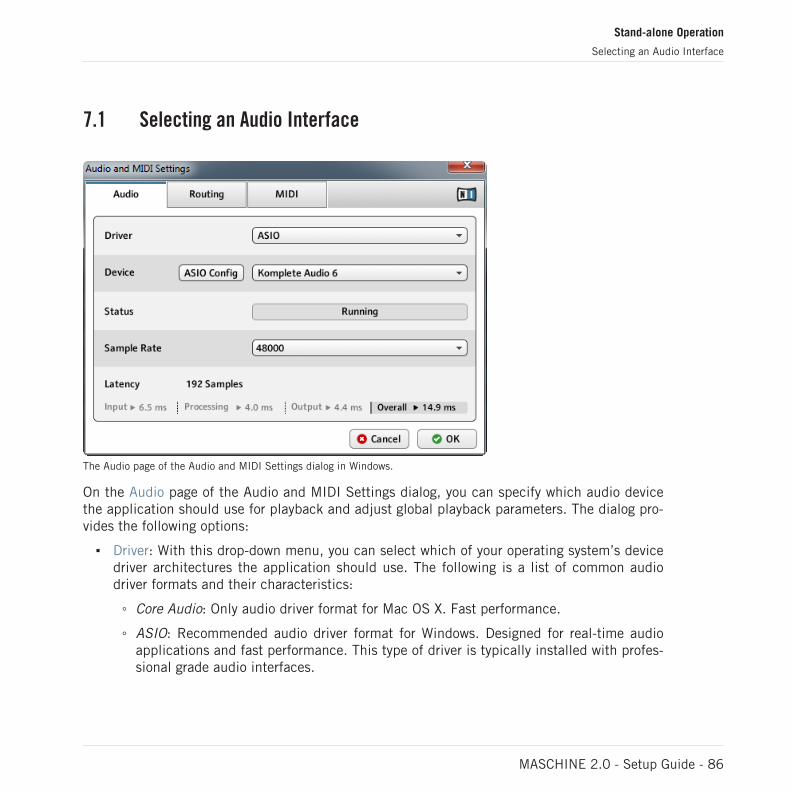
7.1 Selecting an Audio Interface
The Audio page of the Audio and MIDI Settings dialog in Windows.
On the Audio page of the Audio and MIDI Settings dialog, you can specify which audio devicethe application should use for playback and adjust global playback parameters. The dialog pro-vides the following options:
▪ Driver: With this drop-down menu, you can select which of your operating system’s devicedriver architectures the application should use. The following is a list of common audiodriver formats and their characteristics:
◦ Core Audio: Only audio driver format for Mac OS X. Fast performance.
◦ ASIO: Recommended audio driver format for Windows. Designed for real-time audioapplications and fast performance. This type of driver is typically installed with profes-sional grade audio interfaces.
Stand-alone Operation
Selecting an Audio Interface
MASCHINE 2.0 - Setup Guide - 86
◦ WASAPI: Current Windows audio driver standard format for Windows 7 and Vista. Per-formance depends on audio hardware and driver quality, which ranges from fast topoor.
▪ Device: This menu lists all connected audio interfaces that match the driver architecturechosen above. Select the audio interface that you’d like to use for playback here. On Win-dows, the ASIO Config button opens the control panel of the selected audio interface.This button is not present on Mac OS X.
▪ Sample Rate: This drop-down menu allows you to set the global playback sample rate atwhich the application will operate. Common values are 44100 Hz for music and48000 Hz for film production.
▪ Latency: Displays the size of the audio playback buffer in samples. Small values willshorten the delay between pressing a MASCHINE controller pad and hearing the resultingsound (this is called “latency”), but may cause drop-outs and stuttering when playing sev-eral voices at the same time. Conversely, setting this to a higher value will make playbackmore reliable at the cost of more latency.
7.2 Optimizing Latency
The Latency setting controls the size of the playback buffer. In order to find the optimal buffersize for your system, we recommend that you begin by setting the latency to a healthy middlevalue of 256 or 512 samples, then gradually decrease the value during your normal work.
On Mac OS X, a dedicated Latency slider allows you to set the buffer size. On Windows, thebuffer size can be configured in the audio interface’s ASIO panel if you use a low latency ASIOdriver. The ASIO panel can be opened with the ASIO Config button in the Audio and MIDI Set-tings dialog. Some other Windows driver standard formats do not provide any options to adjustthe latency. If so, it is recommended to upgrade your audio driver and/or audio interface.
If you are using low-latency drivers, but cannot get below a certain buffer size without gettingdrop-outs, consult the documentation of your audio hardware to find out whether you can ac-cess it via an alternate driver, as some driver types allow more efficient low-level access to thehardware than others.
Stand-alone Operation
Optimizing Latency
MASCHINE 2.0 - Setup Guide - 87

7.3 Routing Audio Input and Output
On the Routing page of the Audio and MIDI Settings dialog you can map the audio outputs ofthe software to the physical outputs of your audio interface.
If your software shows an output level on the user interface, but you cannot hear any out-put from your audio interface, check on the Routing page to see if the right physical out-puts have been assigned.
The Routing page of the Audio and MIDI Settings dialog in Windows.
MASCHINE can also make use of external audio signals. You can sample these signals or routethem through a MASCHINE Module to add effects. To feed audio coming from external sourcesyou also need to configure the audio inputs of your audio interface:
► To make changes to the input routing, click on the Inputs button in the upper left cornerof the Routing page.
Stand-alone Operation
Routing Audio Input and Output
MASCHINE 2.0 - Setup Guide - 88
For detailed information on sampling external audio and applying effects to external audioplease refer to the MASCHINE / MASCHINE MIKRO Manual.
7.4 Setting up MIDI Connections
The MIDI page of the Audio and MIDI Settings dialog provides a list of all MIDI inputs andoutputs available on your system. These are ports of physical MIDI interfaces connected toyour computer, but also any virtual MIDI ports that may be provided by drivers or other applica-tions to facilitate inter-application MIDI usage.
In order to make the application respond to MIDI data from the outside, you will have to ena-ble one or more ports that appear in the inputs list of the MIDI page:
1. Make sure the Inputs button is highlighted, and identify the port(s) that you intend to usefor MIDI input in the list.
2. If the Status field on the right side of an entry reads Off, to activate the port, click direct-ly on the word Off, which will change the status to On.
Stand-alone Operation
Setting up MIDI Connections
MASCHINE 2.0 - Setup Guide - 89
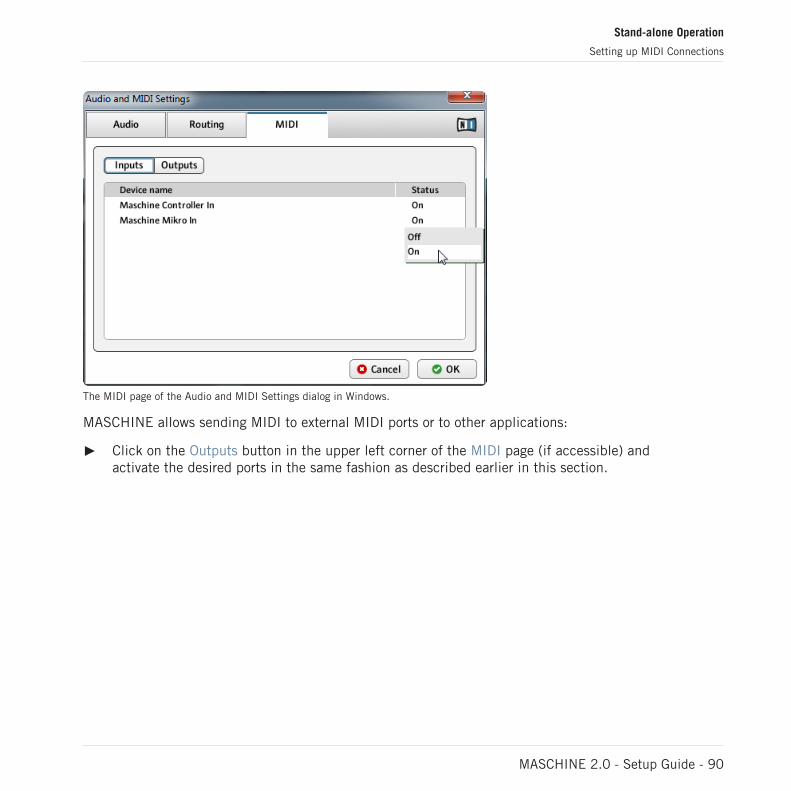
The MIDI page of the Audio and MIDI Settings dialog in Windows.
MASCHINE allows sending MIDI to external MIDI ports or to other applications:
► Click on the Outputs button in the upper left corner of the MIDI page (if accessible) andactivate the desired ports in the same fashion as described earlier in this section.
Stand-alone Operation
Setting up MIDI Connections
MASCHINE 2.0 - Setup Guide - 90
8 Plug-in Operation
MASCHINE is also available as a VST, AU, and AAX plug-in. The MASCHINE plug-in will beadded to the plug-in menu inside your sequencer, and can be loaded following your sequenc-er’s standard procedure. The procedure of loading virtual instruments or effect plug-ins variesbetween sequencers.
Refer to the documentation of your host software to find out which plug-in formats are compat-ible with your particular program, and for instructions on how to load virtual instruments or ef-fect plug-ins.
Plug-in Operation
MASCHINE 2.0 - Setup Guide - 91
9 Other Documentation and Support Resources
9.1 Further Documentation Resources
The following documents are also part of the MASCHINE documentation:
▪ The Getting Started guide provides you with essential information on using MASCHINE,and explains how to accomplish fundamental tasks. After reading the Setup Guide, youshould proceed with this document.
▪ The MASCHINE Manual provides you with a detailed reference of your MASCHINE softwarealong with extra information (solving common issues, specifications, etc.). Each MA-SCHINE controller has a specific manual, please be sure to open the correct one for yourcontroller.
▪ The Hardware Control Reference describes the quick access options performed using theMASCHINE controller, and lots of keyboard shortcuts.
You will find these documents in the documentation folder, which will be created in the pro-gram installation folder during the software installation, and you will find them on the NativeInstruments website. The documents will also be available from the MASCHINE software’sHelp menu.
Windows users may need to install the free Adobe Reader software (www.adobe.com) or anyother application capable of opening PDF files in order to view these documents.
9.2 Support Channel Videos
You can find a number of support videos on The Official Native Instruments Support Channelunder the following url: https://www.youtube.com/NIsupportEN
We recommend that you follow along with these instructions while the respective application isrunning on your computer.
Other Documentation and Support Resources
Further Documentation Resources
MASCHINE 2.0 - Setup Guide - 92
9.3 Knowledge Base / Readme / Online Support
► Open the Service Center application and click on the Support button in the upper rightcorner. Here you will find direct links to the Native Instruments Online Knowledge Baseand the Online Support Form.
The support form will ask you to enter information about your hardware and software setup.This information is essential for our support team to be able to provide you with quality assis-tance.
When communicating with the Native Instruments support team, keep in mind that the moredetails you can provide about your hardware, your operating system, the version of the softwareyou are running, and the problem you are experiencing, the better they will be able to help you.In your description, you should mention:
▪ How to reproduce the problem
▪ What you have already tried to fix the problem
▪ A description of your setup, including all hardware
▪ The brand and specifications of your computer
Always consult the Readme.txt file of a new software version. It contains important infor-mation and all last minute changes which were not available for the printed manual.
9.4 Forum
In the Native Instruments User Forum, you can discuss product features directly with otherusers and with experts moderating the forum: http://www.native-instruments.com/forum
Other Documentation and Support Resources
Knowledge Base / Readme / Online Support
MASCHINE 2.0 - Setup Guide - 93
9.5 Updates
Whenever you encounter problems, it is recommended that you first download and install anyavailable software updates. Updates are released regularly to fix known problems and to con-stantly improve the software. The version number of your software is displayed in the About di-alog for any Native Instruments application. This dialog can be opened by clicking on the NIlogo in the upper right corner of the user interface. Alternatively, you can find the version num-bers of all installed Native Instruments applications when showing the details for an applica-tion within the Overview page of the Service Center. Updates are available on the Update pagein Service Center or on our website under: http://www.native-instruments.com/updates
Other Documentation and Support Resources
Updates
MASCHINE 2.0 - Setup Guide - 94
10 Product Returns
Please contact our Technical Support team prior to returning an item. If your product needs tobe returned, they will assign you an RA (Return Authorization) number to expedite the process-ing of your return.
Contact Native Instruments Technical Support
http://www.native-instruments.com/support
Product Returns
MASCHINE 2.0 - Setup Guide - 95