Embed Size (px)
Citation preview

Mar
/May
- Is
sue
1 /
2014
MA
LTA
PHOTOGRAPHIC SO
CIE
TY
MA
LTA P
HOTOGRAPHIC SOCIETY
FOUNDED 1961
MA
LTA P
HOTOGRAPHIC SOCIETY
FOUNDED 1961 Click

Editorial
Editor Johann Debono
Editorial Advisors Jane Farrugia, Elisabeth Abela
Design & Layout Emanuel Haber
Contributors Alessandro Pagano, Tony Tang, John Borg, Johann Debono, Stephen Buhagiar
Printing: Five Star Printing & Design Ltd
ad
MALTA PHOTOGRAPHIC
SOCIETY
P.O. Box 590, Valletta, VLT 2000, Malta 137, Old Bakery Str, Valletta, VLT 1457, Malta Tel No: (+356) 21 242 265 MPS e-mail: [email protected] e-mail: [email protected]
Readers are invited to visit the MPS website on www.maltaphotographicsociety.org
Table of Contents Editor’s Notes 2 Viewpoint 3 The Underwater Photography 4, 5PSA News, International Competition Acceptances ...Start ing Photography Course 6 , 7How was it Shot 8, 9Events Photography 10, 11Member Profile - Martin Abela 12, 13Winners Modern Architecture in Malta 14, 15Understanding Exposure – Camera basics 16, 17Society Activities, Calendar of events 18, 19, 20, 21Competition results, MPS calendar 22, 23
Front Cover Photo: by Martin Abela
MA
LTA
P
HOTOGRAPHIC SOCIETY
FOUND E D 1961
President Louis Agius
Vice President Jane Farrugia
Hon. Secretary Pauline Grech
Hon. Treasurer Mario Mifsud
Competition Manager Joseph Caruana
Courses Co ordinator Paul Deguara
Premises Manager Mark Brincat
Cli
ck E
dit
ori
al
Bo
ard
Exe
cuti
ve C
omm
itte
e 2
013/
2014
Johann Debono AFIAP AMPS Editor
S ome photography related publications and websites wrote about the Pulitzer Prize-winning
freelance photographer who was fired by the Associated Press (AP) after digitally modifying an image taken during the Syrian War. It is common knowledge that such agencies do not tolerate any editing (e.g. cloning, retouching, etc) of images. What was edited, one might ask! A video
camera was removed from the image to make it ‘look better’.
It is not important to go through how, why or any other question of this sort, but rather that there are rules to be followed and a photographer needs to abide by them. News/Documentary photography cannot be edited. Reporting certain events cannot be modified in any way.
An example to the above is the international competitions rule for Photojournalism, as defined by PSA(Photographic Society of America): “No situations shall be set up for the purpose of photography, and no alteration of the subject matter is allowed, including any techniques that add, combine, relocate, replace or remove any elements of the original image. No unnatural sharpening or special effects filters can be applied. Only cropping, resizing, lightening, or darkening and restoration of original colour are permitted. Colour images can be converted to monochrome”.
Just know the rules, so you’ll not be disappointed, and when in doubt always seek guidance.
* Those who wish to see the image concerned can do so by visiting our Facebook page: https://www.facebook.com/CLICKbyMPS
2 Click

The Society Needs Youhis being the last newsletter before the forthcoming Annual General Meeting on the 26th of June 2014, I would like to highlight this important event. As most of you know,
during the AGM apart from reading reports and making amendments to the statutes, we also elect a new committee. As I have been saying over the years, this is a very important matter in relation to the functioning of the Society. It is in fact extremely important to all of us members, as without the valid contribution of a small number of volunteers, no activities can be organised to fulfil the strong interest of the enthusiastic members of our Society, and as a consequence the Society as we know it, would no longer exist.
Some may ask; what is required to be a member of the Executive Committee? You can always ask any member who has sat on the committee but I will try to give you a brief explanation on this subject.
a) You would need to be a paid member of the Society.b) Be able to read and write in both Maltese and English.c) Have an available e-mail address. Most of the communication takes place through e-mails therefore one must be ready to reply within a reasonable period of time as decisions would have to be taken depending on the feedback of the committee members. d) Be ready to help share some of the regular chores or duties as required.
“Many hands make light work”
The running of the Society is very demanding but if the required number of nine members is reached, the load can be distributed evenly and fairly.
As for meetings, we meet to discuss the Society’s programs and activities every 4 or 5 weeks which
totals to around 12 meetings each year and a meeting normally lasts about 2 hours. As a committee member it is also ideal to be present on the Thursday meetings, but if one needs to give it a miss, the rest of the team would cover up his/her absence.
The role of each of the committee members, including that of President, is decided between the elected members themselves. So a member can take any responsibility of a particular area of his/her choice. The main posts include the President, Vice President, Hon. Secretary, Hon. Treasurer and Competitions Secretary. Some other duties include taking care of the weekly program, the premises, the club’s courses and
other tuition. Other functions that the Club organises are normally shared amongst the team.
So surely amongst the two hundred or so members that the Society has, there must be this small number of enthusiasts who are prepared to join the committee and play a part in the success of this organisation that we must keep alive for many years to come.
As usual we will have the 49th National Competition and Exhibition in April and May. This year there will be only one day for
submitting your entries and that is Saturday 26th April from 0900hrs till 1400hrs which is also the closing date; and the judging will be done on the 17th and 18th of May. The Executive Committee is working hard on the preparations of this important competition and exhibition, and is also looking forward to see the participation of most of the members of the Society in this historical annual event that is our pride and joy.
Louis Agius FMPS EFIAP PPSA MPS President
T
Viewpoint
Issue 1 / 2014 - Mar / May 3

The underwater world is fascinating. From an early age almost everyone has had the urge to wear a diving mask to see what’s hidden beneath the surface. There are those who, in addition to observing, want to immortalize indelibly that particular organism or underwater view. Well this is the underwater photographer. To become a good underwater photographer you also have to be a great diver. This ability is acquired by attending specific courses and then training with diligence and perseverance in order to have an absolute mastery of the equipment that allows us to breathe underwater, and only then can you think of buying an underwater camera. As the costs for underwater cameras are high enough, you should decide from the outset the goals you want to achieve. For example, if your dives take place within 30m of depth, you may want to buy a camera, which combined with a diving case, would be capable of withstanding pressure of up to 40m. If your dives are to be held at further depths, then the choice should be obviously different. Adequate lighting is also very important. I use two very powerful underwater Sea & Sea YS- D1 flash, on my Nikon D800 D-SLR camera.
The Composition: Point of Focus and Depth of Field (D.O.F.)
We’re talking specifically about the meaning that we give to our shot and two things are fundamental: that is the choice of the point of focus and the depth of field we want to give. The combination of these two actions determines the “weight” of the image. The most important thing
is that the focus should be on the subject’s eye/s. It would be unthinkable to have a shot without having the eyes pin sharp. Some of the subjects’ eyes may not be focused properly when there is more than one subject portrayed in the same image. This is acceptable as long as at least one of them has, and it is the dominant player in our shot.
If the subject has a wall behind it we should use a slower tempo in order to be able to capture the light reflected from the background. This way we can enrich the image and reduce the probability of having a dull, dark background. In underwater photography, d.o.f. is one of the hardest things to handle, especially when you are shooting macro or close-ups. The reason is simple and is determined by the characteristics of optics used at that time. With macro lenses, one is forced to close the aperture a lot to maintain a good d.o.f. since we would be limited to a few mm in front and behind the subject.
The underwater photography by Alessandro Pagano
www.underwater4u.com
4 Click

The discussion changes dramatically when photographing large areas instead of small subjects. For example, wide angle lenses are to be used when we are going to shoot in an underwater environment. Opposite to macro lenses these have a high d.o.f.
The rule of thirds
This simple rule is recognizable in everything that surrounds us. To understand this better, just draw our image with a grid that divides it into thirds: two equidistant lines on each side. If we have the key elements of the frame along one or more of these lines, the composition appears less trivial and will capture an image with a greater visual impact.
As you can see, the eye of the fish is located near the intersection of two lines. This brings us to “read” the image in a natural movement from left to right and from top to bottom, inevitably leading the viewer to focus his attention on what matters in the shot.
We end with another element of composition.
The diagonal
The subject is placed in such a way that our eyes, during its course of “patrol” with the diagonal, tend to meet the point of interest. We Latin, as well as the Anglo-Saxon, read and write from left to right, so it’s even easier to give a logical sense to an image that is developed with this course. Also, we prefer to “read” images whose diagonal has a positive slope to the right. So we cannot use a “reading” that is diagonal downhill rather than uphill? Oh yes we can use it! This will change the feelings experienced by the viewer. Let’s give two simple examples: just by changing the orientation of the same image, one follows the natural downhill giving the viewer a feeling of tranquillity, while the other would convey how hard the subject is climbing the huge obstacle ahead. You decide what you would like to transmit to the viewer with your composition …!!!
Issue 1 / 2014 - Mar / May 5
Photographic Society of America Compiled by Anthony Blackman Dip.Ed.Adm. & Mgt ESFIAP Hon.FMPS
PSA DivisionsThere are six Photographic Society of America (PSA) Divisions which, under the supervision of the Divisions Vice President and with the assistance of the Clubs, Councils and Chapters Vice President, are responsible for the conduct of individual and interclub activities. Each division is managed by officers who are elected for two-year terms each even-numbered year, taking office at the conclusion of the annual conference. Numerous division directors, appointed by the division chairperson, manage the operation of the various activities within each division.
Each division provides a wide range of activities consistent with its area of emphasis. Generally these include individual and interclub competitions, study groups for individuals, providing recognition for International Exhibitions, and operating a Stars/Galaxy Ratings program for individual exhibition acceptances.
Divisions identify the top exhibitors, worldwide, on an annual basis through the publication of a Who’s Who listing in the PSA Journal. This listing includes all photographers who achieve an established level of success by participating in PSA recognized exhibitions, whether they are PSA members or not.
The Projected Image Division (PID) is responsible for conducting and overseeing PSA activities regarding projected (digital or slide) open or general subjects photography; there are no limitations on subject matter or techniques used for
International Competition AcceptancesCompiled by Lawrence Bonnici
Name Country Acceptances Awards
Piscopo Vince Egypt 4 PI
Spiteri Derek Bosnia, Macedonia, Serbia 4 PI
6 Click

image capture or post processing. There are two PID Stars tracks - Open and Monochrome.
The Nature Division (ND) is responsible for conducting and overseeing PSA activities regarding Nature photography; there is an accepted definition which specifies its scope.
The Photojournalism Division (PJD) is responsible for conducting and overseeing PSA activities regarding Photojournalistic photography; there is an accepted definition which specifies its scope.
The Photo Travel Division (PTD) is responsible for conducting and overseeing PSA activities regarding Photo Travel photography; there is an accepted definition which specifies its scope.
The Pictorial Print Division (PPD) is responsible for conducting and overseeing PSA activities regarding print photography; there are no limitations on subject matter or techniques used for image capture or post processing. There are four PPD Stars tracks - Large Open, Large Monochrome, Small Open and Small Monochrome.
The 3D Division (3DD), formerly Stereo Division, is responsible for conducting and overseeing PSA activities regarding 3D photography.
The 76th PSA ConferenceThe 76th PSA Conference has an exciting line-up of photo tours, workshops, programs, featured speakers, and social activities.
For further info about the conference or to join the PSA please visit: http://www.psa-photo.org
Starting Photography Course
Issue 1 / 2014 - Mar / May 7

by Tony Tang AIPPA ASWPP* Where was it shot (location)? Wedding photography of Martina & Shane at Cullenstown Strand, Wexford, Ireland.
* What gear (camera, lens etc.) did you use? Camera used: Nikon D3 with 24mm to 70mm F2.8 lens. Shot on RGB Raw, camera setting 400 ISO 1/30 sec F8 on Gitzo carbon fibre tripod.
* What settings did you use? I took a meter reading for the sky & plus one extra stop to expose for light clouds.
* Flash setup, if any? Fill in flash with Nikon SB800 attached to mini softbox triggered using wireless trigger and receiver. The flash was placed 2.5 metres from camera left of couple, pointing flash slightly upwards to reduce intensity on lower half of wedding gown and foreground, creating highlights and shadows yet enhancing texture on bridal gown.
* Why have you composed the shot as you did? I wanted to create a pictorial image, placing the couple 1/3 in the lower section of the frame including lots of sky
to add drama to the shot.
* What post production work was done on the original image? Using layers in Photoshop, curve adjustment to enhance highlight and shadow on clouds. Hue and saturation layer to reduce colour saturation. Burn and dodge tool to darken edge of picture and dodging highlights of waves and grass on ground. Clone tool
was used to remove subtle shadows cast on ground by fill in flash.
* What was the target of this image? The mission of this image was to create a classic pictorial wedding portrait that injects style and happy memories. Images created with passion, Tony would like to share more of his work with you on his web site www.tangfoto.com
How
Was
It S
hot?
8 Click

by John Borg* Where was it shot (location)? Riviera Bay Malta.
* What gear (camera, lens etc.) did you use? Canon EOS6D, Sigma 50mm f1.4 prime lens. Bowens Gemini 500R studio light with external battery. Shot through a white umbrella and external flash metering.
* What settings did you use? ISO 160, f8, 1/160sec, manual metering. Shot in RAW.
* Flash setup, if any? The idea of the exposure was to get a dramatic mood in the lighting. The first step was to measure the exposure of the background, and underexposing it by about two stops, using the maximum flash synchronization speed of the
camera. In this case 1/160th sec. The aperture f8 was noted and then the flash power was adjusted to give a correct exposure on the model’s face, using the external flash meter. This rendered the model brighter than the background and making her stand out. Positioning of the flash with umbrella, was set slightly above the level of the model’s head and roughly at an angle of 45 degrees, and side positioned to the left of the image.
* Why have you composed the shot as you did? The central positioning of the model, and shooting her from a low point of view, was used to give the impression of prominence and making the model look somewhat taller.
* What post production work was done on the original image? Photoshop was used to further balance the exposures, where needed, in different parts of the image. Foreground sand was darkened to eliminate flash overflow which was not needed in this area. Some colour adjustments where used to give some vibrancy to the clouds. Some stray hair, which was blowing with the wind, was also cloned out.
* What was the target of this image? This was shot specifically for the model as a record of her youthful days. What I like is the expression of beauty and freedom conveyed by the model, combined with the colours of the ambient one gets as sunset approaches.
How
Was
It S
hot?
Issue 1 / 2014 - Mar / May 9

In the last Click issue we went through the dos & don’ts for some photography events, with more focus on live concerts.
This time we will take a path through some tips, the most important one to note down is: Know Your Equipment Well!!!! In some occasions you will only be allowed to shoot during the first three songs. So it is vital that you know what changes to make on your DSLR as quickly as possible.
The equipment; What gear is required? Let’s make a checklist. *Fast lens. This is a must in certain events, that is f/2.8 or faster. Slower lenses can also do for a few occasions but be aware that in many events you’ll find poor lighting setups, so the faster the better. Secondly, the shallow depth of field helps blur out distracting objects found at the back of the stage. My favourite lenses are the 24-70mm f/2.8, 70-200mm f/2.8, and sometimes I also use the 15mm f/2.8 fisheye lens. I always take with me the 50mm f/1.8. You never know; once it saved me from a hell of an event. *In most of the events, flash is not permitted, so a good body (or better have 2) is needed to be able to
use higher ISO settings. I generally set the ISO on auto, but lock to a predetermined upper limit. This might sound amateurish, but believe me, having to fiddle less with the settings, you’ll get more time for composition. This is widely used by many photographers but few admit they do so, in order to look professional. Who cares!! * A Battery Grip (a.k.a. Vertical Grip), in my opinion is the most important hop up piece of equipment that can be added to many DSLRs. The battery grip allows you to hold your camera normally and avoid awkward arm positions, reducing the risk of hitting someone with your elbow. Apart from giving more power to shoot more images, since it uses 2 batteries instead of 1, it also increases stability when handling heavy lenses because you balance the body with some more weight. * High quality and reliably memory cards. Just beware that not all memory cards are good for every occasion. Slower memory cards are cheaper than faster ones but they cannot be used in events that require fast shooting modes like ballet/dance events. On the other hand they would be a more convenient solution for a static orchestra.
Events Photography by Johann Debono AFIAP AMPS
10 Click

Do some research before the event! Going through the band’s website will help in identifying the most photogenic members. Remember, it’s not just about the singer. All the
band members like to see themselves in photos and you might even be able to sell some. Furthermore, if you were hired to cover the event, you cannot present 50 images of the singer and some 6 or 7 of the rest of the band. One of the must-have shots of most gigs is a full band shot.
Try to anticipate when your subject stalls a bit and shoot at that moment; you’ll get much sharper images rather than trying to shoot them while they hover round the stage.
For 99% of the events I shoot, I set my camera on aperture priority mode, which is a semiautomatic mode. This is very good when you are shooting concerts where the light may be changing intermittently.
Try to do a reportage, which means going backstage and shooting some activity. Good opportunities are sometimes found in remote places.
Composition is all about making a photo look dynamic. Try to use the general composition rules, such as the rule of thirds, leading lines and filling the frame.
Another important thing is to check that you have everything you need with you before you leave your house/studio. I learnt this the painful way, by going to an event and leaving my memory cards at home. And finally try to enjoy the event.
Issue 1 / 2014 - Mar / May 11

artin Abela still considers photography as a hobby although it is also his full time job. He looks at the photographic
medium as a constant challenge to achieve better results in all aspects of his photography. He lives in Birzebbugia with his wife Rose
and two daughters. For many years, Martin was conducting his business from Birzebbugia, but recently he centralized his office to Birkirkara.
At the age of seven, Martin saw a Polaroid instant film being
developed automatically for the first time. It felt like magic, and that magical feeling triggered his love for photography. Later in life, at the age of twenty, Martin bought his first SLR camera. His first teacher on how to shoot good photos was the illustration printed inside the film carton box. Achieving
postcard-like panoramas encouraged him to quench his thirst to study and learn more about photographic techniques. Soon he started reading any photographic magazines he could lay his hands on, while experimenting in his own way. That magical feeling turned into a passion for photography, doing his utmost to make photography as a living. Now thirty-seven years later, that passion is still visible, mostly by his clients and photographers attending his lectures.
M
12 Click

One thing Martin loves to do is to research about the life and works of Old Masters in photography. Masters such as Ansel Adams, Robert Capa, Henri Cartier-Bresson and Bob Carlos Clarke serve him as a source of inspiration. His eagerness to learn and experiment in photography turned Martin into a very versatile photographer, and his works include food photography, pictorial, street photography, commercial photography and much more. He also specializes in wedding photography and studio portraiture, whilst experimenting with all styles of lighting techniques.
For a good number of years, Martin has been a member of the Malta Photographic Society where he frequently and willingly shared his talents towards the society members as a judge or as a lecturer. Apart from MPS, Martin is also linked with other International photographic clubs and associations where he is still achieving recognitions for his creative talents.
When referring to his equipment, Martin was very short and sweet. All that he requires to create a great piece of art is a camera body and some lenses. More than that is a bonus.
Martin has 101 interests and so he will not see himself retiring easily. Some of his hobbies include fishing, watching movies, painting in water colours and training of Bonsai trees.
Member ProfileMartin Abela
compiled by Jane Farrugia
www.martinsisthename.com
www.facebook.com/martin.abela.3
Issue 1 / 2014 - Mar / May 13

Advanced Category
Leonard Cocks - 1st Adv. Category
Robert Mifsud - 2nd Adv. Category Mark Micallef - 2nd Adv. Category
Noel Fenech - 2nd Adv. Category
Leonard Cocks - 2nd Adv. Category
14 Click

Entr
y Ca
tego
ry
Joe Caruana - 2nd Entry Category
Stefan Cachia - 1st Entry Category
Reno Rapa - 1st Entry Category
Mark Grech - 2nd Entry Category
Joseph Lungaro - 1st Entry Category
Tony Rizzo - 2nd Entry Category
Fredrick Micallef - 2nd Entry Category
Issue 1 / 2014 - Mar / May 15

In the previous articles, I have given some information about the use and importance of aperture and shutter speed in the exposure triangle. The third and important factor which one needs to control to have a correct exposure is the ISO setting. What is ISO? ISO is actually an acronym which stands for International Standards Organisation. It is a numerical representation of the imaging devices’ sensitivity to light. Traditionally, it was known as ASA (American Standards Association) referring to the film speed. Whereas in older times one had to stick to the film speed mounted in his camera (even when this was ‘pushed’), in the digital era, for every photo one takes, s/he can vary the ISO setting instantaneously. There’s a lot to say about the pros and cons of film vs digital. Many argue that one of the major weaknesses of the digital vs the film is the dynamic range. The reason being is that digital cameras do not handle light as well as film does. In my opinion, technology is improving by the minute on this matter as newer high-end cameras are emerging with better sensors. With digital cameras one has the facility to vary the ISO for every single photo s/he takes.
The ISO on your digital camera ranges in value. It can have a range from 100 to 12,800 and even beyond (like ISO 102,400 in high-end digital SLR cameras). Each value represents a ‘stop’ of light and each incremental ISO value represents a doubling or halving of the sensor’s sensitivity to light. Each time you double the ISO (example from 100 to 200); the camera needs only half as much light for the same exposure. Thus, if you had a shutter speed of 1/50 at ISO 100,
going to ISO 200 would let you get the same exposure at 1/100 second. Changing your camera’s ISO setting will amplify or decrease the image sensors’ ability to read light during the exposure process. Note that the lower the ISO value, the less sensitive the image sensor is. This means that your digital camera is less sensitive to light when set to ISO 200 than when set to ISO 800. As a rule, it is always ideal to use the lowest ISO setting possible. Every camera has different levels of picture quality at varying ISO settings. One needs to check and test the image quality at different ISO settings in different lighting conditions. For example, point and shoot cameras have far low-quality image results than digital SLR cameras. Even between a crop factor and a full frame sensor one finds difference in the image quality when shooting at higher ISO settings. The down side of using higher ISO settings is that of having ‘digital camera noise’.
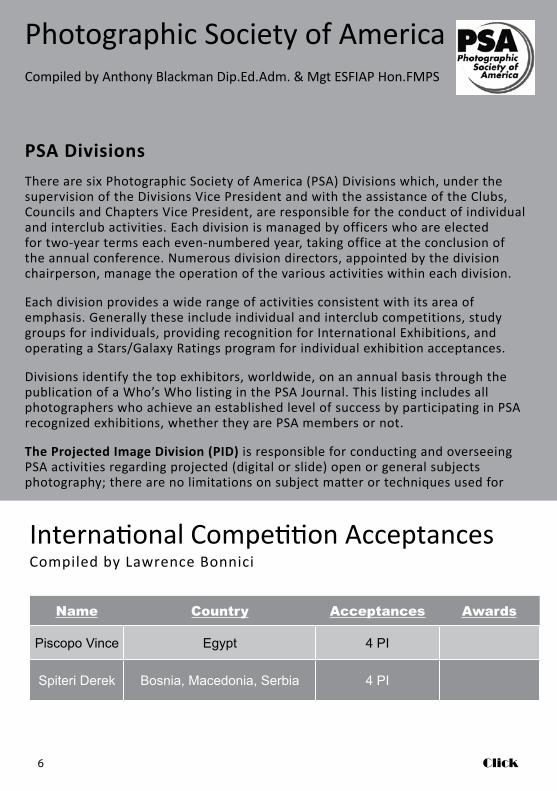
What is noise? To explain this, I am going to compare it to the volume on a stereo. If I want the music to get louder, I will turn up the knob or slider of the volume. What happens? As the volume increases, various imperfections in sound emerge. These various imperfections in the digital image are called ‘noise’ or ‘grain’. Noise in a digital image is tiny dots or flecks in the image that are created when the image sensors’ sensitivity is amplified in order to read more light. In the example below, image 1 was taken at ISO 100 and image 2 was taken at ISO 3200. One can notice that image 2 is grainier and less sharp than image 1. Notice that digital camera noise is more visible in the darker areas of the image. The amount of noise in an image
Understanding Exposure - Camera basics
Part 3 – ISOStephen Buhagiar B.Ed (Hons.) EFIAP, FMPS
16 Click
varies from one camera to another. Images at ISO 400 in a compact camera may look like images captured at ISO 3200 in other SLR cameras.
There are two types of noise – resulting in luminance and colour. Luminance noise is the true equivalent to film grain, while colour noise shows up small dots of random colours in a picture. One can find various software on the market which help remove these nasty dots. Take note that most noise-removal programs have different settings for eliminating and reducing the luminance and colour noise. Try to find a combination of both so as not to lose detail and sharpness in your image.
How to choose the right ISO for my photography – As a general rule, try to choose the lowest ISO value settings possible for smooth and grain-free images. When photographing in daylight sunny conditions,
set your ISO to 100. When photographing in low light conditions, such as indoors or night shots, one needs to increase the ISO value. In a dimly lit scene, if you’re not using flash, start to increase your ISO settings to get a proper exposure. The appropriate ISO setting depends on the level of light you’re shooting in and the visual effect you’re going for.
(a) If your subject is moving and you want to freeze the motion, you need a higher ISO setting to compensate for the low light conditions and get a higher shutter speed.
(b) If you’re photographing a still subject in low light conditions and you’re using a tripod, you can get away by using a slow shutter speed and keeping your ISO settings minimal.
(c) If you’re shooting an image that doesn’t require a large depth of field, you can increase the camera’s aperture and use a lower ISO setting.
(d) If you want to get a grainy, vintage image, you can push your ISO settings to a higher value.
As a last note, before starting a photoshoot, ALWAYS check your ISO settings. Don’t be oblivious as those photographers who have been disappointed at the end of a shoot, when they found out that they had forgotten to check what ISO setting they had left their camera on in their last photoshoot. There’s nothing worse than finding out that you were shooting at an ISO of 1600 instead of ISO 100. Likewise, do not trust your camera’s display. Don’t rely on the camera’s two inch display screen to check whether your image is grainy or not. Most probably, you won’t be able to spot noise on your camera’s small display screen. I highly recommend zooming in to check whether the images are grainy or not and get to know the highest ISO value settings where your images on your camera will remain sharp and grain-free.
Issue 1 / 2014 - Mar / May 17

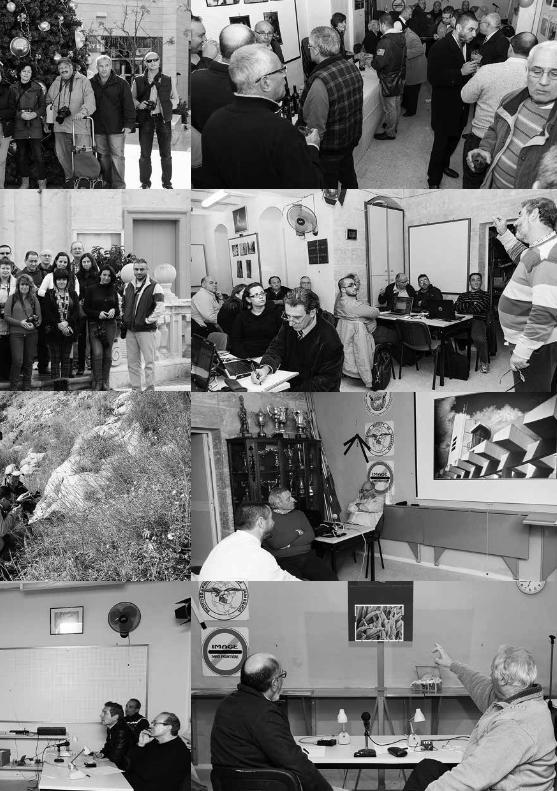
Society ActivitiesPhotography by Mark Brincat
Left Top to Bottom:
Wistin outing Sliema
Wistin outing Hal Gharghur
Wistin outing Wied il-Ghasel Mosta
Modern Architecture competition
Right Top to Bottom
Christmas party
Photoshop course
Mentoring session
Mentoring Competition ‘After the rain’
18

Society ActivitiesPhotography by Mark Brincat
Left Top to Bottom:
1st: Agostino Baldacchino donating his book ‘Human Warmth‘ to the society
2nd: Agostino Baldacchino during the opening of his personal exhibition.
3rd & 4th: Joe Attard & Peter Bartolo Parnis - Photographing Interiors
Centre Top to Bottom
1st & 2nd: Joe Pirotta - Personal interpretations visual and mental
3rd & 4th: Robert Mifsud - Flash guns
Right Top to Bottom
1st & 2nd: Guido Bonett - Wild Bulgaria
3rd & 4th: Tonio Lombardi - The science of light in photography
20


Advanced Category
MPS Mem. No.Mentoring & Panel Competitions
TotalM1 M2 P1 M3 P2 M4
383 29 32 61 28 0 0 150
375 26 32 62 25 0 0 145
74 27 34 0 26 0 29 116
222 27 30 59 0 0 0 116
60 27 0 56 0 0 22 105
137 25 29 0 24 0 23 101
309 28 34 0 0 0 14 76
426 22 28 0 0 0 22 72
515 22 26 0 0 0 24 72
64 27 26 0 0 0 0 53
596 24 29 0 0 0 0 53
520 24 0 0 0 0 27 51
516 23 26 0 0 0 0 49
19 24 0 0 0 0 0 24
424 23 0 0 0 0 0 23
Entry Category
MPS Mem. No.Mentoring & Panel Competitions
TotalM1 M2 P1 M3 P2 M4
563 31 27 68 26 55 28 235
148 25 32 60 33 56 25 231
582 29 28 58 30 54 24 223
694 31 24 58 22 50 26 211
598 30 29 57 27 57 0 200
414 28 24 52 26 47 20 197
395 22 27 60 0 54 29 192
522 0 0 61 29 56 26 172
709 27 26 54 28 0 27 162
248 25 27 53 25 0 0 130
456 28 31 0 29 0 25 113
500 28 30 0 26 0 25 109
471 23 28 0 28 0 27 106
626 28 26 0 27 0 24 105
738 26 25 54 0 0 0 105
513 30 30 0 0 0 24 84
674 0 29 0 0 0 28 57
285 25 0 0 0 0 26 51
665 25 25 0 0 0 0 50
704 23 27 0 0 0 0 50 Men
torin
g an
d pa
nel c
ompe
titio
n re
sults
22 Click

© M
r Aar
on Jo
hnso
n
March 2014
6th: 5th Mentoring Competition/ Blue/ Digital
9th: Monthly photo walk
13th: From colour to monochrome by Anthony Xuereb
20th: Candid Portraiture by Ronald Cocks
27th: Events co-ordination, innovations and more by Conrad Neil Gatt
April 2014
3rd: 4th Panel Competition- Boudoir/colour prints
10th: Myanmar, a photographer’s paradise by Pauline Grech
13th: Monthly walk
17th: No meeting
24th: 6th Mentoring Competition/Metal/monochrome/digital
26th: 49th National Photographic Competition: Submissions will be accepted from 9:00am till 2:00pm.
May 2014
1st: No meeting - Public Holiday
8th: Discussion on 5th and 6th Mentoring Competitions
11th: Monthly photo walk
15th: A lecture by Mr. Manolis Metzakis (foreign judge)
17th & 18th: Judging of National Competition
22nd: 5th Panel Portfolio/monochrome/prints
29th: Monochrome journey by Louis Agius
MPS calendar of events 2013/2014compiled by Jane Farrugia
Issue 1 / 2014 - Mar / May 23

Newsletter of the Malta Photographic Society
Tel: +356 21 242265NEWSPAPER POST