Embed Size (px)
Citation preview

Marketo Cloud Connector Guide
McAfee Cloud Identity Managerversion 3.5 or later
2 McAfee Cloud Identity Manager Marketo Cloud Connector Guide
COPYRIGHTCopyright © 2013 McAfee, Inc. All Rights Reserved.
No part of this publication may be reproduced, transmitted, transcribed, stored in a retrieval system, or translated into any language in any form or by any means without the written permission of McAfee, Inc., or its suppliers or affiliate companies.
TRADEMARK ATTRIBUTIONSMcAfee®, the McAfee logo, Avert, ePO, ePolicy Orchestrator, Foundstone, GroupShield, IntruShield, LinuxShield, MAX (McAfee SecurityAlliance Exchange), NetShield, PortalShield, Preventsys, SecureOS, SecurityAlliance, SiteAdvisor, SmartFilter, Total Protection, TrustedSource, Type Enforcement, VirusScan, and WebShield are registered trademarks or trademarks of McAfee, Inc. or its subsidiaries in the United States and other countries.
LICENSE INFORMATION
License AgreementNOTICE TO ALL USERS: CAREFULLY READ THE APPROPRIATE LEGAL AGREEMENT CORRESPONDING TO THE LICENSE YOU PURCHASED, WHICH SETS FORTH THE GENERAL TERMS AND CONDITIONS FOR THE USE OF THE LICENSED SOFTWARE. IF YOU DO NOT KNOW WHICH TYPE OF LICENSE YOU HAVE ACQUIRED, PLEASE CONSULT THE SALES AND OTHER RELATED LICENSE GRANTOR PURCHASE ORDER DOCUMENTS THAT ACCOMPANIES YOUR SOFTWARE PACKAGING OR THAT YOU HAVE RECEIVED SEPARATELY AS PART OF THE PURCHASE (AS A BOOKLET, A FILE ON THE PRODUCT CD, OR A FILE AVAILABLE ON THE WEBSITE FROM WHICH YOU DOWNLOADED THE SOFTWARE PACKAGE). IF YOU DO NOT AGREE TO ALL OF THE TERMS SET FORTH IN THE AGREEMENT, DO NOT INSTALL THE SOFTWARE. IF APPLICABLE, YOU MAY RETURN THE PRODUCT TO MCAFEE OR THE PLACE OF PURCHASE FOR A FULL REFUND.
Contents
1.0 Introduction to McAfee Cloud Identity Manager ........................................................ 51.1 Supported environments...................................................................................... 61.2 Supported browsers ............................................................................................ 6
1.2.1 Application portal..................................................................................... 61.2.2 Management Console ............................................................................... 6
1.3 Available documentation...................................................................................... 71.4 Technical support ............................................................................................... 7
2.0 Configuring SSO for a Marketo user .......................................................................... 92.1 Certificate management....................................................................................... 9
2.1.1 Export a Cloud Identity Manager certificate for Marketo ................................ 92.2 Configure SSO in your Marketo account ................................................................10
3.0 Configuring a Marketo Cloud Connector ...................................................................113.1 Select the cloud application type..........................................................................123.2 Specifying an Identity Connector .........................................................................12
3.2.1 Select an existing Identity Connector.........................................................133.2.2 Create a new Identity Connector...............................................................15
3.3 Configure SAML credential mapping for a Marketo Cloud Connector ..........................163.3.1 Add a new attribute to the Marketo credential map......................................17
3.4 Configure a SAML assertion for a Marketo Cloud Connector .....................................183.5 Apply an authorization policy to a Marketo Cloud Connector ....................................19
3.5.1 Configure the default policy action ............................................................193.5.2 Configure policy rules and add them to the policy........................................203.5.3 Policy conditions and their Boolean expressions ..........................................213.5.4 Expression editor examples......................................................................24
3.6 Review the Marketo Cloud Connector configuration.................................................26
McAfee Cloud Identity Manager Marketo Cloud Connector Guide 3

4 McAfee Cloud Identity Manager Marketo Cloud Connector Guide
1.0 Introduction to McAfee Cloud Identity Manager
McAfee® Cloud Identity Manager (Cloud Identity Manager, formerly Intel® Expressway Cloud Access 360-SSO) simplifies the management and secures the use of cloud, Software as a Service (SaaS), and web applications for companies and large organizations. Service and application providers can also use Cloud Identity Manager to simplify and improve the authentication process for their customers.
Cloud Identity Manager provides support for the following features:• Extensible framework• Web single sign on (SSO)• Multiple authentication methods• Credential mapping and user provisioning• Authorization policies and access control enforcement• Event auditing and monitoring• Connectors for popular cloud services and applications• Web-based Management Console
Cloud Identity Manager runs as a stand-alone server and is configured by an administrator using a web-based Management Console accessible from a web browser. For information about installing Cloud Identity Manager as a standalone server or as a cluster of servers, see McAfee Cloud Identity Manager Installation Guide. For information about configuring Cloud Identity Manager in the Management Console, see McAfee Cloud Identity Manager Product Guide.
Cloud Identity Manager provides connectors for many popular cloud services and applications, including Google Apps and Salesforce.com. These connectors are built in to Cloud Identity Manager and simplify the deployment of the cloud service or application in an organization. Web SSO requires configuration in the Management Console and in the cloud application’s user interface. Instructions for configuring SSO on the cloud application side are included in the documentation set.
For customers who have Java-based or .NET web applications that do not support SAML2 authentication, Cloud Identity Manager provides a custom connector. For information about integrating Java-based and .NET web applications with Cloud Identity Manager, see McAfee Cloud Identity Manager Integration Guide.
For software developers who want to write their own cloud service connectors or authentication modules, Cloud Identity Manager provides an SDK. For more information about the SDK, see McAfee Cloud Identity Manager Developer’s Guide.
McAfee Cloud Identity Manager Marketo Cloud Connector Guide 5
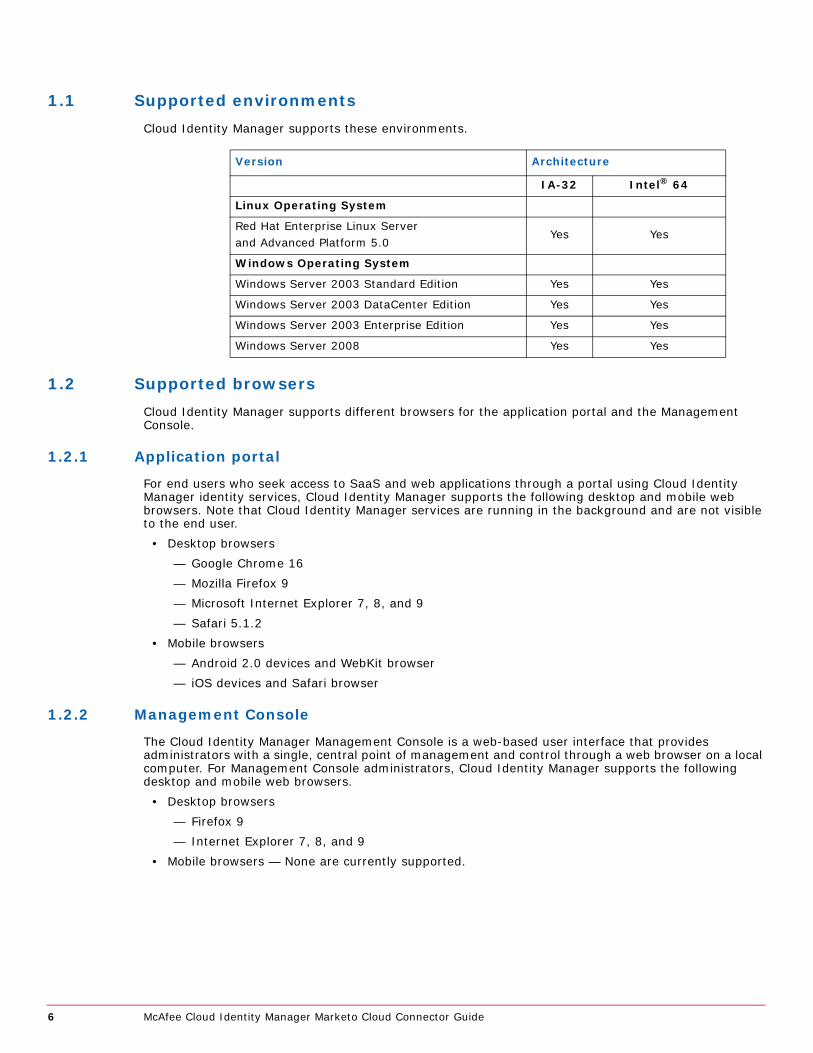
1.1 Supported environmentsCloud Identity Manager supports these environments.
1.2 Supported browsersCloud Identity Manager supports different browsers for the application portal and the Management Console.
1.2.1 Application portal
For end users who seek access to SaaS and web applications through a portal using Cloud Identity Manager identity services, Cloud Identity Manager supports the following desktop and mobile web browsers. Note that Cloud Identity Manager services are running in the background and are not visible to the end user.
• Desktop browsers— Google Chrome 16— Mozilla Firefox 9— Microsoft Internet Explorer 7, 8, and 9— Safari 5.1.2
• Mobile browsers— Android 2.0 devices and WebKit browser— iOS devices and Safari browser
1.2.2 Management Console
The Cloud Identity Manager Management Console is a web-based user interface that provides administrators with a single, central point of management and control through a web browser on a local computer. For Management Console administrators, Cloud Identity Manager supports the following desktop and mobile web browsers.
• Desktop browsers— Firefox 9— Internet Explorer 7, 8, and 9
• Mobile browsers — None are currently supported.
Version Architecture
IA-32 Intel® 64
Linux Operating System
Red Hat Enterprise Linux Serverand Advanced Platform 5.0
Yes Yes
Windows Operating System
Windows Server 2003 Standard Edition Yes Yes
Windows Server 2003 DataCenter Edition Yes Yes
Windows Server 2003 Enterprise Edition Yes Yes
Windows Server 2008 Yes Yes
6 McAfee Cloud Identity Manager Marketo Cloud Connector Guide
1.3 Available documentationThe Cloud Identity Manager documentation set includes the following guides:
• McAfee Cloud Identity Manager Product Guide — A complete guide to the Management Console and the configuration tasks needed to administer Cloud Identity Manager
• McAfee Cloud Identity Manager Developer’s Guide — Provides information for software developers who want to write custom Java code that extends Cloud Identity Manager functionality
• McAfee Cloud Identity Manager Installation Guide — Includes the tasks and procedures that you need to install and remove Cloud Identity Manager as a standalone server on Microsoft Windows and Linux operating system platforms
• McAfee Cloud Identity Manager Integration Guide — Provides instructions on how to integrate Java-based and .NET web applications that do not support SAML2 authentication with Cloud Identity Manager
Note: In addition to these guides, there are separate guides that document how to configure the different Cloud Connectors. For more information, see the McAfee Cloud Identity Manager Product Guide.
1.4 Technical supportFor technical assistance, contact McAfee support by one of the following options:
Support portal: https://mysupport.mcafee.com
Phone number: 1-800-937-2237
McAfee Cloud Identity Manager Marketo Cloud Connector Guide 7

8 McAfee Cloud Identity Manager Marketo Cloud Connector Guide
2.0 Configuring SSO for a Marketo user
Marketo offers marketing automation software as a SaaS application. The Marketo application and Cloud Identity Manager Cloud Connector support Identity Provider (IdP)-initiated authentication.
Integrating the Marketo application and Cloud Identity Manager involves the following configuration tasks. For more information, see the corresponding sections:
• Configuring a Marketo Cloud Connector in the Management Console — See section 3.0 Configuring a Marketo Cloud Connector.
• Certificate management — See section 2.1 Certificate management.• Configuring SSO in your Marketo account — See section 2.2 Configure SSO in your Marketo
account.
Note: The Management Console is the Cloud Identity Manager administrative interface.
2.1 Certificate managementCloud Identity Manager signs SAML assertions, requests, and responses using an X.509 certificate. Marketo needs the X.509 certificate to verify the signatures. You export the Cloud Identity Manager certificate to a file in the Management Console and import the certificate file in your Marketo administrator’s account.
The certificate management tasks are:1. Export an X.509 certificate in the Management Console — See section 2.1.1 Export a Cloud Identity
Manager certificate for Marketo.2. Import the X.509 certificate in your Marketo administrator’s account — See section 2.2 Configure
SSO in your Marketo account.
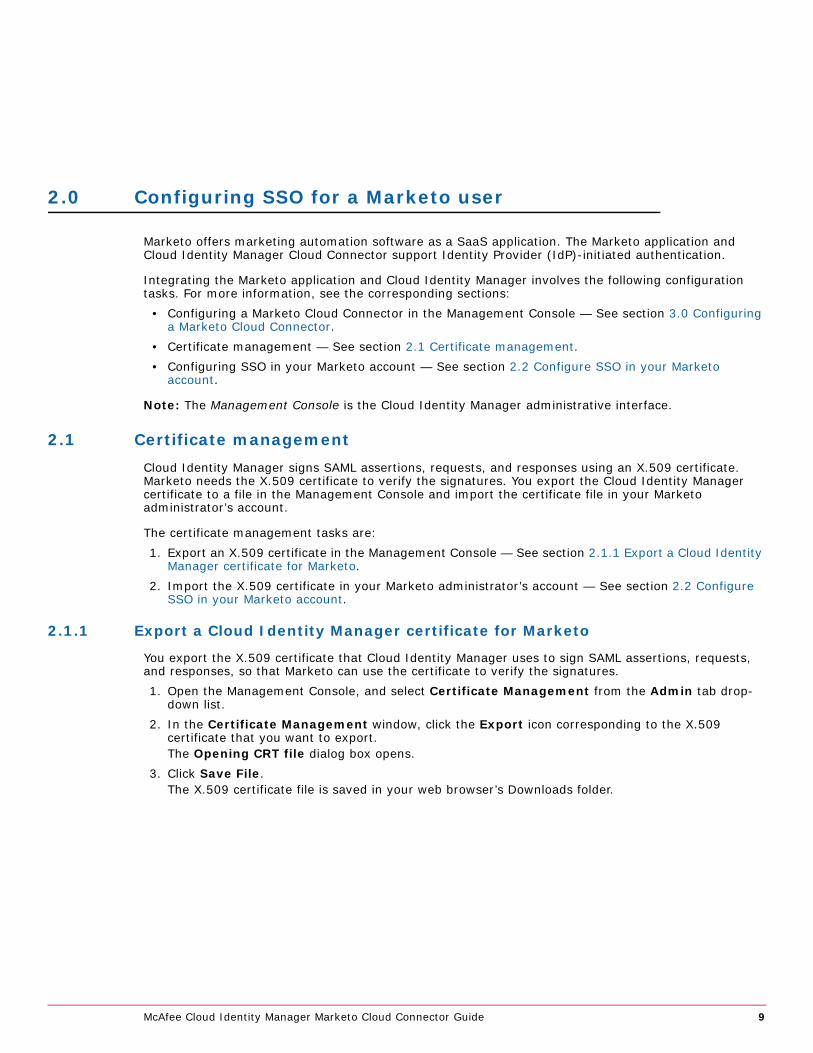
2.1.1 Export a Cloud Identity Manager certificate for Marketo
You export the X.509 certificate that Cloud Identity Manager uses to sign SAML assertions, requests, and responses, so that Marketo can use the certificate to verify the signatures.1. Open the Management Console, and select Certificate Management from the Admin tab drop-
down list.2. In the Certificate Management window, click the Export icon corresponding to the X.509
certificate that you want to export.The Opening CRT file dialog box opens.
3. Click Save File.The X.509 certificate file is saved in your web browser’s Downloads folder.
McAfee Cloud Identity Manager Marketo Cloud Connector Guide 9
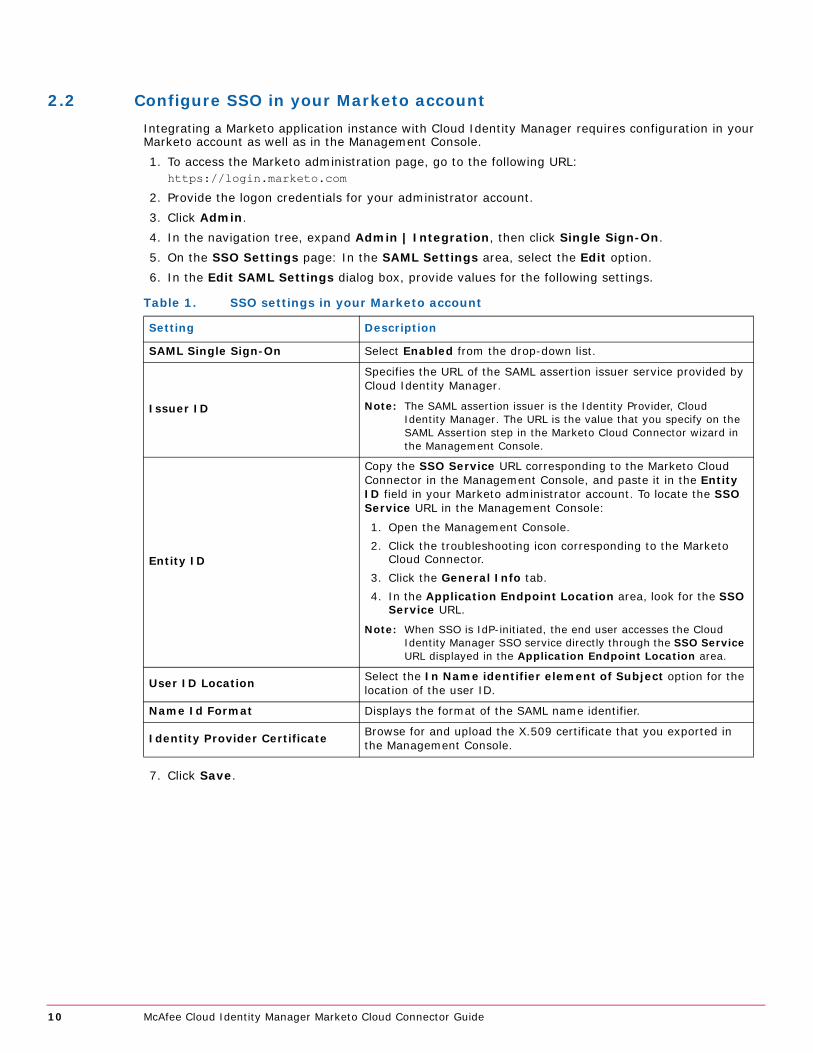
2.2 Configure SSO in your Marketo accountIntegrating a Marketo application instance with Cloud Identity Manager requires configuration in your Marketo account as well as in the Management Console.1. To access the Marketo administration page, go to the following URL:
https://login.marketo.com
2. Provide the logon credentials for your administrator account.3. Click Admin.4. In the navigation tree, expand Admin | Integration, then click Single Sign-On.5. On the SSO Settings page: In the SAML Settings area, select the Edit option.6. In the Edit SAML Settings dialog box, provide values for the following settings.
7. Click Save.
Table 1. SSO settings in your Marketo account
Setting Description
SAML Single Sign-On Select Enabled from the drop-down list.
Issuer ID
Specifies the URL of the SAML assertion issuer service provided by Cloud Identity Manager.
Note: The SAML assertion issuer is the Identity Provider, Cloud Identity Manager. The URL is the value that you specify on the SAML Assertion step in the Marketo Cloud Connector wizard in the Management Console.
Entity ID
Copy the SSO Service URL corresponding to the Marketo Cloud Connector in the Management Console, and paste it in the Entity ID field in your Marketo administrator account. To locate the SSO Service URL in the Management Console:
1. Open the Management Console.2. Click the troubleshooting icon corresponding to the Marketo
Cloud Connector.3. Click the General Info tab.4. In the Application Endpoint Location area, look for the SSO
Service URL.
Note: When SSO is IdP-initiated, the end user accesses the Cloud Identity Manager SSO service directly through the SSO Service URL displayed in the Application Endpoint Location area.
User ID Location Select the In Name identifier element of Subject option for the location of the user ID.
Name Id Format Displays the format of the SAML name identifier.
Identity Provider Certificate Browse for and upload the X.509 certificate that you exported in the Management Console.
10 McAfee Cloud Identity Manager Marketo Cloud Connector Guide
3.0 Configuring a Marketo Cloud Connector
A Cloud Connector is the configuration that allows Cloud Identity Manager to connect to and provide services for a cloud application. When a Marketo Cloud Connector is configured, Cloud Identity Manager can provide identity and SSO services for Marketo users.
You configure a Marketo Cloud Connector in the Cloud Connector wizard in the Management Console. Configuring a Marketo Cloud Connector in the wizard involves the following steps. For more information about each step, see the corresponding sections:1. Cloud Application Type — See section 3.1 Select the cloud application type.2. Identity Connector — See section 3.2 Specifying an Identity Connector.3. SAML Credential Mapping — See section 3.3 Configure SAML credential mapping for a Marketo
Cloud Connector.4. SAML Assertion — See section 3.4 Configure a SAML assertion for a Marketo Cloud Connector.5. Authorization Enforcement — See section 3.5 Apply an authorization policy to a Marketo Cloud
Connector.6. Review — See section 3.6 Review the Marketo Cloud Connector configuration.
McAfee Cloud Identity Manager Marketo Cloud Connector Guide 11
3.1 Select the cloud application typeA Cloud Connector is the configuration that allows Cloud Identity Manager to connect to and provide services for a cloud application. For example, a Marketo Cloud Connector is the configuration that allows Cloud Identity Manager to connect to a Marketo application and to provide SSO, SLO, and other services.
To select the Marketo cloud application type1. Select the Cloud Connectors tab in the Management Console, and then click New Cloud
Connector.The Cloud Connector wizard opens on the Cloud Application Type step.
2. Select the cloud application type: Marketo.Note: If the application is not one of the built-in types shown in the Cloud Application Type window, click More to open the More Applications window. This window shows all plug-in cloud application types in the Cloud Identity Manager system.
3. Type a name for the Marketo Cloud Connector in the Cloud Connector Name field.Note: The name can contain only letters, numbers, and the following characters: “.”, “_” and “-”. The name cannot contain spaces or exceed 64 characters in length and is not case-sensitive. Specify a meaningful name. For example, a name that identifies the Cloud Connector-Identity Connector combination is more useful than a URL, which can change.
4. Click Next.The Identity Connector step opens.
3.2 Specifying an Identity ConnectorTo specify an Identity Connector, you select an existing Identity Connector or create a new one.
There are six types of Identity Connectors:• LDAP• Integrated Windows Authentication with Active Directory (IWA-AD)• ECA360 Token Authentication• Authentication Chain• SAML2 Proxy• Central Authentication Service (CAS)
For LDAP and IWA-AD Identity Connectors, identity information is retrieved from an identity store. To configure these Identity Connectors, you specify the ID of the identity store containing the identity information and how to search the specified identity store. To specify the search, you configure the following LDAP parameters:
• Base DN — Specifies where to start searching in the LDAP tree• Search Attribute — Specifies the user attribute to retrieve from the identity store• Search Scope — Specifies how many levels to search in the LDAP tree below the Base DN
For CAS and other Identity Connectors, identity information is retrieved from an authentication result provided by an external authentication service. To configure one of these Identity Connectors, you specify fields specific to each connector type.
12 McAfee Cloud Identity Manager Marketo Cloud Connector Guide
3.2.1 Select an existing Identity Connector
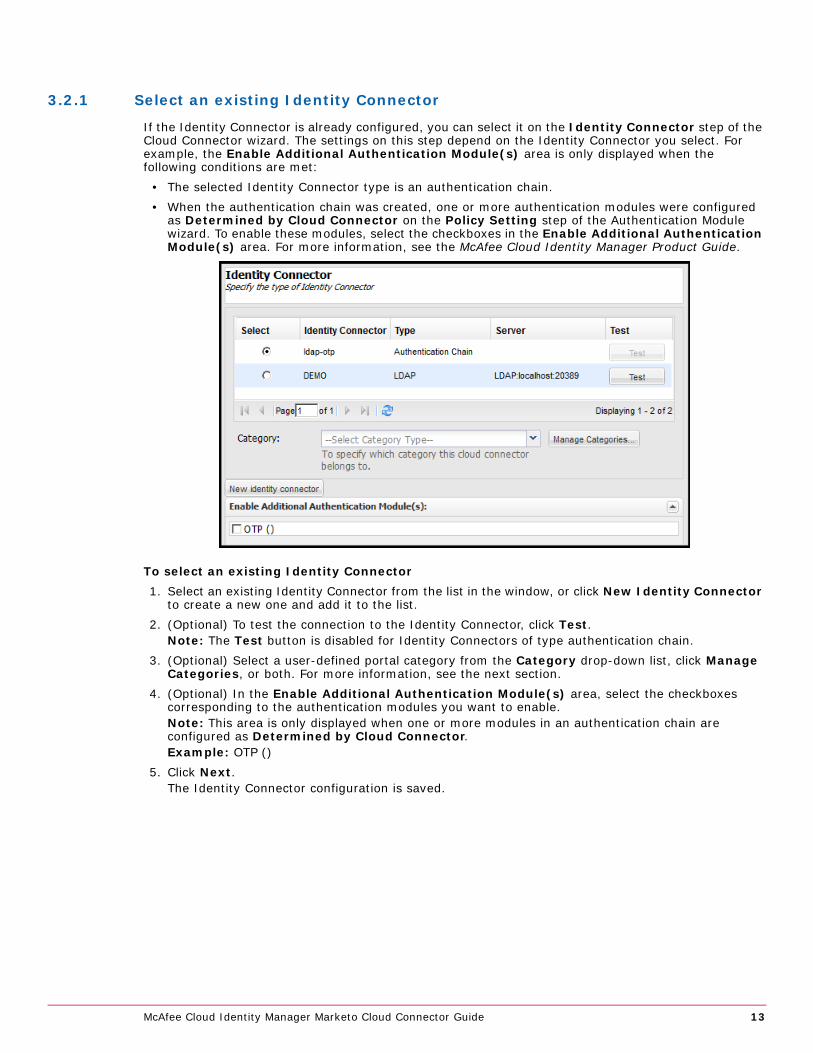
If the Identity Connector is already configured, you can select it on the Identity Connector step of the Cloud Connector wizard. The settings on this step depend on the Identity Connector you select. For example, the Enable Additional Authentication Module(s) area is only displayed when the following conditions are met:
• The selected Identity Connector type is an authentication chain.• When the authentication chain was created, one or more authentication modules were configured
as Determined by Cloud Connector on the Policy Setting step of the Authentication Module wizard. To enable these modules, select the checkboxes in the Enable Additional Authentication Module(s) area. For more information, see the McAfee Cloud Identity Manager Product Guide.
To select an existing Identity Connector1. Select an existing Identity Connector from the list in the window, or click New Identity Connector
to create a new one and add it to the list.2. (Optional) To test the connection to the Identity Connector, click Test.
Note: The Test button is disabled for Identity Connectors of type authentication chain.3. (Optional) Select a user-defined portal category from the Category drop-down list, click Manage
Categories, or both. For more information, see the next section.4. (Optional) In the Enable Additional Authentication Module(s) area, select the checkboxes
corresponding to the authentication modules you want to enable.Note: This area is only displayed when one or more modules in an authentication chain are configured as Determined by Cloud Connector.Example: OTP ()
5. Click Next.The Identity Connector configuration is saved.
McAfee Cloud Identity Manager Marketo Cloud Connector Guide 13
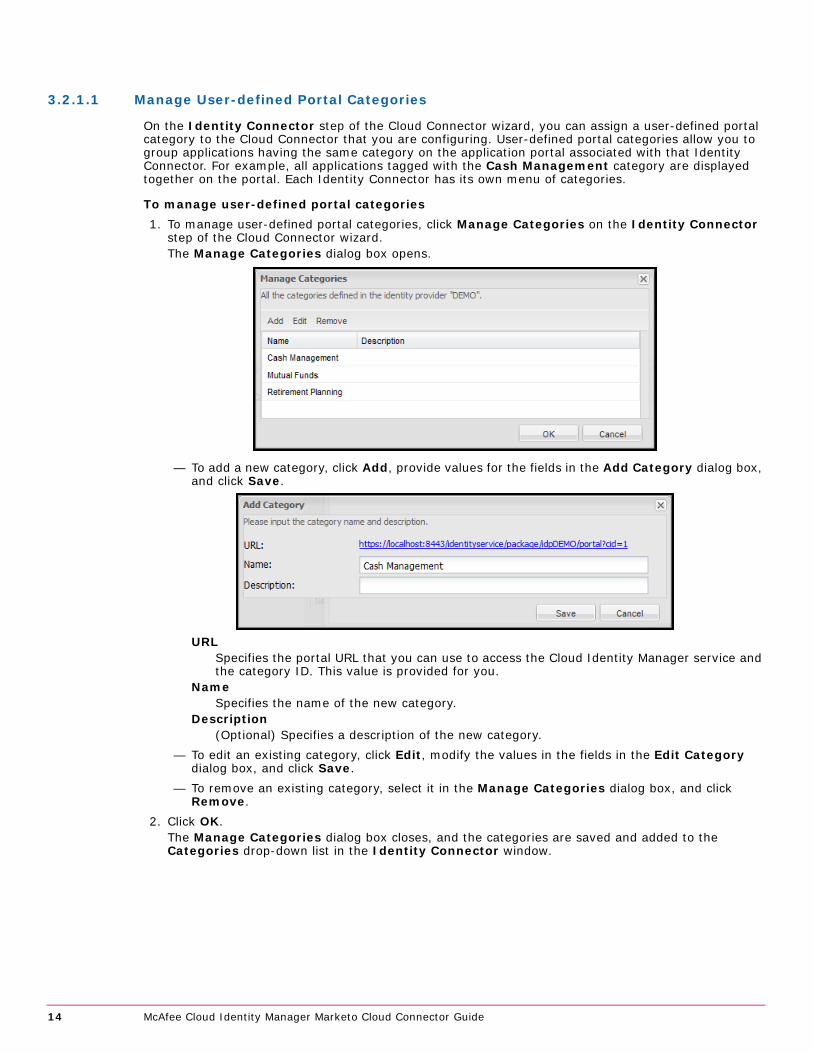
3.2.1.1 Manage User-defined Portal Categories
On the Identity Connector step of the Cloud Connector wizard, you can assign a user-defined portal category to the Cloud Connector that you are configuring. User-defined portal categories allow you to group applications having the same category on the application portal associated with that Identity Connector. For example, all applications tagged with the Cash Management category are displayed together on the portal. Each Identity Connector has its own menu of categories.
To manage user-defined portal categories1. To manage user-defined portal categories, click Manage Categories on the Identity Connector
step of the Cloud Connector wizard.The Manage Categories dialog box opens.
— To add a new category, click Add, provide values for the fields in the Add Category dialog box, and click Save.
URLSpecifies the portal URL that you can use to access the Cloud Identity Manager service and the category ID. This value is provided for you.
NameSpecifies the name of the new category.
Description(Optional) Specifies a description of the new category.
— To edit an existing category, click Edit, modify the values in the fields in the Edit Category dialog box, and click Save.
— To remove an existing category, select it in the Manage Categories dialog box, and click Remove.
2. Click OK.The Manage Categories dialog box closes, and the categories are saved and added to the Categories drop-down list in the Identity Connector window.
14 McAfee Cloud Identity Manager Marketo Cloud Connector Guide
3.2.2 Create a new Identity Connector
To create a new Identity Connector, you specify a name and an Identity Connector type. Fields open that correspond to the type that you select. To configure an LDAP or IWA-AD Identity Connector, you create a new or use an existing identity store. To configure a CAS or other Identity Connector, you specify fields specific to that connector type.
You begin this procedure on the Identity Connector step of the Cloud Connector wizard.
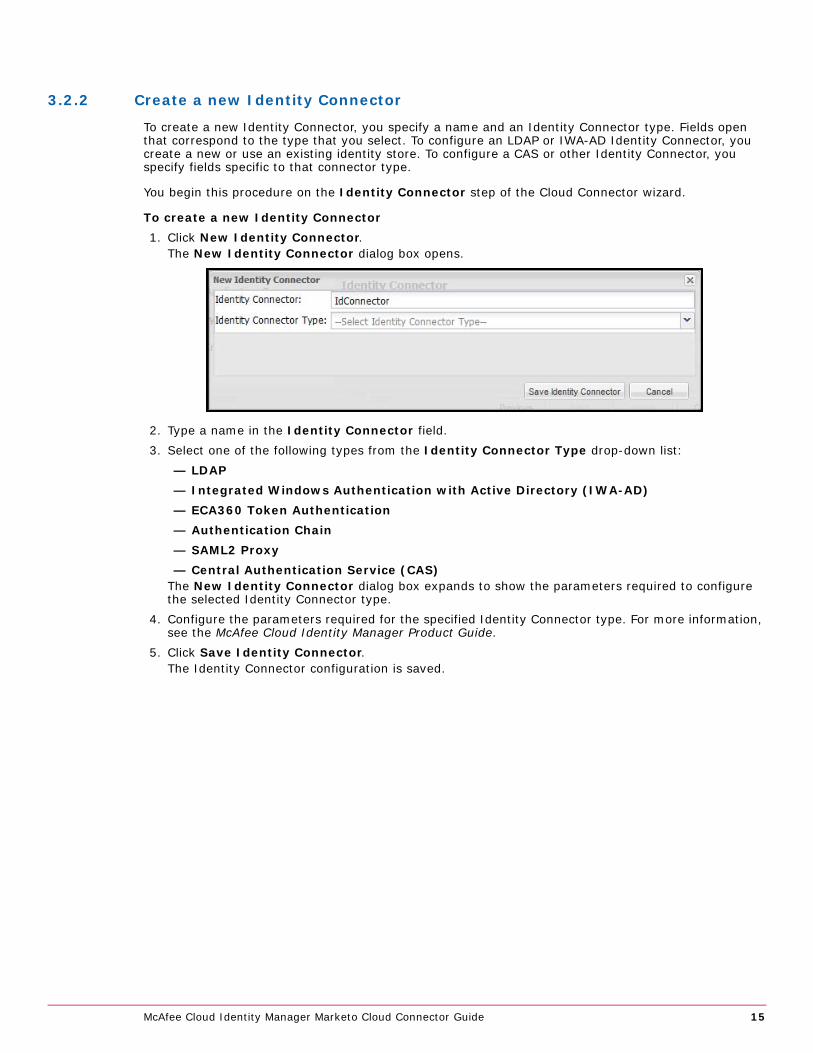
To create a new Identity Connector1. Click New Identity Connector.
The New Identity Connector dialog box opens.
2. Type a name in the Identity Connector field.3. Select one of the following types from the Identity Connector Type drop-down list:
— LDAP— Integrated Windows Authentication with Active Directory (IWA-AD)— ECA360 Token Authentication— Authentication Chain— SAML2 Proxy— Central Authentication Service (CAS)
The New Identity Connector dialog box expands to show the parameters required to configure the selected Identity Connector type.
4. Configure the parameters required for the specified Identity Connector type. For more information, see the McAfee Cloud Identity Manager Product Guide.
5. Click Save Identity Connector.The Identity Connector configuration is saved.
McAfee Cloud Identity Manager Marketo Cloud Connector Guide 15
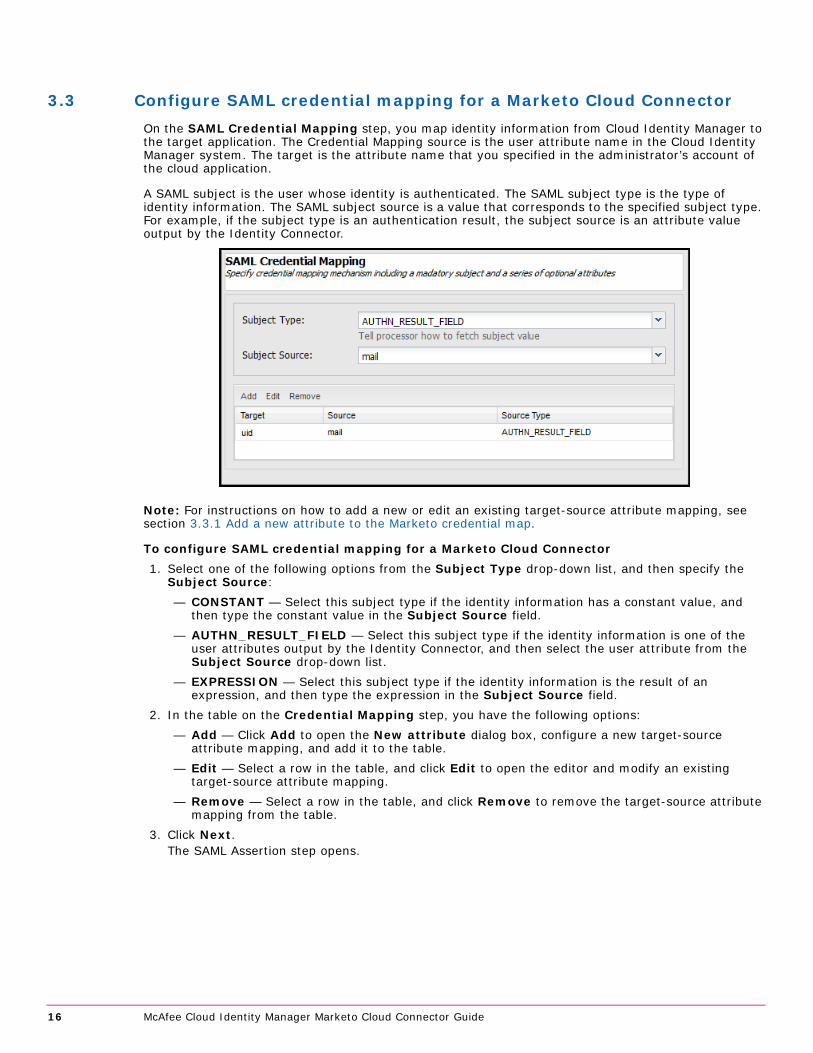
3.3 Configure SAML credential mapping for a Marketo Cloud ConnectorOn the SAML Credential Mapping step, you map identity information from Cloud Identity Manager to the target application. The Credential Mapping source is the user attribute name in the Cloud Identity Manager system. The target is the attribute name that you specified in the administrator’s account of the cloud application.
A SAML subject is the user whose identity is authenticated. The SAML subject type is the type of identity information. The SAML subject source is a value that corresponds to the specified subject type. For example, if the subject type is an authentication result, the subject source is an attribute value output by the Identity Connector.
Note: For instructions on how to add a new or edit an existing target-source attribute mapping, see section 3.3.1 Add a new attribute to the Marketo credential map.
To configure SAML credential mapping for a Marketo Cloud Connector1. Select one of the following options from the Subject Type drop-down list, and then specify the
Subject Source:— CONSTANT — Select this subject type if the identity information has a constant value, and
then type the constant value in the Subject Source field.— AUTHN_RESULT_FIELD — Select this subject type if the identity information is one of the
user attributes output by the Identity Connector, and then select the user attribute from the Subject Source drop-down list.
— EXPRESSION — Select this subject type if the identity information is the result of an expression, and then type the expression in the Subject Source field.
2. In the table on the Credential Mapping step, you have the following options:— Add — Click Add to open the New attribute dialog box, configure a new target-source
attribute mapping, and add it to the table.— Edit — Select a row in the table, and click Edit to open the editor and modify an existing
target-source attribute mapping.— Remove — Select a row in the table, and click Remove to remove the target-source attribute
mapping from the table.3. Click Next.
The SAML Assertion step opens.
16 McAfee Cloud Identity Manager Marketo Cloud Connector Guide
3.3.1 Add a new attribute to the Marketo credential map
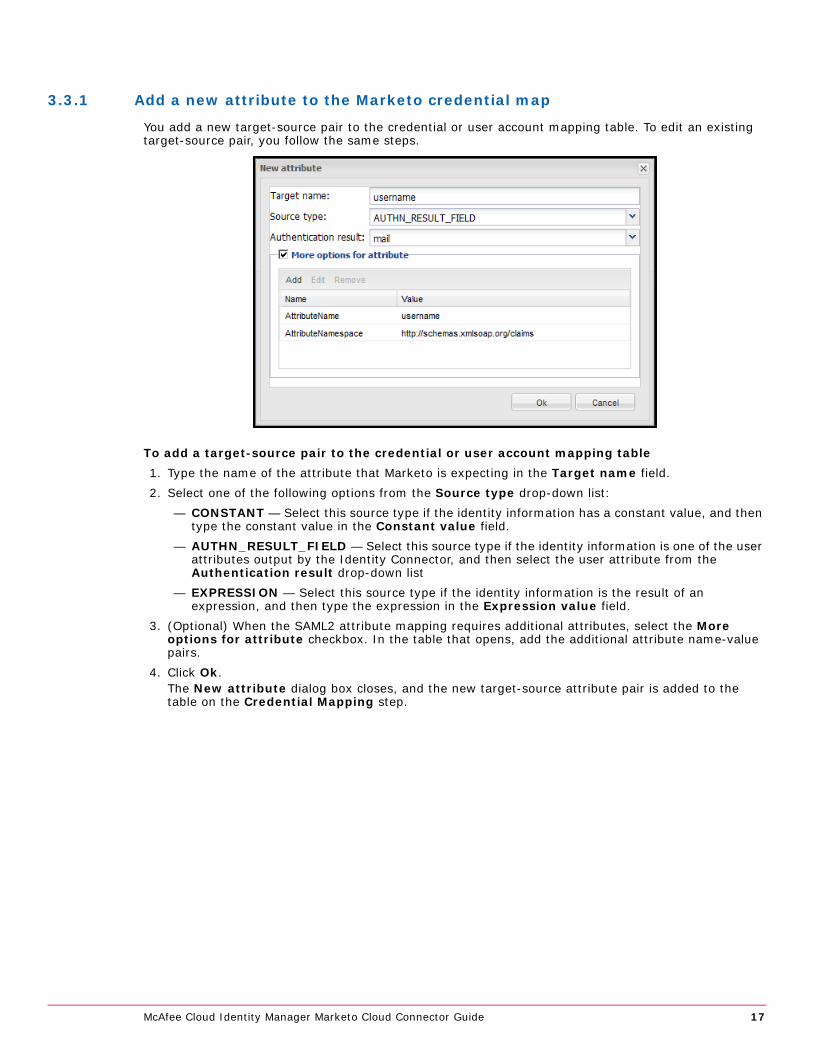
You add a new target-source pair to the credential or user account mapping table. To edit an existing target-source pair, you follow the same steps.
To add a target-source pair to the credential or user account mapping table1. Type the name of the attribute that Marketo is expecting in the Target name field.2. Select one of the following options from the Source type drop-down list:
— CONSTANT — Select this source type if the identity information has a constant value, and then type the constant value in the Constant value field.
— AUTHN_RESULT_FIELD — Select this source type if the identity information is one of the user attributes output by the Identity Connector, and then select the user attribute from the Authentication result drop-down list
— EXPRESSION — Select this source type if the identity information is the result of an expression, and then type the expression in the Expression value field.
3. (Optional) When the SAML2 attribute mapping requires additional attributes, select the More options for attribute checkbox. In the table that opens, add the additional attribute name-value pairs.
4. Click Ok.The New attribute dialog box closes, and the new target-source attribute pair is added to the table on the Credential Mapping step.
McAfee Cloud Identity Manager Marketo Cloud Connector Guide 17
3.4 Configure a SAML assertion for a Marketo Cloud ConnectorAs the Identity Provider, Cloud Identity Manager signs and issues SAML assertions that attest to the user’s identity. You specify the URL of the Cloud Identity Manager service that issues the SAML assertions and the key pair used by Cloud Identity Manager to sign the SAML assertions. WebEx Connect uses this information to verify requests and responses sent by Cloud Identity Manager.1. Specify the ID of your Marketo Munchkin account in the Munchkin ID field.
Note: To locate your Munchkin account ID, go to: https://login.marketo.com. Provide the logon credentials for your administrator account. Click the Admin tab. In the navigation tree, expand Admin | Integration, then click Munchkin.
2. Select a preconfigured key pair from the Signature Keys drop-down list.3. Type the URL of the Cloud Identity Manager service that issues SAML assertions in the SAML
Assertion Issuer field.Format: https://hostname:portnumber/identityservicehostname
Specifies the name of the server on which Cloud Identity Manager is installed.portnumber
Specifies the port number of the server on which Cloud Identity Manager is installed.Default: 8443
4. Specify the following fields in the Conditions area:Clock Skew
Specifies a value to use when calculating the SAML assertion’s expiration time. This value is designed to offset small differences between clocks in different security domains.Default value: 20Units: seconds
LifetimeSpecifies a lifetime value to use when calculating the SAML assertion’s expiration time. When the expiration time is exceeded, the SAML assertion is invalidated by the assertion consumer. When specifying the lifetime value, take into account the estimated transmission latency between security domains.Default value: 60Units: seconds
5. Click Next.The Authorization Enforcement step opens.
18 McAfee Cloud Identity Manager Marketo Cloud Connector Guide
3.5 Apply an authorization policy to a Marketo Cloud ConnectorOn the Authorization Enforcement step of the Cloud Connector wizard, you can build an authorization policy that determines which users can access your cloud application and under what conditions. To build the policy, you configure individual policy rules and add them to the overall policy. Each rule consists of an expression, which can be made up of sub expressions.
Each rule has an action, as does the overall policy. The rule action is to permit or deny access to your cloud application when the rule evaluates to TRUE. The overall policy action — the default action — is to permit or deny access to your cloud application when none of the rules in the policy evaluates to TRUE. When the policy configuration area first opens, the default policy action is set to deny access.
3.5.1 Configure the default policy action
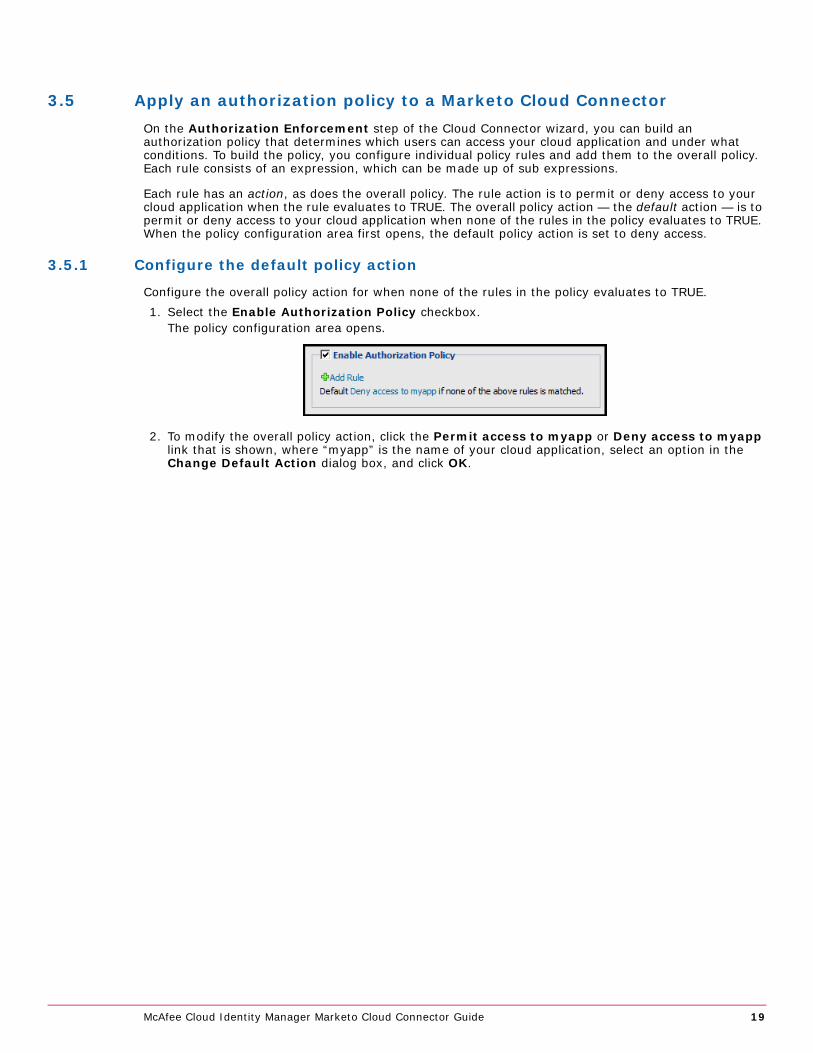
Configure the overall policy action for when none of the rules in the policy evaluates to TRUE.1. Select the Enable Authorization Policy checkbox.
The policy configuration area opens.
2. To modify the overall policy action, click the Permit access to myapp or Deny access to myapp link that is shown, where “myapp” is the name of your cloud application, select an option in the Change Default Action dialog box, and click OK.
McAfee Cloud Identity Manager Marketo Cloud Connector Guide 19
3.5.2 Configure policy rules and add them to the policy
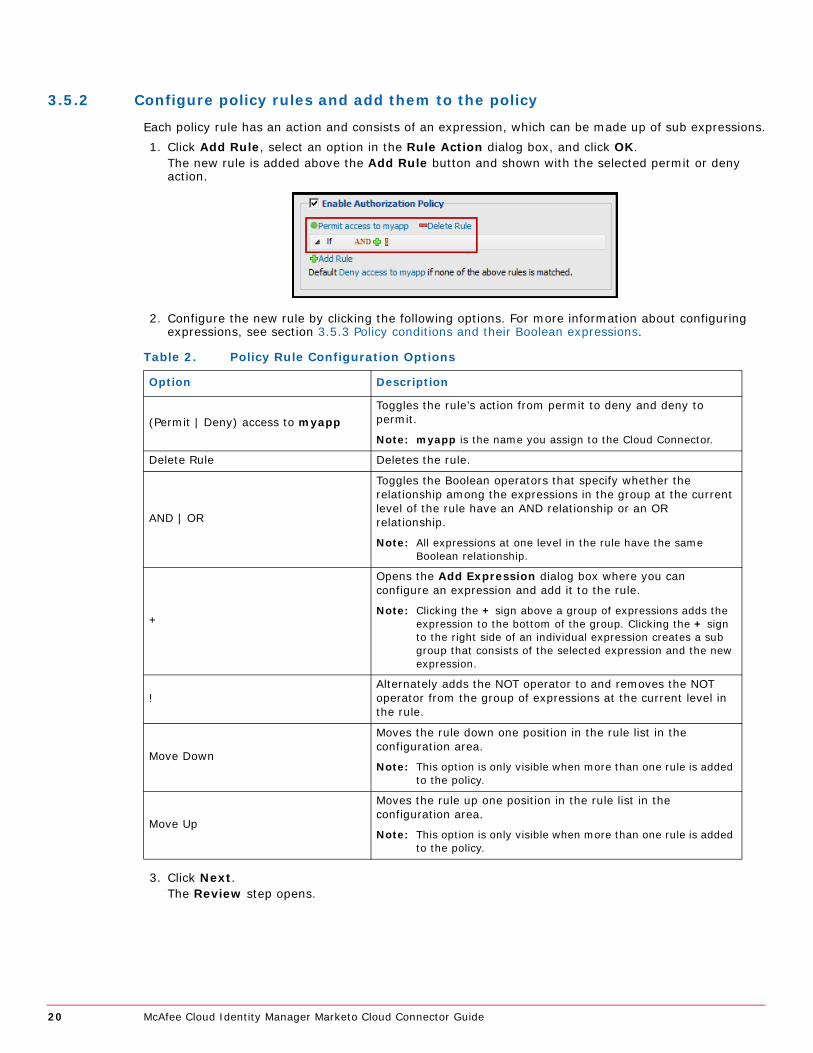
Each policy rule has an action and consists of an expression, which can be made up of sub expressions.1. Click Add Rule, select an option in the Rule Action dialog box, and click OK.
The new rule is added above the Add Rule button and shown with the selected permit or deny action.
2. Configure the new rule by clicking the following options. For more information about configuring expressions, see section 3.5.3 Policy conditions and their Boolean expressions.
3. Click Next.The Review step opens.
Table 2. Policy Rule Configuration Options
Option Description
(Permit | Deny) access to myappToggles the rule’s action from permit to deny and deny to permit.
Note: myapp is the name you assign to the Cloud Connector.
Delete Rule Deletes the rule.
AND | OR
Toggles the Boolean operators that specify whether the relationship among the expressions in the group at the current level of the rule have an AND relationship or an OR relationship.
Note: All expressions at one level in the rule have the same Boolean relationship.
+
Opens the Add Expression dialog box where you can configure an expression and add it to the rule.
Note: Clicking the + sign above a group of expressions adds the expression to the bottom of the group. Clicking the + sign to the right side of an individual expression creates a sub group that consists of the selected expression and the new expression.
!Alternately adds the NOT operator to and removes the NOT operator from the group of expressions at the current level in the rule.
Move Down
Moves the rule down one position in the rule list in the configuration area.
Note: This option is only visible when more than one rule is added to the policy.
Move Up
Moves the rule up one position in the rule list in the configuration area.
Note: This option is only visible when more than one rule is added to the policy.
20 McAfee Cloud Identity Manager Marketo Cloud Connector Guide
3.5.3 Policy conditions and their Boolean expressions
When you configure an expression, you first select the expression type or condition. When the condition is met, the expression evaluates to TRUE. The conditions and their corresponding Boolean expressions are shown in the following table.
3.5.3.1 Restrict access to the specified time range
You can restrict when users are allowed to access your application to a specified time range.1. Click + to open the Add Expression dialog box.2. Select Access Time from the Expression Type drop-down list.3. Select an operator from the Access Time drop-down list, and specify the required values:
— Between — Select a starting and ending time for the time range from the From and To drop-down lists, respectively.
— Greater than — Select a value from the Time drop-down list.— Less than — Select a value from the Time drop-down list.— Greater than or equal to — Select a value from the Time drop-down list.— Less than or equal to — Select a value from the Time drop-down list.
4. Click OK to close the dialog box and add the expression to the policy rule.
3.5.3.2 Restrict access to specified days of the week
You can restrict when users are allowed to access your application to specified days of the week.1. Click + to open the Add Expression dialog box.2. Select Day of Week from the Expression Type drop-down list.3. Select one or more of the checkboxes corresponding to the days of the week.4. Click OK to close the dialog box and add the expression to the policy rule.
Condition Boolean Expression
Access Time The time of access falls within the specified time range.
Day of Week The day of the week belongs to the specified set of days.
Client IP Address The client IP address falls within the specified address range.
Client Device The client device has one of the specified types.
Subject Attribute Match The user attribute value meets the specified match.
Advanced Expression The specified Boolean expression evaluates to TRUE.
McAfee Cloud Identity Manager Marketo Cloud Connector Guide 21
3.5.3.3 Restrict access to the specified range of client IP addresses
You can restrict access to your application to users having an IP address in the specified range.1. Click + to open the Add Expression dialog box.2. Select Client IP from the Expression Type drop-down list.3. Select an operator from the IP Address drop-down list, and specify the required values:
— Between — Select a starting and ending IP address for the address range from the From and To drop-down lists, respectively.
— Equals — Type a valid IP address in the IP field.— Greater than — Type a valid IP address in the IP field.— Less than — Type a valid IP address in the IP field.— Greater than or equal to — Type a valid IP address in the IP field.— Less than or equal to — Type a valid IP address in the IP field.— Masked IP address — Type values for the base IP address and the bit mask in the Base IP
and Mask fields, respectively.4. Click OK to close the dialog box and add the expression to the policy rule.
3.5.3.4 Restrict access to specified client devices
You can restrict access to your application to users on a personal computer or a mobile device.1. Click + to open the Add Expression dialog box.2. Select Client Device from the Expression Type drop-down list.3. Select one or both of the following checkboxes:
— PC — Allows users on a personal computer to access your application.— Mobile — Allows users on a mobile device to access your application.
4. Click OK to close the dialog box and add the expression to the policy rule.
3.5.3.5 Restrict access to subjects having the specified attribute value
You can restrict access to your application to subjects or users having a specified attribute value. To do so, you specify the subject type and the subject source. The subject type is the type of identity information. The subject source is a value that corresponds to the specified subject type. For example, if the subject type is an authentication result, the subject source is an attribute output by the Identity Connector.1. Click + to open the Add Expression dialog box.2. Select Subject Attribute Match Expression from the Expression Type drop-down list.3. Select an option from the Subject Type drop-down list:
— CONSTANT — Type a constant value in the Subject Source field.— AUTHN_RESULT_FIELD — Select a user attribute from the Subject Source drop-down list.— EXPRESSION — Type an expression in the Subject Source field.
4. Select an option from the Operator drop-down list, and specify the required values:— Equals — The user attribute value must equal the value you specify in the Value field.— Contains — The user attribute value must contain the value you specify in the Value field.— Starts with — The user attribute value must start with the value you specify in the Value field.— Ends with — The user attribute value must end with the value you specify in the Value field.— Matches (regular expression) — The user attribute value must equal the result of the
regular expression you specify in the Regex field.— In list — The user attribute value must belong to the list of specified values.
5. Click OK to close the dialog box and add the expression to the policy rule.
22 McAfee Cloud Identity Manager Marketo Cloud Connector Guide
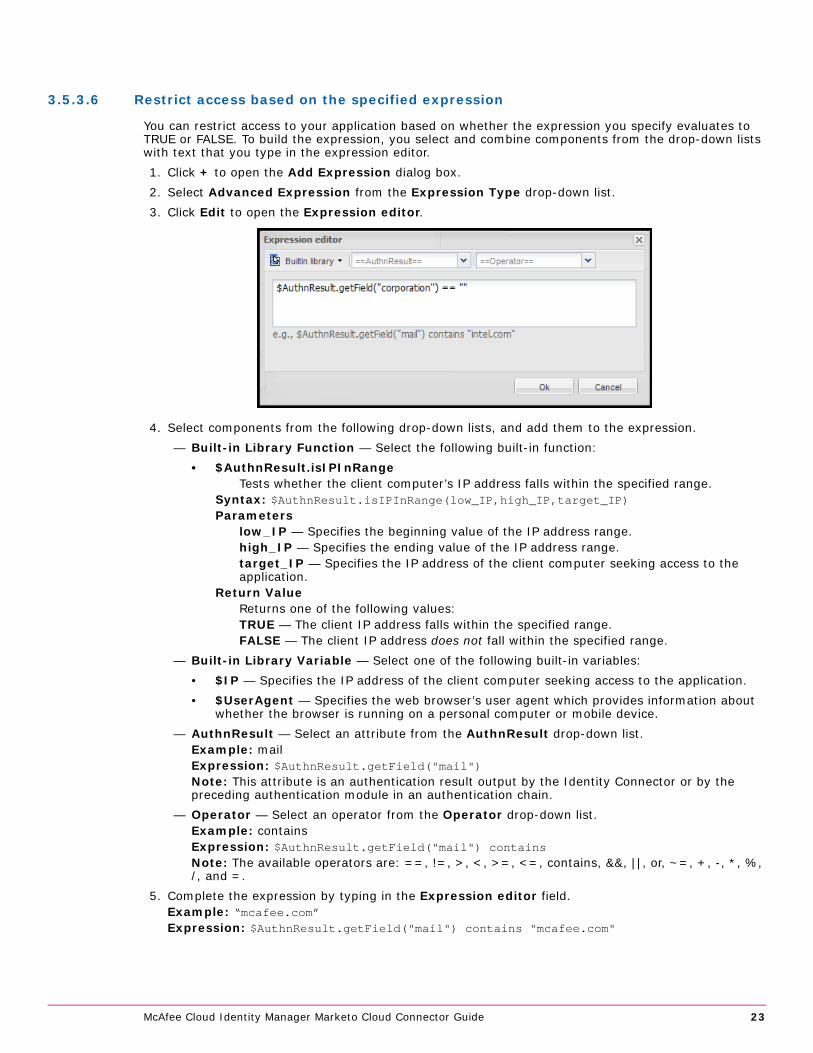
3.5.3.6 Restrict access based on the specified expression
You can restrict access to your application based on whether the expression you specify evaluates to TRUE or FALSE. To build the expression, you select and combine components from the drop-down lists with text that you type in the expression editor.1. Click + to open the Add Expression dialog box.2. Select Advanced Expression from the Expression Type drop-down list.3. Click Edit to open the Expression editor.
4. Select components from the following drop-down lists, and add them to the expression.— Built-in Library Function — Select the following built-in function:
• $AuthnResult.isIPInRangeTests whether the client computer’s IP address falls within the specified range.
Syntax: $AuthnResult.isIPInRange(low_IP,high_IP,target_IP)Parameters
low_IP — Specifies the beginning value of the IP address range.high_IP — Specifies the ending value of the IP address range.target_IP — Specifies the IP address of the client computer seeking access to the application.
Return ValueReturns one of the following values:TRUE — The client IP address falls within the specified range.FALSE — The client IP address does not fall within the specified range.
— Built-in Library Variable — Select one of the following built-in variables:• $IP — Specifies the IP address of the client computer seeking access to the application.• $UserAgent — Specifies the web browser’s user agent which provides information about
whether the browser is running on a personal computer or mobile device.— AuthnResult — Select an attribute from the AuthnResult drop-down list.
Example: mailExpression: $AuthnResult.getField("mail")Note: This attribute is an authentication result output by the Identity Connector or by the preceding authentication module in an authentication chain.
— Operator — Select an operator from the Operator drop-down list.Example: containsExpression: $AuthnResult.getField("mail") containsNote: The available operators are: ==, !=, >, <, >=, <=, contains, &&, ||, or, ~=, +, -, *, %, /, and =.
5. Complete the expression by typing in the Expression editor field.Example: “mcafee.com”Expression: $AuthnResult.getField("mail") contains "mcafee.com"
McAfee Cloud Identity Manager Marketo Cloud Connector Guide 23
6. Click OK to close the Expression editor.7. Click OK to close the dialog box and add the expression to the policy rule.
3.5.4 Expression editor examples
The following examples show how to build an expression using the expression editor.
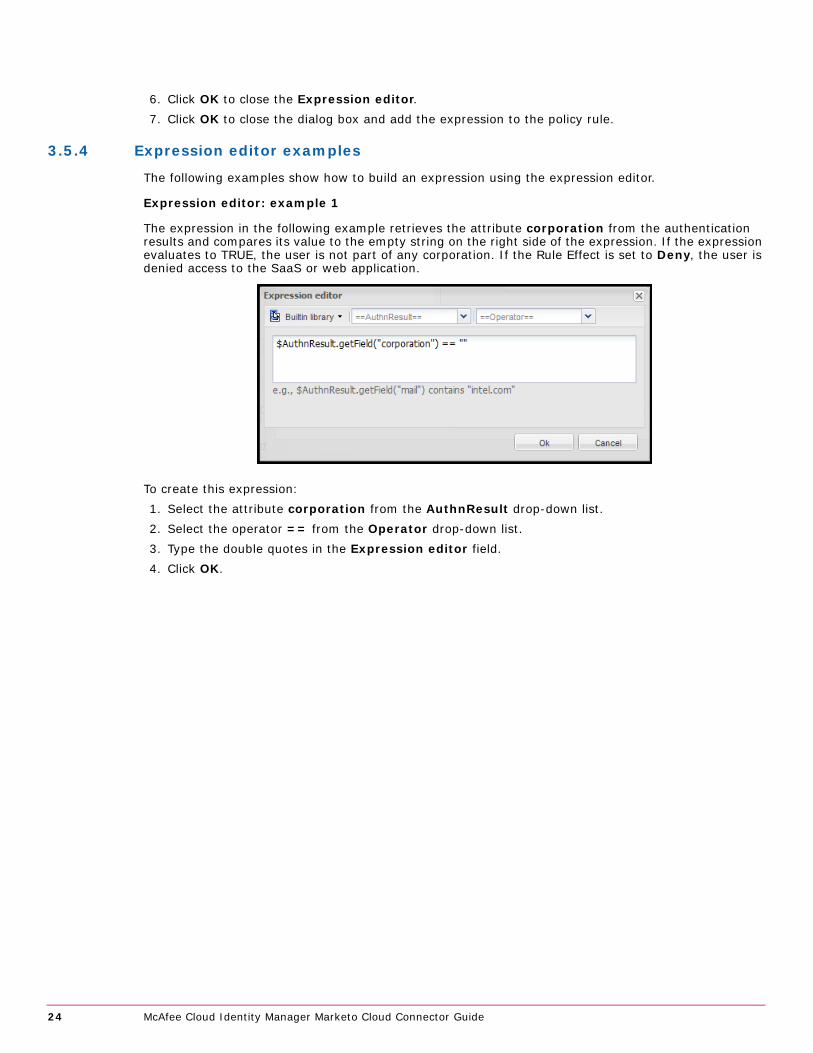
Expression editor: example 1
The expression in the following example retrieves the attribute corporation from the authentication results and compares its value to the empty string on the right side of the expression. If the expression evaluates to TRUE, the user is not part of any corporation. If the Rule Effect is set to Deny, the user is denied access to the SaaS or web application.
To create this expression:1. Select the attribute corporation from the AuthnResult drop-down list.2. Select the operator == from the Operator drop-down list.3. Type the double quotes in the Expression editor field.4. Click OK.
24 McAfee Cloud Identity Manager Marketo Cloud Connector Guide
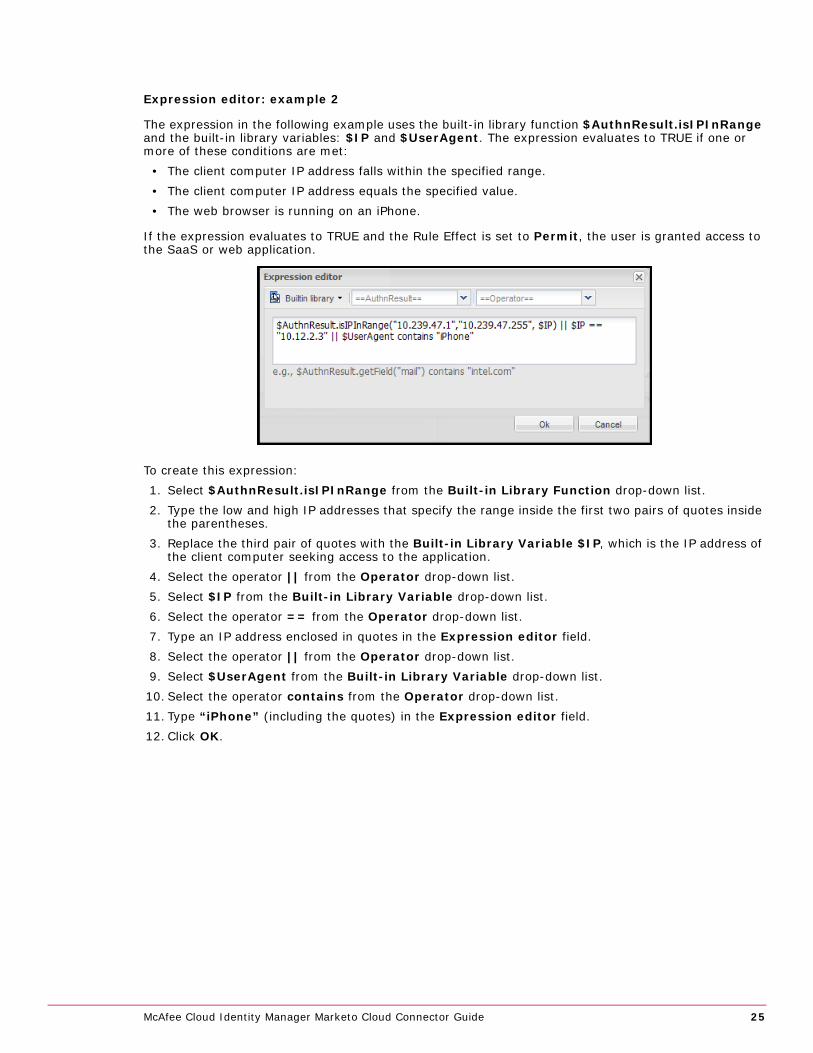
Expression editor: example 2
The expression in the following example uses the built-in library function $AuthnResult.isIPInRange and the built-in library variables: $IP and $UserAgent. The expression evaluates to TRUE if one or more of these conditions are met:
• The client computer IP address falls within the specified range.• The client computer IP address equals the specified value.• The web browser is running on an iPhone.
If the expression evaluates to TRUE and the Rule Effect is set to Permit, the user is granted access to the SaaS or web application.
To create this expression:1. Select $AuthnResult.isIPInRange from the Built-in Library Function drop-down list.2. Type the low and high IP addresses that specify the range inside the first two pairs of quotes inside
the parentheses.3. Replace the third pair of quotes with the Built-in Library Variable $IP, which is the IP address of
the client computer seeking access to the application.4. Select the operator || from the Operator drop-down list.5. Select $IP from the Built-in Library Variable drop-down list.6. Select the operator == from the Operator drop-down list.7. Type an IP address enclosed in quotes in the Expression editor field.8. Select the operator || from the Operator drop-down list.9. Select $UserAgent from the Built-in Library Variable drop-down list.10. Select the operator contains from the Operator drop-down list.11. Type “iPhone” (including the quotes) in the Expression editor field.12. Click OK.
McAfee Cloud Identity Manager Marketo Cloud Connector Guide 25
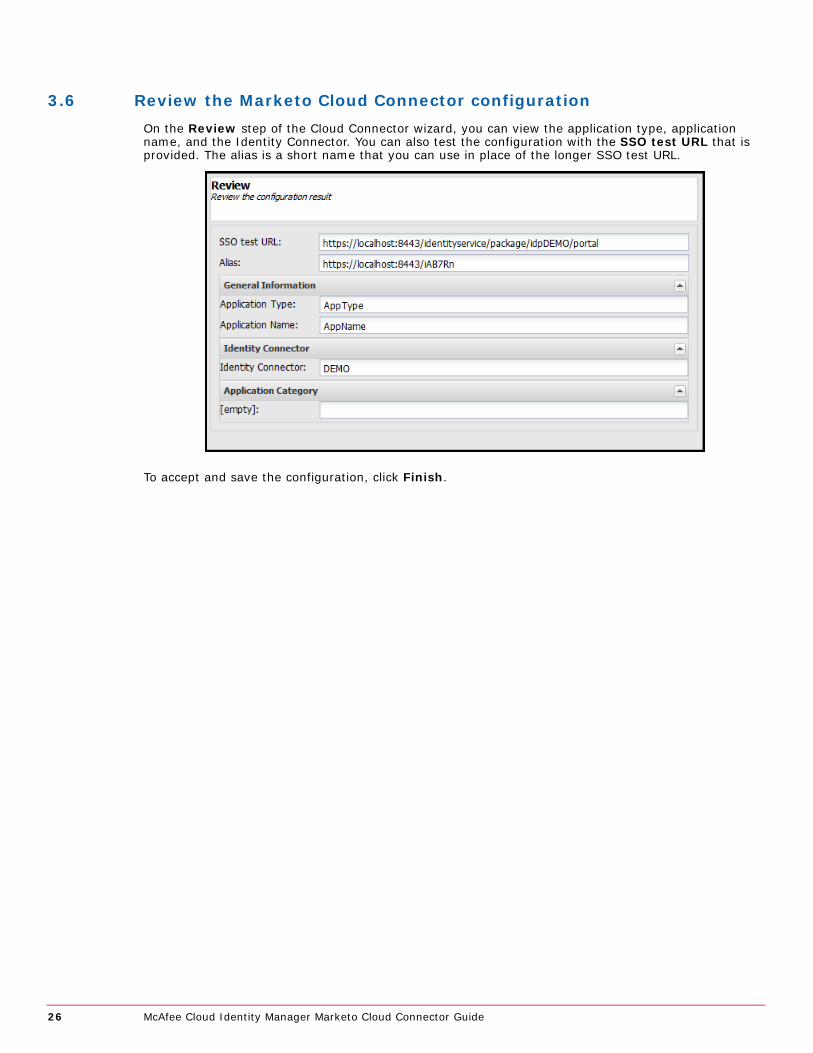
3.6 Review the Marketo Cloud Connector configurationOn the Review step of the Cloud Connector wizard, you can view the application type, application name, and the Identity Connector. You can also test the configuration with the SSO test URL that is provided. The alias is a short name that you can use in place of the longer SSO test URL.
To accept and save the configuration, click Finish.
26 McAfee Cloud Identity Manager Marketo Cloud Connector Guide


[Revision A]