Embed Size (px)
DESCRIPTION
Mark Kistler - Puedes Dibujar en 30 Dias
Citation preview
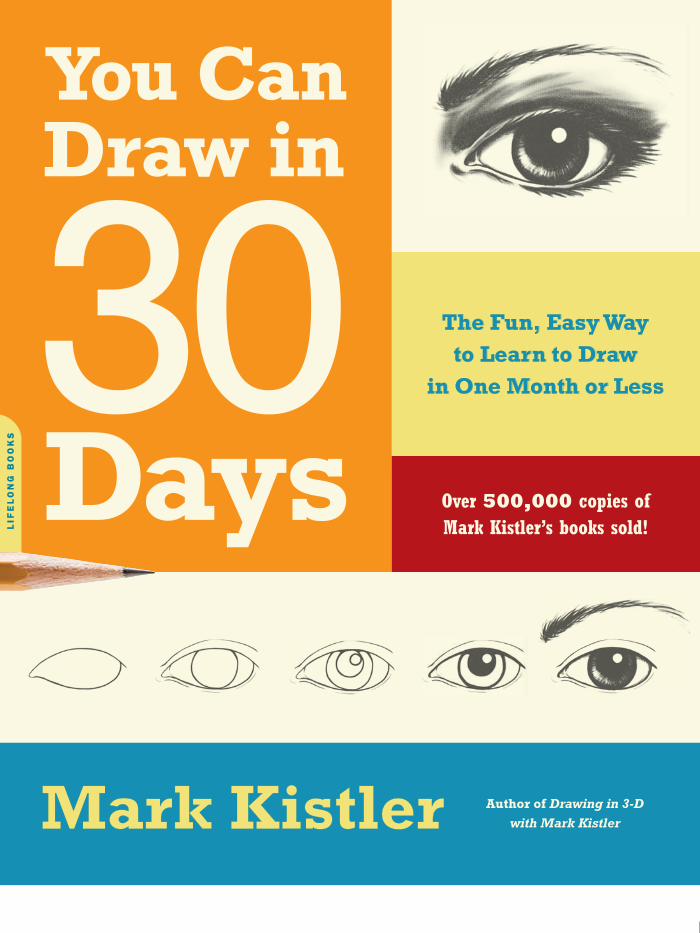
You Can Draw in
30 Days Over 500,000 copies of
Mark Kistler’s books sold!
The Fun, Easy Way to Learn to Draw
in One Month or Less
Mark Kistler Author of Drawing in 3-D
with Mark Kistler
ART
A Lifelong OriginalCover design by Georgia A. FeldmanCover illustrations © Mark Kistler; Author photograph by Allison Hamacher
$19.00 US / £11.99 / $24.00 CAN
DA CAPO PRESS
Lifelong BooksA Member of the Perseus Books Groupwww.dacapopress.com
Learn to draw in 30 days with public television’s favorite drawing teacher.
Drawing is an acquired skill, not a talent—anyone can learn to draw! All you need is a pencil, a piece of paper, and the willingness to tap into your hidden artistic abilities. You Can Draw in 30 Days will teach you the rest. With Emmy award–winning, longtime public television host Mark Kistler as your guide, you’ll learn the secrets of sophisticated three-dimensional renderings, and have fun along the way. Inside you’ll fi nd:
• Quick and easy step-by-step instructions for drawing
everything from simple spheres to apples, trees,
buildings, and the human hand and face
• More than 500 line drawings, illustrating each step
• Time-tested tips, techniques, and tutorials for drawing in 3-D
• The 9 Fundamental Laws of Drawing to create the illusion of
depth in any drawing
• 75 student examples to help gauge your own progress
In just 20 minutes a day for a month, you can learn to draw anything, whether from the world around you or from your own imagination. It’s time to embark on your creative journey. Pick up your pencil and begin today!
Mark Kistler is one of the most popular and most recognized drawing teachers in the world. The longtime public television host of Mark Kistler’s Imagination Station, he is the author of nine books, including the bestselling children’s drawing book, Drawing in 3-D with Mark Kistler. He lives near Houston, Texas.
www.draw3d.com
You C
an
Draw
in 30
Day
sK
istler
The Fun, Easy Way to Learn
in One Month or Less
MD
DA
LIM
#1119468 11/15/10 CY
AN
MA
G Y
EL
O B
LK

YOU CAN
DRAWIN 30 DAYS
Kistler 00 FM_Kistler You Can Draw 10/21/10 11:56 AM Page i
Kistler 00 FM_Kistler You Can Draw 10/21/10 11:56 AM Page ii

√
±¬
A Member of the Perseus Books Group
Mark Kistlers
The Fun, Easy Wayto Learn to Draw
in One Month or Less
30Days
inDrawYou Can
’
Kistler 00 FM_Kistler You Can Draw 10/21/10 11:56 AM Page iii
Many of the designations used by manufacturers and sellers to distinguish their productsare claimed as trademarks. Where those designations appear in this book and Da CapoPress was aware of a trademark claim, the designations have been printed in initial capitalletters.
Copyright © 2011 by Mark Kistler
All rights reserved. No part of this publication may be reproduced, stored in a retrieval system, or transmitted, in any form or by any means, electronic, mechanical, photocopy-ing, recording, or otherwise, without the prior written permission of the publisher. Printedin the United States of America. For information, address Da Capo Press, 11 CambridgeCenter, Cambridge, MA 02142.
Set in 11 point Relay Light by the Perseus Books Group
Library of Congress Cataloging-in-Publication DataKistler, Mark.You can draw in 30 days : the fun, easy way to learn to draw in one month or less /
Mark Kistler.—1st ed.p. cm.
ISBN 978-0-7382-1241-8 (pbk. : alk. paper)1. Drawing—Technique. I. Title. II. Title: You can draw in thirty days.
NC730.K57 2011741.2—dc22
2010036712Published by Da Capo PressA Member of the Perseus Books Groupwww.dacapopress.com
Da Capo Press books are available at special discounts for bulk purchases in the U.S. by corporations, institutions, and other organizations. For more information, please contact the Special Markets Department at the Perseus Books Group, 2300 ChestnutStreet, Suite 200, Philadelphia, PA 19103, or call (800) 810-4145, ext. 5000, or e-mail [email protected].
10 9 8 7 6 5 4 3 2 1
Kistler 00 FM_Kistler You Can Draw 10/25/10 11:27 AM Page iv

This book is dedicated to my dear sister Mari
(http://mari-kistler.memory-of.com/About.aspx)
Mari, LOOK! You’re in my book just like I promised you!
Kistler 00 FM_Kistler You Can Draw 10/21/10 11:56 AM Page v
vi
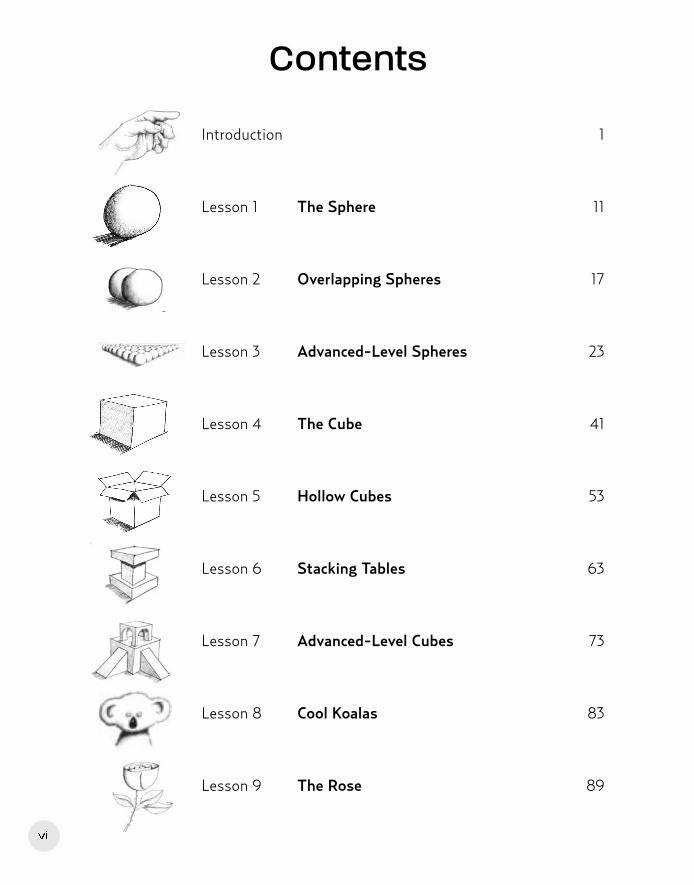
Introduction 1
Lesson 1 The Sphere 11
Lesson 2 Overlapping Spheres 17
Lesson 3 Advanced-Level Spheres 23
Lesson 4 The Cube 41
Lesson 5 Hollow Cubes 53
Lesson 6 Stacking Tables 63
Lesson 7 Advanced-Level Cubes 73
Lesson 8 Cool Koalas 83
Lesson 9 The Rose 89
Contents
Kistler 00 FM_Kistler You Can Draw 10/21/10 11:56 AM Page vi
CONTENTS vii
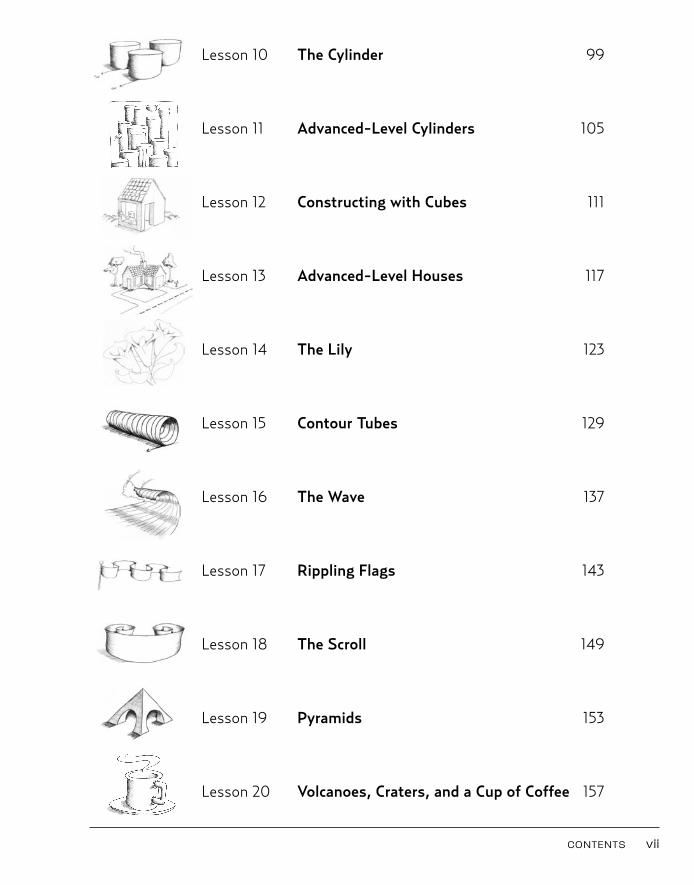
Lesson 10 The Cylinder 99
Lesson 11 Advanced-Level Cylinders 105
Lesson 12 Constructing with Cubes 111
Lesson 13 Advanced-Level Houses 117
Lesson 14 The Lily 123
Lesson 15 Contour Tubes 129
Lesson 16 The Wave 137
Lesson 17 Rippling Flags 143
Lesson 18 The Scroll 149
Lesson 19 Pyramids 153
Lesson 20 Volcanoes, Craters, and a Cup of Coffee 157
Kistler 00 FM_Kistler You Can Draw 10/21/10 11:56 AM Page vii
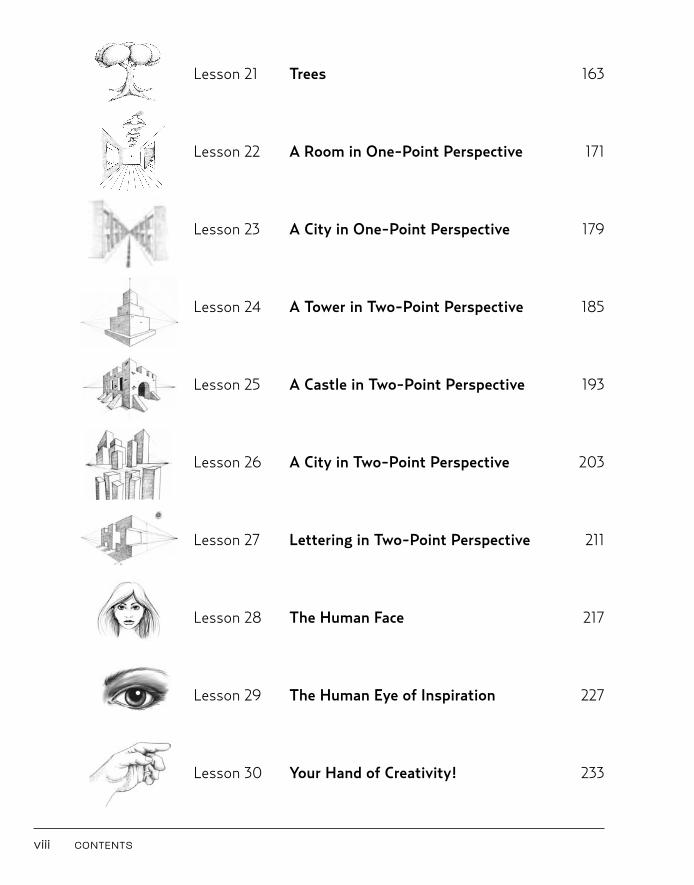
Lesson 21 Trees 163
Lesson 22 A Room in One-Point Perspective 171
Lesson 23 A City in One-Point Perspective 179
Lesson 24 A Tower in Two-Point Perspective 185
Lesson 25 A Castle in Two-Point Perspective 193
Lesson 26 A City in Two-Point Perspective 203
Lesson 27 Lettering in Two-Point Perspective 211
Lesson 28 The Human Face 217
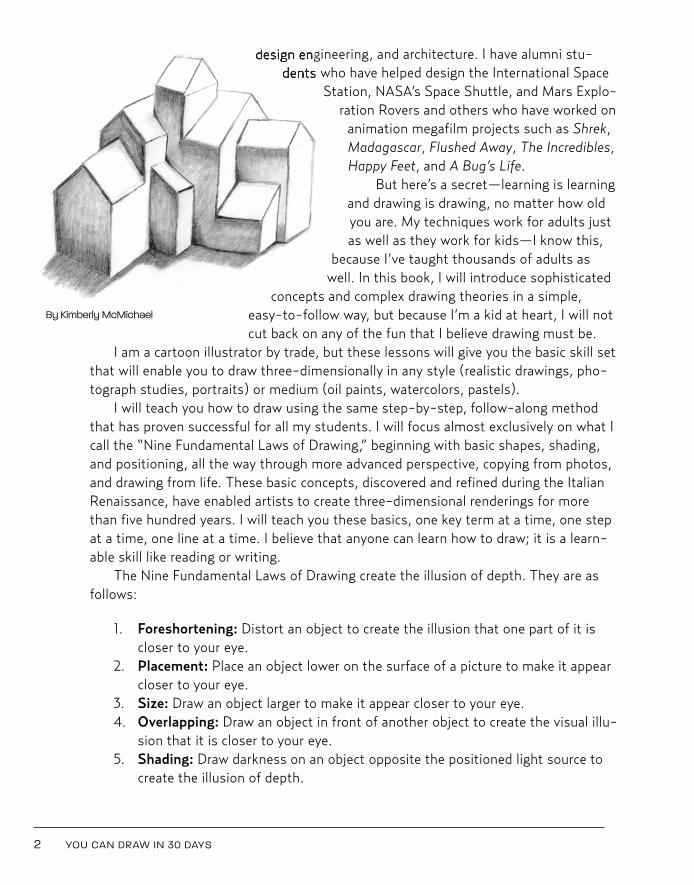
Lesson 29 The Human Eye of Inspiration 227
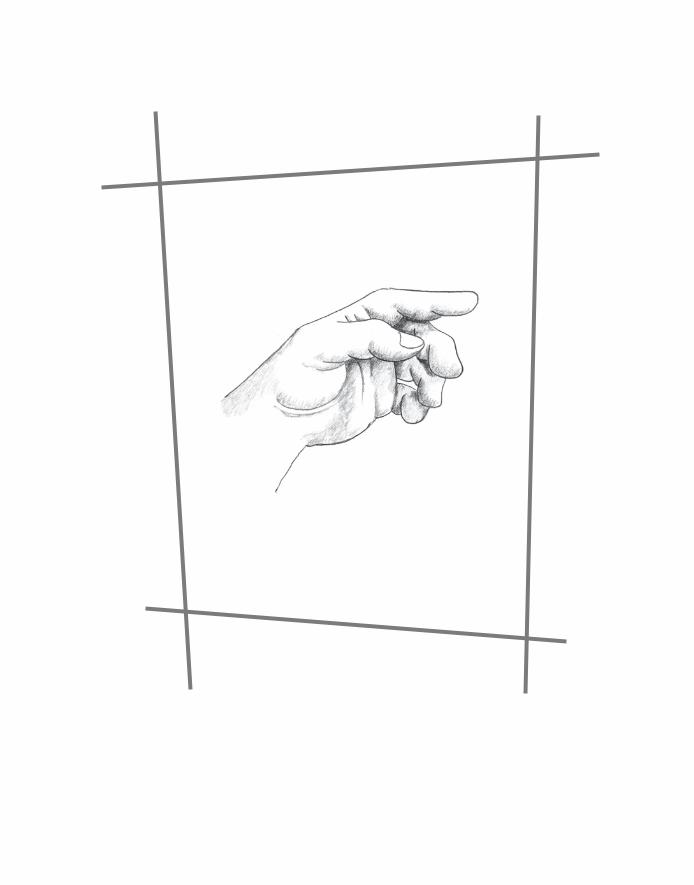
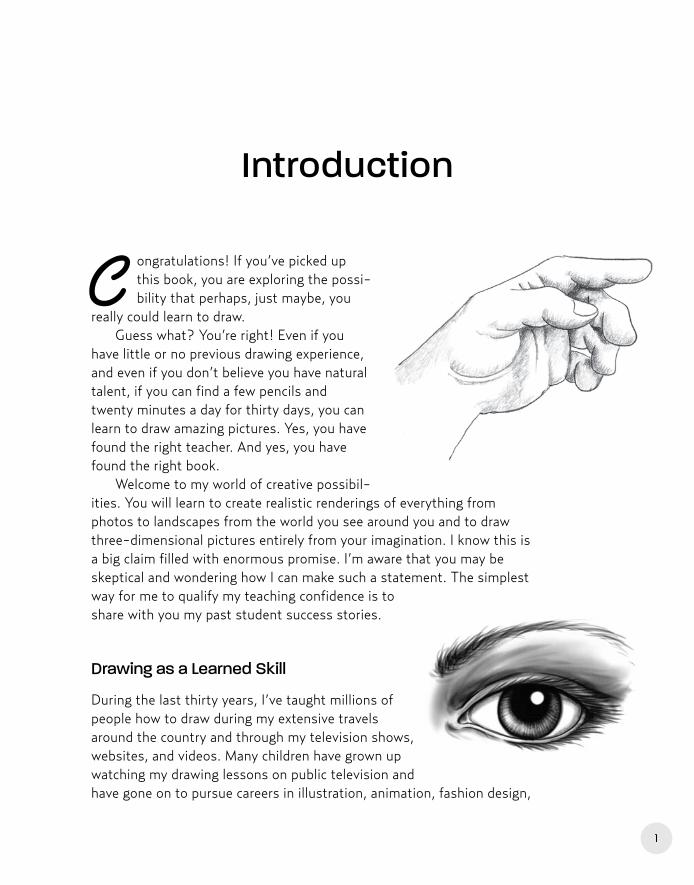
Lesson 30 Your Hand of Creativity! 233
viii CONTENTS
Kistler 00 FM_Kistler You Can Draw 10/21/10 4:26 PM Page viii
1
C ongratulations! If you’ve picked upthis book, you are exploring the possi-bility that perhaps, just maybe, you
really could learn to draw.Guess what? You’re right! Even if you
have little or no previous drawing experience,and even if you don’t believe you have naturaltalent, if you can find a few pencils andtwenty minutes a day for thirty days, you canlearn to draw amazing pictures. Yes, you havefound the right teacher. And yes, you havefound the right book.
Welcome to my world of creative possibil-ities. You will learn to create realistic renderings of everything fromphotos to landscapes from the world you see around you and to drawthree-dimensional pictures entirely from your imagination. I know this isa big claim filled with enormous promise. I’m aware that you may beskeptical and wondering how I can make such a statement. The simplestway for me to qualify my teaching confidence is toshare with you my past student success stories.
Drawing as a Learned Skill
During the last thirty years, I’ve taught millions ofpeople how to draw during my extensive travelsaround the country and through my television shows,websites, and videos. Many children have grown upwatching my drawing lessons on public television andhave gone on to pursue careers in illustration, animation, fashion design,
Introduction
Kistler 00 FM_Kistler You Can Draw 10/21/10 11:56 AM Page 1
2 YOU CAN DRAW IN 30 DAYS
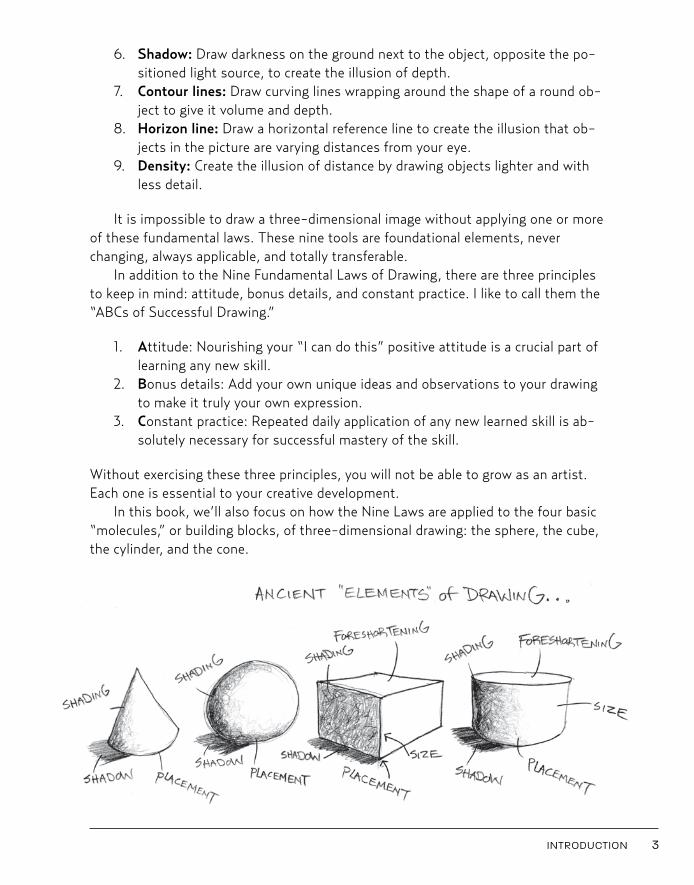
design engineering, and architecture. I have alumni stu-dents who have helped design the International Space
Station, NASA’s Space Shuttle, and Mars Explo-ration Rovers and others who have worked on
animation megafilm projects such as Shrek,Madagascar, Flushed Away, The Incredibles,Happy Feet, and A Bug’s Life.
But here’s a secret—learning is learningand drawing is drawing, no matter how oldyou are. My techniques work for adults justas well as they work for kids—I know this,
because I’ve taught thousands of adults aswell. In this book, I will introduce sophisticated
concepts and complex drawing theories in a simple,easy-to-follow way, but because I’m a kid at heart, I will notcut back on any of the fun that I believe drawing must be.
I am a cartoon illustrator by trade, but these lessons will give you the basic skill setthat will enable you to draw three-dimensionally in any style (realistic drawings, pho-tograph studies, portraits) or medium (oil paints, watercolors, pastels).
I will teach you how to draw using the same step-by-step, follow-along methodthat has proven successful for all my students. I will focus almost exclusively on what Icall the “Nine Fundamental Laws of Drawing,” beginning with basic shapes, shading,and positioning, all the way through more advanced perspective, copying from photos,and drawing from life. These basic concepts, discovered and refined during the ItalianRenaissance, have enabled artists to create three-dimensional renderings for morethan five hundred years. I will teach you these basics, one key term at a time, one stepat a time, one line at a time. I believe that anyone can learn how to draw; it is a learn-able skill like reading or writing.
The Nine Fundamental Laws of Drawing create the illusion of depth. They are asfollows:
1. Foreshortening: Distort an object to create the illusion that one part of it iscloser to your eye.
2. Placement: Place an object lower on the surface of a picture to make it appearcloser to your eye.
3. Size: Draw an object larger to make it appear closer to your eye.4. Overlapping: Draw an object in front of another object to create the visual illu-
sion that it is closer to your eye. 5. Shading: Draw darkness on an object opposite the positioned light source to
create the illusion of depth.
By Kimberly McMichael
Kistler 00 FM_Kistler You Can Draw 10/21/10 4:26 PM Page 2
6. Shadow: Draw darkness on the ground next to the object, opposite the po-sitioned light source, to create the illusion of depth.
7. Contour lines: Draw curving lines wrapping around the shape of a round ob-ject to give it volume and depth.
8. Horizon line: Draw a horizontal reference line to create the illusion that ob-jects in the picture are varying distances from your eye.
9. Density: Create the illusion of distance by drawing objects lighter and withless detail.
It is impossible to draw a three-dimensional image without applying one or moreof these fundamental laws. These nine tools are foundational elements, neverchanging, always applicable, and totally transferable.
In addition to the Nine Fundamental Laws of Drawing, there are three principlesto keep in mind: attitude, bonus details, and constant practice. I like to call them the“ABCs of Successful Drawing.”
1. Attitude: Nourishing your “I can do this” positive attitude is a crucial part oflearning any new skill.
2. Bonus details: Add your own unique ideas and observations to your drawingto make it truly your own expression.
3. Constant practice: Repeated daily application of any new learned skill is ab-solutely necessary for successful mastery of the skill.
Without exercising these three principles, you will not be able to grow as an artist.Each one is essential to your creative development.
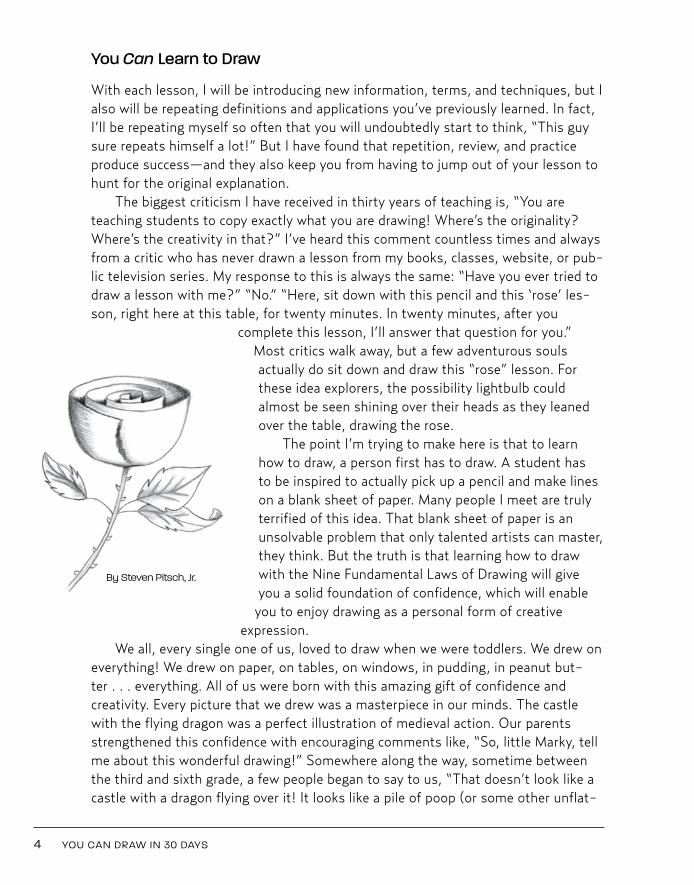
In this book, we’ll also focus on how the Nine Laws are applied to the four basic“molecules,” or building blocks, of three-dimensional drawing: the sphere, the cube,the cylinder, and the cone.
INTRODUCTION 3
Kistler 00 FM_Kistler You Can Draw 10/21/10 11:57 AM Page 3
You Can Learn to Draw
With each lesson, I will be introducing new information, terms, and techniques, but Ialso will be repeating definitions and applications you’ve previously learned. In fact,I’ll be repeating myself so often that you will undoubtedly start to think, “This guysure repeats himself a lot!” But I have found that repetition, review, and practiceproduce success—and they also keep you from having to jump out of your lesson tohunt for the original explanation.
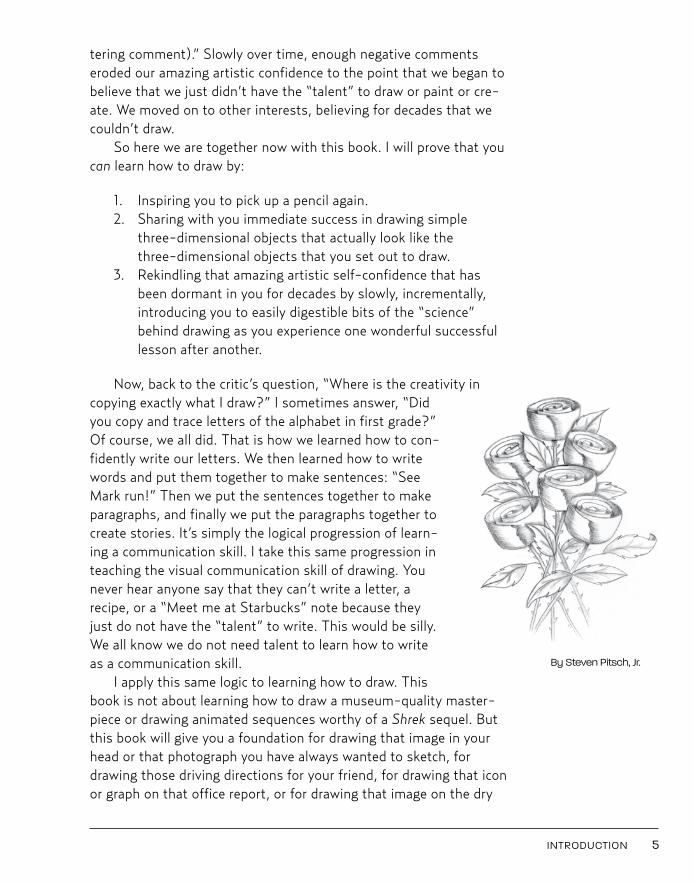
The biggest criticism I have received in thirty years of teaching is, “You areteaching students to copy exactly what you are drawing! Where’s the originality?Where’s the creativity in that?” I’ve heard this comment countless times and alwaysfrom a critic who has never drawn a lesson from my books, classes, website, or pub-lic television series. My response to this is always the same: “Have you ever tried todraw a lesson with me?” “No.” “Here, sit down with this pencil and this ‘rose’ les-son, right here at this table, for twenty minutes. In twenty minutes, after you
complete this lesson, I’ll answer that question for you.”Most critics walk away, but a few adventurous soulsactually do sit down and draw this “rose” lesson. Forthese idea explorers, the possibility lightbulb couldalmost be seen shining over their heads as they leanedover the table, drawing the rose.
The point I’m trying to make here is that to learnhow to draw, a person first has to draw. A student has to be inspired to actually pick up a pencil and make lineson a blank sheet of paper. Many people I meet are trulyterrified of this idea. That blank sheet of paper is anunsolvable problem that only talented artists can master,they think. But the truth is that learning how to drawwith the Nine Fundamental Laws of Drawing will giveyou a solid foundation of confidence, which will enable
you to enjoy drawing as a personal form of creativeexpression.
We all, every single one of us, loved to draw when we were toddlers. We drew oneverything! We drew on paper, on tables, on windows, in pudding, in peanut but-ter . . . everything. All of us were born with this amazing gift of confidence andcreativity. Every picture that we drew was a masterpiece in our minds. The castlewith the flying dragon was a perfect illustration of medieval action. Our parentsstrengthened this confidence with encouraging comments like, “So, little Marky, tellme about this wonderful drawing!” Somewhere along the way, sometime betweenthe third and sixth grade, a few people began to say to us, “That doesn’t look like acastle with a dragon flying over it! It looks like a pile of poop (or some other unflat-
4 YOU CAN DRAW IN 30 DAYS
By Steven Pitsch, Jr.
Kistler 00 FM_Kistler You Can Draw 10/25/10 10:36 AM Page 4
tering comment).” Slowly over time, enough negative commentseroded our amazing artistic confidence to the point that we began tobelieve that we just didn’t have the “talent” to draw or paint or cre-ate. We moved on to other interests, believing for decades that wecouldn’t draw.
So here we are together now with this book. I will prove that youcan learn how to draw by:
1. Inspiring you to pick up a pencil again.2. Sharing with you immediate success in drawing simple
three-dimensional objects that actually look like the three-dimensional objects that you set out to draw.
3. Rekindling that amazing artistic self-confidence that hasbeen dormant in you for decades by slowly, incrementally,introducing you to easily digestible bits of the “science” behind drawing as you experience one wonderful successfullesson after another.
Now, back to the critic’s question, “Where is the creativity incopying exactly what I draw?” I sometimes answer, “Didyou copy and trace letters of the alphabet in first grade?”Of course, we all did. That is how we learned how to con-fidently write our letters. We then learned how to writewords and put them together to make sentences: “SeeMark run!” Then we put the sentences together to makeparagraphs, and finally we put the paragraphs together tocreate stories. It’s simply the logical progression of learn-ing a communication skill. I take this same progression inteaching the visual communication skill of drawing. Younever hear anyone say that they can’t write a letter, arecipe, or a “Meet me at Starbucks” note because theyjust do not have the “talent” to write. This would be silly.We all know we do not need talent to learn how to writeas a communication skill.
I apply this same logic to learning how to draw. Thisbook is not about learning how to draw a museum-quality master-piece or drawing animated sequences worthy of a Shrek sequel. Butthis book will give you a foundation for drawing that image in yourhead or that photograph you have always wanted to sketch, fordrawing those driving directions for your friend, for drawing that iconor graph on that office report, or for drawing that image on the dry
INTRODUCTION 5
By Steven Pitsch, Jr.
Kistler 00 FM_Kistler You Can Draw 10/25/10 10:36 AM Page 5
erase board in a meeting without the obligatory, self-deprecating “Sorry this looksso bad. I never could draw.”
Let’s follow your historical path a bit longer. You were in a high school or collegeart class, and the teacher put a pile of objects on the “still life” table and said, “Drawthat. You have thirty minutes.” That’s it! No instruction, no road map, except per-haps a few vague comments about “seeing” the negative spaces surrounding thepile of objects. So you gave it a valiant effort, you drew your heart out, and despitethe art teacher’s wonderful supportive encouraging comments, “Great effort! Goodjob! We’ll do this one hundred more times and you’ll nail it!” you saw the result ofyour effort glaring at you from the paper: It looked like a pile of scribbles.
I remember annoying my college art teacher to no end during still life drawingexercises. I’d constantly chatter to neighbors on both sides of my easel. “You know,”I’d whisper, “if you try drawing that apple lower on the paper, and the banana higheron the paper, you would make the apple look closer, just like it does on the still lifetable.”
The prevailing methods of teaching Drawing 101 force the student to figure outhow to draw through a long process of trial and error. This method dates back to 1938 and an extraordinary book by Kimon Nicolaides, The Natural Way to Draw(a book you should add to your library!). In it he states “ . . . the sooner you makeyour first 5,000 mistakes, the sooner you will learn how to correct them.” Thisapproach just doesn’t make sense to me. With all due respect to this book as a pro-found work, a classic in teaching art students how to draw . . . but, Why? I ask. Why discourage students with such a daunting task of failing 5,000 times when Ican show them in just twenty minutes how to succeed? Why not build up their skill,confidence, and interest all at the same time?
The thirty-day method in this book will increase your success, inspire your prac-tice, build your confidence, and nourish your interest in drawing for life.
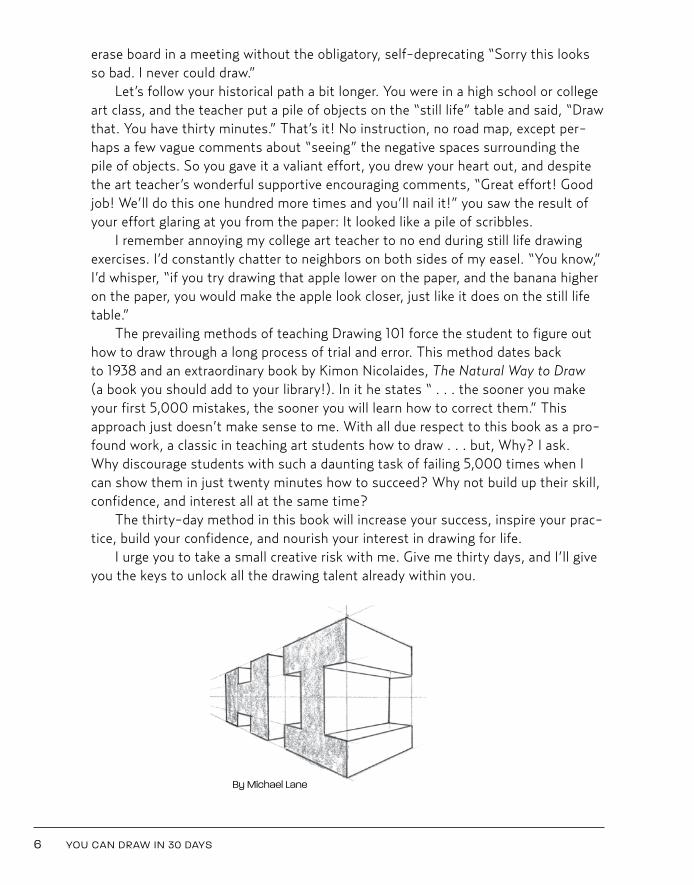
I urge you to take a small creative risk with me. Give me thirty days, and I’ll giveyou the keys to unlock all the drawing talent already within you.
6 YOU CAN DRAW IN 30 DAYS
By Michael Lane
Kistler 00 FM_Kistler You Can Draw 10/21/10 4:26 PM Page 6
What You’ll Need
1. This book.2. A spiral-bound sketchbook or blank journal with at least fifty blank pages.3. A pencil (for now just grab any pencil within reach).4. A “drawing bag” to hold your sketchbook and pencils (anything will do: a
recyclable grocery cloth bag, a book backpack, a book bag with handles. Youwant to make it very easy to quickly grab your drawing bag whenever youhave a spare couple of minutes to scratch out a few drawings).
5. A day planner or calendar (probably the most important item in this check-list). You will need to strategically and methodically carve out a smalltwenty-minute chunk of time each day to draw with me. If you plan now, today, you will be able to follow through with our thirty-day plan.
Step One
Get out your planner and a pencil—let’s schedule some drawing time for just thisfirst week. I know your days are intensely busy, so we’ll get creative. Imagine thatthe pencil in your hand is a steel chisel and you’re going to carve out one twenty-minute chunk each day for seven days. If this is too difficult, try chiseling out twochunks, ten minutes each. Ideally, these time chunks will be at your desk, yourkitchen table, or some fairly quiet table space. My goal is to get you to commit toone week with me. I know that once you accomplish the first seven days (seven les-sons), you’ll be totally hooked. Immediate success is a powerful motivator. If you candraw daily for a week, you’ll successfully finish this book in a month. However, it isperfectly acceptable to take a more leisurely approach and focus on only a few les-sons a week, spending much more time on the lesson steps and the fun bonuschallenges I introduce at the end of each lesson. I’ve had a few students do amazingwork by completing just one lesson a week. It’s totally up to you. The key is this:Just don’t give up.
Step Two
Start drawing! Sit down at a table with your drawing bag. Take a nice deep breath,smile (this is really going to be fun), open your bag, and begin.
INTRODUCTION 7
Kistler 00 FM_Kistler You Can Draw 10/25/10 10:36 AM Page 7
Test Yourself
Okay, enough about my teaching philosophy and method-ology; let’s put the pencil to the paper and start drawing.
Let’s begin with a little pretest so that you will have areference point later on.
I want you to draw a few images for me. Considerthese “warm-up” scribbles. Relax. You are the only personwho ever has to see these. I want you to draw the imagesthat follow in order to give yourself a baseline skill assess-ment of where you are now, as compared to where you willbe in thirty days. Even if you are totally tempted to skipthis part (because no one will ever know!), humor me,humor yourself, and draw these images. In thirty days youwill be glad you did.
Open your sketchbook. At the top of the first pagewrite “Day 1 of 30, Introduction: The pretest,” today’sdate, the time, and your location. (Repeat this informa-tion, with the appropriate lesson number and title, at thebeginning of each of the lessons.)
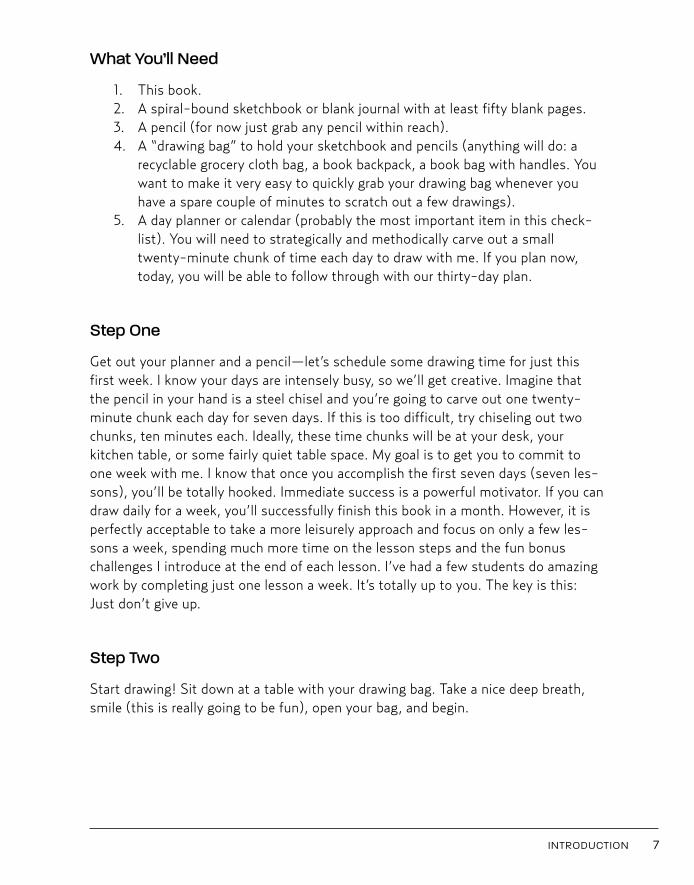
Now spend two minutes drawing a house. Just fromyour imagination, don’t look at any pictures. Next, spendtwo minutes drawing an airplane. And finally, spend twominutes drawing a bagel.
I trust you are not completely stressed from that. Kindof fun? I want you to keep these warm-up drawings inyour sketchbook. You will be able to compare these warm-up drawings with the advanced lessons later in this book.You are going to be amazed with your phenomenalimprovement!
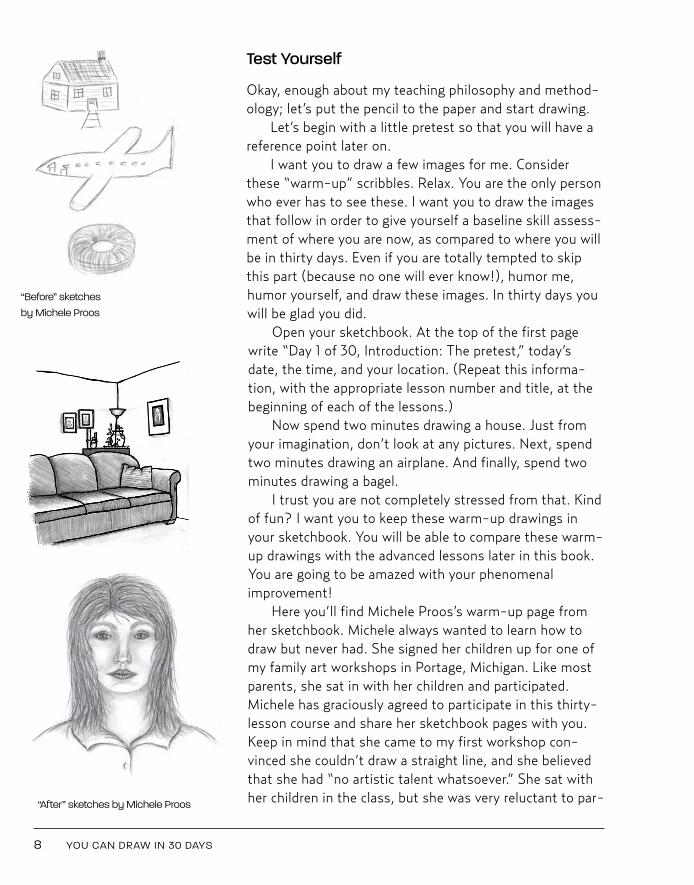
Here you’ll find Michele Proos’s warm-up page fromher sketchbook. Michele always wanted to learn how todraw but never had. She signed her children up for one ofmy family art workshops in Portage, Michigan. Like mostparents, she sat in with her children and participated.Michele has graciously agreed to participate in this thirty-lesson course and share her sketchbook pages with you.Keep in mind that she came to my first workshop con-vinced she couldn’t draw a straight line, and she believedthat she had “no artistic talent whatsoever.” She sat withher children in the class, but she was very reluctant to par-
8 YOU CAN DRAW IN 30 DAYS
“Before” sketches by Michele Proos
“After” sketches by Michele Proos
Kistler 00 FM_Kistler You Can Draw 10/25/10 10:36 AM Page 8
ticipate. As soon as I met her, I knew she was the perfect person to represent thepopulation of adult readers that I am hoping to reach with this book: the person whothinks she can’t draw and thinks she is totally void of talent.
I explained this “You Can Draw in 30 Days!” book project to her and invited herto be my laboratory student. In fact, as I was explaining this new book project to her,other parents in the workshop overheard, and all wanted to participate! A veryenthusiastic seventy-two-year-old grandfather was so impressed with what he
INTRODUCTION 9
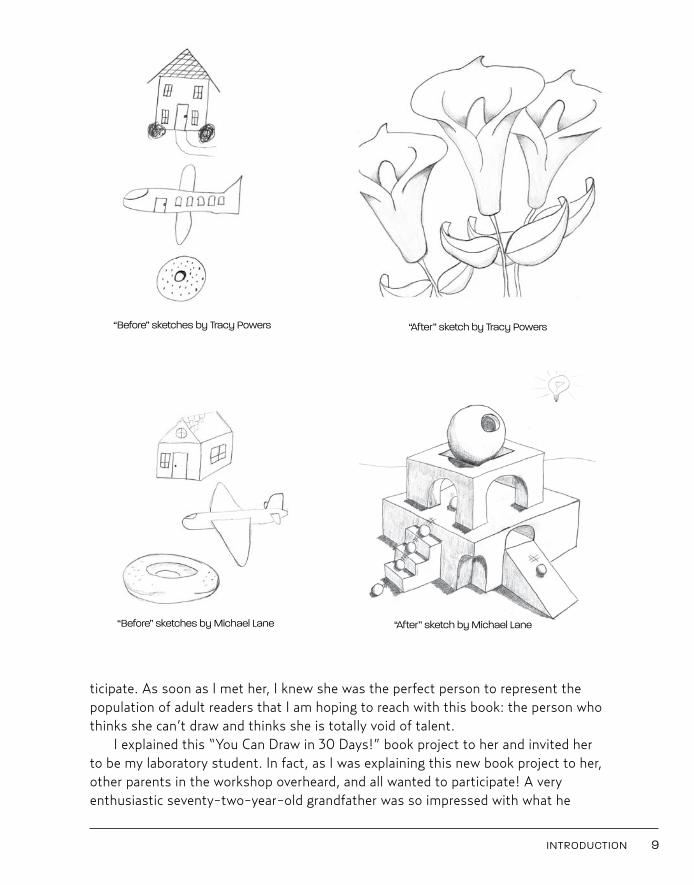
“Before” sketches by Tracy Powers “After” sketch by Tracy Powers
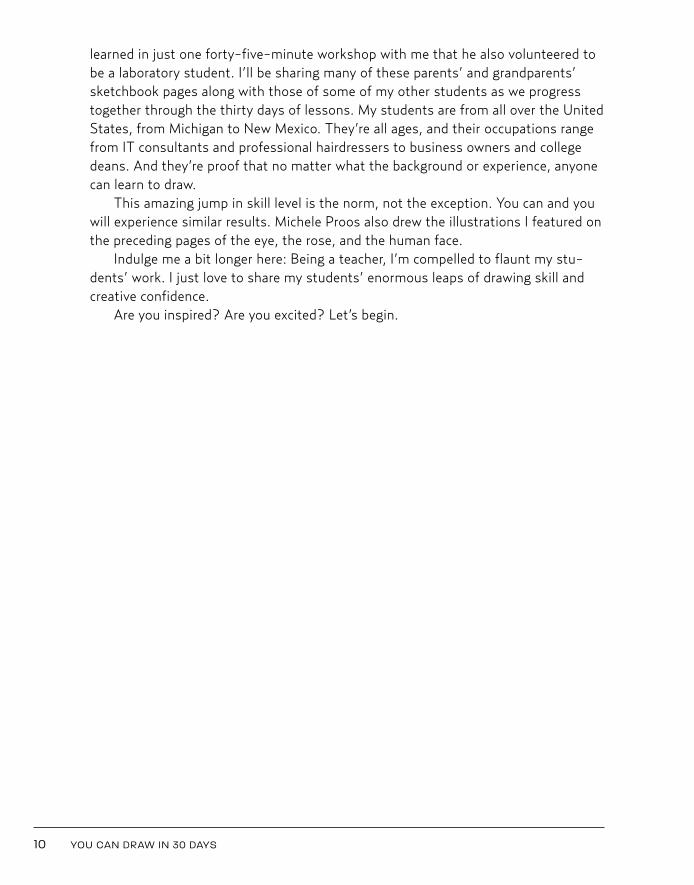
“Before” sketches by Michael Lane “After” sketch by Michael Lane
Kistler 00 FM_Kistler You Can Draw 10/21/10 11:57 AM Page 9
10 YOU CAN DRAW IN 30 DAYS
learned in just one forty-five-minute workshop with me that he also volunteered tobe a laboratory student. I’ll be sharing many of these parents’ and grandparents’sketchbook pages along with those of some of my other students as we progresstogether through the thirty days of lessons. My students are from all over the UnitedStates, from Michigan to New Mexico. They’re all ages, and their occupations rangefrom IT consultants and professional hairdressers to business owners and collegedeans. And they’re proof that no matter what the background or experience, anyonecan learn to draw.
This amazing jump in skill level is the norm, not the exception. You can and youwill experience similar results. Michele Proos also drew the illustrations I featured onthe preceding pages of the eye, the rose, and the human face.
Indulge me a bit longer here: Being a teacher, I’m compelled to flaunt my stu-dents’ work. I just love to share my students’ enormous leaps of drawing skill andcreative confidence.
Are you inspired? Are you excited? Let’s begin.
Kistler 00 FM_Kistler You Can Draw 10/21/10 11:57 AM Page 10

11
L E S S O N 1
THE SPHERE
11
Kistler 01_Kistler You Can Draw 10/21/10 12:00 PM Page 11
L earning how to draw is in large part learning how to control light in your pic-ture. In this lesson you will learn how to identify where your light source isand where to shade objects in your drawing. Let’s draw a three-dimensional
sphere.
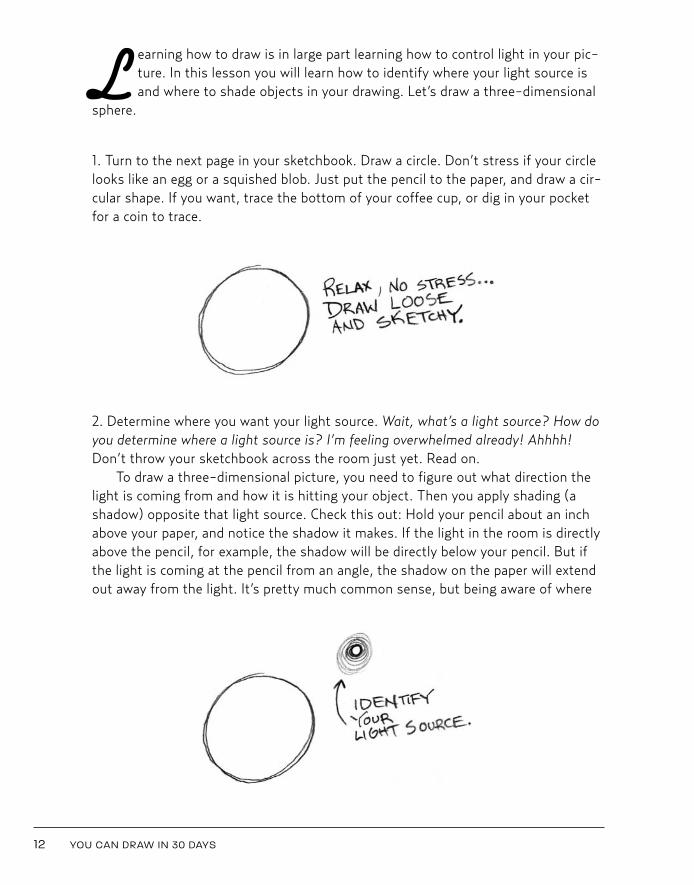
1. Turn to the next page in your sketchbook. Draw a circle. Don’t stress if your circlelooks like an egg or a squished blob. Just put the pencil to the paper, and draw a cir-cular shape. If you want, trace the bottom of your coffee cup, or dig in your pocketfor a coin to trace.
2. Determine where you want your light source. Wait, what’s a light source? How doyou determine where a light source is? I’m feeling overwhelmed already! Ahhhh!Don’t throw your sketchbook across the room just yet. Read on.
To draw a three-dimensional picture, you need to figure out what direction thelight is coming from and how it is hitting your object. Then you apply shading (ashadow) opposite that light source. Check this out: Hold your pencil about an inchabove your paper, and notice the shadow it makes. If the light in the room is directlyabove the pencil, for example, the shadow will be directly below your pencil. But ifthe light is coming at the pencil from an angle, the shadow on the paper will extendout away from the light. It’s pretty much common sense, but being aware of where
12 YOU CAN DRAW IN 30 DAYS
Kistler 01_Kistler You Can Draw 10/21/10 12:00 PM Page 12
the light is coming from, and going to, is an amazingly effective way of bringing yourdrawings to life. Play around with your pencil and the shadow it makes for a fewminutes, moving it around and up and down. Place one end of the pencil directly onyour paper, and note the way the shadow begins attached to the pencil and is thin-ner and darker than the shadow cast when the pencil is in the air. The shadow iscalled (three guesses) a cast shadow.
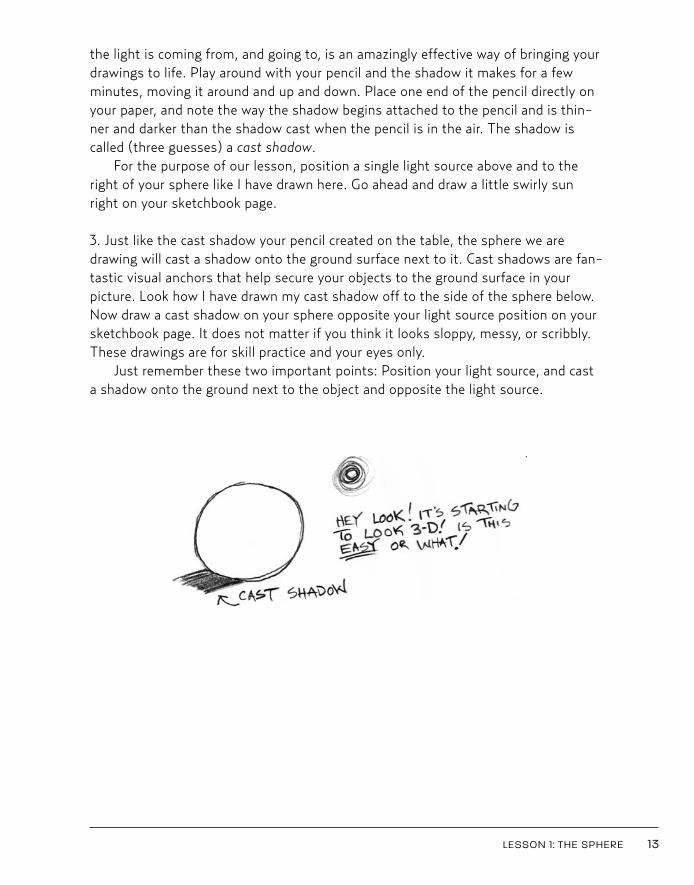
For the purpose of our lesson, position a single light source above and to theright of your sphere like I have drawn here. Go ahead and draw a little swirly sunright on your sketchbook page.
3. Just like the cast shadow your pencil created on the table, the sphere we aredrawing will cast a shadow onto the ground surface next to it. Cast shadows are fan-tastic visual anchors that help secure your objects to the ground surface in yourpicture. Look how I have drawn my cast shadow off to the side of the sphere below.Now draw a cast shadow on your sphere opposite your light source position on yoursketchbook page. It does not matter if you think it looks sloppy, messy, or scribbly.These drawings are for skill practice and your eyes only.
Just remember these two important points: Position your light source, and casta shadow onto the ground next to the object and opposite the light source.
LESSON 1: THE SPHERE 13
Kistler 01_Kistler You Can Draw 10/21/10 12:00 PM Page 13
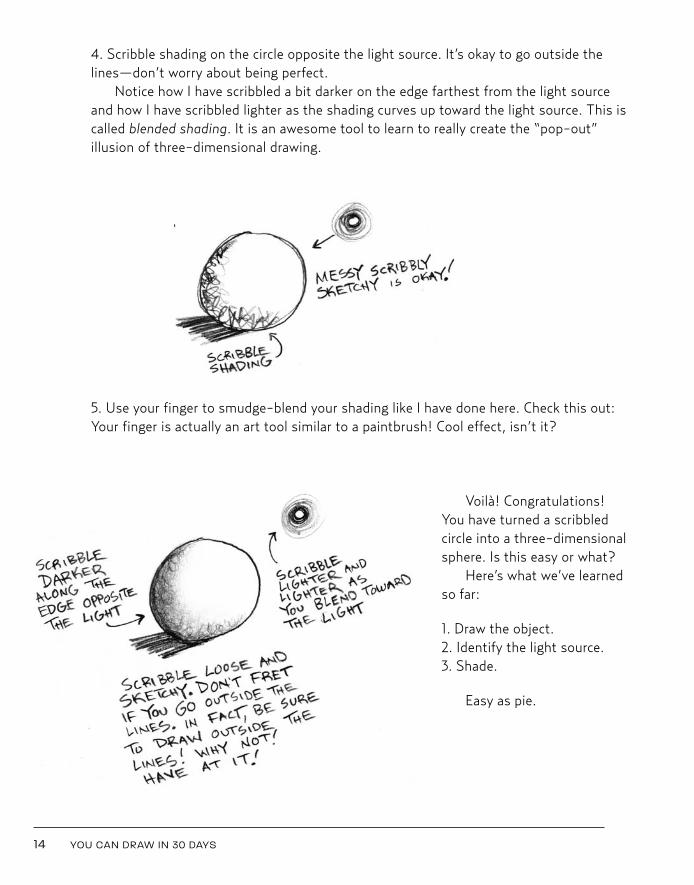
4. Scribble shading on the circle opposite the light source. It’s okay to go outside thelines—don’t worry about being perfect.
Notice how I have scribbled a bit darker on the edge farthest from the light sourceand how I have scribbled lighter as the shading curves up toward the light source. This iscalled blended shading. It is an awesome tool to learn to really create the “pop-out”illusion of three-dimensional drawing.
5. Use your finger to smudge-blend your shading like I have done here. Check this out:Your finger is actually an art tool similar to a paintbrush! Cool effect, isn’t it?
Voilà! Congratulations!You have turned a scribbledcircle into a three-dimensionalsphere. Is this easy or what?
Here’s what we’ve learnedso far:
1. Draw the object.2. Identify the light source.3. Shade.
Easy as pie.
14 YOU CAN DRAW IN 30 DAYS
Kistler 01_Kistler You Can Draw 10/21/10 12:00 PM Page 14

Lesson 1: Bonus Challenge
One important goal of this book is to teach you how to apply theselessons to drawings of “real-world” objects. In future lessons we willbe applying the concepts you have learned in drawing this three-dimensional sphere to drawing fun interesting objects you see in theworld around you. Whether you want to draw a colorful bowl of fruiton a table or a sketch of a family member in real life or from a photo-graph, you will have the tools to do it.
Let’s start with drawing a piece of fruit, an apple. In followinglessons we will tackle more challenging objects, such as buildings andpeople.
Take a look at this photograph of an apple with the light sourcelow and on the right.
LESSON 1: THE SPHERE 15
Photo by Jonathan Little
Kistler 01_Kistler You Can Draw 10/21/10 12:00 PM Page 15
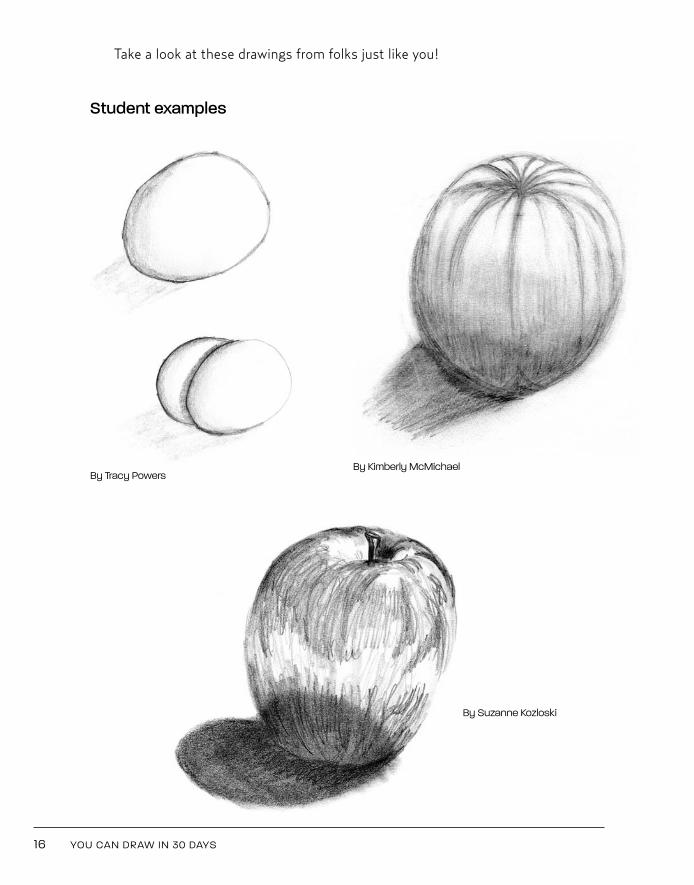
Take a look at these drawings from folks just like you!
Student examples
16 YOU CAN DRAW IN 30 DAYS
By Tracy PowersBy Kimberly McMichael
By Suzanne Kozloski
Kistler 01_Kistler You Can Draw 10/21/10 12:00 PM Page 16
17
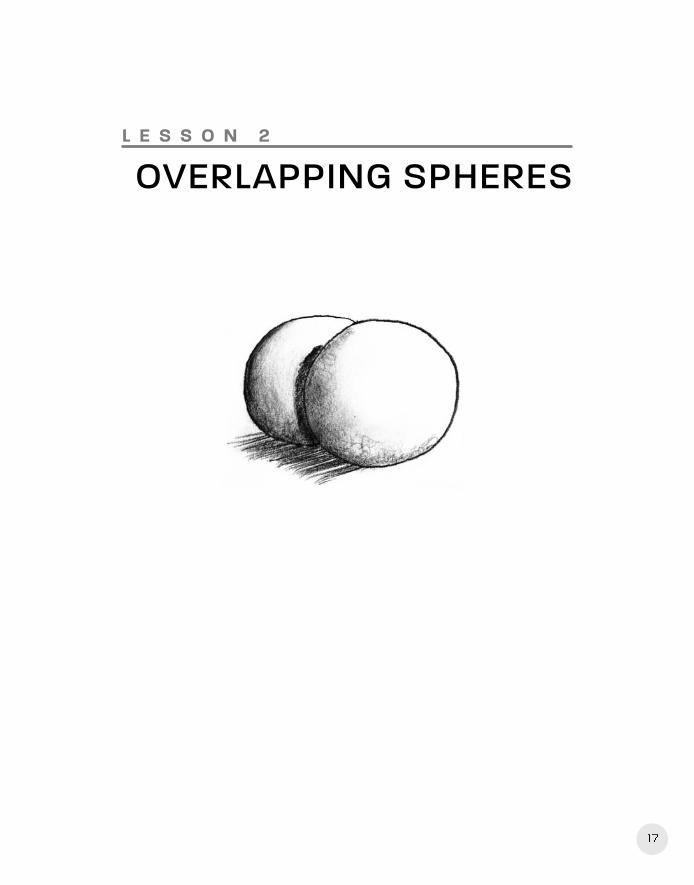
L E S S O N 2
OVERLAPPING SPHERES
Kistler 01_Kistler You Can Draw 10/21/10 12:00 PM Page 17
18 YOU CAN DRAW IN 30 DAYS
Y ou have completed Lesson 1! Way to go! Now, let’s use that sphere skill ofyours to draw globes all over the place.
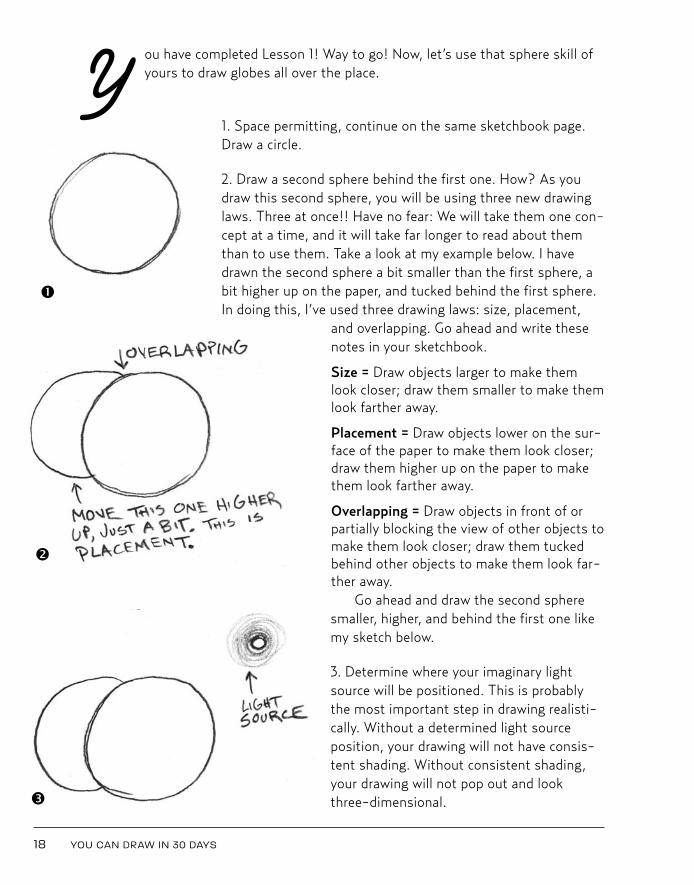
1. Space permitting, continue on the same sketchbook page.Draw a circle.
2. Draw a second sphere behind the first one. How? As youdraw this second sphere, you will be using three new drawinglaws. Three at once!! Have no fear: We will take them one con-cept at a time, and it will take far longer to read about themthan to use them. Take a look at my example below. I havedrawn the second sphere a bit smaller than the first sphere, abit higher up on the paper, and tucked behind the first sphere.In doing this, I’ve used three drawing laws: size, placement,
and overlapping. Go ahead and write thesenotes in your sketchbook.
Size = Draw objects larger to make themlook closer; draw them smaller to make themlook farther away.
Placement = Draw objects lower on the sur-face of the paper to make them look closer;draw them higher up on the paper to makethem look farther away.
Overlapping = Draw objects in front of orpartially blocking the view of other objects tomake them look closer; draw them tuckedbehind other objects to make them look far-ther away.
Go ahead and draw the second spheresmaller, higher, and behind the first one likemy sketch below.
3. Determine where your imaginary lightsource will be positioned. This is probablythe most important step in drawing realisti-cally. Without a determined light sourceposition, your drawing will not have consis-tent shading. Without consistent shading,your drawing will not pop out and lookthree-dimensional.
å
ç
é
Kistler 01_Kistler You Can Draw 10/25/10 11:30 AM Page 18
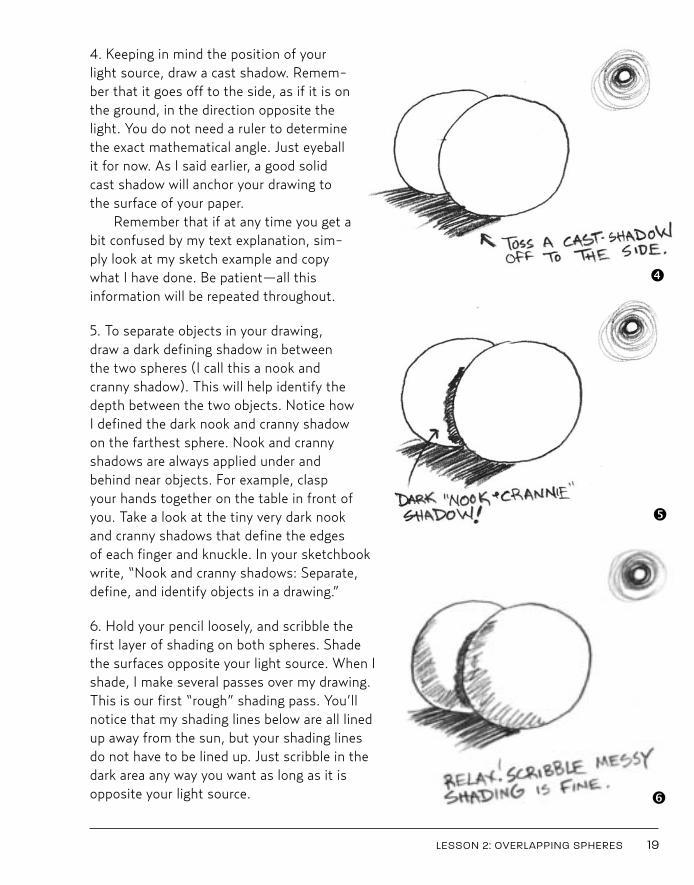
4. Keeping in mind the position of yourlight source, draw a cast shadow. Remem-ber that it goes off to the side, as if it is onthe ground, in the direction opposite thelight. You do not need a ruler to determinethe exact mathematical angle. Just eyeballit for now. As I said earlier, a good solidcast shadow will anchor your drawing tothe surface of your paper.
Remember that if at any time you get abit confused by my text explanation, sim-ply look at my sketch example and copywhat I have done. Be patient—all thisinformation will be repeated throughout.
5. To separate objects in your drawing,draw a dark defining shadow in betweenthe two spheres (I call this a nook andcranny shadow). This will help identify thedepth between the two objects. Notice howI defined the dark nook and cranny shadowon the farthest sphere. Nook and crannyshadows are always applied under andbehind near objects. For example, claspyour hands together on the table in front ofyou. Take a look at the tiny very dark nookand cranny shadows that define the edgesof each finger and knuckle. In your sketchbookwrite, “Nook and cranny shadows: Separate,define, and identify objects in a drawing.”
6. Hold your pencil loosely, and scribble thefirst layer of shading on both spheres. Shadethe surfaces opposite your light source. When Ishade, I make several passes over my drawing.This is our first “rough” shading pass. You’llnotice that my shading lines below are all linedup away from the sun, but your shading linesdo not have to be lined up. Just scribble in thedark area any way you want as long as it isopposite your light source.
LESSON 2: OVERLAPPING SPHERES 19
è
ê
ë
Kistler 01_Kistler You Can Draw 10/25/10 11:30 AM Page 19
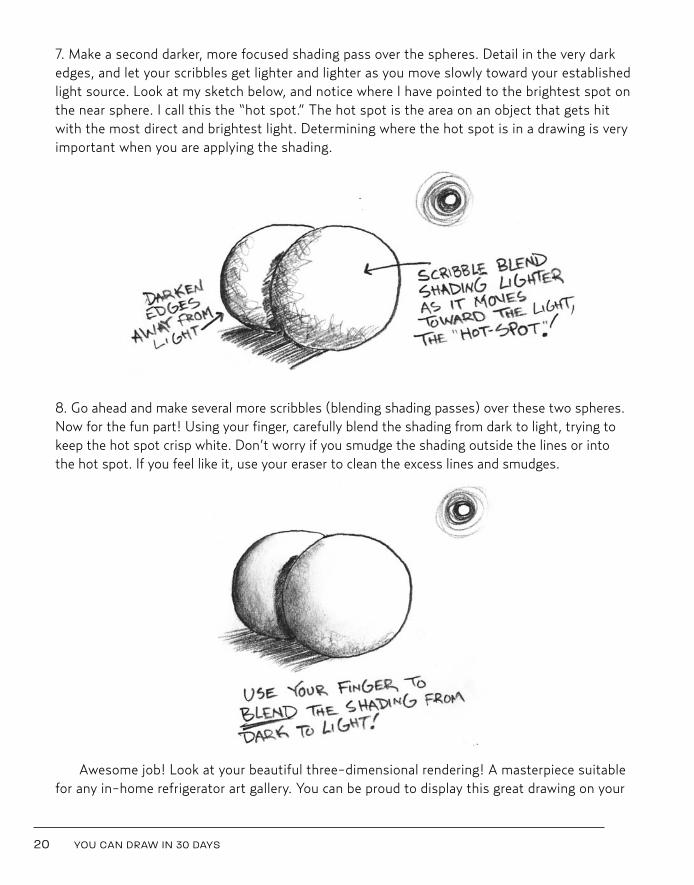
7. Make a second darker, more focused shading pass over the spheres. Detail in the very darkedges, and let your scribbles get lighter and lighter as you move slowly toward your establishedlight source. Look at my sketch below, and notice where I have pointed to the brightest spot onthe near sphere. I call this the “hot spot.” The hot spot is the area on an object that gets hitwith the most direct and brightest light. Determining where the hot spot is in a drawing is veryimportant when you are applying the shading.
8. Go ahead and make several more scribbles (blending shading passes) over these two spheres.Now for the fun part! Using your finger, carefully blend the shading from dark to light, trying tokeep the hot spot crisp white. Don’t worry if you smudge the shading outside the lines or intothe hot spot. If you feel like it, use your eraser to clean the excess lines and smudges.
Awesome job! Look at your beautiful three-dimensional rendering! A masterpiece suitablefor any in-home refrigerator art gallery. You can be proud to display this great drawing on your
20 YOU CAN DRAW IN 30 DAYS
Kistler 01_Kistler You Can Draw 10/25/10 11:30 AM Page 20
fridge, right next to your kids’ work. If you don’t have kids, put this drawing up on yourfridge anyway. You will enjoy seeing it with each trip to the kitchen, not to mention the oohsand ahs you will get from your friends!
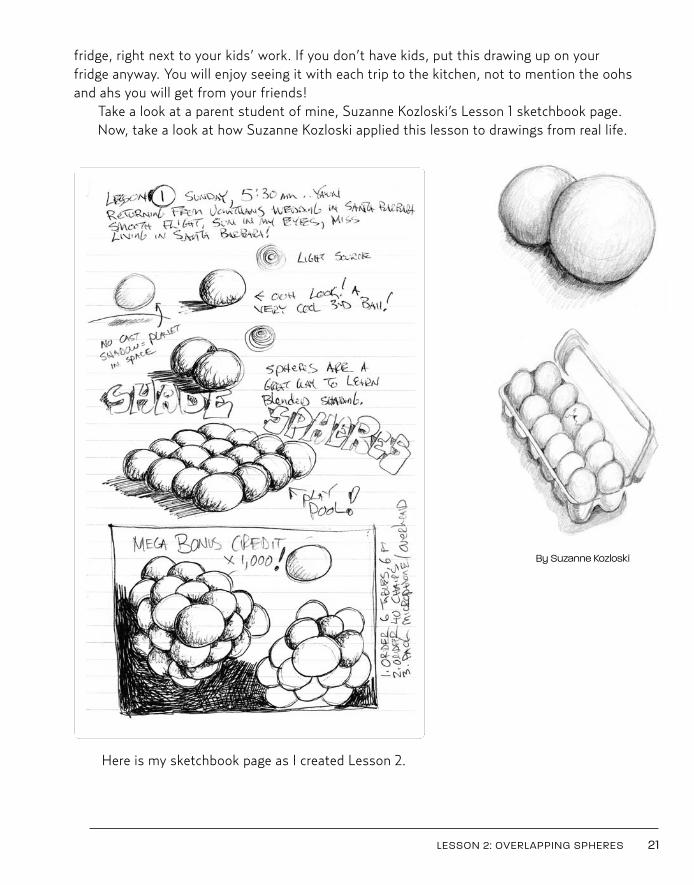
Take a look at a parent student of mine, Suzanne Kozloski’s Lesson 1 sketchbook page.Now, take a look at how Suzanne Kozloski applied this lesson to drawings from real life.
LESSON 2: OVERLAPPING SPHERES 21
Here is my sketchbook page as I created Lesson 2.
By Suzanne Kozloski
Kistler 01_Kistler You Can Draw 10/21/10 12:00 PM Page 21
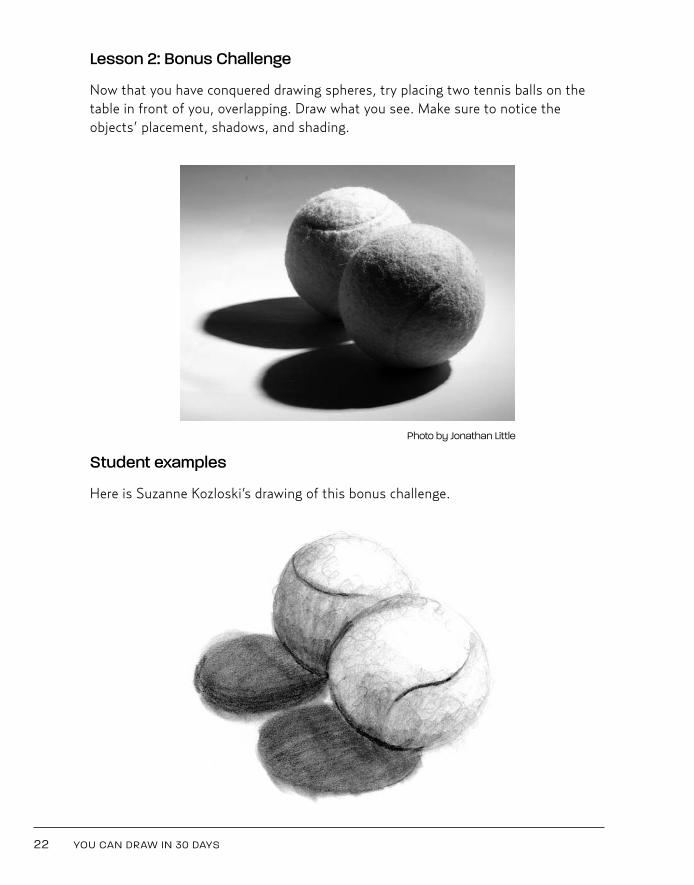
Lesson 2: Bonus Challenge
Now that you have conquered drawing spheres, try placing two tennis balls on thetable in front of you, overlapping. Draw what you see. Make sure to notice theobjects’ placement, shadows, and shading.
Student examples
Here is Suzanne Kozloski’s drawing of this bonus challenge.
22 YOU CAN DRAW IN 30 DAYS
Photo by Jonathan Little
Kistler 01_Kistler You Can Draw 10/21/10 12:00 PM Page 22
23
L E S S O N 3
ADVANCED-LEVEL SPHERES
Kistler 01_Kistler You Can Draw 10/21/10 12:00 PM Page 23
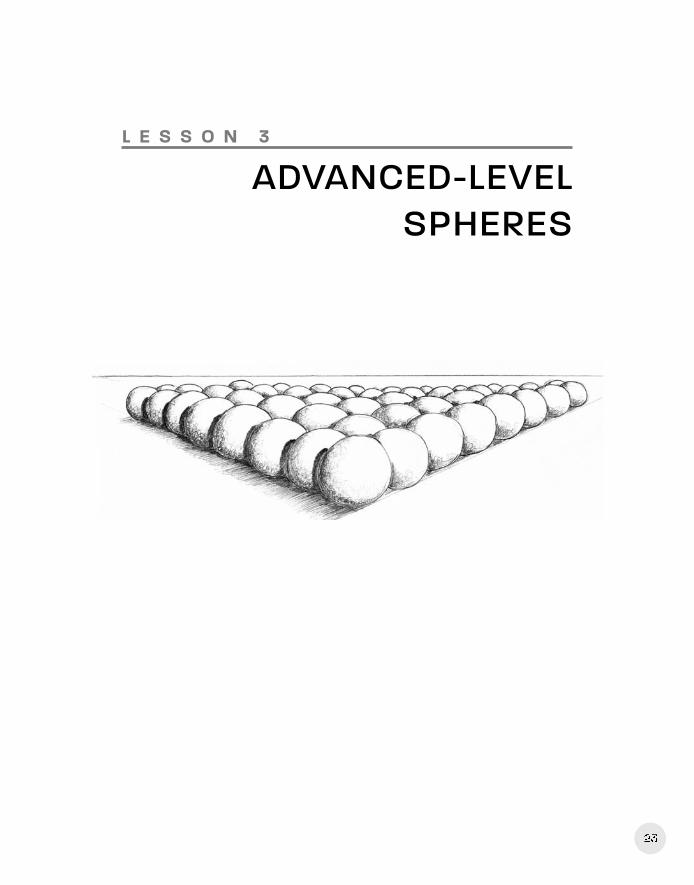
Y ou’re getting into this now, eh? Just think, this is only the third lesson!Imagine how much fun you’ll be having by the thirtieth lesson! Do you wantto push the lesson envelope? This next drawing will take you a bit of time,definitely a full twenty minutes, but if you have the time, you could easily spend an hour or more.
Before you tackle this next challenge, I’m going to suggest that you purchase afew really cool drawing tools. Notice how I waited until now to bring these additionalcosts. This is my sly way of getting some great successes under your belt beforeinundating you with a shopping list of additional drawing supplies. These suppliesare totally optional; you can continue just fine with any regular pencil, any scratchpiece of paper, and your finger as your blended shading tool.
Suggested Products
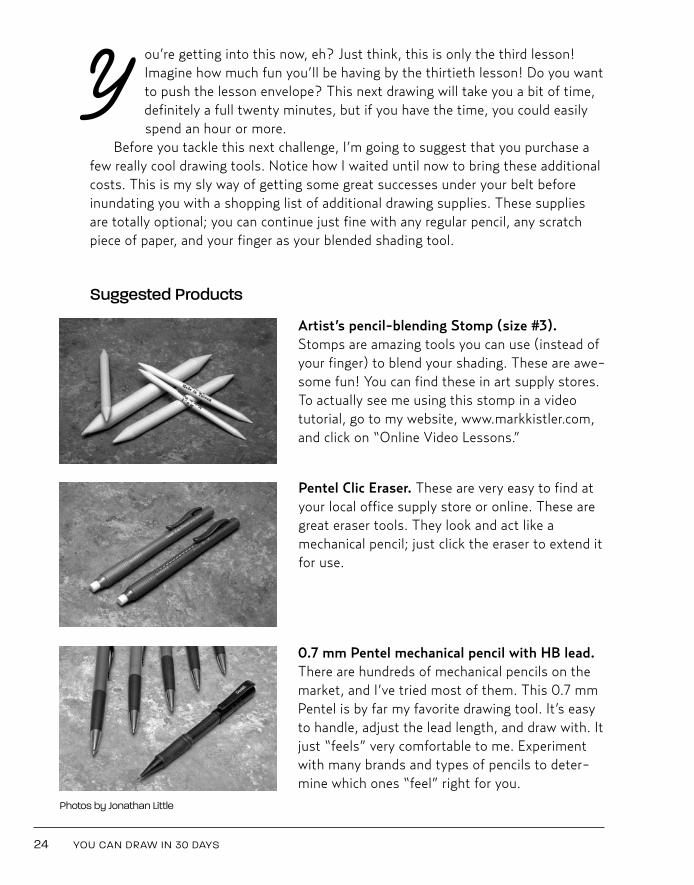
Artist’s pencil-blending Stomp (size #3).Stomps are amazing tools you can use (instead ofyour finger) to blend your shading. These are awe-some fun! You can find these in art supply stores.To actually see me using this stomp in a videotutorial, go to my website, www.markkistler.com,and click on “Online Video Lessons.”
Pentel Clic Eraser. These are very easy to find atyour local office supply store or online. These aregreat eraser tools. They look and act like amechanical pencil; just click the eraser to extend itfor use.
0.7 mm Pentel mechanical pencil with HB lead.There are hundreds of mechanical pencils on themarket, and I’ve tried most of them. This 0.7 mmPentel is by far my favorite drawing tool. It’s easyto handle, adjust the lead length, and draw with. Itjust “feels” very comfortable to me. Experimentwith many brands and types of pencils to deter-mine which ones “feel” right for you.
24 YOU CAN DRAW IN 30 DAYS
Photos by Jonathan Little
Kistler 01_Kistler You Can Draw 10/21/10 12:00 PM Page 24
You see? With just a few additional items in your drawing bag, you have raisedyour lesson enjoyment level exponentially. Enough about products and tools. Let’sget back to producing. Put in your music earbuds and settle in. . . . Let’s draw.
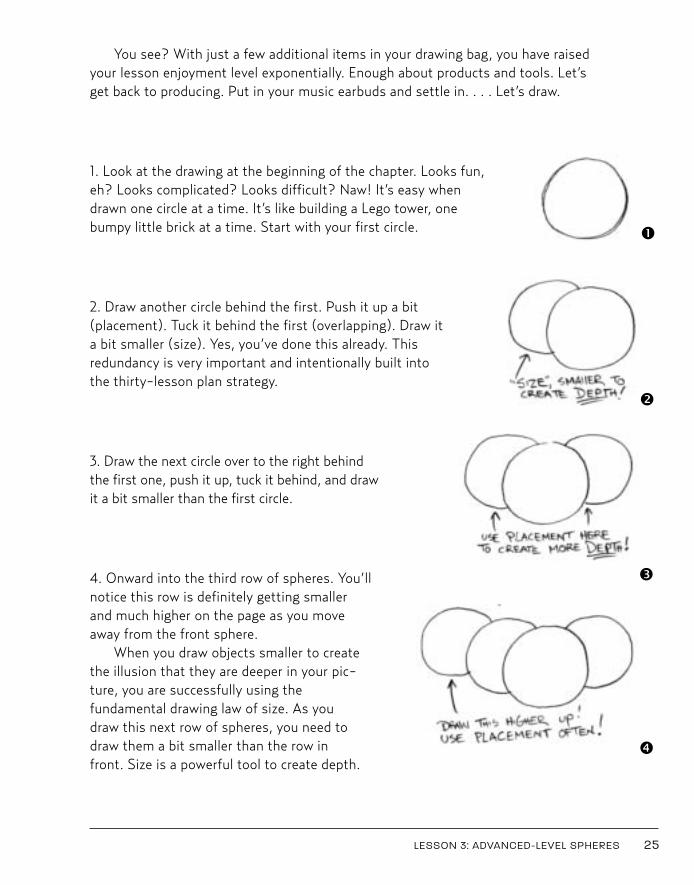
1. Look at the drawing at the beginning of the chapter. Looks fun,eh? Looks complicated? Looks difficult? Naw! It’s easy whendrawn one circle at a time. It’s like building a Lego tower, onebumpy little brick at a time. Start with your first circle.
2. Draw another circle behind the first. Push it up a bit(placement). Tuck it behind the first (overlapping). Draw ita bit smaller (size). Yes, you’ve done this already. Thisredundancy is very important and intentionally built intothe thirty-lesson plan strategy.
3. Draw the next circle over to the right behindthe first one, push it up, tuck it behind, and drawit a bit smaller than the first circle.
4. Onward into the third row of spheres. You’llnotice this row is definitely getting smallerand much higher on the page as you moveaway from the front sphere.
When you draw objects smaller to createthe illusion that they are deeper in your pic-ture, you are successfully using thefundamental drawing law of size. As youdraw this next row of spheres, you need todraw them a bit smaller than the row infront. Size is a powerful tool to create depth.
LESSON 3: ADVANCED-LEVEL SPHERES 25
å
è
é
ç
Kistler 01_Kistler You Can Draw 10/21/10 12:00 PM Page 25
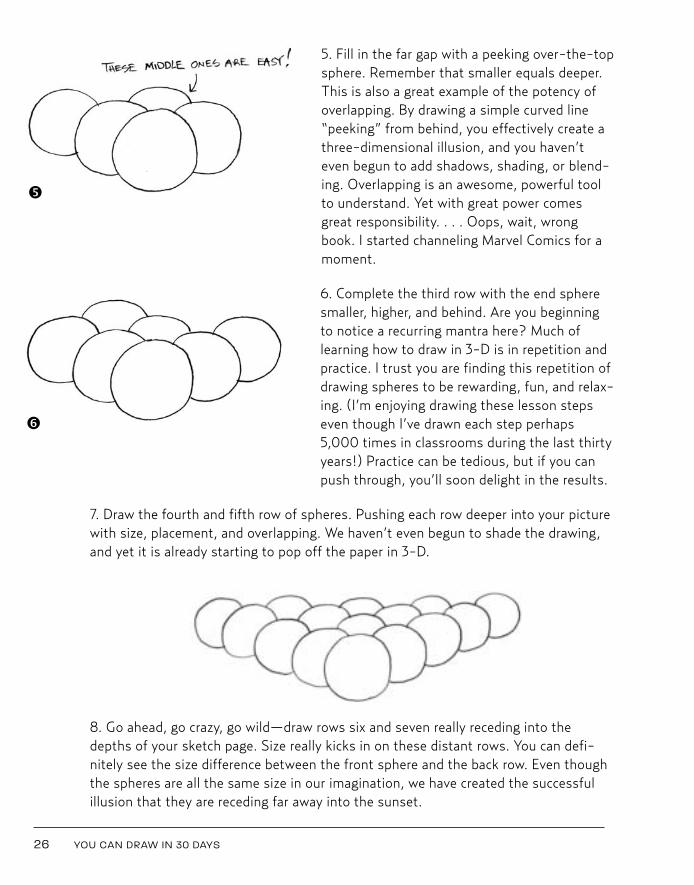
5. Fill in the far gap with a peeking over-the-topsphere. Remember that smaller equals deeper.This is also a great example of the potency ofoverlapping. By drawing a simple curved line“peeking” from behind, you effectively create athree-dimensional illusion, and you haven’teven begun to add shadows, shading, or blend-ing. Overlapping is an awesome, powerful toolto understand. Yet with great power comesgreat responsibility. . . . Oops, wait, wrongbook. I started channeling Marvel Comics for amoment.
6. Complete the third row with the end spheresmaller, higher, and behind. Are you beginningto notice a recurring mantra here? Much oflearning how to draw in 3-D is in repetition andpractice. I trust you are finding this repetition ofdrawing spheres to be rewarding, fun, and relax-ing. (I’m enjoying drawing these lesson stepseven though I’ve drawn each step perhaps5,000 times in classrooms during the last thirtyyears!) Practice can be tedious, but if you canpush through, you’ll soon delight in the results.
7. Draw the fourth and fifth row of spheres. Pushing each row deeper into your picturewith size, placement, and overlapping. We haven’t even begun to shade the drawing,and yet it is already starting to pop off the paper in 3-D.
8. Go ahead, go crazy, go wild—draw rows six and seven really receding into thedepths of your sketch page. Size really kicks in on these distant rows. You can defi-nitely see the size difference between the front sphere and the back row. Even thoughthe spheres are all the same size in our imagination, we have created the successfulillusion that they are receding far away into the sunset.
26 YOU CAN DRAW IN 30 DAYS
ê
ë
Kistler 01_Kistler You Can Draw 10/21/10 12:00 PM Page 26
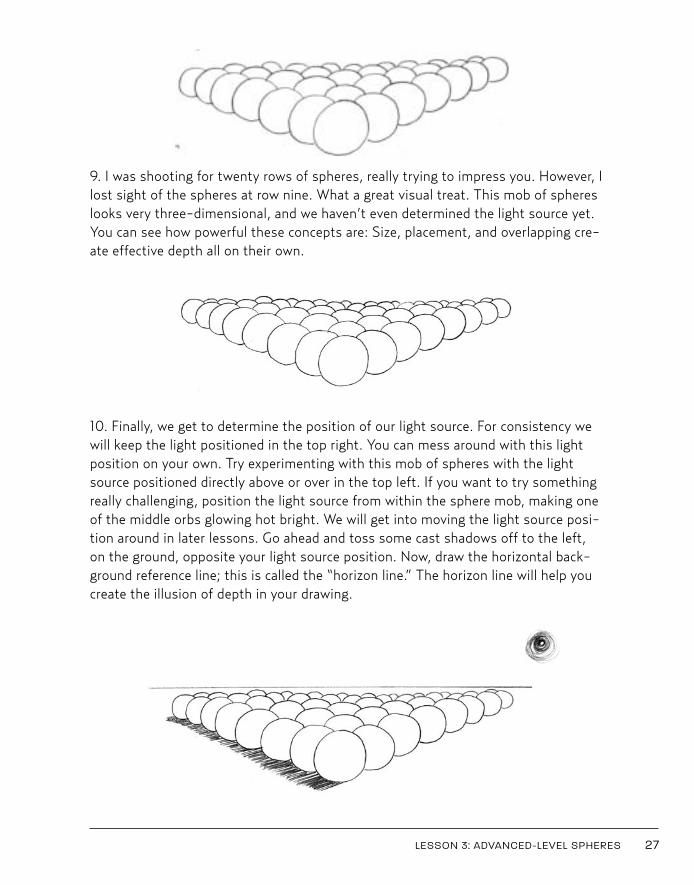
9. I was shooting for twenty rows of spheres, really trying to impress you. However, Ilost sight of the spheres at row nine. What a great visual treat. This mob of sphereslooks very three-dimensional, and we haven’t even determined the light source yet.You can see how powerful these concepts are: Size, placement, and overlapping cre-ate effective depth all on their own.
10. Finally, we get to determine the position of our light source. For consistency wewill keep the light positioned in the top right. You can mess around with this lightposition on your own. Try experimenting with this mob of spheres with the lightsource positioned directly above or over in the top left. If you want to try somethingreally challenging, position the light source from within the sphere mob, making oneof the middle orbs glowing hot bright. We will get into moving the light source posi-tion around in later lessons. Go ahead and toss some cast shadows off to the left,on the ground, opposite your light source position. Now, draw the horizontal back-ground reference line; this is called the “horizon line.” The horizon line will help youcreate the illusion of depth in your drawing.
LESSON 3: ADVANCED-LEVEL SPHERES 27
Kistler 01_Kistler You Can Draw 10/21/10 12:00 PM Page 27
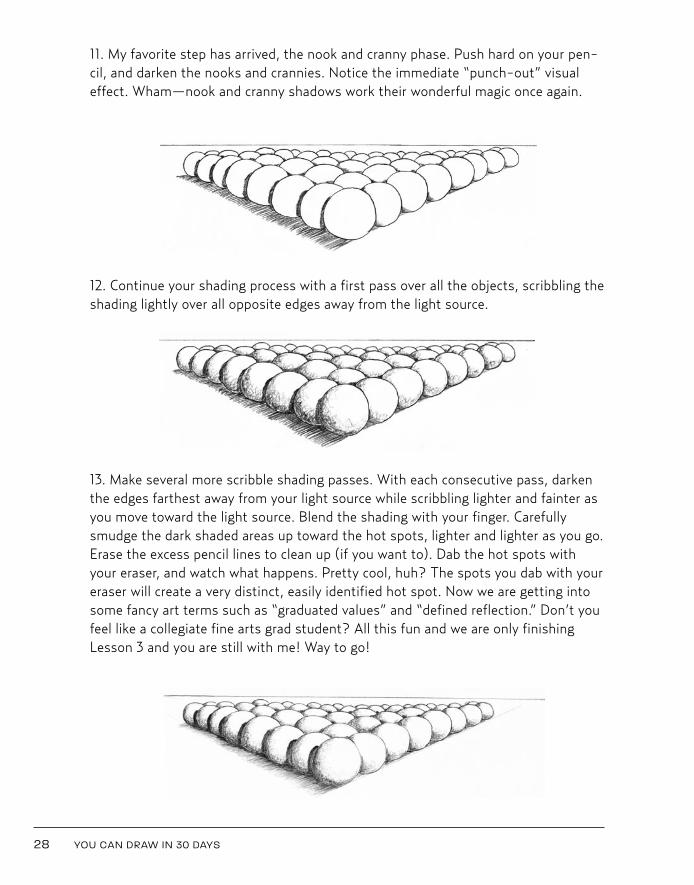
11. My favorite step has arrived, the nook and cranny phase. Push hard on your pen-cil, and darken the nooks and crannies. Notice the immediate “punch-out” visualeffect. Wham—nook and cranny shadows work their wonderful magic once again.
12. Continue your shading process with a first pass over all the objects, scribbling theshading lightly over all opposite edges away from the light source.
13. Make several more scribble shading passes. With each consecutive pass, darkenthe edges farthest away from your light source while scribbling lighter and fainter asyou move toward the light source. Blend the shading with your finger. Carefullysmudge the dark shaded areas up toward the hot spots, lighter and lighter as you go.Erase the excess pencil lines to clean up (if you want to). Dab the hot spots withyour eraser, and watch what happens. Pretty cool, huh? The spots you dab with youreraser will create a very distinct, easily identified hot spot. Now we are getting intosome fancy art terms such as “graduated values” and “defined reflection.” Don’t youfeel like a collegiate fine arts grad student? All this fun and we are only finishingLesson 3 and you are still with me! Way to go!
28 YOU CAN DRAW IN 30 DAYS
Kistler 01_Kistler You Can Draw 10/21/10 12:01 PM Page 28
In three lessons you have learned a lot:
Draw objects larger to make them look closer.Draw objects smaller to make them recede.Draw objects in front of other objects to punch them out in 3-D.Draw objects higher in the picture to make them look farther away.Draw objects lower in the picture to make them look closer.Shade objects opposite the light source.Blend the shading on round objects from dark to light.
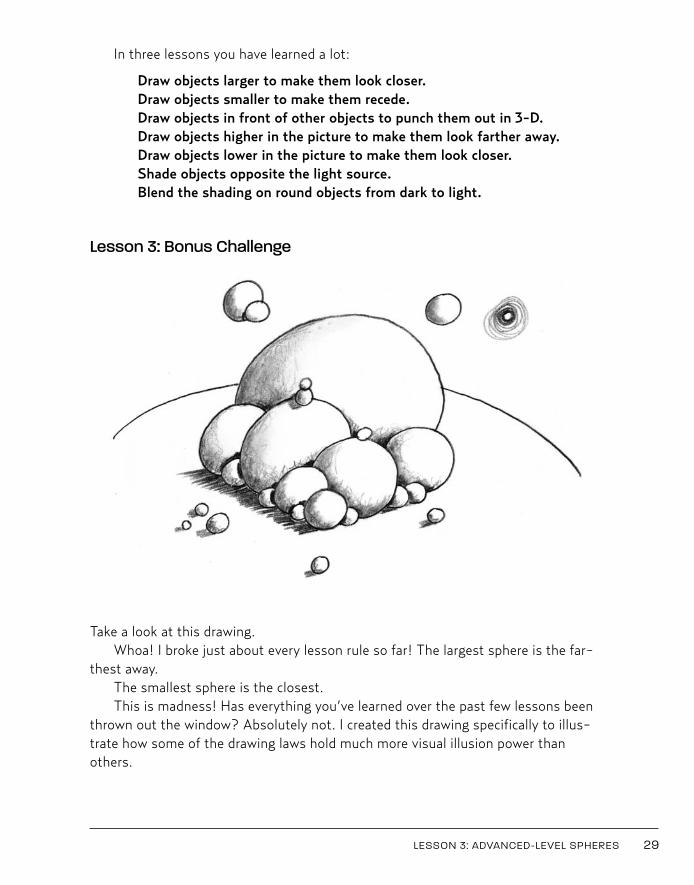
Lesson 3: Bonus Challenge
Take a look at this drawing.Whoa! I broke just about every lesson rule so far! The largest sphere is the far-
thest away.The smallest sphere is the closest. This is madness! Has everything you’ve learned over the past few lessons been
thrown out the window? Absolutely not. I created this drawing specifically to illus-trate how some of the drawing laws hold much more visual illusion power thanothers.
LESSON 3: ADVANCED-LEVEL SPHERES 29
Kistler 01_Kistler You Can Draw 10/25/10 10:44 AM Page 29

I compare this varying level of visual power to a few of my son Anthony’s funobsession with Yu-Gi-Oh cards (an expensive obsession for sure . . . up to $60 for aCARD!). Each Yu-Gi-Oh card has varying strengths to defeat an opponent’s card.Say you have a Yu-Gi-Oh card titled “Marshmallow Musher.” Let’s say “Marshmal-low Musher” has attack power of 1400 and it attacks an opponent’s card, “PickledGnat Brain,” with a defense of only 700. Well, poor Pickled Gnat Brain gets totallydestroyed, wiped out, stomped, crushed. Correlation here: Each of the drawing lawshas varying power over other drawing laws. . . . If you draw a smaller object in frontof any other object, even a Jupiter-size planet, overlapping will prove to be all pow-erful and will prevail in appearing to be the closest. Some drawing laws have morevisual illusion power than others, depending on how you apply them.
Look at the preceding drawing. Even though the farthest, deepest sphere is thelargest, the smaller spheres overlap it, thus trumping the visual power of size. Over-lapping is always more powerful than size.
Look at the drawing again. See the nearest sphere is drawn the smallest. Typi-cally this would mean it would appear the farthest away. However, because it isisolated and placed lowest on the paper, it appears closest. Simply stated, placementtrumped both size and overlapping.
I do not intend for you to commit these visual power variations to memory. Thesefun freaky wrinkles in the rules will naturally absorb into your skill bank as you practice.
1. Draw a circle.
2. Draw guide lines shooting offto the right and left. Theseguide lines will help you posi-tion the group of recedingspheres. We will be using guidelines a lot in upcoming lessons.Draw these guide lines at just aslight angle upward, not toosteep.
3. Using your guide lines, posi-tion a few more spheres behindyour first. Draw the tiny onepeeking out like I did below.Notice how I made use of theguide lines to position thespheres.
30 YOU CAN DRAW IN 30 DAYS
å
ç
é
Kistler 01_Kistler You Can Draw 10/21/10 12:01 PM Page 30
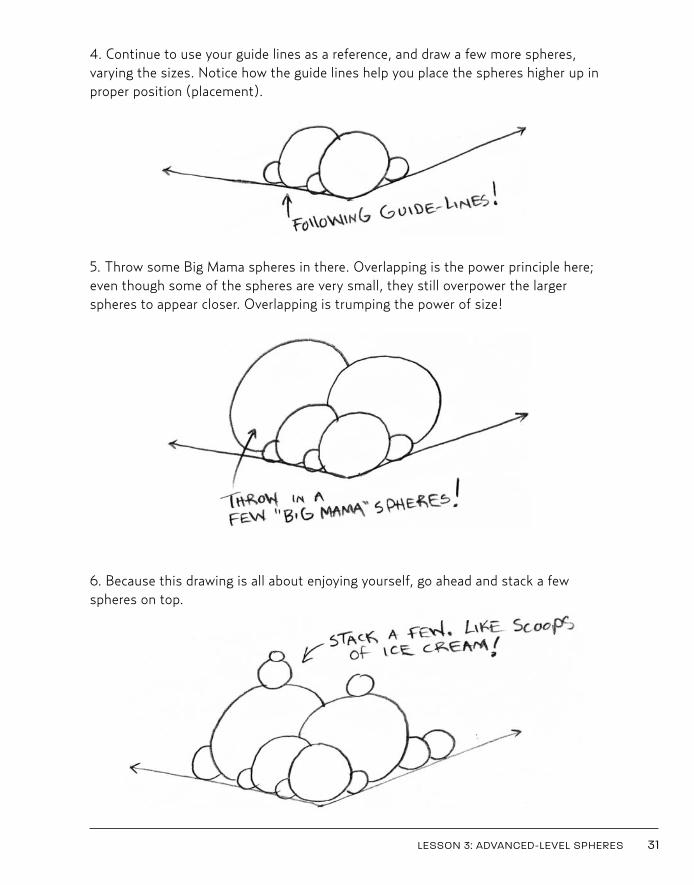
4. Continue to use your guide lines as a reference, and draw a few more spheres,varying the sizes. Notice how the guide lines help you place the spheres higher up inproper position (placement).
5. Throw some Big Mama spheres in there. Overlapping is the power principle here;even though some of the spheres are very small, they still overpower the largerspheres to appear closer. Overlapping is trumping the power of size!
6. Because this drawing is all about enjoying yourself, go ahead and stack a fewspheres on top.
LESSON 3: ADVANCED-LEVEL SPHERES 31
Kistler 01_Kistler You Can Draw 10/21/10 12:01 PM Page 31
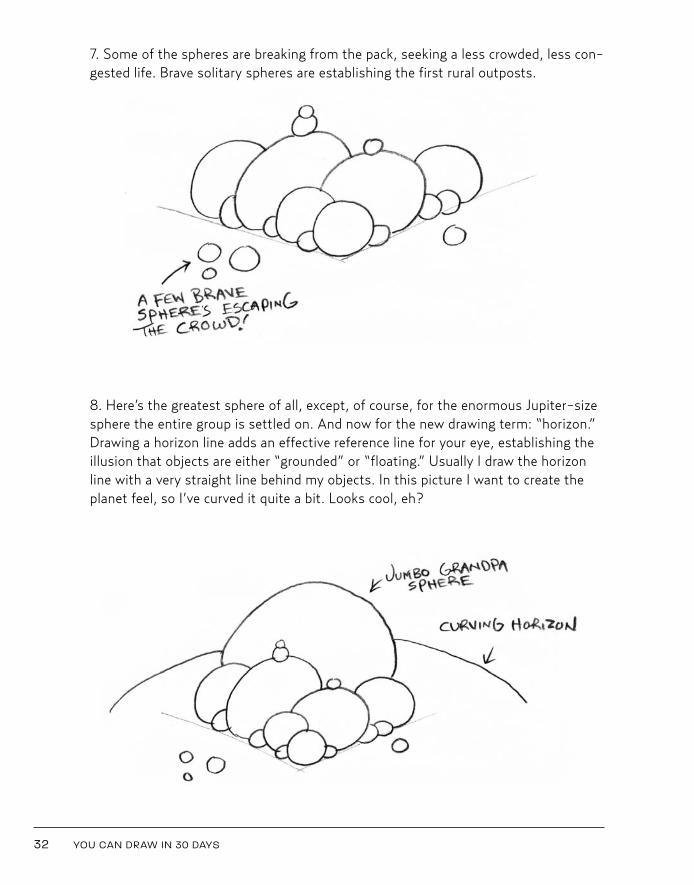
7. Some of the spheres are breaking from the pack, seeking a less crowded, less con-gested life. Brave solitary spheres are establishing the first rural outposts.
8. Here’s the greatest sphere of all, except, of course, for the enormous Jupiter-sizesphere the entire group is settled on. And now for the new drawing term: “horizon.”Drawing a horizon line adds an effective reference line for your eye, establishing theillusion that objects are either “grounded” or “floating.” Usually I draw the horizonline with a very straight line behind my objects. In this picture I want to create theplanet feel, so I’ve curved it quite a bit. Looks cool, eh?
32 YOU CAN DRAW IN 30 DAYS
Kistler 01_Kistler You Can Draw 10/21/10 12:01 PM Page 32
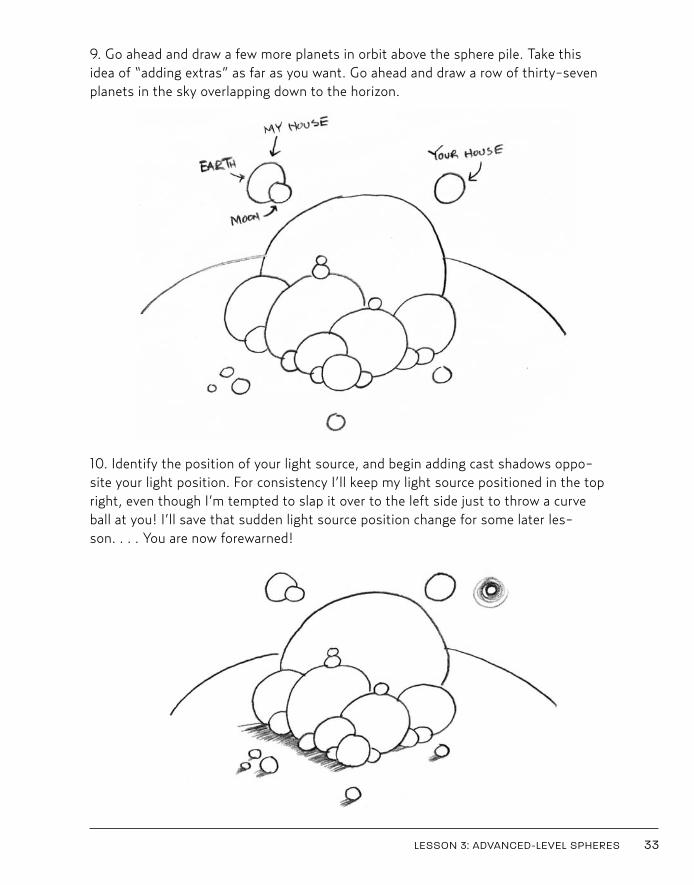
9. Go ahead and draw a few more planets in orbit above the sphere pile. Take thisidea of “adding extras” as far as you want. Go ahead and draw a row of thirty-sevenplanets in the sky overlapping down to the horizon.
10. Identify the position of your light source, and begin adding cast shadows oppo-site your light position. For consistency I’ll keep my light source positioned in the topright, even though I’m tempted to slap it over to the left side just to throw a curveball at you! I’ll save that sudden light source position change for some later les-son. . . . You are now forewarned!
LESSON 3: ADVANCED-LEVEL SPHERES 33
Kistler 01_Kistler You Can Draw 10/21/10 12:01 PM Page 33
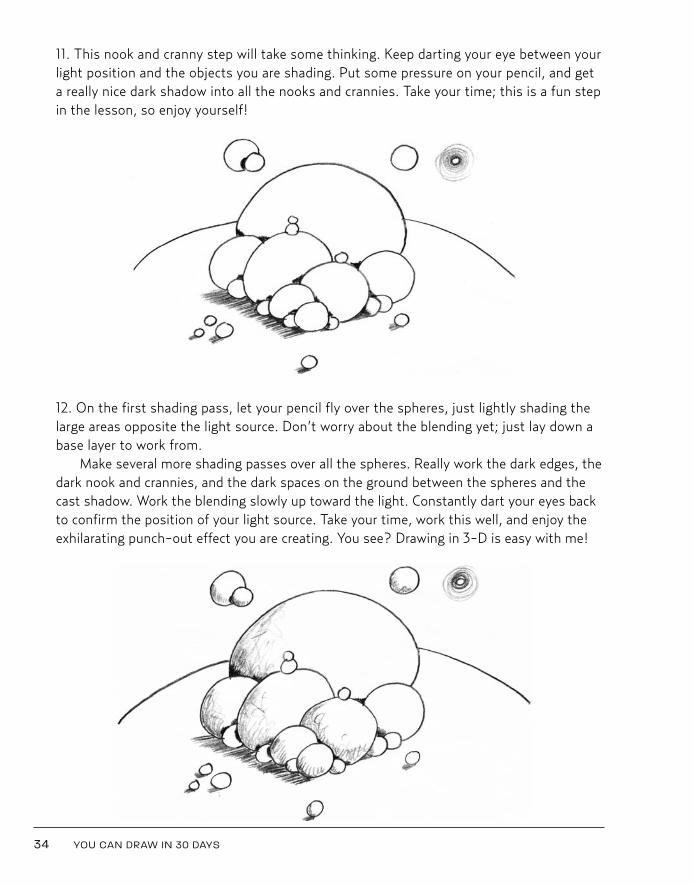
11. This nook and cranny step will take some thinking. Keep darting your eye between yourlight position and the objects you are shading. Put some pressure on your pencil, and geta really nice dark shadow into all the nooks and crannies. Take your time; this is a fun stepin the lesson, so enjoy yourself!
12. On the first shading pass, let your pencil fly over the spheres, just lightly shading thelarge areas opposite the light source. Don’t worry about the blending yet; just lay down abase layer to work from.
Make several more shading passes over all the spheres. Really work the dark edges, thedark nook and crannies, and the dark spaces on the ground between the spheres and thecast shadow. Work the blending slowly up toward the light. Constantly dart your eyes backto confirm the position of your light source. Take your time, work this well, and enjoy theexhilarating punch-out effect you are creating. You see? Drawing in 3-D is easy with me!
34 YOU CAN DRAW IN 30 DAYS
Kistler 01_Kistler You Can Draw 10/21/10 12:01 PM Page 34
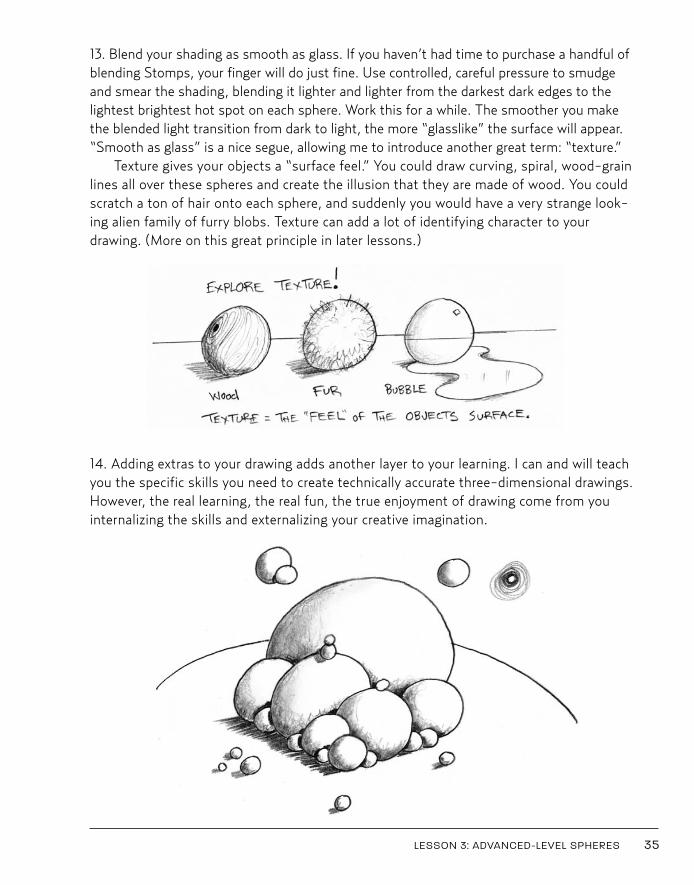
13. Blend your shading as smooth as glass. If you haven’t had time to purchase a handful ofblending Stomps, your finger will do just fine. Use controlled, careful pressure to smudgeand smear the shading, blending it lighter and lighter from the darkest dark edges to thelightest brightest hot spot on each sphere. Work this for a while. The smoother you makethe blended light transition from dark to light, the more “glasslike” the surface will appear.“Smooth as glass” is a nice segue, allowing me to introduce another great term: “texture.”
Texture gives your objects a “surface feel.” You could draw curving, spiral, wood-grainlines all over these spheres and create the illusion that they are made of wood. You couldscratch a ton of hair onto each sphere, and suddenly you would have a very strange look-ing alien family of furry blobs. Texture can add a lot of identifying character to yourdrawing. (More on this great principle in later lessons.)
14. Adding extras to your drawing adds another layer to your learning. I can and will teachyou the specific skills you need to create technically accurate three-dimensional drawings.However, the real learning, the real fun, the true enjoyment of drawing come from youinternalizing the skills and externalizing your creative imagination.
LESSON 3: ADVANCED-LEVEL SPHERES 35
Kistler 01_Kistler You Can Draw 10/21/10 12:01 PM Page 35
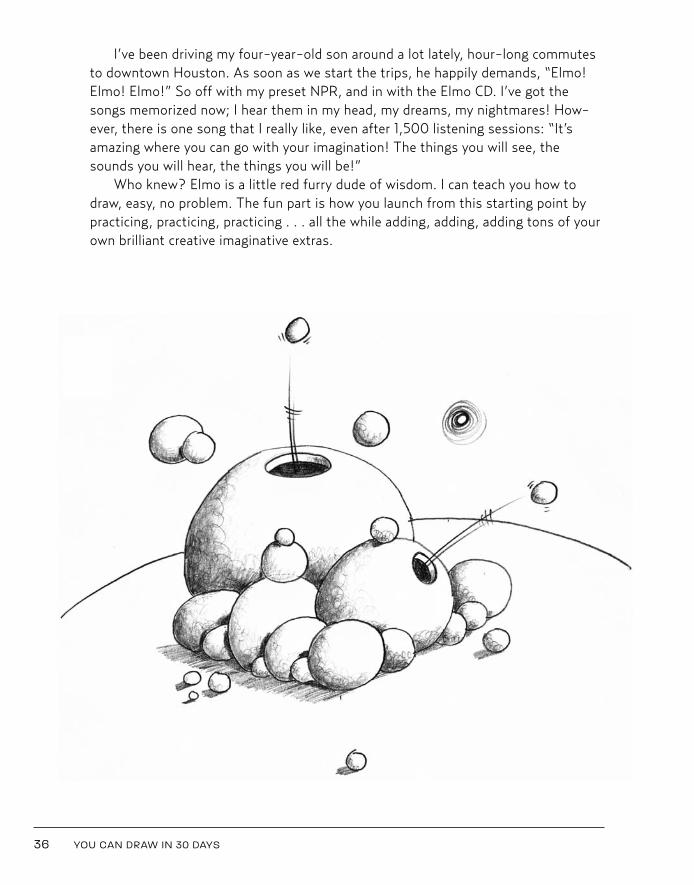
I’ve been driving my four-year-old son around a lot lately, hour-long commutesto downtown Houston. As soon as we start the trips, he happily demands, “Elmo!Elmo! Elmo!” So off with my preset NPR, and in with the Elmo CD. I’ve got thesongs memorized now; I hear them in my head, my dreams, my nightmares! How-ever, there is one song that I really like, even after 1,500 listening sessions: “It’samazing where you can go with your imagination! The things you will see, thesounds you will hear, the things you will be!”
Who knew? Elmo is a little red furry dude of wisdom. I can teach you how todraw, easy, no problem. The fun part is how you launch from this starting point bypracticing, practicing, practicing . . . all the while adding, adding, adding tons of yourown brilliant creative imaginative extras.
36 YOU CAN DRAW IN 30 DAYS
Kistler 01_Kistler You Can Draw 10/21/10 12:01 PM Page 36
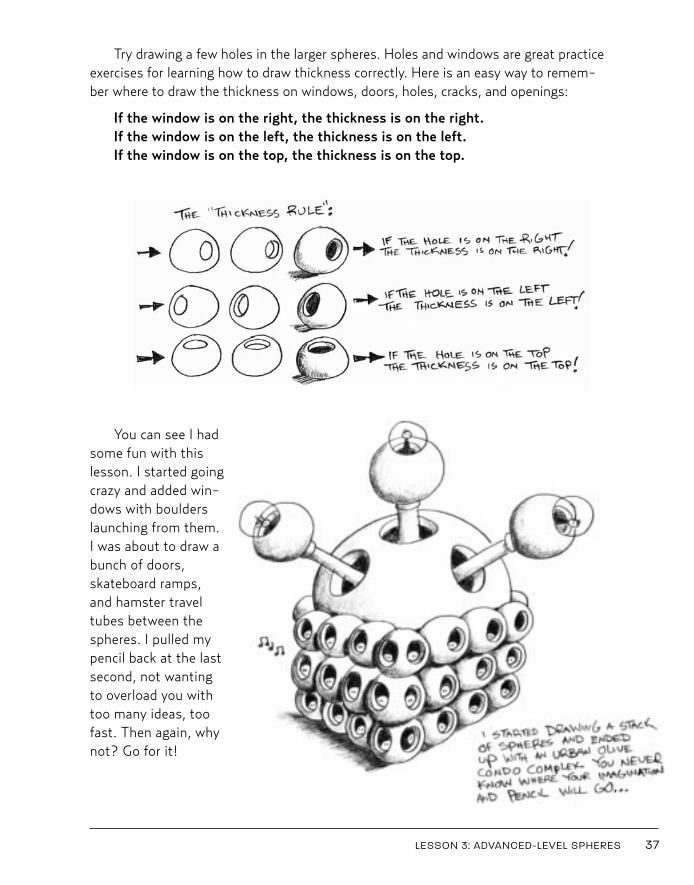
Try drawing a few holes in the larger spheres. Holes and windows are great practiceexercises for learning how to draw thickness correctly. Here is an easy way to remem-ber where to draw the thickness on windows, doors, holes, cracks, and openings:
If the window is on the right, the thickness is on the right.If the window is on the left, the thickness is on the left.If the window is on the top, the thickness is on the top.
You can see I hadsome fun with thislesson. I started goingcrazy and added win-dows with boulderslaunching from them.I was about to draw abunch of doors,skateboard ramps,and hamster traveltubes between thespheres. I pulled mypencil back at the lastsecond, not wantingto overload you withtoo many ideas, toofast. Then again, whynot? Go for it!
LESSON 3: ADVANCED-LEVEL SPHERES 37
Kistler 01_Kistler You Can Draw 10/21/10 12:01 PM Page 37
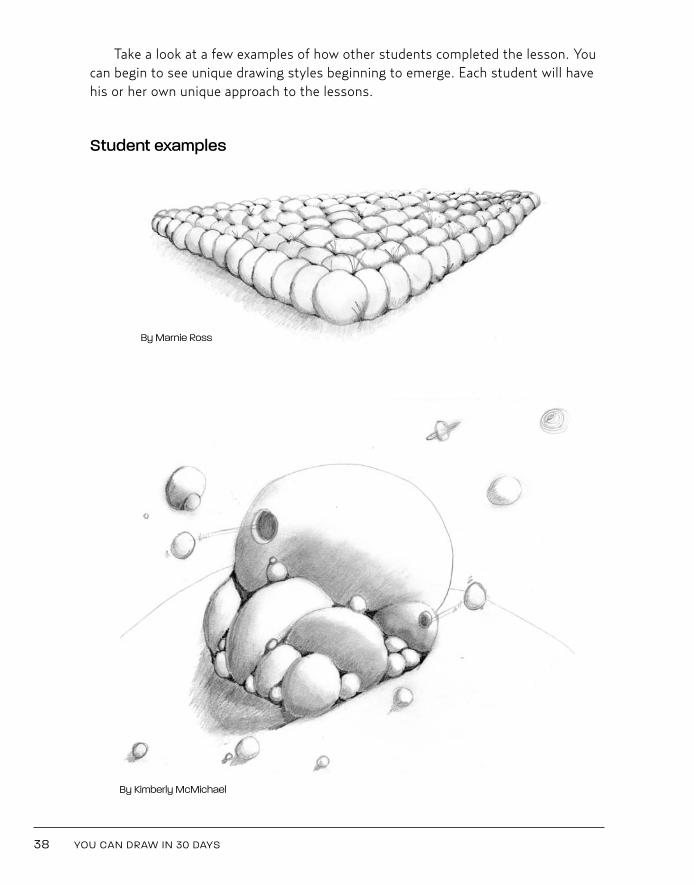
Take a look at a few examples of how other students completed the lesson. Youcan begin to see unique drawing styles beginning to emerge. Each student will havehis or her own unique approach to the lessons.
Student examples
38 YOU CAN DRAW IN 30 DAYS
By Marnie Ross
By Kimberly McMichael
Kistler 01_Kistler You Can Draw 10/21/10 12:01 PM Page 38

LESSON 3: ADVANCED-LEVEL SPHERES 39
By Brenda Jean Kozik
By Tracy Powers
Kistler 01_Kistler You Can Draw 10/21/10 12:01 PM Page 39

Kistler 01_Kistler You Can Draw 10/21/10 12:01 PM Page 40
41
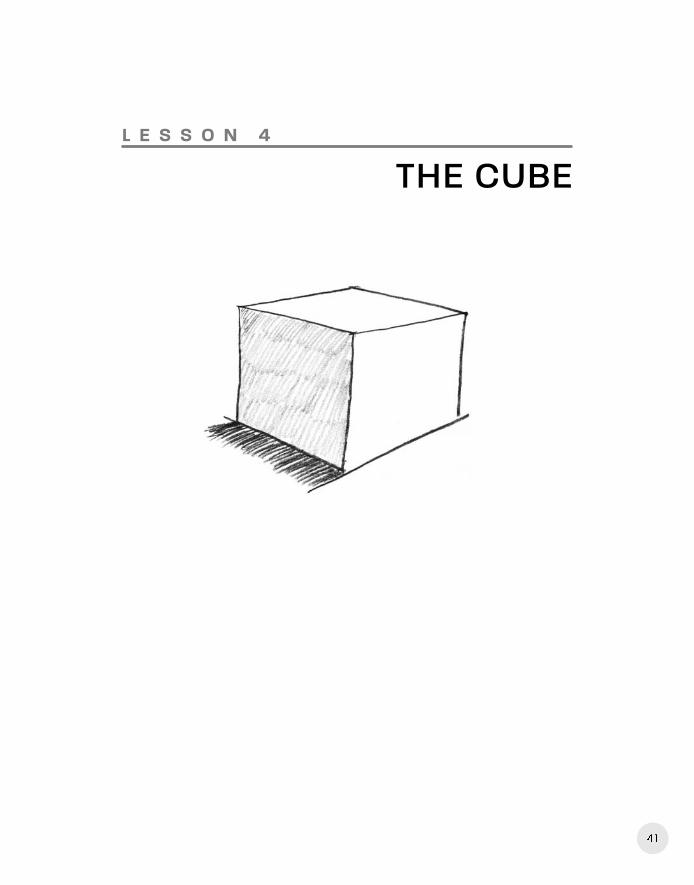
L E S S O N 4
THE CUBE
Kistler 01_Kistler You Can Draw 10/21/10 12:01 PM Page 41
H ad enough spheres for a while? Let’s move on to the all-important,extremely versatile, always-a-crowd-pleaser cube. The cube is so versatilethat you will be using it to draw boxes, houses, buildings, bridges, air-
planes, vehicles, flowers, fish . . . fish? Yes, a cube will even help you draw afine-finned fish in 3-D. Along with helping you draw faces, flowers, and, well, justabout anything you can think of or see in the world around you. So let’s draw a cube.
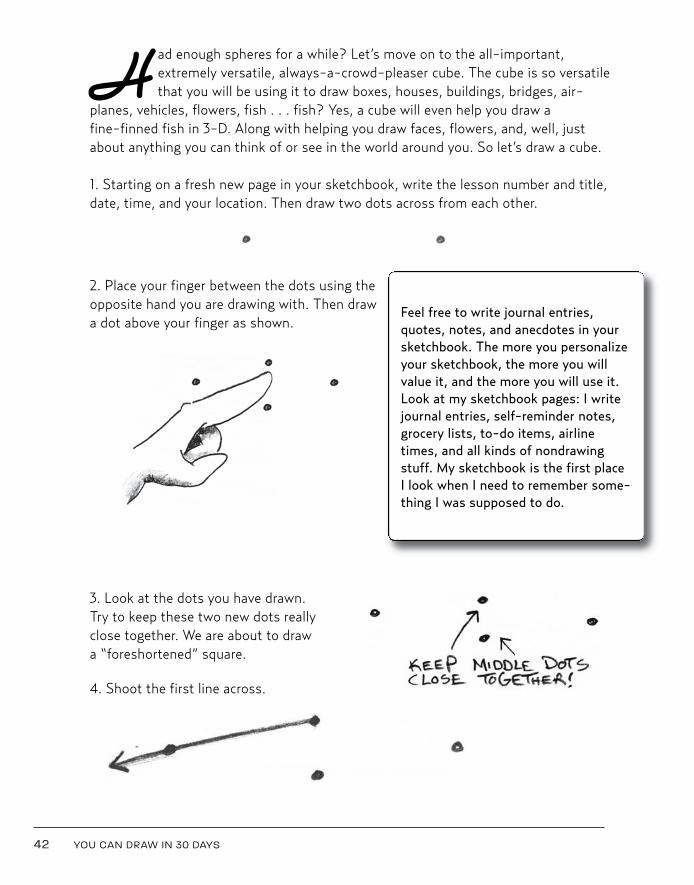
1. Starting on a fresh new page in your sketchbook, write the lesson number and title,date, time, and your location. Then draw two dots across from each other.
2. Place your finger between the dots using theopposite hand you are drawing with. Then drawa dot above your finger as shown.
3. Look at the dots you have drawn. Try to keep these two new dots reallyclose together. We are about to draw a “foreshortened” square.
4. Shoot the first line across.
42 YOU CAN DRAW IN 30 DAYS
Feel free to write journal entries,quotes, notes, and anecdotes in yoursketchbook. The more you personalizeyour sketchbook, the more you willvalue it, and the more you will use it.Look at my sketchbook pages: I writejournal entries, self-reminder notes,grocery lists, to-do items, airlinetimes, and all kinds of nondrawingstuff. My sketchbook is the first placeI look when I need to remember some-thing I was supposed to do.
Kistler 01_Kistler You Can Draw 10/21/10 4:37 PM Page 42
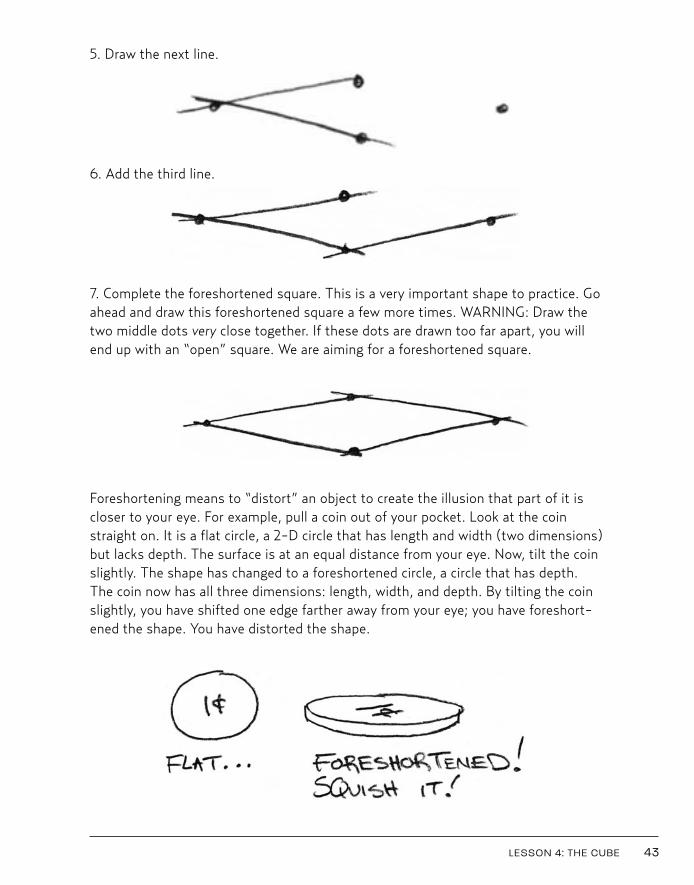
5. Draw the next line.
6. Add the third line.
7. Complete the foreshortened square. This is a very important shape to practice. Goahead and draw this foreshortened square a few more times. WARNING: Draw thetwo middle dots very close together. If these dots are drawn too far apart, you willend up with an “open” square. We are aiming for a foreshortened square.
Foreshortening means to “distort” an object to create the illusion that part of it iscloser to your eye. For example, pull a coin out of your pocket. Look at the coinstraight on. It is a flat circle, a 2-D circle that has length and width (two dimensions)but lacks depth. The surface is at an equal distance from your eye. Now, tilt the coinslightly. The shape has changed to a foreshortened circle, a circle that has depth.The coin now has all three dimensions: length, width, and depth. By tilting the coinslightly, you have shifted one edge farther away from your eye; you have foreshort-ened the shape. You have distorted the shape.
LESSON 4: THE CUBE 43
Kistler 01_Kistler You Can Draw 10/21/10 12:01 PM Page 43
This is basically what drawing in 3-D boils down to, distorting images on a flattwo-dimensional piece of paper to create the illusion of the existence of depth.Drawing in 3-D is distorting shapes to trick the eye into seeing drawn objects nearand far in your picture.
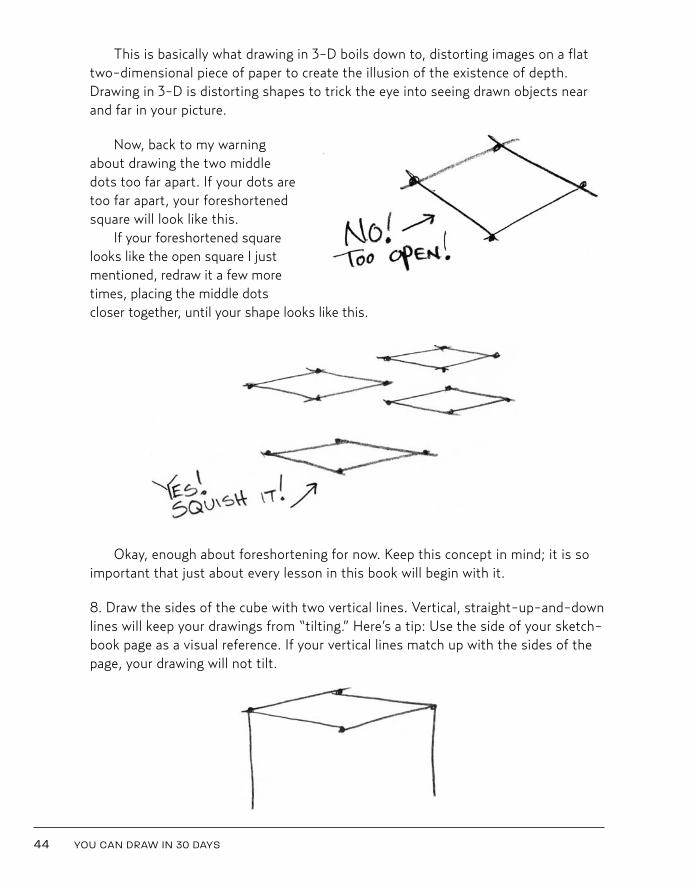
Now, back to my warningabout drawing the two middledots too far apart. If your dots aretoo far apart, your foreshortenedsquare will look like this.
If your foreshortened squarelooks like the open square I justmentioned, redraw it a few moretimes, placing the middle dotscloser together, until your shape looks like this.
Okay, enough about foreshortening for now. Keep this concept in mind; it is soimportant that just about every lesson in this book will begin with it.
8. Draw the sides of the cube with two vertical lines. Vertical, straight-up-and-downlines will keep your drawings from “tilting.” Here’s a tip: Use the side of your sketch-book page as a visual reference. If your vertical lines match up with the sides of thepage, your drawing will not tilt.
44 YOU CAN DRAW IN 30 DAYS
Kistler 01_Kistler You Can Draw 10/21/10 12:01 PM Page 44
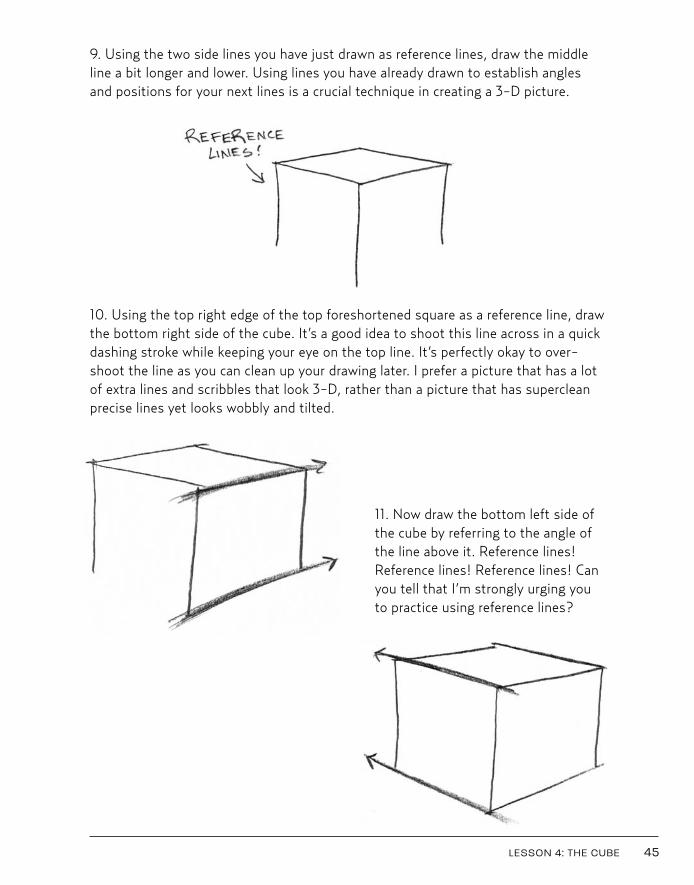
9. Using the two side lines you have just drawn as reference lines, draw the middleline a bit longer and lower. Using lines you have already drawn to establish anglesand positions for your next lines is a crucial technique in creating a 3-D picture.
10. Using the top right edge of the top foreshortened square as a reference line, drawthe bottom right side of the cube. It’s a good idea to shoot this line across in a quickdashing stroke while keeping your eye on the top line. It’s perfectly okay to over-shoot the line as you can clean up your drawing later. I prefer a picture that has a lotof extra lines and scribbles that look 3-D, rather than a picture that has supercleanprecise lines yet looks wobbly and tilted.
11. Now draw the bottom left side ofthe cube by referring to the angle ofthe line above it. Reference lines!Reference lines! Reference lines! Canyou tell that I’m strongly urging youto practice using reference lines?
LESSON 4: THE CUBE 45
Kistler 01_Kistler You Can Draw 10/21/10 12:01 PM Page 45
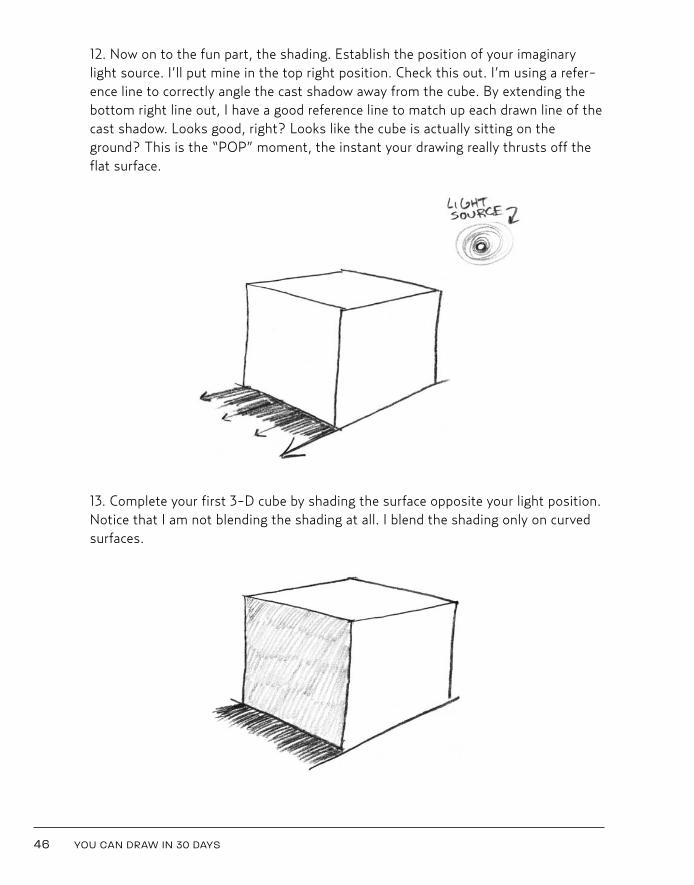
12. Now on to the fun part, the shading. Establish the position of your imaginarylight source. I’ll put mine in the top right position. Check this out. I’m using a refer-ence line to correctly angle the cast shadow away from the cube. By extending thebottom right line out, I have a good reference line to match up each drawn line of thecast shadow. Looks good, right? Looks like the cube is actually sitting on theground? This is the “POP” moment, the instant your drawing really thrusts off theflat surface.
13. Complete your first 3-D cube by shading the surface opposite your light position.Notice that I am not blending the shading at all. I blend the shading only on curvedsurfaces.
46 YOU CAN DRAW IN 30 DAYS
Kistler 01_Kistler You Can Draw 10/21/10 12:01 PM Page 46
Lesson 4: Bonus Challenge
Let’s take what we learned in drawing the basic 3-D cube and add details that enhance andidentify the cube as three different objects.
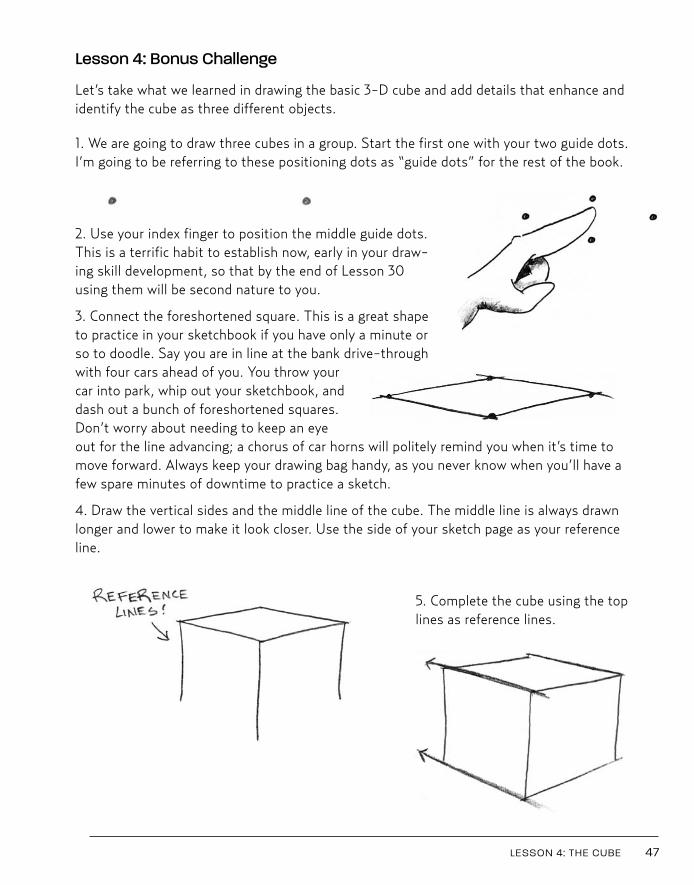
1. We are going to draw three cubes in a group. Start the first one with your two guide dots.I’m going to be referring to these positioning dots as “guide dots” for the rest of the book.
2. Use your index finger to position the middle guide dots.This is a terrific habit to establish now, early in your draw-ing skill development, so that by the end of Lesson 30using them will be second nature to you.
3. Connect the foreshortened square. This is a great shapeto practice in your sketchbook if you have only a minute orso to doodle. Say you are in line at the bank drive-throughwith four cars ahead of you. You throw yourcar into park, whip out your sketchbook, anddash out a bunch of foreshortened squares.Don’t worry about needing to keep an eyeout for the line advancing; a chorus of car horns will politely remind you when it’s time tomove forward. Always keep your drawing bag handy, as you never know when you’ll have afew spare minutes of downtime to practice a sketch.
4. Draw the vertical sides and the middle line of the cube. The middle line is always drawnlonger and lower to make it look closer. Use the side of your sketch page as your referenceline.
5. Complete the cube using the toplines as reference lines.
LESSON 4: THE CUBE 47
Kistler 01_Kistler You Can Draw 10/21/10 12:01 PM Page 47
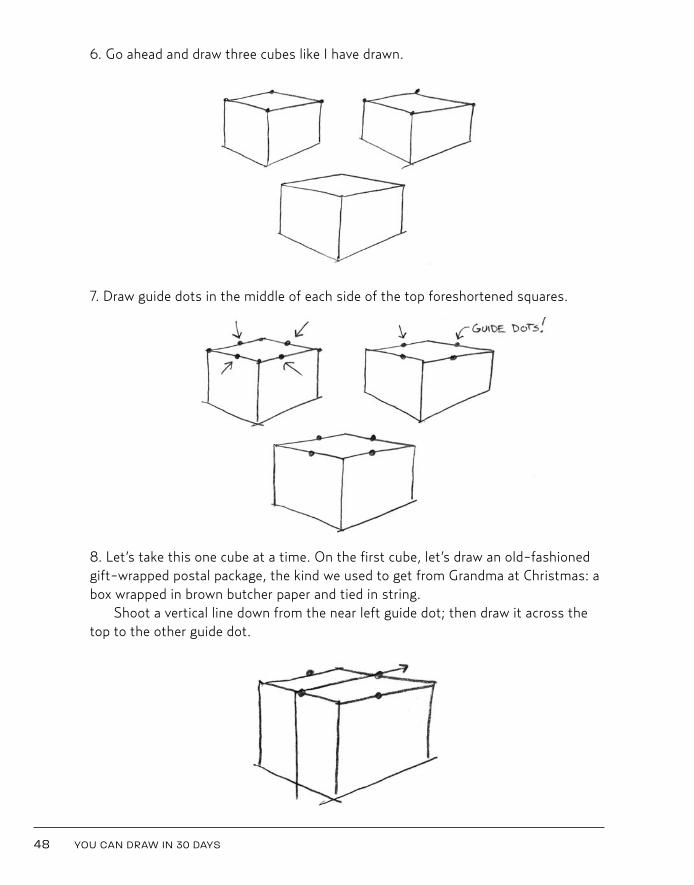
6. Go ahead and draw three cubes like I have drawn.
7. Draw guide dots in the middle of each side of the top foreshortened squares.
8. Let’s take this one cube at a time. On the first cube, let’s draw an old-fashionedgift-wrapped postal package, the kind we used to get from Grandma at Christmas: abox wrapped in brown butcher paper and tied in string.
Shoot a vertical line down from the near left guide dot; then draw it across thetop to the other guide dot.
48 YOU CAN DRAW IN 30 DAYS
Kistler 01_Kistler You Can Draw 10/21/10 12:01 PM Page 48

9. Repeat this on the other side. Look at how you have forced the string to flattenacross the top. The guide dots helped you draw the string inside of a foreshortenedboundary. Guide dots are extremely helpful in lining angles up like this. You’ll seehow often we use guide dots in the upcoming lessons (a lot!).
10. To draw string wrapping around the sides of the package, use guide dots onceagain to position the angles. Draw guide dots halfway down each vertical edge.
11. Draw the string by connecting the guide dots, using the line above as your reference line.
LESSON 4: THE CUBE 49
Kistler 01_Kistler You Can Draw 10/21/10 12:02 PM Page 49
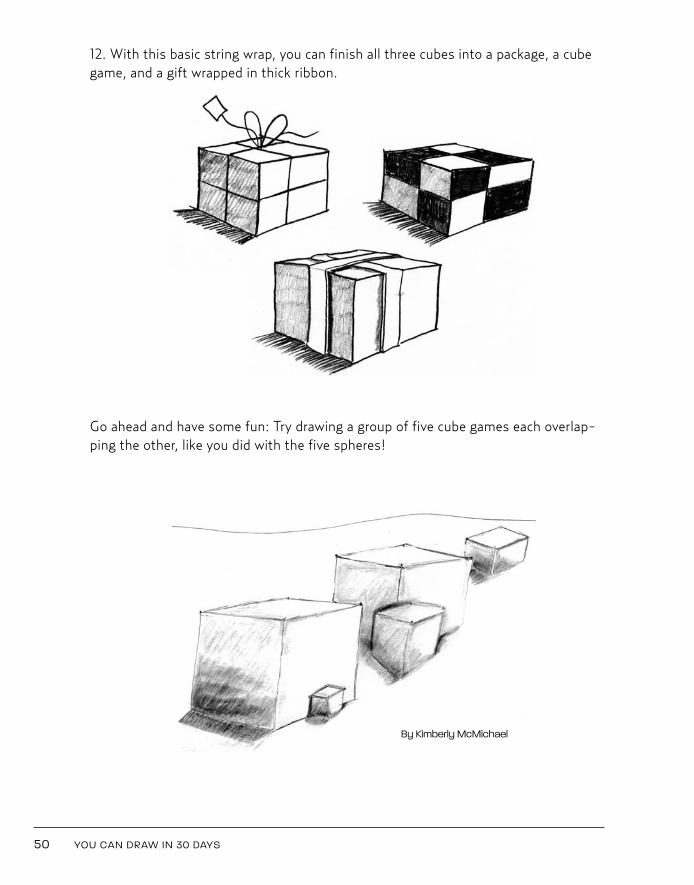
12. With this basic string wrap, you can finish all three cubes into a package, a cubegame, and a gift wrapped in thick ribbon.
Go ahead and have some fun: Try drawing a group of five cube games each overlap-ping the other, like you did with the five spheres!
50 YOU CAN DRAW IN 30 DAYS
By Kimberly McMichael
Kistler 01_Kistler You Can Draw 10/21/10 12:02 PM Page 50
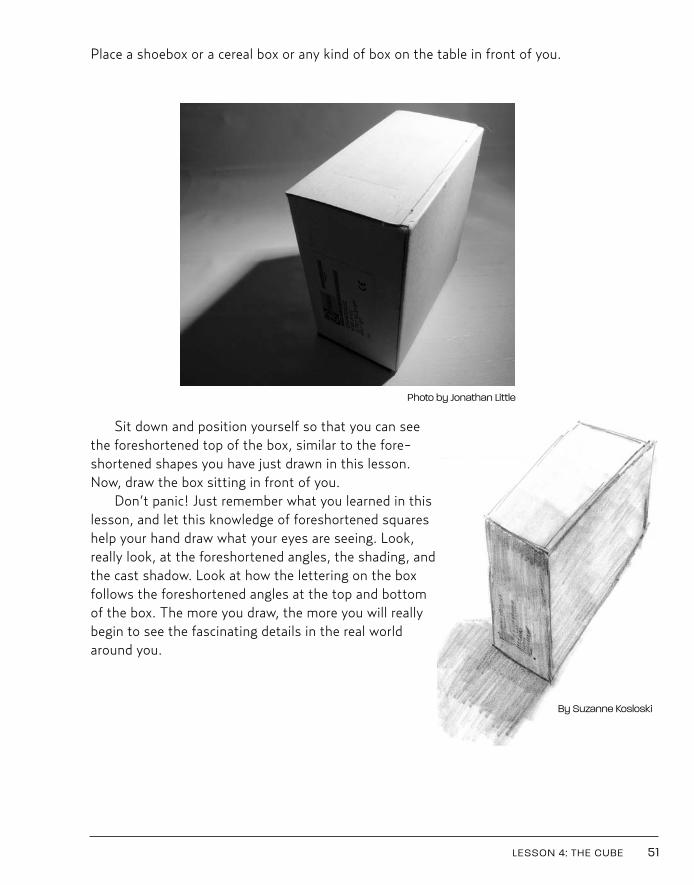
Place a shoebox or a cereal box or any kind of box on the table in front of you.
Sit down and position yourself so that you can seethe foreshortened top of the box, similar to the fore-shortened shapes you have just drawn in this lesson.Now, draw the box sitting in front of you.
Don’t panic! Just remember what you learned in thislesson, and let this knowledge of foreshortened squareshelp your hand draw what your eyes are seeing. Look,really look, at the foreshortened angles, the shading, andthe cast shadow. Look at how the lettering on the boxfollows the foreshortened angles at the top and bottomof the box. The more you draw, the more you will reallybegin to see the fascinating details in the real worldaround you.
LESSON 4: THE CUBE 51
By Suzanne Kosloski
Photo by Jonathan Little
Kistler 01_Kistler You Can Draw 10/21/10 12:02 PM Page 51

Kistler 01_Kistler You Can Draw 10/21/10 12:02 PM Page 52
53
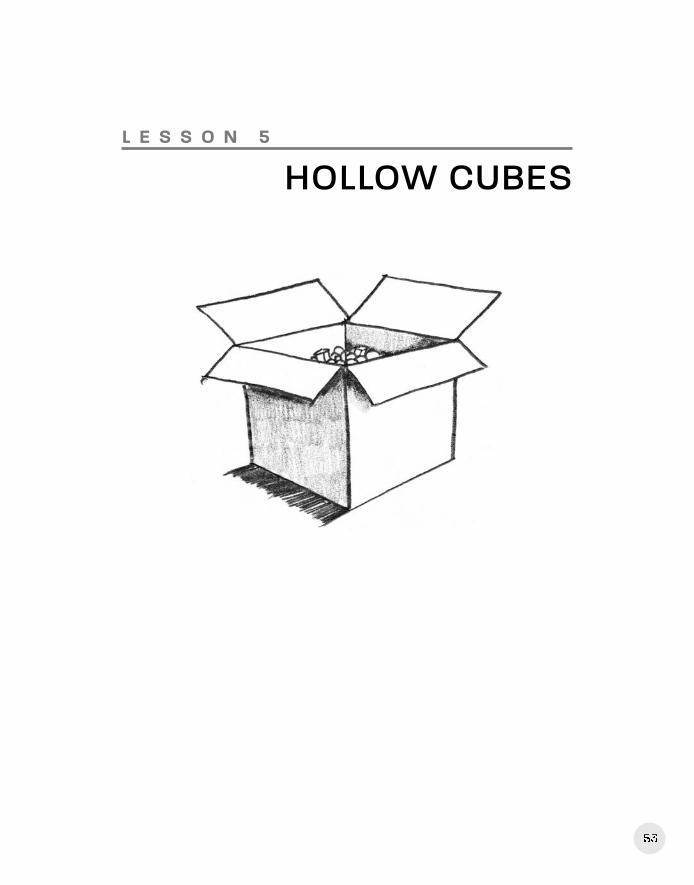
L E S S O N 5
HOLLOW CUBES
Kistler 01_Kistler You Can Draw 10/21/10 12:02 PM Page 53
T o teach you how to really feel like you are gaining control over that daunting flatpiece of paper, I want to explore the challenging fun of hollow boxes and cubes.
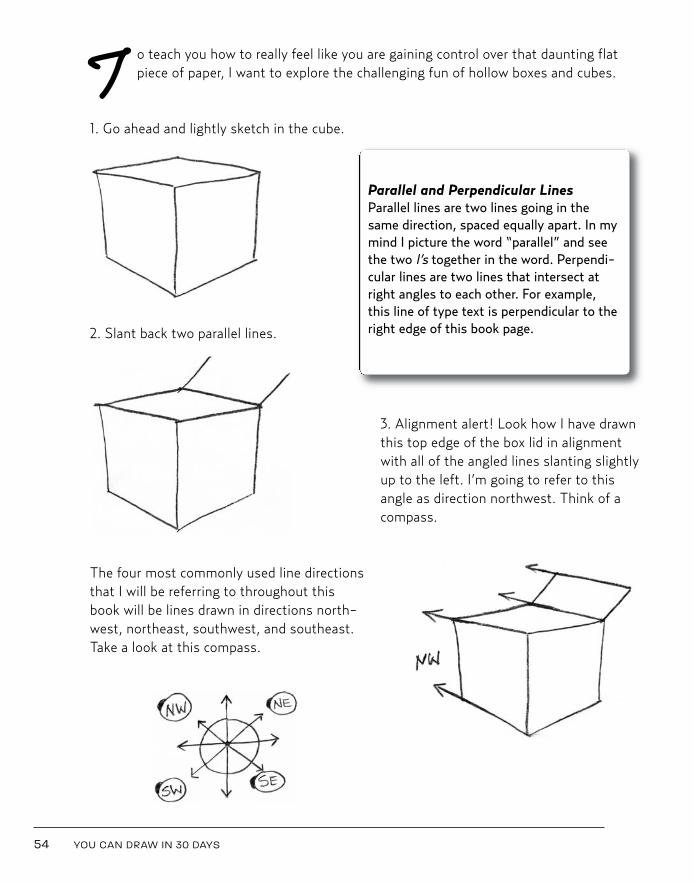
1. Go ahead and lightly sketch in the cube.
2. Slant back two parallel lines.
3. Alignment alert! Look how I have drawnthis top edge of the box lid in alignmentwith all of the angled lines slanting slightlyup to the left. I’m going to refer to thisangle as direction northwest. Think of acompass.
The four most commonly used line directionsthat I will be referring to throughout thisbook will be lines drawn in directions north-west, northeast, southwest, and southeast.Take a look at this compass.
54 YOU CAN DRAW IN 30 DAYS
Parallel and Perpendicular LinesParallel lines are two lines going in thesame direction, spaced equally apart. In mymind I picture the word “parallel” and seethe two l’s together in the word. Perpendi-cular lines are two lines that intersect atright angles to each other. For example,this line of type text is perpendicular to theright edge of this book page.
Kistler 01_Kistler You Can Draw 10/21/10 12:02 PM Page 54
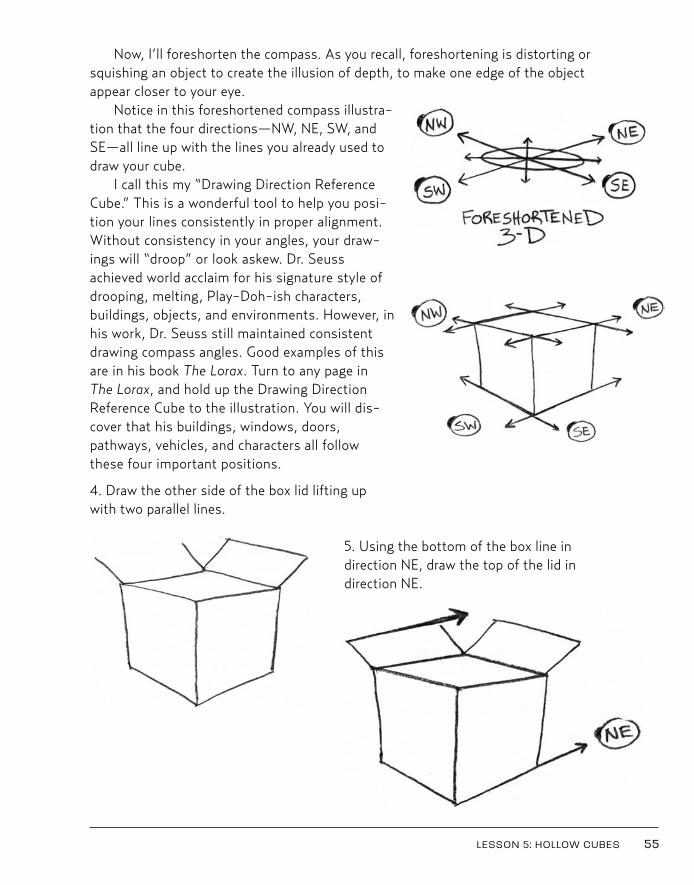
Now, I’ll foreshorten the compass. As you recall, foreshortening is distorting orsquishing an object to create the illusion of depth, to make one edge of the objectappear closer to your eye.
Notice in this foreshortened compass illustra-tion that the four directions—NW, NE, SW, andSE—all line up with the lines you already used todraw your cube.
I call this my “Drawing Direction ReferenceCube.” This is a wonderful tool to help you posi-tion your lines consistently in proper alignment.Without consistency in your angles, your draw-ings will “droop” or look askew. Dr. Seussachieved world acclaim for his signature style ofdrooping, melting, Play-Doh-ish characters,buildings, objects, and environments. However, inhis work, Dr. Seuss still maintained consistentdrawing compass angles. Good examples of thisare in his book The Lorax. Turn to any page in The Lorax, and hold up the Drawing DirectionReference Cube to the illustration. You will dis-cover that his buildings, windows, doors,pathways, vehicles, and characters all followthese four important positions.
4. Draw the other side of the box lid lifting upwith two parallel lines.
5. Using the bottom of the box line indirection NE, draw the top of the lid indirection NE.
LESSON 5: HOLLOW CUBES 55
Kistler 01_Kistler You Can Draw 10/21/10 12:02 PM Page 55
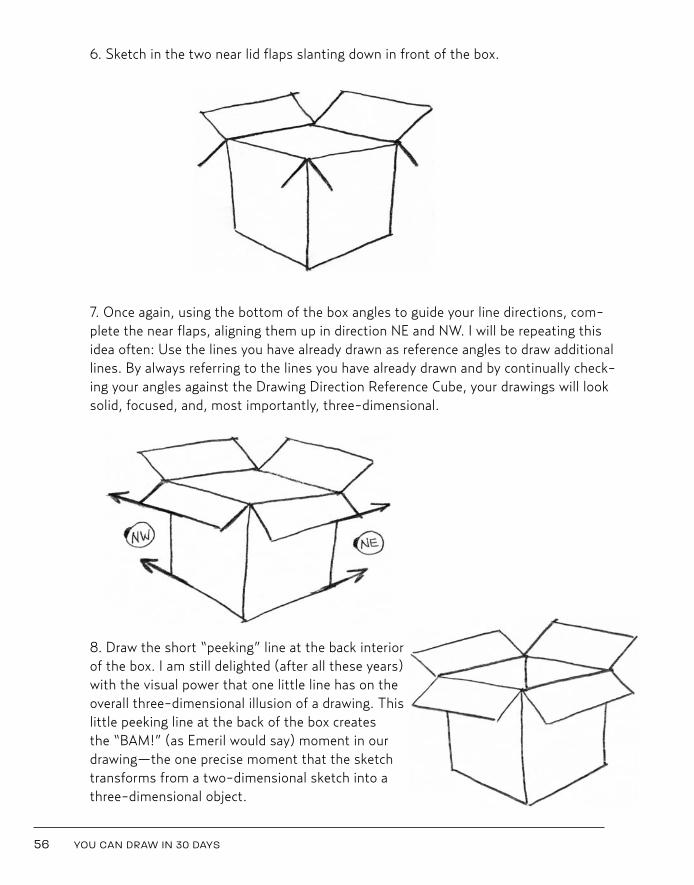
6. Sketch in the two near lid flaps slanting down in front of the box.
7. Once again, using the bottom of the box angles to guide your line directions, com-plete the near flaps, aligning them up in direction NE and NW. I will be repeating thisidea often: Use the lines you have already drawn as reference angles to draw additionallines. By always referring to the lines you have already drawn and by continually check-ing your angles against the Drawing Direction Reference Cube, your drawings will looksolid, focused, and, most importantly, three-dimensional.
8. Draw the short “peeking” line at the back interiorof the box. I am still delighted (after all these years)with the visual power that one little line has on theoverall three-dimensional illusion of a drawing. Thislittle peeking line at the back of the box creates the “BAM!” (as Emeril would say) moment in ourdrawing—the one precise moment that the sketchtransforms from a two-dimensional sketch into athree-dimensional object.
56 YOU CAN DRAW IN 30 DAYS
Kistler 01_Kistler You Can Draw 10/21/10 12:02 PM Page 56
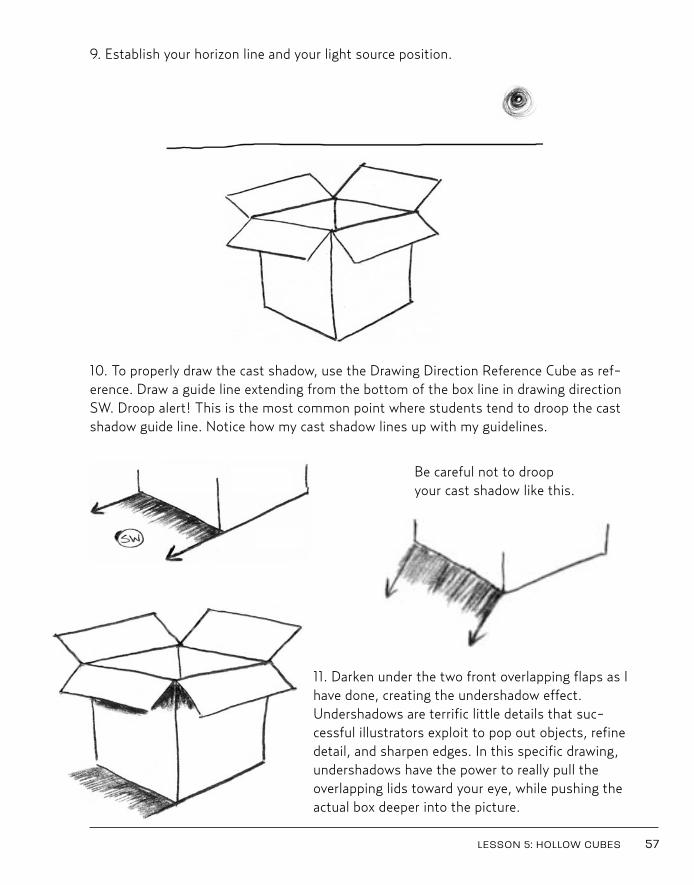
9. Establish your horizon line and your light source position.
10. To properly draw the cast shadow, use the Drawing Direction Reference Cube as ref-erence. Draw a guide line extending from the bottom of the box line in drawing directionSW. Droop alert! This is the most common point where students tend to droop the castshadow guide line. Notice how my cast shadow lines up with my guidelines.
Be careful not to droop your cast shadow like this.
11. Darken under the two front overlapping flaps as Ihave done, creating the undershadow effect.Undershadows are terrific little details that suc-cessful illustrators exploit to pop out objects, refinedetail, and sharpen edges. In this specific drawing,undershadows have the power to really pull theoverlapping lids toward your eye, while pushing theactual box deeper into the picture.
LESSON 5: HOLLOW CUBES 57
Kistler 01_Kistler You Can Draw 10/21/10 12:02 PM Page 57
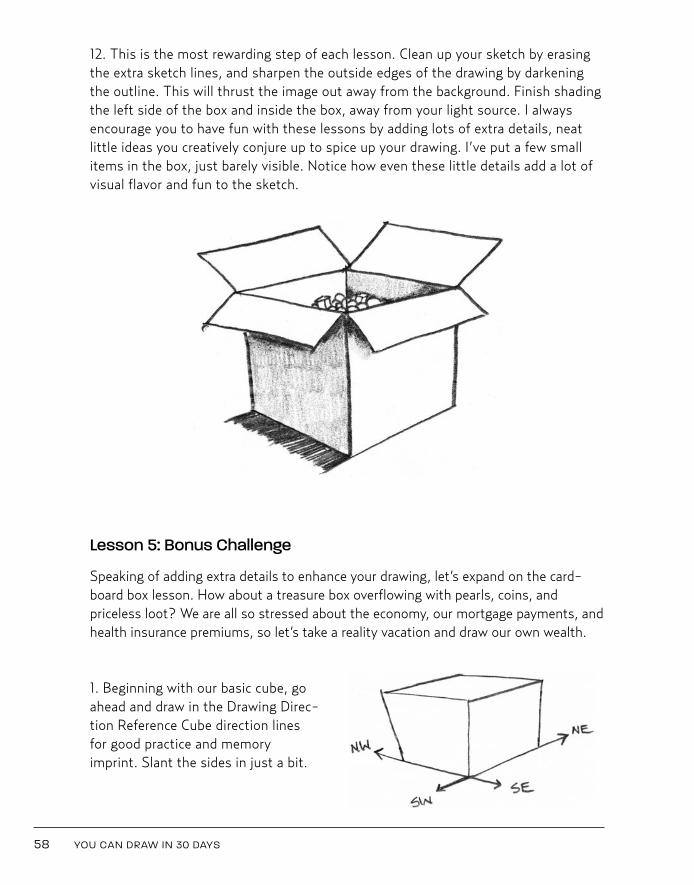
12. This is the most rewarding step of each lesson. Clean up your sketch by erasingthe extra sketch lines, and sharpen the outside edges of the drawing by darkeningthe outline. This will thrust the image out away from the background. Finish shadingthe left side of the box and inside the box, away from your light source. I alwaysencourage you to have fun with these lessons by adding lots of extra details, neatlittle ideas you creatively conjure up to spice up your drawing. I’ve put a few smallitems in the box, just barely visible. Notice how even these little details add a lot ofvisual flavor and fun to the sketch.
Lesson 5: Bonus Challenge
Speaking of adding extra details to enhance your drawing, let’s expand on the card-board box lesson. How about a treasure box overflowing with pearls, coins, andpriceless loot? We are all so stressed about the economy, our mortgage payments, andhealth insurance premiums, so let’s take a reality vacation and draw our own wealth.
1. Beginning with our basic cube, goahead and draw in the Drawing Direc-tion Reference Cube direction linesfor good practice and memoryimprint. Slant the sides in just a bit.
58 YOU CAN DRAW IN 30 DAYS
Kistler 01_Kistler You Can Draw 10/21/10 12:02 PM Page 58
LESSON 5: HOLLOW CUBES 59
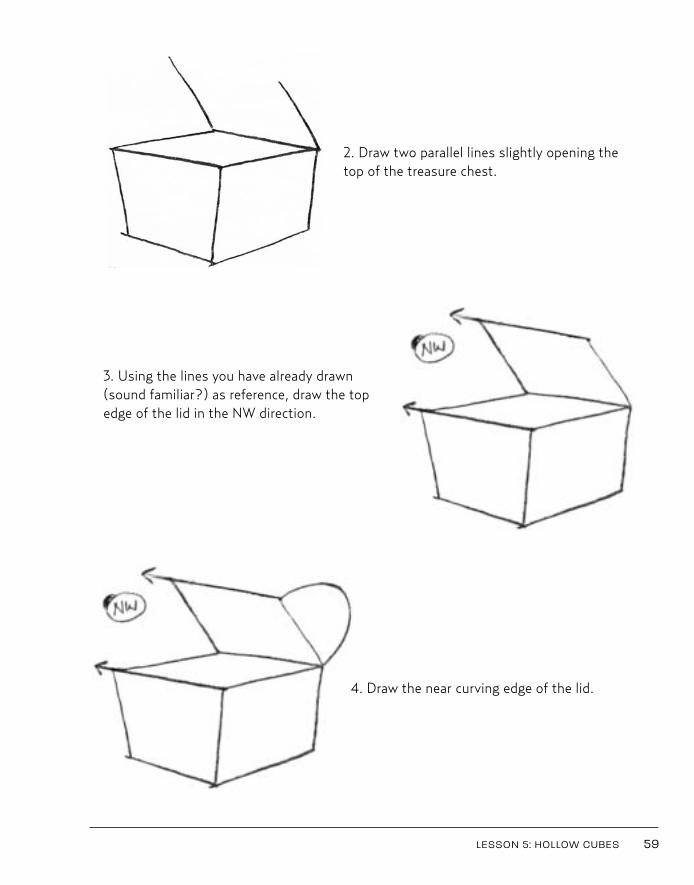
2. Draw two parallel lines slightly opening thetop of the treasure chest.
3. Using the lines you have already drawn(sound familiar?) as reference, draw the topedge of the lid in the NW direction.
4. Draw the near curving edge of the lid.
Kistler 01_Kistler You Can Draw 10/21/10 12:02 PM Page 59
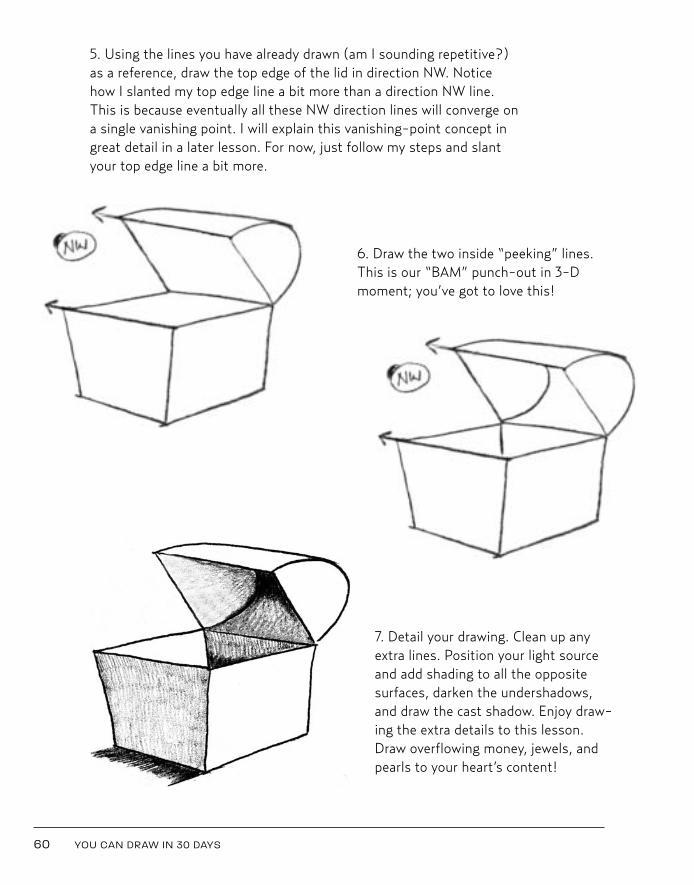
5. Using the lines you have already drawn (am I sounding repetitive?)as a reference, draw the top edge of the lid in direction NW. Noticehow I slanted my top edge line a bit more than a direction NW line.This is because eventually all these NW direction lines will converge ona single vanishing point. I will explain this vanishing-point concept ingreat detail in a later lesson. For now, just follow my steps and slantyour top edge line a bit more.
60 YOU CAN DRAW IN 30 DAYS
6. Draw the two inside “peeking” lines.This is our “BAM” punch-out in 3-Dmoment; you’ve got to love this!
7. Detail your drawing. Clean up anyextra lines. Position your light sourceand add shading to all the oppositesurfaces, darken the undershadows,and draw the cast shadow. Enjoy draw-ing the extra details to this lesson.Draw overflowing money, jewels, andpearls to your heart’s content!
Kistler 01_Kistler You Can Draw 10/25/10 10:44 AM Page 60
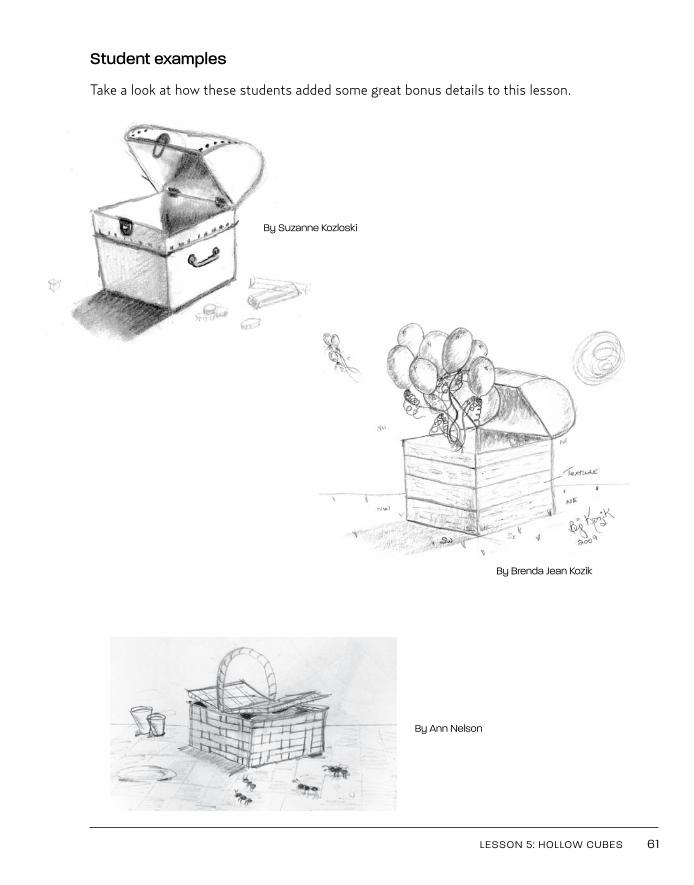
Student examples
Take a look at how these students added some great bonus details to this lesson.
LESSON 5: HOLLOW CUBES 61
By Suzanne Kozloski
By Brenda Jean Kozik
By Ann Nelson
Kistler 01_Kistler You Can Draw 10/21/10 12:02 PM Page 61

Kistler 01_Kistler You Can Draw 10/21/10 12:02 PM Page 62
63
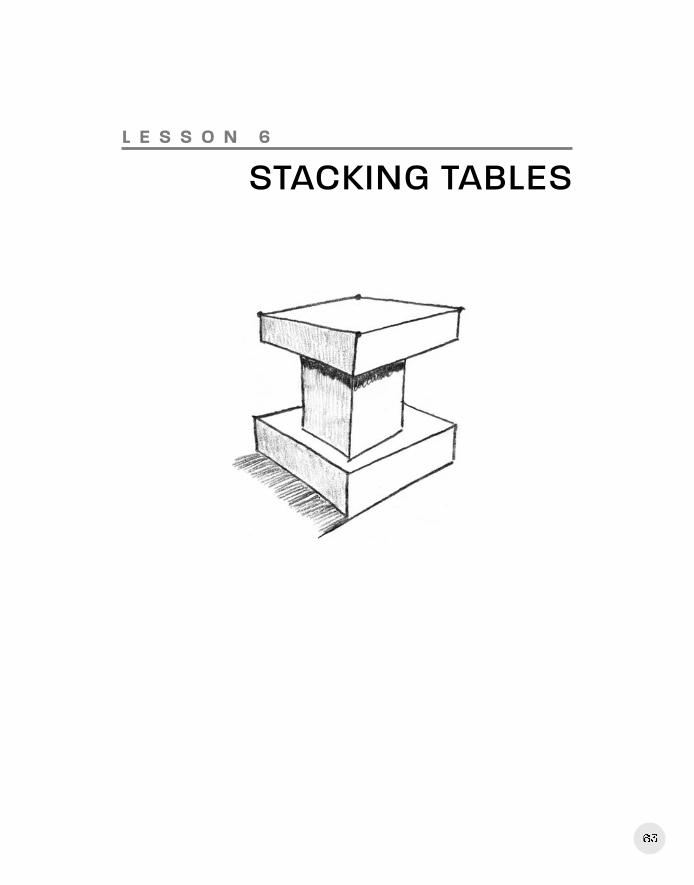
L E S S O N 6
STACKING TABLES
Kistler 01_Kistler You Can Draw 10/21/10 12:02 PM Page 63
T his is a fun and rewarding lesson that was inspired by my fifth-grade artteacher, Bruce McIntyre (Mr. Mac). His enthusiasm for teaching kids how to draw had a profound and lasting effect on me. This lesson will gel all of
the concepts and laws we have been discussing so far into one very cool three-dimensional drawing. Did I mention this is a really fun lesson? I bet that you will enjoy it so much that you will be stacking cubes on every scrap of paper thathappens to be within your reach.
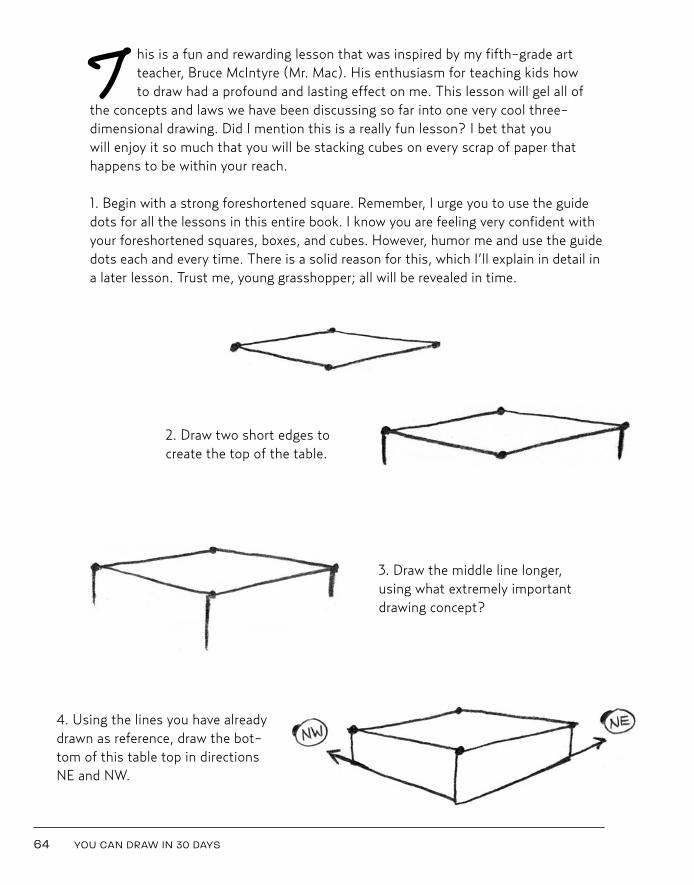
1. Begin with a strong foreshortened square. Remember, I urge you to use the guidedots for all the lessons in this entire book. I know you are feeling very confident withyour foreshortened squares, boxes, and cubes. However, humor me and use the guidedots each and every time. There is a solid reason for this, which I’ll explain in detail ina later lesson. Trust me, young grasshopper; all will be revealed in time.
64 YOU CAN DRAW IN 30 DAYS
2. Draw two short edges tocreate the top of the table.
3. Draw the middle line longer,using what extremely importantdrawing concept?
4. Using the lines you have alreadydrawn as reference, draw the bot-tom of this table top in directionsNE and NW.
Kistler 01_Kistler You Can Draw 10/21/10 4:37 PM Page 64
LESSON 6: STACKING TABLES 65
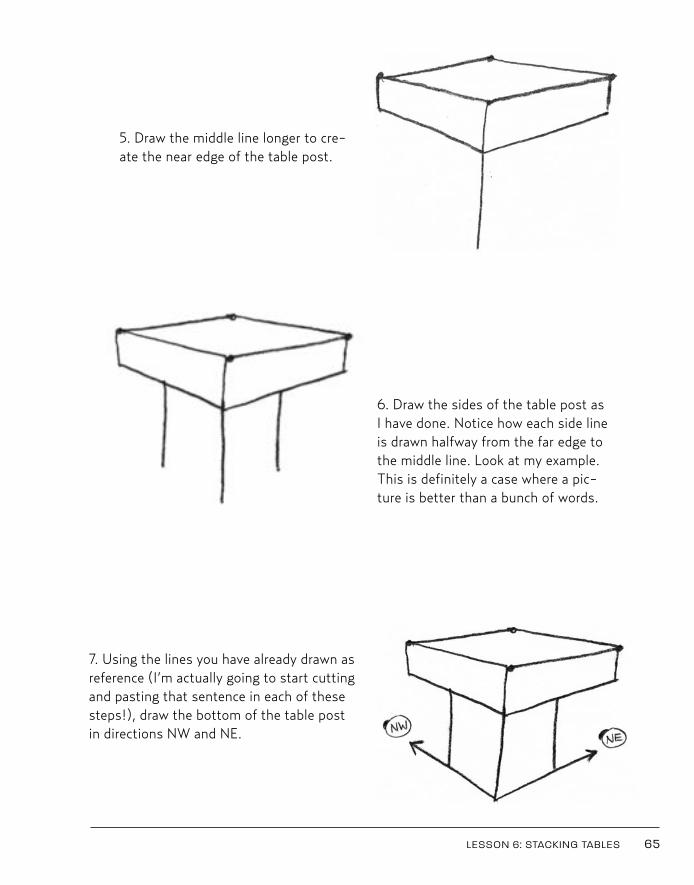
6. Draw the sides of the table post asI have done. Notice how each side lineis drawn halfway from the far edge tothe middle line. Look at my example.This is definitely a case where a pic-ture is better than a bunch of words.
7. Using the lines you have already drawn asreference (I’m actually going to start cuttingand pasting that sentence in each of thesesteps!), draw the bottom of the table postin directions NW and NE.
5. Draw the middle line longer to cre-ate the near edge of the table post.
Kistler 01_Kistler You Can Draw 10/21/10 12:02 PM Page 65
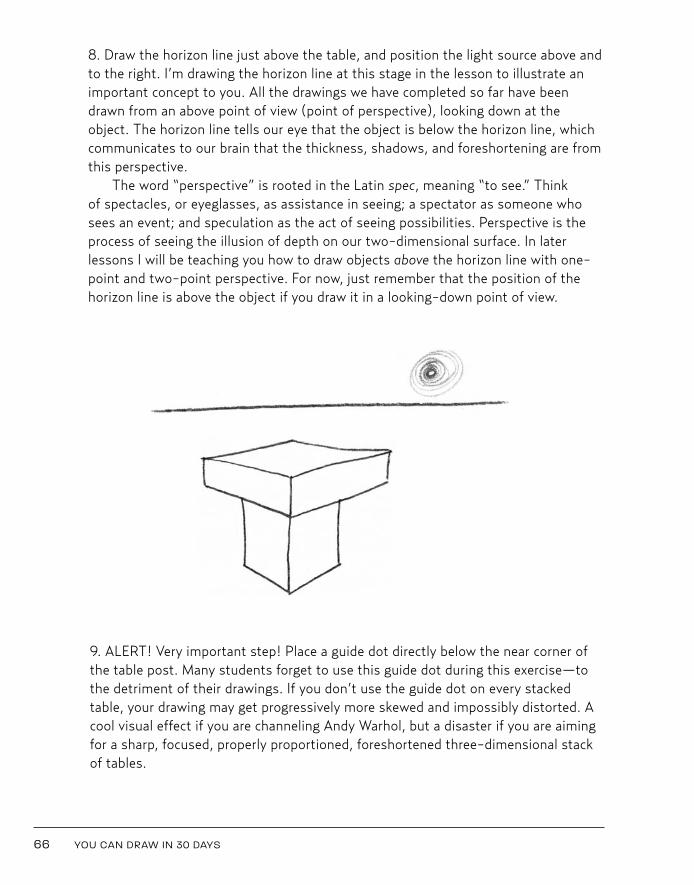
9. ALERT! Very important step! Place a guide dot directly below the near corner ofthe table post. Many students forget to use this guide dot during this exercise—tothe detriment of their drawings. If you don’t use the guide dot on every stackedtable, your drawing may get progressively more skewed and impossibly distorted. Acool visual effect if you are channeling Andy Warhol, but a disaster if you are aimingfor a sharp, focused, properly proportioned, foreshortened three-dimensional stackof tables.
66 YOU CAN DRAW IN 30 DAYS
8. Draw the horizon line just above the table, and position the light source above andto the right. I’m drawing the horizon line at this stage in the lesson to illustrate animportant concept to you. All the drawings we have completed so far have beendrawn from an above point of view (point of perspective), looking down at theobject. The horizon line tells our eye that the object is below the horizon line, whichcommunicates to our brain that the thickness, shadows, and foreshortening are fromthis perspective.
The word “perspective” is rooted in the Latin spec, meaning “to see.” Think of spectacles, or eyeglasses, as assistance in seeing; a spectator as someone whosees an event; and speculation as the act of seeing possibilities. Perspective is theprocess of seeing the illusion of depth on our two-dimensional surface. In later lessons I will be teaching you how to draw objects above the horizon line with one-point and two-point perspective. For now, just remember that the position of thehorizon line is above the object if you draw it in a looking-down point of view.
Kistler 01_Kistler You Can Draw 10/25/10 10:44 AM Page 66
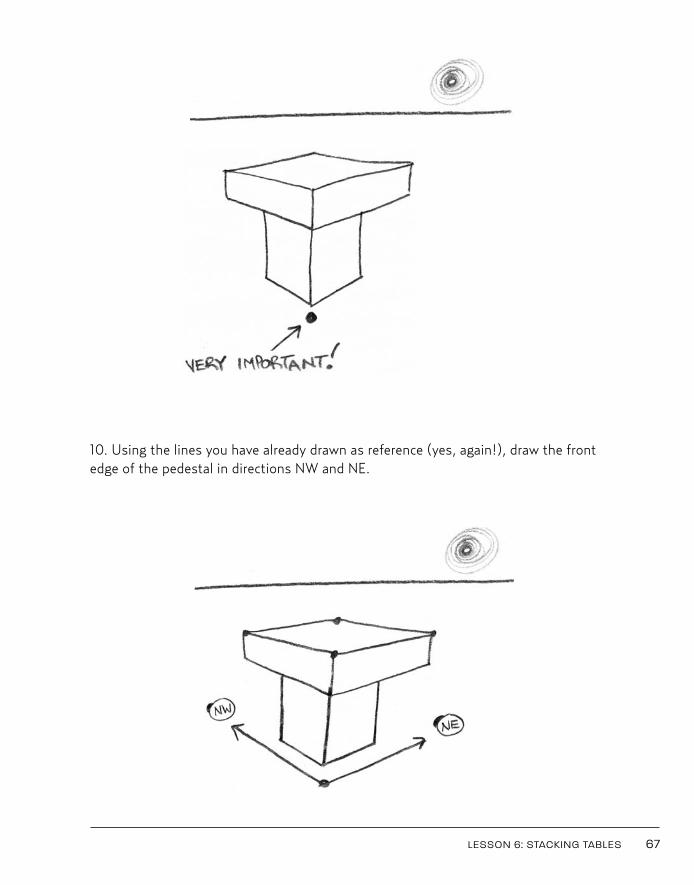
10. Using the lines you have already drawn as reference (yes, again!), draw the frontedge of the pedestal in directions NW and NE.
LESSON 6: STACKING TABLES 67
Kistler 01_Kistler You Can Draw 10/21/10 12:02 PM Page 67
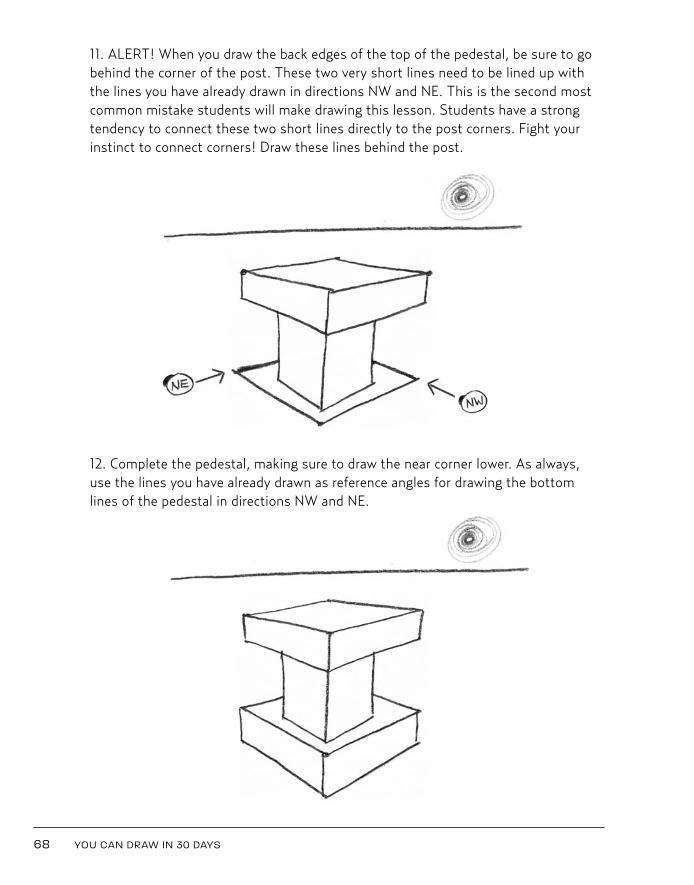
11. ALERT! When you draw the back edges of the top of the pedestal, be sure to gobehind the corner of the post. These two very short lines need to be lined up withthe lines you have already drawn in directions NW and NE. This is the second mostcommon mistake students will make drawing this lesson. Students have a strongtendency to connect these two short lines directly to the post corners. Fight yourinstinct to connect corners! Draw these lines behind the post.
12. Complete the pedestal, making sure to draw the near corner lower. As always,use the lines you have already drawn as reference angles for drawing the bottomlines of the pedestal in directions NW and NE.
68 YOU CAN DRAW IN 30 DAYS
Kistler 01_Kistler You Can Draw 10/25/10 10:44 AM Page 68
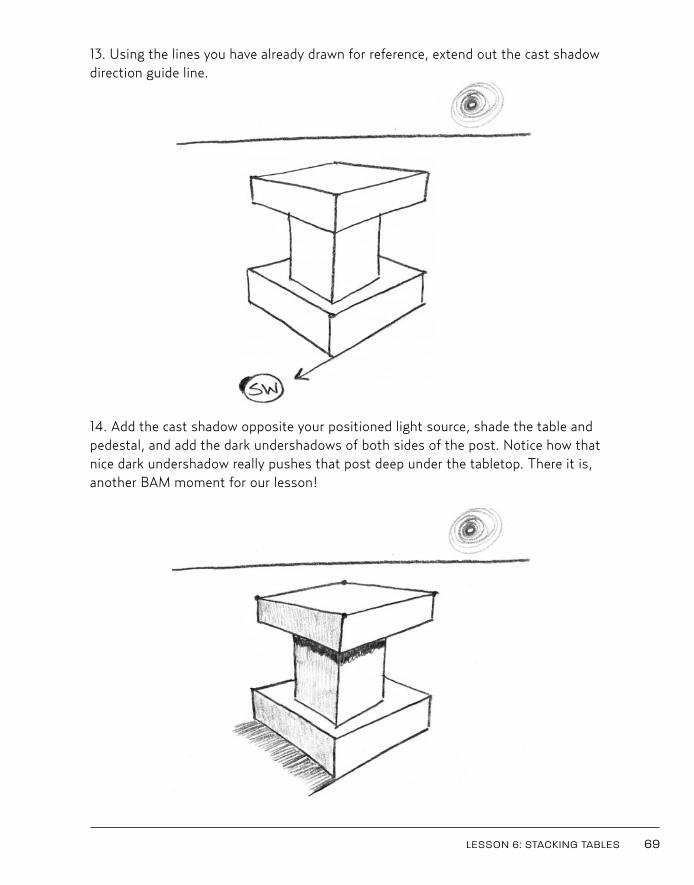
13. Using the lines you have already drawn for reference, extend out the cast shadowdirection guide line.
14. Add the cast shadow opposite your positioned light source, shade the table andpedestal, and add the dark undershadows of both sides of the post. Notice how thatnice dark undershadow really pushes that post deep under the tabletop. There it is,another BAM moment for our lesson!
LESSON 6: STACKING TABLES 69
Kistler 01_Kistler You Can Draw 10/21/10 12:02 PM Page 69
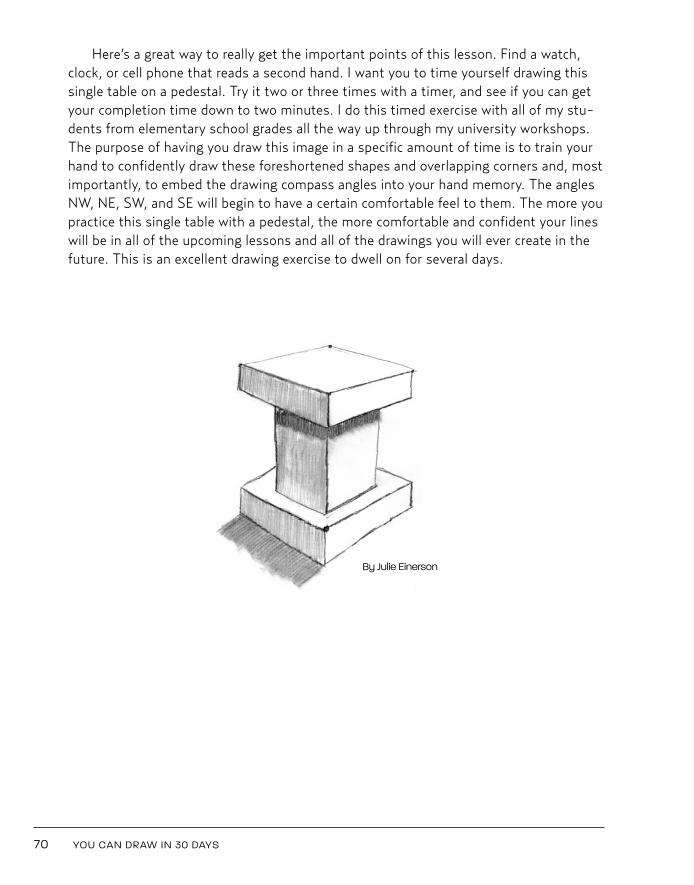
Here’s a great way to really get the important points of this lesson. Find a watch,clock, or cell phone that reads a second hand. I want you to time yourself drawing thissingle table on a pedestal. Try it two or three times with a timer, and see if you can getyour completion time down to two minutes. I do this timed exercise with all of my stu-dents from elementary school grades all the way up through my university workshops.The purpose of having you draw this image in a specific amount of time is to train yourhand to confidently draw these foreshortened shapes and overlapping corners and, mostimportantly, to embed the drawing compass angles into your hand memory. The anglesNW, NE, SW, and SE will begin to have a certain comfortable feel to them. The more youpractice this single table with a pedestal, the more comfortable and confident your lineswill be in all of the upcoming lessons and all of the drawings you will ever create in thefuture. This is an excellent drawing exercise to dwell on for several days.
70 YOU CAN DRAW IN 30 DAYS
By Julie Einerson
Kistler 01_Kistler You Can Draw 10/21/10 12:02 PM Page 70
Lesson 6: Bonus Challenge
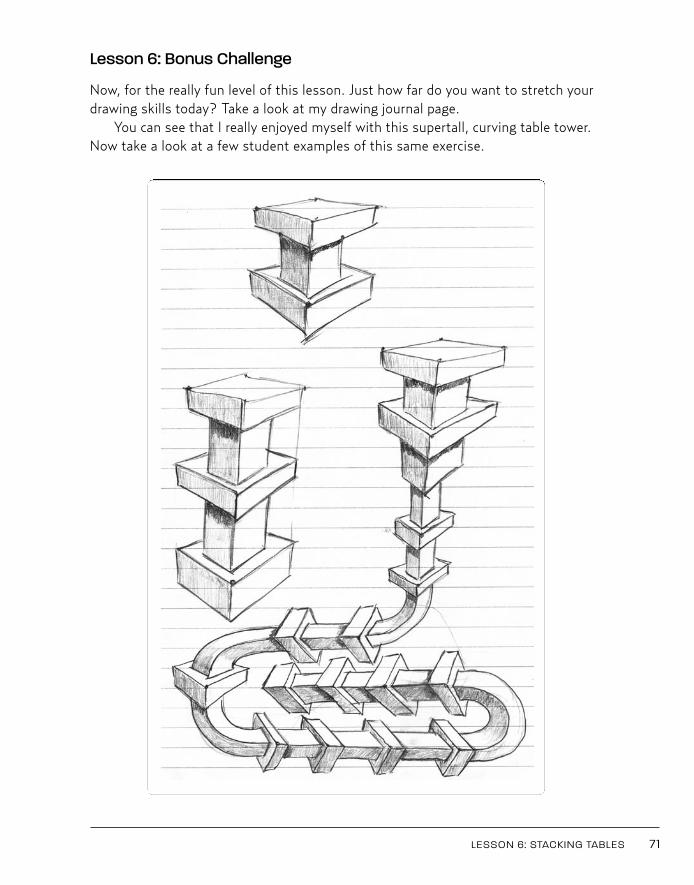
Now, for the really fun level of this lesson. Just how far do you want to stretch yourdrawing skills today? Take a look at my drawing journal page.
You can see that I really enjoyed myself with this supertall, curving table tower.Now take a look at a few student examples of this same exercise.
LESSON 6: STACKING TABLES 71
Kistler 01_Kistler You Can Draw 10/21/10 12:02 PM Page 71
Student examples
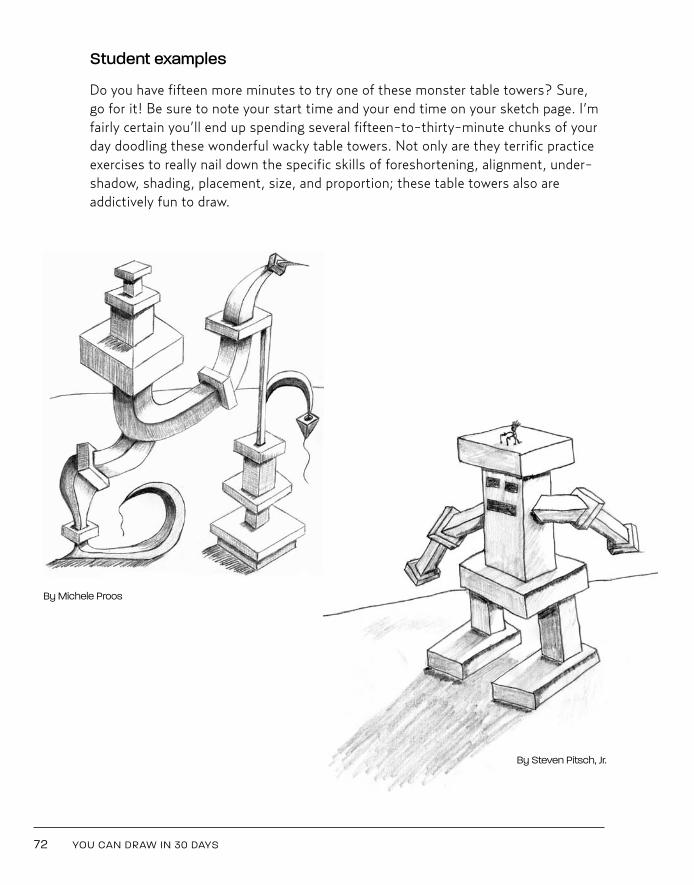
Do you have fifteen more minutes to try one of these monster table towers? Sure,go for it! Be sure to note your start time and your end time on your sketch page. I’mfairly certain you’ll end up spending several fifteen-to-thirty-minute chunks of yourday doodling these wonderful wacky table towers. Not only are they terrific practiceexercises to really nail down the specific skills of foreshortening, alignment, under-shadow, shading, placement, size, and proportion; these table towers also areaddictively fun to draw.
72 YOU CAN DRAW IN 30 DAYS
By Michele Proos
By Steven Pitsch, Jr.
Kistler 01_Kistler You Can Draw 10/21/10 12:03 PM Page 72
73
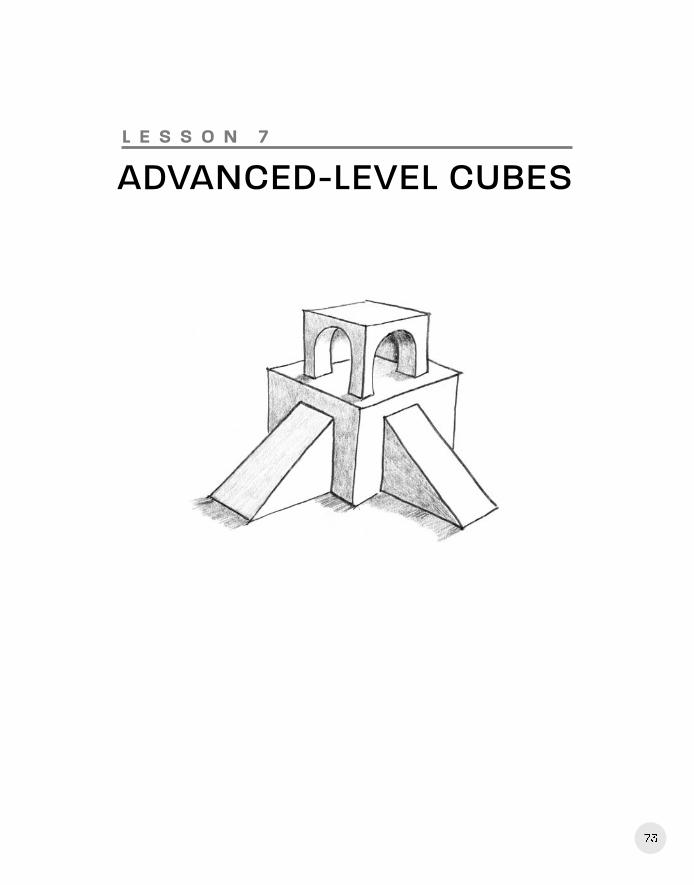
L E S S O N 7
ADVANCED-LEVEL CUBES
73
Kistler 02_Kistler You Can Draw 10/21/10 12:05 PM Page 73
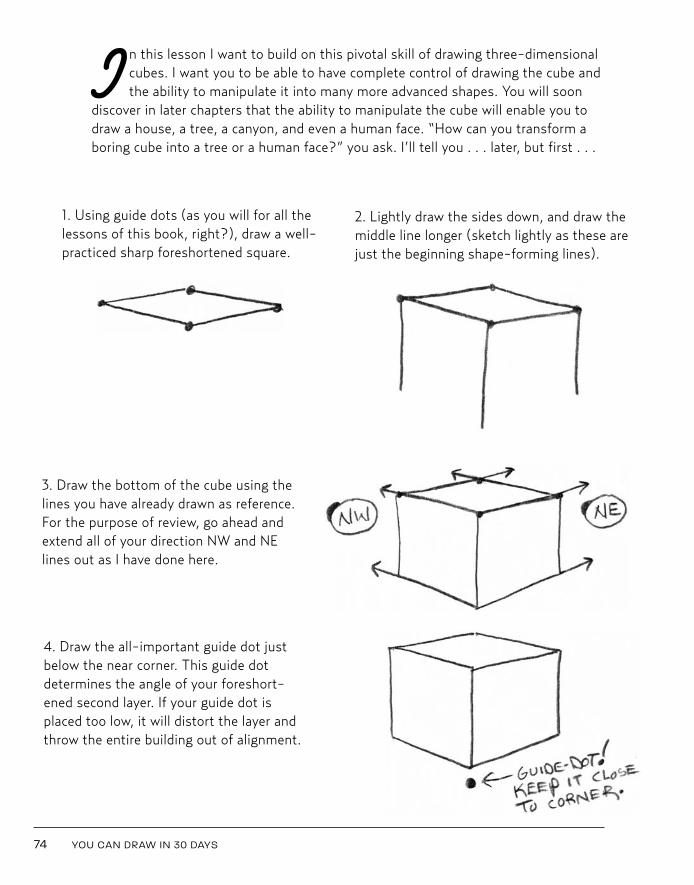
I n this lesson I want to build on this pivotal skill of drawing three-dimensionalcubes. I want you to be able to have complete control of drawing the cube andthe ability to manipulate it into many more advanced shapes. You will soon
discover in later chapters that the ability to manipulate the cube will enable you todraw a house, a tree, a canyon, and even a human face. “How can you transform aboring cube into a tree or a human face?” you ask. I’ll tell you . . . later, but first . . .
74 YOU CAN DRAW IN 30 DAYS
1. Using guide dots (as you will for all thelessons of this book, right?), draw a well-practiced sharp foreshortened square.
2. Lightly draw the sides down, and draw themiddle line longer (sketch lightly as these arejust the beginning shape-forming lines).
3. Draw the bottom of the cube using thelines you have already drawn as reference.For the purpose of review, go ahead andextend all of your direction NW and NElines out as I have done here.
4. Draw the all-important guide dot justbelow the near corner. This guide dotdetermines the angle of your foreshort-ened second layer. If your guide dot isplaced too low, it will distort the layer andthrow the entire building out of alignment.
Kistler 02_Kistler You Can Draw 10/21/10 12:05 PM Page 74
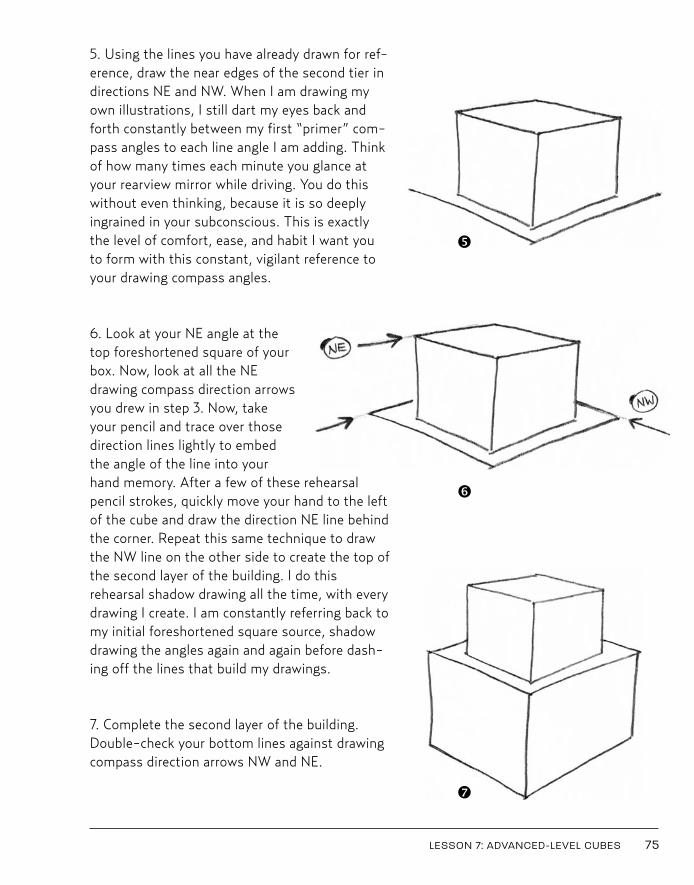
5. Using the lines you have already drawn for ref-erence, draw the near edges of the second tier indirections NE and NW. When I am drawing myown illustrations, I still dart my eyes back andforth constantly between my first “primer” com-pass angles to each line angle I am adding. Thinkof how many times each minute you glance atyour rearview mirror while driving. You do thiswithout even thinking, because it is so deeplyingrained in your subconscious. This is exactlythe level of comfort, ease, and habit I want youto form with this constant, vigilant reference toyour drawing compass angles.
6. Look at your NE angle at thetop foreshortened square of yourbox. Now, look at all the NEdrawing compass direction arrowsyou drew in step 3. Now, takeyour pencil and trace over thosedirection lines lightly to embedthe angle of the line into yourhand memory. After a few of these rehearsalpencil strokes, quickly move your hand to the leftof the cube and draw the direction NE line behindthe corner. Repeat this same technique to drawthe NW line on the other side to create the top ofthe second layer of the building. I do thisrehearsal shadow drawing all the time, with everydrawing I create. I am constantly referring back tomy initial foreshortened square source, shadowdrawing the angles again and again before dash-ing off the lines that build my drawings.
7. Complete the second layer of the building.Double-check your bottom lines against drawingcompass direction arrows NW and NE.
LESSON 7: ADVANCED-LEVEL CUBES 75
ê
ë
í
Kistler 02_Kistler You Can Draw 10/21/10 12:05 PM Page 75
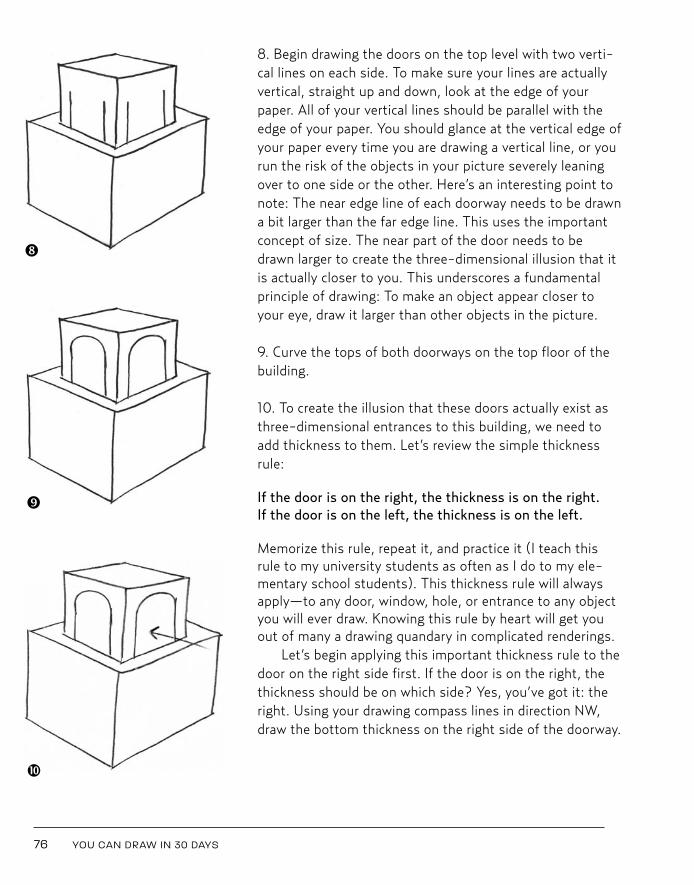
76 YOU CAN DRAW IN 30 DAYS
8. Begin drawing the doors on the top level with two verti-cal lines on each side. To make sure your lines are actuallyvertical, straight up and down, look at the edge of yourpaper. All of your vertical lines should be parallel with theedge of your paper. You should glance at the vertical edge ofyour paper every time you are drawing a vertical line, or yourun the risk of the objects in your picture severely leaningover to one side or the other. Here’s an interesting point tonote: The near edge line of each doorway needs to be drawna bit larger than the far edge line. This uses the importantconcept of size. The near part of the door needs to bedrawn larger to create the three-dimensional illusion that itis actually closer to you. This underscores a fundamentalprinciple of drawing: To make an object appear closer toyour eye, draw it larger than other objects in the picture.
9. Curve the tops of both doorways on the top floor of thebuilding.
10. To create the illusion that these doors actually exist asthree-dimensional entrances to this building, we need toadd thickness to them. Let’s review the simple thicknessrule:
If the door is on the right, the thickness is on the right.If the door is on the left, the thickness is on the left.
Memorize this rule, repeat it, and practice it (I teach thisrule to my university students as often as I do to my ele-mentary school students). This thickness rule will alwaysapply—to any door, window, hole, or entrance to any objectyou will ever draw. Knowing this rule by heart will get youout of many a drawing quandary in complicated renderings.
Let’s begin applying this important thickness rule to thedoor on the right side first. If the door is on the right, thethickness should be on which side? Yes, you’ve got it: theright. Using your drawing compass lines in direction NW,draw the bottom thickness on the right side of the doorway.
ì
ï
î
Kistler 02_Kistler You Can Draw 10/25/10 10:47 AM Page 76
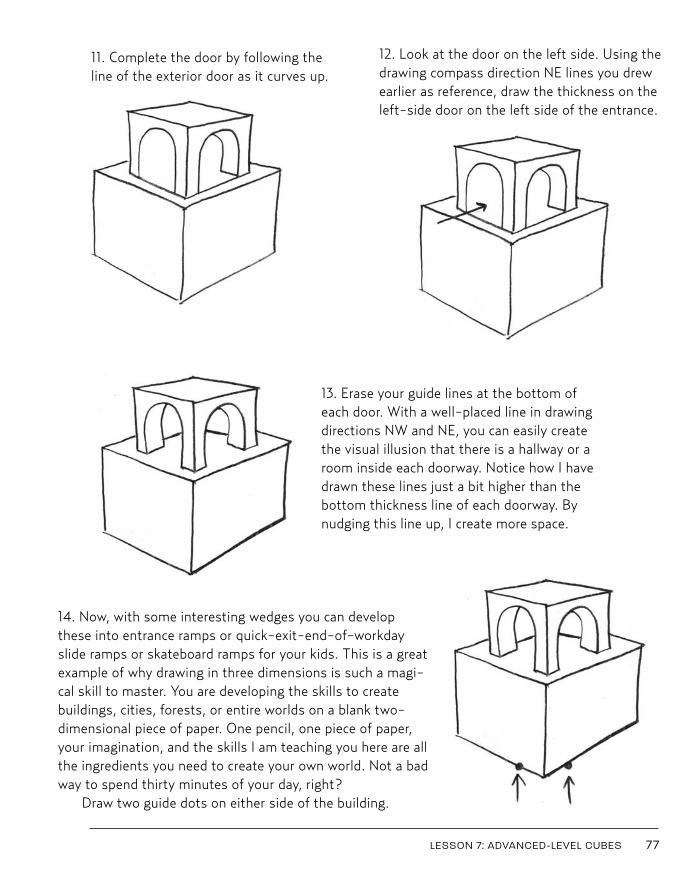
11. Complete the door by following theline of the exterior door as it curves up.
12. Look at the door on the left side. Using thedrawing compass direction NE lines you drewearlier as reference, draw the thickness on theleft-side door on the left side of the entrance.
13. Erase your guide lines at the bottom ofeach door. With a well-placed line in drawingdirections NW and NE, you can easily createthe visual illusion that there is a hallway or aroom inside each doorway. Notice how I havedrawn these lines just a bit higher than thebottom thickness line of each doorway. Bynudging this line up, I create more space.
14. Now, with some interesting wedges you can developthese into entrance ramps or quick-exit-end-of-workdayslide ramps or skateboard ramps for your kids. This is a greatexample of why drawing in three dimensions is such a magi-cal skill to master. You are developing the skills to createbuildings, cities, forests, or entire worlds on a blank two-dimensional piece of paper. One pencil, one piece of paper,your imagination, and the skills I am teaching you here are allthe ingredients you need to create your own world. Not a badway to spend thirty minutes of your day, right?
Draw two guide dots on either side of the building.
LESSON 7: ADVANCED-LEVEL CUBES 77
Kistler 02_Kistler You Can Draw 10/21/10 12:05 PM Page 77
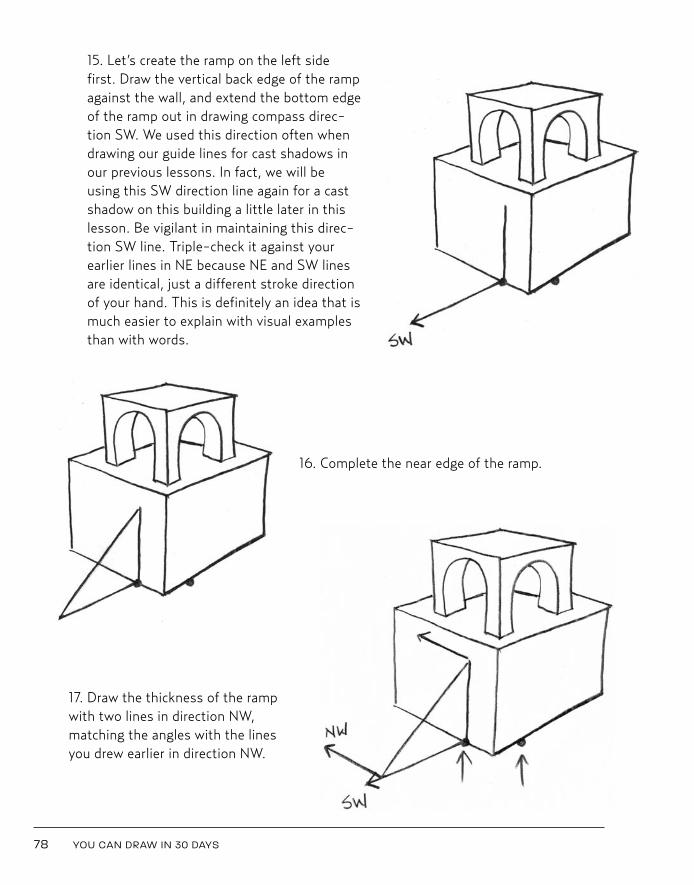
15. Let’s create the ramp on the left sidefirst. Draw the vertical back edge of the rampagainst the wall, and extend the bottom edgeof the ramp out in drawing compass direc-tion SW. We used this direction often whendrawing our guide lines for cast shadows inour previous lessons. In fact, we will beusing this SW direction line again for a castshadow on this building a little later in thislesson. Be vigilant in maintaining this direc-tion SW line. Triple-check it against yourearlier lines in NE because NE and SW linesare identical, just a different stroke directionof your hand. This is definitely an idea that ismuch easier to explain with visual examplesthan with words.
16. Complete the near edge of the ramp.
17. Draw the thickness of the rampwith two lines in direction NW,matching the angles with the linesyou drew earlier in direction NW.
78 YOU CAN DRAW IN 30 DAYS
Kistler 02_Kistler You Can Draw 10/21/10 12:05 PM Page 78

19. Erase your guide lines behind theramp. Using the lines you alreadydrew in direction NE as reference(keep glancing at those lines as youare drawing new ones to match upthe angles), draw the ramp on theright side. Remember: Beware of thetendency to droop the bottom line.No drooping!
LESSON 7: ADVANCED-LEVEL CUBES 79
18. Complete the far edge of the ramp by matching the angle of the front edge(another good example of parallel lines). Notice how I have drawn the bottom of theface or the ramp a tiny bit larger than the top. You must always keep in mind theeffect of size in your drawing. To reiterate, to make objects appear closer, draw themlarger. To make objects appear farther away, draw them smaller. In this case, I wantto draw the bottom of the face of the ramp a bit larger to strengthen the visual illu-sion that it is closer to your eye and that the top of the ramp is pushed deeper intothe picture, farther from your eye. It’s this constant application of these smalldetails, using these important drawing laws (size, placement, shading, shadow, etc.)and the drawing compass directions (NW, NE, SW, and SE) that give you the skillsand confidence to sketch anything in three dimensions.
Kistler 02_Kistler You Can Draw 10/21/10 12:05 PM Page 79
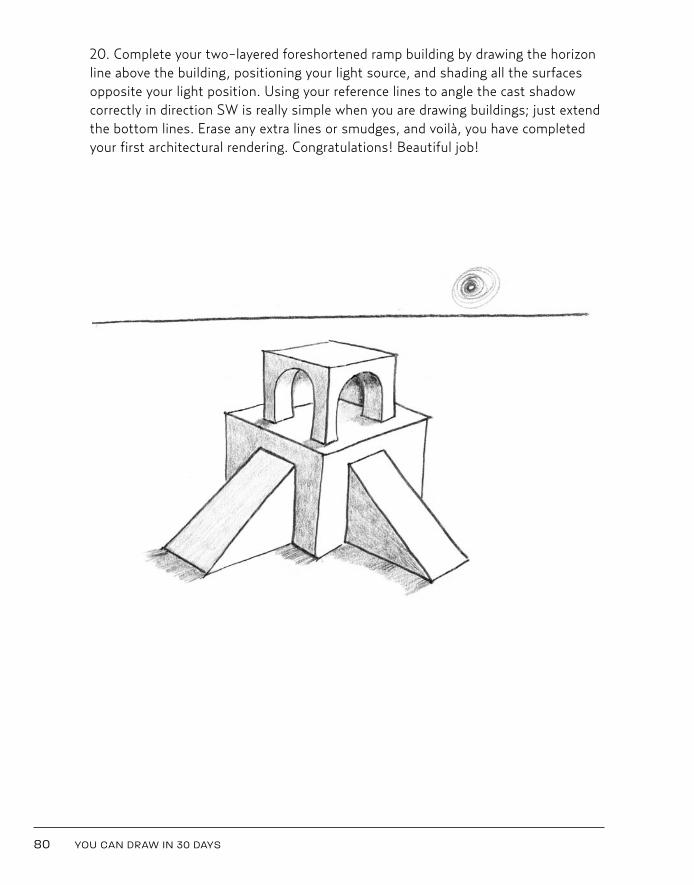
80 YOU CAN DRAW IN 30 DAYS
20. Complete your two-layered foreshortened ramp building by drawing the horizonline above the building, positioning your light source, and shading all the surfacesopposite your light position. Using your reference lines to angle the cast shadowcorrectly in direction SW is really simple when you are drawing buildings; just extendthe bottom lines. Erase any extra lines or smudges, and voilà, you have completedyour first architectural rendering. Congratulations! Beautiful job!
Kistler 02_Kistler You Can Draw 10/21/10 12:05 PM Page 80
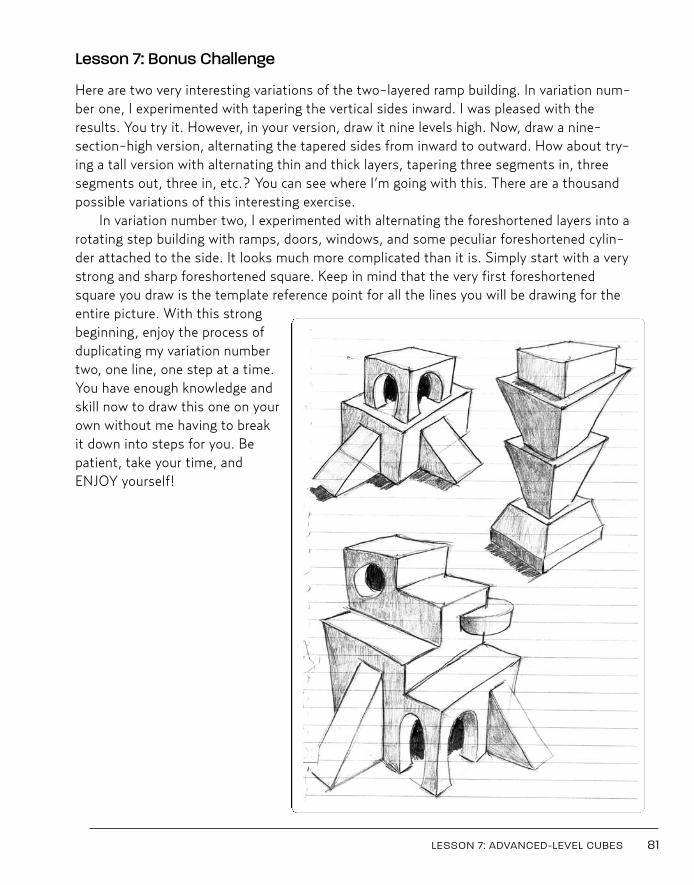
LESSON 7: ADVANCED-LEVEL CUBES 81
Lesson 7: Bonus Challenge
Here are two very interesting variations of the two-layered ramp building. In variation num-ber one, I experimented with tapering the vertical sides inward. I was pleased with theresults. You try it. However, in your version, draw it nine levels high. Now, draw a nine-section-high version, alternating the tapered sides from inward to outward. How about try-ing a tall version with alternating thin and thick layers, tapering three segments in, threesegments out, three in, etc.? You can see where I’m going with this. There are a thousandpossible variations of this interesting exercise.
In variation number two, I experimented with alternating the foreshortened layers into arotating step building with ramps, doors, windows, and some peculiar foreshortened cylin-der attached to the side. It looks much more complicated than it is. Simply start with a verystrong and sharp foreshortened square. Keep in mind that the very first foreshortenedsquare you draw is the template reference point for all the lines you will be drawing for theentire picture. With this strongbeginning, enjoy the process ofduplicating my variation numbertwo, one line, one step at a time.You have enough knowledge andskill now to draw this one on yourown without me having to break it down into steps for you. Bepatient, take your time, andENJOY yourself!
Kistler 02_Kistler You Can Draw 10/25/10 10:47 AM Page 81
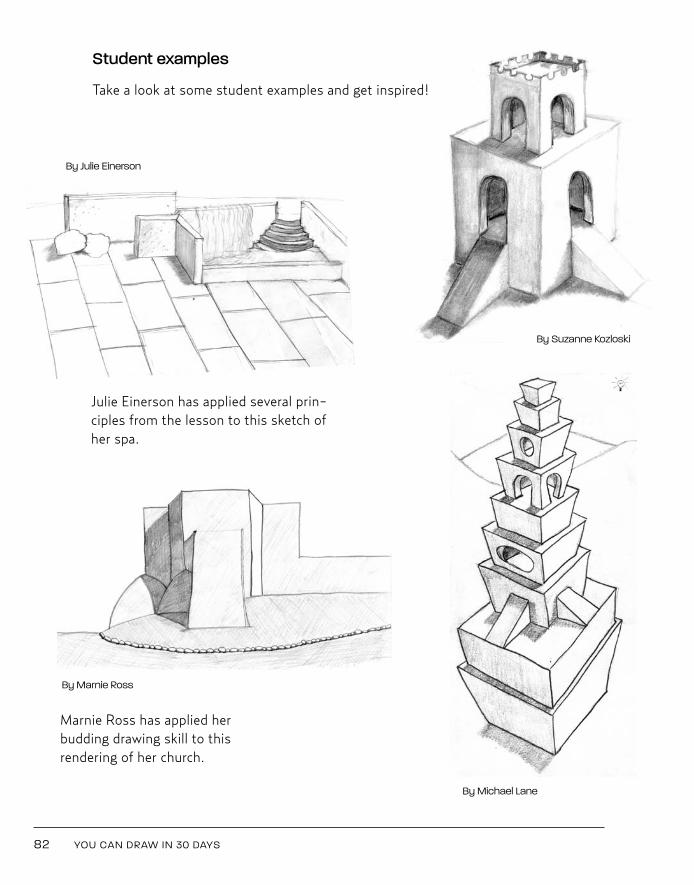
By Suzanne Kozloski
By Michael Lane
By Julie Einerson
By Marnie Ross
Marnie Ross has applied herbudding drawing skill to thisrendering of her church.
82 YOU CAN DRAW IN 30 DAYS
Student examples
Take a look at some student examples and get inspired!
Julie Einerson has applied several prin-ciples from the lesson to this sketch ofher spa.
Kistler 02_Kistler You Can Draw 10/21/10 12:05 PM Page 82

L E S S O N 8
COOL KOALAS
83
Kistler 02_Kistler You Can Draw 10/21/10 12:05 PM Page 83
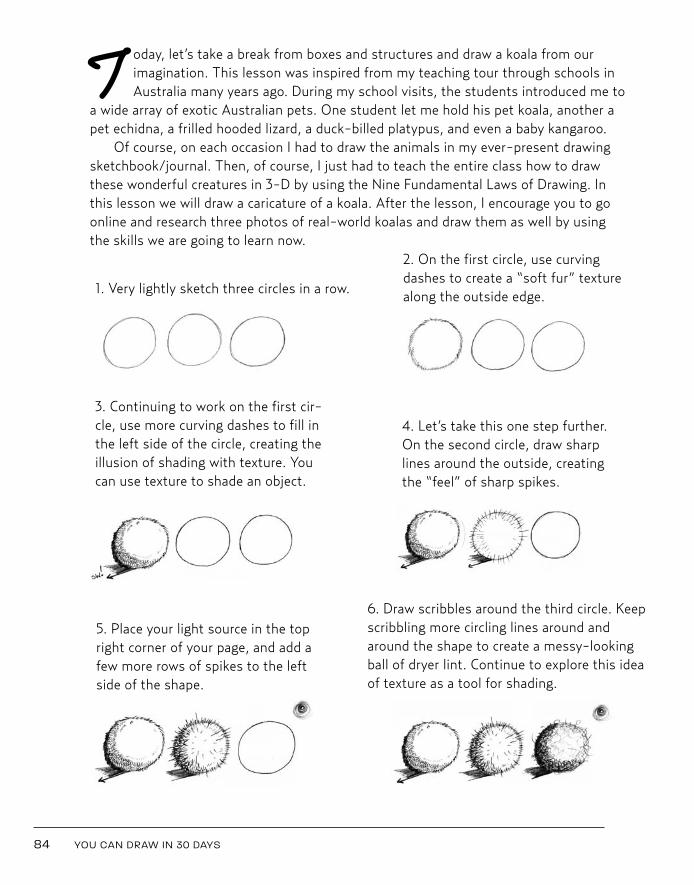
6. Draw scribbles around the third circle. Keepscribbling more circling lines around andaround the shape to create a messy-lookingball of dryer lint. Continue to explore this ideaof texture as a tool for shading.
1. Very lightly sketch three circles in a row.
2. On the first circle, use curvingdashes to create a “soft fur” texturealong the outside edge.
3. Continuing to work on the first cir-cle, use more curving dashes to fill inthe left side of the circle, creating theillusion of shading with texture. Youcan use texture to shade an object.
5. Place your light source in the topright corner of your page, and add afew more rows of spikes to the leftside of the shape.
4. Let’s take this one step further.On the second circle, draw sharplines around the outside, creatingthe “feel” of sharp spikes.
84 YOU CAN DRAW IN 30 DAYS
T oday, let’s take a break from boxes and structures and draw a koala from ourimagination. This lesson was inspired from my teaching tour through schools inAustralia many years ago. During my school visits, the students introduced me to
a wide array of exotic Australian pets. One student let me hold his pet koala, another apet echidna, a frilled hooded lizard, a duck-billed platypus, and even a baby kangaroo.
Of course, on each occasion I had to draw the animals in my ever-present drawingsketchbook/journal. Then, of course, I just had to teach the entire class how to drawthese wonderful creatures in 3-D by using the Nine Fundamental Laws of Drawing. Inthis lesson we will draw a caricature of a koala. After the lesson, I encourage you to goonline and research three photos of real-world koalas and draw them as well by usingthe skills we are going to learn now.
Kistler 02_Kistler You Can Draw 10/21/10 12:05 PM Page 84
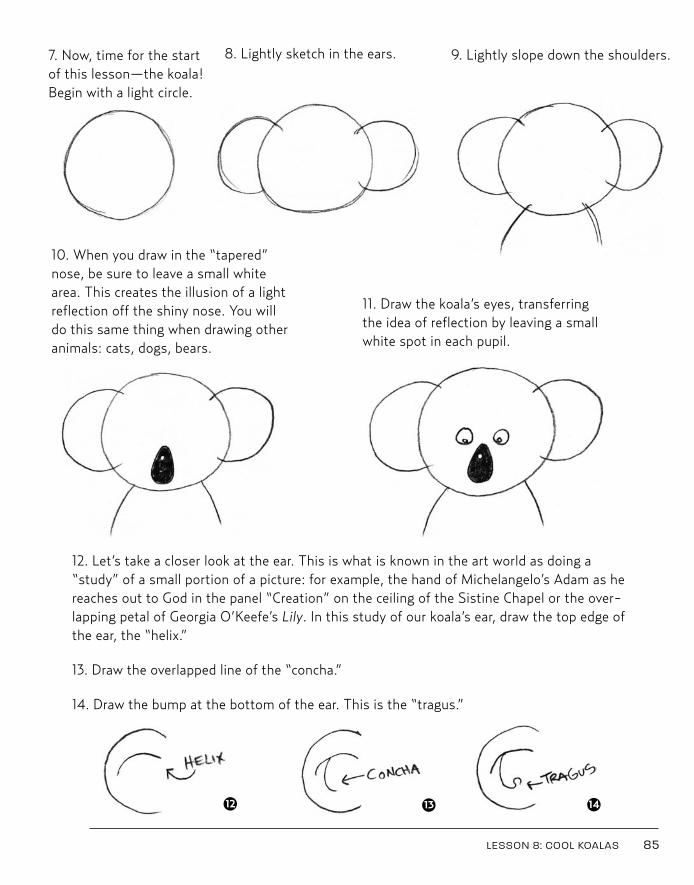
10. When you draw in the “tapered”nose, be sure to leave a small whitearea. This creates the illusion of a lightreflection off the shiny nose. You willdo this same thing when drawing otheranimals: cats, dogs, bears.
7. Now, time for the startof this lesson—the koala!Begin with a light circle.
8. Lightly sketch in the ears. 9. Lightly slope down the shoulders.
11. Draw the koala’s eyes, transferringthe idea of reflection by leaving a smallwhite spot in each pupil.
12. Let’s take a closer look at the ear. This is what is known in the art world as doing a“study” of a small portion of a picture: for example, the hand of Michelangelo’s Adam as hereaches out to God in the panel “Creation” on the ceiling of the Sistine Chapel or the over-lapping petal of Georgia O’Keefe’s Lily. In this study of our koala’s ear, draw the top edge ofthe ear, the “helix.”
13. Draw the overlapped line of the “concha.”
14. Draw the bump at the bottom of the ear. This is the “tragus.”
LESSON 8: COOL KOALAS 85
12 13 14
Kistler 02_Kistler You Can Draw 10/21/10 12:05 PM Page 85

17. Use more furry textureto shade the koala’s head,ears, and body. Emphasizethe undershadow under hischin and in his ear underthe top helix line.
This is a perfect example of how effective visual communication can be. I could write for pagesexplaining what a concha is, where it’s located, and what it looks like. Or I can draw a few lineson a page and point to it. Now take your finger and lightly trace the helix, concha, and tragus inyour own ear. What do you know? We humans have nearly the same ear structure as koalas,and in fact all land mammals’ ears have a helix, a concha, and a tragus. In future drawings youcreate, you’ll be able to transfer this detail to other animals you want to draw.
15. Repeat this ear structure on the right ear.16. Look back at the furry ball you drew atthe beginning of this lesson. Notice howyou created the soft feel of fur as com-pared to the sharp feel of the spike ball.Draw the soft, furry texture around theoutline of the koala.
86 YOU CAN DRAW IN 30 DAYS
Kistler 02_Kistler You Can Draw 10/21/10 12:05 PM Page 86
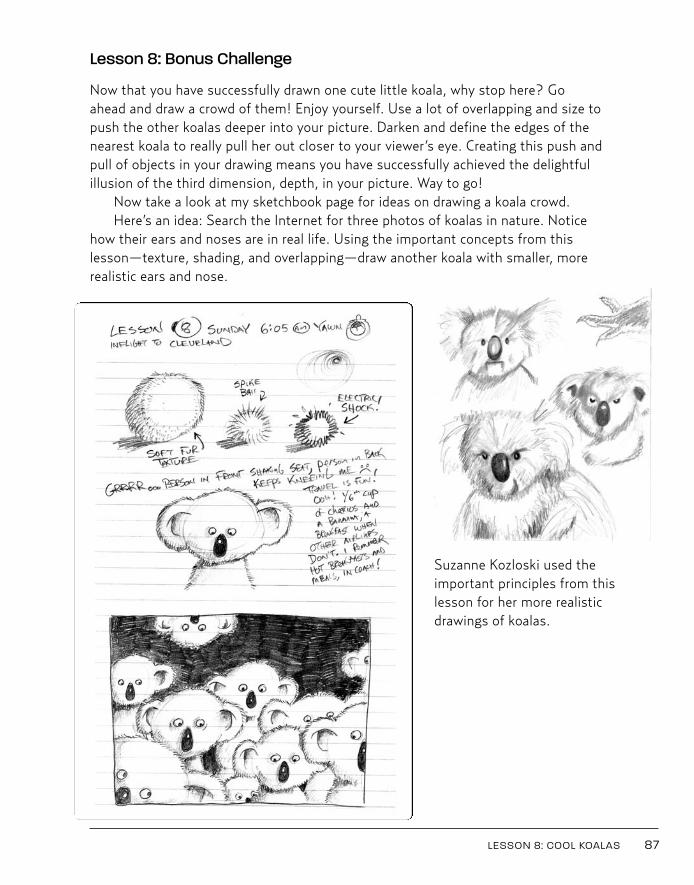
Suzanne Kozloski used theimportant principles from thislesson for her more realisticdrawings of koalas.
LESSON 8: COOL KOALAS 87
Lesson 8: Bonus Challenge
Now that you have successfully drawn one cute little koala, why stop here? Goahead and draw a crowd of them! Enjoy yourself. Use a lot of overlapping and size topush the other koalas deeper into your picture. Darken and define the edges of thenearest koala to really pull her out closer to your viewer’s eye. Creating this push andpull of objects in your drawing means you have successfully achieved the delightfulillusion of the third dimension, depth, in your picture. Way to go!
Now take a look at my sketchbook page for ideas on drawing a koala crowd.Here’s an idea: Search the Internet for three photos of koalas in nature. Notice
how their ears and noses are in real life. Using the important concepts from this lesson—texture, shading, and overlapping—draw another koala with smaller, morerealistic ears and nose.
Kistler 02_Kistler You Can Draw 10/21/10 12:05 PM Page 87
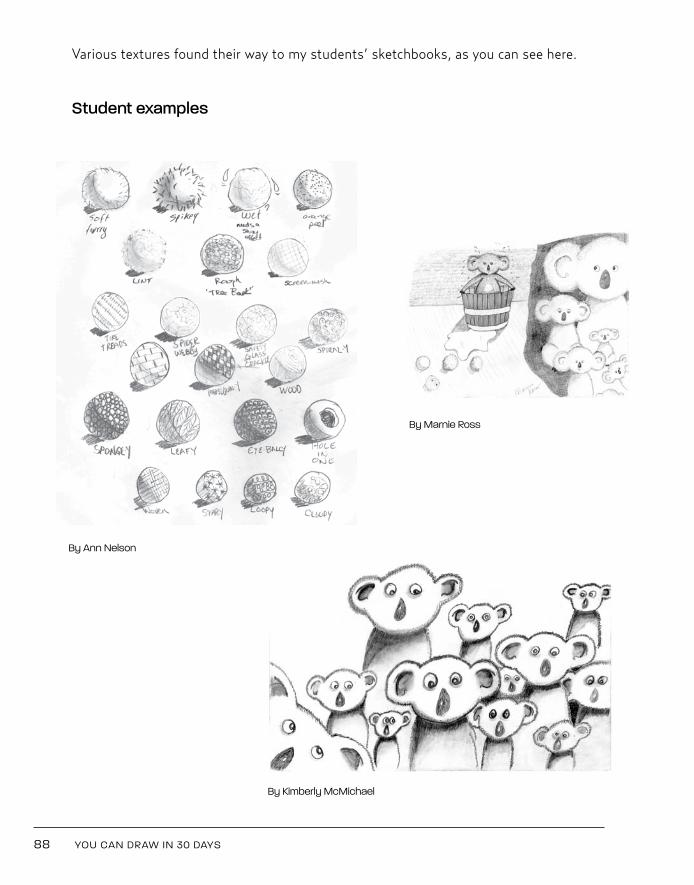
Various textures found their way to my students’ sketchbooks, as you can see here.
Student examples
88 YOU CAN DRAW IN 30 DAYS
By Ann Nelson
By Kimberly McMichael
By Marnie Ross
Kistler 02_Kistler You Can Draw 10/21/10 12:06 PM Page 88

89
L E S S O N 9
THE ROSE
Kistler 02_Kistler You Can Draw 10/21/10 4:42 PM Page 89
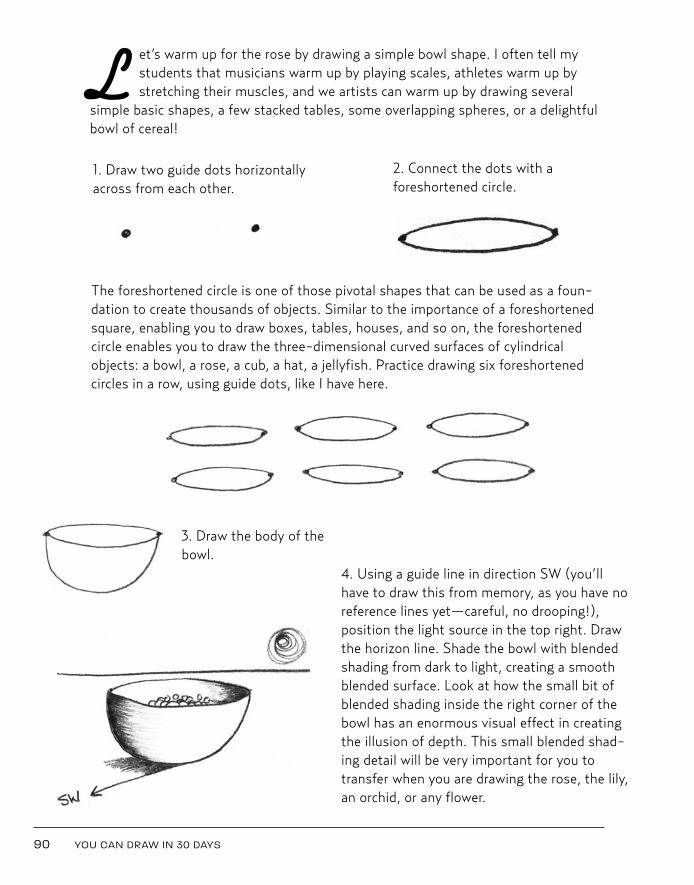
1. Draw two guide dots horizontallyacross from each other.
2. Connect the dots with a foreshortened circle.
3. Draw the body of thebowl.
4. Using a guide line in direction SW (you’llhave to draw this from memory, as you have noreference lines yet—careful, no drooping!),position the light source in the top right. Drawthe horizon line. Shade the bowl with blendedshading from dark to light, creating a smoothblended surface. Look at how the small bit ofblended shading inside the right corner of thebowl has an enormous visual effect in creatingthe illusion of depth. This small blended shad-ing detail will be very important for you totransfer when you are drawing the rose, the lily,an orchid, or any flower.
90 YOU CAN DRAW IN 30 DAYS
L et’s warm up for the rose by drawing a simple bowl shape. I often tell mystudents that musicians warm up by playing scales, athletes warm up bystretching their muscles, and we artists can warm up by drawing several
simple basic shapes, a few stacked tables, some overlapping spheres, or a delightfulbowl of cereal!
The foreshortened circle is one of those pivotal shapes that can be used as a foun-dation to create thousands of objects. Similar to the importance of a foreshortenedsquare, enabling you to draw boxes, tables, houses, and so on, the foreshortenedcircle enables you to draw the three-dimensional curved surfaces of cylindricalobjects: a bowl, a rose, a cub, a hat, a jellyfish. Practice drawing six foreshortenedcircles in a row, using guide dots, like I have here.
Kistler 02_Kistler You Can Draw 10/21/10 12:06 PM Page 90

5a. Draw a vertical flagpole.
5b. Draw two guide dots. 5c. Draw three-quartersof a foreshortened circle.
5d. Draw the verticalthickness of the flag.
5e. Curve the near bottom edgeof the flag a bit more than theline above it. The bottom of theflag is a bit farther from youreye, so you need to distort it,curve it more than the top edge.
5f. Draw the “peeking” line,the most important line in thisexercise. This teeny tiny dashwill make or break this draw-ing and holds an enormousamount of visual power. Ituses overlapping, placement,and size simultaneously.
5. Before you draw the rose, I want to introduce you to an important idea I call the“peeking” line. This tiny detail of a small overlapping line that defines a fold or awrinkle will have a huge visual effect in enabling you to make the rose petals appearto be curling around the bud in three dimensions. The best exercise to familiarize youwith this is a fun simple “flapping flag” exercise.
LESSON 9: THE ROSE 91
Kistler 02_Kistler You Can Draw 10/21/10 12:06 PM Page 91
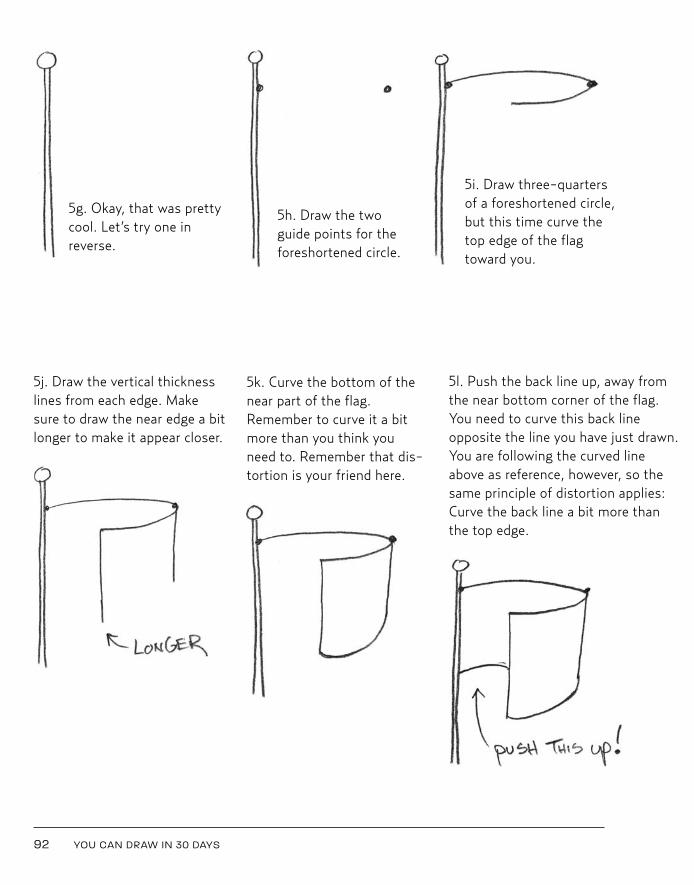
5g. Okay, that was prettycool. Let’s try one inreverse.
5h. Draw the twoguide points for theforeshortened circle.
5i. Draw three-quartersof a foreshortened circle,but this time curve thetop edge of the flagtoward you.
5j. Draw the vertical thicknesslines from each edge. Makesure to draw the near edge a bitlonger to make it appear closer.
5k. Curve the bottom of thenear part of the flag.Remember to curve it a bitmore than you think youneed to. Remember that dis-tortion is your friend here.
5l. Push the back line up, away fromthe near bottom corner of the flag.You need to curve this back lineopposite the line you have just drawn.You are following the curved lineabove as reference, however, so thesame principle of distortion applies:Curve the back line a bit more thanthe top edge.
92 YOU CAN DRAW IN 30 DAYS
Kistler 02_Kistler You Can Draw 10/21/10 12:06 PM Page 92
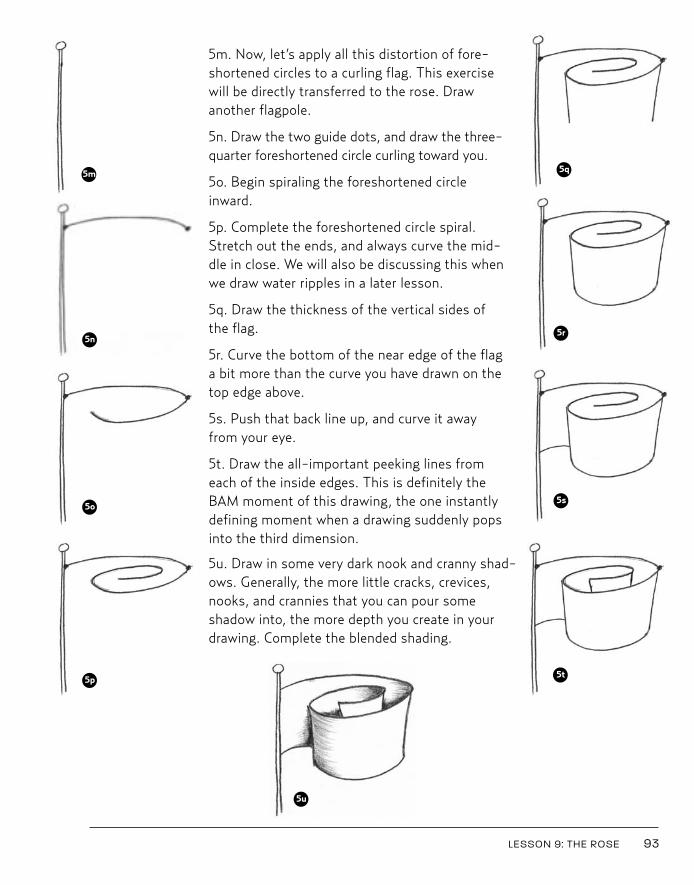
.
5m. Now, let’s apply all this distortion of fore-shortened circles to a curling flag. This exercisewill be directly transferred to the rose. Drawanother flagpole.
5n. Draw the two guide dots, and draw the three-quarter foreshortened circle curling toward you.
5o. Begin spiraling the foreshortened circleinward.
5p. Complete the foreshortened circle spiral.Stretch out the ends, and always curve the mid-dle in close. We will also be discussing this whenwe draw water ripples in a later lesson.
5q. Draw the thickness of the vertical sides ofthe flag.
5r. Curve the bottom of the near edge of the flaga bit more than the curve you have drawn on thetop edge above.
5s. Push that back line up, and curve it awayfrom your eye.
5t. Draw the all-important peeking lines fromeach of the inside edges. This is definitely theBAM moment of this drawing, the one instantlydefining moment when a drawing suddenly popsinto the third dimension.
5u. Draw in some very dark nook and cranny shad-ows. Generally, the more little cracks, crevices,nooks, and crannies that you can pour someshadow into, the more depth you create in yourdrawing. Complete the blended shading.
LESSON 9: THE ROSE 93
5m
5n
5p
5q
5r
5s
5t
5u
5o
Kistler 02_Kistler You Can Draw 10/21/10 12:06 PM Page 93
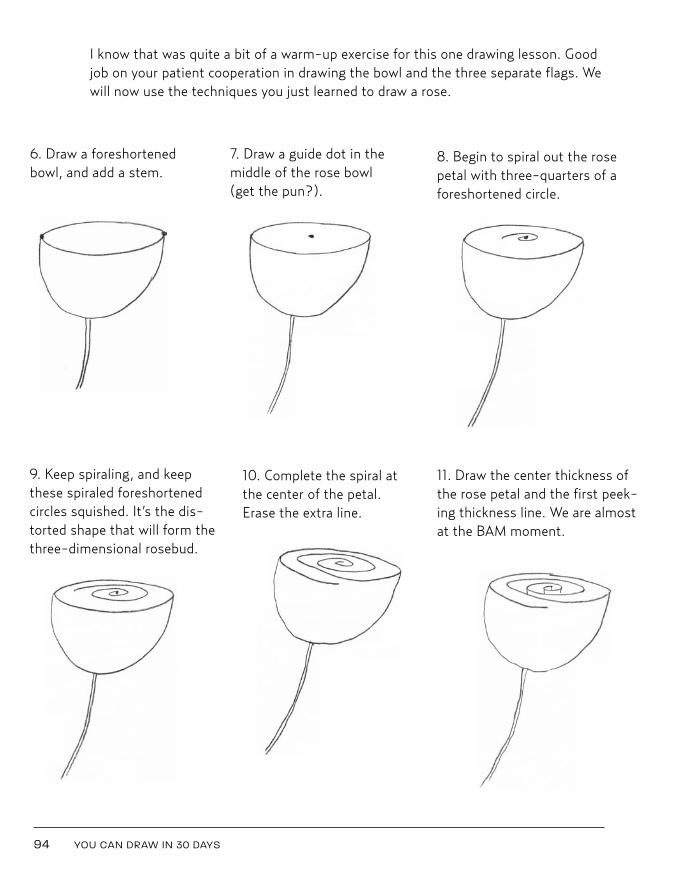
6. Draw a foreshortenedbowl, and add a stem.
7. Draw a guide dot in themiddle of the rose bowl(get the pun?).
8. Begin to spiral out the rosepetal with three-quarters of aforeshortened circle.
9. Keep spiraling, and keepthese spiraled foreshortenedcircles squished. It’s the dis-torted shape that will form thethree-dimensional rosebud.
10. Complete the spiral atthe center of the petal.Erase the extra line.
11. Draw the center thickness ofthe rose petal and the first peek-ing thickness line. We are almostat the BAM moment.
94 YOU CAN DRAW IN 30 DAYS
I know that was quite a bit of a warm-up exercise for this one drawing lesson. Goodjob on your patient cooperation in drawing the bowl and the three separate flags. Wewill now use the techniques you just learned to draw a rose.
Kistler 02_Kistler You Can Draw 10/21/10 12:06 PM Page 94
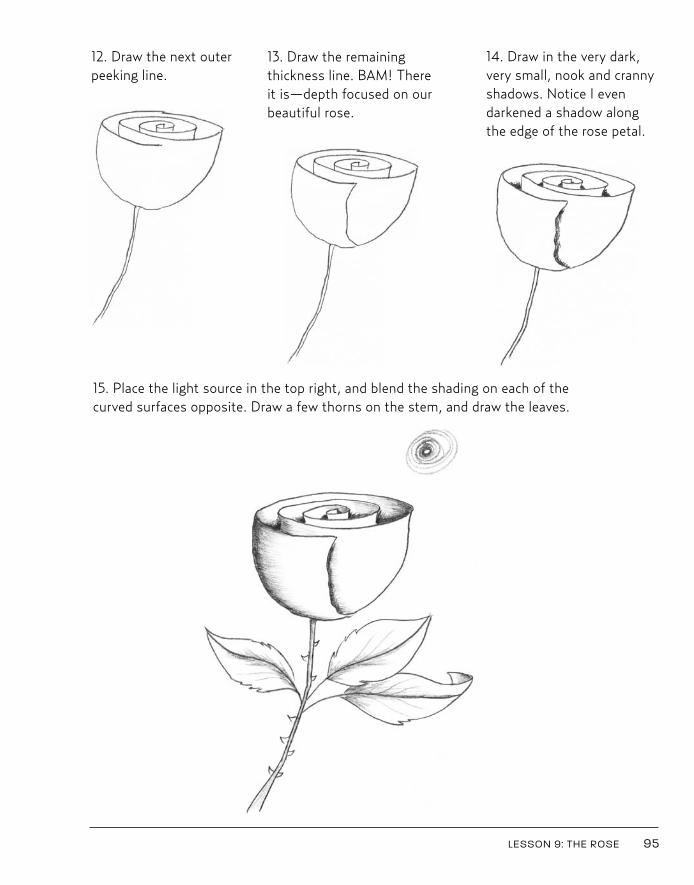
12. Draw the next outerpeeking line.
13. Draw the remainingthickness line. BAM! Thereit is—depth focused on ourbeautiful rose.
14. Draw in the very dark,very small, nook and crannyshadows. Notice I evendarkened a shadow alongthe edge of the rose petal.
15. Place the light source in the top right, and blend the shading on each of thecurved surfaces opposite. Draw a few thorns on the stem, and draw the leaves.
LESSON 9: THE ROSE 95
Kistler 02_Kistler You Can Draw 10/21/10 12:06 PM Page 95
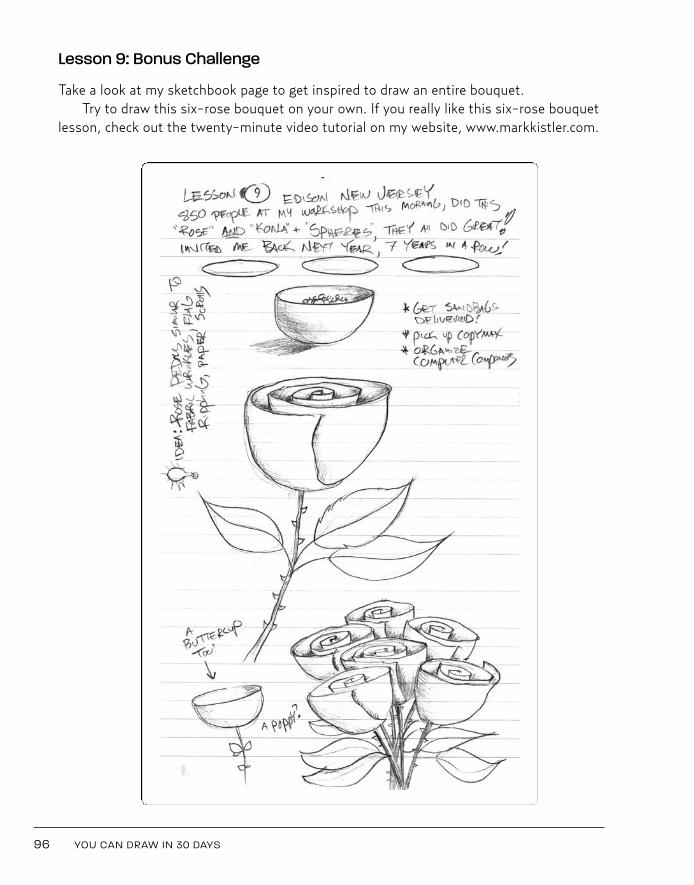
Lesson 9: Bonus Challenge
Take a look at my sketchbook page to get inspired to draw an entire bouquet.Try to draw this six-rose bouquet on your own. If you really like this six-rose bouquet
lesson, check out the twenty-minute video tutorial on my website, www.markkistler.com.
96 YOU CAN DRAW IN 30 DAYS
Kistler 02_Kistler You Can Draw 10/21/10 12:06 PM Page 96
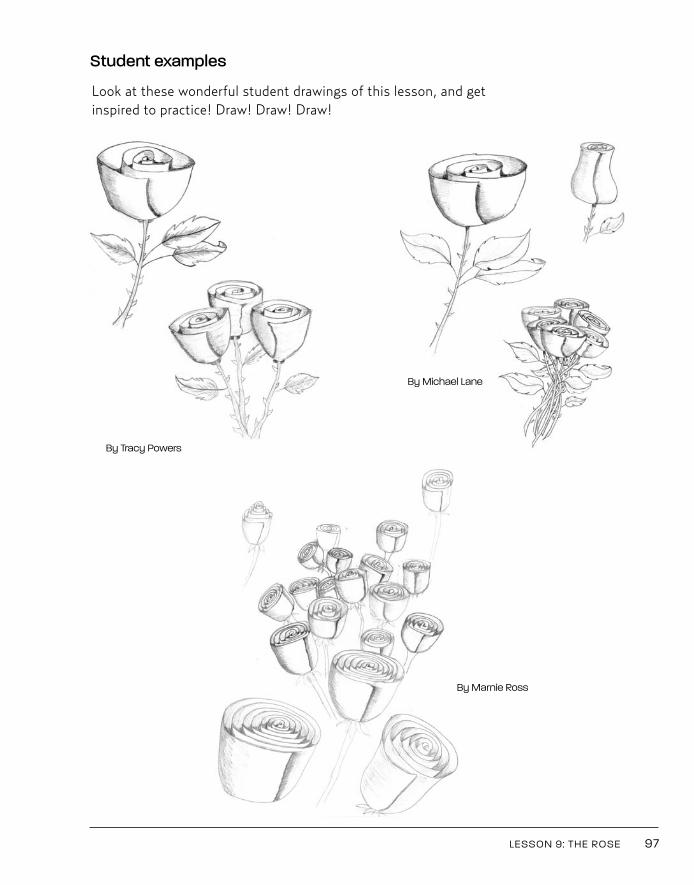
LESSON 9: THE ROSE 97
Look at these wonderful student drawings of this lesson, and getinspired to practice! Draw! Draw! Draw!
Student examples
By Michael Lane
By Tracy Powers
By Marnie Ross
Kistler 02_Kistler You Can Draw 10/21/10 12:06 PM Page 97

Kistler 02_Kistler You Can Draw 10/21/10 12:06 PM Page 98
99
L E S S O N 1 0
THE CYLINDER
Kistler 02_Kistler You Can Draw 10/21/10 12:06 PM Page 99
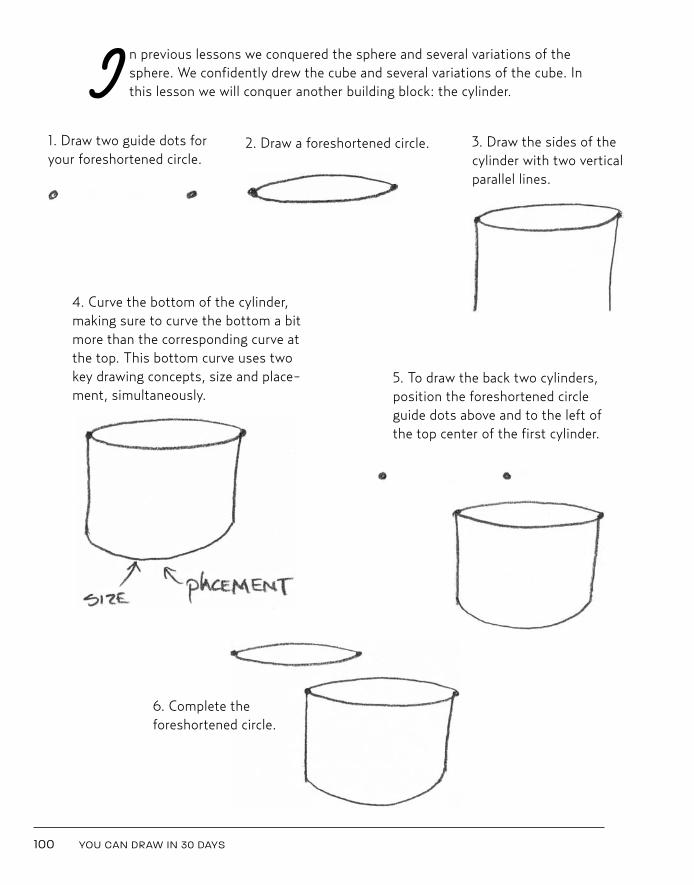
100 YOU CAN DRAW IN 30 DAYS
6. Complete the foreshortened circle.
1. Draw two guide dots foryour foreshortened circle.
2. Draw a foreshortened circle. 3. Draw the sides of thecylinder with two verticalparallel lines.
4. Curve the bottom of the cylinder,making sure to curve the bottom a bitmore than the corresponding curve atthe top. This bottom curve uses twokey drawing concepts, size and place-ment, simultaneously.
5. To draw the back two cylinders,position the foreshortened circleguide dots above and to the left ofthe top center of the first cylinder.
I n previous lessons we conquered the sphere and several variations of thesphere. We confidently drew the cube and several variations of the cube. Inthis lesson we will conquer another building block: the cylinder.
Kistler 02_Kistler You Can Draw 10/21/10 12:07 PM Page 100
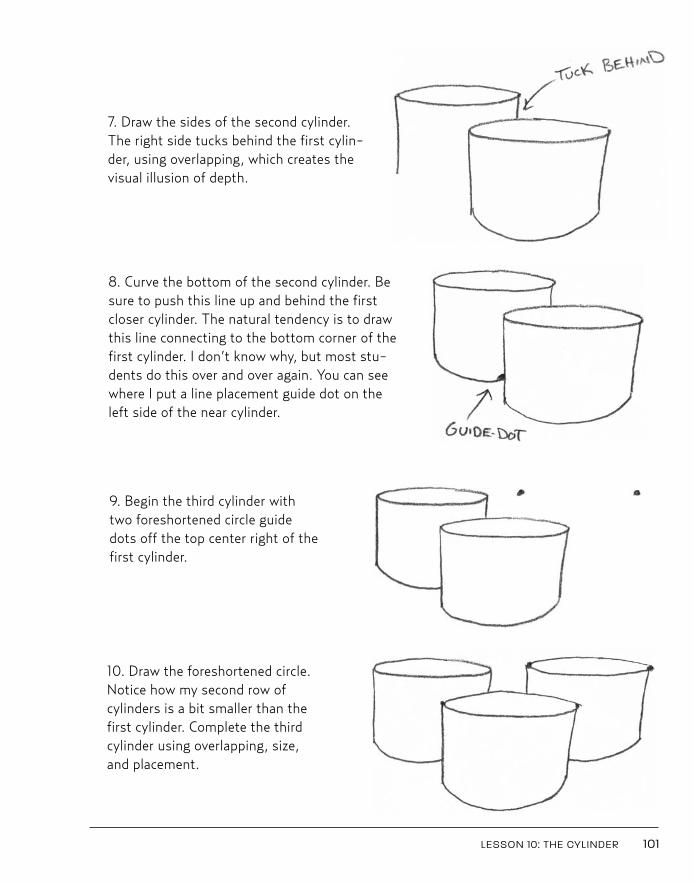
LESSON 10: THE CYLINDER 101
7. Draw the sides of the second cylinder.The right side tucks behind the first cylin-der, using overlapping, which creates thevisual illusion of depth.
10. Draw the foreshortened circle.Notice how my second row ofcylinders is a bit smaller than thefirst cylinder. Complete the thirdcylinder using overlapping, size,and placement.
9. Begin the third cylinder withtwo foreshortened circle guidedots off the top center right of thefirst cylinder.
8. Curve the bottom of the second cylinder. Besure to push this line up and behind the firstcloser cylinder. The natural tendency is to drawthis line connecting to the bottom corner of thefirst cylinder. I don’t know why, but most stu-dents do this over and over again. You can seewhere I put a line placement guide dot on theleft side of the near cylinder.
Kistler 02_Kistler You Can Draw 10/21/10 4:42 PM Page 101
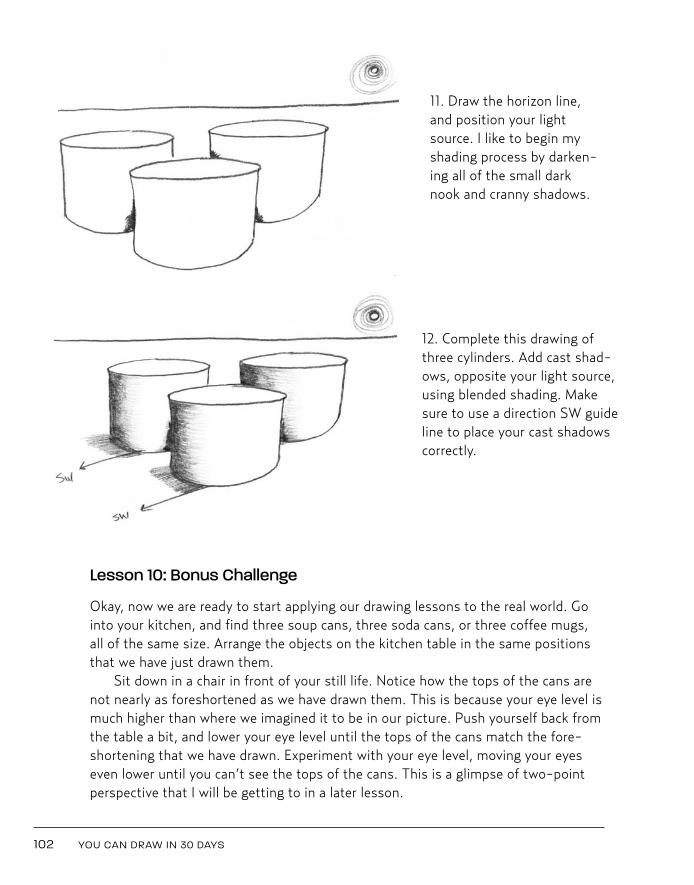
102 YOU CAN DRAW IN 30 DAYS
12. Complete this drawing ofthree cylinders. Add cast shad-ows, opposite your light source,using blended shading. Makesure to use a direction SW guideline to place your cast shadowscorrectly.
Lesson 10: Bonus Challenge
Okay, now we are ready to start applying our drawing lessons to the real world. Gointo your kitchen, and find three soup cans, three soda cans, or three coffee mugs,all of the same size. Arrange the objects on the kitchen table in the same positionsthat we have just drawn them.
Sit down in a chair in front of your still life. Notice how the tops of the cans arenot nearly as foreshortened as we have drawn them. This is because your eye level ismuch higher than where we imagined it to be in our picture. Push yourself back fromthe table a bit, and lower your eye level until the tops of the cans match the fore-shortening that we have drawn. Experiment with your eye level, moving your eyeseven lower until you can’t see the tops of the cans. This is a glimpse of two-pointperspective that I will be getting to in a later lesson.
11. Draw the horizon line,and position your lightsource. I like to begin myshading process by darken-ing all of the small darknook and cranny shadows.
Kistler 02_Kistler You Can Draw 10/21/10 1:10 PM Page 102

LESSON 10: THE CYLINDER 103
Now, stand up and watch what happens to theforeshortened can tops. They expand; they openup to near full circles depending on where your eyelevel is.
Understanding the Nine Fundamental Laws ofDrawing will give you the skill to draw objects yousee in the world around you or that you create inyour imagination in any position. Now grab ninecans or mugs (varying sizes are okay). Positionthem in any way you want on one end of thekitchen table. Sit at the other end of the kitchentable with your sketchbook and pencil. Look atyour still life. Draw what you see. Feel free toplace a box under your cans to raise them to ahigher, more foreshortened perspective.
As you draw what you see, you will recognizethe words that you have been learning in theselessons. You will begin to discover how these NineFundamental Laws of Drawing truly apply to see-ing and drawing the real world in 3-D in yoursketchbook.
Here is an important point: In every three-dimensional drawing you create from yourimagination or from the real world, you will alwaysapply two or more of the Nine Laws every time,without exception. In this lesson we applied fore-shortening, overlapping, placement, size, shading,and shadow.
Photos by Jonathan Little
Kistler 02_Kistler You Can Draw 10/21/10 12:07 PM Page 103
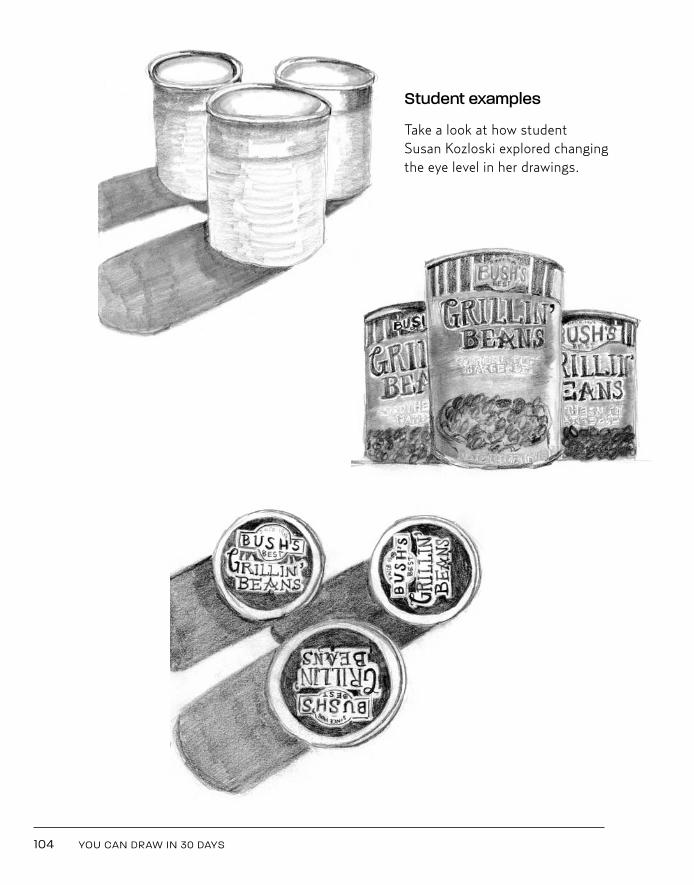
104 YOU CAN DRAW IN 30 DAYS
Student examples
Take a look at how student Susan Kozloski explored changing the eye level in her drawings.
Kistler 02_Kistler You Can Draw 10/21/10 12:07 PM Page 104
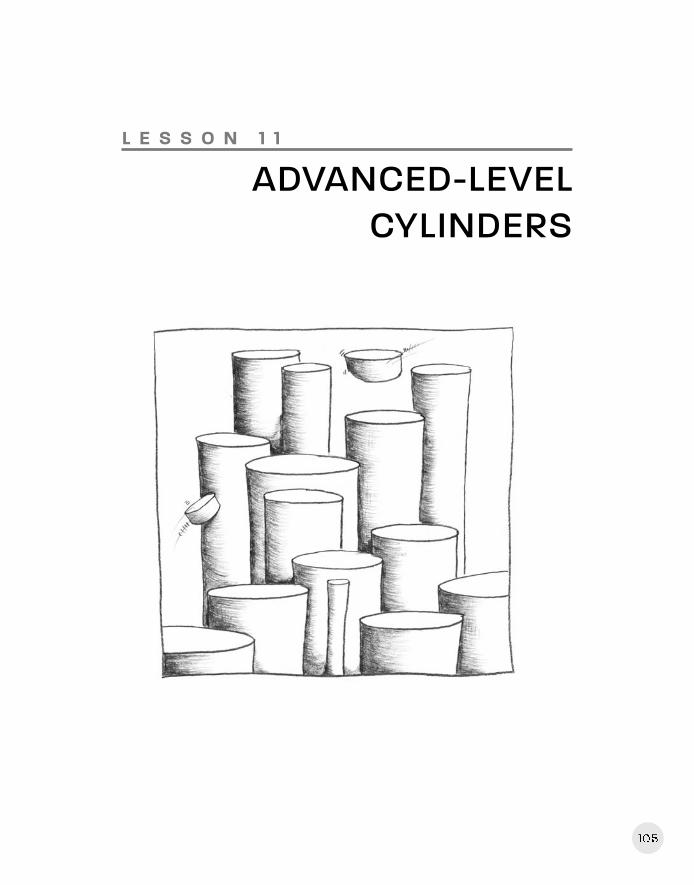
L E S S O N 1 1
ADVANCED-LEVEL CYLINDERS
105
Kistler 02_Kistler You Can Draw 10/21/10 12:07 PM Page 105
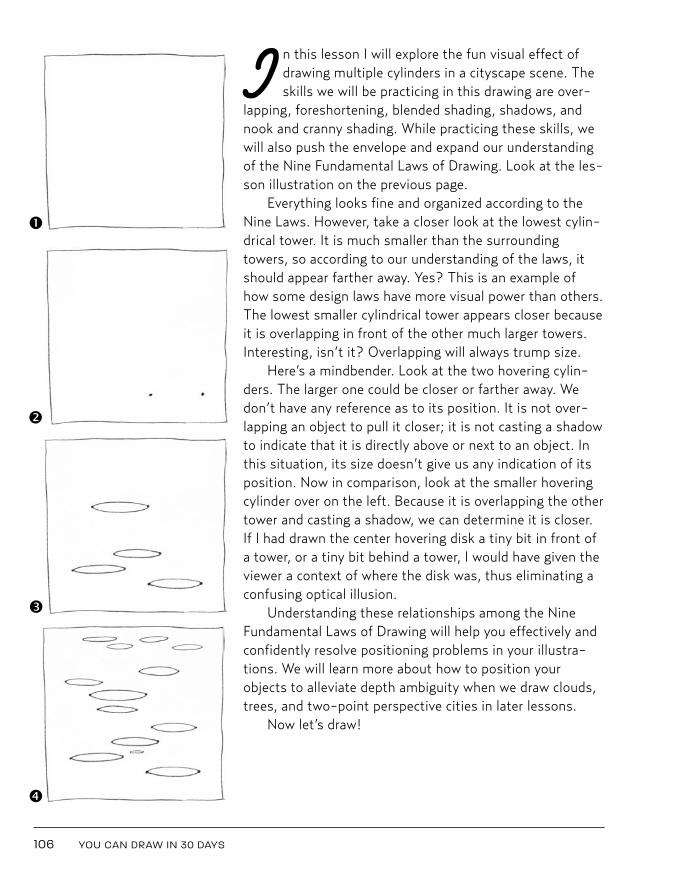
106 YOU CAN DRAW IN 30 DAYS
I n this lesson I will explore the fun visual effect ofdrawing multiple cylinders in a cityscape scene. Theskills we will be practicing in this drawing are over-
lapping, foreshortening, blended shading, shadows, andnook and cranny shading. While practicing these skills, wewill also push the envelope and expand our understandingof the Nine Fundamental Laws of Drawing. Look at the les-son illustration on the previous page.
Everything looks fine and organized according to theNine Laws. However, take a closer look at the lowest cylin-drical tower. It is much smaller than the surroundingtowers, so according to our understanding of the laws, itshould appear farther away. Yes? This is an example ofhow some design laws have more visual power than others.The lowest smaller cylindrical tower appears closer becauseit is overlapping in front of the other much larger towers.Interesting, isn’t it? Overlapping will always trump size.
Here’s a mindbender. Look at the two hovering cylin-ders. The larger one could be closer or farther away. Wedon’t have any reference as to its position. It is not over-lapping an object to pull it closer; it is not casting a shadowto indicate that it is directly above or next to an object. Inthis situation, its size doesn’t give us any indication of itsposition. Now in comparison, look at the smaller hoveringcylinder over on the left. Because it is overlapping the othertower and casting a shadow, we can determine it is closer.If I had drawn the center hovering disk a tiny bit in front ofa tower, or a tiny bit behind a tower, I would have given theviewer a context of where the disk was, thus eliminating aconfusing optical illusion.
Understanding these relationships among the NineFundamental Laws of Drawing will help you effectively andconfidently resolve positioning problems in your illustra-tions. We will learn more about how to position yourobjects to alleviate depth ambiguity when we draw clouds,trees, and two-point perspective cities in later lessons.
Now let’s draw!
å
ç
é
è
Kistler 02_Kistler You Can Draw 10/21/10 12:07 PM Page 106

LESSON 11: ADVANCED-LEVEL CYLINDERS 107
1. Draw a large picture frame, taking up an entire page ofyour sketchbook. Sometimes it’s fun to place your drawinginside a drawn frame like I did in my sketchbook drawingsof the koala, the spheres, and these towers.
2. Using guide dots, draw the first foreshortened circle.
3. Draw more foreshortened circles, some large, somesmall.
4. As you continue to draw more foreshortened circles, besure to place some high in the frame.
5. Draw a few more foreshortened circles positionedslightly out of the frame. These peeking towers have a nicevisual effect. A few of my students have gone on to illus-trate for DC Comics and Marvel Comics. When I’ve had theprivilege of speaking with them over the years, I’ve alwayspicked their brains for techniques to share with my stu-dents. Probably the most valuable tidbit I’ve heard over andover again is to position objects slightly off frame. Forexample, when working on Spiderman or The Hulk, theseartists will draw the character moving into the frame ormoving out of the frame with just partial views, such as anarm, a shoulder, and an edge of the face.
6. Draw vertical sides down from the lowest foreshortenedcircle. When you are drawing full scene pictures like this, itis always a good idea to detail in the lowest objects first.Why? Because the lowest objects will be overlapping everyother object in the picture. One scenario where youwouldn’t necessarily want to draw the lowest objects first isif you are drawing a space scene of planets (think the open-ing segment of Star Trek: The Next Generation or a spacescene from Star Wars). Another scenario would be if youwere drawing a flock of birds in flight. The bird positionedhighest in the frame might be drawn larger in size and over-lapping other smaller birds lower in the frame. In bothscenarios, overlapping still trumps all the other Nine Laws.
7. Continue drawing the vertical sides down for the lowestrow of towers.
8. Concentrate on overlapping, drawing the important peek-ing lines down from each and every foreshortened circle.
ê
ë
í
ì
Kistler 02_Kistler You Can Draw 10/21/10 12:07 PM Page 107

108 YOU CAN DRAW IN 30 DAYS
CAUTION: Avoid drawing the sides of twotowers lining up like this:
If this happens, go ahead and erase theedge and part of one of the foreshortened cir-cles. Extend the erased foreshortened circle asmidge—just enough to ensure that it is over-lapping behind or in front of the other tower.This idea of “offsetting” objects just enoughso that the edge lines don’t merge is a verysmall but helpful tip to put in your drawingtoolbox.
9. Complete all the towers, moving from thelowest in the frame to the highest.
NOTE: There is one small problem youmay encounter as you are drawing the towers.There’s a tendency for your drawing hand tosmear the lower towers as you move overthem to draw the higher towers. A simplepractical solution to this is to place a smallpiece of clean scratch paper over the com-pleted portion of your drawing, place yourhand on the scratch paper, and draw the nextrow. Then pick up the scratch paper and repo-sition it higher. Do not push the scratch paperwith your drawing hand to reposition it. I usethis scratch-paper-shielding technique inevery pencil and ink illustration I create.
Begin your nook and cranny shadows atthe top, and work your way down using yourscratch-paper shielding. You want to avoidsmearing your drawing during this detailphase. I can’t tell you how many nearly com-plete thirty-hour illustrations I have totallysmeared by drawing a final detail near the topof the frame. Avoid smearing!
10. Complete the blended shading on theremaining towers.
î
ï
Kistler 02_Kistler You Can Draw 10/21/10 12:07 PM Page 108
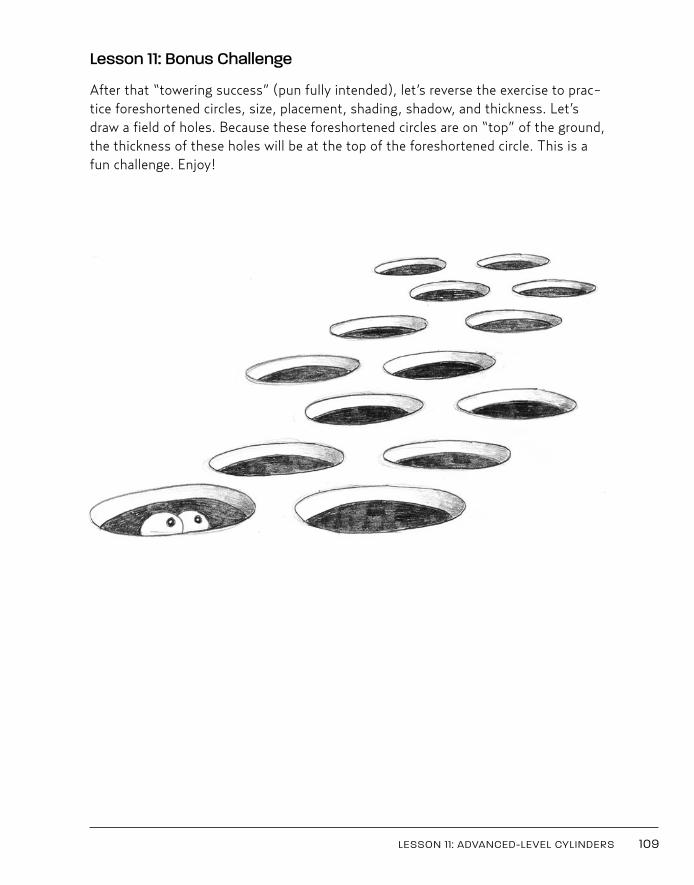
LESSON 11: ADVANCED-LEVEL CYLINDERS 109
Lesson 11: Bonus Challenge
After that “towering success” (pun fully intended), let’s reverse the exercise to prac-tice foreshortened circles, size, placement, shading, shadow, and thickness. Let’sdraw a field of holes. Because these foreshortened circles are on “top” of the ground,the thickness of these holes will be at the top of the foreshortened circle. This is afun challenge. Enjoy!
Kistler 02_Kistler You Can Draw 10/21/10 12:07 PM Page 109
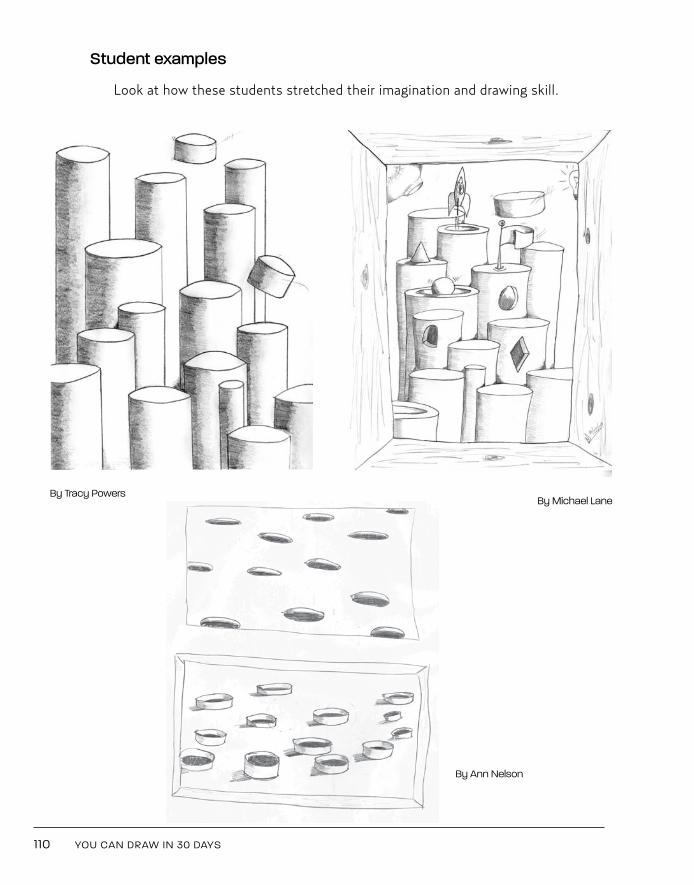
110 YOU CAN DRAW IN 30 DAYS
Student examples
Look at how these students stretched their imagination and drawing skill.
By Michael Lane
By Ann Nelson
By Tracy Powers
Kistler 02_Kistler You Can Draw 10/21/10 4:42 PM Page 110
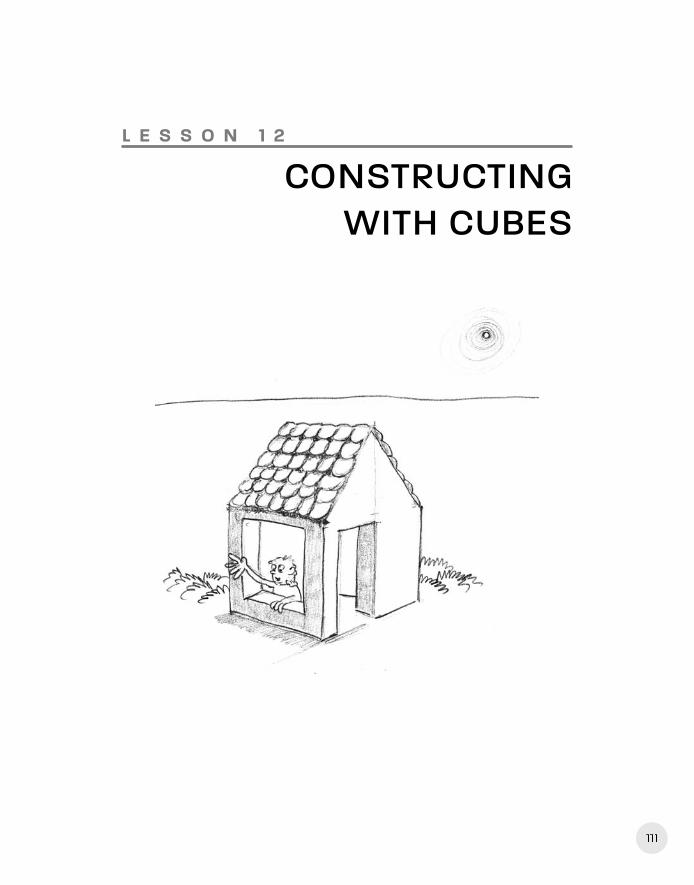
L E S S O N 1 2
CONSTRUCTING WITH CUBES
111
Kistler 02_Kistler You Can Draw 10/21/10 12:07 PM Page 111
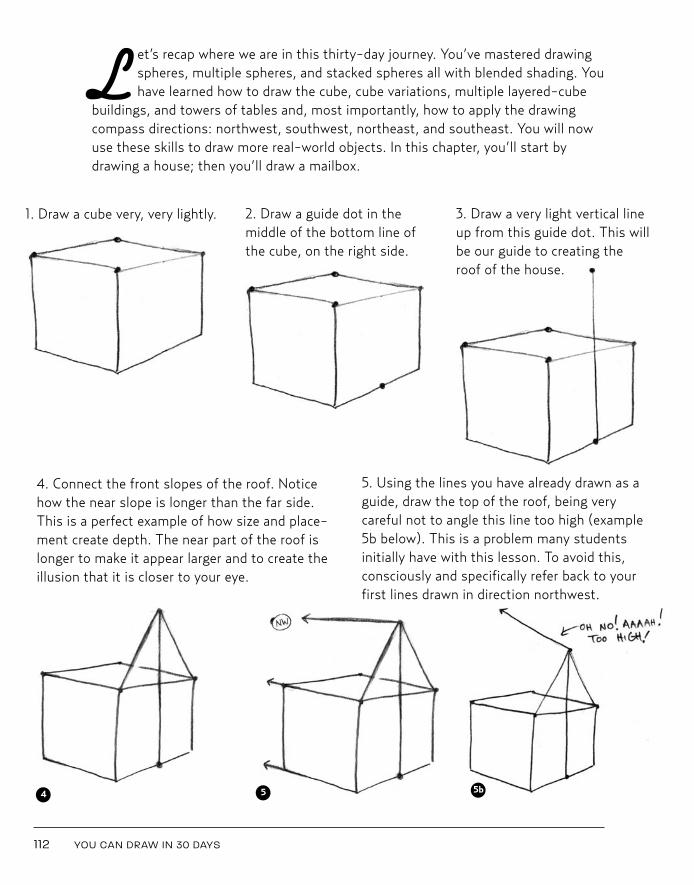
112 YOU CAN DRAW IN 30 DAYS
L et’s recap where we are in this thirty-day journey. You’ve mastered drawingspheres, multiple spheres, and stacked spheres all with blended shading. Youhave learned how to draw the cube, cube variations, multiple layered-cube
buildings, and towers of tables and, most importantly, how to apply the drawingcompass directions: northwest, southwest, northeast, and southeast. You will nowuse these skills to draw more real-world objects. In this chapter, you’ll start bydrawing a house; then you’ll draw a mailbox.
1. Draw a cube very, very lightly. 2. Draw a guide dot in the middle of the bottom line ofthe cube, on the right side.
3. Draw a very light vertical lineup from this guide dot. This willbe our guide to creating theroof of the house.
4. Connect the front slopes of the roof. Noticehow the near slope is longer than the far side.This is a perfect example of how size and place-ment create depth. The near part of the roof islonger to make it appear larger and to create theillusion that it is closer to your eye.
5. Using the lines you have already drawn as aguide, draw the top of the roof, being verycareful not to angle this line too high (example5b below). This is a problem many studentsinitially have with this lesson. To avoid this,consciously and specifically refer back to yourfirst lines drawn in direction northwest.
4 5 5b
Kistler 02_Kistler You Can Draw 10/21/10 12:07 PM Page 112
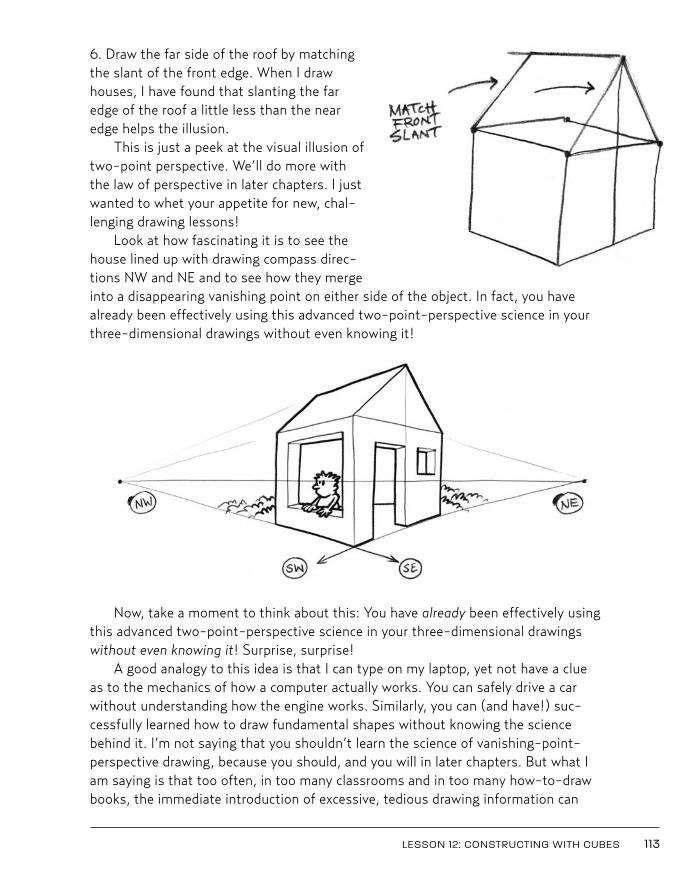
LESSON 12: CONSTRUCTING WITH CUBES 113
6. Draw the far side of the roof by matchingthe slant of the front edge. When I drawhouses, I have found that slanting the faredge of the roof a little less than the nearedge helps the illusion.
This is just a peek at the visual illusion oftwo-point perspective. We’ll do more withthe law of perspective in later chapters. I justwanted to whet your appetite for new, chal-lenging drawing lessons!
Look at how fascinating it is to see thehouse lined up with drawing compass direc-tions NW and NE and to see how they mergeinto a disappearing vanishing point on either side of the object. In fact, you havealready been effectively using this advanced two-point-perspective science in yourthree-dimensional drawings without even knowing it!
Now, take a moment to think about this: You have already been effectively usingthis advanced two-point-perspective science in your three-dimensional drawingswithout even knowing it! Surprise, surprise!
A good analogy to this idea is that I can type on my laptop, yet not have a clueas to the mechanics of how a computer actually works. You can safely drive a carwithout understanding how the engine works. Similarly, you can (and have!) suc-cessfully learned how to draw fundamental shapes without knowing the sciencebehind it. I’m not saying that you shouldn’t learn the science of vanishing-point-perspective drawing, because you should, and you will in later chapters. But what Iam saying is that too often, in too many classrooms and in too many how-to-drawbooks, the immediate introduction of excessive, tedious drawing information can
Kistler 02_Kistler You Can Draw 10/21/10 12:07 PM Page 113
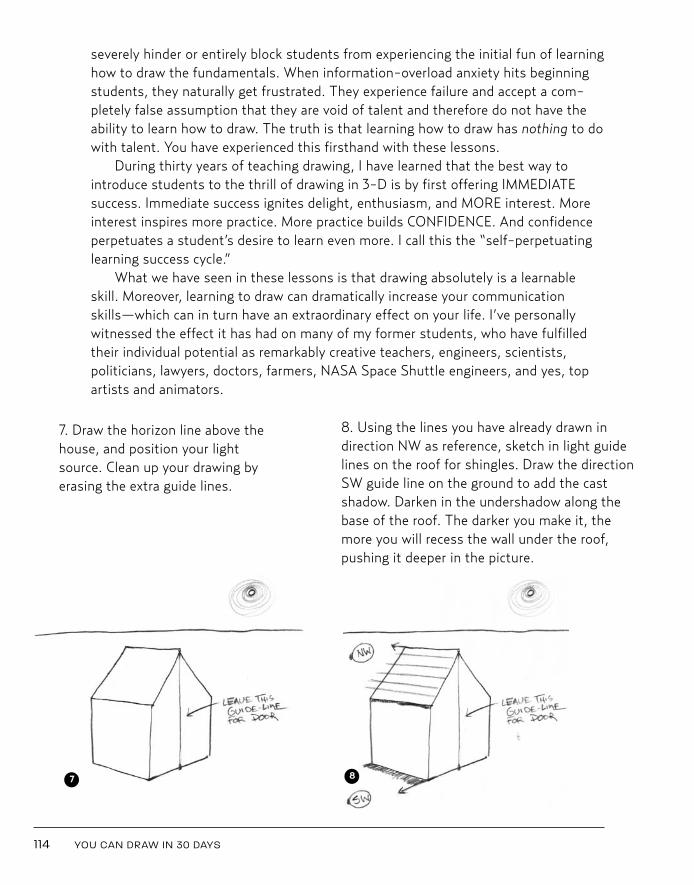
114 YOU CAN DRAW IN 30 DAYS
severely hinder or entirely block students from experiencing the initial fun of learninghow to draw the fundamentals. When information-overload anxiety hits beginningstudents, they naturally get frustrated. They experience failure and accept a com-pletely false assumption that they are void of talent and therefore do not have theability to learn how to draw. The truth is that learning how to draw has nothing to dowith talent. You have experienced this firsthand with these lessons.
During thirty years of teaching drawing, I have learned that the best way tointroduce students to the thrill of drawing in 3-D is by first offering IMMEDIATEsuccess. Immediate success ignites delight, enthusiasm, and MORE interest. Moreinterest inspires more practice. More practice builds CONFIDENCE. And confidenceperpetuates a student’s desire to learn even more. I call this the “self-perpetuatinglearning success cycle.”
What we have seen in these lessons is that drawing absolutely is a learnableskill. Moreover, learning to draw can dramatically increase your communicationskills—which can in turn have an extraordinary effect on your life. I’ve personallywitnessed the effect it has had on many of my former students, who have fulfilledtheir individual potential as remarkably creative teachers, engineers, scientists,politicians, lawyers, doctors, farmers, NASA Space Shuttle engineers, and yes, topartists and animators.
7. Draw the horizon line above thehouse, and position your lightsource. Clean up your drawing byerasing the extra guide lines.
8. Using the lines you have already drawn indirection NW as reference, sketch in light guidelines on the roof for shingles. Draw the directionSW guide line on the ground to add the castshadow. Darken in the undershadow along thebase of the roof. The darker you make it, themore you will recess the wall under the roof,pushing it deeper in the picture.
7 8
Kistler 02_Kistler You Can Draw 10/21/10 12:07 PM Page 114
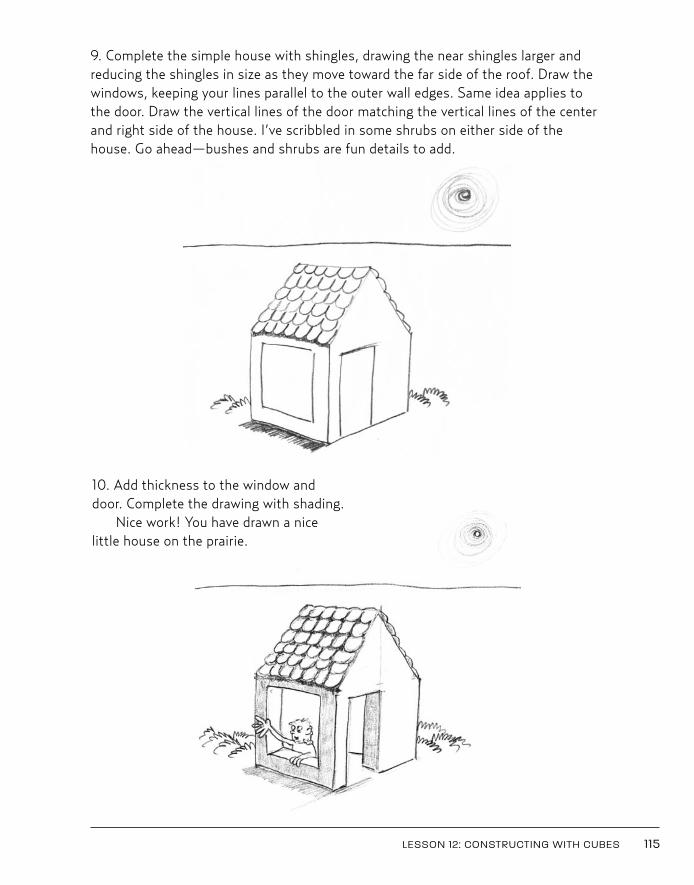
LESSON 12: CONSTRUCTING WITH CUBES 115
10. Add thickness to the window anddoor. Complete the drawing with shading.
Nice work! You have drawn a nice little house on the prairie.
9. Complete the simple house with shingles, drawing the near shingles larger andreducing the shingles in size as they move toward the far side of the roof. Draw thewindows, keeping your lines parallel to the outer wall edges. Same idea applies tothe door. Draw the vertical lines of the door matching the vertical lines of the centerand right side of the house. I’ve scribbled in some shrubs on either side of thehouse. Go ahead—bushes and shrubs are fun details to add.
Kistler 02_Kistler You Can Draw 10/21/10 12:08 PM Page 115
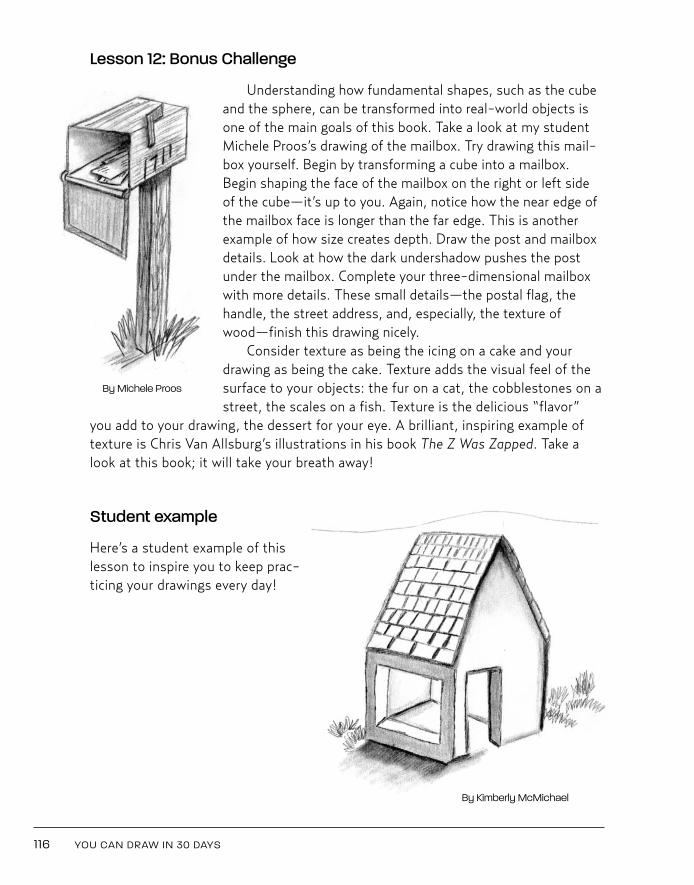
Lesson 12: Bonus Challenge
Understanding how fundamental shapes, such as the cubeand the sphere, can be transformed into real-world objects isone of the main goals of this book. Take a look at my studentMichele Proos’s drawing of the mailbox. Try drawing this mail-box yourself. Begin by transforming a cube into a mailbox.Begin shaping the face of the mailbox on the right or left sideof the cube—it’s up to you. Again, notice how the near edge ofthe mailbox face is longer than the far edge. This is anotherexample of how size creates depth. Draw the post and mailboxdetails. Look at how the dark undershadow pushes the postunder the mailbox. Complete your three-dimensional mailboxwith more details. These small details—the postal flag, thehandle, the street address, and, especially, the texture ofwood—finish this drawing nicely.
Consider texture as being the icing on a cake and yourdrawing as being the cake. Texture adds the visual feel of thesurface to your objects: the fur on a cat, the cobblestones on astreet, the scales on a fish. Texture is the delicious “flavor”
you add to your drawing, the dessert for your eye. A brilliant, inspiring example oftexture is Chris Van Allsburg’s illustrations in his book The Z Was Zapped. Take alook at this book; it will take your breath away!
Student example
Here’s a student example of thislesson to inspire you to keep prac-ticing your drawings every day!
116 YOU CAN DRAW IN 30 DAYS
By Michele Proos
By Kimberly McMichael
Kistler 02_Kistler You Can Draw 10/21/10 12:08 PM Page 116
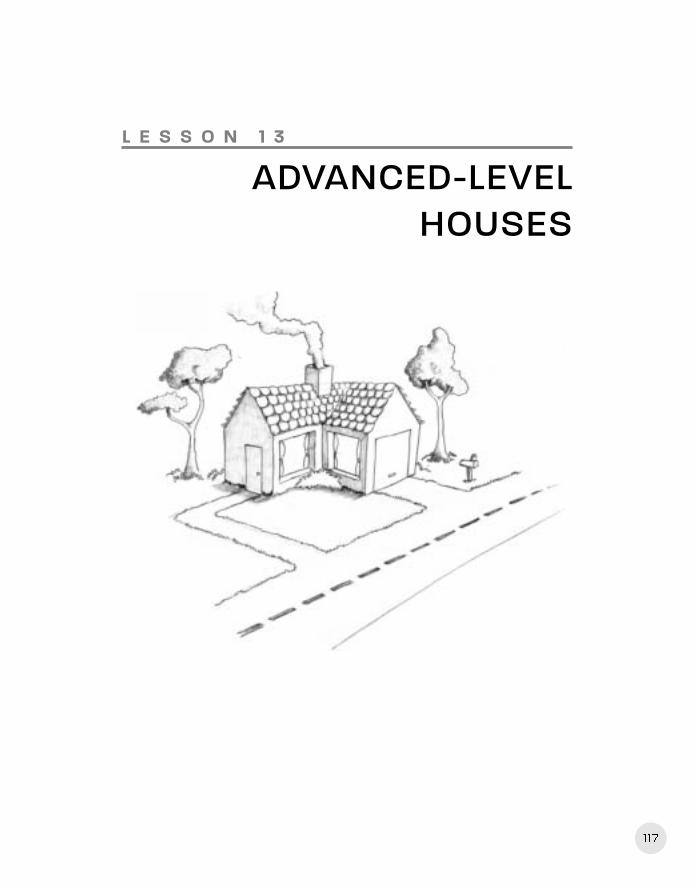
117
L E S S O N 1 3
ADVANCED-LEVEL HOUSES
117
Kistler 03_Kistler You Can Draw 10/21/10 12:09 PM Page 117
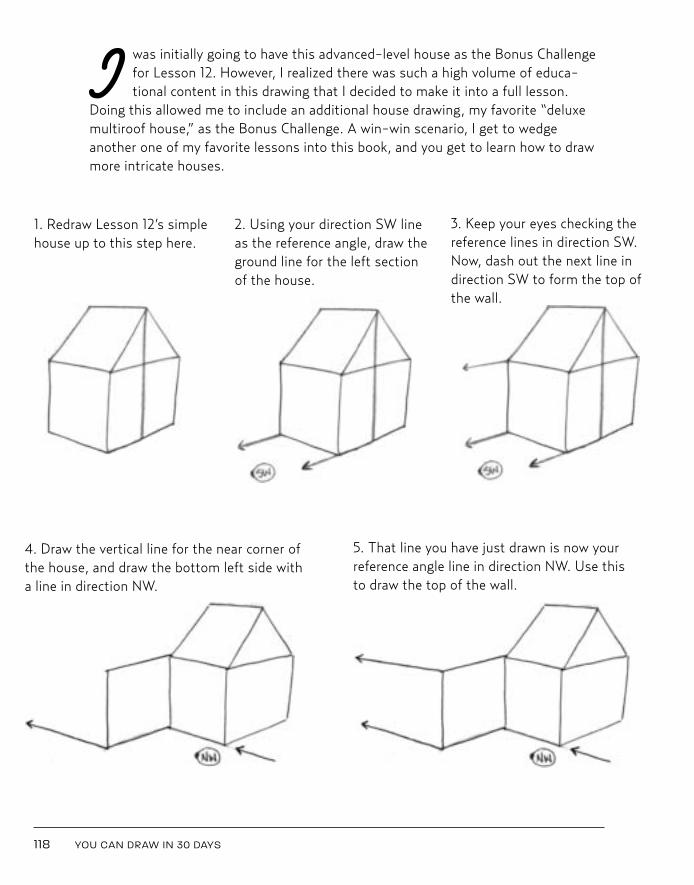
I was initially going to have this advanced-level house as the Bonus Challengefor Lesson 12. However, I realized there was such a high volume of educa-tional content in this drawing that I decided to make it into a full lesson.
Doing this allowed me to include an additional house drawing, my favorite “deluxemultiroof house,” as the Bonus Challenge. A win-win scenario, I get to wedgeanother one of my favorite lessons into this book, and you get to learn how to drawmore intricate houses.
118 YOU CAN DRAW IN 30 DAYS
1. Redraw Lesson 12’s simplehouse up to this step here.
2. Using your direction SW lineas the reference angle, draw theground line for the left sectionof the house.
3. Keep your eyes checking thereference lines in direction SW.Now, dash out the next line indirection SW to form the top ofthe wall.
4. Draw the vertical line for the near corner ofthe house, and draw the bottom left side witha line in direction NW.
5. That line you have just drawn is now yourreference angle line in direction NW. Use thisto draw the top of the wall.
Kistler 03_Kistler You Can Draw 10/21/10 12:09 PM Page 118
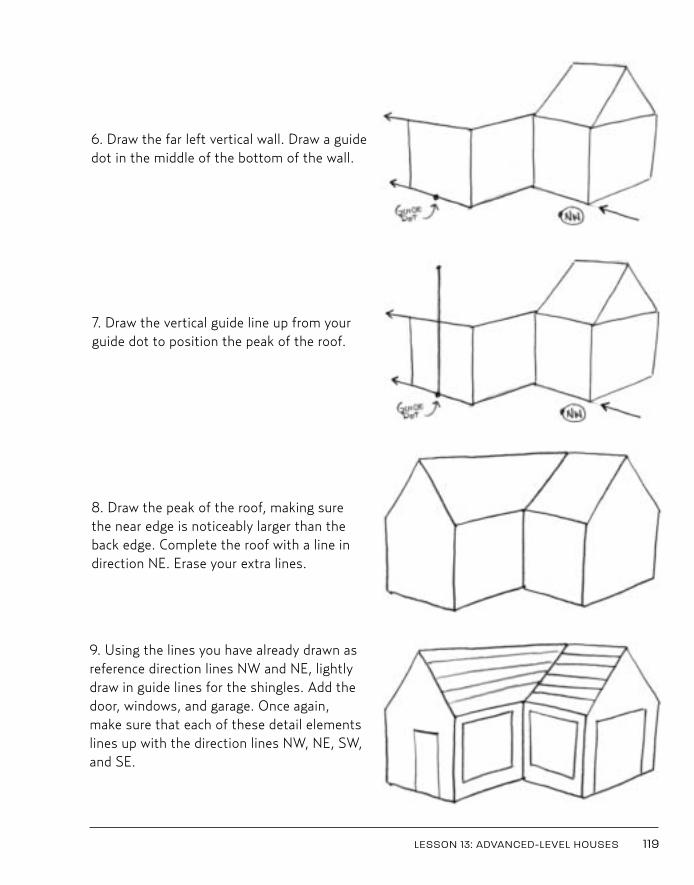
LESSON 13: ADVANCED-LEVEL HOUSES 119
6. Draw the far left vertical wall. Draw a guidedot in the middle of the bottom of the wall.
7. Draw the vertical guide line up from yourguide dot to position the peak of the roof.
8. Draw the peak of the roof, making surethe near edge is noticeably larger than theback edge. Complete the roof with a line indirection NE. Erase your extra lines.
9. Using the lines you have already drawn asreference direction lines NW and NE, lightlydraw in guide lines for the shingles. Add thedoor, windows, and garage. Once again,make sure that each of these detail elementslines up with the direction lines NW, NE, SW,and SE.
Kistler 03_Kistler You Can Draw 10/21/10 12:09 PM Page 119
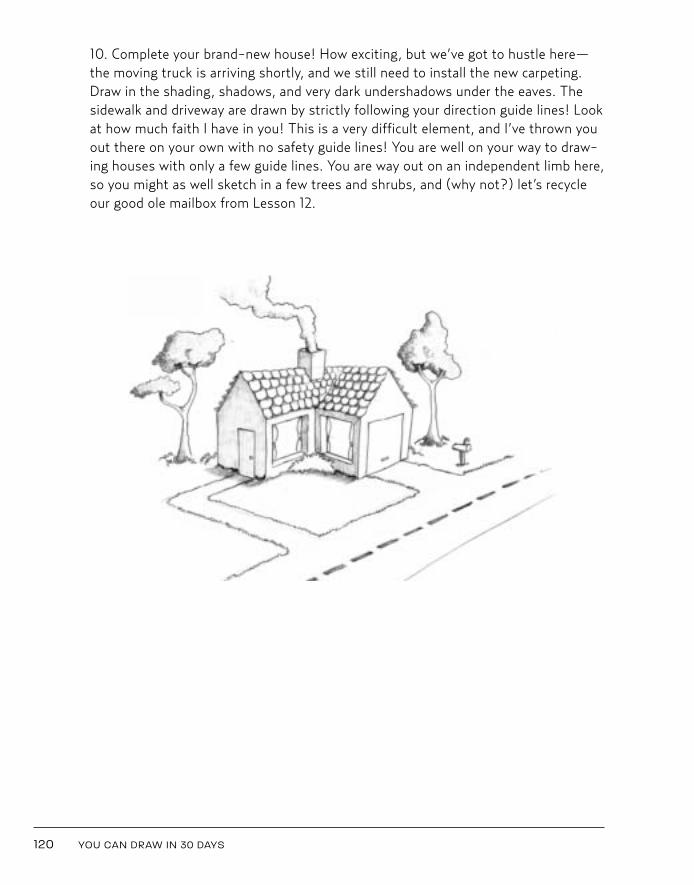
120 YOU CAN DRAW IN 30 DAYS
10. Complete your brand-new house! How exciting, but we’ve got to hustle here—the moving truck is arriving shortly, and we still need to install the new carpeting.Draw in the shading, shadows, and very dark undershadows under the eaves. Thesidewalk and driveway are drawn by strictly following your direction guide lines! Lookat how much faith I have in you! This is a very difficult element, and I’ve thrown youout there on your own with no safety guide lines! You are well on your way to draw-ing houses with only a few guide lines. You are way out on an independent limb here,so you might as well sketch in a few trees and shrubs, and (why not?) let’s recycleour good ole mailbox from Lesson 12.
Kistler 03_Kistler You Can Draw 10/21/10 12:09 PM Page 120
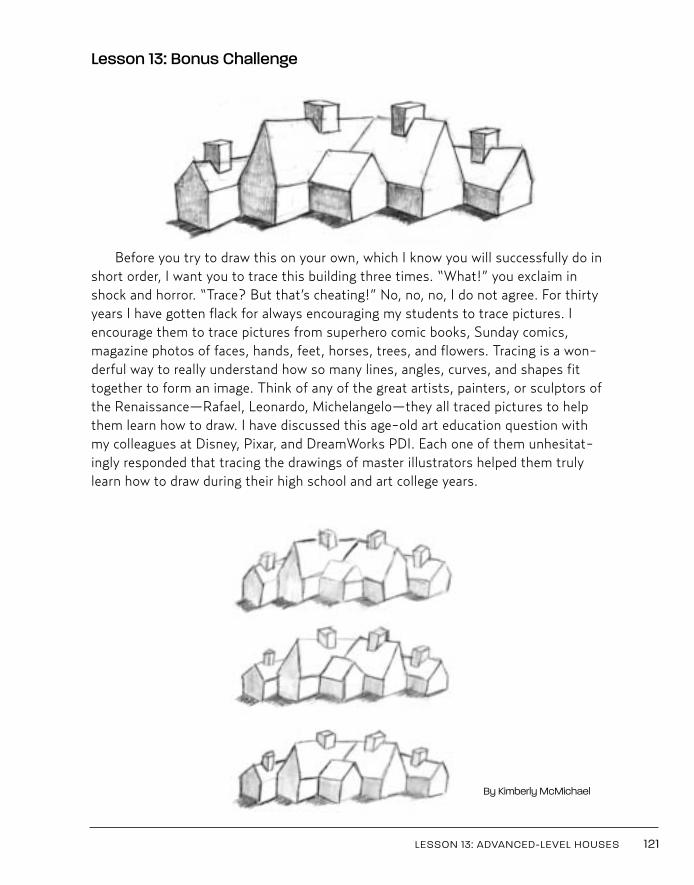
By Kimberly McMichael
LESSON 13: ADVANCED-LEVEL HOUSES 121
Lesson 13: Bonus Challenge
Before you try to draw this on your own, which I know you will successfully do inshort order, I want you to trace this building three times. “What!” you exclaim inshock and horror. “Trace? But that’s cheating!” No, no, no, I do not agree. For thirtyyears I have gotten flack for always encouraging my students to trace pictures. Iencourage them to trace pictures from superhero comic books, Sunday comics,magazine photos of faces, hands, feet, horses, trees, and flowers. Tracing is a won-derful way to really understand how so many lines, angles, curves, and shapes fittogether to form an image. Think of any of the great artists, painters, or sculptors ofthe Renaissance—Rafael, Leonardo, Michelangelo—they all traced pictures to helpthem learn how to draw. I have discussed this age-old art education question withmy colleagues at Disney, Pixar, and DreamWorks PDI. Each one of them unhesitat-ingly responded that tracing the drawings of master illustrators helped them trulylearn how to draw during their high school and art college years.
Kistler 03_Kistler You Can Draw 10/21/10 12:09 PM Page 121
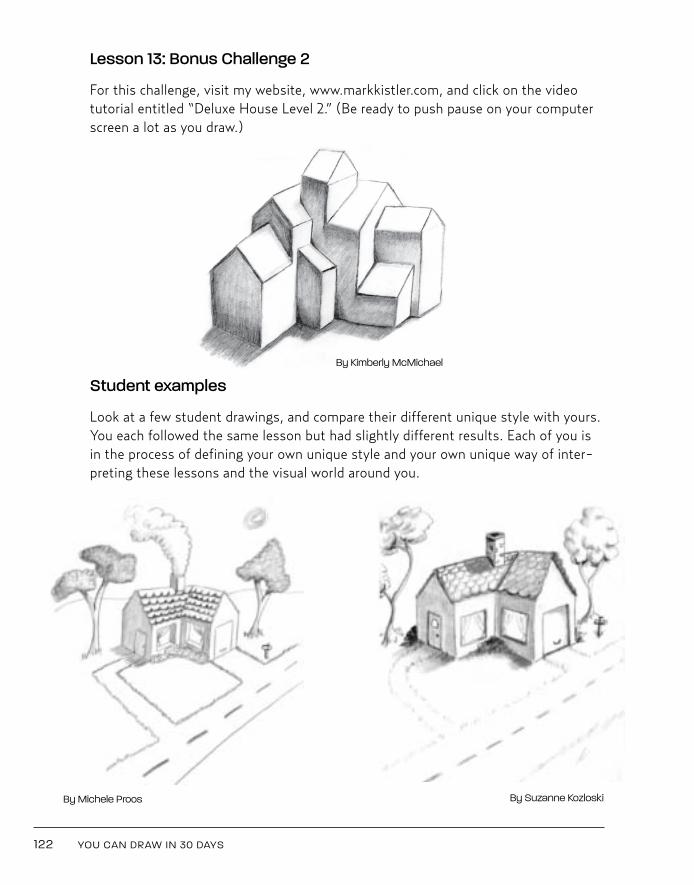
By Michele Proos By Suzanne Kozloski
122 YOU CAN DRAW IN 30 DAYS
Lesson 13: Bonus Challenge 2
For this challenge, visit my website, www.markkistler.com, and click on the videotutorial entitled “Deluxe House Level 2.” (Be ready to push pause on your computerscreen a lot as you draw.)
Student examples
Look at a few student drawings, and compare their different unique style with yours.You each followed the same lesson but had slightly different results. Each of you isin the process of defining your own unique style and your own unique way of inter-preting these lessons and the visual world around you.
By Kimberly McMichael
Kistler 03_Kistler You Can Draw 10/25/10 11:05 AM Page 122

123
L E S S O N 1 4
THE LILY
Kistler 03_Kistler You Can Draw 10/25/10 11:05 AM Page 123
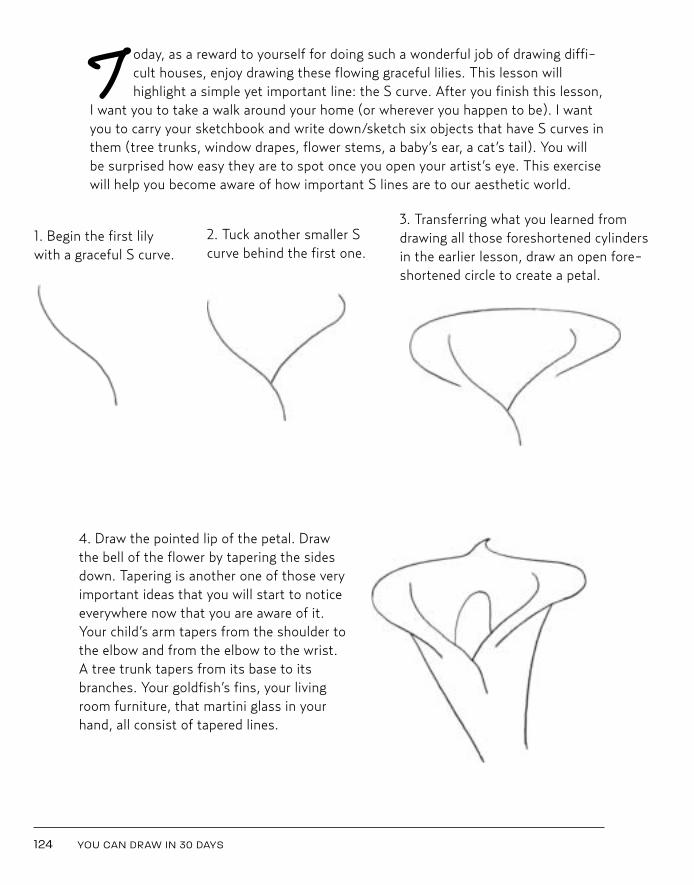
124 YOU CAN DRAW IN 30 DAYS
T oday, as a reward to yourself for doing such a wonderful job of drawing diffi-cult houses, enjoy drawing these flowing graceful lilies. This lesson willhighlight a simple yet important line: the S curve. After you finish this lesson,
I want you to take a walk around your home (or wherever you happen to be). I wantyou to carry your sketchbook and write down/sketch six objects that have S curves inthem (tree trunks, window drapes, flower stems, a baby’s ear, a cat’s tail). You willbe surprised how easy they are to spot once you open your artist’s eye. This exercisewill help you become aware of how important S lines are to our aesthetic world.
1. Begin the first lilywith a graceful S curve.
2. Tuck another smaller Scurve behind the first one.
3. Transferring what you learned fromdrawing all those foreshortened cylindersin the earlier lesson, draw an open fore-shortened circle to create a petal.
4. Draw the pointed lip of the petal. Drawthe bell of the flower by tapering the sidesdown. Tapering is another one of those veryimportant ideas that you will start to noticeeverywhere now that you are aware of it.Your child’s arm tapers from the shoulder tothe elbow and from the elbow to the wrist.A tree trunk tapers from its base to itsbranches. Your goldfish’s fins, your livingroom furniture, that martini glass in yourhand, all consist of tapered lines.
Kistler 03_Kistler You Can Draw 10/21/10 12:10 PM Page 124
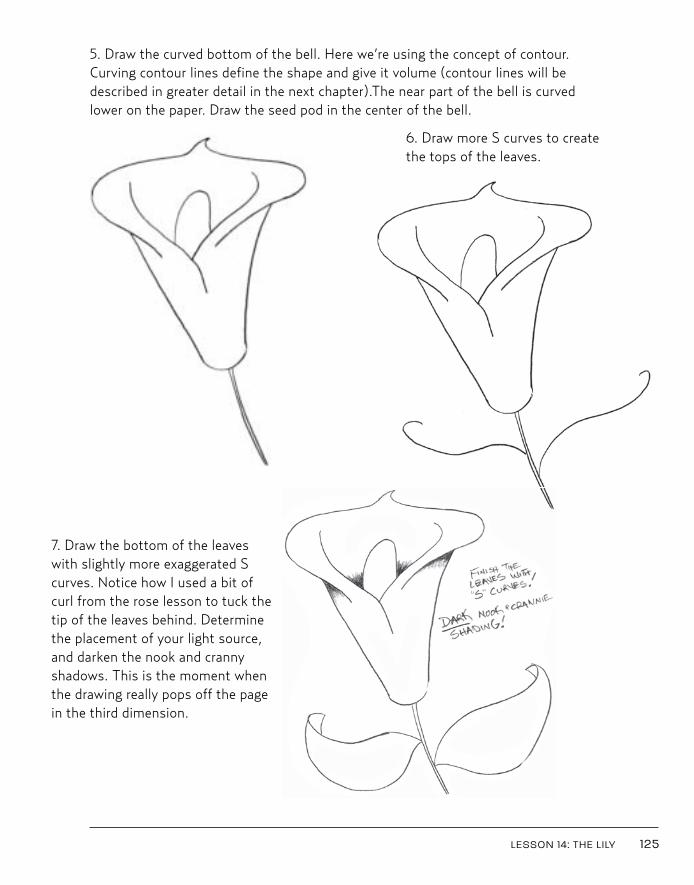
5. Draw the curved bottom of the bell. Here we’re using the concept of contour.Curving contour lines define the shape and give it volume (contour lines will bedescribed in greater detail in the next chapter).The near part of the bell is curvedlower on the paper. Draw the seed pod in the center of the bell.
LESSON 14: THE LILY 125
7. Draw the bottom of the leaveswith slightly more exaggerated Scurves. Notice how I used a bit ofcurl from the rose lesson to tuck thetip of the leaves behind. Determinethe placement of your light source,and darken the nook and crannyshadows. This is the moment whenthe drawing really pops off the pagein the third dimension.
6. Draw more S curves to createthe tops of the leaves.
Kistler 03_Kistler You Can Draw 10/21/10 12:10 PM Page 125
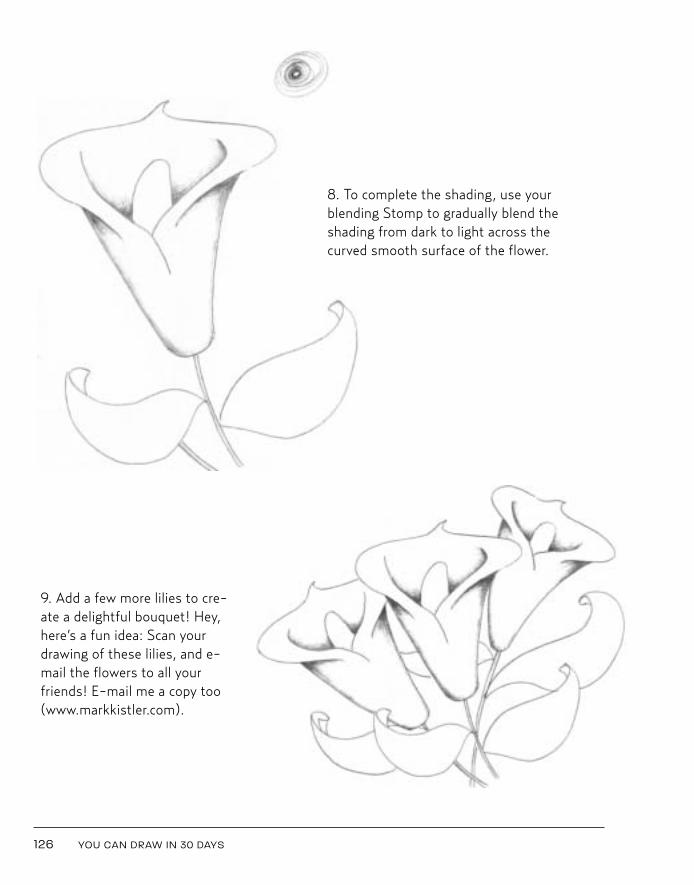
126 YOU CAN DRAW IN 30 DAYS
9. Add a few more lilies to cre-ate a delightful bouquet! Hey,here’s a fun idea: Scan yourdrawing of these lilies, and e-mail the flowers to all yourfriends! E-mail me a copy too(www.markkistler.com).
8. To complete the shading, use yourblending Stomp to gradually blend theshading from dark to light across thecurved smooth surface of the flower.
Kistler 03_Kistler You Can Draw 10/25/10 11:05 AM Page 126
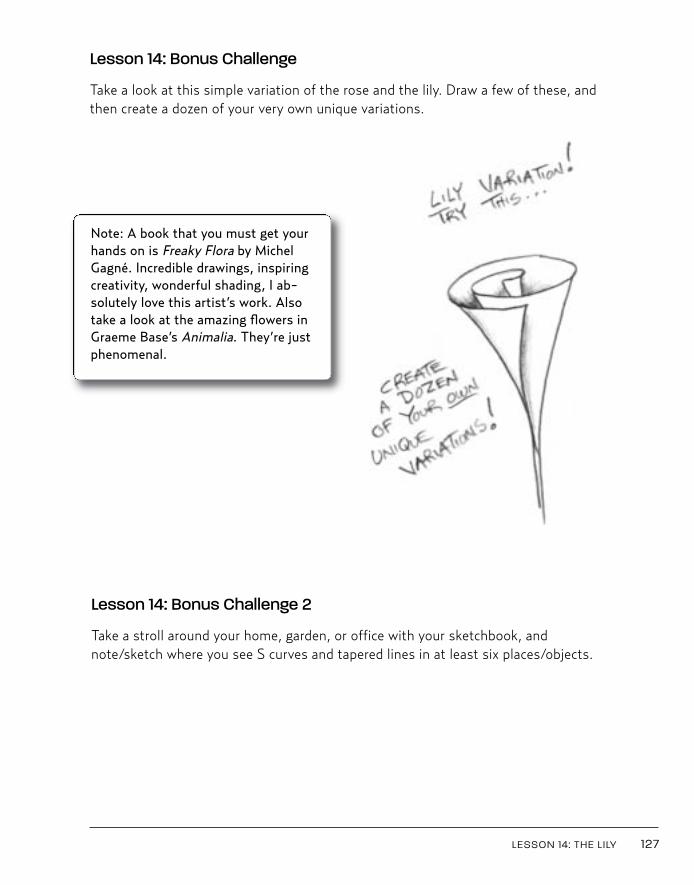
LESSON 14: THE LILY 127
Lesson 14: Bonus Challenge
Take a look at this simple variation of the rose and the lily. Draw a few of these, andthen create a dozen of your very own unique variations.
Note: A book that you must get yourhands on is Freaky Flora by MichelGagné. Incredible drawings, inspiringcreativity, wonderful shading, I ab-solutely love this artist’s work. Alsotake a look at the amazing flowers inGraeme Base’s Animalia. They’re justphenomenal.
Lesson 14: Bonus Challenge 2
Take a stroll around your home, garden, or office with your sketchbook, andnote/sketch where you see S curves and tapered lines in at least six places/objects.
Kistler 03_Kistler You Can Draw 10/21/10 4:48 PM Page 127

Student examples
I enjoyed these student examples so much. Take a look and keep inspired to draw,draw, draw every day!
128 YOU CAN DRAW IN 30 DAYS
By Suzanne Kozloski
By Tracy PowersBy Michele Proos
Kistler 03_Kistler You Can Draw 10/21/10 12:10 PM Page 128
129
L E S S O N 1 5
CONTOUR TUBES
Kistler 03_Kistler You Can Draw 10/21/10 12:10 PM Page 129
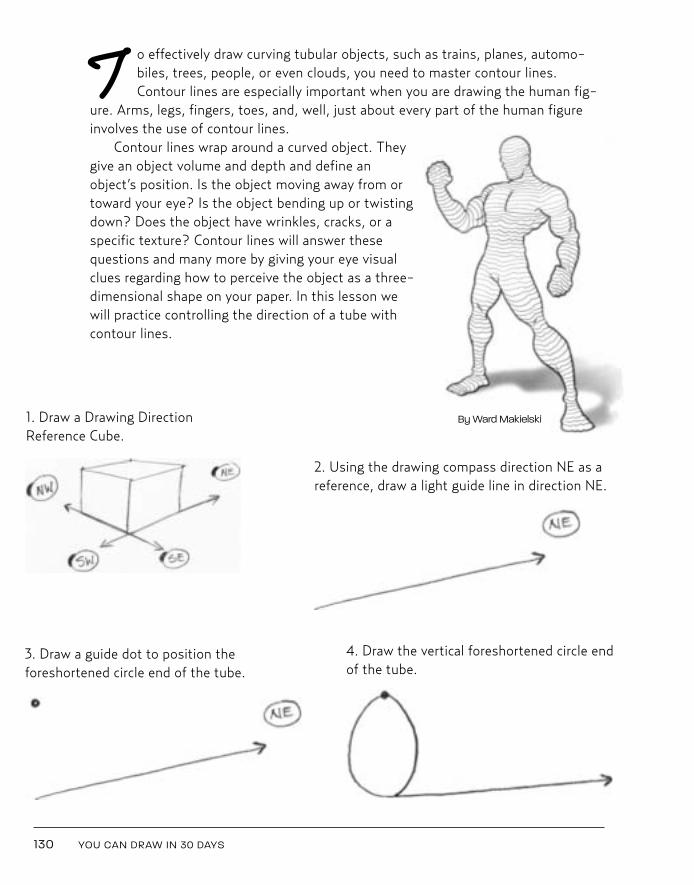
1. Draw a Drawing DirectionReference Cube.
2. Using the drawing compass direction NE as areference, draw a light guide line in direction NE.
3. Draw a guide dot to position the foreshortened circle end of the tube.
4. Draw the vertical foreshortened circle endof the tube.
T o effectively draw curving tubular objects, such as trains, planes, automo-biles, trees, people, or even clouds, you need to master contour lines.Contour lines are especially important when you are drawing the human fig-
ure. Arms, legs, fingers, toes, and, well, just about every part of the human figureinvolves the use of contour lines.
Contour lines wrap around a curved object. Theygive an object volume and depth and define anobject’s position. Is the object moving away from ortoward your eye? Is the object bending up or twistingdown? Does the object have wrinkles, cracks, or aspecific texture? Contour lines will answer thesequestions and many more by giving your eye visualclues regarding how to perceive the object as a three-dimensional shape on your paper. In this lesson wewill practice controlling the direction of a tube withcontour lines.
130 YOU CAN DRAW IN 30 DAYS
By Ward Makielski
Kistler 03_Kistler You Can Draw 10/21/10 12:10 PM Page 130
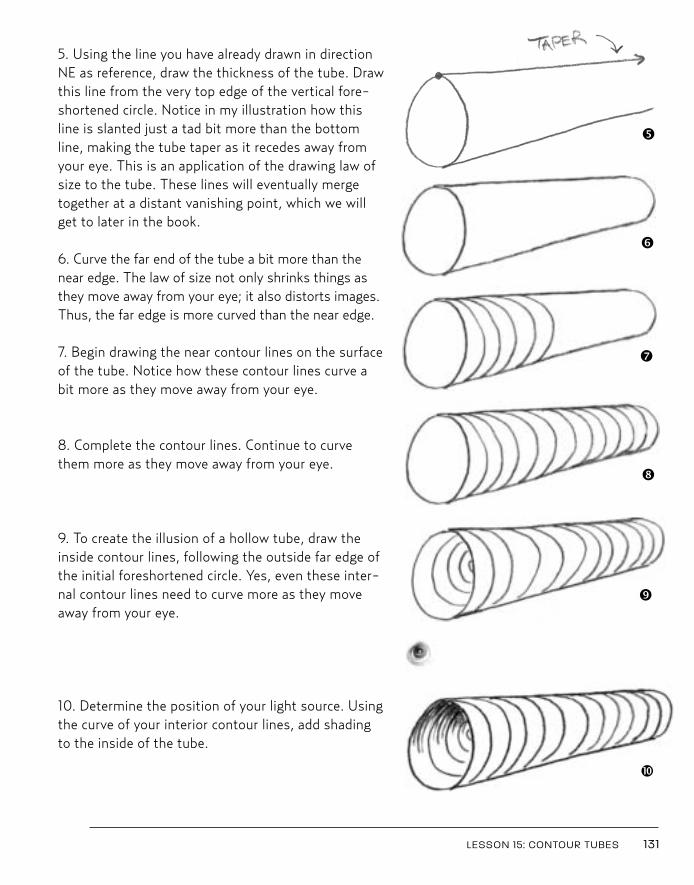
5. Using the line you have already drawn in directionNE as reference, draw the thickness of the tube. Drawthis line from the very top edge of the vertical fore-shortened circle. Notice in my illustration how thisline is slanted just a tad bit more than the bottomline, making the tube taper as it recedes away fromyour eye. This is an application of the drawing law ofsize to the tube. These lines will eventually mergetogether at a distant vanishing point, which we willget to later in the book.
6. Curve the far end of the tube a bit more than thenear edge. The law of size not only shrinks things asthey move away from your eye; it also distorts images.Thus, the far edge is more curved than the near edge.
7. Begin drawing the near contour lines on the surfaceof the tube. Notice how these contour lines curve abit more as they move away from your eye.
8. Complete the contour lines. Continue to curvethem more as they move away from your eye.
9. To create the illusion of a hollow tube, draw theinside contour lines, following the outside far edge ofthe initial foreshortened circle. Yes, even these inter-nal contour lines need to curve more as they moveaway from your eye.
10. Determine the position of your light source. Usingthe curve of your interior contour lines, add shadingto the inside of the tube.
LESSON 15: CONTOUR TUBES 131
ê
ë
í
ì
î
ï
Kistler 03_Kistler You Can Draw 10/21/10 12:10 PM Page 131
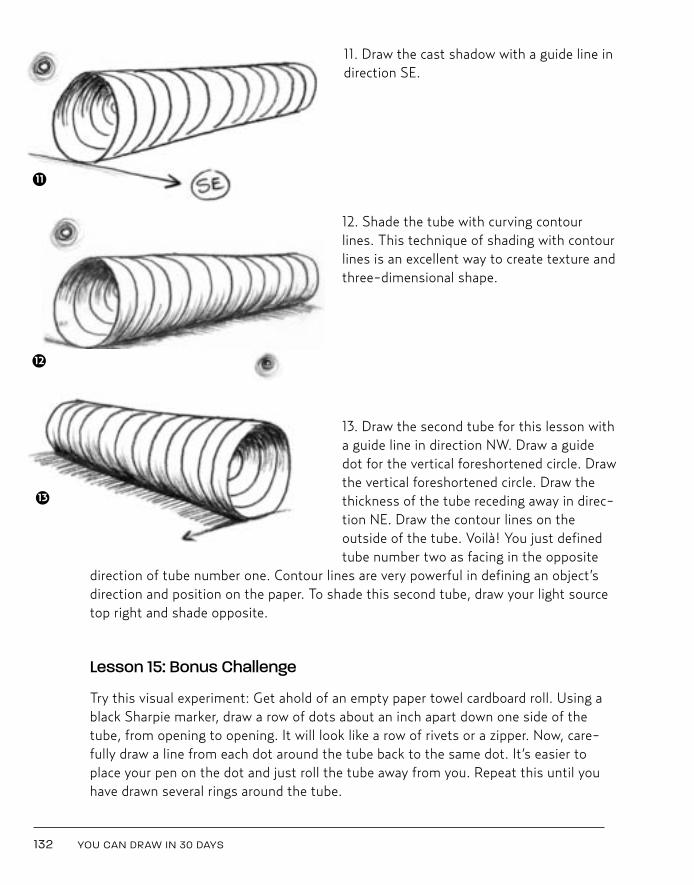
11. Draw the cast shadow with a guide line indirection SE.
12. Shade the tube with curving contourlines. This technique of shading with contourlines is an excellent way to create texture andthree-dimensional shape.
13. Draw the second tube for this lesson witha guide line in direction NW. Draw a guidedot for the vertical foreshortened circle. Drawthe vertical foreshortened circle. Draw thethickness of the tube receding away in direc-tion NE. Draw the contour lines on theoutside of the tube. Voilà! You just definedtube number two as facing in the opposite
direction of tube number one. Contour lines are very powerful in defining an object’sdirection and position on the paper. To shade this second tube, draw your light sourcetop right and shade opposite.
Lesson 15: Bonus Challenge
Try this visual experiment: Get ahold of an empty paper towel cardboard roll. Using ablack Sharpie marker, draw a row of dots about an inch apart down one side of thetube, from opening to opening. It will look like a row of rivets or a zipper. Now, care-fully draw a line from each dot around the tube back to the same dot. It’s easier toplace your pen on the dot and just roll the tube away from you. Repeat this until youhave drawn several rings around the tube.
132 YOU CAN DRAW IN 30 DAYS
11
12
13
Kistler 03_Kistler You Can Draw 10/21/10 4:48 PM Page 132
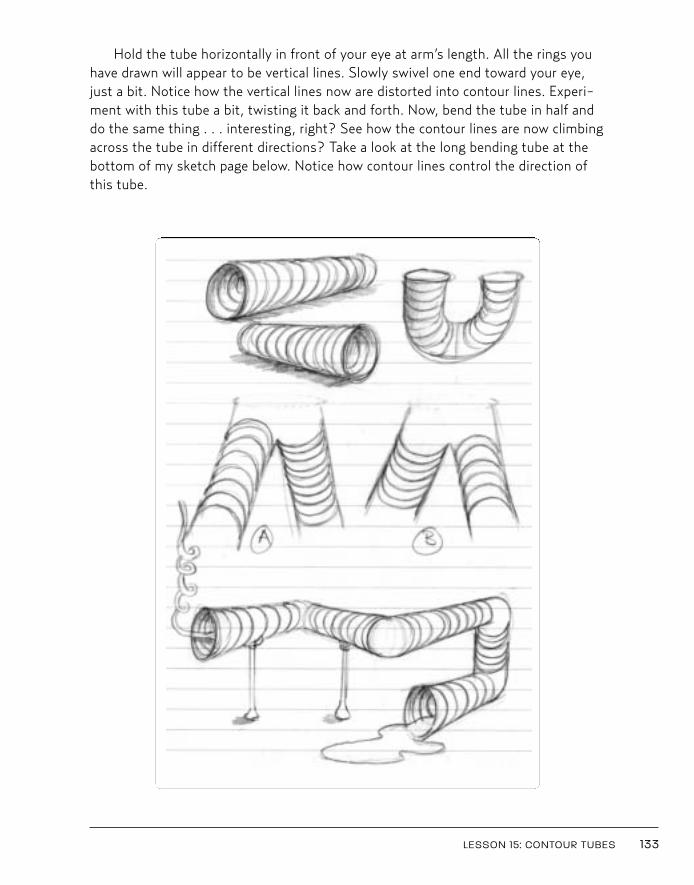
Hold the tube horizontally in front of your eye at arm’s length. All the rings youhave drawn will appear to be vertical lines. Slowly swivel one end toward your eye,just a bit. Notice how the vertical lines now are distorted into contour lines. Experi-ment with this tube a bit, twisting it back and forth. Now, bend the tube in half anddo the same thing . . . interesting, right? See how the contour lines are now climbingacross the tube in different directions? Take a look at the long bending tube at thebottom of my sketch page below. Notice how contour lines control the direction ofthis tube.
LESSON 15: CONTOUR TUBES 133
Kistler 03_Kistler You Can Draw 10/21/10 12:10 PM Page 133
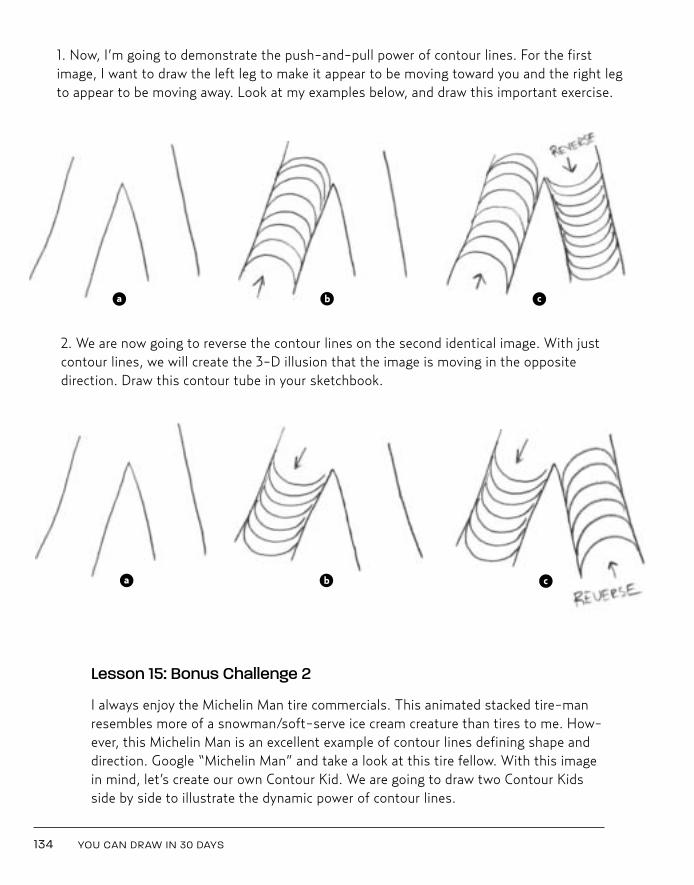
134 YOU CAN DRAW IN 30 DAYS
Lesson 15: Bonus Challenge 2
I always enjoy the Michelin Man tire commercials. This animated stacked tire-manresembles more of a snowman/soft-serve ice cream creature than tires to me. How-ever, this Michelin Man is an excellent example of contour lines defining shape anddirection. Google “Michelin Man” and take a look at this tire fellow. With this imagein mind, let’s create our own Contour Kid. We are going to draw two Contour Kidsside by side to illustrate the dynamic power of contour lines.
1. Now, I’m going to demonstrate the push-and-pull power of contour lines. For the firstimage, I want to draw the left leg to make it appear to be moving toward you and the right legto appear to be moving away. Look at my examples below, and draw this important exercise.
2. We are now going to reverse the contour lines on the second identical image. With justcontour lines, we will create the 3-D illusion that the image is moving in the oppositedirection. Draw this contour tube in your sketchbook.
a
a
b
b
c
c
Kistler 03_Kistler You Can Draw 10/21/10 12:10 PM Page 134
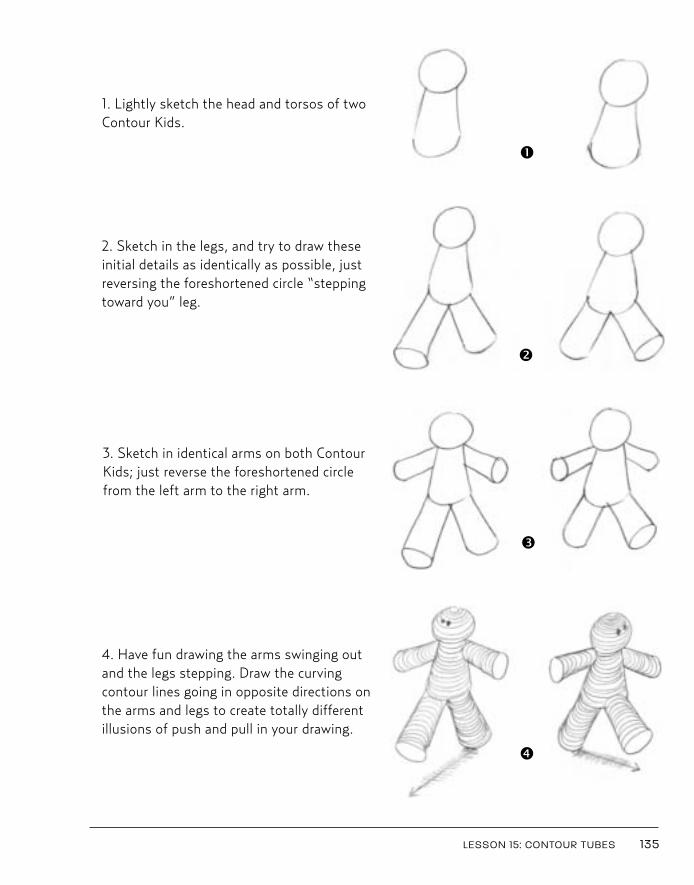
LESSON 15: CONTOUR TUBES 135
1. Lightly sketch the head and torsos of twoContour Kids.
2. Sketch in the legs, and try to draw theseinitial details as identically as possible, justreversing the foreshortened circle “steppingtoward you” leg.
3. Sketch in identical arms on both ContourKids; just reverse the foreshortened circlefrom the left arm to the right arm.
4. Have fun drawing the arms swinging outand the legs stepping. Draw the curvingcontour lines going in opposite directions onthe arms and legs to create totally differentillusions of push and pull in your drawing.
å
ç
é
è
Kistler 03_Kistler You Can Draw 10/21/10 12:10 PM Page 135
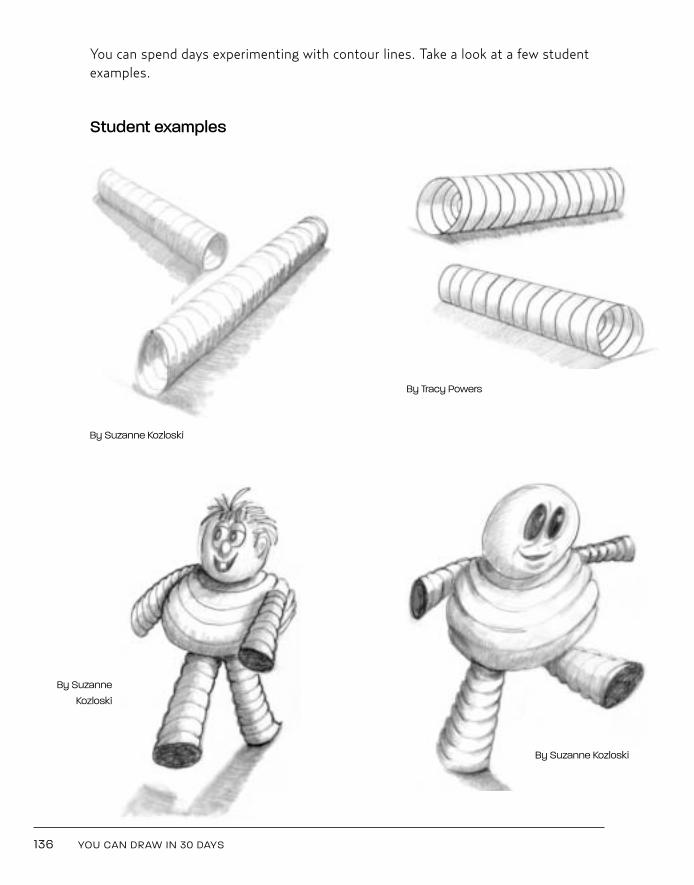
You can spend days experimenting with contour lines. Take a look at a few studentexamples.
Student examples
136 YOU CAN DRAW IN 30 DAYS
By Suzanne Kozloski
By Tracy Powers
By Suzanne Kozloski
By Suzanne Kozloski
Kistler 03_Kistler You Can Draw 10/21/10 12:10 PM Page 136
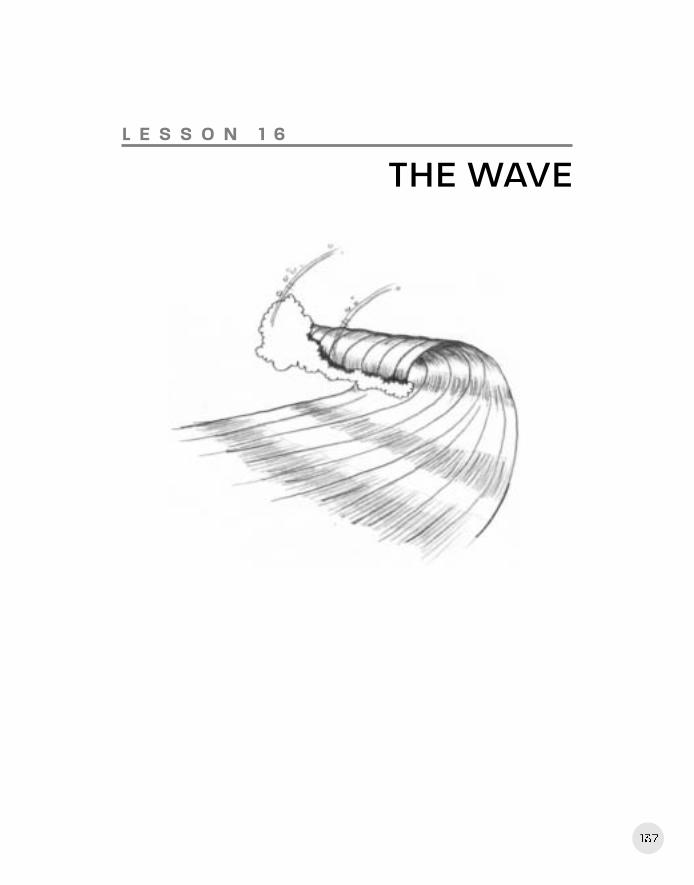
137
L E S S O N 1 6
THE WAVE
Kistler 03_Kistler You Can Draw 10/21/10 12:10 PM Page 137
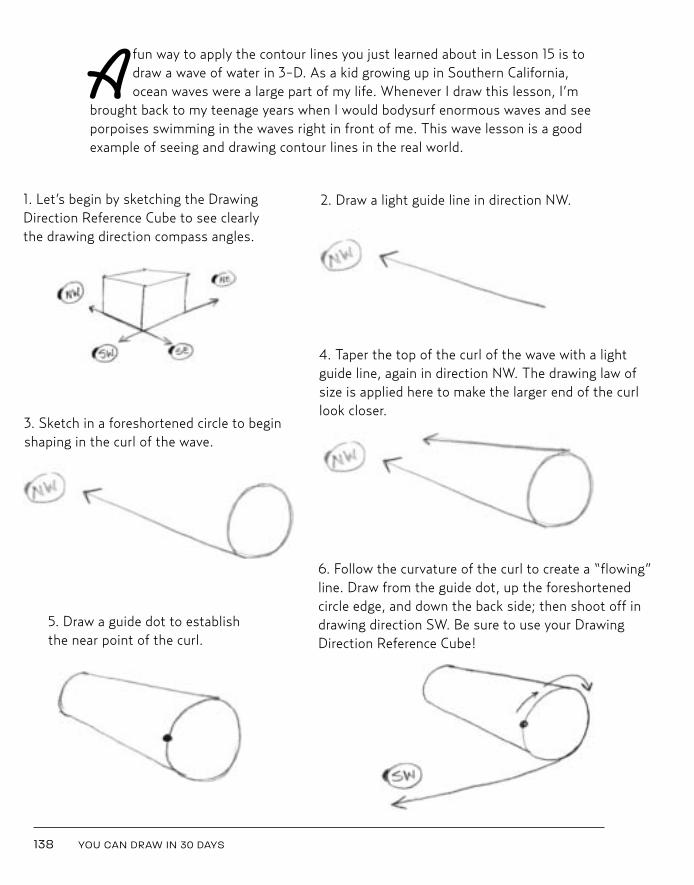
138 YOU CAN DRAW IN 30 DAYS
A fun way to apply the contour lines you just learned about in Lesson 15 is todraw a wave of water in 3-D. As a kid growing up in Southern California,ocean waves were a large part of my life. Whenever I draw this lesson, I’m
brought back to my teenage years when I would bodysurf enormous waves and seeporpoises swimming in the waves right in front of me. This wave lesson is a goodexample of seeing and drawing contour lines in the real world.
1. Let’s begin by sketching the DrawingDirection Reference Cube to see clearly the drawing direction compass angles.
2. Draw a light guide line in direction NW.
3. Sketch in a foreshortened circle to beginshaping in the curl of the wave.
4. Taper the top of the curl of the wave with a lightguide line, again in direction NW. The drawing law ofsize is applied here to make the larger end of the curllook closer.
5. Draw a guide dot to establishthe near point of the curl.
6. Follow the curvature of the curl to create a “flowing”line. Draw from the guide dot, up the foreshortenedcircle edge, and down the back side; then shoot off indrawing direction SW. Be sure to use your DrawingDirection Reference Cube!
Kistler 03_Kistler You Can Draw 10/25/10 12:56 PM Page 138
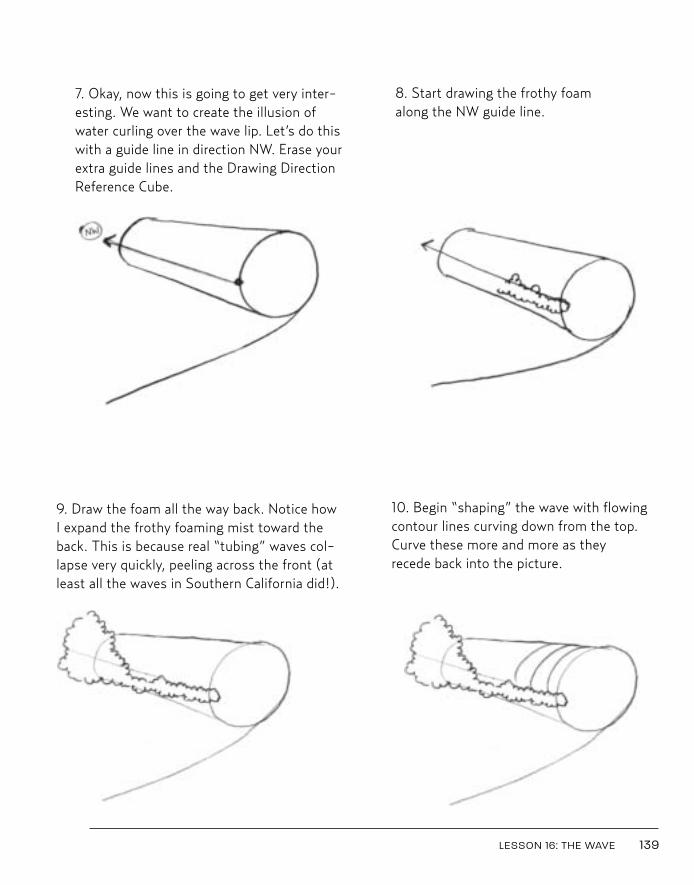
LESSON 16: THE WAVE 139
7. Okay, now this is going to get very inter-esting. We want to create the illusion ofwater curling over the wave lip. Let’s do thiswith a guide line in direction NW. Erase yourextra guide lines and the Drawing DirectionReference Cube.
8. Start drawing the frothy foamalong the NW guide line.
9. Draw the foam all the way back. Notice howI expand the frothy foaming mist toward theback. This is because real “tubing” waves col-lapse very quickly, peeling across the front (atleast all the waves in Southern California did!).
10. Begin “shaping” the wave with flowingcontour lines curving down from the top.Curve these more and more as theyrecede back into the picture.
Kistler 03_Kistler You Can Draw 10/21/10 12:11 PM Page 139
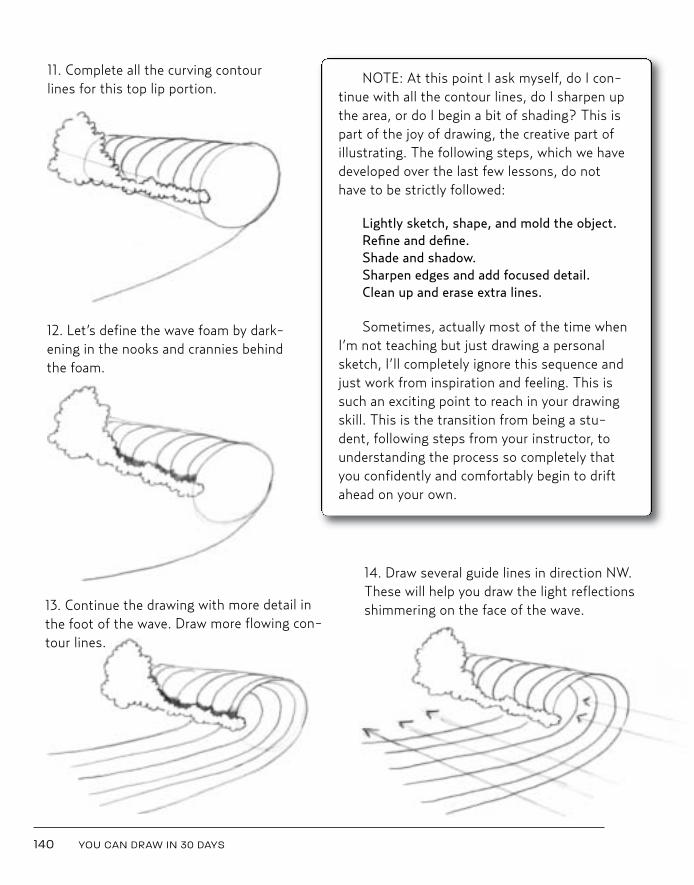
140 YOU CAN DRAW IN 30 DAYS
11. Complete all the curving contourlines for this top lip portion.
12. Let’s define the wave foam by dark-ening in the nooks and crannies behindthe foam.
NOTE: At this point I ask myself, do I con-tinue with all the contour lines, do I sharpen upthe area, or do I begin a bit of shading? This ispart of the joy of drawing, the creative part ofillustrating. The following steps, which we havedeveloped over the last few lessons, do nothave to be strictly followed:
Lightly sketch, shape, and mold the object.Refine and define.Shade and shadow.Sharpen edges and add focused detail.Clean up and erase extra lines.
Sometimes, actually most of the time whenI’m not teaching but just drawing a personalsketch, I’ll completely ignore this sequence andjust work from inspiration and feeling. This issuch an exciting point to reach in your drawingskill. This is the transition from being a stu-dent, following steps from your instructor, tounderstanding the process so completely thatyou confidently and comfortably begin to driftahead on your own.
13. Continue the drawing with more detail inthe foot of the wave. Draw more flowing con-tour lines.
14. Draw several guide lines in direction NW.These will help you draw the light reflectionsshimmering on the face of the wave.
Kistler 03_Kistler You Can Draw 10/21/10 12:11 PM Page 140
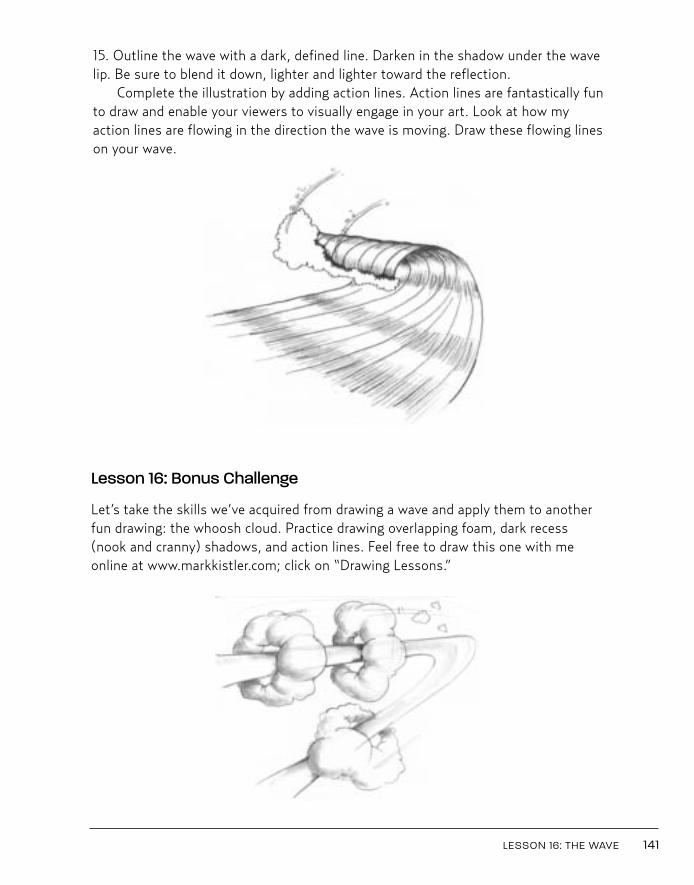
LESSON 16: THE WAVE 141
Lesson 16: Bonus Challenge
Let’s take the skills we’ve acquired from drawing a wave and apply them to anotherfun drawing: the whoosh cloud. Practice drawing overlapping foam, dark recess(nook and cranny) shadows, and action lines. Feel free to draw this one with meonline at www.markkistler.com; click on “Drawing Lessons.”
15. Outline the wave with a dark, defined line. Darken in the shadow under the wavelip. Be sure to blend it down, lighter and lighter toward the reflection.
Complete the illustration by adding action lines. Action lines are fantastically funto draw and enable your viewers to visually engage in your art. Look at how myaction lines are flowing in the direction the wave is moving. Draw these flowing lineson your wave.
Kistler 03_Kistler You Can Draw 10/21/10 12:11 PM Page 141
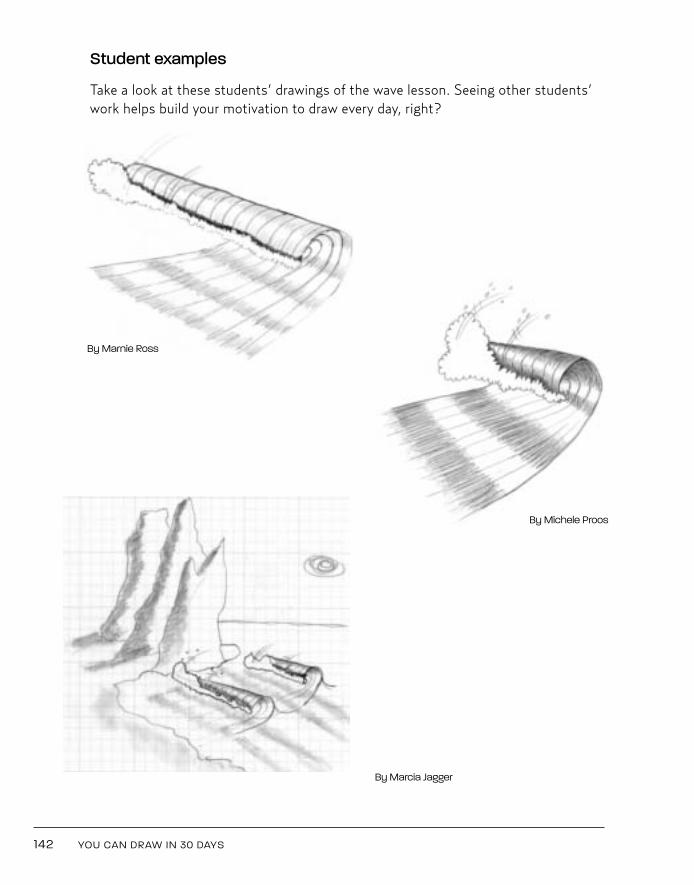
Student examples
Take a look at these students’ drawings of the wave lesson. Seeing other students’work helps build your motivation to draw every day, right?
142 YOU CAN DRAW IN 30 DAYS
By Marnie Ross
By Michele Proos
By Marcia Jagger
Kistler 03_Kistler You Can Draw 10/21/10 12:11 PM Page 142
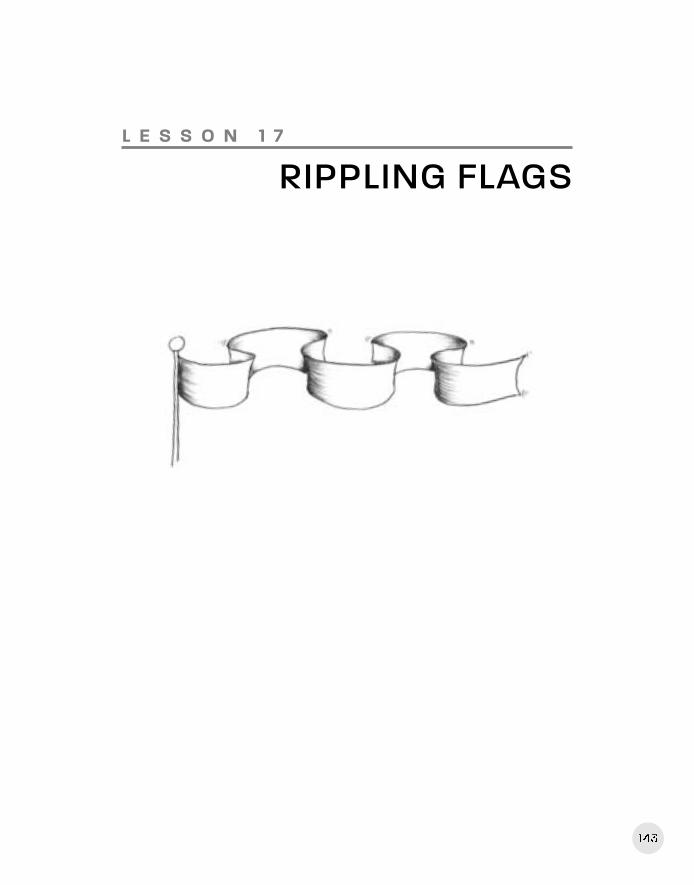
143
L E S S O N 1 7
RIPPLING FLAGS
Kistler 03_Kistler You Can Draw 10/21/10 12:11 PM Page 143
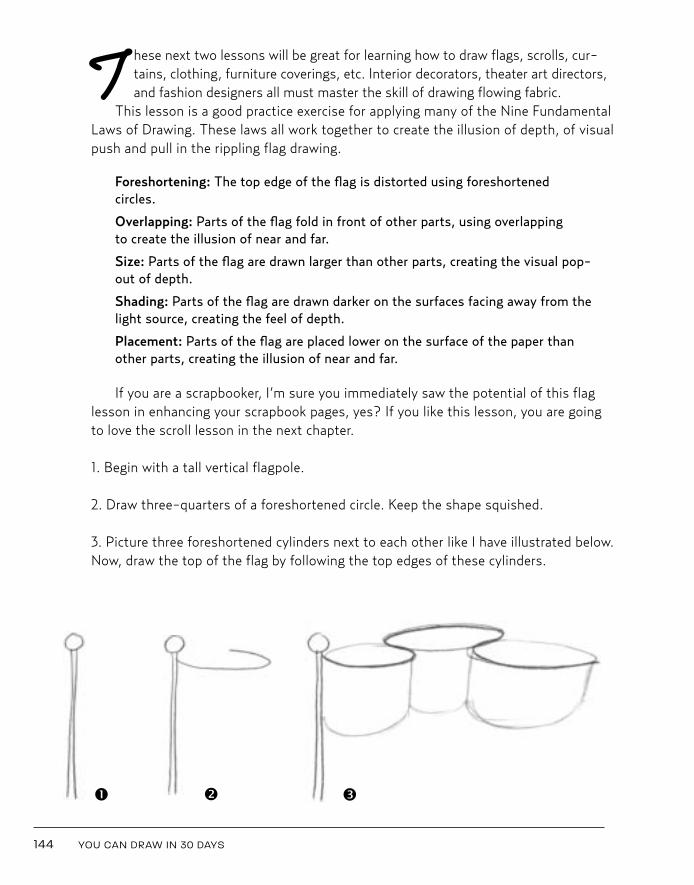
144 YOU CAN DRAW IN 30 DAYS
T hese next two lessons will be great for learning how to draw flags, scrolls, cur-tains, clothing, furniture coverings, etc. Interior decorators, theater art directors,and fashion designers all must master the skill of drawing flowing fabric.
This lesson is a good practice exercise for applying many of the Nine FundamentalLaws of Drawing. These laws all work together to create the illusion of depth, of visualpush and pull in the rippling flag drawing.
Foreshortening: The top edge of the flag is distorted using foreshortened circles.
Overlapping: Parts of the flag fold in front of other parts, using overlapping to create the illusion of near and far.
Size: Parts of the flag are drawn larger than other parts, creating the visual pop-out of depth.
Shading: Parts of the flag are drawn darker on the surfaces facing away from thelight source, creating the feel of depth.
Placement: Parts of the flag are placed lower on the surface of the paper thanother parts, creating the illusion of near and far.
If you are a scrapbooker, I’m sure you immediately saw the potential of this flaglesson in enhancing your scrapbook pages, yes? If you like this lesson, you are goingto love the scroll lesson in the next chapter.
1. Begin with a tall vertical flagpole.
2. Draw three-quarters of a foreshortened circle. Keep the shape squished.
3. Picture three foreshortened cylinders next to each other like I have illustrated below.Now, draw the top of the flag by following the top edges of these cylinders.
å ç é
Kistler 03_Kistler You Can Draw 10/21/10 4:48 PM Page 144
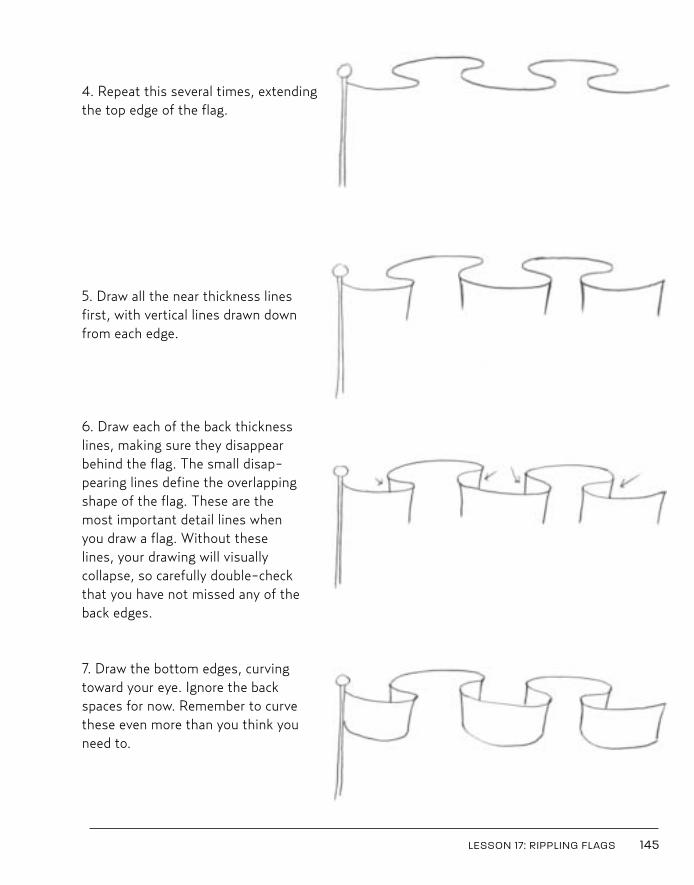
LESSON 17: RIPPLING FLAGS 145
4. Repeat this several times, extendingthe top edge of the flag.
5. Draw all the near thickness linesfirst, with vertical lines drawn downfrom each edge.
6. Draw each of the back thicknesslines, making sure they disappearbehind the flag. The small disap-pearing lines define the overlappingshape of the flag. These are themost important detail lines whenyou draw a flag. Without theselines, your drawing will visually collapse, so carefully double-checkthat you have not missed any of theback edges.
7. Draw the bottom edges, curvingtoward your eye. Ignore the backspaces for now. Remember to curvethese even more than you think youneed to.
Kistler 03_Kistler You Can Draw 10/21/10 12:11 PM Page 145
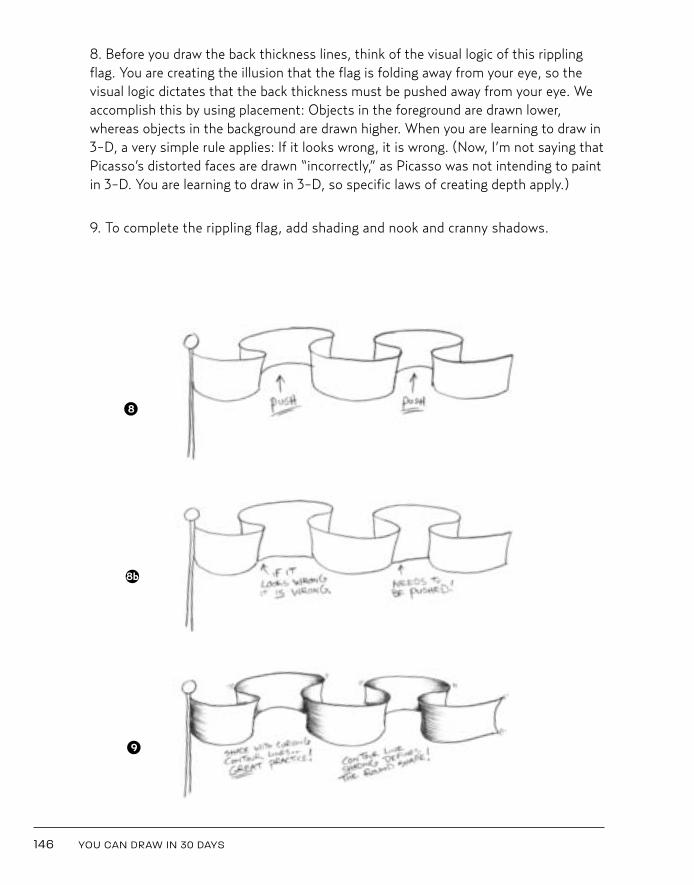
146 YOU CAN DRAW IN 30 DAYS
8. Before you draw the back thickness lines, think of the visual logic of this ripplingflag. You are creating the illusion that the flag is folding away from your eye, so thevisual logic dictates that the back thickness must be pushed away from your eye. Weaccomplish this by using placement: Objects in the foreground are drawn lower,whereas objects in the background are drawn higher. When you are learning to draw in3-D, a very simple rule applies: If it looks wrong, it is wrong. (Now, I’m not saying thatPicasso’s distorted faces are drawn “incorrectly,” as Picasso was not intending to paintin 3-D. You are learning to draw in 3-D, so specific laws of creating depth apply.)
9. To complete the rippling flag, add shading and nook and cranny shadows.
8
8b
9
Kistler 03_Kistler You Can Draw 10/21/10 12:11 PM Page 146
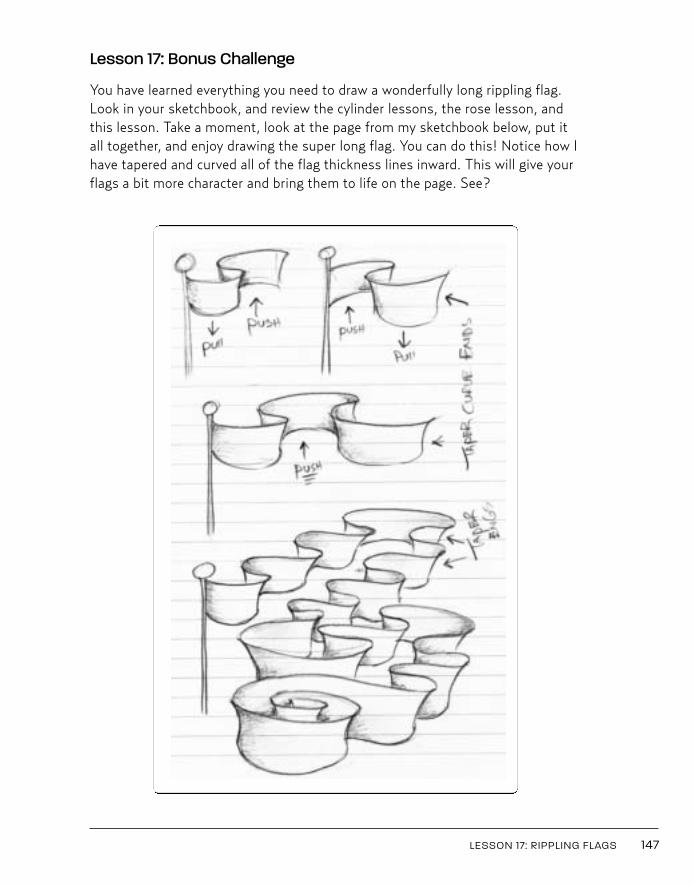
Lesson 17: Bonus Challenge
You have learned everything you need to draw a wonderfully long rippling flag.Look in your sketchbook, and review the cylinder lessons, the rose lesson, andthis lesson. Take a moment, look at the page from my sketchbook below, put it all together, and enjoy drawing the super long flag. You can do this! Notice how Ihave tapered and curved all of the flag thickness lines inward. This will give yourflags a bit more character and bring them to life on the page. See?
LESSON 17: RIPPLING FLAGS 147
Kistler 03_Kistler You Can Draw 10/21/10 12:11 PM Page 147
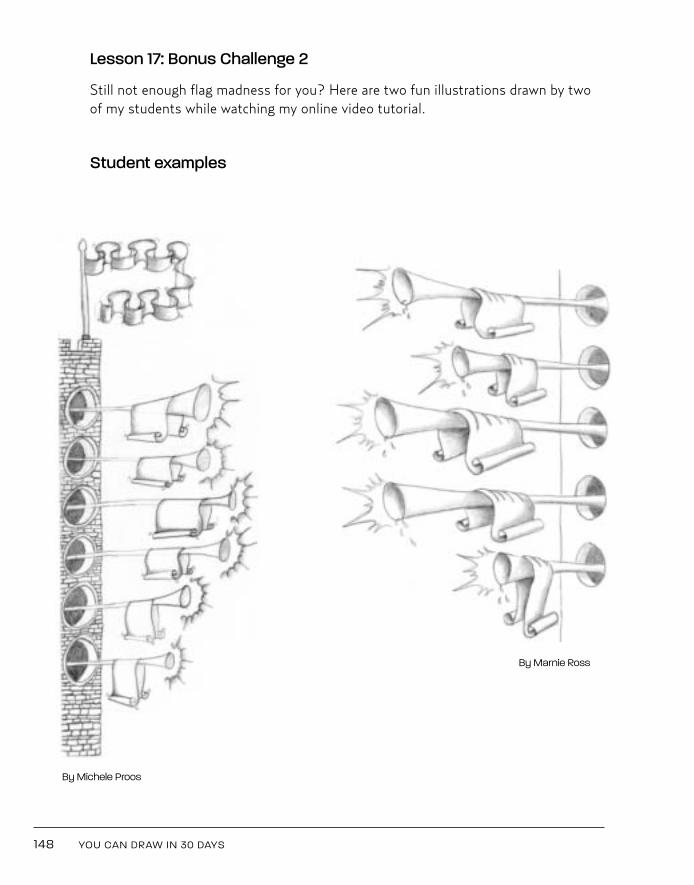
Lesson 17: Bonus Challenge 2
Still not enough flag madness for you? Here are two fun illustrations drawn by twoof my students while watching my online video tutorial.
Student examples
148 YOU CAN DRAW IN 30 DAYS
By Michele Proos
By Marnie Ross
Kistler 03_Kistler You Can Draw 10/21/10 12:11 PM Page 148
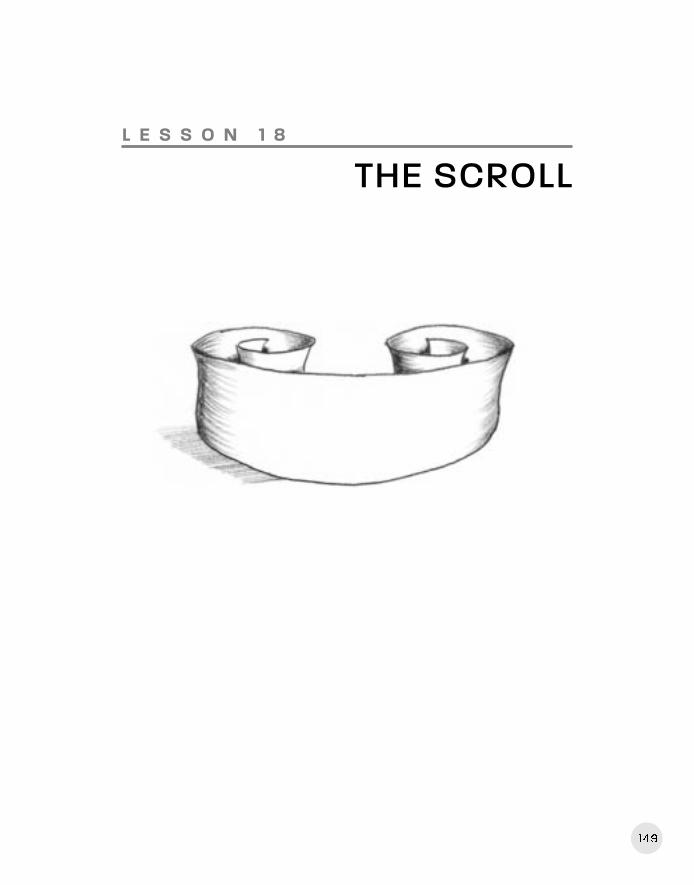
149
L E S S O N 1 8
THE SCROLL
Kistler 03_Kistler You Can Draw 10/21/10 12:11 PM Page 149
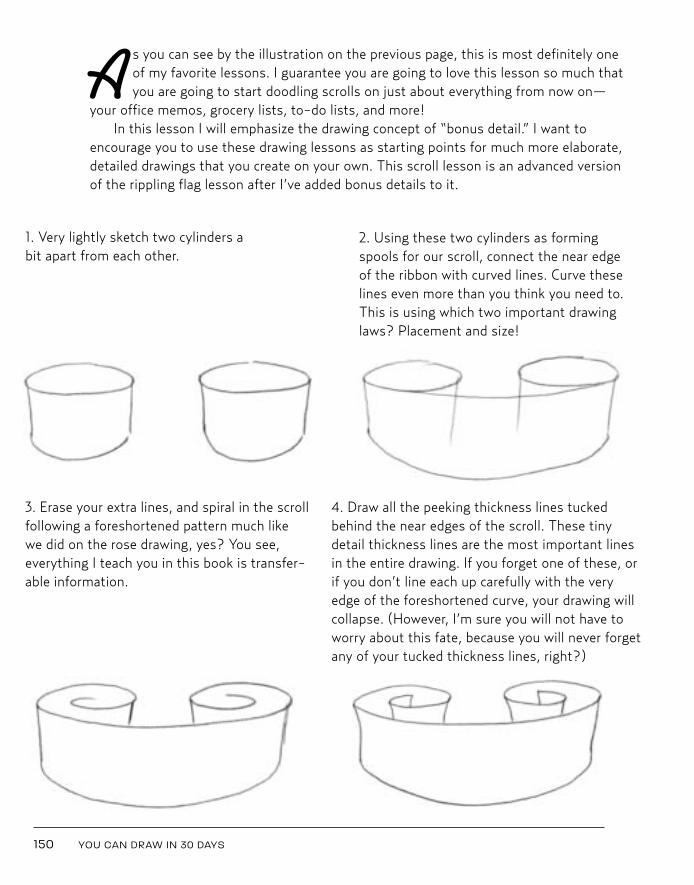
A s you can see by the illustration on the previous page, this is most definitely oneof my favorite lessons. I guarantee you are going to love this lesson so much thatyou are going to start doodling scrolls on just about everything from now on—
your office memos, grocery lists, to-do lists, and more!In this lesson I will emphasize the drawing concept of “bonus detail.” I want to
encourage you to use these drawing lessons as starting points for much more elaborate,detailed drawings that you create on your own. This scroll lesson is an advanced versionof the rippling flag lesson after I’ve added bonus details to it.
150 YOU CAN DRAW IN 30 DAYS
1. Very lightly sketch two cylinders abit apart from each other.
2. Using these two cylinders as formingspools for our scroll, connect the near edgeof the ribbon with curved lines. Curve theselines even more than you think you need to.This is using which two important drawinglaws? Placement and size!
3. Erase your extra lines, and spiral in the scrollfollowing a foreshortened pattern much likewe did on the rose drawing, yes? You see,everything I teach you in this book is transfer-able information.
4. Draw all the peeking thickness lines tuckedbehind the near edges of the scroll. These tinydetail thickness lines are the most important linesin the entire drawing. If you forget one of these, orif you don’t line each up carefully with the veryedge of the foreshortened curve, your drawing willcollapse. (However, I’m sure you will not have toworry about this fate, because you will never forgetany of your tucked thickness lines, right?)
Kistler 03_Kistler You Can Draw 10/21/10 4:48 PM Page 150
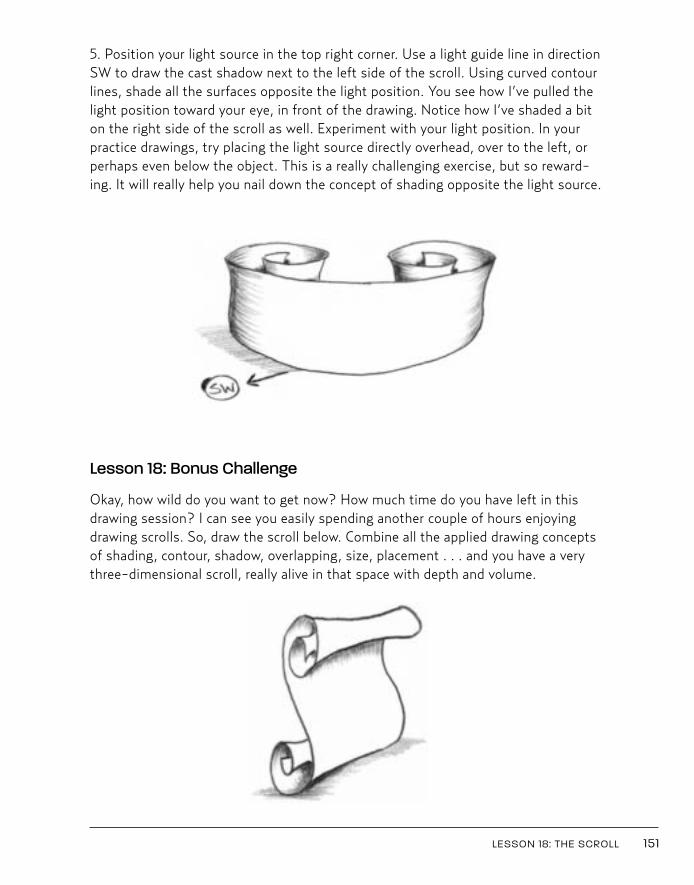
5. Position your light source in the top right corner. Use a light guide line in directionSW to draw the cast shadow next to the left side of the scroll. Using curved contourlines, shade all the surfaces opposite the light position. You see how I’ve pulled thelight position toward your eye, in front of the drawing. Notice how I’ve shaded a biton the right side of the scroll as well. Experiment with your light position. In yourpractice drawings, try placing the light source directly overhead, over to the left, orperhaps even below the object. This is a really challenging exercise, but so reward-ing. It will really help you nail down the concept of shading opposite the light source.
Lesson 18: Bonus Challenge
Okay, how wild do you want to get now? How much time do you have left in thisdrawing session? I can see you easily spending another couple of hours enjoyingdrawing scrolls. So, draw the scroll below. Combine all the applied drawing conceptsof shading, contour, shadow, overlapping, size, placement . . . and you have a verythree-dimensional scroll, really alive in that space with depth and volume.
LESSON 18: THE SCROLL 151
Kistler 03_Kistler You Can Draw 10/21/10 12:11 PM Page 151
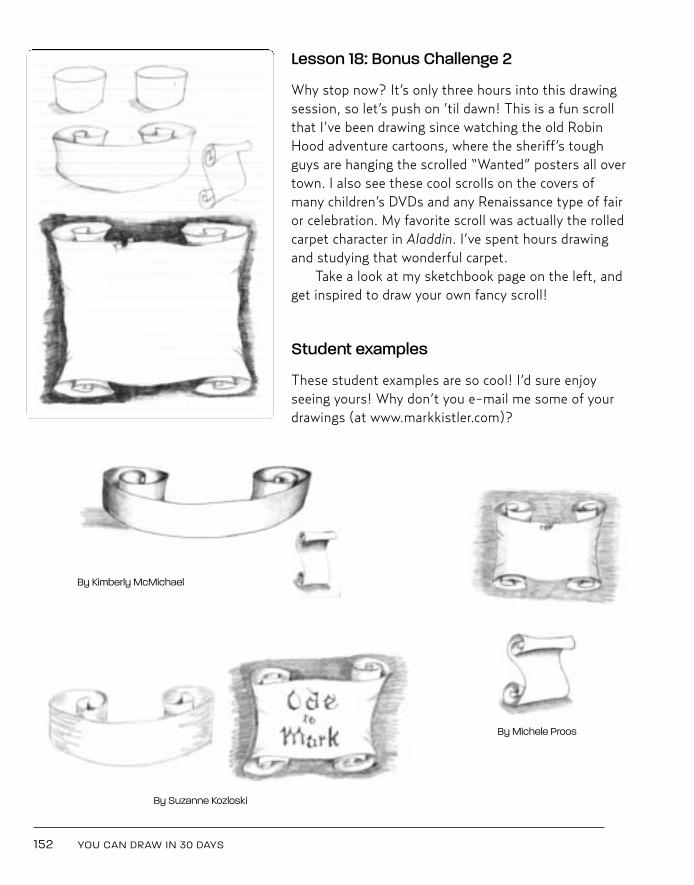
Lesson 18: Bonus Challenge 2
Why stop now? It’s only three hours into this drawingsession, so let’s push on ’til dawn! This is a fun scrollthat I’ve been drawing since watching the old RobinHood adventure cartoons, where the sheriff’s toughguys are hanging the scrolled “Wanted” posters all overtown. I also see these cool scrolls on the covers ofmany children’s DVDs and any Renaissance type of fairor celebration. My favorite scroll was actually the rolledcarpet character in Aladdin. I’ve spent hours drawingand studying that wonderful carpet.
Take a look at my sketchbook page on the left, andget inspired to draw your own fancy scroll!
Student examples
These student examples are so cool! I’d sure enjoyseeing yours! Why don’t you e-mail me some of yourdrawings (at www.markkistler.com)?
152 YOU CAN DRAW IN 30 DAYS
By Kimberly McMichael
By Michele Proos
By Suzanne Kozloski
Kistler 03_Kistler You Can Draw 10/21/10 12:11 PM Page 152
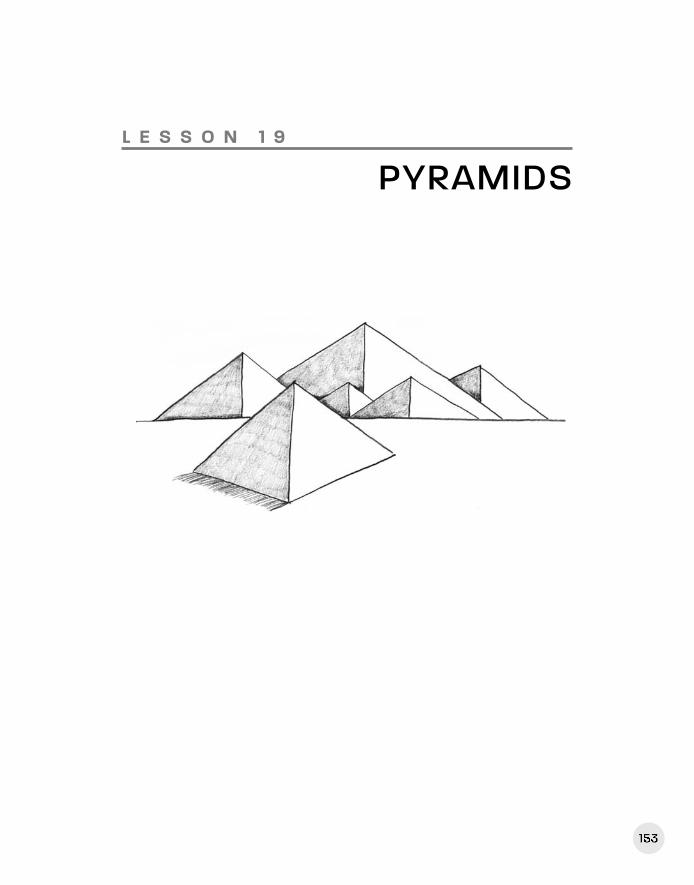
153
L E S S O N 1 9
PYRAMIDS
153
Kistler 04_Kistler You Can Draw 10/21/10 12:13 PM Page 153
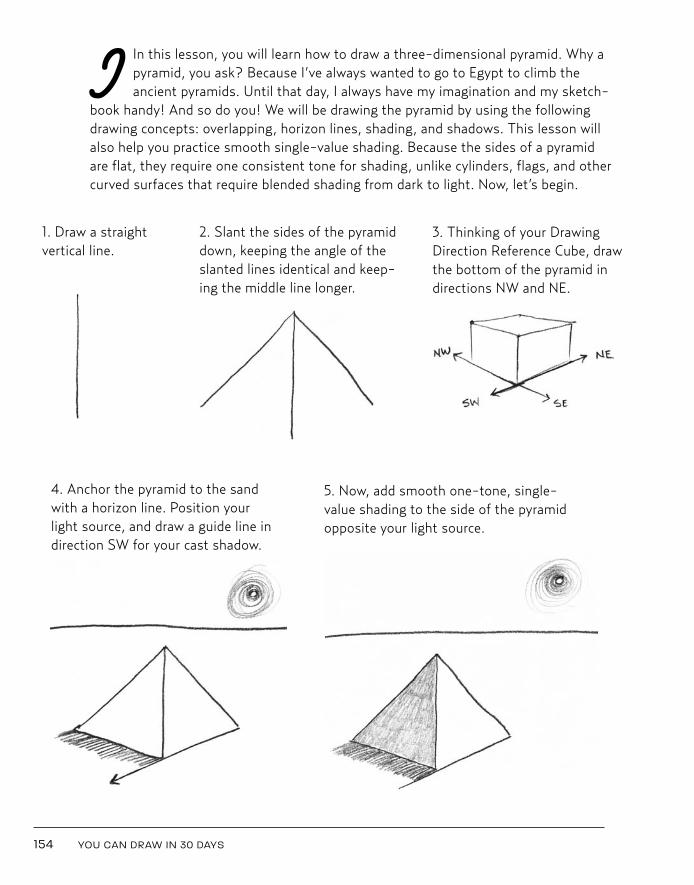
I In this lesson, you will learn how to draw a three-dimensional pyramid. Why apyramid, you ask? Because I’ve always wanted to go to Egypt to climb theancient pyramids. Until that day, I always have my imagination and my sketch-
book handy! And so do you! We will be drawing the pyramid by using the followingdrawing concepts: overlapping, horizon lines, shading, and shadows. This lesson willalso help you practice smooth single-value shading. Because the sides of a pyramidare flat, they require one consistent tone for shading, unlike cylinders, flags, and othercurved surfaces that require blended shading from dark to light. Now, let’s begin.
154 YOU CAN DRAW IN 30 DAYS
1. Draw a straight vertical line.
2. Slant the sides of the pyramiddown, keeping the angle of theslanted lines identical and keep-ing the middle line longer.
3. Thinking of your DrawingDirection Reference Cube, drawthe bottom of the pyramid indirections NW and NE.
4. Anchor the pyramid to the sandwith a horizon line. Position yourlight source, and draw a guide line indirection SW for your cast shadow.
5. Now, add smooth one-tone, single-value shading to the side of the pyramidopposite your light source.
Kistler 04_Kistler You Can Draw 10/21/10 12:13 PM Page 154
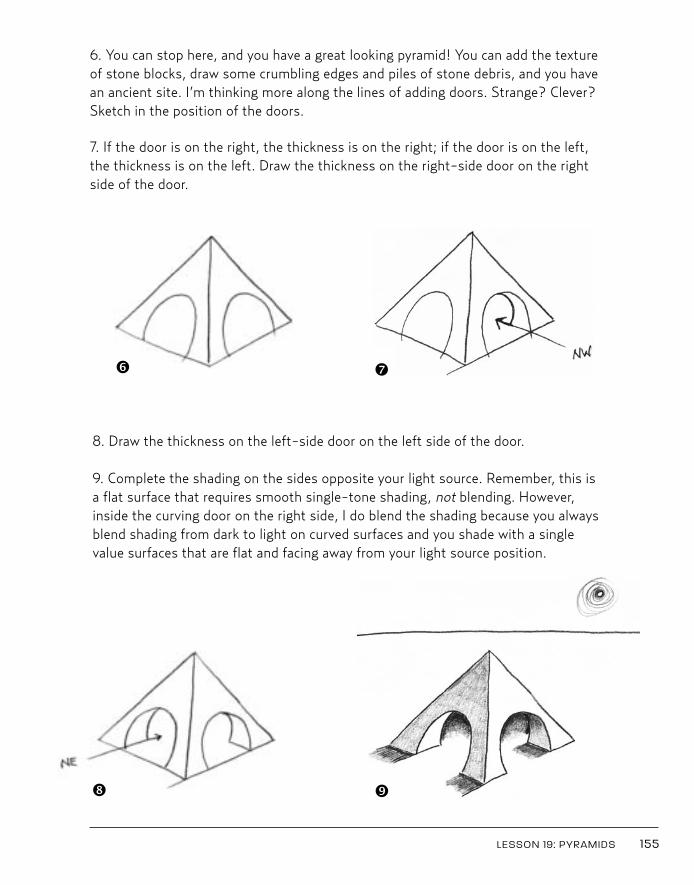
LESSON 19: PYRAMIDS 155
6. You can stop here, and you have a great looking pyramid! You can add the textureof stone blocks, draw some crumbling edges and piles of stone debris, and you havean ancient site. I’m thinking more along the lines of adding doors. Strange? Clever?Sketch in the position of the doors.
7. If the door is on the right, the thickness is on the right; if the door is on the left,the thickness is on the left. Draw the thickness on the right-side door on the rightside of the door.
8. Draw the thickness on the left-side door on the left side of the door.
9. Complete the shading on the sides opposite your light source. Remember, this isa flat surface that requires smooth single-tone shading, not blending. However,inside the curving door on the right side, I do blend the shading because you alwaysblend shading from dark to light on curved surfaces and you shade with a singlevalue surfaces that are flat and facing away from your light source position.
ë í
ì î
Kistler 04_Kistler You Can Draw 10/21/10 12:13 PM Page 155
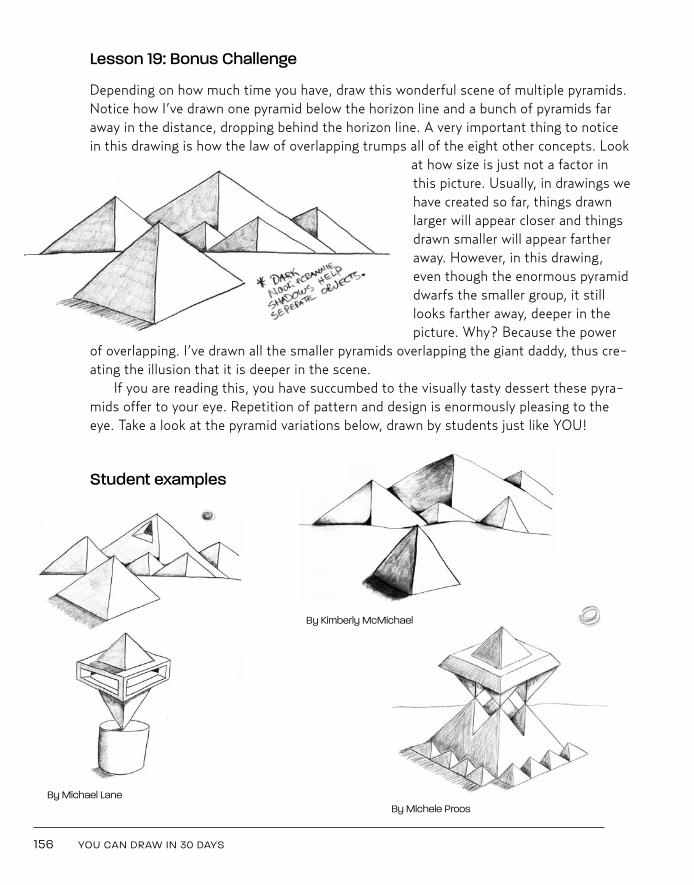
Lesson 19: Bonus Challenge
Depending on how much time you have, draw this wonderful scene of multiple pyramids.Notice how I’ve drawn one pyramid below the horizon line and a bunch of pyramids faraway in the distance, dropping behind the horizon line. A very important thing to noticein this drawing is how the law of overlapping trumps all of the eight other concepts. Look
at how size is just not a factor inthis picture. Usually, in drawings wehave created so far, things drawnlarger will appear closer and thingsdrawn smaller will appear fartheraway. However, in this drawing,even though the enormous pyramiddwarfs the smaller group, it stilllooks farther away, deeper in thepicture. Why? Because the power
of overlapping. I’ve drawn all the smaller pyramids overlapping the giant daddy, thus cre-ating the illusion that it is deeper in the scene.
If you are reading this, you have succumbed to the visually tasty dessert these pyra-mids offer to your eye. Repetition of pattern and design is enormously pleasing to theeye. Take a look at the pyramid variations below, drawn by students just like YOU!
Student examples
156 YOU CAN DRAW IN 30 DAYS
By Michele Proos
By Kimberly McMichael
By Michael Lane
Kistler 04_Kistler You Can Draw 10/21/10 12:14 PM Page 156

157
L E S S O N 2 0
VOLCANOES, CRATERS, AND A CUP OF COFFEE
Kistler 04_Kistler You Can Draw 10/21/10 12:14 PM Page 157
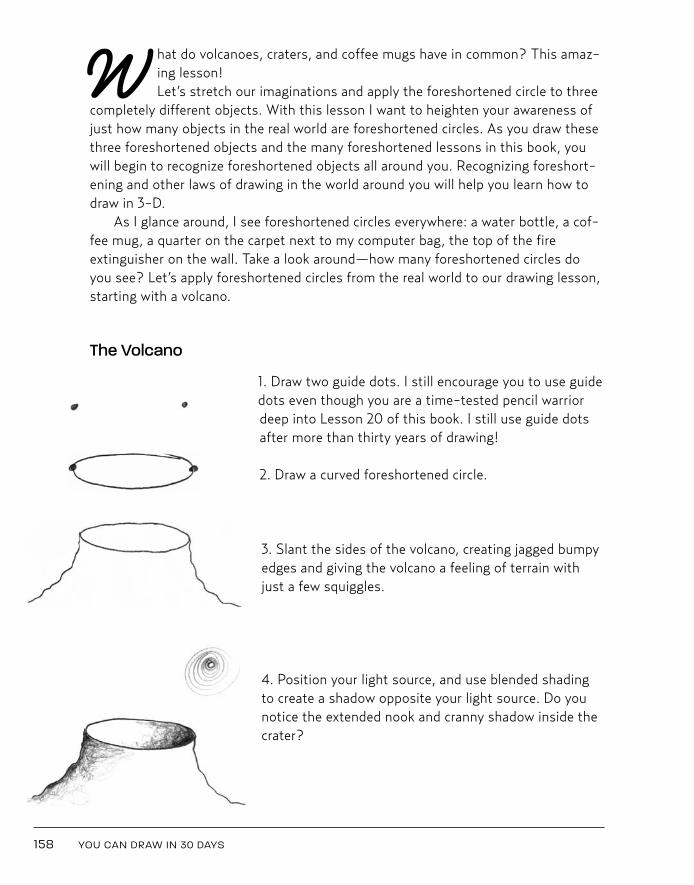
W hat do volcanoes, craters, and coffee mugs have in common? This amaz-ing lesson!Let’s stretch our imaginations and apply the foreshortened circle to three
completely different objects. With this lesson I want to heighten your awareness ofjust how many objects in the real world are foreshortened circles. As you draw thesethree foreshortened objects and the many foreshortened lessons in this book, youwill begin to recognize foreshortened objects all around you. Recognizing foreshort-ening and other laws of drawing in the world around you will help you learn how todraw in 3-D.
As I glance around, I see foreshortened circles everywhere: a water bottle, a cof-fee mug, a quarter on the carpet next to my computer bag, the top of the fireextinguisher on the wall. Take a look around—how many foreshortened circles doyou see? Let’s apply foreshortened circles from the real world to our drawing lesson,starting with a volcano.
The Volcano
1. Draw two guide dots. I still encourage you to use guidedots even though you are a time-tested pencil warriordeep into Lesson 20 of this book. I still use guide dotsafter more than thirty years of drawing!
2. Draw a curved foreshortened circle.
3. Slant the sides of the volcano, creating jagged bumpyedges and giving the volcano a feeling of terrain withjust a few squiggles.
4. Position your light source, and use blended shadingto create a shadow opposite your light source. Do younotice the extended nook and cranny shadow inside thecrater?
158 YOU CAN DRAW IN 30 DAYS
Kistler 04_Kistler You Can Draw 10/21/10 12:14 PM Page 158
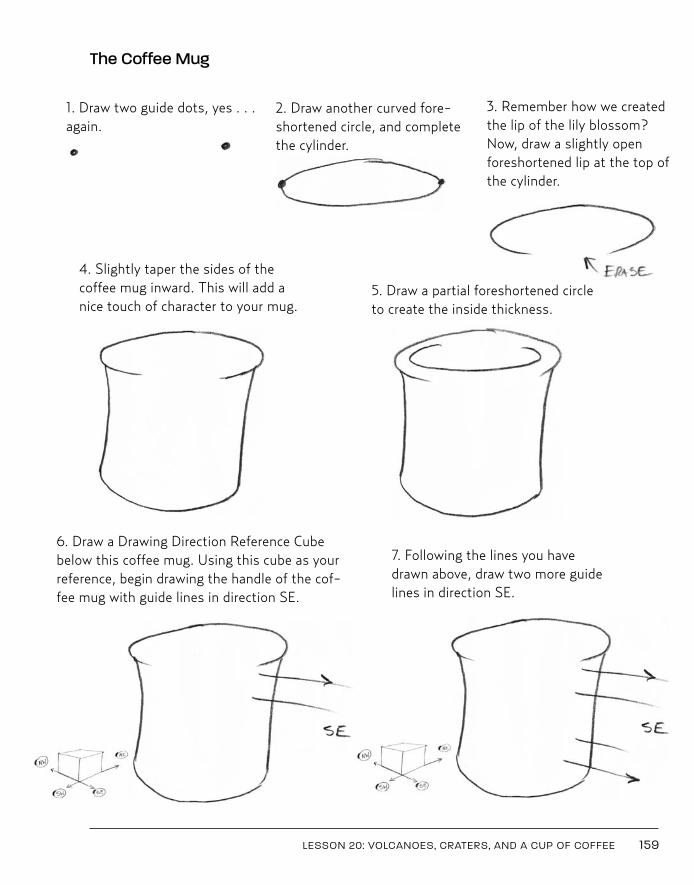
LESSON 20: VOLCANOES, CRATERS, AND A CUP OF COFFEE 159
1. Draw two guide dots, yes . . .again.
2. Draw another curved fore-shortened circle, and completethe cylinder.
3. Remember how we createdthe lip of the lily blossom?Now, draw a slightly openforeshortened lip at the top ofthe cylinder.
The Coffee Mug
4. Slightly taper the sides of thecoffee mug inward. This will add anice touch of character to your mug.
5. Draw a partial foreshortened circleto create the inside thickness.
6. Draw a Drawing Direction Reference Cubebelow this coffee mug. Using this cube as yourreference, begin drawing the handle of the cof-fee mug with guide lines in direction SE.
7. Following the lines you havedrawn above, draw two more guidelines in direction SE.
Kistler 04_Kistler You Can Draw 10/21/10 12:14 PM Page 159
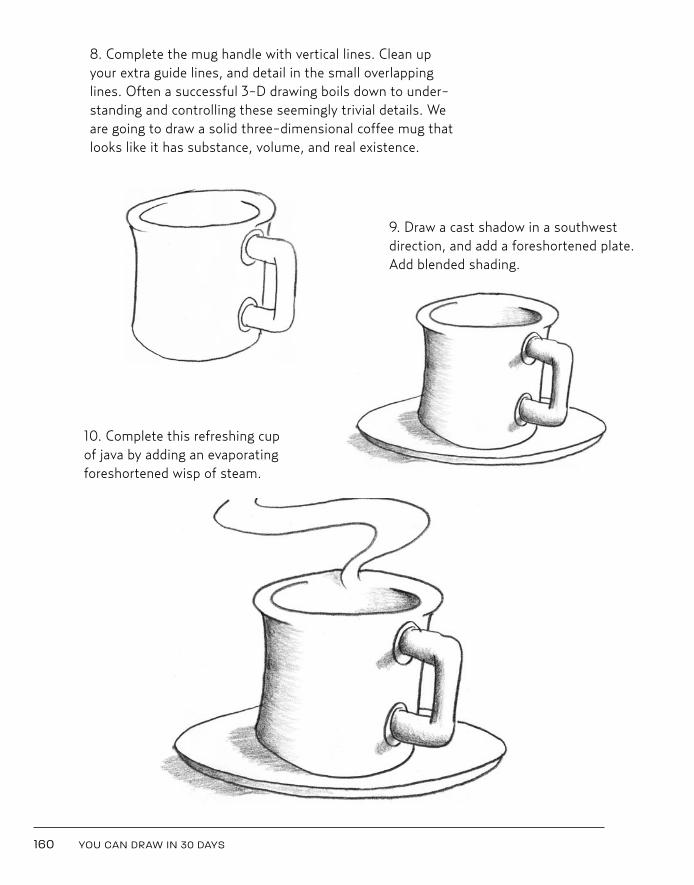
160 YOU CAN DRAW IN 30 DAYS
8. Complete the mug handle with vertical lines. Clean upyour extra guide lines, and detail in the small overlappinglines. Often a successful 3-D drawing boils down to under-standing and controlling these seemingly trivial details. Weare going to draw a solid three-dimensional coffee mug thatlooks like it has substance, volume, and real existence.
9. Draw a cast shadow in a southwestdirection, and add a foreshortened plate.Add blended shading.
10. Complete this refreshing cupof java by adding an evaporatingforeshortened wisp of steam.
Kistler 04_Kistler You Can Draw 10/21/10 12:14 PM Page 160
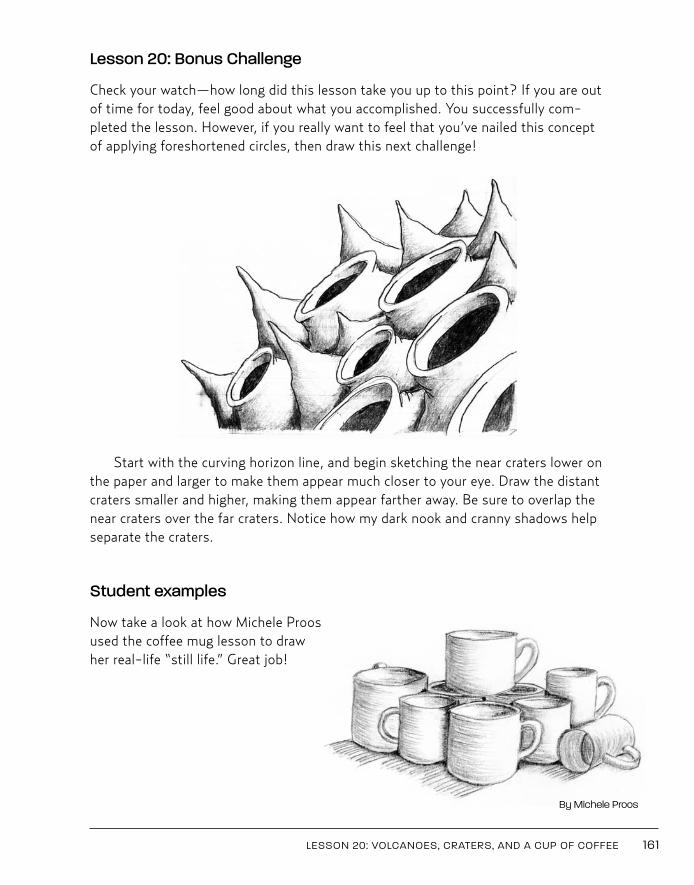
Lesson 20: Bonus Challenge
Check your watch—how long did this lesson take you up to this point? If you are outof time for today, feel good about what you accomplished. You successfully com-pleted the lesson. However, if you really want to feel that you’ve nailed this conceptof applying foreshortened circles, then draw this next challenge!
Start with the curving horizon line, and begin sketching the near craters lower onthe paper and larger to make them appear much closer to your eye. Draw the distantcraters smaller and higher, making them appear farther away. Be sure to overlap thenear craters over the far craters. Notice how my dark nook and cranny shadows helpseparate the craters.
Student examples
Now take a look at how Michele Proosused the coffee mug lesson to drawher real-life “still life.” Great job!
LESSON 20: VOLCANOES, CRATERS, AND A CUP OF COFFEE 161
By Michele Proos
Kistler 04_Kistler You Can Draw 10/21/10 12:14 PM Page 161
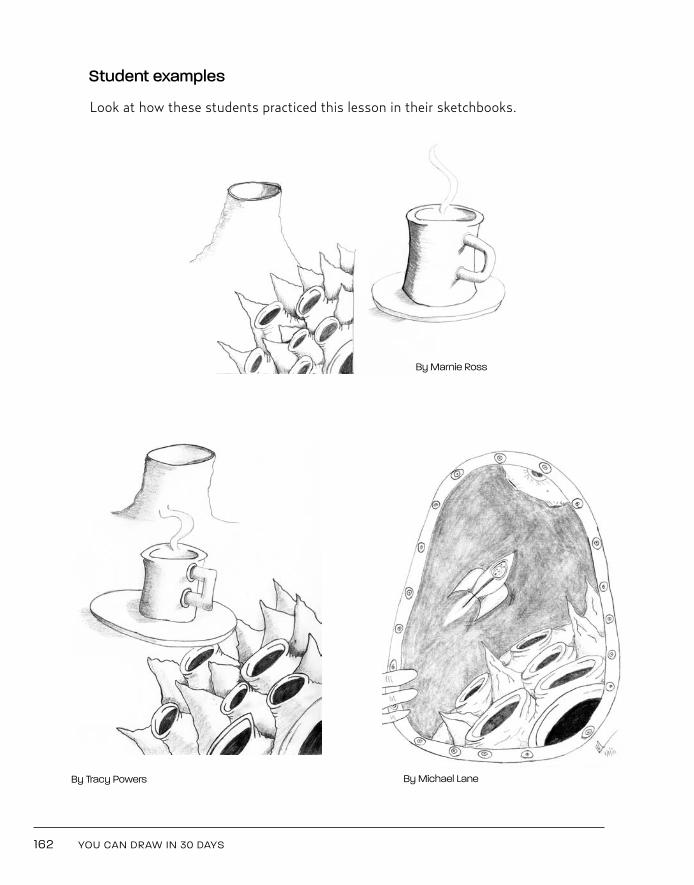
162 YOU CAN DRAW IN 30 DAYS
By Michael Lane
Student examples
Look at how these students practiced this lesson in their sketchbooks.
By Marnie Ross
By Tracy Powers
Kistler 04_Kistler You Can Draw 10/21/10 12:14 PM Page 162

163
L E S S O N 2 1
TREES
Kistler 04_Kistler You Can Draw 10/21/10 12:14 PM Page 163
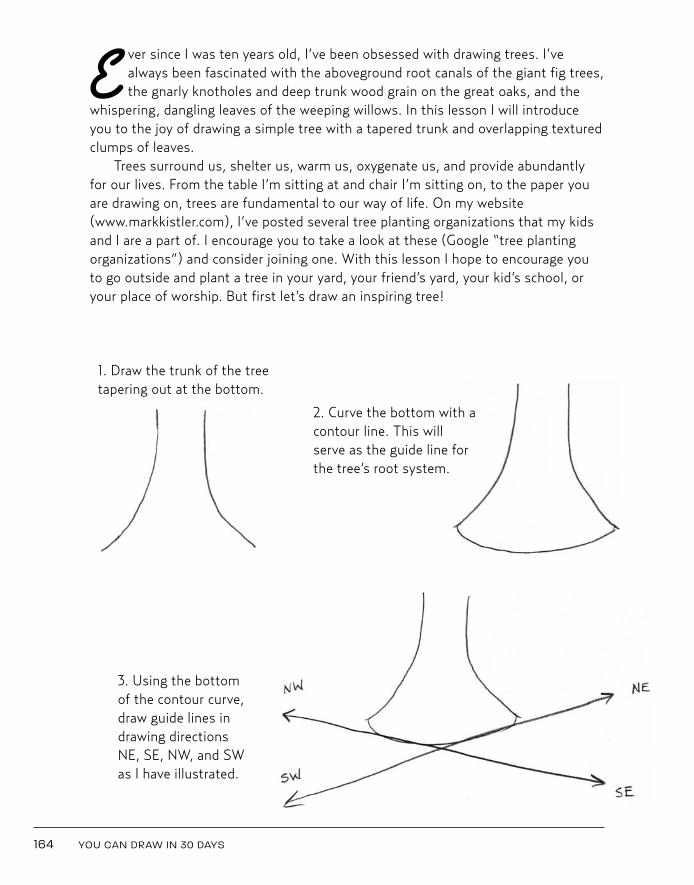
164 YOU CAN DRAW IN 30 DAYS
E ver since I was ten years old, I’ve been obsessed with drawing trees. I’vealways been fascinated with the aboveground root canals of the giant fig trees,the gnarly knotholes and deep trunk wood grain on the great oaks, and the
whispering, dangling leaves of the weeping willows. In this lesson I will introduceyou to the joy of drawing a simple tree with a tapered trunk and overlapping texturedclumps of leaves.
Trees surround us, shelter us, warm us, oxygenate us, and provide abundantlyfor our lives. From the table I’m sitting at and chair I’m sitting on, to the paper youare drawing on, trees are fundamental to our way of life. On my website(www.markkistler.com), I’ve posted several tree planting organizations that my kidsand I are a part of. I encourage you to take a look at these (Google “tree plantingorganizations”) and consider joining one. With this lesson I hope to encourage youto go outside and plant a tree in your yard, your friend’s yard, your kid’s school, oryour place of worship. But first let’s draw an inspiring tree!
1. Draw the trunk of the treetapering out at the bottom.
2. Curve the bottom with acontour line. This willserve as the guide line forthe tree’s root system.
3. Using the bottomof the contour curve,draw guide lines indrawing directionsNE, SE, NW, and SWas I have illustrated.
Kistler 04_Kistler You Can Draw 10/21/10 12:14 PM Page 164
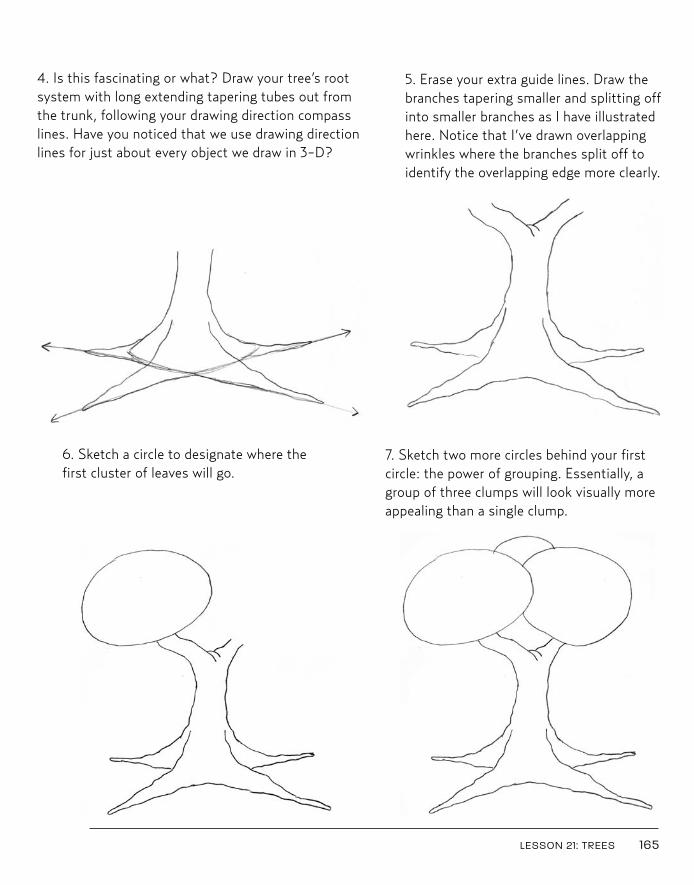
LESSON 21: TREES 165
4. Is this fascinating or what? Draw your tree’s rootsystem with long extending tapering tubes out fromthe trunk, following your drawing direction compasslines. Have you noticed that we use drawing directionlines for just about every object we draw in 3-D?
5. Erase your extra guide lines. Draw thebranches tapering smaller and splitting offinto smaller branches as I have illustratedhere. Notice that I’ve drawn overlappingwrinkles where the branches split off toidentify the overlapping edge more clearly.
6. Sketch a circle to designate where thefirst cluster of leaves will go.
7. Sketch two more circles behind your firstcircle: the power of grouping. Essentially, agroup of three clumps will look visually moreappealing than a single clump.
Kistler 04_Kistler You Can Draw 10/21/10 12:14 PM Page 165
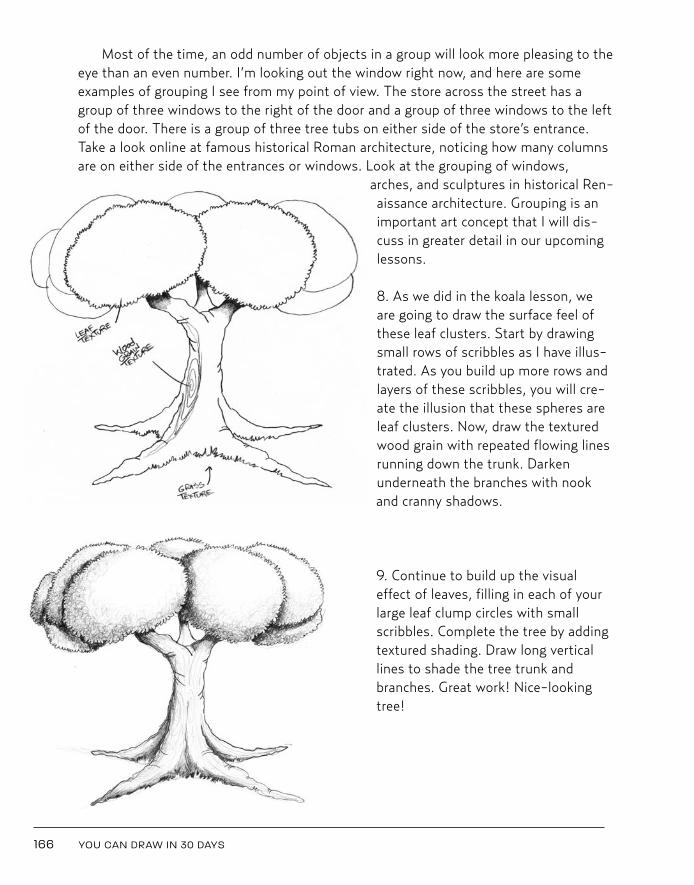
166 YOU CAN DRAW IN 30 DAYS
Most of the time, an odd number of objects in a group will look more pleasing to theeye than an even number. I’m looking out the window right now, and here are someexamples of grouping I see from my point of view. The store across the street has agroup of three windows to the right of the door and a group of three windows to the leftof the door. There is a group of three tree tubs on either side of the store’s entrance.Take a look online at famous historical Roman architecture, noticing how many columnsare on either side of the entrances or windows. Look at the grouping of windows,
arches, and sculptures in historical Ren-aissance architecture. Grouping is animportant art concept that I will dis-cuss in greater detail in our upcominglessons.
8. As we did in the koala lesson, weare going to draw the surface feel ofthese leaf clusters. Start by drawingsmall rows of scribbles as I have illus-trated. As you build up more rows andlayers of these scribbles, you will cre-ate the illusion that these spheres areleaf clusters. Now, draw the texturedwood grain with repeated flowing linesrunning down the trunk. Darkenunderneath the branches with nookand cranny shadows.
9. Continue to build up the visualeffect of leaves, filling in each of yourlarge leaf clump circles with smallscribbles. Complete the tree by addingtextured shading. Draw long verticallines to shade the tree trunk andbranches. Great work! Nice-lookingtree!
Kistler 04_Kistler You Can Draw 10/21/10 12:14 PM Page 166
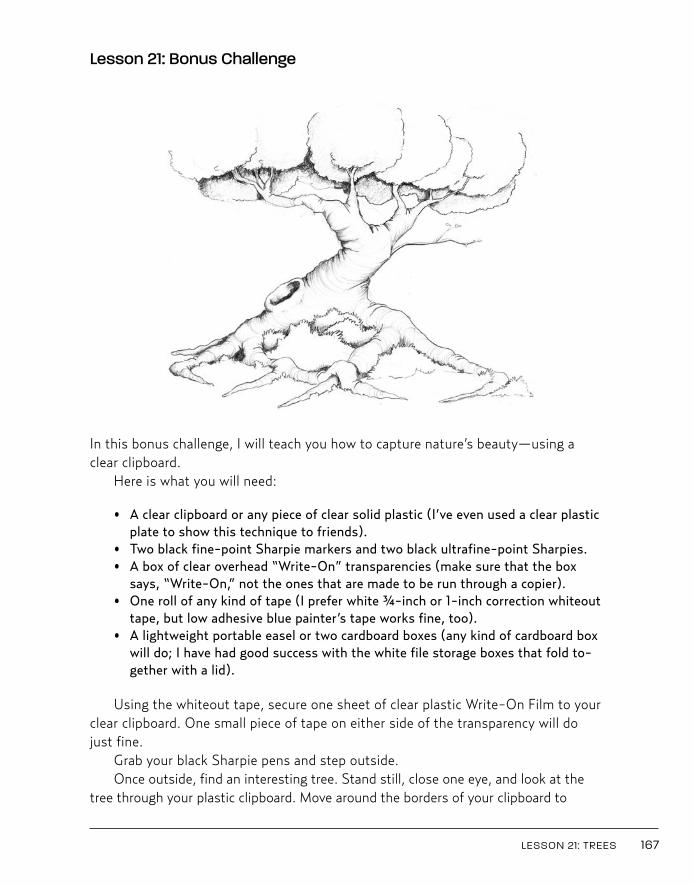
Lesson 21: Bonus Challenge
In this bonus challenge, I will teach you how to capture nature’s beauty—using aclear clipboard.
Here is what you will need:
• A clear clipboard or any piece of clear solid plastic (I’ve even used a clear plasticplate to show this technique to friends).
• Two black fine-point Sharpie markers and two black ultrafine-point Sharpies.• A box of clear overhead “Write-On” transparencies (make sure that the box
says, “Write-On,” not the ones that are made to be run through a copier).• One roll of any kind of tape (I prefer white ¾-inch or 1-inch correction whiteout
tape, but low adhesive blue painter’s tape works fine, too).• A lightweight portable easel or two cardboard boxes (any kind of cardboard box
will do; I have had good success with the white file storage boxes that fold to-gether with a lid).
Using the whiteout tape, secure one sheet of clear plastic Write-On Film to yourclear clipboard. One small piece of tape on either side of the transparency will dojust fine.
Grab your black Sharpie pens and step outside.Once outside, find an interesting tree. Stand still, close one eye, and look at the
tree through your plastic clipboard. Move around the borders of your clipboard to
LESSON 21: TREES 167
Kistler 04_Kistler You Can Draw 10/21/10 12:14 PM Page 167
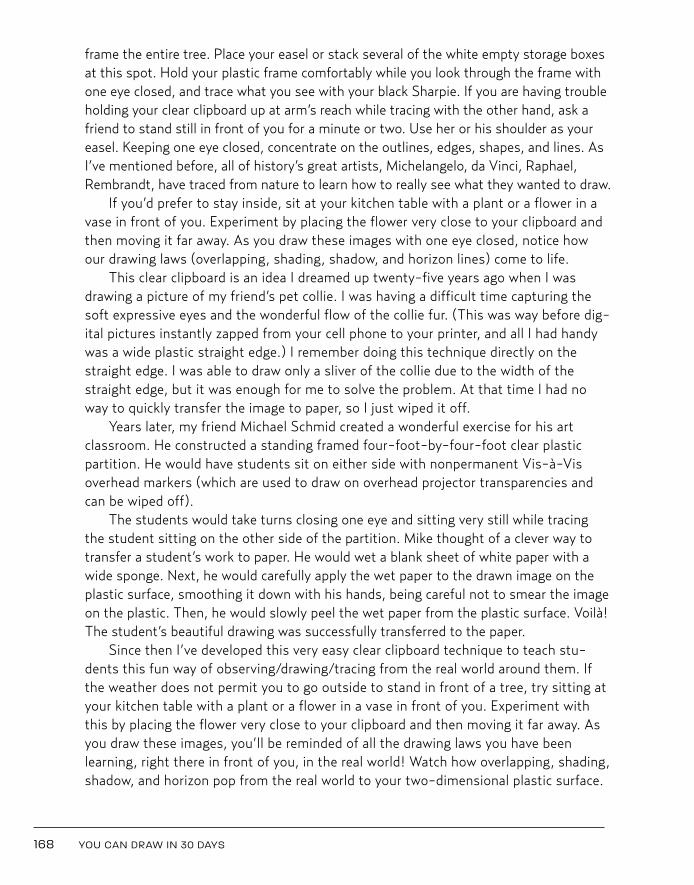
frame the entire tree. Place your easel or stack several of the white empty storage boxesat this spot. Hold your plastic frame comfortably while you look through the frame withone eye closed, and trace what you see with your black Sharpie. If you are having troubleholding your clear clipboard up at arm’s reach while tracing with the other hand, ask afriend to stand still in front of you for a minute or two. Use her or his shoulder as youreasel. Keeping one eye closed, concentrate on the outlines, edges, shapes, and lines. AsI’ve mentioned before, all of history’s great artists, Michelangelo, da Vinci, Raphael,Rembrandt, have traced from nature to learn how to really see what they wanted to draw.
If you’d prefer to stay inside, sit at your kitchen table with a plant or a flower in avase in front of you. Experiment by placing the flower very close to your clipboard andthen moving it far away. As you draw these images with one eye closed, notice howour drawing laws (overlapping, shading, shadow, and horizon lines) come to life.
This clear clipboard is an idea I dreamed up twenty-five years ago when I wasdrawing a picture of my friend’s pet collie. I was having a difficult time capturing thesoft expressive eyes and the wonderful flow of the collie fur. (This was way before dig-ital pictures instantly zapped from your cell phone to your printer, and all I had handywas a wide plastic straight edge.) I remember doing this technique directly on thestraight edge. I was able to draw only a sliver of the collie due to the width of thestraight edge, but it was enough for me to solve the problem. At that time I had noway to quickly transfer the image to paper, so I just wiped it off.
Years later, my friend Michael Schmid created a wonderful exercise for his artclassroom. He constructed a standing framed four-foot-by-four-foot clear plasticpartition. He would have students sit on either side with nonpermanent Vis-à-Visoverhead markers (which are used to draw on overhead projector transparencies andcan be wiped off).
The students would take turns closing one eye and sitting very still while tracingthe student sitting on the other side of the partition. Mike thought of a clever way totransfer a student’s work to paper. He would wet a blank sheet of white paper with awide sponge. Next, he would carefully apply the wet paper to the drawn image on theplastic surface, smoothing it down with his hands, being careful not to smear the imageon the plastic. Then, he would slowly peel the wet paper from the plastic surface. Voilà!The student’s beautiful drawing was successfully transferred to the paper.
Since then I’ve developed this very easy clear clipboard technique to teach stu-dents this fun way of observing/drawing/tracing from the real world around them. Ifthe weather does not permit you to go outside to stand in front of a tree, try sitting atyour kitchen table with a plant or a flower in a vase in front of you. Experiment withthis by placing the flower very close to your clipboard and then moving it far away. Asyou draw these images, you’ll be reminded of all the drawing laws you have beenlearning, right there in front of you, in the real world! Watch how overlapping, shading,shadow, and horizon pop from the real world to your two-dimensional plastic surface.
168 YOU CAN DRAW IN 30 DAYS
Kistler 04_Kistler You Can Draw 10/21/10 12:14 PM Page 168
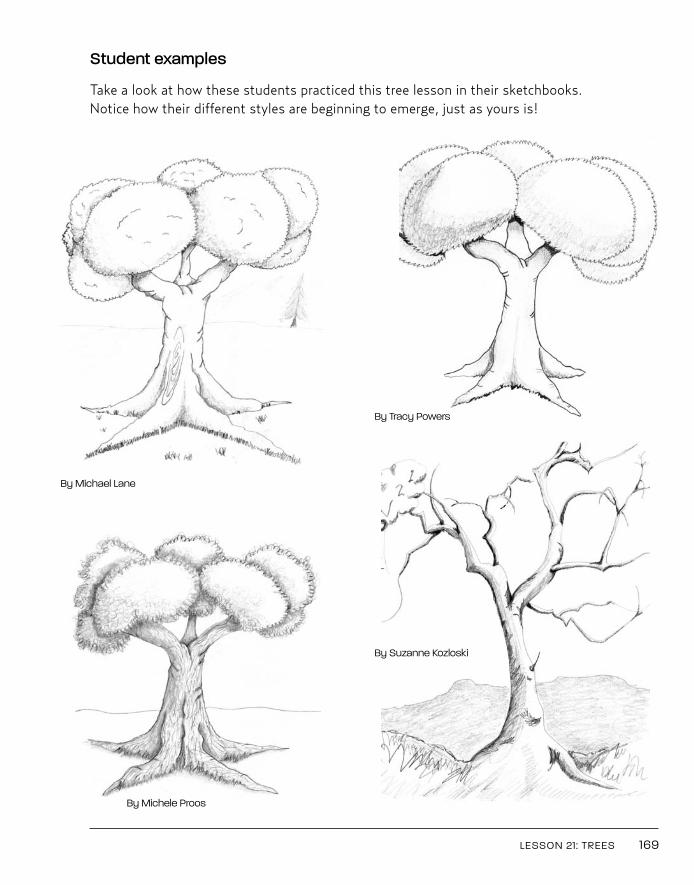
Student examples
Take a look at how these students practiced this tree lesson in their sketchbooks.Notice how their different styles are beginning to emerge, just as yours is!
LESSON 21: TREES 169
By Tracy Powers
By Michael Lane
By Michele Proos
By Suzanne Kozloski
Kistler 04_Kistler You Can Draw 10/21/10 12:14 PM Page 169

Kistler 04_Kistler You Can Draw 10/21/10 12:14 PM Page 170
171
L E S S O N 2 2
A ROOM IN ONE-POINT PERSPECTIVE
Kistler 04_Kistler You Can Draw 10/21/10 12:14 PM Page 171
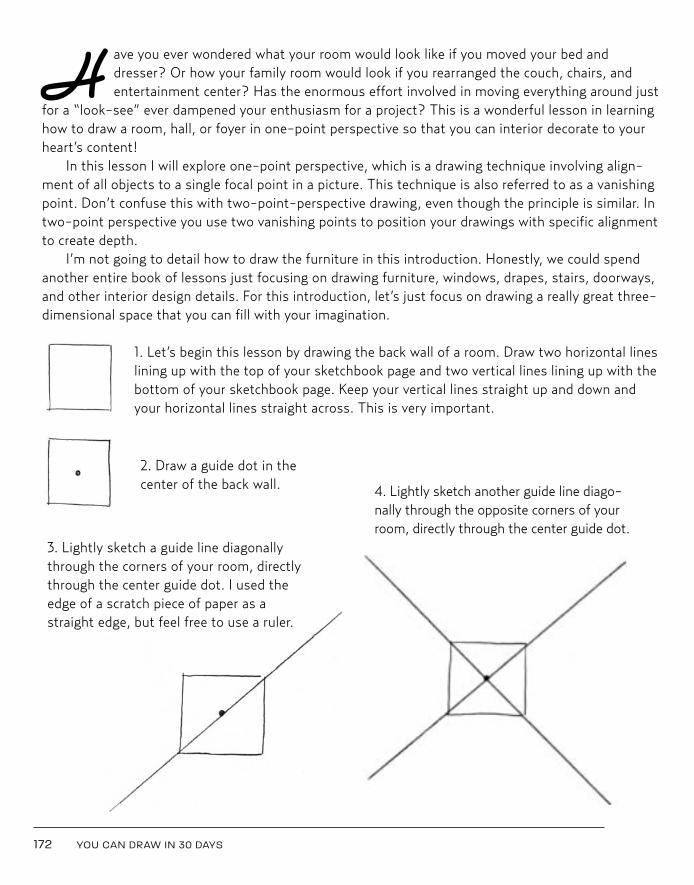
H ave you ever wondered what your room would look like if you moved your bed anddresser? Or how your family room would look if you rearranged the couch, chairs, andentertainment center? Has the enormous effort involved in moving everything around just
for a “look-see” ever dampened your enthusiasm for a project? This is a wonderful lesson in learninghow to draw a room, hall, or foyer in one-point perspective so that you can interior decorate to yourheart’s content!
In this lesson I will explore one-point perspective, which is a drawing technique involving align-ment of all objects to a single focal point in a picture. This technique is also referred to as a vanishingpoint. Don’t confuse this with two-point-perspective drawing, even though the principle is similar. Intwo-point perspective you use two vanishing points to position your drawings with specific alignmentto create depth.
I’m not going to detail how to draw the furniture in this introduction. Honestly, we could spendanother entire book of lessons just focusing on drawing furniture, windows, drapes, stairs, doorways,and other interior design details. For this introduction, let’s just focus on drawing a really great three-dimensional space that you can fill with your imagination.
1. Let’s begin this lesson by drawing the back wall of a room. Draw two horizontal lineslining up with the top of your sketchbook page and two vertical lines lining up with thebottom of your sketchbook page. Keep your vertical lines straight up and down andyour horizontal lines straight across. This is very important.
172 YOU CAN DRAW IN 30 DAYS
4. Lightly sketch another guide line diago-nally through the opposite corners of yourroom, directly through the center guide dot.
3. Lightly sketch a guide line diagonallythrough the corners of your room, directlythrough the center guide dot. I used theedge of a scratch piece of paper as astraight edge, but feel free to use a ruler.
2. Draw a guide dot in thecenter of the back wall.
Kistler 04_Kistler You Can Draw 10/21/10 12:14 PM Page 172
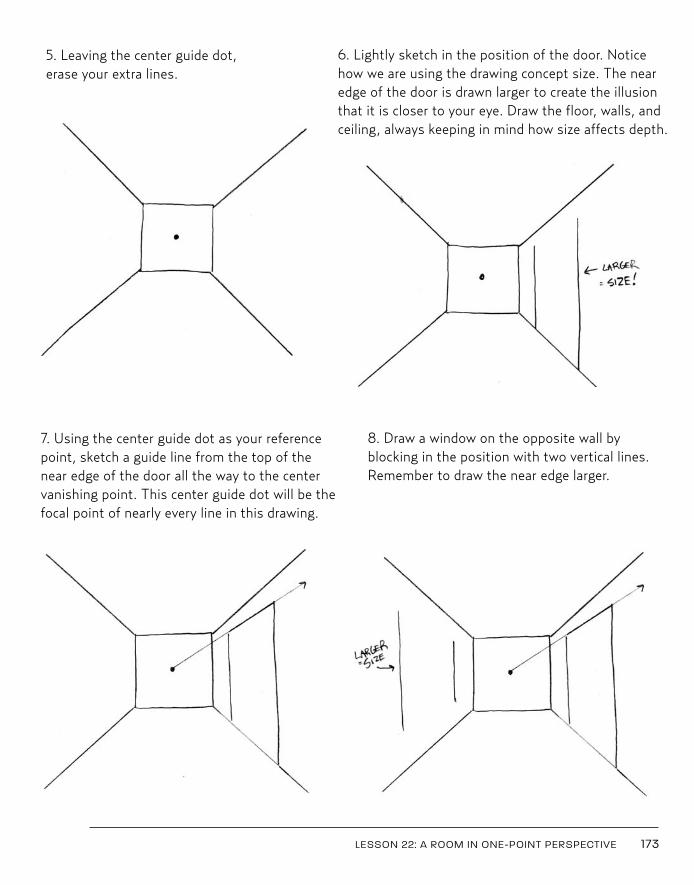
LESSON 22: A ROOM IN ONE-POINT PERSPECTIVE 173
5. Leaving the center guide dot,erase your extra lines.
6. Lightly sketch in the position of the door. Noticehow we are using the drawing concept size. The nearedge of the door is drawn larger to create the illusionthat it is closer to your eye. Draw the floor, walls, andceiling, always keeping in mind how size affects depth.
7. Using the center guide dot as your referencepoint, sketch a guide line from the top of thenear edge of the door all the way to the centervanishing point. This center guide dot will be thefocal point of nearly every line in this drawing.
8. Draw a window on the opposite wall byblocking in the position with two vertical lines.Remember to draw the near edge larger.
Kistler 04_Kistler You Can Draw 10/21/10 12:14 PM Page 173
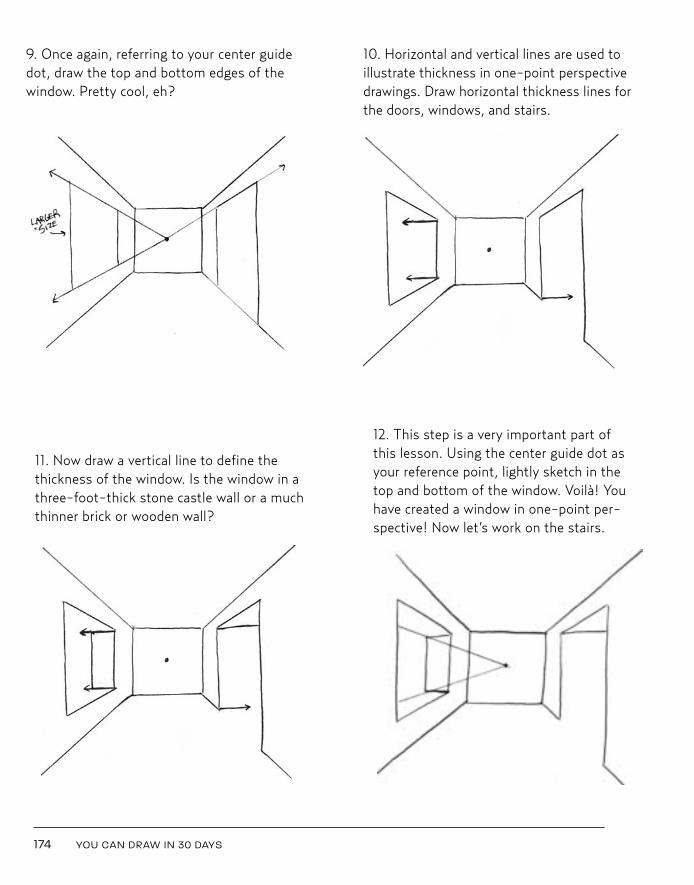
174 YOU CAN DRAW IN 30 DAYS
9. Once again, referring to your center guidedot, draw the top and bottom edges of thewindow. Pretty cool, eh?
10. Horizontal and vertical lines are used toillustrate thickness in one-point perspectivedrawings. Draw horizontal thickness lines forthe doors, windows, and stairs.
11. Now draw a vertical line to define thethickness of the window. Is the window in athree-foot-thick stone castle wall or a muchthinner brick or wooden wall?
12. This step is a very important part of this lesson. Using the center guide dot asyour reference point, lightly sketch in thetop and bottom of the window. Voilà! Youhave created a window in one-point per-spective! Now let’s work on the stairs.
Kistler 04_Kistler You Can Draw 10/25/10 11:08 AM Page 174
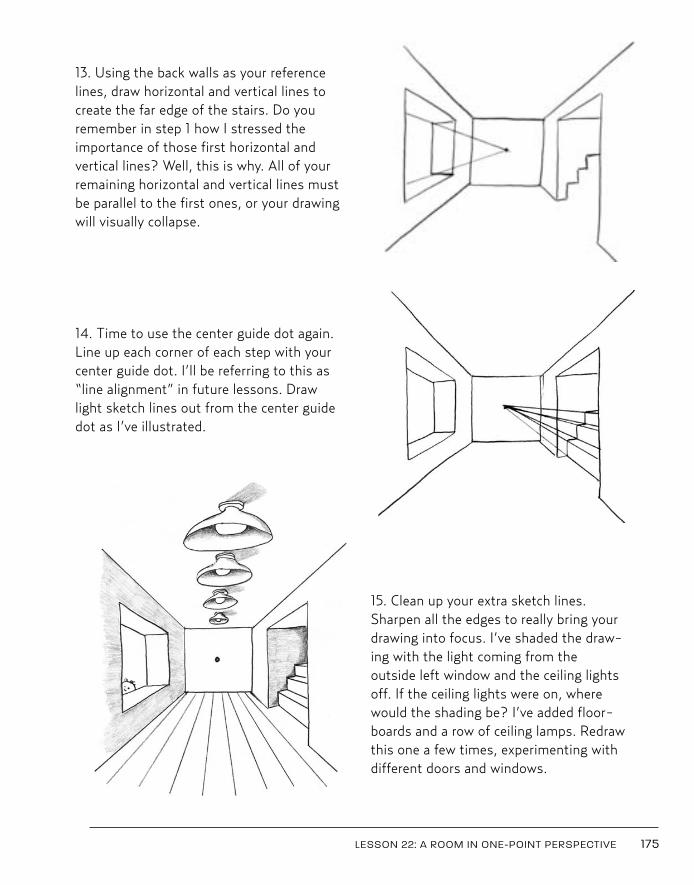
13. Using the back walls as your referencelines, draw horizontal and vertical lines tocreate the far edge of the stairs. Do youremember in step 1 how I stressed theimportance of those first horizontal andvertical lines? Well, this is why. All of yourremaining horizontal and vertical lines mustbe parallel to the first ones, or your drawingwill visually collapse.
14. Time to use the center guide dot again.Line up each corner of each step with yourcenter guide dot. I’ll be referring to this as“line alignment” in future lessons. Drawlight sketch lines out from the center guidedot as I’ve illustrated.
LESSON 22: A ROOM IN ONE-POINT PERSPECTIVE 175
15. Clean up your extra sketch lines.Sharpen all the edges to really bring yourdrawing into focus. I’ve shaded the draw-ing with the light coming from theoutside left window and the ceiling lightsoff. If the ceiling lights were on, wherewould the shading be? I’ve added floor-boards and a row of ceiling lamps. Redrawthis one a few times, experimenting withdifferent doors and windows.
Kistler 04_Kistler You Can Draw 10/21/10 12:14 PM Page 175
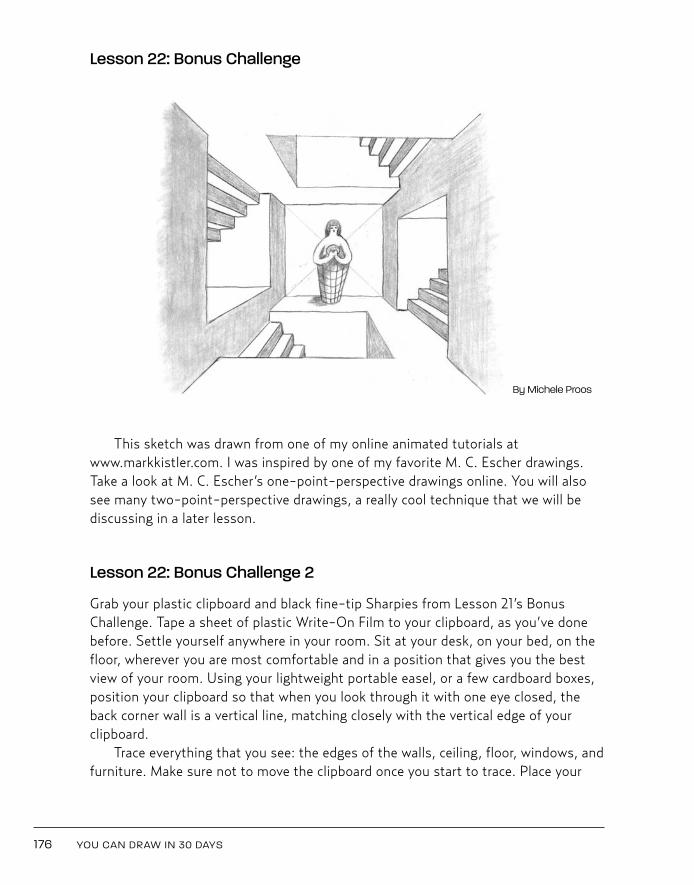
Lesson 22: Bonus Challenge
This sketch was drawn from one of my online animated tutorials atwww.markkistler.com. I was inspired by one of my favorite M. C. Escher drawings.Take a look at M. C. Escher’s one-point-perspective drawings online. You will alsosee many two-point-perspective drawings, a really cool technique that we will bediscussing in a later lesson.
Lesson 22: Bonus Challenge 2
Grab your plastic clipboard and black fine-tip Sharpies from Lesson 21’s Bonus Challenge. Tape a sheet of plastic Write-On Film to your clipboard, as you’ve donebefore. Settle yourself anywhere in your room. Sit at your desk, on your bed, on thefloor, wherever you are most comfortable and in a position that gives you the bestview of your room. Using your lightweight portable easel, or a few cardboard boxes,position your clipboard so that when you look through it with one eye closed, theback corner wall is a vertical line, matching closely with the vertical edge of your clipboard.
Trace everything that you see: the edges of the walls, ceiling, floor, windows, andfurniture. Make sure not to move the clipboard once you start to trace. Place your
176 YOU CAN DRAW IN 30 DAYS
By Michele Proos
Kistler 04_Kistler You Can Draw 10/22/10 9:46 AM Page 176
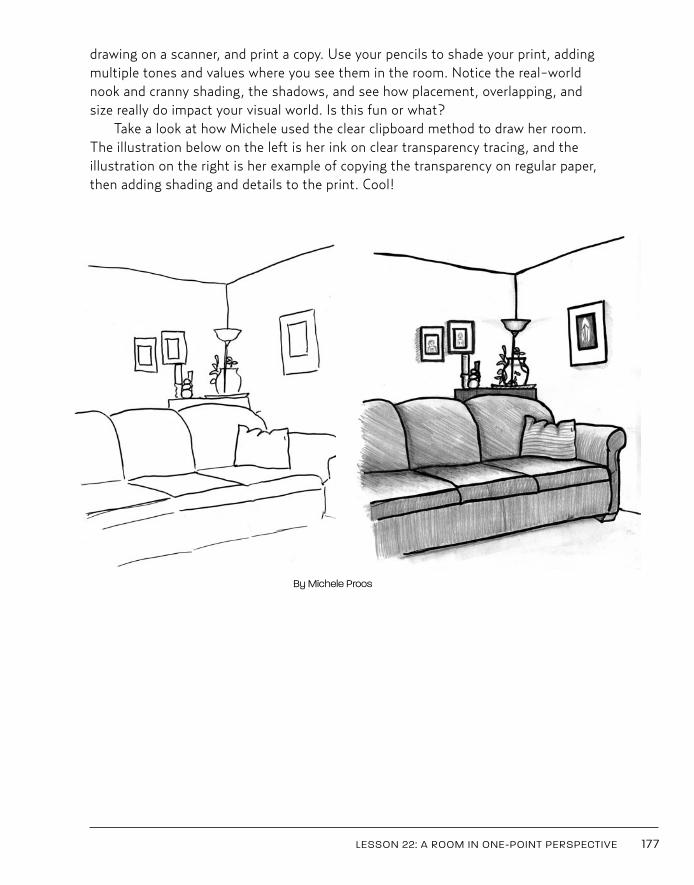
drawing on a scanner, and print a copy. Use your pencils to shade your print, addingmultiple tones and values where you see them in the room. Notice the real-worldnook and cranny shading, the shadows, and see how placement, overlapping, andsize really do impact your visual world. Is this fun or what?
Take a look at how Michele used the clear clipboard method to draw her room.The illustration below on the left is her ink on clear transparency tracing, and theillustration on the right is her example of copying the transparency on regular paper,then adding shading and details to the print. Cool!
LESSON 22: A ROOM IN ONE-POINT PERSPECTIVE 177
By Michele Proos
Kistler 04_Kistler You Can Draw 10/21/10 12:15 PM Page 177
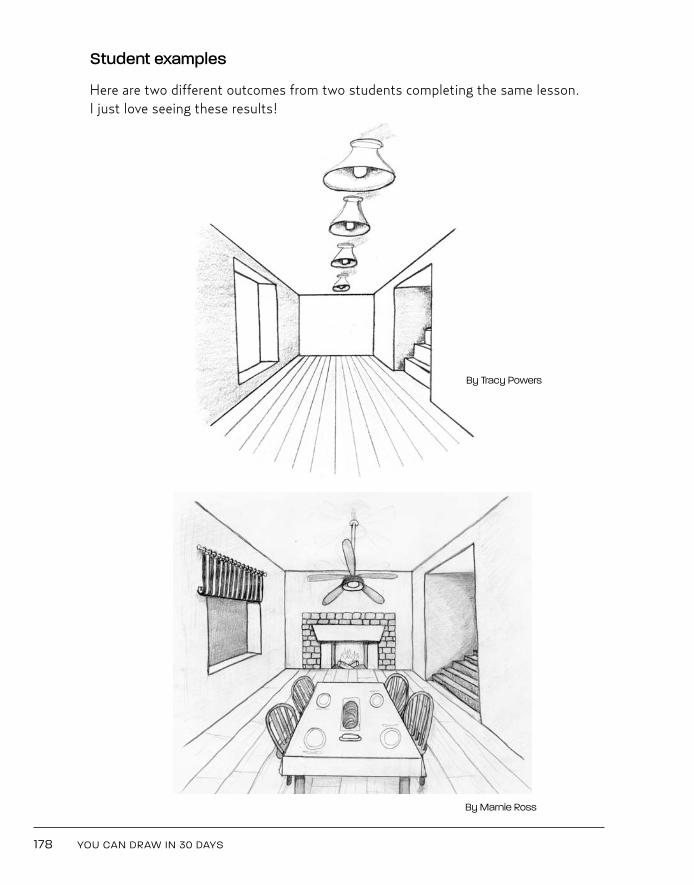
Student examples
Here are two different outcomes from two students completing the same lesson. I just love seeing these results!
178 YOU CAN DRAW IN 30 DAYS
By Tracy Powers
By Marnie Ross
Kistler 04_Kistler You Can Draw 10/25/10 11:08 AM Page 178
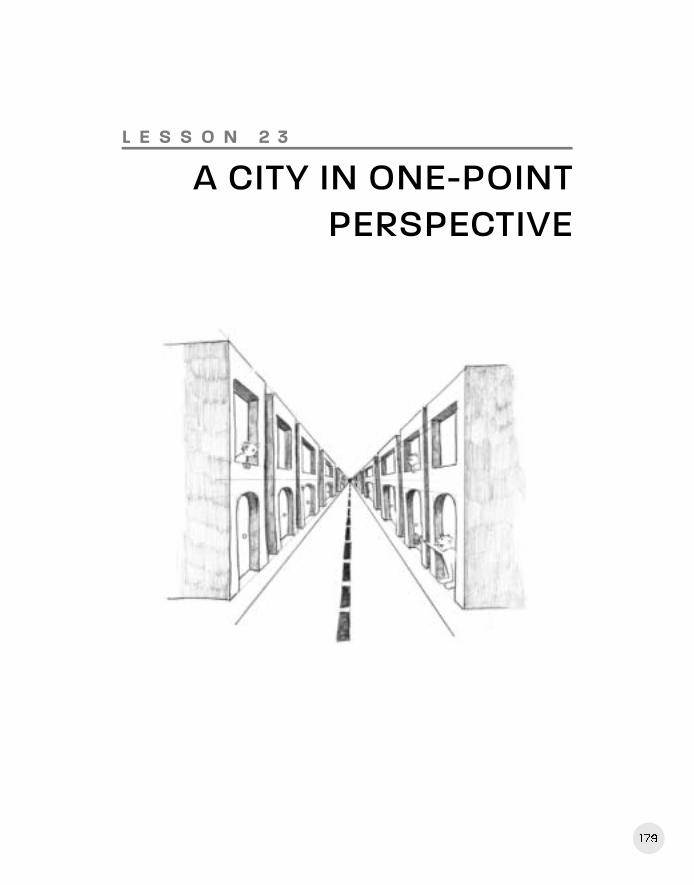
179
L E S S O N 2 3
A CITY IN ONE-POINT PERSPECTIVE
Kistler 04_Kistler You Can Draw 10/21/10 12:15 PM Page 179
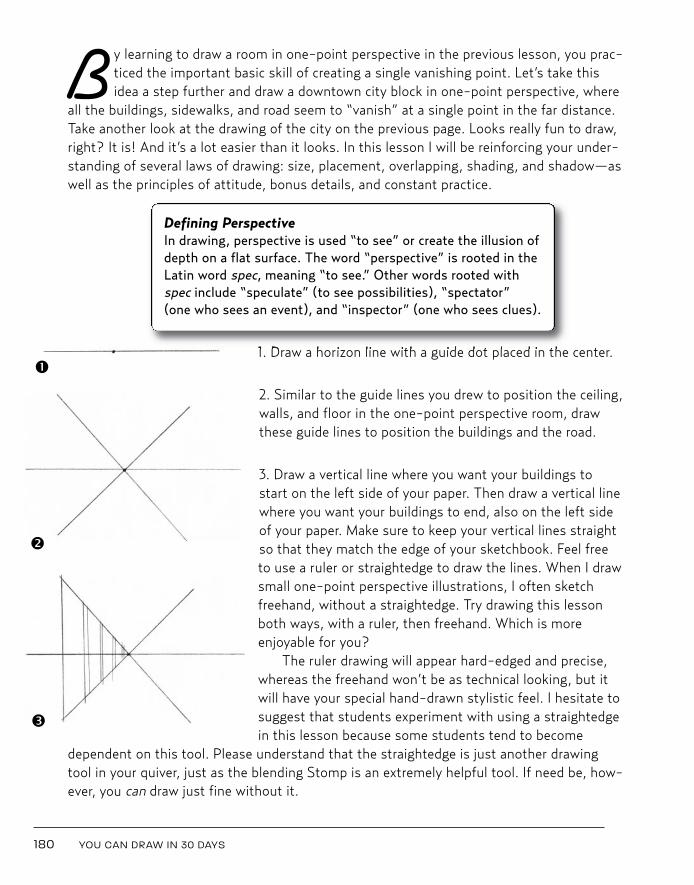
B y learning to draw a room in one-point perspective in the previous lesson, you prac-ticed the important basic skill of creating a single vanishing point. Let’s take thisidea a step further and draw a downtown city block in one-point perspective, where
all the buildings, sidewalks, and road seem to “vanish” at a single point in the far distance.Take another look at the drawing of the city on the previous page. Looks really fun to draw,right? It is! And it’s a lot easier than it looks. In this lesson I will be reinforcing your under-standing of several laws of drawing: size, placement, overlapping, shading, and shadow—aswell as the principles of attitude, bonus details, and constant practice.
1. Draw a horizon line with a guide dot placed in the center.
2. Similar to the guide lines you drew to position the ceiling,walls, and floor in the one-point perspective room, drawthese guide lines to position the buildings and the road.
3. Draw a vertical line where you want your buildings tostart on the left side of your paper. Then draw a vertical linewhere you want your buildings to end, also on the left sideof your paper. Make sure to keep your vertical lines straightso that they match the edge of your sketchbook. Feel freeto use a ruler or straightedge to draw the lines. When I drawsmall one-point perspective illustrations, I often sketchfreehand, without a straightedge. Try drawing this lessonboth ways, with a ruler, then freehand. Which is moreenjoyable for you?
The ruler drawing will appear hard-edged and precise,whereas the freehand won’t be as technical looking, but itwill have your special hand-drawn stylistic feel. I hesitate tosuggest that students experiment with using a straightedgein this lesson because some students tend to become
dependent on this tool. Please understand that the straightedge is just another drawingtool in your quiver, just as the blending Stomp is an extremely helpful tool. If need be, how-ever, you can draw just fine without it.
180 YOU CAN DRAW IN 30 DAYS
Defining PerspectiveIn drawing, perspective is used “to see” or create the illusion ofdepth on a flat surface. The word “perspective” is rooted in theLatin word spec, meaning “to see.” Other words rooted withspec include “speculate” (to see possibilities), “spectator” (one who sees an event), and “inspector” (one who sees clues).
å
ç
é
Kistler 04_Kistler You Can Draw 10/22/10 9:46 AM Page 180
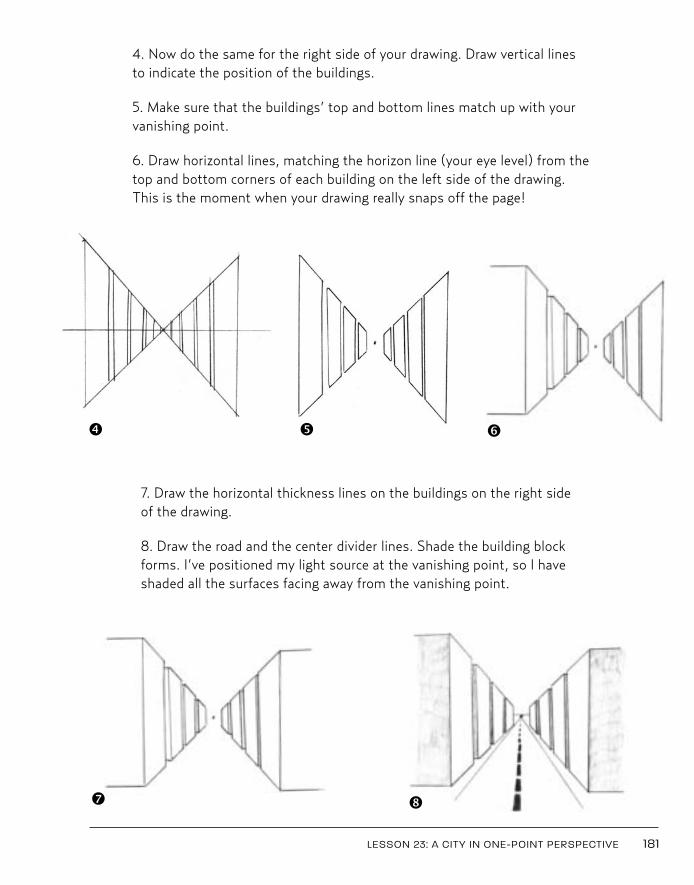
4. Now do the same for the right side of your drawing. Draw vertical linesto indicate the position of the buildings.
5. Make sure that the buildings’ top and bottom lines match up with yourvanishing point.
6. Draw horizontal lines, matching the horizon line (your eye level) from thetop and bottom corners of each building on the left side of the drawing.This is the moment when your drawing really snaps off the page!
LESSON 23: A CITY IN ONE-POINT PERSPECTIVE 181
7. Draw the horizontal thickness lines on the buildings on the right sideof the drawing.
8. Draw the road and the center divider lines. Shade the building blockforms. I’ve positioned my light source at the vanishing point, so I haveshaded all the surfaces facing away from the vanishing point.
è
í ì
ê ë
Kistler 04_Kistler You Can Draw 10/21/10 12:15 PM Page 181
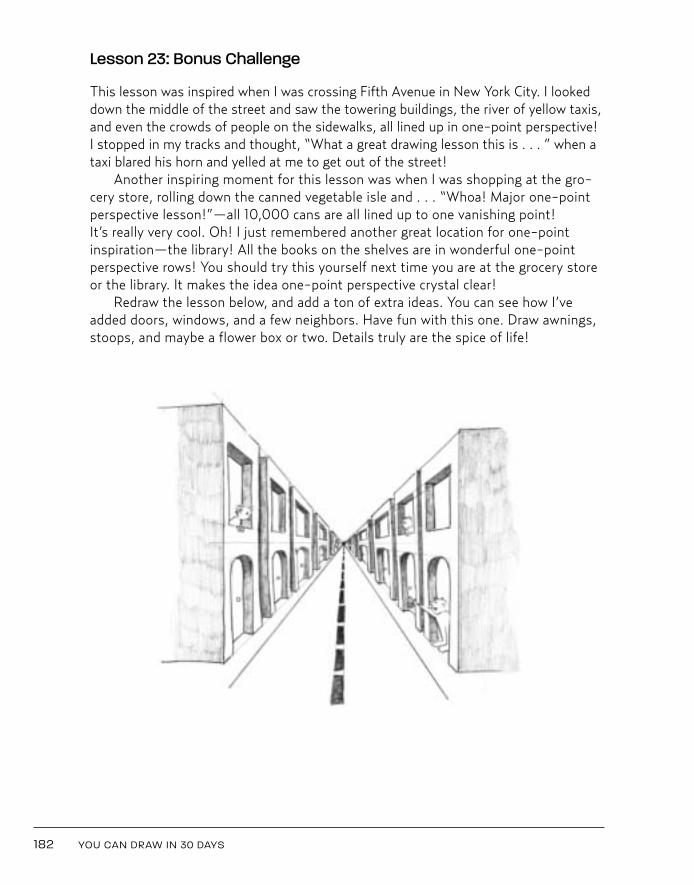
Lesson 23: Bonus Challenge
This lesson was inspired when I was crossing Fifth Avenue in New York City. I lookeddown the middle of the street and saw the towering buildings, the river of yellow taxis,and even the crowds of people on the sidewalks, all lined up in one-point perspective!I stopped in my tracks and thought, “What a great drawing lesson this is . . . ” when ataxi blared his horn and yelled at me to get out of the street!
Another inspiring moment for this lesson was when I was shopping at the gro-cery store, rolling down the canned vegetable isle and . . . “Whoa! Major one-pointperspective lesson!”—all 10,000 cans are all lined up to one vanishing point! It’s really very cool. Oh! I just remembered another great location for one-point inspiration—the library! All the books on the shelves are in wonderful one-pointperspective rows! You should try this yourself next time you are at the grocery storeor the library. It makes the idea one-point perspective crystal clear!
Redraw the lesson below, and add a ton of extra ideas. You can see how I’veadded doors, windows, and a few neighbors. Have fun with this one. Draw awnings,stoops, and maybe a flower box or two. Details truly are the spice of life!
182 YOU CAN DRAW IN 30 DAYS
Kistler 04_Kistler You Can Draw 10/22/10 9:46 AM Page 182
Lesson 23: Bonus Challenge 2
Why stop here? Why not apply this one-point perspective technique out in the realworld to really see how it works? Grab your clear clipboard with a piece of clearWrite-On Film taped to it, along with your fine-point black Sharpies. Walk downyour driveway to the street. Look down the street, either way (it doesn’t matter);just pick the direction that is the most visually interesting. Close one eye, and tracewhat you see by looking through your clear clipboard. To stabilize your arm, leanagainst a stationary object, such as your mailbox or a parked car. Your vanishingpoint is going to be a bit off to the right or left of center as you will not be standingin the middle of the street. However, you will be delighted with your black ink trac-ing. Pretty neat to see how this vanishing point works in reality, yes?
Try this sitting on a bench downtown, in the park, or on a pier. I actually did thisin a department store while looking up the escalators. I couldn’t resist! The unifor-mity and repeated pattern were just too visually compelling. A thousand escalatorsteps all lined up to a single vanishing point. A veritable one-point-perspectivedrawing lottery win! After the sixth curious stare from a passing shopper, I put myclipboard down, but not before I finished the tracing of the foreshortened escalator.
You can achieve a similar exercise by taking a photo and placing a clear plasticWrite-On Film over it. It’s not as fun or adventurous (or as annoying to people try-ing to get around you on the sidewalk), but taking digital pictures of your targetview is another way to make this exercise work. For example, when I was inspiredby the one-point perspective view while walking along Fifth Avenue in New YorkCity, I should have taken a picture rather than stopping in the middle of the side-walk to draw amid several hundred hurried New York pedestrians. It took fiveattempts, crossing an intersection over and over again, to successfully capture theimage in my mind.
LESSON 23: A CITY IN ONE-POINT PERSPECTIVE 183
Kistler 04_Kistler You Can Draw 10/21/10 12:15 PM Page 183
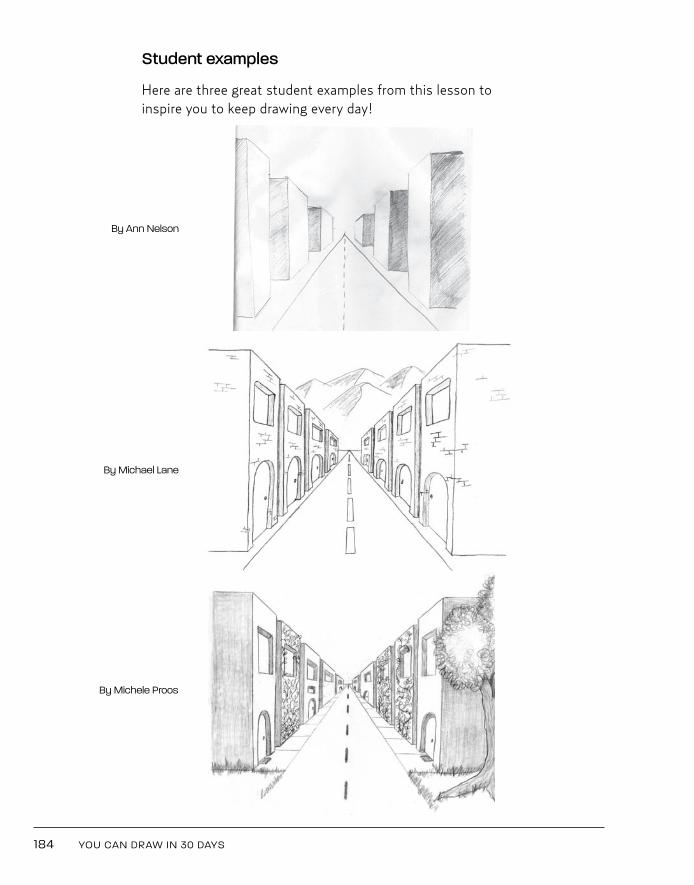
Student examples
Here are three great student examples from this lesson toinspire you to keep drawing every day!
184 YOU CAN DRAW IN 30 DAYS
By Michele Proos
By Ann Nelson
By Michael Lane
Kistler 04_Kistler You Can Draw 10/21/10 12:15 PM Page 184

185
L E S S O N 2 4
A TOWER IN TWO-POINTPERSPECTIVE
Kistler 04_Kistler You Can Draw 10/21/10 12:15 PM Page 185
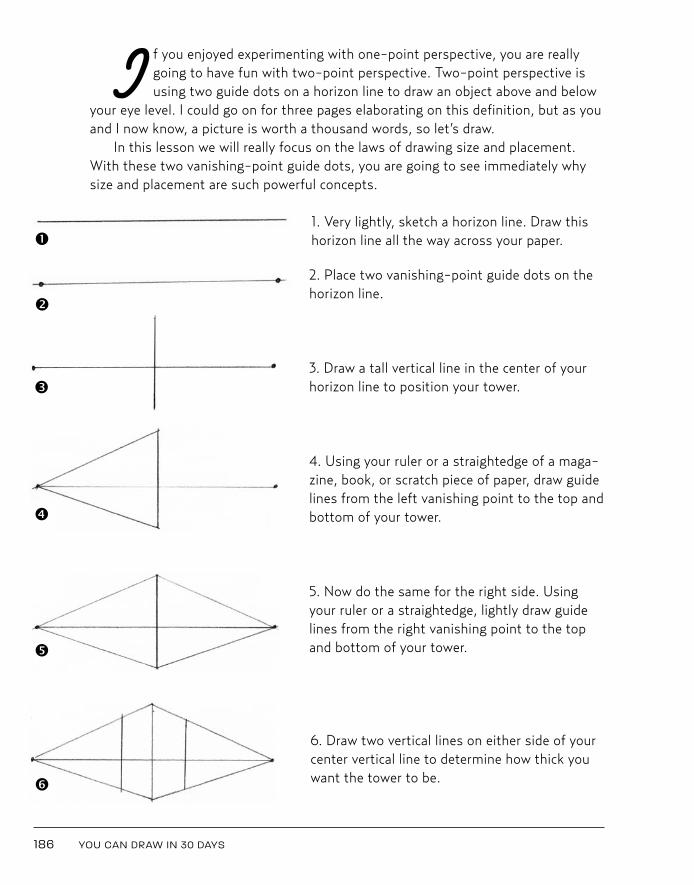
I f you enjoyed experimenting with one-point perspective, you are reallygoing to have fun with two-point perspective. Two-point perspective isusing two guide dots on a horizon line to draw an object above and below
your eye level. I could go on for three pages elaborating on this definition, but as youand I now know, a picture is worth a thousand words, so let’s draw.
In this lesson we will really focus on the laws of drawing size and placement.With these two vanishing-point guide dots, you are going to see immediately whysize and placement are such powerful concepts.
1. Very lightly, sketch a horizon line. Draw thishorizon line all the way across your paper.
2. Place two vanishing-point guide dots on thehorizon line.
3. Draw a tall vertical line in the center of yourhorizon line to position your tower.
4. Using your ruler or a straightedge of a maga-zine, book, or scratch piece of paper, draw guidelines from the left vanishing point to the top andbottom of your tower.
5. Now do the same for the right side. Usingyour ruler or a straightedge, lightly draw guidelines from the right vanishing point to the topand bottom of your tower.
6. Draw two vertical lines on either side of yourcenter vertical line to determine how thick youwant the tower to be.
186 YOU CAN DRAW IN 30 DAYS
å
ç
é
è
ê
ë
Kistler 04_Kistler You Can Draw 10/21/10 12:15 PM Page 186
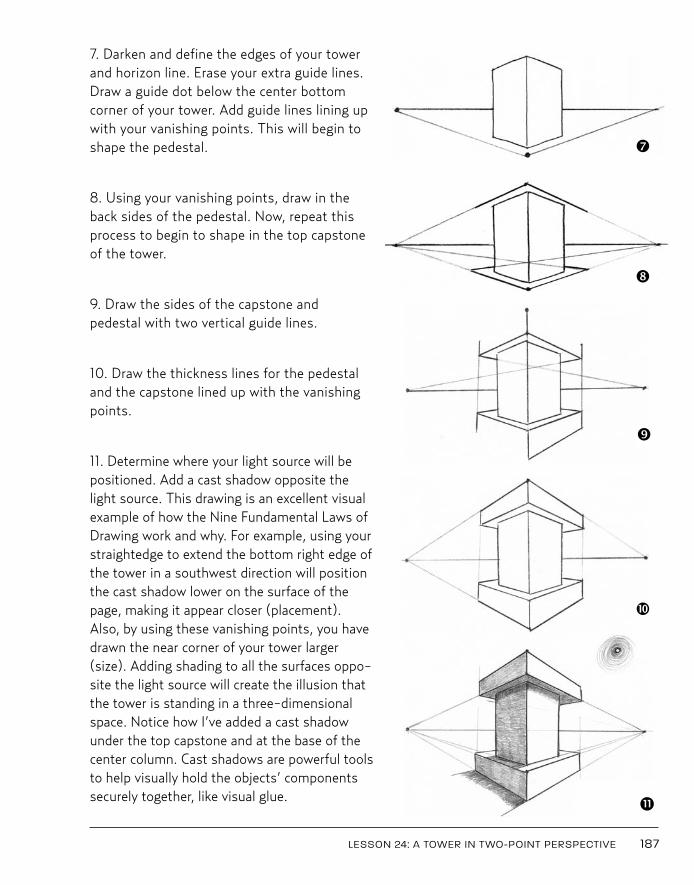
7. Darken and define the edges of your towerand horizon line. Erase your extra guide lines.Draw a guide dot below the center bottomcorner of your tower. Add guide lines lining upwith your vanishing points. This will begin toshape the pedestal.
8. Using your vanishing points, draw in theback sides of the pedestal. Now, repeat thisprocess to begin to shape in the top capstoneof the tower.
9. Draw the sides of the capstone andpedestal with two vertical guide lines.
10. Draw the thickness lines for the pedestaland the capstone lined up with the vanishingpoints.
11. Determine where your light source will bepositioned. Add a cast shadow opposite thelight source. This drawing is an excellent visualexample of how the Nine Fundamental Laws ofDrawing work and why. For example, using yourstraightedge to extend the bottom right edge ofthe tower in a southwest direction will positionthe cast shadow lower on the surface of thepage, making it appear closer (placement).Also, by using these vanishing points, you havedrawn the near corner of your tower larger(size). Adding shading to all the surfaces oppo-site the light source will create the illusion thatthe tower is standing in a three-dimensionalspace. Notice how I’ve added a cast shadowunder the top capstone and at the base of thecenter column. Cast shadows are powerful toolsto help visually hold the objects’ componentssecurely together, like visual glue.
LESSON 24: A TOWER IN TWO-POINT PERSPECTIVE 187
í
ì
î
ï
11
Kistler 04_Kistler You Can Draw 10/22/10 9:47 AM Page 187
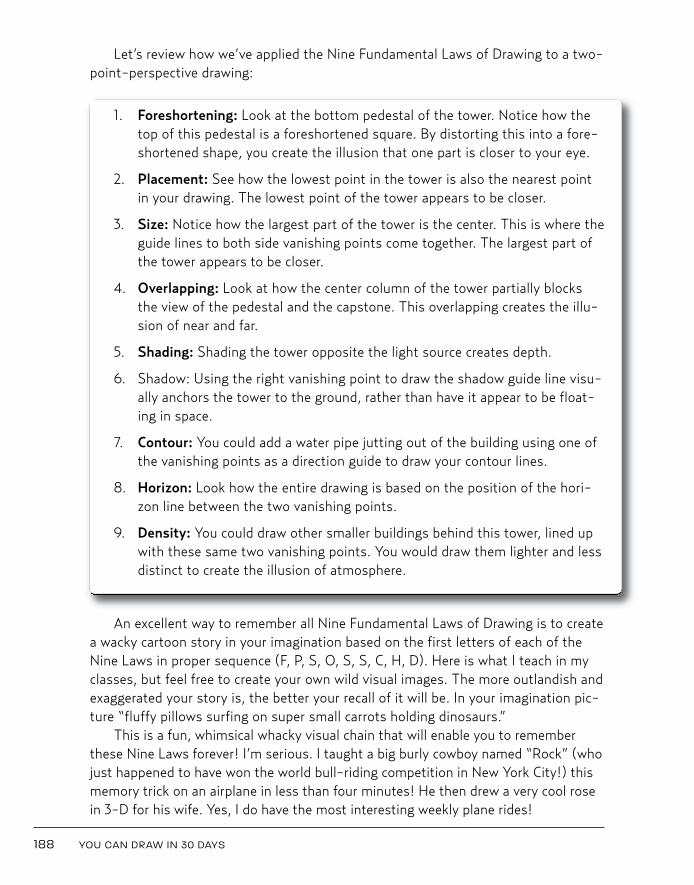
Let’s review how we’ve applied the Nine Fundamental Laws of Drawing to a two-point-perspective drawing:
1. Foreshortening: Look at the bottom pedestal of the tower. Notice how thetop of this pedestal is a foreshortened square. By distorting this into a fore-shortened shape, you create the illusion that one part is closer to your eye.
2. Placement: See how the lowest point in the tower is also the nearest pointin your drawing. The lowest point of the tower appears to be closer.
3. Size: Notice how the largest part of the tower is the center. This is where theguide lines to both side vanishing points come together. The largest part ofthe tower appears to be closer.
4. Overlapping: Look at how the center column of the tower partially blocksthe view of the pedestal and the capstone. This overlapping creates the illu-sion of near and far.
5. Shading: Shading the tower opposite the light source creates depth.
6. Shadow: Using the right vanishing point to draw the shadow guide line visu-ally anchors the tower to the ground, rather than have it appear to be float-ing in space.
7. Contour: You could add a water pipe jutting out of the building using one ofthe vanishing points as a direction guide to draw your contour lines.
8. Horizon: Look how the entire drawing is based on the position of the hori-zon line between the two vanishing points.
9. Density: You could draw other smaller buildings behind this tower, lined upwith these same two vanishing points. You would draw them lighter and lessdistinct to create the illusion of atmosphere.
An excellent way to remember all Nine Fundamental Laws of Drawing is to createa wacky cartoon story in your imagination based on the first letters of each of theNine Laws in proper sequence (F, P, S, O, S, S, C, H, D). Here is what I teach in myclasses, but feel free to create your own wild visual images. The more outlandish andexaggerated your story is, the better your recall of it will be. In your imagination pic-ture “fluffy pillows surfing on super small carrots holding dinosaurs.”
This is a fun, whimsical whacky visual chain that will enable you to rememberthese Nine Laws forever! I’m serious. I taught a big burly cowboy named “Rock” (whojust happened to have won the world bull-riding competition in New York City!) thismemory trick on an airplane in less than four minutes! He then drew a very cool rosein 3-D for his wife. Yes, I do have the most interesting weekly plane rides!
188 YOU CAN DRAW IN 30 DAYS
Kistler 04_Kistler You Can Draw 10/21/10 12:15 PM Page 188
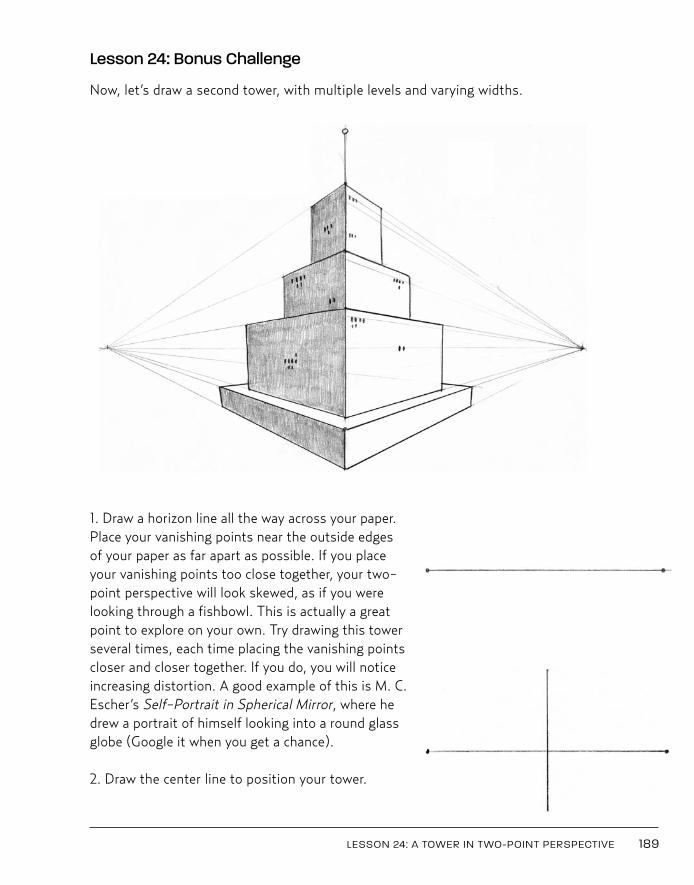
Lesson 24: Bonus Challenge
Now, let’s draw a second tower, with multiple levels and varying widths.
1. Draw a horizon line all the way across your paper.Place your vanishing points near the outside edgesof your paper as far apart as possible. If you placeyour vanishing points too close together, your two-point perspective will look skewed, as if you werelooking through a fishbowl. This is actually a greatpoint to explore on your own. Try drawing this towerseveral times, each time placing the vanishing pointscloser and closer together. If you do, you will noticeincreasing distortion. A good example of this is M. C.Escher’s Self-Portrait in Spherical Mirror, where hedrew a portrait of himself looking into a round glassglobe (Google it when you get a chance).
2. Draw the center line to position your tower.
LESSON 24: A TOWER IN TWO-POINT PERSPECTIVE 189
Kistler 04_Kistler You Can Draw 10/21/10 12:15 PM Page 189
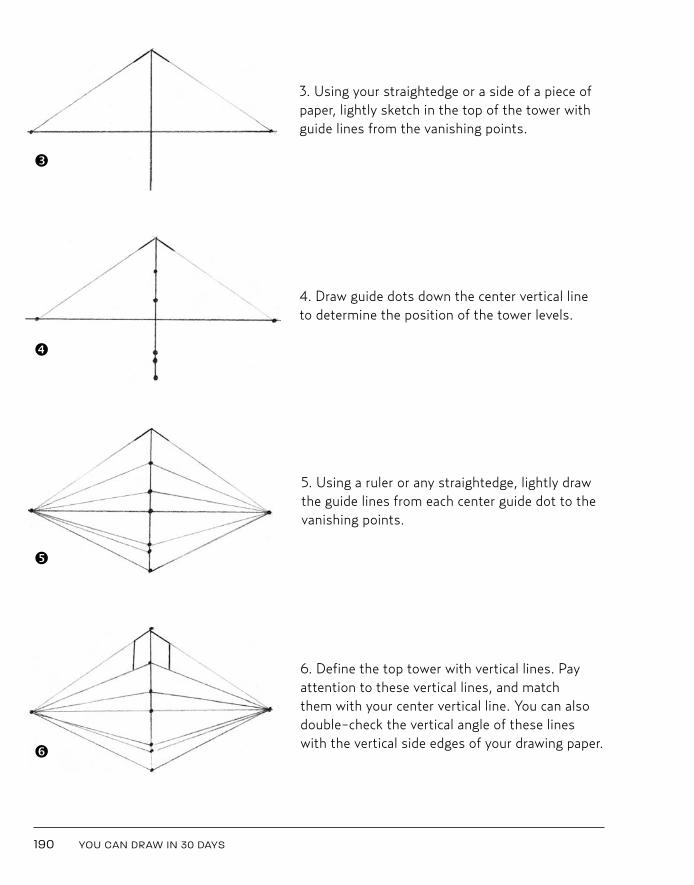
3. Using your straightedge or a side of a piece ofpaper, lightly sketch in the top of the tower withguide lines from the vanishing points.
4. Draw guide dots down the center vertical lineto determine the position of the tower levels.
5. Using a ruler or any straightedge, lightly drawthe guide lines from each center guide dot to thevanishing points.
6. Define the top tower with vertical lines. Payattention to these vertical lines, and match them with your center vertical line. You can alsodouble-check the vertical angle of these lineswith the vertical side edges of your drawing paper.
190 YOU CAN DRAW IN 30 DAYS
é
è
ê
ë
Kistler 04_Kistler You Can Draw 10/22/10 9:47 AM Page 190
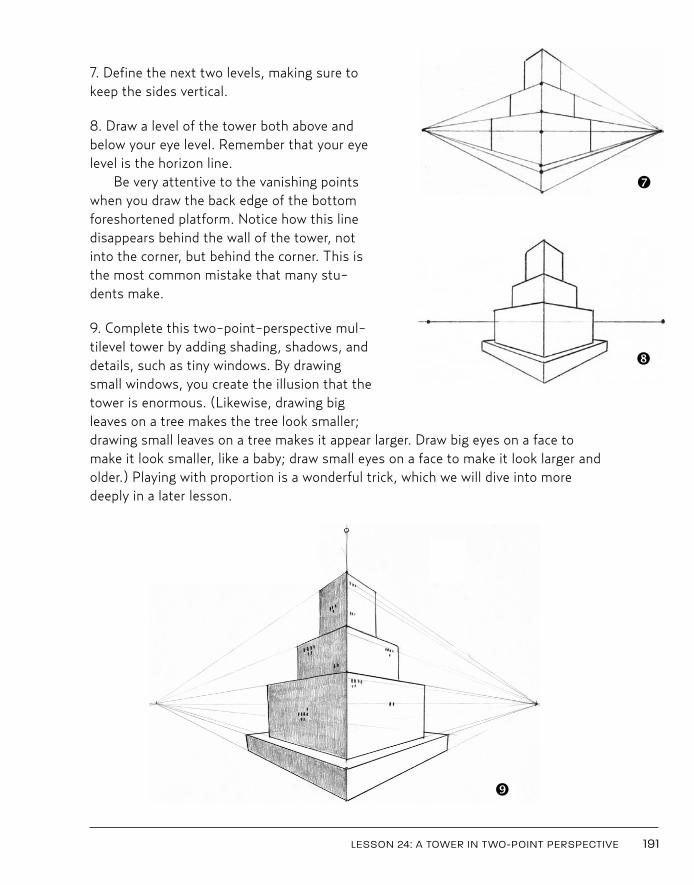
7. Define the next two levels, making sure tokeep the sides vertical.
8. Draw a level of the tower both above andbelow your eye level. Remember that your eyelevel is the horizon line.
Be very attentive to the vanishing pointswhen you draw the back edge of the bottomforeshortened platform. Notice how this linedisappears behind the wall of the tower, notinto the corner, but behind the corner. This isthe most common mistake that many stu-dents make.
9. Complete this two-point-perspective mul-tilevel tower by adding shading, shadows, anddetails, such as tiny windows. By drawingsmall windows, you create the illusion that thetower is enormous. (Likewise, drawing bigleaves on a tree makes the tree look smaller;drawing small leaves on a tree makes it appear larger. Draw big eyes on a face tomake it look smaller, like a baby; draw small eyes on a face to make it look larger andolder.) Playing with proportion is a wonderful trick, which we will dive into moredeeply in a later lesson.
LESSON 24: A TOWER IN TWO-POINT PERSPECTIVE 191
í
ì
î
Kistler 04_Kistler You Can Draw 10/21/10 12:16 PM Page 191
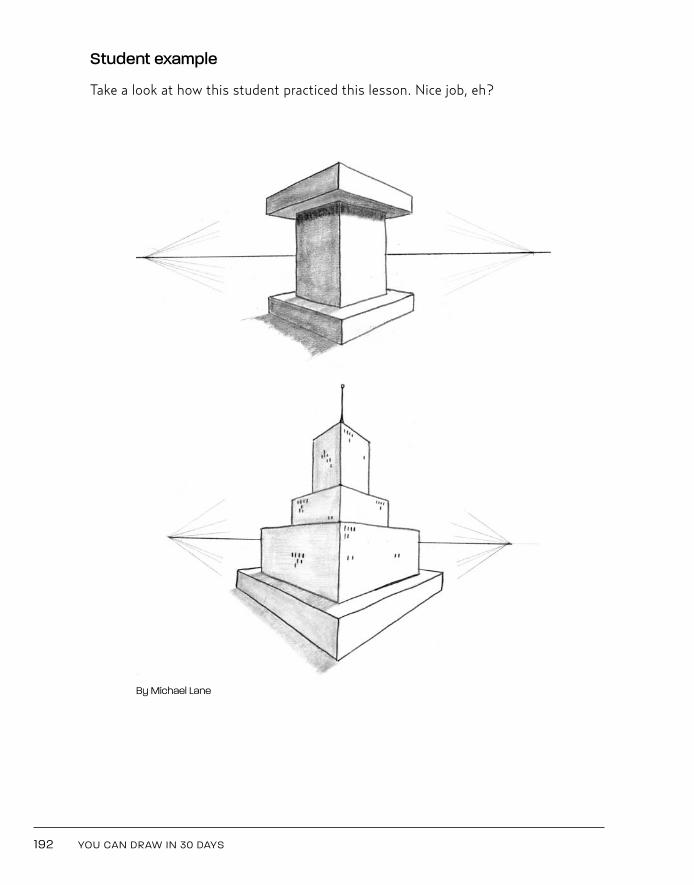
Student example
Take a look at how this student practiced this lesson. Nice job, eh?
192 YOU CAN DRAW IN 30 DAYS
By Michael Lane
Kistler 04_Kistler You Can Draw 10/21/10 12:16 PM Page 192
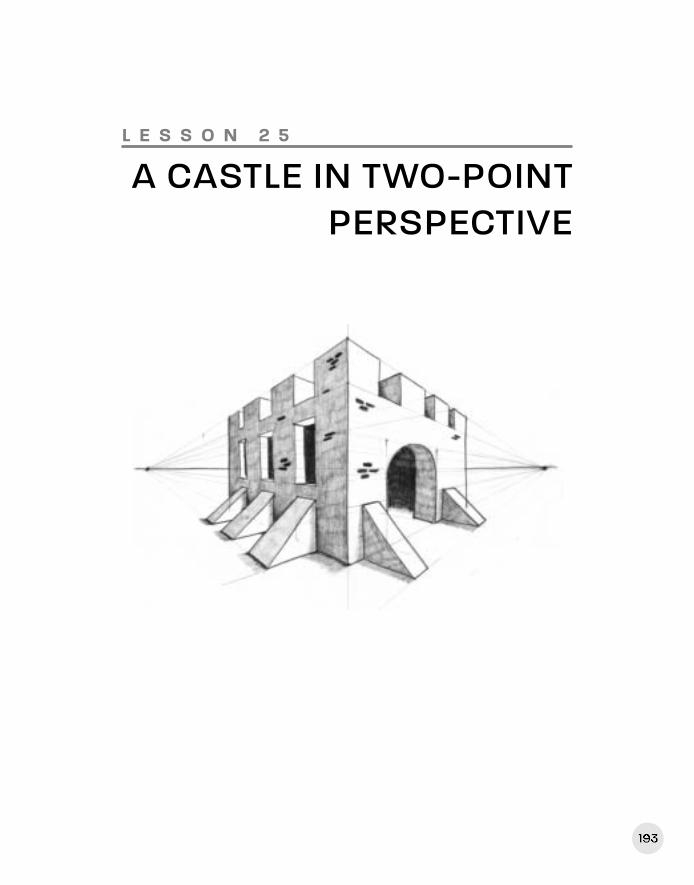
193
L E S S O N 2 5
A CASTLE IN TWO-POINTPERSPECTIVE
193
Kistler 05_Kistler You Can Draw 10/21/10 12:19 PM Page 193
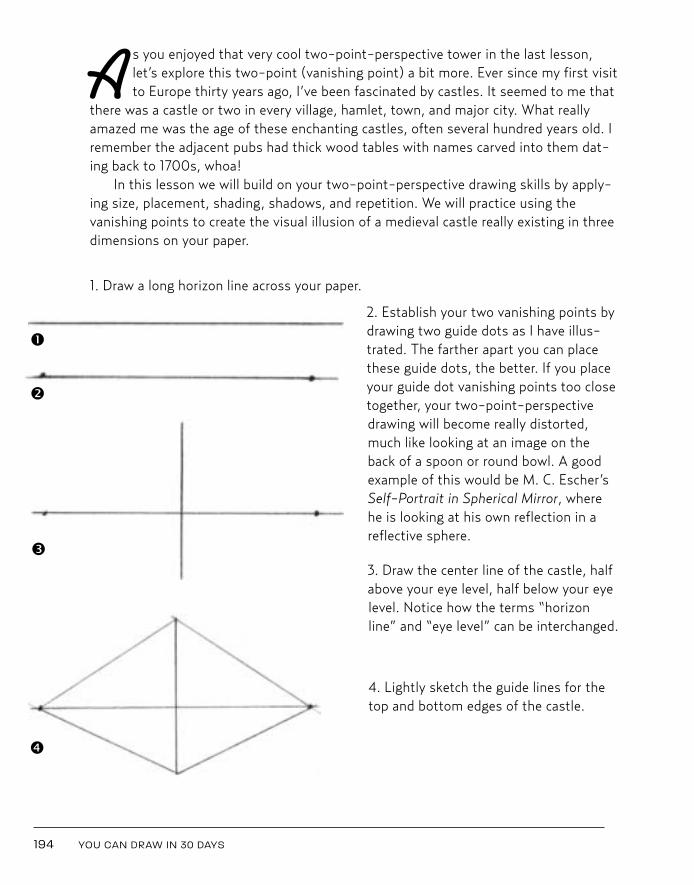
A s you enjoyed that very cool two-point-perspective tower in the last lesson,let’s explore this two-point (vanishing point) a bit more. Ever since my first visitto Europe thirty years ago, I’ve been fascinated by castles. It seemed to me that
there was a castle or two in every village, hamlet, town, and major city. What reallyamazed me was the age of these enchanting castles, often several hundred years old. Iremember the adjacent pubs had thick wood tables with names carved into them dat-ing back to 1700s, whoa!
In this lesson we will build on your two-point-perspective drawing skills by apply-ing size, placement, shading, shadows, and repetition. We will practice using thevanishing points to create the visual illusion of a medieval castle really existing in threedimensions on your paper.
1. Draw a long horizon line across your paper.
2. Establish your two vanishing points bydrawing two guide dots as I have illus-trated. The farther apart you can placethese guide dots, the better. If you placeyour guide dot vanishing points too closetogether, your two-point-perspectivedrawing will become really distorted,much like looking at an image on theback of a spoon or round bowl. A goodexample of this would be M. C. Escher’sSelf-Portrait in Spherical Mirror, wherehe is looking at his own reflection in areflective sphere.
3. Draw the center line of the castle, halfabove your eye level, half below your eyelevel. Notice how the terms “horizonline” and “eye level” can be interchanged.
4. Lightly sketch the guide lines for thetop and bottom edges of the castle.
194 YOU CAN DRAW IN 30 DAYS
å
ç
é
è
Kistler 05_Kistler You Can Draw 10/21/10 12:19 PM Page 194
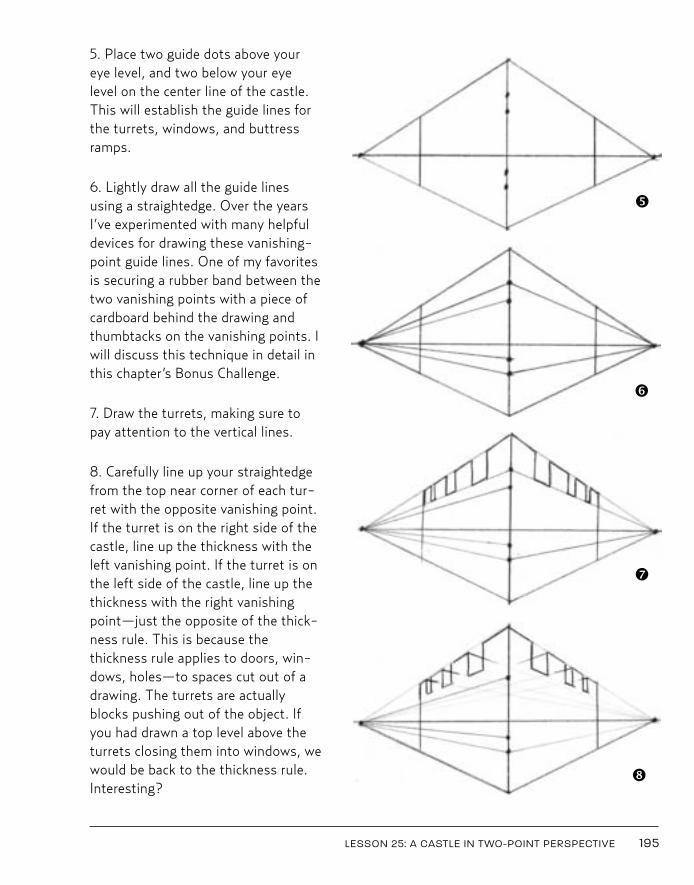
5. Place two guide dots above youreye level, and two below your eyelevel on the center line of the castle.This will establish the guide lines forthe turrets, windows, and buttressramps.
6. Lightly draw all the guide linesusing a straightedge. Over the yearsI’ve experimented with many helpfuldevices for drawing these vanishing-point guide lines. One of my favoritesis securing a rubber band between thetwo vanishing points with a piece ofcardboard behind the drawing andthumbtacks on the vanishing points. Iwill discuss this technique in detail inthis chapter’s Bonus Challenge.
7. Draw the turrets, making sure topay attention to the vertical lines.
8. Carefully line up your straightedgefrom the top near corner of each tur-ret with the opposite vanishing point.If the turret is on the right side of thecastle, line up the thickness with theleft vanishing point. If the turret is onthe left side of the castle, line up thethickness with the right vanishingpoint—just the opposite of the thick-ness rule. This is because thethickness rule applies to doors, win-dows, holes—to spaces cut out of adrawing. The turrets are actuallyblocks pushing out of the object. Ifyou had drawn a top level above theturrets closing them into windows, wewould be back to the thickness rule.Interesting?
LESSON 25: A CASTLE IN TWO-POINT PERSPECTIVE 195
ê
ë
í
ì
Kistler 05_Kistler You Can Draw 10/22/10 9:57 AM Page 195
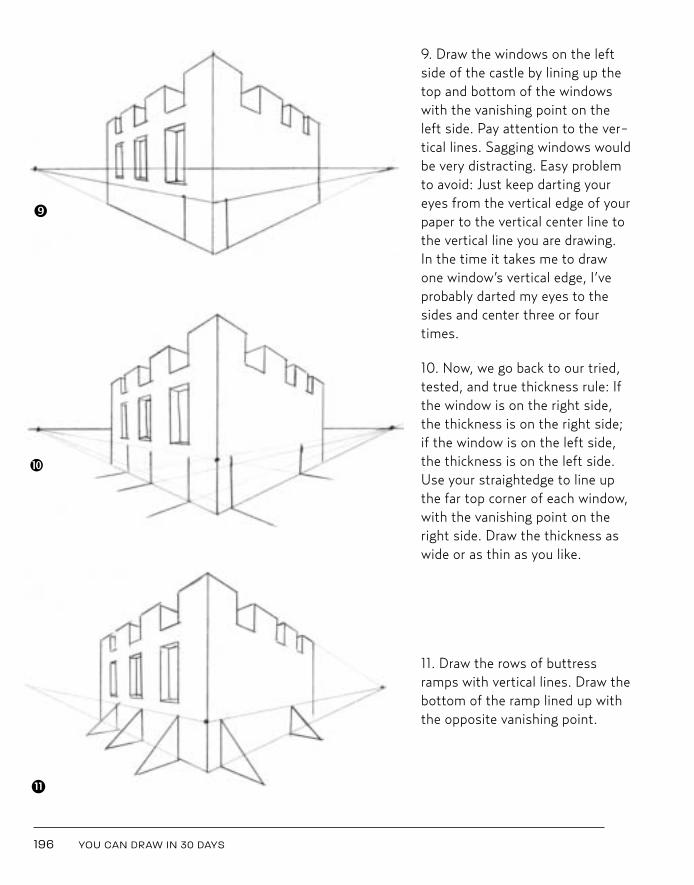
9. Draw the windows on the leftside of the castle by lining up thetop and bottom of the windowswith the vanishing point on theleft side. Pay attention to the ver-tical lines. Sagging windows wouldbe very distracting. Easy problemto avoid: Just keep darting youreyes from the vertical edge of yourpaper to the vertical center line tothe vertical line you are drawing.In the time it takes me to drawone window’s vertical edge, I’veprobably darted my eyes to thesides and center three or fourtimes.
10. Now, we go back to our tried,tested, and true thickness rule: Ifthe window is on the right side,the thickness is on the right side;if the window is on the left side,the thickness is on the left side.Use your straightedge to line upthe far top corner of each window,with the vanishing point on theright side. Draw the thickness aswide or as thin as you like.
11. Draw the rows of buttressramps with vertical lines. Draw thebottom of the ramp lined up withthe opposite vanishing point.
196 YOU CAN DRAW IN 30 DAYS
î
ï
11
Kistler 05_Kistler You Can Draw 10/21/10 12:19 PM Page 196
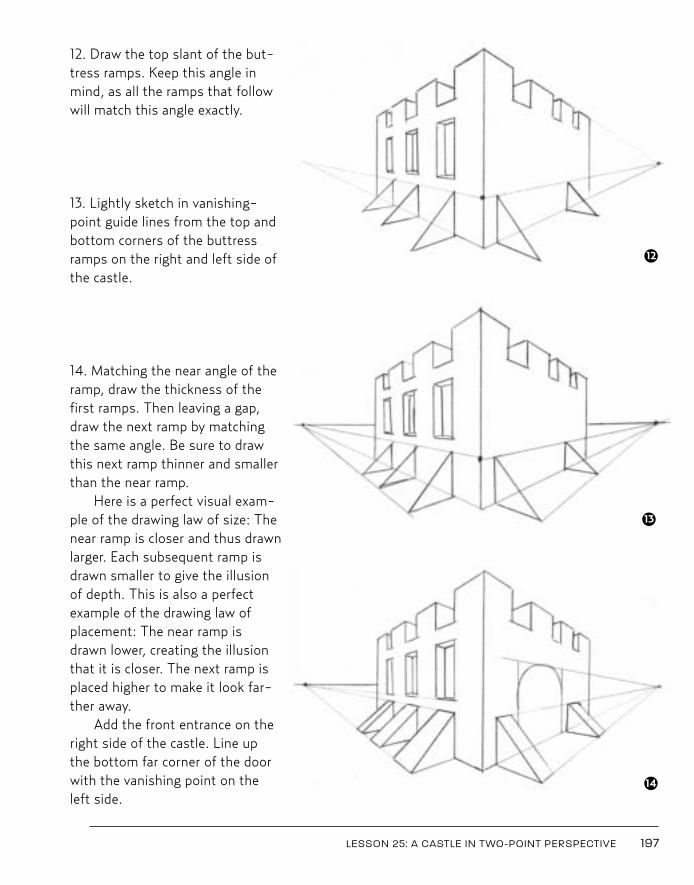
12. Draw the top slant of the but-tress ramps. Keep this angle inmind, as all the ramps that followwill match this angle exactly.
13. Lightly sketch in vanishing-point guide lines from the top andbottom corners of the buttressramps on the right and left side ofthe castle.
14. Matching the near angle of theramp, draw the thickness of thefirst ramps. Then leaving a gap,draw the next ramp by matchingthe same angle. Be sure to drawthis next ramp thinner and smallerthan the near ramp.
Here is a perfect visual exam-ple of the drawing law of size: Thenear ramp is closer and thus drawnlarger. Each subsequent ramp isdrawn smaller to give the illusionof depth. This is also a perfectexample of the drawing law ofplacement: The near ramp isdrawn lower, creating the illusionthat it is closer. The next ramp isplaced higher to make it look far-ther away.
Add the front entrance on theright side of the castle. Line upthe bottom far corner of the doorwith the vanishing point on theleft side.
LESSON 25: A CASTLE IN TWO-POINT PERSPECTIVE 197
12
13
14
Kistler 05_Kistler You Can Draw 10/21/10 12:20 PM Page 197
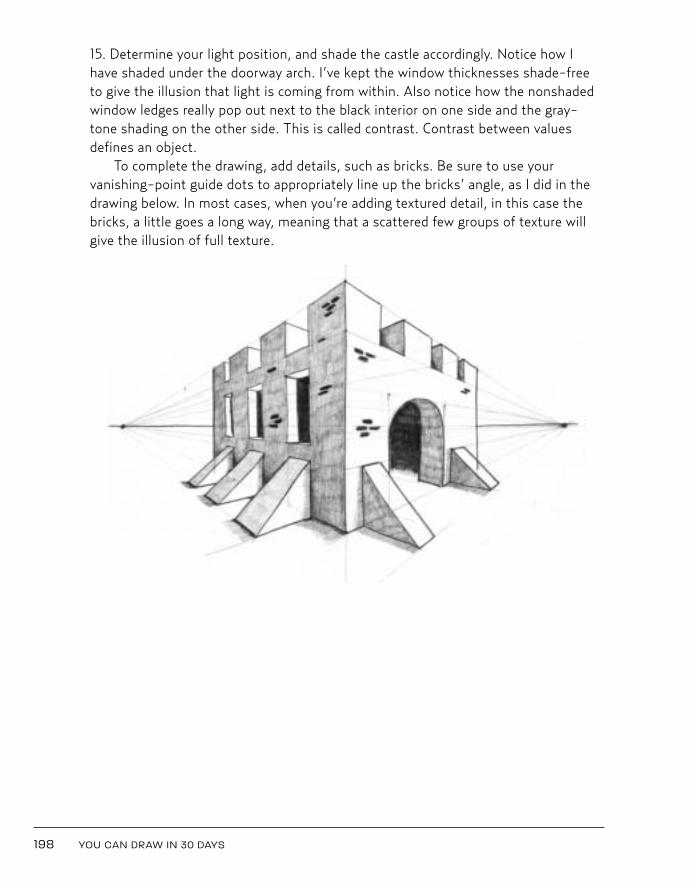
15. Determine your light position, and shade the castle accordingly. Notice how Ihave shaded under the doorway arch. I’ve kept the window thicknesses shade-freeto give the illusion that light is coming from within. Also notice how the nonshadedwindow ledges really pop out next to the black interior on one side and the gray-tone shading on the other side. This is called contrast. Contrast between valuesdefines an object.
To complete the drawing, add details, such as bricks. Be sure to use your vanishing-point guide dots to appropriately line up the bricks’ angle, as I did in thedrawing below. In most cases, when you’re adding textured detail, in this case thebricks, a little goes a long way, meaning that a scattered few groups of texture willgive the illusion of full texture.
198 YOU CAN DRAW IN 30 DAYS
Kistler 05_Kistler You Can Draw 10/21/10 12:20 PM Page 198
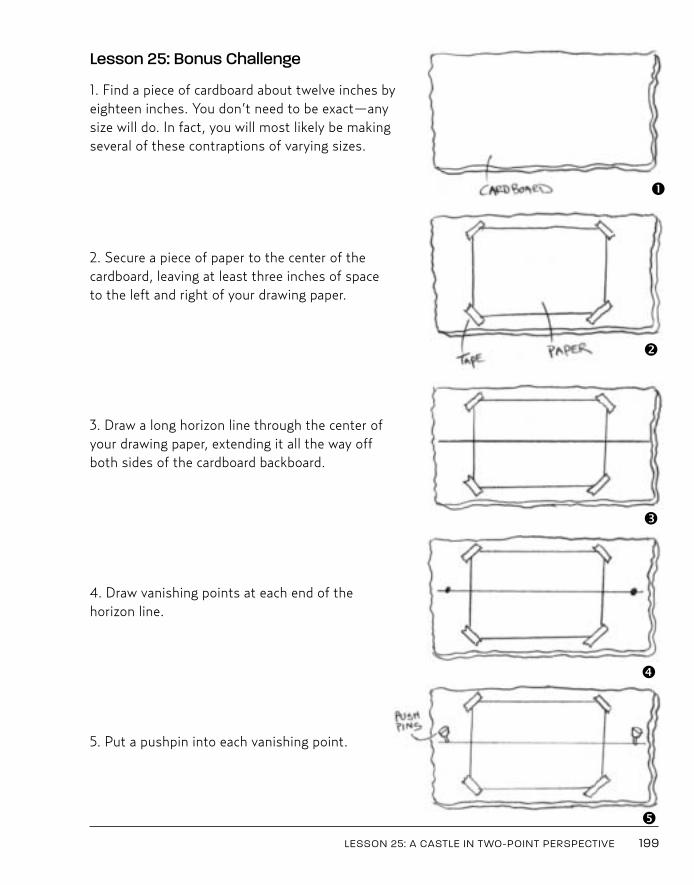
Lesson 25: Bonus Challenge
1. Find a piece of cardboard about twelve inches byeighteen inches. You don’t need to be exact—anysize will do. In fact, you will most likely be makingseveral of these contraptions of varying sizes.
2. Secure a piece of paper to the center of thecardboard, leaving at least three inches of spaceto the left and right of your drawing paper.
3. Draw a long horizon line through the center ofyour drawing paper, extending it all the way offboth sides of the cardboard backboard.
4. Draw vanishing points at each end of the horizon line.
5. Put a pushpin into each vanishing point.
LESSON 25: A CASTLE IN TWO-POINT PERSPECTIVE 199
å
ç
é
è
ê
Kistler 05_Kistler You Can Draw 10/21/10 12:20 PM Page 199
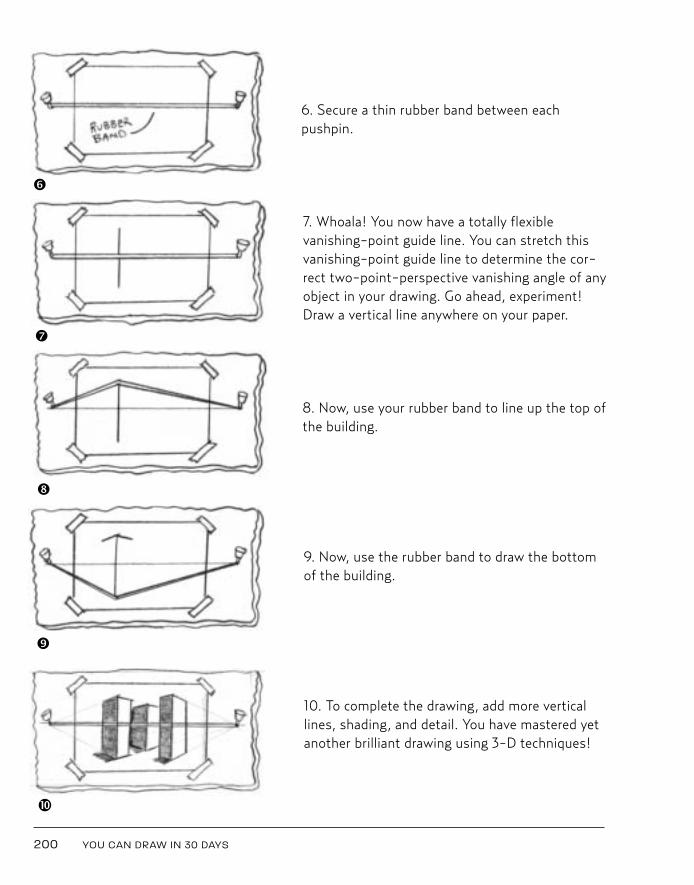
6. Secure a thin rubber band between each pushpin.
7. Whoala! You now have a totally flexible vanishing-point guide line. You can stretch thisvanishing-point guide line to determine the cor-rect two-point-perspective vanishing angle of anyobject in your drawing. Go ahead, experiment!Draw a vertical line anywhere on your paper.
8. Now, use your rubber band to line up the top ofthe building.
9. Now, use the rubber band to draw the bottomof the building.
10. To complete the drawing, add more verticallines, shading, and detail. You have mastered yetanother brilliant drawing using 3-D techniques!
200 YOU CAN DRAW IN 30 DAYS
ë
í
ì
î
ï
Kistler 05_Kistler You Can Draw 10/21/10 12:20 PM Page 200
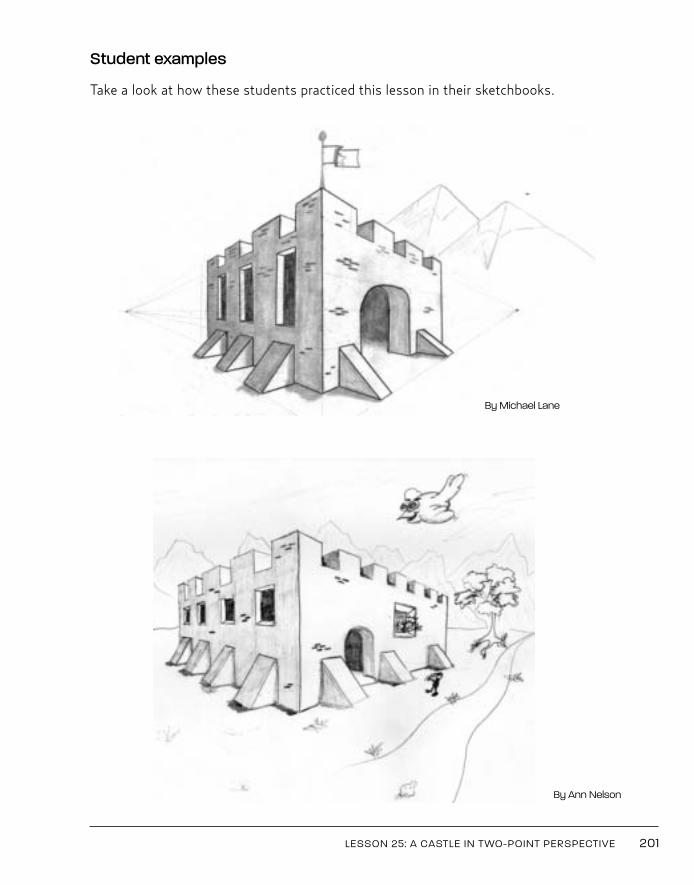
Student examples
Take a look at how these students practiced this lesson in their sketchbooks.
LESSON 25: A CASTLE IN TWO-POINT PERSPECTIVE 201
By Michael Lane
By Ann Nelson
Kistler 05_Kistler You Can Draw 10/21/10 12:20 PM Page 201

Kistler 05_Kistler You Can Draw 10/21/10 12:20 PM Page 202
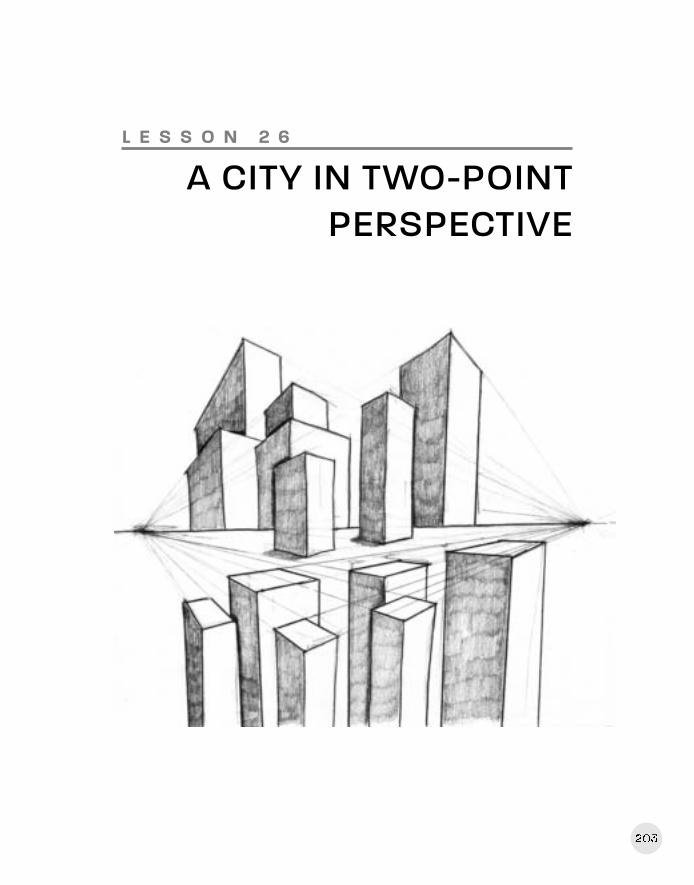
203
L E S S O N 2 6
A CITY IN TWO-POINT PERSPECTIVE
Kistler 05_Kistler You Can Draw 10/21/10 12:20 PM Page 203
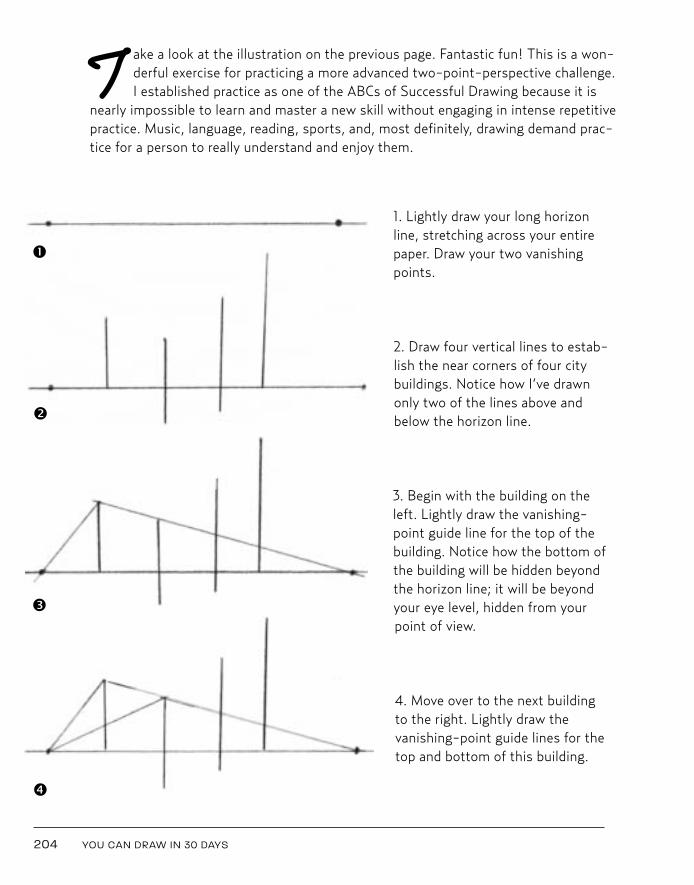
T ake a look at the illustration on the previous page. Fantastic fun! This is a won-derful exercise for practicing a more advanced two-point-perspective challenge.I established practice as one of the ABCs of Successful Drawing because it is
nearly impossible to learn and master a new skill without engaging in intense repetitivepractice. Music, language, reading, sports, and, most definitely, drawing demand prac-tice for a person to really understand and enjoy them.
1. Lightly draw your long horizonline, stretching across your entirepaper. Draw your two vanishingpoints.
2. Draw four vertical lines to estab-lish the near corners of four citybuildings. Notice how I’ve drawnonly two of the lines above andbelow the horizon line.
3. Begin with the building on theleft. Lightly draw the vanishing-point guide line for the top of thebuilding. Notice how the bottom ofthe building will be hidden beyondthe horizon line; it will be beyondyour eye level, hidden from yourpoint of view.
4. Move over to the next building to the right. Lightly draw the vanishing-point guide lines for thetop and bottom of this building.
204 YOU CAN DRAW IN 30 DAYS
å
ç
é
è
Kistler 05_Kistler You Can Draw 10/21/10 12:20 PM Page 204
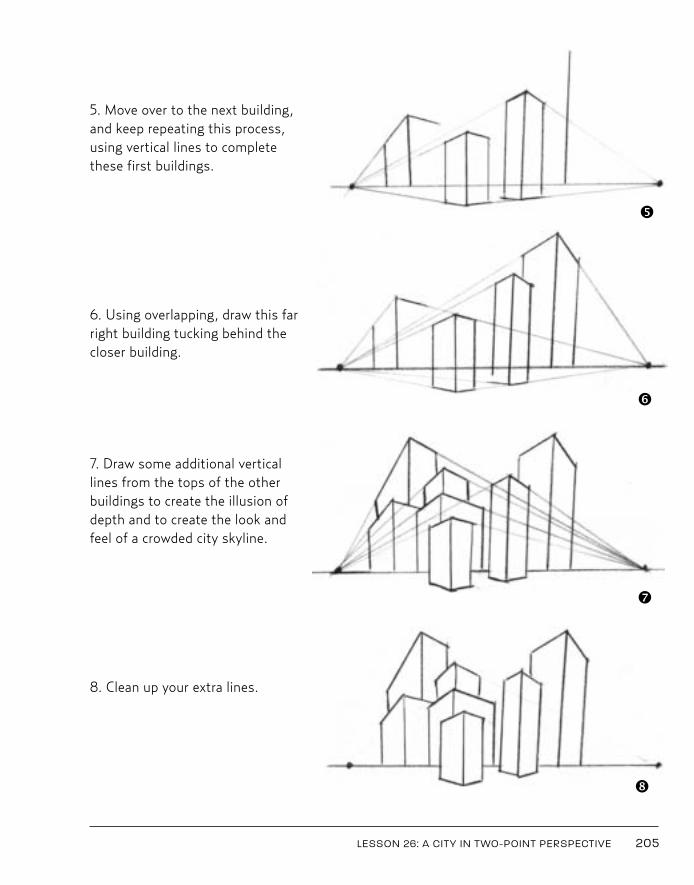
5. Move over to the next building,and keep repeating this process,using vertical lines to completethese first buildings.
6. Using overlapping, draw this farright building tucking behind thecloser building.
7. Draw some additional verticallines from the tops of the otherbuildings to create the illusion ofdepth and to create the look andfeel of a crowded city skyline.
8. Clean up your extra lines.
LESSON 26: A CITY IN TWO-POINT PERSPECTIVE 205
ê
ë
í
ì
Kistler 05_Kistler You Can Draw 10/21/10 12:20 PM Page 205
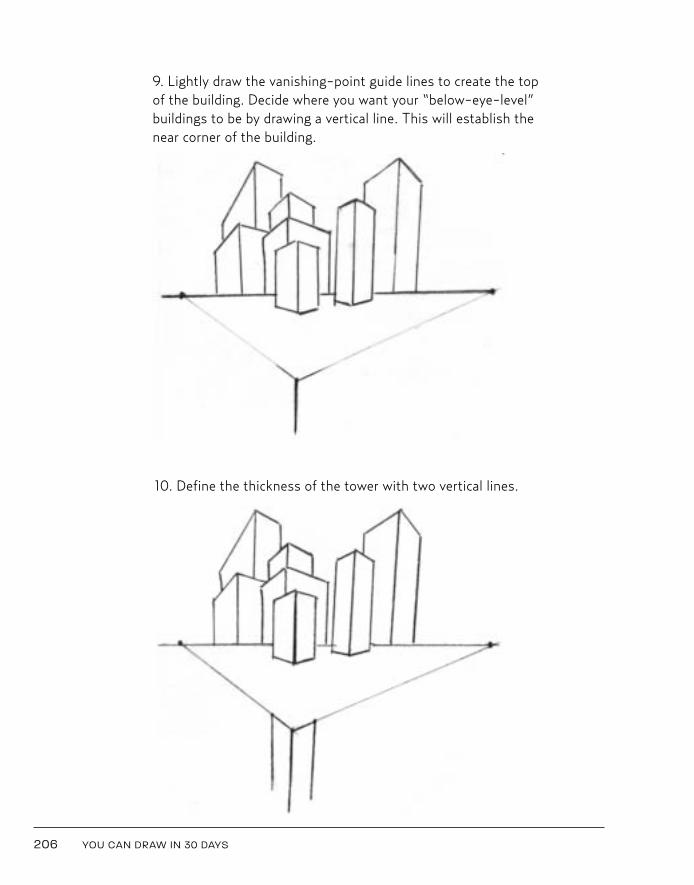
206 YOU CAN DRAW IN 30 DAYS
10. Define the thickness of the tower with two vertical lines.
9. Lightly draw the vanishing-point guide lines to create the topof the building. Decide where you want your “below-eye-level”buildings to be by drawing a vertical line. This will establish thenear corner of the building.
Kistler 05_Kistler You Can Draw 10/21/10 12:20 PM Page 206
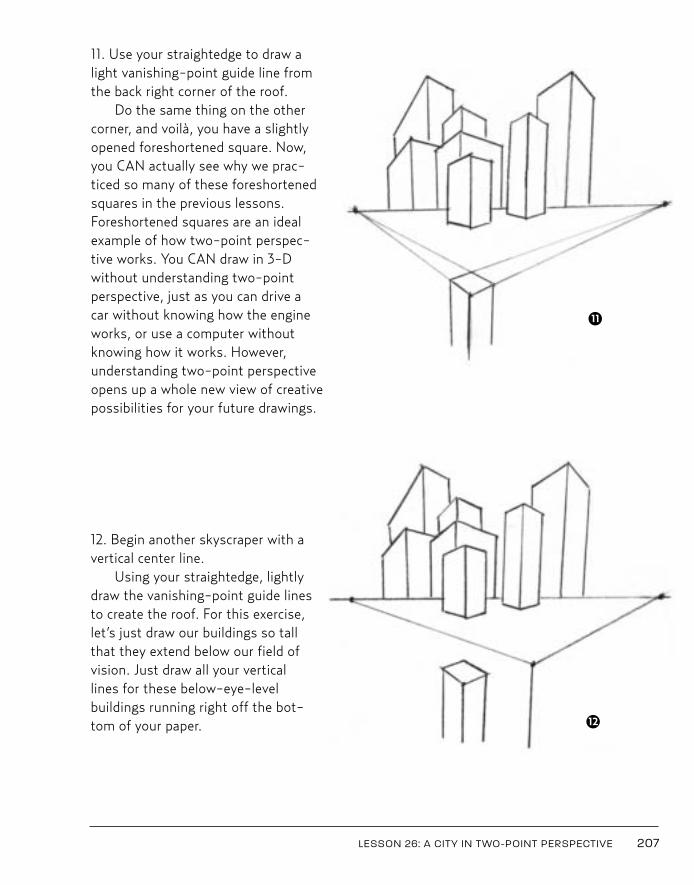
LESSON 26: A CITY IN TWO-POINT PERSPECTIVE 207
12. Begin another skyscraper with avertical center line.
Using your straightedge, lightlydraw the vanishing-point guide linesto create the roof. For this exercise,let’s just draw our buildings so tallthat they extend below our field ofvision. Just draw all your verticallines for these below-eye-levelbuildings running right off the bot-tom of your paper.
11. Use your straightedge to draw alight vanishing-point guide line fromthe back right corner of the roof.
Do the same thing on the othercorner, and voilà, you have a slightlyopened foreshortened square. Now,you CAN actually see why we prac-ticed so many of these foreshortenedsquares in the previous lessons. Foreshortened squares are an idealexample of how two-point perspec-tive works. You CAN draw in 3-Dwithout understanding two-pointperspective, just as you can drive a car without knowing how the engineworks, or use a computer withoutknowing how it works. However,understanding two-point perspectiveopens up a whole new view of creativepossibilities for your future drawings.
11
12
Kistler 05_Kistler You Can Draw 10/25/10 11:22 AM Page 207
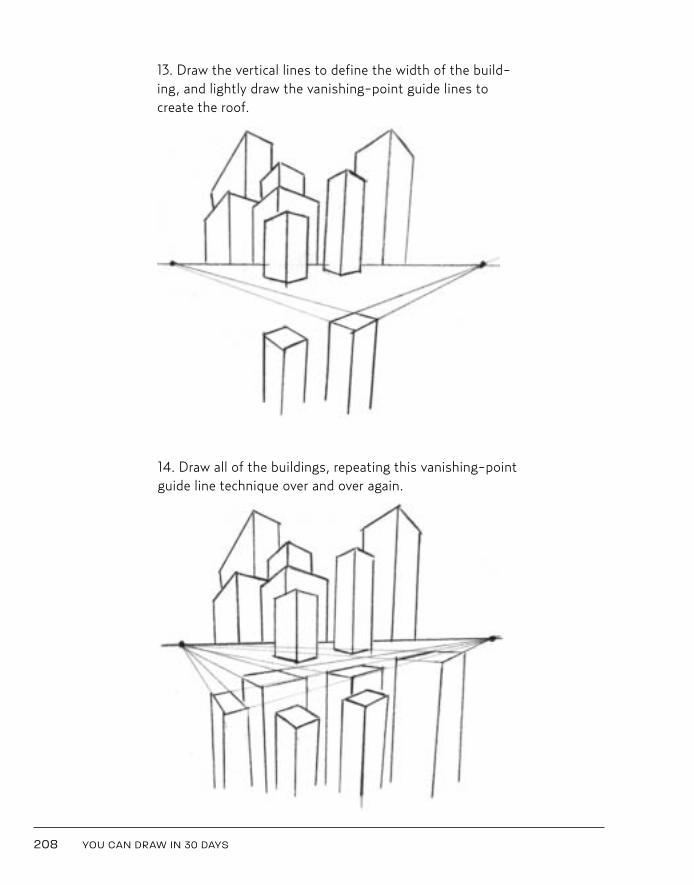
208 YOU CAN DRAW IN 30 DAYS
13. Draw the vertical lines to define the width of the build-ing, and lightly draw the vanishing-point guide lines tocreate the roof.
14. Draw all of the buildings, repeating this vanishing-pointguide line technique over and over again.
Kistler 05_Kistler You Can Draw 10/21/10 12:20 PM Page 208

15. Determine where your light source is positioned, and shade all surfaces oppositethat light position. Notice how I’ve punched out the edges of the overlapping build-ings by really digging in with my pencil to get that very dark nook and crannyshadow. This dark edging, or defining of objects that are in front of other objects, isa very important tool that nearly every illustrator uses. Now that you know what tolook for, I challenge you to find a comic, a magazine illustration, or a museum paint-ing that does not use this technique to define and separate objects.
Lesson 26: Bonus Challenge
Here’s a fun and interesting bonus-level challenge for you: Go online and search forimages of Neuschwanstein Castle, a famous castle in Germany. This castle isbelieved to be the inspiration behind Cinderella’s castle at the Walt Disney Worldtheme parks and on the Disney movie logo you may have seen in the theater or on aDVD. Browse through several images of Neuschwanstein online until you find oneyou really like. Be sure to choose one that has your eye level positioned toward thebottom of the castle, with all the spires reaching for the sky above your eye level.
Enlarge this image to fill your computer screen, and print it. Tape this photoimage to a piece of cardboard, once again making sure the cardboard is larger thanthe image by three inches on each side. Now tape a clear piece of plastic Write-OnFilm over the photo.
LESSON 26: A CITY IN TWO-POINT PERSPECTIVE 209
Kistler 05_Kistler You Can Draw 10/22/10 9:57 AM Page 209
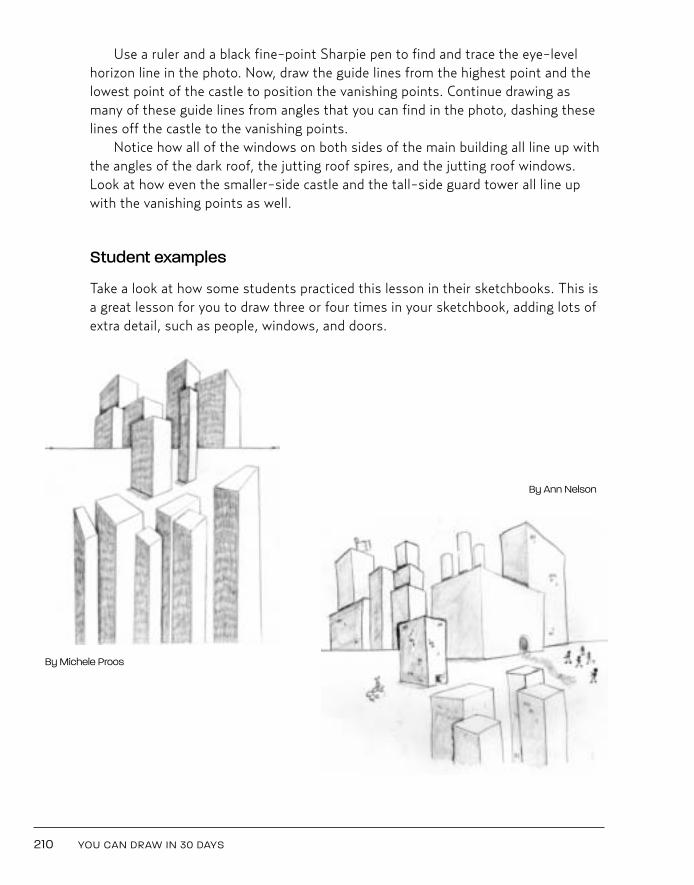
Use a ruler and a black fine-point Sharpie pen to find and trace the eye-levelhorizon line in the photo. Now, draw the guide lines from the highest point and thelowest point of the castle to position the vanishing points. Continue drawing asmany of these guide lines from angles that you can find in the photo, dashing theselines off the castle to the vanishing points.
Notice how all of the windows on both sides of the main building all line up withthe angles of the dark roof, the jutting roof spires, and the jutting roof windows.Look at how even the smaller-side castle and the tall-side guard tower all line upwith the vanishing points as well.
Student examples
Take a look at how some students practiced this lesson in their sketchbooks. This isa great lesson for you to draw three or four times in your sketchbook, adding lots ofextra detail, such as people, windows, and doors.
210 YOU CAN DRAW IN 30 DAYS
By Michele Proos
By Ann Nelson
Kistler 05_Kistler You Can Draw 10/21/10 12:20 PM Page 210
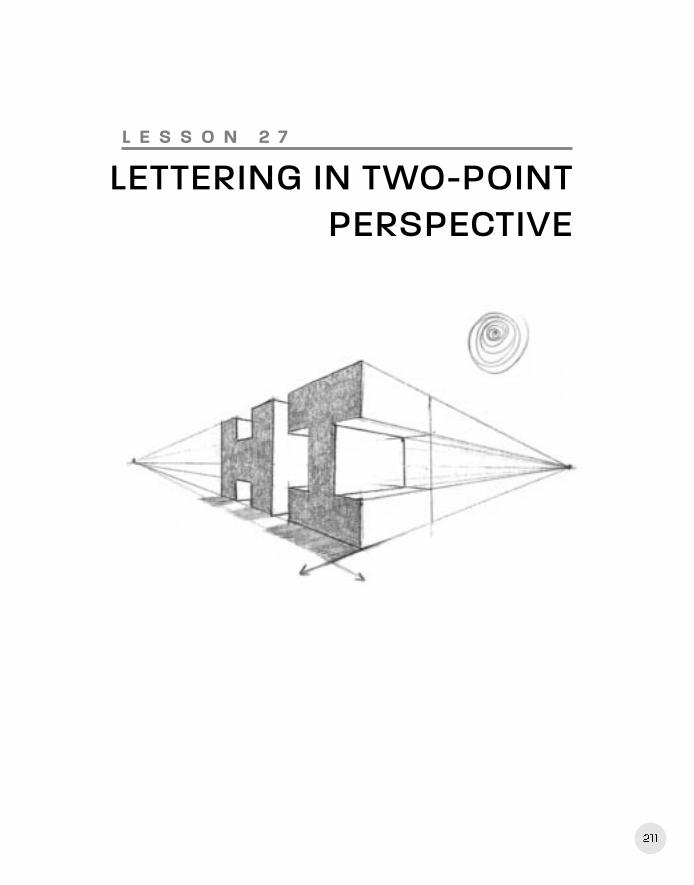
211
L E S S O N 2 7
LETTERING IN TWO-POINTPERSPECTIVE
Kistler 05_Kistler You Can Draw 10/25/10 11:22 AM Page 211
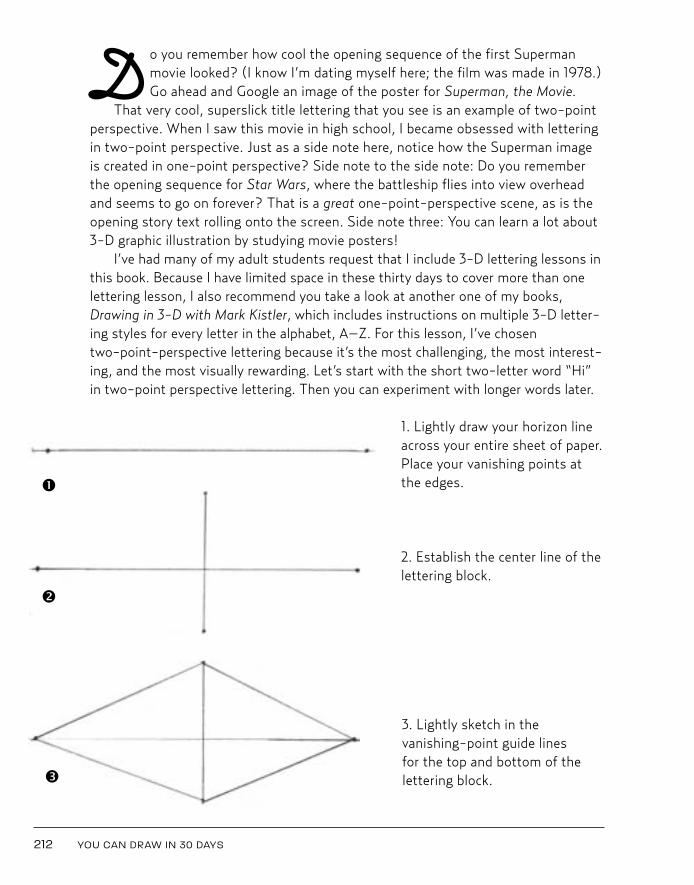
D o you remember how cool the opening sequence of the first Supermanmovie looked? (I know I’m dating myself here; the film was made in 1978.)Go ahead and Google an image of the poster for Superman, the Movie.
That very cool, superslick title lettering that you see is an example of two-pointperspective. When I saw this movie in high school, I became obsessed with letteringin two-point perspective. Just as a side note here, notice how the Superman imageis created in one-point perspective? Side note to the side note: Do you rememberthe opening sequence for Star Wars, where the battleship flies into view overheadand seems to go on forever? That is a great one-point-perspective scene, as is theopening story text rolling onto the screen. Side note three: You can learn a lot about3-D graphic illustration by studying movie posters!
I’ve had many of my adult students request that I include 3-D lettering lessons inthis book. Because I have limited space in these thirty days to cover more than onelettering lesson, I also recommend you take a look at another one of my books,Drawing in 3-D with Mark Kistler, which includes instructions on multiple 3-D letter-ing styles for every letter in the alphabet, A–Z. For this lesson, I’ve chosentwo-point-perspective lettering because it’s the most challenging, the most interest-ing, and the most visually rewarding. Let’s start with the short two-letter word “Hi”in two-point perspective lettering. Then you can experiment with longer words later.
1. Lightly draw your horizon lineacross your entire sheet of paper.Place your vanishing points atthe edges.
2. Establish the center line of thelettering block.
3. Lightly sketch in the vanishing-point guide lines for the top and bottom of thelettering block.
212 YOU CAN DRAW IN 30 DAYS
å
ç
é
Kistler 05_Kistler You Can Draw 10/21/10 12:21 PM Page 212
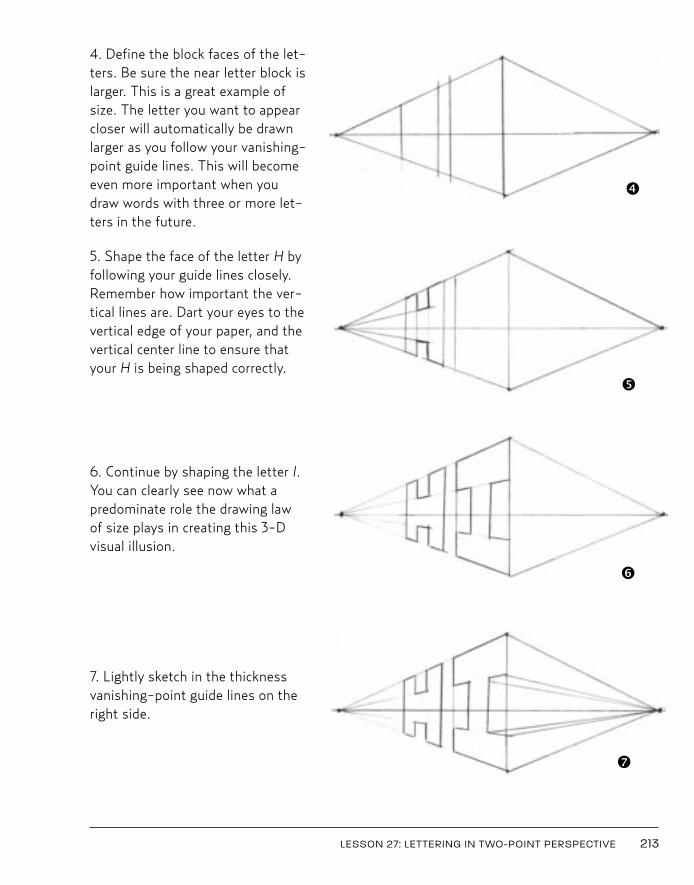
4. Define the block faces of the let-ters. Be sure the near letter block islarger. This is a great example ofsize. The letter you want to appearcloser will automatically be drawnlarger as you follow your vanishing-point guide lines. This will becomeeven more important when youdraw words with three or more let-ters in the future.
5. Shape the face of the letter H byfollowing your guide lines closely.Remember how important the ver-tical lines are. Dart your eyes to thevertical edge of your paper, and thevertical center line to ensure thatyour H is being shaped correctly.
6. Continue by shaping the letter I.You can clearly see now what apredominate role the drawing lawof size plays in creating this 3-Dvisual illusion.
7. Lightly sketch in the thicknessvanishing-point guide lines on theright side.
LESSON 27: LETTERING IN TWO-POINT PERSPECTIVE 213
è
ê
ë
í
Kistler 05_Kistler You Can Draw 10/21/10 12:21 PM Page 213
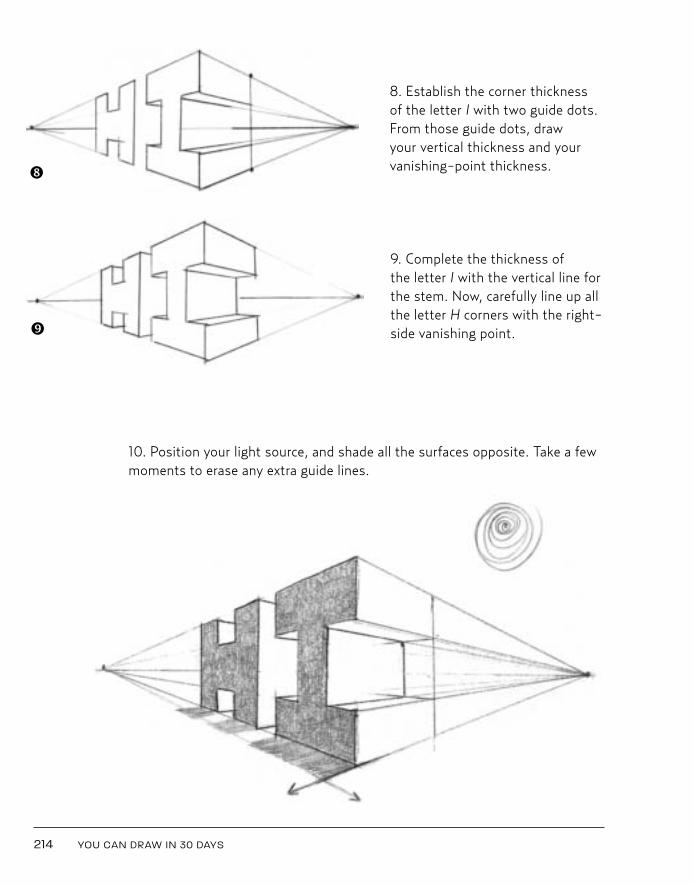
8. Establish the corner thickness of the letter I with two guide dots.From those guide dots, draw your vertical thickness and yourvanishing-point thickness.
9. Complete the thickness of the letter I with the vertical line forthe stem. Now, carefully line up allthe letter H corners with the right-side vanishing point.
214 YOU CAN DRAW IN 30 DAYS
10. Position your light source, and shade all the surfaces opposite. Take a fewmoments to erase any extra guide lines.
ì
î
Kistler 05_Kistler You Can Draw 10/25/10 11:22 AM Page 214
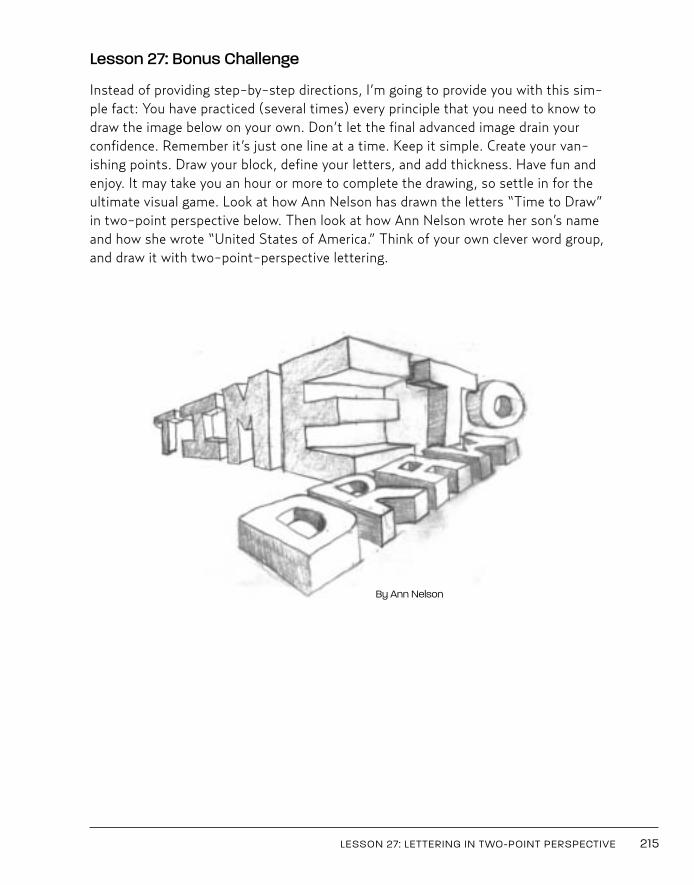
Lesson 27: Bonus Challenge
Instead of providing step-by-step directions, I’m going to provide you with this sim-ple fact: You have practiced (several times) every principle that you need to know todraw the image below on your own. Don’t let the final advanced image drain yourconfidence. Remember it’s just one line at a time. Keep it simple. Create your van-ishing points. Draw your block, define your letters, and add thickness. Have fun andenjoy. It may take you an hour or more to complete the drawing, so settle in for theultimate visual game. Look at how Ann Nelson has drawn the letters “Time to Draw”in two-point perspective below. Then look at how Ann Nelson wrote her son’s nameand how she wrote “United States of America.” Think of your own clever word group,and draw it with two-point-perspective lettering.
LESSON 27: LETTERING IN TWO-POINT PERSPECTIVE 215
By Ann Nelson
Kistler 05_Kistler You Can Draw 10/22/10 9:57 AM Page 215
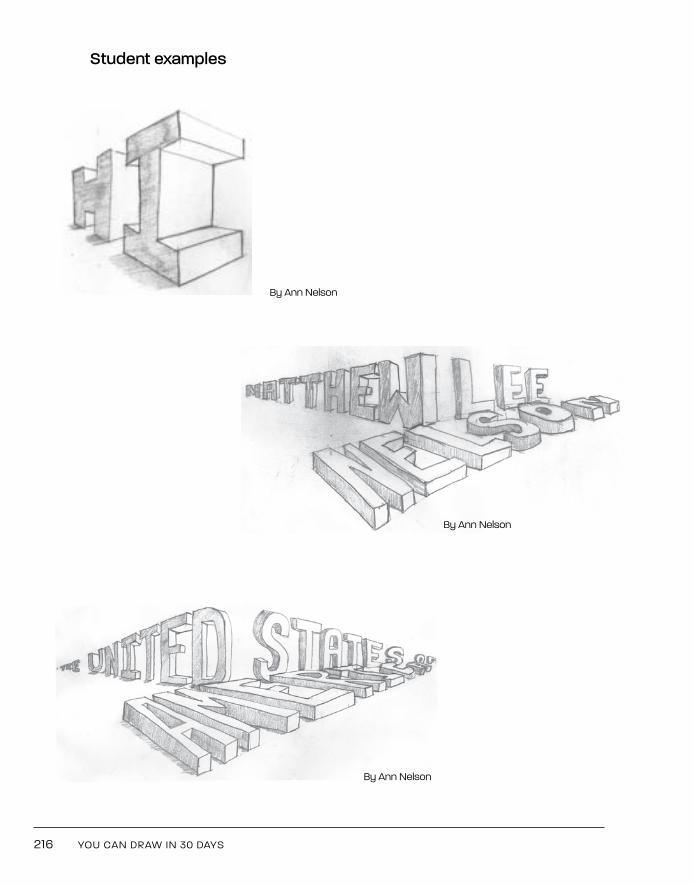
Student examples
216 YOU CAN DRAW IN 30 DAYS
By Ann Nelson
By Ann Nelson
By Ann Nelson
Kistler 05_Kistler You Can Draw 10/21/10 12:21 PM Page 216

217
L E S S O N 2 8
THE HUMAN FACE
Kistler 05_Kistler You Can Draw 10/21/10 12:21 PM Page 217
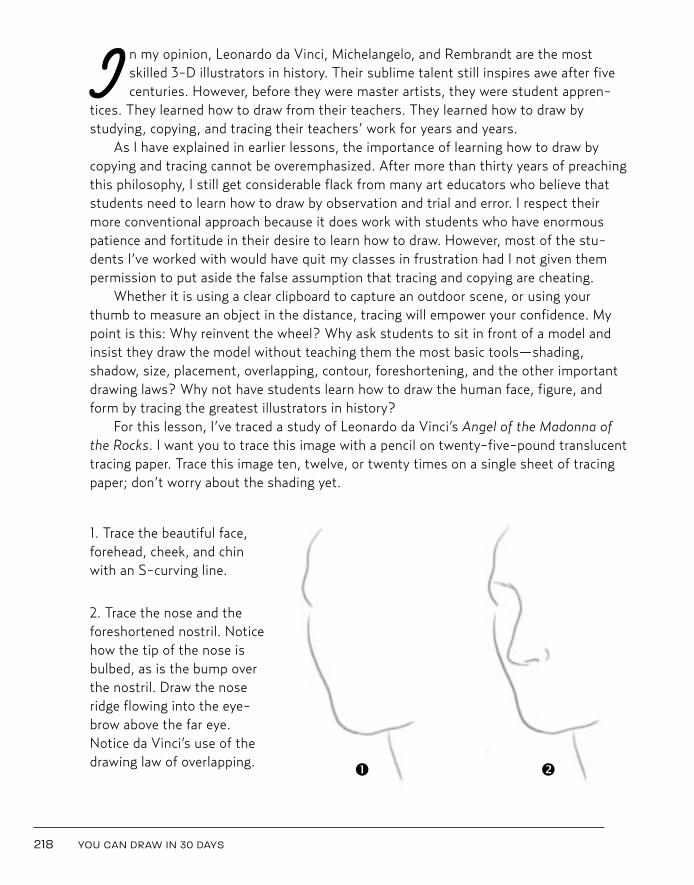
I n my opinion, Leonardo da Vinci, Michelangelo, and Rembrandt are the mostskilled 3-D illustrators in history. Their sublime talent still inspires awe after fivecenturies. However, before they were master artists, they were student appren-
tices. They learned how to draw from their teachers. They learned how to draw bystudying, copying, and tracing their teachers’ work for years and years.
As I have explained in earlier lessons, the importance of learning how to draw bycopying and tracing cannot be overemphasized. After more than thirty years of preachingthis philosophy, I still get considerable flack from many art educators who believe thatstudents need to learn how to draw by observation and trial and error. I respect theirmore conventional approach because it does work with students who have enormouspatience and fortitude in their desire to learn how to draw. However, most of the stu-dents I’ve worked with would have quit my classes in frustration had I not given thempermission to put aside the false assumption that tracing and copying are cheating.
Whether it is using a clear clipboard to capture an outdoor scene, or using yourthumb to measure an object in the distance, tracing will empower your confidence. Mypoint is this: Why reinvent the wheel? Why ask students to sit in front of a model andinsist they draw the model without teaching them the most basic tools—shading,shadow, size, placement, overlapping, contour, foreshortening, and the other importantdrawing laws? Why not have students learn how to draw the human face, figure, andform by tracing the greatest illustrators in history?
For this lesson, I’ve traced a study of Leonardo da Vinci’s Angel of the Madonna ofthe Rocks. I want you to trace this image with a pencil on twenty-five-pound translucenttracing paper. Trace this image ten, twelve, or twenty times on a single sheet of tracingpaper; don’t worry about the shading yet.
1. Trace the beautiful face,forehead, cheek, and chinwith an S-curving line.
2. Trace the nose and theforeshortened nostril. Noticehow the tip of the nose isbulbed, as is the bump overthe nostril. Draw the noseridge flowing into the eye-brow above the far eye.Notice da Vinci’s use of thedrawing law of overlapping.
218 YOU CAN DRAW IN 30 DAYS
å ç
Kistler 05_Kistler You Can Draw 10/21/10 12:21 PM Page 218
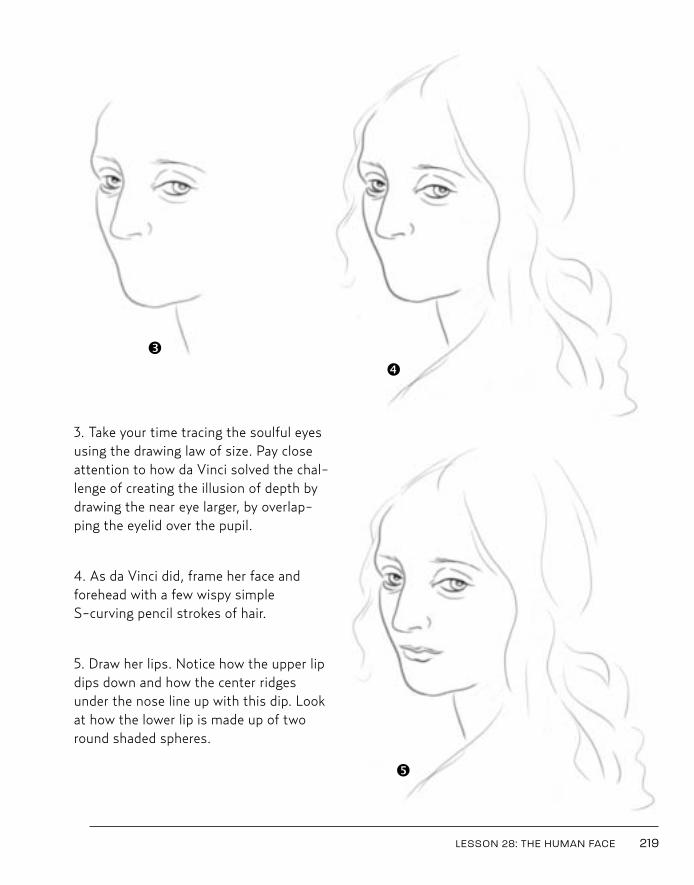
3. Take your time tracing the soulful eyesusing the drawing law of size. Pay closeattention to how da Vinci solved the chal-lenge of creating the illusion of depth bydrawing the near eye larger, by overlap-ping the eyelid over the pupil.
4. As da Vinci did, frame her face andforehead with a few wispy simple S-curving pencil strokes of hair.
5. Draw her lips. Notice how the upper lipdips down and how the center ridgesunder the nose line up with this dip. Lookat how the lower lip is made up of tworound shaded spheres.
LESSON 28: THE HUMAN FACE 219
éè
ê
Kistler 05_Kistler You Can Draw 10/25/10 11:22 AM Page 219
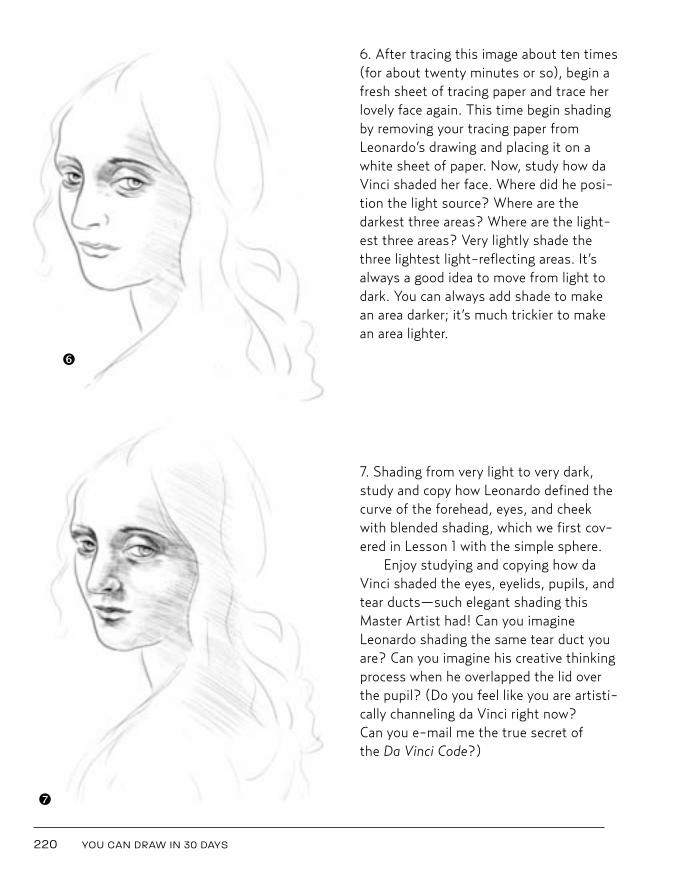
6. After tracing this image about ten times(for about twenty minutes or so), begin afresh sheet of tracing paper and trace herlovely face again. This time begin shadingby removing your tracing paper fromLeonardo’s drawing and placing it on awhite sheet of paper. Now, study how daVinci shaded her face. Where did he posi-tion the light source? Where are thedarkest three areas? Where are the light-est three areas? Very lightly shade thethree lightest light-reflecting areas. It’salways a good idea to move from light todark. You can always add shade to makean area darker; it’s much trickier to makean area lighter.
7. Shading from very light to very dark,study and copy how Leonardo defined thecurve of the forehead, eyes, and cheekwith blended shading, which we first cov-ered in Lesson 1 with the simple sphere.
Enjoy studying and copying how daVinci shaded the eyes, eyelids, pupils, andtear ducts—such elegant shading thisMaster Artist had! Can you imagineLeonardo shading the same tear duct youare? Can you imagine his creative thinkingprocess when he overlapped the lid overthe pupil? (Do you feel like you are artisti-cally channeling da Vinci right now? Can you e-mail me the true secret of the Da Vinci Code?)
220 YOU CAN DRAW IN 30 DAYS
ë
í
Kistler 05_Kistler You Can Draw 10/21/10 12:21 PM Page 220
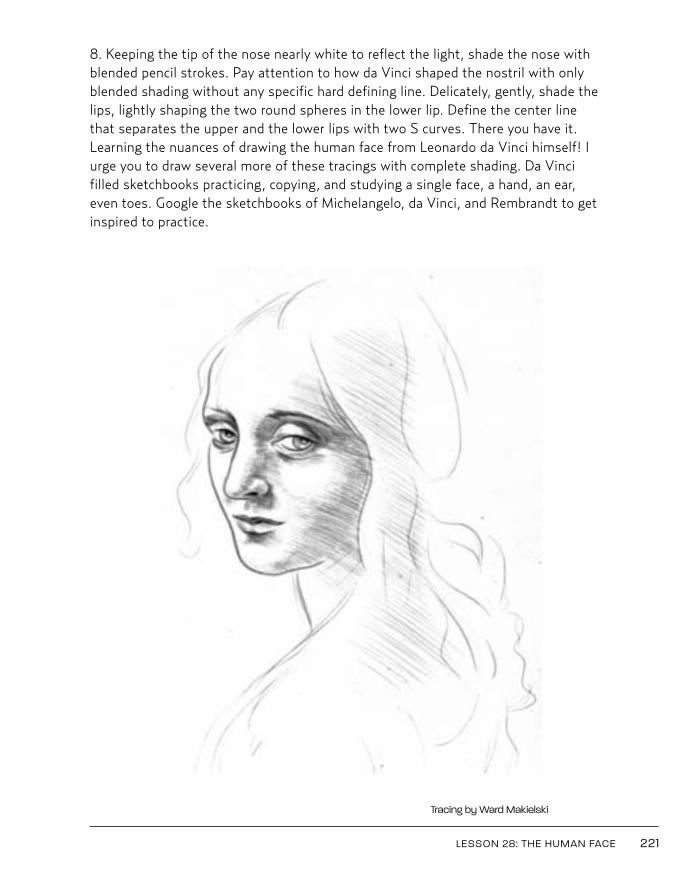
8. Keeping the tip of the nose nearly white to reflect the light, shade the nose withblended pencil strokes. Pay attention to how da Vinci shaped the nostril with onlyblended shading without any specific hard defining line. Delicately, gently, shade thelips, lightly shaping the two round spheres in the lower lip. Define the center linethat separates the upper and the lower lips with two S curves. There you have it.Learning the nuances of drawing the human face from Leonardo da Vinci himself! Iurge you to draw several more of these tracings with complete shading. Da Vincifilled sketchbooks practicing, copying, and studying a single face, a hand, an ear,even toes. Google the sketchbooks of Michelangelo, da Vinci, and Rembrandt to getinspired to practice.
LESSON 28: THE HUMAN FACE 221
Tracing by Ward Makielski
Kistler 05_Kistler You Can Draw 10/21/10 12:21 PM Page 221
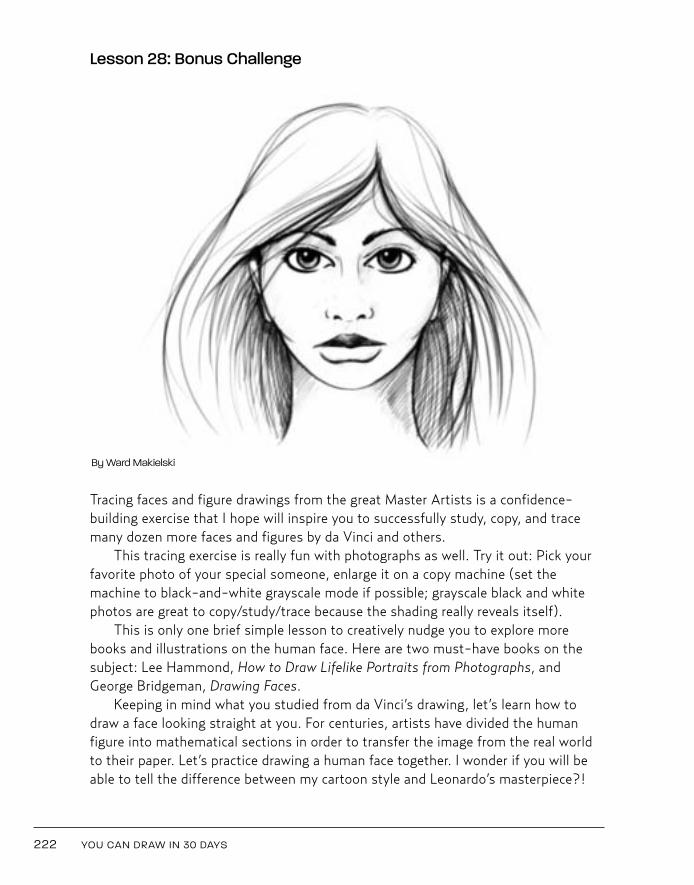
Lesson 28: Bonus Challenge
Tracing faces and figure drawings from the great Master Artists is a confidence-building exercise that I hope will inspire you to successfully study, copy, and tracemany dozen more faces and figures by da Vinci and others.
This tracing exercise is really fun with photographs as well. Try it out: Pick yourfavorite photo of your special someone, enlarge it on a copy machine (set themachine to black-and-white grayscale mode if possible; grayscale black and whitephotos are great to copy/study/trace because the shading really reveals itself).
This is only one brief simple lesson to creatively nudge you to explore morebooks and illustrations on the human face. Here are two must-have books on thesubject: Lee Hammond, How to Draw Lifelike Portraits from Photographs, andGeorge Bridgeman, Drawing Faces.
Keeping in mind what you studied from da Vinci’s drawing, let’s learn how todraw a face looking straight at you. For centuries, artists have divided the humanfigure into mathematical sections in order to transfer the image from the real worldto their paper. Let’s practice drawing a human face together. I wonder if you will beable to tell the difference between my cartoon style and Leonardo’s masterpiece?!
222 YOU CAN DRAW IN 30 DAYS
By Ward Makielski
Kistler 05_Kistler You Can Draw 10/21/10 12:21 PM Page 222
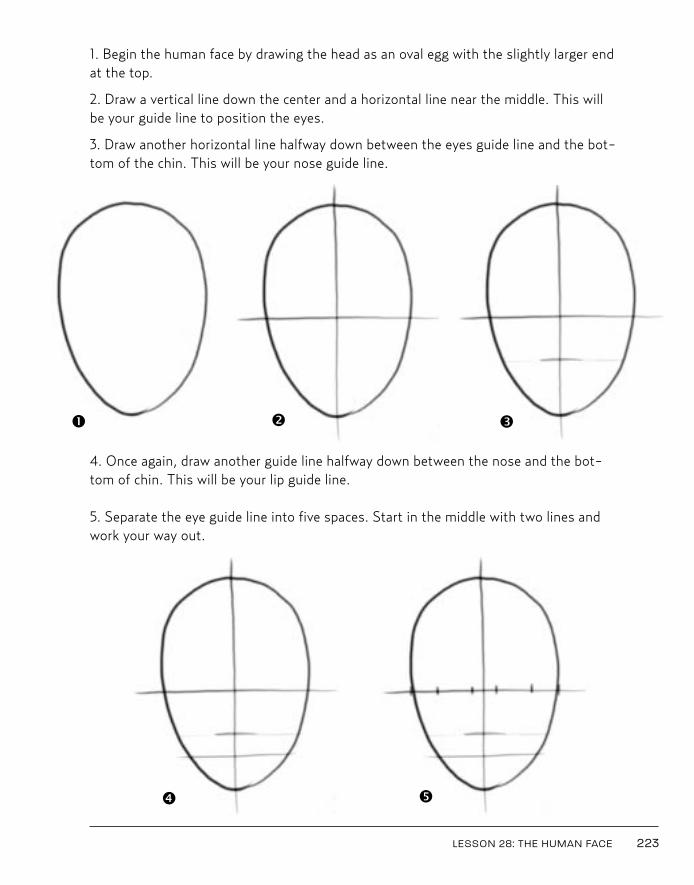
1. Begin the human face by drawing the head as an oval egg with the slightly larger endat the top.
2. Draw a vertical line down the center and a horizontal line near the middle. This willbe your guide line to position the eyes.
3. Draw another horizontal line halfway down between the eyes guide line and the bot-tom of the chin. This will be your nose guide line.
4. Once again, draw another guide line halfway down between the nose and the bot-tom of chin. This will be your lip guide line.
5. Separate the eye guide line into five spaces. Start in the middle with two lines andwork your way out.
LESSON 28: THE HUMAN FACE 223
å ç é
è ê
Kistler 05_Kistler You Can Draw 10/21/10 12:21 PM Page 223
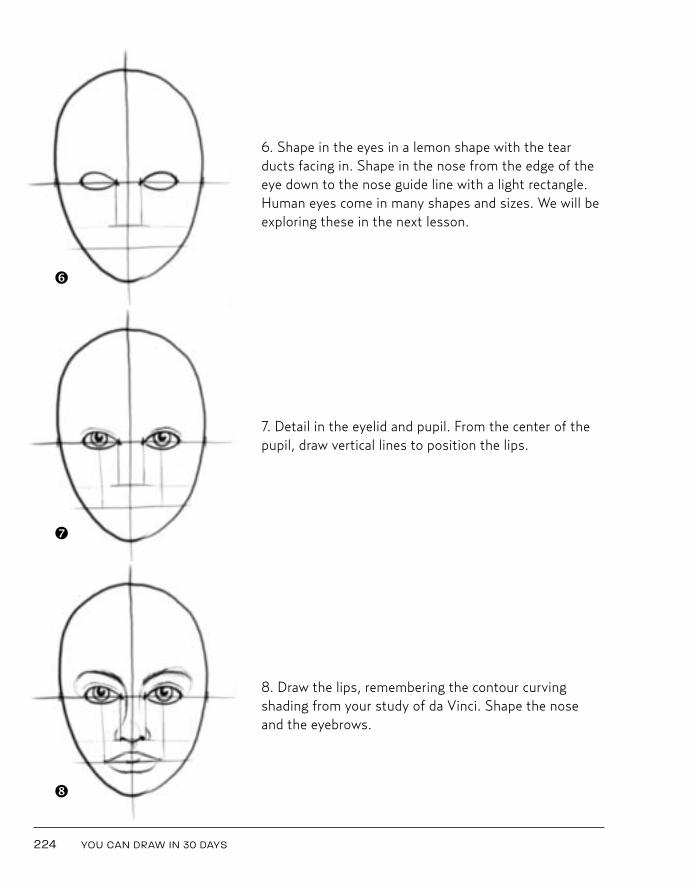
6. Shape in the eyes in a lemon shape with the tearducts facing in. Shape in the nose from the edge of theeye down to the nose guide line with a light rectangle.Human eyes come in many shapes and sizes. We will beexploring these in the next lesson.
7. Detail in the eyelid and pupil. From the center of thepupil, draw vertical lines to position the lips.
8. Draw the lips, remembering the contour curvingshading from your study of da Vinci. Shape the noseand the eyebrows.
224 YOU CAN DRAW IN 30 DAYS
ë
í
ì
Kistler 05_Kistler You Can Draw 10/21/10 12:21 PM Page 224
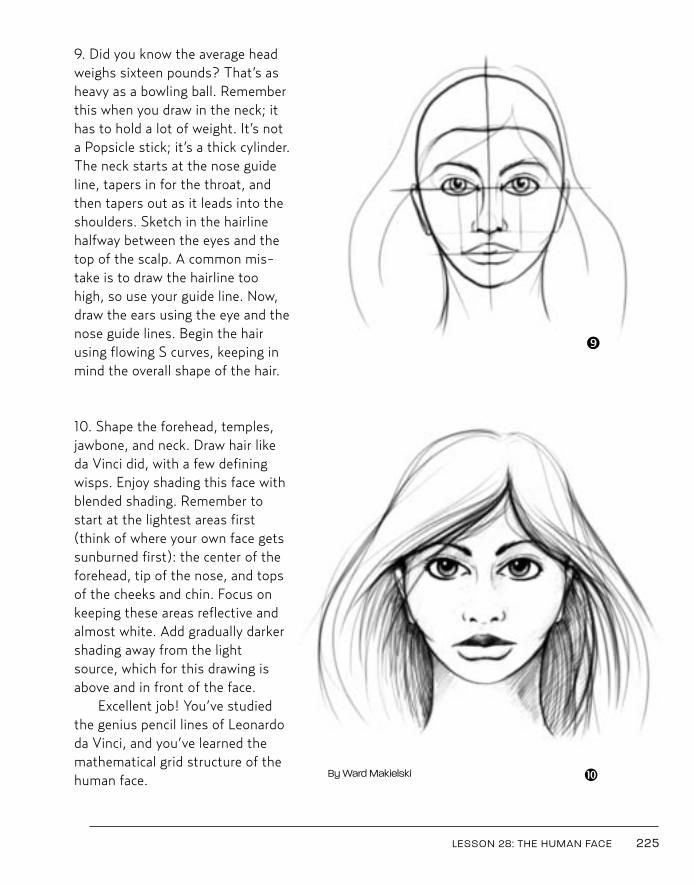
9. Did you know the average headweighs sixteen pounds? That’s asheavy as a bowling ball. Rememberthis when you draw in the neck; ithas to hold a lot of weight. It’s nota Popsicle stick; it’s a thick cylinder.The neck starts at the nose guideline, tapers in for the throat, andthen tapers out as it leads into theshoulders. Sketch in the hairlinehalfway between the eyes and thetop of the scalp. A common mis-take is to draw the hairline toohigh, so use your guide line. Now,draw the ears using the eye and thenose guide lines. Begin the hairusing flowing S curves, keeping inmind the overall shape of the hair.
10. Shape the forehead, temples,jawbone, and neck. Draw hair likeda Vinci did, with a few definingwisps. Enjoy shading this face withblended shading. Remember tostart at the lightest areas first(think of where your own face getssunburned first): the center of theforehead, tip of the nose, and topsof the cheeks and chin. Focus onkeeping these areas reflective andalmost white. Add gradually darkershading away from the lightsource, which for this drawing isabove and in front of the face.
Excellent job! You’ve studiedthe genius pencil lines of Leonardoda Vinci, and you’ve learned themathematical grid structure of thehuman face.
LESSON 28: THE HUMAN FACE 225
î
ïBy Ward Makielski
Kistler 05_Kistler You Can Draw 10/22/10 9:57 AM Page 225
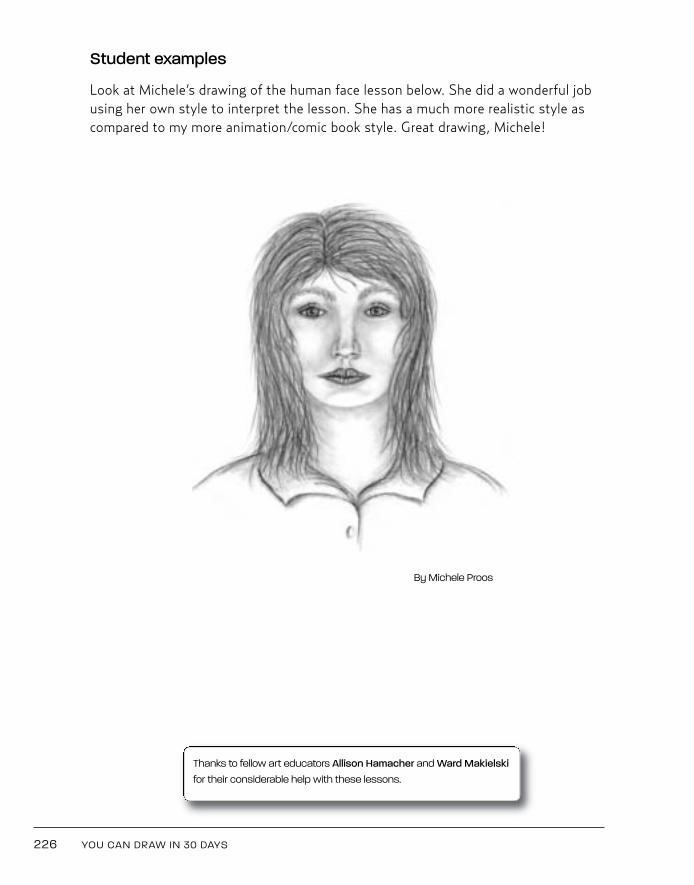
Student examples
Look at Michele’s drawing of the human face lesson below. She did a wonderful jobusing her own style to interpret the lesson. She has a much more realistic style ascompared to my more animation/comic book style. Great drawing, Michele!
226 YOU CAN DRAW IN 30 DAYS
By Michele Proos
Thanks to fellow art educators Allison Hamacher and Ward Makielskifor their considerable help with these lessons.
Kistler 05_Kistler You Can Draw 10/21/10 12:21 PM Page 226
227
L E S S O N 2 9
THE HUMAN EYE OF INSPIRATION
Kistler 05_Kistler You Can Draw 10/21/10 12:21 PM Page 227
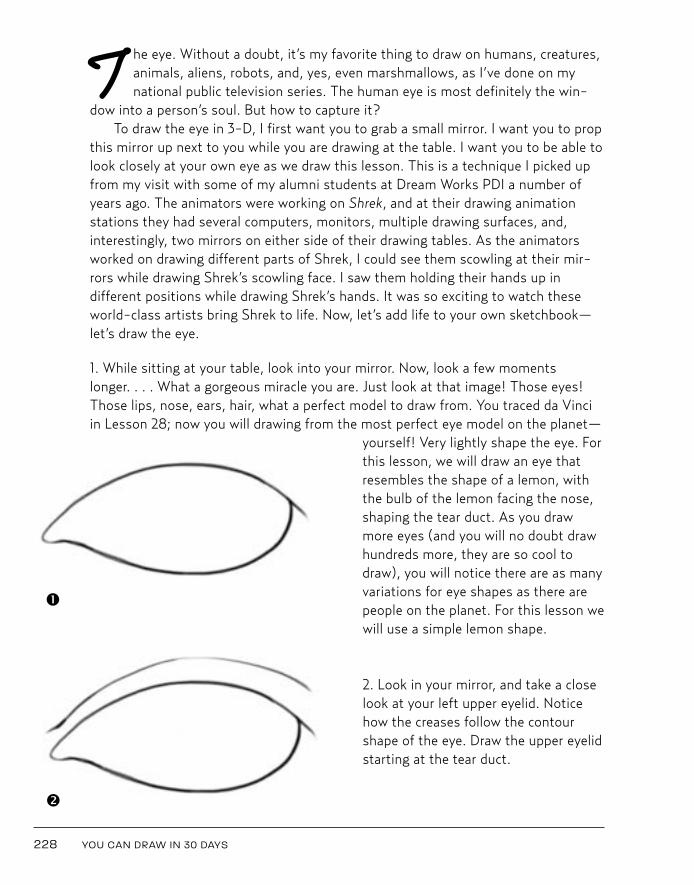
T he eye. Without a doubt, it’s my favorite thing to draw on humans, creatures,animals, aliens, robots, and, yes, even marshmallows, as I’ve done on mynational public television series. The human eye is most definitely the win-
dow into a person’s soul. But how to capture it?To draw the eye in 3-D, I first want you to grab a small mirror. I want you to prop
this mirror up next to you while you are drawing at the table. I want you to be able tolook closely at your own eye as we draw this lesson. This is a technique I picked upfrom my visit with some of my alumni students at Dream Works PDI a number ofyears ago. The animators were working on Shrek, and at their drawing animationstations they had several computers, monitors, multiple drawing surfaces, and,interestingly, two mirrors on either side of their drawing tables. As the animatorsworked on drawing different parts of Shrek, I could see them scowling at their mir-rors while drawing Shrek’s scowling face. I saw them holding their hands up indifferent positions while drawing Shrek’s hands. It was so exciting to watch theseworld-class artists bring Shrek to life. Now, let’s add life to your own sketchbook—let’s draw the eye.
1. While sitting at your table, look into your mirror. Now, look a few momentslonger. . . . What a gorgeous miracle you are. Just look at that image! Those eyes!Those lips, nose, ears, hair, what a perfect model to draw from. You traced da Vinciin Lesson 28; now you will drawing from the most perfect eye model on the planet—
yourself! Very lightly shape the eye. Forthis lesson, we will draw an eye thatresembles the shape of a lemon, withthe bulb of the lemon facing the nose,shaping the tear duct. As you drawmore eyes (and you will no doubt drawhundreds more, they are so cool todraw), you will notice there are as manyvariations for eye shapes as there arepeople on the planet. For this lesson wewill use a simple lemon shape.
2. Look in your mirror, and take a closelook at your left upper eyelid. Noticehow the creases follow the contourshape of the eye. Draw the upper eyelidstarting at the tear duct.
228 YOU CAN DRAW IN 30 DAYS
å
ç
Kistler 05_Kistler You Can Draw 10/22/10 9:57 AM Page 228
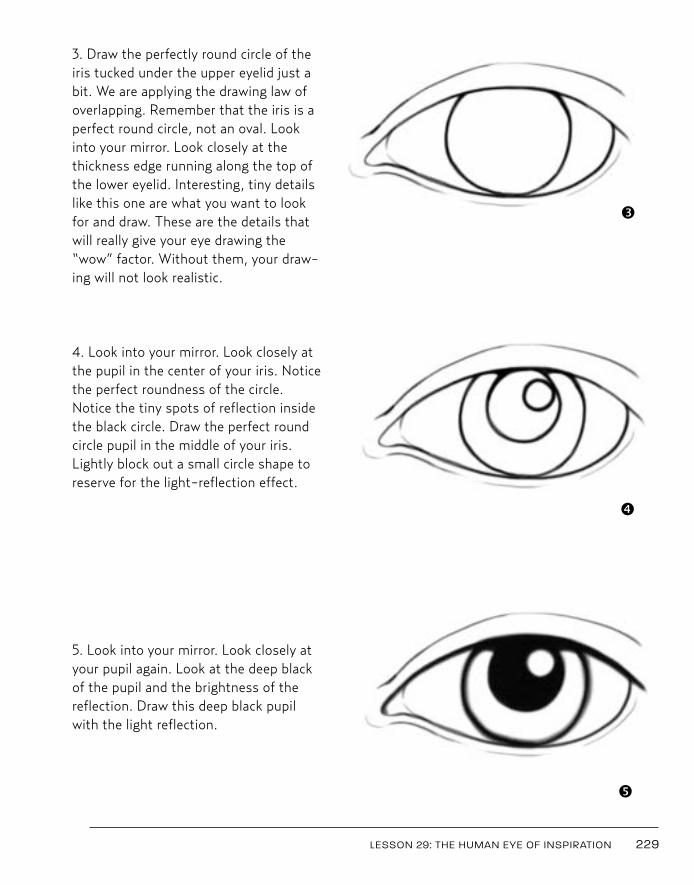
3. Draw the perfectly round circle of theiris tucked under the upper eyelid just abit. We are applying the drawing law ofoverlapping. Remember that the iris is aperfect round circle, not an oval. Lookinto your mirror. Look closely at thethickness edge running along the top ofthe lower eyelid. Interesting, tiny detailslike this one are what you want to lookfor and draw. These are the details thatwill really give your eye drawing the“wow” factor. Without them, your draw-ing will not look realistic.
4. Look into your mirror. Look closely atthe pupil in the center of your iris. Noticethe perfect roundness of the circle.Notice the tiny spots of reflection insidethe black circle. Draw the perfect roundcircle pupil in the middle of your iris.Lightly block out a small circle shape toreserve for the light-reflection effect.
5. Look into your mirror. Look closely atyour pupil again. Look at the deep blackof the pupil and the brightness of thereflection. Draw this deep black pupilwith the light reflection.
LESSON 29: THE HUMAN EYE OF INSPIRATION 229
é
è
ê
Kistler 05_Kistler You Can Draw 10/21/10 12:21 PM Page 229
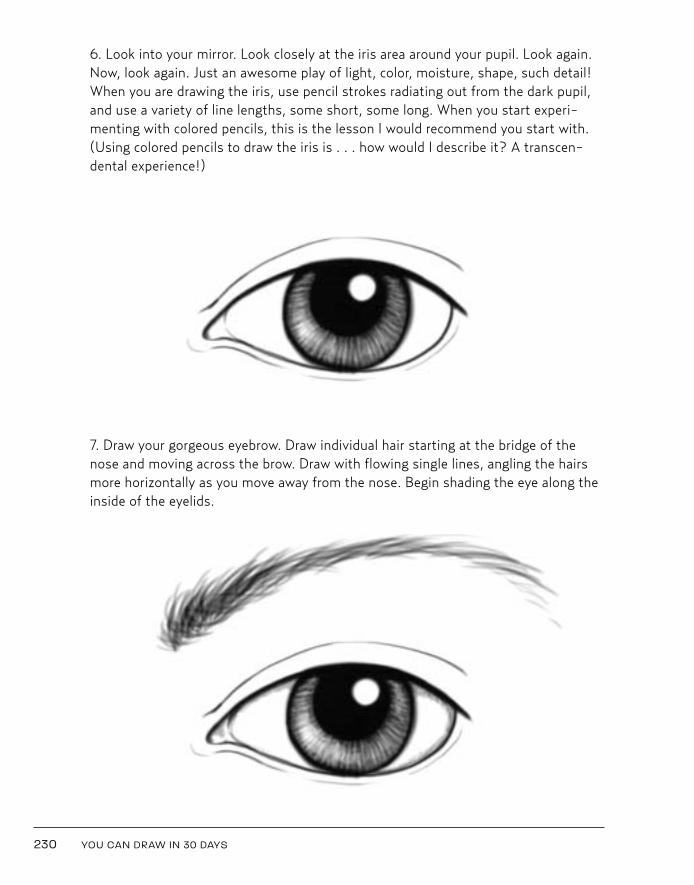
6. Look into your mirror. Look closely at the iris area around your pupil. Look again.Now, look again. Just an awesome play of light, color, moisture, shape, such detail!When you are drawing the iris, use pencil strokes radiating out from the dark pupil,and use a variety of line lengths, some short, some long. When you start experi-menting with colored pencils, this is the lesson I would recommend you start with.(Using colored pencils to draw the iris is . . . how would I describe it? A transcen-dental experience!)
7. Draw your gorgeous eyebrow. Draw individual hair starting at the bridge of thenose and moving across the brow. Draw with flowing single lines, angling the hairsmore horizontally as you move away from the nose. Begin shading the eye along theinside of the eyelids.
230 YOU CAN DRAW IN 30 DAYS
Kistler 05_Kistler You Can Draw 10/21/10 12:21 PM Page 230
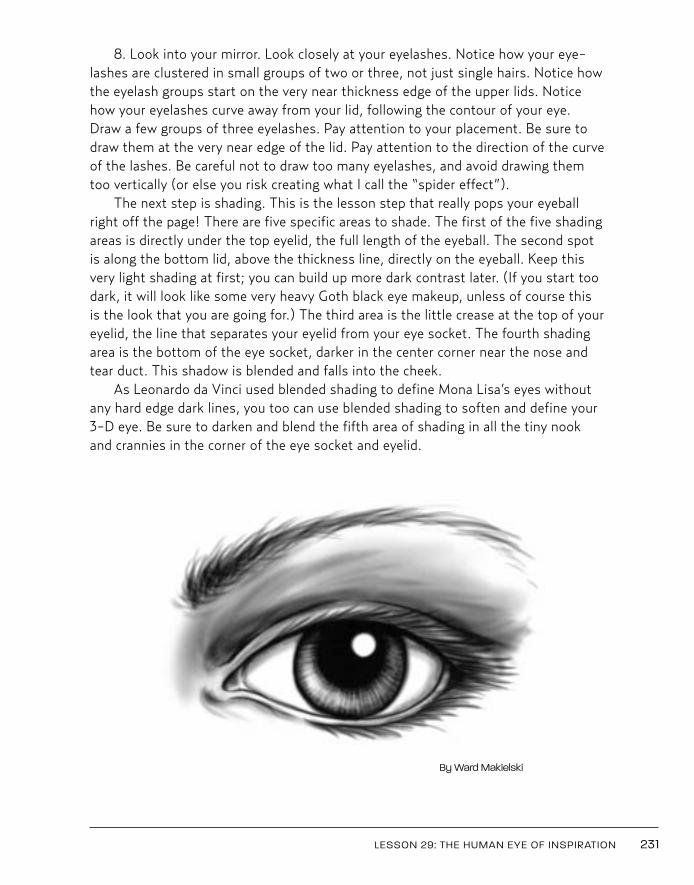
8. Look into your mirror. Look closely at your eyelashes. Notice how your eye-lashes are clustered in small groups of two or three, not just single hairs. Notice howthe eyelash groups start on the very near thickness edge of the upper lids. Noticehow your eyelashes curve away from your lid, following the contour of your eye.Draw a few groups of three eyelashes. Pay attention to your placement. Be sure todraw them at the very near edge of the lid. Pay attention to the direction of the curveof the lashes. Be careful not to draw too many eyelashes, and avoid drawing themtoo vertically (or else you risk creating what I call the “spider effect”).
The next step is shading. This is the lesson step that really pops your eyeballright off the page! There are five specific areas to shade. The first of the five shadingareas is directly under the top eyelid, the full length of the eyeball. The second spotis along the bottom lid, above the thickness line, directly on the eyeball. Keep thisvery light shading at first; you can build up more dark contrast later. (If you start toodark, it will look like some very heavy Goth black eye makeup, unless of course thisis the look that you are going for.) The third area is the little crease at the top of youreyelid, the line that separates your eyelid from your eye socket. The fourth shadingarea is the bottom of the eye socket, darker in the center corner near the nose andtear duct. This shadow is blended and falls into the cheek.
As Leonardo da Vinci used blended shading to define Mona Lisa’s eyes withoutany hard edge dark lines, you too can use blended shading to soften and define your3-D eye. Be sure to darken and blend the fifth area of shading in all the tiny nookand crannies in the corner of the eye socket and eyelid.
LESSON 29: THE HUMAN EYE OF INSPIRATION 231
By Ward Makielski
Kistler 05_Kistler You Can Draw 10/25/10 11:22 AM Page 231
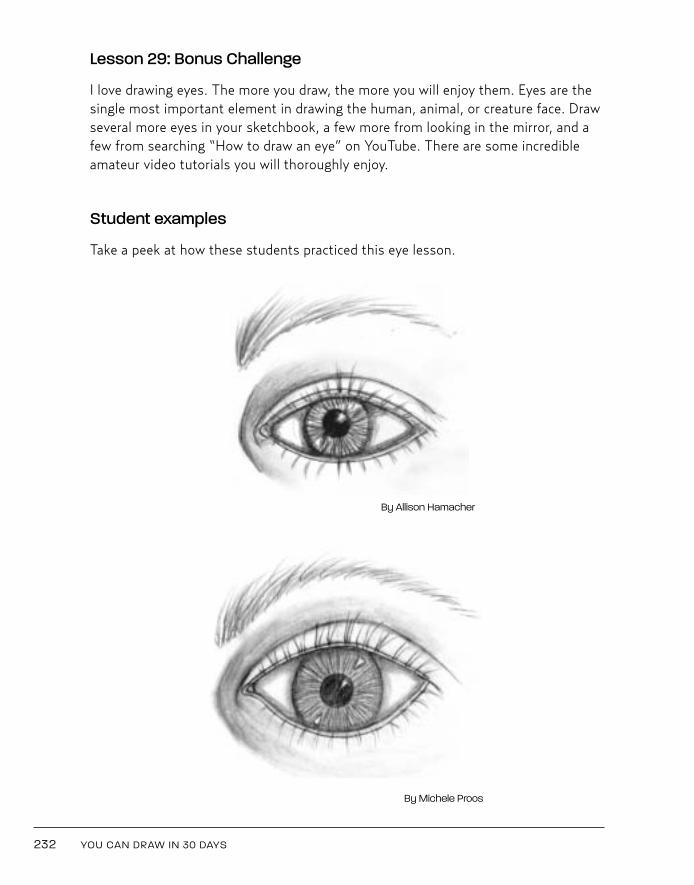
Lesson 29: Bonus Challenge
I love drawing eyes. The more you draw, the more you will enjoy them. Eyes are thesingle most important element in drawing the human, animal, or creature face. Drawseveral more eyes in your sketchbook, a few more from looking in the mirror, and afew from searching “How to draw an eye” on YouTube. There are some incredibleamateur video tutorials you will thoroughly enjoy.
Student examples
Take a peek at how these students practiced this eye lesson.
232 YOU CAN DRAW IN 30 DAYS
By Allison Hamacher
By Michele Proos
Kistler 05_Kistler You Can Draw 10/25/10 11:22 AM Page 232
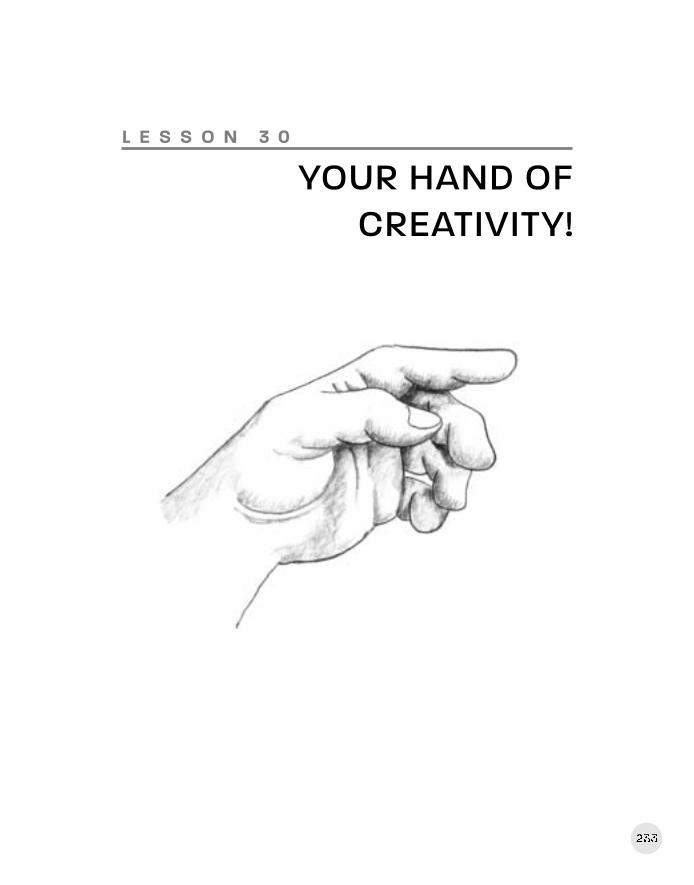
233
L E S S O N 3 0
YOUR HAND OF CREATIVITY!
Kistler 05_Kistler You Can Draw 10/21/10 12:21 PM Page 233
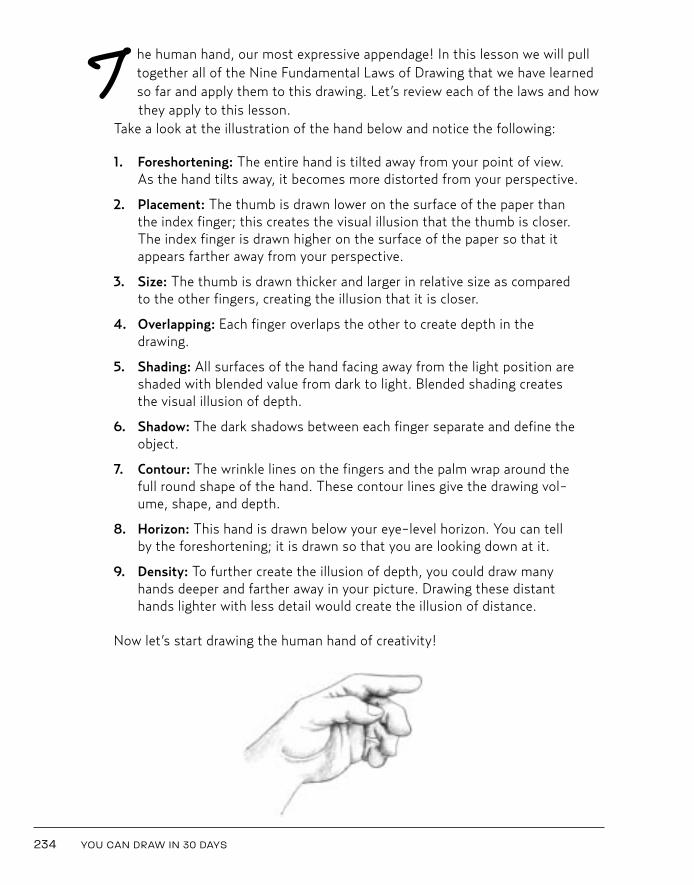
T he human hand, our most expressive appendage! In this lesson we will pulltogether all of the Nine Fundamental Laws of Drawing that we have learnedso far and apply them to this drawing. Let’s review each of the laws and howthey apply to this lesson.
Take a look at the illustration of the hand below and notice the following:
1. Foreshortening: The entire hand is tilted away from your point of view.As the hand tilts away, it becomes more distorted from your perspective.
2. Placement: The thumb is drawn lower on the surface of the paper thanthe index finger; this creates the visual illusion that the thumb is closer.The index finger is drawn higher on the surface of the paper so that itappears farther away from your perspective.
3. Size: The thumb is drawn thicker and larger in relative size as comparedto the other fingers, creating the illusion that it is closer.
4. Overlapping: Each finger overlaps the other to create depth in the drawing.
5. Shading: All surfaces of the hand facing away from the light position areshaded with blended value from dark to light. Blended shading createsthe visual illusion of depth.
6. Shadow: The dark shadows between each finger separate and define theobject.
7. Contour: The wrinkle lines on the fingers and the palm wrap around thefull round shape of the hand. These contour lines give the drawing vol-ume, shape, and depth.
8. Horizon: This hand is drawn below your eye-level horizon. You can tellby the foreshortening; it is drawn so that you are looking down at it.
9. Density: To further create the illusion of depth, you could draw manyhands deeper and farther away in your picture. Drawing these distanthands lighter with less detail would create the illusion of distance.
Now let’s start drawing the human hand of creativity!
234 YOU CAN DRAW IN 30 DAYS
Kistler 05_Kistler You Can Draw 10/21/10 12:21 PM Page 234
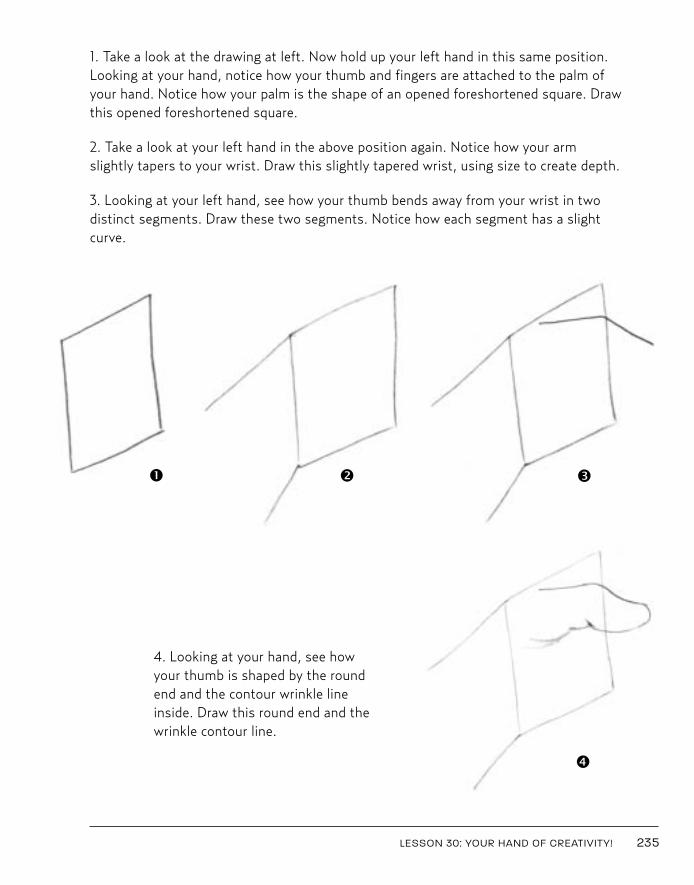
LESSON 30: YOUR HAND OF CREATIVITY! 235
1. Take a look at the drawing at left. Now hold up your left hand in this same position.Looking at your hand, notice how your thumb and fingers are attached to the palm ofyour hand. Notice how your palm is the shape of an opened foreshortened square. Drawthis opened foreshortened square.
2. Take a look at your left hand in the above position again. Notice how your armslightly tapers to your wrist. Draw this slightly tapered wrist, using size to create depth.
3. Looking at your left hand, see how your thumb bends away from your wrist in twodistinct segments. Draw these two segments. Notice how each segment has a slightcurve.
4. Looking at your hand, see howyour thumb is shaped by the roundend and the contour wrinkle lineinside. Draw this round end and thewrinkle contour line.
å ç é
è
Kistler 05_Kistler You Can Draw 10/21/10 12:22 PM Page 235
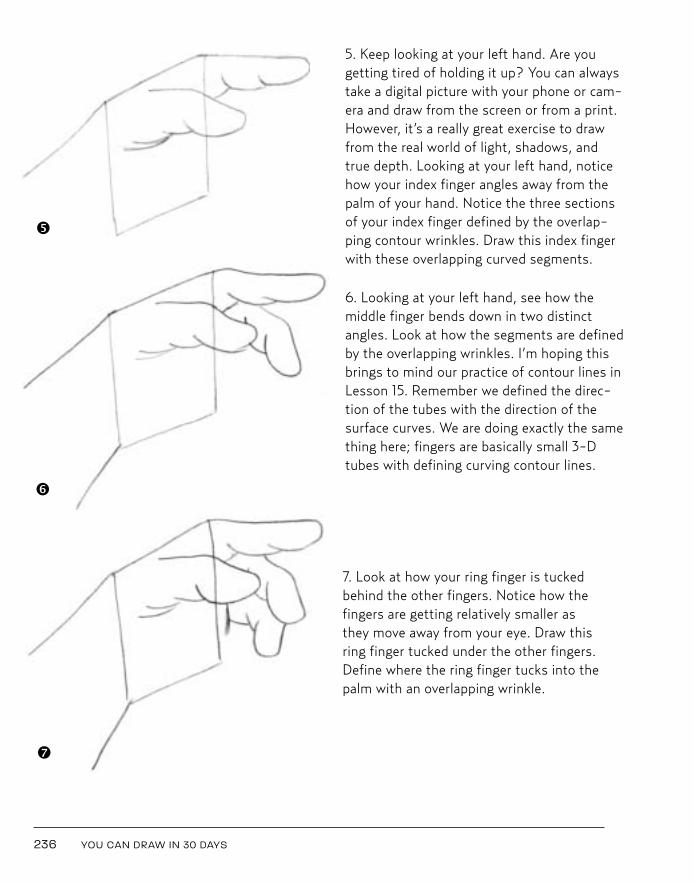
7. Look at how your ring finger is tuckedbehind the other fingers. Notice how thefingers are getting relatively smaller asthey move away from your eye. Draw thisring finger tucked under the other fingers.Define where the ring finger tucks into thepalm with an overlapping wrinkle.
236 YOU CAN DRAW IN 30 DAYS
5. Keep looking at your left hand. Are yougetting tired of holding it up? You can alwaystake a digital picture with your phone or cam-era and draw from the screen or from a print.However, it’s a really great exercise to drawfrom the real world of light, shadows, andtrue depth. Looking at your left hand, noticehow your index finger angles away from thepalm of your hand. Notice the three sectionsof your index finger defined by the overlap-ping contour wrinkles. Draw this index fingerwith these overlapping curved segments.
6. Looking at your left hand, see how themiddle finger bends down in two distinctangles. Look at how the segments are definedby the overlapping wrinkles. I’m hoping thisbrings to mind our practice of contour lines inLesson 15. Remember we defined the direc-tion of the tubes with the direction of thesurface curves. We are doing exactly the samething here; fingers are basically small 3-Dtubes with defining curving contour lines.
ê
ë
í
Kistler 05_Kistler You Can Draw 10/21/10 12:22 PM Page 236
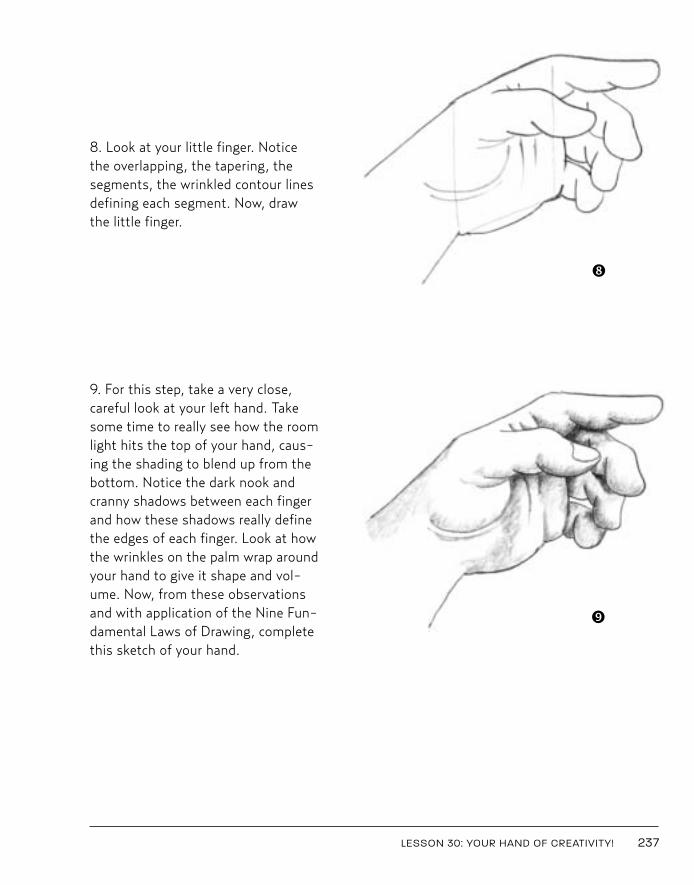
8. Look at your little finger. Noticethe overlapping, the tapering, thesegments, the wrinkled contour linesdefining each segment. Now, drawthe little finger.
9. For this step, take a very close,careful look at your left hand. Takesome time to really see how the roomlight hits the top of your hand, caus-ing the shading to blend up from thebottom. Notice the dark nook andcranny shadows between each fingerand how these shadows really definethe edges of each finger. Look at howthe wrinkles on the palm wrap aroundyour hand to give it shape and vol-ume. Now, from these observationsand with application of the Nine Fun-damental Laws of Drawing, completethis sketch of your hand.
LESSON 30: YOUR HAND OF CREATIVITY! 237
ì
î
Kistler 05_Kistler You Can Draw 10/21/10 12:22 PM Page 237
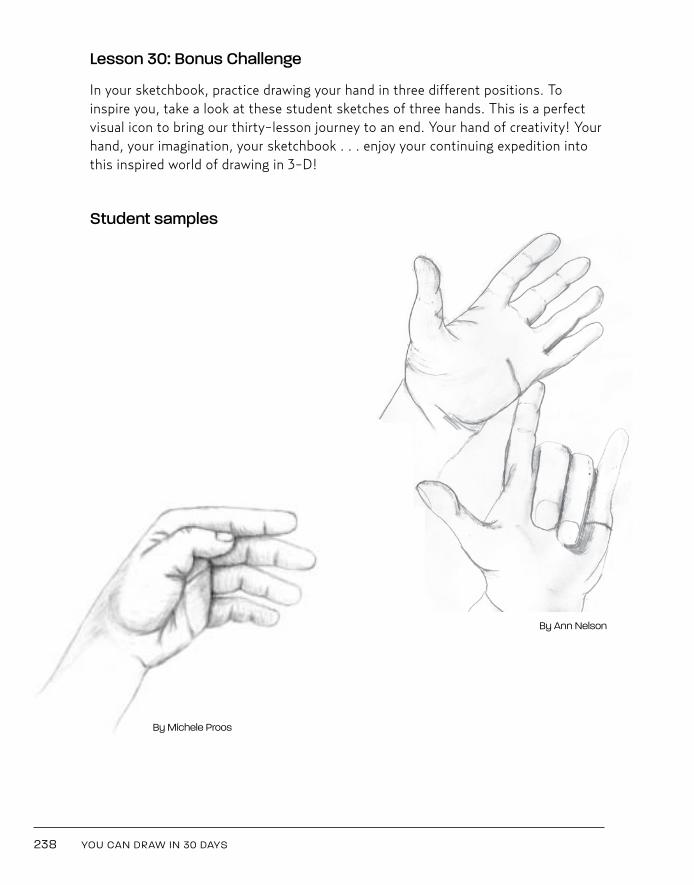
Lesson 30: Bonus Challenge
In your sketchbook, practice drawing your hand in three different positions. Toinspire you, take a look at these student sketches of three hands. This is a perfectvisual icon to bring our thirty-lesson journey to an end. Your hand of creativity! Yourhand, your imagination, your sketchbook . . . enjoy your continuing expedition intothis inspired world of drawing in 3-D!
Student samples
238 YOU CAN DRAW IN 30 DAYS
By Michele Proos
By Ann Nelson
Kistler 05_Kistler You Can Draw 10/22/10 9:57 AM Page 238

I want to thank you for sharing this time with me during these thirty lessons.What an accomplishment you have achieved! For three years, writing thisbook was an intense labor of creativity. At times thrilling, at times (during the
17th edit phase) similar to a root canal procedure, but as my friend McNair Wilson(www.mcnairwilson.com) says, “It’s supposed to be hard. IT’S ART!”
I trust you have found this journey to be as rewarding as I have. Please take afew minutes to e-mail me at www.markkistler.com, and let me know your thoughtsand experiences with this book. Please e-mail me scans of some of your favoritedrawings (300 DPI or less). I look forward to seeing your creative work!
This is just the beginning of an amazing life-enriching journey of creative discov-ery and visual expression! I am honored that you chose to ignite your passion fordrawing with me. Keep drawing every day, twenty or thirty minutes; doing so willcontinue to nourish your heart, mind, and soul.
Dream it! Draw it! Do it!
Mark KistlerHouston, Texas
Kistler 05_Kistler You Can Draw 10/25/10 11:22 AM Page 239

Lesson: __________________________ Date: ________________
Please use the following pages to practice your drawing lessons.
√√√√√√√√√√√√√√
Kistler 05_Kistler You Can Draw 10/21/10 1:21 PM Page 240

Lesson: __________________________ Date: ________________
Kistler 05_Kistler You Can Draw 10/21/10 1:21 PM Page 241

Lesson: __________________________ Date: ________________
Kistler 05_Kistler You Can Draw 10/21/10 1:21 PM Page 242

Lesson: __________________________ Date: ________________
Kistler 05_Kistler You Can Draw 10/21/10 1:21 PM Page 243

Lesson: __________________________ Date: ________________
Kistler 05_Kistler You Can Draw 10/21/10 1:21 PM Page 244

Lesson: __________________________ Date: ________________
Kistler 05_Kistler You Can Draw 10/21/10 1:21 PM Page 245

Lesson: __________________________ Date: ________________
Kistler 05_Kistler You Can Draw 10/21/10 1:21 PM Page 246

Lesson: __________________________ Date: ________________
Kistler 05_Kistler You Can Draw 10/21/10 1:21 PM Page 247

Lesson: __________________________ Date: ________________
Kistler 05_Kistler You Can Draw 10/21/10 1:21 PM Page 248