Embed Size (px)
Citation preview
Ray54EMarineVHF Radio
Owner’s Handbook
Document number: 81232-2
Date: August 2004

iii
About this Handbook
IntroductionThis handbook describes the Ray54E fixed VHF marine radio. The Ray54E provides two-way communications on all International marine channels, pre-set private channels, and (if programmed) all US and Canadian and marine channels. The Ray54E includes equipment for Class “D” Digital Selective Calling (DSC).
Conventions Used Throughout this handbook, the dedicated (labelled) keys are shown in bold capitals (for example: SCAN/SAVE). The LCD indicators and functions are shown in normal capitals (for example: TX).
➤ Operating procedures, which may consist of a single key-press or a sequence of numbered steps, are indicated by an arrow icon shown in the margin.
Technical AccuracyTo the best of our knowledge, the information in this handbook was correct as it went to press. However, our policy of continuous product improvement and updating may change specifications without prior notice. As a result, unavoidable differences between the product and handbook may occur from time to time. Raymarine cannot accept liability for any inaccuracies or omissions it may contain.
For the latest product information visit our website:
www.raymarine.com
WarrantyTo register your new Raymarine product, please take a few minutes to fill out the warranty registration card found at the end of this handbook. It is very important that you complete the owner information and return the card to the factory in order to receive full warranty benefits.
Raymarine is a registered trademark of Raymarine Limited.
© Raymarine Limited 2004

iv Ray54E VHF Radio
Important InformationMaritime Mobile Service Identity (MMSI)
The Ray54E includes equipment for Class “D” Digital Selective Calling (DSC). A nine-digit Maritime Mobile Service Identity (MMSI) number is required to operate the DSC equipment. In some areas, a radio operator licence is required before an MMSI number will be issued. You can request an MMSI number from same agency that issues radio or Ship Radio licences in your area. Once obtained, you can program the MMSI number into your Ray54E as described in this handbook.
Group MMSI IDA Group ID MMSI number can also be entered for vessels that are part of a group, such as a flotilla or racing fleet, enabling DSC communications within the group.
Automatic Transmitter Identification System (ATIS)If you purchased your Ray54E to include use on the inland waterways of the contracting governments of the “Regional Arrangement Concerning the Radiotelephone Service on Inland Waterways”— also known as the Basel Agreement1— your Ray54E will be programmed by your dealer to include Automatic Transmitter Identification System (ATIS) functionality. ATIS includes data at the end of radio transmission that identifies your station. ATIS operation can be turned on or off as needed via the radio’s Menu mode. See page 79.
Note: When ATIS is enabled, certain programming steps have been imple-mented to protect the integrity of the Basel Agreement, including the block-ing of DSC functions when ATIS is active. See Digital Selective Calling (DSC) on page 31 and ATIS Function on page 79.
Your ATIS ID number is derived from your vessel’s call sign. Your authorized Raymarine dealer can assist you in decoding your ATIS ID number, which you can then program into your Ray54E using the operation described on page 77.
1.The Basel Agreement includes Germany, Austria, Belgium, Bulgaria, Croatia,France, Hungary, Luxembourg, Moldova, the Netherlands, Poland, Romania, Rus-sian Federation, the Slovak Republic, Switzerland, the Czech Republic, Ukraine andthe Federal Republic of Yugoslavia.

v
SAFETY NOTICEYour Raymarine VHF radio generates and radiates radio frequency (RF) electromagnetic energy (EME). This equipment must be installed and operated in accordance with the instructions contained in this handbook. Failure to do so can result in personal injury and/or product malfunction.
CAUTION: Navigation AidAlthough we have designed this product to be accurate and reliable, many factors can affect its performance including equipment failure or defects, environmental conditions, and improper handling or use.
As a result, it should only be used as an aid to navigation and should never replace common sense and navigational judgement. Always maintain a permanent watch so you can respond to situations as they develop.
Antenna Mounting and EME ExposureFor optimal radio performance and minimal human exposure to radio frequency electromagnetic energy, make sure the antenna is:
• connected to the radio before transmitting• properly mounted• located where it will be away from people• located at least 1.5 metres (5 feet) from the radio’s main unit
Safe Compass DistanceSafe Compass Distance is 1 meter for a common mechanical compass; other compass types may require greater distances. To be sure, you should locate the radio as far as possible from the compass. Test your compass to verify proper operation while the radio is also operating.
EMC ConformanceAll Raymarine equipment and accessories are designed to the best industry standards for use in the recreational marine environment. Their design and manufacture conform to the appropriate Electromagnetic Compatibility (EMC) standards but correct installation and use is required to ensure that performance is not compromised.

vi Ray54E VHF Radio

vii
ContentsAbout this Handbook ........................................................................................... iii
Introduction ............................................................................................. iiiConventions Used ................................................................................... iiiTechnical Accuracy ................................................................................. iiiWarranty .................................................................................................. iii
Important Information ........................................................................................ivMaritime Mobile Service Identity (MMSI) ............................................. ivAutomatic Transmitter Identification System (ATIS) ............................. ivSAFETY NOTICE .................................................................................. iv
Chapter 1: Introduction .......................................................................................11.1 Ray54E Fixed Station VHF Radio ................................................... 11.2 Features ............................................................................................ 1
Chapter 2: Installation .........................................................................................32.1 Unpacking and Inspection ................................................................ 3
Equipment Supplied ..................................................................... 32.2 Planning the Installation ................................................................... 4
Typical Mounting Methods .......................................................... 4Flush Mounting ............................................................................. 4
2.3 Power Connections .......................................................................... 62.4 External Speaker Connections ......................................................... 72.5 Grounding ........................................................................................ 72.6 NMEA Data ..................................................................................... 72.7 Antenna Connections ....................................................................... 8
Antenna Mounting Suggestions ................................................... 8
Chapter 3: Getting Started ..................................................................................93.1 Keypad and Rotary Knobs ............................................................... 9
Microphone Keys ....................................................................... 10Main Unit Rotary Keys ............................................................... 10Main Unit Push Keys .................................................................. 10Microphone ................................................................................ 11
1. PTT .................................................................................... 112. UP/DOWN ........................................................................ 113. 16/PLUS ............................................................................ 114. HILO ................................................................................. 11
Main Unit .................................................................................... 115. CH ..................................................................................... 116. PWR/VOL ........................................................................ 117. SQ ..................................................................................... 118. DW/TRI ............................................................................ 11

viii Ray54E VHF Radio
9. CALL/MENU ................................................................... 1210. HILO/USER ................................................................... 1311. SCAN / SAVE ................................................................. 1312. 16/PLUS .......................................................................... 1413. CLEAR ........................................................................... 1414. DISTRESS ...................................................................... 14
3.2 LCD Display .................................................................................. 141. (HI/LO) TX Power .................................................................. 142. (TX) Transmitting ................................................................... 143. (RX) Receiving ....................................................................... 154. (LOCAL) Local/Distant Mode ............................................... 155. DSC Message ......................................................................... 156. ATIS Active ............................................................................ 157. NO GPS ................................................................................... 158. Battery Low ............................................................................ 159. (USER) Favourite Channel Mode ........................................... 1510. (SAVED) Memory Mode ...................................................... 1511. (WX) Weather Channel ......................................................... 1512. (ALERT) Weather Alert ........................................................ 1513. (U I C) Channel Set ............................................................... 1614. (A) Simplex Channel ............................................................ 1615. (B) Receive-only Channel .................................................... 1616. Channel Number ................................................................... 1617. Dot Matrix Display ............................................................... 16
Chapter 4: General Operations .........................................................................174.1 Turning the Power ON and OFF ..................................................... 174.2 Setting the Volume ......................................................................... 174.3 Setting the Squelch ......................................................................... 174.4 Setting the Power Output ................................................................ 174.5 Setting the Channel ........................................................................ 18
On the microphone... ............................................................. 18On the main unit... ................................................................. 18
4.6 Selecting a Weather Channel (If Available) ................................... 19Weather Alert Operation (If Available) ................................. 20
4.7 Selecting the Priority Channel ........................................................ 204.8 Selecting the Secondary Priority (PLUS) Channel ........................21
Reprograming the Secondary Priority (PLUS) Channel ............224.9 Transmitting ................................................................................... 234.10 Using the Scan Modes .................................................................... 23
All Scan ....................................................................................... 24Saved (Memory) Scan ................................................................ 24Priority All Scan ......................................................................... 25

ix
Priority Saved Scan ..................................................................... 254.11 Adding Channels to Memory ......................................................... 264.12 Using the Monitor Modes ............................................................... 27
Dual Watch ................................................................................. 27Tri Watch ..................................................................................... 28
4.13 USER Channel Mode ..................................................................... 294.14 DSC Call Operation ....................................................................... 294.15 Menu Mode Operation ................................................................... 30
Chapter 5: Digital Selective Calling (DSC) .......................................................315.1 DSC Call Function ......................................................................... 325.2 Individual Calls .............................................................................. 34
Making DSC Calls to Coast Stations .......................................... 34Transmitting an Individual Call .................................................. 34Receiving Individual Calls ......................................................... 37
5.3 Group Calls .................................................................................... 38Transmitting a Group Call .......................................................... 38Receiving Group Calls ................................................................ 40
5.4 All Ships Calls ................................................................................ 42Transmitting an All Ships Call .................................................... 42Receiving an All Ships Call ........................................................ 43
5.5 Distress Calls .................................................................................. 45Sending a Distress Call ............................................................... 45
Undesignated (Quick) Distress Call ..................................... 46Designated Distress Call ....................................................... 46
Cancelling a Distress Call Made in Error .................................... 48Receiving a Distress Call ............................................................ 48Receiving a Distress ACK Sent from a Coast Station ................. 49Receiving a Distress Relay Sent by Another Station .................. 49
5.6 Position Request ............................................................................. 50Specifying the Target Vessel ....................................................... 50Retrieving the Last Received Position Data ............................... 52Receiving a Position Request From Another Station ................. 53
5.7 Call Log .......................................................................................... 53Making a Call from a Call Log Entry .......................................... 54Saving an MMSI ID Number from a Call Log Entry .................. 55
5.8 DSC Distress Log ........................................................................... 56
Chapter 6: Menu Settings ..................................................................................576.1 Menu Function ............................................................................... 576.2 DSC Phonebook ............................................................................. 59
Adding an Entry .......................................................................... 59Editing an Existing Entry ............................................................ 61Deleting an Existing Entry .......................................................... 62

x Ray54E VHF Radio
6.3 Backlight Adjustment .................................................................... 636.4 Contrast Adjustment ....................................................................... 636.5 GPS/Time Setup ............................................................................. 64
When GPS Information Not Available ................................. 646.6 Settings ........................................................................................... 66
Latitude/Longitude Display ........................................................ 67Time Display ............................................................................... 67Time Offset ................................................................................. 68Time Format ................................................................................ 68COG/SOG Display ..................................................................... 68
6.7 Radio Setup .................................................................................... 69Band ............................................................................................ 69Channel (CH) Name ................................................................... 70
Display Name ....................................................................... 70CH Info ................................................................................. 70Deleting a Channel Name Entry ........................................... 70
Ring Volume ............................................................................... 70Key Beep ..................................................................................... 70
6.8 DSC Setup ...................................................................................... 71My MMSI ID .............................................................................. 72Group MMSI Setup .................................................................... 73
Adding a New Group ......................................................74Editing an Existing Entry ...................................................... 76
My ATIS ID ................................................................................ 77ATIS Function ............................................................................. 79Position Reply ............................................................................. 81Automatic Channel Changing for Incoming Calls .....................82
Procedure When Enabled ..................................................... 82Procedure When Disabled .................................................... 83
6.9 Resetting Factory Defaults ............................................................. 84
Chapter 7: Customer Service ............................................................................857.1 How to Contact Raymarine ............................................................ 85
Appendix A: Specifications ...............................................................................87Appendix B: Channel List ...................................................................................89
International Marine VHF Channels & Frequencies.................. 89European Private Channels and Frequencies .............................. 92WX Channels (North America only) .......................................... 92U.S. Marine VHF Channels and Frequencies............................. 93Canadian Marine VHF Channels and Frequencies .................... 96
Appendix C: Glossary .......................................................................................101Index ............................................................................................103

Chapter 1: Introduction 1
Chapter 1: Introduction
1.1 Ray54E Fixed Station VHF RadioThe Ray54E marine VHF radiotelephone is a microprocessor-controlled transceiver that provides reliable simplex (single frequency) and semi-duplex (two frequency) communications. This handbook describes the physical and functional characteristics of the radio.
Figure 1-1: Ray54E VHF Radio
The Ray54E provides two-way communications on all International marine channels, pre-set private channels, and (if programmed) all US and Canadian marine and weather channels. Refer to the Frequency Tables in Appendix B, which list all marine VHF channels available in your radio. You should familiarize yourself with these tables to ensure proper channel usage.
1.2 FeaturesThe Ray54E is designed and manufactured to provide ease of operation with excellent reliability. The Ray54E has many enhanced features, including:
• Waterproof to IPX-7 standard
• Anti-glare 2" x 1.5" LCD with 4 x 12 dot matrix display
• Nine (9) brightness and contrast adjustments• Dedicated key for switching to Priority Channel 16

2 Ray54E VHF Radio
• Programmable Secondary Priority (PLUS) Channel key
• ATIS operation, if required
• Private Channels (if so licensed)
• All Scan, Memory Scan and 2 Priority Scan functions• Dual/Tri Watch Monitor modes
• Each channel displays an editable 12-character Channel Name• Enhanced GPS Position Data gives Latitude and Longitude to 1/10,000
of a minute plus Time, SOG and COG data from any NMEA input• Automatically distinguishes between calls made to Ship or Coast Stations• Low and High Voltage detection with alarm• User Mode provides easy access to favourite channels• Key Beep volume adjustment (3 levels)
Digital Selective Calling (DSC)The Ray54E includes equipment for Class “D” Digital Selective Calling (DSC). DSC protocol is a globally applied system used to send and receive digital calls. DSC uses a unique Maritime Mobile Service Identity (MMSI) number to direct DSC calls directly to your radio, much like a telephone number.When the DSC signal is received, the radio quickly switches over to channel 70 and performs the corresponding operation.
Note: An MMSI number is required to operate the DSC equipment in this ra-dio. You can program the MMSI number yourself one time only using the Menu Operation described in this handbook. See My MMSI ID on page 72.
The Ray54E includes the following DSC features:
• Separate receiver dedicated to handling DSC Calls on channel 70
• Position Request function sends GPS position data to or receives position data from other stations
• Phonebook for automatically making DSC calls
• Quick Save feature saves incoming DSC Calls and the caller’s associated MMSI number directly into the phonebook
• Quick Call feature sends Individual Calls or Group Calls directly from the phonebook, just like the redial function on a telephone
• Three (3) Group IDs for making DSC Calls only to stations in your group, such as a flotilla or fishing fleet
DSC functions are fully described in Chapter 5:

Chapter 2: Installation 3
Chapter 2: Installation
2.1 Unpacking and InspectionUse care when unpacking the unit from the shipping carton to prevent damage to the contents. It is also good practice to save the carton and the interior packing material in the event you must return the unit to the factory.
Equipment SuppliedThe following is a list of materials supplied with the Ray54E:
The following is a of optional equipment for the Ray54E:
Table 2-1: Supplied Components
Part Number Description
E43024E43025
Ray54E, WhiteRay54E, Charcoal Gray
81232 Handbook, Ray54E
R49108R49128R49133
Power Cord, Ray54ENMEA Cable, Ray54ESpeaker Cord, Ray54E
R49093R49095
Mounting Yoke for White Ray54EMounting Yoke for Charcoal Ray54E
R49094R49096
Yoke Knob and Spacer for White Ray54EYoke Knob and Spacer for Charcoal Ray54E
R49104R49105
Microphone Bracket for White Ray54EMicrophone Bracket for Charcoal Ray54E
R49109R49110
Sun Cover, WhiteSun Cover, Charcoal Gray
Mounting Hardware:Screws (x4) for Mounting YokeScrews (x2) for Microphone Bracket Screw/Lock Washer (x1) for Grounding
Table 2-2: Optional Equipment
Part Number Description
E46034 Flush Mount Kit, A Series VHF Radios

4 Ray54E VHF Radio
2.2 Planning the InstallationWhen planning the installation of your Ray54E, consider the following conditions to ensure dependable and trouble-free operation.
Mount the main unit to allow easy access from the location where the boat is normally navigated.
The main unit is designed to be mounted horizontally or vertically on a flat bulkhead. Select a location that is non-metallic, dry, protected, well-ventilated, and free from high operating temperatures and excessive vibration. Provide sufficient space behind the main unit to allow for proper cable connections to the rear panel connectors. Locate the main unit as near as possible to the power source yet as far apart as possible from any devices that may cause interference such as motors, generators, and other on board electronics. The radio should be protected from prolonged direct exposure to rain and salt spray.
The Ray54E is not designed to be mounted in engine compartments. Do not install the radio in a location where there may be flammable vapours (such as in an engine room or compartment, or in a fuel tank bay), water splash or spray from bilges or hatches, where it is at risk from physical damage from heavy items (such as hatch covers, tool boxes, etc.), or where it might be covered by other equipment. Locate the radio at least 1.5 meters from the antenna.
Safe Compass Distance is 1 meter for a common mechanical compass; other compass types may require greater distances. To be sure, you should locate the radio as far as possible from the compass. Test your compass to verify proper operation while the radio is also operating.
Typical Mounting MethodsThe Ray54E can be conveniently mounted on a chart table, bulkhead, overhead, or any other desired location. Refer to the following figure for typical mounting methods.
Flush MountingIn addition to the typical Mounting Methods, the Ray54E may also be flush mounted using the optional E46034 Flush Mount Kit. Instructions for installing the radio using the Flush Mount Kit are included with the kit. These kits are available from your Raymarine dealer.

Chapter 2: Installation 5
Figure 2-1: Typical Mounting Methods
CAUTION: Make sure there are no hidden electrical wires or other items behind the desired location before proceeding. Check that free access for mounting and cabling is available.
Figure 2-2: Mounting Dimensions

6 Ray54E VHF Radio
2.3 Power ConnectionsThe red and black power cord provides connections to DC power. The red (+) wire is connected to the positive terminal of the power source and contains a 7 amp in-line fuse. The black (-) wire is connected to the negative (ground) of the power source. Should the power connections be inadvertently reversed, the unit will not power up but no damage will occur. Check the polarity with a VOM (Voltage/Ohm Meter) and reconnect observing correct polarity. If the fuse ever needs replacement, be sure to use the same type and rating.
Connect your Ray54E to the nearest primary source of the boat's DC power. A typical source may be a circuit breaker on the power panel or a fuse block near the unit. When connecting to either of these sources, the circuit breaker or other in-line fuse should be rated at 10 amps.
The power cord should be long enough to reach the DC power source. If additional wire length is required, the cable can be extended by adding more cable as necessary. However, for power cable runs longer than 15 feet, larger wire diameter size should be used to prevent voltage line loss.
To ensure adequate current draw to the equipment, Raymarine recommends that you use lugs to connect the power cable to the DC supply and that the lug connections be both crimped and soldered. The connection terminal should be clean, with no sign of corrosion.
The Ray54E is designed to be operated on a 12 volt (nominal) system. If battery voltage drops below 10.5 VDC (approx), the icon appears on the LCD (see page 15). You should discontinue using the radio if a low voltage condition occurs as performance would be unreliable. If voltage exceeds 16 VDC, the message EXCESSIVE VOLTAGE appears on the dot matrix display and an alarm is sounded. You should immediately disconnect the radio if a high voltage condition occurs as the unit could become damaged.
Figure 2-3: Wiring Connections

Chapter 2: Installation 7
2.4 External Speaker ConnectionsLocated just below the power cord is a cable for connection to an optional external speaker. Connect the white(+) wire and black (–) wire to the speaker observing polarity as it is marked on the speaker. When connected, the external speaker will function simultaneously with the internal speaker.
2.5 GroundingWhile special grounding is not generally required for VHF radiotelephone installations, it is good marine practice to properly ground all electronic equipment to the boat’s earth ground system. The Ray54E can be connected to ground by installing the supplied screw and lock washer in the threaded hole labelled GND on the main unit’s rear panel just below the antenna jack. Then attach a wire from this screw to the nearest ship’s earth ground connection point. The recommended wire to be used for such grounding is #10 AWG.
2.6 NMEA DataThe Ray54E accepts NMEA 0183 (V1.5) data from a position determining device (such as a GPS) to provide the Latitude and Longitude position information that is transmitted during a DSC Distress Call.
When valid NMEA signal is detected, the GPS indicator appears on the LCD. When no valid NMEA signal is detected, the NO GPS indicator appears.
Connect the NMEA OUT + and NMEA OUT – signals from the positioning device to the NMEA IN + (yellow) and NMEA IN – (green) wires in the radio’s NMEA cable.
An example of how to connect the NMEA cables and power supply using a suitable connector block is shown in the diagram below. For specific instructions how to connect your particular GPS, please refer to the handbook that came with that device.
Figure 2-4: GPS Wiring

8 Ray54E VHF Radio
2.7 Antenna ConnectionsThe coaxial VHF antenna cable connects to the Ray54E antenna jack on the rear panel using a PL259 VHF type connector. The antenna cable length can be critical to performance. If you are uncertain, contact a professional installer or call Raymarine Product Support. If a longer cable length is required, RG-8x (50 ohm) marine coaxial cable or equivalent cable can be used for runs up to a maximum of 50 feet. If the distance required is even greater, Raymarine recommends using low loss RG-213 or equivalent cable for the entire run to avoid excessive losses in power output.
If the antenna RF connector is likely to be exposed to the marine environment, a protective coating of grease (Dow Corning DC-4 or similar) can be applied to the connector before connecting it to the radio. Any other extensions or adapters in the cable run should also be protected by silicon grease and then wrapped with a waterproofing tape.
Antenna Mounting SuggestionsMounting the VHF antenna properly is very important because it will directly affect the performance of your VHF radio. Use a VHF antenna designed for marine vessels.
Since VHF transmission is essentially line-of-sight, mount the antenna at a location on the vessel that is free of obstruction to obtain maximum range.
If you must extend the length of the coaxial cable between the antenna and the radio, use a coaxial cable designed for the least amount of power loss over the entire cable length.
Antenna Mounting and EME ExposureFor optimal radio performance and minimal human exposure to radio frequency electromagnetic energy, make sure the antenna is:• connected to the radio before transmitting• properly mounted• located where it will be away from people• located at least 1.5 metres (5 feet) from the radio

Chapter 3: Getting Started 9
Chapter 3: Getting Started
3.1 Keypad and Rotary KnobsSeveral of the keys on the front panel of the main unit serve multiple purposes. For the most part, the function indicated on the first line of the key is accessed by pressing and releasing that key. The function indicated on the second line of the key is accessed by pressing and holding the key for three seconds.
Figure 3-1: Ray54E Keys Layout

10 Ray54E VHF Radio
Microphone Keys
Main Unit Rotary Keys
Main Unit Push Keys
Key Name Press & Release (<3 sec.) Press & Hold (>3 sec.)
1. PTT Push-to-Talk Push-to-Talk
2. UP/DOWN Channel increment/decrement and navigating menu item selections
Rapid channel change and navigating menu item selections
3. 16/PLUS Switch between the Priority and Working Channels
Switches to Secondary Priority (PLUS) channel; If already tuned to the PLUS channel, programs a new PLUS chan-nel.
4. HI/LO TX Power High/Low and ACCEPT key for menu item selections
TX Power High/Low and ACCEPT key for menu item selections
Key Name Function
5. CH/PUSH Rotate to increment/decrement channels or navigate menu item selections
6. PWR/VOL Power radio ON / OFF and adjust volume level
7. SQ Adjust squelch threshold level
Key Name Press & Release (<3 sec.) Press & Hold (>3 sec.)
5. CH/PUSH ACCEPT menu item selections ACCEPT menu item selections
8. DW/TRI Dual Watch Mode Tri Watch Mode
9. CALL/MENU Activate DSC functions Activate Menu functions
10. HL/USER TX Power High/Low USER (Saved Memory Channel) Mode
11. SCAN/SAVE Scan ON/OFF SAVE/DELETE channel to/from memory
12.16/PLUS Switch between the Priority and Working Channels
Switches to Secondary Priority (PLUS) channel; If already tuned to the PLUS chan-nel, programs a new PLUS channel.
13.CLEAR Cancel function Weather Channel Mode, if so programmed
14. DISTRESS Designate Distress Type Make Distress Call

Chapter 3: Getting Started 11
Microphone
1. PTTPress this Push-to-Talk key to transmit.
2. UP/DOWNUse the arrow keys to change the active channel number. Press and hold for rapid channel changing. You can also use these keys to scroll through DSC Call and Menu Mode options and make item selections.
3. 16/PLUS Use this key to switch to the priority channel or to change the value of the Secondary Priority (PLUS) Channel.
4. HILOUse this key to toggle the transmit power from HIGH to LOW. You can also use it to accept DSC Call and Menu Mode selections.
Main Unit
5. CHRotate this knob to change the current channel number and to change values in Menu mode or during programming. Press the knob to enter values selected in Menu mode or during programming.
6. PWR/VOLUse this knob to turn the radio ON and OFF and to set the volume.
7. SQUse this knob to set the squelch threshold, which cuts off the receiver when the signal is too weak for reception of anything but noise.
8. DW/TRIPress and release this key to select Dual Watch mode, which monitors the current working channel and CH 16 in cycle. Press and hold to select Tri Watch, which monitors CH 16, the current working channel and the channel you have set as the Secondary Priority (PLUS) Channel in cycle. See Section 4.12.

12 Ray54E VHF Radio
9. CALL/MENUPress and release this key to select to enter DSC Call Mode, which is used for making DSC Calls and viewing the DSC Call Logs and the DSC Call Phonebook.
A Maritime Mobile Service Identity (MMSI) number is required to operate the DSC equipment in this radio. This number directs DSC calls directly to your radio, much like a telephone number. You can program the MMSI number yourself one time only using the Menu Operation described in Section 6.8, DSC Setup. Otherwise, your Raymarine dealer can program or change the number for you.
If the MMSI number has not yet programmed, the message DSC IS NOT OPERATIONAL...PLEASE ENTER MMSI ID is displayed in the dot matrix display when you press and release CALL/MENU.
DSC Call menu structure is outlined in the following drawing. Full details on DSC call operation are described in Chapter 5:

Chapter 3: Getting Started 13
Press and hold CALL/MENU to select Menu Mode, which is used to set up the radio. The menu structure is outlined in the following drawing. Menu operations are fully described in Chapter 6:
10. HILO/USERPress and release this key to toggle the transmit power from HIGH to LOW. Press and hold to select User Channel Mode, which displays only the channels that you have saved to memory. User Mode is described in Section 4.13.
11. SCAN / SAVEPress and release this key to enter one of the Scan Modes, which are described in Section 4.10. Press and hold to enter a channel into the radio’s memory. This function is described in Section 4.11.

14 Ray54E VHF Radio
12. 16/PLUS Use this key to switch to the priority channel or to change the value of the Secondary Priority (PLUS) Channel.
13. CLEARPress and release to terminate a function and return to the last-used channel. Press and hold to select the Weather mode (if available).
14. DISTRESSPush down the spring-loaded cover and press this key to make a DSC Distress Call. Instructions for making a Distress Call are described in Section 5.5.
3.2 LCD DisplayThe following describes the functional characters on the Ray54E’s LCD.
Figure 3-2: Ray54E LCD Layout
1. (HI/LO) TX PowerIndicates whether transmit power is set for 25 watts (HI) or 1 watt (LO).
2. (TX) TransmittingIndicates the PTT is being pressed and the radio is transmitting.

Chapter 3: Getting Started 15
3. (RX) ReceivingIndicates that the radio is receiving a radio signal.
4. (LOCAL) Local/Distant ModeIndicates the radio is in Local Reception mode, which decreases receiver sensitivity in high traffic areas to decrease unwanted reception. Only available in Ray54 (North American) model.
5. DSC MessageIndicates the radio has received a DSC Call. Details of the call can be viewed in the DSC log. See Section 5.8.
6. ATIS ActiveIndicates ATIS transmission is enabled.
7. NO GPSWhen GPS appears, positional data is available. When NO GPS appears, the radio is not receiving positional data.
8. Battery LowIndicates vessel battery voltage is below 10.5 VDC, which is the lowest voltage at which the radio can be reliably operated.
9. (USER) Favourite Channel ModeIndicates the radio is in User Mode. User Mode displays only the channels that you have saved to memory, enabling you to easily scan your favourite channels while bypassing unwanted or seldom-used channels.
10. (SAVED) Memory ModeIndicates the current channel has been saved in memory. Appears during Saved Scan mode. Only saved channels are scanned during USER mode.
11. (WX) Weather ChannelWeather channel mode is active. US and Canada only.
12. (ALERT) Weather AlertMonitoring for weather alert broadcasts. US and Canada only.

16 Ray54E VHF Radio
13. (U I C) Channel SetIndicates which channel set is selected: US, International or Canadian.
Note: Special licensing is required to receive the US and Canadian channel sets.
14. (A) Simplex ChannelIndicates that the currently-selected channel is simplex; you transmit and receive on the same frequency. Used with US and Canadian channels only.
15. (B) Receive-only ChannelIndicates that you cannot transmit on the currently-selected channel; it is receive-only. Used with Canadian channels only.
16. Channel NumberDisplays the current channel number.
17. Dot Matrix DisplayIndicates radio functions or special conditions. The type of information displayed depends on the situation. Figure 3-3 demonstrates a typical screen in normal operating mode. The screen is different when sending/receiving a DSC Call (see Chapter 5:) or setting up a Menu item (see Chapter 6:).
Note: In the following sample:(1) The Channel Name is editable (see page 70).(2) Valid position data received from a GPS or manually entered (see page 64).(3) Last line may contain COG/SOG data instead of time (see page 68).
Figure 3-3: Typical Dot Matrix Display Data

Chapter 4: General Operations 17
Chapter 4: General Operations
4.1 Turning the Power ON and OFFTurn the PWR/VOL knob clockwise until it clicks.When the unit powers up in Normal mode it:
1. Beeps, illuminates the backlight at full brightness, and displays all seg-ments and indicators for 2 seconds.
2. Displays the software version number on the dot matrix display.
3. Recalls the last CH number, TX power settings and operation mode.If no last-used setting data exists, goes to CH 16 and high TX Power.
When GPS Data is available, extended position data is also displayed with the offset time on the dot matrix display. This information will be displayed when display option for the position and time is enabled on the Menu. See Section 6.5.
To turn the unit OFF, rotate the Volume knob completely counter clockwise until it clicks.
4.2 Setting the VolumeAdjust the PWR/VOL knob to control the loudspeaker volume level. Turn clockwise to increase the volume; counter clockwise to decrease the volume.
Note: Key press beep volume is also controlled by the VOL level.
4.3 Setting the SquelchThe Squelch circuit sets the threshold for cutting off the receiver when the signal is too weak for reception of anything but noise.
To properly set the squelch, rotate the SQ knob counter clockwise until audio is heard. Then rotate clockwise until background noise disappears.
4.4 Setting the Power OutputThe choice of power output is dependent upon the distance of transmission and transmitting conditions. International Regulations state you must use the minimum power possible for satisfactory communication.

18 Ray54E VHF Radio
Press and release the HL/USER key on the main unit or microphone to toggle the TX power from LOW (1 watt) to HIGH (25 watts). The corresponding LO or HI indicator appears on the LCD.
As a part of marine communications courtesy, initial contact should always be attempted using low power. You should switch to high power only when contact can not be made on low power in emergency situations.
Note: Some channels are limited by regulation to be low power only. If the HILO operation request is denied, an error tone beeps.
4.5 Setting the Channel
On the microphone...Press and release the UP arrow to increment the channel number.
Press and release the DOWN arrow to decrement the channel.
Press and hold either key for rapid channel scrolling.
On the main unit...Rotate the CH knob clockwise to increment the channel number.
Rotate the CH knob counter clockwise to decrement the channel number.

Chapter 4: General Operations 19
4.6 Selecting a Weather Channel (If Available)The US National Oceanic and Atmospheric Administration (NOAA) broadcasts continuous weather reports and severe weather alerts, as needed. If so equipped, your Ray54E is programmed to receive 10 weather channels and sound an alarm if a weather alert is received.
Press and hold the CLEAR key to enter Weather mode.
The WX indicator appears on the LCD. Rotate the CH knob to select from channels WX01 through WX10.
Press and release the CLEAR key again to return to normal operation.
Note: 1. WX broadcasts can only be heard in the US and Canada.
2. The Ray54E can receive these broadcasts only if the unit has been upgraded by the distributor to use WX Channels.
3. During Weather mode, the PTT, HILO/USER, SCAN/SAVE and DW/TRI keys are disabled and an error beep sounds if pressed.

20 Ray54E VHF Radio
Weather Alert Operation (If Available)Weather Alert is toggled ON and OFF by pressing and holding CLEAR key in the weather mode. The ALERT indicator illuminates.
When Weather Alert function is enabled and the radio is tuned to the normal working channel, the last-used weather channel is checked every four minutes for weather alert tone. If the alert tone is detected, the WX and ALERT indicators flash and an alarm sounds.
The radio automatically turns to the currently-monitored WX channel where the weather alert has been detected. The alert is detected in all modes of operation (Standby, Dual and Tri Watch, Scan, etc.)
Note: The Ray54E can receive weather alert broadcasts in the US or Cana-da only if the unit has been programmed by the distributor to use WX Chan-nels.
4.7 Selecting the Priority ChannelThe Ray54E provides you with a dedicated key for switching to the Priority Channel 16.
If not already tuned to the Priority Channel 16, press and release the 16/PLUS key to switch to CH16 at high power.
PRIORITY CH appears in the dot matrix display.
If already on CH 16, press and release the 16/PLUS to return to the last-used working channel.
Note: When the priority channel is selected, it is always set to HIGH trans-mit power. You may reduce power if desired by pressing the HI/LO key.
The 16/PLUS key also can be used to cancel all modes and switch to CH 16.

Chapter 4: General Operations 21
Note: When you press the 16/PLUS key, the radio always switches to HIGH power. You can use the HL/USER key to change to LOW power.
4.8 Selecting the Secondary Priority (PLUS) ChannelThe Ray54E enables you to program the 16/PLUS key to store a Secondary Priority or Favourite (PLUS) Channel. The default is CH 9.
If on a working channel, press and hold the 16/PLUS for greater than 3 seconds to switch to the Secondary Priority (PLUS) Channel at high power. The default is CH 9.
PRIORITY CH appears in the dot matrix display.
If on primary Priority CH16, press and hold the 16/PLUS for greater 3 seconds to switch to the Secondary Priority (PLUS) Channel at HI power. The default is CH 9.

22 Ray54E VHF Radio
If already on the Secondary Priority (PLUS) Channel, press and release the 16/PLUS key to switch to Priority Channel 16 at high power.
Reprograming the Secondary Priority (PLUS) Channel1. Press and hold the 16/PLUS key for greater 3 seconds to switch to the
Secondary Priority (PLUS) Channel.
2. Press and hold the 16/PLUS key for greater 3 seconds again to switch to Reprogram mode. The current Secondary Priority (PLUS) Channel flashes.
3. Change the channel number with the CH key.
4. Push the CH key to ACCEPT the new Secondary Priority (PLUS) selec-tion. An alert tone sounds to indicate that the Secondary Priority (PLUS) Channel has been changed.
Note: During the reprogramming of the Secondary Priority (PLUS) Chan-nel, the PTT and DW/TRI keys are disabled and an error beep sounds if pressed.

Chapter 4: General Operations 23
4.9 TransmittingPress and hold the Push-to-Talk (PTT) key on the microphone to transmit on the selected channel, then release to receive. The TX indicator appears during transmission.
Note: International regulations and good communications practice dictate that you not interfere with other communications. Before transmitting, listen to make sure the channel is clear.
The radio is equipped with a timeout timer in the event of a stuck key. After PTT has been held continuously for 5 minutes, transmission is discontinued and the radio automatically returns to receive mode. An Error beep is emitted 10 seconds before the time out is triggered and TX flashes on the display until PTT is released.
The TX time out timer is reset once the PTT key is released.
Note: If the current channel is receive-only, an alert tone sounds when PTT is pressed, indicating such a transmission is not permitted.
4.10 Using the Scan ModesThe Ray54E is equipped with four types of scan options: All Scan, Saved (Memory) Scan, Priority All Scan and Priority Saved Scan. If there are no channels in memory, the default is All Scan.
This function automatically searches for broadcasting channels. If a transmission is received, the scan stops on the receiving channel as long as it is present. If the signal is lost for five seconds, the radio resumes scanning.
During the Scan Modes:
• Press the microphone Channel UP/DOWN keys or rotate the CH knob on the main unit to change the scan direction. UP (CH key)/clockwise (CH knob) increments the channel while DOWN (CH key) /counter clock-wise (CH knob) decrements it.
• Press and release SCAN/SAVE to terminate the SCAN mode.
• Press and release CLEAR to terminate the SCAN mode.
• Press 16/PLUS to terminate the SCAN mode and tune to the Priority Channel.
• DW/TRI and HILO/USER keys are disabled.
Note: Scan modes are disabled when the ATIS operation is active.

24 Ray54E VHF Radio
All ScanPress and release the SCAN/SAVE key when no channels are stored in memory to activate the All Scan function.
ALL SCAN appears on the dot matrix display.
In All Scan mode, all channels in the channel set are scanned in sequence, assuming no channels have been stored in memory. After the last channel number has been scanned, the cycle repeats.
All Scan is demonstrated in the figure to the left.
Saved (Memory) ScanPress and release the SCAN/SAVE key when there is at least one channel in memory to activate the Saved Scan function.
SAVED SCAN appears on the dot matrix display.
In Saved Scan mode, only the channels that have been saved in memory are scanned in sequence. After the last saved channel number has been scanned, the cycle repeats.
Saved Scan is demonstrated in the figure to the left.
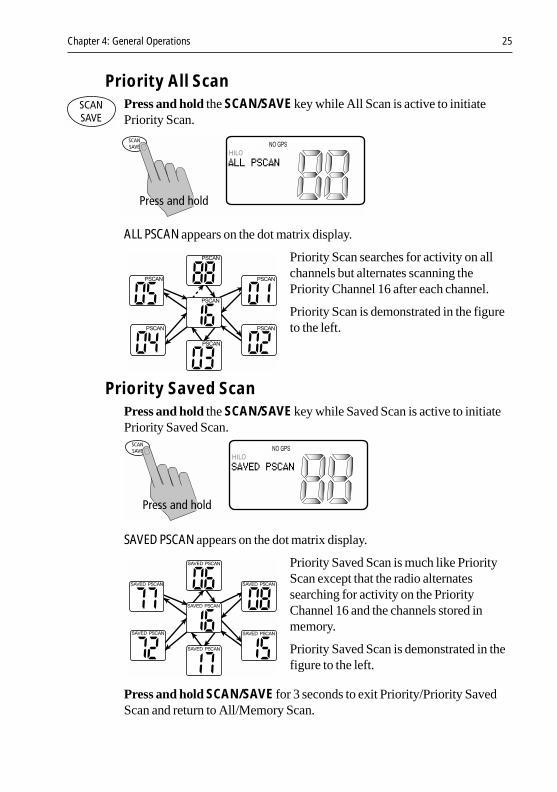
Chapter 4: General Operations 25
Priority All ScanPress and hold the SCAN/SAVE key while All Scan is active to initiate Priority Scan.
ALL PSCAN appears on the dot matrix display.
Priority Scan searches for activity on all channels but alternates scanning the Priority Channel 16 after each channel.
Priority Scan is demonstrated in the figure to the left.
Priority Saved ScanPress and hold the SCAN/SAVE key while Saved Scan is active to initiate Priority Saved Scan.
SAVED PSCAN appears on the dot matrix display.
Priority Saved Scan is much like Priority Scan except that the radio alternates searching for activity on the Priority Channel 16 and the channels stored in memory.
Priority Saved Scan is demonstrated in the figure to the left.
Press and hold SCAN/SAVE for 3 seconds to exit Priority/Priority Saved Scan and return to All/Memory Scan.

26 Ray54E VHF Radio
Press and release the CLEAR key to exit Priority/Priority Saved Scan and return to the last-used channel.
4.11 Adding Channels to MemoryThe Ray54E can store any channel (including Private Channels). The stored channels are the ones scanned in the Saved (Memory) Scan mode.
➤ To Add Channels to Memory
1. During normal operation mode, use the CH knob to select the desired channel for programming.
2. Press and hold the SCAN/SAVE key for 3 seconds.
The SAVED icon appears to indicate the current channel has been saved in memory. Any number of channels can be saved as memory channels.
➤ To delete channels from memory
1. During the normal mode, use the CH knob to select the channel to be deleted.
2. Press and hold the SCAN/SAVE key for 3 seconds.
The selected channel is deleted from memory.
To view the channels set in memory, switch to USER mode, as described in Section 4.13, USER Channel Mode.

Chapter 4: General Operations 27
4.12 Using the Monitor ModesThe Watch Modes monitor the programmed Priority Channel and other user-selected channel(s). The watch is halted when activity is detected on a monitored channel. The Ray54E is equipped with 2 types of monitor operations: Dual Watch and Tri Watch.
Note: Monitor modes are disabled when the ATIS operation is active.
Dual WatchPress and release the DW/TRI key to activate the Dual Watch mode.
DUAL CH16 appears in the dot matrix display.
Dual Watch monitors the current working channel and Channel 16 in cycle.
Dual Watch is demonstrated in the figure to the left; the sample working channel is CH 72.
Press and release the DW/TRI key to terminate Dual Watch and return to the previous working channel.
Press and hold the DW/TRI key to terminate Dual Watch mode and go into Tri Watch mode.
Press and release the CLEAR key to terminate Dual Watch mode and return to the last-used channel.
Press and release the 16/PLUS key to terminate Dual Watch mode and switch to the Priority Channel.
Note: During Dual Watch mode, the SCAN/SAVE, USER and CH keys are inactive and sounds an error beep if pressed.

28 Ray54E VHF Radio
Tri WatchPress and hold the DW/TRI key for 3 seconds to activate Tri Watch mode.
TRI CH16 09 appears on the dot matrix display.
Tri Watch monitors in cycle channel 16, the current working channel and the channel you have set as the Secondary Priority (PLUS) Channel.
Tri Watch is demonstrated in the figure to the left; the sample working channel is channel 72.
Press and release the DW/TRI key to terminate Tri Watch and return to the previous working channel.
Press and release the 16/PLUS key to terminate Tri Watch mode and switch to the Priority Channel.
Press and release the CLEAR key to terminate Tri Watch mode and return to the last-used channel.
Note: During Tri Watch Mode, the SCAN/SAVE, USER and CH keys are in-active and an error beep sounds if pressed.

Chapter 4: General Operations 29
4.13 USER Channel ModePress and hold the HL/USER key while in normal operation mode to enter User Mode. The USER and SAVED indicators appear.
User Channel Mode displays only the channels that you have saved to memory, which enables you to easily use your favourite channels while bypassing unwanted or seldom-used channels during a scan.
Note: The procedure for saving a channel to memory is outlined in Section 4.11, Adding Channels to Memory.
While in User Mode the following operations can be performed:
• Press and release the SCAN/SAVE key to start Memory Scan mode.
• Press and hold the SCAN/SAVE key to delete the current channel from memory list.
• Press 16/PLUS to end User mode and switch to the Priority Channel.
Press and release the CLEAR key to quit User mode and return to the last-used working channel.
Press and hold the HL/USER key for 3 seconds to quit User mode and return to the last-used working channel.
Note: You cannot switch Channel Sets while in User Mode.
4.14 DSC Call OperationPress and release the CALL/MENU key while in normal operation mode to enter Call Mode.
DSC Call mode is fully described in Chapter 5:

30 Ray54E VHF Radio
4.15 Menu Mode OperationPress and hold the CALL/MENU key while in normal operation mode to enter Menu Mode.
Menu mode is fully described in Chapter 6:
Chapter 5: Digital Selective Calling (DSC) 31
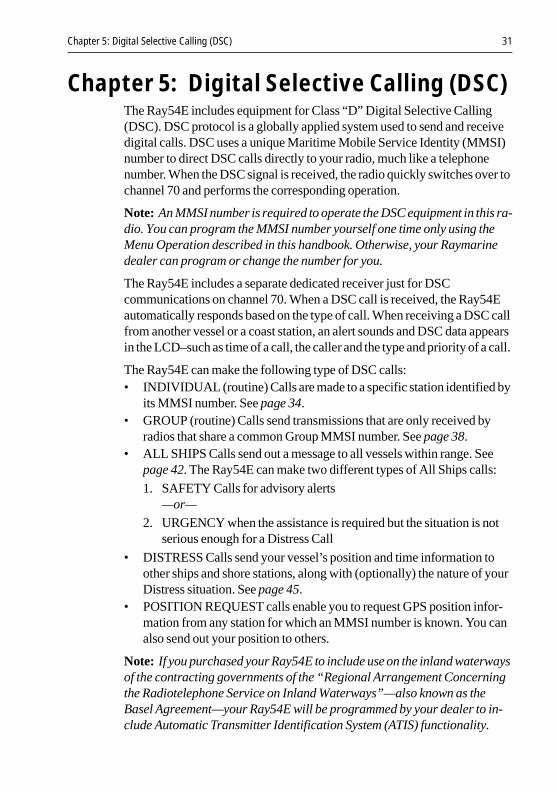
Chapter 5: Digital Selective Calling (DSC)The Ray54E includes equipment for Class “D” Digital Selective Calling (DSC). DSC protocol is a globally applied system used to send and receive digital calls. DSC uses a unique Maritime Mobile Service Identity (MMSI) number to direct DSC calls directly to your radio, much like a telephone number. When the DSC signal is received, the radio quickly switches over to channel 70 and performs the corresponding operation.
Note: An MMSI number is required to operate the DSC equipment in this ra-dio. You can program the MMSI number yourself one time only using the Menu Operation described in this handbook. Otherwise, your Raymarine dealer can program or change the number for you.
The Ray54E includes a separate dedicated receiver just for DSC communications on channel 70. When a DSC call is received, the Ray54E automatically responds based on the type of call. When receiving a DSC call from another vessel or a coast station, an alert sounds and DSC data appears in the LCD–such as time of a call, the caller and the type and priority of a call.
The Ray54E can make the following type of DSC calls:• INDIVIDUAL (routine) Calls are made to a specific station identified by
its MMSI number. See page 34.• GROUP (routine) Calls send transmissions that are only received by
radios that share a common Group MMSI number. See page 38.• ALL SHIPS Calls send out a message to all vessels within range. See
page 42. The Ray54E can make two different types of All Ships calls:
1. SAFETY Calls for advisory alerts—or—
2. URGENCY when the assistance is required but the situation is not serious enough for a Distress Call
• DISTRESS Calls send your vessel’s position and time information to other ships and shore stations, along with (optionally) the nature of your Distress situation. See page 45.
• POSITION REQUEST calls enable you to request GPS position infor-mation from any station for which an MMSI number is known. You can also send out your position to others.
Note: If you purchased your Ray54E to include use on the inland waterways of the contracting governments of the “Regional Arrangement Concerning the Radiotelephone Service on Inland Waterways”—also known as the Basel Agreement—your Ray54E will be programmed by your dealer to in-clude Automatic Transmitter Identification System (ATIS) functionality.

32 Ray54E VHF Radio
If ATIS has been enabled, certain programming steps have been implement-ed to protect the integrity of this agreement, including the blocking of DSC functions when ATIS is active. See ATIS Function on page 79.
5.1 DSC Call FunctionDSC Call Mode is used to initiate DSC Individual, Group, All Ships, Distress and Position Request calls and to access the DSC Call Logs and Phonebook.
The channel remains unchanged and you can perform normal TX operation. DSC mode is exited when transmitting.
Press and release the CALL/MENU key while in normal operation mode to enter DSC Call Mode.
Note: Distress calls are made using the DISTRESS key.
The Ray54E’s DSC Call type and structure are as follows:
DSC Call Type Description
INDIVIDUAL Makes a ROUTINE DSC call to a specific station identified by its MMSI number.
GROUP Sends transmissions that are only received by radios that share a common Group MMSI number. Up to 3 Group MMSI numbers can be stored and called.
ALL SHIPS Sends out a message to all ships within range that you need assistance but the situation is not serious enough for a Distress Call. All Ships calls should only be used if hailing for assistance on channel 16 fails. There are two types of All Ships Calls: SAFETY for advisory alerts and URGENCY for assis-tance when life is not in immediate danger.

Chapter 5: Digital Selective Calling (DSC) 33
Using the Microphone Keys to Make SelectionsThe examples in this chapter describe how to make menu and character selections using the CH knob on the main unit. However, you can also press the microphone UP/ DOWN keys to make selections, and then press the microphone HI/LO key to accept.
Note: To conform with regulations of the Basel Agreement for radiotele-phone service on inland waterways, DSC functions are disabled when ATIS is active. Please see ATIS Function on page 79.
DISTRESS Sends out the position and time information from the input NMEA data along with your MMSI number. This digital information lets other ships and shore stations equipped with appropriate DSC equipment know where you are and that you are in a Distress situation.
POSITION REQUEST
This option enables you to request GPS position information from any ves-sel for which an MMSI number is known. You can specify the target vessel either by selecting it from your MMSI phonebook or by manually entering its MMSI number. You can also be requested to send out your position to someone else.
RX CALL LOG A list of all received DSC Call types (except Distress calls) by number and time of call. The log maintains up to 20 calls; the earliest call is stored at the end of the list. After more than 20 calls have been received, the call at the end of the list is automatically overwritten.
NOTE: You can place a call directly from the DSC Call Log to the station that is currently displayed. You can also add the displayed station to the DSC Phonebook.
DISTRESS LOG Lists all stored Distress Calls by number and time of call. The log maintains up to 10 calls; the earliest call is stored at the end of the list. After more than 10 Distress Calls have been received, the call at the end of the list is automatically overwritten. An Individual call can be placed to the selected MMSI/NAME in the log.
NOTE: Received Distress Relay calls are also stored in the Distress Log.
DSC Call Type Description

34 Ray54E VHF Radio
5.2 Individual CallsThe Ray54E can make Individual Routine calls.
Making DSC Calls to Coast StationsThe examples in this handbook illustrate making DSC calls to Ship Stations. However, the procedures for making Individual Calls to a Coast Station are different. Calls to a Ship Station require that you enter a subsequent working channel chosen from a pre-programmed list offered to you by the Ray54E. Calls to a Coast Station remove this step from the operating procedures. The Coast Station controls and indicates the subsequent working channel within its acknowledgement.
The Ray54E automatically detects the correct procedures for you based on the type of MMSI number you enter manually or with or the phonebook. If “00” is detected as the first two characters of the MMSI, Coast Station procedures are implemented automatically.
Note: When making a call to a coast station, you will not be asked to select a working channel because that will be provided by the coast station.
Transmitting an Individual CallTo make an Individual Call to a ship or coast station, you must select the specific MMSI number to contact and the working channel to be used for the call. The MMSI ID can be entered manually or selected from a Phonebook list of preprogrammed numbers specified using the MENU function.
1. Press and release the CALL/MENU key to enter the DSC menu. The arrow is pointing to INDIVIDUAL.
2. Push the CH knob to select INDIVIDUAL. The Individual menu appears, which displays the Phonebook entries you have saved and <MANUAL> for manual number entry.
Chapter 5: Digital Selective Calling (DSC) 35
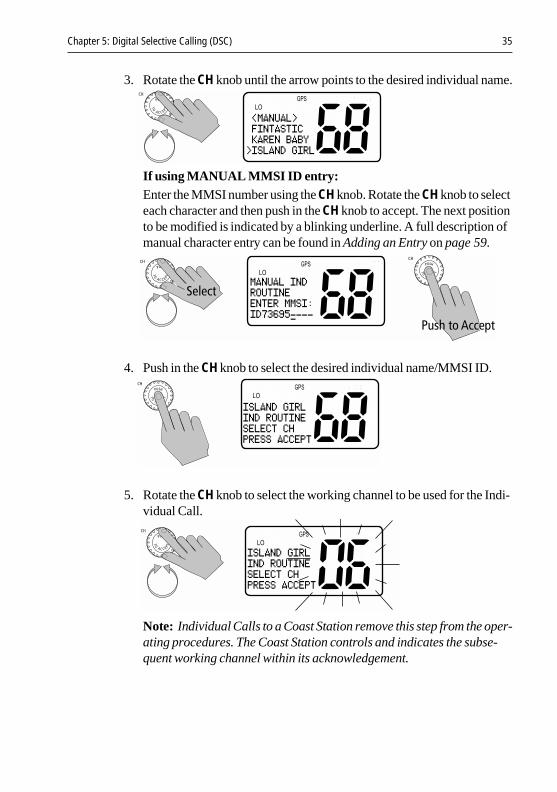
3. Rotate the CH knob until the arrow points to the desired individual name.
If using MANUAL MMSI ID entry:Enter the MMSI number using the CH knob. Rotate the CH knob to select each character and then push in the CH knob to accept. The next position to be modified is indicated by a blinking underline. A full description of manual character entry can be found in Adding an Entry on page 59.
4. Push in the CH knob to select the desired individual name/MMSI ID.
5. Rotate the CH knob to select the working channel to be used for the Indi-vidual Call.
Note: Individual Calls to a Coast Station remove this step from the oper-ating procedures. The Coast Station controls and indicates the subse-quent working channel within its acknowledgement.

36 Ray54E VHF Radio
6. Push in the CH knob to accept the selection.
7. Push CH knob again to send the Individual Call. The Individual Call is transmitted on channel 70, and then the radio tunes to the original channel and waits for acknowledgement. During this period you are still able to receive calls.
Note: Pressing PTT at any time before an ACK is received cancels the Indi-vidual Call.
When the acknowledgement is received, the Ray54E automatically switches to the selected working channel and sounds a DSC Call alert ring. Press any key to mute the alert ring. It shuts off automatically after two minutes.
8. Press PTT to communicate on the specified channel.
If no acknowledgement is received within 3 minutes, the radio prompts you to resend the call.
If you do nothing for 2 minutes, the Individual Call is cancelled and the radio reverts to the original channel.

Chapter 5: Digital Selective Calling (DSC) 37
Receiving Individual CallsWhen an Individual Call is received, the radio sounds an alert tone and displays the type of call, the name or MMSI number (if the caller’s MMSI number has not been programmed into your Phonebook) of the caller and the time the call was initiated. When an Individual Call from a station is received, the radio may also ask you to send an acknowledge (ACK) back to the caller. You are prompted to accept or decline the call.
➤ To silence the alert tone:
Press any key. Automatic cancellation takes place after 2 minutes.
➤ To cancel the mode without sending ACK:
Press the CLEAR key. The alert tone is muted, the Individual Call is interrupted and the normal screen appears on the display.
➤ To accept the Individual Call:
Push the CH knob. The tone is muted (if you have not already pressed another key) and an acknowledge (if requested) is sent to the originating station.
The LCD indicates a change of working channels has been made.
For Routine Calls, the channel changes to the one designated by the caller. For Safety and Urgency Calls, the radio automatically switches to channel 16.

38 Ray54E VHF Radio
If the caller requests that you change to an unsupported working channel the message INVALID CHANNEL appears on the LCD. If an acknowledge is sent, the originating station is notified you were UNABLE TO COMPLY with the channel change request.
Notes: (1) The DSC Call data is stored in the first available slot in the DSC Call Log, regardless of whether the call is acknowledged.
(2) Pressing the 16/PLUS key cancels the channel change request and tunes the radio to channel 16.
(3) If 5 minutes elapse before the call is acknowledged or rejected, the radio automatically declines the incoming Individual Call.
(4) To conform with inland waterways regulations of the Basel Agreement, DSC functions are disabled when ATIS is active.
5.3 Group CallsThe Group Call feature sends transmissions that are only received by radios that share a common Group MMSI number, such as a flotilla or racing fleet.
The Ray54E sends Group Routine calls. As with any DSC operation, the Group Call is made on channel 70.
Transmitting a Group CallTo call another vessel in the group, you must select the Group MMSI number to contact and the working channel to be used for the Group Call. The Group MMSI number is selected from a Phonebook list of preprogrammed numbers specified using the Menu function. Up to three Group ID numbers can be stored.
1. Press and release the CALL/MENU key to enter the DSC menu. The arrow is pointing to INDIVIDUAL.
2. Rotate the CH knob until the arrow points to GROUP.

Chapter 5: Digital Selective Calling (DSC) 39
3. Push in the CH knob to select GROUP. The Group Call menu appears, which displays the Group entries you have saved.
Note: Only the Group IDs that have been programmed into memory ap-pear in the list. If you have not yet programmed any groups into memory, the message NO GROUP IN MEMORY appears. See page 73 for instruc-tions on entering Group ID numbers.
4. Rotate the CH knob until the arrow points to the desired Group name.
5. Push the CH knob to select the desired Group.
6. Rotate the CH knob to select the working channel to be used for the Group Call.
7. Push in the CH knob to accept the selection.

40 Ray54E VHF Radio
8. Push the CH knob again to send the Group Call.The Group Call is transmitted on channel 70, and then the radio tunes to the designated working channel to be used for the Group Call.
9. Press PTT to communicate on the specified channel.
Receiving Group CallsThe Ray54E can receive Group Routine Calls from anyone in your prearranged group.
When a Group Call is received, an alert tone sounds and the LCD alternates screens displaying the group name and MMSI ID of the station initiating the call and that a change of working channels is being requested.
➤ To silence the alert tone:
Press any key. Automatic cancellation takes place after 2 minutes.
➤ To ignore the Group Call:
Press the CLEAR key. The alert tone is muted, the Group Call is interrupted and the normal screen appears on the display.

Chapter 5: Digital Selective Calling (DSC) 41
➤ To accept the Group Call:
Push the CH knob. The alert tone is muted (if you have not already pressed another key). The LCD indicates that the channel has been changed to the one designated by the caller.
If the caller requests that you change to an unsupported working channel the message INVALID CHANNEL appears on the LCD. The radio is unable to comply with the channel change request but the call is registered in the Call Log.
No acknowledgement is sent to the caller. You can establish voice communications on the channel shown in the LCD by pressing the PTT key.
Notes: (1) DSC Call data is stored in the first available slot in the Call Log.
(2) Pressing the 16/PLUS key cancels the channel change request and tunes the radio to channel 16.
(3) If 5 minutes elapse before the Group Call is accepted or rejected, the radio automatically declines the call and the radio reverts to the original channel.
(4) To conform with regulations of the Basel Agreement for radiotelephone service on inland waterways, DSC functions are disabled when ATIS is active. See ATIS Function on page 79.

42 Ray54E VHF Radio
5.4 All Ships CallsAn All Ships Call sends out a message to all ships within range that you need to advise of a hazardous situation or that you require assistance but the situation is not serious enough for a Distress Call.
The Ray54E can make All Ships Safety Calls for advisory alerts and Urgency Calls when assistance is required but life is not in danger. For example, you might send a Safety Call to warn others there is a large floating object that may be a hazard to navigation. A sample Urgency Call might be that you have an illness or an accident on board.
The All Ships Call is made on channel 70, and then the radio automatically switches to channel 16 at high power for voice communications.
Transmitting an All Ships Call1. Press and release the CALL/MENU key to enter the DSC menu. The
arrow is pointing to INDIVIDUAL.
2. Rotate the CH knob until the arrow points to ALL SHIPS.
3. Push in the CH knob to select ALL SHIPS. The All Ships menu appears, which displays the categories from which you can select.

Chapter 5: Digital Selective Calling (DSC) 43
4. Rotate the CH knob to select URGENCY or SAFETY.
5. Press the CH knob again to send the call.
6. Push CH one more time to reconfirm the All Ships Call.The call is transmitted on channel 70, and then the radio tunes to channel 16 at high power.
7. Press PTT to communicate on the channel 16.
Receiving an All Ships CallWhen an All Ships Call is received, the radio sounds an alert tone and displays the type of call, the name or MMSI number (if the caller’s MMSI number has not been programmed into your Phonebook) of the caller and the time the All Ships Call was initiated. You are prompted to accept or decline the call. For Urgency Calls, the prompt appears only if you have disabled automatic channel changing (see page 82).

44 Ray54E VHF Radio
➤ To silence the alert tone:
Press any key. Automatic alert tone cancellation takes place after 2 minutes.
➤ To decline the All Ships Call:
Press the CLEAR key. The alert tone is muted, the All Ships Call is interrupted and the normal screen appears on the display.
➤ To accept the All Ships Call:
Push the CH knob. The alert tone is muted (if you have not already pressed another key) and the radio switches to channel 16.
If the caller requests changing to an unsupported working channel, INVALID CHANNEL appears on the LCD. The radio is unable to comply with the channel change request but the call is registered in the Call Log.
Notes: (1) For All Ships Urgency Calls, the AUTO CH CHG option (see page 82) determines whether your radio automatically switch-es to channel 16 to receive the call or instead prompts you to manually accept or decline the channel change.
(2) Pressing the 16/PLUS key cancels the channel change request and tunes the radio to channel 16.
(3) If 5 minutes elapse before the All Ships Call is acknowledged or rejected, the radio automatically declines the incoming call and the radio reverts to the original channel.
(4) DSC call data is stored in the first available slot in the Call Log, regardless of whether the call is acknowledged.
(5) To conform with regulations of the Basel Agreement for radiotelephone service on inland waterways, DSC functions are disabled when ATIS is active. See ATIS Function on page 79.

Chapter 5: Digital Selective Calling (DSC) 45
5.5 Distress CallsFor a Distress Call transmission, the Ray54E takes the position and time information from the input NMEA data along with your MMSI and converts it into a digital “packet”. When transmitted, this digital information lets other ships and shore stations equipped with appropriate DSC equipment know where you are and that you are in a Distress situation.
Your call can specify the nature of the Distress (designated call) or not (undesignated call). When you make a Designated Distress Call, you can select from the following types:
• UNDESIG (Undesignated)
• FIRE• FLOODING• COLLISION• GROUNDING• LISTING• SINKING• ADRIFT• ABANDONING (Abandoning Ship)
• PIRACY• MANOVERBD (Man Overboard)
Sending a Distress CallOpen the spring-loaded door on the front panel of the main unit.

46 Ray54E VHF Radio
Note: To conform with regulations of the Basel Agreement for radiotele-phone service on inland waterways, DSC functions are disabled when ATIS is active. See ATIS Function on page 79.
Undesignated (Quick) Distress Call1. Press and hold the red DISTRESS key for 3 seconds to initiate the call.
During this time, the radio beeps, the display flashes and a timer counts down 3...2...1.
—or—
Designated Distress Call1. Press and release the red DISTRESS key. The Distress Call screen
appears.
2. Rotate the CH knob until the arrow points to the type of Distress you wish to designate.
3. Push in the CH knob to select that type of Distress.

Chapter 5: Digital Selective Calling (DSC) 47
4. Press and hold the DISTRESS key for 3 seconds to initiate the call. Dur-ing this time, the radio beeps, the display flashes and a timer counts down 3...2...1.
To cancel the Distress Call: release the DISTRESS key before the countdown has completed.After the 3 second countdown is completed, the call is sent and the radio waits for acknowledgement. The display stops flashing and the alarm sounds continuously until muted or an ACK is received.
To mute the alarm: press CLEAR.
After the Distress transmission, the radio is automatically set to channel 16 at high power to listen for and respond to voice replies from SAR authorities or other vessels that may have received your Distress Call.
The Distress Call is resent randomly every 3.5 – 4.5 minutes until an acknowledgement is received or the call is manually cancelled.
To cancel the automatic Distress resend: press CLEAR.

48 Ray54E VHF Radio
Cancelling a Distress Call Made in ErrorI f you should send a Distress Call in error, you should make an announcement as soon as possible that the distress situation does not exist.
1. Immediately power off the radio to cancel the Distress Call.
2. Power the radio back on and set to channel 16.
3. Make a broadcast to all stations giving your ship’s name, call sign and MMSI number and cancel the false distress alert.
Sample Announcement to Cancel a Distress Call Made in Error:
“All Stations, All Stations, All Stations. This is NAME, CALL SIGN, MMSI NUMBER, POSITION. Cancel my distress alert of DATE, TIME, NAME, CALL SIGN.”
Receiving a Distress CallThe Ray54E receives distress messages sent by another vessel and/or acknowledgments (ACK) sent by a coast station to another vessel in distress. The radio also receives distress relays. In such cases you should maintain radio silence and a listening watch on channel 16 and standby to lend assistance if requested.
When a Distress Call is received, the Ray54E automatically tunes to channel 16 and sounds the Distress Alarm Tone. (If you have disabled automatic channel changing, as described on page 82, you are first prompted whether to accept the call.)
➤ To silence the alarm:
Press any key. Automatic alarm cancellation takes place after 2 minutes.
Two alternating screens appear in the display. When position data and time is included within the signal, it is displayed on the first screen in the text area of the LCD. If invalid GPS or Time data is received, the lat/lon position shows ‘9’ in all digits and the time shows all ‘8’s. The second screen shows the nature of the distress and the time it was sent. The 2 alternating pages of data are recorded in the Distress Call Log.
Maintain radio silence and a listening watch on channel 16 and standby to lend assistance if requested.

Chapter 5: Digital Selective Calling (DSC) 49
Note: The AUTO CH CHG option determines whether you want your radio automatically switched to channel 16 to receive the call or instead to be prompted to manually receive or decline the channel change. See page 82.
Receiving a Distress ACK Sent from a Coast StationWhen a Distress ACK is received from a Coast Station (Coast Guard or Search and Rescue) the Distress alarm sounds. The LCD displays the Name/MMSI ID of the vessel in distress. Maintain radio silence and a listening watch on channel 16 and standby to lend assistance if requested.
Receiving a Distress Relay Sent by Another StationWhen a Distress Relay is received from another station, an alarm sounds and the LCD displays two alternating screens. The first page displays the Name/MMSI ID of the station sending the message. The second page displays the Name/MMSI ID of the vessel in distress and its lat/lon position. Your radio does not re-send a distress relay message.
Maintain radio silence and a listening watch on channel 16 and standby to lend assistance if requested.

50 Ray54E VHF Radio
5.6 Position RequestWith this option you can request GPS position information from any station capable of responding to this type of call and for which an MMSI number is known. You can specify the target station either by selecting it from your MMSI phonebook or by manually entering its MMSI number.
Specifying the Target Vessel1. Press and release the CALL/MENU key to enter the DSC menu. The
arrow is pointing to INDIVIDUAL.
2. Rotate the CH knob to select POS REQUEST.
3. Push in the CH knob to select POS REQUEST. The Position Request menu appears.
4. Push the CH knob again to select SEND. Choose the target vessel from the phonebook.

Chapter 5: Digital Selective Calling (DSC) 51
5. Rotate the CH knob until the arrow points to the desired name.
If using MANUAL MMSI ID entry:Enter the MMSI number using the CH knob. Rotate the CH knob to select each character and then push in the CH knob to accept. A full description of manual character entry can be found in Adding an Entry on page 59.
6. Push in the CH knob to select the desired name/MMSI ID.
7. Press the CH knob again to send the Position Request Call. The call is transmitted on channel 70, and then the radio tunes to the orig-inal channel and waits for acknowledgement. During this period you are still able to receive calls.
Notes: (1) Pressing PTT at any time before reply is received cancels the Position Request. In this case, you must resubmit the request.
(2) To conform with regulations of the Basel Agreement for radiotelephone service on inland waterways, DSC functions are disabled when ATIS is active. See ATIS Function on page 79.

52 Ray54E VHF Radio
When the Position Request is accepted by the receiving station:
When the position request is received, the Ray54E shows that the call has been accepted by the requested station. The radio sounds a Call Alert tone. Press any key to mute the alert tone. It shuts off automatically after two minutes.
Push in the CH knob to view the data. The radio automatically jumps to the the LAST RECVD log, where the data is displayed. Exit the log by pressing CLEAR.
Press CLEAR to exit to normal radio operation. You can retrieve the position information later using the LAST RECVD option.
When no reply is received within 3 minutes:
The radio prompts you to resend the call. After a total of 5 minutes of inactivity, the Position Request Call is cancelled and the message NO REPLY POS REQUEST ABORT is displayed. The message disappears after pressing PTT.
Retrieving the Last Received Position Data1. From the Position Request screen, rotate CH to select LAST RECVD.
2. Push the CH knob to select. The last received position request data is dis-played.
Note: Only the last position is saved. The next received position will over-write the existing position data.
Press the CLEAR key to exit the LAST RECVD window.

Chapter 5: Digital Selective Calling (DSC) 53
Receiving a Position Request From Another StationIf you receive a position request from another station, how the Ray54E responds depends on the option you have set in the Position Reply menu item (see page 81). OFF will not send position data under any circumstances. AUTOMATIC sends out your vessel’s position data as soon as it is requested. MANUAL sends out the data only after you respond to the request.
When a Manual Position Reply is received, the requesting station’s MMSI number or station name (if entered in the Phonebook) is displayed.
Push in the CH knob to view and accept the request to send your position data. Decline the request by pressing CLEAR.
5.7 Call LogThe Call Log is a list of the last 20 DSC received INDIVIDUAL, GROUP and ALL SHIPS call types by number and time of call. This does not include Distress Calls, which are maintained in their own log.
If the calling vessel or station is listed in your DSC Phonebook, the vessel or station name appears in the display as it is listed. If the caller is not listed in your directory, the caller’s MMSI ID number appears in the display. Usually, the radio is set to a channel selected by the caller if a channel change request is accepted.
When a DSC Call is received, the envelope icon appears on the LCD. The envelope icon disappears when the log is opened.
1. Press and release the CALL/MENU key to enter the DSC menu. The arrow is pointing to INDIVIDUAL.

54 Ray54E VHF Radio
2. Rotate the CH knob until the arrow points to CALL LOG.
3. Push in the CH knob to select the Call Log. Entry 01 appears first with call type and time of the last call. This is the most recent call.
4. Using the CH knob, scroll down the list of up to 20 entries.
If the caller had requested a change to an unsupported working channel, UC appears in the Channel Number field, indicating the radio was Unable to Comply with the channel change request.
Making a Call from a Call Log EntryYou can make a routine Individual Call to any caller listed in the log.
1. Rotate the CH knob until the log entry you wish to call appears.
2. For received Individual or All Ships Call, push the CH knob. The Individ-ual Call screen appears addressed to the caller.
3. Follow the same directions you would for initiating an Individual Call using the Phonebook, as outlined on page 34.
4. To make a Group Call using the Call Log, push the CH knob to bring up the Group Call menu and make the call as described in Transmitting a Group Call on page 5-38.

Chapter 5: Digital Selective Calling (DSC) 55
Saving an MMSI ID Number from a Call Log EntryAny undefined MMSI number that is listed on an entry in the Call Log can be saved into the Phonebook.
1. Rotate the CH knob to select the desired Call Log entry.
2. Press and hold the SCAN/SAVE key.The MMSI number is entered in the appropriate field of the Phonebook.
3. Use the CH knob to enter the NAME that you wish to have associated with this MMSI ID number. Rotate the CH knob to select each character and then push in the knob to accept it.
Note: In this operation, only the Name field can be edited. You can only edit the MMSI ID from the Phonebook.
4. When the NAME entry is complete, push in the CH knob to accept it.

56 Ray54E VHF Radio
5.8 DSC Distress LogThe Distress Log is a list of all received DSC Distress Calls by number and time of call. The Log maintains up to 10 calls.
When a DSC Distress Call is received, the envelope icon blinks on the LCD. The envelope icon disappears when the log is opened.
➤ To view the Distress Call Log:
1. Press and release the CALL/MENU key to enter the DSC menu. The arrow is pointing to INDIVIDUAL.
2. Rotate the CH knob until the arrow points to DISTRES LOG.
3. Push the CH knob to select the Distress Log. Entry 01 (the most recent call) appears first with call type and position data. The screen then flashes to display the nature of the distress and time of the call.
4. Rotate the CH knob to scroll down the list of up to 10 entries.

Chapter 6: Menu Settings 57
Chapter 6: Menu Settings
6.1 Menu FunctionThe radio’s setup functions are accessed through the Menu mode. Menu mode selections are as follows.
Item Description
PHONEBOOK A list of frequently-called DSC stations that you can select for making an Individual Call. Up to 20 Phonebook entries can be stored.
BACKLIGHTING Selects the backlight levels for the LCD, main unit keypad and microphone keypad.
CONTRAST Selects the LCD contrast setting.
GPS/TIME Used to manually set latitude/longitude position and UTC time for a DSC distress message. Also selects how the data is displayed on the LCD.
RADIO SETUP Selects four separate radio settings:a) BAND – Frequency Group (US, International, Canadian)b) CH NAME – Descriptive name for each channel (up to 12 characters)c) RING VOLUME – Alert tone volume (LOUD or SOFT)d) KEY BEEP – Key beep volume (LOUD, SOFT or OFF)
DSC SETUP Selects the following DSC settings:a) MY MMSI ID – Used for one-time entry of the MMSI number required for
DSC functions. If already programmed, displays thesaved MMSI ID number.
b) GROUP SETUP – Stores up to 3 Group MMSI IDs and associated Namesc) MY ATIS ID – Used for one-time entry of the ATIS number. If already
programmed, displays the saved ATIS ID.
d) ATIS FUNC – Turns ATIS function ON or OFFe) POS REPLY – Selects how Position Request data is transmittedf) AUTO CH CHG – Selects whether your radio automatically switches to
the requested working channel when DSC Calls arereceived.
RESET Enables a return to factory default settings.

58 Ray54E VHF Radio
➤ To make Menu selections:
1. Press and hold the CALL/MENU key to enter Menu mode. The list of available functions appear on the dot matrix display.
2. Rotate the CH knob to scroll down the list until the arrow points to the desired function. Push the CH knob to accept.
To exit the Menu mode or sub-mode, press the 16/PLUS or CLEAR keys, or else select the EXIT option from the menu.
Using the Microphone Keys to Make SelectionsThe examples in this chapter describe how to make menu and character selections using the CH knob on the main unit. However, you can also press the microphone UP/ DOWN keys to make selections and then press the microphone HI/LO key to accept.
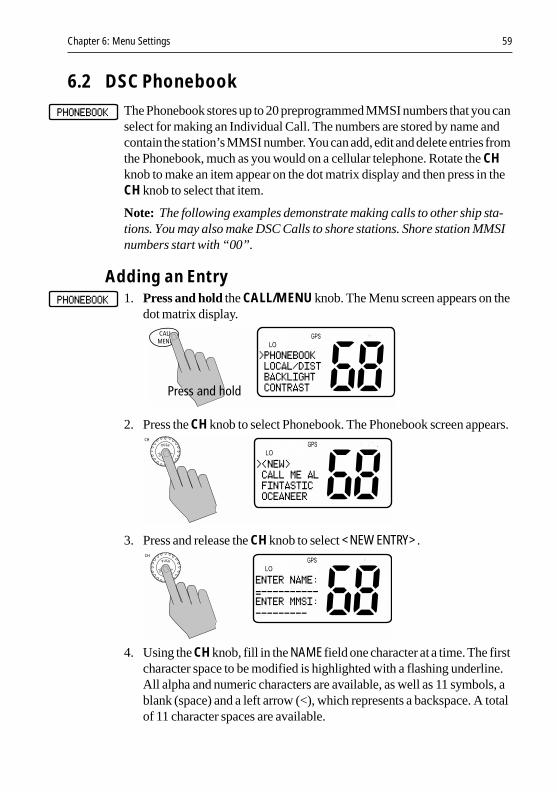
Chapter 6: Menu Settings 59
6.2 DSC PhonebookThe Phonebook stores up to 20 preprogrammed MMSI numbers that you can select for making an Individual Call. The numbers are stored by name and contain the station’s MMSI number. You can add, edit and delete entries from the Phonebook, much as you would on a cellular telephone. Rotate the CH knob to make an item appear on the dot matrix display and then press in the CH knob to select that item.
Note: The following examples demonstrate making calls to other ship sta-tions. You may also make DSC Calls to shore stations. Shore station MMSI numbers start with “00”.
Adding an Entry1. Press and hold the CALL/MENU knob. The Menu screen appears on the
dot matrix display.
2. Press the CH knob to select Phonebook. The Phonebook screen appears.
3. Press and release the CH knob to select <NEW ENTRY>.
4. Using the CH knob, fill in the NAME field one character at a time. The first character space to be modified is highlighted with a flashing underline. All alpha and numeric characters are available, as well as 11 symbols, a blank (space) and a left arrow (<), which represents a backspace. A total of 11 character spaces are available.

60 Ray54E VHF Radio
i. Rotate the CH knob to scroll through the selections.
Note: The last selection in each field is a left arrow (<), which repre-sents a BACKSPACE. Accepting the arrow returns the current char-acter to its default value and moves you back to the previous position.
ii. When the desired character appears, push in the CH knob to accept it. The next character to be filled in sequence is underlined (_).
iii. Continue this process until all characters have been selected.
Note: Pressing and holding CH indicates you have completed edit-ing the current line and forwards you to the first position of the next line. This eliminates the need to accept each character individually.
You can also press the microphone UP/ DOWN keys to select each char-acter and then press the microphone HI/LO key to accept.
5. Continue this process until all NAME characters are selected. Press and hold the CH knob to accept the name and move on to the MMSI ID.
6. Use same procedure to enter the MMSI characters.

Chapter 6: Menu Settings 61
7. When all characters have been selected, press the CH knob to SAVE. The new entry appears in the Phonebook.
Editing an Existing Entry1. From the Phonebook, rotate the CH knob until the arrow on the dot matrix
display points to the entry you wish to edit.
2. Push in the CH knob to select the name.
3. Push the CH knob again to select EDIT.
4. Make your changes to the NAME and MMSI ID, using the CH knob.

62 Ray54E VHF Radio
5. When finished, push the CH knob to SAVE. The revised name appears in the list.
Deleting an Existing Entry1. From the Phonebook, rotate the CH knob until the arrow on the dot matrix
display points to the entry you wish to delete.
2. Push the CH knob to select the name.
3. Rotate the CH knob until the arrow is pointing to DELETE.
4. Press and hold the CH knob. The entry is removed.

Chapter 6: Menu Settings 63
6.3 Backlight AdjustmentThis setting adjusts the backlight brightness for the LCD, microphone keypad and main unit keypad. Choose from 8 brightness settings or OFF.
➤ To adjust the backlight setting:
1. Rotate the CH knob until the arrow points to BACKLIGHT.
2. Push the CH knob to accept. The Backlight screen appears.
3. Rotate the CH knob to select the desired backlight level. The number of blocks illuminated on line 3 of the dot matrix display indicate the level, one through eight. For HI all eight are illuminated; for OFF none are illu-minated. Push the CH knob to accept.
The Distress key backlighting is never turned OFF.
6.4 Contrast AdjustmentThis setting adjusts the levels of LCD contrast. Choose from 8 settings.
➤ To adjust the contrast setting:
1. Rotate the CH knob to scroll until the arrow points to CONTRAST.
2. Push the CH knob to accept. The Contrast screen appears.
3. Rotate the CH knob to select the desired contrast level. The number of blocks illuminated on line 3 of the dot matrix display indicate the level, one through eight. A larger number of blocks indicate a darker LCD. For HI all eight blocks are illuminated; for LO none are illuminated.
4. Push the CH knob to accept your selection.

64 Ray54E VHF Radio
6.5 GPS/Time SetupBy default, the Ray54E auto-detects NMEA strings and decodes appropriate latitude/longitude position and time. If the GPS navigation receiver is not connected or is not functional, a manual latitude/longitude position and UTC time can be entered and used in the DSC distress transmitted message.
When GPS Information Not AvailableIf no GPS data is available, the NO GPS icon appears, POS DATA REQ is displayed on the dot matrix display, followed by NO POS DATA. An alarm sounds for 5 seconds or until you acknowledge by pressing any key.
The position (lat/lon) fields are set to all 9’s and time field is set to all 8’s. The alert repeats every four hours as long as no position information has been entered manually. If position data is entered manually but has not been updated during the previous 23.5 hours, all the position fields are set to 9’s and the display reverts to NO POS DATA.
Note: The Manual Lat/Lon function is valid only when your radio is not con-nected to a GPS receiver.
➤ To manually set the GPS position and time settings:
1. Rotate the CH knob to scroll down the list until the arrow points to GPS/TIME.
2. Push in the CH knob. The arrow is pointing to MANUAL POS.
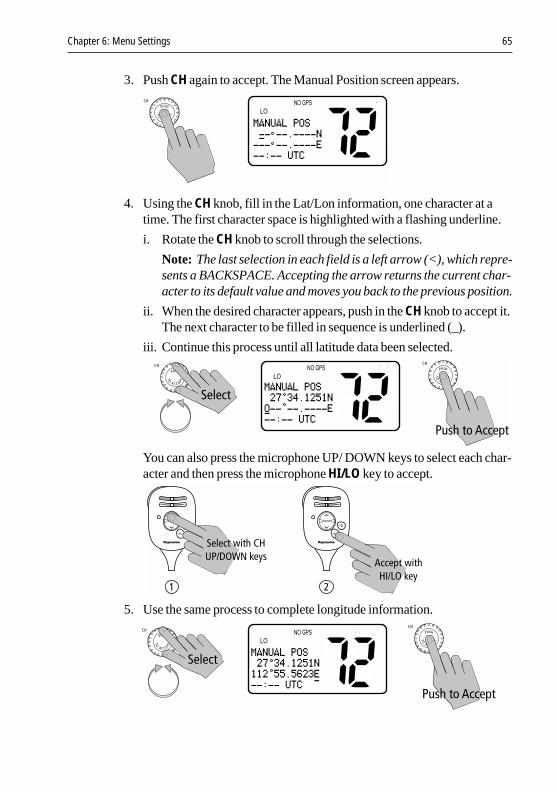
Chapter 6: Menu Settings 65
3. Push CH again to accept. The Manual Position screen appears.
4. Using the CH knob, fill in the Lat/Lon information, one character at a time. The first character space is highlighted with a flashing underline.
i. Rotate the CH knob to scroll through the selections.
Note: The last selection in each field is a left arrow (<), which repre-sents a BACKSPACE. Accepting the arrow returns the current char-acter to its default value and moves you back to the previous position.
ii. When the desired character appears, push in the CH knob to accept it. The next character to be filled in sequence is underlined (_).
iii. Continue this process until all latitude data been selected.
You can also press the microphone UP/ DOWN keys to select each char-acter and then press the microphone HI/LO key to accept.
5. Use the same process to complete longitude information.

66 Ray54E VHF Radio
6. Push in the CH knob to accept and move onto UTC time. Select the time characters in the same manner.
Note: You must enter the TIME parameter in UTC time and not in local time.
When time data is entered manually, the NO GPS indicator remains illuminated and the UTC designator appears following the time.
Note: When the final selection is made the radio returns to the previous Menu Selection. To exit this sub-mode, select BACK or else press the 16/PLUS or CLEAR keys.
6.6 SettingsYou can also set how some time and position information is displayed on the screen:
• whether Lat/Lon data is displayed
• whether the Time is displayed
• whether a Time Zone Offset is used
• how the Time data is formatted
• whether COG/SOG data is displayed
➤ To adjust these Settings:
1. Press and hold the CALL/MENU key to enter Menu mode.
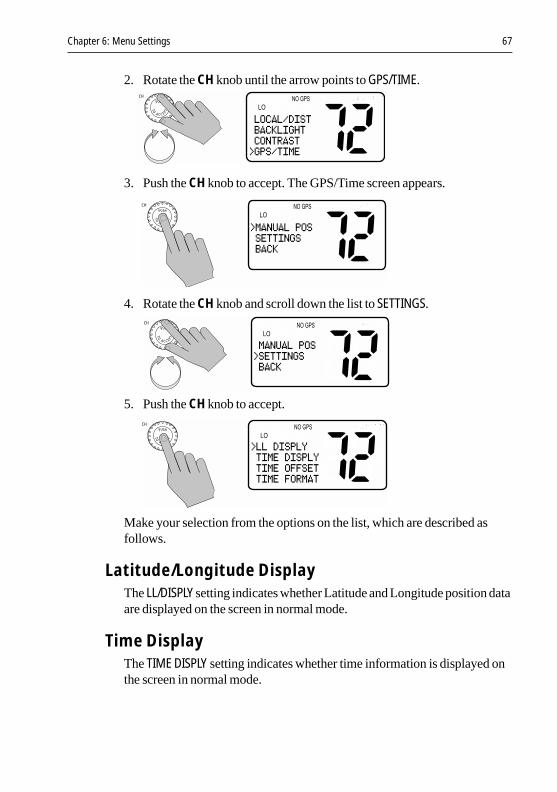
Chapter 6: Menu Settings 67
2. Rotate the CH knob until the arrow points to GPS/TIME.
3. Push the CH knob to accept. The GPS/Time screen appears.
4. Rotate the CH knob and scroll down the list to SETTINGS.
5. Push the CH knob to accept.
Make your selection from the options on the list, which are described as follows.
Latitude/Longitude DisplayThe LL/DISPLY setting indicates whether Latitude and Longitude position data are displayed on the screen in normal mode.
Time DisplayThe TIME DISPLY setting indicates whether time information is displayed on the screen in normal mode.

68 Ray54E VHF Radio
When manual time is used, it is always displayed as UTC time, even if you have entered an offset. The NO GPS icon remains until valid GPS information is available.
Note: If TIME DISPLY is set ON, COG/SOG is automatically set to OFF. Because they occupy the same line on the LCD, only one of these two settings can be displayed at a time.
Time OffsetThe TIME OFFSET setting indicates the amount of time to add or subtract from UTC time to equal your local time.
Note: The Time Offset setting is valid only when GPS data is available. When manual time is used, it is always displayed as UTC time, even though you have entered an offset.
Time FormatThe TIME FORMAT setting indicates whether the time is displayed in 12 hour or 24 hour format.
COG/SOG DisplayThis setting determines whether Course Over Ground and Speed Over Ground (COG/SOG) data is displayed on the bottom line of the dot matrix display instead of the time of day. The letter “T” is always appended to the COG, indicating that this is a True (and not Magnetic) heading.
Note: If COG/SOG is set ON, TIME DISPLY is automatically set to OFF. Because they occupy the same line on the LCD, only one of these two settings can be displayed at a time.

Chapter 6: Menu Settings 69
6.7 Radio SetupThe Radio Setup menu item is used to determine four separate settings:
• Frequency Band• Channel Name• Ring Volume• Key Beep
➤ To adjust these settings:
1. Press and hold the CALL/MENU key to enter Menu mode.
2. Rotate the CH knob to scroll down the list until the arrow points to RADIO SETUP.
3. Push the CH knob to accept. The Radio Setup screen appears.
Make your selection from the options on the list, described as follows.
BandThe Ray54E can transmit and receive all USA, International and Canadian frequencies, if available. This setting determines which channel set is being used. The appropriate indicator is illuminated in the LCD: U for US, I for International, or C for Canadian channel sets.
70 Ray54E VHF Radio
Channel (CH) NameBy default, the Ray54E lists a descriptive name of up to 12 characters in the top line of the dot matrix display for each channel. This option modifies the name for the currently-selected channel from its default.
Display NameUse this option to toggle the Channel Name ON or OFF. If off, the top line of the dot matrix display is blank for that channel.
CH InfoUsing this feature you can delete or change the Channel Names from the default.
1. From the CH NAME menu item, rotate the CH knob until the arrow on the dot matrix display points to CH INFO.
2. Push in the CH knob to select. The currently assigned name appears.
3. Push the CH knob to display your options:EDIT changes the channel name displayed.CLEAR completely removes the channel name. The top line of the dot matrix display is blank for that channel.
4. Push CH again to select EDIT or CLEAR.
5. If you select EDIT, use the CH knob to modify the NAME field using the same technique described in Adding an Entry on page 59.
Deleting a Channel Name EntryUse this feature to completely remove a Channel Name from the list. If the name is deleted, the top line of the dot matrix display is blank for that channel.
Note: The CH NAME is not returned to the factory default value following a reset (page 84).
Ring VolumeThis setting is used to set the volume of the ring that is sounded when an incoming call is received. Select HIGH or LOW.
Note: The ring volume setting is overridden if a DSC Urgency or Distress Call is received. These alarms must meet volume levels required by regula-tions.
Key BeepThis setting is used to set the volume of the beep that sounds when a key is pressed. Select HIGH, LOW or OFF.

Chapter 6: Menu Settings 71
6.8 DSC SetupThe DSC Setup menu item is used to determine these six functions:
• the radio’s MMSI ID number• the radio’s Group MMSI ID number• the radio’s ATIS ID number• whether the ATIS function is turned on or off• how your radio responds to a Position Reply request• whether your radio automatically changes channels for incoming Dis-
tress and All Ships Urgency Calls
➤ To adjust the DSC Settings:
1. Press and hold the CALL/MENU key to enter Menu mode.
2. Rotate the CH knob to scroll down the list until the arrow points to DSC SETUP.
3. Push the CH knob to accept. The DSC Setup screen appears.
Make your selection from the following options:
• MY MMSI ID• GROUP SETUP• MY ATIS ID• ATIS FUNC• POS RPLY• AUTO CH CHG

72 Ray54E VHF Radio
My MMSI IDThis operation stores the MMSI number required for DSC communications, including Distress Calls. If regulations in your area do not permit you to program the MMSI number yourself, your Raymarine dealer/distributor can program the number for you.
If you try to access a DSC function before entering the MMSI number, an error message appears and you are prompted to enter the MMSI ID.
This is a one time operation. After the MMSI number has been programmed:• you will not be able to change it• only your dealer/distributor can change it• after entering your MMSI ID, accessing this menu item will merely dis-
play the programmed number
➤ To enter or view the MMSI ID number:
1. From the DSC SETUP menu item described on page 71, rotate the CH knob until the arrow points to MY MMSI ID.
2. Push the CH knob to accept. If an existing MMSI ID is stored, the value appears. If the MMSI ID is blank, dashes appear, indicating that one has yet to be entered.
3. To enter the MMSI ID number, rotate the CH knob to select the digits using the same technique described in Adding an Entry on page 59.

Chapter 6: Menu Settings 73
4. When all digits are selected, press and hold the CH knob to accept.
5. Re-enter all nine MMSI digits.
6. When complete, press and hold the CH knob to accept.
7. Press the CH knob one last time to save the MMSI ID number.
If the second entry does not match the first entry, the radio exits MY MMSI ID and returns to the previous menu.
Note:
• You cannot begin the MMSI ID number with “0” (single zero), as this prefix indicates a GROUP ID.
• You cannot begin the MMSI ID number with “00” (double zero), as this prefix indicates a COAST STATION.
The Ray54E is designed to be used as a recreational Ship Station only.
Group MMSI SetupThis operation sets up the MMSI number that is used for DSC Group Calls between radios that share a common Group MMSI number. You can program up to three Group MMSI ID numbers and associated Group names, which can be up to 11 characters long. Group MMSI ID numbers always begin with a zero (0). You only enter the last 8 digits of the Group I D number; the initial “0” is automatically entered for you.

74 Ray54E VHF Radio
Adding a New Group1. From the DSC SETUP menu item described on page 71, rotate the CH knob
until the arrow points to GROUP SETUP.
2. Press the CH knob to accept. If an existing Group name and MMSI ID number are already stored, those values appear. If blank, <EMPTY 1>, <EMPTY 2>, and <EMPTY 3> are shown to indicate that the Group IDs have not yet been programmed into the radio.
3. Rotate the CH knob until the arrow points to the first available empty group location.
4. Press the CH knob to accept. The first field for you to enter data is the GROUP NAME.
5. Use the CH knob to modify the GROUP NAME field using the same tech-nique described in Adding an Entry on page 59.

Chapter 6: Menu Settings 75
6. Continue this process until all GROUP NAME characters have been entered. Press and hold the CH knob to accept the name and move on to the GROUP ID.
7. Use the same procedure to enter the GROUP ID numbers.
8. Press and hold the CH knob to accept.
9. Press the CH knob one more time to save. The new entry appears in the list.

76 Ray54E VHF Radio
Editing an Existing Entry
1. From the DSC SETUP menu item described on page 71, rotate the CH knob until the arrow points to GROUP SETUP.
2. Press the CH knob to accept.
3. Rotate the CH knob until the arrow points to the group location you wish to edit.
4. Press the CH knob to select that Group.
5. Press the CH knob again to select EDIT.

Chapter 6: Menu Settings 77
6. Make your changes, using the CH knob using the same technique described in Adding an Entry on page 59.
7. Press and hold the CH knob to accept your changes.
8. Press the CH knob to save. The revised entry appears in the list.
My ATIS IDIf you purchased your Ray54E to include use on the inland waterways of the contracting governments of the Basel Agreement, your Ray54E has been programmed by your dealer to include Automatic Transmitter Identification System (ATIS) functionality. The Basel Agreement includes Germany, Austria, Belgium, Bulgaria, Croatia, France, Hungary, Luxembourg, Moldova, the Netherlands, Poland, Romania, Russian Federation, the Slovak Republic, Switzerland, the Czech Republic, Ukraine and the Federal Republic of Yugoslavia.
ATIS includes data at the end of radio transmission that identifies your station. Your ATIS ID number is derived from your vessel’s call sign. Your authorized Raymarine dealer can assist you in decoding the number. You can then program the ATIS number into your Ray54E using the operation described in this section. If regulations in your area do not permit you to program the ATIS number yourself, you can have your dealer program the number for you.
Note: The ATIS ID number is a ten digit number, beginning with a “9”. The MY ATIS set up process has you input only the last 9 digits. The leading “9” is automatically input for you.
This is a one time operation. After the ATIS number has been programmed:
• you will not be able to change it, only your dealer/distributor can do this
• accessing this menu item will display the programmed ATIS number

78 Ray54E VHF Radio
➤ To enter or view the ATIS ID number:
1. From the DSC SETUP menu item described on page 71, rotate the CH knob until the arrow points to MY ATIS ID.
2. Press the CH knob to accept. If an existing ATIS ID is stored, the values appear. If the ATIS ID is blank, dashes appear, except for the initial ‘9’.
3. Rotate the CH knob or use the microphone UP/ DOWN keys to scroll through the digits for entry into the ATIS ID field. The final available char-acter is an arrow, which serves as a backspace. The initial character posi-tion is indicated by a blinking underline.
When the desired character appears, press and release the CH knob or the microphone HI/LO key to accept it. The next position now has the blink-ing underline, indicating it is ready to be selected. Continue in this manner until all nine digits have been selected.
You can also press the microphone UP/ DOWN keys to select each char-acter and then press the microphone HI/LO key to accept.

Chapter 6: Menu Settings 79
4. When complete, press and hold the CH knob to accept.
5. Re-enter all nine ATIS digits.
6. When complete, press and hold the CH knob to accept.
7. Press the CH knob one last time to save the ATIS ID number.
If the second entry does not match the first entry, the radio exits MY ATIS ID and returns to the previous menu for you to retry.
ATIS FunctionThis operation enables or disables the Automatic Transmitter Identification System (ATIS) feature in the radio. This feature accommodates users who travel outside the inland waterways and wish to disable the ATIS function at that time.
Note: If you purchased your Ray54E to include use on the inland waterways of the contracting governments of the “Regional Arrangement Concerning the Radiotelephone Service on Inland Waterways”– also known as the Basel Agreement– your Ray54E has been programmed by your dealer to include ATIS. If ATIS is enabled, certain programming steps have been implemented to protect the integrity of this agreement, including the blocking of DSC func-tions when ATIS is active.

80 Ray54E VHF Radio
When ATIS is enabled, the following occurs:
• DSC functions are disabled.
• Dual Watch, Tri Watch and all Scan functions are disabled.
• The following International Channels are limited to 1 watt output power:6, 8, 10, 11, 12, 13, 14, 15, 17, 71, 72, 74, 75, 76, 77 (and 31, if enabled).
➤ To enable/disable ATIS:
1. From the DSC SETUP menu item described on page 71, rotate the CH knob until the arrow points to ATIS FUNC.
2. Press the CH knob to accept.
3. Rotate the CH knob to select between switching the ATIS function ON or OFF.
4. Press the CH knob to accept. If enabled in the previous step, the ATIS icon appears.

Chapter 6: Menu Settings 81
Position ReplyThis option enables you to determine how your radio responds to a request for your GPS position information (lat/lon) from another station.
➤ To enable/disable Position Reply:
1. From the DSC SETUP menu item described on page 71, rotate the CH knob until the arrow points to POS REPLY.
2. Press the CH knob to accept.
3. Rotate the CH knob to select the desired setting and push to accept.
AUTOMATIC sends out your vessel’s position data as soon as it is requested.MANUAL sends out the data only after you respond to the request.OFF will not send position data under any circumstances, nor notify you that the request has been made.
The default setting is MANUAL, which is described in Receiving a Position Request From Another Station on page 53.
Note: The Position Reply function is only available when a working GPS is connected to the radio.

82 Ray54E VHF Radio
Automatic Channel Changing for Incoming CallsFor incoming Distress and All Ships Urgency Calls, this option determines whether your radio automatically switches to Priority Channel 16 to receive the call or prompts you to manually accept or decline the channel change.
The default setting is to ENABLE the auto channel change.
This feature is useful for preventing your radio from automatically switching channels while you are maintaining a continuous watch on a certain channel (for example, in a VTS controlled area) or working with other vessels (for example, for towage).
Note: This feature can disable automatic channel switching for incoming DSC Distress and All Ships Urgency Calls. If enabled, you are responsible for determining whether manually declining the call is appropriate.
By regulation, this feature cannot disable the automatic switching of Individual Distress and Individual Urgency Alerts.
➤ To enable/disable the channel change:
1. From the DSC SETUP menu item described on page 71, rotate the CH knob until the arrow points to AUTO CH CHG.
2. Press the CH knob to accept.
Procedure When EnabledIf you accept ENABLE, your Ray54E automatically changes to channel 16 when a Distress or All Ships Urgency Call is received, as described in Chapter 5:

Chapter 6: Menu Settings 83
Procedure When DisabledIf you accept DISABLE, on receipt of a Distress or All Ships Urgency Call you are presented with brief details of the call and advised that a change to channel 16 has been requested. You can either accept the channel change by pressing ACCEPT (CH knob) or decline by pressing CLEAR, thereby continuing to monitor your current channel.
If you accept the request, the call is received, a tone sounds and the radio is changed to channel 16. Pressing any key disables the alarm. When position and time data is included in the signal, it is displayed in the text area of the LCD. If invalid GPS or Time data is received, the lat/lon position shows 9s in all digits and all 8s for the time. The two alternating pages of data are recorded in the Distress Call Log regardless of whether or not you accept the call.
If you ignore the call, after 5 minutes the radio declines the call, records the call in the Call Log and maintains normal operation.

84 Ray54E VHF Radio
6.9 Resetting Factory DefaultsThis feature returns all radio settings to their factory defaults, including BACKLIGHT, CONTRAST, RING VOLUME, KEY BEEP and manual GPS/TIME settings. MY MMSI ID number, MY ATIS ID number, CH NAME and the PHONEBOOK are not affected.
➤ To perform the reset:
1. Press and hold the CALL/MENU key to enter Menu mode.
2. Rotate the CH knob to scroll down the list until the arrow points to RESET.
3. Press the CH knob to accept. The Reset screen appears.
4. Rotate the CH knob until arrow points to YES.
5. Press the CH knob to accept.

Chapter 7: Customer Service 85
Chapter 7: Customer ServiceThis chapter provides information on service for your Ray54E.
7.1 How to Contact Raymarine
On the InternetVisit the Raymarine World Wide Web site for the latest information on Raymarine electronic equipment and systems at:
www.raymarine.com
Customer SupportNavigate to the Customer Support page for links for:
• Finding Factory Service locations and Authorized Dealers near you
• Registering your Raymarine products
• Accessing handbooks in Adobe Acrobat format
• Downloading RayTech software updates
• Accessing the Raymarine solution database
Clicking the Find Answers link routes you to our solution database. Search questions and answers by product, category, keywords, or phrases. If the answer you are seeking is not available, click the Ask Raymarine tab to submit your own question to our technical support staff, who will reply to you by e-mail.
In EuropeIn Europe, Raymarine support, service and accessories may be obtained from your authorized dealer, or contact:
Raymarine LtdAnchorage ParkPortsmouth, HampshireEngland PO3 5TDTel: +44 (0) 23 9269 3611Fax: +44 (0) 23 9269 4642

86 Ray54E VHF Radio
Technical SupportThe Technical Services Department handles inquiries concerning installation, operation, fault diagnosis and repair. For technical helpdesk contact:
Tel: +44 (0) 23 9271 4713Fax: +44 (0) 23 9266 1228
Accessories and PartsRaymarine accessory items and parts are available through your authorized Raymarine distributor. Please refer to the lists of component part numbers and optional accessories in the Installation chapter of this manual and have the Raymarine part number ready when speaking with your dealer.
If you are uncertain about what item to choose for your unit, please contact our Customer Services Department prior to placing your order.
Worldwide SupportPlease contact the authorized distributor in the country.

Appendix A: Specifications 87
Appendix A: Specifications
General
Size (H x W x D) 3.11” (79 mm) x 6.57” (167 mm) x 6.73” (171mm)
Weight 2.87 lbs (1.3kg)
Mounting Bracket or flush mount
Power 13.6 VDC ±15%
Environmental:Operating Range:Storage Range: Humidity:
Waterproof to IPX7–15°C to +55°C–20°C to +70°Cup to 95%
Frequency Range:TransmitReceive
156.050 To 157.425 MHz156.050 To 163.275 MHz
Channels All available International VHF Marine Band. US and Canadian channels also available if so programmed.
Oscillate Mode PLL
Modulation FM(16K0G3E)DSC(16K0G2B)
Channel Spacing 25 kHz Increments
Frequency Stability +/- 10PPM (+/- 0.001%)

88 Ray54E VHF Radio
Receiver
Transmitter
Intermediate Frequency:1st2nd
21.4 MHz455 KHz
Sensitivity 0.25µV (12dB SINAD)
Squelch Sensitivity > 0.7µV at tight
Spurious Response Rejection Ratio 70 dB
Adjacent Channel Selectivity 70 dB
Intermodulation Rejection Ratio 68dB
S/N at 3KHz Dev. 40 dB
Audio Output Power At THD 10% 2 W
Audio Distortion 10%
Current Drain at:Max Audio PowerStand-By
1.5 A0.5 A
RF Power:Hi ModeLo Mode
23 ±2 W0.8 ± 0.1 W
Maximum Deviation ±5 KHz
S/N at 3KHz Dev 40 dB
Modulation Distortion 3KHz </= 7%
Audio Response 1KHz EIA STANDARD dB
Spurious/Harmonic Emissions: 0.25µW
Modulation Sensitivity </= 12mv
Current Drain At 13.6V DC:Hi PowerLo Power
</= 6 A</= 1.5A

Appendix B: Channel List 89
Appendix B: Channel List
International Marine VHF Channels & Frequencies
CH No.
XMIT Freq
RCV Freq
Single Freq Use
01 156.050 160.650 Public Correspondence, Port Operations and Ship Movement
02 156.100 160.700 Public Correspondence, Port Operations and Ship Movement
03 156.150 160.750 Public Correspondence, Port Operations and Ship Movement
04 156.200 160.800 Public Correspondence, Port Operations and Ship Movement
05 156.250 160.850 Public Correspondence, Port Operations and Ship Movement
06 156.300 156.300 x Intership 1
07 156.350 160.950 Public Correspondence, Port Operations and Ship Movement
08 156.400 156.400 x Intership
09 156.450 156.450 x Intership, Port Operations and Ship Movement
10 156.500 156.500 x Intership, Port Operations and Ship Movement 2
11 156.550 156.550 x Port Operations and Ship Movement
12 156.600 156.600 x Port Operations and Ship Movement
13 156.650 156.650 x Intership Safety, Port Operations and Ship Movement 3
14 156.700 156.700 x Port Operations and Ship Movement
15 156.750 156.750 x Intership and On-board Communications at 1W only 4
16 156.800 156.800 x Distress, Safety and Calling
17 156.850 156.850 x Intership and On-board Communications at 1W only 4
18 156.900 161.500 Public Correspondence
19 156.950 161.550 Public Correspondence, Port Operations and Ship Movement
20 157.000 161.600 Public Correspondence, Port Operations and Ship Movement
21 157.050 161.650 Public Correspondence, Port Operations and Ship Movement
22 157.100 161.700 Public Correspondence, Port Operations and Ship Movement
23 157.150 161.750 Public Correspondence, Port Operations and Ship Movement

90 Ray54E VHF Radio
24 157.200 161.800 Public Correspondence, Port Operations and Ship Movement
25 157.250 161.850 Public Correspondence, Port Operations and Ship Movement
26 157.300 161.900 Public Correspondence, Port Operations and Ship Movement
27 157.350 161.950 Public Correspondence, Port Operations and Ship Movement
28 157.400 162.000 Public Correspondence, Port Operations and Ship Movement
60 156.025 160.625 Public Correspondence, Port Operations and Ship Movement
61 156.075 160.675 Public Correspondence, Port Operations and Ship Movement
62 156.125 160.725 Public Correspondence, Port Operations and Ship Movement
63 156.175 160.775 Public Correspondence, Port Operations and Ship Movement
64 156.225 160.825 Public Correspondence, Port Operations and Ship Movement
65 156.275 160.875 Public Correspondence, Port Operations and Ship Movement
66 156.325 160.925 Public Correspondence, Port Operations and Ship Movement
67 156.375 156.375 x Intership, Port Operations and Ship Movement
68 156.425 156.425 x Port Operations and Ship Movement
69 156.475 156.475 x Port Operations and Ship Movement
71 156.575 156.575 x Port Operations and Ship Movement
72 156.625 156.625 x Intership
73 156.675 156.675 x Intership 2
74 156.725 156.725 x Port operations and Ship movement
75 156.775 156.775 x See Note 5
76 156.825 156.825 x See Note 5
77 156.875 156.875 x Intership
78 156.925 161.525 Public correspondence, Port Operations and Ship Movement
79 156.975 161.575 Public correspondence, Port Operations and Ship Movement
80 157.025 161.625 Public correspondence, Port Operations and Ship Movement
81 157.075 161.675 Public correspondence, Port Operations and Ship Movement
CH No.
XMIT Freq
RCV Freq
Single Freq Use

Appendix B: Channel List 91
• Intership channels are for communications between ship stations. Intership commu-nications should be restricted to Channels 6, 8, 72 and 77. If these are not available, the other channels marked for Intership may be used.
• Channels 10, 67 and 73 should be avoided within VHF range of coastal areas in Europe and Canada.
• Channel 70 is used exclusively for Digital Selective Calling (DSC) and is not avail-able for regular voice communications.
Notes:
1. Channel 06 may also be used for communications between ship stations and aircraft engaged in coordinated search and rescue operations. Ship stations should avoid harmful interference to such communications on channel 06 as well as to communi-cations between aircraft stations, ice breakers and assisted ships during ice seasons.
2. Channels 10 or 73 (depending on location) are also used for the broadcast of Marine Safety Information by the Maritime and Coast Guard Agency in the UK only.
3. Channel 13 is designated for use on a worldwide basis as a navigation safety com-munication channel, primarily for intership navigation safety communications.
4. Channels 15 and 17 may also be used for on-board communications provided the effective radiated power does not exceed 1 Watt.
5. The use of Channels 75 and 76 should be restricted to navigation related communi-cation only and all precautions should be taken to avoid harmful interference to channel 16. Transmit power is limited to 1 Watt.
82 157.125 161.725 x Public correspondence, Port Operations and Ship Movement
83 157.175 161.775 x Public correspondence, Port Operations and Ship Movement
84 157.225 161.825 x Public correspondence, Port Operations and Ship Movement
85 157.275 161.875 x Public correspondence, Port Operations and Ship Movement
86 157.325 161.925 x Public correspondence, Port Operations and Ship Movement
87 157.375 157.375 x Port Operations and Ship Movement
88 157.425 157.425 x Port Operations and Ship Movement
CH No.
XMIT Freq
RCV Freq
Single Freq Use

92 Ray54E VHF Radio
European Private Channels and Frequencies
Note: A licence may be required to operate the radio on the private channels. It is your responsibility to obtain the proper licence to operate the radio on these frequencies.
WX Channels (North America only)
CountryChannel Number
TX Freq
RXFreq Channel Use
Belgium 3196
157.550162.425
162.150162.425
n/an/a
Denmark L1L2
155.500155.525
155.500155.525
Pleasure BoatPleasure Boat
Denmark,Finland,Norway &Sweden
F1F2F3
155.625155.775155.825
155.625155.775155.825
Fishing BoatFishing BoatFishing Boat
Finland,Norway &Sweden
L1L2L3
155.500155.525155.650
155.500155.525155.650
Pleasure BoatPleasure BoatPleasure Boat
Netherlands 3137
157.550157.850
162.150157.850
n/an/a
UK M1M2
157.850161.425
157.850161.425
Pleasure BoatPleasure Boat
Weather Channel
Frequencyin MHz
Weather Channel
Frequency in MHz
WX 1 162.550 WX 6 162.500
WX 2 162.400 WX 7 162.525
WX 3 162.475 WX 8 161.650
WX 4 162.425 WX 9 161.775
WX 5 162.450 WX 10 163.275

Appendix B: Channel List 93
U.S. Marine VHF Channels and Frequencies
CH. No
XMIT Freq
RCV Freq
Single Freq Use
01A 156.050 156.050 x Port Operations and Commercial, VTS. Available only in New Orleans / Lower Mississippi area. 1
03A 156.150 156.150 x U.S. Government only
05A 156.250 156.250 x Port Operations or VTS in the Houston, New Orleans and Seattle areas.
06 156.300 156.300 x Intership Safety
07A 156.350 156.350 x Commercial
08 156.400 156.400 x Commercial (Intership only)
09 156.450 156.450 x Boater Calling. Commercial and Non-Commercial.
10 156.500 156.500 x Commercial
11 156.550 156.550 x Commercial. VTS in selected areas.
12 156.600 156.600 x Port Operations. VTS in selected areas.
13 156.650 156.650 x Intership Navigation Safety (Bridge-to-bridge). Ships >20meters in length maintain a listening watch on this channel in US waters. 2, 6
14 156.700 156.700 x Port Operations. VTS in selected areas.
15 - 156.750 x Environmental (Receive only). Used by Class ‘C’ EPIRBs. 3
16 156.800 156.800 x International Distress, Safety and Calling. Ships required to carry radio, USCG, and most coast stations maintain a listening watch on this channel. 4
17 156.850 156.850 x State Control 5
18A 156.900 156.900 x Commercial
19A 156.950 156.950 x Commercial
20 157.000 161.600 Port Operations (duplex)
20A 157.000 157.000 x Port Operations
21A 157.050 157.050 x U.S. Coast Guard only
22A 157.100 157.100 x Coast Guard Liaison and Maritime Safety Information Broadcasts. Broadcasts announced on channel 16.

94 Ray54E VHF Radio
23A 157.150 157.150 x U.S. Coast Guard only
24 157.200 161.800 Public Correspondence (Marine Operator)
25 157.250 161.850 Public Correspondence (Marine Operator)
26 157.300 161.900 Public Correspondence (Marine Operator)
27 157.350 161.950 Public Correspondence (Marine Operator)
28 157.400 162.000 Public Correspondence (Marine Operator)
61A 156.075 156.075 x U.S. Government only
63A 156.175 156.175 x Port Operations and Commercial, VTS. Available only in New Orleans / Lower Mississippi area.
64A 156.225 156.225 x U.S. Coast Guard only
65A 156.275 156.275 x Port Operations
66A 156.325 156.325 x Port Operations
67 156.375 156.375 x Commercial. Used for Bridge-to-bridge communications in lower Mississippi River. Intership only. 6
68 156.425 156.425 x Non-Commercial
69 156.475 156.475 x Non-Commercial
71 156.575 156.575 x Non-Commercial
72 156.625 156.625 x Non-Commercial (Intership only)
73 156.675 156.675 x Port Operations
74 156.725 156.725 x Port Operations
77 156.875 156.875 x Port Operations (Intership only) 5
78A 156.925 156.925 x Non-Commercial
79A 156.975 156.975 x Commercial. Non-Commercial in Great Lakes only.
80A 157.025 157.025 x Commercial. Non-Commercial in Great Lakes only
81A 157.075 157.075 x U.S. Government only – Environmental protection operations.
82A 157.125 157.125 x U.S. Government only
83A 157.175 157.175 x U.S. Coast Guard only
CH. No
XMIT Freq
RCV Freq
Single Freq Use

Appendix B: Channel List 95
• Recreational boaters normally use channels listed as Non-Commercial: 68, 69, 71, 72, 78A.
• Channel 70 is used exclusively for Digital Selective Calling (DSC) and is not avail-able for regular voice communications.
• Channels 75 and 76 are reserved as guard bands for Channel 16 and are not available for regular voice communications.
Notes:
1. The letter “A” following a channel number indicates simplex use of the ship station transmit side of an international duplex channel. Operations are different from that of international operations on that channel.
2. Channel 13 should be used to contact a ship when there is danger of collision. All ships of length 20 meters or greater are required to guard VHF channel 13, in addi-tion to VHF channel 16, when operating within U.S. territorial waters.
3. Channel is Receive Only.
4. Channel 16 is used for calling other stations or for distress alerting.
5. Output power is fixed at 1 watt only.
6. Output power is initially set to 1 watt. User can temporarily override this restriction to transmit at high power.
84 157.225 161.825 Public Correspondence (Marine Operator)
85 157.275 161.875 Public Correspondence (Marine Operator)
86 157.325 161.925 Public Correspondence (Marine Operator)
87 157.375 161.975 Public Correspondence Marine Operator)
88 157.425 162.025 Public Correspondence only near Canadian border
88A 157.425 157.425 x Commercial, Intership only
CH. No
XMIT Freq
RCV Freq
Single Freq Use

96 Ray54E VHF Radio
Canadian Marine VHF Channels and Frequencies
CH No.
XMIT Freq
RCV Freq
Area of Operation Use
01 156.050 160.650 PC Public Correspondence
02 156.100 160.700 PC Public Correspondence
03 156.150 160.750 PC Public Correspondence
04A 156.200 156.200 PC Intership, Ship/Shore and Safety:Canadian Coast Guard search and rescue1
04A 156.200 156.200 EC Intership, Ship/Shore and Commercial:Commercial fishing only
05A 156.250 156.250 Ship Movement
06 156.300 156.300 All areas Intership, Commercial, Non-commercial and Safety:May be used for search and rescue communications between ships and aircraft.
07A 156.350 156.350 All areas Intership, Ship/Shore, Commercial
08 156.400 156.400 WC, EC Intership, Commercial and Safety:Also assigned for operations in the Lake Winnipeg area.
09 156.450 156.450 AC Intership, Ship/Shore, Commercial, Non-commercial and Ship Movement: May be used to communicate with aircraft and helicopters in predominantly maritime support operations.
10 156.500 156.500 AC, GL Intership, Ship/Shore, Commercial, Non-commercial, Safety and Ship Movement: May also be used for communications with aircraft engaged in coordinated search and rescue and antipollution operations.
11 156.550 156.550 PC, AC, GL Intership, Ship/Shore, Commercial, Non-commercial and Ship Movement: Also used for pilotage purposes.
12 156.600 156.600 WC, AC, GL Intership, Ship/Shore, Commercial, Non-commercial and Ship Movement: Port operations and pilot information and mes-sages.
13 156.650 156.650 All areas Intership, Commercial, Non-commercial and Ship Movement:Exclusively for bridge-to-bridge navigational traffic. Limited to 1-watt maximum power.
14 156.700 156.700 AC, GL Intership, Ship/Shore, Commercial, Non-commercial and Ship Movement: Port operations and pilot information and mes-sages.

Appendix B: Channel List 97
15 156.750 156.750 All areas Intership, Ship/Shore, Commercial, Non-commercial and Ship Movement: All operations limited to 1-watt maximum power. May also be used for on-board communications.
16 156.800 156.800 All areas International Distress, Safety and Calling2
17 156.850 156.850 All areas Intership, Ship/Shore, Commercial, Non-commercial and Ship Movement: All operations limited to 1-watt maximum power. May also be used for on-board communications.
18A 156.900 156.900 All areas Intership, Ship/Shore and Commercial:Towing on the Pacific Coast.
19A 156.950 156.950 All areas except PC
Intership and Ship/Shore: Canadian Coast Guard only.
19A 156.950 156.950 PC Intership and Ship/Shore:Various Government departments.
20 157.000 161.600 All areas Ship/Shore, Safety and Ship Movement:Port operations only with 1-watt maximum power.
21A 157.050 157.050 All areas Intership and Ship/Shore:Canadian Coast Guard only.
21B - 161.650 All areas Safety: Continuous Marine Broadcast (CMB) service.3
22A 157.100 157.100 All areas Intership, Ship/Shore, Commercial and Non-commercial:For communications between Canadian Coast Guard and non-Canadian Coast Guard stations only.
23 157.150 161.750 PC Ship/Shore and Public Correspondence:Also in the inland waters of British Columbia and the Yukon.
24 157.200 161.800 All areas Ship/Shore and Public Correspondence
25 157.250 161.850 PC Ship/Shore and Public Correspondence: Also assigned for operations in the Lake Winnipeg area.
25B - 161.850 AC Safety: Continuous Marine Broadcast (CMB) service.
26 157.300 161.900 All areas Ship/Shore, Safety and Public Correspondence
27 157.350 161.950 AC, GL, PC Ship/Shore and Public Correspondence
28 157.400 162.000 PC Ship/Shore, Safety and Public Correspondence
28B - 162.000 AC Safety: Continuous Marine Broadcast (CMB) service.
CH No.
XMIT Freq
RCV Freq
Area of Operation Use

98 Ray54E VHF Radio
60 156.025 160.625 PC Ship/Shore and Public Correspondence
61A 156.075 156.075 PC Intership and Ship/Shore:Canadian Coast Guard only.
61A 156.075 156.075 EC Intership, Ship/Shore and Commercial:Commercial fishing only.
62A 156.125 156.125 PC Intership and Ship/Shore:Canadian Coast Guard only.
62A 156.125 156.125 EC Intership, Ship/Shore and Commercial:Commercial fishing only.
64 156.225 160.825 PC Ship/Shore and Public Correspondence
64A 156.225 156.225 EC Intership, Ship/Shore and Commercial:Commercial fishing only.
65A 156.275 156.275 Intership, Ship/Shore, Commercial, Non-commercial, Safety:Search & rescue and antipollution operations on the Great Lakes. Towing on the Pacific Coast. Port operations only in the St. Lawrence River areas with 1W maximum power. Pleasure craft in the inland waters of Alberta, Saskatchewan and Mani-toba (excluding Lake Winnipeg and the Red River).
66A 156.325 156.325 Intership, Ship/Shore, Commercial, Non-commercial, Safety and Ship Movement: Port operations only in the St.Lawrence River/Great Lakes Areas with 1-watt maximum power.
67 156.375 156.375 EC Intership, Ship/Shore and Commercial:Commercial fishing only.
67 156.375 156.375 All areas except EC
Intership, Ship/Shore, Commercial, Non-commercial, Safety: May also be used for communications with aircraft engaged in coordinated search and rescue and antipollution operations.
68 156.425 156.425 All areas Intership, Ship/Shore and Non-commercial:For marinas and yacht clubs.
69 156.475 156.475 All areas except EC
Intership, Ship/Shore, Commercial and Non-commercial
69 156.475 156.475 EC Intership, Ship/Shore and Commercial:Commercial fishing only
71 156.575 156.575 PC Intership, Ship/Shore, Commercial, Non-commercial, Safety and Ship Movement
CH No.
XMIT Freq
RCV Freq
Area of Operation Use

Appendix B: Channel List 99
71 156.575 156.575 Intership, Ship/Shore and Non-commercial: For marinas and yacht clubs on the East Coast and on Lake Winnipeg.
72 156.625 156.625 EC, PC Intership, Commercial and Non-commercial:May be used to communicate with aircraft and helicopters in predominantly maritime support operations.
73 156.675 156.675 EC Intership, Ship/Shore and Commercial:Commercial fishing only
73 156.675 156.675 All areas except EC
Intership, Ship/Shore, Commercial, Non-commercial, Safety: May also be used for communications with aircraft engaged in coordinated search and rescue and antipollution operations.
74 156.725 156.725 EC, PC Intership, Ship/Shore, Commercial, Non-commercial and Ship Movement
77 156.875 156.875 Intership, Ship/Shore, Safety and Ship Movement:Pilotage on Pacific Coast. Port operations only in the St. Lawrence River/Great Lakes areas with 1W maximum power.
78A 156.925 156.925 EC, PC Intership, Ship/Shore and Commercial
79A 156.975 156.975 EC, PC Intership, Ship/Shore and Commercial
80A 157.025 157.025 EC, PC Intership, Ship/Shore and Commercial
81A 157.075 157.075 Intership and Ship/Shore: Canadian Coast Guard use only in the St. Lawrence River/Great Lakes areas.
81A 157.075 157.075 PC Intership, Ship/Shore and Safety:Canadian Coast Guard antipollution.
82A 157.125 157.125 PC Intership, Ship/Shore and Safety:Canadian Coast Guard use only.
82A 157.125 157.125 Intership and Ship/Shore: Canadian Coast Guard use only in the St. Lawrence River/Great Lakes areas.
83 157.175 161.775 PC Ship/Shore and Safety:Canadian Coast Guard use only.
83A 157.175 157.175 EC Intership and Ship/Shore:Canadian Coast Guard and other Government agencies.
83B - 161.775 AC, GL Safety: Continuous Marine Broadcast (CMB) Service.
84 157.225 161.825 PC Ship/Shore and Public Correspondence
CH No.
XMIT Freq
RCV Freq
Area of Operation Use

100 Ray54E VHF Radio
Area of OperationAC: Atlantic Coast, Gulf and St. Lawrence River up to and including Montreal
EC (East Coast): includes NL, AC, GL and Eastern Arctic areas
GL: Great Lakes (including St. Lawrence above Montreal)
NL: Newfoundland and Labrador
PC: Pacific Coast
WC (West Coast): Pacific Coast, Western Arctic and Athabasca-Mackenzie Watershed areas
All areas: includes East and West Coast areas
Notes:
1. The letter “A” following a channel number indicates simplex use of the ship station transmit side of an international duplex channel. Operations are different from that of international operations on that channel.
2. Channel 16 is used for calling other stations or for distress alerting.
3. The letter “B” following a channel number indicates simplex use of the coast station transmit side of an international duplex channel. That is, the channel is Receive Only.
4. Channel 70 is used exclusively for Digital Selective Calling (DSC) and is not available for regular voice communications.
5. Channels 75 and 76 are reserved as guard bands for Channel 16 and are not available for reg-ular voice communications.
85 157.275 161.875 AC, GL, NL Ship/Shore and Public Correspondence
86 157.325 161.925 PC Ship/Shore and Public Correspondence
87 157.375 161.975 AC, GL, NL Ship/Shore and Public Correspondence
88 157.425 162.025 AC, GL, NL Ship/Shore and Public Correspondence
CH No.
XMIT Freq
RCV Freq
Area of Operation Use
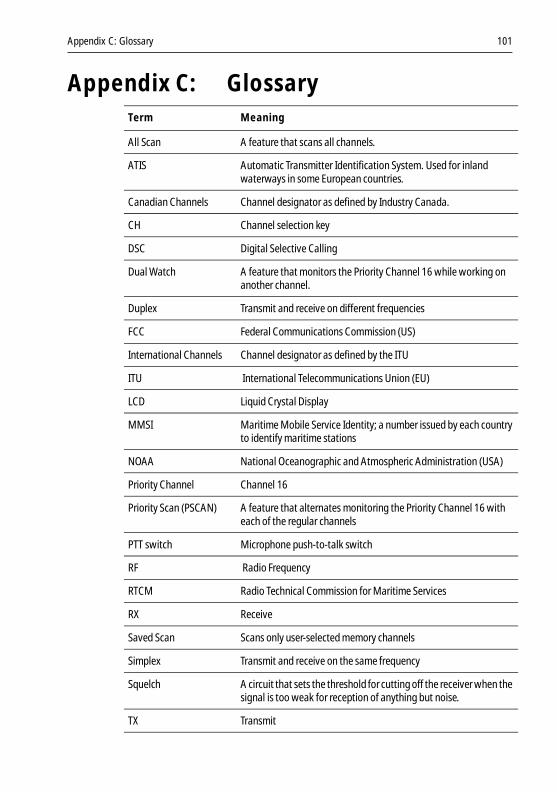
Appendix C: Glossary 101
Appendix C: Glossary
Term Meaning
All Scan A feature that scans all channels.
ATIS Automatic Transmitter Identification System. Used for inland waterways in some European countries.
Canadian Channels Channel designator as defined by Industry Canada.
CH Channel selection key
DSC Digital Selective Calling
Dual Watch A feature that monitors the Priority Channel 16 while working on another channel.
Duplex Transmit and receive on different frequencies
FCC Federal Communications Commission (US)
International Channels Channel designator as defined by the ITU
ITU International Telecommunications Union (EU)
LCD Liquid Crystal Display
MMSI Maritime Mobile Service Identity; a number issued by each country to identify maritime stations
NOAA National Oceanographic and Atmospheric Administration (USA)
Priority Channel Channel 16
Priority Scan (PSCAN) A feature that alternates monitoring the Priority Channel 16 with each of the regular channels
PTT switch Microphone push-to-talk switch
RF Radio Frequency
RTCM Radio Technical Commission for Maritime Services
RX Receive
Saved Scan Scans only user-selected memory channels
Simplex Transmit and receive on the same frequency
Squelch A circuit that sets the threshold for cutting off the receiver when the signal is too weak for reception of anything but noise.
TX Transmit

102 Ray54E VHF Radio
Tri Watch A function that monitors the Priority Channel and the Favourite (PLUS) Channel while working on another channel.
US Channels Channel designations as defined by the FCC.
VOL Volume key
VHF Very High Frequency (30MHz to 300MHz)
Weather (WX) Channels Channels for routine and emergency weather information broadcast by NOAA (USA).
Working Channel The currently-selected (non-priority, non-WX) channel.
Term Meaning

103
Index
Symbols"A" indicator 16"B" indicator 16"C" indicator 16"I" indicator 16"U" indicator 16"UC" indicator 54
Numerics16/PLUS key 11, 14
AAdding channels to memory 26ALERT indicator 15All Scan function 24All Ships Calls 42
Receiving 43Urgency 42
ATIS 77ATIS Function 79ATIS indicator 15Auto Channel Changing 82
BBacklight adjustment 63Battery Low 15
CCall Mode
All Ships Calls 42Distress Calls 45Group Calls 38Individual Calls 34
CALL/MENU key 12, 32, 57Canadian channels 96CH indicator 16Channel List
Canadian frequencies 96International frequencies 89US frequencies 93WX frequencies 92
Channel Name 70Deleting entries 70
Channel setting 18Channel UP/DOWN key 11CLEAR Key 14COG/SOG Display 68Contrast adjustment 63Conventions iiiCustomer Support 85
DDelete channels from memory 26Distress Calls 45
Receiving 48Receiving Acknowledgement 49Receiving Distress Relay 49Sending a Designated call 46Sending an Undesignated (QUICK)
call 45Distress key 14DSC Calls 32DSC Message indicator 15DSC Phonebook 59DSC Settings
ATIS Function 79Auto Channel Changing 82Group MMSI Setup 73My ATIS ID 77My MMSI ID 72Position Reply 81
Dual Watch 11, 27DW/TRI key 11
EExcessive Voltage 6FFavourite (PLUS) Channel 21Features 1Frequency Band 69
Canadian channels 96International channels 89US channels 93WX channels 92
GGlossary 101GPS
indicator 15

104
Installing 7Position Reply 81setup 64
Group Calls 38Receiving 40Transmitting 38
Group MMSI Setup 73
HHelp from Raymarine 85HI/LO
indicator 14key 11power selection 13, 17
HL/USER key 13
IIndividual Calls 34
Receiving 37Sent using the Phonebook 34
Installation 3International channels 89Invalid Channel 38, 41, 44
KKey Beep 70Keypad 9LLast Received Position Request 52Latitude/Longitude Display 67LCD display 14
MMemory
Adding channels 26Menu 12Menu Mode 57
Backlight adjustment 63Contrast adjustment 63DSC Setup 71GPS/Time Setup 64Phonebook 59
Adding entries 59Deleting entries 62Editing entries 61
Radio Setup 69
Reset 84Settings 66
MMSI 72Monitor Mode 27
Dual Watch 27Tri Watch 28
My ATIS ID 77My MMSI ID 72
OOptional equipment 3PPhonebook 59
Adding entries 59Deleting entries 62Editing entries 61
Position Reply 81Position Request 50
from Phonebook 50Receiving from another station 53Retrieving Last Received 52
Power 11ON/OFF 17selection 17
Priority Channel 20Priority Saved Scan function 25Priority Scan function 25PTT key 11, 23Push-to-Talk key 23PWR/VOL key 11
RRadio Setup 69
Channel Name 70Frequency Band 69Key Beep 70Ring Volume 70
RaymarineWebsite 85
Reset 84Ring Volume 70RX indicator 15
SSave 13SAVED indicator 15

105
Saved Scan function 24Scan Mode 23
All Scan 24Priority All Scan 25Priority Saved Scan 25Saved Scan 24
SCAN/SAVE key 13Secondary Priority Channel 21Settings 66, 71
COG/SOG Display 68Latitude/Longitude Display 67Time Display 67Time Format 68Time Offset 68
Specifications 87SQ key 11Squelch 11, 17Standard equipment 3TTime Display 67Time Format 68Time Offset 68Time Setup 64Transmitting 23
indicator 14Tri Watch 11, 28TX 23TX indicator 14
UUnable to Comply 38, 41, 44, 54US channels 93USER Channel Mode 11, 29
indicator 15key 13
UTC time setup 64
VVoltage
high 6low 6, 15
Volume 11, 17
WWarranty iiiWeather Alert 20
Weather Channels 19Website 85WX 19
channels 92indicator 15

106