Embed Size (px)
Citation preview
AUGUST 2009
ii
Table of Contents
INTRODUCTION: .................................................................................................. 1
Development of Tropical Fish Trade in Papua New Guinea ....................................... 1
Training Program ................................................................................................. 2
How to run the Modules for each day ................................................................. 3
MODULE 1: ............................................................................................................. 2
FISH NET MAKING ................................................................................................... 2
Module Summary ................................................................................................. 2
Sessions 1 and 2: ................................................................................................. 3
How to Make Nets and How to Use Them/How to Make and Use a Barrier Net3
Session 3: How to Make and Use Scoop Net ..................................................... 5
Session 4: How to Make and Use Stocking Net ................................................. 7
Session 5: How to Make and Use a Stocking Box (Receiving Cage) ............... 9
Making a Barrier Net – Handout ........................................................................ 14
Making a Scoop Net - Handout .......................................................................... 19
Making a Stocking Net – Handout ..................................................................... 23
Making a Stocking Box – Handout .................................................................... 27
MODULE 2: ........................................................................................................... 32
SPECIES IDENTIFICATIOM ................................................................................... 32
Module Summary ............................................................................................... 32
Introduction to Species Identification .............................................................. 32
Parts of Fish ....................................................................................................... 34
Species Identification ........................................................................................ 35
The Marine Aquarium Organisms ..................................................................... 46
MODULE 3: ........................................................................................................... 71
KEEPING CATCH RECORDS & DOCUMENTING SHIPMENTS OF FISH ............. 71
Module Summary ............................................................................................... 71
Session 1: Completing Coordinators Logbook ................................................ 72
Session 2: Making Monthly Catch Summary.................................................... 75
Session 3: Preparing a packing List ................................................................. 76
Session 4: ORS and SSPR................................................................................. 77
Coordinators logbook - Handout ...................................................................... 80
Monthly Catch Summary – Handout ................................................................. 83
Packing list - handout ........................................................................................ 88
ORS and SSPR - handout .................................................................................. 91
iii
MODULE 4: ........................................................................................................... 97
MARKETING & SELLING ........................................................................................ 97
Module Summary ............................................................................................... 97
Session Proper: Marketing and Selling ............................................................ 98
Marketing and Selling ...................................................................................... 100
MODULE 5: ......................................................................................................... 106
SAFE DIVING PRACTICES ................................................................................... 106
Module Summary ............................................................................................. 106
Session 1: Safe Diving Theory and Principles ............................................... 107
Session 2: Actual Diving ................................................................................. 108
Breath-hold Diving ........................................................................................... 109
MODULE 6: ......................................................................................................... 112
HOLDING FISHES ................................................................................................ 113
Module Summary ............................................................................................. 113
Session 1: Purging and Purging Area ............................................................ 113
Purging ............................................................................................................. 115
MODULE 7: ......................................................................................................... 118
SCREENING FISHES ........................................................................................... 118
Module Summary ............................................................................................. 118
Session 1: Common Fish Defects and Their Causes .................................... 119
Session 2: Screening ....................................................................................... 119
Session 3: Common Aquarium Fish Diseases and Problems ...................... 122
Screening .......................................................................................................... 123
MODULE 8: ......................................................................................................... 136
PACKING FISHES ................................................................................................. 137
Module Summary ............................................................................................. 137
Session 1: Packing .......................................................................................... 137
Packing ............................................................................................................. 141
MODULE 9: ......................................................................................................... 148
FISHING OPERATION CYCLE ............................................................................. 149
Module Summary ............................................................................................. 149
Session 1: Fishing Operation Cycle ............................................................... 150
Session 2: Simulation of Ordering System .................................................... 150
Session 3: Actual Fishing ............................................................................... 152
Session 4: Actual Stocking/Purging .............................................................. 154
Session 5: Monitoring/Determining Order Status ......................................... 155
iv
Session 6: Actual Screening and Packing ..................................................... 156
Session 7: Evaluation of Shipment ................................................................. 159
Fishing Operation Cycle .................................................................................. 161
MODULE 10: ...................................................................................................... 166
EXTENSION ACTIVITIES ...................................................................................... 166
Module Summary ............................................................................................. 166
Session 1: Fishers’ Assessment ..................................................................... 167
Fishers’ Assessment Notes ............................................................................. 167
FISHERS SKILLS ASSESSMENT MATRIX........................................................... 169
Session 2: Monitoring and Refresher Training .............................................. 177
Monitoring and Refresher Training Notes ...................................................... 177

1
INTRODUCTION:
Development of Tropical Fish Trade in Papua New Guinea …………………………………………………………………………………………
As Papua New Guinea integrates further into the modern economy, cash becomes
increasingly important. However, within a single generation facing economical shifts,
coastal fishers have thus encountering coastal resource harvesting limitations.
Examples of such thus include the following; fish catches shrinking, turtles become
scarce, shark fin fisheries become a banned activity, beche-de-mer become more
limited, lobster harder to find, etc.
In limiting fishery activities with less regard to rapid population rise make poachers
and smugglers out of fishers. The authorities that require conservation and restraint
of resources often then fail to provide alternative livelihoods exploring benefits for
most resource-harvesting locals. A review of a more consistent and sustainable way
to make a living is thus a serious need especially for coastal regions exploiting
coastal resources.
The Marine Aquarium Trade when properly practiced is now considered to be one of
the more sustainable alternatives for coastal village people throughout the South
Pacific.
Biological aspects have addressed issues showing that the majority of the target
species replace themselves within the same year as most are yearlings themselves
and there are examples of sustained commercial level fish fishing with a data stream
of 25 years like in Cairns, Australia.
The Australian Great Barrier Reef Marine Park Authority has found that industry to
have negligible impact on the Great Barrier Reef (which is a great tourist attraction)
and has published research to show this. The question of sustainability in the Marine
Aquarium Trade divides neatly between two methodologies: Is it practiced by
allowing coral to be destroyed (coral being the critical habitat of the fish) by crowbars
and drugs or is it practiced only by employing nets to fish fish, sparing the coral?
In Indonesia and the Philippines, cyanide and crowbars are used routinely, not PNG.
The rest of the world would enter this industry strictly on the side of the net fishing
2
methodology and it is our task to ensure this with a training program that “sticks with
the diver forever.”
We propose to enable PNG’s entry into the Aquarium Trade at a high-level of
excellence from the very first day by employing all that our trainers have learned from
a hundred man-years of experience working in a dozen countries around the world.
Our project will remain in PNG for a minimum of 3 years, train fishers to a certifiable
standard and monitor, supervise and evaluate continually. We will also develop local
trainers from the very villages we work with and leave behind a solid pool of talent
when we further reach out to other localities.
We have developed a training manual that illustrates the policies and procedures of a
well-run trade for PNG with reference to implementing it in fishing villages throughout
the country.
Training Program 1. Nets & Equipment – the basis of sustainable fish fishing. The craft of
responsible and productive fishing. The methodology, making nets, tricks of
the trade, uses and importance.
2. Target species Identification – identifying the right for the trade.
3. Catch Records – keeping track of what we do enabling traceability and
certification.
4. Marketing & Selling – outlining guidelines and processes of selling fishes to
your exporter.
5. Safe Diving – outline of key ideas when diving to staying alive and healthy.
6. Holding Fishes – processes of staging live fish for eventual sale.
7. Screening Fishes – key steps of avoiding bad fish, rejects, damages and
lost sales.
8. Packing Fishes – the art of packing and handling fishes for maximum
survival and health.
9. Fishing Operation Cycle – the routine from start to finish concerning live fish
export.
10. Extension Activities – follow-up activities to maintain quality in aquarium
fishing.
3
The course will run for a total of ten (10) days maximum period for every selected
village. The course will run a classroom orientation for 1 day. During the orientation,
the materials and dive equipments will also be issued out. Then, a practicum for
another 3 days for making nets (scoop, barrier and stocking nets) and other fish
handling equipments followed by theory lessons (in house training) for exactly 2
days.
Subsequently, skills training will run for the remaining five days, that is actual fishing,
handling, holding, purging and packing for the very first export: Fishermen will in fact
be working and getting paid from the very first shipment.
How to run the Modules for each day
Preliminaries:
1 Start with the registration
1.1 Let each participant (especially the fisher) sign in the attendance sheet.
1.2 As soon as participant has signed in the attendance sheet, give him/her the
training kit (which will include handouts, paper/notebook and ball pen)
2 Introduce self and participants
2.1 Introduce self and welcome the participants to the Course (Mention Course
Title)
“I am (state your name). I am (state position and organization) Welcome to
the Title of Course.”
2.2 Introduce an icebreaker, if necessary.
3 Remind participants of training rules before the beginning of every module:
a. Full participation
b. Openness for diversity and new ideas
c. Responsibility for one’s learning
d. Cell phones (if there are) STRICTLY on silent mode during sessions
e. Administration needs (if any) settled outside of session time
4 Present training road map (What are we going to learn or do today?)
Present Diagram of Road Map or give clear sense of direction to participants for
each module presentation.
1
FMA
TRA
I
N
I
NG
CHAR
T
10
DAYS
SESSION 1
SESSION 2
-Introduction of Trainees and Trainers
-Introduction of Program/Clarifications of Project
-Introduction of Modules
-Introduction & Lecture of Module 1: NET MAKING
-Net Making Practical/Equipment Construction
DAY 1
DAY 2
SESSION 1
SESSION 2
DAY 3
SESSION 1
SESSION 2
DAY 4
SESSION 1
SESSION 2
DAY 5 to DAY
9
SESSION 1
SESSION 2
DAY 10
-Continue Net Making Practical/Equipment
Construction
Introduction and lecture of:
-Module 2: Species Identification
-Module 3: Keeping Catch Records & Documenting Shipments of Fish
-Module 4: Marketing and Selling
Introduction and lecture of:
-Module 5: Safe Diving Practices
-Module 6: Decompression
-Module 7: Holding Fish Introduction and lecture of:
-Module 8: Screening Fishes
-Module 9: Packing Fishes
-Module 10: Collection operation Cycle
In-water Practical:
- Fish identification
- Fish catch
- Fish handling
- Fish transporting
- Purging
-First hand training experience of fishers to identify fishes and use proper equipment and techniques to catch and handle fish and
purging.
The Ice Breaker
Training of fishers to make their own equipment, their proper use and importance
Lecture on important topics covering aquarium fish industry starting from catch
to export.
Screening by Facility Showing proper processes of Screening
1
2
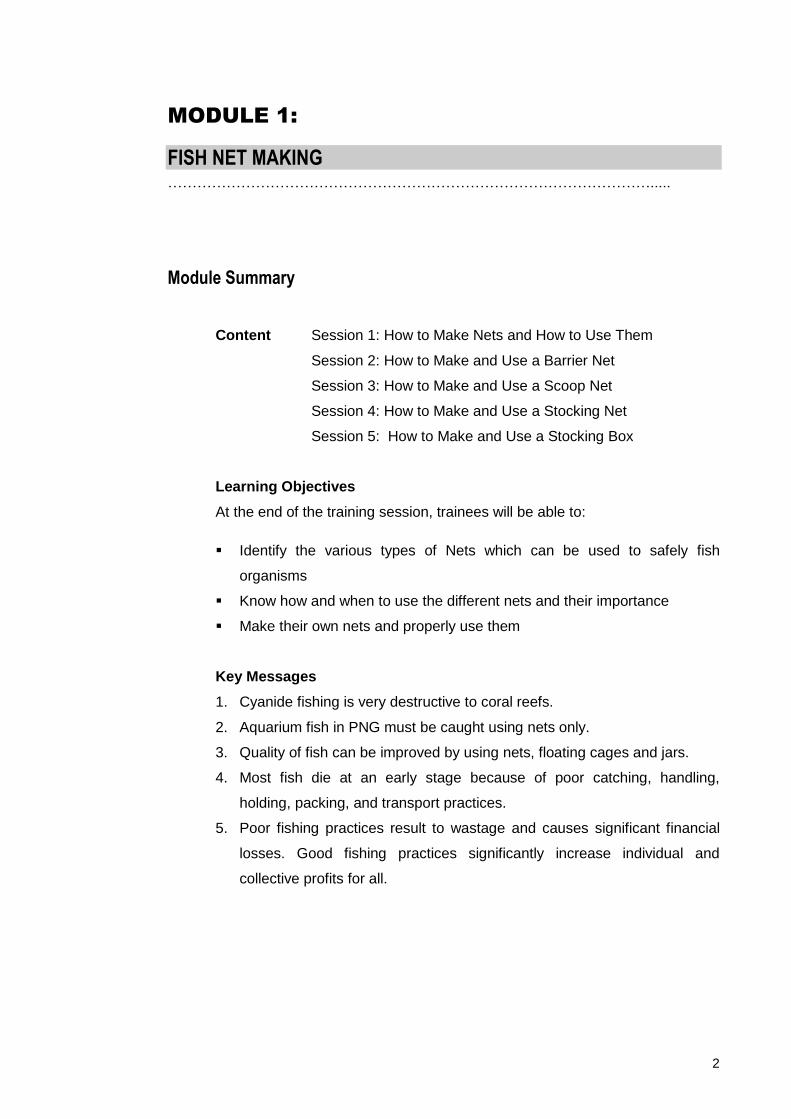
MODULE 1:
FISH NET MAKING ……………………………………………………………………………………….....
Module Summary
Content Session 1: How to Make Nets and How to Use Them
Session 2: How to Make and Use a Barrier Net
Session 3: How to Make and Use a Scoop Net
Session 4: How to Make and Use a Stocking Net
Session 5: How to Make and Use a Stocking Box
Learning Objectives
At the end of the training session, trainees will be able to:
Identify the various types of Nets which can be used to safely fish
organisms
Know how and when to use the different nets and their importance
Make their own nets and properly use them
Key Messages
1. Cyanide fishing is very destructive to coral reefs.
2. Aquarium fish in PNG must be caught using nets only.
3. Quality of fish can be improved by using nets, floating cages and jars.
4. Most fish die at an early stage because of poor catching, handling,
holding, packing, and transport practices.
5. Poor fishing practices result to wastage and causes significant financial
losses. Good fishing practices significantly increase individual and
collective profits for all.
3
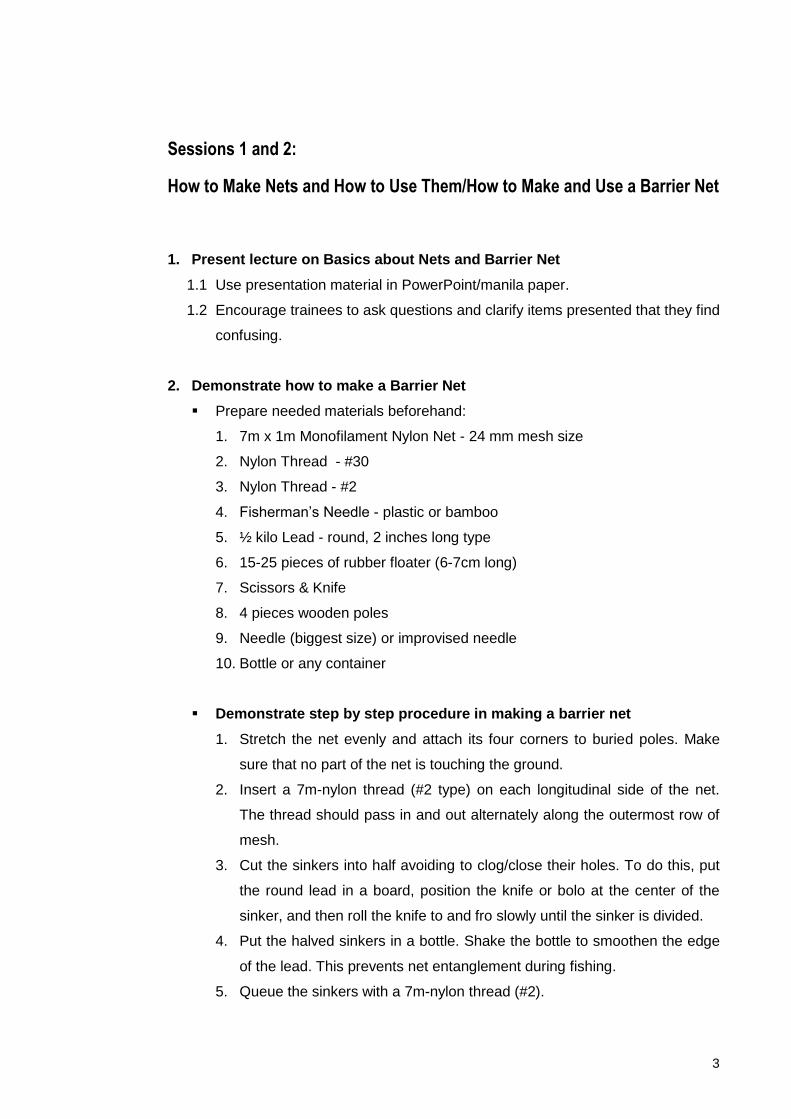
Sessions 1 and 2:
How to Make Nets and How to Use Them/How to Make and Use a Barrier Net
1. Present lecture on Basics about Nets and Barrier Net
1.1 Use presentation material in PowerPoint/manila paper.
1.2 Encourage trainees to ask questions and clarify items presented that they find
confusing.
2. Demonstrate how to make a Barrier Net
Prepare needed materials beforehand:
1. 7m x 1m Monofilament Nylon Net - 24 mm mesh size
2. Nylon Thread - #30
3. Nylon Thread - #2
4. Fisherman’s Needle - plastic or bamboo
5. ½ kilo Lead - round, 2 inches long type
6. 15-25 pieces of rubber floater (6-7cm long)
7. Scissors & Knife
8. 4 pieces wooden poles
9. Needle (biggest size) or improvised needle
10. Bottle or any container
Demonstrate step by step procedure in making a barrier net
1. Stretch the net evenly and attach its four corners to buried poles. Make
sure that no part of the net is touching the ground.
2. Insert a 7m-nylon thread (#2 type) on each longitudinal side of the net.
The thread should pass in and out alternately along the outermost row of
mesh.
3. Cut the sinkers into half avoiding to clog/close their holes. To do this, put
the round lead in a board, position the knife or bolo at the center of the
sinker, and then roll the knife to and fro slowly until the sinker is divided.
4. Put the halved sinkers in a bottle. Shake the bottle to smoothen the edge
of the lead. This prevents net entanglement during fishing.
5. Queue the sinkers with a 7m-nylon thread (#2).
4
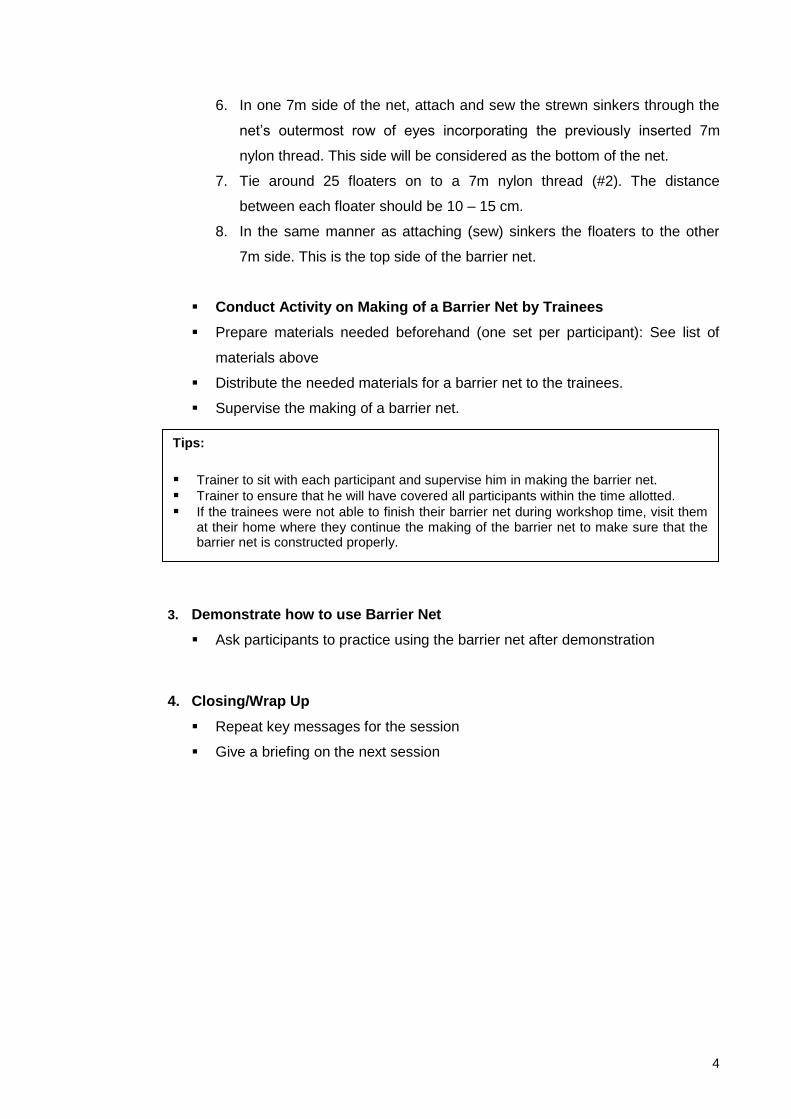
6. In one 7m side of the net, attach and sew the strewn sinkers through the
net’s outermost row of eyes incorporating the previously inserted 7m
nylon thread. This side will be considered as the bottom of the net.
7. Tie around 25 floaters on to a 7m nylon thread (#2). The distance
between each floater should be 10 – 15 cm.
8. In the same manner as attaching (sew) sinkers the floaters to the other
7m side. This is the top side of the barrier net.
Conduct Activity on Making of a Barrier Net by Trainees
Prepare materials needed beforehand (one set per participant): See list of
materials above
Distribute the needed materials for a barrier net to the trainees.
Supervise the making of a barrier net.
3. Demonstrate how to use Barrier Net
Ask participants to practice using the barrier net after demonstration
4. Closing/Wrap Up
Repeat key messages for the session
Give a briefing on the next session
Tips:
Trainer to sit with each participant and supervise him in making the barrier net.
Trainer to ensure that he will have covered all participants within the time allotted.
If the trainees were not able to finish their barrier net during workshop time, visit them at their home where they continue the making of the barrier net to make sure that the barrier net is constructed properly.
5
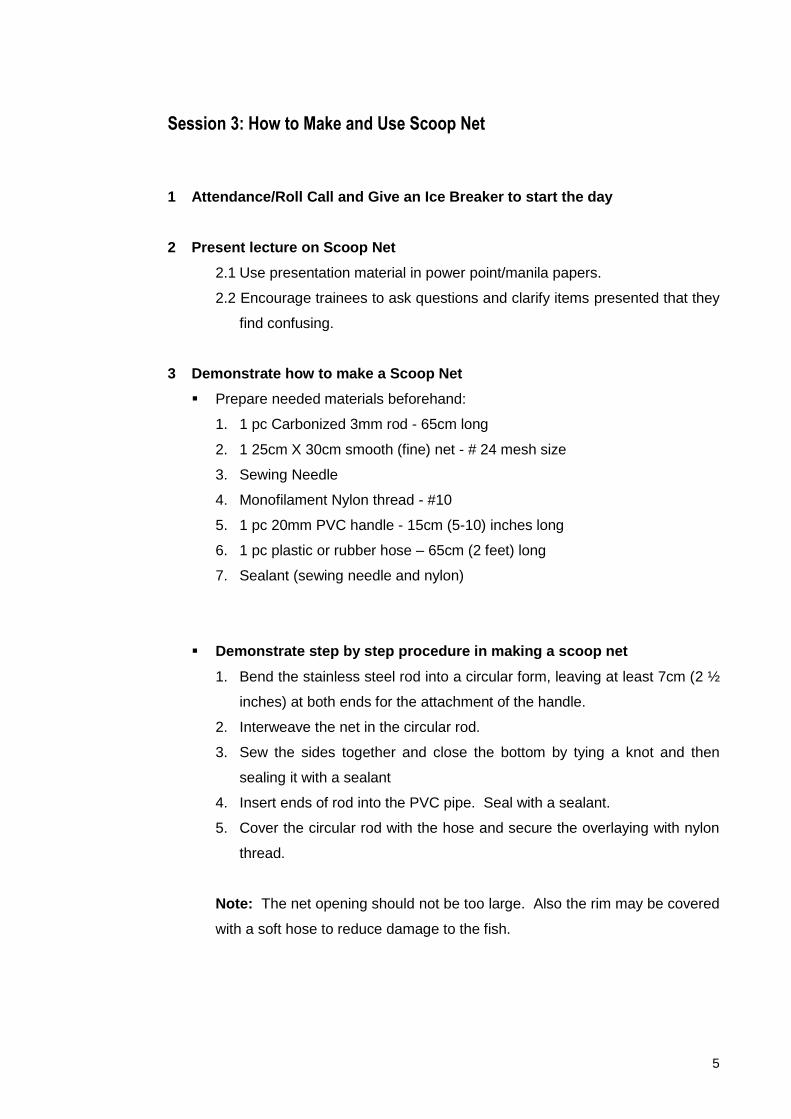
Session 3: How to Make and Use Scoop Net
1 Attendance/Roll Call and Give an Ice Breaker to start the day
2 Present lecture on Scoop Net
2.1 Use presentation material in power point/manila papers.
2.2 Encourage trainees to ask questions and clarify items presented that they
find confusing.
3 Demonstrate how to make a Scoop Net
Prepare needed materials beforehand:
1. 1 pc Carbonized 3mm rod - 65cm long
2. 1 25cm X 30cm smooth (fine) net - # 24 mesh size
3. Sewing Needle
4. Monofilament Nylon thread - #10
5. 1 pc 20mm PVC handle - 15cm (5-10) inches long
6. 1 pc plastic or rubber hose – 65cm (2 feet) long
7. Sealant (sewing needle and nylon)
Demonstrate step by step procedure in making a scoop net
1. Bend the stainless steel rod into a circular form, leaving at least 7cm (2 ½
inches) at both ends for the attachment of the handle.
2. Interweave the net in the circular rod.
3. Sew the sides together and close the bottom by tying a knot and then
sealing it with a sealant
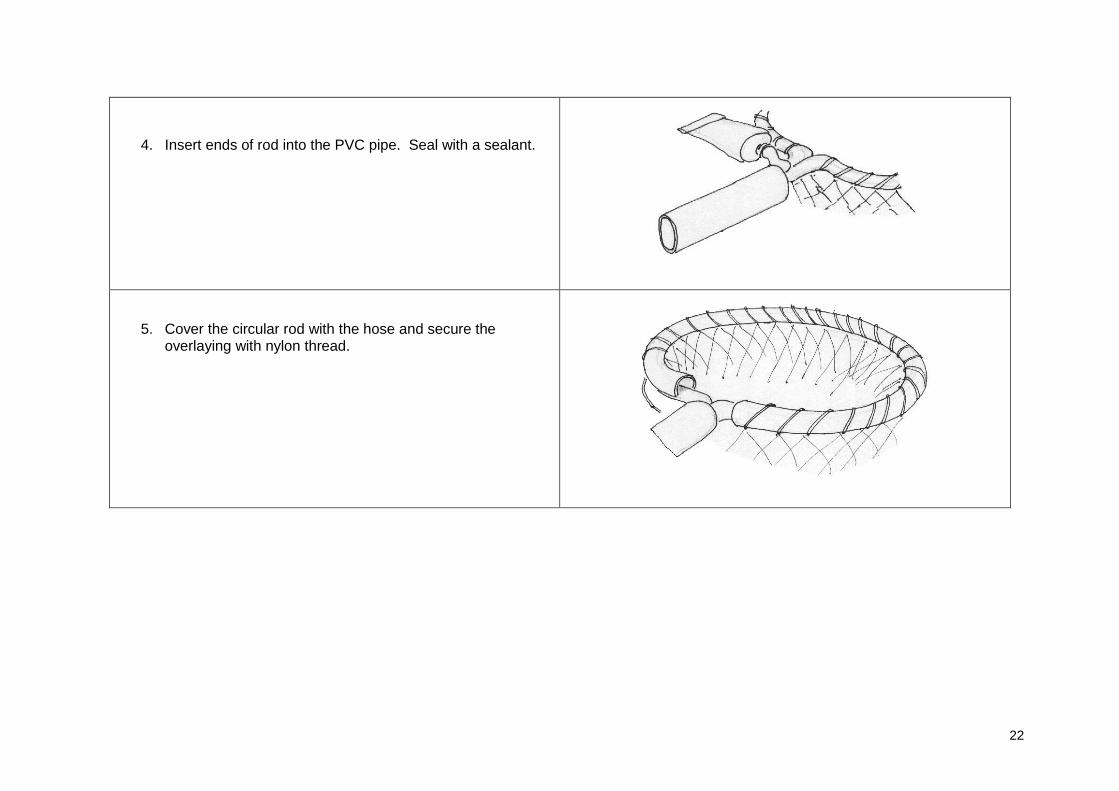
4. Insert ends of rod into the PVC pipe. Seal with a sealant.
5. Cover the circular rod with the hose and secure the overlaying with nylon
thread.
Note: The net opening should not be too large. Also the rim may be covered
with a soft hose to reduce damage to the fish.
6
4 Conduct Activity on Making of a Scoop Net by Trainees
Prepare materials needed beforehand (one set per participant): See list of
materials above
Distribute the needed materials for a scoop net to the trainees.
Supervise the making of a scoop net.
Demonstrate how to use Scoop Net properly Ask participants to practice after the demonstration
Closing/Wrap up
Repeat key messages for the session
Give a briefing on the next session
Tips:
Trainer to sit with each participant and supervise him in making the scoop net.
Trainer to ensure that he will have covered all participants within the time allotted.
If the trainees were not able to finish their scoop net during workshop time, visit them at their home where they continue the making of the scoop net to make sure that the scoop net is constructed properly.
7
Session 4: How to Make and Use Stocking Net
1 Attendance/Roll Call and Give an Ice Breaker to start the day
2 Present lecture on Stocking Net
2.1 Use presentation material in power point/manila paper.
2.2 Encourage trainees to ask questions and clarify items presented that they find
confusing.
3 Demonstrate how to make a Stocking Net
Prepare needed materials beforehand:
1. 2 square meter mesh net – 24mm mesh size
2. Scissors
3. Monofilament nylon thread (80 pound)
4. 2.5 meters 3mm rope
Demonstrate Steps in Making Stocking Net
1. Sew the two sides of the 2 square meters non-fine mesh net together.
2. Insert a rope on each opening of the net. Pass the rope in and out of the
third or fourth row of mesh. (Note: Do not use the end row of mesh.)
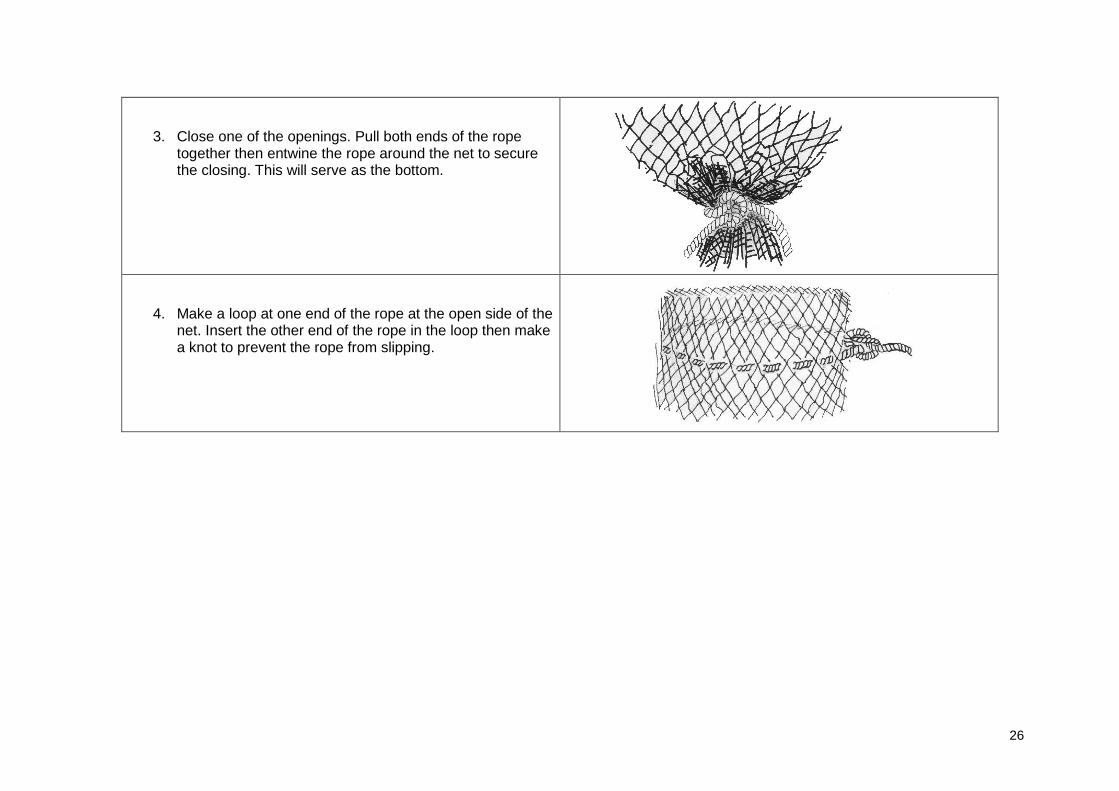
3. Close one of the openings. Pull both ends of the rope together then
entwine the rope around the net to secure the closing. This will serve as
the bottom.
4. Make a loop at one end of the rope at the open side of the net. Insert the
other end of the rope in the loop then make a knot to prevent the rope
from slipping.
4 Conduct Activity on Making of a Stocking Net by Trainees
Prepare materials needed beforehand (one set per participant): See list of
materials above
Distribute the needed materials for a stocking net to the trainees.
Supervise the making of a stocking net.
Tips:
Trainer to sit with each participant and supervise him in making the stocking net.
Trainer to ensure that he will have covered all participants within the time allotted.
If the trainees were not able to finish their stocking net during workshop time, visit them at their home where they continue the making of the stocking net to make sure that the stocking net is constructed properly.

8
5 Demonstrate how to use a Stocking Net
Ask participants to practice after the demonstration.
6 Closing/Wrap up
Repeat key messages for the session
Give a briefing on the next session
9
Session 5: How to Make and Use a Stocking Box (Receiving Cage)
1 Attendance/Roll Call and Give an Ice Breaker to start the day
2 Present lecture on Stocking Box
2.1 Use presentation material in power point/manila paper.
2.2 Encourage trainees to ask questions and clarify items presented that they find
confusing.
3 Demonstrate how to make a Stocking Box
Prepare needed materials beforehand:
1. 2 used square container – 20L containers
2. 2 pcs. 80mm PVC 1m long
3. 4 80mm PVC cap
4. Nylon thread (12m)
5. Polyethylene rope (10m)
6. Boring drill or sharpened wire heated to make holes all around
Demonstrate step by step procedure in making a stocking box
1. Using a knife, remove the middle portion (approximately 20 X30 cm) of
the cover of one wide side of the container fully. This will serve as the
opening of the box.
2. Using a boring drill or a heated sharpened wire bore holes on the upper
sides of the container. Make sure to put holes near the lid for use in tying
the container to the PVC frame later. Set aside.
3. Put one 1m PVC pipe beside the two containers (opening facing up) and
tie the containers and pipe together. Repeat using the other 1m PVC pipe
on the other side.
4. Tie the 10m rope at the centre of the container (widths end) on ether side.
This is the towrope.

10
4 Conduct Activity on Making of a Stocking Box by Trainees
Prepare materials needed beforehand (one set per participant): See list of
materials above
Distribute the needed materials for a stocking box to the trainees.
Supervise the making of a stocking box.
5 Demonstrate how to use a Stocking Box
Ask participants to practice after demonstration
Closing/Wrap up
Repeat key messages for the session
Give a briefing on the next session
Tips:
Trainer to sit with each participant and supervise him in making the scoop net.
Trainer to ensure that he will have covered all participants within the time allotted.
If the trainees were not able to finish their scoop net during workshop time, visit them at their home where they continue the making of the scoop net to make sure that the scoop net is constructed properly.
11
Fish Net Making - Handout
Introduction:
The sustainability of improved fishery livelihoods is dependent on healthy reefs. One
traditional method used by other countries in fishing aquarium fish is by using
cyanide. This method not only destroys reefs, fishes caught by cyanide are unhealthy
and die after an average of three months or even as early as a few days after arrival.
With proper training and coach, it is possible and economically viable to stop using
cyanide. Cyanide is not the only way to fish aquarium fishes. Aquarium fishes can be
caught using net only techniques.
Reminder!
Why Is It Not Good to Handle Fish Using Coarse Net
Fish are covered with protective mucus.
Handling them with coarse nets removes the mucus, (rubs it off).
The fish can then become infected or susceptible to parasitic or fungal
infestation which could result in high mortality.
12
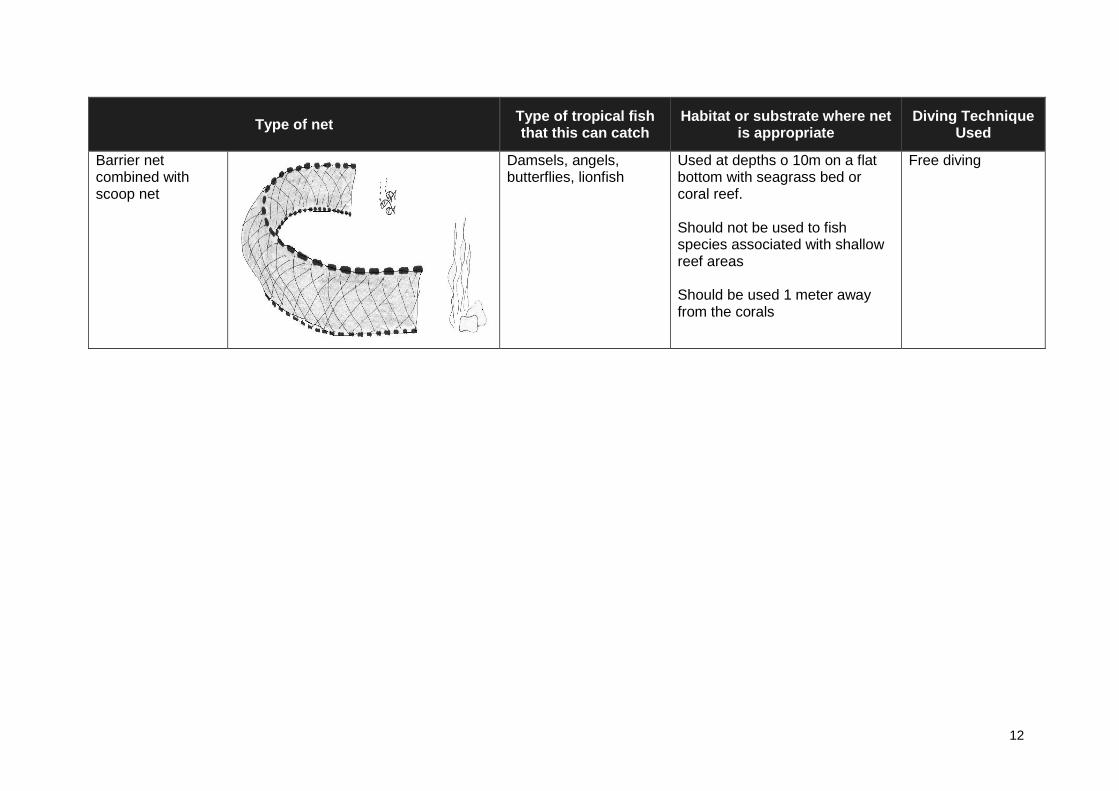
Type of net Type of tropical fish that this can catch
Habitat or substrate where net is appropriate
Diving Technique Used
Barrier net combined with scoop net
Damsels, angels, butterflies, lionfish
Used at depths o 10m on a flat bottom with seagrass bed or coral reef. Should not be used to fish species associated with shallow reef areas Should be used 1 meter away from the corals
Free diving
13
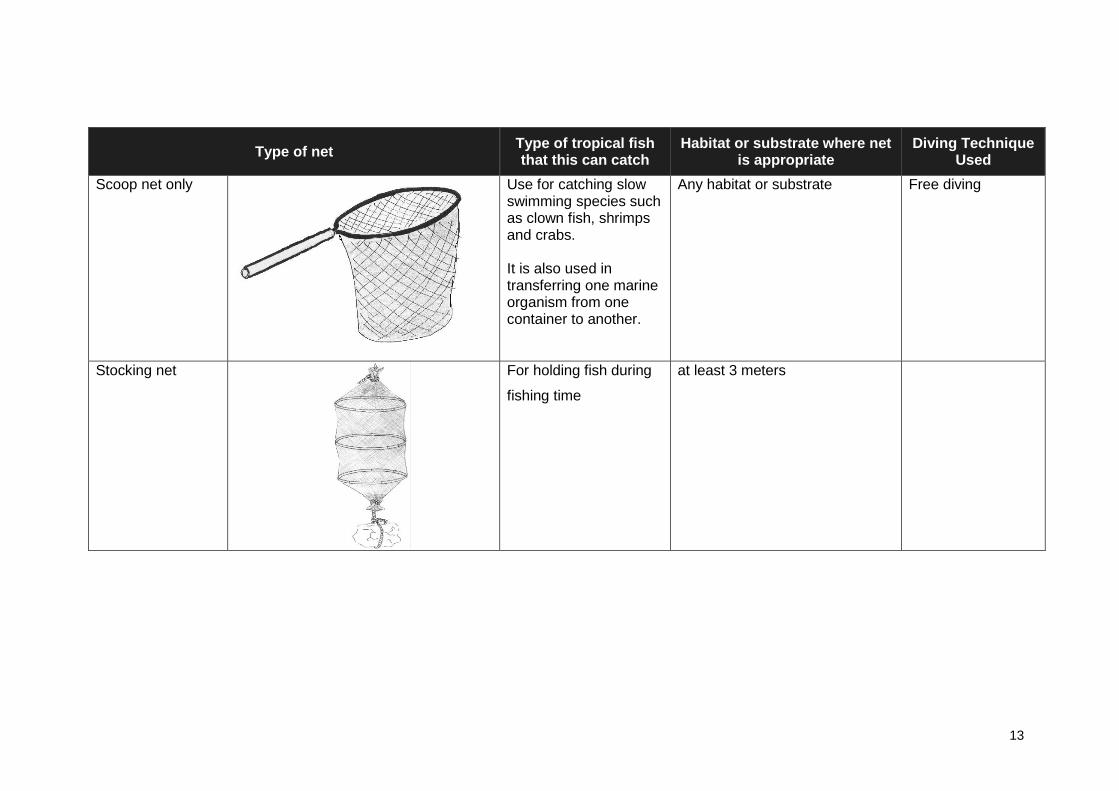
Type of net Type of tropical fish that this can catch
Habitat or substrate where net is appropriate
Diving Technique Used
Scoop net only
Use for catching slow swimming species such as clown fish, shrimps and crabs. It is also used in transferring one marine organism from one container to another.
Any habitat or substrate Free diving
Stocking net
For holding fish during
fishing time
at least 3 meters
14
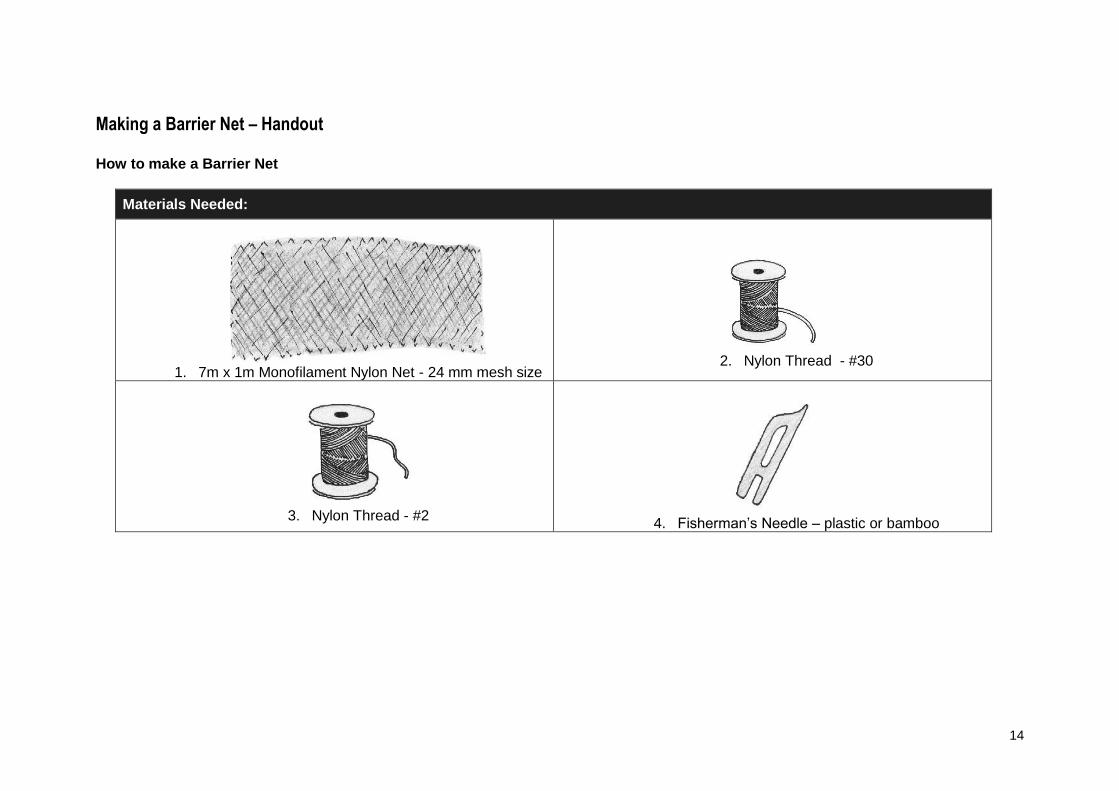
Making a Barrier Net – Handout How to make a Barrier Net
Materials Needed:
1. 7m x 1m Monofilament Nylon Net - 24 mm mesh size
2. Nylon Thread - #30
3. Nylon Thread - #2
4. Fisherman’s Needle – plastic or bamboo

15
5. ½ kilo Lead – round, about 3 cm long type
6. 15-25 pieces of rubber floater ( 6-7cm long)
7. Scissors / Knife
8. 4 pieces wooden poles
9. Needle (biggest size) or improvised needle
10. Bottle or any container
16
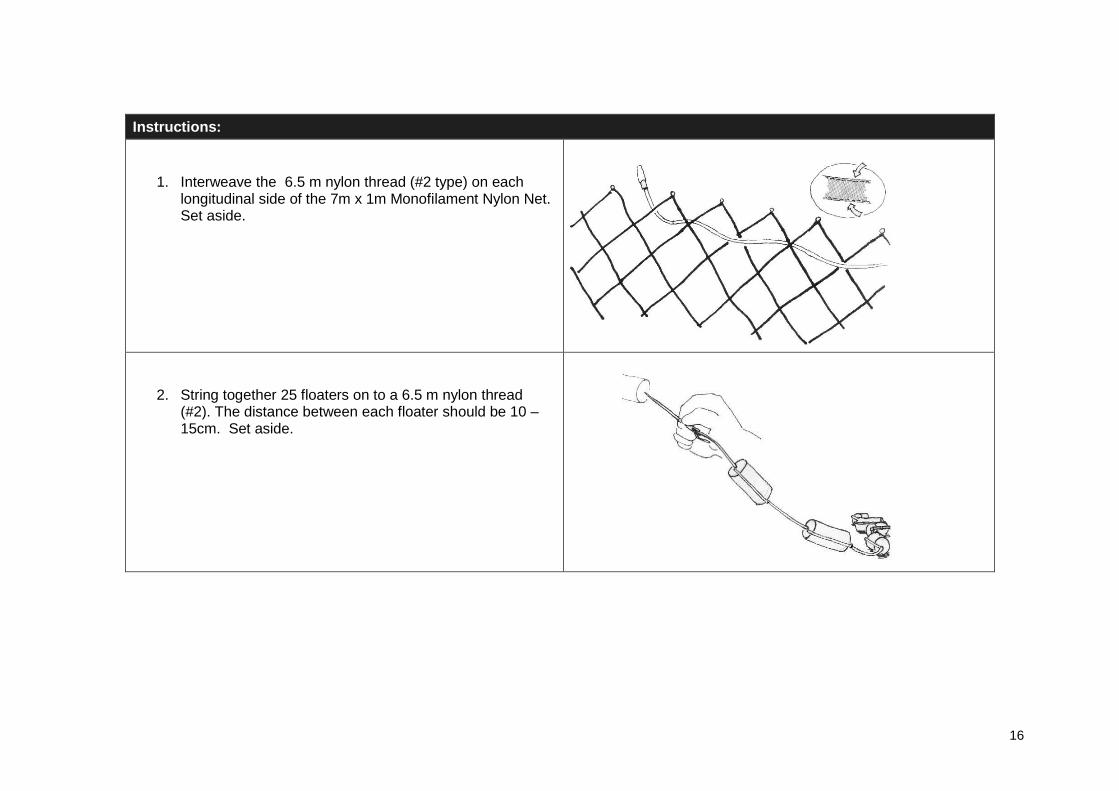
Instructions:
1. Interweave the 6.5 m nylon thread (#2 type) on each
longitudinal side of the 7m x 1m Monofilament Nylon Net. Set aside.
2. String together 25 floaters on to a 6.5 m nylon thread
(#2). The distance between each floater should be 10 – 15cm. Set aside.
17
3. Cut the sinkers slowly into half to avoid clogging/closing
of their holes.
4. Put the halved sinkers in a bottle/container. Shake the
bottle/container to smoothen the edge of the lead. This prevents net entanglement during fishing.
5. String together the sinkers with a 6.5m nylon thread (#2).
6. Stretch the nylon on both sides of the net and attach its
four ends to buried poles. Make sure that no part of the net is touching the ground.
18
7. On one side of the net, attach and sew using the nylon
thread #30 the stringed sinkers through the net’s outermost row of eyes incorporating the previously inserted 6.5 meter nylon thread. This side will be considered as the bottom of the net.
8. In the same manner, attach the stringed floaters on the
other side.
Reminder!
1. The smaller the lead, the more flexible the net.

19
Making a Scoop Net - Handout
How to make a scoop net
Materials Needed
1. 1 pc Carbonized 3mm rod - 65cm
2. 25cm30cm smooth net - # 24 mesh size
3. Fisherman’s Needle
4. Monofilament Nylon thread - #10
20
5. 20mm PVC pipe – 15cm
6. 1 pc plastic or rubber hose – 45 cm cut lengthwise
7. sealant
Instructions:
1. Bend the stainless steel rod into a circular form, leaving at
least 7cm ( 2 ½ inches) at both ends for the attachment of
the handle.
21
2. Interweave the net in the circular rod.
3. Sew the sides together and close the bottom by tying a knot
and then sealing it with a sealant.
22
4. Insert ends of rod into the PVC pipe. Seal with a sealant.
5. Cover the circular rod with the hose and secure the overlaying with nylon thread.
23
Making a Stocking Net – Handout
How to make a Stocking Net
Materials Needed:
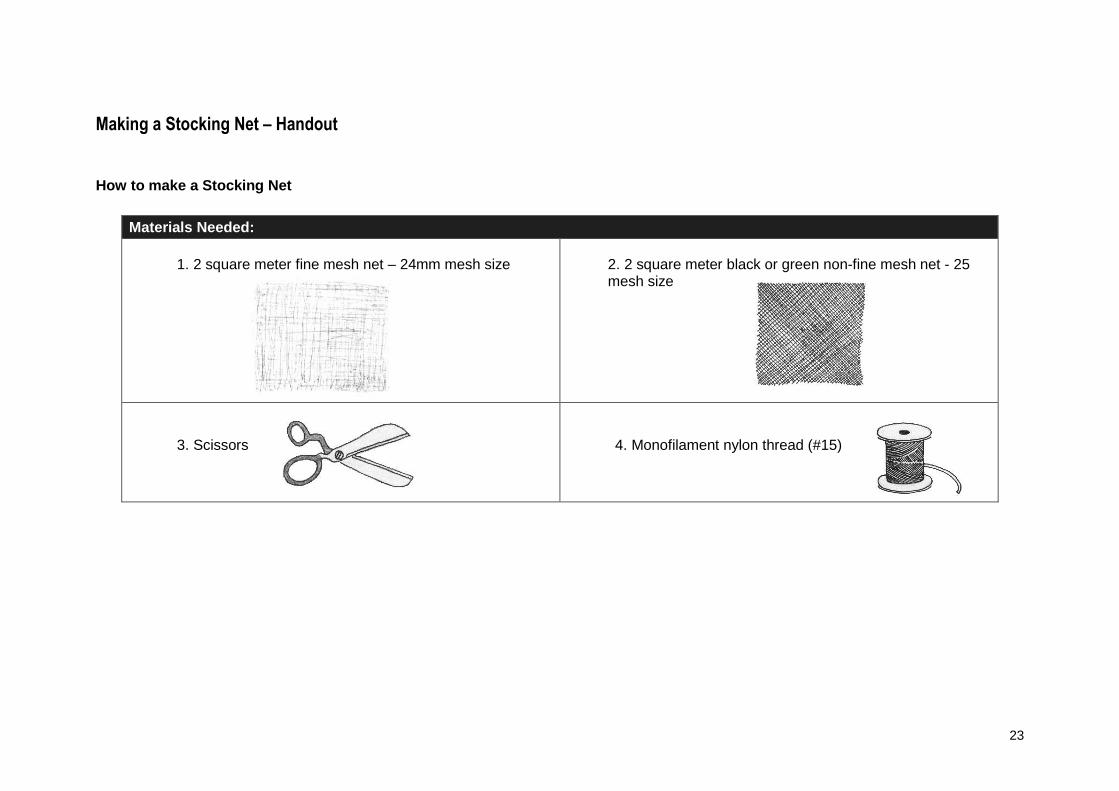
1. 2 square meter fine mesh net – 24mm mesh size
2. 2 square meter black or green non-fine mesh net - 25 mesh size
3. Scissors
4. Monofilament nylon thread (#15)
24
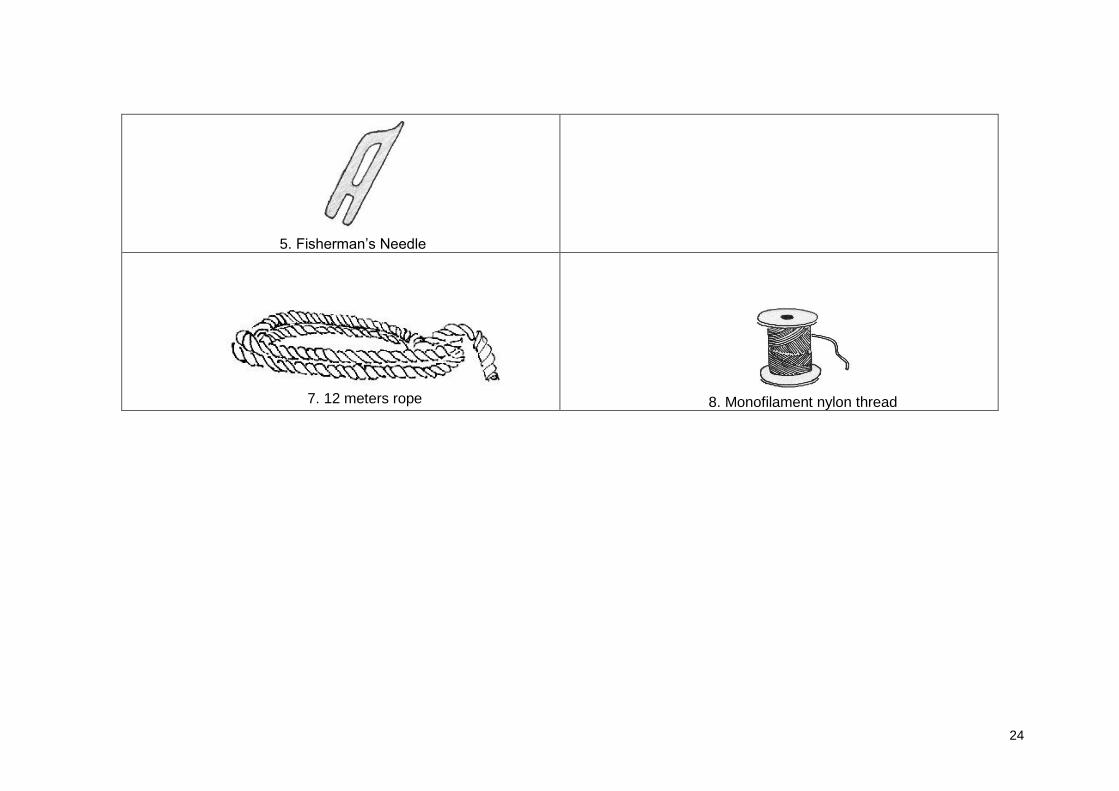
5. Fisherman’s Needle
7. 12 meters rope
8. Monofilament nylon thread
25
Steps in Making Stocking Net:
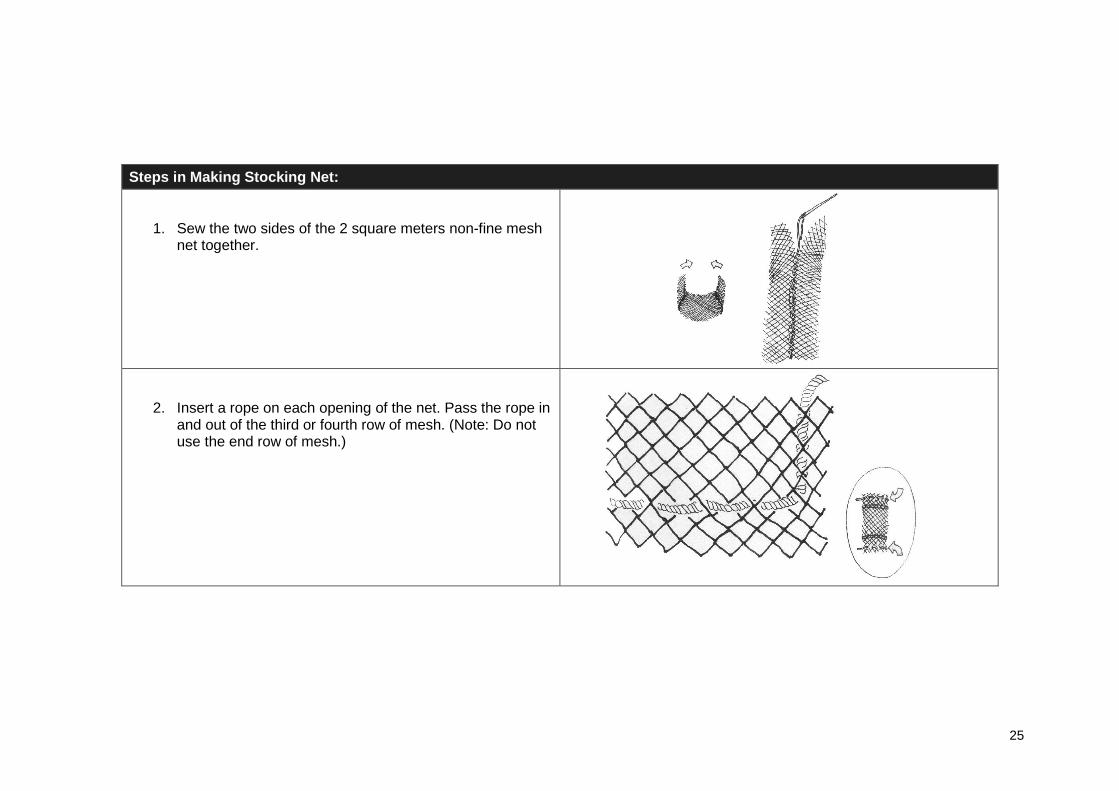
1. Sew the two sides of the 2 square meters non-fine mesh net together.
2. Insert a rope on each opening of the net. Pass the rope in and out of the third or fourth row of mesh. (Note: Do not use the end row of mesh.)
26
3. Close one of the openings. Pull both ends of the rope together then entwine the rope around the net to secure the closing. This will serve as the bottom.
4. Make a loop at one end of the rope at the open side of the net. Insert the other end of the rope in the loop then make a knot to prevent the rope from slipping.
27
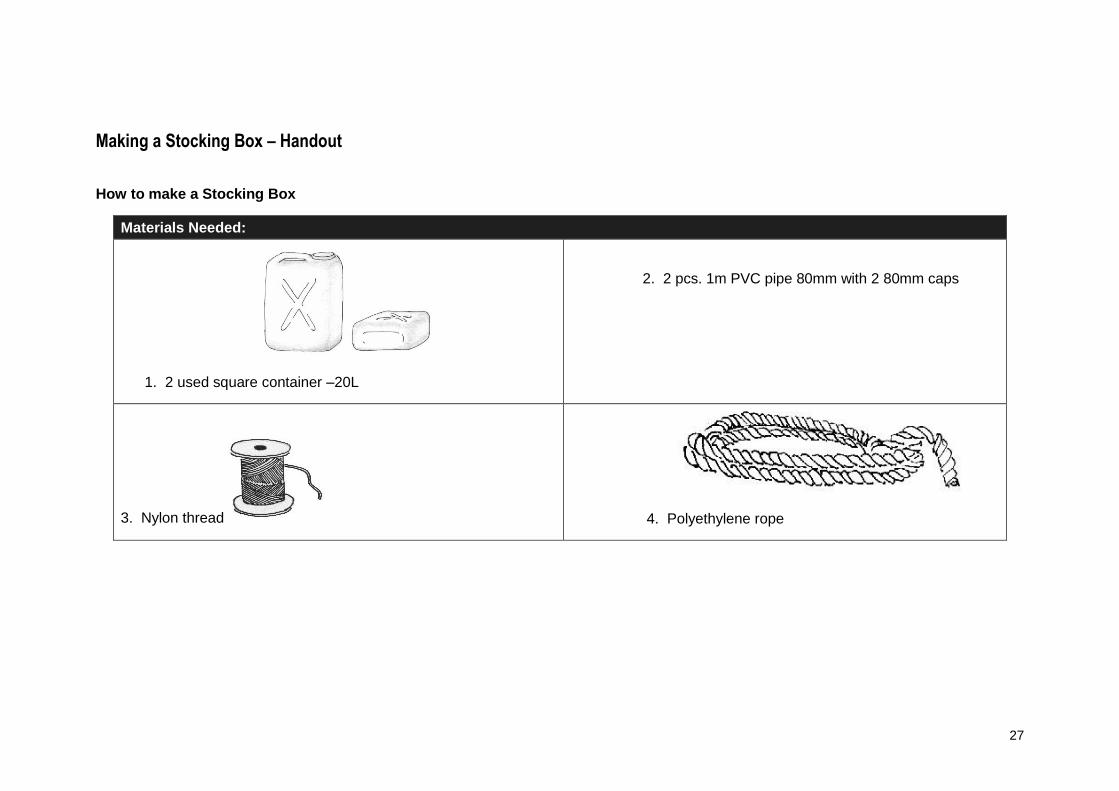
Making a Stocking Box – Handout
How to make a Stocking Box
Materials Needed:
1. 2 used square container –20L
2. 2 pcs. 1m PVC pipe 80mm with 2 80mm caps
3. Nylon thread
4. Polyethylene rope
28
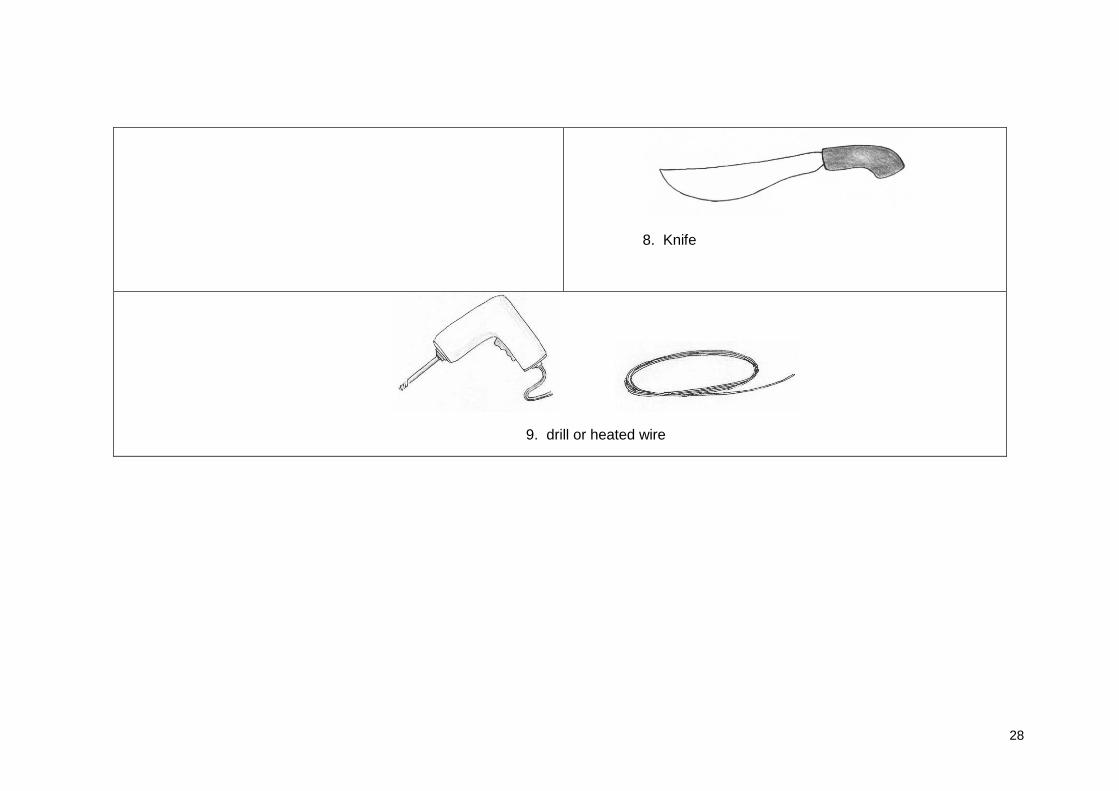
8. Knife
9. drill or heated wire

29
Instructions:
1. Using a knife, remove the middle portion (approximately 20 x 30 cm) of the cover of one wide side of the container fully. This will serve as the opening of the box.
2. Using a boring drill or a heated sharpened wire, bore holes on the upper sides of the container. Make sure to put holes near the lid for use in tying the container to the PVC frame later.
30
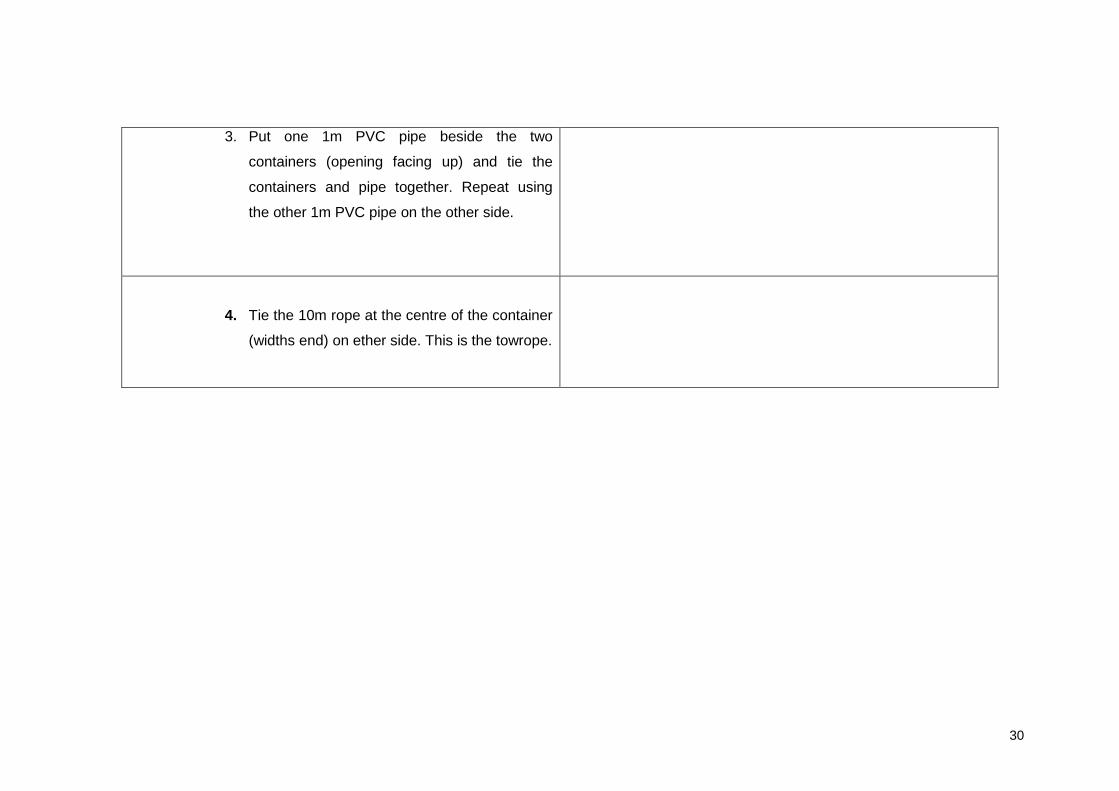
3. Put one 1m PVC pipe beside the two
containers (opening facing up) and tie the
containers and pipe together. Repeat using
the other 1m PVC pipe on the other side.
4. Tie the 10m rope at the centre of the container
(widths end) on ether side. This is the towrope.

31

32
MODULE 2:
SPECIES IDENTIFICATIOM ………………………………………………………………………………………
Module Summary
Content How to Identify Aquarium Fish Species
Types of Marine Aquarium Fish
Types of Marine Aquarium Invertebrates
Hazardous Marine Organisms
Learning Objectives
At the end of the training session, trainees will be able to:
Identify different classification of fish through distinguishable features
Identify and describe different aquarium fish and invertebrates
Identify hazardous marine organisms
Key Messages
1. It is important to be able to identify fish properly to prevent catching
fish that is not in the order list which in return will avoid wastage.
2. It is also important to know the different kinds of fish to avoid getting
hurt when fishing.
Introduction to Species Identification
Definition of Terms
Species
A group of interbreeding organisms with fertile offspring
Within a species, there may be physical differences according to age,
maturity, size, sex, and regional varieties (location of capture).
33
There are more than 20,000 species of fish in the world
More than 11,000 fish are found in marine waters
Common name
The name a species is called in a certain area
Various different common names are applied to one species, depending
on the area and language/dialect.
Sometimes the same common name is applied to different species.
Scientific name
The scientific name is the Latin name for every species.
It is recognized as the standard name by which organisms are identified.
It is made up of the Genus (with a capital letter) and the species name.
It is written either in normal typeface and underlined (e.g. Amphiprion
frenatus) or in italics (e.g. Amphiprion frenatus).
Generally, there is only one internationally accepted scientific name per
species.
It is used by the exporters, importers and retailers, to ensure that they all
know which species is being referred to.
REMINDERS!
It is important therefore that the common and local names should be cross-referenced to the scientific name and vice versa to avoid confusion.
Not all species are identified, so a completely new, un-described species comes onto the market.
34
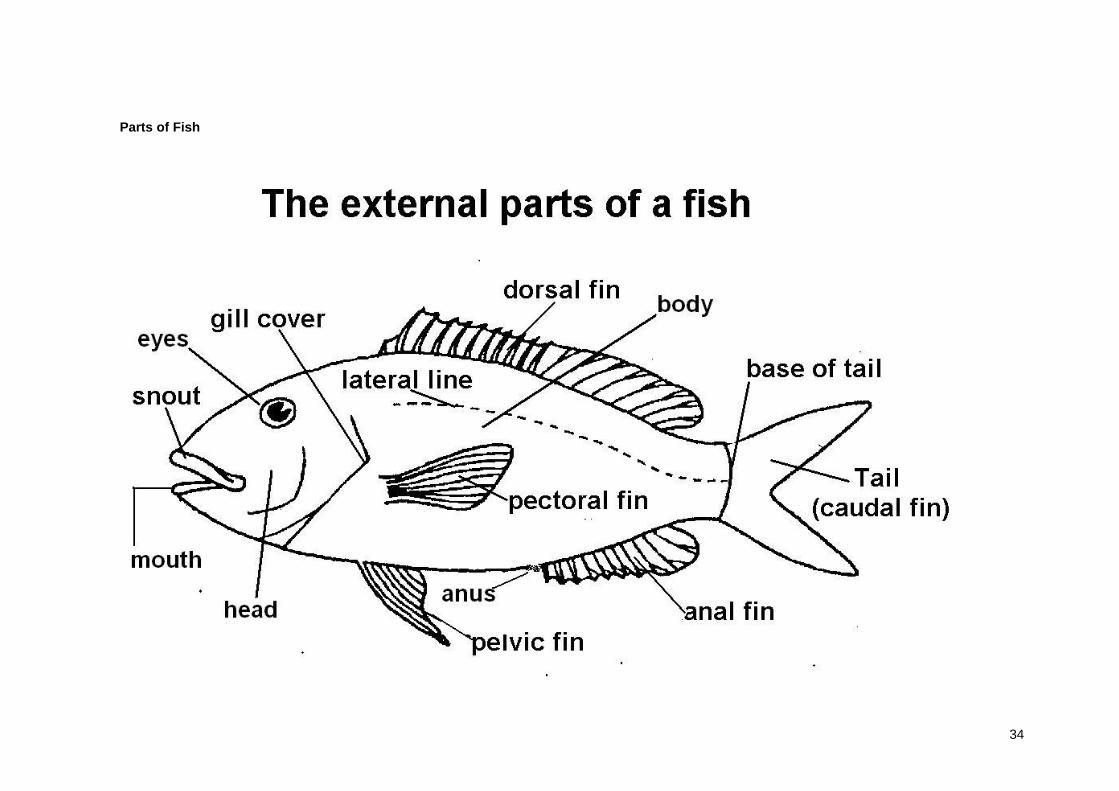
Parts of Fish
35
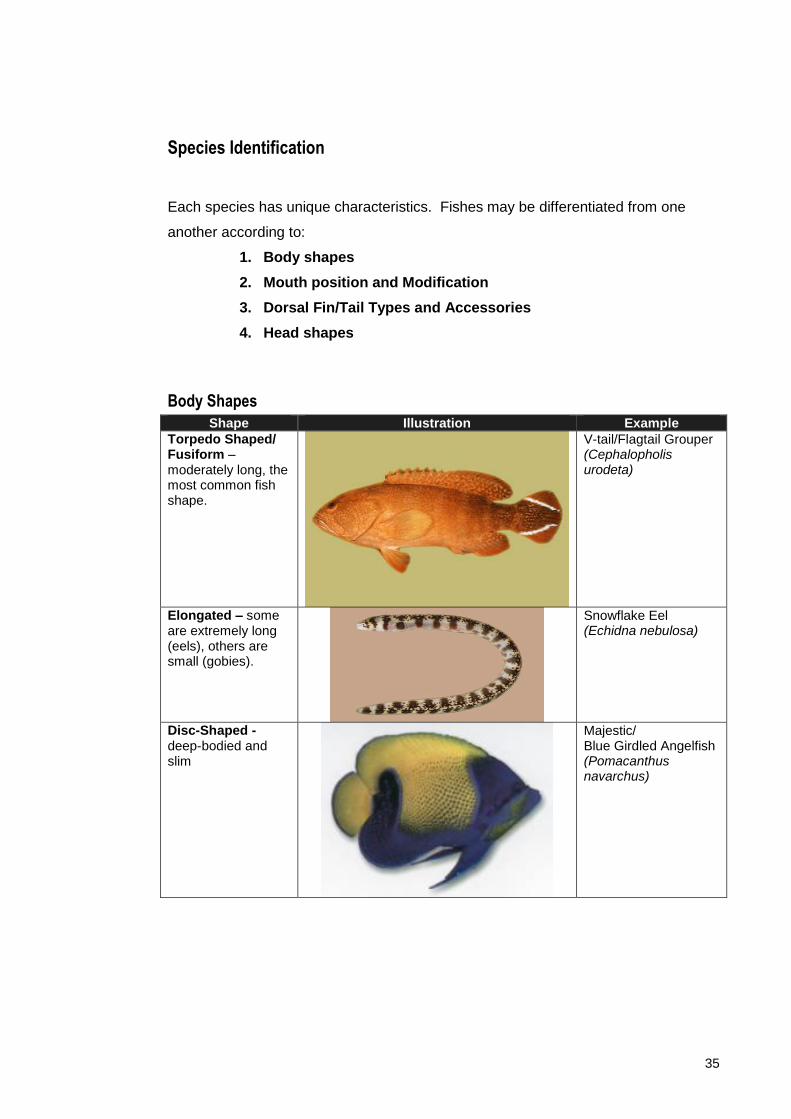
Species Identification
Each species has unique characteristics. Fishes may be differentiated from one
another according to:
1. Body shapes
2. Mouth position and Modification
3. Dorsal Fin/Tail Types and Accessories
4. Head shapes
Body Shapes
Shape Illustration Example
Torpedo Shaped/ Fusiform – moderately long, the most common fish shape.
V-tail/Flagtail Grouper (Cephalopholis urodeta)
Elongated – some are extremely long (eels), others are small (gobies).
Snowflake Eel (Echidna nebulosa)
Disc-Shaped - deep-bodied and slim
Majestic/ Blue Girdled Angelfish (Pomacanthus navarchus)
36
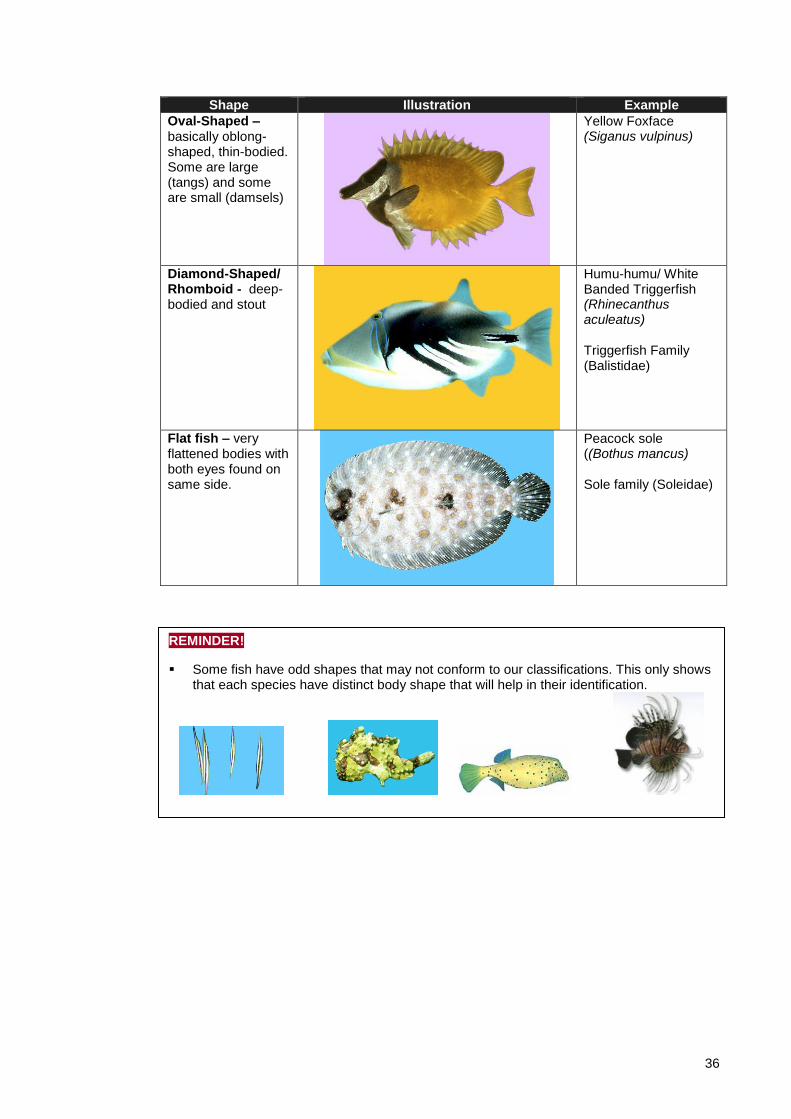
Shape Illustration Example
Oval-Shaped – basically oblong-shaped, thin-bodied. Some are large (tangs) and some are small (damsels)
Yellow Foxface (Siganus vulpinus)
Diamond-Shaped/ Rhomboid - deep-bodied and stout
Humu-humu/ White Banded Triggerfish (Rhinecanthus aculeatus) Triggerfish Family (Balistidae)
Flat fish – very flattened bodies with both eyes found on same side.
Peacock sole ((Bothus mancus) Sole family (Soleidae)
REMINDER!
Some fish have odd shapes that may not conform to our classifications. This only shows that each species have distinct body shape that will help in their identification.
37
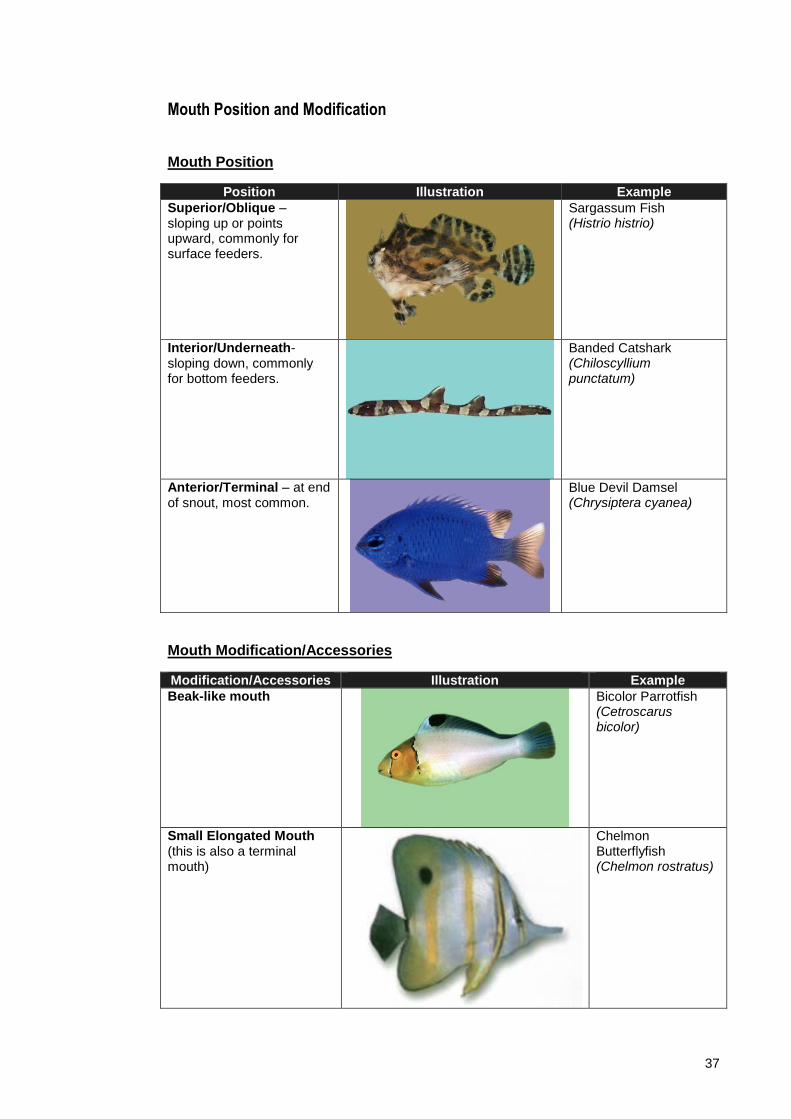
Mouth Position and Modification
Mouth Position
Position Illustration Example
Superior/Oblique – sloping up or points upward, commonly for surface feeders.
Sargassum Fish (Histrio histrio)
Interior/Underneath- sloping down, commonly for bottom feeders.
Banded Catshark (Chiloscyllium punctatum)
Anterior/Terminal – at end of snout, most common.
Blue Devil Damsel (Chrysiptera cyanea)
Mouth Modification/Accessories
Modification/Accessories Illustration Example
Beak-like mouth
Bicolor Parrotfish (Cetroscarus bicolor)
Small Elongated Mouth (this is also a terminal mouth)
Chelmon Butterflyfish (Chelmon rostratus)
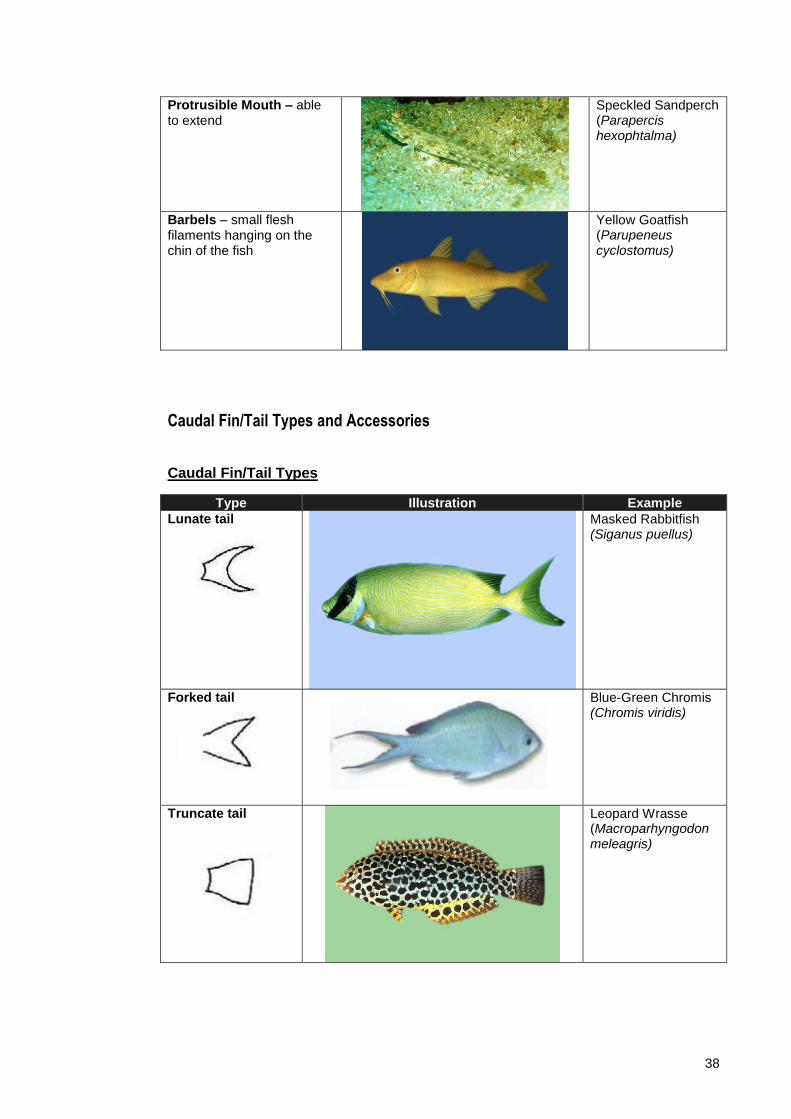
38
Protrusible Mouth – able to extend
Speckled Sandperch (Parapercis hexophtalma)
Barbels – small flesh filaments hanging on the chin of the fish
Yellow Goatfish (Parupeneus cyclostomus)
Caudal Fin/Tail Types and Accessories
Caudal Fin/Tail Types
Type Illustration Example
Lunate tail
Masked Rabbitfish (Siganus puellus)
Forked tail
Blue-Green Chromis (Chromis viridis)
Truncate tail
Leopard Wrasse (Macroparhyngodon meleagris)
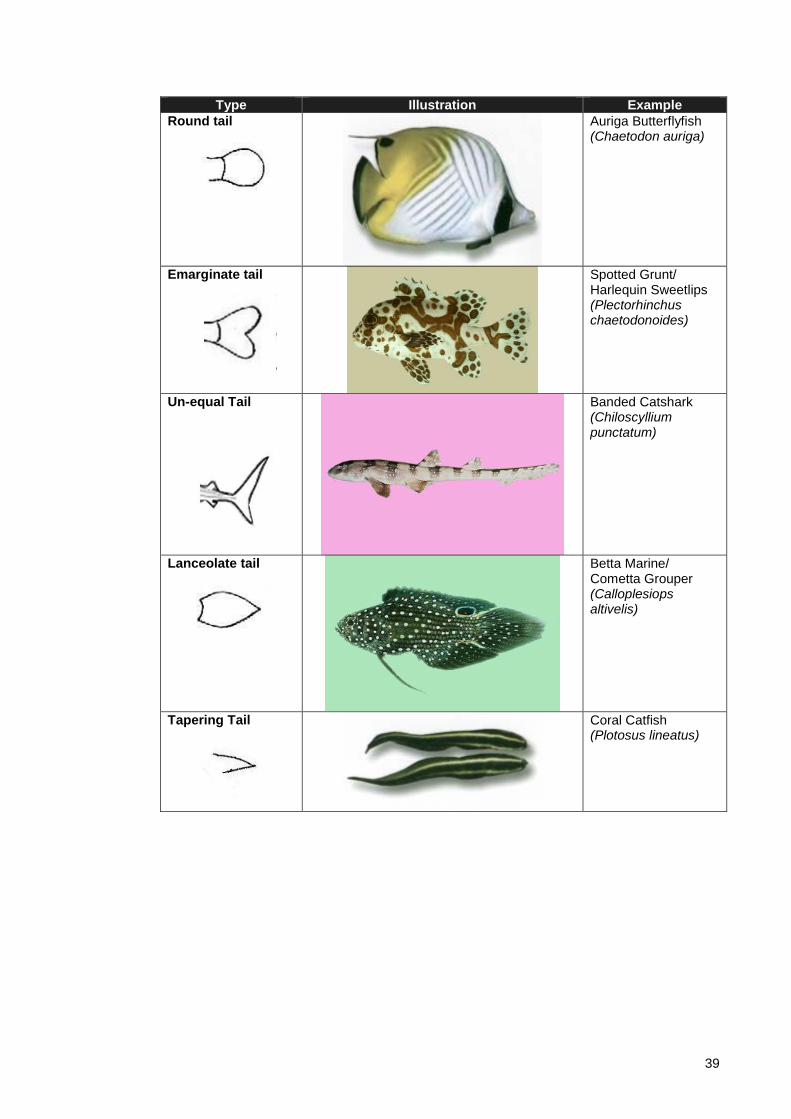
39
Type Illustration Example
Round tail
Auriga Butterflyfish (Chaetodon auriga)
Emarginate tail
Spotted Grunt/ Harlequin Sweetlips (Plectorhinchus chaetodonoides)
Un-equal Tail
Banded Catshark (Chiloscyllium punctatum)
Lanceolate tail
Betta Marine/ Cometta Grouper (Calloplesiops altivelis)
Tapering Tail
Coral Catfish (Plotosus lineatus)
40
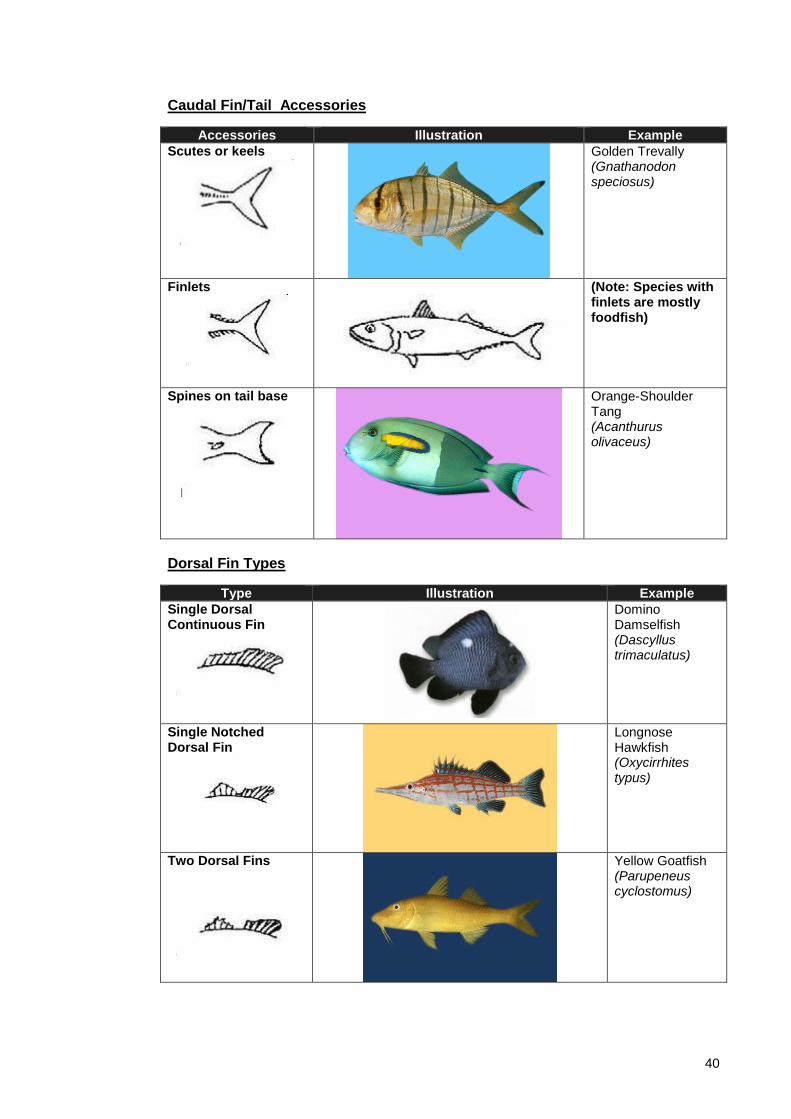
Caudal Fin/Tail Accessories
Accessories Illustration Example
Scutes or keels
Golden Trevally (Gnathanodon speciosus)
Finlets
(Note: Species with finlets are mostly foodfish)
Spines on tail base
Orange-Shoulder Tang (Acanthurus olivaceus)
Dorsal Fin Types
Type Illustration Example
Single Dorsal Continuous Fin
Domino Damselfish (Dascyllus trimaculatus)
Single Notched Dorsal Fin
Longnose Hawkfish (Oxycirrhites typus)
Two Dorsal Fins
Yellow Goatfish (Parupeneus cyclostomus)
41
Type Illustration Example
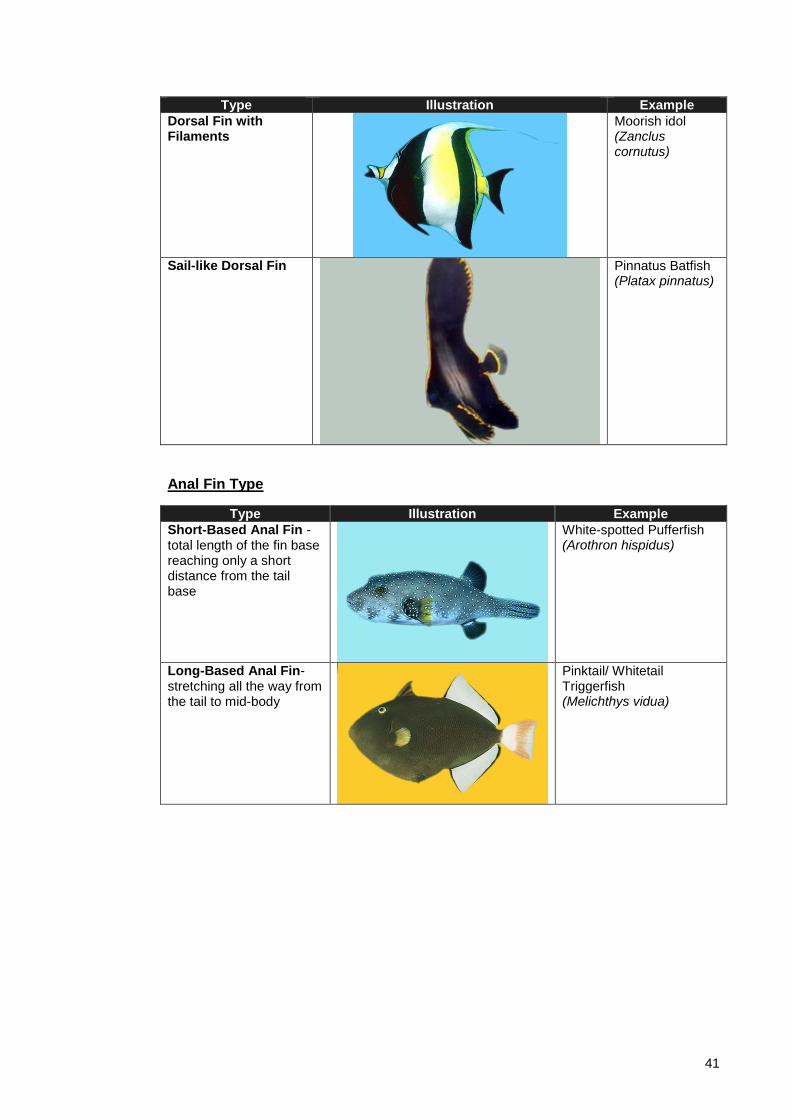
Dorsal Fin with Filaments
Moorish idol (Zanclus cornutus)
Sail-like Dorsal Fin
Pinnatus Batfish (Platax pinnatus)
Anal Fin Type
Type Illustration Example
Short-Based Anal Fin - total length of the fin base reaching only a short distance from the tail base
White-spotted Pufferfish (Arothron hispidus)
Long-Based Anal Fin- stretching all the way from the tail to mid-body
Pinktail/ Whitetail Triggerfish (Melichthys vidua)
42
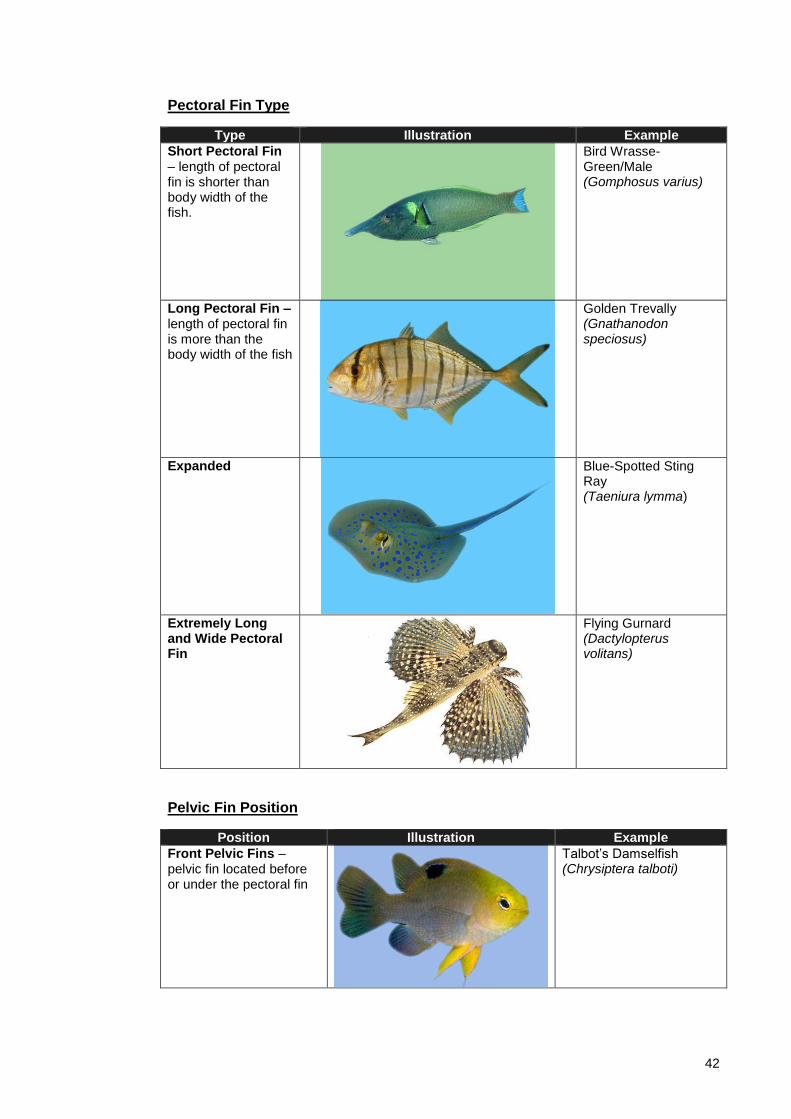
Pectoral Fin Type
Type Illustration Example
Short Pectoral Fin – length of pectoral fin is shorter than body width of the fish.
Bird Wrasse-Green/Male (Gomphosus varius)
Long Pectoral Fin – length of pectoral fin is more than the body width of the fish
Golden Trevally (Gnathanodon speciosus)
Expanded
Blue-Spotted Sting Ray (Taeniura lymma)
Extremely Long and Wide Pectoral Fin
Flying Gurnard (Dactylopterus volitans)
Pelvic Fin Position
Position Illustration Example
Front Pelvic Fins – pelvic fin located before or under the pectoral fin
Talbot’s Damselfish (Chrysiptera talboti)
43
Position Illustration Example
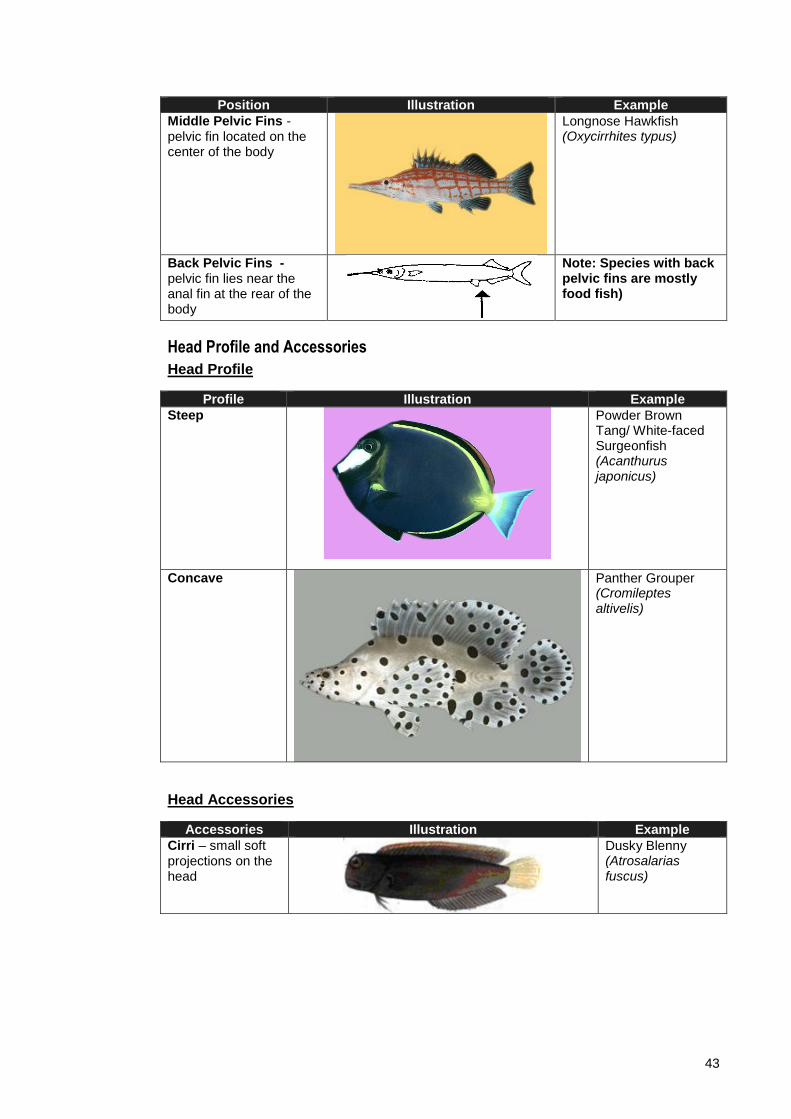
Middle Pelvic Fins - pelvic fin located on the center of the body
Longnose Hawkfish (Oxycirrhites typus)
Back Pelvic Fins - pelvic fin lies near the anal fin at the rear of the body
Note: Species with back pelvic fins are mostly food fish)
Head Profile and Accessories
Head Profile
Profile Illustration Example
Steep
Powder Brown Tang/ White-faced Surgeonfish (Acanthurus japonicus)
Concave
Panther Grouper (Cromileptes altivelis)
Head Accessories
Accessories Illustration Example
Cirri – small soft projections on the head
Dusky Blenny (Atrosalarias fuscus)

44
Horns
Long-horned Cowfish (Lactoria cornuta)
45
Size
Each species has size limitations (e.g. damsels cannot grow as big as adult
angelfish).
Catching fish of the correct size is very important. Fish that are too large/old or
too small/young should not be caught.
Color
Each species has distinct coloration.
Sometimes, fish belonging to same species differ in color shading from each
other due to the following reasons:
a) mood
b) season
c) habitat
d) sex and breeding condition
e) age
f) size
REMINDER!!!
If the identity of a species is in doubt, usually a preserved specimen or at least a photograph should be sent to an expert for identification.
46
The Marine Aquarium Organisms
The Marine Aquarium Fish Families
Type Description Sample Picture
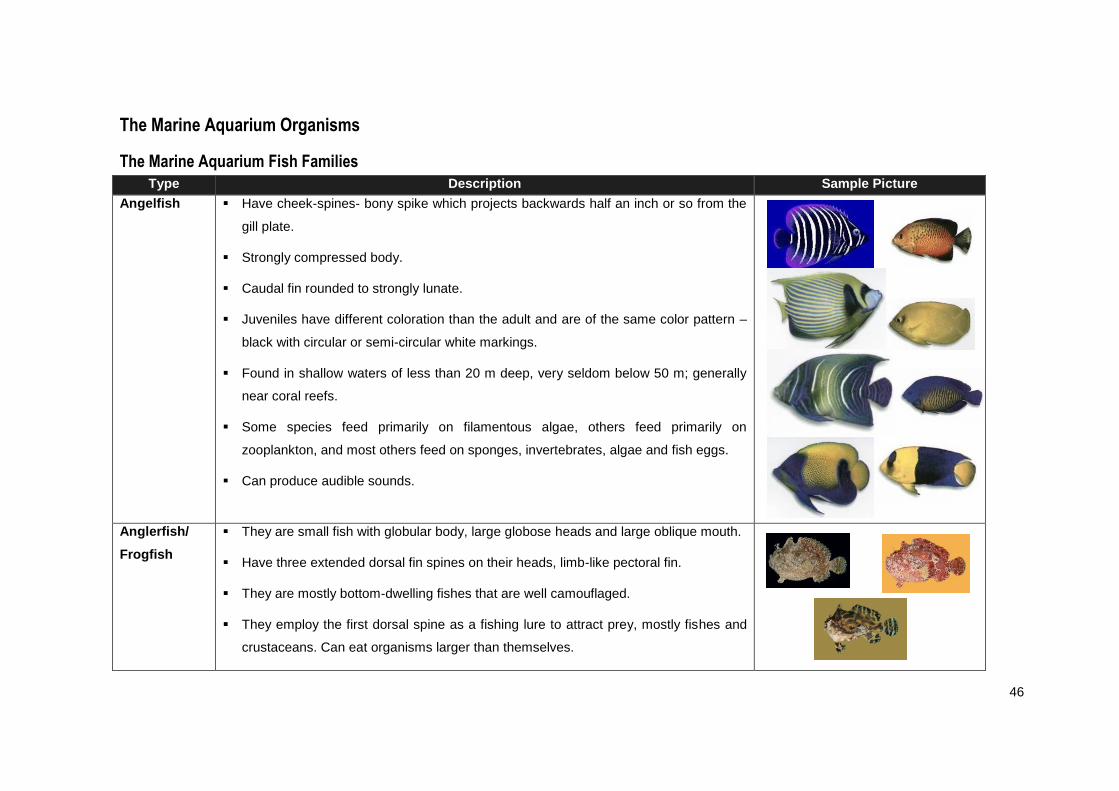
Angelfish
Have cheek-spines- bony spike which projects backwards half an inch or so from the
gill plate.
Strongly compressed body.
Caudal fin rounded to strongly lunate.
Juveniles have different coloration than the adult and are of the same color pattern –
black with circular or semi-circular white markings.
Found in shallow waters of less than 20 m deep, very seldom below 50 m; generally
near coral reefs.
Some species feed primarily on filamentous algae, others feed primarily on
zooplankton, and most others feed on sponges, invertebrates, algae and fish eggs.
Can produce audible sounds.
Anglerfish/
Frogfish
They are small fish with globular body, large globose heads and large oblique mouth.
Have three extended dorsal fin spines on their heads, limb-like pectoral fin.
They are mostly bottom-dwelling fishes that are well camouflaged.
They employ the first dorsal spine as a fishing lure to attract prey, mostly fishes and
crustaceans. Can eat organisms larger than themselves.
47
Type Description Sample Picture
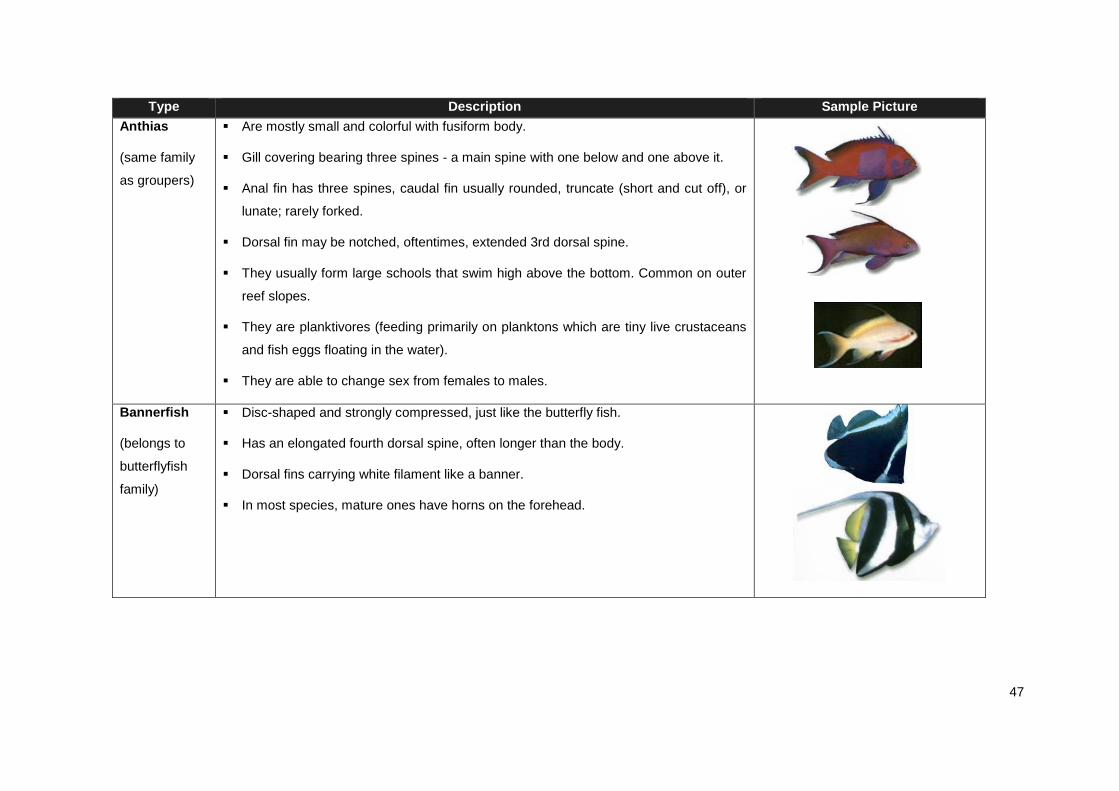
Anthias
(same family
as groupers)
Are mostly small and colorful with fusiform body.
Gill covering bearing three spines - a main spine with one below and one above it.
Anal fin has three spines, caudal fin usually rounded, truncate (short and cut off), or
lunate; rarely forked.
Dorsal fin may be notched, oftentimes, extended 3rd dorsal spine.
They usually form large schools that swim high above the bottom. Common on outer
reef slopes.
They are planktivores (feeding primarily on planktons which are tiny live crustaceans
and fish eggs floating in the water).
They are able to change sex from females to males.
Bannerfish
(belongs to
butterflyfish
family)
Disc-shaped and strongly compressed, just like the butterfly fish.
Has an elongated fourth dorsal spine, often longer than the body.
Dorsal fins carrying white filament like a banner.
In most species, mature ones have horns on the forehead.
48
Type Description Sample Picture
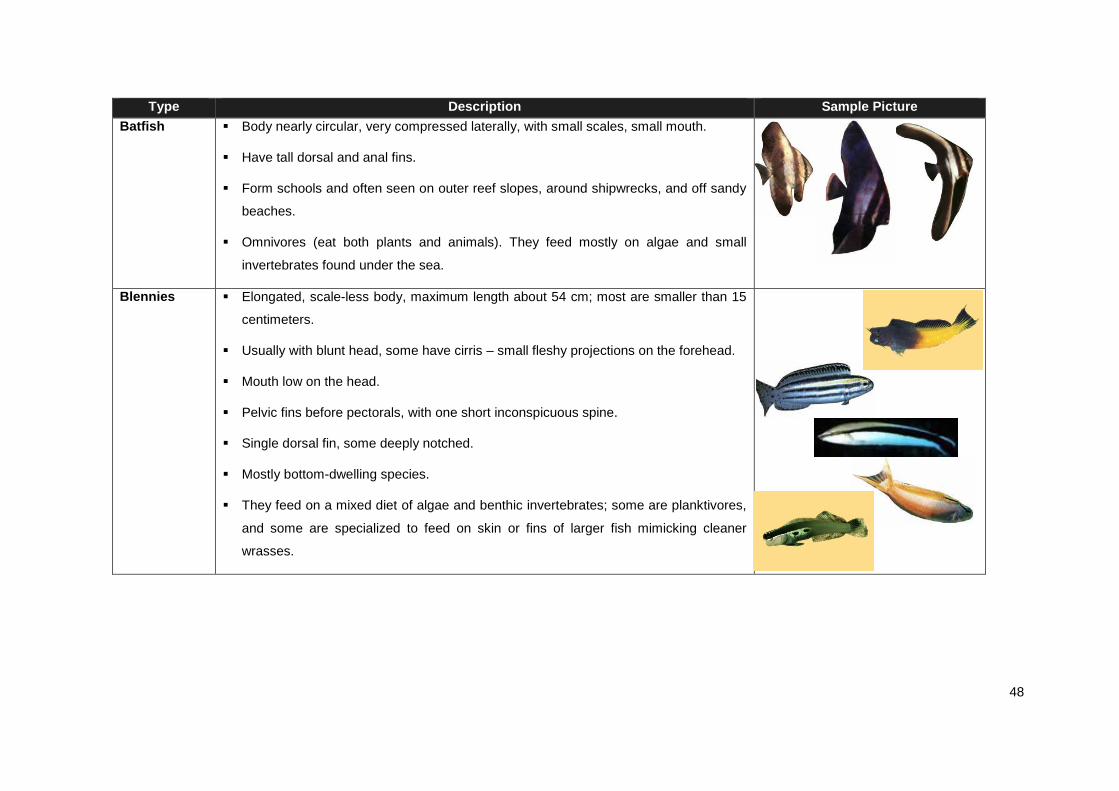
Batfish
Body nearly circular, very compressed laterally, with small scales, small mouth.
Have tall dorsal and anal fins.
Form schools and often seen on outer reef slopes, around shipwrecks, and off sandy
beaches.
Omnivores (eat both plants and animals). They feed mostly on algae and small
invertebrates found under the sea.
Blennies Elongated, scale-less body, maximum length about 54 cm; most are smaller than 15
centimeters.
Usually with blunt head, some have cirris – small fleshy projections on the forehead.
Mouth low on the head.
Pelvic fins before pectorals, with one short inconspicuous spine.
Single dorsal fin, some deeply notched.
Mostly bottom-dwelling species.
They feed on a mixed diet of algae and benthic invertebrates; some are planktivores,
and some are specialized to feed on skin or fins of larger fish mimicking cleaner
wrasses.
49
Type Description Sample Picture
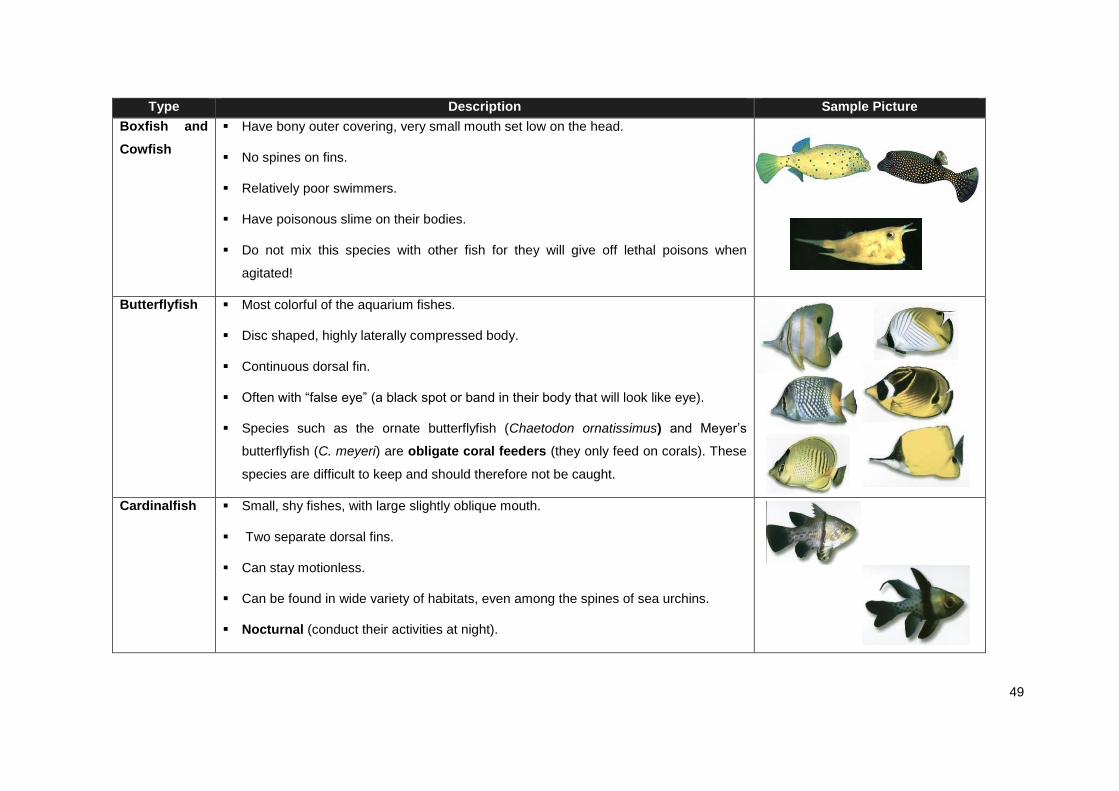
Boxfish and
Cowfish
Have bony outer covering, very small mouth set low on the head.
No spines on fins.
Relatively poor swimmers.
Have poisonous slime on their bodies.
Do not mix this species with other fish for they will give off lethal poisons when
agitated!
Butterflyfish Most colorful of the aquarium fishes.
Disc shaped, highly laterally compressed body.
Continuous dorsal fin.
Often with “false eye” (a black spot or band in their body that will look like eye).
Species such as the ornate butterflyfish (Chaetodon ornatissimus) and Meyer’s
butterflyfish (C. meyeri) are obligate coral feeders (they only feed on corals). These
species are difficult to keep and should therefore not be caught.
Cardinalfish Small, shy fishes, with large slightly oblique mouth.
Two separate dorsal fins.
Can stay motionless.
Can be found in wide variety of habitats, even among the spines of sea urchins.
Nocturnal (conduct their activities at night).
50
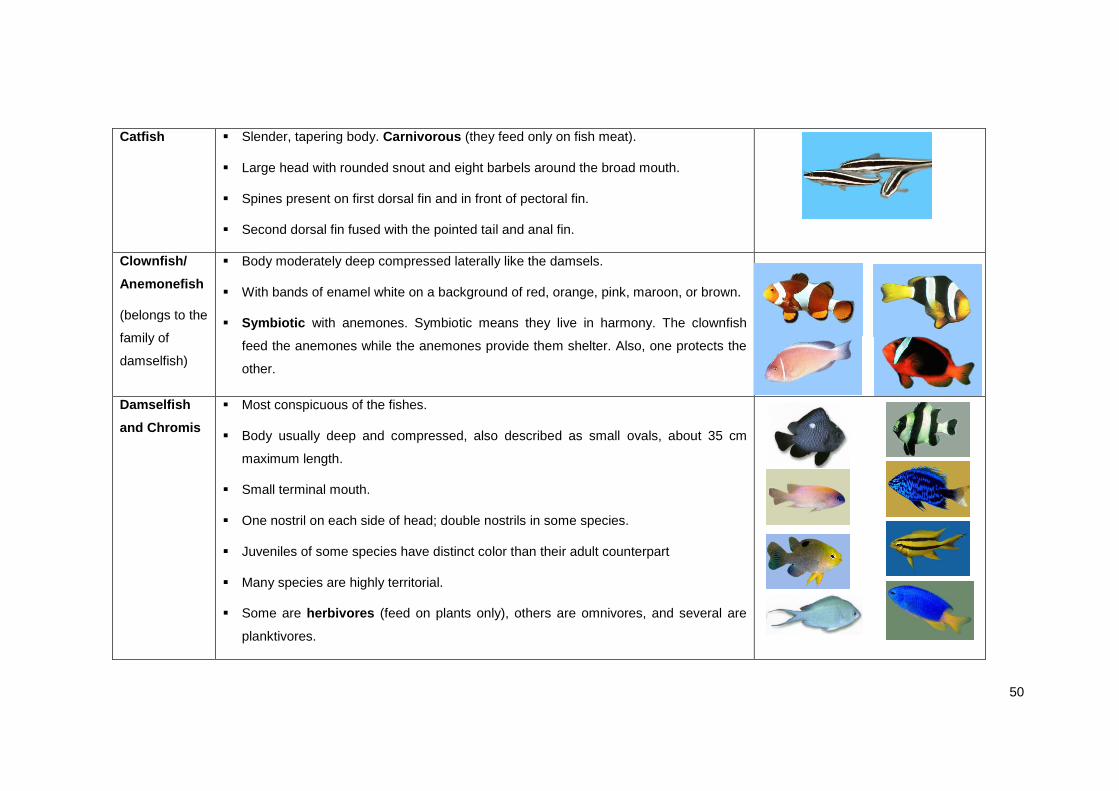
Catfish
Slender, tapering body. Carnivorous (they feed only on fish meat).
Large head with rounded snout and eight barbels around the broad mouth.
Spines present on first dorsal fin and in front of pectoral fin.
Second dorsal fin fused with the pointed tail and anal fin.
Clownfish/
Anemonefish
(belongs to the
family of
damselfish)
Body moderately deep compressed laterally like the damsels.
With bands of enamel white on a background of red, orange, pink, maroon, or brown.
Symbiotic with anemones. Symbiotic means they live in harmony. The clownfish
feed the anemones while the anemones provide them shelter. Also, one protects the
other.
Damselfish
and Chromis
Most conspicuous of the fishes.
Body usually deep and compressed, also described as small ovals, about 35 cm
maximum length.
Small terminal mouth.
One nostril on each side of head; double nostrils in some species.
Juveniles of some species have distinct color than their adult counterpart
Many species are highly territorial.
Some are herbivores (feed on plants only), others are omnivores, and several are
planktivores.
51
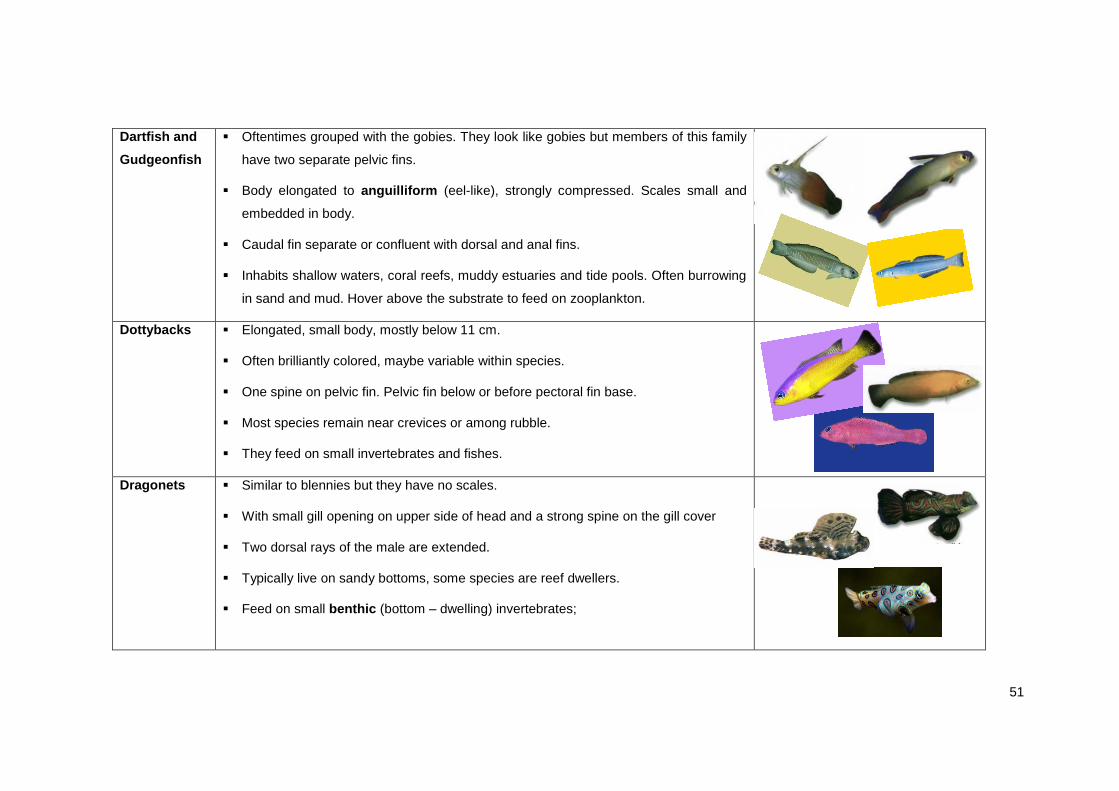
Dartfish and
Gudgeonfish
Oftentimes grouped with the gobies. They look like gobies but members of this family
have two separate pelvic fins.
Body elongated to anguilliform (eel-like), strongly compressed. Scales small and
embedded in body.
Caudal fin separate or confluent with dorsal and anal fins.
Inhabits shallow waters, coral reefs, muddy estuaries and tide pools. Often burrowing
in sand and mud. Hover above the substrate to feed on zooplankton.
Dottybacks
Elongated, small body, mostly below 11 cm.
Often brilliantly colored, maybe variable within species.
One spine on pelvic fin. Pelvic fin below or before pectoral fin base.
Most species remain near crevices or among rubble.
They feed on small invertebrates and fishes.
Dragonets
Similar to blennies but they have no scales.
With small gill opening on upper side of head and a strong spine on the gill cover
Two dorsal rays of the male are extended.
Typically live on sandy bottoms, some species are reef dwellers.
Feed on small benthic (bottom – dwelling) invertebrates;
52
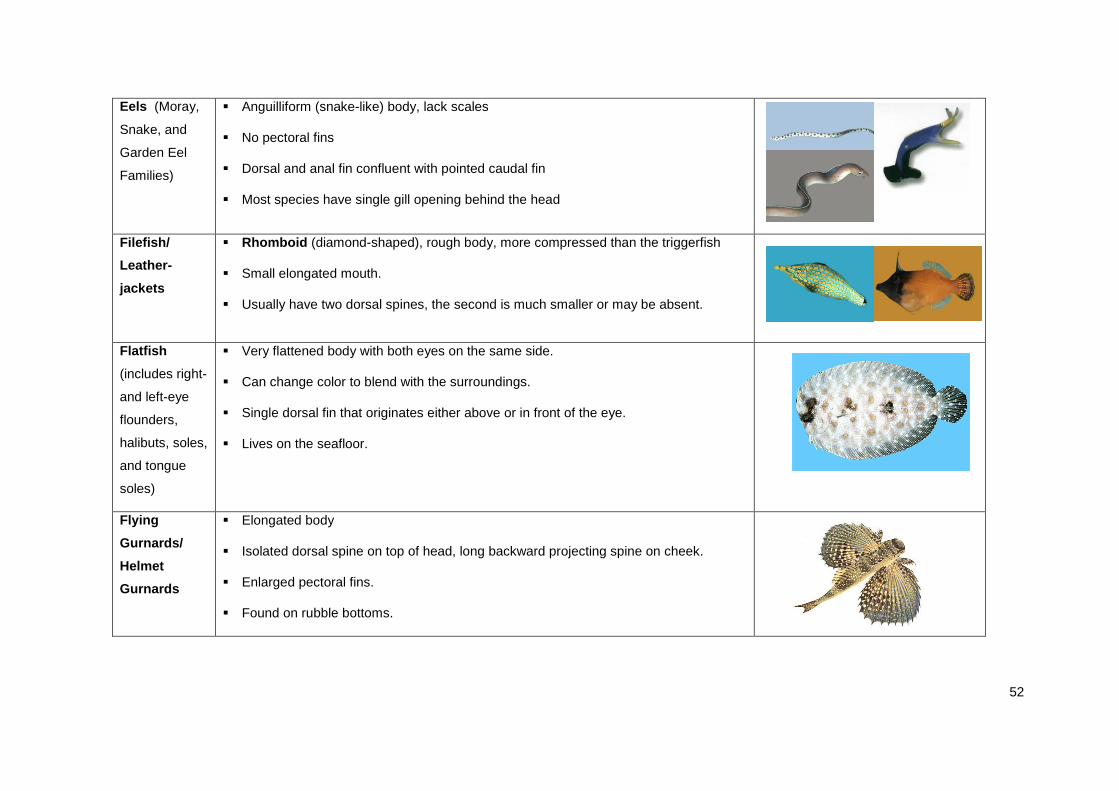
Eels (Moray,
Snake, and
Garden Eel
Families)
Anguilliform (snake-like) body, lack scales
No pectoral fins
Dorsal and anal fin confluent with pointed caudal fin
Most species have single gill opening behind the head
Filefish/
Leather-
jackets
Rhomboid (diamond-shaped), rough body, more compressed than the triggerfish
Small elongated mouth.
Usually have two dorsal spines, the second is much smaller or may be absent.
Flatfish
(includes right-
and left-eye
flounders,
halibuts, soles,
and tongue
soles)
Very flattened body with both eyes on the same side.
Can change color to blend with the surroundings.
Single dorsal fin that originates either above or in front of the eye.
Lives on the seafloor.
Flying
Gurnards/
Helmet
Gurnards
Elongated body
Isolated dorsal spine on top of head, long backward projecting spine on cheek.
Enlarged pectoral fins.
Found on rubble bottoms.
53
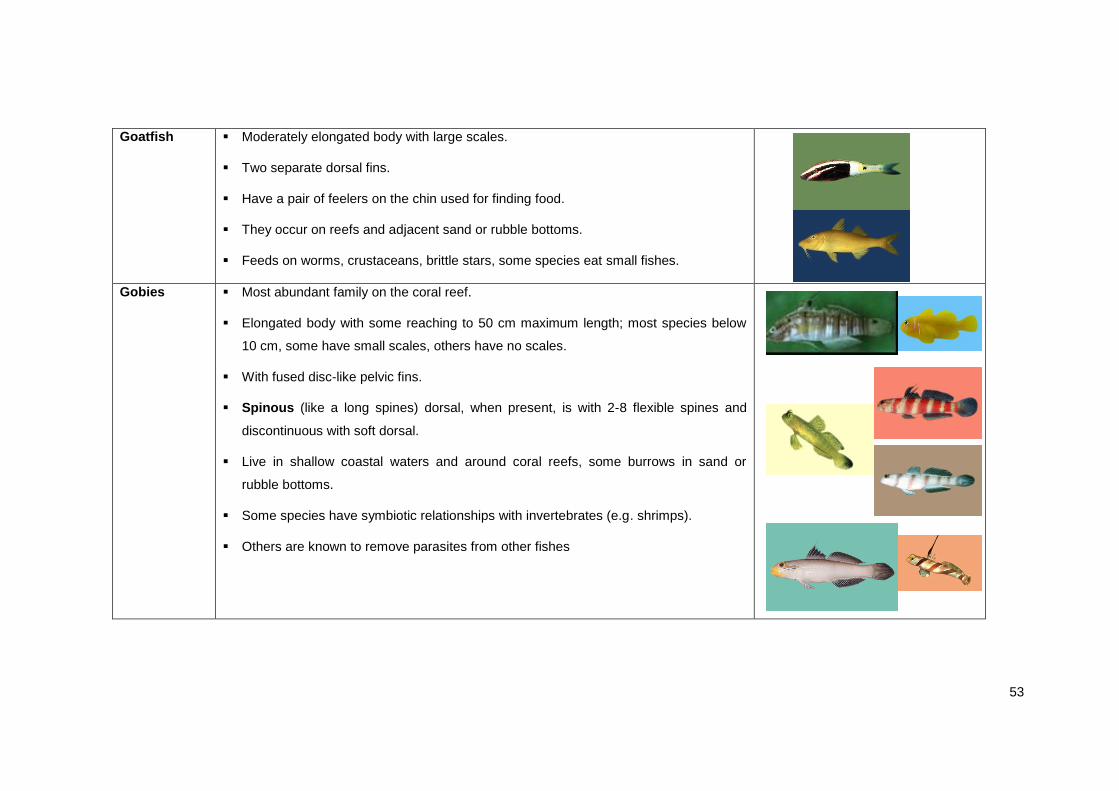
Goatfish
Moderately elongated body with large scales.
Two separate dorsal fins.
Have a pair of feelers on the chin used for finding food.
They occur on reefs and adjacent sand or rubble bottoms.
Feeds on worms, crustaceans, brittle stars, some species eat small fishes.
Gobies
Most abundant family on the coral reef.
Elongated body with some reaching to 50 cm maximum length; most species below
10 cm, some have small scales, others have no scales.
With fused disc-like pelvic fins.
Spinous (like a long spines) dorsal, when present, is with 2-8 flexible spines and
discontinuous with soft dorsal.
Live in shallow coastal waters and around coral reefs, some burrows in sand or
rubble bottoms.
Some species have symbiotic relationships with invertebrates (e.g. shrimps).
Others are known to remove parasites from other fishes
54
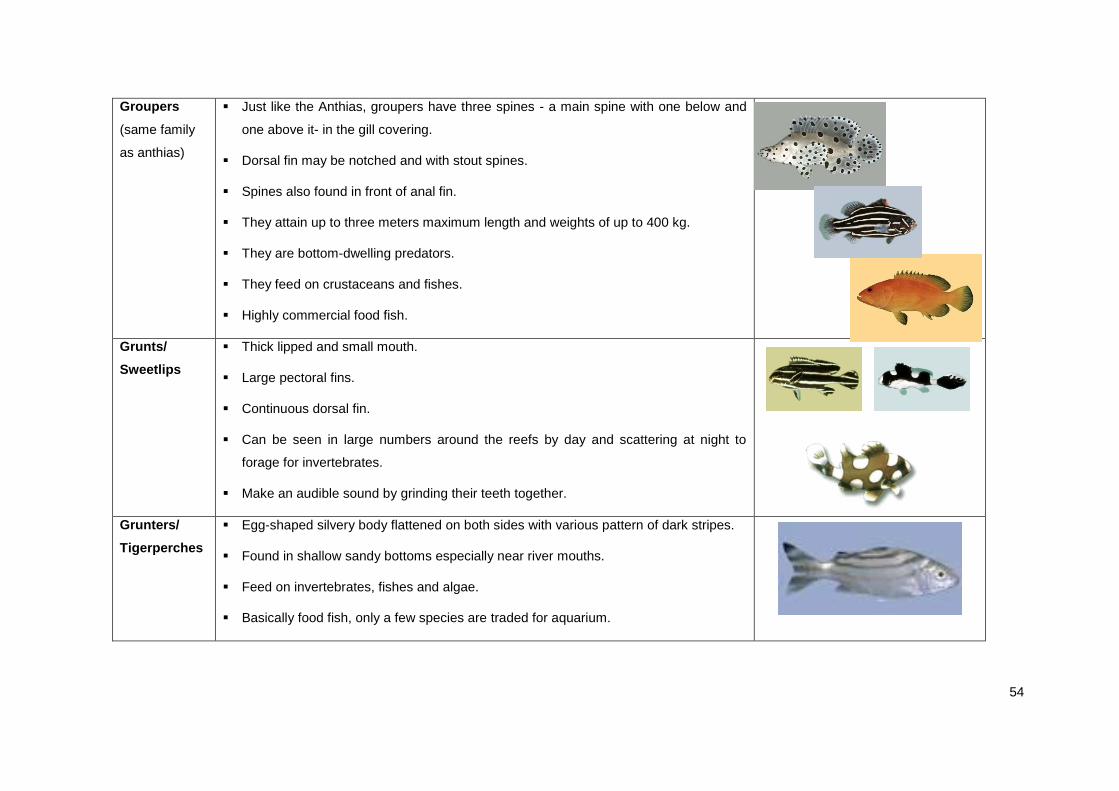
Groupers
(same family
as anthias)
Just like the Anthias, groupers have three spines - a main spine with one below and
one above it- in the gill covering.
Dorsal fin may be notched and with stout spines.
Spines also found in front of anal fin.
They attain up to three meters maximum length and weights of up to 400 kg.
They are bottom-dwelling predators.
They feed on crustaceans and fishes.
Highly commercial food fish.
Grunts/
Sweetlips
Thick lipped and small mouth.
Large pectoral fins.
Continuous dorsal fin.
Can be seen in large numbers around the reefs by day and scattering at night to
forage for invertebrates.
Make an audible sound by grinding their teeth together.
Grunters/
Tigerperches
Egg-shaped silvery body flattened on both sides with various pattern of dark stripes.
Found in shallow sandy bottoms especially near river mouths.
Feed on invertebrates, fishes and algae.
Basically food fish, only a few species are traded for aquarium.
55
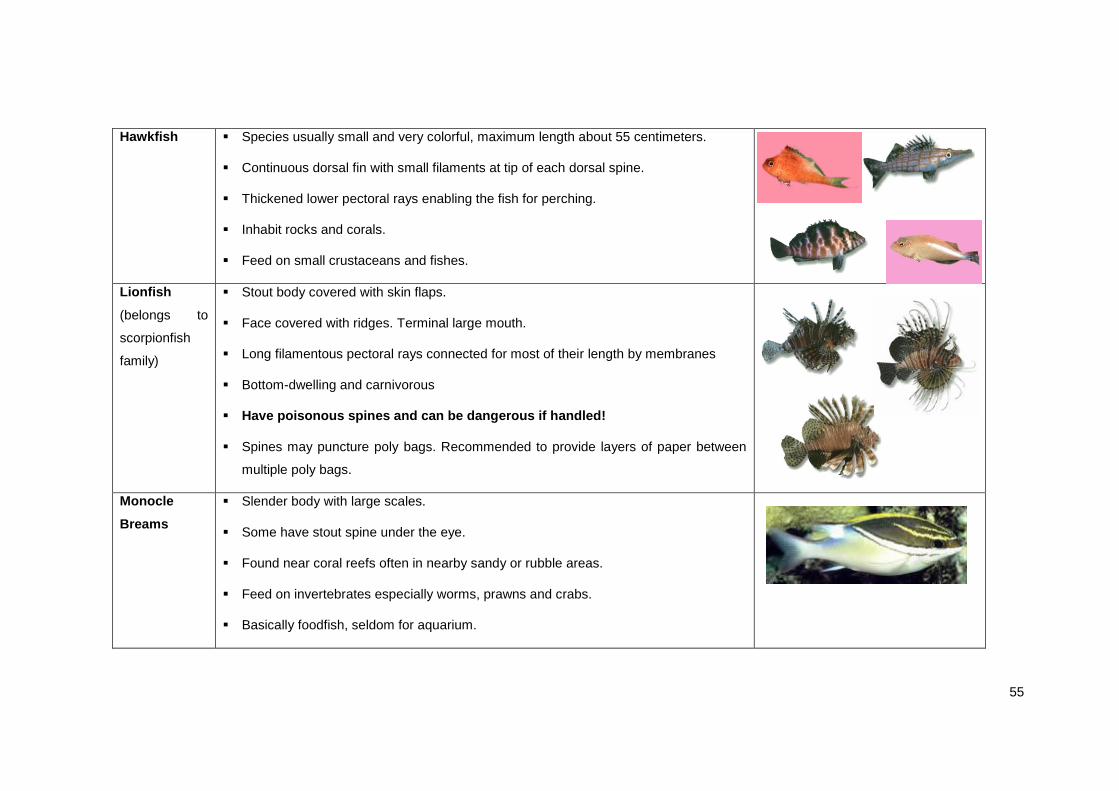
Hawkfish
Species usually small and very colorful, maximum length about 55 centimeters.
Continuous dorsal fin with small filaments at tip of each dorsal spine.
Thickened lower pectoral rays enabling the fish for perching.
Inhabit rocks and corals.
Feed on small crustaceans and fishes.
Lionfish (belongs to
scorpionfish
family)
Stout body covered with skin flaps.
Face covered with ridges. Terminal large mouth.
Long filamentous pectoral rays connected for most of their length by membranes
Bottom-dwelling and carnivorous
Have poisonous spines and can be dangerous if handled!
Spines may puncture poly bags. Recommended to provide layers of paper between
multiple poly bags.
Monocle
Breams
Slender body with large scales.
Some have stout spine under the eye.
Found near coral reefs often in nearby sandy or rubble areas.
Feed on invertebrates especially worms, prawns and crabs.
Basically foodfish, seldom for aquarium.
56
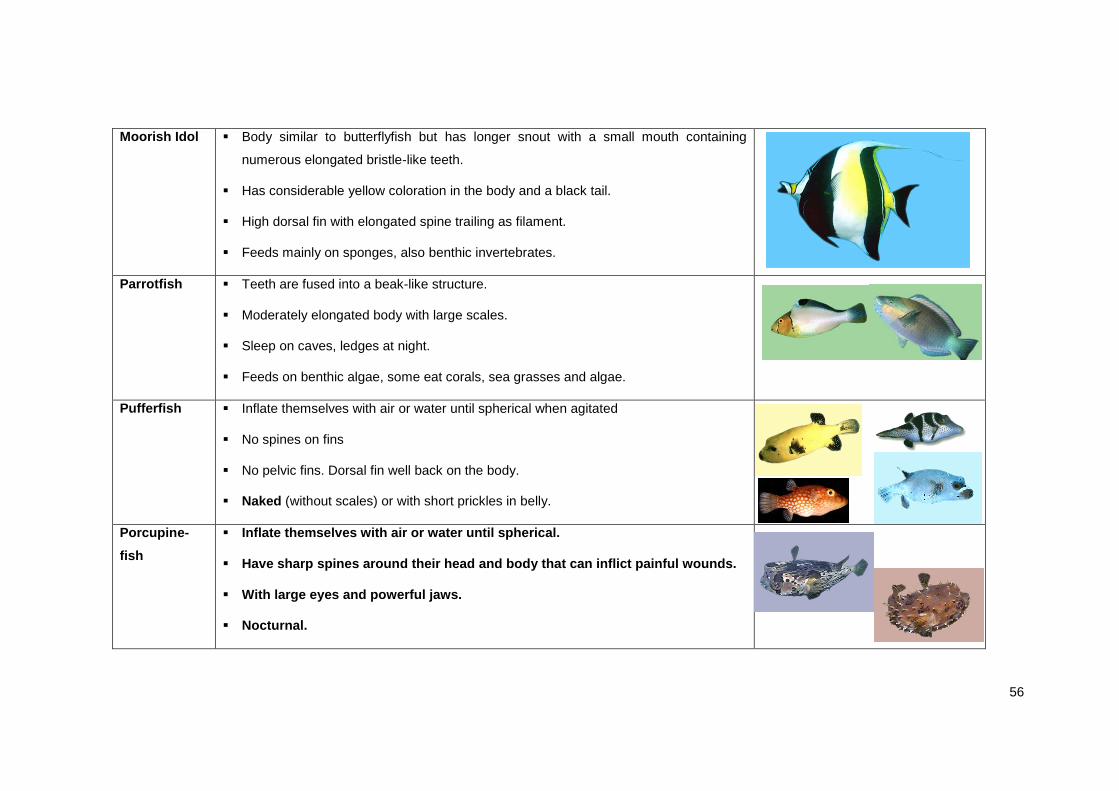
Moorish Idol
Body similar to butterflyfish but has longer snout with a small mouth containing
numerous elongated bristle-like teeth.
Has considerable yellow coloration in the body and a black tail.
High dorsal fin with elongated spine trailing as filament.
Feeds mainly on sponges, also benthic invertebrates.
Parrotfish
Teeth are fused into a beak-like structure.
Moderately elongated body with large scales.
Sleep on caves, ledges at night.
Feeds on benthic algae, some eat corals, sea grasses and algae.
Pufferfish
Inflate themselves with air or water until spherical when agitated
No spines on fins
No pelvic fins. Dorsal fin well back on the body.
Naked (without scales) or with short prickles in belly.
Porcupine-
fish
Inflate themselves with air or water until spherical.
Have sharp spines around their head and body that can inflict painful wounds.
With large eyes and powerful jaws.
Nocturnal.
57
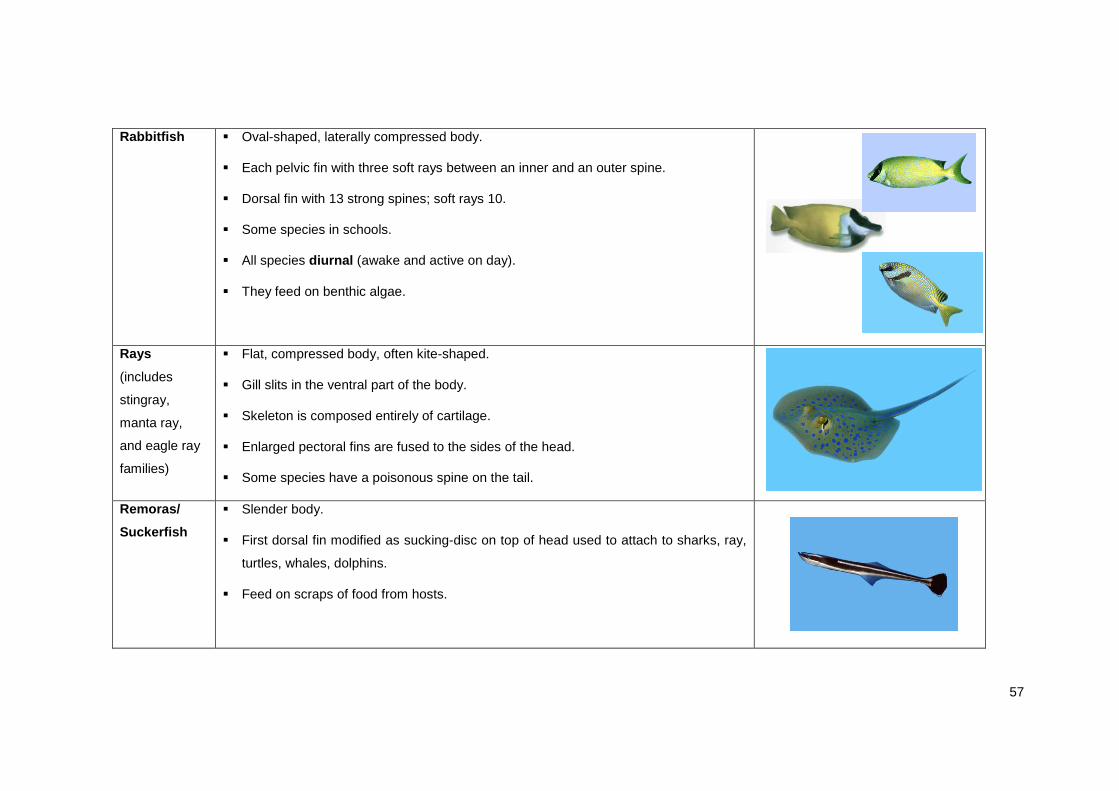
Rabbitfish
Oval-shaped, laterally compressed body.
Each pelvic fin with three soft rays between an inner and an outer spine.
Dorsal fin with 13 strong spines; soft rays 10.
Some species in schools.
All species diurnal (awake and active on day).
They feed on benthic algae.
Rays
(includes
stingray,
manta ray,
and eagle ray
families)
Flat, compressed body, often kite-shaped.
Gill slits in the ventral part of the body.
Skeleton is composed entirely of cartilage.
Enlarged pectoral fins are fused to the sides of the head.
Some species have a poisonous spine on the tail.
Remoras/
Suckerfish
Slender body.
First dorsal fin modified as sucking-disc on top of head used to attach to sharks, ray,
turtles, whales, dolphins.
Feed on scraps of food from hosts.
58
Roundheads/
Longfins
Elongated fishes with large mouths and large eyes. Maximum length about 20 cm.
Genus Calloplesiops has false eye in the dorsal fin and may pose as an inverted
image of a fish.
Nocturnal. Feed on small crustaceans and fishes.
Hide in caves, crevices, ledges and in holes by day.
Sandperches/
Grubfish
Elongated body, nearly cylindrical with terminal, protrusible mouth.
Can stand with the long pelvic fin. Long-based anal fin.
Often found in sand and rubble areas. Feed on small fish and crustaceans.
Scorpionfish
(including leaf
fish}
Large head with many ridges and spines.
Single dorsal fin, strongly notched.
Different color patterns that blends well with surroundings. Reef species hiding in
coral crevices.
Seahorses
and
Pipefishes
Small, elongated, slender body comprised of bony segments.
Long tubular snout, no teeth, feed on tiny benthic and planktonic animals.
No pelvic fins, some species have very small anal fin.
Lives in seagrass beds, on coral heads, and in crevices.
Seahorses have horse-like head, long prehensile tail used to anchor them.
Seahorses are in the CITES List. Fishing and trading banned in the Philippines.
59
Sharks
(include
families of
catsharks,
tiger sharks,
whale sharks,
etc…)
Sleek, streamlined body covered with dermal denticles to protect their skin from
damage and parasites and to improve fluid dynamics.
Flattened head, long and arched mouth underneath, small slits behind eyes.
Rough skin.
Have five to seven gill slits and replaceable teeth.
Skeleton is composed entirely of cartilage.
Most traded species is the banded catshark that lives on shallow waters. It feeds on
invertebrates and small fishes.
Shrimpfish/
Razorfish
Compressed body, with hard exterior surface.
Small transparent fins.
It spends most of the time “standing” on its head.
Found in inshore waters on spines of sea urchins and coral branches.
Squirrelfish/ Soldierfish
Red to silvery coloration
Deep-bodied with large rough scales and large eyes.
Can produce audible sounds.
Come out at night to hunt small fishes and crustaceans. At daytime, they shelter in
caves, under ledges, or near the bottom.
Basically caught for food consumption.
60
Snappers
Round to elongated, robust body with scaly cheek.
Moderate to large terminal mouth with jaws bearing enlarged canine teeth.
Dorsal fin continuous or slightly notched.
Pelvic fins originating just behind pectoral base.
Predators.
Form schools (sometimes, stationary) during the day on shipwrecks, around coral
formations, and along the upper edge of drop-offs.
Foodfish.
Stonefish
Pectoral rays are attached together.
They camouflage as rock, with lots of glands appearing as warts.
Have venoms secreted from glands at the base of their needle-like dorsal fin spines.
Most poisonous of all the fish!!!
Tangs/
Surgeonfish
Have deep, oval-shaped compressed body with very small scales.
Small terminal mouth with a single row of close-set teeth.
Eye high on the head.
Have retractable flick-knife (caudal spine) at the base of the tail that folds into a
groove. Other species have one or two fixed caudal spine/s.
61
Tilefish
Slender elongated body with long pointed snout.
Often, top of head flat.
Gill covering with one blunt or sharp spine.
One relatively long-based dorsal fin and anal fin with one or two weak spines.
Live in pairs or colonies.
All are deep water species found in a burrow or large rubble mound of their own
construction.
They feed on benthic invertebrates and zoopanktons (tiny floating larvae of marine
animals).
Trevallies
/Jacks
Streamlined body, compressed laterally.
Rounded head profile.
Stout spines in front of anal fin.
Found in open water and/or steep outer reef walls.
Powerful swimmers.
62
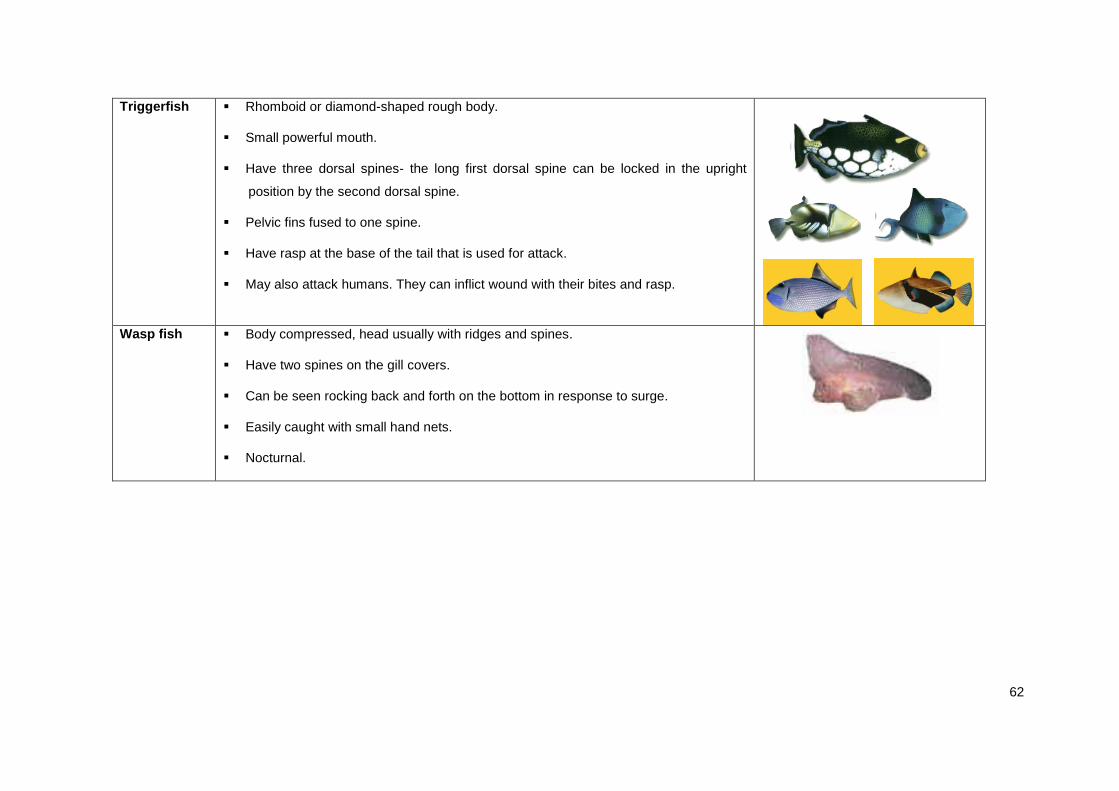
Triggerfish
Rhomboid or diamond-shaped rough body.
Small powerful mouth.
Have three dorsal spines- the long first dorsal spine can be locked in the upright
position by the second dorsal spine.
Pelvic fins fused to one spine.
Have rasp at the base of the tail that is used for attack.
May also attack humans. They can inflict wound with their bites and rasp.
Wasp fish
Body compressed, head usually with ridges and spines.
Have two spines on the gill covers.
Can be seen rocking back and forth on the bottom in response to surge.
Easily caught with small hand nets.
Nocturnal.
63
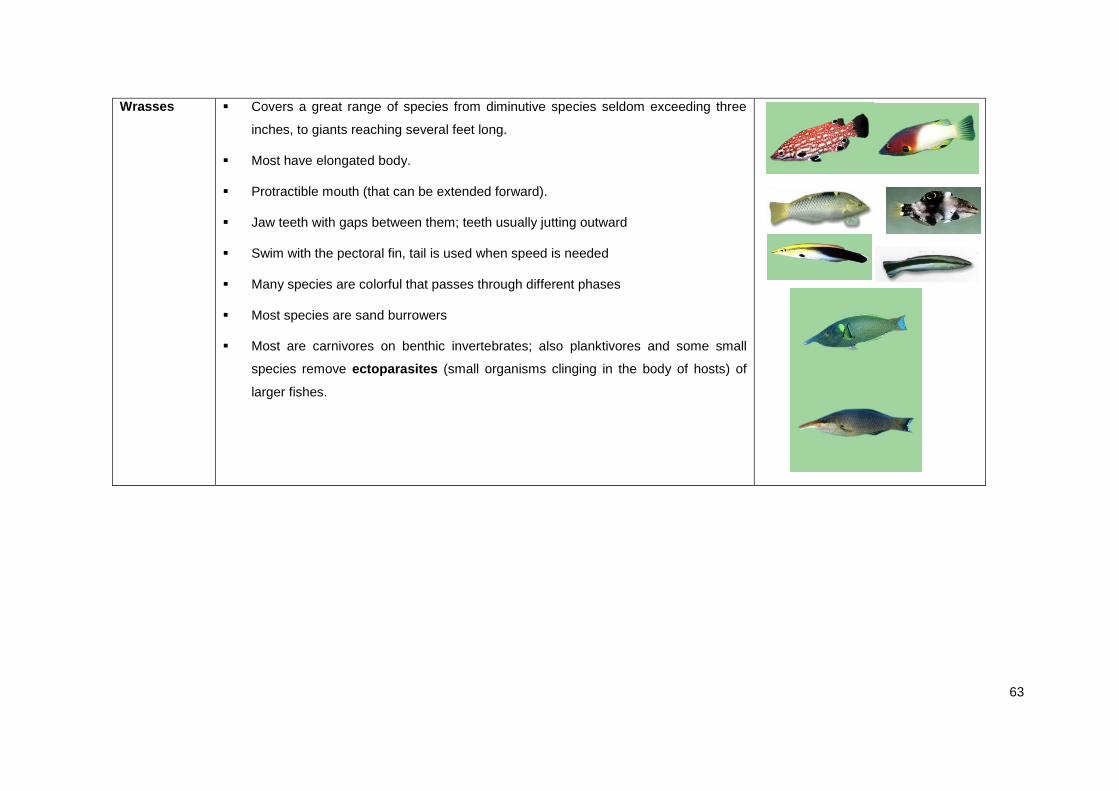
Wrasses
Covers a great range of species from diminutive species seldom exceeding three
inches, to giants reaching several feet long.
Most have elongated body.
Protractible mouth (that can be extended forward).
Jaw teeth with gaps between them; teeth usually jutting outward
Swim with the pectoral fin, tail is used when speed is needed
Many species are colorful that passes through different phases
Most species are sand burrowers
Most are carnivores on benthic invertebrates; also planktivores and some small
species remove ectoparasites (small organisms clinging in the body of hosts) of
larger fishes.
64
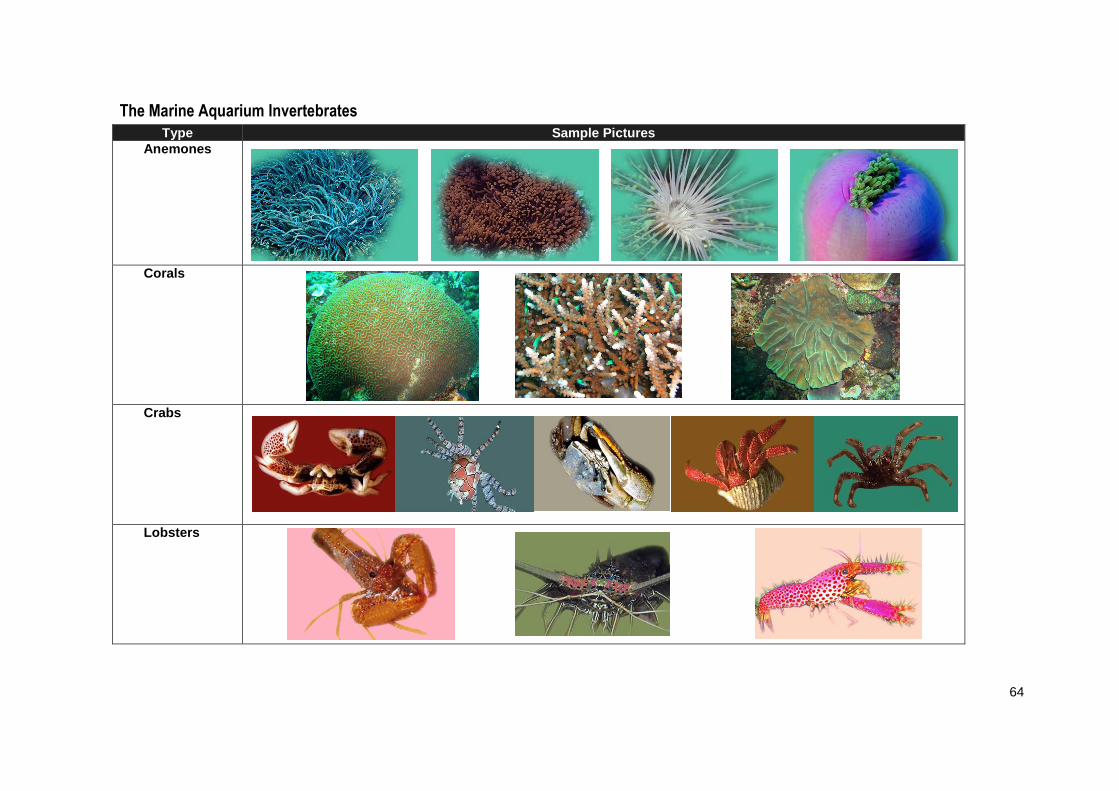
The Marine Aquarium Invertebrates
Type Sample Pictures
Anemones
Corals
Crabs
Lobsters
65
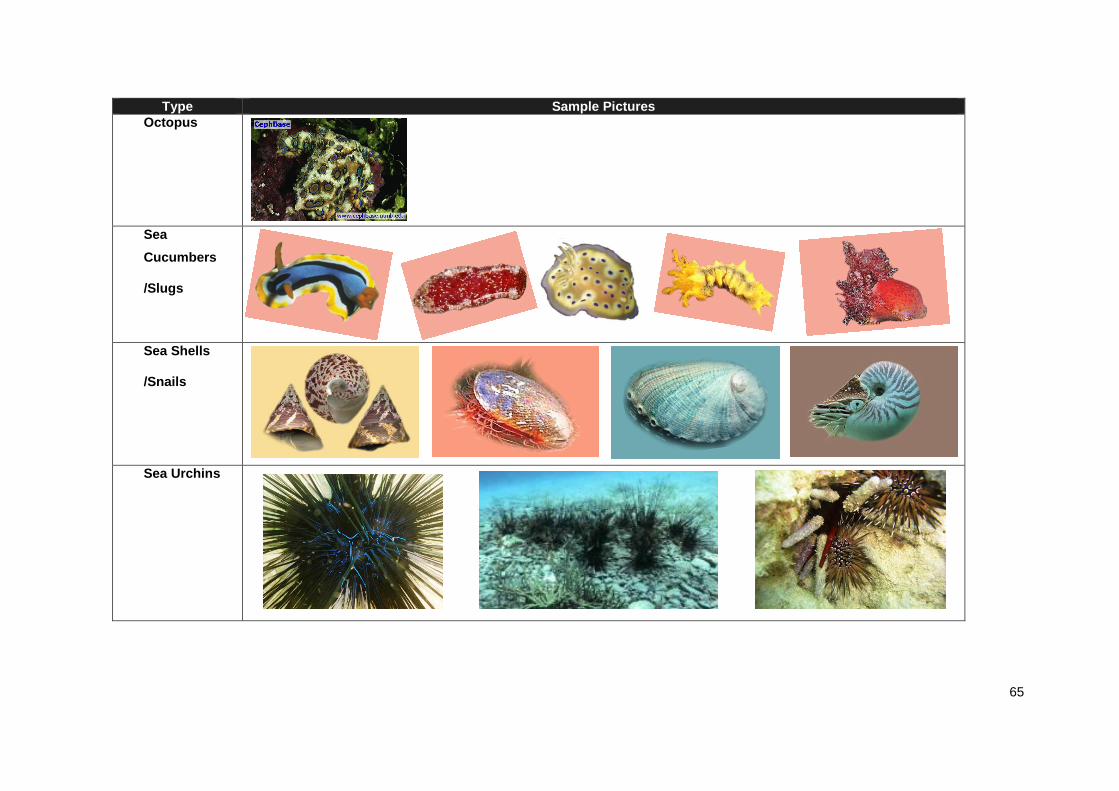
Type Sample Pictures
Octopus
Sea
Cucumbers
/Slugs
Sea Shells
/Snails
Sea Urchins
66
Type Sample Pictures
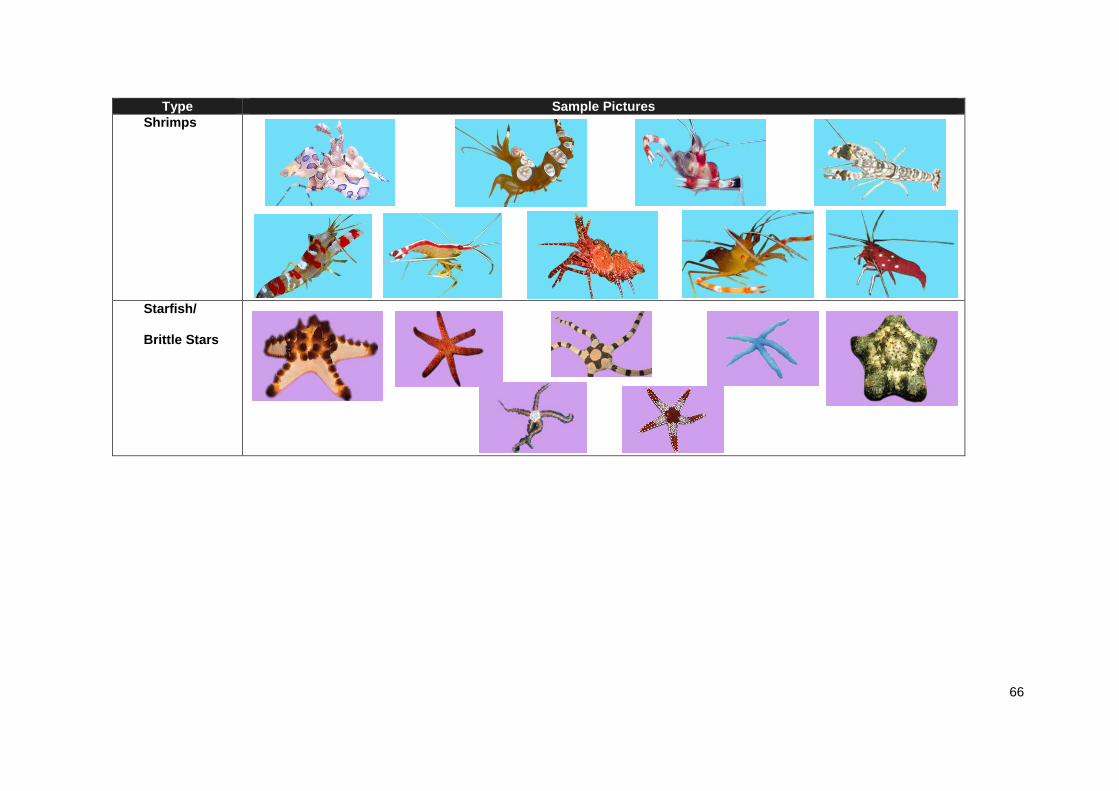
Shrimps
Starfish/
Brittle Stars
67
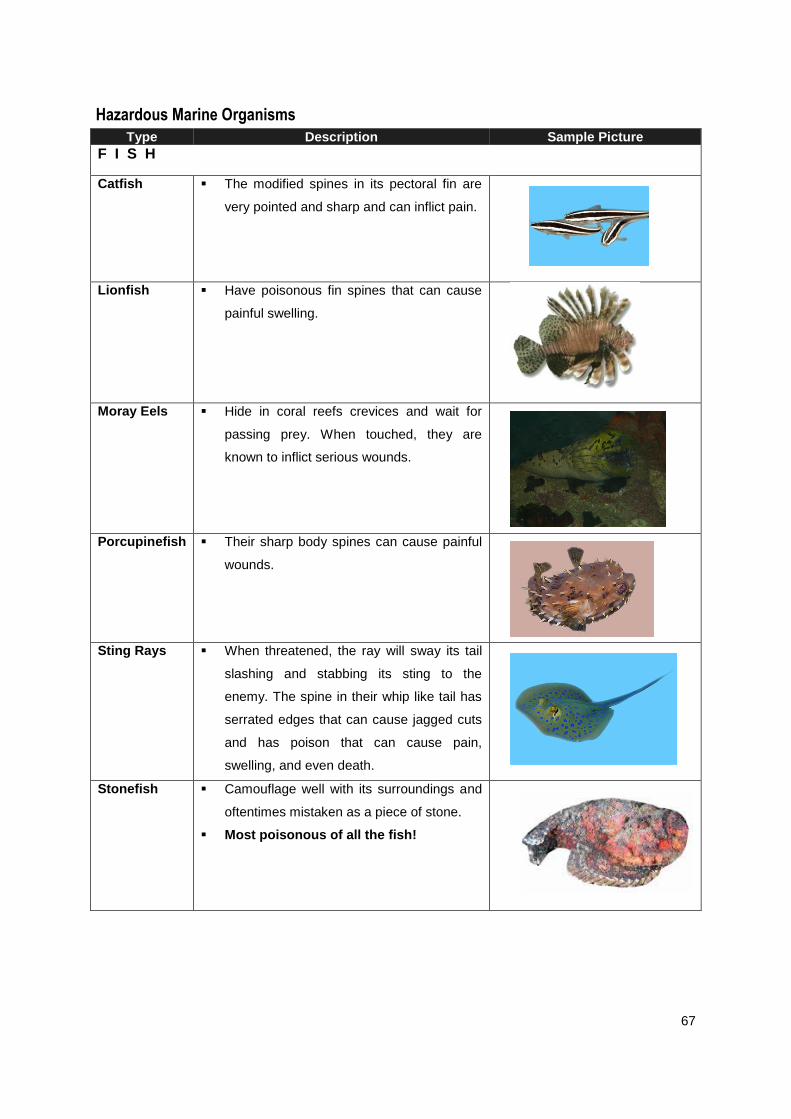
Hazardous Marine Organisms
Type Description Sample Picture
F I S H
Catfish The modified spines in its pectoral fin are
very pointed and sharp and can inflict pain.
Lionfish Have poisonous fin spines that can cause
painful swelling.
Moray Eels Hide in coral reefs crevices and wait for
passing prey. When touched, they are
known to inflict serious wounds.
Porcupinefish Their sharp body spines can cause painful
wounds.
Sting Rays When threatened, the ray will sway its tail
slashing and stabbing its sting to the
enemy. The spine in their whip like tail has
serrated edges that can cause jagged cuts
and has poison that can cause pain,
swelling, and even death.
Stonefish Camouflage well with its surroundings and
oftentimes mistaken as a piece of stone.
Most poisonous of all the fish!
68
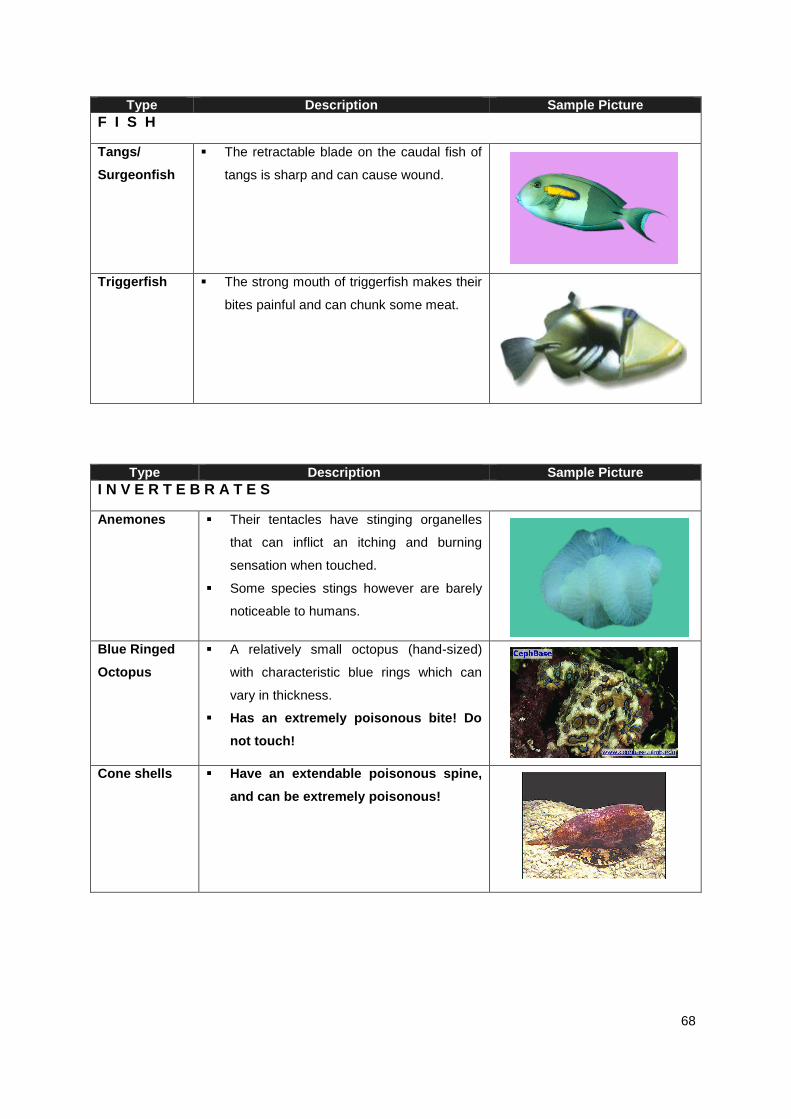
Type Description Sample Picture
F I S H
Tangs/
Surgeonfish
The retractable blade on the caudal fish of
tangs is sharp and can cause wound.
Triggerfish The strong mouth of triggerfish makes their
bites painful and can chunk some meat.
Type Description Sample Picture
I N V E R T E B R A T E S
Anemones Their tentacles have stinging organelles
that can inflict an itching and burning
sensation when touched.
Some species stings however are barely
noticeable to humans.
Blue Ringed
Octopus
A relatively small octopus (hand-sized)
with characteristic blue rings which can
vary in thickness.
Has an extremely poisonous bite! Do
not touch!
Cone shells Have an extendable poisonous spine,
and can be extremely poisonous!
69
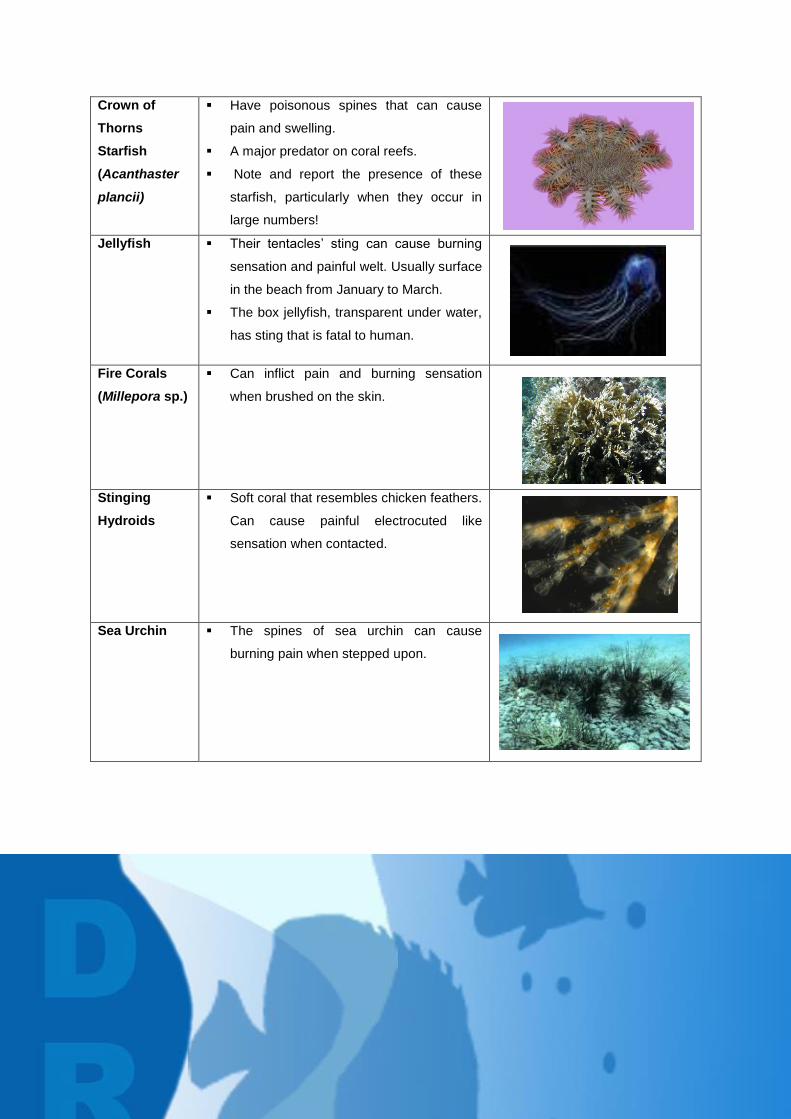
Crown of
Thorns
Starfish
(Acanthaster
plancii)
Have poisonous spines that can cause
pain and swelling.
A major predator on coral reefs.
Note and report the presence of these
starfish, particularly when they occur in
large numbers!
Jellyfish Their tentacles’ sting can cause burning
sensation and painful welt. Usually surface
in the beach from January to March.
The box jellyfish, transparent under water,
has sting that is fatal to human.
Fire Corals
(Millepora sp.)
Can inflict pain and burning sensation
when brushed on the skin.
Stinging
Hydroids
Soft coral that resembles chicken feathers.
Can cause painful electrocuted like
sensation when contacted.
Sea Urchin The spines of sea urchin can cause
burning pain when stepped upon.

70
71
MODULE 3:
KEEPING CATCH RECORDS & DOCUMENTING SHIPMENTS OF FISH ………………………………………………………………………………………
Module Summary
Content Session 1: How to complete Coordinators Logbook
Session 2: How to prepare Monthly Catch Summary
Session 3: How to complete a Packing List
Session 4: How to analyze ORS and SSPR
Learning Objectives
At the end of the training session, trainees will be able to:
Have a basic understanding of the different documents required by
certification
Be able to complete documents related to catch records and shipment
of fish
Be able to analyze the data in the documents
Key Messages
1. Organizations perform better if they have proper documentation of all
transactions.
2. Transparent documentation helps avoid misunderstandings that may
arise among fishers and between fishers and exporters.
3. There will be less wastage of fish if shipping is organized.
72
Session 1: Completing Coordinators Logbook
1 Present lecture on coordinators logbook (15 minutes up to Step 2)
Use presentation material in powerpoint/manila papers.
2 Demonstrate how to fill in the coordinators logbook
2.1 Prepare materials beforehand:
coordinator’s logbook form: in Manila Paper
Permanent Pen/Marker
Cut outs of fishes (at least 16 species)
2.2 Demonstrate how to fill up the coordinator’s logbook.
From among the cut outs, ask a participant (participant No. 1) to select
eight (8) samples for demonstration purposes.
Then ask another participant (participant No. 2) to select another eight
(8) samples.
The selected samples are assumed to be the catch of fish fisher Nos.
1 and 2.
Segregate fish/organism samples selected by fish fisher no. 1
according to species and size. It is possible a fisher may fish different
sizes of the same species.
Segregate fish/organism samples selected by fish fisher no. 2
according to species and size.
Start with Fisher No. 1:
- Write the Name and ID Number of Fisher No. 1 (in column 1)
- Fill in all columns one organism at a time.
- If more than 1 size is caught for a species, record them
separately (I.e. one row for organism A of size Small; and
another row for specie A of size Medium)
- Rule of thumb: one organism one size per row
73
- After all organisms/fishes caught have been recorded, make a
summary (separate row) for the following columns: No. Delivered,
No. Rejected and Total Price
Proceed to Fisher No. 2:
- Write the Name and ID Number of Fisher No. 2 on one row
- Fill in all columns again one organism/fish at a time (one species,
one size per row).
- After all organisms caught by No. 2 have been recorded, make a
summary (separate row) for the following columns: No. Delivered,
No. Rejected and Total Price
From time to time, ask participants if they have any questions.
3 Conduct simulation activity in filling up the coordinators logbook
3.1 Prepare materials beforehand:
Cut outs of different kinds of fishes/species (5 species and 4 of each
species – a combination of in good condition, dead and rejected)
Sample Coordinators Logbook (one per participant).
Price list of fishes
3.2 Give instructions for the simulation exercise in filling up coordinators
logbook
Distribute Coordinator’s logbook and Price List to participants (one set
for each participant)
Give 20 cut out fishes (5 species and 4 each species) per participant.
Let participants fill in the logbook as demonstrated.
- Ask participants to segregate fishes according to species in order
to ensure orderly recording in the logbook
- Ask participants to fill up all columns pertaining to one species
before proceeding to the next species.
For purposes of the activity, the prices of the species have been pre-
identified (participants will refer to price list distributed at the beginning
of the activity).
Note: In actual setting, the price will be based on the prevailing market
price, local price, and operational costs to be set by the coordinator. The

74
coordinators may also use their own format as long as all the necessary
information is contained in their logbook.
4 Have a short break before starting next session
Tips:
Trainer to sit with each participant and assist him in filling up the logbook. Trainer to ensure that he will have covered all participants within the time allotted. Reiterate to participants the importance of reviewing and making sure that entries are
correct At the end of 20 minutes collect filled up logbooks and check them for correctness. Make a copy of activity output for filing.
75
Session 2: Making Monthly Catch Summary
1. Present lecture on monthly catch summary
Use presentation material in powerpoint/manila papers. Distribute copies of
forms.
2. Demonstrate how to complete the monthly catch summary form
2.1 Prepare materials beforehand
Sample Monthly Catch Summary Form in Manila Paper
Sample Filled up Coordinator Logbook
2.2 Demonstrate how to fill up the monthly catch summary form
Distribute Filled up Coordinator Logbook to trainees.
Demonstrate filling up of Monthly Catch Summary using filled up
Coordinator Logbook
Complete all columns first for one organism before proceeding to the
next organism.
Do at least 3 organisms.
3. Conduct activity in completing the Monthly Catch Summary
3.1 Prepare materials beforehand:
Blank Monthly Catch Summary Form
Filled up Coordinator Logbook (sample) – distributed at start of
demonstration
3.2 Give instructions for the activity
Distribute Blank Monthly Catch Summary Form to trainees.
Using the filled up Coordinator Logbook previously distributed to
trainees, ask trainees to record the other organisms in the blank
Summary Form.
76
Session 3: Preparing a packing List
1. Present lecture on preparing a packing list
Use presentation material in powerpoint/manila papers. Distribute copies of
forms.
2. Demonstrate how to complete the packing list form
2.1 Prepare materials beforehand
Packing list Form in Manila Paper
Permanent Pen/Marker
Completed coordinators logbook (from Session 1)
Cut outs of fishes/species (same cutouts used in demonstrating how
to complete coordinators logbook)
2.2 Demonstrate how to complete the packing list form
For Demonstration Purposes Only, use the data from filled up
Logbook as starting point for completing the Packing List.
Record each of the species accepted (based on the Logbook in
Session 1).
If there are more than 1 size for a particular specie, record each size
on separate rows (one specie/one size/one row).
From time to time, ask participants if they have any questions.
3 Conduct activity in completing the Packing List
Give trainees cut outs of fishes (tell them to assume that these fishes
have been properly screened, purged and ready for shipment)
Using the fishes that were given to them, ask the participants to
prepare the packing list as demonstrated.
Record details of each specie to be shipped to exporter in separate
rows
Again, if there are more than 1 size for a particular species, record
each size on separate rows (one specie/one size/one row).
Additional tip (see other tips above): Remind participants that the packing list must be checked or verified against the
fishes inside the boxes and against order list before s/he ships/transports fishes in order to avoid misidentification or shipping of unordered organism(s).
77
Session 4: ORS and SSPR
1. Present lecture on analyzing ORS and SSPR
Use presentation material in powerpoint/manila papers. Distribute copies of
forms.
2. Conduct activity in analyzing ORS and SSPR
2.1 Prepare materials beforehand:
Filled up SSPR and ORS Forms
Manila Paper for posting of answers
2.2 Instructions:
Distribute Sample SSPR and ORS to participants.
Divided participants groups (at least 2 in a group).
Ask them to do an analysis on the Sample SSPR and ORS.
- For the ORS, ask them to discuss the computation of percentage
of DOA and rejects
- For the SSPR, ask them to identify possible reasons for the rating
and actions steps that must be done to prevent same errors from
being committed in the succeeding shipments and thereby
improve rating.
Request each group to make a presentation after the allotted time.
At the end of presentation, consolidate points raised by the group and
points in “Analysis of Performance Report”
End of Module
78
Attachment 1: Resources needed
Session 1: Coordinator Logbook
1. Powerpoint Presentation No.
2. Sample Form Coordinator Logbook
For Demonstration 1 (Coordinator Logbook):
a. Cut out fishes
b. Coordinator Logbook in Manila Paper
c. Marker or Pentel Pen
For Activity 1: Completing Coordinator Logbook
1. Coordinator Logbook Forms (one per participant)
2. Pencil or ballpen – one for each participant
3. Cut out fishes
Session 2: Monthly Catch Summary
1. Powerpoint Presentation No. _____
2. Sample Form Monthly Catch Summary
For Demonstration 2 (Monthly Catch Summary)
1. Monthly Catch Summary Form
2. Filled up Coordinator Logbook
For Activity 2: Completing Monthly Catch Summary
1. Monthly Catch Summary Form (one per participant)
2. Pencil or ballpen – one for each participant
3. Filled up Coordinator Logbook (for Activity 1)
Session 3: Packing List
1. Powerpoint presentation (PPT No. ____)
2. Sample Form Packing List
For Demonstration 3 (Packing List):
1. Coordinator Packing List in Manila Paper
2. Marker or Pentel Pen
3. Filled up Coordinator Logbook (In Demo 1)
79
For Activity 3: Completing Coordinator Packing List
1. Coordinator Packing List Form (one per participant)
2. Pencil or ballpen – one for each participant
3. Cut out fishes from Activity 1
Note: Participants will work on same fishes for the two activities.
Session 4: ORS and SSPR
1. Powerpoint Presentation NO. ____
For Pax Kit:
1. Handouts
2. Ball Pen
3. Writing Paper or Notebook
4. Envelope
Other Training Supplies and Materials:
1. Attendance Sheet
2. Ball pen
3. Whiteboard
4. Whiteboard Markers – 2 colors
5. Camera – for photo documentation
6. Masking tape
7. Manila papers
80
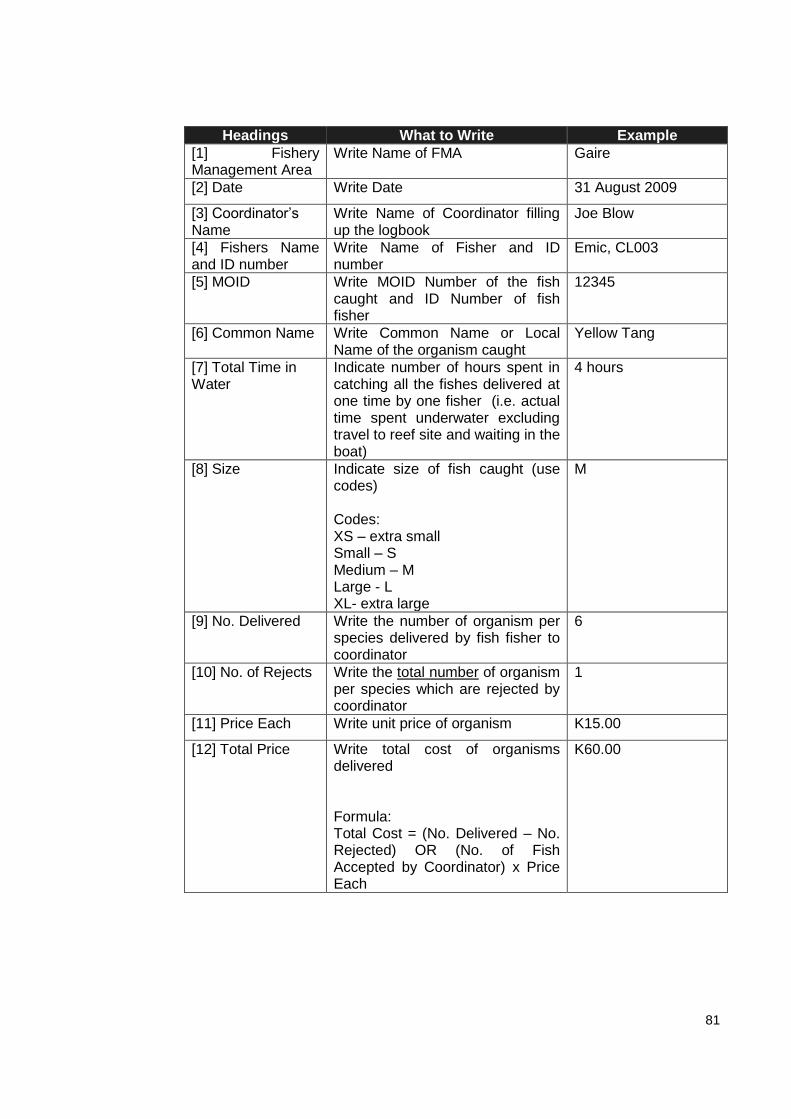
Coordinators logbook - Handout
What is the Coordinators Logbook?
The Coordinators Logbook is a document where the details of the daily
fish harvesting of each fish fisher in the area are recorded. See Table
1 on last page of this section for a sample of a filled up coordinator’s
logbook.
Why use a coordinator’s logbook?
The coordinators who are already using a “record book” use it mainly for
business purposes, ie to record the volume and value of fish delivered to
them so that they know how much they need to pay fishers and to have a
record of available stocks.
The coordinators logbook being proposed serves the same purposes. In
addition, the coordinator’s logbook provides information on the number of
fishes caught from the FMA and the number of fishes that were rejected by
the coordinator and released back to the sea. This information, along with
other data, is used by the MAP (management area plan) committee in
assessing the status of fish stocks and in determining adaptive
management tools that may be required to ensure the sustainability of the
marine aquarium fishery in the area.
Who fills in the Coordinator’s Logbook?
The Coordinator or his/her partner or children fill in the Coordinator’s
Logbook in his/her area. In some FMAs, it is usually the wives who keep
the records.
How often is the Coordinator’s Logbook updated?
The Coordinator shall fill in the logbook daily based on the fish catching
activities of the fish fishers in his/her area.
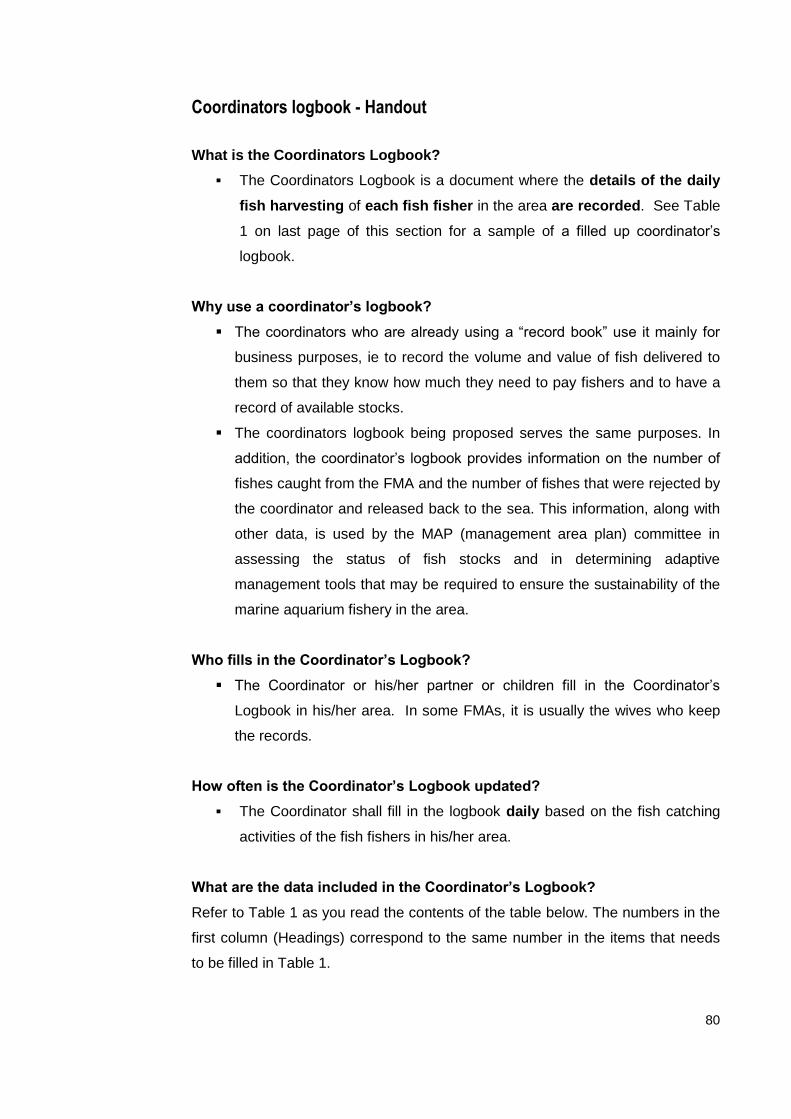
What are the data included in the Coordinator’s Logbook?
Refer to Table 1 as you read the contents of the table below. The numbers in the
first column (Headings) correspond to the same number in the items that needs
to be filled in Table 1.
81
Headings What to Write Example
[1] Fishery Management Area
Write Name of FMA Gaire
[2] Date Write Date 31 August 2009
[3] Coordinator’s Name
Write Name of Coordinator filling up the logbook
Joe Blow
[4] Fishers Name and ID number
Write Name of Fisher and ID number
Emic, CL003
[5] MOID Write MOID Number of the fish caught and ID Number of fish fisher
12345
[6] Common Name Write Common Name or Local Name of the organism caught
Yellow Tang
[7] Total Time in Water
Indicate number of hours spent in catching all the fishes delivered at one time by one fisher (i.e. actual time spent underwater excluding travel to reef site and waiting in the boat)
4 hours
[8] Size Indicate size of fish caught (use codes) Codes: XS – extra small Small – S Medium – M Large - L XL- extra large
M
[9] No. Delivered Write the number of organism per species delivered by fish fisher to coordinator
6
[10] No. of Rejects Write the total number of organism per species which are rejected by coordinator
1
[11] Price Each Write unit price of organism K15.00
[12] Total Price Write total cost of organisms delivered Formula: Total Cost = (No. Delivered – No. Rejected) OR (No. of Fish Accepted by Coordinator) x Price Each
K60.00

82
Table 1: Sampled filled up Coordinator’s Logbook
Coordinators Logbook
[1] FMA _____Gaire________
[2] Date 31 August 2009 [3] Coordinators Name Joe BLow_
[4] Fisher’s Name and number
[5] MOID
[6] Common Name
[7] Total Time in water
[8] Size
[9] No. Delivered to coordinator
[10] No. of Rejects*
[11] Price Each
[12] Total Price
Emic CL003
12345 Chelmon M 12 1 10 110
12346 Percula S 14 0 20 280
12367 Panther M 6 2 10 40
21345 Lipstick Tang
L 4 1 5 15
12371 Turbo Snail
M 6 0 5 30
4 hrs - 42 4 - 475
Goy CL004
12345 Chelmon M 20 1 10 190
12349 Oriole S 4 0 20 80
12367 Panther S 4 2 10 20
21346 Blue Tang L 4 1 5 20
12371 Turbo Snail
M 6 0 5 30
4 hrs - 38 4 - 340
*Assume these were released back to the sea.
F I S H E R S D A I L Y L O G B O O K
83
Name of Fisher/ Fisher’s ID #:
Fishery Management Area:
Fishing Time:
Date:
Species Caught QTY. Reject Remarks
Blue Koran - s
Blue Koran-m
Blue Koran - L
Monthly Catch Summary – Handout
What is the Monthly Catch Summary?
84
The Monthly Catch Summary is a tally of the total marine aquarium fish
fished in a given month in a given FMA.
The Monthly Catch Summary gives a computation of the remaining Total
Target Catch (TAC) for each species in a certain FMA. The TAC is the
number of fishes of a certain species that the Fishers’ are allowed to catch
within a given year. This number is a fraction of the total estimated
number of fishes of a certain species for a given year in a given FMA. The
estimated number of fishes is determined through a resource assessment
exercise. The fraction estimated as TAC is determined from natural
mortality rates or a set 10% when growth parameters are unavailable.
When is the Monthly Catch Summary Prepared?
It is prepared at the end of each month.
What are the data included in the Monthly Catch Summary?
Refer to Table 2 as you read the contents of the table below. The numbers in the
first column (Headings) correspond to the same number in the items that needs
to be filled up in Table 2.
Headings What to Write Example
[1] FMA Write name of the FMA Gaire
[2] Month and Year Write month and year in which summary is being tallied
August 2009
[3] Coordinator Write Name of Coordinator
Joe Blow
[4] Tallied By Write the Name of the Person who prepared the form and position title
Jebjeb Lopez (Community organizer) Eddie Lariosa (Coordinator)
[5] Number Write number of item being listed
1…2….3….4….5
[6] MOID Indicate MOID number of the particular fish/organism
12345
[7] Scientific Name Write Scientific Name of the fish/organism
Chelmon rostratus
[8] Common Name and size
Write the Common Name or Local Name of the fish/organisms and their size: S for Small, M for Medium and L for Large Note: One
Chelmon (M)
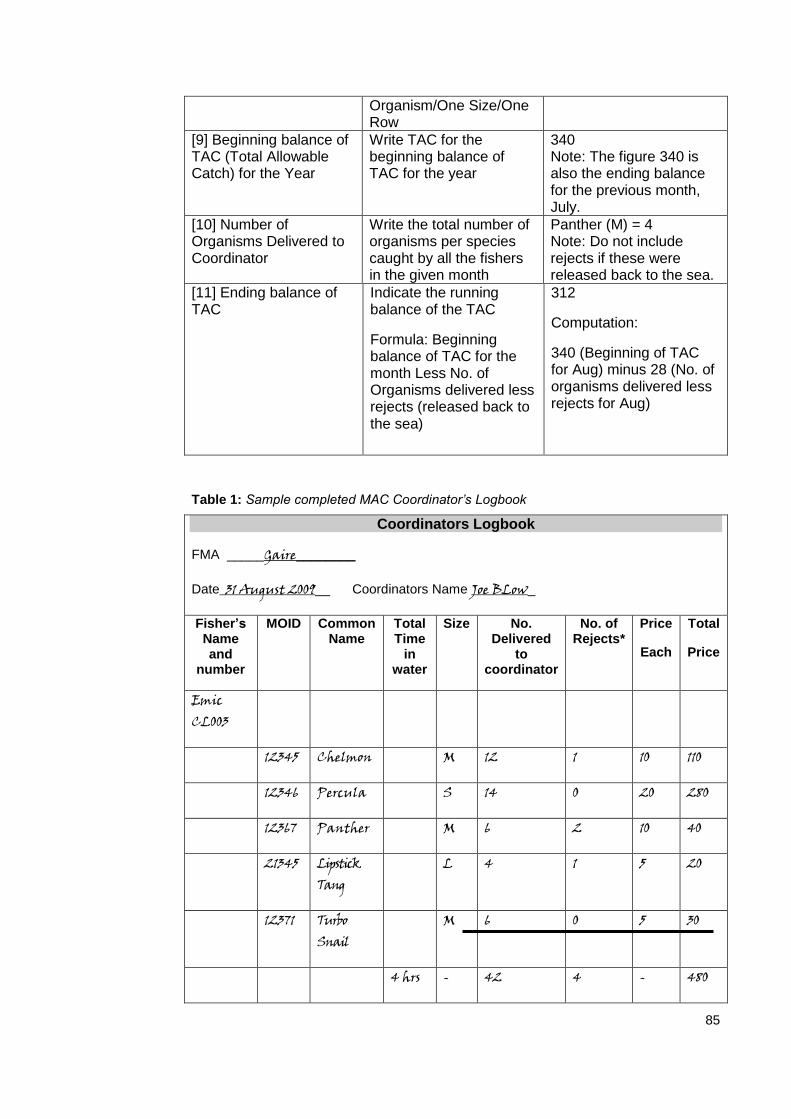
85
Organism/One Size/One Row
[9] Beginning balance of TAC (Total Allowable Catch) for the Year
Write TAC for the beginning balance of TAC for the year
340 Note: The figure 340 is also the ending balance for the previous month, July.
[10] Number of Organisms Delivered to Coordinator
Write the total number of organisms per species caught by all the fishers in the given month
Panther (M) = 4 Note: Do not include rejects if these were released back to the sea.
[11] Ending balance of TAC
Indicate the running balance of the TAC
Formula: Beginning balance of TAC for the month Less No. of Organisms delivered less rejects (released back to the sea)
312
Computation:
340 (Beginning of TAC for Aug) minus 28 (No. of organisms delivered less rejects for Aug)
Table 1: Sample completed MAC Coordinator’s Logbook
Coordinators Logbook
FMA _____Gaire________
Date 31 August 2009__ Coordinators Name Joe BLow_
Fisher’s Name and
number
MOID
Common Name
Total Time
in water
Size No. Delivered
to coordinator
No. of Rejects*
Price
Each
Total
Price
Emic CL003
12345 Chelmon M 12 1 10 110
12346 Percula S 14 0 20 280
12367 Panther M 6 2 10 40
21345 Lipstick Tang
L 4 1 5 20
12371 Turbo Snail
M 6 0 5 30
4 hrs - 42 4 - 480

86
Goy CL004
12345 Chelmon M 20 1 10 190
12349 Oriole S 4 0 20 80
12367 Panther S 4 2 10 20
21346 Blue Tang L 4 1 5 20
12371 Turbo Snail
M 6 0 5 30
4 hrs - 38 4 - 340
*Assume these were released back to the sea.
Assuming, for demonstration purposes, that the above were all the contents of
the coordinator’s logbook for the month of August, the completed monthly catch
summary form for August should look like what’s in Table 2.

87
Table 2: Sample completed Monthly Catch Summary Sheet
[1] FMA: Gaire
[2] Coordinator: Ilo Hare
[3] Month/year: August 2009
[4] Tallied by: Joe Blow [Community organizer]
[5]
No.
[6]
MOID [7] Scientific Name
[8] Common Name and size
[9] Beginning balance of TAC* for the year
[10] Total Catch for the
Month**
[11] Ending balance of
TAC
1 12345 Chelmon rostratus Chelmon (M) 340 28 312
2 12346 Amphiprion ocellaris Percula (S) 400 14 386
3 12367 Cromileptes altiveles Panther (M)
100
4
94 4 12367 Cromileptes altiveles Panther (S) 2
5 21345 Naso lituratus Lipstick tang 250 3 247
6 12371 Tectus niloticus Turbo snail 340 12 328
7 12349 Centropyge bicolor Oriole 500 4 496
8 21346 Paracanthus hepatus Blue tang 260 3 257
Total 70
*Sample only: TAC levels will be taken from RAM Survey results.
**Do not include rejects released back to the sea.
88
Packing list - handout
What is the Packing List?
The Packing List is a document where the details of the fishes delivered to
the exporter from a particular FMA is recorded. (See Sample filled up
packing List on the last page of this section, Table 1). The shaded portion of
the packing list (right side of the document (items 10 to 13) constitutes the
ORS that the exporter needs to fill up and send back to the coordinator. The
packing list is sent to the exporter along with the fishes that are transported.
The Packing list should be used and it contents analyzed alongside the
Organism Receipt Sheet (ORS) and the SSPR (Supplier Shipment
Performance Report).
Why fill up a packing list?
The packing list provides a record of what has been shipped to the exporter.
Upon receipt of the shipment, the exporter will first read the packing list to
know what fishes are contained in a particular shipment.
The ORS portion of the packing list, which the exporter fills up and sends
back to the coordinator, contains information on number of fish received,
DOA, rejects and the reasons for rejection. Along with the SSPR that
summarises the overall performance of a particular shipment, the packing list
(and the SSPR) can help the coordinator monitor the quality of the fish
shipped and to come up with actions to continually improve the quality of
shipments.
Who fills up the Packing List?
The Coordinator is responsible for accomplishing the Packing List in his area.
How often is the Packing List prepared?
The Coordinator shall fill up the Packing List before he transports/ships fishes
to the exporter.
How to fill up the Packing list?
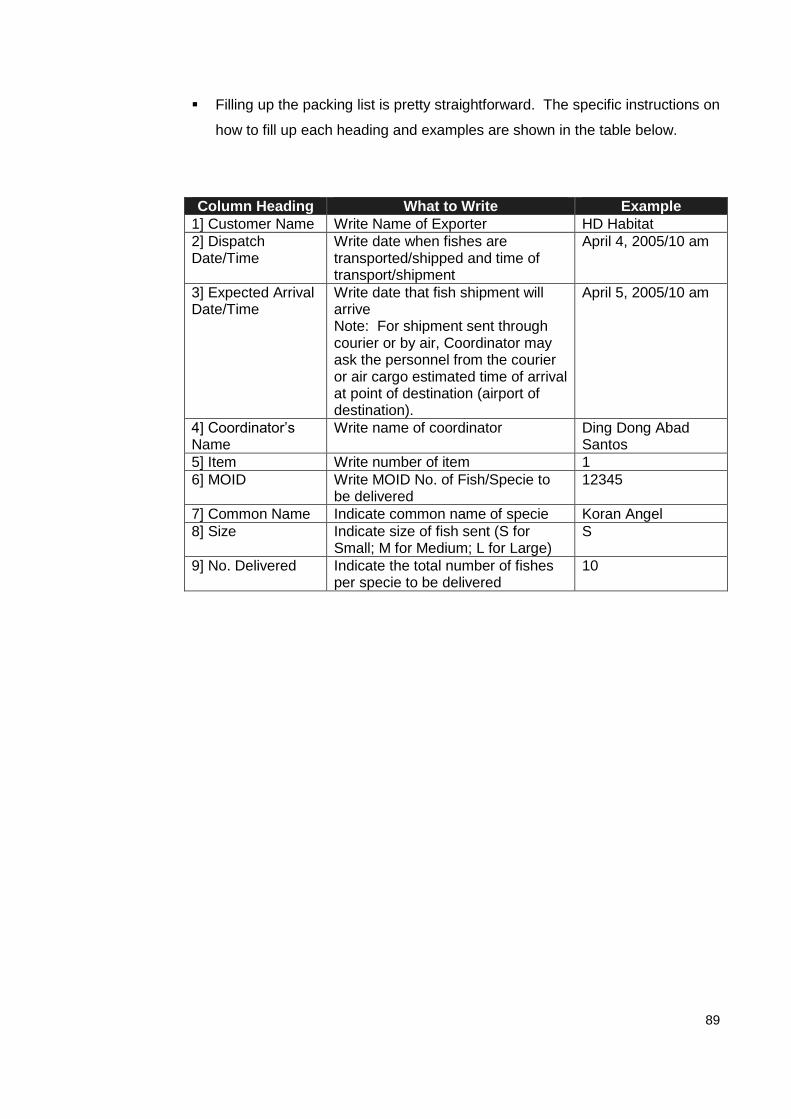
89
Filling up the packing list is pretty straightforward. The specific instructions on
how to fill up each heading and examples are shown in the table below.
Column Heading What to Write Example
1] Customer Name Write Name of Exporter HD Habitat
2] Dispatch Date/Time
Write date when fishes are transported/shipped and time of transport/shipment
April 4, 2005/10 am
3] Expected Arrival Date/Time
Write date that fish shipment will arrive Note: For shipment sent through courier or by air, Coordinator may ask the personnel from the courier or air cargo estimated time of arrival at point of destination (airport of destination).
April 5, 2005/10 am
4] Coordinator’s Name
Write name of coordinator Ding Dong Abad Santos
5] Item Write number of item 1
6] MOID Write MOID No. of Fish/Specie to be delivered
12345
7] Common Name Indicate common name of specie Koran Angel
8] Size Indicate size of fish sent (S for Small; M for Medium; L for Large)
S
9] No. Delivered Indicate the total number of fishes per specie to be delivered
10
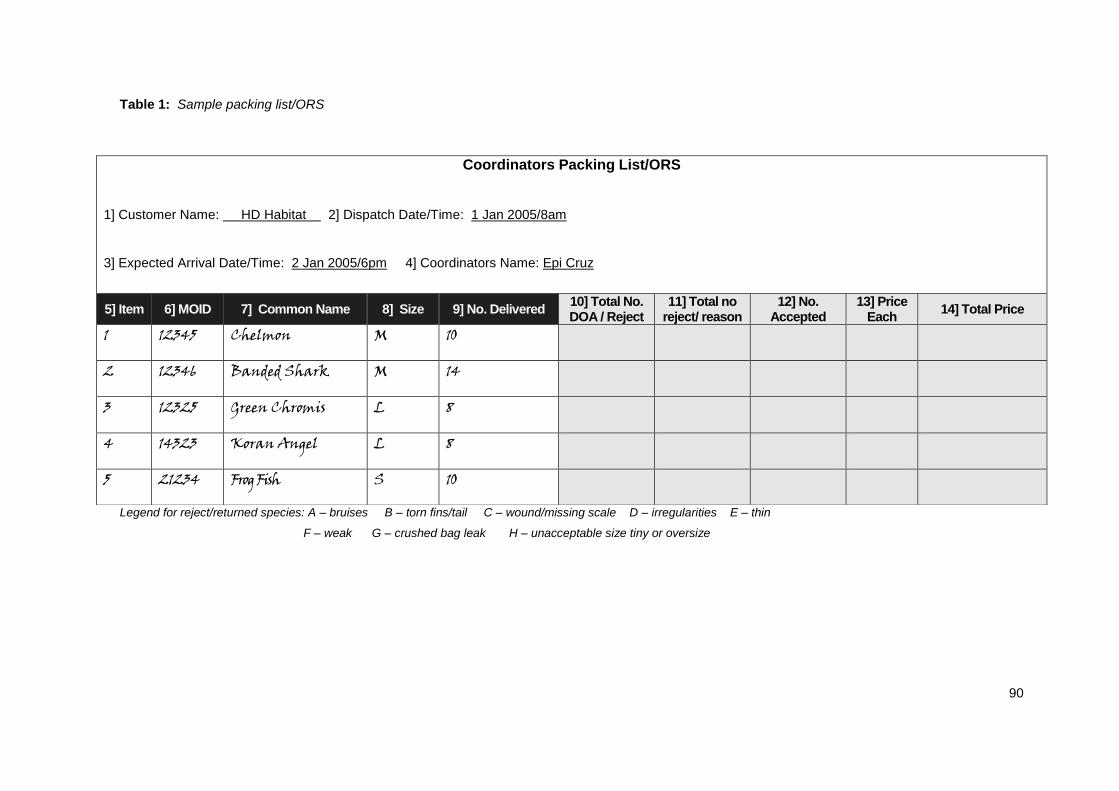
90
Table 1: Sample packing list/ORS
Legend for reject/returned species: A – bruises B – torn fins/tail C – wound/missing scale D – irregularities E – thin
F – weak G – crushed bag leak H – unacceptable size tiny or oversize
Coordinators Packing List/ORS
1] Customer Name: HD Habitat 2] Dispatch Date/Time: 1 Jan 2005/8am
3] Expected Arrival Date/Time: 2 Jan 2005/6pm 4] Coordinators Name: Epi Cruz
5] Item 6] MOID 7] Common Name 8] Size 9] No. Delivered 10] Total No. DOA / Reject
11] Total no reject/ reason
12] No. Accepted
13] Price Each
14] Total Price
1 12345 Chelmon M 10
2 12346 Banded Shark M 14
3 12325 Green Chromis L 8
4 14323 Koran Angel L 8
5 21234 Frog Fish S 10
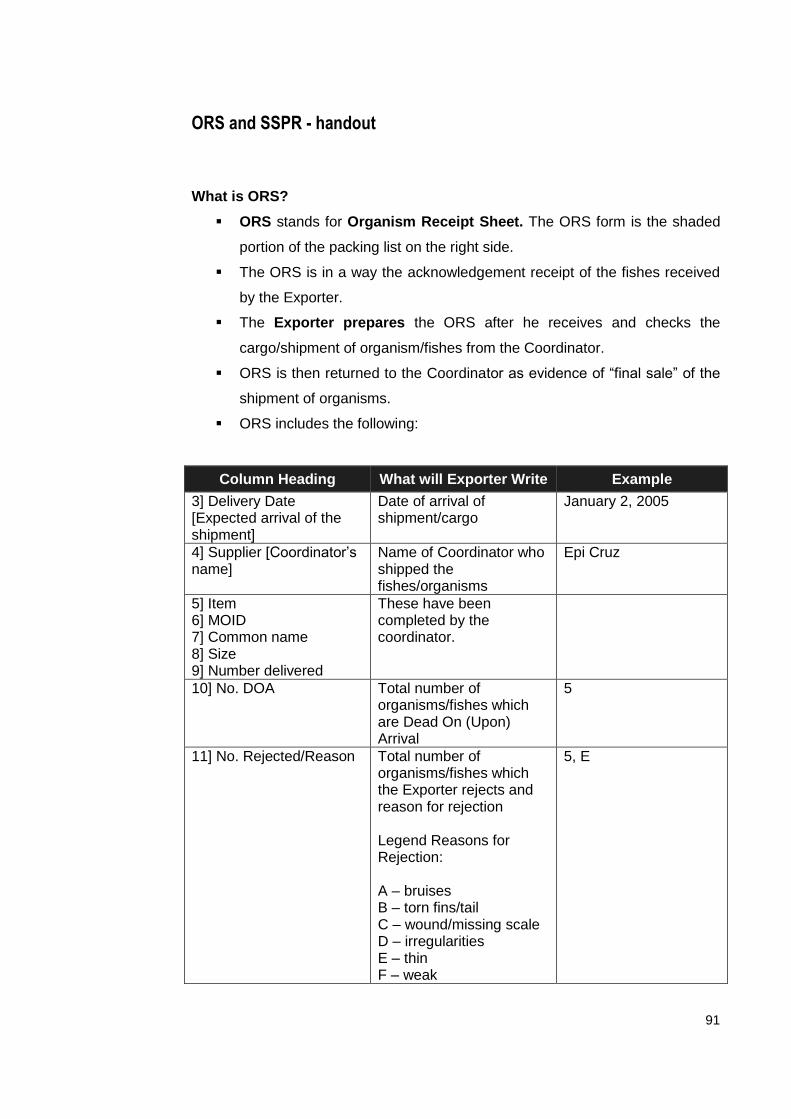
91
ORS and SSPR - handout
What is ORS?
ORS stands for Organism Receipt Sheet. The ORS form is the shaded
portion of the packing list on the right side.
The ORS is in a way the acknowledgement receipt of the fishes received
by the Exporter.
The Exporter prepares the ORS after he receives and checks the
cargo/shipment of organism/fishes from the Coordinator.
ORS is then returned to the Coordinator as evidence of “final sale” of the
shipment of organisms.
ORS includes the following:
Column Heading What will Exporter Write Example
3] Delivery Date [Expected arrival of the shipment]
Date of arrival of shipment/cargo
January 2, 2005
4] Supplier [Coordinator’s name]
Name of Coordinator who shipped the fishes/organisms
Epi Cruz
5] Item 6] MOID 7] Common name 8] Size 9] Number delivered
These have been completed by the coordinator.
10] No. DOA Total number of organisms/fishes which are Dead On (Upon) Arrival
5
11] No. Rejected/Reason Total number of organisms/fishes which the Exporter rejects and reason for rejection Legend Reasons for Rejection: A – bruises B – torn fins/tail C – wound/missing scale D – irregularities E – thin F – weak
5, E
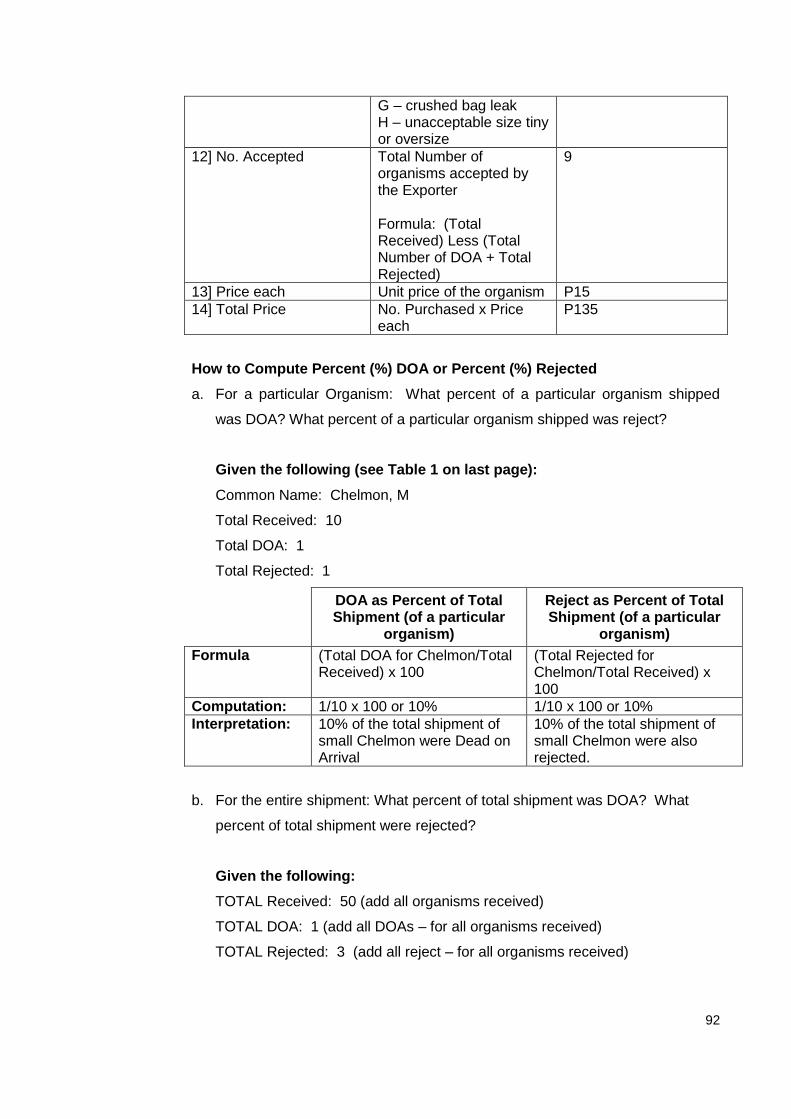
92
G – crushed bag leak H – unacceptable size tiny or oversize
12] No. Accepted Total Number of organisms accepted by the Exporter Formula: (Total Received) Less (Total Number of DOA + Total Rejected)
9
13] Price each Unit price of the organism P15
14] Total Price No. Purchased x Price each
P135
How to Compute Percent (%) DOA or Percent (%) Rejected
a. For a particular Organism: What percent of a particular organism shipped
was DOA? What percent of a particular organism shipped was reject?
Given the following (see Table 1 on last page):
Common Name: Chelmon, M
Total Received: 10
Total DOA: 1
Total Rejected: 1
DOA as Percent of Total Shipment (of a particular
organism)
Reject as Percent of Total Shipment (of a particular
organism)
Formula (Total DOA for Chelmon/Total Received) x 100
(Total Rejected for Chelmon/Total Received) x 100
Computation: 1/10 x 100 or 10% 1/10 x 100 or 10%
Interpretation: 10% of the total shipment of small Chelmon were Dead on Arrival
10% of the total shipment of small Chelmon were also rejected.
b. For the entire shipment: What percent of total shipment was DOA? What
percent of total shipment were rejected?
Given the following:
TOTAL Received: 50 (add all organisms received)
TOTAL DOA: 1 (add all DOAs – for all organisms received)
TOTAL Rejected: 3 (add all reject – for all organisms received)
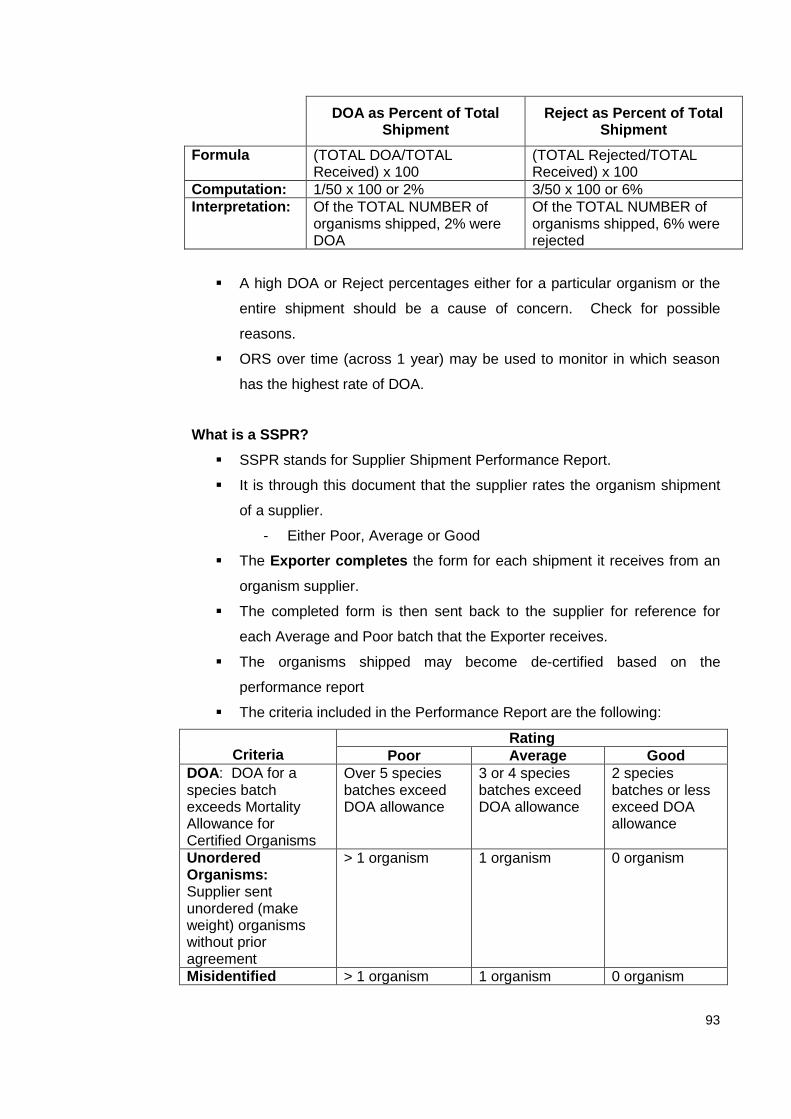
93
DOA as Percent of Total
Shipment Reject as Percent of Total
Shipment
Formula
(TOTAL DOA/TOTAL Received) x 100
(TOTAL Rejected/TOTAL Received) x 100
Computation: 1/50 x 100 or 2% 3/50 x 100 or 6%
Interpretation: Of the TOTAL NUMBER of organisms shipped, 2% were DOA
Of the TOTAL NUMBER of organisms shipped, 6% were rejected
A high DOA or Reject percentages either for a particular organism or the
entire shipment should be a cause of concern. Check for possible
reasons.
ORS over time (across 1 year) may be used to monitor in which season
has the highest rate of DOA.
What is a SSPR?
SSPR stands for Supplier Shipment Performance Report.
It is through this document that the supplier rates the organism shipment
of a supplier.
- Either Poor, Average or Good
The Exporter completes the form for each shipment it receives from an
organism supplier.
The completed form is then sent back to the supplier for reference for
each Average and Poor batch that the Exporter receives.
The organisms shipped may become de-certified based on the
performance report
The criteria included in the Performance Report are the following:
Criteria
Rating
Poor Average Good
DOA: DOA for a species batch exceeds Mortality Allowance for Certified Organisms
Over 5 species batches exceed DOA allowance
3 or 4 species batches exceed DOA allowance
2 species batches or less exceed DOA allowance
Unordered Organisms: Supplier sent unordered (make weight) organisms without prior agreement
> 1 organism 1 organism 0 organism
Misidentified > 1 organism 1 organism 0 organism
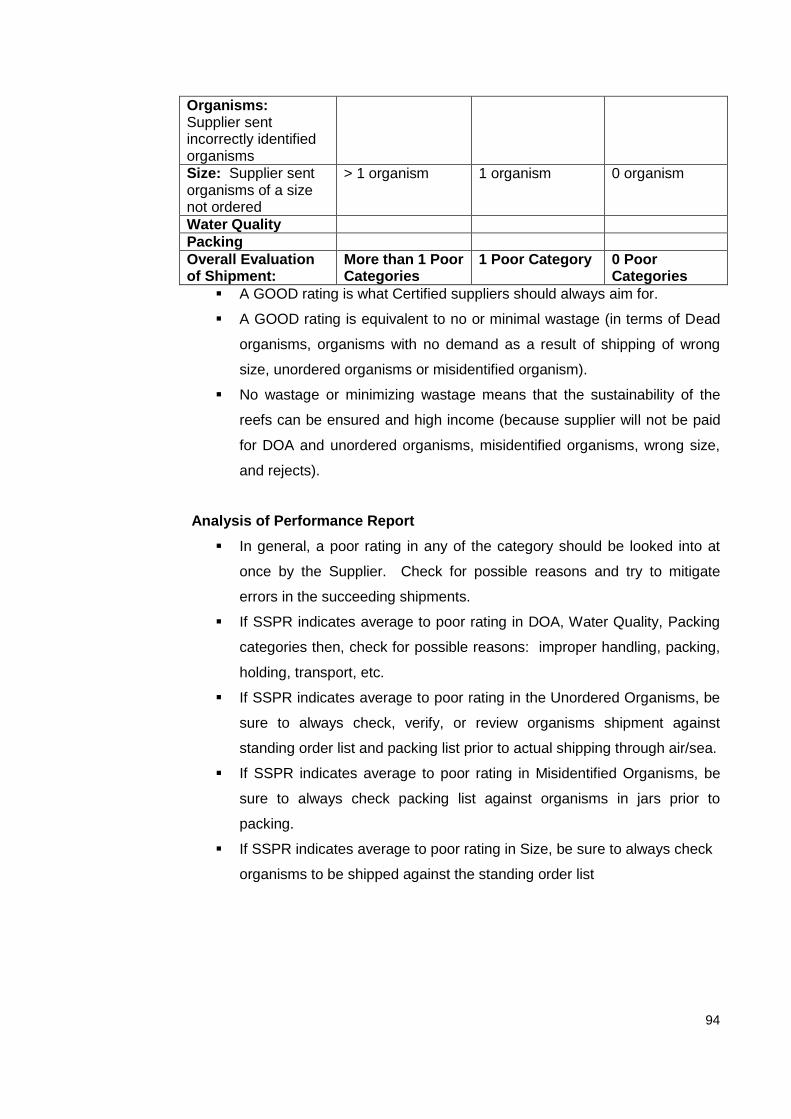
94
Organisms: Supplier sent incorrectly identified organisms
Size: Supplier sent organisms of a size not ordered
> 1 organism 1 organism 0 organism
Water Quality
Packing
Overall Evaluation of Shipment:
More than 1 Poor Categories
1 Poor Category 0 Poor Categories
A GOOD rating is what Certified suppliers should always aim for.
A GOOD rating is equivalent to no or minimal wastage (in terms of Dead
organisms, organisms with no demand as a result of shipping of wrong
size, unordered organisms or misidentified organism).
No wastage or minimizing wastage means that the sustainability of the
reefs can be ensured and high income (because supplier will not be paid
for DOA and unordered organisms, misidentified organisms, wrong size,
and rejects).
Analysis of Performance Report
In general, a poor rating in any of the category should be looked into at
once by the Supplier. Check for possible reasons and try to mitigate
errors in the succeeding shipments.
If SSPR indicates average to poor rating in DOA, Water Quality, Packing
categories then, check for possible reasons: improper handling, packing,
holding, transport, etc.
If SSPR indicates average to poor rating in the Unordered Organisms, be
sure to always check, verify, or review organisms shipment against
standing order list and packing list prior to actual shipping through air/sea.
If SSPR indicates average to poor rating in Misidentified Organisms, be
sure to always check packing list against organisms in jars prior to
packing.
If SSPR indicates average to poor rating in Size, be sure to always check
organisms to be shipped against the standing order list
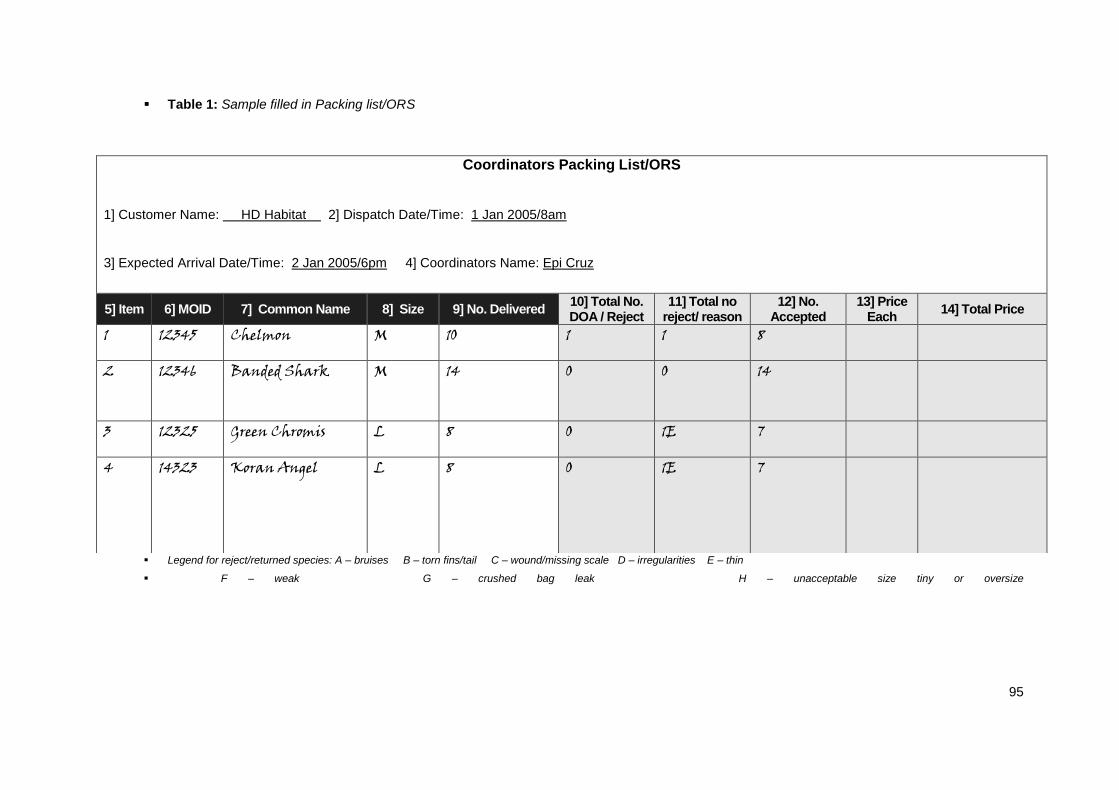
95
Table 1: Sample filled in Packing list/ORS
Legend for reject/returned species: A – bruises B – torn fins/tail C – wound/missing scale D – irregularities E – thin
F – weak G – crushed bag leak H – unacceptable size tiny or oversize
Coordinators Packing List/ORS
1] Customer Name: HD Habitat 2] Dispatch Date/Time: 1 Jan 2005/8am
3] Expected Arrival Date/Time: 2 Jan 2005/6pm 4] Coordinators Name: Epi Cruz
5] Item 6] MOID 7] Common Name 8] Size 9] No. Delivered 10] Total No. DOA / Reject
11] Total no reject/ reason
12] No. Accepted
13] Price Each
14] Total Price
1 12345 Chelmon M 10 1 1 8
2 12346 Banded Shark M 14 0 0 14
3 12325 Green Chromis L 8 0 1E 7
4 14323 Koran Angel L 8 0 1E 7

96
97
MODULE 4:
MARKETING & SELLING ………………………………………………………………………………………
Module Summary
Content Making and Distribution of Species List
Receiving and Evaluation of Buyers’ Order
Monitoring Order Status
Shipment Evaluation
Fish to Order System
Total Allowable Catch
Learning Objectives
At the end of the training session, trainees will be able to:
Learn the different steps of aquarium trade marketing and selling
Understand and appreciate the fish to order system
Understand and appreciate the need to implement a Total Allowable
Catch (TAC) for every species
Key Messages
1. Accurate information and honoring commitments will lead to better
livelihood partnership with buyers.
2. Evaluating a buyer’s order before complying will lessen the probability
of having unprofitable shipments.
3. Fish to Order System ensures less wastage of resources and
prevents delivering of species that the buyers will not buy.
4. TAC will ensure the existence of organisms in a FMA.

98
Session Proper: Marketing and Selling
1. Present lecture
Use the following presentation material in power point/manila paper.
2. Order Receiving and Evaluating
2.1 Assign one fisher to act as the “coordinator”, another to act as an “exporter”. The rest will be “fishers”.
2.2 Ask the “exporter” to order from the “coordinator” through a mobile phone.
If mobile signal is not applicable in the area, the scenario will be: the “coordinator” just delivered his fish and he will ask the “exporter” for new order.
2.3 The “coordinator” will evaluate the order and distribute this to the “fishers” afterwards.
2.5 Give enough time for the group to react.
3. Sharing/Discussion
3.1 Divide fishers into groups (optional depending on size of class).
T I P !
Encourage trainees to ask questions and clarify items presented that they find confusing.
T I P S !
A list and quantity of species to be ordered can be prepared beforehand. When using mobile phone, allow the “exporter” to decide whether he will order
through call or text. Give tips to participants but allow the “coordinator” to process the whole thing
himself. Check the following: a) When ordered through phone or text, was the order written in paper? b) Are dates ordered and expected delivery noted? c) Are the availability and quantity of species ordered evaluated? d) Evaluation of financial viability of the ordered shipment conducted? e) Concerns, if any, to the exporter and vice versa relayed?
99
3.2 Ask fishers to discuss among themselves what to do if the order has not been met, for instance, if there were problems fishing because of a storm.
3.3 Ask each group to share discussion(s) in the class.
3.4 Give pointers on what to do if the order has not been met.
4. Give short oral quiz
a) What are the steps in marketing and selling?
b) Why is it needed to fish only what is ordered?
c) What should be done if the orders are given verbally, through text, or
through phone call?
d) What are the things to consider when evaluating an order?
Session Closing/Wrap Up
Repeat key messages for this session
Give a briefing on the next activity/module
T I P S ! Exporters, just like the importers and any customer, want to have their orders
delivered complete and on time. If order will not be met even after the fishers and coordinators exert all efforts, the
coordinator should relay the reason/s to the ordering exporter/s. The reasons should be relayed as early as possible and not on the expected
delivery date.
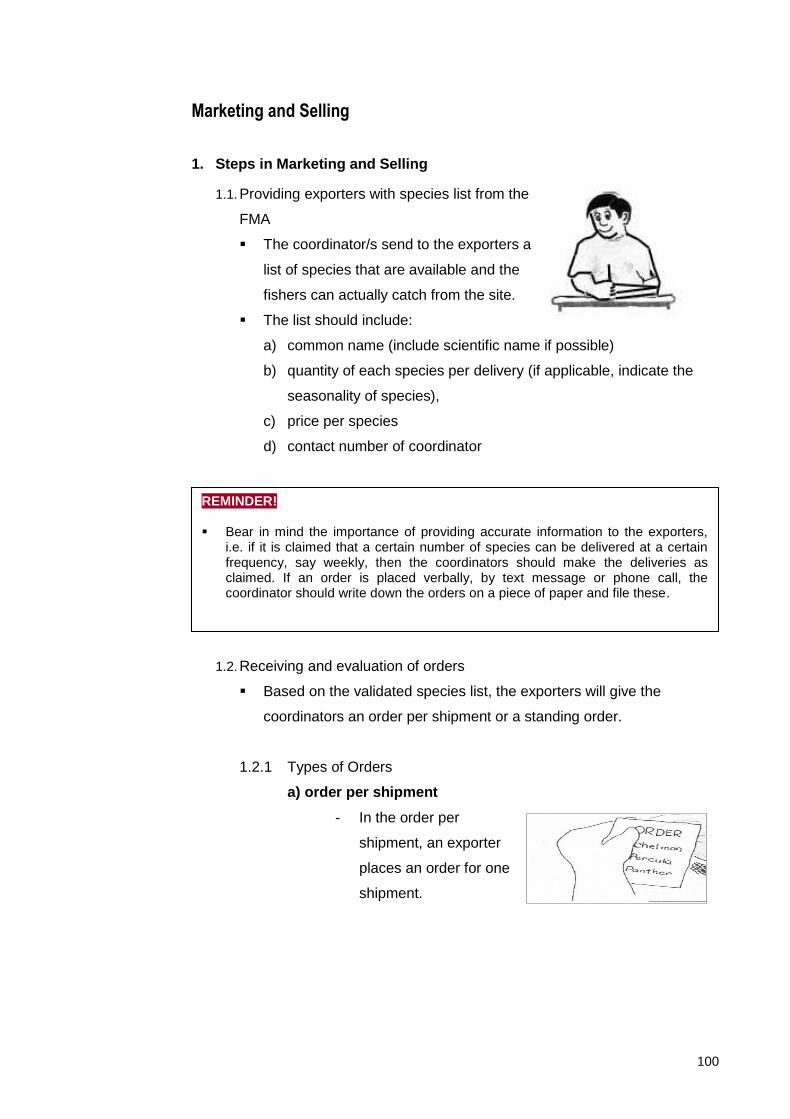
100
Marketing and Selling
1. Steps in Marketing and Selling
1.1. Providing exporters with species list from the
FMA
The coordinator/s send to the exporters a
list of species that are available and the
fishers can actually catch from the site.
The list should include:
a) common name (include scientific name if possible)
b) quantity of each species per delivery (if applicable, indicate the
seasonality of species),
c) price per species
d) contact number of coordinator
1.2. Receiving and evaluation of orders
Based on the validated species list, the exporters will give the
coordinators an order per shipment or a standing order.
1.2.1 Types of Orders
a) order per shipment
- In the order per
shipment, an exporter
places an order for one
shipment.
REMINDER! Bear in mind the importance of providing accurate information to the exporters,
i.e. if it is claimed that a certain number of species can be delivered at a certain frequency, say weekly, then the coordinators should make the deliveries as claimed. If an order is placed verbally, by text message or phone call, the coordinator should write down the orders on a piece of paper and file these.
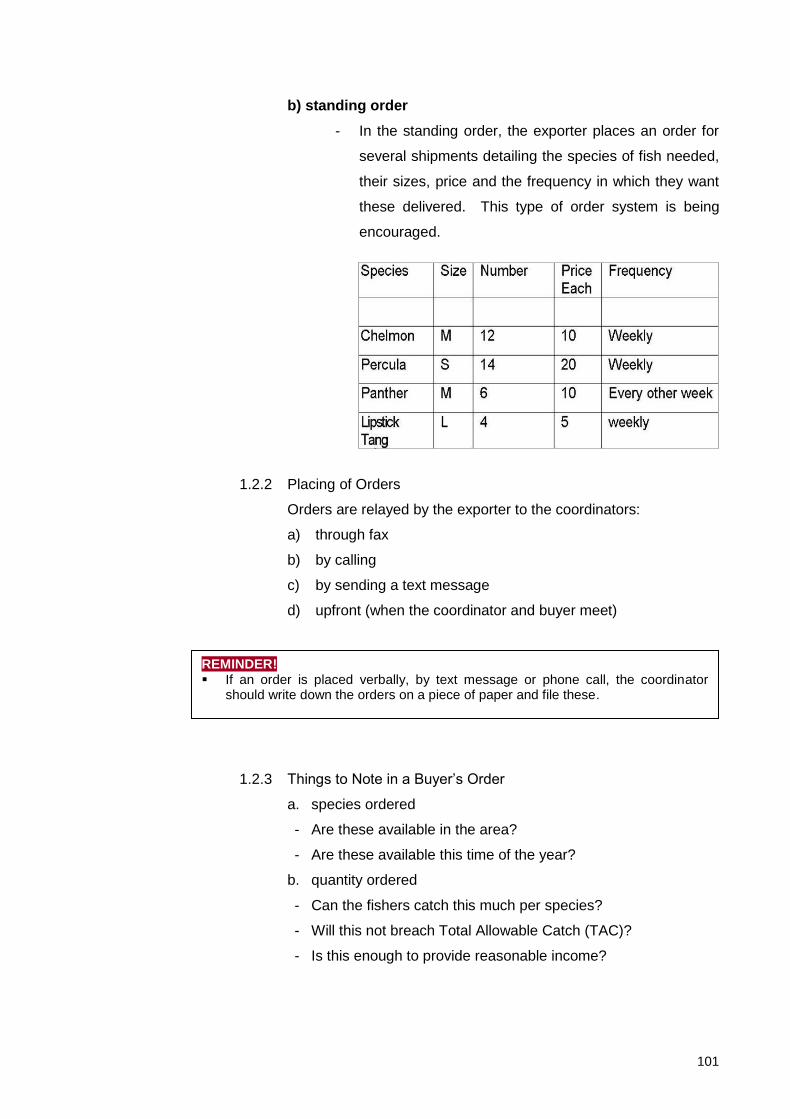
101
b) standing order
- In the standing order, the exporter places an order for
several shipments detailing the species of fish needed,
their sizes, price and the frequency in which they want
these delivered. This type of order system is being
encouraged.
1.2.2 Placing of Orders
Orders are relayed by the exporter to the coordinators:
a) through fax
b) by calling
c) by sending a text message
d) upfront (when the coordinator and buyer meet)
1.2.3 Things to Note in a Buyer’s Order
a. species ordered
- Are these available in the area?
- Are these available this time of the year?
b. quantity ordered
- Can the fishers catch this much per species?
- Will this not breach Total Allowable Catch (TAC)?
- Is this enough to provide reasonable income?
REMINDER! If an order is placed verbally, by text message or phone call, the coordinator
should write down the orders on a piece of paper and file these.
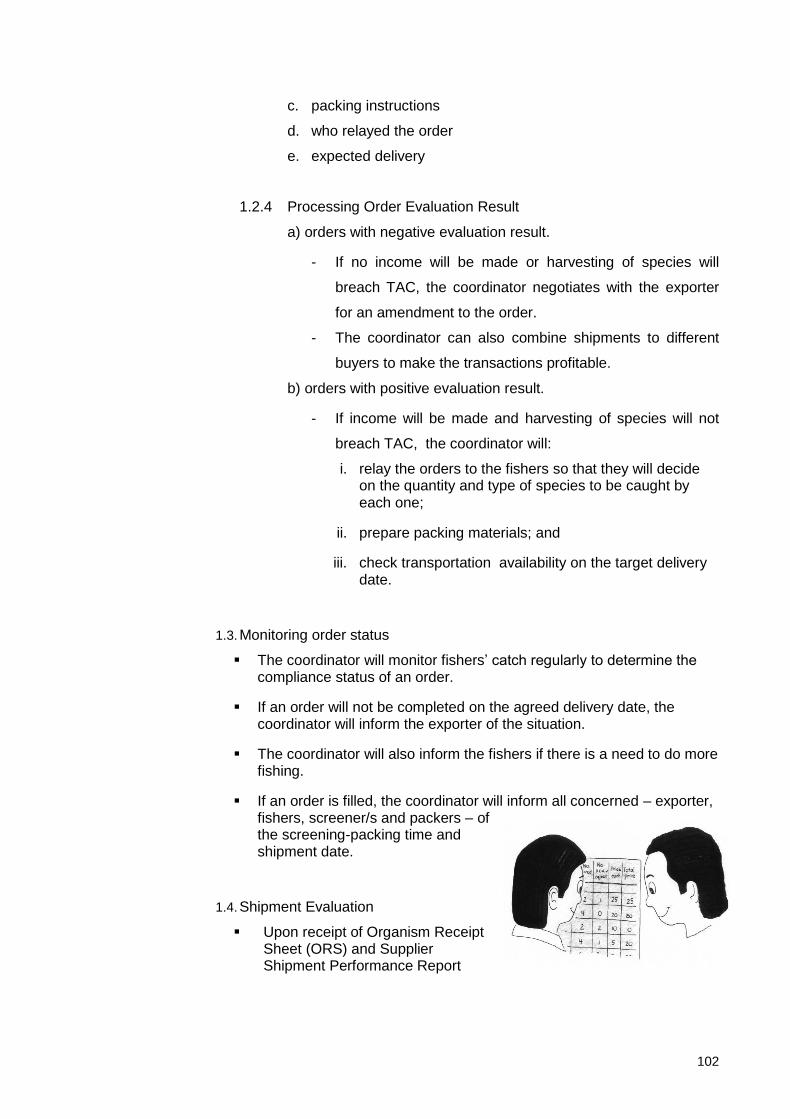
102
c. packing instructions
d. who relayed the order
e. expected delivery
1.2.4 Processing Order Evaluation Result
a) orders with negative evaluation result.
- If no income will be made or harvesting of species will
breach TAC, the coordinator negotiates with the exporter
for an amendment to the order.
- The coordinator can also combine shipments to different
buyers to make the transactions profitable.
b) orders with positive evaluation result.
- If income will be made and harvesting of species will not
breach TAC, the coordinator will:
i. relay the orders to the fishers so that they will decide on the quantity and type of species to be caught by each one;
ii. prepare packing materials; and
iii. check transportation availability on the target delivery date.
1.3. Monitoring order status
The coordinator will monitor fishers’ catch regularly to determine the compliance status of an order.
If an order will not be completed on the agreed delivery date, the coordinator will inform the exporter of the situation.
The coordinator will also inform the fishers if there is a need to do more fishing.
If an order is filled, the coordinator will inform all concerned – exporter, fishers, screener/s and packers – of the screening-packing time and shipment date.
1.4. Shipment Evaluation
Upon receipt of Organism Receipt Sheet (ORS) and Supplier Shipment Performance Report
103
(SSPR) from the exporter, the coordinator discusses with the fishers how to maintain or improve the shipment quality.
2. Marketing Concerns
To ensure the sustainability of the marine aquarium fishery in a Fishery
Management Area, it is required that:
a) Fishers should only catch what is ordered; and
b) Fishers should also only catch marine aquarium fishes within
their (TAC) levels.
2.1. Total Allowable Catch (TAC) and Its Benefits
is the maximum number of individual for every species permitted
to be extracted from a FMA in a certain period (usually, per year).
this is base on the recommendations of experts produced from
their surveys and data analysis.
TAC helps to keep the existence and maintain the population of
aquarium organisms in the FMA.
2.2. Fish to Order System
2.2.1 The Fish to Order System
Fish to orders system is an arrangement wherein the
fishers will only catch marine aquarium organisms ordered
by the buyers.
2.2.2 Benefits of Having a Fish to Order System
Provides a clear written agreement between the exporter
and the supplier on what has been ordered, so that
misunderstandings will be minimized.
Helps the supplier determine the feasibility of shipments.
Provides a guarantee to the supplier that all the fish
delivered will be taken by the exporter.
Helps ensure that there will be less wastage of fish (fish
thrown away because these were not bought) and
therefore fishers do not have to catch a lot of fish thereby
conserving their marine aquarium fishery. Provides a
104
record of transactions that can be used to analyze trade
performance and the management of aquarium fishery in
the future.
REMINDER!
The exporters have all the right to refuse or to accept fish that they did not order. Therefore, suppliers should avoid delivering fish that are not ordered.
In rare occasions where unordered fish are delivered, the coordinator may negotiate with the exporter but not expect a positive response.
If the exporter agreed to the delivery of the unordered fish, the coordinator must record this as an amendment to the order and file this record.
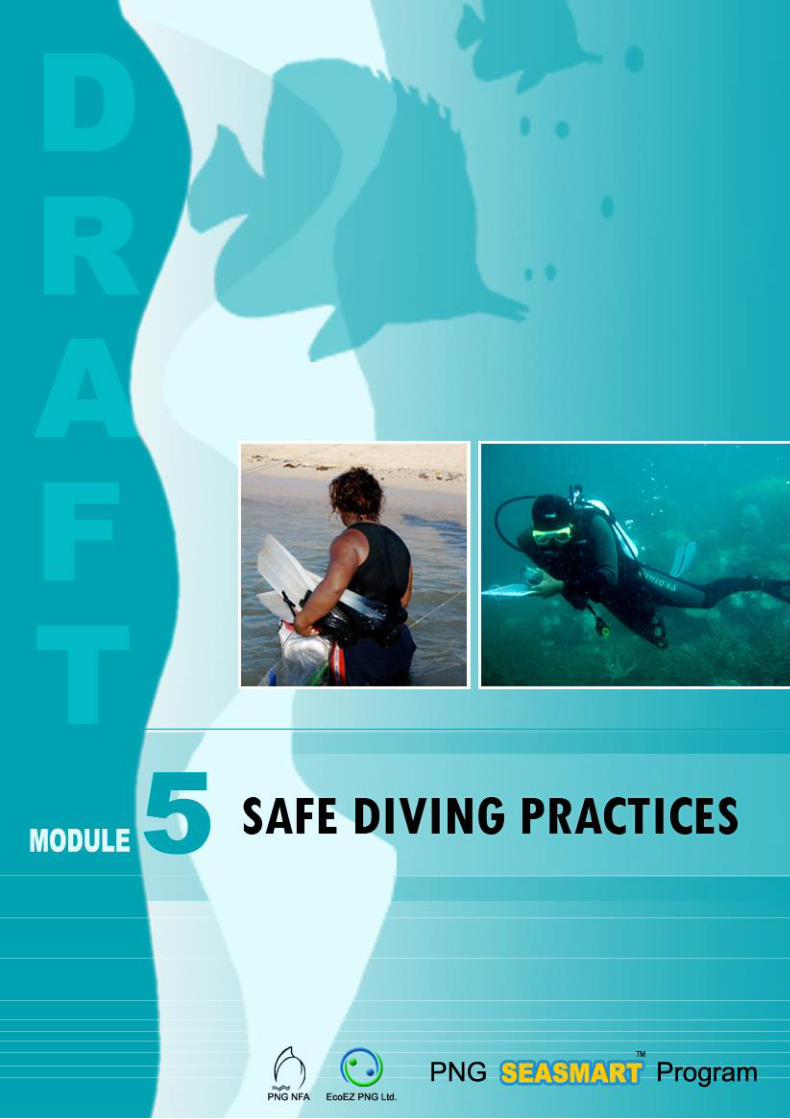
105
106
MODULE 5:
SAFE DIVING PRACTICES ………………………………………………………………………………………
Module Summary
Content Safe Diving Theory and Principles
Actual Diving Session
Learning Objectives
At the end of the training session, trainees will be able to:
Understand the basic theory and principles behind safe diving
Learn how to dive safely
Key Messages
1. Plan the dive, and dive the plan!
2. An inured or sick diver cannot dive, and the resulting loss of income
will affect the diver, his diving group, and his family.
3. Always dive safely!

107
Session 1: Safe Diving Theory and Principles
1. Present lecture on Safe Diving Theory and Principles
2. Continue lecture on Safe Diving Theory and Principles
3. Activity: Calculating the Bottom Time Limit for each depth
3.1 Calculate the Bottom Time Limit for the following Planned dive depths:
a. 5m
3.2 Ask volunteers to share their solution/answers to the class.
108
Session 2: Actual Diving
1. Grouping and briefing of participants
Group the participants. The number of group should equal the number of trainers.
Brief the participants on the activity.
a. Remind the participants about hazardous marine species.
b. Remind them also regarding safe diving practices.
c. Ask the participants to stay with their group always during diving.
Actual diving
Each trainer will bring his group to a safe place where the participants can practice diving.
The trainer will observe and check the swimming and diving ability of the participants.
Discussion/Processing of diving activity
Solicit opinion/response of participants on the following:
a) What problems did you encounter in diving?
b) What could have caused these problems?
c) What are possible solutions?
d) Ask trainees for other issues they may have and identify possible
improvements.
Closing/Wrap-up
1. Repeat key messages for this session
2. Give a briefing on the next activity/module
109
Diving Problems and First Aid
1. Diving problems:
The following may occur during diving due to unbearable water pressure:
a) Pain on the ear
b) Nose bleeding
c) Shortness of breath
d) Chest pains
e) Toothache
f) Nausea
2. First aid and follow up:
The following are immediate steps to be taken when diving problem
occurs:
a) Stop the dive.
b) If the condition does not improve, take the diver to the nearest health
center or hospital.
Breath-hold Diving
Breath-hold or skin diving is generally safer than air supply assisted diving.
However, there are inherent dangers from this type of activity.
Hazards from Breath-hold Diving
1. Breath holding for Too Long
REMINDERS!!! Good health is an absolute pre-requisite for work as a diver. A diver who is
in any doubt about his/her health should not dive. Forcing yourself to dive will not only endanger you but may also endanger your
diving companion/s.
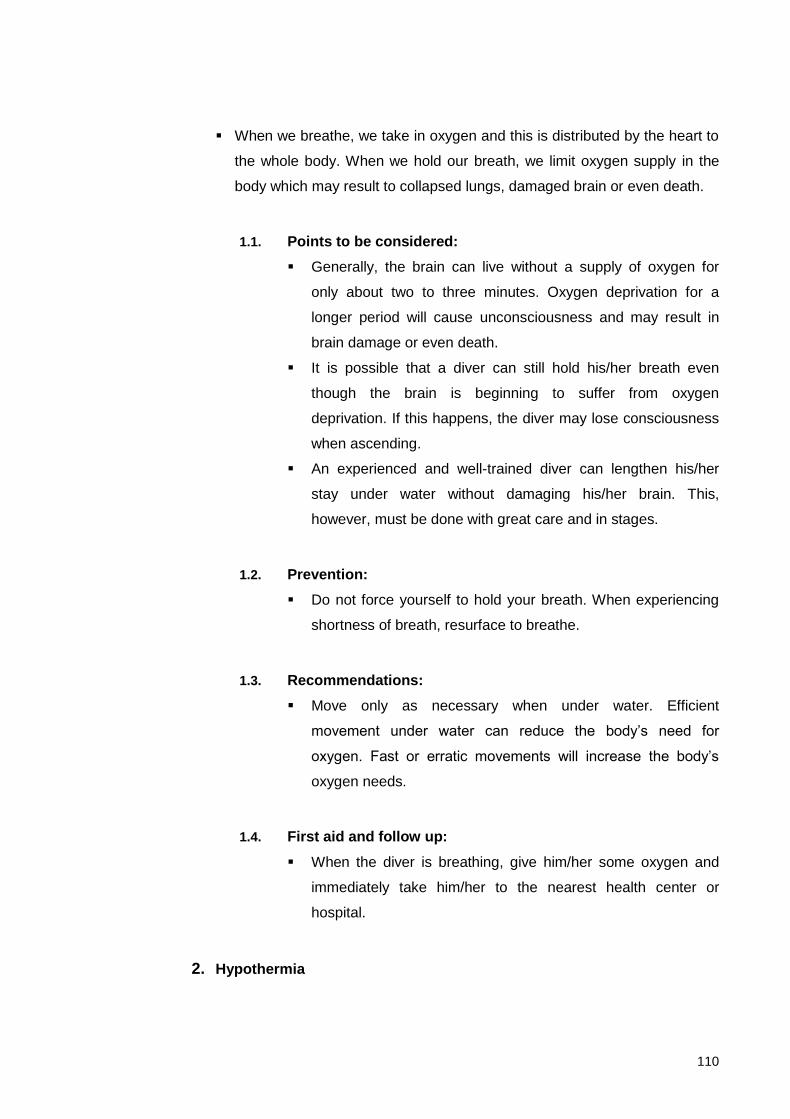
110
When we breathe, we take in oxygen and this is distributed by the heart to
the whole body. When we hold our breath, we limit oxygen supply in the
body which may result to collapsed lungs, damaged brain or even death.
1.1. Points to be considered:
Generally, the brain can live without a supply of oxygen for
only about two to three minutes. Oxygen deprivation for a
longer period will cause unconsciousness and may result in
brain damage or even death.
It is possible that a diver can still hold his/her breath even
though the brain is beginning to suffer from oxygen
deprivation. If this happens, the diver may lose consciousness
when ascending.
An experienced and well-trained diver can lengthen his/her
stay under water without damaging his/her brain. This,
however, must be done with great care and in stages.
1.2. Prevention:
Do not force yourself to hold your breath. When experiencing
shortness of breath, resurface to breathe.
1.3. Recommendations:
Move only as necessary when under water. Efficient
movement under water can reduce the body’s need for
oxygen. Fast or erratic movements will increase the body’s
oxygen needs.
1.4. First aid and follow up:
When the diver is breathing, give him/her some oxygen and
immediately take him/her to the nearest health center or
hospital.
2. Hypothermia
111
Hypothermia is experienced when the diver does not wear protective
clothing against cold. This can cause fatigue and inefficient use of oxygen
in the body and makes the diver weak and unable to react properly when
faced with unexpected events (e.g. strong currents).
2.1. Prevention:
a) Wear clothing that protects against cold whenever possible.
b) Limit the dive 1-2 hours, followed by rest (drink hot drinks,
sunbathe) before continuing the diving work.
2.2. Recommendations:
a) Do not force yourself to stay in water when shivering from cold.
b) Shorten dive time and depth during cold season or when the
water is too cold.

112
113
MODULE 6:
HOLDING FISHES ………………………………………………………………………………………
Module Summary
Content Purging
Purging Area
Learning Objectives
At the end of the training session, trainees will be able to:
Understand the importance of purging fish before transportation
Know how to select a good purging area
Know how to construct their purging area
Key Messages
1. The fish’s gut must be cleaned out by purging before transportation
and shipping, to reduce the amount of toxic waste products in the
water.
2. Purging is necessary to ensure the survival of the stock during
delivery.
Session 1: Purging and Purging Area
1. Present lecture on purging
Use presentation material in power point/manila papers.
1. Discussion
1.1. Ask the participants why purging is important.
1.2. Ask also the participants to discuss how they purge their fish.

114
1.3. Ask them too about their plans to improve their purging system.
Module Closing
Repeat key messages for this session
Give a briefing on the next activity/module
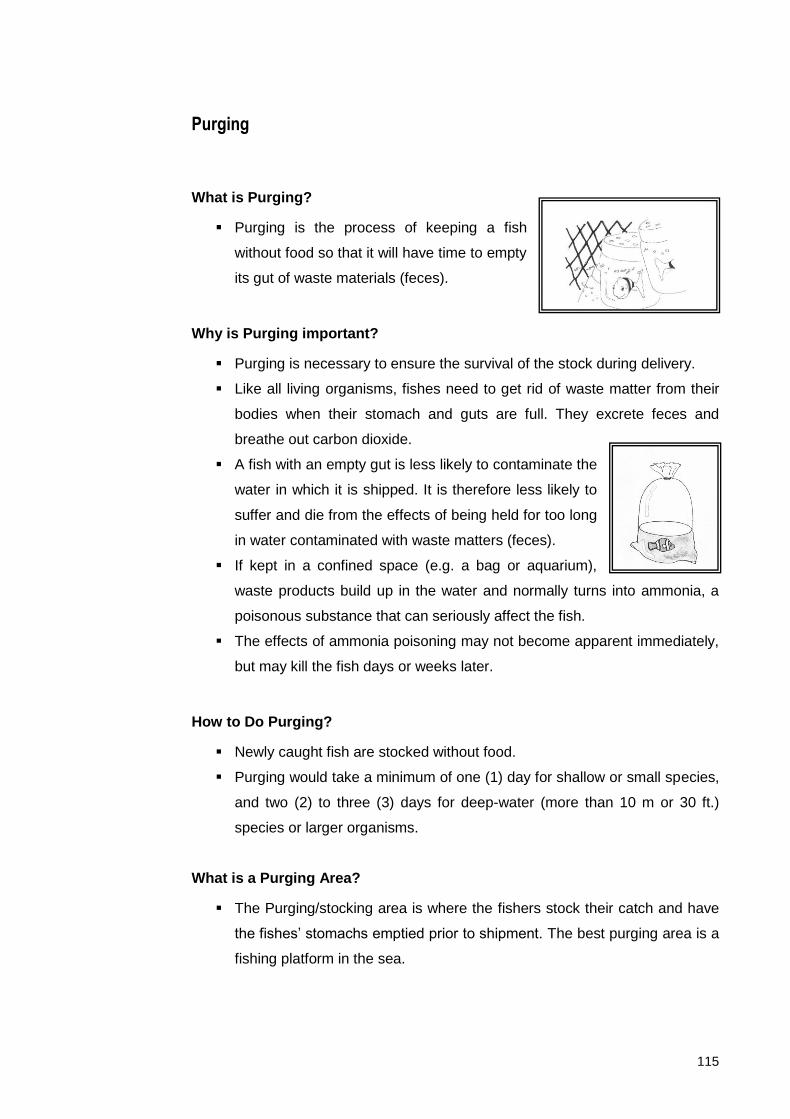
115
Purging
What is Purging?
Purging is the process of keeping a fish
without food so that it will have time to empty
its gut of waste materials (feces).
Why is Purging important?
Purging is necessary to ensure the survival of the stock during delivery.
Like all living organisms, fishes need to get rid of waste matter from their
bodies when their stomach and guts are full. They excrete feces and
breathe out carbon dioxide.
A fish with an empty gut is less likely to contaminate the
water in which it is shipped. It is therefore less likely to
suffer and die from the effects of being held for too long
in water contaminated with waste matters (feces).
If kept in a confined space (e.g. a bag or aquarium),
waste products build up in the water and normally turns into ammonia, a
poisonous substance that can seriously affect the fish.
The effects of ammonia poisoning may not become apparent immediately,
but may kill the fish days or weeks later.
How to Do Purging?
Newly caught fish are stocked without food.
Purging would take a minimum of one (1) day for shallow or small species,
and two (2) to three (3) days for deep-water (more than 10 m or 30 ft.)
species or larger organisms.
What is a Purging Area?
The Purging/stocking area is where the fishers stock their catch and have
the fishes’ stomachs emptied prior to shipment. The best purging area is a
fishing platform in the sea.
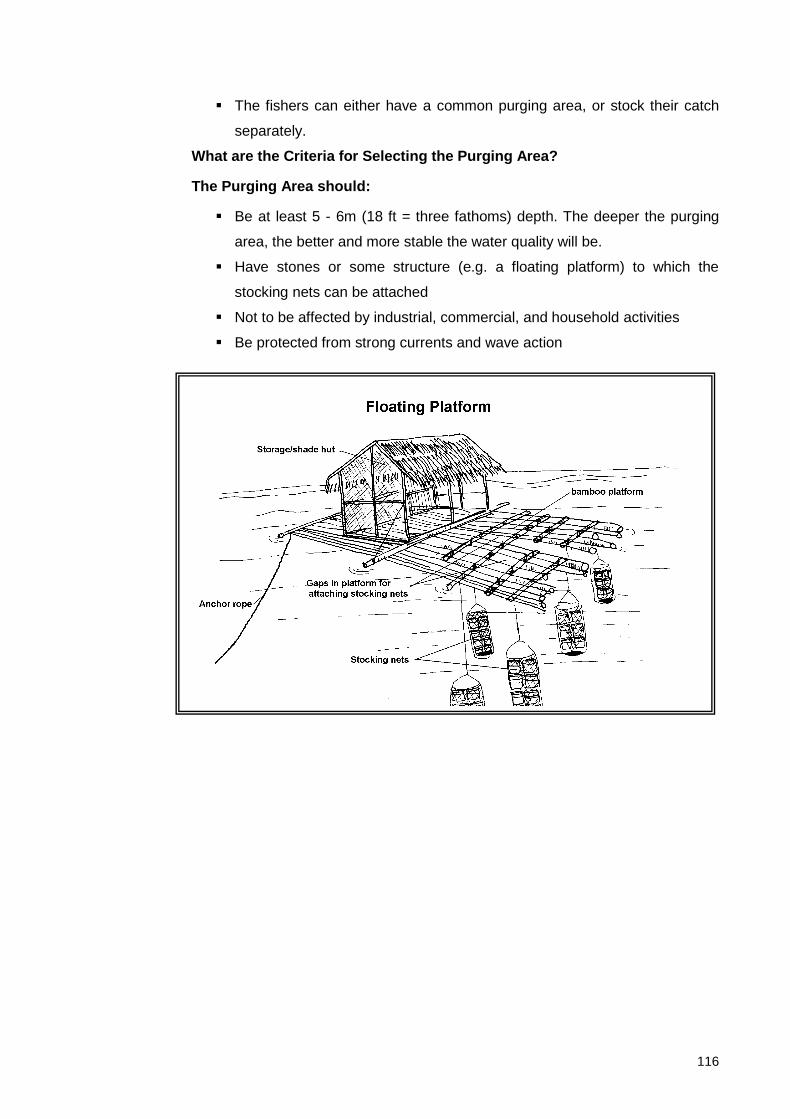
116
The fishers can either have a common purging area, or stock their catch
separately.
What are the Criteria for Selecting the Purging Area?
The Purging Area should:
Be at least 5 - 6m (18 ft = three fathoms) depth. The deeper the purging
area, the better and more stable the water quality will be.
Have stones or some structure (e.g. a floating platform) to which the
stocking nets can be attached
Not to be affected by industrial, commercial, and household activities
Be protected from strong currents and wave action
117
118
MODULE 7:
SCREENING FISHES ………………………………………………………………………………………
Module Summary
Content Common Fish Defects
Possible Causes of Fish Defects/Damages
How to Screen Fish Properly
Common Aquarium Fish Diseases
Learning Objectives
At the end of the training session, trainees will be able to:
Learn the do’s and don’ts in screening
Learn the various reasons for rejecting/accepting fish
Learn the causes of damage and defect in fish
Key Messages
1. Efficient and regular screening significantly reduces the chances of
mortality later on.
2. Sick or unhealthy fish may transmit a disease or parasite to other fish.
Therefore, the temptation to save damaged fish in the hope that they
recover must be avoided as much as possible.
3. All organisms should be screened on a regular basis and always prior
to packing and dispatch.
4. All rejected fish should be released back to the sea or reef!
119
Session 1: Common Fish Defects and Their Causes
1. Present lecture on common fish defects and their causes
Use the following presentation material in power point/manila paper.
Session 2: Screening 1. Present lecture on screening
2. Conduct demonstration activity on how to conduct proper
2.1 Check and ready materials.
a) 1-3 large boxes/plastic basins
b) seawater (if screening is done in land)
c) basin (standby material)
d) plastic ladle, scoop net or rubberized hand gloves (standby material)
2.2 Demonstrate how to conduct proper final screening for transport.
a) Prepare 2 containers, 1 for reject fish, 1 for accepted ones. Fill
containers with clean sea water. Make sure that water quality
(temperature, cleanliness) in the containers and where the fish came
from are the same.
b) If screening in a floating raft or boat, move the stocks to be screened
within the screener’s reach. When in land, put the stocks for screening
in one of the large boxes filled with sea water. The box’s water content
should be frequently changed while screening is being conducted.
c) Take one container/jar with a fish in it.
d) Position the jar between the source of light and the screener. Raise it
to eye level. If the organism cannot be seen properly in the
jar/container, release it in a basin filled with clean sea water.
e) Note/Observe the following:
- Check species type and name.
- Check fish size.
- Check the general health of the fish.
- Check the tail and fins.
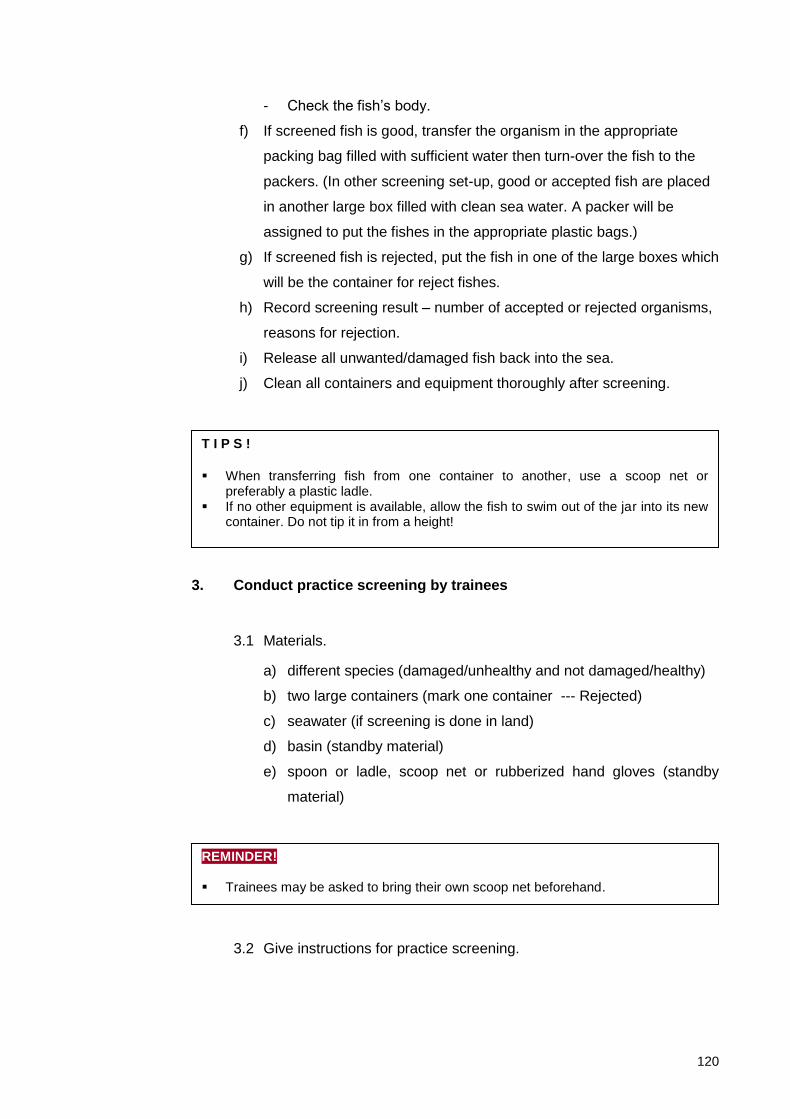
120
- Check the fish’s body.
f) If screened fish is good, transfer the organism in the appropriate
packing bag filled with sufficient water then turn-over the fish to the
packers. (In other screening set-up, good or accepted fish are placed
in another large box filled with clean sea water. A packer will be
assigned to put the fishes in the appropriate plastic bags.)
g) If screened fish is rejected, put the fish in one of the large boxes which
will be the container for reject fishes.
h) Record screening result – number of accepted or rejected organisms,
reasons for rejection.
i) Release all unwanted/damaged fish back into the sea.
j) Clean all containers and equipment thoroughly after screening.
3. Conduct practice screening by trainees
3.1 Materials.
a) different species (damaged/unhealthy and not damaged/healthy)
b) two large containers (mark one container --- Rejected)
c) seawater (if screening is done in land)
d) basin (standby material)
e) spoon or ladle, scoop net or rubberized hand gloves (standby
material)
3.2 Give instructions for practice screening.
T I P S !
When transferring fish from one container to another, use a scoop net or
preferably a plastic ladle. If no other equipment is available, allow the fish to swim out of the jar into its new
container. Do not tip it in from a height!
REMINDER! Trainees may be asked to bring their own scoop net beforehand.
121
a) Ask the trainees to screen different species and decide whether
the organism is to be rejected or not.
b) Ask them to segregate the rejected from the accepted in the
provided containers.
c) Re-screen their work and evaluate their decisions.
d) Ask them to give reasons why they rejected the species they put in
the reject box.
e) If they accepted a “reject” fish, explain why such a fish should
have been rejected.
3.3 Process the group activity. Regroup the trainees and ask for their comments/suggestions. Here are some guide questions.
a) How do they find the screening job?
b) What are the difficulties they encountered while screening?
c) How can they make screening easier and keep it consistent?
TIPS!
Provide different distractions while they are screening (e.g. poor lighting, noisy surroundings, etc…).
122
Session 3: Common Aquarium Fish Diseases and Problems
1. Present lecture on common fish defects and their causes
2. Discussion
Ask the participants to discuss the effects of fishing practices to the
general health of fish in the aquarium.
Module Closing
Repeat key messages for this session
Give a briefing on the next activity/module
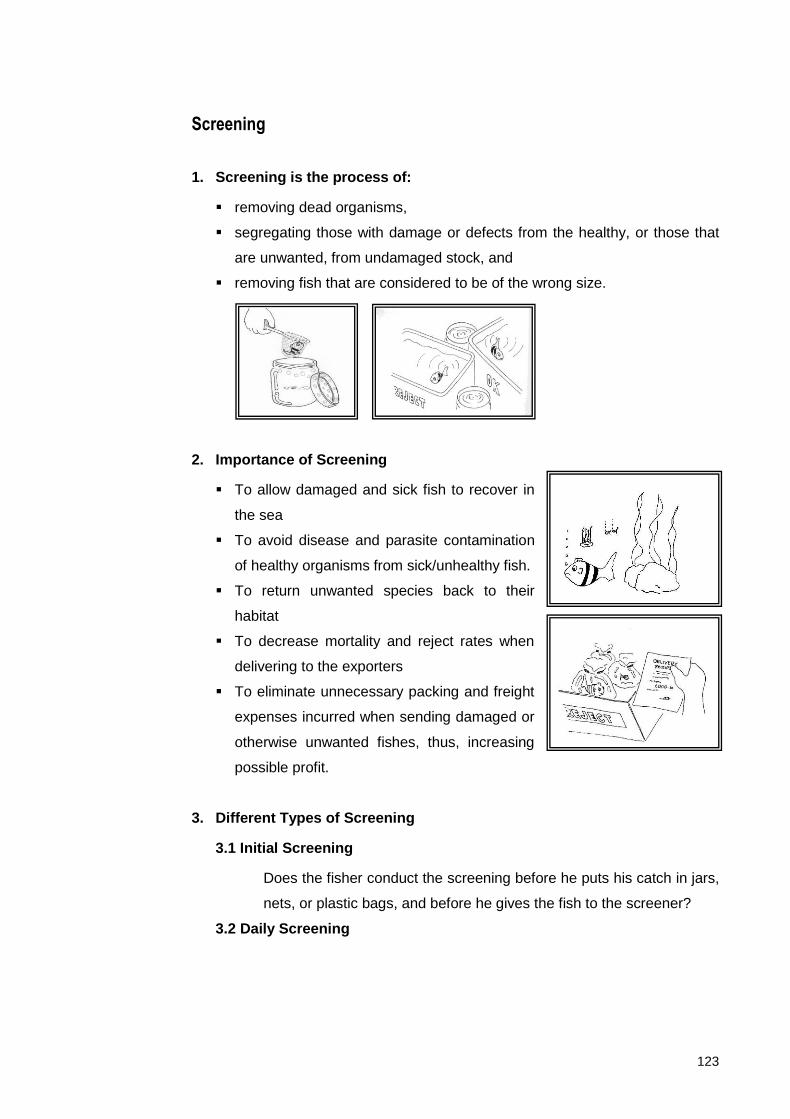
123
Screening
1. Screening is the process of:
removing dead organisms,
segregating those with damage or defects from the healthy, or those that
are unwanted, from undamaged stock, and
removing fish that are considered to be of the wrong size.
2. Importance of Screening
To allow damaged and sick fish to recover in
the sea
To avoid disease and parasite contamination
of healthy organisms from sick/unhealthy fish.
To return unwanted species back to their
habitat
To decrease mortality and reject rates when
delivering to the exporters
To eliminate unnecessary packing and freight
expenses incurred when sending damaged or
otherwise unwanted fishes, thus, increasing
possible profit.
3. Different Types of Screening
3.1 Initial Screening
Does the fisher conduct the screening before he puts his catch in jars,
nets, or plastic bags, and before he gives the fish to the screener?
3.2 Daily Screening

124
Is the day-by-day monitoring of the stocked fish? Each fisher and coordinator
who keeps the fish prior to shipment is responsible for the daily screening of
his/her stock
3.3 Final Screening
Conducted by the designated coordinator,
screener, or the fishers themselves before
the fishes are packed and delivered to the
exporters.
4. What are the Do’s and Don’ts of Screening?
Use white or light-colored containers when screening, so that damage or defects can more easily be spotted.
Do not allow the fish to be without water while screening. Refill the jars with water as often as necessary, and keep the fish submerged at all times.
Do not use hands to touch the fish. Use a net and/or rubber gloves if physical contact with the fish cannot be avoided.
Do not screen when there is no adequate lighting. Screen in the daytime as much as possible. However, remember that prolonged exposure to bright light will stress the fish.
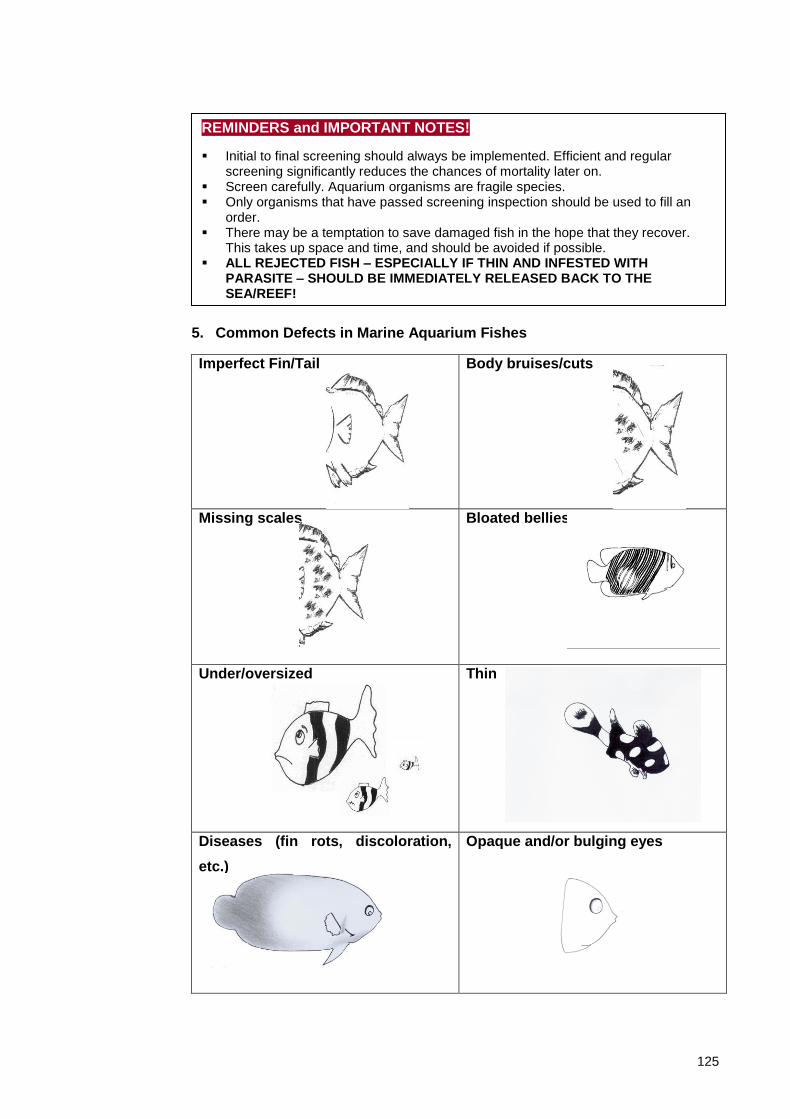
125
5. Common Defects in Marine Aquarium Fishes
Imperfect Fin/Tail
Body bruises/cuts
Missing scales
Bloated bellies
Under/oversized
Thin
Diseases (fin rots, discoloration,
etc.)
Opaque and/or bulging eyes
REMINDERS and IMPORTANT NOTES!
Initial to final screening should always be implemented. Efficient and regular screening significantly reduces the chances of mortality later on.
Screen carefully. Aquarium organisms are fragile species. Only organisms that have passed screening inspection should be used to fill an
order. There may be a temptation to save damaged fish in the hope that they recover.
This takes up space and time, and should be avoided if possible. ALL REJECTED FISH – ESPECIALLY IF THIN AND INFESTED WITH
PARASITE – SHOULD BE IMMEDIATELY RELEASED BACK TO THE SEA/REEF!
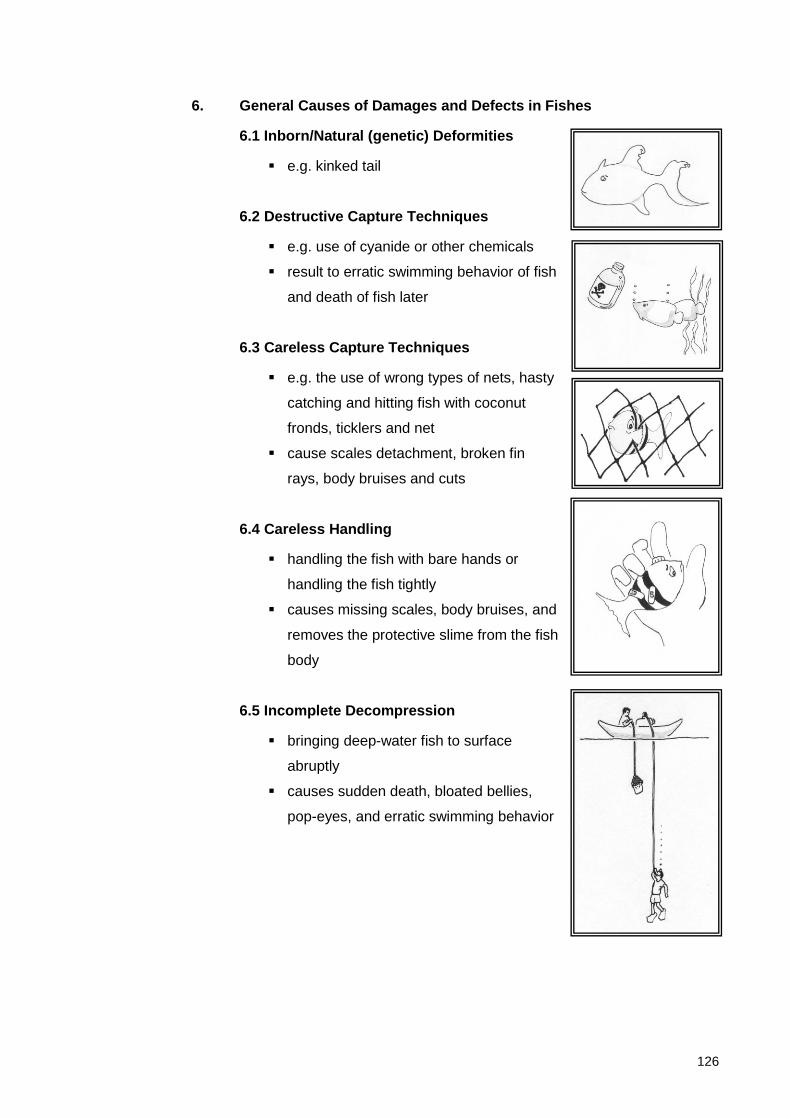
126
6. General Causes of Damages and Defects in Fishes
6.1 Inborn/Natural (genetic) Deformities
e.g. kinked tail
6.2 Destructive Capture Techniques
e.g. use of cyanide or other chemicals
result to erratic swimming behavior of fish
and death of fish later
6.3 Careless Capture Techniques
e.g. the use of wrong types of nets, hasty
catching and hitting fish with coconut
fronds, ticklers and net
cause scales detachment, broken fin
rays, body bruises and cuts
6.4 Careless Handling
handling the fish with bare hands or
handling the fish tightly
causes missing scales, body bruises, and
removes the protective slime from the fish
body
6.5 Incomplete Decompression
bringing deep-water fish to surface
abruptly
causes sudden death, bloated bellies,
pop-eyes, and erratic swimming behavior
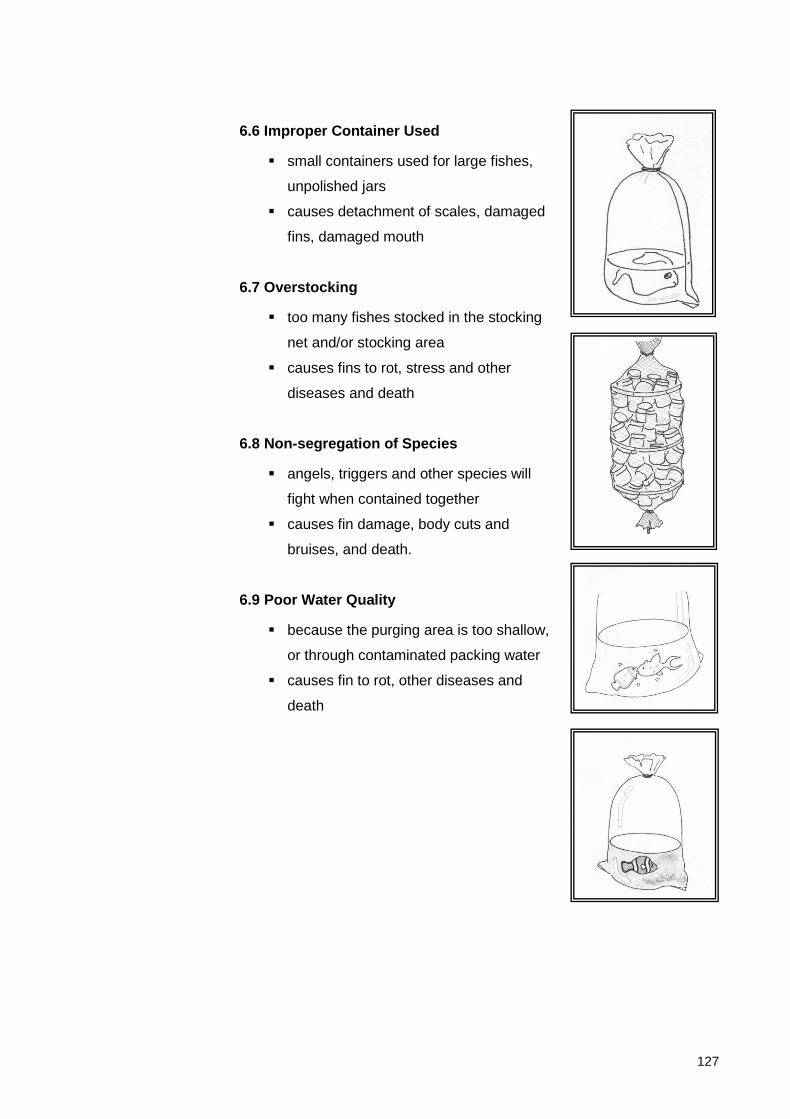
127
6.6 Improper Container Used
small containers used for large fishes,
unpolished jars
causes detachment of scales, damaged
fins, damaged mouth
6.7 Overstocking
too many fishes stocked in the stocking
net and/or stocking area
causes fins to rot, stress and other
diseases and death
6.8 Non-segregation of Species
angels, triggers and other species will
fight when contained together
causes fin damage, body cuts and
bruises, and death.
6.9 Poor Water Quality
because the purging area is too shallow,
or through contaminated packing water
causes fin to rot, other diseases and
death
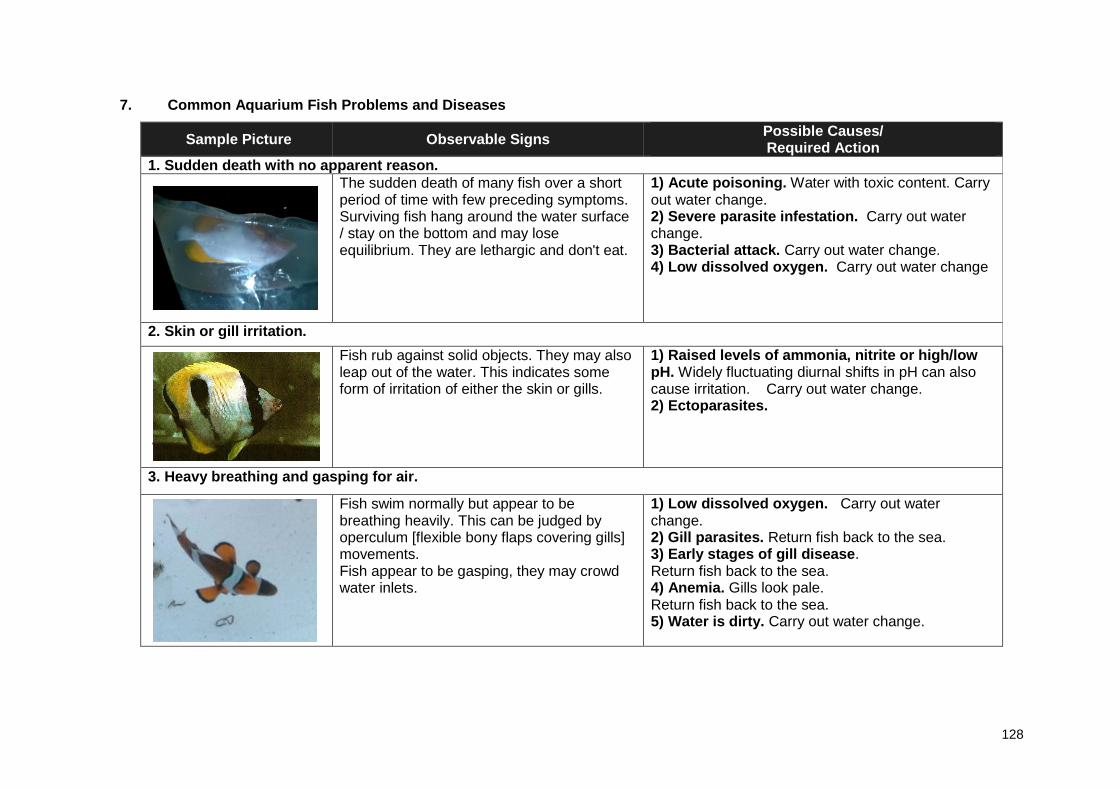
128
7. Common Aquarium Fish Problems and Diseases
Sample Picture Observable Signs Possible Causes/ Required Action
1. Sudden death with no apparent reason.
The sudden death of many fish over a short period of time with few preceding symptoms. Surviving fish hang around the water surface / stay on the bottom and may lose equilibrium. They are lethargic and don't eat.
1) Acute poisoning. Water with toxic content. Carry out water change. 2) Severe parasite infestation. Carry out water change. 3) Bacterial attack. Carry out water change. 4) Low dissolved oxygen. Carry out water change
2. Skin or gill irritation.
Ammonia Poisoning
Fish rub against solid objects. They may also leap out of the water. This indicates some form of irritation of either the skin or gills.
1) Raised levels of ammonia, nitrite or high/low pH. Widely fluctuating diurnal shifts in pH can also cause irritation. Carry out water change. 2) Ectoparasites.
3. Heavy breathing and gasping for air.
Fish swim normally but appear to be breathing heavily. This can be judged by operculum [flexible bony flaps covering gills] movements. Fish appear to be gasping, they may crowd water inlets.
1) Low dissolved oxygen. Carry out water change. 2) Gill parasites. Return fish back to the sea. 3) Early stages of gill disease. Return fish back to the sea. 4) Anemia. Gills look pale. Return fish back to the sea. 5) Water is dirty. Carry out water change.
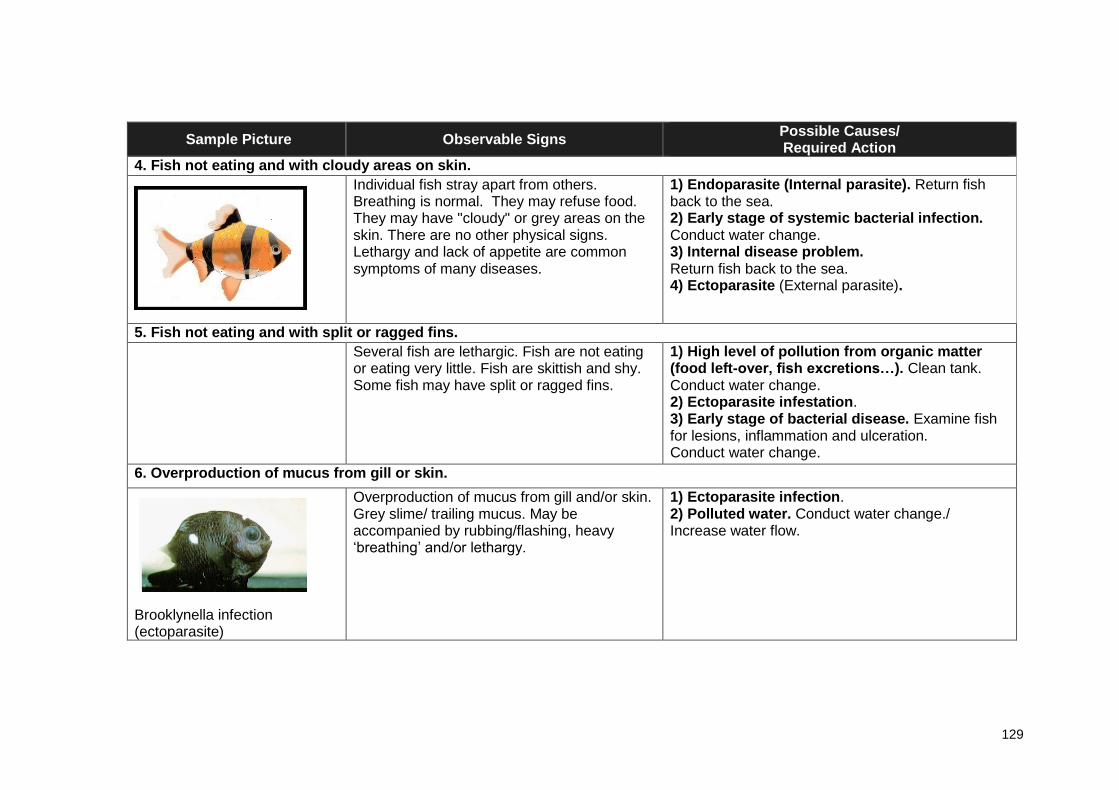
129
Sample Picture Observable Signs Possible Causes/ Required Action
4. Fish not eating and with cloudy areas on skin.
Individual fish stray apart from others. Breathing is normal. They may refuse food. They may have "cloudy" or grey areas on the skin. There are no other physical signs. Lethargy and lack of appetite are common symptoms of many diseases.
1) Endoparasite (Internal parasite). Return fish back to the sea. 2) Early stage of systemic bacterial infection. Conduct water change. 3) Internal disease problem. Return fish back to the sea. 4) Ectoparasite (External parasite).
5. Fish not eating and with split or ragged fins.
Several fish are lethargic. Fish are not eating or eating very little. Fish are skittish and shy. Some fish may have split or ragged fins.
1) High level of pollution from organic matter (food left-over, fish excretions…). Clean tank. Conduct water change. 2) Ectoparasite infestation. 3) Early stage of bacterial disease. Examine fish for lesions, inflammation and ulceration. Conduct water change.
6. Overproduction of mucus from gill or skin.
Brooklynella infection (ectoparasite)
Overproduction of mucus from gill and/or skin. Grey slime/ trailing mucus. May be accompanied by rubbing/flashing, heavy ‘breathing’ and/or lethargy.
1) Ectoparasite infection. 2) Polluted water. Conduct water change./ Increase water flow.
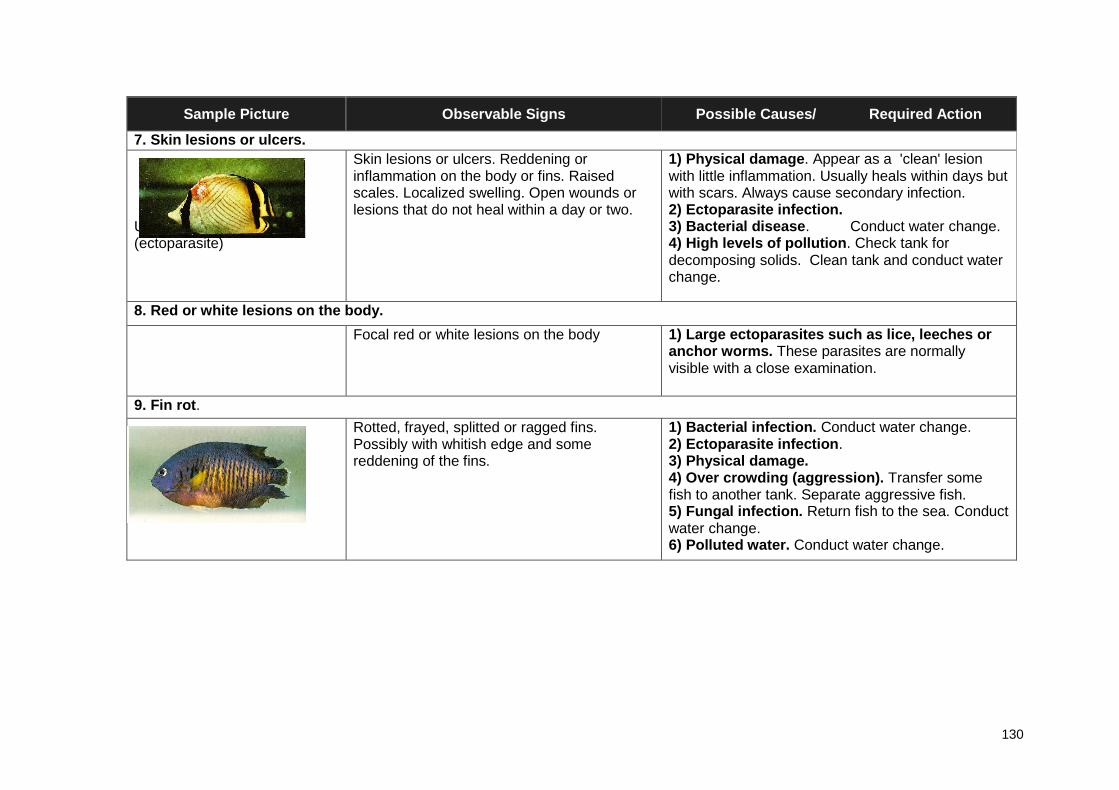
130
Sample Picture Observable Signs Possible Causes/ Required Action
7. Skin lesions or ulcers.
Uronema Infection (ectoparasite)
Skin lesions or ulcers. Reddening or inflammation on the body or fins. Raised scales. Localized swelling. Open wounds or lesions that do not heal within a day or two.
1) Physical damage. Appear as a 'clean' lesion with little inflammation. Usually heals within days but with scars. Always cause secondary infection. 2) Ectoparasite infection. 3) Bacterial disease. Conduct water change. 4) High levels of pollution. Check tank for decomposing solids. Clean tank and conduct water change.
8. Red or white lesions on the body.
Focal red or white lesions on the body 1) Large ectoparasites such as lice, leeches or anchor worms. These parasites are normally visible with a close examination.
9. Fin rot.
bacterial infection
Rotted, frayed, splitted or ragged fins. Possibly with whitish edge and some reddening of the fins.
1) Bacterial infection. Conduct water change. 2) Ectoparasite infection. 3) Physical damage. 4) Over crowding (aggression). Transfer some fish to another tank. Separate aggressive fish. 5) Fungal infection. Return fish to the sea. Conduct water change. 6) Polluted water. Conduct water change.
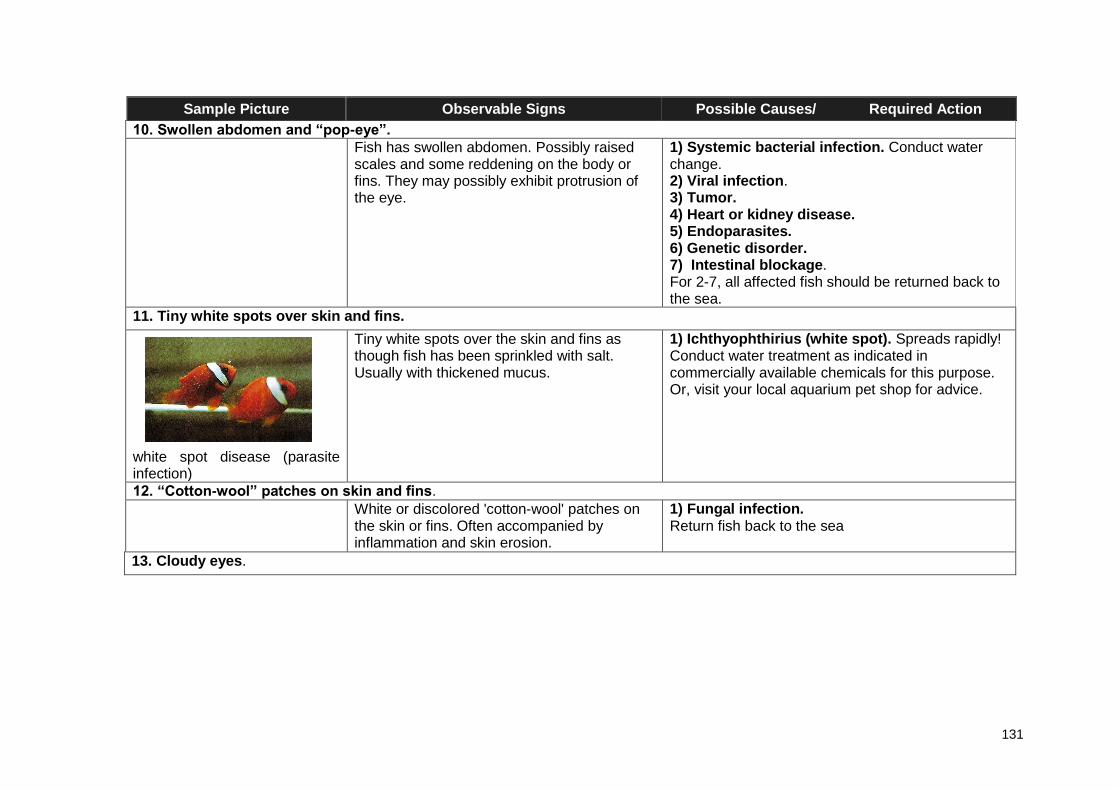
131
Sample Picture Observable Signs Possible Causes/ Required Action
10. Swollen abdomen and “pop-eye”.
Fish has swollen abdomen. Possibly raised scales and some reddening on the body or fins. They may possibly exhibit protrusion of the eye.
1) Systemic bacterial infection. Conduct water change. 2) Viral infection. 3) Tumor. 4) Heart or kidney disease. 5) Endoparasites. 6) Genetic disorder. 7) Intestinal blockage. For 2-7, all affected fish should be returned back to the sea.
11. Tiny white spots over skin and fins.
white spot disease (parasite infection)
Tiny white spots over the skin and fins as though fish has been sprinkled with salt. Usually with thickened mucus.
1) Ichthyophthirius (white spot). Spreads rapidly! Conduct water treatment as indicated in commercially available chemicals for this purpose. Or, visit your local aquarium pet shop for advice.
12. “Cotton-wool” patches on skin and fins.
White or discolored 'cotton-wool' patches on the skin or fins. Often accompanied by inflammation and skin erosion.
1) Fungal infection. Return fish back to the sea
13. Cloudy eyes.
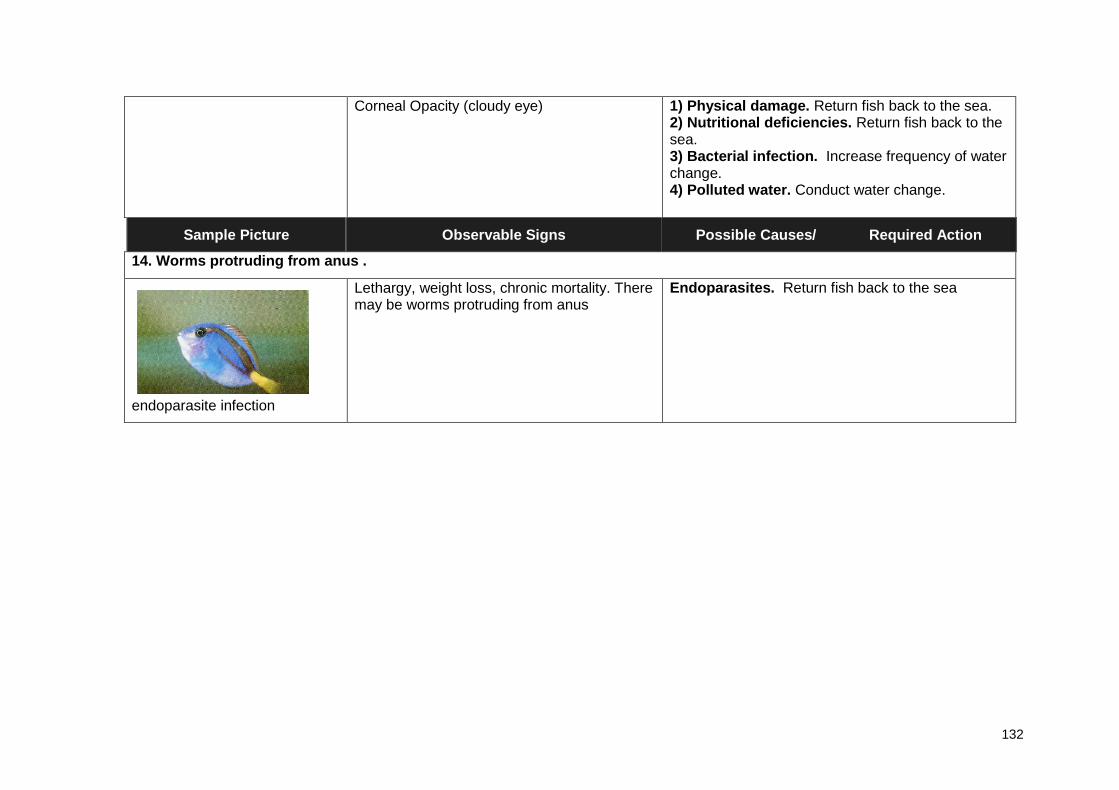
132
Corneal Opacity (cloudy eye) 1) Physical damage. Return fish back to the sea. 2) Nutritional deficiencies. Return fish back to the sea. 3) Bacterial infection. Increase frequency of water change. 4) Polluted water. Conduct water change.
Sample Picture Observable Signs Possible Causes/ Required Action
14. Worms protruding from anus .
endoparasite infection
Lethargy, weight loss, chronic mortality. There may be worms protruding from anus
Endoparasites. Return fish back to the sea
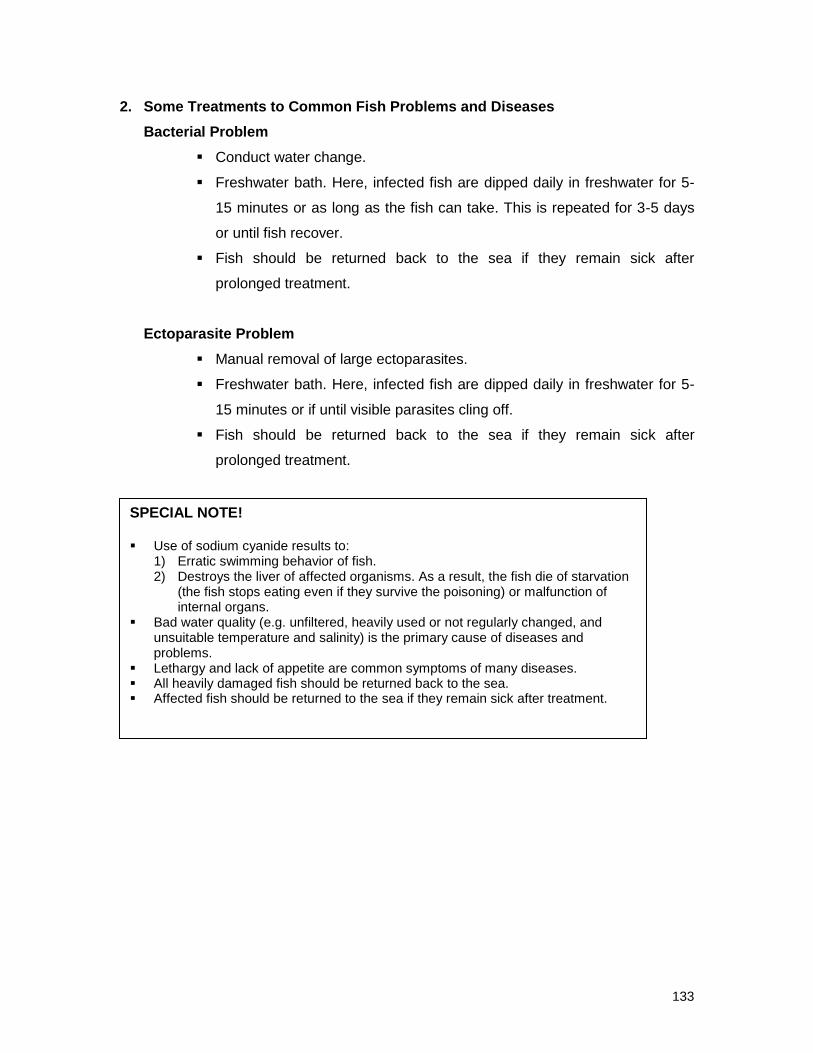
133
2. Some Treatments to Common Fish Problems and Diseases
Bacterial Problem
Conduct water change.
Freshwater bath. Here, infected fish are dipped daily in freshwater for 5-
15 minutes or as long as the fish can take. This is repeated for 3-5 days
or until fish recover.
Fish should be returned back to the sea if they remain sick after
prolonged treatment.
Ectoparasite Problem
Manual removal of large ectoparasites.
Freshwater bath. Here, infected fish are dipped daily in freshwater for 5-
15 minutes or if until visible parasites cling off.
Fish should be returned back to the sea if they remain sick after
prolonged treatment.
SPECIAL NOTE! Use of sodium cyanide results to:
1) Erratic swimming behavior of fish. 2) Destroys the liver of affected organisms. As a result, the fish die of starvation
(the fish stops eating even if they survive the poisoning) or malfunction of internal organs.
Bad water quality (e.g. unfiltered, heavily used or not regularly changed, and unsuitable temperature and salinity) is the primary cause of diseases and problems.
Lethargy and lack of appetite are common symptoms of many diseases. All heavily damaged fish should be returned back to the sea. Affected fish should be returned to the sea if they remain sick after treatment.
134
3. Summary of Some Frequent Problems, Causes and Solutions
Problem Cause Simple solution
Skinny, thin body Too long without food Release back into ocean
Cuts on fins Fighting due to lack of segregation
Release back into ocean
Wounds, or scales missing
Improper catching or handling techniques
Release back into ocean
White spot or white film Parasite infection Freshwater bath
Cloudy eyes Injury, improper handling, disease
Release back into ocean
“Popped” eye Injury, disease Release back into ocean
Fin rot, skin rot, red wounds
Improper handling, disease
Release back into ocean
Rapid breathing, gasping Stress, disease Correct maintenance, add oxygen
Swimming disorders Injury, improper handling, disease
Release back into ocean
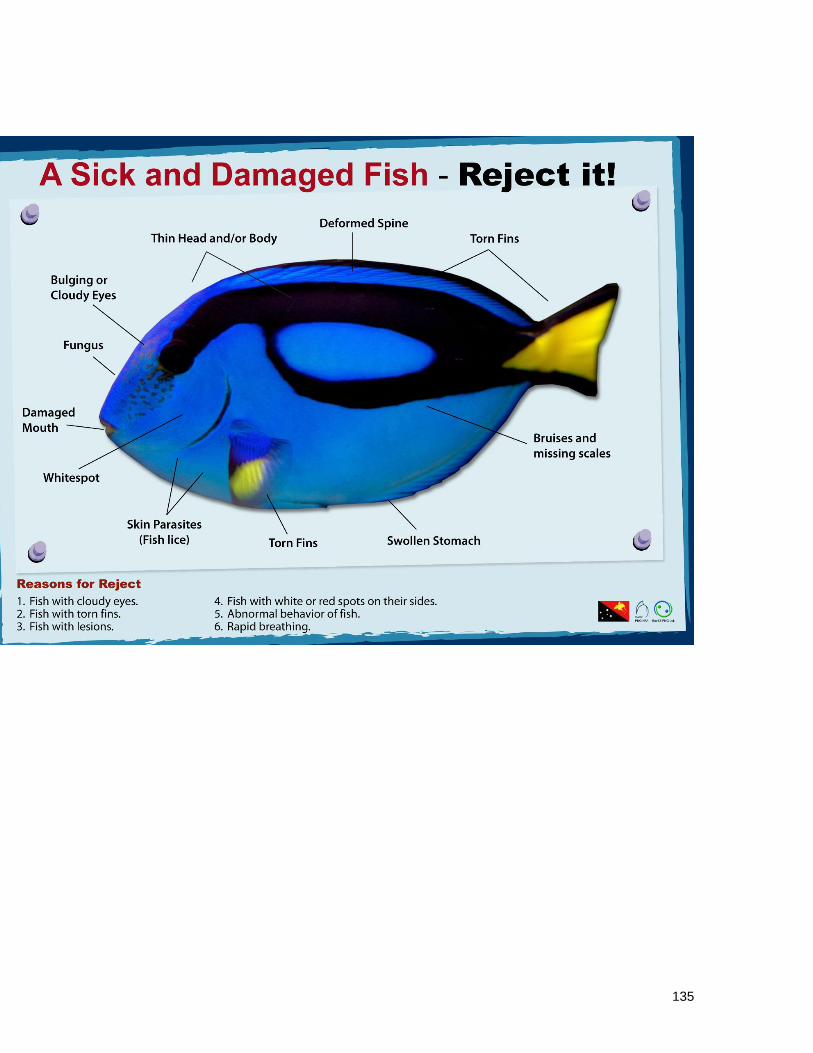
135

136
137
MODULE 8:
PACKING FISHES ………………………………………………………………………………………
Module Summary
Content Proper Packing
Qualities and Preparation of Packing Water
Special Packing of Sensitive Species
Learning Objectives
At the end of the training session, trainees will be able to:
Learn to pack fish properly
Learn useful tips in packing
Learn packing tips for sensitive species
Key Messages
1. Packing the fish properly is important to ensure safety and health of
organisms being shipped.
2. Be organized.
3. The shorter the time the fish stays inside the plastic bag, the better.
4. The less handling the better.
Session 1: Packing
1. Present lecture on how to pack properly for transport

138
2. Conduct demonstration on how to pack fish properly
2.1 Materials.
a) various aquarium organisms
b) polythene plastic bags of various sizes
c) rubber bands
d) medical oxygen cylinder (Check that it is full)
e) packing water
f) basin (standby material)
g) ladle, large deep spoon, scoop net or rubberized hand gloves (standby
material)
h) bamboo sticks
i) Styrofoam boxes
j) corrugated box with plastic bag lining
k) packing tape
l) ice packs – 3 to 4 ice cubes placed in plastic bags, sealed, and rolled in
newspaper.
2.2 Demonstrate how to pack fish properly.
Bagging
a) Pick a screened fish from the box containing good or accepted
organisms.
b) Determine the size of the fish. Prepare a plastic bag and quarter-fill it with
water.
c) Check the water in the jar. Drain and replace the water if it is dirty.
d) Transfer the fish from the jar to the plastic bag using a scoop net or
plastic ladle with a drain hole in it. This reduces the chances of any old
dirty water being transferred with the fish into the clean packing water.
e) Check and adjust the water level.
f) Remove the atmospheric air from the plastic bag.
g) Fill the bag with oxygen. The bag should contain 60% oxygen when tied
up.
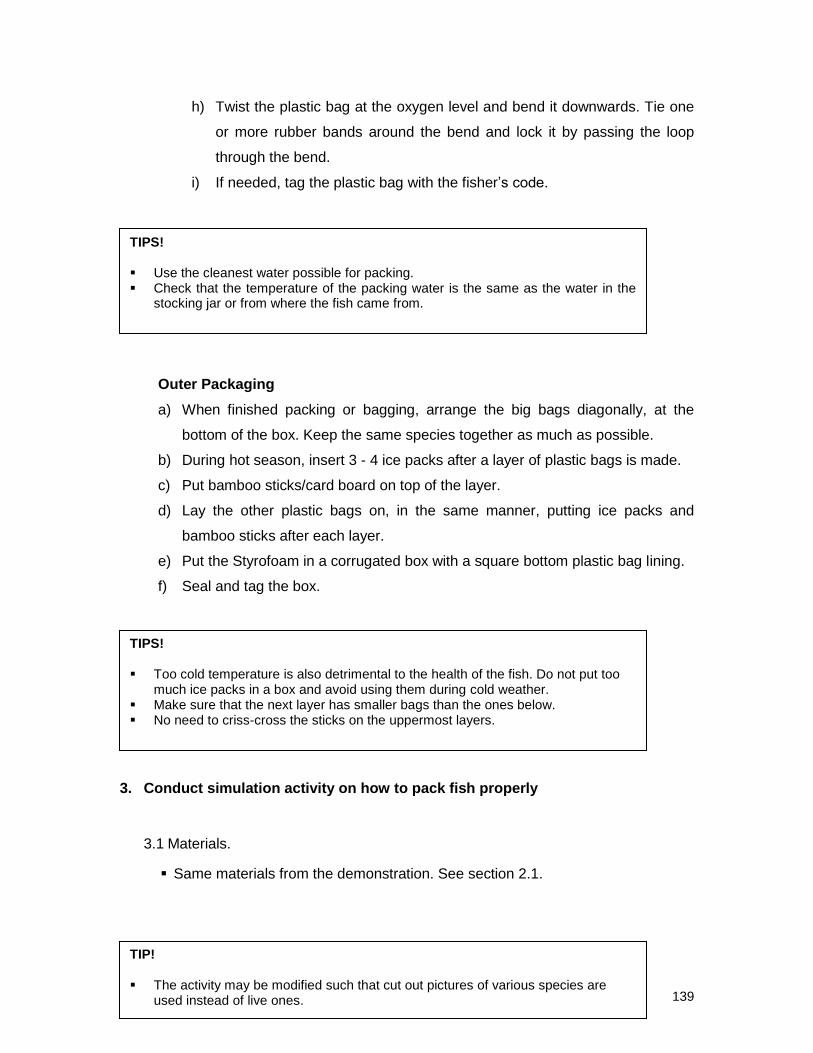
139
h) Twist the plastic bag at the oxygen level and bend it downwards. Tie one
or more rubber bands around the bend and lock it by passing the loop
through the bend.
i) If needed, tag the plastic bag with the fisher’s code.
Outer Packaging
a) When finished packing or bagging, arrange the big bags diagonally, at the
bottom of the box. Keep the same species together as much as possible.
b) During hot season, insert 3 - 4 ice packs after a layer of plastic bags is made.
c) Put bamboo sticks/card board on top of the layer.
d) Lay the other plastic bags on, in the same manner, putting ice packs and
bamboo sticks after each layer.
e) Put the Styrofoam in a corrugated box with a square bottom plastic bag lining.
f) Seal and tag the box.
3. Conduct simulation activity on how to pack fish properly
3.1 Materials.
Same materials from the demonstration. See section 2.1.
TIPS! Too cold temperature is also detrimental to the health of the fish. Do not put too
much ice packs in a box and avoid using them during cold weather. Make sure that the next layer has smaller bags than the ones below. No need to criss-cross the sticks on the uppermost layers.
TIPS! Use the cleanest water possible for packing. Check that the temperature of the packing water is the same as the water in the
stocking jar or from where the fish came from.
TIP! The activity may be modified such that cut out pictures of various species are
used instead of live ones.
140
3.2 Give instructions on activity.
a) Assign one of the trainees to act as the coordinator while the
facilitator/trainer will act as exporter.
b) Let the trainees pack various species. The coordinator will then supervise
the packing activities.
c) After they have packed and boxed the species, they will then submit the
“shipment” to the “exporter” (facilitator/trainer).
d) The facilitator/trainer will check and evaluate the species the trainees
packed. Note the water and oxygen levels, the tying of the plastic bags,
and the sizes of bags used.
e) For each species that the trainees packed improperly, ask them for
reasons why they think the specie was not properly packed or alternately
explain to them why the specie was not packed properly.
3.3 Process group activity.
Regroup the trainees and ask their comments/suggestions on the
following topics:
a) How did you find the packing job?
b) What difficulties did you encounter while packing?
c) How can you make packing easier and keep it consistent?
d) Why is it important to prepare for packing?
e) What are the advantages and disadvantages of single packing compared
to gang packing?
Session Closing/Wrap Up
Repeat key messages for this session
Give a briefing on the next activity/module
141
Packing
1. Packing Preparation
It involves checking for availability of packing materials – polythene/ plastic bags, rubber bands, styrofoam boxes, packing tape, labels, marker pens, and content of oxygen tank (make sure it is full!).
It includes ensuring that the oxygen tank nozzle, valve and gauge are properly working.
It includes segregation and arrangement of plastic bags as per various sizes. Make sure that the bigger plastic bags (12 cm / 5” and up) are doubled and with paper in between.
It involves fetching of packing water if this has to be processed (stocked and filtered) before it can be used for packing.
2. The Packing Water
Packing water is one of the major factors that affect
the quality of aquarium organisms during transport.
Good quality packing water helps maintain the
optimum health of the organisms. It is clean and has
the same temperature and salinity from where the
fish and invertebrates came from.
2.1. Qualities of Good Packing Water
2.1.1 Clean

142
Packing water should be free of floating debris and toxic materials. Thus,
packing water should strictly be taken from areas far from the shore.
To ensure cleanliness of water, if ever possible, a simple filtration system
should be used.
2.1.2 Cool Temperature
Temperature under the sea is cool (oxygen
dissolves better in cool water!!!).
Most fish live happily in temperature
ranging from 22 to 26 degrees centigrade.
Packing water should be taken from at
least 1.5m depths.
2.1.3 Saltwater Salinity/Specific Gravity
Marine organisms live well in salinity
ranging from 26 to 33 ppt (parts per
thousand) or specific gravity of 1.020 to
1.025.
Water near river mouth should not be used
as packing water.
Packing water should not be mixed with
freshwater unless thermometer is available to measure the salinity.
REMINDERS! . If measuring equipment is available, always take note of packing water
parameters - pH, temperature and salinity. Sudden changes in temperature shock and even kill fish. Always make sure
that the temperature of the packing water is the same as that in which the fish are being kept.
143
2.2. Packing Water Level
Mostly, plastic bags containing aquarium
fish have 1/3 water and 2/3 oxygen (40:60
ratio).
Generally, packing water level should be
at least a centimeter higher from the tallest
part of the fish.
Water volume is higher for sensitive
species such as boxfish and dragonets.
More water for longer travel time.
More water is better but it also means heavier boxes and higher pay for
hauling and freight.
3. Plastic Bags Size
Bag size must be appropriate to species type and individual size.
Generally, packed fish should be able to turn and swim on its axis.
Bigger bags should be used for prolonged delivery time.
However, big bags provide more space that enables heavy swimming which
in turn can exhaust the fish.
Bigger bags also mean more space thus lowering the number of fish per box
and increasing the freight expenses.
4. P
l
a
PACKING TIPS! . Start packing with hardy species! Ideally, smaller fishes are bagged ahead of the bigger ones. Cheaper fish is packed first before the expensive ones. Be quick, but not hectic! Kept.
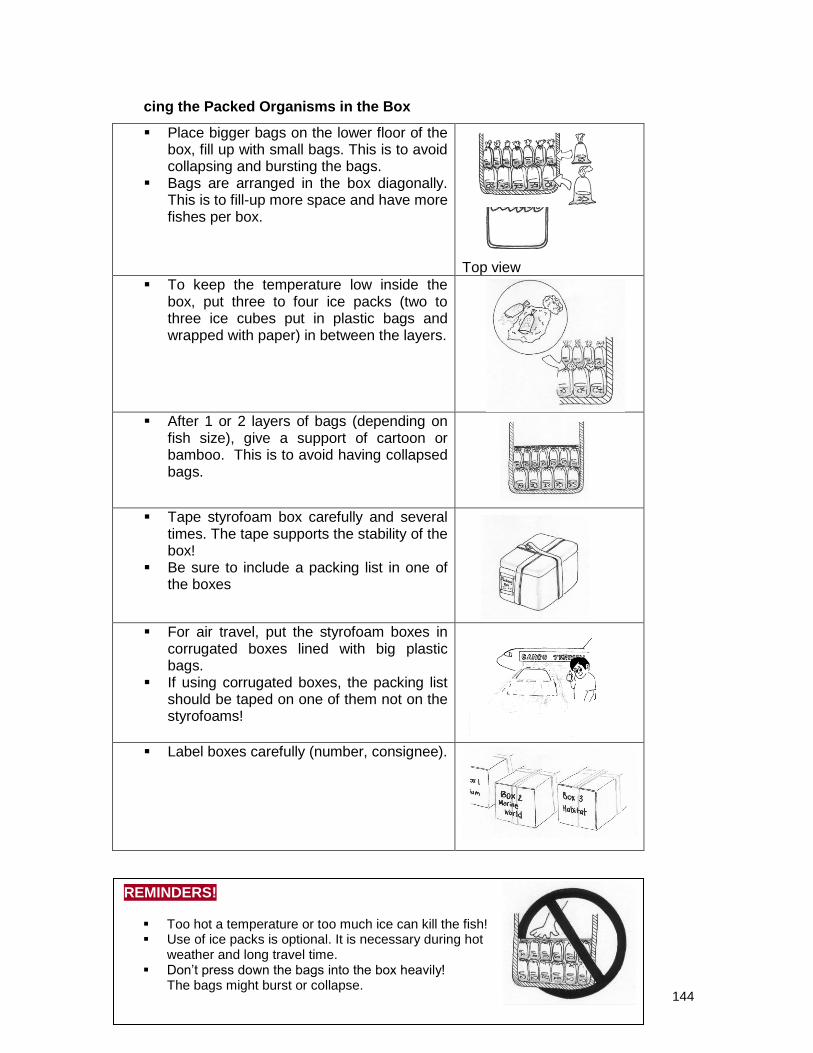
144
cing the Packed Organisms in the Box
Place bigger bags on the lower floor of the box, fill up with small bags. This is to avoid collapsing and bursting the bags.
Bags are arranged in the box diagonally. This is to fill-up more space and have more fishes per box.
Top view
To keep the temperature low inside the box, put three to four ice packs (two to three ice cubes put in plastic bags and wrapped with paper) in between the layers.
After 1 or 2 layers of bags (depending on fish size), give a support of cartoon or bamboo. This is to avoid having collapsed bags.
Tape styrofoam box carefully and several times. The tape supports the stability of the box!
Be sure to include a packing list in one of the boxes
For air travel, put the styrofoam boxes in corrugated boxes lined with big plastic bags.
If using corrugated boxes, the packing list should be taped on one of them not on the styrofoams!
Label boxes carefully (number, consignee).
REMINDERS! Too hot a temperature or too much ice can kill the fish! Use of ice packs is optional. It is necessary during hot
weather and long travel time. Don’t press down the bags into the box heavily!
The bags might burst or collapse.

145
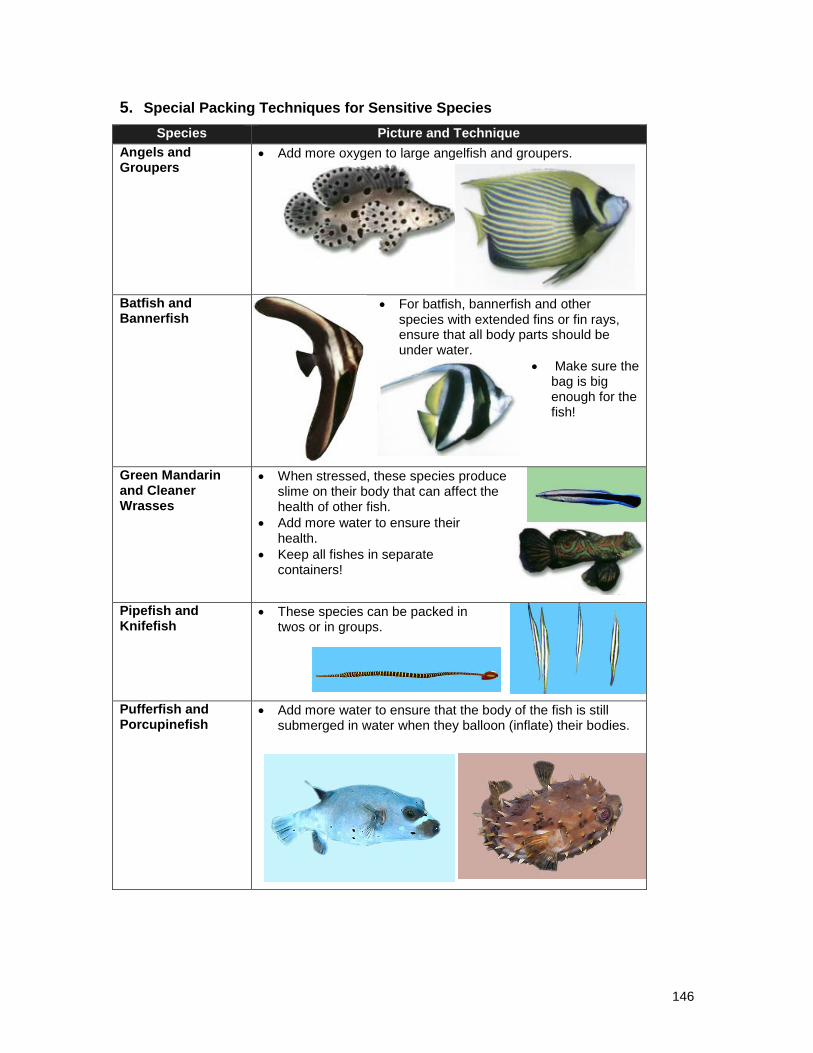
146
5. Special Packing Techniques for Sensitive Species
Species Picture and Technique
Angels and Groupers
Add more oxygen to large angelfish and groupers.
Batfish and Bannerfish
For batfish, bannerfish and other species with extended fins or fin rays, ensure that all body parts should be under water.
Make sure the bag is big enough for the fish!
Green Mandarin and Cleaner Wrasses
When stressed, these species produce slime on their body that can affect the health of other fish.
Add more water to ensure their health.
Keep all fishes in separate containers!
Pipefish and Knifefish
These species can be packed in twos or in groups.
Pufferfish and Porcupinefish
Add more water to ensure that the body of the fish is still submerged in water when they balloon (inflate) their bodies.
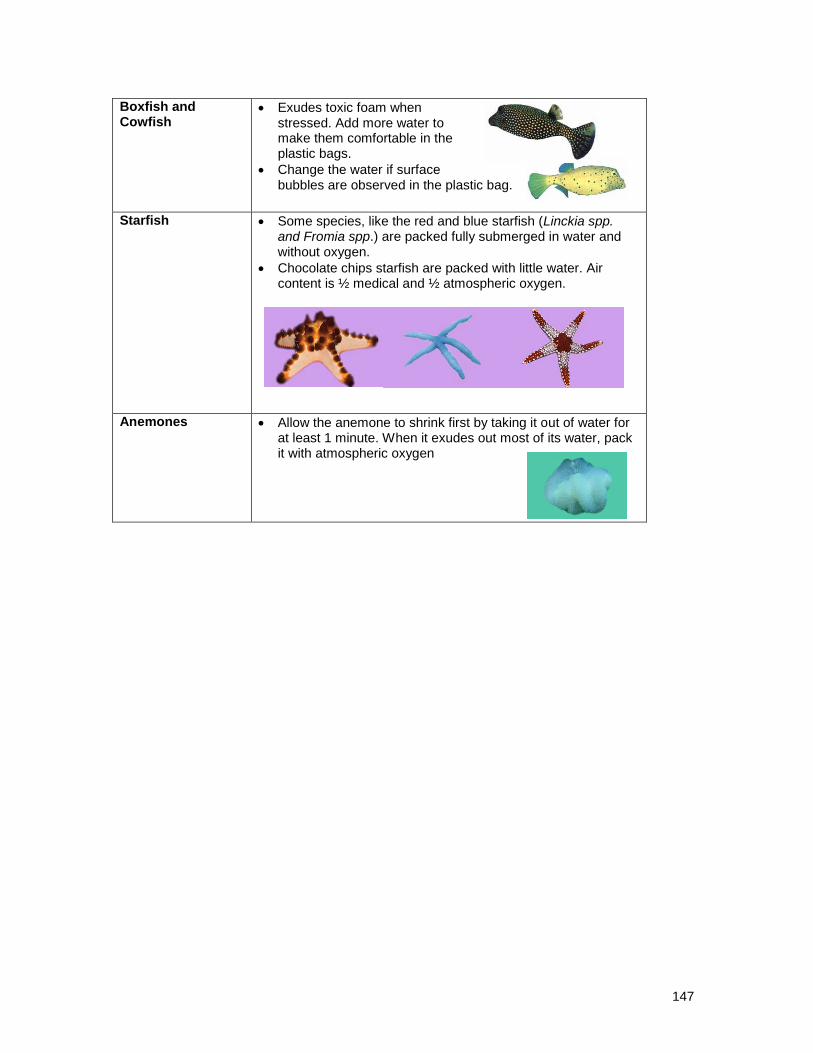
147
Boxfish and Cowfish
Exudes toxic foam when stressed. Add more water to make them comfortable in the plastic bags.
Change the water if surface bubbles are observed in the plastic bag.
Starfish
Some species, like the red and blue starfish (Linckia spp. and Fromia spp.) are packed fully submerged in water and without oxygen.
Chocolate chips starfish are packed with little water. Air content is ½ medical and ½ atmospheric oxygen.
Anemones
Allow the anemone to shrink first by taking it out of water for at least 1 minute. When it exudes out most of its water, pack it with atmospheric oxygen
148
149
MODULE 9:
FISHING OPERATION CYCLE ………………………………………………………………………………………
Module Summary
Content The Fishing Operation Cycle
Review and Simulation of Marketing and Order Processing
Review on Actual Fishing
Review on Stocking/Purging Methods and Actual
Stocking/Purging
Review and Simulation of Monitoring Order Status
Review on Screening and Packing System and Actual Screening
and Packing
Evaluation of Shipment
Learning Objectives
At the end of the training session, trainees will be able to:
Understand and appreciate the Fishing Operation Cycle
Understand each of the activities in the cycle
Key Messages
1. Best practices can improve quality.
2. Achieving best practices and maintaining standards involve effort, take time,
and results cannot be expected overnight.
3. Fishers who supply a superior quality product have the right to be selective
when it comes to choosing a buyer.
150
Session 1: Fishing Operation Cycle
1. Present lecture
Session 2:
Simulation of Ordering System
1. Review
1.1. Ask the participants on what they remember about the session on Marketing and
Selling.
2. A
c
ti
v
ity: Simulation of Ordering System
This is the same from the Marketing and Selling Module but with modification to
test the learning of the participants. Some materials are removed deliberately and
part of the instruction is changed.
2.1. Materials.
a) Species list to be ordered
b) 2 mobile phones
c) Record Notebook/ Order Form
d) Ballpoint pen/Pencil
2.2. Conduct a fish to order simulation activity.
TIP! Encourage trainees to ask questions and clarify items presented that they find
confusing.
TIP!
If this module is presented after the Marketing and Selling module, the order list made from the activity in the previous module can be used and the simulation can be skipped.

151
2.2.1 Assign one trainee to act as the coordinator, another to act as an exporter.
The rest will be the fishers.
2.2.2 Ask the “exporter” to order from the “fisher” through a mobile phone.
If mobile signal is not applicable in the area, the scenario will be: the
“coordinator” just delivered his fish and he will ask the “exporter” for new
order.
2.2.3 The coordinator will then do the process of evaluating the order and
distributing this to the fishers.
2.2.4 When the orders are distributed, ask the “exporter” to change some of his/her
order.
2.2.5 Give enough time for the group to react.
3. Session Recap/Discussion
Lead the discussion of the participants in answering the following questions:
a) Some things were not provided to test if the group can remember some
things from the previous lecture. What are the things you think were missing
in the simulation activity?
b) Is it important to make a list of orders and file them for reference?
c) What should have been done when “Mr. Exporter” changed his/her order?
152
Session 3: Actual Fishing
1. Review/Briefing
1.1. Conduct review on types of nets and gears and their uses in fishing ornamental
fish.
1.2. Conduct review on safe diving.
1.3. Brief the participants about the fishing activity.
2. Activity: Fishing
2.1. Materials needed.
To be prepared by the fishers beforehand:
a) Barrier net
b) Scoop net
c) Stocking box
d) Stocking jars
e) Flippers/Fins
f) Masks/Snorkels
g) Poker/Tickler Rod
h) Long sleeve shirts
i) Long pants
j) Bonnet
k) Hand gloves
To be readied by the trainers:
a) Boat/s
2.2. Divide the group equally. The number of groups to be formed should be the
same as the number of available trainers. Assign a trainer to each group.
153
2.3. Ask the fisher to catch the species assigned to them in Session 2 of this module.
The trainers will supervise the fishing and ensure the safety of the group
assigned to them.
3. Discussion
a) What species are difficult to catch and why?
b) Are there new ways learned that improved the fishers’ efficiency and effectivity of
catching marine aquarium fish?
c) Were the fishers able to catch the quantity of each species assigned to them? If
not, why was the order not complied with?
154
Session 4: Actual Stocking/Purging
1. Review
1.1. Remind the fishers about the do’s and don’ts in stocking.
2. Activity: Stocking/Purging
2.1. Prepare materials beforehand:
Stocking jars
Plastic bags
Stocking net
2.2. Allow each fisher to stock his/her own catch in the plastic jars, plastic bags, and
stocking nets as they deem appropriate. Trainers will observe.
3. Assessment
Trainers will state their observations and comments for each fisher.

155
Session 5: Monitoring/Determining Order Status
1. Review
1.1. Remind the coordinator and the fishers the importance of relaying back the
status of their customers’ order.
2. Activity: Simulation of Monitoring/Determining Order Status
2.1. Prepare materials beforehand:
Order List
Record notebook
Mobile phones
2.2. Assign the coordinator to tally the number of species caught and compare this
with the order.
2.3. Designate one trainer to act as exporter (to answer in case the coordinator has
questions/clarifications).
2.4. Allow the coordinator to do the rest of the process in determining order status.
3. Discussion
3.1. Ask the fishers to comment on how the coordinator handled his job of
determining the order status.
156
Session 6: Actual Screening and Packing
1. Review on Screening, Packing, and Recording
1.1. Ask the participants the things they remember about:
Screening
Packing
Recording of Catch
2. Conduct simulation activity on screening and packing
2.1. Maintaining the same grouping used during the actual fishing, allow each group
to decide who among their members will act as:
1 water boy – to put water in the plastic bags
1 screener – to screen the fish
1 checker – to check the water and put oxygen in the plastic bag
1 sealer – to check water and oxygen ratio inside the oxygenated plastic bag
and seal the bag
1 packer – to put the sealed plastic bags in the Styrofoam boxes
1 recorder – to prepare the packing list and ensure the availability of
materials.
2.2. P
r
e
p
a
r
e materials beforehand:
For Screening
a) 2 large boxes or stocking nets
b) salt water (if screening is done inland)
c) basin (standby material)
TIPS!
If people are not enough to assume the different tasks, the following adjustment can be done:
The screener can also be the water boy at the same time.
The packer can also act as the recorder.
The coordinator can assume any role he is expert with.
157
d) Ladle, scoop net or rubberized hand gloves (standby material)
e) fisher’s notebook/Log Book sheet for each trainee
f) ballpoint pen/pencil
For Packing
a) polythene plastic bags – various sizes
b) rubber bands
c) medical oxygen
d) packing water
e) basin (standby material)
f) Ladle (with drain hole), scoop net or rubberized hand gloves (standby
material)
g) styrofoam boxes
h) corrugated box with plastic lining
i) packing tape
j) packing paper
k) ice packs
l) labels, pens
For Making of Packing List
a) packing list
b) ballpoint pen/pencil
2.3. Conduct Actual Screening and Packing
a) The water boy estimates the size of the fish being screened and fills
appropriate plastic bags with water and gives this to the screener.
b) The screener picks and screens an organism as taught and demonstrated.
He decides if the fish is good, or reject. Reject organisms are placed in a box
for reject fishes. If good, the screener puts the fish in a plastic bag then
passes this to the trainer.
c) The trainer will re-screen the fish and will explain why if he needs to reverse a
decision made by the trainee. Accepted fish are passed to the checker.
d) The checker, in return, will adjust the water content of the plastic bag if
needed then fills the plastic bag with oxygen (DO NOT OVERINFLATE!). He
158
adjusts the oxygen level if needed, twists and bends the open end of the bag,
and returns the fish to the trainer.
e) The trainer checks the water and oxygen level, asks the checker to adjust the
levels if necessary, and then passes the bag to the sealer.
f) The sealer closes the plastic bag with a rubber band (2 rubber bands are
safer) and give it to the packer.
g) The packer will segregate the bags per species and size. When all the stocks
are in, he will arrange the bags in the Styrofoam box as taught during the
packing session. When another person is doing the recording, the packer will
call out the name and quantity of the fish as he packs.
h) The recorder will enter accurately in the packing list the species type, size
and quantity of organisms being packed.
i) The recorder will then put the styrofoam boxes in corrugated boxes with
plastic linings, sealing the boxes with packing tape, and labeling the boxes
(exporter’s name and address, box number etc).
j) When packing is done, he will make a second copy of the list. A copy of the
packing list will be sent with the stock as the delivery receipt to the exporter,
another will be left and filed in the area.
TIPS!
Each trainee’s catch will be packed one after the other. The trainees may carry out the various tasks alternately to be able to practice
what they have learned. Note if the coordinator will contact the “exporter” when packing is done. Re-iterate
the importance of communicating with the exporters to avoid delay in picking up the stocks.
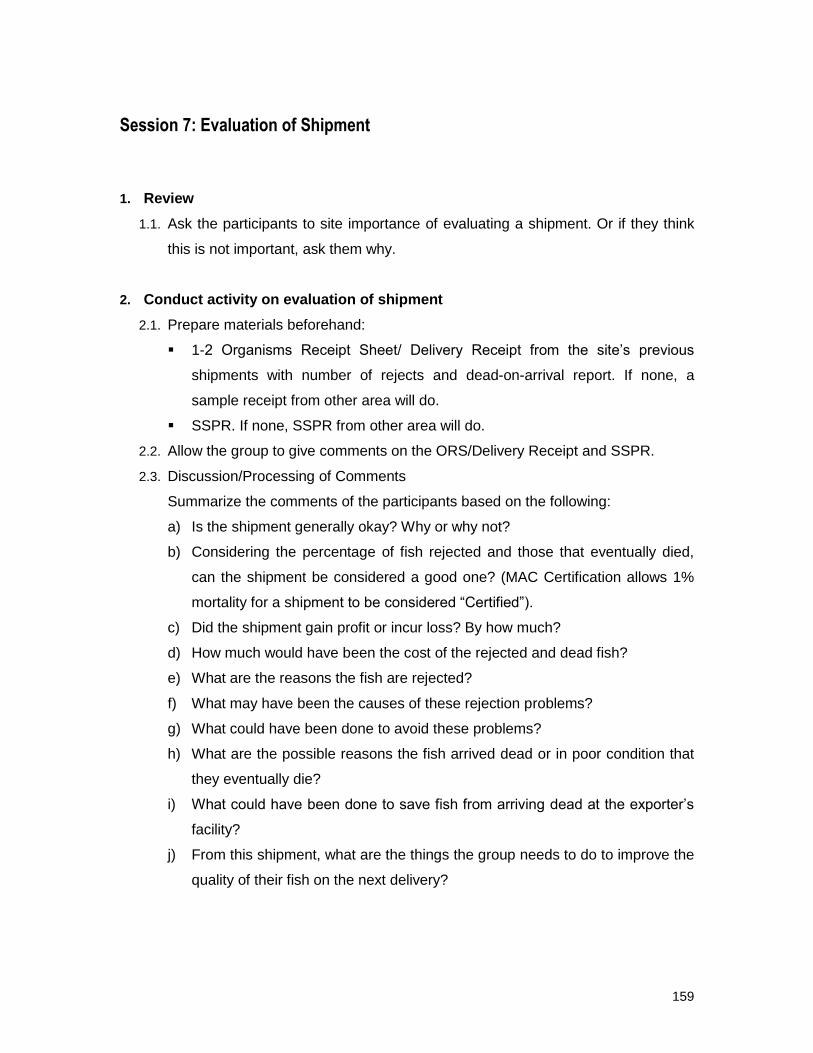
159
Session 7: Evaluation of Shipment
1. Review
1.1. Ask the participants to site importance of evaluating a shipment. Or if they think
this is not important, ask them why.
2. Conduct activity on evaluation of shipment
2.1. Prepare materials beforehand:
1-2 Organisms Receipt Sheet/ Delivery Receipt from the site’s previous
shipments with number of rejects and dead-on-arrival report. If none, a
sample receipt from other area will do.
SSPR. If none, SSPR from other area will do.
2.2. Allow the group to give comments on the ORS/Delivery Receipt and SSPR.
2.3. Discussion/Processing of Comments
Summarize the comments of the participants based on the following:
a) Is the shipment generally okay? Why or why not?
b) Considering the percentage of fish rejected and those that eventually died,
can the shipment be considered a good one? (MAC Certification allows 1%
mortality for a shipment to be considered “Certified”).
c) Did the shipment gain profit or incur loss? By how much?
d) How much would have been the cost of the rejected and dead fish?
e) What are the reasons the fish are rejected?
f) What may have been the causes of these rejection problems?
g) What could have been done to avoid these problems?
h) What are the possible reasons the fish arrived dead or in poor condition that
they eventually die?
i) What could have been done to save fish from arriving dead at the exporter’s
facility?
j) From this shipment, what are the things the group needs to do to improve the
quality of their fish on the next delivery?

160
Closing/Wrap Up
a) Identify the activities involved in the Fishing Operation Cycle
b) In Relaying of Order Compliance to Exporters, what information must be
given to the exporters?
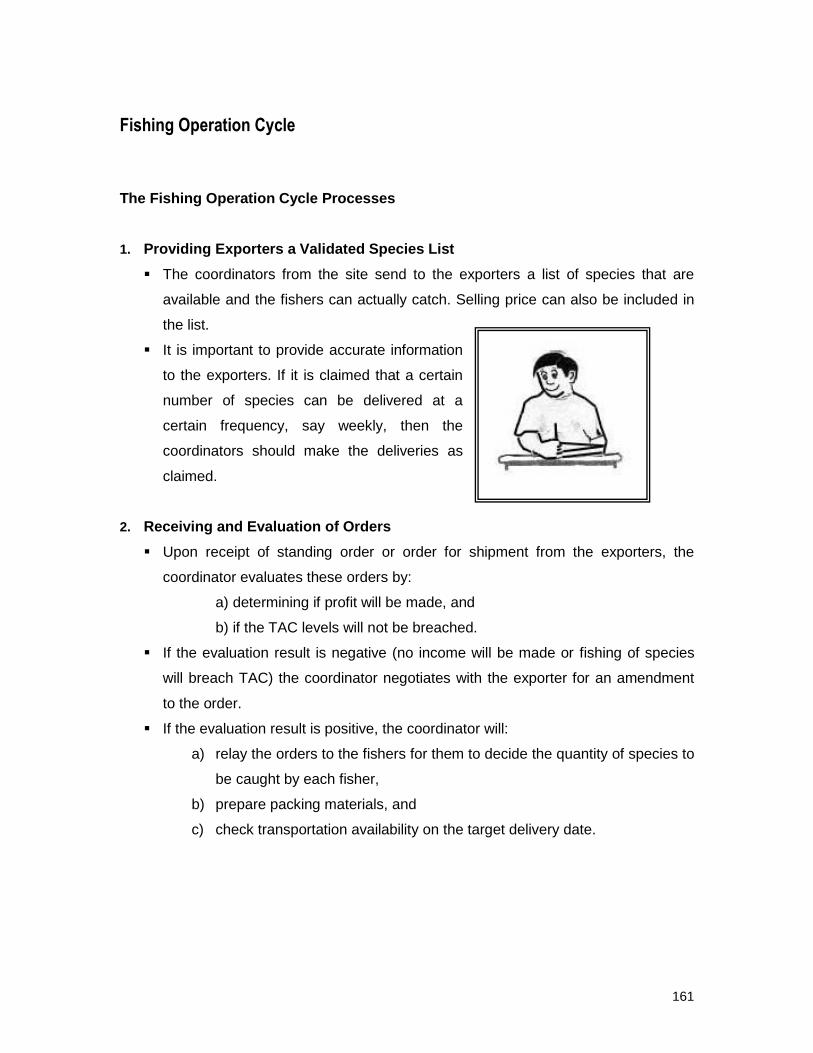
161
Fishing Operation Cycle
The Fishing Operation Cycle Processes
1. Providing Exporters a Validated Species List
The coordinators from the site send to the exporters a list of species that are
available and the fishers can actually catch. Selling price can also be included in
the list.
It is important to provide accurate information
to the exporters. If it is claimed that a certain
number of species can be delivered at a
certain frequency, say weekly, then the
coordinators should make the deliveries as
claimed.
2. Receiving and Evaluation of Orders
Upon receipt of standing order or order for shipment from the exporters, the
coordinator evaluates these orders by:
a) determining if profit will be made, and
b) if the TAC levels will not be breached.
If the evaluation result is negative (no income will be made or fishing of species
will breach TAC) the coordinator negotiates with the exporter for an amendment
to the order.
If the evaluation result is positive, the coordinator will:
a) relay the orders to the fishers for them to decide the quantity of species to
be caught by each fisher,
b) prepare packing materials, and
c) check transportation availability on the target delivery date.
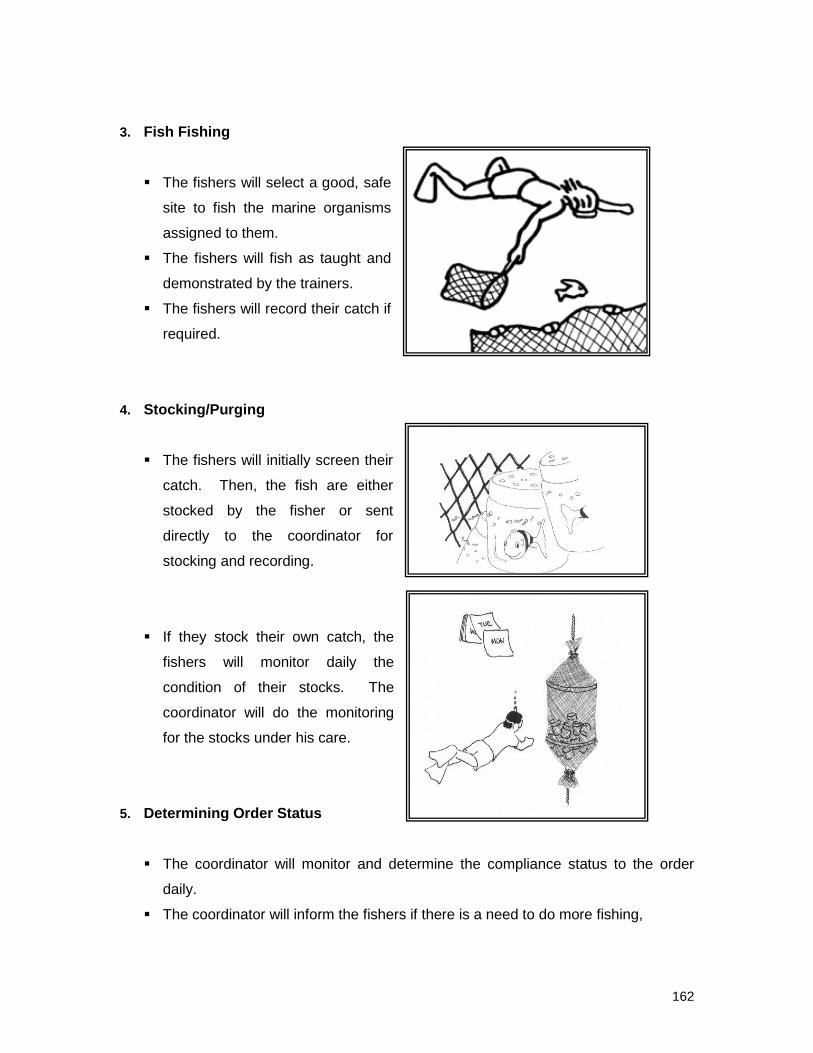
162
3. Fish Fishing
The fishers will select a good, safe
site to fish the marine organisms
assigned to them.
The fishers will fish as taught and
demonstrated by the trainers.
The fishers will record their catch if
required.
4. Stocking/Purging
The fishers will initially screen their
catch. Then, the fish are either
stocked by the fisher or sent
directly to the coordinator for
stocking and recording.
If they stock their own catch, the
fishers will monitor daily the
condition of their stocks. The
coordinator will do the monitoring
for the stocks under his care.
5. Determining Order Status
The coordinator will monitor and determine the compliance status to the order
daily.
The coordinator will inform the fishers if there is a need to do more fishing,
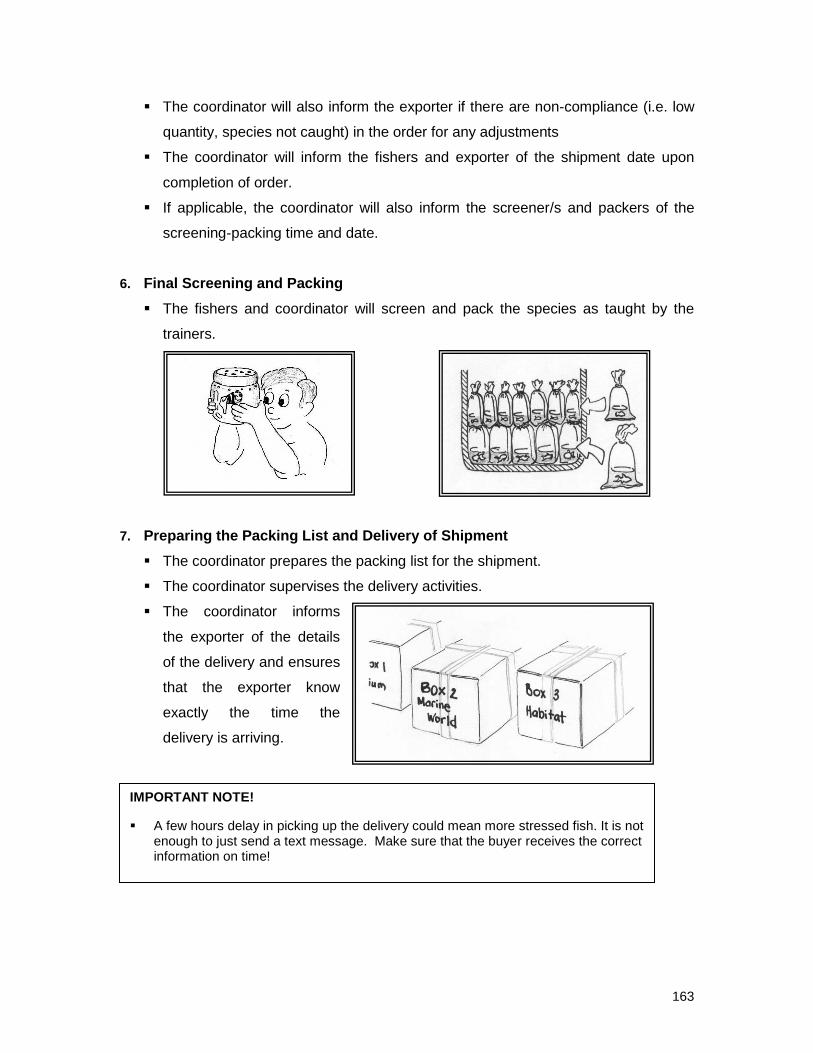
163
The coordinator will also inform the exporter if there are non-compliance (i.e. low
quantity, species not caught) in the order for any adjustments
The coordinator will inform the fishers and exporter of the shipment date upon
completion of order.
If applicable, the coordinator will also inform the screener/s and packers of the
screening-packing time and date.
6. Final Screening and Packing
The fishers and coordinator will screen and pack the species as taught by the
trainers.
7. Preparing the Packing List and Delivery of Shipment
The coordinator prepares the packing list for the shipment.
The coordinator supervises the delivery activities.
The coordinator informs
the exporter of the details
of the delivery and ensures
that the exporter know
exactly the time the
delivery is arriving.
IMPORTANT NOTE!
A few hours delay in picking up the delivery could mean more stressed fish. It is not enough to just send a text message. Make sure that the buyer receives the correct information on time!
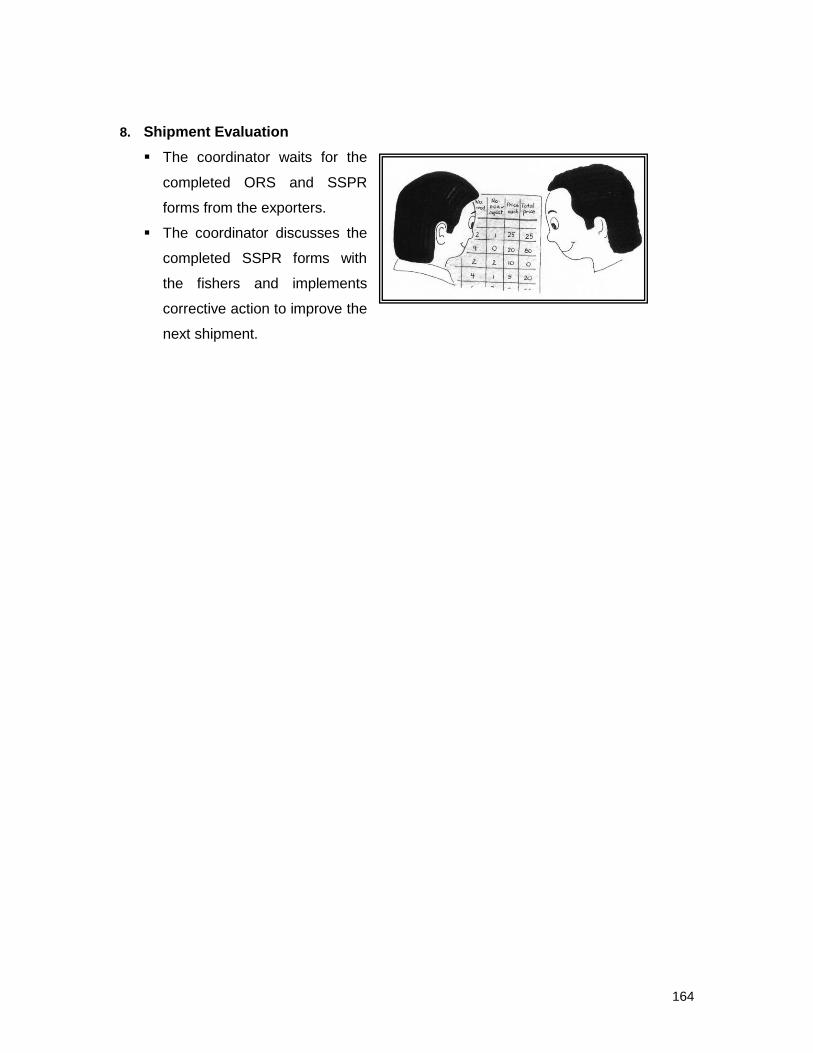
164
8. Shipment Evaluation
The coordinator waits for the
completed ORS and SSPR
forms from the exporters.
The coordinator discusses the
completed SSPR forms with
the fishers and implements
corrective action to improve the
next shipment.

165
166
MODULE 10: EXTENSION ACTIVITIES ………………………………………………………………………………………
Module Summary
Content Session 1: Fisher’s Assessment
Session 2: Monitoring and Refresher Training
Objectives
Trainers will have to assess the techniques of fishers
Proper methods and equipment are being used by fishers
Trainers make sure fishers are well equipped both in skills and materials in
anytime fishing is done
Quality of fishing methods, equipment and fishers skills are maintained at all
times
Key Messages
1. Fisher’s Assessment looks into the quality of fishers’ method of fishing at any
one time during fishing of fish
2. Monitoring and refresh training involves trainers making sure fishers’ welfare
are properly served at any one time during fish harvesting. Fishers’ fishing
methods, materials and general management are met mutually with the
requirements of export aims.
167
Session 1: Fishers’ Assessment
1. Present lecture on Fishers’ Assessment
Use presentation material in power point/manila papers.
2. Discussion
2.1. Explain the aims and importance of Fishers’ Assessment
2.2. Explain on how the assessment in performed and who is involved
2.3. Ask fishers’ about their plans on how improvements can be made to apply
evenly
Module Closing
Repeat key messages for this session
Fishers’ Assessment Notes
What is Fishers’ Assessment?
Fishers’ Assessment basically looks into the assessment of fishers’ skills and
techniques used to fish fish according to order given. The assessment is done by
trainers swimming alongside fishers making sure they perform the correct
methods of fish harvesting as listed in the order. It thus defines the quality of
understanding fishers have in the task they undertake using the right methods
and materials for the right species.
Why is Fishers’ Assessment important?
Because it ensures fish quality is maintained for proper export requirements
Because fishers skills and techniques in fish harvesting must always address
sustainability and quality in comparison to world aquarium standards
Because to make sure fishers get what is worth for in the effort they put in
catching the different species
168
Because to enhance fishers’ skills in catching the different species
How to Do Fishers’ Assessment?
All fishers are assessed in the process that a trainer swims with each fisher with
the assessment criteria (drawn up on the slate) and observes the fishers skills
and techniques used to catch specific species on the order and thus grades the
fisher according to the question asked to the performance of the fisher.
This assessment would take at least 3 to 4 catch per fisher for any different target
species
What are the Criteria for Fishers’ Assessment?
The Fishers’ Assessment should:
Be for each fisher’s skills and techniques assessment
Answer questions related directly to how each fisher catch fish
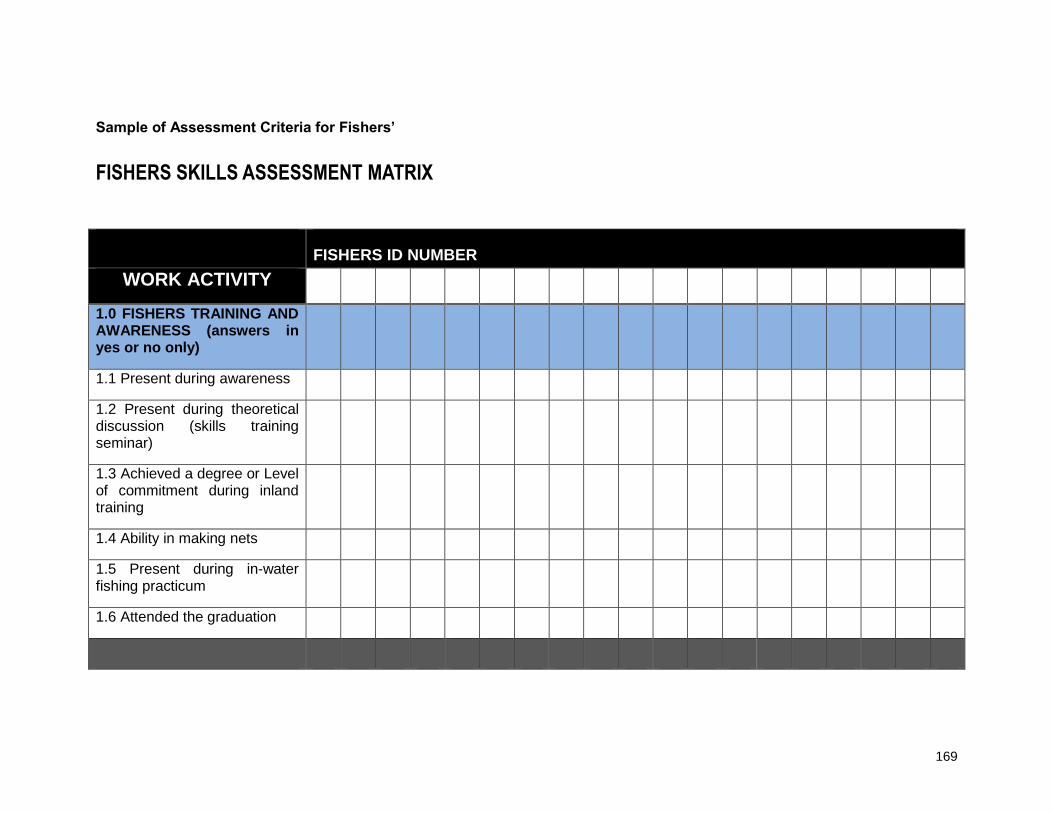
169
Sample of Assessment Criteria for Fishers’
FISHERS SKILLS ASSESSMENT MATRIX
FISHERS ID NUMBER
WORK ACTIVITY
1.0 FISHERS TRAINING AND AWARENESS (answers in yes or no only)
1.1 Present during awareness
1.2 Present during theoretical discussion (skills training seminar)
1.3 Achieved a degree or Level of commitment during inland training
1.4 Ability in making nets
1.5 Present during in-water fishing practicum
1.6 Attended the graduation
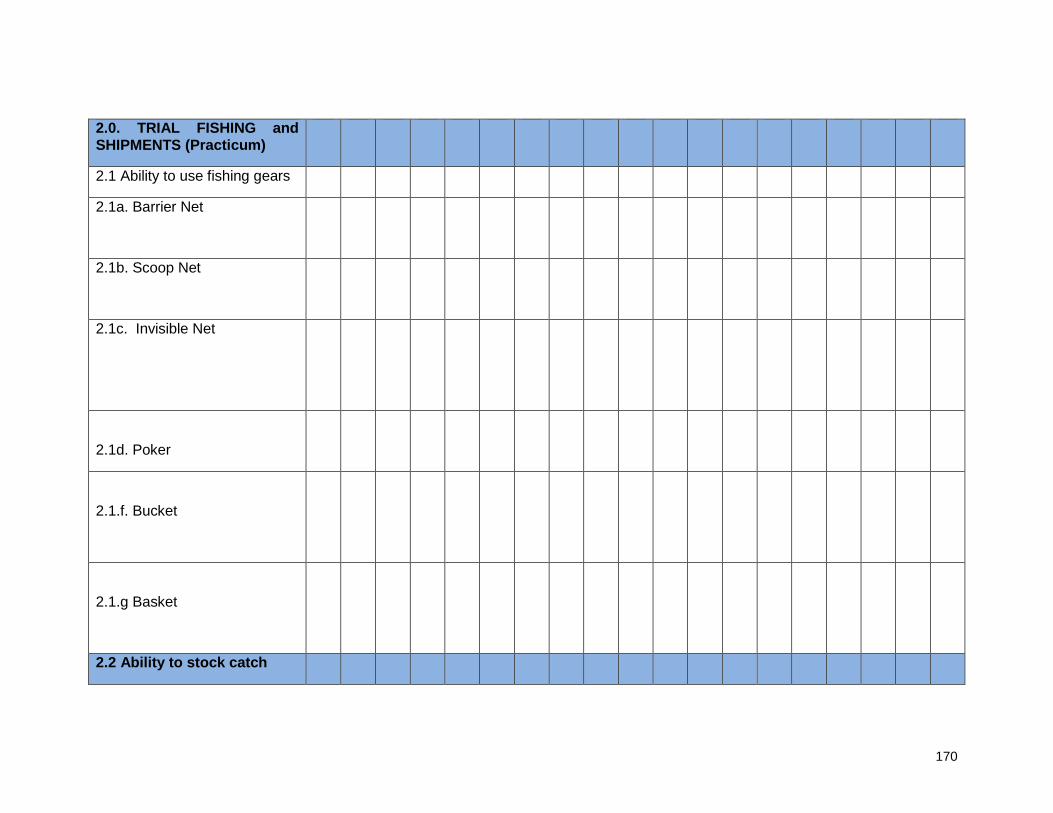
170
2.0. TRIAL FISHING and SHIPMENTS (Practicum)
2.1 Ability to use fishing gears
2.1a. Barrier Net
2.1b. Scoop Net
2.1c. Invisible Net
2.1d. Poker
2.1.f. Bucket
2.1.g Basket
2.2 Ability to stock catch
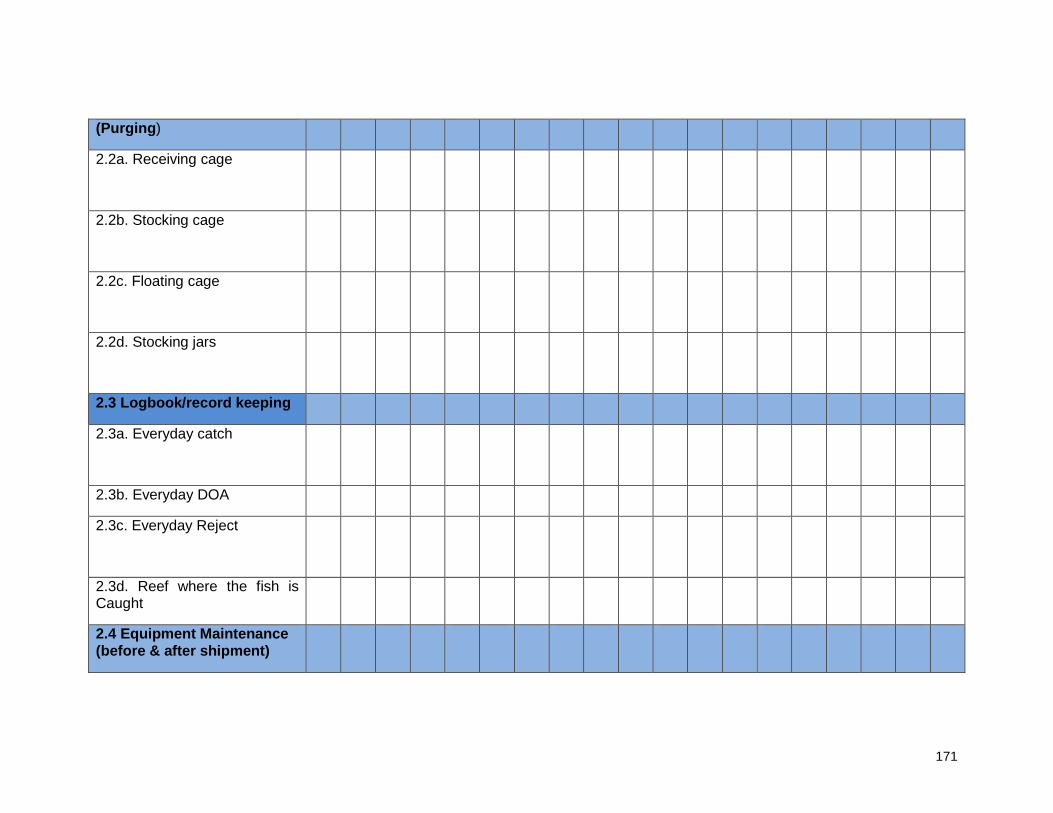
171
(Purging)
2.2a. Receiving cage
2.2b. Stocking cage
2.2c. Floating cage
2.2d. Stocking jars
2.3 Logbook/record keeping
2.3a. Everyday catch
2.3b. Everyday DOA
2.3c. Everyday Reject
2.3d. Reef where the fish is Caught
2.4 Equipment Maintenance (before & after shipment)
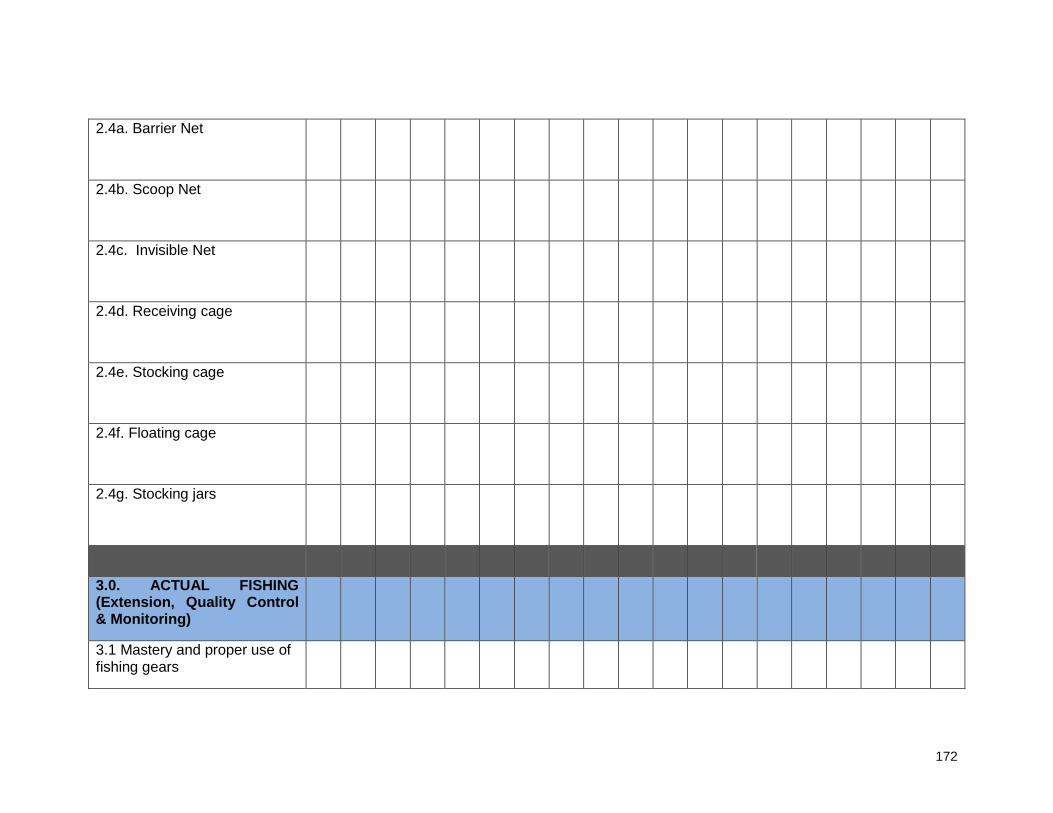
172
2.4a. Barrier Net
2.4b. Scoop Net
2.4c. Invisible Net
2.4d. Receiving cage
2.4e. Stocking cage
2.4f. Floating cage
2.4g. Stocking jars
3.0. ACTUAL FISHING (Extension, Quality Control & Monitoring)
3.1 Mastery and proper use of fishing gears
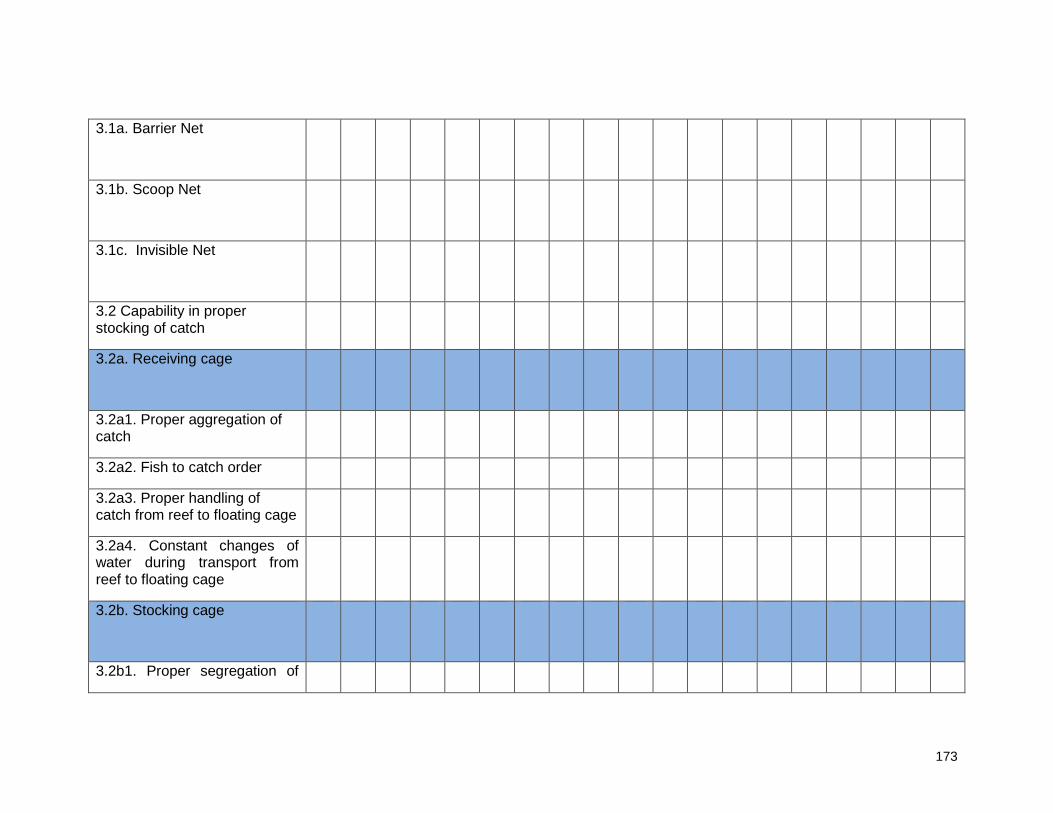
173
3.1a. Barrier Net
3.1b. Scoop Net
3.1c. Invisible Net
3.2 Capability in proper stocking of catch
3.2a. Receiving cage
3.2a1. Proper aggregation of catch
3.2a2. Fish to catch order
3.2a3. Proper handling of catch from reef to floating cage
3.2a4. Constant changes of water during transport from reef to floating cage
3.2b. Stocking cage
3.2b1. Proper segregation of
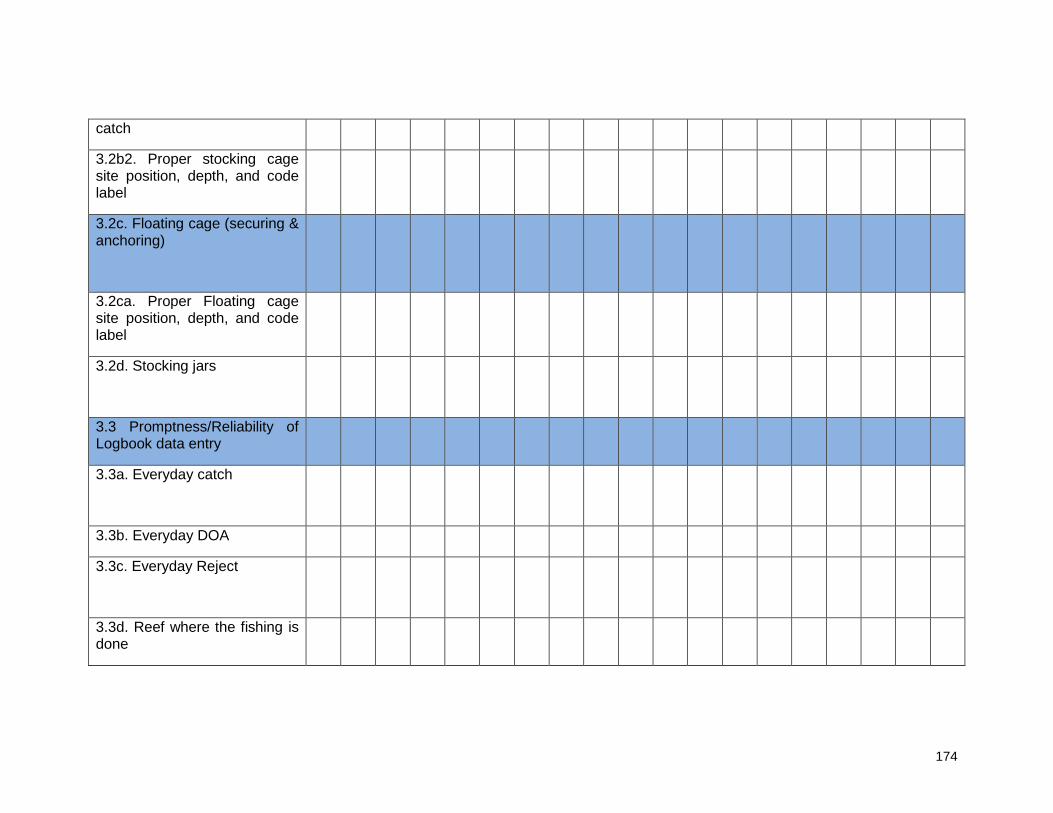
174
catch
3.2b2. Proper stocking cage site position, depth, and code label
3.2c. Floating cage (securing & anchoring)
3.2ca. Proper Floating cage site position, depth, and code label
3.2d. Stocking jars
3.3 Promptness/Reliability of Logbook data entry
3.3a. Everyday catch
3.3b. Everyday DOA
3.3c. Everyday Reject
3.3d. Reef where the fishing is done
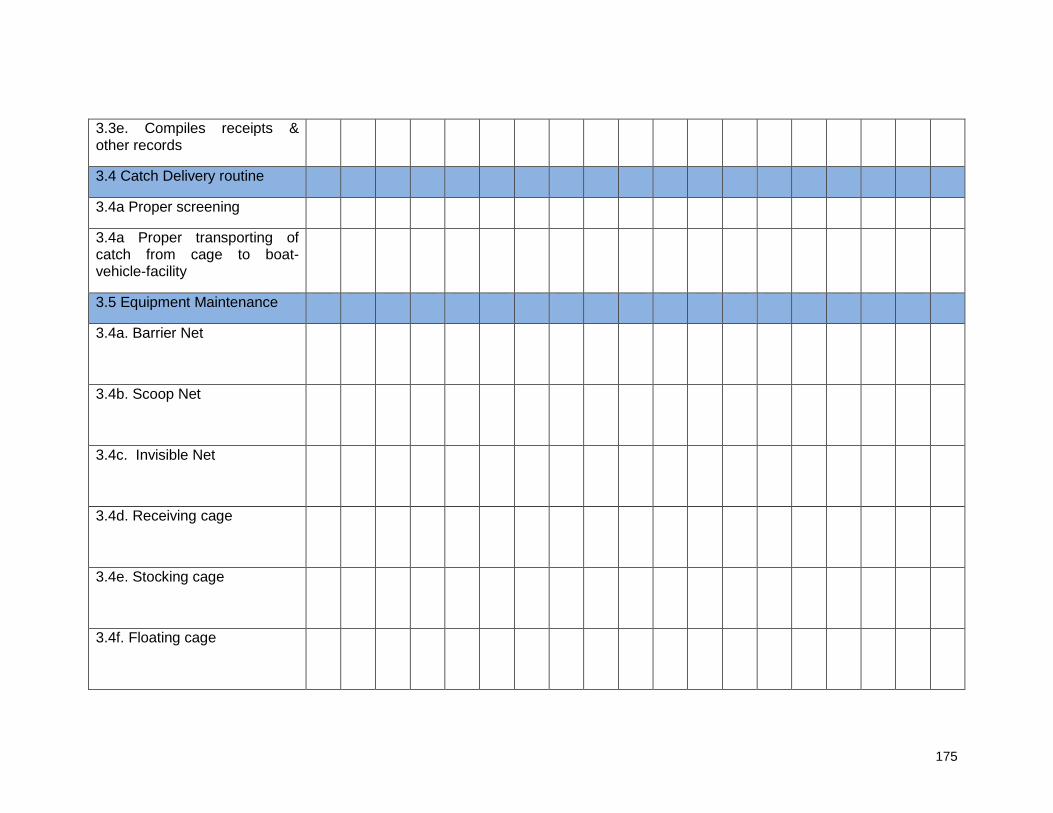
175
3.3e. Compiles receipts & other records
3.4 Catch Delivery routine
3.4a Proper screening
3.4a Proper transporting of catch from cage to boat-vehicle-facility
3.5 Equipment Maintenance
3.4a. Barrier Net
3.4b. Scoop Net
3.4c. Invisible Net
3.4d. Receiving cage
3.4e. Stocking cage
3.4f. Floating cage

176
3.4g. Stocking jars
177
Session 2: Monitoring and Refresher Training
2. Present lecture on Fishers’ Assessment
Use presentation material in power point/manila papers.
3. Discussion
3.1. Explain the aims and importance of Monitoring and Refresher Training
3.2. Explain on how the Monitoring and Refresher Training is performed
and who is involved
3.3. Ask fishers’ about their plans on how improvements can be made to
apply evenly
Module Closing
Repeat key messages for this session
Monitoring and Refresher Training Notes
What is Monitoring and Refresher Training?
Monitoring and Refresher Training involves filling in monitoring check list
that aims at securing and ensuring fishers needs and queries (welfare)
being addressed in line with export aims. Also it provides opportunity for
fishers to gain extra knowledge, skills and techniques through the process
of trainers seeing how fishers perform and thus correcting faults.
Requirements of addressing maintenances of fishers’ materials and the
problems they face are thus critical in this episode.
Why is Monitoring and Refresher Training important?
Because it ensures fish quality is maintained for proper export
requirements
178
Because it enhances fishers skills and techniques in fish harvesting
always addressing sustainability and quality in comparison to world
aquarium standards
Because it provides opportunity for fishers to openly discuss and thus find
solutions to common problems facing them
How to Do Monitoring and Refresher Training important?
Trainers go out to FMA’s to discuss problems faced by fishers. Also they
observe their equipment and thus provide possibilities of malignances of
fishers gear and equipment
Trainers also go out fishing with the fishers to observe their skills and thus
help in correcting faults and thus enhance skills and techniques of fishers
Queries that cannot be directly resolved on the field are thus forwarded to
the administration and thus dealt with accordingly
What are the Criteria for Monitoring and Refresher Training?
It should:
Be for enhancing fishers equipment, skills and techniques
Address fishers common problems faced
Answer questions related directly to fishers’ welfare
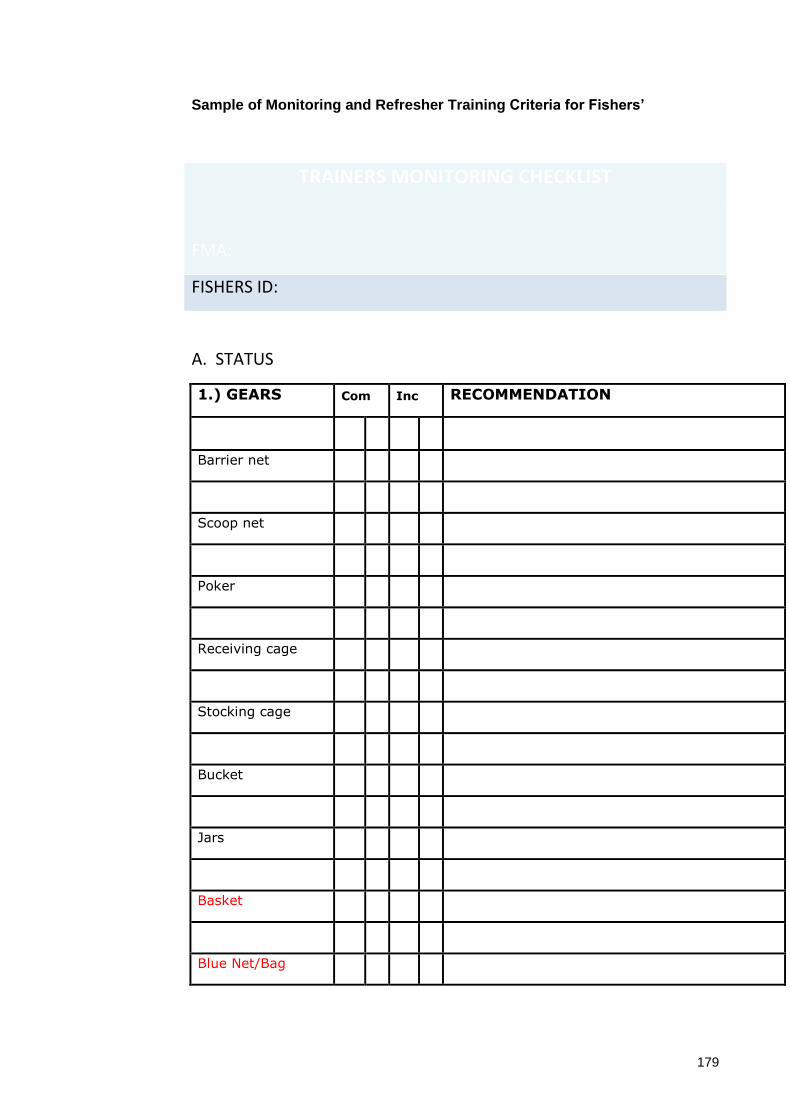
179
Sample of Monitoring and Refresher Training Criteria for Fishers’
TRAINERS MONITORING CHECKLIST
FMA:
FISHERS ID:
A. STATUS
1.) GEARS Com Inc RECOMMENDATION
Barrier net
Scoop net
Poker
Receiving cage
Stocking cage
Bucket
Jars
Basket
Blue Net/Bag
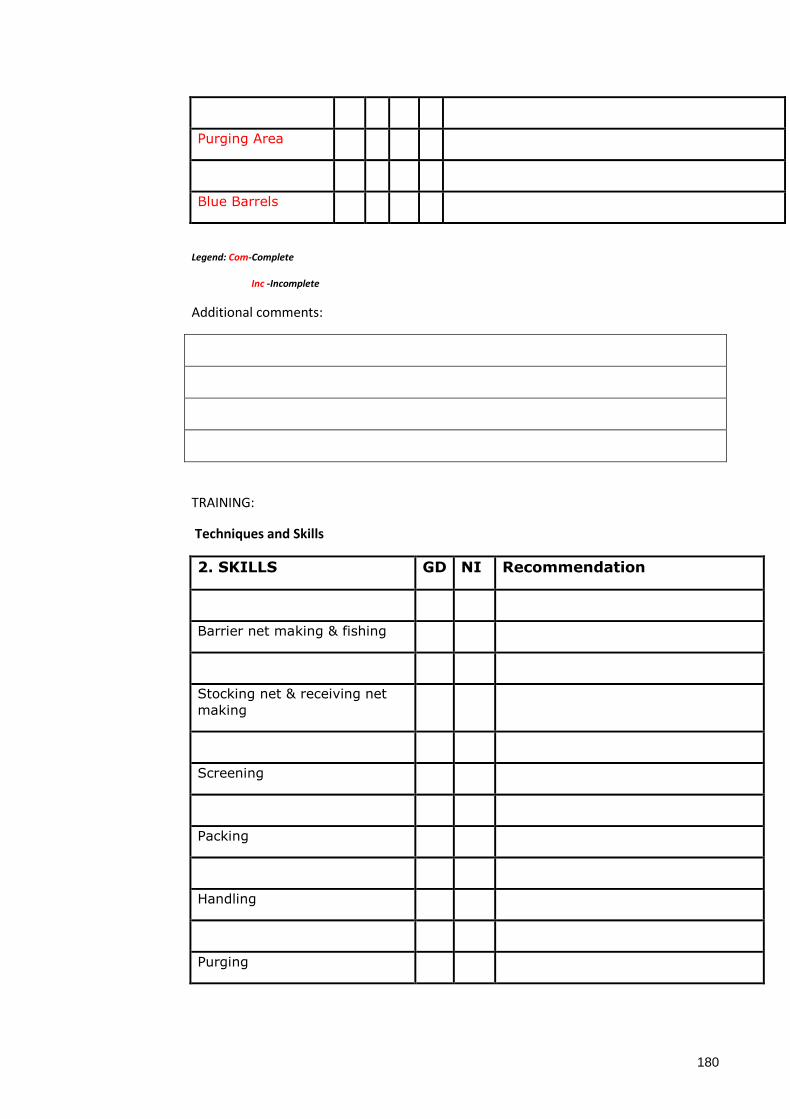
180
Purging Area
Blue Barrels
Legend: Com-Complete
Inc -Incomplete
Additional comments:
TRAINING:
Techniques and Skills
2. SKILLS GD NI Recommendation
Barrier net making & fishing
Stocking net & receiving net
making
Screening
Packing
Handling
Purging
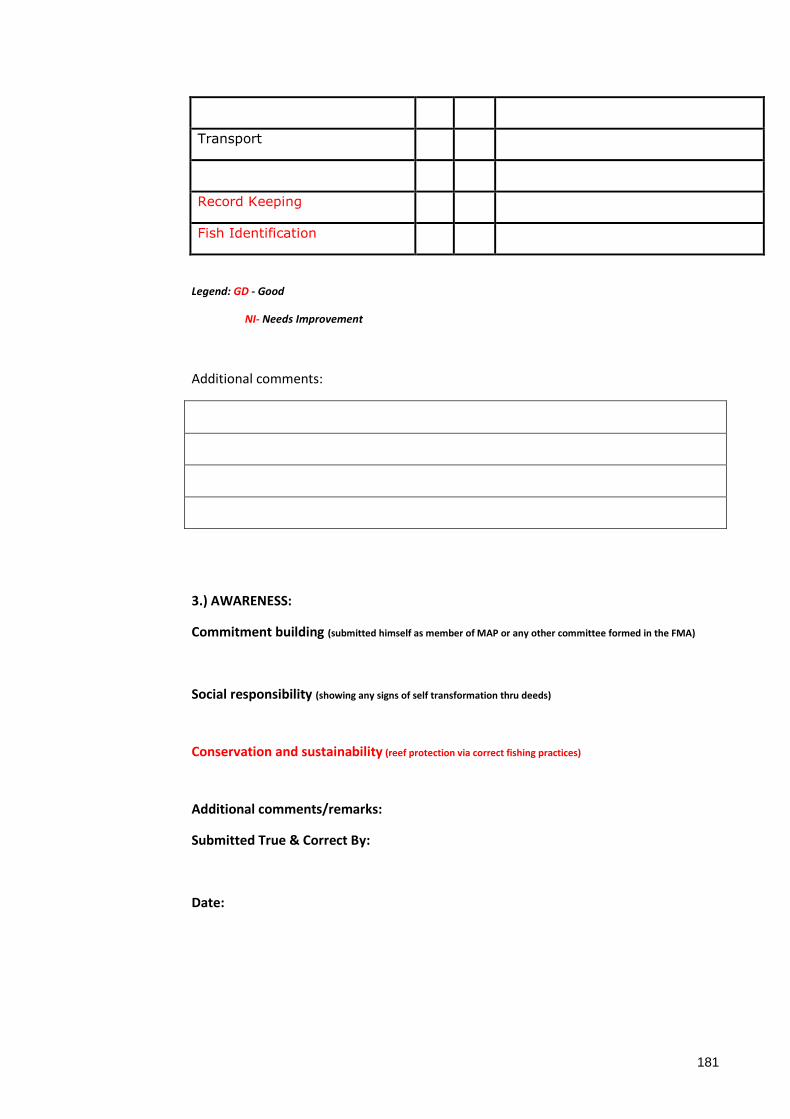
181
Transport
Record Keeping
Fish Identification
Legend: GD - Good
NI- Needs Improvement
Additional comments:
3.) AWARENESS:
Commitment building (submitted himself as member of MAP or any other committee formed in the FMA)
Social responsibility (showing any signs of self transformation thru deeds)
Conservation and sustainability (reef protection via correct fishing practices)
Additional comments/remarks:
Submitted True & Correct By:
Date:

182