Embed Size (px)
Citation preview

Manual
Theses LayoutBooks


Manual
Pottenbakkerstraat 15 2984 AX Ridderkerk
P.O. Box 46 2980 AA Ridderkerk
T +31 (0)180 463 962 E [email protected] I www.ridderprint.nl
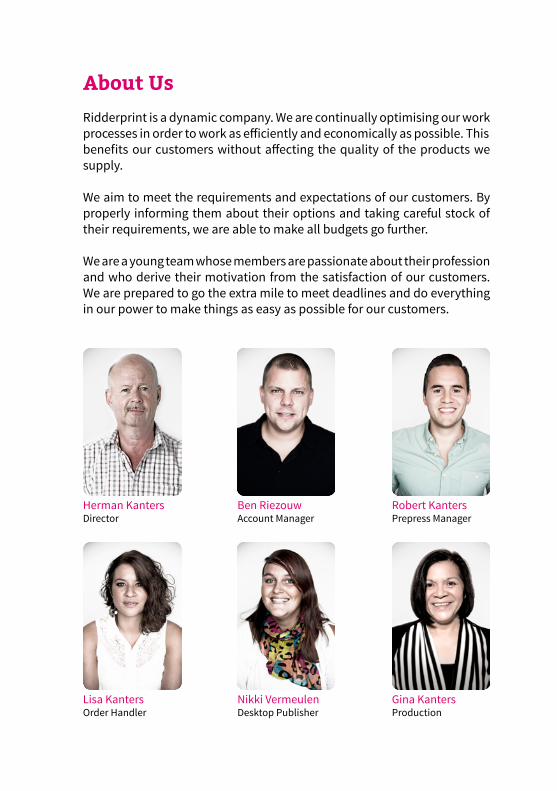
About Us
Ridderprint is a dynamic company. We are continually optimising our work processes in order to work as efficiently and economically as possible. This benefits our customers without affecting the quality of the products we supply.
We aim to meet the requirements and expectations of our customers. By properly informing them about their options and taking careful stock of their requirements, we are able to make all budgets go further.
We are a young team whose members are passionate about their profession and who derive their motivation from the satisfaction of our customers. We are prepared to go the extra mile to meet deadlines and do everything in our power to make things as easy as possible for our customers.
Herman KantersDirector
Ben RiezouwAccount Manager
Robert KantersPrepress Manager
Lisa KantersOrder Handler
Nikki VermeulenDesktop Publisher
Gina KantersProduction

Content
About Us 3
Chapter 1 - Procedure Procedure 9
Chapter 2 - Layout Introduction 15Complete+ 16Complete 17Standard 18Basic 19Cover 20
Chapter 3 – Inside Work Printing Methods 27Types of Paper 27Layout of the Inside Work 29Propositions with your thesis 29Front Matter 31Layout in Microsoft Word 33Bleed 34Quality of Figures 38Use of Colour in the Inside Work 39
Chapter 4 - Cover Layout of the Cover by Ridderprint 43Creating Your Own Cover 43Use of Colour in the Cover 43Invitation in the Form of a Bookmarker 44Additional Invitation 44Type of Paper for the Cover 44Cover Options 44

Chapter 5 - Submission Submitting PDFs 51Applying for an ISBN 51Ridderprint Mentioned on the Copyright Page 52Submitting Files 53Creating a PDF File Using PDFCreator 55Creating a PDF File in Mac OS X 57Creating a PDF File Using Adobe Acrobat Pro 59Creating a PDF File Using Adobe Indesign 61
Types of Paper 65


1Procedure

Ridderprint stands for service and quality, but without the high costs. With clear agreements, proper guidance and quality print, we aim for 100% customer satisfaction.
#Ridderprint

9
Procedure
Procedure
You can submit a request for an offer on our website (www.ridderprint.nl ). The offer is all-inclusive. We will personally deal with your offer. You can expect to receive an offer within 1 working day. A group discount may be offered if you employ our services together with other colleagues.
If you are sumbitting the files yourself, the entire procedure can take 2 to 3 weeks. A breakdown of the procedure is given below.
When the layout is arranged by us, the procedure takes longer. The method in this procedure is explained during a call or an on-site visit.
1. Requesting an offer
Request an offer without any obligations. We will personally deal with your offer. You can expect to receive an offer within 1 working day. The offer is all-inclusive, with the exception of VAT. We will be happy to amend our offer in response to your questions or suggested changes.
2. Offer approval
If, after comparing offers, you select Ridderprint, please let us know by phone or email.
3. Planning and finalising orders
We will contact you in order to finalise your order. We require the following information: the delivery address, the invoice address, the desired delivery date, whether or not you wish to apply for an ISBN, etc. On the basis of your desired delivery date, we will immediately prepare an exact schedule.
4. Submitting files
You can mail PDF files smaller than 25 MB to [email protected]
At the bottom of our website (www.ridderprint.nl) you will find two different options for sending files to us.

10
Chapter 1
5. Checking and feedback
We will check your inside work for:• Image resolution• Embedding fonts• Use of colour• Format• Layout and pagination
If you are going to submit a cover:• Image resolution• Dimensions• Use of colour
After we have checked your files, one of our technical staff members will provide feedback by email on how to improve quality. If you have any questions, you can contact this person directly.
6. Sending proofs
We will send you proofs as soon as the files have been fully optimised. These proofs are usually sent by post, but can also be sent by email if you are not able to receive post or in order to save time.
7. Checking proofs
The proofs consist of a loose-leaf copy of the inside work and cover. We will enclose an info card with extensive notes.
8. Proof approval or definitive files
Please inform us by email if, after checking, you approve of the proofs. If you would like to make any changes, you can submit a new PDF file.
9. Order confirmation and approval for production
After you have approved the proofs, we will send you an order conformation by email. You can check the final specifications of your order in this confirmation. This is your last opportunity to suggest changes. We will commence production after you have confirmed your approval.

11
Procedure
10. Production and binding
Digital printingThe inside work and cover will be produced on our digital printing presses and bound using perfect bind.
Offset printingThe inside work and cover will be produced on our offset presses. It is our standard procedure to use perfect bind, but you can also opt for a paperbound edition.
11. Delivery
Your book will be suitably packed in boxes and forwarded to the address you provided. Delivery will take place on the agreed date during office hours.


2Layout

We provide several layout solutions for books and theses; a package for every budget!
#Ridderprint
Layout
15
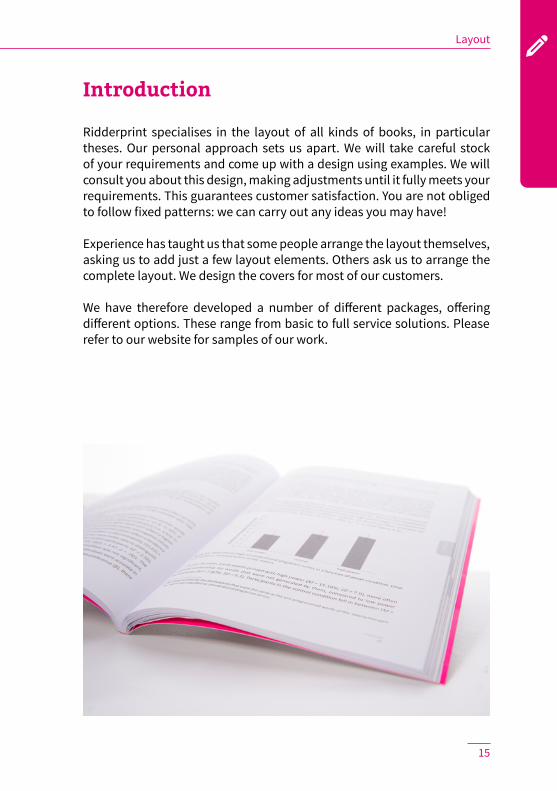
Introduction
Ridderprint specialises in the layout of all kinds of books, in particular theses. Our personal approach sets us apart. We will take careful stock of your requirements and come up with a design using examples. We will consult you about this design, making adjustments until it fully meets your requirements. This guarantees customer satisfaction. You are not obliged to follow fixed patterns: we can carry out any ideas you may have!
Experience has taught us that some people arrange the layout themselves, asking us to add just a few layout elements. Others ask us to arrange the complete layout. We design the covers for most of our customers.
We have therefore developed a number of different packages, offering different options. These range from basic to full service solutions. Please refer to our website for samples of our work.
Chapter 2
16
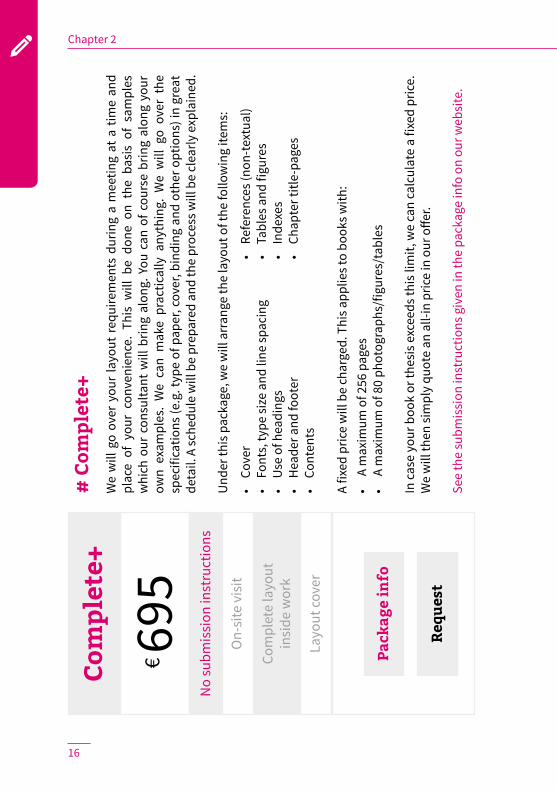
# C
omp
lete
+W
e w
ill g
o ov
er y
our
layo
ut r
equi
rem
ents
dur
ing
a m
eetin
g at
a t
ime
and
plac
e of
you
r co
nven
ienc
e. T
his
will
be
done
on
the
basi
s of
sam
ples
w
hich
our
con
sulta
nt w
ill b
ring
alon
g. Y
ou c
an o
f cou
rse
brin
g al
ong
your
ow
n ex
ampl
es.
We
can
mak
e pr
actic
ally
any
thin
g. W
e w
ill g
o ov
er t
he
spec
ifica
tions
(e.g
. typ
e of
pap
er, c
over
, bin
ding
and
oth
er o
ptio
ns) i
n gr
eat
deta
il. A
sche
dule
will
be
prep
ared
and
the
proc
ess w
ill b
e cl
early
exp
lain
ed.
Und
er th
is p
acka
ge, w
e w
ill a
rran
ge th
e la
yout
of t
he fo
llow
ing
item
s:
A fix
ed p
rice
will
be
char
ged.
Thi
s app
lies t
o bo
oks w
ith:
•
A m
axim
um o
f 256
pag
es•
A m
axim
um o
f 80
phot
ogra
phs/
figur
es/t
able
s
In c
ase
your
boo
k or
thes
is e
xcee
ds th
is li
mit,
we
can
calc
ulat
e a
fixed
pric
e.
We
will
then
sim
ply
quot
e an
all-
in p
rice
in o
ur o
ffer.
See
the
subm
issi
on in
stru
ctio
ns g
iven
in th
e pa
ckag
e in
fo o
n ou
r web
site
.
Com
ple
te+
€ 69
5
Layo
ut co
ver
Com
plet
e la
yout
insi
de w
ork
Pac
kag
e in
fo
Req
ues
t
No
subm
issi
on in
stru
ctio
ns
On-
site
vis
it•
Cove
r•
Font
s, ty
pe si
ze a
nd li
ne sp
acin
g•
Use
of h
eadi
ngs
• H
eade
r and
foot
er•
Cont
ents
• Re
fere
nces
(non
-tex
tual
)•
Tabl
es a
nd fi
gure
s•
Inde
xes
• Ch
apte
r titl
e-pa
ges

Layout
17
# C
omp
lete
The
Com
plet
e La
yout
pac
kage
is id
entic
al to
the
Com
plet
e La
yout
+ pa
ckag
e,
with
the
exc
eptio
n of
the
man
ner
of s
ubm
issi
on.
This
has
to
be d
one
acco
rdin
g to
cer
tain
ins
truc
tions
. Th
is p
acka
ge i
s th
eref
ore
slig
htly
les
s ex
pens
ive.
You
can
com
pare
the
pack
ages
on
our w
ebsi
te.
Und
er th
is p
acka
ge, w
e w
ill a
rran
ge th
e la
yout
of t
he fo
llow
ing
item
s:
A fix
ed p
rice
will
be
char
ged.
Thi
s app
lies t
o bo
oks w
ith:
•
A m
axim
um o
f 256
pag
es•
A m
axim
um o
f 80
phot
ogra
phs/
figur
es/t
able
s
In c
ase
your
boo
k or
thes
is e
xcee
ds th
is li
mit,
we
can
calc
ulat
e a
fixed
pric
e.
We
will
then
sim
ply
quot
e an
all-
in p
rice
in o
ur o
ffer.
See
the
subm
issi
on in
stru
ctio
ns g
iven
in th
e pa
ckag
e in
fo o
n ou
r web
site
.
Com
ple
te
€ 54
5
Layo
ut co
ver
Com
plet
e la
yout
insi
de w
ork
Pac
kag
e in
fo
Req
ues
t
Acco
rdin
g to
subm
issi
on in
stru
ct.
On-
site
vis
it•
Cove
r•
Font
s, ty
pe si
ze a
nd li
ne sp
acin
g•
Use
of h
eadi
ngs
• H
eade
r and
foot
er•
Cont
ents
• Re
fere
nces
(non
-tex
tual
)•
Tabl
es a
nd fi
gure
s•
Inde
xes
• Ch
apte
r titl
e-pa
ges

Chapter 2
18
# S
tan
dar
dAd
vice
is g
iven
by
e-m
ail a
nd p
hone
. On
the
basi
s of p
revi
ousl
y pu
blis
hed
book
s (s
ee “O
ur w
ork”
on
our w
ebsi
te),
you
can
choo
se a
styl
e fo
r the
follo
win
g ite
ms:
• H
eade
r and
foot
er•
Inde
xes
• Ch
apte
r titl
e-pa
ges
You
will
ther
efor
e su
bmit
a fu
lly la
id-o
ut te
xt b
lock
, inc
ludi
ng ta
bles
and
figu
res,
in
form
at.
The
fixed
pric
e ap
plie
s to
book
s with
no
mor
e th
an 1
2 ch
apte
rs.
In c
ase
your
boo
k or
thes
is e
xcee
ds th
is li
mit,
we
can
calc
ulat
e a
fixed
pric
e. W
e w
ill th
en si
mpl
y qu
ote
an a
ll-in
pric
e in
our
offe
r.
See
the
subm
issi
on in
stru
ctio
ns g
iven
in th
e pa
ckag
e in
fo o
n ou
r web
site
.
Stan
dar
dP
OP
ULA
R C
HO
ICE
€ 29
5La
yout
cove
r
Layo
ut e
lem
ents
out
side
the
text
box
Pac
kag
e in
fo
Req
ues
t
Layout
19
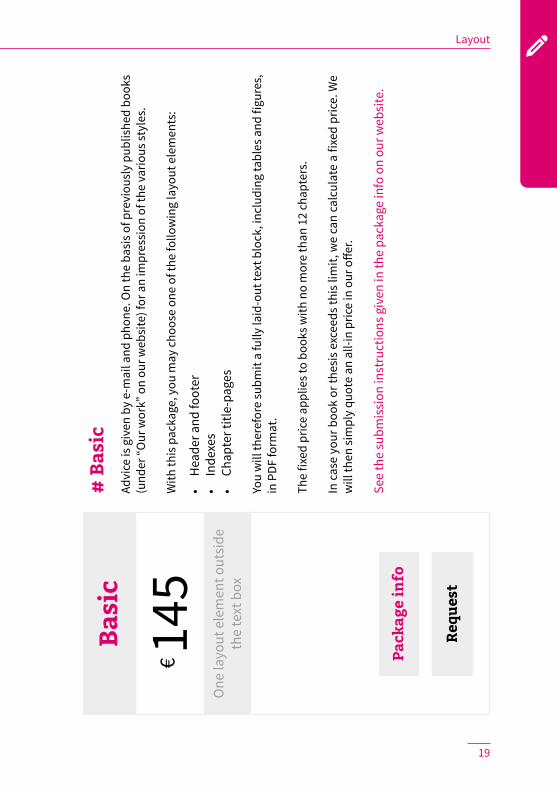
# B
asic
Advi
ce is
giv
en b
y e-
mai
l and
pho
ne. O
n th
e ba
sis o
f pre
viou
sly
publ
ishe
d bo
oks
(und
er “O
ur w
ork”
on
our w
ebsi
te) f
or a
n im
pres
sion
of t
he v
ario
us st
yles
.
With
this
pac
kage
, you
may
cho
ose
one
of th
e fo
llow
ing
layo
ut e
lem
ents
:
• H
eade
r and
foot
er•
Inde
xes
• Ch
apte
r titl
e-pa
ges
You
will
ther
efor
e su
bmit
a fu
lly la
id-o
ut te
xt b
lock
, inc
ludi
ng ta
bles
and
figu
res,
in
form
at.
The
fixed
pric
e ap
plie
s to
book
s with
no
mor
e th
an 1
2 ch
apte
rs.
In c
ase
your
boo
k or
thes
is e
xcee
ds th
is li
mit,
we
can
calc
ulat
e a
fixed
pric
e. W
e w
ill th
en si
mpl
y qu
ote
an a
ll-in
pric
e in
our
offe
r.
See
the
subm
issi
on in
stru
ctio
ns g
iven
in th
e pa
ckag
e in
fo o
n ou
r web
site
.
Bas
ic
€ 14
5O
ne la
yout
ele
men
t out
side
the
text
box
Pac
kag
e in
fo
Req
ues
t

Chapter 2
20
# C
over
You
can
send
an
emai
l with
your
requ
irem
ents
, tex
t and
imag
es to
n.v
erm
eule
n@rid
derp
rint.n
l. Fi
les l
arge
r tha
n 25
MB
shou
ld b
e up
load
ed o
n ou
r web
site
.
If yo
u ar
e lo
okin
g fo
r a su
itabl
e im
age,
ther
e ar
e se
vera
l web
site
s whe
re y
ou m
ay
find
one,
suc
h as
ww
w.is
tock
phot
o.co
m a
nd w
ww
.shu
tter
stoc
k.co
m. I
f you
find
so
met
hing
tha
t is
to y
our
likin
g, w
e ca
n bu
y th
e im
age(
s) o
n yo
ur b
ehal
f. Th
e re
leva
nt co
sts w
ill b
e pa
ssed
on.
Read
the
subm
issi
on in
stru
ctio
ns g
iven
in th
e pa
ckag
e in
fo o
n ou
r web
site
.
Cov
er
€ 45
Layo
ut co
ver
Pac
kag
e in
fo
Req
ues
t

Layout
21
Layo
ut o
f the
cove
r of a
thes
is, i
ncl.
an in
vita
tion
in th
e fo
rm o
f a b
ookm
arke
r

Chapter 2
22
Layo
ut o
f the
insi
de w
ork
of a
thes
is

Layout
23
Layo
ut o
f the
insi
de w
ork
of a
boo
k


3Inside Work

Chapter 3
26
We aim to meet the requirements of our customers. By properly informing them about their options and taking careful stock, we get the most out of every budget.
#Ridderprint

Inside work
27
Printing methods
Digital printing
Characteristics:• Short delivery time.• Easy to order extra copies.• Ideal if you have colour pages. You pay per page and are not affected by
sections, as is the case in offset printing.
Binding method: PaperboundSingle sheets form a book block, which is roughened using a milling machine. The cover is then glued to the book block.
Offset Printing
Characteristics:• The delivery time exceeds that of digital printing by one week.• Favourable for higher print runs.• Colour pages can be expensive, depending on their position and
number. This determines the number of sections that have to be printed in colour.
Binding method: Stitch boundSheets are folded into sections, which are sewn together and glued to the cover.
Types of paper
• 100 gsm G-Print: white and coated. Used for this manual.• 90 gsm HVO (woodfree uncoated white): white and uncoated.• 90 gsm Biotop: soft cream and uncoated.
You can examine the different types of paper - with different types of print - at the end of this manual.
The three paper types mentioned above form part of our standard product range. Other paper types can be provided at an extra charge.

Chapter 3
28
Chapter 1 (header)
4 (footer) 5
Even-numbered page (left-hand side) Odd-numbered page (right-hand side)
TOP TOP
BOTTOM BOTTOM
RIGH
T
LEFT
Margins in Microsoft Word
Page Layout
Insi
de
Insi
de
Chapter Title
Out
side
Out
side
LEFT
RIGH
T
Inside work
29
The Layout of the Inside Work
Microsoft Word is generally used to arrange the layout of the inside work. Because this is automatically installed on most computers, we will use it as an example.
White margins determine the width and height of a text box (this does not include the header and footer, which can be placed outside the box).
Points requiring attention
• Even-numbered pages will appear on the left-hand side of a book and odd-numbered pages will appear on the right-hand side of a book.
• Even page numbers should go on the left-hand side and odd page numbers should go on the right-hand side. In this way, page numbers will appear in the outside corners of a book, where they are easy to see when leafing through. The page numbers can also be centred.
• Try to keep as many images, tables, etc. within the layout width of the text as possible. This looks neater and improves the readability of the text.
• We rotate landscape pages in an counterclockwise direction. Bear in mind that the side margins will become the top and bottom margins (and vice versa) as a result.
Propositions with Your Thesis
You can have the propositions printed along with your thesis free of charge. Please submit them to us as a PDF file in A5 format (14.8 x 21 cm). This is the standard format we use for propositions. Because it is smaller than the 17 x 24 cm format, they easily fit into the book.
Chapter 3
30
Progressive Supranuclear Palsy expanding the clinical and genetic spectrum
Laura Donker Kaat
Financial support for the printing of this thesis was kindly provided byErasmus University RotterdamParkinson VerenigingBoehringer Ingelheim B.V.UCB Pharma B.V.Teva Nederland B.V.Abbott B.V.GRIPP B.V.
ISBN: 978-90-5335-481-0
The studies in this thesis were financially supported by the Prinses Beatrix Fonds (grant number 01-0128).
Cover: Ridderprint BV, Ridderkerk, the NetherlandsLay-out: Ridderprint BV, Ridderkerk, the NetherlandsPrinted by: Ridderprint BV, Ridderkerk, the Netherlands
Copyright © 2011 by L. Donker Kaat
Progressive Supranuclear Palsy expanding the clinical and genetic spectrum
Progressieve supranucleaire verlamming: verbreding van het klinisch en genetisch spectrum
Proefschrift
ter verkrijging van de graad van doctor aan de Erasmus Universiteit Rotterdam
op gezag van de rector magnificus
Prof. dr. H.G. Schmidt en volgens besluit van het College voor Promoties.
De openbare verdediging zal plaatsvinden op vrijdag 2 december 2011 om 9:30 uur
door
Laura Donker Kaatgeboren te Haarlem
Promotiecommissie
Promotoren: Prof.dr. P.A.E. Sillevis Smitt Prof.dr. P. Heutink Overige leden: Prof.dr.ir. C.M. van Duijn Dr. V. Bonifati Dr. T. van Laar
I
IV
II III
Inside work
31
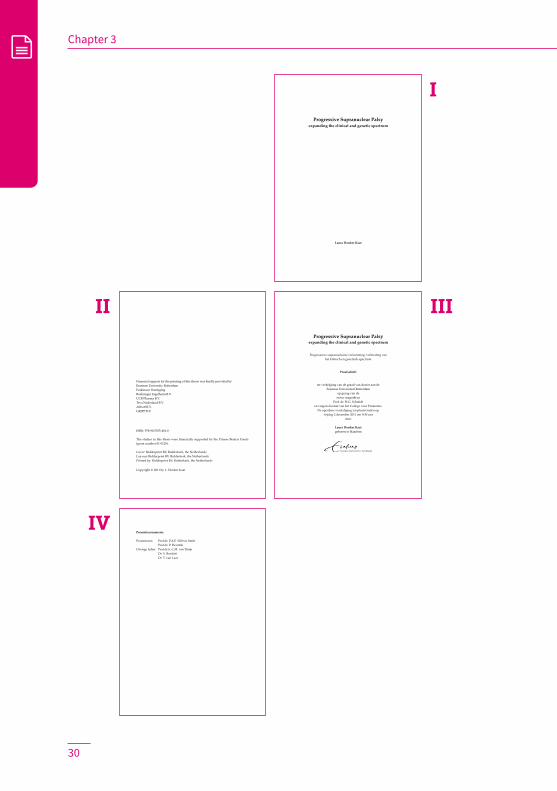
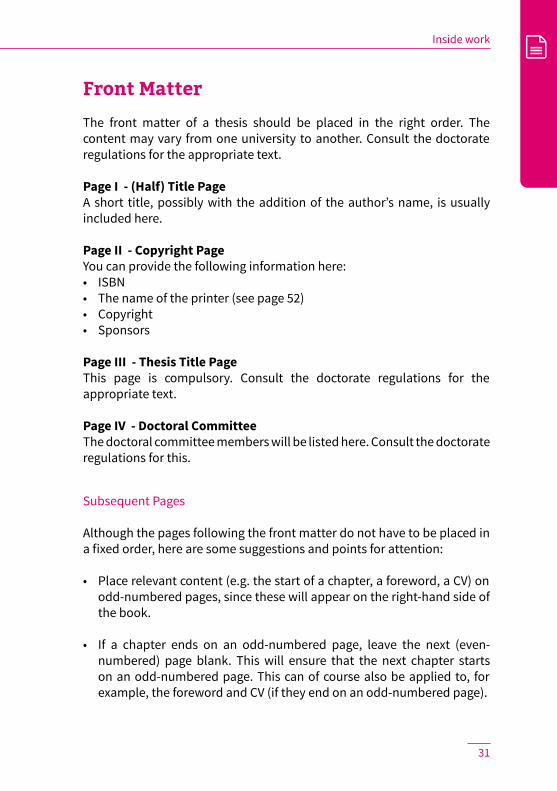
Front Matter
The front matter of a thesis should be placed in the right order. The content may vary from one university to another. Consult the doctorate regulations for the appropriate text.
Page I - (Half) Title PageA short title, possibly with the addition of the author’s name, is usually included here.
Page II - Copyright PageYou can provide the following information here:• ISBN• The name of the printer (see page 52)• Copyright• Sponsors
Page III - Thesis Title PageThis page is compulsory. Consult the doctorate regulations for the appropriate text.
Page IV - Doctoral CommitteeThe doctoral committee members will be listed here. Consult the doctorate regulations for this.
Subsequent Pages
Although the pages following the front matter do not have to be placed in a fixed order, here are some suggestions and points for attention:
• Place relevant content (e.g. the start of a chapter, a foreword, a CV) on odd-numbered pages, since these will appear on the right-hand side of the book.
• If a chapter ends on an odd-numbered page, leave the next (even-numbered) page blank. This will ensure that the next chapter starts on an odd-numbered page. This can of course also be applied to, for example, the foreword and CV (if they end on an odd-numbered page).
Chapter 3
32
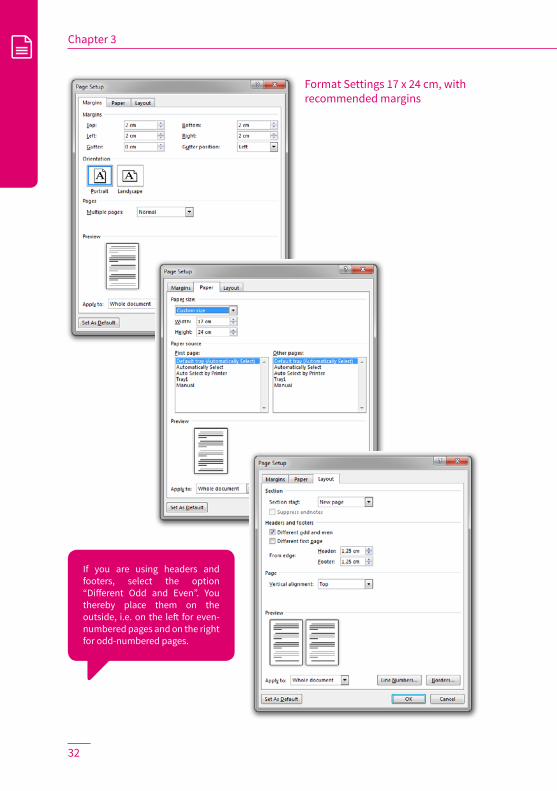
Format Settings 17 x 24 cm, with recommended margins
If you are using headers and footers, select the option “Different Odd and Even”. You thereby place them on the outside, i.e. on the left for even-numbered pages and on the right for odd-numbered pages.

Inside work
33
17 x 24 cm format
Set the format to 17 x 24 cmMargins:Top 2 cmBottom 2 cmLeft 2 cmRight 2 cm
A4 format
Set the format to A4 (21 x 29.7)Margins:Top 2.5 cmBottom 2.5 cmLeft 2.5 cmRight 2.5 cm
A5 format
Set the format to A5 (14.8 x 21)Margins:Top 2 cmBottom 2 cmLeft 2 cmRight 2 cm
16 x 24 cm format
Set the format to 16 x 24 cmMargins:Top 2 cmBottom 2 cmLeft 2 cmRight 2 cm
Arranging the Layout in Microsoft Word
Submitting a thesis in A4 format
The standard format for theses is usually 17 x 24 cm. However, the layout is often created in A4 format, with the corresponding standard margins and settings.
We can reduce such a file to 81%. This corresponds to submission in 17 x 24 cm format, which can be processed without any difficulty. What should you pay attention to?
• Use the recommended A4 format margins, i.e. a 2.5 cm margin (top, bottom and both sides).
• Set the type size of the core text to 12 points. This will be reduced to about 10 points after reduction. This is what we recommend for submission in the final publication format.
• Also take into account the size of the other text elements, such as headers and footers, captions and text in tables.
• You can print a few pages at 81% to get an impression of the end result. You may then decide to increase or decrease the type size a little.
Several formats and recommended margins are given below:

Chapter 3
34
Bleed
If surfaces, photographs and other visual elements are to run to the edge of a page, the layout should be made to “run off the page”. You can do this by having the layout extend beyond the final page size by at least 3 mm. This ensures that there is printing outside the finished publication format so that there will not be any white margins after trimming. Therefore, after the bleed page has been trimmed down to the final page size, it looks as if the printed matter “runs off” the page.
Chapter 1General introduction
Partly based on:
Schoonheim MM, Geurts JJ, Barkhof F. The limits of functional reorganization in multiple sclerosis.
Neurology. 2010 Apr 20;74(16):1246-7.Schoonheim MM, Filippi M. Functional plasticity in MS: friend or foe?
Neurology. 2012 Oct 2;79(14):1418-9.
9U.F.S.W. Alcmaeon
Het golden days
bestuur
Bleed pages including crop marks
Inside work
35
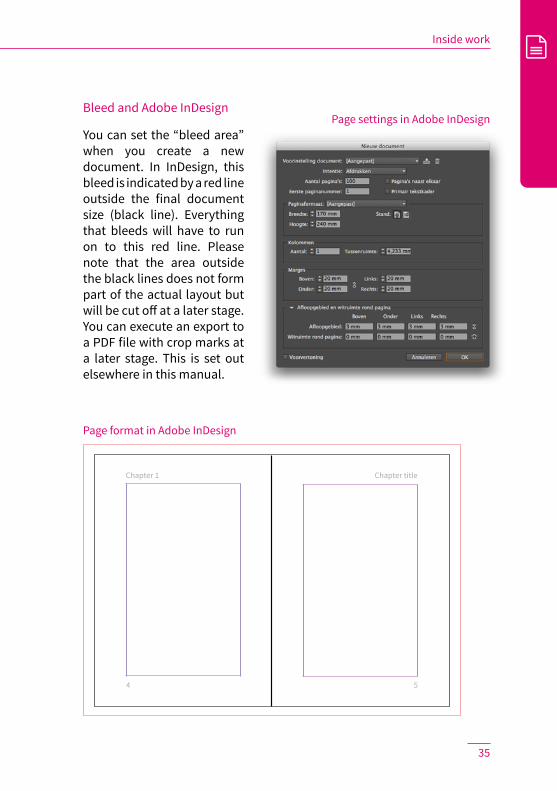
Bleed and Adobe InDesign
You can set the “bleed area” when you create a new document. In InDesign, this bleed is indicated by a red line outside the final document size (black line). Everything that bleeds will have to run on to this red line. Please note that the area outside the black lines does not form part of the actual layout but will be cut off at a later stage. You can execute an export to a PDF file with crop marks at a later stage. This is set out elsewhere in this manual.
Chapter 1 Chapter title
4 5
Page format in Adobe InDesign
Page settings in Adobe InDesign

Chapter 3
36
If you are going to use headers and footers, set their margins at 1.75 cm at “From edge”. This is the area between the header and footer and the edge of the page, which needs to be compensated due to the extra space for the bleed.

Inside work
37
17 x 24 cm format with bleedSet the format to 18 x 25 cmMargins:Top 2.5 cmBottom 2.5 cmLeft 2.5 cmRight 2.5 cm
Set the header/footer margins to 1.75 cm at “From edge”
A4 format with bleedSet the format to 22 x 30.7 cmMargins:Top 3 cmBottom 3 cmLeft 3 cmRight 3 cm
Set the header/footer margins to 1.75 cm at “From edge”
A5 format with bleedSet the format to 15.8 x 22 cmMargins:Top 2.5 cmBottom 2.5 cmLeft 2.5 cmRight 2.5 cm
Set the header/footer margins to 1.75 cm at “From edge”
16 x 24 cm format with bleedSet the format to 17 x 25 cmMargins:Top 2.5 cmBottom 2.5 cmLeft 2.5 cmRight 2.5 cm
Set the header/footer margins to 1.75 cm at “From edge”
Bleed and Microsoft Word
It is not possible to actually indicate a bleed in Word. You can create a bleed area by increasing the file in all four directions by 5 mm. The bleed will then have to be compensated in the margins since the bleed does not form part of the actual layout.
Any content in your Word file that needs to run off the page will have to be aligned with the edge or enlarged until it extends to the edge.
Because it is not possible to show crop marks in Word, we will centre the final PDF file and add these crop marks for you. You can later check the proofs to see if this was done correctly. We use these marks during production to trim a page down to its final size.
A few examples to make a page run off the edge are given below for each format:

Chapter 3
38
Quality of Figures
Resolution
If your thesis contains images, make sure that they are of good quality (resolution). We recommend a resolution of at least 300 DPI (dots per inch). We will of course check the quality of the images.
Bear in mind that enlarging an image will have a negative effect on its resolution. For example, when you increase a 300 DPI image to twice its size, its effective resolution will be reduced to a mere 150 DPI. However, reducing an image can have a positive effect on its resolution.
Vector graphics
Vector graphics can be scaled without affecting their quality. Because they have no resolution and are not dependent on the number of pixels, vector graphics are well-suited for line drawings, graphs, logos, etc. Due to their small file size, vector graphics are also easy to process. Adobe Illustrator is an example of vector-oriented software and Adobe Photoshop an example of pixel-oriented software.
PowerPoint graphics
If you have created any graphics in Microsoft PowerPoint, it may be possible to submit these in vector quality. Save these graphics as an EMF (Enhanced Meta-File). You can then place this file in, for example, your Word document.
300 DPI 72 DPI

Inside work
39
Use of Colour in the Inside Work
In the case of digital printing, it does not matter where colour images are included in a book since sections are not used.
Because sections are used in offset printing, the location of the images in a book can have a considerable effect on the costs. Because a section is in fact a folded printing sheet, it is difficult to tell which page numbers will appear on the same side of a printing sheet (section). A section can contain 8, 16 or 32 pages.
Imposition scheme
To keep the costs of offset printing as low as possible, it is worth making the effort of using an imposition scheme to see which page numbers will be printed on the same side so that the colour images will appear on a limited number of printable sides. We have imposition schemes up to 384 pages available.
Imposition scheme for a 32-page section
1 32 29 4
8 25 28 5
3 30 31 2
6 27 26 7
9 24 21 12
16 17 20 13
11 22 23 10
14 19 18 15
Front Back
Front Back
Printing sheet 1
Printing sheet 2


4Cover

back
cove
r: 17
cm
height cover: 24 cm
INV
ITA
TIO
N
To a
tten
d th
e de
fens
e of
this
thes
is
Man
ual
onFr
iday
Aug
ust 1
, 2014
at 1
2:00
Ridd
erpr
int B
V Po
tten
bakk
erst
raat
15
2984
AX
Ridd
erke
rk
Follo
wed
by
a re
cept
ion
Para
nym
phs
Thes
is p
rintin
ginfo@proe
fsch
riftdruk
ken.nl
Ridd
erpr
int
info@rid
derprin
t.nl
www.ridd
erprint.n
l
book
mar
k: 6
,5 c
m
spin
e w
idth
(can
be
calc
ulat
ed o
n ou
r web
site
)
cu
t mar
gin
with
ble
ed: 8
mm
front
cove
r: 17
cm
height bookmark: 23 cm
Man
ual
Thes
esLa
you
tB
ook
s
Ridderprint Manual
3 m
m b
leed
Plea
se t
o no
t ad
d th
e w
hite
out
lines
in y
our
desi
gn.
Thes
e ar
e on
ly t
o ill
ustr
ate
the
end
form
at o
f 17
x 24
cm
.
Guidelines for the cover of a thesis with an invitation

Cover
43
Layout of the cover by Ridderprint
It often takes a lot of work to create the layout for a cover. We therefore provide this service under our “Cover Layout” package. This is detailed on page 20.
Creating Your Own Cover
If you would like to submit your own cover, the following guidelines apply:
• Proper dimensions for the front cover, back cover, spine and bookmarker.
• Bleeding the page if the images or picture run to the edge.
• Proper spine thickness. This depends on the type of paper, the number of pages and the binding method. You can calculate this on our website.
• Clear use of colour: CMYK or RGB.
• Sufficient image quality (ideally 300 DPI).
• Standard format of the invitation in the form of a bookmarker (6 x 23 cm): slightly shorter than the cover so that it easily fits into the book. We prefer to have the invitation and cover in one design, since they will be printed at the same time.
Use of Colour in the Cover
If you have any multicolour photographs or visual elements, these will be printed in full colour CMYK (Cyan, Magenta, Yellow and Key (=black)). These are the 4 primary colours used in digital and offset printing.
Creating a cover using Adobe Photoshop
If you are going to create a cover using Adobe Photoshop, make sure that all “layers” are preserved, and that you save your work as a PDF file. The text will retain its vector qualities as a result (and therefore a better quality).

Chapter 4
44
Invitation in the Form of a BookmarkerWe can make an invitation in the form of a bookmarker - free of charge. This invitation has a standard 6 x 23 cm format; slightly shorter than the book format so that it easily fits into the book. When you ask us to arrange the layout of the cover, the layout of the invitation forms part of our service.If you are going to submit your own cover, we prefer a single design for both the invitation and cover, since they can be printed at the same time.
Additional InvitationIf you want to send your invitation for a (dinner) party separately, we can also make this invitation for you. Such invitations usually have a standard postcard format (10 x 15 cm) and are printed on the same material as the cover.
All our additional invitations are printed in full colour and laminated on one side. If you are interested, please indicate this when you request an offer. If you would like us to arrange the layout of the cover, we will create the layout for the additional invitation at no extra charge.
Type of Paper for the CoverThe cover is printed on 250 gsm single-sided sulphate board. We also used this for this manual in order to give you an idea of how it will look and feel like. You may of course opt for another type of cardboard. Please contact us if this is of interest.
Cover OptionsPrinting the inside of the coverYou can have the inside of the cover printed. This can, for example, be done in a nice solid colour to give the book a better look and feel. The cover of this booklet is printed on the inside.
LaminationWhen a cover is “laminated”, this means that a plastic layer is applied. You can choose between gloss and matt laminate. This protects the cover, making it considerably stronger, and adds to the book’s look and feel. Only

Cover
45
smooth-surfaced cardboard can be laminated. The cover of this booklet has a matt laminate finish.
Spot UV coatingWith Spot UV coating, a glossy layer is applied to designated spots on the cover. Because of the contrast between the materials, the glossy spot UV coating can only be applied on a matt laminated cover.
Raised Spot UV coatingA form of Spot UV coating that creates an even fuller effect. This is not only easier to see, but it is more tactile.
Embossing Text or image are applied in relief to the cover. These can be in high or low relief.
Die-cutting With die-cutting, you can have any desired form cut out of the cover. You can also have a particular design die cut into a desired form (e.g. the invitation in the form of a bookmarker, or the additional invitation for a (dinner) party).
HardcoverYou can have your book printed with a hardcover. This is a hard, inflexible cardboard cover, which gives a book a luxurious look and feel. It can be finished with a gloss or matt laminate but can also be covered with, for example, cloth or even leather. A hardcover cannot be printed on the inside. However, you could use a printed or colour end leaf.
Bear in mind that a hardcover can be quite expensive. Please contact us if you are interested in this, or if you would like to receive additional information.
If you are going to submit your own files for a hardcover, the guidelines differ from those for a standard softcover. These instructions may be obtained from us.
Chapter 4
46
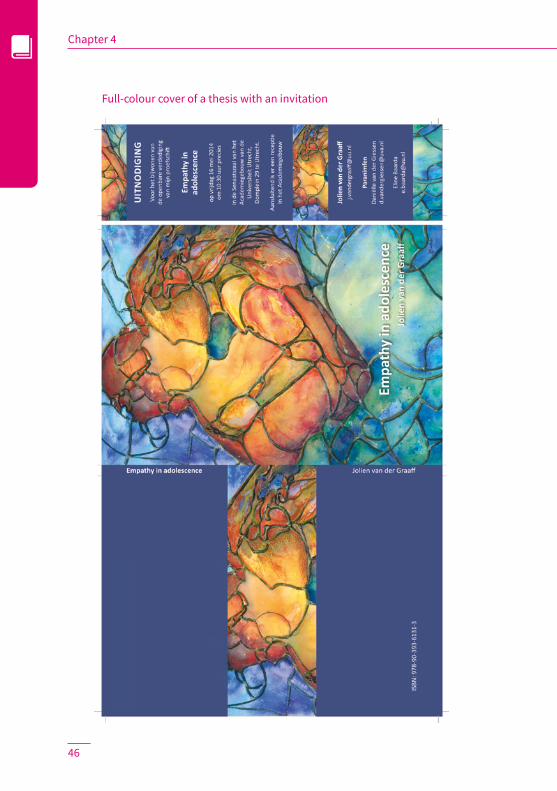
Full-colour cover of a thesis with an invitation

Cover
47
Full-colour cover


5Submission

We carefully check all files and always give customers useful advice or feedback.
#Ridderprint
Submission
51
Submitting PDFs
Most files are submitted as PDFs.
A proper PDF file meets the following requirements:
• The fonts are embedded.
• Figures should have a resolution between 150 DPI (minimum) and 300 DPI (maximum).
• All the pages of a PDF file should have the same format.
An explanation of how to create proper PDF files is given on p 55 and subsequent pages.
Things to consider when submitting a PDF
• Do all pages have the same format?
• Do the headers and footers appear in the same location on every page?
• Do the chapters start on a right-hand (odd-numbered) page?
• If you are going to use black line drawings, are these made up exclusively of black lines (as opposed to full-colour lines)?
Applying for an ISBN
By assigning an ISBN (International Standard Book Number) to your thesis, bookshops and libraries in the Netherlands and abroad will be able to find your thesis and may be able to order a copy from you.
We can apply for an ISBN on your behalf. You can specify this in your request for an offer. You will then receive a form, asking you to provide us with certain information. You can complete this form online.

Chapter 5
52
Listing Ridderprint on the Copyright page
If you would like to list Ridderprint as your printer, the following are your options:
Dutch
Inside work:• Druk: Ridderprint BV• Druk: Ridderprint BV, Ridderkerk• Druk: Ridderprint BV, www.ridderprint.nl
For the cover layout:• Cover: ‘ontwerper hier’, Ridderprint BV• Cover: Ridderprint BV, Ridderkerk• Cover: Ridderprint BV, www.ridderprint.nl
English
Inside work:• Printing: Ridderprint BV• Printing: Ridderprint BV, the Netherlands• Printing: Ridderprint BV, www.ridderprint.nl
For the cover layout:• Cover: “designer here”, Ridderprint BV• Cover: Ridderprint BV, the Netherlands• Cover: Ridderprint BV, www.ridderprint.nl

Submission
53
File submission
Files can be submitted in a number of different ways:
• By email (files smaller than 25 MB): [email protected]
• They can be uploaded to our server: www. ridderprint.nl/nl/server-upload/
• They can be uploaded through our WeTransfer channel: www.ridderprint.nl/nl/wetransfer/
• By post, on a CD or DVD. Because this takes longer, we prefer one of the other methods.
File names for uploading
When you upload files, please make sure that the file names are clear in order to avoid confusion.
For example, use:
• ‘‘yoursurname_insidework.pdf’’
• “yoursurname_cover.pdf”
• ‘‘Orderno_allfiles.zip”

Chapter 5
54
Setting the formatin PDFCreator
Select PDFCreatorfrom the list of printers

Submission
55
Creating a PDF File Using PDFCreator (Windows)
PFDCreator is a cost-free PDF creator. It can be downloaded from our web-site.
1. Start the installation of PDFCreator and follow the steps. Select ”Basic Installation” when asked to install components. After installation, PDFCreator can be used as a virtual printer.
2. Go to File > Print. Select PDFCreator from your list of printers and go to “Preferences”.
3. Select “Advanced”. Go to ”Edit custom page size” and select ”Postscript custom page size”. Set the format you use in Microsoft Word here. Click OK until you have returned to the print window.
4. Then select ”OK/Print”. A PDFCreator options window will now open. Under ”Profile”, select ”PDF/2A 2b (digital preservation)”, for the proper quality. Select “Save”, name the file and save it in a directory of your choice.
Save the PDF with the right profile

Chapter 5
56
Creating a PDF in Mac OS X

Submission
57
Creating a PDF File in Mac OS X
Recent Apple computers come standard with a PDF creator that meets the quality requirements.
We will use Microsoft Word as an example. Go to File > Print. Select “Save as PDF” from the options at the bottom of the window.
Then name the file and save it in a directory of your choice.

Chapter 5
58
Creating a PDF using Adobe Acrobat Pro
Submission
59
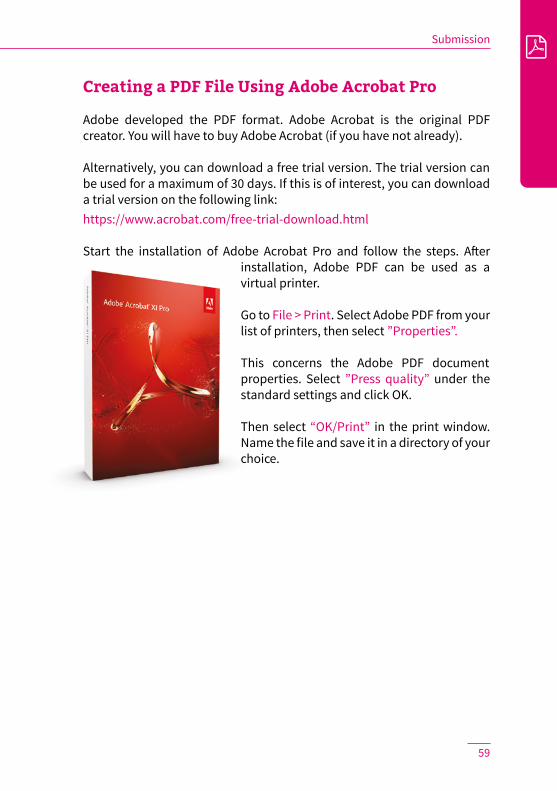
Creating a PDF File Using Adobe Acrobat Pro
Adobe developed the PDF format. Adobe Acrobat is the original PDF creator. You will have to buy Adobe Acrobat (if you have not already).
Alternatively, you can download a free trial version. The trial version can be used for a maximum of 30 days. If this is of interest, you can download a trial version on the following link: https://www.acrobat.com/free-trial-download.html
Start the installation of Adobe Acrobat Pro and follow the steps. After installation, Adobe PDF can be used as a virtual printer.
Go to File > Print. Select Adobe PDF from your list of printers, then select ”Properties”.
This concerns the Adobe PDF document properties. Select ”Press quality” under the standard settings and click OK.
Then select “OK/Print” in the print window. Name the file and save it in a directory of your choice.

Chapter 5
60
2
Creating a PDF File Using Adobe InDesign
InDesign is a professional layout programme for creating works such as books, magazines and brochures. All our layout packages are created using this software. In case you have this software, the instructions for exporting to a proper PDF file are given below.
1

Submission
61
Go to File > Export and select “Adobe PDF (Print)”.
1. Under the “General” tab:• Under “Adobe PDF presets”, select “PDF/X-1a:2001” as a basis.• Make sure the “Spreads” option is not selected.
2. Go to the “Marks and Bleeds” tab:• Only tick “Crop Marks” and “Page Information”.• Set “Offset” to 3 mm.• Under “Bleed”, set all fields to 5 mm.
3. Go to the “Export” tab:• Under “Convert Colours”, select “Convert to Destination (Preserve
Numbers)”• Under “Destination”, select “Coated FOGRA 39”• Under “Profile Inclusion Policy”, select “Don’t Include Profiles”
After following these steps, select ”Save Presets”. This allows you to name the settings. You can then select this preset the next time round.
Submitting Adobe InDesign files
If you want to submit InDesign files, you can create a ”package” . Go to File > Package. Thereby you will create a folder with the InDesign file, fonts and links to any images. You can then zip this folder and send it to us.
3

Ridderprint BVPottenbakkerstraat 15 2984 AX Ridderkerk
P.O. Box 46 2980 AA Ridderkerk
T +31 (0)180 463 962 E [email protected] I www.ridderprint.nl