Embed Size (px)
Citation preview

Reference Manual
RRA001 | v.1.1
1 | P a g e
Contents
Welcome to Palette 2
Installation & Activation 3
Instruments 4
Strings, Brass & Woodwinds 4
Percussion & Hand Percussion 9
Trailer Drums 10
Timpani 11
Tuned Percussion 12
Piano 13
Harp 14
Choir 16
Trailer Tools 17
Synth 18
List of Articulations 19
FX 20
Credits 29
License Agreement 30
2 | P a g e
WELCOME TO PALETTE
Palette is a series of thematic professional orchestral and cinematic Kontakt virtual instruments for songwriters and media composers. It was recorded in a dedicated hall with world-renowned performers by a passionate and experienced team. It was a dream come true for us to make and we hope this expansive set of scoring tools inspires you to write some great music. Palette – Symphonic Sketchpad, the flagship of the Palette line, is a 29 GB orchestral/cinematic virtual instrument featuring strings, woodwinds, brass, choir, tonal and atonal percussion, piano, harp and a set of modern hybrid trailer instruments. The orchestral ensembles offer a variety of articulations, including 4 kinds of short notes, as well as trills, tremolo, pizzicato, and other deeper techniques. We recorded 3 dynamic layers and up to 7 round robins and to give you even more flexibility we recorded everything in 2 different ensemble sizes (chamber and full) so you can go epic or go intimate.
As with the entire Palette line, our players were recorded in standard orchestral seating position with 3 microphone perspectives – Close, Decca Tree and Hall. The room is spacious but fairly dry, which allows for easy blending with other libraries using your favorite reverbs so you’re not limited to the sound of one particular hall. Since Palette – Symphonic Sketchpad was recorded by the same amazing musicians and production team with the same equipment and in the same hall, it was designed to blend perfectly with all the other Palette libraries.
3 | P a g e
INSTALLATION & ACTIVATION If this is your FIRST Palette product…
1. From your User Account downloads page (or your email), download all the .rar files. You should have one .rar titled “Palette … Main” and several numbered .rar’s starting with “Palette … Samples.part01.” Check that their file sizes match what’s listed in your download email.
2. To properly install the library you’ll need to use .rar extraction software. PC users can download the free WinRAR application, or Mac users download the free Keka app.
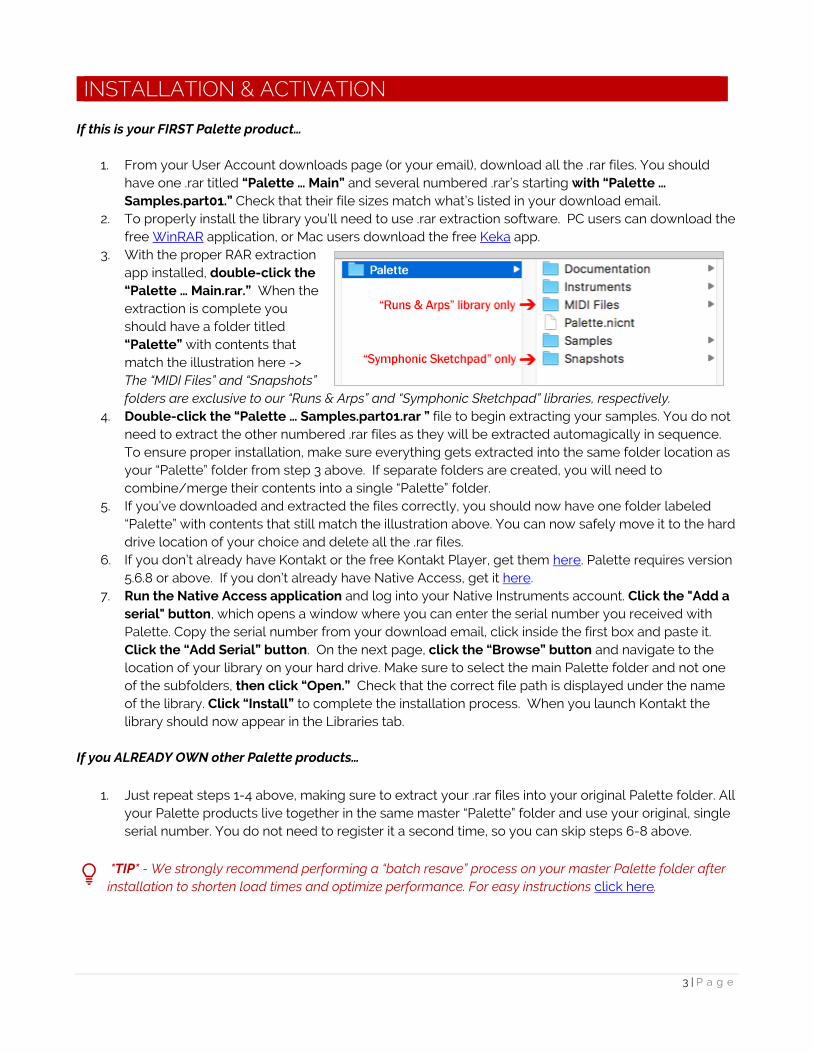
3. With the proper RAR extraction app installed, double-click the “Palette … Main.rar.” When the extraction is complete you should have a folder titled “Palette” with contents that match the illustration here -> The “MIDI Files” and “Snapshots” folders are exclusive to our “Runs & Arps” and “Symphonic Sketchpad” libraries, respectively.
4. Double-click the “Palette … Samples.part01.rar ” file to begin extracting your samples. You do not need to extract the other numbered .rar files as they will be extracted automagically in sequence. To ensure proper installation, make sure everything gets extracted into the same folder location as your “Palette” folder from step 3 above. If separate folders are created, you will need to combine/merge their contents into a single “Palette” folder.
5. If you’ve downloaded and extracted the files correctly, you should now have one folder labeled “Palette” with contents that still match the illustration above. You can now safely move it to the hard drive location of your choice and delete all the .rar files.
6. If you don’t already have Kontakt or the free Kontakt Player, get them here. Palette requires version 5.6.8 or above. If you don’t already have Native Access, get it here.
7. Run the Native Access application and log into your Native Instruments account. Click the "Add a serial" button, which opens a window where you can enter the serial number you received with Palette. Copy the serial number from your download email, click inside the first box and paste it. Click the “Add Serial” button. On the next page, click the “Browse” button and navigate to the location of your library on your hard drive. Make sure to select the main Palette folder and not one of the subfolders, then click “Open.” Check that the correct file path is displayed under the name of the library. Click “Install” to complete the installation process. When you launch Kontakt the library should now appear in the Libraries tab.
If you ALREADY OWN other Palette products…
1. Just repeat steps 1-4 above, making sure to extract your .rar files into your original Palette folder. All
your Palette products live together in the same master “Palette” folder and use your original, single serial number. You do not need to register it a second time, so you can skip steps 6-8 above.
*TIP* - We strongly recommend performing a “batch resave” process on your master Palette folder after installation to shorten load times and optimize performance. For easy instructions click here.
4 | P a g e
INSTRUMENTS Palette – Symphonic Sketchpad includes 20 Kontakt Instruments (.nki’s). Let’s go through the features and details of each. But first, 2 very handy tips:
*TIP* - We’ve added handy help text for every control in our GUI! If you’re unclear as to the function of a control, simply hover over it and the help text appears at the bottom of the Kontakt window. For patches
containing multiple instruments you can also hover over the keys in Kontakt’s virtual keyboard for mapping.
*TIP* - Palette – Symphonic Sketchpad makes use of Kontakt 5.6.8’s full available 1000-pixel wide GUI. Since
some users may be viewing on laptops or lower resolution monitors, we’ve also included a trick to narrow the GUI to eliminate the fancy artwork and display only the primary, usable portion. To go narrow, simply click on the small double-arrows in the lower left of the GUI. Then, to complete the transformation, click on the exclamation point (!) in the top right corner of Kontakt. Voila! Repeat this same process to go wide again.
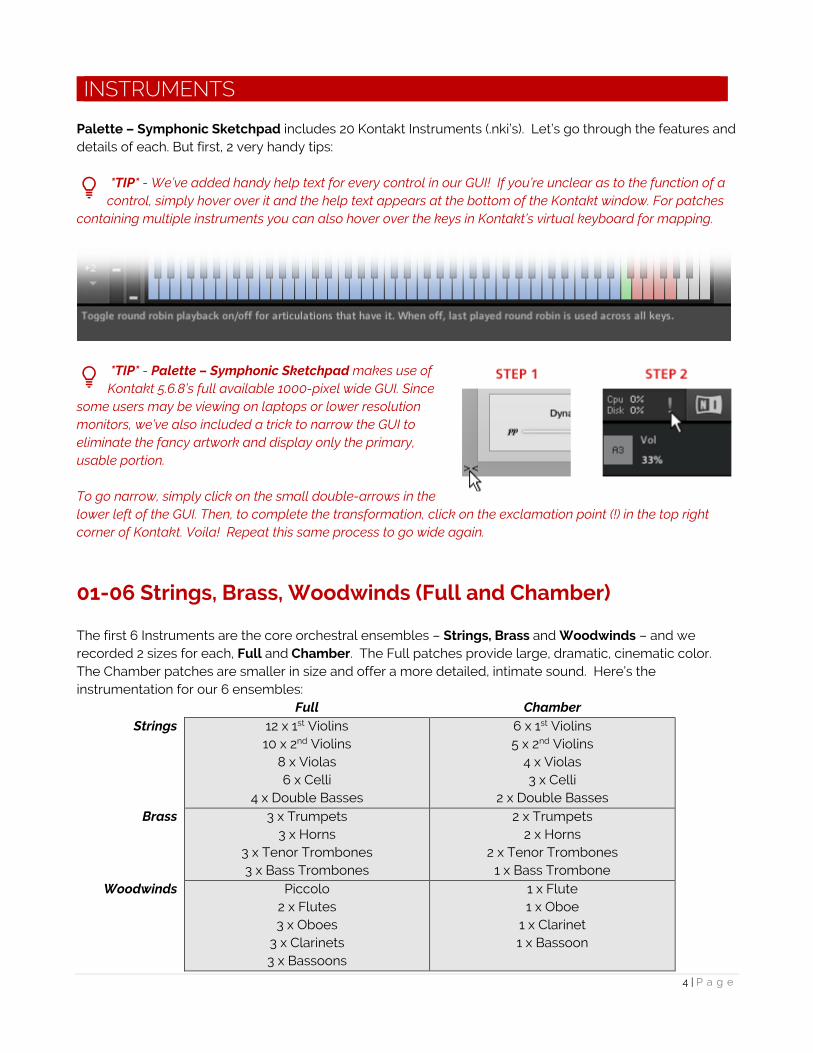
01-06 Strings, Brass, Woodwinds (Full and Chamber) The first 6 Instruments are the core orchestral ensembles – Strings, Brass and Woodwinds – and we recorded 2 sizes for each, Full and Chamber. The Full patches provide large, dramatic, cinematic color. The Chamber patches are smaller in size and offer a more detailed, intimate sound. Here’s the instrumentation for our 6 ensembles:
Full Chamber Strings 12 x 1st Violins
10 x 2nd Violins 8 x Violas 6 x Celli
4 x Double Basses
6 x 1st Violins 5 x 2nd Violins
4 x Violas 3 x Celli
2 x Double Basses Brass 3 x Trumpets
3 x Horns 3 x Tenor Trombones 3 x Bass Trombones
2 x Trumpets 2 x Horns
2 x Tenor Trombones 1 x Bass Trombone
Woodwinds Piccolo 2 x Flutes 3 x Oboes
3 x Clarinets 3 x Bassoons
1 x Flute 1 x Oboe
1 x Clarinet 1 x Bassoon
5 | P a g e
*TIP* - If you’re feeling adventurous try layering the Full and Chamber patches to create a massive ensemble!
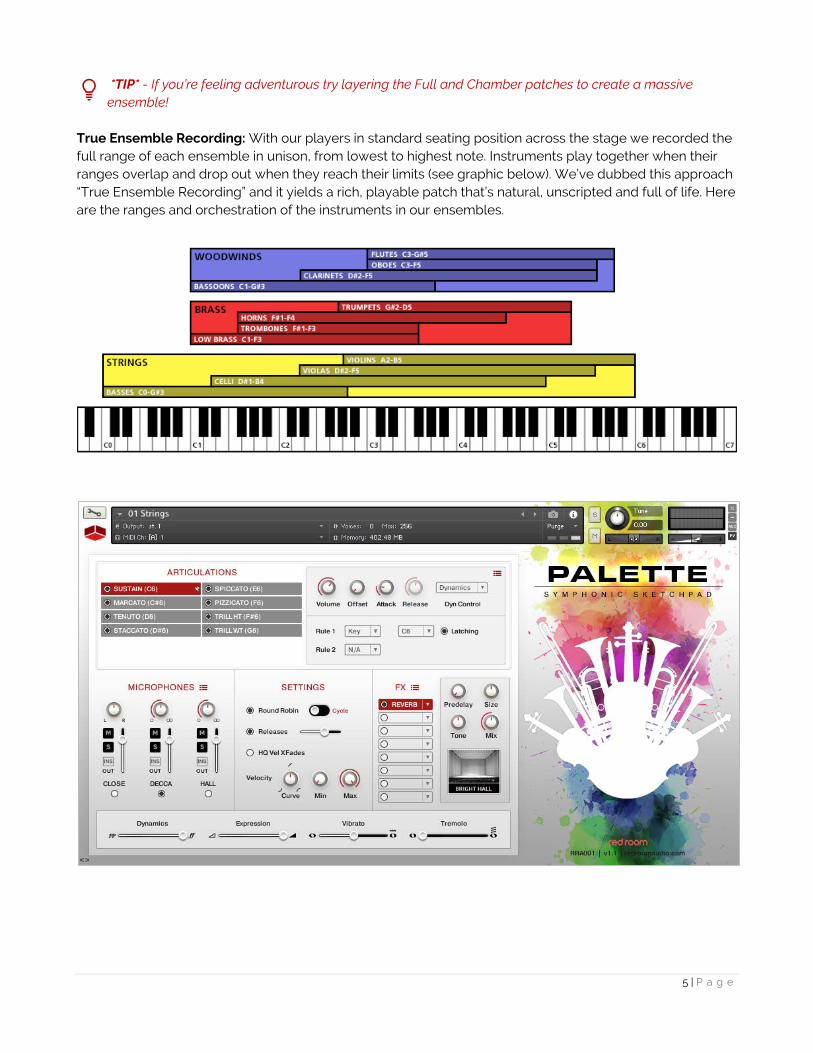
True Ensemble Recording: With our players in standard seating position across the stage we recorded the full range of each ensemble in unison, from lowest to highest note. Instruments play together when their ranges overlap and drop out when they reach their limits (see graphic below). We’ve dubbed this approach “True Ensemble Recording” and it yields a rich, playable patch that’s natural, unscripted and full of life. Here are the ranges and orchestration of the instruments in our ensembles.
6 | P a g e
Articulations
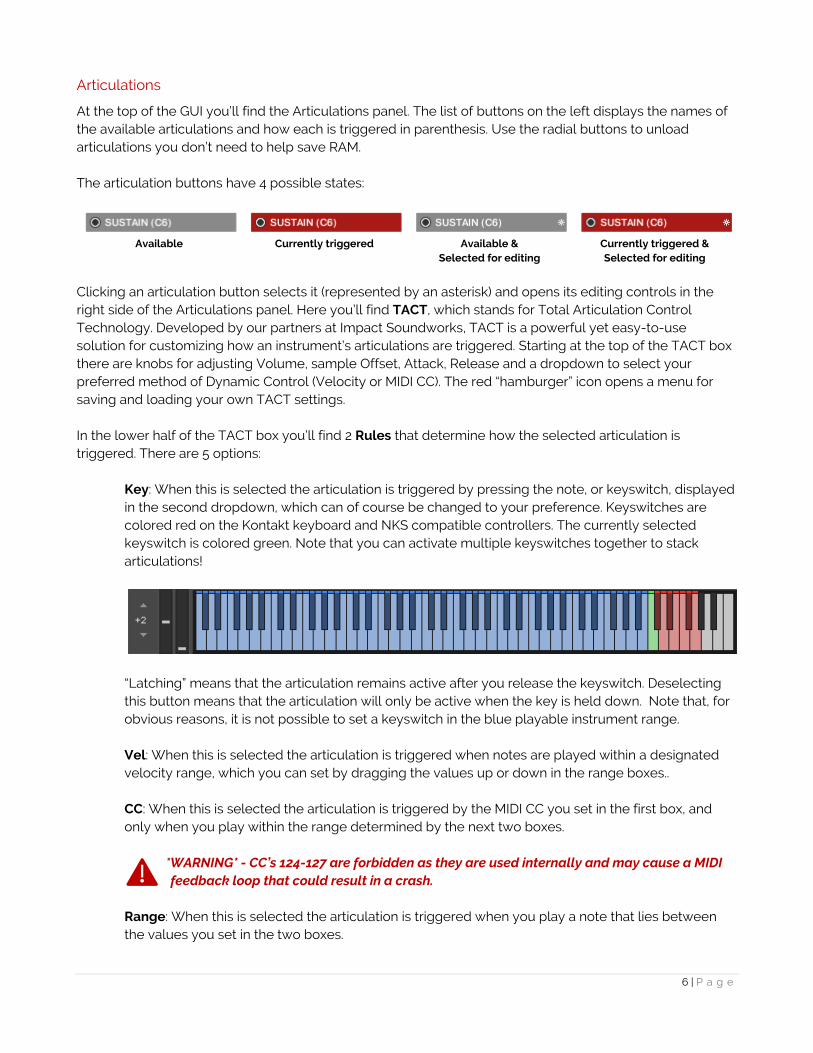
At the top of the GUI you’ll find the Articulations panel. The list of buttons on the left displays the names of the available articulations and how each is triggered in parenthesis. Use the radial buttons to unload articulations you don’t need to help save RAM. The articulation buttons have 4 possible states:
Available Currently triggered Available &
Selected for editing Currently triggered & Selected for editing
Clicking an articulation button selects it (represented by an asterisk) and opens its editing controls in the right side of the Articulations panel. Here you’ll find TACT, which stands for Total Articulation Control Technology. Developed by our partners at Impact Soundworks, TACT is a powerful yet easy-to-use solution for customizing how an instrument’s articulations are triggered. Starting at the top of the TACT box there are knobs for adjusting Volume, sample Offset, Attack, Release and a dropdown to select your preferred method of Dynamic Control (Velocity or MIDI CC). The red “hamburger” icon opens a menu for saving and loading your own TACT settings. In the lower half of the TACT box you’ll find 2 Rules that determine how the selected articulation is triggered. There are 5 options:
Key: When this is selected the articulation is triggered by pressing the note, or keyswitch, displayed in the second dropdown, which can of course be changed to your preference. Keyswitches are colored red on the Kontakt keyboard and NKS compatible controllers. The currently selected keyswitch is colored green. Note that you can activate multiple keyswitches together to stack articulations!
“Latching” means that the articulation remains active after you release the keyswitch. Deselecting this button means that the articulation will only be active when the key is held down. Note that, for obvious reasons, it is not possible to set a keyswitch in the blue playable instrument range.
Vel: When this is selected the articulation is triggered when notes are played within a designated velocity range, which you can set by dragging the values up or down in the range boxes.. CC: When this is selected the articulation is triggered by the MIDI CC you set in the first box, and only when you play within the range determined by the next two boxes.
*WARNING* - CC’s 124-127 are forbidden as they are used internally and may cause a MIDI feedback loop that could result in a crash.
Range: When this is selected the articulation is triggered when you play a note that lies between the values you set in the two boxes.
7 | P a g e
Pedal: When this is selected the articulation is triggered when you press/activatate a sustain/control pedal (also known as CC64).
*TIP* - Try using rules to layer 2 different articulations. This is useful when, for example, you’d like to create a sforzando by overlapping Staccato and Sustain. Set Sustain’s Rule 1 to a Keyswitch and the
Staccato’s Rule 1 to a Velocity range, maybe 110-127. Now when you hit a Sustain hard you get sforzando! In most cases, like a typical keyswitched setup, one Rule will be sufficient. But there may be times when you’d activate a second. For example, you might set all the short articulations to the same Rule 1 keyswitch, but then set Rule 2 to Velocity to trigger each one with a different velocity range for quicker performance (e.g. Marcato 00-40, Tenuto 41-70, Staccato 71-100, Spiccato 101-127). Another example is to set Rule 1 for both kinds of trills to the same keyswitch and set the WT Trill’s Rule 2 to Pedal. There are many possibilities. Notice that when you change an articulation’s rule(s) that gets updated on the articulation button so you can always see at a glance how each is currently set be triggered. Microphones
The second panel of the GUI contains the microphone controls. For each of the 3 mic positions - Close, Decca and Hall - there’s an on/off button (turn off unneeded mics to save RAM), volume fader, pan knob, mute & solo buttons and a button to select the output channel for cases when you’d like each mics routed to different tracks in your DAW. The red “hamburger” button allows you to save/load mixer settings. Settings
The third (center) panel of the GUI is where you can adjust various performance settings.
Round Robin: Turning this off deactivates the additional round robin samples, which makes the instrument sound more robotic. It is recommended that this be left on for more realistic results. The switch changes the order of playback of the round robins from Cycle to Random. Releases: Releases provide a more natural, realistic ending to sustained notes when you release the key. Again we recommend these be left on for a best results. You can use the slider to adjust their volume. HQ Vel Xfade: When this is active Kontakt employs AET filters on all short articulations to smooth out the steps between dynamics layers for more natural results. Note that this does, however, use more CPU. Velocity: These 3 knobs allow you to customize the velocity curve for additional control over dynamics. This will be most useful for short articulations and when Dyn Control is set to Velocity in TACT.
FX
The fourth panel of the GUI houses a compact yet powerful 8-slot FX rack. To load an effect, click on any slot’s down-facing arrow. This opens a dropdown where you can select one of 17 effects, or move them up or down in the rack to change their order. The radio buttons turn the slot on and off (bypass).
8 | P a g e
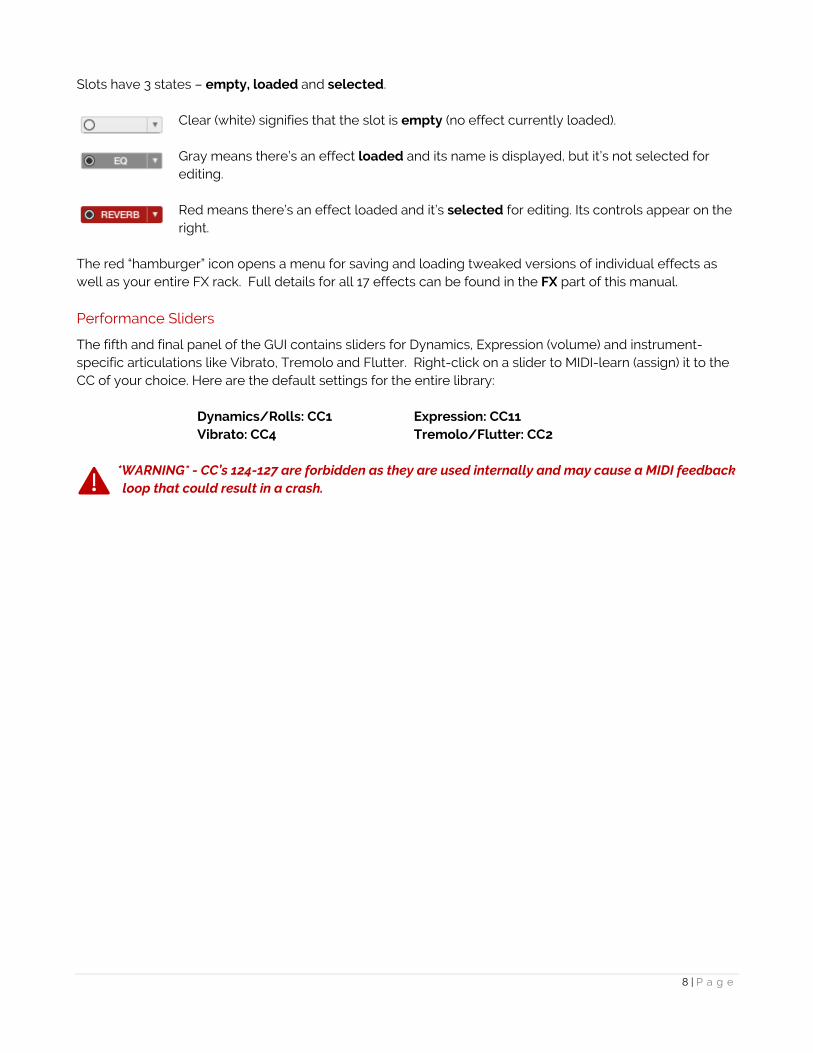
Slots have 3 states – empty, loaded and selected.
Clear (white) signifies that the slot is empty (no effect currently loaded). Gray means there’s an effect loaded and its name is displayed, but it’s not selected for editing.
Red means there’s an effect loaded and it’s selected for editing. Its controls appear on the right.
The red “hamburger” icon opens a menu for saving and loading tweaked versions of individual effects as well as your entire FX rack. Full details for all 17 effects can be found in the FX part of this manual. Performance Sliders
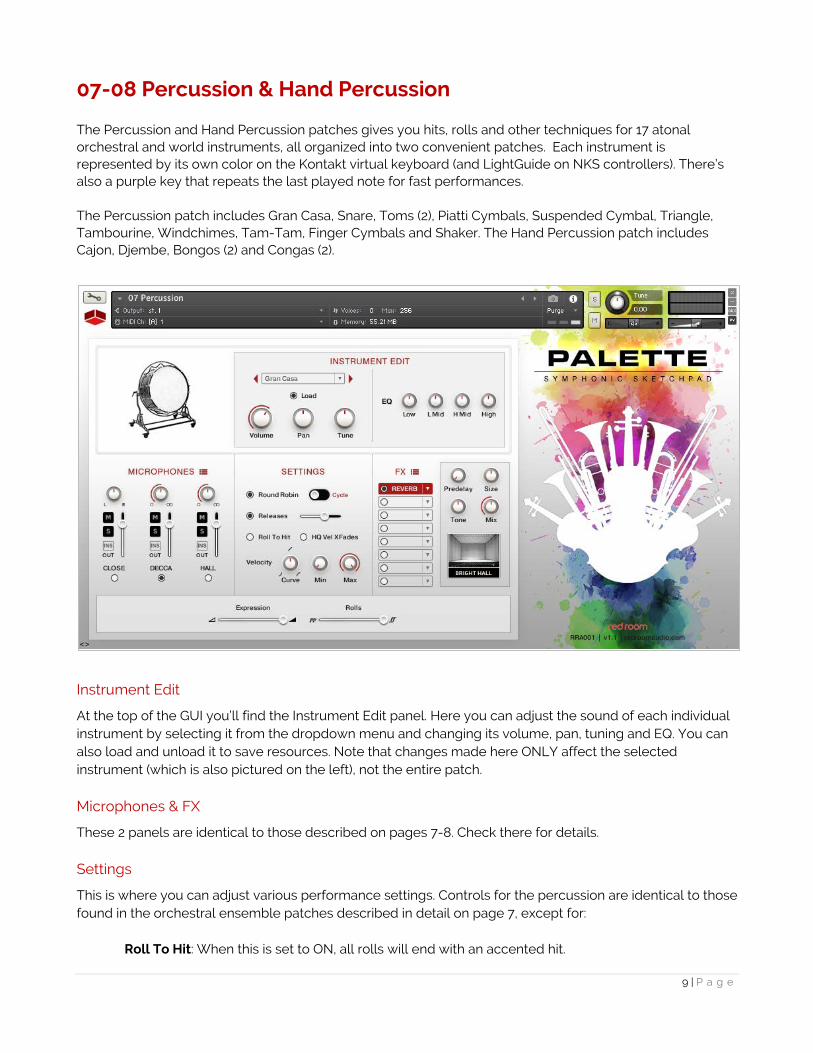
The fifth and final panel of the GUI contains sliders for Dynamics, Expression (volume) and instrument-specific articulations like Vibrato, Tremolo and Flutter. Right-click on a slider to MIDI-learn (assign) it to the CC of your choice. Here are the default settings for the entire library:
Dynamics/Rolls: CC1 Expression: CC11 Vibrato: CC4 Tremolo/Flutter: CC2
*WARNING* - CC’s 124-127 are forbidden as they are used internally and may cause a MIDI feedback loop that could result in a crash.
9 | P a g e
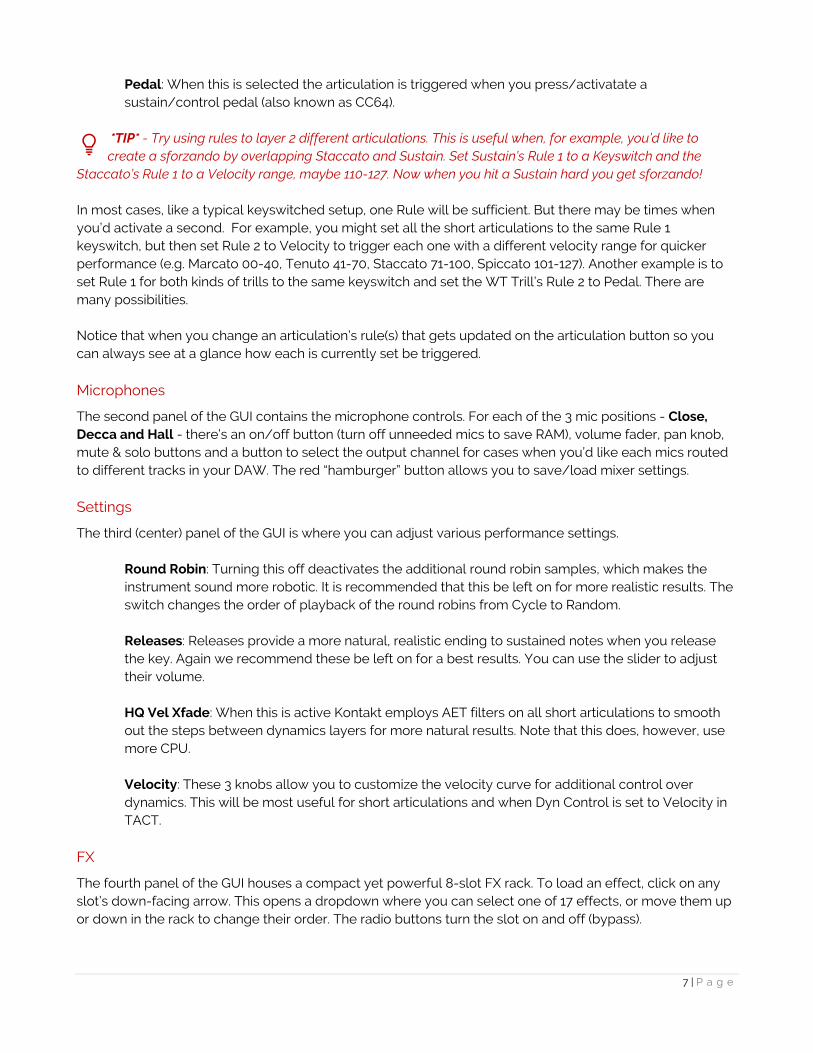
07-08 Percussion & Hand Percussion The Percussion and Hand Percussion patches gives you hits, rolls and other techniques for 17 atonal orchestral and world instruments, all organized into two convenient patches. Each instrument is represented by its own color on the Kontakt virtual keyboard (and LightGuide on NKS controllers). There’s also a purple key that repeats the last played note for fast performances. The Percussion patch includes Gran Casa, Snare, Toms (2), Piatti Cymbals, Suspended Cymbal, Triangle, Tambourine, Windchimes, Tam-Tam, Finger Cymbals and Shaker. The Hand Percussion patch includes Cajon, Djembe, Bongos (2) and Congas (2).
Instrument Edit
At the top of the GUI you’ll find the Instrument Edit panel. Here you can adjust the sound of each individual instrument by selecting it from the dropdown menu and changing its volume, pan, tuning and EQ. You can also load and unload it to save resources. Note that changes made here ONLY affect the selected instrument (which is also pictured on the left), not the entire patch. Microphones & FX
These 2 panels are identical to those described on pages 7-8. Check there for details. Settings
This is where you can adjust various performance settings. Controls for the percussion are identical to those found in the orchestral ensemble patches described in detail on page 7, except for:
Roll To Hit: When this is set to ON, all rolls will end with an accented hit.
10 | P a g e
Performance Sliders
The bottom panel of the GUI contains sliders for Expression (volume) and Rolls Dynamics (assigned by default to CC1/mod wheel). Right-click on a slider to MIDI-learn (assign) it to the CC of your choice. Please refer to page 8 to review default slider assignments.
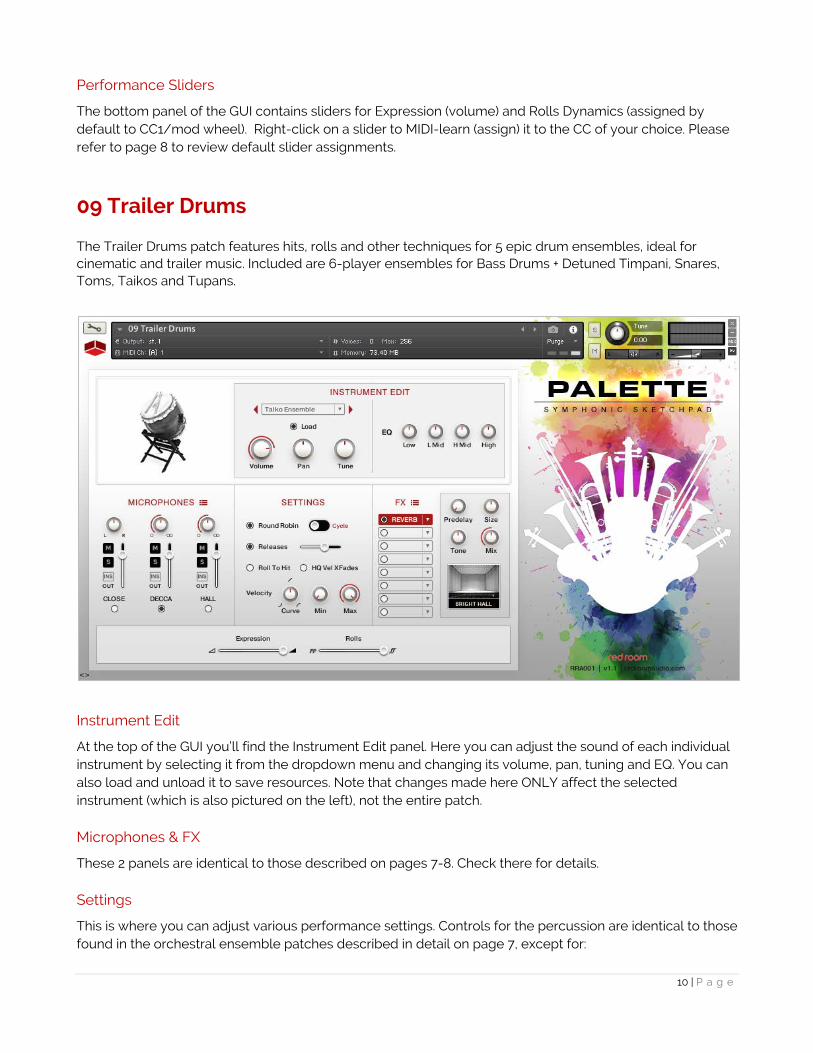
09 Trailer Drums The Trailer Drums patch features hits, rolls and other techniques for 5 epic drum ensembles, ideal for cinematic and trailer music. Included are 6-player ensembles for Bass Drums + Detuned Timpani, Snares, Toms, Taikos and Tupans.
Instrument Edit
At the top of the GUI you’ll find the Instrument Edit panel. Here you can adjust the sound of each individual instrument by selecting it from the dropdown menu and changing its volume, pan, tuning and EQ. You can also load and unload it to save resources. Note that changes made here ONLY affect the selected instrument (which is also pictured on the left), not the entire patch. Microphones & FX
These 2 panels are identical to those described on pages 7-8. Check there for details. Settings
This is where you can adjust various performance settings. Controls for the percussion are identical to those found in the orchestral ensemble patches described in detail on page 7, except for:
11 | P a g e
Roll To Hit: When this is set to ON, all rolls will end with an accented hit. Performance Sliders
The bottom panel of the GUI contains sliders for Expression (volume) and Rolls Dynamics (assigned by default to CC1/mod wheel). Right-click on a slider to MIDI-learn (assign) it to the CC of your choice. Please refer to page 8 to review default slider assignments.
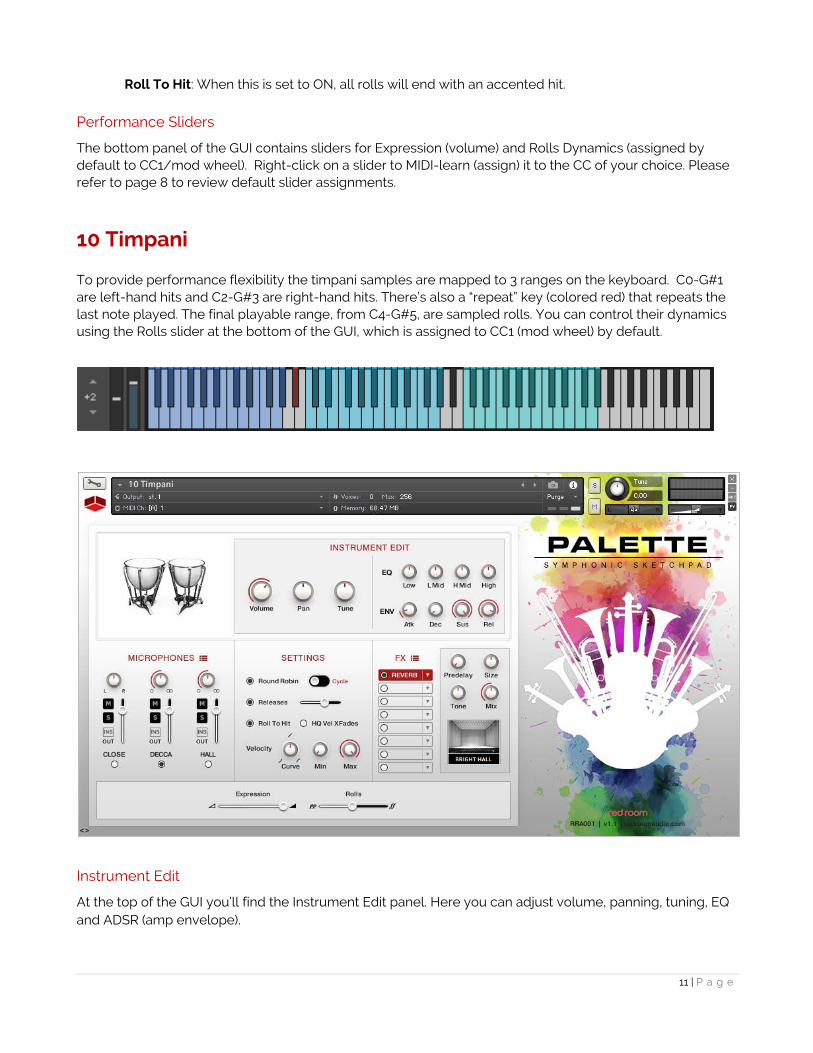
10 Timpani To provide performance flexibility the timpani samples are mapped to 3 ranges on the keyboard. C0-G#1 are left-hand hits and C2-G#3 are right-hand hits. There’s also a “repeat” key (colored red) that repeats the last note played. The final playable range, from C4-G#5, are sampled rolls. You can control their dynamics using the Rolls slider at the bottom of the GUI, which is assigned to CC1 (mod wheel) by default.
Instrument Edit
At the top of the GUI you’ll find the Instrument Edit panel. Here you can adjust volume, panning, tuning, EQ and ADSR (amp envelope).

12 | P a g e
Microphones & FX
These 2 panels are identical to those described on pages 7-8. Check there for details. Settings
This is where you can adjust various performance settings. Controls for the timpani patch are identical to those found in the orchestral ensemble patches described in detail on page 7, except for:
Roll To Hit: When this is set to ON, all rolls will end with an accented hit. HQ Vel Xfade: When this is active Kontakt employs AET filters to smooth out the steps between dynamics layers for more natural results. Note that this does, however, use more CPU.
Performance Sliders
The bottom panel of the GUI contains sliders for Expression (volume) and Rolls Dynamics (assigned by default to CC1/mod wheel). Right-click on a slider to MIDI-learn (assign) it to the CC of your choice. Please refer to page 8 to review default slider assignments.
11-15 Tubular Bells, Crotales, Glockenspiel, Marimba & Xylophone These 5 tonal percussion patches share the same set of controls and features.
13 | P a g e
Instrument Edit
At the top of the GUI you’ll find the Instrument Edit panel. Here you can adjust volume, panning, tuning, EQ and ADSR (amp envelope). Microphones & FX
These 2 panels are identical to those described on pages 7-8. Check there for details. Settings
This is where you can adjust various performance settings. Controls for these 5 tonal percussion patches are identical to those found in the orchestral ensemble patches described in detail on page 7.
Performance Slider
The bottom panel contains the Expression (volume) slider (assigned by default to CC11). Right-click on the slider to MIDI-learn (assign) it to the CC of your choice. Please refer to page 8 to review default slider assignments.
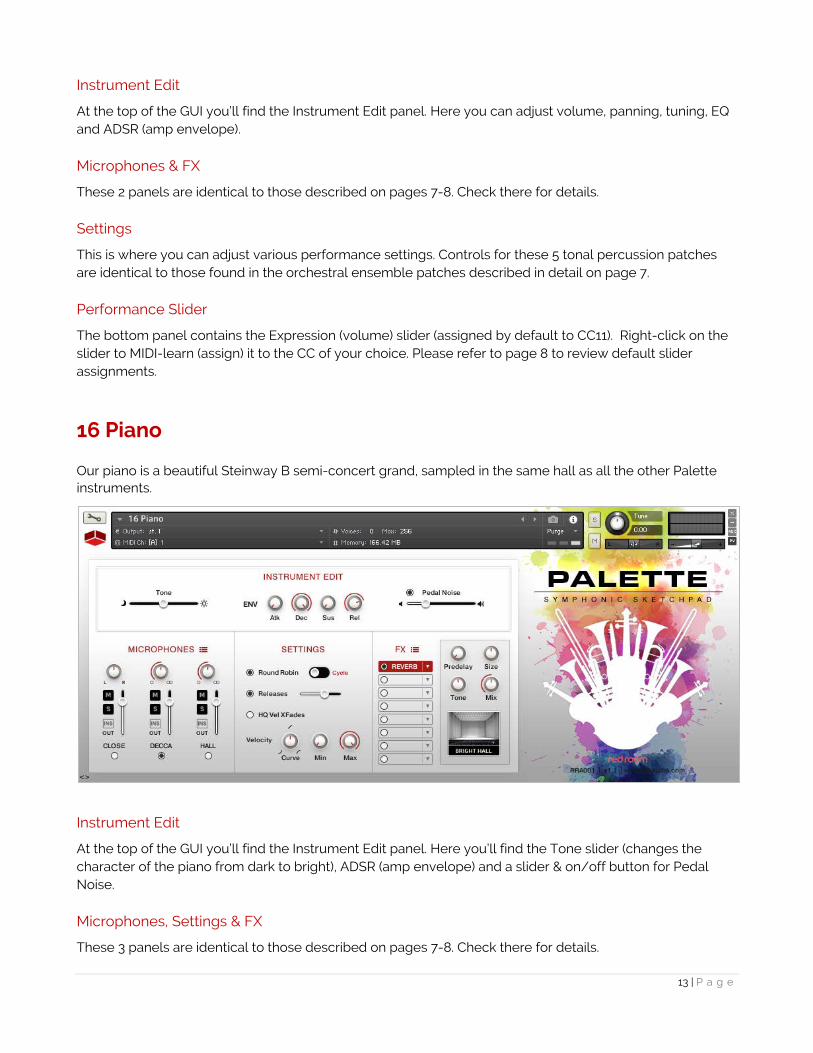
16 Piano Our piano is a beautiful Steinway B semi-concert grand, sampled in the same hall as all the other Palette instruments.
Instrument Edit
At the top of the GUI you’ll find the Instrument Edit panel. Here you’ll find the Tone slider (changes the character of the piano from dark to bright), ADSR (amp envelope) and a slider & on/off button for Pedal Noise. Microphones, Settings & FX
These 3 panels are identical to those described on pages 7-8. Check there for details.
14 | P a g e
17 Harp
Mode
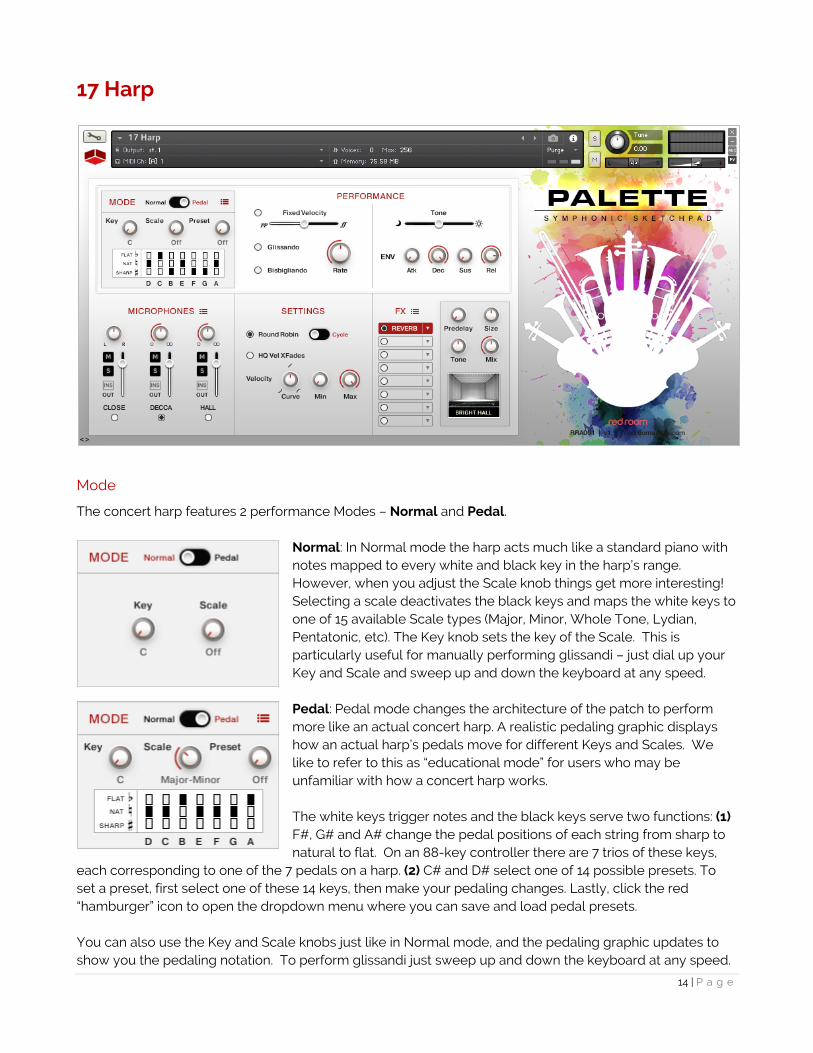
The concert harp features 2 performance Modes – Normal and Pedal.
Normal: In Normal mode the harp acts much like a standard piano with notes mapped to every white and black key in the harp’s range. However, when you adjust the Scale knob things get more interesting! Selecting a scale deactivates the black keys and maps the white keys to one of 15 available Scale types (Major, Minor, Whole Tone, Lydian, Pentatonic, etc). The Key knob sets the key of the Scale. This is particularly useful for manually performing glissandi – just dial up your Key and Scale and sweep up and down the keyboard at any speed. Pedal: Pedal mode changes the architecture of the patch to perform more like an actual concert harp. A realistic pedaling graphic displays how an actual harp’s pedals move for different Keys and Scales. We like to refer to this as “educational mode” for users who may be unfamiliar with how a concert harp works. The white keys trigger notes and the black keys serve two functions: (1) F#, G# and A# change the pedal positions of each string from sharp to natural to flat. On an 88-key controller there are 7 trios of these keys,
each corresponding to one of the 7 pedals on a harp. (2) C# and D# select one of 14 possible presets. To set a preset, first select one of these 14 keys, then make your pedaling changes. Lastly, click the red “hamburger” icon to open the dropdown menu where you can save and load pedal presets. You can also use the Key and Scale knobs just like in Normal mode, and the pedaling graphic updates to show you the pedaling notation. To perform glissandi just sweep up and down the keyboard at any speed.
15 | P a g e
Performance
Next to the Mode panel is the Performance controls, which allow you to shape the tone of the harp as well as activate alternative techniques. The Tone slider (assigned to CC11 by default) changes the brightness of the harp and ADSR (amp envelope) can be used as you’d expect to adjust note length, attack, decay, etc.
Fixed Velocity: When ON, this forces all notes to remain at the designated dynamic regardless of how heavily they are played on the keyboard. Here, the slider is assigned to CC1/mod wheel by default. Glissando: In Glissando mode, you can define a glissando range by playing two notes tied (legato). You can adjust its speed with the Speed knob. Multiple glissandi can be chained together by playing different clusters of two tied notes in quick succession. Bisbigliando: Bisbigliando is a performance technique that alternates between two clusters of notes. It works similarly to Glissando mode, except you can play two notes that are spread out as long as you tie between them (legato).
Microphones, Settings & FX
These 2 panels are identical to those described on pages 7-8. Check there for details.
16 | P a g e
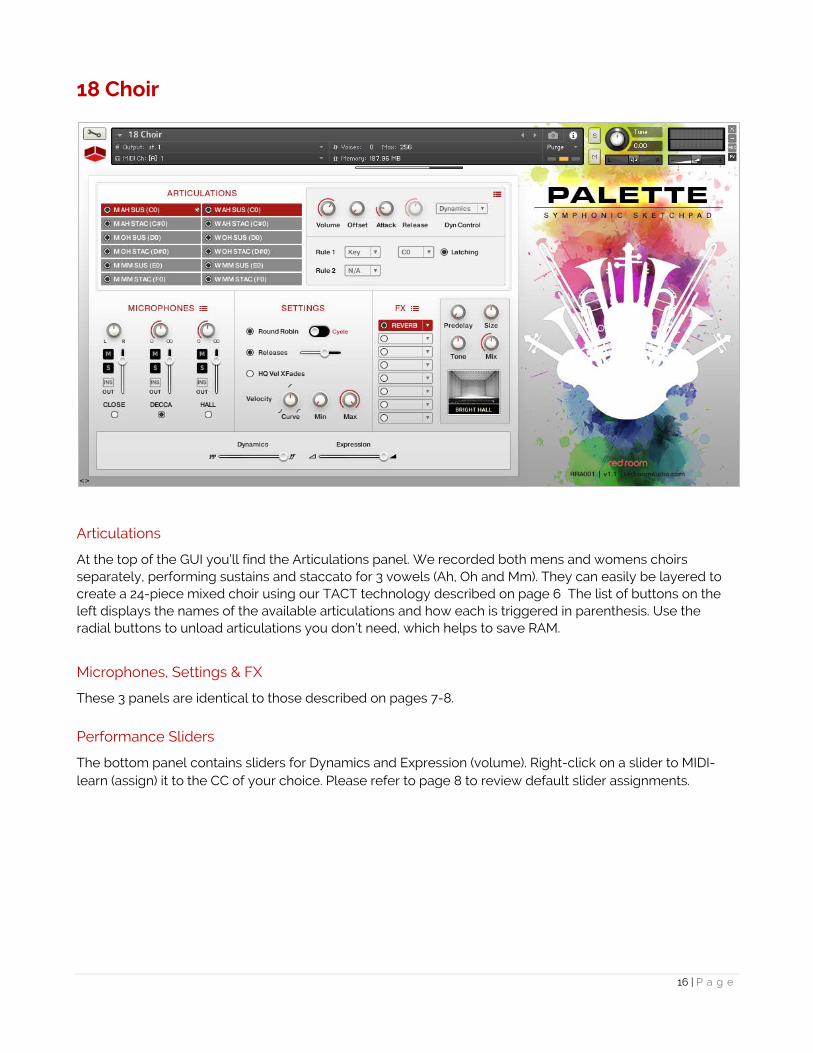
18 Choir
Articulations
At the top of the GUI you’ll find the Articulations panel. We recorded both mens and womens choirs separately, performing sustains and staccato for 3 vowels (Ah, Oh and Mm). They can easily be layered to create a 24-piece mixed choir using our TACT technology described on page 6 The list of buttons on the left displays the names of the available articulations and how each is triggered in parenthesis. Use the radial buttons to unload articulations you don’t need, which helps to save RAM.
Microphones, Settings & FX
These 3 panels are identical to those described on pages 7-8. Performance Sliders
The bottom panel contains sliders for Dynamics and Expression (volume). Right-click on a slider to MIDI-learn (assign) it to the CC of your choice. Please refer to page 8 to review default slider assignments.
17 | P a g e
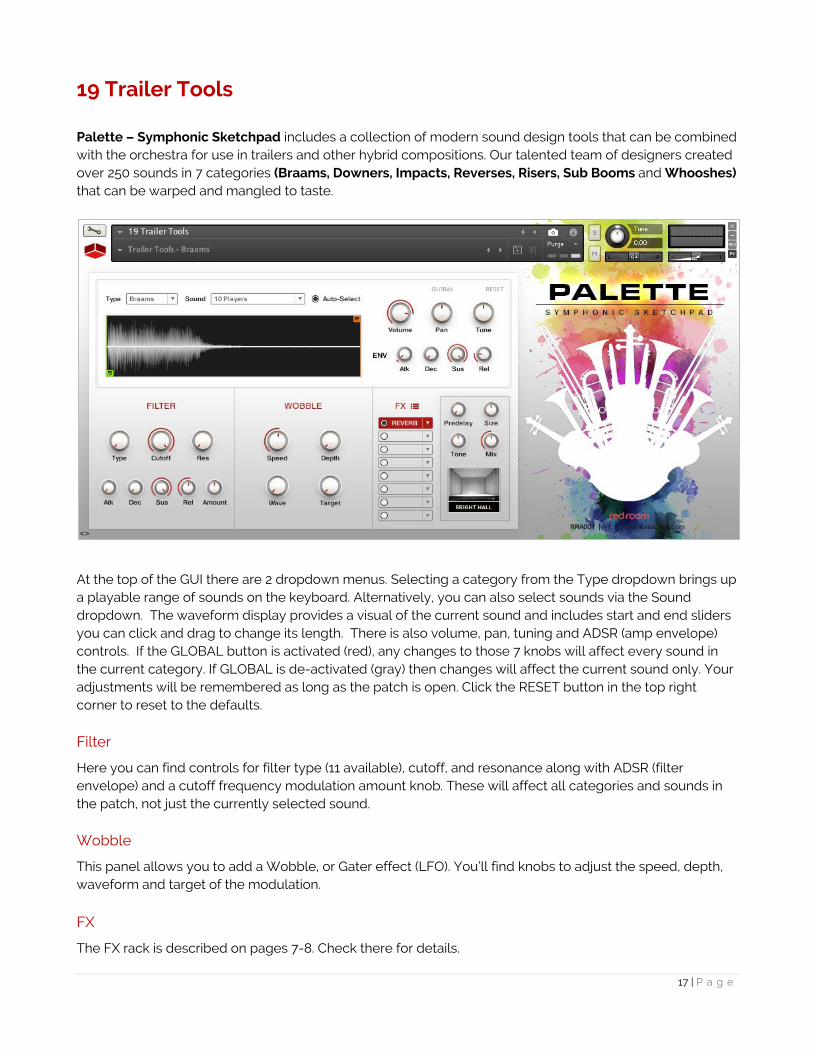
19 Trailer Tools
Palette – Symphonic Sketchpad includes a collection of modern sound design tools that can be combined with the orchestra for use in trailers and other hybrid compositions. Our talented team of designers created over 250 sounds in 7 categories (Braams, Downers, Impacts, Reverses, Risers, Sub Booms and Whooshes) that can be warped and mangled to taste.
At the top of the GUI there are 2 dropdown menus. Selecting a category from the Type dropdown brings up a playable range of sounds on the keyboard. Alternatively, you can also select sounds via the Sound dropdown. The waveform display provides a visual of the current sound and includes start and end sliders you can click and drag to change its length. There is also volume, pan, tuning and ADSR (amp envelope) controls. If the GLOBAL button is activated (red), any changes to those 7 knobs will affect every sound in the current category. If GLOBAL is de-activated (gray) then changes will affect the current sound only. Your adjustments will be remembered as long as the patch is open. Click the RESET button in the top right corner to reset to the defaults. Filter
Here you can find controls for filter type (11 available), cutoff, and resonance along with ADSR (filter envelope) and a cutoff frequency modulation amount knob. These will affect all categories and sounds in the patch, not just the currently selected sound. Wobble
This panel allows you to add a Wobble, or Gater effect (LFO). You’ll find knobs to adjust the speed, depth, waveform and target of the modulation. FX
The FX rack is described on pages 7-8. Check there for details.
18 | P a g e
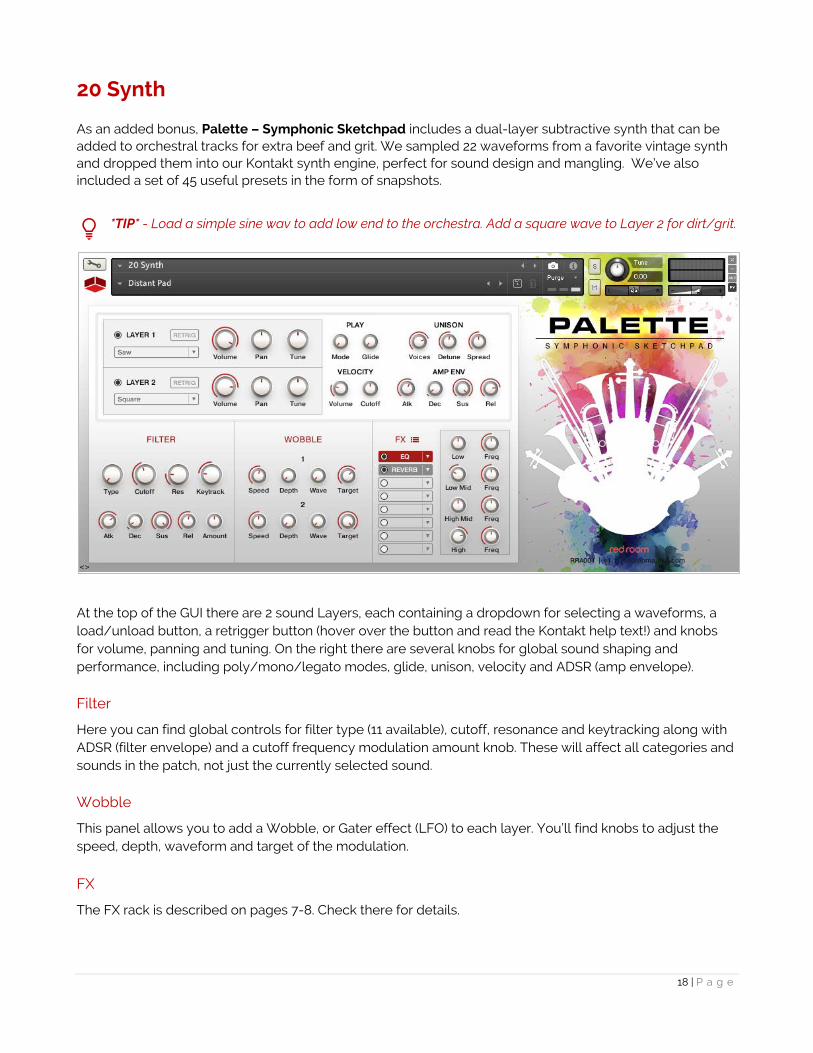
20 Synth As an added bonus, Palette – Symphonic Sketchpad includes a dual-layer subtractive synth that can be added to orchestral tracks for extra beef and grit. We sampled 22 waveforms from a favorite vintage synth and dropped them into our Kontakt synth engine, perfect for sound design and mangling. We’ve also included a set of 45 useful presets in the form of snapshots.
*TIP* - Load a simple sine wav to add low end to the orchestra. Add a square wave to Layer 2 for dirt/grit.
At the top of the GUI there are 2 sound Layers, each containing a dropdown for selecting a waveforms, a load/unload button, a retrigger button (hover over the button and read the Kontakt help text!) and knobs for volume, panning and tuning. On the right there are several knobs for global sound shaping and performance, including poly/mono/legato modes, glide, unison, velocity and ADSR (amp envelope). Filter
Here you can find global controls for filter type (11 available), cutoff, resonance and keytracking along with ADSR (filter envelope) and a cutoff frequency modulation amount knob. These will affect all categories and sounds in the patch, not just the currently selected sound. Wobble
This panel allows you to add a Wobble, or Gater effect (LFO) to each layer. You’ll find knobs to adjust the speed, depth, waveform and target of the modulation. FX
The FX rack is described on pages 7-8. Check there for details.
19 | P a g e
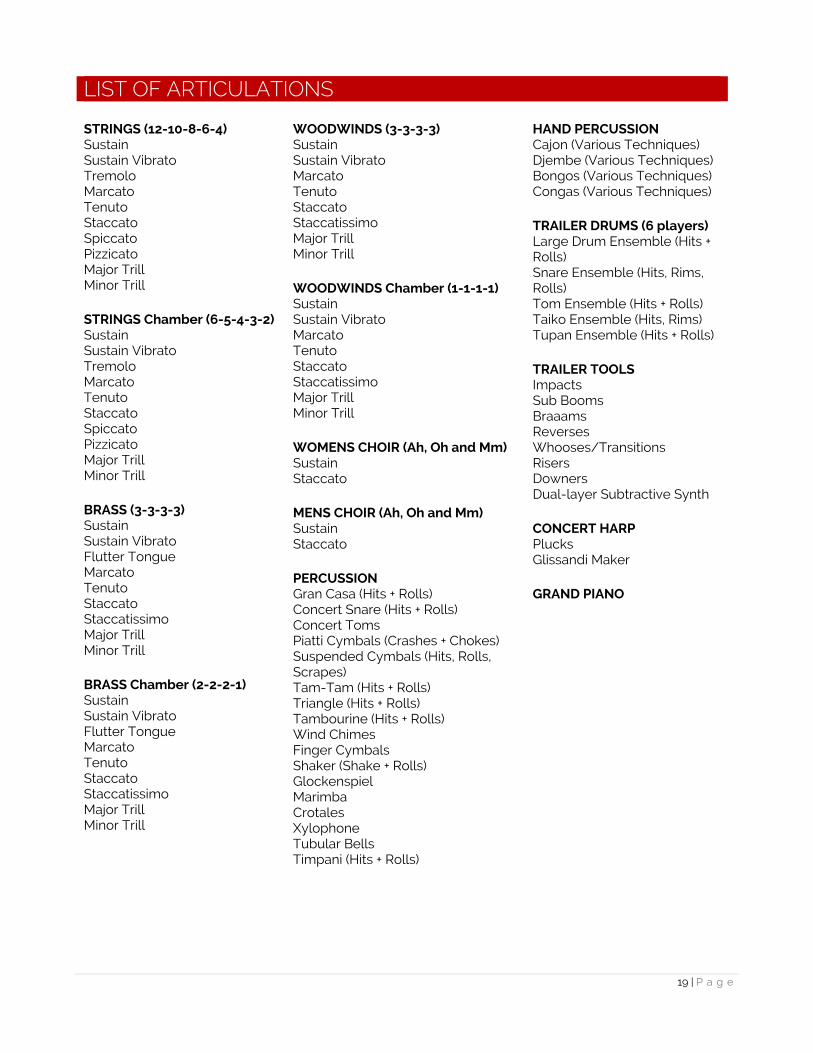
LIST OF ARTICULATIONS
STRINGS (12-10-8-6-4) Sustain Sustain Vibrato Tremolo Marcato Tenuto Staccato Spiccato Pizzicato Major Trill Minor Trill
STRINGS Chamber (6-5-4-3-2) Sustain Sustain Vibrato Tremolo Marcato Tenuto Staccato Spiccato Pizzicato Major Trill Minor Trill
BRASS (3-3-3-3) Sustain Sustain Vibrato Flutter Tongue Marcato Tenuto Staccato Staccatissimo Major Trill Minor Trill
BRASS Chamber (2-2-2-1) Sustain Sustain Vibrato Flutter Tongue Marcato Tenuto Staccato Staccatissimo Major Trill Minor Trill
WOODWINDS (3-3-3-3) Sustain Sustain Vibrato Marcato Tenuto Staccato Staccatissimo Major Trill Minor Trill
WOODWINDS Chamber (1-1-1-1) Sustain Sustain Vibrato Marcato Tenuto Staccato Staccatissimo Major Trill Minor Trill
WOMENS CHOIR (Ah, Oh and Mm) Sustain Staccato
MENS CHOIR (Ah, Oh and Mm) Sustain Staccato
PERCUSSION Gran Casa (Hits + Rolls) Concert Snare (Hits + Rolls) Concert Toms Piatti Cymbals (Crashes + Chokes) Suspended Cymbals (Hits, Rolls, Scrapes) Tam-Tam (Hits + Rolls) Triangle (Hits + Rolls) Tambourine (Hits + Rolls) Wind Chimes Finger Cymbals Shaker (Shake + Rolls) Glockenspiel Marimba Crotales Xylophone Tubular Bells Timpani (Hits + Rolls)
HAND PERCUSSION Cajon (Various Techniques) Djembe (Various Techniques) Bongos (Various Techniques) Congas (Various Techniques)
TRAILER DRUMS (6 players) Large Drum Ensemble (Hits + Rolls) Snare Ensemble (Hits, Rims, Rolls) Tom Ensemble (Hits + Rolls) Taiko Ensemble (Hits, Rims) Tupan Ensemble (Hits + Rolls)
TRAILER TOOLS Impacts Sub Booms Braaams Reverses Whooses/Transitions Risers Downers Dual-layer Subtractive Synth
CONCERT HARP Plucks Glissandi Maker
GRAND PIANO
20 | P a g e
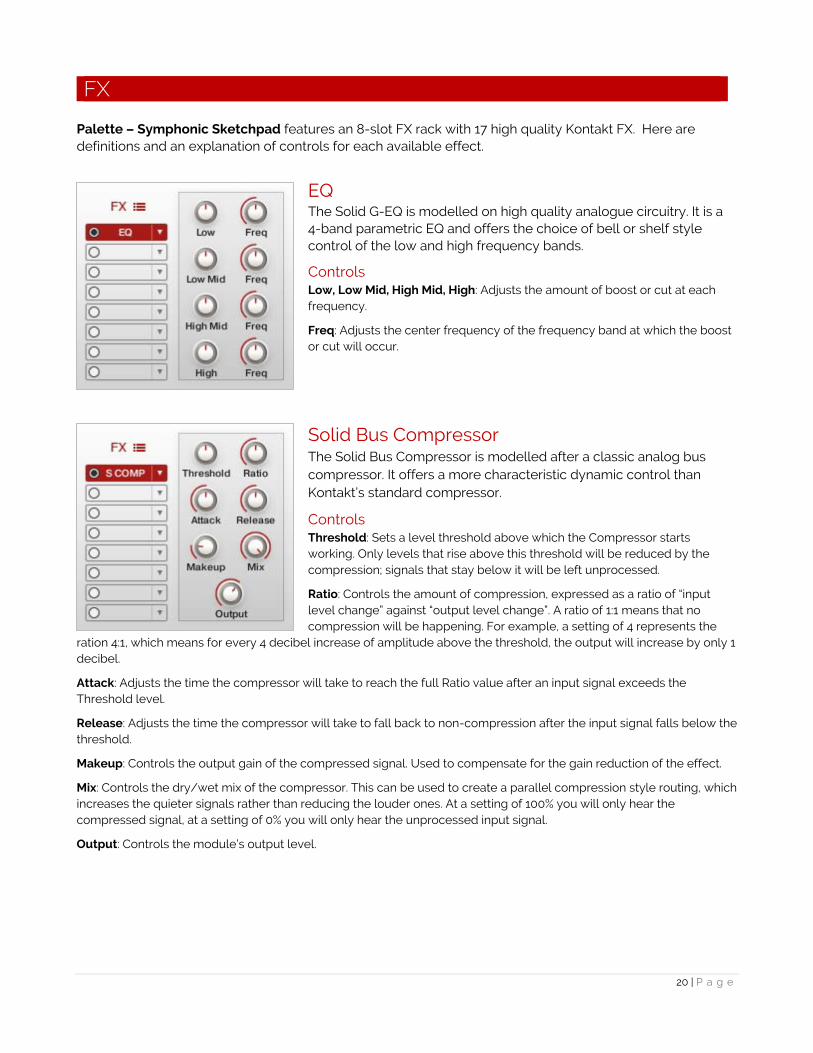
FX Palette – Symphonic Sketchpad features an 8-slot FX rack with 17 high quality Kontakt FX. Here are definitions and an explanation of controls for each available effect.
EQ The Solid G-EQ is modelled on high quality analogue circuitry. It is a 4-band parametric EQ and offers the choice of bell or shelf style control of the low and high frequency bands.
Controls Low, Low Mid, High Mid, High: Adjusts the amount of boost or cut at each frequency.
Freq: Adjusts the center frequency of the frequency band at which the boost or cut will occur.
Solid Bus Compressor The Solid Bus Compressor is modelled after a classic analog bus compressor. It offers a more characteristic dynamic control than Kontakt’s standard compressor.
Controls Threshold: Sets a level threshold above which the Compressor starts working. Only levels that rise above this threshold will be reduced by the compression; signals that stay below it will be left unprocessed.
Ratio: Controls the amount of compression, expressed as a ratio of “input level change” against “output level change”. A ratio of 1:1 means that no compression will be happening. For example, a setting of 4 represents the
ration 4:1, which means for every 4 decibel increase of amplitude above the threshold, the output will increase by only 1 decibel.
Attack: Adjusts the time the compressor will take to reach the full Ratio value after an input signal exceeds the Threshold level.
Release: Adjusts the time the compressor will take to fall back to non-compression after the input signal falls below the threshold.
Makeup: Controls the output gain of the compressed signal. Used to compensate for the gain reduction of the effect.
Mix: Controls the dry/wet mix of the compressor. This can be used to create a parallel compression style routing, which increases the quieter signals rather than reducing the louder ones. At a setting of 100% you will only hear the compressed signal, at a setting of 0% you will only hear the unprocessed input signal.
Output: Controls the module’s output level.
21 | P a g e
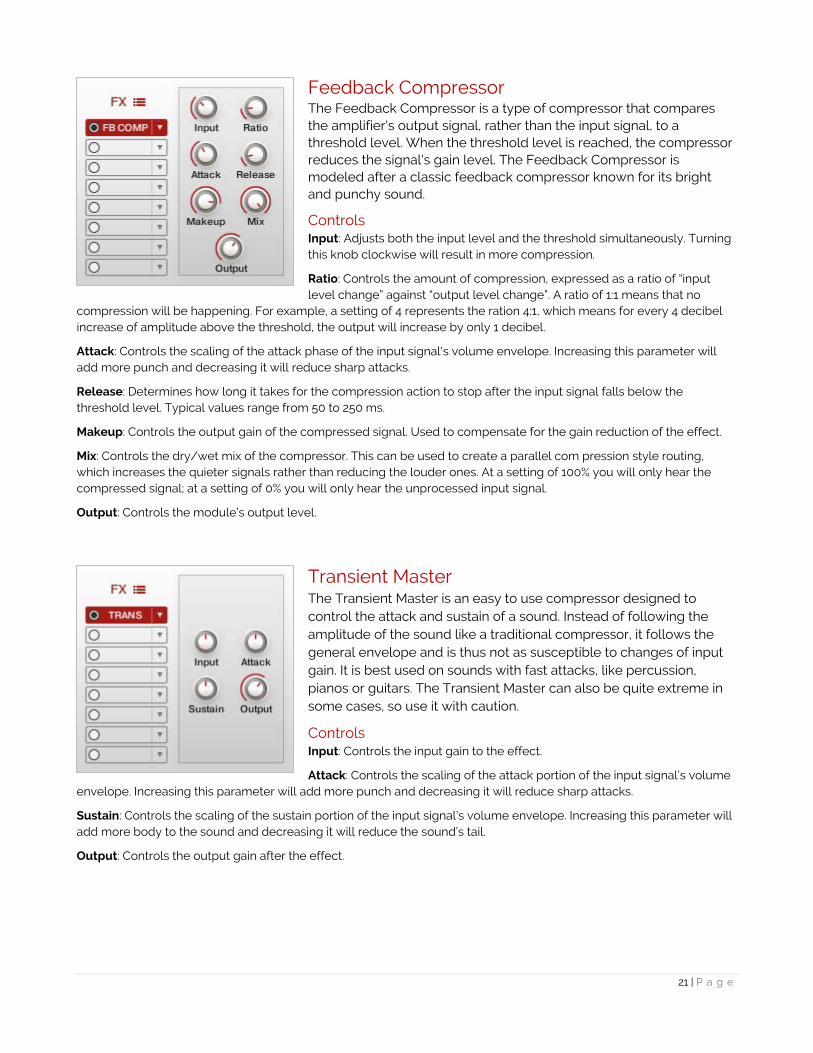
Feedback Compressor The Feedback Compressor is a type of compressor that compares the amplifier's output signal, rather than the input signal, to a threshold level. When the threshold level is reached, the compressor reduces the signal's gain level. The Feedback Compressor is modeled after a classic feedback compressor known for its bright and punchy sound.
Controls Input: Adjusts both the input level and the threshold simultaneously. Turning this knob clockwise will result in more compression.
Ratio: Controls the amount of compression, expressed as a ratio of “input level change” against “output level change”. A ratio of 1:1 means that no
compression will be happening. For example, a setting of 4 represents the ration 4:1, which means for every 4 decibel increase of amplitude above the threshold, the output will increase by only 1 decibel.
Attack: Controls the scaling of the attack phase of the input signal's volume envelope. Increasing this parameter will add more punch and decreasing it will reduce sharp attacks.
Release: Determines how long it takes for the compression action to stop after the input signal falls below the threshold level. Typical values range from 50 to 250 ms.
Makeup: Controls the output gain of the compressed signal. Used to compensate for the gain reduction of the effect.
Mix: Controls the dry/wet mix of the compressor. This can be used to create a parallel com pression style routing, which increases the quieter signals rather than reducing the louder ones. At a setting of 100% you will only hear the compressed signal; at a setting of 0% you will only hear the unprocessed input signal.
Output: Controls the module’s output level.
Transient Master The Transient Master is an easy to use compressor designed to control the attack and sustain of a sound. Instead of following the amplitude of the sound like a traditional compressor, it follows the general envelope and is thus not as susceptible to changes of input gain. It is best used on sounds with fast attacks, like percussion, pianos or guitars. The Transient Master can also be quite extreme in some cases, so use it with caution.
Controls Input: Controls the input gain to the effect.
Attack: Controls the scaling of the attack portion of the input signal’s volume envelope. Increasing this parameter will add more punch and decreasing it will reduce sharp attacks.
Sustain: Controls the scaling of the sustain portion of the input signal’s volume envelope. Increasing this parameter will add more body to the sound and decreasing it will reduce the sound’s tail.
Output: Controls the output gain after the effect.

22 | P a g e
Limiter The Limiter acts as a “safety net” to keep short signal peaks from overloading the system, which would result in audio clipping. While compressors have a range of artistic applications, limiters are usually used for technical reasons - they can tame signals with peaks which would otherwise overload the output, without requiring you to turn the signal’s overall volume down.
Controls Input: Sets the gain of the input signal. The Limiter is different from the Compressor in that it has a fixed threshold; to achieve a sensible peak reduction, use this control to adjust the input gain until you see the Attenuation meter responding only to occasional level peaks.
Release: Just like the Compressor’s control of the same name, this knob adjusts the time it takes the Limiter to return to an unprocessed signal after the input level falls below the threshold.
Output: Adjusts the module’s output level.
Tape Saturator The Tape Saturator emulates the soft compression and distortion of recording to tape. It can be used lightly to add warmth and coloring to the sound, or heavily to add aggressive distortion.
Controls Gain: Controls the input gain of the effect. This will increase the amount of tape distortion and compression.
Warmth: Controls the low frequency boost/cut of the effect.
Rolloff: Controls the high frequency rolloff starting frequency. Frequencies above this point will be attenuated.
Output: Controls the output gain of the effect.
Saturation The Saturation effect is basically an amplifier with a non-linear characteristic.
Controls Amount: Adjusts the transfer curve. A negative setting results in a characteristic that will expand the signal - lower sample values will be attenuated; higher values will be amplified. Positive settings do the opposite and thusly simulate the compression-like saturation of an analogue circuit. At a value of 0.0, the signal will pass the module unprocessed.
Output: Adjusts the module’s output level.
23 | P a g e
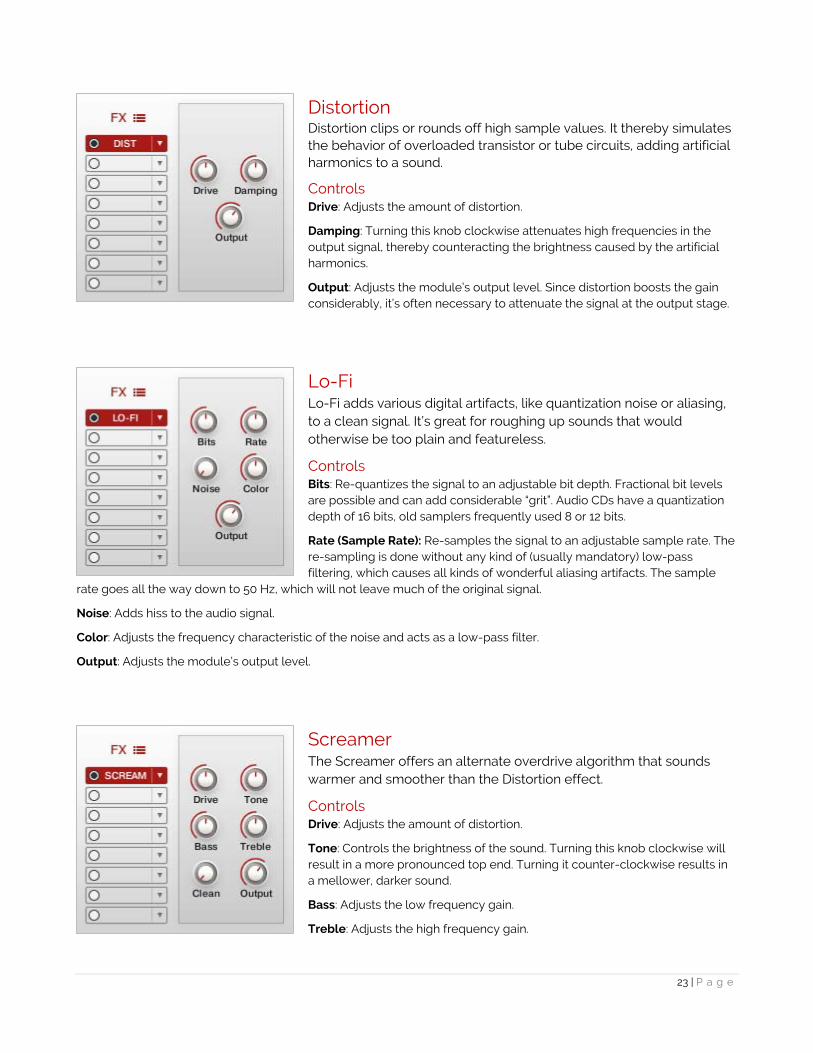
Distortion Distortion clips or rounds off high sample values. It thereby simulates the behavior of overloaded transistor or tube circuits, adding artificial harmonics to a sound.
Controls Drive: Adjusts the amount of distortion.
Damping: Turning this knob clockwise attenuates high frequencies in the output signal, thereby counteracting the brightness caused by the artificial harmonics.
Output: Adjusts the module’s output level. Since distortion boosts the gain considerably, it’s often necessary to attenuate the signal at the output stage.
Lo-Fi Lo-Fi adds various digital artifacts, like quantization noise or aliasing, to a clean signal. It’s great for roughing up sounds that would otherwise be too plain and featureless.
Controls Bits: Re-quantizes the signal to an adjustable bit depth. Fractional bit levels are possible and can add considerable “grit”. Audio CDs have a quantization depth of 16 bits, old samplers frequently used 8 or 12 bits.
Rate (Sample Rate): Re-samples the signal to an adjustable sample rate. The re-sampling is done without any kind of (usually mandatory) low-pass filtering, which causes all kinds of wonderful aliasing artifacts. The sample
rate goes all the way down to 50 Hz, which will not leave much of the original signal.
Noise: Adds hiss to the audio signal.
Color: Adjusts the frequency characteristic of the noise and acts as a low-pass filter.
Output: Adjusts the module’s output level.
Screamer The Screamer offers an alternate overdrive algorithm that sounds warmer and smoother than the Distortion effect.
Controls Drive: Adjusts the amount of distortion.
Tone: Controls the brightness of the sound. Turning this knob clockwise will result in a more pronounced top end. Turning it counter-clockwise results in a mellower, darker sound.
Bass: Adjusts the low frequency gain.
Treble: Adjusts the high frequency gain.
24 | P a g e
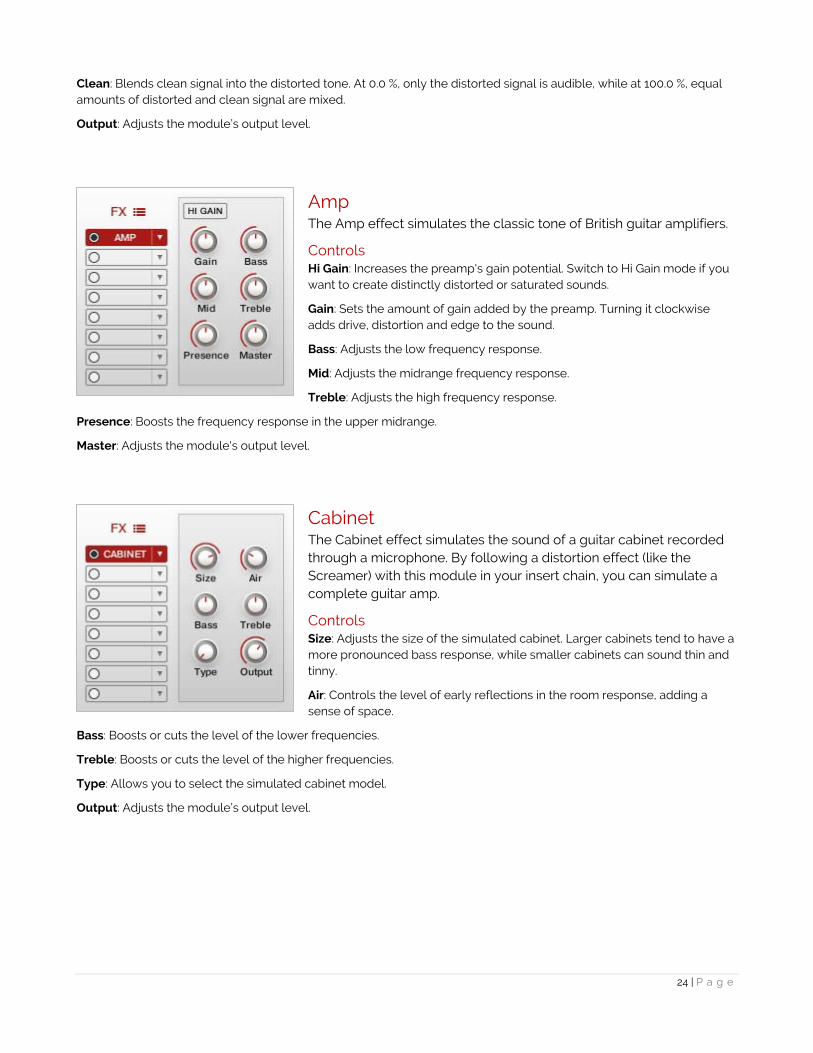
Clean: Blends clean signal into the distorted tone. At 0.0 %, only the distorted signal is audible, while at 100.0 %, equal amounts of distorted and clean signal are mixed.
Output: Adjusts the module’s output level.
Amp The Amp effect simulates the classic tone of British guitar amplifiers.
Controls Hi Gain: Increases the preamp's gain potential. Switch to Hi Gain mode if you want to create distinctly distorted or saturated sounds.
Gain: Sets the amount of gain added by the preamp. Turning it clockwise adds drive, distortion and edge to the sound.
Bass: Adjusts the low frequency response.
Mid: Adjusts the midrange frequency response.
Treble: Adjusts the high frequency response.
Presence: Boosts the frequency response in the upper midrange.
Master: Adjusts the module's output level.
Cabinet The Cabinet effect simulates the sound of a guitar cabinet recorded through a microphone. By following a distortion effect (like the Screamer) with this module in your insert chain, you can simulate a complete guitar amp.
Controls Size: Adjusts the size of the simulated cabinet. Larger cabinets tend to have a more pronounced bass response, while smaller cabinets can sound thin and tinny.
Air: Controls the level of early reflections in the room response, adding a sense of space.
Bass: Boosts or cuts the level of the lower frequencies.
Treble: Boosts or cuts the level of the higher frequencies.
Type: Allows you to select the simulated cabinet model.
Output: Adjusts the module’s output level.
25 | P a g e
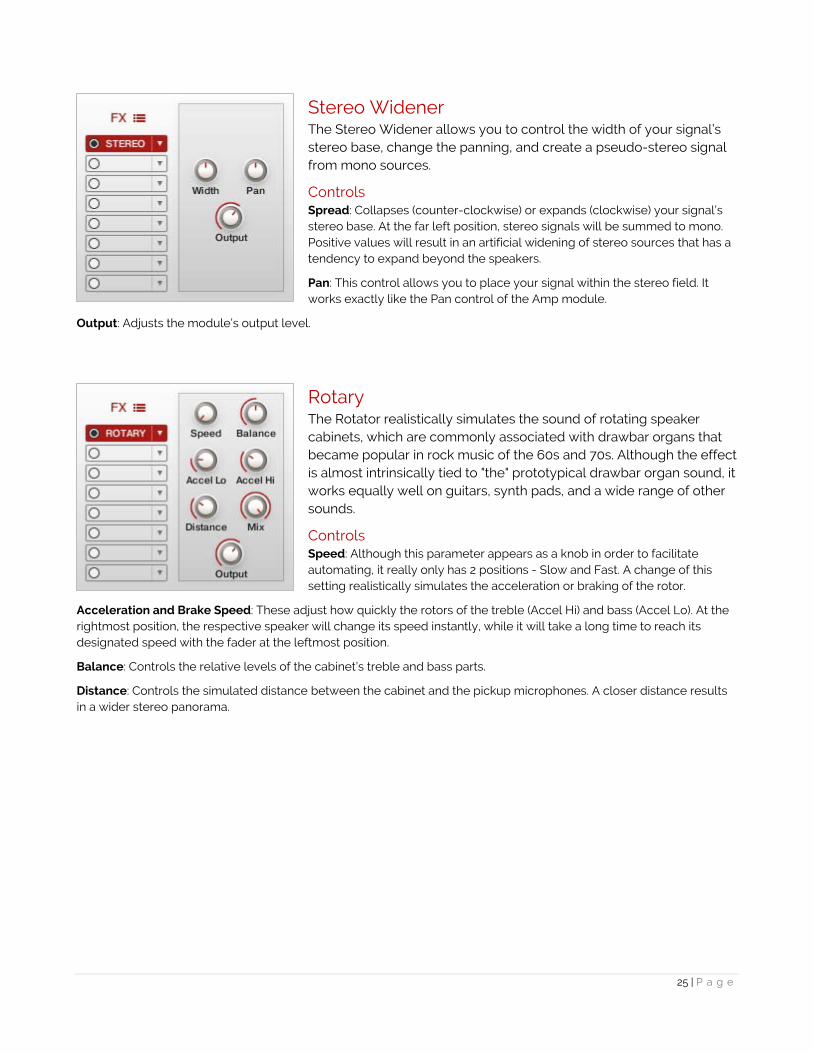
Stereo Widener The Stereo Widener allows you to control the width of your signal’s stereo base, change the panning, and create a pseudo-stereo signal from mono sources.
Controls Spread: Collapses (counter-clockwise) or expands (clockwise) your signal’s stereo base. At the far left position, stereo signals will be summed to mono. Positive values will result in an artificial widening of stereo sources that has a tendency to expand beyond the speakers.
Pan: This control allows you to place your signal within the stereo field. It works exactly like the Pan control of the Amp module.
Output: Adjusts the module’s output level.
Rotary The Rotator realistically simulates the sound of rotating speaker cabinets, which are commonly associated with drawbar organs that became popular in rock music of the 60s and 70s. Although the effect is almost intrinsically tied to "the" prototypical drawbar organ sound, it works equally well on guitars, synth pads, and a wide range of other sounds.
Controls Speed: Although this parameter appears as a knob in order to facilitate automating, it really only has 2 positions - Slow and Fast. A change of this setting realistically simulates the acceleration or braking of the rotor.
Acceleration and Brake Speed: These adjust how quickly the rotors of the treble (Accel Hi) and bass (Accel Lo). At the rightmost position, the respective speaker will change its speed instantly, while it will take a long time to reach its designated speed with the fader at the leftmost position.
Balance: Controls the relative levels of the cabinet’s treble and bass parts.
Distance: Controls the simulated distance between the cabinet and the pickup microphones. A closer distance results in a wider stereo panorama.
26 | P a g e
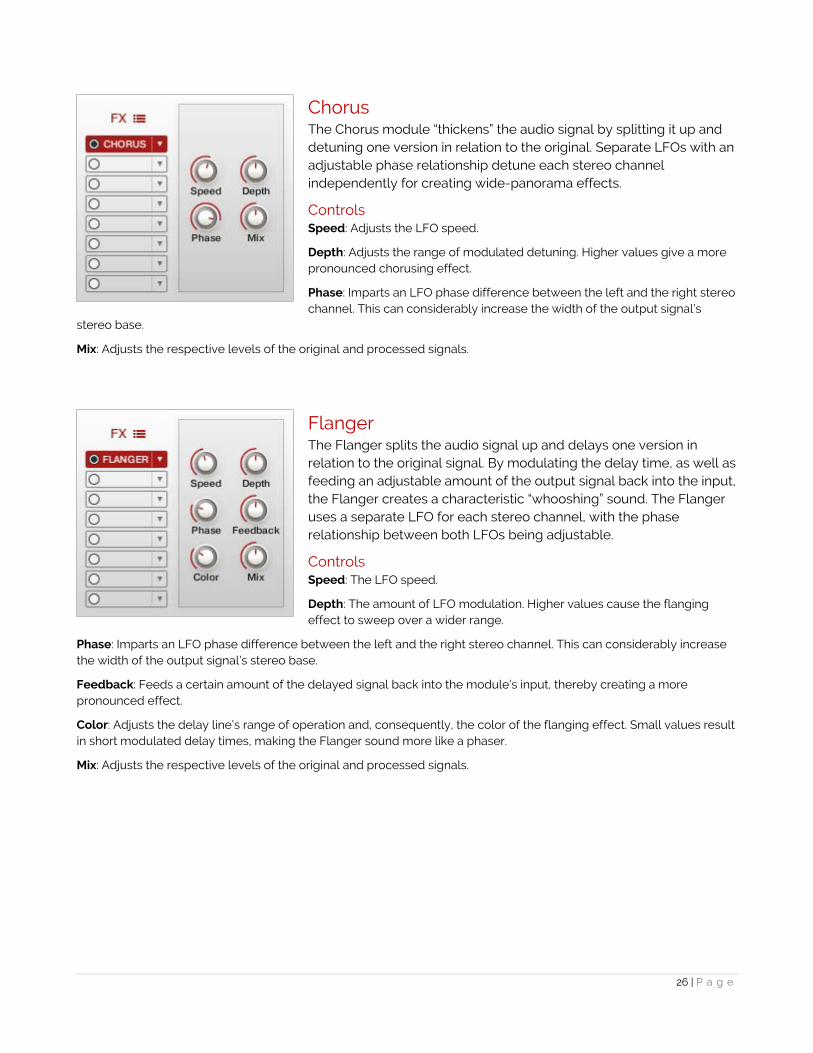
Chorus The Chorus module “thickens” the audio signal by splitting it up and detuning one version in relation to the original. Separate LFOs with an adjustable phase relationship detune each stereo channel independently for creating wide-panorama effects.
Controls Speed: Adjusts the LFO speed.
Depth: Adjusts the range of modulated detuning. Higher values give a more pronounced chorusing effect.
Phase: Imparts an LFO phase difference between the left and the right stereo channel. This can considerably increase the width of the output signal’s
stereo base.
Mix: Adjusts the respective levels of the original and processed signals.
Flanger The Flanger splits the audio signal up and delays one version in relation to the original signal. By modulating the delay time, as well as feeding an adjustable amount of the output signal back into the input, the Flanger creates a characteristic “whooshing” sound. The Flanger uses a separate LFO for each stereo channel, with the phase relationship between both LFOs being adjustable. Controls Speed: The LFO speed.
Depth: The amount of LFO modulation. Higher values cause the flanging effect to sweep over a wider range.
Phase: Imparts an LFO phase difference between the left and the right stereo channel. This can considerably increase the width of the output signal’s stereo base.
Feedback: Feeds a certain amount of the delayed signal back into the module’s input, thereby creating a more pronounced effect.
Color: Adjusts the delay line’s range of operation and, consequently, the color of the flanging effect. Small values result in short modulated delay times, making the Flanger sound more like a phaser.
Mix: Adjusts the respective levels of the original and processed signals.
27 | P a g e
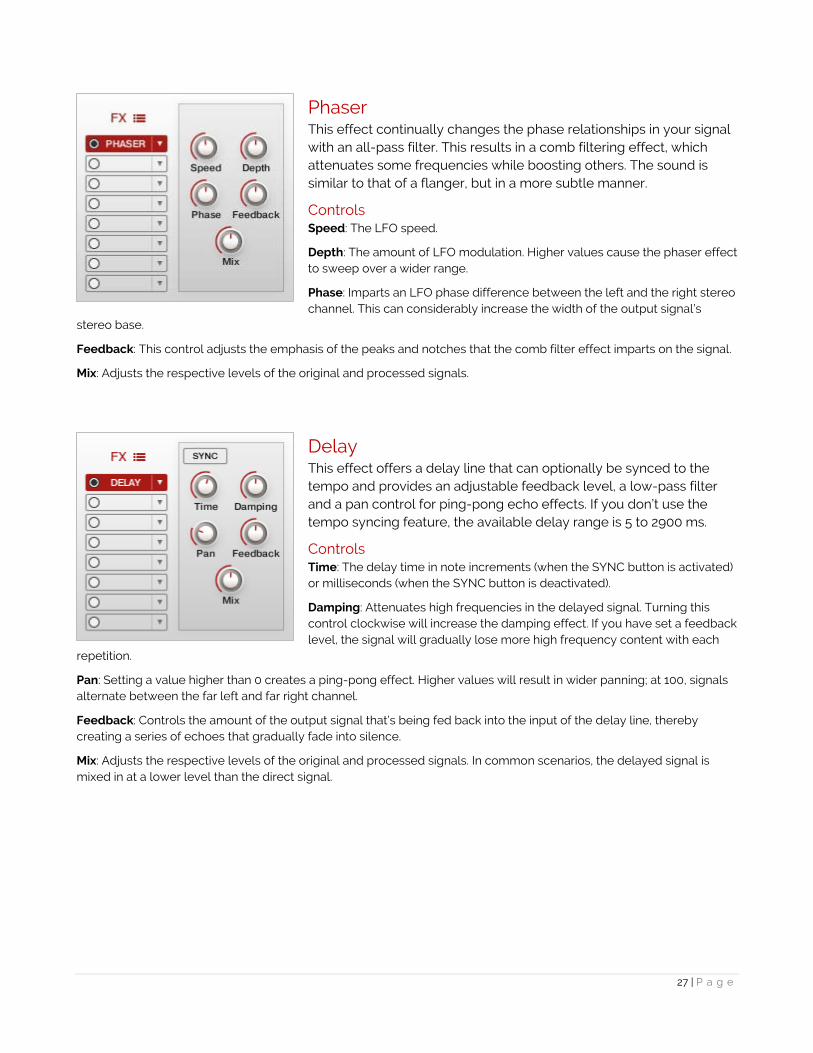
Phaser This effect continually changes the phase relationships in your signal with an all-pass filter. This results in a comb filtering effect, which attenuates some frequencies while boosting others. The sound is similar to that of a flanger, but in a more subtle manner. Controls Speed: The LFO speed.
Depth: The amount of LFO modulation. Higher values cause the phaser effect to sweep over a wider range.
Phase: Imparts an LFO phase difference between the left and the right stereo channel. This can considerably increase the width of the output signal’s
stereo base.
Feedback: This control adjusts the emphasis of the peaks and notches that the comb filter effect imparts on the signal.
Mix: Adjusts the respective levels of the original and processed signals.
Delay This effect offers a delay line that can optionally be synced to the tempo and provides an adjustable feedback level, a low-pass filter and a pan control for ping-pong echo effects. If you don’t use the tempo syncing feature, the available delay range is 5 to 2900 ms.
Controls Time: The delay time in note increments (when the SYNC button is activated) or milliseconds (when the SYNC button is deactivated).
Damping: Attenuates high frequencies in the delayed signal. Turning this control clockwise will increase the damping effect. If you have set a feedback level, the signal will gradually lose more high frequency content with each
repetition.
Pan: Setting a value higher than 0 creates a ping-pong effect. Higher values will result in wider panning; at 100, signals alternate between the far left and far right channel.
Feedback: Controls the amount of the output signal that’s being fed back into the input of the delay line, thereby creating a series of echoes that gradually fade into silence.
Mix: Adjusts the respective levels of the original and processed signals. In common scenarios, the delayed signal is mixed in at a lower level than the direct signal.
28 | P a g e
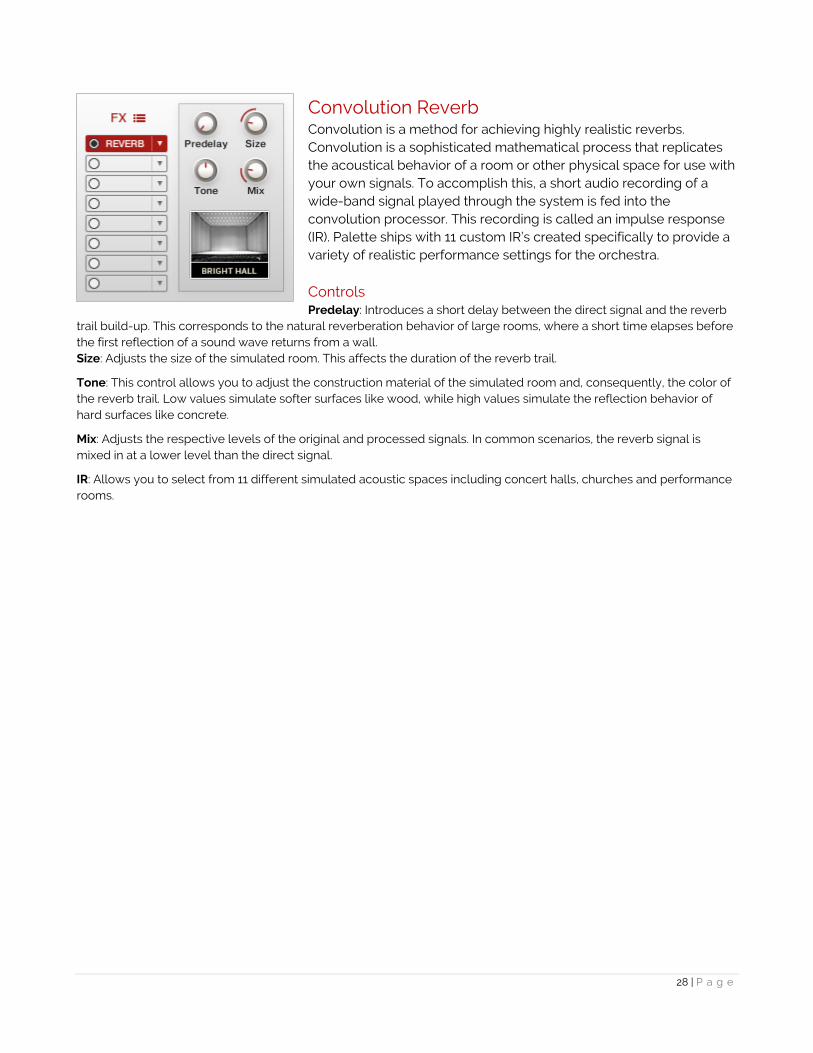
Convolution Reverb Convolution is a method for achieving highly realistic reverbs. Convolution is a sophisticated mathematical process that replicates the acoustical behavior of a room or other physical space for use with your own signals. To accomplish this, a short audio recording of a wide-band signal played through the system is fed into the convolution processor. This recording is called an impulse response (IR). Palette ships with 11 custom IR’s created specifically to provide a variety of realistic performance settings for the orchestra.
Controls Predelay: Introduces a short delay between the direct signal and the reverb
trail build-up. This corresponds to the natural reverberation behavior of large rooms, where a short time elapses before the first reflection of a sound wave returns from a wall. Size: Adjusts the size of the simulated room. This affects the duration of the reverb trail.
Tone: This control allows you to adjust the construction material of the simulated room and, consequently, the color of the reverb trail. Low values simulate softer surfaces like wood, while high values simulate the reflection behavior of hard surfaces like concrete.
Mix: Adjusts the respective levels of the original and processed signals. In common scenarios, the reverb signal is mixed in at a lower level than the direct signal.
IR: Allows you to select from 11 different simulated acoustic spaces including concert halls, churches and performance rooms.

29 | P a g e
CREDITS Concept & Art: Dickie Chapin Kontakt Scriptors: Mario Krušelj & Nabeel Ansari Sample Editor: Christian Yoder Live recordings performed by The Sofia Session Orchestra at FourForMusic, Sofia, Bulgaria Session Producer: Yuliyan Stoyanov Orchestration & Score Prep: Dickie Chapin & Yuliyan Stoyanov Engineers: Plamen Penchev & Angelia Vihrova Conductors: Lyubomir Denev Jr., Georgi Elenkov, Boris Radilov, George Strezov Sound Design: Jordan Aquirre, Christian Yoder, Dickie Chapin Thanks: In addition to everyone above who worked so hard to create this library we’d also like to give extra special thanks to Jodi & Phoebe & Lola Chapin, Marcy & Wren Yoder, Jelena & Viktor Krušelj, Impact Soundworks, and the entire staff at Sofia Sessions Studios and FourForMusic. If you have any questions about Palette – Symphonic Sketchpad please go to www.redroomaudio.com/my-account and login using your Red Room Audio username and password. Then click CONTACT from the main navigation. This ensures that all your info is included automatically with your question. You can also email support directly at [email protected]. All programming, scripting, samples, images and text © Red Room Audio 2018. All rights reserved. Red Room Audio is a Registered Trademark of Constructive Stumblings, Inc.
30 | P a g e
LICENSE AGREEMENT
All sound recordings, performances, scripting and/or code contained in this product is the intellectual property of Red Room Audio unless otherwise noted, and remain the property of Red Room Audio after the product is purchased. When purchasing a Red Room Audio product, you are purchasing a non-exclusive license to use, edit, perform, or otherwise utilize these recordings, performances, scripting and/or code for commercial and non-commercial purposes as defined below.
Authorized Users
Depending on the type of customer and usage scenario, authorized users of this license will vary. ALL purchases fall into category A or B.
A. Individual Purchase
This license is extended to customers who are purchasing as the primary user of the product, OR are purchasing on the behalf of another primary user (i.e. as a gift). The licensee (primary user) MAY install the product on as many computer systems as he or she has access to. However, ONLY the licensee may use the product. No other users are authorized.
B. Corporate, Academic, Institutional Purchase
This license is extended to customers who are purchasing for a multi-user setting, such as a shared studio, networked workstation, computer lab, etc. In this case, the licensee is the institution and not any one user. In contrast with individual purchases, an institutional license applies to ONE computer / workstation. All users of that workstation who belong to the purchasing institution (licensee) shall be considered authorized users. However, at no point may multiple authorized users access one license simultaneously. Multiple licenses must be purchased if the product is to be used by multiple users simultaneously.
Scope of License
The licensee is entitled to the use and unlimited editing of the product within the scope of music production, performance, recording, and composition. This includes both non-commercial and commercial usage of all types, including, but not limited to, film scores, television scores, music libraries, video game soundtracks, digital and physical music releases, albums, compilations, etc. Exceptions to this scope are listed below.
The licensee MAY NOT use the product in the production of any other sample library or virtual instrument products.
The licensee MAY NOT sell individual sounds from a product in any context.
For clarity: The licensee MAY use sounds from the product to create individual sound effects (SFX) for use in film, TV, advertising, and video games. However, the licensee cannot sell these sounds individually via marketplace, stock music/stock audio site, etc.
31 | P a g e
Ownership, Resale and Transfer
Redistributing, reselling, electronically transmitting, uploading, sharing, or renting the product in any way, shape, or form is prohibited by law. The licensee may create a physical backup copy of any digitally purchased and downloaded product. This backup copy is subject to the same limitations as the original copy of the product, and may not be transferred to any other individual for any reason.