Embed Size (px)
Citation preview

Operation and System AdministrationManual
Version 5.5.0Oct. 11, 2019
Last modified on March 26, 2020
44444445556666668
11131414141415151515161617171818191919212222
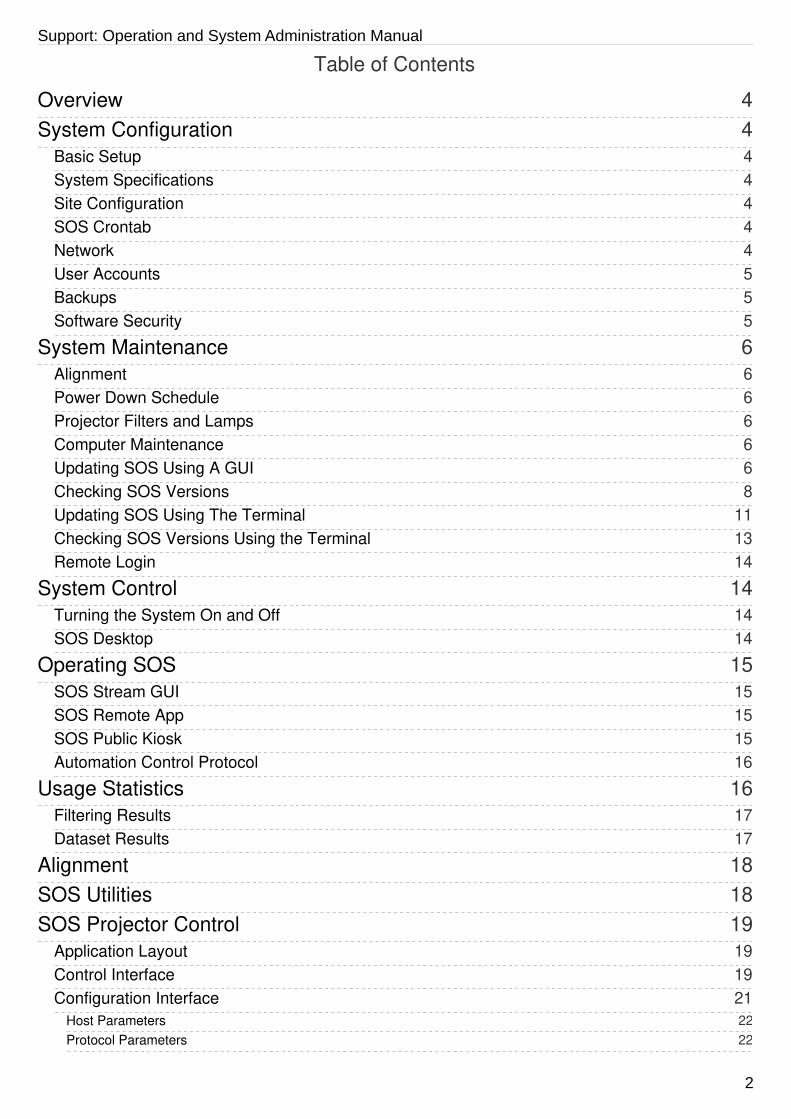
Table of Contents
OverviewSystem Configuration
Basic SetupSystem SpecificationsSite ConfigurationSOS CrontabNetworkUser AccountsBackupsSoftware Security
System MaintenanceAlignmentPower Down ScheduleProjector Filters and LampsComputer MaintenanceUpdating SOS Using A GUIChecking SOS VersionsUpdating SOS Using The TerminalChecking SOS Versions Using the TerminalRemote Login
System ControlTurning the System On and OffSOS Desktop
Operating SOSSOS Stream GUISOS Remote AppSOS Public KioskAutomation Control Protocol
Usage StatisticsFiltering ResultsDataset Results
AlignmentSOS UtilitiesSOS Projector Control
Application LayoutControl InterfaceConfiguration Interface
Host ParametersProtocol Parameters
Support: Operation and System Administration Manual
2

23232323232424242424252525252626262728
Configuration FileStartupCommand Line InterfaceUsing the projector control in the crontabReverting to the Old Projector ControlKnown Issues
Appendix A: SOS Stream Control Configuration FileAutorun TimerDefault VolumeMaximum Frame Width in SOSMaximum Frame Width in SplitterDefault PlaylistProjector SettingsText PIPMagnify GraphicsDisplay PerformanceAuto Alignment (Experimental Feature)Exhibit Distances
Appendix B: SOS Configuration Manager
Support: Operation and System Administration Manual
3

OverviewThis manual is intended for System's Administrators and others that have responsibility for maintaining the hardware and softwarecomponents of the Science On a Sphere system (SOS).
System ConfigurationBasic SetupSOS is a collection of hardware that integrates computers and video projectors to display animated images onto the surface of a largesphere. Taken in pieces, the system consists of a sphere situated in a room, surrounded by four video projectors, numbered one tofour starting with number one closest to the computer and then going counterclockwise.
The video projectors are connected and driven by the primary computer. Each projector is responsible for its own quadrant of thesphere. The computer has one six output graphics card to support the four projectors and a second graphics card to run the userinterface. The computer pulls in content, usually some type of planetary imagery, renders it to an Earth projection, subsets it, andupon command displays it onto the sphere. The computer is responsible for many things, namely among them: running the main userinterface to the system, real time data collection, and providing the interface to the automation control protocol. All of the computersuse the Linux operating system Ubuntu (currently version 16.04). Most sites buy a "hot" spare that is identical to the primary computerin terms of hardware, as a backup system. All of the software that drives and controls the SOS system is written and maintained byNOAA.
System SpecificationsThe computer in the SOS system is a standard computer system with mid- to high-end graphics cards.The system is generallyspecified so that both the primary and spare computers are identical from a hardware perspective to allow easy swapping ofcomponents (in case of system failures).
Projectors are usually specified so that they work well in high duty hour environments. Mostly, projectors classified as "board room"projectors meet this requirement. These projectors typically have multiple fans to provide adequate cooling during the day. Theprojectors are also specified so that they produce a high light output (lumens), mostly in the range of 3500 to 5000 lumens. Thesupported resolution for the projectors should be at least 1024x768, though higher resolutions are recommended.
An audio system is part of a standard SOS exhibit. A typical setup includes a mixer, microphones, and four speakers. Some of thecontent that comes with Science On a Sphere includes a narration track with background music, requiring the use of the audiosystem. Also, presenters often use the microphones, if available, during large presentations. Each site is responsible for designingtheir audio system to meet their needs.
Site ConfigurationEach site is configured differently in regards to projector height, distance and resolution. All of this information is stored in/home/sos/sos_stream_control.config if you're using a SOS version 5.4 and below, or held in /shared/sos/site-config/local_sos_config.json
if you're on version 5.5 or above. The parameters in this file are set during installation and normally should only be changed if theexhibit is reconfigured. Details on what is in this file and a few options you can modify are discussed in Appendix A: SOS StreamControl Configuration File.
Every site also has individual alignment files that are stored in /shared/sos/site-config . In this directory you will find the alignment files.All of these files are included in those that are backed up and synced daily.
SOS CrontabCron is a time-based job scheduler that is used to automate processes on the computer. The crontab is the file that contains all theinformation about the jobs that are scheduled. The SOS computers come with a default crontab that can be edited by each site.Included in the default crontab are hourly real-time data downloads, daily data syncs and backups, and weekly downloads of newdatasets. The crontab can also be configured to include the automatic power up and down of the projectors if desired. In a terminal,entering crontab –l will display everything that is included in the cron. For more information about the cron, watch the How to Editthe Crontab video tutorials found here: https://sos.noaa.gov/Support/tutorials.html.
NetworkThe computers are connected via a gigabit network to enable high speed communication and data transport.The primary and sparecomputers reside in a private, non-routable network space (usually in the 10.x.x.x network range). The primary computer, however,also usually sits on the border between the private SOS network and the sites local Intranet. The primary computer sits at the borderof the network to enable outside access for remote systems administration, software updates,and download of real time data from the
®
®
Support: Operation and System Administration Manual
4

NOAA servers. While the local, private SOS network is gigabit, the external connection can be whatever the local site supports intheir network infrastructure. If supported by the projector infrastructure, the projectors can also be connected to the private network toallow for remote power on/off.
In many cases a Wi-Fi network is also set up to allow use of the iPad SOS Remote App. An existing Wi-Fi infrastructure can be used,or a dedicated Wi-Fi network can be set up for use with SOS. A dedicated Wi-Fi network provides the most responsive control of yourSOS system by the app. Doing this in a secure way requires some network expertise. You may need to select a Wi-Fi channel thatdoesn't conflict with other Wi-Fi networks, for example. Using the minimum transmitter power that you need is always a good idea.And WPA2 encryption is probably the minimum level of encryption you will want to use. You might want to turn off the beaconidentifier for your Wi-Fi router to make it less obvious to casual visitors at your site. You might also consider limiting access to thespecific MAC addresses of your portable devices. SOS personnel work with the site staff to determine the best options for eachindividual site.
User AccountsAdministrators of Linux sometimes need access to the super user account (similar to the Windows "administrator" privileges). Thesuper user account in Linux is called "root". The password is set at machine installation and can be changed locally at the site. It isgenerally considered safer, or at least a better practice, to not use root directly, but rather use the sudo command that temporarilyraises a normal users privilege to root for the duration of a single command. Only the sos user has sudo privileges.
sos is an administrative account that has the ability to download new data, run the alignment software, install updates andmanage the real-time data downloads.
sosdemo is used for day-to-day system operation and running the SOS software. The user sosdemo does not havepermission to delete data, edit the software or run alignment. This user is intended to serve as a “safe” mode, where thecomputer operator will be able to do very little damage to the software or the data.
Every process that runs under Linux must have a user id. The SOS system uses two user ids: sos and sosdemo.
BackupsThe computers are set to run backup scripts early every morning to push data from the primary computer to the spare computer. Ingeneral, all of the data that comes with the system can be retrieved from NOAA, however, there are some data files that arecustomized to be site specific. Examples of site specific data include the custom playlist data in the SOS home directory, thealignment configuration files that are in the home directory, and any custom or local site content that was developed and installed onthe system.
All of the media files and playlist files are synced from the primary to the spare computer so that there is a backup copy on the sparecomputer. Backup copies of the playlist and alignment files are stored on the spare computer in /shared/sos/site-backup.hostname . Incase of failure, the spare computer has a duplicate copy of everything needed, though the alignment files will have to be moved fromthe backup folder to /shared/sos/site-config . Sites are still encouraged to backup data on a separate system as well. Generally, theplaylist and alignment data are just a few megabytes (usually much less). In terms of content, only the content developed by the siteneeds to be backed up on a separate system. All of the content that comes preloaded on the system is always available from NOAA.The custom content can sometimes be many gigabytes, but is definitely worth backing up.
In addition to syncing the computers, backups are also stored on the local computer in /shared/sos/site-backup.hostname. In thisdirectory, you will find dated files for every day that contain all of the same files that are synced to the other computer (excluding themedia tree), including configuration files and playlists. In addition, backups of the playlist files are tarred and stored every time theplaylist editor is opened. Those files are in the home folder for each users in a directory called sosrc-backups: /home/sos/sosrc-backups and /home/sosdemo/sosrc-backups.
Software SecurityWe have increased our software security measures starting in SOS version 5.3. SOS now requires a new licensed Wibu CodeMetersecurity USB dongle before you can do the software upgrade. You can request one using an online SOS Version 5.3.0 UpgradeRequest form. Once SOS Support has received your request, a dongle will be mailed to your site. If you run into any problems usingthe request form you can e-mail us at [email protected]. We will provide instructions on how to upgrade your system to 5.3once we have mailed out your new CodeMeter device.
Note that unlike the previous Bluetooth USB devices used in earlier versions of SOS, you will have only one CodeMeter dongle thatwill be required to be plugged into the computer that is running SOS. This means if you switch to using your backup system, you willalso need to physically move the CodeMeter dongle to that machine before you can run SOS. Also, if your site is using Bluetooth toconnect your iPad to SOS, you will still need to keep the current dongle keys in place as the Bluetooth software depends on them.
Support: Operation and System Administration Manual
5

System MaintenanceAlignmentFor system maintenance, the main priority is keeping the projectors aligned. The rest of the components in SOS tend to be rathermaintenance-free. Projector alignment should be checked frequently (once a week ideally) to ensure that the system is alignedproperly. Usually, the system only gets out of alignment when there has been some disturbance to the projectors. It is recommendedto check it weekly just to ensure that the system is displaying data in an optimal manor. If the alignment is really off, it will be visible inthe display of datasets. For more details on how to align your SOS system, see the SOS Alignment Manual.
Power Down ScheduleGenerally, it is recommended that both of the SOS computers remain powered up all the time in order to receive real time data andfor system backups. The projectors only need to be on during operation and should be powered down to save lamp life when not inuse. If the projectors have network capability, it’s possible to set the projectors on a timer with schedule power on and power offtimes. If a complete system power down is required, then it is recommended to close the SOS software before powering down thecomputers. A single press of the power button starts a clean shutdown.
Projector Filters and LampsProjector lamps are the main consumable for SOS. A typical projector lamp lasts anywhere from 1500 to 3000 hours. In darkersettings, the economy mode can be used to extend the life of the lamp. As a projector lamps ages, it will start to dim or showdiscoloration and then in many cases, suddenly go out. Generally, the projector will turn on a lamp warning light indicating a new lampis needed. It's a good idea to have a spare lamp on hand in case of a sudden failure. It is suggested to follow the manufacturer’srecommendations on lamp replacement. When lamps are replaced because of age, it is recommended to replace all of them at thesame time, since the color and intensity difference between an old lamp and a new lamp will make the sphere visualization look bad.
Projector alignment will need to be adjusted after replacing the lamps. When replacing the lamps, change one lamp and then fix thealignment of that projector before moving on to the next projector. If you replace all the lamps without adjusting the alignment alongthe way, then you will have to start from scratch on the alignment.
For LCD projectors, projector air filters should be checked monthly to ensure proper airflow. At minimum, check the filters everyquarter, though this depends largely on the projectors environment. Dusty areas require more frequent filter cleaning. Dirty filtersreduce cooling capacity and shorten projector lamp life. This is probably the most important of the maintenance tasks to perform.
For DLP projectors, the optics are sealed and dust is not as much of a concern. In fact, many DLP projectors do not have air filters.Check your specific model to determine if there is an air filter to clean.
Computer MaintenanceThe SOS systems are like any other computer system. In general, they run and run without the need for maintenance. Ubuntureleases operating system patches frequently and patches that affect security should be applied as needed. Notification of patcheswill appear in the left-hand menu in the Ubuntu Update Manager.If NOAA comes across an operating system patch that adverselyaffects system operation, sites will be informed through the SOS Yahoo Forum.
Periodically, software upgrades from NOAA for the SOS software will be distributed. The SOS software upgrades will also appear inthe Ubuntu Update Manager. It is up to each site to decide if they want to install the upgrade. An announcement with full instructionsfor the upgrade and a description of the new features in the upgrade will be posted to the SOS Yahoo Forum when available.
Should you encounter problems with the SOS software, the log files can be a good place to turn to try to diagnose what is happening.The log files for SOS are stored in the home folder for each user in a directory called soslogs . The logs vary from crash reports todownload progress reports.
Updating SOS Using A GUILog in as the sos user, since this user has admin privileges. Use the Ubuntu Dash Home to search for the Ubuntu Software Updater.
Support: Operation and System Administration Manual
6

Click the Software Updater icon, and Ubuntu will start checking for updates.
If it finds packages that need to be updated, go ahead and update. The Software Updater will update all Ubuntu software, not justSOS software.
Support: Operation and System Administration Manual
7

If your computer already has all packages updated, the Software Updater will notify you.
Checking SOS VersionsNote that not all components of the SOS software suite will have the same version. Each SOS component may be updatedindividually.
To check which version of SOS is installed, open the SOS software using the desktop launcher or by searching for SOS in the UbuntuDash Home.
In the SOS Stream GUI, click File -> About SOS to show the SOS software version.
Support: Operation and System Administration Manual
8

To check for the SOS Visual Playlist Editor (VPLE) software version, open the VPLE using the desktop launcher or by searching for itwith the Ubuntu Dash Home. Click Help -> About to show the VPLE software version.
Support: Operation and System Administration Manual
9

To check for the SOS Projector Control software version, open the application with the desktop launcher or by searching for it withthe Ubuntu Dash Home. The version should be in the title bar of the application window.
To check the iPad SOS Remote App software version, open the iPad settings:
Support: Operation and System Administration Manual
10

Scroll down to the bottom of the left pane of the settings window to find the SOS Remote App and tap on it to show applicationinformation.
Updating SOS Using The TerminalLog in as the sos user, since this user has admin privileges. Use the Ubuntu Dash Home to search for the Terminal application.
Support: Operation and System Administration Manual
11

Update the Ubuntu package cache with the command: sudo apt update
Optionally, request that Ubuntu list the packages that have updates available: sudo apt list --upgradable
Support: Operation and System Administration Manual
12

Next, tell Ubuntu to install the packages which have updated versions available: sudo apt dist-upgrade
Checking SOS Versions Using the TerminalTo check which version of the SOS software you are running, open the Terminal application and run the command: dpkg -l | grep sos
The first column, contains either ii or rc, to indicate the packages installation state. An installation state of ii means the package iscurrently installed. An installation state of rc means that the package is no longer installed, but there may be configuration files whichare still installed.
Support: Operation and System Administration Manual
13

Remote LoginIn order facilitate support, maintenance, and troubleshooting, the SOS computers come loaded with a program called TeamViewer.This is launched from the SOS Utilities application. This program allows the SOS support team to logon remotely to the SOScomputers and temporarily take over the desktop. The site must launch the software and provide log in information to the SOS teamin order for them to log on. The SOS team will only log in at the request of the site and at a scheduled time when it is convenient forthe site.
System ControlTurning the System On and OffWhen you turn on the primary computer, it will automatically log into the user sosdemo. The primary computer should be always on.The spare computer doesn’t have to be on, but it is recommended to leave it on for backup purposes. If you want to change users youwill have to log out and then log in using your user name and password. There is an icon that looks like a power button in the top rightmenu bar for logging in and out.
To shut the system off use the icon that looks like a power button in the top right menu bar. This lists many options including log out,shut down, and reboot. Typing shutdown -h now to shut down or sudo reboot to reboot in a terminal also works. To force a suddenpower off hold the power button for 5 seconds. This last option is to be used only as a last resort.
SOS DesktopWhen first logging in to the SOS machine, you will see the SOS desktop, similar to what is shown in the following screenshot.
To the right of center is the SOS Project Control GUI, which is used to control and troubleshoot the projectors.In the lower right corner is the SOS decorative graphic, which is shown on SOS desktops since release 5.2.In the center is the SOS Stream GUI, which appears when SOS is started.In the upper right corner, the current user will be shown (normally either sos or sosdemo) and the number 1 or 2, dependingon which SOS machine you're logged into.In the upper left corner are four desktop icons to launch applications (see enlarged image and descriptions below).
1. The SOS Projector Control icon launches the Projector Control UI as described in the Projector Control section.
Support: Operation and System Administration Manual
14

2. The SOS Utilities icon launches the SOS Utilities UI as described in the SOS Utilities section.3. The SOS Visual Playlist Editor icon launches the Playlist Editor as described in the Visual Playlist Editor Manual.4. The Start SOS icon launches SOS and brings up the SOS Stream GUI as described in the SOS Display Software Manual.
Operating SOSThere are several alternative ways to operate Science On a Sphere®. The primary option that comes supported by the NOAA SOSteam is the Remote App app, designed for use by docents and other SOS presenters.
SOS Stream GUIWhen SOS is running, the SOS Stream GUI appears on the SOS desktop. It has basic controls for SOS that may be convenient whensetting up or troubleshooting SOS. The SOS Stream GUI is described in the SOS Display Software Manual.
SOS Remote AppIn order to connect the iPad to the SOS system, it must either be on the same Wi-Fi network as the SOS system or be paired to thecomputer using Bluetooth. Refer to the Network section above for specifics of the network. The most recent SOS Remote App isfreely available through the Apple App Store for download onto Apple devices.
To get started with the Wi-Fi connection, tap on the Settings app icon on the homepage of your device, and then tap on SOS Remotelocated under the Apps category. In the Name or IP field under SOS computer to control, enter the host name or IP address of yourSOS computer. Now, check the Wi-Fi network and make sure the iPad is connected to the right SOS network. Return to thehomepage and tap on the SOS Remote app icon to open the application. The iPad should automatically connect. If it can’t connect,an alert badge will be displayed on the Settings tab and there will be an error message within the Settings tab. The SOS Stream GUImust be running in order for the iPad to connect.
While visitors have access to the SOS Remote App through the Apple App Store, they won’t be able to take control of the SOS unlessthey have the Wi-Fi password and the IP address of the SOS computer. For more information, see the SOS Remote App Manual.
In SOS version 4.3 we added the ability to connect an iPad to the SOS server over a bluetooth connection. Until this time alliPad/SOS server connections were over Wi-Fi. The iPad Bluetooth connection replaced the Wii remotes in SOS version 5.0. Forinformation, refer to the document Connecting the iPad to the SOS Server via Bluetooth.
SOS Public KioskAnother way to operate SOS is with the touch screen-based Public Kiosk. As its name suggests, the Public Kiosk is a controller thatmuseum visitors or other public users can perform simple controls on SOS when there is no presenter available. See the SOS PublicKiosk Manual for information on how to set up, customize, and operate the Public Kiosk.
Support: Operation and System Administration Manual
15

Automation Control ProtocolThrough the Automation Control Protocol, it’s possible for sites to create their own interfaces to control SOS. See the AutomationControl Protocol Guide for additional information.
Usage StatisticsThere are a set of features in the SOS software that show statistics about how often specific SOS data sets are displayed across theSOS network. At each SOS site, every SOS play event is logged in a usage log, in the $ HOME/soslogs directory. Periodically, theselog files are automatically collected and sent to the SOS developers in Boulder, CO. There, the logs are processed and the resultingaggregate statistics are displayed on the SOS web site.
Four main parameters are recorded: Plays, Autoplays, Duration, and Autoplay Duration.
Plays represent all plays of clips on the SOS machine. Statistics are only shown for NOAA distributed datasets, but theproportion of site created to NOAA-provided datasets is shown.
Autoplays represent the plays that occurred while SOS is in autorun mode. This number will be a subset of Plays and isrecorded so a distinction can be made between docent-led presentations and autorun presentations.
Duration is the total amount of time a dataset has been played.
Autoplay Duration is the fraction of duration that a dataset has been in autorun mode.
The web interface on the SOS website shows the number of times data sets were displayed and the total amount of time they wereplayed. The information is further subdivided by whether the play occurred during autorun or not. The queries can be refined by timeperiod and other attributes. Information about specific site usage is not publicly available on the website, but if you would like to trackthe usage statistics at your site, the SOS team can provide you with a specific web page link corresponding to your site. Below is thebasic view for the SOS usage statistics web page.
Support: Operation and System Administration Manual
16

Filtering ResultsThe usage statistics results on the website can be filtered by different attributes, such as dataset category, who played the dataset,the dataset’s format, and when the dataset was played. When multiple attributes are selected, the results are additive. This justmeans that if you select ‘Atmosphere’ and ‘Ocean’ from the ‘Dataset Category’ filter, sites categorized as Atmosphere or Ocean willbe returned.
Played By: These filters allow you to filter play events by site categorizations. This is useful if, for example, you’re aplanetarium interested in the most popular datasets among all planetariums.
Dataset Category: These filters allow you to filter datasets based on their categorization. Selecting different categories willactivate the category by changing the button’s font to black. By default, datasets for all categories are shown, so the ‘AllCategories’ button is active.
Time Period: These filters allow you to pick play events that occur during a specified window of time. If you select ‘week’,‘month’, or ‘year’, play events for the week/month/year so far will be returned. Specific dates may also be specified. Keep inmind, play event information will always be one day behind.
Filter By: These filters allow you to filter datasets by their format. For example, ‘Movies’ gets datasets that have moviesassociated with them. ‘Static Images’ gets datasets composed of static images. ‘Real-time Data’ selects our real-time datasets.‘KML Files’ gets datasets that have KML type files associated.
Once you have specified your search filters, be sure to click the ‘Display’ button to apply them! ‘Clear’ will remove active search filters.
Dataset ResultsClicking on a dataset title will expand the section to show a graph of specific play event information by month. You’ll notice that thereare two bars for each month on the x-axis and two y-axes. The left y-axis specifies number of plays and corresponds to the blue (left)
Support: Operation and System Administration Manual
17

bar. The right y-axis specifies length of play duration and corresponds to orange (right) bar. The play bar and duration bar both haveembedded bars, which represent autoplays and autoplay duration, respectively. Hovering your mouse over any of the bars will tellyou what the bar represents and its value.
For sites interested in doing their own number crunching, an ‘export to csv’ function has been provided. The ‘Export all to csv’ willexport raw data for all the datasets on the page. If you just want data for a single dataset, there is an ‘Export data to .csv’ undereach dataset’s graph. If you want raw data for some selected datasets, activate the checkbox next to the datasets you’re interestedin, click the ‘Display’ button, then click ‘Export all to .csv’.
AlignmentIn order to optimize the appearance of Science On a Sphere , it is important to have the sphere properly aligned. Because of this, itis suggested that more than one person at the site learns how to align the sphere. For the most up-to-date alignment directions,please consult the SOS Alignment Manual.
SOS UtilitiesThe SOS Utilities UI has buttons to perform various SOS system-related operations. As indicated in the screenshot, you must belogged on as the sos user. The sosdemo user is more restricted and cannot run many of these operations.
Fix file permissions: the program will attempt to change the access permissions on SOS files. Typically, it is useful if youreceive any errors about not having the required permissions or access to files. This can only be run as user sos.
Make a diagnostics log file: generates a sos_diagnostics.log file in the sos user home directory that can then be emailed tothe SOS support team at [email protected] provide a description of your problem in the email. The log file aids inidentifying the problem with your system.
Start TeamViewer: launches the TeamViewer application so the SOS support team can work to fix your computer remotely.
Change projector model: launches a program that lets you change the type of projector SOS is configured for. If SOS is openwhen this program is run it will crash. This can only be run as user sos. Note there are two options for each projector type,CRT and DFP.
If your new projectors are connected to the computer with UXGA or VGA cables, choose the option ending in CRT.
®
Support: Operation and System Administration Manual
18

If your projectors are connected with DVI cables, choose the option ending in “DFP”. If you choose the wrong option,nothing will display on the sphere.
Restart video card output: this option can be useful if you are having issues with your display such as blank projectors,projectors displaying incorrect colors or your monitor isn't blank. It restarts the X server. (Your displays will all go dark for a bitbefore they restart, this is normal.) This can only be run as user sos.
Start Auto Alignment camera stream: this option works with Auto Alignment (experimental feature) and requires additionalequipment to be used. More information is described in the SOS Alignment Manual.
Stop SOS program: if something goes wrong with your SOS program and you need to terminate it, select this option.
SOS Projector ControlThe newest Science On a Sphere (SOS) projector control debuted in the 5.2.0 release and is a refinement of the previous projectorcontrol. It provides improved user feedback and control of SOS projectors that use the PjLink or PjTalk protocols.
This software is automatically included with SOS during installation or upgrade, however the package is also available separately inits own debian package. This means that it is also available to previous SOS versions on Ubuntu 16.04.
Application LayoutThe application is split into two main interfaces – a control interface and a configuration interface. Tabs at the bottom of theapplication may be used to toggle between the two interfaces.
Control InterfaceThe control interface is simple and provides feedback on each projector’s state. The components of the control interface are - apower switch, status indicators for each projector, and a button which may be used to refresh the projector states.
Illustration 1: SOS Projector Control with the power switch in the On position and all projectors in an On state.
There are three possible states for the projector status indicators:
Standby: The projector is in standby and ready to receive control commands.On: The projector is on and ready to receive control commands.Error: An error has been encountered with the last command sent to the projector.
Support: Operation and System Administration Manual
19

Illustration 2: SOS Projector Control with the power switch in the Off position and all projectors in a Standby state.
Illustration 3: Hovering the mouse over any projector status indicator displays additional information about the projector.
Support: Operation and System Administration Manual
20

Illustration 4: Obtaining information about a projector with an error by hovering the mouse over that projector’s status indicator.Typical reasons for errors include: no connection to the projector, the projector is rejection connections, the connection is timing out(default 3 seconds), or the incorrect port/protocol is being used with the projector.
Configuration InterfaceThe configuration (config) interface is a tab where projector connection information may be specified. A default configuration isprovided with the installation and the configuration consists of four PjLink projectors with host names projector1, projector2,projector3, projector4. This configuration should just work for most sites because those host names are correlated to the correctprojector IP addresses in the /etc/hosts file. Some sites, however, may need to do additional configuration or revert to the previousprojector control if their projectors do not support PjLink or PjTalk.
Support: Operation and System Administration Manual
21

Illustration 5: Projector settings in the Config tab.
Illustration 5 shows the connection parameters for a projector. There are really only two parameters - the hostname parameters andthe protocol parameters. The host parameters specify how the projector will be identified, while the protocol parameters specify thecommunication protocol.
Host Parameters
Under Host Parameters, the projector may be referred to by its hostname or by its IP address. To refer to a projector by hostname,select the Use hostname radio button and type in the hostname of the projector. To refer to a projector by IP address, select the UseIPv4 address radio button and use the four spin boxes to set each octet of the IP address.
For example, the typical IP address of projector1 is 10.1.1.71. You can refer to the projector by hostname projector1 as shown inIllustration 5, or you could select the ‘Use IPv4 address radio button and enter 10 1 1 71 into each spinbox, respectively. Theconfiguration is equivalent, but it’s usually easier to remember machines by hostname that by IP.
Protocol Parameters
Under Protocol Parameters, the PjLink or PjTalk protocol may be selected. Leaving the Port set to Auto (or 0) tells the controller touse the default port for the selected protocol. The default PjLink port is 4352 and the default PjTalk port is 53484.
Projector configurations may be updated using the Save button and deleted using the Delete button. New projector configurationsmay be added using the New Projector button. When the New Projector button is pressed, the config tab will add a new entry at thebottom of the tab and try to scroll down to it. An actual controller and status indicator will not be added until the configuration issuccessfully saved.
Only one entry per IP or hostname is allowed, however, there is no verification that checks whether or not a particular IP is associatedwith a hostname or a hostname with an IP.
Support: Operation and System Administration Manual
22

Configuration FileThe SOS Projector Control loads and saves projector configurations to a file located at /etc/NOAA/sos-projector-control/sos-projector-control.conf . This file should not need to be hand edited. Changes made to the configuration file will persist across projector controlupgrades.
NOTE: The configuration file will be removed if the the projector control package is purged (via sudo apt purge sos-projector-control ). Ifyou would like to remove the projector control and keep your configuration file, just remove the package (via sudo apt remove sos-projector-control ).
StartupThe installer will attempt to put desktop launchers on the desktops of the sos and sosdemo users. Double-clicking the SOSProjector Control desktop icon will launch the application.
When the SOS Projector Control is first started, it tries to obtain and display the status of each projector. If it determines that all theprojectors are on, the power switch will automatically be moved to the On position. Otherwise, the power switch will remain in the Offposition and each projector’s individual status will be displayed.
Thereafter, the projector control will try to keep the status indicators fairly current by checking the status of each projector every 90seconds. The statuses can also be refreshed on demand with the Refresh Status button.
Command Line InterfaceThe control may also be used from the command line. Opening a terminal, typing launch_pj_control , and pressing Enter will start theapplication. Passing an argument of on or off to the application will make the application attempt to turn on or off each projector inthe config file, then exit. This is useful for turning on and off projectors with the crontab.
For example, to send the On command to each projector in the config file, run:
launch_pj_control on
To send the Off command to each projector in the config file, run:
launch_pj_control off
Using the projector control in the crontabUsing the projector control in the crontab is similar to running it from the command line. One difference is that you’ll need to use thefull path of the executable and set the display environment variable to that of the desktop.
Since the desktop display is on X screen :0, the command becomes:
env DISPLAY=:0 /usr/bin/launch_pj_control
Therefore, if you would like to turn on your projectors every day at 7:30 and off at 5:30, add the following lines to your crontab.
# Turn projectors on at 7:30am30 7 * * * env DISPLAY=:0 /usr/bin/launch_pj_control on > $HOME/soslogs/projector_ctl.log 2>&1# Turn projectors off at 5:30pm Monday - Saturday30 17 * * * env DISPLAY=:0 /usr/bin/launch_pj_control off > $HOME/soslogs/projector_ctl.log 2>&
Good references for crontab formatting can be found online, but contact us if you’re having issues just e-mail support [email protected].
Reverting to the Old Projector ControlWhen upgrading from SOS 5.1.0 or 5.1.1, the new projector control installer will backup your old projector control desktop launcherbefore installing its own. In the event that the projector control doesn’t work with your projectors, you may revert to the previousprojector control by opening a terminal and running the command:
mv ~/Desktop/.Projector_Control.desktop ~/Desktop/Projector_Control.desktop
Support: Operation and System Administration Manual
23

The old desktop launcher should then appear on your desktop.
Known IssuesNo title bar on application: sometimes when the application is started, there is no title bar. This prevents a user from moving orclosing the window. To get the title bar to show up, toggle between the config and control tabs. This breaks that applicationaway from the top of the screen.
Projector status indicators don’t show up in the same sequence as when they were added: When adding new projectors to theprojector control, they will be appended to the end of the config tab and corresponding status indicators will be added to thenext available position in the control tab. However, when the application is closed and re-opened, the status indicators are thenin alphabetical order. This is due to the fact the the projector configurations are always saved alphabetically, then loaded in thatorder.
The projector control resizes when switching tabs: this is the intended behaviour. We try to keep the window small andunobtrusive when in the control tab, but expand it so that the configuration panel fits into view when in the config tab.
The projector control doesn’t look exactly like the screenshots: the application uses a framework that tries to take localoperating systems preferences into account when displaying itself. The exact look of your projector control may vary accordingto those preferences.Projector control is slow to start: this usually occurs if the the control cannot talk to the projectors. The control tries to update itsstatus before showing itself and if the control can’t reach the projectors, a timeout must be overcome. This issue will be fixed infuture versions.
Appendix A: SOS Stream Control Configuration FileIf you're on SOS version 5.5 or above, please visit Appendix B: SOS Configuration Manager.
Each site's configuration for projector height, distance and resolution are stored in /home/sos/sos_stream_control.config . Theparameters in this file are set during installation and normally should only be changed if the exhibit is reconfigur
The first part of the file may be edited while the last part should not be changed. The dividing line between these two parts is clearlydemarcated. The editable part is shown here, divided into separate blocks to provide more explanation. To change the default valuefor a given setting, uncomment the line in a text editor and use or change the value there. In older systems, some of these settingsmay be missing, in which case you can add them and set the value you need.
Autorun TimerThe length in seconds for playing a dataset in autorun mode. The default value of 180.
# Default amount of time (in seconds) a clip will play in autorun mode, if not# set specifically in the playlist.#set defaultTimer 10
Default VolumeThe default volume level to use as a percentage of the system equipment volume. The valid range is 0 to 100.
# Default mplayer volume level for each clip that does not explicitly specify a# level using the 'volume' keyword. Note that mplayer volume can only be a# fraction of what the system volume is. So, if the system volume is set to 50%# and the defaultVolume is set to 50%, the output volume will be 25%.#set defaultVolume 75
Maximum Frame Width in SOS
Support: Operation and System Administration Manual
24

The maximum frame width supported in SOS. The default value of 4096 is normally used, but may be increased for 4K systems.
# Max texture size for SOS data. The default is 4096.#set env(SOS_MAX_TEXTURE_SIZE) 8192
Maximum Frame Width in SplitterThe maximum frame width of the splitter slices shown on SOS. The default value of 2048 is typically used, but may be increased ifthe SOS system (particularly graphics card) is newer and higher resolution of the replicated slices is desired, such as on a 4Ksystem.
# Max texture size for the splitter (used for replicating sphere content onto# multiple slices around the sphere). The default is 2048.#set env(SOS_SPLITTER_TEXTURE_SIZE) 4096
Default PlaylistPath to a playlist that is automatically loaded each time the SOS system first starts up. The default is the nomal-demo.sos playlist ineither / home/sos/sosrc or / home/sosdemo/sosrc , depending on which user starts SOS.
# Default playlist that opens with the SOS GUI.set auto_open_sos_file $env(HOME)/sosrc/normal-demo.sos
Projector SettingsThese properties are typically set when first installing the SOS equipment. They will not require editing afterward unless the number ortype of projectors are changed.
# Default gamma setting for projectors to facilitate edge blending.set gamma 0.8set fullScreen "-fullScreen"set projectorInfo(viewport) { 0,0,0.5,0.5 0.5,0,0.5,0.5 0,0.5,0.5,0.5 0.5,0.5,0.5,0.5 }set projectorInfo(hostname) { localhost localhost localhost localhost }set numberOfProjectors 4set env(SOS_DISPLAY) :1set bottommask 60,70
Text PIPNew for SOS v5.2. These properties are typically set when first installing the SOS equipment, and are used to achieve optimal textresolution on the sphere. They will not require editing afterward unless the number or type of projectors are changed.
Support: Operation and System Administration Manual
25

## Text PIP Configuration: ### Native resolution for a single projector in the SOS display.set env(SOS_PROJECTOR_WIDTH) 1920set env(SOS_PROJECTOR_HEIGHT) 1200# Number of projectors.set env(SOS_NUM_PROJECTORS) 4# Total degrees longitude of display. Typically, 90 degrees per projector.set env(SOS_DISPLAY_DEGREES_WIDTH) 360# Total degrees latitude of display. Typically, total is 180 degrees.set env(SOS_DISPLAY_DEGREES_HEIGHT) 180## End Text PIP Config ##
Magnify GraphicsNew for SOS v5.3. This property determines whether to show graphics elements (text and image PIPS, labels, icons, and annotationlines) inside the zoom magnifier window. By default, they are shown. Valid values are 1 (on) or 0 (off).
set env(SOS_MAGNIFY_GRAPHICS) 1
Display PerformanceNew for SOS v5.3. These properties determine system settings related to image display. They may be modified to tune SOSperformance but generally won't need to be changed once set.
# Set thread count. Default is 4set env(SOS_THREAD_COUNT) 6
# Set stream size (number of frames SOS keeps in memory at a time).# Default is 20.set env(SOS_STREAM_SIZE) 30
Auto Alignment (Experimental Feature)These properties are typically set when first installing the experimental auto alignment camera equipment. They with probably will notrequire editing unless the type of camera is changed.
Support: Operation and System Administration Manual
26

## Auto-Alignment Configuration: ### Set the cameras we want to use. Options are: V4L2 or POINTGREY. # Unless you are a legacy installation, you will want to use POINTGREY.set env(SOS_CAMERA_LIBRARY) POINTGREY
# (default) Point Grey - BlackFly resolution is 1280x960 # V4L2 - Full resolution web cam is 2304x1536.# V4L2 - Low resolution is typically set at 640x480set env(SOS_MAX_CAMERA_WIDTH) 1280set env(SOS_MAX_CAMERA_HEIGHT) 960## End Auto-Alignment Config ##
Exhibit DistancesThese properties are typically set when first installing the SOS equipment. The projectorInfo property changes where latitude 0degrees will be located relative to the projectors.
The other properties are measurements that must be as accurate as possible to get a good alignment of the projectors. They will notrequire editing afterward unless the position of the sphere or any of the projectors are changed.
Support: Operation and System Administration Manual
27

# Default orientation of all datasets around the z-axis, in degrees, when they# are first loaded on the sphere.#set projectorInfo(projectorRotation) 0
# Measured height, in inches, of the equator.set Sphere_Height_At_Equator_Inches 84.0
# Measured height, in inches, of each projector lens.# By experience, 1 inch lower than real height makes better alignment.set P1_Height_Inches 92.0set P2_Height_Inches 92.0set P3_Height_Inches 92.0set P4_Height_Inches 92.0
# Horizontal distance, in inches, of each of the four projectors from sphere# center.set P1_DIST_INCHES 211.0set P2_DIST_INCHES 211.0set P3_DIST_INCHES 211.0 set P4_DIST_INCHES 211.0
Appendix B: SOS Configuration ManagerThe SOS Configuration Manager is a new application that comes with SOS version 5.5. If you open the "SOS Utilities" application onyour Desktop, there will be an option called "Edit SOS Settings". Please note that in order to run this application, you will need to belogged in as user SOS. This application provides a replacement for the /home/sos/sos_stream_control.config file from previousversions.
This application is a graphical editor for a new file /shared/sos/site-config/local_sos_config.json. This is now where all of yourconfiguration and SOS settings are held (the same exact settings from Appendix A above). You can hand edit the file if you'd likethrough the terminal, but the graphical interface makes the process much simpler.
Support: Operation and System Administration Manual
28

In the image above, you'll see that there are a few items of interest. First, the settings are categorized into groups such as"Presentation" and "Sphere Measurements", which help to keep everything organized. Some settings have provided drop-downboxes, to help give recommendations on what values are expected. From here, you can edit the values of each setting, and then clicksave to apply the changes.
Also to note, there are arrows to the left of each setting's name. If you click this, it will open the description of the setting, as well asprovide the default value that comes pre-loaded with SOS. If you want to reset your entire configuration to its defaults, you can clickthe "File" menu at the top, and choose the "Reset to Factory Defaults" option, which will overwrite your file with the default values foreach setting. It is important to record at least the "Sphere Measurements" categories values, as these are usually set at install timeand you will not want to have to remeasure those distances.
Support: Operation and System Administration Manual
29