Embed Size (px)
Citation preview
Manual
Modelmaking made easy
i.materialise Google SketchUp Plugin - V1.1
2
Intr
oduc
tion
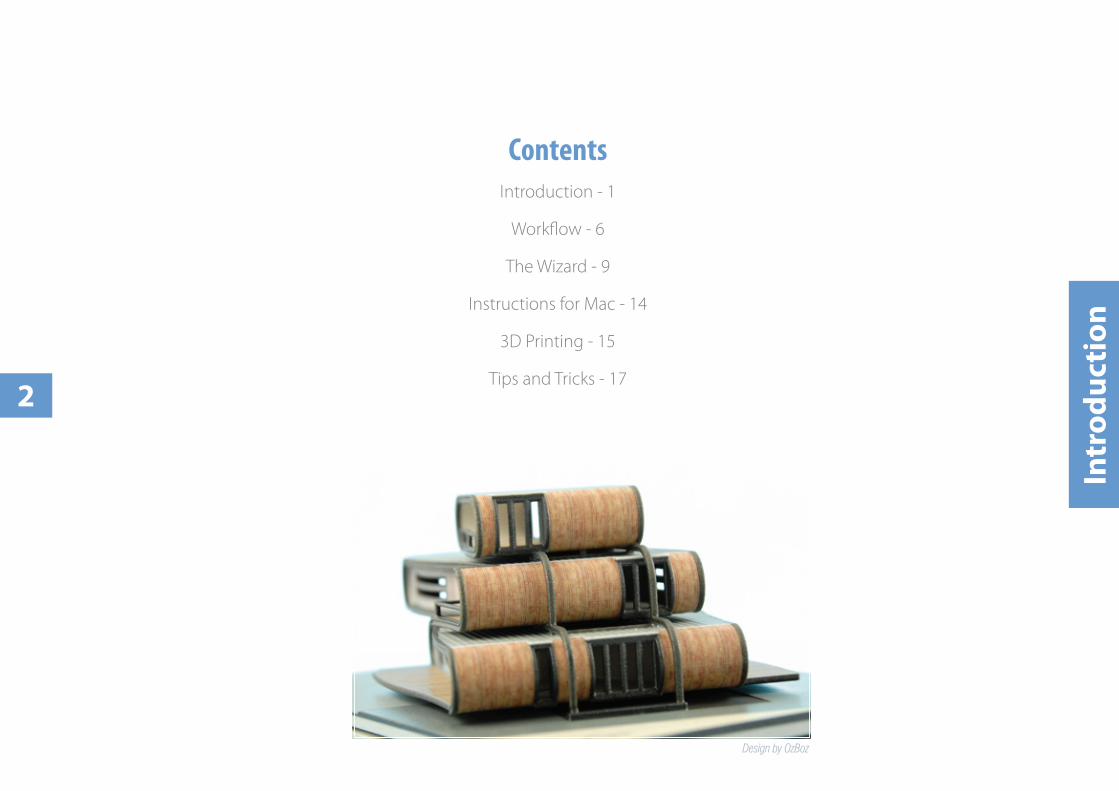
ContentsIntroduction - 1
Workflow - 6
The Wizard - 9
Instructions for Mac - 14
3D Printing - 15
Tips and Tricks - 17
Design by OzBoz
3
Intr
oduc
tion
i.materialise
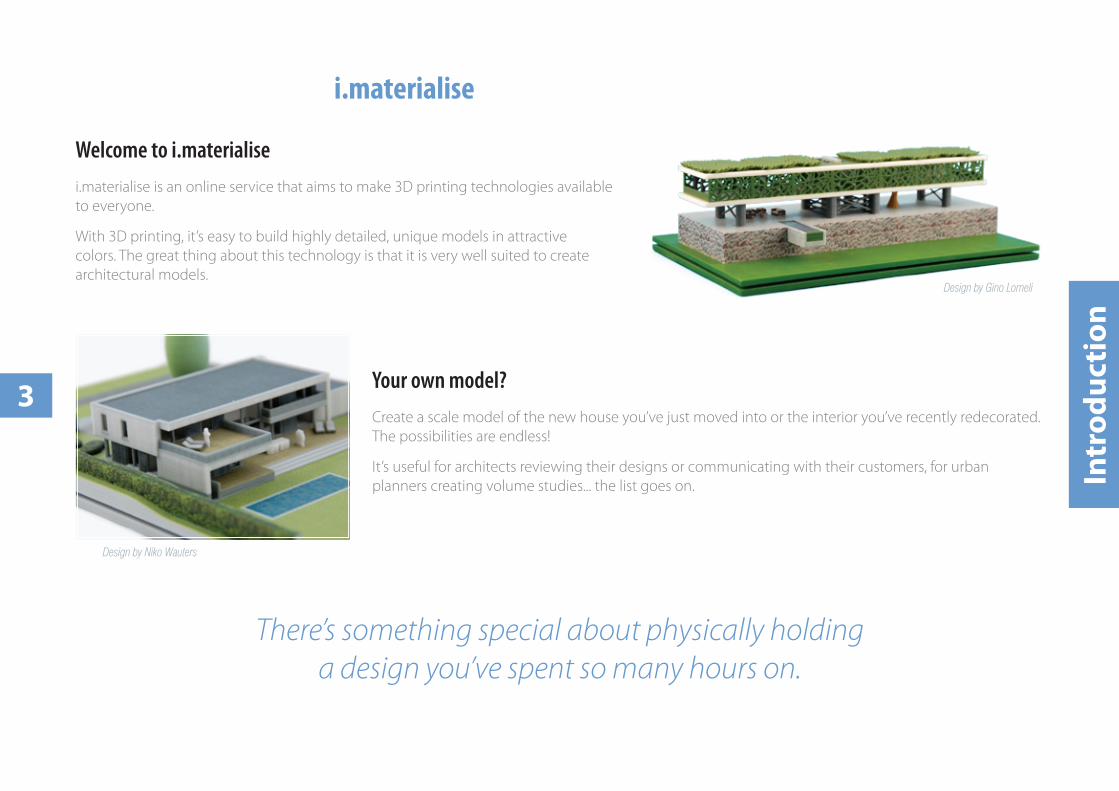
Welcome to i.materialisei.materialise is an online service that aims to make 3D printing technologies available to everyone.
With 3D printing, it’s easy to build highly detailed, unique models in attractive colors. The great thing about this technology is that it is very well suited to create architectural models.
There’s something special about physically holding a design you’ve spent so many hours on.
Your own model?Create a scale model of the new house you’ve just moved into or the interior you’ve recently redecorated. The possibilities are endless!
It’s useful for architects reviewing their designs or communicating with their customers, for urban planners creating volume studies... the list goes on.
Design by Gino Lomeli
Design by Niko Wauters
4
Intr
oduc
tion
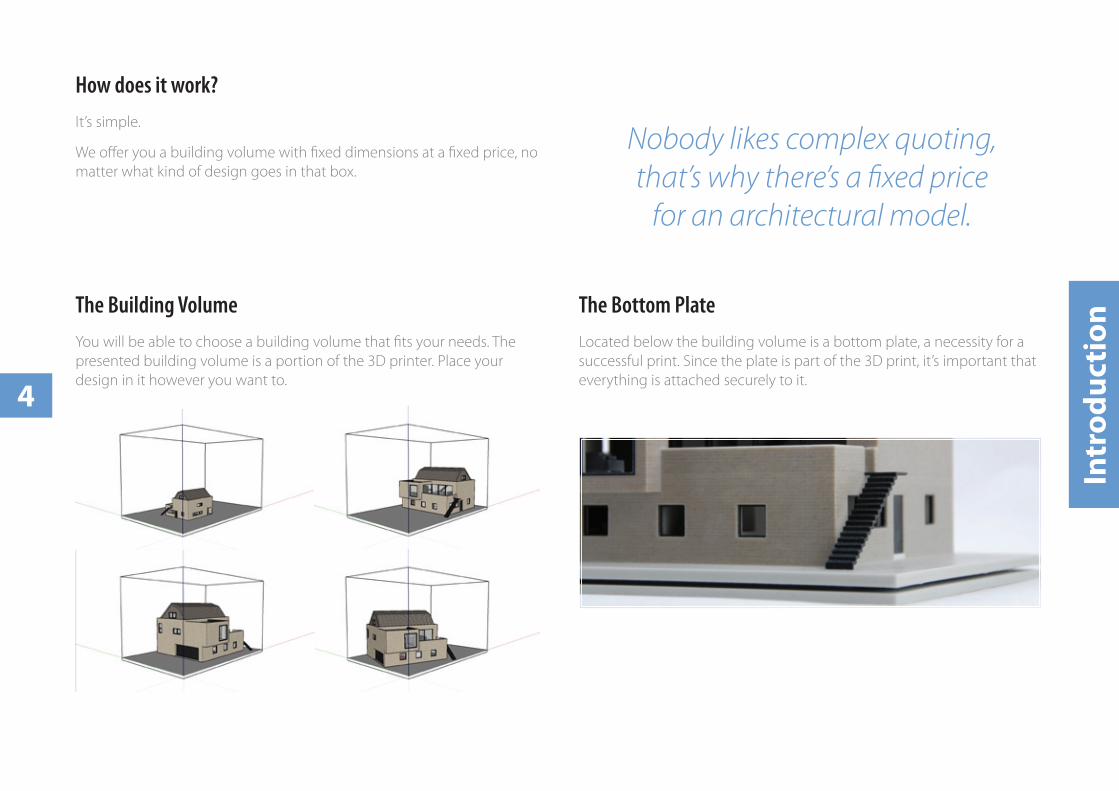
The Bottom PlateLocated below the building volume is a bottom plate, a necessity for a successful print. Since the plate is part of the 3D print, it’s important that everything is attached securely to it.
The Building VolumeYou will be able to choose a building volume that fits your needs. The presented building volume is a portion of the 3D printer. Place your design in it however you want to.
How does it work?It’s simple.
We offer you a building volume with fixed dimensions at a fixed price, no matter what kind of design goes in that box.
Nobody likes complex quoting, that’s why there’s a fixed price
for an architectural model.
5
Intr
oduc
tion
Why Google SketchUp?3D prints always start from a 3D model. While there are many alternatives for creating 3D models, we choose Google SketchUp for architectural models.
Why?
FreeGoogle SketchUp is available to everyone at no cost. Visit sketchup.google.com/download to install the free version of SketchUp. You’ll be modeling in minutes.
Easy to use and fast Google SketchUp is a user-friendly package that doesn’t require extensive knowledge of 3D modeling. The simplified tool set allows you to create the design you want quickly and easily.
Easy to learnJust start exploring, or check out the tutorials at sketchup.google.com/training/videos.html.
We know you’ll like Google SketchUp. We like it too! That’s why you can prepare your 3D print model right into SketchUp.
6
Wor
kflow
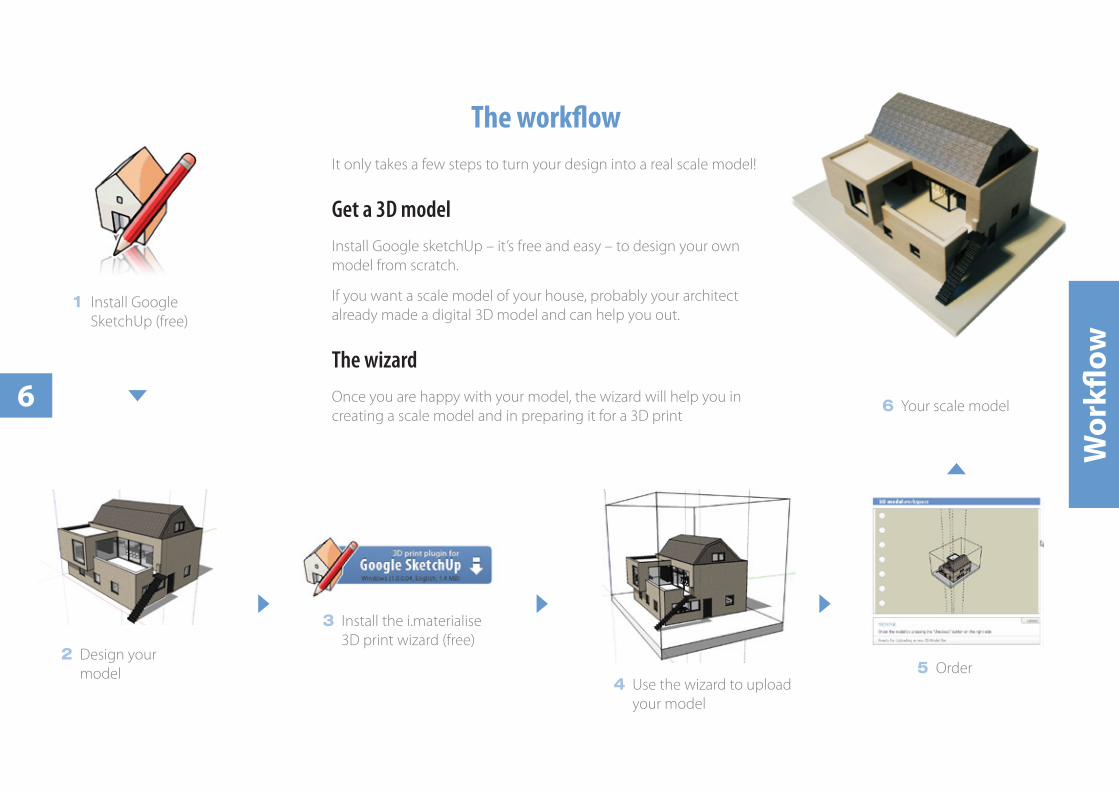
1 Install Google SketchUp (free)
2 Design your model
3 Install the i.materialise 3D print wizard (free)
4 Use the wizard to upload your model
5 Order
The workflowIt only takes a few steps to turn your design into a real scale model!
Get a 3D modelInstall Google sketchUp – it’s free and easy – to design your own model from scratch.
If you want a scale model of your house, probably your architect already made a digital 3D model and can help you out.
The wizardOnce you are happy with your model, the wizard will help you in creating a scale model and in preparing it for a 3D print
6 Your scale model
7
Wor
kflow
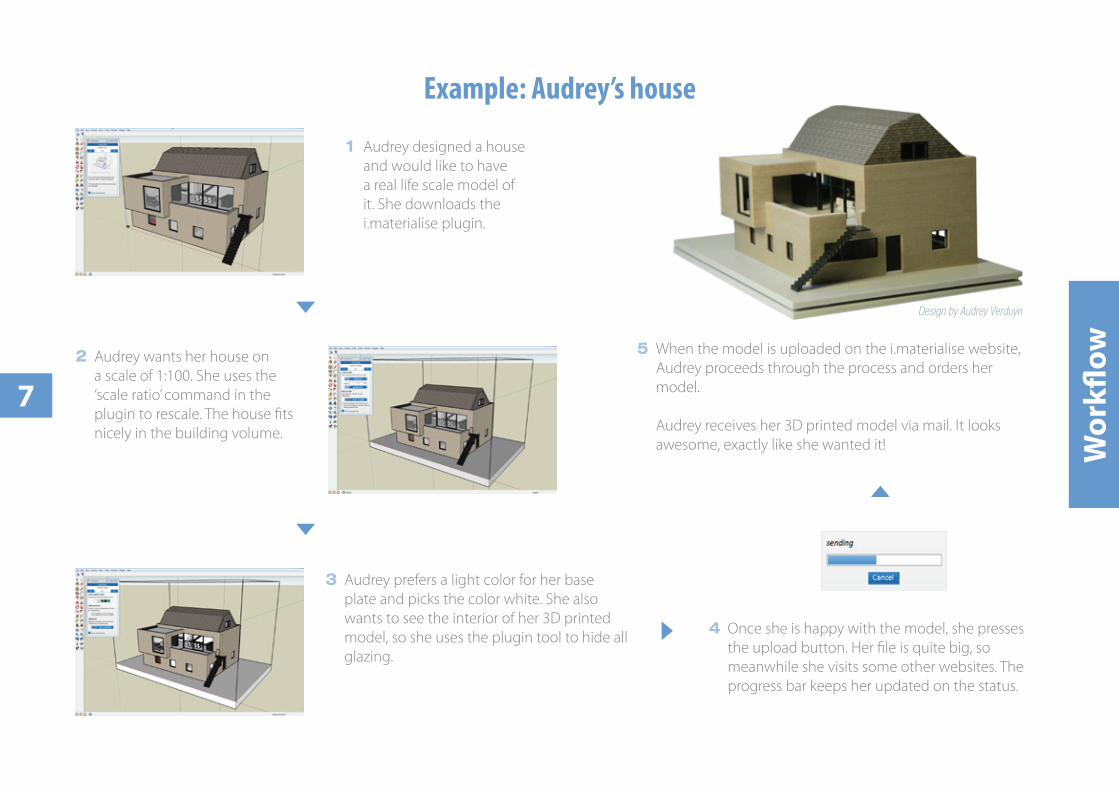
Example: Audrey’s house
1 Audrey designed a house and would like to have a real life scale model of it. She downloads the i.materialise plugin.
2 Audrey wants her house on a scale of 1:100. She uses the ‘scale ratio’ command in the plugin to rescale. The house fits nicely in the building volume.
3 Audrey prefers a light color for her base plate and picks the color white. She also wants to see the interior of her 3D printed model, so she uses the plugin tool to hide all glazing.
4 Once she is happy with the model, she presses the upload button. Her file is quite big, so meanwhile she visits some other websites. The progress bar keeps her updated on the status.
5 When the model is uploaded on the i.materialise website, Audrey proceeds through the process and orders her model. Audrey receives her 3D printed model via mail. It looks awesome, exactly like she wanted it!
Design by Audrey Verduyn
8
Wor
kflow
Example: Matthew’s house
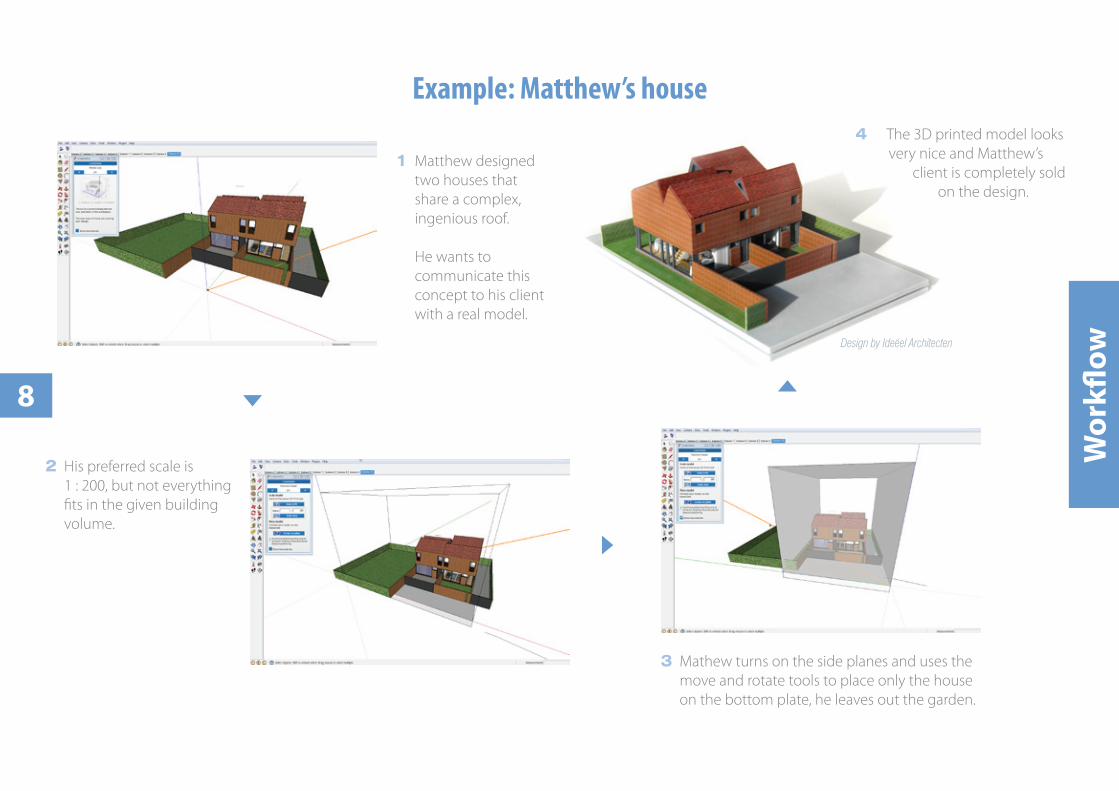
1 Matthew designed two houses that share a complex, ingenious roof. He wants to communicate this concept to his client with a real model.
2 His preferred scale is 1 : 200, but not everything fits in the given building volume.
3 Mathew turns on the side planes and uses the move and rotate tools to place only the house on the bottom plate, he leaves out the garden.
4 The 3D printed model looks very nice and Matthew’s
client is completely sold on the design.
Design by Ideëel Architecten
9
The
Wiz
ard
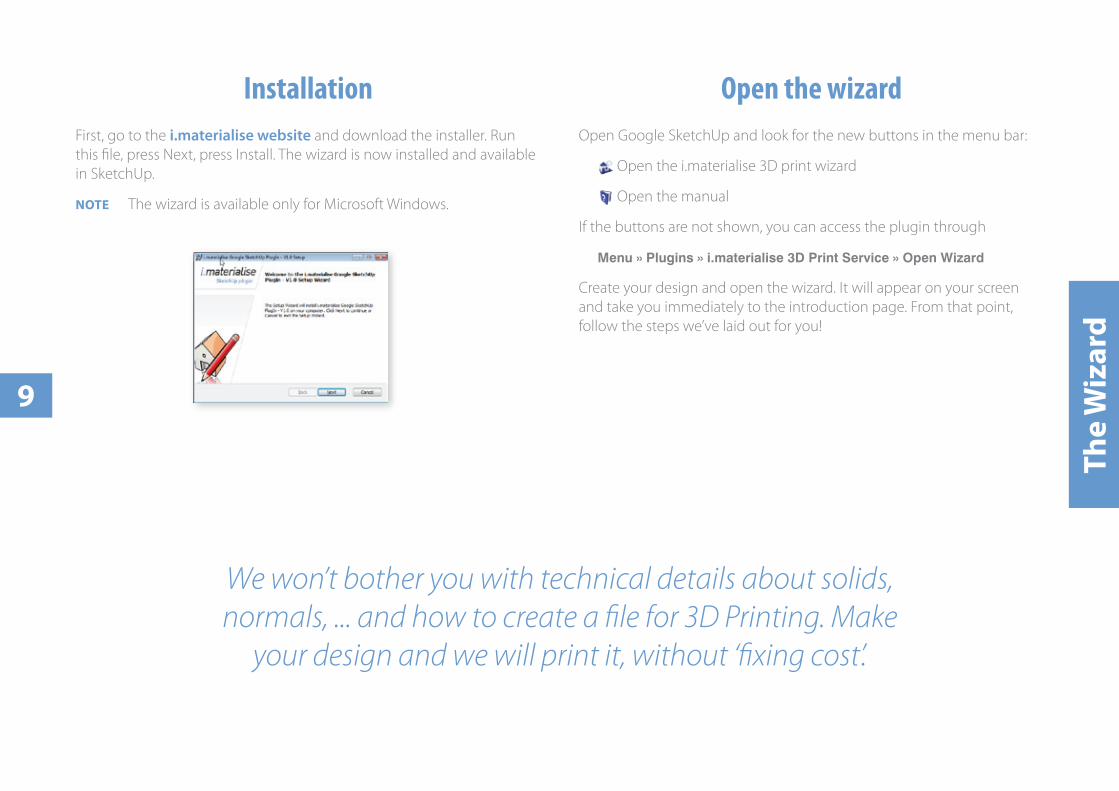
InstallationFirst, go to the i.materialise website and download the installer. Run this file, press Next, press Install. The wizard is now installed and available in SketchUp.
NoTe The wizard is available only for Microsoft Windows.
We won’t bother you with technical details about solids, normals, ... and how to create a file for 3D Printing. Make
your design and we will print it, without ‘fixing cost’.
Open the wizardOpen Google SketchUp and look for the new buttons in the menu bar:
Open the i.materialise 3D print wizard
Open the manual
If the buttons are not shown, you can access the plugin through
Menu » Plugins » i.materialise 3D Print Service » Open Wizard
Create your design and open the wizard. It will appear on your screen and take you immediately to the introduction page. From that point, follow the steps we’ve laid out for you!
10
The
Wiz
ard
Step 1 - Model Size
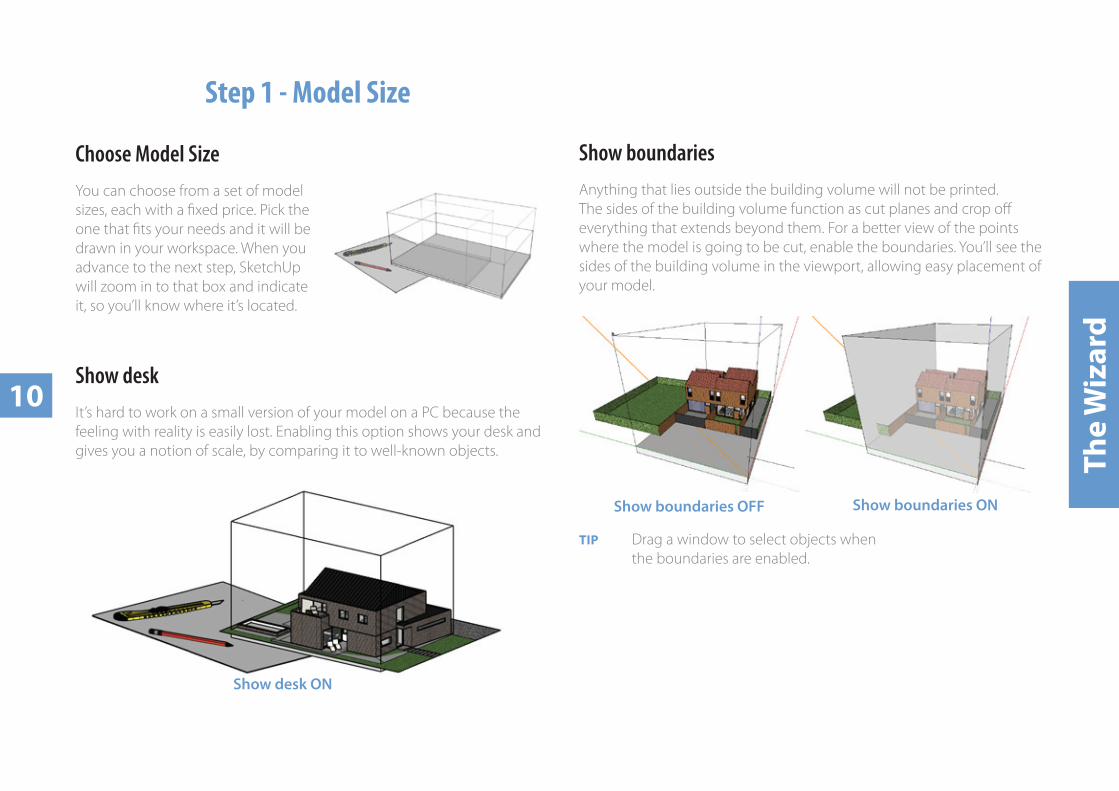
Choose Model SizeYou can choose from a set of model sizes, each with a fixed price. Pick the one that fits your needs and it will be drawn in your workspace. When you advance to the next step, SketchUp will zoom in to that box and indicate it, so you’ll know where it’s located.
Show boundariesAnything that lies outside the building volume will not be printed. The sides of the building volume function as cut planes and crop off everything that extends beyond them. For a better view of the points where the model is going to be cut, enable the boundaries. You’ll see the sides of the building volume in the viewport, allowing easy placement of your model.
Show boundaries OFF Show boundaries ON
TIP Drag a window to select objects when the boundaries are enabled.
Show deskIt’s hard to work on a small version of your model on a PC because the feeling with reality is easily lost. Enabling this option shows your desk and gives you a notion of scale, by comparing it to well-known objects.
Show desk ON
11
The
Wiz
ard
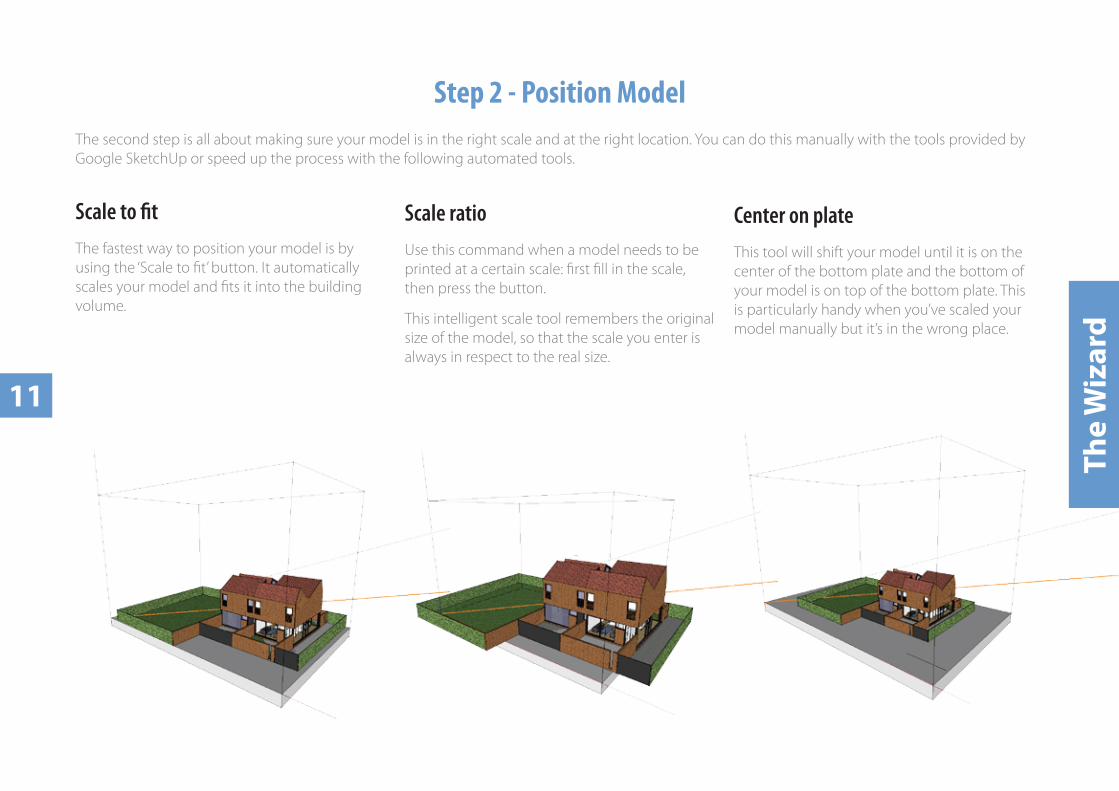
Scale to fitThe fastest way to position your model is by using the ‘Scale to fit’ button. It automatically scales your model and fits it into the building volume.
Scale ratioUse this command when a model needs to be printed at a certain scale: first fill in the scale, then press the button.
This intelligent scale tool remembers the original size of the model, so that the scale you enter is always in respect to the real size.
Center on plateThis tool will shift your model until it is on the center of the bottom plate and the bottom of your model is on top of the bottom plate. This is particularly handy when you’ve scaled your model manually but it’s in the wrong place.
Step 2 - Position ModelThe second step is all about making sure your model is in the right scale and at the right location. You can do this manually with the tools provided by Google SketchUp or speed up the process with the following automated tools.
12
The
Wiz
ard
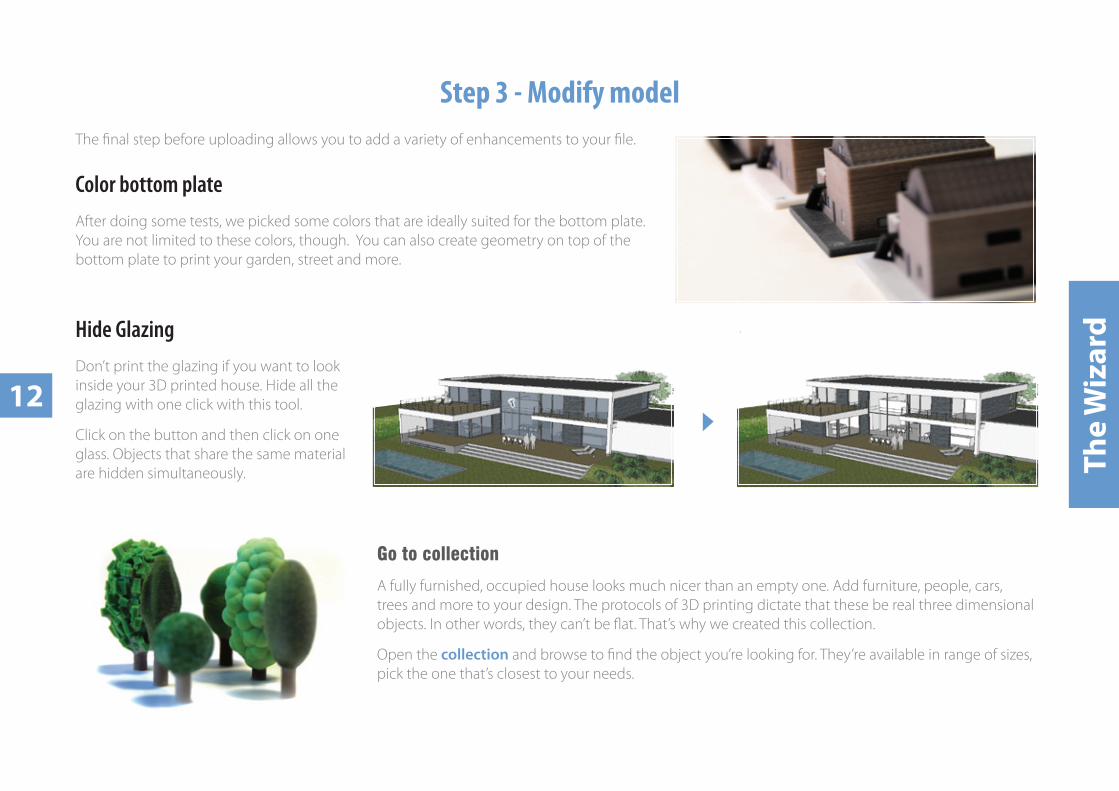
Step 3 - Modify modelThe final step before uploading allows you to add a variety of enhancements to your file.
Color bottom plateAfter doing some tests, we picked some colors that are ideally suited for the bottom plate. You are not limited to these colors, though. You can also create geometry on top of the bottom plate to print your garden, street and more.
Go to collection
A fully furnished, occupied house looks much nicer than an empty one. Add furniture, people, cars, trees and more to your design. The protocols of 3D printing dictate that these be real three dimensional objects. In other words, they can’t be flat. That’s why we created this collection.
Open the collection and browse to find the object you’re looking for. They’re available in range of sizes, pick the one that’s closest to your needs.
Hide GlazingDon’t print the glazing if you want to look inside your 3D printed house. Hide all the glazing with one click with this tool.
Click on the button and then click on one glass. Objects that share the same material are hidden simultaneously.
13
The
Wiz
ard
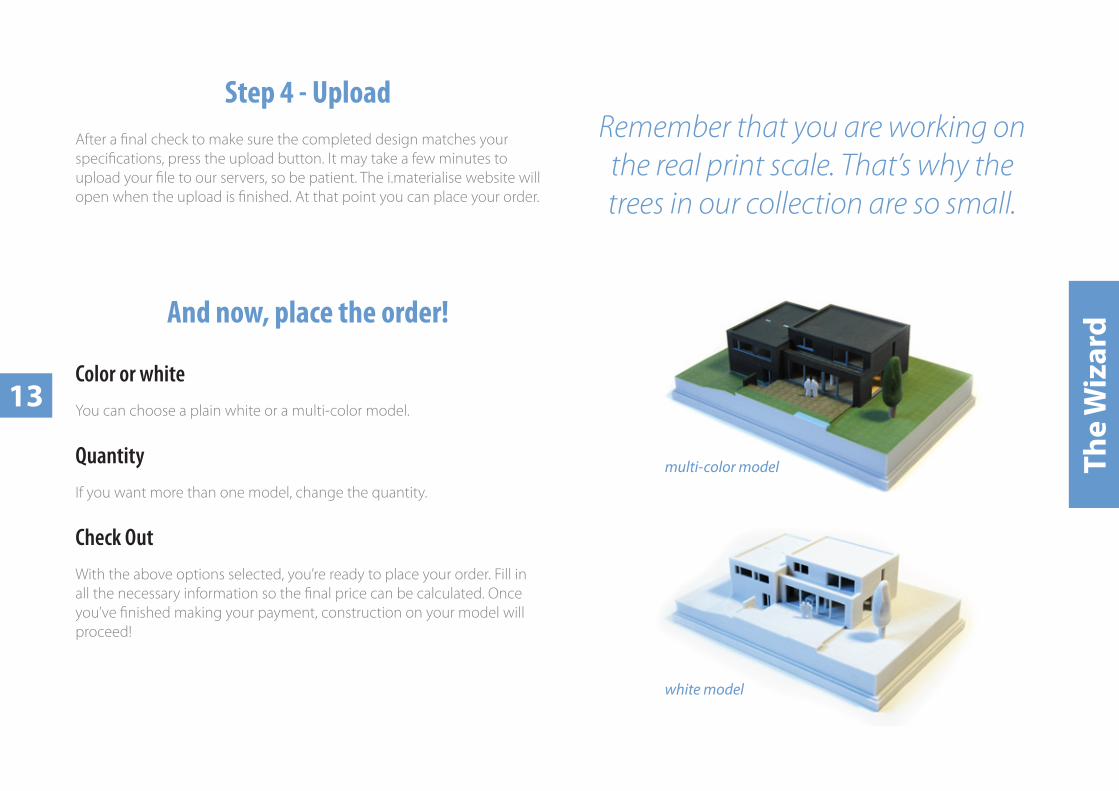
Remember that you are working on the real print scale. That’s why the trees in our collection are so small.
Step 4 - UploadAfter a final check to make sure the completed design matches your specifications, press the upload button. It may take a few minutes to upload your file to our servers, so be patient. The i.materialise website will open when the upload is finished. At that point you can place your order.
And now, place the order!
Color or whiteYou can choose a plain white or a multi-color model.
QuantityIf you want more than one model, change the quantity.
Check OutWith the above options selected, you’re ready to place your order. Fill in all the necessary information so the final price can be calculated. Once you’ve finished making your payment, construction on your model will proceed!
white model
multi-color model
14 Mac
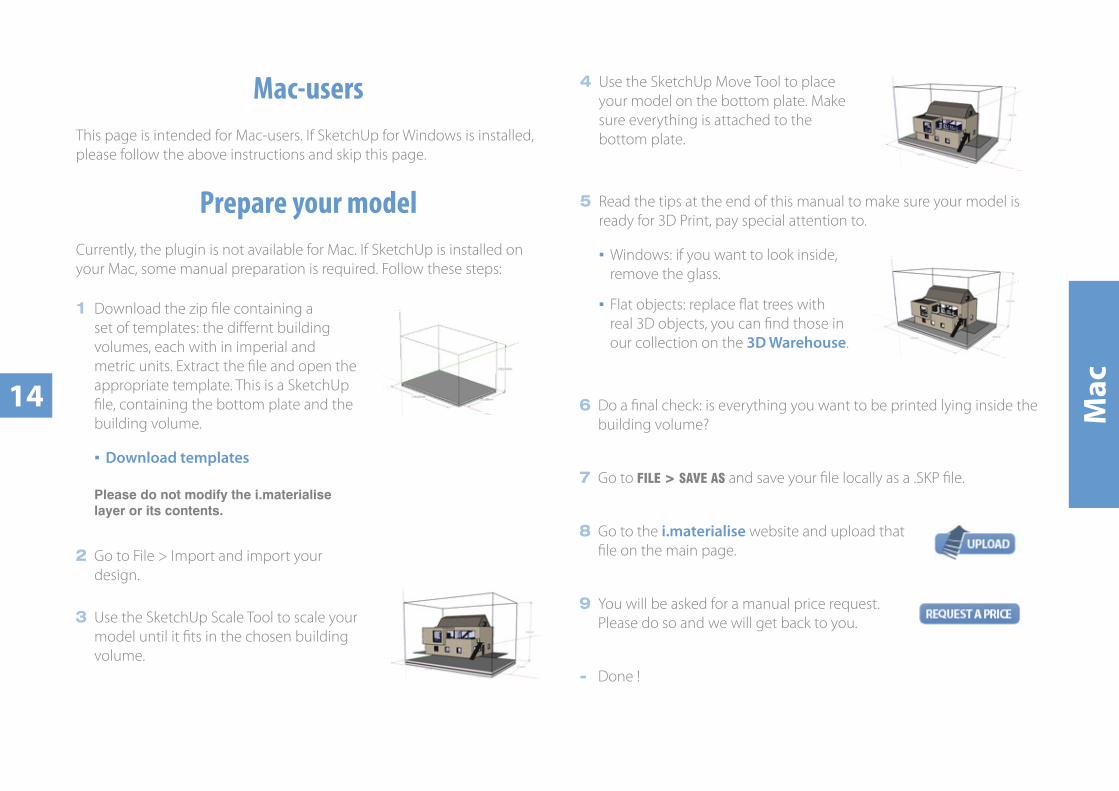
Mac-usersThis page is intended for Mac-users. If SketchUp for Windows is installed, please follow the above instructions and skip this page.
Prepare your modelCurrently, the plugin is not available for Mac. If SketchUp is installed on your Mac, some manual preparation is required. Follow these steps:
1 Download the zip file containing a set of templates: the differnt building volumes, each with in imperial and metric units. Extract the file and open the appropriate template. This is a SketchUp file, containing the bottom plate and the building volume.
D ▪ ownload templates
3 Use the SketchUp Scale Tool to scale your model until it fits in the chosen building volume.
6 Do a final check: is everything you want to be printed lying inside the building volume?
7 Go to FILE > SAVE AS and save your file locally as a .SKP file.
8 Go to the i.materialise website and upload that file on the main page.
9 You will be asked for a manual price request. Please do so and we will get back to you.
- Done !
4 Use the SketchUp Move Tool to place your model on the bottom plate. Make sure everything is attached to the bottom plate.
5 Read the tips at the end of this manual to make sure your model is ready for 3D Print, pay special attention to.
Windows: if you want to look inside, ▪remove the glass.
Flat objects: replace flat trees with ▪real 3D objects, you can find those in our collection on the 3D Warehouse.
Please do not modify the i.materialise layer or its contents.
2 Go to File > Import and import your design.
15
3D P
rint
ing
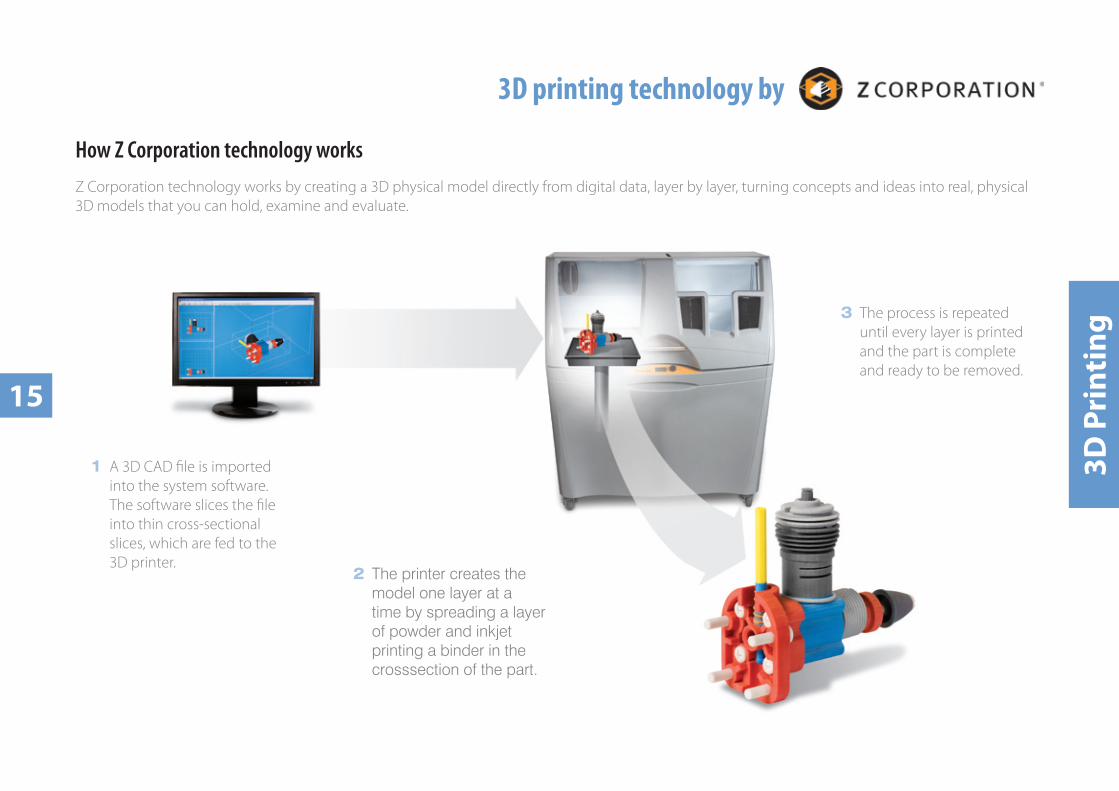
How Z Corporation technology worksZ Corporation technology works by creating a 3D physical model directly from digital data, layer by layer, turning concepts and ideas into real, physical 3D models that you can hold, examine and evaluate.
3D printing technology by
1 A 3D CAD file is imported into the system software. The software slices the file into thin cross-sectional slices, which are fed to the 3D printer.
2 The printer creates the model one layer at a time by spreading a layer of powder and inkjet printing a binder in the crosssection of the part.
3 The process is repeated until every layer is printed and the part is complete and ready to be removed.
16
3D P
rint
ing
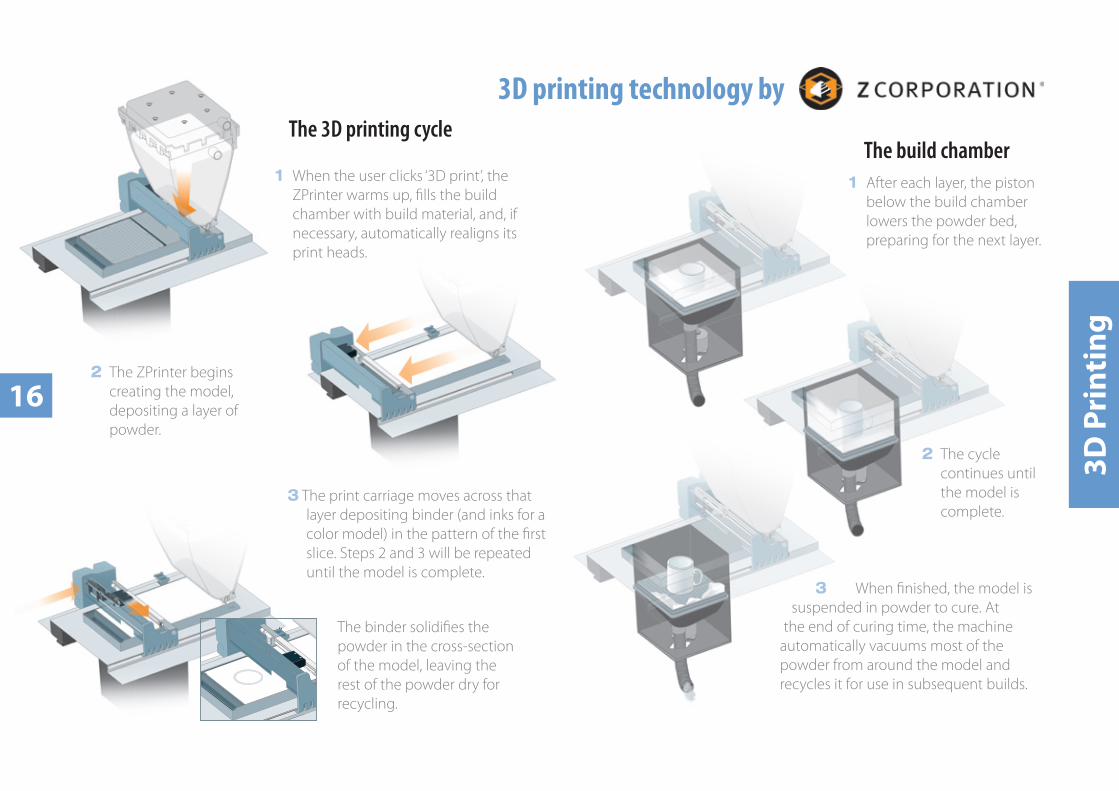
1 When the user clicks ‘3D print’, the ZPrinter warms up, fills the build chamber with build material, and, if necessary, automatically realigns its print heads.
2 The ZPrinter begins creating the model, depositing a layer of powder.
3 The print carriage moves across that layer depositing binder (and inks for a color model) in the pattern of the first slice. Steps 2 and 3 will be repeated until the model is complete.
The binder solidifies the powder in the cross-section of the model, leaving the rest of the powder dry for recycling.
1 After each layer, the piston below the build chamber lowers the powder bed, preparing for the next layer.
2 The cycle continues until the model is complete.
3 When finished, the model is suspended in powder to cure. At
the end of curing time, the machine automatically vacuums most of the powder from around the model and recycles it for use in subsequent builds.
The build chamberThe 3D printing cycle
3D printing technology by
17
Tips
& T
rick
s
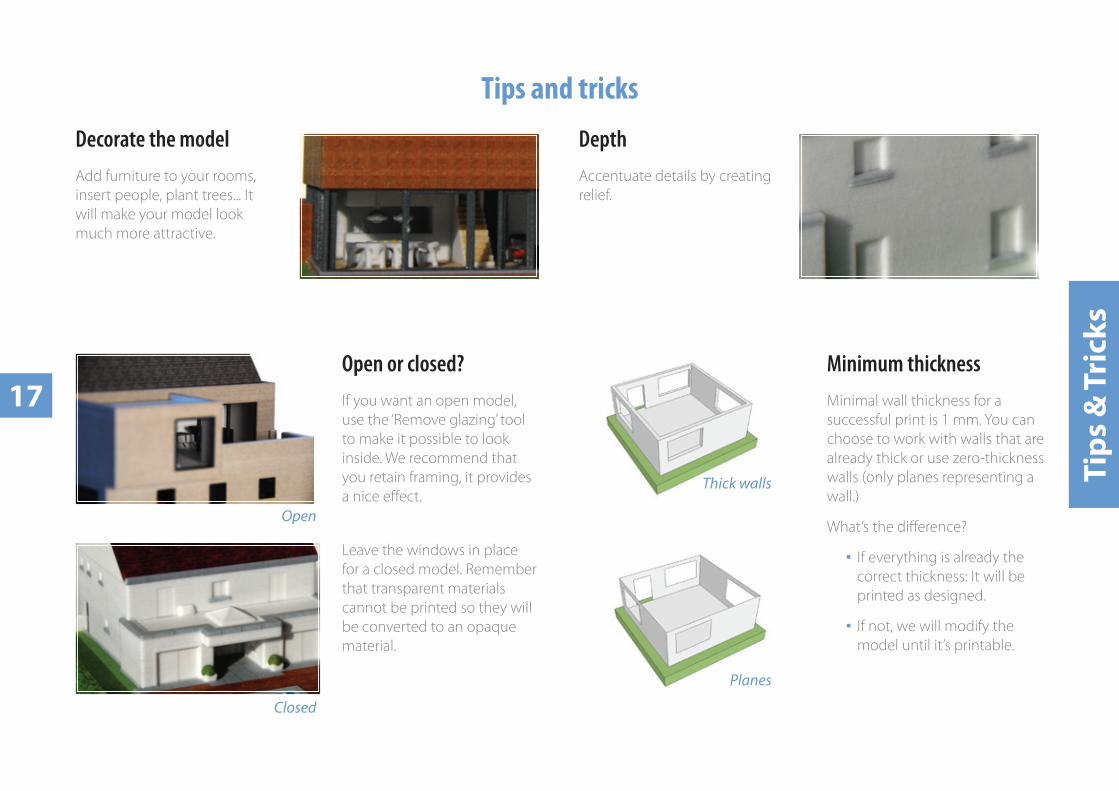
Tips and tricksDecorate the modelAdd furniture to your rooms, insert people, plant trees... It will make your model look much more attractive.
DepthAccentuate details by creating relief.
Open or closed?If you want an open model, use the ‘Remove glazing’ tool to make it possible to look inside. We recommend that you retain framing, it provides a nice effect.
Leave the windows in place for a closed model. Remember that transparent materials cannot be printed so they will be converted to an opaque material.
Open
Closed
Minimum thicknessMinimal wall thickness for a successful print is 1 mm. You can choose to work with walls that are already thick or use zero-thickness walls (only planes representing a wall.)
What’s the difference?
If everything is already the ▪correct thickness: It will be printed as designed.
If not, we will modify the ▪model until it’s printable.
Thick walls
Planes
18
Tips
& T
rick
s
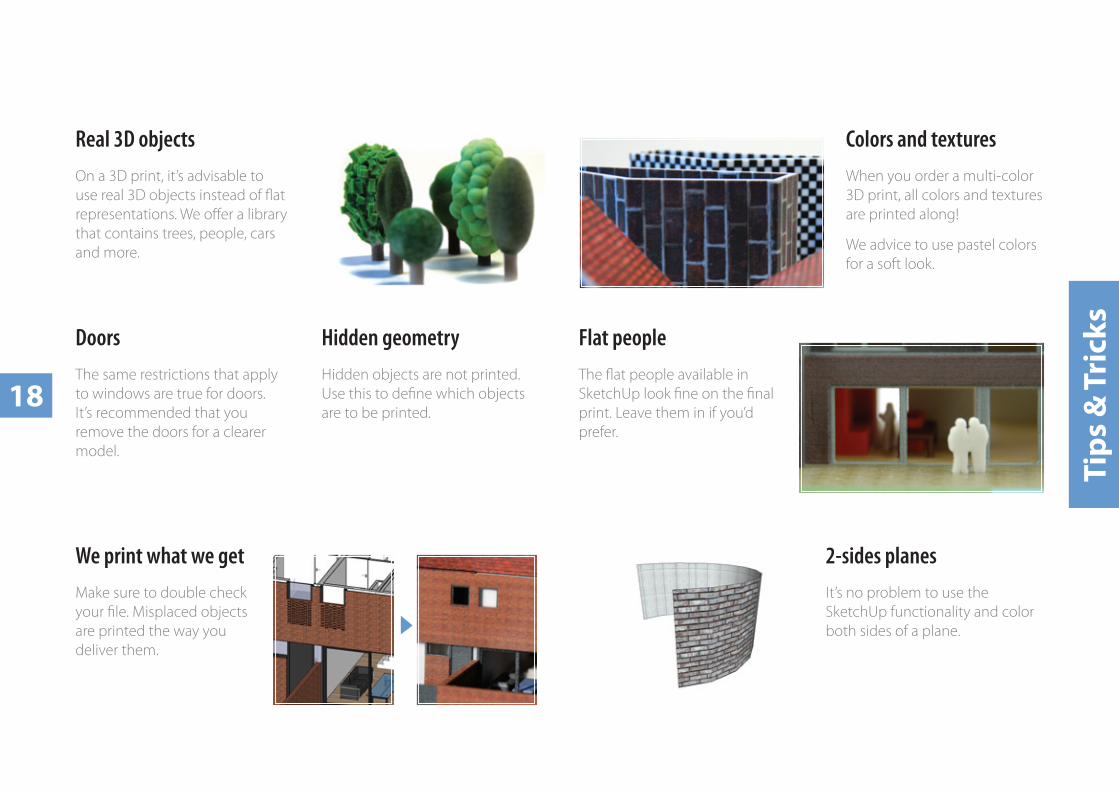
Real 3D objectsOn a 3D print, it’s advisable to use real 3D objects instead of flat representations. We offer a library that contains trees, people, cars and more.
DoorsThe same restrictions that apply to windows are true for doors. It’s recommended that you remove the doors for a clearer model.
We print what we getMake sure to double check your file. Misplaced objects are printed the way you deliver them.
2-sides planesIt’s no problem to use the SketchUp functionality and color both sides of a plane.
Colors and texturesWhen you order a multi-color 3D print, all colors and textures are printed along!
We advice to use pastel colors for a soft look.
Flat peopleThe flat people available in SketchUp look fine on the final print. Leave them in if you’d prefer.
Hidden geometryHidden objects are not printed. Use this to define which objects are to be printed.
19
Tips
& T
rick
s
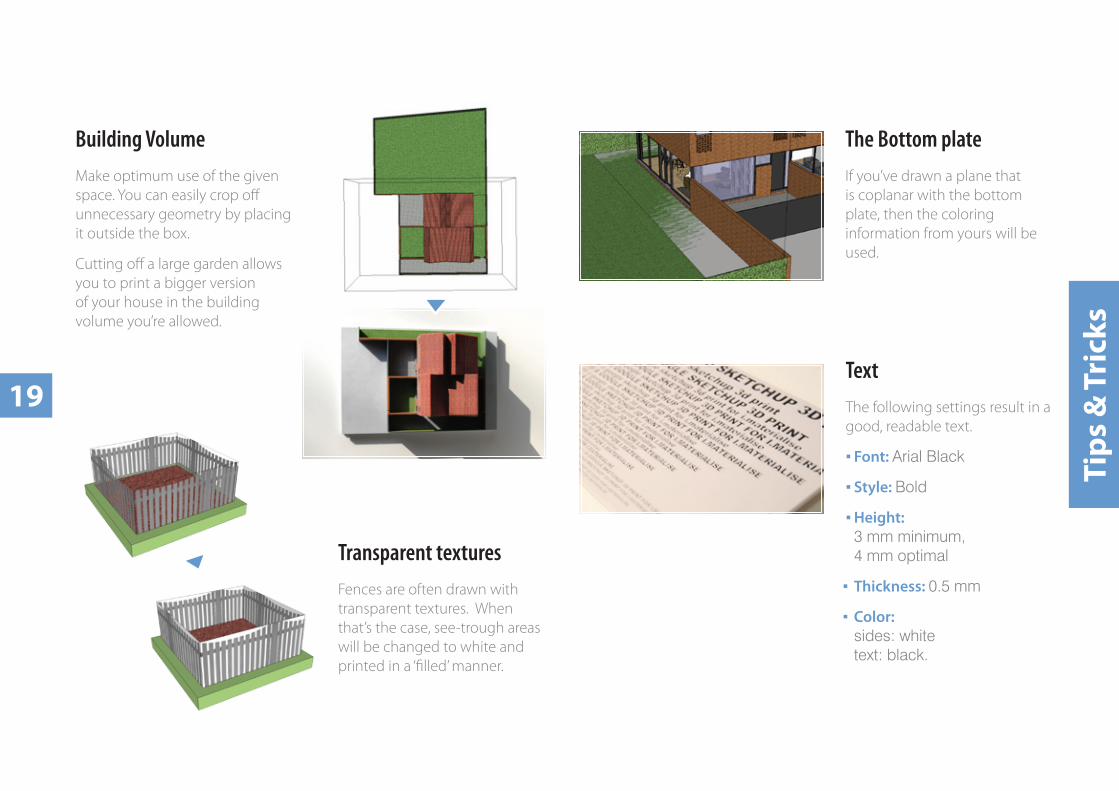
Building VolumeMake optimum use of the given space. You can easily crop off unnecessary geometry by placing it outside the box.
Cutting off a large garden allows you to print a bigger version of your house in the building volume you’re allowed.
TextThe following settings result in a good, readable text.
Font: ▪ Arial Black
Style: ▪ Bold
Height: ▪3 mm minimum, 4 mm optimal
Thickness: ▪ 0.5 mm
Color: ▪sides: white text: black.
The Bottom plateIf you’ve drawn a plane that is coplanar with the bottom plate, then the coloring information from yours will be used.
Transparent texturesFences are often drawn with transparent textures. When that’s the case, see-trough areas will be changed to white and printed in a ‘filled’ manner.
Enjoy your 3D printed model!
▪ ▪


![Google SketchUp Basics for K-12 Educationsketchup-basics.wikispaces.com/file/view/EDU_SketchUpBasics.pdf · [4]:: Google SketchUp is an ex-tremely powerful 3d modeling tool. SketchUp](https://img.pdfslide.us/doc/110x75/5aae0ef87f8b9a25088bc80a/google-sketchup-basics-for-k-12-educationsketchup-4-google-sketchup-is-an-ex-tremely.jpg)