Embed Size (px)
Citation preview

Manual for Thesis Template


Manual for Thesis Templates/translation - 1 - 2013-10-07
TABLE OF CONTENT
General information .................................................................................................................. 2
Aim ........................................................................................................................................ 2
Format and versions ............................................................................................................... 2
Fonts ...................................................................................................................................... 2
The different parts of the template ............................................................................................. 2
A template ............................................................................................................................. 2
B template .............................................................................................................................. 3
Using the style sheets.................................................................................................................. 4
Using the template ..................................................................................................................... 5
Instructions for writing directly in the B template ................................................................... 5
Inserting text from another document into the B template ....................................................... 5
Monograph or compilation thesis? ......................................................................................... 6
Tips for pictures and text ........................................................................................................... 6
Inserting pictures .................................................................................................................... 6
Captions ................................................................................................................................ 7
Alternative text ...................................................................................................................... 7
Pasting text ............................................................................................................................ 7
Bulleted lists ........................................................................................................................... 7
Footnotes and endnotes .......................................................................................................... 8
Inserting page breaks/section breaks ....................................................................................... 8
Changing where page numbers start ....................................................................................... 9
References .............................................................................................................................. 9
Updating the table of content ............................................................................................... 10
More tips ................................................................................................................................. 10
Abstract ............................................................................................................................... 10
Adjusting loosely spaced text and line ending errors.............................................................. 10
Headings .............................................................................................................................. 10
How do I change heading fonts? ........................................................................................... 10
Hyphenation ........................................................................................................................ 11
Language settings ................................................................................................................. 11
Page references ..................................................................................................................... 12
Pictures/figures ..................................................................................................................... 12
Style guides .......................................................................................................................... 12
Tables .................................................................................................................................. 12

Manual for Thesis Templates/translation - 2 - 2013-10-07
GENERAL INFORMATION
Aim The template has been created to help you as a writer and give the theses that are published at Örebro University a uniform design. It supports various disability aids which means that if you use the tem-plate, your thesis will, to a higher degree, be made accessible to the visually impaired and people with other disabilities on conversion to a digital resource for publication in DiVA1.
To make your file as accessible as possible in the digital format it is therefore important that you use the style sheets available and do not try to create your own “layout”, for example by adding extra blank lines or formatting headings manually.
Format and versions The template is in book format (157 x 223 mm), the format in which the theses are printed.
The thesis template is designed for the word processing program Microsoft Word 2007 and newer versions. Each template consists of two files (A and B) as follows.
The A templates, A-mall_eng.docx and A-mall _svenska.docx, are protected documents, designed as fillable forms for basic information such as the title of the thesis, author, etc. If you are writing your thesis in any of the Scandinavian languages, you should use the Swedish A template.
The B template, B-mall_157x223mm.docx, is an open document for editing body text. Use this template for your actual thesis text.
In addition, there is a template for the front page of the loose title sheet, Title sheet_Spikblad.dot.
Fonts The template uses the fonts Trade Gothic LT Std and Sabon LT Std. These must be installed on the computer you intend to use. If you do not already have the fonts installed on your computer, please contact [email protected]. Doctoral students who use the county council’s computers and need the fonts installed can ask for support via the county council’s task management system.
THE DIFFERENT PARTS OF THE TEMPLATE
A template The A template contains the title pages, imprint page and abstract. The template is protected to prevent the text and logotype from shifting. This means that you can only type in text in the grey-coloured fields. Use the keyboard keys DOWN ARROW or UP ARROW to move between the grey-coloured fields. Please note that if you are writing your thesis in Swedish, Norwegian or Danish, the template A-mall_svenska.docx should be used.
1 As a public authority, Örebro University is obliged to comply with the directives issued by the Swedish government, such as the ordinance on state authorities’ responsibility for the implementation of the Swe-dish disability policy (Swedish Code of Statutes 2001:526). Örebro University also has an action plan for accessibility (reg. no. CF 16-690/2010) which underlines the importance of making material that is pub-lished on the web accessible to all.

Manual for Thesis Templates/translation - 3 - 2013-10-07
The A template consists of:
o Half title page (smutstitelsida) – this is where you enter the title of your thesis. o Dedication (dedikation) – this is where you enter any dedications or quotes. The field
will be deleted if it is not used. o Title page (titelsida) – this is where you enter the name and number of the series to which
your thesis belongs, as well as your name, the title and subtitle (if any) of your thesis. o Imprint page (tryckortssida) – this is where you enter details that concern the actual print-
ing, including ISBN and ISSN numbers. If the series to which your thesis belongs does not have an ISSN number (applies to series created after 1 July 2008), the field will be deleted.
o Abstract. The upper and lower part of the abstract is protected in the same way as the first four pages. The table box in the middle of the page can be edited freely, but should you enter more text than there is room for in the table, the excess text will be hidden from view. This is because an abstract may not be longer than one page since the printers must be able to fit the abstract page onto the back of the loose title sheet.
B template The B template is used for the actual thesis text. It uses custom style sheets for headings, body text, bulleted lists, etc. to make it easier for you as a writer. You type in your text as you would in a normal Word document. Text that is not body text is formatted using the style sheets. Simply place the cursor on the text in question and select the style sheet you wish to use. The styles sheets can be changed, but you are yourself responsible for any such changes.
The template consists of the following parts:
1) Table of content. Read more about how this works in the section “Updating the table of content”.
2) Writable part which you can edit freely and which contains the style sheets mentioned below.
Style sheets The following custom style sheets are available in the template:
• Abstract med indrag/Abstract utan indrag (abstract with indentations/abstract without indentations) – normally only used in the A template
• Avstånd före punktlista/Avstånd efter punktlista (spacing before bulleted lists/spacing after bulleted lists
• Bild/figurtext vänsterställd/Bild/figurtext centrerad (caption/figure text left-aligned/caption/figure text centred
• Brödtext med indrag/Brödtext utan indrag (body text with indentations/body text with-out indentations
• Citat 1 (quote 1) • Fotnot (footnote) • H1_Heading_1 through H5_Heading_5, i.e. five different heading formats • Kapitel (chapter) – only used in monographs when a clear chapter division is desired • Lista_indrag med bokstäver/siffror/punkter (list_indentation with letters/numbers/bullets)
i.e. three different types of lists • Litteraturlista med siffror/Litteraturlista utan siffror (list of references with numbers/list
of references without numbers) • Tabelltext (table text)
Manual for Thesis Templates/translation - 4 - 2013-10-07
USING THE STYLE SHEETS
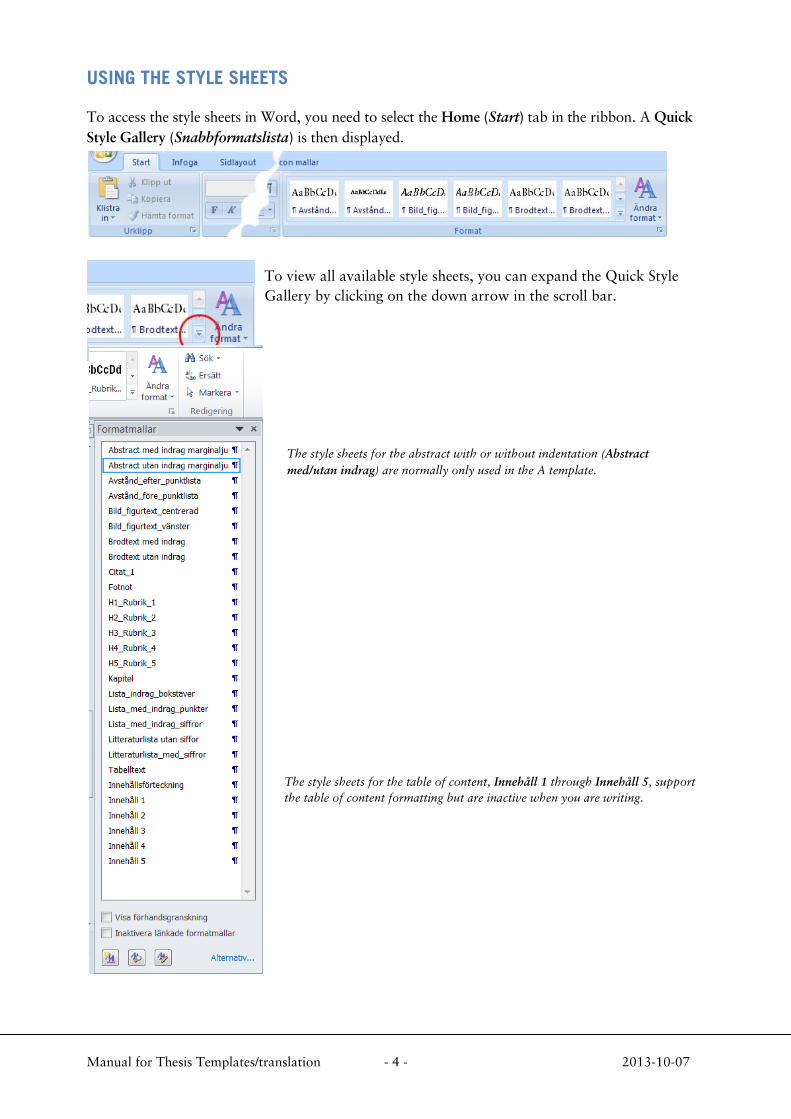
To access the style sheets in Word, you need to select the Home (Start) tab in the ribbon. A Quick Style Gallery (Snabbformatslista) is then displayed.
To view all available style sheets, you can expand the Quick Style Gallery by clicking on the down arrow in the scroll bar.
The style sheets for the abstract with or without indentation (Abstract med/utan indrag) are normally only used in the A template.
The style sheets for the table of content, Innehåll 1 through Innehåll 5, support the table of content formatting but are inactive when you are writing.

Manual for Thesis Templates/translation - 5 - 2013-10-07
USING THE TEMPLATE
The A template is only used for what is known as the title pages and for the abstract. Most likely you will do these pages last. Whether you write directly in the template (recommended) or paste text from another document, be sure to use the arrow keys or the tab key when you move be-tween the different fields. Please note that if you are writing your thesis in Swedish, Norwegian or Danish, you should use the template A-mall_svenska.docx.
The B template is your main template where you write the actual thesis text. The template works best if you, from the beginning, write your thesis directly in the template. However, it is possible to insert a whole text or parts of texts that have been created in other documents. Before you do so however, please read the section “Inserting text from another document into the B template” below.
Instructions for writing directly in the B template Place the cursor directly after the heading H1 and click on the Enter key (line break). You can now start writing directly. The first paragraph you write will be formatted automatically as body text without indentations, Brödtext utan indrag. When you press the Enter key to start the next para-graph it is automatically formatted as body text with indentations, Brödtext med indrag (see the PDF file Example_B template). Any new headings added need to be formatted using the style sheets, see above. All heading formats have been designed to apply the style sheet Brödtext utan indrag (body text without indentations) directly following a line break.
Inserting text from another document into the B template For the style sheets to work as intended, and for you to avoid copying unwanted formatting from another document, you need to paste all text in the template as plain, or unformatted, text (see sec-tion “Pasting text” below). After having done that you select all text except the table of content that you have started on the first page (please note that it is very important that you do not select the table of content) and click on the style sheet for body text with indentations, Brödtext med in-drag. After that, you format the parts of the text that need other styles, for example headings, bul-leted lists, references and especially body text without indentations, Brödtext utan indrag, which should always follow after headings, bulleted lists, quotations or captions.
There are a few important exceptions from the rule of always pasting text as unformatted text:
1) When the text you are pasting contains notes that need to be included in the thesis docu-ment and it is too time-consuming to copy them manually.
2) When you have been using EndNote or another reference management program and would like to continue editing your notes with that program.
3) When the text you are pasting contains italics or other formatting that needs to be main-tained and manual formatting is too time-consuming.
It is however important to remember that when you paste text without removing the old format-ting, the template will add these styles, which means that it can appear “messy”. You should therefore pay extra attention to which style sheets are the original ones; see the section “Style sheets” as well as the screenshot under the heading “Using the style sheets” above.
Manual for Thesis Templates/translation - 6 - 2013-10-07
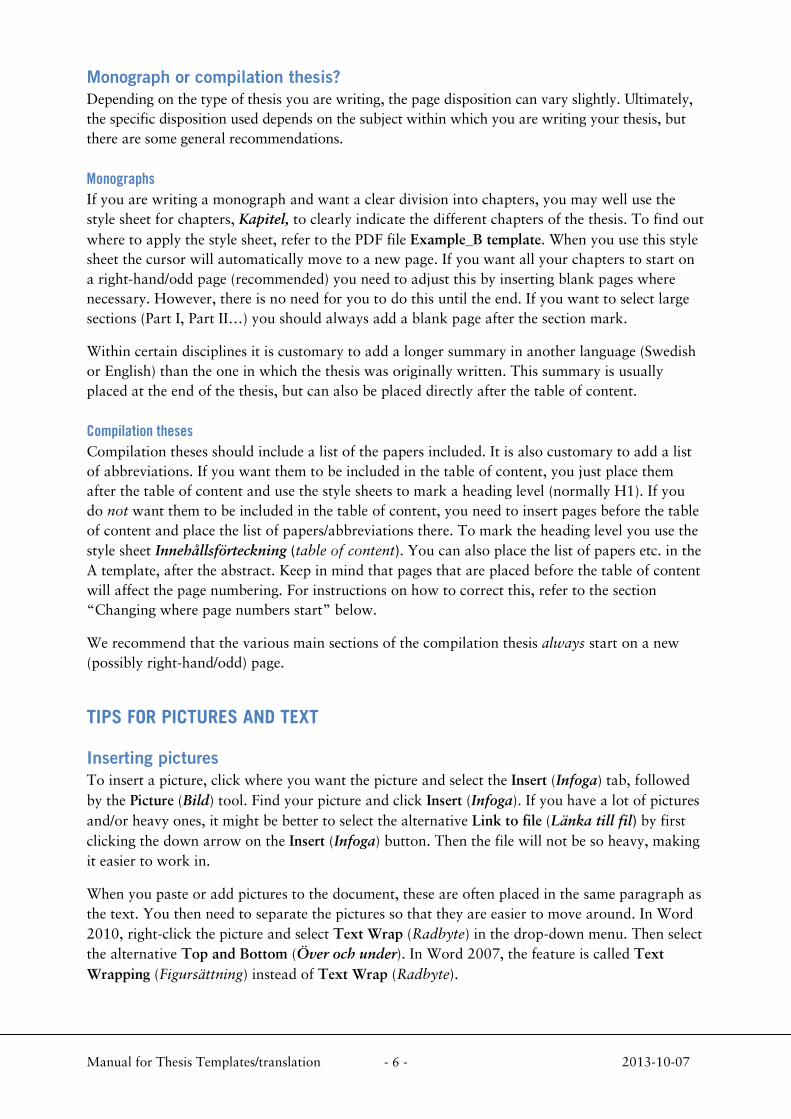
Monograph or compilation thesis? Depending on the type of thesis you are writing, the page disposition can vary slightly. Ultimately, the specific disposition used depends on the subject within which you are writing your thesis, but there are some general recommendations.
Monographs If you are writing a monograph and want a clear division into chapters, you may well use the style sheet for chapters, Kapitel, to clearly indicate the different chapters of the thesis. To find out where to apply the style sheet, refer to the PDF file Example_B template. When you use this style sheet the cursor will automatically move to a new page. If you want all your chapters to start on a right-hand/odd page (recommended) you need to adjust this by inserting blank pages where necessary. However, there is no need for you to do this until the end. If you want to select large sections (Part I, Part II…) you should always add a blank page after the section mark.
Within certain disciplines it is customary to add a longer summary in another language (Swedish or English) than the one in which the thesis was originally written. This summary is usually placed at the end of the thesis, but can also be placed directly after the table of content.
Compilation theses Compilation theses should include a list of the papers included. It is also customary to add a list of abbreviations. If you want them to be included in the table of content, you just place them after the table of content and use the style sheets to mark a heading level (normally H1). If you do not want them to be included in the table of content, you need to insert pages before the table of content and place the list of papers/abbreviations there. To mark the heading level you use the style sheet Innehållsförteckning (table of content). You can also place the list of papers etc. in the A template, after the abstract. Keep in mind that pages that are placed before the table of content will affect the page numbering. For instructions on how to correct this, refer to the section “Changing where page numbers start” below.
We recommend that the various main sections of the compilation thesis always start on a new (possibly right-hand/odd) page.
TIPS FOR PICTURES AND TEXT
Inserting pictures To insert a picture, click where you want the picture and select the Insert (Infoga) tab, followed by the Picture (Bild) tool. Find your picture and click Insert (Infoga). If you have a lot of pictures and/or heavy ones, it might be better to select the alternative Link to file (Länka till fil) by first clicking the down arrow on the Insert (Infoga) button. Then the file will not be so heavy, making it easier to work in.
When you paste or add pictures to the document, these are often placed in the same paragraph as the text. You then need to separate the pictures so that they are easier to move around. In Word 2010, right-click the picture and select Text Wrap (Radbyte) in the drop-down menu. Then select the alternative Top and Bottom (Över och under). In Word 2007, the feature is called Text Wrapping (Figursättning) instead of Text Wrap (Radbyte).

Manual for Thesis Templates/translation - 7 - 2013-10-07
Now you can place the picture where you want it by using the pointer. You can make the picture larger or smaller by dragging one of the four corners of the picture. Please note that you should only drag one of the corners when you want to alter the size of the picture, otherwise you will change the proportions of the picture. You can also go into Size and Position (Storlek och läge) to make these adjustments.
For more advanced picture editing we recommend that you use an image processing program, for example Photoshop or Photoshop Elements.
If you make additions to the text afterwards it may become necessary to move pictures and captions manually.
Captions To add a caption, place the cursor under the picture and select the style sheet for either centred or left-aligned caption, Bild_figurtext_centrerad or Bild_figurtext_vänster. Use a text box if you want to place the caption somewhere else than under the picture: select the Insert (Infoga) tab, Text Box (Textruta) followed by Simple Text Box (Enkel textruta).
When you have entered your text in the box, you can adjust its size and place the text box exactly where you want it.
Alternative text To enable the aids used by people with disabilities to read your thesis in digital format, it is im-portant that all pictures and figures are provided with an explanatory, so-called alternative text which states what the picture/image represents. Often, a brief description is enough, for example “Illustration of a DNA molecule”. In the caption and the body text you can give a more compre-hensive description of the picture’s content and meaning.
To insert alternative text, select the picture/figure and right-click it.
- In Word 2010, select Format Picture (Formatera Bild) (in Word 2007: Size [Storlek]) followed by Alt text (Alternativ text).
Pasting text Normally, when you copy and paste text from another document the formatting of that docu-ment will be included, which can create problems when you are working with the text in the style sheet. To insert the text without the formatting, so called plain text, you need to use the function Paste special (Klistra in special).
- Select the Home (Start) tab. By the Paste (Klistra in) button, click on the down arrow and se-lect Paste Special (Klistra in special) and the alternative Unformatted Text (Oformaterad text).
Bulleted lists There are three types of lists in the template: with letters, numbers and bullets. When you start a list you need to add some space between the previous text (body text) and the list and there is therefore a special style sheet called Avstånd före punktlista (space before bulleted lists). When you end the list you insert a slightly larger space after the list by using the style sheet Avstånd efter punktlista (space after bulleted lists). If you instead insert a normal blank line you will make it more difficult for people who use different kinds of accessibility aids to read the content in digital format.
Manual for Thesis Templates/translation - 8 - 2013-10-07
Footnotes and endnotes In Word the footnotes and endnotes are automatically numbered. You can use a single number-ing system for the whole document or different kinds of numbering for each section (a section is a part of the document where you can use alternative page formatting). If you have many and long notes, we recommend that you put them as endnotes rather than footnotes.
Inserting footnotes and endnotes • In the text, click where you want to insert the note reference mark. • Select the References (Referenser) tab and click on Insert Footnote (Infoga fotnot) or In-
sert Endnote (Infoga slutkommentar). • The number of the footnote or the endnote is inserted and the text insertion point is placed
next to the note number. • Type the text for the note.
Keyboard shortcut for Insert Footnote (Infoga fotnot): CTRL+ALT+F Keyboard shortcut for Insert Endnote (Infoga slutkommentar): CTRL+ALT+D
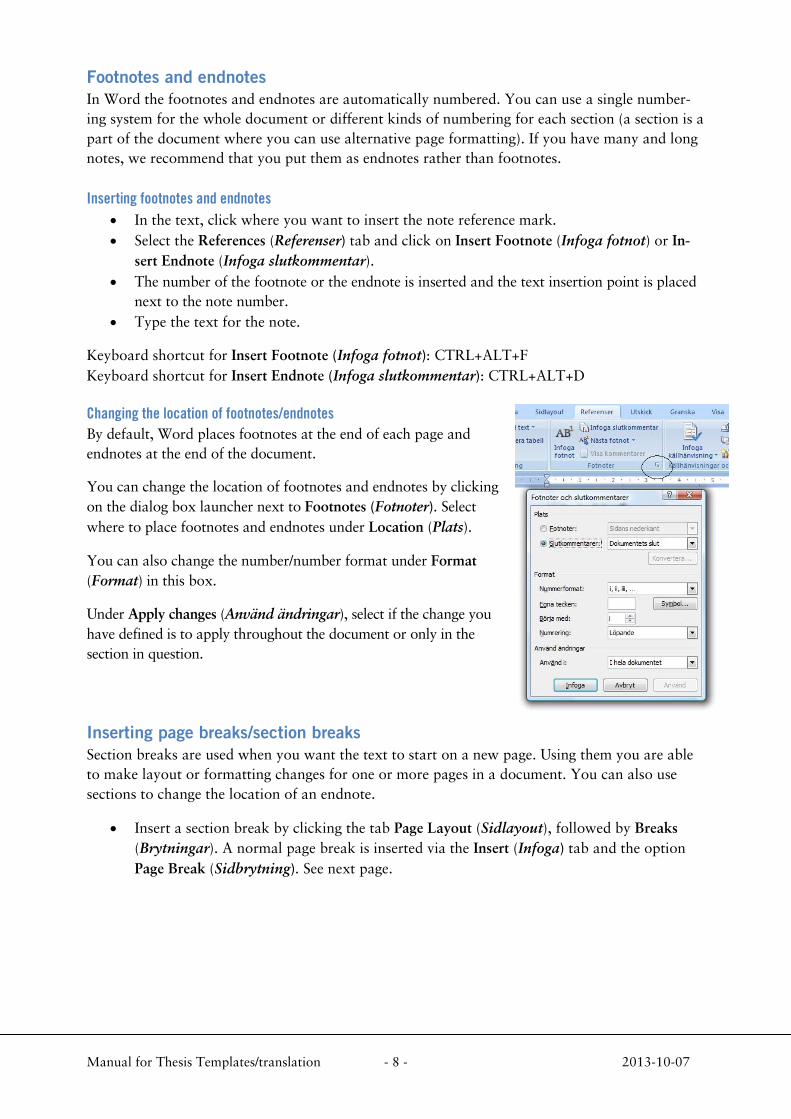
Changing the location of footnotes/endnotes By default, Word places footnotes at the end of each page and endnotes at the end of the document.
You can change the location of footnotes and endnotes by clicking on the dialog box launcher next to Footnotes (Fotnoter). Select where to place footnotes and endnotes under Location (Plats).
You can also change the number/number format under Format (Format) in this box.
Under Apply changes (Använd ändringar), select if the change you have defined is to apply throughout the document or only in the section in question.
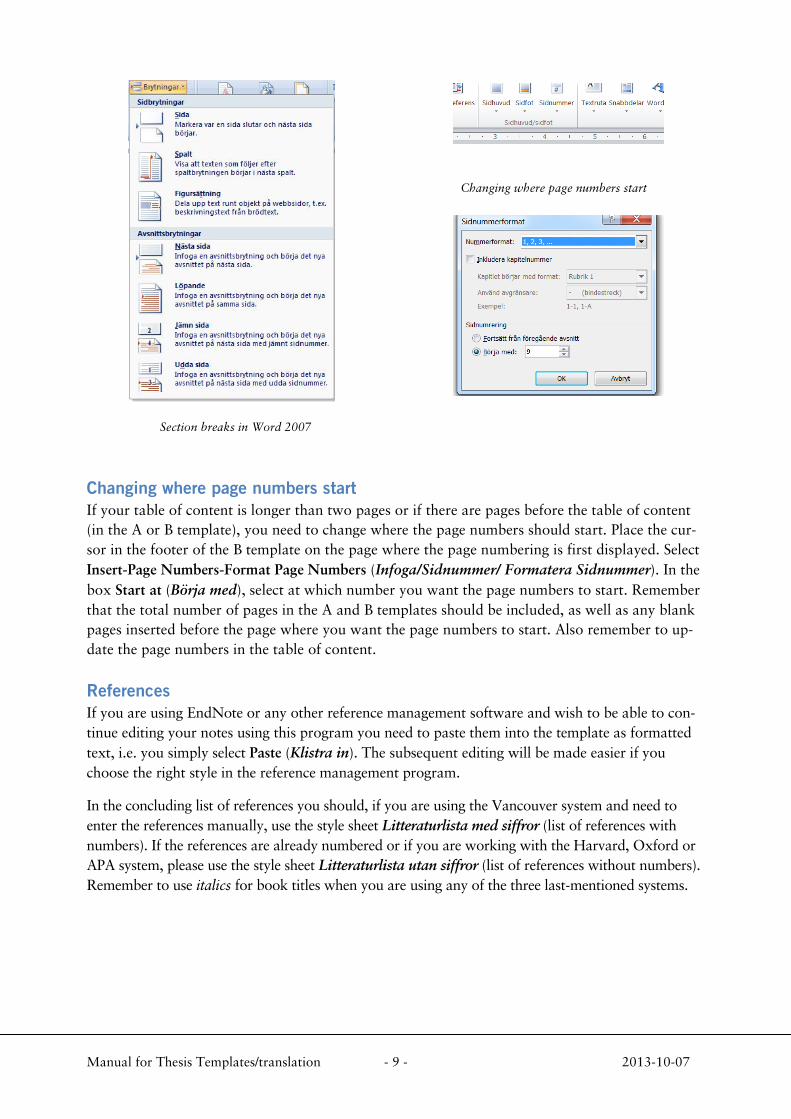
Inserting page breaks/section breaks Section breaks are used when you want the text to start on a new page. Using them you are able to make layout or formatting changes for one or more pages in a document. You can also use sections to change the location of an endnote.
• Insert a section break by clicking the tab Page Layout (Sidlayout), followed by Breaks (Brytningar). A normal page break is inserted via the Insert (Infoga) tab and the option Page Break (Sidbrytning). See next page.
Manual for Thesis Templates/translation - 9 - 2013-10-07
Section breaks in Word 2007
Changing where page numbers start
Changing where page numbers start If your table of content is longer than two pages or if there are pages before the table of content (in the A or B template), you need to change where the page numbers should start. Place the cur-sor in the footer of the B template on the page where the page numbering is first displayed. Select Insert-Page Numbers-Format Page Numbers (Infoga/Sidnummer/ Formatera Sidnummer). In the box Start at (Börja med), select at which number you want the page numbers to start. Remember that the total number of pages in the A and B templates should be included, as well as any blank pages inserted before the page where you want the page numbers to start. Also remember to up-date the page numbers in the table of content.
References If you are using EndNote or any other reference management software and wish to be able to con-tinue editing your notes using this program you need to paste them into the template as formatted text, i.e. you simply select Paste (Klistra in). The subsequent editing will be made easier if you choose the right style in the reference management program.
In the concluding list of references you should, if you are using the Vancouver system and need to enter the references manually, use the style sheet Litteraturlista med siffror (list of references with numbers). If the references are already numbered or if you are working with the Harvard, Oxford or APA system, please use the style sheet Litteraturlista utan siffror (list of references without numbers). Remember to use italics for book titles when you are using any of the three last-mentioned systems.
Manual for Thesis Templates/translation - 10 - 2013-10-07
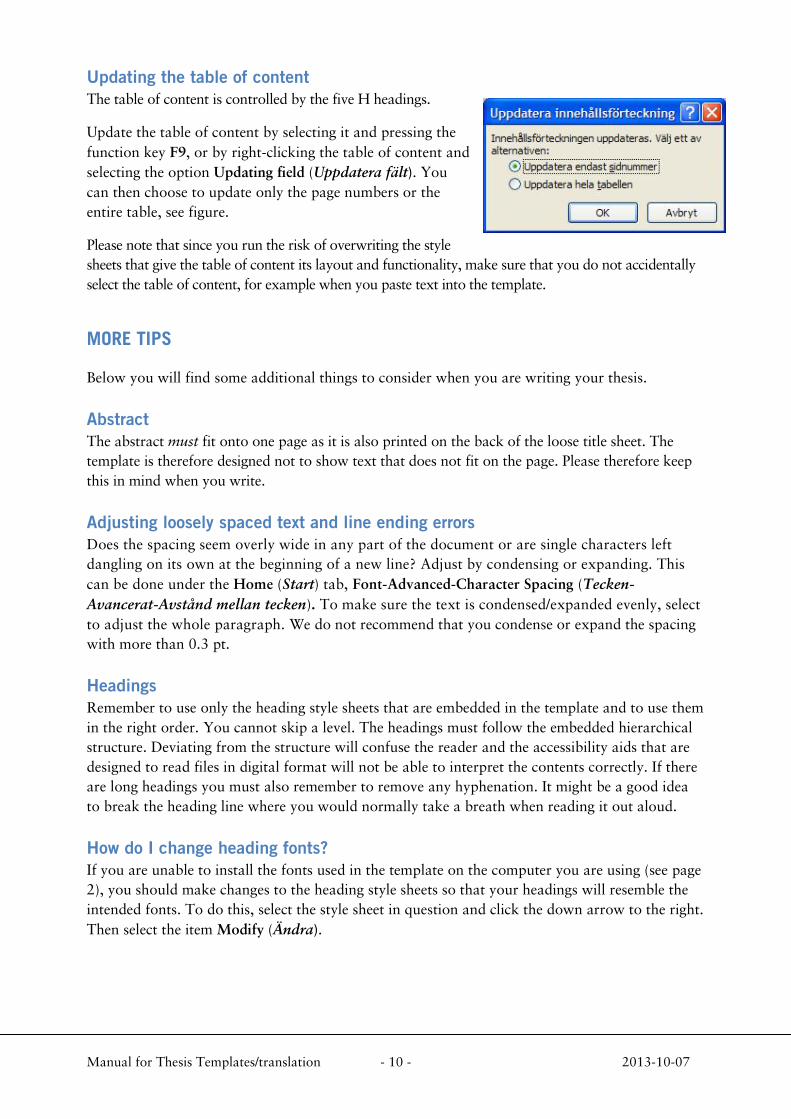
Updating the table of content The table of content is controlled by the five H headings.
Update the table of content by selecting it and pressing the function key F9, or by right-clicking the table of content and selecting the option Updating field (Uppdatera fält). You can then choose to update only the page numbers or the entire table, see figure.
Please note that since you run the risk of overwriting the style sheets that give the table of content its layout and functionality, make sure that you do not accidentally select the table of content, for example when you paste text into the template.
MORE TIPS
Below you will find some additional things to consider when you are writing your thesis.
Abstract The abstract must fit onto one page as it is also printed on the back of the loose title sheet. The template is therefore designed not to show text that does not fit on the page. Please therefore keep this in mind when you write.
Adjusting loosely spaced text and line ending errors Does the spacing seem overly wide in any part of the document or are single characters left dangling on its own at the beginning of a new line? Adjust by condensing or expanding. This can be done under the Home (Start) tab, Font-Advanced-Character Spacing (Tecken-Avancerat-Avstånd mellan tecken). To make sure the text is condensed/expanded evenly, select to adjust the whole paragraph. We do not recommend that you condense or expand the spacing with more than 0.3 pt.
Headings Remember to use only the heading style sheets that are embedded in the template and to use them in the right order. You cannot skip a level. The headings must follow the embedded hierarchical structure. Deviating from the structure will confuse the reader and the accessibility aids that are designed to read files in digital format will not be able to interpret the contents correctly. If there are long headings you must also remember to remove any hyphenation. It might be a good idea to break the heading line where you would normally take a breath when reading it out aloud.
How do I change heading fonts? If you are unable to install the fonts used in the template on the computer you are using (see page 2), you should make changes to the heading style sheets so that your headings will resemble the intended fonts. To do this, select the style sheet in question and click the down arrow to the right. Then select the item Modify (Ändra).

Manual for Thesis Templates/translation - 11 - 2013-10-07
The dialog box Modify Style (Ändra formatmall) opens, in which you can change to a similar font in-stalled on your computer. For the headings H1_Rubrik_1 through H3_Rubrik_3, Trade Gothic LT Std Bold is used which can be replaced by, for ex-ample, Arial Rounded MT_Bold. For heading level 4, Arial (not bold) may for instance be used. Heading level 5 changes automatically to Times (New Roman) just like any other style sheets that use Sabon LT Std.
If you are using the style sheet for table text, you should modify the font also in this as described above.
You should not change any other for-matting settings in the style sheets than the actual font.
Hyphenation Automatic hyphenation has been activated in the template. Occasionally however, hyphenations may have to be made manually, either by inserting a soft line break or by condensing/expanding the text (see “Adjusting loosely spaced text and line errors” above). Manual hyphenation should be done at the very end when the final editing of the text has otherwise been completed.
Language settings Spelling and other language tools, such as quotation marks, are automatically adjusted based on the language settings in your document as well as in the style sheets. The default setting in the B tem-plate is English. In the most recent versions of Word, the software detects which language you are

Manual for Thesis Templates/translation - 12 - 2013-10-07
using which means that you normally do not have to worry about this. If you need to change the language settings for the text, you can do so in the Review tab, followed by Language-Set Proofing Language (Granska-Språk-Ange redigeringsspråk). Do not forget to first select the paragraphs for which you want the change to apply. You can also go in and change the language settings in the respective style sheet.
Page references You should avoid references to a specific page in your thesis to avoid problems if you make changes to the text (resulting in the text shifting). It is better to refer to a chapter and/or section. Of course you also need to pay attention to any changes you make in chapter and/or section headings.
Pictures/figures The best format for pictures and figures are usually files with the extension .eps (figures) or .tif (photos). All pictures should have a resolution of at least 300dpi. Black and white images should always be in grey scale, and not in RGB mode. Please note that the school/doctoral student pays for the printing of pictures that result in a large additional cost, for example when several colour images are included.
Style guides Below is a list of recommended reading in terms of style guides:
European Commission Directorate-General for Translation (2011/2013): English Style Guide. A handbook for authors and translators in the European Commission. http://ec.europa.eu/translation/writing/style_guides/english/style_guide_en.pdf
Modern Language Association of America (2009): MLA Handbook for Writers of Research Papers, 7th edition. New York: MLA.
Språkrådet (2008): Svenska skrivregler, 3 utg. Stockholm: Liber.
TNC, Terminologicentrum. Sveriges nationella centrum för terminologi och fackspråk: Länksamling över engelska skrivregler: http://www.tnc.se/Länkar/Engelska-skrivregler/
Further support may be obtained at the Language Centre, Örebro University Library, see http://www.oru.se/ub/Sprakverkstaden/
Tables Always use the table function in Word when you make tables. Do not attempt to create tables in the body text using spaces between columns as this will cause your text to shift. Preferably use the style sheet for table text when you are writing as it is adapted to provide the best possible readabil-ity. If you have existing tables that you wish to insert into the template, the best thing is generally to create a new table in the template using the table function and copy and paste any content from the original table (formatting your data as table text). If this is too time-consuming, one alternative is to insert the existing table as a picture.