Embed Size (px)
Citation preview

English
Table of Contents 1. Introduction ................................................................................................ 3
1.1 Preface ............................................................................................... 3 1.2 Packing List ........................................................................................ 3 1.3 Caution ............................................................................................... 4 1.4 Connection ......................................................................................... 6 1.5 First Time Usage ............................................................................... 11
2. About the Player ....................................................................................... 12 2.1 Remote Control ................................................................................ 12 2.2 Front Panel ....................................................................................... 15 2.3 Rear Panel ........................................................................................ 15 2.4 Side Panel ........................................................................................ 16
3. Functions .................................................................................................. 17 3.1 Main Interface ................................................................................... 17 3.2 Photo Playback ................................................................................. 17 3.3 Music Playback ................................................................................. 18 3.4 Movie Playback ................................................................................ 18 3.5 Browser ............................................................................................ 19 3.5.1 DVD Playback................................................................................ 19 3.6 Storage device .................................................................................. 20 3.7 Setup Menu ...................................................................................... 21
4. Upgrading the Firmware .......................................................................... 24 5. Appendixes ............................................................................................... 25
5.1 Specifications .................................................................................... 25 5.2 Frequently Asked Questions ............................................................. 26 5.3 Copyrights and Trademarks .............................................................. 28 5.4 Warranty ........................................................................................... 28
EN 2 / 28

1. Introduction 1.1 Preface Thank you for purchasing the FANTEC P2300. We hope you will enjoy using it as a great home entertainment partner. This player has the following functionality: Data Storage - supports 3.5” SATA HDD up to 1TB. Video Playback - Supports AVI, VOB (DVD), MPG, DAT files with corresponding
codec: MPEG-1, MPEG-2, Dixv, Xvid Music Playback - supports MP3, WMA Lossless, WMA (DRM, Pro and Advanced Profile
not supported), Dolby Digital Photo Playback - supports JPG/JPEG files Subtitle Playback - supports SUB, SRT, SSA, SMI USB HOST - direct playback files from USB disk and external USB HDD Card Reader - supports memory cards: SD/MMC
Note: All the information in this manual was correct at the time of publication. However, as our
engineers are always updating and improving the product, your device’s software may have a
slightly different appearance or modified functionality than presented in this manual.
1.2 Packing List Part Quantity FANTEC P2300 1 A/V cable 1 USB cable 1 Remote Control 1 AC/DC adaptor 1 CD (with User Manual and format tool) 1 Quick Start Guide 1 Note: The actual contents in the package might be different from the packing list in this manual.
EN 3 / 28

1.3 Caution 1.3.1 Usage cautions User should not modify this player. If commercial hard disk is being used, the environmental temperature should be within +5℃ ~ +35℃. 1.3.2 Power The player’s power voltage: DC 12V. When using this player, please connect the supplied AC adapter or AC adapter cable to the player’s power jack. When placing the adapter cable, make sure it can not get damaged or be subject to pressure. To reduce the risk of electric shock, unplug the adapter first before cleaning it. Never connect the adapter to the player in a humid or dusty area. Do not replace the adapter or cable’s wire or connector. 1.3.3 Radio interference/compatibility - If not properly shielded, almost all electronic devices will get radio interference. Under some conditions, your player might get interference. - The design of this player has followed the FCC/CE standard, and has followed the following rules: (1) This player may not cause harmful interference;
(2) This player could accept some interference received including interference that may cause undesired operation.
1.3.4 Repair If the player has a problem, you should take it to an appointed repair center and let the specialists do the repair, never repair the player yourself, you might damage the player or endanger yourself or your data. 1.3.5 Disposing of the player When you dispose of the player, be sure to dispose it appropriately. Some countries may regulate disposal of electrical device, please consult with your local authority. 1.3.6 Hard disk cautions The player uses an internal hard disk for data storage, in normal case, format or repair is not required. You should carefully read the < Frequently Asked Questions > chapter, and check our website for latest information before formatting the hard disk. - Physical impact may create bad sector in the hard disk, you can use CHKDSK to fix the problem. - All data stored in the player may be lost due to physical impact, electrical shock, power lost, HDD format etc. Please backup your data. - It is suggested to do defragment after a long period of usage. - Regularly backup the data in the hard disk so that it can be recovered in the event of data corruption or loss. Our company takes no responsibility for loss of data stored on the hard disk.
EN 4 / 28
1.3.7 Others When using this player, please do not let the player come into contact with water or other liquid, if water is accidentally spilled on the player, please use a dry cloth to absorb the spillage. Electronic products are vulnerable, when using please avoid shaking or hitting the player, and do not press the buttons too hard.
Do not let the player come into contact with water or other liquid. Do not disassemble the player, repair the player or change the design of the player, any
damage done will not be included in the repair policy. Avoid hitting the player with hard object, avoid shaking the player, and stay away from
magnetic fields. During electrostatic discharge and the strong electromagnetic field, the product will
malfunction, then unplug the power cable and the product will return to normal performance next time it is powered on.
EN 5 / 28

1.4 Connection 1.4.1 Connect to Computer (1) Make sure the player is powered on; (2) Plug in the squarish connector of the USB cable to this player’s USB DEVICE port; (3) Plug in the rectangular connector of the USB cable to computer.
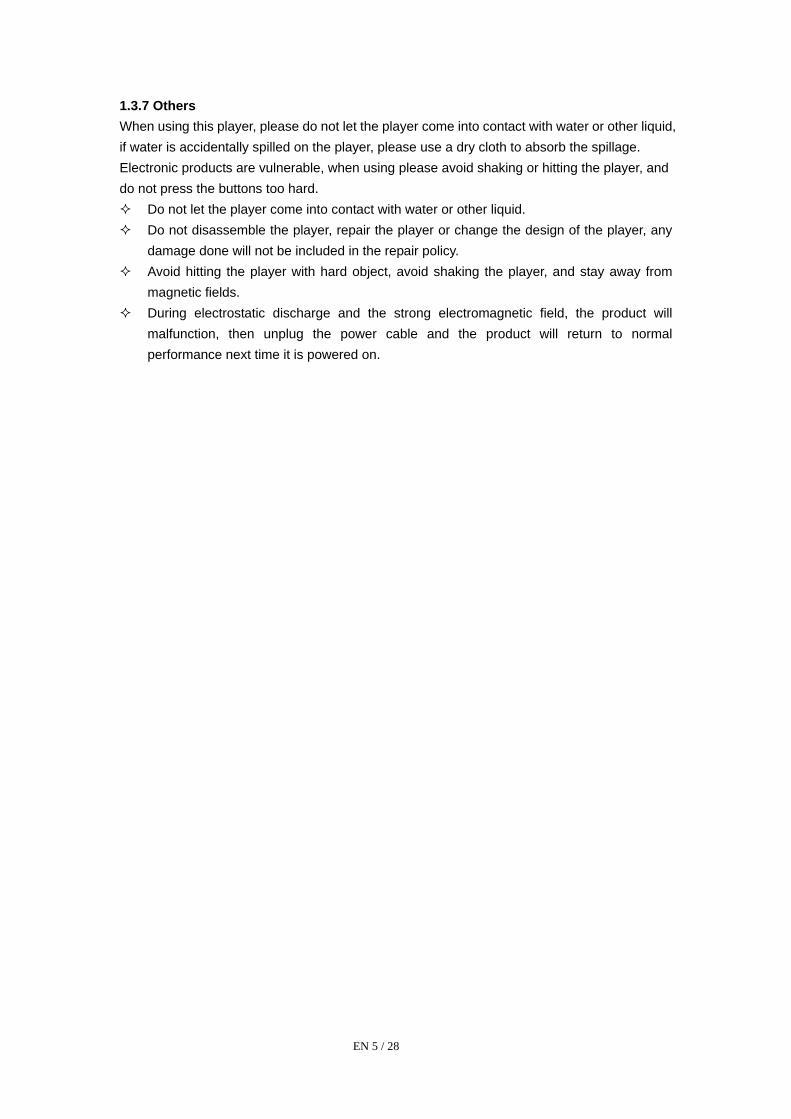
Important: If your HDD is formatted with NTFS file system, please do not forget to remove it before removing from PC. Otherwise the P2300 will not recognize the HDD.
1) Click the green icon at the right down corner. 2) Click the popup to remove the device .
1.4.2 USB Mass Storage Device (like USB Pen Drive, MP3, USB HDD etc.) Connection (1) Make sure the player is powered on; (2) Plug in the USB Pen Drive or USB HDD etc. to the USB host port of this player.
EN 6 / 28
Important: If your HDD is formatted with NTFS file system, please do not forget to remove it before removing from PC. Otherwise the P2300 will not recognize the HDD.
3) Click the green icon at the right down corner. 4) Click the popup to remove the device .
EN 7 / 28
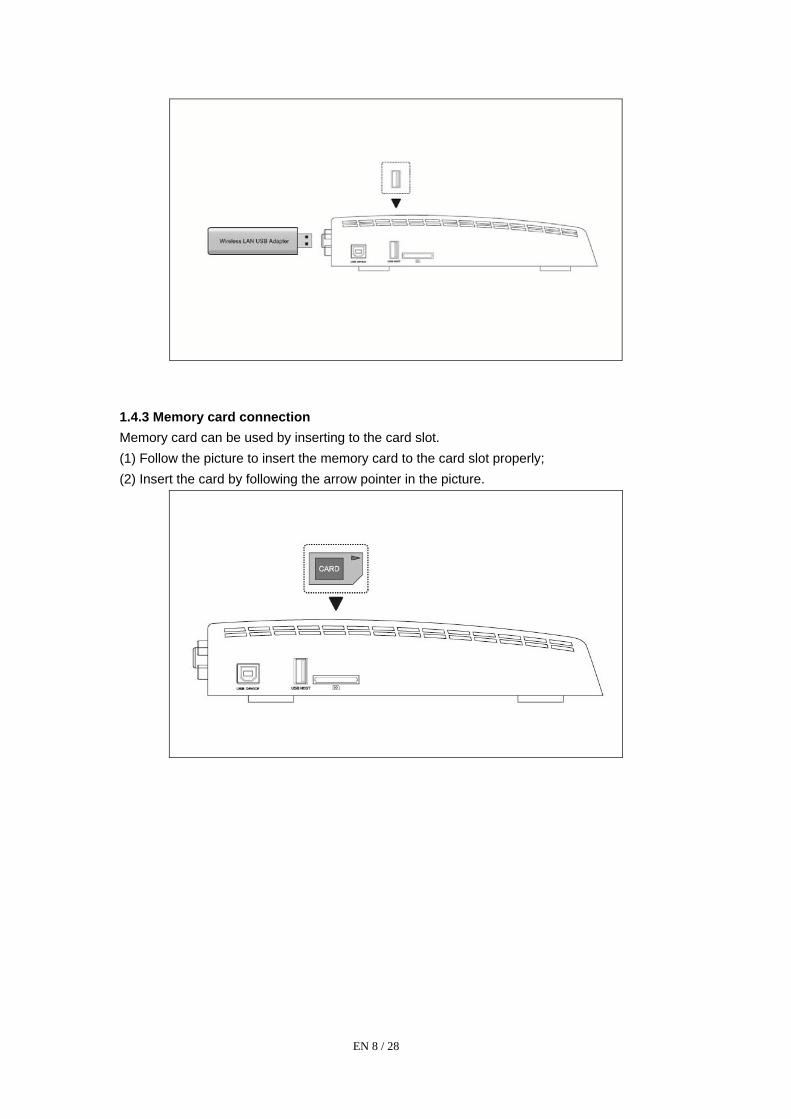
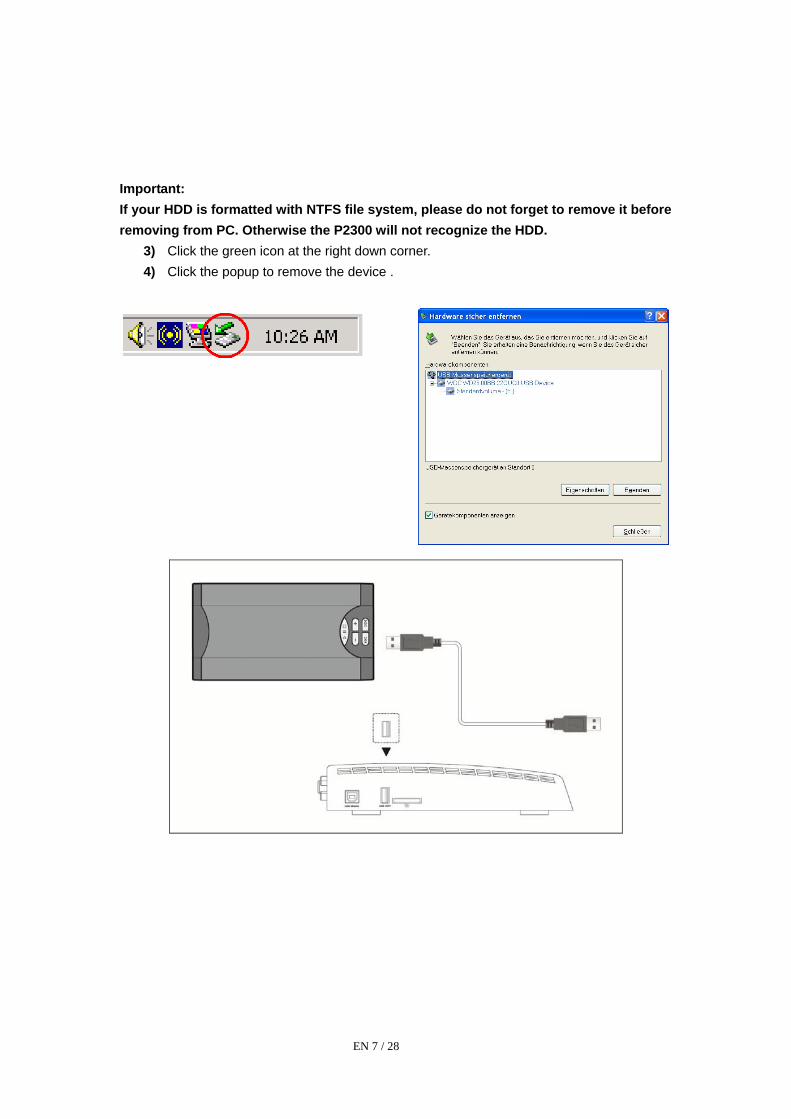
1.4.3 Memory card connection Memory card can be used by inserting to the card slot. (1) Follow the picture to insert the memory card to the card slot properly; (2) Insert the card by following the arrow pointer in the picture.
EN 8 / 28

1.4.4 TV connection 1.4.4.1 A/V OUT (1) Follow the picture and plug in the 3 color connector to the player’s A/V OUT jack; (2) Follow the picture and plug in the 3 color connector to the TV’s A/V IN jack.
In this way, you can also enjoy videos, music, and photos in the player on TV. 1.4.4.2 HDMI OUT (1) Follow the picture and plug one connector on your HDMI cable to the player’s HDMI jack; (2) Follow the picture and plug the other connector on your HDMI cable to the TV’s HDMI jack. (HDMI cable is not supplied)
In this way, you can have the highest quality video and audio via a single cable.
EN 9 / 28
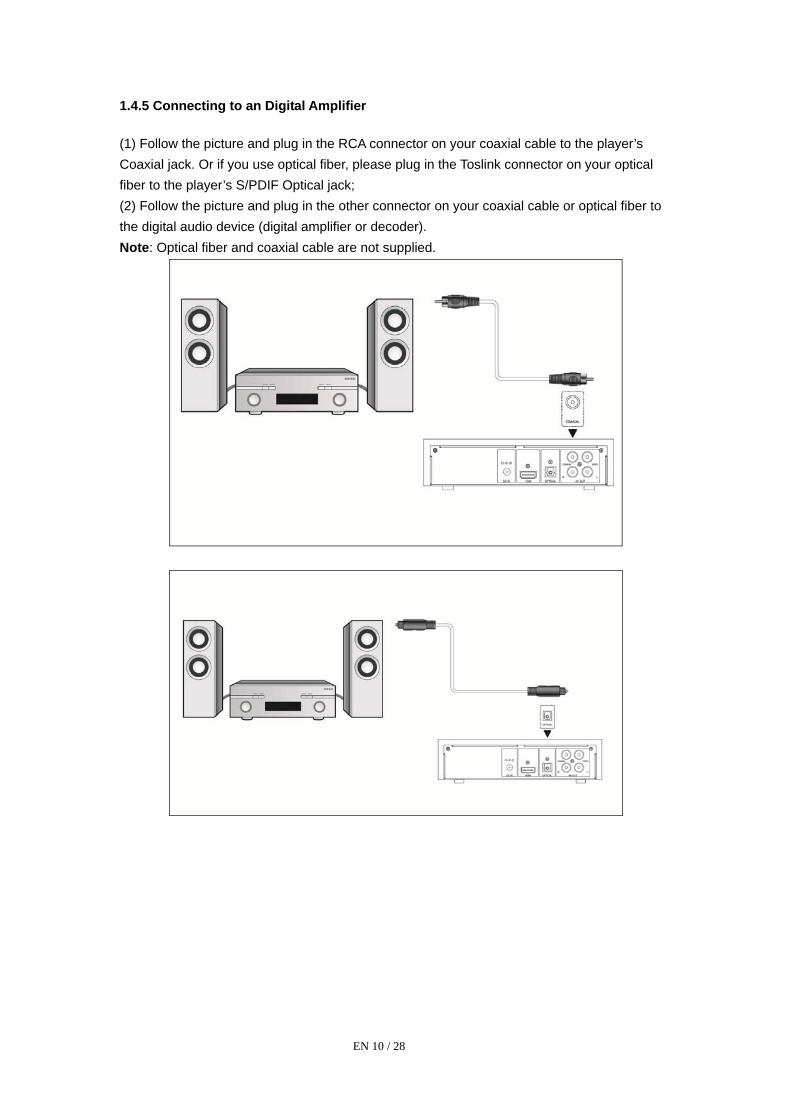
1.4.5 Connecting to an Digital Amplifier
(1) Follow the picture and plug in the RCA connector on your coaxial cable to the player’s Coaxial jack. Or if you use optical fiber, please plug in the Toslink connector on your optical fiber to the player’s S/PDIF Optical jack; (2) Follow the picture and plug in the other connector on your coaxial cable or optical fiber to the digital audio device (digital amplifier or decoder). Note: Optical fiber and coaxial cable are not supplied.
EN 10 / 28

1.4.6 Power connection (1) Follow the picture and connect the AC adaptor to the player’s DC IN jack; (2) Follow the picture and plug in the AC adaptor to the power outlet.
1.5 First Time Usage 1. Hard disk format At first you must format the hard disk of the P2300 at a PC. Format your HDD in NTFS or in FAT32 with a FAT32 format tool, like Swissknife or EASEUS Partition Master. 2. Power on After connected to power, the indicator of the POWER LED on the front panel will turn on (red light). When push the POWER button on the remote control will power on the player. During startup, the indicator light is flashing blue, after the player is ready, the indictor will stay blue.
3. Power off To power off the unit, press the POWER button on the remote control. When power off the player, it will prompt you that the system is shutting down. After the system is shut down, the indicator light of the POWER button on the front panel will turn red. 4. Language control The system language of this player can be set to English or other languages. In setup interface, the selected language will take effect immediately.
EN 11 / 28

2. About the Player 2.1 Remote Control All procedures in this manual can be carried out using the remote control buttons. See the following for details on each button and its function:
1. POWER 2. TV SYS
3. SETUP 4. DEVICE
5. ZOOM 6. INFO
7. MOVIE 8. MUSIC
9. REPEAT 10. FR
11. PLAY/PAUSE 12. HOME
13. UP 14. LEFT
15. ENTER 16. VOL +
17. VOL - 18. DOWN
19. No.1 20. No.2
21. No.4 22. No.5
23. No.7 24. No.8
25. No.9 26. No.0
27. No.6 28. SUBTITLE
29. No.3 30. AUDIO
31. PREV 32. NEXT
33. RIGHT 34. RETURN
35. STOP 36. FF
37. PHOTO 38. SLIDE
39. OPTION 40. MUTE
EN 12 / 28

No. Button Function
1 POWER Press 1 sec to enter standby mode or wake up.
2 TV SYSTEM Switch video output mode. (480P, 576P, 720P, 1080I, 1080P)
3 SETUP Enter the setup menu
4 DEVICE Enter DEVICE selection (USB, HDD, Card Reader)
5 ZOOM Press to zoom out/in the photo, Press to zoom in the video
6 INFO Press to hide or display the information bar during playback.
7 MOVIE Quick start for movie playback.
8 MUSIC Quick start for music playback.
9 REPEAT Setup the repeat mode.
10 FR During video/audio playback, press this button to fast rewind
11 PLAY/PAUSE Playback/Pause
12 HOME Press this button to return to the main interface.
13 UP Move up
Rotate the photo.
14 LEFT Move left
Rotate the photo.
15 ENTER Press ENTER button to confirm
16 VOL+ Press to increase the volume.
17 VOL- Press to decrease the volume.
18 DOWN Move down
Rotate the photo. 19 NUMERIC buttons No.1
20 NUMERIC buttons No.2
21 NUMERIC buttons No.4.
22 NUMERIC buttons No.5
23 NUMERIC buttons No.7
24 NUMERIC buttons No.8
25 NUMERIC buttons No.9
26 NUMERIC buttons No.0
27 NUMERIC buttons No.6
28 SUBTITLE Turn on/off subtitle.
29 NUMERIC buttons No.3
30 AUDIO Switch audio channels.
EN 13 / 28

31 PREV In file list mode, press this button to return to the previous file list.
In playback mode, press this button to playback the previous
media file.
32 NEXT In file list mode, press this button to return to the next file list.
In playback mode, press this button to playback the next media file.
33 RIGHT Move right
Rotate the photo.
34 RETURN Press to go back to the previous screen when navigating menus.
35 STOP During playback, press this button to stop the playback.
36 FF During video/audio playback, press this button for fast forward.
37 PHOTO Quick start for photo playback.
38 SLIDE Press to start music and picture slideshow.
39 OPTION Press to open tool bar.
40 MUTE Press this button to turn on/off mute function.
EN 14 / 28

2.2 Front Panel
1. IR receiver 2. Sartup LED
.3 Rear Panel
3. POWER LED 2
1. DC IN jack 2. HDMI jack 3. S/PDIF OPTICAL jack XIAL jack 4. S/PDIF COA5. A/V OUT jack (red/white - R/L audio, yellow - video)
EN 15 / 28

2.4 Side Panel
1. USB DEVICE port (Type-B) 2. USB HOST port (Type-A) 3. Card slot
EN 16 / 28
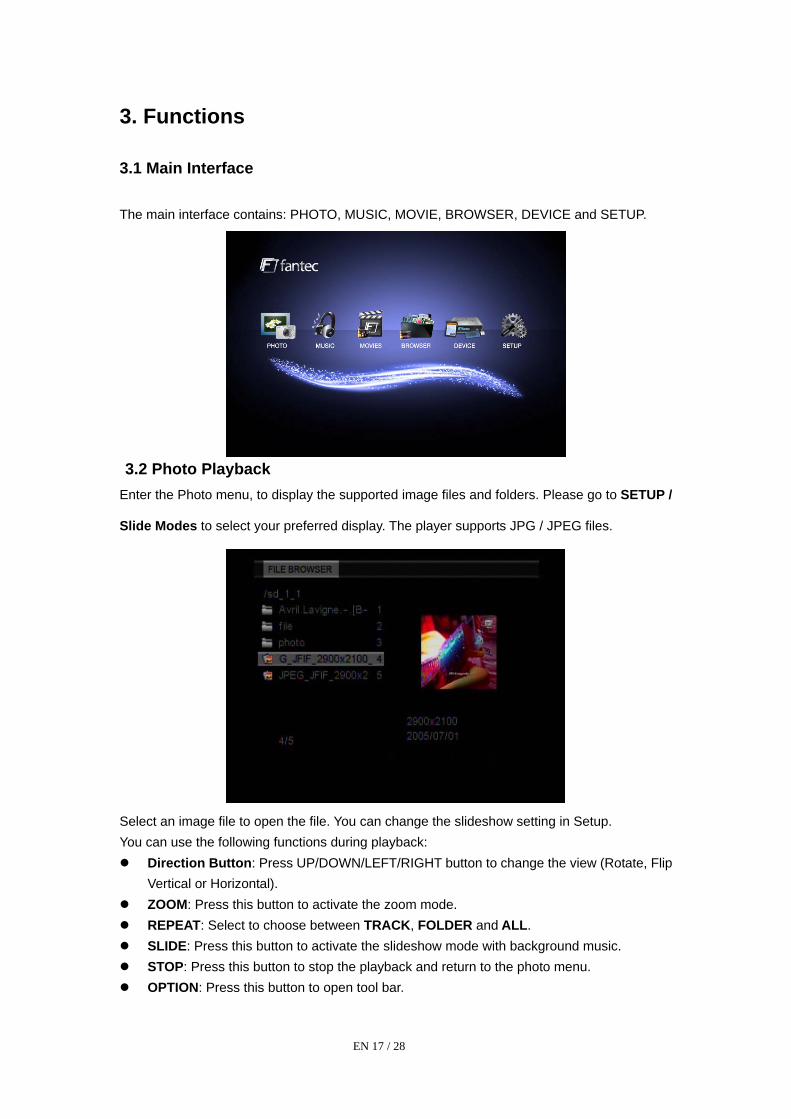
3. Functions 3.1 Main Interface The main interface contains: PHOTO, MUSIC, MOVIE, BROWSER, DEVICE and SETUP.
3.2 Photo Playback
Enter the Photo menu, to display the supported image files and folders. Please go to SETUP /
Slide Modes to select your preferred display. The player supports JPG / JPEG files.
Select an image file to open the file. You can change the slideshow setting in Setup. You can use the following functions during playback:
Direction Button: Press UP/DOWN/LEFT/RIGHT button to change the view (Rotate, Flip Vertical or Horizontal).
ZOOM: Press this button to activate the zoom mode. REPEAT: Select to choose between TRACK, FOLDER and ALL. SLIDE: Press this button to activate the slideshow mode with background music. STOP: Press this button to stop the playback and return to the photo menu. OPTION: Press this button to open tool bar.
EN 17 / 28

3.3 Music Playback Enter the Music menu, to display the supported audio files and folders. This player supports MP3 and WMA audio files.
Select an audio file to start playback. You can use the following functions during playback:
PLAY/PUASE: Press this button to play/pause the playback. FR/FF: Press to fast reverse/fast forward the current playback. Press repeatedly to select
speed (2x/4x/6x/8x/16x/32x). REPEAT: Select to choose between TRACK, FOLDER and ALL. STOP: Press to stop the playback and return to the audio menu. OPTION: Press to open tool bar.
3.4 Movie Playback
Enter the Movie menu, to display the supported movie files and folders. This player supports DAT, VOB (DVD), AVI, MPG, Dvix and Xvid video files.
Select a video file to start playback, due to size of the video, the loading process might take a while.
EN 18 / 28

You can use the following functions during playback: PLAY/PAUSE: Press to play/pause the playback. FR/FF: Press to fast reverse/fast forward the current playback. Press repeatedly to select
speed (2x/4x/6x/8x/16x/32x). REPEAT: Select to choose between TRACK, FOLDER and ALL. AUDIO: Press to switch the audio channel. Subtitle: Press to turn on/off the subtitle. OPTION: Press to open tool bar. STOP: Press to stop the playback and return to the movie menu.
3.5 Browser
Enter the Browser menu, to display all supported video/audio/image files and folders. In this menu you can access all the functions corresponding to each file type.
3.5.1 DVD Playback DVD DISC files stored on the portable HDD can be played directly on the player. Enter the DVD folder, make sure the cursor stop on VIDEO_TS, press the Play button on the remote control and begin playback.
EN 19 / 28
Press the navigational buttons to select options while navigating the DVD root menu. You can use the following functions during playback:
HOME: Press to return to the root menu during playback. OPTION: Press to activate/hide the tool bar during playback. PREV/NEXT: Press to go to previous/next chapter. STOP: Press to stop the playback.
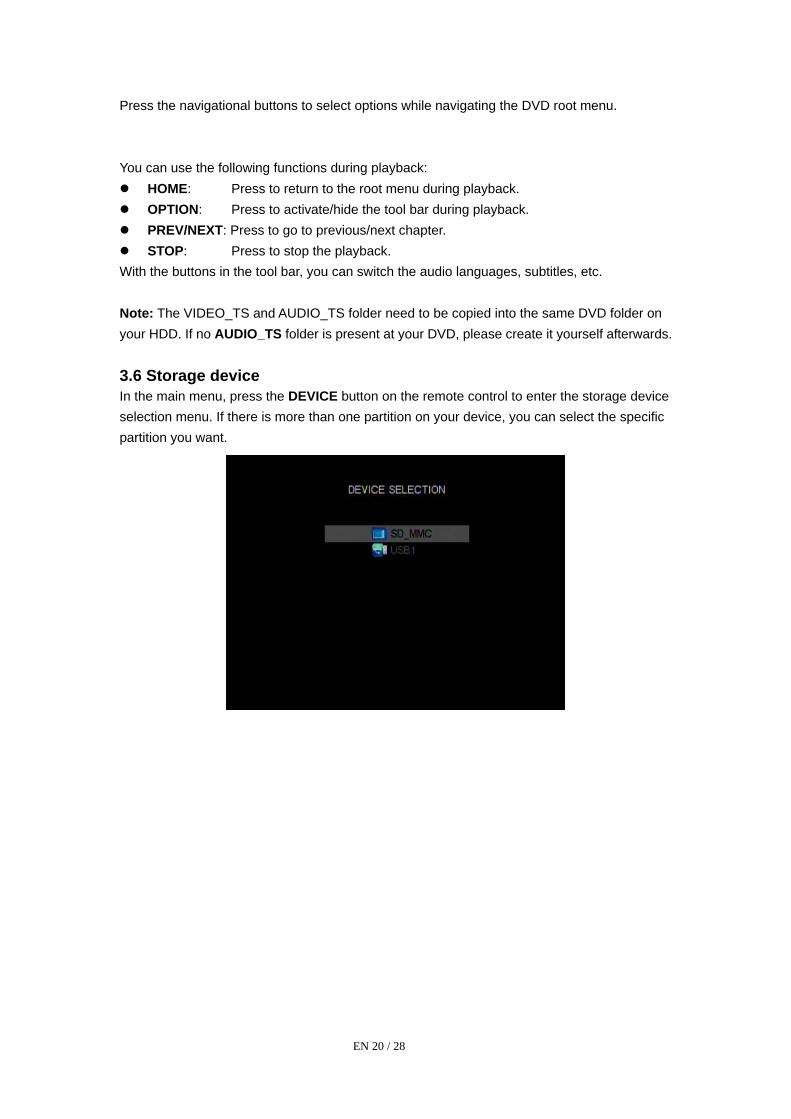
With the buttons in the tool bar, you can switch the audio languages, subtitles, etc. Note: The VIDEO_TS and AUDIO_TS folder need to be copied into the same DVD folder on your HDD. If no AUDIO_TS folder is present at your DVD, please create it yourself afterwards. 3.6 Storage device In the main menu, press the DEVICE button on the remote control to enter the storage device selection menu. If there is more than one partition on your device, you can select the specific partition you want.
EN 20 / 28
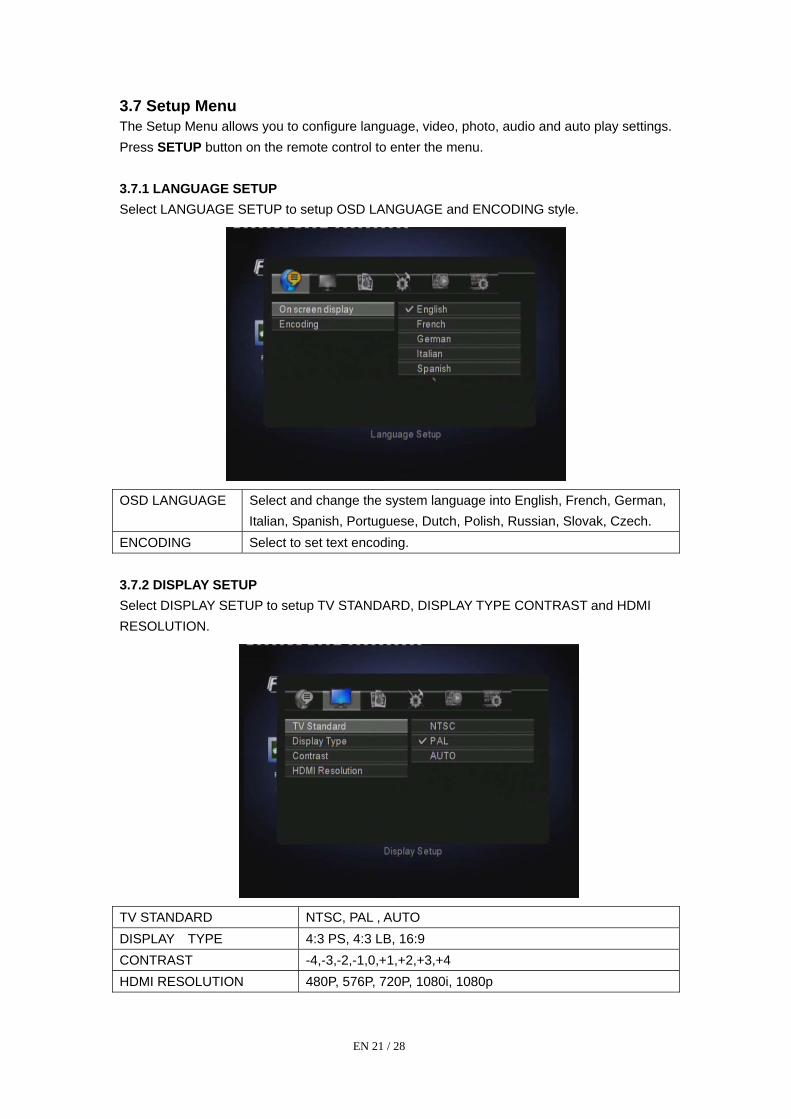
3.7 Setup Menu The Setup Menu allows you to configure language, video, photo, audio and auto play settings. Press SETUP button on the remote control to enter the menu. 3.7.1 LANGUAGE SETUP Select LANGUAGE SETUP to setup OSD LANGUAGE and ENCODING style.
OSD LANGUAGE Select and change the system language into English, French, German, Italian, Spanish, Portuguese, Dutch, Polish, Russian, Slovak, Czech.
ENCODING Select to set text encoding. 3.7.2 DISPLAY SETUP Select DISPLAY SETUP to setup TV STANDARD, DISPLAY TYPE CONTRAST and HDMI RESOLUTION.
TV STANDARD NTSC, PAL , AUTO DISPLAY TYPE 4:3 PS, 4:3 LB, 16:9 CONTRAST -4,-3,-2,-1,0,+1,+2,+3,+4 HDMI RESOLUTION 480P, 576P, 720P, 1080i, 1080p
EN 21 / 28

3.7.3 PHOTO SETUP Select PHOTO SETUP to setup INTERVAL TIME, TRANSITION EFFECT, SHOW TYPE, COLOR TONE and BROWSE.
INTERVAL TIME 5 Sec, 10 Sec, 15 Sec, 30 Sec, 1 Min, 3 Min, Off TRANSITION EFFECT Select to set the transition effect for photo slide show. SHOW TYPE Fit Screen, Full Screen
COLOR TONE Normal, Black & White, Classic
BROWSE Thumbnail, File Manager
3.7.4 Custom SETUP Select Custom SETUP to setup DIGITAL AUDIO MODE, SLIDE SHOW MODE, FW VERSION and DEFAULT.
DIGITAL AUDIO MODE SPDIF/PCM, SPDIF/RAW, OFF Downmix Lo/Ro (Left only / Right only), Lt/Rt (Left / Right) SLIDE SHOW MODE FOLDER, ALL FILES FW VESION Show the FW version DEFAULT Select to restore factory defaults.
EN 22 / 28

3.7.5 AUTO PLAY SETUP Select AUTO PLAY SETUP and you can setup AUTO PLAY in PHOTO, MUSIC and MOVIE.
PHOTO ON, OFF MUSIC ON, OFF MOVIE ON, OFF
EN 23 / 28

4. Upgrading the Firmware The firmware is the operating system (OS) installed on the device. Firmware upgrades can bring new features, improvements and bug fixes. Download the latest firmware from www.fantec.de. Step 1: Prepare the Memory Card / USB pen You will need a Memory Card / USB pen for firmware upgrade. Make sure that the device is empty! After that copy the "UP*.AP" file to the root directory of the device. Do not change the file name. Step 2: Power on the FANTEC media device and connect it with TV. Step 3: Connect the Memory Card / USB pen Plug the Memory Card / USB pen into one of the slots of the media device. Step 4: Enter PHOTO, MUSIC, MOVIE or BROWSER in the main interface Firmware installation will then start. You will see a short message “Upgrade flash..Erase.." on the left upper corner on the TV screen. Please wait for about 1 minute until the installation is completed. Then the device will turn off itself. Note: Do not turn off the power during installation. Do not unplug the Memory Card / USB pen during firmware installation.
EN 24 / 28

5. Appendixes 5.1 Specifications Technical Specifications Video Format: AVI, VOB, MPG, DAT
Codec: MPEG-1, MPEG-2, Divx, Xivid Resolution: Up to 720x576 (PAL), 720x480 (NTSC) Subtitle: SRT, SSA, SMI
Audio Format: MP3, WMA (DRM, Pro and Advanced Profile not supported) Codec: MP2, MP3, PCM, LPCM Compression rate: MP3: 32 Kbps~320 Kbps; WMA: 32 Kbps~192 Kbps
Photo JPG/JPEG (720p/1080i) Slide Show and zoom support
A/V Output Video: Composite, Component, HDM I (Version 1.1) up to 720p/1080P Audio: HDMI, S/PDIF Optical, S/PDIF Coaxial
TV System PAL, NTSC, Auto USB Interface USB 2.0 DEVICE port x 1
USB 2.0 HOST port x 1 Card Reader SD/MMC Hard Disk 3.5’ SATA HDD up to 1TB File System FAT32 (recommended), NTFS Operating Temperature +5°C to +35°C Power AC-DC Adapter 12V, 1.5A Dimension (WxDxH) 180 x 228 x 44 mm Note: The specifications and design of this product are subject to change without notice.
EN 25 / 28

5.2 Frequently Asked Questions Question 1. What kind of file format do I have to use on my device? Answer: In order to avoid the “Safely remove hardware“ procedure for disconnecting the PC2300 from your PC, please use the FAT32 file system. Format your HDD with a FAT32 format tool, like Swissknife or EASEUS Partiton Master. Question 2. My computer does not recognize my player. Answer: (1) Make sure the player is powered on. If it is off, the computer will not be able to find the player; (2) Make sure the player is connected to computer. (Refer to 1.4.1 for connecting player to computer); (3) When using Windows 98SE, install the USB driver first. After installation, restart the computer. Then reconnect the player to the computer. (Refer to 1.4.1 for connecting player to computer); (4) If you installed the Windows 98SE driver over your Windows® XP, 2000, or ME edition, problems might occur; (5) It is not recommend using the USB ports in the front of your computer, try to use the USB ports in the rear, because the USB ports in the front are often from non-powered hubs. Question 3. When I try to disconnect the USB device, I keep on getting “The device ‘Generic volume’ cannot be stopped right now. Try stopping the device again later.” message, what should I do? Answer: Close any program that might be accessing data on the player, including Windows® Explorer. If it does not work, close all programs and wait for another 20 seconds, then try the green arrow icon again. If it still does not work, you should shut down the player and disconnect the USB cable. Question 4. I find new file names and folder names that I never created before or they have strange gibberish names. Answer: Most likely, the player’s file allocation table (FAT) has been corrupted. This might be due to the player shutting down (due to low battery power) while reading or writing to your computer by the USB connection. Windows and Macintosh often write extra files to the hard disk such as finder.def or System volume info. These are normal and will not do any harm to the player. Question 5. I used my player to transfer files back and forth between different computers. Will defragmenting the player hard disk do any harm to it? Answer: Defragmenting the player hard disk may be useful after having transferred many files to and from the player. It is never harmful to use the defragment on the player. Make sure no other
EN 26 / 28

programs are running while using the Windows® defragment utility. Make sure you have connected the player with the external power adapter during this procedure. Question 6. My files have disappeared from the player. Answer: Make sure that you browse your files via the correct Browser mode which means correct filtered views such as Photos, Music, or Movies. Otherwise please read point 1.4.1 from this manual. Question 7. Why do some supported photo formats, cannot be shown in the photo function? Answer: In the JPEG format there are different modes. The player doesn’t support all the modes. So you have to change your photo format first as follow: (1) Use Photoshop to open the photo; (2) Choose ”File” then “save as” from the menu, as the picture on the left hand side shows, select the picture format as JPEG, input the file name and click the “save” icon; (3) After click on the “save” icon, a new window will appear as the picture on the right hand side shows, select “Baseline (standard)” or “Baseline optimized”;
(4) Click the “OK” icon.
EN 27 / 28
EN 28 / 28
5.3 Copyrights and Trademarks Copyrights All rights reserved. No part of this manual may be reproduced, or transmitted in any form or by any means, whether by electronically or mechanically, without the express written permission from the copyright holder. Copyrighted materials, such as software, music files, or movies, are protected by local law, and may not be illegally copied or used without permission from the copyright owner. Trademarks Microsoft and Windows are registered trademarks of Microsoft Corporation. All other trademarks are property of their respective holders. 5.4 Warranty What your warranty does not cover: -Acts of nature, such as fire, static discharge. -Damage from unauthorized repair, alteration or accident. -Damage from misuse or neglect. -A unit that has been modified or incorporated into other products or is used for institutional or other commercial purposes. -Loss of customer’s software, firmware, information, or memory data. -Improper handling or installation.