Embed Size (px)
Citation preview
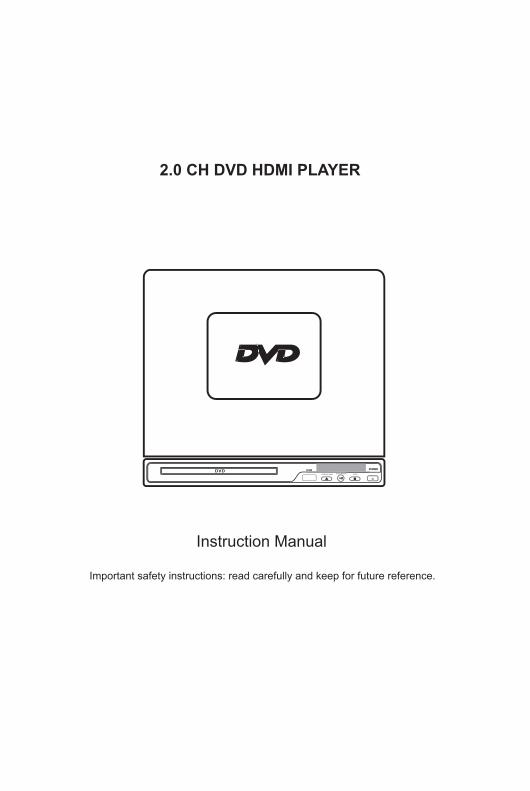
2.0 CH DVD HDMI PLAYER
Instruction Manual
Important safety instructions: read carefully and keep for future reference.
FeaturesThank you for purchasing our product. Please read this manual carefully before connection and operation. Please keep this manual for future reference.
DVD player is a new generation home player which can produce high quality video and audio. Its performance is much better that of any previous home video playing equipment. As the best signal source of home theatre system, It will give you the uppermost enjoyment !
MPEG4, DIVX, PCM, MPEG etc.digital audio decoder HHi, 96 kHz/24bit audio digital processor. Software intelligent upgrade. High-resolution component video output future video equipment HDMI output, support 720P.1080I.1080P. Super compatible with DIVX/DVD/DVD+RW/DVD-RW/DVD+R/DVD- R/HDCD/VCD/CD/CD-R/MP3/MP4/KODAK/PICTURE. Latest the forth generation servo, decoding on single-chip technology, high reliability and stability and super error correction.

For Your AttentionIMPORTANT NOTES:
Please read through the manual carefully before connecting and operation. Do not open the cover or touch any internal components for non-professional. Turn off the power when the unit is not being used. (Unplug the power cord if the unit is not used for a long time.) Do not expose the unit to direct sunlight Keep away the heating sources or equipments. Do not expose the unit to moisture. Place the unit on a horizontal level. Keep the unit ventilated. Don't block the heat hole. Overheat may cause malfunction. Clean the cabinet with soft cloth Detergent or alcohol is forbidden. This book is only a guide for user's operation not a criterion for configuration. This apparatus shall not be exposed to dripping or splashing and that no object filled with liquids, such as vases, shall be placed on the apparatus.
The lightning flash is intended to alert the user to the presence of dangerous voltages within the product's enclosure, and touching the inner parts may result in a risk of electric shockto persons.
The exclamation mark is intended to alert the user to the presence of important operating instructions.
To reduce the risk of electric shock or fire, do not open the cover. Refer servicing to qualified service personnel.
This mark indicates that this unit contains a class 1 laser product. The laser beam may produce harmful radiation if it directly touches the human body.
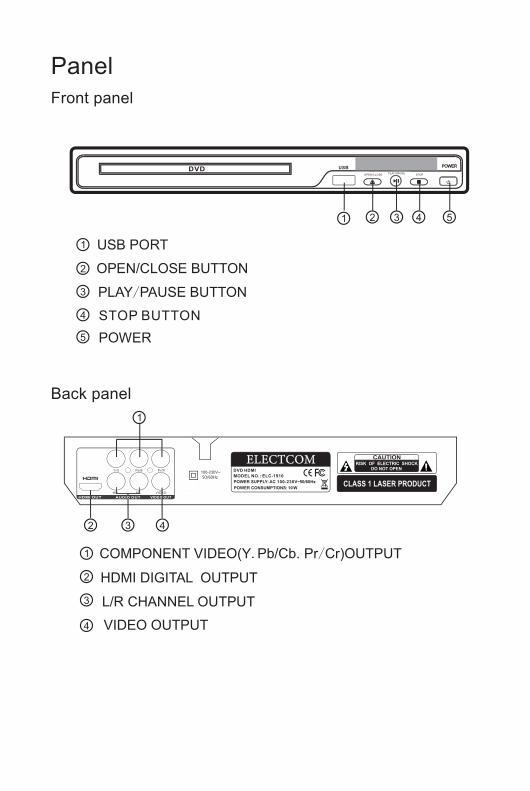
PanelFront panel
Back panel
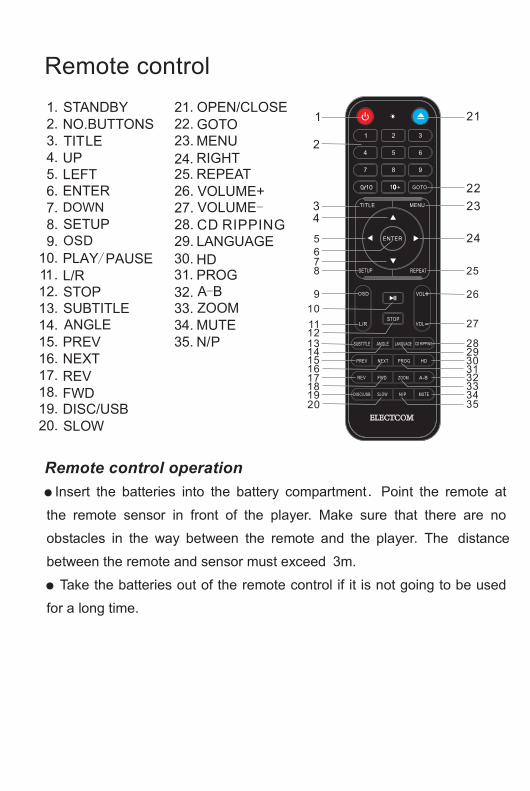
Remote control
Remote control operation
MENU
1
20
2
21
32223
4245
25
6
26
7
27
8
28
91011
29
1213
3014
3115
3216
3317
341819
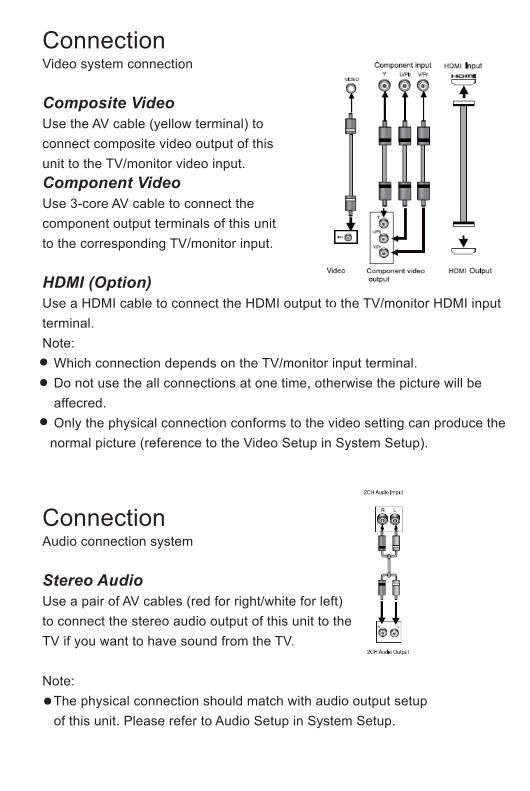
ConnectionVideo system connection
Composite VideoUse the AV cable (yellow terminal) to connect composite video output of this unit to the TV/monitor video input.Component VideoUse 3-core AV cable to connect the component output terminals of this unit to the corresponding TV/monitor input.
HDMI (Option)Use a HDMI cable to connect the HDMI output to the TV/monitor HDMI input terminal.Note: Which connection depends on the TV/monitor input terminal. Do not use the all connections at one time, otherwise the picture will be affecred. Only the physical connection conforms to the video setting can produce the normal picture (reference to the Video Setup in System Setup).
ConnectionAudio connection system
Stereo AudioUse a pair of AV cables (red for right/white for left) to connect the stereo audio output of this unit to theTV if you want to have sound from the TV.
Note: The physical connection should match with audio output setup of this unit. Please refer to Audio Setup in System Setup.
System SetupBasic OperationPress SETUP on the remote control unit to setup the initial setting.select related[SETUP PAGE] with the directional buttons.
Menu OperationsYou can setup the mode of audio and video output, initial setup, parental control level, etc. You can also select the aspect ratio of the playback pictureto your TV screen.Press SETUP to display the setup menu and the system will automatically stop play.
System SetupPress SETUP and select system setup page. TV SYSTEM: Use up/down arrow buttons to make TV system selection. There are four TV output systems to choose from: NTSC, PAL, PAL- M and AUTO. SCREEN SAVER: Use up/down arrow buttons to select the status of the screen saver.On: When enabled, if the unit has been idle(e.g.in stop/pause state are waiting for user input for about 180 seconds), a screen saver will bounce around the screen to protect screen.Off: Setting without screen saver. HD OUTPUT: Use up/down arrow buttons to set video resolution, there are five resolution(720P, 10801,1080P). VIDEO: There are five video output modes to choose from: INTERLACE-YUV: Use Y Cb Cr terminals to output signals. P-SCAN YPBPR: Use Y Cb Cr terminals to output signals and convert to progressive output. TV TYPE: Using left/right arrow button to select TV aspect ratio.4:3/PS:Pan & Scan video output for a normal TV set. The screen displays the wide picture on the wide screen with a left and right portion automatically cut Off.

4:3/LB:Letter Box video output for a normal TV set. The screen displays the wide picture with bands displayed on the upper and lower portions of the Screen.16:9:Wide screen video output for a wide screen TV set. PASSWORDThe initial setting of this item is under locked status. You can not set the rating and also can not change password . Input initial password: 0000 and press [ENTER] to confirm and then you can set rating and change password. RATINGPlaying some DVD discs can be limited depending on the age of the users. The parental control function allows playback limitation level to be set by the parent from level 1 to level 8. The level is from high to low. Level 1 is the lowest level and level 8 is the highest lever. This function is only valid for some DVD discs that have the limit level. And you should set the password first and make sure the password lock is locked. DEFAULTUse the right arrow button to select [RESTORE] and press [ENTER] to return all the settings of the system to the original settings. POWER RESUMEUse up/down arrow buttons to set resume play.
Language Setup OSD LANGUAGE: Use up/down arrow buttons to select desired OSD language and press [ENTER] to confirm.The unit includes OSD languages: ENGLISH. AUDIO LANGUAGE: Use up/down arrow buttons to select desired AUDIO language and press [ENTER] to confirm. SUBTITLE LANGUAGE: Use up/down arrow buttons to select desired SUBTITLE language and press [ENTER] to confirm. MENU LANGUAGE: Use up/down arrow buttons to select desired MENU language and press [ENTER] to confirm.
Audio Setup AUDIO OUT: Use right arrow button to sdect the audio output way. This is the way for you to select SPDIF/OFF, SPDIF/RAW, SPDIF/PCM. KEY: Press ▲ ▼ to adjust the tone level.
Video Setup BRIGHTNESS: Use ▲ ▼ to adjust the brightness of the video output. CONTRAST: Use ▲ ▼ to adjust the contrast value of the video output. HUE: Use ▲ ▼ to adjust the HUE value of the video output. SATURATION : Use ▲ ▼ to adjust the saturation value of the video output. SHARPNESS: Use ▲ ▼ to adjust the sharpness value of the video output. Speaker Setup DOWN MIX LT/RT : When you play a disc that has logic effect, you can choose LT/RT output. The disc information will be decoded and show better effect. STEREO: When 2ch output is selected, normal stereo signals may be played from the L & R output socket.
Digital Setup OP MODELINE OUT: The input signals are linear compressed and the volume is lower. You should rather choose LINE OUT setting at night.RF REMOD: The volume is higher and adapt to daytime use. DYNAMIC RANGE: When you choose LINE OUT mode, select DYNAMIC RANGE to adjust the compression ratio and you can get different effects. When you adjust to FULL, the compression ratio will be set to the lowest level. When adjust is OFF, the compression ratio will be set to the lowest level. DUAL MONO: You can set the audio output mode for Lor R channel. There are four modes: STEREO, MONO L, MONO R, and MIX MONO.

PlayBasic Operation
Press OPEN/CLOSE button, the disc into tray opens. Place the disc on the tray with the title facing up. Press OPEN/CLOSE again to close the disc tray.
When playing, press STANDBY button, the machine will be power-off and go to standby state. Press STANDBY again, the machine will be power-on and start playing.Warning : The power is not fully cut off at the standby state. If the machine will not be used for a long time, turn off the power by pressing the 'Power' button on the front panel.
When playing DVD. Press TITLE button to return to the title menu.
When playing DVD discs press MENU once to return to submenu.Press MENU again to return to the main menu. When playing VCD discs press MENU button to turn on PBC, the VCD is played by menu, press MENU button again to turn off PBC, then VCD is played in sequence.
Can choose the following resolution levels from the HDMI output.
When playing DVD with more than one audio stream, press LANGUAGE to select what you desired.
When playing VCD or CD discs, press L/R button to select the left, right channels or stereo.
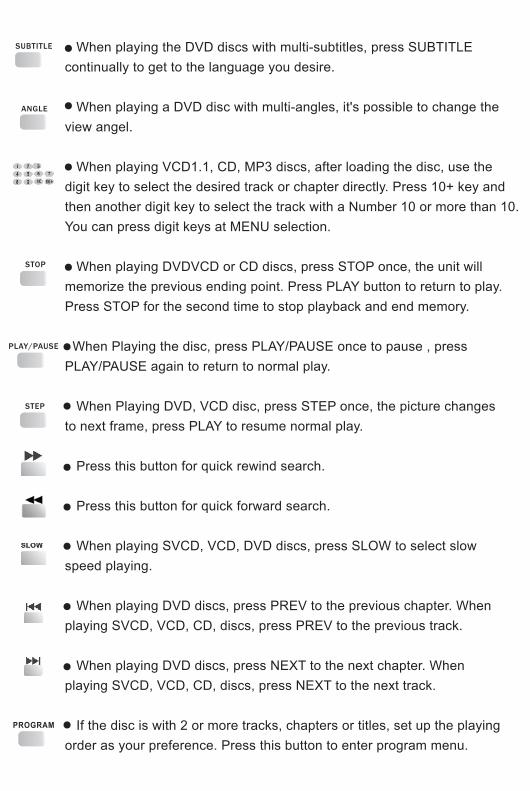
When playing the DVD discs with multi-subtitles, press SUBTITLE continually to get to the language you desire.
When playing a DVD disc with multi-angles, it's possible to change the view angel.
When playing VCD1.1, CD, MP3 discs, after loading the disc, use the digit key to select the desired track or chapter directly. Press 10+ key and then another digit key to select the track with a Number 10 or more than 10. You can press digit keys at MENU selection.
When playing DVDVCD or CD discs, press STOP once, the unit will memorize the previous ending point. Press PLAY button to return to play. Press STOP for the second time to stop playback and end memory.
When Playing the disc, press PLAY/PAUSE once to pause , press PLAY/PAUSE again to return to normal play.
When Playing DVD, VCD disc, press STEP once, the picture changes to next frame, press PLAY to resume normal play.
Press this button for quick rewind search. Press this button for quick forward search.
When playing SVCD, VCD, DVD discs, press SLOW to select slow speed playing.
When playing DVD discs, press PREV to the previous chapter. When playing SVCD, VCD, CD, discs, press PREV to the previous track.
When playing DVD discs, press NEXT to the next chapter. When playing SVCD, VCD, CD, discs, press NEXT to the next track.
If the disc is with 2 or more tracks, chapters or titles, set up the playing order as your preference. Press this button to enter program menu.
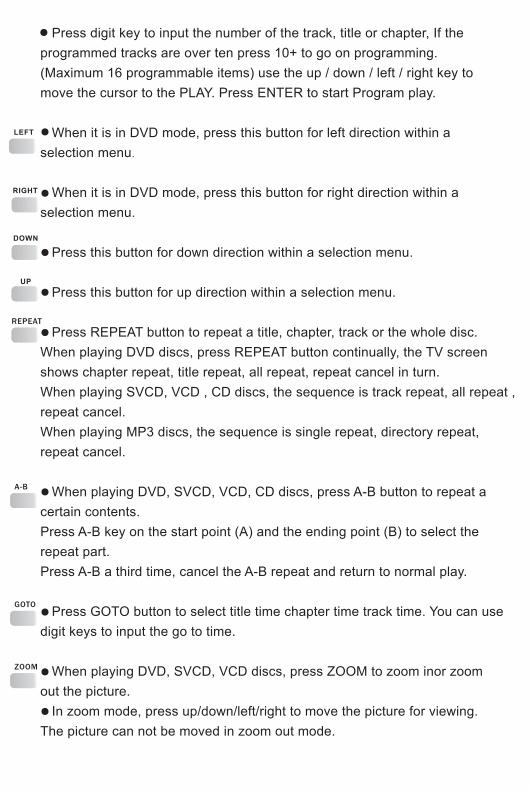
Press digit key to input the number of the track, title or chapter, If the programmed tracks are over ten press 10+ to go on programming. (Maximum 16 programmable items) use the up / down / left / right key to move the cursor to the PLAY. Press ENTER to start Program play.
When it is in DVD mode, press this button for left direction within a selection menu.
When it is in DVD mode, press this button for right direction within a selection menu.
Press this button for down direction within a selection menu. Press this button for up direction within a selection menu.
Press REPEAT button to repeat a title, chapter, track or the whole disc.When playing DVD discs, press REPEAT button continually, the TV screen shows chapter repeat, title repeat, all repeat, repeat cancel in turn. When playing SVCD, VCD , CD discs, the sequence is track repeat, all repeat , repeat cancel. When playing MP3 discs, the sequence is single repeat, directory repeat, repeat cancel.
When playing DVD, SVCD, VCD, CD discs, press A-B button to repeat a certain contents.Press A-B key on the start point (A) and the ending point (B) to select the repeat part.Press A-B a third time, cancel the A-B repeat and return to normal play.
Press GOTO button to select title time chapter time track time. You can use digit keys to input the go to time.
When playing DVD, SVCD, VCD discs, press ZOOM to zoom inor zoom out the picture. In zoom mode, press up/down/left/right to move the picture for viewing. The picture can not be moved in zoom out mode.
Press VOL+ to increase volume up. Press VOL- to decrease volume down.
Mute the sound during playing.
Press the OSD button, the relative information of the disc will display on the TV screen.
Press SETUP to get into [SETUP] menu.
Confirm the selection.
Press this button to switch the play between DISC and USB.
Press N/P button to switch the TV system selection NTSC and PAL.
Play Picture CD DiscPress up/down/left/right to select the desired picture.
Play MP3 Disc: When playing a MP3 disc, there is a menu screen on TV press the [▲] or [▼] button to shift the cursor to select the track or folder and press the [ENTER] button to play the selected track or folder (it need to enterthe sub-folder to select the track and press the [ENTER] button to play for some MP3 discs). Also use the digit button to select the track.
USB Operations Remove the DVD/CD disc from the tray, insert the USB drive into the USB jack. The player will automatically detect the readable files in the USB drive. Use remote control to select the files for playback.
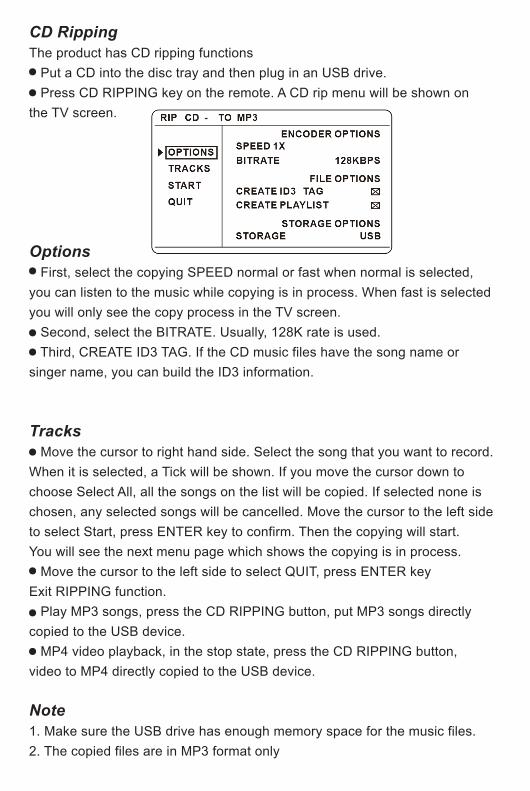
CD RippingThe product has CD ripping functions Put a CD into the disc tray and then plug in an USB drive. Press CD RIPPING key on the remote. A CD rip menu will be shown on the TV screen.
Options First, select the copying SPEED normal or fast when normal is selected,you can listen to the music while copying is in process. When fast is selected you will only see the copy process in the TV screen. Second, select the BITRATE. Usually, 128K rate is used. Third, CREATE ID3 TAG. If the CD music files have the song name or singer name, you can build the ID3 information.
Tracks Move the cursor to right hand side. Select the song that you want to record.When it is selected, a Tick will be shown. If you move the cursor down to choose Select All, all the songs on the list will be copied. If selected none is chosen, any selected songs will be cancelled. Move the cursor to the left side to select Start, press ENTER key to confirm. Then the copying will start. You will see the next menu page which shows the copying is in process. Move the cursor to the left side to select QUIT, press ENTER key Exit RIPPING function. Play MP3 songs, press the CD RIPPING button, put MP3 songs directly copied to the USB device. MP4 video playback, in the stop state, press the CD RIPPING button, video to MP4 directly copied to the USB device.
Note1. Make sure the USB drive has enough memory space for the music files.2. The copied files are in MP3 format only
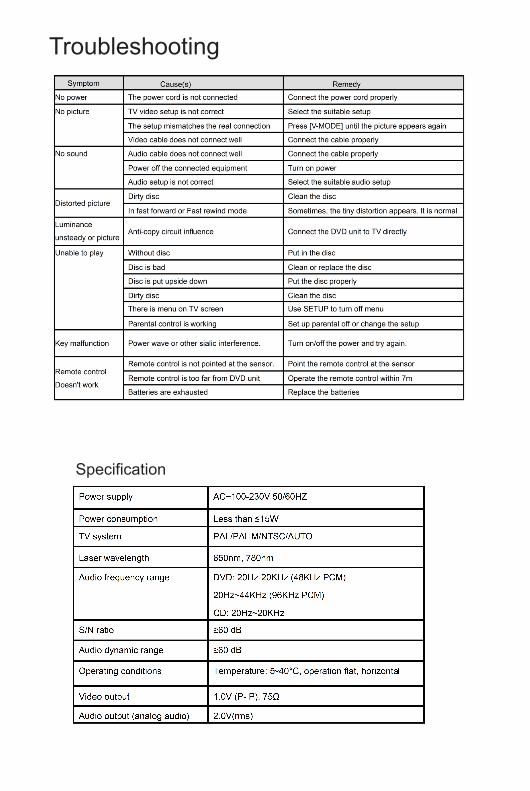
Troubleshooting
Specification