Embed Size (px)
Citation preview
EASY-ROB™ Stefan Anton Hans-Thoma-Str.26a 60596 Frankfurt/Main Germany Tel. +49 69 677 24-287 Fax. +49 69 677 24-320 [email protected] www.easy-rob.com
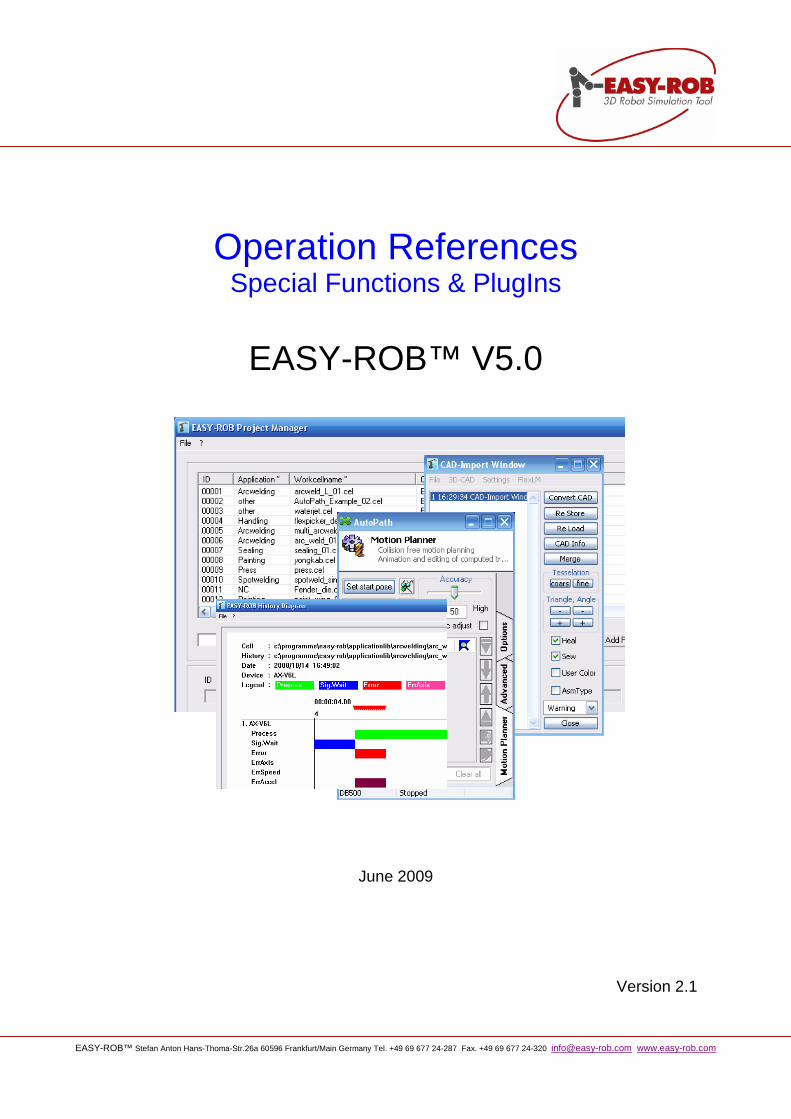
Operation References Special Functions & PlugIns
EASY-ROB™ V5.0
June 2009
Version 2.1
The right is reserved to make technical changes and improvements 2/26 EASY-ROB™ Stefan Anton Hans-Thoma-Str.26a 60596 Frankfurt/Main Germany Tel. +49 69 677 24-287 Fax. +49 69 677 24-320 [email protected] www.easy-rob.com
The right is reserved to make technical changes and improvements 3/26 EASY-ROB™ Stefan Anton Hans-Thoma-Str.26a 60596 Frankfurt/Main Germany Tel. +49 69 677 24-287 Fax. +49 69 677 24-320 [email protected] www.easy-rob.com
EASY-ROB™
Table of contents Table of contents ............................................................................................................................................... 3 PlugIn Dlls.......................................................................................................................................................... 4
AVI - Recorder ............................................................................................................................................... 4 VRML Export .................................................................................................................................................. 6 Path planning with AutoPathTM ...................................................................................................................... 7
CAD Import ...................................................................................................................................................... 13 Import VRML ................................................................................................................................................ 13 Import CAD data from other CAD Systems ................................................................................................. 16
Project Manager .............................................................................................................................................. 19 Administrate Projects ................................................................................................................................... 19
History Diagram ............................................................................................................................................... 21 Visual analyses of the simulation................................................................................................................. 21
ERC Command Searcher ................................................................................................................................ 23 Search ERC Commands.............................................................................................................................. 23
Appendix .......................................................................................................................................................... 24 Kin ID’s ......................................................................................................................................................... 24
Contact............................................................................................................................................................. 25 Notes................................................................................................................................................................ 26
The right is reserved to make technical changes and improvements 4/26 EASY-ROB™ Stefan Anton Hans-Thoma-Str.26a 60596 Frankfurt/Main Germany Tel. +49 69 677 24-287 Fax. +49 69 677 24-320 [email protected] www.easy-rob.com
EASY-ROB™ Operation References
PlugIn Dlls
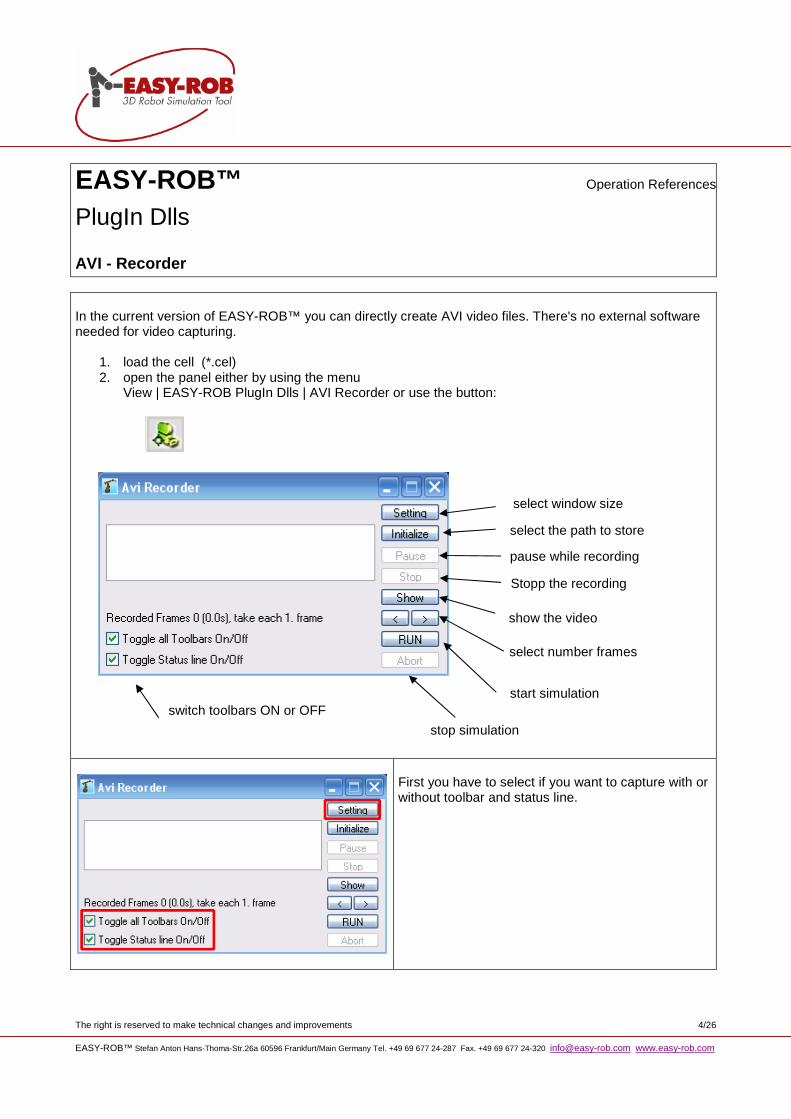
AVI - Recorder In the current version of EASY-ROB™ you can directly create AVI video files. There's no external software needed for video capturing.
1. load the cell (*.cel) 2. open the panel either by using the menu
View | EASY-ROB PlugIn Dlls | AVI Recorder or use the button:
First you have to select if you want to capture with or without toolbar and status line.
select window size
select the path to store
pause while recording
Stopp the recording
show the video
select number frames
start simulation
stop simulation
switch toolbars ON or OFF
The right is reserved to make technical changes and improvements 5/26 EASY-ROB™ Stefan Anton Hans-Thoma-Str.26a 60596 Frankfurt/Main Germany Tel. +49 69 677 24-287 Fax. +49 69 677 24-320 [email protected] www.easy-rob.com
AVI Recorder
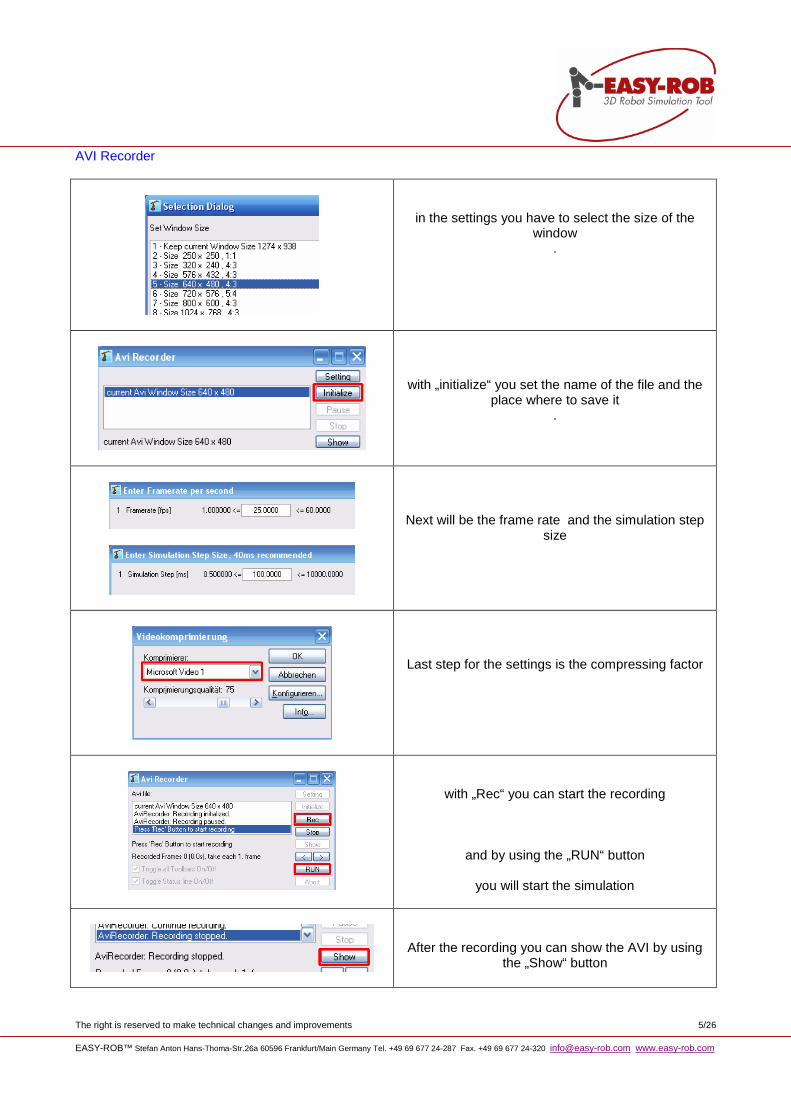
in the settings you have to select the size of the window
.
with „initialize“ you set the name of the file and the
place where to save it .
Next will be the frame rate and the simulation step size
Last step for the settings is the compressing factor
with „Rec“ you can start the recording
and by using the „RUN“ button
you will start the simulation
After the recording you can show the AVI by using the „Show“ button
The right is reserved to make technical changes and improvements 6/26 EASY-ROB™ Stefan Anton Hans-Thoma-Str.26a 60596 Frankfurt/Main Germany Tel. +49 69 677 24-287 Fax. +49 69 677 24-320 [email protected] www.easy-rob.com
EASY-ROB™ Operation References
PlugIn Dlls
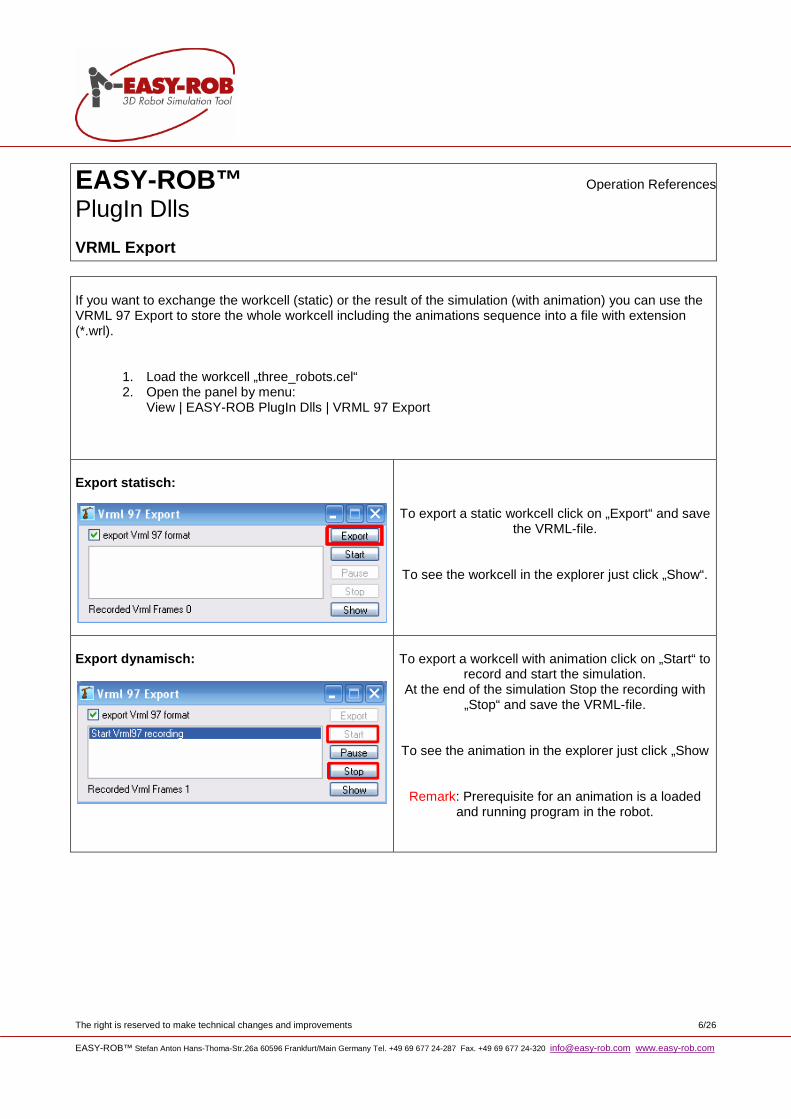
VRML Export If you want to exchange the workcell (static) or the result of the simulation (with animation) you can use the VRML 97 Export to store the whole workcell including the animations sequence into a file with extension (*.wrl).
1. Load the workcell „three_robots.cel“ 2. Open the panel by menu:
View | EASY-ROB PlugIn Dlls | VRML 97 Export
Export statisch:
To export a static workcell click on „Export“ and save the VRML-file.
To see the workcell in the explorer just click „Show“.
Export dynamisch:
To export a workcell with animation click on „Start“ to
record and start the simulation. At the end of the simulation Stop the recording with
„Stop“ and save the VRML-file.
To see the animation in the explorer just click „Show
Remark: Prerequisite for an animation is a loaded and running program in the robot.
The right is reserved to make technical changes and improvements 7/26 EASY-ROB™ Stefan Anton Hans-Thoma-Str.26a 60596 Frankfurt/Main Germany Tel. +49 69 677 24-287 Fax. +49 69 677 24-320 [email protected] www.easy-rob.com
EASY-ROB™ Operation References
PlugIn Dlls
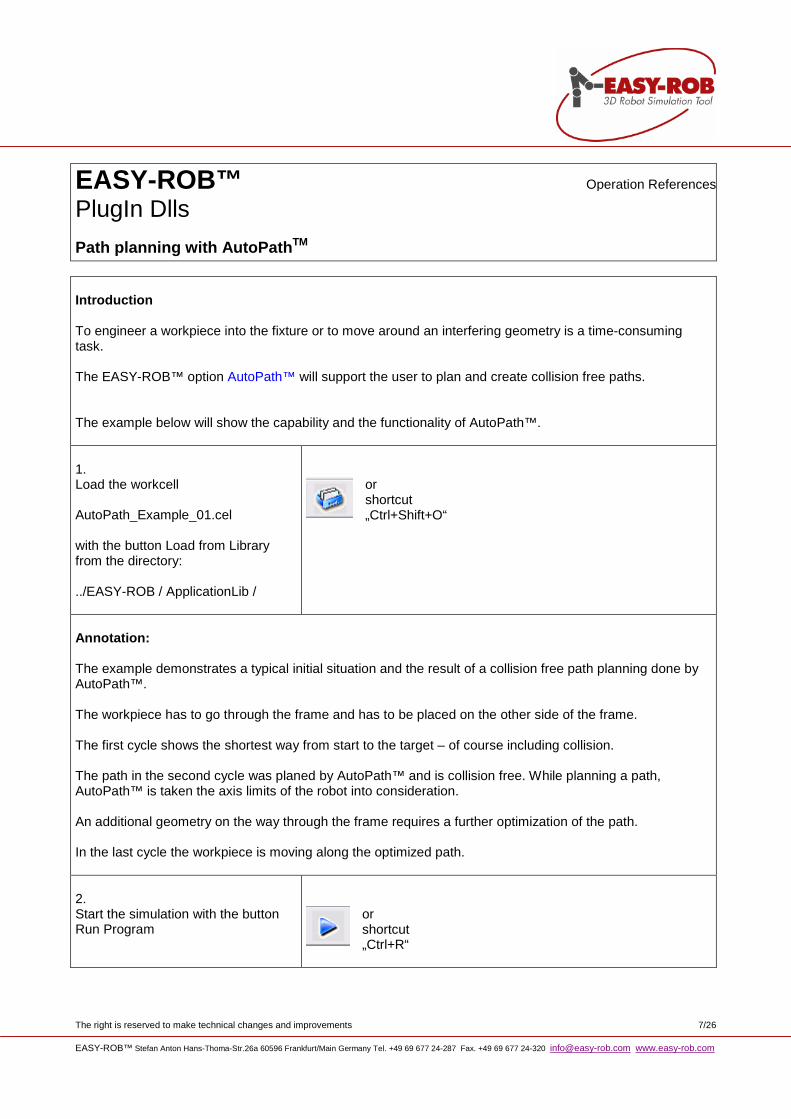
Path planning with AutoPath TM Introduction To engineer a workpiece into the fixture or to move around an interfering geometry is a time-consuming task. The EASY-ROB™ option AutoPath™ will support the user to plan and create collision free paths. The example below will show the capability and the functionality of AutoPath™. 1. Load the workcell AutoPath_Example_01.cel with the button Load from Library from the directory: ../EASY-ROB / ApplicationLib /
or shortcut „Ctrl+Shift+O“
Annotation: The example demonstrates a typical initial situation and the result of a collision free path planning done by AutoPath™. The workpiece has to go through the frame and has to be placed on the other side of the frame. The first cycle shows the shortest way from start to the target – of course including collision. The path in the second cycle was planed by AutoPath™ and is collision free. While planning a path, AutoPath™ is taken the axis limits of the robot into consideration. An additional geometry on the way through the frame requires a further optimization of the path. In the last cycle the workpiece is moving along the optimized path. 2. Start the simulation with the button Run Program
or shortcut „Ctrl+R“
The right is reserved to make technical changes and improvements 8/26 EASY-ROB™ Stefan Anton Hans-Thoma-Str.26a 60596 Frankfurt/Main Germany Tel. +49 69 677 24-287 Fax. +49 69 677 24-320 [email protected] www.easy-rob.com
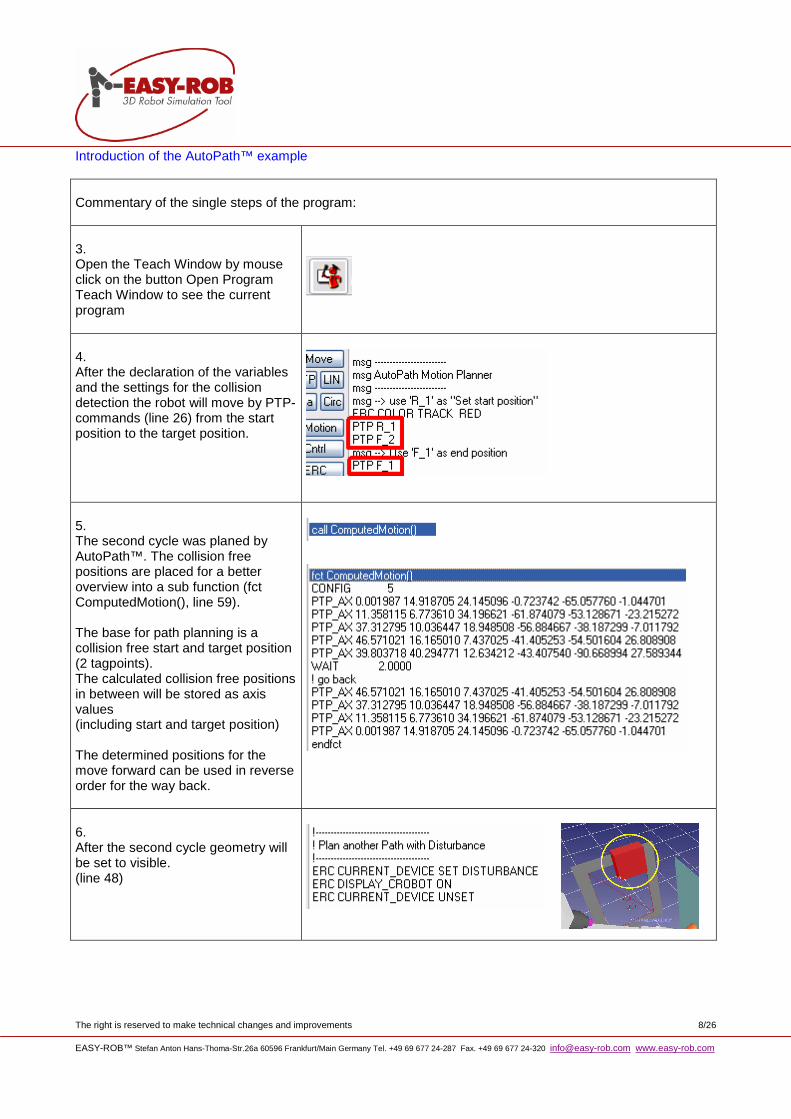
Introduction of the AutoPath™ example Commentary of the single steps of the program: 3. Open the Teach Window by mouse click on the button Open Program Teach Window to see the current program
4. After the declaration of the variables and the settings for the collision detection the robot will move by PTP-commands (line 26) from the start position to the target position.
5. The second cycle was planed by AutoPath™. The collision free positions are placed for a better overview into a sub function (fct ComputedMotion(), line 59). The base for path planning is a collision free start and target position (2 tagpoints). The calculated collision free positions in between will be stored as axis values (including start and target position) The determined positions for the move forward can be used in reverse order for the way back.
6. After the second cycle geometry will be set to visible. (line 48)
The right is reserved to make technical changes and improvements 9/26 EASY-ROB™ Stefan Anton Hans-Thoma-Str.26a 60596 Frankfurt/Main Germany Tel. +49 69 677 24-287 Fax. +49 69 677 24-320 [email protected] www.easy-rob.com
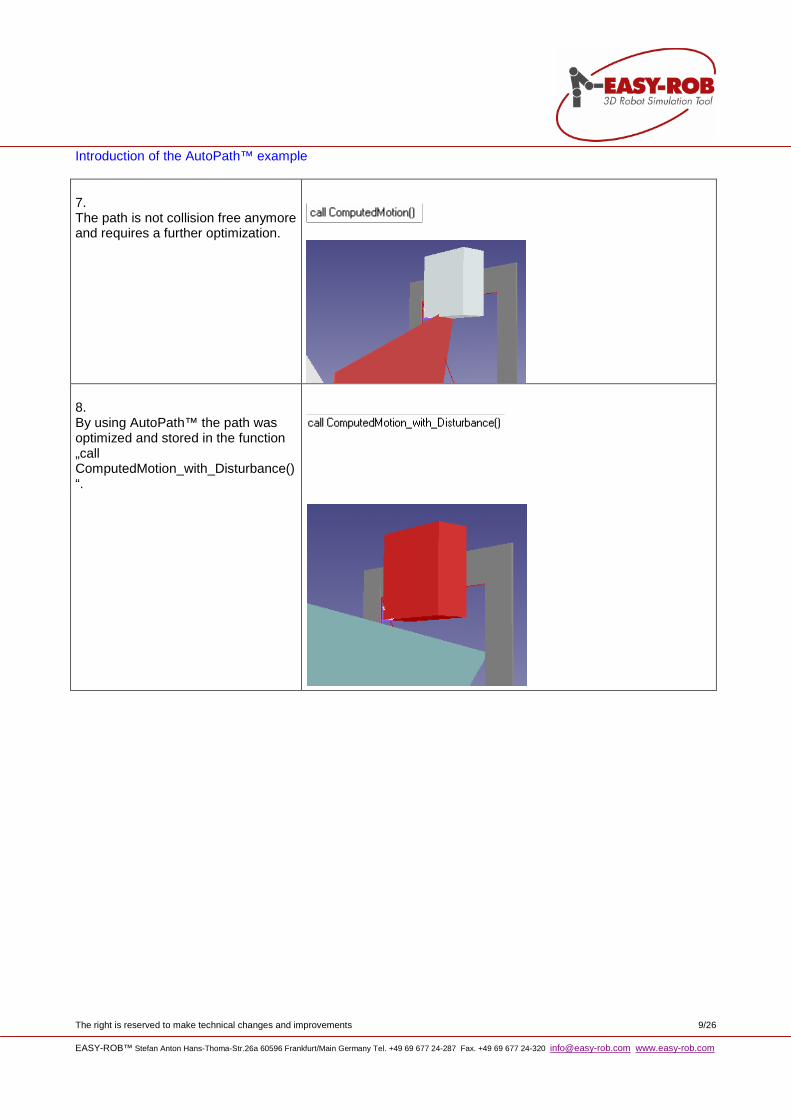
Introduction of the AutoPath™ example 7. The path is not collision free anymore and requires a further optimization.
8. By using AutoPath™ the path was optimized and stored in the function „call ComputedMotion_with_Disturbance()“.
The right is reserved to make technical changes and improvements 10/26 EASY-ROB™ Stefan Anton Hans-Thoma-Str.26a 60596 Frankfurt/Main Germany Tel. +49 69 677 24-287 Fax. +49 69 677 24-320 [email protected] www.easy-rob.com
EASY-ROB™ Operation References
PlugIn Dlls
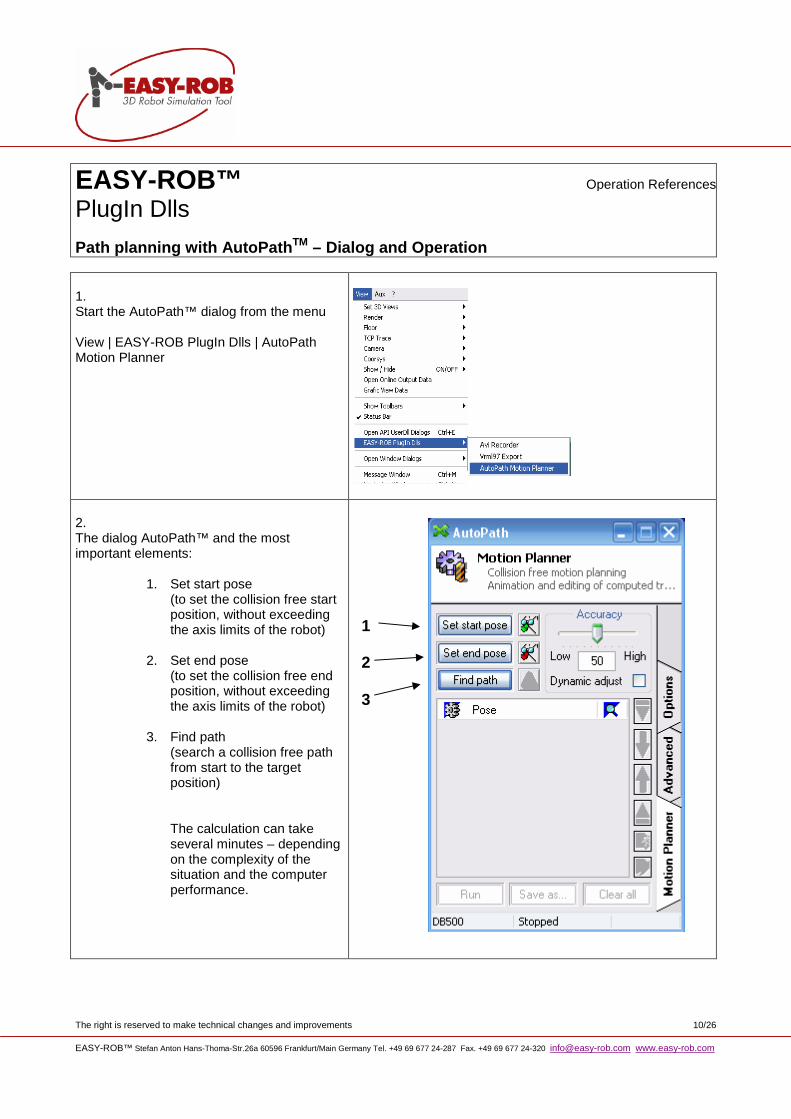
Path planning with AutoPath TM – Dialog and Operation 1. Start the AutoPath™ dialog from the menu View | EASY-ROB PlugIn Dlls | AutoPath Motion Planner
2. The dialog AutoPath™ and the most important elements:
1. Set start pose (to set the collision free start position, without exceeding the axis limits of the robot)
2. Set end pose (to set the collision free end position, without exceeding the axis limits of the robot)
3. Find path (search a collision free path from start to the target position) The calculation can take several minutes – depending on the complexity of the situation and the computer performance.
1 2 3
The right is reserved to make technical changes and improvements 11/26 EASY-ROB™ Stefan Anton Hans-Thoma-Str.26a 60596 Frankfurt/Main Germany Tel. +49 69 677 24-287 Fax. +49 69 677 24-320 [email protected] www.easy-rob.com
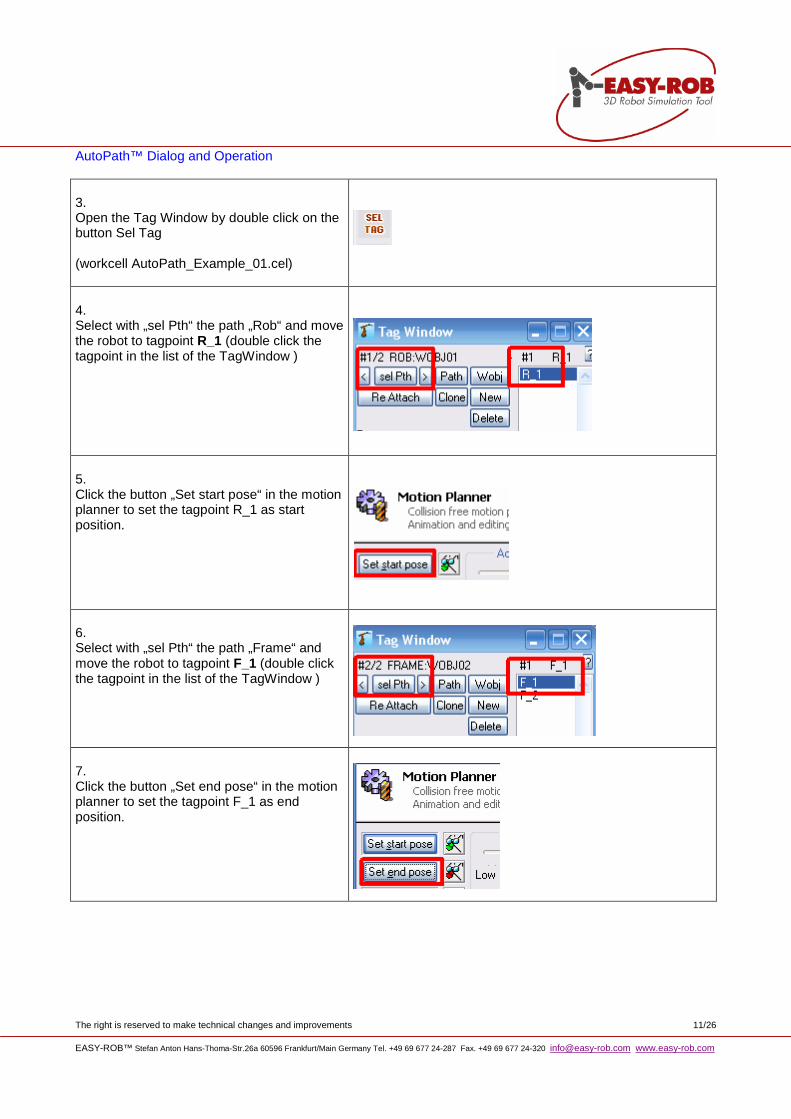
AutoPath™ Dialog and Operation 3. Open the Tag Window by double click on the button Sel Tag (workcell AutoPath_Example_01.cel)
4. Select with „sel Pth“ the path „Rob“ and move the robot to tagpoint R_1 (double click the tagpoint in the list of the TagWindow )
5. Click the button „Set start pose“ in the motion planner to set the tagpoint R_1 as start position.
6. Select with „sel Pth“ the path „Frame“ and move the robot to tagpoint F_1 (double click the tagpoint in the list of the TagWindow )
7. Click the button „Set end pose“ in the motion planner to set the tagpoint F_1 as end position.
The right is reserved to make technical changes and improvements 12/26 EASY-ROB™ Stefan Anton Hans-Thoma-Str.26a 60596 Frankfurt/Main Germany Tel. +49 69 677 24-287 Fax. +49 69 677 24-320 [email protected] www.easy-rob.com
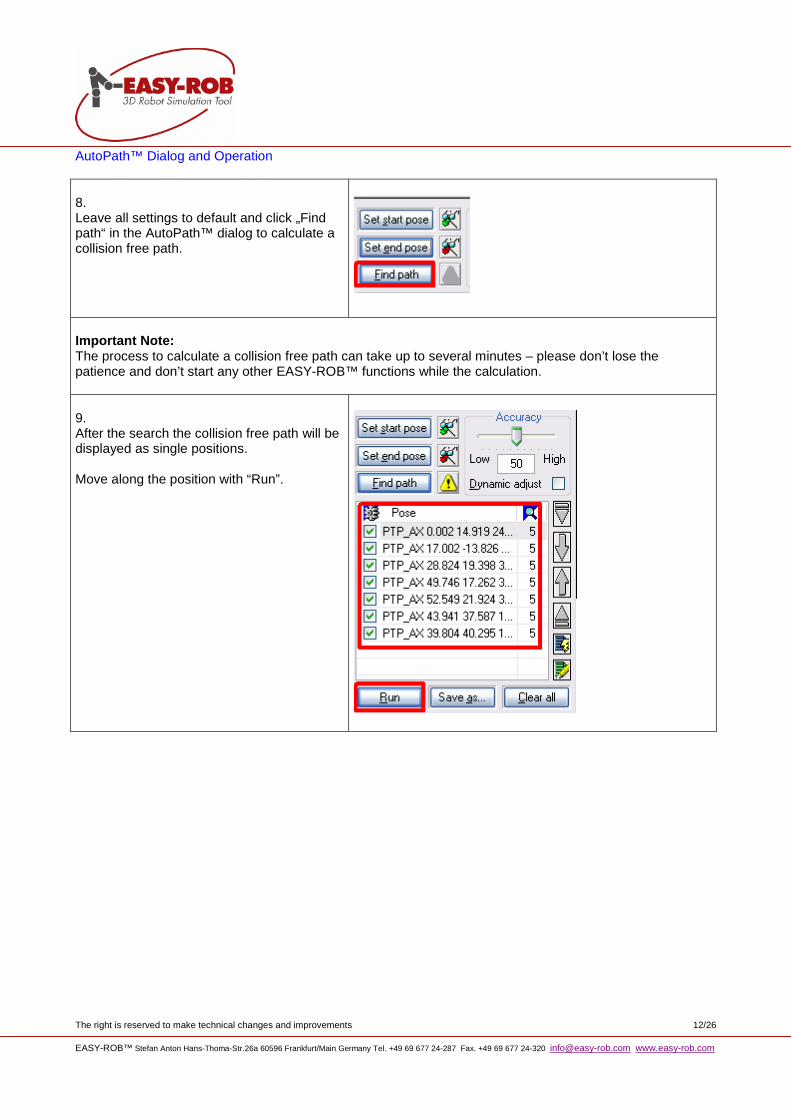
AutoPath™ Dialog and Operation 8. Leave all settings to default and click „Find path“ in the AutoPath™ dialog to calculate a collision free path.
Important Note: The process to calculate a collision free path can take up to several minutes – please don’t lose the patience and don’t start any other EASY-ROB™ functions while the calculation. 9. After the search the collision free path will be displayed as single positions. Move along the position with “Run”.
The right is reserved to make technical changes and improvements 13/26 EASY-ROB™ Stefan Anton Hans-Thoma-Str.26a 60596 Frankfurt/Main Germany Tel. +49 69 677 24-287 Fax. +49 69 677 24-320 [email protected] www.easy-rob.com
EASY-ROB™ Operation References
CAD Import
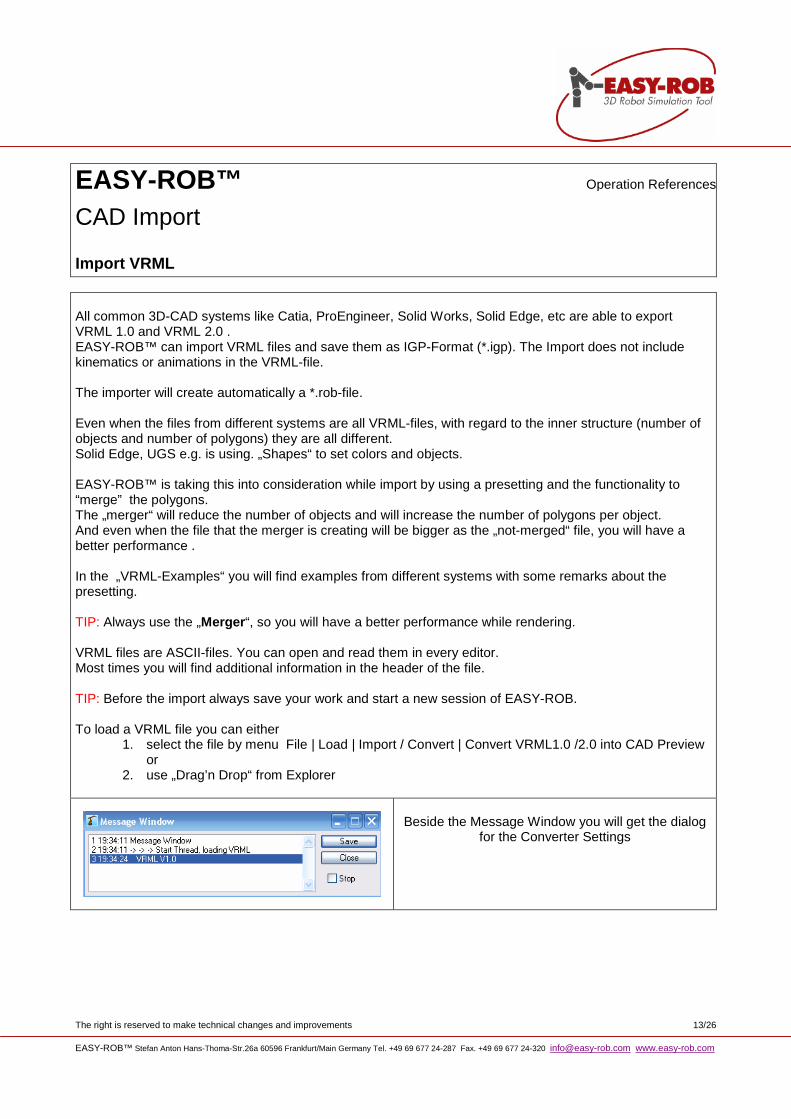
Import VRML All common 3D-CAD systems like Catia, ProEngineer, Solid Works, Solid Edge, etc are able to export VRML 1.0 and VRML 2.0 . EASY-ROB™ can import VRML files and save them as IGP-Format (*.igp). The Import does not include kinematics or animations in the VRML-file. The importer will create automatically a *.rob-file. Even when the files from different systems are all VRML-files, with regard to the inner structure (number of objects and number of polygons) they are all different. Solid Edge, UGS e.g. is using. „Shapes“ to set colors and objects. EASY-ROB™ is taking this into consideration while import by using a presetting and the functionality to “merge” the polygons. The „merger“ will reduce the number of objects and will increase the number of polygons per object. And even when the file that the merger is creating will be bigger as the „not-merged“ file, you will have a better performance . In the „VRML-Examples“ you will find examples from different systems with some remarks about the presetting. TIP: Always use the „Merger “, so you will have a better performance while rendering. VRML files are ASCII-files. You can open and read them in every editor. Most times you will find additional information in the header of the file. TIP: Before the import always save your work and start a new session of EASY-ROB. To load a VRML file you can either
1. select the file by menu File | Load | Import / Convert | Convert VRML1.0 /2.0 into CAD Preview or
2. use „Drag’n Drop“ from Explorer
Beside the Message Window you will get the dialog
for the Converter Settings
The right is reserved to make technical changes and improvements 14/26 EASY-ROB™ Stefan Anton Hans-Thoma-Str.26a 60596 Frankfurt/Main Germany Tel. +49 69 677 24-287 Fax. +49 69 677 24-320 [email protected] www.easy-rob.com
CAD Import - VRML
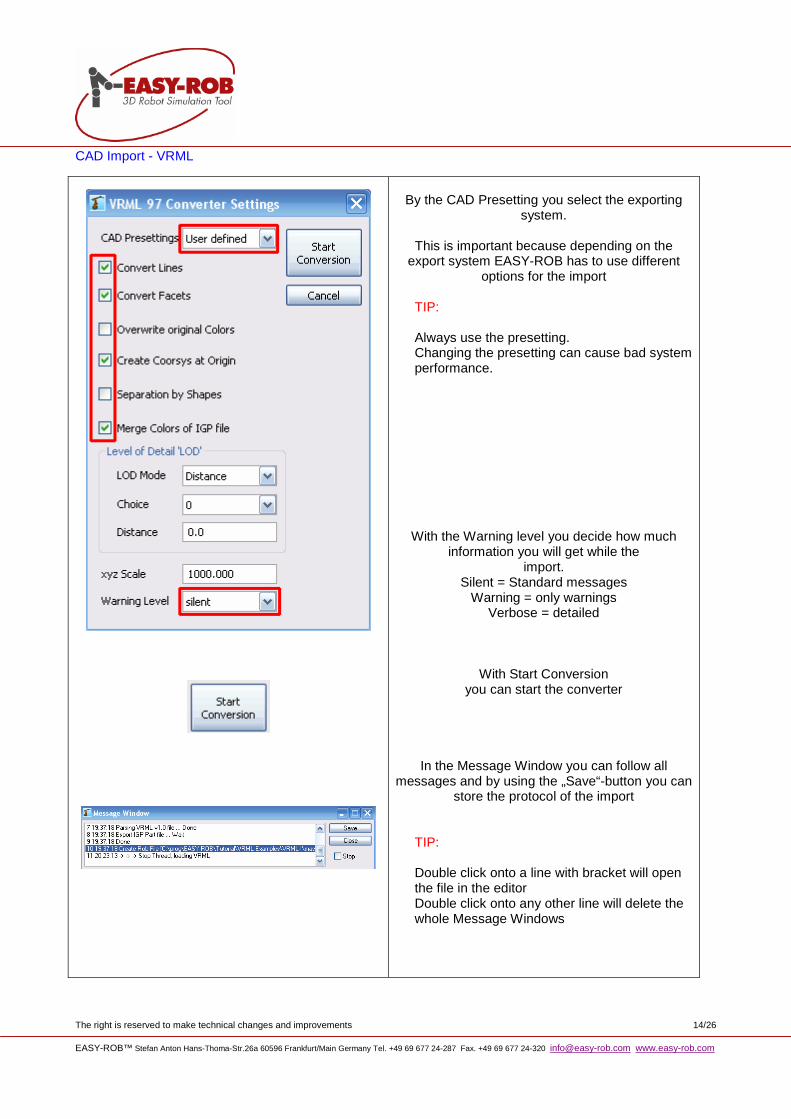
By the CAD Presetting you select the exporting
system.
This is important because depending on the export system EASY-ROB has to use different
options for the import
TIP: Always use the presetting. Changing the presetting can cause bad system performance.
With the Warning level you decide how much information you will get while the
import. Silent = Standard messages
Warning = only warnings Verbose = detailed
With Start Conversion you can start the converter
In the Message Window you can follow all messages and by using the „Save“-button you can
store the protocol of the import
TIP: Double click onto a line with bracket will open the file in the editor Double click onto any other line will delete the whole Message Windows
The right is reserved to make technical changes and improvements 15/26 EASY-ROB™ Stefan Anton Hans-Thoma-Str.26a 60596 Frankfurt/Main Germany Tel. +49 69 677 24-287 Fax. +49 69 677 24-320 [email protected] www.easy-rob.com
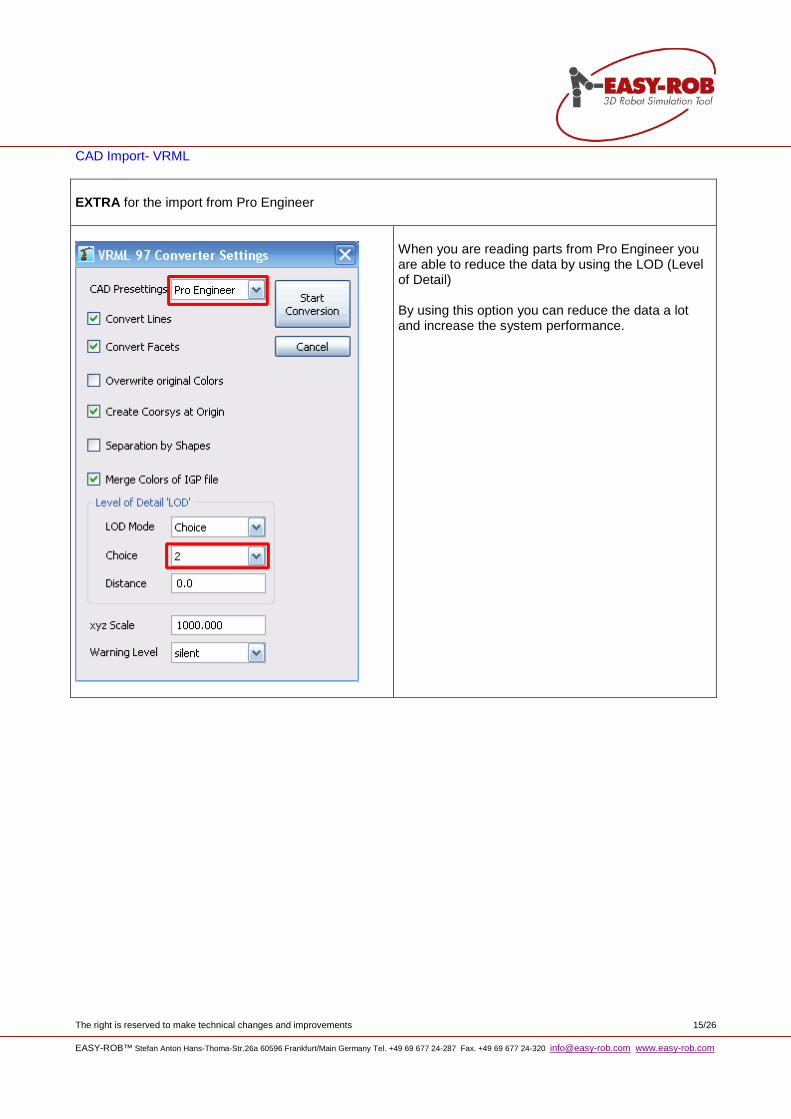
CAD Import- VRML EXTRA for the import from Pro Engineer
When you are reading parts from Pro Engineer you are able to reduce the data by using the LOD (Level of Detail) By using this option you can reduce the data a lot and increase the system performance.
The right is reserved to make technical changes and improvements 16/26 EASY-ROB™ Stefan Anton Hans-Thoma-Str.26a 60596 Frankfurt/Main Germany Tel. +49 69 677 24-287 Fax. +49 69 677 24-320 [email protected] www.easy-rob.com
EASY-ROB™ Operation References
CAD Import
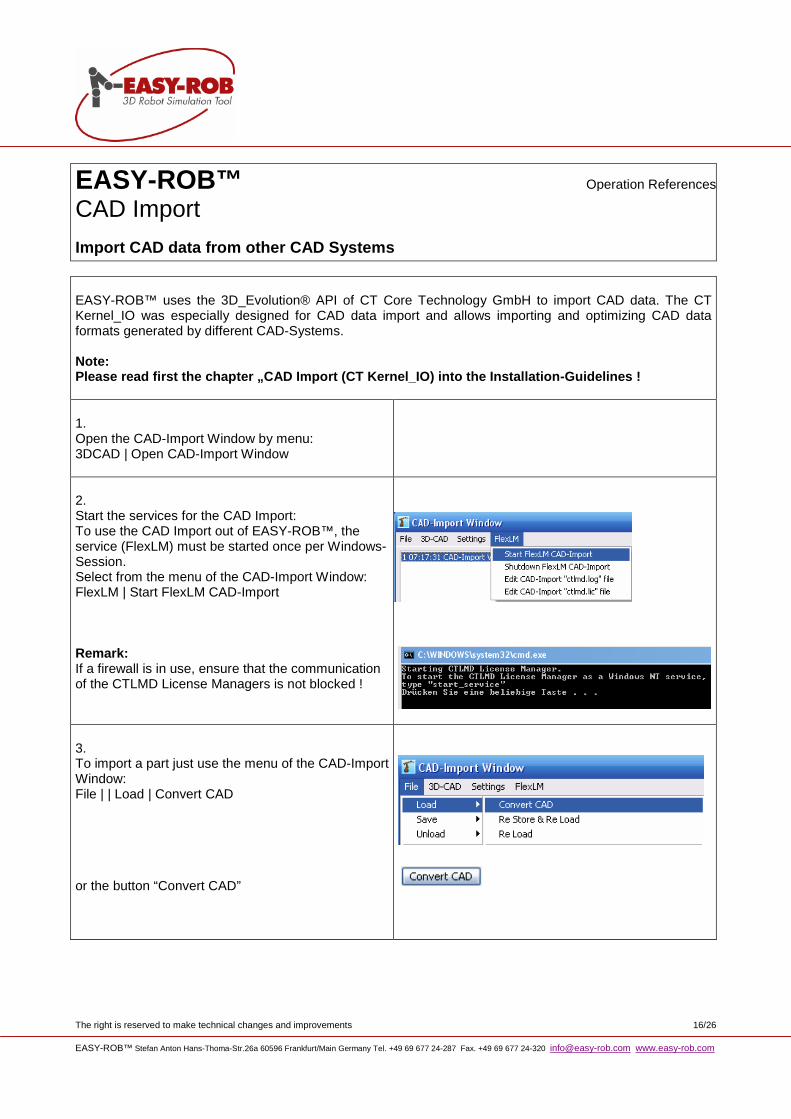
Import CAD data from other CAD Systems EASY-ROB™ uses the 3D_Evolution® API of CT Core Technology GmbH to import CAD data. The CT Kernel_IO was especially designed for CAD data import and allows importing and optimizing CAD data formats generated by different CAD-Systems. Note: Please read first the chapter „CAD Import (CT Kerne l_IO) into the Installation-Guidelines ! 1. Open the CAD-Import Window by menu: 3DCAD | Open CAD-Import Window
2. Start the services for the CAD Import: To use the CAD Import out of EASY-ROB™, the service (FlexLM) must be started once per Windows-Session. Select from the menu of the CAD-Import Window: FlexLM | Start FlexLM CAD-Import Remark: If a firewall is in use, ensure that the communication of the CTLMD License Managers is not blocked !
3. To import a part just use the menu of the CAD-Import Window: File | | Load | Convert CAD or the button “Convert CAD”
The right is reserved to make technical changes and improvements 17/26 EASY-ROB™ Stefan Anton Hans-Thoma-Str.26a 60596 Frankfurt/Main Germany Tel. +49 69 677 24-287 Fax. +49 69 677 24-320 [email protected] www.easy-rob.com
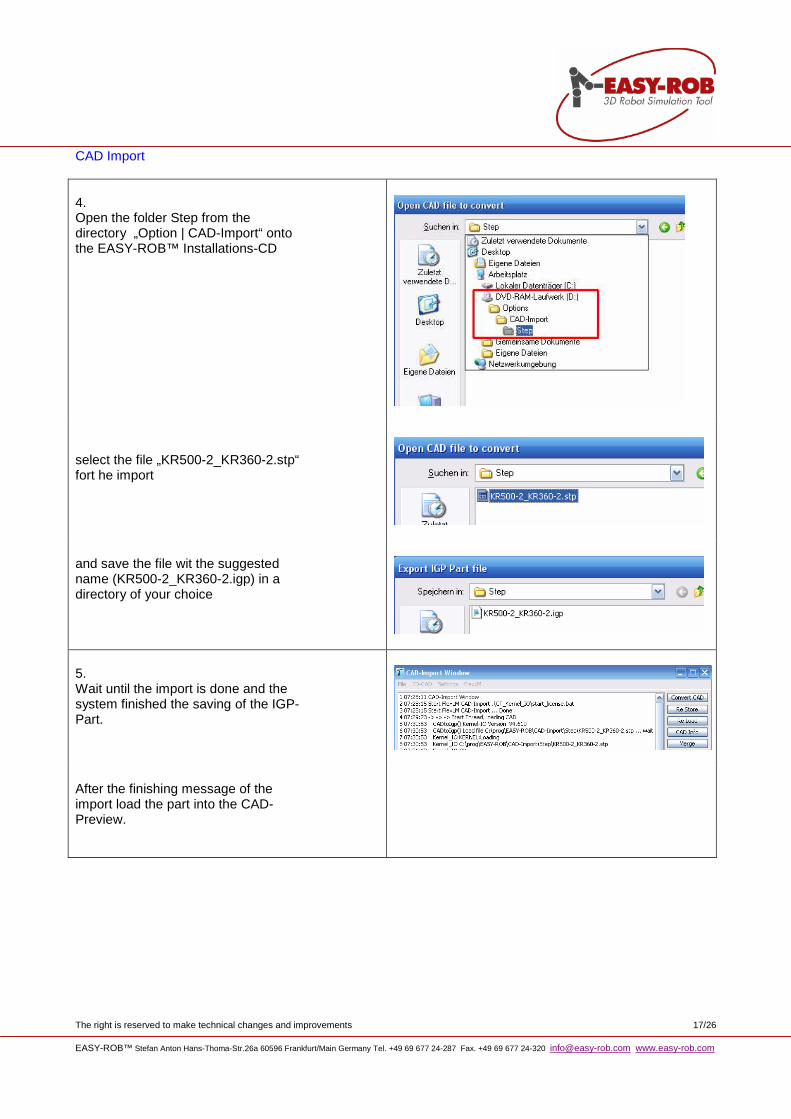
CAD Import 4. Open the folder Step from the directory „Option | CAD-Import“ onto the EASY-ROB™ Installations-CD
select the file „KR500-2_KR360-2.stp“ fort he import
and save the file wit the suggested name (KR500-2_KR360-2.igp) in a directory of your choice
5. Wait until the import is done and the system finished the saving of the IGP-Part.
After the finishing message of the import load the part into the CAD-Preview.
The right is reserved to make technical changes and improvements 18/26 EASY-ROB™ Stefan Anton Hans-Thoma-Str.26a 60596 Frankfurt/Main Germany Tel. +49 69 677 24-287 Fax. +49 69 677 24-320 [email protected] www.easy-rob.com
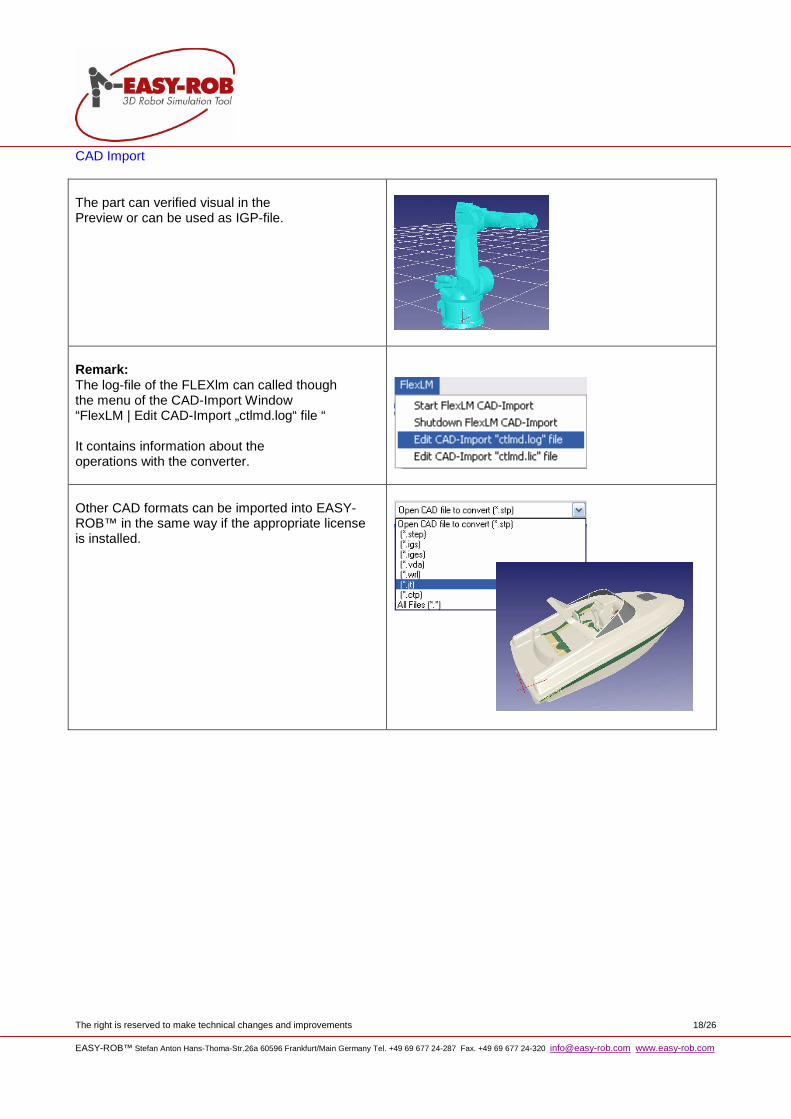
CAD Import The part can verified visual in the Preview or can be used as IGP-file.
Remark: The log-file of the FLEXlm can called though the menu of the CAD-Import Window “FlexLM | Edit CAD-Import „ctlmd.log“ file “ It contains information about the operations with the converter.
Other CAD formats can be imported into EASY-ROB™ in the same way if the appropriate license is installed.
The right is reserved to make technical changes and improvements 19/26 EASY-ROB™ Stefan Anton Hans-Thoma-Str.26a 60596 Frankfurt/Main Germany Tel. +49 69 677 24-287 Fax. +49 69 677 24-320 [email protected] www.easy-rob.com
EASY-ROB™ Operation References
Project Manager
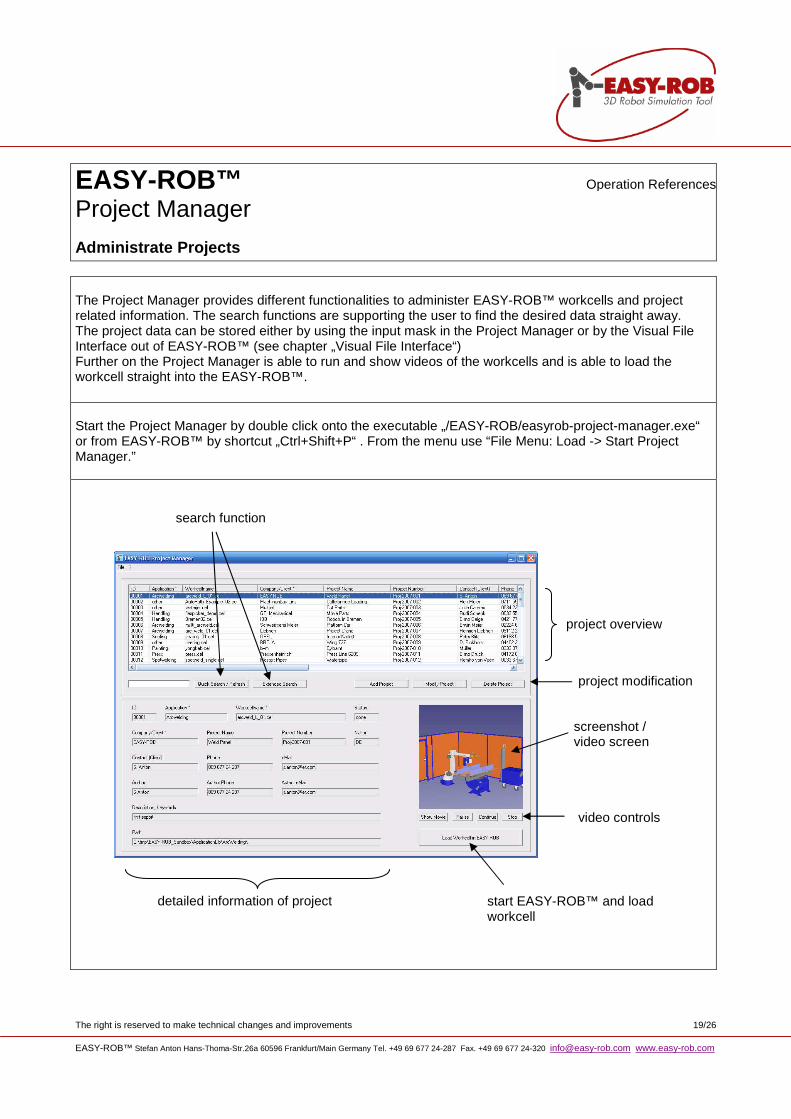
Administrate Projects The Project Manager provides different functionalities to administer EASY-ROB™ workcells and project related information. The search functions are supporting the user to find the desired data straight away. The project data can be stored either by using the input mask in the Project Manager or by the Visual File Interface out of EASY-ROB™ (see chapter „Visual File Interface“) Further on the Project Manager is able to run and show videos of the workcells and is able to load the workcell straight into the EASY-ROB™. Start the Project Manager by double click onto the executable „/EASY-ROB/easyrob-project-manager.exe“ or from EASY-ROB™ by shortcut „Ctrl+Shift+P“ . From the menu use “File Menu: Load -> Start Project Manager.”
screenshot / video screen
start EASY-ROB™ and load workcell
detailed information of project
project overview
project modification
video controls
search function
The right is reserved to make technical changes and improvements 20/26 EASY-ROB™ Stefan Anton Hans-Thoma-Str.26a 60596 Frankfurt/Main Germany Tel. +49 69 677 24-287 Fax. +49 69 677 24-320 [email protected] www.easy-rob.com
Project Manager
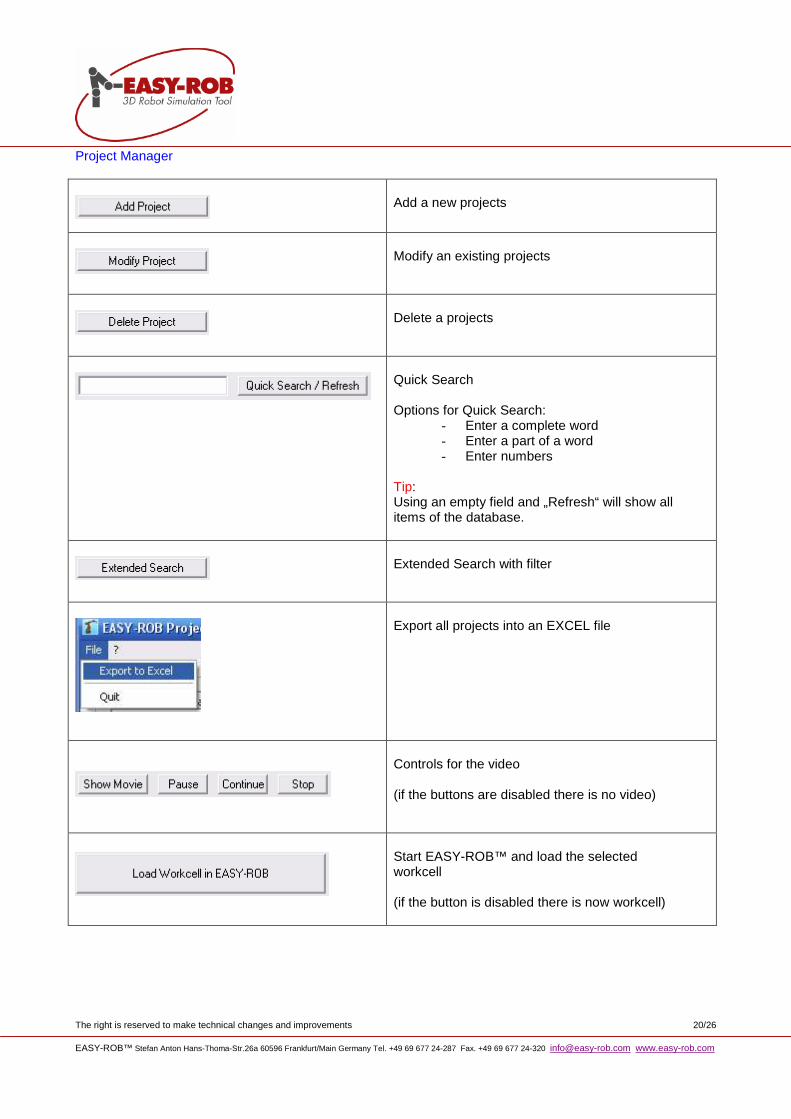
Add a new projects
Modify an existing projects
Delete a projects
Quick Search Options for Quick Search:
- Enter a complete word - Enter a part of a word - Enter numbers
Tip: Using an empty field and „Refresh“ will show all items of the database.
Extended Search with filter
Export all projects into an EXCEL file
Controls for the video (if the buttons are disabled there is no video)
Start EASY-ROB™ and load the selected workcell (if the button is disabled there is now workcell)
The right is reserved to make technical changes and improvements 21/26 EASY-ROB™ Stefan Anton Hans-Thoma-Str.26a 60596 Frankfurt/Main Germany Tel. +49 69 677 24-287 Fax. +49 69 677 24-320 [email protected] www.easy-rob.com
EASY-ROB™ Operation References
History Diagram
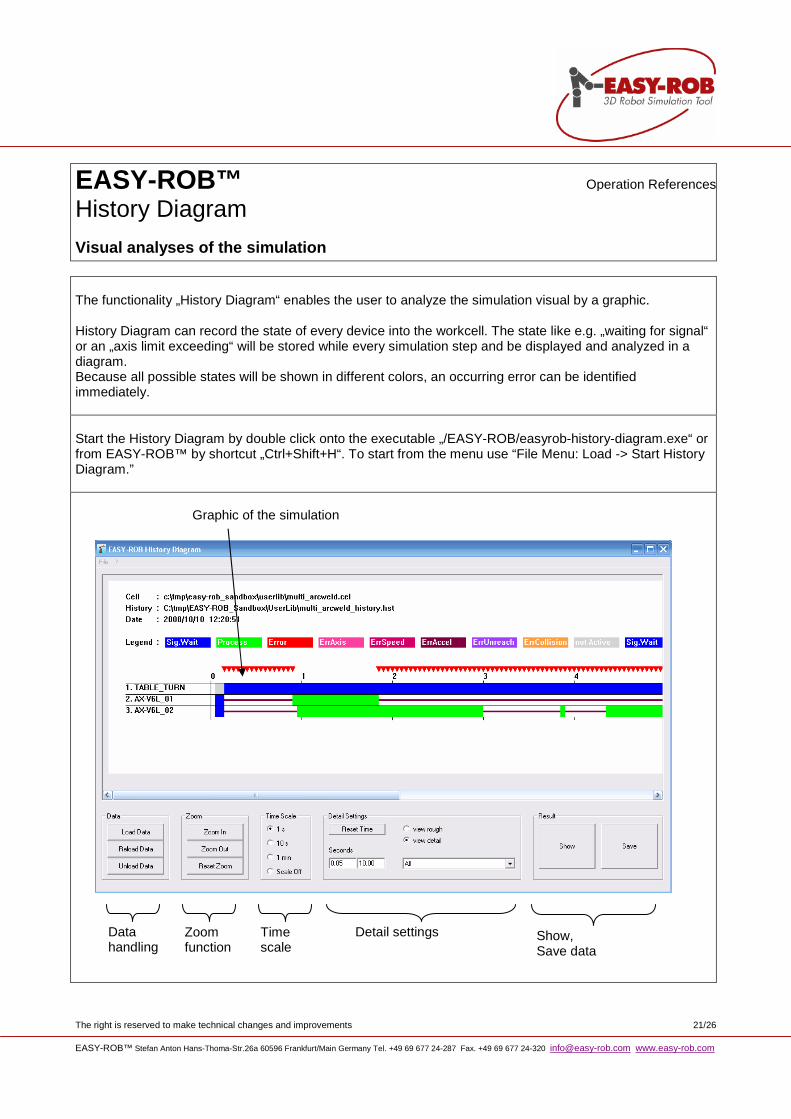
Visual analyses of the simulation The functionality „History Diagram“ enables the user to analyze the simulation visual by a graphic. History Diagram can record the state of every device into the workcell. The state like e.g. „waiting for signal“ or an „axis limit exceeding“ will be stored while every simulation step and be displayed and analyzed in a diagram. Because all possible states will be shown in different colors, an occurring error can be identified immediately. Start the History Diagram by double click onto the executable „/EASY-ROB/easyrob-history-diagram.exe“ or from EASY-ROB™ by shortcut „Ctrl+Shift+H“. To start from the menu use “File Menu: Load -> Start History Diagram.”
Detail settings Data handling
Graphic of the simulation
Zoom function
Time scale
Show, Save data
The right is reserved to make technical changes and improvements 22/26 EASY-ROB™ Stefan Anton Hans-Thoma-Str.26a 60596 Frankfurt/Main Germany Tel. +49 69 677 24-287 Fax. +49 69 677 24-320 [email protected] www.easy-rob.com
History Diagram
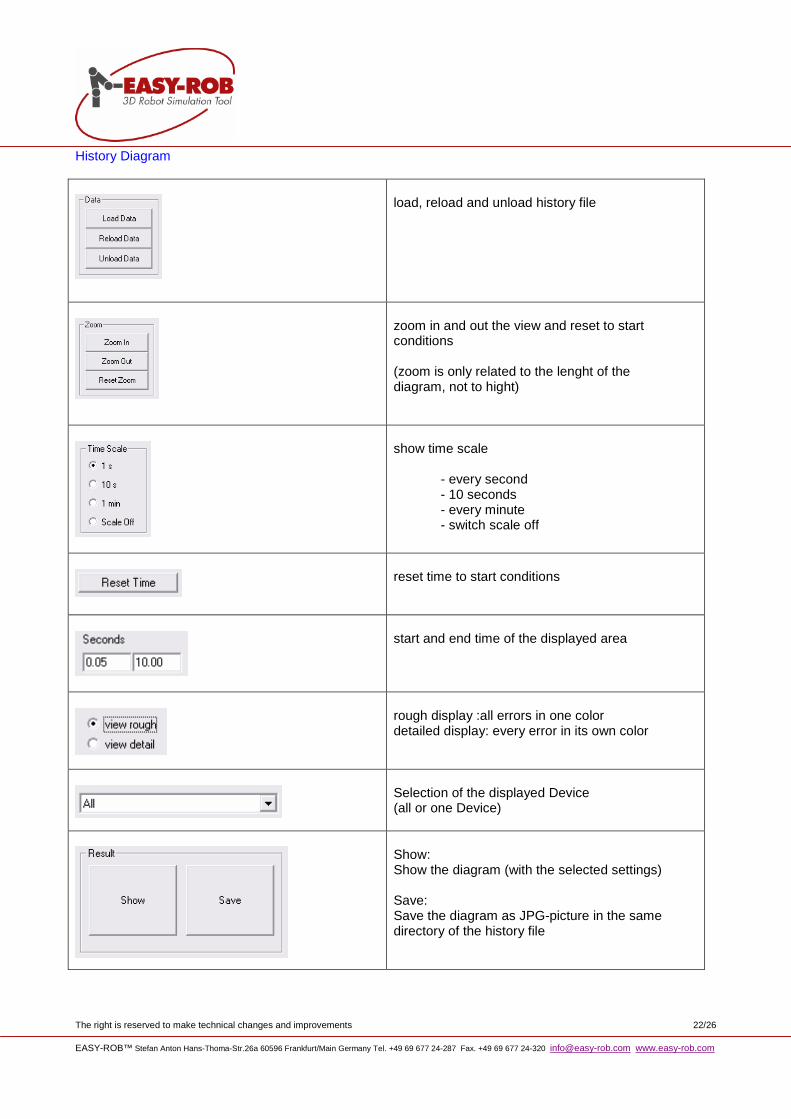
load, reload and unload history file
zoom in and out the view and reset to start conditions (zoom is only related to the lenght of the diagram, not to hight)
show time scale
- every second - 10 seconds - every minute - switch scale off
reset time to start conditions
start and end time of the displayed area
rough display :all errors in one color detailed display: every error in its own color
Selection of the displayed Device (all or one Device)
Show: Show the diagram (with the selected settings) Save: Save the diagram as JPG-picture in the same directory of the history file
The right is reserved to make technical changes and improvements 23/26 EASY-ROB™ Stefan Anton Hans-Thoma-Str.26a 60596 Frankfurt/Main Germany Tel. +49 69 677 24-287 Fax. +49 69 677 24-320 [email protected] www.easy-rob.com
EASY-ROB™ Operation References
ERC Command Searcher
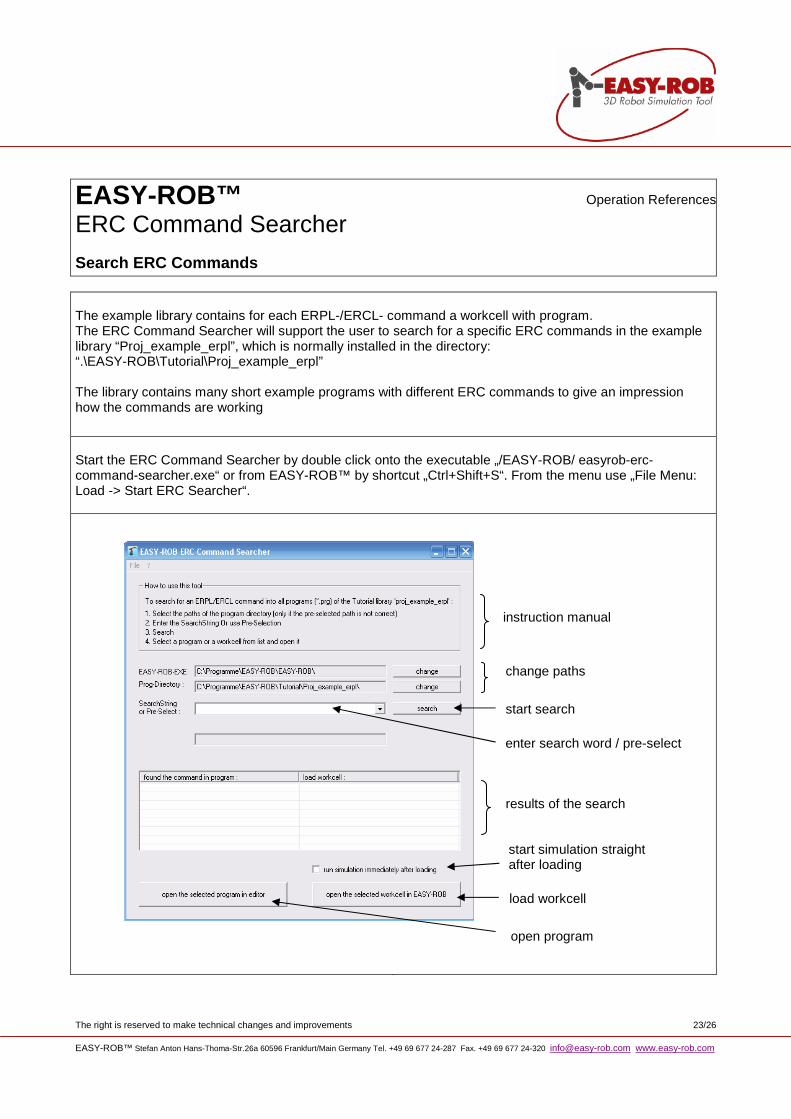
Search ERC Commands The example library contains for each ERPL-/ERCL- command a workcell with program. The ERC Command Searcher will support the user to search for a specific ERC commands in the example library “Proj_example_erpl”, which is normally installed in the directory: “.\EASY-ROB\Tutorial\Proj_example_erpl” The library contains many short example programs with different ERC commands to give an impression how the commands are working
Start the ERC Command Searcher by double click onto the executable „/EASY-ROB/ easyrob-erc-command-searcher.exe“ or from EASY-ROB™ by shortcut „Ctrl+Shift+S“. From the menu use „File Menu: Load -> Start ERC Searcher“.
enter search word / pre-select
load workcell
open program
instruction manual
change paths
results of the search
start search
start simulation straight after loading
The right is reserved to make technical changes and improvements 24/26 EASY-ROB™ Stefan Anton Hans-Thoma-Str.26a 60596 Frankfurt/Main Germany Tel. +49 69 677 24-287 Fax. +49 69 677 24-320 [email protected] www.easy-rob.com
EASY-ROB™ Operation References
Appendix
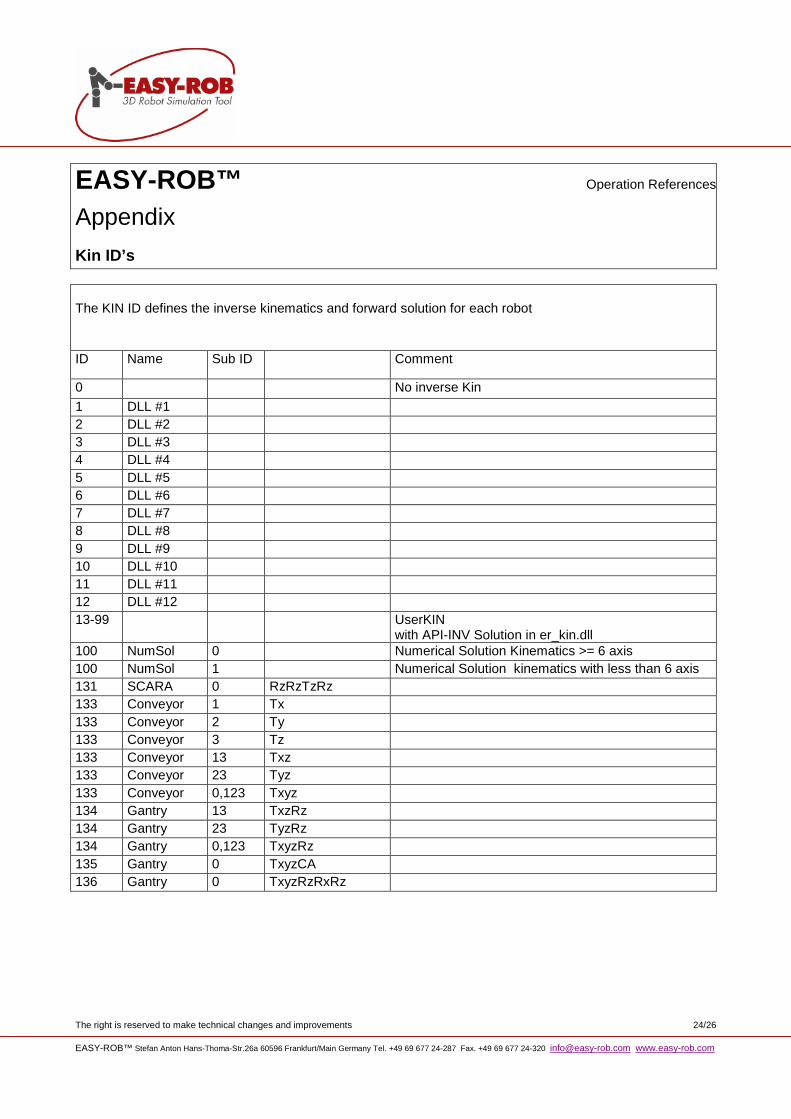
Kin ID’s The KIN ID defines the inverse kinematics and forward solution for each robot
ID Name Sub ID Comment
0 No inverse Kin
1 DLL #1 2 DLL #2 3 DLL #3 4 DLL #4 5 DLL #5 6 DLL #6 7 DLL #7 8 DLL #8 9 DLL #9 10 DLL #10 11 DLL #11 12 DLL #12 13-99 UserKIN
with API-INV Solution in er_kin.dll 100 NumSol 0 Numerical Solution Kinematics >= 6 axis 100 NumSol 1 Numerical Solution kinematics with less than 6 axis 131 SCARA 0 RzRzTzRz 133 Conveyor 1 Tx 133 Conveyor 2 Ty 133 Conveyor 3 Tz 133 Conveyor 13 Txz 133 Conveyor 23 Tyz 133 Conveyor 0,123 Txyz 134 Gantry 13 TxzRz 134 Gantry 23 TyzRz 134 Gantry 0,123 TxyzRz 135 Gantry 0 TxyzCA 136 Gantry 0 TxyzRzRxRz
The right is reserved to make technical changes and improvements 25/26 EASY-ROB™ Stefan Anton Hans-Thoma-Str.26a 60596 Frankfurt/Main Germany Tel. +49 69 677 24-287 Fax. +49 69 677 24-320 [email protected] www.easy-rob.com
EASY-ROB™
Contact
EASY-ROB 3D Robot Simulation Tool Stefan Anton Hans - Thoma - Str. 26a, 60596 Frankfurt/Main, Germany Tel. +49 (0) 69 677 24 287 Fax. +49 (0) 69 677 24 320 Sales Office - North Gregor Hölting West I 17, 48324 Sendenhorst, Germany Tel. +49 (0) 2506 81 65 73 Fax. +49 (0) 2506 81 65 74 Email: [email protected] [email protected] Web: www.easy-rob.com
EASY-ROB Customer area Online available: Program Updates and Robot libraries Web: www.easy-rob.com/en/special/customer-area Access data:
User: customer Password: **********
The right is reserved to make technical changes and improvements 26/26 EASY-ROB™ Stefan Anton Hans-Thoma-Str.26a 60596 Frankfurt/Main Germany Tel. +49 69 677 24-287 Fax. +49 69 677 24-320 [email protected] www.easy-rob.com
EASY-ROB™
Notes