Embed Size (px)
Citation preview

Robotic ArmInteractiveOperatingSystem
Lynxmotion RIOS SSC-32 V1.04
Manual
Author and programmer : Laurent Gay - [email protected]
1 / 20

Safety First!
Robots move without warning, wear eye protection at all times!
1 - Configuration of the SSC-32 card …………………………..… 3, 4 and 5
2 - Configuration of the Arm geometry …………………………………...... 6
3 - Configuration of the gravity compensate ………………………….. 6
4 - The 'Moves / Motions' module ………………………………………….…... 7
4.1 Moving robot. Mouse ………………………………………………………………..……..... 7
4.2 Moving robot. Joystick ……………………………………………………………............... 7
4.3 Storing data. Robot position …………………………………………………..………...... 8
4.4 Storing data. Features …………………………………………..………………………..…. 8
5 - The 'Play' module …………………………………………………………...…….…... 9
5.1 Play. Features …………………………………………………………………………….…...... 9
5.2 Outputs options. ……………………………………………………………...…….……...... 9
5.3 Play log. ………………………………………………………………………….…….……....... 9
5.4 Sequence list. ……………………………………………………………………………...... 10
5.4.1 The For-Next loop …………………………………………………………….……….….. 10
5.4.2 The Do-While loop …………………………………………………………..…….…….... 10
5.4.3 The If-Break Structure ………………………………………………………………...... 11
5.4.4 The If-Else-Endif Structure ……………………………………………………….…..... 11
5.4.5 All If… Structures …………………………………………………………………..…...... 12
6 - The 'Project' module …………………………………………………………...…. 13
6.1 Export. ……………………………………………………………………………….………..... 13
6.2 Import. ………………………………………………………………………………...…...….. 13
7 - New RIOS SSC-32 features ……………………………………………...…. 14
7.1 Export Basic code for Basic Atom or Basic Stamp 2 ………………….…........ 14
7.2 Analog inputs …………………………………….………………………....…..…. 14 and 15
7.3 Independent shoulder servo drive ………………………………………....…..…. 16
8 - The 'Timeouts' module ………………………………………………….......... 17
9 - 3D Scanner ………………………………………………………...... 18 and 19
10 - Command line ………………………………………………………………...... 20
Table of contents
Lynxmotion RIOS SSC-32 V1.04 Manual
Read and understand the documentation associated with any of the tools used in the assembly of these kits. Work in a clean, well lit environment. Work slowly taking breaks often. Plan your work with plenty of extra time to avoid cramming to complete the project at the last minute. Lynxmotion, Inc. has taken every step to ensure the products sold are safe when used in a responsible manner. Therefore, Lynxmotion, Inc. can not be held accountable for irresponsible, careless or reckless behavior of the builder.
These kits are purely educational. Items sold by Lynxmotion, Inc. are not authorized for use in human contact, medical, life-saving, life-support, industrial or light industrial applications. Do not under any circumstances use these robots to move, touch, or handle dangerous or hazardous materials. Doing this could result in injury or death to the user, or damage to property.
Lynxmotion, Inc. is not responsible for any special, incidental, or consequential damages resulting from any breach of warranty, or under any legal theory, including lost profits, downtime, goodwill, damage to or replacement of equipment or property, and any costs of recovering, reprogramming, or reproducing of data associated with the use of the mechanics, hardware or software it sells.
2 / 20

1 - Configuration of the SSC-32 card
Figure 1.
If the card is not detected, select the right COM p ort number in the list box.
If you don't know the COM port number you are using : - Just try from COM1, COM2 etc… when you find the right one, the card will auto-connect.
If the COM port you are using is not listed (USB to Serial cable issue) : - Make sure your USB to Serial cable is connected. - Wait for Windows to recognize it. - Click on the 'Setup' button and select your COM port in the Setup form.
Check SSC-32 firmware is set to SSC32X-ER V1.04 or later.
Check your servos connections, refer to table 1.
SSC-32 pins / servos SSC-32 OutputsPin 0 Base Pin 8 to 15 Output 1 to 8
Pin 1 Shoulder (Or Pin #16 and #17… Table 2.Pin 2 Elbow …see chapter 7.3Pin 3 Wrist
Pin 4 Grip SSC-32 InputsPin 5 Wrist Rotate (Numeric or analog)Pin 6 Extra Servo 7 Pin A to D Input 1 to 4Pin 7 Extra Servo 8 Table 1. Table 3.
Generate a 1.5mS pulse for all servos (neutral) : - Click on the 'All=1.5mS' button.
Figure 2.
- Click on the 'Test' button then 'Yes' on the warning message. - Check the arm appearance. - Click on the 'Stop' button to return to the previous arm state.
Figure 3.
Figure 4.
Step 1. Install the RIOS program. Insert the CD into your CD drive and follow the instructions.
Step 2. Test your arm.
Lynxmotion RIOS SSC-32 V1.04 Manual
Step 3. To enter the SSC-32 configuration screen, click on the 'SSC-32' button in the upper left corner.
The controller card is NOT powered from the Serial or the Serial to USB cable. It will be necessary to apply servo power to complete the setup. Connect the Serial or the Serial to USB cable, wait for the system to recognize the card and run RIOS. If you run RIOS before the system recognizes the card, you will see the message box in Figure 1. Click 'Yes', and the program will enable the grayed buttons when the card is ready.
3 / 20

1 - Configuration of the SSC-32 card
Figure 5.
Figure 6.
1
2
3
4
56
Figure 7.
For now, DO NOT change anything to the 'Min Deg' and 'Max Deg' boxes.
Adjust Slider #1 to the middle.Move the robot base CAREFULLY to the middle.Check the 'enable' checkbox #1, and the base will move a bit!Move slider #1 slowly to the top. The base will turn to the right.When the slider is all the way at the top, the base must be at 90° to the right. - If less, decrease the 'Min Pos' box #1. It will allow you to push the slider a bit more to the top. - If more, increase the 'Min pos' box #1. It will push the slider down.When finished, do the same for the left. It must be full left (90°).
Put the slider #1 at 0° (look at the 'Pos Deg' box when moving).
Adjust Slider #2 to the middle.Move the robot arm/shoulder vertically CAREFULLY and hold the robot forearm in your hand.Check the 'enable' checkbox #2, the shoulder will move a bit!Push slider #2 slowly to the top. The arm must be at the front of the robot and horizontal. - Adjust the 'Min Pos' box #2 if needed.Push slider #2 slowly to the bottom. The arm must be at the rear of the robot and horizontal. - Adjust the 'Max Pos' box #2 if needed.
Keep the arm in this position (full rear).
Wrist (Up/Down)
Elbow
Trackbars / Sliders
Step 8. Configure the Shoulder
Grip
Step 6. Make sure the boxes in the top row are NOT CHECKED then switch the robot power ON.
Refer to Table 7-1 for what each of the trackbars / sliders controls.
Base
Step 7. Configure the Base
Shoulder
To quick adjust the 'Min Pos' and the 'Max Pos', move the slider to the position and right click to show the popup menu.
Lynxmotion RIOS SSC-32 V1.04 Manual
Wrist RotateTable 7-1
Step 4. Click 'Yes' on this window. Step 5. Click 'No' on this window.
4 / 20

1 - Configuration of the SSC-32 card
Adjust Slider #3 to the middle.Move the robot forearm/elbow CAREFULLY vertically.Check the 'enable' checkbox #3, the elbow will move a bit!Push slider #3 slowly to the top. The forearm must be slightly touching (NOT crashed into) the arm Hex Spacer. - Adjust the 'Min Pos' box #3 if needed.Push slider #3 slowly to the bottom. The forearm must be at the rear of the robot and horizontal. - Adjust the 'Max Pos' box #3 if needed.
Put the slider #3 at 0° (look at the 'Pos Deg' box when moving).
Adjust Slider #4 to the middle.Move the robot hand/wrist CAREFULLY verticallyCheck the 'enable' checkbox #4, the wrist will move a bit!Push slider #4 slowly to the top. The hand must be at the front of the robot and horizontal. - Adjust the 'Min Pos' box #4 if needed.Push slider #4 slowly to the bottom. The hand must be at the rear of the robot and horizontal. - Adjust the 'Max Pos' box #4 if needed.
Put slider #4 at -40° (look at the 'Pos Deg' box when moving).Put slider #3 at -65° (look at the 'Pos Deg' box when moving).The forearm must be slightly touching (NOT crashed into) the arm Hex Spacer.
Adjust Slider #5 to the middle.DON'T MOVE THE GRIPPER manually, leave it how it is.Check the 'enable' checkbox #5, the gripper will move a bit!Push slider #5 slowly to the top. The gripper must be fully opened. - Adjust the 'Min Pos' box #5 if needed.Push slider #5 slowly to the bottom. The gripper must be fully closed. - Adjust the 'Max Pos' box #5
Put slider #5 at 57° (look at the 'Pos Deg' box when moving). The gripper should be half opened.
Adjust slider #6 to the middle.DON'T MOVE THE WRIST ROTATE manually, leave it how it is.Check the 'enable' checkbox #6, the grip rotate axis will move a bit!Push slider #6 slowly to the bottom. The Gripper should turn left to 65°. - Adjust the 'Max Pos' box #6 if needed.Push slider #6 slowly to the top. The Gripper should turn right to 65°. - Adjust the 'Min Pos' box #6 if needed.If you want, enter your own 'Min Deg' and 'Max Deg' and adjust the Min Pos and Max Pos to allow the robot to reachyour own values. For example, Min Deg = -90° and Max Deg = 90°.Just be careful to not move the servo past its mechanical limits!
Put the slider #6 at 0° (look at the 'Pos Deg' box when moving).The gripper rotate axis should be flat (the two fingers at the same height).
Figure 8.
Step 12. Configure the Wrist (Rotate)
Step 13. Save your Progress
Step 10. Configure the Wrist (Up/Down)
Step 11. Configure the Gripper
Step 9. Configure the Elbow
Lynxmotion RIOS SSC-32 V1.04 Manual
The robot should look like Figure 8. If so, click on the
'Save' button. This will be the robot's default position.
5 / 20

2 - Configuration of the Arm geometry
All angles are in degrees and all distances are in centimeters (1 inch = 2.54 centimeters).
The default values are for an L6 arm.
Switch the robot power OFF before changing geometry values or the robot will move/crash without warning .
L5 L6
7.9 7.94.925 4.925
9.525 12.0659.525 12.066
5.7 5.713.095 15
3 3
The 'Neutral' values are relative to the part which holds it:
- Shoulder/Arm neutral is relative to horizontal.- Elbow/Forearm neutral is relative to Arm.- Wrist/Hand neutral is relative to Forearm.You may not have to change these values.
Click on the 'Save' button if you have made changes.
You can use Trackbars to test moves: The arm display window
- X, Y and Z perform motions in straight lines and in parallel with X, Y and Z axis. auto size, according
- Distance performs a motion in a straight line in a radius away from base axis. to arm geometry.
3 - Configuration of the gravity compensate
Click on the 'Save' button on the previous form if you have made changes.
Height
This is not the servo's neutral, but a geometry shift when all joints are at 0° (due to SSC-32 card configuration).
Here, you may just have to change the weight of an object that the arm is going to be lifting.
You can modify the geartrain play compensate with the sliders.
Base
Length
Arm
Radius
Lynxmotion RIOS SSC-32 V1.04 Manual
Max lengthServo Height
Hand/grip
Forearm
Max Open
6 / 20
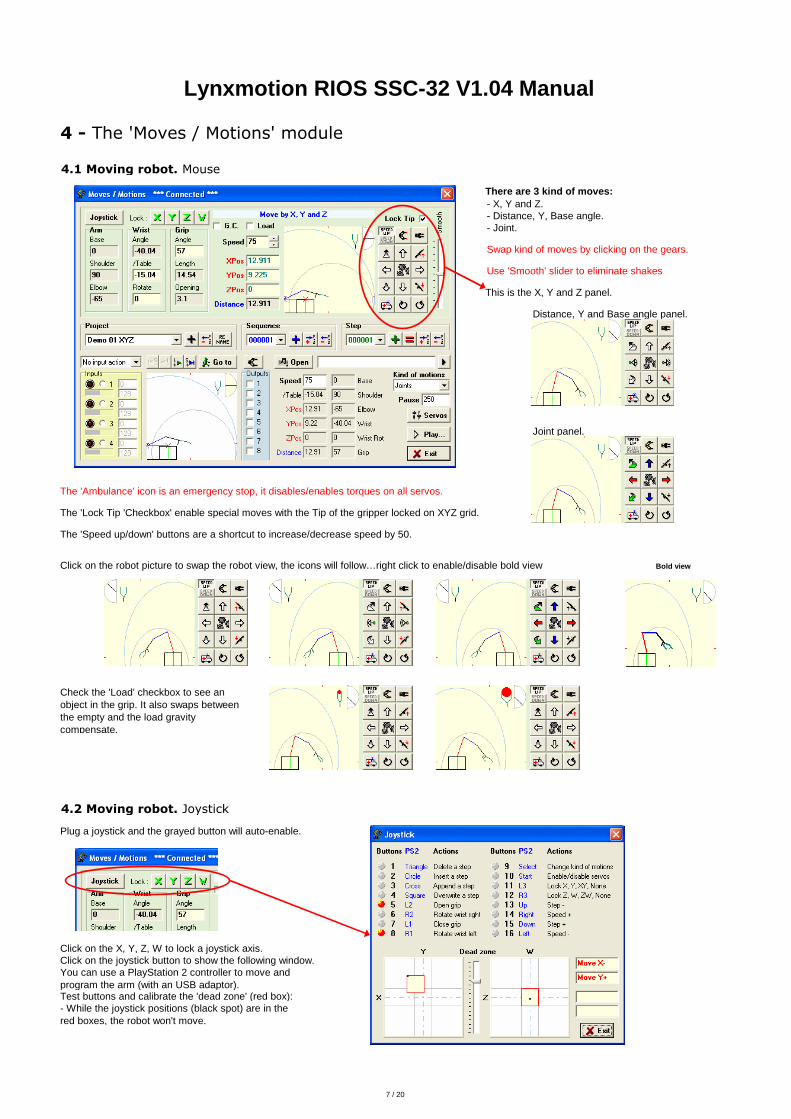
4 - The 'Moves / Motions' module
There are 3 kind of moves:- X, Y and Z.- Distance, Y, Base angle.- Joint.
Swap kind of moves by clicking on the gears.
Use 'Smooth' slider to eliminate shakes
This is the X, Y and Z panel.
Distance, Y and Base angle panel.
Joint panel.
The 'Ambulance' icon is an emergency stop, it disables/enables torques on all servos.
The 'Lock Tip 'Checkbox' enable special moves with the Tip of the gripper locked on XYZ grid.
The 'Speed up/down' buttons are a shortcut to increase/decrease speed by 50.
Click on the robot picture to swap the robot view, the icons will follow…right click to enable/disable bold view
Plug a joystick and the grayed button will auto-enable.
Click on the X, Y, Z, W to lock a joystick axis.Click on the joystick button to show the following window.
Test buttons and calibrate the 'dead zone' (red box):
Bold view
Check the 'Load' checkbox to see an object in the grip. It also swaps between the empty and the load gravity compensate.
4.1 Moving robot. Mouse
Lynxmotion RIOS SSC-32 V1.04 Manual
You can use a PlayStation 2 controller to move and program the arm (with an USB adaptor).
- While the joystick positions (black spot) are in the red boxes, the robot won't move.
4.2 Moving robot. Joystick
7 / 20

4 - The 'Moves / Motions' module
Use the combo-boxes to select a Project/Sequence/Step or use the four S-, I-, I+ and S+ icons to navigate through Sequences and Steps.
(Outputs 1 to 8 are Pin 8 to 15)
You can also store the 'Extra servos' #7 and #8 posit ions in a Step:
Click on the 'Servos' button,select new Positions and Rates,store information in the current Step by clicking on the 'Equal' icon (it updates only this new information).
You can adjust the rate or add a pause in the Step to ensure the Extra servos' moves will finish during a step.If the same positions are set during several Steps, the moves will start on the first Step and can end on another.
You can swap between the 'Move / Motions' window and this window without closing it.
4.3 Storing data. Robot position
- You can 'Append', 'Delete' or 'Rename' Projects.
'Open' icon allows you to add a media to this Step,
These moves are NOT synchronized with the Steps. They will start with a Step, but they can finish the move before or after the step ends... or never!
4.4 Storing data. Features
Use the 'Grip' icon to swap the grip state (Empty/Load).
Use the 'Go to' icon to move the robot to the position
music or video, or you can type a little comment.
and add a Pause (performed at the end of Step).
(applied when starting the Step).
'Stop project' will stop the current Project if an input occurs or a counter reaches a value.
Trackbars show the current servo position, not the stored servo position (if you click on 'Store' they will be the same), the stored values are in the grey boxes.
'Stop this Step' will stop the current Step if an input occurs or a counter reaches a value and go to the next Step.
Select an input to test and set a counter valueThis version of RIOS allows only 'Relative' counter values and not 'Absolute'.So, if the counter value is set to '3', for example, the input selected must occur 3 times DURING the Step, no matter what the counter was at before the step.
Select an input action if needed:
If an Extra servo's move is not finished when going to a new Step with new values, the Extra servo will abort the current move to go to the new positions.
Lynxmotion RIOS SSC-32 V1.04 Manual
'Wait for' will wait for an input to occur or a counter to reach a value before starting the step.'Pause/Play' will Swap between Pause and Play if an input occurs or a counter reaches a value.
Test the media with the black triangle icon.
Change the Speed to reach this Step, the Kind of motions
Check the Outputs check-boxes to set them On/Off
- The Step green 'plus sign' icon will append this step
Projects :
For more about Projects, see the 'Project module'.
using the 'plus sign' icons :
in a new Project.
in a new Sequence of the current Project.
in the current Sequence of the current Project.
Projects contain Sequences, which contain Steps.
You can store the current robot position as a 'Step'
- The Project black 'plus sign' icon will append this step
- The Sequence blue 'plus sign' icon will append this step
Sequences : - You can 'Append', 'Insert' or 'Delete' Sequences.
Steps : - You can 'Append', 'Overwrite', 'Insert' or 'Delete' Steps.
8 / 20

5 - The 'Play' module
Click on the 'Signal' button in the Outputs panel to show this window.
Delay :
Duration :
Speed :
click on the 'Log' button to show this window.
Inputs events :
The playlog.txt file is auto saved in the installation directory.This window is sizeable.You can swap between the 'Play' window and this window without closing it.
When a Step sets an output on, this allows a delay before the output is really set on.
When an output is really set on, it will auto set off after the Duration period (if duration = 0 it will not auto set off).
Delay and duration are in ms (1000 ms = 1 second) and will run across steps if the next steps also set output on.Delay and duration do not run after a 'Play' is ended, the outputs will stay in their current states.
Push this button if you want to log all the inputs events (set on, set off). If you are using big counters, you may not activate this.
'Thread' means that the message was sent by the separate 'Play thread' (Task).
Select 'inputs as starter for sequence' and push the 'Scan' button, if a corresponding input occur, it will Play the Sequence selected (only if there's nothing already playing).
'Go to' the position you've selected.
Break a loop with If-Break instruction.Save a Sequence list by Project.
Build a Sequence list and Play it.
Outputs configuration with delays, durations and blink speeds.
5.1 Play. Features
The robot picture shows the current position and a ghost of the selected or next Step in Play mode.
See the Base, Shoulder, Elbow and Wrist trajectories... with scrolling!
Click on the test button to perform the Delay, then the blink/set on, and after the duration, the auto set off.
Real time play log.Trigger inputs and watch outputs turn on and off.
(Outputs 1 to 8 are Pin 8 to 15)
Lynxmotion RIOS SSC-32 V1.04 Manual
Play a Project or a Sequence.
Select a position with the S-, I-, I+ and S+ icons.
Append If-Then-Else structure.
5.3 Play log.
If you need an output to blink, set a speed > 0. 1 is the slowest and 20 the fastest, 0 is no blink.
Append For-Next and Do-While loops.
Use 'Smooth' slider to eliminate shakes
Click the robot picture to change the view.
Real time torques display.
5.2 Outputs options.
9 / 20

5 - The 'Play' module
There's a better way to repeat a group of lines (Seq uences, other loops and structures) than the Sequenc e list below!
ExampleTo repeat the group of lines 'Sequence 000002 and 000003' four times:
Playing this sequence list will perform Sequences 000001, 000002, 000003, 000002, 000003, 000002, 00003, 000002, 000003 and 000004.Open the Play Log file and look at the details, the log file is a good way to teach yourself...
Need to repeat a group of lines while an input is O n or while a counter (input counter) is less than a value?The condition test is at the end of loop, so the co ntent of the loop will be perform one time at least , even if the end test fails.When entering a 'Do-While' loop the current counter position is stored, so the counter value to test i s an increment (relative).
ExampleTo repeat the Sequence 000004 while the input counter #1 is less than 10:
Playing this sequence list will perform Sequences 000001, 000002, 000003 and 000004…(000004) while the input counter #1 is less than 10.Whatever counter #1 was when entering the 'Do-While' loop it must be increased by 10 to exit the loop.Abort a loop (the current) prematurely with the 'If-Break' structure.If you don't have input #1 connected, you can push the input #1 button on the Inputs panel.Use as many Do-While loops as you need, and you can nest up to 10 Do-While loops.
click on 'Append' icon,
click on 'Insert' icon,
To delete a sequence (from list only), select a sequence in the list and click on the 'left arrow with a minus sign'.
You can nest up to 10 For-Next loops max.
Click on the 'For' button
click 'Exit'.
select the sequence 000002 (insertion point),
click 'Exit'.
push the 'While' button,
and click on the 'plus sign' to append,or on the 'right arrow and the little plus sign' to insert.
The Sequence list contains Sequences from one Project only.
5.4.1 The For-Next loop
Enter '4' in the 'Loop' box,
You can only delete sequence with the delete icon, not the structures words.
Repeat a group of lines from 1 to 999 times between the For and it's Next.
Abort a loop (the current) prematurely with the 'If-Break' structure.
Use as many For-Next loops as you need.
Select a Sequence in the Combo-box,
push the 'Do' button,click on 'Insert' icon,
push the 'For' button,
Enter '10' in the counter box,
5.4.2 The Do-While loop
5.4 Sequence list.
Lynxmotion RIOS SSC-32 V1.04 Manual
Select the input #1Click on the 'Do' button
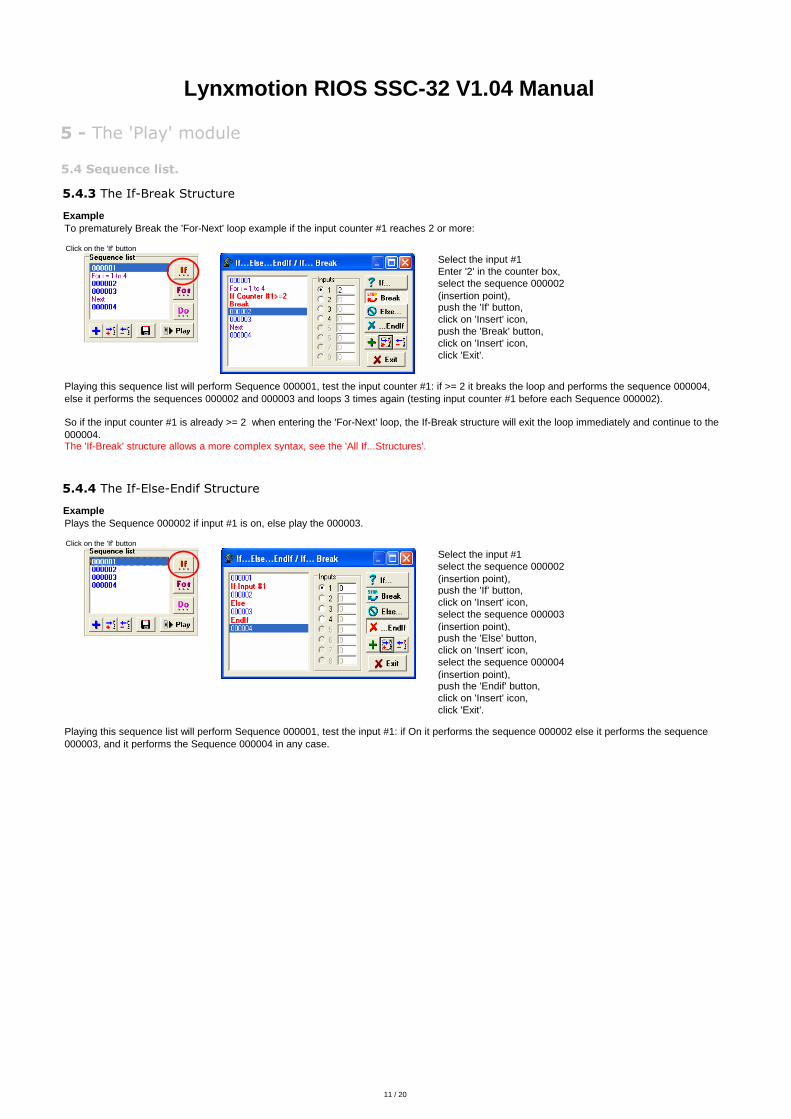
select the sequence 000004 (insertion point),
push the 'Next' button,select the sequence 000004
(insertion point),click on 'Insert' icon,
10 / 20
5 - The 'Play' module
ExampleTo prematurely Break the 'For-Next' loop example if the input counter #1 reaches 2 or more:
ExamplePlays the Sequence 000002 if input #1 is on, else play the 000003.
click on 'Insert' icon,
click 'Exit'.
push the 'Endif' button,
Playing this sequence list will perform Sequence 000001, test the input #1: if On it performs the sequence 000002 else it performs the sequence 000003, and it performs the Sequence 000004 in any case.
select the sequence 000004 (insertion point),
click on 'Insert' icon,
select the sequence 000002 (insertion point),push the 'If' button,click on 'Insert' icon,
push the 'Else' button,
select the sequence 000003 (insertion point),
The 'If-Break' structure allows a more complex syntax, see the 'All If...Structures'.
5.4 Sequence list.
5.4.3 The If-Break Structure
Lynxmotion RIOS SSC-32 V1.04 Manual
click 'Exit'.
Click on the 'If' button
Click on the 'If' button
Select the input #1
select the sequence 000002 (insertion point),
5.4.4 The If-Else-Endif Structure
push the 'If' button,click on 'Insert' icon,
So if the input counter #1 is already >= 2 when entering the 'For-Next' loop, the If-Break structure will exit the loop immediately and continue to the 000004.
push the 'Break' button,click on 'Insert' icon,
Playing this sequence list will perform Sequence 000001, test the input counter #1: if >= 2 it breaks the loop and performs the sequence 000004, else it performs the sequences 000002 and 000003 and loops 3 times again (testing input counter #1 before each Sequence 000002).
Select the input #1Enter '2' in the counter box,
11 / 20

5 - The 'Play' module
If-(else)-Endif If-(else)-Break
Perform the line(s) between the 'If' and the 'Endif' If Input #x is On (or the counter #x >= n),if Input #x is On (or the counter #x >= n) break the current loop (Do-While or For-Next)… …If Input #x (or Counter #x >= n) If Input #x (or Counter #x >= n)… BreakEndif ……
If Input #x is On (or the counter #x >= n),Perform the line(s) between the 'Else' and the 'Endif' perform the line(s) between the 'If' and the 'Break',if Input #x is Off (or the counter #x < n) and break the current loop (Do-While or For-Next)… …If Input #x (or Counter #x >= n) If Input #x (or Counter #x >= n)Else …… BreakEndif ……
If Input #x is On (or the counter #x >= n),Perform the line(s) between the 'If' and the 'Else' perform the line(s) between the 'If' and the 'Else',if Input #x is On (or the counter #x >= n), else break the current loop (Do-While or For-Next)else perform the line(s) between the 'Else' and the 'Endif' …… If Input #x (or Counter #x >= n)If Input #x (or Counter #x >= n) …… ElseElse Break… …Endif…
If Input #x is On (or the counter #x >= n),perform the line(s) between the 'If' and the 'Else',else (perform the line(s) between the 'Else' and the 'Break' and
break the current loop (Do-While or For-Next)).…If Input #x (or Counter #x >= n)…Else…Break…
If Input #x is Off (or the counter #x < n),(perform the line(s) between the 'Else' and the 'Break' and
break the current loop (Do-While or For-Next)).…If Input #x (or Counter #x >= n)Else…Break…
If Input #x is Off (or the counter #x < n),break the current loop (Do-While or For-Next)).…If Input #x (or Counter #x >= n)ElseBreak…
5.4 Sequence list.
5.4.5 All If… Structures
Lynxmotion RIOS SSC-32 V1.04 Manual
12 / 20

6 - The 'Project' module
File format is csv, it's a text file with a semicolon separator for fields. Notepad, Excel...etc, are able to open and edit this.
Use Export to make a backup of your work or to share projects with friends.
Click on the 'Import' button, select a project name and click 'Ok'.
For 'Basic Export', see chapter 7.1
Click on the 'Export' button, select a destination directory / file name and click save.
- a Sequence number from 1 to 999999 with no missing number (1 and 3 without 2 is not valid)- a Step number from 1 to 999999 with no missing number (1 and 3 without 2 is not valid)
If your field names differ from the internal field names, you'll be asked to reassign them.
Import a previously exported file
6.2 Import.
Here you can export, import, rename or delete a Project and add comments.
Import your home-made csv fileA csv file must contain only ONE project.
All following lines must contain at least:
Select the csv file to importSelect the fields (all by default)
Importing your home-made csv is a risk to crash the internal database!To prevent this, close the software, go to installa tion directory and backup the two files 'Moves.dbf' and 'Moves.mdx' in a secure p lace. If you crash the database, you'll just have to close the software an d restore these two files.
- the project name
and the other fields to import.
The first line is the fields' names separated with semicolons.
Select the Project to export
6.1 Export.
Select the fields (all selected by default)
Lynxmotion RIOS SSC-32 V1.04 Manual
13 / 20

7 - New RIOS SSC-32 features
Select the kind of arm (selecting L5 won't export the 'wrist rotate' positions).
Select the kind of microcontroller.
Select the positions data size : - byte, byte + nib or word for a Basic Atom. - byte or word for a Basic Stamp 2.
Select the shoulder pin(s). (see chapter 7.3 : Independent shoulder servo drive)
Click 'OK' and select a destination file/folder.
Open the exported file with the 'Basic Micro Atom IDE' (for Basic Atom *.bas files),*** use the Pro IDE for Pro chips ***or the 'Basic Stamp Editor v2.2' (for Basic Stamp 2 *.bs2 files)(don't forget to connect the microcontroller to the PC)and download the program to the microcontroller.
Then, connect the microcontroller to the SSC-32 (don't forget to remove some jumpers).
The Basic exported file contains position data, durations, pause data, and the complete program to read data and perform movements.
Basic Stamp 2 program require the version 2.2 of the BASIC Stamp Editor (with Pbasic 2.5 include).
Outputs and inputs settings are not exported.
New Basic Atom IDE V05.3.0.0 :if you are using this new IDE, select the '>=05.3.0.0' choice, it export the correct 'serout' syntax (new constant values format) and a config line requested by this new IDE.
The values in this array are NOT GUARANTEED to be exact, it depends on compilers/IDE version and micro controllers version!
Maximum export steps (for example: 'RIOS DEMO 01 XYZ' is only 32 steps)Chip Method L5 L6BA Byte 752 674 BA: Basic Atom 28 - IDE : Basic Micro ATOM IDE 02.2 .1.1
Byte + Nib 552 507Word 485 423
BA Pro Byte 3150 2830 BA Pro: Basic Atom Pro 28 - IDE : Basic Micro ATOM Pro IDE 07.2.0.6Byte + Nib 2350 2160
Word 2030 1770
BS2 Byte 206 182 BS2: Basic Stamp 2 - IDE : Basic Stamp Editor v2.2Word 129 110
7.2 Analog inputs
Select 'A' for analog (N = Numeric)If a sensor is connected, the blue bar and the 'Analog' box will show the value.
The input #1 is the SSC-32 'A' input.(2 = B, 3 = C, 4 = D)
Enter a threshold value.
When the analog value > threshold value, the Input is 'On'
So, if you use a Sharp GP2D12 IR Sensor for example, the threshold value lets you adjust the 'distance'.
Lynxmotion RIOS SSC-32 V1.04 Manual
7.1 Export Basic code for Basic Atom or Basic Stamp 2
In the 'Project' module, select 'Export' then 'Export Basic' button, the 'Basic Export parameters' will appear.
To enable analog inputs, go to the SSC-32 config module.
14 / 20

7 - New RIOS SSC-32 features
Go to the 'Moves' module and select 'Demo 01 XYZ'.
Then, select sequence 000001 and step 000001, and select inputs #1. It will select 'Wait for' as default 'input action', change the threshold value if needed.
Then, go to the 'Play' module and click on the Project Play button.
The Program will wait until the analog input #1 > threshold value. If you use a Sharp GP2D12 IR Sensor for example, just approach the sensor with your hand and the program will start!
Try this :
Lynxmotion RIOS SSC-32 V1.04 Manual
7.2 Analog inputs
15 / 20

7 - New RIOS SSC-32 features
Open the 'SSC-32' window and click on the 'Shoulder' button
When you enable the independent shoulder servo drive, the pin #16 is used to control one shoulder servo, and the pin #17 the other one. (so you'll have to remove the 'Y' cable and plug each servo on each pin) Then, you can adjust the pin17 offset to make both servo perfectly lined. (offset is -100uS to 100uS by 1uS steps)
This is useful when mechanical adjust can't be done.
Note : when independent shoulder servo drive is on, the pin #1 is still driven.
if you select 'pin #16 and pin #17', it will add a line with the offset command too. Now you can choose to export code to drive either the pin #1 or the pins #16 and #17
Lynxmotion RIOS SSC-32 V1.04 Manual
7.3 Independent shoulder servo drive
Now you can choose to control the shoulder servos independently
About the Basic code export function :
16 / 20

8 - The 'Timeouts' module
Here, you can change some advanced COM port communication values. ** Don't change anything if there's no communication problem ! **
If you're using a 'Wiport' and have experienced som e communication problems, try to set the 'Read inte rval' = 25 (no change on other values)
The 'Write' values are not critical, so no need to change them.
Before clicking 'Test', check the 'Timeout : xxmS' value. It's the time you will wait in the worst case.If this value is too big, it could freeze the window for a long time, be careful !
More information with the 'Help' button :
Lynxmotion RIOS SSC-32 V1.04 Manual
You normally have to specify the number of bytes when reading bytes on the Com port. However, when you don't knowhow many bytes to read, the timeout value will let you know when the Com port has finished sending data.
Trying to read 4 bytes 4 bytes read
1. Total method Multiplier (1) Multiplier (2) Multiplier (3) Multiplier (4) Constant Timeout
2. Interval method Interval Interval Interval IntervalOK OK OK Timeout! 3 bytes read
1. Read Total method : Activated if the "Read Interval" value = 0 - The "Read Total Multiplier" is the value multiplied by the number of bytes requested. The "Read Total Constant" value is the maximum time to wait for all the requested bytes before generating a timeout event. Timeout value depends on the number of bytes requested
2. Read Interval method : Activated if the "Read Interval" value is > 0 and Both "Read Total Multiplier" and "Read Total Consta nt" = 0 - The "Read Interval" value is the maximum time to wait between bytes before generating a timeout event.Timeout value is the "Read Interval"
3. Read 'mixed' method : Activated if the "Read Interval" value is > 0 and "Read Total Multiplier" and/or "Read Total Constant " > 0 - The first Timeout value elapsed will end the function.Timeout value depends on the number of bytes requested and the "Read Interval"
Read Interval method ends faster when you don't know how many bytes to ask for.For example, when asking for the SSC-32's version string, you don't know how many bytes the SSC-32 card will return,but you know you don't want more than 30 bytes to display.Sequencer asks for 30 bytes, and the timeout occurs after the last byte is sent (it could be 14, 15, etc…)So 10mS (default) after the last byte is sent by the SSC-32 card, the Read buffer is cleared to remove unrequested bytes.
If there are some missing bytes, try increasing the "Read Interval" value.If it doesn't help, try increasing the "Read Total Multiplier" then "Read Total Constant" slowly.
Byte 3 Byte 4Byte 1 Byte 2
17 / 20

9 - 3D Scanner
The 3D scanner module needs a Sharp GP2D12 IR sens or, mounted on the Gripper servo and connected to t he SSC-32 Analog Input #A.
It browses an area with the arm, storing GP2D12 sensor data into a 256 levels grayscale bitmap, fr om black (distance >= 80cm ~ 31.5 inches) to white (distance <= 10cm ~ 4 inches). The res ult is a 3D image. (For now it needs an external free 'leveller' s oftware to see the grayscale bitmap in 3D.)
Just use a small rubber band to attach the sensor.
Choose Vertical or Horizontal scan : - Vertical scan is perfect to scan a face, a bust or any vertical object. - Horizontal scan is better for small objects, laid on a table.
Select a resolution : - Low is 64X64, nice for a preview - Normal is 128X128 - High is 256X256, but slow
Select scanning direction : - Bidirectional is fast but not the best quality. - Single direction is a bit slower but pretty good result.
Press 'Start' to begin the Scan
Grayscale : - Linear => datas from the GP2D12 are corrected to be proportionally spaced, according to the distance (correcting the non-linearity of the GP2D12). - Raw => datas are only scaled to suit the 0-255 grayscale range. You don't have to choose the grayscale option before starting the scan. You can change this after the scan is complete to decide the one you will save, or you can select 'linear', save it as bmp image, then select 'raw' and save it too. You can change this option during the scanning process too, just to check.
De-interlace This slider allows fine adjustment to the odd and even lines matching. It's very useful when using the bidirectional scanning option. For single direction scanning, set the slider in the middle. You can change this setting during the scanning process or after it's complete.
View level (use this when the scanning process is co mplete) You can use this in two different ways : - Move the slider slowly to highlight in red the corresponding level (distance). It's useful to see all the pixels on the 'same level'. - Click on the bitmap (left click) and keep pressed, then move the mouse cursor on the bitmap, all the 'same level' pixels as the one your hovering are highlighted in red, and the view level slider reflects the current level.
Save Save the current scan to a 256X256 grayscale bitmap (*.bmp) file. It doesn't save any red pixel from the 'view level' feature.
Time with single direction scanning
Lynxmotion RIOS SSC-32 V1.04 Manual
GP2D12 GP2D12
18 / 20

9 - 3D Scanner
Some examples :
Vertical scanning Vertical scanning Vertical scanningLow resolution, linear, single direction Normal reso lution, linear, single direction High resolution, li near, single direction
Horizontal scanning Horizontal scanning Vertical scanningHigh resolution, linear, single direction High resol ution, raw, single direction High resolution, raw, s ingle direction
Click on the bitmap or move the 'View level' sl ider to show all the pixel at the same level.
Lynxmotion RIOS SSC-32 V1.04 Manual
19 / 20

10 - Command line
Using command line, you can start and make RIOS : - going directly to the 'Moves/Motions' form with the right project selected, - going directly to 'Play' form, bypassing initialization warning message and play a selected project automatically.
First, you need to create a new RIOS shortcut :
1. Right-click an open area on the desktop, point to New, and then click Shortcut. 2. Click Browse. 3. Locate the C:\Program Files\RIOS_SSC-32\RIOS_SSC32.exe file and click on it to select,click Open or Ok, and then click Next. 4. Type a name for the shortcut and then click Finish.
Now, you need to edit this shortcut to add some com mand line parameters :
1. Right-click on your new RIOS shortcut, select the 'shortcut' tab.2. Click on the 'Target' Box and go to the end of the line "C:\Program Files\RIOS_SSC-32\RIOS_SSC32.exe"3. Here you can add 'moves' or 'play' to select the according form to open automatically in RIOS.4. Then you can add "Your Project name", it will select this project automatically.5. If you have chosen 'play' form, you can add a third parameter to automatically play the selected project : - 'play' to play the complete project - 'playseqlist' to launch the sequence list player - or 'playscan' to activate the input scan player (the one which play sequences according to inputs, see '5.1 Play')
Examples :
To Open the 'Moves/Motions' form,"C:\Program Files\RIOS_SSC-32\RIOS_SSC32.exe" moves
To Open the 'Moves/Motions' form and select the "De mo 03 Joint" project,"C:\Program Files\RIOS_SSC-32\RIOS_SSC32.exe" moves "Demo 03 Joint"
To Open the 'Play' form,"C:\Program Files\RIOS_SSC-32\RIOS_SSC32.exe" play
To Open the 'Play' form and select the "Demo 03 Join t" project,"C:\Program Files\RIOS_SSC-32\RIOS_SSC32.exe" play "Demo 0 3 Joint"
To Open the 'Play' form and select the "Demo 03 Join t" project and to play it automatically,"C:\Program Files\RIOS_SSC-32\RIOS_SSC32.exe" play "Demo 0 3 Joint" play
To Open the 'Play' form and select the "Demo 03 Join t" project and launch the sequence list player auto matically,(you must have saved a sequence list for this project, or it won't work)"C:\Program Files\RIOS_SSC-32\RIOS_SSC32.exe" play "Demo 0 3 Joint" playseqlist
To Open the 'Play' form and select the "Demo 03 Join t" project and activate the input scan player autom atically,(you must have defined some sequences to play with the input scanner for this project, or it won't work)"C:\Program Files\RIOS_SSC-32\RIOS_SSC32.exe" play "Demo 0 3 Joint" playscan
Lynxmotion RIOS SSC-32 V1.04 Manual
For the (third parameter) 'play' command to work properly, the robot must be 'on' before
running RIOS with the shortcut!
Warning, when using the (third parameter) 'play' command, there's no more message asking to set the robot in default position before activating all
servos… It will activate them automatically!
20 / 20