Embed Size (px)
Citation preview

S I D E M O U N T S Y S T E M
M A N U A L
2
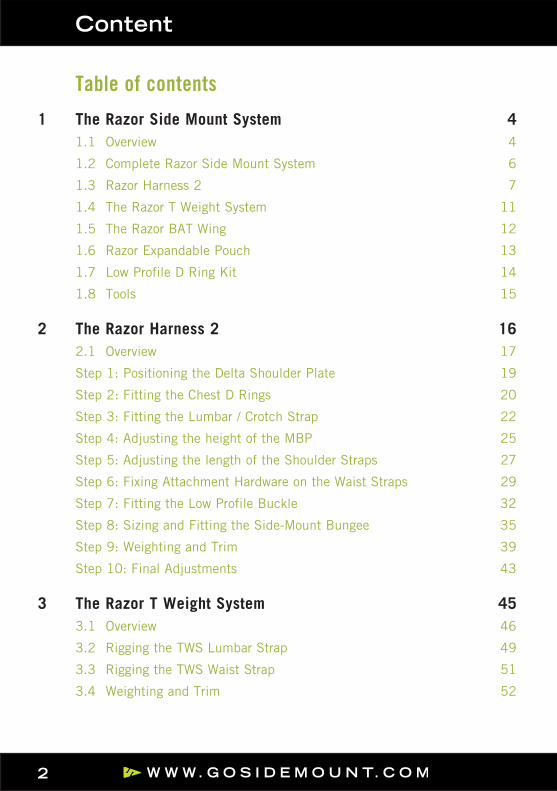
Content
1 The Razor Side Mount System 41.1 Overview 4
1.2 Complete Razor Side Mount System 6
1.3 Razor Harness 2 7
1.4 The Razor T Weight System 11
1.5 The Razor BAT Wing 12
1.6 Razor Expandable Pouch 13
1.7 Low Profile D Ring Kit 14
1.8 Tools 15
2 The Razor Harness 2 162.1 Overview 17
Step 1: Positioning the Delta Shoulder Plate 19
Step 2: Fitting the Chest D Rings 20
Step 3: Fitting the Lumbar / Crotch Strap 22
Step 4: Adjusting the height of the MBP 25
Step 5: Adjusting the length of the Shoulder Straps 27
Step 6: Fixing Attachment Hardware on the Waist Straps 29
Step 7: Fitting the Low Profile Buckle 32
Step 8: Sizing and Fitting the Side-Mount Bungee 35
Step 9: Weighting and Trim 39
Step 10: Final Adjustments 43
3 The Razor T Weight System 453.1 Overview 46
3.2 Rigging the TWS Lumbar Strap 49
3.3 Rigging the TWS Waist Strap 51
3.4 Weighting and Trim 52
Table of contents
3
Content
4 The Razor BAT Wing 544.1 Overview 55
Step 1: Adjusting and Attaching the top of the BAT Wing
to the DSP of the Razor Harness 61
Step 2: Attaching and Adjusting the BAT Wing Waist Bungee 62
Step 3: Attaching and Adjusting the BAT Wing Rear Bungee to the Razor Harness 64
Step 4: Adjusting and Attaching the Large Diameter Inflation Hose of the Primary wing to the Razor Harness 67
Step 5: Positioning the Oral Inflator Hose of the Backup Wing 70
Step 6: Correct Use of the BAT Wing 72
5 The Razor Expandable Pouch (REP) 765.1 Overview 77
6 The Low Profile D Ring Kit 806.1 Overview 81
Step 1 – Step 5 82
Step 6 – Step 10 83
Go Diving! 85
Table of contents

4
«Necessity is the mother of invention»Steve Bogaerts originally designed the Razor Harness for use on side-mount / no-mount exploration dives in very restricted cave where every piece of extra equipment can become a hindrance or hazard.
The system evolved over time as the exploration dives became more chal-lenging and demanded more from both diver and equipment. The current system is the distillation of years of trial and error. That experience refined and streamlined equipment, skill sets and procedures.
Each of the components in the system is designed to fit together seamlessly and work as part of an integrated whole. The Razor Harness is at the heart of this system and is the foundation of all the Bogarthian Side-Mount pro-cedures.
To get the full benefit from your Razor Harness you need to understand and implement the entire Bogarthian Side-Mount Philosophy. This philosophy is holistic in approach and is designed from the inside out so that as additional layers of equipment are added there is no change in the core equipment, equipment placement, procedures or skill sets.
Get properly trained for Side-Mount diving. Training will distill into a few days’ years of experience and advance your side mount diving accordingly.
1.1 Overview
1 The Razor Side Mount System
5
«Less is More»The Razor Harness is simplicity and elegance personified with only 2 con-tinuous pieces of webbing and 1 closure point. It is simple, strong, rugged, reliable, low profile and extremely minimalist in design. It fits like a glove and is very comfortable to wear.
The Razor will fit anyone no matter what their physical size or shape and is quick and easy to set up and adjust so that each individual diver gets a custom fit using standardized hardware.
The Razor can be adjusted at several points to ensure the optimal fit for each individual.
Each of the shoulder straps / waist straps can be adjusted at the Mini Back Plate. The length of the Lumbar / Crotch Strap can be adjusted at the Delta Shoulder Plate. The height of the Waist / Hip strap can be adjusted at the Mini Back Plate.
All the attachment points such as D rings on the Razor Harness can be adjusted quickly and easily to allow personalized positioning of equipment placement.
Extra attachment points can be added easily if required.
Weight can be added to exactly where you need it on the Razor Harness to optimize trim.
1.1 Overview
1 The Razor Side Mount System
6
1 The Razor Side Mount System
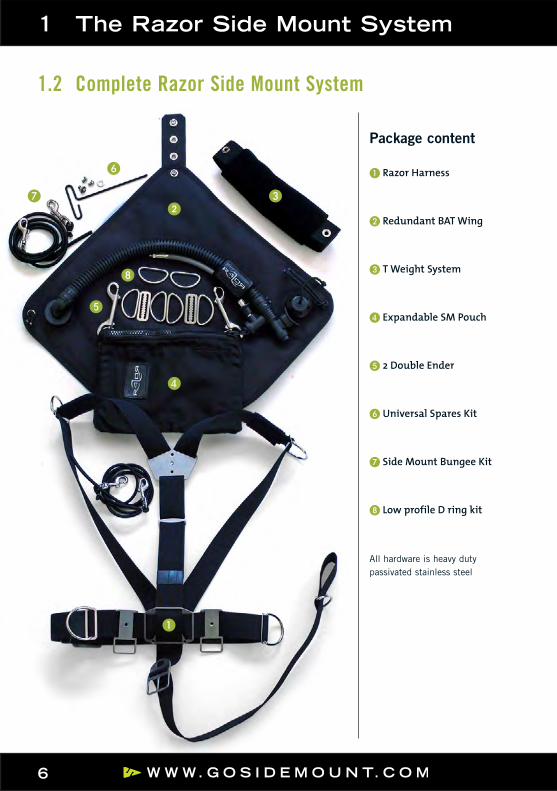
Package content
ARazor Harness
BRedundant BAT Wing
CT Weight System
DExpandable SM Pouch
E2 Double Ender
FUniversal Spares Kit
GSide Mount Bungee Kit
HLow profile D ring kit
All hardware is heavy duty passivated stainless steel
1.2 Complete Razor Side Mount System
F
G C2
H
E
A
D
7
1 The Razor Side Mount System
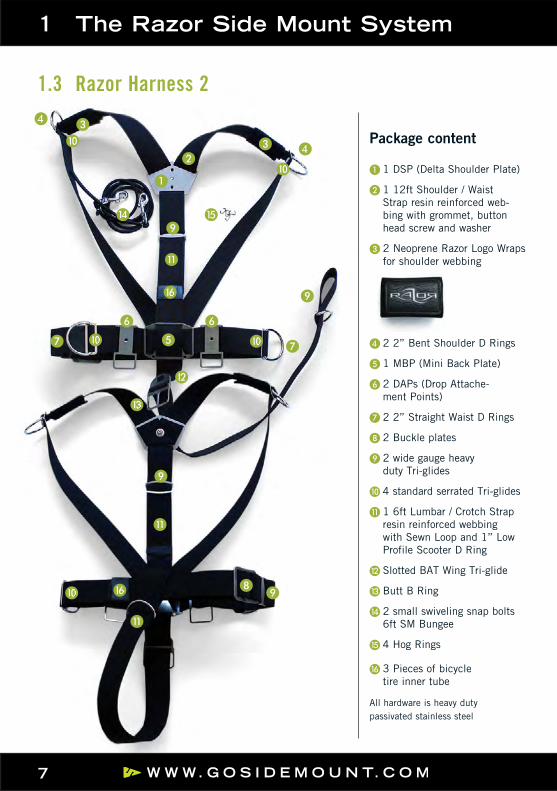
Package content
A1 DSP (Delta Shoulder Plate)
B1 12ft Shoulder / Waist Strap resin reinforced web-bing with grommet, button head screw and washer
C2 Neoprene Razor Logo Wraps for shoulder webbing
D2 2” Bent Shoulder D Rings
E1 MBP (Mini Back Plate)
F2 DAPs (Drop Attache-ment Points)
G2 2” Straight Waist D Rings
H2 Buckle plates
I2 wide gauge heavy duty Tri-glides
J4 standard serrated Tri-glides
K1 6ft Lumbar / Crotch Strap resin reinforced webbing with Sewn Loop and 1” Low Profile Scooter D Ring
LSlotted BAT Wing Tri-glide
MButt B Ring
N2 small swiveling snap bolts 6ft SM Bungee
O4 Hog Rings
P3 Pieces of bicycle tire inner tube
All hardware is heavy duty passivated stainless steel
1.3 Razor Harness 2
A
B
N O
G GE
FF
I
L
M
K
K
C
C D
D
J
J J
J
J
P
P
HI
I
I
K
8
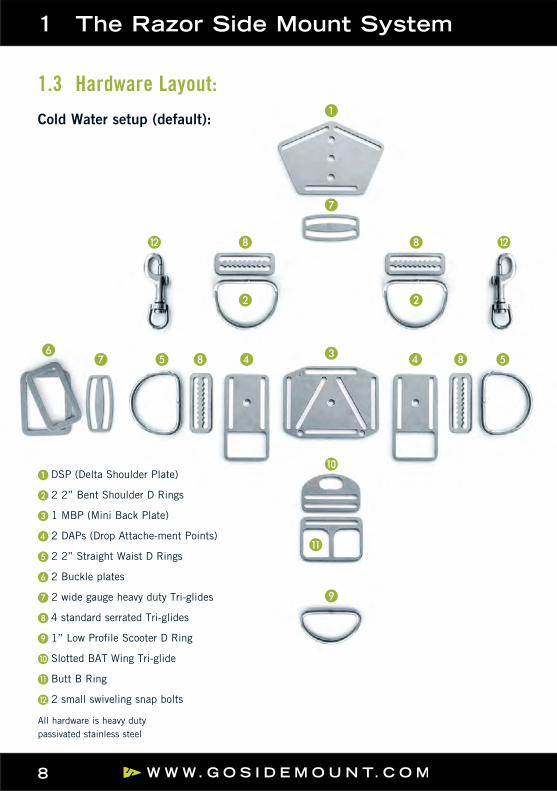
Cold Water setup (default):
1 The Razor Side Mount System
1.3 Hardware Layout:
ADSP (Delta Shoulder Plate)
B2 2” Bent Shoulder D Rings
C1 MBP (Mini Back Plate)
D2 DAPs (Drop Attache-ment Points)
E2 2” Straight Waist D Rings
F2 Buckle plates
G2 wide gauge heavy duty Tri-glides
H4 standard serrated Tri-glides
I1” Low Profile Scooter D Ring
JSlotted BAT Wing Tri-glide
KButt B Ring
L2 small swiveling snap bolts
All hardware is heavy duty passivated stainless steel
A
G
HL LH
B
DH EE HG DF
B
C
J
I
K
9
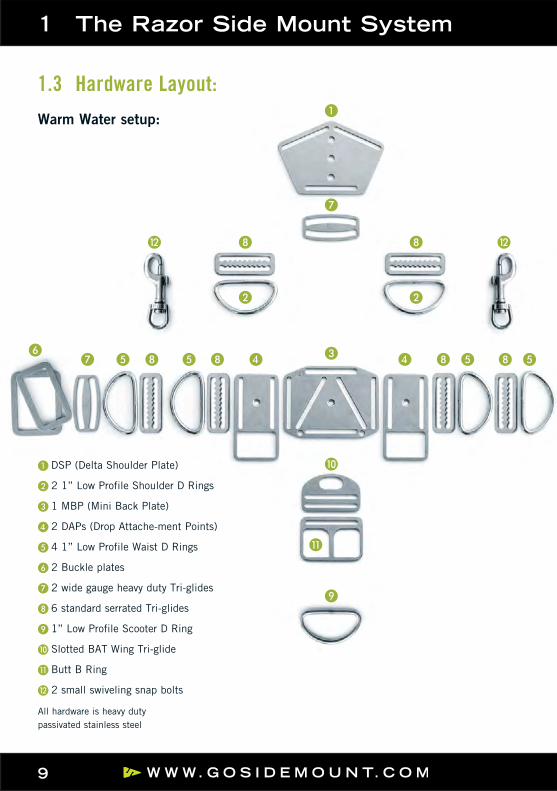
1 The Razor Side Mount System
1.3 Hardware Layout:
ADSP (Delta Shoulder Plate)
B2 1” Low Profile Shoulder D Rings
C1 MBP (Mini Back Plate)
D2 DAPs (Drop Attache-ment Points)
E4 1” Low Profile Waist D Rings
F2 Buckle plates
G2 wide gauge heavy duty Tri-glides
H6 standard serrated Tri-glides
I1” Low Profile Scooter D Ring
JSlotted BAT Wing Tri-glide
KButt B Ring
L2 small swiveling snap bolts
All hardware is heavy duty passivated stainless steel
A
G
HL LH
B
DH H HHG E E E EDF
B
C
J
I
K
Warm Water setup:
10
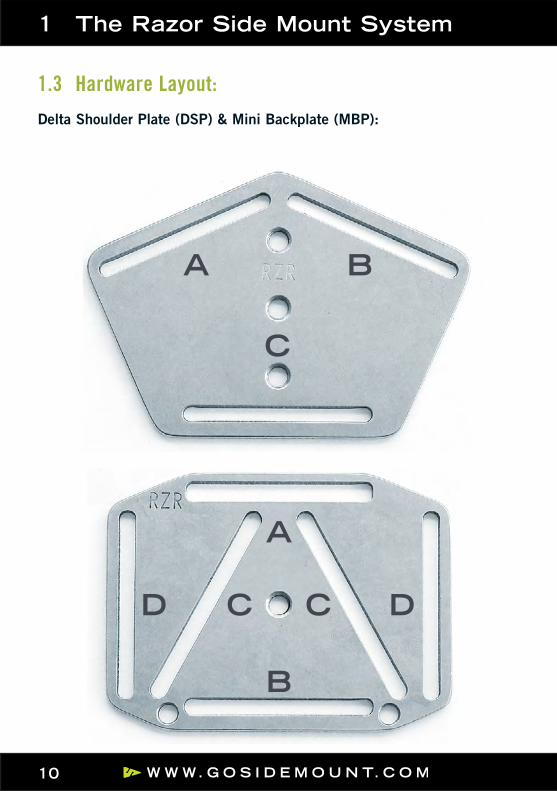
Delta Shoulder Plate (DSP) & Mini Backplate (MBP):
1.3 Hardware Layout:
1 The Razor Side Mount System
A
B
C DD C
A
C
B
11
1 The Razor Side Mount System
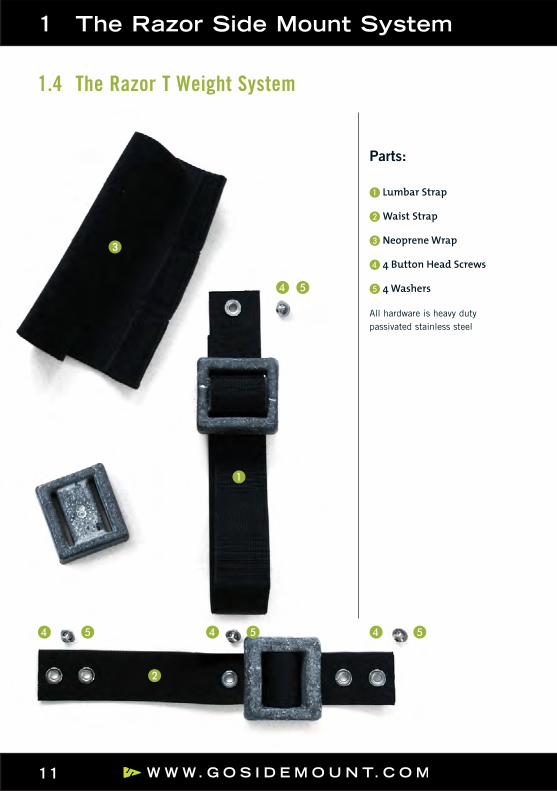
Parts:
ALumbar Strap
BWaist Strap
CNeoprene Wrap
D4 Button Head Screws
E4 Washers
All hardware is heavy duty passivated stainless steel
1.4 The Razor T Weight System
C
A
B
D E D ED E
D E

12
1 The Razor Side Mount System
Package content
HEAvy DuTy 3 LAyER DouBLE REDunDAnT WinG WiTH 45LBS / 20KGS LifT in BoTH THE PRiMARy AnD BAcKuP.
APrimary wing:
B 19” large diameter inflation hose with fixed low profile elbow and power inflator
CLarge Razor Logo Wrap for large diameter Inflation Hose
D8” LPI Hose fit-ted with Hose Hat
EHeavy Duty Pull Dump Valve
FBackup Wing:
GOral Inflation Hose with Bite-On Mouthpiece
HLow Profile Coin Dump Valve
ISeparate Extension Piece for fitting the top of the BAT Wing to the DSP of the Razor Harness
JLong Waist Bungee with snap bolt attached
KShort Waist Bungee no snap bolt
LWing Tab with Bungee cord
MWing Tri-glide (this will already be fitted to your Razor Harness if you ordered a complete RSMS)
N2 Button head screws 2 Washers 1 Hex nut
1.5 The Razor BAT Wing
B E
A D
F
JK
N
I
N
L
G
H
C
M

13
1 The Razor Side Mount System
Package content
ADouble Enders
BLarge Heavy Duty Top Zipper
C2 Internal Lanyards
D2 Internal Pockets
EVelcro Expandable Sides
F1 Inch Stainless Steel D Rings
GMesh Pocket for Slates / Wetnotes
1.6 Razor Expandable Pouch
A A
2
E
E
E
E
E
C C
D D
F
G
14
1 The Razor Side Mount System
1.7 Low Profile D Ring Kit
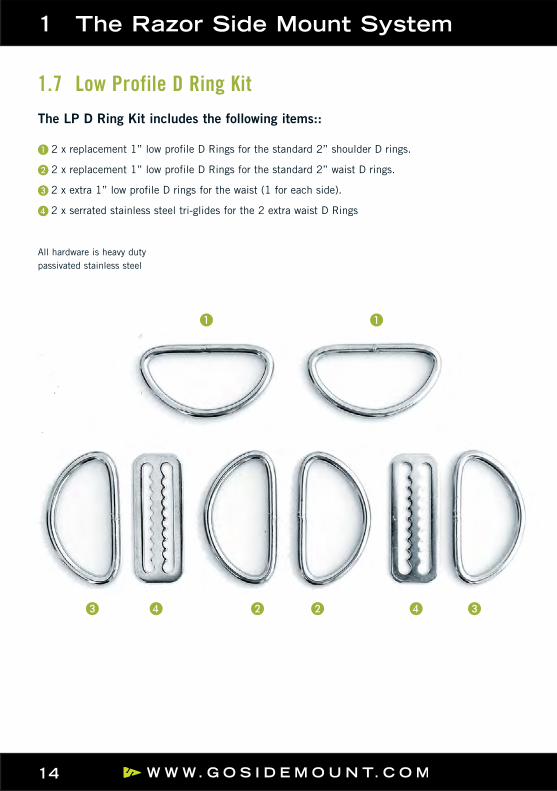
The LP D Ring Kit includes the following items::A2 x replacement 1” low profile D Rings for the standard 2” shoulder D rings.
B2 x replacement 1” low profile D Rings for the standard 2” waist D rings.
C2 x extra 1” low profile D rings for the waist (1 for each side).
D2 x serrated stainless steel tri-glides for the 2 extra waist D Rings
All hardware is heavy duty passivated stainless steel
A
C B B C
A
D D
15
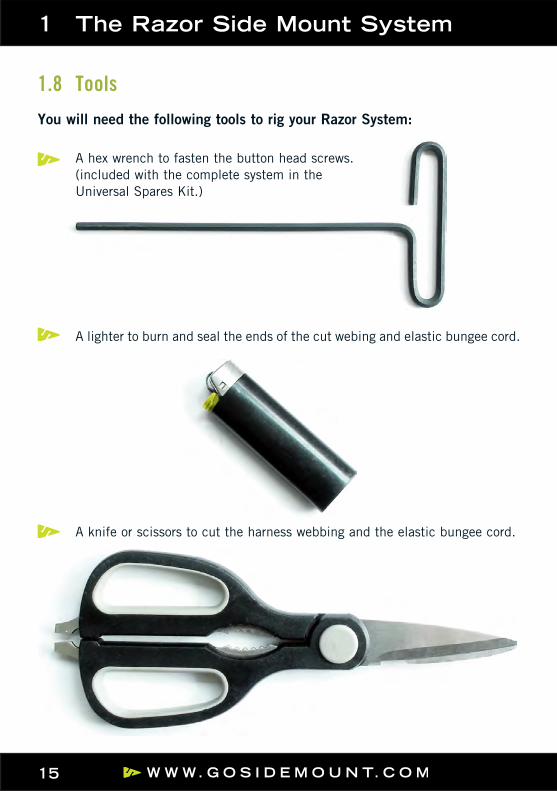
A hex wrench to fasten the button head screws. (included with the complete system in the Universal Spares Kit.)
A lighter to burn and seal the ends of the cut webing and elastic bungee cord.
A knife or scissors to cut the harness webbing and the elastic bungee cord.
You will need the following tools to rig your Razor System:
1 The Razor Side Mount System
1.8 Tools

2 The Razor Harness 2

17
2 The Razor Harness 2
Below is an easy to follow guide detailing the 10 steps to rigging and adjust-ing your Razor Harness.
Each step has supporting pictures.
It is highly recommended that you read through the guide and look at the accompanying pictures to thoroughly familiarize yourself with the various parts and assembly procedures before you start to put your Razor Harness together.
Ideally you should have your Side-Mount Instructor rig your Razor Harness with you.
Rigging the harness is much easier with 2 people.
No one is perfectly bilaterally symmetrical and a properly fitted harness will not be either.
The person having the harness fitted should wear it while their partner makes adjustments in situ to get the perfect fit.
If rigging the harness by yourself a full length mirror will help you to position everything correctly.
Ideally when you rig the harness you should do so while wearing your normal exposure protection so that it fits snugly. If that is not practicable then wear clothing of a similar thickness to your normal exposure protection and make sure you leave some extra webbing for later adjustments should they be required.
It is highly recommended that you use the T weight system with the Razor Harness however if you are going to put weight directly on the Razor Harness then it is advisable to work out how much weight you will need and where you want to place it on your harness before assembling it (see Step 9: Weighting and Trim).
2.1 Overview

18
2 The Razor Harness 2
Your Razor Harness comes already partially pre-assembled to give you an idea of how everything should fit together but you will need to make some adjust-ments to get the best fit possible.
You may need to disassemble it to replace the standard D rings with the low profile D rings or to add weight directly to the harness itself although it is recommended to use the T Weight System to add any weight you may need.
2.1 Overview
ALow profile D ring (for warm water divers)
BStandard 2" D ring (for cold water Divers)
A
B

19
The DSP is placed with the button head screw on the inside against the div-ers back
The DSP should be positioned between the shoulder blades below the nape of the neck.
To get the right height place 1 arm behind your head and the tips of your fingers should just touch the top of the DSP.
Make sure that the top of the DSP is clear of your Drysuit neck seal or zipper. It should also be positioned below the closed zip position of a wetsuit.
Step 1: Positioning the Delta Shoulder Plate
2 The Razor Harness 2
A
C
B

20
Making sure the DSP remains in the correct position the shoulder D Rings should be positioned at the same approximate height as the ends of the clavicle.
To fine tune this position stand with both arms straight out from the shoul-ders palms facing down and thumbs extended then bend at the elbows until the thumbs hit the shoulders without lowering the arms.
The D Rings should be placed at this height and can be moved to the ideal location easily by sliding the serrated tri-glides either up or down the webbing ensuring each side is even in height.
2 The Razor Harness 2
Step 2: Fitting the Chest D Rings
21
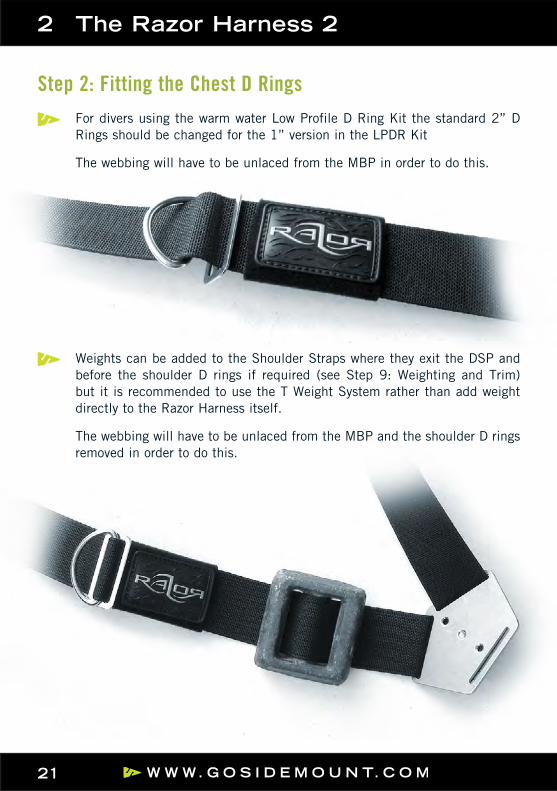
For divers using the warm water Low Profile D Ring Kit the standard 2” D Rings should be changed for the 1” version in the LPDR Kit
The webbing will have to be unlaced from the MBP in order to do this.
Weights can be added to the Shoulder Straps where they exit the DSP and before the shoulder D rings if required (see Step 9: Weighting and Trim) but it is recommended to use the T Weight System rather than add weight directly to the Razor Harness itself.
The webbing will have to be unlaced from the MBP and the shoulder D rings removed in order to do this.
2 The Razor Harness 2
Step 2: Fitting the Chest D Rings
22
Adjustment
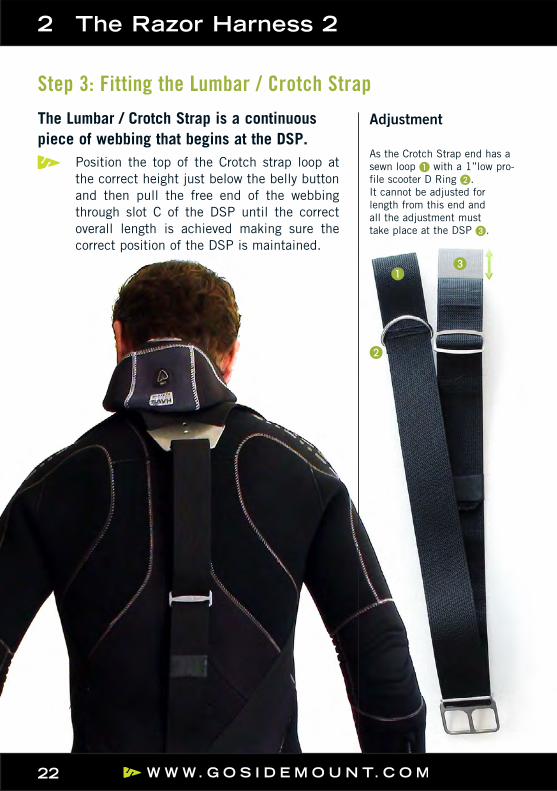
As the Crotch Strap end has a sewn loop A with a 1”low pro-file scooter D Ring B. It cannot be adjusted for length from this end and all the adjustment must take place at the DSP C.
2 The Razor Harness 2
Step 3: Fitting the Lumbar / Crotch Strap
Position the top of the Crotch strap loop at the correct height just below the belly button and then pull the free end of the webbing through slot C of the DSP until the correct overall length is achieved making sure the correct position of the DSP is maintained.
The Lumbar / crotch Strap is a continuous piece of webbing that begins at the DSP.
A
B
C
23
Adjustment
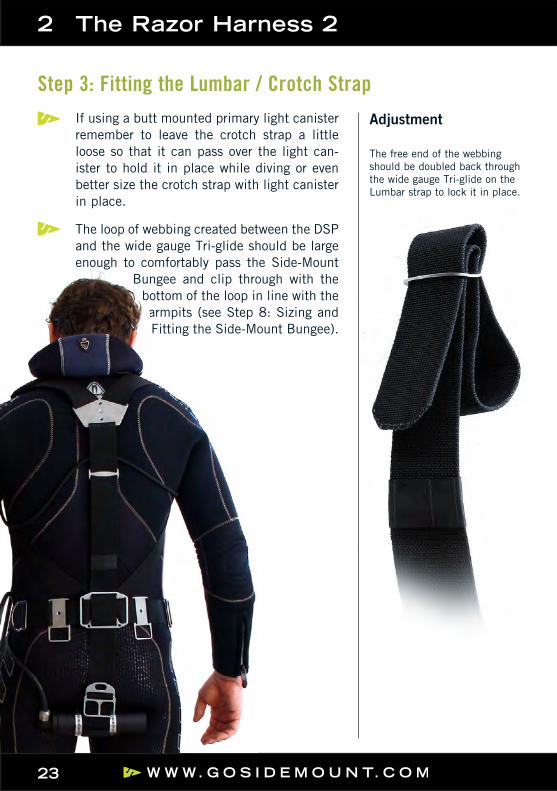
The free end of the webbing should be doubled back through the wide gauge Tri-glide on the Lumbar strap to lock it in place.
2 The Razor Harness 2
Step 3: Fitting the Lumbar / Crotch StrapIf using a butt mounted primary light canister remember to leave the crotch strap a little loose so that it can pass over the light can-ister to hold it in place while diving or even better size the crotch strap with light canister in place.
The loop of webbing created between the DSP and the wide gauge Tri-glide should be large enough to comfortably pass the Side-Mount
Bungee and clip through with the bottom of the loop in line with the armpits (see Step 8: Sizing and Fitting the Side-Mount Bungee).
A
C
B
24
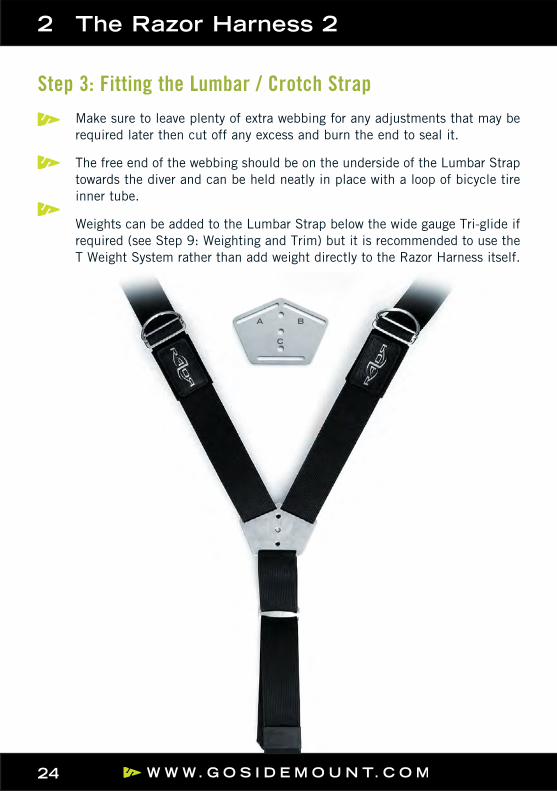
Make sure to leave plenty of extra webbing for any adjustments that may be required later then cut off any excess and burn the end to seal it.
The free end of the webbing should be on the underside of the Lumbar Strap towards the diver and can be held neatly in place with a loop of bicycle tire inner tube.
Weights can be added to the Lumbar Strap below the wide gauge Tri-glide if required (see Step 9: Weighting and Trim) but it is recommended to use the T Weight System rather than add weight directly to the Razor Harness itself.
Step 3: Fitting the Lumbar / Crotch Strap
2 The Razor Harness 2

25
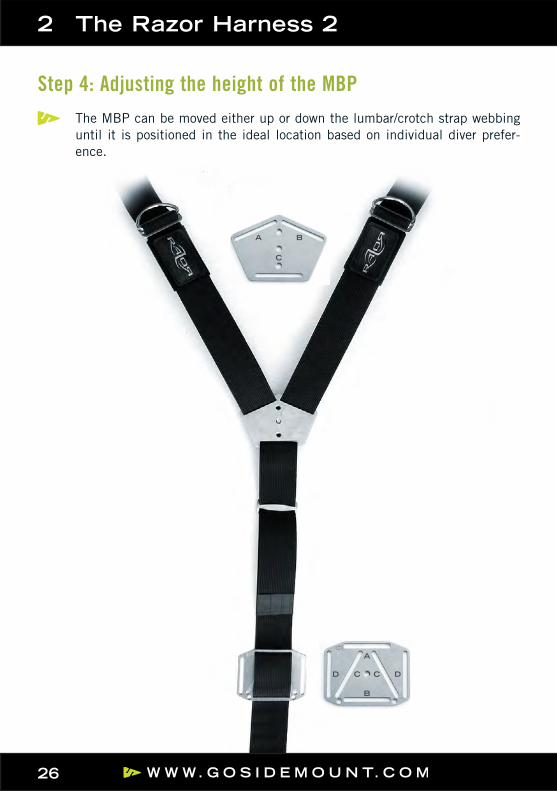
The position of the MBP will determine the position of the lower attachment points for the bottom of the Side-Mount Tanks.
Most divers will position the MBP at waist height but shorter divers may wish to move the MBP lower to mid hip height to be able to position the side mount tanks lower on the body for greater comfort.
Step 4: Adjusting the height of the MBP
2 The Razor Harness 2
26
Step 4: Adjusting the height of the MBP
2 The Razor Harness 2
A
C
B
A
B
C DD C
The MBP can be moved either up or down the lumbar/crotch strap webbing until it is positioned in the ideal location based on individual diver prefer-ence.
A
B
C DD C
27
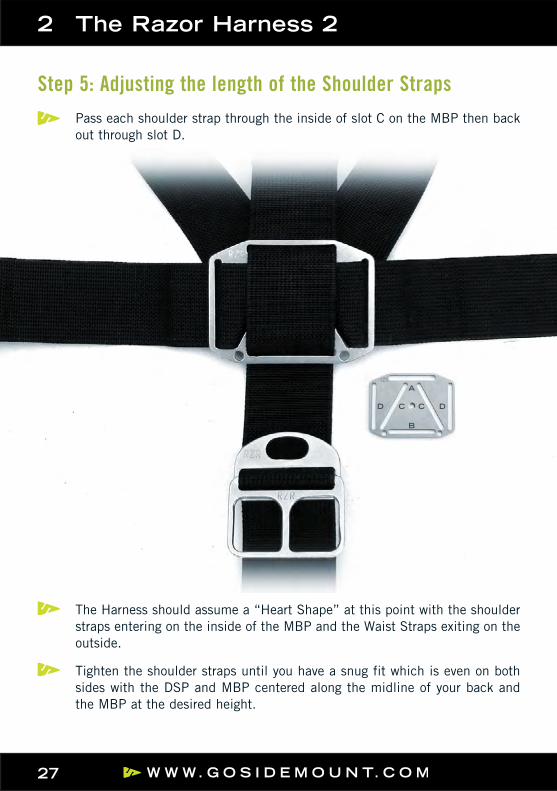
Pass each shoulder strap through the inside of slot C on the MBP then back out through slot D.
The Harness should assume a “Heart Shape” at this point with the shoulder straps entering on the inside of the MBP and the Waist Straps exiting on the outside.
Tighten the shoulder straps until you have a snug fit which is even on both sides with the DSP and MBP centered along the midline of your back and the MBP at the desired height.
Step 5: Adjusting the length of the Shoulder Straps
2 The Razor Harness 2

28
Step 5: Adjusting the length of the Shoulder Straps
2 The Razor Harness 2
Weights can be added to the Waist Straps where they exit the MBP if required but it is recommended to use the T Weight System rather than add weight directly to the Razor Harness itself (see Step 9: Weighting and Trim).
All the hardware on both sides of the waist straps will have to be removed in order to do this.
A
B
C DD C
29
The two Drop Attachment Points (DAPs) should be positioned on the waist webbing either side of the MBP.
The DAP’s should be close to the MBP so that anything clipped to them will not hang too far to the sides and get between the body and the SM tanks.
If required the loop of the DAP can be placed in a vice and bent gently to have them stand off slightly from the body to make clipping in easier.
The DAPs are an ideal location to clip off the Razor Expandable Pouch as well as other items such as reels or lift bags for example.
The DAPs can also be used to clip off a heavy butt mounted primary light canister to give it more support if required.
Step 6: Fixing Attachment Hardware on the Waist Straps
2 The Razor Harness 2
A
B
C DD C
30
Now move the serrated belt slides and 2” straight D Rings until they are positioned just behind the hipbone on each side of the waist strap webbing.
Make sure that both D Rings are positioned evenly and far enough back that the bottom of the Side-Mount Tanks will not hang down below the body when trimmed out in a horizontal position.
Weights can be added to the Waist Strap between the DAPs and the Hip D ring if required but it is recommended to use the T Weight System rather than add weight directly to the Razor Harness itself (see Step 9: Weighting and Trim).
Hardware on both sides of the waist straps will have to be removed in order to do this.
Extra attachment hardware such as a second D ring on each side can be added at this point if required.
2 The Razor Harness 2
Step 6: Fixing Attachment Hardware on the Waist Straps
31
Steel tanks will tend to remain negative throughout the dive even as gas is used from them however if using Aluminium 80cuft Side-Mount tanks a sec-ond attachment point further forward is necessary to adjust tank trim as gas is breathed from the tanks and they get lighter and become more buoyant.
When the bottom of the tanks start to float up clipping them forward keeps them horizontal along the sides of the divers body thus reducing profile and drag.
The first D ring should be positioned behind the hip with the second d ring positioned half way between this and the center line of the body.
The Low Profile D Ring Kit is ideal for use in warm water with Aluminium Side-Mount tanks.
Step 6: Fixing Attachment Hardware on the Waist Straps
2 The Razor Harness 2
32
Attach the Low Profile Buckle to the left hand side of the webbing leaving plenty of extra webbing for adjustments of the harness.
2 The Razor Harness 2
Step 7: Fitting the Low Profile Buckle
33
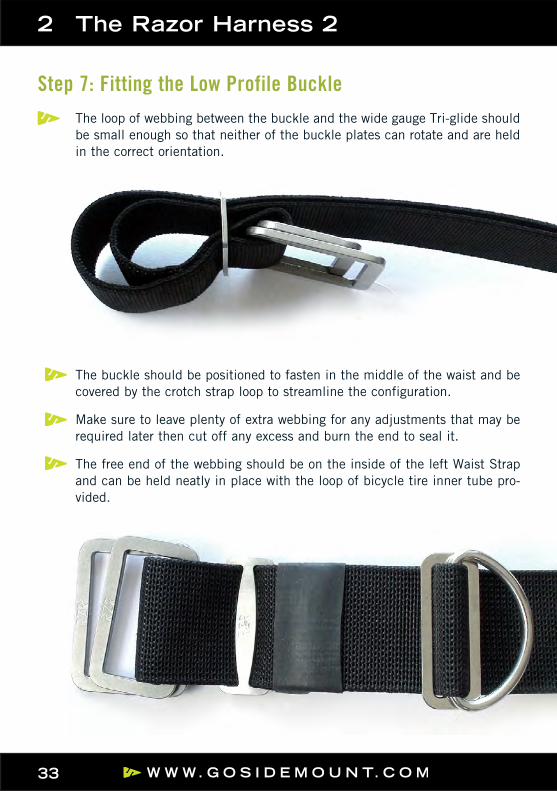
The loop of webbing between the buckle and the wide gauge Tri-glide should be small enough so that neither of the buckle plates can rotate and are held in the correct orientation.
The buckle should be positioned to fasten in the middle of the waist and be covered by the crotch strap loop to streamline the configuration.
Make sure to leave plenty of extra webbing for any adjustments that may be required later then cut off any excess and burn the end to seal it.
The free end of the webbing should be on the inside of the left Waist Strap and can be held neatly in place with the loop of bicycle tire inner tube pro-vided.
2 The Razor Harness 2
Step 7: Fitting the Low Profile Buckle
34
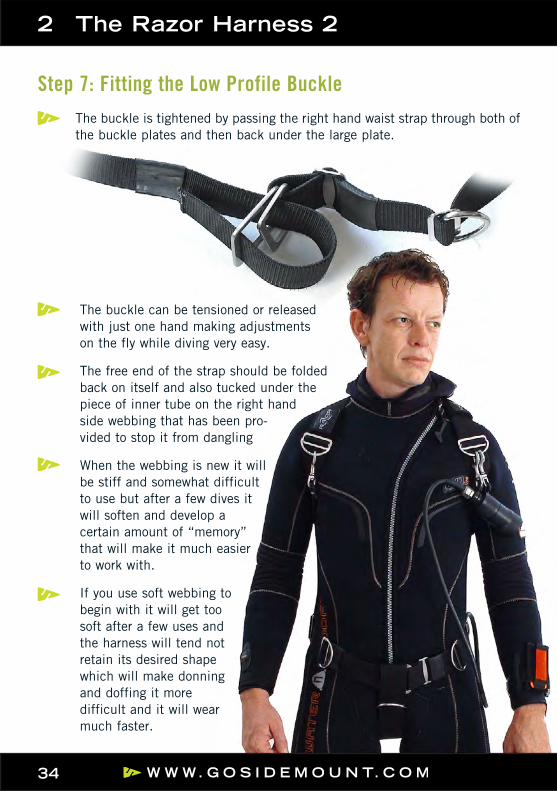
The buckle is tightened by passing the right hand waist strap through both of the buckle plates and then back under the large plate.
2 The Razor Harness 2
Step 7: Fitting the Low Profile Buckle
The buckle can be tensioned or released with just one hand making adjustments on the fly while diving very easy.
The free end of the strap should be folded back on itself and also tucked under the piece of inner tube on the right hand side webbing that has been pro- vided to stop it from dangling
When the webbing is new it will be stiff and somewhat difficult to use but after a few dives it will soften and develop a certain amount of “memory” that will make it much easier to work with.
If you use soft webbing to begin with it will get too soft after a few uses and the harness will tend not retain its desired shape which will make donning and doffing it more difficult and it will wear much faster.
35
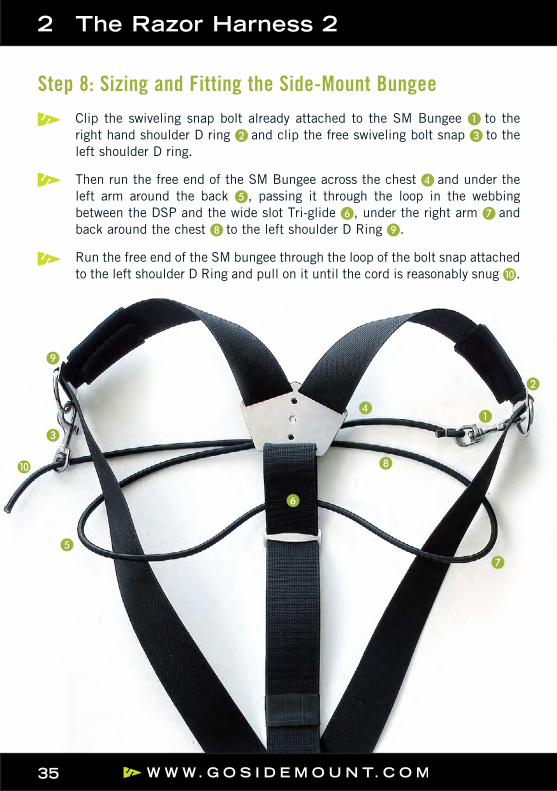
Clip the swiveling snap bolt already attached to the SM Bungee Ato the right hand shoulder D ring Band clip the free swiveling bolt snap Cto the left shoulder D ring.
Then run the free end of the SM Bungee across the chest Dand under the left arm around the back E, passing it through the loop in the webbing between the DSP and the wide slot Tri-glide F, under the right arm Gand back around the chest Hto the left shoulder D Ring I.
Run the free end of the SM bungee through the loop of the bolt snap attached to the left shoulder D Ring and pull on it until the cord is reasonably snug J.
2 The Razor Harness 2
Step 8: Sizing and Fitting the Side-Mount Bungee
AD
B
F
G
H
I
J
C
E
36
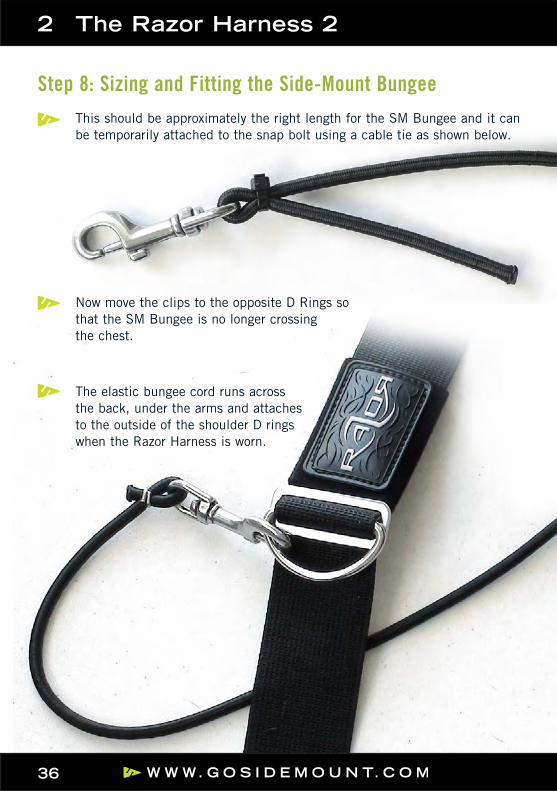
This should be approximately the right length for the SM Bungee and it can be temporarily attached to the snap bolt using a cable tie as shown below.
Now move the clips to the opposite D Rings so that the SM Bungee is no longer crossing the chest.
The elastic bungee cord runs across the back, under the arms and attaches to the outside of the shoulder D rings when the Razor Harness is worn.
2 The Razor Harness 2
Step 8: Sizing and Fitting the Side-Mount Bungee

37
It will require some experimentation with your side mount tanks in the water to get the exact length of the cord right so leave it long to begin with and shorten it progressively as required.
Once you have got the ideal tension cut the cord to the appropriate length burn the end to seal it and fix it permanently to the swiveling snap bolt with one of the Hog rings provided as shown below.
The SM Bungee will stretch over time and may need to be shortened periodically or replaced.
It is recommended to replace the SM Bungee regular-ly or as soon as it shows any sign of wear and tear.
It is strongly recommended to make up a second SM Bungee and carry it with you while div-ing in the Expandable Pouch as a backup.
The complete Razor Side Mount System comes with a Spare Side Mount Bungee included in the package.
A “Spare SM Bungee” is also available in the Go Side Mount Online Shop as a separate item if required.
2 The Razor Harness 2
Step 8: Sizing and Fitting the Side-Mount Bungee

38
If using very heavy SM tanks then a thicker gauge bungee cord may be required. Thicker bungee cord will also need larger gauge Hog rings.
The SM Bungee is not designed to support the SM tanks out of the water and will be damaged or broken if this is attempted.
If a diver wishes to carry the tanks on the harness out of the water then a loop of heavy duty cord can be tied around the tank neck and a double ender used to clip this to the shoulder D rings.
2 The Razor Harness 2
Step 8: Sizing and Fitting the Side-Mount Bungee
39
Diving either under weighted or over weighted is inefficient and potentially danger-ous. Correct weighting is critical to mastery of buoyancy control and trim allowing easier more comfortable diving.
Both the correct amount of ballast weight required and its ideal position on the diver need to be established.
Enter the water wearing all of your equipment including your normal exposure pro-tection and full tanks.
Dump all of the air from both the Primary and Backup BAT Wing and your Drysuit if you are using one.
Add any weight required until you are neutrally buoyant while holding a normal breath just below the surface.
This is the amount of weight you will need to add to the T Weight System plus a small amount extra to compensate for the weight of the gas in the tanks.
It is recommended to redo the weighting check at the end of the dive with the gas in your SM tanks at 500psi
Now you will need to establish the correct positioning of the weight to improve trim, swimming efficiency and your stability in the water.
Trim has 2 components horizontal (head to toe) and lateral (side to side).
Horizontal trim can be optimized by moving the weight higher or lower as required.
Lateral trim can be optimized by positioning weights as close to the center line of the body as possible to minimize turning moments.
Having weights positioned as close as possible to both the center line of the body and the middle of the body will give greater stability and therefore greater control while diving in all orientations.
2 The Razor Harness 2
Step 9: Weighting and Trim
40
Weights can be added easily to either the Lumbar T Weight Belt or the Waist T Weight Belt or to both if required.
The optimal positioning for ballast weight assuming neutral trim is to either side of, or just above the MBP using both the Lumbar and Waist strap of the T Weight System.
When using the BAT Wing this ensures that the center of gravity is also the center of buoyancy thereby increasing stability and control.
If more head down trim is required which is often the case when side-mounting due to the tanks being lower on the diver and dropping the center of gravity towards the feet then more of the ballast weight can be positioned higher on the Lumbar Strap of the T Weight System to counteract this.
If more head up trim is required due then more of the ballast weight should be positioned lower at the Waist Strap of the T Weight System
2 The Razor Harness 2
Step 9: Weighting and Trim
C
D D EE
AA
B
41
2 The Razor Harness 2
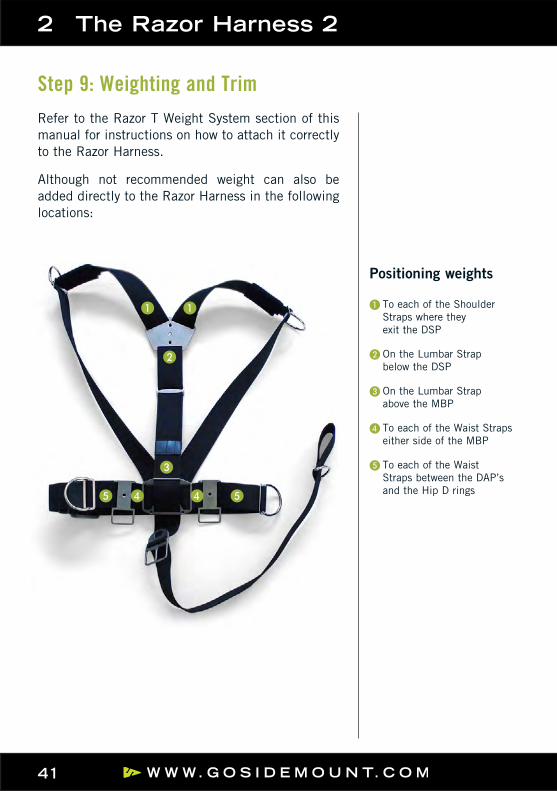
Step 9: Weighting and TrimRefer to the Razor T Weight System section of this manual for instructions on how to attach it correctly to the Razor Harness.
Although not recommended weight can also be added directly to the Razor Harness in the following locations:
Positioning weightsATo each of the Shoulder
Straps where they exit the DSP
BOn the Lumbar Strap below the DSP
COn the Lumbar Strap above the MBP
DTo each of the Waist Straps either side of the MBP
ETo each of the Waist Straps between the DAP’s and the Hip D rings
42
Normal lead block diving weights can be added to the harness by feeding the webbing through them as you would with a standard weight belt (make sure you leave some extra webbing to do this when you adjust the Razor).
The weight can be locked in position with a belt slide if required.
Weight pouches that slide onto the harness webbing and allow you to remove or replace weights quickly and easily without having to disassemble the har-ness (for example when changing exposure protection or travelling) can also be used but are not ideal as they have the tendency to slide around or have the weight fall out.
2 The Razor Harness 2
Step 9: Weighting and Trim
43
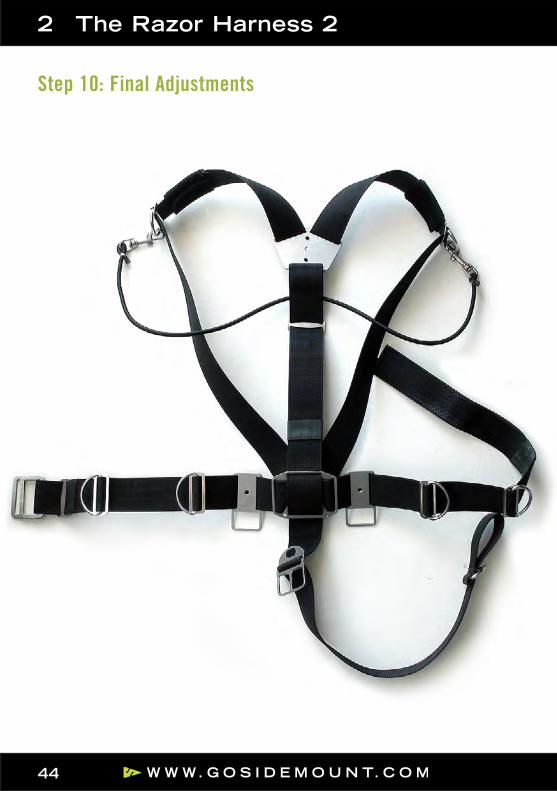
Remember everything changes when you get wet!
Find some shallow open water or a swimming pool and try out the harness.
The Razor Harness should have a tight fit to increase control of buoyancy, trim and equipment load.
A sloppy harness equates to a sloppy diver!
Swimming efficiency and gas consumption will improve when the diver and equipment load are all one unit and move together.
Once you have made the final adjustments to your harness you can cut off any extra webbing and burn the ends to seal them.
Remember to leave enough adjustment in the harness for changes in thick-ness of exposure protection or any gain in weight
All loose ends of webbing remaining can be held in place with the short sec-tions of bicycle tire inner-tube provided.
Many divers choose to get 2 Razor Harnesses, 1 for cold water diving in a Drysuit and 1 for warm water diving in a Wetsuit so that they do not have to worry about adjusting the harness or changing D rings etc. when they change environments.
All the other component of the Razor System will work with either harness without any further changes needing to be made
2 The Razor Harness 2
Step 10: Final Adjustments
44
2 The Razor Harness 2
Step 10: Final Adjustments

3 The Razor T Weight System
46
3 The Razor T Weight System
3.1 Overview The Razor T Weight System (TWS) is a modular 2 part weighting system
designed to make adding or removing weights from the Razor Harness quick and easy.
Part one allows weight to be added to the Lumbar area between the DSP and the MBP and the second part allows weight to be added to the waist area between the DAPs and the MBP.
You can use either part individually or use both together at the same time so you have the option of using 3 different configurations according to diver preference:
a Weights placed on the Lumbar Strap only
b Weights placed on the Waist Strap only
c Weights placed on both the Lumbar Strap and Waist Strap
47
3 The Razor T Weight System
The TWS is designed to use standard lead diving weights that are universally available. Up to four 3kg block weights can be added to the Lumbar Strap and two 3kg blocks weights can be added to the waist strap.
So in total as much as 18kgs/40lbs can be added to the TWS although with a properly weighted equipment configuration this amount should never actu-ally be required.
The advantage of using the TWS over a weight belt is that it reduces clutter and allows you to place weight exactly where you need it to optimize trim.
Unlike a weight belt or weight pockets the weights are held very securely and there is no chance of losing them accidently resulting in a potential for injury/DCS due to a buoyant ascent in the open water. In the overhead environment loss of weights would result in the diver becoming pinned to the ceiling unable to exit.
The TWS ensures weights are placed close to both the center line and the midline of the body helping to maintain stability and reduce turning moments thus giving the diver greater control while diving.
When the TWS is used in conjunction with BAT Wing then both the center of ballast and center of buoyancy are very close to one another which also helps to maintain stability and control while diving.
3.1 Overview
48
Weight can be added directly to the Razor Harness itself (see Razor Harness Manual) but this is not recommended. The advantage of using the TWS over putting weights directly on the harness is fourfold:
a Ease of use in removing or changing weights quickly
b Hardware on the harness will not have to be removed and replaced to add or remove weights
c No adjustments to the harness webbing are required as the length of the webbing stays the same and is not affected by adding or removing weights or using different size weight blocks
d You do not have to travel with weight on the harness
Velcro closing weight pouches can also be used on the Razor Harness in conjunction with the TWS so that in an emergency divers have the option of ditching some weight at the surface during open water dives. Ditching weight underwater is not recommended as it may result in an uncontrolled buoyant ascent.
In an emergency if extra buoyancy is required at the surface while using SM configuration negatively buoyant Steel tanks can be removed or Aluminium tanks can be drained to 140bar/2000psi or below at which point they will start to become positively buoyant.
3 The Razor T Weight System
3.1 Overview
49
3 The Razor T Weight System
a Remove the BAT wing if fitted to the Razor Harness.
b Bolt the top of the Lumbar Strap webbing to the bottom hole of the DSP using one of the supplied button head screws and a washer.
c If the BAT Wing is also normally attached at this bottom hole on the DSP then the longer bolt found in the BAT Wing or Universal Spares kit will be required to fix both the Lumbar Strap and the BAT Wing to the same mount-ing point.
d Slide block weights onto the webbing and position them correctly on the Lumbar strap between the DSP and the MBP to optimize trim. Ideally weight should not be placed above the Lumbar Strap Tri-glide so as not to interfere with the SM Bungee.
e Up to 4 block weights can be added to the Lumbar Strap. If more head down trim is required the weight can be moved closer to the DSP or the heavier weights can placed at the top of the Lumbar Strap. If more head up trim is required weight can be moved closer to the MBP or the heavier blocks placed lower on the Lumbar Strap.
f Feed the free end of the webbing through the top slot of the MBP (the top slot “A” on the MBP is cut slightly wider than the other slots to accept the Lumbar Strap easily) and double the webbing back over.
3.2 Rigging the TWS Lumbar Strap
50
3 The Razor T Weight System
g The extra webbing can cut off and sealed by burning the cut end. Be sure to leave enough extra webbing to add more or larger weights in the future if necessary.
h The webbing can be finished off by feeding it back through the bottom block weight if required although this is not really necessary as it will end up inside the Neoprene Wrap.
i It is very important that the Lumbar strap of the Razor Harness determines the distance between the DSP and the MBP not the Lumbar Strap of the TWS. Make sure that the TWS Lumbar strap is not pulled tight and is the same length with the weights fitted as the Lumbar strap of the Razor Harness.
j Fit the Neoprene Wrap around the weight blocks on the Lumbar Strap of the TWS and the Lumbar Strap of the Razor Harness so that they are both solidly locked together. Ideally the Velcro closure of the Neoprene Wrap should be positioned on the inside of the Razor Harness against the divers back. The loose end of the Lumbar strap should be secured inside the Neoprene wrap. The Neoprene wrap should not be placed around the webbing loop below the DSP so as not to interfere with the SM Bungee.
k The Neoprene Wrap can be cut down in two places in between the guide stitching if required allowing the following configurations:
•Three single weight block wraps
•One double and one single weight block wrap
•One triple weight block wrap
Be sure to only cut between the stitching tramlines otherwise the edges of the neoprene will fray.
l Double check all fittings on the TWS are secure and refit the BAT Wing.
3.2 Rigging the TWS Lumbar Strap
51
3 The Razor T Weight System
a Remove the BAT wing if fitted to the Razor Harness.
b Slide the Waist Strap of the TWS under the webbing of the Razor Harness that passes through slots A and B of the MBP and bolt it into the hole in the middle of the MBP using one of the supplied button head screws and a washer.
c Slide one block weight onto either side of the Waist Strap webbing. Up to a maximum of 3kgs can be used on either side. The amount of weight used should be equal either side.
d Bolt the outside grommets into the DAPs on either side using 2 of the but-ton head screws and washers supplied. With small weight blocks use the two inside grommets and with large block weights use the 2 outside grommets.
e The DAPs can be moved on the Razor Harness either closer to or further away from the MBP as required to get a good fit with the Waist Strap of the TWS.
f Neoprene Wraps are not required for the Waist Strap
g Double check all fittings on the TWS are secure and refit the BAT Wing.
3.3 Rigging the TWS Waist Strap
52
3 The Razor T Weight System
It is very important to dive properly weighted and trimmed out in a well bal-anced equipment configuration. This will make your diving both safer and easier.
Tank selection is important in helping to achieve correct weighting.
Diving in cold water with a Drysuit and thick undergarments it is recom-mended to use low pressure Steel tanks as the primary SM tanks which will help to offset the extra positive buoyancy of the exposure protection.
High pressure Steel tanks are not recommended as they tend to be too nega-tively buoyant and make handling SM tanks underwater very difficult.
Diving in warm water in a wetsuit it is recommended to use Aluminium pri-mary Side Mount Tanks so as not to be excessively over weighted.
Aluminium tanks should always be used for stages and deco tanks so that as you add extra tanks to your configuration you do not become excessively over weighted.
3.4 Weighting and Trim
53
3 The Razor T Weight System
To determine your correct amount of ballast the following weighting check should be carried out:1. Enter the water wearing all of your equipment including the primary SM tanks
2. Completely deflate your Bat Wing and your Drysuit if you are using one
3. While holding a normal breath stop kicking and add enough weight until you sink to eye level. When you exhale you should submerge completely.
4. If you are using full tanks you will need to add a little more weight to com-pensate for the weight of the gas in the tanks that will be used during a dive.
5. Now that the correct amount of weight has been established submerge and attempt to hover in a horizontal position while moving the weight up or down the torso until the ideal position is achieved to maintain comfortable trim.
After a few dives as you become more relaxed and comfortable diving your Razor Side Mount System you may find that you can reduce your ballast weight a little.
When you are correctly weighted you will need very little gas in your Bat Wing.
If you are diving in a Drysuit all your buoyancy can be controlled with the Drysuit for the most part just using the BAT Wing for surface buoyancy and extra lift when carrying heavier equipment loads.
3.4 Weighting and Trim
4 The Razor BAT Wing

55
Once your Razor Harness and T Weight System have been set up then you can attach the BAT Wing to the Harness.
The BAT Wing should be worn with the Primary Wing on the outside and the Backup Wing on the inside.
This makes finding both the Primary and Backup wing dump valves easier and allows both to be vented more effectively and the Backup wing is very well protected.
The design of the BAT wing places the position of the dump valve and the inflator elbow in a well protected low profile position between the Side Mount tanks and the diver’s body.
In addition the outside material of the wing is not placed between a hard object such as the dump valve and the ceiling of a cave, or a sharp object in a wreck for example where it may be more prone to damage.
In the very unlikely event that the dump valve or inflator elbow or large diameter inflation hose should be damaged these components are easily and cheaply replaced which is not the case if the wing material is damaged.
The BAT Wing is supplied with a 19” long large diameter inflation hose and an 8” long LPI hose fitted with a hose hat.
This configuration should fit just about everyone but shorter large diameter inflation hoses of 16” or 13” and shorter LPI hoses of 6” or 4” can be purchased separately in order to custo- mize hose lengths if required.
4.1 Overview
4 The Razor BAT Wing
56
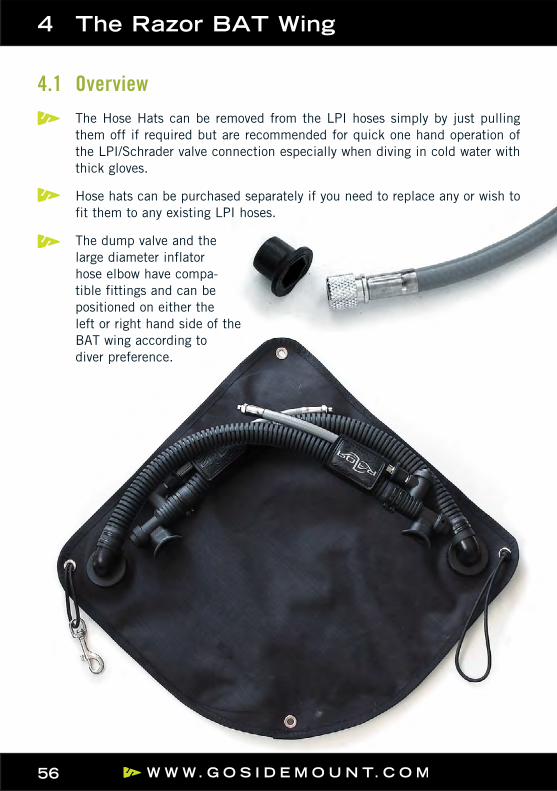
The Hose Hats can be removed from the LPI hoses simply by just pulling them off if required but are recommended for quick one hand operation of the LPI/Schrader valve connection especially when diving in cold water with thick gloves.
Hose hats can be purchased separately if you need to replace any or wish to fit them to any existing LPI hoses.
The dump valve and the large diameter inflator hose elbow have compa- tible fittings and can be positioned on either the left or right hand side of the BAT wing according to diver preference.
4.1 Overview
4 The Razor BAT Wing

57
Normally when using a Drysuit the dump valve will be positioned on the left hand side of the wing with the large diameter Inflator hose on the right hand side of the wing. The large diameter inflation hose will deliver in front of the diver across the chest from the right hand side with the LPI hose delivering from the regulator on the right SM tank.
The BAT wing is supplied already set up in this configuration.
When using a wetsuit normally the fittings should be switched so that the large diameter inflator hose is on the left hand side and the LPI hose can deliver from the regulator on the left hand Side Mount tank.
4.1 Overview
4 The Razor BAT Wing

58
When changing the fittings make sure that they are not cross threaded when screwing them in. The best way to do this is to turn anti clock-wise until the threads drop into position and then tighten gently. No force should be used to get the threads started.
4.1 Overview
4 The Razor BAT Wing
When the Inflator hose is unscrewed remember to also take out the sealing O ring and replace it in the other fitting with the rounded side of the O ring facing down so that the flat side of the inflator elbow will seal against the flat side of the O ring.
The inflator elbow is keyed and it is im- portant that it drops into position so that it will seal on the O ring when the fitting is screwed back into place.

59
The orientation of the elbow can be adjusted so that the large diameter inflation hose routes comfortably under the arm and across the chest.
To do this start the threads a couple of turns but do not tighten them until the correct orientation of the elbow is achieved making sure the keyed flange drops into place to ensure a seal and then tighten fully.
Once fitted pressure test the seal by inflating the wing and making sure it is airtight.
4.1 Overview
4 The Razor BAT Wing

60
When replacing the dump valve it is important that the spring is located in the right position in the center and can move freely so that the valve does not stick in the closed position.
Hold the dump cord and spring under a little tension as you screw the fitting back into place.
After tightening the dump valve fully check to make sure that it operates correctly and that the spring moves freely when the cord is pulled.
Check correct operation of the wing by inflating and deflating it and making sure there are no leaks from either of these fittings before going diving.
4.1 Overview
4 The Razor BAT Wing
61
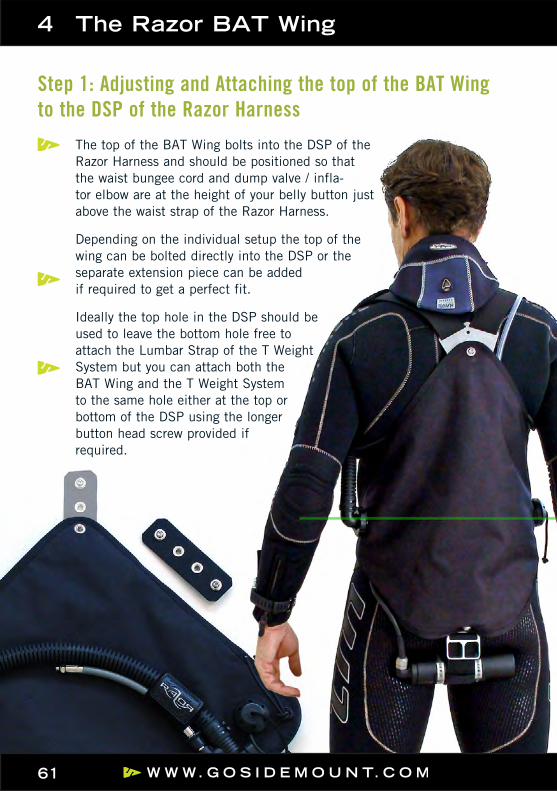
The top of the BAT Wing bolts into the DSP of the Razor Harness and should be positioned so that the waist bungee cord and dump valve / infla-tor elbow are at the height of your belly button just above the waist strap of the Razor Harness.
Depending on the individual setup the top of the wing can be bolted directly into the DSP or the separate extension piece can be added if required to get a perfect fit.
Ideally the top hole in the DSP should be used to leave the bottom hole free to attach the Lumbar Strap of the T Weight System but you can attach both the BAT Wing and the T Weight System to the same hole either at the top or bottom of the DSP using the longer button head screw provided if required.
Step 1: Adjusting and Attaching the top of the BAT Wing to the DSP of the Razor Harness
4 The Razor BAT Wing

62
STYLES
1A simple overhand knot tied into the end of the bungee cord will hold the right hand side bungee in place. This knot should be on the inside of the wing.
BOn the left hand side of the wing a short waist bun-gee cord is held in place with 2 overhand knots tied either side or the wing grommet to secure it.
The BAT Wing Waist Bungee is designed to secure the sides of the BAT Wing in a low profile stream-lined position even when the wing is inflated and still give easy unrestricted access to all of the Razor Harness attachment points.
The waist bungee on the right hand side of the BAT wing should have a long loop with a small snap bolt attached to it. This will feed across the waist and through the loop of the crotch strap of the Razor Harness and clip into the short bungee loop attached to the left hand side of the BAT wing.
Step 2: Attaching and Adjusting the BAT Wing Waist Bungee
4 The Razor BAT Wing
A
B
63
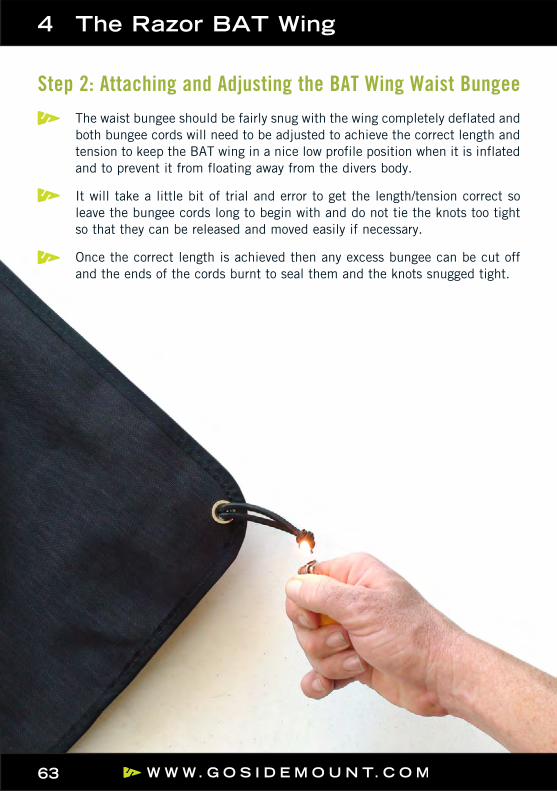
The waist bungee should be fairly snug with the wing completely deflated and both bungee cords will need to be adjusted to achieve the correct length and tension to keep the BAT wing in a nice low profile position when it is inflated and to prevent it from floating away from the divers body.
It will take a little bit of trial and error to get the length/tension correct so leave the bungee cords long to begin with and do not tie the knots too tight so that they can be released and moved easily if necessary.
Once the correct length is achieved then any excess bungee can be cut off and the ends of the cords burnt to seal them and the knots snugged tight.
Step 2: Attaching and Adjusting the BAT Wing Waist Bungee
4 The Razor BAT Wing
64
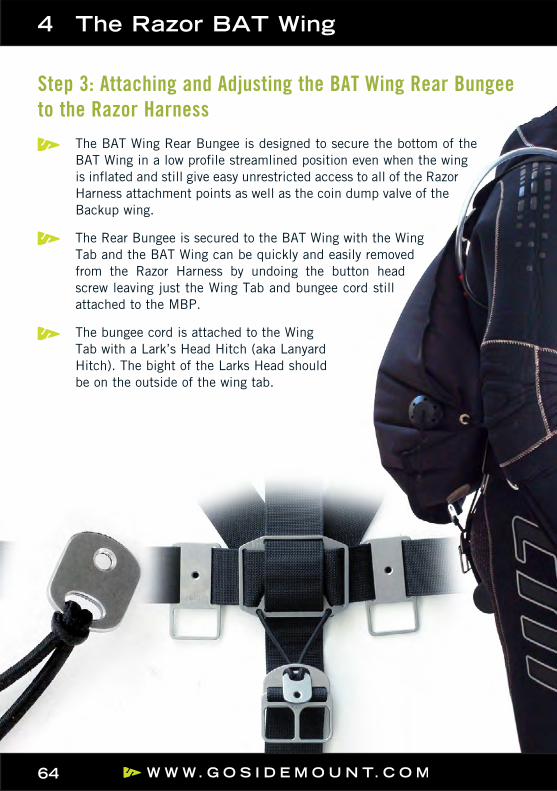
The BAT Wing Rear Bungee is designed to secure the bottom of the BAT Wing in a low profile streamlined position even when the wing is inflated and still give easy unrestricted access to all of the Razor Harness attachment points as well as the coin dump valve of the Backup wing.
The Rear Bungee is secured to the BAT Wing with the Wing Tab and the BAT Wing can be quickly and easily removed from the Razor Harness by undoing the button head screw leaving just the Wing Tab and bungee cord still attached to the MBP.
The bungee cord is attached to the Wing Tab with a Lark’s Head Hitch (aka Lanyard Hitch). The bight of the Larks Head should be on the outside of the wing tab.
Step 3: Attaching and Adjusting the BAT Wing Rear Bungee to the Razor Harness
4 The Razor BAT Wing
65
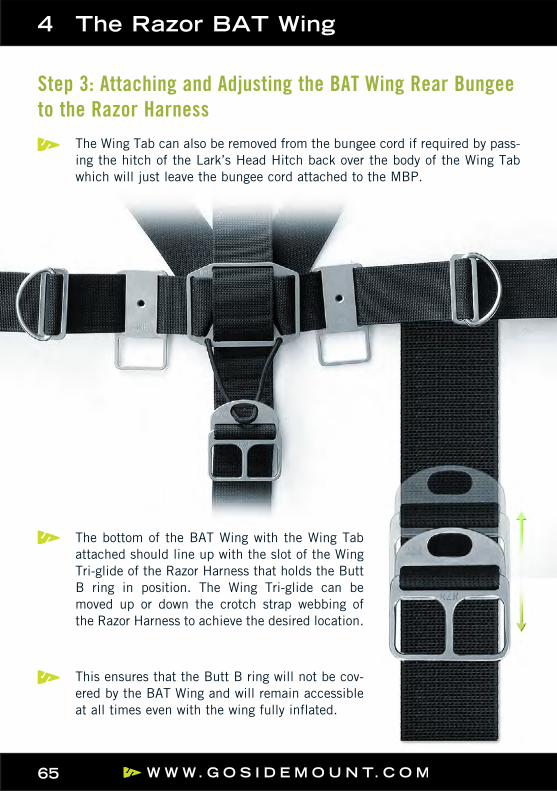
The Wing Tab can also be removed from the bungee cord if required by pass-ing the hitch of the Lark’s Head Hitch back over the body of the Wing Tab which will just leave the bungee cord attached to the MBP.
Step 3: Attaching and Adjusting the BAT Wing Rear Bungee to the Razor Harness
4 The Razor BAT Wing
The bottom of the BAT Wing with the Wing Tab attached should line up with the slot of the Wing Tri-glide of the Razor Harness that holds the Butt B ring in position. The Wing Tri-glide can be moved up or down the crotch strap webbing of the Razor Harness to achieve the desired location.
This ensures that the Butt B ring will not be cov-ered by the BAT Wing and will remain accessible at all times even with the wing fully inflated.
66
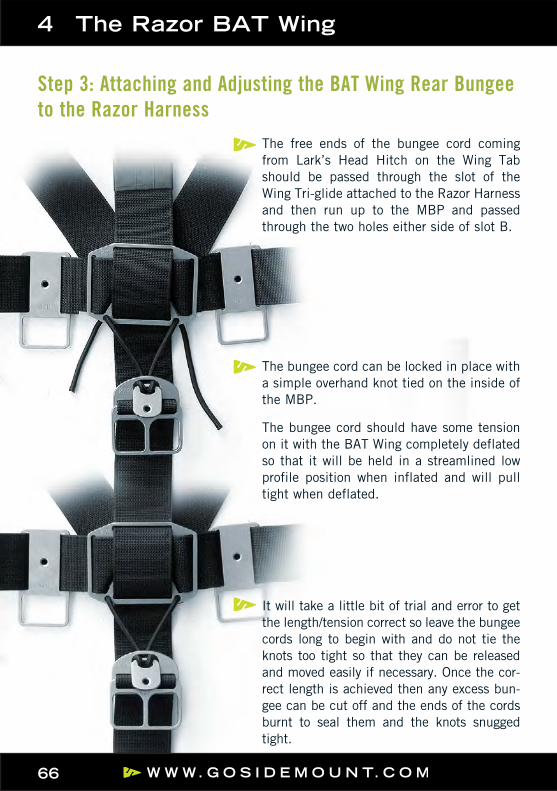
The free ends of the bungee cord coming from Lark’s Head Hitch on the Wing Tab should be passed through the slot of the Wing Tri-glide attached to the Razor Harness and then run up to the MBP and passed through the two holes either side of slot B.
The bungee cord can be locked in place with a simple overhand knot tied on the inside of the MBP.
The bungee cord should have some tension on it with the BAT Wing completely deflated so that it will be held in a streamlined low profile position when inflated and will pull tight when deflated.
It will take a little bit of trial and error to get the length/tension correct so leave the bungee cords long to begin with and do not tie the knots too tight so that they can be released and moved easily if necessary. Once the cor-rect length is achieved then any excess bun-gee can be cut off and the ends of the cords burnt to seal them and the knots snugged tight.
Step 3: Attaching and Adjusting the BAT Wing Rear Bungee to the Razor Harness
4 The Razor BAT Wing
67
Step 4: Adjusting and Attaching the Large Diameter Inflation Hose of the Primary wing to the Razor Harness
4 The Razor BAT Wing
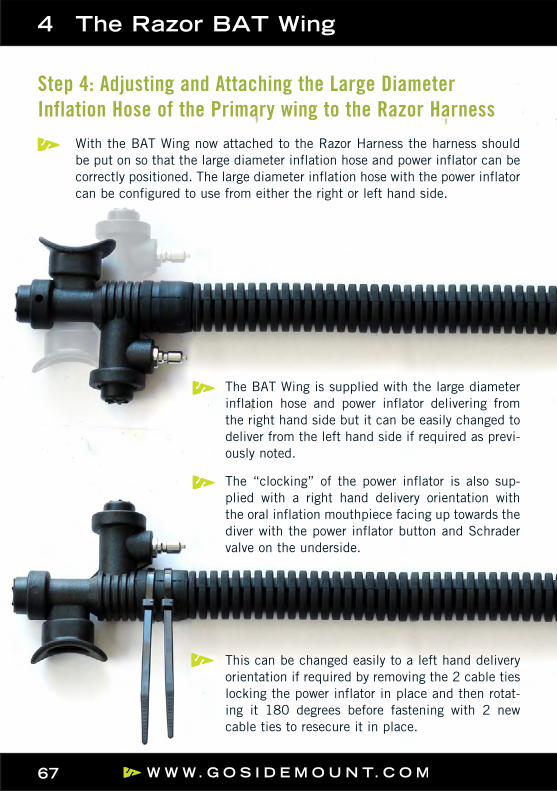
With the BAT Wing now attached to the Razor Harness the harness should be put on so that the large diameter inflation hose and power inflator can be correctly positioned. The large diameter inflation hose with the power inflator can be configured to use from either the right or left hand side.
This can be changed easily to a left hand delivery orientation if required by removing the 2 cable ties locking the power inflator in place and then rotat-ing it 180 degrees before fastening with 2 new cable ties to resecure it in place.
The BAT Wing is supplied with the large diameter inflation hose and power inflator delivering from the right hand side but it can be easily changed to deliver from the left hand side if required as previ-ously noted.
The “clocking” of the power inflator is also sup-plied with a right hand delivery orientation with the oral inflation mouthpiece facing up towards the diver with the power inflator button and Schrader valve on the underside.
68
Step 4: Adjusting and Attaching the Large Diameter Inflation Hose of the Primary wing to the Razor Harness
2 Rigging the Razor Harness:
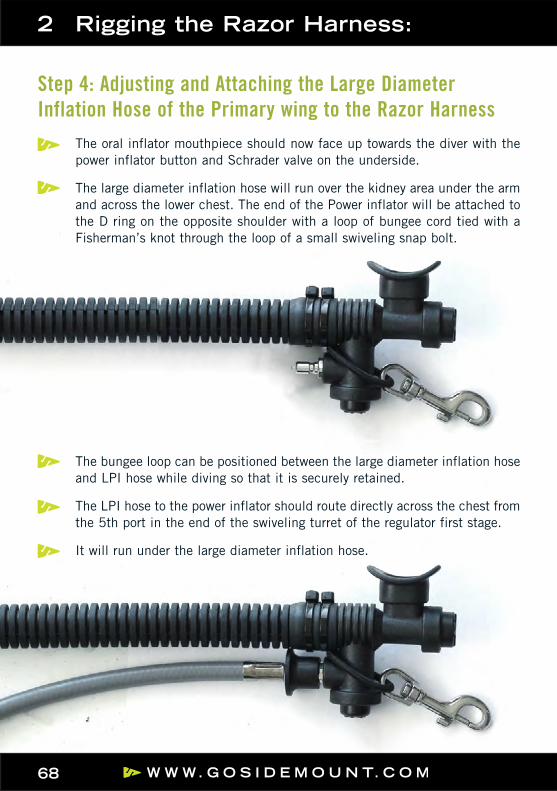
The oral inflator mouthpiece should now face up towards the diver with the power inflator button and Schrader valve on the underside.
The large diameter inflation hose will run over the kidney area under the arm and across the lower chest. The end of the Power inflator will be attached to the D ring on the opposite shoulder with a loop of bungee cord tied with a Fisherman’s knot through the loop of a small swiveling snap bolt.
The bungee loop can be positioned between the large diameter inflation hose and LPI hose while diving so that it is securely retained.
The LPI hose to the power inflator should route directly across the chest from the 5th port in the end of the swiveling turret of the regulator first stage.
It will run under the large diameter inflation hose.
69
Step 4: Adjusting and Attaching the Large Diameter Inflation Hose of the Primary wing to the Razor Harness
4 The Razor BAT Wing
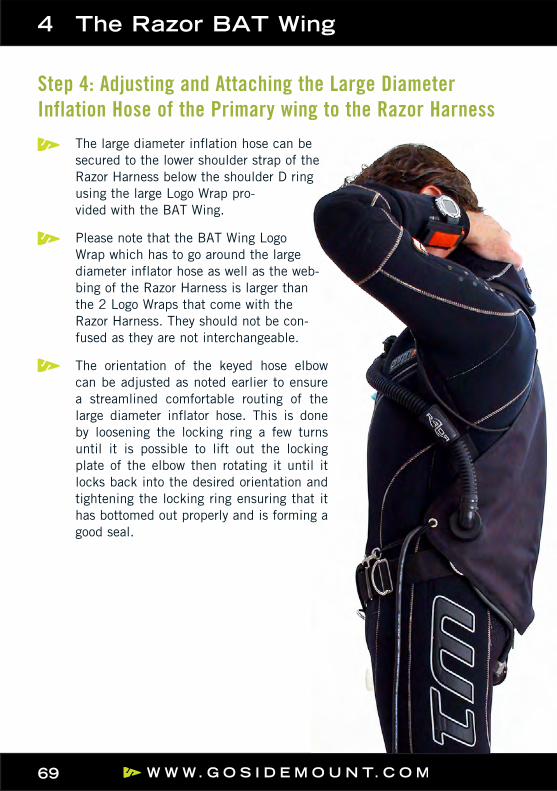
The large diameter inflation hose can be secured to the lower shoulder strap of the Razor Harness below the shoulder D ring using the large Logo Wrap pro-vided with the BAT Wing.
Please note that the BAT Wing Logo Wrap which has to go around the large diameter inflator hose as well as the web-bing of the Razor Harness is larger than the 2 Logo Wraps that come with the Razor Harness. They should not be con-fused as they are not interchangeable.
The orientation of the keyed hose elbow can be adjusted as noted earlier to ensure a streamlined comfortable routing of the large diameter inflator hose. This is done by loosening the locking ring a few turns until it is possible to lift out the locking plate of the elbow then rotating it until it locks back into the desired orientation and tightening the locking ring ensuring that it has bottomed out properly and is forming a good seal.
70
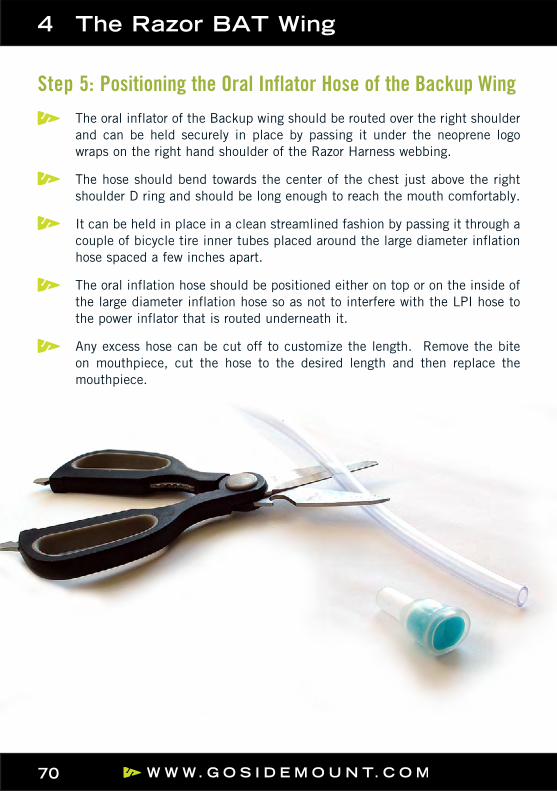
The oral inflator of the Backup wing should be routed over the right shoulder and can be held securely in place by passing it under the neoprene logo wraps on the right hand shoulder of the Razor Harness webbing.
The hose should bend towards the center of the chest just above the right shoulder D ring and should be long enough to reach the mouth comfortably.
It can be held in place in a clean streamlined fashion by passing it through a couple of bicycle tire inner tubes placed around the large diameter inflation hose spaced a few inches apart.
The oral inflation hose should be positioned either on top or on the inside of the large diameter inflation hose so as not to interfere with the LPI hose to the power inflator that is routed underneath it.
Any excess hose can be cut off to customize the length. Remove the bite on mouthpiece, cut the hose to the desired length and then replace the mouthpiece.
Step 5: Positioning the Oral Inflator Hose of the Backup Wing
4 The Razor BAT Wing
71
The mouthpiece can be glued in position when you are happy that you have the correct length. Spare mouthpieces are available and it is recommended to carry one in your Razor Expandable Pouch in case you should lose it while diving.
In the event it should be lost while diving and you have no replacement it will have no effect at all unless you are actually using the Backup wing.
The only problem then will be that the hose will tend to vent gas when you are in a head up position such as when ascending. This can be prevented by placing your finger over the end of the hose and releasing it when you wish to vent gas to adjust buoyancy or slow an ascent.
Step 5: Positioning the Oral Inflator Hose of the Backup Wing
4 The Razor BAT Wing
72
Only use one wing at a time either the Primary or the Backup.
Make sure the wing you are not using is completely empty while diving so that you only have 1 air space to control.
The Primary wing can be inflated in the following ways:
• By using the power inflator connected to a tank with an LPI hose
• By oral inflation by holding down the dump button of the power inflator and blowing into the mouthpiece
The Primary wing can be vented in the following ways:• By using the pull dump while rolling the body to the opposite side when in
a horizontal position to get the dump valve to the highest position of the wing
• By using the dump valve on the power inflator when in a head up position
• By sucking a vacuum on the power inflator when in a head down position
The Backup wing can only be inflated orally using the bite on mouthpiece.Not having a power inflator connected to the Backup wing avoids any prob-lems associated with a mechanical failure or accidental inflation of the wing resulting in a potential buoyant ascent.
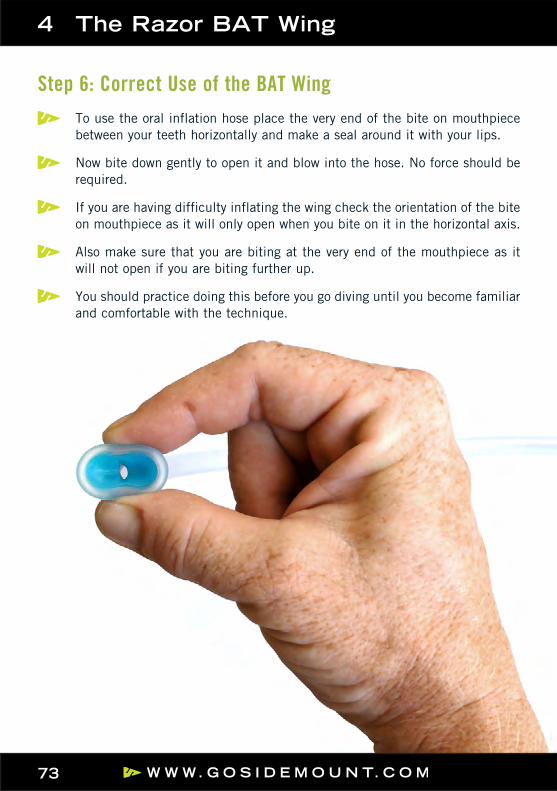
To use the oral inflation hose place the very end of the bite on mouthpiece between your teeth horizontally and make a seal around it with your lips.
Step 6: Correct Use of the BAT Wing
4 The Razor BAT Wing
73
To use the oral inflation hose place the very end of the bite on mouthpiece between your teeth horizontally and make a seal around it with your lips.
Now bite down gently to open it and blow into the hose. No force should be required.
If you are having difficulty inflating the wing check the orientation of the bite on mouthpiece as it will only open when you bite on it in the horizontal axis.
Also make sure that you are biting at the very end of the mouthpiece as it will not open if you are biting further up.
You should practice doing this before you go diving until you become familiar and comfortable with the technique.
Step 6: Correct Use of the BAT Wing
4 The Razor BAT Wing

74
The Backup wing can be deflated in 3 ways:• By using the coin dump at the rear of the wing. Roll slightly to the left and
slightly head down to position the coin valve at the highest point of the wing then deflect one side of the coin valve by pressing on it gently with your thumb or finger. No force is required as you just need to break the seal.
• By holding the oral inflation hose at the highest point and pinching gently on the bite valve between thumb and forefinger to open it
• By biting gently on the bite valve of the oral inflation tube and sucking a vacuum on it.
If you are having trouble venting air from the oral inflation tube check that this dump valve is at the highest position of the wing, that you are pinching it in the correct orientation across the horizontal axis and that you are pinch-ing at the very end.
Step 6: Correct Use of the BAT Wing
4 The Razor BAT Wing
75
Please note that the coin dump valve also functions as an over pressure relief valve so that in the event you have a lot of gas in the Backup wing and start to ascend it will vent automatically to prevent a wing rupture.
For this reason if the Backup wing is very full and you put any pressure on it the coin dump valve will release a small amount of air without you touching it.
This is a design feature and perfectly normal.
After diving both the Primary and Backup wings should be drained of any water that is inside and partially inflated to dry.
Both Primary and Backup wings can be drained of water in exactly the same way air is vented from them although it is easier if you orally inflate them a little first so that you can force any water out under pressure.
Please note that even when not using the Backup wing during a dive a small amount of water may enter it by being forced through the coin dump valve under pressure as you descend as any small internal airspace remaining inside the backup wing is not equalized with external pressure.
This is completely normal and will not affect the function of the wing in any way but will need to be drained at the end of the dive.
Step 6: Correct Use of the BAT Wing
4 The Razor BAT Wing

5 The Razor Expandable Pouch (REP)
77
5 The Razor Expandable Pouch (REP)
5.1 OverviewThe completely new REP has been specifically designed to be butt mounted which is the most streamlined and easiest to access location in SM configu-ration.
Pockets on the waist are difficult to access due to the placement of the SM tanks and become an entanglement hazard in low areas.
Thigh pockets are also difficult to access due to the placement of the SM tanks and will also have the tendency to push the bottom of the tanks away from the diver's body resulting in “A Framing” and a greater risk of the tanks getting ratcheted in small areas.
The REP should be clipped off to both of the DAPs with the 2 double ender’s provided and will hang just below the BAT Wing with the Butt B Ring posi-tioned between the bottom of the wing and the top of the pouch allowing easy unobstructed access to the B Ring as well.
The pouch will rest on top of a butt mounted primary light if one is being used and anything clipped off to the Butt B Ring will be lie on top of it.
The way that the REP is attached with a double ender clipped off to each of the small stainless steel D Rings sewn into the REP and then each double ender clipped to the DAPs on the Razor Harness provides a very solid secure attachment which will prevent accidental loss of the pouch.
Although this is a metal to metal connection each double ender can easily be removed at either the DAP or the Pouch D Rings in the very unlikely event that one side of either double ender should jam closed. In addition the D Ring can be cut free if required as a last resort.
78
5 The Razor Expandable Pouch (REP)
This position also prevents the REP from swinging from side to side while swimming or getting caught between the diver’s body and the SM tanks.
The REP can be either used in situ or unclipped and brought to the front so that the diver can see exactly what they are removing or replacing from the pouch which is not possible with thigh or waist mounted pockets.
The REP can also be clipped off temporarily to both the Shoulder D Rings while working with the contents if required which allows the diver to keep both hands free and allows easy access to and good visibility of the contents.
The REP can be clipped off temporarily using just 1 double ender to the Butt B Ring or either of the DAPs if required but will tend to swing in this position while swimming.
The REP can be kept as flat and streamlined as possible or expanded consid-erably by pulling open the Velcro closures around all four edges.
Even squashed flat the pouch has quite a large volume and will hold a con-siderable amount.
The back of the REP has a large mesh pocket with Velcro closure and a cen-ter tab to make opening it easier when wearing thick gloves. This was specifi-cally designed to carry slates/wet notes and dive tables/laminated deco plans.
The top zip of the REP is very robust and has a large tab to make operation with gloves easier and it opens across the full length to the pouch giving easy access to the contents.
5.1 Overview
79
5 The Razor Expandable Pouch (REP)
The REP has 2 internal Velcro closure pockets on the inside of the front panel which were designed to carry small items such as a backup cutting tool like the EZZYCUT or your Spare SM Bungee.
In addition there are internal fixing points on both sides of the REP and a length of bungee cord for a lanyard which can be set up in any of the follow-ing ways depending on diver preference:
1. one loop tied between both attachment points
2. two small loops tied either side of the pouch
3. one large loop tied just to an attachment point on one side of the pouch
The bungee lanyard can be secured to the attachment point by passing one end of the bungee cord through the webbing loop and then tying both ends together with a Fisherman’s Knot.
The Spare SM Bungee can also be clipped off to one of these internal attach-ment points if desired.
5.1 Overview

6 The Low Profile D Ring Kit
81
6 The Low Profile D Ring Kit
6.1 OverviewThe Razor Harness comes set up with 4 standard 2” D rings 1 at each shoul-der and 1 at each hip as well as a low profile scooter D ring at the crotch and the Butt B ring.
This configuration is ideal for cold water diving where larger target areas are required to make clipping and unclipping tanks and other items easier due to loss of manual dexterity from having to wear thick gloves or from the numb fingers due to the cold.
The larger 2” D ring also provides more room for the larger snap bolts that are typically used in cold water diving.
Typically divers in cold water environments will use steel primary tanks to help offset the extra positive buoyancy created by using Drysuits and thick undergarments.
Unlike Aluminium tanks Steel tanks do not have a buoyancy swing from negative to positive as you breathe the gas from them and they remain nega-tive throughout the dive so only 1 D ring is required at each side on the waist of the harness as the tanks will not have to be repositioned during the dive to maintain a streamlined profile
The Low Profile D Ring Kit has been specifically designed for warm water diving using Aluminium 80cuft primary SM tanks
It can be used whether diving in a Drysuit or a Wetsuit
82
Step 1: Remove the BAT Wing if fitted
Step 2: Remove the waist strap of the T Weight System if fitted
Step 3: Remove all the hardware on both waist straps of the Razor Harness including the 2” D ring on each side. Keep the 2 serrated tri-glides to reuse.
Step 4: Unthread the shoulder/waist webbing of the har-ness from the MBP
Step 5: Both of the 2” shoulder D rings should be remo-ved and exchanged for the 1” version reusing the same serrated tri-glides
6 The Low Profile D Ring Kit

83
Step 6: Re-weave the shoulder/waist webbing back through the MBP
Step 7: Replace the DAPs either side of the MBP
Step 8: Slide the first 1” waist D ring into position just behind the hip bone on each side of the waist strap using the 2 serrated tri-glides from the D rings that were removed
Step 9: Slide the second 1” waist D ring into position just behind the hip on each side of the waist strap using the 2 extra serrated tri-glides provided with the Low Profile D Ring Kit
Step 10: Replace the waist buckle and bicycle tire inner tubes
6 The Low Profile D Ring Kit
84
6 The Low Profile D Ring Kit
It is a good idea to mark the position of all the hardware before you remove it so that you can get it back in the right position easily. This can be done with a piece of chalk for example.
You can also mix up the 2 sizes of D rings on the Razor Harness according to diver preference.
Some divers will use the 1” Low Profile D rings at the waist but prefer to have 2” D rings at the shoulders as that is a busy working area that is used a lot to clip things off and the larger D Ring gives more room and a larger target area.
If you are switching between warm and cold water diving a lot or between Wetsuit and Drysuit on a regular basis then you may want to consider pur-chasing a second Razor Harness so that one is permanently set up for warm water diving in a wetsuit with Aluminium SM tanks and the low profile D ring kit and one is permanently set up for cold water diving in a Drysuit using Steel SM tanks and the standard 2” D rings.
85
There is no substitute for time spent in the water.
Take it easy to begin with while you get used to your new Razor Side Mount System.
Please contact Go Side Mount directly if you have any questions or problems with your Razor Harness.
Best Wishes
Steve Bogaerts
www.gosidemount.com
Go Diving!

S I D E M O U N T S Y S T E M
CAvE SOfTLY, DIvE SAfELY!