Embed Size (px)
Citation preview
MASTERPRESENCERESONANCESAGGINGNOISE GATETREBLEMIDBASSVOLUME
50
1 8
2 7
3 64 5
GAINREVERBDLY LEVELFEEDBACKDLY T IMEMOD TYPEINTENSITY
CLEAN ULTRACRUNCH LEAD
POWER
PHONES / L INE
CAB TYPE
STOREFX LOOPFX ACCESSBOOST
PRE LOOP
OFF OFF1400 OFF
C
2
1T
F P
S P I R I T ™ T O N E G E N E R A T O R
• E
nglish
• D
eu
tsch
• Fra
nçais
• It
alian
o•
Esp
añ
ol
• 日本語
• 中文
中文
Manual 1.0
Version 2.5 07/2018
Important Safety Instructions! Read before connecting!
This product has been built by the manufacturer in accordance with IEC 62368-1 and left the factory in safe working order. To maintain this condition and ensure non-risk operation, the user must follow the advice and warning comments found in the operating instructions. The unit conforms to Protection Class 1 (protectively earthed). If this product shall be used in vehicles, ships or aircraft or at altitudes exceeding 2000 m above sea level, take care of the relevant safety regulations which may exceed the IEC 62368-1 requirements.WARNING: To prevent the risk of fire and shock hazard, do not expose this appliance to moisture or rain. Do not open case – no user serviceable parts inside. Refer service to qualified service personnel.
This symbol, wherever it appears, alerts you to the presence of uninsulated dangerous voltage inside the enclosure – voltage that may be sufficient to constitute a risk of shock.
This symbol, wherever it appears, alerts you to the presence of externally accessible hazardous voltage. External wiring connected to any terminal marked with this symbol must be a "ready made cable” complying with the manufacturers recommendations, or must be a wiring installed by instructed persons only.
This symbol, wherever it appears, alerts you to important operating and maintenance instructions in the accompanying literature. Read the manual.
This symbol, wherever it appears, tells you: Take care! Hot surface! To prevent burns you must not touch.
All electrical and electronic products including batteries should be disposed of separately from the municipal waste stream via designated collection facilities appointed by the government or the local authorities.
Read these instructions. Keep these instructions. Follow all warnings and instructions marked on the product and in this manual.
• Do not use this product near water. Do not place the product near water, baths, wash basins, kitchen sinks, wet areas, swimming pools or damp rooms.
• Do not place objects containing liquid on the product – vases, glasses, bottles etc.
• Clean only with dry cloth.• Do not remove any covers or sections of the housing.• The set operating voltage of the product must match
the local mains supply voltage. If you are not sure of the type of power available consult your dealer or local power company.
• To reduce the risk of electrical shock, the grounding of this product must be maintained. Use only the power supply cord provided with this product, and maintain the function of the center (grounding) pin of the mains connection at any time. Do not defeat the safety purpose of the polarized or grounding-type plug.
• Do not defeat the safety purpose of the polarized or grounding-type plug. A polarized plug has two blades with one wider than the other. A grounding type plug has two blades and a third grounding prong. The wide blade or the third prong are provided for your safety. If the provided plug does not fit into your outlet, consult an electrician for replacement of the obsolete outlet.
• Protect the power cord from being walked on or pinched particularly at plugs, convenience receptacles, and the point where they exit from the device! Power supply cords should always be handled carefully. Periodically check cords for cuts or sign of stress, especially at the plug and the point where the cord exits the device.
• Never use a damaged power cord.• Unplug this product during lightning storms or when
unused for long periods of time.• This product can be fully disconnected from mains
only by pulling the mains plug at the unit or the wall socket. The product must be placed in such a way at any time, that disconnecting from mains is easily possible.
• Fuses: Replace with IEC127 (5x20mm) type and rated fuse only! It is prohibited to use "patched fuses” or to short the fuse-holder. Replacing any kind of fuses must only be carried out by qualified service personal.
• Refer all servicing to qualified service personnel. Servicing is required when the unit has been damaged in any way, such as:
- When the power cord or plug is damaged or frayed.- If liquid has been spilled or objects have fallen into
the product.- If the product has been exposed to rain or moisture.- If the product does not operate normally when the
operating instructions are followed.- If the product has been dropped or the cabinet has
been damaged.• Do not connect external speakers to this product with
an impedance lower than the rated impedance given on the product or in this manual. Use only cables with sufficient cross section according to the local safety regulations.
• Keep away from direct sunlight.• Do not install near heat sources such as radiators,
heat registers, stoves or other devices that produce heat.
• This apparatus is for moderate climates areas use, not suitable for use in tropical climates countries.
• Do not block any ventilation openings. Install in accordance with manufacturer’s instructions. This product must not be placed in a built-in installation such as a rack unless proper ventilation is provided.
• Always allow a cold device to warm up to ambient temperature, when being moved into a room. Condensation can form inside it and damage the product, when being used without warming up.
• Do not place naked flame sources, such as lighted candles on the product.
• The device must be positioned at least 20 cm/8" away from walls with free air space inbetween, and there must be free air space of at least 50 cm / 20" immediately above the unit within which no object(s) may be placed or positioned.
• Make sure that the device is always placed on a solid, flat surface.
• Use only with the cart, stand, tripod, bracket or table specified by the manufacturer or sold with the product. When a cart is used, use caution when moving the cart/product combination to avoid injury from tip-over.
• Use only accessories recommended by the manufacturer, this applies for all kind of accessories, for example protective covers, transport bags, stands, wall or ceiling mounting equipment. In case of attaching any kind of accessories to the product, always follow the instructions for use, provided by the manufacturer. Never use fixing points on the product other than specified by the manufacturer.
• This appliance is NOT suitable to be used by any person or persons (including children) with limited physical, sensorial or mental ability, or by persons with insufficient experience and/or knowledge to operate such an appliance. Children under 4 years
of age must be kept away from this appliance at all times.
• Never push objects of any kind into this product through cabinet slots as they may touch dangerous voltage points or short out parts that could result in risk of fire or electric shock.
• This product is capable of delivering sound pressure levels in excess of 90 dB, which may cause permanent hearing damage! Exposure to extremely high noise levels may cause a permanent hearing loss. Wear hearing protection if continuously exposed to such high levels.
• The manufacturer only guarantees the safety, reliability and efficiency of this product if:
- Assembly, extension, re-adjustment, modifications or repairs are carried out by the manufacturer or by persons authorized to do so.
- The electrical installation of the relevant area complies with the requirements of IEC (ANSI) specifications.
- The unit is used in accordance with the operating instructions.
- The grounding of the center pin of the mains plug is maintained to reduce the risk of shock.
Things to do before operating the amp
• Please read these instructions carefully,
particularly the notes on safety, before
operating the amp.
• The manufacturer disclaims any liability on
responsibility whatsoever for any damage or
defect to this and other devices resulting from
misuse.
• Before you plug this amp into a mains power
outlet, make sure its Power switche is off and
that the voltage rating indicated on its rear
panel matches your local mains current.
• A word of warning before you fire up your
Black Spirit 200 Floor: It’s loud, and high
volume levels can cause hearing damage. To
avoid very loud and unwelcome surprises,
make a habit of backing the Volume knob of
the guitar connected to the Black Spirit 200
Floor all the way down before switching on
the amp!
3
Black Spirit 200 Floor – Manual 1.0
1 Quick-Start Guide ........................................................................ 3
2 The Fundamentals of Handling Black Spirit 200 Floor .................. 3
3 Control Features ........................................................................ 6
4 Connections .............................................................................. 7
5 Presets ....................................................................................... 9
6 Bluetooth® ................................................................................. 10
7 MIDI .......................................................................................... 11
8 Technical Data ........................................................................... 13
Heads up: Black Spirit 200 Floor comes with a universal power supply
that works reliably at any mains voltage worldwide and maintains the
sound quality wherever you go. When the amp is connected to a mains
outlet, it will consume a tiny amount of power – less than 0.5 watts –
even when it is switched off. Every seven seconds or so, it will issue a
soft chirping sound that is only audible in a very quiet environment. This
does not constitute a material defect that can or needs to be repaired.
If this sound bothers you, we recommend that you plug the amp into a
switchable extension socket so you can flip its switch to cut off the power
supply to the amp.
1 Quick-Start Guide
MASTERPRESENCERESONANCESAGGINGNOISE GATETREBLEMIDBASSVOLUME
50
1 8
2 7
3 64 5
GAINREVERBDLY LEVELFEEDBACKDLY T IMEMOD TYPEINTENSITY
CLEAN ULTRACRUNCH LEAD
POWER
PHONES / L INE
CAB TYPE
STOREFX LOOPFX ACCESSBOOST
PRE LOOP
OFF OFF1400 OFF
C
2
1T
F P
S P I R I T ™ T O N E G E N E R A T O R
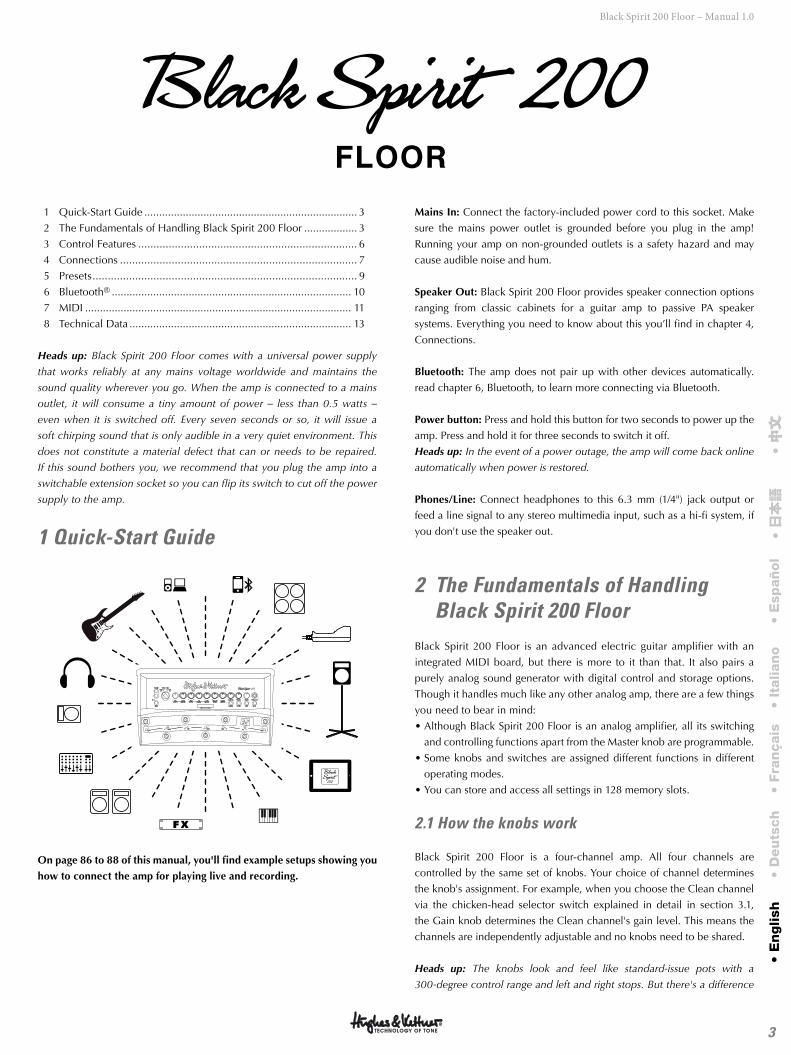
On page 86 to 88 of this manual, you'll find example setups showing you
how to connect the amp for playing live and recording.
Mains In: Connect the factory-included power cord to this socket. Make
sure the mains power outlet is grounded before you plug in the amp!
Running your amp on non-grounded outlets is a safety hazard and may
cause audible noise and hum.
Speaker Out: Black Spirit 200 Floor provides speaker connection options
ranging from classic cabinets for a guitar amp to passive PA speaker
systems. Everything you need to know about this you’ll find in chapter 4,
Connections.
Bluetooth: The amp does not pair up with other devices automatically.
read chapter 6, Bluetooth, to learn more connecting via Bluetooth.
Power button: Press and hold this button for two seconds to power up the
amp. Press and hold it for three seconds to switch it off.
Heads up: In the event of a power outage, the amp will come back online
automatically when power is restored.
Phones/Line: Connect headphones to this 6.3 mm (1/4") jack output or
feed a line signal to any stereo multimedia input, such as a hi-fi system, if
you don't use the speaker out.
2 The Fundamentals of Handling Black Spirit 200 Floor
Black Spirit 200 Floor is an advanced electric guitar amplifier with an
integrated MIDI board, but there is more to it than that. It also pairs a
purely analog sound generator with digital control and storage options.
Though it handles much like any other analog amp, there are a few things
you need to bear in mind:
• Although Black Spirit 200 Floor is an analog amplifier, all its switching
and controlling functions apart from the Master knob are programmable.
• Some knobs and switches are assigned different functions in different
operating modes.
• You can store and access all settings in 128 memory slots.
2.1 How the knobs work
Black Spirit 200 Floor is a four-channel amp. All four channels are
controlled by the same set of knobs. Your choice of channel determines
the knob's assignment. For example, when you choose the Clean channel
via the chicken-head selector switch explained in detail in section 3.1,
the Gain knob determines the Clean channel's gain level. This means the
channels are independently adjustable and no knobs need to be shared.
Heads up: The knobs look and feel like standard-issue pots with a
300-degree control range and left and right stops. But there's a difference
• E
nglish
• D
eu
tsch
• Fra
nçais
• It
alian
o•
Esp
añ
ol
• 日本語
• 中文
中文
4
Black Spirit 200 Floor – Manual 1.0
that may take some time getting used to: The knob setting programmed
in a preset is independent of the knob's physical position. In other words,
when you switch from one preset to another, the knob's actual position
may not reflect the setting programmed in the preset, and you may well
hear something other than what you're seeing would suggest. The knob
will respond like any other conventional pot as soon as you move it. The
Store LED in the Master section tells you the knob setting stored in the
preset. It lights up when the physical position of the knob corresponds to
the preset setting.
Heads up: You may hear a soft background noise when twisting knobs.
This sound is made by the Programmable Resistor Network, or PRN™, as
it switches its 256 resistors. Each of these smart rotary controls consists of
256 individual resistors in serial array, 256 switches, and a memory with the
ability to save and recall every switch's position.
2.2 The Black Spirit 200 Floor app for iPads and Android devices
All controls and buttons on Black Spirit 200 Floor are MIDI-enabled, so
we programmed an app that makes the most of MIDI to extend the amp's
capabilities.
This app lets you:
• Give every preset a unique name
• Visually monitor all parameters in real time
• Remotely control all parameters in real time
• Save presets in the App
• Download and upload presets to and from the amp
• Share presets via email or text messages.
• Create and organize preset lists.
Available at the Apple App Store and at Google Play, this free app
connects to Black Spirit 200 Floor via Bluetooth. For more on this, see
chapter 6, Bluetooth.
3 Control Features
3.1 The channel section
Black Spirit 200 Floor sports four channels, each voiced very differently
and accessible via a chicken-head selector switch. The power amp
feedback circuit, which has a formative hand in shaping your tone, is
also reconfigured during channel switching. The programmable knobs
afford you full access to all sound parameters on every channel. We even
painstakingly fine-tuned the knobs' control ranges and characteristics to
match the selected channel's voicing.
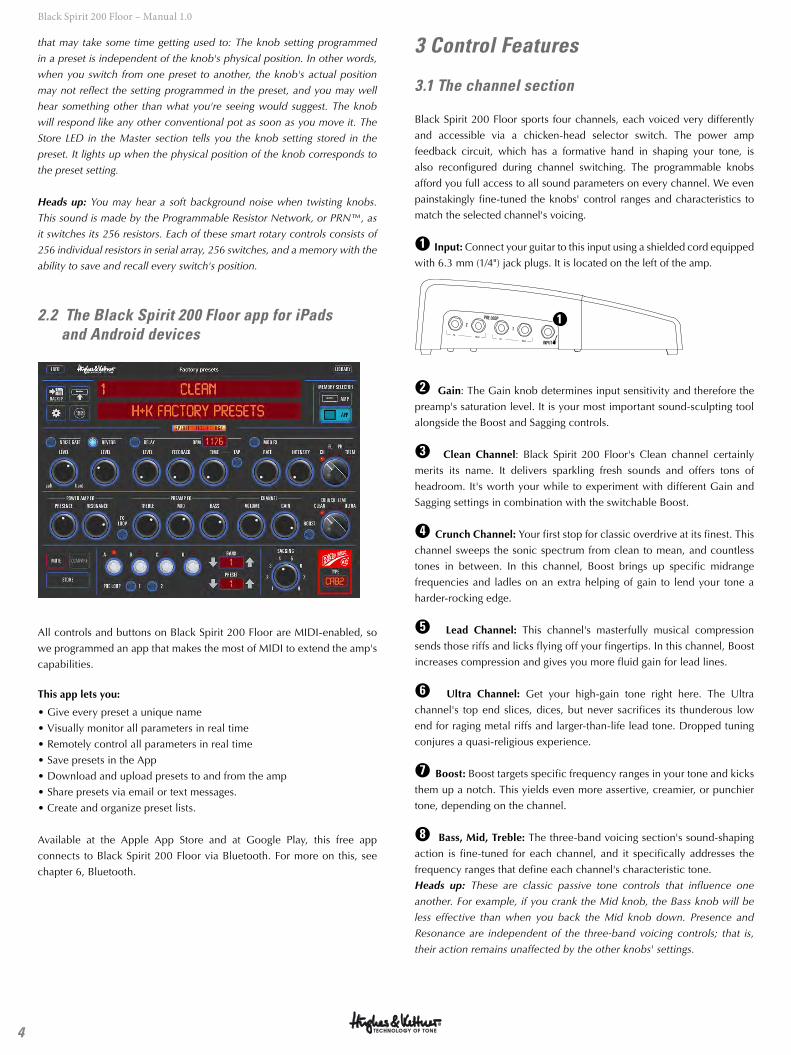
●1 Input: Connect your guitar to this input using a shielded cord equipped
with 6.3 mm (1/4") jack plugs. It is located on the left of the amp.
INPUT
PRE LOOP
12
1
●2 Gain: The Gain knob determines input sensitivity and therefore the
preamp's saturation level. It is your most important sound-sculpting tool
alongside the Boost and Sagging controls.
●3 Clean Channel: Black Spirit 200 Floor's Clean channel certainly
merits its name. It delivers sparkling fresh sounds and offers tons of
headroom. It's worth your while to experiment with different Gain and
Sagging settings in combination with the switchable Boost.
●4 Crunch Channel: Your first stop for classic overdrive at its finest. This
channel sweeps the sonic spectrum from clean to mean, and countless
tones in between. In this channel, Boost brings up specific midrange
frequencies and ladles on an extra helping of gain to lend your tone a
harder-rocking edge.
●5 Lead Channel: This channel's masterfully musical compression
sends those riffs and licks flying off your fingertips. In this channel, Boost
increases compression and gives you more fluid gain for lead lines.
●6 Ultra Channel: Get your high-gain tone right here. The Ultra
channel's top end slices, dices, but never sacrifices its thunderous low
end for raging metal riffs and larger-than-life lead tone. Dropped tuning
conjures a quasi-religious experience.
●7 Boost: Boost targets specific frequency ranges in your tone and kicks
them up a notch. This yields even more assertive, creamier, or punchier
tone, depending on the channel.
●8 Bass, Mid, Treble: The three-band voicing section's sound-shaping
action is fine-tuned for each channel, and it specifically addresses the
frequency ranges that define each channel's characteristic tone.
Heads up: These are classic passive tone controls that influence one
another. For example, if you crank the Mid knob, the Bass knob will be
less effective than when you back the Mid knob down. Presence and
Resonance are independent of the three-band voicing controls; that is,
their action remains unaffected by the other knobs' settings.
5
Black Spirit 200 Floor – Manual 1.0
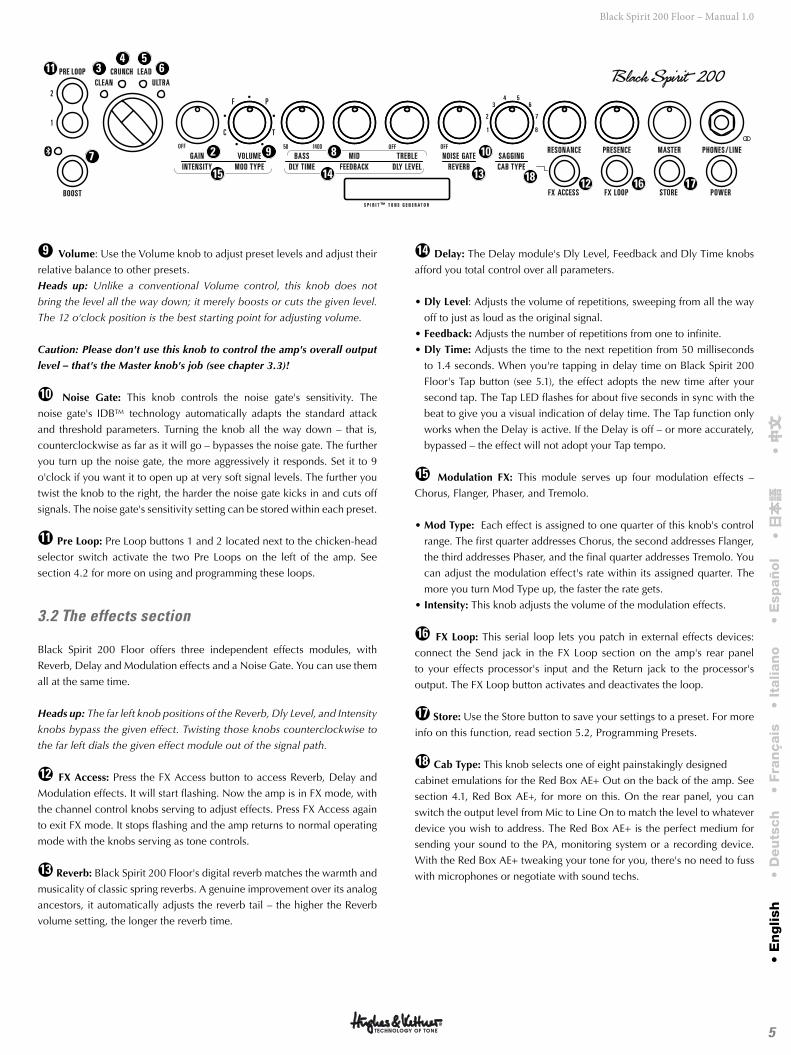
●9 Volume: Use the Volume knob to adjust preset levels and adjust their
relative balance to other presets.
Heads up: Unlike a conventional Volume control, this knob does not
bring the level all the way down; it merely boosts or cuts the given level.
The 12 o'clock position is the best starting point for adjusting volume.
Caution: Please don't use this knob to control the amp's overall output
level – that's the Master knob's job (see chapter 3.3)!
●10 Noise Gate: This knob controls the noise gate's sensitivity. The
noise gate's IDB™ technology automatically adapts the standard attack
and threshold parameters. Turning the knob all the way down – that is,
counterclockwise as far as it will go – bypasses the noise gate. The further
you turn up the noise gate, the more aggressively it responds. Set it to 9
o'clock if you want it to open up at very soft signal levels. The further you
twist the knob to the right, the harder the noise gate kicks in and cuts off
signals. The noise gate's sensitivity setting can be stored within each preset.
●11 Pre Loop: Pre Loop buttons 1 and 2 located next to the chicken-head
selector switch activate the two Pre Loops on the left of the amp. See
section 4.2 for more on using and programming these loops.
3.2 The effects section
Black Spirit 200 Floor offers three independent effects modules, with
Reverb, Delay and Modulation effects and a Noise Gate. You can use them
all at the same time.
Heads up: The far left knob positions of the Reverb, Dly Level, and Intensity
knobs bypass the given effect. Twisting those knobs counterclockwise to
the far left dials the given effect module out of the signal path.
●12 FX Access: Press the FX Access button to access Reverb, Delay and
Modulation effects. It will start flashing. Now the amp is in FX mode, with
the channel control knobs serving to adjust effects. Press FX Access again
to exit FX mode. It stops flashing and the amp returns to normal operating
mode with the knobs serving as tone controls.
●13 Reverb: Black Spirit 200 Floor's digital reverb matches the warmth and
musicality of classic spring reverbs. A genuine improvement over its analog
ancestors, it automatically adjusts the reverb tail – the higher the Reverb
volume setting, the longer the reverb time.
●14 Delay: The Delay module's Dly Level, Feedback and Dly Time knobs
afford you total control over all parameters.
• Dly Level: Adjusts the volume of repetitions, sweeping from all the way
off to just as loud as the original signal.
• Feedback: Adjusts the number of repetitions from one to infinite.
• Dly Time: Adjusts the time to the next repetition from 50 milliseconds
to 1.4 seconds. When you're tapping in delay time on Black Spirit 200
Floor's Tap button (see 5.1), the effect adopts the new time after your
second tap. The Tap LED flashes for about five seconds in sync with the
beat to give you a visual indication of delay time. The Tap function only
works when the Delay is active. If the Delay is off – or more accurately,
bypassed – the effect will not adopt your Tap tempo.
●15 Modulation FX: This module serves up four modulation effects –
Chorus, Flanger, Phaser, and Tremolo.
• Mod Type: Each effect is assigned to one quarter of this knob's control
range. The first quarter addresses Chorus, the second addresses Flanger,
the third addresses Phaser, and the final quarter addresses Tremolo. You
can adjust the modulation effect's rate within its assigned quarter. The
more you turn Mod Type up, the faster the rate gets.
• Intensity: This knob adjusts the volume of the modulation effects.
●16 FX Loop: This serial loop lets you patch in external effects devices:
connect the Send jack in the FX Loop section on the amp's rear panel
to your effects processor's input and the Return jack to the processor's
output. The FX Loop button activates and deactivates the loop.
●17 Store: Use the Store button to save your settings to a preset. For more
info on this function, read section 5.2, Programming Presets.
●18 Cab Type: This knob selects one of eight painstakingly designed
cabinet emulations for the Red Box AE+ Out on the back of the amp. See
section 4.1, Red Box AE+, for more on this. On the rear panel, you can
switch the output level from Mic to Line On to match the level to whatever
device you wish to address. The Red Box AE+ is the perfect medium for
sending your sound to the PA, monitoring system or a recording device.
With the Red Box AE+ tweaking your tone for you, there's no need to fuss
with microphones or negotiate with sound techs.
• E
nglish
• D
eu
tsch
• Fra
nçais
• It
alian
o•
Esp
añ
ol
• 日本語
• 中文
中文
MASTERPRESENCERESONANCESAGGINGNOISE GATETREBLEMIDBASSVOLUME
50
1 8
2 7
3 64 5
GAINREVERBDLY LEVELFEEDBACKDLY T IMEMOD TYPEINTENSITY
CLEAN ULTRACRUNCH LEAD
POWER
PHONES / L INE
CAB TYPE
STOREFX LOOPFX ACCESSBOOST
PRE LOOP
OFF OFF1400 OFF
C
2
1T
F P
S P I R I T ™ T O N E G E N E R A T O R
2 9
3 64 5
7 8 10
12
11
16131415 18 17
6
Black Spirit 200 Floor – Manual 1.0
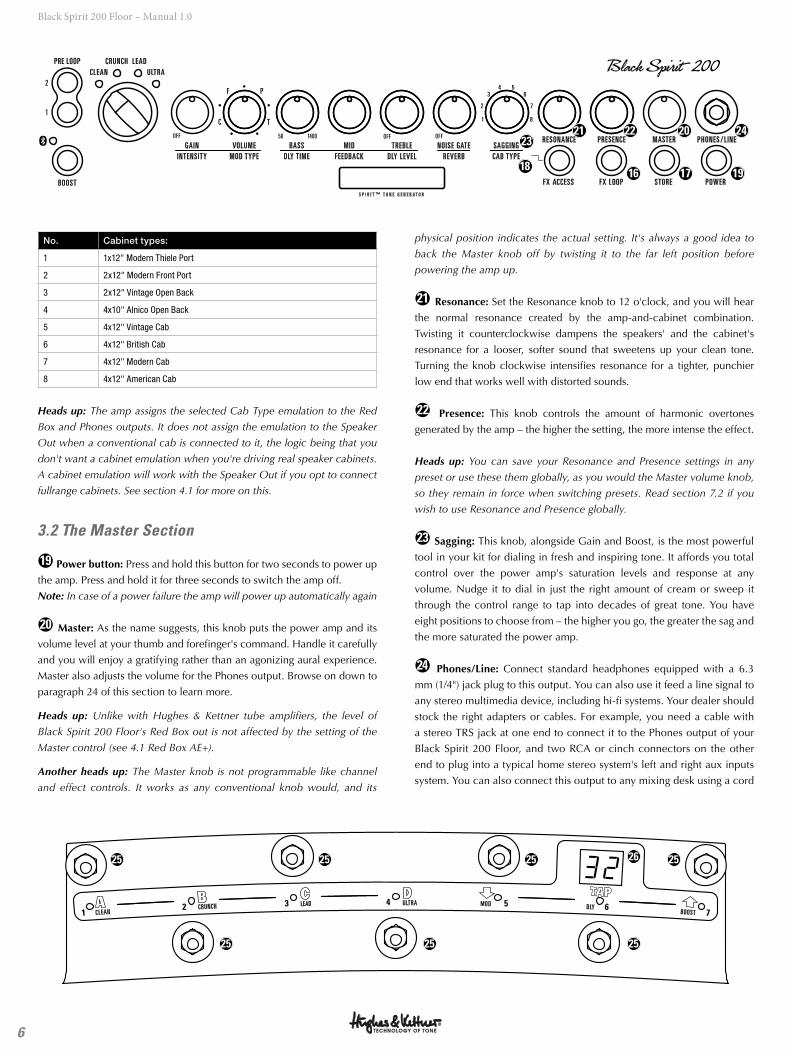
No. Cabinet types:
1 1x12" Modern Thiele Port
2 2x12" Modern Front Port
3 2x12" Vintage Open Back
4 4x10" Alnico Open Back
5 4x12" Vintage Cab
6 4x12" British Cab
7 4x12" Modern Cab
8 4x12" American Cab
Heads up: The amp assigns the selected Cab Type emulation to the Red
Box and Phones outputs. It does not assign the emulation to the Speaker
Out when a conventional cab is connected to it, the logic being that you
don't want a cabinet emulation when you're driving real speaker cabinets.
A cabinet emulation will work with the Speaker Out if you opt to connect
fullrange cabinets. See section 4.1 for more on this.
3.2 The Master Section
●19 Power button: Press and hold this button for two seconds to power up
the amp. Press and hold it for three seconds to switch the amp off.
Note: In case of a power failure the amp will power up automatically again
●20 Master: As the name suggests, this knob puts the power amp and its
volume level at your thumb and forefinger's command. Handle it carefully
and you will enjoy a gratifying rather than an agonizing aural experience.
Master also adjusts the volume for the Phones output. Browse on down to
paragraph 24 of this section to learn more.
Heads up: Unlike with Hughes & Kettner tube amplifiers, the level of
Black Spirit 200 Floor's Red Box out is not affected by the setting of the
Master control (see 4.1 Red Box AE+).
Another heads up: The Master knob is not programmable like channel
and effect controls. It works as any conventional knob would, and its
physical position indicates the actual setting. It's always a good idea to
back the Master knob off by twisting it to the far left position before
powering the amp up.
●21 Resonance: Set the Resonance knob to 12 o'clock, and you will hear
the normal resonance created by the amp-and-cabinet combination.
Twisting it counterclockwise dampens the speakers' and the cabinet's
resonance for a looser, softer sound that sweetens up your clean tone.
Turning the knob clockwise intensifies resonance for a tighter, punchier
low end that works well with distorted sounds.
●22 Presence: This knob controls the amount of harmonic overtones
generated by the amp – the higher the setting, the more intense the effect.
Heads up: You can save your Resonance and Presence settings in any
preset or use these them globally, as you would the Master volume knob,
so they remain in force when switching presets. Read section 7.2 if you
wish to use Resonance and Presence globally.
●23 Sagging: This knob, alongside Gain and Boost, is the most powerful
tool in your kit for dialing in fresh and inspiring tone. It affords you total
control over the power amp's saturation levels and response at any
volume. Nudge it to dial in just the right amount of cream or sweep it
through the control range to tap into decades of great tone. You have
eight positions to choose from – the higher you go, the greater the sag and
the more saturated the power amp.
●24 Phones/Line: Connect standard headphones equipped with a 6.3
mm (1/4") jack plug to this output. You can also use it feed a line signal to
any stereo multimedia device, including hi-fi systems. Your dealer should
stock the right adapters or cables. For example, you need a cable with
a stereo TRS jack at one end to connect it to the Phones output of your
Black Spirit 200 Floor, and two RCA or cinch connectors on the other
end to plug into a typical home stereo system's left and right aux inputs
system. You can also connect this output to any mixing desk using a cord
31216
1017 1921 18 20 29
1
641115 5 7
13 14
8
25
25 25 25
2625 25 25
MASTERPRESENCERESONANCESAGGINGNOISE GATETREBLEMIDBASSVOLUME
50
1 8
2 7
3 64 5
GAINREVERBDLY LEVELFEEDBACKDLY T IMEMOD TYPEINTENSITY
CLEAN ULTRACRUNCH LEAD
POWER
PHONES / L INE
CAB TYPE
STOREFX LOOPFX ACCESSBOOST
PRE LOOP
OFF OFF1400 OFF
C
2
1T
F P
S P I R I T ™ T O N E G E N E R A T O R
18
2021 22 2423
16 17 19
7
Black Spirit 200 Floor – Manual 1.0
sporting two mono 6.3 mm (1/4") jack plugs or two XLR connectors. Be
sure to pan the mixing console's inputs hard left and right to enjoy the
full stereo effect.
Heads up: Plugging a cord into the front panel Phones output switches the
Speaker Out off.
Heads up again: The Phones output delivers a natural-sounding right/left
stereo signal to your headphones. The mono Red Box out is the better
choice for feeding your signal to a mixing desk for most applications on
stage and in the studio. Read section 4.1, Red Box AE+, for more on this.
3.4 Controllers
Controlling the amp with the footswitches is an exercise in convenience.
You can operate the amp in three modes, Preset, Stompbox and Direct
7. To learn more about them, see chapter 5, Presets.
●25 Footswitches: Use Black Spirit 200 Floor's seven footswitches to
access and program sounds. The buttons' assignments and functions vary
from mode to mode as shown in the table below.
1
CLEAN
2
CRUNCH
3
LEAD
4
ULTRA
6
DLY
7
BOOST
5
MOD
●26 Display: The display's read-out also varies from mode to mode. In
Preset mode, it indicates the selected bank (1-32). It reads "Sb" in Stompbox
mode and "7P" in Direct-7 mode.
4 Connections
4.1 Rear panel
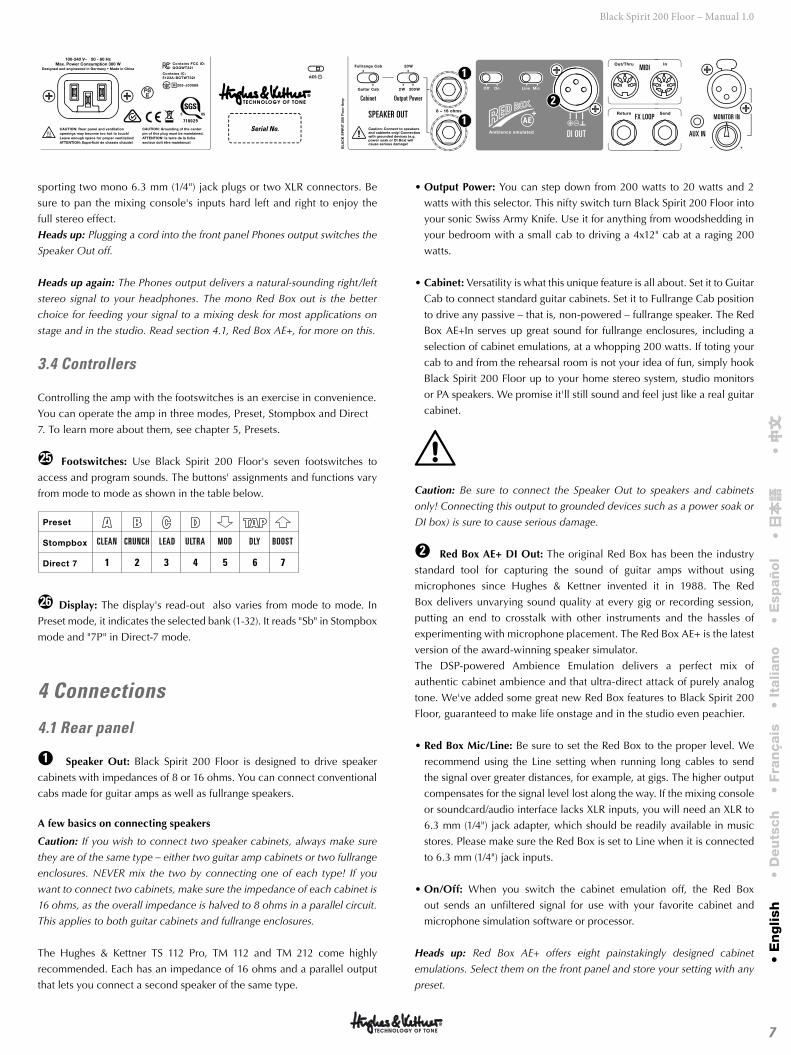
●1 Speaker Out: Black Spirit 200 Floor is designed to drive speaker
cabinets with impedances of 8 or 16 ohms. You can connect conventional
cabs made for guitar amps as well as fullrange speakers.
A few basics on connecting speakers
Caution: If you wish to connect two speaker cabinets, always make sure
they are of the same type – either two guitar amp cabinets or two fullrange
enclosures. NEVER mix the two by connecting one of each type! If you
want to connect two cabinets, make sure the impedance of each cabinet is
16 ohms, as the overall impedance is halved to 8 ohms in a parallel circuit.
This applies to both guitar cabinets and fullrange enclosures.
The Hughes & Kettner TS 112 Pro, TM 112 and TM 212 come highly
recommended. Each has an impedance of 16 ohms and a parallel output
that lets you connect a second speaker of the same type.
• Output Power: You can step down from 200 watts to 20 watts and 2
watts with this selector. This nifty switch turn Black Spirit 200 Floor into
your sonic Swiss Army Knife. Use it for anything from woodshedding in
your bedroom with a small cab to driving a 4x12" cab at a raging 200
watts.
• Cabinet: Versatility is what this unique feature is all about. Set it to Guitar
Cab to connect standard guitar cabinets. Set it to Fullrange Cab position
to drive any passive – that is, non-powered – fullrange speaker. The Red
Box AE+In serves up great sound for fullrange enclosures, including a
selection of cabinet emulations, at a whopping 200 watts. If toting your
cab to and from the rehearsal room is not your idea of fun, simply hook
Black Spirit 200 Floor up to your home stereo system, studio monitors
or PA speakers. We promise it'll still sound and feel just like a real guitar
cabinet.
Caution: Be sure to connect the Speaker Out to speakers and cabinets
only! Connecting this output to grounded devices such as a power soak or
DI box) is sure to cause serious damage.
●2 Red Box AE+ DI Out: The original Red Box has been the industry
standard tool for capturing the sound of guitar amps without using
microphones since Hughes & Kettner invented it in 1988. The Red
Box delivers unvarying sound quality at every gig or recording session,
putting an end to crosstalk with other instruments and the hassles of
experimenting with microphone placement. The Red Box AE+ is the latest
version of the award-winning speaker simulator.
The DSP-powered Ambience Emulation delivers a perfect mix of
authentic cabinet ambience and that ultra-direct attack of purely analog
tone. We've added some great new Red Box features to Black Spirit 200
Floor, guaranteed to make life onstage and in the studio even peachier.
• Red Box Mic/Line: Be sure to set the Red Box to the proper level. We
recommend using the Line setting when running long cables to send
the signal over greater distances, for example, at gigs. The higher output
compensates for the signal level lost along the way. If the mixing console
or soundcard/audio interface lacks XLR inputs, you will need an XLR to
6.3 mm (1/4") jack adapter, which should be readily available in music
stores. Please make sure the Red Box is set to Line when it is connected
to 6.3 mm (1/4") jack inputs.
• On/Off: When you switch the cabinet emulation off, the Red Box
out sends an unfiltered signal for use with your favorite cabinet and
microphone simulation software or processor.
Heads up: Red Box AE+ offers eight painstakingly designed cabinet
emulations. Select them on the front panel and store your setting with any
preset.
• E
nglish
• D
eu
tsch
• Fra
nçais
• It
alian
o•
Esp
añ
ol
• 日本語
• 中文
中文
Serial No.
Output Power
SPEAKER OUT
MIDI
FX LOOP
AUX IN
Cabinet
MONITOR IN
DI OUT
AE
1
1
2
8
Black Spirit 200 Floor – Manual 1.0
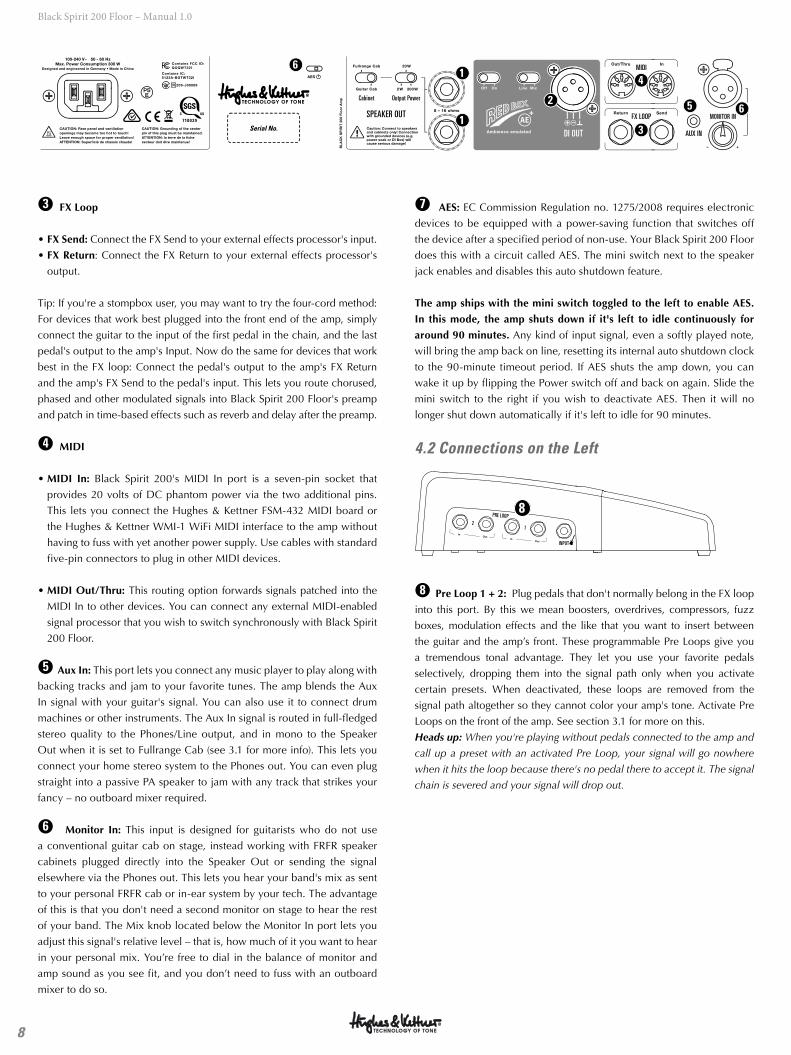
●3 FX Loop
• FX Send: Connect the FX Send to your external effects processor's input.
• FX Return: Connect the FX Return to your external effects processor's
output.
Tip: If you're a stompbox user, you may want to try the four-cord method:
For devices that work best plugged into the front end of the amp, simply
connect the guitar to the input of the first pedal in the chain, and the last
pedal's output to the amp's Input. Now do the same for devices that work
best in the FX loop: Connect the pedal's output to the amp's FX Return
and the amp's FX Send to the pedal's input. This lets you route chorused,
phased and other modulated signals into Black Spirit 200 Floor's preamp
and patch in time-based effects such as reverb and delay after the preamp.
●4 MIDI
• MIDI In: Black Spirit 200's MIDI In port is a seven-pin socket that
provides 20 volts of DC phantom power via the two additional pins.
This lets you connect the Hughes & Kettner FSM-432 MIDI board or
the Hughes & Kettner WMI-1 WiFi MIDI interface to the amp without
having to fuss with yet another power supply. Use cables with standard
five-pin connectors to plug in other MIDI devices.
• MIDI Out/Thru: This routing option forwards signals patched into the
MIDI In to other devices. You can connect any external MIDI-enabled
signal processor that you wish to switch synchronously with Black Spirit
200 Floor.
●5 Aux In: This port lets you connect any music player to play along with
backing tracks and jam to your favorite tunes. The amp blends the Aux
In signal with your guitar's signal. You can also use it to connect drum
machines or other instruments. The Aux In signal is routed in full-fledged
stereo quality to the Phones/Line output, and in mono to the Speaker
Out when it is set to Fullrange Cab (see 3.1 for more info). This lets you
connect your home stereo system to the Phones out. You can even plug
straight into a passive PA speaker to jam with any track that strikes your
fancy – no outboard mixer required.
●6 Monitor In: This input is designed for guitarists who do not use
a conventional guitar cab on stage, instead working with FRFR speaker
cabinets plugged directly into the Speaker Out or sending the signal
elsewhere via the Phones out. This lets you hear your band's mix as sent
to your personal FRFR cab or in-ear system by your tech. The advantage
of this is that you don't need a second monitor on stage to hear the rest
of your band. The Mix knob located below the Monitor In port lets you
adjust this signal's relative level – that is, how much of it you want to hear
in your personal mix. You’re free to dial in the balance of monitor and
amp sound as you see fit, and you don’t need to fuss with an outboard
mixer to do so.
●7 AES: EC Commission Regulation no. 1275/2008 requires electronic
devices to be equipped with a power-saving function that switches off
the device after a specified period of non-use. Your Black Spirit 200 Floor
does this with a circuit called AES. The mini switch next to the speaker
jack enables and disables this auto shutdown feature.
The amp ships with the mini switch toggled to the left to enable AES.
In this mode, the amp shuts down if it's left to idle continuously for
around 90 minutes. Any kind of input signal, even a softly played note,
will bring the amp back on line, resetting its internal auto shutdown clock
to the 90-minute timeout period. If AES shuts the amp down, you can
wake it up by flipping the Power switch off and back on again. Slide the
mini switch to the right if you wish to deactivate AES. Then it will no
longer shut down automatically if it's left to idle for 90 minutes.
4.2 Connections on the Left
INPUT
PRE LOOP
12
8
●8 Pre Loop 1 + 2: Plug pedals that don't normally belong in the FX loop
into this port. By this we mean boosters, overdrives, compressors, fuzz
boxes, modulation effects and the like that you want to insert between
the guitar and the amp’s front. These programmable Pre Loops give you
a tremendous tonal advantage. They let you use your favorite pedals
selectively, dropping them into the signal path only when you activate
certain presets. When deactivated, these loops are removed from the
signal path altogether so they cannot color your amp's tone. Activate Pre
Loops on the front of the amp. See section 3.1 for more on this.
Heads up: When you're playing without pedals connected to the amp and
call up a preset with an activated Pre Loop, your signal will go nowhere
when it hits the loop because there's no pedal there to accept it. The signal
chain is severed and your signal will drop out.
Serial No.
Output Power
SPEAKER OUT
MIDI
FX LOOP
AUX IN
Cabinet
MONITOR IN
DI OUT
AE
1
1
2
3
4
5 6
6
9
Black Spirit 200 Floor – Manual 1.0
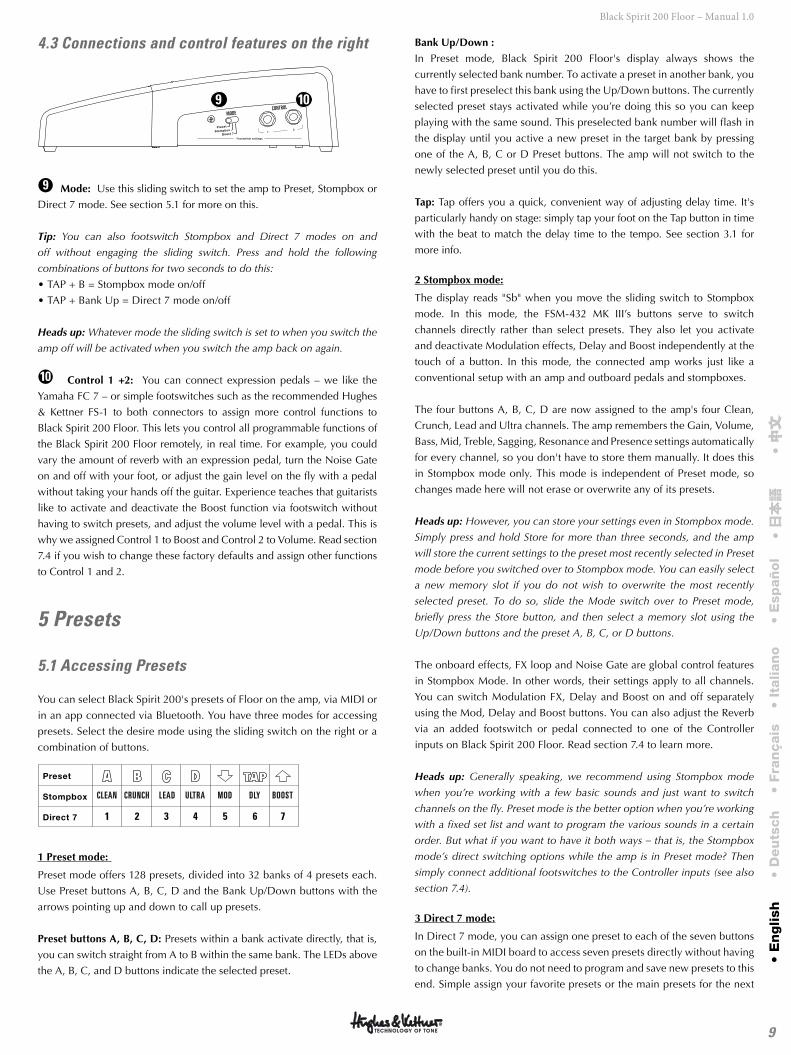
4.3 Connections and control features on the right
CONTROLMODE
9 10
●9 Mode: Use this sliding switch to set the amp to Preset, Stompbox or
Direct 7 mode. See section 5.1 for more on this.
Tip: You can also footswitch Stompbox and Direct 7 modes on and
off without engaging the sliding switch. Press and hold the following
combinations of buttons for two seconds to do this:
• TAP + B = Stompbox mode on/off
• TAP + Bank Up = Direct 7 mode on/off
Heads up: Whatever mode the sliding switch is set to when you switch the
amp off will be activated when you switch the amp back on again.
●10 Control 1 +2: You can connect expression pedals – we like the
Yamaha FC 7 – or simple footswitches such as the recommended Hughes
& Kettner FS-1 to both connectors to assign more control functions to
Black Spirit 200 Floor. This lets you control all programmable functions of
the Black Spirit 200 Floor remotely, in real time. For example, you could
vary the amount of reverb with an expression pedal, turn the Noise Gate
on and off with your foot, or adjust the gain level on the fly with a pedal
without taking your hands off the guitar. Experience teaches that guitarists
like to activate and deactivate the Boost function via footswitch without
having to switch presets, and adjust the volume level with a pedal. This is
why we assigned Control 1 to Boost and Control 2 to Volume. Read section
7.4 if you wish to change these factory defaults and assign other functions
to Control 1 and 2.
5 Presets
5.1 Accessing Presets
You can select Black Spirit 200's presets of Floor on the amp, via MIDI or
in an app connected via Bluetooth. You have three modes for accessing
presets. Select the desire mode using the sliding switch on the right or a
combination of buttons.
1
CLEAN
2
CRUNCH
3
LEAD
4
ULTRA
6
DLY
7
BOOST
5
MOD
1 Preset mode:
Preset mode offers 128 presets, divided into 32 banks of 4 presets each.
Use Preset buttons A, B, C, D and the Bank Up/Down buttons with the
arrows pointing up and down to call up presets.
Preset buttons A, B, C, D: Presets within a bank activate directly, that is,
you can switch straight from A to B within the same bank. The LEDs above
the A, B, C, and D buttons indicate the selected preset.
Bank Up/Down :
In Preset mode, Black Spirit 200 Floor's display always shows the
currently selected bank number. To activate a preset in another bank, you
have to first preselect this bank using the Up/Down buttons. The currently
selected preset stays activated while you’re doing this so you can keep
playing with the same sound. This preselected bank number will flash in
the display until you active a new preset in the target bank by pressing
one of the A, B, C or D Preset buttons. The amp will not switch to the
newly selected preset until you do this.
Tap: Tap offers you a quick, convenient way of adjusting delay time. It's
particularly handy on stage: simply tap your foot on the Tap button in time
with the beat to match the delay time to the tempo. See section 3.1 for
more info.
2 Stompbox mode:
The display reads "Sb" when you move the sliding switch to Stompbox
mode. In this mode, the FSM-432 MK III’s buttons serve to switch
channels directly rather than select presets. They also let you activate
and deactivate Modulation effects, Delay and Boost independently at the
touch of a button. In this mode, the connected amp works just like a
conventional setup with an amp and outboard pedals and stompboxes.
The four buttons A, B, C, D are now assigned to the amp's four Clean,
Crunch, Lead and Ultra channels. The amp remembers the Gain, Volume,
Bass, Mid, Treble, Sagging, Resonance and Presence settings automatically
for every channel, so you don't have to store them manually. It does this
in Stompbox mode only. This mode is independent of Preset mode, so
changes made here will not erase or overwrite any of its presets.
Heads up: However, you can store your settings even in Stompbox mode.
Simply press and hold Store for more than three seconds, and the amp
will store the current settings to the preset most recently selected in Preset
mode before you switched over to Stompbox mode. You can easily select
a new memory slot if you do not wish to overwrite the most recently
selected preset. To do so, slide the Mode switch over to Preset mode,
briefly press the Store button, and then select a memory slot using the
Up/Down buttons and the preset A, B, C, or D buttons.
The onboard effects, FX loop and Noise Gate are global control features
in Stompbox Mode. In other words, their settings apply to all channels.
You can switch Modulation FX, Delay and Boost on and off separately
using the Mod, Delay and Boost buttons. You can also adjust the Reverb
via an added footswitch or pedal connected to one of the Controller
inputs on Black Spirit 200 Floor. Read section 7.4 to learn more.
Heads up: Generally speaking, we recommend using Stompbox mode
when you’re working with a few basic sounds and just want to switch
channels on the fly. Preset mode is the better option when you’re working
with a fixed set list and want to program the various sounds in a certain
order. But what if you want to have it both ways – that is, the Stompbox
mode’s direct switching options while the amp is in Preset mode? Then
simply connect additional footswitches to the Controller inputs (see also
section 7.4).
3 Direct 7 mode:
In Direct 7 mode, you can assign one preset to each of the seven buttons
on the built-in MIDI board to access seven presets directly without having
to change banks. You do not need to program and save new presets to this
end. Simple assign your favorite presets or the main presets for the next
• E
nglish
• D
eu
tsch
• Fra
nçais
• It
alian
o•
Esp
añ
ol
• 日本語
• 中文
中文
10
Black Spirit 200 Floor – Manual 1.0
gig to the seven buttons. First, select the desired preset in Preset mode,
select Direct 7 mode, and then press and hold one of the seven buttons
for two seconds. This assigns the preset to that button.
5.2 Programming presets
1 Preset mode:
Programming a preset is simple. Once you dial in the sound you want to
hear, the Store button lets you save the settings for every knob and switch
apart from the Master Volume knob in a preset. This is pretty much like
playing an amp with 128 channels, each with its own Gain, Volume, EQ
and even effects settings.
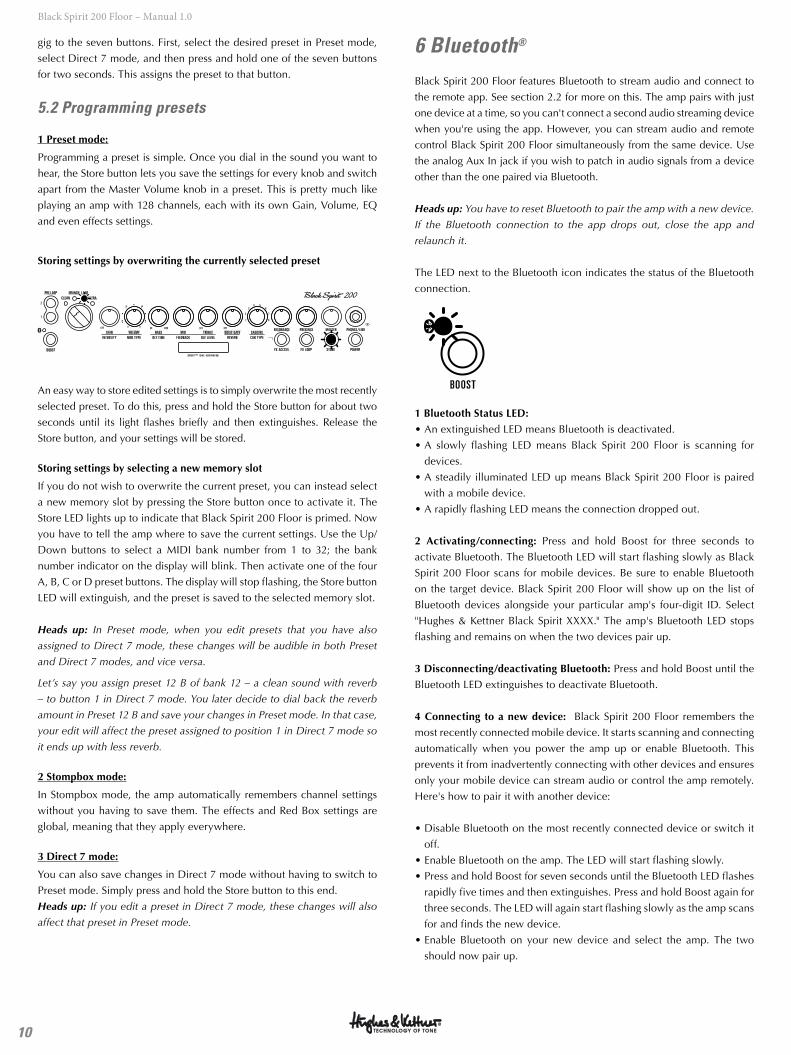
Storing settings by overwriting the currently selected preset
MASTERPRESENCERESONANCESAGGINGNOISE GATETREBLEMIDBASSVOLUME
50
1 8
2 7
3 64 5
GAINREVERBDLY LEVELFEEDBACKDLY T IMEMOD TYPEINTENSITY
CLEAN ULTRACRUNCH LEAD
POWER
PHONES / L INE
CAB TYPE
STOREFX LOOPFX ACCESSBOOST
PRE LOOP
OFF OFF1400 OFF
C
2
1T
F P
S P I R I T ™ T O N E G E N E R A T O R
An easy way to store edited settings is to simply overwrite the most recently
selected preset. To do this, press and hold the Store button for about two
seconds until its light flashes briefly and then extinguishes. Release the
Store button, and your settings will be stored.
Storing settings by selecting a new memory slot
If you do not wish to overwrite the current preset, you can instead select
a new memory slot by pressing the Store button once to activate it. The
Store LED lights up to indicate that Black Spirit 200 Floor is primed. Now
you have to tell the amp where to save the current settings. Use the Up/
Down buttons to select a MIDI bank number from 1 to 32; the bank
number indicator on the display will blink. Then activate one of the four
A, B, C or D preset buttons. The display will stop flashing, the Store button
LED will extinguish, and the preset is saved to the selected memory slot.
Heads up: In Preset mode, when you edit presets that you have also
assigned to Direct 7 mode, these changes will be audible in both Preset
and Direct 7 modes, and vice versa.
Let’s say you assign preset 12 B of bank 12 – a clean sound with reverb
– to button 1 in Direct 7 mode. You later decide to dial back the reverb
amount in Preset 12 B and save your changes in Preset mode. In that case,
your edit will affect the preset assigned to position 1 in Direct 7 mode so
it ends up with less reverb.
2 Stompbox mode:
In Stompbox mode, the amp automatically remembers channel settings
without you having to save them. The effects and Red Box settings are
global, meaning that they apply everywhere.
3 Direct 7 mode:
You can also save changes in Direct 7 mode without having to switch to
Preset mode. Simply press and hold the Store button to this end.
Heads up: If you edit a preset in Direct 7 mode, these changes will also
affect that preset in Preset mode.
6 Bluetooth®
Black Spirit 200 Floor features Bluetooth to stream audio and connect to
the remote app. See section 2.2 for more on this. The amp pairs with just
one device at a time, so you can't connect a second audio streaming device
when you're using the app. However, you can stream audio and remote
control Black Spirit 200 Floor simultaneously from the same device. Use
the analog Aux In jack if you wish to patch in audio signals from a device
other than the one paired via Bluetooth.
Heads up: You have to reset Bluetooth to pair the amp with a new device.
If the Bluetooth connection to the app drops out, close the app and
relaunch it.
The LED next to the Bluetooth icon indicates the status of the Bluetooth
connection.
BOOST
1 Bluetooth Status LED:
• An extinguished LED means Bluetooth is deactivated.
• A slowly flashing LED means Black Spirit 200 Floor is scanning for
devices.
• A steadily illuminated LED up means Black Spirit 200 Floor is paired
with a mobile device.
• A rapidly flashing LED means the connection dropped out.
2 Activating/connecting: Press and hold Boost for three seconds to
activate Bluetooth. The Bluetooth LED will start flashing slowly as Black
Spirit 200 Floor scans for mobile devices. Be sure to enable Bluetooth
on the target device. Black Spirit 200 Floor will show up on the list of
Bluetooth devices alongside your particular amp's four-digit ID. Select
"Hughes & Kettner Black Spirit XXXX." The amp's Bluetooth LED stops
flashing and remains on when the two devices pair up.
3 Disconnecting/deactivating Bluetooth: Press and hold Boost until the
Bluetooth LED extinguishes to deactivate Bluetooth.
4 Connecting to a new device: Black Spirit 200 Floor remembers the
most recently connected mobile device. It starts scanning and connecting
automatically when you power the amp up or enable Bluetooth. This
prevents it from inadvertently connecting with other devices and ensures
only your mobile device can stream audio or control the amp remotely.
Here's how to pair it with another device:
• Disable Bluetooth on the most recently connected device or switch it
off.
• Enable Bluetooth on the amp. The LED will start flashing slowly.
• Press and hold Boost for seven seconds until the Bluetooth LED flashes
rapidly five times and then extinguishes. Press and hold Boost again for
three seconds. The LED will again start flashing slowly as the amp scans
for and finds the new device.
• Enable Bluetooth on your new device and select the amp. The two
should now pair up.
11
Black Spirit 200 Floor – Manual 1.0
Heads up: A factory reset also resets Bluetooth, so you will have to
reconnect the amp.
5 Bluetooth audio streaming: You can stream audio to your Black Spirit
200 Floor to play along to your favorite songs. The Aux In signal is routed
in full-fledged stereo quality to the Phones/Line output, and in mono to
the Speaker Out when it is set to Fullrange Cab (see section 4.1 to learn
more). This lets you connect your home stereo system to the Phones out.
You can even plug straight into a passive PA speaker to jam with any track
that strikes your fancy – no outboard mixer required.
7 MIDIIf you wish to control Black Spirit 200 Floor via MIDI, the controller
sending MIDI commands and the amp receiving these commands have to
be on the same MIDI channel. The amp ships with MIDI channel 1 and
Omni On activated. If Black Spirit 200 Floor does not respond properly to
program change messages, change the MIDI channel setting.
7.1 Setting MIDI channels and switching Omni On/Off
Press and hold FX Access and FX Loop simultaneously for three seconds.
The Store button will light up. This assigns special programming functions
to the following LEDs and buttons:
• Boost lights up to indicate Black Spirit 200 Floor is configured to
receive incoming program changes via all MIDI channels. Omni On is
the default. If the LED does not light up, the amp receives messages via
the selected channel only (Omni Off). Simply press the Boost button to
switch Omni modes.
• FX Loop now serves as a +1/up button, while FX Access now serves as a
-1/down button. Use these buttons to change the MIDI channel.
• When configuring MIDI channels, the four Channel LEDs serve to
indicate the MIDI channels. Consult the table below for the MIDI channel
assignments. They show what in tech-speak is called binary code:
MIDI Channel Clean Crunch Lead Ultra
1 = ¢ ¢ ¢ ¢
2 = ¢ ¢ ¢ {
3 = ¢ ¢ £ ¢
4 = ¢ ¢ £ £
5 = ¢ £ ¢ ¢
6 = ¢ £ ¢ £
7 = ¢ £ £ ¢
8 = ¢ £ £ £
9 = £ ¢ ¢ ¢
10 = £ ¢ ¢ £
11 = £ ¢ £ ¢
12 = £ ¢ £ £
13 = £ £ ¢ ¢
14 = £ £ ¢ £
15 = £ £ £ ¢
16 = £ £ £ £
Press and hold the Store button for three seconds to save the settings and
quit MIDI setup mode. The amp is now back in normal
operating mode.
7.2 Global Settings
If you press the Store and FX Loop buttons simultaneously for three
seconds, the Store button will start flashing. The following LEDs and
buttons on the amp will then serve special programming purposes:
• FX Access: This indicates the status of Global EQ mode. The button
lights up when Global EQ mode is active. To deactivate it, press the FX
Access button again.
• FX Loop: This indicates the status of Global Cabinet Type mode. The
button lights up when Global Cabinet Type mode is active. To deactivate
it, press FX Loop again.
Press and hold the Store button for three seconds to save your settings
and quit Global Settings mode. The amp is now back in normal operating
mode.
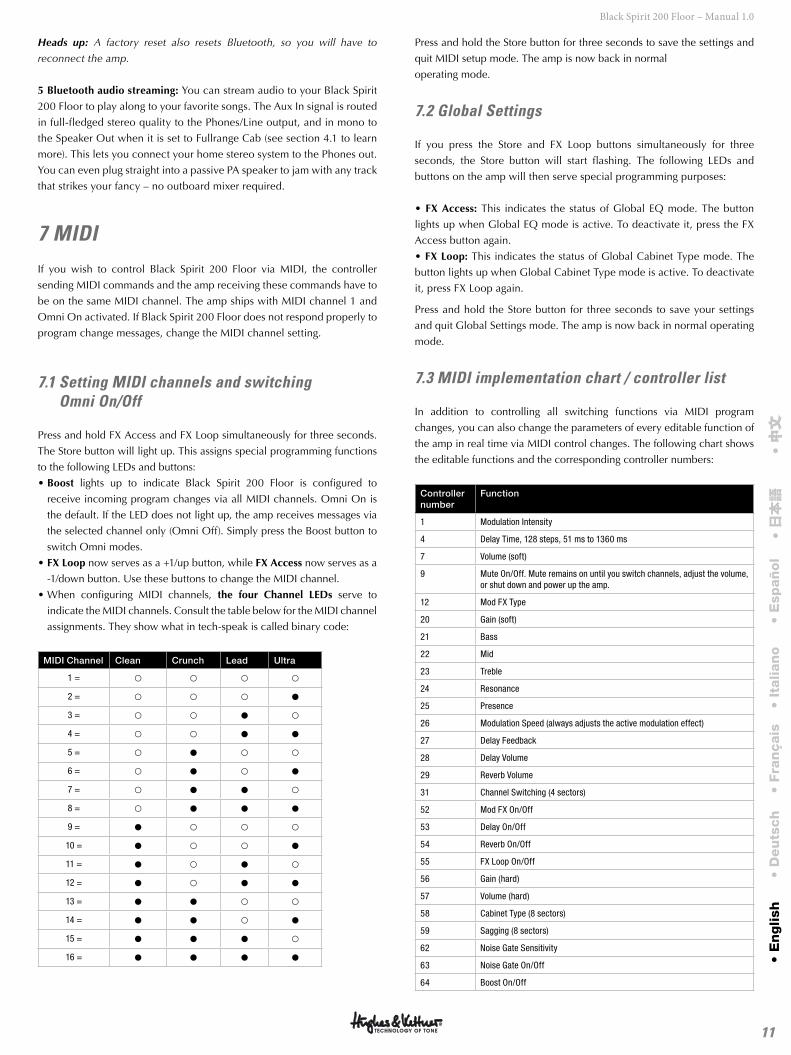
7.3 MIDI implementation chart / controller list
In addition to controlling all switching functions via MIDI program
changes, you can also change the parameters of every editable function of
the amp in real time via MIDI control changes. The following chart shows
the editable functions and the corresponding controller numbers:
Controller number
Function
1 Modulation Intensity
4 Delay Time, 128 steps, 51 ms to 1360 ms
7 Volume (soft)
9 Mute On/Off. Mute remains on until you switch channels, adjust the volume, or shut down and power up the amp.
12 Mod FX Type
20 Gain (soft)
21 Bass
22 Mid
23 Treble
24 Resonance
25 Presence
26 Modulation Speed (always adjusts the active modulation effect)
27 Delay Feedback
28 Delay Volume
29 Reverb Volume
31 Channel Switching (4 sectors)
52 Mod FX On/Off
53 Delay On/Off
54 Reverb On/Off
55 FX Loop On/Off
56 Gain (hard)
57 Volume (hard)
58 Cabinet Type (8 sectors)
59 Sagging (8 sectors)
62 Noise Gate Sensitivity
63 Noise Gate On/Off
64 Boost On/Off
• E
nglish
• D
eu
tsch
• Fra
nçais
• It
alian
o•
Esp
añ
ol
• 日本語
• 中文
中文
12
Black Spirit 200 Floor – Manual 1.0
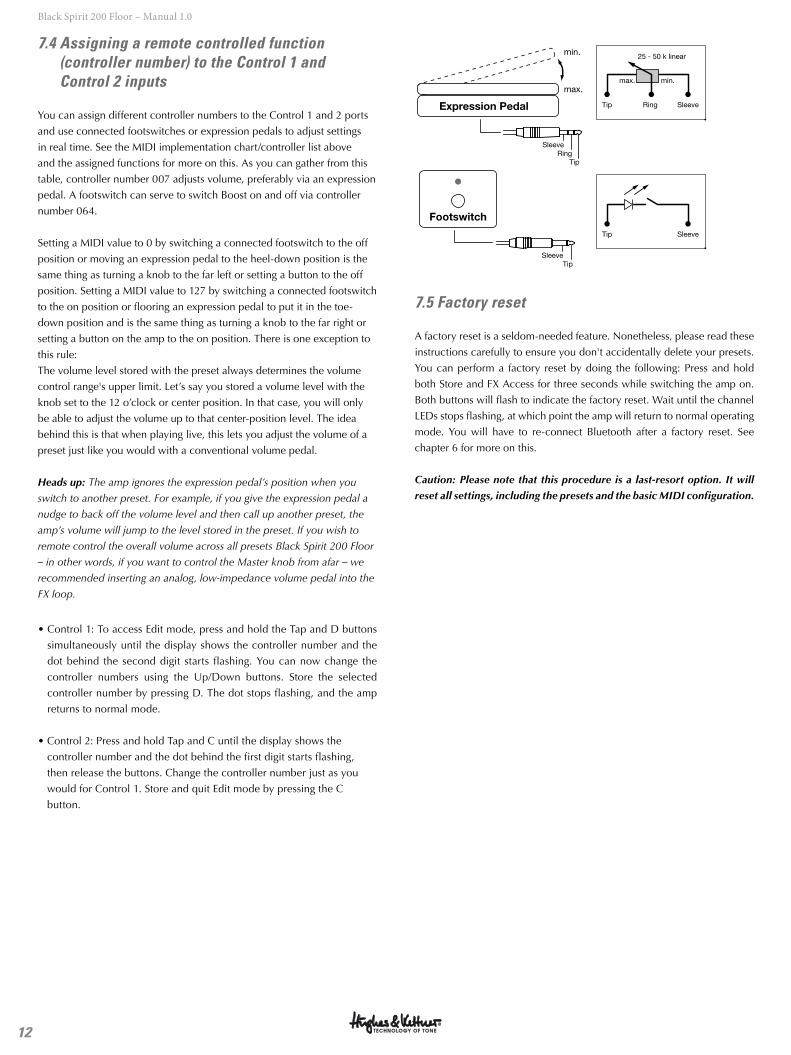
7.4 Assigning a remote controlled function (controller number) to the Control 1 and Control 2 inputs
You can assign different controller numbers to the Control 1 and 2 ports
and use connected footswitches or expression pedals to adjust settings
in real time. See the MIDI implementation chart/controller list above
and the assigned functions for more on this. As you can gather from this
table, controller number 007 adjusts volume, preferably via an expression
pedal. A footswitch can serve to switch Boost on and off via controller
number 064.
Setting a MIDI value to 0 by switching a connected footswitch to the off
position or moving an expression pedal to the heel-down position is the
same thing as turning a knob to the far left or setting a button to the off
position. Setting a MIDI value to 127 by switching a connected footswitch
to the on position or flooring an expression pedal to put it in the toe-
down position and is the same thing as turning a knob to the far right or
setting a button on the amp to the on position. There is one exception to
this rule:
The volume level stored with the preset always determines the volume
control range's upper limit. Let’s say you stored a volume level with the
knob set to the 12 o’clock or center position. In that case, you will only
be able to adjust the volume up to that center-position level. The idea
behind this is that when playing live, this lets you adjust the volume of a
preset just like you would with a conventional volume pedal.
Heads up: The amp ignores the expression pedal’s position when you
switch to another preset. For example, if you give the expression pedal a
nudge to back off the volume level and then call up another preset, the
amp’s volume will jump to the level stored in the preset. If you wish to
remote control the overall volume across all presets Black Spirit 200 Floor
– in other words, if you want to control the Master knob from afar – we
recommended inserting an analog, low-impedance volume pedal into the
FX loop.
• Control 1: To access Edit mode, press and hold the Tap and D buttons
simultaneously until the display shows the controller number and the
dot behind the second digit starts flashing. You can now change the
controller numbers using the Up/Down buttons. Store the selected
controller number by pressing D. The dot stops flashing, and the amp
returns to normal mode.
• Control 2: Press and hold Tap and C until the display shows the
controller number and the dot behind the first digit starts flashing,
then release the buttons. Change the controller number just as you
would for Control 1. Store and quit Edit mode by pressing the C
button.
min.
max.
SleeveRing
Tip
Tip Ring Sleeve
max.
25 - 50 k linear
min.
Expression Pedal
SleeveTip
Footswitch
Tip Sleeve
7.5 Factory reset
A factory reset is a seldom-needed feature. Nonetheless, please read these
instructions carefully to ensure you don't accidentally delete your presets.
You can perform a factory reset by doing the following: Press and hold
both Store and FX Access for three seconds while switching the amp on.
Both buttons will flash to indicate the factory reset. Wait until the channel
LEDs stops flashing, at which point the amp will return to normal operating
mode. You will have to re-connect Bluetooth after a factory reset. See
chapter 6 for more on this.
Caution: Please note that this procedure is a last-resort option. It will
reset all settings, including the presets and the basic MIDI configuration.
13
Black Spirit 200 Floor – Manual 1.0
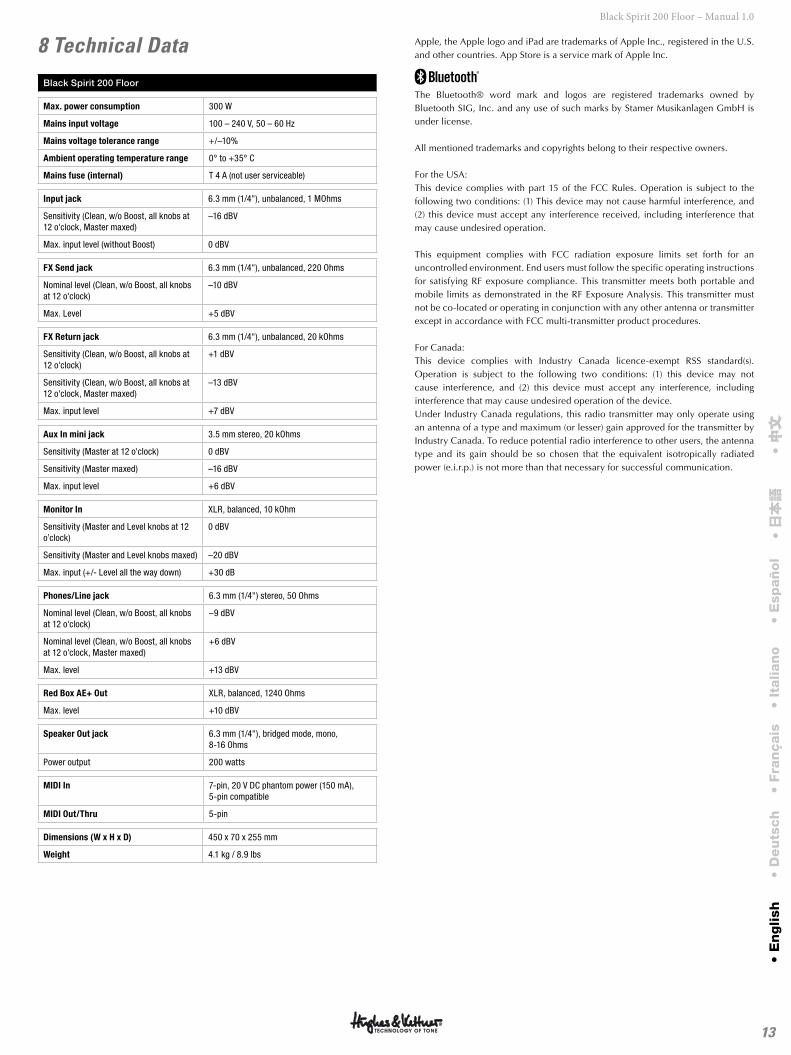
8 Technical Data
Black Spirit 200 Floor
Max. power consumption 300 W
Mains input voltage 100 – 240 V, 50 – 60 Hz
Mains voltage tolerance range +/–10%
Ambient operating temperature range 0° to +35° C
Mains fuse (internal) T 4 A (not user serviceable)
Input jack 6.3 mm (1/4"), unbalanced, 1 MOhms
Sensitivity (Clean, w/o Boost, all knobs at 12 o'clock, Master maxed)
–16 dBV
Max. input level (without Boost) 0 dBV
FX Send jack 6.3 mm (1/4"), unbalanced, 220 Ohms
Nominal level (Clean, w/o Boost, all knobs at 12 o'clock)
–10 dBV
Max. Level +5 dBV
FX Return jack 6.3 mm (1/4"), unbalanced, 20 kOhms
Sensitivity (Clean, w/o Boost, all knobs at 12 o'clock)
+1 dBV
Sensitivity (Clean, w/o Boost, all knobs at 12 o'clock, Master maxed)
–13 dBV
Max. input level +7 dBV
Aux In mini jack 3.5 mm stereo, 20 kOhms
Sensitivity (Master at 12 o'clock) 0 dBV
Sensitivity (Master maxed) –16 dBV
Max. input level +6 dBV
Monitor In XLR, balanced, 10 kOhm
Sensitivity (Master and Level knobs at 12 o’clock)
0 dBV
Sensitivity (Master and Level knobs maxed) –20 dBV
Max. input (+/- Level all the way down) +30 dB
Phones/Line jack 6.3 mm (1/4") stereo, 50 Ohms
Nominal level (Clean, w/o Boost, all knobs at 12 o'clock)
–9 dBV
Nominal level (Clean, w/o Boost, all knobs at 12 o'clock, Master maxed)
+6 dBV
Max. level +13 dBV
Red Box AE+ Out XLR, balanced, 1240 Ohms
Max. level +10 dBV
Speaker Out jack 6.3 mm (1/4"), bridged mode, mono, 8-16 Ohms
Power output 200 watts
MIDI In 7-pin, 20 V DC phantom power (150 mA), 5-pin compatible
MIDI Out/Thru 5-pin
Dimensions (W x H x D) 450 x 70 x 255 mm
Weight 4.1 kg / 8.9 lbs
Apple, the Apple logo and iPad are trademarks of Apple Inc., registered in the U.S. and other countries. App Store is a service mark of Apple Inc.
The Bluetooth® word mark and logos are registered trademarks owned by Bluetooth SIG, Inc. and any use of such marks by Stamer Musikanlagen GmbH is under license.
All mentioned trademarks and copyrights belong to their respective owners.
For the USA: This device complies with part 15 of the FCC Rules. Operation is subject to the following two conditions: (1) This device may not cause harmful interference, and (2) this device must accept any interference received, including interference that may cause undesired operation.
This equipment complies with FCC radiation exposure limits set forth for an uncontrolled environment. End users must follow the specific operating instructions for satisfying RF exposure compliance. This transmitter meets both portable and mobile limits as demonstrated in the RF Exposure Analysis. This transmitter must not be co-located or operating in conjunction with any other antenna or transmitter except in accordance with FCC multi-transmitter product procedures.
For Canada:This device complies with Industry Canada licence-exempt RSS standard(s). Operation is subject to the following two conditions: (1) this device may not cause interference, and (2) this device must accept any interference, including interference that may cause undesired operation of the device. Under Industry Canada regulations, this radio transmitter may only operate using an antenna of a type and maximum (or lesser) gain approved for the transmitter by Industry Canada. To reduce potential radio interference to other users, the antenna type and its gain should be so chosen that the equivalent isotropically radiated power (e.i.r.p.) is not more than that necessary for successful communication.
• E
nglish
• D
eu
tsch
• Fra
nçais
• It
alian
o•
Esp
añ
ol
• 日本語
• 中文
中文
Wichtige Sicherheitshinweise! Bitte vor Anschluss lesen!
Dieses Produkt wurde gemäß IEC 62368-1 hergestellt und hat das Werk in einem sicheren, betriebsfähigen Zustand verlassen. Um diesen Zustand zu erhalten und um einen gefahrlosen Betrieb zu gewährleisten, ist es notwendig, dass der Benutzer die Empfehlungen und Warnhinweise befolgt, die in der Betriebsanleitung zu finden sind. Dieses Gerät entspricht der Schutzklasse 1 (Erdungsschutz). Bei Einsatz dieses Produktes in Fahrzeugen, Schiffen oder Flugzeugen, oder in Höhen oberhalb 2000 m Meereshöhe müssen die entsprechen-den Sicherheitsstandards zusätzlich zur IEC 62368-1 beachtet werden.WARNUNG: Um das Risiko von Feuer oder Strom-schlag zu verhüten, darf dieses Gerät nicht Feuchtigkeit oder Regen ausgesetzt werden. Öffnen Sie das Gehäu-se nicht – im Inneren gibt es keine Bauteile, die vom Benutzer wartbar sind. Die Wartung darf nur von einem qualifiziertem Kundendienst durchgeführt werden.
Dieses Symbol, wo immer es erscheint, warnt Sie vor gefährlicher, nicht isolierter Spannung im Gehäuse – Spannung, die möglicherweise genügt, eine Stromschlaggefahr darzustellen.
Dieses Symbol, wo immer es erscheint, warnt Sie vor außen zugänglicher, gefährlicher Spannung. Eine Verbindung zu jeder Anschlussklemme, die mit diesem Symbol versehen ist, darf nur mit konfektionier-tem Kabel hergestellt werden, dass den Empfehlungen des Herstellers genügt, oder mit Kabel, das von qualifiziertem Personal installiert wurde.
Dieses Symbol, wo immer es erscheint, macht Sie auf wichtige Bedienungs- und Wartungsanweisun-gen aufmerksam, die in beiliegenden Unterlagen zu finden sind. Bitte lesen Sie das Handbuch.
Dieses Symbol, wo immer es erscheint, sagt Ihnen: Vorsicht! Heiße Oberfläche! Um Verbrennungen zu vermeiden, nicht anfassen.
Elektro- und Elektronikgeräte einschließlich Batterien sind getrennt vom Hausmüll über offizielle Sammelstellen fachgerecht zu entsorgen.
Bitte lesen Sie diese Anweisungen. Bewahren Sie diese Anweisungen auf. Befolgen Sie alle Warnhinweise und Anweisungen auf dem Gerät und in dieser Anleitung.
• Benutzen Sie dieses Gerät nicht in der Nähe von Wasser. Stellen Sie das Gerät nicht in der Nähe von Wasser, Badewannen, Waschbecken, Küchenspülen, nassen Stellen, Schwimmbecken oder in feuchten Räumen auf.
• Stellen Sie keine Gefäße, wie Vasen, Gläser, Flaschen usw., die Flüssigkeiten enthalten, auf das Gerät.
• Reinigen Sie das Gerät nur mit einem trockenen Tuch.• Entfernen Sie keine Abdeckungen oder Teile des
Gehäuses.• Die auf dem Gerät eingestellte Betriebsspannung
muss mit der örtlichen Spannung der Netzstromver-sorgung übereinstimmen. Wenn Sie sich nicht sicher sind, welche Spannung in Ihrem Netz zur Verfügung steht, konsultieren Sie bitte Ihren Händler oder den örtlichen Stromversorger.
• Um das Risiko eines Stromschlags zu verringern, muss die Erdung des Gerätes beibehalten werden. Verwenden Sie nur das mitgelieferte Stromführungs-kabel und behalten Sie die Funktion der seitlichen, geerdeten Schutzkontakte des Netzanschlusses
immer aufrecht. Versuchen Sie nicht, die Sicherheits-aufgabe des geerdeten Steckers zu umgehen.
• Schützen Sie das Stromführungskabel vor Betreten und Quetschen, besonders in der Nähe der Stecker, Gerätesteckdosen – und dort, wo sie am Gerät austre-ten! Stromführungskabel sollten immer vorsichtig be-handelt werden. Kontrollieren Sie die Stromführungs-kabel in regelmäßigen Abständen auf Einschnitte und Anzeichen von Abnutzung, besonders in der Nähe des Steckers und an der Verbindung zum Gerät.
• Benutzen Sie niemals ein beschädigtes Stromfüh-rungskabel.
• Ziehen Sie bei Gewittern den Stecker des Gerätes und wenn das Gerät über einen längeren Zeitraum nicht benutzt wird.
• Dieses Gerät wird nur vollständig von Stromnetz getrennt, wenn der Stecker vom Gerät oder aus der Steckdose gezogen wird. Das Gerät sollte so aufge-stellt werden, dass das Trennen vom Stromnetz leicht möglich ist.
• Sicherungen: Ersetzen Sie Sicherungen nur mit dem Typ IEC127 (5x20mm) und dem korrekten Nennwert! Es ist untersagt, kurzgeschlossene Sicherungen zu verwenden oder den Sicherungshalter zu überbrü-cken. Sicherungen dürfen nur von qualifiziertem Personal gewechselt werden.
• Alle Wartungsarbeiten sollten nur von qualifiziertem Personal ausgeführt werden. Wartung ist notwendig, wenn das Gerät auf irgendeine Weise beschädigt wurde, wie zum Beispiel:
- Wenn das Stromführungskabel oder der Stecker beschädigt oder abgenutzt ist.
- Wenn Flüssigkeit oder Gegenstände in das Gerät gelangt sind.
- Wenn das Gerät Regen oder Feuchtigkeit ausgesetzt war.
- Wenn das Gerät nicht ordnungsgemäß funktioniert, obwohl die Bedienungsanleitung beachtet wurde.
- Wenn das Gerät hingefallen ist oder das Gehäuse beschädigt wurde.
• Beim Anschluss von Lautsprechern an dieses Gerät darf die auf dem Gerät oder in dieser Anleitung ange-gebene Mindestimpedanz nicht unterschritten wer-den. Die verwendeten Kabel müssen entsprechend den lokalen Regelungen über einen ausreichenden Querschnitt verfügen.
• Halten Sie das Gerät vom Sonnenlicht fern.• Installieren Sie das Gerät nicht in der Nähe von Wär-
mequellen, wie zum Beispiel Heizkörper, Heizregis-ter, Öfen oder anderen Geräten, die Hitze erzeugen.
• Dieses Gerät wurde für die Verwendung in gemä-ßigten Klimazonen entwickelt. Nicht geeignet zur Verwendung in tropischen Klimazonen.
• Verstopfen Sie nicht die Lüftungsöffnungen. Instal-lieren Sie das Gerät entsprechend der Anleitung des Herstellers. Das Gerät darf nicht eingebaut werden – wie zum Beispiel in einen Gestellrahmen, es sei denn, dass für angemessene Belüftung gesorgt wird.
• Ein kaltes Gerät sollte immer auf die Umgebungs-temperatur erwärmt werden, wenn es in einen Raum transportiert wird. Es könnte sich Kondensation im Inneren bilden, die das Gerät beschädigt, wenn es ohne vorherige Erwärmung benutzt wird.
• Stellen Sie keine offenen Flammen, wie brennende Kerzen, auf das Gerät.
• Das Gerät sollte mindestens 20 cm von Wänden auf-gestellt werden, das Gerät darf nicht bedeckt werden, es muss ein Freiraum von mindestens 50 cm über dem Gerät gewährleistet sein.
• Achten Sie stets auf sicheren Stand auf einer stabilen, ebenen Fläche.
• Das Gerät darf nur mit Rollwagen, Ständern, Stativen, Tischen oder Halterungen benutzt werden, die vom Hersteller spezifiziert sind oder zusammen mit dem Gerät verkauft wurden. Wenn ein Rollwagen benutzt
wird, seien Sie vorsichtig, wenn Sie die Rollwagen/Geräte-Kombination transportieren, um Verletzungen durch Umkippen zu vermeiden.
• Verwenden Sie nur Zubehör, das vom Hersteller empfohlen ist. Das gilt für alle Arten von Zubehör, wie zum Beispiel Schutzabdeckungen, Transportta-schen, Ständer sowie Wand- und Deckenhalterungen. Wenn Sie irgendein Zubehör am Gerät anbringen, befolgen Sie immer die Anleitungen des Herstellers. Benutzen Sie nur die Befestigungspunkte des Geräts, die vom Hersteller vorgesehen sind.
• Dieses Gerät ist NICHT geeignet für eine Person oder Personen (einschließlich Kindern) mit einge-schränkten physischen, sensorischen und geistigen Fähigkeiten, oder für Personen mit unzulänglicher Erfahrung und/oder Fachkenntnis, um solch ein Gerät zu bedienen. Kinder unter 4 Jahren sollten stets von diesem Gerät fern gehalten werden.
• Es sollten keinerlei Gegenstände durch die Gehäuse-schlitze eingeführt werden, da dadurch gefährliche, spannungsführende Bauteile berührt oder kurzge-schlossen werden können. Dies könnte zu einer Feuer- oder Stromschlaggefahr führen.
• Dieses Gerät ist imstande, Schalldruckpegel von mehr als 90 dB zu produzieren. Dies könnte zu ei-nem dauerhaften Hörschaden führen! Eine Belastung durch extrem hohe Geräuschpegel kann zu einem dauerhaften Gehörverlust führen. Bei einer anhal-tenden Belastung durch solch hohe Pegel sollte ein Gehörschutz getragen werden.
• Der Hersteller gewährleistet die Sicherheit, Zuverläs-sigkeit und Leistung des Gerätes nur unter folgenden Voraussetzungen:
- Einbau, Erweiterung, Neueinstellung, Modifikationen oder Reparaturen werden vom Hersteller oder autori-siertem Personal ausgeführt.
- Die elektrische Installation des betreffenden Berei-ches entspricht den Anforderungen der IEC (ANSI) Maßgaben.
- Das Gerät wird entsprechend der Bedienungsanlei-tung benutzt.
Vor Inbetriebnahme
• Vor der Inbetriebnahme diese Anleitung in-
klusive der Sicherheitshinweise bitte sorgfaltig
durchlesen.
• Für Schäden am Gerät oder an anderen
Geräten, die durch unsachgemäßen Betrieb
entstehen, kann seitens des Herstellers keine
Haftung übernommen werden.
• Vor dem Anschluss an das Stromnetz muss
sichergestellt sein, dass der Power-Schalter
ausgeschaltet ist und der angegebene Span-
nungswert auf der Rückseite des Geräts mit der
ortsüblichen Netzspannung übereinstimmt.
• Ein Wort der Mahnung bevor der Black Spirit
200 Floor in Betrieb genommen wird: Er ist
laut! Hohe Lautstärkepegel können Gehör-
schäden verursachen.
• Um laute und nicht willkommene Überra-
schungen zu vermeiden, solltest du es dir zur
Angewohnheit machen, das Lautstärke-Poti
deiner mit dem Black Spirit 200 Floor verbun-
denen Gitarre ganz zurückzudrehen, bevor du
den Amp anschaltest!
Version 2.5 07/2018
15
Black Spirit 200 Floor – Manual 1.0
1 Quick Start .............................................................................. 15
2 Bedienungsgrundlagen des Black Spirit 200 Floor .................... 15
3 Bedienelemente ....................................................................... 16
4 Anschlussmöglichkeiten ........................................................... 19
5 Presets ..................................................................................... 21
6 Bluetooth® ............................................................................... 22
7 MIDI ........................................................................................ 23
8 Technische Daten .................................................................... 25
Hinweis: Im Black Spirit 200 Floor ist ein Weitbereichsnetzteil verbaut,
das weltweit bei jeder Netzspannung zuverlässig funktioniert und eine
immer gleichbleibende Sound-Qualität garantiert. Ist der Verstärker im
ausgeschalteten Zustand mit dem Stromnetz verbunden, wird eine mini-
male (<0,5 W) Spannung verbraucht und es kommt etwa alle 7 Sekunden
zu einem leisen Zirpen. Dieses Geräusch ist in der Regel nur in lautloser
Umgebung zu hören und stellt keinen Sachmangel dar, der durch eine
Reparatur behoben werden kann. Falls dieses Geräusch dennoch als stö-
rend empfunden wird, empfehlen wir eine Schaltsteckdose dazwischen
zu schalten, um die Stromzufuhr komplett zu unterbrechen.
1 Quick Start
MASTERPRESENCERESONANCESAGGINGNOISE GATETREBLEMIDBASSVOLUME
50
1 8
2 7
3 64 5
GAINREVERBDLY LEVELFEEDBACKDLY T IMEMOD TYPEINTENSITY
CLEAN ULTRACRUNCH LEAD
POWER
PHONES / L INE
CAB TYPE
STOREFX LOOPFX ACCESSBOOST
PRE LOOP
OFF OFF1400 OFF
C
2
1T
F P
S P I R I T ™ T O N E G E N E R A T O R
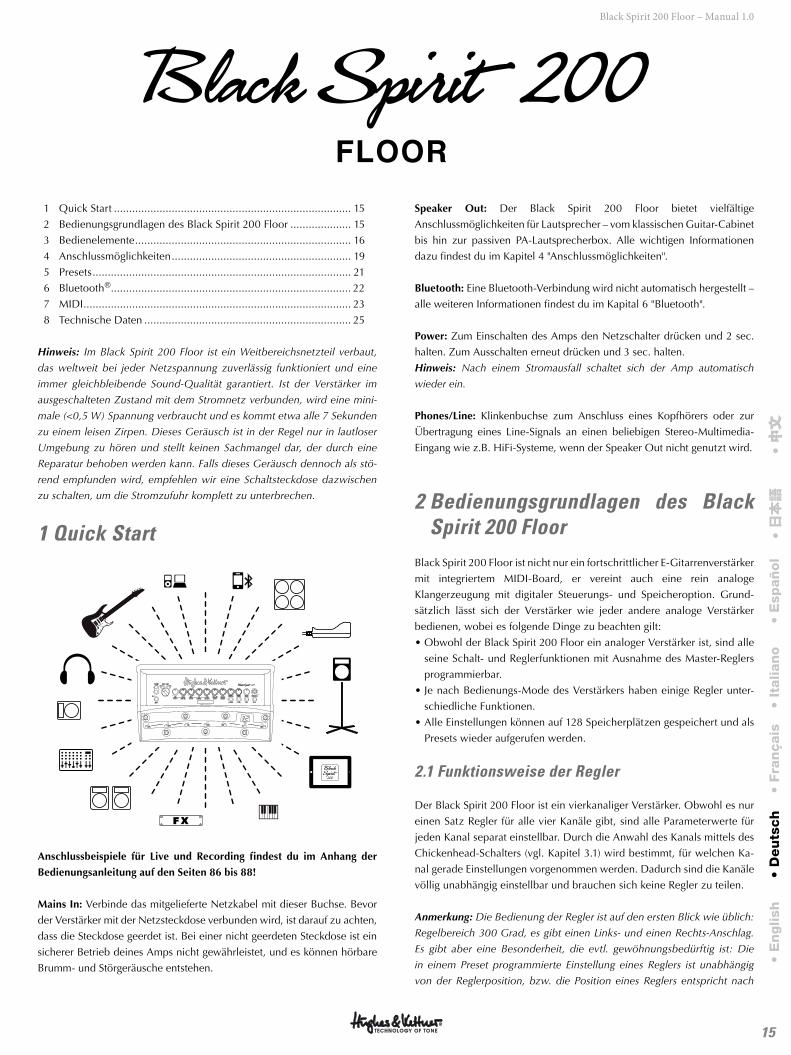
Anschlussbeispiele für Live und Recording findest du im Anhang der
Bedienungsanleitung auf den Seiten 86 bis 88!
Mains In: Verbinde das mitgelieferte Netzkabel mit dieser Buchse. Bevor
der Verstärker mit der Netzsteckdose verbunden wird, ist darauf zu achten,
dass die Steckdose geerdet ist. Bei einer nicht geerdeten Steckdose ist ein
sicherer Betrieb deines Amps nicht gewährleistet, und es können hörbare
Brumm- und Störgeräusche entstehen.
Speaker Out: Der Black Spirit 200 Floor bietet vielfältige
Anschlussmöglichkeiten für Lautsprecher – vom klassischen Guitar-Cabinet
bis hin zur passiven PA-Lautsprecherbox. Alle wichtigen Informationen
dazu findest du im Kapitel 4 "Anschlussmöglichkeiten".
Bluetooth: Eine Bluetooth-Verbindung wird nicht automatisch hergestellt –
alle weiteren Informationen findest du im Kapital 6 "Bluetooth".
Power: Zum Einschalten des Amps den Netzschalter drücken und 2 sec.
halten. Zum Ausschalten erneut drücken und 3 sec. halten.
Hinweis: Nach einem Stromausfall schaltet sich der Amp automatisch
wieder ein.
Phones/Line: Klinkenbuchse zum Anschluss eines Kopfhörers oder zur
Übertragung eines Line-Signals an einen beliebigen Stereo-Multimedia-
Eingang wie z.B. HiFi-Systeme, wenn der Speaker Out nicht genutzt wird.
2 Bedienungsgrundlagen des Black Spirit 200 Floor
Black Spirit 200 Floor ist nicht nur ein fortschrittlicher E-Gitarrenverstärker
mit integriertem MIDI-Board, er vereint auch eine rein analoge
Klangerzeugung mit digitaler Steuerungs- und Speicheroption. Grund-
sätzlich lässt sich der Verstärker wie jeder andere analoge Verstärker
bedienen, wobei es folgende Dinge zu beachten gilt:
• Obwohl der Black Spirit 200 Floor ein analoger Verstärker ist, sind alle
seine Schalt- und Reglerfunktionen mit Ausnahme des Master-Reglers
programmierbar.
• Je nach Bedienungs-Mode des Verstärkers haben einige Regler unter-
schiedliche Funktionen.
• Alle Einstellungen können auf 128 Speicherplätzen gespeichert und als
Presets wieder aufgerufen werden.
2.1 Funktionsweise der Regler
Der Black Spirit 200 Floor ist ein vierkanaliger Verstärker. Obwohl es nur
einen Satz Regler für alle vier Kanäle gibt, sind alle Parameterwerte für
jeden Kanal separat einstellbar. Durch die Anwahl des Kanals mittels des
Chickenhead-Schalters (vgl. Kapitel 3.1) wird bestimmt, für welchen Ka-
nal gerade Einstellungen vorgenommen werden. Dadurch sind die Kanäle
völlig unabhängig einstellbar und brauchen sich keine Regler zu teilen.
Anmerkung: Die Bedienung der Regler ist auf den ersten Blick wie üblich:
Regelbereich 300 Grad, es gibt einen Links- und einen Rechts-Anschlag.
Es gibt aber eine Besonderheit, die evtl. gewöhnungsbedürftig ist: Die
in einem Preset programmierte Einstellung eines Reglers ist unabhängig
von der Reglerposition, bzw. die Position eines Reglers entspricht nach
• E
nglish
• D
eu
tsch
• Fra
nçais
• It
alian
o•
Esp
añ
ol
• 日本語
• 中文
中文
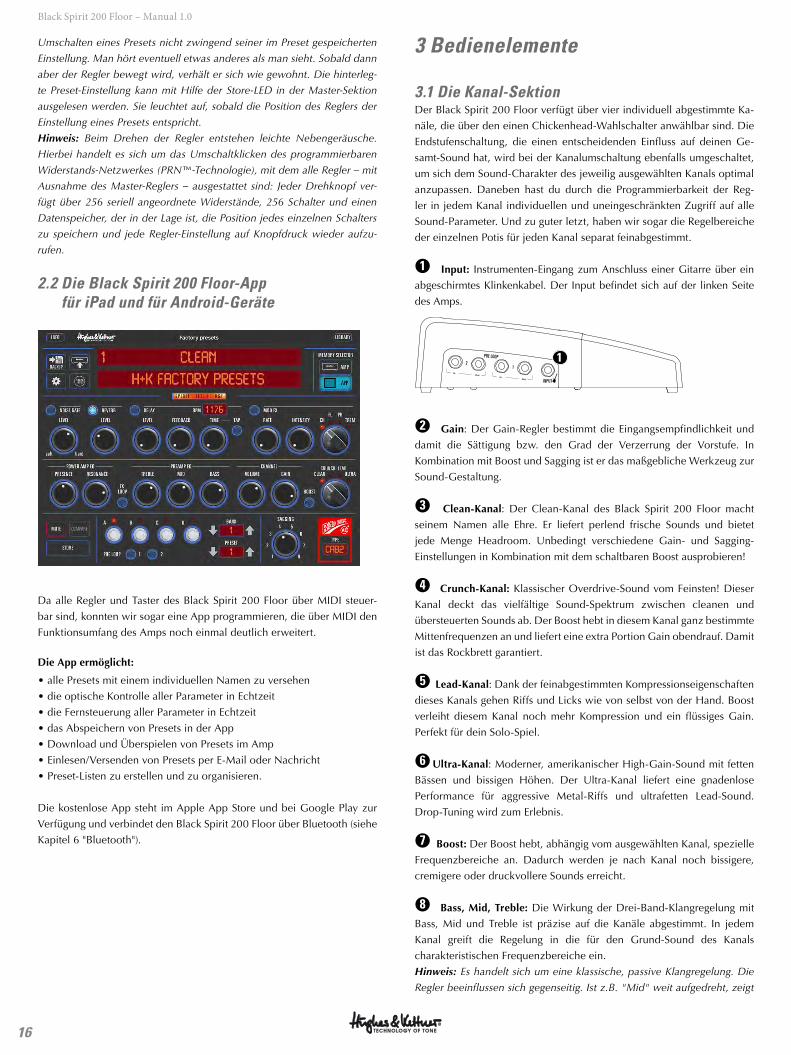
16
Black Spirit 200 Floor – Manual 1.0
Umschalten eines Presets nicht zwingend seiner im Preset gespeicherten
Einstellung. Man hört eventuell etwas anderes als man sieht. Sobald dann
aber der Regler bewegt wird, verhält er sich wie gewohnt. Die hinterleg-
te Preset-Einstellung kann mit Hilfe der Store-LED in der Master-Sektion
ausgelesen werden. Sie leuchtet auf, sobald die Position des Reglers der
Einstellung eines Presets entspricht.
Hinweis: Beim Drehen der Regler entstehen leichte Nebengeräusche.
Hierbei handelt es sich um das Umschaltklicken des programmierbaren
Widerstands-Netzwerkes (PRN™-Technologie), mit dem alle Regler – mit
Ausnahme des Master-Reglers – ausgestattet sind: Jeder Drehknopf ver-
fügt über 256 seriell angeordnete Widerstände, 256 Schalter und einen
Datenspeicher, der in der Lage ist, die Position jedes einzelnen Schalters
zu speichern und jede Regler-Einstellung auf Knopfdruck wieder aufzu-
rufen.
2.2 Die Black Spirit 200 Floor-App für iPad und für Android-Geräte
Da alle Regler und Taster des Black Spirit 200 Floor über MIDI steuer-
bar sind, konnten wir sogar eine App programmieren, die über MIDI den
Funktionsumfang des Amps noch einmal deutlich erweitert.
Die App ermöglicht:
• alle Presets mit einem individuellen Namen zu versehen
• die optische Kontrolle aller Parameter in Echtzeit
• die Fernsteuerung aller Parameter in Echtzeit
• das Abspeichern von Presets in der App
• Download und Überspielen von Presets im Amp
• Einlesen/Versenden von Presets per E-Mail oder Nachricht
• Preset-Listen zu erstellen und zu organisieren.
Die kostenlose App steht im Apple App Store und bei Google Play zur
Verfügung und verbindet den Black Spirit 200 Floor über Bluetooth (siehe
Kapitel 6 "Bluetooth").
3 Bedienelemente
3.1 Die Kanal-SektionDer Black Spirit 200 Floor verfügt über vier individuell abgestimmte Ka-
näle, die über den einen Chickenhead-Wahlschalter anwählbar sind. Die
Endstufenschaltung, die einen entscheidenden Einfluss auf deinen Ge-
samt-Sound hat, wird bei der Kanalumschaltung ebenfalls umgeschaltet,
um sich dem Sound-Charakter des jeweilig ausgewählten Kanals optimal
anzupassen. Daneben hast du durch die Programmierbarkeit der Reg-
ler in jedem Kanal individuellen und uneingeschränkten Zugriff auf alle
Sound-Parameter. Und zu guter letzt, haben wir sogar die Regelbereiche
der einzelnen Potis für jeden Kanal separat feinabgestimmt.
●1 Input: Instrumenten-Eingang zum Anschluss einer Gitarre über ein
abgeschirmtes Klinkenkabel. Der Input befindet sich auf der linken Seite
des Amps.
INPUT
PRE LOOP
12
1
●2 Gain: Der Gain-Regler bestimmt die Eingangsempfindlichkeit und
damit die Sättigung bzw. den Grad der Verzerrung der Vorstufe. In
Kombination mit Boost und Sagging ist er das maßgebliche Werkzeug zur
Sound-Gestaltung.
●3 Clean-Kanal: Der Clean-Kanal des Black Spirit 200 Floor macht
seinem Namen alle Ehre. Er liefert perlend frische Sounds und bietet
jede Menge Head room. Unbedingt verschiedene Gain- und Sagging-
Einstellungen in Kombination mit dem schaltbaren Boost ausprobieren!
●4 Crunch-Kanal: Klassischer Overdrive-Sound vom Feinsten! Dieser
Kanal deckt das vielfältige Sound-Spektrum zwischen cleanen und
übersteuerten Sounds ab. Der Boost hebt in diesem Kanal ganz bestimmte
Mittenfrequenzen an und liefert eine extra Portion Gain obendrauf. Damit
ist das Rockbrett garantiert.
●5 Lead-Kanal: Dank der feinabgestimmten Kompressionseigenschaften
dieses Kanals gehen Riffs und Licks wie von selbst von der Hand. Boost
verleiht diesem Kanal noch mehr Kompression und ein flüssiges Gain.
Perfekt für dein Solo-Spiel.
●6 Ultra-Kanal: Moderner, amerikanischer High-Gain-Sound mit fetten
Bässen und bissigen Höhen. Der Ultra-Kanal liefert eine gnadenlose
Performance für aggressive Metal-Riffs und ultrafetten Lead-Sound.
Drop-Tuning wird zum Erlebnis.
●7 Boost: Der Boost hebt, abhängig vom ausgewählten Kanal, spezielle
Frequenzbereiche an. Dadurch werden je nach Kanal noch bissigere,
cremigere oder druckvollere Sounds erreicht.
●8 Bass, Mid, Treble: Die Wirkung der Drei-Band-Klangregelung mit
Bass, Mid und Treble ist präzise auf die Kanäle abgestimmt. In jedem
Kanal greift die Regelung in die für den Grund-Sound des Kanals
charakteristischen Frequenzbereiche ein.
Hinweis: Es handelt sich um eine klassische, passive Klangregelung. Die
Regler beeinflussen sich gegenseitig. Ist z.B. "Mid" weit aufgedreht, zeigt
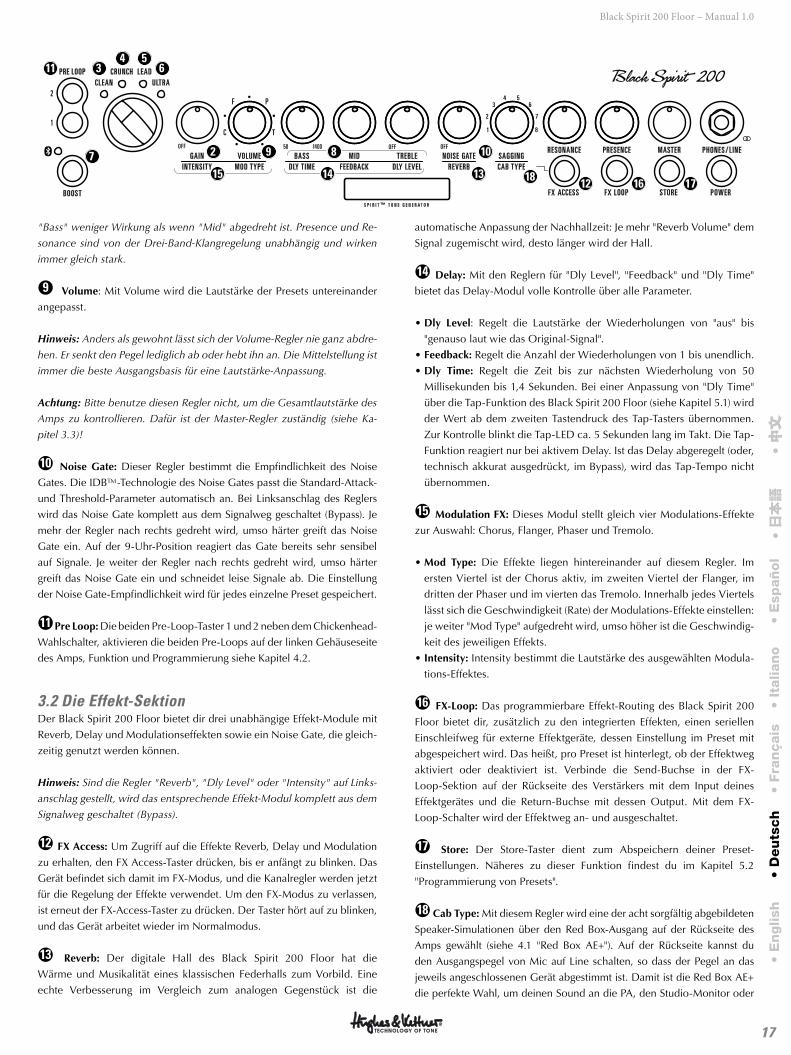
17
Black Spirit 200 Floor – Manual 1.0
"Bass" weniger Wirkung als wenn "Mid" abgedreht ist. Presence und Re-
sonance sind von der Drei-Band-Klangregelung unabhängig und wirken
immer gleich stark.
●9 Volume: Mit Volume wird die Lautstärke der Presets untereinander
angepasst.
Hinweis: Anders als gewohnt lässt sich der Volume-Regler nie ganz abdre-
hen. Er senkt den Pegel lediglich ab oder hebt ihn an. Die Mittelstellung ist
immer die beste Ausgangsbasis für eine Lautstärke-Anpassung.
Achtung: Bitte benutze diesen Regler nicht, um die Gesamtlautstärke des
Amps zu kontrollieren. Dafür ist der Master-Regler zuständig (siehe Ka-
pitel 3.3)!
●10 Noise Gate: Dieser Regler bestimmt die Empfindlichkeit des Noise
Gates. Die IDB™-Technologie des Noise Gates passt die Standard-Attack-
und Threshold-Parameter automatisch an. Bei Linksanschlag des Reglers
wird das Noise Gate komplett aus dem Signalweg geschaltet (Bypass). Je
mehr der Regler nach rechts gedreht wird, umso härter greift das Noise
Gate ein. Auf der 9-Uhr-Position reagiert das Gate bereits sehr sensibel
auf Signale. Je weiter der Regler nach rechts gedreht wird, umso härter
greift das Noise Gate ein und schneidet leise Signale ab. Die Einstellung
der Noise Gate-Empfindlichkeit wird für jedes einzelne Preset gespeichert.
●11 Pre Loop: Die beiden Pre-Loop-Taster 1 und 2 neben dem Chickenhead-
Wahlschalter, aktivieren die beiden Pre-Loops auf der linken Gehäuseseite
des Amps, Funktion und Programmierung siehe Kapitel 4.2.
3.2 Die Effekt-SektionDer Black Spirit 200 Floor bietet dir drei unabhängige Effekt-Module mit
Reverb, Delay und Modulationseffekten sowie ein Noise Gate, die gleich-
zeitig genutzt werden können.
Hinweis: Sind die Regler "Reverb", "Dly Level" oder "Intensity" auf Links-
anschlag gestellt, wird das entsprechende Effekt-Modul komplett aus dem
Signalweg geschaltet (Bypass).
●12 FX Access: Um Zugriff auf die Effekte Reverb, Delay und Modulation
zu erhalten, den FX Access-Taster drücken, bis er anfängt zu blinken. Das
Gerät befindet sich damit im FX-Modus, und die Kanalregler werden jetzt
für die Regelung der Effekte verwendet. Um den FX-Modus zu verlassen,
ist erneut der FX-Access-Taster zu drücken. Der Taster hört auf zu blinken,
und das Gerät arbeitet wieder im Normalmodus.
●13 Reverb: Der digitale Hall des Black Spirit 200 Floor hat die
Wärme und Musikalität eines klassischen Federhalls zum Vorbild. Eine
echte Verbesserung im Vergleich zum analogen Gegenstück ist die
automatische Anpassung der Nachhallzeit: Je mehr "Reverb Volume" dem
Signal zugemischt wird, desto länger wird der Hall.
●14 Delay: Mit den Reglern für "Dly Level", "Feedback" und "Dly Time"
bietet das Delay-Modul volle Kontrolle über alle Parameter.
• Dly Level: Regelt die Lautstärke der Wiederholungen von "aus" bis
"genauso laut wie das Original-Signal".
• Feedback: Regelt die Anzahl der Wiederholungen von 1 bis unendlich.
• Dly Time: Regelt die Zeit bis zur nächsten Wiederholung von 50
Millisekunden bis 1,4 Sekunden. Bei einer Anpassung von "Dly Time"
über die Tap-Funktion des Black Spirit 200 Floor (siehe Kapitel 5.1) wird
der Wert ab dem zweiten Tastendruck des Tap-Tasters übernommen.
Zur Kontrolle blinkt die Tap-LED ca. 5 Sekunden lang im Takt. Die Tap-
Funktion reagiert nur bei aktivem Delay. Ist das Delay abgeregelt (oder,
technisch akkurat ausgedrückt, im Bypass), wird das Tap-Tempo nicht
übernommen.
●15 Modulation FX: Dieses Modul stellt gleich vier Modulations-Effekte
zur Auswahl: Chorus, Flanger, Phaser und Tremolo.
• Mod Type: Die Effekte liegen hintereinander auf diesem Regler. Im
ersten Viertel ist der Chorus aktiv, im zweiten Viertel der Flanger, im
dritten der Phaser und im vierten das Tremolo. Innerhalb jedes Viertels
lässt sich die Geschwindigkeit (Rate) der Modulations-Effekte einstellen:
je weiter "Mod Type" aufgedreht wird, umso höher ist die Geschwindig-
keit des jeweiligen Effekts.
• Intensity: Intensity bestimmt die Lautstärke des ausgewählten Modula-
tions-Effektes.
●16 FX-Loop: Das programmierbare Effekt-Routing des Black Spirit 200
Floor bietet dir, zusätzlich zu den integrierten Effekten, einen seriellen
Einschleifweg für externe Effektgeräte, dessen Einstellung im Preset mit
abgespeichert wird. Das heißt, pro Preset ist hinterlegt, ob der Effektweg
aktiviert oder deaktiviert ist. Verbinde die Send-Buchse in der FX-
Loop-Sektion auf der Rückseite des Verstärkers mit dem Input deines
Effektgerätes und die Return-Buchse mit dessen Output. Mit dem FX-
Loop-Schalter wird der Effektweg an- und ausgeschaltet.
●17 Store: Der Store-Taster dient zum Abspeichern deiner Preset-
Einstellungen. Näheres zu dieser Funktion findest du im Kapitel 5.2
"Programmierung von Presets".
●18 Cab Type: Mit diesem Regler wird eine der acht sorgfältig abgebildeten
Speaker-Simulationen über den Red Box-Ausgang auf der Rückseite des
Amps gewählt (siehe 4.1 "Red Box AE+"). Auf der Rückseite kannst du
den Ausgangspegel von Mic auf Line schalten, so dass der Pegel an das
jeweils angeschlossenen Gerät abgestimmt ist. Damit ist die Red Box AE+
die perfekte Wahl, um deinen Sound an die PA, den Studio-Monitor oder
• E
nglish
• D
eu
tsch
• Fra
nçais
• It
alian
o•
Esp
añ
ol
• 日本語
• 中文
中文
MASTERPRESENCERESONANCESAGGINGNOISE GATETREBLEMIDBASSVOLUME
50
1 8
2 7
3 64 5
GAINREVERBDLY LEVELFEEDBACKDLY T IMEMOD TYPEINTENSITY
CLEAN ULTRACRUNCH LEAD
POWER
PHONES / L INE
CAB TYPE
STOREFX LOOPFX ACCESSBOOST
PRE LOOP
OFF OFF1400 OFF
C
2
1T
F P
S P I R I T ™ T O N E G E N E R A T O R
2 9
3 64 5
7 8 10
12
11
16131415 18 17
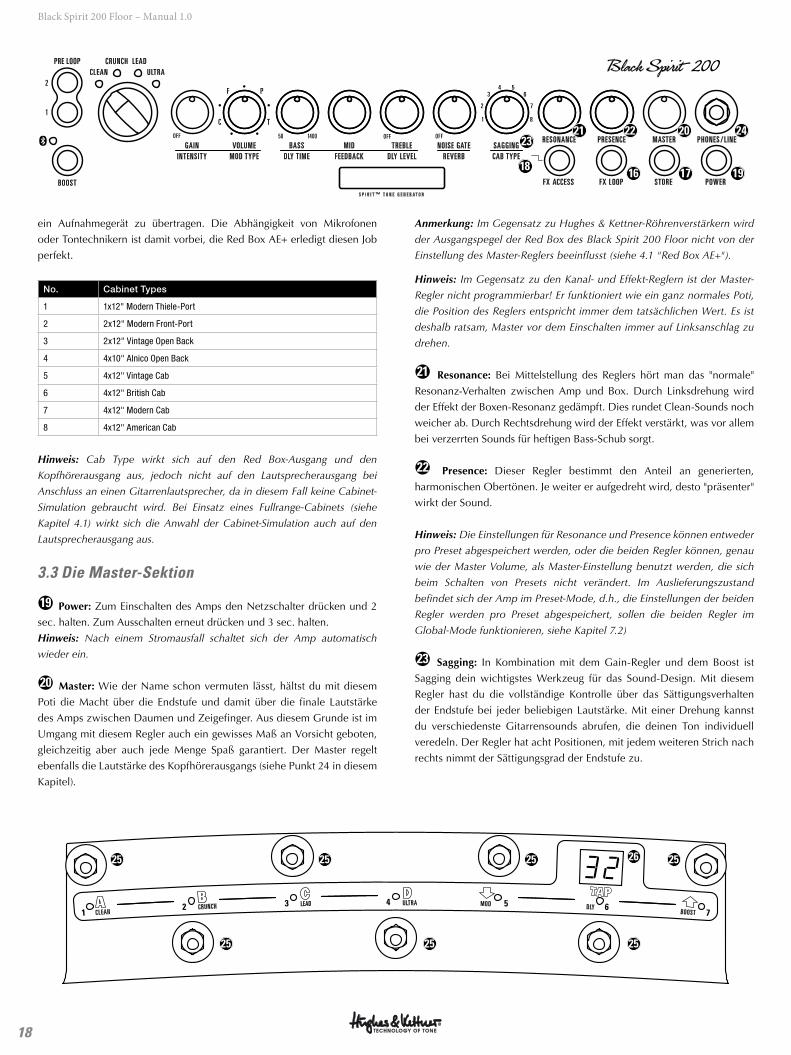
18
Black Spirit 200 Floor – Manual 1.0
ein Aufnahmegerät zu übertragen. Die Abhängigkeit von Mikrofonen
oder Tontechnikern ist damit vorbei, die Red Box AE+ erledigt diesen Job
perfekt.
No. Cabinet Types
1 1x12" Modern Thiele-Port
2 2x12" Modern Front-Port
3 2x12" Vintage Open Back
4 4x10" Alnico Open Back
5 4x12" Vintage Cab
6 4x12" British Cab
7 4x12" Modern Cab
8 4x12" American Cab
Hinweis: Cab Type wirkt sich auf den Red Box-Ausgang und den
Kopfhörerausgang aus, jedoch nicht auf den Lautsprecherausgang bei
Anschluss an einen Gitarrenlautsprecher, da in diesem Fall keine Cabinet-
Simulation gebraucht wird. Bei Einsatz eines Fullrange-Cabinets (siehe
Kapitel 4.1) wirkt sich die Anwahl der Cabinet-Simulation auch auf den
Lautsprecherausgang aus.
3.3 Die Master-Sektion
●19 Power: Zum Einschalten des Amps den Netzschalter drücken und 2
sec. halten. Zum Ausschalten erneut drücken und 3 sec. halten.
Hinweis: Nach einem Stromausfall schaltet sich der Amp automatisch
wieder ein.
●20 Master: Wie der Name schon vermuten lässt, hältst du mit diesem
Poti die Macht über die Endstufe und damit über die finale Lautstärke
des Amps zwischen Daumen und Zeigefinger. Aus diesem Grunde ist im
Umgang mit diesem Regler auch ein gewisses Maß an Vorsicht geboten,
gleichzeitig aber auch jede Menge Spaß garantiert. Der Master regelt
ebenfalls die Lautstärke des Kopfhörerausgangs (siehe Punkt 24 in diesem
Kapitel).
Anmerkung: Im Gegensatz zu Hughes & Kettner-Röhrenverstärkern wird
der Ausgangspegel der Red Box des Black Spirit 200 Floor nicht von der
Einstellung des Master-Reglers beeinflusst (siehe 4.1 "Red Box AE+").
Hinweis: Im Gegensatz zu den Kanal- und Effekt-Reglern ist der Master-
Regler nicht programmierbar! Er funktioniert wie ein ganz normales Poti,
die Position des Reglers entspricht immer dem tatsächlichen Wert. Es ist
deshalb ratsam, Master vor dem Einschalten immer auf Linksanschlag zu
drehen.
●21 Resonance: Bei Mittelstellung des Reglers hört man das "normale"
Resonanz-Verhalten zwischen Amp und Box. Durch Linksdrehung wird
der Effekt der Boxen-Resonanz gedämpft. Dies rundet Clean-Sounds noch
weicher ab. Durch Rechtsdrehung wird der Effekt verstärkt, was vor allem
bei verzerrten Sounds für heftigen Bass-Schub sorgt.
●22 Presence: Dieser Regler bestimmt den Anteil an generierten,
harmonischen Obertönen. Je weiter er aufgedreht wird, desto "präsenter"
wirkt der Sound.
Hinweis: Die Einstellungen für Resonance und Presence können entweder
pro Preset abgespeichert werden, oder die beiden Regler können, genau
wie der Master Volume, als Master-Einstellung benutzt werden, die sich
beim Schalten von Presets nicht verändert. Im Auslieferungszustand
befindet sich der Amp im Preset-Mode, d.h., die Einstellungen der beiden
Regler werden pro Preset abgespeichert, sollen die beiden Regler im
Global-Mode funktionieren, siehe Kapitel 7.2)
●23 Sagging: In Kombination mit dem Gain-Regler und dem Boost ist
Sagging dein wichtigstes Werkzeug für das Sound-Design. Mit diesem
Regler hast du die vollständige Kontrolle über das Sättigungsverhalten
der Endstufe bei jeder beliebigen Lautstärke. Mit einer Drehung kannst
du verschiedenste Gitarrensounds abrufen, die deinen Ton individuell
veredeln. Der Regler hat acht Positionen, mit jedem weiteren Strich nach
rechts nimmt der Sättigungsgrad der Endstufe zu.
25
25 25 25
2625 25 25
MASTERPRESENCERESONANCESAGGINGNOISE GATETREBLEMIDBASSVOLUME
50
1 8
2 7
3 64 5
GAINREVERBDLY LEVELFEEDBACKDLY T IMEMOD TYPEINTENSITY
CLEAN ULTRACRUNCH LEAD
POWER
PHONES / L INE
CAB TYPE
STOREFX LOOPFX ACCESSBOOST
PRE LOOP
OFF OFF1400 OFF
C
2
1T
F P
S P I R I T ™ T O N E G E N E R A T O R
18
2021 22 2423
16 17 19
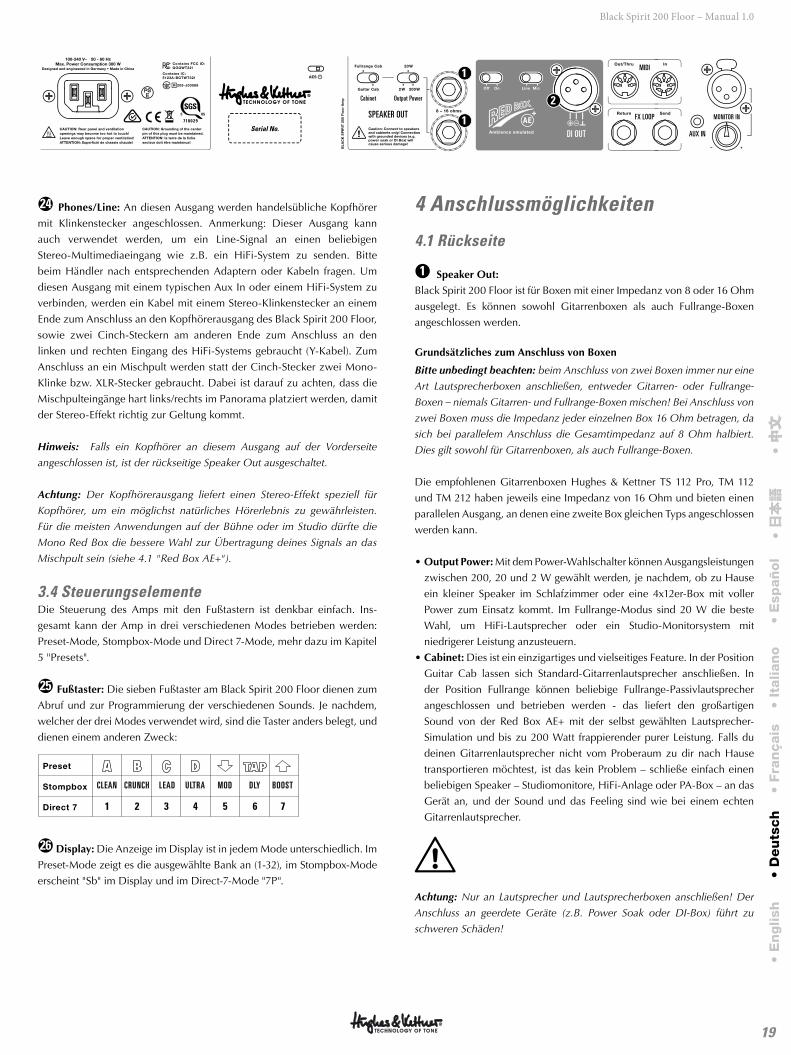
19
Black Spirit 200 Floor – Manual 1.0
●24 Phones/Line: An diesen Ausgang werden handelsübliche Kopfhörer
mit Klinkenstecker angeschlossen. Anmerkung: Dieser Ausgang kann
auch verwendet werden, um ein Line-Signal an einen beliebigen
Stereo-Multimediaeingang wie z.B. ein HiFi-System zu senden. Bitte
beim Händler nach entsprechenden Adaptern oder Kabeln fragen. Um
diesen Ausgang mit einem typischen Aux In oder einem HiFi-System zu
verbinden, werden ein Kabel mit einem Stereo-Klinkenstecker an einem
Ende zum Anschluss an den Kopfhörerausgang des Black Spirit 200 Floor,
sowie zwei Cinch-Steckern am anderen Ende zum Anschluss an den
linken und rechten Eingang des HiFi-Systems gebraucht (Y-Kabel). Zum
Anschluss an ein Mischpult werden statt der Cinch-Stecker zwei Mono-
Klinke bzw. XLR-Stecker gebraucht. Dabei ist darauf zu achten, dass die
Mischpulteingänge hart links/rechts im Panorama platziert werden, damit
der Stereo-Effekt richtig zur Geltung kommt.
Hinweis: Falls ein Kopfhörer an diesem Ausgang auf der Vorderseite
angeschlossen ist, ist der rückseitige Speaker Out ausgeschaltet.
Achtung: Der Kopfhörerausgang liefert einen Stereo-Effekt speziell für
Kopfhörer, um ein möglichst natürliches Hörerlebnis zu gewährleisten.
Für die meisten Anwendungen auf der Bühne oder im Studio dürfte die
Mono Red Box die bessere Wahl zur Übertragung deines Signals an das
Mischpult sein (siehe 4.1 "Red Box AE+").
3.4 Steuerungselemente Die Steuerung des Amps mit den Fußtastern ist denkbar einfach. Ins-
gesamt kann der Amp in drei verschiedenen Modes betrieben werden:
Preset-Mode, Stompbox-Mode und Direct 7-Mode, mehr dazu im Kapitel
5 "Presets".
●25 Fußtaster: Die sieben Fußtaster am Black Spirit 200 Floor dienen zum
Abruf und zur Programmierung der verschiedenen Sounds. Je nachdem,
welcher der drei Modes verwendet wird, sind die Taster anders belegt, und
dienen einem anderen Zweck:
1
CLEAN
2
CRUNCH
3
LEAD
4
ULTRA
6
DLY
7
BOOST
5
MOD
●26 Display: Die Anzeige im Display ist in jedem Mode unterschiedlich. Im
Preset-Mode zeigt es die ausgewählte Bank an (1-32), im Stompbox-Mode
erscheint "Sb" im Display und im Direct-7-Mode "7P".
4 Anschlussmöglichkeiten
4.1 Rückseite
●1 Speaker Out:
Black Spirit 200 Floor ist für Boxen mit einer Impedanz von 8 oder 16 Ohm
ausgelegt. Es können sowohl Gitarrenboxen als auch Fullrange-Boxen
angeschlossen werden.
Grundsätzliches zum Anschluss von Boxen
Bitte unbedingt beachten: beim Anschluss von zwei Boxen immer nur eine
Art Lautsprecherboxen anschließen, entweder Gitarren- oder Fullrange-
Boxen – niemals Gitarren- und Fullrange-Boxen mischen! Bei Anschluss von
zwei Boxen muss die Impedanz jeder einzelnen Box 16 Ohm betragen, da
sich bei parallelem Anschluss die Gesamtimpedanz auf 8 Ohm halbiert.
Dies gilt sowohl für Gitarrenboxen, als auch Fullrange-Boxen.
Die empfohlenen Gitarrenboxen Hughes & Kettner TS 112 Pro, TM 112
und TM 212 haben jeweils eine Impedanz von 16 Ohm und bieten einen
parallelen Ausgang, an denen eine zweite Box gleichen Typs angeschlossen
werden kann.
• Output Power: Mit dem Power-Wahlschalter können Ausgangsleistungen
zwischen 200, 20 und 2 W gewählt werden, je nachdem, ob zu Hause
ein kleiner Speaker im Schlafzimmer oder eine 4x12er-Box mit voller
Power zum Einsatz kommt. Im Fullrange-Modus sind 20 W die beste
Wahl, um HiFi-Lautsprecher oder ein Studio-Monitorsystem mit
niedrigerer Leistung anzusteuern.
• Cabinet: Dies ist ein einzigartiges und vielseitiges Feature. In der Position
Guitar Cab lassen sich Standard-Gitarrenlautsprecher anschließen. In
der Position Fullrange können beliebige Fullrange-Passivlautsprecher
angeschlossen und betrieben werden - das liefert den großartigen
Sound von der Red Box AE+ mit der selbst gewählten Lautsprecher-
Simulation und bis zu 200 Watt frappierender purer Leistung. Falls du
deinen Gitarrenlautsprecher nicht vom Proberaum zu dir nach Hause
transportieren möchtest, ist das kein Problem – schließe einfach einen
beliebigen Speaker – Studiomonitore, HiFi-Anlage oder PA-Box – an das
Gerät an, und der Sound und das Feeling sind wie bei einem echten
Gitarrenlautsprecher.
Achtung: Nur an Lautsprecher und Lautsprecherboxen anschließen! Der
Anschluss an geerdete Geräte (z.B. Power Soak oder DI-Box) führt zu
schweren Schäden!
• E
nglish
• D
eu
tsch
• Fra
nçais
• It
alian
o•
Esp
añ
ol
• 日本語
• 中文
中文
Serial No.
Output Power
SPEAKER OUT
MIDI
FX LOOP
AUX IN
Cabinet
MONITOR IN
DI OUT
AE
1
1
2
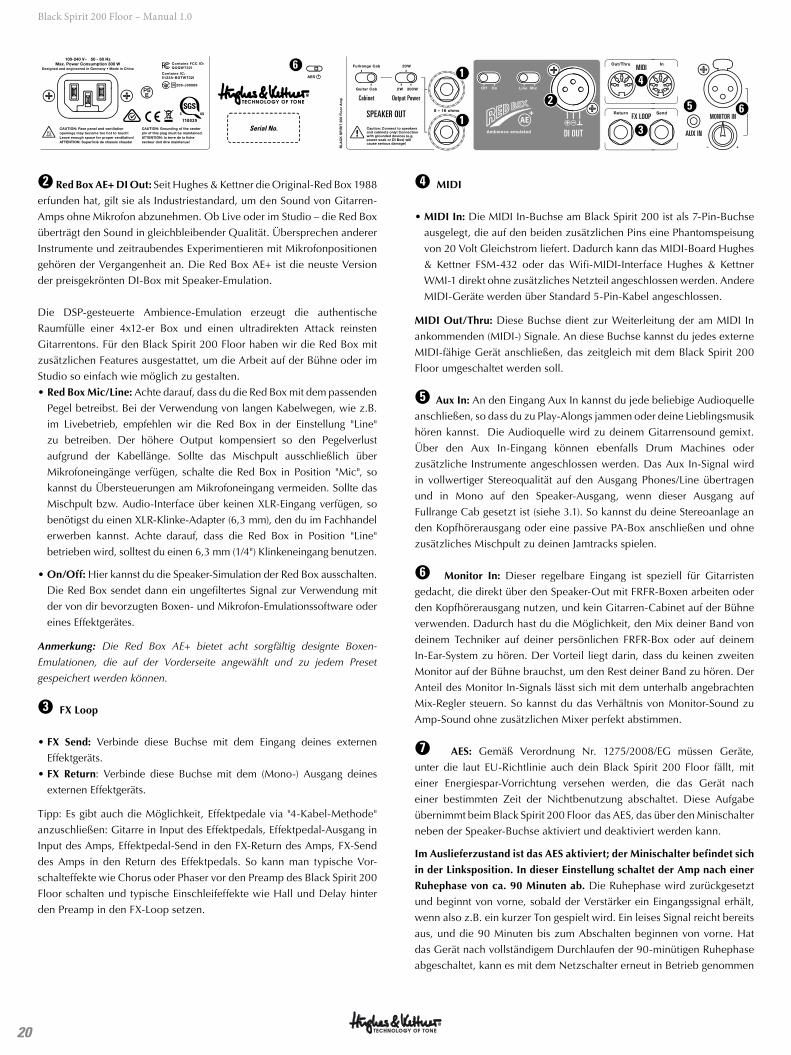
20
Black Spirit 200 Floor – Manual 1.0
●2 Red Box AE+ DI Out: Seit Hughes & Kettner die Original-Red Box 1988
erfunden hat, gilt sie als Industriestandard, um den Sound von Gitarren-
Amps ohne Mikrofon abzunehmen. Ob Live oder im Studio – die Red Box
überträgt den Sound in gleichbleibender Qualität. Übersprechen anderer
Instrumente und zeitraubendes Experimentieren mit Mikrofonpositionen
gehören der Vergangenheit an. Die Red Box AE+ ist die neuste Version
der preisgekrönten DI-Box mit Speaker-Emulation.
Die DSP-gesteuerte Ambience-Emulation erzeugt die authentische
Raumfülle einer 4x12-er Box und einen ultradirekten Attack reinsten
Gitarrentons. Für den Black Spirit 200 Floor haben wir die Red Box mit
zusätzlichen Features ausgestattet, um die Arbeit auf der Bühne oder im
Studio so einfach wie möglich zu gestalten.
• Red Box Mic/Line: Achte darauf, dass du die Red Box mit dem passenden
Pegel betreibst. Bei der Verwendung von langen Kabelwegen, wie z.B.
im Livebetrieb, empfehlen wir die Red Box in der Einstellung "Line"
zu betreiben. Der höhere Output kompensiert so den Pegelverlust
aufgrund der Kabellänge. Sollte das Mischpult ausschließlich über
Mikrofoneingänge verfügen, schalte die Red Box in Position "Mic", so
kannst du Übersteuerungen am Mikrofoneingang vermeiden. Sollte das
Mischpult bzw. Audio-Interface über keinen XLR-Eingang verfügen, so
benötigst du einen XLR-Klinke-Adapter (6,3 mm), den du im Fachhandel
erwerben kannst. Achte darauf, dass die Red Box in Position "Line"
betrieben wird, solltest du einen 6,3 mm (1/4") Klinkeneingang benutzen.
• On/Off: Hier kannst du die Speaker-Simulation der Red Box ausschalten.
Die Red Box sendet dann ein ungefiltertes Signal zur Verwendung mit
der von dir bevorzugten Boxen- und Mikrofon-Emulationssoftware oder
eines Effektgerätes.
Anmerkung: Die Red Box AE+ bietet acht sorgfältig designte Boxen-
Emulationen, die auf der Vorderseite angewählt und zu jedem Preset
gespeichert werden können.
●3 FX Loop
• FX Send: Verbinde diese Buchse mit dem Eingang deines externen
Effektgeräts.
• FX Return: Verbinde diese Buchse mit dem (Mono-) Ausgang deines
externen Effektgeräts.
Tipp: Es gibt auch die Möglichkeit, Effektpedale via "4-Kabel-Methode"
anzuschließen: Gitarre in Input des Effektpedals, Effektpedal-Ausgang in
Input des Amps, Effektpedal-Send in den FX-Return des Amps, FX-Send
des Amps in den Return des Effektpedals. So kann man typische Vor-
schalteffekte wie Chorus oder Phaser vor den Preamp des Black Spirit 200
Floor schalten und typische Einschleifeffekte wie Hall und Delay hinter
den Preamp in den FX-Loop setzen.
●4 MIDI
• MIDI In: Die MIDI In-Buchse am Black Spirit 200 ist als 7-Pin-Buchse
ausgelegt, die auf den beiden zusätzlichen Pins eine Phantomspeisung
von 20 Volt Gleichstrom liefert. Dadurch kann das MIDI-Board Hughes
& Kettner FSM-432 oder das Wifi-MIDI-Interface Hughes & Kettner
WMI-1 direkt ohne zusätzliches Netzteil angeschlossen werden. Andere
MIDI-Geräte werden über Standard 5-Pin-Kabel angeschlossen.
MIDI Out/Thru: Diese Buchse dient zur Weiterleitung der am MIDI In
ankommenden (MIDI-) Signale. An diese Buchse kannst du jedes externe
MIDI-fähige Gerät anschließen, das zeitgleich mit dem Black Spirit 200
Floor umgeschaltet werden soll.
●5 Aux In: An den Eingang Aux In kannst du jede beliebige Audioquelle
anschließen, so dass du zu Play-Alongs jammen oder deine Lieblingsmusik
hören kannst. Die Audioquelle wird zu deinem Gitarrensound gemixt.
Über den Aux In-Eingang können ebenfalls Drum Machines oder
zusätzliche Instrumente angeschlossen werden. Das Aux In-Signal wird
in vollwertiger Stereoqualität auf den Ausgang Phones/Line übertragen
und in Mono auf den Speaker-Ausgang, wenn dieser Ausgang auf
Fullrange Cab gesetzt ist (siehe 3.1). So kannst du deine Stereoanlage an
den Kopfhörerausgang oder eine passive PA-Box anschließen und ohne
zusätzliches Mischpult zu deinen Jamtracks spielen.
●6 Monitor In: Dieser regelbare Eingang ist speziell für Gitarristen
gedacht, die direkt über den Speaker-Out mit FRFR-Boxen arbeiten oder
den Kopfhörerausgang nutzen, und kein Gitarren-Cabinet auf der Bühne
verwenden. Dadurch hast du die Möglichkeit, den Mix deiner Band von
deinem Techniker auf deiner persönlichen FRFR-Box oder auf deinem
In-Ear-System zu hören. Der Vorteil liegt darin, dass du keinen zweiten
Monitor auf der Bühne brauchst, um den Rest deiner Band zu hören. Der
Anteil des Monitor In-Signals lässt sich mit dem unterhalb angebrachten
Mix-Regler steuern. So kannst du das Verhältnis von Monitor-Sound zu
Amp-Sound ohne zusätzlichen Mixer perfekt abstimmen.
●7 AES: Gemäß Verordnung Nr. 1275/2008/EG müssen Geräte,
unter die laut EU-Richtlinie auch dein Black Spirit 200 Floor fällt, mit
einer Energiespar-Vorrichtung versehen werden, die das Gerät nach
einer bestimmten Zeit der Nichtbenutzung abschaltet. Diese Aufgabe
übernimmt beim Black Spirit 200 Floor das AES, das über den Minischalter
neben der Speaker-Buchse aktiviert und deaktiviert werden kann.
Im Auslieferzustand ist das AES aktiviert; der Minischalter befindet sich
in der Linksposition. In dieser Einstellung schaltet der Amp nach einer
Ruhephase von ca. 90 Minuten ab. Die Ruhephase wird zurückgesetzt
und beginnt von vorne, sobald der Verstärker ein Eingangssignal erhält,
wenn also z.B. ein kurzer Ton gespielt wird. Ein leises Signal reicht bereits
aus, und die 90 Minuten bis zum Abschalten beginnen von vorne. Hat
das Gerät nach vollständigem Durchlaufen der 90-minütigen Ruhephase
abgeschaltet, kann es mit dem Netzschalter erneut in Betrieb genommen
Serial No.
Output Power
SPEAKER OUT
MIDI
FX LOOP
AUX IN
Cabinet
MONITOR IN
DI OUT
AE
1
1
2
3
4
5 6
6
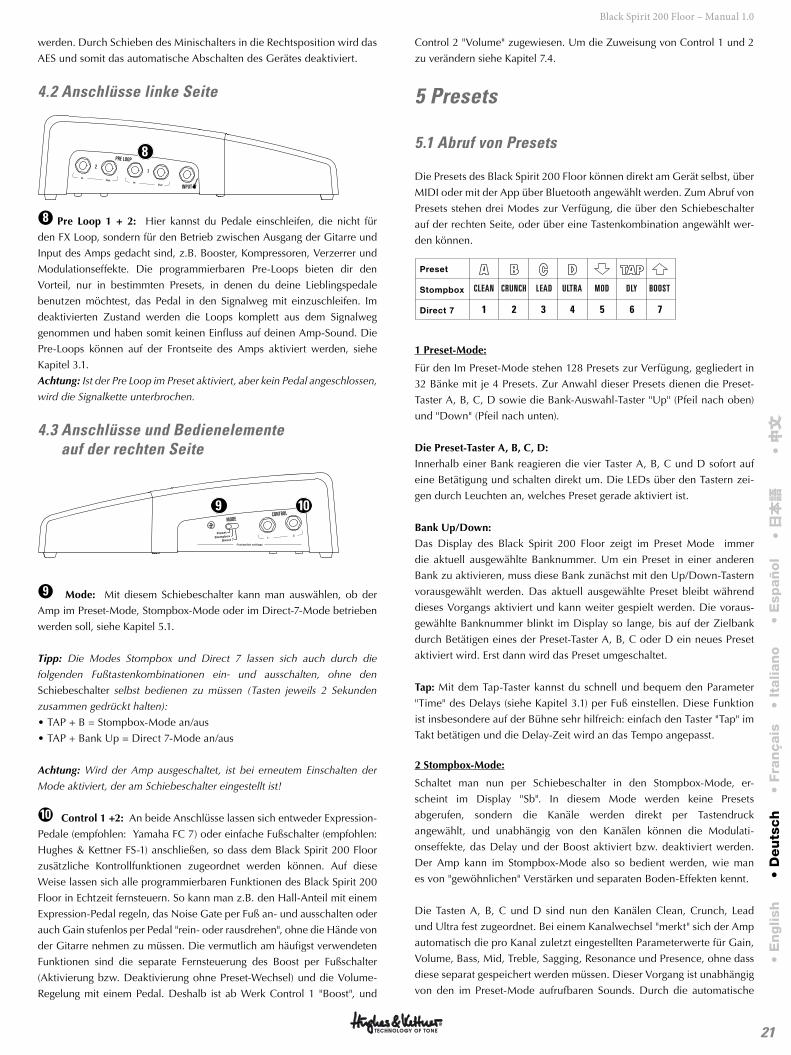
21
Black Spirit 200 Floor – Manual 1.0
werden. Durch Schieben des Minischalters in die Rechtsposition wird das
AES und somit das automatische Abschalten des Gerätes deaktiviert.
4.2 Anschlüsse linke Seite
INPUT
PRE LOOP
12
8
●8 Pre Loop 1 + 2: Hier kannst du Pedale einschleifen, die nicht für
den FX Loop, sondern für den Betrieb zwischen Ausgang der Gitarre und
Input des Amps gedacht sind, z.B. Booster, Kompressoren, Verzerrer und
Modulationseffekte. Die programmierbaren Pre-Loops bieten dir den
Vorteil, nur in bestimmten Presets, in denen du deine Lieblingspedale
benutzen möchtest, das Pedal in den Signalweg mit einzuschleifen. Im
deaktivierten Zustand werden die Loops komplett aus dem Signalweg
genommen und haben somit keinen Einfluss auf deinen Amp-Sound. Die
Pre-Loops können auf der Frontseite des Amps aktiviert werden, siehe
Kapitel 3.1.
Achtung: Ist der Pre Loop im Preset aktiviert, aber kein Pedal angeschlossen,
wird die Signalkette unterbrochen.
4.3 Anschlüsse und Bedienelemente auf der rechten Seite
CONTROLMODE
9 10
●9 Mode: Mit diesem Schiebeschalter kann man auswählen, ob der
Amp im Preset-Mode, Stompbox-Mode oder im Direct-7-Mode betrieben
werden soll, siehe Kapitel 5.1.
Tipp: Die Modes Stompbox und Direct 7 lassen sich auch durch die
folgenden Fußtastenkombinationen ein- und ausschalten, ohne den
Schiebeschalter selbst bedienen zu müssen (Tasten jeweils 2 Sekunden
zusammen gedrückt halten):
• TAP + B = Stompbox-Mode an/aus
• TAP + Bank Up = Direct 7-Mode an/aus
Achtung: Wird der Amp ausgeschaltet, ist bei erneutem Einschalten der
Mode aktiviert, der am Schiebeschalter eingestellt ist!
●10 Control 1 +2: An beide Anschlüsse lassen sich entweder Expression-
Pedale (empfohlen: Yamaha FC 7) oder einfache Fußschalter (empfohlen:
Hughes & Kettner FS-1) anschließen, so dass dem Black Spirit 200 Floor
zusätzliche Kontrollfunktionen zugeordnet werden können. Auf diese
Weise lassen sich alle programmierbaren Funktionen des Black Spirit 200
Floor in Echtzeit fernsteuern. So kann man z.B. den Hall-Anteil mit einem
Expression-Pedal regeln, das Noise Gate per Fuß an- und ausschalten oder
auch Gain stufenlos per Pedal "rein- oder rausdrehen", ohne die Hände von
der Gitarre nehmen zu müssen. Die vermutlich am häufigst verwendeten
Funktionen sind die separate Fernsteuerung des Boost per Fußschalter
(Aktivierung bzw. Deaktivierung ohne Preset-Wechsel) und die Volume-
Regelung mit einem Pedal. Deshalb ist ab Werk Control 1 "Boost", und
Control 2 "Volume" zugewiesen. Um die Zuweisung von Control 1 und 2
zu verändern siehe Kapitel 7.4.
5 Presets
5.1 Abruf von Presets
Die Presets des Black Spirit 200 Floor können direkt am Gerät selbst, über
MIDI oder mit der App über Bluetooth angewählt werden. Zum Abruf von
Presets stehen drei Modes zur Verfügung, die über den Schiebeschalter
auf der rechten Seite, oder über eine Tastenkombination angewählt wer-
den können.
1
CLEAN
2
CRUNCH
3
LEAD
4
ULTRA
6
DLY
7
BOOST
5
MOD
1 Preset-Mode:
Für den Im Preset-Mode stehen 128 Presets zur Verfügung, gegliedert in
32 Bänke mit je 4 Presets. Zur Anwahl dieser Presets dienen die Preset-
Taster A, B, C, D sowie die Bank-Auswahl-Taster "Up" (Pfeil nach oben)
und "Down" (Pfeil nach unten).
Die Preset-Taster A, B, C, D:
Innerhalb einer Bank reagieren die vier Taster A, B, C und D sofort auf
eine Betätigung und schalten direkt um. Die LEDs über den Tastern zei-
gen durch Leuchten an, welches Preset gerade aktiviert ist.
Bank Up/Down:
Das Display des Black Spirit 200 Floor zeigt im Preset Mode immer
die aktuell ausgewählte Banknummer. Um ein Preset in einer anderen
Bank zu aktivieren, muss diese Bank zunächst mit den Up/Down-Tastern
vorausgewählt werden. Das aktuell ausgewählte Preset bleibt während
dieses Vorgangs aktiviert und kann weiter gespielt werden. Die voraus-
gewählte Banknummer blinkt im Display so lange, bis auf der Zielbank
durch Betätigen eines der Preset-Taster A, B, C oder D ein neues Preset
aktiviert wird. Erst dann wird das Preset umgeschaltet.
Tap: Mit dem Tap-Taster kannst du schnell und bequem den Parameter
"Time" des Delays (siehe Kapitel 3.1) per Fuß einstellen. Diese Funktion
ist insbesondere auf der Bühne sehr hilfreich: einfach den Taster "Tap" im
Takt betätigen und die Delay-Zeit wird an das Tempo angepasst.
2 Stompbox-Mode:
Schaltet man nun per Schiebeschalter in den Stompbox-Mode, er-
scheint im Display "Sb". In diesem Mode werden keine Presets
abgerufen, sondern die Kanäle werden direkt per Tastendruck
angewählt, und unabhängig von den Kanälen können die Modulati-
onseffekte, das Delay und der Boost aktiviert bzw. deaktiviert werden.
Der Amp kann im Stompbox-Mode also so bedient werden, wie man
es von "gewöhnlichen" Verstärken und separaten Boden-Effekten kennt.
Die Tasten A, B, C und D sind nun den Kanälen Clean, Crunch, Lead
und Ultra fest zugeordnet. Bei einem Kanalwechsel "merkt" sich der Amp
automatisch die pro Kanal zuletzt eingestellten Parameterwerte für Gain,
Volume, Bass, Mid, Treble, Sagging, Resonance und Presence, ohne dass
diese separat gespeichert werden müssen. Dieser Vorgang ist unabhängig
von den im Preset-Mode aufrufbaren Sounds. Durch die automatische
• E
nglish
• D
eu
tsch
• Fra
nçais
• It
alian
o•
Esp
añ
ol
• 日本語
• 中文
中文
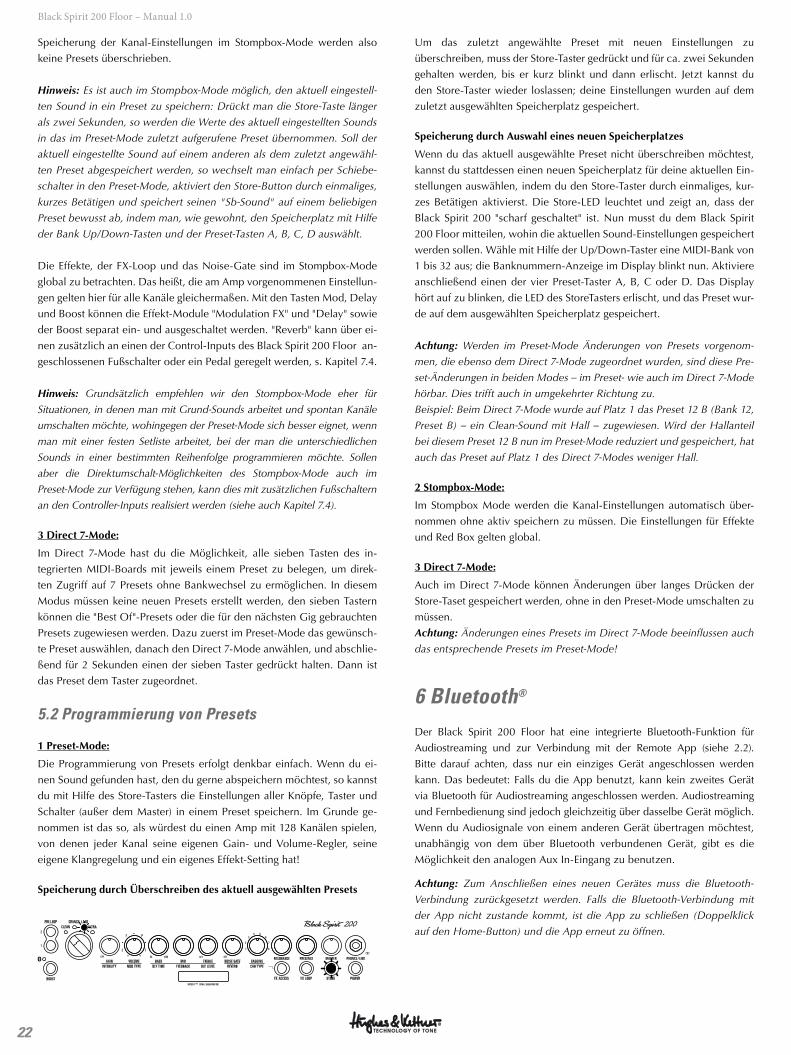
22
Black Spirit 200 Floor – Manual 1.0
Speicherung der Kanal-Einstellungen im Stompbox-Mode werden also
keine Presets überschrieben.
Hinweis: Es ist auch im Stompbox-Mode möglich, den aktuell eingestell-
ten Sound in ein Preset zu speichern: Drückt man die Store-Taste länger
als zwei Sekunden, so werden die Werte des aktuell eingestellten Sounds
in das im Preset-Mode zuletzt aufgerufene Preset übernommen. Soll der
aktuell eingestellte Sound auf einem anderen als dem zuletzt angewähl-
ten Preset abgespeichert werden, so wechselt man einfach per Schiebe-
schalter in den Preset-Mode, aktiviert den Store-Button durch einmaliges,
kurzes Betätigen und speichert seinen "Sb-Sound" auf einem beliebigen
Preset bewusst ab, indem man, wie gewohnt, den Speicherplatz mit Hilfe
der Bank Up/Down-Tasten und der Preset-Tasten A, B, C, D auswählt.
Die Effekte, der FX-Loop und das Noise-Gate sind im Stompbox-Mode
global zu betrachten. Das heißt, die am Amp vorgenommenen Einstellun-
gen gelten hier für alle Kanäle gleichermaßen. Mit den Tasten Mod, Delay
und Boost können die Effekt-Module "Modulation FX" und "Delay" sowie
der Boost separat ein- und ausgeschaltet werden. "Reverb" kann über ei-
nen zusätzlich an einen der Control-Inputs des Black Spirit 200 Floor an-
geschlossenen Fußschalter oder ein Pedal geregelt werden, s. Kapitel 7.4.
Hinweis: Grundsätzlich empfehlen wir den Stompbox-Mode eher für
Situationen, in denen man mit Grund-Sounds arbeitet und spontan Kanäle
umschalten möchte, wohingegen der Preset-Mode sich besser eignet, wenn
man mit einer festen Setliste arbeitet, bei der man die unterschiedlichen
Sounds in einer bestimmten Reihenfolge programmieren möchte. Sollen
aber die Direktumschalt-Möglichkeiten des Stompbox-Mode auch im
Preset-Mode zur Verfügung stehen, kann dies mit zusätzlichen Fußschaltern
an den Controller-Inputs realisiert werden (siehe auch Kapitel 7.4).
3 Direct 7-Mode:
Im Direct 7-Mode hast du die Möglichkeit, alle sieben Tasten des in-
tegrierten MIDI-Boards mit jeweils einem Preset zu belegen, um direk-
ten Zugriff auf 7 Presets ohne Bankwechsel zu ermöglichen. In diesem
Modus müssen keine neuen Presets erstellt werden, den sieben Tastern
können die "Best Of"-Presets oder die für den nächsten Gig gebrauchten
Presets zugewiesen werden. Dazu zuerst im Preset-Mode das gewünsch-
te Preset auswählen, danach den Direct 7-Mode anwählen, und abschlie-
ßend für 2 Sekunden einen der sieben Taster gedrückt halten. Dann ist
das Preset dem Taster zugeordnet.
5.2 Programmierung von Presets
1 Preset-Mode:
Die Programmierung von Presets erfolgt denkbar einfach. Wenn du ei-
nen Sound gefunden hast, den du gerne abspeichern möchtest, so kannst
du mit Hilfe des Store-Tasters die Einstellungen aller Knöpfe, Taster und
Schalter (außer dem Master) in einem Preset speichern. Im Grunde ge-
nommen ist das so, als würdest du einen Amp mit 128 Kanälen spielen,
von denen jeder Kanal seine eigenen Gain- und Volume-Regler, seine
eigene Klangregelung und ein eigenes Effekt-Setting hat!
Speicherung durch Überschreiben des aktuell ausgewählten Presets
MASTERPRESENCERESONANCESAGGINGNOISE GATETREBLEMIDBASSVOLUME
50
1 8
2 7
3 64 5
GAINREVERBDLY LEVELFEEDBACKDLY T IMEMOD TYPEINTENSITY
CLEAN ULTRACRUNCH LEAD
POWER
PHONES / L INE
CAB TYPE
STOREFX LOOPFX ACCESSBOOST
PRE LOOP
OFF OFF1400 OFF
C
2
1T
F P
S P I R I T ™ T O N E G E N E R A T O R
Um das zuletzt angewählte Preset mit neuen Einstellungen zu
überschreiben, muss der Store-Taster gedrückt und für ca. zwei Sekunden
gehalten werden, bis er kurz blinkt und dann erlischt. Jetzt kannst du
den Store-Taster wieder loslassen; deine Einstellungen wurden auf dem
zuletzt ausgewählten Speicherplatz gespeichert.
Speicherung durch Auswahl eines neuen Speicherplatzes
Wenn du das aktuell ausgewählte Preset nicht überschreiben möchtest,
kannst du stattdessen einen neuen Speicherplatz für deine aktuellen Ein-
stellungen auswählen, indem du den Store-Taster durch einmaliges, kur-
zes Betätigen aktivierst. Die Store-LED leuchtet und zeigt an, dass der
Black Spirit 200 "scharf geschaltet" ist. Nun musst du dem Black Spirit
200 Floor mitteilen, wohin die aktuellen Sound-Einstellungen gespeichert
werden sollen. Wähle mit Hilfe der Up/Down-Taster eine MIDI-Bank von
1 bis 32 aus; die Banknummern-Anzeige im Display blinkt nun. Aktiviere
anschließend einen der vier Preset-Taster A, B, C oder D. Das Display
hört auf zu blinken, die LED des StoreTasters erlischt, und das Preset wur-
de auf dem ausgewählten Speicherplatz gespeichert.
Achtung: Werden im Preset-Mode Änderungen von Presets vorgenom-
men, die ebenso dem Direct 7-Mode zugeordnet wurden, sind diese Pre-
set-Änderungen in beiden Modes – im Preset- wie auch im Direct 7-Mode
hörbar. Dies trifft auch in umgekehrter Richtung zu.
Beispiel: Beim Direct 7-Mode wurde auf Platz 1 das Preset 12 B (Bank 12,
Preset B) – ein Clean-Sound mit Hall – zugewiesen. Wird der Hallanteil
bei diesem Preset 12 B nun im Preset-Mode reduziert und gespeichert, hat
auch das Preset auf Platz 1 des Direct 7-Modes weniger Hall.
2 Stompbox-Mode:
Im Stompbox Mode werden die Kanal-Einstellungen automatisch über-
nommen ohne aktiv speichern zu müssen. Die Einstellungen für Effekte
und Red Box gelten global.
3 Direct 7-Mode:
Auch im Direct 7-Mode können Änderungen über langes Drücken der
Store-Taset gespeichert werden, ohne in den Preset-Mode umschalten zu
müssen.
Achtung: Änderungen eines Presets im Direct 7-Mode beeinflussen auch
das entsprechende Presets im Preset-Mode!
6 Bluetooth®
Der Black Spirit 200 Floor hat eine integrierte Bluetooth-Funktion für
Audiostreaming und zur Verbindung mit der Remote App (siehe 2.2).
Bitte darauf achten, dass nur ein einziges Gerät angeschlossen werden
kann. Das bedeutet: Falls du die App benutzt, kann kein zweites Gerät
via Bluetooth für Audiostreaming angeschlossen werden. Audiostreaming
und Fernbedienung sind jedoch gleichzeitig über dasselbe Gerät möglich.
Wenn du Audiosignale von einem anderen Gerät übertragen möchtest,
unabhängig von dem über Bluetooth verbundenen Gerät, gibt es die
Möglichkeit den analogen Aux In-Eingang zu benutzen.
Achtung: Zum Anschließen eines neuen Gerätes muss die Bluetooth-
Verbindung zurückgesetzt werden. Falls die Bluetooth-Verbindung mit
der App nicht zustande kommt, ist die App zu schließen (Doppelklick
auf den Home-Button) und die App erneut zu öffnen.
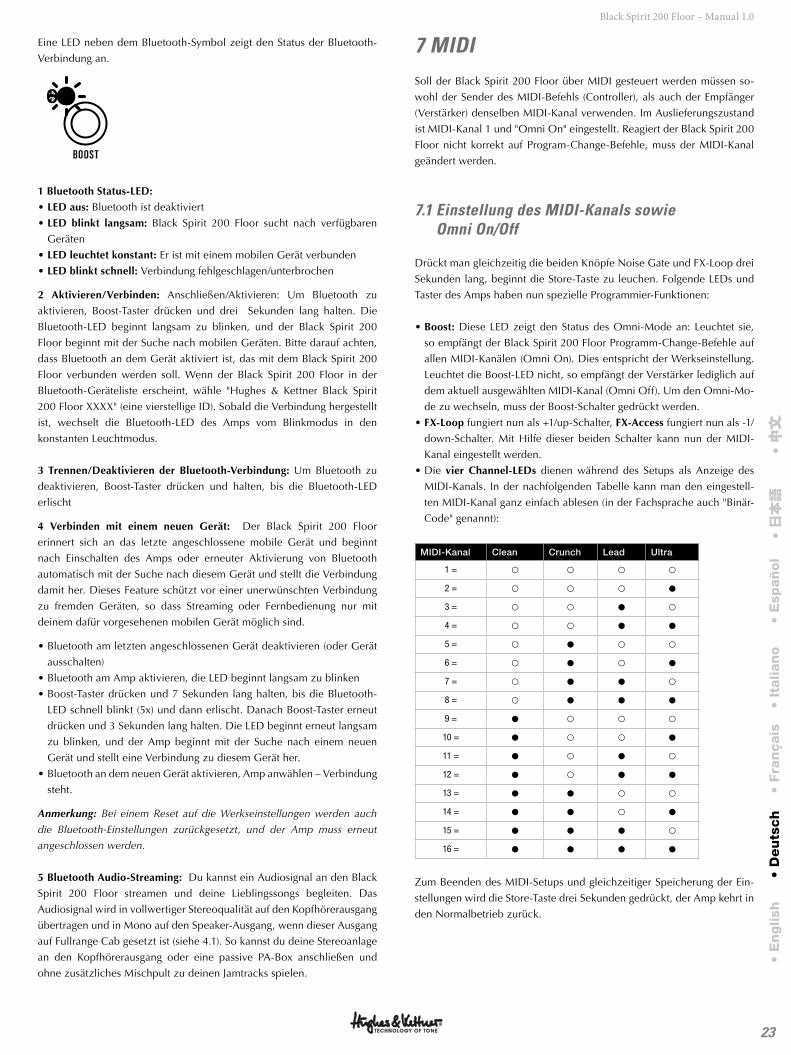
23
Black Spirit 200 Floor – Manual 1.0
Eine LED neben dem Bluetooth-Symbol zeigt den Status der Bluetooth-
Verbindung an.
BOOST
1 Bluetooth Status-LED:
• LED aus: Bluetooth ist deaktiviert
• LED blinkt langsam: Black Spirit 200 Floor sucht nach verfügbaren
Geräten
• LED leuchtet konstant: Er ist mit einem mobilen Gerät verbunden
• LED blinkt schnell: Verbindung fehlgeschlagen/unterbrochen
2 Aktivieren/Verbinden: Anschließen/Aktivieren: Um Bluetooth zu
aktivieren, Boost-Taster drücken und drei Sekunden lang halten. Die
Bluetooth-LED beginnt langsam zu blinken, und der Black Spirit 200
Floor beginnt mit der Suche nach mobilen Geräten. Bitte darauf achten,
dass Bluetooth an dem Gerät aktiviert ist, das mit dem Black Spirit 200
Floor verbunden werden soll. Wenn der Black Spirit 200 Floor in der
Bluetooth-Geräteliste erscheint, wähle "Hughes & Kettner Black Spirit
200 Floor XXXX" (eine vierstellige ID). Sobald die Verbindung hergestellt
ist, wechselt die Bluetooth-LED des Amps vom Blinkmodus in den
konstanten Leuchtmodus.
3 Trennen/Deaktivieren der Bluetooth-Verbindung: Um Bluetooth zu
deaktivieren, Boost-Taster drücken und halten, bis die Bluetooth-LED
erlischt
4 Verbinden mit einem neuen Gerät: Der Black Spirit 200 Floor
erinnert sich an das letzte angeschlossene mobile Gerät und beginnt
nach Einschalten des Amps oder erneuter Aktivierung von Bluetooth
automatisch mit der Suche nach diesem Gerät und stellt die Verbindung
damit her. Dieses Feature schützt vor einer unerwünschten Verbindung
zu fremden Geräten, so dass Streaming oder Fernbedienung nur mit
deinem dafür vorgesehenen mobilen Gerät möglich sind.
• Bluetooth am letzten angeschlossenen Gerät deaktivieren (oder Gerät
ausschalten)
• Bluetooth am Amp aktivieren, die LED beginnt langsam zu blinken
• Boost-Taster drücken und 7 Sekunden lang halten, bis die Bluetooth-
LED schnell blinkt (5x) und dann erlischt. Danach Boost-Taster erneut
drücken und 3 Sekunden lang halten. Die LED beginnt erneut langsam
zu blinken, und der Amp beginnt mit der Suche nach einem neuen
Gerät und stellt eine Verbindung zu diesem Gerät her.
• Bluetooth an dem neuen Gerät aktivieren, Amp anwählen – Verbindung
steht.
Anmerkung: Bei einem Reset auf die Werkseinstellungen werden auch
die Bluetooth-Einstellungen zurückgesetzt, und der Amp muss erneut
angeschlossen werden.
5 Bluetooth Audio-Streaming: Du kannst ein Audiosignal an den Black
Spirit 200 Floor streamen und deine Lieblingssongs begleiten. Das
Audiosignal wird in vollwertiger Stereoqualität auf den Kopfhörerausgang
übertragen und in Mono auf den Speaker-Ausgang, wenn dieser Ausgang
auf Fullrange Cab gesetzt ist (siehe 4.1). So kannst du deine Stereoanlage
an den Kopfhörerausgang oder eine passive PA-Box anschließen und
ohne zusätzliches Mischpult zu deinen Jamtracks spielen.
7 MIDISoll der Black Spirit 200 Floor über MIDI gesteuert werden müssen so-
wohl der Sender des MIDI-Befehls (Controller), als auch der Empfänger
(Verstärker) denselben MIDI-Kanal verwenden. Im Auslieferungszustand
ist MIDI-Kanal 1 und "Omni On" eingestellt. Reagiert der Black Spirit 200
Floor nicht korrekt auf Program-Change-Befehle, muss der MIDI-Kanal
geändert werden.
7.1 Einstellung des MIDI-Kanals sowie Omni On/Off
Drückt man gleichzeitig die beiden Knöpfe Noise Gate und FX-Loop drei
Sekunden lang, beginnt die Store-Taste zu leuchen. Folgende LEDs und
Taster des Amps haben nun spezielle Programmier-Funktionen:
• Boost: Diese LED zeigt den Status des Omni-Mode an: Leuchtet sie,
so empfängt der Black Spirit 200 Floor Programm-Change-Befehle auf
allen MIDI-Kanälen (Omni On). Dies entspricht der Werkseinstellung.
Leuchtet die Boost-LED nicht, so empfängt der Verstärker lediglich auf
dem aktuell ausgewählten MIDI-Kanal (Omni Off). Um den Omni-Mo-
de zu wechseln, muss der Boost-Schalter gedrückt werden.
• FX-Loop fungiert nun als +1/up-Schalter, FX-Access fungiert nun als -1/
down-Schalter. Mit Hilfe dieser beiden Schalter kann nun der MIDI-
Kanal eingestellt werden.
• Die vier Channel-LEDs dienen während des Setups als Anzeige des
MIDI-Kanals. In der nachfolgenden Tabelle kann man den eingestell-
ten MIDI-Kanal ganz einfach ablesen (in der Fachsprache auch "Binär-
Code" genannt):
MIDI-Kanal Clean Crunch Lead Ultra
1 = ¢ ¢ ¢ ¢
2 = ¢ ¢ ¢ {
3 = ¢ ¢ £ ¢
4 = ¢ ¢ £ £
5 = ¢ £ ¢ ¢
6 = ¢ £ ¢ £
7 = ¢ £ £ ¢
8 = ¢ £ £ £
9 = £ ¢ ¢ ¢
10 = £ ¢ ¢ £
11 = £ ¢ £ ¢
12 = £ ¢ £ £
13 = £ £ ¢ ¢
14 = £ £ ¢ £
15 = £ £ £ ¢
16 = £ £ £ £
Zum Beenden des MIDI-Setups und gleichzeitiger Speicherung der Ein-
stellungen wird die Store-Taste drei Sekunden gedrückt, der Amp kehrt in
den Normalbetrieb zurück.
• E
nglish
• D
eu
tsch
• Fra
nçais
• It
alian
o•
Esp
añ
ol
• 日本語
• 中文
中文
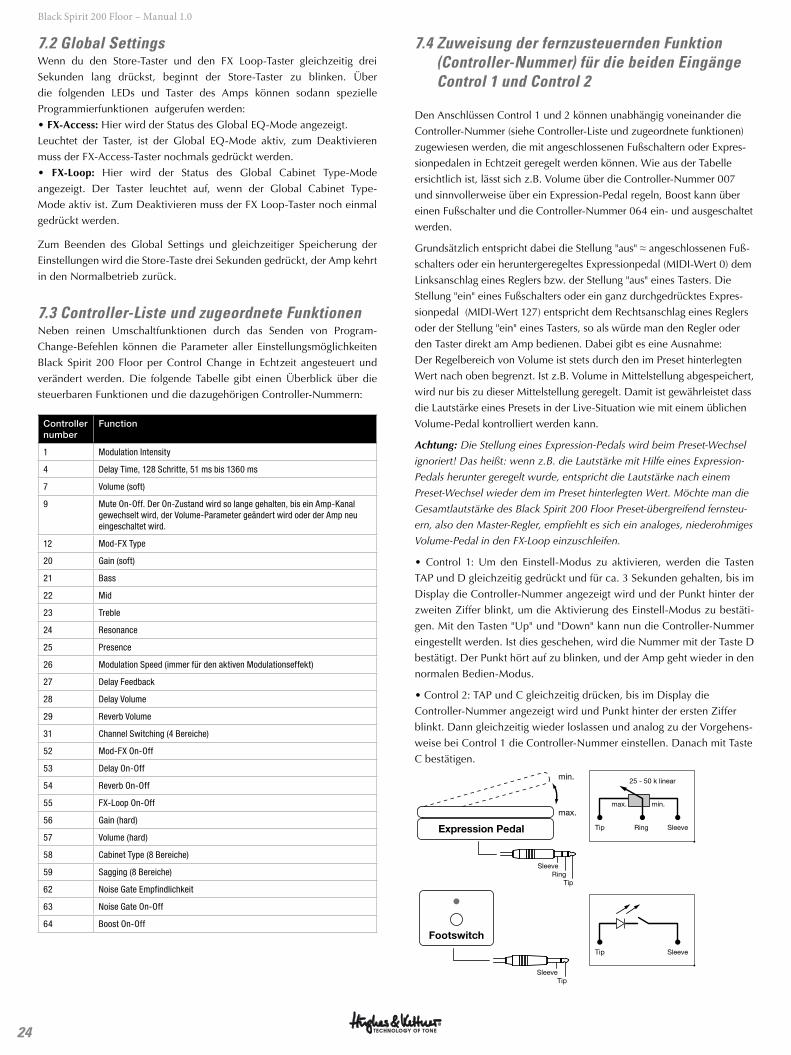
24
Black Spirit 200 Floor – Manual 1.0
7.2 Global SettingsWenn du den Store-Taster und den FX Loop-Taster gleichzeitig drei
Sekunden lang drückst, beginnt der Store-Taster zu blinken. Über
die folgenden LEDs und Taster des Amps können sodann spezielle
Programmierfunktionen aufgerufen werden:
• FX-Access: Hier wird der Status des Global EQ-Mode angezeigt.
Leuchtet der Taster, ist der Global EQ-Mode aktiv, zum Deaktivieren
muss der FX-Access-Taster nochmals gedrückt werden.
• FX-Loop: Hier wird der Status des Global Cabinet Type-Mode
angezeigt. Der Taster leuchtet auf, wenn der Global Cabinet Type-
Mode aktiv ist. Zum Deaktivieren muss der FX Loop-Taster noch einmal
gedrückt werden.
Zum Beenden des Global Settings und gleichzeitiger Speicherung der
Einstellungen wird die Store-Taste drei Sekunden gedrückt, der Amp kehrt
in den Normalbetrieb zurück.
7.3 Controller-Liste und zugeordnete FunktionenNeben reinen Umschaltfunktionen durch das Senden von Program-
Change-Befehlen können die Parameter aller Einstellungsmöglichkeiten
Black Spirit 200 Floor per Control Change in Echtzeit angesteuert und
verändert werden. Die folgende Tabelle gibt einen Überblick über die
steuerbaren Funktionen und die dazugehörigen Controller-Nummern:
Controller number
Function
1 Modulation Intensity
4 Delay Time, 128 Schritte, 51 ms bis 1360 ms
7 Volume (soft)
9 Mute On-Off. Der On-Zustand wird so lange gehalten, bis ein Amp-Kanal gewechselt wird, der Volume-Parameter geändert wird oder der Amp neu eingeschaltet wird.
12 Mod-FX Type
20 Gain (soft)
21 Bass
22 Mid
23 Treble
24 Resonance
25 Presence
26 Modulation Speed (immer für den aktiven Modulationseffekt)
27 Delay Feedback
28 Delay Volume
29 Reverb Volume
31 Channel Switching (4 Bereiche)
52 Mod-FX On-Off
53 Delay On-Off
54 Reverb On-Off
55 FX-Loop On-Off
56 Gain (hard)
57 Volume (hard)
58 Cabinet Type (8 Bereiche)
59 Sagging (8 Bereiche)
62 Noise Gate Empfindlichkeit
63 Noise Gate On-Off
64 Boost On-Off
7.4 Zuweisung der fernzusteuernden Funktion (Controller-Nummer) für die beiden Eingänge Control 1 und Control 2
Den Anschlüssen Control 1 und 2 können unabhängig voneinander die
Controller-Nummer (siehe Controller-Liste und zugeordnete funktionen)
zugewiesen werden, die mit angeschlossenen Fußschaltern oder Expres-
sionpedalen in Echtzeit geregelt werden können. Wie aus der Tabelle
ersichtlich ist, lässt sich z.B. Volume über die Controller-Nummer 007
und sinnvollerweise über ein Expression-Pedal regeln, Boost kann über
einen Fußschalter und die Controller-Nummer 064 ein- und ausgeschaltet
werden.
Grundsätzlich entspricht dabei die Stellung "aus" ≈ angeschlossenen Fuß-
schalters oder ein heruntergeregeltes Expressionpedal (MIDI-Wert 0) dem
Linksanschlag eines Reglers bzw. der Stellung "aus" eines Tasters. Die
Stellung "ein" eines Fußschalters oder ein ganz durchgedrücktes Expres-
sionpedal (MIDI-Wert 127) entspricht dem Rechtsanschlag eines Reglers
oder der Stellung "ein" eines Tasters, so als würde man den Regler oder
den Taster direkt am Amp bedienen. Dabei gibt es eine Ausnahme:
Der Regelbereich von Volume ist stets durch den im Preset hinterlegten
Wert nach oben begrenzt. Ist z.B. Volume in Mittelstellung abgespeichert,
wird nur bis zu dieser Mittelstellung geregelt. Damit ist gewährleistet dass
die Lautstärke eines Presets in der Live-Situation wie mit einem üblichen
Volume-Pedal kontrolliert werden kann.
Achtung: Die Stellung eines Expression-Pedals wird beim Preset-Wechsel
ignoriert! Das heißt: wenn z.B. die Lautstärke mit Hilfe eines Expression-
Pedals herunter geregelt wurde, entspricht die Lautstärke nach einem
Preset-Wechsel wieder dem im Preset hinterlegten Wert. Möchte man die
Gesamtlautstärke des Black Spirit 200 Floor Preset-übergreifend fernsteu-
ern, also den Master-Regler, empfiehlt es sich ein analoges, niederohmiges
Volume-Pedal in den FX-Loop einzuschleifen.
• Control 1: Um den Einstell-Modus zu aktivieren, werden die Tasten
TAP und D gleichzeitig gedrückt und für ca. 3 Sekunden gehalten, bis im
Display die Controller-Nummer angezeigt wird und der Punkt hinter der
zweiten Ziffer blinkt, um die Aktivierung des Einstell-Modus zu bestäti-
gen. Mit den Tasten "Up" und "Down" kann nun die Controller-Nummer
eingestellt werden. Ist dies geschehen, wird die Nummer mit der Taste D
bestätigt. Der Punkt hört auf zu blinken, und der Amp geht wieder in den
normalen Bedien-Modus.
• Control 2: TAP und C gleichzeitig drücken, bis im Display die
Controller-Nummer angezeigt wird und Punkt hinter der ersten Ziffer
blinkt. Dann gleichzeitig wieder loslassen und analog zu der Vorgehens-
weise bei Control 1 die Controller-Nummer einstellen. Danach mit Taste
C bestätigen.
min.
max.
SleeveRing
Tip
Tip Ring Sleeve
max.
25 - 50 k linear
min.
Expression Pedal
SleeveTip
Footswitch
Tip Sleeve
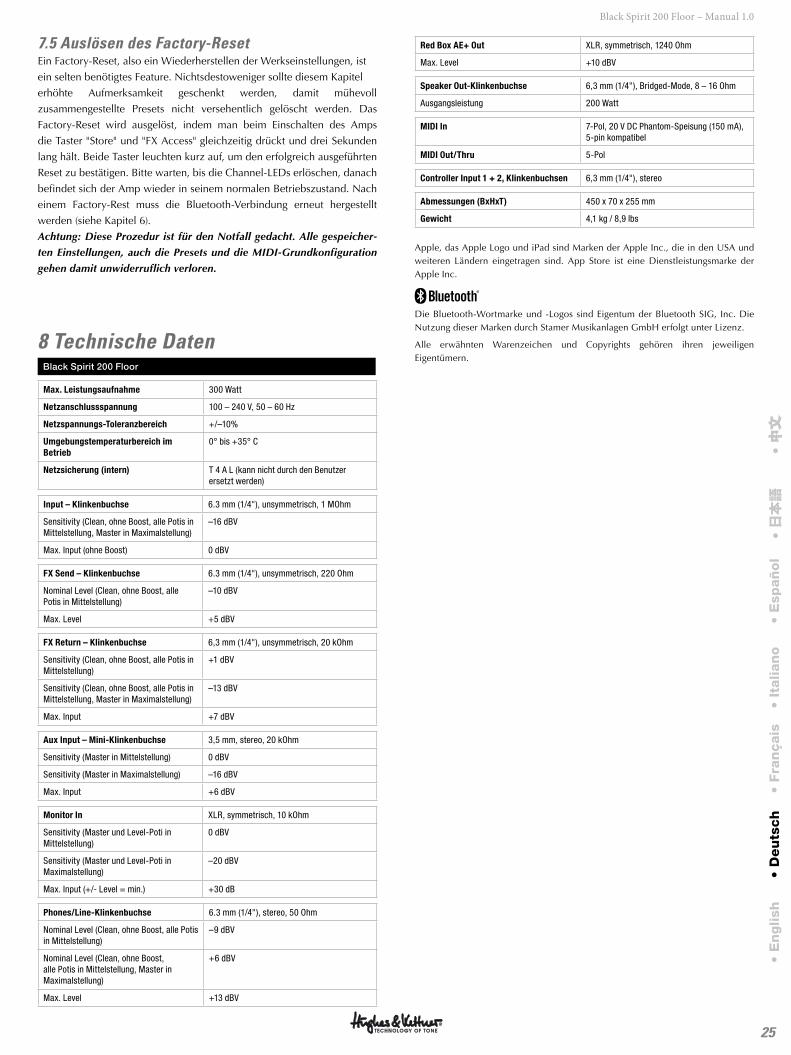
25
Black Spirit 200 Floor – Manual 1.0
7.5 Auslösen des Factory-ResetEin Factory-Reset, also ein Wiederherstellen der Werkseinstellungen, ist
ein selten benötigtes Feature. Nichtsdestoweniger sollte diesem Kapitel
erhöhte Aufmerksamkeit geschenkt werden, damit mühevoll
zusammengestellte Presets nicht versehentlich gelöscht werden. Das
Factory-Reset wird ausgelöst, indem man beim Einschalten des Amps
die Taster "Store" und "FX Access" gleichzeitig drückt und drei Sekunden
lang hält. Beide Taster leuchten kurz auf, um den erfolgreich ausgeführten
Reset zu bestätigen. Bitte warten, bis die Channel-LEDs erlöschen, danach
befindet sich der Amp wieder in seinem normalen Betriebszustand. Nach
einem Factory-Rest muss die Bluetooth-Verbindung erneut hergestellt
werden (siehe Kapitel 6).
Achtung: Diese Prozedur ist für den Notfall gedacht. Alle gespeicher-
ten Einstellungen, auch die Presets und die MIDI-Grundkonfiguration
gehen damit unwiderruflich verloren.
8 Technische DatenBlack Spirit 200 Floor
Max. Leistungsaufnahme 300 Watt
Netzanschlussspannung 100 – 240 V, 50 – 60 Hz
Netzspannungs-Toleranzbereich +/–10%
Umgebungstemperaturbereich im Betrieb
0° bis +35° C
Netzsicherung (intern) T 4 A L (kann nicht durch den Benutzer ersetzt werden)
Input – Klinkenbuchse 6.3 mm (1/4"), unsymmetrisch, 1 MOhm
Sensitivity (Clean, ohne Boost, alle Potis in Mittelstellung, Master in Maximalstellung)
–16 dBV
Max. Input (ohne Boost) 0 dBV
FX Send – Klinkenbuchse 6.3 mm (1/4"), unsymmetrisch, 220 Ohm
Nominal Level (Clean, ohne Boost, alle Potis in Mittelstellung)
–10 dBV
Max. Level +5 dBV
FX Return – Klinkenbuchse 6,3 mm (1/4"), unsymmetrisch, 20 kOhm
Sensitivity (Clean, ohne Boost, alle Potis in Mittelstellung)
+1 dBV
Sensitivity (Clean, ohne Boost, alle Potis in Mittelstellung, Master in Maximalstellung)
–13 dBV
Max. Input +7 dBV
Aux Input – Mini-Klinkenbuchse 3,5 mm, stereo, 20 kOhm
Sensitivity (Master in Mittelstellung) 0 dBV
Sensitivity (Master in Maximalstellung) –16 dBV
Max. Input +6 dBV
Monitor In XLR, symmetrisch, 10 kOhm
Sensitivity (Master und Level-Poti in Mittelstellung)
0 dBV
Sensitivity (Master und Level-Poti in Maximalstellung)
–20 dBV
Max. Input (+/- Level = min.) +30 dB
Phones/Line-Klinkenbuchse 6.3 mm (1/4"), stereo, 50 Ohm
Nominal Level (Clean, ohne Boost, alle Potis in Mittelstellung)
–9 dBV
Nominal Level (Clean, ohne Boost, alle Potis in Mittelstellung, Master in Maximalstellung)
+6 dBV
Max. Level +13 dBV
Red Box AE+ Out XLR, symmetrisch, 1240 Ohm
Max. Level +10 dBV
Speaker Out-Klinkenbuchse 6,3 mm (1/4"), Bridged-Mode, 8 – 16 Ohm
Ausgangsleistung 200 Watt
MIDI In 7-Pol, 20 V DC Phantom-Speisung (150 mA), 5-pin kompatibel
MIDI Out/Thru 5-Pol
Controller Input 1 + 2, Klinkenbuchsen 6,3 mm (1/4"), stereo
Abmessungen (BxHxT) 450 x 70 x 255 mm
Gewicht 4,1 kg / 8,9 lbs
Apple, das Apple Logo und iPad sind Marken der Apple Inc., die in den USA und weiteren Ländern eingetragen sind. App Store ist eine Dienstleistungsmarke der Apple Inc.
Die Bluetooth-Wortmarke und -Logos sind Eigentum der Bluetooth SIG, Inc. Die Nutzung dieser Marken durch Stamer Musikanlagen GmbH erfolgt unter Lizenz.
Alle erwähnten Warenzeichen und Copyrights gehören ihren jeweiligen Eigentümern.
• E
nglish
• D
eu
tsch
• Fra
nçais
• It
alian
o•
Esp
añ
ol
• 日本語
• 中文
中文
Version 2.5 07/2018
Consignes de sécurité importantes ! A lire avant de se connecter !
Ce produit a été construit conformément à la norme IEC 62368-1 par le fabricant et a quitté l’usine en bon état de marche. Pour garantir son intégrité et un fonctionnement sans risque, l’utilisateur se doit de suivre les conseils et les avertissements préconisés dans cette notice d’utilisation. Les unités sont conformes à la classe de protection 1 (protection par mise à la terre). En cas d’utilisation de ce produit dans un véhicule terrestre, un navire ou un avion, ou encore à une altitude supérieure à 2 000 mètres, il convient de prendre en considération les normes de sécurité suivantes, en plus de la norme IEC 62368-1.ATTENTION : Afin d’éviter tout risque d'incendie et d'électrocution, n'exposez pas cet appareil à l’humidité ou à la pluie. N’ouvrez pas le boîtier ; les pièces se trouvant à l’intérieur ne nécessitent pas d’entretien de la part des utilisateurs. Adressez-vous à un spécialiste qualifié pour procéder à l'entretien de l'appareil.
Ce symbole, quel que soit l’endroit où il apparaît, vous signale des pièces sous tension non isolées dans le boîtier. Une tension suffisante pour présenter un risque d’électrocution.
Ce symbole, quel que soit l’endroit où il apparaît, vous signale des pièces sous tension accessibles depuis l’extérieur du boîtier. Tous les câbles extérieurs raccordés à un composant marqué de ce symbole doivent être de type préfabriqués et conformes aux spécifications du fabricant ou doivent avoir été installés par des spécialistes qualifiés.
Ce symbole, quel que soit l’endroit où il apparaît, vous signale des instructions importantes relatives à l’utilisation ou l’entretien de l’appareil à lire dans les documents l’accompagnant. Lisez la notice d’utilisation.
Ce symbole, quel que soit l’endroit où il apparaît, vous signale un risque de brûlure dû à une surface chaude. Ne touchez pas cette surface afin d’éviter de vous brûler.
Tous les appareils électriques et électroniques y compris les piles doivent être éliminés séparément des déchets ménagers auprès des points de collecte officiels prévus à cet effet.
Lisez ces instructions. Conservez ces instructions.Prenez en compte tous les avertissements et toutes les instructions mentionnés sur le produit ou dans cette notice d’utilisation.
• N’utilisez pas ce produit à proximité de l’eau. Ne le placez pas près de l’eau, d’une baignoire, d’un bassin, d’un évier, d’une surface humide, d’une piscine ou d’une pièce humide.
• Ne mettez pas d’objet contenant du liquide sur l’appareil, par exemple, un vase, un verre ou une bouteille, etc.
• Nettoyez-le exclusivement avec un chiffon sec.• N’enlevez pas le boîtier, ne serait-ce que
partiellement.• La tension de fonctionnement de l’appareil doit
être réglée de manière à correspondre à la tension d’alimentation de l’endroit où vous vous trouvez. Si vous n’êtes pas sûr de connaître la tension d’alimentation, demandez à votre revendeur ou à la compagnie d’électricité locale.
• Afin de réduire le risque d’électrocution, vous ne devez jamais supprimer la mise à la terre
de l’appareil. Utilisez uniquement le câble d’alimentation fourni avec le produit et maintenez la broche centrale de la prise (mise à la terre) en état de fonctionnement. Ne négligez pas la sécurité offerte par les prises polarisées ou avec mise à la terre.
• Protégez le câble d’alimentation afin d’éviter que quelqu’un marche dessus ou qu’il soit pincé, notamment près de la prise, de la prise murale ou à la sortie de l’appareil même ! Les câbles d’alimentation doivent être tout le temps maniés avec précaution. Vérifiez régulièrement que le câble n’est pas fendu ou qu’il ne présente pas de signe d’usure, en particulier près de la prise et à la sortie de l’appareil.
• N’utilisez jamais de câble d’alimentation usé.• Débranchez l’appareil en cas d’orage ou si vous ne
l’utilisez pas pendant une longue période.• Débranchez l’appareil uniquement en le tenant par la
prise au niveau de la prise murale ou de la rallonge. L’appareil doit être placé de telle manière à ce qu’il puisse être débranché facilement à tout moment.
• Fusibles : si nécessaire, remplacez-les uniquement par des fusibles de type IEC127 (5x20 mm). Il est interdit d’utiliser des fusibles bricolés ou de raccourcir le porte-fusible. Seul un personnel qualifié est habilité à remplacer les fusibles.
• Confiez tous les travaux d’entretien à des spécialistes qualifiés. Il est nécessaire d’effectuer de tels travaux lorsque l’unité a été endommagée, comme par exemple dans les cas suivants :
- Lorsque le câble d’alimentation est endommagé ou effiloché.
- Si du liquide a pénétré ou un objet est tombé dans le boîtier.
- Si l’appareil a été exposé à la pluie ou à l’humidité.- Si l’appareil ne fonctionne pas correctement alors que
vous avez suivi toutes les instructions à la lettre.- Si l’appareil est tombé ou que le boîtier est
endommagé.• En cas de raccordement de haut-parleurs à cet
appareil, il faut veiller à ne pas descendre sous l’impédance minimale indiquée sur ledit appareil ou dans la présente notice. Les câbles employés doivent présenter une section suffisante, qui soit conforme aux réglementations locales en vigueur.
• Ne l’exposez pas directement aux rayons du soleil.• Ne l’installez pas à proximité d’une source de
chaleur, telle qu’un radiateur, une grille de chauffage, un four ou tout autre appareil susceptible de produire de la chaleur.
• Cet appareil est conçu pour une utilisation dans des zones climatiques modérées. Il n'est pas adapté pour une utilisation dans des pays à climat tropical.
• Ne masquez pas les bouches d’aération. Installez l’appareil conformément aux instructions du fabricant. Il ne doit pas être placé dans un emplacement confiné, comme un rack ou une console, sauf si une ventilation suffisante est garantie.
• Si vous déplacez l’appareil, attendez qu’il soit à température ambiante avant de le démarrer, sinon de la condensation peut se former à l’intérieur et endommager l’appareil.
• Ne posez pas de d’objet à flamme ouverte sur l’appareil, comme par exemple une bougie allumée.
• L'appareil doit être situé à 20 cm minimum des murs, il ne doit en aucun cas être couvert et il convient de prévoir un espace d'au moins 50 cm au-dessus de l'appareil.
• Assurez-vous que l'appareil est toujours placé sur une surface plane et solide.
• Utilisez l’appareil uniquement avec un chariot, un support, un trépied, des fixations ou une table recommandés par le fabricant ou vendus avec le produit. Si vous utilisez un chariot, maniez-le avec précaution afin d’éviter tout risque de blessure s’il se renverse.
• Utilisez uniquement les accessoires recommandés
par le fabricant. Cette consigne concerne toute sorte d’accessoires, qu’il s’agisse de couvercles de protection, de sacs de transport, de supports ou de dispositifs de fixation au mur ou au plafond. Si vous fixez un accessoire à l’appareil, suivez toujours les instructions d’utilisation du fabricant. N’utilisez pas d’autres points de fixation que ceux préconisés par le fabricant.
• Cet appareil NE convient PAS aux personnes dont les capacités motrices, sensorielles ou mentales sont déficientes (y compris les enfants) ou aux personnes ne disposant pas de l’expérience ou des connaissances nécessaires pour faire fonctionner le présent appareil. Cet appareil doit dans tous les cas et être tenu constamment hors de portée des enfants de moins de quatre ans.
• N’insérez jamais d'objets à travers les grilles du boîtier, car ils pourraient toucher des pièces sous tension dangereuses ou provoquer un court-circuit pouvant causer un risque d’incendie ou d’électrocution.
• Cet appareil est capable de délivrer un niveau de pression acoustique de 90 dB, pouvant ainsi causer des troubles irréversibles de l’audition ! L’exposition continue à une nuisance sonore peut provoquer une perte d’audition permanente. Portez des protections auditives adéquates si vous vous exposez de manière continue à un tel niveau de pression acoustique.
• Le fabricant garantit la sécurité, la fiabilité et l’efficacité de fonctionnement de son produit uniquement si :
- l’assemblage, l’extension, le réajustement, la modification ou la réparation de l’appareil ont été effectués par le fabricant ou par des personnes agréées pour ce genre de travaux.
- l’installation électrique concernée est conforme aux normes IEC (ANSI).
- l’unité est utilisée conformément aux instructions d’utilisation.
Avant la mise en service
• Avant la mise en service, lire attentivement la
présente notice, consignes de sécurité compri-
ses.
• Le fabricant décline toute responsabilité en
cas de dommages à l’appareil ou à d’autres
appareils, qui résulteraient d’une utilisation
inappropriée.
• Avant de raccorder l’appareil au réseau élec-
trique, il est nécessaire de s’assurer que
l’interrupteur d’alimentation est en position
arrêt et que la tension indiquée sur le bord de
l’appareil correspond à la tension du réseau
électrique local.
• Un petit avertissement avant de mettre votre
Black Spirit 200 Floor sous tension : il a du
coffre ! Un volume élevé peut entraîner des
troubles de l’audition.
• Pour éviter les surprises sonores agressives,
prenez l'habitude de ramener sur zéro les
potentiomètres de volume de la guitare rac-
cordée au Black Spirit 200 Floor avant de bran-
cher l'ampli !
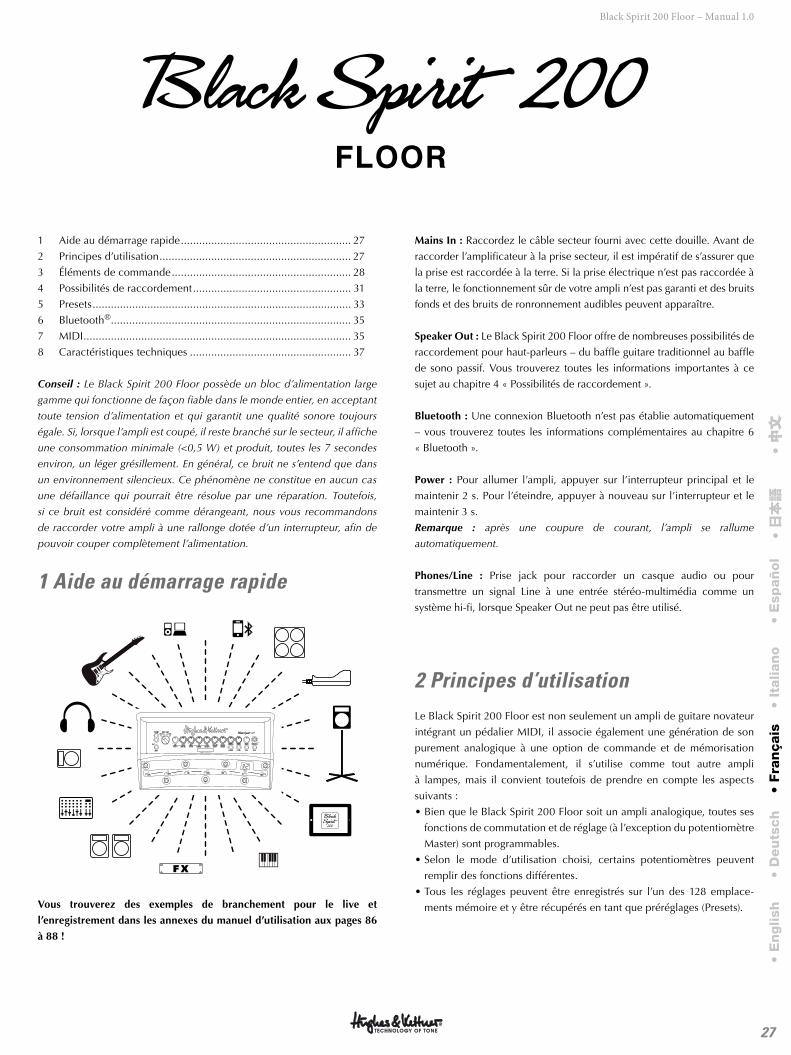
27
Black Spirit 200 Floor – Manual 1.0
1 Aide au démarrage rapide ........................................................ 27
2 Principes d’utilisation ............................................................... 27
3 Éléments de commande ........................................................... 28
4 Possibilités de raccordement .................................................... 31
5 Presets ..................................................................................... 33
6 Bluetooth® ............................................................................... 35
7 MIDI ........................................................................................ 35
8 Caractéristiques techniques ..................................................... 37
Conseil : Le Black Spirit 200 Floor possède un bloc d’alimentation large
gamme qui fonctionne de façon fiable dans le monde entier, en acceptant
toute tension d’alimentation et qui garantit une qualité sonore toujours
égale. Si, lorsque l’ampli est coupé, il reste branché sur le secteur, il affiche
une consommation minimale (<0,5 W) et produit, toutes les 7 secondes
environ, un léger grésillement. En général, ce bruit ne s’entend que dans
un environnement silencieux. Ce phénomène ne constitue en aucun cas
une défaillance qui pourrait être résolue par une réparation. Toutefois,
si ce bruit est considéré comme dérangeant, nous vous recommandons
de raccorder votre ampli à une rallonge dotée d’un interrupteur, afin de
pouvoir couper complètement l’alimentation.
1 Aide au démarrage rapide
MASTERPRESENCERESONANCESAGGINGNOISE GATETREBLEMIDBASSVOLUME
50
1 8
2 7
3 64 5
GAINREVERBDLY LEVELFEEDBACKDLY T IMEMOD TYPEINTENSITY
CLEAN ULTRACRUNCH LEAD
POWER
PHONES / L INE
CAB TYPE
STOREFX LOOPFX ACCESSBOOST
PRE LOOP
OFF OFF1400 OFF
C
2
1T
F P
S P I R I T ™ T O N E G E N E R A T O R
Vous trouverez des exemples de branchement pour le live et
l’enregistrement dans les annexes du manuel d’utilisation aux pages 86
à 88 !
Mains In : Raccordez le câble secteur fourni avec cette douille. Avant de
raccorder l’amplificateur à la prise secteur, il est impératif de s’assurer que
la prise est raccordée à la terre. Si la prise électrique n’est pas raccordée à
la terre, le fonctionnement sûr de votre ampli n’est pas garanti et des bruits
fonds et des bruits de ronronnement audibles peuvent apparaître.
Speaker Out : Le Black Spirit 200 Floor offre de nombreuses possibilités de
raccordement pour haut-parleurs – du baffle guitare traditionnel au baffle
de sono passif. Vous trouverez toutes les informations importantes à ce
sujet au chapitre 4 « Possibilités de raccordement ».
Bluetooth : Une connexion Bluetooth n’est pas établie automatiquement
– vous trouverez toutes les informations complémentaires au chapitre 6
« Bluetooth ».
Power : Pour allumer l’ampli, appuyer sur l’interrupteur principal et le
maintenir 2 s. Pour l’éteindre, appuyer à nouveau sur l’interrupteur et le
maintenir 3 s.
Remarque : après une coupure de courant, l’ampli se rallume
automatiquement.
Phones/Line : Prise jack pour raccorder un casque audio ou pour
transmettre un signal Line à une entrée stéréo-multimédia comme un
système hi-fi, lorsque Speaker Out ne peut pas être utilisé.
2 Principes d’utilisationLe Black Spirit 200 Floor est non seulement un ampli de guitare novateur
intégrant un pédalier MIDI, il associe également une génération de son
purement analogique à une option de commande et de mémorisation
numérique. Fondamentalement, il s’utilise comme tout autre ampli
à lampes, mais il convient toutefois de prendre en compte les aspects
suivants :
• Bien que le Black Spirit 200 Floor soit un ampli analogique, toutes ses
fonctions de commutation et de réglage (à l’exception du potentiomètre
Master) sont programmables.
• Selon le mode d’utilisation choisi, certains potentiomètres peuvent
remplir des fonctions différentes.
• Tous les réglages peuvent être enregistrés sur l’un des 128 emplace-
ments mémoire et y être récupérés en tant que préréglages (Presets).
• E
nglish
• D
eu
tsch
• Fra
nçais
• It
alian
o•
Esp
añ
ol
• 日本語
• 中文
中文
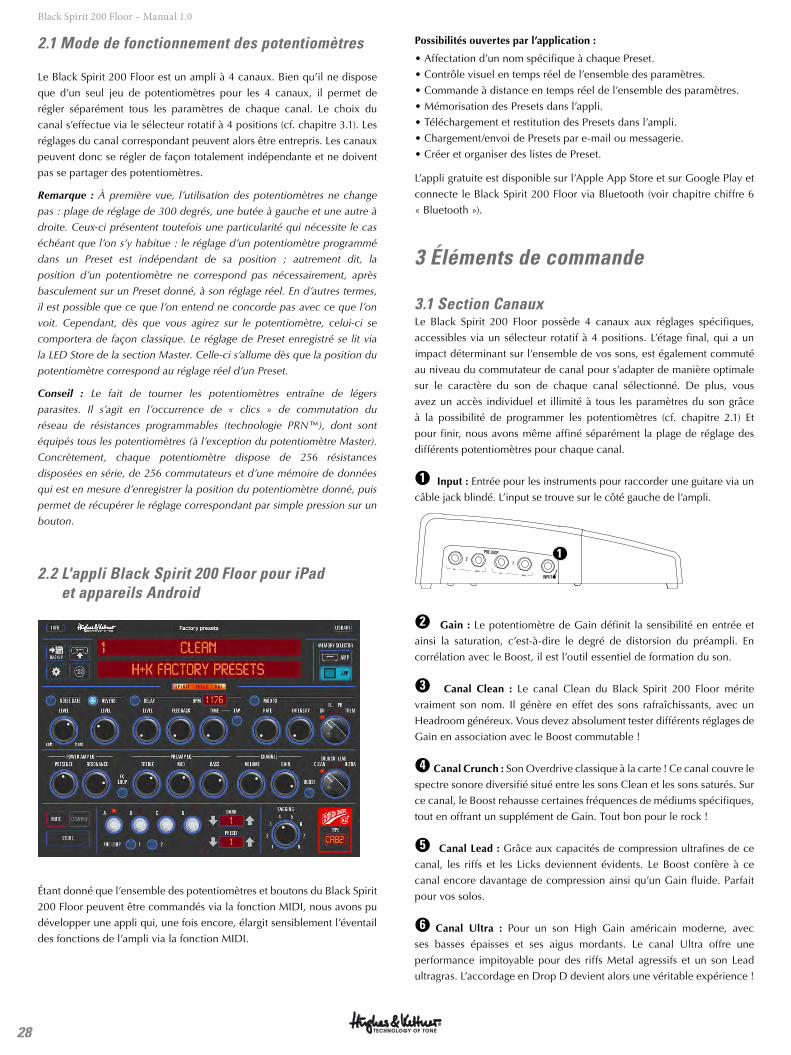
28
Black Spirit 200 Floor – Manual 1.0
2.1 Mode de fonctionnement des potentiomètres
Le Black Spirit 200 Floor est un ampli à 4 canaux. Bien qu’il ne dispose
que d’un seul jeu de potentiomètres pour les 4 canaux, il permet de
régler séparément tous les paramètres de chaque canal. Le choix du
canal s’effectue via le sélecteur rotatif à 4 positions (cf. chapitre 3.1). Les
réglages du canal correspondant peuvent alors être entrepris. Les canaux
peuvent donc se régler de façon totalement indépendante et ne doivent
pas se partager des potentiomètres.
Remarque : À première vue, l’utilisation des potentiomètres ne change
pas : plage de réglage de 300 degrés, une butée à gauche et une autre à
droite. Ceux-ci présentent toutefois une particularité qui nécessite le cas
échéant que l’on s’y habitue : le réglage d’un potentiomètre programmé
dans un Preset est indépendant de sa position ; autrement dit, la
position d’un potentiomètre ne correspond pas nécessairement, après
basculement sur un Preset donné, à son réglage réel. En d’autres termes,
il est possible que ce que l’on entend ne concorde pas avec ce que l’on
voit. Cependant, dès que vous agirez sur le potentiomètre, celui-ci se
comportera de façon classique. Le réglage de Preset enregistré se lit via
la LED Store de la section Master. Celle-ci s’allume dès que la position du
potentiomètre correspond au réglage réel d’un Preset.
Conseil : Le fait de tourner les potentiomètres entraîne de légers
parasites. Il s’agit en l’occurrence de « clics » de commutation du
réseau de résistances programmables (technologie PRN™), dont sont
équipés tous les potentiomètres (à l’exception du potentiomètre Master).
Concrètement, chaque potentiomètre dispose de 256 résistances
disposées en série, de 256 commutateurs et d’une mémoire de données
qui est en mesure d’enregistrer la position du potentiomètre donné, puis
permet de récupérer le réglage correspondant par simple pression sur un
bouton.
2.2 L'appli Black Spirit 200 Floor pour iPad et appareils Android
Étant donné que l’ensemble des potentiomètres et boutons du Black Spirit
200 Floor peuvent être commandés via la fonction MIDI, nous avons pu
développer une appli qui, une fois encore, élargit sensiblement l’éventail
des fonctions de l’ampli via la fonction MIDI.
Possibilités ouvertes par l’application :
• Affectation d’un nom spécifique à chaque Preset.
• Contrôle visuel en temps réel de l’ensemble des paramètres.
• Commande à distance en temps réel de l’ensemble des paramètres.
• Mémorisation des Presets dans l’appli.
• Téléchargement et restitution des Presets dans l’ampli.
• Chargement/envoi de Presets par e-mail ou messagerie.
• Créer et organiser des listes de Preset.
L’appli gratuite est disponible sur l’Apple App Store et sur Google Play et
connecte le Black Spirit 200 Floor via Bluetooth (voir chapitre chiffre 6
« Bluetooth »).
3 Éléments de commande
3.1 Section CanauxLe Black Spirit 200 Floor possède 4 canaux aux réglages spécifiques,
accessibles via un sélecteur rotatif à 4 positions. L’étage final, qui a un
impact déterminant sur l’ensemble de vos sons, est également commuté
au niveau du commutateur de canal pour s’adapter de manière optimale
sur le caractère du son de chaque canal sélectionné. De plus, vous
avez un accès individuel et illimité à tous les paramètres du son grâce
à la possibilité de programmer les potentiomètres (cf. chapitre 2.1) Et
pour finir, nous avons même affiné séparément la plage de réglage des
différents potentiomètres pour chaque canal.
●1 Input : Entrée pour les instruments pour raccorder une guitare via un
câble jack blindé. L’input se trouve sur le côté gauche de l’ampli.
INPUT
PRE LOOP
12
1
●2 Gain : Le potentiomètre de Gain définit la sensibilité en entrée et
ainsi la saturation, c’est-à-dire le degré de distorsion du préampli. En
corrélation avec le Boost, il est l’outil essentiel de formation du son.
●3 Canal Clean : Le canal Clean du Black Spirit 200 Floor mérite
vraiment son nom. Il génère en effet des sons rafraîchissants, avec un
Headroom généreux. Vous devez absolument tester différents réglages de
Gain en association avec le Boost commutable !
●4 Canal Crunch : Son Overdrive classique à la carte ! Ce canal couvre le
spectre sonore diversifié situé entre les sons Clean et les sons saturés. Sur
ce canal, le Boost rehausse certaines fréquences de médiums spécifiques,
tout en offrant un supplément de Gain. Tout bon pour le rock !
●5 Canal Lead : Grâce aux capacités de compression ultrafines de ce
canal, les riffs et les Licks deviennent évidents. Le Boost confère à ce
canal encore davantage de compression ainsi qu’un Gain fluide. Parfait
pour vos solos.
●6 Canal Ultra : Pour un son High Gain américain moderne, avec
ses basses épaisses et ses aigus mordants. Le canal Ultra offre une
performance impitoyable pour des riffs Metal agressifs et un son Lead
ultragras. L’accordage en Drop D devient alors une véritable expérience !
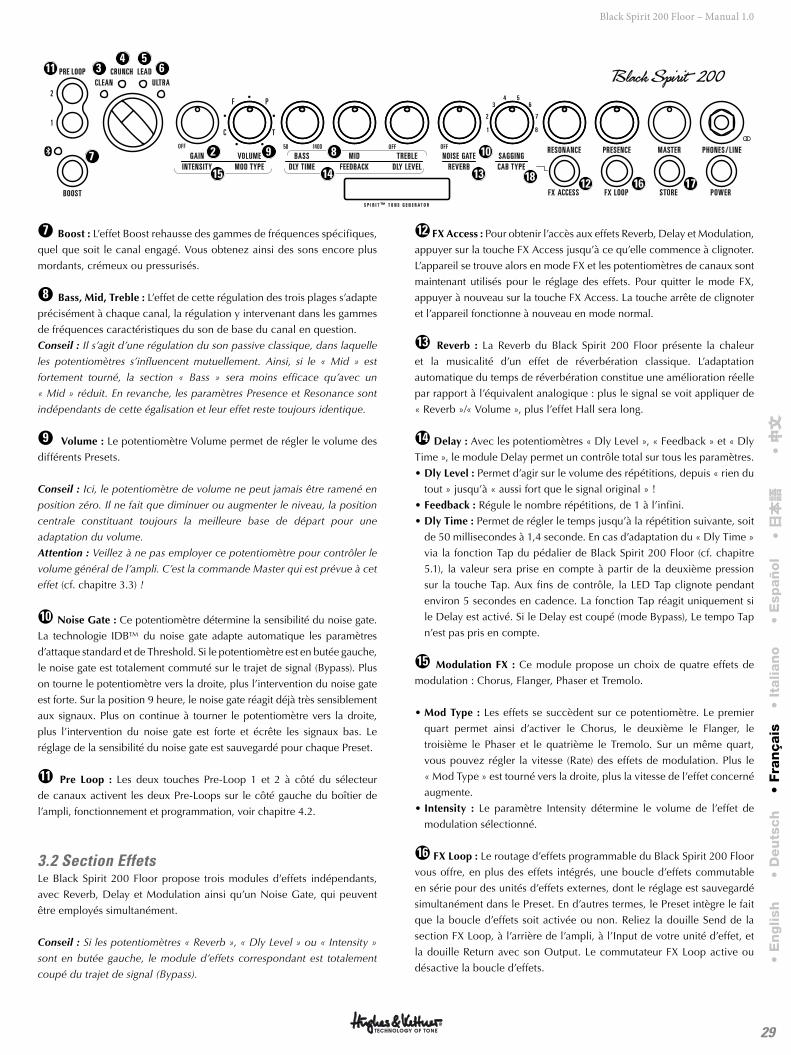
29
Black Spirit 200 Floor – Manual 1.0
●7 Boost : L’effet Boost rehausse des gammes de fréquences spécifiques,
quel que soit le canal engagé. Vous obtenez ainsi des sons encore plus
mordants, crémeux ou pressurisés.
●8 Bass, Mid, Treble : L’effet de cette régulation des trois plages s’adapte
précisément à chaque canal, la régulation y intervenant dans les gammes
de fréquences caractéristiques du son de base du canal en question.
Conseil : Il s’agit d’une régulation du son passive classique, dans laquelle
les potentiomètres s’influencent mutuellement. Ainsi, si le « Mid » est
fortement tourné, la section « Bass » sera moins efficace qu’avec un
« Mid » réduit. En revanche, les paramètres Presence et Resonance sont
indépendants de cette égalisation et leur effet reste toujours identique.
●9 Volume : Le potentiomètre Volume permet de régler le volume des
différents Presets.
Conseil : Ici, le potentiomètre de volume ne peut jamais être ramené en
position zéro. Il ne fait que diminuer ou augmenter le niveau, la position
centrale constituant toujours la meilleure base de départ pour une
adaptation du volume.
Attention : Veillez à ne pas employer ce potentiomètre pour contrôler le
volume général de l’ampli. C’est la commande Master qui est prévue à cet
effet (cf. chapitre 3.3) !
●10 Noise Gate : Ce potentiomètre détermine la sensibilité du noise gate.
La technologie IDB™ du noise gate adapte automatique les paramètres
d’attaque standard et de Threshold. Si le potentiomètre est en butée gauche,
le noise gate est totalement commuté sur le trajet de signal (Bypass). Plus
on tourne le potentiomètre vers la droite, plus l’intervention du noise gate
est forte. Sur la position 9 heure, le noise gate réagit déjà très sensiblement
aux signaux. Plus on continue à tourner le potentiomètre vers la droite,
plus l’intervention du noise gate est forte et écrête les signaux bas. Le
réglage de la sensibilité du noise gate est sauvegardé pour chaque Preset.
●11 Pre Loop : Les deux touches Pre-Loop 1 et 2 à côté du sélecteur
de canaux activent les deux Pre-Loops sur le côté gauche du boîtier de
l’ampli, fonctionnement et programmation, voir chapitre 4.2.
3.2 Section EffetsLe Black Spirit 200 Floor propose trois modules d’effets indépendants,
avec Reverb, Delay et Modulation ainsi qu’un Noise Gate, qui peuvent
être employés simultanément.
Conseil : Si les potentiomètres « Reverb », « Dly Level » ou « Intensity »
sont en butée gauche, le module d’effets correspondant est totalement
coupé du trajet de signal (Bypass).
●12 FX Access : Pour obtenir l’accès aux effets Reverb, Delay et Modulation,
appuyer sur la touche FX Access jusqu’à ce qu’elle commence à clignoter.
L’appareil se trouve alors en mode FX et les potentiomètres de canaux sont
maintenant utilisés pour le réglage des effets. Pour quitter le mode FX,
appuyer à nouveau sur la touche FX Access. La touche arrête de clignoter
et l’appareil fonctionne à nouveau en mode normal.
●13 Reverb : La Reverb du Black Spirit 200 Floor présente la chaleur
et la musicalité d’un effet de réverbération classique. L’adaptation
automatique du temps de réverbération constitue une amélioration réelle
par rapport à l’équivalent analogique : plus le signal se voit appliquer de
« Reverb »/« Volume », plus l’effet Hall sera long.
●14 Delay : Avec les potentiomètres « Dly Level », « Feedback » et « Dly
Time », le module Delay permet un contrôle total sur tous les paramètres.
• Dly Level : Permet d’agir sur le volume des répétitions, depuis « rien du
tout » jusqu’à « aussi fort que le signal original » !
• Feedback : Régule le nombre répétitions, de 1 à l’infini.
• Dly Time : Permet de régler le temps jusqu’à la répétition suivante, soit
de 50 millisecondes à 1,4 seconde. En cas d’adaptation du « Dly Time »
via la fonction Tap du pédalier de Black Spirit 200 Floor (cf. chapitre
5.1), la valeur sera prise en compte à partir de la deuxième pression
sur la touche Tap. Aux fins de contrôle, la LED Tap clignote pendant
environ 5 secondes en cadence. La fonction Tap réagit uniquement si
le Delay est activé. Si le Delay est coupé (mode Bypass), Le tempo Tap
n’est pas pris en compte.
●15 Modulation FX : Ce module propose un choix de quatre effets de
modulation : Chorus, Flanger, Phaser et Tremolo.
• Mod Type : Les effets se succèdent sur ce potentiomètre. Le premier
quart permet ainsi d’activer le Chorus, le deuxième le Flanger, le
troisième le Phaser et le quatrième le Tremolo. Sur un même quart,
vous pouvez régler la vitesse (Rate) des effets de modulation. Plus le
« Mod Type » est tourné vers la droite, plus la vitesse de l’effet concerné
augmente.
• Intensity : Le paramètre Intensity détermine le volume de l’effet de
modulation sélectionné.
●16 FX Loop : Le routage d’effets programmable du Black Spirit 200 Floor
vous offre, en plus des effets intégrés, une boucle d’effets commutable
en série pour des unités d’effets externes, dont le réglage est sauvegardé
simultanément dans le Preset. En d’autres termes, le Preset intègre le fait
que la boucle d’effets soit activée ou non. Reliez la douille Send de la
section FX Loop, à l’arrière de l’ampli, à l’Input de votre unité d’effet, et
la douille Return avec son Output. Le commutateur FX Loop active ou
désactive la boucle d’effets.
• E
nglish
• D
eu
tsch
• Fra
nçais
• It
alian
o•
Esp
añ
ol
• 日本語
• 中文
中文
MASTERPRESENCERESONANCESAGGINGNOISE GATETREBLEMIDBASSVOLUME
50
1 8
2 7
3 64 5
GAINREVERBDLY LEVELFEEDBACKDLY T IMEMOD TYPEINTENSITY
CLEAN ULTRACRUNCH LEAD
POWER
PHONES / L INE
CAB TYPE
STOREFX LOOPFX ACCESSBOOST
PRE LOOP
OFF OFF1400 OFF
C
2
1T
F P
S P I R I T ™ T O N E G E N E R A T O R
2 9
3 64 5
7 8 10
12
11
16131415 18 17

30
Black Spirit 200 Floor – Manual 1.0
●17 Store : La touche store permet de mémoriser votre configuration
Preset. Vous trouverez de plus amples détails sur cette fonction au
chapitre 5.2 « programmation de Presets ».
●18 Cab Type : Ce potentiomètre sélectionne une des huit simulations
de haut-parleur minutieusement reproduite via la sortie Red Box sur le
côté de l’ampli (voir 4.1 « Red Box AE+ »). Sur le côté de l’appareil, vous
pouvez commuté le niveau de sortie de Mic à Line afin que le niveau
corresponde à chaque appareil raccordé. Red Box AE+ est ainsi le choix
parfait pour transmettre votre son au PA, au moniteur studio ou un appareil
d’enregistrement. La dépendance de microphones ou techniciens du son
est alors terminé, la Red Box AE+ remplit cette mission à la perfection.
N° Types d’enceinte
1 1x12" Modern Thiele-Port
2 2x12" Modern Front-Port
3 2x12" Vintage Open Back
4 4x10" Alnico Open Back
5 4x12" Vintage Cab
6 4x12" British Cab
7 4x12" Modern Cab
8 4x12" American Cab
Remarque : Cab Type agit sur la sortie Red Box et la sortie casque, mais pas
sur la sortie haut-parleur dans le cas d’un raccordement à un haut-parleur
de guitare puisqu’aucune simulation d’enceinte n’est nécessaire dans ce
cas. En cas d’utilisation d’une enceinte Fullrange (voir 4.1 « Red Box AE+ »),
la sélection de la simulation d’enceinte agit aussi sur la sortie haut-parleur.
3.3 Section Master
●19 Power : Pour allumer l’ampli, appuyer sur l’interrupteur principal et
le maintenir 2 s. Pour l’éteindre, appuyer à nouveau sur l’interrupteur et
le maintenir 3 s.
Remarque : après une coupure de courant, l’ampli se rallume
automatiquement.
●20 Master : Comme son nom l’indique, il s’agit du potentiomètre qui
alimente l’étage de puissance et qui vous permet dès lors de réguler
la puissance de sortie du bout des doigts. C’est pourquoi nous vous
recommandons d’utiliser avec prudence ce potentiomètre, qui vous fera
cependant vivre des moments inoubliables. Master règle également le
volume de la sortie casque (voir point 24 du présent chapitre).
Remarque : contrairement aux amplificateurs à lampes Hughes & Kettner,
le réglage du potentiomètre Master n’a pas d’impact sur le niveau de
sortie de la Red Box du Black Spirit 200 Floor (voir 4.1 « Red Box AE+ »).
Conseil : Contrairement aux potentiomètres d’effets et de canaux, le
potentiomètre Master n’est pas programmable ! Il fonctionne comme un
potentiomètre normal, la position du bouton correspondant ainsi toujours
à la valeur effective. Il est donc recommandé de toujours ramener le
Master en butée gauche avant la mise sous tension.
●21 Resonance : Lorsque ce potentiomètre est en position centrale,
vous entendez le comportement en résonance « normal » entre ampli et
enceinte. En le tournant vers la gauche, vous atténuez l’effet de résonance
des haut-parleurs, ce qui arrondit et assouplit encore les sons Clean. En
le tournant vers la droite, vous renforcez l’effet, ce qui se traduit par une
puissante poussée des basses, surtout sur les sons saturés.
●22 Presence : Ce potentiomètre permet de déterminer la part
d’harmoniques générées. Plus il est tourné vers la droite, plus la présence
du son est forte.
MASTERPRESENCERESONANCESAGGINGNOISE GATETREBLEMIDBASSVOLUME
50
1 8
2 7
3 64 5
GAINREVERBDLY LEVELFEEDBACKDLY T IMEMOD TYPEINTENSITY
CLEAN ULTRACRUNCH LEAD
POWER
PHONES / L INE
CAB TYPE
STOREFX LOOPFX ACCESSBOOST
PRE LOOP
OFF OFF1400 OFF
C
2
1T
F P
S P I R I T ™ T O N E G E N E R A T O R
18
2021 22 2423
16 17 19
25
25 25 25
2625 25 25
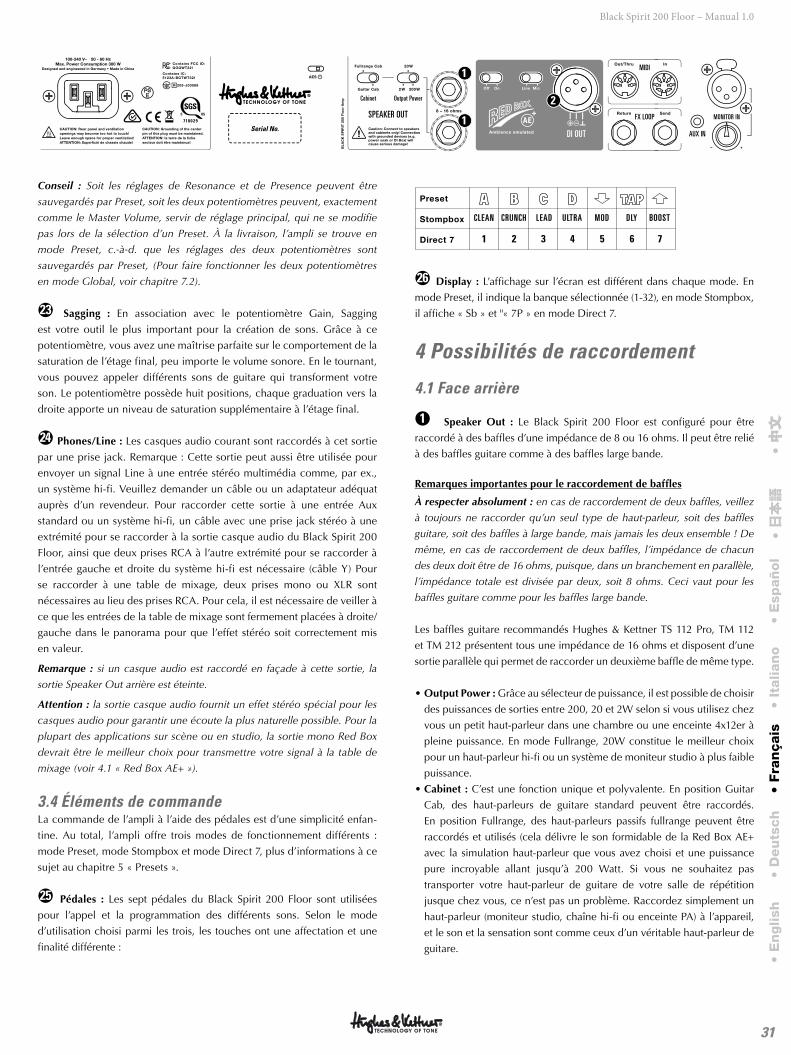
31
Black Spirit 200 Floor – Manual 1.0
Conseil : Soit les réglages de Resonance et de Presence peuvent être
sauvegardés par Preset, soit les deux potentiomètres peuvent, exactement
comme le Master Volume, servir de réglage principal, qui ne se modifie
pas lors de la sélection d’un Preset. À la livraison, l’ampli se trouve en
mode Preset, c.-à-d. que les réglages des deux potentiomètres sont
sauvegardés par Preset, (Pour faire fonctionner les deux potentiomètres
en mode Global, voir chapitre 7.2).
●23 Sagging : En association avec le potentiomètre Gain, Sagging
est votre outil le plus important pour la création de sons. Grâce à ce
potentiomètre, vous avez une maîtrise parfaite sur le comportement de la
saturation de l’étage final, peu importe le volume sonore. En le tournant,
vous pouvez appeler différents sons de guitare qui transforment votre
son. Le potentiomètre possède huit positions, chaque graduation vers la
droite apporte un niveau de saturation supplémentaire à l’étage final.
●24 Phones/Line : Les casques audio courant sont raccordés à cet sortie
par une prise jack. Remarque : Cette sortie peut aussi être utilisée pour
envoyer un signal Line à une entrée stéréo multimédia comme, par ex.,
un système hi-fi. Veuillez demander un câble ou un adaptateur adéquat
auprès d’un revendeur. Pour raccorder cette sortie à une entrée Aux
standard ou un système hi-fi, un câble avec une prise jack stéréo à une
extrémité pour se raccorder à la sortie casque audio du Black Spirit 200
Floor, ainsi que deux prises RCA à l’autre extrémité pour se raccorder à
l’entrée gauche et droite du système hi-fi est nécessaire (câble Y) Pour
se raccorder à une table de mixage, deux prises mono ou XLR sont
nécessaires au lieu des prises RCA. Pour cela, il est nécessaire de veiller à
ce que les entrées de la table de mixage sont fermement placées à droite/
gauche dans le panorama pour que l’effet stéréo soit correctement mis
en valeur.
Remarque : si un casque audio est raccordé en façade à cette sortie, la
sortie Speaker Out arrière est éteinte.
Attention : la sortie casque audio fournit un effet stéréo spécial pour les
casques audio pour garantir une écoute la plus naturelle possible. Pour la
plupart des applications sur scène ou en studio, la sortie mono Red Box
devrait être le meilleur choix pour transmettre votre signal à la table de
mixage (voir 4.1 « Red Box AE+ »).
3.4 Éléments de commande La commande de l’ampli à l’aide des pédales est d’une simplicité enfan-
tine. Au total, l’ampli offre trois modes de fonctionnement différents :
mode Preset, mode Stompbox et mode Direct 7, plus d’informations à ce
sujet au chapitre 5 « Presets ».
●25 Pédales : Les sept pédales du Black Spirit 200 Floor sont utilisées
pour l’appel et la programmation des différents sons. Selon le mode
d’utilisation choisi parmi les trois, les touches ont une affectation et une
finalité différente :
1
CLEAN
2
CRUNCH
3
LEAD
4
ULTRA
6
DLY
7
BOOST
5
MOD
●26 Display : L’affichage sur l’écran est différent dans chaque mode. En
mode Preset, il indique la banque sélectionnée (1-32), en mode Stompbox,
il affiche « Sb » et "« 7P » en mode Direct 7.
4 Possibilités de raccordement
4.1 Face arrière
●1 Speaker Out : Le Black Spirit 200 Floor est configuré pour être
raccordé à des baffles d’une impédance de 8 ou 16 ohms. Il peut être relié
à des baffles guitare comme à des baffles large bande.
Remarques importantes pour le raccordement de baffles
À respecter absolument : en cas de raccordement de deux baffles, veillez
à toujours ne raccorder qu’un seul type de haut-parleur, soit des baffles
guitare, soit des baffles à large bande, mais jamais les deux ensemble ! De
même, en cas de raccordement de deux baffles, l’impédance de chacun
des deux doit être de 16 ohms, puisque, dans un branchement en parallèle,
l’impédance totale est divisée par deux, soit 8 ohms. Ceci vaut pour les
baffles guitare comme pour les baffles large bande.
Les baffles guitare recommandés Hughes & Kettner TS 112 Pro, TM 112
et TM 212 présentent tous une impédance de 16 ohms et disposent d’une
sortie parallèle qui permet de raccorder un deuxième baffle de même type.
• Output Power : Grâce au sélecteur de puissance, il est possible de choisir
des puissances de sorties entre 200, 20 et 2W selon si vous utilisez chez
vous un petit haut-parleur dans une chambre ou une enceinte 4x12er à
pleine puissance. En mode Fullrange, 20W constitue le meilleur choix
pour un haut-parleur hi-fi ou un système de moniteur studio à plus faible
puissance.
• Cabinet : C’est une fonction unique et polyvalente. En position Guitar
Cab, des haut-parleurs de guitare standard peuvent être raccordés.
En position Fullrange, des haut-parleurs passifs fullrange peuvent être
raccordés et utilisés (cela délivre le son formidable de la Red Box AE+
avec la simulation haut-parleur que vous avez choisi et une puissance
pure incroyable allant jusqu’à 200 Watt. Si vous ne souhaitez pas
transporter votre haut-parleur de guitare de votre salle de répétition
jusque chez vous, ce n’est pas un problème. Raccordez simplement un
haut-parleur (moniteur studio, chaîne hi-fi ou enceinte PA) à l’appareil,
et le son et la sensation sont comme ceux d’un véritable haut-parleur de
guitare.
• E
nglish
• D
eu
tsch
• Fra
nçais
• It
alian
o•
Esp
añ
ol
• 日本語
• 中文
中文
Serial No.
Output Power
SPEAKER OUT
MIDI
FX LOOP
AUX IN
Cabinet
MONITOR IN
DI OUT
AE
1
1
2

32
Black Spirit 200 Floor – Manual 1.0
Attention : ne raccorder qu'à des haut-parleurs et des enceintes ! Le
raccorder à des appareils équipés d’une terre (Power Soak ou enceinte DI,
par ex.) entraîne des dégâts importants.
●2 Red Box AE+ DI Out : Depuis que Hughes & Kettner a inventé la
Red Box originale en 1988, elle est considérée comme un standard du
secteur pour restituer le son des amplis de guitare sans microphone. Que
ce soit en live ou en studio, la Red Box transmet le son avec une qualité
constante. Les diaphonies d’autres instruments et les expérimentations
fastidieuses avec les positions du microphone font partie du passé. La Red
Box AE+ est la dernière version de l’enceinte DI primée avec émulation
d’haut-parleur.
L’émulation d’ambiance commandée par DSP produit l'acoustique
authentique d’une enceinte 4x12 et une attaque ultradirecte d’un son de
guitare de la plus grande pureté. Pour le Black Spirit 200 Floor, nous
avons équipé la Red Box de fonctions supplémentaires pour concevoir le
travail sur scène ou en studio aussi simplement que possible.
• Red Box Mic/Line : Veillez à faire fonctionner la Red Box avec le niveau
adéquat. Si les longueurs de câblage sont importantes, comme en
concert, par exemple, nous recommandons d’activer le réglage « Line »
sur la Red Box. Le niveau de sortie supérieur compense ainsi la perte
de niveau résultant de ces grandes longueurs de câbles. Si la table de
mixage dispose uniquement d’entrées microphones, commutez la Red
Box en position « Mic », vous pourrez ainsi éviter les surmodulations
de l’entrée microphone. Si la table de mixage ou l’interface audio ne
dispose pas d’une entrée XLR, vous aurez alors besoin d’un adaptateur
jack XLR (6,3 mm) que vous pourrez obtenir dans un magasin spécialisé.
Si vous utilisez une entrée jack 6,3 mm (1/4"), veillez à faire fonctionner
la Red Box en position « Line ».
• On/Off : Vous pouvez ici éteindre la simulation de haut-parleur de la
Red Box. La Red Box envoie alors un signal non filtré à utiliser avec
votre logiciel d’émulation d’enceintes ou de microphones préféré ou un
générateur d’effets.
Remarque : la Red Box AE+ offre huit émulations d’enceintes conçues
minutieusement qui peuvent être sélectionnées sur la face avant et
sauvegardées avec chaque Preset.
●3 FX Loop
• FX Send : Raccordez cette prise avec l’entrée de votre générateur d’effets
externe.
• FX Return : Raccordez cette prise avec la sortie (mono) de votre
générateur d’effets externe.
Astuce : Il est également possible de raccorder les pédales d’effet par la
« méthode des 4 câbles » : guitare dans l’entrée de la pédale d’effet, sor-
tie de la pédale d’effet dans l’entrée de l’ampli, Send de la pédale d’effet
dans le FX Return de l’ampli et enfin, FX Send de l’ampli dans le retour de
la pédale d’effet. Vous pouvez de cette façon raccorder des effets amont
typiques comme le Chorus ou le Phaser en amont du préampli du Black
Spirit 200 Floor et placer des boucles d’effet comme le Hall ou le Delay
dans la FX Loop, en aval du préampli.
●4 MIDI
• MIDI In : La douille MIDI In du Black Spirit 200 est conçue en qualité
de douille à 7 broches délivrant une alimentation fantôme 20 V à
courant continu sur les deux broches supplémentaires. Cela autorise
la connexion directe du pédalier MIDI Hughes & Kettner FSM-432 ou
de l’interface MIDI Wifi Hughes & Kettner WMI-1 sans alimentation
supplémentaire. Les autres appareils MIDI sont raccordés par
l’intermédiaire de câbles standard à 5 broches.
• MIDI Out/Thru : Cette prise permet de transmettre les signaux arrivant
à la douille MIDI In. Vous pouvez par exemple y raccorder toute unité
d’effets externe compatible MIDI, qui doit être commutée en même
temps que le Black Spirit 200 Floor.
●5 Aux In : Vous pouvez raccorder une source audio à l’entrée Aux In
afin de pouvoir improviser avec un accompagnement ou écouter votre
musique préférée. La source audio est mélangée au son de votre guitare.
Des boîtes à rythmes ou des instruments supplémentaires peuvent
également être raccordé via l’entrée Aux In. Le signal Aux In est transmis
en haute qualité stéréo sur la sortie Phones/Line et en mono sur la sortie
haut-parleur, lorsque cette sortie est positionnée sur Fullrange Cab (voir
3.1). Vous pouvez ainsi raccorder un équipement stéréo sur la sortie
casque audio ou une enceinte PA passive et jouer des improvisations
sans table de mixage supplémentaire.
●6 Monitor In : Cette entrée spécialement pensée pour les guitaristes qui
travaillent directement via la sortie haut-parleur à l’aide d’enceintes FRFR
ou qui utilisent la sortie casque et n’emploient pas de baffes de guitare
sur scène. Ainsi, vous avez la possibilité d’entendre directement le mix
de votre groupe par votre technicien sur votre enceinte FRFR personnelle
ou votre système intra-auriculaire. L’avantage réside dans le fait que vous
n’avez pas besoin d’un second retour de scène pour entendre le reste
de votre groupe. La proportion du signal Monitor In peut être gérée à
l’aide du potentiomètre mix situé en dessous. Ainsi, vous pouvez ajuster
parfaitement le rapport entre le son du retour de scène et de l’ampli sans
table de mixage supplémentaire.
●7 AES : Selon la directive 1275/2008/CE, les appareils dont fait partie
le Black Spirit 200 Floor aux termes de celles-ci doivent posséder un
dispositif économiseur d’énergie qui les coupe après un certain temps de
non-utilisation. Sur le Black Spirit 200 Floor, c’est l’AES qui se charge de
Serial No.
Output Power
SPEAKER OUT
MIDI
FX LOOP
AUX IN
Cabinet
MONITOR IN
DI OUT
AE
1
1
2
3
4
5 6
6
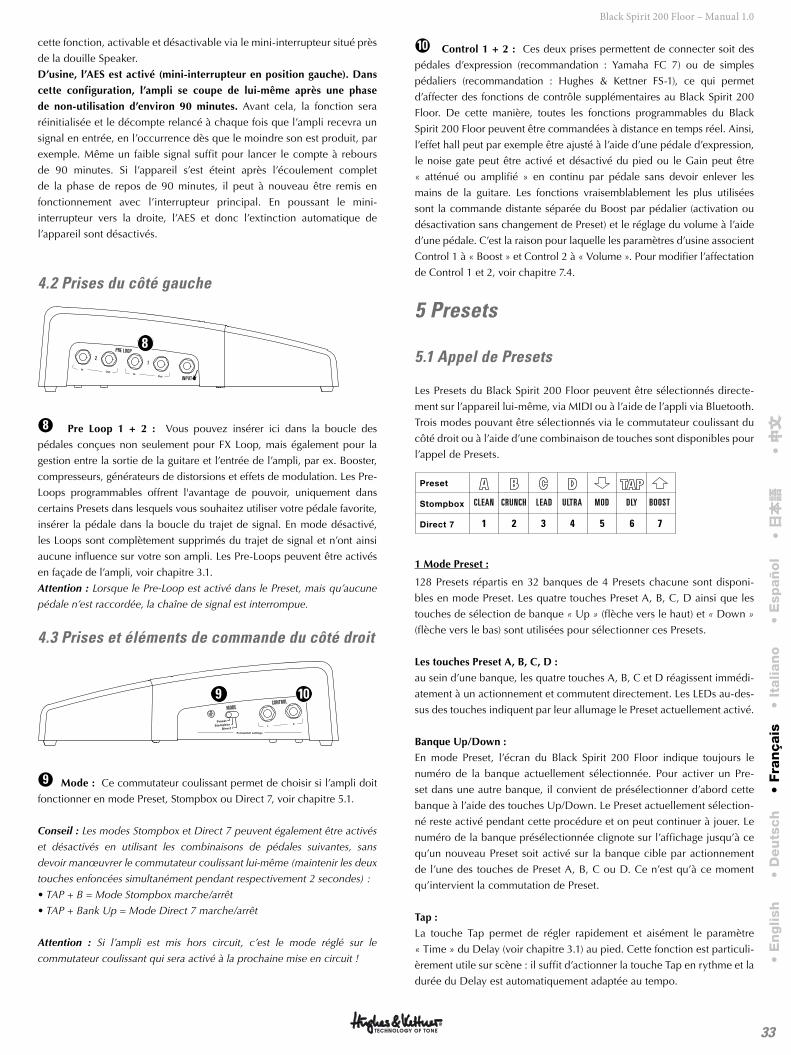
33
Black Spirit 200 Floor – Manual 1.0
cette fonction, activable et désactivable via le mini-interrupteur situé près
de la douille Speaker.
D’usine, l’AES est activé (mini-interrupteur en position gauche). Dans
cette configuration, l’ampli se coupe de lui-même après une phase
de non-utilisation d’environ 90 minutes. Avant cela, la fonction sera
réinitialisée et le décompte relancé à chaque fois que l’ampli recevra un
signal en entrée, en l’occurrence dès que le moindre son est produit, par
exemple. Même un faible signal suffit pour lancer le compte à rebours
de 90 minutes. Si l’appareil s’est éteint après l’écoulement complet
de la phase de repos de 90 minutes, il peut à nouveau être remis en
fonctionnement avec l’interrupteur principal. En poussant le mini-
interrupteur vers la droite, l’AES et donc l’extinction automatique de
l’appareil sont désactivés.
4.2 Prises du côté gauche
INPUT
PRE LOOP
12
8
●8 Pre Loop 1 + 2 : Vous pouvez insérer ici dans la boucle des
pédales conçues non seulement pour FX Loop, mais également pour la
gestion entre la sortie de la guitare et l’entrée de l’ampli, par ex. Booster,
compresseurs, générateurs de distorsions et effets de modulation. Les Pre-
Loops programmables offrent l'avantage de pouvoir, uniquement dans
certains Presets dans lesquels vous souhaitez utiliser votre pédale favorite,
insérer la pédale dans la boucle du trajet de signal. En mode désactivé,
les Loops sont complètement supprimés du trajet de signal et n’ont ainsi
aucune influence sur votre son ampli. Les Pre-Loops peuvent être activés
en façade de l’ampli, voir chapitre 3.1.
Attention : Lorsque le Pre-Loop est activé dans le Preset, mais qu’aucune
pédale n’est raccordée, la chaîne de signal est interrompue.
4.3 Prises et éléments de commande du côté droit
CONTROLMODE
9 10
●9 Mode : Ce commutateur coulissant permet de choisir si l’ampli doit
fonctionner en mode Preset, Stompbox ou Direct 7, voir chapitre 5.1.
Conseil : Les modes Stompbox et Direct 7 peuvent également être activés
et désactivés en utilisant les combinaisons de pédales suivantes, sans
devoir manœuvrer le commutateur coulissant lui-même (maintenir les deux
touches enfoncées simultanément pendant respectivement 2 secondes) :
• TAP + B = Mode Stompbox marche/arrêt
• TAP + Bank Up = Mode Direct 7 marche/arrêt
Attention : Si l’ampli est mis hors circuit, c’est le mode réglé sur le
commutateur coulissant qui sera activé à la prochaine mise en circuit !
●10 Control 1 + 2 : Ces deux prises permettent de connecter soit des
pédales d’expression (recommandation : Yamaha FC 7) ou de simples
pédaliers (recommandation : Hughes & Kettner FS-1), ce qui permet
d’affecter des fonctions de contrôle supplémentaires au Black Spirit 200
Floor. De cette manière, toutes les fonctions programmables du Black
Spirit 200 Floor peuvent être commandées à distance en temps réel. Ainsi,
l’effet hall peut par exemple être ajusté à l’aide d’une pédale d’expression,
le noise gate peut être activé et désactivé du pied ou le Gain peut être
« atténué ou amplifié » en continu par pédale sans devoir enlever les
mains de la guitare. Les fonctions vraisemblablement les plus utilisées
sont la commande distante séparée du Boost par pédalier (activation ou
désactivation sans changement de Preset) et le réglage du volume à l’aide
d’une pédale. C’est la raison pour laquelle les paramètres d’usine associent
Control 1 à « Boost » et Control 2 à « Volume ». Pour modifier l’affectation
de Control 1 et 2, voir chapitre 7.4.
5 Presets
5.1 Appel de Presets
Les Presets du Black Spirit 200 Floor peuvent être sélectionnés directe-
ment sur l’appareil lui-même, via MIDI ou à l’aide de l’appli via Bluetooth.
Trois modes pouvant être sélectionnés via le commutateur coulissant du
côté droit ou à l’aide d’une combinaison de touches sont disponibles pour
l’appel de Presets.
1
CLEAN
2
CRUNCH
3
LEAD
4
ULTRA
6
DLY
7
BOOST
5
MOD
1 Mode Preset :
128 Presets répartis en 32 banques de 4 Presets chacune sont disponi-
bles en mode Preset. Les quatre touches Preset A, B, C, D ainsi que les
touches de sélection de banque « Up » (flèche vers le haut) et « Down »
(flèche vers le bas) sont utilisées pour sélectionner ces Presets.
Les touches Preset A, B, C, D :
au sein d’une banque, les quatre touches A, B, C et D réagissent immédi-
atement à un actionnement et commutent directement. Les LEDs au-des-
sus des touches indiquent par leur allumage le Preset actuellement activé.
Banque Up/Down :
En mode Preset, l’écran du Black Spirit 200 Floor indique toujours le
numéro de la banque actuellement sélectionnée. Pour activer un Pre-
set dans une autre banque, il convient de présélectionner d’abord cette
banque à l’aide des touches Up/Down. Le Preset actuellement sélection-
né reste activé pendant cette procédure et on peut continuer à jouer. Le
numéro de la banque présélectionnée clignote sur l’affichage jusqu’à ce
qu’un nouveau Preset soit activé sur la banque cible par actionnement
de l’une des touches de Preset A, B, C ou D. Ce n’est qu’à ce moment
qu’intervient la commutation de Preset.
Tap :
La touche Tap permet de régler rapidement et aisément le paramètre
« Time » du Delay (voir chapitre 3.1) au pied. Cette fonction est particuli-
èrement utile sur scène : il suffit d’actionner la touche Tap en rythme et la
durée du Delay est automatiquement adaptée au tempo.
• E
nglish
• D
eu
tsch
• Fra
nçais
• It
alian
o•
Esp
añ
ol
• 日本語
• 中文
中文
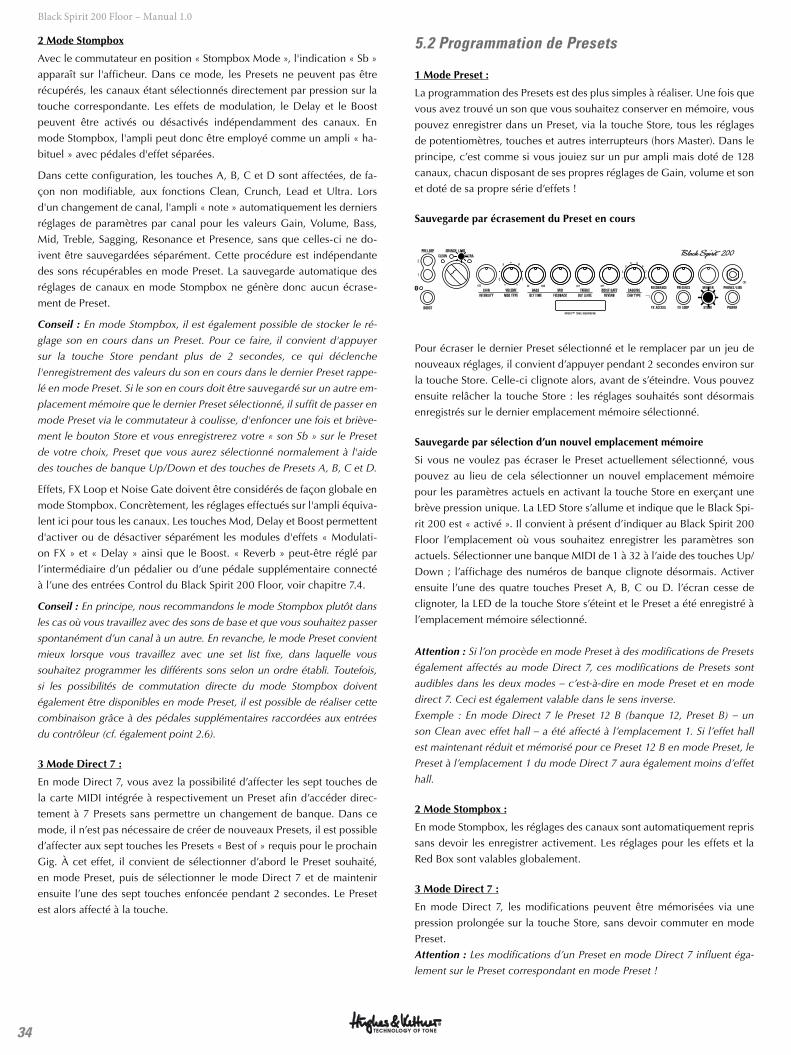
34
Black Spirit 200 Floor – Manual 1.0
2 Mode Stompbox
Avec le commutateur en position « Stompbox Mode », l'indication « Sb »
apparaît sur l'afficheur. Dans ce mode, les Presets ne peuvent pas être
récupérés, les canaux étant sélectionnés directement par pression sur la
touche correspondante. Les effets de modulation, le Delay et le Boost
peuvent être activés ou désactivés indépendamment des canaux. En
mode Stompbox, l'ampli peut donc être employé comme un ampli « ha-
bituel » avec pédales d'effet séparées.
Dans cette configuration, les touches A, B, C et D sont affectées, de fa-
çon non modifiable, aux fonctions Clean, Crunch, Lead et Ultra. Lors
d'un changement de canal, l'ampli « note » automatiquement les derniers
réglages de paramètres par canal pour les valeurs Gain, Volume, Bass,
Mid, Treble, Sagging, Resonance et Presence, sans que celles-ci ne do-
ivent être sauvegardées séparément. Cette procédure est indépendante
des sons récupérables en mode Preset. La sauvegarde automatique des
réglages de canaux en mode Stompbox ne génère donc aucun écrase-
ment de Preset.
Conseil : En mode Stompbox, il est également possible de stocker le ré-
glage son en cours dans un Preset. Pour ce faire, il convient d'appuyer
sur la touche Store pendant plus de 2 secondes, ce qui déclenche
l'enregistrement des valeurs du son en cours dans le dernier Preset rappe-
lé en mode Preset. Si le son en cours doit être sauvegardé sur un autre em-
placement mémoire que le dernier Preset sélectionné, il suffit de passer en
mode Preset via le commutateur à coulisse, d'enfoncer une fois et briève-
ment le bouton Store et vous enregistrerez votre « son Sb » sur le Preset
de votre choix, Preset que vous aurez sélectionné normalement à l'aide
des touches de banque Up/Down et des touches de Presets A, B, C et D.
Effets, FX Loop et Noise Gate doivent être considérés de façon globale en
mode Stompbox. Concrètement, les réglages effectués sur l'ampli équiva-
lent ici pour tous les canaux. Les touches Mod, Delay et Boost permettent
d'activer ou de désactiver séparément les modules d'effets « Modulati-
on FX » et « Delay » ainsi que le Boost. « Reverb » peut-être réglé par
l’intermédiaire d’un pédalier ou d’une pédale supplémentaire connecté
à l’une des entrées Control du Black Spirit 200 Floor, voir chapitre 7.4.
Conseil : En principe, nous recommandons le mode Stompbox plutôt dans
les cas où vous travaillez avec des sons de base et que vous souhaitez passer
spontanément d’un canal à un autre. En revanche, le mode Preset convient
mieux lorsque vous travaillez avec une set list fixe, dans laquelle vous
souhaitez programmer les différents sons selon un ordre établi. Toutefois,
si les possibilités de commutation directe du mode Stompbox doivent
également être disponibles en mode Preset, il est possible de réaliser cette
combinaison grâce à des pédales supplémentaires raccordées aux entrées
du contrôleur (cf. également point 2.6).
3 Mode Direct 7 :
En mode Direct 7, vous avez la possibilité d’affecter les sept touches de
la carte MIDI intégrée à respectivement un Preset afin d’accéder direc-
tement à 7 Presets sans permettre un changement de banque. Dans ce
mode, il n’est pas nécessaire de créer de nouveaux Presets, il est possible
d’affecter aux sept touches les Presets « Best of » requis pour le prochain
Gig. À cet effet, il convient de sélectionner d’abord le Preset souhaité,
en mode Preset, puis de sélectionner le mode Direct 7 et de maintenir
ensuite l’une des sept touches enfoncée pendant 2 secondes. Le Preset
est alors affecté à la touche.
5.2 Programmation de Presets
1 Mode Preset :
La programmation des Presets est des plus simples à réaliser. Une fois que
vous avez trouvé un son que vous souhaitez conserver en mémoire, vous
pouvez enregistrer dans un Preset, via la touche Store, tous les réglages
de potentiomètres, touches et autres interrupteurs (hors Master). Dans le
principe, c’est comme si vous jouiez sur un pur ampli mais doté de 128
canaux, chacun disposant de ses propres réglages de Gain, volume et son
et doté de sa propre série d’effets !
Sauvegarde par écrasement du Preset en cours
MASTERPRESENCERESONANCESAGGINGNOISE GATETREBLEMIDBASSVOLUME
50
1 8
2 7
3 64 5
GAINREVERBDLY LEVELFEEDBACKDLY T IMEMOD TYPEINTENSITY
CLEAN ULTRACRUNCH LEAD
POWER
PHONES / L INE
CAB TYPE
STOREFX LOOPFX ACCESSBOOST
PRE LOOP
OFF OFF1400 OFF
C
2
1T
F P
S P I R I T ™ T O N E G E N E R A T O R
Pour écraser le dernier Preset sélectionné et le remplacer par un jeu de
nouveaux réglages, il convient d’appuyer pendant 2 secondes environ sur
la touche Store. Celle-ci clignote alors, avant de s’éteindre. Vous pouvez
ensuite relâcher la touche Store : les réglages souhaités sont désormais
enregistrés sur le dernier emplacement mémoire sélectionné.
Sauvegarde par sélection d’un nouvel emplacement mémoire
Si vous ne voulez pas écraser le Preset actuellement sélectionné, vous
pouvez au lieu de cela sélectionner un nouvel emplacement mémoire
pour les paramètres actuels en activant la touche Store en exerçant une
brève pression unique. La LED Store s’allume et indique que le Black Spi-
rit 200 est « activé ». Il convient à présent d’indiquer au Black Spirit 200
Floor l’emplacement où vous souhaitez enregistrer les paramètres son
actuels. Sélectionner une banque MIDI de 1 à 32 à l’aide des touches Up/
Down ; l’affichage des numéros de banque clignote désormais. Activer
ensuite l’une des quatre touches Preset A, B, C ou D. l’écran cesse de
clignoter, la LED de la touche Store s’éteint et le Preset a été enregistré à
l’emplacement mémoire sélectionné.
Attention : Si l’on procède en mode Preset à des modifications de Presets
également affectés au mode Direct 7, ces modifications de Presets sont
audibles dans les deux modes – c’est-à-dire en mode Preset et en mode
direct 7. Ceci est également valable dans le sens inverse.
Exemple : En mode Direct 7 le Preset 12 B (banque 12, Preset B) – un
son Clean avec effet hall – a été affecté à l’emplacement 1. Si l’effet hall
est maintenant réduit et mémorisé pour ce Preset 12 B en mode Preset, le
Preset à l’emplacement 1 du mode Direct 7 aura également moins d’effet
hall.
2 Mode Stompbox :
En mode Stompbox, les réglages des canaux sont automatiquement repris
sans devoir les enregistrer activement. Les réglages pour les effets et la
Red Box sont valables globalement.
3 Mode Direct 7 :
En mode Direct 7, les modifications peuvent être mémorisées via une
pression prolongée sur la touche Store, sans devoir commuter en mode
Preset.
Attention : Les modifications d’un Preset en mode Direct 7 influent éga-
lement sur le Preset correspondant en mode Preset !
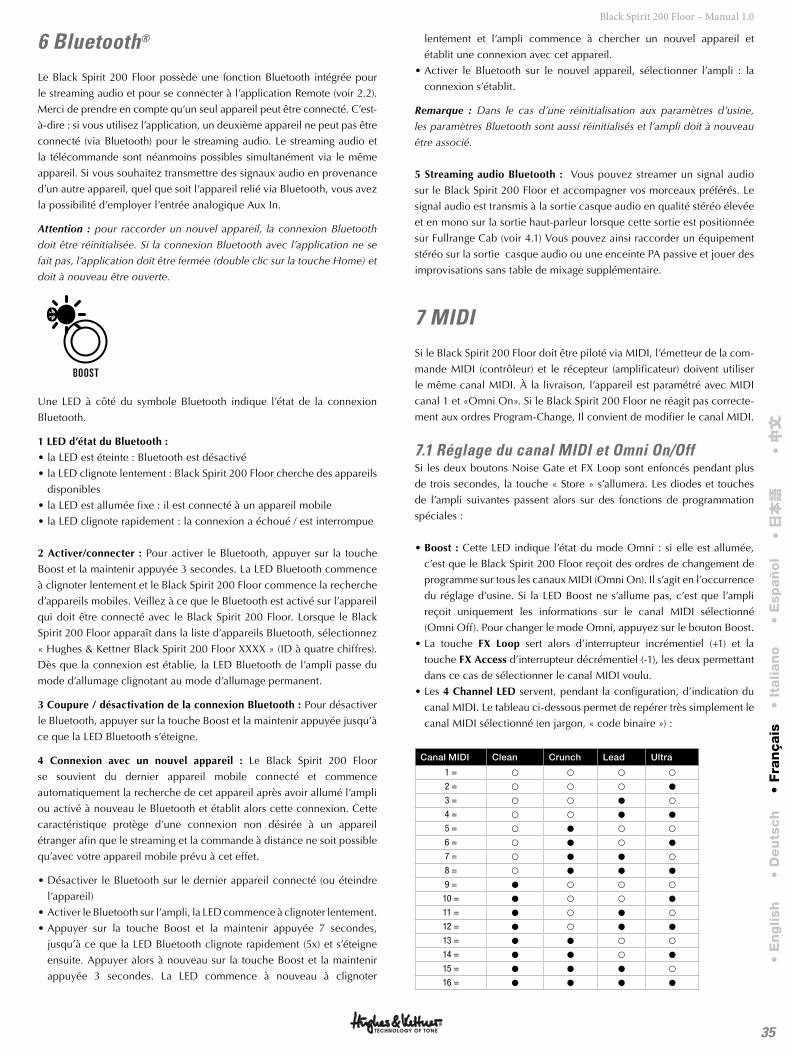
35
Black Spirit 200 Floor – Manual 1.0
6 Bluetooth®
Le Black Spirit 200 Floor possède une fonction Bluetooth intégrée pour
le streaming audio et pour se connecter à l’application Remote (voir 2.2).
Merci de prendre en compte qu’un seul appareil peut être connecté. C’est-
à-dire : si vous utilisez l’application, un deuxième appareil ne peut pas être
connecté (via Bluetooth) pour le streaming audio. Le streaming audio et
la télécommande sont néanmoins possibles simultanément via le même
appareil. Si vous souhaitez transmettre des signaux audio en provenance
d’un autre appareil, quel que soit l’appareil relié via Bluetooth, vous avez
la possibilité d’employer l’entrée analogique Aux In.
Attention : pour raccorder un nouvel appareil, la connexion Bluetooth
doit être réinitialisée. Si la connexion Bluetooth avec l’application ne se
fait pas, l’application doit être fermée (double clic sur la touche Home) et
doit à nouveau être ouverte.
BOOST
Une LED à côté du symbole Bluetooth indique l’état de la connexion
Bluetooth.
1 LED d’état du Bluetooth :
• la LED est éteinte : Bluetooth est désactivé
• la LED clignote lentement : Black Spirit 200 Floor cherche des appareils
disponibles
• la LED est allumée fixe : il est connecté à un appareil mobile
• la LED clignote rapidement : la connexion a échoué / est interrompue
2 Activer/connecter : Pour activer le Bluetooth, appuyer sur la touche
Boost et la maintenir appuyée 3 secondes. La LED Bluetooth commence
à clignoter lentement et le Black Spirit 200 Floor commence la recherche
d’appareils mobiles. Veillez à ce que le Bluetooth est activé sur l’appareil
qui doit être connecté avec le Black Spirit 200 Floor. Lorsque le Black
Spirit 200 Floor apparaît dans la liste d’appareils Bluetooth, sélectionnez
« Hughes & Kettner Black Spirit 200 Floor XXXX » (ID à quatre chiffres).
Dès que la connexion est établie, la LED Bluetooth de l’ampli passe du
mode d’allumage clignotant au mode d’allumage permanent.
3 Coupure / désactivation de la connexion Bluetooth : Pour désactiver
le Bluetooth, appuyer sur la touche Boost et la maintenir appuyée jusqu’à
ce que la LED Bluetooth s’éteigne.
4 Connexion avec un nouvel appareil : Le Black Spirit 200 Floor
se souvient du dernier appareil mobile connecté et commence
automatiquement la recherche de cet appareil après avoir allumé l’ampli
ou activé à nouveau le Bluetooth et établit alors cette connexion. Cette
caractéristique protège d’une connexion non désirée à un appareil
étranger afin que le streaming et la commande à distance ne soit possible
qu’avec votre appareil mobile prévu à cet effet.
• Désactiver le Bluetooth sur le dernier appareil connecté (ou éteindre
l’appareil)
• Activer le Bluetooth sur l’ampli, la LED commence à clignoter lentement.
• Appuyer sur la touche Boost et la maintenir appuyée 7 secondes,
jusqu’à ce que la LED Bluetooth clignote rapidement (5x) et s’éteigne
ensuite. Appuyer alors à nouveau sur la touche Boost et la maintenir
appuyée 3 secondes. La LED commence à nouveau à clignoter
lentement et l’ampli commence à chercher un nouvel appareil et
établit une connexion avec cet appareil.
• Activer le Bluetooth sur le nouvel appareil, sélectionner l’ampli : la
connexion s’établit.
Remarque : Dans le cas d’une réinitialisation aux paramètres d’usine,
les paramètres Bluetooth sont aussi réinitialisés et l’ampli doit à nouveau
être associé.
5 Streaming audio Bluetooth : Vous pouvez streamer un signal audio
sur le Black Spirit 200 Floor et accompagner vos morceaux préférés. Le
signal audio est transmis à la sortie casque audio en qualité stéréo élevée
et en mono sur la sortie haut-parleur lorsque cette sortie est positionnée
sur Fullrange Cab (voir 4.1) Vous pouvez ainsi raccorder un équipement
stéréo sur la sortie casque audio ou une enceinte PA passive et jouer des
improvisations sans table de mixage supplémentaire.
7 MIDISi le Black Spirit 200 Floor doit être piloté via MIDI, l’émetteur de la com-
mande MIDI (contrôleur) et le récepteur (amplificateur) doivent utiliser
le même canal MIDI. À la livraison, l’appareil est paramétré avec MIDI
canal 1 et «Omni On». Si le Black Spirit 200 Floor ne réagit pas correcte-
ment aux ordres Program-Change, Il convient de modifier le canal MIDI.
7.1 Réglage du canal MIDI et Omni On/Off Si les deux boutons Noise Gate et FX Loop sont enfoncés pendant plus
de trois secondes, la touche « Store » s’allumera. Les diodes et touches
de l’ampli suivantes passent alors sur des fonctions de programmation
spéciales :
• Boost : Cette LED indique l’état du mode Omni : si elle est allumée,
c’est que le Black Spirit 200 Floor reçoit des ordres de changement de
programme sur tous les canaux MIDI (Omni On). Il s’agit en l’occurrence
du réglage d’usine. Si la LED Boost ne s’allume pas, c’est que l’ampli
reçoit uniquement les informations sur le canal MIDI sélectionné
(Omni Off). Pour changer le mode Omni, appuyez sur le bouton Boost.
• La touche FX Loop sert alors d’interrupteur incrémentiel (+1) et la
touche FX Access d’interrupteur décrémentiel (-1), les deux permettant
dans ce cas de sélectionner le canal MIDI voulu.
• Les 4 Channel LED servent, pendant la configuration, d’indication du
canal MIDI. Le tableau ci-dessous permet de repérer très simplement le
canal MIDI sélectionné (en jargon, « code binaire ») :
Canal MIDI Clean Crunch Lead Ultra
1 = ¢ ¢ ¢ ¢
2 = ¢ ¢ ¢ {
3 = ¢ ¢ £ ¢
4 = ¢ ¢ £ £
5 = ¢ £ ¢ ¢
6 = ¢ £ ¢ £
7 = ¢ £ £ ¢
8 = ¢ £ £ £
9 = £ ¢ ¢ ¢
10 = £ ¢ ¢ £
11 = £ ¢ £ ¢
12 = £ ¢ £ £
13 = £ £ ¢ ¢
14 = £ £ ¢ £
15 = £ £ £ ¢
16 = £ £ £ £
• E
nglish
• D
eu
tsch
• Fra
nçais
• It
alian
o•
Esp
añ
ol
• 日本語
• 中文
中文
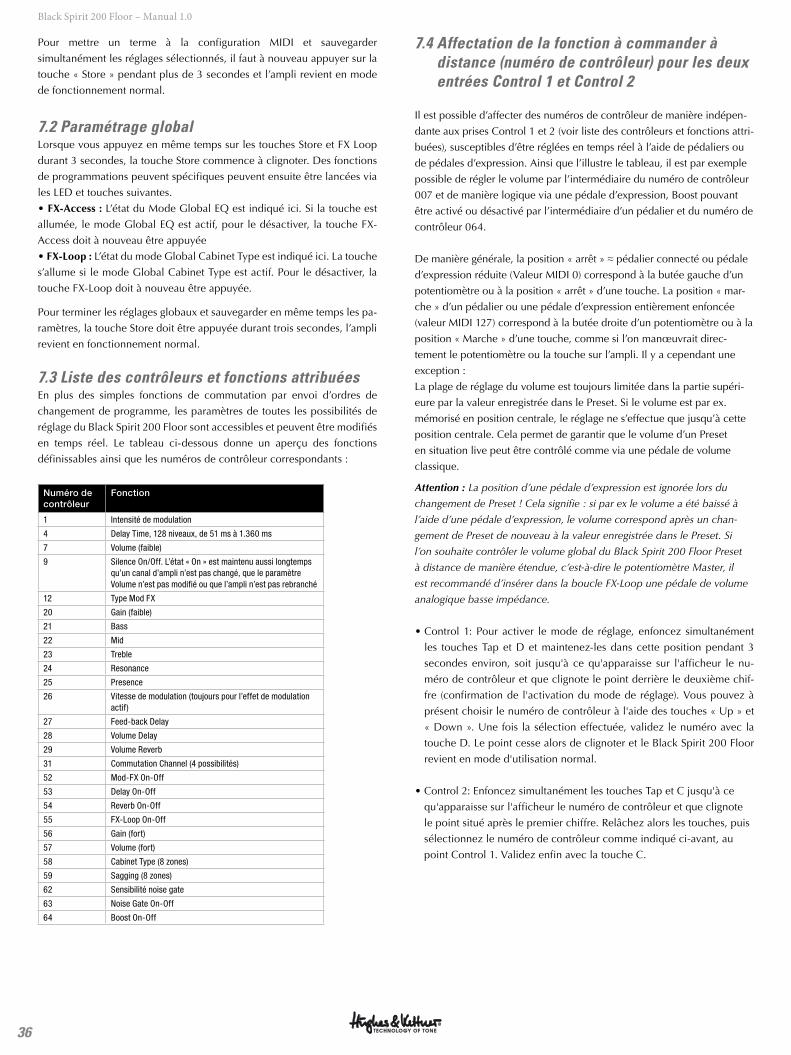
36
Black Spirit 200 Floor – Manual 1.0
Pour mettre un terme à la configuration MIDI et sauvegarder
simultanément les réglages sélectionnés, il faut à nouveau appuyer sur la
touche « Store » pendant plus de 3 secondes et l’ampli revient en mode
de fonctionnement normal.
7.2 Paramétrage globalLorsque vous appuyez en même temps sur les touches Store et FX Loop
durant 3 secondes, la touche Store commence à clignoter. Des fonctions
de programmations peuvent spécifiques peuvent ensuite être lancées via
les LED et touches suivantes.
• FX-Access : L’état du Mode Global EQ est indiqué ici. Si la touche est
allumée, le mode Global EQ est actif, pour le désactiver, la touche FX-
Access doit à nouveau être appuyée
• FX-Loop : L’état du mode Global Cabinet Type est indiqué ici. La touche
s’allume si le mode Global Cabinet Type est actif. Pour le désactiver, la
touche FX-Loop doit à nouveau être appuyée.
Pour terminer les réglages globaux et sauvegarder en même temps les pa-
ramètres, la touche Store doit être appuyée durant trois secondes, l’ampli
revient en fonctionnement normal.
7.3 Liste des contrôleurs et fonctions attribuéesEn plus des simples fonctions de commutation par envoi d’ordres de
changement de programme, les paramètres de toutes les possibilités de
réglage du Black Spirit 200 Floor sont accessibles et peuvent être modifiés
en temps réel. Le tableau ci-dessous donne un aperçu des fonctions
définissables ainsi que les numéros de contrôleur correspondants :
Numéro de contrôleur
Fonction
1 Intensité de modulation
4 Delay Time, 128 niveaux, de 51 ms à 1.360 ms
7 Volume (faible)
9 Silence On/Off. L’état « On » est maintenu aussi longtemps qu’un canal d’ampli n’est pas changé, que le paramètre Volume n’est pas modifié ou que l’ampli n’est pas rebranché
12 Type Mod FX
20 Gain (faible)
21 Bass
22 Mid
23 Treble
24 Resonance
25 Presence
26 Vitesse de modulation (toujours pour l’effet de modulation actif)
27 Feed-back Delay
28 Volume Delay
29 Volume Reverb
31 Commutation Channel (4 possibilités)
52 Mod-FX On-Off
53 Delay On-Off
54 Reverb On-Off
55 FX-Loop On-Off
56 Gain (fort)
57 Volume (fort)
58 Cabinet Type (8 zones)
59 Sagging (8 zones)
62 Sensibilité noise gate
63 Noise Gate On-Off
64 Boost On-Off
7.4 Affectation de la fonction à commander à distance (numéro de contrôleur) pour les deux entrées Control 1 et Control 2
Il est possible d’affecter des numéros de contrôleur de manière indépen-
dante aux prises Control 1 et 2 (voir liste des contrôleurs et fonctions attri-
buées), susceptibles d’être réglées en temps réel à l’aide de pédaliers ou
de pédales d’expression. Ainsi que l’illustre le tableau, il est par exemple
possible de régler le volume par l’intermédiaire du numéro de contrôleur
007 et de manière logique via une pédale d’expression, Boost pouvant
être activé ou désactivé par l’intermédiaire d’un pédalier et du numéro de
contrôleur 064.
De manière générale, la position « arrêt » ≈ pédalier connecté ou pédale
d’expression réduite (Valeur MIDI 0) correspond à la butée gauche d’un
potentiomètre ou à la position « arrêt » d’une touche. La position « mar-
che » d’un pédalier ou une pédale d’expression entièrement enfoncée
(valeur MIDI 127) correspond à la butée droite d’un potentiomètre ou à la
position « Marche » d’une touche, comme si l’on manœuvrait direc-
tement le potentiomètre ou la touche sur l’ampli. Il y a cependant une
exception :
La plage de réglage du volume est toujours limitée dans la partie supéri-
eure par la valeur enregistrée dans le Preset. Si le volume est par ex.
mémorisé en position centrale, le réglage ne s’effectue que jusqu’à cette
position centrale. Cela permet de garantir que le volume d’un Preset
en situation live peut être contrôlé comme via une pédale de volume
classique.
Attention : La position d’une pédale d’expression est ignorée lors du
changement de Preset ! Cela signifie : si par ex le volume a été baissé à
l’aide d’une pédale d’expression, le volume correspond après un chan-
gement de Preset de nouveau à la valeur enregistrée dans le Preset. Si
l’on souhaite contrôler le volume global du Black Spirit 200 Floor Preset
à distance de manière étendue, c’est-à-dire le potentiomètre Master, il
est recommandé d’insérer dans la boucle FX-Loop une pédale de volume
analogique basse impédance.
• Control 1: Pour activer le mode de réglage, enfoncez simultanément
les touches Tap et D et maintenez-les dans cette position pendant 3
secondes environ, soit jusqu'à ce qu'apparaisse sur l'afficheur le nu-
méro de contrôleur et que clignote le point derrière le deuxième chif-
fre (confirmation de l'activation du mode de réglage). Vous pouvez à
présent choisir le numéro de contrôleur à l'aide des touches « Up » et
« Down ». Une fois la sélection effectuée, validez le numéro avec la
touche D. Le point cesse alors de clignoter et le Black Spirit 200 Floor
revient en mode d'utilisation normal.
• Control 2: Enfoncez simultanément les touches Tap et C jusqu'à ce
qu'apparaisse sur l'afficheur le numéro de contrôleur et que clignote
le point situé après le premier chiffre. Relâchez alors les touches, puis
sélectionnez le numéro de contrôleur comme indiqué ci-avant, au
point Control 1. Validez enfin avec la touche C.
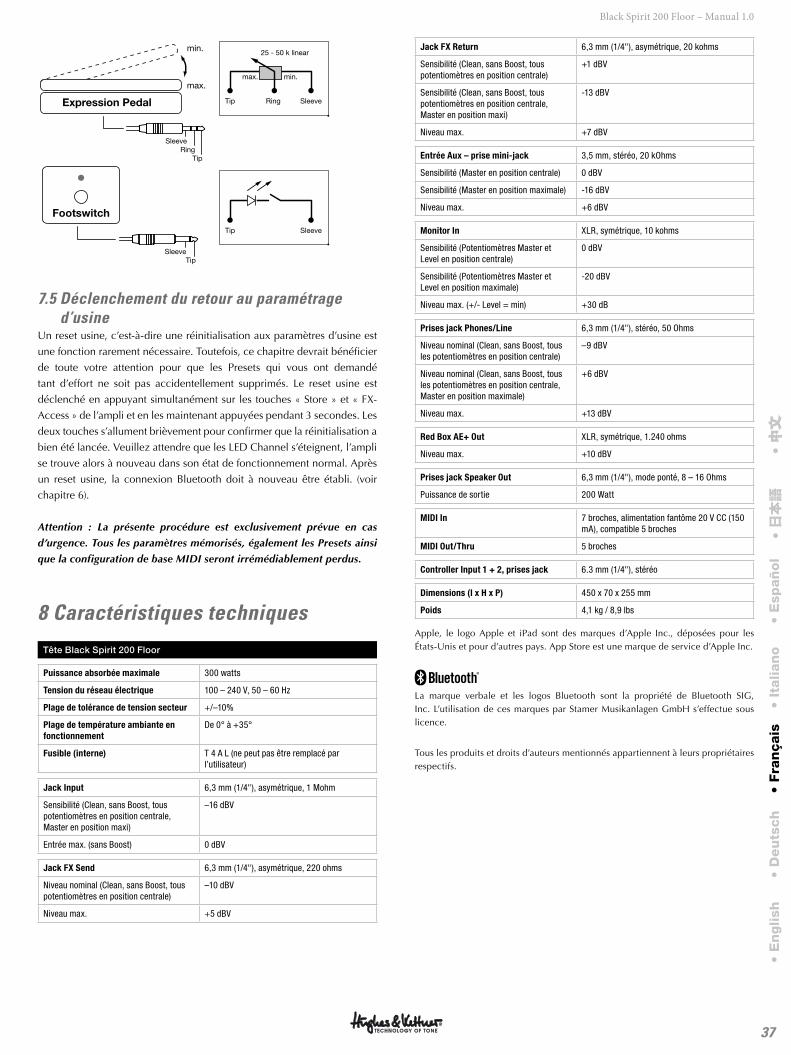
37
Black Spirit 200 Floor – Manual 1.0
min.
max.
SleeveRing
Tip
Tip Ring Sleeve
max.
25 - 50 k linear
min.
Expression Pedal
SleeveTip
Footswitch
Tip Sleeve
7.5 Déclenchement du retour au paramétrage d’usine
Un reset usine, c’est-à-dire une réinitialisation aux paramètres d’usine est
une fonction rarement nécessaire. Toutefois, ce chapitre devrait bénéficier
de toute votre attention pour que les Presets qui vous ont demandé
tant d’effort ne soit pas accidentellement supprimés. Le reset usine est
déclenché en appuyant simultanément sur les touches « Store » et « FX-
Access » de l’ampli et en les maintenant appuyées pendant 3 secondes. Les
deux touches s’allument brièvement pour confirmer que la réinitialisation a
bien été lancée. Veuillez attendre que les LED Channel s’éteignent, l’ampli
se trouve alors à nouveau dans son état de fonctionnement normal. Après
un reset usine, la connexion Bluetooth doit à nouveau être établi. (voir
chapitre 6).
Attention : La présente procédure est exclusivement prévue en cas
d’urgence. Tous les paramètres mémorisés, également les Presets ainsi
que la configuration de base MIDI seront irrémédiablement perdus.
8 Caractéristiques techniques
Tête Black Spirit 200 Floor
Puissance absorbée maximale 300 watts
Tension du réseau électrique 100 – 240 V, 50 – 60 Hz
Plage de tolérance de tension secteur +/–10%
Plage de température ambiante en fonctionnement
De 0° à +35°
Fusible (interne) T 4 A L (ne peut pas être remplacé par l’utilisateur)
Jack Input 6,3 mm (1/4"), asymétrique, 1 Mohm
Sensibilité (Clean, sans Boost, tous potentiomètres en position centrale, Master en position maxi)
–16 dBV
Entrée max. (sans Boost) 0 dBV
Jack FX Send 6,3 mm (1/4"), asymétrique, 220 ohms
Niveau nominal (Clean, sans Boost, tous potentiomètres en position centrale)
–10 dBV
Niveau max. +5 dBV
Jack FX Return 6,3 mm (1/4"), asymétrique, 20 kohms
Sensibilité (Clean, sans Boost, tous potentiomètres en position centrale)
+1 dBV
Sensibilité (Clean, sans Boost, tous potentiomètres en position centrale, Master en position maxi)
-13 dBV
Niveau max. +7 dBV
Entrée Aux – prise mini-jack 3,5 mm, stéréo, 20 kOhms
Sensibilité (Master en position centrale) 0 dBV
Sensibilité (Master en position maximale) -16 dBV
Niveau max. +6 dBV
Monitor In XLR, symétrique, 10 kohms
Sensibilité (Potentiomètres Master et Level en position centrale)
0 dBV
Sensibilité (Potentiomètres Master et Level en position maximale)
-20 dBV
Niveau max. (+/- Level = min) +30 dB
Prises jack Phones/Line 6,3 mm (1/4"), stéréo, 50 Ohms
Niveau nominal (Clean, sans Boost, tous les potentiomètres en position centrale)
–9 dBV
Niveau nominal (Clean, sans Boost, tous les potentiomètres en position centrale, Master en position maximale)
+6 dBV
Niveau max. +13 dBV
Red Box AE+ Out XLR, symétrique, 1.240 ohms
Niveau max. +10 dBV
Prises jack Speaker Out 6,3 mm (1/4"), mode ponté, 8 – 16 Ohms
Puissance de sortie 200 Watt
MIDI In 7 broches, alimentation fantôme 20 V CC (150 mA), compatible 5 broches
MIDI Out/Thru 5 broches
Controller Input 1 + 2, prises jack 6.3 mm (1/4"), stéréo
Dimensions (l x H x P) 450 x 70 x 255 mm
Poids 4,1 kg / 8,9 lbs
Apple, le logo Apple et iPad sont des marques d’Apple Inc., déposées pour les États-Unis et pour d’autres pays. App Store est une marque de service d’Apple Inc.
La marque verbale et les logos Bluetooth sont la propriété de Bluetooth SIG, Inc. L’utilisation de ces marques par Stamer Musikanlagen GmbH s’effectue sous licence.
Tous les produits et droits d’auteurs mentionnés appartiennent à leurs propriétaires respectifs.
• E
nglish
• D
eu
tsch
• Fra
nçais
• It
alian
o•
Esp
añ
ol
• 日本語
• 中文
中文
Version 2.5 07/2018
Istruzioni di sicurezza importanti. Leggere prima di effettuare il collegamento!
Il presente prodotto è stato fabbricato dal produttore in conformità alla norma IEC 62368-1 ed è uscito dallo stabilimento in perfette condizioni di funzionamento. Per preservare tali condizioni e garantirne l’uso sicuro, l’utente deve attenersi alle indicazioni e alle avvertenze riportate nelle istruzioni per l’uso. L’unità è conforme alla Classe di protezione 1 (apparecchio con messa a terra di protezione). Se volete usare questo prodotto su veicoli, a bordo di navi o di aerei oppure ad altitudini superiori a 2000 m dovete badare alle rispettive norme di sicurezza suppletive alla norma IEC 62368-1.AVVISO: Per evitare il rischio di incendio o folgorazione, non esporre l’apparecchio ad umidità o pioggia. Non aprire l’involucro poiché al suo interno non vi sono parti riparabili dall’utente. Per la riparazione rivolgersi a personale tecnico qualificato.
Questo simbolo segnala la presenza all’interno dell’involucro di tensione pericolosa priva di isolamento sufficientemente alta da costituire un pericolo di folgorazione.
Questo simbolo segnala la presenza di tensione pericolosa accessibile dall’esterno. Il cablaggio esterno collegato ad un qualunque morsetto contrassegnato da questo simbolo deve essere un cavo preconfezionato conforme ai requisiti indicati dal produttore o un cablaggio installato da personale qualificato.
Questo simbolo segnala importanti istruzioni per l’uso e la manutenzione nella documentazione allegata. Leggere il manuale.
Questo simbolo ha il seguente significato: Attenzione! Superficie calda! Non toccare per evitare scottature.
Apparecchiature elettriche o elettroniche di qualsiasi tipo, batterie incluse, non appartengono nell'immondizia - smaltite questo tipo di rifiuti presso gli ufficiali centri di raccolta.
Leggere queste istruzioni. Conservare queste istruzioni. Attenersi a tutti gli avvisi e istruzioni riportati sul prodotto e nel manuale.
• Non utilizzare il prodotto vicino all’acqua. Non collocare il prodotto vicino ad acqua, vasche, lavandini, zone umide, piscine o stanze con presenza di vapore.
• Non collocare sul prodotto oggetti contenenti liquidi, quali vasi, bicchieri, bottiglie ecc.
• Pulire solo con un panno asciutto.• Non togliere alcun coperchio o parti dell’involucro.• La tensione di esercizio prescritta per il prodotto deve
corrispondere alla tensione di alimentazione della rete locale. In caso di dubbi sul tipo di alimentazione disponibile, rivolgersi al proprio rivenditore o all’azienda di fornitura elettrica locale.
• Per ridurre il rischio di folgorazione, la messa a terra del prodotto deve essere mantenuta. Utilizzare solo il cavo di alimentazione in dotazione al prodotto e mantenere sempre in funzione il connettore centrale (di terra) del collegamento alla rete. Non escludere la funzione di sicurezza del connettore polarizzato o di messa a terra.
• Proteggere il cavo di alimentazione affinché non venga calpestato o pizzicato, in particolare in corrispondenza delle prese e degli innesti e nel punto di uscita dal dispositivo. Maneggiare sempre con cura i cavi di alimentazione. Controllare periodicamente la presenza di tagli o usura sui cavi, soprattutto
all’altezza della presa e nel punto di uscita dal dispositivo.
• Non utilizzare mai il cavo di alimentazione se danneggiato.
• Scollegare il prodotto in caso di temporale o di lunghi periodi di inutilizzo.
• Il prodotto si scollega completamente dall’alimentazione di rete solo staccando la spina di alimentazione dall’unità o dalla presa a muro. Il prodotto va collocato sempre in modo che sia possibile scollegarlo dall’alimentazione con facilità.
• Fusibili: I fusibili utilizzati come ricambio devono essere di tipo IEC127 (5x20 mm) e dell’amperaggio nominale richiesto. È vietato utilizzare fusibili riparati o cortocircuitare il portafusibili. Fate sostituire i fusibili soltanto da un tecnico qualificato.
• Per tutte le operazioni di riparazione, rivolgersi a personale qualificato. L’unità va riparata nel caso abbia subito danni, come nei seguenti casi:
- Il cavo o la presa di alimentazione sono danneggiati o usurati.
- È penetrato del liquido o degli oggetti all’interno del prodotto.
- Il prodotto è stato esposto a pioggia o umidità.- Il prodotto non funziona correttamente seguendo le
istruzioni.- Il prodotto ha subito una caduta o l’armadio è stato
danneggiato.• Quando collegate altoparlanti badate di non scendere
sotto l’impedenza minima dichiarata sull’apparecchio oppure in questo manuale. Usate sempre cavi dello spessore adatto e corrispondenti alle vigenti norme locali.
• Non esporre ai raggi solari diretti.• Non installare accanto a fonti di calore quali
radiatori, bocchette di diffusione d’aria calda, fornelli o altri dispositivi che generano calore.
• Questo apparecchio è stato concepito per l'uso nelle zone di clima temperate - e non per essere usato nelle zone tropicali.
• Non chiudere le aperture di ventilazione. Installare l’unità seguendo le istruzioni fornite dal produttore. Il prodotto non è adatto all’installazione ad incasso, ad esempio in un rack, a meno di non garantire un’adeguata ventilazione.
• Quando viene spostato all’interno di un locale, attendere sempre che il dispositivo, se freddo, raggiunga la temperatura ambiente. Qualora venga utilizzato senza che si sia riscaldato, sussiste il rischio di formazione di condensa al suo interno e di conseguenti danni.
• Non collocare sul prodotto fiamme libere, come ad esempio candele accese.
• Posate l’apparecchio mantenendo una distanza minima di 20 cm da pareti. Non copritelo e provvedete a lasciare uno spazio libero di almeno 50 cm al di sopra dell’apparecchio.
• Badate sempre a piazzare l’apparecchio su una superficie piana e stabile.
• Utilizzare solo in abbinamento al carrello, supporto, piedistallo, staffa o tavola specificati dal produttore o venduti insieme al prodotto. Qualora si utilizzi un carrello, prestare attenzione nello spostare il carrello/la combinazione di prodotto per evitare lesioni causate dall’inciampamento.
• Utilizzare solo accessori consigliati dal produttore. Tale prescrizione si applica a tutti i tipi di accessori, ad esempio coperchi di protezione, borse per il trasporto, supporti, dispositivi per il montaggio a parete o a soffitto, ecc. In caso di applicazione di qualsiasi tipo di accessorio al prodotto, osservare sempre le istruzioni per l’uso fornite dal produttore. Non utilizzare mai punti di fissaggio sul prodotto diversi da quelli indicati dal produttore.
• Questo apparecchio NON è adatto all’uso da parte di persone (compresi i bambini) con capacità fisiche, mentali o sensoriali limitate o da persone prive
della necessaria esperienza e/o conoscenza. Tenere sempre l’apparecchio al di fuori della portata dei bambini di età inferiore ai 4 anni.
• Non inserire mai oggetti di alcun tipo all’interno del prodotto attraverso le fessure dell’armadio, poiché potrebbero toccare punti con presenza di tensione pericolosa o causare il cortocircuito dei componenti, con il conseguente rischio di incendio o folgorazione.
• Questo prodotto genera livelli di pressione sonora superiori a 90 dB in grado di causare danni permanenti all’udito. L’esposizione a livelli di rumore estremamente elevati può causare la perdita permanente dell’udito. In caso di esposizione continua, indossare protezioni per l’udito.
• Il produttore garantisce la sicurezza, l’affidabilità e l’efficienza del prodotto solo se:
- l’assemblaggio, l’ampliamento, la reimpostazione, le modifiche o le riparazioni sono eseguiti dal produttore o da personale autorizzato.
- l’impianto elettrico dell’area interessata è conforme ai requisiti specificati nelle norme IEC (ANSI).
- l’unità è utilizzata secondo le istruzioni per l’uso.
Prima di usare l'amplificatore
• Leggere attentamente questo manuale
e gli avvisi di sicurezza prima di usare
l'amplificatore.
• Hughes & Kettner non è responsabile per
qualunque danno causato da un utilizzo
improprio dell'amplificatore.
• Prima di collegare l’apparecchio alla rete,
verificare che l’interruttore Power sia spento e
che la tensione elettrica locale corrisponda al
valore indicato sul retro.
• Un ultimo avviso prima di usare il Black Spirit
200 Floor: L'amplificatore produce alti livelli di
volume che possono danneggiare l’udito!
• Per evitare una sorpresa assordante, vi
consigliamo di assuefarvi a chiudere il
controllo volume della vostra chitarra collegata
al Black Spirit 200 Floor prima di accendere
l'amplificatore.
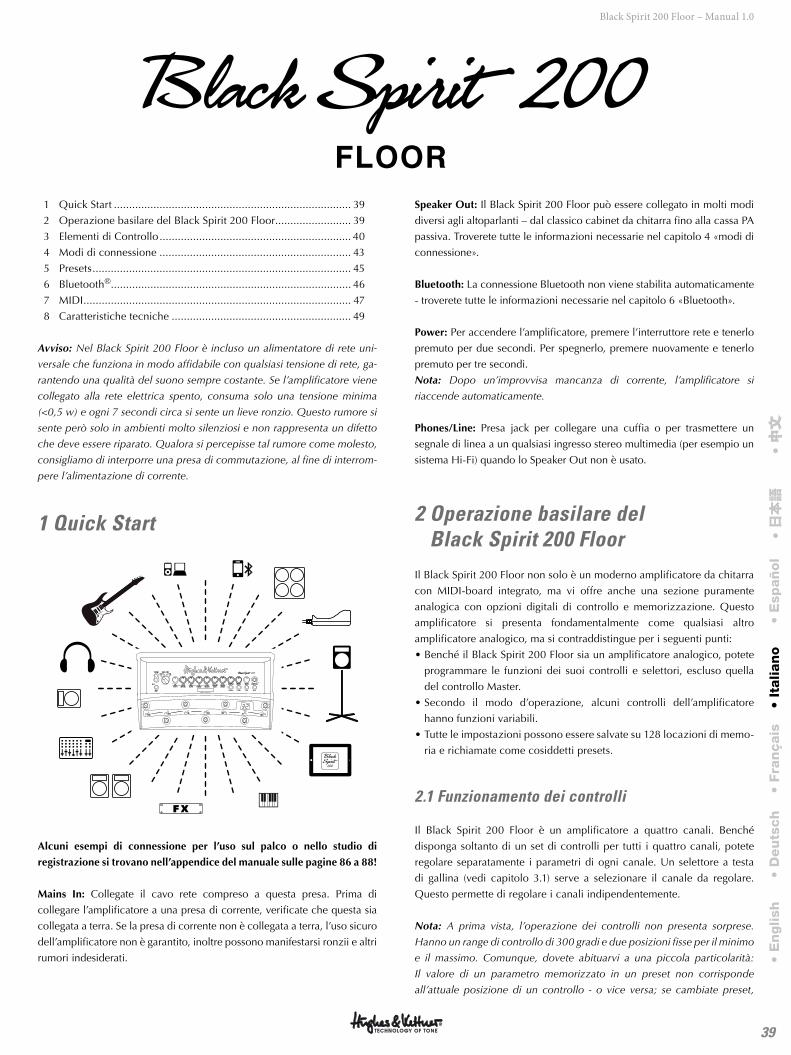
39
Black Spirit 200 Floor – Manual 1.0
1 Quick Start .............................................................................. 39
2 Operazione basilare del Black Spirit 200 Floor ......................... 39
3 Elementi di Controllo ............................................................... 40
4 Modi di connessione ............................................................... 43
5 Presets ..................................................................................... 45
6 Bluetooth® ............................................................................... 46
7 MIDI ........................................................................................ 47
8 Caratteristiche tecniche ........................................................... 49
Avviso: Nel Black Spirit 200 Floor è incluso un alimentatore di rete uni-
versale che funziona in modo affidabile con qualsiasi tensione di rete, ga-
rantendo una qualità del suono sempre costante. Se l’amplificatore viene
collegato alla rete elettrica spento, consuma solo una tensione minima
(<0,5 w) e ogni 7 secondi circa si sente un lieve ronzio. Questo rumore si
sente però solo in ambienti molto silenziosi e non rappresenta un difetto
che deve essere riparato. Qualora si percepisse tal rumore come molesto,
consigliamo di interporre una presa di commutazione, al fine di interrom-
pere l’alimentazione di corrente.
1 Quick Start
MASTERPRESENCERESONANCESAGGINGNOISE GATETREBLEMIDBASSVOLUME
50
1 8
2 7
3 64 5
GAINREVERBDLY LEVELFEEDBACKDLY T IMEMOD TYPEINTENSITY
CLEAN ULTRACRUNCH LEAD
POWER
PHONES / L INE
CAB TYPE
STOREFX LOOPFX ACCESSBOOST
PRE LOOP
OFF OFF1400 OFF
C
2
1T
F P
S P I R I T ™ T O N E G E N E R A T O R
Alcuni esempi di connessione per l’uso sul palco o nello studio di
registrazione si trovano nell’appendice del manuale sulle pagine 86 a 88!
Mains In: Collegate il cavo rete compreso a questa presa. Prima di
collegare l’amplificatore a una presa di corrente, verificate che questa sia
collegata a terra. Se la presa di corrente non è collegata a terra, l’uso sicuro
dell’amplificatore non è garantito, inoltre possono manifestarsi ronzii e altri
rumori indesiderati.
Speaker Out: Il Black Spirit 200 Floor può essere collegato in molti modi
diversi agli altoparlanti – dal classico cabinet da chitarra fino alla cassa PA
passiva. Troverete tutte le informazioni necessarie nel capitolo 4 «modi di
connessione».
Bluetooth: La connessione Bluetooth non viene stabilita automaticamente
- troverete tutte le informazioni necessarie nel capitolo 6 «Bluetooth».
Power: Per accendere l’amplificatore, premere l’interruttore rete e tenerlo
premuto per due secondi. Per spegnerlo, premere nuovamente e tenerlo
premuto per tre secondi.
Nota: Dopo un’improvvisa mancanza di corrente, l’amplificatore si
riaccende automaticamente.
Phones/Line: Presa jack per collegare una cuffia o per trasmettere un
segnale di linea a un qualsiasi ingresso stereo multimedia (per esempio un
sistema Hi-Fi) quando lo Speaker Out non è usato.
2 Operazione basilare del Black Spirit 200 Floor
Il Black Spirit 200 Floor non solo è un moderno amplificatore da chitarra
con MIDI-board integrato, ma vi offre anche una sezione puramente
analogica con opzioni digitali di controllo e memorizzazione. Questo
amplificatore si presenta fondamentalmente come qualsiasi altro
amplificatore analogico, ma si contraddistingue per i seguenti punti:
• Benché il Black Spirit 200 Floor sia un amplificatore analogico, potete
programmare le funzioni dei suoi controlli e selettori, escluso quella
del controllo Master.
• Secondo il modo d’operazione, alcuni controlli dell’amplificatore
hanno funzioni variabili.
• Tutte le impostazioni possono essere salvate su 128 locazioni di memo-
ria e richiamate come cosiddetti presets.
2.1 Funzionamento dei controlli
Il Black Spirit 200 Floor è un amplificatore a quattro canali. Benché
disponga soltanto di un set di controlli per tutti i quattro canali, potete
regolare separatamente i parametri di ogni canale. Un selettore a testa
di gallina (vedi capitolo 3.1) serve a selezionare il canale da regolare.
Questo permette di regolare i canali indipendentemente.
Nota: A prima vista, l’operazione dei controlli non presenta sorprese.
Hanno un range di controllo di 300 gradi e due posizioni fisse per il minimo
e il massimo. Comunque, dovete abituarvi a una piccola particolarità:
Il valore di un parametro memorizzato in un preset non corrisponde
all’attuale posizione di un controllo - o vice versa; se cambiate preset,
• E
nglish
• D
eu
tsch
• Fra
nçais
• It
alian
o•
Esp
añ
ol
• 日本語
• 中文
中文
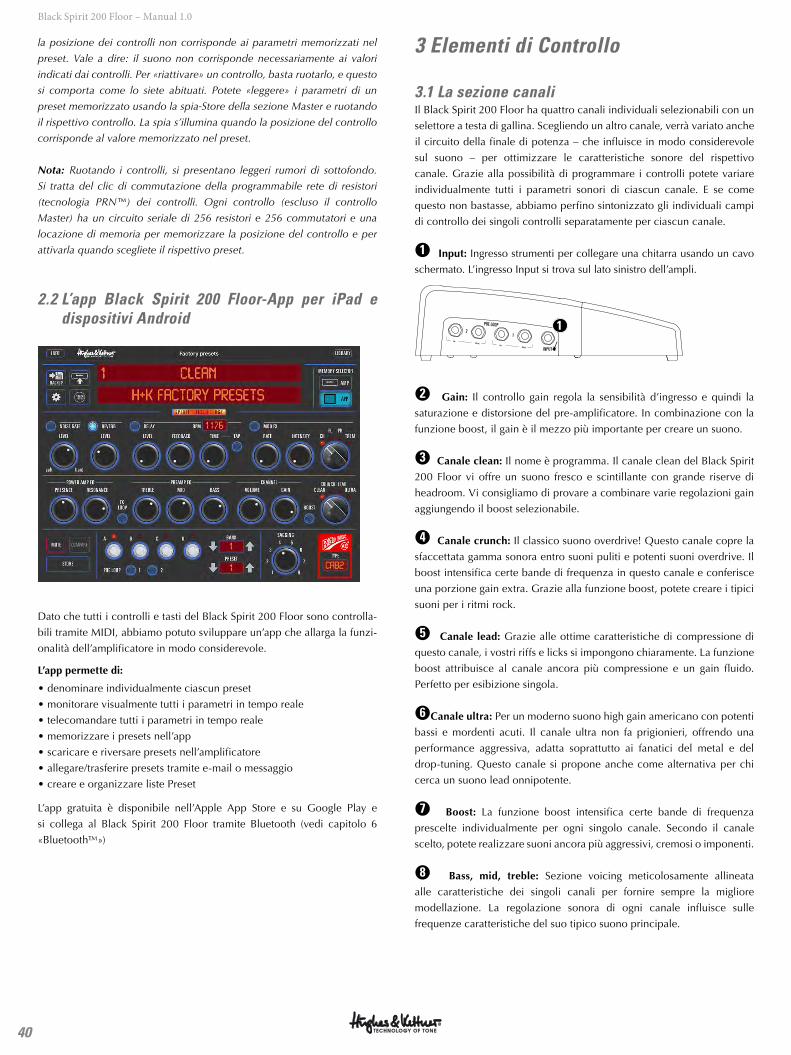
40
Black Spirit 200 Floor – Manual 1.0
la posizione dei controlli non corrisponde ai parametri memorizzati nel
preset. Vale a dire: il suono non corrisponde necessariamente ai valori
indicati dai controlli. Per «riattivare» un controllo, basta ruotarlo, e questo
si comporta come lo siete abituati. Potete «leggere» i parametri di un
preset memorizzato usando la spia-Store della sezione Master e ruotando
il rispettivo controllo. La spia s’illumina quando la posizione del controllo
corrisponde al valore memorizzato nel preset.
Nota: Ruotando i controlli, si presentano leggeri rumori di sottofondo.
Si tratta del clic di commutazione della programmabile rete di resistori
(tecnologia PRN™) dei controlli. Ogni controllo (escluso il controllo
Master) ha un circuito seriale di 256 resistori e 256 commutatori e una
locazione di memoria per memorizzare la posizione del controllo e per
attivarla quando scegliete il rispettivo preset.
2.2 L’app Black Spirit 200 Floor-App per iPad e dispositivi Android
Dato che tutti i controlli e tasti del Black Spirit 200 Floor sono controlla-
bili tramite MIDI, abbiamo potuto sviluppare un’app che allarga la funzi-
onalità dell’amplificatore in modo considerevole.
L’app permette di:
• denominare individualmente ciascun preset
• monitorare visualmente tutti i parametri in tempo reale
• telecomandare tutti i parametri in tempo reale
• memorizzare i presets nell’app
• scaricare e riversare presets nell’amplificatore
• allegare/trasferire presets tramite e-mail o messaggio
• creare e organizzare liste Preset
L’app gratuita è disponibile nell’Apple App Store e su Google Play e
si collega al Black Spirit 200 Floor tramite Bluetooth (vedi capitolo 6
«Bluetooth™»)
3 Elementi di Controllo
3.1 La sezione canaliIl Black Spirit 200 Floor ha quattro canali individuali selezionabili con un
selettore a testa di gallina. Scegliendo un altro canale, verrà variato anche
il circuito della finale di potenza – che influisce in modo considerevole
sul suono – per ottimizzare le caratteristiche sonore del rispettivo
canale. Grazie alla possibilità di programmare i controlli potete variare
individualmente tutti i parametri sonori di ciascun canale. E se come
questo non bastasse, abbiamo perfino sintonizzato gli individuali campi
di controllo dei singoli controlli separatamente per ciascun canale.
●1 Input: Ingresso strumenti per collegare una chitarra usando un cavo
schermato. L’ingresso Input si trova sul lato sinistro dell’ampli.
INPUT
PRE LOOP
12
1
●2 Gain: Il controllo gain regola la sensibilità d’ingresso e quindi la
saturazione e distorsione del pre-amplificatore. In combinazione con la
funzione boost, il gain è il mezzo più importante per creare un suono.
●3 Canale clean: Il nome è programma. Il canale clean del Black Spirit
200 Floor vi offre un suono fresco e scintillante con grande riserve di
headroom. Vi consigliamo di provare a combinare varie regolazioni gain
aggiungendo il boost selezionabile.
●4 Canale crunch: Il classico suono overdrive! Questo canale copre la
sfaccettata gamma sonora entro suoni puliti e potenti suoni overdrive. Il
boost intensifica certe bande di frequenza in questo canale e conferisce
una porzione gain extra. Grazie alla funzione boost, potete creare i tipici
suoni per i ritmi rock.
●5 Canale lead: Grazie alle ottime caratteristiche di compressione di
questo canale, i vostri riffs e licks si impongono chiaramente. La funzione
boost attribuisce al canale ancora più compressione e un gain fluido.
Perfetto per esibizione singola.
●6 Canale ultra: Per un moderno suono high gain americano con potenti
bassi e mordenti acuti. Il canale ultra non fa prigionieri, offrendo una
performance aggressiva, adatta soprattutto ai fanatici del metal e del
drop-tuning. Questo canale si propone anche come alternativa per chi
cerca un suono lead onnipotente.
●7 Boost: La funzione boost intensifica certe bande di frequenza
prescelte individualmente per ogni singolo canale. Secondo il canale
scelto, potete realizzare suoni ancora più aggressivi, cremosi o imponenti.
●8 Bass, mid, treble: Sezione voicing meticolosamente allineata
alle caratteristiche dei singoli canali per fornire sempre la migliore
modellazione. La regolazione sonora di ogni canale influisce sulle
frequenze caratteristiche del suo tipico suono principale.
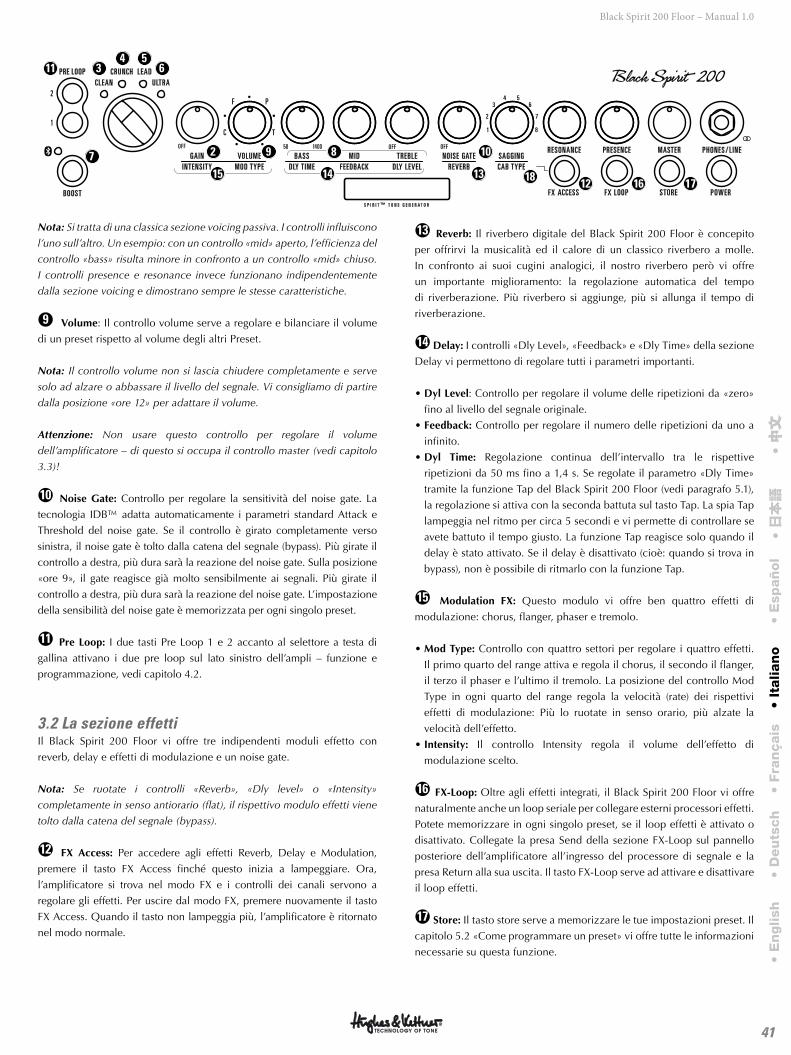
41
Black Spirit 200 Floor – Manual 1.0
Nota: Si tratta di una classica sezione voicing passiva. I controlli influiscono
l’uno sull’altro. Un esempio: con un controllo «mid» aperto, l’efficienza del
controllo «bass» risulta minore in confronto a un controllo «mid» chiuso.
I controlli presence e resonance invece funzionano indipendentemente
dalla sezione voicing e dimostrano sempre le stesse caratteristiche.
●9 Volume: Il controllo volume serve a regolare e bilanciare il volume
di un preset rispetto al volume degli altri Preset.
Nota: Il controllo volume non si lascia chiudere completamente e serve
solo ad alzare o abbassare il livello del segnale. Vi consigliamo di partire
dalla posizione «ore 12» per adattare il volume.
Attenzione: Non usare questo controllo per regolare il volume
dell’amplificatore – di questo si occupa il controllo master (vedi capitolo
3.3)!
●10 Noise Gate: Controllo per regolare la sensitività del noise gate. La
tecnologia IDB™ adatta automaticamente i parametri standard Attack e
Threshold del noise gate. Se il controllo è girato completamente verso
sinistra, il noise gate è tolto dalla catena del segnale (bypass). Più girate il
controllo a destra, più dura sarà la reazione del noise gate. Sulla posizione
«ore 9», il gate reagisce già molto sensibilmente ai segnali. Più girate il
controllo a destra, più dura sarà la reazione del noise gate. L’impostazione
della sensibilità del noise gate è memorizzata per ogni singolo preset.
●11 Pre Loop: I due tasti Pre Loop 1 e 2 accanto al selettore a testa di
gallina attivano i due pre loop sul lato sinistro dell’ampli – funzione e
programmazione, vedi capitolo 4.2.
3.2 La sezione effettiIl Black Spirit 200 Floor vi offre tre indipendenti moduli effetto con
reverb, delay e effetti di modulazione e un noise gate.
Nota: Se ruotate i controlli «Reverb», «Dly level» o «Intensity»
completamente in senso antiorario (flat), il rispettivo modulo effetti viene
tolto dalla catena del segnale (bypass).
●12 FX Access: Per accedere agli effetti Reverb, Delay e Modulation,
premere il tasto FX Access finché questo inizia a lampeggiare. Ora,
l’amplificatore si trova nel modo FX e i controlli dei canali servono a
regolare gli effetti. Per uscire dal modo FX, premere nuovamente il tasto
FX Access. Quando il tasto non lampeggia più, l’amplificatore è ritornato
nel modo normale.
●13 Reverb: Il riverbero digitale del Black Spirit 200 Floor è concepito
per offrirvi la musicalità ed il calore di un classico riverbero a molle.
In confronto ai suoi cugini analogici, il nostro riverbero però vi offre
un importante miglioramento: la regolazione automatica del tempo
di riverberazione. Più riverbero si aggiunge, più si allunga il tempo di
riverberazione.
●14 Delay: I controlli «Dly Level», «Feedback» e «Dly Time» della sezione
Delay vi permettono di regolare tutti i parametri importanti.
• Dyl Level: Controllo per regolare il volume delle ripetizioni da «zero»
fino al livello del segnale originale.
• Feedback: Controllo per regolare il numero delle ripetizioni da uno a
infinito.
• Dyl Time: Regolazione continua dell’intervallo tra le rispettive
ripetizioni da 50 ms fino a 1,4 s. Se regolate il parametro «Dly Time»
tramite la funzione Tap del Black Spirit 200 Floor (vedi paragrafo 5.1),
la regolazione si attiva con la seconda battuta sul tasto Tap. La spia Tap
lampeggia nel ritmo per circa 5 secondi e vi permette di controllare se
avete battuto il tempo giusto. La funzione Tap reagisce solo quando il
delay è stato attivato. Se il delay è disattivato (cioè: quando si trova in
bypass), non è possibile di ritmarlo con la funzione Tap.
●15 Modulation FX: Questo modulo vi offre ben quattro effetti di
modulazione: chorus, flanger, phaser e tremolo.
• Mod Type: Controllo con quattro settori per regolare i quattro effetti.
Il primo quarto del range attiva e regola il chorus, il secondo il flanger,
il terzo il phaser e l’ultimo il tremolo. La posizione del controllo Mod
Type in ogni quarto del range regola la velocità (rate) dei rispettivi
effetti di modulazione: Più lo ruotate in senso orario, più alzate la
velocità dell’effetto.
• Intensity: Il controllo Intensity regola il volume dell’effetto di
modulazione scelto.
●16 FX-Loop: Oltre agli effetti integrati, il Black Spirit 200 Floor vi offre
naturalmente anche un loop seriale per collegare esterni processori effetti.
Potete memorizzare in ogni singolo preset, se il loop effetti è attivato o
disattivato. Collegate la presa Send della sezione FX-Loop sul pannello
posteriore dell’amplificatore all’ingresso del processore di segnale e la
presa Return alla sua uscita. Il tasto FX-Loop serve ad attivare e disattivare
il loop effetti.
●17 Store: Il tasto store serve a memorizzare le tue impostazioni preset. Il
capitolo 5.2 «Come programmare un preset» vi offre tutte le informazioni
necessarie su questa funzione. • E
nglish
• D
eu
tsch
• Fra
nçais
• It
alian
o•
Esp
añ
ol
• 日本語
• 中文
中文
MASTERPRESENCERESONANCESAGGINGNOISE GATETREBLEMIDBASSVOLUME
50
1 8
2 7
3 64 5
GAINREVERBDLY LEVELFEEDBACKDLY T IMEMOD TYPEINTENSITY
CLEAN ULTRACRUNCH LEAD
POWER
PHONES / L INE
CAB TYPE
STOREFX LOOPFX ACCESSBOOST
PRE LOOP
OFF OFF1400 OFF
C
2
1T
F P
S P I R I T ™ T O N E G E N E R A T O R
2 9
3 64 5
7 8 10
12
11
16131415 18 17
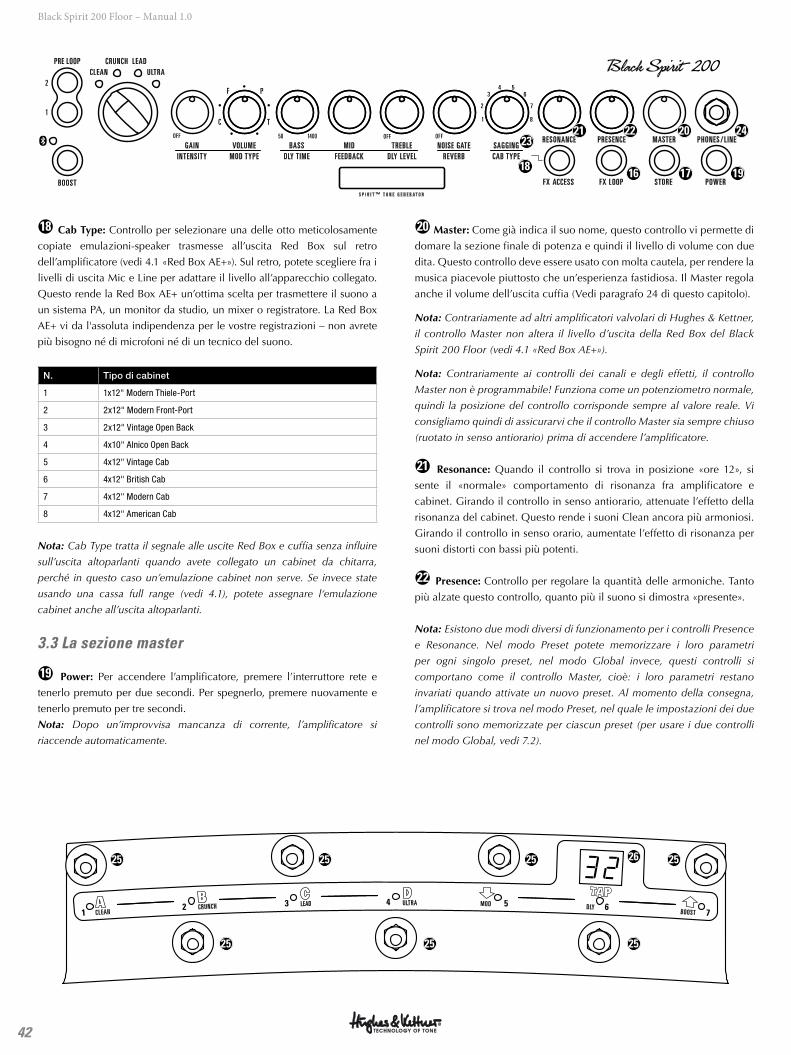
42
Black Spirit 200 Floor – Manual 1.0
●18 Cab Type: Controllo per selezionare una delle otto meticolosamente
copiate emulazioni-speaker trasmesse all’uscita Red Box sul retro
dell’amplificatore (vedi 4.1 «Red Box AE+»). Sul retro, potete scegliere fra i
livelli di uscita Mic e Line per adattare il livello all’apparecchio collegato.
Questo rende la Red Box AE+ un’ottima scelta per trasmettere il suono a
un sistema PA, un monitor da studio, un mixer o registratore. La Red Box
AE+ vi da l'assoluta indipendenza per le vostre registrazioni – non avrete
più bisogno né di microfoni né di un tecnico del suono.
N. Tipo di cabinet
1 1x12" Modern Thiele-Port
2 2x12" Modern Front-Port
3 2x12" Vintage Open Back
4 4x10" Alnico Open Back
5 4x12" Vintage Cab
6 4x12" British Cab
7 4x12" Modern Cab
8 4x12" American Cab
Nota: Cab Type tratta il segnale alle uscite Red Box e cuffia senza influire
sull’uscita altoparlanti quando avete collegato un cabinet da chitarra,
perché in questo caso un’emulazione cabinet non serve. Se invece state
usando una cassa full range (vedi 4.1), potete assegnare l‘emulazione
cabinet anche all’uscita altoparlanti.
3.3 La sezione master
●19 Power: Per accendere l’amplificatore, premere l’interruttore rete e
tenerlo premuto per due secondi. Per spegnerlo, premere nuovamente e
tenerlo premuto per tre secondi.
Nota: Dopo un’improvvisa mancanza di corrente, l’amplificatore si
riaccende automaticamente.
●20 Master: Come già indica il suo nome, questo controllo vi permette di
domare la sezione finale di potenza e quindi il livello di volume con due
dita. Questo controllo deve essere usato con molta cautela, per rendere la
musica piacevole piuttosto che un’esperienza fastidiosa. Il Master regola
anche il volume dell’uscita cuffia (Vedi paragrafo 24 di questo capitolo).
Nota: Contrariamente ad altri amplificatori valvolari di Hughes & Kettner,
il controllo Master non altera il livello d’uscita della Red Box del Black
Spirit 200 Floor (vedi 4.1 «Red Box AE+»).
Nota: Contrariamente ai controlli dei canali e degli effetti, il controllo
Master non è programmabile! Funziona come un potenziometro normale,
quindi la posizione del controllo corrisponde sempre al valore reale. Vi
consigliamo quindi di assicurarvi che il controllo Master sia sempre chiuso
(ruotato in senso antiorario) prima di accendere l’amplificatore.
●21 Resonance: Quando il controllo si trova in posizione «ore 12», si
sente il «normale» comportamento di risonanza fra amplificatore e
cabinet. Girando il controllo in senso antiorario, attenuate l’effetto della
risonanza del cabinet. Questo rende i suoni Clean ancora più armoniosi.
Girando il controllo in senso orario, aumentate l’effetto di risonanza per
suoni distorti con bassi più potenti.
●22 Presence: Controllo per regolare la quantità delle armoniche. Tanto
più alzate questo controllo, quanto più il suono si dimostra «presente».
Nota: Esistono due modi diversi di funzionamento per i controlli Presence
e Resonance. Nel modo Preset potete memorizzare i loro parametri
per ogni singolo preset, nel modo Global invece, questi controlli si
comportano come il controllo Master, cioè: i loro parametri restano
invariati quando attivate un nuovo preset. Al momento della consegna,
l’amplificatore si trova nel modo Preset, nel quale le impostazioni dei due
controlli sono memorizzate per ciascun preset (per usare i due controlli
nel modo Global, vedi 7.2).
MASTERPRESENCERESONANCESAGGINGNOISE GATETREBLEMIDBASSVOLUME
50
1 8
2 7
3 64 5
GAINREVERBDLY LEVELFEEDBACKDLY T IMEMOD TYPEINTENSITY
CLEAN ULTRACRUNCH LEAD
POWER
PHONES / L INE
CAB TYPE
STOREFX LOOPFX ACCESSBOOST
PRE LOOP
OFF OFF1400 OFF
C
2
1T
F P
S P I R I T ™ T O N E G E N E R A T O R
18
2021 22 2423
16 17 19
25
25 25 25
2625 25 25
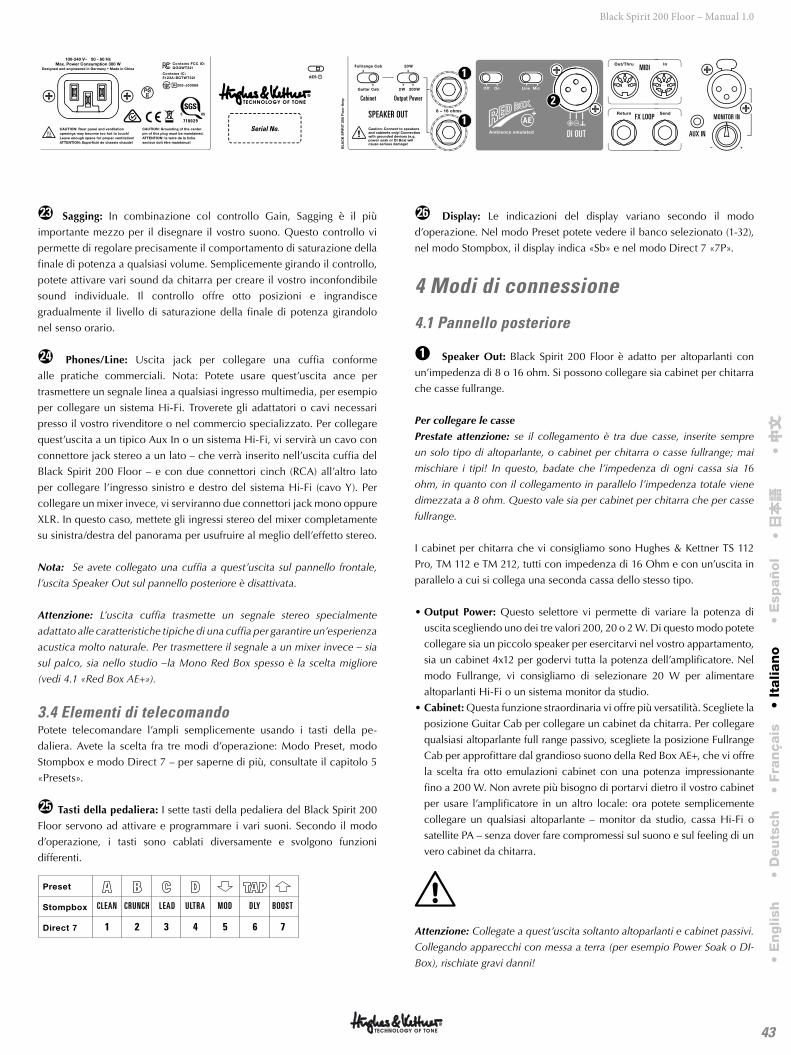
43
Black Spirit 200 Floor – Manual 1.0
●23 Sagging: In combinazione col controllo Gain, Sagging è il più
importante mezzo per il disegnare il vostro suono. Questo controllo vi
permette di regolare precisamente il comportamento di saturazione della
finale di potenza a qualsiasi volume. Semplicemente girando il controllo,
potete attivare vari sound da chitarra per creare il vostro inconfondibile
sound individuale. Il controllo offre otto posizioni e ingrandisce
gradualmente il livello di saturazione della finale di potenza girandolo
nel senso orario.
●24 Phones/Line: Uscita jack per collegare una cuffia conforme
alle pratiche commerciali. Nota: Potete usare quest’uscita ance per
trasmettere un segnale linea a qualsiasi ingresso multimedia, per esempio
per collegare un sistema Hi-Fi. Troverete gli adattatori o cavi necessari
presso il vostro rivenditore o nel commercio specializzato. Per collegare
quest’uscita a un tipico Aux In o un sistema Hi-Fi, vi servirà un cavo con
connettore jack stereo a un lato – che verrà inserito nell’uscita cuffia del
Black Spirit 200 Floor – e con due connettori cinch (RCA) all’altro lato
per collegare l’ingresso sinistro e destro del sistema Hi-Fi (cavo Y). Per
collegare un mixer invece, vi serviranno due connettori jack mono oppure
XLR. In questo caso, mettete gli ingressi stereo del mixer completamente
su sinistra/destra del panorama per usufruire al meglio dell’effetto stereo.
Nota: Se avete collegato una cuffia a quest’uscita sul pannello frontale,
l’uscita Speaker Out sul pannello posteriore è disattivata.
Attenzione: L’uscita cuffia trasmette un segnale stereo specialmente
adattato alle caratteristiche tipiche di una cuffia per garantire un’esperienza
acustica molto naturale. Per trasmettere il segnale a un mixer invece – sia
sul palco, sia nello studio –la Mono Red Box spesso è la scelta migliore
(vedi 4.1 «Red Box AE+»).
3.4 Elementi di telecomando Potete telecomandare l’ampli semplicemente usando i tasti della pe-
daliera. Avete la scelta fra tre modi d’operazione: Modo Preset, modo
Stompbox e modo Direct 7 – per saperne di più, consultate il capitolo 5
«Presets».
●25 Tasti della pedaliera: I sette tasti della pedaliera del Black Spirit 200
Floor servono ad attivare e programmare i vari suoni. Secondo il modo
d’operazione, i tasti sono cablati diversamente e svolgono funzioni
differenti.
1
CLEAN
2
CRUNCH
3
LEAD
4
ULTRA
6
DLY
7
BOOST
5
MOD
●26 Display: Le indicazioni del display variano secondo il modo
d’operazione. Nel modo Preset potete vedere il banco selezionato (1-32),
nel modo Stompbox, il display indica «Sb» e nel modo Direct 7 «7P».
4 Modi di connessione
4.1 Pannello posteriore
●1 Speaker Out: Black Spirit 200 Floor è adatto per altoparlanti con
un’impedenza di 8 o 16 ohm. Si possono collegare sia cabinet per chitarra
che casse fullrange.
Per collegare le casse
Prestate attenzione: se il collegamento è tra due casse, inserite sempre
un solo tipo di altoparlante, o cabinet per chitarra o casse fullrange; mai
mischiare i tipi! In questo, badate che l’impedenza di ogni cassa sia 16
ohm, in quanto con il collegamento in parallelo l’impedenza totale viene
dimezzata a 8 ohm. Questo vale sia per cabinet per chitarra che per casse
fullrange.
I cabinet per chitarra che vi consigliamo sono Hughes & Kettner TS 112
Pro, TM 112 e TM 212, tutti con impedenza di 16 Ohm e con un’uscita in
parallelo a cui si collega una seconda cassa dello stesso tipo.
• Output Power: Questo selettore vi permette di variare la potenza di
uscita scegliendo uno dei tre valori 200, 20 o 2 W. Di questo modo potete
collegare sia un piccolo speaker per esercitarvi nel vostro appartamento,
sia un cabinet 4x12 per godervi tutta la potenza dell’amplificatore. Nel
modo Fullrange, vi consigliamo di selezionare 20 W per alimentare
altoparlanti Hi-Fi o un sistema monitor da studio.
• Cabinet: Questa funzione straordinaria vi offre più versatilità. Scegliete la
posizione Guitar Cab per collegare un cabinet da chitarra. Per collegare
qualsiasi altoparlante full range passivo, scegliete la posizione Fullrange
Cab per approfittare dal grandioso suono della Red Box AE+, che vi offre
la scelta fra otto emulazioni cabinet con una potenza impressionante
fino a 200 W. Non avrete più bisogno di portarvi dietro il vostro cabinet
per usare l’amplificatore in un altro locale: ora potete semplicemente
collegare un qualsiasi altoparlante – monitor da studio, cassa Hi-Fi o
satellite PA – senza dover fare compromessi sul suono e sul feeling di un
vero cabinet da chitarra.
Attenzione: Collegate a quest’uscita soltanto altoparlanti e cabinet passivi.
Collegando apparecchi con messa a terra (per esempio Power Soak o DI-
Box), rischiate gravi danni! • E
nglish
• D
eu
tsch
• Fra
nçais
• It
alian
o•
Esp
añ
ol
• 日本語
• 中文
中文
Serial No.
Output Power
SPEAKER OUT
MIDI
FX LOOP
AUX IN
Cabinet
MONITOR IN
DI OUT
AE
1
1
2
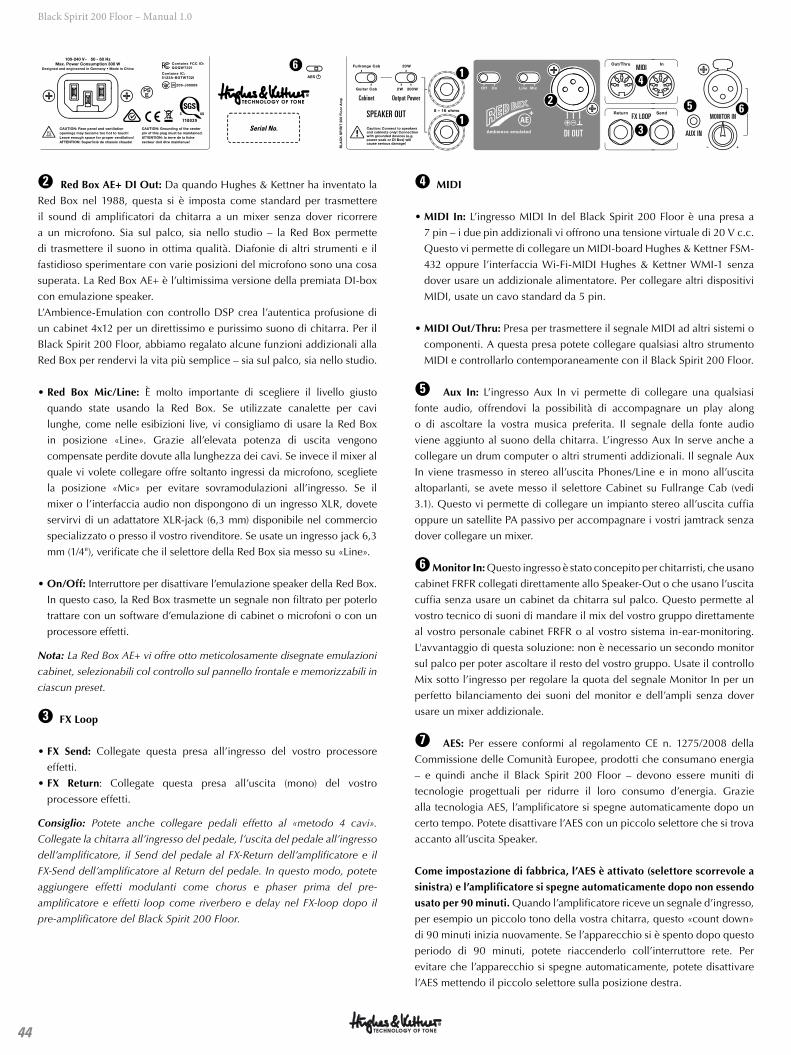
44
Black Spirit 200 Floor – Manual 1.0
●2 Red Box AE+ DI Out: Da quando Hughes & Kettner ha inventato la
Red Box nel 1988, questa si è imposta come standard per trasmettere
il sound di amplificatori da chitarra a un mixer senza dover ricorrere
a un microfono. Sia sul palco, sia nello studio – la Red Box permette
di trasmettere il suono in ottima qualità. Diafonie di altri strumenti e il
fastidioso sperimentare con varie posizioni del microfono sono una cosa
superata. La Red Box AE+ è l’ultimissima versione della premiata DI-box
con emulazione speaker.
L’Ambience-Emulation con controllo DSP crea l’autentica profusione di
un cabinet 4x12 per un direttissimo e purissimo suono di chitarra. Per il
Black Spirit 200 Floor, abbiamo regalato alcune funzioni addizionali alla
Red Box per rendervi la vita più semplice – sia sul palco, sia nello studio.
• Red Box Mic/Line: È molto importante di scegliere il livello giusto
quando state usando la Red Box. Se utilizzate canalette per cavi
lunghe, come nelle esibizioni live, vi consigliamo di usare la Red Box
in posizione «Line». Grazie all’elevata potenza di uscita vengono
compensate perdite dovute alla lunghezza dei cavi. Se invece il mixer al
quale vi volete collegare offre soltanto ingressi da microfono, scegliete
la posizione «Mic» per evitare sovramodulazioni all’ingresso. Se il
mixer o l’interfaccia audio non dispongono di un ingresso XLR, dovete
servirvi di un adattatore XLR-jack (6,3 mm) disponibile nel commercio
specializzato o presso il vostro rivenditore. Se usate un ingresso jack 6,3
mm (1/4"), verificate che il selettore della Red Box sia messo su «Line».
• On/Off: Interruttore per disattivare l’emulazione speaker della Red Box.
In questo caso, la Red Box trasmette un segnale non filtrato per poterlo
trattare con un software d’emulazione di cabinet o microfoni o con un
processore effetti.
Nota: La Red Box AE+ vi offre otto meticolosamente disegnate emulazioni
cabinet, selezionabili col controllo sul pannello frontale e memorizzabili in
ciascun preset.
●3 FX Loop
• FX Send: Collegate questa presa all’ingresso del vostro processore
effetti.
• FX Return: Collegate questa presa all’uscita (mono) del vostro
processore effetti.
Consiglio: Potete anche collegare pedali effetto al «metodo 4 cavi».
Collegate la chitarra all’ingresso del pedale, l’uscita del pedale all’ingresso
dell’amplificatore, il Send del pedale al FX-Return dell’amplificatore e il
FX-Send dell’amplificatore al Return del pedale. In questo modo, potete
aggiungere effetti modulanti come chorus e phaser prima del pre-
amplificatore e effetti loop come riverbero e delay nel FX-loop dopo il
pre-amplificatore del Black Spirit 200 Floor.
●4 MIDI
• MIDI In: L’ingresso MIDI In del Black Spirit 200 Floor è una presa a
7 pin – i due pin addizionali vi offrono una tensione virtuale di 20 V c.c.
Questo vi permette di collegare un MIDI-board Hughes & Kettner FSM-
432 oppure l’interfaccia Wi-Fi-MIDI Hughes & Kettner WMI-1 senza
dover usare un addizionale alimentatore. Per collegare altri dispositivi
MIDI, usate un cavo standard da 5 pin.
• MIDI Out/Thru: Presa per trasmettere il segnale MIDI ad altri sistemi o
componenti. A questa presa potete collegare qualsiasi altro strumento
MIDI e controllarlo contemporaneamente con il Black Spirit 200 Floor.
●5 Aux In: L’ingresso Aux In vi permette di collegare una qualsiasi
fonte audio, offrendovi la possibilità di accompagnare un play along
o di ascoltare la vostra musica preferita. Il segnale della fonte audio
viene aggiunto al suono della chitarra. L’ingresso Aux In serve anche a
collegare un drum computer o altri strumenti addizionali. Il segnale Aux
In viene trasmesso in stereo all’uscita Phones/Line e in mono all’uscita
altoparlanti, se avete messo il selettore Cabinet su Fullrange Cab (vedi
3.1). Questo vi permette di collegare un impianto stereo all’uscita cuffia
oppure un satellite PA passivo per accompagnare i vostri jamtrack senza
dover collegare un mixer.
●6 Monitor In: Questo ingresso è stato concepito per chitarristi, che usano
cabinet FRFR collegati direttamente allo Speaker-Out o che usano l’uscita
cuffia senza usare un cabinet da chitarra sul palco. Questo permette al
vostro tecnico di suoni di mandare il mix del vostro gruppo direttamente
al vostro personale cabinet FRFR o al vostro sistema in-ear-monitoring.
L'avvantaggio di questa soluzione: non è necessario un secondo monitor
sul palco per poter ascoltare il resto del vostro gruppo. Usate il controllo
Mix sotto l’ingresso per regolare la quota del segnale Monitor In per un
perfetto bilanciamento dei suoni del monitor e dell’ampli senza dover
usare un mixer addizionale.
●7 AES: Per essere conformi al regolamento CE n. 1275/2008 della
Commissione delle Comunità Europee, prodotti che consumano energia
– e quindi anche il Black Spirit 200 Floor – devono essere muniti di
tecnologie progettuali per ridurre il loro consumo d’energia. Grazie
alla tecnologia AES, l’amplificatore si spegne automaticamente dopo un
certo tempo. Potete disattivare l’AES con un piccolo selettore che si trova
accanto all’uscita Speaker.
Come impostazione di fabbrica, l’AES è attivato (selettore scorrevole a
sinistra) e l’amplificatore si spegne automaticamente dopo non essendo
usato per 90 minuti. Quando l’amplificatore riceve un segnale d’ingresso,
per esempio un piccolo tono della vostra chitarra, questo «count down»
di 90 minuti inizia nuovamente. Se l’apparecchio si è spento dopo questo
periodo di 90 minuti, potete riaccenderlo coll’interruttore rete. Per
evitare che l’apparecchio si spegne automaticamente, potete disattivare
l’AES mettendo il piccolo selettore sulla posizione destra.
Serial No.
Output Power
SPEAKER OUT
MIDI
FX LOOP
AUX IN
Cabinet
MONITOR IN
DI OUT
AE
1
1
2
3
4
5 6
6
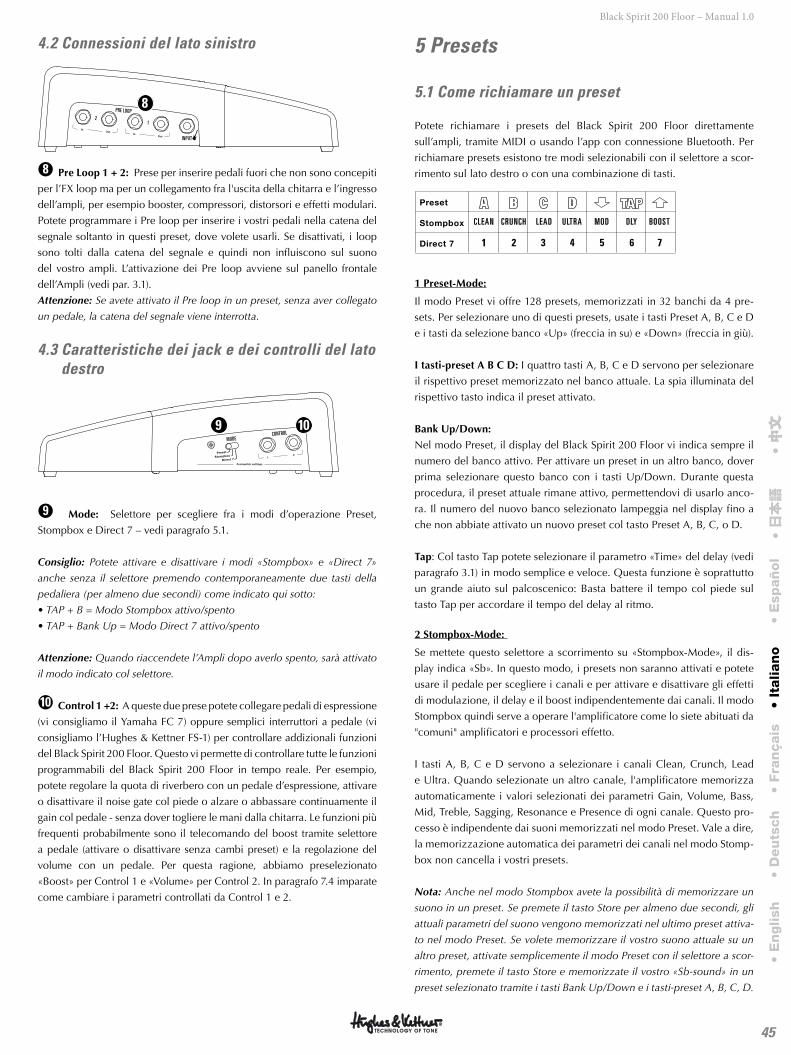
45
Black Spirit 200 Floor – Manual 1.0
4.2 Connessioni del lato sinistro
INPUT
PRE LOOP
12
8
●8 Pre Loop 1 + 2: Prese per inserire pedali fuori che non sono concepiti
per l’FX loop ma per un collegamento fra l'uscita della chitarra e l’ingresso
dell’ampli, per esempio booster, compressori, distorsori e effetti modulari.
Potete programmare i Pre loop per inserire i vostri pedali nella catena del
segnale soltanto in questi preset, dove volete usarli. Se disattivati, i loop
sono tolti dalla catena del segnale e quindi non influiscono sul suono
del vostro ampli. L’attivazione dei Pre loop avviene sul panello frontale
dell’Ampli (vedi par. 3.1).
Attenzione: Se avete attivato il Pre loop in un preset, senza aver collegato
un pedale, la catena del segnale viene interrotta.
4.3 Caratteristiche dei jack e dei controlli del lato destro
CONTROLMODE
9 10
●9 Mode: Selettore per scegliere fra i modi d’operazione Preset,
Stompbox e Direct 7 – vedi paragrafo 5.1.
Consiglio: Potete attivare e disattivare i modi «Stompbox» e «Direct 7»
anche senza il selettore premendo contemporaneamente due tasti della
pedaliera (per almeno due secondi) come indicato qui sotto:
• TAP + B = Modo Stompbox attivo/spento
• TAP + Bank Up = Modo Direct 7 attivo/spento
Attenzione: Quando riaccendete l’Ampli dopo averlo spento, sarà attivato
il modo indicato col selettore.
●10 Control 1 +2: A queste due prese potete collegare pedali di espressione
(vi consigliamo il Yamaha FC 7) oppure semplici interruttori a pedale (vi
consigliamo l’Hughes & Kettner FS-1) per controllare addizionali funzioni
del Black Spirit 200 Floor. Questo vi permette di controllare tutte le funzioni
programmabili del Black Spirit 200 Floor in tempo reale. Per esempio,
potete regolare la quota di riverbero con un pedale d’espressione, attivare
o disattivare il noise gate col piede o alzare o abbassare continuamente il
gain col pedale - senza dover togliere le mani dalla chitarra. Le funzioni più
frequenti probabilmente sono il telecomando del boost tramite selettore
a pedale (attivare o disattivare senza cambi preset) e la regolazione del
volume con un pedale. Per questa ragione, abbiamo preselezionato
«Boost» per Control 1 e «Volume» per Control 2. In paragrafo 7.4 imparate
come cambiare i parametri controllati da Control 1 e 2.
5 Presets
5.1 Come richiamare un preset
Potete richiamare i presets del Black Spirit 200 Floor direttamente
sull’ampli, tramite MIDI o usando l’app con connessione Bluetooth. Per
richiamare presets esistono tre modi selezionabili con il selettore a scor-
rimento sul lato destro o con una combinazione di tasti.
1
CLEAN
2
CRUNCH
3
LEAD
4
ULTRA
6
DLY
7
BOOST
5
MOD
1 Preset-Mode:
Il modo Preset vi offre 128 presets, memorizzati in 32 banchi da 4 pre-
sets. Per selezionare uno di questi presets, usate i tasti Preset A, B, C e D
e i tasti da selezione banco «Up» (freccia in su) e «Down» (freccia in giù).
I tasti-preset A B C D: I quattro tasti A, B, C e D servono per selezionare
il rispettivo preset memorizzato nel banco attuale. La spia illuminata del
rispettivo tasto indica il preset attivato.
Bank Up/Down:
Nel modo Preset, il display del Black Spirit 200 Floor vi indica sempre il
numero del banco attivo. Per attivare un preset in un altro banco, dover
prima selezionare questo banco con i tasti Up/Down. Durante questa
procedura, il preset attuale rimane attivo, permettendovi di usarlo anco-
ra. Il numero del nuovo banco selezionato lampeggia nel display fino a
che non abbiate attivato un nuovo preset col tasto Preset A, B, C, o D.
Tap: Col tasto Tap potete selezionare il parametro «Time» del delay (vedi
paragrafo 3.1) in modo semplice e veloce. Questa funzione è soprattutto
un grande aiuto sul palcoscenico: Basta battere il tempo col piede sul
tasto Tap per accordare il tempo del delay al ritmo.
2 Stompbox-Mode:
Se mettete questo selettore a scorrimento su «Stompbox-Mode», il dis-
play indica «Sb». In questo modo, i presets non saranno attivati e potete
usare il pedale per scegliere i canali e per attivare e disattivare gli effetti
di modulazione, il delay e il boost indipendentemente dai canali. Il modo
Stompbox quindi serve a operare l'amplificatore come lo siete abituati da
"comuni" amplificatori e processori effetto.
I tasti A, B, C e D servono a selezionare i canali Clean, Crunch, Lead
e Ultra. Quando selezionate un altro canale, l'amplificatore memorizza
automaticamente i valori selezionati dei parametri Gain, Volume, Bass,
Mid, Treble, Sagging, Resonance e Presence di ogni canale. Questo pro-
cesso è indipendente dai suoni memorizzati nel modo Preset. Vale a dire,
la memorizzazione automatica dei parametri dei canali nel modo Stomp-
box non cancella i vostri presets.
Nota: Anche nel modo Stompbox avete la possibilità di memorizzare un
suono in un preset. Se premete il tasto Store per almeno due secondi, gli
attuali parametri del suono vengono memorizzati nel ultimo preset attiva-
to nel modo Preset. Se volete memorizzare il vostro suono attuale su un
altro preset, attivate semplicemente il modo Preset con il selettore a scor-
rimento, premete il tasto Store e memorizzate il vostro «Sb-sound» in un
preset selezionato tramite i tasti Bank Up/Down e i tasti-preset A, B, C, D.
• E
nglish
• D
eu
tsch
• Fra
nçais
• It
alian
o•
Esp
añ
ol
• 日本語
• 中文
中文
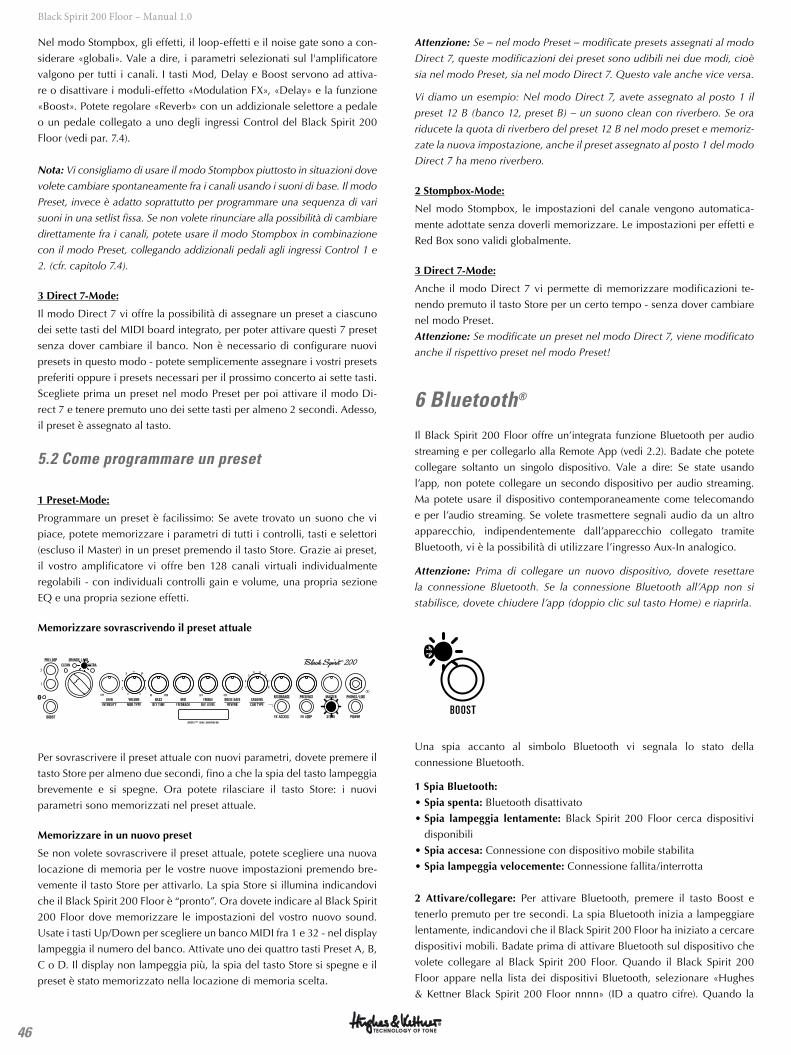
46
Black Spirit 200 Floor – Manual 1.0
Nel modo Stompbox, gli effetti, il loop-effetti e il noise gate sono a con-
siderare «globali». Vale a dire, i parametri selezionati sul l'amplificatore
valgono per tutti i canali. I tasti Mod, Delay e Boost servono ad attiva-
re o disattivare i moduli-effetto «Modulation FX», «Delay» e la funzione
«Boost». Potete regolare «Reverb» con un addizionale selettore a pedale
o un pedale collegato a uno degli ingressi Control del Black Spirit 200
Floor (vedi par. 7.4).
Nota: Vi consigliamo di usare il modo Stompbox piuttosto in situazioni dove
volete cambiare spontaneamente fra i canali usando i suoni di base. Il modo
Preset, invece è adatto soprattutto per programmare una sequenza di vari
suoni in una setlist fissa. Se non volete rinunciare alla possibilità di cambiare
direttamente fra i canali, potete usare il modo Stompbox in combinazione
con il modo Preset, collegando addizionali pedali agli ingressi Control 1 e
2. (cfr. capitolo 7.4).
3 Direct 7-Mode:
Il modo Direct 7 vi offre la possibilità di assegnare un preset a ciascuno
dei sette tasti del MIDI board integrato, per poter attivare questi 7 preset
senza dover cambiare il banco. Non è necessario di configurare nuovi
presets in questo modo - potete semplicemente assegnare i vostri presets
preferiti oppure i presets necessari per il prossimo concerto ai sette tasti.
Scegliete prima un preset nel modo Preset per poi attivare il modo Di-
rect 7 e tenere premuto uno dei sette tasti per almeno 2 secondi. Adesso,
il preset è assegnato al tasto.
5.2 Come programmare un preset
1 Preset-Mode:
Programmare un preset è facilissimo: Se avete trovato un suono che vi
piace, potete memorizzare i parametri di tutti i controlli, tasti e selettori
(escluso il Master) in un preset premendo il tasto Store. Grazie ai preset,
il vostro amplificatore vi offre ben 128 canali virtuali individualmente
regolabili - con individuali controlli gain e volume, una propria sezione
EQ e una propria sezione effetti.
Memorizzare sovrascrivendo il preset attuale
MASTERPRESENCERESONANCESAGGINGNOISE GATETREBLEMIDBASSVOLUME
50
1 8
2 7
3 64 5
GAINREVERBDLY LEVELFEEDBACKDLY T IMEMOD TYPEINTENSITY
CLEAN ULTRACRUNCH LEAD
POWER
PHONES / L INE
CAB TYPE
STOREFX LOOPFX ACCESSBOOST
PRE LOOP
OFF OFF1400 OFF
C
2
1T
F P
S P I R I T ™ T O N E G E N E R A T O R
Per sovrascrivere il preset attuale con nuovi parametri, dovete premere il
tasto Store per almeno due secondi, fino a che la spia del tasto lampeggia
brevemente e si spegne. Ora potete rilasciare il tasto Store: i nuovi
parametri sono memorizzati nel preset attuale.
Memorizzare in un nuovo preset
Se non volete sovrascrivere il preset attuale, potete scegliere una nuova
locazione di memoria per le vostre nuove impostazioni premendo bre-
vemente il tasto Store per attivarlo. La spia Store si illumina indicandovi
che il Black Spirit 200 Floor è “pronto”. Ora dovete indicare al Black Spirit
200 Floor dove memorizzare le impostazioni del vostro nuovo sound.
Usate i tasti Up/Down per scegliere un banco MIDI fra 1 e 32 - nel display
lampeggia il numero del banco. Attivate uno dei quattro tasti Preset A, B,
C o D. Il display non lampeggia più, la spia del tasto Store si spegne e il
preset è stato memorizzato nella locazione di memoria scelta.
Attenzione: Se – nel modo Preset – modificate presets assegnati al modo
Direct 7, queste modificazioni dei preset sono udibili nei due modi, cioè
sia nel modo Preset, sia nel modo Direct 7. Questo vale anche vice versa.
Vi diamo un esempio: Nel modo Direct 7, avete assegnato al posto 1 il
preset 12 B (banco 12, preset B) – un suono clean con riverbero. Se ora
riducete la quota di riverbero del preset 12 B nel modo preset e memoriz-
zate la nuova impostazione, anche il preset assegnato al posto 1 del modo
Direct 7 ha meno riverbero.
2 Stompbox-Mode:
Nel modo Stompbox, le impostazioni del canale vengono automatica-
mente adottate senza doverli memorizzare. Le impostazioni per effetti e
Red Box sono validi globalmente.
3 Direct 7-Mode:
Anche il modo Direct 7 vi permette di memorizzare modificazioni te-
nendo premuto il tasto Store per un certo tempo - senza dover cambiare
nel modo Preset.
Attenzione: Se modificate un preset nel modo Direct 7, viene modificato
anche il rispettivo preset nel modo Preset!
6 Bluetooth®
Il Black Spirit 200 Floor offre un’integrata funzione Bluetooth per audio
streaming e per collegarlo alla Remote App (vedi 2.2). Badate che potete
collegare soltanto un singolo dispositivo. Vale a dire: Se state usando
l’app, non potete collegare un secondo dispositivo per audio streaming.
Ma potete usare il dispositivo contemporaneamente come telecomando
e per l’audio streaming. Se volete trasmettere segnali audio da un altro
apparecchio, indipendentemente dall’apparecchio collegato tramite
Bluetooth, vi è la possibilità di utilizzare l’ingresso Aux-In analogico.
Attenzione: Prima di collegare un nuovo dispositivo, dovete resettare
la connessione Bluetooth. Se la connessione Bluetooth all’App non si
stabilisce, dovete chiudere l’app (doppio clic sul tasto Home) e riaprirla.
BOOST
Una spia accanto al simbolo Bluetooth vi segnala lo stato della
connessione Bluetooth.
1 Spia Bluetooth:
• Spia spenta: Bluetooth disattivato
• Spia lampeggia lentamente: Black Spirit 200 Floor cerca dispositivi
disponibili
• Spia accesa: Connessione con dispositivo mobile stabilita
• Spia lampeggia velocemente: Connessione fallita/interrotta
2 Attivare/collegare: Per attivare Bluetooth, premere il tasto Boost e
tenerlo premuto per tre secondi. La spia Bluetooth inizia a lampeggiare
lentamente, indicandovi che il Black Spirit 200 Floor ha iniziato a cercare
dispositivi mobili. Badate prima di attivare Bluetooth sul dispositivo che
volete collegare al Black Spirit 200 Floor. Quando il Black Spirit 200
Floor appare nella lista dei dispositivi Bluetooth, selezionare «Hughes
& Kettner Black Spirit 200 Floor nnnn» (ID a quatro cifre). Quando la
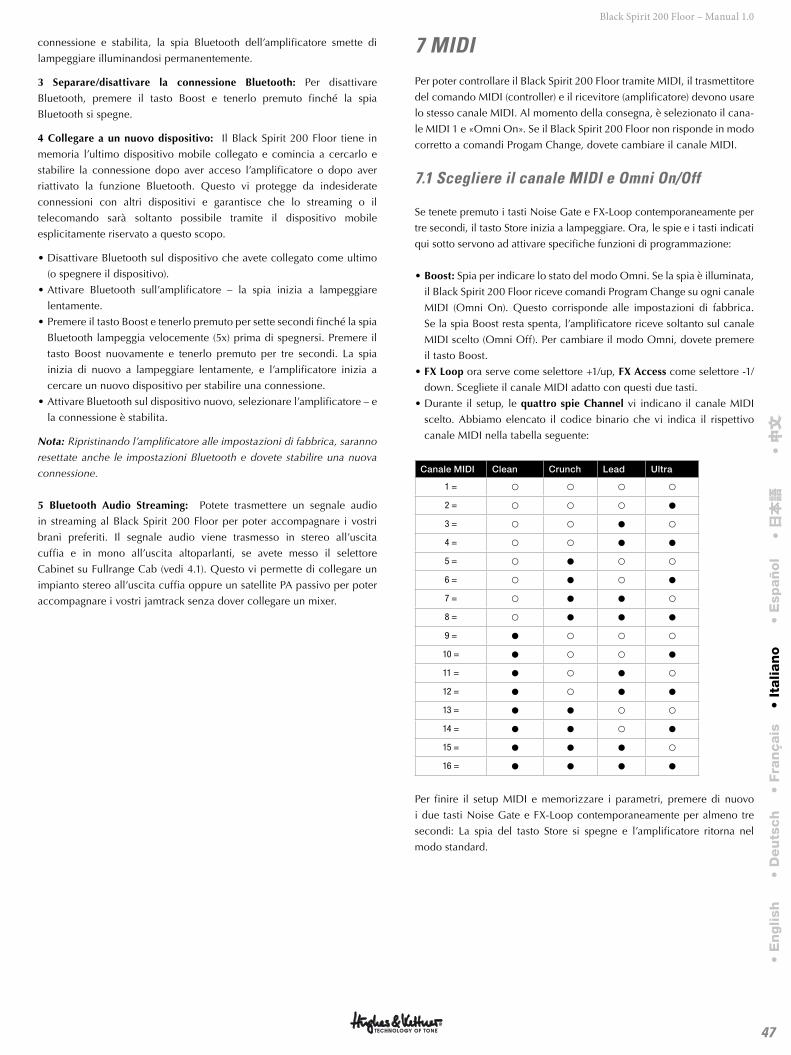
47
Black Spirit 200 Floor – Manual 1.0
connessione e stabilita, la spia Bluetooth dell’amplificatore smette di
lampeggiare illuminandosi permanentemente.
3 Separare/disattivare la connessione Bluetooth: Per disattivare
Bluetooth, premere il tasto Boost e tenerlo premuto finché la spia
Bluetooth si spegne.
4 Collegare a un nuovo dispositivo: Il Black Spirit 200 Floor tiene in
memoria l’ultimo dispositivo mobile collegato e comincia a cercarlo e
stabilire la connessione dopo aver acceso l’amplificatore o dopo aver
riattivato la funzione Bluetooth. Questo vi protegge da indesiderate
connessioni con altri dispositivi e garantisce che lo streaming o il
telecomando sarà soltanto possibile tramite il dispositivo mobile
esplicitamente riservato a questo scopo.
• Disattivare Bluetooth sul dispositivo che avete collegato come ultimo
(o spegnere il dispositivo).
• Attivare Bluetooth sull’amplificatore – la spia inizia a lampeggiare
lentamente.
• Premere il tasto Boost e tenerlo premuto per sette secondi finché la spia
Bluetooth lampeggia velocemente (5x) prima di spegnersi. Premere il
tasto Boost nuovamente e tenerlo premuto per tre secondi. La spia
inizia di nuovo a lampeggiare lentamente, e l’amplificatore inizia a
cercare un nuovo dispositivo per stabilire una connessione.
• Attivare Bluetooth sul dispositivo nuovo, selezionare l’amplificatore – e
la connessione è stabilita.
Nota: Ripristinando l’amplificatore alle impostazioni di fabbrica, saranno
resettate anche le impostazioni Bluetooth e dovete stabilire una nuova
connessione.
5 Bluetooth Audio Streaming: Potete trasmettere un segnale audio
in streaming al Black Spirit 200 Floor per poter accompagnare i vostri
brani preferiti. Il segnale audio viene trasmesso in stereo all’uscita
cuffia e in mono all’uscita altoparlanti, se avete messo il selettore
Cabinet su Fullrange Cab (vedi 4.1). Questo vi permette di collegare un
impianto stereo all’uscita cuffia oppure un satellite PA passivo per poter
accompagnare i vostri jamtrack senza dover collegare un mixer.
7 MIDIPer poter controllare il Black Spirit 200 Floor tramite MIDI, il trasmettitore
del comando MIDI (controller) e il ricevitore (amplificatore) devono usare
lo stesso canale MIDI. Al momento della consegna, è selezionato il cana-
le MIDI 1 e «Omni On». Se il Black Spirit 200 Floor non risponde in modo
corretto a comandi Progam Change, dovete cambiare il canale MIDI.
7.1 Scegliere il canale MIDI e Omni On/Off
Se tenete premuto i tasti Noise Gate e FX-Loop contemporaneamente per
tre secondi, il tasto Store inizia a lampeggiare. Ora, le spie e i tasti indicati
qui sotto servono ad attivare specifiche funzioni di programmazione:
• Boost: Spia per indicare lo stato del modo Omni. Se la spia è illuminata,
il Black Spirit 200 Floor riceve comandi Program Change su ogni canale
MIDI (Omni On). Questo corrisponde alle impostazioni di fabbrica.
Se la spia Boost resta spenta, l’amplificatore riceve soltanto sul canale
MIDI scelto (Omni Off). Per cambiare il modo Omni, dovete premere
il tasto Boost.
• FX Loop ora serve come selettore +1/up, FX Access come selettore -1/
down. Scegliete il canale MIDI adatto con questi due tasti.
• Durante il setup, le quattro spie Channel vi indicano il canale MIDI
scelto. Abbiamo elencato il codice binario che vi indica il rispettivo
canale MIDI nella tabella seguente:
Canale MIDI Clean Crunch Lead Ultra
1 = ¢ ¢ ¢ ¢
2 = ¢ ¢ ¢ {
3 = ¢ ¢ £ ¢
4 = ¢ ¢ £ £
5 = ¢ £ ¢ ¢
6 = ¢ £ ¢ £
7 = ¢ £ £ ¢
8 = ¢ £ £ £
9 = £ ¢ ¢ ¢
10 = £ ¢ ¢ £
11 = £ ¢ £ ¢
12 = £ ¢ £ £
13 = £ £ ¢ ¢
14 = £ £ ¢ £
15 = £ £ £ ¢
16 = £ £ £ £
Per finire il setup MIDI e memorizzare i parametri, premere di nuovo
i due tasti Noise Gate e FX-Loop contemporaneamente per almeno tre
secondi: La spia del tasto Store si spegne e l’amplificatore ritorna nel
modo standard.
• E
nglish
• D
eu
tsch
• Fra
nçais
• It
alian
o•
Esp
añ
ol
• 日本語
• 中文
中文

48
Black Spirit 200 Floor – Manual 1.0
7.2 Global Settings
Se tenete premuto i tasti Store e FX-Loop contemporaneamente per tre
secondi, il tasto Store inizia a lampeggiare. Ora potete usare le spie e i
tasti indicati qui sotto per attivare specifiche funzioni di programmazione:
• FX Access: Indica lo stato del modo Global EQ. Se il tasto è illuminato,
il modo Global EQ è attivo – per disattivarlo, premere nuovamente il
tasto FX-Access.
• FX Loop: Indica lo stato del modo Global Cabinet Type. Se il tasto
è illuminato, il modo Global Cabinet Type è attivato. Per disattivarlo,
premere nuovamente il tasto FX-Loop.
Per terminare Global Settings e memorizzare le impostazioni, tenere pre-
muto il tasto Store per tre secondi – ora, l’amplificatore si ritrova nel
modo di funzionamento normale.
7.3 Lista dei controller e delle rispettive funzioni
Oltre a selezionare altre funzioni tramite i comandi Program Change
potete controllare i parametri di tutti i controlli e tasti del Black Spirit
200 Floor in tempo reale tramite i comandi Control Change. Nella tabella
seguente trovate le funzioni editabili e i rispettivi numeri-controller.
Numero-controller
Funzione
1 Modulation Intensity
4 Delay Time, 128 passi, 51 ms bis 1360 ms
7 Volume (soft)
9 Mute On-Off. Lo stato On resta attivato fino a che cambiate il canale dell’amplificatore, il parametro volume o riaccendete l’amplificatore.
12 Mod-FX Type
20 Gain (soft)
21 Bass
22 Mid
23 Treble
24 Resonance
25 Presence
26 Modulation Speed (dell’effetto di modulazione attivato)
27 Delay Feedback
28 Delay Volume
29 Reverb Volume
31 Channel Switching (4 settori)
52 Mod-FX On-Off
53 Delay On-Off
54 Reverb On-Off
55 FX-Loop On-Off
56 Gain (hard)
57 Volume (hard)
58 Cabinet Type (8 settori)
59 Sagging (8 settori)
62 Sensibilità Noise Gate
63 Noise Gate On-Off
64 Boost On-Off
7.4 Come assegnare la funzione da telecomandare (numero-controller) ai due ingressi Control 1 e Control 2.
Potete assegnare indipendentemente un numero-controller agli ingressi
Control 1 e 2 (vedi lista controller e funzioni assegnati) per poterli regola-
re in tempo reale usando un selettore a pedale o un pedale d'espressione
collegato Come risulta dalla tabella, potete regolare per esempio Volume
col numero-controller 007 usando un pedale d'espressione, e attivare e
disattivare Boost con un selettore a pedale e il numero-controller 064.
Per principio, la posizione «off» di un selettore a pedale o la posizione
minima di un pedale d'espressione corrispondono alla posizione «off» di
un tasto o a un controllo girato completamente verso il senso antiorario
(valore MIDI 0). La posizione «on» di un selettore a pedale o la posizione
massima di un pedale d'espressione corrispondono alla posizione «on»
di un tasto o a un controllo girato completamente verso il senso orario
(valore MIDI 127). Con una sola eccezione:
Il campo di controllo di Volume è limitato tramite il valore massimo
memorizzato nel Preset. Se per esempio avete memorizzato una posizi-
one media (valore MIDI 63), non è possibile di ottenere un volume che
oltrepassa questo valore. Questo vi permette di controllare il volume di
un preset sul palco come con un «normale» pedale da volume
Attenzione: Quando cambiate preset, la posizione di un pedale
d'espressione viene ignorata! Vale a dire: se per esempio avete abbassa-
to il volume con un pedale d'espressione e cambiate preset, il volume
corrisponde al valore memorizzato in questo preset. Per telecomandare il
volume comprensivo, cioè il controllo Master del Black Spirit 200 Floor, vi
consigliamo di collegare un pedale da volume analogico a bassa resisten-
za al FX-Loop.
• Control 1: Per attivare il modo di assegnamento, premere contempora-
neamente i tasti TAP e D per almeno 3 secondi fino a che il display indica
il numero-controller e il punto dopo la seconda cifra lampeggia. Rilascia-
te i tasti e scegliete il numero-controller con i tasti «Up» e «Down». Con-
fermate il numero scelto premendo il tasto D. Il punto nel display smette
di lampeggiare e il Black Spirit 200 Floor ritorna nel modo standard.
• Control 2: Premere contemporaneamente i tasti TAP e D del FSM-432
MK III fino a che il display indica il numero-controller e il punto dopo la
prima cifra lampeggia. Rilasciate i tasti e scegliete il numero-controller
con i tasti «Up» e «Down». Confermate il numero scelto premendo il
tasto C.
min.
max.
SleeveRing
Tip
Tip Ring Sleeve
max.
25 - 50 k linear
min.
Expression Pedal
SleeveTip
Footswitch
Tip Sleeve
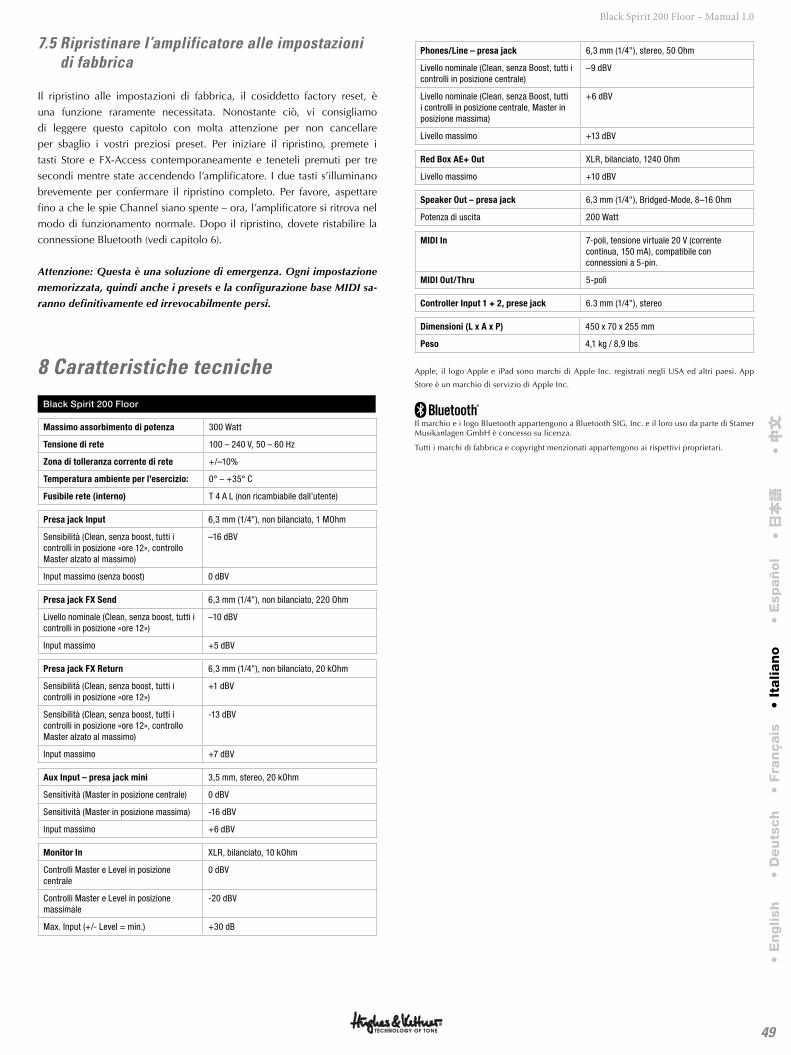
49
Black Spirit 200 Floor – Manual 1.0
7.5 Ripristinare l’amplificatore alle impostazioni di fabbrica
Il ripristino alle impostazioni di fabbrica, il cosiddetto factory reset, è
una funzione raramente necessitata. Nonostante ciò, vi consigliamo
di leggere questo capitolo con molta attenzione per non cancellare
per sbaglio i vostri preziosi preset. Per iniziare il ripristino, premete i
tasti Store e FX-Access contemporaneamente e teneteli premuti per tre
secondi mentre state accendendo l’amplificatore. I due tasti s’illuminano
brevemente per confermare il ripristino completo. Per favore, aspettare
fino a che le spie Channel siano spente – ora, l’amplificatore si ritrova nel
modo di funzionamento normale. Dopo il ripristino, dovete ristabilire la
connessione Bluetooth (vedi capitolo 6).
Attenzione: Questa è una soluzione di emergenza. Ogni impostazione
memorizzata, quindi anche i presets e la configurazione base MIDI sa-
ranno definitivamente ed irrevocabilmente persi.
8 Caratteristiche tecniche
Black Spirit 200 Floor
Massimo assorbimento di potenza 300 Watt
Tensione di rete 100 – 240 V, 50 – 60 Hz
Zona di tolleranza corrente di rete +/–10%
Temperatura ambiente per l’esercizio: 0° – +35° C
Fusibile rete (interno) T 4 A L (non ricambiabile dall’utente)
Presa jack Input 6,3 mm (1/4"), non bilanciato, 1 MOhm
Sensibilità (Clean, senza boost, tutti i controlli in posizione «ore 12», controllo Master alzato al massimo)
–16 dBV
Input massimo (senza boost) 0 dBV
Presa jack FX Send 6,3 mm (1/4"), non bilanciato, 220 Ohm
Livello nominale (Clean, senza boost, tutti i controlli in posizione «ore 12»)
–10 dBV
Input massimo +5 dBV
Presa jack FX Return 6,3 mm (1/4"), non bilanciato, 20 kOhm
Sensibilità (Clean, senza boost, tutti i controlli in posizione «ore 12»)
+1 dBV
Sensibilità (Clean, senza boost, tutti i controlli in posizione «ore 12», controllo Master alzato al massimo)
-13 dBV
Input massimo +7 dBV
Aux Input – presa jack mini 3,5 mm, stereo, 20 kOhm
Sensitività (Master in posizione centrale) 0 dBV
Sensitività (Master in posizione massima) -16 dBV
Input massimo +6 dBV
Monitor In XLR, bilanciato, 10 kOhm
Controlli Master e Level in posizione centrale
0 dBV
Controlli Master e Level in posizione massimale
-20 dBV
Max. Input (+/- Level = min.) +30 dB
Phones/Line – presa jack 6,3 mm (1/4"), stereo, 50 Ohm
Livello nominale (Clean, senza Boost, tutti i controlli in posizione centrale)
–9 dBV
Livello nominale (Clean, senza Boost, tutti i controlli in posizione centrale, Master in posizione massima)
+6 dBV
Livello massimo +13 dBV
Red Box AE+ Out XLR, bilanciato, 1240 Ohm
Livello massimo +10 dBV
Speaker Out – presa jack 6,3 mm (1/4"), Bridged-Mode, 8–16 Ohm
Potenza di uscita 200 Watt
MIDI In 7-poli, tensione virtuale 20 V (corrente continua, 150 mA), compatibile con connessioni a 5-pin.
MIDI Out/Thru 5-poli
Controller Input 1 + 2, prese jack 6.3 mm (1/4"), stereo
Dimensioni (L x A x P) 450 x 70 x 255 mm
Peso 4,1 kg / 8,9 lbs
Apple, il logo Apple e iPad sono marchi di Apple Inc. registrati negli USA ed altri paesi. App
Store è un marchio di servizio di Apple Inc.
Il marchio e i logo Bluetooth appartengono a Bluetooth SIG, Inc. e il loro uso da parte di Stamer Musikanlagen GmbH è concesso su licenza.
Tutti i marchi di fabbrica e copyright menzionati appartengono ai rispettivi proprietari.
• E
nglish
• D
eu
tsch
• Fra
nçais
• It
alian
o•
Esp
añ
ol
• 日本語
• 中文
中文
Version 2.5 07/2018
Importantes instrucciones de seguridad. ¡Leer antes de encender!
Este producto ha sido elaborado por el fabricante de conformidad con IEC 62368-1 y ha salido de fábrica en perfecto estado. Para que se mantenga en perfectas condiciones y asegurar que no exista riesgo alguno, el usuario deberá observar los avisos y advertencias que se encuentran en el manual de instrucciones. La unidad es conforme a la Clase de Protección 1 (puesta a tierra de protección). En caso de utilizar este producto en vehículos, embarcaciones o aviones, así como a altitudes superiores a los 2.000 m sobre el nivel del mar, además de la norma IEC 62368-1 también se deberán cumplir las demás normas de seguridad aplicablesADVERTENCIA: Para prevenir el riesgo de incendio y el peligro de electrocución, evite la exposición del equipo a humedad o lluvia. No abra la cubierta: en el interior no hay elementos que deba manipular el usuario. El mantenimiento deberá quedar a cargo de personal cualificado.
La presencia de este símbolo advierte de la existencia de tensión peligrosa sin aislar en el interior que podría ser suficiente para provocar una electrocución.
La presencia de este símbolo advierte de la existencia de tensión peligrosa accesible desde el exterior. Todo cableado externo conectado con algún terminal marcado con este símbolo deberá ser un cableado preelaborado que satisfaga las recomendaciones del fabricante o deberá ser instalado por personal cualificado.
La presencia de este símbolo advierte de importantes instrucciones de uso y mantenimiento en la bibliografía adjunta. Lea el manual.
La presencia de este símbolo indica: ¡Precaución! ¡Superficie caliente! No tocar para evitar quemaduras.
Todos los aparatos eléctricos y electrónicos inclusive las baterías, se han de evacuar por separado de la basura doméstica, a través de centros de recogida y reciclaje oficiales.
Lea las presentes instrucciones. Conserve las presentes instrucciones. Observe todas las advertencias e indicaciones señaladas en el producto y en las instrucciones.
• No utilice el producto cerca del agua. No coloque el producto cerca de agua, baños, bañeras, fregaderos, zonas húmedas, piscinas o saunas.
• No coloque objetos que contengan líquidos sobre el producto, como jarrones, vasos, botellas, etcétera.
• Limpie exclusivamente con paños secos.• No retire ninguna cubierta ni elementos del armazón.• La tensión operativa del producto deberá ajustarse
a la tensión del suministro eléctrico local. Si no está seguro del tipo de electricidad disponible, consulte con su distribuidor o con la compañía eléctrica local.
• Para reducir el riesgo de electrocución, deberá mantenerse la puesta a tierra del producto. Utilice solamente el cable de alimentación suministrado con el producto y mantenga siempre activo de la patilla central (puesta a tierra) del cuadro de conexiones. No desactive la función de seguridad del enchufe polarizado o con puesta a tierra.
• Proteja el cable de alimentación de pisadas o pinzamientos, especialmente junto a enchufes,
soportes de dispositivos y el punto de salida desde el equipo. Los cables de alimentación deberán manipularse siempre con precaución. Compruebe periódicamente que los cables no tengan cortes ni signos de desgaste, especialmente en el enchufe y en el punto de salida desde el equipo.
• No utilice nunca un cable dañado.• Desenchufe el producto durante las tormentas con
aparato eléctrico o cuando vaya a estar en desuso durante periodos prolongados.
• El producto solamente se puede desconectar por completo de la red extrayendo el enchufe de red de la unidad o de la toma de la pared. El producto deberá colocarse en todo momento de tal modo que su desconexión de la red sea sencilla.
• Fusibles: Reemplace solamente con fusibles de tipo (5x20 mm) y amperaje según IEC 127. Está prohibido usar "fusibles parcheados" o cortocircuitar los portafusibles. La sustitución de los fusibles debe ser realizada únicamente por personal cualificado.
• El mantenimiento deberá quedar a cargo de personal cualificado. Será necesaria una revisión si la unidad resulta dañada de cualquier forma, por ejemplo:
- si el cable de alimentación o el enchufe están dañados o deshilachados;
- si se han derramado líquidos sobre el producto o han caído objetos en él;
- si el producto se ha visto expuesto a lluvia o humedad;
- si el producto no funciona con normalidad pese a seguirse las instrucciones de uso;
- si el producto ha sido salpicado o el cajetín ha sido dañado.
• Cuando se conecten altavoces a este aparato no se podrá sobrepasar el límite de impedancia mínima especificado en el aparato o en las presentes instrucciones. La sección de los cables empleados debe ser suficiente en conformidad con la reglamentación local.
• Proteja de la luz solar directa.• No instale cerca de fuentes de calor como
radiadores, difusores de calor, estufas u otros dispositivos que produzcan calor.
• Este aparato ha sido desarrollado para su uso en zonas climáticas moderadas – y no para su uso en zonas climáticas tropicales.
• No bloquee ninguna abertura de ventilación. Instale de conformidad con las instrucciones del fabricante. No deberá situarse el producto en una instalación integrada, como una rejilla, a no ser que exista la ventilación necesaria.
• Permita siempre que un dispositivo frío se caliente a temperatura ambiente cuando se traslade a alguna sala. Pueden formarse condensaciones en el interior del producto y dañarlo cuando se usa sin precalentamiento.
• No sitúe fuentes de llama abierta, como velas encendidas, sobre el producto.
• El aparato debe colocarse, como mínimo, a 20 cm de cualquier pared, no se debe tapar y debe garantizarse un espacio libre de, como mínimo, 50 cm por encima del aparato.
• Asegúrese de que el dispositivo esté siempre colocado sobre una superficie sólida y plana
• Utilice solamente con el carro, soporte, trípode, abrazadera o tablero especificado por el fabricante o vendido junto con el producto. Cuando se use un carro, deberá tenerse precaución al mover la combinación de carro/producto para evitar daños por vuelcos.
• Utilice solamente accesorios recomendados por el fabricante; esto será de aplicación para todo tipo de accesorios, por ejemplo, cubiertas protectoras, bolsas de transporte, pies, soportes murales o de techo. En caso de instalación de cualquier tipo de accesorio en el producto, siga siempre las instrucciones de
uso suministradas por el fabricante. Nunca utilice puntos de fijación distintos de los especificados por el fabricante.
• El dispositivo NO es apropiado para su uso por parte de cualquier persona o personas (niños incluidos) con las capacidades físicas, sensoriales o mentales limitadas o sin la experiencia o el conocimiento suficientes con productos de este tipo. El dispositivo deberá mantenerse siempre fuera del alcance de los niños menores de 4 años.
• Nunca introduzca objetos de ninguna clase en el producto a través de las ranuras del cajetín, ya que podrían tocar puntos de tensión peligrosa, ni cortocircuite elementos que pudieran causar riesgo de incendio o electrocución.
• El producto puede emitir niveles de presión sonora por encima de 90 dB, lo que puede causar daños auditivos permanentes. La exposición a niveles sonoros extremadamente altos puede causar pérdidas auditivas permanentes. Lleve protección auditiva si va a estar expuesto de forma continua a dicho tipo de elevados niveles.
• El fabricante solamente garantiza la seguridad, la fiabilidad y la eficiencia del producto si:
- el montaje, la extensión, el reajuste, las modificaciones o las reparaciones son realizados por el fabricante o por personal autorizado
- la instalación eléctrica del área interesada es conforme con los requisitos de las especificaciones de IEC (ANSI)
- la unidad se utiliza conforme a las instrucciones de uso
Leer antes de usar
• Por favor leer cuidadosamente estas
instrucciones y el aviso de seguridad antes
de usar.
• El fabricante no se responsabiliza por daños en
el aparato, los cuales sean causados por
un manejo no adecuado.
• Antes de conectar a la red eléctrica es necesa-
rio asegurarse de que el interruptor Power esté
desconectado y el valor de tensión indicado
en la parte posterior del dispositivo coincida
con la tensión de red local.
• Advertencia antes de utilizar el Black Spirit 200
Floor: ¡Suena muy alto! Volumenes de sonido
muy altos pueden causar daños auditivos.
• Para evitar sorpresas, debes acostumbrarte a
girar la perilla del volumen de la guitarra, que
tengas conectada al Black Spirit 200 Floor,
hasta el tope mínimo antes de encender el
amplificador.
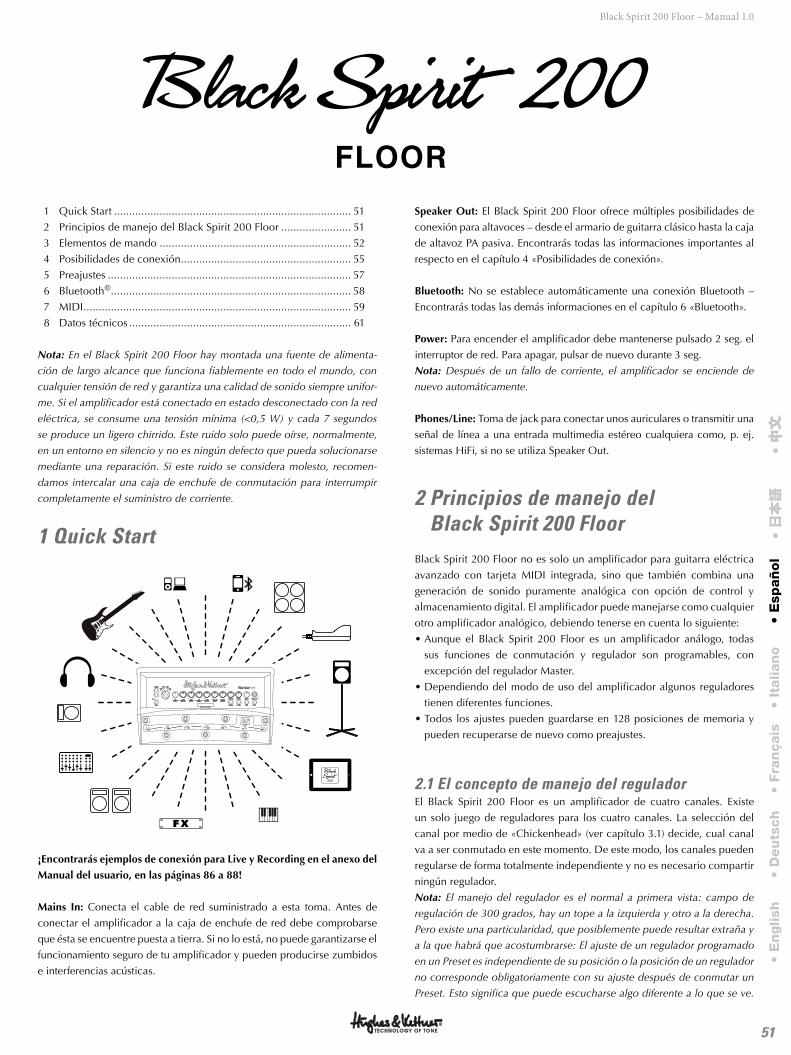
51
Black Spirit 200 Floor – Manual 1.0
1 Quick Start .............................................................................. 51
2 Principios de manejo del Black Spirit 200 Floor ....................... 51
3 Elementos de mando ............................................................... 52
4 Posibilidades de conexión ........................................................ 55
5 Preajustes ................................................................................ 57
6 Bluetooth® ............................................................................... 58
7 MIDI ........................................................................................ 59
8 Datos técnicos ......................................................................... 61
Nota: En el Black Spirit 200 Floor hay montada una fuente de alimenta-
ción de largo alcance que funciona fiablemente en todo el mundo, con
cualquier tensión de red y garantiza una calidad de sonido siempre unifor-
me. Si el amplificador está conectado en estado desconectado con la red
eléctrica, se consume una tensión mínima (<0,5 W) y cada 7 segundos
se produce un ligero chirrido. Este ruido solo puede oírse, normalmente,
en un entorno en silencio y no es ningún defecto que pueda solucionarse
mediante una reparación. Si este ruido se considera molesto, recomen-
damos intercalar una caja de enchufe de conmutación para interrumpir
completamente el suministro de corriente.
1 Quick Start
MASTERPRESENCERESONANCESAGGINGNOISE GATETREBLEMIDBASSVOLUME
50
1 8
2 7
3 64 5
GAINREVERBDLY LEVELFEEDBACKDLY T IMEMOD TYPEINTENSITY
CLEAN ULTRACRUNCH LEAD
POWER
PHONES / L INE
CAB TYPE
STOREFX LOOPFX ACCESSBOOST
PRE LOOP
OFF OFF1400 OFF
C
2
1T
F P
S P I R I T ™ T O N E G E N E R A T O R
¡Encontrarás ejemplos de conexión para Live y Recording en el anexo del
Manual del usuario, en las páginas 86 a 88!
Mains In: Conecta el cable de red suministrado a esta toma. Antes de
conectar el amplificador a la caja de enchufe de red debe comprobarse
que ésta se encuentre puesta a tierra. Si no lo está, no puede garantizarse el
funcionamiento seguro de tu amplificador y pueden producirse zumbidos
e interferencias acústicas.
Speaker Out: El Black Spirit 200 Floor ofrece múltiples posibilidades de
conexión para altavoces – desde el armario de guitarra clásico hasta la caja
de altavoz PA pasiva. Encontrarás todas las informaciones importantes al
respecto en el capítulo 4 «Posibilidades de conexión».
Bluetooth: No se establece automáticamente una conexión Bluetooth –
Encontrarás todas las demás informaciones en el capítulo 6 «Bluetooth».
Power: Para encender el amplificador debe mantenerse pulsado 2 seg. el
interruptor de red. Para apagar, pulsar de nuevo durante 3 seg.
Nota: Después de un fallo de corriente, el amplificador se enciende de
nuevo automáticamente.
Phones/Line: Toma de jack para conectar unos auriculares o transmitir una
señal de línea a una entrada multimedia estéreo cualquiera como, p. ej.
sistemas HiFi, si no se utiliza Speaker Out.
2 Principios de manejo del Black Spirit 200 Floor
Black Spirit 200 Floor no es solo un amplificador para guitarra eléctrica
avanzado con tarjeta MIDI integrada, sino que también combina una
generación de sonido puramente analógica con opción de control y
almacenamiento digital. El amplificador puede manejarse como cualquier
otro amplificador analógico, debiendo tenerse en cuenta lo siguiente:
• Aunque el Black Spirit 200 Floor es un amplificador análogo, todas
sus funciones de conmutación y regulador son programables, con
excepción del regulador Master.
• Dependiendo del modo de uso del amplificador algunos reguladores
tienen diferentes funciones.
• Todos los ajustes pueden guardarse en 128 posiciones de memoria y
pueden recuperarse de nuevo como preajustes.
2.1 El concepto de manejo del reguladorEl Black Spirit 200 Floor es un amplificador de cuatro canales. Existe
un solo juego de reguladores para los cuatro canales. La selección del
canal por medio de «Chickenhead» (ver capítulo 3.1) decide, cual canal
va a ser conmutado en este momento. De este modo, los canales pueden
regularse de forma totalmente independiente y no es necesario compartir
ningún regulador.
Nota: El manejo del regulador es el normal a primera vista: campo de
regulación de 300 grados, hay un tope a la izquierda y otro a la derecha.
Pero existe una particularidad, que posiblemente puede resultar extraña y
a la que habrá que acostumbrarse: El ajuste de un regulador programado
en un Preset es independiente de su posición o la posición de un regulador
no corresponde obligatoriamente con su ajuste después de conmutar un
Preset. Esto significa que puede escucharse algo diferente a lo que se ve.
• E
nglish
• D
eu
tsch
• Fra
nçais
• It
alian
o•
Esp
añ
ol
• 日本語
• 中文
中文
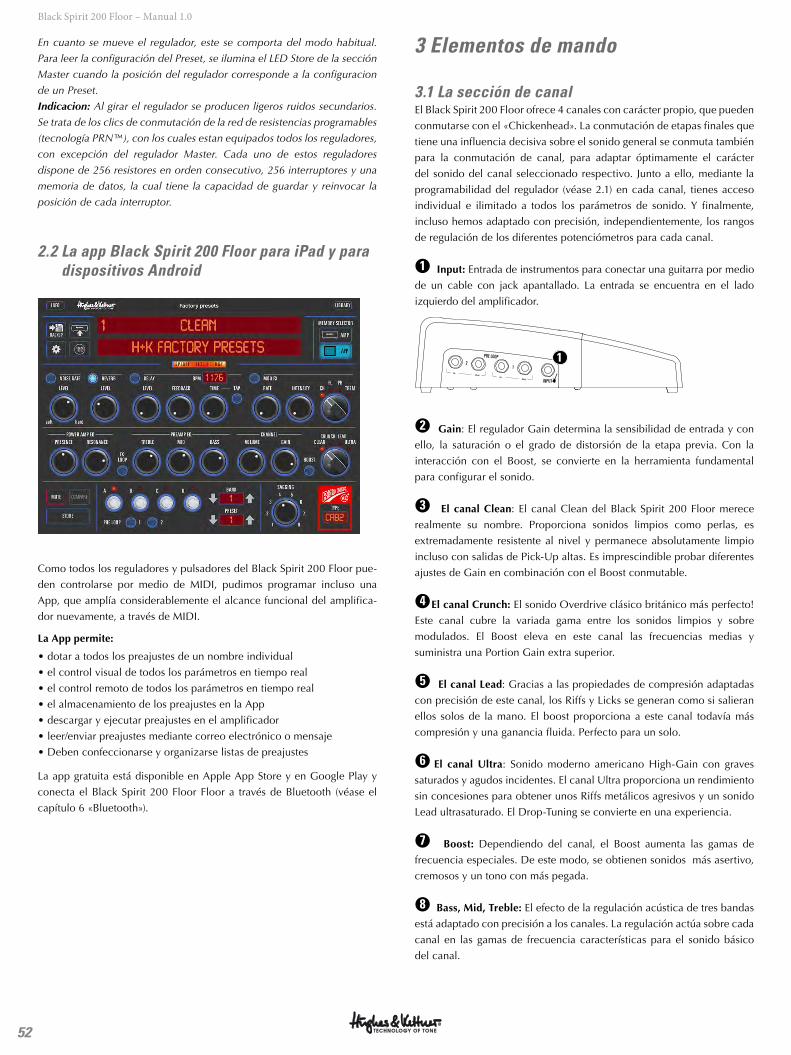
52
Black Spirit 200 Floor – Manual 1.0
En cuanto se mueve el regulador, este se comporta del modo habitual.
Para leer la configuración del Preset, se ilumina el LED Store de la sección
Master cuando la posición del regulador corresponde a la configuracion
de un Preset.
Indicacion: Al girar el regulador se producen ligeros ruidos secundarios.
Se trata de los clics de conmutación de la red de resistencias programables
(tecnología PRN™), con los cuales estan equipados todos los reguladores,
con excepción del regulador Master. Cada uno de estos reguladores
dispone de 256 resistores en orden consecutivo, 256 interruptores y una
memoria de datos, la cual tiene la capacidad de guardar y reinvocar la
posición de cada interruptor.
2.2 La app Black Spirit 200 Floor para iPad y para dispositivos Android
Como todos los reguladores y pulsadores del Black Spirit 200 Floor pue-
den controlarse por medio de MIDI, pudimos programar incluso una
App, que amplía considerablemente el alcance funcional del amplifica-
dor nuevamente, a través de MIDI.
La App permite:
• dotar a todos los preajustes de un nombre individual
• el control visual de todos los parámetros en tiempo real
• el control remoto de todos los parámetros en tiempo real
• el almacenamiento de los preajustes en la App
• descargar y ejecutar preajustes en el amplificador
• leer/enviar preajustes mediante correo electrónico o mensaje
• Deben confeccionarse y organizarse listas de preajustes
La app gratuita está disponible en Apple App Store y en Google Play y
conecta el Black Spirit 200 Floor Floor a través de Bluetooth (véase el
capítulo 6 «Bluetooth»).
3 Elementos de mando
3.1 La sección de canalEl Black Spirit 200 Floor ofrece 4 canales con carácter propio, que pueden
conmutarse con el «Chickenhead». La conmutación de etapas finales que
tiene una influencia decisiva sobre el sonido general se conmuta también
para la conmutación de canal, para adaptar óptimamente el carácter
del sonido del canal seleccionado respectivo. Junto a ello, mediante la
programabilidad del regulador (véase 2.1) en cada canal, tienes acceso
individual e ilimitado a todos los parámetros de sonido. Y finalmente,
incluso hemos adaptado con precisión, independientemente, los rangos
de regulación de los diferentes potenciómetros para cada canal.
●1 Input: Entrada de instrumentos para conectar una guitarra por medio
de un cable con jack apantallado. La entrada se encuentra en el lado
izquierdo del amplificador.
INPUT
PRE LOOP
12
1
●2 Gain: El regulador Gain determina la sensibilidad de entrada y con
ello, la saturación o el grado de distorsión de la etapa previa. Con la
interacción con el Boost, se convierte en la herramienta fundamental
para configurar el sonido.
●3 El canal Clean: El canal Clean del Black Spirit 200 Floor merece
realmente su nombre. Proporciona sonidos limpios como perlas, es
extremadamente resistente al nivel y permanece absolutamente limpio
incluso con salidas de Pick-Up altas. Es imprescindible probar diferentes
ajustes de Gain en combinación con el Boost conmutable.
●4 El canal Crunch: El sonido Overdrive clásico británico más perfecto!
Este canal cubre la variada gama entre los sonidos limpios y sobre
modulados. El Boost eleva en este canal las frecuencias medias y
suministra una Portion Gain extra superior.
●5 El canal Lead: Gracias a las propiedades de compresión adaptadas
con precisión de este canal, los Riffs y Licks se generan como si salieran
ellos solos de la mano. El boost proporciona a este canal todavía más
compresión y una ganancia fluida. Perfecto para un solo.
●6 El canal Ultra: Sonido moderno americano High-Gain con graves
saturados y agudos incidentes. El canal Ultra proporciona un rendimiento
sin concesiones para obtener unos Riffs metálicos agresivos y un sonido
Lead ultrasaturado. El Drop-Tuning se convierte en una experiencia.
●7 Boost: Dependiendo del canal, el Boost aumenta las gamas de
frecuencia especiales. De este modo, se obtienen sonidos más asertivo,
cremosos y un tono con más pegada.
●8 Bass, Mid, Treble: El efecto de la regulación acústica de tres bandas
está adaptado con precisión a los canales. La regulación actúa sobre cada
canal en las gamas de frecuencia características para el sonido básico
del canal.

53
Black Spirit 200 Floor – Manual 1.0
Indicación: Se trata de una regulación acústica clásica y pasiva. Los
reguladores se influencian el uno al otro. Por ejemplo: Si «Mid» se
encuentra completamente en alto, «Bass» presenta un menor efecto que
si «Mid» se encontrara en bajo. Presence y Resonance son independientes
de la regulación acústica de tres bandas y muestran siempre el mismo
efecto.
●9 Volume: Con Volume se adaptan los volúmenes de los Preset entre sí.
Nota: A diferencia de lo habitual, el regulador Volume no puede cerrarse
completamente, solamente reduce el nivel o lo aumenta. La posición
central es siempre el mejor punto de partida para una adaptación del
volumen.
Atención: ¡No utilices este regulador para controlar el volumen general
del amplificador, ya que para ello está el regulador Master (ver 3.3)!
●10 Noise Gate: Este regulador determina la sensibilidad del Noise Gate.
La tecnología IDB™ del Noise Gate se adapta automáticamente a los
parámetros de umbral y de ataque estándar. En el tope izquierdo del
regulador se conmuta totalmente el Noise Gate fuera del trayecto de señal
(bypass). Cuanto más se gira a la derecha el regulador, más intensidad
adquiere el Noise Gate. En la posición a las 9, el Gate reacciona ya muy
sensiblemente a las señales. Cuanto más se gira el regulador a la derecha,
más intensidad adquiere el Noise Gate y corta las señales débiles. El ajuste
de la sensibilidad del Noise Gate se almacena para cada preajuste.
●11 Pre Loop: Los dos pulsadores Pre-Loop 1 y 2 que hay junto al selector
"chickenhead" activan los dos Pre-Loops en el lado izquierdo de la carcasa
del amplificador; véase el funcionamiento y la programación en el capítulo
4.2.
3.2 La sección de efectosEl Black Spirit 200 Floor te ofrece tres secciones independientes de
efectos, que pueden utilizarse simultáneamente.
Nota: Si los reguladores «Reverb», «Del Level» o «Intensity» están
ajustados en el tope izquierdo, el módulo de efectos correspondiente está
totalmente excluido de la vía de señales (Bypass).
●12 FX Access: Para poder acceder a los efectos Reverb, Delay y
Modulation, presionar el pulsador FX Access hasta que empiece a
parpadear. De este modo, el dispositivo se encuentra en el modo FX y los
reguladores de canal se usan ahora para regular los efectos. Para salir del
modo FX debe presionarse de nuevo el pulsador FX-Access. El pulsador
deja de parpadear y el dispositivo vuelve a funcionar en el modo normal.
●13 Reverb: El reverberador digital del Black Spirit 200 Floor se inspira
en la calidez y musicalidad de un reverberador de muelle clásico. Una
verdadera mejora en comparación con el equivalente analógico es la
adaptación automática del tiempo de reverberación: Cuanto más Reverb
Volume se añada a la señal, más larga será la reverberación.
●14 Delay: Con los reguladores «Dly Level», «Feedback» y «Dly Time» , la
sección de Delay ofrece control integral sobre todos los parámetros.
• Dly Level: Regula el volumen de las repeticiones desde «off» hasta
«exactamente igual que la señal original».
• Feedback: Regula el número de repeticiones desde 1 a infinito.
• Dly Time: Regula el tiempo hasta la siguiente repetición, desde 80
milisegundos hasta 1,4 segundos. Adaptando «Dly Time» por medio
de la función Tap del Black Spirit 200 Floor (ver 5.1) se acepta el valor
a partir de la segunda pulsación de tecla. Como verificación, el LED de
Tap parpadea durante 5 segundos aprox. a intervalos largos. La función
Tap solo reacciona con el Delay activo. Si el Delay está desconectado
(Bypass), no se acepta el ritmo de Tap.
●15 Modulation FX: Esta sección permite escoger entre los cuatro efectos
de modulación: Chorus, Flanger, Phaser y Tremolo.
• Mod Type: Los efectos se encuentran sucesivamente en este regulador.
En el primer cuarto, esta activo Chorus, en el segundo cuarto Flanger,
en el tercero Phaser y en el cuarto Tremolo. Dentro de un cuarto puede
ajustarse la velocidad (Rate) de los efectos de modulación: Cuanto más
gires el botón «Mod Type», más rápida es la velocidad del efecto.
• Intensity: Intensity determina el volumen del efecto de modulación.
●16 FX-Loop: El Routing de efecto programable del Black Spirit 200 Floor
te ofrece una vía de bucle conmutable de paralelo a serie para aparatos
de efectos externos, con ajustes que también se guardan en el Preset. Esto
significa que en cada Preset se guarda si la vía de efecto está abierta o
cerrada. Conecta el casquillo Send con el Input de tu aparato de efectos
y el casquillo Return con su Output. Con el interruptor FX-Loop puedes
abrir o cerrar la vía de efecto.
●17 Store: El pulsador Store sirve para guardar los preajustes. Encontrarás
más información sobre esta función en el capítulo 5.2 «Programación de
preajustes».
●18 Cab Type: Con este regulador se selecciona una de las ocho
simulaciones de altavoz reproducidas cuidadosamente a través de la
salida Red Box en la parte posterior del amplificador (véase 4.1 «Red Box
AE+»). En la parte posterior puedes conmutar el nivel de salida de Mic a
Line, de modo que el nivel esté adaptado al dispositivo respectivamente
conectado. De este modo, Red Box AE+ es la elección perfecta para
transmitir tu sonido al PA, al monitor de estudio o a un grabador. Así, ya
no se depende de micrófonos o técnicos de sonido, la Red Box AE+ realiza
este trabajo perfectamente.
• E
nglish
• D
eu
tsch
• Fra
nçais
• It
alian
o•
Esp
añ
ol
• 日本語
• 中文
中文
MASTERPRESENCERESONANCESAGGINGNOISE GATETREBLEMIDBASSVOLUME
50
1 8
2 7
3 64 5
GAINREVERBDLY LEVELFEEDBACKDLY T IMEMOD TYPEINTENSITY
CLEAN ULTRACRUNCH LEAD
POWER
PHONES / L INE
CAB TYPE
STOREFX LOOPFX ACCESSBOOST
PRE LOOP
OFF OFF1400 OFF
C
2
1T
F P
S P I R I T ™ T O N E G E N E R A T O R
2 9
3 64 5
7 8 10
12
11
16131415 18 17
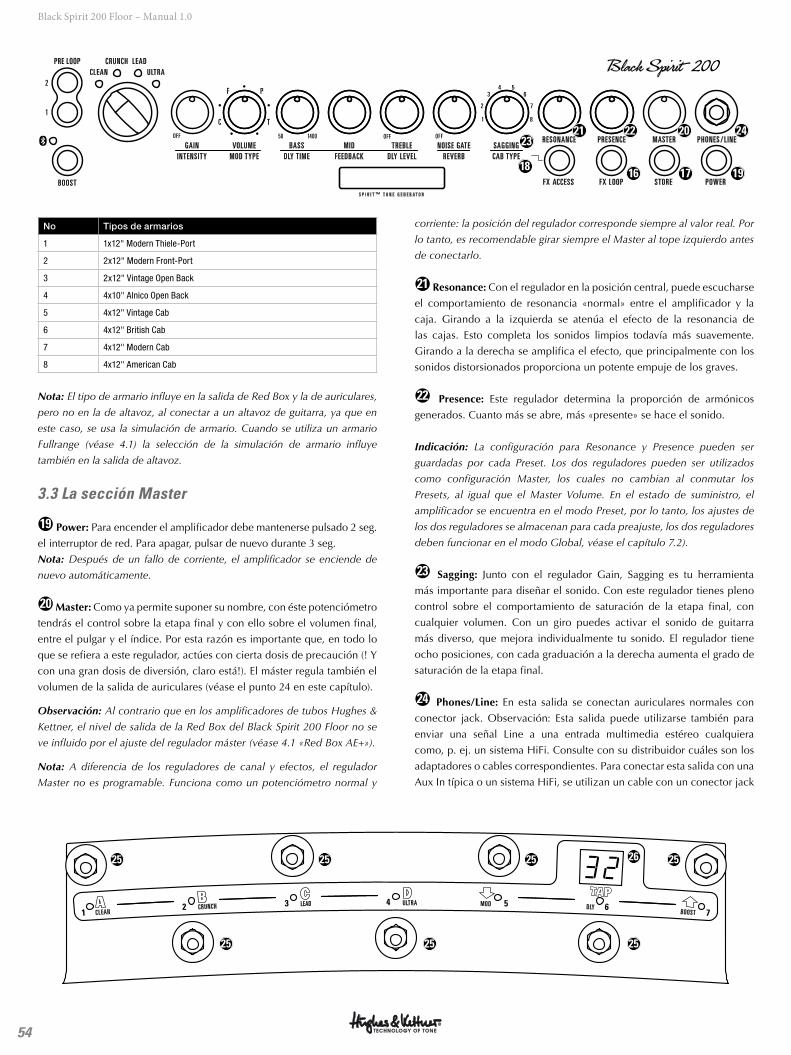
54
Black Spirit 200 Floor – Manual 1.0
No Tipos de armarios
1 1x12" Modern Thiele-Port
2 2x12" Modern Front-Port
3 2x12" Vintage Open Back
4 4x10" Alnico Open Back
5 4x12" Vintage Cab
6 4x12" British Cab
7 4x12" Modern Cab
8 4x12" American Cab
Nota: El tipo de armario influye en la salida de Red Box y la de auriculares,
pero no en la de altavoz, al conectar a un altavoz de guitarra, ya que en
este caso, se usa la simulación de armario. Cuando se utiliza un armario
Fullrange (véase 4.1) la selección de la simulación de armario influye
también en la salida de altavoz.
3.3 La sección Master
●19 Power: Para encender el amplificador debe mantenerse pulsado 2 seg.
el interruptor de red. Para apagar, pulsar de nuevo durante 3 seg.
Nota: Después de un fallo de corriente, el amplificador se enciende de
nuevo automáticamente.
●20 Master: Como ya permite suponer su nombre, con éste potenciómetro
tendrás el control sobre la etapa final y con ello sobre el volumen final,
entre el pulgar y el índice. Por esta razón es importante que, en todo lo
que se refiera a este regulador, actúes con cierta dosis de precaución (! Y
con una gran dosis de diversión, claro está!). El máster regula también el
volumen de la salida de auriculares (véase el punto 24 en este capítulo).
Observación: Al contrario que en los amplificadores de tubos Hughes &
Kettner, el nivel de salida de la Red Box del Black Spirit 200 Floor no se
ve influido por el ajuste del regulador máster (véase 4.1 «Red Box AE+»).
Nota: A diferencia de los reguladores de canal y efectos, el regulador
Master no es programable. Funciona como un potenciómetro normal y
corriente: la posición del regulador corresponde siempre al valor real. Por
lo tanto, es recomendable girar siempre el Master al tope izquierdo antes
de conectarlo.
●21 Resonance: Con el regulador en la posición central, puede escucharse
el comportamiento de resonancia «normal» entre el amplificador y la
caja. Girando a la izquierda se atenúa el efecto de la resonancia de
las cajas. Esto completa los sonidos limpios todavía más suavemente.
Girando a la derecha se amplifica el efecto, que principalmente con los
sonidos distorsionados proporciona un potente empuje de los graves.
●22 Presence: Este regulador determina la proporción de armónicos
generados. Cuanto más se abre, más «presente» se hace el sonido.
Indicación: La configuración para Resonance y Presence pueden ser
guardadas por cada Preset. Los dos reguladores pueden ser utilizados
como configuración Master, los cuales no cambian al conmutar los
Presets, al igual que el Master Volume. En el estado de suministro, el
amplificador se encuentra en el modo Preset, por lo tanto, los ajustes de
los dos reguladores se almacenan para cada preajuste, los dos reguladores
deben funcionar en el modo Global, véase el capítulo 7.2).
●23 Sagging: Junto con el regulador Gain, Sagging es tu herramienta
más importante para diseñar el sonido. Con este regulador tienes pleno
control sobre el comportamiento de saturación de la etapa final, con
cualquier volumen. Con un giro puedes activar el sonido de guitarra
más diverso, que mejora individualmente tu sonido. El regulador tiene
ocho posiciones, con cada graduación a la derecha aumenta el grado de
saturación de la etapa final.
●24 Phones/Line: En esta salida se conectan auriculares normales con
conector jack. Observación: Esta salida puede utilizarse también para
enviar una señal Line a una entrada multimedia estéreo cualquiera
como, p. ej. un sistema HiFi. Consulte con su distribuidor cuáles son los
adaptadores o cables correspondientes. Para conectar esta salida con una
Aux In típica o un sistema HiFi, se utilizan un cable con un conector jack
MASTERPRESENCERESONANCESAGGINGNOISE GATETREBLEMIDBASSVOLUME
50
1 8
2 7
3 64 5
GAINREVERBDLY LEVELFEEDBACKDLY T IMEMOD TYPEINTENSITY
CLEAN ULTRACRUNCH LEAD
POWER
PHONES / L INE
CAB TYPE
STOREFX LOOPFX ACCESSBOOST
PRE LOOP
OFF OFF1400 OFF
C
2
1T
F P
S P I R I T ™ T O N E G E N E R A T O R
18
2021 22 2423
16 17 19
25
25 25 25
2625 25 25
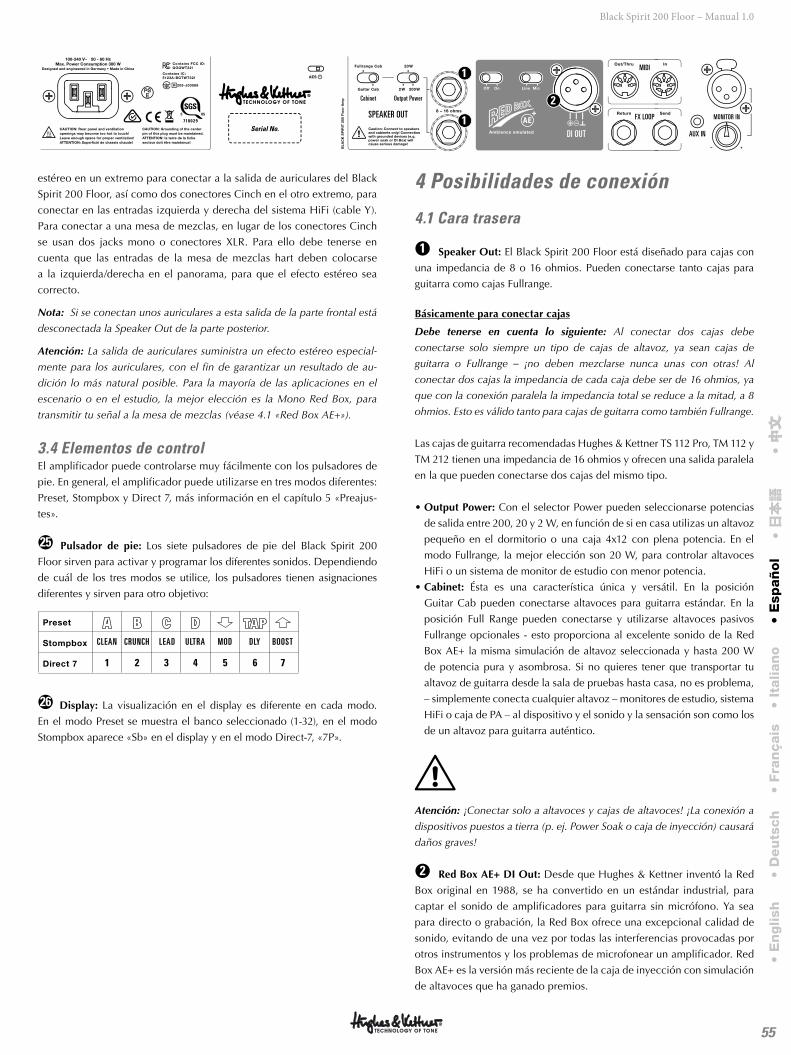
55
Black Spirit 200 Floor – Manual 1.0
estéreo en un extremo para conectar a la salida de auriculares del Black
Spirit 200 Floor, así como dos conectores Cinch en el otro extremo, para
conectar en las entradas izquierda y derecha del sistema HiFi (cable Y).
Para conectar a una mesa de mezclas, en lugar de los conectores Cinch
se usan dos jacks mono o conectores XLR. Para ello debe tenerse en
cuenta que las entradas de la mesa de mezclas hart deben colocarse
a la izquierda/derecha en el panorama, para que el efecto estéreo sea
correcto.
Nota: Si se conectan unos auriculares a esta salida de la parte frontal está
desconectada la Speaker Out de la parte posterior.
Atención: La salida de auriculares suministra un efecto estéreo especial-
mente para los auriculares, con el fin de garantizar un resultado de au-
dición lo más natural posible. Para la mayoría de las aplicaciones en el
escenario o en el estudio, la mejor elección es la Mono Red Box, para
transmitir tu señal a la mesa de mezclas (véase 4.1 «Red Box AE+»).
3.4 Elementos de control El amplificador puede controlarse muy fácilmente con los pulsadores de
pie. En general, el amplificador puede utilizarse en tres modos diferentes:
Preset, Stompbox y Direct 7, más información en el capítulo 5 «Preajus-
tes».
●25 Pulsador de pie: Los siete pulsadores de pie del Black Spirit 200
Floor sirven para activar y programar los diferentes sonidos. Dependiendo
de cuál de los tres modos se utilice, los pulsadores tienen asignaciones
diferentes y sirven para otro objetivo:
1
CLEAN
2
CRUNCH
3
LEAD
4
ULTRA
6
DLY
7
BOOST
5
MOD
●26 Display: La visualización en el display es diferente en cada modo.
En el modo Preset se muestra el banco seleccionado (1-32), en el modo
Stompbox aparece «Sb» en el display y en el modo Direct-7, «7P».
4 Posibilidades de conexión
4.1 Cara trasera
●1 Speaker Out: El Black Spirit 200 Floor está diseñado para cajas con
una impedancia de 8 o 16 ohmios. Pueden conectarse tanto cajas para
guitarra como cajas Fullrange.
Básicamente para conectar cajas
Debe tenerse en cuenta lo siguiente: Al conectar dos cajas debe
conectarse solo siempre un tipo de cajas de altavoz, ya sean cajas de
guitarra o Fullrange – ¡no deben mezclarse nunca unas con otras! Al
conectar dos cajas la impedancia de cada caja debe ser de 16 ohmios, ya
que con la conexión paralela la impedancia total se reduce a la mitad, a 8
ohmios. Esto es válido tanto para cajas de guitarra como también Fullrange.
Las cajas de guitarra recomendadas Hughes & Kettner TS 112 Pro, TM 112 y
TM 212 tienen una impedancia de 16 ohmios y ofrecen una salida paralela
en la que pueden conectarse dos cajas del mismo tipo.
• Output Power: Con el selector Power pueden seleccionarse potencias
de salida entre 200, 20 y 2 W, en función de si en casa utilizas un altavoz
pequeño en el dormitorio o una caja 4x12 con plena potencia. En el
modo Fullrange, la mejor elección son 20 W, para controlar altavoces
HiFi o un sistema de monitor de estudio con menor potencia.
• Cabinet: Ésta es una característica única y versátil. En la posición
Guitar Cab pueden conectarse altavoces para guitarra estándar. En la
posición Full Range pueden conectarse y utilizarse altavoces pasivos
Fullrange opcionales - esto proporciona al excelente sonido de la Red
Box AE+ la misma simulación de altavoz seleccionada y hasta 200 W
de potencia pura y asombrosa. Si no quieres tener que transportar tu
altavoz de guitarra desde la sala de pruebas hasta casa, no es problema,
– simplemente conecta cualquier altavoz – monitores de estudio, sistema
HiFi o caja de PA – al dispositivo y el sonido y la sensación son como los
de un altavoz para guitarra auténtico.
Atención: ¡Conectar solo a altavoces y cajas de altavoces! ¡La conexión a
dispositivos puestos a tierra (p. ej. Power Soak o caja de inyección) causará
daños graves!
●2 Red Box AE+ DI Out: Desde que Hughes & Kettner inventó la Red
Box original en 1988, se ha convertido en un estándar industrial, para
captar el sonido de amplificadores para guitarra sin micrófono. Ya sea
para directo o grabación, la Red Box ofrece una excepcional calidad de
sonido, evitando de una vez por todas las interferencias provocadas por
otros instrumentos y los problemas de microfonear un amplificador. Red
Box AE+ es la versión más reciente de la caja de inyección con simulación
de altavoces que ha ganado premios.
• E
nglish
• D
eu
tsch
• Fra
nçais
• It
alian
o•
Esp
añ
ol
• 日本語
• 中文
中文
Serial No.
Output Power
SPEAKER OUT
MIDI
FX LOOP
AUX IN
Cabinet
MONITOR IN
DI OUT
AE
1
1
2
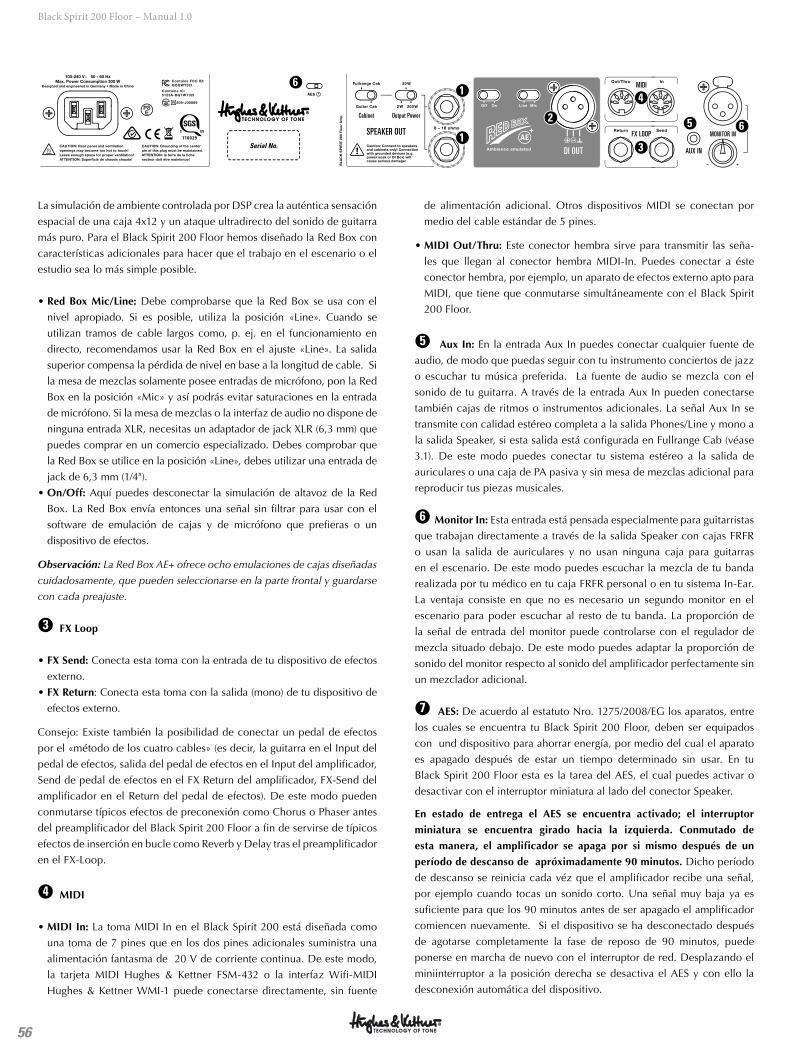
56
Black Spirit 200 Floor – Manual 1.0
La simulación de ambiente controlada por DSP crea la auténtica sensación
espacial de una caja 4x12 y un ataque ultradirecto del sonido de guitarra
más puro. Para el Black Spirit 200 Floor hemos diseñado la Red Box con
características adicionales para hacer que el trabajo en el escenario o el
estudio sea lo más simple posible.
• Red Box Mic/Line: Debe comprobarse que la Red Box se usa con el
nivel apropiado. Si es posible, utiliza la posición «Line». Cuando se
utilizan tramos de cable largos como, p. ej. en el funcionamiento en
directo, recomendamos usar la Red Box en el ajuste «Line». La salida
superior compensa la pérdida de nivel en base a la longitud de cable. Si
la mesa de mezclas solamente posee entradas de micrófono, pon la Red
Box en la posición «Mic» y así podrás evitar saturaciones en la entrada
de micrófono. Si la mesa de mezclas o la interfaz de audio no dispone de
ninguna entrada XLR, necesitas un adaptador de jack XLR (6,3 mm) que
puedes comprar en un comercio especializado. Debes comprobar que
la Red Box se utilice en la posición «Line», debes utilizar una entrada de
jack de 6,3 mm (1/4").
• On/Off: Aquí puedes desconectar la simulación de altavoz de la Red
Box. La Red Box envía entonces una señal sin filtrar para usar con el
software de emulación de cajas y de micrófono que prefieras o un
dispositivo de efectos.
Observación: La Red Box AE+ ofrece ocho emulaciones de cajas diseñadas
cuidadosamente, que pueden seleccionarse en la parte frontal y guardarse
con cada preajuste.
●3 FX Loop
• FX Send: Conecta esta toma con la entrada de tu dispositivo de efectos
externo.
• FX Return: Conecta esta toma con la salida (mono) de tu dispositivo de
efectos externo.
Consejo: Existe también la posibilidad de conectar un pedal de efectos
por el «método de los cuatro cables» (es decir, la guitarra en el Input del
pedal de efectos, salida del pedal de efectos en el Input del amplificador,
Send de pedal de efectos en el FX Return del amplificador, FX-Send del
amplificador en el Return del pedal de efectos). De este modo pueden
conmutarse típicos efectos de preconexión como Chorus o Phaser antes
del preamplificador del Black Spirit 200 Floor a fin de servirse de típicos
efectos de inserción en bucle como Reverb y Delay tras el preamplificador
en el FX-Loop.
●4 MIDI
• MIDI In: La toma MIDI In en el Black Spirit 200 está diseñada como
una toma de 7 pines que en los dos pines adicionales suministra una
alimentación fantasma de 20 V de corriente continua. De este modo,
la tarjeta MIDI Hughes & Kettner FSM-432 o la interfaz Wifi-MIDI
Hughes & Kettner WMI-1 puede conectarse directamente, sin fuente
de alimentación adicional. Otros dispositivos MIDI se conectan por
medio del cable estándar de 5 pines.
• MIDI Out/Thru: Este conector hembra sirve para transmitir las seña-
les que llegan al conector hembra MIDI-In. Puedes conectar a éste
conector hembra, por ejemplo, un aparato de efectos externo apto para
MIDI, que tiene que conmutarse simultáneamente con el Black Spirit
200 Floor.
●5 Aux In: En la entrada Aux In puedes conectar cualquier fuente de
audio, de modo que puedas seguir con tu instrumento conciertos de jazz
o escuchar tu música preferida. La fuente de audio se mezcla con el
sonido de tu guitarra. A través de la entrada Aux In pueden conectarse
también cajas de ritmos o instrumentos adicionales. La señal Aux In se
transmite con calidad estéreo completa a la salida Phones/Line y mono a
la salida Speaker, si esta salida está configurada en Fullrange Cab (véase
3.1). De este modo puedes conectar tu sistema estéreo a la salida de
auriculares o una caja de PA pasiva y sin mesa de mezclas adicional para
reproducir tus piezas musicales.
●6 Monitor In: Esta entrada está pensada especialmente para guitarristas
que trabajan directamente a través de la salida Speaker con cajas FRFR
o usan la salida de auriculares y no usan ninguna caja para guitarras
en el escenario. De este modo puedes escuchar la mezcla de tu banda
realizada por tu médico en tu caja FRFR personal o en tu sistema In-Ear.
La ventaja consiste en que no es necesario un segundo monitor en el
escenario para poder escuchar al resto de tu banda. La proporción de
la señal de entrada del monitor puede controlarse con el regulador de
mezcla situado debajo. De este modo puedes adaptar la proporción de
sonido del monitor respecto al sonido del amplificador perfectamente sin
un mezclador adicional.
●7 AES: De acuerdo al estatuto Nro. 1275/2008/EG los aparatos, entre
los cuales se encuentra tu Black Spirit 200 Floor, deben ser equipados
con und dispositivo para ahorrar energía, por medio del cual el aparato
es apagado después de estar un tiempo determinado sin usar. En tu
Black Spirit 200 Floor esta es la tarea del AES, el cual puedes activar o
desactivar con el interruptor miniatura al lado del conector Speaker.
En estado de entrega el AES se encuentra activado; el interruptor
miniatura se encuentra girado hacia la izquierda. Conmutado de
esta manera, el amplificador se apaga por si mismo después de un
período de descanso de apróximadamente 90 minutos. Dicho período
de descanso se reinicia cada véz que el amplificador recibe una señal,
por ejemplo cuando tocas un sonido corto. Una señal muy baja ya es
suficiente para que los 90 minutos antes de ser apagado el amplificador
comiencen nuevamente. Si el dispositivo se ha desconectado después
de agotarse completamente la fase de reposo de 90 minutos, puede
ponerse en marcha de nuevo con el interruptor de red. Desplazando el
miniinterruptor a la posición derecha se desactiva el AES y con ello la
desconexión automática del dispositivo.
Serial No.
Output Power
SPEAKER OUT
MIDI
FX LOOP
AUX IN
Cabinet
MONITOR IN
DI OUT
AE
1
1
2
3
4
5 6
6
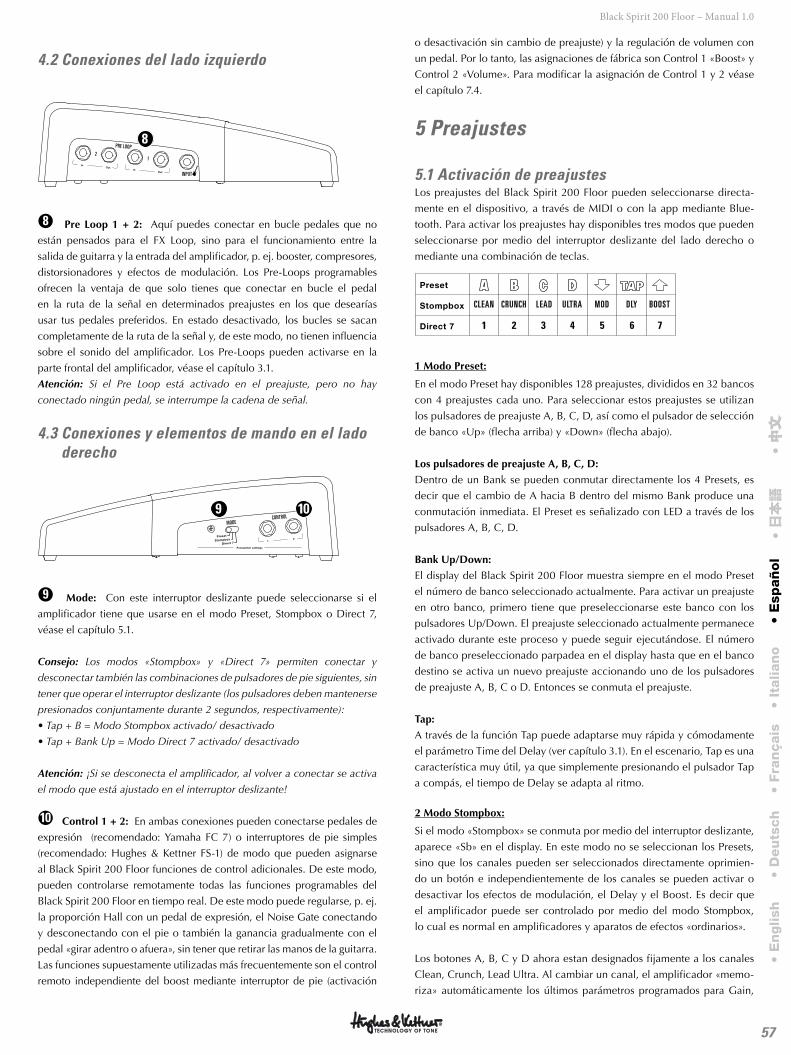
57
Black Spirit 200 Floor – Manual 1.0
4.2 Conexiones del lado izquierdo
INPUT
PRE LOOP
12
8
●8 Pre Loop 1 + 2: Aquí puedes conectar en bucle pedales que no
están pensados para el FX Loop, sino para el funcionamiento entre la
salida de guitarra y la entrada del amplificador, p. ej. booster, compresores,
distorsionadores y efectos de modulación. Los Pre-Loops programables
ofrecen la ventaja de que solo tienes que conectar en bucle el pedal
en la ruta de la señal en determinados preajustes en los que desearías
usar tus pedales preferidos. En estado desactivado, los bucles se sacan
completamente de la ruta de la señal y, de este modo, no tienen influencia
sobre el sonido del amplificador. Los Pre-Loops pueden activarse en la
parte frontal del amplificador, véase el capítulo 3.1.
Atención: Si el Pre Loop está activado en el preajuste, pero no hay
conectado ningún pedal, se interrumpe la cadena de señal.
4.3 Conexiones y elementos de mando en el lado derecho
CONTROLMODE
9 10
●9 Mode: Con este interruptor deslizante puede seleccionarse si el
amplificador tiene que usarse en el modo Preset, Stompbox o Direct 7,
véase el capítulo 5.1.
Consejo: Los modos «Stompbox» y «Direct 7» permiten conectar y
desconectar también las combinaciones de pulsadores de pie siguientes, sin
tener que operar el interruptor deslizante (los pulsadores deben mantenerse
presionados conjuntamente durante 2 segundos, respectivamente):
• Tap + B = Modo Stompbox activado/ desactivado
• Tap + Bank Up = Modo Direct 7 activado/ desactivado
Atención: ¡Si se desconecta el amplificador, al volver a conectar se activa
el modo que está ajustado en el interruptor deslizante!
●10 Control 1 + 2: En ambas conexiones pueden conectarse pedales de
expresión (recomendado: Yamaha FC 7) o interruptores de pie simples
(recomendado: Hughes & Kettner FS-1) de modo que pueden asignarse
al Black Spirit 200 Floor funciones de control adicionales. De este modo,
pueden controlarse remotamente todas las funciones programables del
Black Spirit 200 Floor en tiempo real. De este modo puede regularse, p. ej.
la proporción Hall con un pedal de expresión, el Noise Gate conectando
y desconectando con el pie o también la ganancia gradualmente con el
pedal «girar adentro o afuera», sin tener que retirar las manos de la guitarra.
Las funciones supuestamente utilizadas más frecuentemente son el control
remoto independiente del boost mediante interruptor de pie (activación
o desactivación sin cambio de preajuste) y la regulación de volumen con
un pedal. Por lo tanto, las asignaciones de fábrica son Control 1 «Boost» y
Control 2 «Volume». Para modificar la asignación de Control 1 y 2 véase
el capítulo 7.4.
5 Preajustes
5.1 Activación de preajustesLos preajustes del Black Spirit 200 Floor pueden seleccionarse directa-
mente en el dispositivo, a través de MIDI o con la app mediante Blue-
tooth. Para activar los preajustes hay disponibles tres modos que pueden
seleccionarse por medio del interruptor deslizante del lado derecho o
mediante una combinación de teclas.
1
CLEAN
2
CRUNCH
3
LEAD
4
ULTRA
6
DLY
7
BOOST
5
MOD
1 Modo Preset:
En el modo Preset hay disponibles 128 preajustes, divididos en 32 bancos
con 4 preajustes cada uno. Para seleccionar estos preajustes se utilizan
los pulsadores de preajuste A, B, C, D, así como el pulsador de selección
de banco «Up» (flecha arriba) y «Down» (flecha abajo).
Los pulsadores de preajuste A, B, C, D:
Dentro de un Bank se pueden conmutar directamente los 4 Presets, es
decir que el cambio de A hacia B dentro del mismo Bank produce una
conmutación inmediata. El Preset es señalizado con LED a través de los
pulsadores A, B, C, D.
Bank Up/Down:
El display del Black Spirit 200 Floor muestra siempre en el modo Preset
el número de banco seleccionado actualmente. Para activar un preajuste
en otro banco, primero tiene que preseleccionarse este banco con los
pulsadores Up/Down. El preajuste seleccionado actualmente permanece
activado durante este proceso y puede seguir ejecutándose. El número
de banco preseleccionado parpadea en el display hasta que en el banco
destino se activa un nuevo preajuste accionando uno de los pulsadores
de preajuste A, B, C o D. Entonces se conmuta el preajuste.
Tap:
A través de la función Tap puede adaptarse muy rápida y cómodamente
el parámetro Time del Delay (ver capítulo 3.1). En el escenario, Tap es una
característica muy útil, ya que simplemente presionando el pulsador Tap
a compás, el tiempo de Delay se adapta al ritmo.
2 Modo Stompbox:
Si el modo «Stompbox» se conmuta por medio del interruptor deslizante,
aparece «Sb» en el display. En este modo no se seleccionan los Presets,
sino que los canales pueden ser seleccionados directamente oprimien-
do un botón e independientemente de los canales se pueden activar o
desactivar los efectos de modulación, el Delay y el Boost. Es decir que
el amplificador puede ser controlado por medio del modo Stompbox,
lo cual es normal en amplificadores y aparatos de efectos «ordinarios».
Los botones A, B, C y D ahora estan designados fijamente a los canales
Clean, Crunch, Lead Ultra. Al cambiar un canal, el amplificador «memo-
riza» automáticamente los últimos parámetros programados para Gain,
• E
nglish
• D
eu
tsch
• Fra
nçais
• It
alian
o•
Esp
añ
ol
• 日本語
• 中文
中文
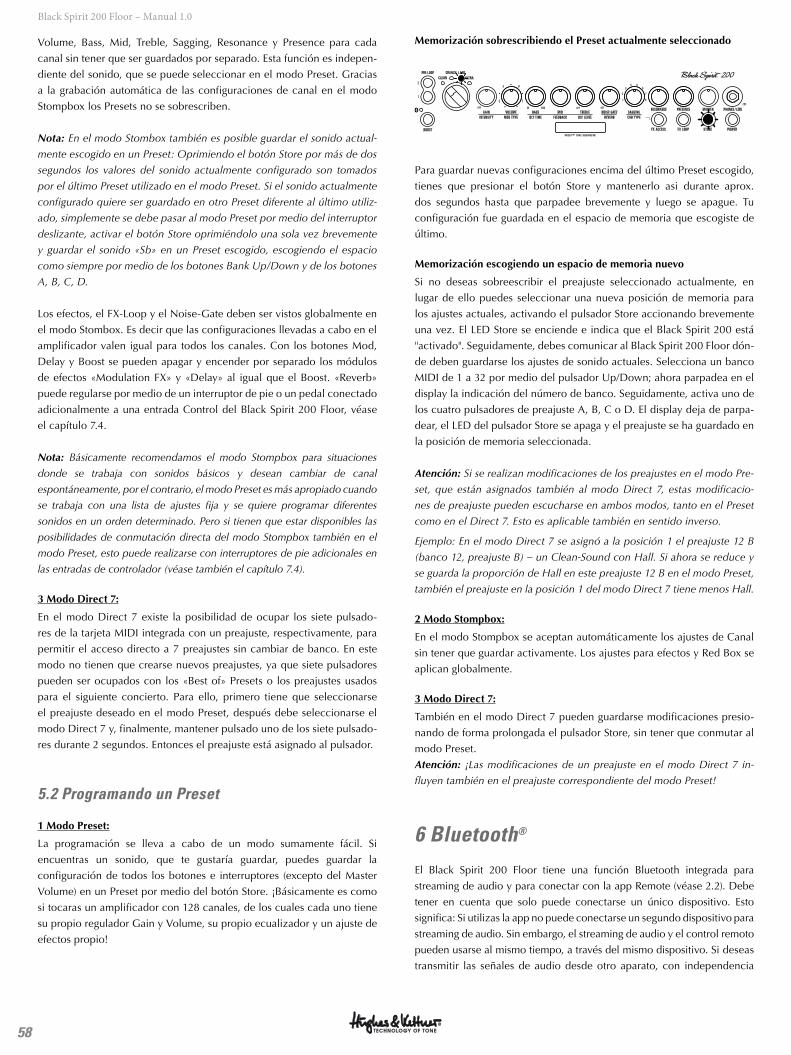
58
Black Spirit 200 Floor – Manual 1.0
Volume, Bass, Mid, Treble, Sagging, Resonance y Presence para cada
canal sin tener que ser guardados por separado. Esta función es indepen-
diente del sonido, que se puede seleccionar en el modo Preset. Gracias
a la grabación automática de las configuraciones de canal en el modo
Stompbox los Presets no se sobrescriben.
Nota: En el modo Stombox también es posible guardar el sonido actual-
mente escogido en un Preset: Oprimiendo el botón Store por más de dos
segundos los valores del sonido actualmente configurado son tomados
por el último Preset utilizado en el modo Preset. Si el sonido actualmente
configurado quiere ser guardado en otro Preset diferente al último utiliz-
ado, simplemente se debe pasar al modo Preset por medio del interruptor
deslizante, activar el botón Store oprimiéndolo una sola vez brevemente
y guardar el sonido «Sb» en un Preset escogido, escogiendo el espacio
como siempre por medio de los botones Bank Up/Down y de los botones
A, B, C, D.
Los efectos, el FX-Loop y el Noise-Gate deben ser vistos globalmente en
el modo Stombox. Es decir que las configuraciones llevadas a cabo en el
amplificador valen igual para todos los canales. Con los botones Mod,
Delay y Boost se pueden apagar y encender por separado los módulos
de efectos «Modulation FX» y «Delay» al igual que el Boost. «Reverb»
puede regularse por medio de un interruptor de pie o un pedal conectado
adicionalmente a una entrada Control del Black Spirit 200 Floor, véase
el capítulo 7.4.
Nota: Básicamente recomendamos el modo Stompbox para situaciones
donde se trabaja con sonidos básicos y desean cambiar de canal
espontáneamente, por el contrario, el modo Preset es más apropiado cuando
se trabaja con una lista de ajustes fija y se quiere programar diferentes
sonidos en un orden determinado. Pero si tienen que estar disponibles las
posibilidades de conmutación directa del modo Stompbox también en el
modo Preset, esto puede realizarse con interruptores de pie adicionales en
las entradas de controlador (véase también el capítulo 7.4).
3 Modo Direct 7:
En el modo Direct 7 existe la posibilidad de ocupar los siete pulsado-
res de la tarjeta MIDI integrada con un preajuste, respectivamente, para
permitir el acceso directo a 7 preajustes sin cambiar de banco. En este
modo no tienen que crearse nuevos preajustes, ya que siete pulsadores
pueden ser ocupados con los «Best of» Presets o los preajustes usados
para el siguiente concierto. Para ello, primero tiene que seleccionarse
el preajuste deseado en el modo Preset, después debe seleccionarse el
modo Direct 7 y, finalmente, mantener pulsado uno de los siete pulsado-
res durante 2 segundos. Entonces el preajuste está asignado al pulsador.
5.2 Programando un Preset
1 Modo Preset:
La programación se lleva a cabo de un modo sumamente fácil. Si
encuentras un sonido, que te gustaría guardar, puedes guardar la
configuración de todos los botones e interruptores (excepto del Master
Volume) en un Preset por medio del botón Store. ¡Básicamente es como
si tocaras un amplificador con 128 canales, de los cuales cada uno tiene
su propio regulador Gain y Volume, su propio ecualizador y un ajuste de
efectos propio!
Memorización sobrescribiendo el Preset actualmente seleccionado
MASTERPRESENCERESONANCESAGGINGNOISE GATETREBLEMIDBASSVOLUME
50
1 8
2 7
3 64 5
GAINREVERBDLY LEVELFEEDBACKDLY T IMEMOD TYPEINTENSITY
CLEAN ULTRACRUNCH LEAD
POWER
PHONES / L INE
CAB TYPE
STOREFX LOOPFX ACCESSBOOST
PRE LOOP
OFF OFF1400 OFF
C
2
1T
F P
S P I R I T ™ T O N E G E N E R A T O R
Para guardar nuevas configuraciones encima del último Preset escogido,
tienes que presionar el botón Store y mantenerlo asi durante aprox.
dos segundos hasta que parpadee brevemente y luego se apague. Tu
configuración fue guardada en el espacio de memoria que escogiste de
último.
Memorización escogiendo un espacio de memoria nuevo
Si no deseas sobreescribir el preajuste seleccionado actualmente, en
lugar de ello puedes seleccionar una nueva posición de memoria para
los ajustes actuales, activando el pulsador Store accionando brevemente
una vez. El LED Store se enciende e indica que el Black Spirit 200 está
"activado". Seguidamente, debes comunicar al Black Spirit 200 Floor dón-
de deben guardarse los ajustes de sonido actuales. Selecciona un banco
MIDI de 1 a 32 por medio del pulsador Up/Down; ahora parpadea en el
display la indicación del número de banco. Seguidamente, activa uno de
los cuatro pulsadores de preajuste A, B, C o D. El display deja de parpa-
dear, el LED del pulsador Store se apaga y el preajuste se ha guardado en
la posición de memoria seleccionada.
Atención: Si se realizan modificaciones de los preajustes en el modo Pre-
set, que están asignados también al modo Direct 7, estas modificacio-
nes de preajuste pueden escucharse en ambos modos, tanto en el Preset
como en el Direct 7. Esto es aplicable también en sentido inverso.
Ejemplo: En el modo Direct 7 se asignó a la posición 1 el preajuste 12 B
(banco 12, preajuste B) – un Clean-Sound con Hall. Si ahora se reduce y
se guarda la proporción de Hall en este preajuste 12 B en el modo Preset,
también el preajuste en la posición 1 del modo Direct 7 tiene menos Hall.
2 Modo Stompbox:
En el modo Stompbox se aceptan automáticamente los ajustes de Canal
sin tener que guardar activamente. Los ajustes para efectos y Red Box se
aplican globalmente.
3 Modo Direct 7:
También en el modo Direct 7 pueden guardarse modificaciones presio-
nando de forma prolongada el pulsador Store, sin tener que conmutar al
modo Preset.
Atención: ¡Las modificaciones de un preajuste en el modo Direct 7 in-
fluyen también en el preajuste correspondiente del modo Preset!
6 Bluetooth®
El Black Spirit 200 Floor tiene una función Bluetooth integrada para
streaming de audio y para conectar con la app Remote (véase 2.2). Debe
tener en cuenta que solo puede conectarse un único dispositivo. Esto
significa: Si utilizas la app no puede conectarse un segundo dispositivo para
streaming de audio. Sin embargo, el streaming de audio y el control remoto
pueden usarse al mismo tiempo, a través del mismo dispositivo. Si deseas
transmitir las señales de audio desde otro aparato, con independencia
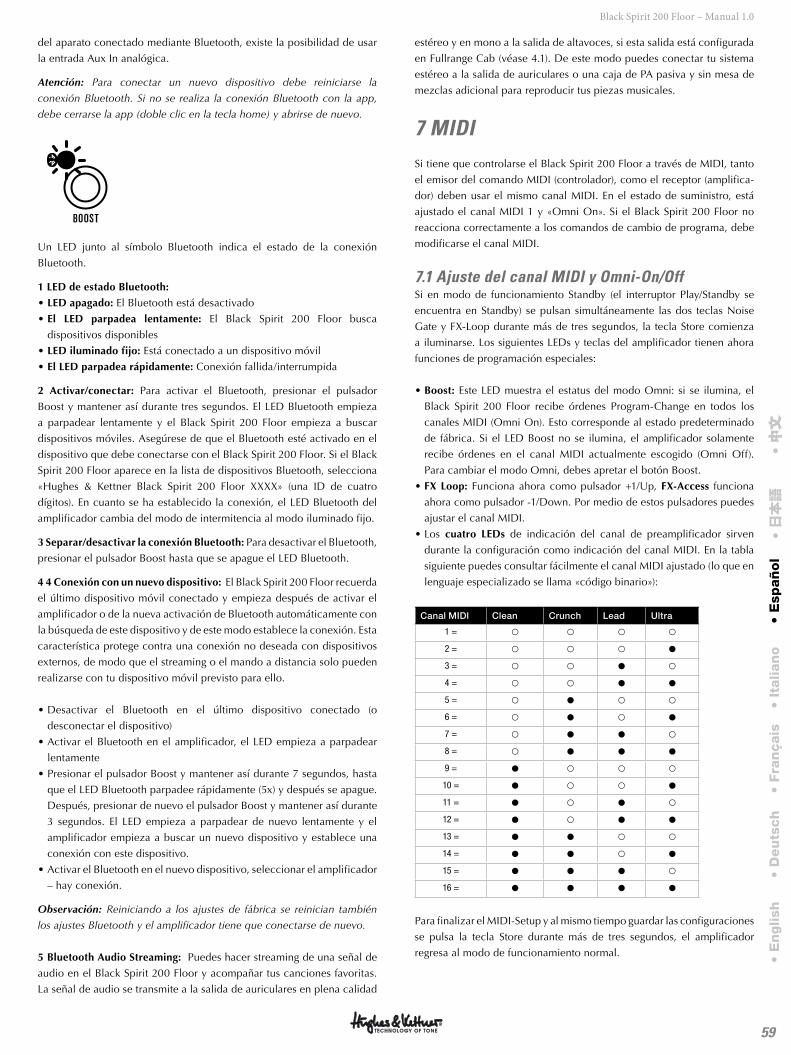
59
Black Spirit 200 Floor – Manual 1.0
del aparato conectado mediante Bluetooth, existe la posibilidad de usar
la entrada Aux In analógica.
Atención: Para conectar un nuevo dispositivo debe reiniciarse la
conexión Bluetooth. Si no se realiza la conexión Bluetooth con la app,
debe cerrarse la app (doble clic en la tecla home) y abrirse de nuevo.
BOOST
Un LED junto al símbolo Bluetooth indica el estado de la conexión
Bluetooth.
1 LED de estado Bluetooth:
• LED apagado: El Bluetooth está desactivado
• El LED parpadea lentamente: El Black Spirit 200 Floor busca
dispositivos disponibles
• LED iluminado fijo: Está conectado a un dispositivo móvil
• El LED parpadea rápidamente: Conexión fallida/interrumpida
2 Activar/conectar: Para activar el Bluetooth, presionar el pulsador
Boost y mantener así durante tres segundos. El LED Bluetooth empieza
a parpadear lentamente y el Black Spirit 200 Floor empieza a buscar
dispositivos móviles. Asegúrese de que el Bluetooth esté activado en el
dispositivo que debe conectarse con el Black Spirit 200 Floor. Si el Black
Spirit 200 Floor aparece en la lista de dispositivos Bluetooth, selecciona
«Hughes & Kettner Black Spirit 200 Floor XXXX» (una ID de cuatro
dígitos). En cuanto se ha establecido la conexión, el LED Bluetooth del
amplificador cambia del modo de intermitencia al modo iluminado fijo.
3 Separar/desactivar la conexión Bluetooth: Para desactivar el Bluetooth,
presionar el pulsador Boost hasta que se apague el LED Bluetooth.
4 4 Conexión con un nuevo dispositivo: El Black Spirit 200 Floor recuerda
el último dispositivo móvil conectado y empieza después de activar el
amplificador o de la nueva activación de Bluetooth automáticamente con
la búsqueda de este dispositivo y de este modo establece la conexión. Esta
característica protege contra una conexión no deseada con dispositivos
externos, de modo que el streaming o el mando a distancia solo pueden
realizarse con tu dispositivo móvil previsto para ello.
• Desactivar el Bluetooth en el último dispositivo conectado (o
desconectar el dispositivo)
• Activar el Bluetooth en el amplificador, el LED empieza a parpadear
lentamente
• Presionar el pulsador Boost y mantener así durante 7 segundos, hasta
que el LED Bluetooth parpadee rápidamente (5x) y después se apague.
Después, presionar de nuevo el pulsador Boost y mantener así durante
3 segundos. El LED empieza a parpadear de nuevo lentamente y el
amplificador empieza a buscar un nuevo dispositivo y establece una
conexión con este dispositivo.
• Activar el Bluetooth en el nuevo dispositivo, seleccionar el amplificador
– hay conexión.
Observación: Reiniciando a los ajustes de fábrica se reinician también
los ajustes Bluetooth y el amplificador tiene que conectarse de nuevo.
5 Bluetooth Audio Streaming: Puedes hacer streaming de una señal de
audio en el Black Spirit 200 Floor y acompañar tus canciones favoritas.
La señal de audio se transmite a la salida de auriculares en plena calidad
estéreo y en mono a la salida de altavoces, si esta salida está configurada
en Fullrange Cab (véase 4.1). De este modo puedes conectar tu sistema
estéreo a la salida de auriculares o una caja de PA pasiva y sin mesa de
mezclas adicional para reproducir tus piezas musicales.
7 MIDISi tiene que controlarse el Black Spirit 200 Floor a través de MIDI, tanto
el emisor del comando MIDI (controlador), como el receptor (amplifica-
dor) deben usar el mismo canal MIDI. En el estado de suministro, está
ajustado el canal MIDI 1 y «Omni On». Si el Black Spirit 200 Floor no
reacciona correctamente a los comandos de cambio de programa, debe
modificarse el canal MIDI.
7.1 Ajuste del canal MIDI y Omni-On/OffSi en modo de funcionamiento Standby (el interruptor Play/Standby se
encuentra en Standby) se pulsan simultáneamente las dos teclas Noise
Gate y FX-Loop durante más de tres segundos, la tecla Store comienza
a iluminarse. Los siguientes LEDs y teclas del amplificador tienen ahora
funciones de programación especiales:
• Boost: Este LED muestra el estatus del modo Omni: si se ilumina, el
Black Spirit 200 Floor recibe órdenes Program-Change en todos los
canales MIDI (Omni On). Esto corresponde al estado predeterminado
de fábrica. Si el LED Boost no se ilumina, el amplificador solamente
recibe órdenes en el canal MIDI actualmente escogido (Omni Off).
Para cambiar el modo Omni, debes apretar el botón Boost.
• FX Loop: Funciona ahora como pulsador +1/Up, FX-Access funciona
ahora como pulsador -1/Down. Por medio de estos pulsadores puedes
ajustar el canal MIDI.
• Los cuatro LEDs de indicación del canal de preamplificador sirven
durante la configuración como indicación del canal MIDI. En la tabla
siguiente puedes consultar fácilmente el canal MIDI ajustado (lo que en
lenguaje especializado se llama «código binario»):
Canal MIDl Clean Crunch Lead Ultra
1 = ¢ ¢ ¢ ¢
2 = ¢ ¢ ¢ {
3 = ¢ ¢ £ ¢
4 = ¢ ¢ £ £
5 = ¢ £ ¢ ¢
6 = ¢ £ ¢ £
7 = ¢ £ £ ¢
8 = ¢ £ £ £
9 = £ ¢ ¢ ¢
10 = £ ¢ ¢ £
11 = £ ¢ £ ¢
12 = £ ¢ £ £
13 = £ £ ¢ ¢
14 = £ £ ¢ £
15 = £ £ £ ¢
16 = £ £ £ £
Para finalizar el MIDI-Setup y al mismo tiempo guardar las configuraciones
se pulsa la tecla Store durante más de tres segundos, el amplificador
regresa al modo de funcionamiento normal. • E
nglish
• D
eu
tsch
• Fra
nçais
• It
alian
o•
Esp
añ
ol
• 日本語
• 中文
中文
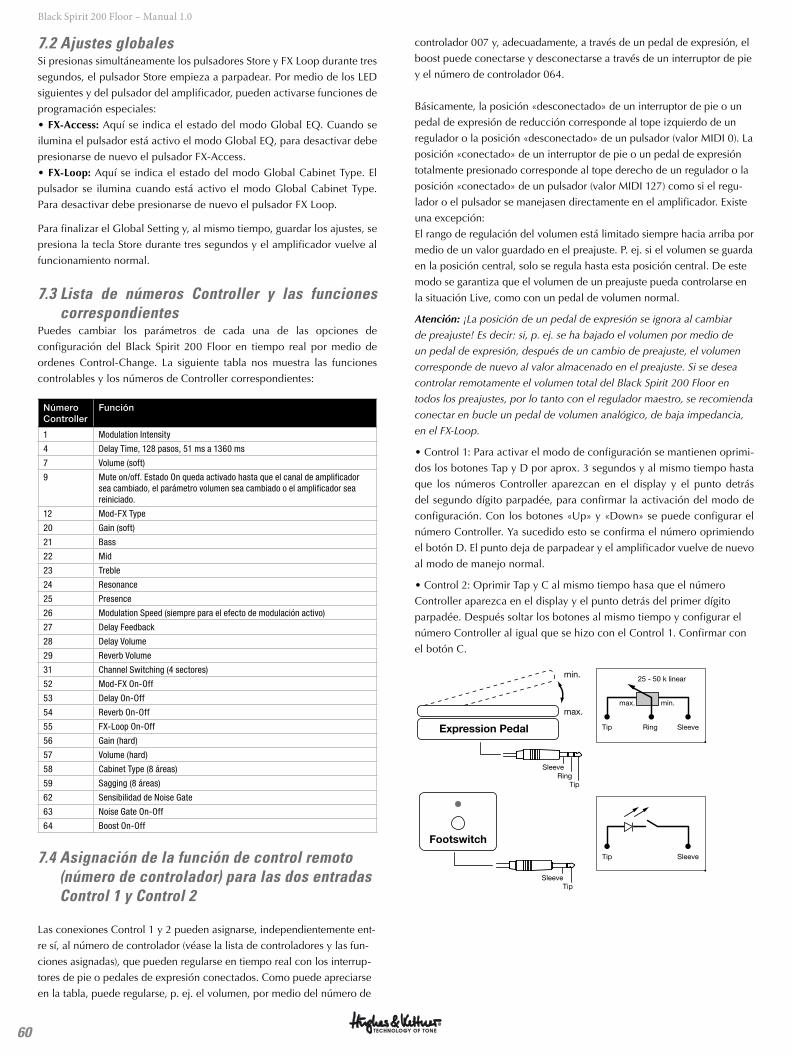
60
Black Spirit 200 Floor – Manual 1.0
7.2 Ajustes globalesSi presionas simultáneamente los pulsadores Store y FX Loop durante tres
segundos, el pulsador Store empieza a parpadear. Por medio de los LED
siguientes y del pulsador del amplificador, pueden activarse funciones de
programación especiales:
• FX-Access: Aquí se indica el estado del modo Global EQ. Cuando se
ilumina el pulsador está activo el modo Global EQ, para desactivar debe
presionarse de nuevo el pulsador FX-Access.
• FX-Loop: Aquí se indica el estado del modo Global Cabinet Type. El
pulsador se ilumina cuando está activo el modo Global Cabinet Type.
Para desactivar debe presionarse de nuevo el pulsador FX Loop.
Para finalizar el Global Setting y, al mismo tiempo, guardar los ajustes, se
presiona la tecla Store durante tres segundos y el amplificador vuelve al
funcionamiento normal.
7.3 Lista de números Controller y las funciones correspondientes
Puedes cambiar los parámetros de cada una de las opciones de
configuración del Black Spirit 200 Floor en tiempo real por medio de
ordenes Control-Change. La siguiente tabla nos muestra las funciones
controlables y los números de Controller correspondientes:
Número Controller
Función
1 Modulation Intensity
4 Delay Time, 128 pasos, 51 ms a 1360 ms
7 Volume (soft)
9 Mute on/off. Estado On queda activado hasta que el canal de amplificador sea cambiado, el parámetro volumen sea cambiado o el amplificador sea reiniciado.
12 Mod-FX Type
20 Gain (soft)
21 Bass
22 Mid
23 Treble
24 Resonance
25 Presence
26 Modulation Speed (siempre para el efecto de modulación activo)
27 Delay Feedback
28 Delay Volume
29 Reverb Volume
31 Channel Switching (4 sectores)
52 Mod-FX On-Off
53 Delay On-Off
54 Reverb On-Off
55 FX-Loop On-Off
56 Gain (hard)
57 Volume (hard)
58 Cabinet Type (8 áreas)
59 Sagging (8 áreas)
62 Sensibilidad de Noise Gate
63 Noise Gate On-Off
64 Boost On-Off
7.4 Asignación de la función de control remoto (número de controlador) para las dos entradas Control 1 y Control 2
Las conexiones Control 1 y 2 pueden asignarse, independientemente ent-
re sí, al número de controlador (véase la lista de controladores y las fun-
ciones asignadas), que pueden regularse en tiempo real con los interrup-
tores de pie o pedales de expresión conectados. Como puede apreciarse
en la tabla, puede regularse, p. ej. el volumen, por medio del número de
controlador 007 y, adecuadamente, a través de un pedal de expresión, el
boost puede conectarse y desconectarse a través de un interruptor de pie
y el número de controlador 064.
Básicamente, la posición «desconectado» de un interruptor de pie o un
pedal de expresión de reducción corresponde al tope izquierdo de un
regulador o la posición «desconectado» de un pulsador (valor MIDI 0). La
posición «conectado» de un interruptor de pie o un pedal de expresión
totalmente presionado corresponde al tope derecho de un regulador o la
posición «conectado» de un pulsador (valor MIDI 127) como si el regu-
lador o el pulsador se manejasen directamente en el amplificador. Existe
una excepción:
El rango de regulación del volumen está limitado siempre hacia arriba por
medio de un valor guardado en el preajuste. P. ej. si el volumen se guarda
en la posición central, solo se regula hasta esta posición central. De este
modo se garantiza que el volumen de un preajuste pueda controlarse en
la situación Live, como con un pedal de volumen normal.
Atención: ¡La posición de un pedal de expresión se ignora al cambiar
de preajuste! Es decir: si, p. ej. se ha bajado el volumen por medio de
un pedal de expresión, después de un cambio de preajuste, el volumen
corresponde de nuevo al valor almacenado en el preajuste. Si se desea
controlar remotamente el volumen total del Black Spirit 200 Floor en
todos los preajustes, por lo tanto con el regulador maestro, se recomienda
conectar en bucle un pedal de volumen analógico, de baja impedancia,
en el FX-Loop.
• Control 1: Para activar el modo de configuración se mantienen oprimi-
dos los botones Tap y D por aprox. 3 segundos y al mismo tiempo hasta
que los números Controller aparezcan en el display y el punto detrás
del segundo dígito parpadée, para confirmar la activación del modo de
configuración. Con los botones «Up» y «Down» se puede configurar el
número Controller. Ya sucedido esto se confirma el número oprimiendo
el botón D. El punto deja de parpadear y el amplificador vuelve de nuevo
al modo de manejo normal.
• Control 2: Oprimir Tap y C al mismo tiempo hasa que el número
Controller aparezca en el display y el punto detrás del primer dígito
parpadée. Después soltar los botones al mismo tiempo y configurar el
número Controller al igual que se hizo con el Control 1. Confirmar con
el botón C.
min.
max.
SleeveRing
Tip
Tip Ring Sleeve
max.
25 - 50 k linear
min.
Expression Pedal
SleeveTip
Footswitch
Tip Sleeve
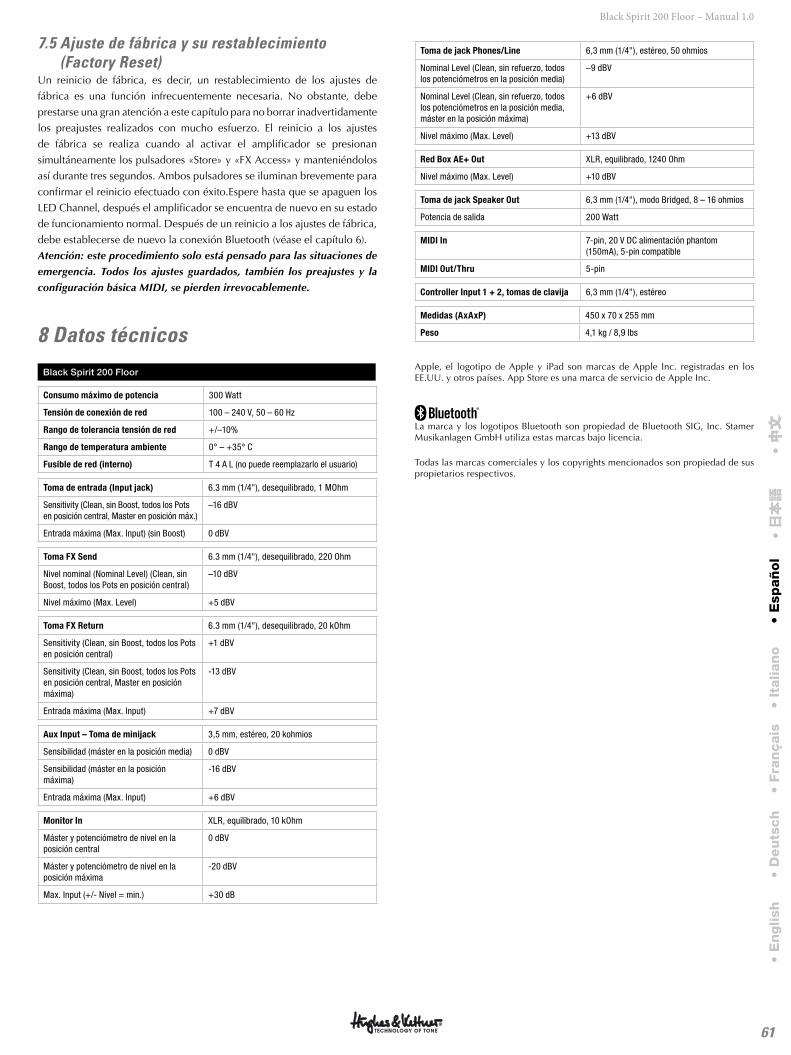
61
Black Spirit 200 Floor – Manual 1.0
7.5 Ajuste de fábrica y su restablecimiento ( Factory Reset)
Un reinicio de fábrica, es decir, un restablecimiento de los ajustes de
fábrica es una función infrecuentemente necesaria. No obstante, debe
prestarse una gran atención a este capítulo para no borrar inadvertidamente
los preajustes realizados con mucho esfuerzo. El reinicio a los ajustes
de fábrica se realiza cuando al activar el amplificador se presionan
simultáneamente los pulsadores «Store» y «FX Access» y manteniéndolos
así durante tres segundos. Ambos pulsadores se iluminan brevemente para
confirmar el reinicio efectuado con éxito.Espere hasta que se apaguen los
LED Channel, después el amplificador se encuentra de nuevo en su estado
de funcionamiento normal. Después de un reinicio a los ajustes de fábrica,
debe establecerse de nuevo la conexión Bluetooth (véase el capítulo 6).
Atención: este procedimiento solo está pensado para las situaciones de
emergencia. Todos los ajustes guardados, también los preajustes y la
configuración básica MIDI, se pierden irrevocablemente.
8 Datos técnicos
Black Spirit 200 Floor
Consumo máximo de potencia 300 Watt
Tensión de conexión de red 100 – 240 V, 50 – 60 Hz
Rango de tolerancia tensión de red +/–10%
Rango de temperatura ambiente 0° – +35° C
Fusible de red (interno) T 4 A L (no puede reemplazarlo el usuario)
Toma de entrada (Input jack) 6.3 mm (1/4"), desequilibrado, 1 MOhm
Sensitivity (Clean, sin Boost, todos los Pots en posición central, Master en posición máx.)
–16 dBV
Entrada máxima (Max. Input) (sin Boost) 0 dBV
Toma FX Send 6.3 mm (1/4"), desequilibrado, 220 Ohm
Nivel nominal (Nominal Level) (Clean, sin Boost, todos los Pots en posición central)
–10 dBV
Nivel máximo (Max. Level) +5 dBV
Toma FX Return 6.3 mm (1/4"), desequilibrado, 20 kOhm
Sensitivity (Clean, sin Boost, todos los Pots en posición central)
+1 dBV
Sensitivity (Clean, sin Boost, todos los Pots en posición central, Master en posición máxima)
-13 dBV
Entrada máxima (Max. Input) +7 dBV
Aux Input – Toma de minijack 3,5 mm, estéreo, 20 kohmios
Sensibilidad (máster en la posición media) 0 dBV
Sensibilidad (máster en la posición máxima)
-16 dBV
Entrada máxima (Max. Input) +6 dBV
Monitor In XLR, equilibrado, 10 kOhm
Máster y potenciómetro de nivel en la posición central
0 dBV
Máster y potenciómetro de nivel en la posición máxima
-20 dBV
Max. Input (+/- Nivel = min.) +30 dB
Toma de jack Phones/Line 6,3 mm (1/4"), estéreo, 50 ohmios
Nominal Level (Clean, sin refuerzo, todos los potenciómetros en la posición media)
–9 dBV
Nominal Level (Clean, sin refuerzo, todos los potenciómetros en la posición media, máster en la posición máxima)
+6 dBV
Nivel máximo (Max. Level) +13 dBV
Red Box AE+ Out XLR, equilibrado, 1240 Ohm
Nivel máximo (Max. Level) +10 dBV
Toma de jack Speaker Out 6,3 mm (1/4"), modo Bridged, 8 – 16 ohmios
Potencia de salida 200 Watt
MIDI In 7-pin, 20 V DC alimentación phantom (150mA), 5-pin compatible
MIDI Out/Thru 5-pin
Controller Input 1 + 2, tomas de clavija 6,3 mm (1/4"), estéreo
Medidas (AxAxP) 450 x 70 x 255 mm
Peso 4,1 kg / 8,9 lbs
Apple, el logotipo de Apple y iPad son marcas de Apple Inc. registradas en los EE.UU. y otros países. App Store es una marca de servicio de Apple Inc.
La marca y los logotipos Bluetooth son propiedad de Bluetooth SIG, Inc. Stamer Musikanlagen GmbH utiliza estas marcas bajo licencia.
Todas las marcas comerciales y los copyrights mencionados son propiedad de sus propietarios respectivos.
• E
nglish
• D
eu
tsch
• Fra
nçais
• It
alian
o•
Esp
añ
ol
• 日本語
• 中文
中文
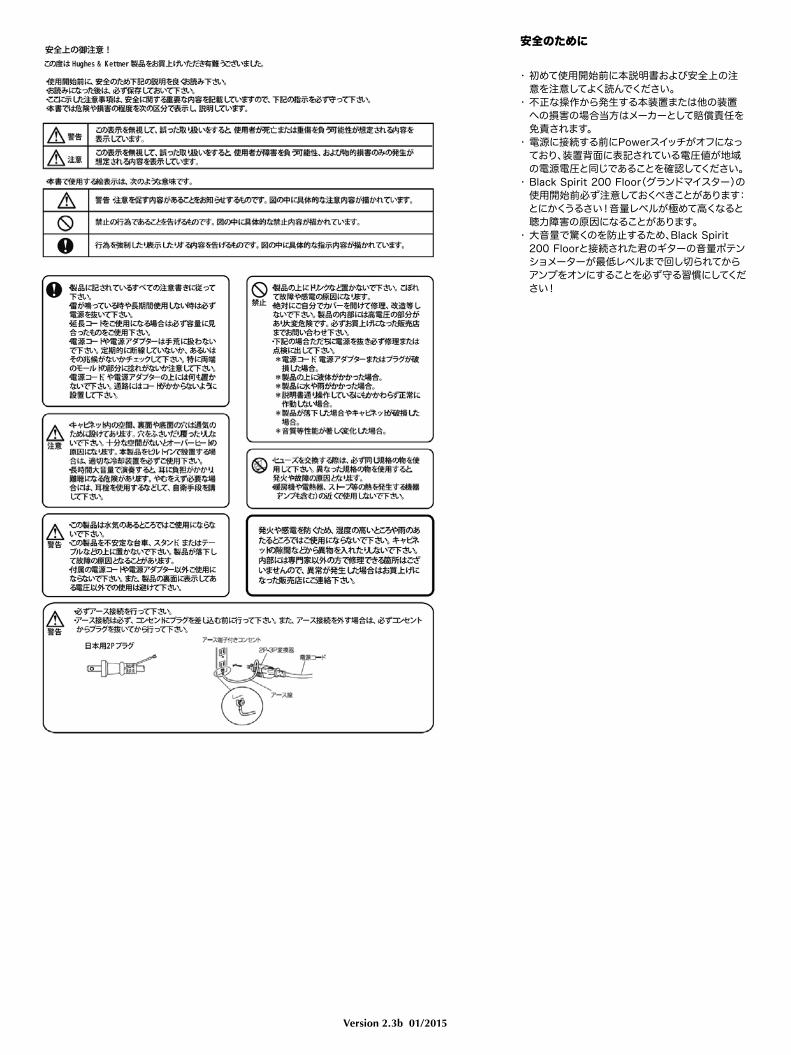
Version 2.3b 01/2015
安全のために
• 初めて使用開始前に本説明書および安全上の注意を注意してよく読んでください。• 不正な操作から発生する本装置または他の装置への損害の場合当方はメーカーとして賠償責任を免責されます。• 電源に接続する前にPowerスイッチがオフになっており、装置背面に表記されている電圧値が地域の電源電圧と同じであることを確認してください。• Black Spirit 200 Floor(グランドマイスター)の使用開始前必ず注意しておくべきことがあります:とにかくうるさい!音量レベルが極めて高くなると聴力障害の原因になることがあります。• 大音量で驚くのを防止するため、Black Spirit 200 Floorと接続された君のギターの音量ポテンショメーターが最低レベルまで回し切られてからアンプをオンにすることを必ず守る習慣にしてください!
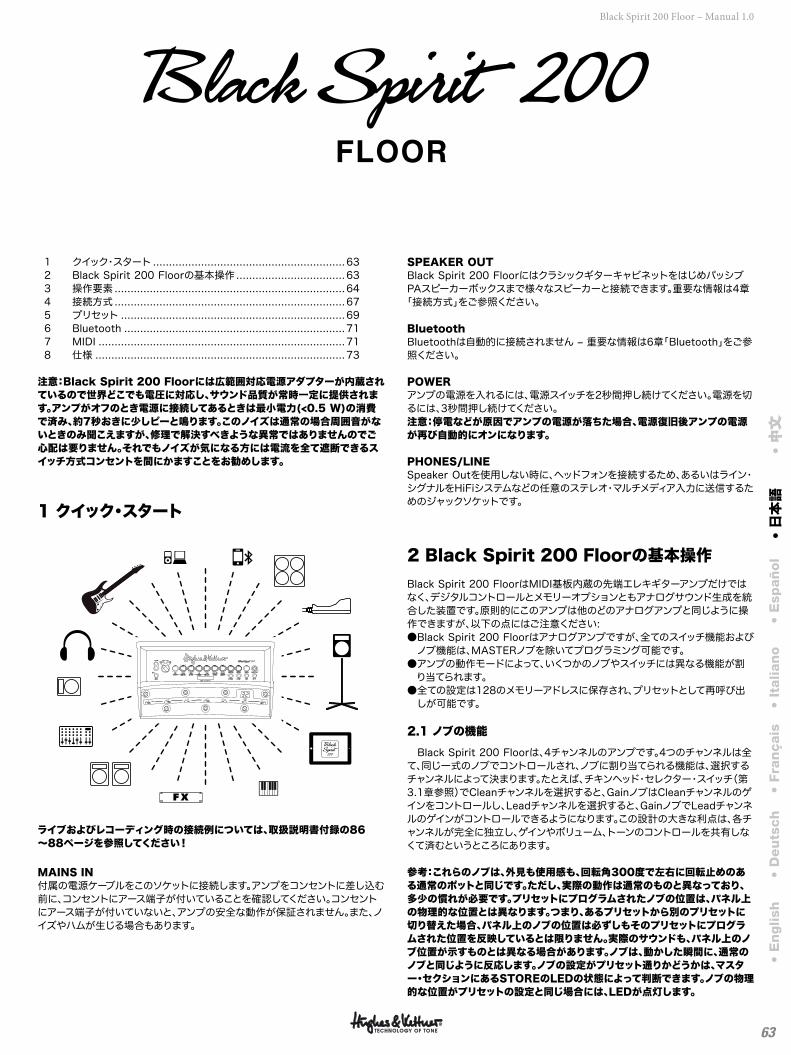
63
Black Spirit 200 Floor – Manual 1.0
1 クイック・スタート ............................................................ 63 2 Black Spirit 200 Floorの基本操作 .................................. 63 3 操作要素 ........................................................................ 64 4 接続方式 ........................................................................ 67 5 プリセット ...................................................................... 69 6 Bluetooth ..................................................................... 71 7 MIDI ............................................................................. 71 8 仕様 .............................................................................. 73
注意:Black Spirit 200 Floorには広範囲対応電源アダプターが内蔵されているので世界どこでも電圧に対応し、サウンド品質が常時一定に提供されます。アンプがオフのとき電源に接続してあるときは最小電力(<0.5 W)の消費で済み、約7秒おきに少しピーと鳴ります。このノイズは通常の場合周囲音がないときのみ聞こえますが、修理で解決すべきような異常ではありませんのでご心配は要りません。それでもノイズが気になる方には電流を全て遮断できるスイッチ方式コンセントを間にかますことをお勧めします。
1 クイック・スタート
MASTERPRESENCERESONANCESAGGINGNOISE GATETREBLEMIDBASSVOLUME
50
1 8
2 7
3 64 5
GAINREVERBDLY LEVELFEEDBACKDLY T IMEMOD TYPEINTENSITY
CLEAN ULTRACRUNCH LEAD
POWER
PHONES / L INE
CAB TYPE
STOREFX LOOPFX ACCESSBOOST
PRE LOOP
OFF OFF1400 OFF
C
2
1T
F P
S P I R I T ™ T O N E G E N E R A T O R
ライブおよびレコーディング時の接続例については、取扱説明書付録の86~88ページを参照してください!
MAINS IN 付属の電源ケーブルをこのソケットに接続します。アンプをコンセントに差し込む前に、コンセントにアース端子が付いていることを確認してください。コンセントにアース端子が付いていないと、アンプの安全な動作が保証されません。また、ノイズやハムが生じる場合もあります。
SPEAKER OUTBlack Spirit 200 FloorにはクラシックギターキャビネットをはじめパッシブPAスピーカーボックスまで様々なスピーカーと接続できます。重要な情報は4章「接続方式」をご参照ください。
BluetoothBluetoothは自動的に接続されません ‒ 重要な情報は6章「Bluetooth」をご参照ください。
POWERアンプの電源を入れるには、電源スイッチを2秒間押し続けてください。電源を切るには、3秒間押し続けてください。注意:停電などが原因でアンプの電源が落ちた場合、電源復旧後アンプの電源が再び自動的にオンになります。
PHONES/LINESpeaker Outを使用しない時に、ヘッドフォンを接続するため、あるいはライン・シグナルをHiFiシステムなどの任意のステレオ・マルチメディア入力に送信するためのジャックソケットです。
2 Black Spirit 200 Floorの基本操作Black Spirit 200 FloorはMIDI基板内蔵の先端エレキギターアンプだけではなく、デジタルコントロールとメモリーオプションともアナログサウンド生成を統合した装置です。原則的にこのアンプは他のどのアナログアンプと同じように操作できますが、以下の点にはご注意ください:● Black Spirit 200 Floorはアナログアンプですが、全てのスイッチ機能およびノブ機能は、MASTERノブを除いてプログラミング可能です。● アンプの動作モードによって、いくつかのノブやスイッチには異なる機能が割り当てられます。● 全ての設定は128のメモリーアドレスに保存され、プリセットとして再呼び出しが可能です。
2.1 ノブの機能
Black Spirit 200 Floorは、4チャンネルのアンプです。4つのチャンネルは全て、同じ一式のノブでコントロールされ、ノブに割り当てられる機能は、選択するチャンネルによって決まります。たとえば、チキンヘッド・セレクター・スイッチ(第3.1章参照)でCleanチャンネルを選択すると、GainノブはCleanチャンネルのゲインをコントロールし、Leadチャンネルを選択すると、GainノブでLeadチャンネルのゲインがコントロールできるようになります。この設計の大きな利点は、各チャンネルが完全に独立し、ゲインやボリューム、トーンのコントロールを共有しなくて済むというところにあります。
参考:これらのノブは、外見も使用感も、回転角300度で左右に回転止めのある通常のポットと同じです。ただし、実際の動作は通常のものと異なっており、多少の慣れが必要です。プリセットにプログラムされたノブの位置は、パネル上の物理的な位置とは異なります。つまり、あるプリセットから別のプリセットに切り替えた場合、パネル上のノブの位置は必ずしもそのプリセットにプログラムされた位置を反映しているとは限りません。実際のサウンドも、パネル上のノブ位置が示すものとは異なる場合があります。ノブは、動かした瞬間に、通常のノブと同じように反応します。ノブの設定がプリセット通りかどうかは、マスター・セクションにあるSTOREのLEDの状態によって判断できます。ノブの物理的な位置がプリセットの設定と同じ場合には、LEDが点灯します。
• E
nglish
• D
eu
tsch
• Fra
nçais
• It
alian
o•
Esp
añ
ol
• 日本語
• 中文
中文
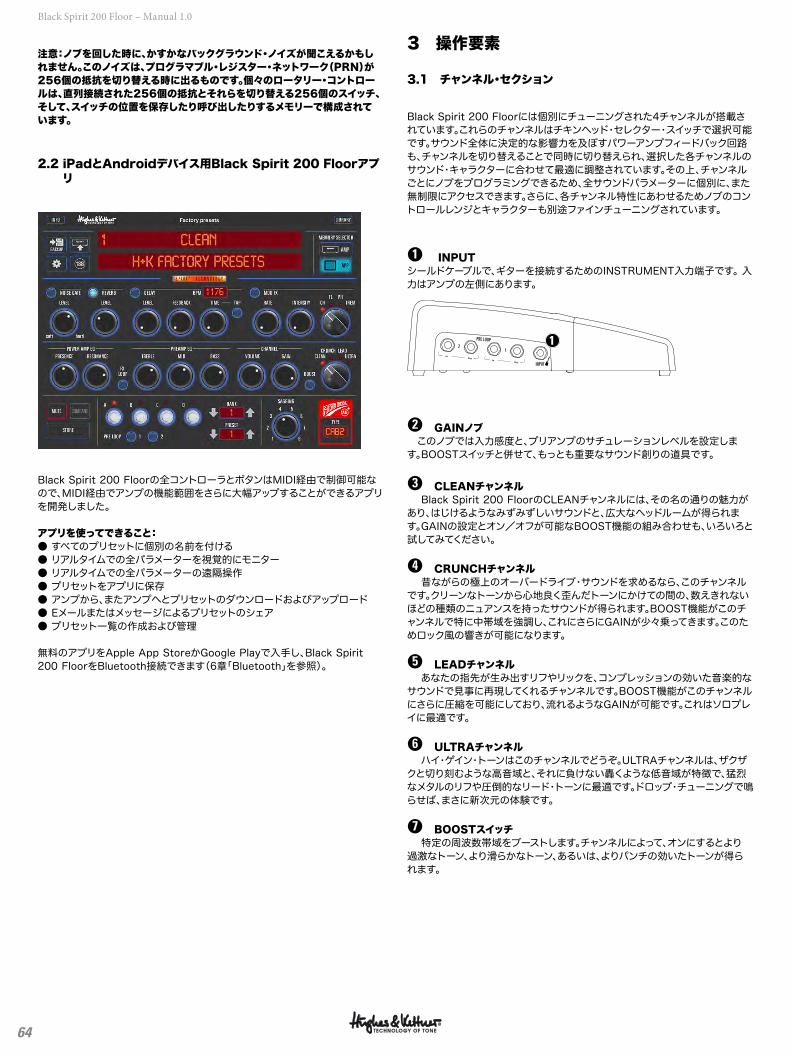
64
Black Spirit 200 Floor – Manual 1.0
注意:ノブを回した時に、かすかなバックグラウンド・ノイズが聞こえるかもしれません。このノイズは、プログラマブル・レジスター・ネットワーク(PRN)が256個の抵抗を切り替える時に出るものです。個々のロータリー・コントロールは、直列接続された256個の抵抗とそれらを切り替える256個のスイッチ、そして、スイッチの位置を保存したり呼び出したりするメモリーで構成されています。
2.2 iPadとAndroidデバイス用Black Spirit 200 Floorアプリ
Black Spirit 200 Floorの全コントローラとボタンはMIDI経由で制御可能なので、MIDI経由でアンプの機能範囲をさらに大幅アップすることができるアプリを開発しました。
アプリを使ってできること: ● すべてのプリセットに個別の名前を付ける● リアルタイムでの全パラメーターを視覚的にモニター● リアルタイムでの全パラメーターの遠隔操作● プリセットをアプリに保存● アンプから、またアンプへとプリセットのダウンロードおよびアップロード● Eメールまたはメッセージによるプリセットのシェア● プリセット一覧の作成および管理
無料のアプリをApple App StoreかGoogle Playで入手し、Black Spirit 200 FloorをBluetooth接続できます(6章「Bluetooth」を参照)。
3 操作要素
3.1 チャンネル・セクション
Black Spirit 200 Floorには個別にチューニングされた4チャンネルが搭載されています。これらのチャンネルはチキンヘッド・セレクター・スイッチで選択可能です。サウンド全体に決定的な影響力を及ぼすパワーアンプフィードバック回路も、チャンネルを切り替えることで同時に切り替えられ、選択した各チャンネルのサウンド・キャラクターに合わせて最適に調整されています。その上、チャンネルごとにノブをプログラミングできるため、全サウンドパラメーターに個別に、また無制限にアクセスできます。さらに、各チャンネル特性にあわせるためノブのコントロールレンジとキャラクターも別途ファインチューニングされています。
●1 INPUTシールドケーブルで、ギターを接続するためのINSTRUMENT入力端子です。 入力はアンプの左側にあります。
INPUT
PRE LOOP
12
1
●2 GAINノブ このノブでは入力感度と、プリアンプのサチュレーションレベルを設定します。BOOSTスイッチと併せて、もっとも重要なサウンド創りの道具です。
●3 CLEANチャンネル Black Spirit 200 FloorのCLEANチャンネルには、その名の通りの魅力があり、はじけるようなみずみずしいサウンドと、広大なヘッドルームが得られます。GAINの設定とオン/オフが可能なBOOST機能の組み合わせも、いろいろと試してみてください。
●4 CRUNCHチャンネル 昔ながらの極上のオーバードライブ・サウンドを求めるなら、このチャンネルです。クリーンなトーンから心地良く歪んだトーンにかけての間の、数えきれないほどの種類のニュアンスを持ったサウンドが得られます。BOOST機能がこのチャンネルで特に中帯域を強調し、これにさらにGAINが少々乗ってきます。このためロック風の響きが可能になります。
●5 LEADチャンネル あなたの指先が生み出すリフやリックを、コンプレッションの効いた音楽的なサウンドで見事に再現してくれるチャンネルです。BOOST機能がこのチャンネルにさらに圧縮を可能にしており、流れるようなGAINが可能です。これはソロプレイに最適です。
●6 ULTRAチャンネル ハイ・ゲイン・トーンはこのチャンネルでどうぞ。ULTRAチャンネルは、ザクザクと切り刻むような高音域と、それに負けない轟くような低音域が特徴で、猛烈なメタルのリフや圧倒的なリード・トーンに最適です。ドロップ・チューニングで鳴らせば、まさに新次元の体験です。
●7 BOOSTスイッチ 特定の周波数帯域をブーストします。チャンネルによって、オンにするとより過激なトーン、より滑らかなトーン、あるいは、よりパンチの効いたトーンが得られます。
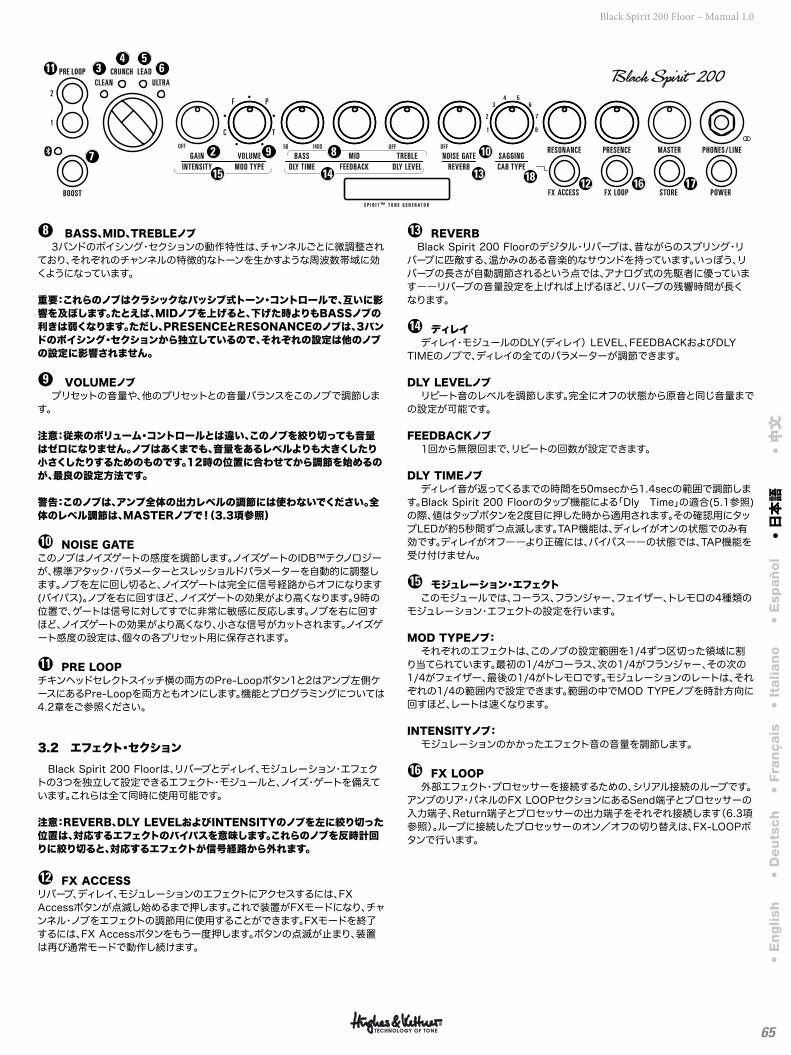
65
Black Spirit 200 Floor – Manual 1.0
●8 BASS、MID、TREBLEノブ 3バンドのボイシング・セクションの動作特性は、チャンネルごとに微調整されており、それぞれのチャンネルの特徴的なトーンを生かすような周波数帯域に効くようになっています。
重要:これらのノブはクラシックなパッシブ式トーン・コントロールで、互いに影響を及ぼします。たとえば、MIDノブを上げると、下げた時よりもBASSノブの利きは弱くなります。ただし、PRESENCEとRESONANCEのノブは、3バンドのボイシング・セクションから独立しているので、それぞれの設定は他のノブの設定に影響されません。
●9 VOLUMEノブ プリセットの音量や、他のプリセットとの音量バランスをこのノブで調節します。
注意:従来のボリューム・コントロールとは違い、このノブを絞り切っても音量はゼロになりません。ノブはあくまでも、音量をあるレベルよりも大きくしたり小さくしたりするためのものです。12時の位置に合わせてから調節を始めるのが、最良の設定方法です。
警告:このノブは、アンプ全体の出力レベルの調節には使わないでください。全体のレベル調節は、MASTERノブで!(3.3項参照)
●10 NOISE GATEこのノブはノイズゲートの感度を調節します。ノイズゲートのIDB™テクノロジーが、標準アタック・パラメーターとスレッショルドパラメーターを自動的に調整します。ノブを左に回し切ると、ノイズゲートは完全に信号経路からオフになります (バイパス)。ノブを右に回すほど、ノイズゲートの効果がより高くなります。9時の位置で、ゲートは信号に対してすでに非常に敏感に反応します。ノブを右に回すほど、ノイズゲートの効果がより高くなり、小さな信号がカットされます。ノイズゲート感度の設定は、個々の各プリセット用に保存されます。
●11 PRE LOOPチキンヘッドセレクトスイッチ横の両方のPre-Loopボタン1と2はアンプ左側ケースにあるPre-Loopを両方ともオンにします。機能とプログラミングについては4.2章をご参照ください。
3.2 エフェクト・セクション
Black Spirit 200 Floorは、リバーブとディレイ、モジュレーション・エフェクトの3つを独立して設定できるエフェクト・モジュールと、ノイズ・ゲートを備えています。これらは全て同時に使用可能です。
注意:REVERB、DLY LEVELおよびINTENSITYのノブを左に絞り切った位置は、対応するエフェクトのバイパスを意味します。これらのノブを反時計回りに絞り切ると、対応するエフェクトが信号経路から外れます。
●12 FX ACCESSリバーブ、ディレイ、モジュレーションのエフェクトにアクセスするには、FX Accessボタンが点滅し始めるまで押します。これで装置がFXモードになり、チャンネル・ノブをエフェクトの調節用に使用することができます。FXモードを終了するには、FX Accessボタンをもう一度押します。ボタンの点滅が止まり、装置は再び通常モードで動作し続けます。
●13 REVERB Black Spirit 200 Floorのデジタル・リバーブは、昔ながらのスプリング・リバーブに匹敵する、温かみのある音楽的なサウンドを持っています。いっぽう、リバーブの長さが自動調節されるという点では、アナログ式の先駆者に優っています――リバーブの音量設定を上げれば上げるほど、リバーブの残響時間が長くなります。
●14 ディレイ ディレイ・モジュールのDLY(ディレイ) LEVEL、FEEDBACKおよびDLY TIMEのノブで、ディレイの全てのパラメーターが調節できます。
DLY LEVELノブ リピート音のレベルを調節します。完全にオフの状態から原音と同じ音量までの設定が可能です。
FEEDBACKノブ 1回から無限回まで、リピートの回数が設定できます。
DLY TIMEノブ ディレイ音が返ってくるまでの時間を50msecから1.4secの範囲で調節します。Black Spirit 200 Floorのタップ機能による「Dly Time」の適合(5.1参照)の際、値はタップボタンを2度目に押した時から適用されます。その確認用にタップLEDが約5秒間ずつ点滅します。TAP機能は、ディレイがオンの状態でのみ有効です。ディレイがオフ――より正確には、バイパス――の状態では、TAP機能を受け付けません。
●15 モジュレーション・エフェクト このモジュールでは、コーラス、フランジャー、フェイザー、トレモロの4種類のモジュレーション・エフェクトの設定を行います。
MOD TYPEノブ: それぞれのエフェクトは、このノブの設定範囲を1/4ずつ区切った領域に割り当てられています。最初の1/4がコーラス、次の1/4がフランジャー、その次の1/4がフェイザー、最後の1/4がトレモロです。モジュレーションのレートは、それぞれの1/4の範囲内で設定できます。範囲の中でMOD TYPEノブを時計方向に回すほど、レートは速くなります。
INTENSITYノブ: モジュレーションのかかったエフェクト音の音量を調節します。
●16 FX LOOP 外部エフェクト・プロセッサーを接続するための、シリアル接続のループです。アンプのリア・パネルのFX LOOPセクションにあるSend端子とプロセッサーの入力端子、Return端子とプロセッサーの出力端子をそれぞれ接続します(6.3項参照)。ループに接続したプロセッサーのオン/オフの切り替えは、FX-LOOPボタンで行います。
• E
nglish
• D
eu
tsch
• Fra
nçais
• It
alian
o•
Esp
añ
ol
• 日本語
• 中文
中文
MASTERPRESENCERESONANCESAGGINGNOISE GATETREBLEMIDBASSVOLUME
50
1 8
2 7
3 64 5
GAINREVERBDLY LEVELFEEDBACKDLY T IMEMOD TYPEINTENSITY
CLEAN ULTRACRUNCH LEAD
POWER
PHONES / L INE
CAB TYPE
STOREFX LOOPFX ACCESSBOOST
PRE LOOP
OFF OFF1400 OFF
C
2
1T
F P
S P I R I T ™ T O N E G E N E R A T O R
2 9
3 64 5
7 8 10
12
11
16131415 18 17
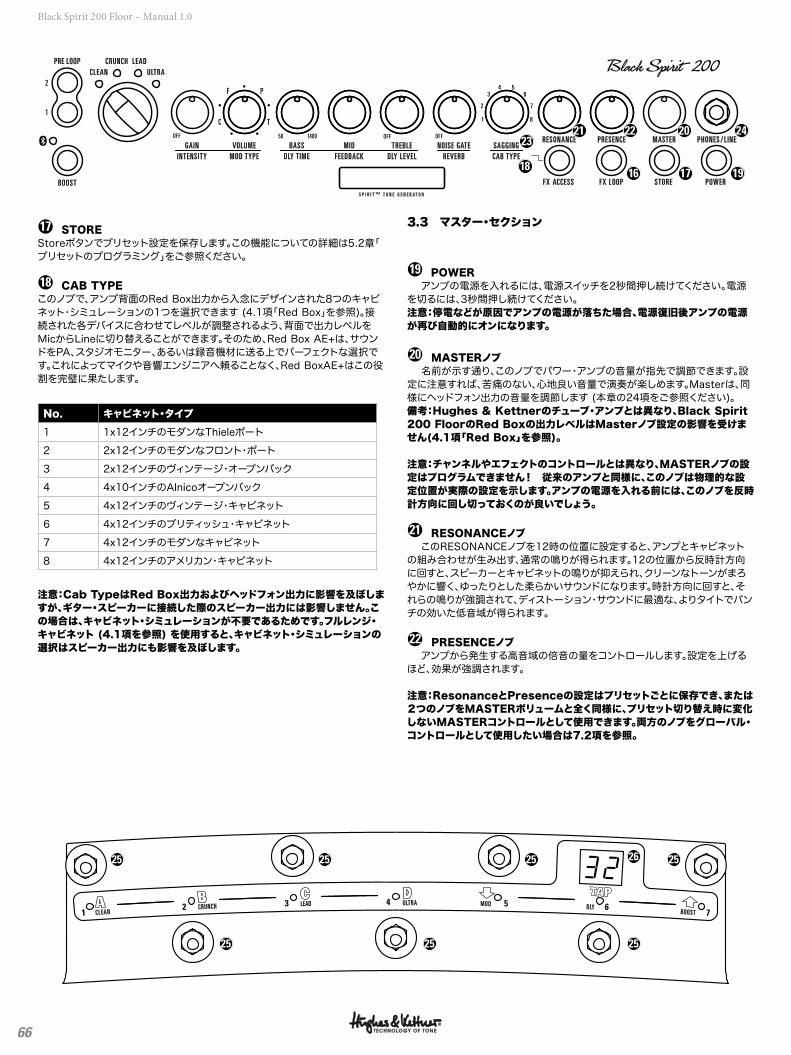
66
Black Spirit 200 Floor – Manual 1.0
●17 STOREStoreボタンでプリセット設定を保存します。この機能についての詳細は5.2章「プリセットのプログラミング」をご参照ください。
●18 CAB TYPEこのノブで、アンプ背面のRed Box出力から入念にデザインされた8つのキャビネット・シミュレーションの1つを選択できます (4.1項「Red Box」を参照)。接続された各デバイスに合わせてレベルが調整されるよう、背面で出力レベルをMicからLineに切り替えることができます。そのため、Red Box AE+は、サウンドをPA、スタジオモニター、あるいは録音機材に送る上でパーフェクトな選択です。これによってマイクや音響エンジニアへ頼ることなく、Red BoxAE+はこの役割を完璧に果たします。
No. キャビネット・タイプ
1 1x12インチのモダンなThieleポート
2 2x12インチのモダンなフロント・ポート
3 2x12インチのヴィンテージ・オープンバック
4 4x10インチのAlnicoオープンバック
5 4x12インチのヴィンテージ・キャビネット
6 4x12インチのブリティッシュ・キャビネット
7 4x12インチのモダンなキャビネット
8 4x12インチのアメリカン・キャビネット
注意:Cab TypeはRed Box出力およびヘッドフォン出力に影響を及ぼしますが、ギター・スピーカーに接続した際のスピーカー出力には影響しません。この場合は、キャビネット・シミュレーションが不要であるためです。フルレンジ・キャビネット (4.1項を参照) を使用すると、キャビネット・シミュレーションの選択はスピーカー出力にも影響を及ぼします。
3.3 マスター・セクション
●19 POWER アンプの電源を入れるには、電源スイッチを2秒間押し続けてください。電源を切るには、3秒間押し続けてください。注意:停電などが原因でアンプの電源が落ちた場合、電源復旧後アンプの電源が再び自動的にオンになります。
●20 MASTERノブ 名前が示す通り、このノブでパワー・アンプの音量が指先で調節できます。設定に注意すれば、苦痛のない、心地良い音量で演奏が楽しめます。Masterは、同様にヘッドフォン出力の音量を調節します (本章の24項をご参照ください)。備考:Hughes & Kettnerのチューブ・アンプとは異なり、Black Spirit 200 FloorのRed Boxの出力レベルはMasterノブ設定の影響を受けません(4.1項「Red Box」を参照)。
注意:チャンネルやエフェクトのコントロールとは異なり、MASTERノブの設定はプログラムできません! 従来のアンプと同様に、このノブは物理的な設定位置が実際の設定を示します。アンプの電源を入れる前には、このノブを反時計方向に回し切っておくのが良いでしょう。
●21 RESONANCEノブ このRESONANCEノブを12時の位置に設定すると、アンプとキャビネットの組み合わせが生み出す、通常の鳴りが得られます。12の位置から反時計方向に回すと、スピーカーとキャビネットの鳴りが抑えられ、クリーンなトーンがまろやかに響く、ゆったりとした柔らかいサウンドになります。時計方向に回すと、それらの鳴りが強調されて、ディストーション・サウンドに最適な、よりタイトでパンチの効いた低音域が得られます。
●22 PRESENCEノブ アンプから発生する高音域の倍音の量をコントロールします。設定を上げるほど、効果が強調されます。
注意:ResonanceとPresenceの設定はプリセットごとに保存でき、または2つのノブをMASTERボリュームと全く同様に、プリセット切り替え時に変化しないMASTERコントロールとして使用できます。両方のノブをグローバル・コントロールとして使用したい場合は7.2項を参照。
25
25 25 25
2625 25 25
MASTERPRESENCERESONANCESAGGINGNOISE GATETREBLEMIDBASSVOLUME
50
1 8
2 7
3 64 5
GAINREVERBDLY LEVELFEEDBACKDLY T IMEMOD TYPEINTENSITY
CLEAN ULTRACRUNCH LEAD
POWER
PHONES / L INE
CAB TYPE
STOREFX LOOPFX ACCESSBOOST
PRE LOOP
OFF OFF1400 OFF
C
2
1T
F P
S P I R I T ™ T O N E G E N E R A T O R
18
2021 22 2423
16 17 19
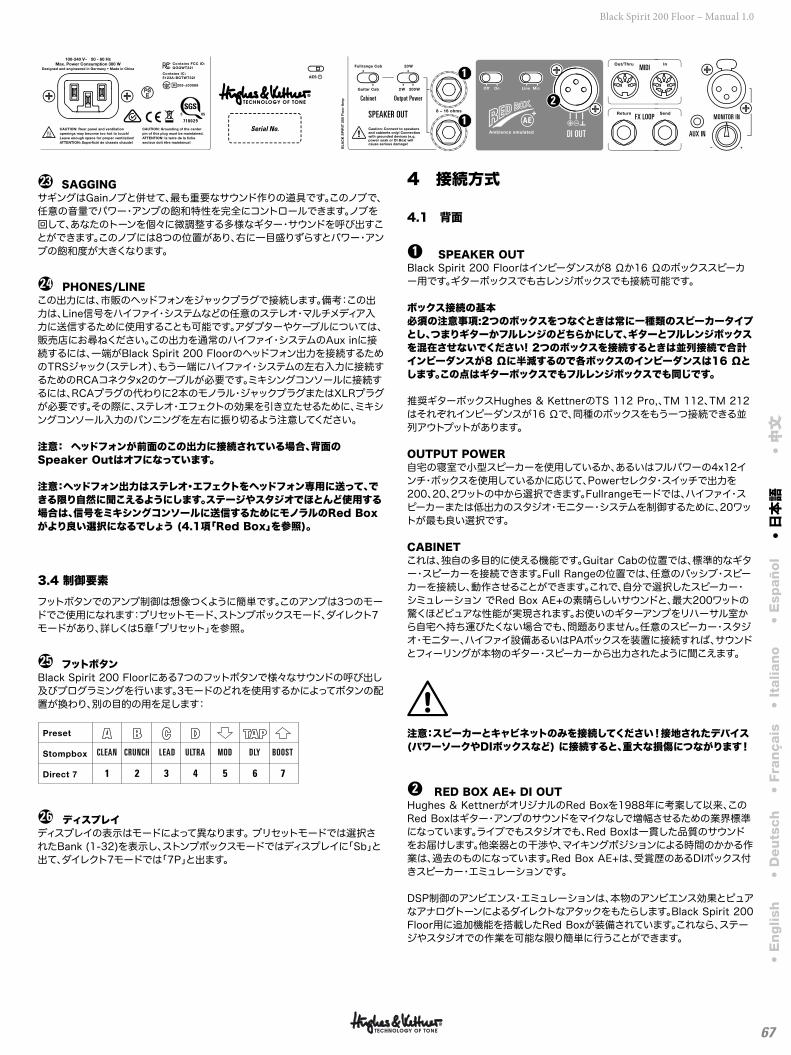
67
Black Spirit 200 Floor – Manual 1.0
●23 SAGGINGサギングはGainノブと併せて、最も重要なサウンド作りの道具です。このノブで、任意の音量でパワー・アンプの飽和特性を完全にコントロールできます。ノブを回して、あなたのトーンを個々に微調整する多様なギター・サウンドを呼び出すことができます。このノブには8つの位置があり、右に一目盛りずらすとパワー・アンプの飽和度が大きくなります。
●24 PHONES/LINEこの出力には、市販のヘッドフォンをジャックプラグで接続します。備考:この出力は、Line信号をハイファイ・システムなどの任意のステレオ・マルチメディア入力に送信するために使用することも可能です。アダプターやケーブルについては、販売店にお尋ねください。この出力を通常のハイファイ・システムのAux inに接続するには、一端がBlack Spirit 200 Floorのヘッドフォン出力を接続するためのTRSジャック(ステレオ)、もう一端にハイファイ・システムの左右入力に接続するためのRCAコネクタx2のケーブルが必要です。ミキシングコンソールに接続するには、RCAプラグの代わりに2本のモノラル・ジャックプラグまたはXLRプラグが必要です。その際に、ステレオ・エフェクトの効果を引き立たせるために、ミキシングコンソール入力のパンニングを左右に振り切るよう注意してください。
注意: ヘッドフォンが前面のこの出力に接続されている場合、背面のSpeaker Outはオフになっています。
注意:ヘッドフォン出力はステレオ・エフェクトをヘッドフォン専用に送って、できる限り自然に聞こえるようにします。ステージやスタジオでほとんど使用する場合は、信号をミキシングコンソールに送信するためにモノラルのRed Boxがより良い選択になるでしょう (4.1項「Red Box」を参照)。
3.4 制御要素
フットボタンでのアンプ制御は想像つくように簡単です。このアンプは3つのモードでご使用になれます:プリセットモード、ストンプボックスモード、ダイレクト7モードがあり、詳しくは5章「プリセット」を参照。
●25 フットボタンBlack Spirit 200 Floorにある7つのフットボタンで様々なサウンドの呼び出し及びプログラミングを行います。3モードのどれを使用するかによってボタンの配置が換わり、別の目的の用を足します:
1
CLEAN
2
CRUNCH
3
LEAD
4
ULTRA
6
DLY
7
BOOST
5
MOD
●26 ディスプレイディスプレイの表示はモードによって異なります。 プリセットモードでは選択されたBank (1-32)を表示し、ストンプボックスモードではディスプレイに「Sb」と出て、ダイレクト7モードでは「7P」と出ます。
4 接続方式
4.1 背面
●1 SPEAKER OUTBlack Spirit 200 Floorはインピーダンスが8 Ωか16 Ωのボックススピーカー用です。ギターボックスでも古レンジボックスでも接続可能です。
ボックス接続の基本必須の注意事項:2つのボックスをつなぐときは常に一種類のスピーカータイプとし、つまりギターかフルレンジのどちらかにして、ギターとフルレンジボックスを混在させないでください! 2つのボックスを接続するときは並列接続で合計インピーダンスが8 Ωに半減するので各ボックスのインピーダンスは16 Ωとします。この点はギターボックスでもフルレンジボックスでも同じです。
推奨ギターボックスHughes & KettnerのTS 112 Pro,、TM 112、TM 212はそれぞれインピーダンスが16 Ωで、同種のボックスをもう一つ接続できる並列アウトプットがあります。 OUTPUT POWER自宅の寝室で小型スピーカーを使用しているか、あるいはフルパワーの4x12インチ・ボックスを使用しているかに応じて、Powerセレクタ・スイッチで出力を200、20、2ワットの中から選択できます。Fullrangeモードでは、ハイファイ・スピーカーまたは低出力のスタジオ・モニター・システムを制御するために、20ワットが最も良い選択です。
CABINETこれは、独自の多目的に使える機能です。Guitar Cabの位置では、標準的なギター・スピーカーを接続できます。Full Rangeの位置では、任意のパッシブ・スピーカーを接続し、動作させることができます。これで、自分で選択したスピーカー・シミュレーション でRed Box AE+の素晴らしいサウンドと、最大200ワットの驚くほどピュアな性能が実現されます。お使いのギターアンプをリハーサル室から自宅へ持ち運びたくない場合でも、問題ありません。任意のスピーカー・スタジオ・モニター、ハイファイ設備あるいはPAボックスを装置に接続すれば、サウンドとフィーリングが本物のギター・スピーカーから出力されたように聞こえます。
注意:スピーカーとキャビネットのみを接続してください!接地されたデバイス (パワーソークやDIボックスなど) に接続すると、重大な損傷につながります!
●2 RED BOX AE+ DI OUTHughes & KettnerがオリジナルのRed Boxを1988年に考案して以来、このRed Boxはギター・アンプのサウンドをマイクなしで増幅させるための業界標準になっています。ライブでもスタジオでも、Red Boxは一貫した品質のサウンドをお届けします。他楽器との干渉や、マイキングポジションによる時間のかかる作業は、過去のものになっています。Red Box AE+は、受賞歴のあるDIボックス付きスピーカー・エミュレーションです。
DSP制御のアンビエンス・エミュレーションは、本物のアンビエンス効果とピュアなアナログトーンによるダイレクトなアタックをもたらします。Black Spirit 200 Floor用に追加機能を搭載したRed Boxが装備されています。これなら、ステージやスタジオでの作業を可能な限り簡単に行うことができます。
• E
nglish
• D
eu
tsch
• Fra
nçais
• It
alian
o•
Esp
añ
ol
• 日本語
• 中文
中文
Serial No.
Output Power
SPEAKER OUT
MIDI
FX LOOP
AUX IN
Cabinet
MONITOR IN
DI OUT
AE
1
1
2
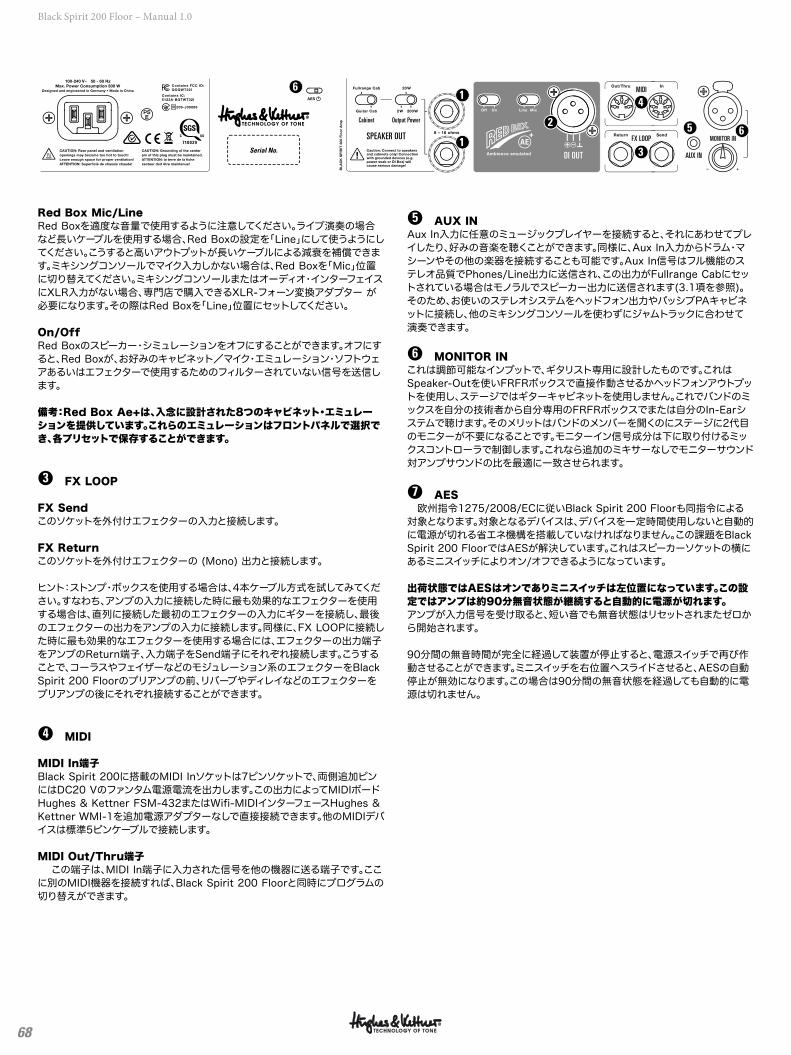
68
Black Spirit 200 Floor – Manual 1.0
Red Box Mic/LineRed Boxを適度な音量で使用するように注意してください。ライブ演奏の場合など長いケーブルを使用する場合、Red Boxの設定を「Line」にして使うようにしてください。こうすると高いアウトプットが長いケーブルによる減衰を補償できます。ミキシングコンソールでマイク入力しかない場合は、Red Boxを「Mic」位置に切り替えてください。ミキシングコンソールまたはオーディオ・インターフェイスにXLR入力がない場合、専門店で購入できるXLR-フォーン変換アダプター が必要になります。その際はRed Boxを「Line」位置にセットしてください。
On/OffRed Boxのスピーカー・シミュレーションをオフにすることができます。オフにすると、Red Boxが、お好みのキャビネット/マイク・エミュレーション・ソフトウェアあるいはエフェクターで使用するためのフィルターされていない信号を送信します。
備考:Red Box Ae+は、入念に設計された8つのキャビネット・エミュレーションを提供しています。これらのエミュレーションはフロントパネルで選択でき、各プリセットで保存することができます。
●3 FX LOOP
FX Sendこのソケットを外付けエフェクターの入力と接続します。
FX Returnこのソケットを外付けエフェクターの (Mono) 出力と接続します。
ヒント:ストンプ・ボックスを使用する場合は、4本ケーブル方式を試してみてください。すなわち、アンプの入力に接続した時に最も効果的なエフェクターを使用する場合は、直列に接続した最初のエフェクターの入力にギターを接続し、最後のエフェクターの出力をアンプの入力に接続します。同様に、FX LOOPに接続した時に最も効果的なエフェクターを使用する場合には、エフェクターの出力端子をアンプのReturn端子、入力端子をSend端子にそれぞれ接続します。こうすることで、コーラスやフェイザーなどのモジュレーション系のエフェクターをBlack Spirit 200 Floorのプリアンプの前、リバーブやディレイなどのエフェクターをプリアンプの後にそれぞれ接続することができます。
●4 MIDI
MIDI In端子Black Spirit 200に搭載のMIDI Inソケットは7ピンソケットで、両側追加ピンにはDC20 Vのファンタム電源電流を出力します。この出力によってMIDIボードHughes & Kettner FSM-432またはWifi-MIDIインターフェースHughes & Kettner WMI-1を追加電源アダプターなしで直接接続できます。他のMIDIデバイスは標準5ピンケーブルで接続します。
MIDI Out/Thru端子 この端子は、MIDI In端子に入力された信号を他の機器に送る端子です。ここに別のMIDI機器を接続すれば、Black Spirit 200 Floorと同時にプログラムの切り替えができます。
●5 AUX INAux In入力に任意のミュージックプレイヤーを接続すると、それにあわせてプレイしたり、好みの音楽を聴くことができます。同様に、Aux In入力からドラム・マシーンやその他の楽器を接続することも可能です。Aux In信号はフル機能のステレオ品質でPhones/Line出力に送信され、この出力がFullrange Cabにセットされている場合はモノラルでスピーカー出力に送信されます(3.1項を参照)。そのため、お使いのステレオシステムをヘッドフォン出力やパッシブPAキャビネットに接続し、他のミキシングコンソールを使わずにジャムトラックに合わせて演奏できます。
●6 MONITOR INこれは調節可能なインプットで、ギタリスト専用に設計したものです。これはSpeaker-Outを使いFRFRボックスで直接作動させるかヘッドフォンアウトプットを使用し、ステージではギターキャビネットを使用しません。これでバンドのミックスを自分の技術者から自分専用のFRFRボックスでまたは自分のIn-Earシステムで聴けます。そのメリットはバンドのメンバーを聞くのにステージに2代目のモニターが不要になることです。モニターイン信号成分は下に取り付けるミックスコントローラで制御します。これなら追加のミキサーなしでモニターサウンド対アンプサウンドの比を最適に一致させられます。
●7 AES 欧州指令1275/2008/ECに従いBlack Spirit 200 Floorも同指令による対象となります。対象となるデバイスは、デバイスを一定時間使用しないと自動的に電源が切れる省エネ機構を搭載していなければなりません。この課題をBlack Spirit 200 FloorではAESが解決しています。これはスピーカーソケットの横にあるミニスイッチによりオン/オフできるようになっています。
出荷状態ではAESはオンでありミニスイッチは左位置になっています。この設定ではアンプは約90分無音状態が継続すると自動的に電源が切れます。アンプが入力信号を受け取ると、短い音でも無音状態はリセットされまたゼロから開始されます。
90分間の無音時間が完全に経過して装置が停止すると、電源スイッチで再び作動させることができます。ミニスイッチを右位置へスライドさせると、AESの自動停止が無効になります。この場合は90分間の無音状態を経過しても自動的に電源は切れません。
Serial No.
Output Power
SPEAKER OUT
MIDI
FX LOOP
AUX IN
Cabinet
MONITOR IN
DI OUT
AE
1
1
2
3
4
5 6
6
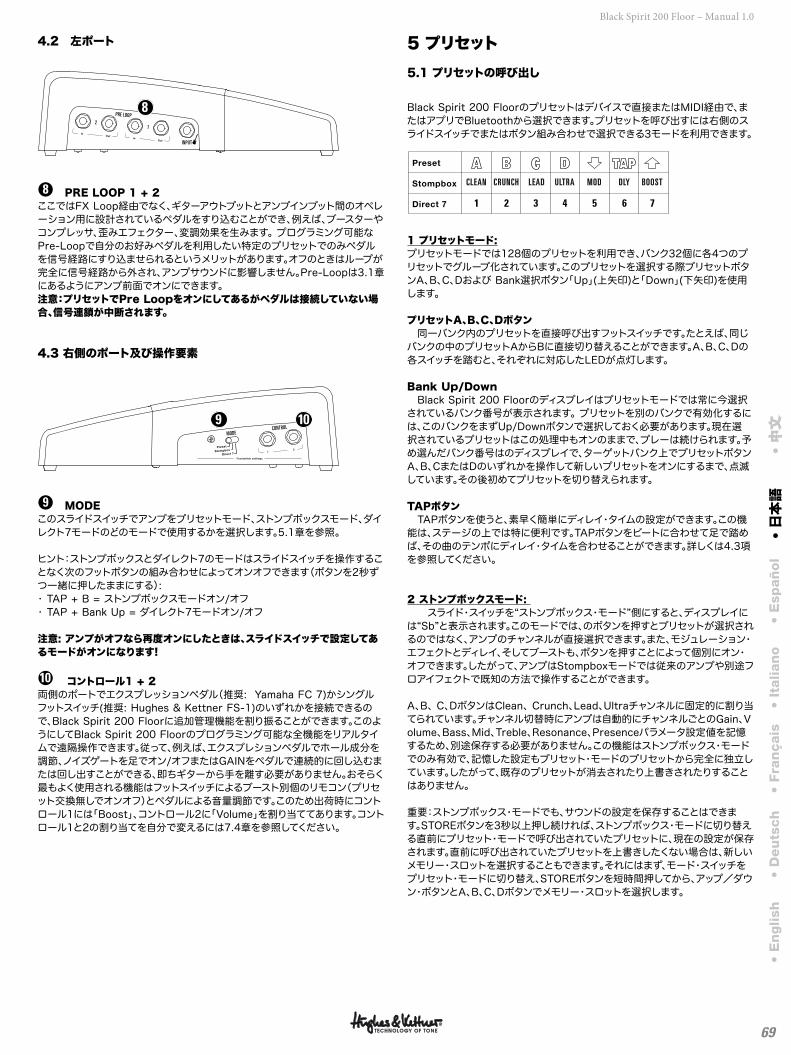
69
Black Spirit 200 Floor – Manual 1.0
4.2 左ポート
INPUT
PRE LOOP
12
8
●8 PRE LOOP 1 + 2ここではFX Loop経由でなく、ギターアウトプットとアンプインプット間のオペレーション用に設計されているペダルをすり込むことができ、例えば、ブースターやコンプレッサ、歪みエフェクター、変調効果を生みます。 プログラミング可能なPre-Loopで自分のお好みペダルを利用したい特定のプリセットでのみペダルを信号経路にすり込ませられるというメリットがあります。オフのときはループが完全に信号経路から外され、アンプサウンドに影響しません。Pre-Loopは3.1章にあるようにアンプ前面でオンにできます。注意:プリセットでPre Loopをオンにしてあるがペダルは接続していない場合、信号連鎖が中断されます。
4.3 右側のポート及び操作要素
CONTROLMODE
9 10
●9 MODEこのスライドスイッチでアンプをプリセットモード、ストンプボックスモード、ダイレクト7モードのどのモードで使用するかを選択します。5.1章を参照。
ヒント:ストンプボックスとダイレクト7のモードはスライドスイッチを操作することなく次のフットボタンの組み合わせによってオンオフできます(ボタンを2秒ずつ一緒に押したままにする): • TAP + B = ストンプボックスモードオン/オフ• TAP + Bank Up = ダイレクト7モードオン/オフ
注意: アンプがオフなら再度オンにしたときは、スライドスイッチで設定してあるモードがオンになります!
●10 コントロール1 + 2両側のポートでエクスプレッションペダル(推奨: Yamaha FC 7)かシングルフットスイッチ(推奨: Hughes & Kettner FS-1)のいずれかを接続できるので、Black Spirit 200 Floorに追加管理機能を割り振ることができます。このようにしてBlack Spirit 200 Floorのプログラミング可能な全機能をリアルタイムで遠隔操作できます。従って、例えば、エクスプレションペダルでホール成分を調節、ノイズゲートを足でオン/オフまたはGAINをペダルで連続的に回し込むまたは回し出すことができる、即ちギターから手を離す必要がありません。おそらく最もよく使用される機能はフットスイッチによるブースト別個のリモコン(プリセット交換無しでオンオフ)とペダルによる音量調節です。このため出荷時にコントロール1には「Boost」、コントロール2に「Volume」を割り当ててあります。コントロール1と2の割り当てを自分で変えるには7.4章を参照してください。
5 プリセット5.1 プリセットの呼び出し
Black Spirit 200 Floorのプリセットはデバイスで直接またはMIDI経由で、またはアプリでBluetoothから選択できます。プリセットを呼び出すには右側のスライドスイッチでまたはボタン組み合わせで選択できる3モードを利用できます。
1
CLEAN
2
CRUNCH
3
LEAD
4
ULTRA
6
DLY
7
BOOST
5
MOD
1 プリセットモード:プリセットモードでは128個のプリセットを利用でき、バンク32個に各4つのプリセットでグループ化されています。このプリセットを選択する際プリセットボタンA、B、C、Dおよび Bank選択ボタン「Up」(上矢印)と「Down」(下矢印)を使用します。
プリセットA、B、C、Dボタン 同一バンク内のプリセットを直接呼び出すフットスイッチです。たとえば、同じバンクの中のプリセットAからBに直接切り替えることができます。A、B、C、Dの各スイッチを踏むと、それぞれに対応したLEDが点灯します。
Bank Up/Down Black Spirit 200 Floorのディスプレイはプリセットモードでは常に今選択されているバンク番号が表示されます。 プリセットを別のバンクで有効化するには、このバンクをまずUp/Downボタンで選択しておく必要があります。現在選択されているプリセットはこの処理中もオンのままで、プレーは続けられます。予め選んだバンク番号はのディスプレイで、ターゲットバンク上でプリセットボタンA、B、CまたはDのいずれかを操作して新しいプリセットをオンにするまで、点滅しています。その後初めてプリセットを切り替えられます。
TAPボタン TAPボタンを使うと、素早く簡単にディレイ・タイムの設定ができます。この機能は、ステージの上では特に便利です。TAPボタンをビートに合わせて足で踏めば、その曲のテンポにディレイ・タイムを合わせることができます。詳しくは4.3項を参照してください。
2 ストンプボックスモード: スライド・スイッチを“ストンプボックス・モード”側にすると、ディスプレイには“Sb”と表示されます。このモードでは、のボタンを押すとプリセットが選択されるのではなく、アンプのチャンネルが直接選択できます。また、モジュレーション・エフェクトとディレイ、そしてブーストも、ボタンを押すことによって個別にオン・オフできます。したがって、アンプはStompboxモードでは従来のアンプや別途フロアイフェクトで既知の方法で操作することができます。
A、B、 C、DボタンはClean、 Crunch、Lead、Ultraチャンネルに固定的に割り当てられています。チャンネル切替時にアンプは自動的にチャンネルごとのGain、Volume、Bass、Mid、Treble、Resonance、Presenceパラメータ設定値を記憶するため、別途保存する必要がありません。この機能はストンプボックス・モードでのみ有効で、記憶した設定もプリセット・モードのプリセットから完全に独立しています。したがって、既存のプリセットが消去されたり上書きされたりすることはありません。
重要:ストンプボックス・モードでも、サウンドの設定を保存することはできます。STOREボタンを3秒以上押し続ければ、ストンプボックス・モードに切り替える直前にプリセット・モードで呼び出されていたプリセットに、現在の設定が保存されます。直前に呼び出されていたプリセットを上書きしたくない場合は、新しいメモリー・スロットを選択することもできます。それにはまず、モード・スイッチをプリセット・モードに切り替え、STOREボタンを短時間押してから、アップ/ダウン・ボタンとA、B、C、Dボタンでメモリー・スロットを選択します。
• E
nglish
• D
eu
tsch
• Fra
nçais
• It
alian
o•
Esp
añ
ol
• 日本語
• 中文
中文
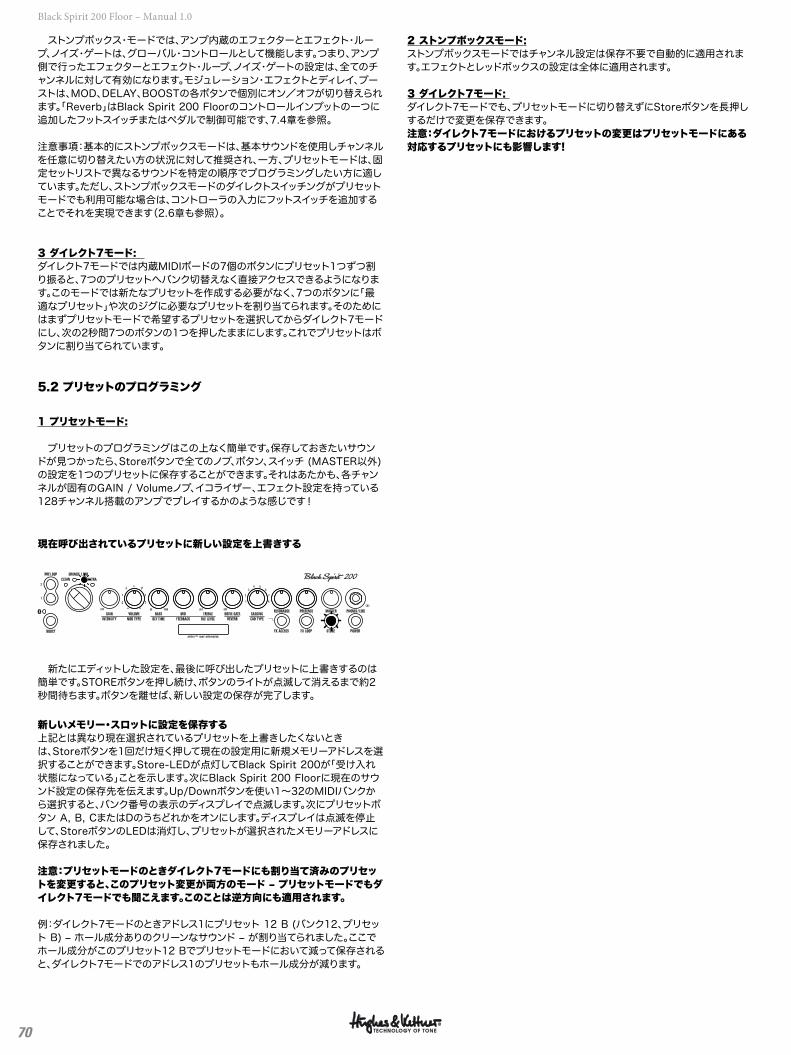
70
Black Spirit 200 Floor – Manual 1.0
ストンプボックス・モードでは、アンプ内蔵のエフェクターとエフェクト・ループ、ノイズ・ゲートは、グローバル・コントロールとして機能します。つまり、アンプ側で行ったエフェクターとエフェクト・ループ、ノイズ・ゲートの設定は、全てのチャンネルに対して有効になります。モジュレーション・エフェクトとディレイ、ブーストは、MOD、DELAY、BOOSTの各ボタンで個別にオン/オフが切り替えられます。「Reverb」はBlack Spirit 200 Floorのコントロールインプットの一つに追加したフットスイッチまたはペダルで制御可能です、7.4章を参照。
注意事項:基本的にストンプボックスモードは、基本サウンドを使用しチャンネルを任意に切り替えたい方の状況に対して推奨され、一方、プリセットモードは、固定セットリストで異なるサウンドを特定の順序でプログラミングしたい方に適しています。ただし、ストンプボックスモードのダイレクトスイッチングがプリセットモードでも利用可能な場合は、コントローラの入力にフットスイッチを追加することでそれを実現できます(2.6章も参照)。
3 ダイレクト7モード: ダイレクト7モードでは内蔵MIDIボードの7個のボタンにプリセット1つずつ割り振ると、7つのプリセットへバンク切替えなく直接アクセスできるようになります。このモードでは新たなプリセットを作成する必要がなく、7つのボタンに「最適なプリセット」や次のジグに必要なプリセットを割り当てられます。そのためにはまずプリセットモードで希望するプリセットを選択してからダイレクト7モードにし、次の2秒間7つのボタンの1つを押したままにします。これでプリセットはボタンに割り当てられています。
5.2 プリセットのプログラミング
1 プリセットモード:
プリセットのプログラミングはこの上なく簡単です。保存しておきたいサウンドが見つかったら、Storeボタンで全てのノブ、ボタン、スイッチ (MASTER以外) の設定を1つのプリセットに保存することができます。それはあたかも、各チャンネルが固有のGAIN / Volumeノブ、イコライザー、エフェクト設定を持っている128チャンネル搭載のアンプでプレイするかのような感じです!
現在呼び出されているプリセットに新しい設定を上書きする
MASTERPRESENCERESONANCESAGGINGNOISE GATETREBLEMIDBASSVOLUME
50
1 8
2 7
3 64 5
GAINREVERBDLY LEVELFEEDBACKDLY T IMEMOD TYPEINTENSITY
CLEAN ULTRACRUNCH LEAD
POWER
PHONES / L INE
CAB TYPE
STOREFX LOOPFX ACCESSBOOST
PRE LOOP
OFF OFF1400 OFF
C
2
1T
F P
S P I R I T ™ T O N E G E N E R A T O R
新たにエディットした設定を、最後に呼び出したプリセットに上書きするのは簡単です。STOREボタンを押し続け、ボタンのライトが点滅して消えるまで約2秒間待ちます。ボタンを離せば、新しい設定の保存が完了します。
新しいメモリー・スロットに設定を保存する上記とは異なり現在選択されているプリセットを上書きしたくないときは、Storeボタンを1回だけ短く押して現在の設定用に新規メモリーアドレスを選択することができます。Store-LEDが点灯してBlack Spirit 200が「受け入れ状態になっている」ことを示します。次にBlack Spirit 200 Floorに現在のサウンド設定の保存先を伝えます。Up/Downボタンを使い1~32のMIDIバンクから選択すると、バンク番号の表示のディスプレイで点滅します。次にプリセットボタン A, B, CまたはDのうちどれかをオンにします。ディスプレイは点滅を停止して、StoreボタンのLEDは消灯し、プリセットが選択されたメモリーアドレスに保存されました。
注意:プリセットモードのときダイレクト7モードにも割り当て済みのプリセットを変更すると、このプリセット変更が両方のモード ‒ プリセットモードでもダイレクト7モードでも聞こえます。このことは逆方向にも適用されます。
例:ダイレクト7モードのときアドレス1にプリセット 12 B (バンク12、プリセット B) ‒ ホール成分ありのクリーンなサウンド ‒ が割り当てられました。ここでホール成分がこのプリセット12 Bでプリセットモードにおいて減って保存されると、ダイレクト7モードでのアドレス1のプリセットもホール成分が減ります。
2 ストンプボックスモード:ストンプボックスモードではチャンネル設定は保存不要で自動的に適用されます。エフェクトとレッドボックスの設定は全体に適用されます。
3 ダイレクト7モード: ダイレクト7モードでも、プリセットモードに切り替えずにStoreボタンを長押しするだけで変更を保存できます。注意:ダイレクト7モードにおけるプリセットの変更はプリセットモードにある対応するプリセットにも影響します!
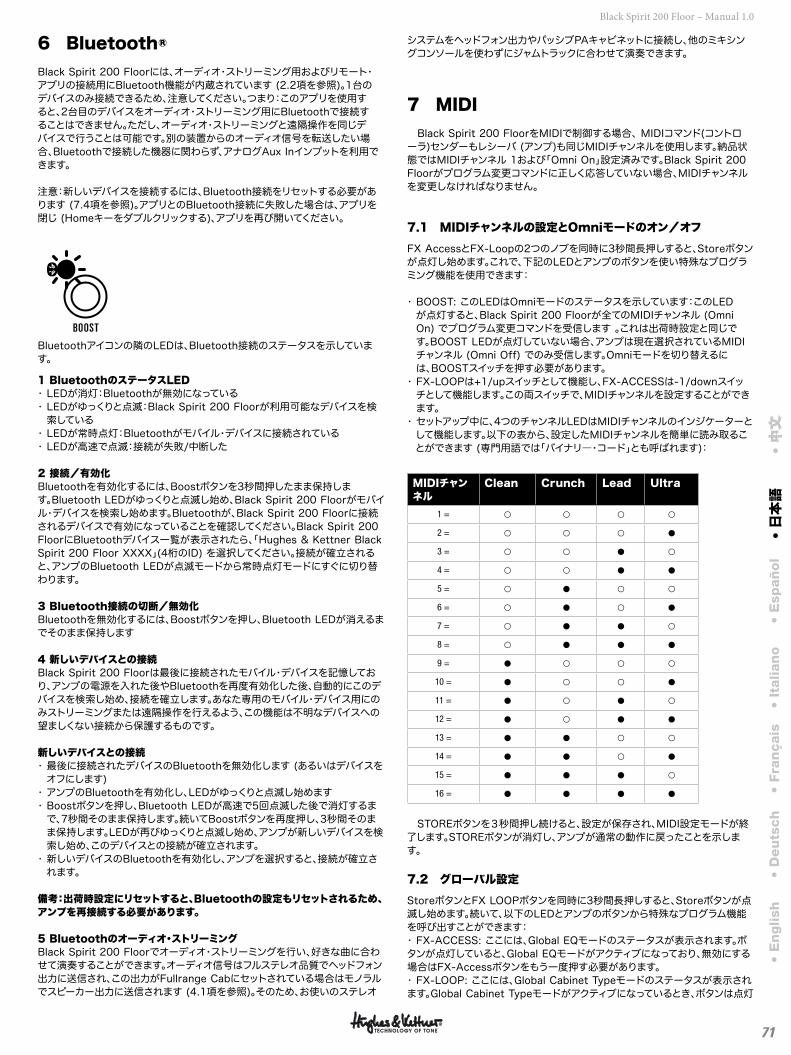
71
Black Spirit 200 Floor – Manual 1.0
• E
nglish
• D
eu
tsch
• Fra
nçais
• It
alian
o•
Esp
añ
ol
• 日本語
• 中文
中文
6 Bluetooth®Black Spirit 200 Floorには、オーディオ・ストリーミング用およびリモート・アプリの接続用にBluetooth機能が内蔵されています (2.2項を参照)。1台のデバイスのみ接続できるため、注意してください。つまり:このアプリを使用すると、2台目のデバイスをオーディオ・ストリーミング用にBluetoothで接続することはできません。ただし、オーディオ・ストリーミングと遠隔操作を同じデバイスで行うことは可能です。別の装置からのオーディオ信号を転送したい場合、Bluetoothで接続した機器に関わらず、アナログAux Inインプットを利用できます。
注意:新しいデバイスを接続するには、Bluetooth接続をリセットする必要があります (7.4項を参照)。アプリとのBluetooth接続に失敗した場合は、アプリを閉じ (Homeキーをダブルクリックする)、アプリを再び開いてください。
BOOST
Bluetoothアイコンの隣のLEDは、Bluetooth接続のステータスを示しています。
1 BluetoothのステータスLED• LEDが消灯:Bluetoothが無効になっている• LEDがゆっくりと点滅:Black Spirit 200 Floorが利用可能なデバイスを検索している• LEDが常時点灯:Bluetoothがモバイル・デバイスに接続されている • LEDが高速で点滅:接続が失敗/中断した
2 接続/有効化Bluetoothを有効化するには、Boostボタンを3秒間押したまま保持します。Bluetooth LEDがゆっくりと点滅し始め、Black Spirit 200 Floorがモバイル・デバイスを検索し始めます。Bluetoothが、Black Spirit 200 Floorに接続されるデバイスで有効になっていることを確認してください。Black Spirit 200 FloorにBluetoothデバイス一覧が表示されたら、「Hughes & Kettner Black Spirit 200 Floor XXXX」(4桁のID) を選択してください。接続が確立されると、アンプのBluetooth LEDが点滅モードから常時点灯モードにすぐに切り替わります。
3 Bluetooth接続の切断/無効化Bluetoothを無効化するには、Boostボタンを押し、Bluetooth LEDが消えるまでそのまま保持します
4 新しいデバイスとの接続Black Spirit 200 Floorは最後に接続されたモバイル・デバイスを記憶しており、アンプの電源を入れた後やBluetoothを再度有効化した後、自動的にこのデバイスを検索し始め、接続を確立します。あなた専用のモバイル・デバイス用にのみストリーミングまたは遠隔操作を行えるよう、この機能は不明なデバイスへの望ましくない接続から保護するものです。
新しいデバイスとの接続• 最後に接続されたデバイスのBluetoothを無効化します (あるいはデバイスをオフにします)• アンプのBluetoothを有効化し、LEDがゆっくりと点滅し始めます• Boostボタンを押し、Bluetooth LEDが高速で5回点滅した後で消灯するまで、7秒間そのまま保持します。続いてBoostボタンを再度押し、3秒間そのまま保持します。LEDが再びゆっくりと点滅し始め、アンプが新しいデバイスを検索し始め、このデバイスとの接続が確立されます。• 新しいデバイスのBluetoothを有効化し、アンプを選択すると、接続が確立されます。
備考:出荷時設定にリセットすると、Bluetoothの設定もリセットされるため、アンプを再接続する必要があります。
5 Bluetoothのオーディオ・ストリーミングBlack Spirit 200 Floorでオーディオ・ストリーミングを行い、好きな曲に合わせて演奏することができます。オーディオ信号はフルステレオ品質でヘッドフォン出力に送信され、この出力がFullrange Cabにセットされている場合はモノラルでスピーカー出力に送信されます (4.1項を参照)。そのため、お使いのステレオ
システムをヘッドフォン出力やパッシブPAキャビネットに接続し、他のミキシングコンソールを使わずにジャムトラックに合わせて演奏できます。
7 MIDI Black Spirit 200 FloorをMIDIで制御する場合、 MIDIコマンド(コントローラ)センダーもレシーバ (アンプ)も同じMIDIチャンネルを使用します。納品状態ではMIDIチャンネル 1および「Omni On」設定済みです。Black Spirit 200 Floorがプログラム変更コマンドに正しく応答していない場合、MIDIチャンネルを変更しなければなりません。
7.1 MIDIチャンネルの設定とOmniモードのオン/オフ
FX AccessとFX-Loopの2つのノブを同時に3秒間長押しすると、Storeボタンが点灯し始めます。これで、下記のLEDとアンプのボタンを使い特殊なプログラミング機能を使用できます:
• BOOST: このLEDはOmniモードのステータスを示しています:このLEDが点灯すると、Black Spirit 200 Floorが全てのMIDIチャンネル (Omni On) でプログラム変更コマンドを受信します 。これは出荷時設定と同じです。BOOST LEDが点灯していない場合、アンプは現在選択されているMIDIチャンネル (Omni Off) でのみ受信します。Omniモードを切り替えるには、BOOSTスイッチを押す必要があります。• FX-LOOPは+1/upスイッチとして機能し、FX-ACCESSは-1/downスイッチとして機能します。この両スイッチで、MIDIチャンネルを設定することができます。• セットアップ中に、4つのチャンネルLEDはMIDIチャンネルのインジケーターとして機能します。以下の表から、設定したMIDIチャンネルを簡単に読み取ることができます (専門用語では「バイナリ―・コード」とも呼ばれます):
MIDIチャンネル
Clean Crunch Lead Ultra
1 = ¢ ¢ ¢ ¢
2 = ¢ ¢ ¢ {
3 = ¢ ¢ £ ¢
4 = ¢ ¢ £ £
5 = ¢ £ ¢ ¢
6 = ¢ £ ¢ £
7 = ¢ £ £ ¢
8 = ¢ £ £ £
9 = £ ¢ ¢ ¢
10 = £ ¢ ¢ £
11 = £ ¢ £ ¢
12 = £ ¢ £ £
13 = £ £ ¢ ¢
14 = £ £ ¢ £
15 = £ £ £ ¢
16 = £ £ £ £
STOREボタンを3秒間押し続けると、設定が保存され、MIDI設定モードが終了します。STOREボタンが消灯し、アンプが通常の動作に戻ったことを示します。
7.2 グローバル設定
StoreボタンとFX LOOPボタンを同時に3秒間長押しすると、Storeボタンが点滅し始めます。続いて、以下のLEDとアンプのボタンから特殊なプログラム機能を呼び出すことができます: • FX-ACCESS: ここには、Global EQモードのステータスが表示されます。ボタンが点灯していると、Global EQモードがアクティブになっており、無効にする場合はFX-Accessボタンをもう一度押す必要があります。 • FX-LOOP: ここには、Global Cabinet Typeモードのステータスが表示されます。Global Cabinet Typeモードがアクティブになっているとき、ボタンは点灯

72
Black Spirit 200 Floor – Manual 1.0
しています。無効にするには、FX LOOPボタンをもう一度押す必要があります。
グローバル・セッティングを終了し、同時に設定値を保存するには、Storeボタンを3秒間長押しします。アンプが通常モードに戻ります。
7.3 MIDIインプリメンテーション・チャートおよびコントローラー・リスト
MIDIプログラム・チェンジ信号でアンプの全ての切り替え機能がコントロールできるばかりでなく、MIDIプログラム・チェンジ信号を送信することで、アンプのエディット機能の個々のパラメーターを変更することもできます。以下に示すのは、エディットできる機能とそれに対応するコントロール・ナンバーの対照表です
コントロール・ナンバー:
機能
1 モジュレーションの深さ4 ディレイ・タイム、51msから1360msまで128段階7 音量(ソフト)9 ミュート・オン/オフ。オンの状態は、アンプのチャンネルが変更され
るか、ボリュームのパラメーターが変更されるか、あるいはアンプが再起動されるまで維持されます。
12 モジュレーション・エフェクトのタイプ20 ゲイン(ソフト)21 ベース22 ミッド23 トレブル
24 レゾナンス25 プレゼンス26 モジュレーション・スピード(呼び出されたモジュレーション・エフェ
クトにのみ有効)27 ディレイ・フィードバック28 ディレイ・ボリューム29 リバーブ・ボリューム31 チャンネル切り替え(4段階)52 モジュレーション・エフェクト・オン/オフ53 ディレイ・オン/オフ54 リバーブ・オン/オフ55 エフェクト・ループ・オン/オフ56 ゲイン(ハード)57 ボリューム(ハード)58 Cabinet Type (8タイプ)59 Sagging (8タイプ)62 Noise Gateの感度63 ノイズ・ゲート・オン/オフ64 ブースト・オン/オフ
7.4 コントロール1とコントロール2両方の入力用遠隔操作機能割当(コントローラ番号)
コントロール1と2のポートには独立的にコントローラ番号 (コントローラリストと割り当てられている機能を参照)を割り当てることができ、これらは接続してあるフットスイッチかエクスプレッションペダルでリアルタイムに制御できます。 表からわかるように、例えばボリュームはコントローラー号007および効果的にエクスプレションペダルで制御でき、ブーストはフットスイッチおよびコントローラー番号064によりオン/オフすることができます。 この際原則的に「オフ」位置 接続してあるフットスイッチのオフまたはステップダウンしたエクスプレッションペダル(MIDI値0)は コントローラの左リミットストップに対応するか一つのボタンの「オフ」位置に相当します。フットスイッチの「オン」位置または一杯に押し込んだエクスプレッションペダルの位置(MIDI値127)は、コントローラーの右リミットストップ、またはボタンの「オン」位置に相当し、コントローラーまたはボタンを直接アンプで操作しているようなものです。例外:
ボリュームの制御領域は、常にプリセットに登録されている値によって上限が設定されています。例えばボリュームをセンターで保存すると、このセンターまでのみ制御されます。これにより、ライブ状況でのプリセットの音量を、通常のボリュームペダルで行うように制御することができます。
注意:プリセットの切り替え時、エクスプレッションペダルの位置は無視されます。つまり、例えば、エクスプレッションペダルを使って音量を下げた場合、音量は、プリセットの切り替え後、再びプリセットに登録されている値と等しくなります。Black Spirit 200 Floorの総音量を、プリセットを越えて遠隔操作したい場合、つまり、マスターコントローラーの場合、アナログで低抵抗のボリュームペダルをFXループにすり込むことを推奨します。
• コントロール1:設定モードにするためにはボタン TAP と D を同時に押してディスプレイにコントローラ番号が表示され、2番めの数字の後ろにある点が点滅し設定モードになったことが確認されるまで、約3秒押したままにします。次に"Up"と"Down"ボタンでコントローラー番号を設定することができます。設定が完了するとボタンDで番号を確認します。この点は点滅が停止し、アンプは再び通常の操作モードになります。
• Control 2: TAPボタンとCボタンを同時に押し続けて、ディスプレイにコントロール・ナンバーが表示され、10の位の数字の右横にあるドットが点滅を始めたら、ボタンを同時に離します。アップ/ダウン・ボタンでコントロール・ナンバーを選択し、Cボタンを押します。
min.
max.
SleeveRing
Tip
Tip Ring Sleeve
max.
25 - 50 k linear
min.
Expression Pedal
SleeveTip
Footswitch
Tip Sleeve
7.5 工場出荷時の状態に戻す(ファクトリー・リセット)
ファクトリー・リセット、つまり出荷時設定の復元が必要になることは稀です。それでも、本章をよく注意して読む必要があります。そうすれば、苦心して構成したプリセットをうっかり消去してしまうことはなくなります。ファクトリー・リセットを行うには、アンプの電源を入れる時に [Store] ボタンと [FX Access] ボタンを同時に押して、3秒間そのまま保持します。両ボタンが短時間点灯して、リセットが正常に完了したことが通知されます。チャンネルLEDが消灯した後、アンプが通常の作動状態になるまでお待ちください。ファクトリー・リセットを行った後、Bluetooth接続を再び確立する必要があります (6章を参照)。
注意:この手順は緊急事態用です。保存された全ての設定、すなわちプリセット及びMIDI基本設定は復元できないかたちで損失します。
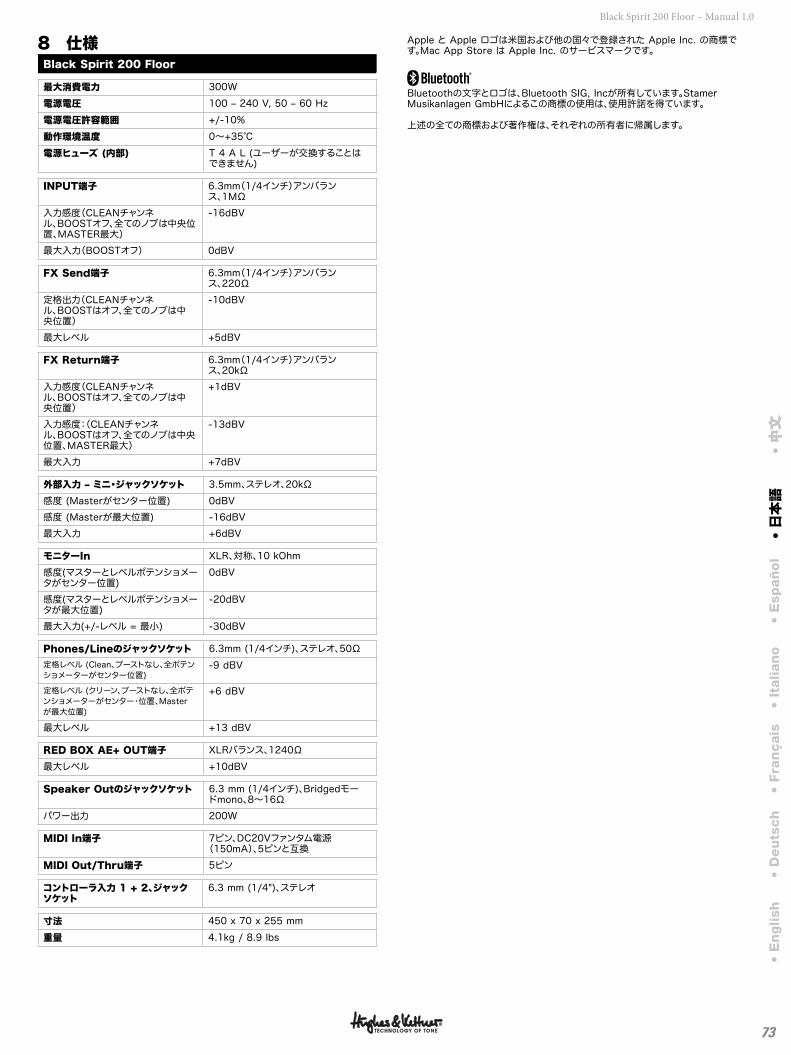
73
Black Spirit 200 Floor – Manual 1.0
• E
nglish
• D
eu
tsch
• Fra
nçais
• It
alian
o•
Esp
añ
ol
• 日本語
• 中文
中文
8 仕様Black Spirit 200 Floor
最大消費電力 300W電源電圧 100 ‒ 240 V, 50 ‒ 60 Hz電源電圧許容範囲 +/-10%動作環境温度 0~+35℃電源ヒューズ (内部) T 4 A L (ユーザーが交換することは
できません)
INPUT端子 6.3mm(1/4インチ)アンバランス、1MΩ
入力感度(CLEANチャンネル、BOOSTオフ、全てのノブは中央位置、MASTER最大)
-16dBV
最大入力(BOOSTオフ) 0dBV
FX Send端子 6.3mm(1/4インチ)アンバランス、220Ω
定格出力(CLEANチャンネル、BOOSTはオフ、全てのノブは中央位置)
-10dBV
最大レベル +5dBV
FX Return端子 6.3mm(1/4インチ)アンバランス、20kΩ
入力感度(CLEANチャンネル、BOOSTはオフ、全てのノブは中央位置)
+1dBV
入力感度:(CLEANチャンネル、BOOSTはオフ、全てのノブは中央位置、MASTER最大)
-13dBV
最大入力 +7dBV
外部入力 ‒ ミニ・ジャックソケット 3.5mm、ステレオ、20kΩ感度 (Masterがセンター位置) 0dBV感度 (Masterが最大位置) -16dBV最大入力 +6dBV
モニターIn XLR、対称、10 kOhm感度(マスターとレベルポテンショメータがセンター位置)
0dBV
感度(マスターとレベルポテンショメータが最大位置)
-20dBV
最大入力(+/-レベル = 最小) -30dBV
Phones/Lineのジャックソケット 6.3mm (1/4インチ)、ステレオ、50Ω定格レベル (Clean、ブーストなし、全ポテンショメーターがセンター位置)
-9 dBV
定格レベル (クリーン、ブーストなし、全ポテンショメーターがセンター・位置、Masterが最大位置)
+6 dBV
最大レベル +13 dBV
RED BOX AE+ OUT端子 XLRバランス、1240Ω最大レベル +10dBV
Speaker Outのジャックソケット 6.3 mm (1/4インチ)、Bridgedモードmono、8~16Ω
パワー出力 200W
MIDI In端子 7ピン、DC20Vファンタム電源(150mA)、5ピンと互換
MIDI Out/Thru端子 5ピン
コントローラ入力 1 + 2、ジャックソケット
6.3 mm (1/4")、ステレオ
寸法 450 x 70 x 255 mm重量 4.1kg / 8.9 lbs
Apple と Apple ロゴは米国および他の国々で登録された Apple Inc. の商標です。Mac App Store は Apple Inc. のサービスマークです。
Bluetoothの文字とロゴは、Bluetooth SIG, Incが所有しています。Stamer Musikanlagen GmbHによるこの商標の使用は、使用許諾を得ています。
上述の全ての商標および著作権は、それぞれの所有者に帰属します。
Version 2.4 08/2019
重要安全说明!连接之前请认真阅读!
本产品由制造商按照 IEC 62368-1 规格生产,出厂时设置安全。为维持安全状况,确保无风险操作,用户必须遵守操作说明中的建议和警告注释。如果该产品用于车辆、船只或飞机或高于海平面 2000 米的高空,请注意遵守相关安全规章,这些规章可能比 IEC 62368-1 更加严格。警告︰为预防火灾和电击危险,请勿将此器械暴露在潮湿的空气或雨中。请勿打开机箱,机箱内不含用户可用部件。如有需要,请向合资格服务人员求助。
出现该符号,意在警告您封装内部存在非绝缘危险电压-即足以构成电击危险的电压。
出现该符号,意在警告您存在外部可触及的危险电压。与任何标有此符号的终端相连的外部接线,必须是符合制造商建议的"预制电缆”,或必须是仅由指示人员安装的接线。
出现该符号,意在提示您随附手册中含有重要的操作和维护说明。请阅读手册。
出现该符号,表示:请当心!表面灼热!为防止灼伤,请勿触摸。
阅读这些说明。保存好这些说明。遵守所有标在产品上及本手册的警告和说明。
· 请勿在靠近水的地方使用该产品。请勿将该产品置于水、浴缸、洗涤盆、厨房水槽、潮湿区域、泳池或潮湿的房间附近。
· 请勿在该产品上放置含有液体的物体,如花瓶、玻璃杯、瓶子等。
· 仅用干布清洁。· 请勿卸除任何封盖或外壳的任何部分。· 产品设定的操作电压必须匹配当地电网的供电电压。如果您不确定所用电源类型,请咨询经销商或当地电力公司。
· 为降低电击危险,必须对该产品接地装置进行维护。请仅使用本产品提供的电源线,并随时维护电源接线的中心(接地)引脚功能。切勿损坏极化或接地类型插头的安全作用。
· 请避免踩踏或挤压电源线,特别是插头、电源插座和电源线从设备拔出的地方!请谨记小心处理电源线。定期检查电源线是否有切口或被压迹象,特别是插头处和电源线从设备拔出的地方。
· 切勿使用损坏的电源线。· 在雷雨期间或长时间不用时,请拔出该产品电源插头。
· 只有拔出该设备或壁插座上的电源插头后,该产品方能完全从电源处断开。该产品必须总是以断开电源的方式放置,将其从电源处断开只是举手之劳。
· 保险丝︰以 IEC127 (5x20mm) 类型额定保险丝替换,以获得最佳性能!禁止使用经修补的保险丝或让保险丝盒断路。更换任何类型的保险丝均必须由合资格的服务人员执行。
· 请让合资格服务人员处理所有的维修。无论设备出现何种形式的损坏,均需要维修,如:
- 电源线或插头损坏或磨损。- 液体洒到或物体掉入该产品。- 该产品暴露在雨中或潮湿的环境中。- 遵守了操作说明,产品仍运转异常。- 产品功能下降或机箱损坏。· 产品请勿连接阻抗若低于对本产品或在该手册中给出额定阻抗的外部扬声器。请按照当地安全规章,仅使用横截面足够大的电缆。
· 避免阳光直射。· 请勿在热源附近安置本产品,如散热器、热风调节器、火炉或其他产生热量的装置。
· 请勿堵住任何通风口。请按照制造商说明进行安装。除非提供合适的通风设备,否则该产品不可置于机架等内置装置中。
· 搬动至某房间时,请总是加热冷设备的温度至室温。如果未进行加热,产品内部可能发生冷凝,
从而造成损坏。· 请勿将明火源放在产品上,如燃烧的蜡烛。· 此设备必须放置在离墙面至少20cm/8"的地方,后面保持通风。设备上方至少保持50cm/20"的通风距离,并且不允许放置其他物品。。
· 只能使用由制造商指定或随产品一起出售的推车、架子、三脚架、支架或桌子。使用推车时,请在移动推车/产品组合时小心,避免倾翻而受到伤害。
· 仅使用制造商推荐的配件,所有类型的配件均是如此,例如防护罩、运输包、架子、壁装或天花板安装设备。在附加任何配件至该产品时,请总是遵照制造商提供的使用说明。请勿使用制造商未指定的安装点。
· 该器械不适合任何体格、知觉或心智受限的人员(包括儿童)使用,也不适合经验不足和/或知识不足的人员操作。必须始终避免 4 岁以下儿童接触该器械。
· 请勿将任何物体推入机箱插槽,它们可能触碰到危险电压点或短路部件,造成火灾或电击风险。
· 该产品可传递超过 90 分贝的声压值,这可能造成永久的听力损伤!极高噪音可能会造成永久的听力损失。长期置身于如此高水平噪音的环境中时,请戴上听力防护。
· 制造商仅在以下情况下保证该产品的安全、可靠和有效:
- 装配、重新调整、修改或修理由制造商或授权人员执行。- 相关区域的电力装置符合 IEC (ANSI) 规格的要求。- 按照操作说明使用该设备。
制造商:Stamer Musikanlagen GmbH, Magdeburger Str.8, 66606 St. Wendel, Germany
仅适用于海拔2000m 以下地区安全使用。
仅适用于非热带气候条件下安全使用。
调试本设备之前的注意事项
· 调试本设备之前,请仔细阅读本说明书,包括安全说明。
· 未正确使用本设备而导致的设备损坏或其它设备损坏,制造商不承担任何责任。
· 连接电源之前,要确保 Power 开关已关闭,且本设备背面标示的额定电压要与当地电源电压相匹配。
· 启动 Black Spirit 200 Floor 之前的警告:声音很大!高音量级别可能造成听力损伤。
· 为了避免声音过大和发生意外,在接通功放之前,使用者要习惯于关闭和 Black Spirit 200 Floor 相连接的吉他音量电位器!
产品中有害物质的名称及含量
部件名称 有害物质
铅(Pb)
汞(Hg)
镉(Cd)
六价铬(Cr(VI))
多溴联苯(PBB)
多溴二苯醚(PBDE)
电路板组件 X ○ X ○ ○ ○
机壳装配件 X ○ ○ ○ ○ ○
附件 ○ ○ ○ ○ ○ ○
本表格依据 SJ/T 11364 的规定编制。
○: 表示该有害物质在该部件所有均质材料中的含量均在 GB/T 26572 规定的限量要求以下。
X : 表示该有害物质至少在该部件的某一均质材料中的含量超出 GB/T 26572 规定的限量要求。
注: 含有有害物质的部件由于全球技术发展水平限制而无法实现有害物质的替代。
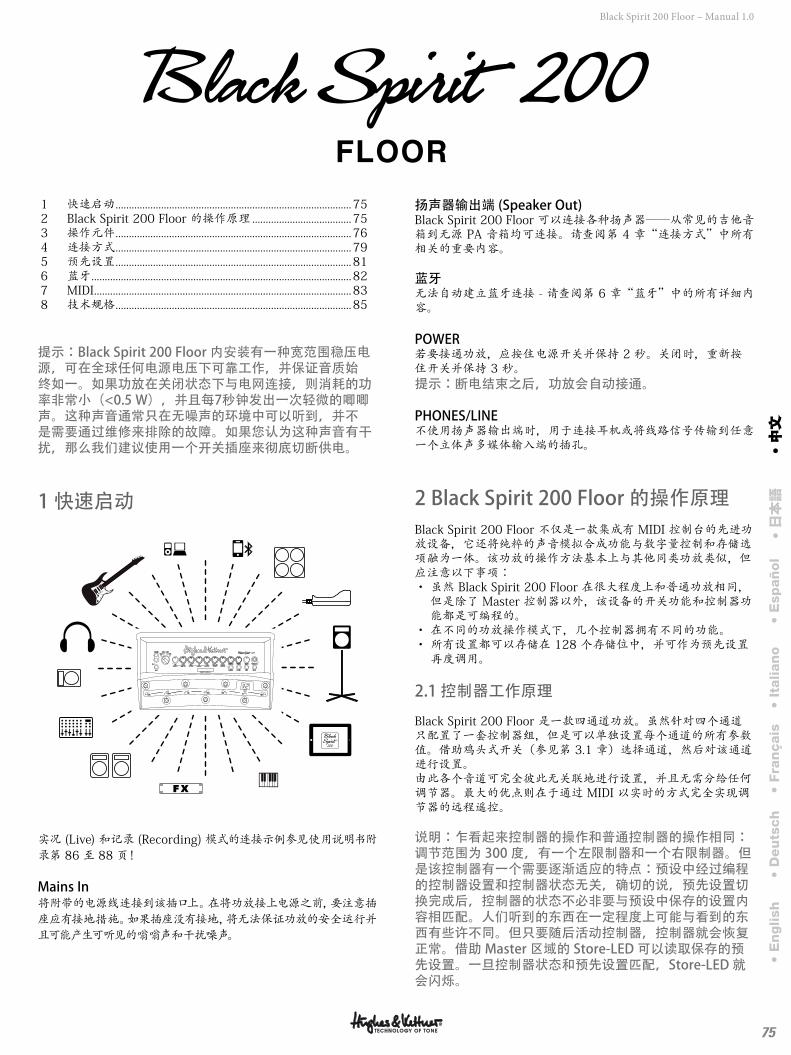
75
Black Spirit 200 Floor – Manual 1.0
1 快速启动 ........................................................................................75 2 Black Spirit 200 Floor 的操作原理 .....................................75 3 操作元件 ........................................................................................76 4 连接方式 ........................................................................................79 5 预先设置 ........................................................................................81 6 蓝牙 .................................................................................................82 7 MIDI ................................................................................................83 8 技术规格 ........................................................................................85
提示:Black Spirit 200 Floor 内安装有一种宽范围稳压电源,可在全球任何电源电压下可靠工作,并保证音质始终如一。如果功放在关闭状态下与电网连接,则消耗的功率非常小(<0.5 W),并且每7秒钟发出一次轻微的唧唧声。这种声音通常只在无噪声的环境中可以听到,并不是需要通过维修来排除的故障。如果您认为这种声音有干扰,那么我们建议使用一个开关插座来彻底切断供电。
1 快速启动
MASTERPRESENCERESONANCESAGGINGNOISE GATETREBLEMIDBASSVOLUME
50
1 8
2 7
3 64 5
GAINREVERBDLY LEVELFEEDBACKDLY T IMEMOD TYPEINTENSITY
CLEAN ULTRACRUNCH LEAD
POWER
PHONES / L INE
CAB TYPE
STOREFX LOOPFX ACCESSBOOST
PRE LOOP
OFF OFF1400 OFF
C
2
1T
F P
S P I R I T ™ T O N E G E N E R A T O R
实况 (Live) 和记录 (Recording) 模式的连接示例参见使用说明书附录第 86 至 88 页!
Mains In将附带的电源线连接到该插口上。在将功放接上电源之前,要注意插座应有接地措施。如果插座没有接地,将无法保证功放的安全运行并且可能产生可听见的嗡嗡声和干扰噪声。
扬声器输出端 (Speaker Out)Black Spirit 200 Floor 可以连接各种扬声器——从常见的吉他音箱到无源 PA 音箱均可连接。请查阅第 4 章“连接方式”中所有相关的重要内容。
蓝牙无法自动建立蓝牙连接 - 请查阅第 6 章“蓝牙”中的所有详细内容。
POWER若要接通功放,应按住电源开关并保持 2 秒。关闭时,重新按住开关并保持 3 秒。提示:断电结束之后,功放会自动接通。
PHONES/LINE不使用扬声器输出端时,用于连接耳机或将线路信号传输到任意一个立体声多媒体输入端的插孔。
2 Black Spirit 200 Floor 的操作原理Black Spirit 200 Floor 不仅是一款集成有 MIDI 控制台的先进功放设备,它还将纯粹的声音模拟合成功能与数字量控制和存储选项融为一体。该功放的操作方法基本上与其他同类功放类似,但应注意以下事项:· 虽然 Black Spirit 200 Floor 在很大程度上和普通功放相同,但是除了 Master 控制器以外,该设备的开关功能和控制器功能都是可编程的。
· 在不同的功放操作模式下,几个控制器拥有不同的功能。· 所有设置都可以存储在 128 个存储位中,并可作为预先设置再度调用。
2.1 控制器工作原理
Black Spirit 200 Floor 是一款四通道功放。虽然针对四个通道只配置了一套控制器组,但是可以单独设置每个通道的所有参数值。借助鸡头式开关(参见第 3.1 章)选择通道,然后对该通道进行设置。由此各个音道可完全彼此无关联地进行设置,并且无需分给任何调节器。最大的优点则在于通过 MIDI 以实时的方式完全实现调节器的远程遥控。
说明:乍看起来控制器的操作和普通控制器的操作相同:调节范围为 300 度,有一个左限制器和一个右限制器。但是该控制器有一个需要逐渐适应的特点:预设中经过编程的控制器设置和控制器状态无关,确切的说,预先设置切换完成后,控制器的状态不必非要与预设中保存的设置内容相匹配。人们听到的东西在一定程度上可能与看到的东西有些许不同。但只要随后活动控制器,控制器就会恢复正常。借助 Master 区域的 Store-LED 可以读取保存的预先设置。一旦控制器状态和预先设置匹配,Store-LED 就会闪烁。
• E
nglish
• D
eu
tsch
• Fra
nçais
• It
alian
o•
Esp
añ
ol
• 日本語
• 中文
中文
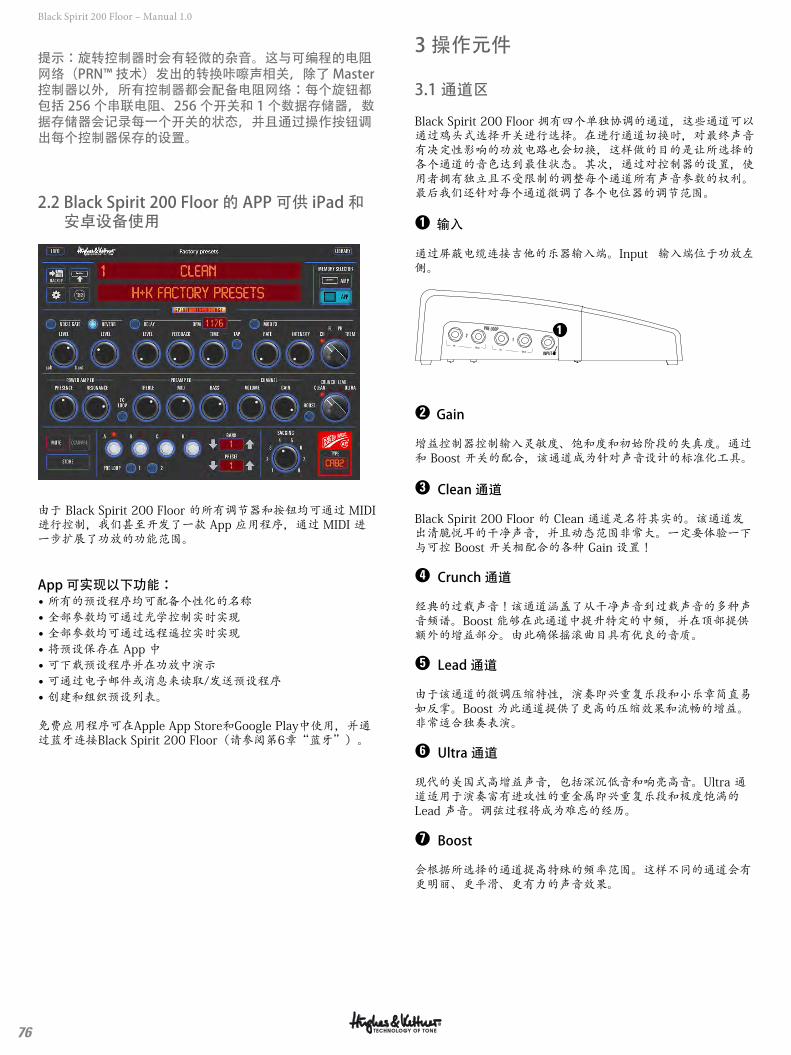
76
Black Spirit 200 Floor – Manual 1.0
提示:旋转控制器时会有轻微的杂音。这与可编程的电阻网络(PRN™ 技术)发出的转换咔嚓声相关,除了 Master 控制器以外,所有控制器都会配备电阻网络:每个旋钮都包括 256 个串联电阻、256 个开关和 1 个数据存储器,数据存储器会记录每一个开关的状态,并且通过操作按钮调出每个控制器保存的设置。
2.2 Black Spirit 200 Floor 的 APP 可供 iPad 和安卓设备使用
由于 Black Spirit 200 Floor 的所有调节器和按钮均可通过 MIDI 进行控制,我们甚至开发了一款 App 应用程序,通过 MIDI 进一步扩展了功放的功能范围。
App 可实现以下功能: • 所有的预设程序均可配备个性化的名称• 全部参数均可通过光学控制实时实现• 全部参数均可通过远程遥控实时实现• 将预设保存在 App 中• 可下载预设程序并在功放中演示• 可通过电子邮件或消息来读取/发送预设程序• 创建和组织预设列表。
免费应用程序可在Apple App Store和Google Play中使用,并通过蓝牙连接Black Spirit 200 Floor(请参阅第6章“蓝牙”)。
3 操作元件
3.1 通道区
Black Spirit 200 Floor 拥有四个单独协调的通道,这些通道可以通过鸡头式选择开关进行选择。在进行通道切换时,对最终声音有决定性影响的功放电路也会切换,这样做的目的是让所选择的各个通道的音色达到最佳状态。其次,通过对控制器的设置,使用者拥有独立且不受限制的调整每个通道所有声音参数的权利。最后我们还针对每个通道微调了各个电位器的调节范围。
●1 输入
通过屏蔽电缆连接吉他的乐器输入端。Input 输入端位于功放左侧。
INPUT
PRE LOOP
12
1
●2 Gain
增益控制器控制输入灵敏度、饱和度和初始阶段的失真度。通过和 Boost 开关的配合,该通道成为针对声音设计的标准化工具。
●3 Clean 通道
Black Spirit 200 Floor 的 Clean 通道是名符其实的。该通道发出清脆悦耳的干净声音,并且动态范围非常大。一定要体验一下与可控 Boost 开关相配合的各种 Gain 设置!
●4 Crunch 通道
经典的过载声音!该通道涵盖了从干净声音到过载声音的多种声音频谱。Boost 能够在此通道中提升特定的中频,并在顶部提供额外的增益部分。由此确保摇滚曲目具有优良的音质。
●5 Lead 通道
由于该通道的微调压缩特性,演奏即兴重复乐段和小乐章简直易如反掌。Boost 为此通道提供了更高的压缩效果和流畅的增益。非常适合独奏表演。
●6 Ultra 通道
现代的美国式高增益声音,包括深沉低音和响亮高音。Ultra 通道适用于演奏富有进攻性的重金属即兴重复乐段和极度饱满的 Lead 声音。调弦过程将成为难忘的经历。
●7 Boost
会根据所选择的通道提高特殊的频率范围。这样不同的通道会有更明丽、更平滑、更有力的声音效果。
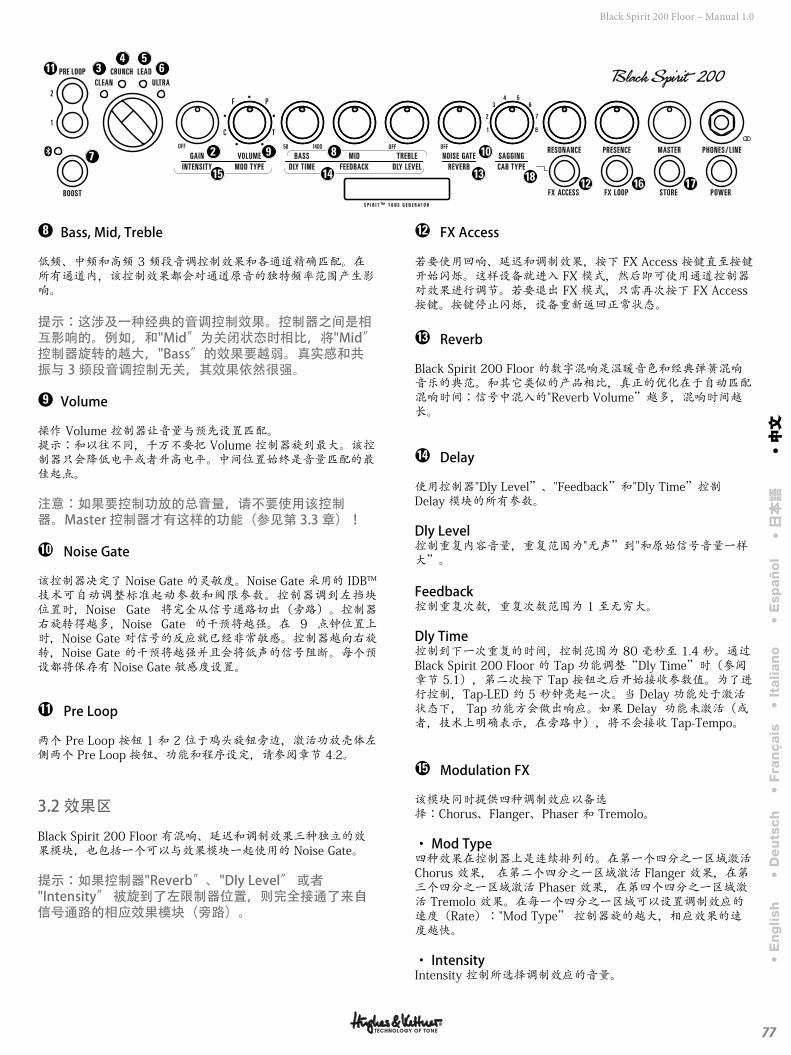
77
Black Spirit 200 Floor – Manual 1.0
●8 Bass, Mid, Treble
低频、中频和高频 3 频段音调控制效果和各通道精确匹配。在所有通道内,该控制效果都会对通道原音的独特频率范围产生影响。
提示:这涉及一种经典的音调控制效果。控制器之间是相互影响的。例如,和"Mid”为关闭状态时相比,将"Mid”控制器旋转的越大,"Bass”的效果要越弱。真实感和共振与 3 频段音调控制无关,其效果依然很强。
●9 Volume
操作 Volume 控制器让音量与预先设置匹配。提示:和以往不同,千万不要把 Volume 控制器旋到最大。该控制器只会降低电平或者升高电平。中间位置始终是音量匹配的最佳起点。
注意:如果要控制功放的总音量,请不要使用该控制器。Master 控制器才有这样的功能(参见第 3.3 章)!
●10 Noise Gate
该控制器决定了 Noise Gate 的灵敏度。Noise Gate 采用的 IDB™ 技术可自动调整标准起动参数和阀限参数。控制器调到左挡块位置时,Noise Gate 将完全从信号通路切出(旁路)。控制器右旋转得越多,Noise Gate 的干预将越强。在 9 点钟位置上时,Noise Gate 对信号的反应就已经非常敏感。控制器越向右旋转,Noise Gate 的干预将越强并且会将低声的信号阻断。每个预设都将保存有 Noise Gate 敏感度设置。
●11 Pre Loop
两个 Pre Loop 按钮 1 和 2 位于鸡头旋钮旁边,激活功放壳体左侧两个 Pre Loop 按钮、功能和程序设定,请参阅章节 4.2。
3.2 效果区
Black Spirit 200 Floor 有混响、延迟和调制效果三种独立的效果模块,也包括一个可以与效果模块一起使用的 Noise Gate。
提示:如果控制器"Reverb”、"Dly Level” 或者 "Intensity” 被旋到了左限制器位置,则完全接通了来自信号通路的相应效果模块(旁路)。
●12 FX Access
若要使用回响、延迟和调制效果,按下 FX Access 按键直至按键开始闪烁。这样设备就进入 FX 模式,然后即可使用通道控制器对效果进行调节。若要退出 FX 模式,只需再次按下 FX Access 按键。按键停止闪烁,设备重新返回正常状态。
●13 Reverb
Black Spirit 200 Floor 的数字混响是温暖音色和经典弹簧混响音乐的典范。和其它类似的产品相比,真正的优化在于自动匹配混响时间:信号中混入的"Reverb Volume”越多,混响时间越长。
●14 Delay
使用控制器"Dly Level”、"Feedback”和"Dly Time”控制 Delay 模块的所有参数。
Dly Level控制重复内容音量,重复范围为"无声”到"和原始信号音量一样大”。
Feedback控制重复次数,重复次数范围为 1 至无穷大。
Dly Time控制到下一次重复的时间,控制范围为 80 毫秒至 1.4 秒。通过 Black Spirit 200 Floor 的 Tap 功能调整“Dly Time”时(参阅章节 5.1),第二次按下 Tap 按钮之后开始接收参数值。为了进行控制,Tap-LED 约 5 秒钟亮起一次。当 Delay 功能处于激活状态下, Tap 功能方会做出响应。如果 Delay 功能未激活(或者,技术上明确表示,在旁路中),将不会接收 Tap-Tempo。
●15 Modulation FX
该模块同时提供四种调制效应以备选择:Chorus、Flanger、Phaser 和 Tremolo。
· Mod Type四种效果在控制器上是连续排列的。在第一个四分之一区域激活 Chorus 效果, 在第二个四分之一区域激活 Flanger 效果,在第三个四分之一区域激活 Phaser 效果,在第四个四分之一区域激活 Tremolo 效果。在每一个四分之一区域可以设置调制效应的速度(Rate):"Mod Type” 控制器旋的越大,相应效果的速度越快。
· IntensityIntensity 控制所选择调制效应的音量。
• E
nglish
• D
eu
tsch
• Fra
nçais
• It
alian
o•
Esp
añ
ol
• 日本語
• 中文
中文
MASTERPRESENCERESONANCESAGGINGNOISE GATETREBLEMIDBASSVOLUME
50
1 8
2 7
3 64 5
GAINREVERBDLY LEVELFEEDBACKDLY T IMEMOD TYPEINTENSITY
CLEAN ULTRACRUNCH LEAD
POWER
PHONES / L INE
CAB TYPE
STOREFX LOOPFX ACCESSBOOST
PRE LOOP
OFF OFF1400 OFF
C
2
1T
F P
S P I R I T ™ T O N E G E N E R A T O R
2 9
3 64 5
7 8 10
12
11
16131415 18 17
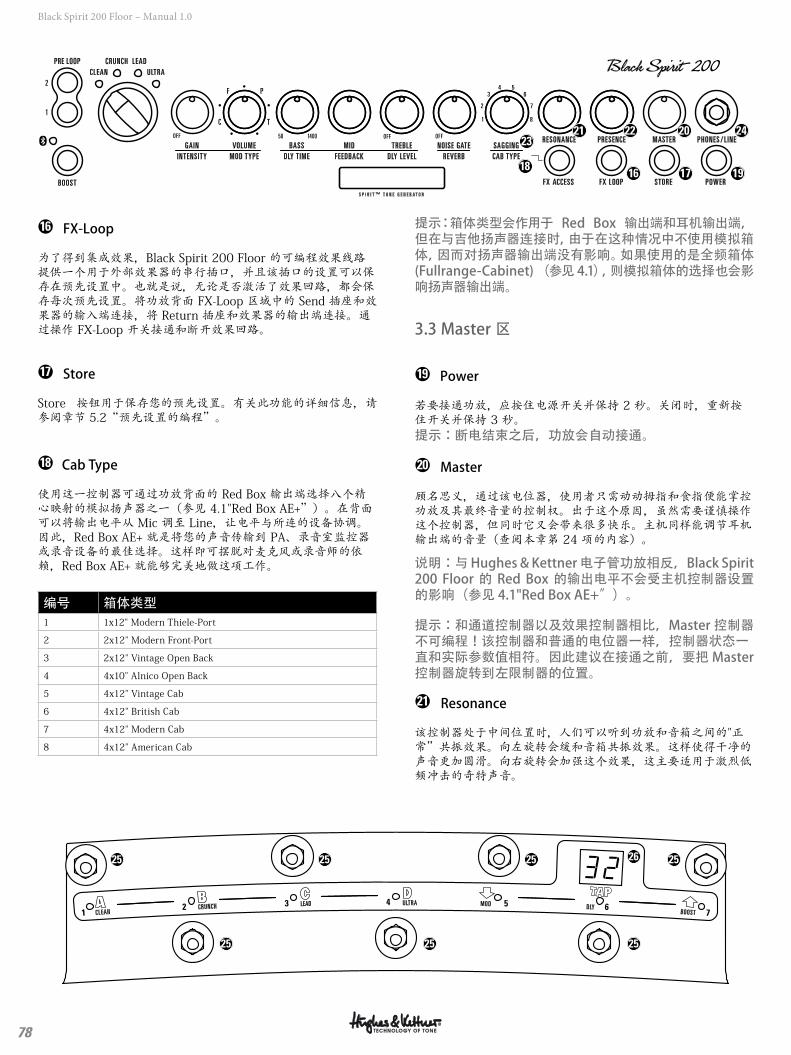
78
Black Spirit 200 Floor – Manual 1.0
●16 FX-Loop
为了得到集成效果,Black Spirit 200 Floor 的可编程效果线路提供一个用于外部效果器的串行插口,并且该插口的设置可以保存在预先设置中。也就是说,无论是否激活了效果回路,都会保存每次预先设置。将功放背面 FX-Loop 区域中的 Send 插座和效果器的输入端连接,将 Return 插座和效果器的输出端连接。通过操作 FX-Loop 开关接通和断开效果回路。
●17 Store
Store 按钮用于保存您的预先设置。有关此功能的详细信息,请参阅章节 5.2“预先设置的编程”。
●18 Cab Type
使用这一控制器可通过功放背面的 Red Box 输出端选择八个精心映射的模拟扬声器之一(参见 4.1"Red Box AE+”)。在背面可以将输出电平从 Mic 调至 Line,让电平与所连的设备协调。因此,Red Box AE+ 就是将您的声音传输到 PA、录音室监控器或录音设备的最佳选择。这样即可摆脱对麦克风或录音师的依赖,Red Box AE+ 就能够完美地做这项工作。
编号 箱体类型1 1x12" Modern Thiele-Port
2 2x12" Modern Front-Port
3 2x12" Vintage Open Back
4 4x10" Alnico Open Back
5 4x12" Vintage Cab
6 4x12" British Cab
7 4x12" Modern Cab
8 4x12" American Cab
提示:箱体类型会作用于 Red Box 输出端和耳机输出端,但在与吉他扬声器连接时,由于在这种情况中不使用模拟箱体,因而对扬声器输出端没有影响。如果使用的是全频箱体 (Fullrange-Cabinet) (参见 4.1),则模拟箱体的选择也会影响扬声器输出端。
3.3 Master 区
●19 Power
若要接通功放,应按住电源开关并保持 2 秒。关闭时,重新按住开关并保持 3 秒。提示:断电结束之后,功放会自动接通。
●20 Master
顾名思义,通过该电位器,使用者只需动动拇指和食指便能掌控功放及其最终音量的控制权。出于这个原因,虽然需要谨慎操作这个控制器,但同时它又会带来很多快乐。主机同样能调节耳机输出端的音量(查阅本章第 24 项的内容)。
说明:与 Hughes & Kettner 电子管功放相反,Black Spirit 200 Floor 的 Red Box 的输出电平不会受主机控制器设置的影响(参见 4.1"Red Box AE+”)。
提示:和通道控制器以及效果控制器相比,Master 控制器不可编程!该控制器和普通的电位器一样,控制器状态一直和实际参数值相符。因此建议在接通之前,要把 Master 控制器旋转到左限制器的位置。
●21 Resonance
该控制器处于中间位置时,人们可以听到功放和音箱之间的"正常”共振效果。向左旋转会缓和音箱共振效果。这样使得干净的声音更加圆滑。向右旋转会加强这个效果,这主要适用于激烈低频冲击的奇特声音。
25
25 25 25
2625 25 25
MASTERPRESENCERESONANCESAGGINGNOISE GATETREBLEMIDBASSVOLUME
50
1 8
2 7
3 64 5
GAINREVERBDLY LEVELFEEDBACKDLY T IMEMOD TYPEINTENSITY
CLEAN ULTRACRUNCH LEAD
POWER
PHONES / L INE
CAB TYPE
STOREFX LOOPFX ACCESSBOOST
PRE LOOP
OFF OFF1400 OFF
C
2
1T
F P
S P I R I T ™ T O N E G E N E R A T O R
18
2021 22 2423
16 17 19
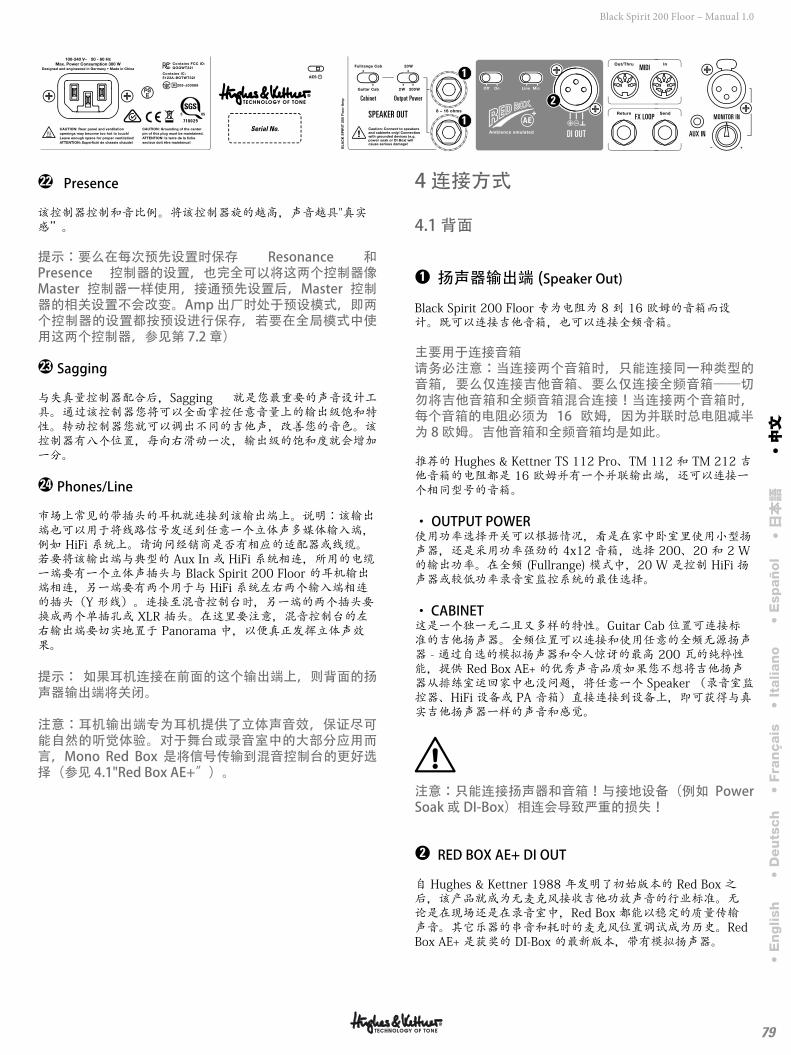
79
Black Spirit 200 Floor – Manual 1.0
●22 Presence
该控制器控制和音比例。将该控制器旋的越高,声音越具"真实感”。
提示:要么在每次预先设置时保存 Resonance 和 Presence 控制器的设置,也完全可以将这两个控制器像 Master 控制器一样使用,接通预先设置后,Master 控制器的相关设置不会改变。Amp 出厂时处于预设模式,即两个控制器的设置都按预设进行保存,若要在全局模式中使用这两个控制器,参见第 7.2 章)
●23 Sagging
与失真量控制器配合后,Sagging 就是您最重要的声音设计工具。通过该控制器您将可以全面掌控任意音量上的输出级饱和特性。转动控制器您就可以调出不同的吉他声,改善您的音色。该控制器有八个位置,每向右滑动一次,输出级的饱和度就会增加一分。
●24 Phones/Line
市场上常见的带插头的耳机就连接到该输出端上。说明:该输出端也可以用于将线路信号发送到任意一个立体声多媒体输入端,例如 HiFi 系统上。请询问经销商是否有相应的适配器或线缆。若要将该输出端与典型的 Aux In 或 HiFi 系统相连,所用的电缆一端要有一个立体声插头与 Black Spirit 200 Floor 的耳机输出端相连,另一端要有两个用于与 HiFi 系统左右两个输入端相连的插头(Y 形线)。连接至混音控制台时,另一端的两个插头要换成两个单插孔或 XLR 插头。在这里要注意,混音控制台的左右输出端要切实地置于 Panorama 中,以便真正发挥立体声效果。
提示: 如果耳机连接在前面的这个输出端上,则背面的扬声器输出端将关闭。
注意:耳机输出端专为耳机提供了立体声音效,保证尽可能自然的听觉体验。对于舞台或录音室中的大部分应用而言,Mono Red Box 是将信号传输到混音控制台的更好选择(参见 4.1"Red Box AE+”)。
4 连接方式
4.1 背面
●1 扬声器输出端 (Speaker Out)
Black Spirit 200 Floor 专为电阻为 8 到 16 欧姆的音箱而设计。既可以连接吉他音箱,也可以连接全频音箱。
主要用于连接音箱请务必注意:当连接两个音箱时,只能连接同一种类型的音箱,要么仅连接吉他音箱、要么仅连接全频音箱——切勿将吉他音箱和全频音箱混合连接!当连接两个音箱时,每个音箱的电阻必须为 16 欧姆,因为并联时总电阻减半为 8 欧姆。吉他音箱和全频音箱均是如此。
推荐的 Hughes & Kettner TS 112 Pro、TM 112 和 TM 212 吉他音箱的电阻都是 16 欧姆并有一个并联输出端,还可以连接一个相同型号的音箱。 · OUTPUT POWER使用功率选择开关可以根据情况,看是在家中卧室里使用小型扬声器,还是采用功率强劲的 4x12 音箱,选择 200、20 和 2 W 的输出功率。在全频 (Fullrange) 模式中,20 W 是控制 HiFi 扬声器或较低功率录音室监控系统的最佳选择。
· CABINET这是一个独一无二且又多样的特性。Guitar Cab 位置可连接标准的吉他扬声器。全频位置可以连接和使用任意的全频无源扬声器 - 通过自选的模拟扬声器和令人惊讶的最高 200 瓦的纯粹性能,提供 Red Box AE+ 的优秀声音品质如果您不想将吉他扬声器从排练室运回家中也没问题,将任意一个 Speaker (录音室监控器、HiFi 设备或 PA 音箱)直接连接到设备上,即可获得与真实吉他扬声器一样的声音和感觉。
注意:只能连接扬声器和音箱!与接地设备(例如 Power Soak 或 DI-Box)相连会导致严重的损失!
●2 RED BOX AE+ DI OUT
自 Hughes & Kettner 1988 年发明了初始版本的 Red Box 之后,该产品就成为无麦克风接收吉他功放声音的行业标准。无论是在现场还是在录音室中,Red Box 都能以稳定的质量传输声音。其它乐器的串音和耗时的麦克风位置调试成为历史。Red Box AE+ 是获奖的 DI-Box 的最新版本,带有模拟扬声器。
• E
nglish
• D
eu
tsch
• Fra
nçais
• It
alian
o•
Esp
añ
ol
• 日本語
• 中文
中文
Serial No.
Output Power
SPEAKER OUT
MIDI
FX LOOP
AUX IN
Cabinet
MONITOR IN
DI OUT
AE
1
1
2
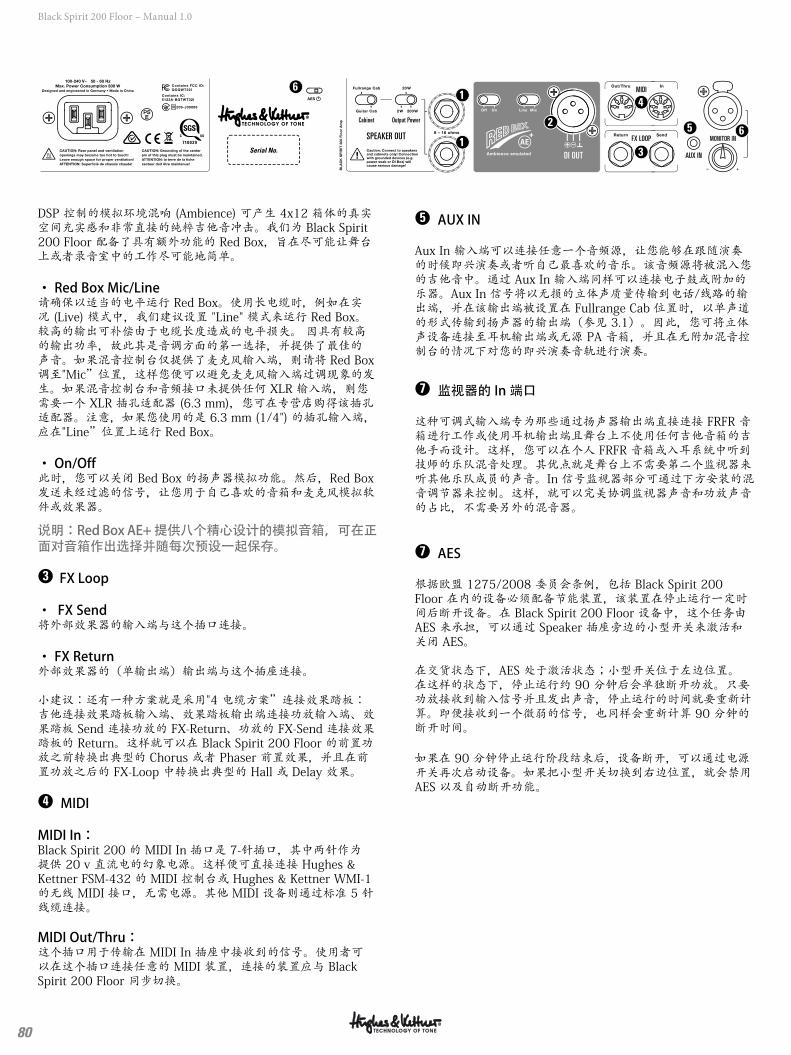
80
Black Spirit 200 Floor – Manual 1.0
DSP 控制的模拟环境混响 (Ambience) 可产生 4x12 箱体的真实空间充实感和非常直接的纯粹吉他音冲击。我们为 Black Spirit 200 Floor 配备了具有额外功能的 Red Box,旨在尽可能让舞台上或者录音室中的工作尽可能地简单。
· Red Box Mic/Line请确保以适当的电平运行 Red Box。使用长电缆时,例如在实况 (Live) 模式中,我们建议设置 "Line" 模式来运行 Red Box。较高的输出可补偿由于电缆长度造成的电平损失。 因具有较高的输出功率,故此其是音调方面的第一选择,并提供了最佳的声音。如果混音控制台仅提供了麦克风输入端,则请将 Red Box 调至"Mic”位置,这样您便可以避免麦克风输入端过调现象的发生。如果混音控制台和音频接口未提供任何 XLR 输入端,则您需要一个 XLR 插孔适配器 (6.3 mm),您可在专营店购得该插孔适配器。注意,如果您使用的是 6.3 mm (1/4") 的插孔输入端,应在"Line”位置上运行 Red Box。
· On/Off此时,您可以关闭 Bed Box 的扬声器模拟功能。然后,Red Box 发送未经过滤的信号,让您用于自己喜欢的音箱和麦克风模拟软件或效果器。
说明:Red Box AE+ 提供八个精心设计的模拟音箱,可在正面对音箱作出选择并随每次预设一起保存。
●3 FX Loop
· FX Send将外部效果器的输入端与这个插口连接。
· FX Return外部效果器的(单输出端)输出端与这个插座连接。
小建议:还有一种方案就是采用"4 电缆方案”连接效果踏板:吉他连接效果踏板输入端、效果踏板输出端连接功放输入端、效果踏板 Send 连接功放的 FX-Return、功放的 FX-Send 连接效果踏板的 Return。这样就可以在 Black Spirit 200 Floor 的前置功放之前转换出典型的 Chorus 或者 Phaser 前置效果,并且在前置功放之后的 FX-Loop 中转换出典型的 Hall 或 Delay 效果。
●4 MIDI
MIDI In:Black Spirit 200 的 MIDI In 插口是 7-针插口,其中两针作为提供 20 v 直流电的幻象电源。这样便可直接连接 Hughes & Kettner FSM-432 的 MIDI 控制台或 Hughes & Kettner WMI-1 的无线 MIDI 接口,无需电源。其他 MIDI 设备则通过标准 5 针线缆连接。
MIDI Out/Thru:这个插口用于传输在 MIDI In 插座中接收到的信号。使用者可以在这个插口连接任意的 MIDI 装置,连接的装置应与 Black Spirit 200 Floor 同步切换。
●5 AUX IN
Aux In 输入端可以连接任意一个音频源,让您能够在跟随演奏的时候即兴演奏或者听自己最喜欢的音乐。该音频源将被混入您的吉他音中。通过 Aux In 输入端同样可以连接电子鼓或附加的乐器。Aux In 信号将以无损的立体声质量传输到电话/线路的输出端,并在该输出端被设置在 Fullrange Cab 位置时,以单声道的形式传输到扬声器的输出端(参见 3.1)。因此,您可将立体声设备连接至耳机输出端或无源 PA 音箱,并且在无附加混音控制台的情况下对您的即兴演奏音轨进行演奏。
●7 监视器的 In 端口
这种可调式输入端专为那些通过扬声器输出端直接连接 FRFR 音箱进行工作或使用耳机输出端且舞台上不使用任何吉他音箱的吉他手而设计。这样,您可以在个人 FRFR 音箱或入耳系统中听到技师的乐队混音处理。其优点就是舞台上不需要第二个监视器来听其他乐队成员的声音。In 信号监视器部分可通过下方安装的混音调节器来控制。这样,就可以完美协调监视器声音和功放声音的占比,不需要另外的混音器。
●7 AES
根据欧盟 1275/2008 委员会条例,包括 Black Spirit 200 Floor 在内的设备必须配备节能装置,该装置在停止运行一定时间后断开设备。在 Black Spirit 200 Floor 设备中,这个任务由 AES 来承担,可以通过 Speaker 插座旁边的小型开关来激活和关闭 AES。
在交货状态下,AES 处于激活状态;小型开关位于左边位置。在这样的状态下,停止运行约 90 分钟后会单独断开功放。只要功放接收到输入信号并且发出声音,停止运行的时间就要重新计算。即便接收到一个微弱的信号,也同样会重新计算 90 分钟的断开时间。
如果在 90 分钟停止运行阶段结束后,设备断开,可以通过电源开关再次启动设备。如果把小型开关切换到右边位置,就会禁用 AES 以及自动断开功能。
Serial No.
Output Power
SPEAKER OUT
MIDI
FX LOOP
AUX IN
Cabinet
MONITOR IN
DI OUT
AE
1
1
2
3
4
5 6
6
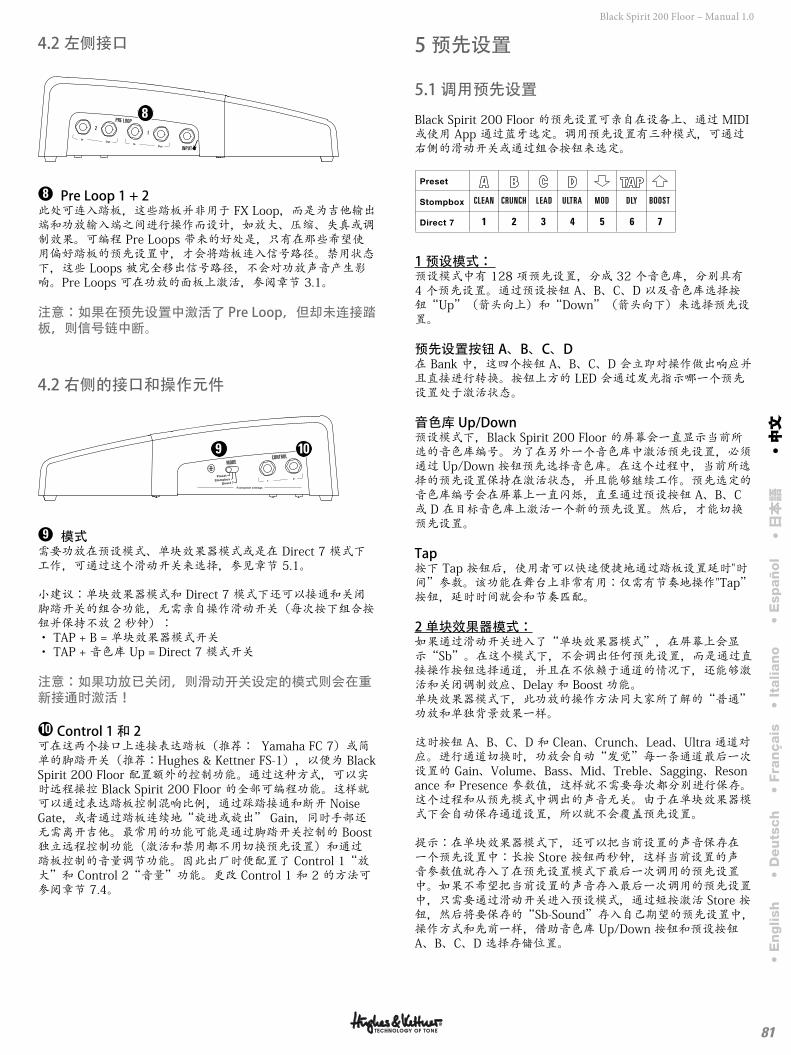
81
Black Spirit 200 Floor – Manual 1.0
4.2 左侧接口
INPUT
PRE LOOP
12
8
●8 Pre Loop 1 + 2此处可连入踏板,这些踏板并非用于 FX Loop,而是为吉他输出端和功放输入端之间进行操作而设计,如放大、压缩、失真或调制效果。可编程 Pre Loops 带来的好处是,只有在那些希望使用偏好踏板的预先设置中,才会将踏板连入信号路径。禁用状态下,这些 Loops 被完全移出信号路径,不会对功放声音产生影响。Pre Loops 可在功放的面板上激活,参阅章节 3.1。
注意:如果在预先设置中激活了 Pre Loop,但却未连接踏板,则信号链中断。
4.2 右侧的接口和操作元件
CONTROLMODE
9 10
●9 模式需要功放在预设模式、单块效果器模式或是在 Direct 7 模式下工作,可通过这个滑动开关来选择,参见章节 5.1。
小建议:单块效果器模式和 Direct 7 模式下还可以接通和关闭脚踏开关的组合功能,无需亲自操作滑动开关(每次按下组合按钮并保持不放 2 秒钟):· TAP + B = 单块效果器模式开关· TAP + 音色库 Up = Direct 7 模式开关
注意:如果功放已关闭,则滑动开关设定的模式则会在重新接通时激活!
●10 Control 1 和 2可在这两个接口上连接表达踏板(推荐: Yamaha FC 7)或简单的脚踏开关(推荐:Hughes & Kettner FS-1),以便为 Black Spirit 200 Floor 配置额外的控制功能。通过这种方式,可以实时远程操控 Black Spirit 200 Floor 的全部可编程功能。这样就可以通过表达踏板控制混响比例,通过踩踏接通和断开 Noise Gate,或者通过踏板连续地“旋进或旋出” Gain,同时手部还无需离开吉他。最常用的功能可能是通过脚踏开关控制的 Boost 独立远程控制功能(激活和禁用都不用切换预先设置)和通过踏板控制的音量调节功能。因此出厂时便配置了 Control 1“放大”和 Control 2“音量”功能。更改 Control 1 和 2 的方法可参阅章节 7.4。
5 预先设置
5.1 调用预先设置
Black Spirit 200 Floor 的预先设置可亲自在设备上、通过 MIDI 或使用 App 通过蓝牙选定。调用预先设置有三种模式,可通过右侧的滑动开关或通过组合按钮来选定。
1
CLEAN
2
CRUNCH
3
LEAD
4
ULTRA
6
DLY
7
BOOST
5
MOD
1 预设模式: 预设模式中有 128 项预先设置,分成 32 个音色库,分别具有 4 个预先设置。通过预设按钮 A、B、C、D 以及音色库选择按钮“Up”(箭头向上)和“Down”(箭头向下)来选择预先设置。
预先设置按钮 A、B、C、D 在 Bank 中,这四个按钮 A、B、C、D 会立即对操作做出响应并且直接进行转换。按钮上方的 LED 会通过发光指示哪一个预先设置处于激活状态。
音色库 Up/Down预设模式下,Black Spirit 200 Floor 的屏幕会一直显示当前所选的音色库编号。为了在另外一个音色库中激活预先设置,必须通过 Up/Down 按钮预先选择音色库。在这个过程中,当前所选择的预先设置保持在激活状态,并且能够继续工作。预先选定的音色库编号会在屏幕上一直闪烁,直至通过预设按钮 A、B、C 或 D 在目标音色库上激活一个新的预先设置。然后,才能切换预先设置。
Tap 按下 Tap 按钮后,使用者可以快速便捷地通过踏板设置延时"时间”参数。该功能在舞台上非常有用:仅需有节奏地操作"Tap”按钮,延时时间就会和节奏匹配。
2 单块效果器模式:如果通过滑动开关进入了“单块效果器模式”,在屏幕上会显示“Sb”。在这个模式下,不会调出任何预先设置,而是通过直接操作按钮选择通道,并且在不依赖于通道的情况下,还能够激活和关闭调制效应、Delay 和 Boost 功能。 单块效果器模式下,此功放的操作方法同大家所了解的“普通”功放和单独背景效果一样。
这时按钮 A、B、C、D 和 Clean、Crunch、Lead、Ultra 通道对应。进行通道切换时,功放会自动“发觉”每一条通道最后一次设置的 Gain、Volume、Bass、Mid、Treble、Sagging、Resonance 和 Presence 参数值,这样就不需要每次都分别进行保存。这个过程和从预先模式中调出的声音无关。由于在单块效果器模式下会自动保存通道设置,所以就不会覆盖预先设置。
提示:在单块效果器模式下,还可以把当前设置的声音保存在一个预先设置中:长按 Store 按钮两秒钟,这样当前设置的声音参数值就存入了在预先设置模式下最后一次调用的预先设置中。如果不希望把当前设置的声音存入最后一次调用的预先设置中,只需要通过滑动开关进入预设模式,通过短按激活 Store 按钮,然后将要保存的“Sb-Sound”存入自己期望的预先设置中,操作方式和先前一样,借助音色库 Up/Down 按钮和预设按钮 A、B、C、D 选择存储位置。
• E
nglish
• D
eu
tsch
• Fra
nçais
• It
alian
o•
Esp
añ
ol
• 日本語
• 中文
中文
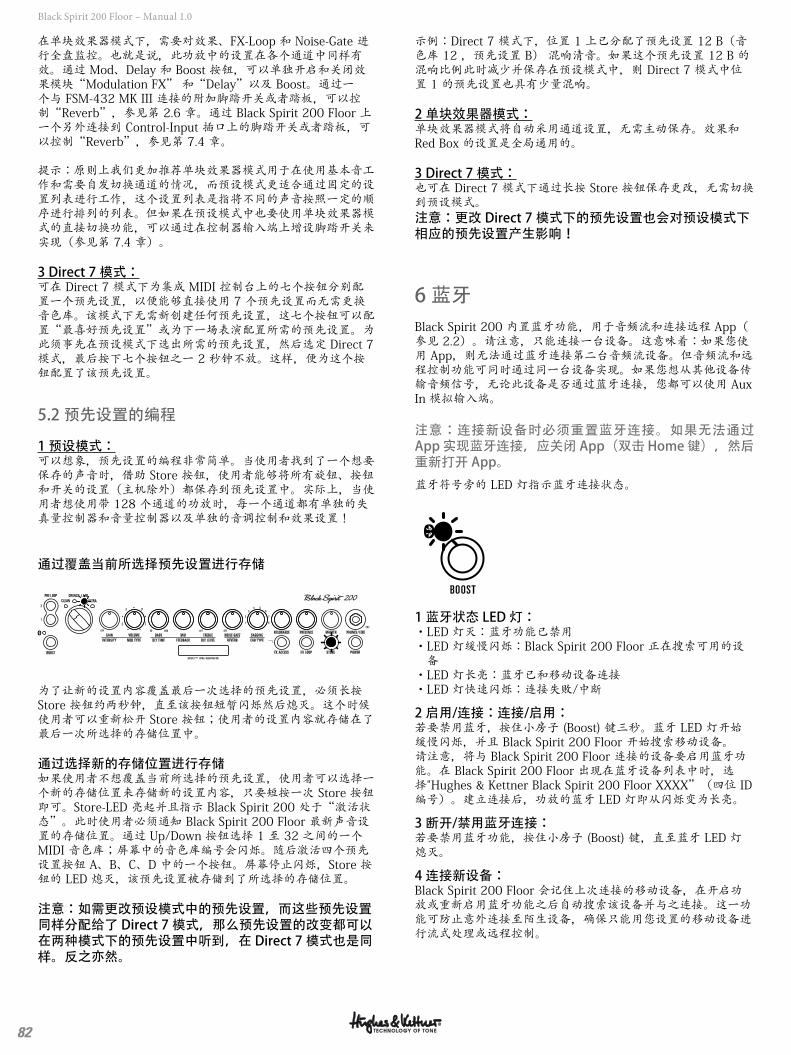
82
Black Spirit 200 Floor – Manual 1.0
在单块效果器模式下,需要对效果、FX-Loop 和 Noise-Gate 进行全盘监控。也就是说,此功放中的设置在各个通道中同样有效。通过 Mod、Delay 和 Boost 按钮,可以单独开启和关闭效果模块“Modulation FX” 和“Delay”以及 Boost。通过一个与 FSM-432 MK III 连接的附加脚踏开关或者踏板,可以控制“Reverb”,参见第 2.6 章。通过 Black Spirit 200 Floor 上一个另外连接到 Control-Input 插口上的脚踏开关或者踏板,可以控制“Reverb”,参见第 7.4 章。
提示:原则上我们更加推荐单块效果器模式用于在使用基本音工作和需要自发切换通道的情况,而预设模式更适合通过固定的设置列表进行工作,这个设置列表是指将不同的声音按照一定的顺序进行排列的列表。但如果在预设模式中也要使用单块效果器模式的直接切换功能,可以通过在控制器输入端上增设脚踏开关来实现(参见第 7.4 章)。
3 Direct 7 模式:可在 Direct 7 模式下为集成 MIDI 控制台上的七个按钮分别配置一个预先设置,以便能够直接使用 7 个预先设置而无需更换音色库。该模式下无需新创建任何预先设置,这七个按钮可以配置“最喜好预先设置”或为下一场表演配置所需的预先设置。为此须事先在预设模式下选出所需的预先设置,然后选定 Direct 7 模式,最后按下七个按钮之一 2 秒钟不放。这样,便为这个按钮配置了该预先设置。
5.2 预先设置的编程
1 预设模式:可以想象,预先设置的编程非常简单。当使用者找到了一个想要保存的声音时,借助 Store 按钮,使用者能够将所有旋钮、按钮和开关的设置(主机除外)都保存到预先设置中。实际上,当使用者想使用带 128 个通道的功放时,每一个通道都有单独的失真量控制器和音量控制器以及单独的音调控制和效果设置!
通过覆盖当前所选择预先设置进行存储
MASTERPRESENCERESONANCESAGGINGNOISE GATETREBLEMIDBASSVOLUME
50
1 8
2 7
3 64 5
GAINREVERBDLY LEVELFEEDBACKDLY T IMEMOD TYPEINTENSITY
CLEAN ULTRACRUNCH LEAD
POWER
PHONES / L INE
CAB TYPE
STOREFX LOOPFX ACCESSBOOST
PRE LOOP
OFF OFF1400 OFF
C
2
1T
F P
S P I R I T ™ T O N E G E N E R A T O R
为了让新的设置内容覆盖最后一次选择的预先设置,必须长按 Store 按钮约两秒钟,直至该按钮短暂闪烁然后熄灭。这个时候使用者可以重新松开 Store 按钮;使用者的设置内容就存储在了最后一次所选择的存储位置中。
通过选择新的存储位置进行存储如果使用者不想覆盖当前所选择的预先设置,使用者可以选择一个新的存储位置来存储新的设置内容,只要短按一次 Store 按钮即可。Store-LED 亮起并且指示 Black Spirit 200 处于“激活状态”。此时使用者必须通知 Black Spirit 200 Floor 最新声音设置的存储位置。通过 Up/Down 按钮选择 1 至 32 之间的一个 MIDI 音色库;屏幕中的音色库编号会闪烁。随后激活四个预先设置按钮 A、B、C、D 中的一个按钮。屏幕停止闪烁,Store 按钮的 LED 熄灭,该预先设置被存储到了所选择的存储位置。
注意:如需更改预设模式中的预先设置,而这些预先设置同样分配给了 Direct 7 模式,那么预先设置的改变都可以在两种模式下的预先设置中听到,在 Direct 7 模式也是同样。反之亦然。
示例:Direct 7 模式下,位置 1 上已分配了预先设置 12 B(音色库 12 ,预先设置 B) 混响清音。如果这个预先设置 12 B 的混响比例此时减少并保存在预设模式中,则 Direct 7 模式中位置 1 的预先设置也具有少量混响。
2 单块效果器模式:单块效果器模式将自动采用通道设置,无需主动保存。效果和 Red Box 的设置是全局通用的。
3 Direct 7 模式:也可在 Direct 7 模式下通过长按 Store 按钮保存更改,无需切换到预设模式。注意:更改 Direct 7 模式下的预先设置也会对预设模式下相应的预先设置产生影响!
6 蓝牙Black Spirit 200 内置蓝牙功能,用于音频流和连接远程 App(参见 2.2)。请注意,只能连接一台设备。这意味着:如果您使用 App,则无法通过蓝牙连接第二台音频流设备。但音频流和远程控制功能可同时通过同一台设备实现。如果您想从其他设备传输音频信号,无论此设备是否通过蓝牙连接,您都可以使用 Aux In 模拟输入端。
注意:连接新设备时必须重置蓝牙连接。如果无法通过 App 实现蓝牙连接,应关闭 App(双击 Home 键),然后重新打开 App。
蓝牙符号旁的 LED 灯指示蓝牙连接状态。
BOOST
1 蓝牙状态 LED 灯:·LED 灯灭:蓝牙功能已禁用· LED 灯缓慢闪烁:Black Spirit 200 Floor 正在搜索可用的设备
·LED 灯长亮:蓝牙已和移动设备连接 ·LED 灯快速闪烁:连接失败/中断
2 启用/连接:连接/启用:若要禁用蓝牙,按住小房子 (Boost) 键三秒。蓝牙 LED 灯开始缓慢闪烁,并且 Black Spirit 200 Floor 开始搜索移动设备。请注意,将与 Black Spirit 200 Floor 连接的设备要启用蓝牙功能。在 Black Spirit 200 Floor 出现在蓝牙设备列表中时,选择"Hughes & Kettner Black Spirit 200 Floor XXXX”(四位 ID 编号)。建立连接后,功放的蓝牙 LED 灯即从闪烁变为长亮。
3 断开/禁用蓝牙连接:若要禁用蓝牙功能,按住小房子 (Boost) 键,直至蓝牙 LED 灯熄灭。
4 连接新设备:Black Spirit 200 Floor 会记住上次连接的移动设备,在开启功放或重新启用蓝牙功能之后自动搜索该设备并与之连接。这一功能可防止意外连接至陌生设备,确保只能用您设置的移动设备进行流式处理或远程控制。
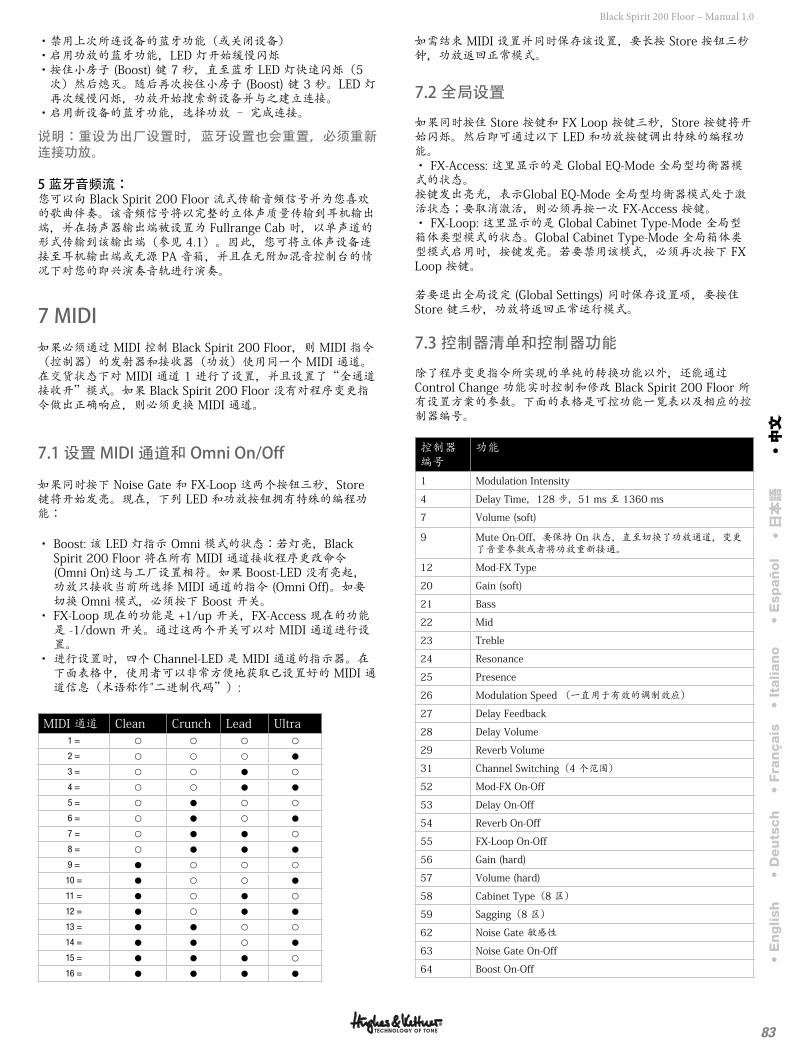
83
Black Spirit 200 Floor – Manual 1.0
·禁用上次所连设备的蓝牙功能(或关闭设备)·启用功放的蓝牙功能,LED 灯开始缓慢闪烁· 按住小房子 (Boost) 键 7 秒,直至蓝牙 LED 灯快速闪烁(5 次)然后熄灭。随后再次按住小房子 (Boost) 键 3 秒。LED 灯再次缓慢闪烁,功放开始搜索新设备并与之建立连接。
·启用新设备的蓝牙功能,选择功放 – 完成连接。
说明:重设为出厂设置时,蓝牙设置也会重置,必须重新连接功放。
5 蓝牙音频流:您可以向 Black Spirit 200 Floor 流式传输音频信号并为您喜欢的歌曲伴奏。该音频信号将以完整的立体声质量传输到耳机输出端,并在扬声器输出端被设置为 Fullrange Cab 时,以单声道的形式传输到该输出端(参见 4.1)。因此,您可将立体声设备连接至耳机输出端或无源 PA 音箱,并且在无附加混音控制台的情况下对您的即兴演奏音轨进行演奏。
7 MIDI如果必须通过 MIDI 控制 Black Spirit 200 Floor,则 MIDI 指令(控制器)的发射器和接收器(功放)使用同一个 MIDI 通道。在交货状态下对 MIDI 通道 1 进行了设置,并且设置了“全通道接收开”模式。如果 Black Spirit 200 Floor 没有对程序变更指令做出正确响应,则必须更换 MIDI 通道。
7.1 设置 MIDI 通道和 Omni On/Off
如果同时按下 Noise Gate 和 FX-Loop 这两个按钮三秒,Store 键将开始发亮。现在,下列 LED 和功放按钮拥有特殊的编程功能:
· Boost: 该 LED 灯指示 Omni 模式的状态:若灯亮,Black Spirit 200 Floor 将在所有 MIDI 通道接收程序更改命令 (Omni On)这与工厂设置相符。如果 Boost-LED 没有亮起,功放只接收当前所选择 MIDI 通道的指令 (Omni Off)。如要切换 Omni 模式,必须按下 Boost 开关。
· FX-Loop 现在的功能是 +1/up 开关,FX-Access 现在的功能是 -1/down 开关。通过这两个开关可以对 MIDI 通道进行设置。
· 进行设置时,四个 Channel-LED 是 MIDI 通道的指示器。在下面表格中,使用者可以非常方便地获取已设置好的 MIDI 通道信息(术语称作"二进制代码”):
MIDI 通道 Clean Crunch Lead Ultra1 = ¢ ¢ ¢ ¢
2 = ¢ ¢ ¢ {
3 = ¢ ¢ £ ¢
4 = ¢ ¢ £ £
5 = ¢ £ ¢ ¢
6 = ¢ £ ¢ £
7 = ¢ £ £ ¢
8 = ¢ £ £ £
9 = £ ¢ ¢ ¢
10 = £ ¢ ¢ £
11 = £ ¢ £ ¢
12 = £ ¢ £ £
13 = £ £ ¢ ¢
14 = £ £ ¢ £
15 = £ £ £ ¢
16 = £ £ £ £
如需结束 MIDI 设置并同时保存该设置,要长按 Store 按钮三秒钟,功放返回正常模式。
7.2 全局设置
如果同时按住 Store 按键和 FX Loop 按键三秒,Store 按键将开始闪烁。然后即可通过以下 LED 和功放按键调出特殊的编程功能。 · FX-Access: 这里显示的是 Global EQ-Mode 全局型均衡器模式的状态。按键发出亮光,表示Global EQ-Mode 全局型均衡器模式处于激活状态;要取消激活,则必须再按一次 FX-Access 按键。 · FX-Loop: 这里显示的是 Global Cabinet Type-Mode 全局型箱体类型模式的状态。Global Cabinet Type-Mode 全局箱体类型模式启用时,按键发亮。若要禁用该模式,必须再次按下 FX Loop 按键。
若要退出全局设定 (Global Settings) 同时保存设置项,要按住 Store 键三秒,功放将返回正常运行模式。
7.3 控制器清单和控制器功能
除了程序变更指令所实现的单纯的转换功能以外,还能通过 Control Change 功能实时控制和修改 Black Spirit 200 Floor 所有设置方案的参数。下面的表格是可控功能一览表以及相应的控制器编号。
控制器编号
功能
1 Modulation Intensity
4 Delay Time,128 步,51 ms 至 1360 ms
7 Volume (soft)
9 Mute On-Off。要保持 On 状态,直至切换了功放通道,变更了音量参数或者将功放重新接通。
12 Mod-FX Type
20 Gain (soft)
21 Bass
22 Mid
23 Treble
24 Resonance
25 Presence
26 Modulation Speed (一直用于有效的调制效应)
27 Delay Feedback
28 Delay Volume
29 Reverb Volume
31 Channel Switching(4 个范围)
52 Mod-FX On-Off
53 Delay On-Off
54 Reverb On-Off
55 FX-Loop On-Off
56 Gain (hard)
57 Volume (hard)
58 Cabinet Type(8 区)
59 Sagging(8 区)
62 Noise Gate 敏感性
63 Noise Gate On-Off
64 Boost On-Off
• E
nglish
• D
eu
tsch
• Fra
nçais
• It
alian
o•
Esp
añ
ol
• 日本語
• 中文
中文
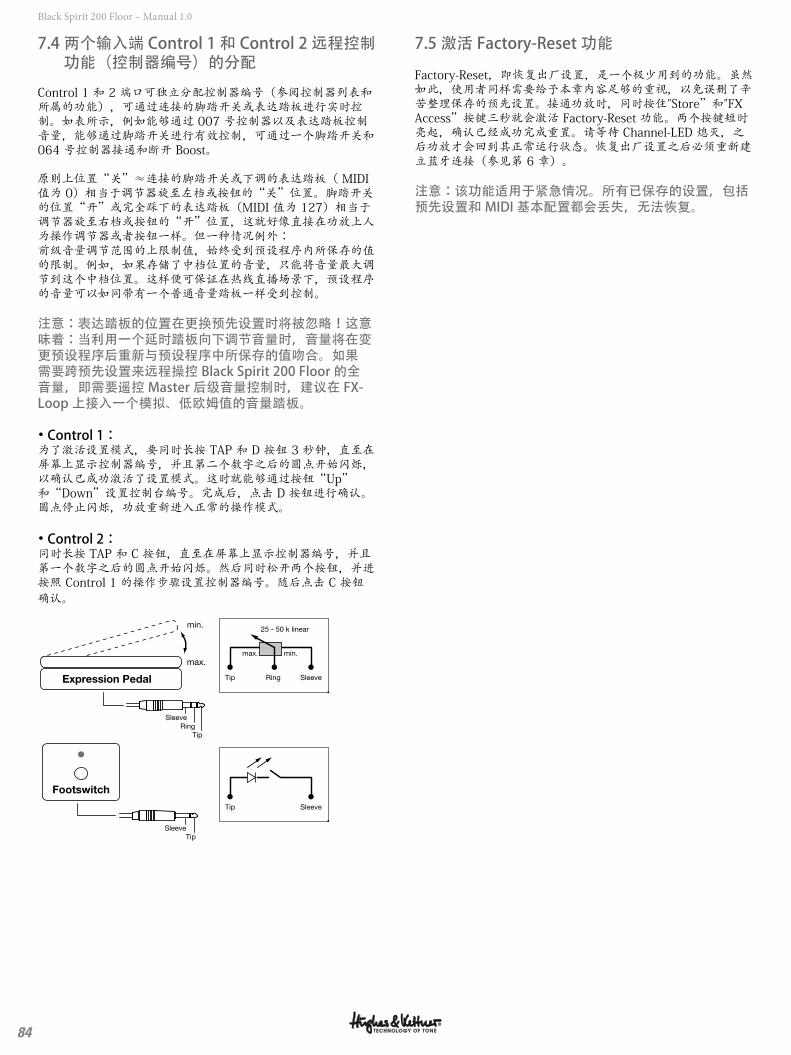
84
Black Spirit 200 Floor – Manual 1.0
7.4 两个输入端 Control 1 和 Control 2 远程控制功能(控制器编号)的分配
Control 1 和 2 端口可独立分配控制器编号(参阅控制器列表和所属的功能),可通过连接的脚踏开关或表达踏板进行实时控制。如表所示,例如能够通过 007 号控制器以及表达踏板控制音量,能够通过脚踏开关进行有效控制,可通过一个脚踏开关和 064 号控制器接通和断开 Boost。
原则上位置“关”≈连接的脚踏开关或下调的表达踏板( MIDI 值为 0)相当于调节器旋至左档或按钮的“关”位置。脚踏开关的位置“开”或完全踩下的表达踏板(MIDI 值为 127)相当于调节器旋至右档或按钮的“开”位置,这就好像直接在功放上人为操作调节器或者按钮一样。但一种情况例外: 前级音量调节范围的上限制值,始终受到预设程序内所保存的值的限制。例如,如果存储了中档位置的音量,只能将音量最大调节到这个中档位置。这样便可保证在热线直播场景下,预设程序的音量可以如同带有一个普通音量踏板一样受到控制。
注意:表达踏板的位置在更换预先设置时将被忽略!这意味着:当利用一个延时踏板向下调节音量时,音量将在变更预设程序后重新与预设程序中所保存的值吻合。如果需要跨预先设置来远程操控 Black Spirit 200 Floor 的全音量,即需要遥控 Master 后级音量控制时,建议在 FX-Loop 上接入一个模拟、低欧姆值的音量踏板。
• Control 1: 为了激活设置模式,要同时长按 TAP 和 D 按钮 3 秒钟,直至在屏幕上显示控制器编号,并且第二个数字之后的圆点开始闪烁,以确认已成功激活了设置模式。这时就能够通过按钮“Up”和“Down”设置控制台编号。完成后,点击 D 按钮进行确认。圆点停止闪烁,功放重新进入正常的操作模式。
• Control 2:同时长按 TAP 和 C 按钮,直至在屏幕上显示控制器编号,并且第一个数字之后的圆点开始闪烁。然后同时松开两个按钮,并进按照 Control 1 的操作步骤设置控制器编号。随后点击 C 按钮确认。
min.
max.
SleeveRing
Tip
Tip Ring Sleeve
max.
25 - 50 k linear
min.
Expression Pedal
SleeveTip
Footswitch
Tip Sleeve
7.5 激活 Factory-Reset 功能
Factory-Reset,即恢复出厂设置,是一个极少用到的功能。虽然如此,使用者同样需要给予本章内容足够的重视,以免误删了辛苦整理保存的预先设置。接通功放时,同时按住"Store”和"FX Access”按键三秒就会激活 Factory-Reset 功能。两个按键短时亮起,确认已经成功完成重置。请等待 Channel-LED 熄灭,之后功放才会回到其正常运行状态。恢复出厂设置之后必须重新建立蓝牙连接(参见第 6 章)。
注意:该功能适用于紧急情况。所有已保存的设置,包括预先设置和 MIDI 基本配置都会丢失,无法恢复。
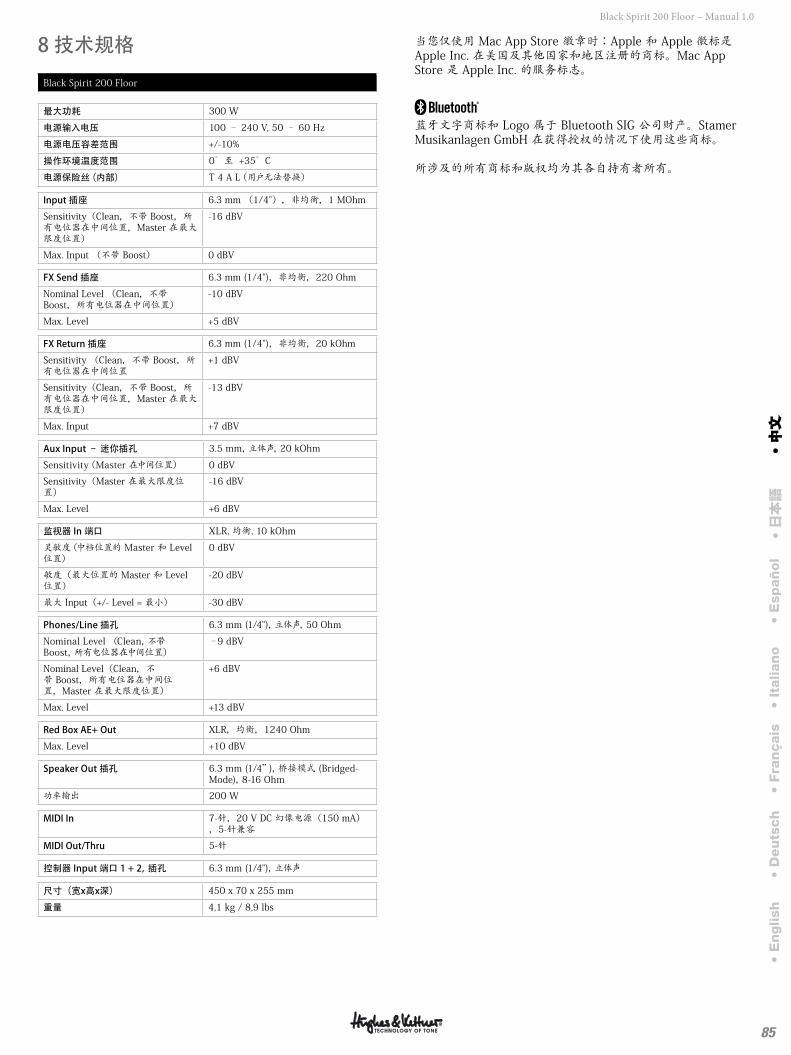
85
Black Spirit 200 Floor – Manual 1.0
8 技术规格
Black Spirit 200 Floor
最大功耗 300 W
电源输入电压 100 – 240 V, 50 – 60 Hz
电源电压容差范围 +/-10%
操作环境温度范围 0°至 +35°C
电源保险丝(内部) T 4 A L(用户无法替换)
Input 插座 6.3 mm (1/4"),非均衡,1 MOhm
Sensitivity(Clean,不带 Boost,所有电位器在中间位置,Master 在最大限度位置)
-16 dBV
Max. Input (不带 Boost) 0 dBV
FX Send 插座 6.3 mm (1/4"),非均衡,220 Ohm
Nominal Level (Clean,不带 Boost,所有电位器在中间位置)
-10 dBV
Max. Level +5 dBV
FX Return 插座 6.3 mm (1/4"),非均衡,20 kOhm
Sensitivity (Clean,不带 Boost,所有电位器在中间位置
+1 dBV
Sensitivity(Clean,不带 Boost,所有电位器在中间位置,Master 在最大限度位置)
-13 dBV
Max. Input +7 dBV
Aux Input – 迷你插孔 3.5 mm,立体声,20 kOhm
Sensitivity(Master 在中间位置) 0 dBV
Sensitivity(Master 在最大限度位置)
-16 dBV
Max. Level +6 dBV
监视器 In 端口 XLR, 均衡, 10 kOhm
灵敏度(中档位置的 Master 和 Level 位置)
0 dBV
敏度(最大位置的 Master 和 Level 位置)
-20 dBV
最大 Input(+/- Level = 最小) -30 dBV
Phones/Line 插孔 6.3 mm (1/4"),立体声,50 Ohm
Nominal Level (Clean,不带 Boost,所有电位器在中间位置)
–9 dBV
Nominal Level(Clean,不带 Boost,所有电位器在中间位置,Master 在最大限度位置)
+6 dBV
Max. Level +13 dBV
Red Box AE+ Out XLR,均衡,1240 Ohm
Max. Level +10 dBV
Speaker Out 插孔 6.3 mm (1/4”),桥接模式 (Bridged-Mode),8-16 Ohm
功率输出 200 W
MIDI In 7-针,20 V DC 幻像电源(150 mA),5-针兼容
MIDI Out/Thru 5-针
控制器 Input 端口 1 + 2,插孔 6.3 mm (1/4"),立体声
尺寸(宽x高x深) 450 x 70 x 255 mm
重量 4,1 kg / 8,9 lbs
当您仅使用 Mac App Store 徽章时:Apple 和 Apple 徽标是 Apple Inc. 在美国及其他国家和地区注册的商标。Mac App Store 是 Apple Inc. 的服务标志。
蓝牙文字商标和 Logo 属于 Bluetooth SIG 公司财产。Stamer Musikanlagen GmbH 在获得授权的情况下使用这些商标。
所涉及的所有商标和版权均为其各自持有者所有。
• E
nglish
• D
eu
tsch
• Fra
nçais
• It
alian
o•
Esp
añ
ol
• 日本語
• 中文
中文
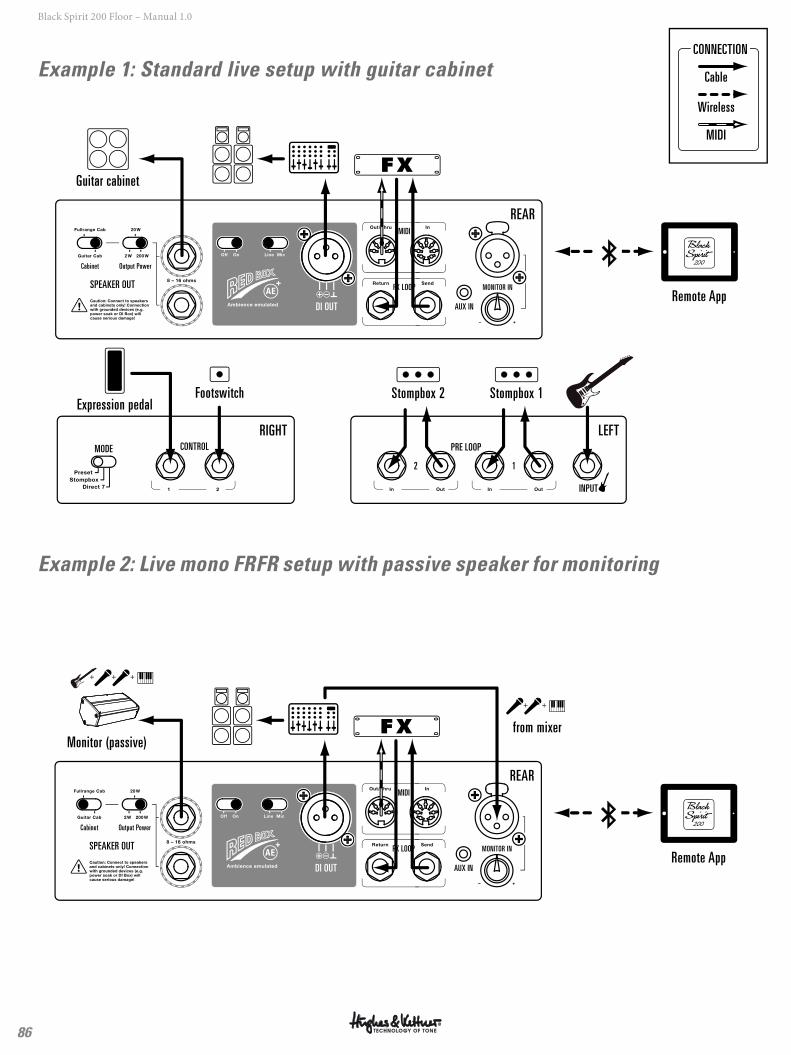
86
Black Spirit 200 Floor – Manual 1.0
INPUT
PRE LOOP
12
CONTROLMODE
Output Power
SPEAKER OUT
MIDI
FX LOOP
AUX IN
Cabinet
MONITOR IN
DI OUT
AE
LEFT
REAR
RIGHT
Remote App
Guitar cabinet
Expression pedalFootswitch Stompbox 2 Stompbox 1
Output Power
SPEAKER OUT
MIDI
FX LOOP
AUX IN
Cabinet
MONITOR IN
DI OUT
AE
REAR
Remote App
from mixerMonitor (passive)
+ + +
+ +
Example 1: Standard live setup with guitar cabinet
Example 2: Live mono FRFR setup with passive speaker for monitoring
Cable
CONNECTION
Wireless
MIDI
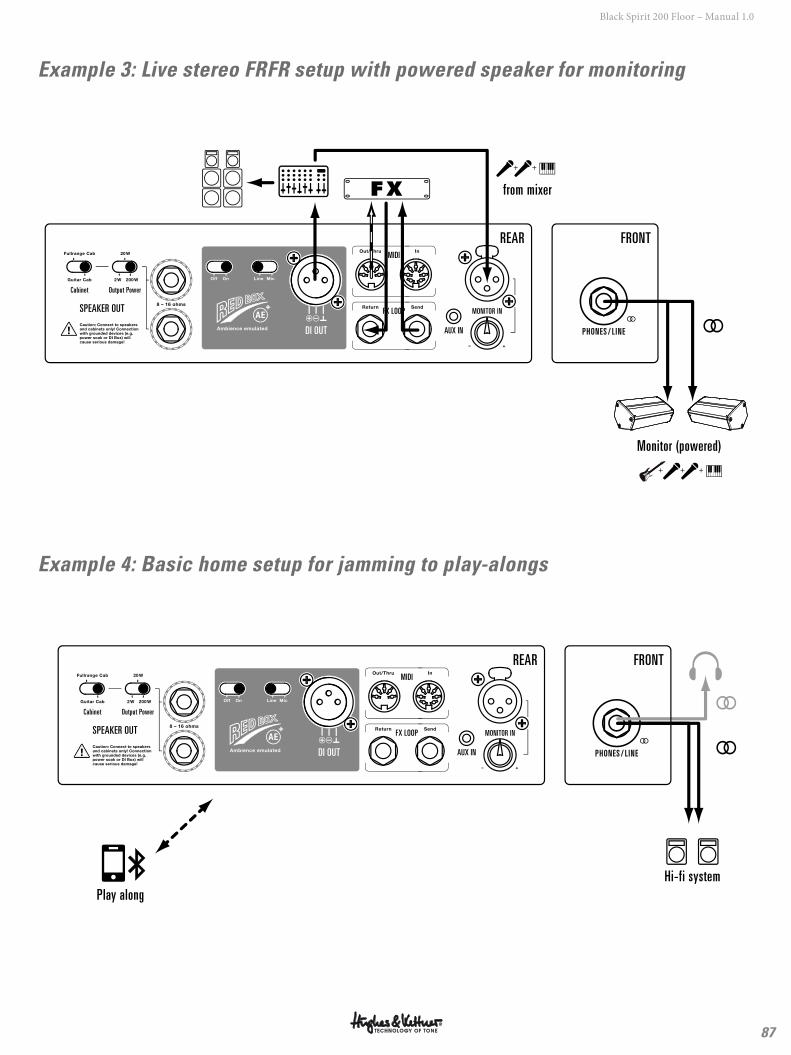
87
Black Spirit 200 Floor – Manual 1.0
PHONES / L INE
Output Power
SPEAKER OUT
MIDI
FX LOOP
AUX IN
Cabinet
MONITOR IN
DI OUT
AE
REAR FRONT
from mixer
Monitor (powered)
+ + +
+ +
PHONES / L INE
Output Power
SPEAKER OUT
MIDI
FX LOOP
AUX IN
Cabinet
MONITOR IN
DI OUT
AE
REAR FRONT
Hi-fi systemPlay along
Example 3: Live stereo FRFR setup with powered speaker for monitoring
Example 4: Basic home setup for jamming to play-alongs
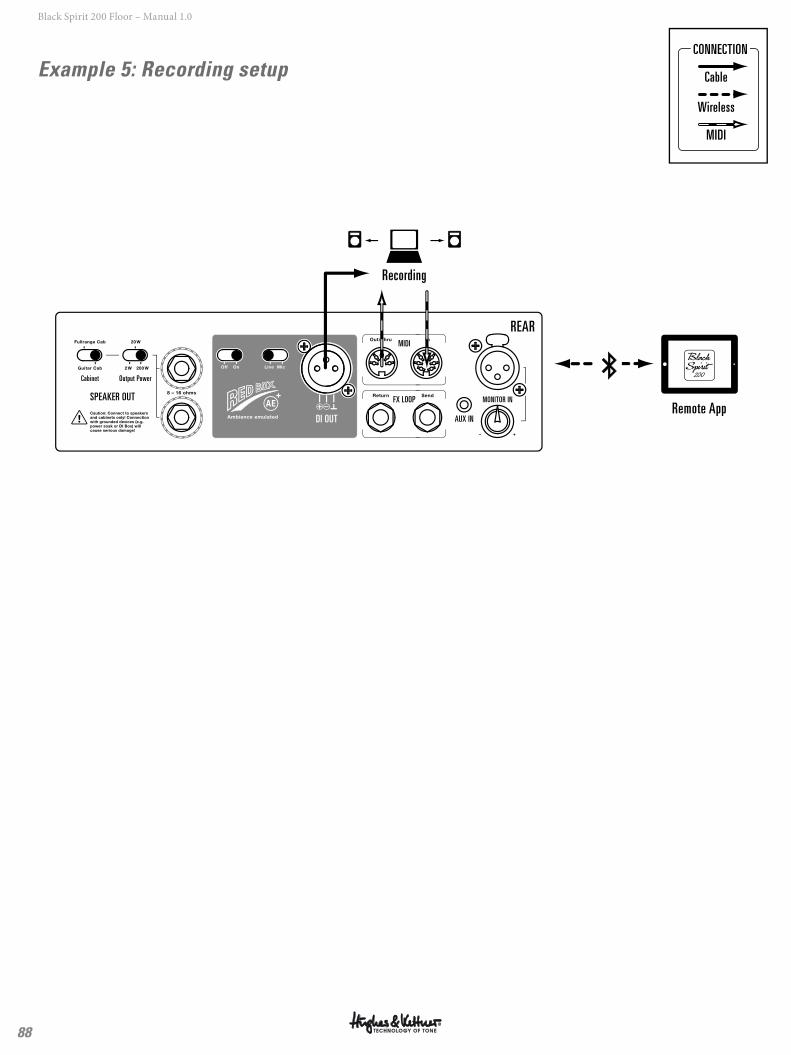
88
Black Spirit 200 Floor – Manual 1.0
Output Power
SPEAKER OUT
MIDI
FX LOOP
AUX IN
Cabinet
MONITOR IN
DI OUT
AE
REAR
Remote App
Recording
Example 5: Recording setup Cable
CONNECTION
Wireless
MIDI

89
Black Spirit 200 Floor – Manual 1.0

90
Black Spirit 200 Floor – Manual 1.0

91
Black Spirit 200 Floor – Manual 1.0

92
Black Spirit 200 Floor – Manual 1.0

93
Black Spirit 200 Floor – Manual 1.0

94
Black Spirit 200 Floor – Manual 1.0

95
Black Spirit 200 Floor – Manual 1.0

Hughes & Kettner
Postfach 1509
66595 St. Wendel
Germany
Tel: +49 (0) 68 51 - 905 0
Fax: +49 (0) 68 51 - 905 103
International Inquiries:
Fax: +49 - 68 51 - 905 200
www.hughes-and-kettner.com
facebook.com/hughesandkettner
Copyright 09/2019 by Music & Sales GmbH.
Subject to change without notice.
D-3
106
Manufacturer • Hersteller • Fabricant • Produttore • Fabricante • メーカー • 制造商: Stamer Musikanlagen GmbH, Magdeburger Str. 8, 66606 St. Wendel, Germany