Embed Size (px)
Citation preview

Cover Page
Managing System Settings and Processes10g Release 3 (10.1.3.3.1)
May 2007
Managing System Settings and Processes, 10g Release 3 (10.1.3.3.1)Copyright © 2007, Oracle. All rights reserved.
Contributing Authors: Deanna Burke
Contributors: Sandra Christiansen
The Programs (which include both the software and documentation) contain proprietary information; they are provided under a license agreement containing restrictions on use and disclosure and are also protected by copyright, patent, and other intellectual and industrial property laws. Reverse engineering, disassembly, or decompilation of the Programs, except to the extent required to obtain interoperability with other independently created software or as specified by law, is prohibited.
The information contained in this document is subject to change without notice. If you find any problems in the documentation, please report them to us in writing. This document is not warranted to be error-free. Except as may be expressly permitted in your license agreement for these Programs, no part of these Programs may be reproduced or transmitted in any form or by any means, electronic or mechanical, for any purpose.
If the Programs are delivered to the United States Government or anyone licensing or using the Programs on behalf of the United States Government, the following notice is applicable:
U.S. GOVERNMENT RIGHTS Programs, software, databases, and related documentation and technical data delivered to U.S. Government customers are "commercial computer software" or "commercial technical data" pursuant to the applicable Federal Acquisition Regulation and agency-specific supplemental regulations. As such, use, duplication, disclosure, modification, and adaptation of the Programs, including documentation and technical data, shall be subject to the licensing restrictions set forth in the applicable Oracle license agreement, and, to the extent applicable, the additional rights set forth in FAR 52.227-19, Commercial Computer Software--Restricted Rights (June 1987). Oracle USA, Inc., 500 Oracle Parkway, Redwood City, CA 94065.
The Programs are not intended for use in any nuclear, aviation, mass transit, medical, or other inherently dangerous applications. It shall be the licensee's responsibility to take all appropriate fail-safe, backup, redundancy and other measures to ensure the safe use of such applications if the Programs are used for such purposes, and we disclaim liability for any damages caused by such use of the Programs.
Oracle, JD Edwards, PeopleSoft, and Siebel are registered trademarks of Oracle Corporation and/or its affiliates. Other names may be trademarks of their respective owners.
The Programs may provide links to Web sites and access to content, products, and services from third parties. Oracle is not responsible for the availability of, or any content provided on, third-party Web sites. You bear all risks associated with the use of such content. If you choose to purchase any products or services from a third party, the relationship is directly between you and the third party. Oracle is not responsible for: (a) the quality of third-party products or services; or (b) fulfilling any of the terms of the agreement with the third party, including delivery of products or services and warranty obligations related to purchased products or services. Oracle is not responsible for any loss or damage of any sort that you may incur from dealing with any third party.
T a b l e o f C o n t e n t s
Chapter 1: IntroductionOverview . . . . . . . . . . . . . . . . . . . . . . . . . . . . . . . . . . . . . . . . . . . . . . . . . . .1-1
About This Guide . . . . . . . . . . . . . . . . . . . . . . . . . . . . . . . . . . . . . . . . . . . . .1-1
Audience . . . . . . . . . . . . . . . . . . . . . . . . . . . . . . . . . . . . . . . . . . . . . . . . . . .1-2
What’s New . . . . . . . . . . . . . . . . . . . . . . . . . . . . . . . . . . . . . . . . . . . . . . . . .1-2
Other Administrator Guides . . . . . . . . . . . . . . . . . . . . . . . . . . . . . . . . . . . . .1-3
Understanding the Content Server. . . . . . . . . . . . . . . . . . . . . . . . . . . . . . . .1-4Purpose . . . . . . . . . . . . . . . . . . . . . . . . . . . . . . . . . . . . . . . . . . . . . . . . .1-4Users . . . . . . . . . . . . . . . . . . . . . . . . . . . . . . . . . . . . . . . . . . . . . . . . . . .1-5
Administration Utilities and Applets . . . . . . . . . . . . . . . . . . . . . . . . . . . . . . .1-5Administration Interfaces . . . . . . . . . . . . . . . . . . . . . . . . . . . . . . . . . . . .1-5
Applications. . . . . . . . . . . . . . . . . . . . . . . . . . . . . . . . . . . . . . . . . . .1-6Utilities. . . . . . . . . . . . . . . . . . . . . . . . . . . . . . . . . . . . . . . . . . . . . . .1-6Management Pages . . . . . . . . . . . . . . . . . . . . . . . . . . . . . . . . . . . .1-6
Administration Page. . . . . . . . . . . . . . . . . . . . . . . . . . . . . . . . . . . . . . . .1-7Administration Applications . . . . . . . . . . . . . . . . . . . . . . . . . . . . . . . . . . . . .1-7
Running Administration Applications as Applets . . . . . . . . . . . . . . . . . .1-7Running Administration Applications in Stand-alone Mode . . . . . . . . . .1-8
On Windows Systems . . . . . . . . . . . . . . . . . . . . . . . . . . . . . . . . . . .1-8On UNIX Systems . . . . . . . . . . . . . . . . . . . . . . . . . . . . . . . . . . . . . .1-9
Conventions . . . . . . . . . . . . . . . . . . . . . . . . . . . . . . . . . . . . . . . . . . . . . . . . .1-9
Chapter 2: Configuring System PropertiesOverview . . . . . . . . . . . . . . . . . . . . . . . . . . . . . . . . . . . . . . . . . . . . . . . . . . .2-1
About System Properties . . . . . . . . . . . . . . . . . . . . . . . . . . . . . . . . . . . . . . .2-2
Configuring General Options . . . . . . . . . . . . . . . . . . . . . . . . . . . . . . . . . . . .2-4System Properties: Options Tab . . . . . . . . . . . . . . . . . . . . . . . . . . .2-5Admin Server: General Configuration Page . . . . . . . . . . . . . . . . . .2-6
Revision Label Sequence . . . . . . . . . . . . . . . . . . . . . . . . . . . . . . . . . .2-10
Managing System Settings and Processes iii
Table of Contents
Revision Label Ranges . . . . . . . . . . . . . . . . . . . . . . . . . . . . . . . . .2-10Revision Examples . . . . . . . . . . . . . . . . . . . . . . . . . . . . . . . . . . . .2-10Revision Configuration Settings . . . . . . . . . . . . . . . . . . . . . . . . . .2-11
Chunking Function. . . . . . . . . . . . . . . . . . . . . . . . . . . . . . . . . . . . . . . .2-11Configuring the Chunking Function. . . . . . . . . . . . . . . . . . . . . . . .2-11
Configuring Content Security . . . . . . . . . . . . . . . . . . . . . . . . . . . . . . . . . . .2-12System Properties: Content Security Tab . . . . . . . . . . . . . . . . . . .2-13Admin Server: Content Security Configuration Page . . . . . . . . . .2-13
Configuring Internet Information. . . . . . . . . . . . . . . . . . . . . . . . . . . . . . . . .2-14System Properties: Internet Tab . . . . . . . . . . . . . . . . . . . . . . . . . .2-15Admin Server: Internet Configuration Page. . . . . . . . . . . . . . . . . .2-15
Configuring the Database . . . . . . . . . . . . . . . . . . . . . . . . . . . . . . . . . . . . .2-17System Properties: Database Tab . . . . . . . . . . . . . . . . . . . . . . . .2-18Changing the Database Driver Settings . . . . . . . . . . . . . . . . . . . .2-19
Configuring the Content Server . . . . . . . . . . . . . . . . . . . . . . . . . . . . . . . . .2-20System Properties: Server Tab . . . . . . . . . . . . . . . . . . . . . . . . . . .2-21
Configuring Locales . . . . . . . . . . . . . . . . . . . . . . . . . . . . . . . . . . . . . . . . . .2-24Date Format . . . . . . . . . . . . . . . . . . . . . . . . . . . . . . . . . . . . . . . . .2-24
Configuring Paths. . . . . . . . . . . . . . . . . . . . . . . . . . . . . . . . . . . . . . . . . . . .2-25System Properties: Paths Tab. . . . . . . . . . . . . . . . . . . . . . . . . . . .2-26
Chapter 3: Managing Multiple Content Servers with Admin Server
Overview . . . . . . . . . . . . . . . . . . . . . . . . . . . . . . . . . . . . . . . . . . . . . . . . . . .3-1
About the Admin Server . . . . . . . . . . . . . . . . . . . . . . . . . . . . . . . . . . . . . . . .3-2
Managing the Admin Server. . . . . . . . . . . . . . . . . . . . . . . . . . . . . . . . . . . . .3-2Starting and Stopping the Content Server . . . . . . . . . . . . . . . . . . . . . . .3-3Adding a Content Server . . . . . . . . . . . . . . . . . . . . . . . . . . . . . . . . . . . .3-3Editing a Content Server . . . . . . . . . . . . . . . . . . . . . . . . . . . . . . . . . . . .3-4Removing a Content Server . . . . . . . . . . . . . . . . . . . . . . . . . . . . . . . . .3-4Viewing Server Output. . . . . . . . . . . . . . . . . . . . . . . . . . . . . . . . . . . . . .3-4
Admin Server Interface Screen . . . . . . . . . . . . . . . . . . . . . . . . . . . . . . . . . .3-5Admin Server Home Page . . . . . . . . . . . . . . . . . . . . . . . . . . . . . . . . . . .3-6Admin Server Output Page . . . . . . . . . . . . . . . . . . . . . . . . . . . . . . . . . .3-7Add a New Content Server Page. . . . . . . . . . . . . . . . . . . . . . . . . . . . . .3-8Add an Existing Local Content Server Page . . . . . . . . . . . . . . . . . . . . .3-8Add Remote Content Server . . . . . . . . . . . . . . . . . . . . . . . . . . . . . . . . .3-9Edit or Remove Content Server Page . . . . . . . . . . . . . . . . . . . . . . . . .3-10Add/Edit Content Server Configuration Page . . . . . . . . . . . . . . . . . . .3-11Specific Instance Page . . . . . . . . . . . . . . . . . . . . . . . . . . . . . . . . . . . .3-13Content Server Output Page . . . . . . . . . . . . . . . . . . . . . . . . . . . . . . . .3-14
iv Managing System Settings and Processes
Table of Contents
Chapter 4: Configuring the Search IndexOverview . . . . . . . . . . . . . . . . . . . . . . . . . . . . . . . . . . . . . . . . . . . . . . . . . . .4-1
Variances in Indexing Tools and Methods . . . . . . . . . . . . . . . . . . . . . . . . . .4-1
Working with the Search Index . . . . . . . . . . . . . . . . . . . . . . . . . . . . . . . . . .4-2About the Search Index . . . . . . . . . . . . . . . . . . . . . . . . . . . . . . . . . . . . .4-2
Using the Search Index . . . . . . . . . . . . . . . . . . . . . . . . . . . . . . . . . . . . . . . .4-3Updating the Search Index . . . . . . . . . . . . . . . . . . . . . . . . . . . . . . . . . .4-3Rebuilding the Collection . . . . . . . . . . . . . . . . . . . . . . . . . . . . . . . . . . . .4-3Configuring the Update or Rebuild . . . . . . . . . . . . . . . . . . . . . . . . . . . .4-4Disabling Full-Text Indexing . . . . . . . . . . . . . . . . . . . . . . . . . . . . . . . . .4-4
Indexing Interface Screens . . . . . . . . . . . . . . . . . . . . . . . . . . . . . . . . . . . . .4-5Repository Manager: Indexer Tab . . . . . . . . . . . . . . . . . . . . . . . . . . . . .4-5Automatic Update Cycle Screen . . . . . . . . . . . . . . . . . . . . . . . . . . . . . .4-7Collection Rebuild Cycle Screen . . . . . . . . . . . . . . . . . . . . . . . . . . . . .4-10Actions Page . . . . . . . . . . . . . . . . . . . . . . . . . . . . . . . . . . . . . . . . . . . .4-12
Text File Full-Text Indexing . . . . . . . . . . . . . . . . . . . . . . . . . . . . . . . . . . . .4-12
Managing Zone Text Fields . . . . . . . . . . . . . . . . . . . . . . . . . . . . . . . . . . . .4-12About Zone Text Fields . . . . . . . . . . . . . . . . . . . . . . . . . . . . . . . . . . . .4-13Enabling and Disabling Zone Text Fields . . . . . . . . . . . . . . . . . . . . . .4-14Changing the MinFullTextFieldLength Variable. . . . . . . . . . . . . . . . . .4-15Disabling Database Search Contains Operator. . . . . . . . . . . . . . . . . .4-16Zone Fields Configuration Page . . . . . . . . . . . . . . . . . . . . . . . . . . . . .4-17
Indexing with Databases . . . . . . . . . . . . . . . . . . . . . . . . . . . . . . . . . . . . . .4-18Database-Supported File Formats. . . . . . . . . . . . . . . . . . . . . . . . . . . .4-20
Searching Content Using the Oracle Query Optimizer Feature . . . . . . . . .4-21About the Oracle Query Optimizer Feature . . . . . . . . . . . . . . . . . . . . .4-22
Query Optimization Process . . . . . . . . . . . . . . . . . . . . . . . . . . . . .4-23How Reformatted Queries Optimize Searches . . . . . . . . . . . . . . . . . .4-26Types of Recognized Hints . . . . . . . . . . . . . . . . . . . . . . . . . . . . . . . . .4-27
Oracle Hints . . . . . . . . . . . . . . . . . . . . . . . . . . . . . . . . . . . . . . . . .4-28Query Hints Syntax . . . . . . . . . . . . . . . . . . . . . . . . . . . . . . . . . . . . . . .4-29Supported Search Operators and Keywords . . . . . . . . . . . . . . . . . . . .4-30Additional Supported Sort Constructs . . . . . . . . . . . . . . . . . . . . . . . . .4-31The Hint Rules Table . . . . . . . . . . . . . . . . . . . . . . . . . . . . . . . . . . . . . .4-31The Hint Cache . . . . . . . . . . . . . . . . . . . . . . . . . . . . . . . . . . . . . . . . . .4-37Using Hint Rules . . . . . . . . . . . . . . . . . . . . . . . . . . . . . . . . . . . . . . . . .4-40
Adding and Enabling New Hint Rules . . . . . . . . . . . . . . . . . . . . . .4-40Editing Existing Hint Rules . . . . . . . . . . . . . . . . . . . . . . . . . . . . . .4-41Disabling Hint Rules . . . . . . . . . . . . . . . . . . . . . . . . . . . . . . . . . . .4-41Enabling Hint Rules. . . . . . . . . . . . . . . . . . . . . . . . . . . . . . . . . . . .4-41
Managing System Settings and Processes v
Table of Contents
Removing Hint Rules. . . . . . . . . . . . . . . . . . . . . . . . . . . . . . . . . . .4-42Using the Query Converter . . . . . . . . . . . . . . . . . . . . . . . . . . . . . . . . .4-42
Converting a Data Source or Query . . . . . . . . . . . . . . . . . . . . . . .4-43Editing a Converted Data Source or Query. . . . . . . . . . . . . . . . . .4-44
Updating the Hint Cache . . . . . . . . . . . . . . . . . . . . . . . . . . . . . . . . . . .4-44Checking the Hint Cache for Existing Hints. . . . . . . . . . . . . . . . . .4-44Modifying an Existing Hint Cache Query or Data Source Entry . .4-45Removing a Hint Cache Query or Data Source Entry . . . . . . . . . .4-47
Oracle Query Interface Screens . . . . . . . . . . . . . . . . . . . . . . . . . . . . .4-48Hint Rules Configuration Page . . . . . . . . . . . . . . . . . . . . . . . . . . .4-49Hint Rule Editor . . . . . . . . . . . . . . . . . . . . . . . . . . . . . . . . . . . . . . .4-50Query Converter Page . . . . . . . . . . . . . . . . . . . . . . . . . . . . . . . . .4-53Hint Cache Updater Page . . . . . . . . . . . . . . . . . . . . . . . . . . . . . . .4-56
Chapter 5: Configuring a Web Server FilterOverview . . . . . . . . . . . . . . . . . . . . . . . . . . . . . . . . . . . . . . . . . . . . . . . . . . .5-1
Content Server’s Use of a Web Server . . . . . . . . . . . . . . . . . . . . . . . . . . . .5-2Web Servers . . . . . . . . . . . . . . . . . . . . . . . . . . . . . . . . . . . . . . . . . . . . .5-2
Internet Information Services (IIS). . . . . . . . . . . . . . . . . . . . . . . . . .5-2iPlanet/Sun ONE . . . . . . . . . . . . . . . . . . . . . . . . . . . . . . . . . . . . . . .5-2Apache . . . . . . . . . . . . . . . . . . . . . . . . . . . . . . . . . . . . . . . . . . . . . .5-3
Local Web Server Filter . . . . . . . . . . . . . . . . . . . . . . . . . . . . . . . . . . . . .5-3Filter Plug-Ins . . . . . . . . . . . . . . . . . . . . . . . . . . . . . . . . . . . . . . . . .5-3Plug-in Architecture. . . . . . . . . . . . . . . . . . . . . . . . . . . . . . . . . . . . .5-4
WebUrlMap Feature. . . . . . . . . . . . . . . . . . . . . . . . . . . . . . . . . . . . . . . . . . .5-5Script Construction . . . . . . . . . . . . . . . . . . . . . . . . . . . . . . . . . . . . . . . .5-5Supported Variables for Referencing. . . . . . . . . . . . . . . . . . . . . . . . . . .5-6Mapping Examples . . . . . . . . . . . . . . . . . . . . . . . . . . . . . . . . . . . . . . . .5-7
Managing Web Server Filter Options . . . . . . . . . . . . . . . . . . . . . . . . . . . . . .5-9Setting Web Filter Configuration Options . . . . . . . . . . . . . . . . . . . . . . .5-9Viewing the Web Filter Log . . . . . . . . . . . . . . . . . . . . . . . . . . . . . . . . . .5-9Configuring IIS for External Security . . . . . . . . . . . . . . . . . . . . . . . . . . .5-9Add/Edit URL Mapping Entries . . . . . . . . . . . . . . . . . . . . . . . . . . . . . .5-10
Web Server Filter Interface Screens . . . . . . . . . . . . . . . . . . . . . . . . . . . . .5-11Configure Web Server Filter Page. . . . . . . . . . . . . . . . . . . . . . . . . . . .5-12WebUrlMaps Screen . . . . . . . . . . . . . . . . . . . . . . . . . . . . . . . . . . . . . .5-15
Chapter 6: Connecting to Outside Entities with ProvidersOverview . . . . . . . . . . . . . . . . . . . . . . . . . . . . . . . . . . . . . . . . . . . . . . . . . . .6-1
About Providers . . . . . . . . . . . . . . . . . . . . . . . . . . . . . . . . . . . . . . . . . . . . . .6-2Content Server Providers . . . . . . . . . . . . . . . . . . . . . . . . . . . . . . . . . . .6-2Adding an Appropriate Provider. . . . . . . . . . . . . . . . . . . . . . . . . . . . . . .6-3
vi Managing System Settings and Processes
Table of Contents
When to Add an Outgoing Provider . . . . . . . . . . . . . . . . . . . . . . . .6-3When to Add a Database Provider . . . . . . . . . . . . . . . . . . . . . . . . .6-4When to Add an Incoming Provider. . . . . . . . . . . . . . . . . . . . . . . . .6-5When to Add a Preview Provider . . . . . . . . . . . . . . . . . . . . . . . . . .6-6When to Add an LDAP Provider . . . . . . . . . . . . . . . . . . . . . . . . . . .6-7
Managing Providers . . . . . . . . . . . . . . . . . . . . . . . . . . . . . . . . . . . . . . . . . . .6-9Adding an Outgoing Provider. . . . . . . . . . . . . . . . . . . . . . . . . . . . . . . . .6-9Adding a Database Provider . . . . . . . . . . . . . . . . . . . . . . . . . . . . . . . .6-11Adding an Incoming Provider. . . . . . . . . . . . . . . . . . . . . . . . . . . . . . . .6-11Adding a Preview Provider . . . . . . . . . . . . . . . . . . . . . . . . . . . . . . . . .6-11Editing Provider Information . . . . . . . . . . . . . . . . . . . . . . . . . . . . . . . .6-12Deleting a Provider . . . . . . . . . . . . . . . . . . . . . . . . . . . . . . . . . . . . . . .6-12
Provider Interface Screens. . . . . . . . . . . . . . . . . . . . . . . . . . . . . . . . . . . . .6-13Providers Page . . . . . . . . . . . . . . . . . . . . . . . . . . . . . . . . . . . . . . . . . .6-13Provider Information Page . . . . . . . . . . . . . . . . . . . . . . . . . . . . . . . . . .6-15Add/Edit Provider Page . . . . . . . . . . . . . . . . . . . . . . . . . . . . . . . . . . . .6-16Outgoing Provider Page . . . . . . . . . . . . . . . . . . . . . . . . . . . . . . . . . . .6-17Database Provider Page . . . . . . . . . . . . . . . . . . . . . . . . . . . . . . . . . . .6-20Incoming Provider Page . . . . . . . . . . . . . . . . . . . . . . . . . . . . . . . . . . .6-22Preview Provider Page . . . . . . . . . . . . . . . . . . . . . . . . . . . . . . . . . . . .6-23Ldap Provider Page . . . . . . . . . . . . . . . . . . . . . . . . . . . . . . . . . . . . . . .6-25
Chapter 7: Batchloading ContentOverview . . . . . . . . . . . . . . . . . . . . . . . . . . . . . . . . . . . . . . . . . . . . . . . . . . .7-1
About Batch Loading . . . . . . . . . . . . . . . . . . . . . . . . . . . . . . . . . . . . . . . . . .7-1File Records. . . . . . . . . . . . . . . . . . . . . . . . . . . . . . . . . . . . . . . . . . . . . .7-2Actions . . . . . . . . . . . . . . . . . . . . . . . . . . . . . . . . . . . . . . . . . . . . . . . . . .7-3Insert . . . . . . . . . . . . . . . . . . . . . . . . . . . . . . . . . . . . . . . . . . . . . . . . . . .7-3
Insert Requirements . . . . . . . . . . . . . . . . . . . . . . . . . . . . . . . . . . . .7-4Insert Example . . . . . . . . . . . . . . . . . . . . . . . . . . . . . . . . . . . . . . . .7-5
Delete . . . . . . . . . . . . . . . . . . . . . . . . . . . . . . . . . . . . . . . . . . . . . . . . . .7-7Delete Requirements . . . . . . . . . . . . . . . . . . . . . . . . . . . . . . . . . . .7-8Delete Example. . . . . . . . . . . . . . . . . . . . . . . . . . . . . . . . . . . . . . . .7-8
Update . . . . . . . . . . . . . . . . . . . . . . . . . . . . . . . . . . . . . . . . . . . . . . . . . .7-8Update Requirements . . . . . . . . . . . . . . . . . . . . . . . . . . . . . . . . . .7-10Update Example 1. . . . . . . . . . . . . . . . . . . . . . . . . . . . . . . . . . . . .7-12Update Example 2. . . . . . . . . . . . . . . . . . . . . . . . . . . . . . . . . . . . .7-13
Optional Parameters . . . . . . . . . . . . . . . . . . . . . . . . . . . . . . . . . . . . . .7-14Custom Metadata Fields . . . . . . . . . . . . . . . . . . . . . . . . . . . . . . . . . . .7-19Sample Batch Load Files. . . . . . . . . . . . . . . . . . . . . . . . . . . . . . . . . . .7-19
Preparing a Batch Load File. . . . . . . . . . . . . . . . . . . . . . . . . . . . . . . . . . . .7-20About Preparing a Batch Load File . . . . . . . . . . . . . . . . . . . . . . . . . . .7-20
Managing System Settings and Processes vii
Table of Contents
Mapping Files . . . . . . . . . . . . . . . . . . . . . . . . . . . . . . . . . . . . . . . . . . .7-21Mapping File Formats . . . . . . . . . . . . . . . . . . . . . . . . . . . . . . . . . .7-21Mapping File Values . . . . . . . . . . . . . . . . . . . . . . . . . . . . . . . . . . .7-22
Creating a Batch Load File from the BatchBuilder Screen . . . . . . . . .7-24Creating a Mapping File. . . . . . . . . . . . . . . . . . . . . . . . . . . . . . . . . . . .7-25Creating a Batch Load File from the Command Line. . . . . . . . . . . . . .7-26
Win32 Example . . . . . . . . . . . . . . . . . . . . . . . . . . . . . . . . . . . . . . .7-27UNIX Example. . . . . . . . . . . . . . . . . . . . . . . . . . . . . . . . . . . . . . . .7-27
Batch Interface Screens. . . . . . . . . . . . . . . . . . . . . . . . . . . . . . . . . . . . . . .7-28BatchBuilder Screen . . . . . . . . . . . . . . . . . . . . . . . . . . . . . . . . . . . . . .7-28BatchBuilder Mapping List Screen. . . . . . . . . . . . . . . . . . . . . . . . . . . .7-30Add BatchBuilder Mapping Screen . . . . . . . . . . . . . . . . . . . . . . . . . . .7-31Edit BatchBuilder Mapping Screen . . . . . . . . . . . . . . . . . . . . . . . . . . .7-32Add/Edit BatchBuilder Mapping Field Screen . . . . . . . . . . . . . . . . . . .7-33Batch Loader Application. . . . . . . . . . . . . . . . . . . . . . . . . . . . . . . . . . .7-34
Running the Batch Loader . . . . . . . . . . . . . . . . . . . . . . . . . . . . . . . . . . . . .7-35About Running the Batch Loader. . . . . . . . . . . . . . . . . . . . . . . . . . . . .7-36Batch Loading from the Batch Loader Screen. . . . . . . . . . . . . . . . . . .7-36Batch Loading from the Command Line . . . . . . . . . . . . . . . . . . . . . . .7-37
Win32 Example . . . . . . . . . . . . . . . . . . . . . . . . . . . . . . . . . . . . . . .7-38UNIX Example. . . . . . . . . . . . . . . . . . . . . . . . . . . . . . . . . . . . . . . .7-38
Using the IdcCommand Utility and Remote Access . . . . . . . . . . . . . .7-38Batch Load Command Files . . . . . . . . . . . . . . . . . . . . . . . . . . . . .7-39Preparing for Remote Batch Loading . . . . . . . . . . . . . . . . . . . . . .7-39
Batch Loading Content as Metadata Only . . . . . . . . . . . . . . . . . . . . . .7-43Batch Loader -console Command Line Switch . . . . . . . . . . . . . . . . . .7-44
Examples . . . . . . . . . . . . . . . . . . . . . . . . . . . . . . . . . . . . . . . . . . .7-44Adding a Redirect . . . . . . . . . . . . . . . . . . . . . . . . . . . . . . . . . . . . . . . .7-44Correcting Batch Load Errors . . . . . . . . . . . . . . . . . . . . . . . . . . . . . . .7-45
Optimizing Batch Loader Performance . . . . . . . . . . . . . . . . . . . . . . . . . . .7-46Example: Best Practice Case Study . . . . . . . . . . . . . . . . . . . . . . . . . .7-47
Appendix A: Building a Web SitePlanning a Web Site. . . . . . . . . . . . . . . . . . . . . . . . . . . . . . . . . . . . . . . . . . A-1
About Planning a Web Site . . . . . . . . . . . . . . . . . . . . . . . . . . . . . . . . . A-2Defining the Site Structure and Displaying Criteria . . . . . . . . . . . . . . . A-3Task Sequence . . . . . . . . . . . . . . . . . . . . . . . . . . . . . . . . . . . . . . . . . . A-3
Working with Web Pages . . . . . . . . . . . . . . . . . . . . . . . . . . . . . . . . . . . . . . A-4About Web Pages . . . . . . . . . . . . . . . . . . . . . . . . . . . . . . . . . . . . . . . . A-4
Local Page . . . . . . . . . . . . . . . . . . . . . . . . . . . . . . . . . . . . . . . . . . A-5External URL. . . . . . . . . . . . . . . . . . . . . . . . . . . . . . . . . . . . . . . . . A-5Query . . . . . . . . . . . . . . . . . . . . . . . . . . . . . . . . . . . . . . . . . . . . . . A-5
viii Managing System Settings and Processes
Table of Contents
Report . . . . . . . . . . . . . . . . . . . . . . . . . . . . . . . . . . . . . . . . . . . . . . A-6Working With the Portal Page . . . . . . . . . . . . . . . . . . . . . . . . . . . . . . . . . . A-6
Update Portal Page Screen . . . . . . . . . . . . . . . . . . . . . . . . . . . . . . . . . A-7Updating the Portal Page. . . . . . . . . . . . . . . . . . . . . . . . . . . . . . . . . . . A-8
Web Layout Editor Application . . . . . . . . . . . . . . . . . . . . . . . . . . . . . . . . . . A-8Web Page Hierarchy Pane . . . . . . . . . . . . . . . . . . . . . . . . . . . . . . . . . A-9Page Properties Pane . . . . . . . . . . . . . . . . . . . . . . . . . . . . . . . . . . . . A-10Page Links Pane . . . . . . . . . . . . . . . . . . . . . . . . . . . . . . . . . . . . . . . . A-11Adding a New Web Page. . . . . . . . . . . . . . . . . . . . . . . . . . . . . . . . . . A-12Editing Web Page Properties. . . . . . . . . . . . . . . . . . . . . . . . . . . . . . . A-13Creating a Local Page Link . . . . . . . . . . . . . . . . . . . . . . . . . . . . . . . . A-14Creating an External URL Link . . . . . . . . . . . . . . . . . . . . . . . . . . . . . A-15Editing a Hierarchical Web Page Structure . . . . . . . . . . . . . . . . . . . . A-16
Working with Reports . . . . . . . . . . . . . . . . . . . . . . . . . . . . . . . . . . . . . . . . A-17About Reports . . . . . . . . . . . . . . . . . . . . . . . . . . . . . . . . . . . . . . . . . . A-18Defining an Active Report . . . . . . . . . . . . . . . . . . . . . . . . . . . . . . . . . A-19Defining a Historical Report . . . . . . . . . . . . . . . . . . . . . . . . . . . . . . . . A-19Editing a Query Expression in an Active Report . . . . . . . . . . . . . . . . A-19
Query Interface Screens . . . . . . . . . . . . . . . . . . . . . . . . . . . . . . . . . . . . . A-20Edit Active Report Query Screen. . . . . . . . . . . . . . . . . . . . . . . . . . . . A-20
Writing Queries . . . . . . . . . . . . . . . . . . . . . . . . . . . . . . . . . . . . . . . . . . . . A-22About Writing Queries . . . . . . . . . . . . . . . . . . . . . . . . . . . . . . . . . . . . A-23Writing Directory Queries. . . . . . . . . . . . . . . . . . . . . . . . . . . . . . . . . . A-23Writing Report Queries . . . . . . . . . . . . . . . . . . . . . . . . . . . . . . . . . . . A-23Creating a Query Link . . . . . . . . . . . . . . . . . . . . . . . . . . . . . . . . . . . . A-24Editing the Query Expression in a Query Link . . . . . . . . . . . . . . . . . . A-27Adding a Query Results Page . . . . . . . . . . . . . . . . . . . . . . . . . . . . . . A-28Editing a Query Results Page . . . . . . . . . . . . . . . . . . . . . . . . . . . . . . A-30Deleting a Query Results Page . . . . . . . . . . . . . . . . . . . . . . . . . . . . . A-30
Writing Queries With Tamino . . . . . . . . . . . . . . . . . . . . . . . . . . . . . . . . . . A-31About Writing Queries with Tamino . . . . . . . . . . . . . . . . . . . . . . . . . . A-31Writing Directory Queries. . . . . . . . . . . . . . . . . . . . . . . . . . . . . . . . . . A-32Tamino Operators . . . . . . . . . . . . . . . . . . . . . . . . . . . . . . . . . . . . . . . A-32Tamino Wildcards . . . . . . . . . . . . . . . . . . . . . . . . . . . . . . . . . . . . . . . A-32Tamino Full-text Search Operators . . . . . . . . . . . . . . . . . . . . . . . . . . A-33Tamino Query Examples . . . . . . . . . . . . . . . . . . . . . . . . . . . . . . . . . . A-34Writing Report Queries . . . . . . . . . . . . . . . . . . . . . . . . . . . . . . . . . . . A-34Creating a Query Link . . . . . . . . . . . . . . . . . . . . . . . . . . . . . . . . . . . . A-36Editing the Query Expression in a Query Link . . . . . . . . . . . . . . . . . . A-40Adding a Query Results Page . . . . . . . . . . . . . . . . . . . . . . . . . . . . . . A-40Editing a Query Results Page . . . . . . . . . . . . . . . . . . . . . . . . . . . . . . A-42
Managing System Settings and Processes ix
Table of Contents
Deleting a Query Results Page . . . . . . . . . . . . . . . . . . . . . . . . . . . . . A-42
Appendix B: Third Party LicensesOverview . . . . . . . . . . . . . . . . . . . . . . . . . . . . . . . . . . . . . . . . . . . . . . . . . . B-1
Apache Software License . . . . . . . . . . . . . . . . . . . . . . . . . . . . . . . . . . . . . B-1
W3C® Software Notice and License . . . . . . . . . . . . . . . . . . . . . . . . . . . . . B-2
Zlib License . . . . . . . . . . . . . . . . . . . . . . . . . . . . . . . . . . . . . . . . . . . . . . . . B-3
General BSD License. . . . . . . . . . . . . . . . . . . . . . . . . . . . . . . . . . . . . . . . . B-4
General MIT License . . . . . . . . . . . . . . . . . . . . . . . . . . . . . . . . . . . . . . . . . B-5
Unicode License. . . . . . . . . . . . . . . . . . . . . . . . . . . . . . . . . . . . . . . . . . . . . B-5
Miscellaneous Attributions . . . . . . . . . . . . . . . . . . . . . . . . . . . . . . . . . . . . . B-6
x Managing System Settings and Processes
C h a p t e r
1.INTRODUCTION
OVERVIEWThis chapter covers the following topics:
About This Guide (page 1-1)
Audience (page 1-2)
What’s New (page 1-2)
Other Administrator Guides (page 1-3)
Understanding the Content Server (page 1-4)
Administration Utilities and Applets (page 1-5)
Administration Applications (page 1-7)
Conventions (page 1-9)
ABOUT THIS GUIDEThis guide describes tasks that impact system settings and processes on an ongoing basis. These tasks include managing system properties, multiple content servers, the search index, the web filter, providers, and the content batchload process.
Managing System Settings and Processes 1-1

Introduction
AUDIENCEThis guide is intended for people who are responsible for managing system configurations such as configuring providers, using the Admin Server, and adjusting database, localization, or other system properties for Content Server.
WHAT’S NEWThis section describes the features that have been added to this version of Content Server and are included in the Managing System Settings and Processes guide.
Database Search Contains Operator Feature:
The Database Search Contains Operator feature enables you to use the Contains search operator to search text fields when performing database and database full-text searches with SQL Server and Oracle. To use this feature, you must first enable the text fields (called zone text fields) that can be queried using the Contains search operator. When a text field is added as a zone text field, the text within the field is parsed and a full-text index for the field is created in the database. See Managing Zone Text Fields (page 4-12).
Oracle Query Optimizer Feature:
The Oracle Query Optimizer feature is designed to improve your Oracle database’s performance by removing inefficiencies in user queries. Generally, Oracle does not select the best execution plan for certain types of user queries. To counter this, the Oracle Query Optimizer feature adds hints to queries that force Oracle to perform searches more efficiently.
The hints are based on an intrinsic knowledge of Content Server’s table data distribution and its index selectivity. To take advantage of this knowledge, the Oracle Query Optimizer feature uses a pre-defined hint rules table to analyze the database query and then add appropriate hints to the query. In turn, the added hints improve Oracle’s search performance. See Searching Content Using the Oracle Query Optimizer Feature (page 4-21).
Note: The Database Search Contains Operator feature is available if you elect to install and enable the feature after installing Content Server.
Note: The Oracle Query Optimizer functionality is available if you elect to enable the feature after installing Content Server.
1-2 Managing System Settings and Processes
Introduction
Web URL Map Feature
The WebUrlMap feature enables you to map shortened URLs to other URLs in Content Server using a substitution script for the mapping. That means that you can map long URLs to abbreviated versions. See WebUrlMap Feature (page 5-5).
OTHER ADMINISTRATOR GUIDESAdministrators set up, maintain, and manage the content server users, content, and system configurations. Common tasks for an administrator include configuring the system to manage and index files, archiving and replicating information, working with content server security, adjusting system properties, reviewing log files, etc.
Documentation for administrators and sub-administrators of the Content Server software includes the following:
Getting Started (PDF and HTML)This document provides an overview of the Oracle suite of products and general guidelines for their setup and implementation.
Managing Security and User Access Guide (PDF and HTML)This document discusses tasks related to user administration, such as planning and implementing a security model, adding and deleting users, and implementing accounts. Additionally, it explains how to integrate external user bases with Content Server. The most common security integrations—Active Directory and LDAP—are described in detail.
Managing Repository Content Guide (PDF and HTML)This guide discusses tasks that affect how the content is displayed or handled, such as creating customized content types, using schemas, building a web site, or moving content through a workflow.
Managing System Settings and Processes Guide (PDF and HTML)This guide describes tasks that are impact system configuration on an ongoing basis such as managing revisions and indexing, configuring providers, and working with system properties.
Administration Tutorials (PDF and HTML)This document contains administration tutorials for people who need to administer (part of) a Oracle-based content management solution.
Enterprise Search Administration and User Guide (PDF and HTML)This document provides management and administration information for Enterprise
Managing System Settings and Processes 1-3
Introduction
Search. This enables multiple content server instances to be searchable as if they were a single instance.
Troubleshooting Guide (PDF and HTML)This document contains general information about troubleshooting a Content Server environment and how to diagnose issues, also provides more in-depth information about troubleshooting in specific areas.
Release Notes (hardcopy and PDF)The Content Server software is shipped with release notes, which list new and enhanced features of each new software release, and also provide special, up-to-the-minute considerations for installing and using the software. The release notes are important documents. Always make sure you read them before installing or updating Oracle software. T
UNDERSTANDING THE CONTENT SERVERThis section covers these topics:
Purpose (page 1-4)
Users (page 1-5)
PurposeUse Content Server for sharing, managing, and distributing business information using a website as a low-cost access point.
Designed for the web, this software is considered the unrivaled solution for medium to large companies for building secure business libraries with check in/check out, revision control, and automated publishing in web-ready formats. Current information is available to authorized users anytime, anywhere. You can link virtually any type of file—letters, reports, engineering drawings, spreadsheets, manuals, sales literature, and more—under one powerful system of knowledge distribution.
Note: The optional add-ons to Content Server generally have their own administration documentation, which is included as PDF files on the add-on distribution media, typically in a /documentation directory.
1-4 Managing System Settings and Processes
Introduction
UsersContent Server is designed for two types of users and two types of administrators:
Consumers: Users who just need to find, view, and print files.
Contributors: Users who need to create and revise files.
Administrators: Administrators who oversee an entire instance.
Sub-administrators: Administrators who oversee a subset of an instance.
In a typical system, the majority of the users are consumers. These users do not need a user name and password to access the content server system unless security is placed on the files. To safeguard the integrity of the files, the contributors need a user name and password to check files in and out of the system.
Typically, the majority of administrators are sub-administrators. They administer portions of the software that correspond to the rights that the system administrator assigns to them.
ADMINISTRATION UTILITIES AND APPLETSThis section covers these topics:
Administration Interfaces (page 1-5)
Administration Page (page 1-7)
Administration InterfacesThe system provides administration applications, utilities, and pages to configure and maintain the Content Server system operation.
ApplicationsThe following applications are described in this guide and can be started as stand-alone applications at the server, as applets through a browser, or from the Apps menu in each of the tools:
Note: Please see General Browser Considerations in your Content Server Installation Guide for information on Java-browser plugins and applet display issues.
Managing System Settings and Processes 1-5
Introduction
Repository Manager—Perform file diagnostics, file management functions, search data reindexing, and subscription management functions. See Configuring the Search Index (page 4-1).
WebLayout Editor—Build a web site, work with reports, write queries. See Building a Web Site (page A-1).
UtilitiesThe following tools can be started only as stand-alone applications from the computer where the content server is installed:
Batch Loader—Update or check in a large number of content items at one time. See Batchloading Content (page 7-1).
System Properties—Configure the system options and functionality of the content server. See Configuring System Properties (page 2-1).
Management PagesThe following pages can be accessed by using a browser and selecting the Administration link or accessing the options directly from the Administration tray:
Admin Server—Configure system-wide settings for multiple content server instances. See Managing Multiple Content Servers with Admin Server (page 3-1).
Filter Administration—Configure and troubleshoot the web server filter communication with Content Server. See Configuring a Web Server Filter (page 5-1).
Providers—Add providers, configure provider information, and test providers. See Connecting to Outside Entities with Providers (page 6-1).
1-6 Managing System Settings and Processes
Introduction
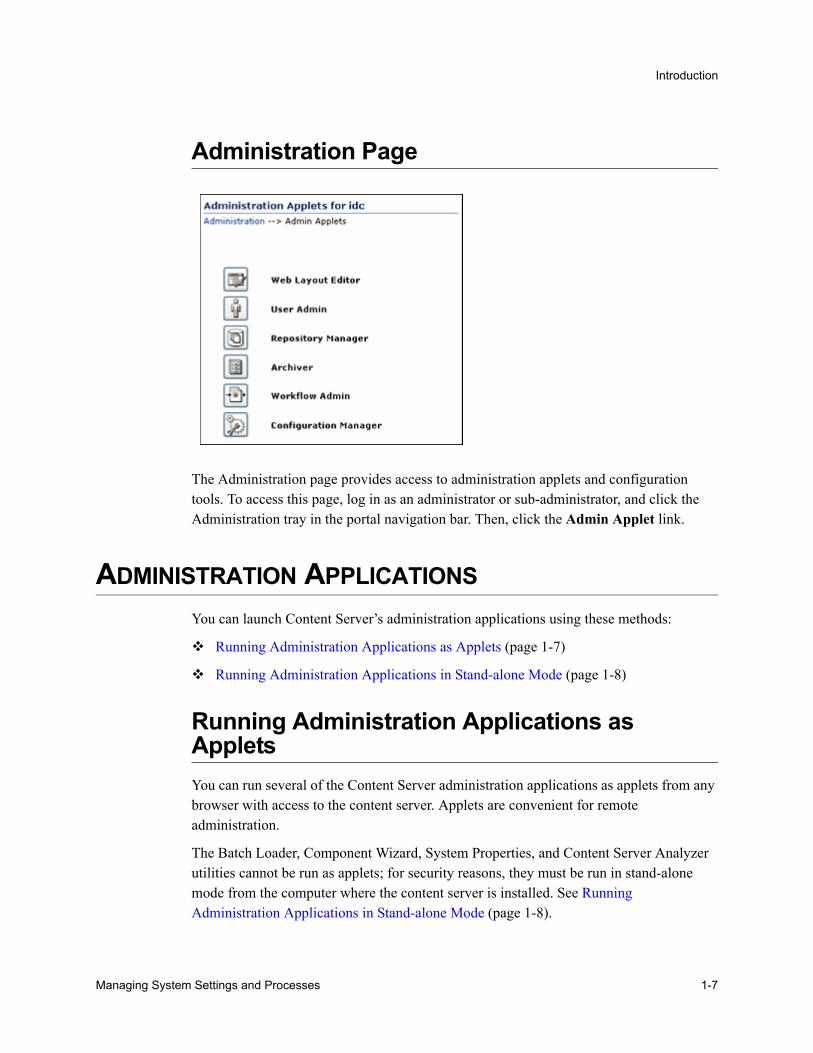
Administration Page
The Administration page provides access to administration applets and configuration tools. To access this page, log in as an administrator or sub-administrator, and click the Administration tray in the portal navigation bar. Then, click the Admin Applet link.
ADMINISTRATION APPLICATIONSYou can launch Content Server’s administration applications using these methods:
Running Administration Applications as Applets (page 1-7)
Running Administration Applications in Stand-alone Mode (page 1-8)
Running Administration Applications as AppletsYou can run several of the Content Server administration applications as applets from any browser with access to the content server. Applets are convenient for remote administration.
The Batch Loader, Component Wizard, System Properties, and Content Server Analyzer utilities cannot be run as applets; for security reasons, they must be run in stand-alone mode from the computer where the content server is installed. See Running Administration Applications in Stand-alone Mode (page 1-8).
Managing System Settings and Processes 1-7
Introduction
Some functions that are available in the stand-alone version of an application are not available from the applet version. See the documentation for each application for more information.
To run an administration application as a Java applet within a Java-enabled browser:
1. Open a browser window.
2. Log in to the content server as an administrator.
3. Click the Administration tray link in the portal navigation bar.
4. Click the Admin Applets link.
Running Administration Applications in Stand-alone ModeYou can run all Content Server administration applications in stand-alone mode from the computer where the content server is installed. The method required to start these programs differs slightly between Windows and UNIX installations.
Running the stand-alone version of an application offers greater security than browser applets, and enables you to send passwords without having them captured or copied from the web or a network.
On Windows SystemsTo run a stand-alone administration application on a Windows operating system:
1. Select the application from the Windows Start menu:
• To run one of the administration Applications (page 1-6), select Start—Programs—Content Server—instance—Applications—application.
• To run one of the administration Utilities (page 1-6), select Start—Programs—Content Server—instance—Utilities—utility.
For all applications except for Component Wizard and System Properties, a login screen is displayed. For Component Wizard and System Properties, the main screen of the application is displayed.
2. Enter the administrator login name and password.
Tech Tip: It may take several seconds for the login screen or the application screen to appear, and the screen may be hidden by other windows.
1-8 Managing System Settings and Processes
Introduction
3. Click OK.
The main screen of the application is displayed.
On UNIX SystemsTo run a stand-alone administration application on a UNIX operating system:
1. Navigate to the <Install_Dir>/bin/ directory.
2. Executable applications are listed. Enter /application_name, where application_name is the name of one of the executable files. If an application is not listed, it can be entered as a parameter to the IntradocApp application, as in this example:
%<Install_Dir>%/bin/intradocApp workflow
3. Press Enter.
For all applications except for Component Wizard and System Properties, a login screen is displayed. For Component Wizard and System Properties, the main screen of the application is displayed.
4. Enter the administrator login name and password.
5. Click OK.
The main screen of the application is displayed.
CONVENTIONSThe notation <Install_Dir>/ is used to refer to the location on your system where Content Server is installed.
Forward slashes (/) are used to separate the directory levels in a path name. A forward slash will always appear after the end of a directory name.
Notes, technical tips, important notices, and cautions use these conventions:
Symbols Description
This is a note. It is used to bring special attention to information.
Managing System Settings and Processes 1-9
Introduction
This is a technical tip. It is used to identify information that can be used to make your tasks easier.
This is an important notice. It is used to identify a required step or required information.
This is a caution. It is used to identify information that might cause loss of data or serious system problems.
Symbols Description
1-10 Managing System Settings and Processes
C h a p t e r
2.CONFIGURING SYSTEMPROPERTIES
OVERVIEWThis chapter covers these topics:
ConceptsAbout System Properties (page 2-2)
TasksConfiguring General Options (page 2-4)
Configuring Content Security (page 2-12)
Configuring Internet Information (page 2-14)
Configuring the Database (page 2-17)
Configuring the Content Server (page 2-20)
Configuring Locales (page 2-24)
Configuring Paths (page 2-25)
Note: Information on configuring locales (on the Localization tab of the System Properties screen) can be found in the International Considerations Guide.
Managing System Settings and Processes 2-1
Configuring System Properties
ABOUT SYSTEM PROPERTIES
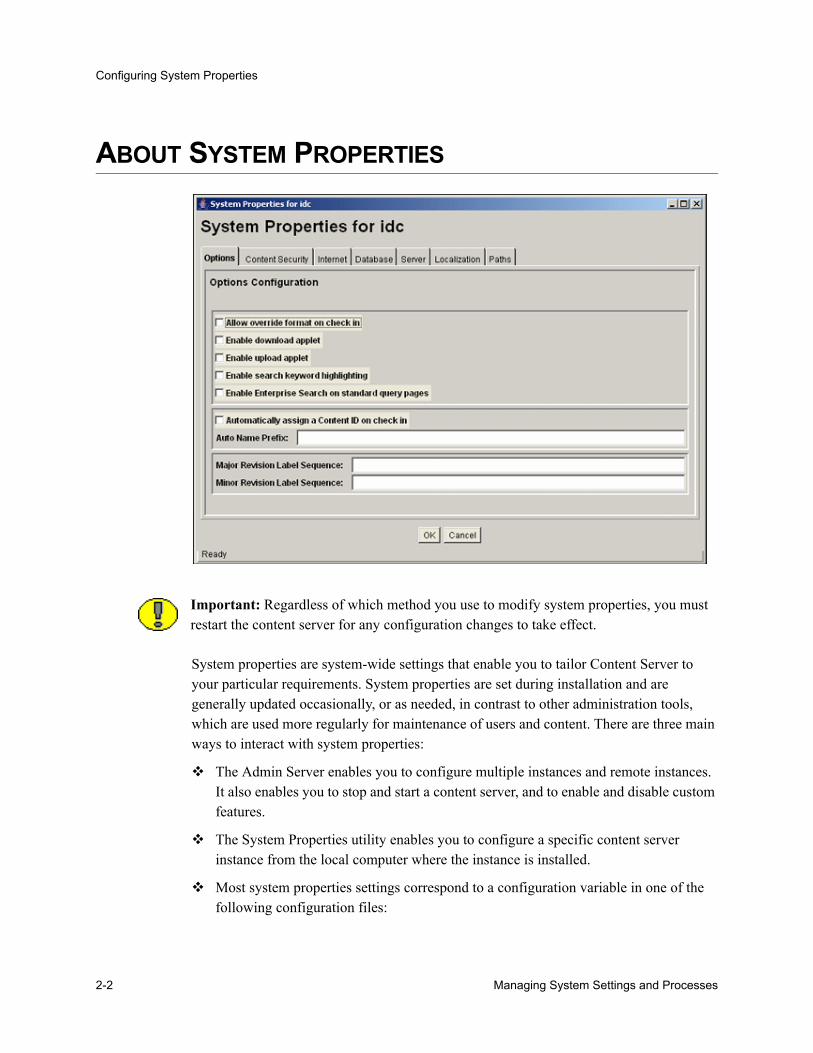
System properties are system-wide settings that enable you to tailor Content Server to your particular requirements. System properties are set during installation and are generally updated occasionally, or as needed, in contrast to other administration tools, which are used more regularly for maintenance of users and content. There are three main ways to interact with system properties:
The Admin Server enables you to configure multiple instances and remote instances. It also enables you to stop and start a content server, and to enable and disable custom features.
The System Properties utility enables you to configure a specific content server instance from the local computer where the instance is installed.
Most system properties settings correspond to a configuration variable in one of the following configuration files:
Important: Regardless of which method you use to modify system properties, you must restart the content server for any configuration changes to take effect.
2-2 Managing System Settings and Processes
Configuring System Properties
• <Install_Dir>/config/config.cfg
• <Install_Dir>/bin/intradoc.cfg
• <Install_Dir>/search/search.cfg
You can edit these files directly in a text editor; however, it is recommended that you make changes through the Admin Server or System Properties tool to ensure that the settings are entered correctly. See the Idoc Script Reference Guide for more information on configuration variables.
You do not have to log in as the system administrator to access the System Properties application. You only need access to the local computer where the content server is installed.
The System Properties application is an administration application that is used to configure system-wide settings from the system on which the content server instance is installed. To access the System Properties application, see Running Administration Applications in Stand-alone Mode (page 1-8).
Tech Tip: There are many techniques that you can use to optimize the performance of Content Server. One of the types of tuning involves changing default parameters and software settings that affect the core Content Server performance. System optimization and performance tuning is often accomplished by adjusting system settings and configuration variables or tuning resources such as databases and indexes.
For example, as the content in your Content Server instance increases, you may experience a shortage of available space. In this case, moving the vault, weblayout, and search index directories to another drive with more space can help alleviate storage problems. Moving these directories requires adding entries into the <Install_Dir>/bin/intradoc.cfg file.
For more information about alleviating storage problems, see the system architecture tuning information in the Content Server Performance Tuning Guide. This guide provides numerous additional techniques that you can implement to optimize your Content Server instance.
Feature Description
Options tab Used to set optional functionality for the content server. See Configuring General Options (page 2-4).
Content Security tab
Used to set options related to content item security. See Configuring Content Security (page 2-12).
Managing System Settings and Processes 2-3
Configuring System Properties
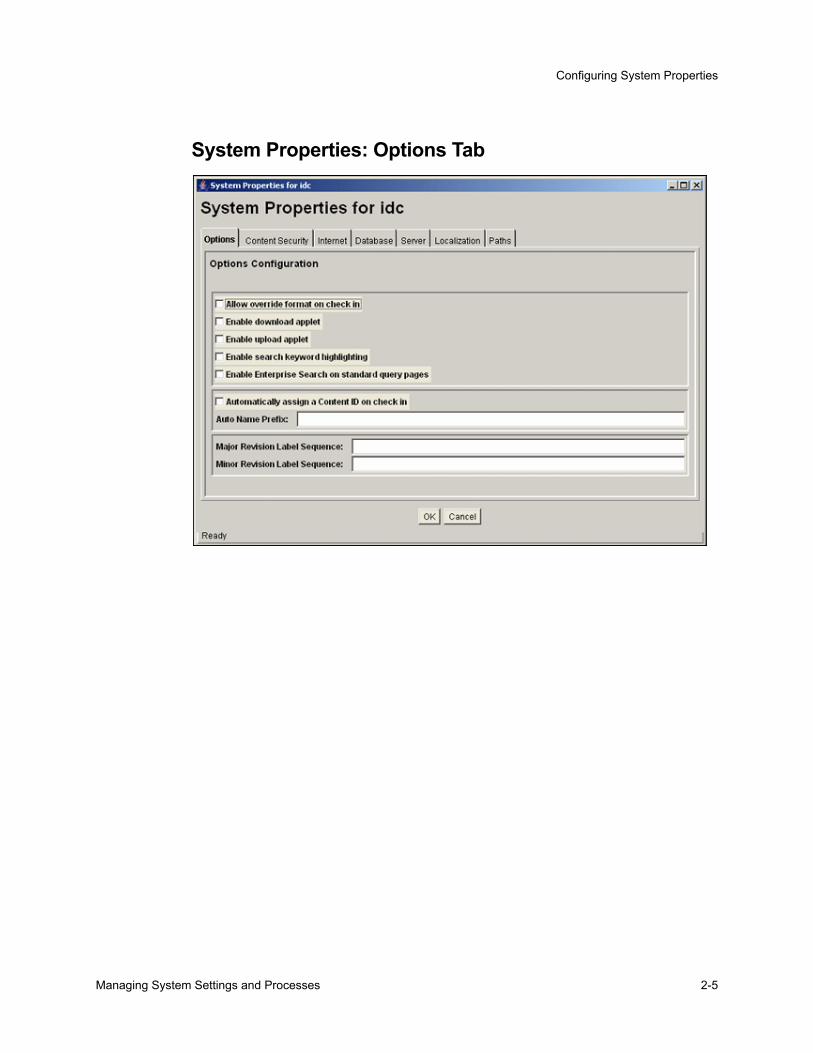
CONFIGURING GENERAL OPTIONSYou can set general options on the System Properties: Options Tab (page 2-5) or on the Admin Server: General Configuration Page (page 2-6).
Internet tab Used to set options related to content server interaction with web entities. See Configuring Internet Information (page 2-14).
Database tab Used to set database options. See Configuring the Database (page 2-17).
Server tab Used to set optional functionality for the content server. See Configuring the Content Server (page 2-20).
Localization tab See the Oracle International Considerations Guide.
Paths tab Used to set content server directory paths. See Configuring Paths (page 2-25).
OK button Saves the changes and closes the System Properties screen.Important: You must restart the content server for any changes to take effect.
Cancel button Closes the System Properties screen without saving any changes.
Feature Description
Important: You must restart Content Server for any configuration changes to take effect.
2-4 Managing System Settings and Processes
Configuring System Properties
System Properties: Options Tab
Managing System Settings and Processes 2-5
Configuring System Properties
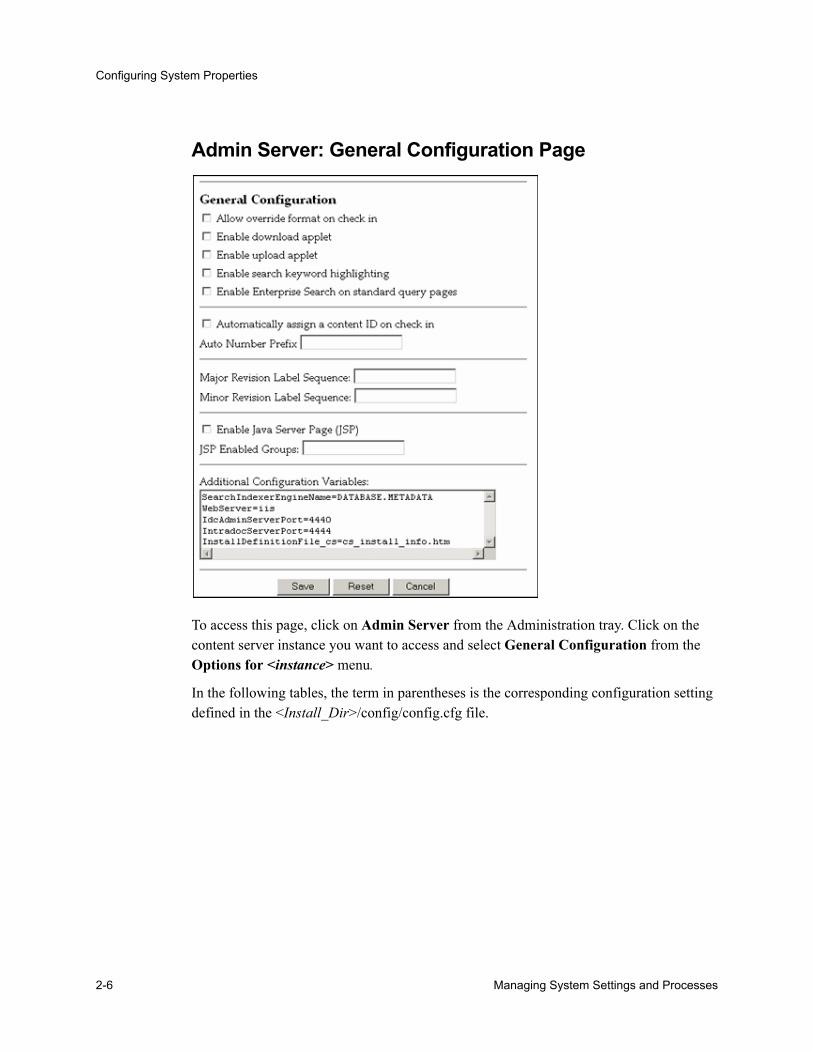
Admin Server: General Configuration Page
To access this page, click on Admin Server from the Administration tray. Click on the content server instance you want to access and select General Configuration from the Options for <instance> menu.
In the following tables, the term in parentheses is the corresponding configuration setting defined in the <Install_Dir>/config/config.cfg file.
2-6 Managing System Settings and Processes
Configuring System Properties
Feature Description
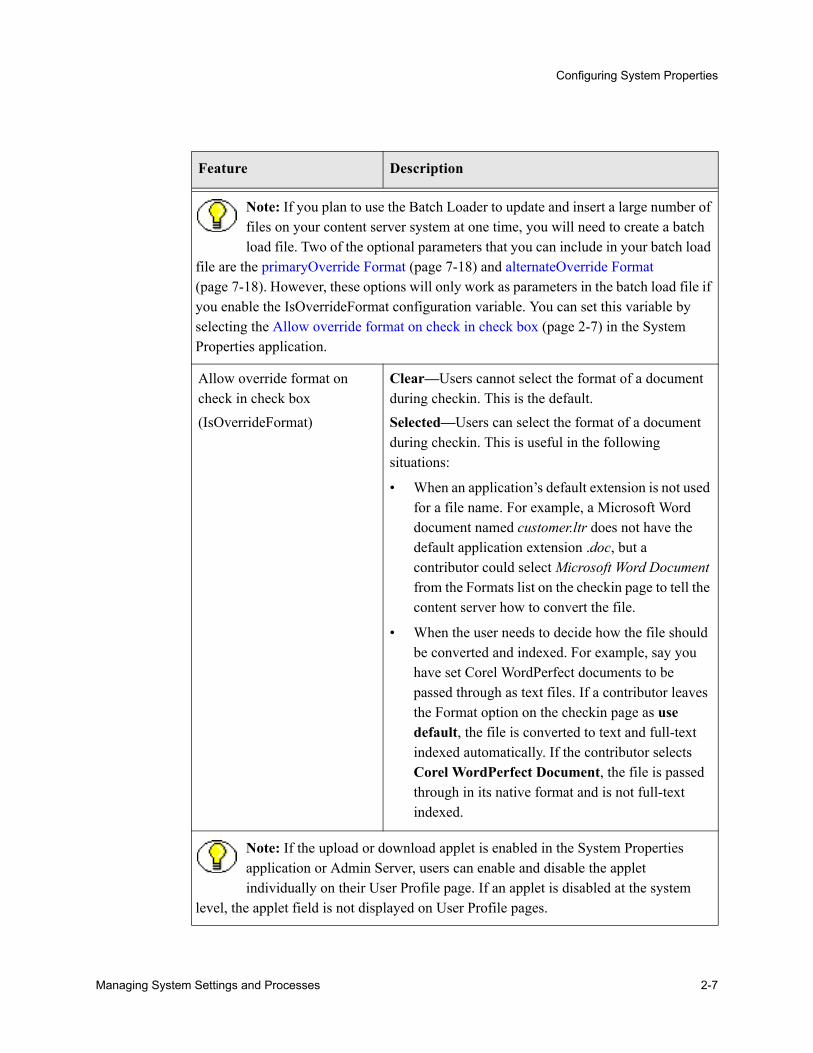
Note: If you plan to use the Batch Loader to update and insert a large number of files on your content server system at one time, you will need to create a batch load file. Two of the optional parameters that you can include in your batch load
file are the primaryOverride Format (page 7-18) and alternateOverride Format (page 7-18). However, these options will only work as parameters in the batch load file if you enable the IsOverrideFormat configuration variable. You can set this variable by selecting the Allow override format on check in check box (page 2-7) in the System Properties application.
Allow override format on check in check box(IsOverrideFormat)
Clear—Users cannot select the format of a document during checkin. This is the default.Selected—Users can select the format of a document during checkin. This is useful in the following situations:
• When an application’s default extension is not used for a file name. For example, a Microsoft Word document named customer.ltr does not have the default application extension .doc, but a contributor could select Microsoft Word Document from the Formats list on the checkin page to tell the content server how to convert the file.
• When the user needs to decide how the file should be converted and indexed. For example, say you have set Corel WordPerfect documents to be passed through as text files. If a contributor leaves the Format option on the checkin page as use default, the file is converted to text and full-text indexed automatically. If the contributor selects Corel WordPerfect Document, the file is passed through in its native format and is not full-text indexed.
Note: If the upload or download applet is enabled in the System Properties application or Admin Server, users can enable and disable the applet individually on their User Profile page. If an applet is disabled at the system
level, the applet field is not displayed on User Profile pages.
Managing System Settings and Processes 2-7
Configuring System Properties
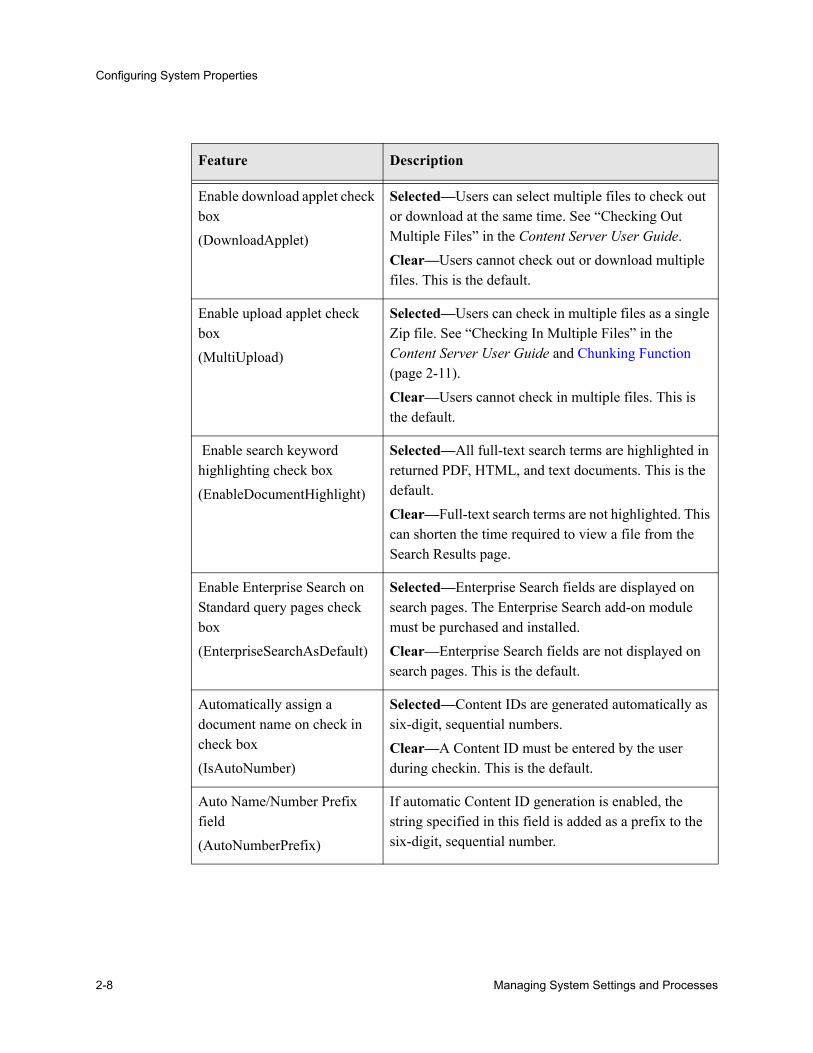
Enable download applet check box(DownloadApplet)
Selected—Users can select multiple files to check out or download at the same time. See “Checking Out Multiple Files” in the Content Server User Guide.Clear—Users cannot check out or download multiple files. This is the default.
Enable upload applet check box(MultiUpload)
Selected—Users can check in multiple files as a single Zip file. See “Checking In Multiple Files” in the Content Server User Guide and Chunking Function (page 2-11).Clear—Users cannot check in multiple files. This is the default.
Enable search keyword highlighting check box(EnableDocumentHighlight)
Selected—All full-text search terms are highlighted in returned PDF, HTML, and text documents. This is the default.Clear—Full-text search terms are not highlighted. This can shorten the time required to view a file from the Search Results page.
Enable Enterprise Search on Standard query pages check box(EnterpriseSearchAsDefault)
Selected—Enterprise Search fields are displayed on search pages. The Enterprise Search add-on module must be purchased and installed.Clear—Enterprise Search fields are not displayed on search pages. This is the default.
Automatically assign a document name on check in check box(IsAutoNumber)
Selected—Content IDs are generated automatically as six-digit, sequential numbers.Clear—A Content ID must be entered by the user during checkin. This is the default.
Auto Name/Number Prefix field(AutoNumberPrefix)
If automatic Content ID generation is enabled, the string specified in this field is added as a prefix to the six-digit, sequential number.
Feature Description
2-8 Managing System Settings and Processes
Configuring System Properties
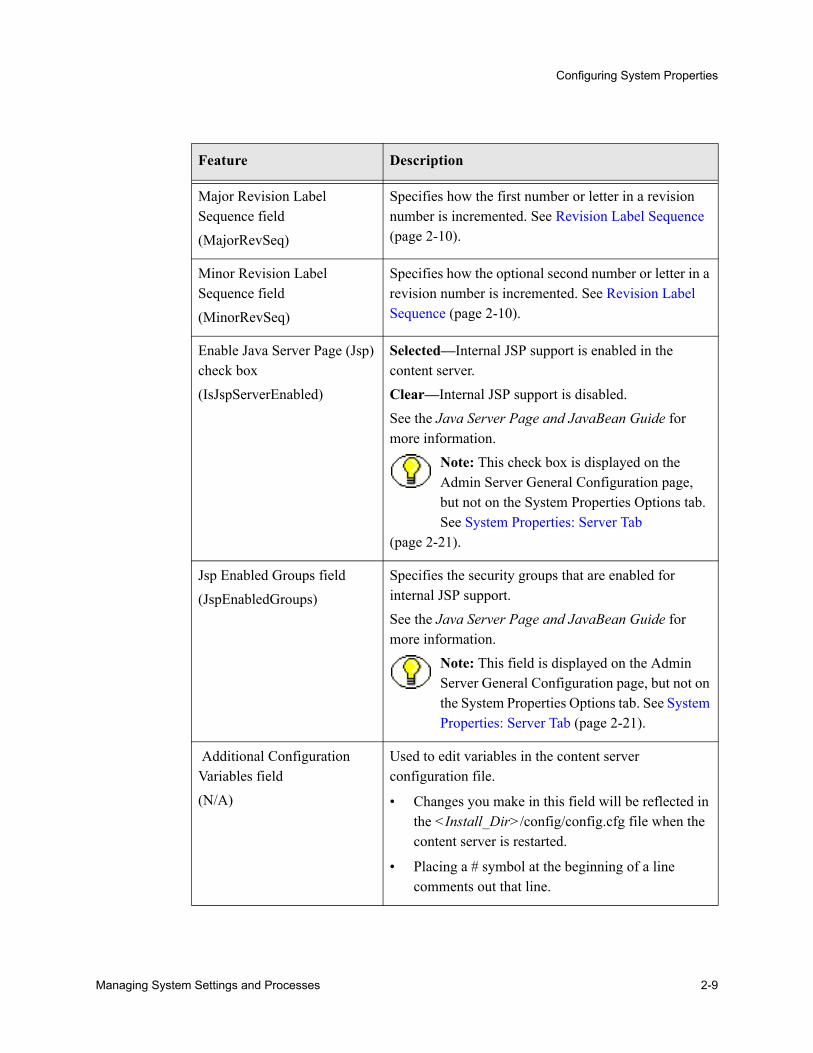
Major Revision Label Sequence field(MajorRevSeq)
Specifies how the first number or letter in a revision number is incremented. See Revision Label Sequence (page 2-10).
Minor Revision Label Sequence field(MinorRevSeq)
Specifies how the optional second number or letter in a revision number is incremented. See Revision Label Sequence (page 2-10).
Enable Java Server Page (Jsp) check box(IsJspServerEnabled)
Selected—Internal JSP support is enabled in the content server.Clear—Internal JSP support is disabled.See the Java Server Page and JavaBean Guide for more information.
Note: This check box is displayed on the Admin Server General Configuration page, but not on the System Properties Options tab. See System Properties: Server Tab
(page 2-21).
Jsp Enabled Groups field(JspEnabledGroups)
Specifies the security groups that are enabled for internal JSP support.See the Java Server Page and JavaBean Guide for more information.
Note: This field is displayed on the Admin Server General Configuration page, but not on the System Properties Options tab. See System Properties: Server Tab (page 2-21).
Additional Configuration Variables field(N/A)
Used to edit variables in the content server configuration file.
• Changes you make in this field will be reflected in the <Install_Dir>/config/config.cfg file when the content server is restarted.
• Placing a # symbol at the beginning of a line comments out that line.
Feature Description
Managing System Settings and Processes 2-9

Configuring System Properties
Revision Label SequenceThe metadata field named Revision has a default revision number sequence of 1, 2, 3, 4, 5, and so forth. This number increments automatically for each revision of a document.
You can override the Revision default by changing the definition of the revision label. The revision label consists of two parts: a major and minor revision sequence. The Major Revision Label Sequence is the first number or letter and the Minor Revision Label Sequence follows. For example, in the revision sequence 1a, 1b, 1c, 2a, 2b, 2c, 3a, 3b, 3c, and so forth, the numbers 1, 2, 3 are the major revision sequence and a, b, c are the minor revision sequence.
Revision Label RangesBoth the major and minor revision sequences are defined as a range of numbers or letters. The major sequence can have multiple ranges, while the minor sequence can only have one range.
The following are the restrictions on defining the range:
Numbers or letters can be used, but not both. For example, 1-10 is a valid range but A-10 is not a valid range.
Letter ranges can have only one letter. For example, A-Z is a valid range but AA-ZZ is not a valid range.
Revision ExamplesThe following are examples of different revision sequences and how you would define the major and minor revision entries in the config.cfg file.
Example 1
MajorRevSeq=A-D,1-99
The revision sequence is A, B, C, D, 1, 2, 3, 4, and so forth.
Example 2
MajorRevSeq=1-99
MinorRevSeq=a-c
The revision sequence is 1a, 1b, 1c, 2a, 2b, 2c, 3a, 3b, 3c, and so forth.
2-10 Managing System Settings and Processes
Configuring System Properties
Revision Configuration SettingsTo change the default revision sequence manually in the <Install_Dir>/config/config.cfg file, enter the following name/value pairs:
MajorRevSeq=range1,range2,range3...
MinorRevSeq=range
where range1,range2,range3... and range are the defined range sequence.
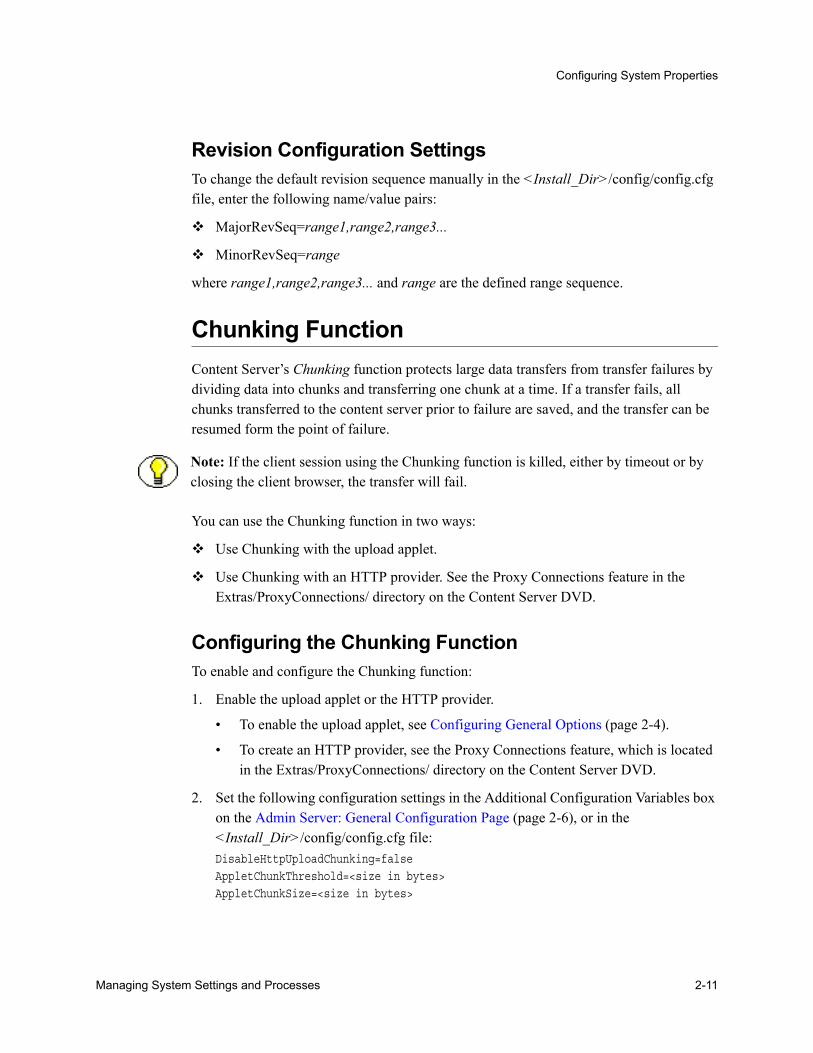
Chunking FunctionContent Server’s Chunking function protects large data transfers from transfer failures by dividing data into chunks and transferring one chunk at a time. If a transfer fails, all chunks transferred to the content server prior to failure are saved, and the transfer can be resumed form the point of failure.
You can use the Chunking function in two ways:
Use Chunking with the upload applet.
Use Chunking with an HTTP provider. See the Proxy Connections feature in the Extras/ProxyConnections/ directory on the Content Server DVD.
Configuring the Chunking FunctionTo enable and configure the Chunking function:
1. Enable the upload applet or the HTTP provider.
• To enable the upload applet, see Configuring General Options (page 2-4).
• To create an HTTP provider, see the Proxy Connections feature, which is located in the Extras/ProxyConnections/ directory on the Content Server DVD.
2. Set the following configuration settings in the Additional Configuration Variables box on the Admin Server: General Configuration Page (page 2-6), or in the <Install_Dir>/config/config.cfg file:DisableHttpUploadChunking=falseAppletChunkThreshold=<size in bytes>AppletChunkSize=<size in bytes>
Note: If the client session using the Chunking function is killed, either by timeout or by closing the client browser, the transfer will fail.
Managing System Settings and Processes 2-11
Configuring System Properties
The AppletChunkSize setting sets the size of the individual chunks. The AppletChunkThreshold setting sets the minimum file size that will use the Chunking function. Both of these values default to 1M.
3. To debug the Chunking function, set ChunkedRequestTrace=true.
This enables you to view the chunked requests on Content Server Output Page (page 3-14).
4. Save the changes.
5. Restart the content server.
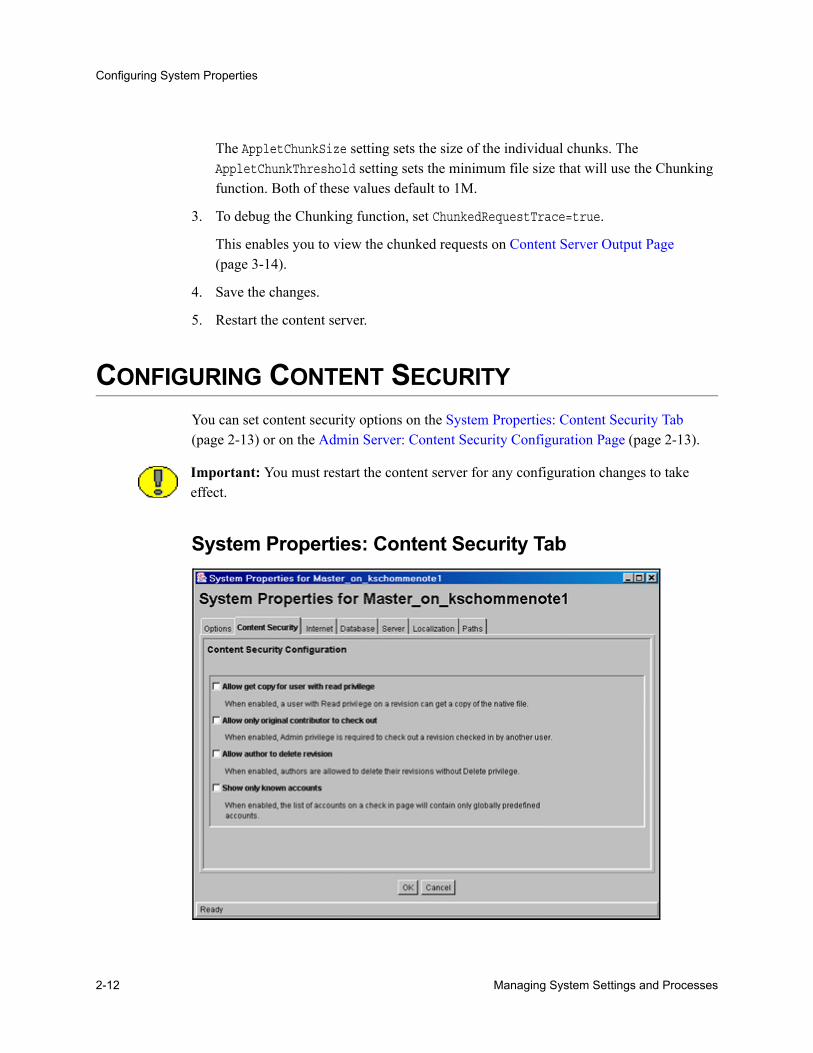
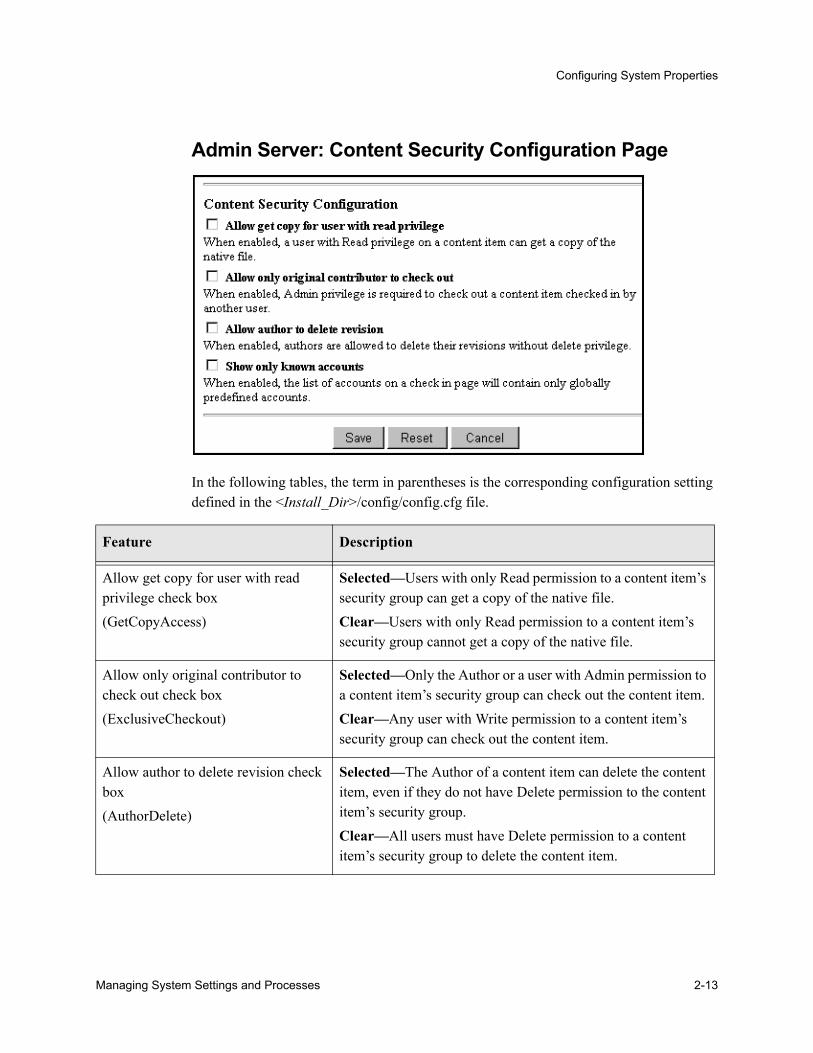
CONFIGURING CONTENT SECURITYYou can set content security options on the System Properties: Content Security Tab (page 2-13) or on the Admin Server: Content Security Configuration Page (page 2-13).
System Properties: Content Security Tab
Important: You must restart the content server for any configuration changes to take effect.
2-12 Managing System Settings and Processes
Configuring System Properties
Admin Server: Content Security Configuration Page
In the following tables, the term in parentheses is the corresponding configuration setting defined in the <Install_Dir>/config/config.cfg file.
Feature Description
Allow get copy for user with read privilege check box(GetCopyAccess)
Selected—Users with only Read permission to a content item’s security group can get a copy of the native file.Clear—Users with only Read permission to a content item’s security group cannot get a copy of the native file.
Allow only original contributor to check out check box(ExclusiveCheckout)
Selected—Only the Author or a user with Admin permission to a content item’s security group can check out the content item.Clear—Any user with Write permission to a content item’s security group can check out the content item.
Allow author to delete revision check box(AuthorDelete)
Selected—The Author of a content item can delete the content item, even if they do not have Delete permission to the content item’s security group.Clear—All users must have Delete permission to a content item’s security group to delete the content item.
Managing System Settings and Processes 2-13

Configuring System Properties
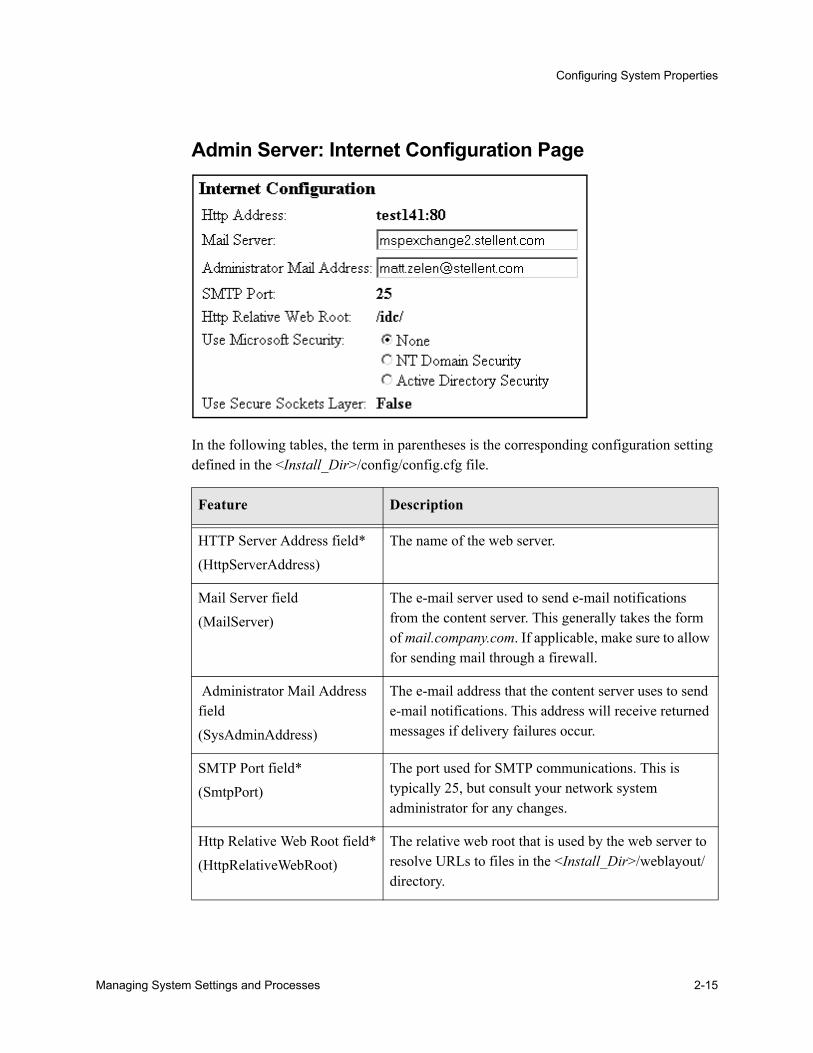
CONFIGURING INTERNET INFORMATIONYou can set Internet options on the System Properties: Internet Tab (page 2-15) or on the Admin Server: Internet Configuration Page (page 2-15).
System Properties: Internet Tab
Show only known accounts check box(ShowOnlyKnownAccounts)
Selected—Only predefined accounts appear in the Accounts option list on checkin and search pages.Clear—User-defined accounts and predefined accounts appear in the Accounts option list on checkin and search pages.
Feature Description
Important: You must restart the content server for any configuration changes to take effect.
2-14 Managing System Settings and Processes
Configuring System Properties
Admin Server: Internet Configuration Page
In the following tables, the term in parentheses is the corresponding configuration setting defined in the <Install_Dir>/config/config.cfg file.
Feature Description
HTTP Server Address field*(HttpServerAddress)
The name of the web server.
Mail Server field(MailServer)
The e-mail server used to send e-mail notifications from the content server. This generally takes the form of mail.company.com. If applicable, make sure to allow for sending mail through a firewall.
Administrator Mail Address field(SysAdminAddress)
The e-mail address that the content server uses to send e-mail notifications. This address will receive returned messages if delivery failures occur.
SMTP Port field*(SmtpPort)
The port used for SMTP communications. This is typically 25, but consult your network system administrator for any changes.
Http Relative Web Root field*(HttpRelativeWebRoot)
The relative web root that is used by the web server to resolve URLs to files in the <Install_Dir>/weblayout/ directory.
Managing System Settings and Processes 2-15
Configuring System Properties
CONFIGURING THE DATABASEYou can set JDBC (Java Database Connectivity) configuration options on the System Properties: Database Tab (page 2-18).
For security reasons, the Admin Server cannot be used to configure the database. You must use the standalone application to configure the database.
Database options are configured automatically during installation as long as there are no network errors that make it impossible for the system to connect to the database. You need to manually configure the database only if you change databases or if the system could not find the content server database during installation.
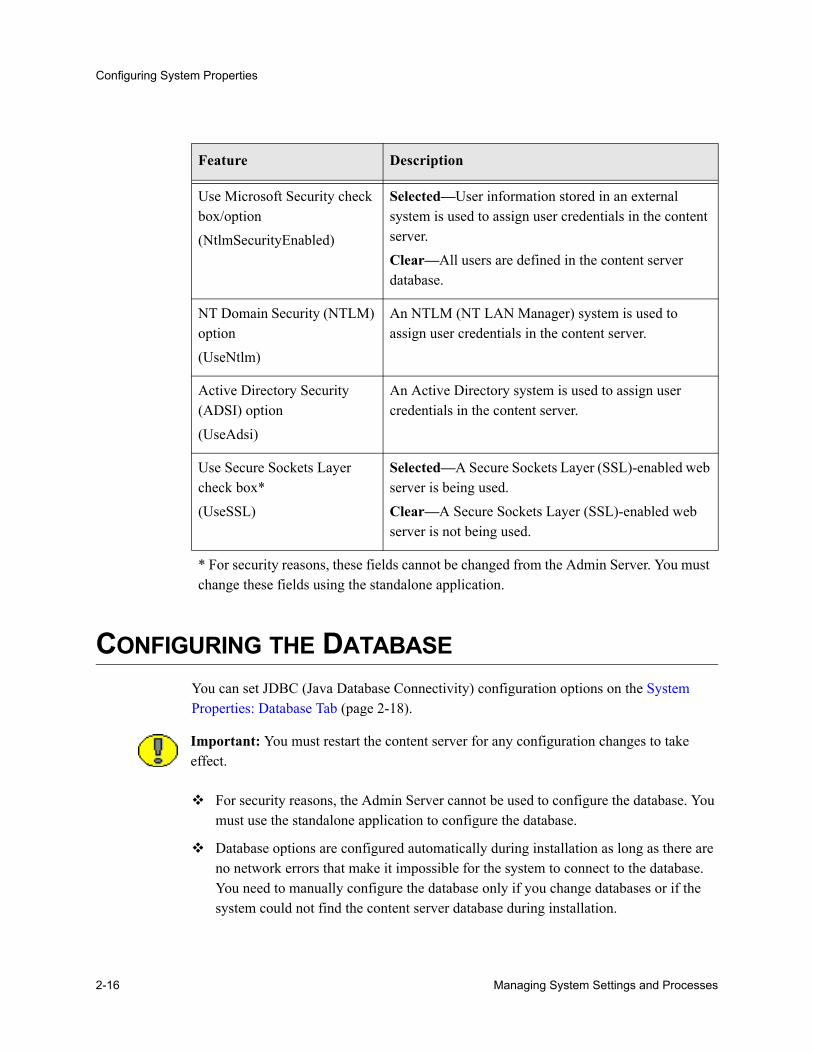
Use Microsoft Security check box/option(NtlmSecurityEnabled)
Selected—User information stored in an external system is used to assign user credentials in the content server.Clear—All users are defined in the content server database.
NT Domain Security (NTLM) option(UseNtlm)
An NTLM (NT LAN Manager) system is used to assign user credentials in the content server.
Active Directory Security (ADSI) option
(UseAdsi)
An Active Directory system is used to assign user credentials in the content server.
Use Secure Sockets Layer check box*(UseSSL)
Selected—A Secure Sockets Layer (SSL)-enabled web server is being used.Clear—A Secure Sockets Layer (SSL)-enabled web server is not being used.
* For security reasons, these fields cannot be changed from the Admin Server. You must change these fields using the standalone application.
Feature Description
Important: You must restart the content server for any configuration changes to take effect.
2-16 Managing System Settings and Processes
Configuring System Properties
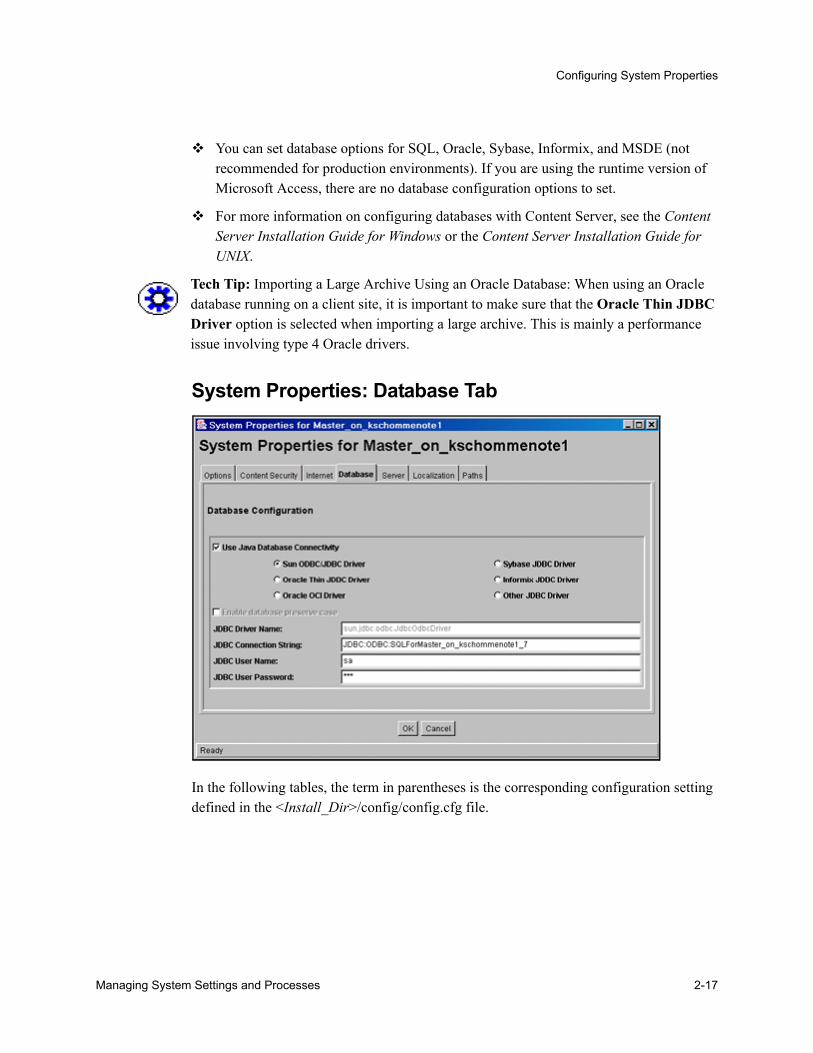
You can set database options for SQL, Oracle, Sybase, Informix, and MSDE (not recommended for production environments). If you are using the runtime version of Microsoft Access, there are no database configuration options to set.
For more information on configuring databases with Content Server, see the Content Server Installation Guide for Windows or the Content Server Installation Guide for UNIX.
System Properties: Database Tab
In the following tables, the term in parentheses is the corresponding configuration setting defined in the <Install_Dir>/config/config.cfg file.
Tech Tip: Importing a Large Archive Using an Oracle Database: When using an Oracle database running on a client site, it is important to make sure that the Oracle Thin JDBC Driver option is selected when importing a large archive. This is mainly a performance issue involving type 4 Oracle drivers.
Managing System Settings and Processes 2-17
Configuring System Properties
Feature Description
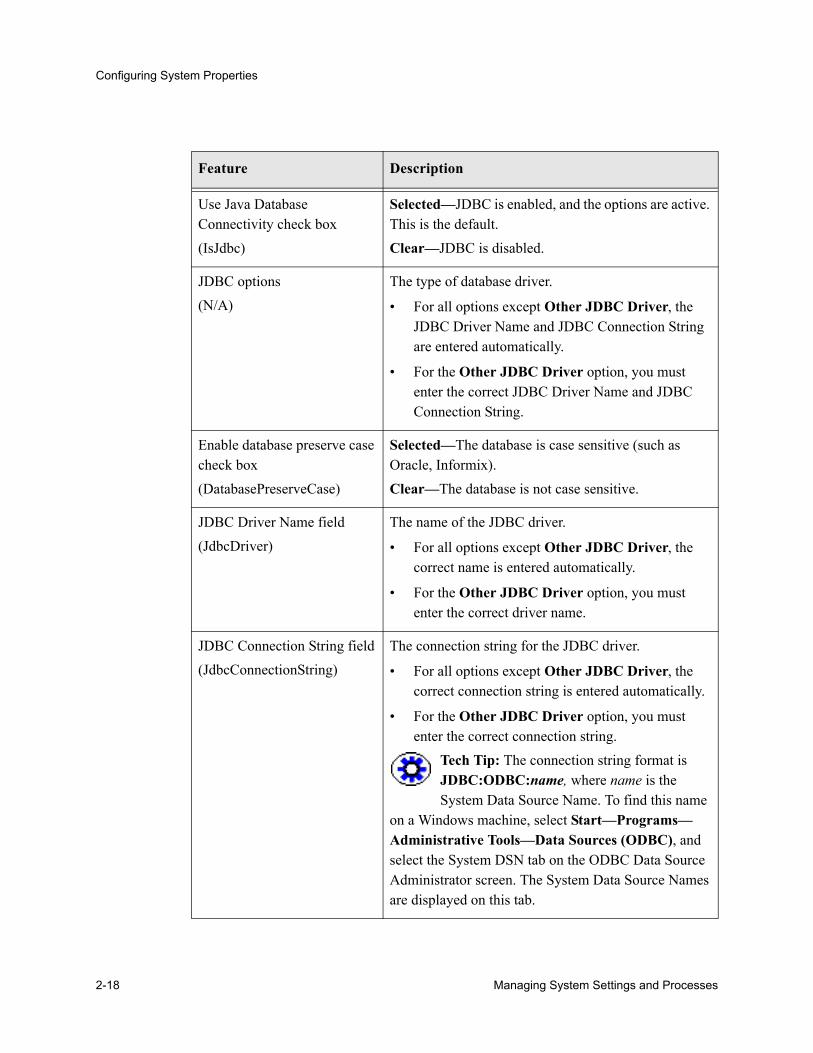
Use Java Database Connectivity check box(IsJdbc)
Selected—JDBC is enabled, and the options are active. This is the default.Clear—JDBC is disabled.
JDBC options(N/A)
The type of database driver.
• For all options except Other JDBC Driver, the JDBC Driver Name and JDBC Connection String are entered automatically.
• For the Other JDBC Driver option, you must enter the correct JDBC Driver Name and JDBC Connection String.
Enable database preserve case check box(DatabasePreserveCase)
Selected—The database is case sensitive (such as Oracle, Informix).Clear—The database is not case sensitive.
JDBC Driver Name field(JdbcDriver)
The name of the JDBC driver.
• For all options except Other JDBC Driver, the correct name is entered automatically.
• For the Other JDBC Driver option, you must enter the correct driver name.
JDBC Connection String field(JdbcConnectionString)
The connection string for the JDBC driver.
• For all options except Other JDBC Driver, the correct connection string is entered automatically.
• For the Other JDBC Driver option, you must enter the correct connection string.
Tech Tip: The connection string format is JDBC:ODBC:name, where name is the System Data Source Name. To find this name
on a Windows machine, select Start—Programs—Administrative Tools—Data Sources (ODBC), and select the System DSN tab on the ODBC Data Source Administrator screen. The System Data Source Names are displayed on this tab.
2-18 Managing System Settings and Processes

Configuring System Properties
Changing the Database Driver SettingsYou can update or edit your database settings as necessary to ensure that these system settings are correctly tailored for your Content Server requirements. For this reason, you might need to change your database driver settings if you are switching to a different driver. For example, you might need to switch to a Microsoft SQL Server JDBC driver to integrate the iMarkup application.
By default, when Microsoft SQL Server JDBC drivers are installed, one or more spaces are included in the name of the directory where the drivers are located. After reconfiguring the Content Server to use the Microsoft JDBC driver, the spaces in the driver’s directory will cause a fatal error when you try to restart Content Server.
To resolve this problem:
1. Move the Microsoft SQL Server JDBC driver files to a directory that does not contain spaces in its name.
2. Edit the CLASSPATH variable in the intradoc.cfg file and ensure that it points to the new directory:
<Install_Dir>/bin/intradoc.cfg
3. Restart the Content Server to apply the changes.
CONFIGURING THE CONTENT SERVERYou can set content server options on the System Properties: Server Tab (page 2-21). For security reasons, the Admin Server cannot be used to configure these options. You must use the standalone application to configure options.
JDBC User Name field(JdbcUser)
The user name that owns the tables inside the database.
JDBC User Password field(JdbcPassword)
The password for the user name that owns the tables inside the database.
Feature Description
Managing System Settings and Processes 2-19

Configuring System Properties
System Properties: Server Tab
In the following tables, the term in parentheses is the corresponding configuration setting defined in the <Install_Dir>/config/config.cfg file.
Caution: If you do not use a Hostname filter, IP Address filter, or some other network-based security, you will have a security hole in your content server instance. For example, with no login, any user with in-depth knowledge of the system could create or modify any other user to have sysadmin access.
Important: You must restart the content server for any configuration changes to take effect.
2-20 Managing System Settings and Processes
Configuring System Properties
Feature Description
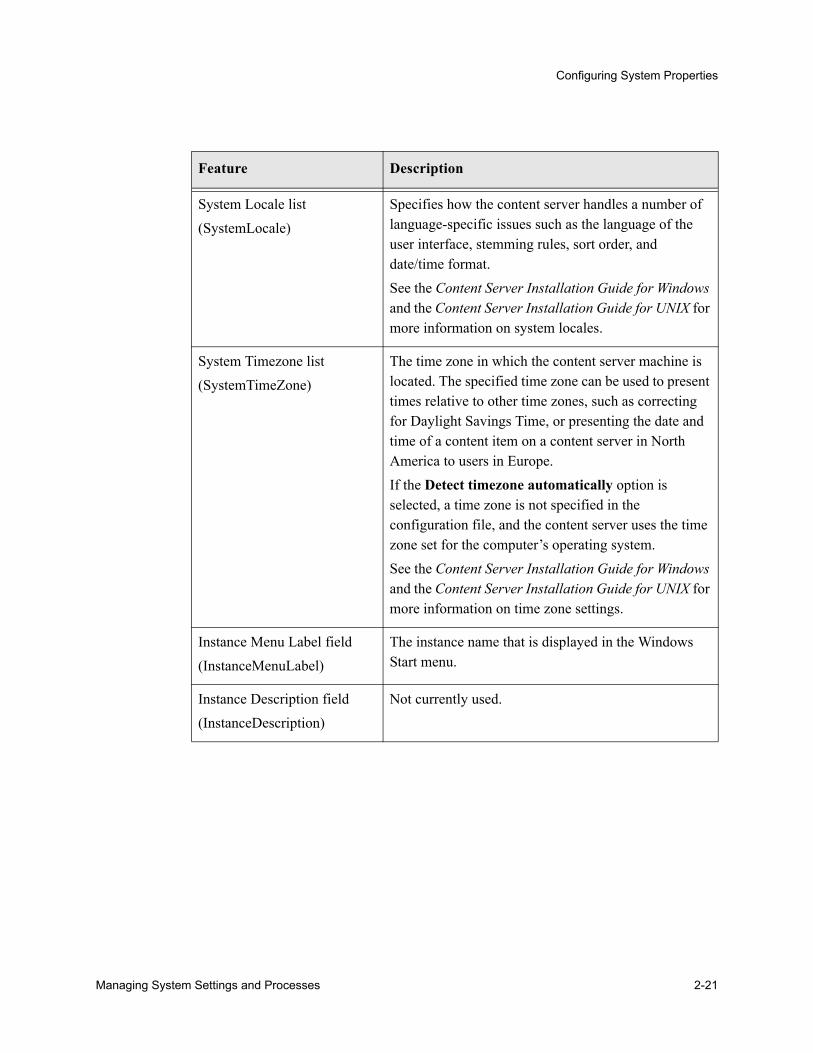
System Locale list(SystemLocale)
Specifies how the content server handles a number of language-specific issues such as the language of the user interface, stemming rules, sort order, and date/time format.See the Content Server Installation Guide for Windows and the Content Server Installation Guide for UNIX for more information on system locales.
System Timezone list(SystemTimeZone)
The time zone in which the content server machine is located. The specified time zone can be used to present times relative to other time zones, such as correcting for Daylight Savings Time, or presenting the date and time of a content item on a content server in North America to users in Europe. If the Detect timezone automatically option is selected, a time zone is not specified in the configuration file, and the content server uses the time zone set for the computer’s operating system.See the Content Server Installation Guide for Windows and the Content Server Installation Guide for UNIX for more information on time zone settings.
Instance Menu Label field(InstanceMenuLabel)
The instance name that is displayed in the Windows Start menu.
Instance Description field(InstanceDescription)
Not currently used.
Managing System Settings and Processes 2-21

Configuring System Properties
Note: Hostname Filter or IP Address filter values must be set to allow communication with the content server in the following situations:• Running Inbound Refinery and PDF Converter (even on the same physical
machine as the content server).• Transferring content server archives between computers.• Configurations where the web server and the content server are on different
systems.• EJB-enhanced operations.• Using the IdcCommand or IdcCommandX utilities on a system separate
from the content server. (You will need to change the default value and specify the IP address of the web server.)
Hostname Filter field(SocketHostNameSecurityFilter)
Restricts access to the content server to computers with a specified host name. You can specify multiple host names, separated by pipes ( | ). Make sure that there are no spaces on either side of the pipe character (for example, serverA|serverB). Generally, use only the Hostname Filter field or IP Address Filter field, not both. (IP Address Filter is more commonly used.)
IP Address Filter field(SocketHostAddressSecurityFilter)
Restricts access to the content server to computers with a specified IP address.
• By default, this field is pre-filled with the IP address of the local host (127.0.0.1).
• You can specify multiple IP addresses, separated by pipes ( | ). Make sure that there are no spaces on either side of the pipe character. (For example, 127.0.0.1|10.10.50.143)
• You can use wildcards in this field, * for zero or many characters, and ? for any one character. (For example, 10.10.3.*)
• Generally, use only the IP Address Filter field or Hostname Filter field, not both. (IP Address Filter is more commonly used.)
Feature Description
2-22 Managing System Settings and Processes
Configuring System Properties
CONFIGURING LOCALESYou can use the System Properties’ Localization tab to change language-specific issues such as date/time format, default time zone, sort order, and default interface language. Although this section provides information about a specific date format issue, the remainder of the Localization tab functionality is provided in the International Considerations Guide.
Date FormatThe default English-US locale uses two digits to represent the year (‘yy’), where the year is interpreted to be between 1969 and 2068. In other words, 65 is considered to be 2065, not 1965. If you want years prior to 1969 to be interpreted correctly in the English-US locale, you need to change the default date format for that locale to use four digits to represent years (‘yyyy’).
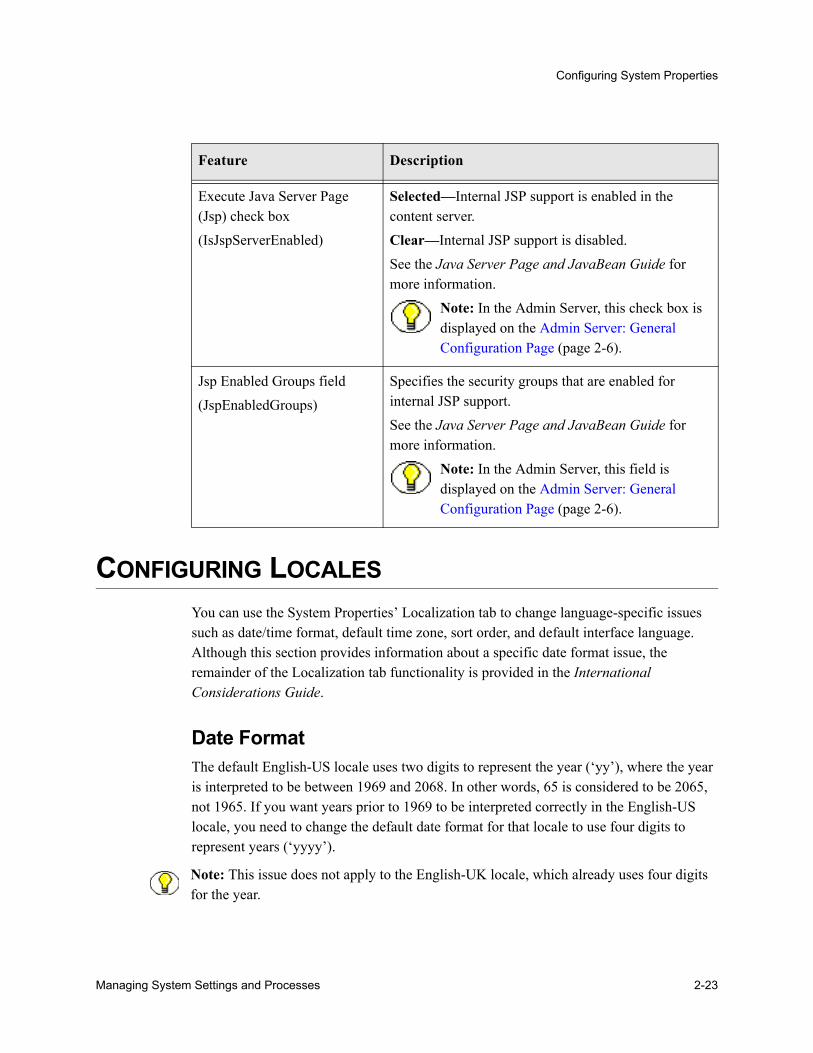
Execute Java Server Page (Jsp) check box(IsJspServerEnabled)
Selected—Internal JSP support is enabled in the content server.Clear—Internal JSP support is disabled.See the Java Server Page and JavaBean Guide for more information.
Note: In the Admin Server, this check box is displayed on the Admin Server: General Configuration Page (page 2-6).
Jsp Enabled Groups field(JspEnabledGroups)
Specifies the security groups that are enabled for internal JSP support.See the Java Server Page and JavaBean Guide for more information.
Note: In the Admin Server, this field is displayed on the Admin Server: General Configuration Page (page 2-6).
Feature Description
Note: This issue does not apply to the English-UK locale, which already uses four digits for the year.
Managing System Settings and Processes 2-23
Configuring System Properties
To modify the default English-US data format:
1. Start the System Properties applet:
Windows
Start—All Programs—Content Server—[Instance Name]—Utilities—System Properties.
UNIX
The SystemProperties utility is located in the /bin subdirectory of the Content Server’s installation directory.
2. Open the Localization tab.
3. Select the English-US entry in the list of locales, and click Edit.
The Configure Locale dialog is displayed.
4. Modify the date format to use four digits for the year (‘yyyy’) rather than two (‘yy’).
5. After you are done editing, click OK to close the Configure Locale dialog.
6. Click OK to apply the change and exit System Properties.
7. Stop and restart the Content Server (otherwise the change will not take effect).
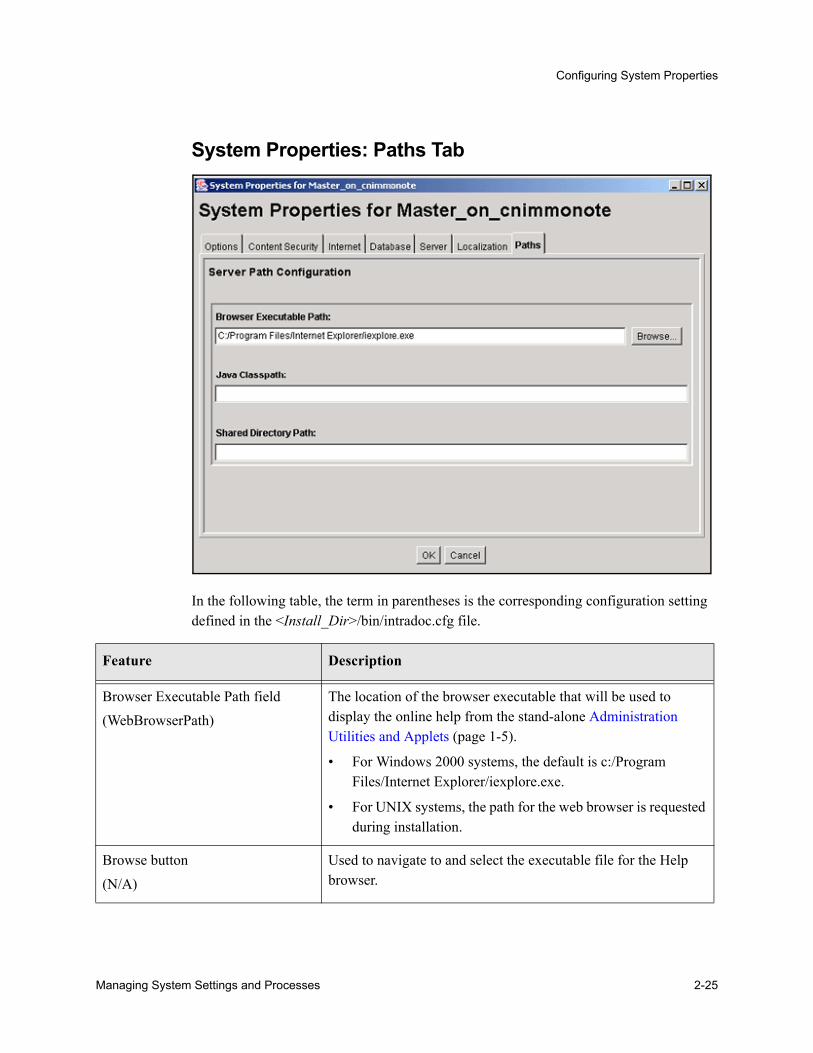
CONFIGURING PATHSYou can use the System Properties: Paths Tab (page 2-26) to change the location of the help browser, Java classpath, and the shared directory path. For security reasons, the Admin Server cannot be used to configure the path options. You must use the standalone application for this configuration.
Important: You must restart the content server for any configuration changes to take effect.
2-24 Managing System Settings and Processes
Configuring System Properties
System Properties: Paths Tab
In the following table, the term in parentheses is the corresponding configuration setting defined in the <Install_Dir>/bin/intradoc.cfg file.
Feature Description
Browser Executable Path field(WebBrowserPath)
The location of the browser executable that will be used to display the online help from the stand-alone Administration Utilities and Applets (page 1-5).
• For Windows 2000 systems, the default is c:/Program Files/Internet Explorer/iexplore.exe.
• For UNIX systems, the path for the web browser is requested during installation.
Browse button(N/A)
Used to navigate to and select the executable file for the Help browser.
Managing System Settings and Processes 2-25
Configuring System Properties
Java Classpath field(CLASSPATH)
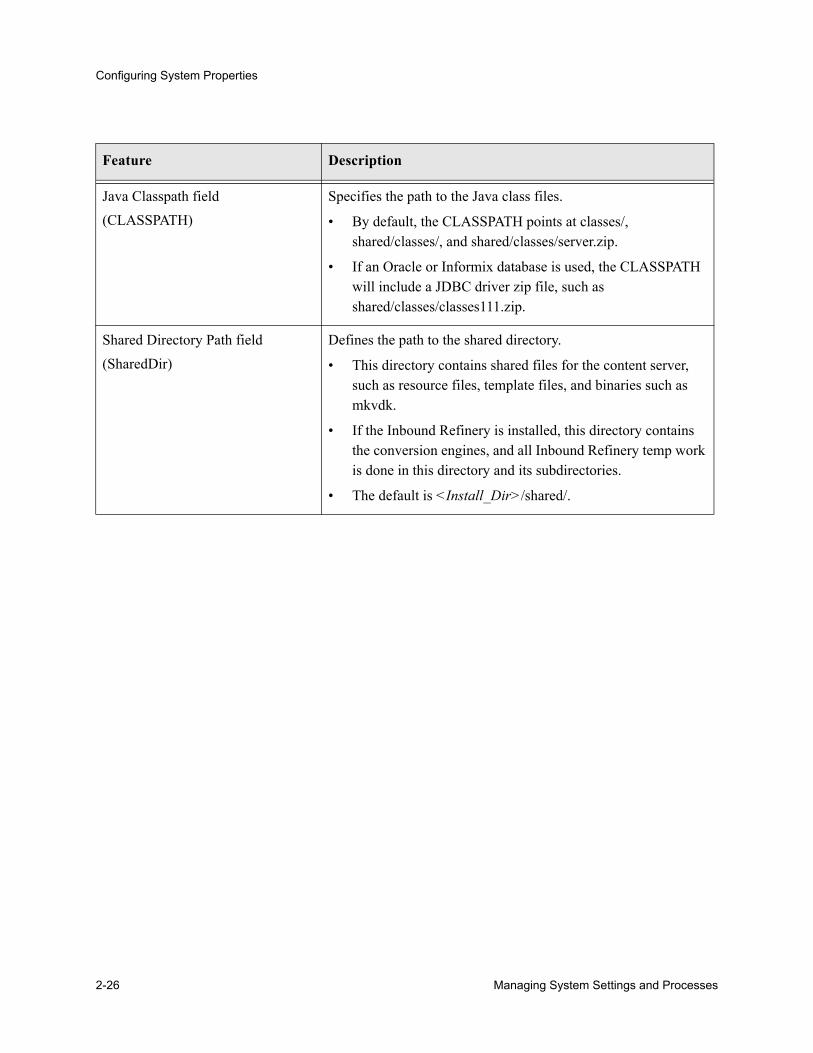
Specifies the path to the Java class files.
• By default, the CLASSPATH points at classes/, shared/classes/, and shared/classes/server.zip.
• If an Oracle or Informix database is used, the CLASSPATH will include a JDBC driver zip file, such as shared/classes/classes111.zip.
Shared Directory Path field(SharedDir)
Defines the path to the shared directory.
• This directory contains shared files for the content server, such as resource files, template files, and binaries such as mkvdk.
• If the Inbound Refinery is installed, this directory contains the conversion engines, and all Inbound Refinery temp work is done in this directory and its subdirectories.
• The default is <Install_Dir>/shared/.
Feature Description
2-26 Managing System Settings and Processes
C h a p t e r
3.MANAGING MULTIPLE CONTENTSERVERS WITH ADMIN SERVER
OVERVIEWThis chapter includes these topics:
ConceptsAbout the Admin Server (page 3-2)
TasksStarting and Stopping the Content Server (page 3-3)
Adding a Content Server (page 3-3)
Editing a Content Server (page 3-4)
Removing a Content Server (page 3-4)
Viewing Server Output (page 3-4)
InterfaceAdmin Server Output Page (page 3-7)
Add a New Content Server Page (page 3-8)
Add an Existing Local Content Server Page (page 3-8)
Managing System Settings and Processes 3-1

Managing Multiple Content Servers with Admin Server
Add Remote Content Server (page 3-9)
Edit or Remove Content Server Page (page 3-10)
Add/Edit Content Server Configuration Page (page 3-11)
Specific Instance Page (page 3-13)
Content Server Output Page (page 3-14)
ABOUT THE ADMIN SERVERThe Admin Server is a collection of web pages that enable you to configure system-wide settings for multiple content server instances. If you use the Admin Server, keep the following restrictions in mind:
You must be logged in as the system administrator or a user with the sysmanager role to access the Admin Server.
To administer a content server instance with the Admin Server, the instance must be accessible on the local file system. This means the drive on which any remote instance is installed must be mapped or mounted to the local drive.
The Admin Server must run on the same file system as the master content server that it administrates.
Due to Win32 security restrictions, the Admin Server can start and stop servers only if they are on the same computer. However, the Admin Server can edit the system properties of servers on different computers.
MANAGING THE ADMIN SERVERThe following tasks are involved in using the Admin Server functionality.
Starting and Stopping the Content Server (page 3-3)
Adding a Content Server (page 3-3)
Editing a Content Server (page 3-4)
Removing a Content Server (page 3-4)
Viewing Server Output (page 3-4)
3-2 Managing System Settings and Processes
Managing Multiple Content Servers with Admin Server
Starting and Stopping the Content ServerTo start, stop, or restart the content server:
1. Display either the Admin Server Home Page (page 3-6) or the Specific Instance Page (page 3-13).
2. Click one of the following icons:
• To stop and restart a running content server, click .
• To stop a running content server without restarting it, click .
• To start a stopped content server, click .
Adding a Content ServerTo add a content server to an Admin Server:
1. Make sure that the installation directory for the content server to be added is accessible to the local file system. The drive on which the instance is installed must be mapped/mounted.
2. Display the Admin Server Home Page (page 3-6) for the Admin Server you want to add the instance to.
3. Click the Add Existing Server link.
The Add an Existing Local Content Server Page (page 3-8) is displayed.
4. Enter the drive and installation directory for the content server instance you want to add.
5. Make sure that the file encoding is correct.
6. Click Next.
The Add/Edit Content Server Configuration Page (page 3-11) is displayed.
7. Modify the content server configuration as necessary. Typically, you will not change any settings except for the Description and possibly the Allowed Actions.
8. Click Finish.
A button for the content server is displayed on the Admin Server home page.
Note: Click the icon only once and wait for the screen to refresh. It might take several seconds for the content server to start or stop.
Managing System Settings and Processes 3-3
Managing Multiple Content Servers with Admin Server
Editing a Content ServerTo edit the configuration of a content server in the Admin Server:
1. Display the Admin Server Home Page (page 3-6) for the Admin Server you want to edit.
2. Click the Edit Server link.
The Edit or Remove Content Server Page (page 3-10) is displayed.
3. Select the content server you want to edit from the list.
4. Click Edit.
The Add/Edit Content Server Configuration Page (page 3-11) is displayed.
5. Modify the content server configuration as necessary. Typically, you will not change any settings except for the Description and possibly the Allowed Actions.
6. Click Finish.
Removing a Content ServerTo remove a content server from the Admin Server:
1. Display the Admin Server Home Page (page 3-6) for the Admin Server you want to remove.
2. Click the Edit Server link.
The Edit or Remove Content Server Page (page 3-10) is displayed.
3. Select the content server you want to remove.
4. Click Remove.
A confirmation screen is displayed.
5. Click Yes.
The button for the content server is removed from the Admin Server home page.
Viewing Server OutputTo view the Java output of the Admin Server and content server:
1. Display the Admin Server Home Page (page 3-6) for the Admin Server you want to view.
3-4 Managing System Settings and Processes
Managing Multiple Content Servers with Admin Server
2. Click the View Server Output link.
The Admin Server Output Page (page 3-7) is displayed.
3. To refresh the output messages, click Refresh. To clear the output messages, click Clear.
4. Click the Server Status link.
The Admin Server home page is displayed.
5. Click the button for the content server you want view.
The Specific Instance Page (page 3-13) is displayed.
6. Click the View Server Output link.
The Content Server Output Page (page 3-14) is displayed.
7. To refresh the output messages, click Refresh. To clear the output messages, click Clear.
ADMIN SERVER INTERFACE SCREENThe following screens are available when using the Admin Server.
Admin Server Home Page (page 3-6)
Admin Server Output Page (page 3-7)
Add a New Content Server Page (page 3-8)
Add an Existing Local Content Server Page (page 3-8)
Add Remote Content Server (page 3-9)
Edit or Remove Content Server Page (page 3-10)
Add/Edit Content Server Configuration Page (page 3-11)
Specific Instance Page (page 3-13)
Content Server Output Page (page 3-14)
Managing System Settings and Processes 3-5
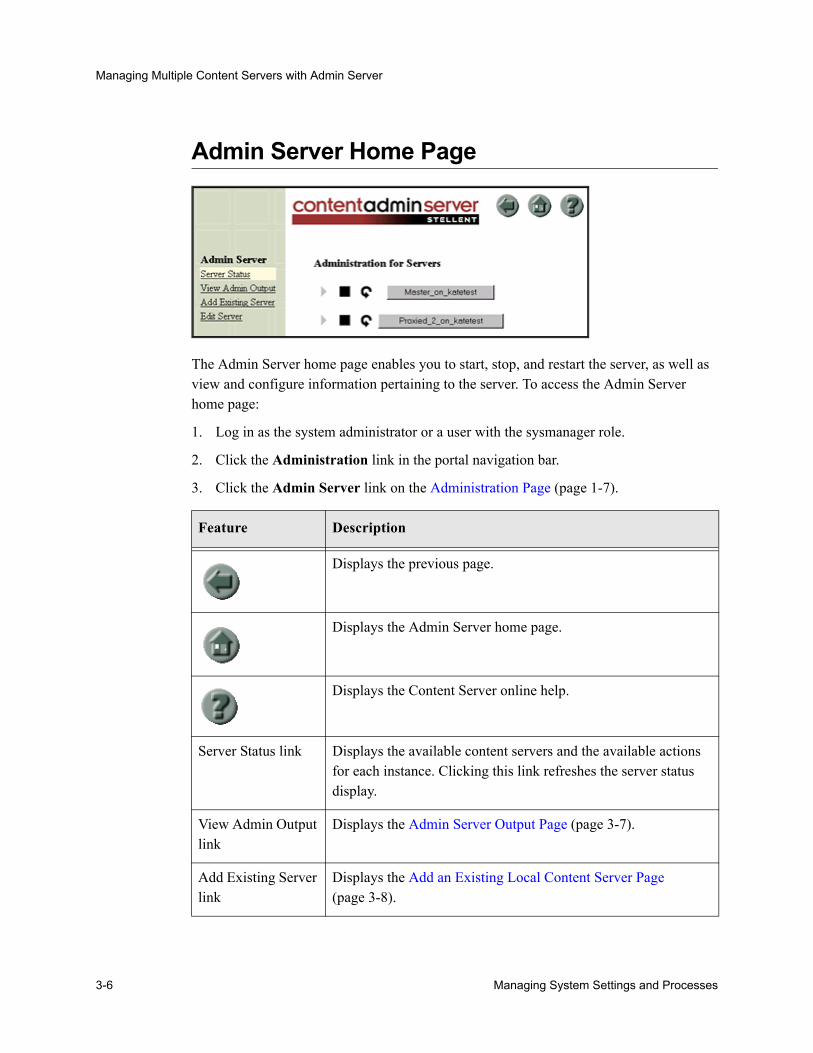
Managing Multiple Content Servers with Admin Server
Admin Server Home Page
The Admin Server home page enables you to start, stop, and restart the server, as well as view and configure information pertaining to the server. To access the Admin Server home page:
1. Log in as the system administrator or a user with the sysmanager role.
2. Click the Administration link in the portal navigation bar.
3. Click the Admin Server link on the Administration Page (page 1-7).
Feature Description
Displays the previous page.
Displays the Admin Server home page.
Displays the Content Server online help.
Server Status link Displays the available content servers and the available actions for each instance. Clicking this link refreshes the server status display.
View Admin Output link
Displays the Admin Server Output Page (page 3-7).
Add Existing Server link
Displays the Add an Existing Local Content Server Page (page 3-8).
3-6 Managing System Settings and Processes
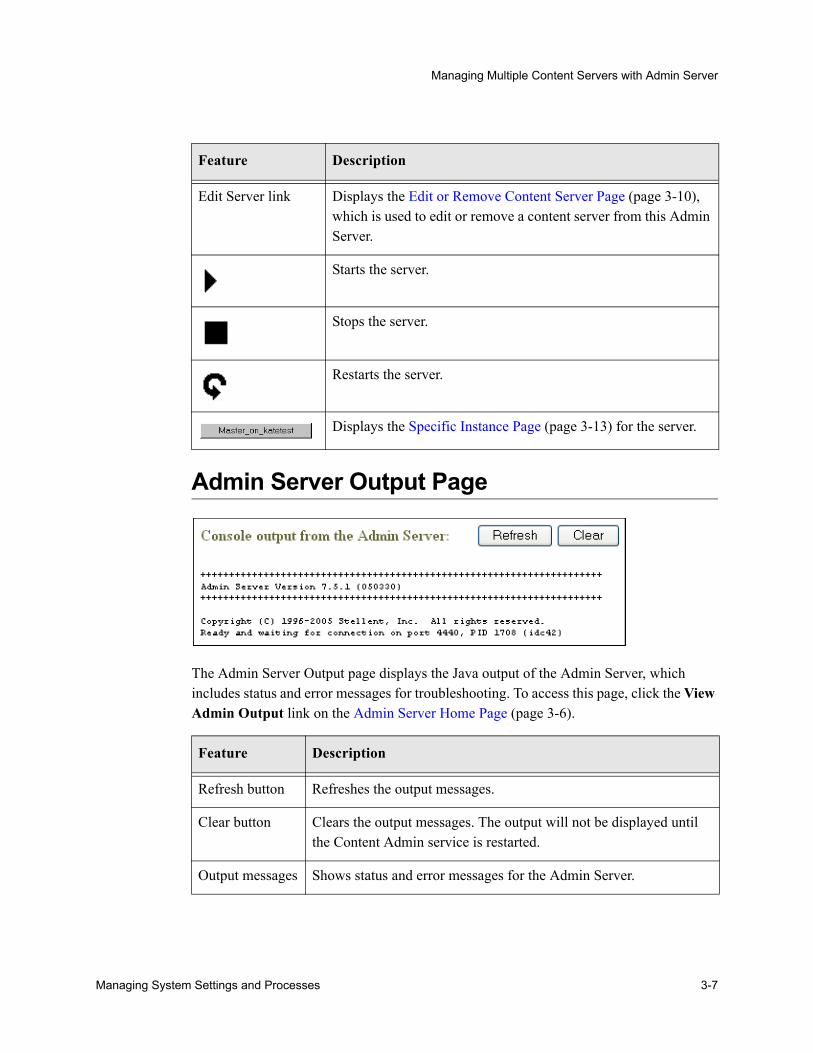
Managing Multiple Content Servers with Admin Server
Admin Server Output Page
The Admin Server Output page displays the Java output of the Admin Server, which includes status and error messages for troubleshooting. To access this page, click the View Admin Output link on the Admin Server Home Page (page 3-6).
Edit Server link Displays the Edit or Remove Content Server Page (page 3-10), which is used to edit or remove a content server from this Admin Server.
Starts the server.
Stops the server.
Restarts the server.
Displays the Specific Instance Page (page 3-13) for the server.
Feature Description
Refresh button Refreshes the output messages.
Clear button Clears the output messages. The output will not be displayed until the Content Admin service is restarted.
Output messages Shows status and error messages for the Admin Server.
Feature Description
Managing System Settings and Processes 3-7
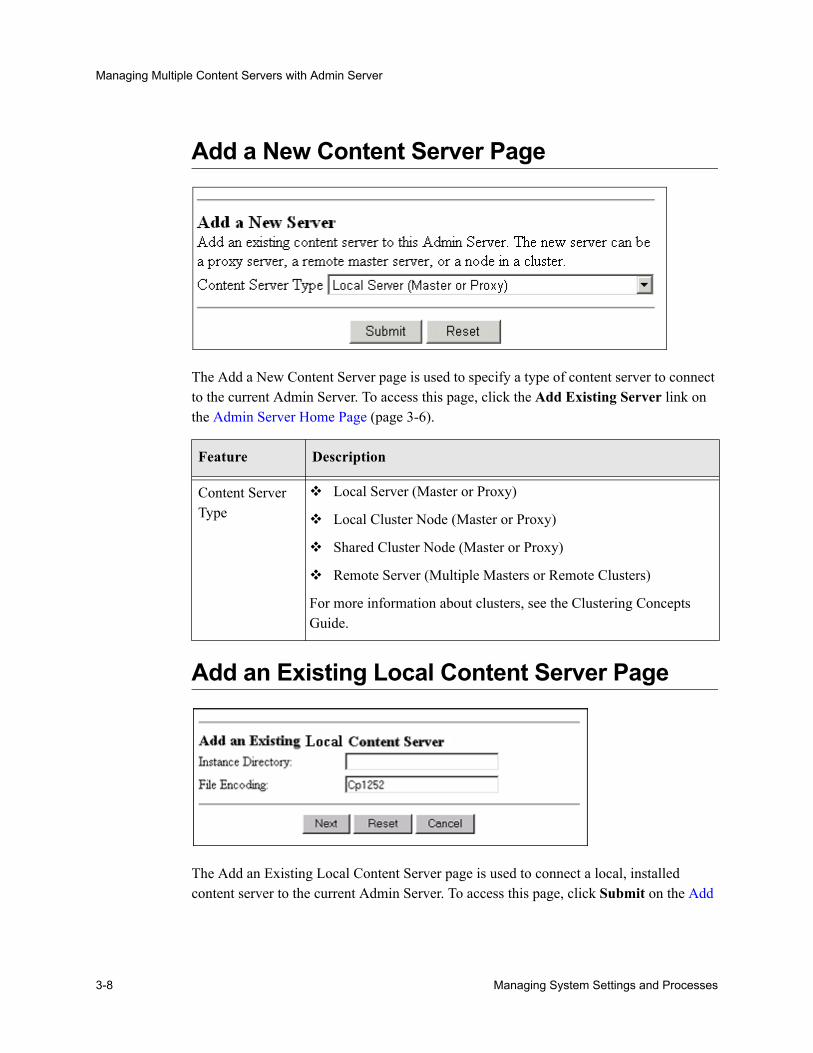
Managing Multiple Content Servers with Admin Server
Add a New Content Server Page
The Add a New Content Server page is used to specify a type of content server to connect to the current Admin Server. To access this page, click the Add Existing Server link on the Admin Server Home Page (page 3-6).
Add an Existing Local Content Server Page
The Add an Existing Local Content Server page is used to connect a local, installed content server to the current Admin Server. To access this page, click Submit on the Add
Feature Description
Content Server Type
Local Server (Master or Proxy)
Local Cluster Node (Master or Proxy)
Shared Cluster Node (Master or Proxy)
Remote Server (Multiple Masters or Remote Clusters)
For more information about clusters, see the Clustering Concepts Guide.
3-8 Managing System Settings and Processes
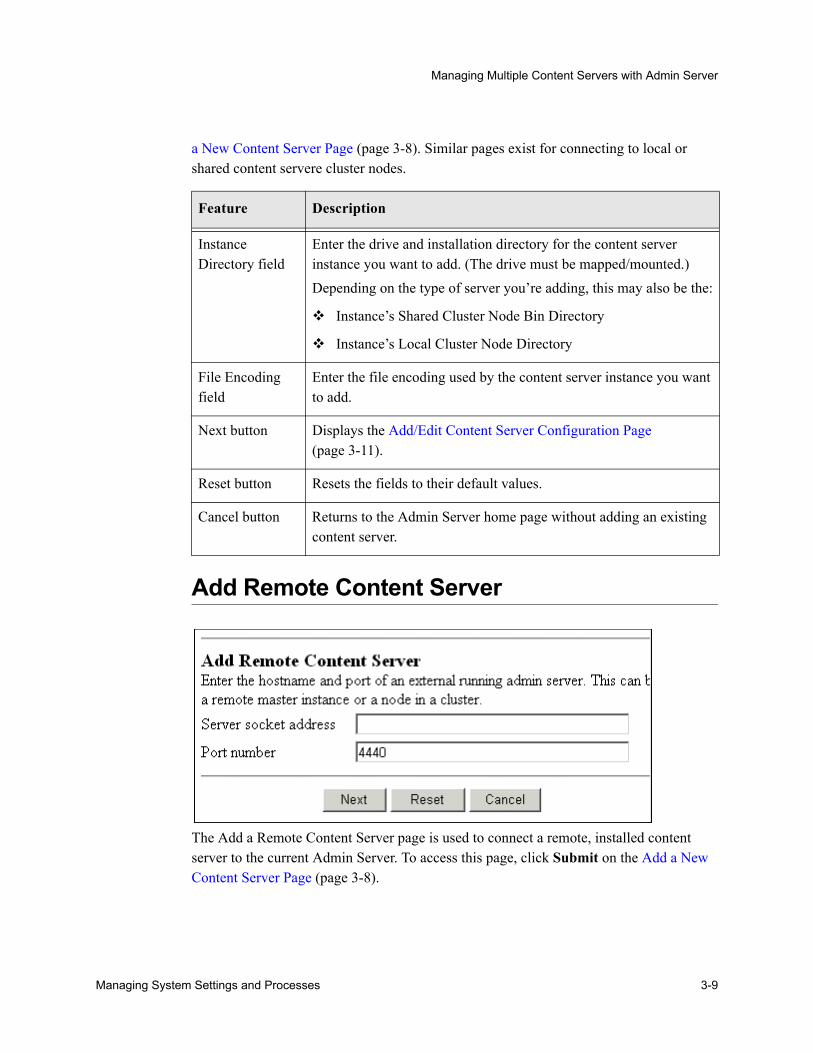
Managing Multiple Content Servers with Admin Server
a New Content Server Page (page 3-8). Similar pages exist for connecting to local or shared content servere cluster nodes.
Add Remote Content Server
The Add a Remote Content Server page is used to connect a remote, installed content server to the current Admin Server. To access this page, click Submit on the Add a New Content Server Page (page 3-8).
Feature Description
Instance Directory field
Enter the drive and installation directory for the content server instance you want to add. (The drive must be mapped/mounted.)Depending on the type of server you’re adding, this may also be the:
Instance’s Shared Cluster Node Bin Directory
Instance’s Local Cluster Node Directory
File Encoding field
Enter the file encoding used by the content server instance you want to add.
Next button Displays the Add/Edit Content Server Configuration Page (page 3-11).
Reset button Resets the fields to their default values.
Cancel button Returns to the Admin Server home page without adding an existing content server.
Managing System Settings and Processes 3-9
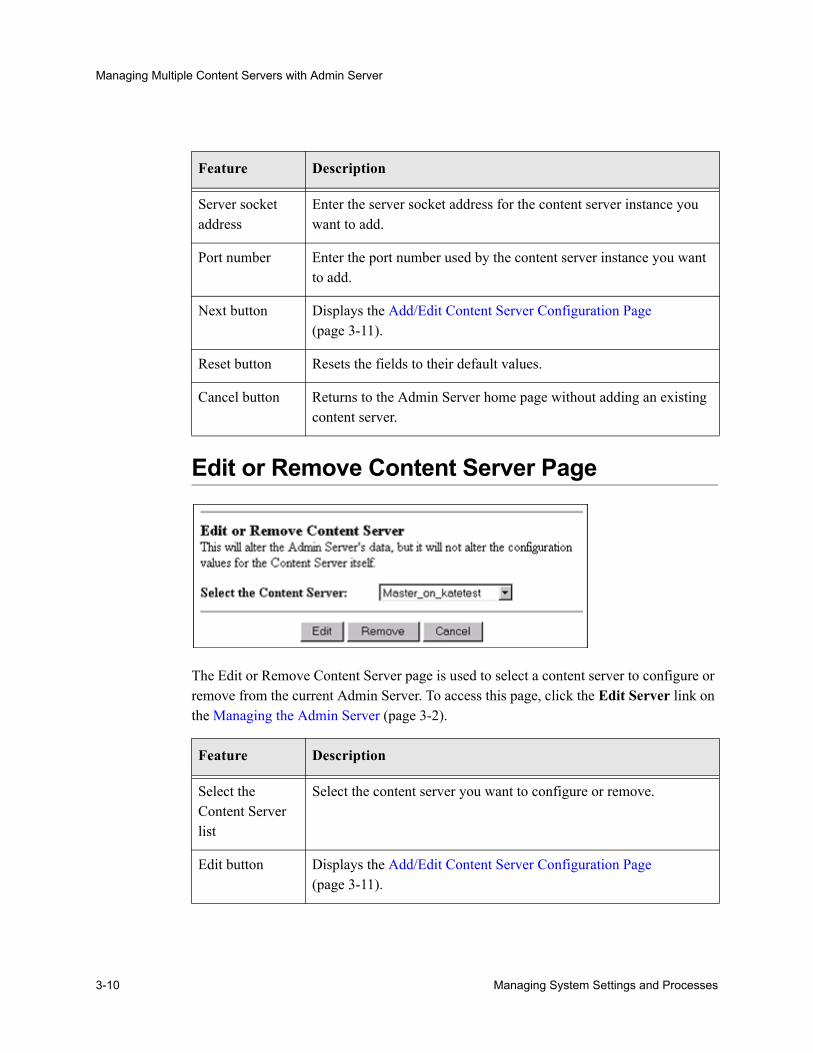
Managing Multiple Content Servers with Admin Server
Edit or Remove Content Server Page
The Edit or Remove Content Server page is used to select a content server to configure or remove from the current Admin Server. To access this page, click the Edit Server link on the Managing the Admin Server (page 3-2).
Feature Description
Server socket address
Enter the server socket address for the content server instance you want to add.
Port number Enter the port number used by the content server instance you want to add.
Next button Displays the Add/Edit Content Server Configuration Page (page 3-11).
Reset button Resets the fields to their default values.
Cancel button Returns to the Admin Server home page without adding an existing content server.
Feature Description
Select the Content Server list
Select the content server you want to configure or remove.
Edit button Displays the Add/Edit Content Server Configuration Page (page 3-11).
3-10 Managing System Settings and Processes
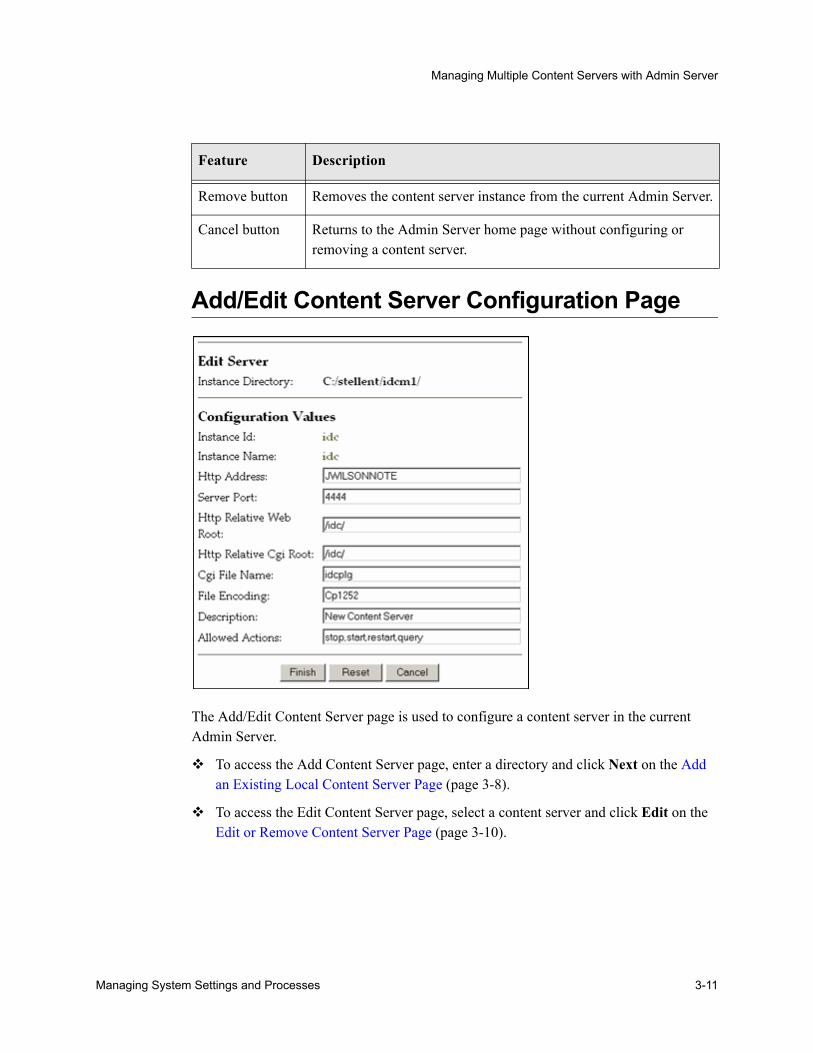
Managing Multiple Content Servers with Admin Server
Add/Edit Content Server Configuration Page
The Add/Edit Content Server page is used to configure a content server in the current Admin Server.
To access the Add Content Server page, enter a directory and click Next on the Add an Existing Local Content Server Page (page 3-8).
To access the Edit Content Server page, select a content server and click Edit on the Edit or Remove Content Server Page (page 3-10).
Remove button Removes the content server instance from the current Admin Server.
Cancel button Returns to the Admin Server home page without configuring or removing a content server.
Feature Description
Managing System Settings and Processes 3-11
Managing Multiple Content Servers with Admin Server
Feature Description
Instance Name field
The name of the content server instance.
HTTP Address field
The name of your web server.
Server Port field The port number that the content server uses to communicate.
Http Relative Web Root field
The relative web root used by the web server to resolve URLs.
Http Relative Cgi Root field
The location of the content server’s web filter.
Cgi File Name field
The file name of the content server’s web filter.
File Encoding field
The character encoding used by the content server instance.
Description field The description that is displayed below the instance button on the Admin Server home page.
Allowed Actions field
Actions that can be performed in the Admin Server. The standard actions are Stop, Start, Restart, and Query. Custom actions can be implemented by Consulting Services.
Finish button Saves any changes and displays the Admin Server home page.
Reset button Resets the fields to their default values.
Cancel button Returns to the Admin Server home page without changing the content server configuration.
3-12 Managing System Settings and Processes
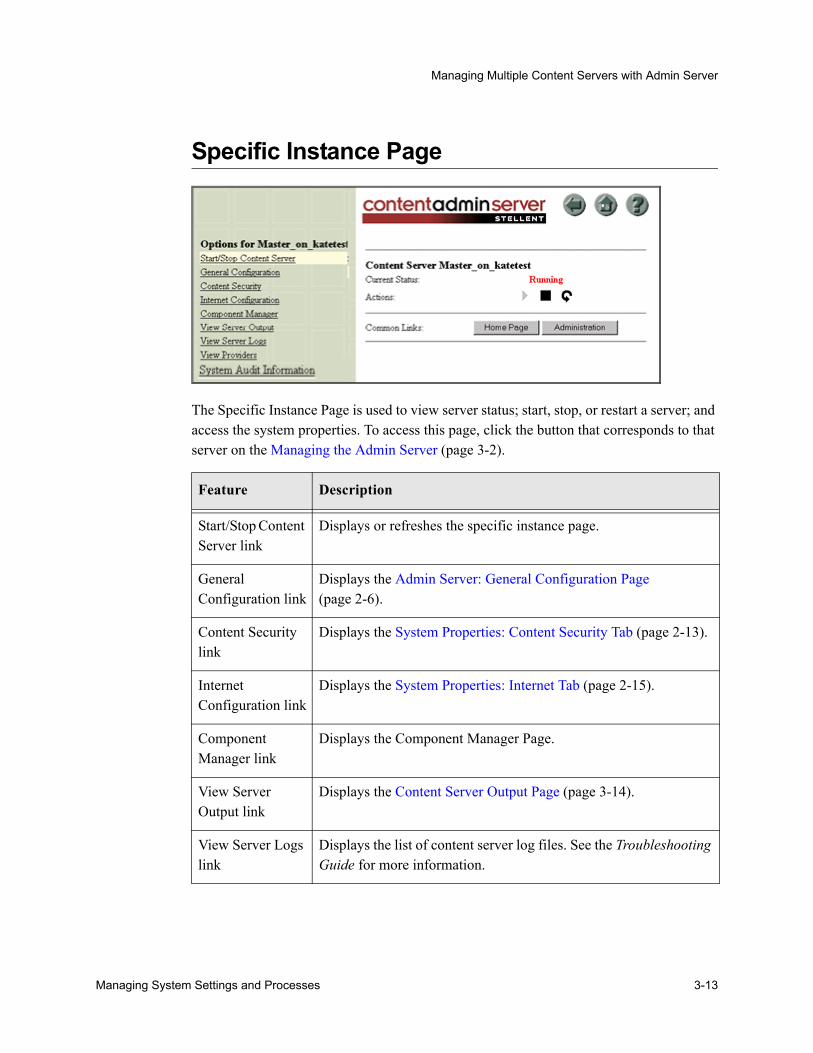
Managing Multiple Content Servers with Admin Server
Specific Instance Page
The Specific Instance Page is used to view server status; start, stop, or restart a server; and access the system properties. To access this page, click the button that corresponds to that server on the Managing the Admin Server (page 3-2).
Feature Description
Start/Stop Content Server link
Displays or refreshes the specific instance page.
General Configuration link
Displays the Admin Server: General Configuration Page (page 2-6).
Content Security link
Displays the System Properties: Content Security Tab (page 2-13).
Internet Configuration link
Displays the System Properties: Internet Tab (page 2-15).
Component Manager link
Displays the Component Manager Page.
View Server Output link
Displays the Content Server Output Page (page 3-14).
View Server Logs link
Displays the list of content server log files. See the Troubleshooting Guide for more information.
Managing System Settings and Processes 3-13
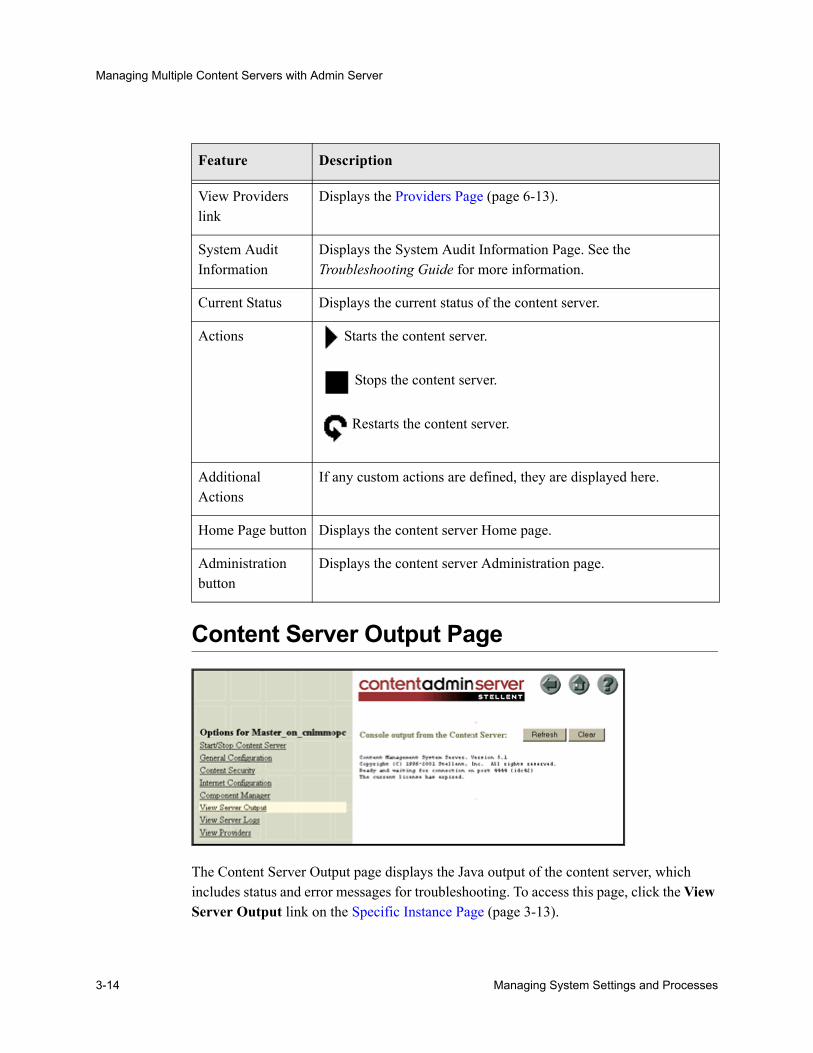
Managing Multiple Content Servers with Admin Server
Content Server Output Page
The Content Server Output page displays the Java output of the content server, which includes status and error messages for troubleshooting. To access this page, click the View Server Output link on the Specific Instance Page (page 3-13).
View Providers link
Displays the Providers Page (page 6-13).
System Audit Information
Displays the System Audit Information Page. See the Troubleshooting Guide for more information.
Current Status Displays the current status of the content server.
Actions Starts the content server.
Stops the content server.
Restarts the content server.
Additional Actions
If any custom actions are defined, they are displayed here.
Home Page button Displays the content server Home page.
Administration button
Displays the content server Administration page.
Feature Description
3-14 Managing System Settings and Processes
Managing Multiple Content Servers with Admin Server
Feature Description
Refresh button Displays the most current output messages, including the content server version number, status, and license expiration date.
Clear button Clears the output messages. The output is not displayed until the content server is restarted.
Output messages Shows status and error messages for the content server.
Managing System Settings and Processes 3-15

C h a p t e r
4.CONFIGURING THE SEARCH INDEX
OVERVIEWThis chapter explains the following topics related to indexing:
Variances in Indexing Tools and Methods (page 4-1)
Working with the Search Index (page 4-2)
Using the Search Index (page 4-3)
Indexing Interface Screens (page 4-5)
Text File Full-Text Indexing (page 4-12)
Managing Zone Text Fields (page 4-12)
Indexing with Databases (page 4-18)
Searching Content Using the Oracle Query Optimizer Feature (page 4-21)
VARIANCES IN INDEXING TOOLS AND METHODSContent Server interfaces with a variety of indexing tools such as commercial search engines and databases. The indexing tool to use is chosen prior to installation based on the purpose and environment in which the content server performs.
Each indexing tool provides full-text indexing and metadata-only indexing. Full-text indexing means that every word in a file is indexed, not only its metadata. Full-text indexing takes longer than metadata indexing; however, it can return a more
Managing System Settings and Processes 4-1
Configuring the Search Index
comprehensive result set. Metadata-only indexing means that every word in the stored content information is indexed. Metadata-only indexing is faster than full-text indexing.
WORKING WITH THE SEARCH INDEXThis section covers these topics:
ConceptsAbout the Search Index (page 4-2)
TasksUpdating the Search Index (page 4-3)
Rebuilding the Collection (page 4-3)
Configuring the Update or Rebuild (page 4-4)
Disabling Full-Text Indexing (page 4-4)
InterfaceRepository Manager: Indexer Tab (page 4-5)
Automatic Update Cycle Screen (page 4-7)
Collection Rebuild Cycle Screen (page 4-10)
About the Search IndexThe Indexer tab on the Repository Manager screen enables administrators (not subadministrators) to perform these actions:
Update the Search Index: Incrementally updates the index database. This is usually not necessary because the index is automatically updated approximately every five minutes by the server.
Rebuild the Collection: The search index is entirely rebuilt, and the old index collection is replaced with a new index collection.
Suspend an Update or a Rebuild: Stops the update or rebuild temporarily. You can restart the process by clicking the appropriate Start button.
4-2 Managing System Settings and Processes
Configuring the Search Index
Cancel Update Search: Index update process terminates, and only files processed to that point are accessible to the search engine.
Cancel Rebuild Collection: Index rebuild process terminates, and the previous index database continues to be used by the search engine.
To access the Repository Manager, click on Admin Applets in the Administration tray then click on Repository Manager. You can also access the Repository Manager as a standalone application. See Running Administration Applications in Stand-alone Mode (page 1-8) for details.
USING THE SEARCH INDEXThe following are common tasks performed with the search index:
Updating the Search Index (page 4-3)
Rebuilding the Collection (page 4-3)
Configuring the Update or Rebuild (page 4-4)
Disabling Full-Text Indexing (page 4-4)
Updating the Search Index1. On the Repository Manager page, click the Indexer tab.
2. Click Start in the Automatic Update Cycle area.
Rebuilding the Collection1. Select the Indexer tab.
2. Click Start in the Collection Rebuild Cycle area.
Caution: For Verity and FAST users: Rebuilding the search index is necessary only when you change or add metadata fields. Depending on the quantity and size of your files, this process can take up to a couple of days. If rebuilding is necessary, rebuild at times of non-peak system usage. A rebuild is not required for adding or changing metadata fields if you use database search and index.
Managing System Settings and Processes 4-3
Configuring the Search Index
Configuring the Update or RebuildTo set the parameters for a search index update or collection rebuild:
1. From the Repository Manager, select the Indexer tab.
2. Click Configure in either the Automatic Update Cycle portion of the screen or the Collection Rebuild Cycle portion.
Either the Automatic Update Cycle Screen (page 4-7) or the Collection Rebuild Cycle Screen (page 4-10) is displayed.
3. Specify the number of content items (files) per indexer batch. This is the maximum number of files that the search index will process at one time.
4. Specify the content items (files) per checkpoint. This is the number of files that will go through all relevant indexing states at a time. You can have multiple batches of files indexed per checkpoint.
5. Specify the indexer debug level. This is the amount of information pertaining to each file to display in the server window.
6. Click OK.
Disabling Full-Text IndexingYou might want to disable full-text indexing if, for example, you want to conserve file space or if you do not require full-text searching for specific content types. Even if you disable full-text indexing, metadata is still indexed.
To disable full-text indexing on specific files:
1. Define a format in the Configuration Manager screen named application/noindex.
2. Enable the Allow Override Format on Check In setting. See Configuring General Options (page 2-4).
3. When a user checks in a file that they do not want to be indexed, they should select the application/noindex format. This applies to standard files, batch loads, and archived revisions.
4-4 Managing System Settings and Processes
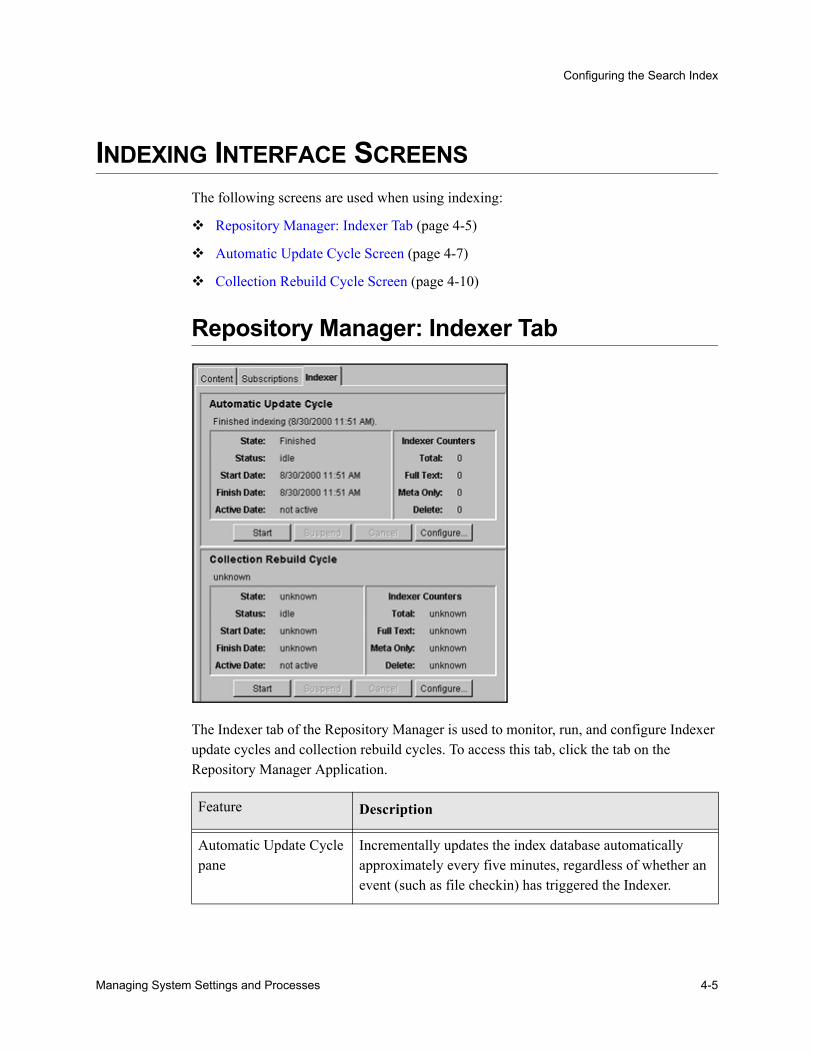
Configuring the Search Index
INDEXING INTERFACE SCREENSThe following screens are used when using indexing:
Repository Manager: Indexer Tab (page 4-5)
Automatic Update Cycle Screen (page 4-7)
Collection Rebuild Cycle Screen (page 4-10)
Repository Manager: Indexer Tab
The Indexer tab of the Repository Manager is used to monitor, run, and configure Indexer update cycles and collection rebuild cycles. To access this tab, click the tab on the Repository Manager Application.
Feature Description
Automatic Update Cycle pane
Incrementally updates the index database automatically approximately every five minutes, regardless of whether an event (such as file checkin) has triggered the Indexer.
Managing System Settings and Processes 4-5
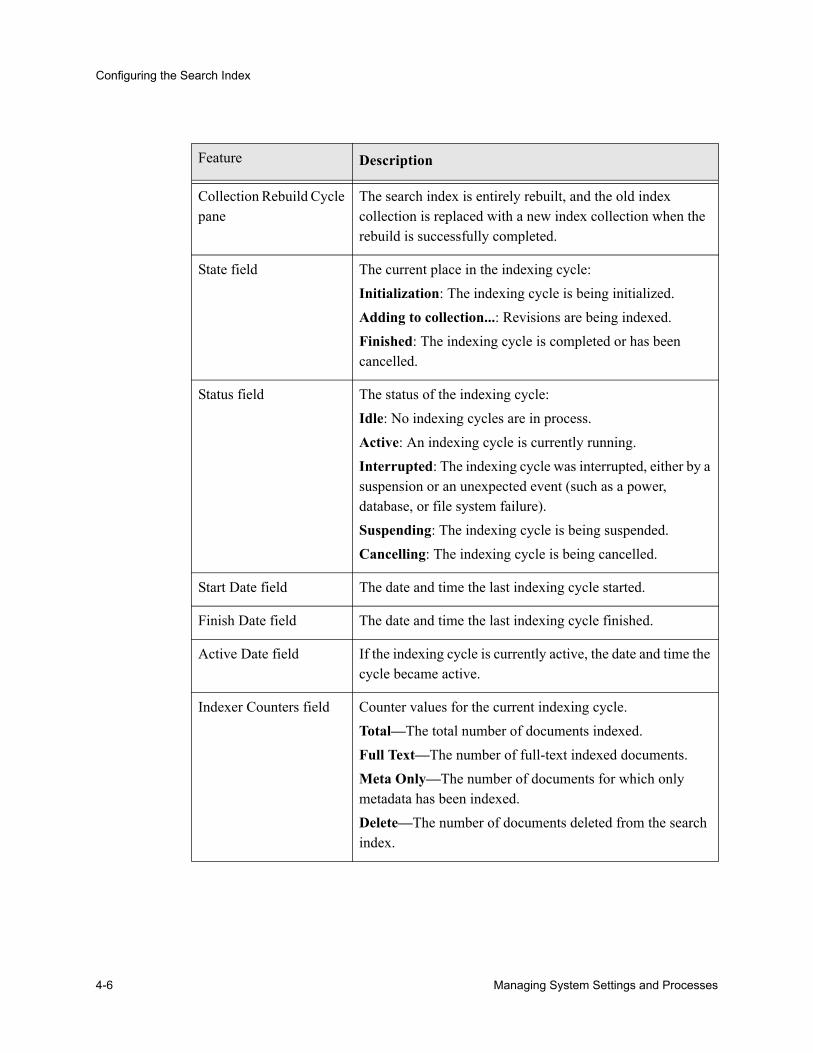
Configuring the Search Index
Collection Rebuild Cycle pane
The search index is entirely rebuilt, and the old index collection is replaced with a new index collection when the rebuild is successfully completed.
State field The current place in the indexing cycle:Initialization: The indexing cycle is being initialized.Adding to collection...: Revisions are being indexed.Finished: The indexing cycle is completed or has been cancelled.
Status field The status of the indexing cycle:Idle: No indexing cycles are in process.
Active: An indexing cycle is currently running.Interrupted: The indexing cycle was interrupted, either by a suspension or an unexpected event (such as a power, database, or file system failure).Suspending: The indexing cycle is being suspended.Cancelling: The indexing cycle is being cancelled.
Start Date field The date and time the last indexing cycle started.
Finish Date field The date and time the last indexing cycle finished.
Active Date field If the indexing cycle is currently active, the date and time the cycle became active.
Indexer Counters field Counter values for the current indexing cycle.Total—The total number of documents indexed.Full Text—The number of full-text indexed documents.Meta Only—The number of documents for which only metadata has been indexed.Delete—The number of documents deleted from the search index.
Feature Description
4-6 Managing System Settings and Processes
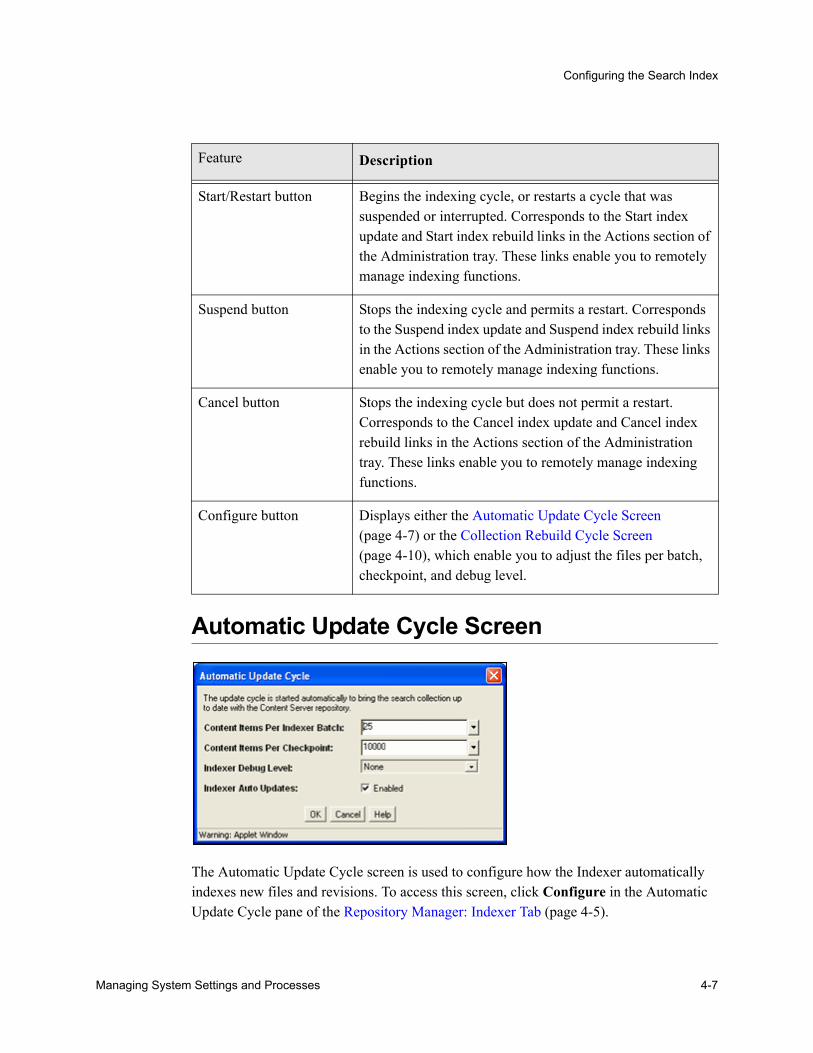
Configuring the Search Index
Automatic Update Cycle Screen
The Automatic Update Cycle screen is used to configure how the Indexer automatically indexes new files and revisions. To access this screen, click Configure in the Automatic Update Cycle pane of the Repository Manager: Indexer Tab (page 4-5).
Start/Restart button Begins the indexing cycle, or restarts a cycle that was suspended or interrupted. Corresponds to the Start index update and Start index rebuild links in the Actions section of the Administration tray. These links enable you to remotely manage indexing functions.
Suspend button Stops the indexing cycle and permits a restart. Corresponds to the Suspend index update and Suspend index rebuild links in the Actions section of the Administration tray. These links enable you to remotely manage indexing functions.
Cancel button Stops the indexing cycle but does not permit a restart. Corresponds to the Cancel index update and Cancel index rebuild links in the Actions section of the Administration tray. These links enable you to remotely manage indexing functions.
Configure button Displays either the Automatic Update Cycle Screen (page 4-7) or the Collection Rebuild Cycle Screen (page 4-10), which enable you to adjust the files per batch, checkpoint, and debug level.
Feature Description
Managing System Settings and Processes 4-7
Configuring the Search Index
Feature Description
Content Items Per Indexer Batch field
The maximum number of files that the search index will process at one time. The default is 25. This means 25 files are indexed together, then the next 25 files are indexed. However, if one item fails, then the batch is processed again.Thus, if you set this value to 2000 and a document fails, the entire batch would be reprocessed. This would take longer than if you use the default setting and an item fails. But, if there are no failures in the batch, then setting this value higher accelerates the process.The only time you would change this setting to one (1) is if you are experiencing problems with the search engine indexing large and complicated files.
Content Items Per Checkpoint field
The number of files that will go through all relevant indexing states at a time. You can have multiple batches of files indexed per checkpoint. After the checkpoint is reached, some merging of the collection is done before the next batch is processed.If this is set to a high value and you try to cancel a rebuild or an update cycle, the Repository Manager does not stop processing until the checkpoint is reached. However, setting the value too low slows down the indexing process.
4-8 Managing System Settings and Processes
Configuring the Search Index
Indexer Debug Level list The Indexer debug level. The more debug information listed in the server window, the slower the indexing progresses. The following list shows the debug levels from the least to the most debug information:none: No information for each file access is displayed, and no log will be generated.verbose: Displays information for each file accessed. Indicates indexed, ignored, or failed, and generates a full report.debug: Displays the medium level of information, which is specifically functional.trace: Displays the lowest level of information for each activity performed.all: Displays the highest level of debug information.
Note: Database and Database Full-Text Search do not support indexer debug levels, so only the none option is displayed if you use a database for search and index.
Indexer Auto Updates check box Selected—The index database is updated automatically.Clear—The index database is not updated automatically.
Feature Description
Managing System Settings and Processes 4-9
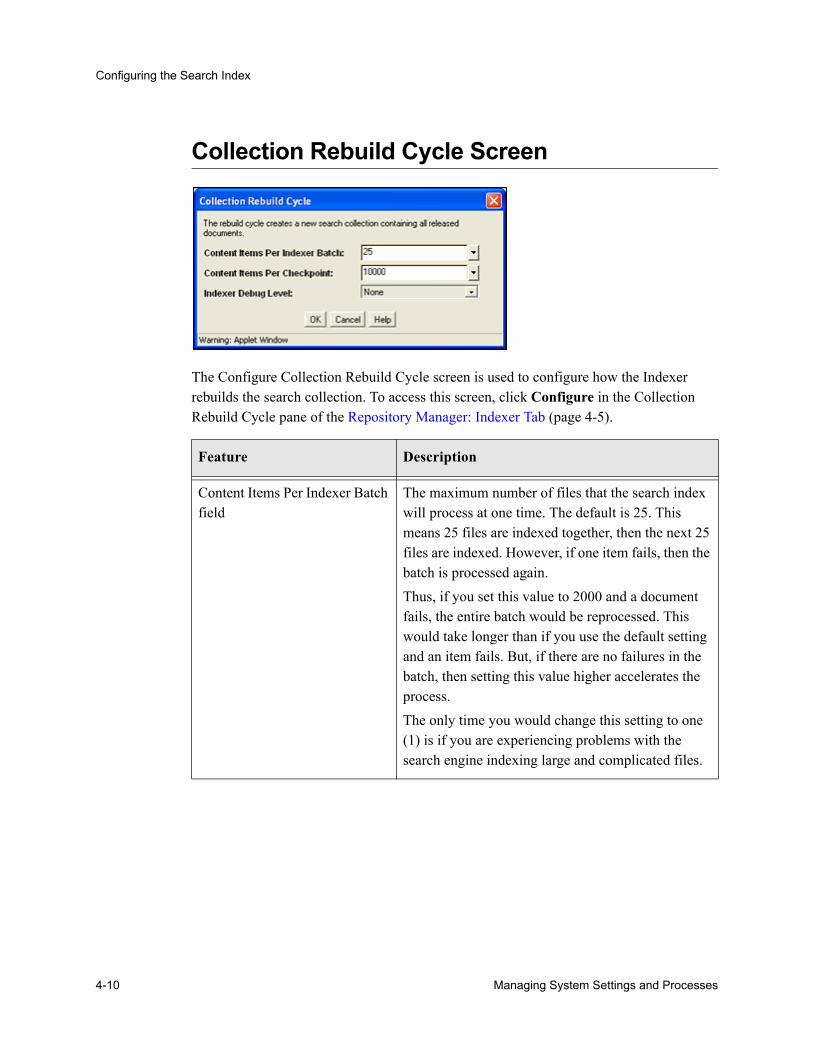
Configuring the Search Index
Collection Rebuild Cycle Screen
The Configure Collection Rebuild Cycle screen is used to configure how the Indexer rebuilds the search collection. To access this screen, click Configure in the Collection Rebuild Cycle pane of the Repository Manager: Indexer Tab (page 4-5).
Feature Description
Content Items Per Indexer Batch field
The maximum number of files that the search index will process at one time. The default is 25. This means 25 files are indexed together, then the next 25 files are indexed. However, if one item fails, then the batch is processed again.Thus, if you set this value to 2000 and a document fails, the entire batch would be reprocessed. This would take longer than if you use the default setting and an item fails. But, if there are no failures in the batch, then setting this value higher accelerates the process.The only time you would change this setting to one (1) is if you are experiencing problems with the search engine indexing large and complicated files.
4-10 Managing System Settings and Processes
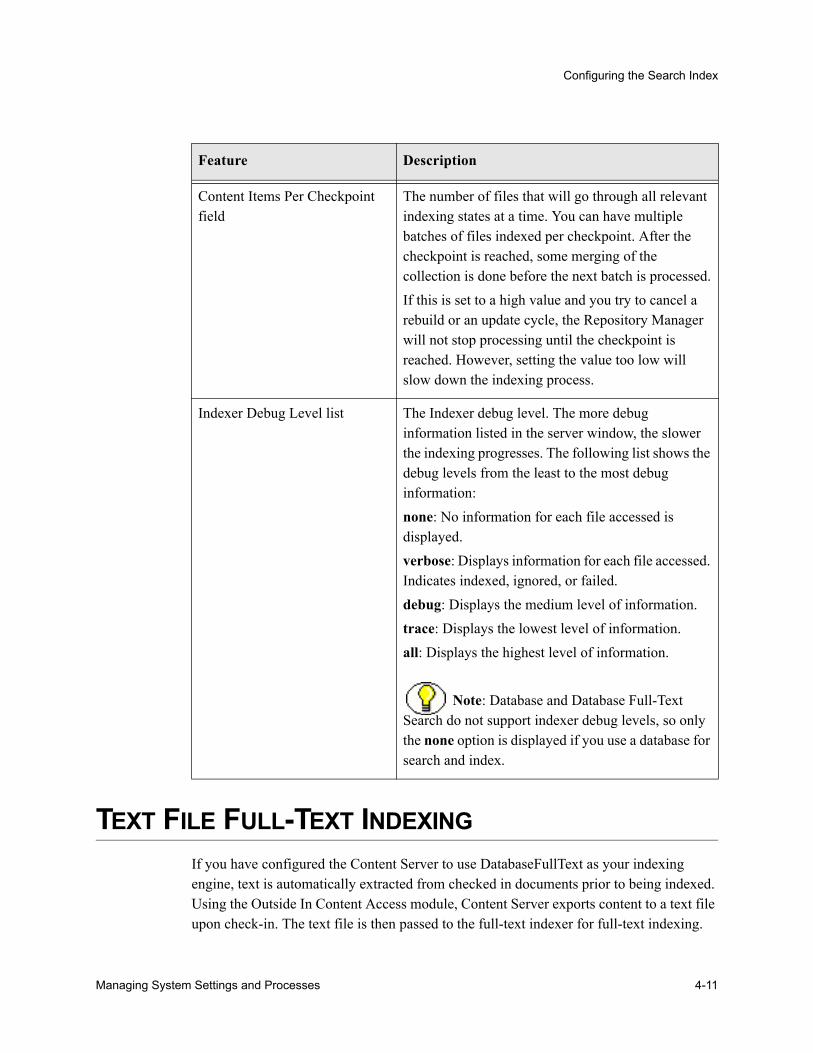
Configuring the Search Index
TEXT FILE FULL-TEXT INDEXINGIf you have configured the Content Server to use DatabaseFullText as your indexing engine, text is automatically extracted from checked in documents prior to being indexed. Using the Outside In Content Access module, Content Server exports content to a text file upon check-in. The text file is then passed to the full-text indexer for full-text indexing.
Content Items Per Checkpoint field
The number of files that will go through all relevant indexing states at a time. You can have multiple batches of files indexed per checkpoint. After the checkpoint is reached, some merging of the collection is done before the next batch is processed.If this is set to a high value and you try to cancel a rebuild or an update cycle, the Repository Manager will not stop processing until the checkpoint is reached. However, setting the value too low will slow down the indexing process.
Indexer Debug Level list The Indexer debug level. The more debug information listed in the server window, the slower the indexing progresses. The following list shows the debug levels from the least to the most debug information:none: No information for each file accessed is displayed.verbose: Displays information for each file accessed. Indicates indexed, ignored, or failed.debug: Displays the medium level of information.trace: Displays the lowest level of information.all: Displays the highest level of information.
Note: Database and Database Full-Text Search do not support indexer debug levels, so only the none option is displayed if you use a database for search and index.
Feature Description
Managing System Settings and Processes 4-11
Configuring the Search Index
MANAGING ZONE TEXT FIELDS
This section covers these topics:
ConceptsAbout Zone Text Fields (page 4-13)
TasksEnabling and Disabling Zone Text Fields (page 4-14)
Changing the MinFullTextFieldLength Variable (page 4-15)
Disabling Database Search Contains Operator (page 4-16)
InterfaceZone Fields Configuration Page (page 4-17)
About Zone Text FieldsThe Database Search Contains Operator feature enables you to use the Contains search operator to search text fields when performing Database and Database Full Text searches on SQL Server and Oracle. You must first enable the text fields that can be queried using the Contains search operator. These text fields are called zone text fields.
When a text field is added as a zone text field, the text within the field is parsed and a full-text index for the field is created in the database. The database performs all the work of creating the index, and the index is dropped from the database if the text field is
Note: If you check in a PostScript file, it will be full-text indexed. However, when the Outside In Content Access module converts a PostScript file, the conversion process produces text that contains extra characters. Unfortunately, this creates a file that is full-text indexed but cannot be full-text searched.
Note: If you chose to install and enable the Database Search Contains Operator feature during the Content Server installation process, then the functionality described in this section is available to you.
4-12 Managing System Settings and Processes
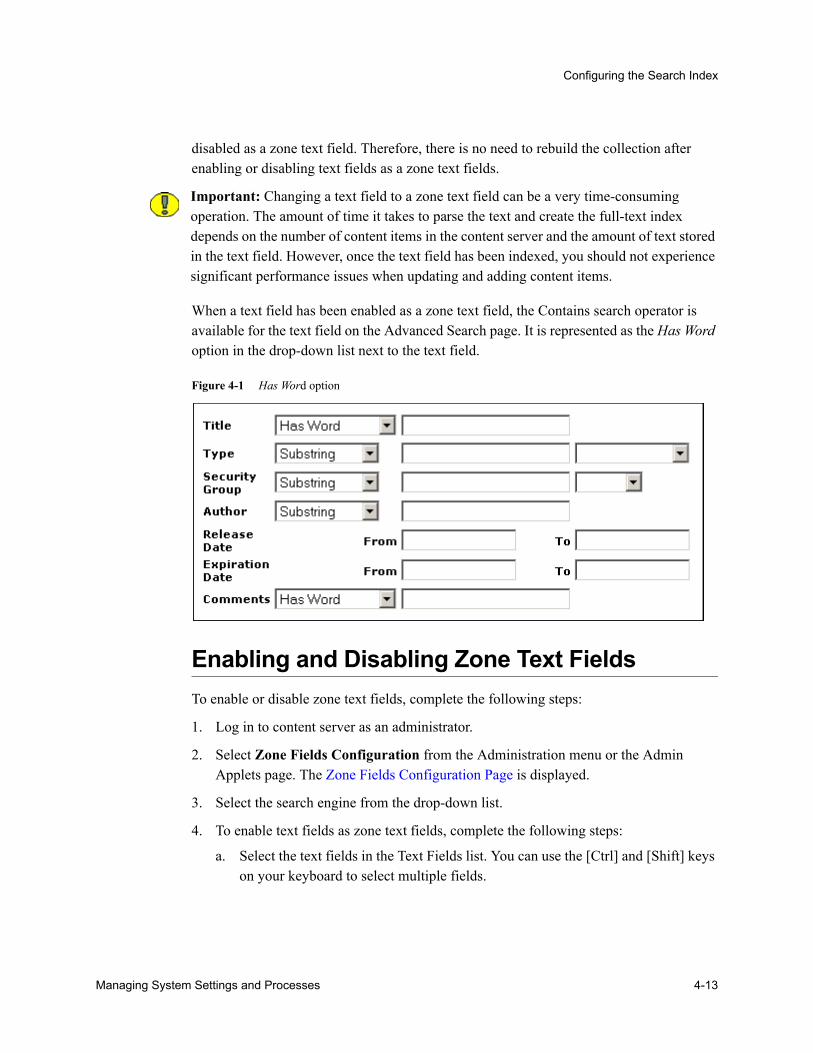
Configuring the Search Index
disabled as a zone text field. Therefore, there is no need to rebuild the collection after enabling or disabling text fields as a zone text fields.
When a text field has been enabled as a zone text field, the Contains search operator is available for the text field on the Advanced Search page. It is represented as the Has Word option in the drop-down list next to the text field.
Figure 4-1 Has Word option
Enabling and Disabling Zone Text FieldsTo enable or disable zone text fields, complete the following steps:
1. Log in to content server as an administrator.
2. Select Zone Fields Configuration from the Administration menu or the Admin Applets page. The Zone Fields Configuration Page is displayed.
3. Select the search engine from the drop-down list.
4. To enable text fields as zone text fields, complete the following steps:
a. Select the text fields in the Text Fields list. You can use the [Ctrl] and [Shift] keys on your keyboard to select multiple fields.
Important: Changing a text field to a zone text field can be a very time-consuming operation. The amount of time it takes to parse the text and create the full-text index depends on the number of content items in the content server and the amount of text stored in the text field. However, once the text field has been indexed, you should not experience significant performance issues when updating and adding content items.
Managing System Settings and Processes 4-13

Configuring the Search Index
b. Click the left arrow button to move the text fields to the Zone Text Fields list.
c. Click Update.
5. To disable zone text fields, complete the following steps:
a. Select the zone text fields in the Zone Text Fields list. You can use the [Ctrl] and [Shift] keys on your keyboard to select multiple fields.
b. Click the right arrow button to move the text fields to the Text Fields list.
c. Click Update.
6. When enabling and disabling zone text fields, consider the following:
If you start making changes to the lists and you then want to revert to the last saved lists, click Reset.
Custom text fields (the Comments field and any customer-created text fields) are shared between the Database and Database search engines, and therefore changing the status of these text fields for one search engine also applies the changes to the other search engine.
Standard text fields (Author, Content ID, Content Type, Title, etc.) can be enabled or disabled independently for each search engine.
The database performs all the work of creating the indexes, and the index are dropped from the database if the text fields are disabled as zone text fields. Therefore, there is no need to rebuild the collection after enabling or disabling text fields as a zone text fields.
You must disable a zone text field before the field can be deleted from the content server using Configuration Manager. If you delete an enabled zone text field using Configuration Manager and then click Update Database Design, you will receive an error.
Note: By default, text fields with a field length of 20 characters or less are not included in the Text Fields list. You can change this setting by modifying the MinFullTextFieldLength configuration variable. For details, see Changing the MinFullTextFieldLength Variable (page 4-15).
Important: Changing a text field to a zone text field can be a very time-consuming operation. The amount of time it takes to parse the text and create the full-text index depends on the number of content items in the content server and the amount of text stored in the text field. However, once the text field has been indexed, you should not experience significant performance issues when updating and adding content items.
4-14 Managing System Settings and Processes
Configuring the Search Index
Disabling the zone text field drops the index for the field from the database, allowing the field to be deleted from the database. As an alternative to disabling the zone text field, you could log into the database and issue a command to drop the index for the field, and then delete the field.
You might want to disable all zone text fields before uninstalling the feature. Otherwise, you will not be able to delete the zone text fields from the content server unless you reinstall the feature to disable the zone text fields or drop the indexes for the zone text fields from the database manually.
Changing the MinFullTextFieldLength VariableBy default, text fields with a field length of 20 characters or less are not included in the Text Fields list. You can change this setting by modifying the MinFullTextFieldLength configuration variable. To change this variable, complete the following steps:
1. Using a text editor, open the config.cfg file located in the <install_dir>/<instance_name>/config/ directory.
2. Add the MinFullTextFieldLength configuration variable, and set its value (the default value is 21). For example:MinFullTextFieldLength=16
3. Save your changes to the config.cfg file.
4. Restart the content server.
Disabling Database Search Contains OperatorBefore disabling the feature, you might want to disable all zone text fields. The database contains an index for each enabled zone text field (the indexes are dropped when the zone text fields are disabled). If the database contains an index for a field, it will not let you delete the field from your content server using Configuration Manager. For more information, see Enabling and Disabling Zone Text Fields (page 4-14).
If you disable the feature and later want to delete a field that is enabled as a zone text field, you can use one of the following options:
Reinstall the feature, disable the zone text field, use Configuration Manager to delete the field, and uninstall the feature.
Log into the database and issue a command to drop the index for the field, and then use Configuration Manager to delete the field.
Managing System Settings and Processes 4-15
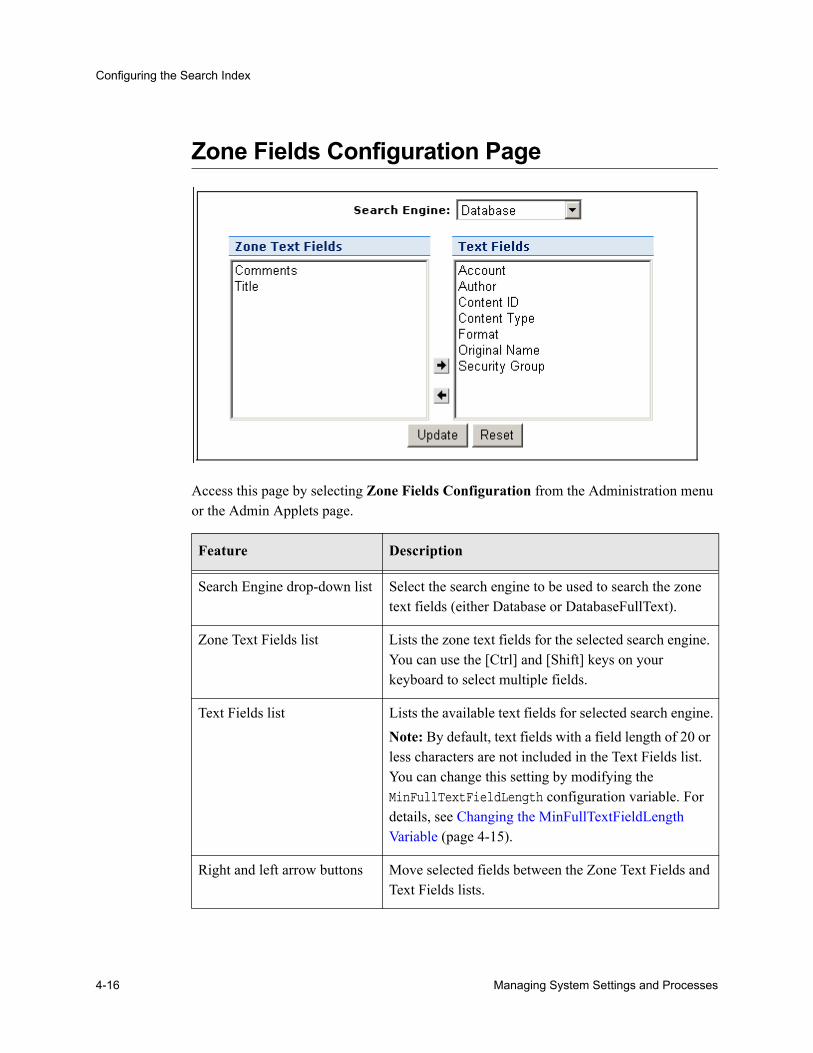
Configuring the Search Index
Zone Fields Configuration Page
Access this page by selecting Zone Fields Configuration from the Administration menu or the Admin Applets page.
Feature Description
Search Engine drop-down list Select the search engine to be used to search the zone text fields (either Database or DatabaseFullText).
Zone Text Fields list Lists the zone text fields for the selected search engine. You can use the [Ctrl] and [Shift] keys on your keyboard to select multiple fields.
Text Fields list Lists the available text fields for selected search engine.Note: By default, text fields with a field length of 20 or less characters are not included in the Text Fields list. You can change this setting by modifying the MinFullTextFieldLength configuration variable. For details, see Changing the MinFullTextFieldLength Variable (page 4-15).
Right and left arrow buttons Move selected fields between the Zone Text Fields and Text Fields lists.
4-16 Managing System Settings and Processes
Configuring the Search Index
INDEXING WITH DATABASESIf your system was set up to provide indexing and searching capabilities with databases, your system integrator would have added one of the following lines in <Install_Dir>/config/config.cfg:
Metadata Searching Only: SearchIndexerEngineName=DATABASE
Full-text Searching: SearchIndexerEngineName=DATABASEFULLTEXT
The dbfulltextsearch script appropriate for the supported database would then be run.
By default, full-text indexing is applied to all converted files.
Update button Enables text fields in the Zone Text Fields list as zone text fields, and disables text fields in the Text Field list. Parses the text within all zone text fields and creates a full-text index that can be queried using the Contains search operator.Important: Changing a text field to a zone text field can be a very time-consuming operation. The amount of time it takes to parse the text and create the full-text index depends on the number of content items in the content server and the amount of text stored in the text field. However, once the text field has been indexed, you should not experience significant performance issues when updating and adding content items.
Reset button Reverts the Zone Text Fields and Text Fields lists to the last saved lists.
Feature Description
Note: Custom text fields (the Comments text field and any customer-created text fields) are shared between the Database and Database search engines, and therefore changing the status of these text fields for one search engine also applies the changes to the other search engine. Standard text fields (Author, Content ID, Content Type, Title, etc.) can be enabled or disabled independently for each search engine.
Managing System Settings and Processes 4-17
Configuring the Search Index
By default, the content server full-text indexes files that are passed through or converted to any of the following formats:
MS SQL Supported Formats
Oracle Supported Formats
For example, if you want to convert your Microsoft Word (.doc) files to text files instead of PDF, you can specify this in the Configuration Manager. That is, when you use the File Formats option to map the .doc file extension to a text format, then this defines how the file is converted to a web-viewable format. In this case, the text file is fully indexed before it is passed to the web site.
For more information about the Configuration Manager’s File Formats option, see the Managing Repository Content Guide.
You can enable contributors to specify whether to full-text index a file by enabling the format override feature in System Properties. (See Configuring General Options (page 2-4).)
For example, if you have used the Configuration Manager’s File Formats option to map Corel WordPerfect (.wpd) files to use a text format and a contributor selects the use default option in the Format field on the checkin page, the file will be converted to text and full-text indexed. If the contributor selects Corel WordPerfect Document, the file will be passed through in its native format and will not be full-text indexed.
For more information about the Configuration Manager’s File Formats option, see the Managing Repository Content Guide.
• text • doc • ppt• txt • msword • ms-excel• htm • ms-word • xls• html • ms-powerpoint
• pdf • hcsp • doc• html • text • rtf• htm • txt • ppt• xls
4-18 Managing System Settings and Processes
Configuring the Search Index
Database-Supported File FormatsIf you define a file format to PASSTHRU in the native format, and the format name contains one of the types listed above (such as application/ms-excel.native), the passed through native file will be full-text indexed by default.
Alternatively, you can use configuration variables to control whether or not a document is full-text indexed. To manage the full-text indexing and search of specific document format types, add applicable entries to <Install_Dir>/config/config.cfg, and save the file. Full-text indexing configuration variables include:
FormatMap (page 4-20)
ExceptionFormatMap (page 4-20)
FormatMapThe FormatMap configuration variable controls whether files of a specific format should be included in the full-text search index. It is a comma-separated list of all the formats that will be full-text indexed. The decision is made by taking the MIME type assigned to a file, splitting the MIME type apart at any slash (/) or period (.), and then checking if that value is in the FormatMap list.
For example, application/vnd.msword will turn into a list of three items:
• application
• vnd
• msword
If FormatMap has “msword” in its list, then the indexer engine will attempt to full-text index the file. the comparison test is not case sensitive.
ExceptionFormatMapThe ExceptionFormatMap configuration variable is used to exclude document formats from the FormatMap test. Any format that satisfies the ExceptionFormatMap test will not be full-text indexed. This test is done after splitting the MIME format at slashes (/), but not periods(.). For example, if “msword” is included in the exceptions list, then the MIME format application/msword is excluded but not application/vnd.mssword.
Managing System Settings and Processes 4-19
Configuring the Search Index
SEARCHING CONTENT USING THE ORACLE QUERY OPTIMIZER FEATURE
This section covers these topics:
ConceptsAbout the Oracle Query Optimizer Feature (page 4-22)
Query Optimization Process (page 4-23)
How Reformatted Queries Optimize Searches (page 4-26)
Types of Recognized Hints (page 4-27)
Query Hints Syntax (page 4-29)
Supported Search Operators and Keywords (page 4-30)
Additional Supported Sort Constructs (page 4-31)
The Hint Rules Table (page 4-31)
The Hint Cache (page 4-37)
TasksUsing Hint Rules (page 4-40)
Adding and Enabling New Hint Rules (page 4-40)
Editing Existing Hint Rules (page 4-41)
Disabling Hint Rules (page 4-41)
Enabling Hint Rules (page 4-41)
Removing Hint Rules (page 4-42)
Using the Query Converter (page 4-42)
Converting a Data Source or Query (page 4-43)
Editing a Converted Data Source or Query (page 4-44)
Note: If you chose to enable the Oracle Query Optimizer feature during the Content Server installation process, then the functionality described in this section is available to you.
4-20 Managing System Settings and Processes
Configuring the Search Index
Updating the Hint Cache (page 4-44)
Checking the Hint Cache for Existing Hints (page 4-44)
Modifying an Existing Hint Cache Query or Data Source Entry (page 4-45)
Removing a Hint Cache Query or Data Source Entry (page 4-47)
InterfaceHint Rules Configuration Page (page 4-49)
Hint Rule Editor (page 4-50)
Query Converter Page (page 4-53)
Examples of Converted Data Source and Query (page 4-55)
Hint Cache Updater Page (page 4-56)
Examples of Hint Cache Updating Results (page 4-59)
About the Oracle Query Optimizer FeatureThe Oracle Query Optimizer feature is designed to improve your Oracle database’s performance by removing inefficiencies in user queries. Generally, Oracle does not select the best execution plan for certain types of user queries. To counter this, the Oracle Query Optimizer feature adds hints to queries that force Oracle to perform searches more efficiently.
The hints are based on an intrinsic knowledge of Content Server’s table data distribution and its index selectivity. To take advantage of this knowledge, the Oracle Query Optimizer feature uses a pre-defined hint rules table to analyze the database query and then add appropriate hints to the query. In turn, the added hints improve Oracle’s search performance.
The Oracle Query Optimizer feature takes advantage of Content Server’s data distribution in database tables and its index selection preferences. Based on these characteristics, the hint rules table included with the Oracle Query Optimizer feature contains pre-defined rules. The feature uses these rules to analyze a database query and to add one or more appropriate hints to the query to optimize the search performance.
In very large collections containing millions of content items, Oracle generally has a difficult time selecting an appropriate optimization strategy to resolve even simple queries. To counteract this problem, the Oracle Query Optimizer feature examines the submitted query and, based on its analysis, reformats the query by adding appropriate
Managing System Settings and Processes 4-21
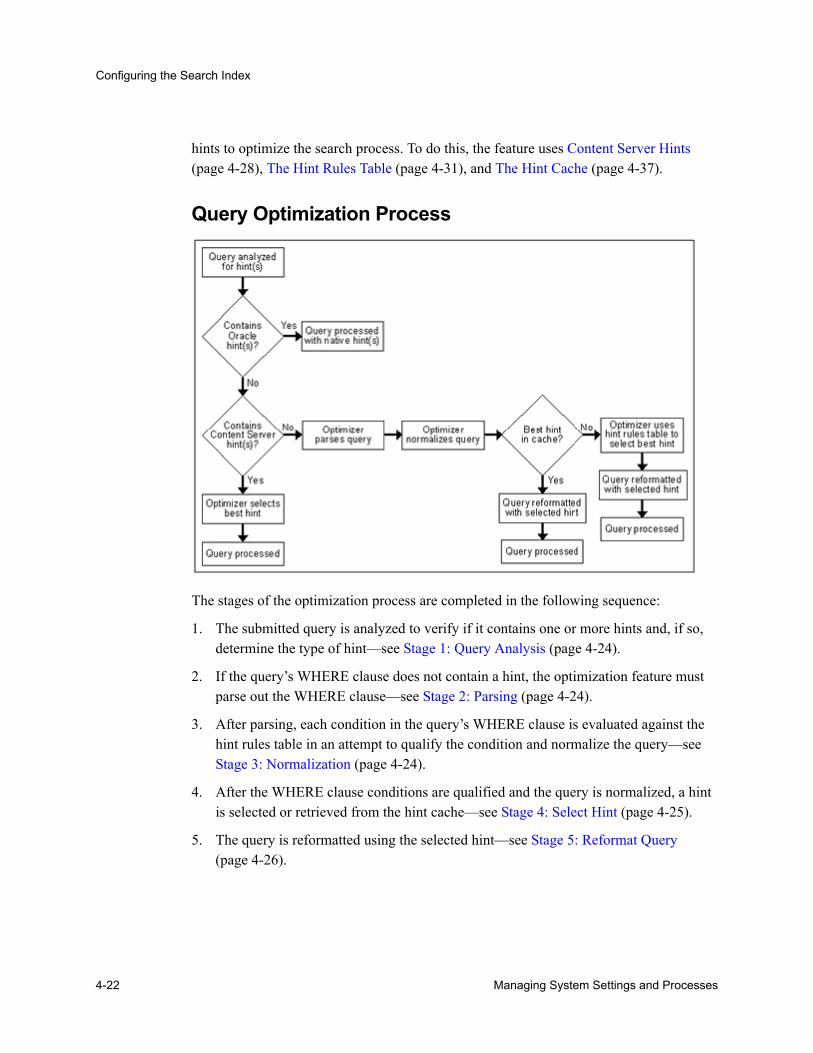
Configuring the Search Index
hints to optimize the search process. To do this, the feature uses Content Server Hints (page 4-28), The Hint Rules Table (page 4-31), and The Hint Cache (page 4-37).
Query Optimization Process
The stages of the optimization process are completed in the following sequence:
1. The submitted query is analyzed to verify if it contains one or more hints and, if so, determine the type of hint—see Stage 1: Query Analysis (page 4-24).
2. If the query’s WHERE clause does not contain a hint, the optimization feature must parse out the WHERE clause—see Stage 2: Parsing (page 4-24).
3. After parsing, each condition in the query’s WHERE clause is evaluated against the hint rules table in an attempt to qualify the condition and normalize the query—see Stage 3: Normalization (page 4-24).
4. After the WHERE clause conditions are qualified and the query is normalized, a hint is selected or retrieved from the hint cache—see Stage 4: Select Hint (page 4-25).
5. The query is reformatted using the selected hint—see Stage 5: Reformat Query (page 4-26).
4-22 Managing System Settings and Processes

Configuring the Search Index
Stage 1: Query AnalysisIn this stage, a query is checked for both Oracle (native) and Content Server hints. This is determined based on the hint syntax—Query Hints Syntax (page 4-29). A query that contains Oracle hints is passed through. A query that contains Content Server hints bypasses Stage 2: Parsing (page 4-24) and Stage 3: Normalization (page 4-24). If a query contains multiple Content Server hints, the best hint is chosen. Queries that do not contain any hints must be parsed and normalized.
Stage 2: ParsingIn this stage, a query that does not contain any hints is sent through the query parser and the WHERE clause is parsed out. A WHERE clause consists of one or more conditions joined with either AND or OR conjunctions—see Supported Search Operators and Keywords (page 4-30). For each condition, the field name, operator, and field value are extracted. The AND/OR conjunctions of the clause are preserved; the parentheses are dropped. Conditions must use the following format:
<fieldname> <operator> <value>
For example, a properly formatted condition would be dID = 3. An incorrect condition would be 3 = dID.
For additional information about search operators, keywords, and additional WHERE clause operators that the parser recognizes, see Supported Search Operators and Keywords (page 4-30) and Additional Supported Sort Constructs (page 4-31).
Stage 3: NormalizationIn this stage, normalization simplifies conditions, finalizes query operators, and provides a stable view of the WHERE clause for additional steps. The end result of the normalization process produces a base for generating the cache key and the list of fields to use to search for hints.
Qualifying WHERE Clause Conditions:
Each condition in the WHERE clause is checked against The Hint Rules Table (page 4-31). If a condition’s field name is included in the hint rules table, then it is qualified and the condition is considered to be normalized. This means that the condition contains its table name and alias. Then the normalized conditions are sorted to ensure that the same set of conditions is always listed consistently.
Note: To establish which database tables and columns have indexes, the hint rules table is defined on Content Server resources as well as on the running system.
Managing System Settings and Processes 4-23

Configuring the Search Index
Discarding WHERE Clause Conditions During Normalization:
During normalization, the following conditions are not considered relevant and are eliminated from further processing:
• Join conditions.
• Conditions that contain subqueries.
• Conditions whose field names do not have entries in the hint rules table and cannot be qualified.
• OR conditions that contain more than one field. For example:(dSecurityGroup = 'Secure' or dDocAccount LIKE 'prj%')
• Conditions that contain the LIKE operator whose value begins with a wildcard.
Reformatting WHERE Clause Conditions:
In the normalization step, the query conditions are rewritten to consolidate complex query conditions. OR conditions are re-evaluated as follows:
• If all the fields are the same and all the operators are equal, the conditions are combined and changed to an IN query.
• If the fields are the same but have different operators, the conditions are combined and the 'generic' operator is assigned.
• If the fields are different, the conditions are dropped.
For example, during normalization, the following condition:(dReleaseState = 'Y' OR dReleaseState = 'O")
Is reformatted as follows:dReleaseState IN ('Y', 'O')
Finding Potential Range Queries:
The parsed query is analyzed to find potential range queries that are then consolidated during the normalization process. For example, the conditions dIndate > date1 and dInDate < date2 are changed to one condition with the operator ‘range’.
Stage 4: Select HintIn this stage, the normalized conditions are checked against the hint cache. If one or more conditions have applicable hints in the cache, they are included. If applicable hints are not found in the cache, the conditions are analyzed and the preference orders are compared to determine the best possible hint.
4-24 Managing System Settings and Processes
Configuring the Search Index
Stage 5: Reformat QueryIn this stage, the query is reformatted by adding in the selected hint. For more information about how reformatting queries with hints helps to optimize searches and some examples of reformatted queries, see How Reformatted Queries Optimize Searches (page 4-26).
How Reformatted Queries Optimize SearchesThe majority of queries in Content Server involve a small, targeted set of content items or return a hundred rows, at most. This means that Content Server can easily scale to millions of content items. However, testing on an Oracle database with a collection containing 10 million content items indicates that the execution plan that Oracle selects is not the most efficient. Oracle generally does not choose the best optimization strategies to resolve many queries, even some that are trivial. The following examples explain this issue:
Example 1: Reformatting a Query by Adding a Single Hint (page 4-26)
Example 2: Reformatting a Query by Adding Multiple Hints (page 4-27)
Example 1: Reformatting a Query by Adding a Single HintIn the environment described above, Oracle does not resolve the following query as efficiently as possible:
SELECT *FROM Revisions, Documents, DocMetaWHERE Revisions.dID = Documents.dID
AND Revisions.dID = DocMeta.dIDAND Revisions.dRevClassID = 333
Order By Revisions.dID
Because a fairly selective index is available (dRevClassID_2 for Revisions.dRevClassID), this query should access dRevClassID_2 and perform a sort on the rows that match the dRevClassID. However, in this query example, Oracle chooses to use the Revisions.dID index.
This choice is actually worse than performing a full table scan on the Revisions table because it does a full index scan and accesses the table to obtain the dRevClassID for each row. Obviously, resolving the query using this execution plan does not work well when the Content Server has over 10 million content items. In this case, it requires approximately 500 seconds to return the results.
However, the performance improves dramatically when the query is modified by adding a hint as follows:
Managing System Settings and Processes 4-25
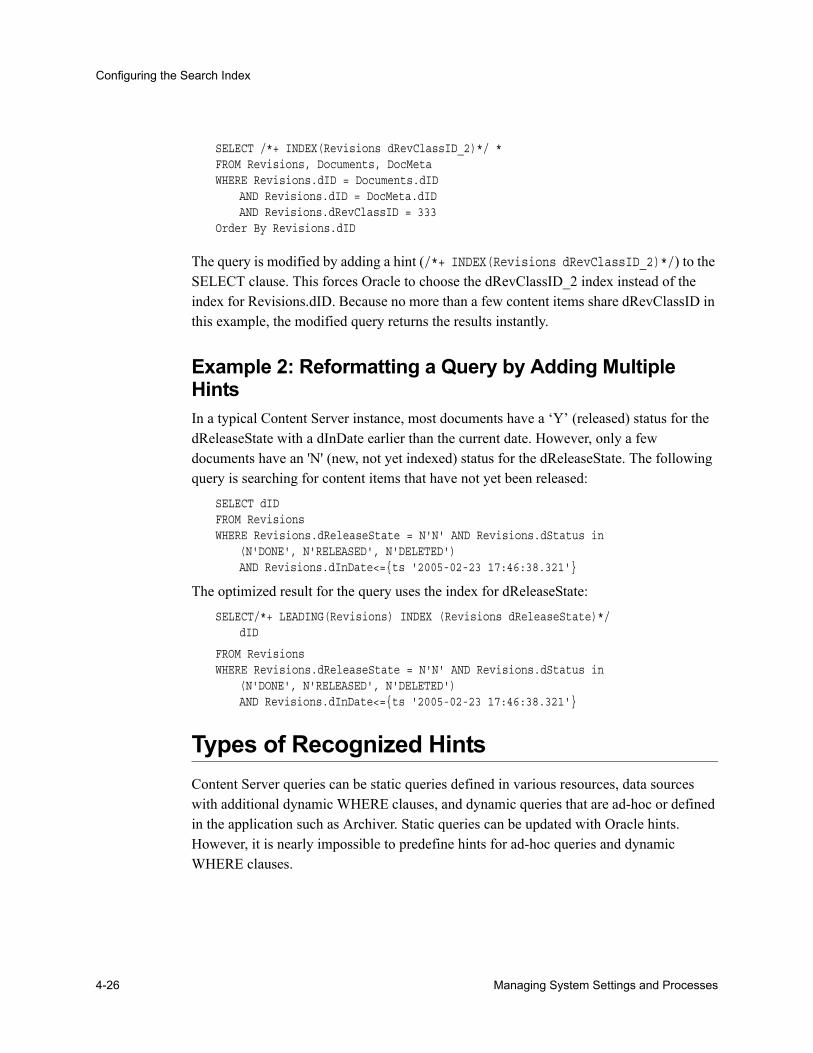
Configuring the Search Index
SELECT /*+ INDEX(Revisions dRevClassID_2)*/ *FROM Revisions, Documents, DocMetaWHERE Revisions.dID = Documents.dID
AND Revisions.dID = DocMeta.dIDAND Revisions.dRevClassID = 333
Order By Revisions.dID
The query is modified by adding a hint (/*+ INDEX(Revisions dRevClassID_2)*/) to the SELECT clause. This forces Oracle to choose the dRevClassID_2 index instead of the index for Revisions.dID. Because no more than a few content items share dRevClassID in this example, the modified query returns the results instantly.
Example 2: Reformatting a Query by Adding Multiple HintsIn a typical Content Server instance, most documents have a ‘Y’ (released) status for the dReleaseState with a dInDate earlier than the current date. However, only a few documents have an 'N' (new, not yet indexed) status for the dReleaseState. The following query is searching for content items that have not yet been released:
SELECT dIDFROM RevisionsWHERE Revisions.dReleaseState = N'N' AND Revisions.dStatus in
(N'DONE', N'RELEASED', N'DELETED')AND Revisions.dInDate<={ts '2005-02-23 17:46:38.321'}
The optimized result for the query uses the index for dReleaseState:
SELECT/*+ LEADING(Revisions) INDEX (Revisions dReleaseState)*/dID
FROM Revisions WHERE Revisions.dReleaseState = N'N' AND Revisions.dStatus in
(N'DONE', N'RELEASED', N'DELETED')AND Revisions.dInDate<={ts '2005-02-23 17:46:38.321'}
Types of Recognized HintsContent Server queries can be static queries defined in various resources, data sources with additional dynamic WHERE clauses, and dynamic queries that are ad-hoc or defined in the application such as Archiver. Static queries can be updated with Oracle hints. However, it is nearly impossible to predefine hints for ad-hoc queries and dynamic WHERE clauses.
4-26 Managing System Settings and Processes

Configuring the Search Index
Oracle HintsThe Oracle Query Optimizer feature includes a Query Definition Table. This table contains pre-defined Oracle queries that automatically replace the standard Content Server queries when the Oracle Query Optimizer feature is installed and enabled. The queries in this table are customized with Oracle-specific hints to ensure more effective search performance.
Figure 4-2 Query Definition Table
During the optimization process, if Oracle hints are included in the query, no further processing is performed and the query is passed through—see Stage 1: Query Analysis (page 4-24). The screen below shows several entries in the Query Definition table.
Content Server HintsContent Server hints use a database-neutral hint syntax that supports multiple hints in the same query. A Content Server hint can be used in any query, data source, and WHERE clause. However, it cannot be combined with an Oracle hint. If a query contains both types of hints, the Oracle Query Optimizer will retain the Oracle hint and ignore the Content Server hint.
Caution: The Query Definition Table lists the pre-defined queries and is located in the <install_dir>/custom/OracleQueryOptimizer/resources/oraclequeryoptimizer_query.htm directory. Do not modify any of the queries in this table.
Managing System Settings and Processes 4-27
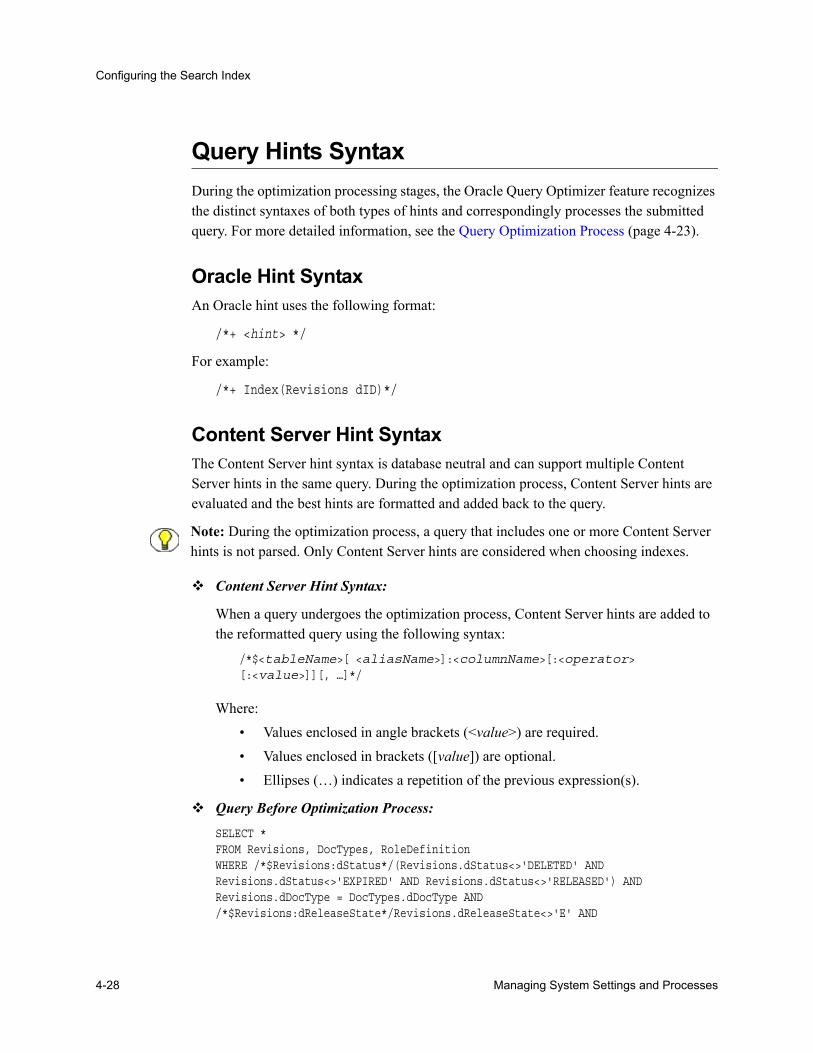
Configuring the Search Index
Query Hints SyntaxDuring the optimization processing stages, the Oracle Query Optimizer feature recognizes the distinct syntaxes of both types of hints and correspondingly processes the submitted query. For more detailed information, see the Query Optimization Process (page 4-23).
Oracle Hint SyntaxAn Oracle hint uses the following format:
/*+ <hint> */
For example:
/*+ Index(Revisions dID)*/
Content Server Hint SyntaxThe Content Server hint syntax is database neutral and can support multiple Content Server hints in the same query. During the optimization process, Content Server hints are evaluated and the best hints are formatted and added back to the query.
Content Server Hint Syntax:
When a query undergoes the optimization process, Content Server hints are added to the reformatted query using the following syntax:
/*$<tableName>[ <aliasName>]:<columnName>[:<operator>[:<value>]][, …]*/
Where:• Values enclosed in angle brackets (<value>) are required.• Values enclosed in brackets ([value]) are optional.• Ellipses (…) indicates a repetition of the previous expression(s).
Query Before Optimization Process:
SELECT * FROM Revisions, DocTypes, RoleDefinition WHERE /*$Revisions:dStatus*/(Revisions.dStatus<>'DELETED' AND Revisions.dStatus<>'EXPIRED' AND Revisions.dStatus<>'RELEASED') AND Revisions.dDocType = DocTypes.dDocType AND /*$Revisions:dReleaseState*/Revisions.dReleaseState<>'E' AND
Note: During the optimization process, a query that includes one or more Content Server hints is not parsed. Only Content Server hints are considered when choosing indexes.
4-28 Managing System Settings and Processes
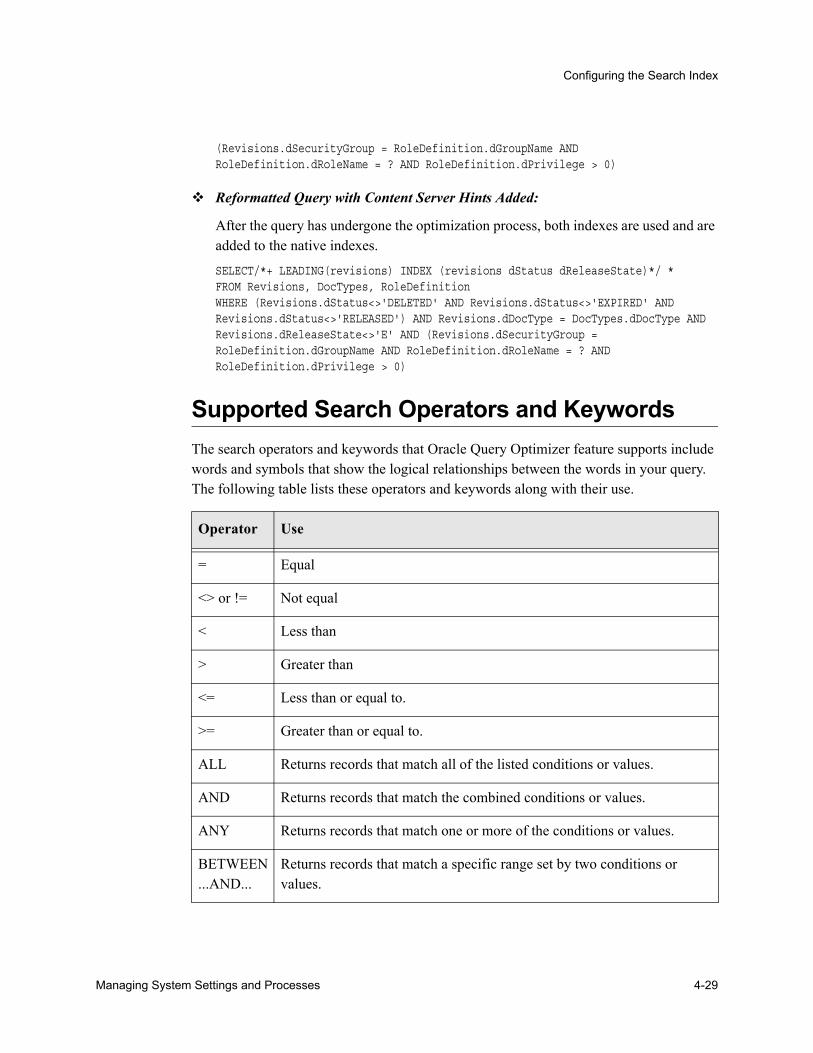
Configuring the Search Index
(Revisions.dSecurityGroup = RoleDefinition.dGroupName AND RoleDefinition.dRoleName = ? AND RoleDefinition.dPrivilege > 0)
Reformatted Query with Content Server Hints Added:
After the query has undergone the optimization process, both indexes are used and are added to the native indexes.
SELECT/*+ LEADING(revisions) INDEX (revisions dStatus dReleaseState)*/ * FROM Revisions, DocTypes, RoleDefinition WHERE (Revisions.dStatus<>'DELETED' AND Revisions.dStatus<>'EXPIRED' AND Revisions.dStatus<>'RELEASED') AND Revisions.dDocType = DocTypes.dDocType AND Revisions.dReleaseState<>'E' AND (Revisions.dSecurityGroup = RoleDefinition.dGroupName AND RoleDefinition.dRoleName = ? AND RoleDefinition.dPrivilege > 0)
Supported Search Operators and KeywordsThe search operators and keywords that Oracle Query Optimizer feature supports include words and symbols that show the logical relationships between the words in your query. The following table lists these operators and keywords along with their use.
Operator Use
= Equal
<> or != Not equal
< Less than
> Greater than
<= Less than or equal to.
>= Greater than or equal to.
ALL Returns records that match all of the listed conditions or values.
AND Returns records that match the combined conditions or values.
ANY Returns records that match one or more of the conditions or values.
BETWEEN...AND...
Returns records that match a specific range set by two conditions or values.
Managing System Settings and Processes 4-29
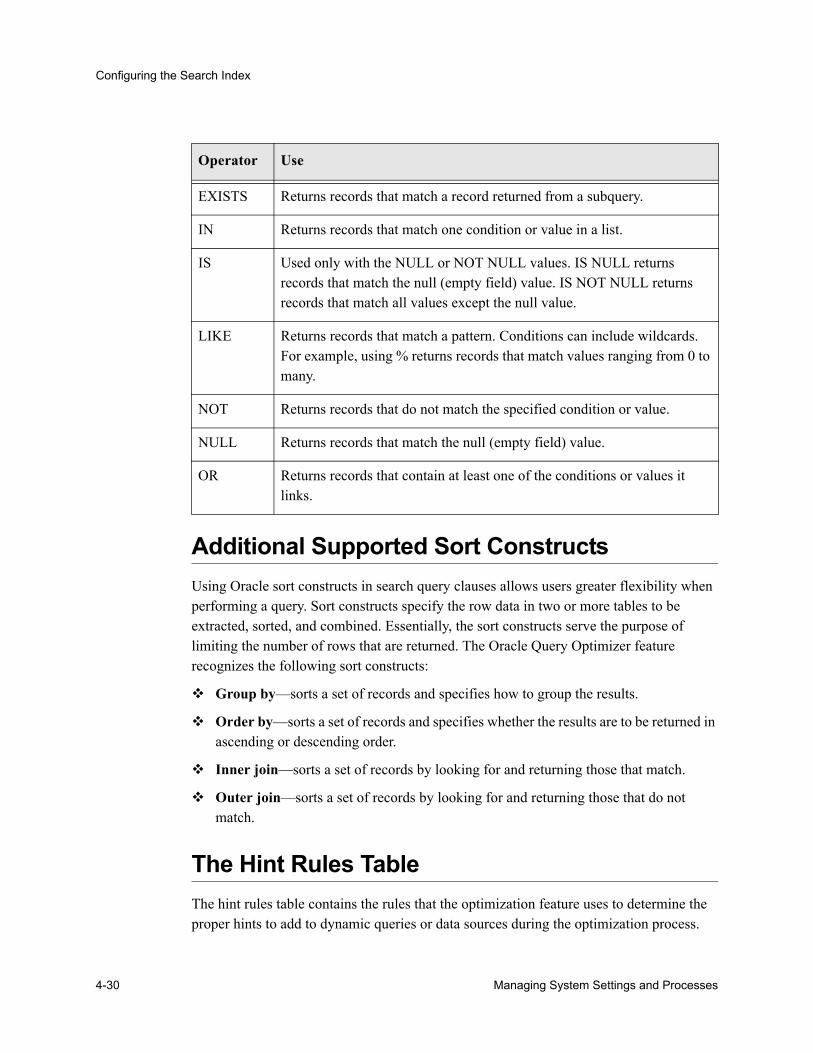
Configuring the Search Index
Additional Supported Sort ConstructsUsing Oracle sort constructs in search query clauses allows users greater flexibility when performing a query. Sort constructs specify the row data in two or more tables to be extracted, sorted, and combined. Essentially, the sort constructs serve the purpose of limiting the number of rows that are returned. The Oracle Query Optimizer feature recognizes the following sort constructs:
Group by—sorts a set of records and specifies how to group the results.
Order by—sorts a set of records and specifies whether the results are to be returned in ascending or descending order.
Inner join—sorts a set of records by looking for and returning those that match.
Outer join—sorts a set of records by looking for and returning those that do not match.
The Hint Rules TableThe hint rules table contains the rules that the optimization feature uses to determine the proper hints to add to dynamic queries or data sources during the optimization process.
EXISTS Returns records that match a record returned from a subquery.
IN Returns records that match one condition or value in a list.
IS Used only with the NULL or NOT NULL values. IS NULL returns records that match the null (empty field) value. IS NOT NULL returns records that match all values except the null value.
LIKE Returns records that match a pattern. Conditions can include wildcards. For example, using % returns records that match values ranging from 0 to many.
NOT Returns records that do not match the specified condition or value.
NULL Returns records that match the null (empty field) value.
OR Returns records that contain at least one of the conditions or values it links.
Operator Use
4-30 Managing System Settings and Processes

Configuring the Search Index
Using the Hint Rule Editor (page 4-50), a hint rule can be defined for a particular field and operator. A hint rule can also be defined based on values or date/number ranges. The hint rule table is extensible by other components, and can be updated while the Content Server is running.
Figure 4-3 The Hint Rules Table
Several default hint rules included with the Oracle Query Optimizer feature are described in Examples: Explanations of Several Hint Rules (page 4-32). For more detailed descriptions of the table columns, see Hint Rules Table Column Descriptions (page 4-33). The content of the hint rules table is available on the Hint Rules Configuration Page (page 4-49) that is accessed through the Administration tray.
The hint rules table is scheduled to reload every night, and when a rule is added or modified. The hint value is recalculated at each reload.
Examples: Explanations of Several Hint RulesExplanation of First Hint Rule:
For this rule, if the WHERE clause contains the following condition:
Revisions.dID = <some_value>
then the PK_Revisions index is used and added as a hint to the optimized query.
Explanation of Second Hint Rule:
For this rule, if the WHERE clause contains either of the following conditions:
Revisions.dDocName = <some_value>
Revisions.dDocName LIKE '<some_value>'
then the dDocName index is used and added as a hint to the optimized query.
Important: Although the hint rules table includes a column allowing multiple indexes to be used in conjunction with each other, in Oracle only the bitmap index can be combined. This is because the hint rules table was designed for core Content Server functionality.
Therefore, it might not be sufficient for a system with components that create additional tables and/or add additional metadata fields. However, the hint rules table can be extended or overwritten by other components to provide knowledge of additional tables, indexes and fields.
Managing System Settings and Processes 4-31
Configuring the Search Index
Explanation of Third Hint Rule:
For this rule, if the WHERE clause contains the following condition:
dStatus = 'DONE'
then the condition does not meet the requirements and cannot be qualified. However, if the WHERE clause contains the following condition:
dStatus = 'RELEASED'
then the dStatus index is used and added as a hint to the optimized query.
Hint Rules Table Column DescriptionsThis section describes the following columns in the hint rules table:
Key (page 4-33)
Table (page 4-34)
Column (page 4-34)
Operators (page 4-34)
Index (page 4-35)
Order (page 4-35)
Values (page 4-35)
AllowMultiple (page 4-36)
Disabled (page 4-36)
KeyThis column contains the unique name to identify the rule. A component can use the unique key to overwrite a particular rule. This key is usually identical to its index name because the index name is unique in the same database schema.
By default, Oracle uses a B+ Tree (binary tree) as the indexing structure to provide efficient access to logical records. B+ Tree indexes are most useful for queries involving a small number of result rows or when the user needs to execute queries using varying criteria (such as equality and range conditions). Because B+ Tree indexes store the indexed data values, these indexes are useful as sources of data if the requested value is the stored value.
However, bitmapped indexes offer substantial performance improvements with minimal storage cost compared to the default B+ Tree indexes. Bitmapped indexes are particularly
4-32 Managing System Settings and Processes
Configuring the Search Index
effective for searching columns with poor selectivity due to having very few distinct values. Also, a bitmap is built for each value including the NULL value (which means the NULL is indexed). Overall, using bitmapped indexes is very efficient because the index lookup process is a bit-level operation and allows access to multiple indexes.
Oracle recommends that you use bitmapped indexes for the table columns listed below, and set the index name to the corresponding column name.
Revisions table:• dIndexerState• dReleaseState• dProcessingState• dIsCheckedOut• dSecurityGroup• dStatus
WorkflowDocuments table:• dWfDocState
TableThis column identifies the specific database table.
ColumnThis column identifies the specific column within the database table listed in the Table column.
OperatorsThis column is a comma-separated list of allowable operators. See the Operators field and pull-down menu on the Hint Rule Editor (page 4-50) for more information about the valid operator options. The hint rule’s operator is important in the decision of whether a hint rule will be applied to a condition.
For example, if the WHERE clause contains the following condition:
Revisions.dID = 3
then using the PK_Revisions index would be a very valuable hint to include in an optimized query. However, if the WHERE clause contains the following condition:
Note: Because hint rules can be overwritten, the Oracle Query Optimizer feature does not allow you to add a hint rule using an existing key. Therefore, it is important when you are creating your bitmapped indexes for columns that you assign unique keys.
Managing System Settings and Processes 4-33
Configuring the Search Index
Revisions.dID > 3
then using the PK_Revisions index would not be useful.
IndexThis column identifies the specific index to use in the optimized query if the condition meets the hint rule requirements.
OrderThis column contains the preferred order to use when the rule is included in the hint rules table. The highest ordered rules in a query are given precedence when deciding which hint to use.
The order values include:
5—This value indicates that the specified index is unique or does not match more than 50 rows for any value. For example, specifying dID with the Revisions, Documents, or DocMeta tables.
4—This value indicates that the specified index should be somewhat less selective. The specified value should typically match a few rows and, at the very most, several hundred rows. For example, specifying dDocTitle with the Revisions table.
3—This value indicates that the specified index matches less than a thousand rows. For example, specifying dInDate or dOutDate.
2—This value indicates that the specified index matches less than ten thousand rows.
1—This value indicates that the specified index matches more than ten thousand rows.
ValuesThis column is Idoc scriptable. This column can only be defined when the Operators column value is one of the following:
in or notIn—When you use either of these operators, the value should be a comma-separated list enclosed in parenthesis.
range—When you use this operator, the value must use one of the following formats:
• Format 1:([<lowValue>],range[,<highDateValue>])
Examples of acceptable values include:('Y', 'O')
4-34 Managing System Settings and Processes
Configuring the Search Index
(,7d)
({ts '2004-12-11 12:03:23.000'}, 2d, <$dateCurrent()$>)
• Format 2:#[d|h]
For example, a range of five days is 5d and seven hours is 7h.
The following use cases demonstrate how this column provides additional flexibility to the hint rules:
Use Case 1: State or Status Table Columns
Table columns that indicate a state or status such as dReleaseState or dStatus are biased in regard to the finished states. For example, dReleaseState is predisposed for 'Y' (released) or 'O' (old version). Likewise, dStatus is predisposed for and RELEASED. Therefore, in WHERE clauses, conditions such as dReleaseState = Y or dStatus = RELEASED match the majority of rows in the Revisions table. Thus, indexes for these two columns are almost useless. Conversely, the condition dReleaseState = N (new, not yet indexed) matches only a few rows. Consequently, indexes on this column would be very helpful.
Use Case 2: Date or Number Table Columns
Table columns that indicate a date or number exhibit similar behavior to state or status. For example, the condition dInDate < <$dateCurrent()$> matches almost all the table rows and makes indexes on this field irrelevant. However, the combined conditions dInDate < <$dateCurrent()$> AND dInDate > <$dateCurrent(-1)$> usually match only a small set of rows and would benefit from using the corresponding index as a hint.
AllowMultipleThis column indicates whether or not the defined index is used in conjunction with other indexes. In Oracle, only the bitmap index can be combined.
DisabledThis column indicates whether or not a hint rule has been disabled. Any rule in the table can be enabled/disabled. If you disable a hint rule, a value of ‘Y’ is displayed. Existing rules can be disabled to match the current Content Server state.
Tech Tip: The operators in or notIn can substitute for the operators equal and notEqual, respectively, along with their matching values. For more information about operator options, see the Operators field and pull-down menu on the Hint Rule Editor (page 4-50).
Managing System Settings and Processes 4-35
Configuring the Search Index
For example, if a Content Server instance contains only a few distinct content revClasses, each revClass may have thousands of revisions. Therefore, the dRevClass_2 index is not very effective. In this case, this corresponding hint rule should be disabled and you should add one or more new rules with different preference orders.
The Hint CacheThe Oracle Query Optimizer feature also contains a hint cache to store dynamically generated hints. For example, a hint derived from a parsed query or data source is cached to maintain persistence. In this way, the hint cache provides stability for queries and data sources.
The hint cache is used during the optimization process to select hints for queries that do not contain Oracle or Content Server hints. The hint cache provides a mechanism to fine tune query hints. In addition, administrator can check/edit cache and change hint for queries at run time.
The characteristics of the hint cache include:
Reusing Hint Cache Entries (page 4-37)
Hint Cache Management (page 4-38)
Default Capacity Algorithm (page 4-39)
Origin of Hint Cache Keys (page 4-39)
Hint Cache Persistence (page 4-40)
Reusing Hint Cache EntriesThe same query matches the same cache entry regardless of its values unless the new value does not satisfy the hint rule conditions. Two examples are included below to demonstrate how the same hint cache entry can and can not be used for multiple queries.
Example 1: Using Similar Hint Cache Entries
Note: Although any rule in the table can be enabled/disabled, only the rules that are added using the Hint Rule Editor (page 4-50) can be removed. The default hint rules that are included with the Oracle Query Optimization feature can only be disabled; they cannot be removed.
Note: The hint cache is stored to disk every two hours and is reloaded when the Content Server instance is started.
4-36 Managing System Settings and Processes

Configuring the Search Index
In the following two queries, the same hint cache entry is used because both queries match the hint rule requirements.
QueryA:SELECT * FROM RevisionsWHERE dDocName = 'name1'
QueryB:SELECT * FROM RevisionsWHERE dDocName = 'name2'
Example 2: Using Different Hint Cache Entries
In the following two queries, the same hint cache entry can not be used because QueryB violates the requirements for the dReleaseState hint rule. The dReleaseState hint rule requires that the dReleaseState values are neither Y (released) nor O (old revision).
QueryA:SELECT * FROM RevisionsWHERE dReleaseState = 'U' AND dStatus = 'DONE'
QueryB:SELECT * FROM RevisionsWHERE dReleaseState = 'Y' AND dStatus = 'DONE'
Hint Cache ManagementIn the hint cache, you can add a new entry, edit an existing entry, or remove an existing entry using the Hint Cache Updater Page (page 4-56). When adding or editing hint cache entries, you must use the Content Server Hint Syntax (page 4-29). The ability to manage the hint cache is very useful for fine tuning query hints. The example below demonstrates the benefits of fine tuning a hint cache entry.
Example:
If you have just batchloaded 100K content items into the Content Server and they are not yet indexed, the index-based query used above (Example 2: Using Different Hint Cache Entries) would match all of the batchloaded documents.
QueryA:As long as most of the batchloaded documents have not been indexed, the dReleaseState index that is used in this query is not the best choice. For the best results
Managing System Settings and Processes 4-37
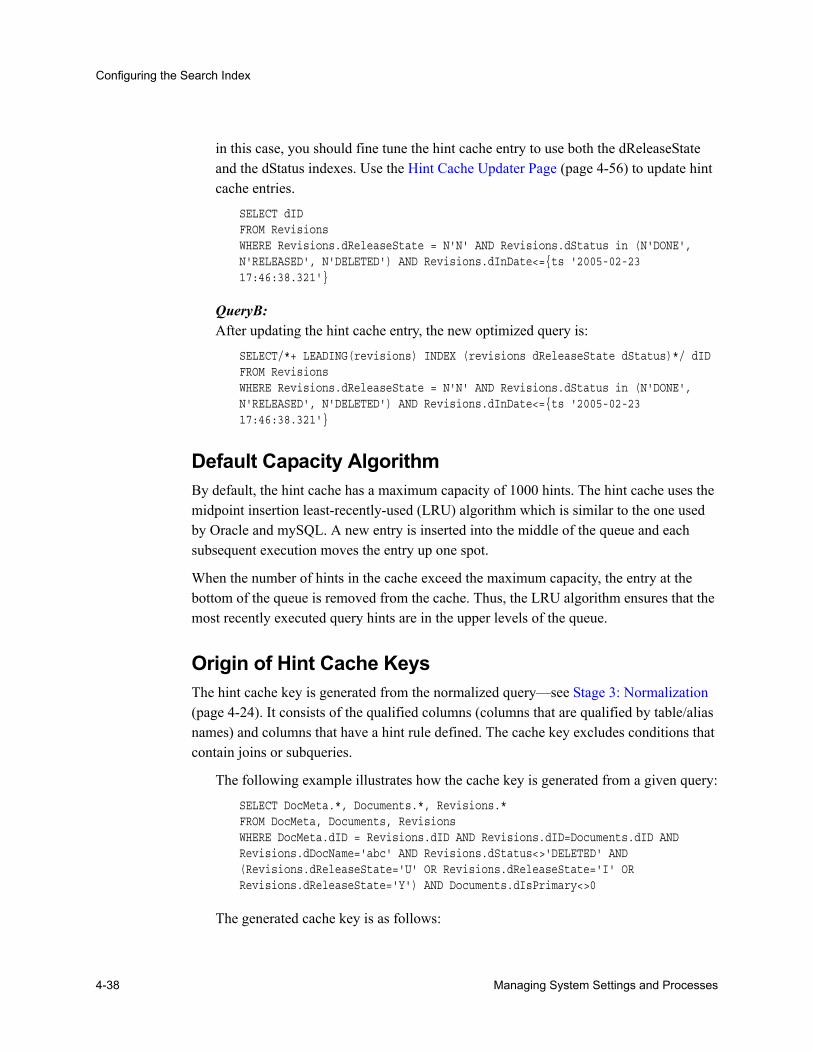
Configuring the Search Index
in this case, you should fine tune the hint cache entry to use both the dReleaseState and the dStatus indexes. Use the Hint Cache Updater Page (page 4-56) to update hint cache entries.
SELECT dIDFROM RevisionsWHERE Revisions.dReleaseState = N'N' AND Revisions.dStatus in (N'DONE', N'RELEASED', N'DELETED') AND Revisions.dInDate<={ts '2005-02-23 17:46:38.321'}
QueryB:After updating the hint cache entry, the new optimized query is:
SELECT/*+ LEADING(revisions) INDEX (revisions dReleaseState dStatus)*/ dIDFROM RevisionsWHERE Revisions.dReleaseState = N'N' AND Revisions.dStatus in (N'DONE', N'RELEASED', N'DELETED') AND Revisions.dInDate<={ts '2005-02-23 17:46:38.321'}
Default Capacity AlgorithmBy default, the hint cache has a maximum capacity of 1000 hints. The hint cache uses the midpoint insertion least-recently-used (LRU) algorithm which is similar to the one used by Oracle and mySQL. A new entry is inserted into the middle of the queue and each subsequent execution moves the entry up one spot.
When the number of hints in the cache exceed the maximum capacity, the entry at the bottom of the queue is removed from the cache. Thus, the LRU algorithm ensures that the most recently executed query hints are in the upper levels of the queue.
Origin of Hint Cache KeysThe hint cache key is generated from the normalized query—see Stage 3: Normalization (page 4-24). It consists of the qualified columns (columns that are qualified by table/alias names) and columns that have a hint rule defined. The cache key excludes conditions that contain joins or subqueries.
The following example illustrates how the cache key is generated from a given query:
SELECT DocMeta.*, Documents.*, Revisions.* FROM DocMeta, Documents, Revisions WHERE DocMeta.dID = Revisions.dID AND Revisions.dID=Documents.dID AND Revisions.dDocName='abc' AND Revisions.dStatus<>'DELETED' AND (Revisions.dReleaseState='U' OR Revisions.dReleaseState='I' OR Revisions.dReleaseState='Y') AND Documents.dIsPrimary<>0
The generated cache key is as follows:
4-38 Managing System Settings and Processes

Configuring the Search Index
documents.disprimary:notequal:documents|revisions.ddocname:equal:revisions|revisions.dreleasestate:in:revisions|revisions.dstatus:notequal:revisions
Hint Cache PersistenceThe hint cache is designed to be persistent. To ensure this, the hint cache is saved to the file system every two hours. The persisted hint cache is reloaded when the Content Server instance is started.
Using Hint RulesThe following tasks are involved in using hint rules:
Adding and Enabling New Hint Rules (page 4-40)
Editing Existing Hint Rules (page 4-41)
Disabling Hint Rules (page 4-41)
Enabling Hint Rules (page 4-41)
Removing Hint Rules (page 4-42)
To access the Hint Rules Configuration page:
1. Open the Administration tray.
2. Click the Hint Rules Configuration link.
The Hint Rules Configuration page is displayed.
3. Click the Show hint rule editor toggle switch on the Hint Rules Configuration page.
The Hint Rule Editor is displayed.
Adding and Enabling New Hint RulesTo add a new hint rule to the hint rules table:
1. Click the Show hint rule editor toggle switch on the Hint Rules Configuration page.
The Hint Rule Editor is displayed.
2. Complete the fields as desired. For more detailed explanations of each field, see The Hint Rules Table (page 4-31) and the Hint Rule Editor (page 4-50).
3. Click the Add/Enable button.
The new hint rule is added to the hint rules table and is effective immediately.
Managing System Settings and Processes 4-39
Configuring the Search Index
Editing Existing Hint RulesTo edit an existing hint rule in the hint rules table:
1. Select the desired hint rule in the hint rules table.
The Hint Rule Editor is displayed and all of the applicable fields are populated with the hint rule’s values.
2. Edit the fields as desired. For more detailed explanations of each field, see The Hint Rules Table (page 4-31) and the Hint Rule Editor (page 4-50).
3. Change the key.
4. Click the Add/Enable button.
The hint rules table is refreshed and the new hint rule is added. The modifications are effective immediately.
5. Delete the old hint rule.
Disabling Hint Rules
To disable a hint rule in the hint rules table:
1. Select the desired hint rule in the hint rules table.
The Hint Rule Editor is displayed and all of the applicable fields are populated with the hint rule’s values.
2. Click the Disable button.
The hint rules table is refreshed and ‘Y’ is displayed in the Disabled column indicating that the hint rule is deactivated.
Enabling Hint Rules
Note: Although any rule in the table can be enabled/disabled, only the rules that are added through the Hint Rule Editor (page 4-50) can be removed. The default hint rules that are included with the Oracle Query Optimization feature can only be disabled; they cannot be removed.
Note: Although any rule in the table can be enabled/disabled, only the rules that are added through the Hint Rule Editor (page 4-50) can be removed. The default hint rules that are included with the Oracle Query Optimization feature can only be disabled; they cannot be removed.
4-40 Managing System Settings and Processes
Configuring the Search Index
To enable a disabled hint rule in the hint rules table:
1. Select the desired hint rule in the hint rules table.
The Hint Rule Editor is displayed and all of the applicable fields are populated with the hint rule’s values.
2. Click the Add/Enable button.
The hint rules table is refreshed and the Disabled column is clear indicating that the hint rule is reactivated.
Removing Hint Rules
To delete a hint rule from the hint rules table:
1. Select the desired hint rule in the hint rules table.
The Hint Rule Editor is displayed and all of the applicable fields are populated with the hint rule’s values.
2. Ensure that the hint rule is enabled. If the hint rule is disabled it can not be removed. To reactivate a disabled hint rule, see Enabling Hint Rules (page 4-41).
3. Click the Remove button.
The hint rules table is refreshed and the selected hint rule is removed.
Using the Query ConverterThe following tasks are involved when you use the Query Converter:
Converting a Data Source or Query (page 4-43)
Editing a Converted Data Source or Query (page 4-44)
The Query Converter page can be accessed from both the Hint Rules Configuration Page (page 4-49) or the Hint Cache Updater Page (page 4-56):
From the Hint Rules Configuration page
1. Open the Administration tray.
Note: Although any rule in the table can be enabled/disabled, only the rules that are added through the Hint Rule Editor (page 4-50) can be removed. The default hint rules that are included with the Oracle Query Optimization feature can only be disabled; they cannot be removed.
Managing System Settings and Processes 4-41
Configuring the Search Index
2. Click the Hint Rules Configuration link.
The Hint Rules Configuration page is displayed.
3. Select Query Converter from the Action pull-down menu.
The Query Converter page is displayed.
From the Hint Cache Update page
1. Select Query Converter from the Action pull-down menu.
The Query Converter page is displayed.
Converting a Data Source or Query
Data Source:1. If applicable, select the Use Data Source check box.
The data source-related fields are displayed on the Query Converter page.
2. Select the desired data source from the DS Name pull-down menu.
The data source query is displayed in below the DS Name field.
3. Enter the applicable information for additional parameters and WHERE clauses.
4. Click Convert Query.
The data source is converted and the results are displayed in a text area above the Use Data Source check box. To see an example of a converted data source, see Example of Converted Data Source (page 4-55).
Query:1. If applicable, clear the Use Data Source check box.
The data source-related fields are hidden from the Query Converter page.
2. Enter the applicable information for the query.
3. Click Convert Query.
The query is converted and the results are displayed in a text area above the Use Data Source check box. To see an example of a converted query, see Example of Converted Query (page 4-56).
4-42 Managing System Settings and Processes
Configuring the Search Index
Editing a Converted Data Source or QueryAfter the data source or query is converted, the results are displayed above the Use Data Source check box. Because the conversion process clears the fields, the converted query can only be modified by entering new information in the fields. To do this for a data source or query, see the applicable sections in Converting a Data Source or Query (page 4-43).
Updating the Hint CacheThe following tasks are involved when updating the hint cache:
Checking the Hint Cache for Existing Hints (page 4-44)
Modifying an Existing Hint Cache Query or Data Source Entry (page 4-45)
Removing a Hint Cache Query or Data Source Entry (page 4-47)
The Hint Cache Updater page can be accessed from both the Hint Rules Configuration Page (page 4-49) or the Query Converter Page (page 4-53):
From the Hint Rules Configuration page
1. Open the Administration tray.
2. Click the Hint Rules Configuration link.
3. The Hint Rules Configuration page is displayed.
4. Select Hint Cache Updater from the Action pull-down menu.
5. The Hint Cache Updater page is displayed.
From the Query Converter page
1. Select Hint Cache Updater from the Action pull-down menu.
The Hint Cache Updater page is displayed.
Checking the Hint Cache for Existing Hints
Data Source:1. If applicable, select the Use Data Source check box.
The data source-related fields are displayed on the Hint Cache Updater page.
2. Select the desired data source from the DS Name pull-down menu.
The data source query is displayed in below the DS Name field.
Managing System Settings and Processes 4-43
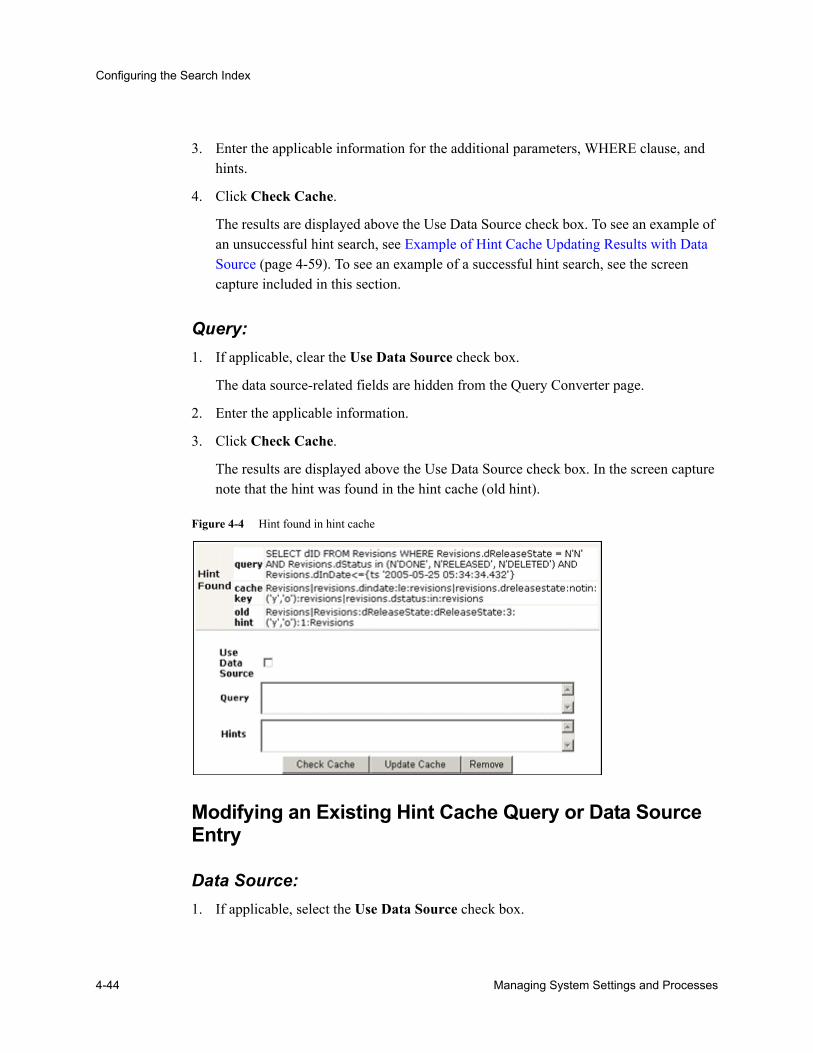
Configuring the Search Index
3. Enter the applicable information for the additional parameters, WHERE clause, and hints.
4. Click Check Cache.
The results are displayed above the Use Data Source check box. To see an example of an unsuccessful hint search, see Example of Hint Cache Updating Results with Data Source (page 4-59). To see an example of a successful hint search, see the screen capture included in this section.
Query:1. If applicable, clear the Use Data Source check box.
The data source-related fields are hidden from the Query Converter page.
2. Enter the applicable information.
3. Click Check Cache.
The results are displayed above the Use Data Source check box. In the screen capture note that the hint was found in the hint cache (old hint).
Figure 4-4 Hint found in hint cache
Modifying an Existing Hint Cache Query or Data Source Entry
Data Source:1. If applicable, select the Use Data Source check box.
4-44 Managing System Settings and Processes
Configuring the Search Index
The data source-related fields are displayed on the Hint Cache Updater page.
2. Select the desired data source from the DS Name pull-down menu.
The data source query is displayed in below the DS Name field.
3. Enter the applicable information for the additional parameters, WHERE clause, and hints.
4. Click Check Cache to find any existing hints in the hint cache. See Checking the Hint Cache for Existing Hints (page 4-44).
5. Click Update Cache to overwrite the previous hint cache.
The results are displayed in a text box above the Use Data Source check box. To see an example of successfully adding a new hint to a query and updating the hint cache, see the screen capture included in this section.
Query:1. If applicable, clear the Use Data Source check box.
The data source-related fields are hidden from the Query Converter page.
2. Enter the applicable information.
3. Click Check Cache to find any existing hints in the hint cache. See Checking the Hint Cache for Existing Hints (page 4-44).
4. Click Update Cache to overwrite the previous hint cache.
The results are displayed above the Use Data Source check box. In the screen capture note that the new hint was added and the hint cache was updated.
Managing System Settings and Processes 4-45
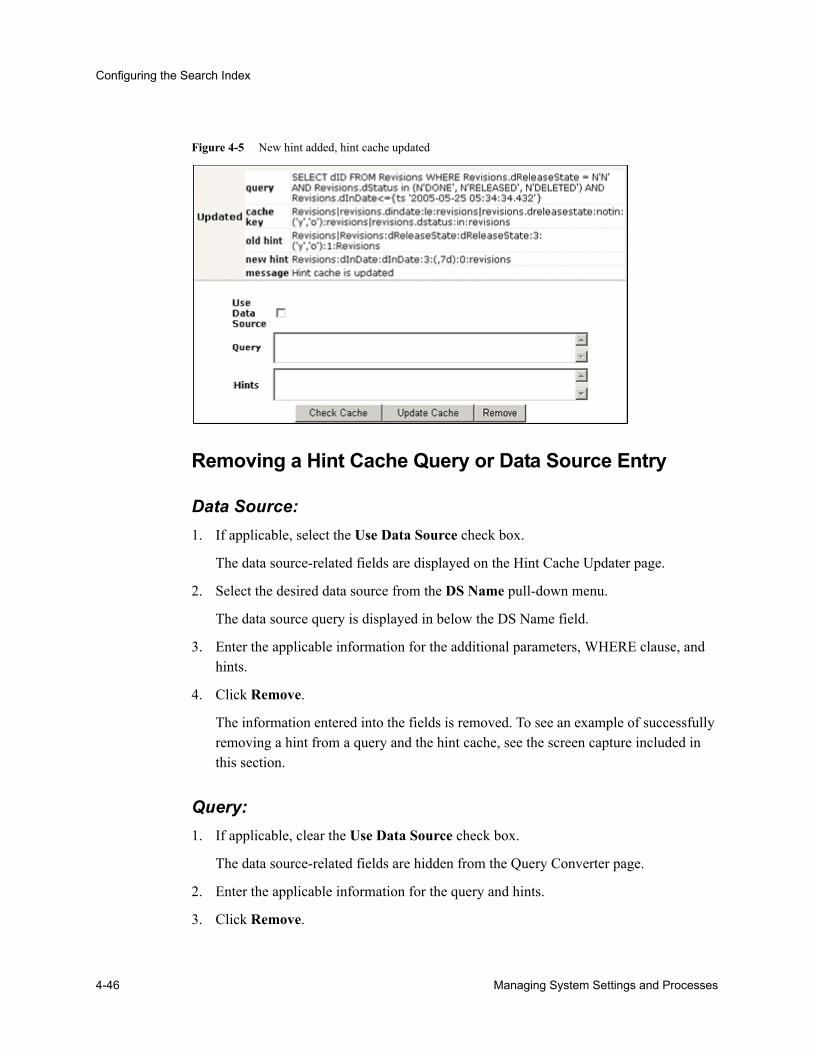
Configuring the Search Index
Figure 4-5 New hint added, hint cache updated
Removing a Hint Cache Query or Data Source Entry
Data Source:1. If applicable, select the Use Data Source check box.
The data source-related fields are displayed on the Hint Cache Updater page.
2. Select the desired data source from the DS Name pull-down menu.
The data source query is displayed in below the DS Name field.
3. Enter the applicable information for the additional parameters, WHERE clause, and hints.
4. Click Remove.
The information entered into the fields is removed. To see an example of successfully removing a hint from a query and the hint cache, see the screen capture included in this section.
Query:1. If applicable, clear the Use Data Source check box.
The data source-related fields are hidden from the Query Converter page.
2. Enter the applicable information for the query and hints.
3. Click Remove.
4-46 Managing System Settings and Processes
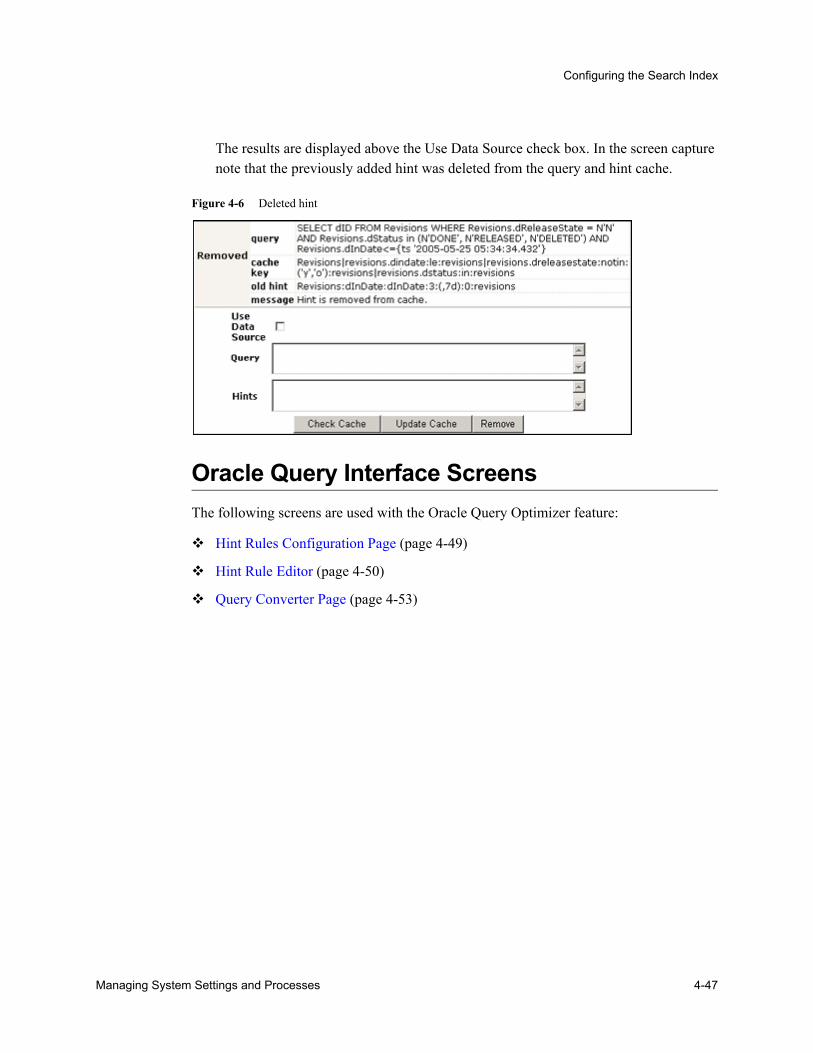
Configuring the Search Index
The results are displayed above the Use Data Source check box. In the screen capture note that the previously added hint was deleted from the query and hint cache.
Figure 4-6 Deleted hint
Oracle Query Interface ScreensThe following screens are used with the Oracle Query Optimizer feature:
Hint Rules Configuration Page (page 4-49)
Hint Rule Editor (page 4-50)
Query Converter Page (page 4-53)
Managing System Settings and Processes 4-47
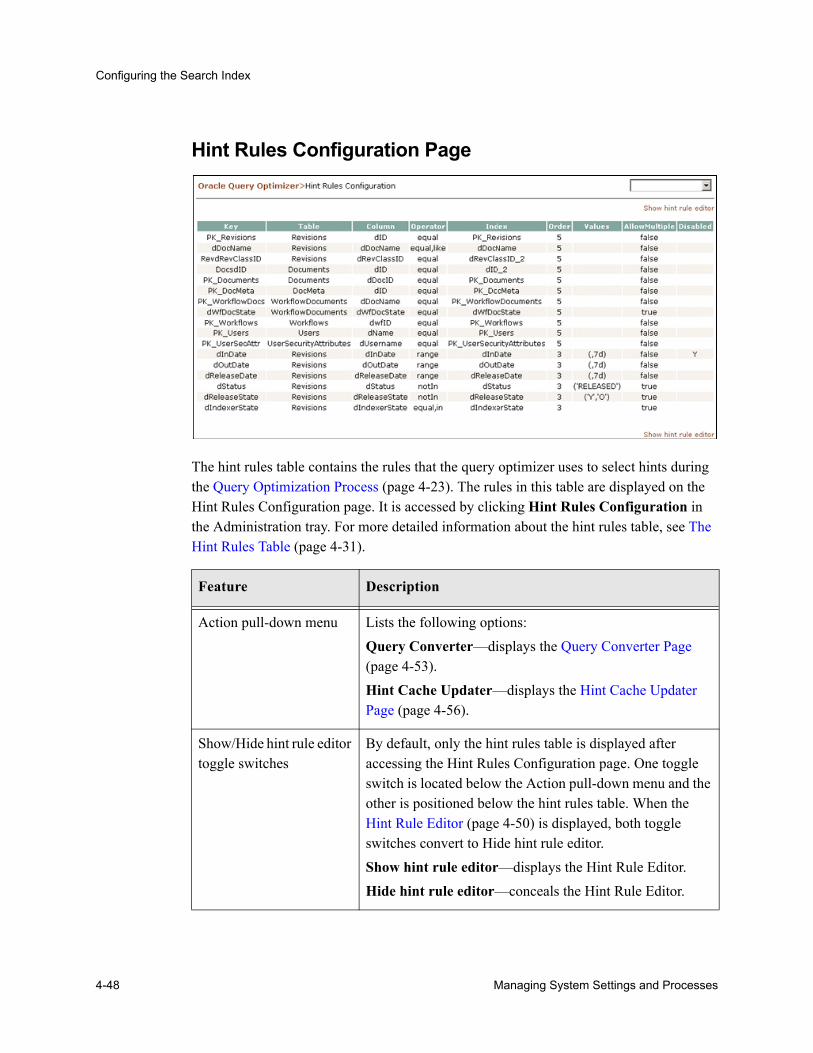
Configuring the Search Index
Hint Rules Configuration Page
The hint rules table contains the rules that the query optimizer uses to select hints during the Query Optimization Process (page 4-23). The rules in this table are displayed on the Hint Rules Configuration page. It is accessed by clicking Hint Rules Configuration in the Administration tray. For more detailed information about the hint rules table, see The Hint Rules Table (page 4-31).
Feature Description
Action pull-down menu Lists the following options:Query Converter—displays the Query Converter Page (page 4-53).Hint Cache Updater—displays the Hint Cache Updater Page (page 4-56).
Show/Hide hint rule editor toggle switches
By default, only the hint rules table is displayed after accessing the Hint Rules Configuration page. One toggle switch is located below the Action pull-down menu and the other is positioned below the hint rules table. When the Hint Rule Editor (page 4-50) is displayed, both toggle switches convert to Hide hint rule editor.Show hint rule editor—displays the Hint Rule Editor.Hide hint rule editor—conceals the Hint Rule Editor.
4-48 Managing System Settings and Processes
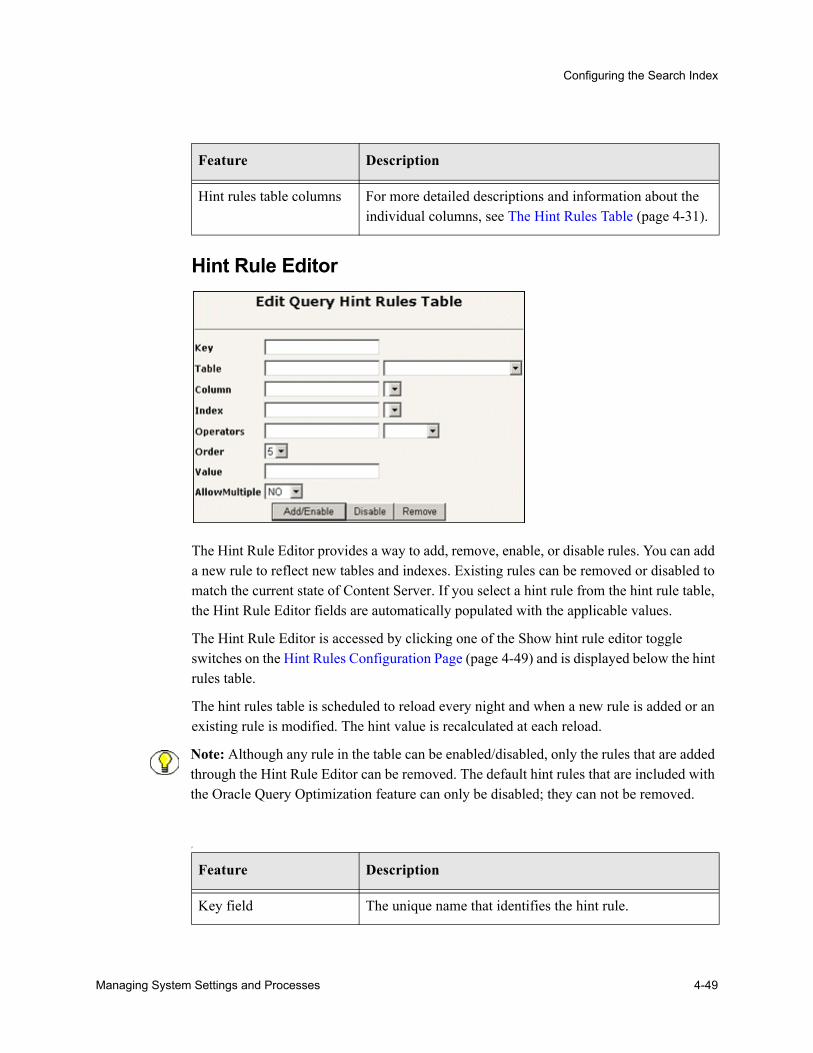
Configuring the Search Index
Hint Rule Editor
The Hint Rule Editor provides a way to add, remove, enable, or disable rules. You can add a new rule to reflect new tables and indexes. Existing rules can be removed or disabled to match the current state of Content Server. If you select a hint rule from the hint rule table, the Hint Rule Editor fields are automatically populated with the applicable values.
The Hint Rule Editor is accessed by clicking one of the Show hint rule editor toggle switches on the Hint Rules Configuration Page (page 4-49) and is displayed below the hint rules table.
The hint rules table is scheduled to reload every night and when a new rule is added or an existing rule is modified. The hint value is recalculated at each reload.
p
Hint rules table columns For more detailed descriptions and information about the individual columns, see The Hint Rules Table (page 4-31).
Feature Description
Note: Although any rule in the table can be enabled/disabled, only the rules that are added through the Hint Rule Editor can be removed. The default hint rules that are included with the Oracle Query Optimization feature can only be disabled; they can not be removed.
Feature Description
Key field The unique name that identifies the hint rule.
Managing System Settings and Processes 4-49
Configuring the Search Index
Table field and pull-down menu
Identifies the database table associated with the hint rule. The pull-down menu lists the current database tables. Selecting a table from the pull-down menu automatically populates the Column field, Column pull-down menu options, Index field and Index pull-down menu options.
Column field and pull-down menu
Identifies the database table column associated with the hint rule. Selecting a column from the pull-down menu automatically populates the Index field and Index pull-down menu options.
Index field and pull-down menu
Identifies the index associated with the hint rule.
Feature Description
4-50 Managing System Settings and Processes
Configuring the Search Index
Operators field and pull-down menu
Identifies the specific operator(s) associated with the hint rule. Valid options include:equal—compares records to find equal values.like—compares records to find similar values.in—compares records to find values equal to any member of the specified item(s). Using this operator allows you to define the Values field.greater—compares records to find larger values on the left.ge—(greater than or equal to) compares records to find equal values or larger values on the left.le—(less than or equal to) compares records to find equal values or smaller values on the left.less—compares records to find larger values on the right.notEqual—compares records to find different values.notIn—compares records to find values that are not equal to any member of the specified item(s). Using this operator allows you to define the Values field.notLike—compares records to find dissimilar values.generic—this operator should be used if multiple operators are used in the conditions and are connected by an OR conjunction. For example: dIndexerState IS NULL OR dIndexerState IN ('N', 'Y').range—this operator can be applied to an Integer field or a Date field. This operator should be used when the Values field is defined with a valid range of values that would cause the hint to be applied. Using this operator allows you to define the Values field. For more detailed information about range operator formats, see Values (page 4-35).
Order pull-down menu In descending order from 5 to 1, indicates the preference value of the hint rule. During the optimization process, the highest ranked hint rule that meets the condition’s requirements is selected. For more detailed information, see Order (page 4-35).
Feature Description
Managing System Settings and Processes 4-51

Configuring the Search Index
Query Converter PageFigure 4-7 Query Converter Page with the Data Source Option
Values field Specifies applicable quantities when used in conjunction with the operators in, notIn, and range—see the Operators field on the Hint Rule Editor (page 4-50). For more detailed information about using this Values field with the allowed operators, see Values (page 4-35).
AllowMultiple pull-down menu
Available options include:Yes—the defined index can be used in conjunction with other indexes.No—the defined index must be used alone.
Add/Enable button Used to add/edit a hint rule or activate a disabled hint rule.
Disable button Deactivates the selected rule. For more detailed information, see Disabled (page 4-36).
Remove button Deletes the selected hint rule from the hint rules table. Only rules added using the Hint Rule Editor can be removed.
Feature Description
4-52 Managing System Settings and Processes
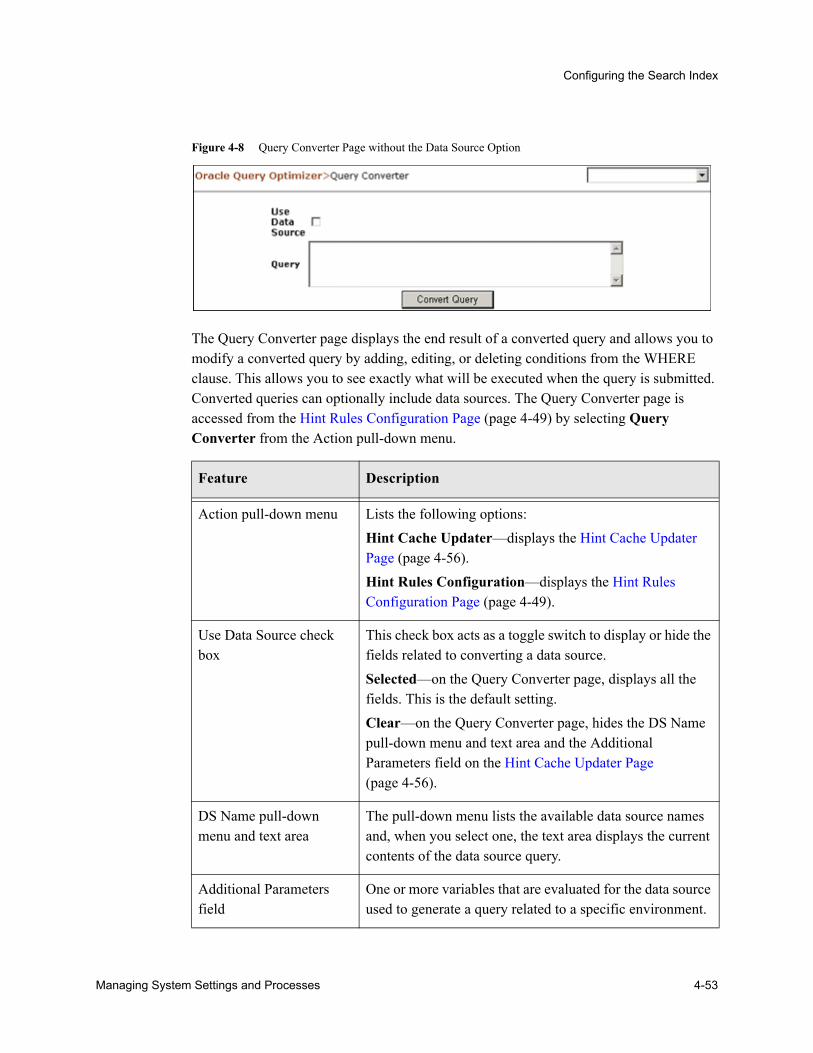
Configuring the Search Index
Figure 4-8 Query Converter Page without the Data Source Option
The Query Converter page displays the end result of a converted query and allows you to modify a converted query by adding, editing, or deleting conditions from the WHERE clause. This allows you to see exactly what will be executed when the query is submitted. Converted queries can optionally include data sources. The Query Converter page is accessed from the Hint Rules Configuration Page (page 4-49) by selecting Query Converter from the Action pull-down menu.
Feature Description
Action pull-down menu Lists the following options:Hint Cache Updater—displays the Hint Cache Updater Page (page 4-56).Hint Rules Configuration—displays the Hint Rules Configuration Page (page 4-49).
Use Data Source check box
This check box acts as a toggle switch to display or hide the fields related to converting a data source.Selected—on the Query Converter page, displays all the fields. This is the default setting.Clear—on the Query Converter page, hides the DS Name pull-down menu and text area and the Additional Parameters field on the Hint Cache Updater Page (page 4-56).
DS Name pull-down menu and text area
The pull-down menu lists the available data source names and, when you select one, the text area displays the current contents of the data source query.
Additional Parameters field
One or more variables that are evaluated for the data source used to generate a query related to a specific environment.
Managing System Settings and Processes 4-53
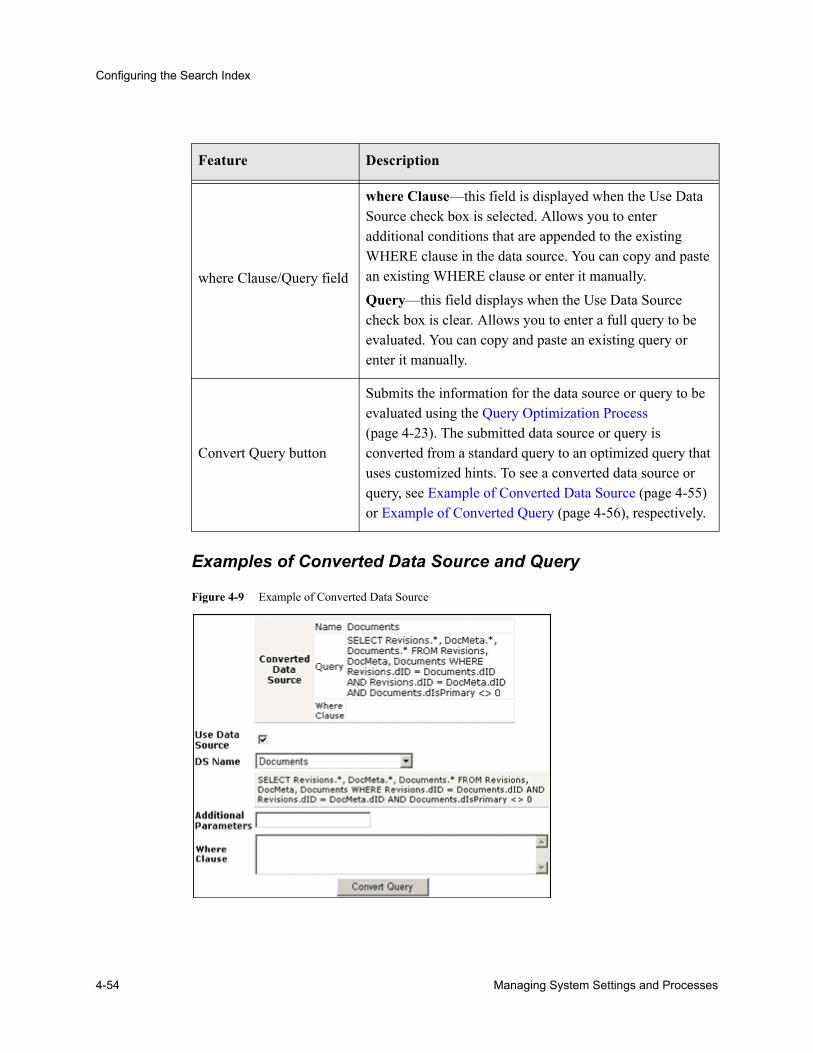
Configuring the Search Index
Examples of Converted Data Source and Query
Figure 4-9 Example of Converted Data Source
where Clause/Query field
where Clause—this field is displayed when the Use Data Source check box is selected. Allows you to enter additional conditions that are appended to the existing WHERE clause in the data source. You can copy and paste an existing WHERE clause or enter it manually.Query—this field displays when the Use Data Source check box is clear. Allows you to enter a full query to be evaluated. You can copy and paste an existing query or enter it manually.
Convert Query button
Submits the information for the data source or query to be evaluated using the Query Optimization Process (page 4-23). The submitted data source or query is converted from a standard query to an optimized query that uses customized hints. To see a converted data source or query, see Example of Converted Data Source (page 4-55) or Example of Converted Query (page 4-56), respectively.
Feature Description
4-54 Managing System Settings and Processes
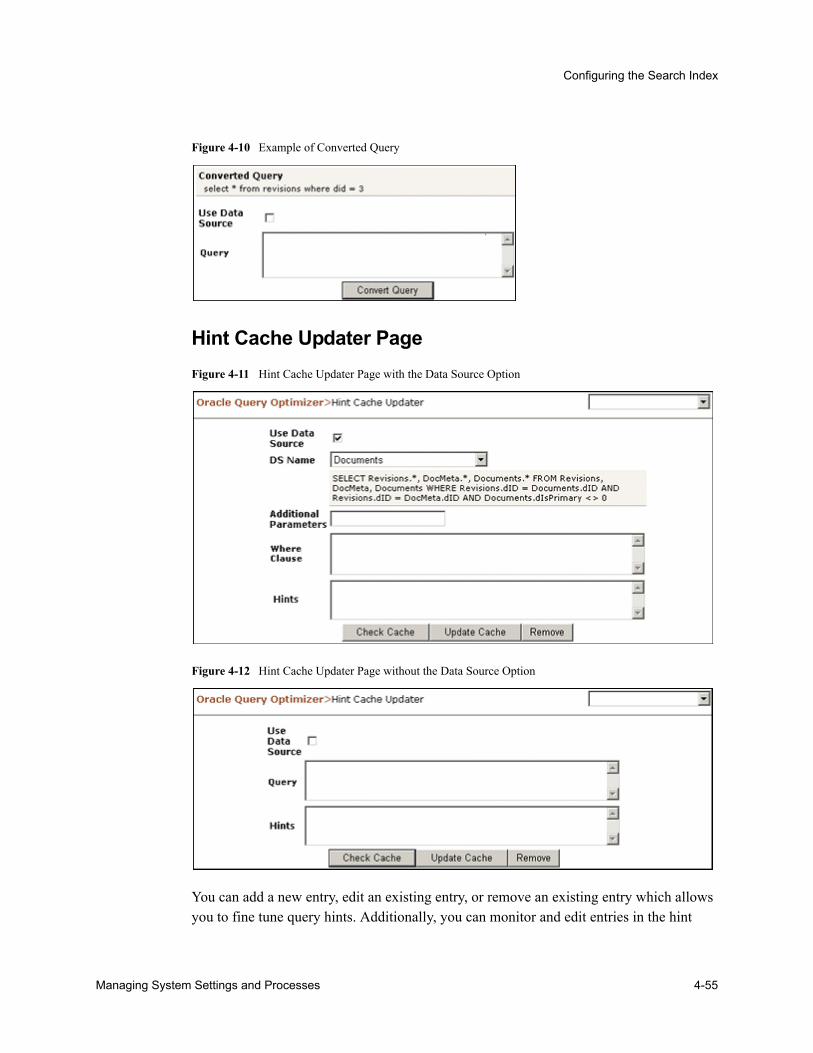
Configuring the Search Index
Figure 4-10 Example of Converted Query
Hint Cache Updater PageFigure 4-11 Hint Cache Updater Page with the Data Source Option
Figure 4-12 Hint Cache Updater Page without the Data Source Option
You can add a new entry, edit an existing entry, or remove an existing entry which allows you to fine tune query hints. Additionally, you can monitor and edit entries in the hint
Managing System Settings and Processes 4-55
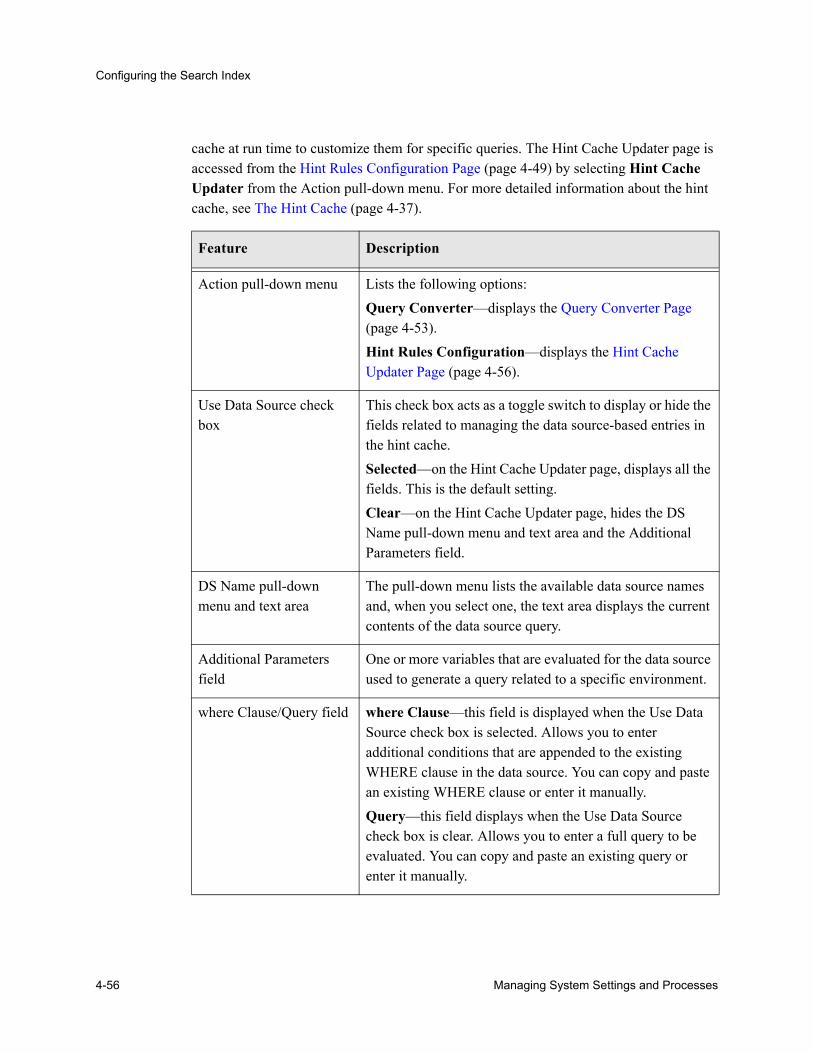
Configuring the Search Index
cache at run time to customize them for specific queries. The Hint Cache Updater page is accessed from the Hint Rules Configuration Page (page 4-49) by selecting Hint Cache Updater from the Action pull-down menu. For more detailed information about the hint cache, see The Hint Cache (page 4-37).
Feature Description
Action pull-down menu Lists the following options:Query Converter—displays the Query Converter Page (page 4-53).Hint Rules Configuration—displays the Hint Cache Updater Page (page 4-56).
Use Data Source check box
This check box acts as a toggle switch to display or hide the fields related to managing the data source-based entries in the hint cache.Selected—on the Hint Cache Updater page, displays all the fields. This is the default setting.Clear—on the Hint Cache Updater page, hides the DS Name pull-down menu and text area and the Additional Parameters field.
DS Name pull-down menu and text area
The pull-down menu lists the available data source names and, when you select one, the text area displays the current contents of the data source query.
Additional Parameters field
One or more variables that are evaluated for the data source used to generate a query related to a specific environment.
where Clause/Query field where Clause—this field is displayed when the Use Data Source check box is selected. Allows you to enter additional conditions that are appended to the existing WHERE clause in the data source. You can copy and paste an existing WHERE clause or enter it manually.Query—this field displays when the Use Data Source check box is clear. Allows you to enter a full query to be evaluated. You can copy and paste an existing query or enter it manually.
4-56 Managing System Settings and Processes

Configuring the Search Index
Hints field Enter any additional hints for the data source or query. If you enter one or more Content Server Hints (page 4-28), the Oracle Query Optimizer feature will consider them as default hints and they will not go through the Query Optimization Process (page 4-23). If you enter multiple hints, the feature will look for the best hint and, if possible, select more than one.
Check Cache button Evaluates the submitted query and checks the hint cache to determine if matching hints already exist. If so, they are returned. If not, the message, “Hint does not exist in cache” is displayed.With data source—Combines the WHERE clause and hints and applies the additional parameters before submitting the query for evaluation.Without data source—Combines the query and hints before submitting the query for evaluation.
Update Cache button Ensures that the data source or query will always use the specified hints because the hint cache is updated. Thus, clicking this button results in a manual overwrite of the previously defined hint cache. This means that from now on, the new hints will be used with this particular query.To see the results of updating a data source or query entry, see Example of Hint Cache Updating Results with Data Source (page 4-59) or Example of Hint Cache Updating Results without Data Source (page 4-59), respectively.
Remove button Removes the information entered into any of the fields for the specified query. To see the results of removing an existing hint from a query, see Removing a Hint Cache Query or Data Source Entry (page 4-47).
Feature Description
Managing System Settings and Processes 4-57

Configuring the Search Index
Examples of Hint Cache Updating Results
Figure 4-13 Example of Hint Cache Updating Results with Data Source
Figure 4-14 Example of Hint Cache Updating Results without Data Source
4-58 Managing System Settings and Processes
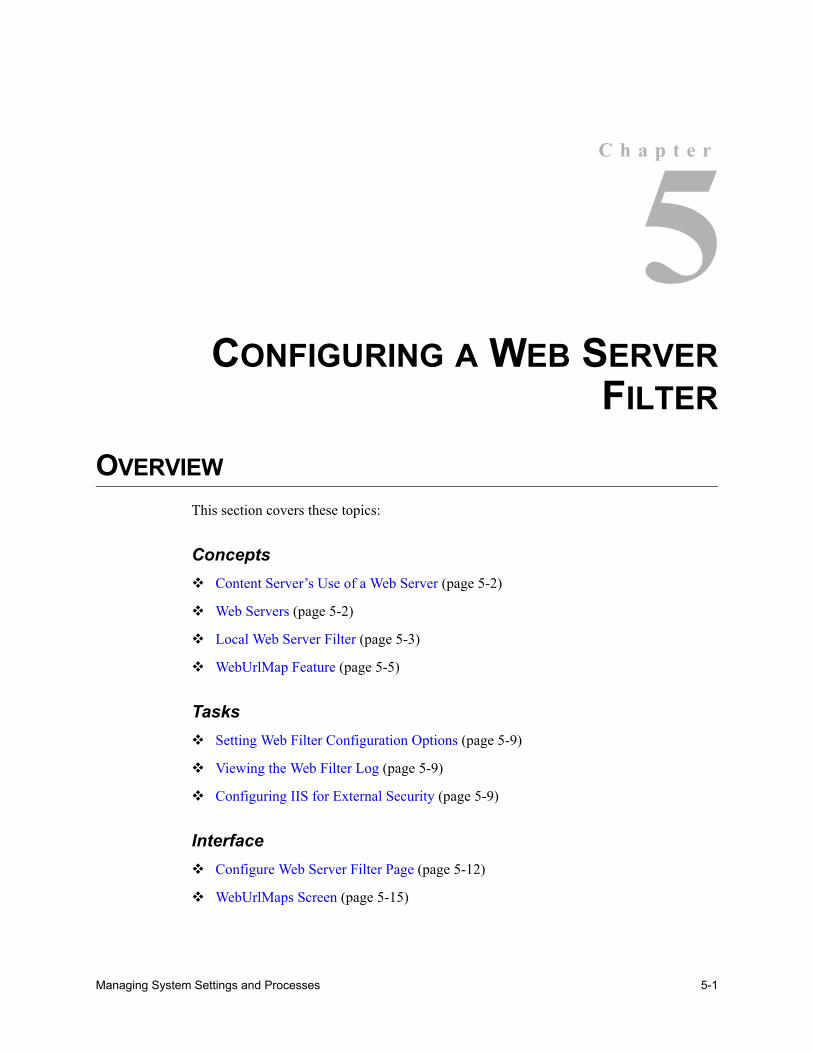
C h a p t e r
5.CONFIGURING A WEB SERVERFILTER
OVERVIEWThis section covers these topics:
ConceptsContent Server’s Use of a Web Server (page 5-2)
Web Servers (page 5-2)
Local Web Server Filter (page 5-3)
WebUrlMap Feature (page 5-5)
TasksSetting Web Filter Configuration Options (page 5-9)
Viewing the Web Filter Log (page 5-9)
Configuring IIS for External Security (page 5-9)
InterfaceConfigure Web Server Filter Page (page 5-12)
WebUrlMaps Screen (page 5-15)
Managing System Settings and Processes 5-1
Configuring a Web Server Filter
CONTENT SERVER’S USE OF A WEB SERVERIn general terms, a web server is a computer equipped with the server software that uses Internet protocols such as HTTP to respond to client browser requests on a TCP/IP network. Web servers make it easy to publish content to the Internet. Common web servers such as Internet Information Services (IIS), iPlanet/Sun ONE, and Apache can help you administer, oversee, and maintain a web site.
Content Server requires a web server to be able to serve pages through a browser. A local web server filter is installed in the web server so that user requests can be authenticated in the content server.
When Content Server is installed, the web server filter is installed with default configuration settings. However, you can change and troubleshoot these settings on the Configure Web Server Filter Page (page 5-12).
Web ServersContent Server works with several common web servers:
Internet Information Services (IIS) (page 5-2)
iPlanet/Sun ONE (page 5-2)
Apache (page 5-3)
Internet Information Services (IIS)IIS is Microsoft’s web server. IIS has a built-in mechanism where it authenticates the user password after querying the PDC (Primary Domain Controller), or cache. After this process, the local ISAPI web server filter takes over the authorization protocol.
iPlanet/Sun ONEThe iPlanet/Sun ONE web server is Sun’s web server. iPlanet/Sun ONE automatically defaults the authentication protocol to Netscape Directory Server. The local NSAPI web server filter authenticates content server requests in an iPlanet/Sun ONE web server.
5-2 Managing System Settings and Processes
Configuring a Web Server Filter
ApacheThe Apache HTTP server is an open-source web server that can run on Windows or UNIX operating systems. The local Apache Loadable Module (ALM) authenticates content server requests in the Apache web server.
See Also– Local Web Server Filter (page 5-3)
– Getting Started with the Software Developer’s Kit (SDK)
Local Web Server FilterWhen Content Server is installed, an ISAPI or NSAPI web server filter is also installed in the default web server. The Apache module must be installed manually. The local web server filter is written in C++, which makes it compatible with multiple operating systems and multiple web servers.
The following web server filter files are located in the <install_dir>/idcplg/ directory:
IIS (ISAPI): idc_cgi_isapi-<instance>.dll
iPlanet/Sun ONE (NSAPI): nph-idc_cgi.exe
Filter Plug-InsSome Content Server features include a custom filter plug-in that modifies the behavior of the standard web server filter.
The name of the custom plug-in is specified in the IdcAuthPlugins table, which is typically defined in the <install_dir>/data/users/SecurityInfo.hda file, or can be defined in a resource table that is merged into the IdcAuthPlugins table. For example, the Extranet Look feature includes the following files to add the CookieLoginPlugin filter plug-in:
extranetlook_resource.hda file:@ResultSet IdcAuthPlugins_CookieLogin2iapExportedSymbolNameiapFileNameRootCookieLoginPluginCookieLoginPlugin@end
Managing System Settings and Processes 5-3

Configuring a Web Server Filter
extranet_look.hda file:@ResultSet MergeRules4fromTabletoTablecolumnloadOrderIdcAuthPlugins_CookieLoginIdcAuthPluginsiapExportedSymbolName1...@end
Plug-in ArchitectureThe web server filter uses a universal plug-in architecture that allows the filter to process events such as:
preprocessRequest
computeUser
computeCredentials
alterCredentials
alterApproveUrl
immediateResponsePage
computerServerResponse
handleRequest
getFilterVersion
This architecture uses a number of communication protocols. In a typical Windows security integration scenario, the browser makes a call to the web server using HTTP (Hypertext Transfer Protocol), in which case the web server goes to the NT domain or Active Directory to verify the user’s credentials using NTLM. When the web server receives a response, it queries the PDC (Primary Domain Controller) and send the user’s credentials via TCP/IP.
Note: The iapFileNameRoot can be a full path rather than just the file name of the plug-in.
5-4 Managing System Settings and Processes
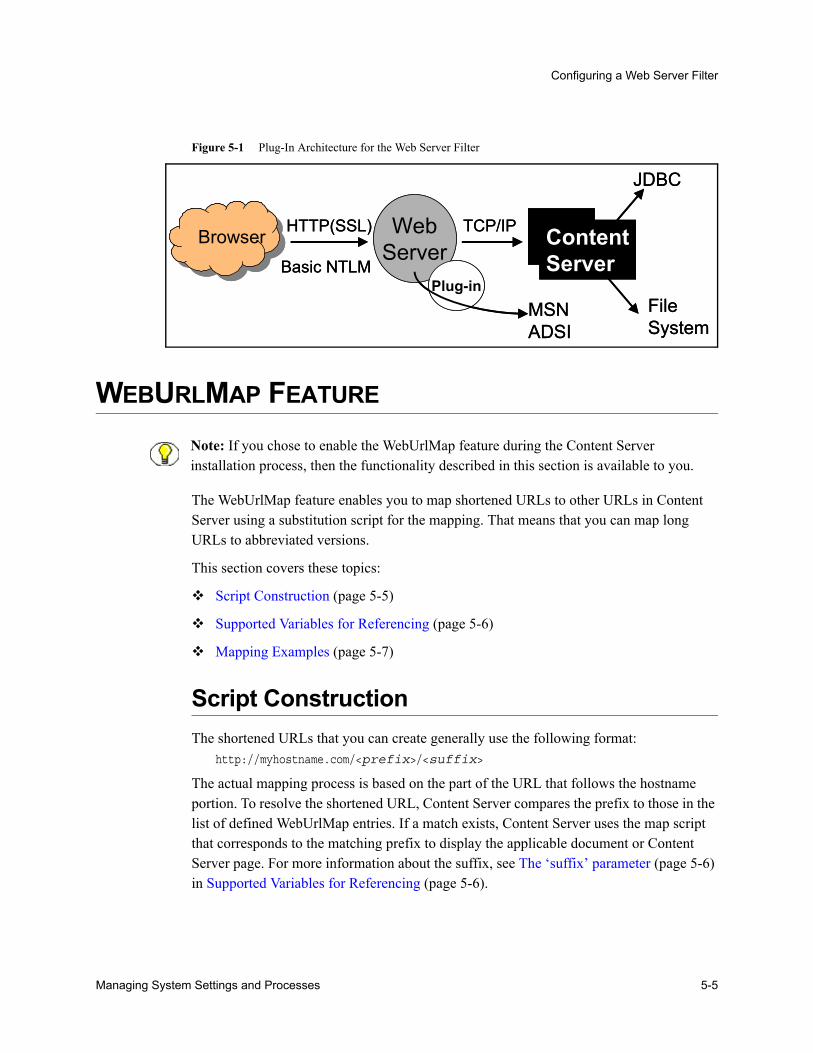
Configuring a Web Server Filter
Figure 5-1 Plug-In Architecture for the Web Server Filter
WEBURLMAP FEATURE
The WebUrlMap feature enables you to map shortened URLs to other URLs in Content Server using a substitution script for the mapping. That means that you can map long URLs to abbreviated versions.
This section covers these topics:
Script Construction (page 5-5)
Supported Variables for Referencing (page 5-6)
Mapping Examples (page 5-7)
Script ConstructionThe shortened URLs that you can create generally use the following format:
http://myhostname.com/<prefix>/<suffix>
The actual mapping process is based on the part of the URL that follows the hostname portion. To resolve the shortened URL, Content Server compares the prefix to those in the list of defined WebUrlMap entries. If a match exists, Content Server uses the map script that corresponds to the matching prefix to display the applicable document or Content Server page. For more information about the suffix, see The ‘suffix’ parameter (page 5-6) in Supported Variables for Referencing (page 5-6).
Browser WebServer
HTTP(SSL) ContentServer
Plug-inBasic NTLM
MSNADSI
TCP/IP
JDBC
File System
Browser WebServer
HTTP(SSL) ContentServer
Plug-inBasic NTLM
MSNADSI
TCP/IP
JDBC
File System
Note: If you chose to enable the WebUrlMap feature during the Content Server installation process, then the functionality described in this section is available to you.
Managing System Settings and Processes 5-5
Configuring a Web Server Filter
To construct a URL mapping entry using the WebUrlMaps Screen (page 5-15), you need to establish a prefix and define the corresponding map.
Prefix
The prefix portion of the mapping entry is any abbreviation that you want to use to identify URLs of a certain form. For example, if you want your short URL to return the dynamic conversions of documents, you can use “dc” as your prefix (e.g. the abbreviated form of dynamic converter).
Map
The map portion of the mapping entry is the IdocScript code that Content Server uses to resolve the shortened URL. You can use substitution tags (<!--$variable-->) in the map portion. Examples include <!--$cgipath-->, <!--$internetuser-->, and <!--$suffix-->. These substitution tags are variables that refer to the applicable parameters of a URL.
Simple ‘if’ constructions are also supported. For example, the following script segment performs a test to determine whether a value exists and is not empty:
<!--$if myconfigvar-->something<!--$endif-->
Supported Variables for ReferencingThe map portion of the URL mapping entry uses the following standard variables for referencing:
The CGI path
This is the current CGI path of the web server filter's configured master Content Server. The web server filter is configured to provide both communication and security for this Content Server. A typical example is /idcm1/idcplg.
The ‘suffix’ parameter
Note: When you create your prefix, do not enter a slash (/) character at the beginning of it because Content Server removes the first slash from the incoming URL before the prefix test is performed.
Caution: You should include a forward slash (/) at the end of your URL map prefix. Otherwise, your mappings can apply to many more URLs and interfere with standard Content Server operations.
5-6 Managing System Settings and Processes
Configuring a Web Server Filter
The value of the suffix variable (<!--$suffix-->) is derived from the part of the URL that follows the preliminary mapping ‘prefix’ and before the question mark (?). Any slashes (/) at the beginning of the suffix are removed before being substituted into this variable. For example, in the following URL, ‘dc’ is the mapping prefix followed by the suffix.
http://myhostname.com/dc/mydocumentname
After removing the slash, ‘mydocumentname’ is used as the value for the suffix variable that is used as a substitution tag in the map portion of the mapping entry. Also, the suffix variable does not include any CGI parameters. Therefore, in the following URL, ‘mydocumentname’ is still used as the suffix variable’s value.
http://myhostname.com/dc/mydocumentname?a=1
Any plugin variable
For example, you could use the construct <!--$internetuser--> to substitute for the user ID of the currently logged-in user.
Any CGI parameter
Mapping Examples
Example 1: Info Update FormYou can define a web URL mapping script that enables you to create a shortened URL to generate the Info Update Form for existing content items. You can write the mapping script to allow users to enter any identification variable for a particular document. For example, all URLs with the following format:
http://myhostname.com/u/mydoc_parameter
can be mapped to the URL:http://myhostname.com/idcm1//idcplg?IdcService=GET_UPDATE_FORM&dDocName=mydocumentname
To do this, define the following web URL map entry using the WebUrlMaps Screen (page 5-15):
Prefix:
u/
Note: If you want to enforce the slash separation between the prefix and suffix, add the slash at the end of your prefix abbreviation.
Managing System Settings and Processes 5-7

Configuring a Web Server Filter
Map:<!--$cgipath-->?IdcService=GET_UPDATE_FORM<!--$suffix-->&myparam=<!--$myparam-->
Example 2: Dynamic ConversionYou can define a web URL mapping script that enables you to create shortened URLs to various dynamic conversions of documents. For example, all URLs with the following format:
http://myhostname.com/dc/mydocumentname
can be mapped to the URL:http://myhostname.com/idcm1/idcplg?IdcService=GET_DYNAMIC_CONVERSION&dDocName=mydocumentname&RevisionSelectionMethod=LatestReleased
To do this, define the following web URL map entry using the WebUrlMaps Screen (page 5-15):
Prefix:
dc/
Map:<!--$cgipath-->?IdcService=GET_DYNAMIC_CONVERSION&dDocName=<!--$suffix-->&RevisionSelectionMethod=LatestReleased
Example 3: CGI parametersYou can also directly reference CGI parameters. For example, URLs with the following format:
http://myhostname.com/dcp/mydocumentname?myparam=myvalue
can be mapped to the URL:http://myhostname.com/idcm1/idcplg?IdcService=GET_DYNAMIC_CONVERSION&dDocName=mydocumentname&RevisionSelectionMethod=LatestReleased&myparam=myvalue
To do this, define the following web URL map entry using the WebUrlMaps Screen (page 5-15):
Prefix:
dcp/
Note: You need to have Dynamic Converter installed for this URL mapping example to work.
5-8 Managing System Settings and Processes
Configuring a Web Server Filter
Map:<!--$cgipath-->?IdcService=GET_DYNAMIC_CONVERSION&dDocName=<!--$suffix-->&RevisionSelectionMethod=LatestReleased&myparam=<!--$myparam-->
MANAGING WEB SERVER FILTER OPTIONSThis section covers these topics:
Setting Web Filter Configuration Options (page 5-9)
Viewing the Web Filter Log (page 5-9)
Configuring IIS for External Security (page 5-9)
Add/Edit URL Mapping Entries (page 5-10)
Setting Web Filter Configuration OptionsTo change web filter configuration options:
1. Display the Configure Web Server Filter Page (page 5-12).
2. Change options as required.
3. Click Update.
Viewing the Web Filter LogTo view the web filter log:
1. Display the Configure Web Server Filter Page (page 5-12).
2. In the View Web Filter Log field, enter the amount of logged data to view.
3. Click the Go button next to the View Web Filter Log field.
4. To clear the web filter log, click the Go button next to Clear Web Filter Log.
5. To view the type and version number of the web filter, click the Go button next to Retrieve Filter Version Info.
Configuring IIS for External SecurityIf you are integrating an external user base with an IIS web server, you must set up IIS as follows:
Managing System Settings and Processes 5-9
Configuring a Web Server Filter
1. Open the Internet Information Services screen. On Windows 2000, select Start—Programs—Administrative Tools—Internet Services Manager.
2. Expand the web server that is used by the content server.
3. Expand the Default Web Site.
4. Right-click the content server virtual directory and select Properties.
The Properties screen is displayed.
5. Click the Directory Security tab.
6. Under Anonymous access and authentication control, click Edit.
The Authentication Methods screen is displayed.
7. Make sure Anonymous access and Integrated Windows authentication are selected.
8. Click OK.
9. Repeat steps 4 through 8 for the /idcplg virtual directory.
10. Close the Internet Information Services screen.
11. Open the Services screen. On Windows 2000, select Start—Programs—Administrative Tools—Services.
12. Select IIS Admin Service.
13. Click the Restart button to restart the IIS Admin Service. (If you stop and then start this service, make sure that you also start the World Wide Web Publishing and the Simple Mail Transfer Protocol (SMTP) services.)
14. Close the Services screen.
Add/Edit URL Mapping EntriesTo add or edit URL mapping entries:
1. On the Administration page, click the Filter Administration icon.
The Configure Web Server Filter Page (page 5-12) is displayed.
2. In the Other Options section, click the Edit the WebUrlMap link.
The WebUrlMaps Screen (page 5-15) is displayed.
3. Enter the appropriate values in the Prefix and Map fields to edit the existing mapping entries and/or define new entries.
5-10 Managing System Settings and Processes
Configuring a Web Server Filter
4. Click Update.
The screen refreshes and the Prefix and Map field values are saved. If all of the displayed fields are populated, two additional Prefix and Map field pairs are displayed after the screen is redisplayed.
WEB SERVER FILTER INTERFACE SCREENSThis section covers these topics:
Configure Web Server Filter Page (page 5-12)
WebUrlMaps Screen (page 5-15)
Important: The WebUrlMaps feature is designed to support hundreds of mapping entries. However, be aware that thousands of mapping entries will impact performance of the web server.
Managing System Settings and Processes 5-11
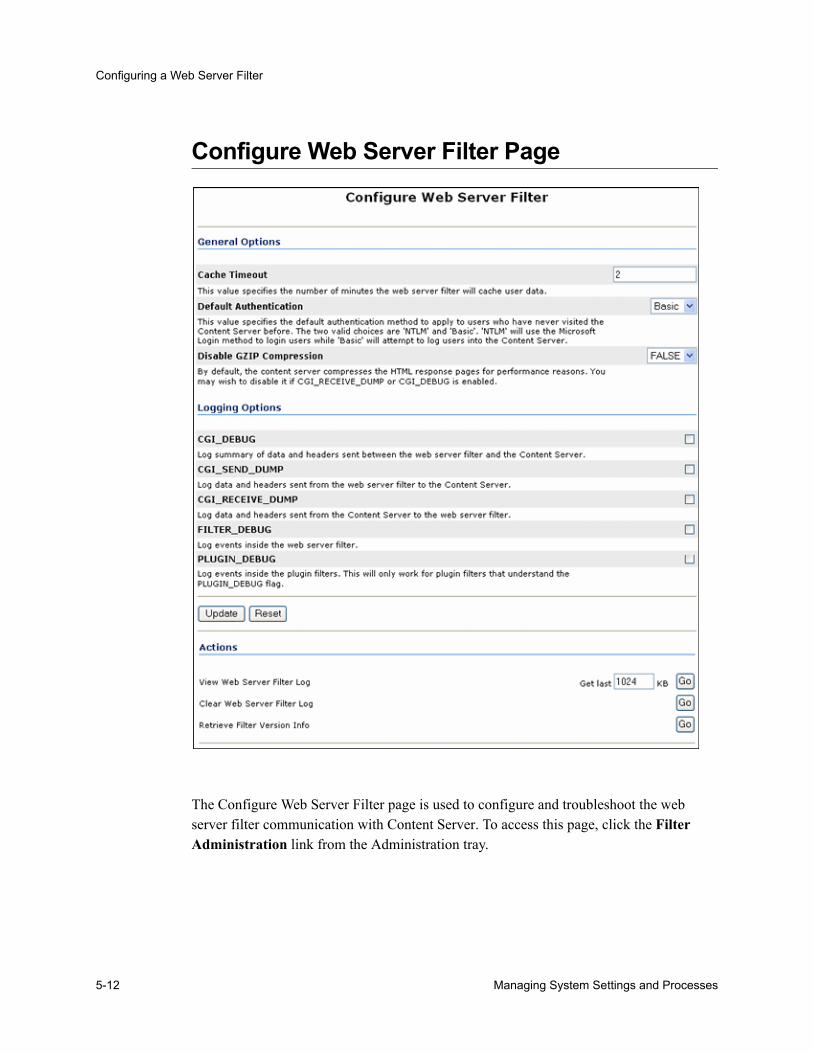
Configuring a Web Server Filter
Configure Web Server Filter Page
The Configure Web Server Filter page is used to configure and troubleshoot the web server filter communication with Content Server. To access this page, click the Filter Administration link from the Administration tray.
5-12 Managing System Settings and Processes
Configuring a Web Server Filter
Feature Description
General Options
Cache Timeout field Sets the amount of time in minutes that the web server holds user credentials. To maintain the content server user credentials, you should select a finite time for the web server to cache user data.
Default Authentication field
The first time a user logs into the content server, a cookie is sent to the filter. If you change the default authentication from the default Basic to NTLM, the first time a user logs into the content server the user will not be prompted to log in again because their credentials will automatically be authenticated.
Disable GZIP Compression
For optimal performance, the content server compresses the HTML response pages. This option is useful for debugging purposes.TRUE = Prevents the content server from compressing HTML response pages.FALSE = Configures the content server to compress HTML response pages. This is the default setting.
Logging Options
When you select any of the logging options, a web server filter log file will be created as follows:
IIS: <install_dir>/<idcm1>/idcplg/idc_cgi_isapi-idcm1.dll.log
Apache or NES: <install_dir>/data/users/authfilt.log
CGI_DEBUG check box
Enables logging of high-level information that is passed through the web server filter. This is helpful in determining password and user authentication problems.
CGI_SEND_DUMP check box
Enables logging of all incoming data that is passed through the web server filter.
CGI_RECEIVE_DUMP check box
Enables logging of all outgoing data that is passed through the web server filter.
Managing System Settings and Processes 5-13
Configuring a Web Server Filter
FILTER_DEBUG check box
Enables logging of events that occur inside the web server filter.
PLUGIN_DEBUG check box
Enables logging of events that occur inside any web server plug-in filters that understand this flag.
Buttons
Update button Saves any changes to the web filter configuration settings.
Reset button Returns the web filter configuration settings to their last saved values.
Actions
View Web Server Filter Log field and Go button
This option enables you to view the log file and limit how much of the log file is displayed. (Communication between the web server and content server can generate a large amount of information.)
Clear Web Server Filter Log Go button
Clears the log file.
Retrieve Filter Version Info Go button
Displays the version of the web server filter and any plug-in version information that might be useful in detecting user authentication errors.
Other Options
Edit the WebUrlMap link
If you elected to install and enable the WebURLMap function, this link appears and displays the WebUrlMaps Screen (page 5-15).
Feature Description
5-14 Managing System Settings and Processes
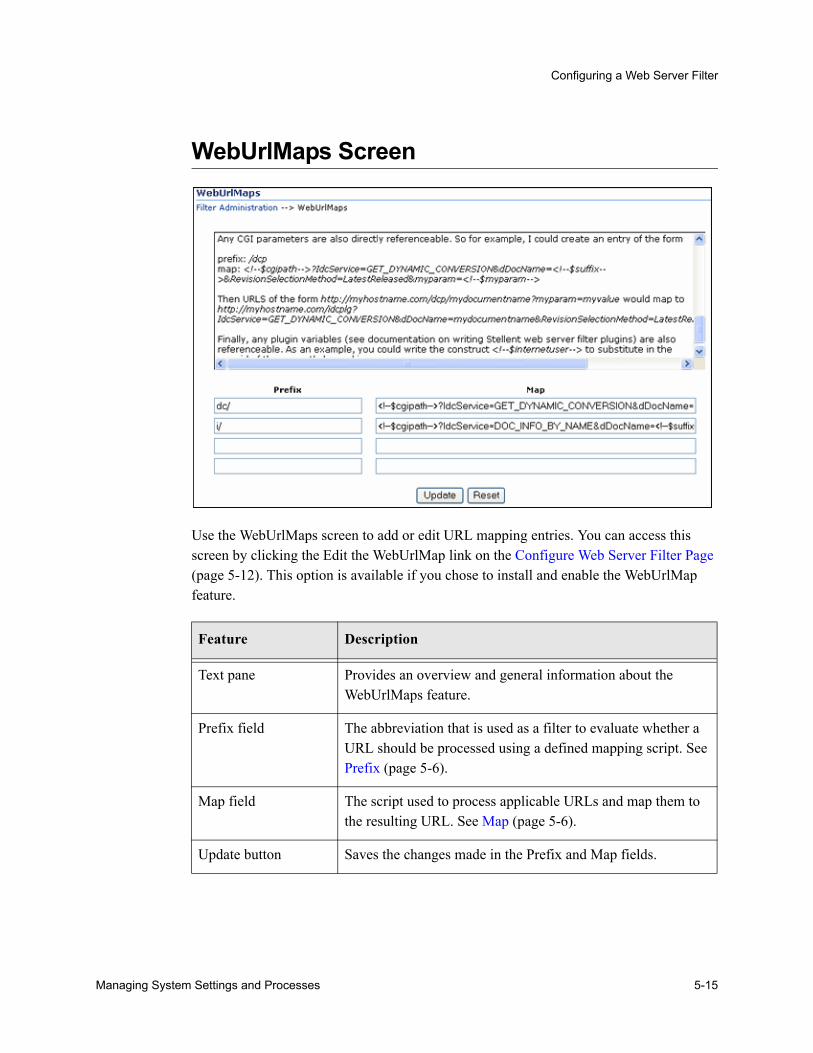
Configuring a Web Server Filter
WebUrlMaps Screen
Use the WebUrlMaps screen to add or edit URL mapping entries. You can access this screen by clicking the Edit the WebUrlMap link on the Configure Web Server Filter Page (page 5-12). This option is available if you chose to install and enable the WebUrlMap feature.
Feature Description
Text pane Provides an overview and general information about the WebUrlMaps feature.
Prefix field The abbreviation that is used as a filter to evaluate whether a URL should be processed using a defined mapping script. See Prefix (page 5-6).
Map field The script used to process applicable URLs and map them to the resulting URL. See Map (page 5-6).
Update button Saves the changes made in the Prefix and Map fields.
Managing System Settings and Processes 5-15
Configuring a Web Server Filter
Reset button Reverts the values of the Prefix and Map fields to their previously saved settings. Any values entered but not saved are removed from the fields.
Feature Description
5-16 Managing System Settings and Processes

C h a p t e r
6.CONNECTING TO OUTSIDEENTITIES WITH PROVIDERS
OVERVIEWThis section covers these topics:
ConceptsAbout Providers (page 6-2)
Content Server Providers (page 6-2)
Adding an Appropriate Provider (page 6-3)
TasksAdding an Outgoing Provider (page 6-9)
Adding a Database Provider (page 6-11)
Adding an Incoming Provider (page 6-11)
Adding a Preview Provider (page 6-11)
Editing Provider Information (page 6-12)
Deleting a Provider (page 6-12)
Managing System Settings and Processes 6-1
Connecting to Outside Entities with Providers
InterfaceProviders Page (page 6-13)
Provider Information Page (page 6-15)
Add/Edit Provider Page (page 6-16)
Outgoing Provider Page (page 6-17)
Database Provider Page (page 6-20)
Incoming Provider Page (page 6-22)
Preview Provider Page (page 6-23)
Ldap Provider Page (page 6-25)
ABOUT PROVIDERSA provider is an Application Programming Interface (API) that establishes connection to outside entities. These entities can be:
other Content Server instances
LDAP servers
databases
server sockets
Content Server ProvidersBy default, a Content Server instance has two system providers:
SystemDatabase: the system database
SystemServerSocket: a server socket that listens for browser requests
In addition, you can create the following types of providers:
Outgoing: A connection initiated to an outside entity. You can use this type to communicate between content server instances.
Note: Currently, Oracle Consulting Services are required to use providers to connect to other databases and server sockets. Contact your sales representative for more information.
6-2 Managing System Settings and Processes
Connecting to Outside Entities with Providers
Database: An information repository server that provides an API for connecting and communicating with it. This retrieves information and enables information to be changed in the database. Examples of this type are system databases.
Incoming: A connection initiated from an outside entity like a browser or client application. The provider listens on a specified port to be aware of incoming connections.
Preview: An outgoing provider connection to Oracle Content Publisher, for use with the optional HTML Preview feature.
LDAP: A connection initiated to an LDAP (Lightweight Directory Access Protocol) server for managing external user access to the content server.
HTTP: A connection that allows communication between content servers using the HTTP protocol. This type of provider requires the Proxy Credentials Extension feature, which is located in the Extras/ProxyCredentialsExtension/ directory on the Content Server DVD.
Adding an Appropriate ProviderThe different types of providers described in the previous section are added under specific circumstances to work with various other Oracle products or utilities. The following subsections describe those conditions and the particular provider types that must be added in each scenario.
When to Add an Outgoing Provider (page 6-3)
When to Add a Database Provider (page 6-4)
When to Add an Incoming Provider (page 6-5)
When to Add a Preview Provider (page 6-6)
When to Add an LDAP Provider (page 6-7)
When to Add an Outgoing ProviderOutgoing providers are added as follows:
Oracle Enterprise Search (page 6-4)
Archiver Utility (Content Server) (page 6-4)
Managing System Settings and Processes 6-3
Connecting to Outside Entities with Providers
Oracle Enterprise SearchEnterprise Search enables users to perform either a metadata or full-text search across multiple content server instances. These expanded search capabilities are supported through the use of system administrator-defined outgoing providers. To fully activate and enable Enterprise Search, an outgoing provider must be added and properly configured for the master content server instance and each proxied content server instance.
These outgoing providers are necessary to ensure proper communication between all content server instances and to optionally allow change notification synchronization. Specific settings on the Outgoing Provider page are enabled to make sure that the master server can search each proxied server and vice versa. Other settings determine whether or not the proxied servers will notify the master server when user or content item information changes occur.
For more detailed information about Enterprise Search and the outgoing provider requirements, see the Oracle Enterprise Search Administration and User Guide.
Archiver Utility (Content Server)The Archiver is a utility within the core Content Server product that enables system administrators to copy and remove content and store it for future use. Users can query a set of content from the content server instance and export it to an archive. Archives can then be imported to other content server instances or can be imported back to the same instance with changed metadata fields.
An outgoing provider is required to use the Archiver Transfer feature, which is used to archive content across a firewall or between two systems that do not share a file system. For additional information about the Transfer feature, the different types of transfers and the outgoing provider requirements, see theSystem Migration Guide for more information.
For more general overview and reference information about the Archiver utility and the Transfer feature, see the Oracle Content Server Getting Started Guide. For additional reference information about outgoing providers and each specific field, see Outgoing Provider Page (page 6-17).
When to Add a Database ProviderDatabase providers are added as follows:
External Database (page 6-5)
6-4 Managing System Settings and Processes
Connecting to Outside Entities with Providers
External DatabaseFrequently, it is desirable or necessary to perform database queries on databases that are not the default Content Server database. In this case, customized database providers can be created that make it possible to access any data from any application, regardless of which database management system is handling the data. Using customized database providers to integrate external databases into a Content Server system, search results can be combined and viewed on a single search screen. Additionally, data can be imported from these external database sources.
For additional reference information about database providers and each specific field, see Database Provider Page (page 6-20).
When to Add an Incoming ProviderIncoming providers are added as follows:
Oracle WebDAV Support (page 6-5)
Archiver Utility (Content Server) (page 6-5)
Oracle WebDAV SupportWith version 6.2 of Content Server, you could implement WebDAV (Web-Based Distributed Authoring and Versioning) support using an incoming provider and the content server’s integrated Tomcat servlet engine. In Content Server 7.0, however, WebDAV support is provided by a custom feature, so the provider and servlet engine are no longer necessary.
See the Folders and WebDAV Administration Guide for more information.
Archiver Utility (Content Server)The Archiver is a utility within the core Content Server product that enables system administrators to copy and remove content and store it for future use. Users can query a set of content from the content server instance and export, import, or replicate to another instance, or change metadata fields. Tasks most frequently performed involve transfer, backup, and reorganization of information within the system.
Generally, when data or content items are moved from one repository to another, the Archiver utility uses a push technology to relocate the files. However, occasionally your
Note: Currently, Consulting Services are required to set up a database provider to an external database source. Contact your sales representative for more information.
Managing System Settings and Processes 6-5
Connecting to Outside Entities with Providers
system might require that the files be pulled rather than pushed. In this case, an incoming provider must be created. For more general information about the Archiver utility and its data transport features, see the Oracle Content Server Getting Started Guide. For additional reference information about incoming providers and each specific field, see Incoming Provider Page (page 6-22).
When to Add a Preview ProviderPreview providers are added as follows:
Oracle HTML Preview (page 6-6)
Oracle Content Categorizer (page 6-6)
Oracle HTML PreviewHTML Preview is a Oracle “Extras” feature that provides users with instant feedback on how their content will display on the published web site. This enables users to modify the original content before it is actually checked in. HTML Preview also helps users ensure that correct metadata has been assigned to the content. During the installation process, a preview provider must be created. For additional overview and installation information about HTML Preview, see the DTM Server and HTML Preview Guide.
Oracle Content CategorizerContent Categorizer suggests metadata values for documents being checked into Content Server or for existing documents that need to have metadata reapplied. For Content Categorizer to recognize structural properties of a document, the file must be converted to XML.
If you are using Oracle Content Publisher to set up a template for the required XML conversion process, the HTML Preview feature must be configured as a preview provider. (HTML Preview is an “Extras” feature that enables users to preview their content and see what the converted output from Content Publisher will look like.)
For more general overview, reference, pre-installation tasks and considerations, and complete installation information about Content Categorizer, see the Oracle Content Categorizer Administration Guide. This guide provides relevant information about any additional Oracle products that may be required or are optional. For additional reference
Note: Currently, Oracle Consulting Services are required to set up incoming providers to connect to server sockets. Contact your sales representative for more information.
6-6 Managing System Settings and Processes
Connecting to Outside Entities with Providers
information about preview providers and each specific field, see Preview Provider Page (page 6-23).
When to Add an LDAP ProviderLightweight Directory Access Protocol (LDAP) is a directory service protocol that runs over TCP/IP. It provides high-level functionality to manage resources within a network and works with Content Server to manage security and user authentication. The LDAP directory service model is based on a collection of attributes and is used to access information stored in an information directory. As such, LDAP is used to validate a set of user name and password credentials against an authentication source. This process will grant privileges to a user to give them access to web resources.
An LDAP server provides a single source for user-related information that can be accessed from applications such as Content Server and other Oracle product modules. Instead of maintaining user information within Content Server, you can integrate an LDAP directory to authenticate user credentials to the content server instance.
If you decide to use an LDAP server (other than Active Directory, which can be integrated directly with the content server), you will need to create an LDAP provider to set up communication between the content server instance and the LDAP server. When properly configured, the LDAP provider authorizes external users through the mapping properties that are linked to role assignments and account permissions (defined on the Ldap Provider page).
For a more comprehensive overview of the LDAP directory service, installation procedures, and detailed information about setting up an external security model, see the Security Integration Guide.
For additional reference information about LDAP providers and each specific field, see Ldap Provider Page (page 6-25).
LDAP integration is also useful with the following content management products and architectures:
Clustered Content Server (page 6-8)
Oracle Portlets on WebSphere (page 6-8)
Content Tracker (page 6-8)
Note: Although not required, you are encouraged to have Oracle Consulting Services assist you with creating an LDAP security model and deploying the LDAP integration. Contact your sales representative for more information.
Managing System Settings and Processes 6-7
Connecting to Outside Entities with Providers
Oracle Collaboration Manager (page 6-9)
Clustered Content ServerThe clustered Content Server can be a stand-alone system, or it can be modified and integrated in unlimited configurations to alleviate problems of maintenance, load balancing, and scalability. In a cluster configuration using a single content server, multiple servers share a common file system, database, and index collection. In a clustered Content Server configuration, integrating an LDAP directory server is optional. However, if LDAP is used, an LDAP provider must be created.
For more information about the clustered Content Server implementation, see the Content Server Clustering Concepts Guide.
Oracle Portlets on WebSphereWebSphere users can access Content Server through the Oracle Content Integration Suite. This portal interface enables users and developers to retrieve, view, and download Content Server content items based on full text or metadata search queries. When using the Content Integration Suite, the WebSphere Application Server is recommended. If you are using a WebSphere Portal Server, the Oracle Content Portal Suite is a recommended addition to the Content Integration Suite.
The Content Integration Suite connects directly to the content server instead of the database. This direct connection avoids the authentication step at the web server and enables the developer total control over the authentication and authorization of users. The advantage is you can authenticate users at the Content Integration Suite layer however you want. You can integrate with an LDAP server at the application server level, or you can ask the content server to validate the passwords for you.
For more information about using WebSphere with the Content Integration Suite and the Content Portal Suite, see the documentation provided with the WebSphere Portal Server, WebSphere Application Server, Oracle Content Integration Suite, and Oracle Content Portal Suite.
Content TrackerContent Tracker is a system that is built from a collection of software features that, when combined, enable users to use a standard web browser to track Oracle content usage through an integrated set of analytical tools. The data provided by the content server is derived from logged data that includes web server log data, content server data, and user information. Content Tracker accesses this data, performs analysis on it, and produces
6-8 Managing System Settings and Processes
Connecting to Outside Entities with Providers
descriptive reports. Integrating an LDAP directory server with Content Tracker is optional. However, if LDAP is used, an LDAP provider must be created.
For more information about the related data repositories, report generation, producing queries and installation procedures, see the Oracle Content Tracker Brief Guide for System Administrators.
Oracle Collaboration ManagerCollaboration Manager is a fully functional content management system providing ene-to-end content management and personalized delivery of that content. Additionally, it enables project-level security for collaborative authoring environments. Integrating an LDAP directory server with Collaboration Server is optional. However, if LDAP is used, an LDAP provider must be created.
For more information about administration features, setting security, and using Collaboration workflows, see the Collaboration Manager Administration Guide.
MANAGING PROVIDERSThe following tasks are involved in managing providers.
Adding an Outgoing Provider (page 6-9)
Adding a Database Provider (page 6-11)
Adding an Incoming Provider (page 6-11)
Adding a Preview Provider (page 6-11)
Editing Provider Information (page 6-12)
Deleting a Provider (page 6-12)
Adding an Outgoing ProviderTo create an outgoing provider:
1. Display the Providers Page (page 6-13).
2. In the Create a New Provider table, click Add in the Action column for the outgoing provider type.
The Outgoing Provider Page (page 6-17) is displayed.
3. Complete the following fields:
Managing System Settings and Processes 6-9
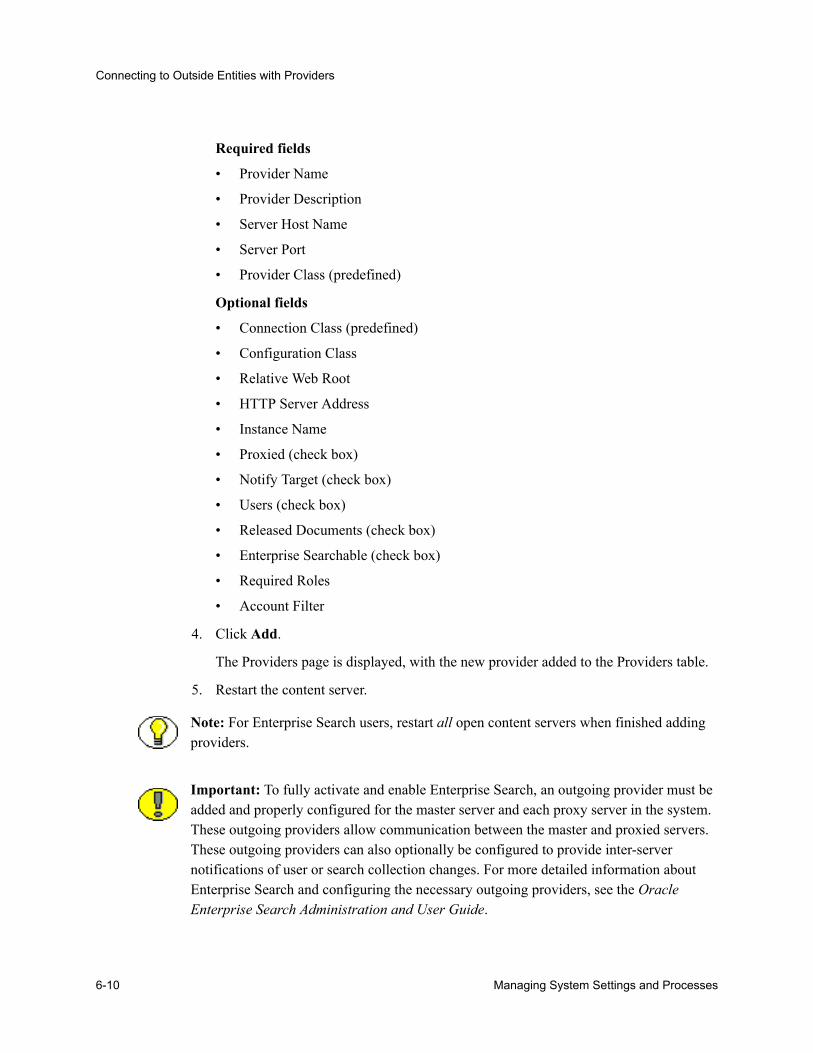
Connecting to Outside Entities with Providers
Required fields
• Provider Name
• Provider Description
• Server Host Name
• Server Port
• Provider Class (predefined)
Optional fields
• Connection Class (predefined)
• Configuration Class
• Relative Web Root
• HTTP Server Address
• Instance Name
• Proxied (check box)
• Notify Target (check box)
• Users (check box)
• Released Documents (check box)
• Enterprise Searchable (check box)
• Required Roles
• Account Filter
4. Click Add.
The Providers page is displayed, with the new provider added to the Providers table.
5. Restart the content server.
Note: For Enterprise Search users, restart all open content servers when finished adding providers.
Important: To fully activate and enable Enterprise Search, an outgoing provider must be added and properly configured for the master server and each proxy server in the system. These outgoing providers allow communication between the master and proxied servers. These outgoing providers can also optionally be configured to provide inter-server notifications of user or search collection changes. For more detailed information about Enterprise Search and configuring the necessary outgoing providers, see the Oracle Enterprise Search Administration and User Guide.
6-10 Managing System Settings and Processes
Connecting to Outside Entities with Providers
Adding a Database ProviderCurrently, we strongly recommend that you use Oracle Consulting Services to connect to other databases using a provider. Contact your sales representative for more information.
Adding an Incoming Provider
To add an incoming provider:
1. Display the Providers Page (page 6-13).
2. In the Create a New Provider section, click Add in the Action column for the incoming provider type.
The Incoming Provider Page (page 6-22) is displayed.
3. Complete the following fields:
Required fields
• Provider Name
• Provider Description
• Server Port
• Provider Class (predefined)
Optional fields
• Connection Class (predefined)
• Configuration Class
4. Click Add.
The Providers page is displayed, with the new provider added to the Providers table.
5. Restart the content server.
Adding a Preview ProviderSee the DTM Server and HTML Preview Guide for instructions on adding the Preview provider. The HTML Preview feature zip file and guide are available for download from the Oracle support Web Site.
Note: Currently, Oracle Consulting Services are required to use providers to connect to server sockets. Contact your sales representative for more information.
Managing System Settings and Processes 6-11
Connecting to Outside Entities with Providers
Editing Provider InformationTo edit information for an existing provider (except for default system providers):
1. Display the Providers Page (page 6-13).
2. In the Providers table, click Info in the Action column for the provider to edit.
The Provider Information Page (page 6-15) is displayed.
3. Click Edit.
The Add/Edit Provider Page (page 6-16) is displayed.
4. Make the required changes.
5. Click Update to save the changes and return to the Providers page.
6. Restart the content server.
Deleting a Provider
To delete an existing provider (except for default system providers):
1. Display the Providers Page (page 6-13).
2. In the Providers table, click the Info link in the Action column for the provider you want to delete.
The Provider Information Page (page 6-15) is displayed.
3. Click Delete.
A confirmation screen is displayed.
4. Click OK.
The provider is removed from the Providers table.
Important: Ensure that you intend to delete the provider and not just edit the information. When delete a provider, the provider name and all of its related information is permanently removed from the Providers table.
6-12 Managing System Settings and Processes
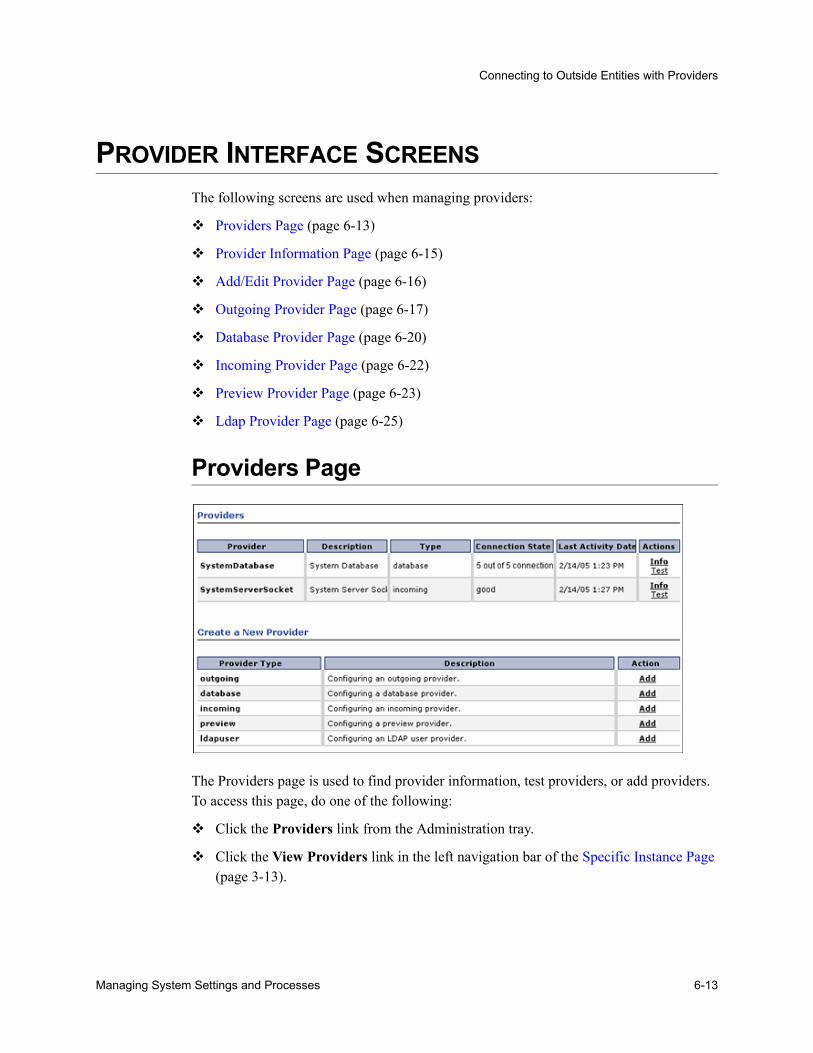
Connecting to Outside Entities with Providers
PROVIDER INTERFACE SCREENSThe following screens are used when managing providers:
Providers Page (page 6-13)
Provider Information Page (page 6-15)
Add/Edit Provider Page (page 6-16)
Outgoing Provider Page (page 6-17)
Database Provider Page (page 6-20)
Incoming Provider Page (page 6-22)
Preview Provider Page (page 6-23)
Ldap Provider Page (page 6-25)
Providers Page
The Providers page is used to find provider information, test providers, or add providers. To access this page, do one of the following:
Click the Providers link from the Administration tray.
Click the View Providers link in the left navigation bar of the Specific Instance Page (page 3-13).
Managing System Settings and Processes 6-13
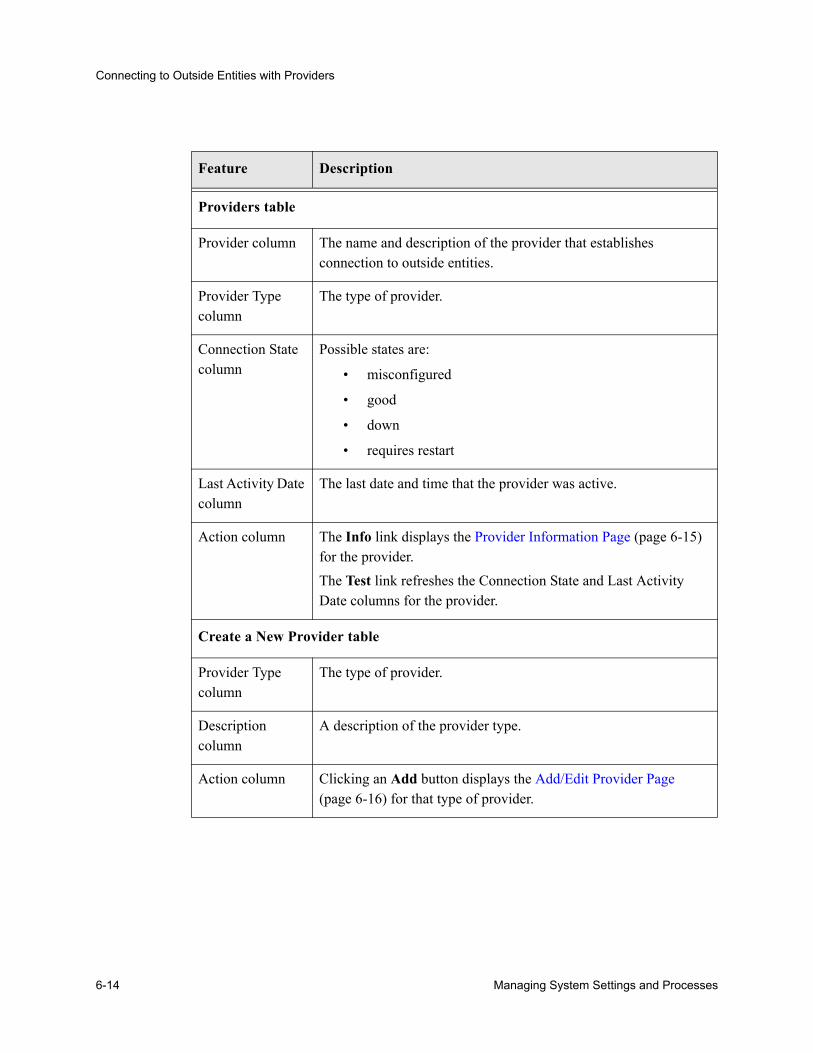
Connecting to Outside Entities with Providers
Feature Description
Providers table
Provider column The name and description of the provider that establishes connection to outside entities.
Provider Type column
The type of provider.
Connection State column
Possible states are:
• misconfigured
• good
• down
• requires restart
Last Activity Date column
The last date and time that the provider was active.
Action column The Info link displays the Provider Information Page (page 6-15) for the provider.The Test link refreshes the Connection State and Last Activity Date columns for the provider.
Create a New Provider table
Provider Type column
The type of provider.
Description column
A description of the provider type.
Action column Clicking an Add button displays the Add/Edit Provider Page (page 6-16) for that type of provider.
6-14 Managing System Settings and Processes
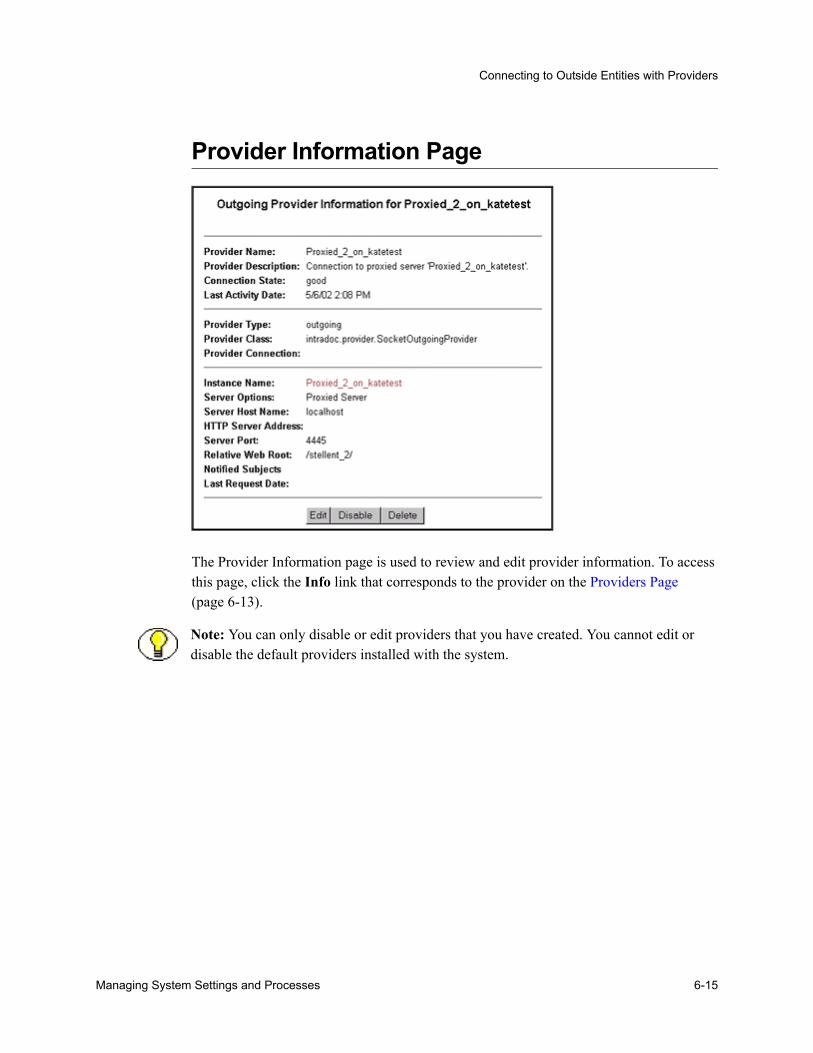
Connecting to Outside Entities with Providers
Provider Information Page
The Provider Information page is used to review and edit provider information. To access this page, click the Info link that corresponds to the provider on the Providers Page (page 6-13).
Note: You can only disable or edit providers that you have created. You cannot edit or disable the default providers installed with the system.
Managing System Settings and Processes 6-15
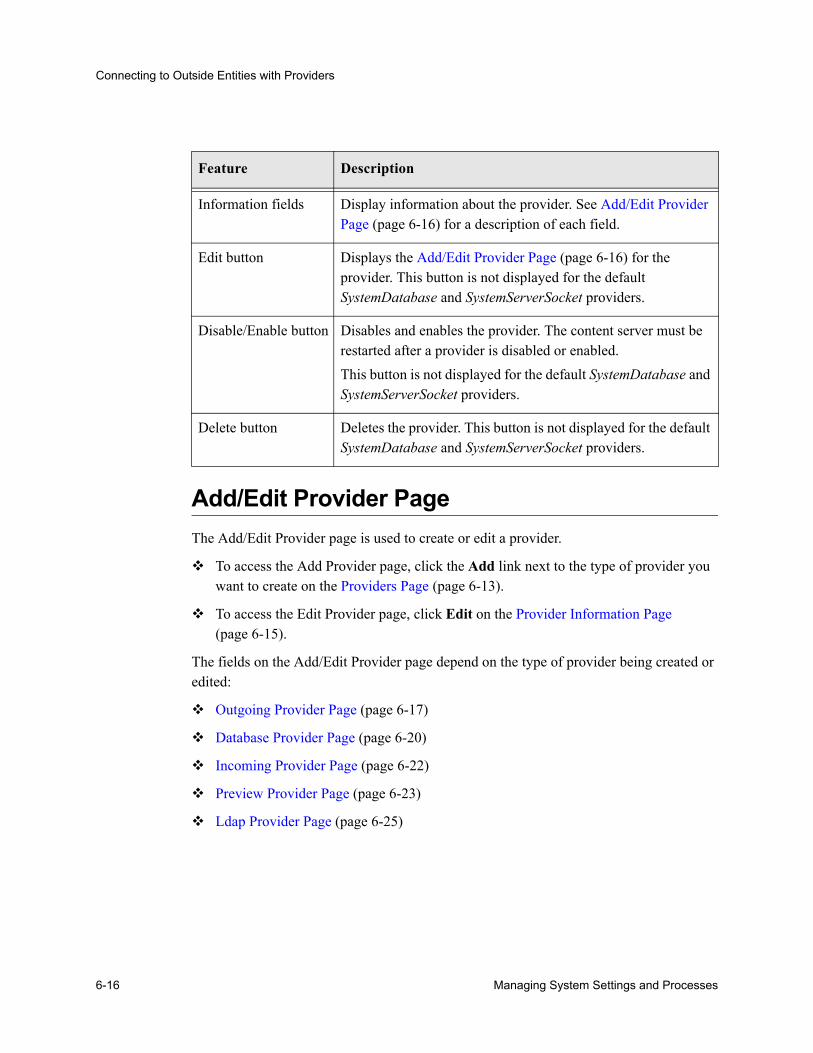
Connecting to Outside Entities with Providers
Add/Edit Provider PageThe Add/Edit Provider page is used to create or edit a provider.
To access the Add Provider page, click the Add link next to the type of provider you want to create on the Providers Page (page 6-13).
To access the Edit Provider page, click Edit on the Provider Information Page (page 6-15).
The fields on the Add/Edit Provider page depend on the type of provider being created or edited:
Outgoing Provider Page (page 6-17)
Database Provider Page (page 6-20)
Incoming Provider Page (page 6-22)
Preview Provider Page (page 6-23)
Ldap Provider Page (page 6-25)
Feature Description
Information fields Display information about the provider. See Add/Edit Provider Page (page 6-16) for a description of each field.
Edit button Displays the Add/Edit Provider Page (page 6-16) for the provider. This button is not displayed for the default SystemDatabase and SystemServerSocket providers.
Disable/Enable button Disables and enables the provider. The content server must be restarted after a provider is disabled or enabled.This button is not displayed for the default SystemDatabase and SystemServerSocket providers.
Delete button Deletes the provider. This button is not displayed for the default SystemDatabase and SystemServerSocket providers.
6-16 Managing System Settings and Processes
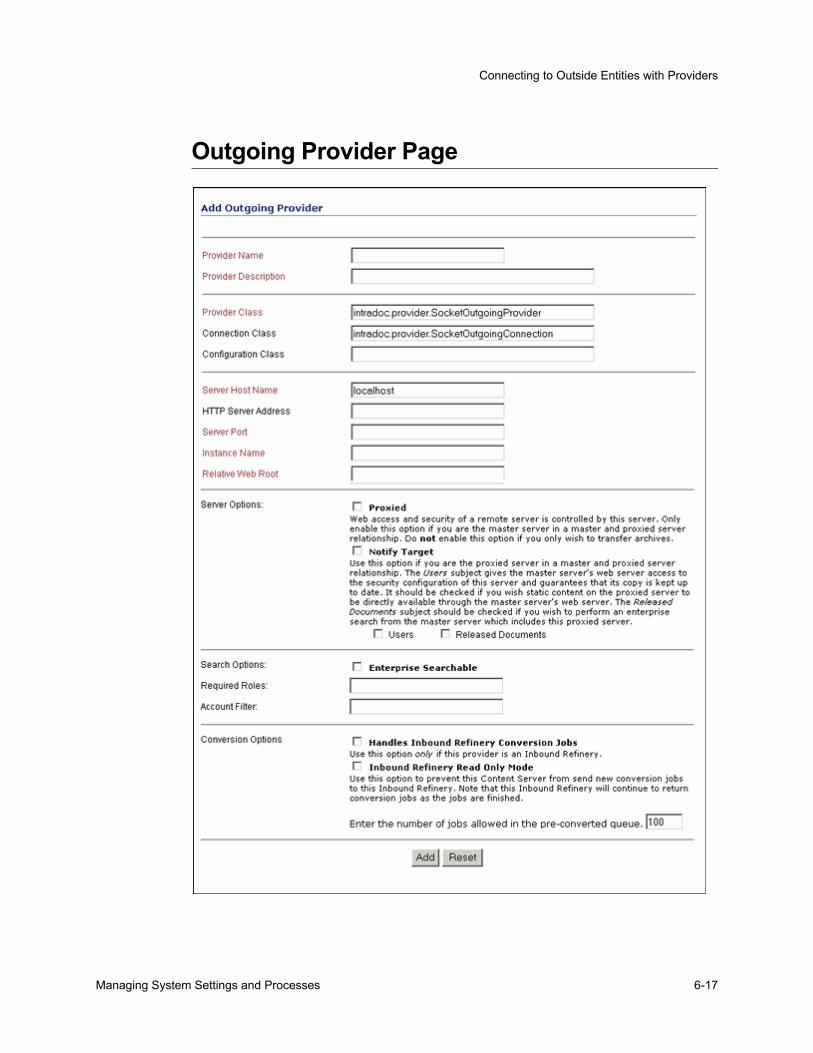
Connecting to Outside Entities with Providers
Outgoing Provider Page
Managing System Settings and Processes 6-17
Connecting to Outside Entities with Providers
The Add/Edit Outgoing Provider page is used to create or edit an outgoing provider. To access this page, click the Add link next to the type of provider to add on the Providers Page (page 6-13) or click the Edit link on the Provider Information Page (page 6-15).
Feature Description
Provider Name field The name of the provider, which will become a subdirectory in the <install_dir>/data/providers/ directory.
Provider Description field User-friendly description of the provider.
Provider Class field The name of the Java class for the provider. For example, intradoc.provider.SocketOutgoingProvider.
Connection Class field The name of the Java class that implements the provider connection. For example, intradoc.provider.SocketOutgoingConnection.
Configuration Class field The name of a Java class that performs some extra configuration. This class is very useful for database providers, where the connection classes are already providers.
Server Host Name field The server host name (IDC_Name) of the other content server instance.
HTTP Server Address field The HTTP address of the other content server instance. For example, intradoc:90.
Server Port field The port on which the provider communicates with the other content server.
Instance Name field The instance name of the other content server instance.
Relative Web Root field The relative web root of the other content server instance. For example, /oracle_2/.
6-18 Managing System Settings and Processes
Connecting to Outside Entities with Providers
Proxied check box Enable this option if the provider is connecting to a content server that will be controlled by the current instance.
Notify Target check box Enable this option if the provider is connecting to a content server that is acting as a controlling instance, and you want this content server to notify the controlling instance when user information and/or content item information changes.
Users check box Enable this option if you want this content server to notify the controlling instance when user information changes.
Released Documents check box Enable this option if you want this content server to notify the controlling instance when content item information changes.
Enterprise Searchable check box Enable this option if you have enabled Enterprise Search and you want this content server instance to be searchable. See the Oracle Enterprise Search Administration and User Guide for more information.
Required Roles field Enter roles that have permission to search this content server instance using Enterprise Search. If no roles are entered, all users will have permission.
Account Filter field Enter accounts that have permission to search this content server instance using Enterprise Search. If no accounts are entered, all users will have permission.
Add/Update button Saves the provider information.
Reset button Resets the provider information to the last saved values.
Feature Description
Managing System Settings and Processes 6-19
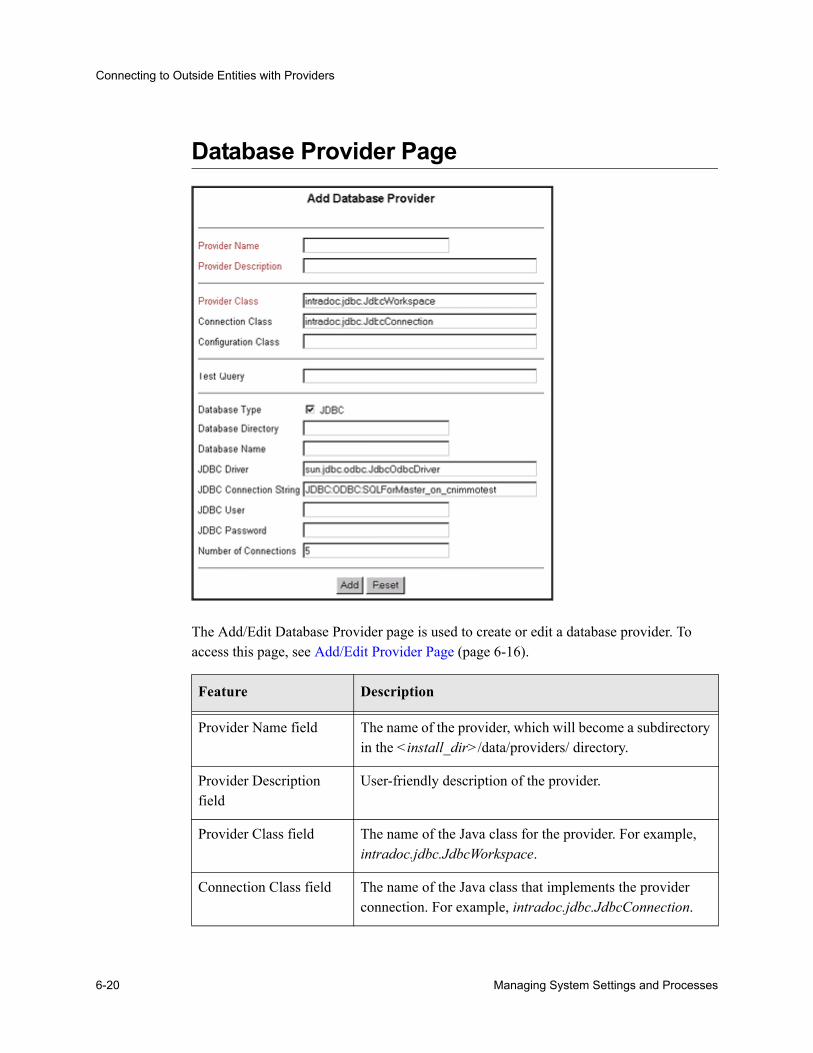
Connecting to Outside Entities with Providers
Database Provider Page
The Add/Edit Database Provider page is used to create or edit a database provider. To access this page, see Add/Edit Provider Page (page 6-16).
Feature Description
Provider Name field The name of the provider, which will become a subdirectory in the <install_dir>/data/providers/ directory.
Provider Description field
User-friendly description of the provider.
Provider Class field The name of the Java class for the provider. For example, intradoc.jdbc.JdbcWorkspace.
Connection Class field The name of the Java class that implements the provider connection. For example, intradoc.jdbc.JdbcConnection.
6-20 Managing System Settings and Processes
Connecting to Outside Entities with Providers
Configuration Class field The name of a Java class that performs some extra configuration. This class is very useful for database providers, where the connection classes are already providers.
Test Query field Enter a query that will be used to test the provider when the Test link on the Providers page is clicked.
Database Type check box Selected = The database is JDBC.Cleared = The database is DAO.
Database Directory field The directory that contains the content server database information. For example, <install_dir>/database. Used only by DAO databases.
Database Name field Used only by DAO databases.
JDBC Driver field This field is automatically filled.
JDBC Connection String field
This field is automatically filled. It should take the format JDBC:ODBC:name, where name is the System Data Source Name that is displayed on the System DSN tab.
JDBC User field This is your JdbcUser.
JDBC Password field This is your JdbcPassword.
Number of Connections field
The number of database connections the provider maintains. This is used only by JDBC databases.
Add/Update button Saves the provider information.
Reset button Resets the provider information to the last saved values.
Feature Description
Managing System Settings and Processes 6-21
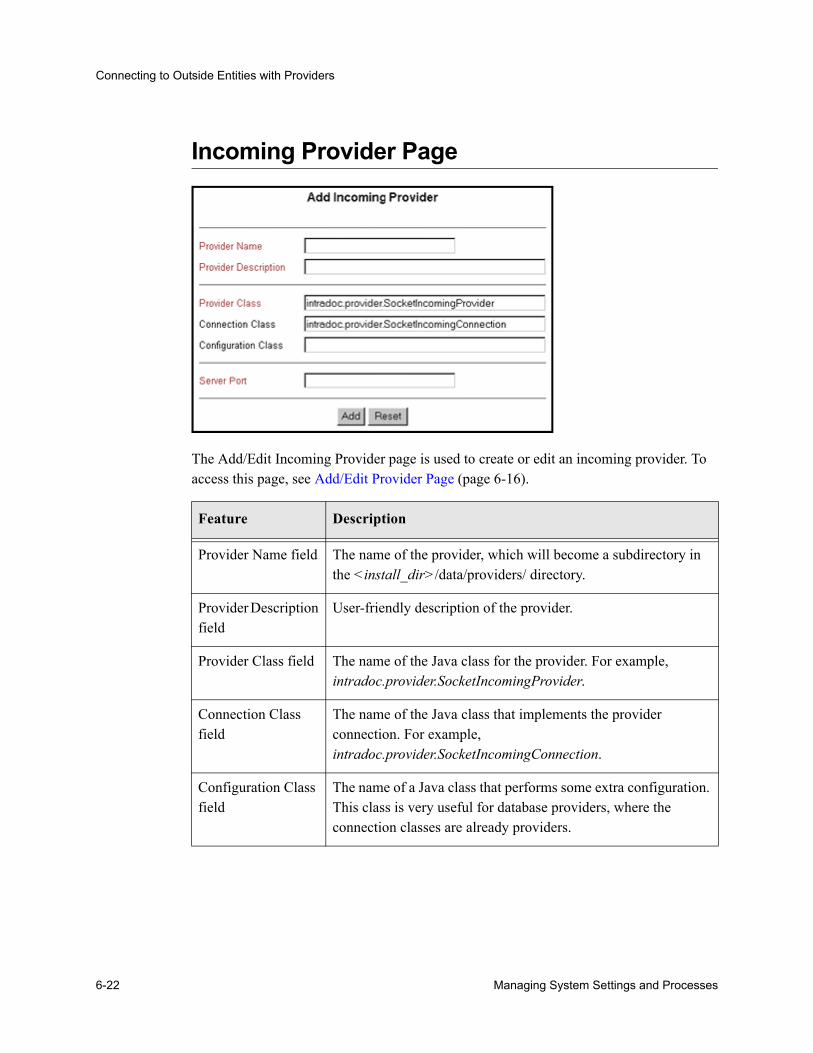
Connecting to Outside Entities with Providers
Incoming Provider Page
The Add/Edit Incoming Provider page is used to create or edit an incoming provider. To access this page, see Add/Edit Provider Page (page 6-16).
Feature Description
Provider Name field The name of the provider, which will become a subdirectory in the <install_dir>/data/providers/ directory.
Provider Description field
User-friendly description of the provider.
Provider Class field The name of the Java class for the provider. For example, intradoc.provider.SocketIncomingProvider.
Connection Class field
The name of the Java class that implements the provider connection. For example, intradoc.provider.SocketIncomingConnection.
Configuration Class field
The name of a Java class that performs some extra configuration. This class is very useful for database providers, where the connection classes are already providers.
6-22 Managing System Settings and Processes
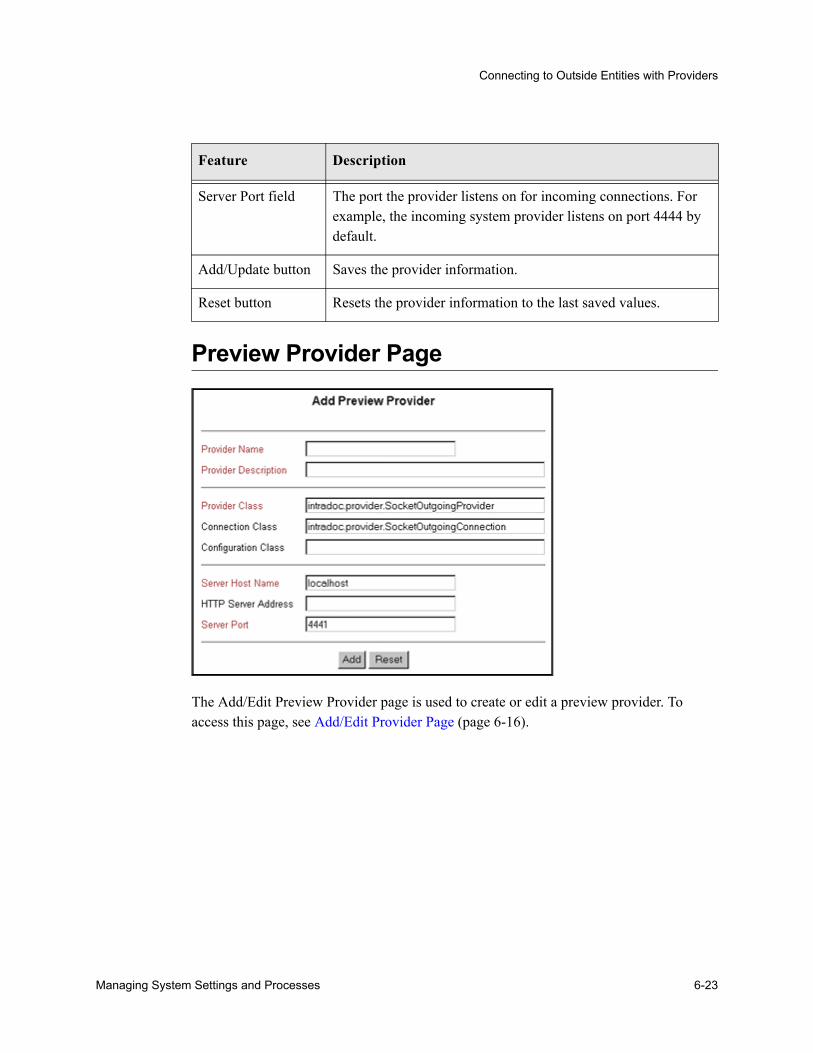
Connecting to Outside Entities with Providers
Preview Provider Page
The Add/Edit Preview Provider page is used to create or edit a preview provider. To access this page, see Add/Edit Provider Page (page 6-16).
Server Port field The port the provider listens on for incoming connections. For example, the incoming system provider listens on port 4444 by default.
Add/Update button Saves the provider information.
Reset button Resets the provider information to the last saved values.
Feature Description
Managing System Settings and Processes 6-23
Connecting to Outside Entities with Providers
Feature Description
Provider Name field The name of the provider, which will become a subdirectory in the <install_dir>/data/providers/ directory.
Provider Description field
User-friendly description of the provider.
Provider Class field The name of the Java class for the provider. For example, intradoc.provider.SocketOutgoingProvider.
Connection Class field
The name of the Java class that implements the provider connection. For example, intradoc.provider.SocketOutgoingConnection.
Configuration Class field
The name of a Java class that performs some extra configuration. This class is very useful for database providers, where the connection classes are already providers.
Server Host Name field
The server host name of the other content server instance. For example, localhost.
HTTP Server Address field
The HTTP address of the other content server instance. Use the value listed for HTTP Server on the Configuration Information page. For example, intradoc:90.
Server Port field The port on which the provider communicates with Oracle Content Publisher. Typically, this is 4441.
Add/Update button Saves the provider information.
Reset button Resets the provider information to the last saved values.
6-24 Managing System Settings and Processes
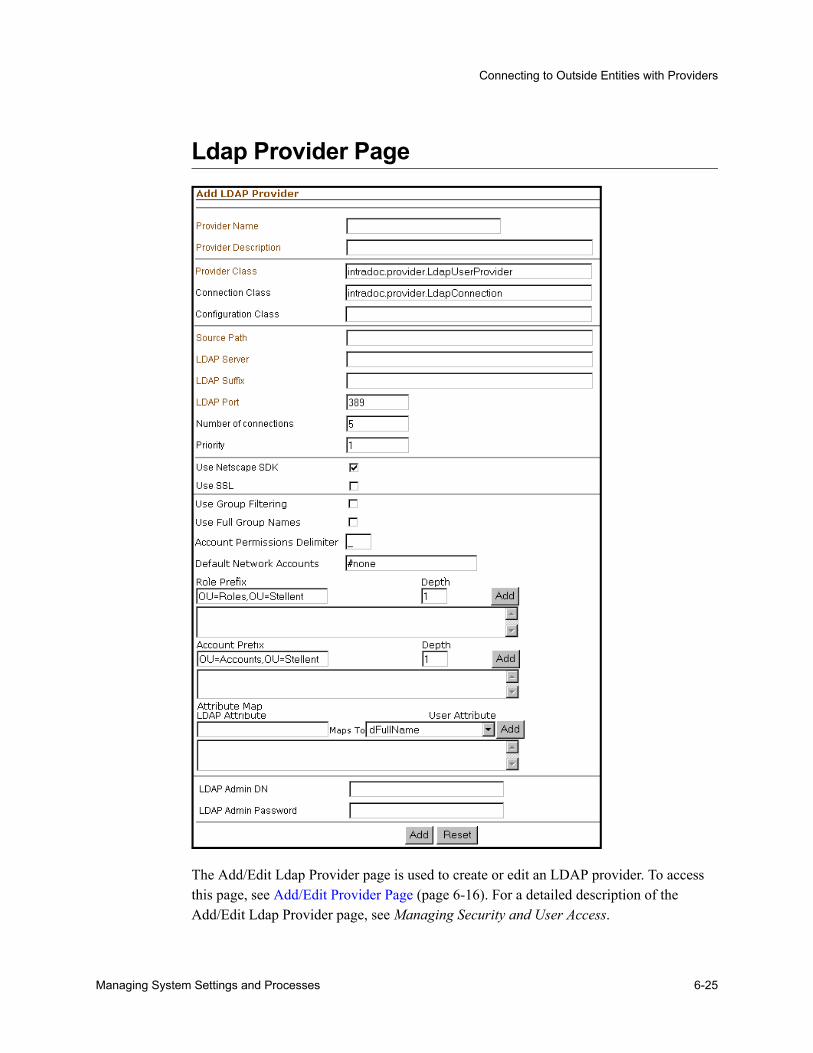
Connecting to Outside Entities with Providers
Ldap Provider Page
The Add/Edit Ldap Provider page is used to create or edit an LDAP provider. To access this page, see Add/Edit Provider Page (page 6-16). For a detailed description of the Add/Edit Ldap Provider page, see Managing Security and User Access.
Managing System Settings and Processes 6-25


C h a p t e r
7.BATCHLOADING CONTENT
OVERVIEWThis section covers these topics:
About Batch Loading (page 7-1)
Preparing a Batch Load File (page 7-20)
Running the Batch Loader (page 7-35)
Optimizing Batch Loader Performance (page 7-46)
ABOUT BATCH LOADINGThis section describes how to use the Batch Loader utility to check in (insert), delete, and/or update a large number of files on your content server system at one time. The Batch Loader can save you time and effort by automating the batch loading process. The following are examples of when to use the Batch Loader:
You just purchased the Content Server software, and you want check in all of your existing files with metadata that exists in a database.
You have documents checked into the content server repository, and you just created a new custom metadata field. You can use the Batch Loader to add the values you specify for the new metadata field to each existing content item.
You want to remove a large number of specific files from the system.
Managing System Settings and Processes 7-1
Batchloading Content
You want to load an external collection of content into the content server. (This requires the Lightly Managed Content feature to be installed and enabled. See the Lightly Managed Content Component documentation for further information.)
The Batch Loader performs actions that are specified in a batch load file, which is a text file that describes the action to perform and the metadata for each content item in the batch.
A batch load file is a text file that tells the Batch Loader which actions to perform and what metadata to assign to each content item in the batch.
This section covers these topics:
File Records (page 7-2)
Actions (page 7-3)
Insert (page 7-3)
Delete (page 7-7)
Update (page 7-8)
Optional Parameters (page 7-14)
Custom Metadata Fields (page 7-19)
File RecordsA batch load file is made up of file records, which are sets of name/value pairs that specify the action to perform and/or the metadata for individual content items.
Each file record ends with an <<EOD>> (end of data) marker.
A pound sign (#) followed by a space at the beginning of a line indicates a comment.
The following is an example of a file record:# This is a commentAction=insertdDocName=Sample1
Important: Field names and parameters are case sensitive. They must appear in the batch load file exactly as they appear in the following sections. For example, dDocName is not the same as ddocname, dDocname, or DDOCNAME.
Note: The comment character (#) must be followed by a space. For example:# primaryFile=test.txt works properly, but #primaryFile=test.txt will cause errors.
7-2 Managing System Settings and Processes
Batchloading Content
dDocType=ADACCTdDocTitle=Batch Load record insert exampledDocAuthor=sysadmindSecurityGroup=PublicprimaryFile=links.docdInDate=8/15/2001<<EOD>>
ActionsValid actions for batch loading are Insert (page 7-3), Delete (page 7-7), and Update (page 7-8).
If no action is specified for a file, the system tries to perform an update.
Each file record can have only one action, but file records with different actions can be present in the same batch load file.
The logic process for each action is different.
InsertThe insert action checks a new file into the content server repository. If the Content ID (dDocName) already exists in the content server, no action is performed.Figure 7-1 illustrates the insert action.
Figure 7-1 The Insert Action Sequence for Checking In a New File
Managing System Settings and Processes 7-3

Batchloading Content
Insert RequirementsThe following table defines the fields required for successful performance of an insert action.
Field Length: Maximum number of characters permitted in the field.
Carried Over: If the next record does not contain this field, the value of this field will be taken from the previous record.
Important: If you have defined any custom metadata fields as required fields, those fields also need to be defined for an insert action.
Note: Batch loaded revisions will not enter a workflow, even if they meet the criteria for an active workflow.
Required Items
Field Length
Carried Over
Definition
Action=insert N/A Yes The command to insert a file.Important: The term ‘Action’ is case sensitive and must be initial capitalized.
dDocName 30 No The metadata field named Content ID.
dDocType 30 Yes The metadata field named Type.
dDocTitle 80 No The metadata field named Title.
dDocAuthor 30 Yes The metadata field named Author.
dSecurityGroup 30 Yes The metadata field named Security Group.
7-4 Managing System Settings and Processes
Batchloading Content
Insert ExampleFigure 7-2 shows the batch load file syntax for inserting files. This example shows two file records.
The first file record includes all required fields and the action statement, Action=insert. The second file record does not list the required fields dDocType, dDocAuthor, or dSecurityGroup. However, the information for these items is taken from the previous record. Also, the second record does not specify an action, so the insert action is carried
primaryFile N/A N/A The metadata field named Primary File. The Primary File name can be a complete path or just the file name. If a file name only is specified, the location of the file is determined as follows:
• If the SetFileDir optional parameter has been set in this file record or any previous file record, the directory specified in SetFileDir will be used.
• If the SetFileDir parameter has not been set, the batch load file path is used. (The path is specified in the Batch Load File field on the Batch Loader Application (page 7-34).)
dInDate N/A No The metadata field named Release Date.
• The dInDate must use the date format of the locale of the user executing the Batch Loader. For example, the US English date format is mm/dd/yy hh:mm:ss am/pm.
• Time information is optional. If you specify the time, only the “hh:mm” part is required. The “ss” and “am/pm” parts are optional.
<<EOD>> N/A N/A Indicates the end of data for the file record.
Required Items
Field Length
Carried Over
Definition
Managing System Settings and Processes 7-5
Batchloading Content
over. Therefore, if the Content ID HR003 does not exist, the file will be inserted. However, if the Content ID does exist, it will not be inserted because the action is insert and not update.
Figure 7-2 The Batch Load File Syntax for Inserting Files
7-6 Managing System Settings and Processes
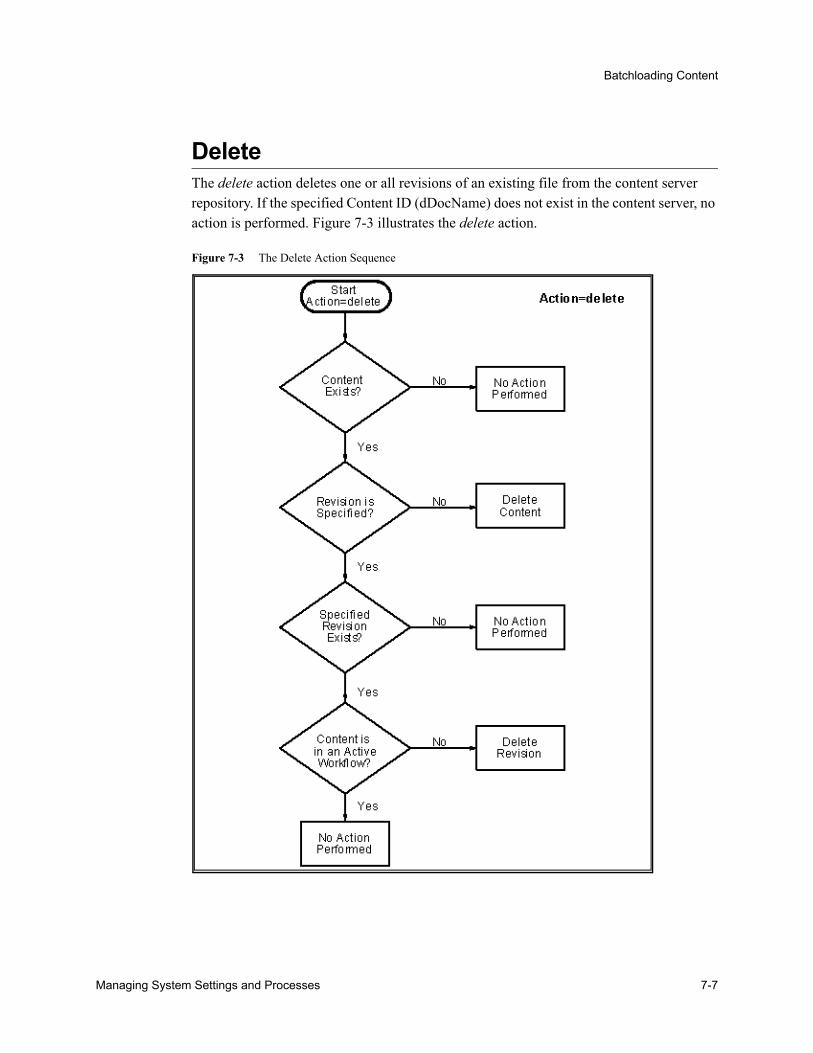
Batchloading Content
DeleteThe delete action deletes one or all revisions of an existing file from the content server repository. If the specified Content ID (dDocName) does not exist in the content server, no action is performed. Figure 7-3 illustrates the delete action.
Figure 7-3 The Delete Action Sequence
Managing System Settings and Processes 7-7
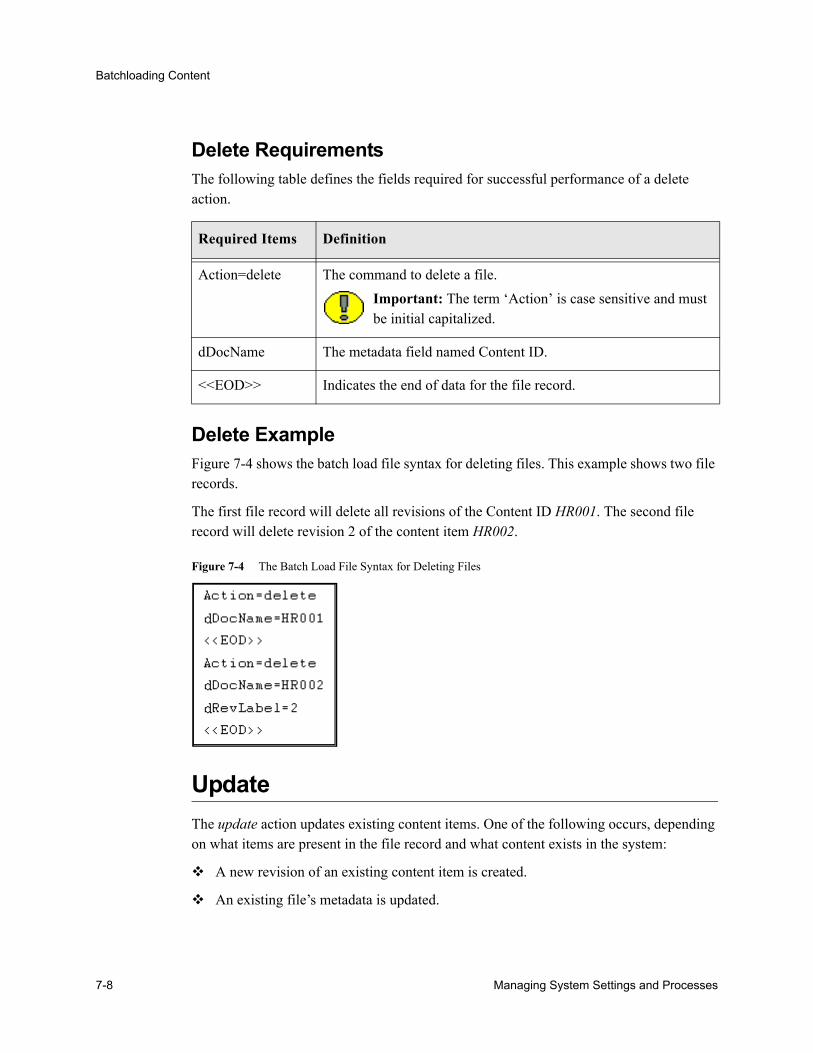
Batchloading Content
Delete RequirementsThe following table defines the fields required for successful performance of a delete action.
Delete ExampleFigure 7-4 shows the batch load file syntax for deleting files. This example shows two file records.
The first file record will delete all revisions of the Content ID HR001. The second file record will delete revision 2 of the content item HR002.
Figure 7-4 The Batch Load File Syntax for Deleting Files
UpdateThe update action updates existing content items. One of the following occurs, depending on what items are present in the file record and what content exists in the system:
A new revision of an existing content item is created.
An existing file’s metadata is updated.
Required Items Definition
Action=delete The command to delete a file.Important: The term ‘Action’ is case sensitive and must be initial capitalized.
dDocName The metadata field named Content ID.
<<EOD>> Indicates the end of data for the file record.
7-8 Managing System Settings and Processes
Batchloading Content
A new content item is inserted (Action=insert is performed).
A new revision is created when one of the following scenarios occur:
Note: Batch loaded revisions will not enter a workflow, even if they meet the criteria for an active workflow.
Content ID (dDocName)
Revision (dRevLabel)Release Date in Batch Load file (dInDate)
Scenario 1 Exists in content server
Not specified in the batch load file.
After the release date of the latest revision of the file in the system.
Scenario 2 Exists in content server
Specified in the batch load file, but does not exist in the content server.
After the release date of the latest revision of the file in the system.
Managing System Settings and Processes 7-9
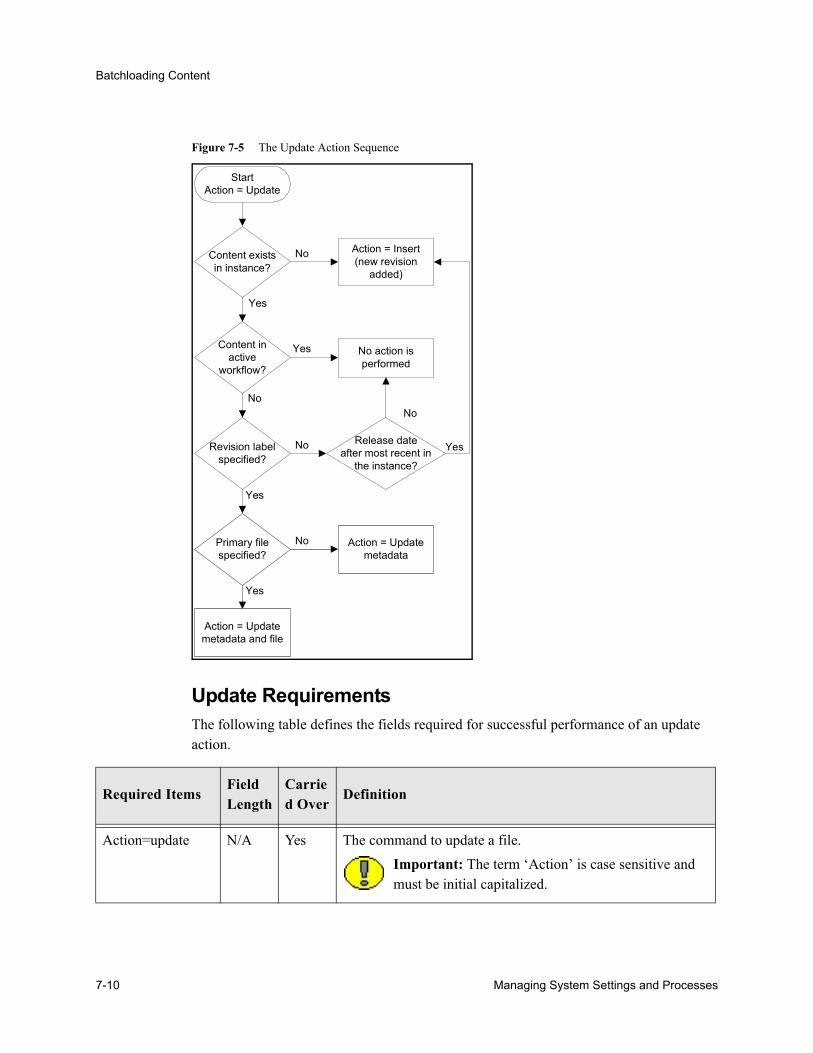
Batchloading Content
Figure 7-5 The Update Action Sequence
Update RequirementsThe following table defines the fields required for successful performance of an update action.
StartAction = Update
Content existsin instance?
Content inactive
workflow?
Revision labelspecified?
Primary filespecified?
Action = Updatemetadata and file
Release dateafter most recent in
the instance?
No action isperformed
Action = Insert(new revision
added)
No
Yes
Yes
No
No
Yes
Yes
Action = Updatemetadata
No
No
Yes
Required ItemsField Length
Carried Over
Definition
Action=update N/A Yes The command to update a file.
Important: The term ‘Action’ is case sensitive and must be initial capitalized.
7-10 Managing System Settings and Processes
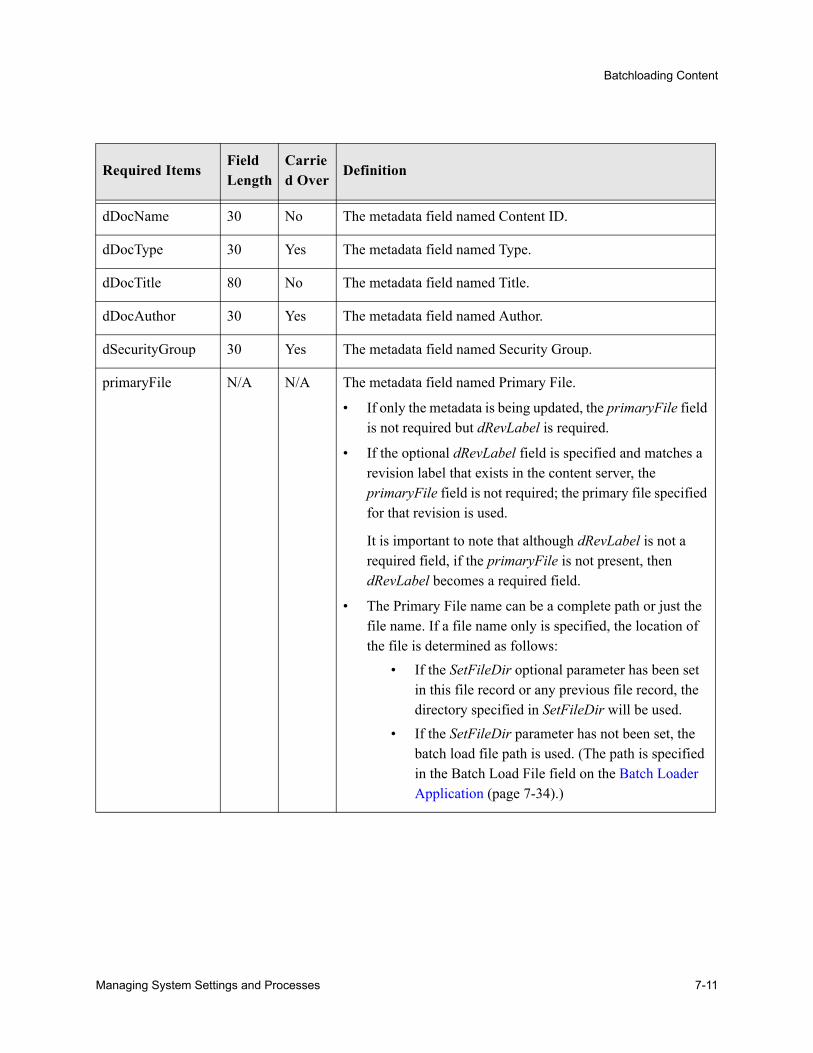
Batchloading Content
dDocName 30 No The metadata field named Content ID.
dDocType 30 Yes The metadata field named Type.
dDocTitle 80 No The metadata field named Title.
dDocAuthor 30 Yes The metadata field named Author.
dSecurityGroup 30 Yes The metadata field named Security Group.
primaryFile N/A N/A The metadata field named Primary File.
• If only the metadata is being updated, the primaryFile field is not required but dRevLabel is required.
• If the optional dRevLabel field is specified and matches a revision label that exists in the content server, the primaryFile field is not required; the primary file specified for that revision is used.
It is important to note that although dRevLabel is not a required field, if the primaryFile is not present, then dRevLabel becomes a required field.
• The Primary File name can be a complete path or just the file name. If a file name only is specified, the location of the file is determined as follows:
• If the SetFileDir optional parameter has been set in this file record or any previous file record, the directory specified in SetFileDir will be used.
• If the SetFileDir parameter has not been set, the batch load file path is used. (The path is specified in the Batch Load File field on the Batch Loader Application (page 7-34).)
Required ItemsField Length
Carried Over
Definition
Managing System Settings and Processes 7-11
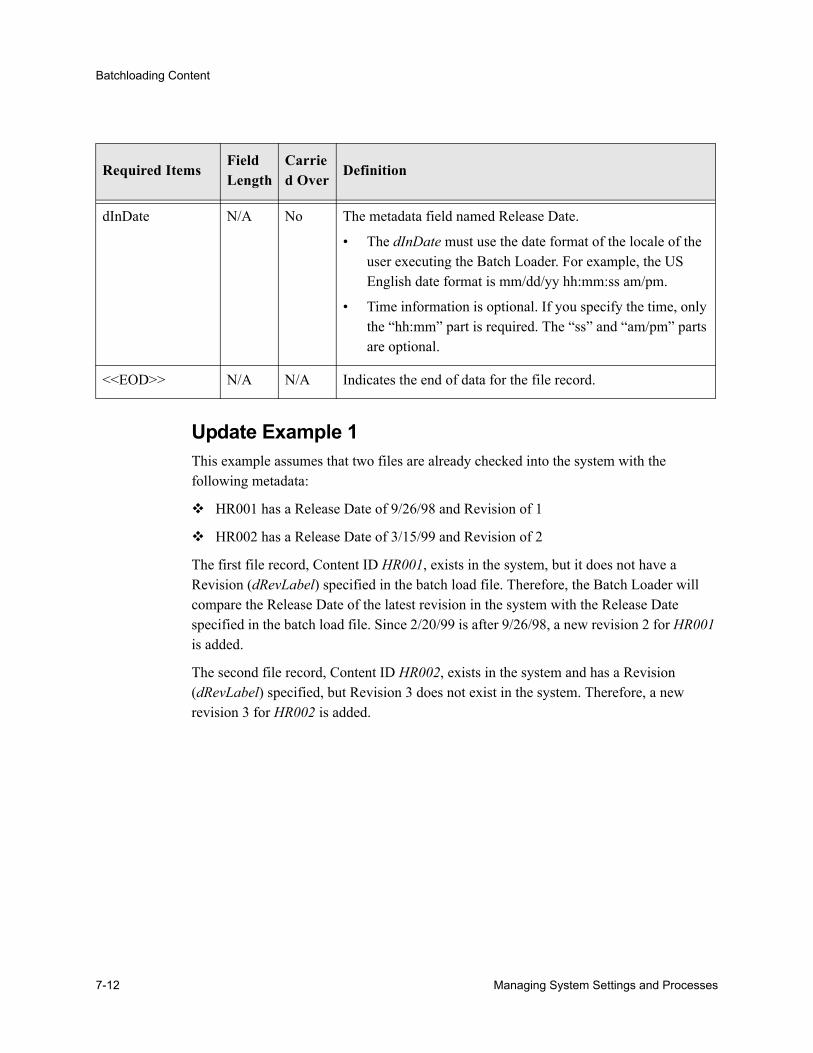
Batchloading Content
Update Example 1This example assumes that two files are already checked into the system with the following metadata:
HR001 has a Release Date of 9/26/98 and Revision of 1
HR002 has a Release Date of 3/15/99 and Revision of 2
The first file record, Content ID HR001, exists in the system, but it does not have a Revision (dRevLabel) specified in the batch load file. Therefore, the Batch Loader will compare the Release Date of the latest revision in the system with the Release Date specified in the batch load file. Since 2/20/99 is after 9/26/98, a new revision 2 for HR001 is added.
The second file record, Content ID HR002, exists in the system and has a Revision (dRevLabel) specified, but Revision 3 does not exist in the system. Therefore, a new revision 3 for HR002 is added.
dInDate N/A No The metadata field named Release Date.
• The dInDate must use the date format of the locale of the user executing the Batch Loader. For example, the US English date format is mm/dd/yy hh:mm:ss am/pm.
• Time information is optional. If you specify the time, only the “hh:mm” part is required. The “ss” and “am/pm” parts are optional.
<<EOD>> N/A N/A Indicates the end of data for the file record.
Required ItemsField Length
Carried Over
Definition
7-12 Managing System Settings and Processes
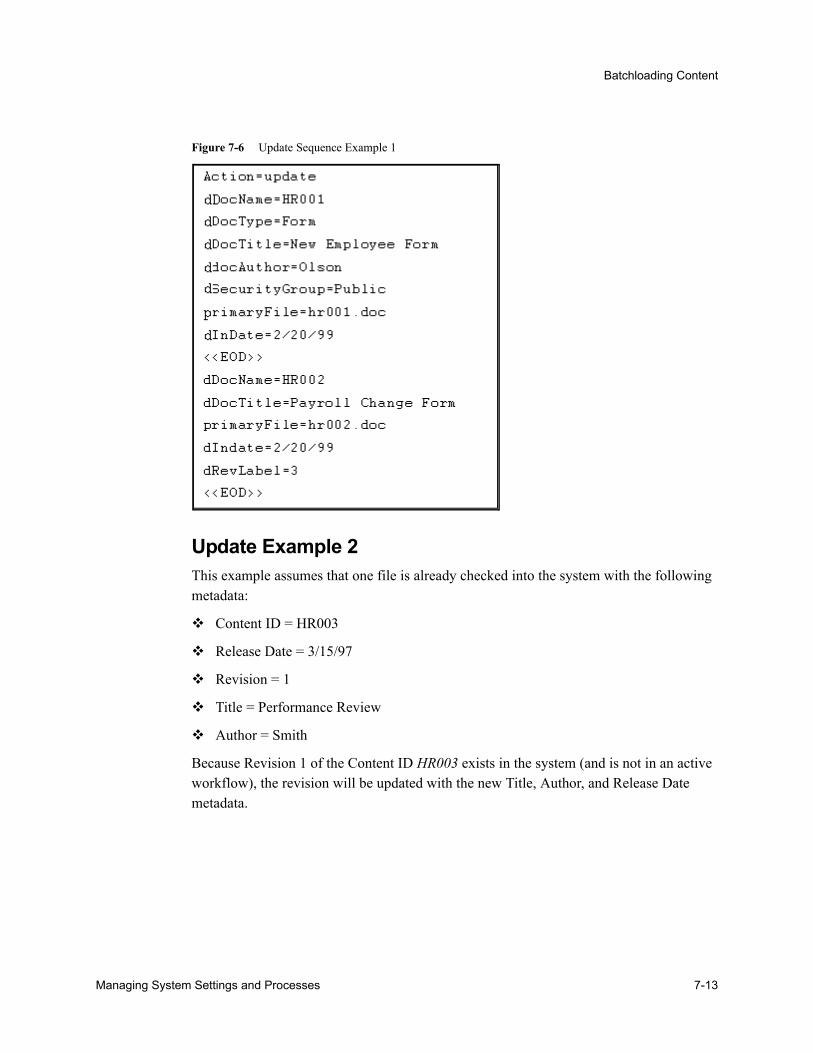
Batchloading Content
Figure 7-6 Update Sequence Example 1
Update Example 2This example assumes that one file is already checked into the system with the following metadata:
Content ID = HR003
Release Date = 3/15/97
Revision = 1
Title = Performance Review
Author = Smith
Because Revision 1 of the Content ID HR003 exists in the system (and is not in an active workflow), the revision will be updated with the new Title, Author, and Release Date metadata.
Managing System Settings and Processes 7-13
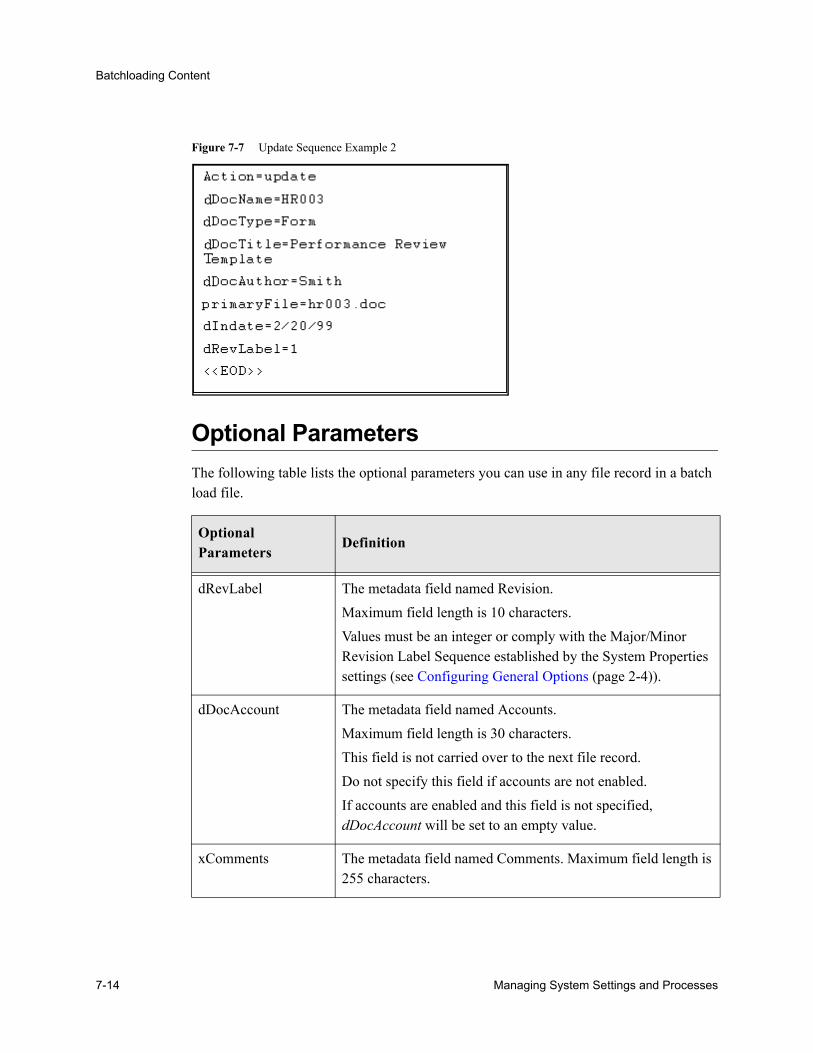
Batchloading Content
Figure 7-7 Update Sequence Example 2
Optional ParametersThe following table lists the optional parameters you can use in any file record in a batch load file.
Optional Parameters
Definition
dRevLabel The metadata field named Revision.Maximum field length is 10 characters.Values must be an integer or comply with the Major/Minor Revision Label Sequence established by the System Properties settings (see Configuring General Options (page 2-4)).
dDocAccount The metadata field named Accounts.Maximum field length is 30 characters.This field is not carried over to the next file record.Do not specify this field if accounts are not enabled.If accounts are enabled and this field is not specified, dDocAccount will be set to an empty value.
xComments The metadata field named Comments. Maximum field length is 255 characters.
7-14 Managing System Settings and Processes
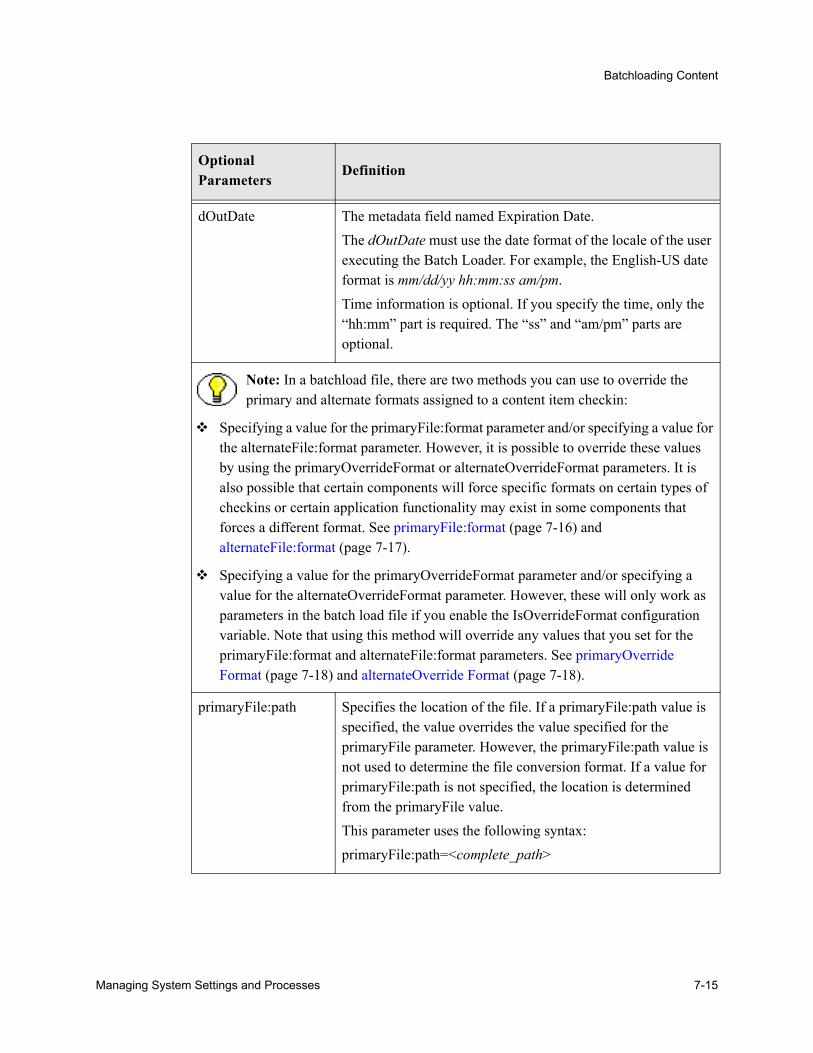
Batchloading Content
dOutDate The metadata field named Expiration Date.The dOutDate must use the date format of the locale of the user executing the Batch Loader. For example, the English-US date format is mm/dd/yy hh:mm:ss am/pm.Time information is optional. If you specify the time, only the “hh:mm” part is required. The “ss” and “am/pm” parts are optional.
Note: In a batchload file, there are two methods you can use to override the primary and alternate formats assigned to a content item checkin:
Specifying a value for the primaryFile:format parameter and/or specifying a value for the alternateFile:format parameter. However, it is possible to override these values by using the primaryOverrideFormat or alternateOverrideFormat parameters. It is also possible that certain components will force specific formats on certain types of checkins or certain application functionality may exist in some components that forces a different format. See primaryFile:format (page 7-16) and alternateFile:format (page 7-17).
Specifying a value for the primaryOverrideFormat parameter and/or specifying a value for the alternateOverrideFormat parameter. However, these will only work as parameters in the batch load file if you enable the IsOverrideFormat configuration variable. Note that using this method will override any values that you set for the primaryFile:format and alternateFile:format parameters. See primaryOverride Format (page 7-18) and alternateOverride Format (page 7-18).
primaryFile:path Specifies the location of the file. If a primaryFile:path value is specified, the value overrides the value specified for the primaryFile parameter. However, the primaryFile:path value is not used to determine the file conversion format. If a value for primaryFile:path is not specified, the location is determined from the primaryFile value. This parameter uses the following syntax:primaryFile:path=<complete_path>
Optional Parameters
Definition
Managing System Settings and Processes 7-15

Batchloading Content
primaryFile:format Specifies the file format to use for the Primary File. This file format overrides the one specified by the file extension of the file and the value specified for the primaryFile parameter. If a primaryFile:format value is not specified, the file format is determined from the file extension for the primaryFile value.This parameter uses the following syntax:primaryFile:format=<application>/<conversion_type>
alternateFile The metadata field named Alternate File. The Alternate File name can be a complete path or just the file name. If a file name only is specified, the location of the file is determined as follows:If the SetFileDir optional parameter has been set in this file record or any previous file record, the directory specified in SetFileDir will be used.If the SetFileDir parameter has not been set, the batch load file path is used. (The path is specified in the Batch Load File field on the Batch Loader Application (page 7-34).)
alternateFile:path Specifies the location of the alternate file. If an alternateFile:path value is specified, the value overrides the value specified for the alternateFile parameter. However, the alternateFile:path value is not used to determine the file conversion format. If an alternateFile:path value is not specified, the location is determined from the alternateFile parameter, if a value is specified. Otherwise, by default, the primaryFile value is used for the computation.This parameter uses the following syntax:alternateFile:path=<complete_path>
Optional Parameters
Definition
7-16 Managing System Settings and Processes
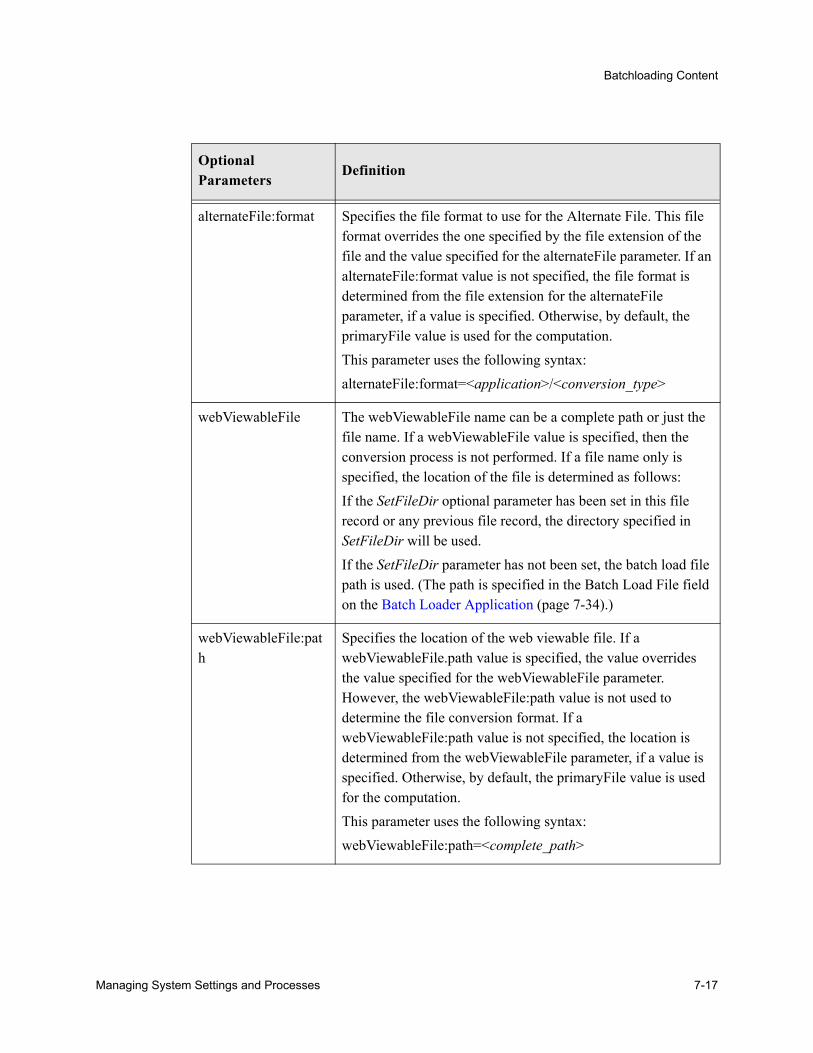
Batchloading Content
alternateFile:format Specifies the file format to use for the Alternate File. This file format overrides the one specified by the file extension of the file and the value specified for the alternateFile parameter. If an alternateFile:format value is not specified, the file format is determined from the file extension for the alternateFile parameter, if a value is specified. Otherwise, by default, the primaryFile value is used for the computation.This parameter uses the following syntax:alternateFile:format=<application>/<conversion_type>
webViewableFile The webViewableFile name can be a complete path or just the file name. If a webViewableFile value is specified, then the conversion process is not performed. If a file name only is specified, the location of the file is determined as follows:If the SetFileDir optional parameter has been set in this file record or any previous file record, the directory specified in SetFileDir will be used.If the SetFileDir parameter has not been set, the batch load file path is used. (The path is specified in the Batch Load File field on the Batch Loader Application (page 7-34).)
webViewableFile:path
Specifies the location of the web viewable file. If a webViewableFile.path value is specified, the value overrides the value specified for the webViewableFile parameter. However, the webViewableFile:path value is not used to determine the file conversion format. If a webViewableFile:path value is not specified, the location is determined from the webViewableFile parameter, if a value is specified. Otherwise, by default, the primaryFile value is used for the computation.This parameter uses the following syntax:webViewableFile:path=<complete_path>
Optional Parameters
Definition
Managing System Settings and Processes 7-17
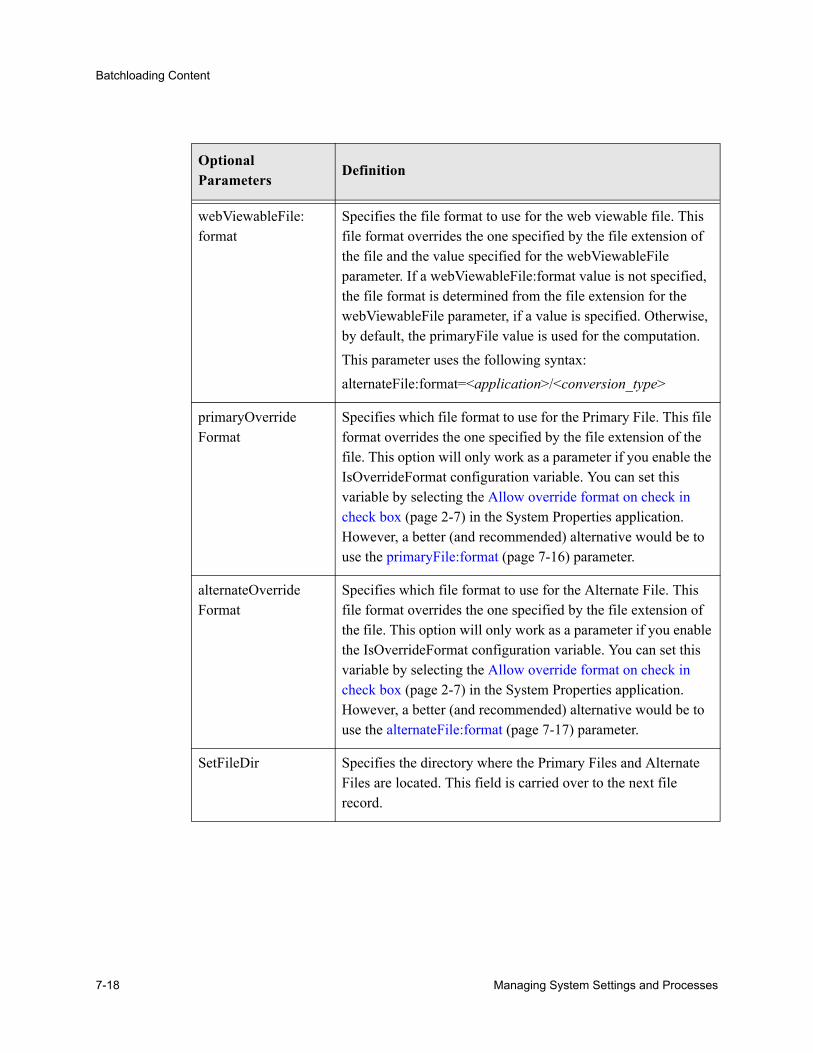
Batchloading Content
webViewableFile:format
Specifies the file format to use for the web viewable file. This file format overrides the one specified by the file extension of the file and the value specified for the webViewableFile parameter. If a webViewableFile:format value is not specified, the file format is determined from the file extension for the webViewableFile parameter, if a value is specified. Otherwise, by default, the primaryFile value is used for the computation.This parameter uses the following syntax:alternateFile:format=<application>/<conversion_type>
primaryOverrideFormat
Specifies which file format to use for the Primary File. This file format overrides the one specified by the file extension of the file. This option will only work as a parameter if you enable the IsOverrideFormat configuration variable. You can set this variable by selecting the Allow override format on check in check box (page 2-7) in the System Properties application. However, a better (and recommended) alternative would be to use the primaryFile:format (page 7-16) parameter.
alternateOverrideFormat
Specifies which file format to use for the Alternate File. This file format overrides the one specified by the file extension of the file. This option will only work as a parameter if you enable the IsOverrideFormat configuration variable. You can set this variable by selecting the Allow override format on check in check box (page 2-7) in the System Properties application. However, a better (and recommended) alternative would be to use the alternateFile:format (page 7-17) parameter.
SetFileDir Specifies the directory where the Primary Files and Alternate Files are located. This field is carried over to the next file record.
Optional Parameters
Definition
7-18 Managing System Settings and Processes
Batchloading Content
Custom Metadata FieldsAny custom metadata field that has been defined in the Configuration Manager can be included in a file record.
If you have defined any custom metadata fields as required fields, those fields must be defined for an insert action or an update action.
If a custom metadata field is not a required field, but it has a default value (even if blank), then the default value will be used if the value is not specified in the batch load file.
When specifying a custom metadata field value, the field name preceded with an x. For example, if you have a custom metadata field called Location, then the batch load file entry will be xLocation=value.
Keep in mind that some add-on products use custom metadata fields. For example, if you have PDF Watermark, you will have created a field called Watermark. To include this field in a batch load file, precede it with an x just like any other custom metadata field (that is, xWatermark).
PREPARING A BATCH LOAD FILEThis section covers these topics:
ConceptsAbout Preparing a Batch Load File (page 7-20)
Mapping Files (page 7-21)
TasksCreating a Batch Load File from the BatchBuilder Screen (page 7-24)
Creating a Mapping File (page 7-25)
Creating a Batch Load File from the Command Line (page 7-26)
InterfaceBatchBuilder Screen (page 7-28)
BatchBuilder Mapping List Screen (page 7-30)
Managing System Settings and Processes 7-19
Batchloading Content
Add BatchBuilder Mapping Screen (page 7-31)
Edit BatchBuilder Mapping Screen (page 7-32)
Add/Edit BatchBuilder Mapping Field Screen (page 7-33)
About Preparing a Batch Load FileYou can use any method you prefer to create a batch load file, as long as the resulting text file conforms to the batch load file syntax requirements. However, the Batch Loader provides a tool called the BatchBuilder to assist you in creating batch load files.
The BatchBuilder creates a batch load file based on the files in a specified directory. The BatchBuilder reads recursively through all the sub-directories to create the batch load file.
A mapping file tells the BatchBuilder how to determine the metadata for each file record. You can use the BatchBuilder to create and save custom Mapping Files (page 7-21).
You can run the BatchBuilder from the stand-alone application interface or from the command line.
The BatchBuilder can also be used to create external collections of content, which are indexed and stored in a separate search collection rather than in the content server database.
• If you want users to be able to update metadata and delete content from an external collection, you must install the Lightly Managed Content feature.
• If you do not install the Lightly Managed Content feature, you can still set up “read-only” external collections, where users can search for content but cannot update metadata or delete content. This option is recommended when external content is also included in another content server instance.
Mapping FilesMapping files are text files that have a .hda extension, which identifies them as a type of data file used by the content server.
Note: See Working With Components for more information on HDA files, LocalData properties, and ResultSets.
7-20 Managing System Settings and Processes
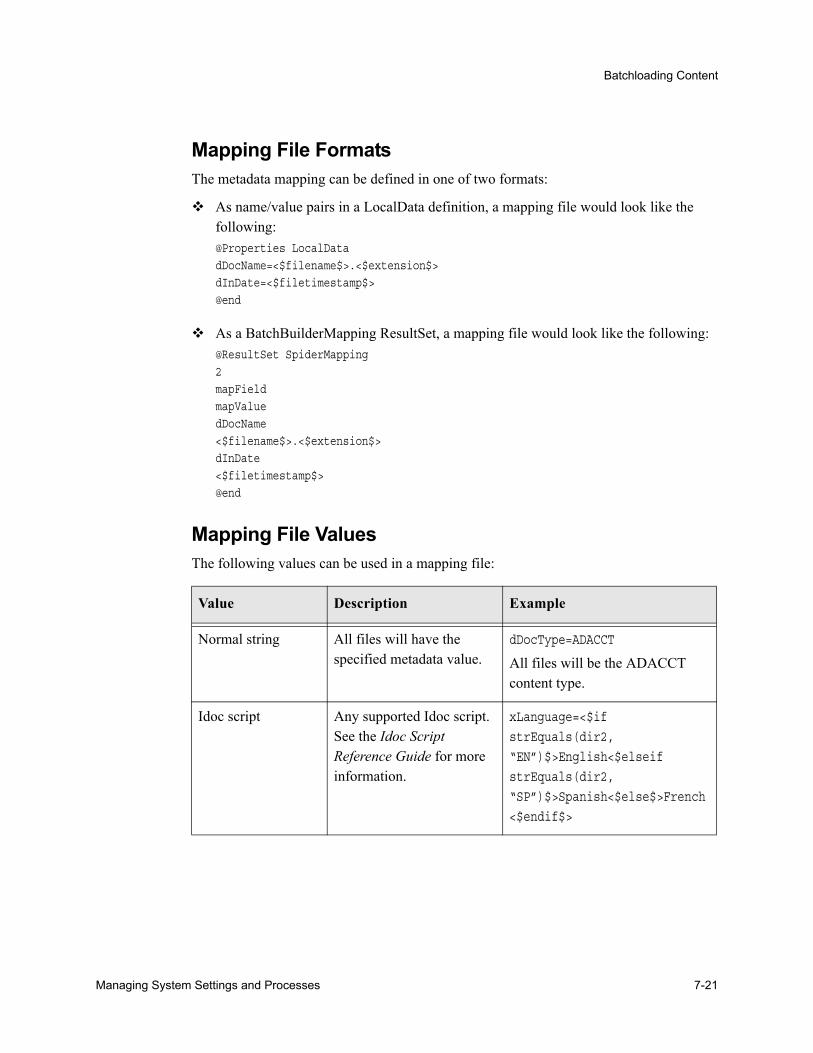
Batchloading Content
Mapping File FormatsThe metadata mapping can be defined in one of two formats:
As name/value pairs in a LocalData definition, a mapping file would look like the following:@Properties LocalDatadDocName=<$filename$>.<$extension$>dInDate=<$filetimestamp$>@end
As a BatchBuilderMapping ResultSet, a mapping file would look like the following:@ResultSet SpiderMapping2mapFieldmapValuedDocName<$filename$>.<$extension$>dInDate<$filetimestamp$>@end
Mapping File ValuesThe following values can be used in a mapping file:
Value Description Example
Normal string All files will have the specified metadata value.
dDocType=ADACCT
All files will be the ADACCT content type.
Idoc script Any supported Idoc script. See the Idoc Script Reference Guide for more information.
xLanguage=<$if
strEquals(dir2,
“EN”)$>English<$elseif
strEquals(dir2,
“SP”)$>Spanish<$else$>French
<$endif$>
Managing System Settings and Processes 7-21
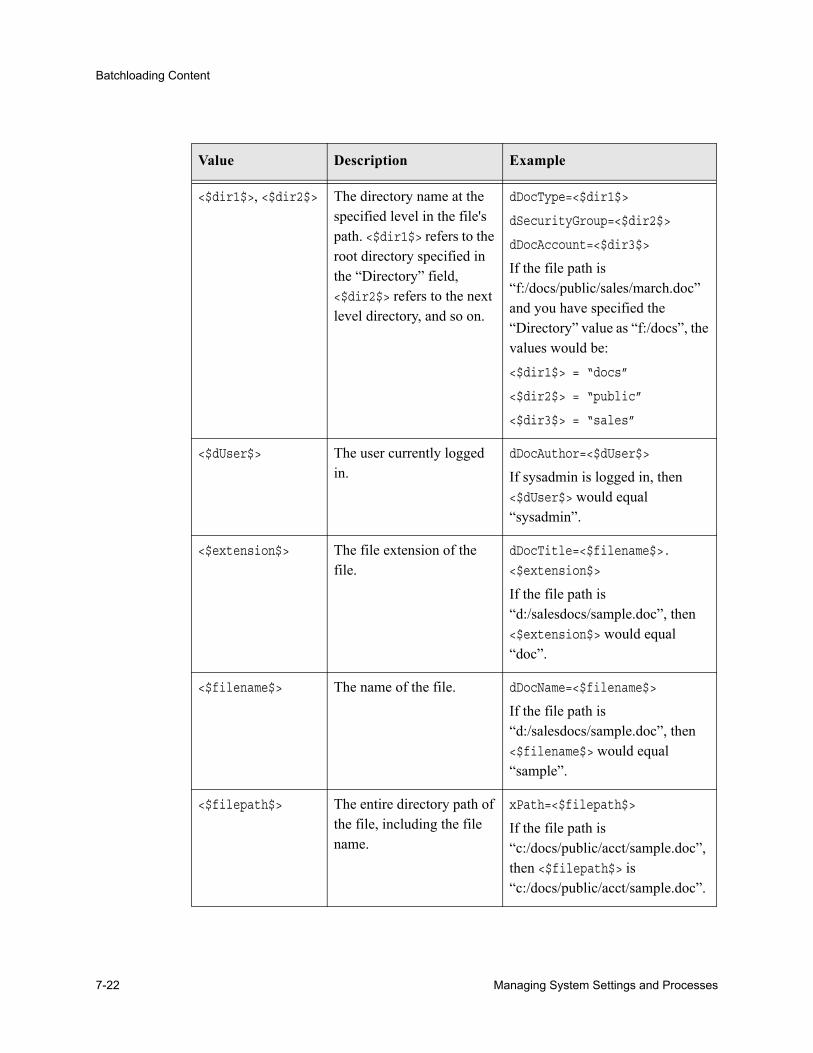
Batchloading Content
<$dir1$>, <$dir2$> The directory name at the specified level in the file's path. <$dir1$> refers to the root directory specified in the “Directory” field, <$dir2$> refers to the next level directory, and so on.
dDocType=<$dir1$>
dSecurityGroup=<$dir2$>
dDocAccount=<$dir3$>
If the file path is “f:/docs/public/sales/march.doc” and you have specified the “Directory” value as “f:/docs”, the values would be:<$dir1$> = “docs”
<$dir2$> = “public”
<$dir3$> = “sales”
<$dUser$> The user currently logged in.
dDocAuthor=<$dUser$>
If sysadmin is logged in, then <$dUser$> would equal “sysadmin”.
<$extension$> The file extension of the file.
dDocTitle=<$filename$>.
<$extension$>
If the file path is “d:/salesdocs/sample.doc”, then <$extension$> would equal “doc”.
<$filename$> The name of the file. dDocName=<$filename$>
If the file path is “d:/salesdocs/sample.doc”, then <$filename$> would equal “sample”.
<$filepath$> The entire directory path of the file, including the file name.
xPath=<$filepath$>
If the file path is “c:/docs/public/acct/sample.doc”, then <$filepath$> is “c:/docs/public/acct/sample.doc”.
Value Description Example
7-22 Managing System Settings and Processes
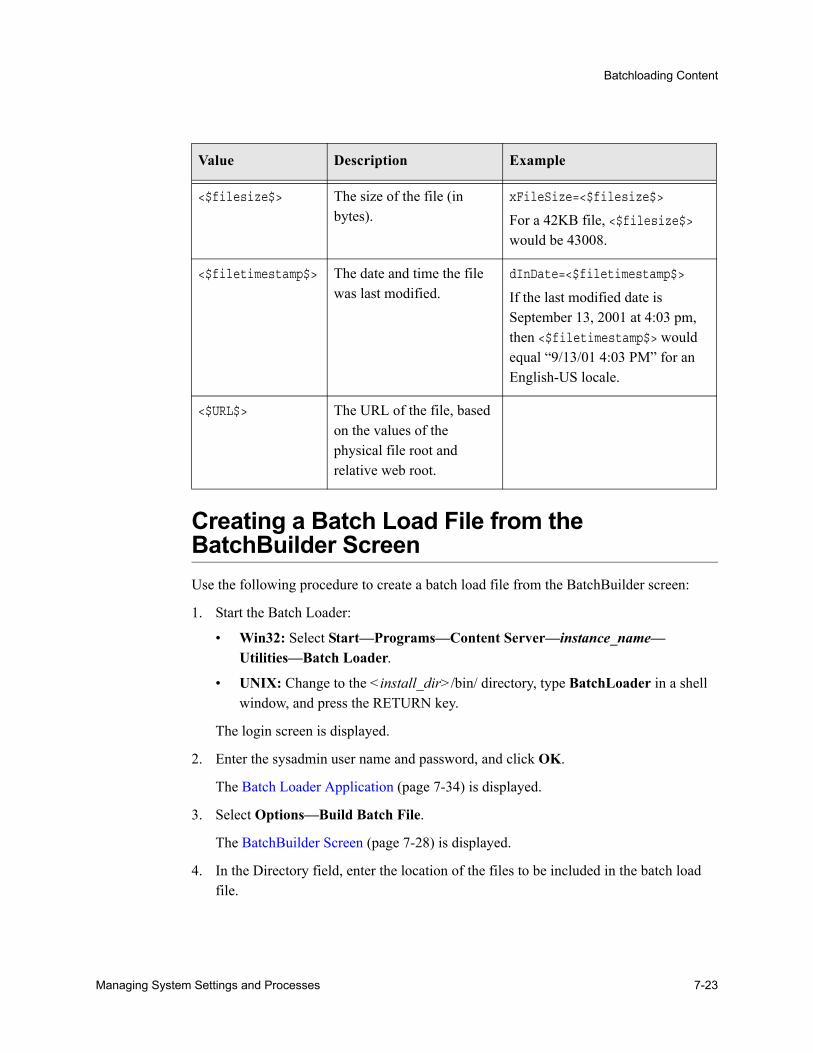
Batchloading Content
Creating a Batch Load File from the BatchBuilder ScreenUse the following procedure to create a batch load file from the BatchBuilder screen:
1. Start the Batch Loader:
• Win32: Select Start—Programs—Content Server—instance_name—Utilities—Batch Loader.
• UNIX: Change to the <install_dir>/bin/ directory, type BatchLoader in a shell window, and press the RETURN key.
The login screen is displayed.
2. Enter the sysadmin user name and password, and click OK.
The Batch Loader Application (page 7-34) is displayed.
3. Select Options—Build Batch File.
The BatchBuilder Screen (page 7-28) is displayed.
4. In the Directory field, enter the location of the files to be included in the batch load file.
<$filesize$> The size of the file (in bytes).
xFileSize=<$filesize$>
For a 42KB file, <$filesize$> would be 43008.
<$filetimestamp$> The date and time the file was last modified.
dInDate=<$filetimestamp$>
If the last modified date is September 13, 2001 at 4:03 pm, then <$filetimestamp$> would equal “9/13/01 4:03 PM” for an English-US locale.
<$URL$> The URL of the file, based on the values of the physical file root and relative web root.
Value Description Example
Managing System Settings and Processes 7-23
Batchloading Content
5. In the Batch Load File field, enter the path and file name for the batch load file. You can click the Browse button to navigate to and select the directory and file.
6. From the Mapping list, select a mapping file. To create a new mapping file or edit an existing one, see Creating a Mapping File (page 7-25).
7. Optional: In the File Filter field, enter filter settings to include or exclude particular files from the batch load file.
8. Optional: To batch load a read-only external collection, select the External check box and select the external collection options. See the Lightly Managed Content Component documentation for details.
9. Click Build.
10. When the build process is complete, click OK.
11. Open the batch load file in a text editor and double-check the file records.
12. To save the current batch load file settings as the default, select Options—Save Configuration.
Creating a Mapping FileUse the following procedure to create a mapping file.
1. Display the BatchBuilder Screen (page 7-28).
2. Click Edit next to the Mapping field.
The BatchBuilder Mapping List Screen (page 7-30) is displayed.
3. Click Add.
The Add BatchBuilder Mapping Screen (page 7-31) is displayed.
4. Enter a name and description for the mapping file, and click OK.
The Edit BatchBuilder Mapping Screen (page 7-32) is displayed.
5. Click Add.
The Add/Edit BatchBuilder Mapping Field Screen (page 7-33) is displayed.
6. Enter a metadata field name to be defined. For example, enter dDocName for the Content ID field, or xComments for the Comments field.
Note: You do not need to install the LMC feature to create a read-only external collection, and if you are not using the LMC feature, you do not need to set the LMCReadOnly configuration variable.
7-24 Managing System Settings and Processes
Batchloading Content
7. Enter the value for the metadata field.
• Type any constant text and Idoc script directly in the Value field. For example, to set ADACCT as the Type for all documents in the batch load file, enter dDocType in the Field field, and enter ADACCT in the Value field. (See the Idoc Script Reference Guide for more information on Idoc Script.)
• To add a predefined variable to the Value field, select the variable in the right column and click the << button. For example, to set each document's second-level directory as the Security Group, enter dSecurityGroup in the Field field, and insert the <$dir1$> variable in the Value field.
8. Click OK.
9. Repeat steps 4 through 8 for as many metadata fields as you want to define.
10. Click OK to save changes and close the Edit BatchBuilder Mapping screen.
The mapping file is saved as MapFileName.hda in the <install_dir>/search/external/mapping/ directory.
11. Click Close to close the BatchBuilder Mapping List screen.
Creating a Batch Load File from the Command LineYou can create a batch load file by entering the BatchBuilder parameters from a command line rather than entering them in the BatchBuilder screen. Use the following procedure to create a batch load file from the command line:
1. Open the <install_dir>/bin/intradoc.cfg file in a text editor, and add the following line:BatchLoaderUserName=sysadmin
This is required so that the system logs in as the system administrator, because only users who have admin rights have permission to run the Batch Loader and BatchBuilder applications.
2. Save and close the file.
3. Open a command line window and change to the <install_dir>/bin/ directory.
Caution: Be careful when choosing predefined variables. Many metadata fields have length limitations and cannot contain certain characters (such as spaces or punctuation marks). See Managing Repository Content for more information.
Managing System Settings and Processes 7-25
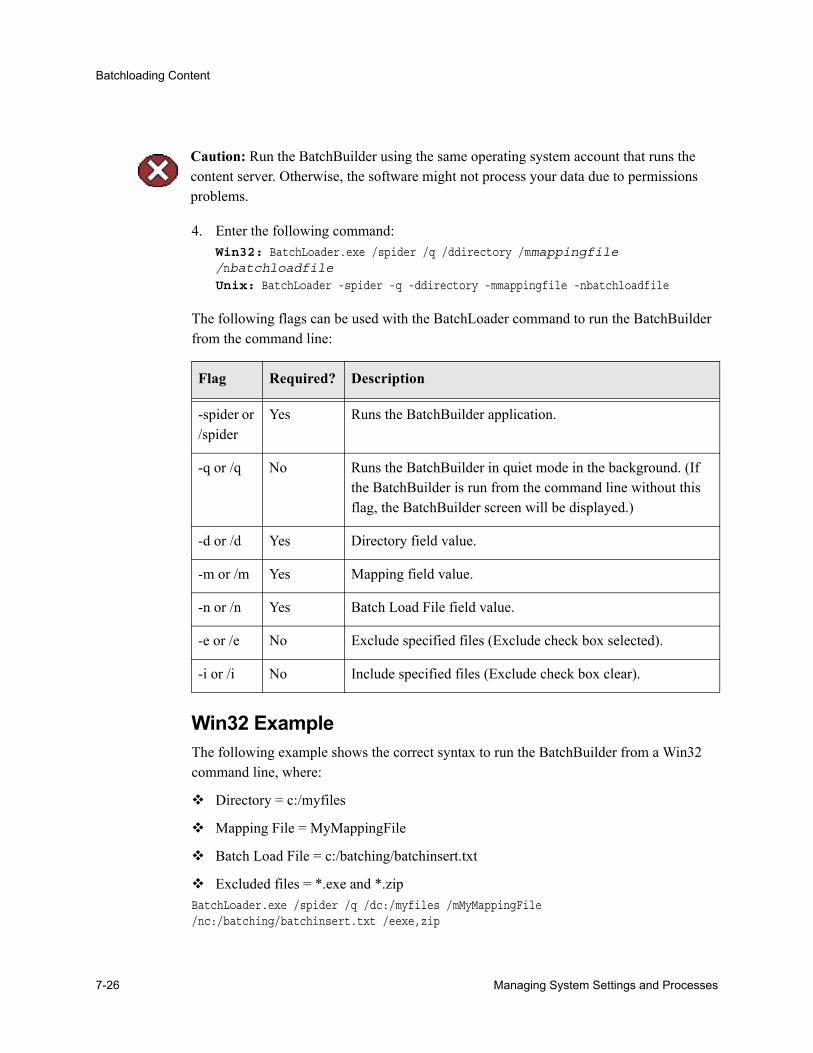
Batchloading Content
4. Enter the following command:Win32: BatchLoader.exe /spider /q /ddirectory /mmappingfile /nbatchloadfileUnix: BatchLoader -spider -q -ddirectory -mmappingfile -nbatchloadfile
The following flags can be used with the BatchLoader command to run the BatchBuilder from the command line:
Win32 ExampleThe following example shows the correct syntax to run the BatchBuilder from a Win32 command line, where:
Directory = c:/myfiles
Mapping File = MyMappingFile
Batch Load File = c:/batching/batchinsert.txt
Excluded files = *.exe and *.zipBatchLoader.exe /spider /q /dc:/myfiles /mMyMappingFile /nc:/batching/batchinsert.txt /eexe,zip
Caution: Run the BatchBuilder using the same operating system account that runs the content server. Otherwise, the software might not process your data due to permissions problems.
Flag Required? Description
-spider or /spider
Yes Runs the BatchBuilder application.
-q or /q No Runs the BatchBuilder in quiet mode in the background. (If the BatchBuilder is run from the command line without this flag, the BatchBuilder screen will be displayed.)
-d or /d Yes Directory field value.
-m or /m Yes Mapping field value.
-n or /n Yes Batch Load File field value.
-e or /e No Exclude specified files (Exclude check box selected).
-i or /i No Include specified files (Exclude check box clear).
7-26 Managing System Settings and Processes
Batchloading Content
UNIX ExampleThe following example shows the correct syntax to run the BatchBuilder from a UNIX command line, where:
Directory = /myfiles
Mapping File = MyMappingFile
Batch Load File = /batching/batchinsert.txt
Excluded files = index.htm and index.htmlBatchLoader -spider -q -d/myfiles -mMyMappingFile -n/batching/batchinsert.txt -eindex.htm,index.html
BATCH INTERFACE SCREENSThe following screens are used in batch loading operations.
BatchBuilder Screen (page 7-28)
BatchBuilder Mapping List Screen (page 7-30)
Add BatchBuilder Mapping Screen (page 7-31)
Edit BatchBuilder Mapping Screen (page 7-32)
Add/Edit BatchBuilder Mapping Field Screen (page 7-33)
Batch Loader Application (page 7-34)
Managing System Settings and Processes 7-27
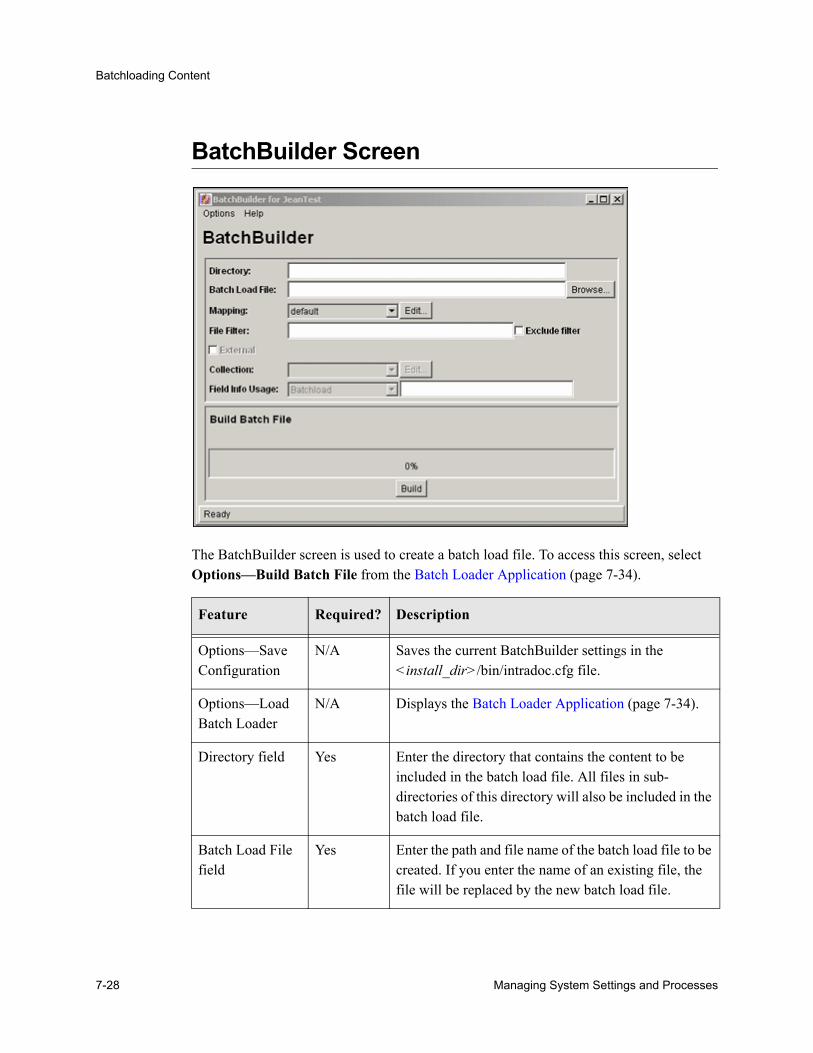
Batchloading Content
BatchBuilder Screen
The BatchBuilder screen is used to create a batch load file. To access this screen, select Options—Build Batch File from the Batch Loader Application (page 7-34).
Feature Required? Description
Options—Save Configuration
N/A Saves the current BatchBuilder settings in the <install_dir>/bin/intradoc.cfg file.
Options—Load Batch Loader
N/A Displays the Batch Loader Application (page 7-34).
Directory field Yes Enter the directory that contains the content to be included in the batch load file. All files in sub-directories of this directory will also be included in the batch load file.
Batch Load File field
Yes Enter the path and file name of the batch load file to be created. If you enter the name of an existing file, the file will be replaced by the new batch load file.
7-28 Managing System Settings and Processes
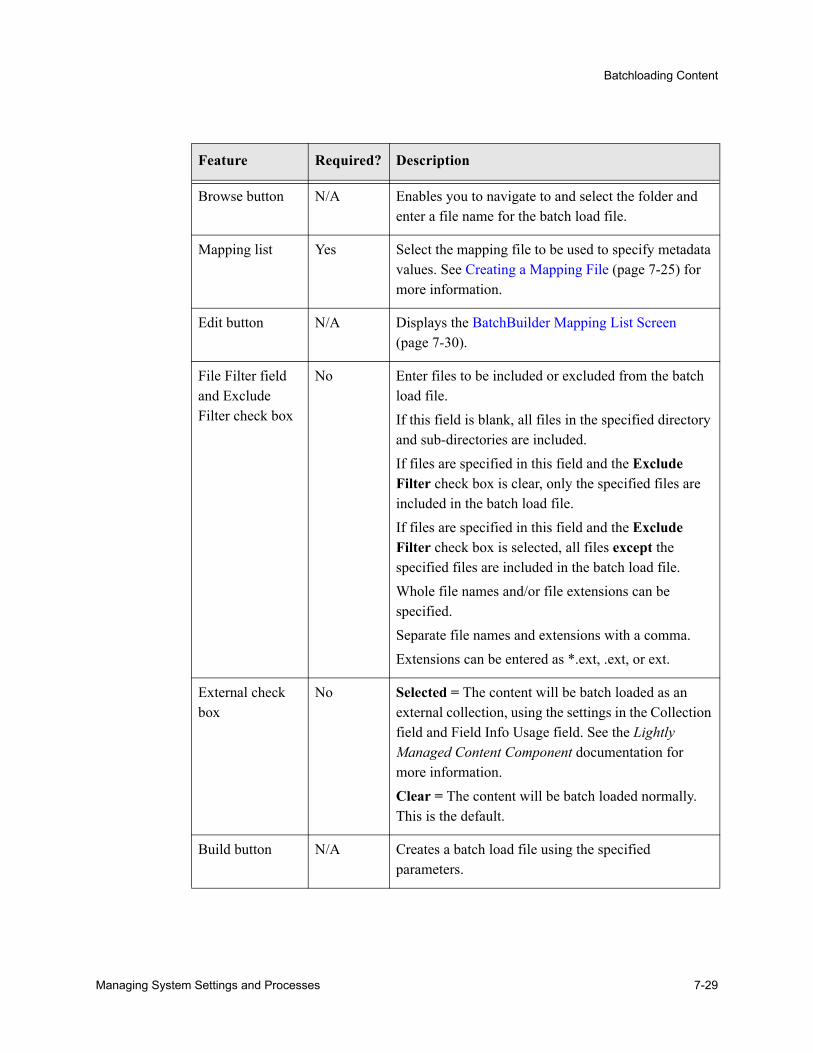
Batchloading Content
Browse button N/A Enables you to navigate to and select the folder and enter a file name for the batch load file.
Mapping list Yes Select the mapping file to be used to specify metadata values. See Creating a Mapping File (page 7-25) for more information.
Edit button N/A Displays the BatchBuilder Mapping List Screen (page 7-30).
File Filter field and Exclude Filter check box
No Enter files to be included or excluded from the batch load file.If this field is blank, all files in the specified directory and sub-directories are included.If files are specified in this field and the Exclude Filter check box is clear, only the specified files are included in the batch load file.If files are specified in this field and the Exclude Filter check box is selected, all files except the specified files are included in the batch load file.Whole file names and/or file extensions can be specified.Separate file names and extensions with a comma.Extensions can be entered as *.ext, .ext, or ext.
External check box
No Selected = The content will be batch loaded as an external collection, using the settings in the Collection field and Field Info Usage field. See the Lightly Managed Content Component documentation for more information.Clear = The content will be batch loaded normally. This is the default.
Build button N/A Creates a batch load file using the specified parameters.
Feature Required? Description
Managing System Settings and Processes 7-29
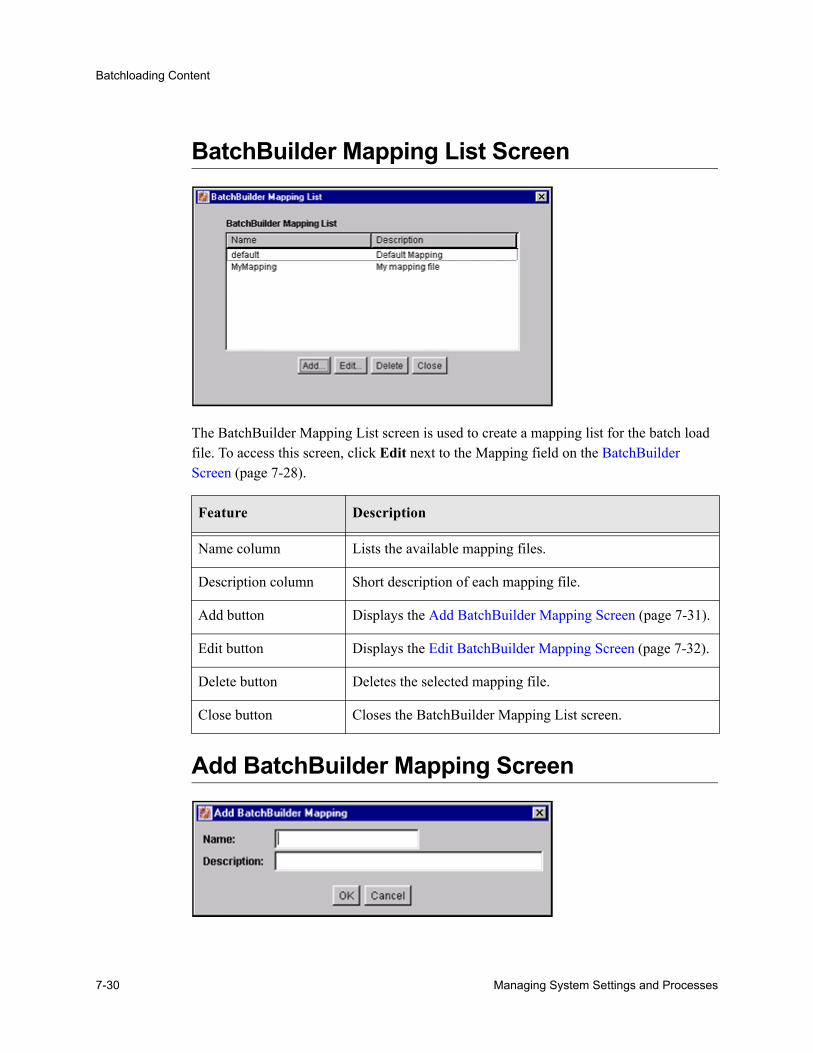
Batchloading Content
BatchBuilder Mapping List Screen
The BatchBuilder Mapping List screen is used to create a mapping list for the batch load file. To access this screen, click Edit next to the Mapping field on the BatchBuilder Screen (page 7-28).
Add BatchBuilder Mapping Screen
Feature Description
Name column Lists the available mapping files.
Description column Short description of each mapping file.
Add button Displays the Add BatchBuilder Mapping Screen (page 7-31).
Edit button Displays the Edit BatchBuilder Mapping Screen (page 7-32).
Delete button Deletes the selected mapping file.
Close button Closes the BatchBuilder Mapping List screen.
7-30 Managing System Settings and Processes
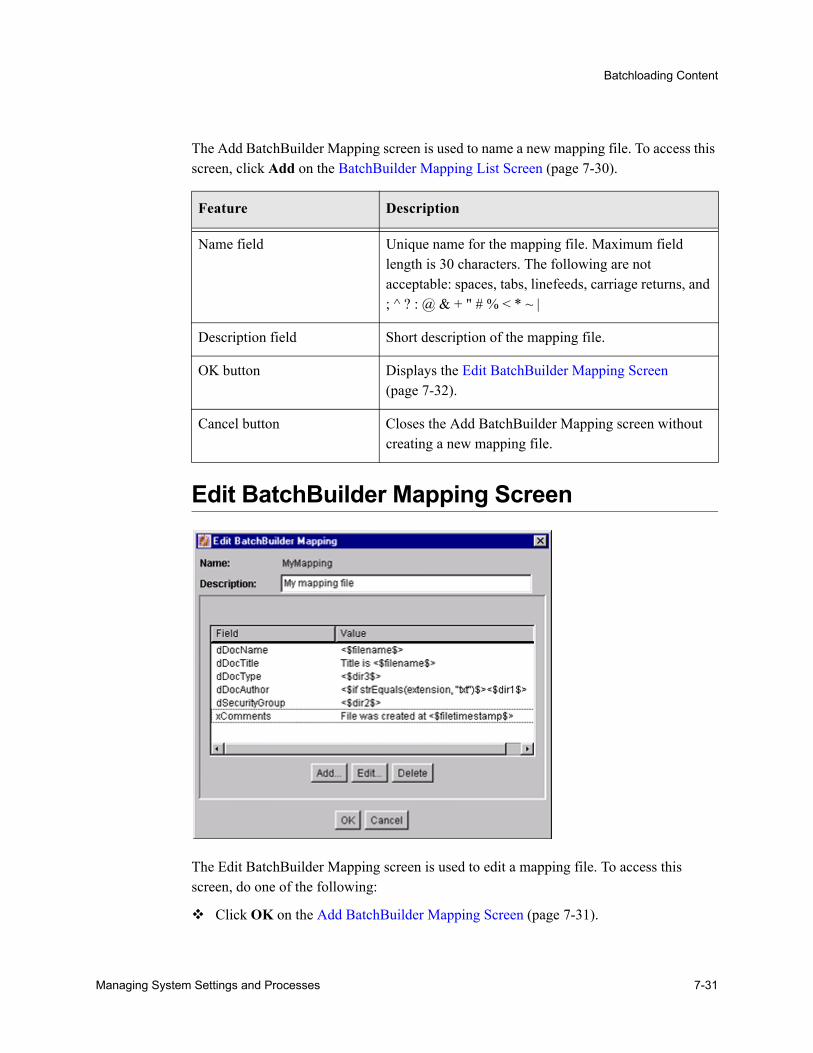
Batchloading Content
The Add BatchBuilder Mapping screen is used to name a new mapping file. To access this screen, click Add on the BatchBuilder Mapping List Screen (page 7-30).
Edit BatchBuilder Mapping Screen
The Edit BatchBuilder Mapping screen is used to edit a mapping file. To access this screen, do one of the following:
Click OK on the Add BatchBuilder Mapping Screen (page 7-31).
Feature Description
Name field Unique name for the mapping file. Maximum field length is 30 characters. The following are not acceptable: spaces, tabs, linefeeds, carriage returns, and ; ^ ? : @ & + " # % < * ~ |
Description field Short description of the mapping file.
OK button Displays the Edit BatchBuilder Mapping Screen (page 7-32).
Cancel button Closes the Add BatchBuilder Mapping screen without creating a new mapping file.
Managing System Settings and Processes 7-31
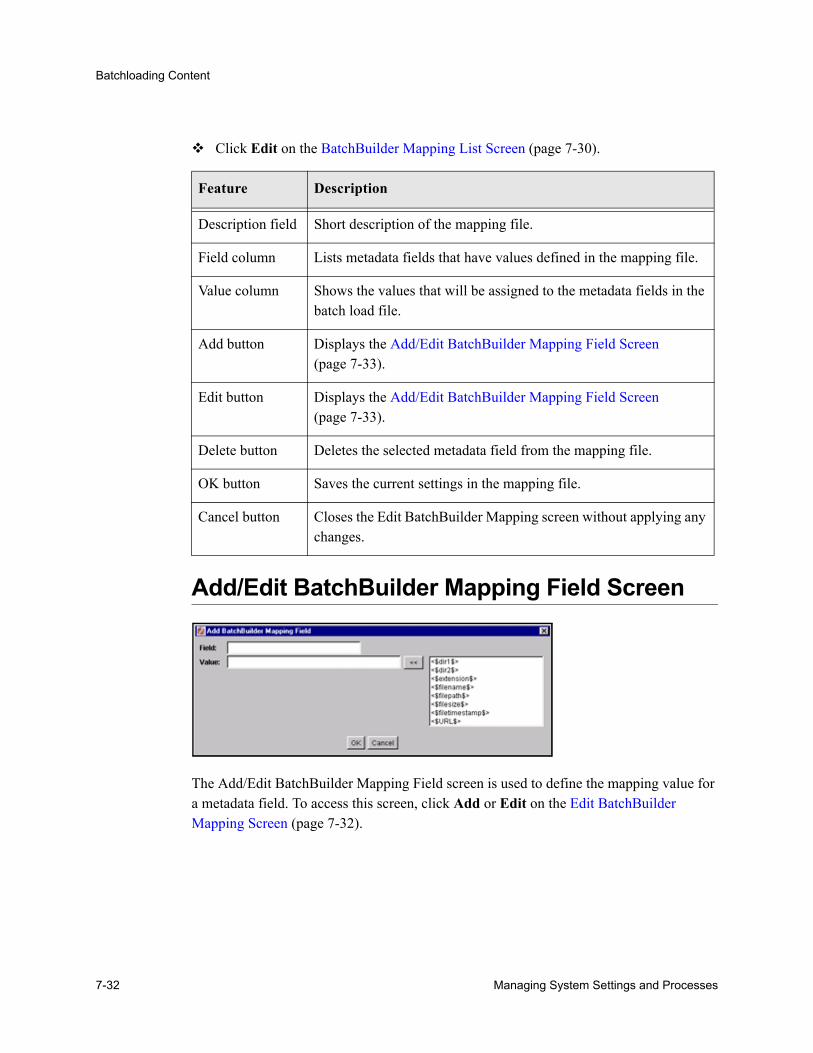
Batchloading Content
Click Edit on the BatchBuilder Mapping List Screen (page 7-30).
Add/Edit BatchBuilder Mapping Field Screen
The Add/Edit BatchBuilder Mapping Field screen is used to define the mapping value for a metadata field. To access this screen, click Add or Edit on the Edit BatchBuilder Mapping Screen (page 7-32).
Feature Description
Description field Short description of the mapping file.
Field column Lists metadata fields that have values defined in the mapping file.
Value column Shows the values that will be assigned to the metadata fields in the batch load file.
Add button Displays the Add/Edit BatchBuilder Mapping Field Screen (page 7-33).
Edit button Displays the Add/Edit BatchBuilder Mapping Field Screen (page 7-33).
Delete button Deletes the selected metadata field from the mapping file.
OK button Saves the current settings in the mapping file.
Cancel button Closes the Edit BatchBuilder Mapping screen without applying any changes.
7-32 Managing System Settings and Processes
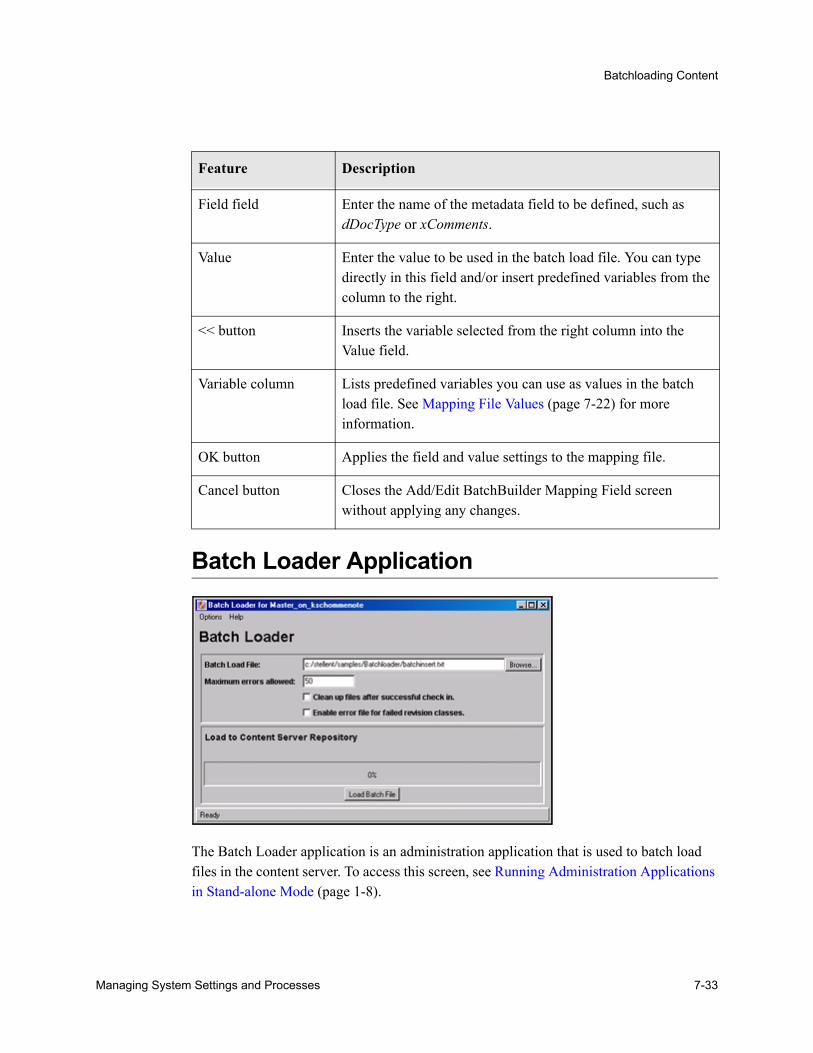
Batchloading Content
Batch Loader Application
The Batch Loader application is an administration application that is used to batch load files in the content server. To access this screen, see Running Administration Applications in Stand-alone Mode (page 1-8).
Feature Description
Field field Enter the name of the metadata field to be defined, such as dDocType or xComments.
Value Enter the value to be used in the batch load file. You can type directly in this field and/or insert predefined variables from the column to the right.
<< button Inserts the variable selected from the right column into the Value field.
Variable column Lists predefined variables you can use as values in the batch load file. See Mapping File Values (page 7-22) for more information.
OK button Applies the field and value settings to the mapping file.
Cancel button Closes the Add/Edit BatchBuilder Mapping Field screen without applying any changes.
Managing System Settings and Processes 7-33
Batchloading Content
Feature Description
Options menu Save Configuration—Saves the current Batch Loader settings in the <install_dir>/bin/intradoc.cfg file.Build Batch File—Displays the BatchBuilder Screen (page 7-28).Exit—Closes the Batch Loader screen.
Help menu Contents—Displays the content server online help.About Content Server—Displays version, build, and copyright information for the content server.
Batch Load File field
The path and file name of the batch load file. If settings have not been saved to the intradoc.cfg file, the default is <install_dir>/samples/Batchloader/batchinsert.txt.
Browse button Enables you to navigate to and select the batch load file.
Maximum errors allowed field
The number of errors after which the Batch Loader stops processing records from the batch load file. The default is 50.If you plan to run the Batch Loader with a large number of files overnight, consider increasing this number so that the process doesn’t stop prematurely.If you are monitoring the Batch Loader closely, consider decreasing this number so you are notified of errors as they occur.
Clean up files after successful check in check box
Deletes each file from the hard drive after it is successfully checked in or updated.
Enable error file for failed revision classes check box
Creates a text file containing the file records that failed during batch loading. You can fix the errors in this content and rerun it as the batch load file.
Progress bar Displays the progress of the batch loading process.
Load Batch File button
Starts the batch loading process.
7-34 Managing System Settings and Processes
Batchloading Content
RUNNING THE BATCH LOADERThis section covers these topics:
ConceptsAbout Running the Batch Loader (page 7-36)
TasksBatch Loading from the Batch Loader Screen (page 7-36)
Batch Loading from the Command Line (page 7-37)
Using the IdcCommand Utility and Remote Access (page 7-38)
Batch Loading Content as Metadata Only (page 7-43)
Batch Loader -console Command Line Switch (page 7-44)
Adding a Redirect (page 7-44)
Correcting Batch Load Errors (page 7-45)
InterfaceBatch Loader Application (page 7-34)
About Running the Batch LoaderThe Batch Loader uses the information from a batch load file to check in (insert), delete, and/or update a large number of files on your content server system at one time.
You can run the Batch Loader from the stand-alone application interface or from the command line.
After you run the Batch Loader, the content server processes files through the Inbound Refinery and the Indexer as it would for any other content item.
Batch Loading from the Batch Loader ScreenUse the following procedure to batch load content using the Batch Loader screen:
1. Display the Batch Loader Application (page 7-34).
Managing System Settings and Processes 7-35
Batchloading Content
2. Click Browse, and navigate to and select the batch load file.
3. To change the number of errors that can occur before the Batch Loader stops processing, enter the number in the Maximum errors allowed field.
4. To delete files from the hard drive after they are successfully checked in or updated, select the Clean up files after successful check in check box.
5. To create a text file containing the file records that failed during batch loading, select the Enable error file for failed revision classes check box.
6. Click Load Batch File to start the Batch Loader process.
When the batch load process is complete, a Batch Loader message screen is displayed, indicating the number of errors that occurred, if any.
7. If you enabled the error file, write down the file name shown in the message box.
8. Click OK.
9. Correct any problems with the batch load.
10. To save the current Batch Loader settings as the default, select Options—Save Configuration.
Batch Loading from the Command LineYou can batch load content by entering the Batch Loader parameters from a command line rather than entering them in the Batch Loader screen. Use the following procedure to run the Batch Loader from the command line:
1. Open the <install_dir>/bin/intradoc.cfg file in a text editor, and add the following line:BatchLoaderUserName=sysadmin
This is required so that the system logs in as the system administrator, because only users who have admin rights have permission to run the Batch Loader application.
2. Save and close the file.
3. Open a command line window and change to the <install_dir>/bin/ directory.
4. Enter the following command:
Caution: Run the Batch Loader using the same operating system account that runs the content server. Otherwise, the software might not process your files due to permissions problems.
7-36 Managing System Settings and Processes
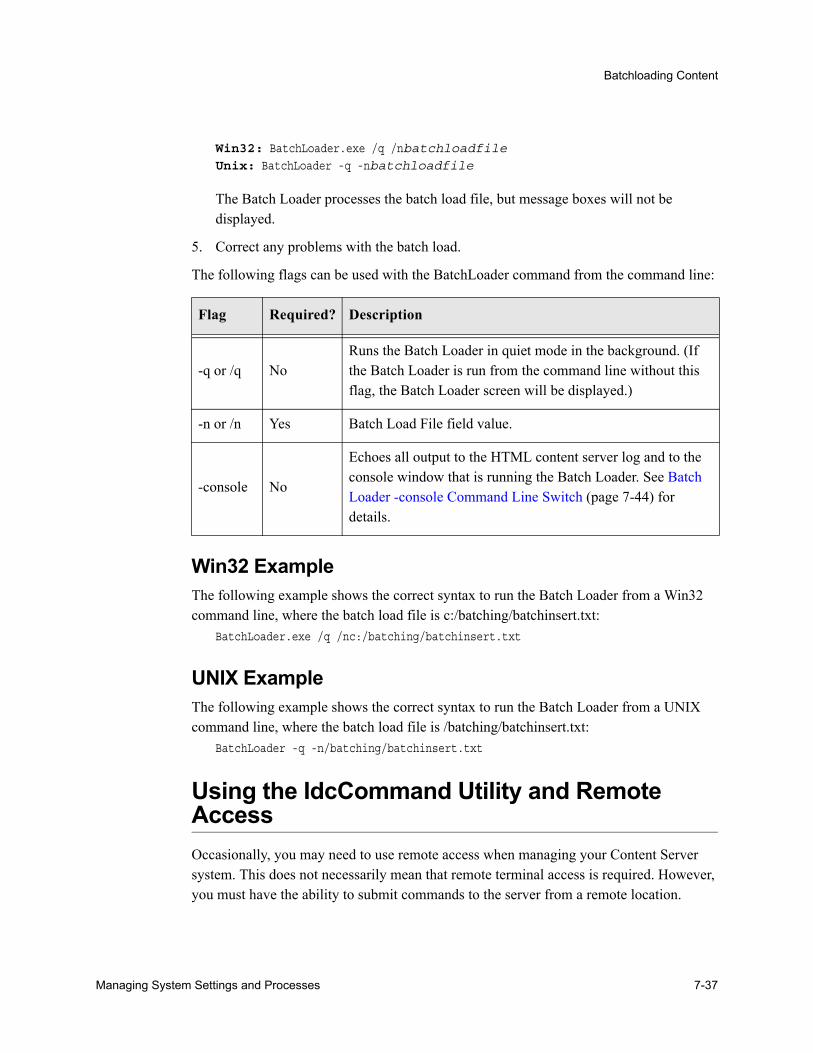
Batchloading Content
Win32: BatchLoader.exe /q /nbatchloadfileUnix: BatchLoader -q -nbatchloadfile
The Batch Loader processes the batch load file, but message boxes will not be displayed.
5. Correct any problems with the batch load.
The following flags can be used with the BatchLoader command from the command line:
Win32 ExampleThe following example shows the correct syntax to run the Batch Loader from a Win32 command line, where the batch load file is c:/batching/batchinsert.txt:
BatchLoader.exe /q /nc:/batching/batchinsert.txt
UNIX ExampleThe following example shows the correct syntax to run the Batch Loader from a UNIX command line, where the batch load file is /batching/batchinsert.txt:
BatchLoader -q -n/batching/batchinsert.txt
Using the IdcCommand Utility and Remote AccessOccasionally, you may need to use remote access when managing your Content Server system. This does not necessarily mean that remote terminal access is required. However, you must have the ability to submit commands to the server from a remote location.
Flag Required? Description
-q or /q NoRuns the Batch Loader in quiet mode in the background. (If the Batch Loader is run from the command line without this flag, the Batch Loader screen will be displayed.)
-n or /n Yes Batch Load File field value.
-console No
Echoes all output to the HTML content server log and to the console window that is running the Batch Loader. See Batch Loader -console Command Line Switch (page 7-44) for details.
Managing System Settings and Processes 7-37
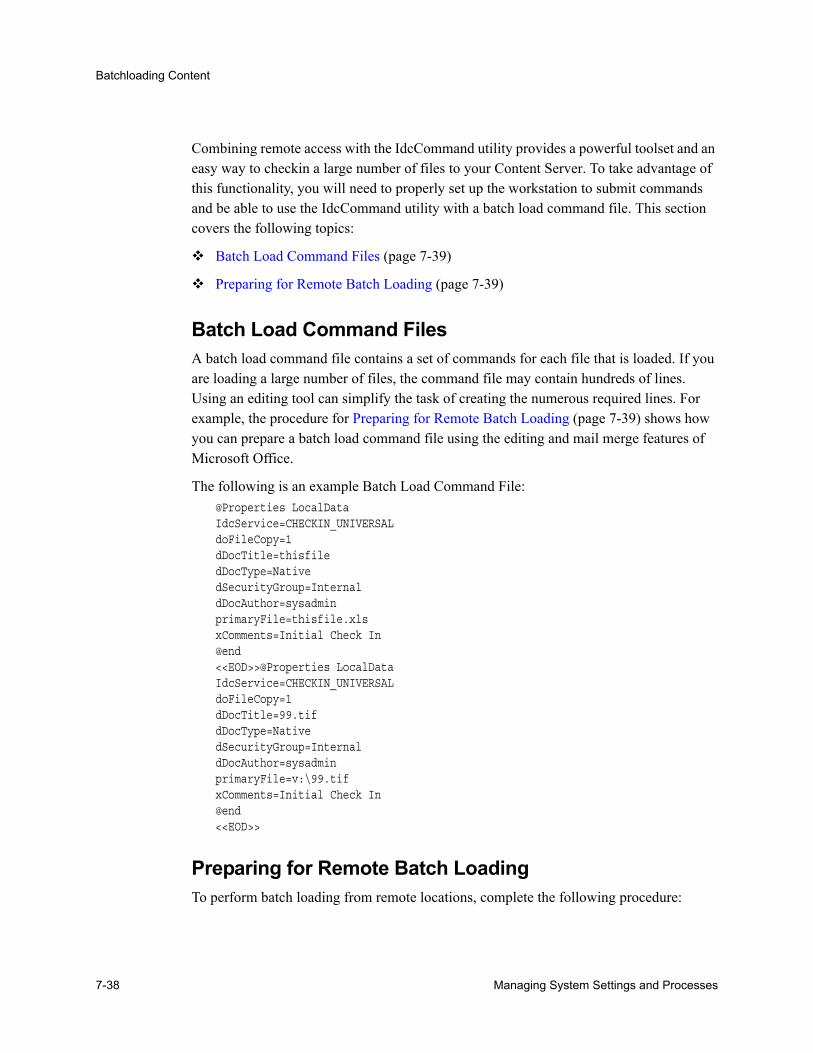
Batchloading Content
Combining remote access with the IdcCommand utility provides a powerful toolset and an easy way to checkin a large number of files to your Content Server. To take advantage of this functionality, you will need to properly set up the workstation to submit commands and be able to use the IdcCommand utility with a batch load command file. This section covers the following topics:
Batch Load Command Files (page 7-39)
Preparing for Remote Batch Loading (page 7-39)
Batch Load Command FilesA batch load command file contains a set of commands for each file that is loaded. If you are loading a large number of files, the command file may contain hundreds of lines. Using an editing tool can simplify the task of creating the numerous required lines. For example, the procedure for Preparing for Remote Batch Loading (page 7-39) shows how you can prepare a batch load command file using the editing and mail merge features of Microsoft Office.
The following is an example Batch Load Command File:@Properties LocalDataIdcService=CHECKIN_UNIVERSALdoFileCopy=1dDocTitle=thisfiledDocType=NativedSecurityGroup=InternaldDocAuthor=sysadminprimaryFile=thisfile.xlsxComments=Initial Check In@end<<EOD>>@Properties LocalDataIdcService=CHECKIN_UNIVERSALdoFileCopy=1dDocTitle=99.tifdDocType=NativedSecurityGroup=InternaldDocAuthor=sysadminprimaryFile=v:\99.tifxComments=Initial Check In@end<<EOD>>
Preparing for Remote Batch LoadingTo perform batch loading from remote locations, complete the following procedure:
7-38 Managing System Settings and Processes
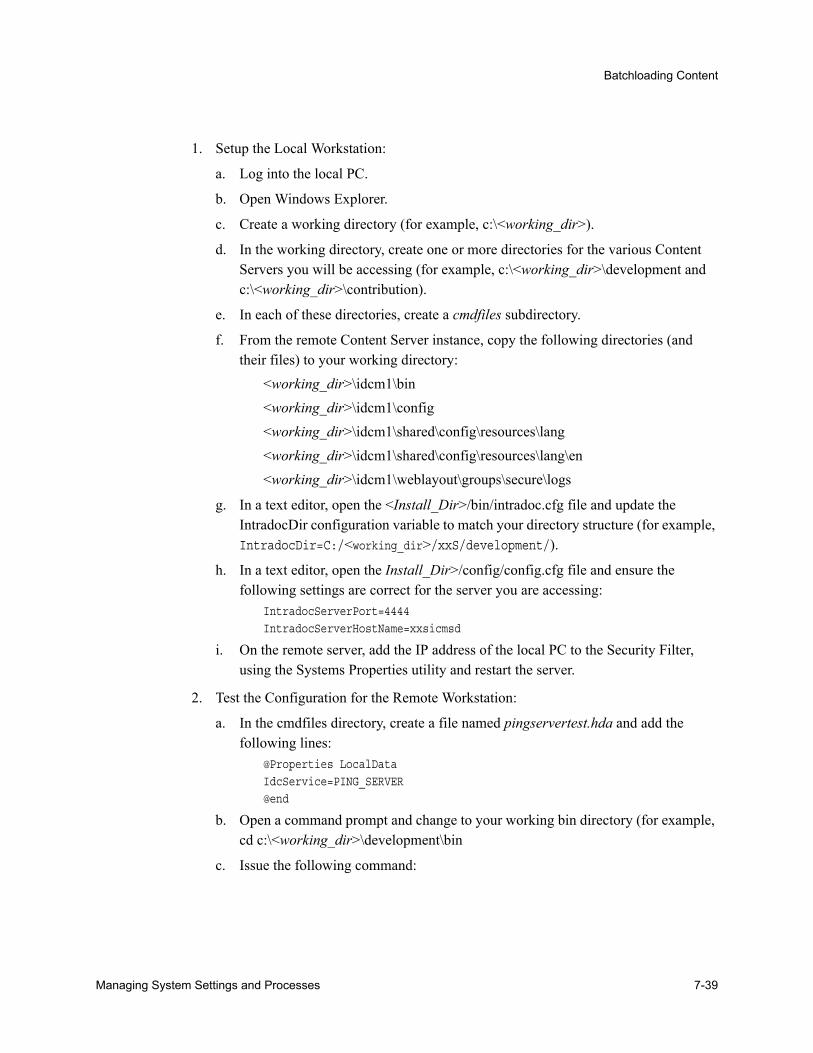
Batchloading Content
1. Setup the Local Workstation:
a. Log into the local PC.
b. Open Windows Explorer.
c. Create a working directory (for example, c:\<working_dir>).
d. In the working directory, create one or more directories for the various Content Servers you will be accessing (for example, c:\<working_dir>\development and c:\<working_dir>\contribution).
e. In each of these directories, create a cmdfiles subdirectory.
f. From the remote Content Server instance, copy the following directories (and their files) to your working directory:
<working_dir>\idcm1\bin<working_dir>\idcm1\config<working_dir>\idcm1\shared\config\resources\lang<working_dir>\idcm1\shared\config\resources\lang\en<working_dir>\idcm1\weblayout\groups\secure\logs
g. In a text editor, open the <Install_Dir>/bin/intradoc.cfg file and update the IntradocDir configuration variable to match your directory structure (for example, IntradocDir=C:/<working_dir>/xxS/development/).
h. In a text editor, open the Install_Dir>/config/config.cfg file and ensure the following settings are correct for the server you are accessing:
IntradocServerPort=4444IntradocServerHostName=xxsicmsd
i. On the remote server, add the IP address of the local PC to the Security Filter, using the Systems Properties utility and restart the server.
2. Test the Configuration for the Remote Workstation:
a. In the cmdfiles directory, create a file named pingservertest.hda and add the following lines:
@Properties LocalDataIdcService=PING_SERVER@end
b. Open a command prompt and change to your working bin directory (for example, cd c:\<working_dir>\development\bin
c. Issue the following command:
Managing System Settings and Processes 7-39
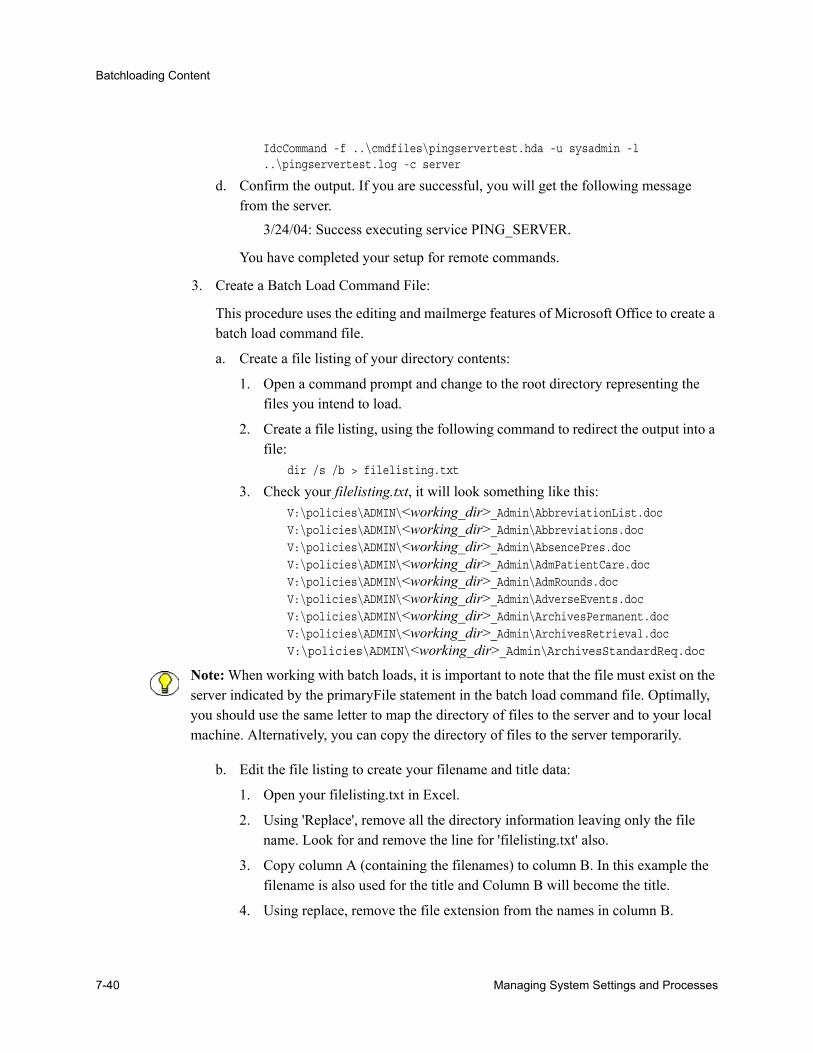
Batchloading Content
IdcCommand -f ..\cmdfiles\pingservertest.hda -u sysadmin -l ..\pingservertest.log -c server
d. Confirm the output. If you are successful, you will get the following message from the server.
3/24/04: Success executing service PING_SERVER.
You have completed your setup for remote commands.
3. Create a Batch Load Command File:
This procedure uses the editing and mailmerge features of Microsoft Office to create a batch load command file.
a. Create a file listing of your directory contents:
1. Open a command prompt and change to the root directory representing the files you intend to load.
2. Create a file listing, using the following command to redirect the output into a file:
dir /s /b > filelisting.txt
3. Check your filelisting.txt, it will look something like this:V:\policies\ADMIN\<working_dir>_Admin\AbbreviationList.docV:\policies\ADMIN\<working_dir>_Admin\Abbreviations.docV:\policies\ADMIN\<working_dir>_Admin\AbsencePres.docV:\policies\ADMIN\<working_dir>_Admin\AdmPatientCare.docV:\policies\ADMIN\<working_dir>_Admin\AdmRounds.docV:\policies\ADMIN\<working_dir>_Admin\AdverseEvents.docV:\policies\ADMIN\<working_dir>_Admin\ArchivesPermanent.docV:\policies\ADMIN\<working_dir>_Admin\ArchivesRetrieval.docV:\policies\ADMIN\<working_dir>_Admin\ArchivesStandardReq.doc
b. Edit the file listing to create your filename and title data:
1. Open your filelisting.txt in Excel.
2. Using 'Replace', remove all the directory information leaving only the file name. Look for and remove the line for 'filelisting.txt' also.
3. Copy column A (containing the filenames) to column B. In this example the filename is also used for the title and Column B will become the title.
4. Using replace, remove the file extension from the names in column B.
Note: When working with batch loads, it is important to note that the file must exist on the server indicated by the primaryFile statement in the batch load command file. Optimally, you should use the same letter to map the directory of files to the server and to your local machine. Alternatively, you can copy the directory of files to the server temporarily.
7-40 Managing System Settings and Processes
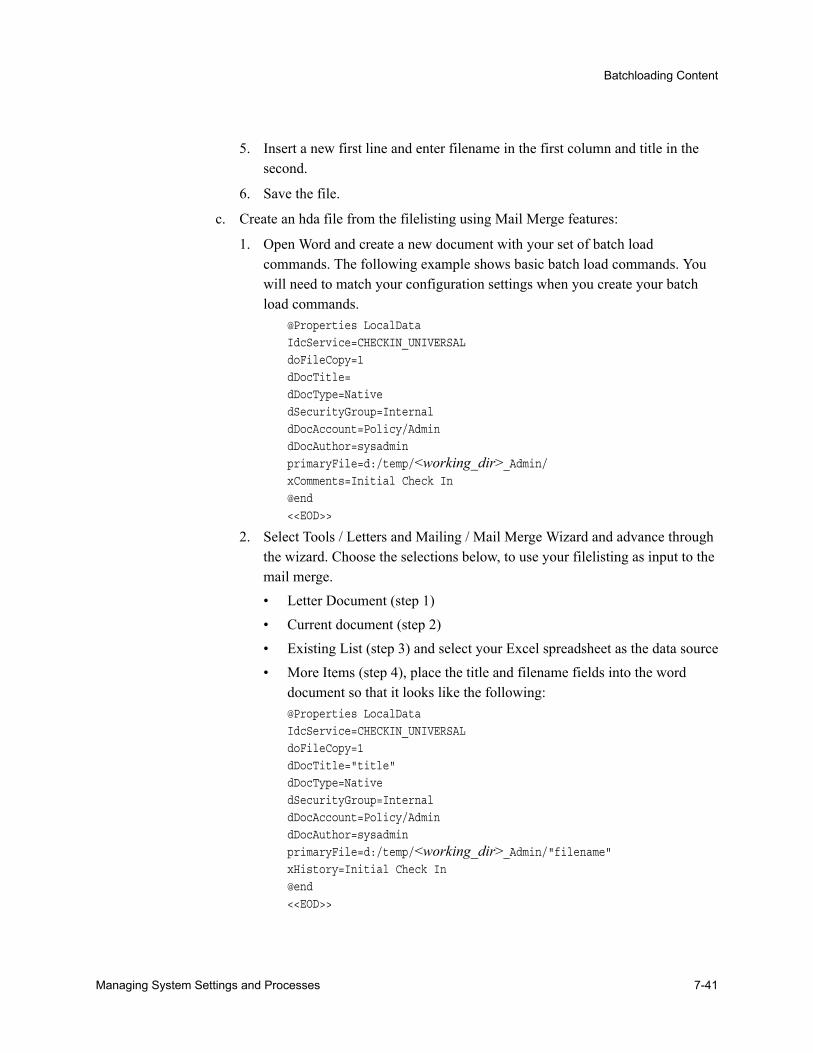
Batchloading Content
5. Insert a new first line and enter filename in the first column and title in the second.
6. Save the file.
c. Create an hda file from the filelisting using Mail Merge features:
1. Open Word and create a new document with your set of batch load commands. The following example shows basic batch load commands. You will need to match your configuration settings when you create your batch load commands.
@Properties LocalDataIdcService=CHECKIN_UNIVERSALdoFileCopy=1dDocTitle=dDocType=NativedSecurityGroup=InternaldDocAccount=Policy/AdmindDocAuthor=sysadminprimaryFile=d:/temp/<working_dir>_Admin/xComments=Initial Check In@end<<EOD>>
2. Select Tools / Letters and Mailing / Mail Merge Wizard and advance through the wizard. Choose the selections below, to use your filelisting as input to the mail merge.• Letter Document (step 1)• Current document (step 2) • Existing List (step 3) and select your Excel spreadsheet as the data source• More Items (step 4), place the title and filename fields into the word
document so that it looks like the following:@Properties LocalDataIdcService=CHECKIN_UNIVERSALdoFileCopy=1dDocTitle="title"dDocType=NativedSecurityGroup=InternaldDocAccount=Policy/AdmindDocAuthor=sysadminprimaryFile=d:/temp/<working_dir>_Admin/"filename"xHistory=Initial Check In@end<<EOD>>
Managing System Settings and Processes 7-41
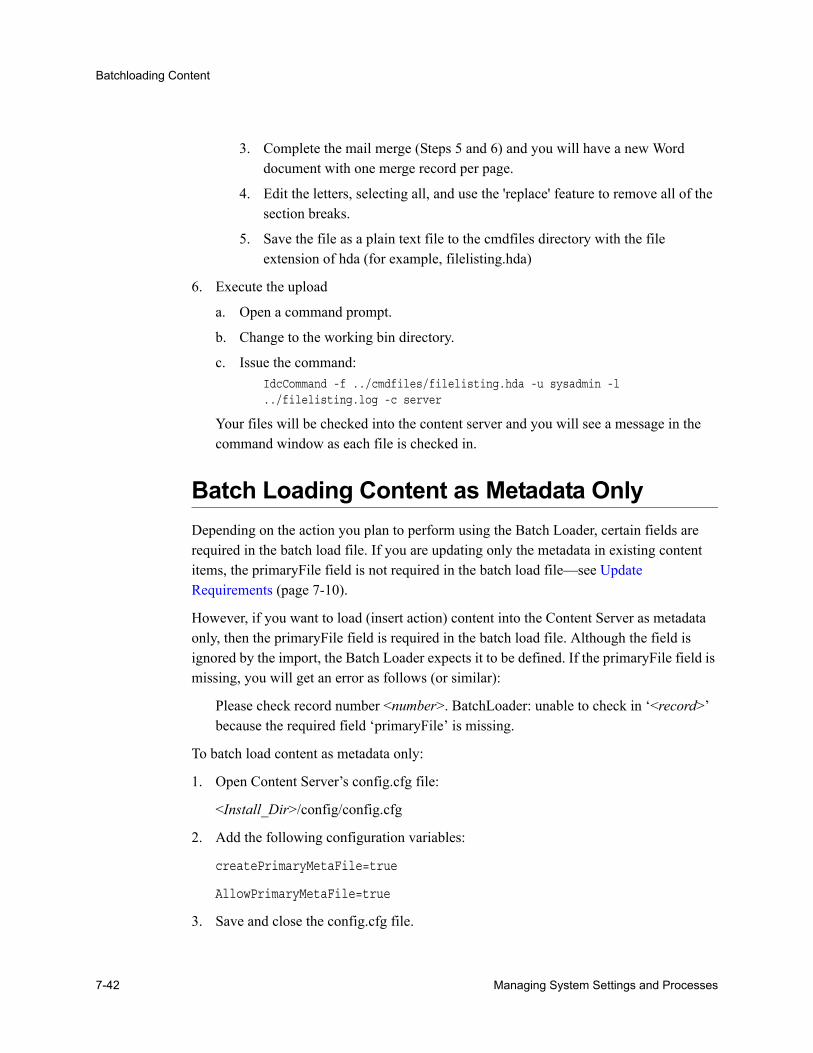
Batchloading Content
3. Complete the mail merge (Steps 5 and 6) and you will have a new Word document with one merge record per page.
4. Edit the letters, selecting all, and use the 'replace' feature to remove all of the section breaks.
5. Save the file as a plain text file to the cmdfiles directory with the file extension of hda (for example, filelisting.hda)
6. Execute the upload
a. Open a command prompt.
b. Change to the working bin directory.
c. Issue the command:IdcCommand -f ../cmdfiles/filelisting.hda -u sysadmin -l ../filelisting.log -c server
Your files will be checked into the content server and you will see a message in the command window as each file is checked in.
Batch Loading Content as Metadata OnlyDepending on the action you plan to perform using the Batch Loader, certain fields are required in the batch load file. If you are updating only the metadata in existing content items, the primaryFile field is not required in the batch load file—see Update Requirements (page 7-10).
However, if you want to load (insert action) content into the Content Server as metadata only, then the primaryFile field is required in the batch load file. Although the field is ignored by the import, the Batch Loader expects it to be defined. If the primaryFile field is missing, you will get an error as follows (or similar):
Please check record number <number>. BatchLoader: unable to check in ‘<record>’ because the required field ‘primaryFile’ is missing.
To batch load content as metadata only:
1. Open Content Server’s config.cfg file:
<Install_Dir>/config/config.cfg
2. Add the following configuration variables:
createPrimaryMetaFile=true
AllowPrimaryMetaFile=true
3. Save and close the config.cfg file.
7-42 Managing System Settings and Processes
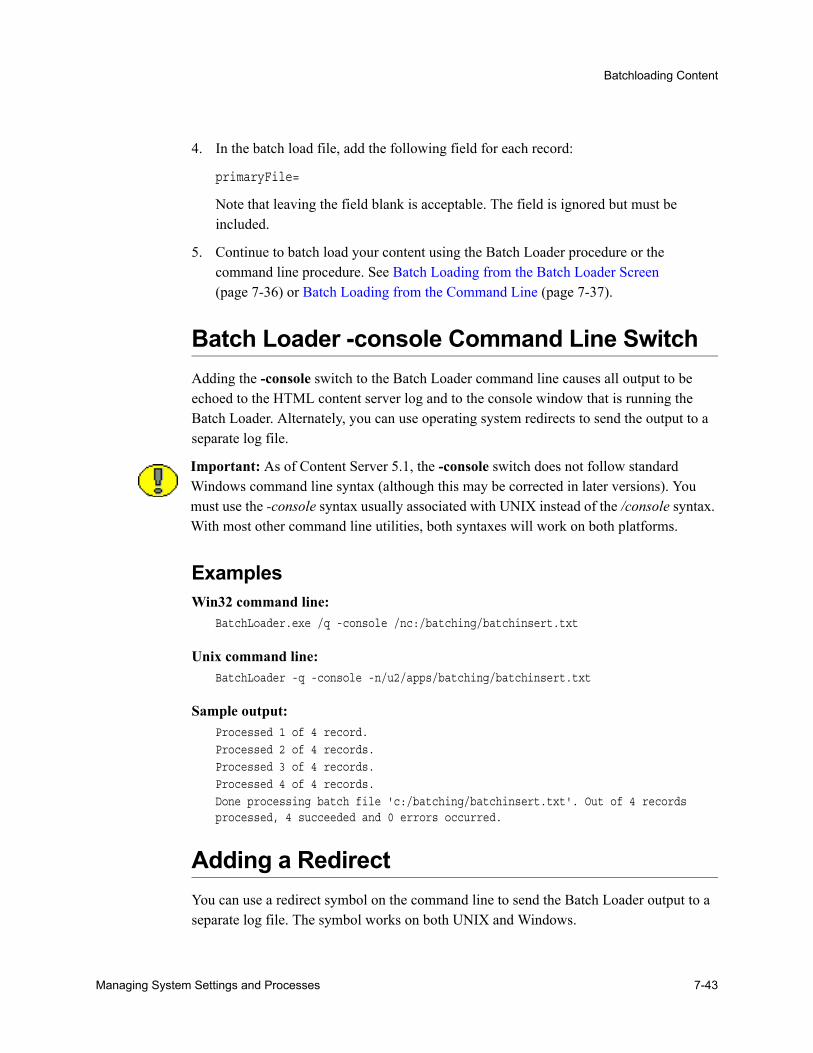
Batchloading Content
4. In the batch load file, add the following field for each record:
primaryFile=
Note that leaving the field blank is acceptable. The field is ignored but must be included.
5. Continue to batch load your content using the Batch Loader procedure or the command line procedure. See Batch Loading from the Batch Loader Screen (page 7-36) or Batch Loading from the Command Line (page 7-37).
Batch Loader -console Command Line SwitchAdding the -console switch to the Batch Loader command line causes all output to be echoed to the HTML content server log and to the console window that is running the Batch Loader. Alternately, you can use operating system redirects to send the output to a separate log file.
ExamplesWin32 command line:
BatchLoader.exe /q -console /nc:/batching/batchinsert.txt
Unix command line:BatchLoader -q -console -n/u2/apps/batching/batchinsert.txt
Sample output:Processed 1 of 4 record.Processed 2 of 4 records.Processed 3 of 4 records.Processed 4 of 4 records.Done processing batch file 'c:/batching/batchinsert.txt'. Out of 4 records processed, 4 succeeded and 0 errors occurred.
Adding a RedirectYou can use a redirect symbol on the command line to send the Batch Loader output to a separate log file. The symbol works on both UNIX and Windows.
Important: As of Content Server 5.1, the -console switch does not follow standard Windows command line syntax (although this may be corrected in later versions). You must use the -console syntax usually associated with UNIX instead of the /console syntax. With most other command line utilities, both syntaxes will work on both platforms.
Managing System Settings and Processes 7-43

Batchloading Content
Content Server v4.0 through 5.0: By default, the -console switch sends the Batch Loader’s output to stdout. To redirect the output to a different file, use the standard redirect symbol >.
Content Server v5.0.1 and later: By default, the -console switch sends the Batch Loader’s output to stderr. To redirect the output to a different file, use the special redirect symbol 2>.
Example: Content Server v4.0 through 5.0Win32 command line with redirect:
BatchLoader.exe /q -console /nc:/batching/batchinsert.txt > batchlog.txt
Unix command line with redirect:BatchLoader -q -console -n/u2/apps/batching/batchinsert.txt > /logs/CSbatchload.log
Example: Content Server v 5.0.1 and LaterWin32 command line with redirect:
BatchLoader.exe /q -console /nc:/batching/batchinsert.txt 2> batchlog.txt
Unix command line with redirect:BatchLoader -q -console -n/u2/apps/batching/batchinsert.txt 2> /logs/CSbatchload.log
Correcting Batch Load ErrorsUse the following procedure to correct any errors that occur during batch loading.
1. Open the content server log. See the Troubleshooting Content Server Guide for more information.
2. Look through the Type column for the word Error.
3. Read the description to determine the problem.
4. Fix the error in one of these files:
• Batch load file
Note: In the examples that follow, each command would be entered all on one line.
7-44 Managing System Settings and Processes
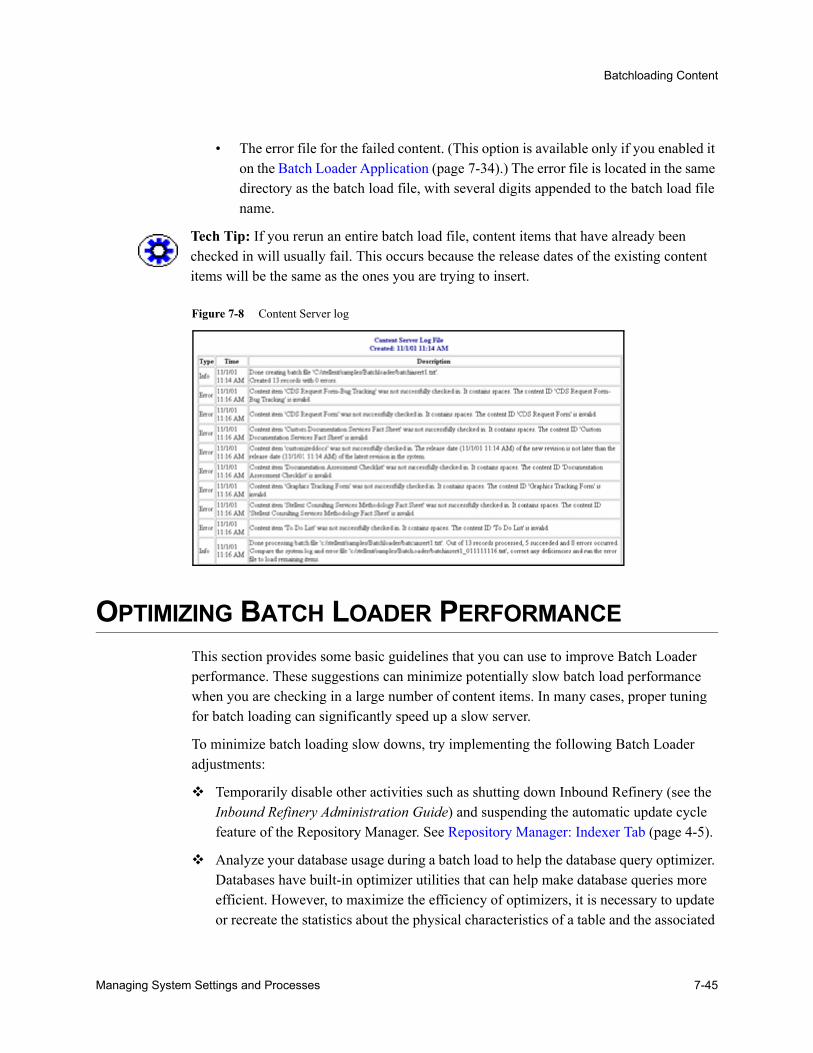
Batchloading Content
• The error file for the failed content. (This option is available only if you enabled it on the Batch Loader Application (page 7-34).) The error file is located in the same directory as the batch load file, with several digits appended to the batch load file name.
Figure 7-8 Content Server log
OPTIMIZING BATCH LOADER PERFORMANCEThis section provides some basic guidelines that you can use to improve Batch Loader performance. These suggestions can minimize potentially slow batch load performance when you are checking in a large number of content items. In many cases, proper tuning for batch loading can significantly speed up a slow server.
To minimize batch loading slow downs, try implementing the following Batch Loader adjustments:
Temporarily disable other activities such as shutting down Inbound Refinery (see the Inbound Refinery Administration Guide) and suspending the automatic update cycle feature of the Repository Manager. See Repository Manager: Indexer Tab (page 4-5).
Analyze your database usage during a batch load to help the database query optimizer. Databases have built-in optimizer utilities that can help make database queries more efficient. However, to maximize the efficiency of optimizers, it is necessary to update or recreate the statistics about the physical characteristics of a table and the associated
Tech Tip: If you rerun an entire batch load file, content items that have already been checked in will usually fail. This occurs because the release dates of the existing content items will be the same as the ones you are trying to insert.
Managing System Settings and Processes 7-45
Batchloading Content
indexes. These characteristics include number of records, number of pages, and the average record length. The optimizers use these statistics to access data.
Each database has a proprietary command that you can use to invoke the statistic update or recreation process. For example:
• For Oracle, use the ANALYZE TABLE COMPUTE STATISTICS command
• For SQL Server, use the CREATE STATISTICS statement
• For DB2, use the RUNSTATS command
Example: Best Practice Case StudyThis case study describes a very slow load batch performance and the steps taken to diagnose and correct the situation. This information can serve as a model for isolating underlying issues and resolving batch loading performance problems.
Background InformationA user wanted to load 27,000 content items into Content Server that was running on an AIX server. The DB2 database was running on a separate AIX server. The content items included TIFs as the native files and corresponding PDFs as the web-viewable files. Inbound Refinery generated thumbnails from the native files.
Initially during the batch load, the performance was acceptable with sub-second insert times. However, after a few thousand content items were loaded, the performance began to degrade. Content items started to require a few seconds to load and, eventually, the load time was over 10 seconds per content item.
Preliminary TroubleshootingWhile the batch load was running, nothing seemed to be wrong with the Content Server system. It had sufficient memory, the CPU utilization was low (less than 5%), and there were no disk bottlenecks. The Inbound Refinery server was busy, but was processing thumbnails at an acceptable rate.
Two issues were found with the database server:
Two processes were taking turns to update the database. While one process was executing, the second process waited for other process to release database locks. When the first process completed, the second process executed while the first process waited. The processes in this execute/wait cycle included:
7-46 Managing System Settings and Processes
Batchloading Content
• The actual batch load process that was updating the database tables after inserting a content item.
• The Content Server was updating the database tables; changing the status from GENWWW to DONE after receiving notification that a thumbnail had been completed.
The two processes should not have been contending with each other because they were not updating the same content items. It seemed that the two processes were locking each other out because DB2 had performed lock escalation and was now locking entire database pages instead of single rows.
There were a large number of tablespace scans being performed by both processes.
SolutionA two-step solution was used:
1. Inbound Refinery was shut down to prevent the status update process from competing with the batch loading process. The performance did improve because there was a 2000+ backlog of content items from the completed thumbnails.
2. A RUNSTATS command was issued on all the Content Server database tables to update the table statistics. This dramatically improved the performance of the batch load. The insert time returned to sub-second and the batch load completed within a short amount of time. It took 21 hours to insert the first 22,000 content items. After updating the table statistics, the remaining 5,000 content items were inserted in 13 minutes.
Managing System Settings and Processes 7-47

C h a p t e r
A.BUILDING A WEB SITEThis section describes the Web Layout Editor and how it is used to build a web site. The following items are described:
Planning a Web Site (page A-1)
Working with Web Pages (page A-4)
Web Layout Editor Application (page A-8)
Working with Reports (page A-17)
Writing Queries (page A-22)
PLANNING A WEB SITEThis section covers these topics:
ConceptsAbout Planning a Web Site (page A-2)
Defining the Site Structure and Displaying Criteria (page A-3)
Task Sequence (page A-3)
Managing System Settings and Processes A-1
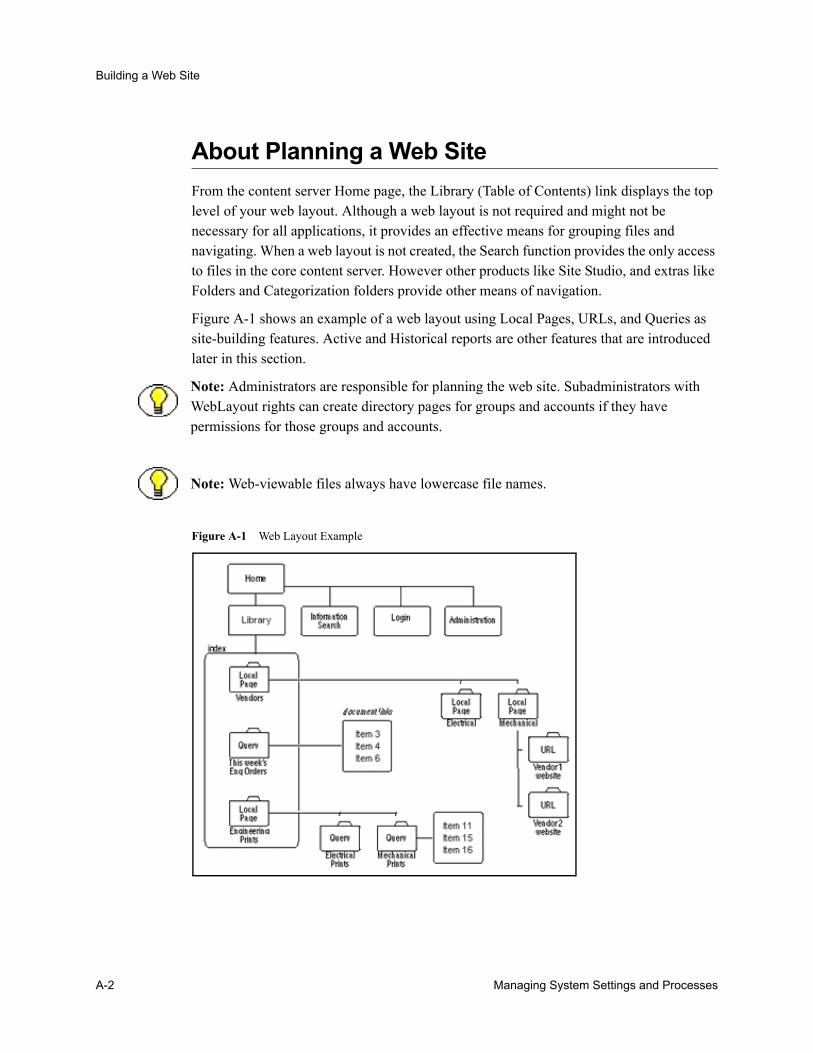
Building a Web Site
About Planning a Web SiteFrom the content server Home page, the Library (Table of Contents) link displays the top level of your web layout. Although a web layout is not required and might not be necessary for all applications, it provides an effective means for grouping files and navigating. When a web layout is not created, the Search function provides the only access to files in the core content server. However other products like Site Studio, and extras like Folders and Categorization folders provide other means of navigation.
Figure A-1 shows an example of a web layout using Local Pages, URLs, and Queries as site-building features. Active and Historical reports are other features that are introduced later in this section.
Figure A-1 Web Layout Example
Note: Administrators are responsible for planning the web site. Subadministrators with WebLayout rights can create directory pages for groups and accounts if they have permissions for those groups and accounts.
Note: Web-viewable files always have lowercase file names.
A-2 Managing System Settings and Processes
Building a Web Site
On the Library web pages, these features are displayed as links with a title next to a file-folder icon. When clicking on a folder that represents a query, the result produces a set of links to files that match the query’s criteria.
Defining the Site Structure and Displaying CriteriaDefine the web site structure in the Web Hierarchy pane of the Web Layout Editor. Then define criteria to display specific files when the user clicks a folder (or link). The criteria for each link is based on the metadata for each file. Besides executing a query, links can jump to another page of links, go to a URL, or display a report. The following examples demonstrate how links are setup to display files.
Example 1: To enable users to access engineering forms from a link named Forms, create a content type named Forms. (Use Configuration Manager; see the Managing Repository Content Guide.) Then, create a query with Type equal to Forms using the Web Layout Editor.
Example 2: To enable users to access specific Standard Work Procedures, create a content type called SWP (using Configuration Manager), and create a query of Type equal to SWP and Content Name substring of 7200.
Task SequenceThe following steps demonstrate the typical sequence of tasks for creating a web site with WebLayout Editor:
1. Gather Information. The first step is to gather information about how your users would intuitively retrieve information; what do they want and how would they typically search for it? How does this impact security?
2. Customize Metadata. If necessary, customize your site’s metadata by creating any additional fields that might be useful (described in the Managing Repository Content guide).
3. Define Content Types. Define the content types to support your site (described in the Managing Repository Content Guide).
4. Define Security Groups, Users, and Roles. Create security groups and users, and assign roles to users to establish their permissions (described in Managing Security and User Access guide).
Managing System Settings and Processes A-3
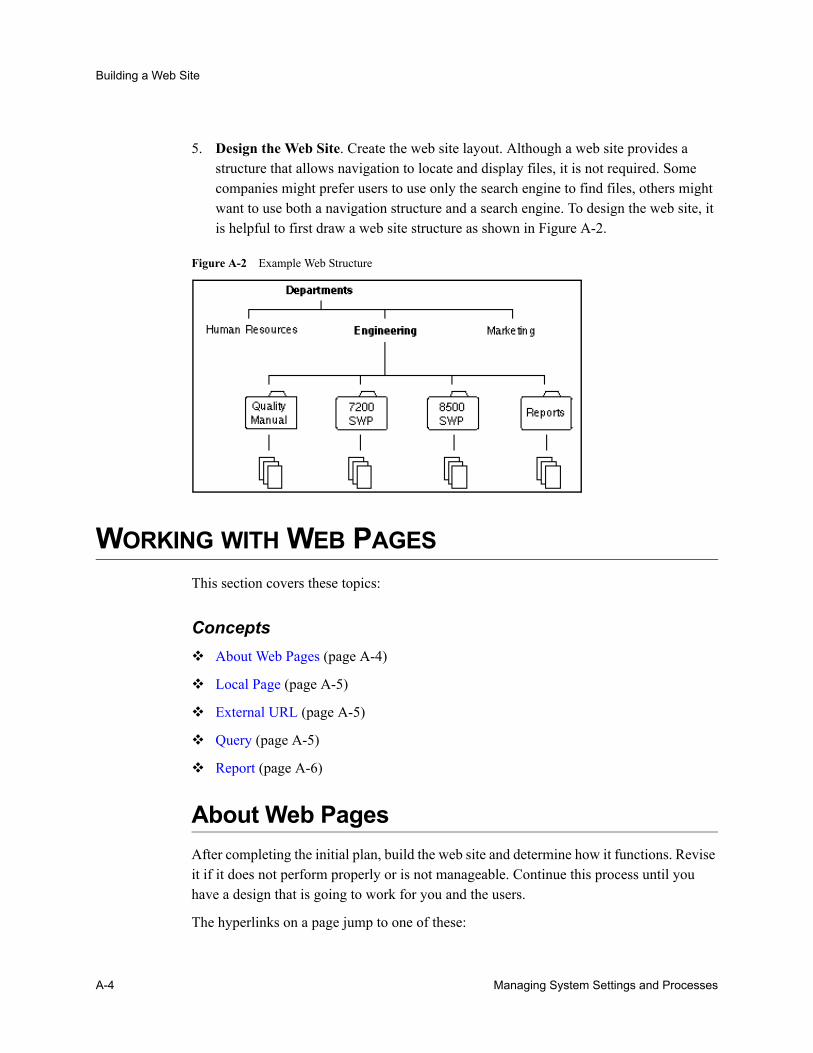
Building a Web Site
5. Design the Web Site. Create the web site layout. Although a web site provides a structure that allows navigation to locate and display files, it is not required. Some companies might prefer users to use only the search engine to find files, others might want to use both a navigation structure and a search engine. To design the web site, it is helpful to first draw a web site structure as shown in Figure A-2.
Figure A-2 Example Web Structure
WORKING WITH WEB PAGESThis section covers these topics:
ConceptsAbout Web Pages (page A-4)
Local Page (page A-5)
External URL (page A-5)
Query (page A-5)
Report (page A-6)
About Web PagesAfter completing the initial plan, build the web site and determine how it functions. Revise it if it does not perform properly or is not manageable. Continue this process until you have a design that is going to work for you and the users.
The hyperlinks on a page jump to one of these:
A-4 Managing System Settings and Processes
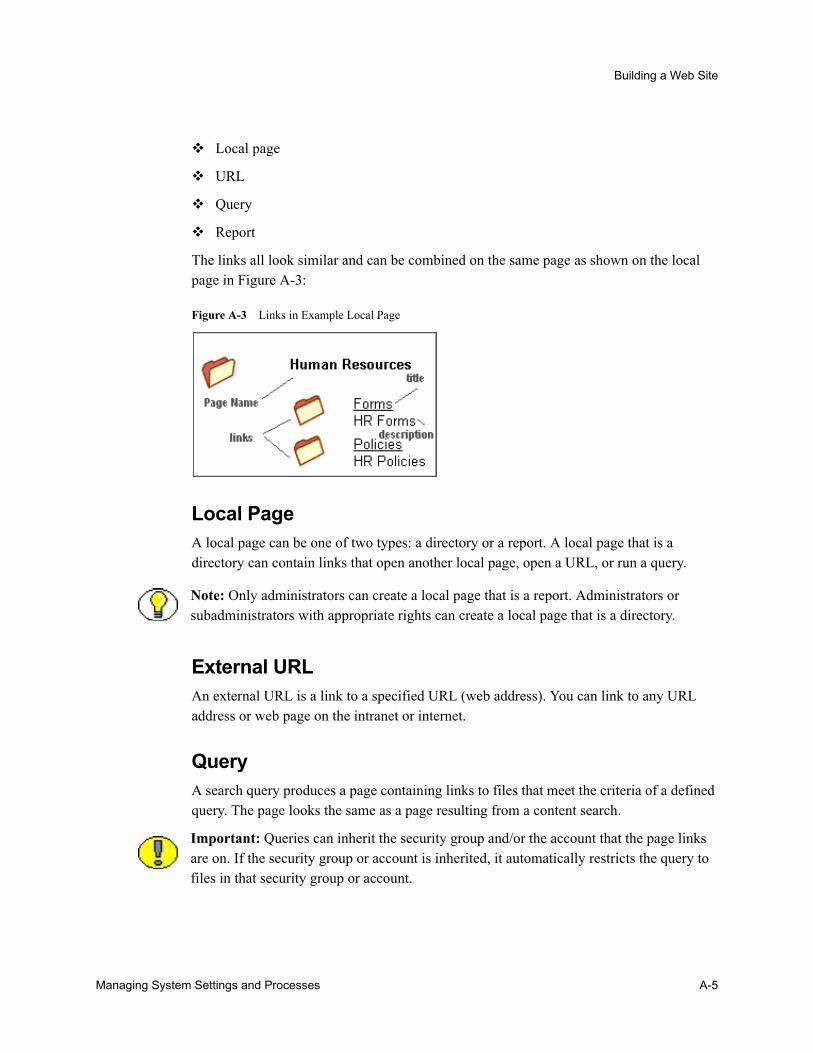
Building a Web Site
Local page
URL
Query
Report
The links all look similar and can be combined on the same page as shown on the local page in Figure A-3:
Figure A-3 Links in Example Local Page
Local PageA local page can be one of two types: a directory or a report. A local page that is a directory can contain links that open another local page, open a URL, or run a query.
External URLAn external URL is a link to a specified URL (web address). You can link to any URL address or web page on the intranet or internet.
QueryA search query produces a page containing links to files that meet the criteria of a defined query. The page looks the same as a page resulting from a content search.
Note: Only administrators can create a local page that is a report. Administrators or subadministrators with appropriate rights can create a local page that is a directory.
Important: Queries can inherit the security group and/or the account that the page links are on. If the security group or account is inherited, it automatically restricts the query to files in that security group or account.
Managing System Settings and Processes A-5
Building a Web Site
ReportReports are either Active or Historical. Active reports appear as a file folder link and perform a database query each time they are run, generating a display of current information. Like Active Reports, Historical Reports appear as a file folder link, but they contain information that was queried at the time they were initially run. They do not perform a database query each time they are opened, and the report is only changed if it is updated.
WEB LAYOUT EDITOR APPLICATIONUse the Web Layout Editor to build the web site.
Subadministrators do not have access to the Query Result Pages function in the Options menu nor to any applications for which they do not have rights. Additionally, subadministrators have viewing, editing, and deleting rights that are restricted as described in these sections:
Web Page Hierarchy Pane (page A-9)
Page Properties Pane (page A-10)
Page Links Pane (page A-11)
Adding a New Web Page (page A-12)
Editing Web Page Properties (page A-13)
Creating a Local Page Link (page A-14)
Creating an External URL Link (page A-15)
Editing a Hierarchical Web Page Structure (page A-16)
Feature Description
Web Page Hierarchy Pane (page A-9)
Displays the web site structure and relationship between pages. Child pages are shown in the parent’s folder. A page must be selected in this pane to edit it.
Page Properties Pane (page A-10)
Defines the page header text and the security group that filters the content for the page.
A-6 Managing System Settings and Processes
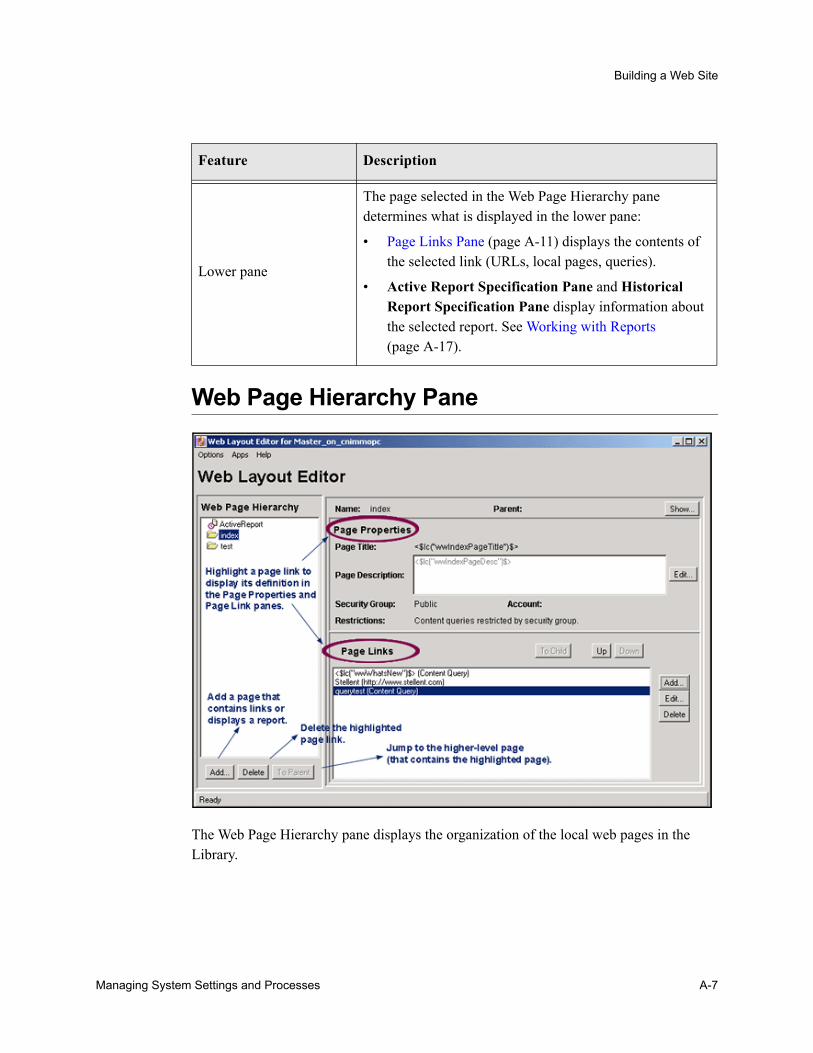
Building a Web Site
Web Page Hierarchy Pane
The Web Page Hierarchy pane displays the organization of the local web pages in the Library.
Lower pane
The page selected in the Web Page Hierarchy pane determines what is displayed in the lower pane:
• Page Links Pane (page A-11) displays the contents of the selected link (URLs, local pages, queries).
• Active Report Specification Pane and Historical Report Specification Pane display information about the selected report. See Working with Reports (page A-17).
Feature Description
Managing System Settings and Processes A-7
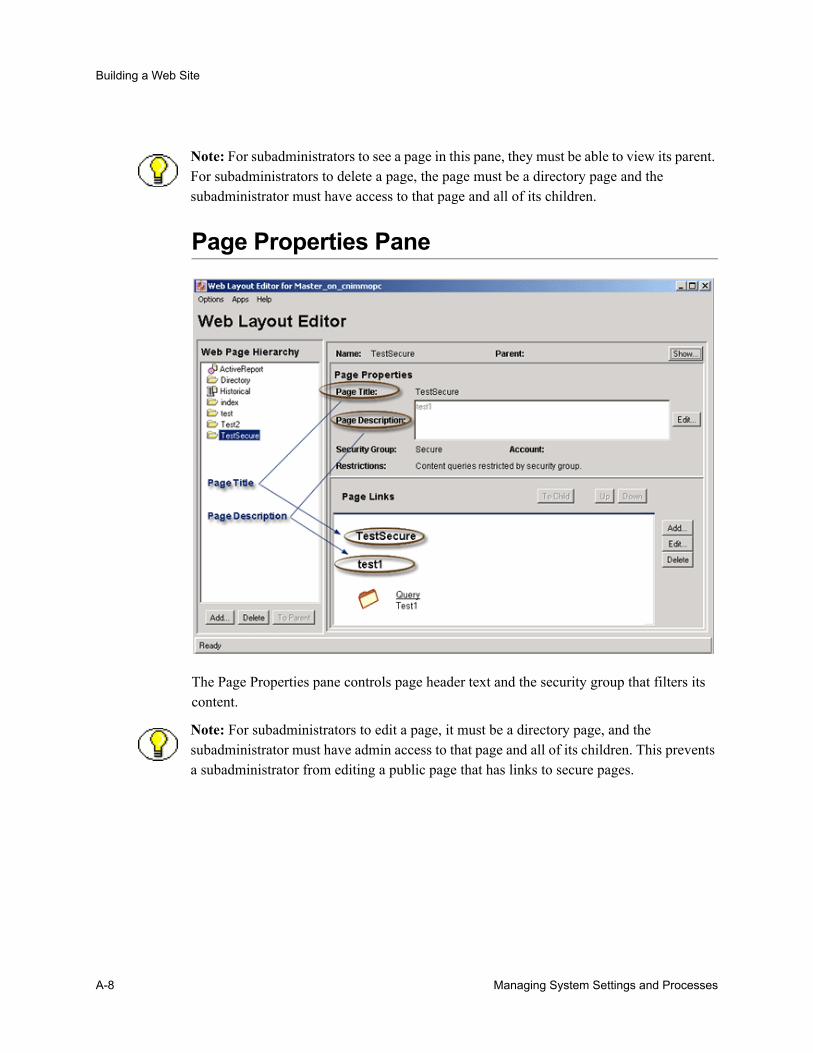
Building a Web Site
Page Properties Pane
The Page Properties pane controls page header text and the security group that filters its content.
Note: For subadministrators to see a page in this pane, they must be able to view its parent. For subadministrators to delete a page, the page must be a directory page and the subadministrator must have access to that page and all of its children.
Note: For subadministrators to edit a page, it must be a directory page, and the subadministrator must have admin access to that page and all of its children. This prevents a subadministrator from editing a public page that has links to secure pages.
A-8 Managing System Settings and Processes
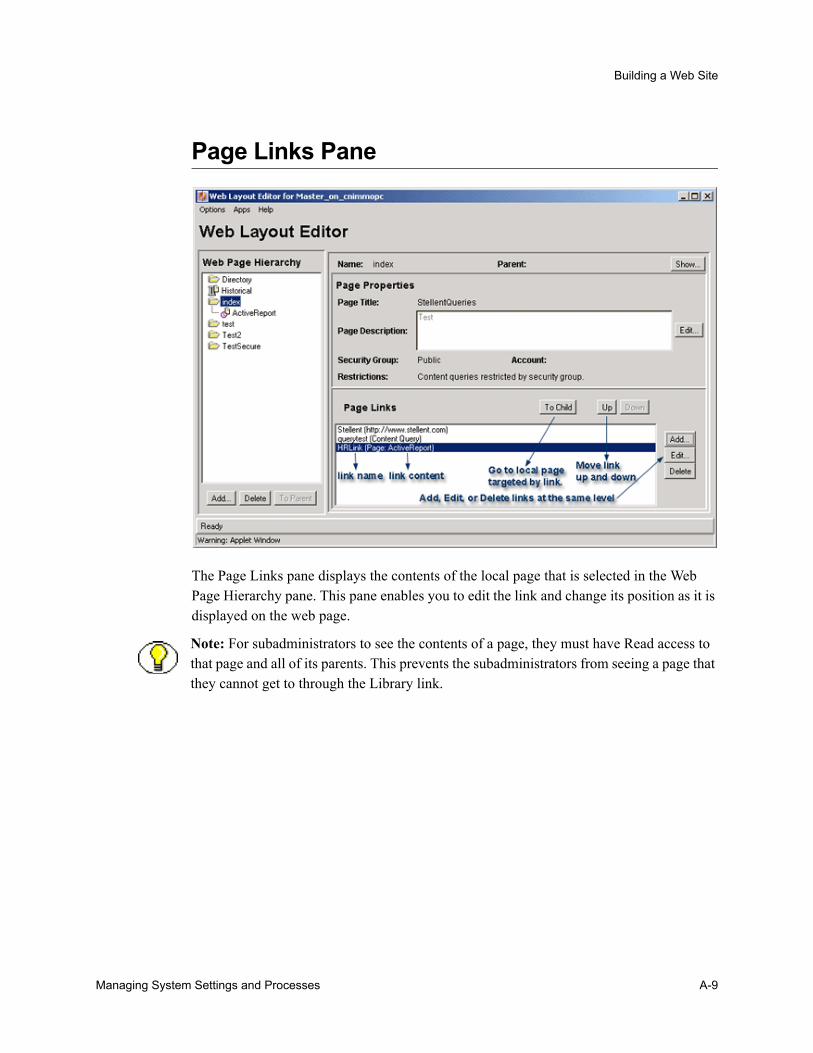
Building a Web Site
Page Links Pane
The Page Links pane displays the contents of the local page that is selected in the Web Page Hierarchy pane. This pane enables you to edit the link and change its position as it is displayed on the web page.
Note: For subadministrators to see the contents of a page, they must have Read access to that page and all of its parents. This prevents the subadministrators from seeing a page that they cannot get to through the Library link.
Managing System Settings and Processes A-9
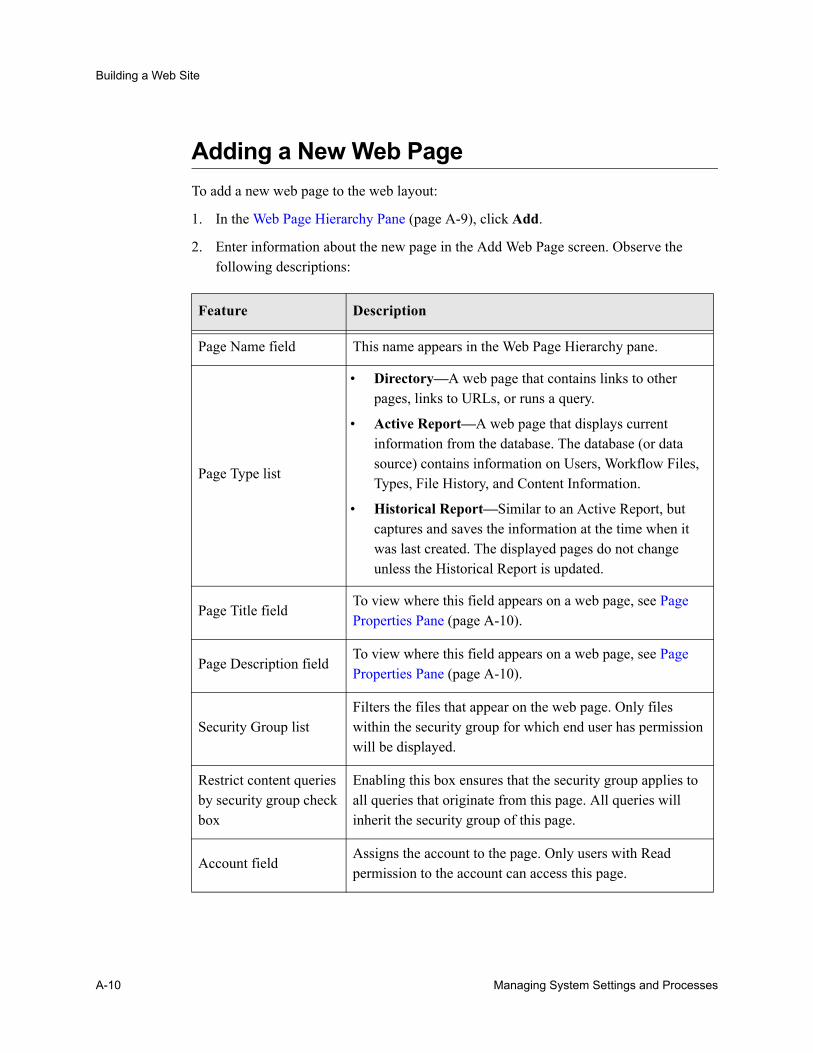
Building a Web Site
Adding a New Web PageTo add a new web page to the web layout:
1. In the Web Page Hierarchy Pane (page A-9), click Add.
2. Enter information about the new page in the Add Web Page screen. Observe the following descriptions:
Feature Description
Page Name field This name appears in the Web Page Hierarchy pane.
Page Type list
• Directory—A web page that contains links to other pages, links to URLs, or runs a query.
• Active Report—A web page that displays current information from the database. The database (or data source) contains information on Users, Workflow Files, Types, File History, and Content Information.
• Historical Report—Similar to an Active Report, but captures and saves the information at the time when it was last created. The displayed pages do not change unless the Historical Report is updated.
Page Title fieldTo view where this field appears on a web page, see Page Properties Pane (page A-10).
Page Description fieldTo view where this field appears on a web page, see Page Properties Pane (page A-10).
Security Group listFilters the files that appear on the web page. Only files within the security group for which end user has permission will be displayed.
Restrict content queries by security group check box
Enabling this box ensures that the security group applies to all queries that originate from this page. All queries will inherit the security group of this page.
Account fieldAssigns the account to the page. Only users with Read permission to the account can access this page.
A-10 Managing System Settings and Processes

Building a Web Site
3. Click OK.
Editing Web Page Properties
To edit the properties of a web page:
1. Select the page in the Web Page Hierarchy Pane (page A-9).
2. Click Edit in the Page Properties pane.
The Edit Page Properties screen is displayed.
3. Edit the properties.
4. Click OK.
Restrict content queries by account check box
Enabling this box ensures that the account applies to all queries that originate from this page.
Feature Description
Managing System Settings and Processes A-11
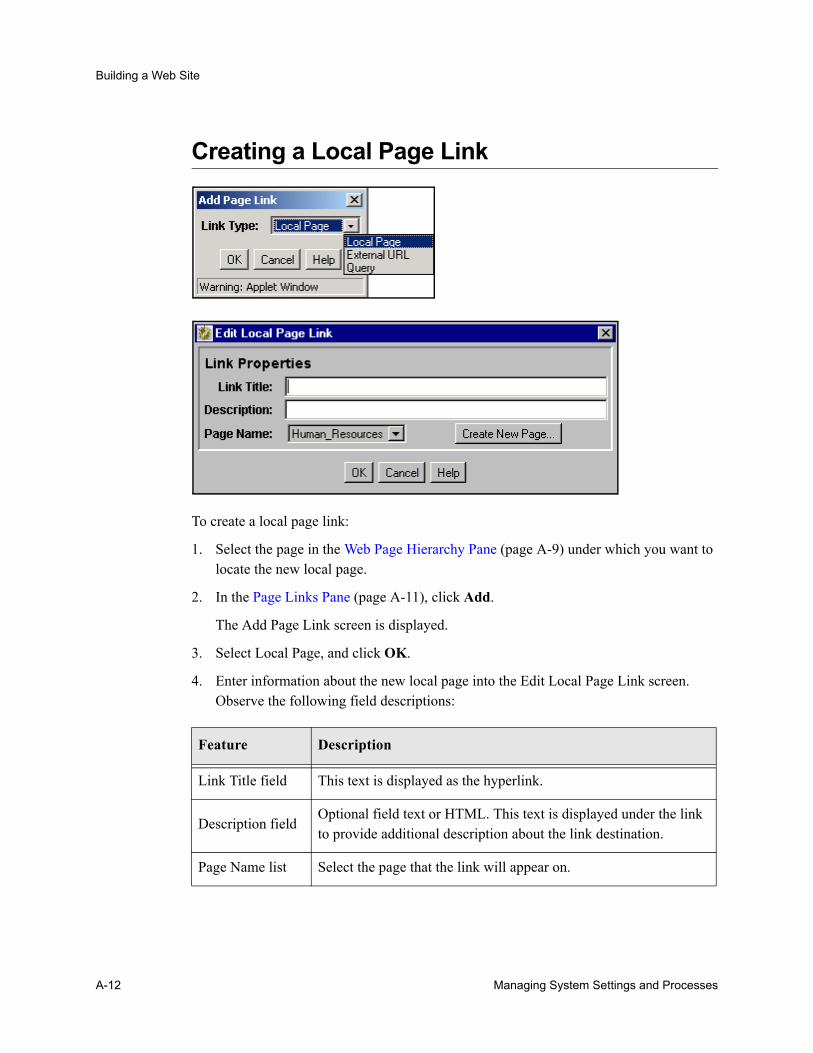
Building a Web Site
Creating a Local Page Link
To create a local page link:
1. Select the page in the Web Page Hierarchy Pane (page A-9) under which you want to locate the new local page.
2. In the Page Links Pane (page A-11), click Add.
The Add Page Link screen is displayed.
3. Select Local Page, and click OK.
4. Enter information about the new local page into the Edit Local Page Link screen. Observe the following field descriptions:
Feature Description
Link Title field This text is displayed as the hyperlink.
Description fieldOptional field text or HTML. This text is displayed under the link to provide additional description about the link destination.
Page Name list Select the page that the link will appear on.
A-12 Managing System Settings and Processes
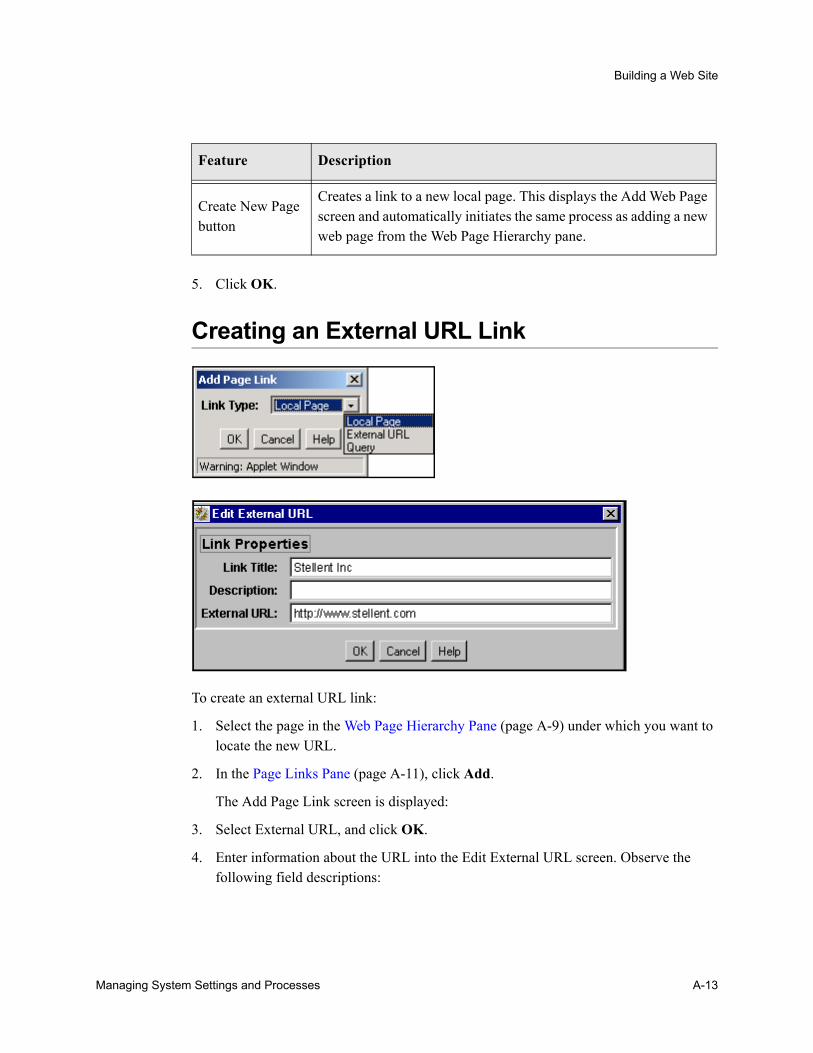
Building a Web Site
5. Click OK.
Creating an External URL Link
To create an external URL link:
1. Select the page in the Web Page Hierarchy Pane (page A-9) under which you want to locate the new URL.
2. In the Page Links Pane (page A-11), click Add.
The Add Page Link screen is displayed:
3. Select External URL, and click OK.
4. Enter information about the URL into the Edit External URL screen. Observe the following field descriptions:
Create New Page button
Creates a link to a new local page. This displays the Add Web Page screen and automatically initiates the same process as adding a new web page from the Web Page Hierarchy pane.
Feature Description
Managing System Settings and Processes A-13
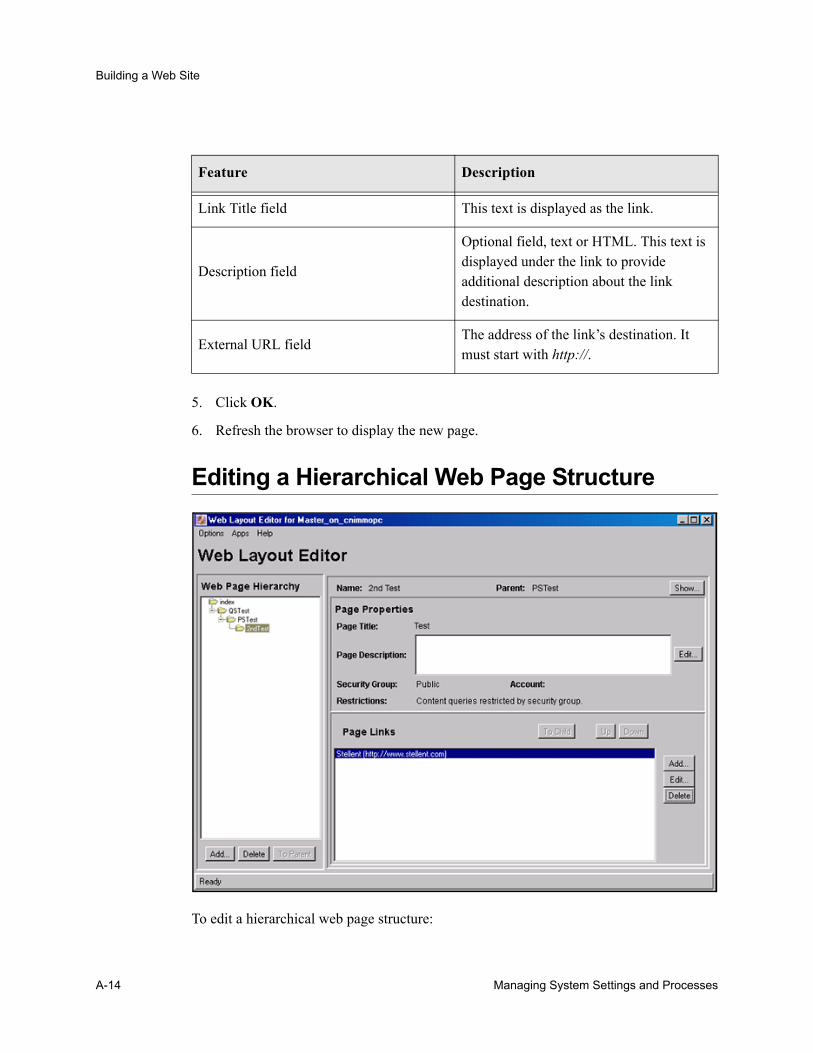
Building a Web Site
5. Click OK.
6. Refresh the browser to display the new page.
Editing a Hierarchical Web Page Structure
To edit a hierarchical web page structure:
Feature Description
Link Title field This text is displayed as the link.
Description field
Optional field, text or HTML. This text is displayed under the link to provide additional description about the link destination.
External URL fieldThe address of the link’s destination. It must start with http://.
A-14 Managing System Settings and Processes
Building a Web Site
The objective is to insert a page, making it the new parent of the hierarchical page.
For example:
1. Create a structure.
2. Select QSTest directory with the Page Link PCTest also selected.
3. Click the Page LinksDelete.
4. Select the Index directory and select Page LinksAdd.
5. Create a new page.
• Title the page NewEngPage.
• Type a Description as NewEngPage.
6. Click OK.
The NewEngPage will appear in the Web Page Hierarchy pane.
7. Select QSTest and click Page LinksAdd.
8. Select Local Page.
9. Click OK.
The NewEngPage now appears under QSTest.
10. Select NewEngPage and click the Page LinksAdd.
11. Select Local PageOK.
You will note that the Page name is PCTest.
The NewEngPage has now been entered with PCTest as its child and the External URL in 2ndTest has been preserved.
WORKING WITH REPORTSThis section covers these topics:
ConceptsAbout Reports (page A-18)
TasksDefining an Active Report (page A-19)
Managing System Settings and Processes A-15
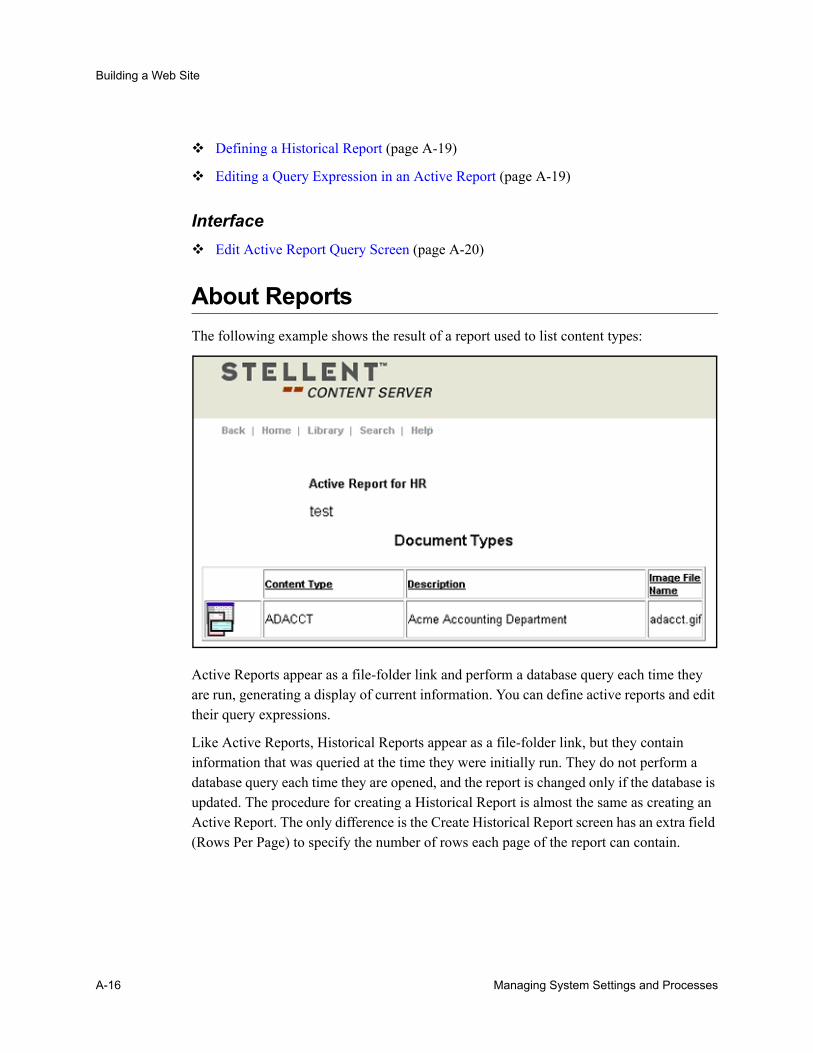
Building a Web Site
Defining a Historical Report (page A-19)
Editing a Query Expression in an Active Report (page A-19)
InterfaceEdit Active Report Query Screen (page A-20)
About ReportsThe following example shows the result of a report used to list content types:
Active Reports appear as a file-folder link and perform a database query each time they are run, generating a display of current information. You can define active reports and edit their query expressions.
Like Active Reports, Historical Reports appear as a file-folder link, but they contain information that was queried at the time they were initially run. They do not perform a database query each time they are opened, and the report is changed only if the database is updated. The procedure for creating a Historical Report is almost the same as creating an Active Report. The only difference is the Create Historical Report screen has an extra field (Rows Per Page) to specify the number of rows each page of the report can contain.
A-16 Managing System Settings and Processes
Building a Web Site
Defining an Active ReportTo define an active report:
1. In the Web Layout Editor, add a new web page and select Active Report as Page Type.
2. In the Active Report Specification pane, click Edit Report Query.
3. Define the query by entering information on the Defining an Active Report (page A-19).
4. Click OK.
Defining a Historical ReportTo prepare an Archive Historical Report:
1. Select the WebLayout Editor from the Administration page.
2. Add a historical report web page.
3. Click Create Report Data.
4. When you create the report data, specify Archive History for the data source.
5. Write a query that will return the data that you want to retrieve. For example, specify the Content ID.
Editing a Query Expression in an Active ReportTo edit the query expression in an active report:
1. In the Web Page Hierarchy Pane (page A-9), select the report you want to edit.
2. In the Active Report Specification pane, click Edit Report Query.
3. In the Query Expression window on the Defining an Active Report (page A-19), select the query line to edit.
4. Make changes to the query as necessary, and click Update.
5. Click OK.
Caution: If you clear the Custom Query Expression check box, the expression reverts to its original definition; all modifications will be lost.
Managing System Settings and Processes A-17
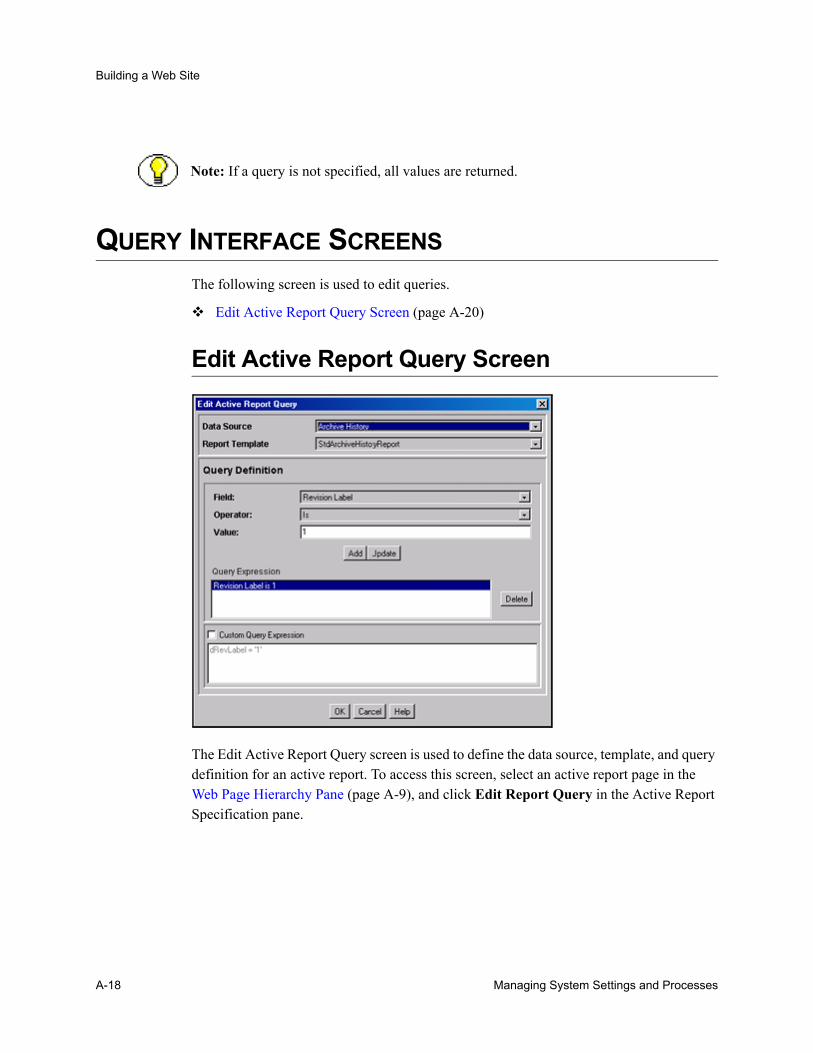
Building a Web Site
QUERY INTERFACE SCREENSThe following screen is used to edit queries.
Edit Active Report Query Screen (page A-20)
Edit Active Report Query Screen
The Edit Active Report Query screen is used to define the data source, template, and query definition for an active report. To access this screen, select an active report page in the Web Page Hierarchy Pane (page A-9), and click Edit Report Query in the Active Report Specification pane.
Note: If a query is not specified, all values are returned.
A-18 Managing System Settings and Processes
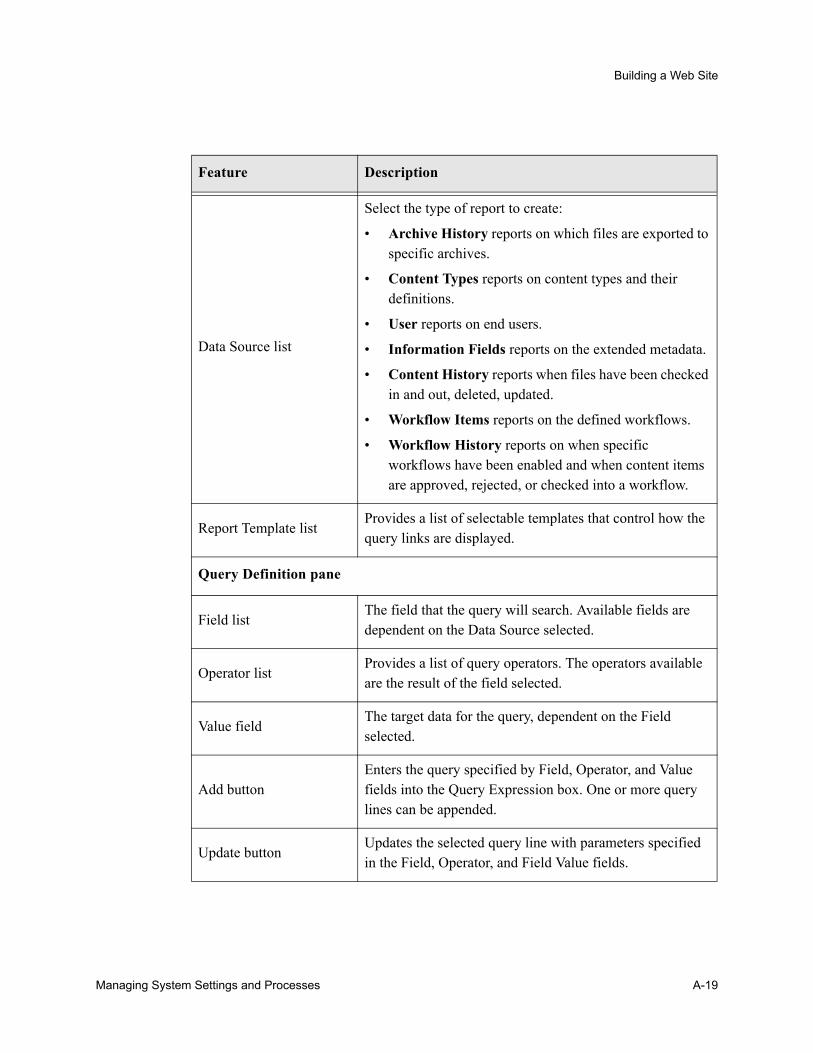
Building a Web Site
Feature Description
Data Source list
Select the type of report to create:
• Archive History reports on which files are exported to specific archives.
• Content Types reports on content types and their definitions.
• User reports on end users.
• Information Fields reports on the extended metadata.
• Content History reports when files have been checked in and out, deleted, updated.
• Workflow Items reports on the defined workflows.
• Workflow History reports on when specific workflows have been enabled and when content items are approved, rejected, or checked into a workflow.
Report Template listProvides a list of selectable templates that control how the query links are displayed.
Query Definition pane
Field listThe field that the query will search. Available fields are dependent on the Data Source selected.
Operator listProvides a list of query operators. The operators available are the result of the field selected.
Value fieldThe target data for the query, dependent on the Field selected.
Add buttonEnters the query specified by Field, Operator, and Value fields into the Query Expression box. One or more query lines can be appended.
Update buttonUpdates the selected query line with parameters specified in the Field, Operator, and Field Value fields.
Managing System Settings and Processes A-19
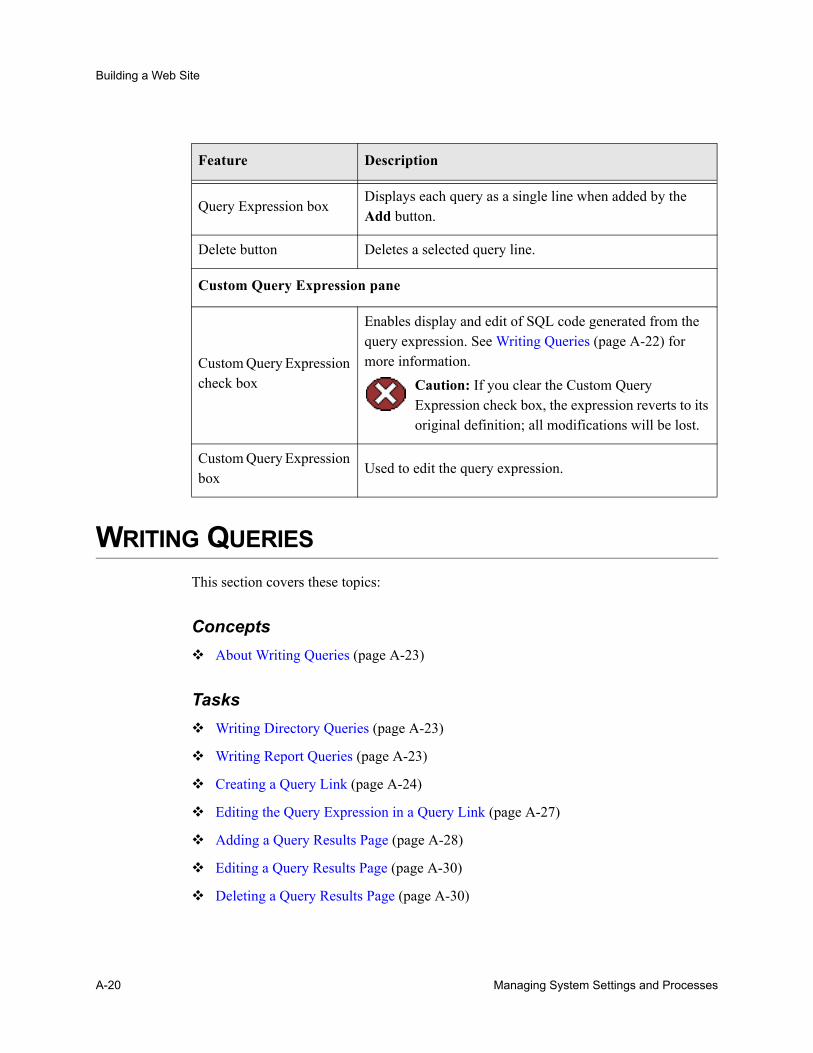
Building a Web Site
WRITING QUERIESThis section covers these topics:
ConceptsAbout Writing Queries (page A-23)
TasksWriting Directory Queries (page A-23)
Writing Report Queries (page A-23)
Creating a Query Link (page A-24)
Editing the Query Expression in a Query Link (page A-27)
Adding a Query Results Page (page A-28)
Editing a Query Results Page (page A-30)
Deleting a Query Results Page (page A-30)
Query Expression boxDisplays each query as a single line when added by the Add button.
Delete button Deletes a selected query line.
Custom Query Expression pane
Custom Query Expression check box
Enables display and edit of SQL code generated from the query expression. See Writing Queries (page A-22) for more information.
Caution: If you clear the Custom Query Expression check box, the expression reverts to its original definition; all modifications will be lost.
Custom Query Expression box
Used to edit the query expression.
Feature Description
A-20 Managing System Settings and Processes
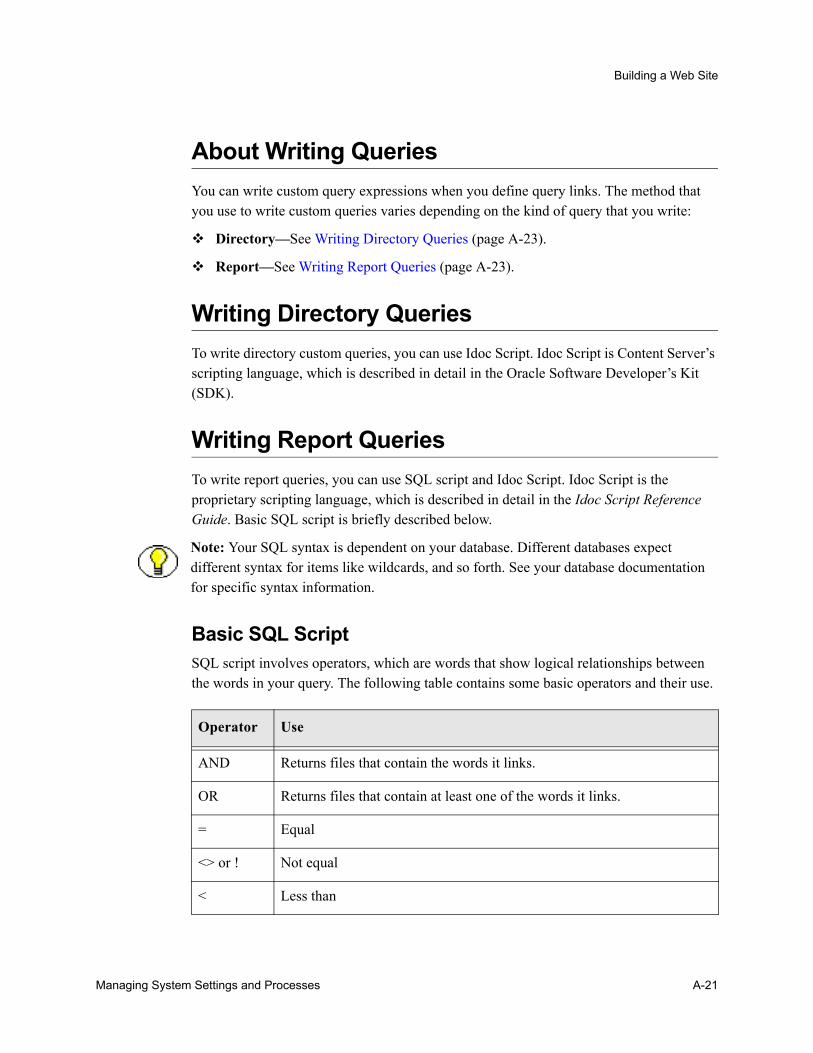
Building a Web Site
About Writing QueriesYou can write custom query expressions when you define query links. The method that you use to write custom queries varies depending on the kind of query that you write:
Directory—See Writing Directory Queries (page A-23).
Report—See Writing Report Queries (page A-23).
Writing Directory QueriesTo write directory custom queries, you can use Idoc Script. Idoc Script is Content Server’s scripting language, which is described in detail in the Oracle Software Developer’s Kit (SDK).
Writing Report QueriesTo write report queries, you can use SQL script and Idoc Script. Idoc Script is the proprietary scripting language, which is described in detail in the Idoc Script Reference Guide. Basic SQL script is briefly described below.
Basic SQL ScriptSQL script involves operators, which are words that show logical relationships between the words in your query. The following table contains some basic operators and their use.
Note: Your SQL syntax is dependent on your database. Different databases expect different syntax for items like wildcards, and so forth. See your database documentation for specific syntax information.
Operator Use
AND Returns files that contain the words it links.
OR Returns files that contain at least one of the words it links.
= Equal
<> or ! Not equal
< Less than
Managing System Settings and Processes A-21
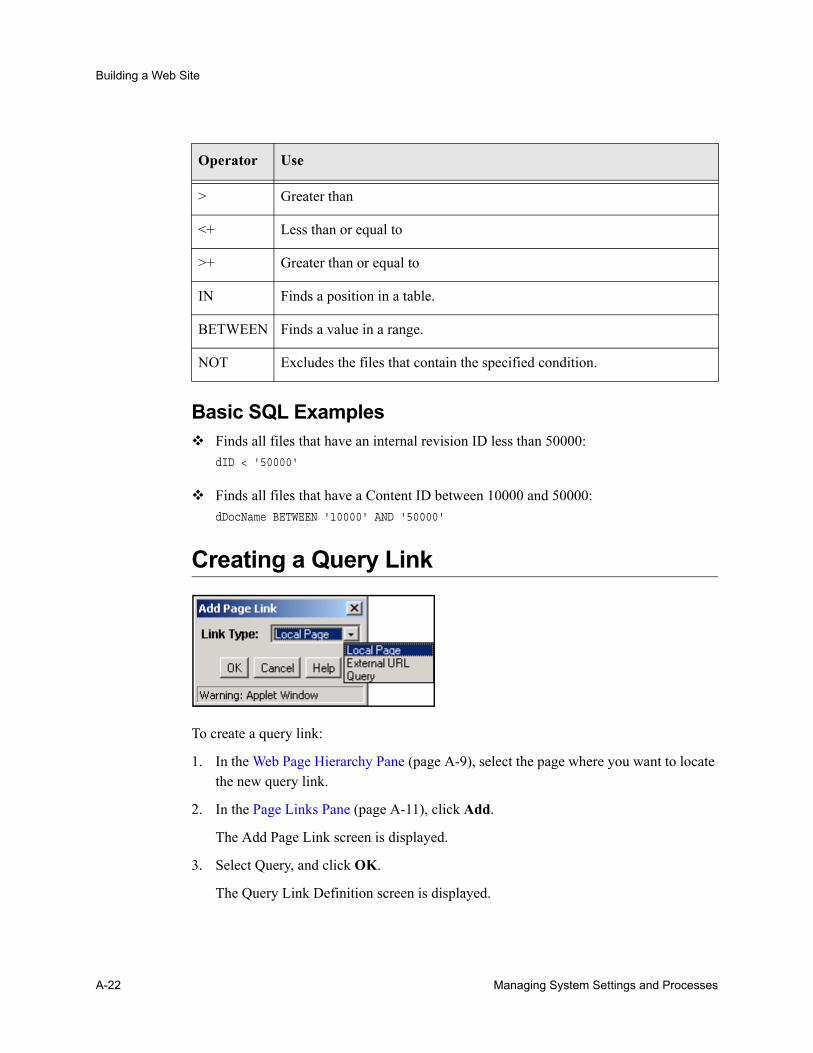
Building a Web Site
Basic SQL ExamplesFinds all files that have an internal revision ID less than 50000:dID < '50000'
Finds all files that have a Content ID between 10000 and 50000:dDocName BETWEEN '10000' AND '50000'
Creating a Query Link
To create a query link:
1. In the Web Page Hierarchy Pane (page A-9), select the page where you want to locate the new query link.
2. In the Page Links Pane (page A-11), click Add.
The Add Page Link screen is displayed.
3. Select Query, and click OK.
The Query Link Definition screen is displayed.
> Greater than
<+ Less than or equal to
>+ Greater than or equal to
IN Finds a position in a table.
BETWEEN Finds a value in a range.
NOT Excludes the files that contain the specified condition.
Operator Use
A-22 Managing System Settings and Processes
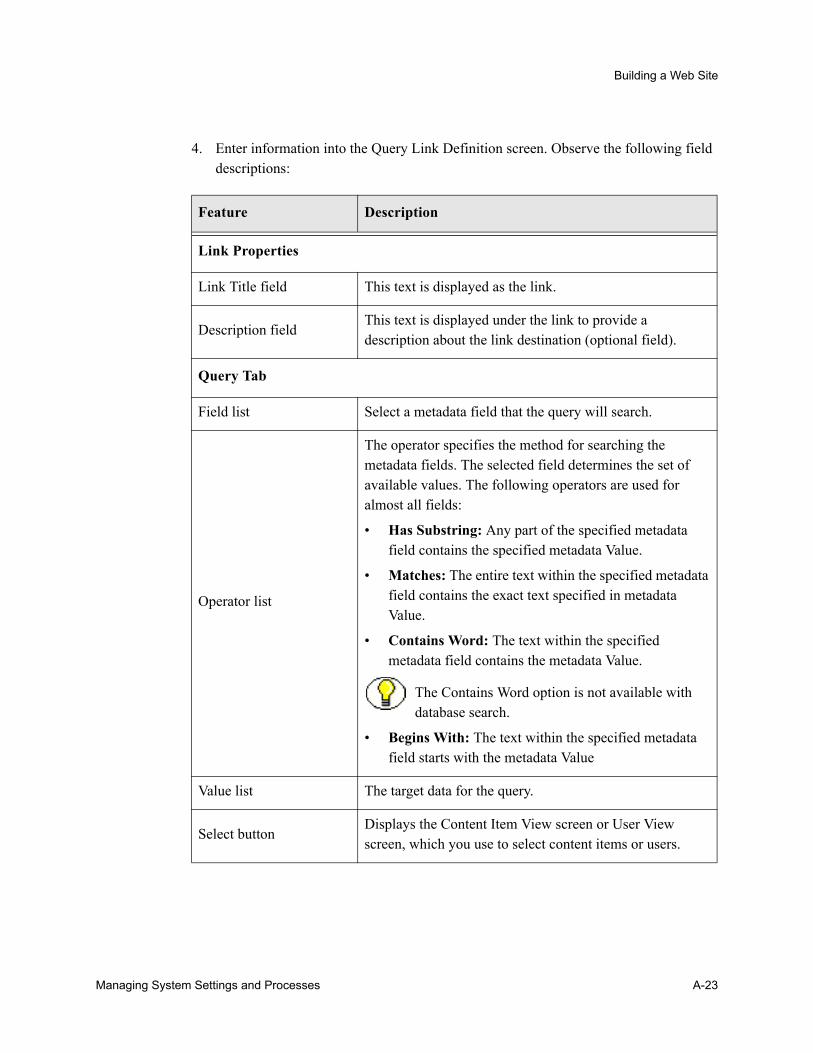
Building a Web Site
4. Enter information into the Query Link Definition screen. Observe the following field descriptions:
Feature Description
Link Properties
Link Title field This text is displayed as the link.
Description fieldThis text is displayed under the link to provide a description about the link destination (optional field).
Query Tab
Field list Select a metadata field that the query will search.
Operator list
The operator specifies the method for searching the metadata fields. The selected field determines the set of available values. The following operators are used for almost all fields:
• Has Substring: Any part of the specified metadata field contains the specified metadata Value.
• Matches: The entire text within the specified metadata field contains the exact text specified in metadata Value.
• Contains Word: The text within the specified metadata field contains the metadata Value.
The Contains Word option is not available with database search.
• Begins With: The text within the specified metadata field starts with the metadata Value
Value list The target data for the query.
Select buttonDisplays the Content Item View screen or User View screen, which you use to select content items or users.
Managing System Settings and Processes A-23
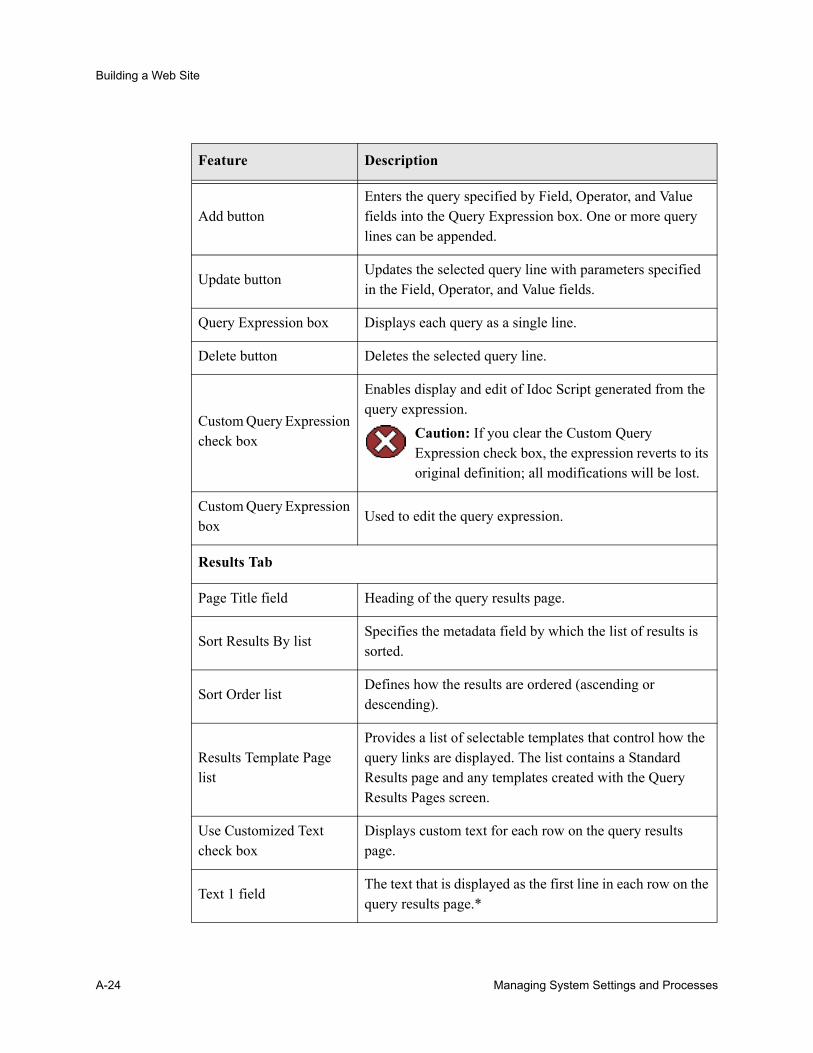
Building a Web Site
Add buttonEnters the query specified by Field, Operator, and Value fields into the Query Expression box. One or more query lines can be appended.
Update buttonUpdates the selected query line with parameters specified in the Field, Operator, and Value fields.
Query Expression box Displays each query as a single line.
Delete button Deletes the selected query line.
Custom Query Expression check box
Enables display and edit of Idoc Script generated from the query expression.
Caution: If you clear the Custom Query Expression check box, the expression reverts to its original definition; all modifications will be lost.
Custom Query Expression box
Used to edit the query expression.
Results Tab
Page Title field Heading of the query results page.
Sort Results By listSpecifies the metadata field by which the list of results is sorted.
Sort Order listDefines how the results are ordered (ascending or descending).
Results Template Page list
Provides a list of selectable templates that control how the query links are displayed. The list contains a Standard Results page and any templates created with the Query Results Pages screen.
Use Customized Text check box
Displays custom text for each row on the query results page.
Text 1 fieldThe text that is displayed as the first line in each row on the query results page.*
Feature Description
A-24 Managing System Settings and Processes
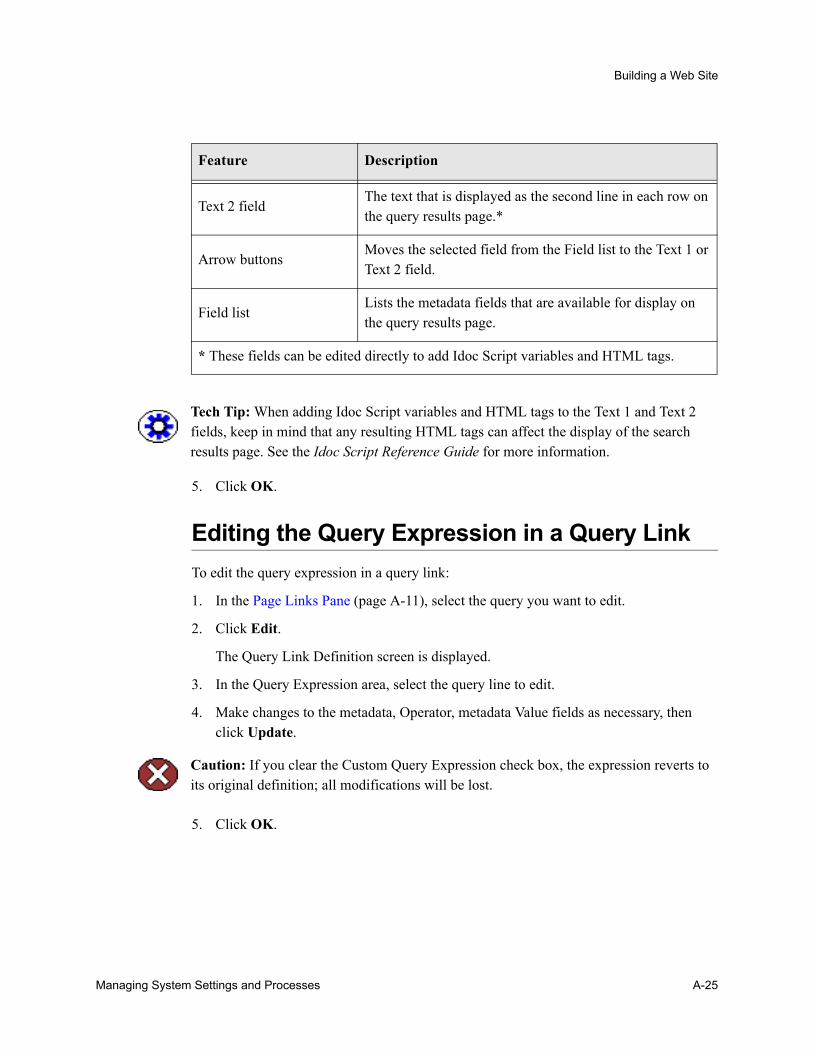
Building a Web Site
5. Click OK.
Editing the Query Expression in a Query LinkTo edit the query expression in a query link:
1. In the Page Links Pane (page A-11), select the query you want to edit.
2. Click Edit.
The Query Link Definition screen is displayed.
3. In the Query Expression area, select the query line to edit.
4. Make changes to the metadata, Operator, metadata Value fields as necessary, then click Update.
5. Click OK.
Text 2 fieldThe text that is displayed as the second line in each row on the query results page.*
Arrow buttonsMoves the selected field from the Field list to the Text 1 or Text 2 field.
Field listLists the metadata fields that are available for display on the query results page.
* These fields can be edited directly to add Idoc Script variables and HTML tags.
Feature Description
Tech Tip: When adding Idoc Script variables and HTML tags to the Text 1 and Text 2 fields, keep in mind that any resulting HTML tags can affect the display of the search results page. See the Idoc Script Reference Guide for more information.
Caution: If you clear the Custom Query Expression check box, the expression reverts to its original definition; all modifications will be lost.
Managing System Settings and Processes A-25
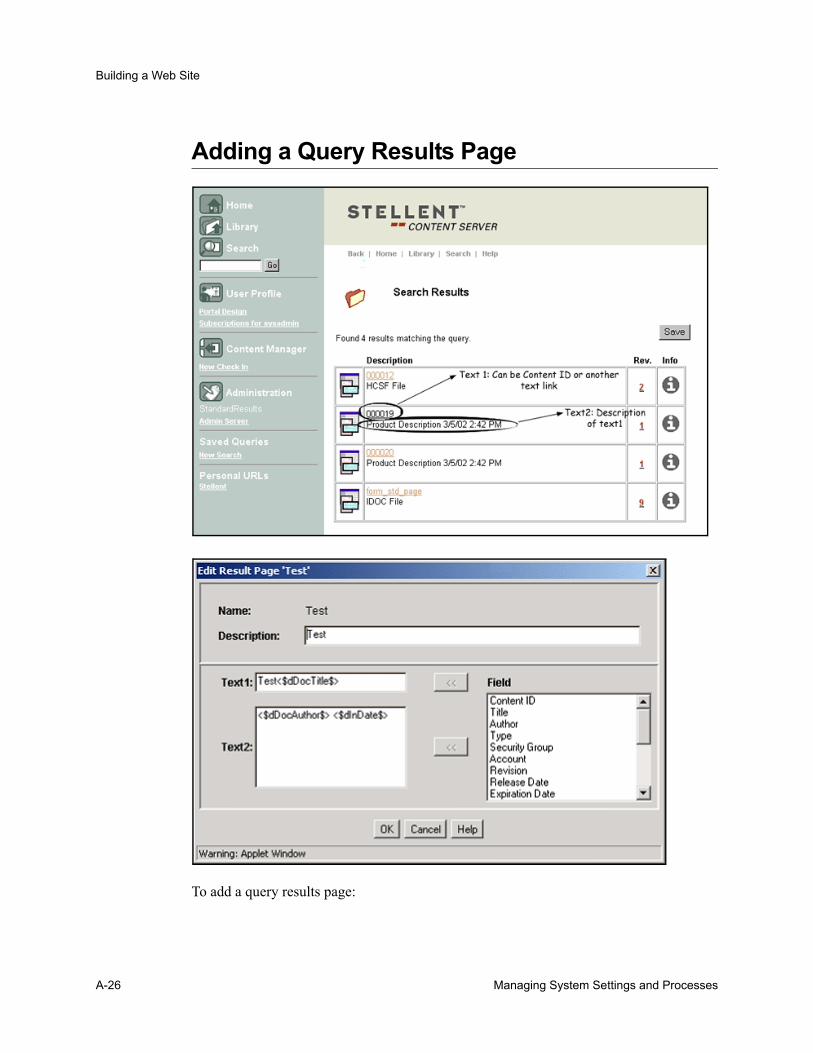
Building a Web Site
Adding a Query Results Page
To add a query results page:
A-26 Managing System Settings and Processes
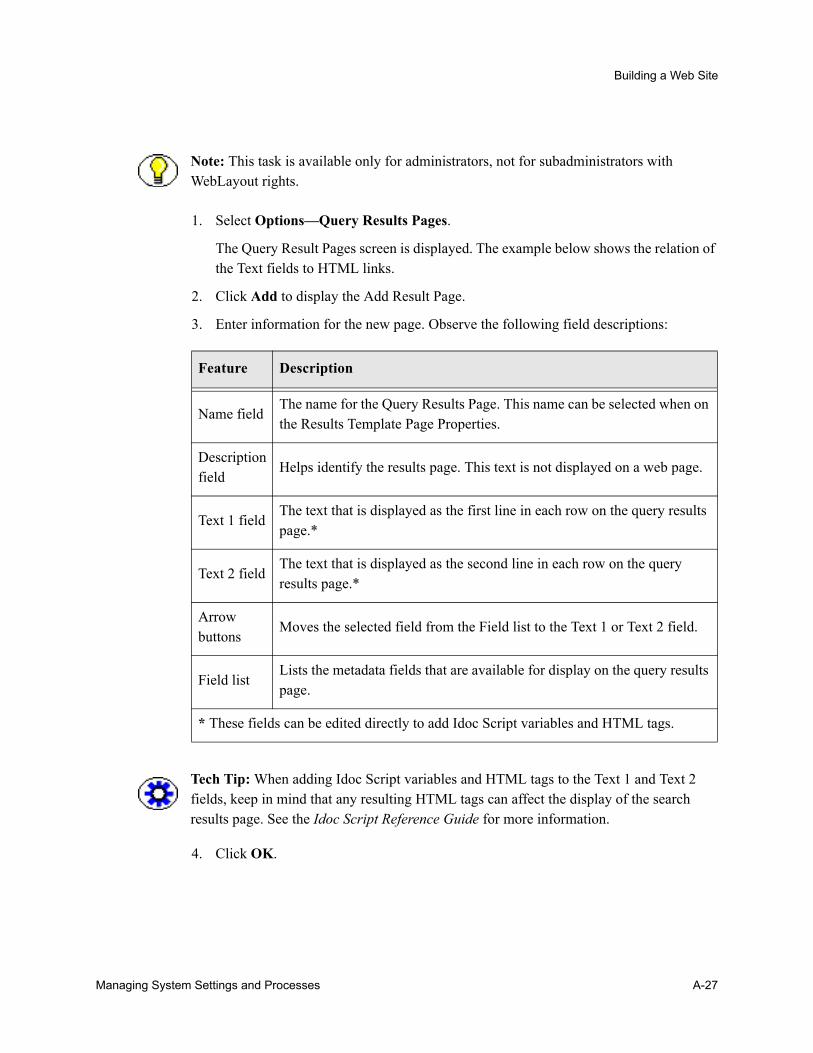
Building a Web Site
1. Select Options—Query Results Pages.
The Query Result Pages screen is displayed. The example below shows the relation of the Text fields to HTML links.
2. Click Add to display the Add Result Page.
3. Enter information for the new page. Observe the following field descriptions:
4. Click OK.
Note: This task is available only for administrators, not for subadministrators with WebLayout rights.
Feature Description
Name fieldThe name for the Query Results Page. This name can be selected when on the Results Template Page Properties.
Description field
Helps identify the results page. This text is not displayed on a web page.
Text 1 fieldThe text that is displayed as the first line in each row on the query results page.*
Text 2 fieldThe text that is displayed as the second line in each row on the query results page.*
Arrow buttons
Moves the selected field from the Field list to the Text 1 or Text 2 field.
Field listLists the metadata fields that are available for display on the query results page.
* These fields can be edited directly to add Idoc Script variables and HTML tags.
Tech Tip: When adding Idoc Script variables and HTML tags to the Text 1 and Text 2 fields, keep in mind that any resulting HTML tags can affect the display of the search results page. See the Idoc Script Reference Guide for more information.
Managing System Settings and Processes A-27
Building a Web Site
Editing a Query Results PageTo edit a query results page:
1. Select Options—Query Results Pages, then select the name of the page.
2. Click Edit.
The Edit Results Page is displayed.
3. Make the necessary changes, and click OK.
Deleting a Query Results PageTo delete a query results page:
1. Select Options—Query Results Pages, then select the name of the page.
2. Click Delete.
3. When prompted, click OK to verify the deletion.
Note: This task is available only for administrators, not for subadministrators with WebLayout rights.
Note: This task is available only for administrators, not for subadministrators with WebLayout rights.
A-28 Managing System Settings and Processes
A p p e n d i x
THIRD PARTY LICENSES
OVERVIEWThis appendix includes a description of the Third Party Licenses for all the third party products included with this product.
Apache Software License (page B-1)
W3C® Software Notice and License (page B-2)
Zlib License (page B-3)
General BSD License (page B-4)
General MIT License (page B-5)
Unicode License (page B-5)
Miscellaneous Attributions (page B-6)
APACHE SOFTWARE LICENSE* Copyright 1999-2004 The Apache Software Foundation.
* Licensed under the Apache License, Version 2.0 (the "License");
* you may not use this file except in compliance with the License.
* You may obtain a copy of the License at
* http://www.apache.org/licenses/LICENSE-2.0
*
Managing System Settings and Processes B-1
Third Party Licenses
* Unless required by applicable law or agreed to in writing, software
* distributed under the License is distributed on an "AS IS" BASIS,
* WITHOUT WARRANTIES OR CONDITIONS OF ANY KIND, either express or implied.
* See the License for the specific language governing permissions and
* limitations under the License.
W3C® SOFTWARE NOTICE AND LICENSE* Copyright © 1994-2000 World Wide Web Consortium,
* (Massachusetts Institute of Technology, Institut National de
* Recherche en Informatique et en Automatique, Keio University).
* All Rights Reserved. http://www.w3.org/Consortium/Legal/
*
* This W3C work (including software, documents, or other related items) is
* being provided by the copyright holders under the following license. By
* obtaining, using and/or copying this work, you (the licensee) agree that
* you have read, understood, and will comply with the following terms and
* conditions:
*
* Permission to use, copy, modify, and distribute this software and its
* documentation, with or without modification, for any purpose and without
* fee or royalty is hereby granted, provided that you include the following
* on ALL copies of the software and documentation or portions thereof,
* including modifications, that you make:
*
* 1. The full text of this NOTICE in a location viewable to users of the
* redistributed or derivative work.
*
* 2. Any pre-existing intellectual property disclaimers, notices, or terms
* and conditions. If none exist, a short notice of the following form
* (hypertext is preferred, text is permitted) should be used within the
* body of any redistributed or derivative code: "Copyright ©
* [$date-of-software] World Wide Web Consortium, (Massachusetts
B-2 Managing System Settings and Processes
Third Party Licenses
* Institute of Technology, Institut National de Recherche en
* Informatique et en Automatique, Keio University). All Rights
* Reserved. http://www.w3.org/Consortium/Legal/"
*
* 3. Notice of any changes or modifications to the W3C files, including the
* date changes were made. (We recommend you provide URIs to the location
* from which the code is derived.)
*
* THIS SOFTWARE AND DOCUMENTATION IS PROVIDED "AS IS," AND COPYRIGHT HOLDERS
* MAKE NO REPRESENTATIONS OR WARRANTIES, EXPRESS OR IMPLIED, INCLUDING BUT
* NOT LIMITED TO, WARRANTIES OF MERCHANTABILITY OR FITNESS FOR ANY PARTICULAR
* PURPOSE OR THAT THE USE OF THE SOFTWARE OR DOCUMENTATION WILL NOT INFRINGE
* ANY THIRD PARTY PATENTS, COPYRIGHTS, TRADEMARKS OR OTHER RIGHTS.
*
* COPYRIGHT HOLDERS WILL NOT BE LIABLE FOR ANY DIRECT, INDIRECT, SPECIAL OR
* CONSEQUENTIAL DAMAGES ARISING OUT OF ANY USE OF THE SOFTWARE OR
* DOCUMENTATION.
*
* The name and trademarks of copyright holders may NOT be used in advertising
* or publicity pertaining to the software without specific, written prior
* permission. Title to copyright in this software and any associated
* documentation will at all times remain with copyright holders.
*
ZLIB LICENSE* zlib.h -- interface of the 'zlib' general purpose compression library
version 1.2.3, July 18th, 2005
Copyright (C) 1995-2005 Jean-loup Gailly and Mark Adler
This software is provided 'as-is', without any express or implied
warranty. In no event will the authors be held liable for any damages
arising from the use of this software.
Managing System Settings and Processes B-3
Third Party Licenses
Permission is granted to anyone to use this software for any purpose,
including commercial applications, and to alter it and redistribute it
freely, subject to the following restrictions:
1. The origin of this software must not be misrepresented; you must not
claim that you wrote the original software. If you use this software
in a product, an acknowledgment in the product documentation would be
appreciated but is not required.
2. Altered source versions must be plainly marked as such, and must not be
misrepresented as being the original software.
3. This notice may not be removed or altered from any source distribution.
Jean-loup Gailly [email protected]
Mark Adler [email protected]
GENERAL BSD LICENSECopyright (c) 1998, Regents of the University of California
All rights reserved.
Redistribution and use in source and binary forms, with or without modification, are permitted provided that the following conditions are met:
"Redistributions of source code must retain the above copyright notice, this list of conditions and the following disclaimer.
"Redistributions in binary form must reproduce the above copyright notice, this list of conditions and the following disclaimer in the documentation and/or other materials provided with the distribution.
"Neither the name of the <ORGANIZATION> nor the names of its contributors may be used to endorse or promote products derived from this software without specific prior written permission.
THIS SOFTWARE IS PROVIDED BY THE COPYRIGHT HOLDERS AND CONTRIBUTORS "AS IS" AND ANY EXPRESS OR IMPLIED WARRANTIES, INCLUDING, BUT NOT LIMITED TO, THE IMPLIED WARRANTIES OF MERCHANTABILITY AND FITNESS FOR A PARTICULAR PURPOSE ARE DISCLAIMED. IN NO EVENT SHALL THE COPYRIGHT OWNER OR CONTRIBUTORS BE LIABLE FOR ANY DIRECT, INDIRECT, INCIDENTAL, SPECIAL, EXEMPLARY, OR CONSEQUENTIAL DAMAGES (INCLUDING, BUT NOT LIMITED TO, PROCUREMENT OF SUBSTITUTE GOODS OR SERVICES; LOSS OF USE, DATA, OR
B-4 Managing System Settings and Processes
Third Party Licenses
PROFITS; OR BUSINESS INTERRUPTION) HOWEVER CAUSED AND ON ANY THEORY OF LIABILITY, WHETHER IN CONTRACT, STRICT LIABILITY, OR TORT (INCLUDING NEGLIGENCE OR OTHERWISE) ARISING IN ANY WAY OUT OF THE USE OF THIS SOFTWARE, EVEN IF ADVISED OF THE POSSIBILITY OF SUCH DAMAGE.
GENERAL MIT LICENSECopyright (c) 1998, Regents of the Massachusetts Institute of Technology
Permission is hereby granted, free of charge, to any person obtaining a copy of this software and associated documentation files (the "Software"), to deal in the Software without restriction, including without limitation the rights to use, copy, modify, merge, publish, distribute, sublicense, and/or sell copies of the Software, and to permit persons to whom the Software is furnished to do so, subject to the following conditions:
The above copyright notice and this permission notice shall be included in all copies or substantial portions of the Software.
THE SOFTWARE IS PROVIDED "AS IS", WITHOUT WARRANTY OF ANY KIND, EXPRESS OR IMPLIED,
INCLUDING BUT NOT LIMITED TO THE WARRANTIES OF MERCHANTABILITY, FITNESS FOR A
PARTICULAR PURPOSE AND NONINFRINGEMENT. IN NO EVENT SHALL THE AUTHORS OR COPYRIGHT
HOLDERS BE LIABLE FOR ANY CLAIM, DAMAGES OR OTHER LIABILITY, WHETHER IN AN ACTION OF
CONTRACT, TORT OR OTHERWISE, ARISING FROM, OUT OF OR IN CONNECTION WITH THE SOFTWARE
OR THE USE OR OTHER DEALINGS IN THE SOFTWARE.
UNICODE LICENSEUNICODE, INC. LICENSE AGREEMENT - DATA FILES AND SOFTWARE
Unicode Data Files include all data files under the directories http://www.unicode.org/Public/, http://www.unicode.org/reports/, and http://www.unicode.org/cldr/data/ . Unicode Software includes any source code published in the Unicode Standard or under the directories http://www.unicode.org/Public/, http://www.unicode.org/reports/, and http://www.unicode.org/cldr/data/.
NOTICE TO USER: Carefully read the following legal agreement. BY DOWNLOADING, INSTALLING, COPYING OR OTHERWISE USING UNICODE INC.'S DATA FILES ("DATA FILES"), AND/OR SOFTWARE ("SOFTWARE"), YOU UNEQUIVOCALLY ACCEPT, AND AGREE TO BE BOUND BY, ALL OF THE TERMS AND CONDITIONS OF THIS AGREEMENT. IF YOU DO NOT AGREE, DO NOT DOWNLOAD, INSTALL, COPY, DISTRIBUTE OR USE THE DATA FILES OR SOFTWARE.
COPYRIGHT AND PERMISSION NOTICE
Managing System Settings and Processes B-5

Third Party Licenses
B-6 Managing System Settings and Processes
Copyright © 1991-2006 Unicode, Inc. All rights reserved. Distributed under the Terms of Use in http://www.unicode.org/copyright.html.
Permission is hereby granted, free of charge, to any person obtaining a copy of the Unicode data files and any associated documentation (the "Data Files") or Unicode software and any associated documentation (the "Software") to deal in the Data Files or Software without restriction, including without limitation the rights to use, copy, modify, merge, publish, distribute, and/or sell copies of the Data Files or Software, and to permit persons to whom the Data Files or Software are furnished to do so, provided that (a) the above copyright notice(s) and this permission notice appear with all copies of the Data Files or Software, (b) both the above copyright notice(s) and this permission notice appear in associated documentation, and (c) there is clear notice in each modified Data File or in the Software as well as in the documentation associated with the Data File(s) or Software that the data or software has been modified.
THE DATA FILES AND SOFTWARE ARE PROVIDED "AS IS", WITHOUT WARRANTY OF ANY KIND, EXPRESS OR IMPLIED, INCLUDING BUT NOT LIMITED TO THE WARRANTIES OF MERCHANTABILITY, FITNESS FOR A PARTICULAR PURPOSE AND NONINFRINGEMENT OF THIRD PARTY RIGHTS. IN NO EVENT SHALL THE COPYRIGHT HOLDER OR HOLDERS INCLUDED IN THIS NOTICE BE LIABLE FOR ANY CLAIM, OR ANY SPECIAL INDIRECT OR CONSEQUENTIAL DAMAGES, OR ANY DAMAGES WHATSOEVER RESULTING FROM LOSS OF USE, DATA OR PROFITS, WHETHER IN AN ACTION OF CONTRACT, NEGLIGENCE OR OTHER TORTIOUS ACTION, ARISING OUT OF OR IN CONNECTION WITH THE USE OR PERFORMANCE OF THE DATA FILES OR SOFTWARE.
Except as contained in this notice, the name of a copyright holder shall not be used in advertising or otherwise to promote the sale, use or other dealings in these Data Files or Software without prior written authorization of the copyright holder.
________________________________________Unicode and the Unicode logo are trademarks of Unicode, Inc., and may be registered in some jurisdictions. All other trademarks and registered trademarks mentioned herein are the property of their respective owners
MISCELLANEOUS ATTRIBUTIONSAdobe, Acrobat, and the Acrobat Logo are registered trademarks of Adobe Systems Incorporated.
FAST Instream is a trademark of Fast Search and Transfer ASA.
HP-UX is a registered trademark of Hewlett-Packard Company.
IBM, Informix, and DB2 are registered trademarks of IBM Corporation.
Jaws PDF Library is a registered trademark of Global Graphics Software Ltd.
Kofax is a registered trademark, and Ascent and Ascent Capture are trademarks of Kofax Image Products.
Linux is a registered trademark of Linus Torvalds.
Mac is a registered trademark, and Safari is a trademark of Apple Computer, Inc.
Third Party Licenses
Microsoft, Windows, and Internet Explorer are registered trademarks of Microsoft Corporation.
MrSID is property of LizardTech, Inc. It is protected by U.S. Patent No. 5,710,835. Foreign Patents Pending.
Oracle is a registered trademark of Oracle Corporation.
Portions Copyright © 1994-1997 LEAD Technologies, Inc. All rights reserved.
Portions Copyright © 1990-1998 Handmade Software, Inc. All rights reserved.
Portions Copyright © 1988, 1997 Aladdin Enterprises. All rights reserved.
Portions Copyright © 1997 Soft Horizons. All rights reserved.
Portions Copyright © 1995-1999 LizardTech, Inc. All rights reserved.
Red Hat is a registered trademark of Red Hat, Inc.
Sun is a registered trademark, and Sun ONE, Solaris, iPlanet and Java are trademarks of Sun Microsystems, Inc.
Sybase is a registered trademark of Sybase, Inc.
UNIX is a registered trademark of The Open Group.
Verity is a registered trademark of Autonomy Corporation plc
Managing System Settings and Processes B-7

I n d e x
#-console switch
Batch Loader, 7-44, 7-44
Aabout
Admin Server, 3-1system properties, 2-2
accountsshow only known, 2-14
actions, Batch Loader, 7-3Active Directory Security (ADSI), 2-16Active Reports, A-18
defining, A-19editing query expression, A-19
Add an Existing Content Server page, 3-8Add BatchBuilder Mapping Field screen, 7-33Add BatchBuilder Mapping screen, 7-31Add Content Server Configuration page, 3-11Add Provider page, 6-16adding
content server to Admin Server, 3-3database providers, 6-4incoming providers, 6-5LDAP providers, 6-7outgoing providers, 6-3preview providers, 6-6provider
database, 6-11incoming, 6-11outgoing, 6-9preview, 6-11
providers, 6-3query results pages, A-28, A-40redirect in Batch Loader, 7-44web pages, A-12
Additional Configuration Variables field, 2-10Admin Server, 2-2
about, 3-1adding a content server, 3-3Additional Configuration Variables field, 2-10Content Security Configuration page, 2-13editing content server, 3-4General Configuration page, 2-6Home page, 3-2Internet Configuration page, 2-15Output page, 3-7removing a content server, 3-4using, 2-3
administrationlaunching applications, 1-7
administration applicationsrunning as applets, 1-7
Administration page, 1-7administrator documentation, 1-3Administrator Mail Address, 2-16administrators, 1-5
documentation for --, 1-3ADSI, 2-16
enabling, 2-16ALL
supported search operator/keyword, 4-30Allow author to delete revision, 2-14Allow get copy for user with read privilege, 2-14Allow only original contributor to check out, 2-14Allow override format on check in, 2-7AllowMultiple
column description, 4-36ALM, 5-3AND
supported search operator/keyword, 4-30ANY
supported search operator/keyword, 4-30Apache Loadable Module, 5-3Apache web server, 5-3
Managing System Settings and Processes Index-1
Index
AppletChunkSize, 2-12AppletChunkThreshold, 2-12applets, running applications, 1-7applications
launching administration, 1-7running as applets, 1-7running in stand-alone mode, 1-8
architectureweb server filter, 5-4
Archive Historical Report, A-19Archiver, 6-4, 6-5author, allowing delete, 2-14AuthorDelete, 2-14automatic Content ID, 2-8automatic update cycle, 4-5AutoNumberPrefix, 2-9
Bbatch load files
case sensitivity, 7-2creating from BatchBuilder screen, 7-24creating from command line, 7-26file records, 7-2preparing, 7-20, 7-20samples, 7-19
Batch Loader, 1-6, 7-1, 7-1-console switch, 7-44actions, 7-3adding a redirect, 7-44command line example, 7-44delete action, 7-7file records, 7-2insert action, 7-3mapping file, 7-21optional parameters, 7-14preparing batch load files, 7-20running, 7-35, 7-36UNIX example, 7-38update action, 7-8Win32 example, 7-38
Batch Loader screen, 7-34batch loading, 7-36
batch loading, 7-1, 7-1correcting errors, 7-45custom metadata fields, 7-19from Batch Loader screen, 7-36from command line, 7-37
BatchBuilder, 7-20creating mapping file, 7-25UNIX example, 7-27Win32 example, 7-27
BatchBuilder Mapping List screen, 7-30
BatchBuilder screen, 7-28creating batch load file, 7-24
BETWEENsupported search operator/keyword, 4-30
Browser Executable Path, 2-26building
web site, A-1
Ccheckout
only original contributor, 2-14ChunkedRequestTrace, 2-12Chunking function, 2-11CLASSPATH, 2-27clearing
web filter log, 5-9clustered Content Server, 6-8Collaboration Server, 6-9collection rebuild cycle, 4-6collections
rebuilding search, 4-3Column
column description, 4-34command line
Batch Loader, 7-44Batch Loader example, 7-44batch loading, 7-37creating batch load file, 7-26
communication protocols, 5-4config.cfg file, 2-10configuration
revision labels, 2-11setting web filter options, 5-9web filter, 5-2
configuration files, 2-2configuration information
understanding, 2-3Configure Automatic Update Cycle screen, 4-7Configure Collection Rebuild Cycle screen, 4-10Configure Web Server Filter page, 5-9configuring
content security, 2-12content server, 2-20database, 2-17general options, 2-4IIS for external security, 5-9Internet information, 2-14paths, 2-25search collection rebuild, 4-4search index update, 4-4System Properties, 2-1web server filter, 5-13, 5-15
Index -2 Managing System Settings and Processes
Index
connection string, JDBC, 2-19consumers, 1-5Content Categorizer, 6-6Content ID
generating automatically, 2-8Content Publisher, 6-6content security options, System Properties, 2-12Content Server
clustered, 6-8purpose, 1-4running, 1-7running on Windows, 1-7
content serveradding to Admin Server, 3-3clustered, 6-8configuring, 2-20editing on Admin Server, 3-4removing from Admin Server, 3-4running, 1-7running on Windows, 1-7viewing output, 3-4
Content Server hintstype of query hint, 4-28
Content Server Output page, 3-14Content Tracker, 6-8contributors, 1-5conventions, 1-4correcting batch load errors, 7-45creating
batch load filesfrom BatchBuilder screen, 7-24from command line, 7-26
external URL links, A-15Local page links, A-14mapping file, 7-25providers
database, 6-11incoming, 6-11outgoing, 6-9preview, 6-11
Query links, A-24, A-36web site, A-3
criteria, displaying, A-3custom metadata fields, batch loading, 7-19, 7-19
Ddatabase, 2-19
external, 6-5database options, System Properties, 2-17database provider
adding, 6-4, 6-11Database Provider page, 6-20
DatabasePreserveCase, 2-19debug level, Indexer, 4-9, 4-11default capacity algorithm
characteristic of hint cache, 4-39defining
Active Report, A-19revision labels, 2-9, 2-9web site structure, A-3
deleteallowing authors permission, 2-14
delete action, 7-7example, 7-8requirements, 7-8
deletingproviders, 6-12Query Results pages, A-30, A-42
directory querieswriting, A-23, A-32
Disabledcolumn description, 4-36
DisableHttpUploadChunking, 2-12disabling
ADSI, 2-16download applet, 2-8, 2-8Dynamic Converter, 2-8Enterprise Search, 2-8full-text indexing, 4-4JSP support, 2-9, 2-23keyword highlighting, 2-8NTLM, 2-16
displaying criteria, A-3documentation
documentation for system administrators, 1-3download applet
enabling, 2-8DownloadApplet, 2-8driver, JDBC, 2-19Dynamic Converter
enabling and disabling, 2-8
Ee-mail address, system administrator, 2-16e-mail port, 2-16Edit Active Report Query screen, A-19Edit BatchBuilder Mapping Field screen, 7-33Edit BatchBuilder Mapping screen, 7-32Edit Content Server Configuration page, 3-11Edit or Remove Content Server page, 3-10Edit Provider page, 6-16editing
Active Report query expressions, A-19content server on Admin Server, 3-4
Managing System Settings and Processes Index-3
Index
provider information, 6-12Query link query expressions, A-27, A-40Query Results pages, A-30, A-42web page properties, A-13web page structure, A-16
EnableDocumentHighlight, 2-8enabling
ADSI, 2-16download applet, 2-8Dynamic Converter, 2-8Enterprise Search, 2-8JSP support, 2-9, 2-23keyword highlighting, 2-8NTLM, 2-16upload applet, 2-8
Enterprise Search, 6-4enabling and disabling, 2-8
EnterpriseSearchAsDefault, 2-8equal symbol
supported search operator/keyword, 4-30error messages
content server, 3-7errors
correcting batch load, 7-45examples
batch load file record, 7-2batch load files, 7-19Batch Loader, 7-44
delete action, 7-8insert action, 7-5on UNIX, 7-38on Win32, 7-38update action, 7-12, 7-13
BatchBuilderon UNIX, 7-27on Win32, 7-27
revision, 2-10SQL script, A-24, A-35Tamino query, A-34
ExclusiveCheckout, 2-14EXISTS
supported search operator/keyword, 4-31external collections, 7-21
read-only, 7-24external database, 6-5external URL, A-5
creating link, A-15
Ffields
custom metadata, 7-19file records, 7-2
example, 7-2filter
clearing the log, 5-9plug-ins, 5-3setting options, 5-9viewing the log, 5-9viewing version, 5-9web server, 5-3
formatsmapping file, 7-21
full-text indexingdisabling, 4-4
full-text searchTamino operators, A-33
Ggeneral options, System Properties, 2-4generating
Content IDs, 2-8get copy permission, 2-14GetCopyAccess, 2-14greater than symbol
supported search operator/keyword, 4-30, 4-30group by
supported sort construct, 4-31
Hhint cache
default capacity algorithm, 4-39managing entries, 4-38origin of keys, 4-39overview, 4-37persistence, 4-40reusing entries, 4-37
Hint Cache Updater pageaccessing, 4-44checking hint cache for hints
data sourcechecking hint cache for hints, 4-44
modifyng data source or query entrydata source
modifying entry to hint cache, 4-45overview, 4-56removing data source or query entry
data sourceremoving entry to hint cache, 4-47
Hint Rule Editoroverview
Hint Rules Configuration page
Index -4 Managing System Settings and Processes
Index
Hint Rule Editor, 4-50hint rules
adding and enabling, 4-40Hint Rules Configuration page
accessing, 4-40adding and enabling new hint rules, 4-40disabling hint rules
hint rulesdisabling, 4-41
editing hint ruleshint rules
editing, 4-41enabling hint rules
hint rulesenabling, 4-42
overview, 4-49removing hint rules
hint rulesremoving, 4-42
hint rules tableAllowMultiple - column description, 4-36Column - column description, 4-34Disabled - column description, 4-36explanations of rules, 4-32Index - column description, 4-35Key - column description, 4-33on Hint Rules Configuration page, 4-49Operators - column description, 4-34Order - column description, 4-35overview, 4-31Table - column description, 4-34Values - column description, 4-35
Historical Reports, A-18Hostname Filter, 2-23HTML Preview, 6-3, 6-6, 6-6HTTP provider
chunking, 2-11Http Relative Web Root, 2-16HTTP Server Address, 2-16HttpRelativeWebRoot, 2-16HttpServerAddress, 2-16
IIdcAuthPlugins table, 5-3IIS web server, 5-2, 5-3
configuring, 5-9IN
supported search operator/keyword, 4-31Incoming Provider page, 6-22incoming provider, adding, 6-5, 6-11Index
column description, 4-35index
updating, 4-3Indexer
automatic update cycle, 4-5collection rebuild cycle, 4-6debug level, 4-9, 4-11state, 4-6status, 4-6
indexing, 4-1disabling full-text, 4-4
Informix, 2-19inner join
supported sort construct, 4-31insert action, 7-3
example, 7-5requirements, 7-4
Instance Description, 2-22Instance Menu Label, 2-22InstanceDescription, 2-22InstanceMenuLabel, 2-22Internet Information Services
See IIS web serverInternet options
System Properties, 2-14IP Address Filter, 2-23iPlanet/Sun ONE web server, 5-2, 5-3IS
supported search operator/keyword, 4-31ISAPI filter, 5-2, 5-3IsAutoNumber, 2-8IsDynamicConverterEnabled, 2-8IsJdbc, 2-18IsJspServerEnabled, 2-9, 2-23IsOverrideFormat, 2-7
JJava applets, 1-8Java Classpath, 2-27JDBC, 2-17JDBC Connection String, 2-19JDBC Driver Name, 2-19JDBC User Name, 2-19JDBC User Password, 2-19JdbcConnectionString, 2-19JdbcDriver, 2-19JdbcPassword, 2-19JdbcUser, 2-19JSP
security groups enabled for, 2-9, 2-24JSP support, enabling and disabling, 2-9, 2-23JspEnabledGroups, 2-9, 2-24
Managing System Settings and Processes Index-5
Index
KKey
column description, 4-33keys
origin of - characteristic of hint cache, 4-39keyword highlighting, 2-8known accounts, 2-14
Llabel ranges, revision, 2-10label sequence, revision, 2-10launching administration applications, 1-7Ldap Provider page, 6-25LDAP provider, adding, 6-7less than or equal to symbol
supported search operator/keyword, 4-30less than symbol
supported search operator/keyword, 4-30Library, A-2Lightly Managed Content component, 7-21LIKE
supported search operator/keyword, 4-31Local page, A-5
creating link, A-14locale, system, 2-21locales, 2-1Localization tab, System Properties, 2-1logs
viewing web filter, 5-9
MMail Server, 2-16MailServer, 2-16major revision label, 2-9major revision label sequence, 2-10MajorRevSeq, 2-9managing hint cache entries
characteristic of hint cache, 4-38mapping files
Batch Loader, 7-21creating, 7-25formats, 7-21values, 7-22
metadata fieldsbatch loading custom, 7-19, 7-19
Microsoft network security, 2-16minor revision label, 2-9minor revision label sequence, 2-10MinorRevSeq, 2-9
MultiUpload, 2-8
Nnormalization
discarding WHERE clause conditions, 4-25finding range queries, 4-25qualify WHERE clause conditions, 4-24reformatting WHERE clause conditions, 4-25stage 3 of optimization process, 4-24
NOTsupported search operator/keyword, 4-31
not equal symbolsupported search operator/keyword, 4-30
NSAPI filter, 5-2, 5-3NT Domain Security (NTLM), 2-16NTLM, 2-16
enabling, 2-16NtlmSecurityEnabled, 2-16NULL
supported search operator/keyword, 4-31
OOperators
column description, 4-34operators, Tamino full-text search, A-33optimizing queries
by reformatting, 4-26example - adding multiple hints, 4-27example - adding single hint, 4-26
optional parameters, Batch Loader, 7-14options
System Propertiescontent server, 2-20database, 2-17general, 2-4Internet, 2-14
ORsupported search operator/keyword, 4-31
Oracle, 2-19Oracle hints
type of query hint, 4-28Oracle Portlets, 6-8Oracle Query Optimizer
overview, 4-22Order
column description, 4-35order by
supported sort construct, 4-31outer join
supported sort construct, 4-31
Index -6 Managing System Settings and Processes
Index
outgoing provideradding, 6-3, 6-9
Outgoing Provider page, 6-17output, viewing content server, 3-4overview
security, 6-1
Pparameters, optional Batch Loader, 7-14parsing
stage 2 of optimization process, 4-24passthru, 4-20password
JDBC, 2-19path options, System Properties, 2-25PDC
See primary domain controllerpersistence
characteristic of hint cache, 4-40planning
web site, A-1, A-2plug-ins
architecture, 5-4filter, 5-3
portal pageupdating, A-8working with, A-6
portlets, 6-8predefined accounts
limiting display to, 2-14preparing
batch load file, 7-20, 7-20preserving case, 2-19Preview Provider page, 6-23preview provider, adding, 6-6, 6-11primary domain controller, 5-2properties, editing web page, A-13properties, system, 2-1Provider Information page, 6-15providers, 6-2
adding, 6-3adding database, 6-4, 6-11adding incoming, 6-5, 6-11adding LDAP, 6-7adding outgoing, 6-3, 6-9adding preview, 6-6, 6-11deleting, 6-12editing information, 6-12SystemDatabase, 6-2SystemServerSocket, 6-2understanding, 6-1
Providers page, 6-13
purpose, Content Server, 1-4
Qqueries, A-5
Tamino examples, A-34writing directory, A-23, A-32writing report, A-23, A-34writing Tamino, A-31, A-31
querychecking hint cache for hints, 4-44converting, 4-43modifying, 4-44modifying entry to hint cache, 4-45removing entry to hint cache, 4-47
query analysisstage 1 of optimization process, 4-24
Query Converter pageaccessing, 4-42converting data source or query
data sourceconverting, 4-43
modifying data source or querydata source
modifying, 4-44overview, 4-54
query expressionediting Active Reports, A-19editing Query link, A-27, A-40
query hintsContent Server hints, 4-28Oracle hints, 4-28overview, 4-27syntax, 4-29
Query linkcreating, A-24, A-36editing query expression, A-27, A-40
query optimization processreformatting queries to optimize searches, 4-26stage 1 - query analysis, 4-24stage 2 - parsing, 4-24stage 3 - normalization, 4-24stage 4 - select hint, 4-25stage 5 - reformat query, 4-26
query results pageadding, A-28, A-40deleting, A-30, A-42editing, A-30, A-42
Rrange queries
Managing System Settings and Processes Index-7
Index
finding, 4-25rebuild
configuring, 4-4rebuilding
search collection, 4-3records, file, 7-2redirect, adding in Batch Loader, 7-44reformat query
stage 5 of optimization process, 4-26reformatting queries
adding multiple hints, 4-27adding single hint, 4-26to optimize searches, 4-26
relative web root, 2-16removing
content server from Admin Server, 3-4report queries
writing, A-23, A-34reports, A-6, A-17, A-18reports, Archive Historical, A-19Repository Manager, 1-6
Indexer tab, 4-5requirements
Batch Loader delete action, 7-8Batch Loader insert action, 7-4Batch Loader update action, 7-10
reusing hint cache entriescharacteristic of hint cache, 4-37
revision labelsdefining, 2-9, 2-9
revisionsexamples, 2-10label configuration settings, 2-11label ranges, 2-10label sequence, 2-10
runningapplications as applets, 1-7applications in stand-alone mode, 1-8Batch Loader, 7-35, 7-36Content Server, 1-7Content Server on Windows, 1-7
Ssamples
batch load files, 7-19script
SQL, A-23, A-35SQL example, A-24, A-35
search collectionsconfiguring rebuild, 4-4rebuilding, 4-3
search index, 4-2
configuring update, 4-4updating, 4-3
search operators, Tamino full-text, A-33secure sockets layer (SSL), 2-16security
configuring, 2-12enabling Microsoft, 2-16overview, 6-1setting up users, 6-1
security groupsJSP enabled, 2-9, 2-24
select hinthint cache, 4-37hint rules table, 4-31stage 4 of optimization process, 4-25
sequence, revision label, 2-10services
UNIX, 1-9setting
web filter configuration options, 5-9setting up
users, 6-1settings, revision label, 2-11Shared Directory Path, 2-27SharedDir, 2-27Show only known accounts, 2-14ShowOnlyKnownAccounts, 2-14site structure, defining, A-3SMTP Port, 2-16SmtpPort, 2-16SocketHostAddressSecurityFilter, 2-23SocketHostNameSecurityFilter, 2-23sort constructs
group by, 4-31inner join, 4-31order by, 4-31outer join, 4-31supported, 4-31
Specific Instance page, 3-13SQL
script example, A-24, A-35SQL script, A-23, A-35SSL (Secure Sockets Layer), 2-16stand-alone mode, running applications, 1-8starting
Content Server, 1-7Content Server on Windows, 1-7
stateIndexer, 4-6
statusIndexer, 4-6
subadministrators, 1-5substrings, Tamino, A-32SysAdminAddress, 2-16
Index -8 Managing System Settings and Processes

Index
system administratore-mail address, 2-16
system administratorsdocumentation for --, 1-3
System Locale, 2-21System Properties, 1-6, 2-1, 2-2
content security, 2-12Content Security tab, 2-13content server, 2-20database, 2-17Database tab, 2-18general options, 2-4Internet options, 2-14Internet tab, 2-15Localization tab, 2-1Options tab, 2-5Paths tab, 2-26Server tab, 2-21understanding configuration information, 2-3
system propertiesabout, 2-2
System Properties application, 2-3System Timezone, 2-22SystemDatabase provider, 6-2SystemLocale, 2-21SystemServerSocket provider, 6-2SystemTimeZone, 2-22
TTable
column description, 4-34Tamino
full-text search operators, A-33query examples, A-34substrings, A-32wildcards, A-32writing queries, A-31, A-31
taskscreating web site, A-3Indexer, 4-2
timezone, system, 2-22troubleshooting
content server, 3-7
Uunderstanding
configuration information, 2-3providers, 6-1
UNIXBatch Loader example, 7-38
BatchBuilder example, 7-27services, 1-9
updateconfiguring search index, 4-4
update action, 7-8example, 7-12, 7-13requirements, 7-10
Update Portal Page screen, A-7updating
portal page, A-8search index, 4-3
upload appletchunking, 2-11enabling, 2-8
URLcreating external link, A-15external, A-5
Use Java Database Connectivity, 2-18Use Microsoft Security, 2-16Use Secure Sockets Layer, 2-16UseAdsi, 2-16UseNtlm, 2-16user name, JDBC, 2-19users, 1-5
setting up, 6-1UseSSL, 2-16using
Admin Server, 2-3System Properties application, 2-3
VValues
column description, 4-35values
Batch Loader mapping file, 7-22version
viewing web filter, 5-9viewing
web filter log, 5-9web filter version, 5-9
viewing content server output, 3-4
Wweb filter
clearing the log, 5-9configuration, 5-2setting configuration options, 5-9viewing the log, 5-9viewing version, 5-9
Web Layout Editor, A-1, A-8
Managing System Settings and Processes Index-9
Index
addingquery results page, A-28, A-40
adding web pages, A-12creating
external URL link, A-15Local page link, A-14Query link, A-24, A-36
definingActive Reports, A-19site structure, A-3
deletingquery results page, A-30, A-42
displaying criteria, A-3editing
Active Report query expression, A-19Query link query expression, A-27, A-40query results page, A-30, A-42web page properties, A-13web page structure, A-16
Page Hierarchy pane, A-9Page Links pane, A-11Page Properties pane, A-10planning web site, A-1queries, A-5reports, A-6tasks, A-3working with reports, A-17working with web pages, A-4writing
report queries, A-23, A-34Tamino queries, A-31
web pages, A-4adding, A-12
editing properties, A-13editing structure, A-16working with, A-4
web server, 5-2name, 2-16relative web root, 2-16
web server filter, 5-3architecture, 5-4configuring, 5-13, 5-15
web sitebuilding, A-1
web site, planning, A-1, A-2webBrowserPath, 2-26WebDAV, 6-5WHERE clause conditions
discarding, 4-25qualifying, 4-24reformatting, 4-25
wildcards, Tamino, A-32Win32
Batch Loader example, 7-38BatchBuilder example, 7-27
Windows, 1-8running Content Server, 1-7
working withbatches of files, 7-1portal page, A-6reports, A-17web pages, A-4
writingdirectory queries, A-23, A-32report queries, A-23, A-34Tamino queries, A-31, A-31
Index -10 Managing System Settings and Processes