Embed Size (px)
Citation preview
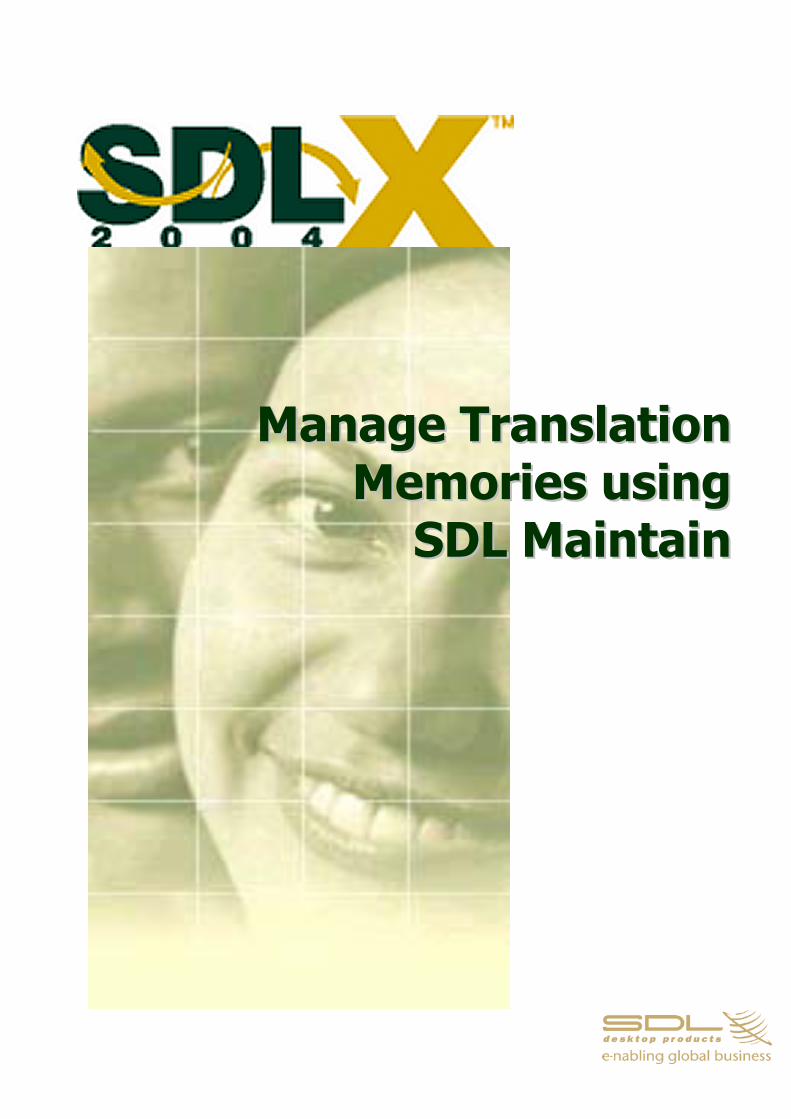
MMaannaaggee TTrraannssllaattiioonnMMeemmoorriieess uussiinngg
SSDDLL MMaaiinnttaaiinn
Published by SDL International (http://www.sdlintl.com). © Copyright SDL International. All rights reserved. Documentation for SDLX2004™. Microsoft® and Windows® are registered trademarks of Microsoft Corporation. All other trademarks are acknowledged as belonging to their respective companies. Documentation produced July 2004.
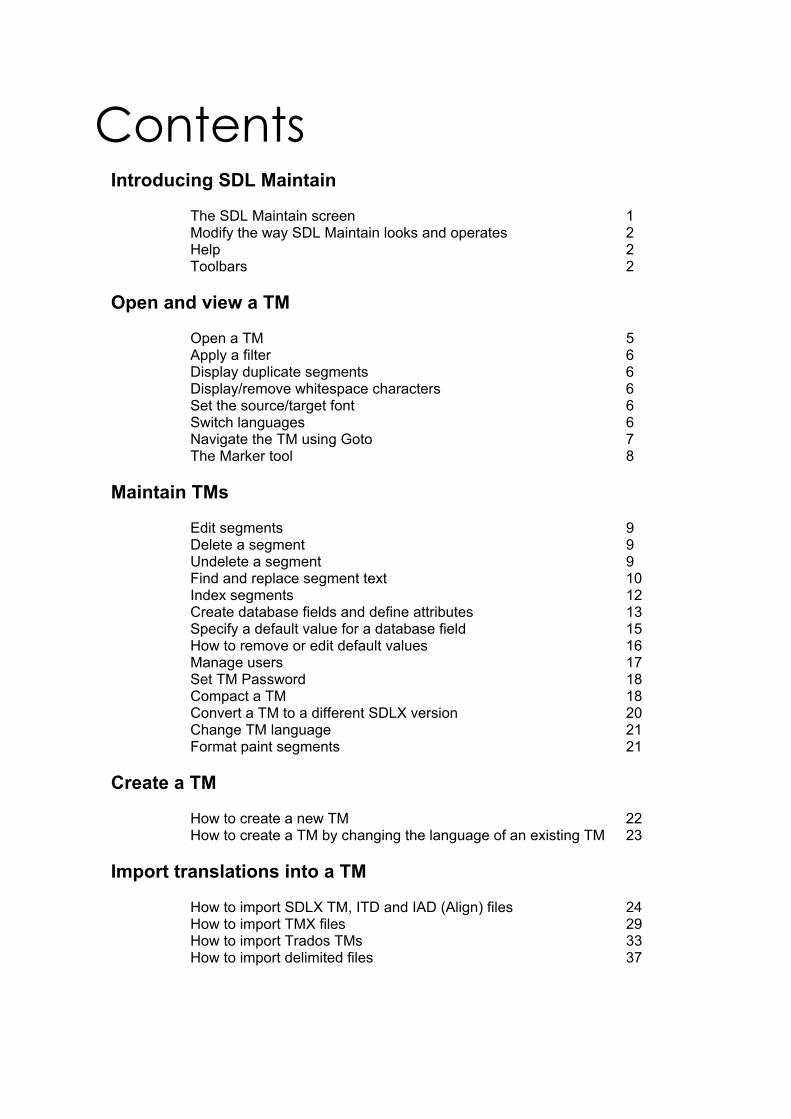
Contents
Introducing SDL Maintain The SDL Maintain screen 1 Modify the way SDL Maintain looks and operates 2 Help 2 Toolbars 2
Open and view a TM Open a TM 5 Apply a filter 6 Display duplicate segments 6 Display/remove whitespace characters 6 Set the source/target font 6 Switch languages 6 Navigate the TM using Goto 7 The Marker tool 8
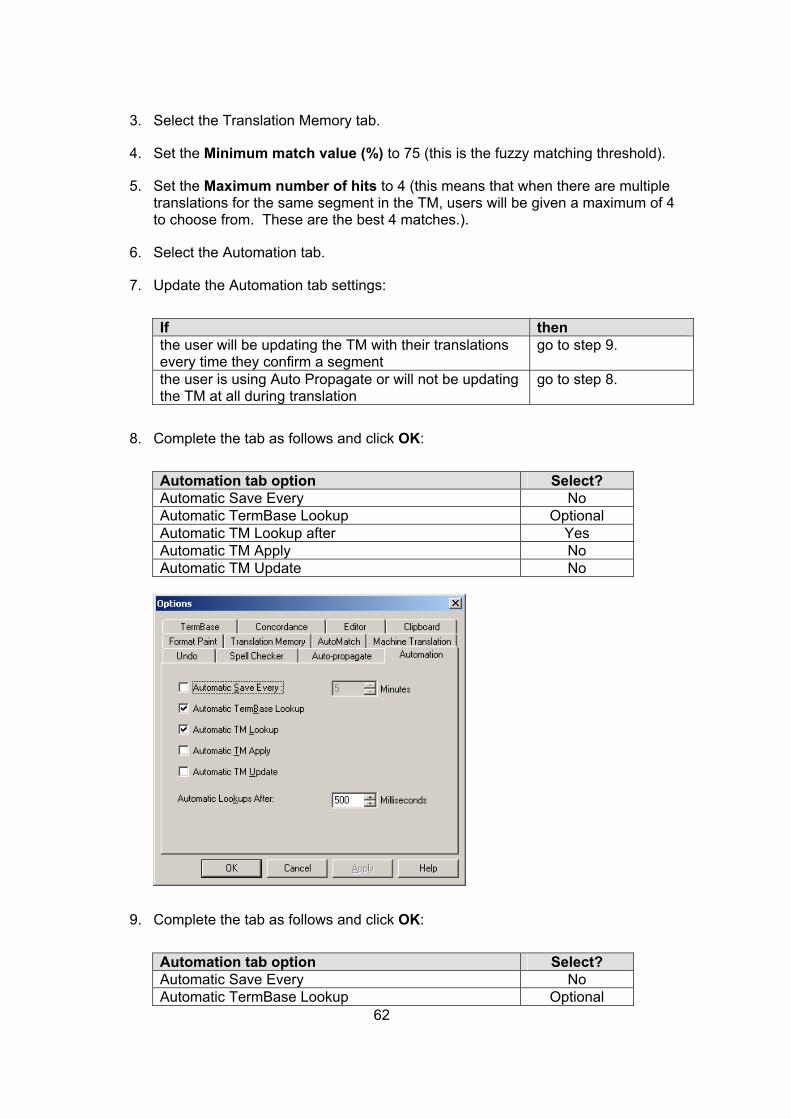
Maintain TMs Edit segments 9 Delete a segment 9 Undelete a segment 9 Find and replace segment text 10 Index segments 12 Create database fields and define attributes 13 Specify a default value for a database field 15 How to remove or edit default values 16 Manage users 17 Set TM Password 18 Compact a TM 18 Convert a TM to a different SDLX version 20 Change TM language 21 Format paint segments 21
Create a TM How to create a new TM 22 How to create a TM by changing the language of an existing TM 23
Import translations into a TM How to import SDLX TM, ITD and IAD (Align) files 24 How to import TMX files 29 How to import Trados TMs 33 How to import delimited files 37
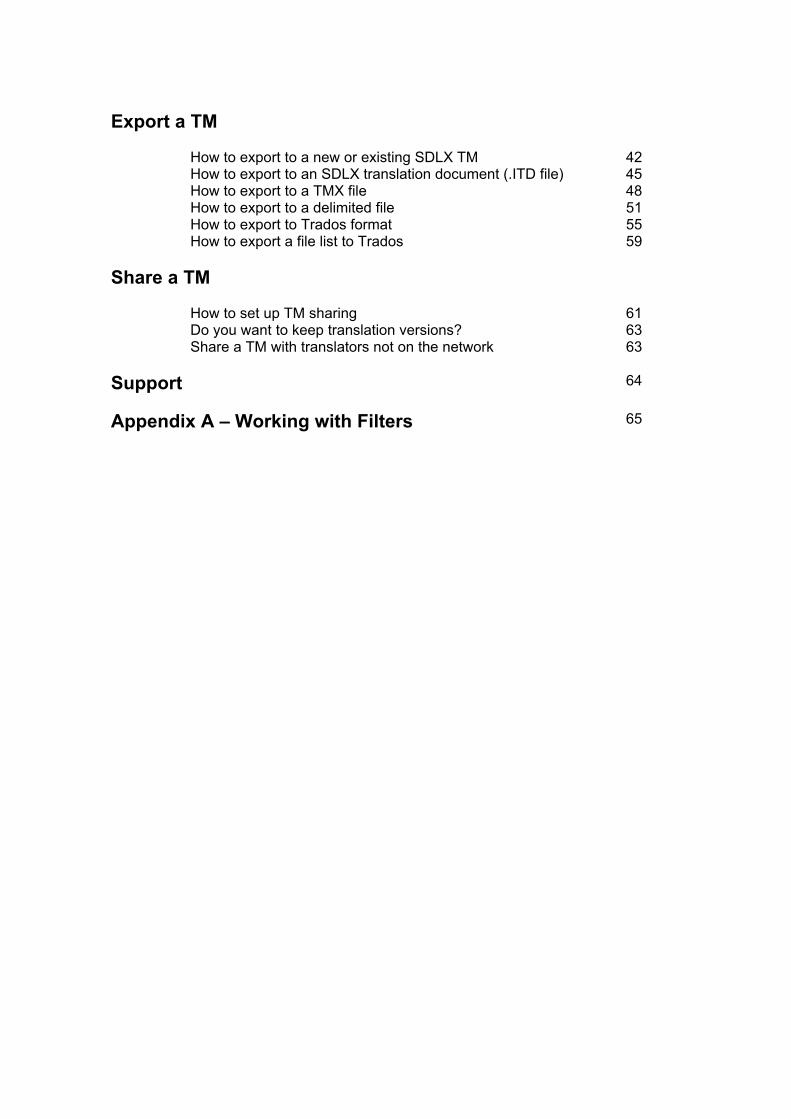
Export a TM How to export to a new or existing SDLX TM 42 How to export to an SDLX translation document (.ITD file) 45 How to export to a TMX file 48 How to export to a delimited file 51 How to export to Trados format 55 How to export a file list to Trados 59
Share a TM How to set up TM sharing 61 Do you want to keep translation versions? 63 Share a TM with translators not on the network 63
Support 64
Appendix A – Working with Filters 65
1
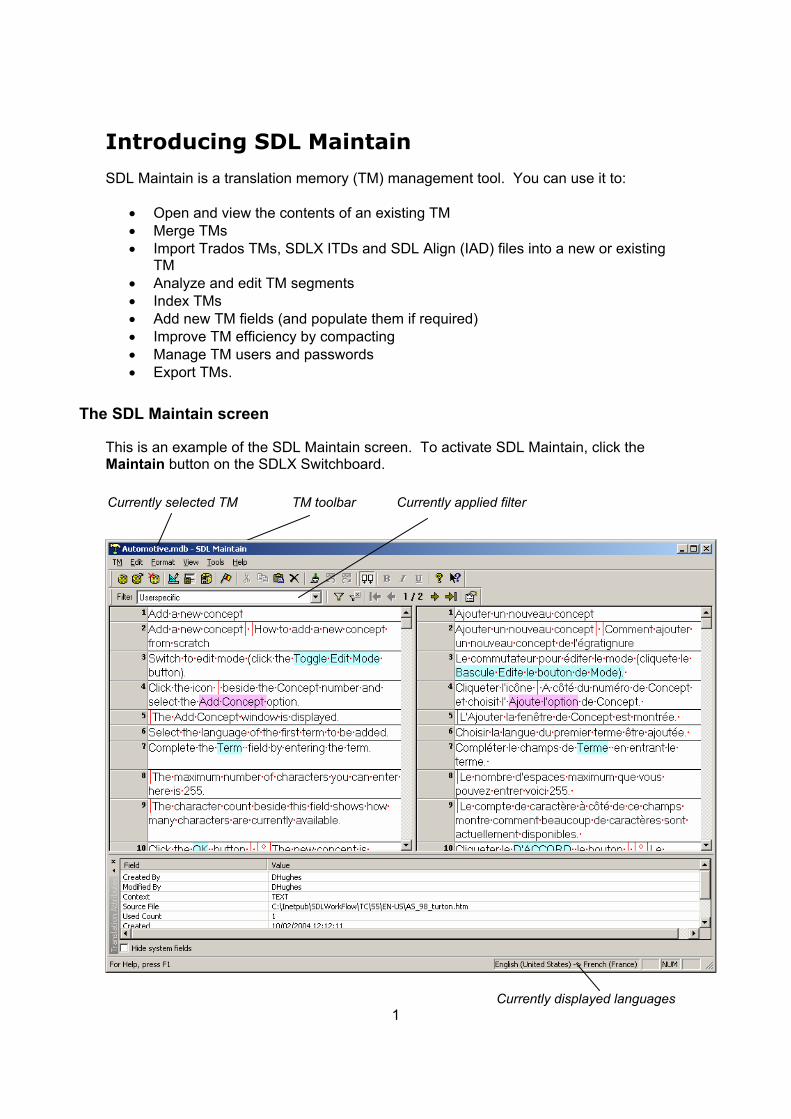
Introducing SDL Maintain
SDL Maintain is a translation memory (TM) management tool. You can use it to:
• Open and view the contents of an existing TM • Merge TMs • Import Trados TMs, SDLX ITDs and SDL Align (IAD) files into a new or existing
TM • Analyze and edit TM segments • Index TMs • Add new TM fields (and populate them if required) • Improve TM efficiency by compacting • Manage TM users and passwords • Export TMs.
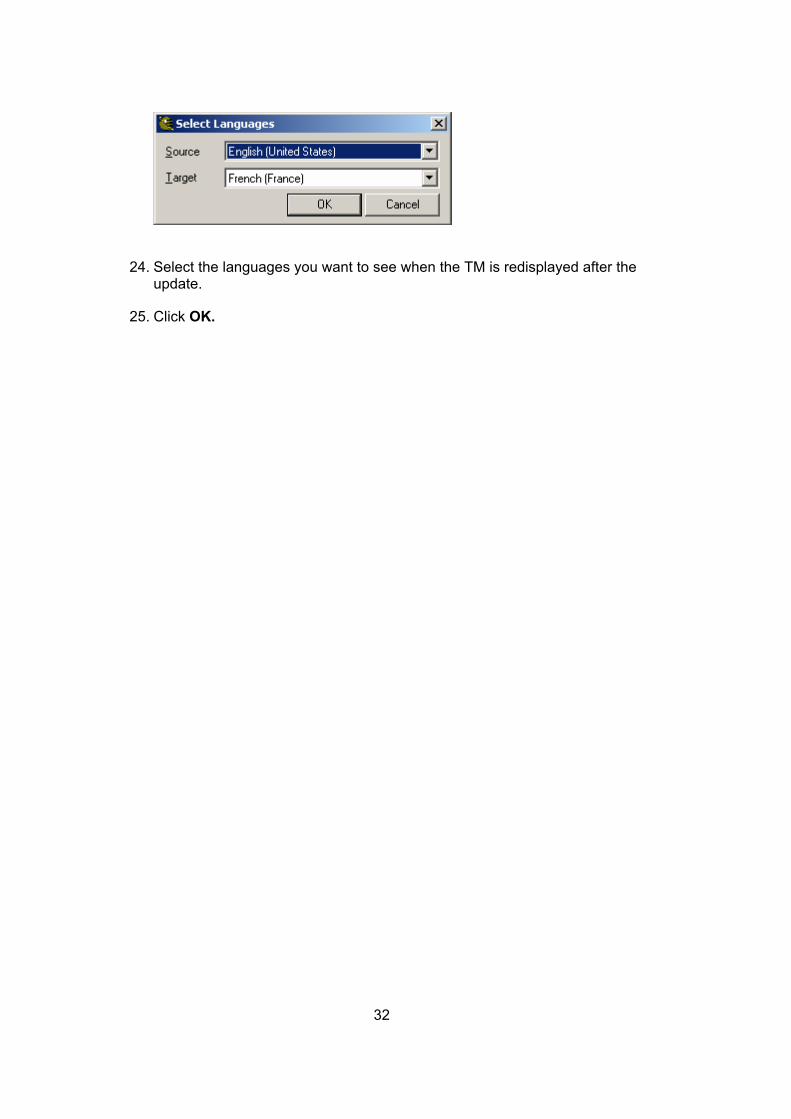
The SDL Maintain screen
This is an example of the SDL Maintain screen. To activate SDL Maintain, click the Maintain button on the SDLX Switchboard. Currently selected TM TM toolbar Currently applied filter
Currently displayed languages
2
Modify the way SDL Maintain looks and operates
You can specify: The maximum number of segments to be displayed at a time
• How you want format paint to operate • The size of the buffer where TM changes are stored • Which type of database file a translation memory is output as (the default is
Microsoft Access). These options are all available on the SDL Maintain dialog box. To display this dialog box, select Tools, Options from the menu bar.
Help
Remember that help is available for all SDL Maintain menus, screens and dialog boxes. To display the help:
• If you are working on the main SDL Maintain screen, select Help, Help Topics from the menu bar
• If you are working in a window or dialog box press F1.
Toolbars
When you have a TM open on screen, two toolbars are available - Standard and Filter.
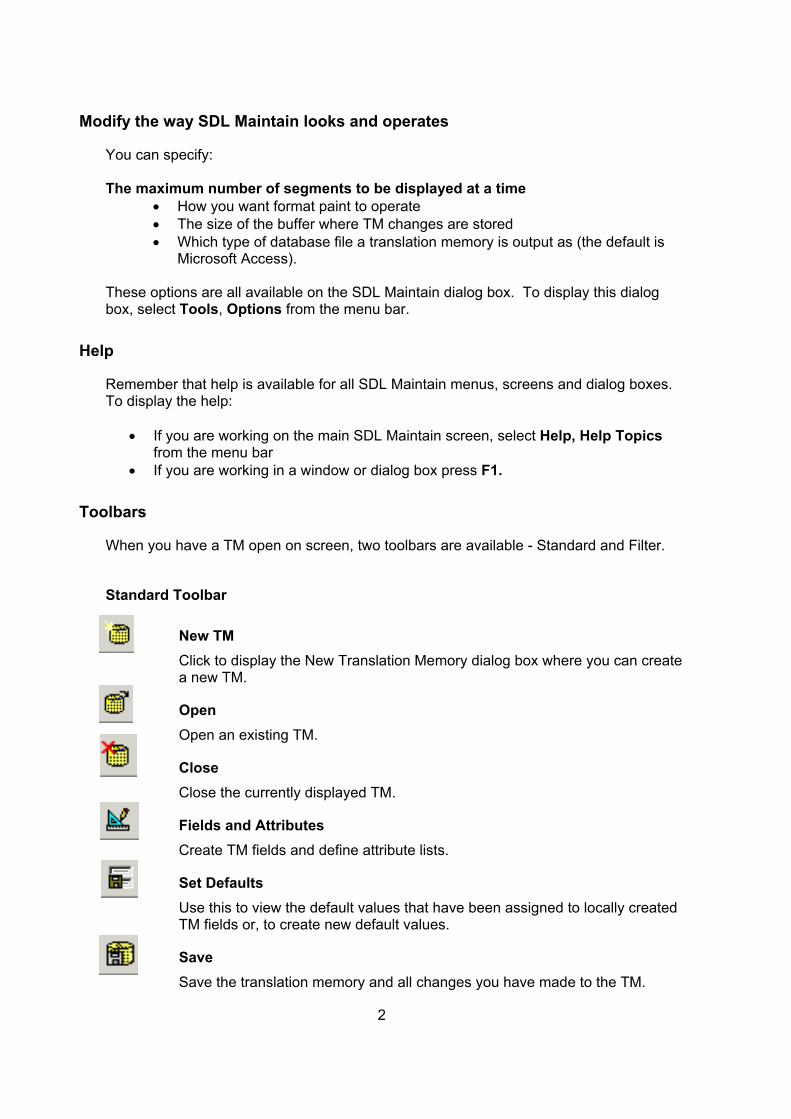
Standard Toolbar
New TM Click to display the New Translation Memory dialog box where you can create a new TM.
Open Open an existing TM.
Close Close the currently displayed TM.
Fields and Attributes Create TM fields and define attribute lists.
Set Defaults Use this to view the default values that have been assigned to locally created TM fields or, to create new default values.
Save Save the translation memory and all changes you have made to the TM.
3
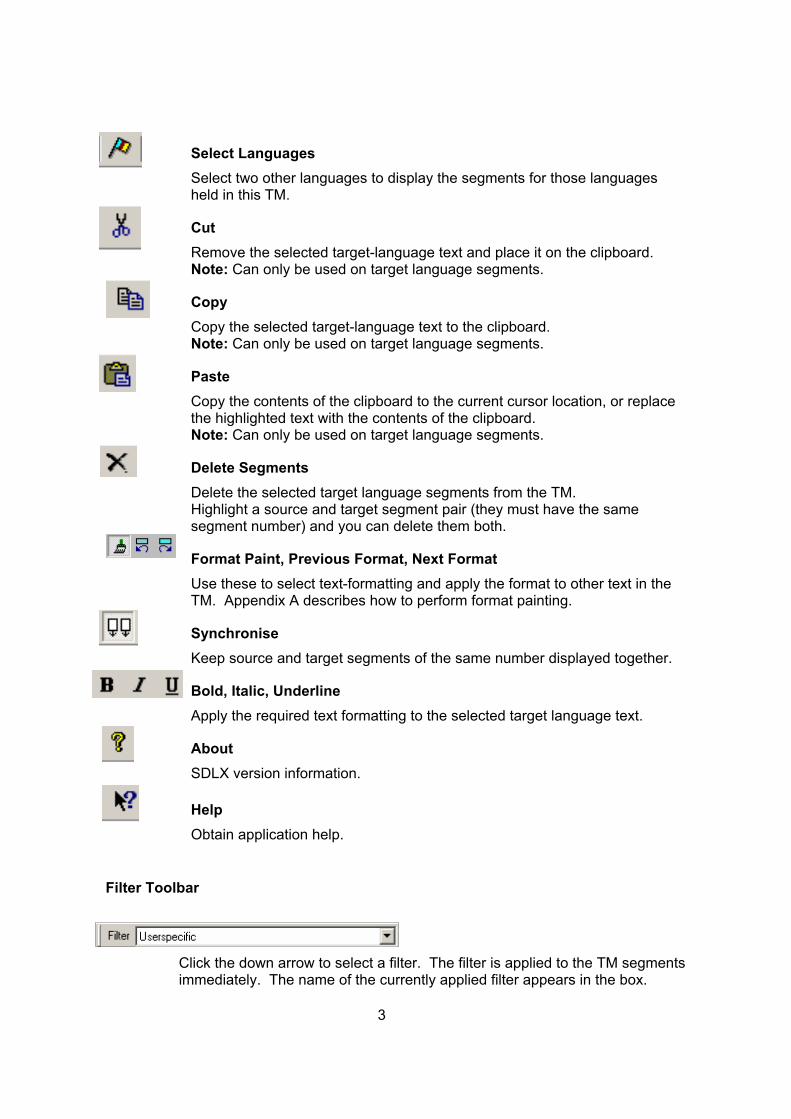
Select Languages Select two other languages to display the segments for those languages held in this TM.
Cut Remove the selected target-language text and place it on the clipboard. Note: Can only be used on target language segments.
Copy Copy the selected target-language text to the clipboard. Note: Can only be used on target language segments.
Paste Copy the contents of the clipboard to the current cursor location, or replace the highlighted text with the contents of the clipboard. Note: Can only be used on target language segments.
Delete Segments Delete the selected target language segments from the TM. Highlight a source and target segment pair (they must have the same segment number) and you can delete them both.
Format Paint, Previous Format, Next Format Use these to select text-formatting and apply the format to other text in the TM. Appendix A describes how to perform format painting.
Synchronise Keep source and target segments of the same number displayed together.
Bold, Italic, Underline Apply the required text formatting to the selected target language text.
About SDLX version information.
Help Obtain application help.
Filter Toolbar
Click the down arrow to select a filter. The filter is applied to the TM segments immediately. The name of the currently applied filter appears in the box.
4
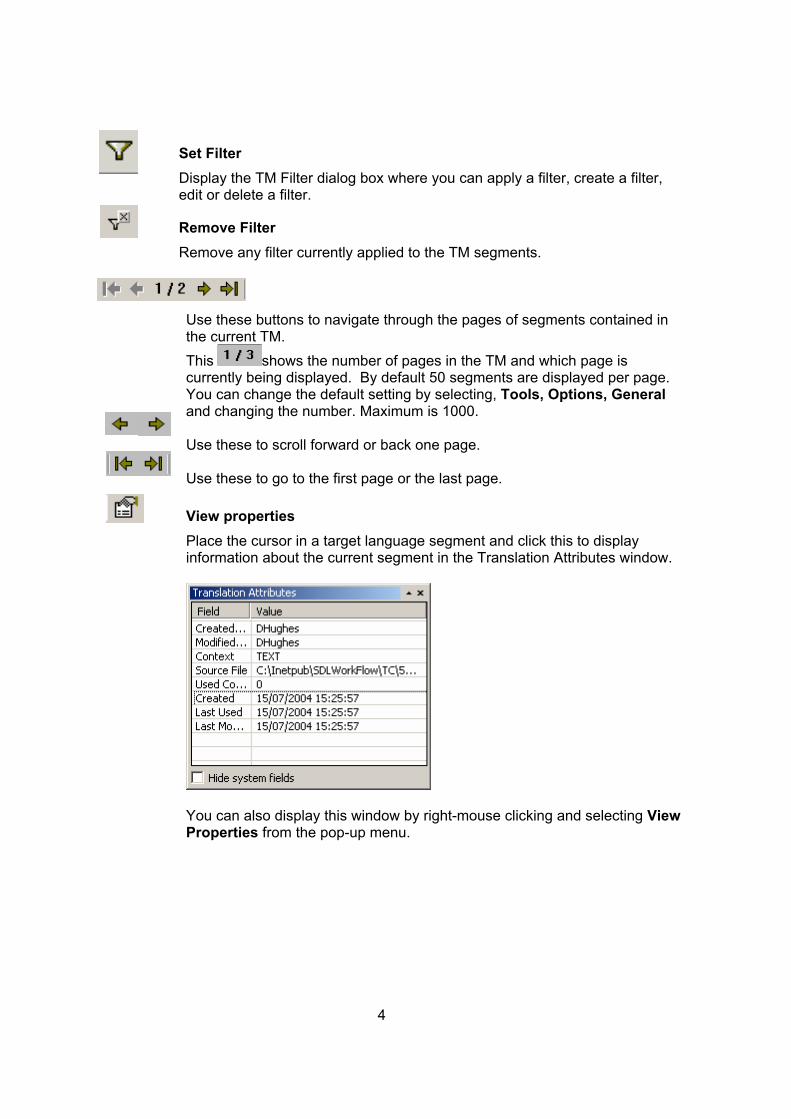
Set Filter Display the TM Filter dialog box where you can apply a filter, create a filter, edit or delete a filter.
Remove Filter Remove any filter currently applied to the TM segments.
Use these buttons to navigate through the pages of segments contained in the current TM. This shows the number of pages in the TM and which page is currently being displayed. By default 50 segments are displayed per page. You can change the default setting by selecting, Tools, Options, General and changing the number. Maximum is 1000. Use these to scroll forward or back one page. Use these to go to the first page or the last page.
View properties Place the cursor in a target language segment and click this to display information about the current segment in the Translation Attributes window.
You can also display this window by right-mouse clicking and selecting View Properties from the pop-up menu.
Open and view a TM
Always use SDL Maintain to open and view SDLX translation memories. Opening one in Microsoft Access can cause problems.
Open a TM
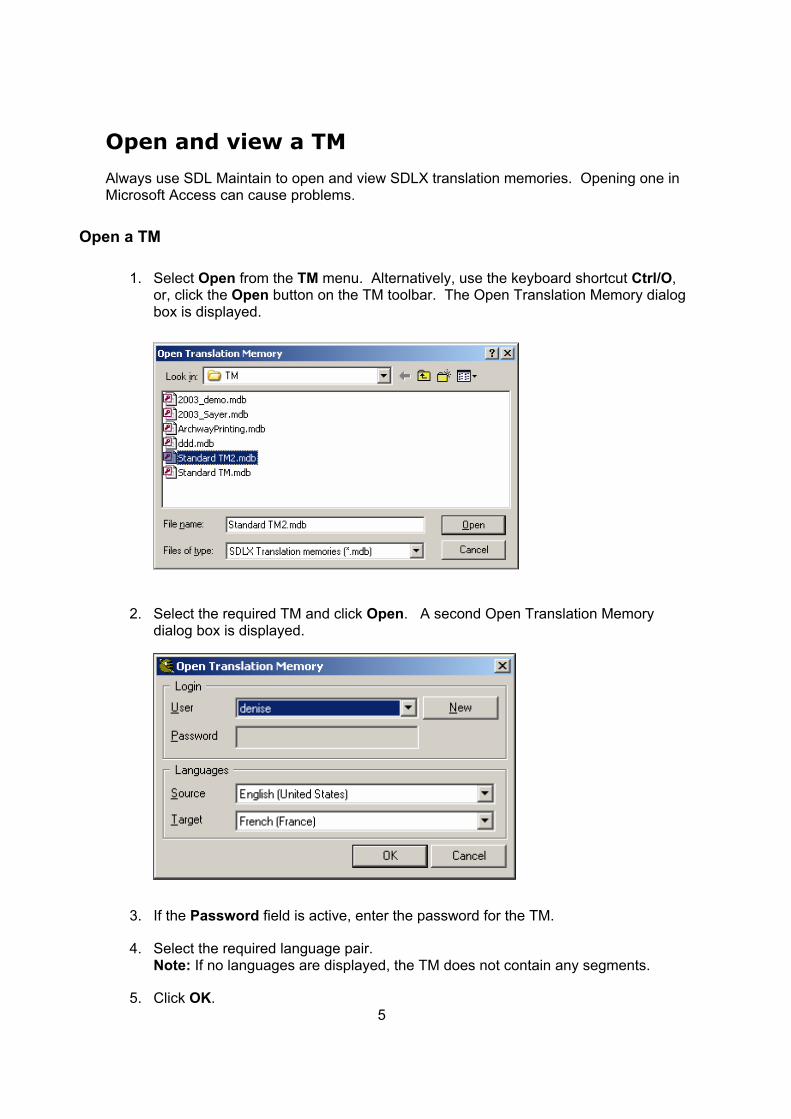
1. Select Open from the TM menu. Alternatively, use the keyboard shortcut Ctrl/O, or, click the Open button on the TM toolbar. The Open Translation Memory dialog box is displayed.
2. Select the required TM and click Open. A second Open Translation Memory dialog box is displayed.
3. If the Password field is active, enter the password for the TM.
4. Select the required language pair. Note: If no languages are displayed, the TM does not contain any segments.
5 5. Click OK.

6
Apply a filter
Click the down arrow in the Filter box and select the required filter. To remove the filter click the Remove Filter button.
Display duplicate segments
Duplicate segments are segments where the source is identical but the translation is different. To view duplicate segments, select Tools, Duplicates Search from the menu bar. Any duplicate segments found are displayed on the SDL Maintain screen. To return to the view of the entire TM click the Remove Filter button.
Display/remove whitespace characters
1. Select View, Whitespace from the menu bar. The Whitespace Options dialog box is displayed.
2. If you want to remove all special whitespace characters, deselect all of the check boxes and click OK.
3. If you want to display some of the whitespace characters, select the appropriate check boxes and click OK. (Deselect the All check box to activate the other check boxes.)
4. If you want to display all of the whitespace characters, select the All check box and click OK.
Set the source or target segment font
Select View, Set Source Font or View, Set Translation Font from the menu bar. The Font dialog box is displayed. Make your selections and click OK.
Switch languages
1. Select View, Select Languages from the menu bar. The Select Languages dialog box is displayed. Make your selections and click OK.
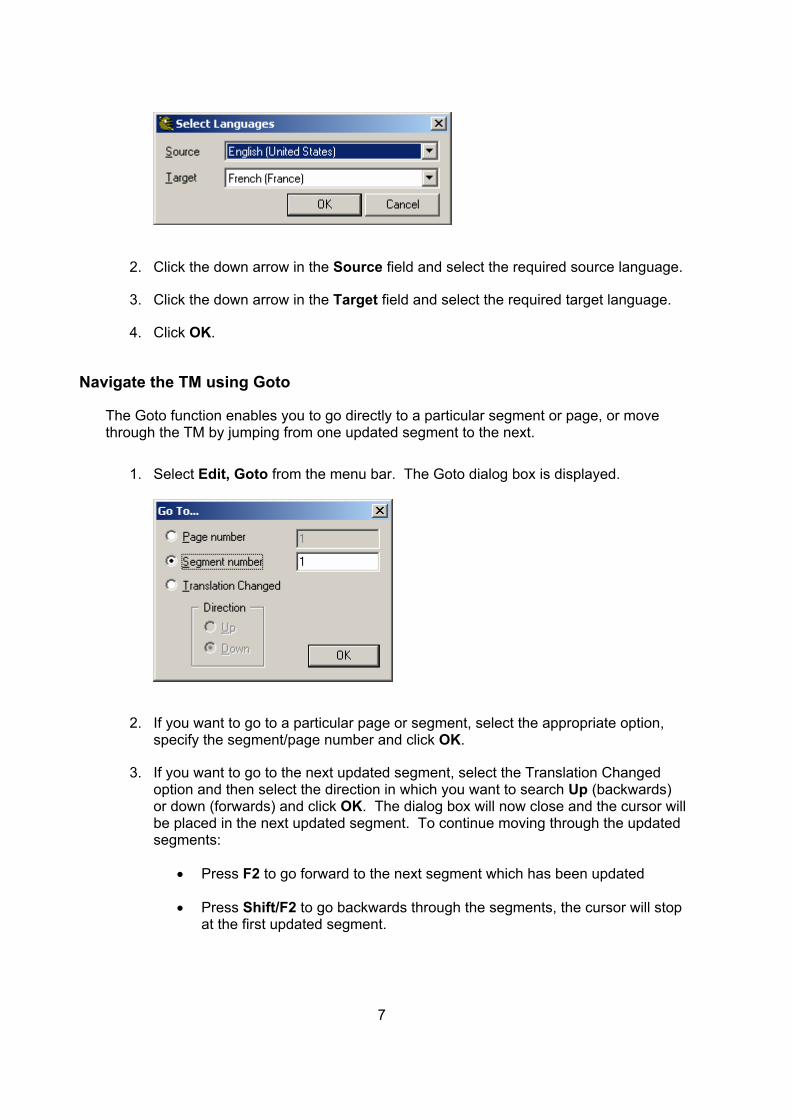
2. Click the down arrow in the Source field and select the required source language.
3. Click the down arrow in the Target field and select the required target language.
4. Click OK.
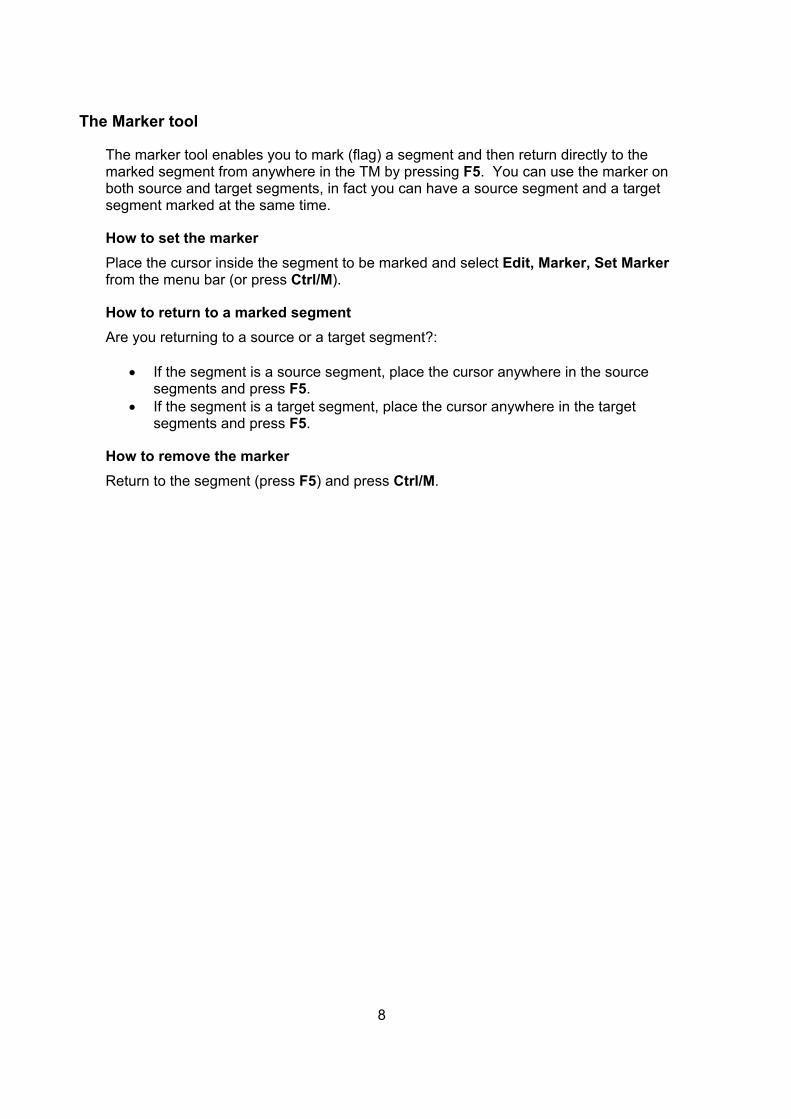
Navigate the TM using Goto
The Goto function enables you to go directly to a particular segment or page, or move through the TM by jumping from one updated segment to the next.
1. Select Edit, Goto from the menu bar. The Goto dialog box is displayed.
2. If you want to go to a particular page or segment, select the appropriate option, specify the segment/page number and click OK.
3. If you want to go to the next updated segment, select the Translation Changed option and then select the direction in which you want to search Up (backwards) or down (forwards) and click OK. The dialog box will now close and the cursor will be placed in the next updated segment. To continue moving through the updated segments:
• Press F2 to go forward to the next segment which has been updated
• Press Shift/F2 to go backwards through the segments, the cursor will stop at the first updated segment.
7
8
The Marker tool
The marker tool enables you to mark (flag) a segment and then return directly to the marked segment from anywhere in the TM by pressing F5. You can use the marker on both source and target segments, in fact you can have a source segment and a target segment marked at the same time.
How to set the marker Place the cursor inside the segment to be marked and select Edit, Marker, Set Marker from the menu bar (or press Ctrl/M).
How to return to a marked segment Are you returning to a source or a target segment?:
• If the segment is a source segment, place the cursor anywhere in the source segments and press F5.
• If the segment is a target segment, place the cursor anywhere in the target segments and press F5.
How to remove the marker Return to the segment (press F5) and press Ctrl/M.
Maintain TMs
SDL Maintain enables you to update a TM by editing individual segments or making changes that affect the entire TM. This section describes how to:
• Edit segments • Delete segments • Find and replace segment text • Format paint segments • Index target language TM • Manage TM users • Password protect a TM • Compact a TM • Convert a TM to another SDLX version.
Edit segments
Click inside the target language segment, make the change and click the Save button when you have finished.
Delete a segment
1. Click inside the target language segment.
2. Right mouse-click. A pop-up menu is displayed.
3. Select Delete Segments. A confirmation dialog is displayed.
4. Click Yes to delete the segment.
Note 1: An alternative method of deleting is to click inside the segment and press
Ctrl/R.
Note 2: Deleted segments are copied to the Deleted Translation list and you can restore segments to the TM from this list if required. Segments remain on the Deleted Translation list until you click Save. When you click Save the segments are fully deleted from the TM.
Undelete a segment
1. Select View, Deleted List from the menu bar. The Deleted Translation list window appears at the bottom of the SDL Maintain screen.
2. Right-mouse click inside the segment to be restored and select Undelete Segment or, select Edit, Undelete Segment from the menu bar.
9
10
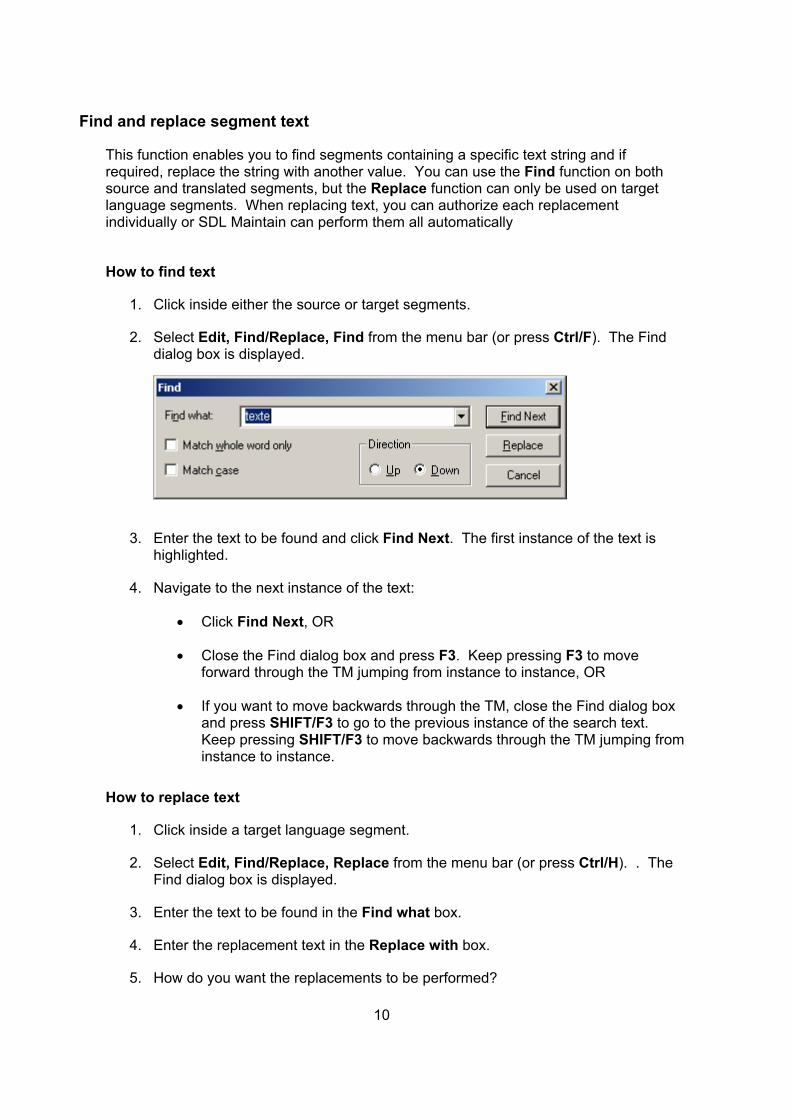
Find and replace segment text
This function enables you to find segments containing a specific text string and if required, replace the string with another value. You can use the Find function on both source and translated segments, but the Replace function can only be used on target language segments. When replacing text, you can authorize each replacement individually or SDL Maintain can perform them all automatically
How to find text
1. Click inside either the source or target segments.
2. Select Edit, Find/Replace, Find from the menu bar (or press Ctrl/F). The Find dialog box is displayed.
3. Enter the text to be found and click Find Next. The first instance of the text is highlighted.
4. Navigate to the next instance of the text:
• Click Find Next, OR
• Close the Find dialog box and press F3. Keep pressing F3 to move forward through the TM jumping from instance to instance, OR
• If you want to move backwards through the TM, close the Find dialog box and press SHIFT/F3 to go to the previous instance of the search text. Keep pressing SHIFT/F3 to move backwards through the TM jumping from instance to instance.
How to replace text
1. Click inside a target language segment.
2. Select Edit, Find/Replace, Replace from the menu bar (or press Ctrl/H). . The Find dialog box is displayed.
3. Enter the text to be found in the Find what box.
4. Enter the replacement text in the Replace with box.
5. How do you want the replacements to be performed?
11
If then you want to control each replace action click Find Next, the first instance of the
Find what text is highlighted: • If you want to replace this with the
new text, click Replace. The next instance of the Find what text is highlighted.
• If you do not want to replace the found text, click the Find Next button.
Continue working through the TM until all replacements have been made.
you want SDL Maintain to automatically replace all instances of the Find what text with the replacement value,
click the Replace All button. Every instance of the Find what text will be replaced with the replacement text. A pop-up window tells you how many replacements were made. Click OK to close the pop-up.
6. Click the Find dialog box close button when you have finished.
Search source or target segments using Text Search
The Text Search function enables you to search for segments that contain a particular text string. You can search either the source or target language segments (before you can search target segments you must index the target language). When the search is complete all segments containing the string are all displayed on the Maintain screen; all other segments are removed from the display.
How to select a text string and search for it in the TM 1. Open a TM. 2. Select (highlight) the text string (minimum 4 characters). 3. Perform the search.
If then you want to search source segments select Tools, Text Search, Source from
the menu bar, OR press F7.
you want to search target segments select Tools, Text Search, Target from the menu bar, OR press Shift/F7.
All segments containing the text string are now displayed. To redisplay the entire TM, press Ctrl/SHIFT/F7.
How to specify a text string and search for it in the TM
1. Open a TM. 2. Specify which segments are to be searched.
If then you want to search source segments select Tools, Text Search, Source from
the menu bar, OR press F7. The Text Search (Source dialog box is displayed).
you want to search target segments select Tools, Text Search, Target from the menu bar, OR press Shift/F7. The Text Search (Target dialog box is displayed).
3. Specify the text string (minimum 4 characters).
4. Click OK. All segments containing the string are displayed.
To redisplay the entire TM, press Ctrl/SHIFT/F7.
Index segments
An index allows a concordance search to be performed in SDL Edit. By default, the source language is indexed automatically and you can opt to index target languages. You must index the target language if you want to use Text Searching on the target language segments in SDL Maintain
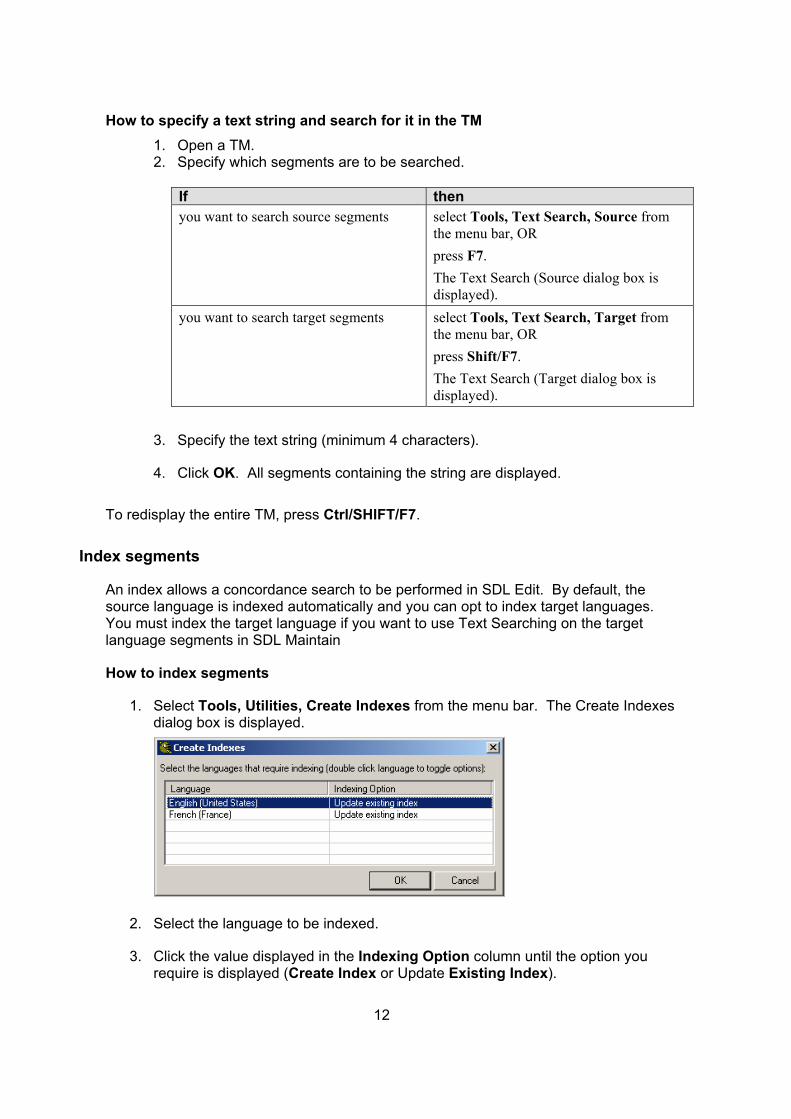
How to index segments
1. Select Tools, Utilities, Create Indexes from the menu bar. The Create Indexes dialog box is displayed.
2. Select the language to be indexed.
3. Click the value displayed in the Indexing Option column until the option you require is displayed (Create Index or Update Existing Index).
12
13
4. Click OK.
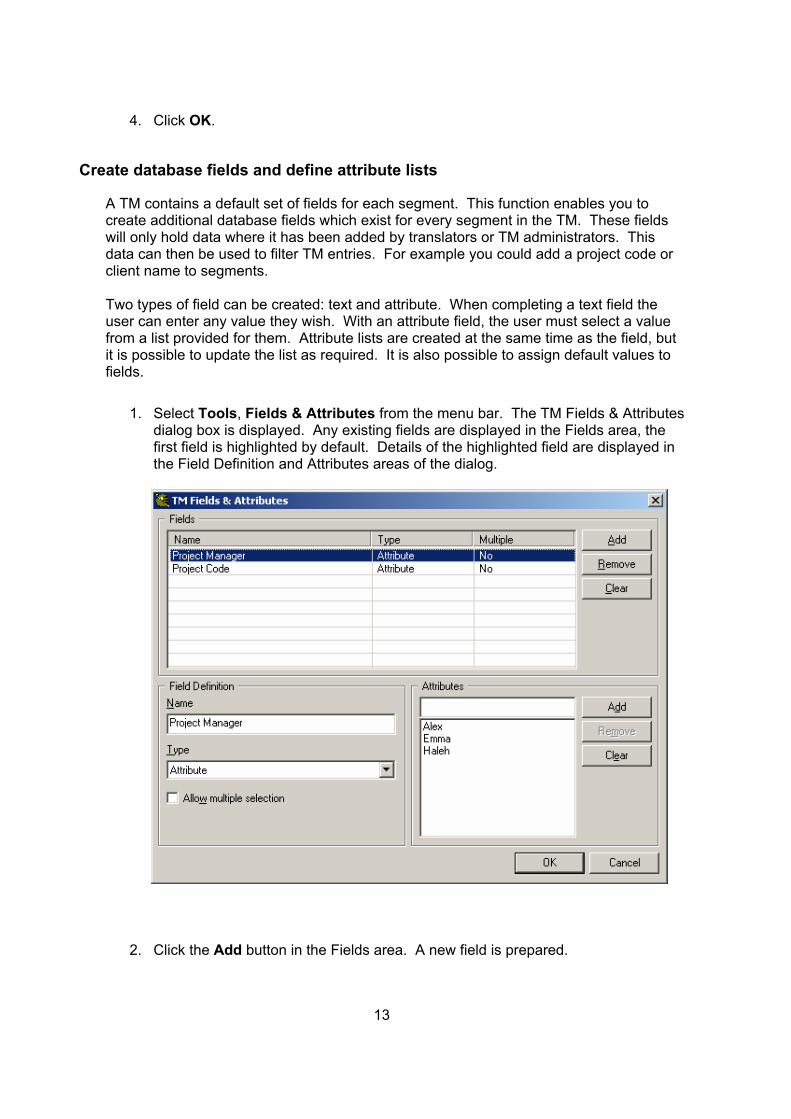
Create database fields and define attribute lists
A TM contains a default set of fields for each segment. This function enables you to create additional database fields which exist for every segment in the TM. These fields will only hold data where it has been added by translators or TM administrators. This data can then be used to filter TM entries. For example you could add a project code or client name to segments. Two types of field can be created: text and attribute. When completing a text field the user can enter any value they wish. With an attribute field, the user must select a value from a list provided for them. Attribute lists are created at the same time as the field, but it is possible to update the list as required. It is also possible to assign default values to fields.
1. Select Tools, Fields & Attributes from the menu bar. The TM Fields & Attributes dialog box is displayed. Any existing fields are displayed in the Fields area, the first field is highlighted by default. Details of the highlighted field are displayed in the Field Definition and Attributes areas of the dialog.
2. Click the Add button in the Fields area. A new field is prepared.
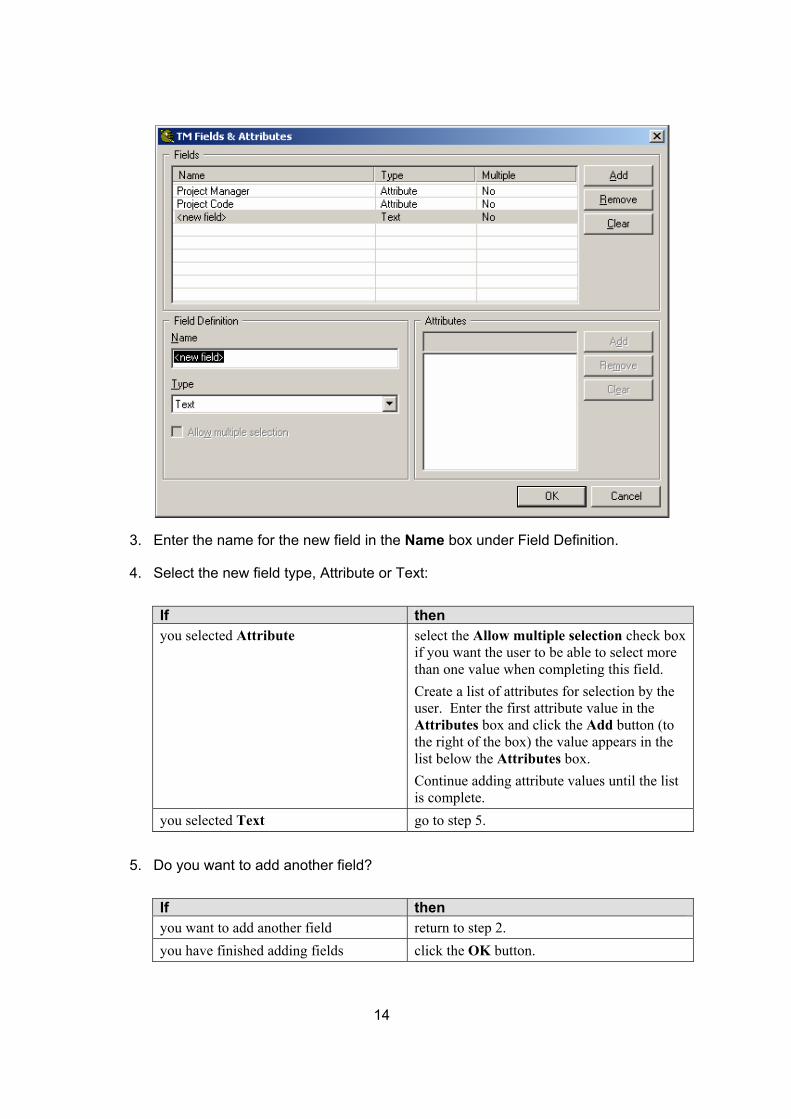
3. Enter the name for the new field in the Name box under Field Definition.
4. Select the new field type, Attribute or Text:
If then you selected Attribute select the Allow multiple selection check box
if you want the user to be able to select more than one value when completing this field. Create a list of attributes for selection by the user. Enter the first attribute value in the Attributes box and click the Add button (to the right of the box) the value appears in the list below the Attributes box. Continue adding attribute values until the list is complete.
you selected Text go to step 5.
5. Do you want to add another field?
If then you want to add another field return to step 2. you have finished adding fields click the OK button.
14
15
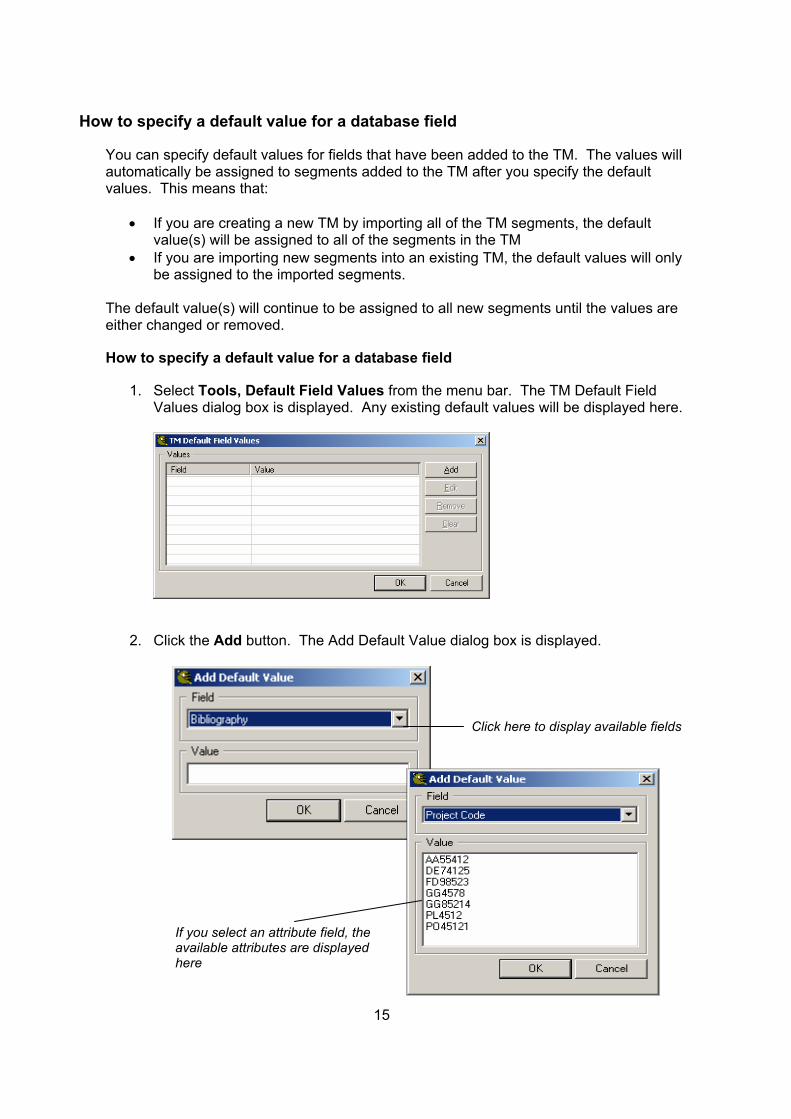
How to specify a default value for a database field
You can specify default values for fields that have been added to the TM. The values will automatically be assigned to segments added to the TM after you specify the default values. This means that:
• If you are creating a new TM by importing all of the TM segments, the default value(s) will be assigned to all of the segments in the TM
• If you are importing new segments into an existing TM, the default values will only be assigned to the imported segments.
The default value(s) will continue to be assigned to all new segments until the values are either changed or removed.
How to specify a default value for a database field
1. Select Tools, Default Field Values from the menu bar. The TM Default Field Values dialog box is displayed. Any existing default values will be displayed here.
2. Click the Add button. The Add Default Value dialog box is displayed.
If you select an attribute field, the available attributes are displayed here
Click here to display available fields
16
3. Select the field to which the default value is to be assigned.
4. If the field is an attribute type field, select the value from the list displayed in the Value box.
5. If the field is a text field, enter the value in the Value box.
6. Click OK.
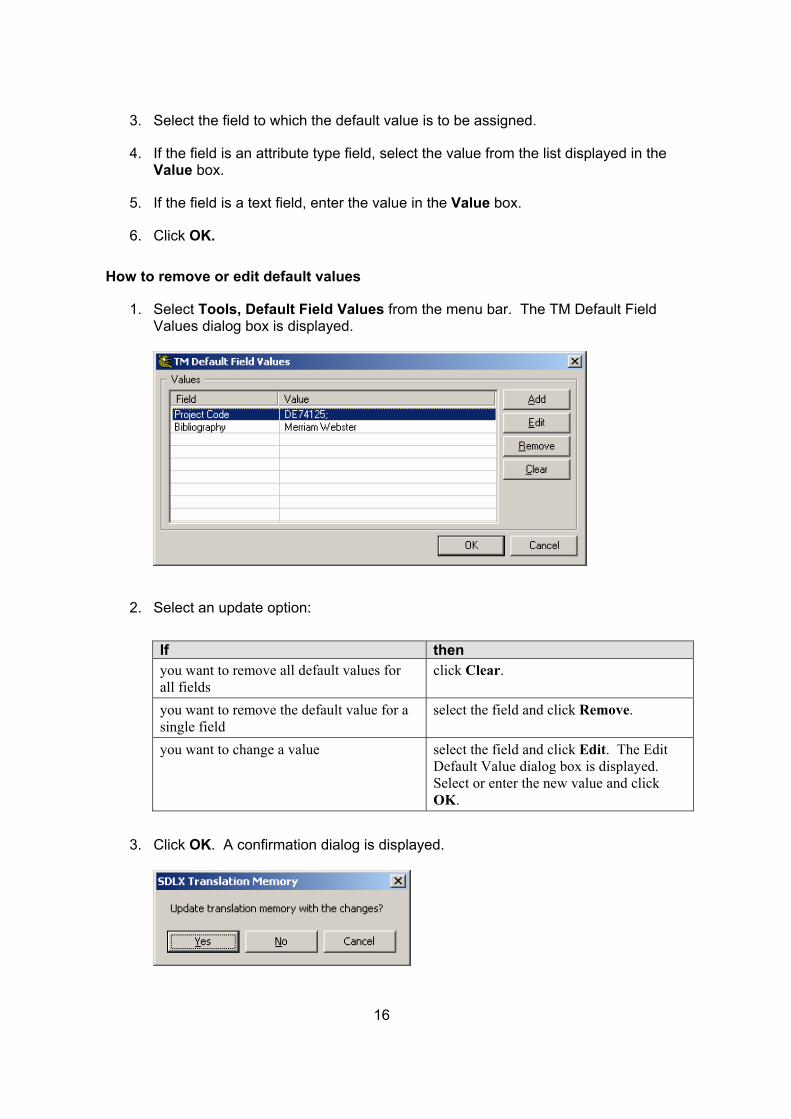
How to remove or edit default values
1. Select Tools, Default Field Values from the menu bar. The TM Default Field Values dialog box is displayed.
2. Select an update option:
If then you want to remove all default values for all fields
click Clear.
you want to remove the default value for a single field
select the field and click Remove.
you want to change a value select the field and click Edit. The Edit Default Value dialog box is displayed. Select or enter the new value and click OK.
3. Click OK. A confirmation dialog is displayed.
17
4. Click Yes.
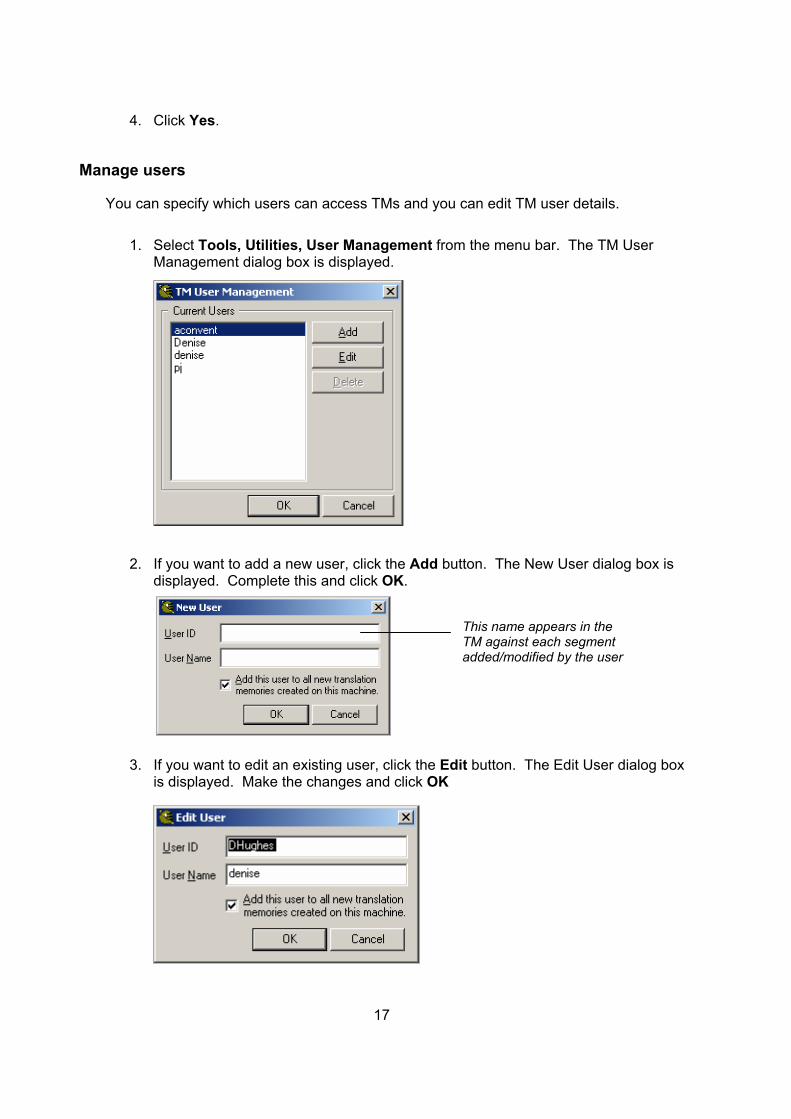
Manage users
You can specify which users can access TMs and you can edit TM user details.
1. Select Tools, Utilities, User Management from the menu bar. The TM User Management dialog box is displayed.
2. If you want to add a new user, click the Add button. The New User dialog box is displayed. Complete this and click OK.
This name appears in the TM against each segment added/modified by the user
3. If you want to edit an existing user, click the Edit button. The Edit User dialog box is displayed. Make the changes and click OK
18
4. If you want to delete a user, select the user and click the Delete button. Note: If the Delete button is disabled, you do not have authority to delete the selected user.
5. When you have finished, click the button to close the TM User Management dialog box.
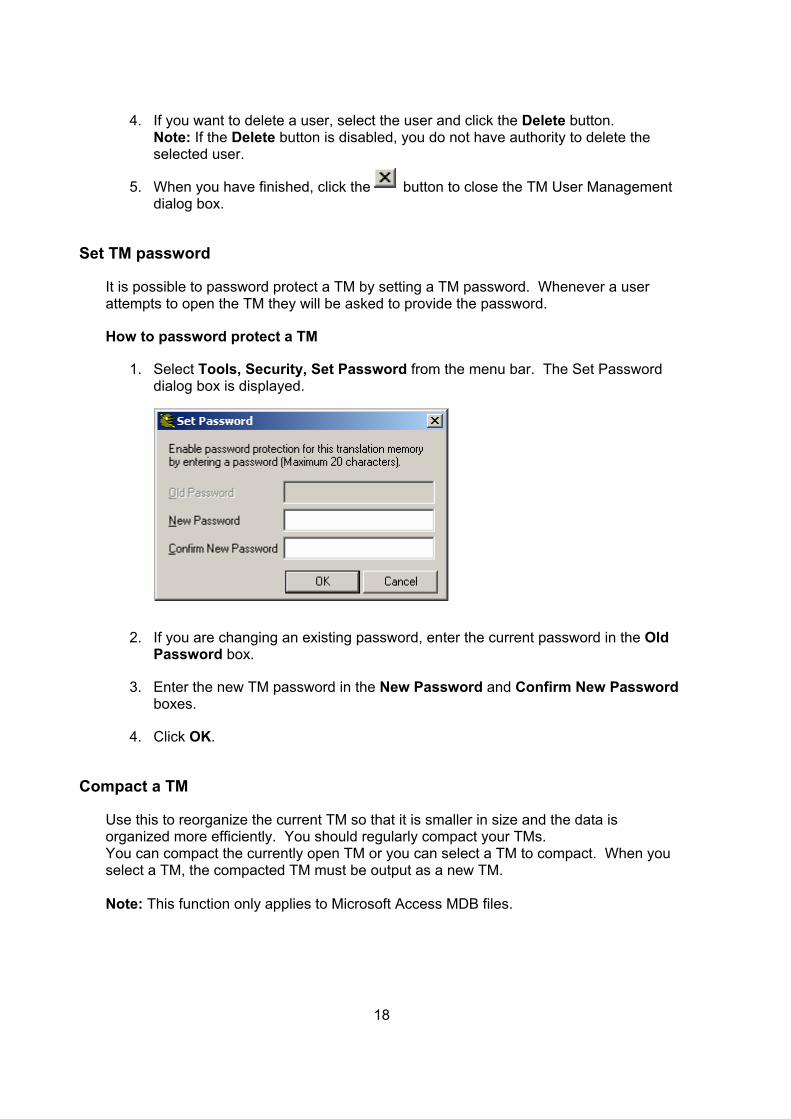
Set TM password
It is possible to password protect a TM by setting a TM password. Whenever a user attempts to open the TM they will be asked to provide the password.
How to password protect a TM
1. Select Tools, Security, Set Password from the menu bar. The Set Password dialog box is displayed.
2. If you are changing an existing password, enter the current password in the Old Password box.
3. Enter the new TM password in the New Password and Confirm New Password boxes.
4. Click OK.
Compact a TM
Use this to reorganize the current TM so that it is smaller in size and the data is organized more efficiently. You should regularly compact your TMs. You can compact the currently open TM or you can select a TM to compact. When you select a TM, the compacted TM must be output as a new TM. Note: This function only applies to Microsoft Access MDB files.
19
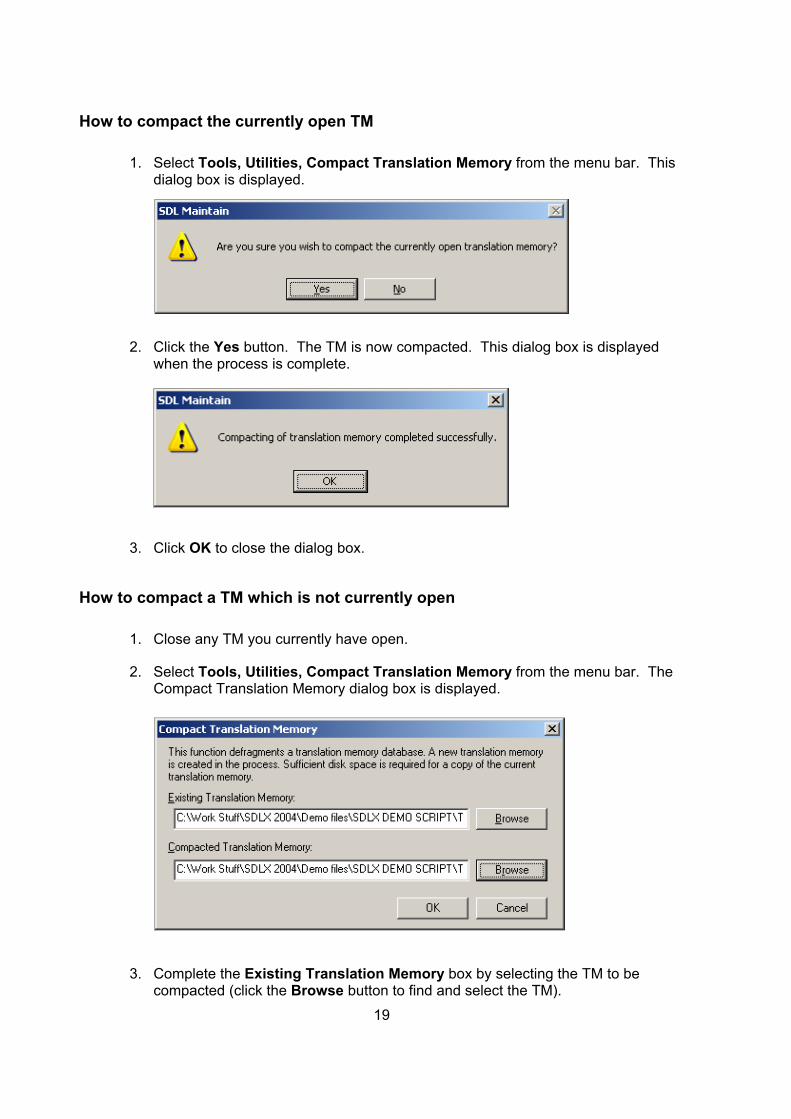
How to compact the currently open TM
1. Select Tools, Utilities, Compact Translation Memory from the menu bar. This dialog box is displayed.
2. Click the Yes button. The TM is now compacted. This dialog box is displayed when the process is complete.
3. Click OK to close the dialog box.
How to compact a TM which is not currently open
1. Close any TM you currently have open.
2. Select Tools, Utilities, Compact Translation Memory from the menu bar. The Compact Translation Memory dialog box is displayed.
3. Complete the Existing Translation Memory box by selecting the TM to be compacted (click the Browse button to find and select the TM).
20
4. Complete the Compacted Translation Memory box by specifying the output TM. You can select an existing TM (it will be overwritten) or you can create a new TM.
5. Click OK to start the compaction process.
Convert a TM to make it compatible with a different version of SDLX
If you need to share a TM with a user who is using a different version of SDLX, this function enables you to convert a TM to another SDLX version. You can convert from an earlier version to the current one and you can convert from the current version to an earlier one.
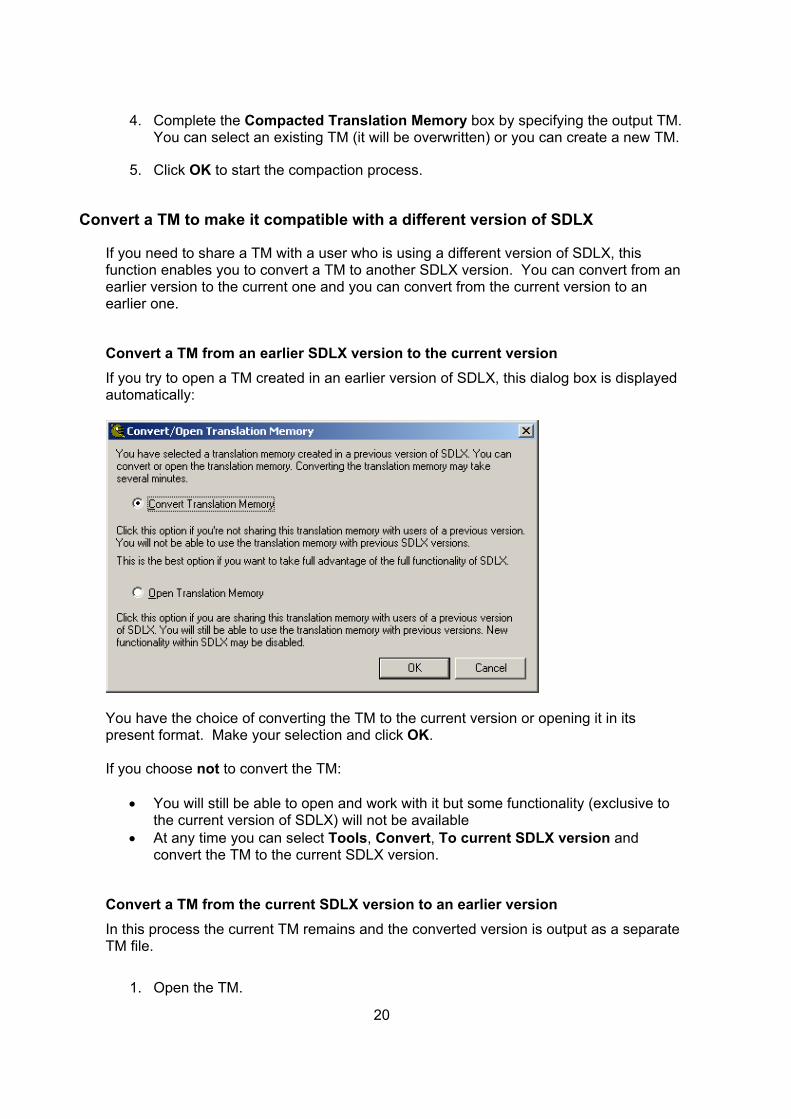
Convert a TM from an earlier SDLX version to the current version If you try to open a TM created in an earlier version of SDLX, this dialog box is displayed automatically:
You have the choice of converting the TM to the current version or opening it in its present format. Make your selection and click OK. If you choose not to convert the TM:
• You will still be able to open and work with it but some functionality (exclusive to the current version of SDLX) will not be available
• At any time you can select Tools, Convert, To current SDLX version and convert the TM to the current SDLX version.
Convert a TM from the current SDLX version to an earlier version In this process the current TM remains and the converted version is output as a separate TM file.
1. Open the TM.
21
2. Select Tools, Convert, To previous SDLX version. The Convert Translation Memory into dialog box is displayed.
3. Navigate to the folder where the new version of the TM is to be placed.
4. Enter the name for the new TM version in the File name box.
5. Click Save. The new TM version is created and placed in the selected folder.
Change TM language
If you made a mistake with the language selections when creating a TM (for example if you selected English US but the TM contains British English segments), use this option to correct the mistake. Note: You can create a new TM by changing the language of an existing TM. See the
Create TM section for details.
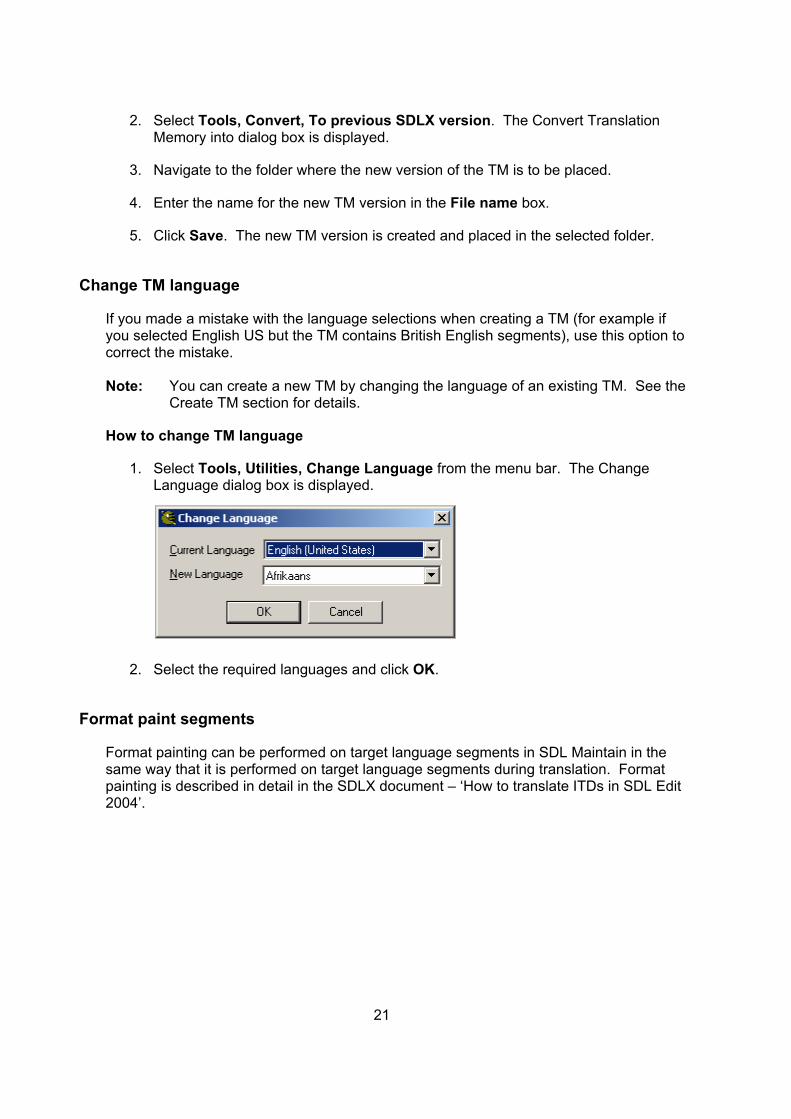
How to change TM language
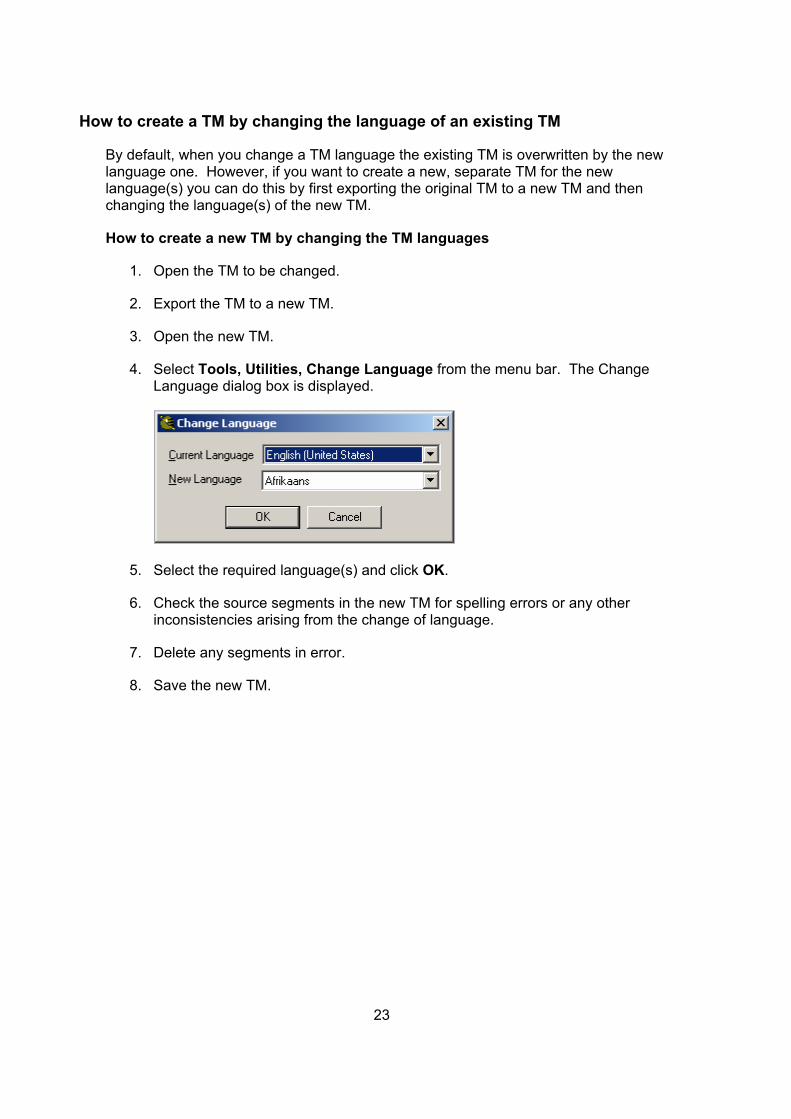
1. Select Tools, Utilities, Change Language from the menu bar. The Change Language dialog box is displayed.
2. Select the required languages and click OK.
Format paint segments
Format painting can be performed on target language segments in SDL Maintain in the same way that it is performed on target language segments during translation. Format painting is described in detail in the SDLX document – ‘How to translate ITDs in SDL Edit 2004’.
Create a TM
How to create a new TM
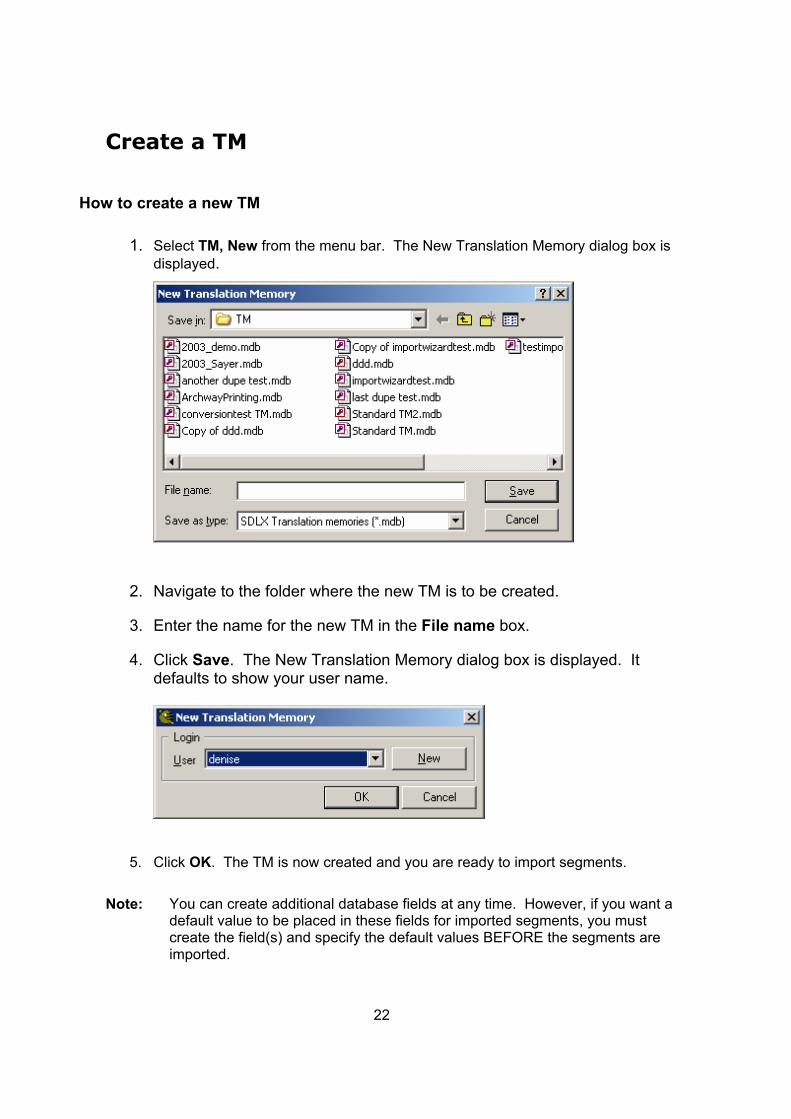
1. Select TM, New from the menu bar. The New Translation Memory dialog box is displayed.
2. Navigate to the folder where the new TM is to be created.
3. Enter the name for the new TM in the File name box.
4. Click Save. The New Translation Memory dialog box is displayed. It defaults to show your user name.
5. Click OK. The TM is now created and you are ready to import segments.
Note: You can create additional database fields at any time. However, if you want a
default value to be placed in these fields for imported segments, you must create the field(s) and specify the default values BEFORE the segments are imported.
22
23
How to create a TM by changing the language of an existing TM
By default, when you change a TM language the existing TM is overwritten by the new language one. However, if you want to create a new, separate TM for the new language(s) you can do this by first exporting the original TM to a new TM and then changing the language(s) of the new TM.
How to create a new TM by changing the TM languages
1. Open the TM to be changed.
2. Export the TM to a new TM.
3. Open the new TM.
4. Select Tools, Utilities, Change Language from the menu bar. The Change Language dialog box is displayed.
5. Select the required language(s) and click OK.
6. Check the source segments in the new TM for spelling errors or any other inconsistencies arising from the change of language.
7. Delete any segments in error.
8. Save the new TM.
24
Import segments into a TM
You can import segments into a TM from:
• SDLX TM, ITD and Align files • TMX files • Trados TMs • Delimited files.
If you want to assign default values to fields on imported segments, you must set that up before you perform the import.
How to import from SDLX files (TM, ITD and .IAD (Align))
1 Open the TM to be updated in SDL Maintain.
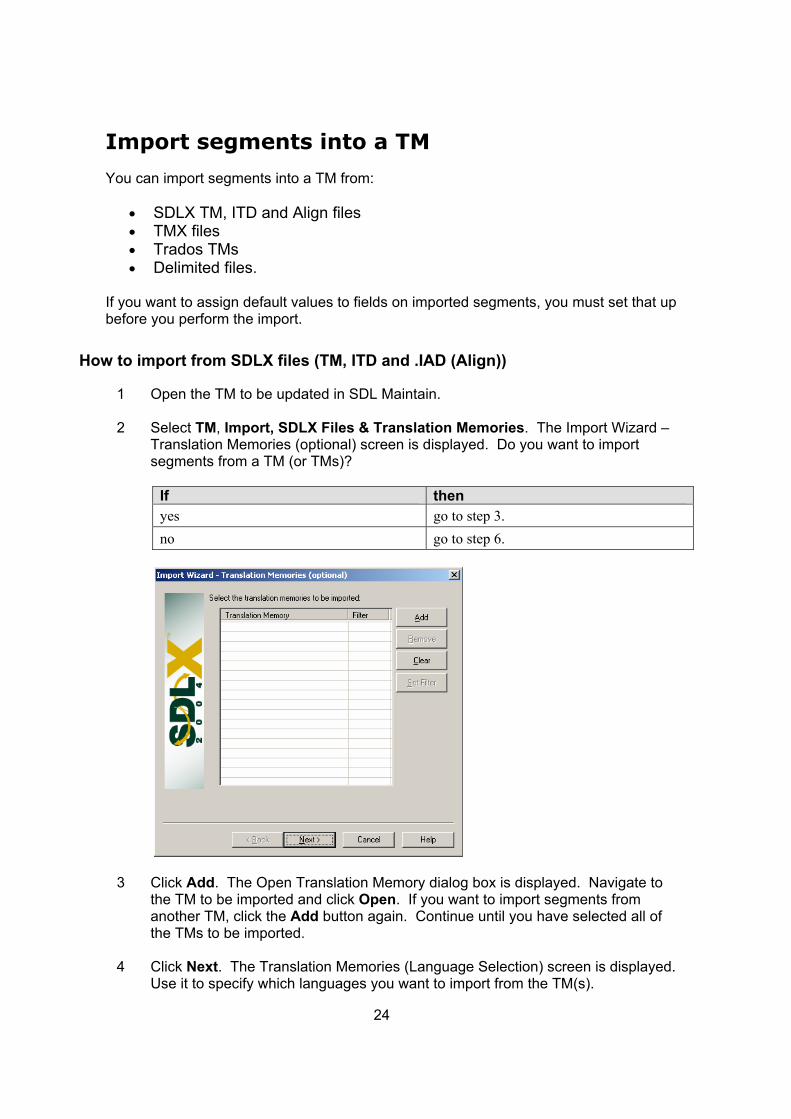
2 Select TM, Import, SDLX Files & Translation Memories. The Import Wizard – Translation Memories (optional) screen is displayed. Do you want to import segments from a TM (or TMs)?
If then yes go to step 3. no go to step 6.
3 Click Add. The Open Translation Memory dialog box is displayed. Navigate to the TM to be imported and click Open. If you want to import segments from another TM, click the Add button again. Continue until you have selected all of the TMs to be imported.
4 Click Next. The Translation Memories (Language Selection) screen is displayed. Use it to specify which languages you want to import from the TM(s).
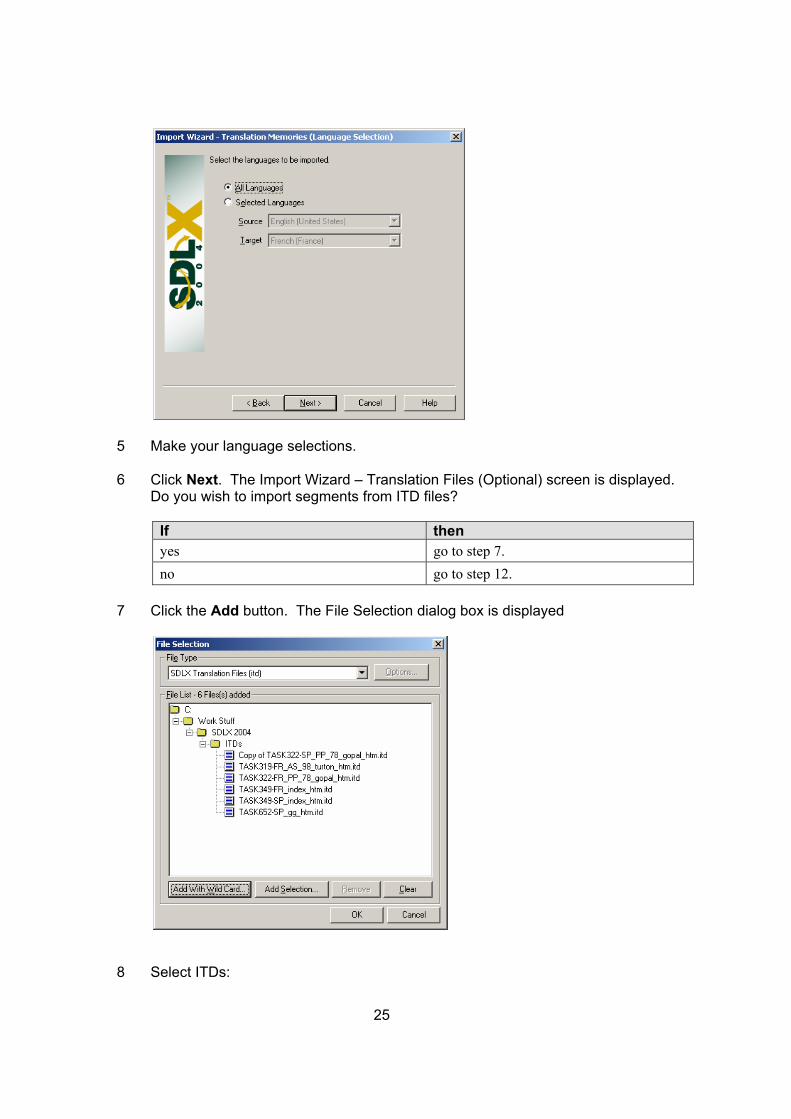
5 Make your language selections.
6 Click Next. The Import Wizard – Translation Files (Optional) screen is displayed. Do you wish to import segments from ITD files?
If then yes go to step 7. no go to step 12.
7 Click the Add button. The File Selection dialog box is displayed
8 Select ITDs:
25
26
If then you want select ITDs individually click the Add Selection button. The Open
dialog box is displayed. Select the ITD and click Open. If you want to select further ITDs, click the Add Selection button again. The selected ITDs are displayed in the File Selection dialog box.
you want to select all ITDs contained in a single folder or folder hierarchy
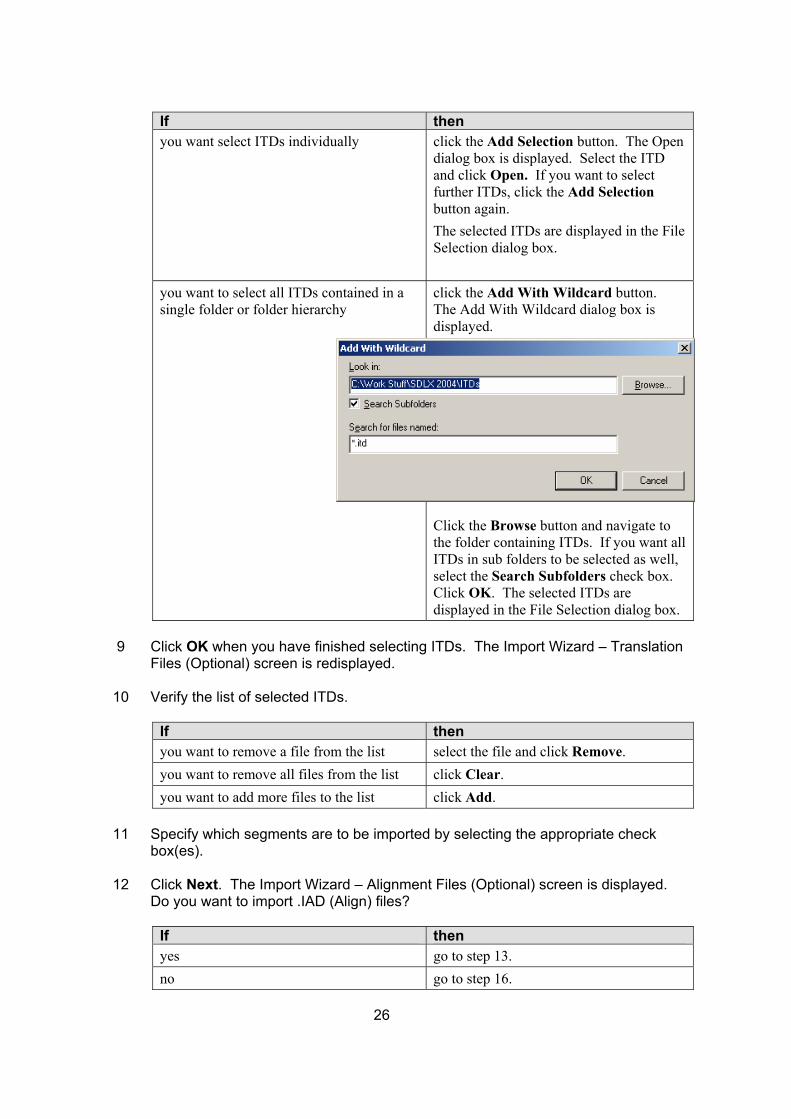
click the Add With Wildcard button. The Add With Wildcard dialog box is displayed. Click the Browse button and navigate to the folder containing ITDs. If you want all ITDs in sub folders to be selected as well, select the Search Subfolders check box. Click OK. The selected ITDs are displayed in the File Selection dialog box.
9 Click OK when you have finished selecting ITDs. The Import Wizard – Translation
Files (Optional) screen is redisplayed.
10 Verify the list of selected ITDs.
If then you want to remove a file from the list select the file and click Remove. you want to remove all files from the list click Clear. you want to add more files to the list click Add.
11 Specify which segments are to be imported by selecting the appropriate check
box(es).
12 Click Next. The Import Wizard – Alignment Files (Optional) screen is displayed. Do you want to import .IAD (Align) files?
If then yes go to step 13. no go to step 16.

27
13 Click the Add button. The File Selection dialog box is displayed (step 8 describes how to use this dialog to select files).
14 Select the required .IAD files and click OK. The Import Wizard – Alignment Files (Optional) screen is redisplayed.
15 Specify how you want alignment markers to be handled (select the appropriate option).
16 Click Next. The Import Wizard – General Options screen is displayed.
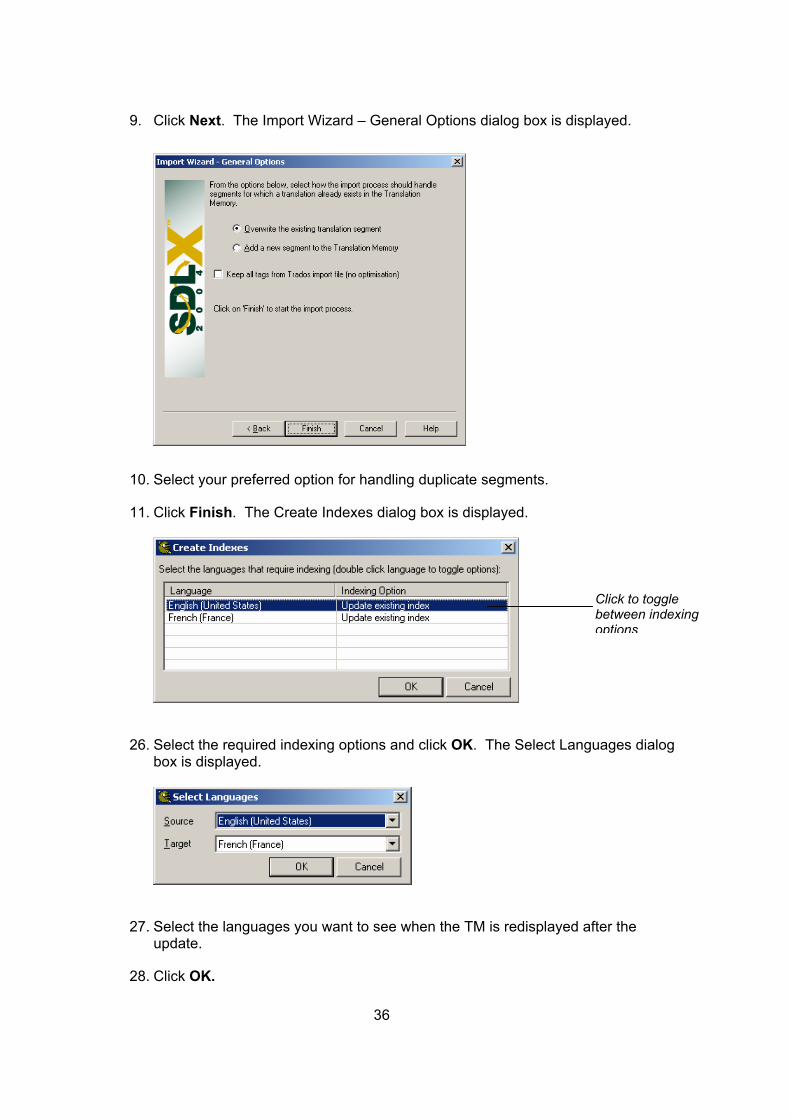
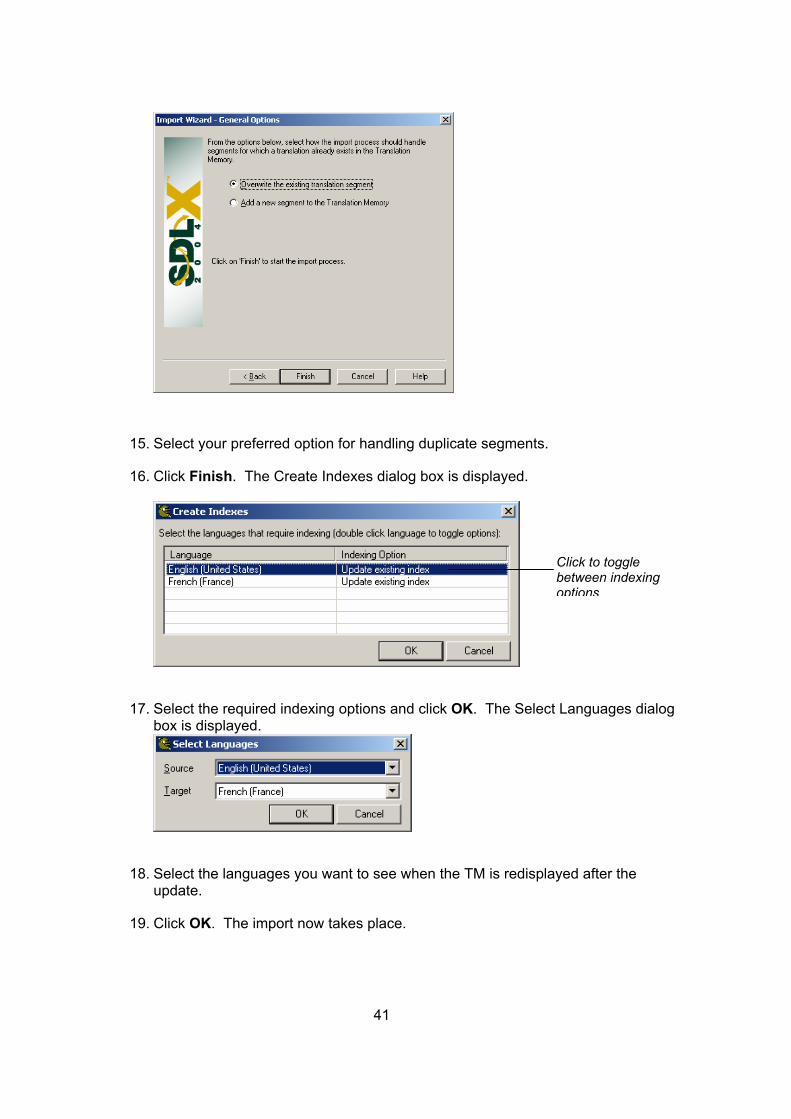
17 Select your preferred option for handling duplicate segments.
18 Click Finish. The import process begins. The Create Indexes dialog box is displayed.
Click to toggle between indexingoptions
28
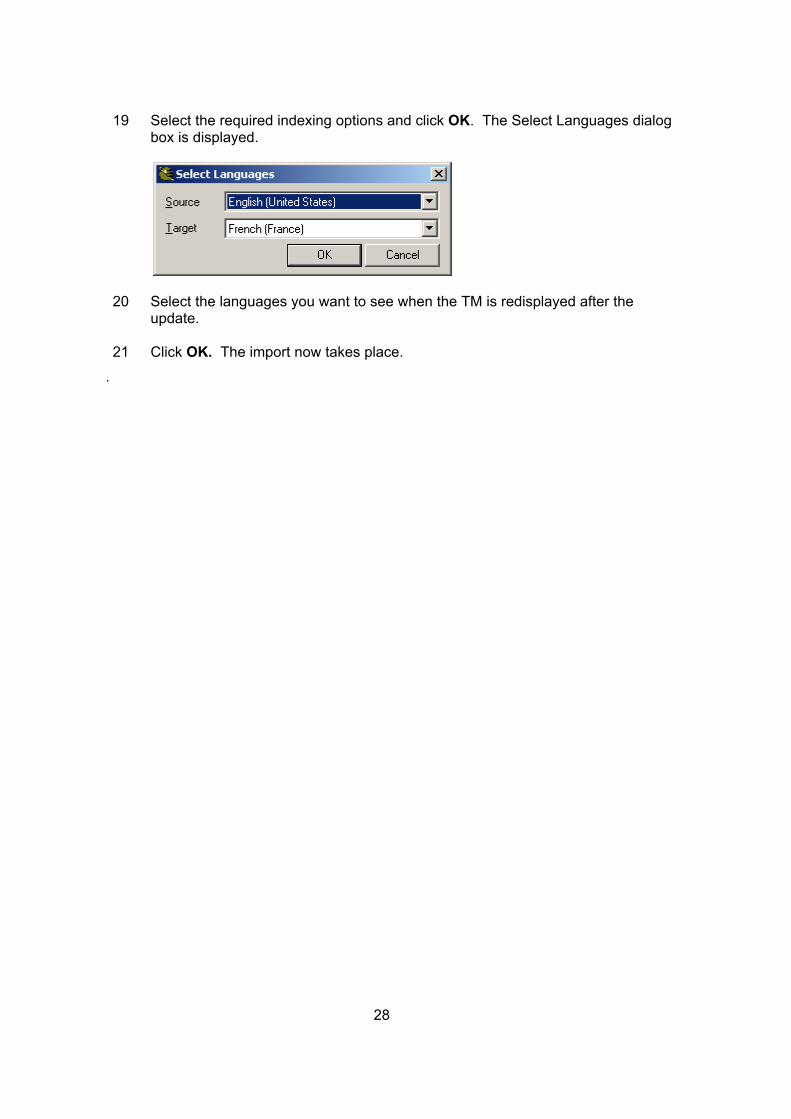
19 Select the required indexing options and click OK. The Select Languages dialog box is displayed.
20 Select the languages you want to see when the TM is redisplayed after the
update.
21 Click OK. The import now takes place.
.
How to import .TMX files
1. Open the TM to be updated in SDL Maintain.
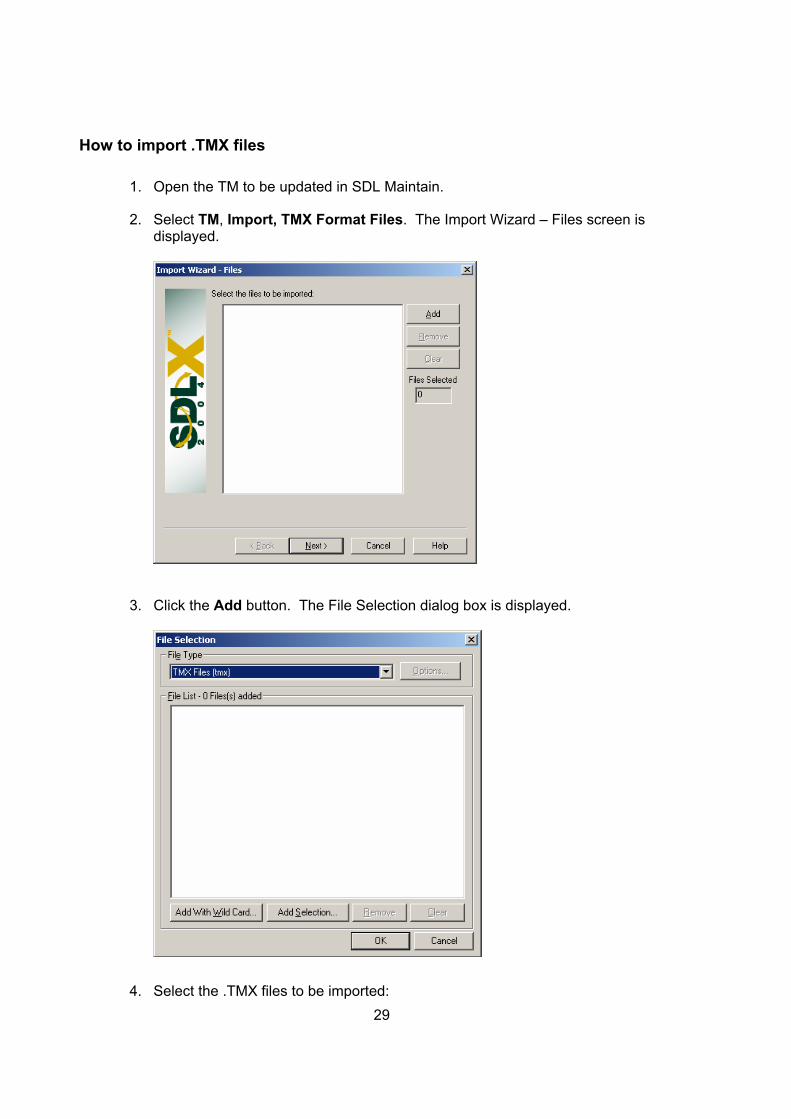
2. Select TM, Import, TMX Format Files. The Import Wizard – Files screen is displayed.
3. Click the Add button. The File Selection dialog box is displayed.
4. Select the .TMX files to be imported: 29
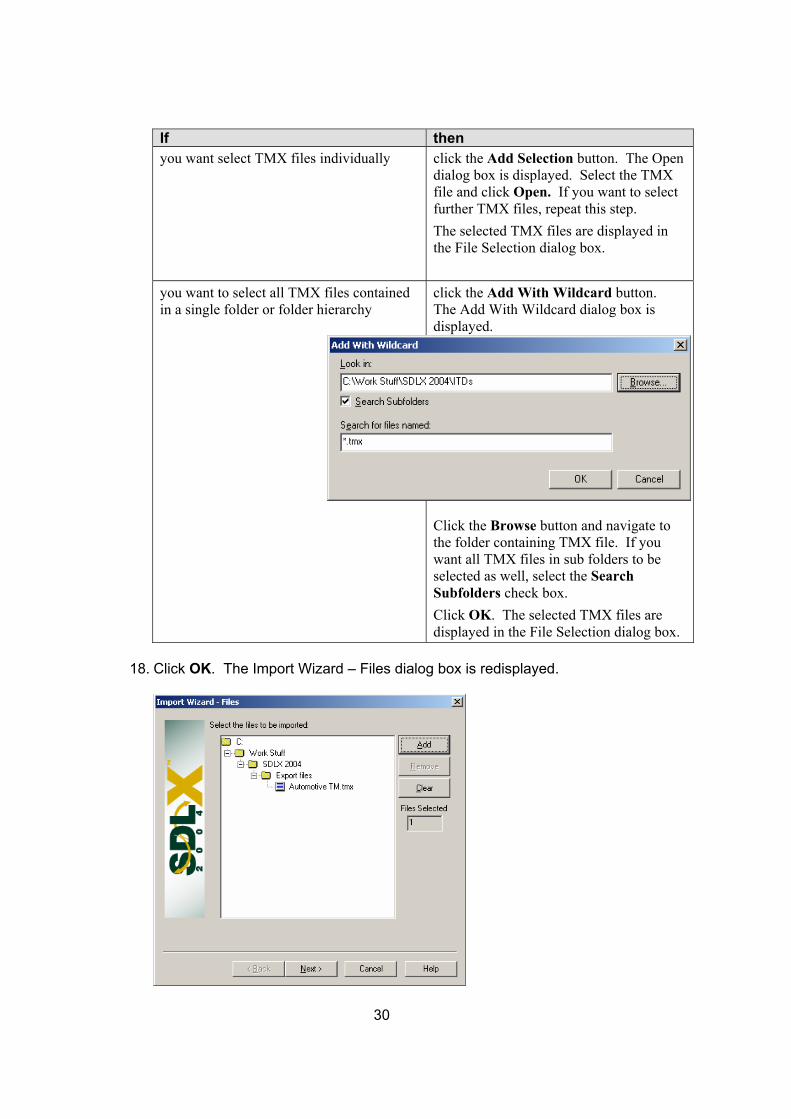
If then you want select TMX files individually click the Add Selection button. The Open
dialog box is displayed. Select the TMX file and click Open. If you want to select further TMX files, repeat this step. The selected TMX files are displayed in the File Selection dialog box.
you want to select all TMX files contained in a single folder or folder hierarchy
click the Add With Wildcard button. The Add With Wildcard dialog box is displayed. Click the Browse button and navigate to the folder containing TMX file. If you want all TMX files in sub folders to be selected as well, select the Search Subfolders check box. Click OK. The selected TMX files are displayed in the File Selection dialog box.
18. Click OK. The Import Wizard – Files dialog box is redisplayed.
30
31
19. Verify the list of selected TMX files.
If then you want to remove a file from the list select the file and click Remove. you want to remove all files from the list click Clear. you want to add more files to the list click Add.
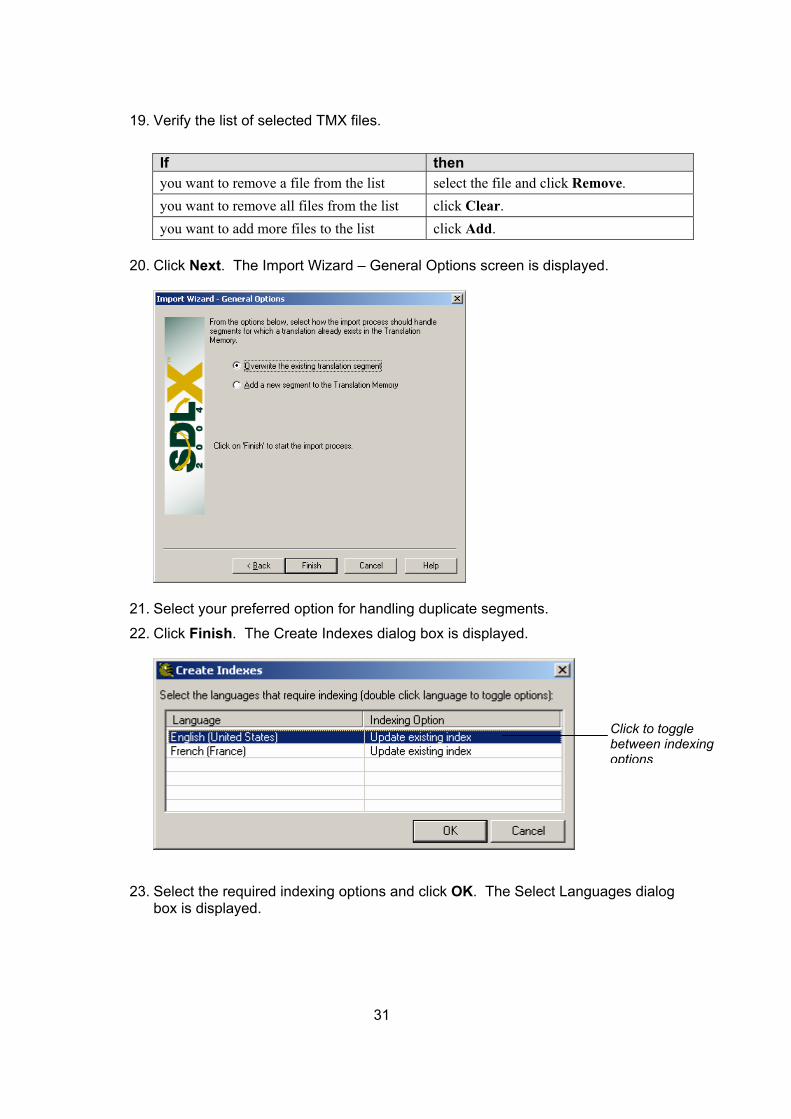
20. Click Next. The Import Wizard – General Options screen is displayed.
21. Select your preferred option for handling duplicate segments.
22. Click Finish. The Create Indexes dialog box is displayed.
23. Select the required indexing options and click OK. The Select Languabox is displayed.
Click to toggle between indexingoptions
ges dialog
24. Select the languages you want to see when the TM is redisplayed after the update.
25. Click OK.
32
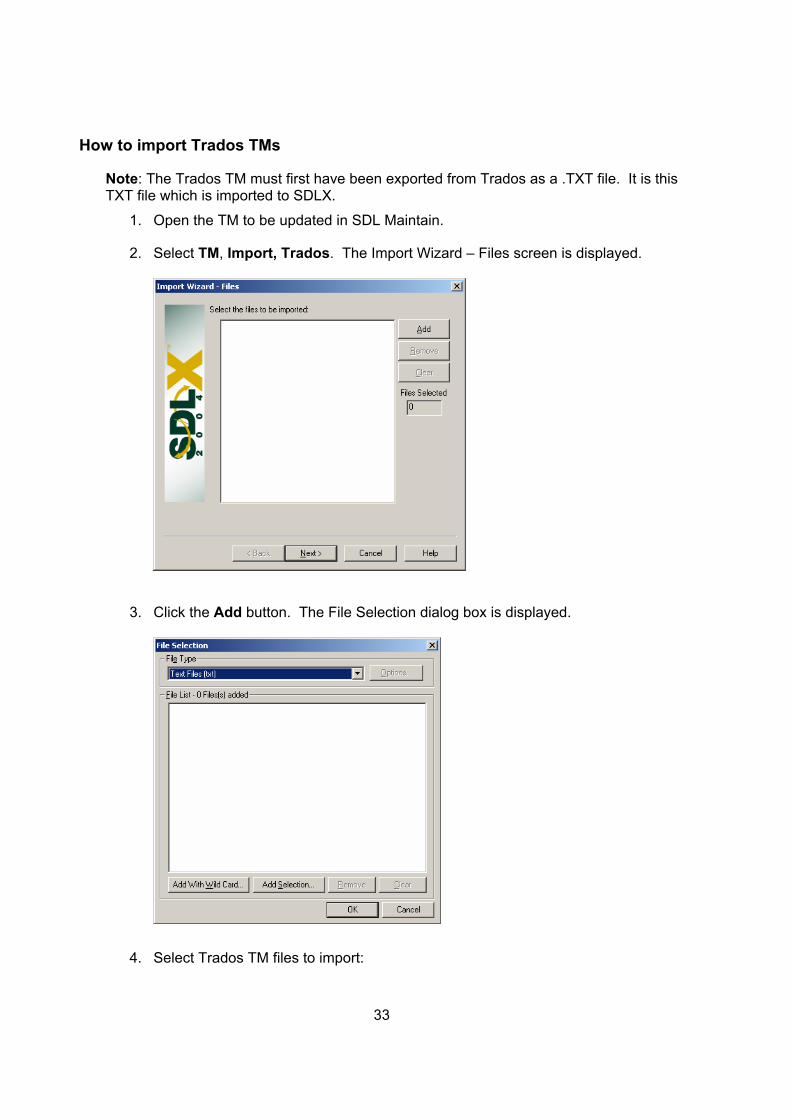
How to import Trados TMs
Note: The Trados TM must first have been exported from Trados as a .TXT file. It is this TXT file which is imported to SDLX.
1. Open the TM to be updated in SDL Maintain.
2. Select TM, Import, Trados. The Import Wizard – Files screen is displayed.
3. Click the Add button. The File Selection dialog box is displayed.
4. Select Trados TM files to import:
33
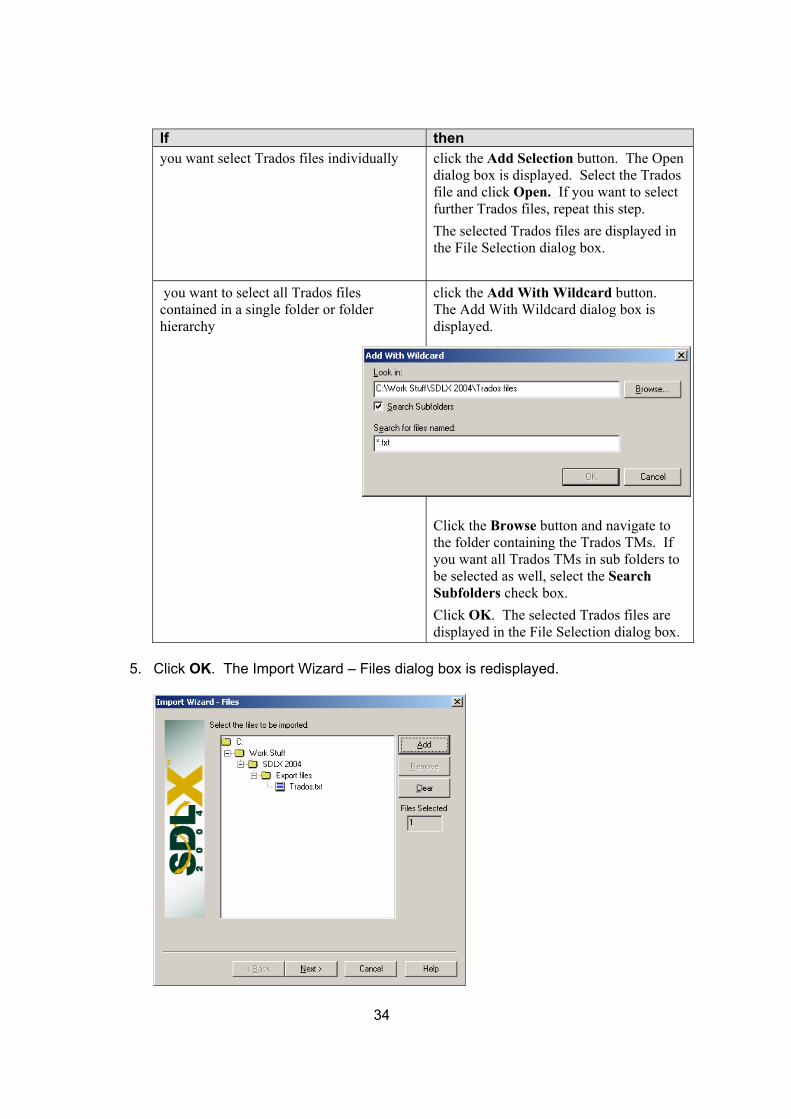
If then you want select Trados files individually click the Add Selection button. The Open
dialog box is displayed. Select the Trados file and click Open. If you want to select further Trados files, repeat this step. The selected Trados files are displayed in the File Selection dialog box.
you want to select all Trados files contained in a single folder or folder hierarchy
click the Add With Wildcard button. The Add With Wildcard dialog box is displayed. Click the Browse button and navigate to the folder containing the Trados TMs. If you want all Trados TMs in sub folders to be selected as well, select the Search Subfolders check box. Click OK. The selected Trados files are displayed in the File Selection dialog box.
5. Click OK. The Import Wizard – Files dialog box is redisplayed.
34
35
6. Verify the list of selected Trados TM files.
If then you want to remove a file from the list select the file and click Remove. you want to remove all files from the list click Clear. you want to add more files to the list click Add.
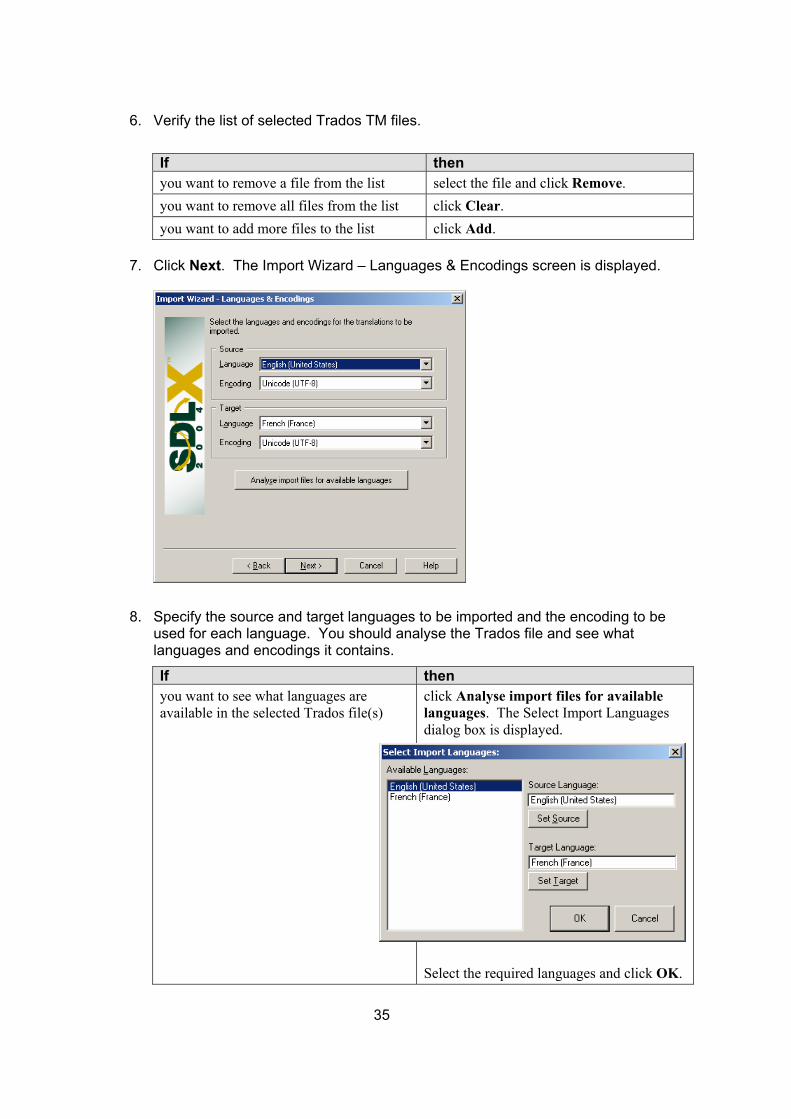
7. Click Next. The Import Wizard – Languages & Encodings screen is displayed.
8. Specify the source and target languages to be imported and the encoding to be used for each language. You should analyse the Trados file and see what languages and encodings it contains.
If then you want to see what languages are available in the selected Trados file(s)
click Analyse import files for available languages. The Select Import Languages dialog box is displayed. Select the required languages and click OK.
36
9. Click Next. The Import Wizard – General Options dialog box is displayed.
10. Select your preferred option for handling duplicate segments.
11. Click Finish. The Create Indexes dialog box is displayed.
26. Select the required indexing options and click OK. The Select Langbox is displayed.
27. Select the languages you want to see when the TM is redisplayed aupdate.
28. Click OK.
Click to toggle between indexingoptions
uages dialog
fter the
37
How to import Delimited files
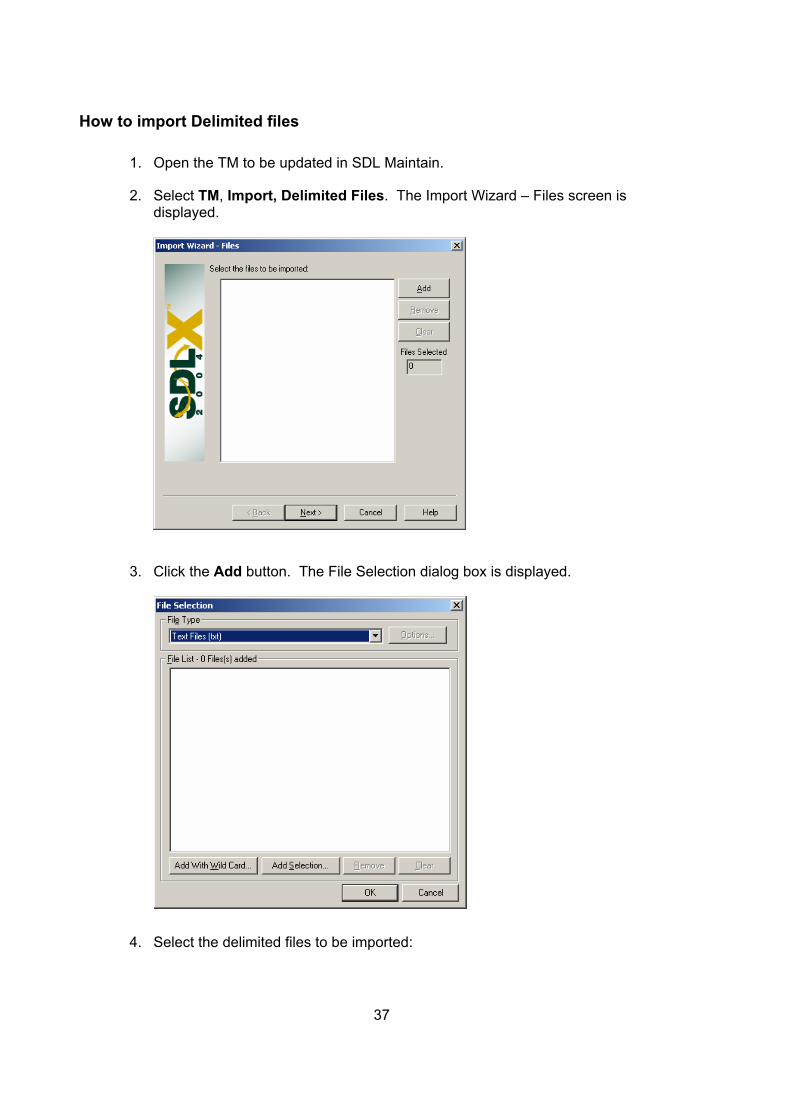
1. Open the TM to be updated in SDL Maintain.
2. Select TM, Import, Delimited Files. The Import Wizard – Files screen is displayed.
3. Click the Add button. The File Selection dialog box is displayed.
4. Select the delimited files to be imported:
38
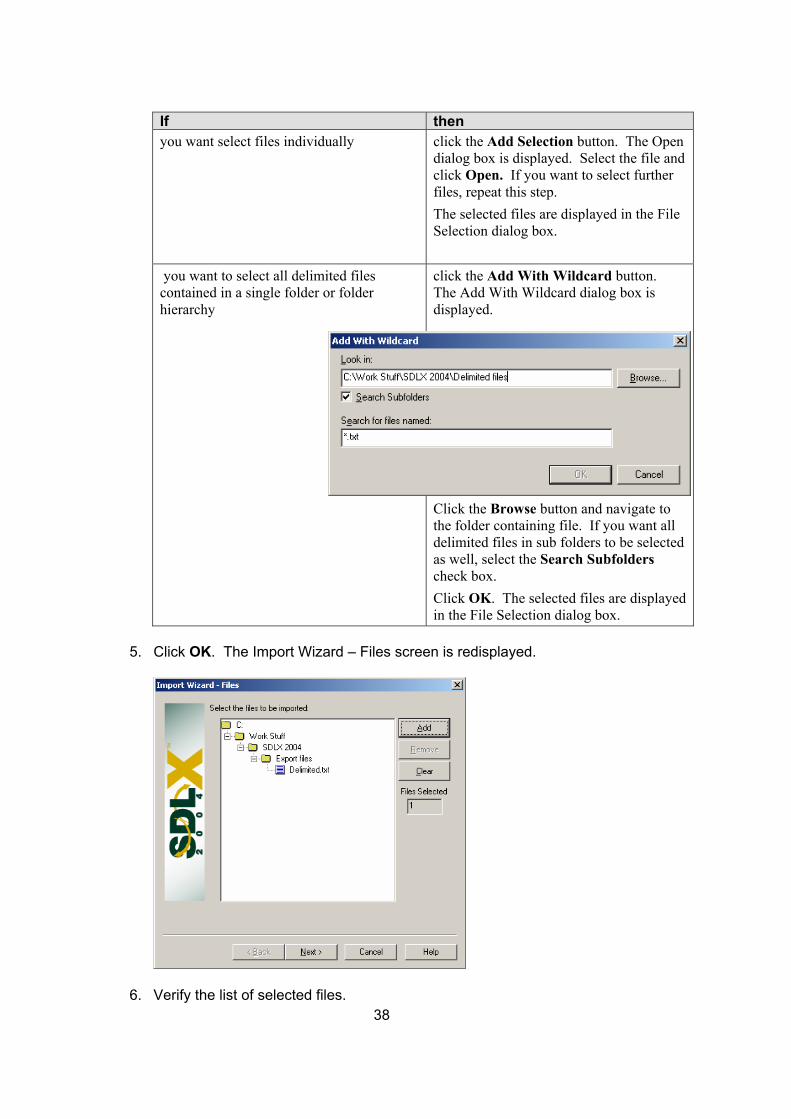
If then you want select files individually click the Add Selection button. The Open
dialog box is displayed. Select the file and click Open. If you want to select further files, repeat this step. The selected files are displayed in the File Selection dialog box.
you want to select all delimited files contained in a single folder or folder hierarchy
click the Add With Wildcard button. The Add With Wildcard dialog box is displayed. Click the Browse button and navigate to the folder containing file. If you want all delimited files in sub folders to be selected as well, select the Search Subfolders check box. Click OK. The selected files are displayed in the File Selection dialog box.
5. Click OK. The Import Wizard – Files screen is redisplayed.
6. Verify the list of selected files.
39
If then you want to remove a file from the list select the file and click Remove. you want to remove all files from the list click Clear. you want to add more files to the list click Add.
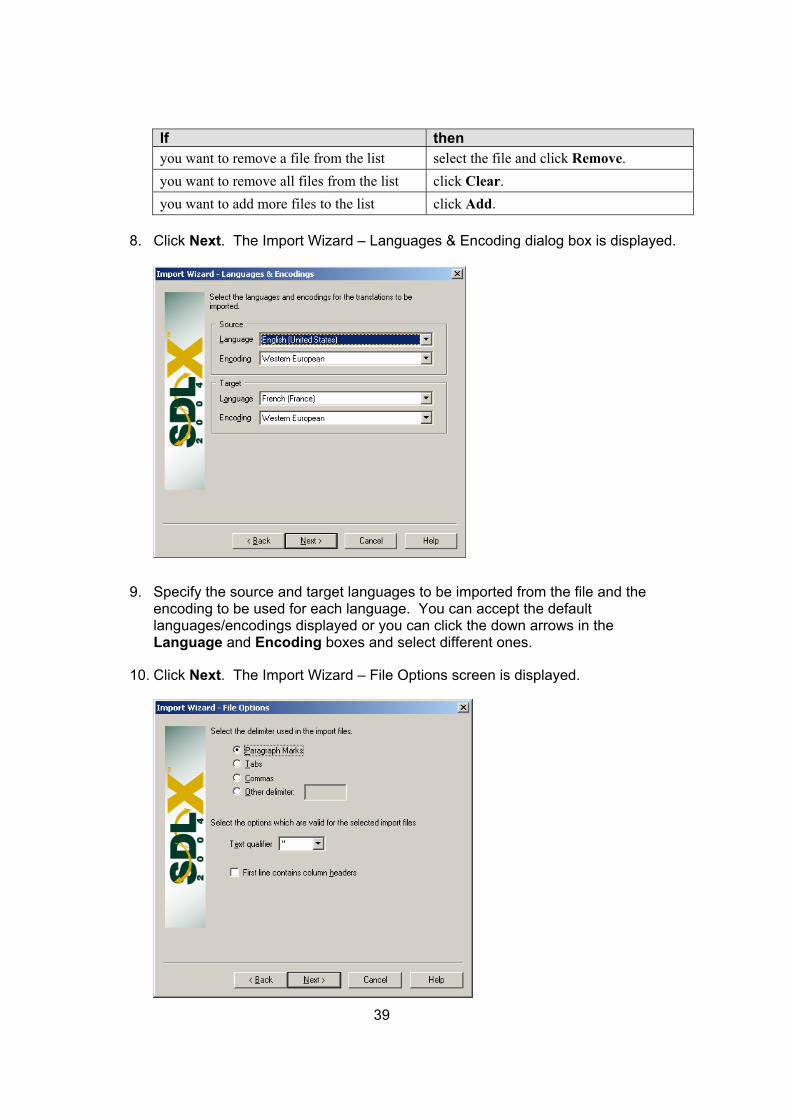
8. Click Next. The Import Wizard – Languages & Encoding dialog box is displayed.
9. Specify the source and target languages to be imported from the file and the encoding to be used for each language. You can accept the default languages/encodings displayed or you can click the down arrows in the Language and Encoding boxes and select different ones.
10. Click Next. The Import Wizard – File Options screen is displayed.
40
11. Select the options that accurately describe the import file. If you do not select the correct options, the import will fail!
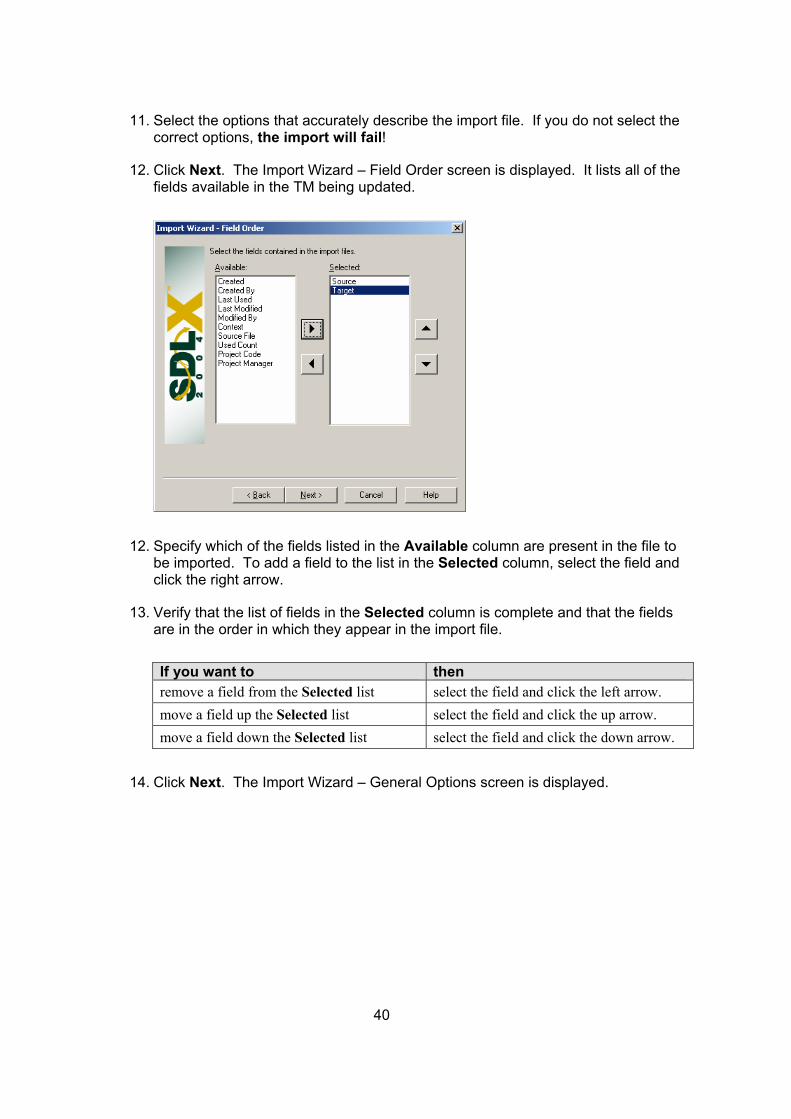
12. Click Next. The Import Wizard – Field Order screen is displayed. It lists all of the fields available in the TM being updated.
12. Specify which of the fields listed in the Available column are present in the file to be imported. To add a field to the list in the Selected column, select the field and click the right arrow.
13. Verify that the list of fields in the Selected column is complete and that the fields are in the order in which they appear in the import file.
If you want to then remove a field from the Selected list select the field and click the left arrow. move a field up the Selected list select the field and click the up arrow. move a field down the Selected list select the field and click the down arrow.
14. Click Next. The Import Wizard – General Options screen is displayed.
15. Select your preferred option for handling duplicate segments.
16. Click Finish. The Create Indexes dialog box is displayed.
17. Select the required indexing options and click OK. The Selecbox is displayed.
18. Select the languages you want to see when the TM is redisplaupdate.
19. Click OK. The import now takes place.
41
Click to toggle between indexingoptions
t Languages dialog
yed after the
42
Export a TM
How to export to an SDLX TM
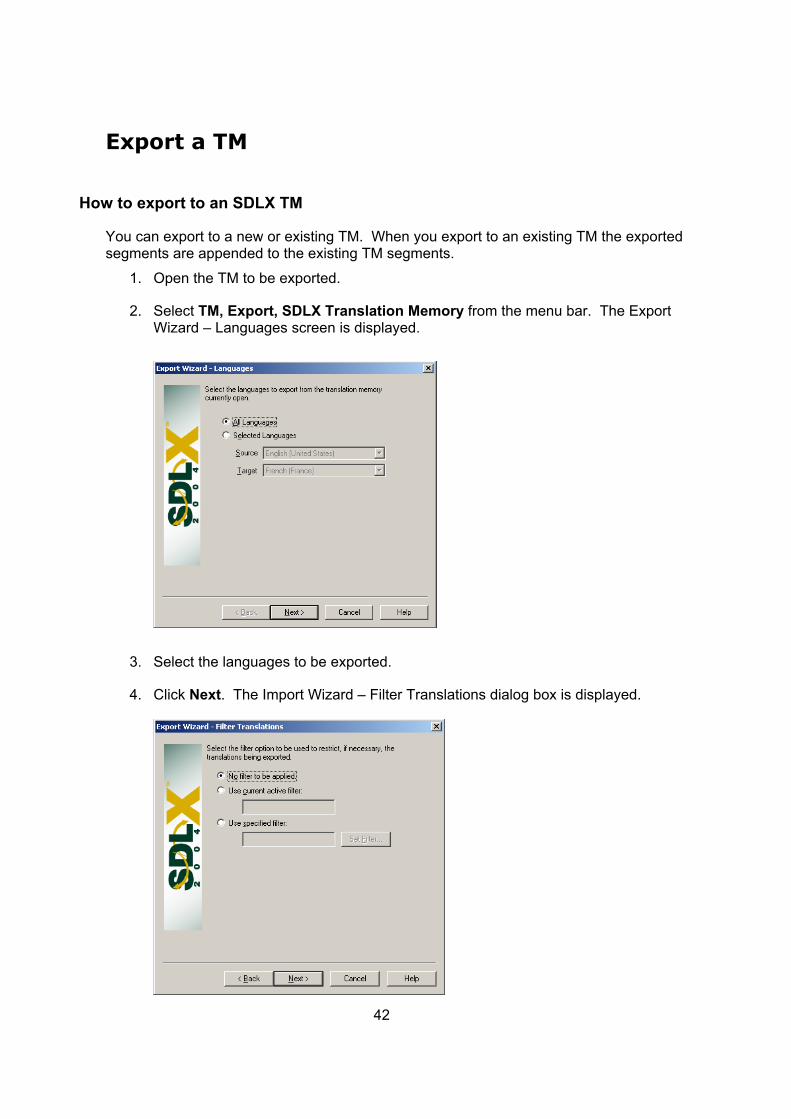
You can export to a new or existing TM. When you export to an existing TM the exported segments are appended to the existing TM segments.
1. Open the TM to be exported.
2. Select TM, Export, SDLX Translation Memory from the menu bar. The Export Wizard – Languages screen is displayed.
3. Select the languages to be exported.
4. Click Next. The Import Wizard – Filter Translations dialog box is displayed.
43
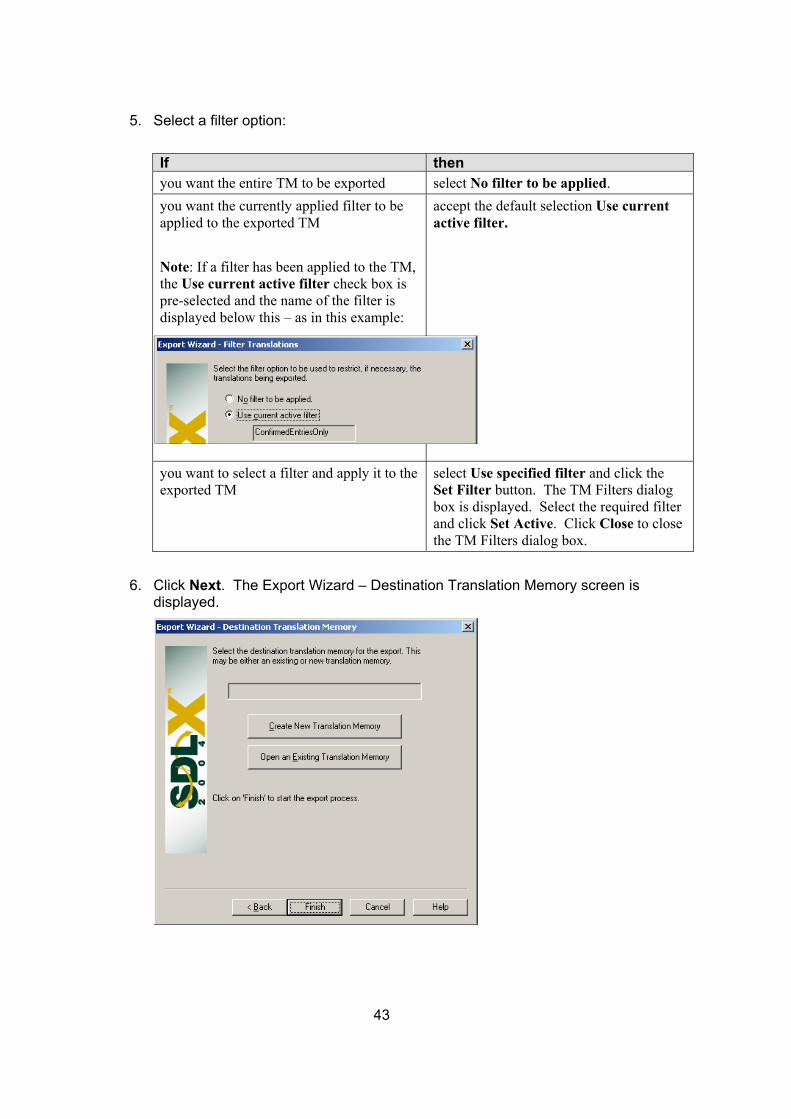
5. Select a filter option:
If then you want the entire TM to be exported select No filter to be applied. you want the currently applied filter to be applied to the exported TM Note: If a filter has been applied to the TM, the Use current active filter check box is pre-selected and the name of the filter is displayed below this – as in this example:
accept the default selection Use current active filter.
you want to select a filter and apply it to the exported TM
select Use specified filter and click the Set Filter button. The TM Filters dialog box is displayed. Select the required filter and click Set Active. Click Close to close the TM Filters dialog box.
6. Click Next. The Export Wizard – Destination Translation Memory screen is displayed.
7. Specify where you want the exported TM segments to go:
If then you want to create a new TM file click Create New Translation Memory.
The New Translation Memory dialog box is displayed. • Navigate to the location where you want
the new TM to be created. • Specify the name for the new TM in the
File name box. • Click Save.
you want to add the exported segments to an existing TM
click Open an Existing Translation Memory. The Open Translation Memory dialog box is displayed. • Navigate to the folder containing the TM. • Select the TM and click Open.
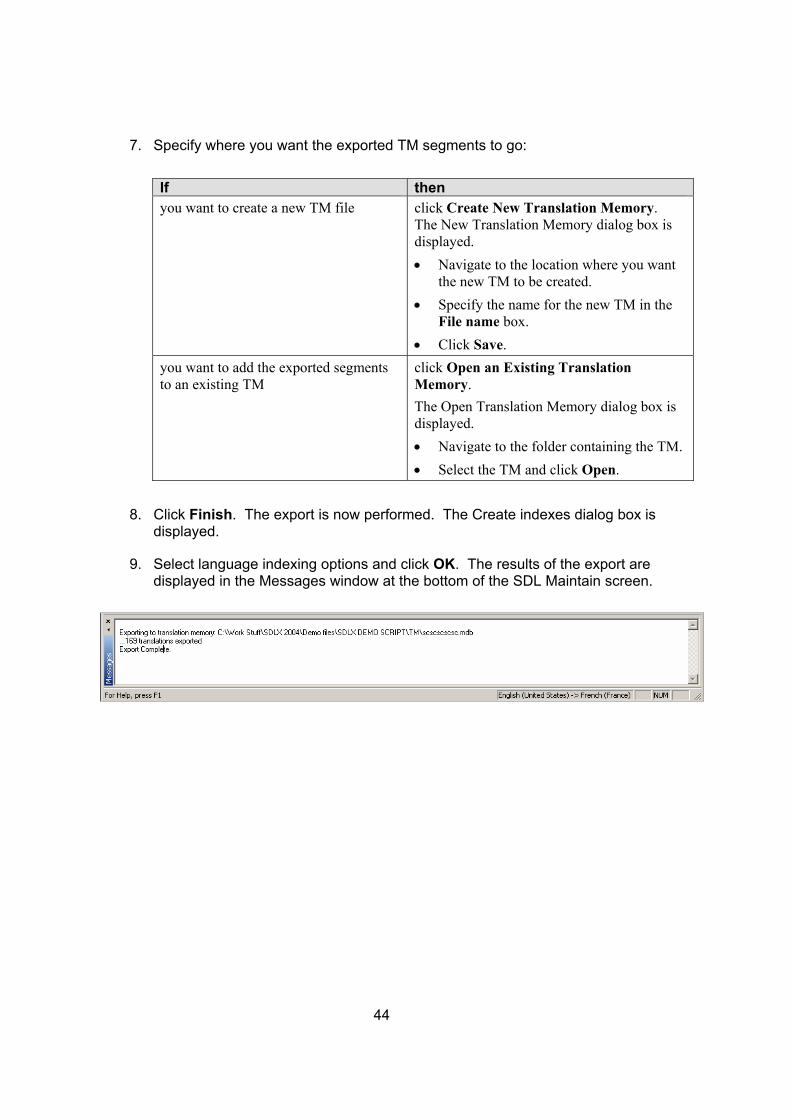
8. Click Finish. The export is now performed. The Create indexes dialog box is displayed.
9. Select language indexing options and click OK. The results of the export are displayed in the Messages window at the bottom of the SDL Maintain screen.
44
45
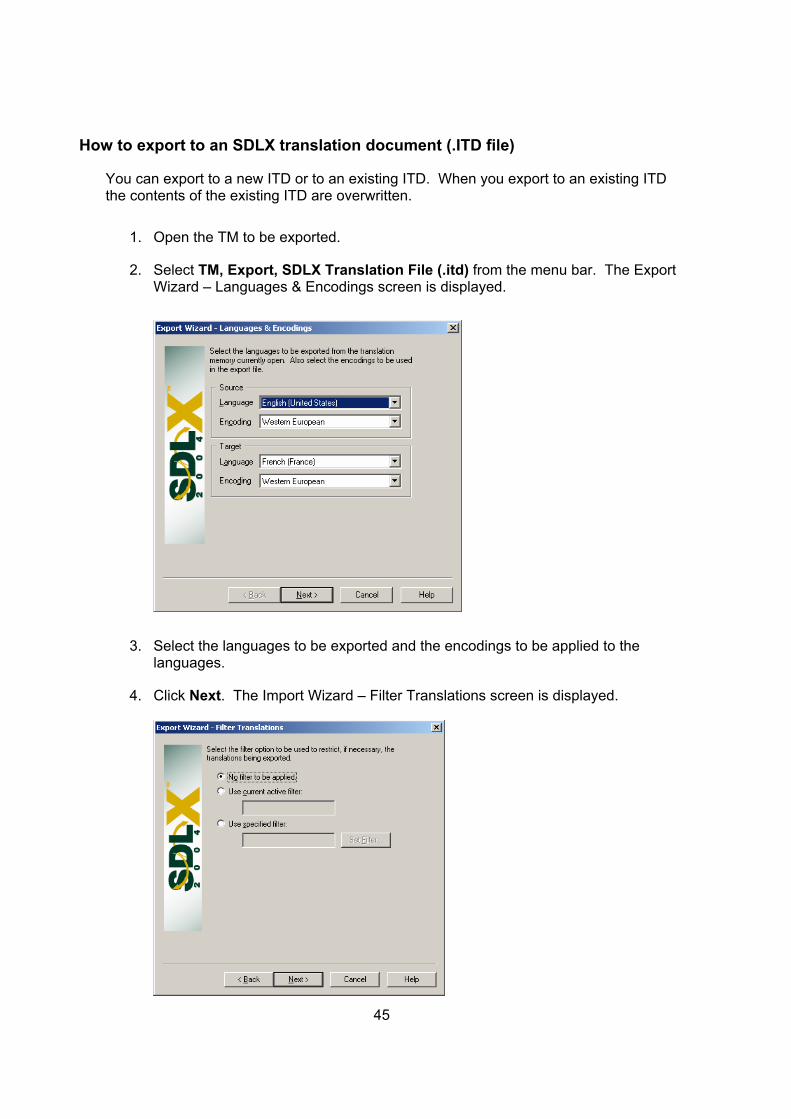
How to export to an SDLX translation document (.ITD file)
You can export to a new ITD or to an existing ITD. When you export to an existing ITD the contents of the existing ITD are overwritten.
1. Open the TM to be exported.
2. Select TM, Export, SDLX Translation File (.itd) from the menu bar. The Export Wizard – Languages & Encodings screen is displayed.
3. Select the languages to be exported and the encodings to be applied to the languages.
4. Click Next. The Import Wizard – Filter Translations screen is displayed.
46
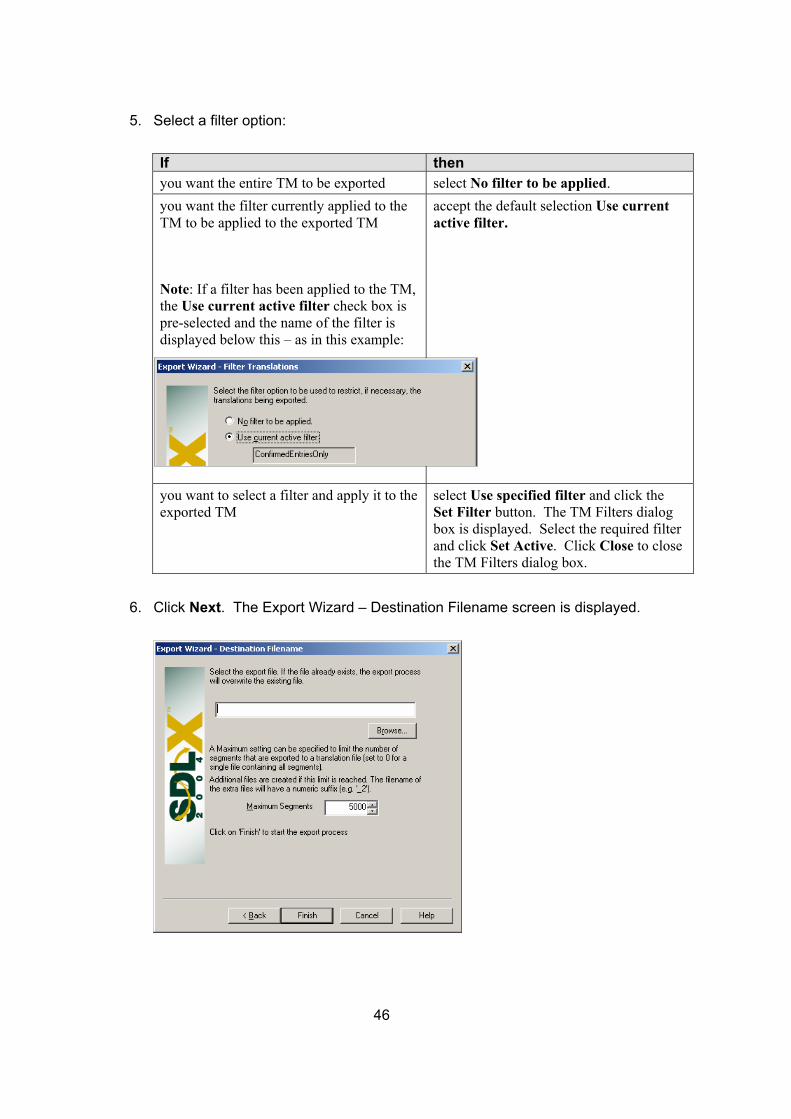
5. Select a filter option:
If then you want the entire TM to be exported select No filter to be applied. you want the filter currently applied to the TM to be applied to the exported TM Note: If a filter has been applied to the TM, the Use current active filter check box is pre-selected and the name of the filter is displayed below this – as in this example:
accept the default selection Use current active filter.
you want to select a filter and apply it to the exported TM
select Use specified filter and click the Set Filter button. The TM Filters dialog box is displayed. Select the required filter and click Set Active. Click Close to close the TM Filters dialog box.
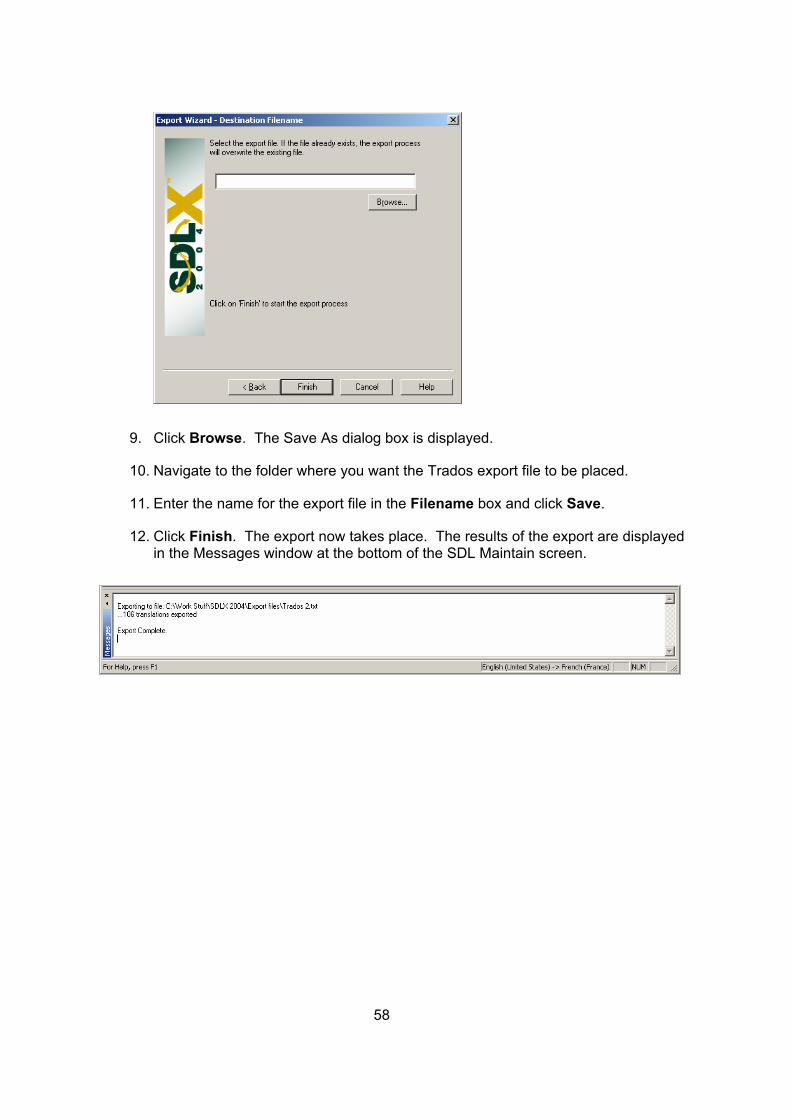
6. Click Next. The Export Wizard – Destination Filename screen is displayed.
7. Click the Browse button. The Save As dialog box is displayed. Use it to specify where you want the exported TM segments to go:
If then you want to create a new ITD file • Navigate to the location where you
want the new ITD to be created. • Specify the name for the new ITD in
the File name box. • Click Save.
you want to overwrite an existing ITD • Navigate to the folder containing the ITD.
• Select the ITD and click Save.
8. Check the Maximum Segments setting. Does it need to be changed?:
If then you want to specify a maximum file size which is smaller than the default 5000 segments
specify the number in the Maximum Segments box. If the number of segments in the exported TM exceeds this figure, multiple export files will be created.
you want all segments exported to a single file, irrespective of the size
enter 0 (zero) in the Maximum Segments box.
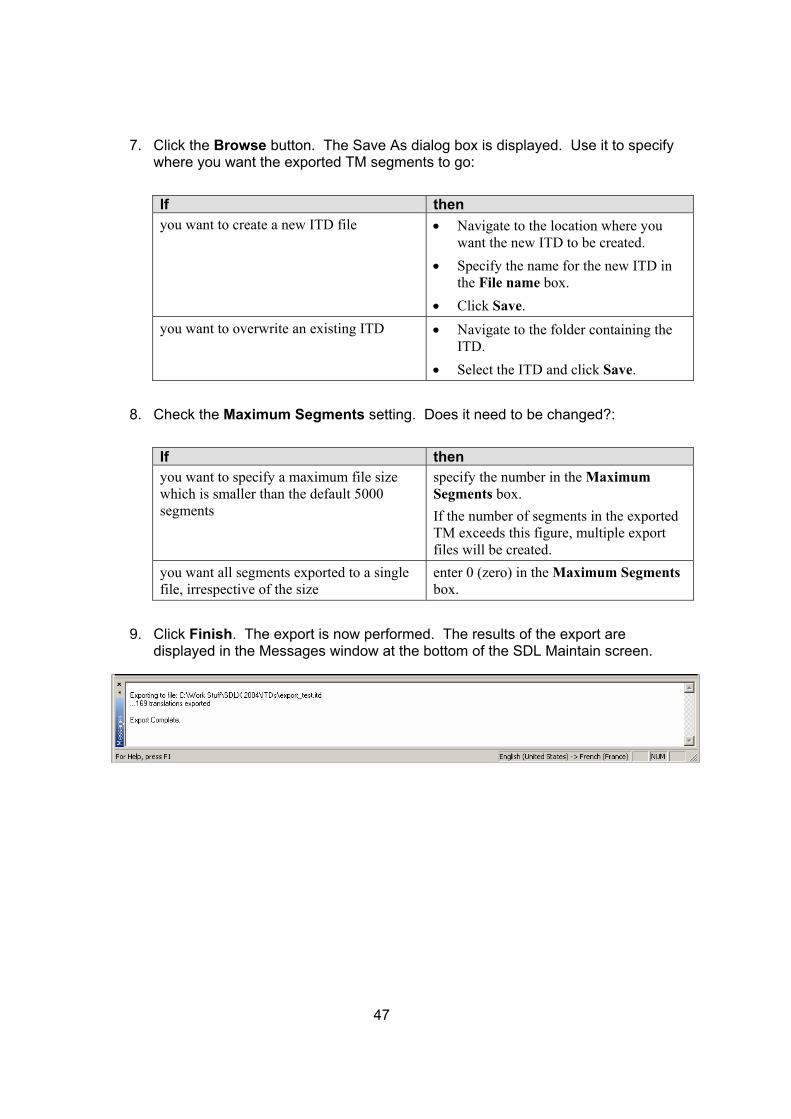
9. Click Finish. The export is now performed. The results of the export are displayed in the Messages window at the bottom of the SDL Maintain screen.
47
48
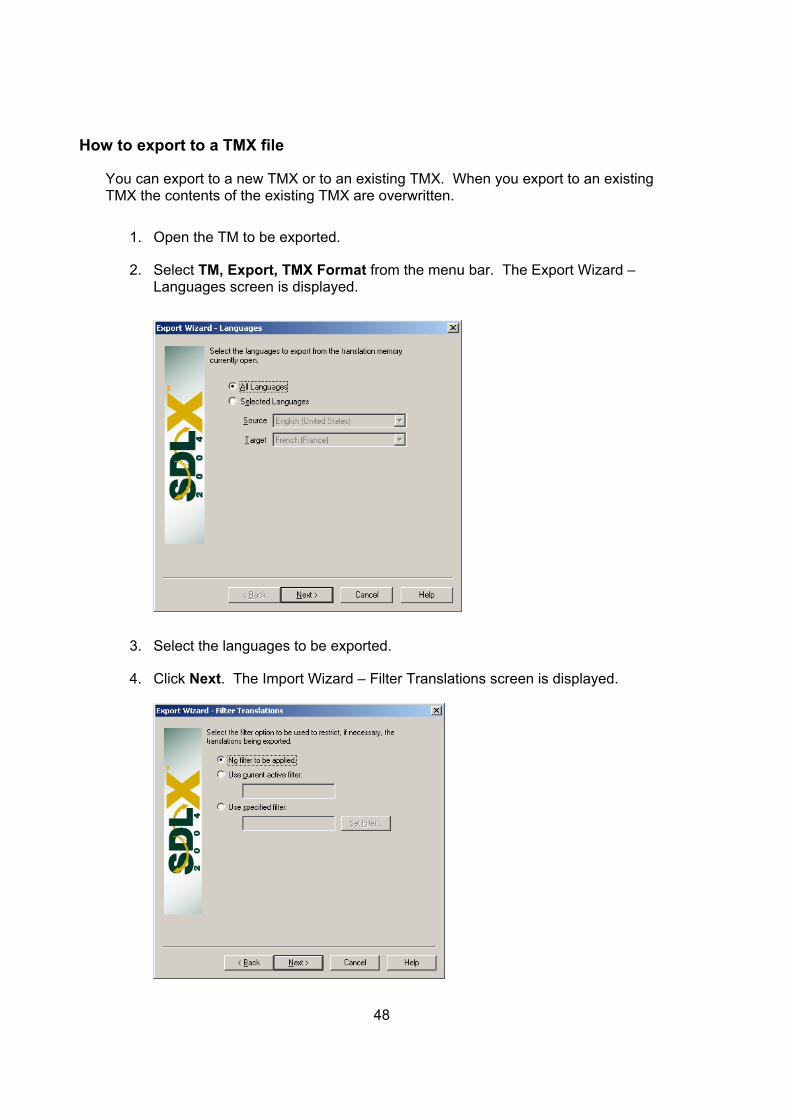
How to export to a TMX file
You can export to a new TMX or to an existing TMX. When you export to an existing TMX the contents of the existing TMX are overwritten.
1. Open the TM to be exported.
2. Select TM, Export, TMX Format from the menu bar. The Export Wizard – Languages screen is displayed.
3. Select the languages to be exported.
4. Click Next. The Import Wizard – Filter Translations screen is displayed.
49
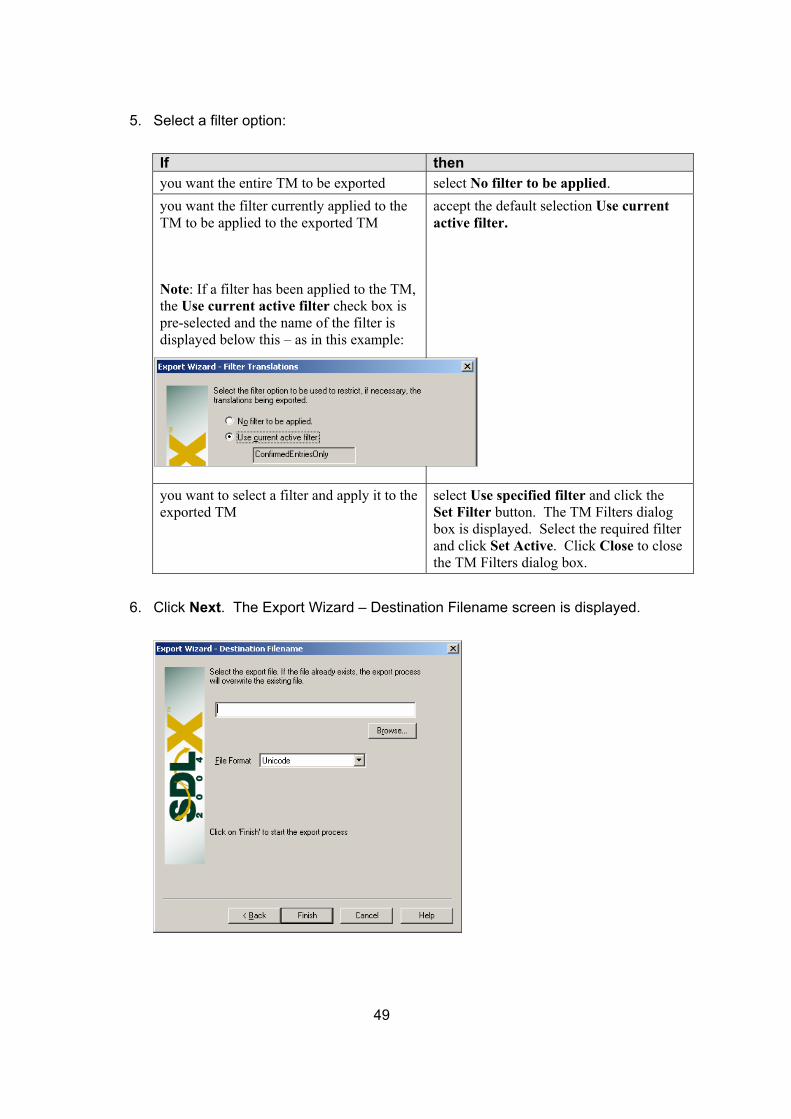
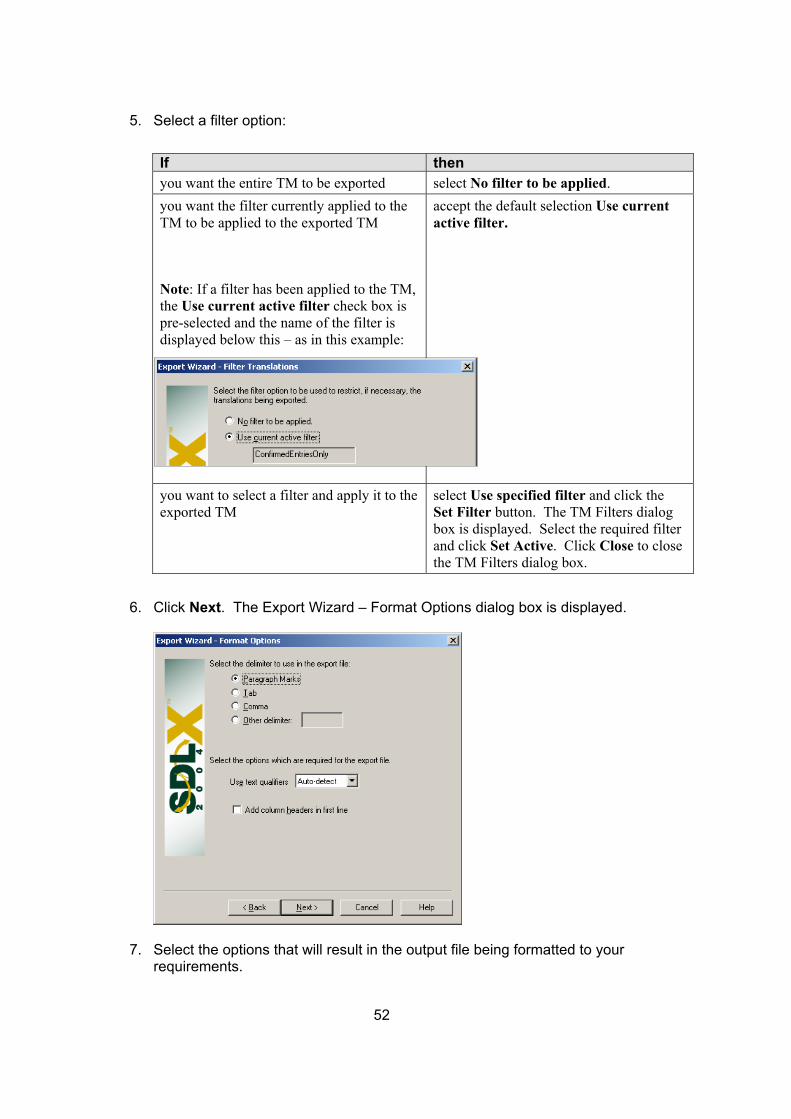
5. Select a filter option:
If then you want the entire TM to be exported select No filter to be applied. you want the filter currently applied to the TM to be applied to the exported TM Note: If a filter has been applied to the TM, the Use current active filter check box is pre-selected and the name of the filter is displayed below this – as in this example:
accept the default selection Use current active filter.
you want to select a filter and apply it to the exported TM
select Use specified filter and click the Set Filter button. The TM Filters dialog box is displayed. Select the required filter and click Set Active. Click Close to close the TM Filters dialog box.
6. Click Next. The Export Wizard – Destination Filename screen is displayed.

50
7. Click the Browse button. The Save As screen is displayed. Use it to specify where you want the exported TM segments to go:
If then you want to create a new TMX file • Navigate to the location where you
want the new TMX to be created. • Specify the name for the new TMX in
the File name box. • Click Save.
you want to overwrite an existing TMX • Navigate to the folder containing the TMX.
• Select the TMX and click Save.
8. Change the default file format if required.
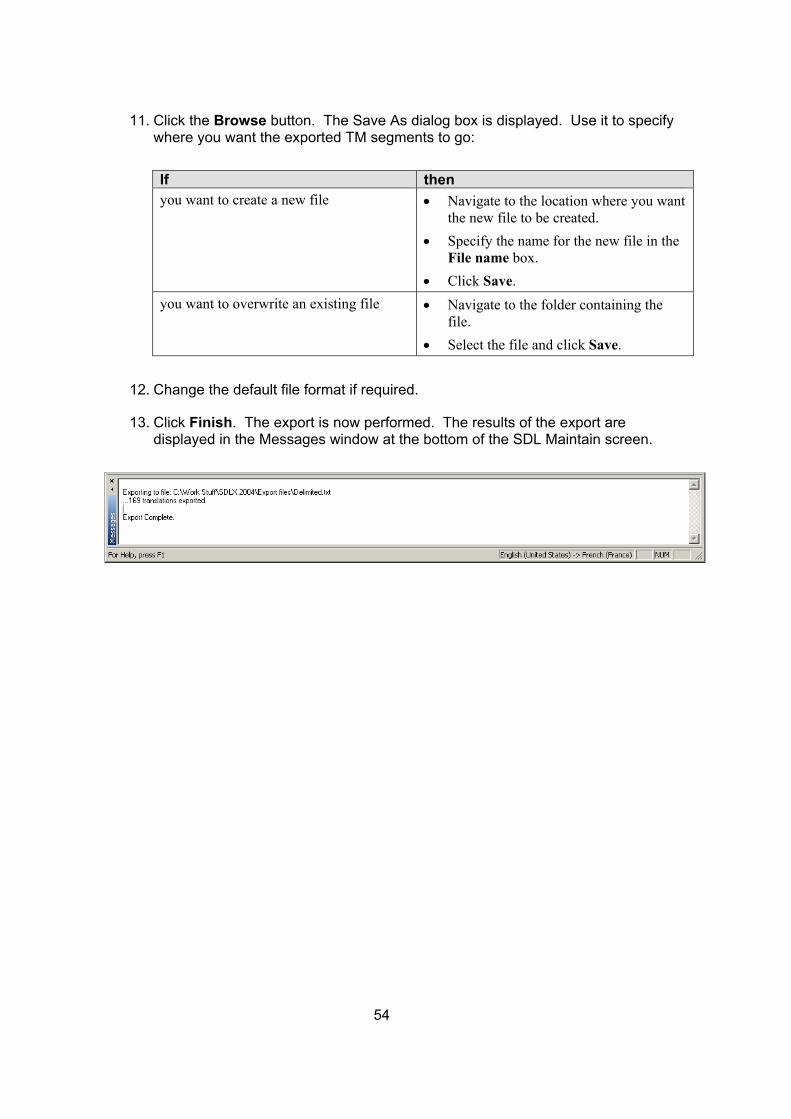
9. Click Finish. The export is now performed. The results of the export are displayed in the Messages window at the bottom of the SDL Maintain screen.

51
How to export to a Delimited File
You can export to a new TMX or to an existing TMX. When you export to an existing TMX the contents of the existing TMX are overwritten.
1. Open the TM to be exported.
2. Select TM, Export, Delimited File from the menu bar. The Export Wizard – Languages & Encodings screen is displayed.
3. Select the languages to be exported and the encodings to be used with the languages.
4. Click Next. The Import Wizard – Filter Translations screen is displayed.
52
5. Select a filter option:
If then you want the entire TM to be exported select No filter to be applied. you want the filter currently applied to the TM to be applied to the exported TM Note: If a filter has been applied to the TM, the Use current active filter check box is pre-selected and the name of the filter is displayed below this – as in this example:
accept the default selection Use current active filter.
you want to select a filter and apply it to the exported TM
select Use specified filter and click the Set Filter button. The TM Filters dialog box is displayed. Select the required filter and click Set Active. Click Close to close the TM Filters dialog box.
6. Click Next. The Export Wizard – Format Options dialog box is displayed.
7. Select the options that will result in the output file being formatted to your requirements.
53
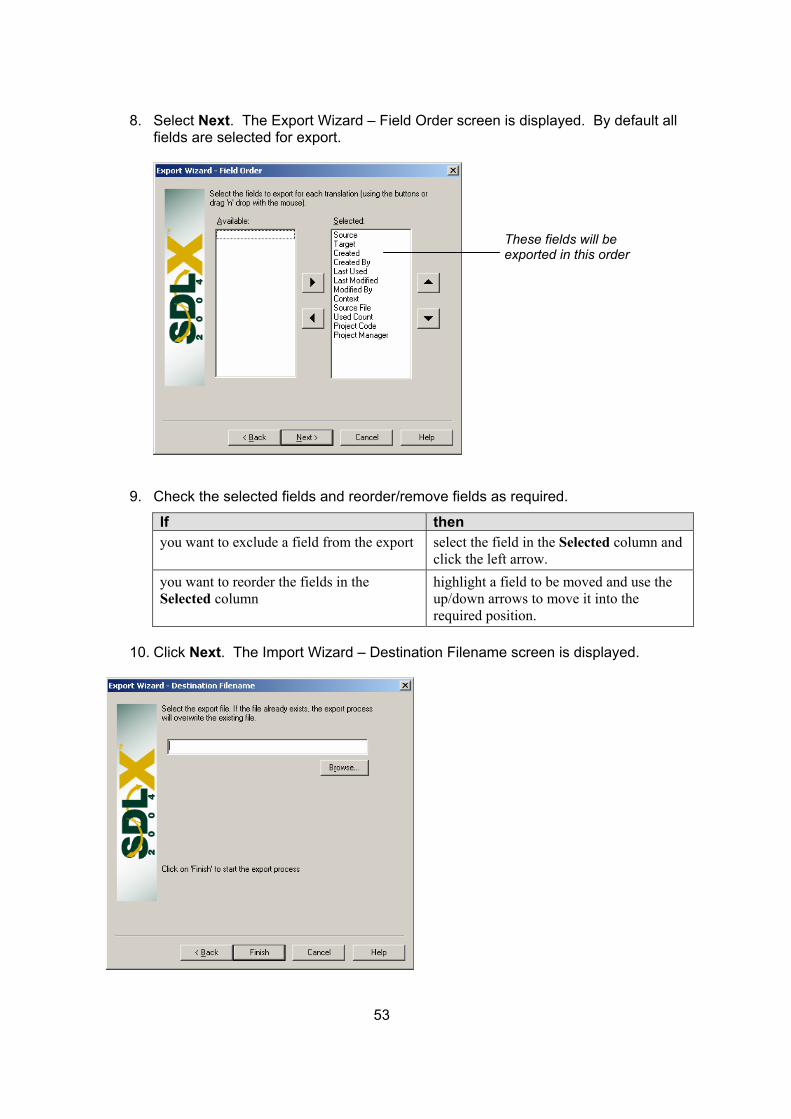
8. Select Next. The Export Wizard – Field Order screen is displayed. By default all fields are selected for export.
These fields will be exported in this order
9. Check the selected fields and reorder/remove fields as required.
If then you want to exclude a field from the export select the field in the Selected column and
click the left arrow. you want to reorder the fields in the Selected column
highlight a field to be moved and use the up/down arrows to move it into the required position.
10. Click Next. The Import Wizard – Destination Filename screen is displayed.
54
11. Click the Browse button. The Save As dialog box is displayed. Use it to specify where you want the exported TM segments to go:
If then you want to create a new file • Navigate to the location where you want
the new file to be created. • Specify the name for the new file in the
File name box. • Click Save.
you want to overwrite an existing file • Navigate to the folder containing the file.
• Select the file and click Save.
12. Change the default file format if required.
13. Click Finish. The export is now performed. The results of the export are displayed in the Messages window at the bottom of the SDL Maintain screen.
55
How to export to Trados format
Note: Although you can export a TM to Trados TXT format, this is not the most effective way to make use of existing SDLX translations in Trados. If you want the best leverage possible, and you have the original translated files then you should export a file list to Trados NOT a TM.
You can export to a new TMX or to an existing TMX. When you export to an existing TMX the contents of the existing TMX are overwritten.
1. Open the TM to be exported.
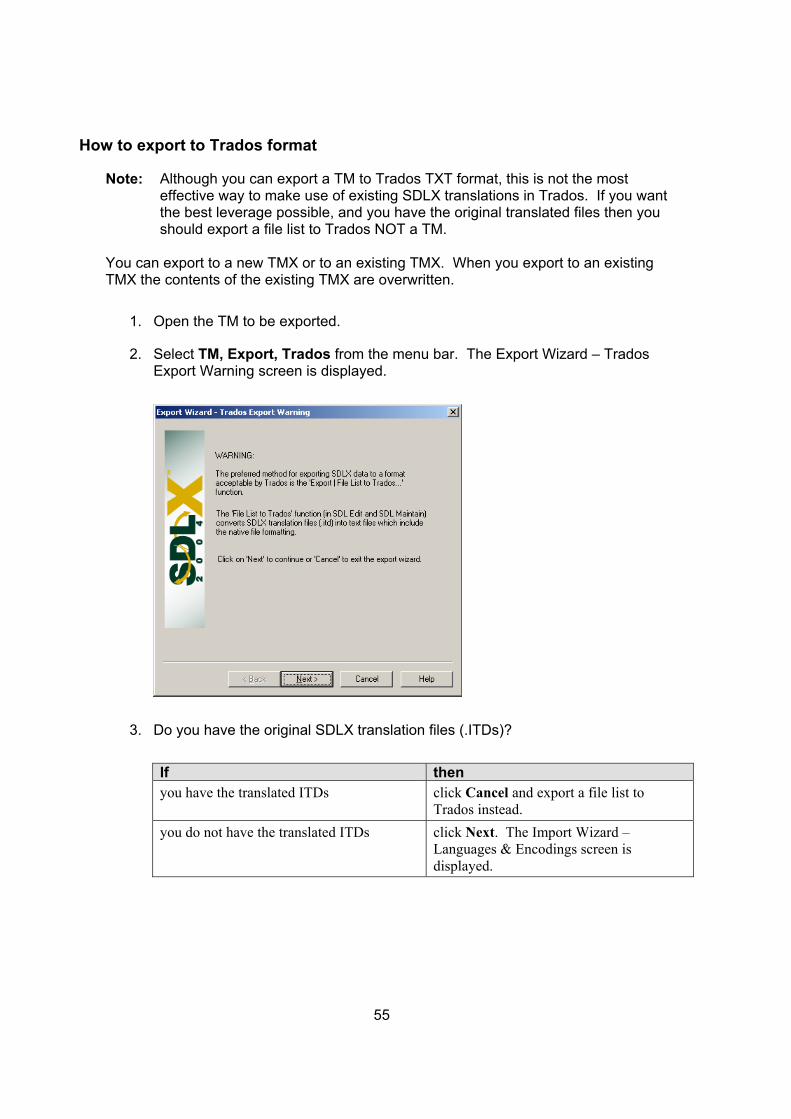
2. Select TM, Export, Trados from the menu bar. The Export Wizard – Trados Export Warning screen is displayed.
3. Do you have the original SDLX translation files (.ITDs)?
If then you have the translated ITDs click Cancel and export a file list to
Trados instead. you do not have the translated ITDs click Next. The Import Wizard –
Languages & Encodings screen is displayed.
56
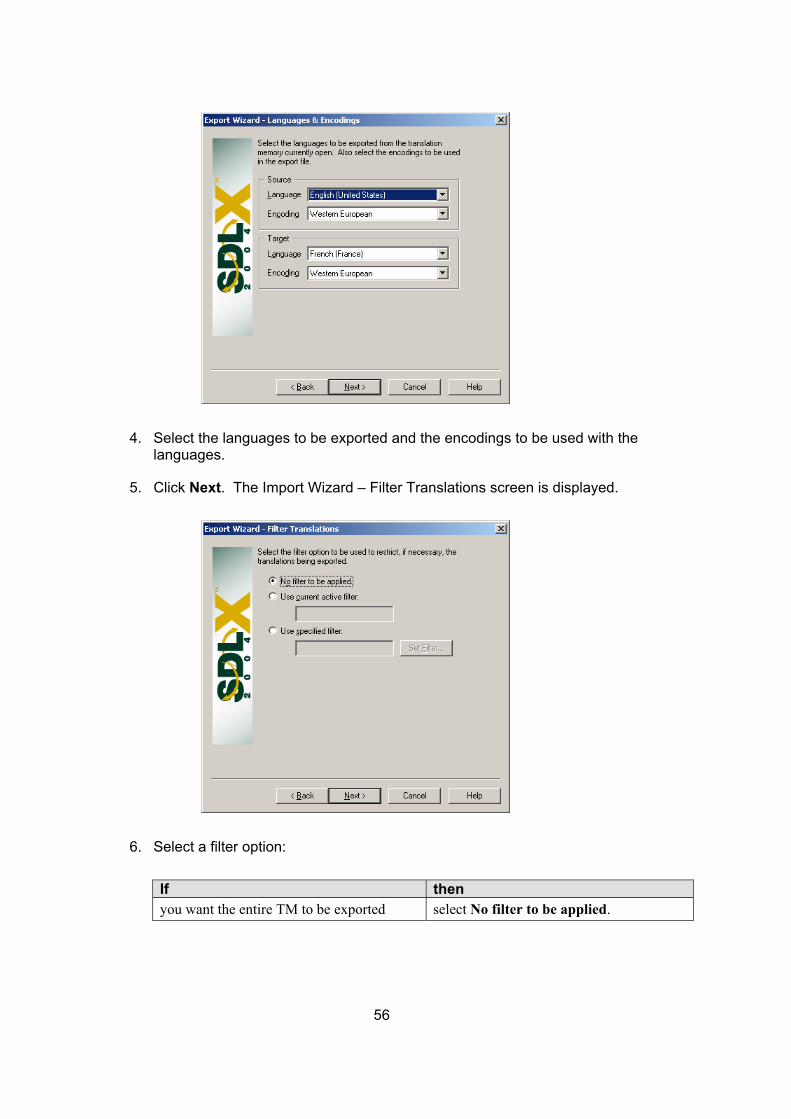
4. Select the languages to be exported and the encodings to be used with the languages.
5. Click Next. The Import Wizard – Filter Translations screen is displayed.
6. Select a filter option:
If then you want the entire TM to be exported select No filter to be applied.
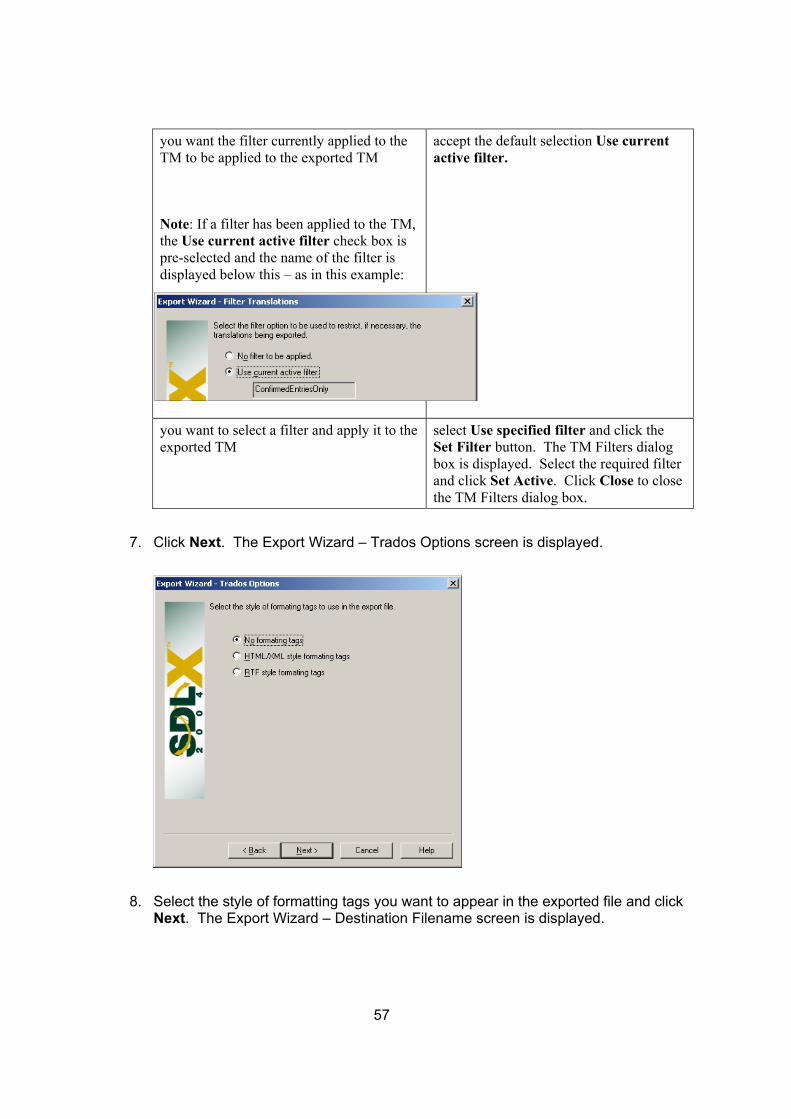
you want the filter currently applied to the TM to be applied to the exported TM Note: If a filter has been applied to the TM, the Use current active filter check box is pre-selected and the name of the filter is displayed below this – as in this example:
accept the default selection Use current active filter.
you want to select a filter and apply it to the exported TM
select Use specified filter and click the Set Filter button. The TM Filters dialog box is displayed. Select the required filter and click Set Active. Click Close to close the TM Filters dialog box.
7. Click Next. The Export Wizard – Trados Options screen is displayed.
8. Select the style of formatting tags you want to appear in the exported file and click Next. The Export Wizard – Destination Filename screen is displayed.
57
9. Click Browse. The Save As dialog box is displayed.
10. Navigate to the folder where you want the Trados export file to be placed.
11. Enter the name for the export file in the Filename box and click Save.
12. Click Finish. The export now takes place. The results of the export are displayed in the Messages window at the bottom of the SDL Maintain screen.
58
59
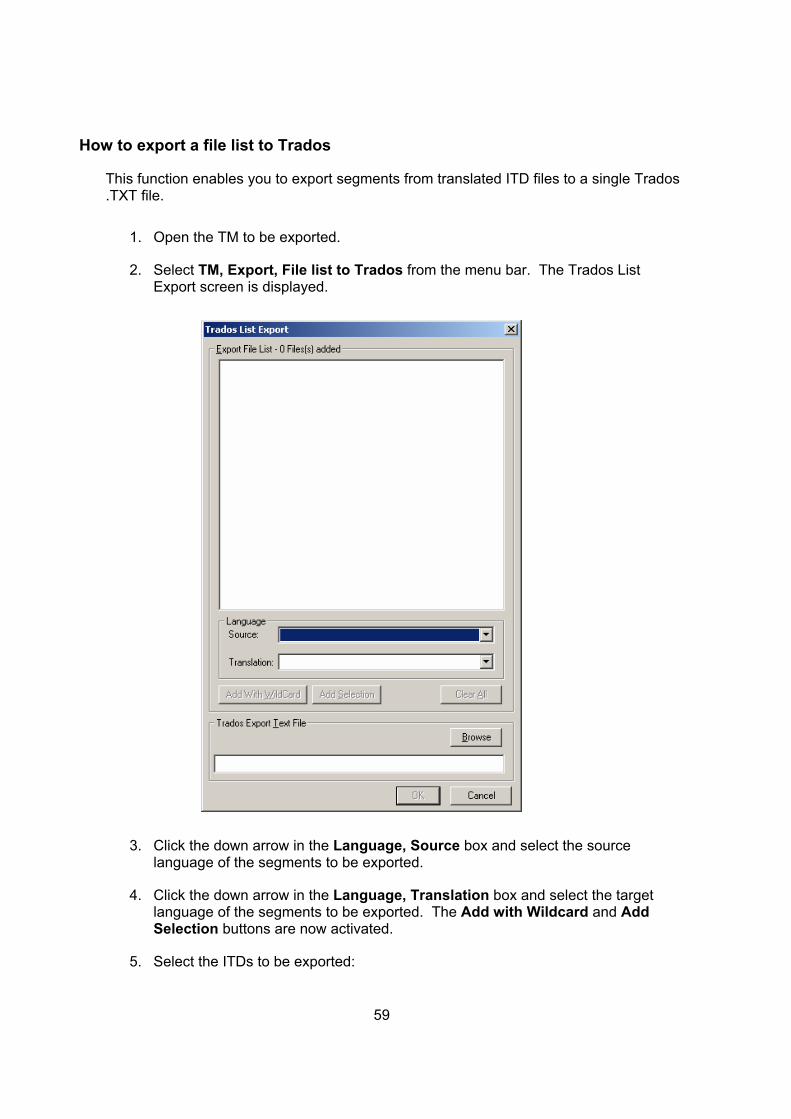
How to export a file list to Trados
This function enables you to export segments from translated ITD files to a single Trados .TXT file.
1. Open the TM to be exported.
2. Select TM, Export, File list to Trados from the menu bar. The Trados List Export screen is displayed.
3. Click the down arrow in the Language, Source box and select the source language of the segments to be exported.
4. Click the down arrow in the Language, Translation box and select the target language of the segments to be exported. The Add with Wildcard and Add Selection buttons are now activated.
5. Select the ITDs to be exported:
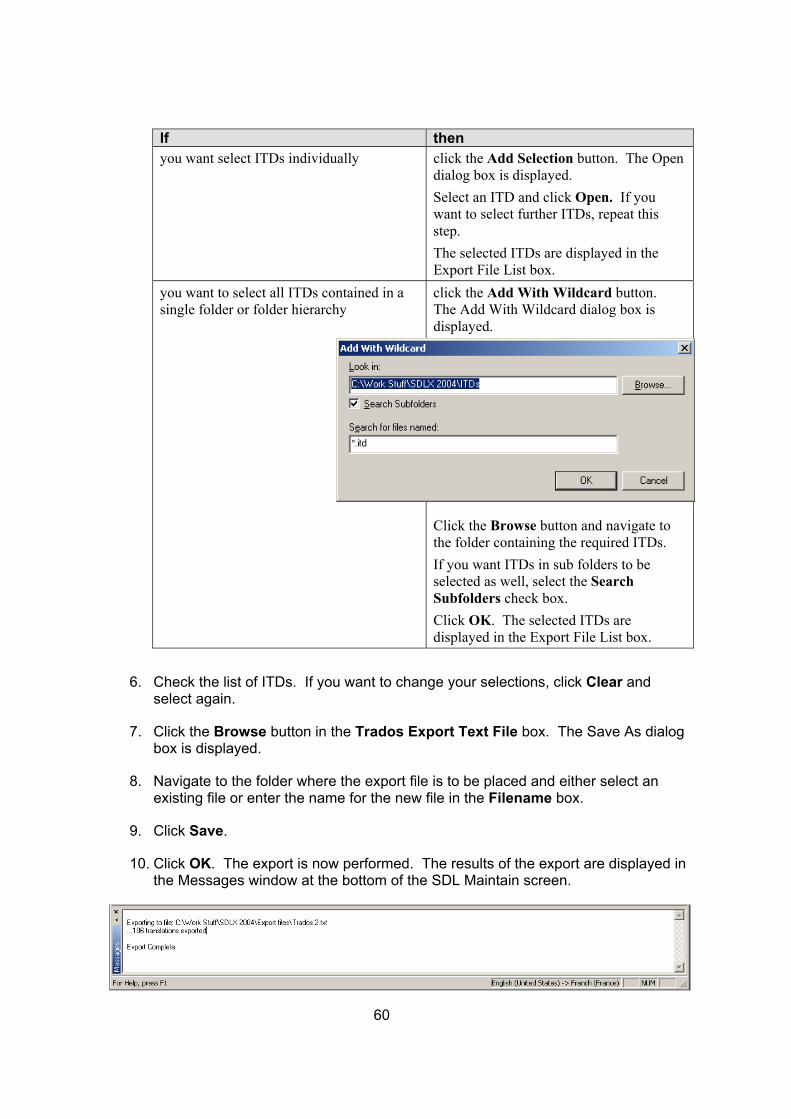
If then you want select ITDs individually click the Add Selection button. The Open
dialog box is displayed. Select an ITD and click Open. If you want to select further ITDs, repeat this step. The selected ITDs are displayed in the Export File List box.
you want to select all ITDs contained in a single folder or folder hierarchy
click the Add With Wildcard button. The Add With Wildcard dialog box is displayed. Click the Browse button and navigate to the folder containing the required ITDs. If you want ITDs in sub folders to be selected as well, select the Search Subfolders check box. Click OK. The selected ITDs are displayed in the Export File List box.
6. Check the list of ITDs. If you want to change your selections, click Clear and select again.
7. Click the Browse button in the Trados Export Text File box. The Save As dialog box is displayed.
8. Navigate to the folder where the export file is to be placed and either select an existing file or enter the name for the new file in the Filename box.
9. Click Save.
10. Click OK. The export is now performed. The results of the export are displayed in the Messages window at the bottom of the SDL Maintain screen.
60
61
Sharing a Translation Memory (TM)
If a TM is located on a network and users have been given the necessary permissions to access it there, it is possible for a number of SDLX users to share a TM. The actual number of simultaneous users is limited as follows:
• If the TM is a Microsoft Access database (the SDLX default) we advise that no more than 5 users be allowed to share the TM at a time
• If the TM is a SQL database, the number of users is limited to the number of SQL licenses that you have purchased.
SDLX Standard users and SDLX Lite users are excluded completely from TM sharing. All other SDLX users with access to a network are able to share a TM.
How to set up TM sharing
To enable TM sharing you have do some setting up in these two areas:
1. The network via which the TM will be accessed. 2. The PC of each user who will be accessing the TM.
On the network:
• Put the TM on the network • Give all users who will be accessing the TM read and write permissions for the
database (irrespective of whether they will be updating the TM or not) • If the TM format is SQL Server, it is essential that permissions are set correctly,
otherwise severe problems may result when users try to access the TM. Contact your SQL Server database administrator if you are at all unclear about what you need to do.
On each user’s PC
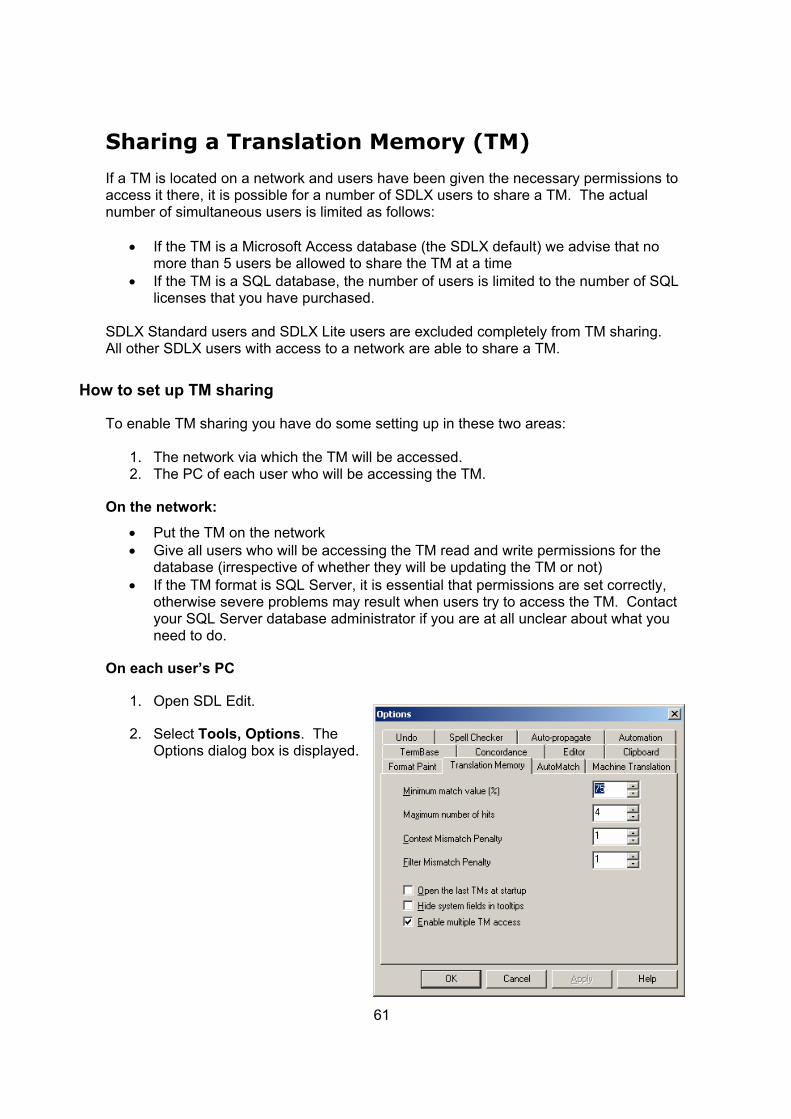
1. Open SDL Edit.
2. Select Tools, Options. The Options dialog box is displayed.
62
3. Select the Translation Memory tab.
4. Set the Minimum match value (%) to 75 (this is the fuzzy matching threshold).
5. Set the Maximum number of hits to 4 (this means that when there are multiple translations for the same segment in the TM, users will be given a maximum of 4 to choose from. These are the best 4 matches.).
6. Select the Automation tab.
7. Update the Automation tab settings:
If then the user will be updating the TM with their translations every time they confirm a segment
go to step 9.
the user is using Auto Propagate or will not be updating the TM at all during translation
go to step 8.
8. Complete the tab as follows and click OK:
Automation tab option Select? Automatic Save Every No Automatic TermBase Lookup Optional Automatic TM Lookup after Yes Automatic TM Apply No Automatic TM Update No
9. Complete the tab as follows and click OK:
Automation tab option Select? Automatic Save Every No Automatic TermBase Lookup Optional
63
Automatic TM Lookup after Yes Automatic TM Apply Yes Automatic TM Update Yes
Do you want to keep translation versions?
When you have a number of translators sharing a TM it is possible that they could all at some point translate source segments with identical content. If the completed translations are different (no matter how slightly) and if each translator updates the TM with their version, then as each one is added, the new one will overwrite the last. If you would prefer to keep all of the translation versions in the TM , you need to ensure that users do not have the Automatic TM Update setting selected and that users do not update the TM themselves. Instead the completed translations should be imported to the TM using SDL Maintain. When importing .ITD files to a TM you have the option to retain different translations for the same segment.
Share a TM with translators not on the network
If you want translators who do not have access to your network to use a TM, then you can export the existing TM segments to a new TM and send this to them. If the TM is too large you could first compact it (in SDL Maintain) and then compress it (using a tool like WinZip) before sending it. Alternatively you could create a sub-set of the TM by applying a filter to the segments during export. A filter enables you to select those segments which are relevant to the project the translator is working on and export only these. The rest of the TM segments are excluded from the export. Using Filters is described in Appendix A.
Support
Remember to use the help available in SDLX:
• Select Help, Help Topics to display the help for the module you are currently working in, or
• Press F1 to display the help for the current screen or dialog box.
Online Support Centre
If you have any SDLX questions or problems you can visit our Online Support Centre at: http://support.sdl.com. We suggest that you register your details in the My Stuff section. You will then be able to look for answers and ask questions etc. using this site.
64

65
Appendix A – Filters
A filter is a set of conditions which act as selection criteria. In SDLX, filters are applied to TM segments; they test the values contained in default database fields such as Created By or Last Used, and in fields that have been added to the TM (for example you may have added a Project Code field). Depending on where you are working in SDLX, TM segments that do not match the conditions contained in a filter are either:
• Not selected at all, or • Are selected but have a (%) mismatch penalty imposed.
In SDL Maintain When you apply a filter to a TM that is being exported, segments which do not match the filter conditions are excluded from the export. This means that you can create a new, tailored, TM that contains only the segments relevant to a project or client or translator.
In SDL Edit, SDL Apply and SDL Analyse Here filters enable you to prioritize segments by imposing a filter mismatch penalty on segments that do not meet the filter criteria. Example: A segment has a 100% TM match but the TM segment does not match the
filter criteria. If the filter mismatch penalty is set at 10%, the TM segment will be presented as a 90% TM match. As a result, although this segment has the best origin text match it will not be selected in preference to a segment that has a 95% origin text match but which meets the filter criteria.
How to set the filter mismatch penalty
In SDL Edit select Tools, Options from the menu bar. Filter Mismatch Penalty is an option on the Translation Memory tab of the Options dialog box. In SDL Apply, Filter Mismatch Penalty is an option on the Options tab.
How to apply a filter
SDL Apply Set Filter is an option on the Translation Memory tab.
SDL Edit Open a TM and either click the Set Filter button on the Translation Memory toolbar or press Ctrl/SHIFT/S or select Translation Memory, Set Filter from the menu bar.
SDL Maintain Open a TM and click the Set Filter button on the Filter toolbar or press Ctrl/SHIFT/S or select Tools, Set Filter from the menu bar.
66
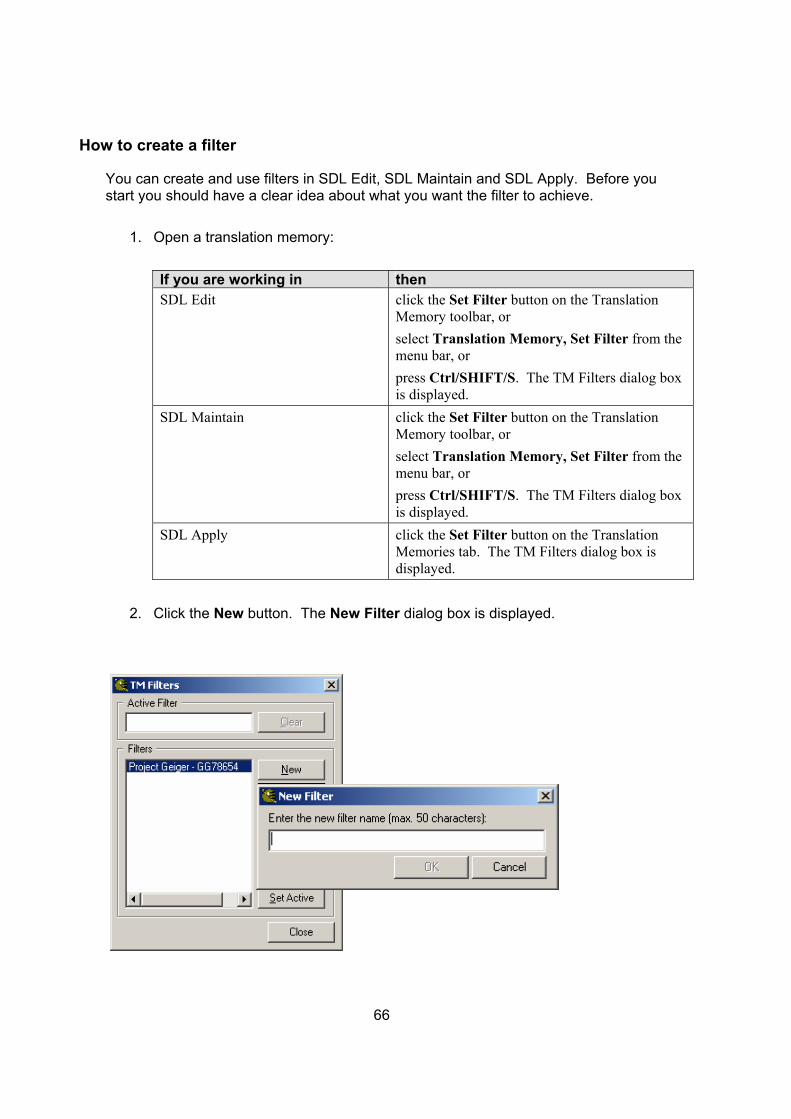
How to create a filter
You can create and use filters in SDL Edit, SDL Maintain and SDL Apply. Before you start you should have a clear idea about what you want the filter to achieve.
1. Open a translation memory:
If you are working in then SDL Edit click the Set Filter button on the Translation
Memory toolbar, or select Translation Memory, Set Filter from the menu bar, or press Ctrl/SHIFT/S. The TM Filters dialog box is displayed.
SDL Maintain click the Set Filter button on the Translation Memory toolbar, or select Translation Memory, Set Filter from the menu bar, or press Ctrl/SHIFT/S. The TM Filters dialog box is displayed.
SDL Apply click the Set Filter button on the Translation Memories tab. The TM Filters dialog box is displayed.
2. Click the New button. The New Filter dialog box is displayed.
67
3. Enter the name for the new filter and click OK. The New Filter dialog box closes and the new filter appears in the Filters box on the TM Filters dialog. The new filter name is highlighted.
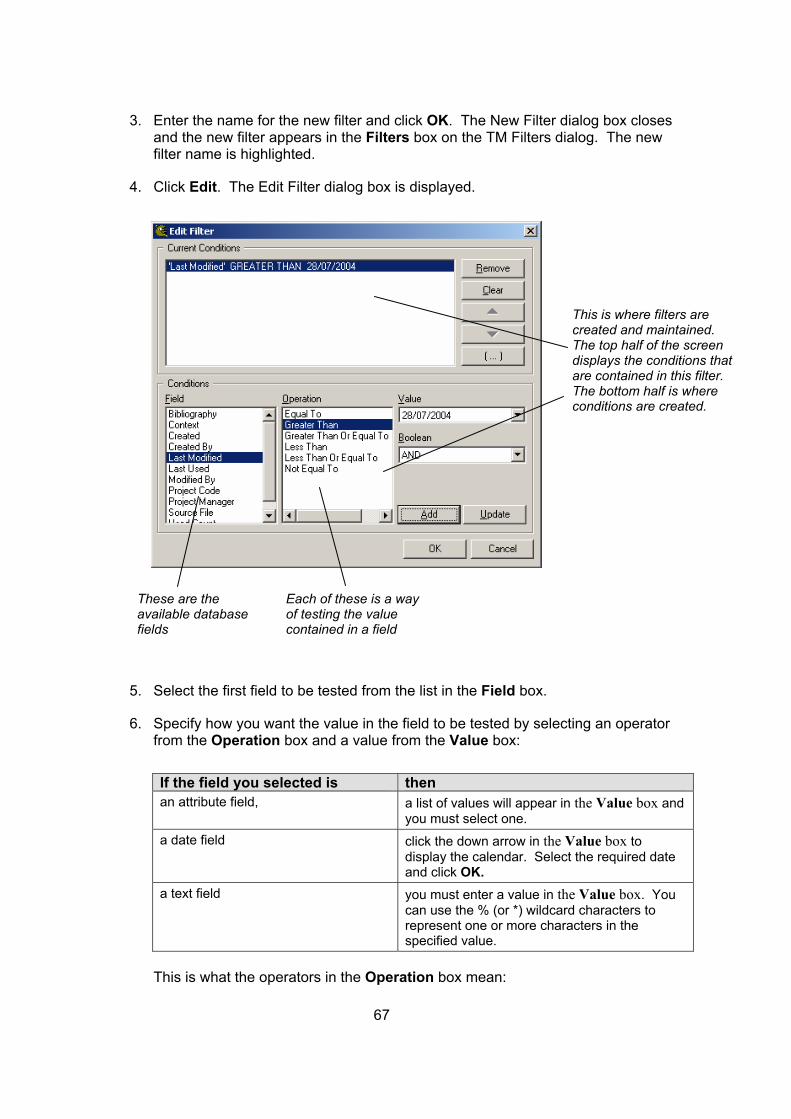
4. Click Edit. The Edit Filter dialog box is displayed.
This is where filters are
created and maintained. The top half of the screen displays the conditions that are contained in this filter. The bottom half is where conditions are created.
These are the
available database fields
Each of these is a way of testing the value contained in a field
5. Select the first field to be tested from the list in the Field box.
6. Specify how you want the value in the field to be tested by selecting an operator from the Operation box and a value from the Value box:
If the field you selected is then an attribute field, a list of values will appear in the Value box and
you must select one. a date field click the down arrow in the Value box to
display the calendar. Select the required date and click OK.
a text field you must enter a value in the Value box. You can use the % (or *) wildcard characters to represent one or more characters in the specified value.
This is what the operators in the Operation box mean:
Operator Is true when the value in the selected field: Equal to
Is an exact match for the value in the Value field.
Not equal to
Is any other value than the one in the Value field.
Less than
Is less than the value in the Value field.
Greater Than
Is greater than the value in the Value field.
Greater Than Or Equal to
Is equal to the value in the Value field or is a higher value.
Less Than Or Equal to Is equal to the value in the Value field or is a lesser value. The Like and Not Like operators enable you to use a wildcard search in text fields.
Like
Like *test* Would find fields containing the string “test” Like test* Would find fields containing a value beginning with the string “test” Like *test Would find fields containing a value that ends with the string “test” Like [t-v]*es*[1-5] Would find fields containing a value beginning with a letter from the first range specified (in this example t-v), contains the letters “es” and ends with a number from the second range specified (in this example 1 to 5). So it would find: test, test bed, testing, test 1, test 2, test 3, test 4, test 5, vest, vested, vestry.
Not like Finds all segments where this field does not contain the specified value.
7. Click Add. The condition is added to the Current Conditions box.
8. If the filter is complete, click OK. The filter is created and is available for use immediately.
9. If you want to add another condition to the filter, select the required Field, Operation and Value and check the selection in the Boolean field (change it if necessary). ADD = Both conditions must be true OR = Either the first or the second must be true.
10. click the Add button.
68
69
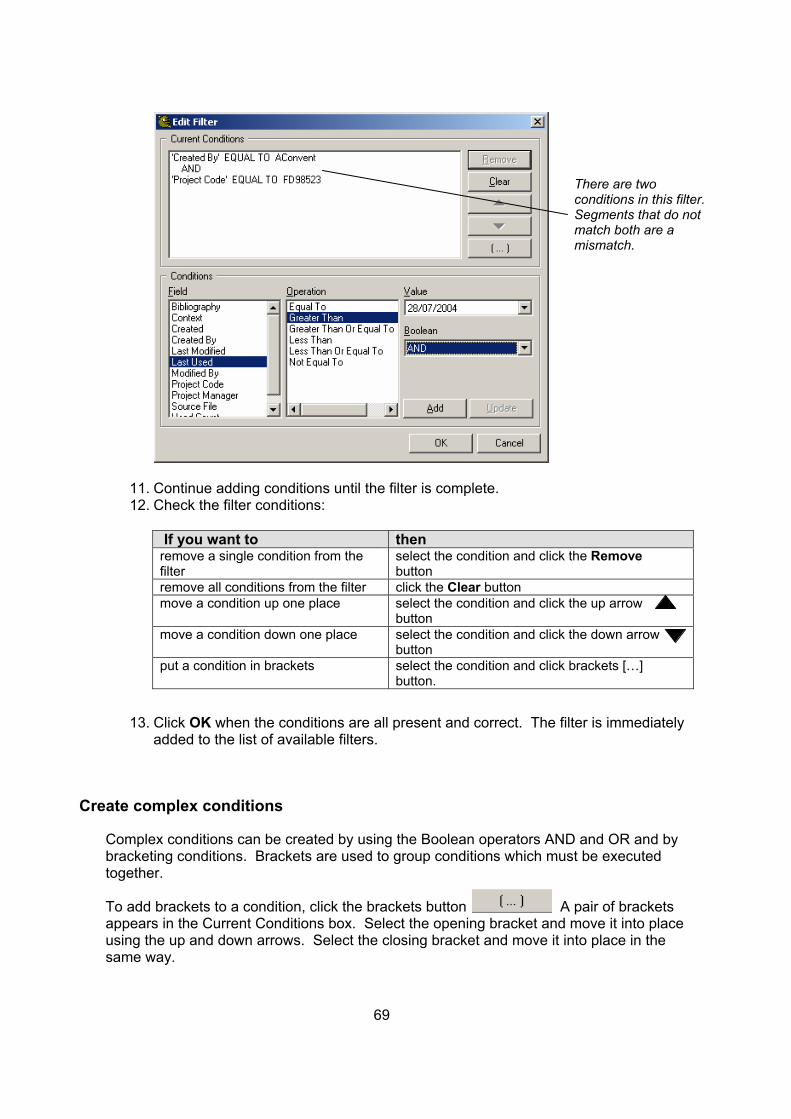
There are two conditions in this filter. Segments that do not match both are a mismatch.
11. Continue adding conditions until the filter is complete. 12. Check the filter conditions:
If you want to then remove a single condition from the filter
select the condition and click the Remove button
remove all conditions from the filter click the Clear button move a condition up one place select the condition and click the up arrow
button move a condition down one place select the condition and click the down arrow
button put a condition in brackets select the condition and click brackets […]
button.
13. Click OK when the conditions are all present and correct. The filter is immediately added to the list of available filters.
Create complex conditions
Complex conditions can be created by using the Boolean operators AND and OR and by bracketing conditions. Brackets are used to group conditions which must be executed together. To add brackets to a condition, click the brackets button A pair of brackets appears in the Current Conditions box. Select the opening bracket and move it into place using the up and down arrows. Select the closing bracket and move it into place in the same way.

70
Example: In this example the filter will test for segments where the translation was created by: A Convert working on project AA5412 OR D Baldwin working on project FD98523 Where either of those is true, the segment meets the filter criteria. Without brackets each condition is tested in order and immediately a segment fails to match a condition, it has failed the filter test. So without the brackets, every segment where the translator’s name is not A Convent would fail to meet the first condition.