Embed Size (px)
Citation preview
Malware Protection II White Paper Windows 7
Rohde & Schwarz recognizes the potential
risk of computer virus infection when con-
necting Windows®-based test instrumenta-
tion to other computers via local area net-
works (LANs), or using removable storage
devices.
This white paper introduces measures to
minimize malware threats and discusses
ways to mitigate risks while insuring that
instrument performance is not compro-
mised.
The paper discusses the use of anti-virus
software. It also outlines how to keep the
Windows® 7 operating system properly
updated through regular installation of OS
patches.
Mal
war
e P
rote
ctio
n W
indo
ws
7
Whi
te P
aper
Dr.
Chr
istia
n H
ölzl
01.2
015-
1DC
01_0
e
Windows 7®-Based Instruments
1EF73_0e Rohde & Schwarz Malware Protection II - White Paper 2
Table of Contents
1 Windows 7®-Based Instruments ......................................................................... 4
1.1 Overview............................................................................................................................................ 4
1.2 Computer Virus Control Program ................................................................................................... 4
1.3 Preventative Maintenance Considerations .................................................................................... 4
1.4 User / Admin Account ...................................................................................................................... 5
2 Firewall Settings .................................................................................................. 6
2.1 Firewall – Port Configuration .......................................................................................................... 7
2.2 Changing Firewall Settings ............................................................................................................. 8
3 USB Devices ...................................................................................................... 12
3.1 USB Autorun Function ...................................................................................................................12
3.2 Scan USB Devices ..........................................................................................................................15
4 Anti-Virus Software ........................................................................................... 16
4.1 Kaspersky™ Anti-Virus 2014 ........................................................................................................17
4.1.1 Installation and Requirements ......................................................................................................17
4.1.2 Deactivate Automatic Updates .....................................................................................................19
4.1.3 Virus Scans of removable drives on connection ........................................................................23
4.1.4 Deactivate Automatic Virus Scans ...............................................................................................24
4.2 Bit Defender® Anti-Virus 2014 ......................................................................................................25
4.2.1 Installation and Requirements ......................................................................................................25
4.2.2 Deactivate Automatic Updates .....................................................................................................27
4.2.3 Deactivate Automatic Virus Scans ...............................................................................................27
4.3 Avira™ Anti-Virus 2014 ..................................................................................................................28
4.3.1 Installation and Requirements ......................................................................................................28
4.3.2 Deactivate Automatic Updates .....................................................................................................30
4.3.3 Deactivate Automatic Virus Scans ...............................................................................................30
4.4 Scanning from another USB drive ................................................................................................32
4.5 Scanning Instruments from another PC ......................................................................................32
4.5.1 Share Drives of the Instrument / prepare the instrument ..........................................................32
4.5.2 Mapping Instrument Drives on a computer with Windows 7® ...................................................36
4.5.3 Mapping Instrument Drives on a computer with Windows 8® ...................................................38
Windows 7®-Based Instruments
1EF73_0e Rohde & Schwarz Malware Protection II - White Paper 3
5 Microsoft® Patches and Updates ...................................................................... 42
5.1 Enabling Windows Update Service ..............................................................................................42
5.2 Starting Windows Update Manually .............................................................................................45
5.3 Starting Windows Update Automatically .....................................................................................47
5.4 Windows® Update over WSUS Server ..........................................................................................49
6 Related Documents and Links.......................................................................... 50
Windows 7®-Based Instruments
1EF73_0e Rohde & Schwarz Malware Protection II - White Paper 4
1 Windows 7®-Based Instruments
1.1 Overview
Instruments that run Windows 7 operating systems should be protected from malware
just like any other PC. Users are strongly advised to take measures to protect their in-
struments such as using anti-virus software and installing OS patches and updates on
a regular basis. It is highly recommended that you work closely with your IT depart-
ment or system administrator to ensure compliance with your company policies when
connecting instruments to your company’s network. This document does not make any
difference between Windows 7 32-Bit and Windows 7 64-Bit. If you are using any anti-
virus software make sure it is designed for your operating system.
1.2 Computer Virus Control Program
Rohde & Schwarz recognizes the potential risk of computer virus infections on Win-
dows-based instrumentations which are connected to local area networks (LANs).
Rohde & Schwarz has established processes within the company to take all reasona-
ble precautions to prevent the spread of viruses from instruments to our customers’
computers and networks:
All computers used within Rohde & Schwarz that may be connected to instru-
ments destined for customers are equipped with centrally managed firewall
and anti-virus software and maintain the latest virus definitions. Computers and
removable storage devices are scanned regularly to prevent the spread of
computer viruses.
Strict virus control protocols have been established in manufacturing, service,
support, sales, distribution and demonstration environments. This includes the
use of isolated LANs, scanning of instruments and removable storage devices
and/or re-imaging hard drives, depending on instrument configuration.
Procedures have been established for all Rohde & Schwarz employees who
come in contact with customer instruments to reinforce anti-virus security pro-
tocols. This includes all personnel from manufacturing, service, support, sales
and distribution.
1.3 Preventative Maintenance Considerations
From that point on it is the user's responsibility to ensure the security of the instrument.
Before connecting the instrument to your company's network, please consult with your
IT department or system administrator to determine what specific policies apply. Re-
member that the instrument appears to be a standard computer to the network. Follow
your company’s policies with regards to computer security and virus protection.
Windows 7®-Based Instruments
1EF73_0e Rohde & Schwarz Malware Protection II - White Paper 5
It is also important to update both the virus definitions and operating system regularly.
Rohde & Schwarz recommends checking both virus definitions and operating system
updates, in addition to scanning the instrument for any malware, at least once per
week. Be sure to always update the OS and anti-virus definitions if advised to do so by
your IT department or system administrator. The following steps should be taken to
ensure the instrument’s operating system is better protected:
Do not disable the firewall on the instrument, keep it always active.
Scan all removable storage devices (e.g. USB thumb drives) that are used with
an instrument regularly and deactivate the Autorun / Autoplay function to pre-
vent inadvertent execution of malicious code from these devices.
Install the latest Windows® patches and updates on the instrument.
Scan the instrument regularly with anti-virus software, and keep virus definition
files updated. It is NOT recommended to run anti-virus software in the back-
ground (“on-access” mode) as this will impact instrument performance signifi-
cantly.
1.4 User / Admin Account
Windows requires that users identify themselves by entering a user name and pass-
word in a login window. In general, R&S instruments provide a factory-installed auto-
login function, i.e. login is carried out automatically during the startup of the instrument.
The factory default for this auto-login function has administrator rights with unrestricted
access, so that printer installation and network configuration are possible.
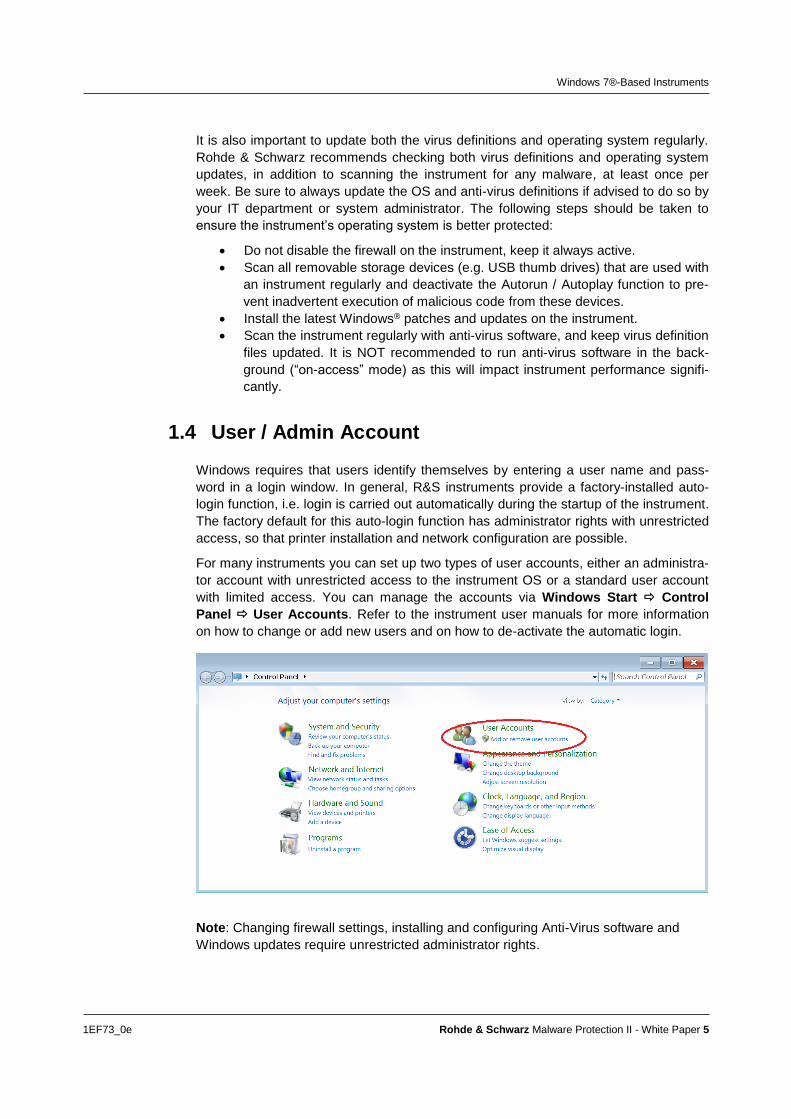
For many instruments you can set up two types of user accounts, either an administra-
tor account with unrestricted access to the instrument OS or a standard user account
with limited access. You can manage the accounts via Windows Start Control
Panel User Accounts. Refer to the instrument user manuals for more information
on how to change or add new users and on how to de-activate the automatic login.
Note: Changing firewall settings, installing and configuring Anti-Virus software and
Windows updates require unrestricted administrator rights.
Firewall Settings
1EF73_0e Rohde & Schwarz Malware Protection II - White Paper 6
2 Firewall Settings With Windows 7 a firewall can help to better protect a computer or instrument against
attacks from the network. R&S instruments are shipped with the Windows firewall ena-
bled and preconfigured. Having the firewall activated on the instruments is helpful even
when you use the instruments within your company’s protected network. With the
number of worms, viruses and other malware circulating on the Internet today, it is in-
evitable that something will penetrate the enterprise firewall. Instrument firewalls not
only help protect against threats inside the perimeter, but they can also prevent the
spread of many viruses and worms.
If you have additional requirements for security and protection please contact your IT
department or system administrator to ensure conformity with your company’s security
policy.
The Windows 7 firewall has three different profiles in which the firewall settings can be
independently configured. The following profiles are defined:
Private Profile:
Applied to a network adapter when it is connected to a network that is identified by the
user or administrator as a private network. A private network is one that is not con-
nected directly to the Internet, but is behind some kind of security device, such as a
network address translation (NAT) router or hardware firewall.
Domain Profile:
Applied to a network adapter when it is connected to a network on which it can detect
a domain controller of the domain to which the computer is joined.
Public Profile:
Applied to a network adapter when it is connected to a public network. When the pro-
file is not set to Work or Private, the default profile is Public. The Public profile settings
should be the most restrictive because the computer is connected to a public network
where the security cannot be controlled.
R&S Instruments are shipped with preconfigured firewall, which enables all necessary
ports for the R&S software on all profiles.
Firewall Settings
1EF73_0e Rohde & Schwarz Malware Protection II - White Paper 7
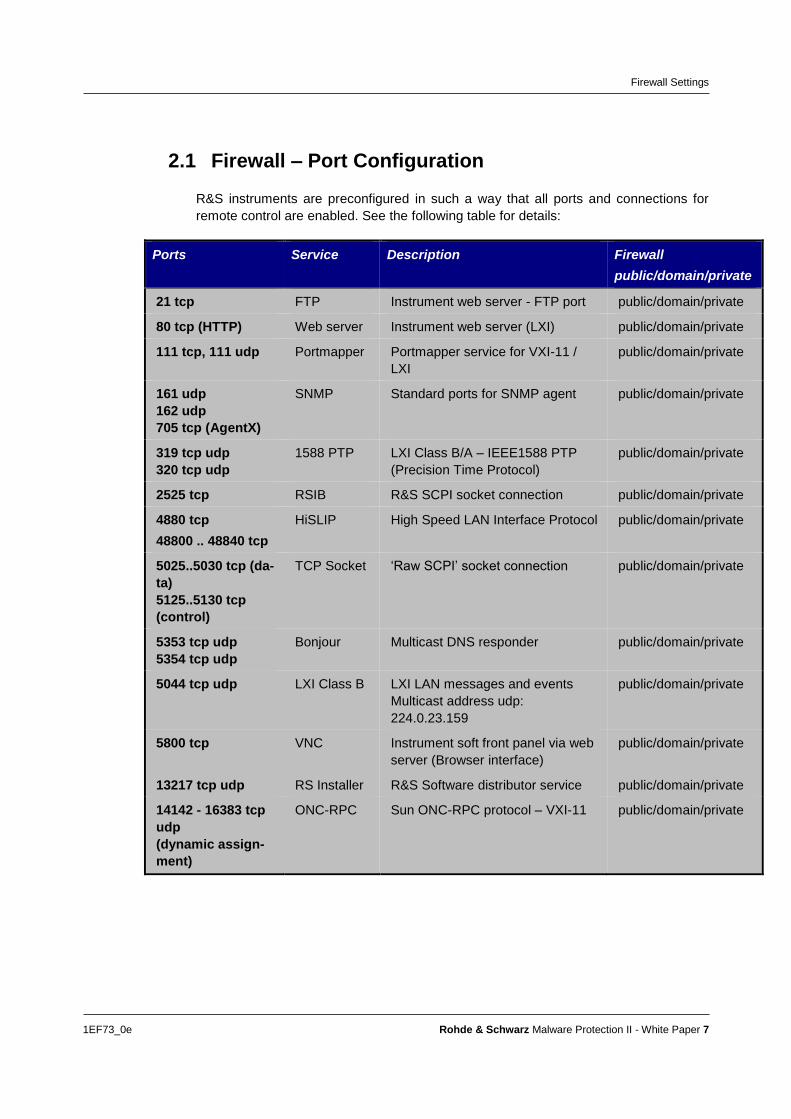
2.1 Firewall – Port Configuration
R&S instruments are preconfigured in such a way that all ports and connections for
remote control are enabled. See the following table for details:
Ports Service Description Firewall
public/domain/private
21 tcp FTP Instrument web server - FTP port public/domain/private
80 tcp (HTTP) Web server Instrument web server (LXI) public/domain/private
111 tcp, 111 udp Portmapper Portmapper service for VXI-11 /
LXI
public/domain/private
161 udp
162 udp
705 tcp (AgentX)
SNMP Standard ports for SNMP agent public/domain/private
319 tcp udp
320 tcp udp
1588 PTP LXI Class B/A – IEEE1588 PTP
(Precision Time Protocol)
public/domain/private
2525 tcp RSIB R&S SCPI socket connection public/domain/private
4880 tcp
48800 .. 48840 tcp
HiSLIP High Speed LAN Interface Protocol public/domain/private
5025..5030 tcp (da-
ta)
5125..5130 tcp
(control)
TCP Socket ‘Raw SCPI’ socket connection public/domain/private
5353 tcp udp
5354 tcp udp
Bonjour Multicast DNS responder public/domain/private
5044 tcp udp LXI Class B LXI LAN messages and events
Multicast address udp:
224.0.23.159
public/domain/private
5800 tcp
VNC Instrument soft front panel via web
server (Browser interface)
public/domain/private
13217 tcp udp RS Installer R&S Software distributor service public/domain/private
14142 - 16383 tcp
udp
(dynamic assign-
ment)
ONC-RPC Sun ONC-RPC protocol – VXI-11 public/domain/private
Firewall Settings
1EF73_0e Rohde & Schwarz Malware Protection II - White Paper 8
2.2 Changing Firewall Settings
Rohde & Schwarz highly recommends the use of the firewall on your instrument.
Please do NOT turn off the firewall and confirm any change with your IT department.
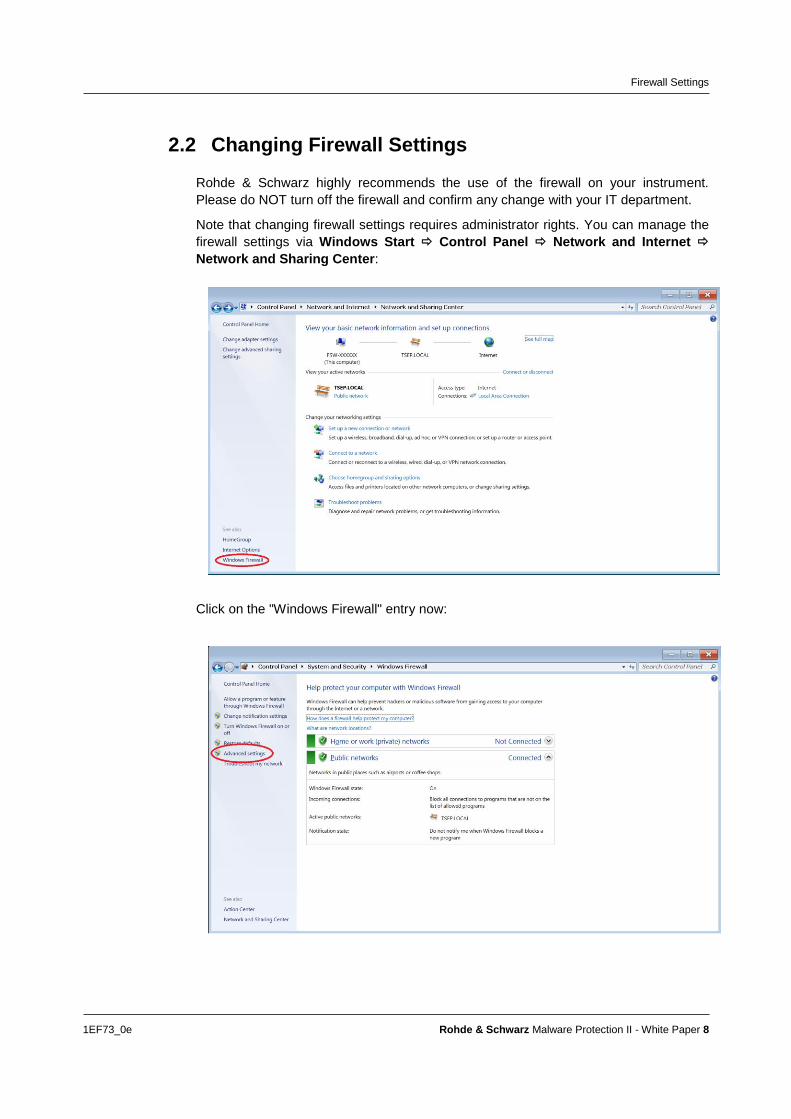
Note that changing firewall settings requires administrator rights. You can manage the
firewall settings via Windows Start Control Panel Network and Internet
Network and Sharing Center:
Click on the "Windows Firewall" entry now:
Firewall Settings
1EF73_0e Rohde & Schwarz Malware Protection II - White Paper 9
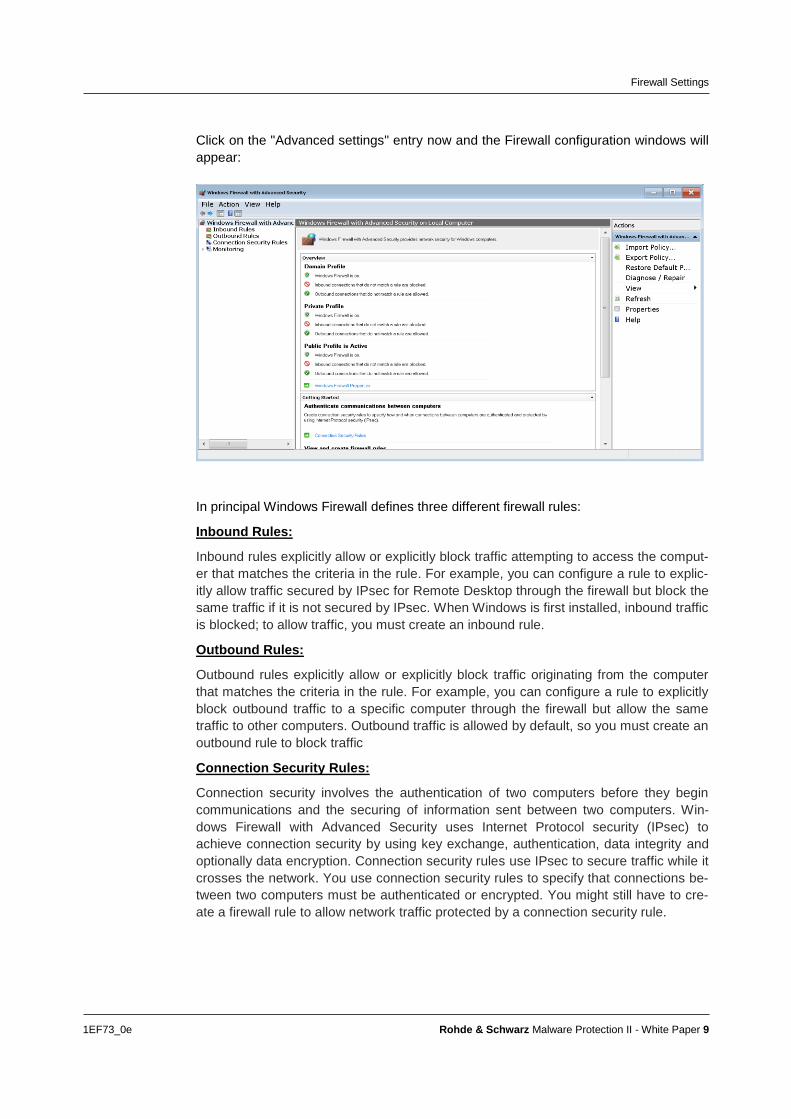
Click on the "Advanced settings" entry now and the Firewall configuration windows will
appear:
In principal Windows Firewall defines three different firewall rules:
Inbound Rules:
Inbound rules explicitly allow or explicitly block traffic attempting to access the comput-
er that matches the criteria in the rule. For example, you can configure a rule to explic-
itly allow traffic secured by IPsec for Remote Desktop through the firewall but block the
same traffic if it is not secured by IPsec. When Windows is first installed, inbound traffic
is blocked; to allow traffic, you must create an inbound rule.
Outbound Rules:
Outbound rules explicitly allow or explicitly block traffic originating from the computer
that matches the criteria in the rule. For example, you can configure a rule to explicitly
block outbound traffic to a specific computer through the firewall but allow the same
traffic to other computers. Outbound traffic is allowed by default, so you must create an
outbound rule to block traffic
Connection Security Rules:
Connection security involves the authentication of two computers before they begin
communications and the securing of information sent between two computers. Win-
dows Firewall with Advanced Security uses Internet Protocol security (IPsec) to
achieve connection security by using key exchange, authentication, data integrity and
optionally data encryption. Connection security rules use IPsec to secure traffic while it
crosses the network. You use connection security rules to specify that connections be-
tween two computers must be authenticated or encrypted. You might still have to cre-
ate a firewall rule to allow network traffic protected by a connection security rule.

Firewall Settings
1EF73_0e Rohde & Schwarz Malware Protection II - White Paper 10
Normally there is no need to change the configuration of the firewall. In rare circum-
stances it might be necessary to create a new firewall rule. Please note that this con-
figuration influences your computer security, so change only the firewall configuration if
you are familiar with the concepts of firewalls.
To create a new rule, select the appropriate category of rules on the left side:
After you have selected the appropriate category of rules (Inbound, Outbound, Con-
nection Security) you can start the "New Rule.." creation by clicking on the right side:
After this the "New Rule" wizard is started. This wizard guides you through the creation
steps. The different steps are described in detail on the Microsoft TechNet.
Problems that are related to the default firewall configuration appear in two ways:
Client programs may not receive data from the instrument.
Server programs that are running on the instrument may not respond to client
requests.
Firewall Settings
1EF73_0e Rohde & Schwarz Malware Protection II - White Paper 11
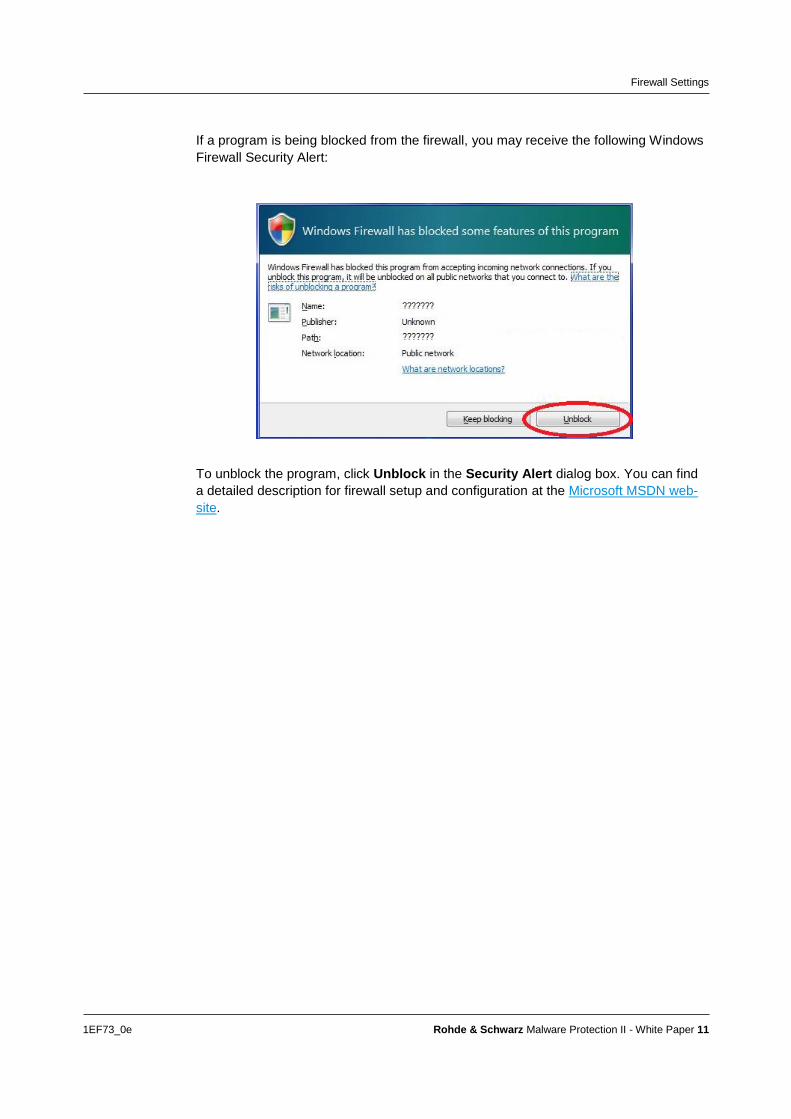
If a program is being blocked from the firewall, you may receive the following Windows
Firewall Security Alert:
To unblock the program, click Unblock in the Security Alert dialog box. You can find
a detailed description for firewall setup and configuration at the Microsoft MSDN web-
site.
USB Devices
1EF73_0e Rohde & Schwarz Malware Protection II - White Paper 12
3 USB Devices USB thumb drives and removable hard drives are now common throughout the work-
place, as they have considerable storage capacity and can be used to store instrument
settings, measurement results, hardcopies etc. in a very convenient way. However,
they also introduce new problems; a large number of viruses, trojans and other mal-
ware infect computers via USB storage devices. Once an infected USB drive is
plugged into an instrument, the malware on it can spread throughout the whole net-
work.
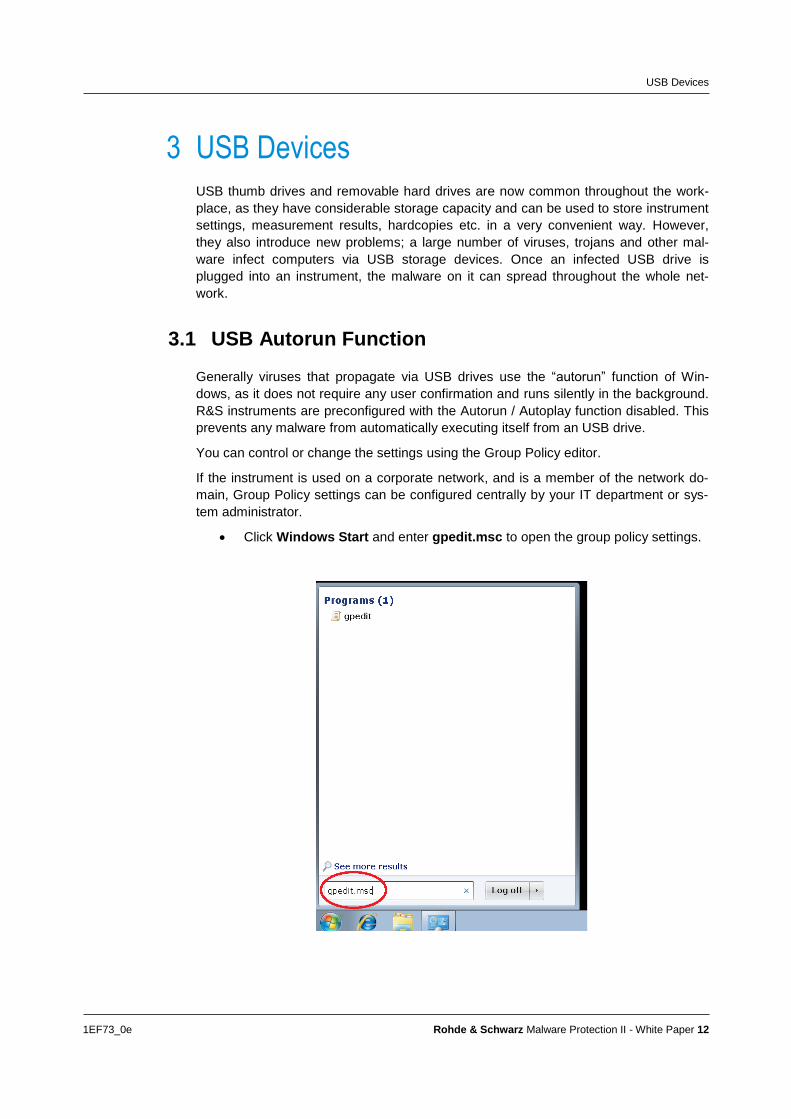
3.1 USB Autorun Function
Generally viruses that propagate via USB drives use the “autorun” function of Win-
dows, as it does not require any user confirmation and runs silently in the background.
R&S instruments are preconfigured with the Autorun / Autoplay function disabled. This
prevents any malware from automatically executing itself from an USB drive.
You can control or change the settings using the Group Policy editor.
If the instrument is used on a corporate network, and is a member of the network do-
main, Group Policy settings can be configured centrally by your IT department or sys-
tem administrator.
Click Windows Start and enter gpedit.msc to open the group policy settings.

USB Devices
1EF73_0e Rohde & Schwarz Malware Protection II - White Paper 13
Go to Computer Configuration Administrative Templates Windows Compo-
nents Autoplay Policies:
USB Devices
1EF73_0e Rohde & Schwarz Malware Protection II - White Paper 14
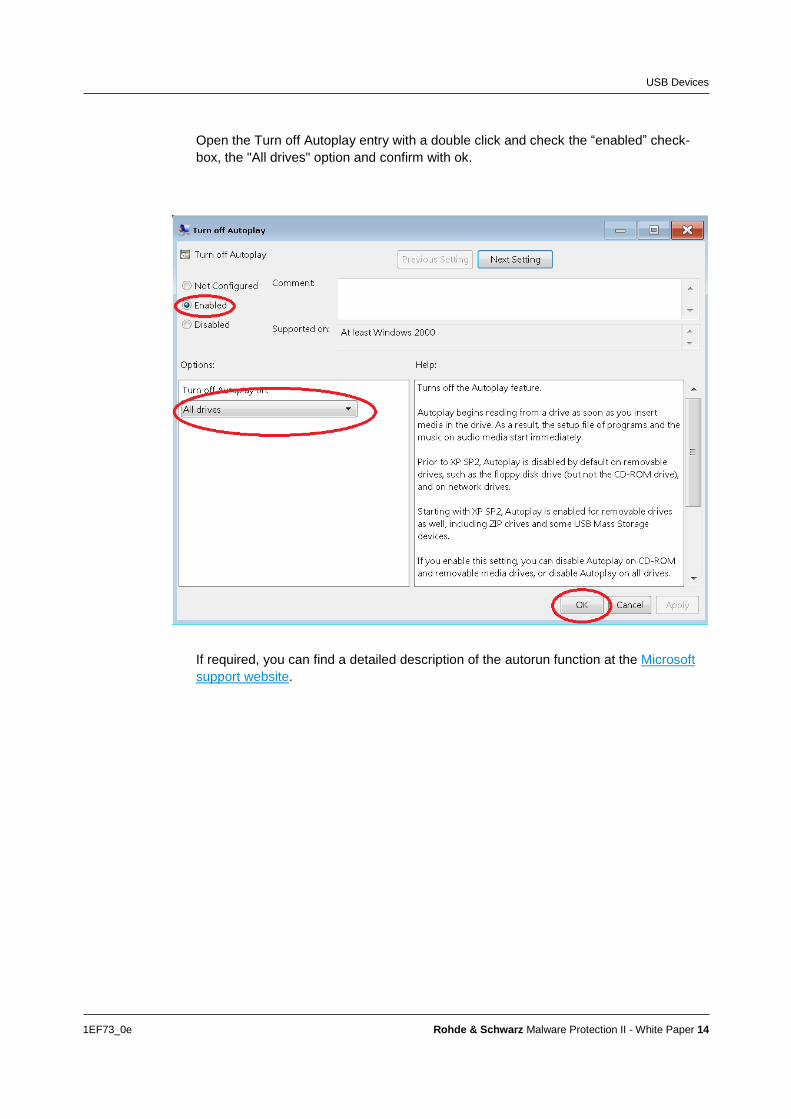
Open the Turn off Autoplay entry with a double click and check the “enabled” check-
box, the "All drives" option and confirm with ok.
If required, you can find a detailed description of the autorun function at the Microsoft
support website.
USB Devices
1EF73_0e Rohde & Schwarz Malware Protection II - White Paper 15
3.2 Scan USB Devices
Rohde & Schwarz highly recommends scanning USB thumb drives and removable
hard drives with anti-virus software on a regular basis to keep them free of malware.
Use your computer and anti-virus software to scan the USB storage devices before
plugging them into an R&S instrument.
Anti-Virus Software
1EF73_0e Rohde & Schwarz Malware Protection II - White Paper 16
4 Anti-Virus Software As with personal and business computers, users must take appropriate steps to protect
their instruments from infection. Besides the use of strong firewall settings and regular-
ly scanning of any removable storage device used with an R&S instrument, it is also
recommended that anti-virus software is installed on the instrument. While Rohde &
Schwarz does NOT recommend running anti-virus software in the background (“on-
access” mode) on Windows-based instruments, due to potentially degrading instru-
ment performance, it does recommend running it during non-critical hours at least once
per week.
Today’s anti-virus software requires a significant amount of system resources (both
hard drive space and memory consumption). Therefore some instruments may not be
capable of installing or running anti-virus software due to limited resources. Other op-
tions in that case are to scan these instruments with software run from a USB thumb
drive, or to mount these instruments as a drive on the network and scan them from
another computer with anti-virus software. These options will be detailed later.
Any anti-viurs software which is not regularly updated, does not help to protect your
system, because the anti-virus software is running out of date. Any modern anti-virus
software is able to do regular updates over the internet or with offline installations.
Please contact your IT department to determine the correct solution for your ant-virus
software. Keep in mind that any anti-virus software update will influence the instru-
ments performance.
Note: The following sections are intended to highlight recommendations for anti-virus
software, using a few commonly used programs as examples. It is recognized that
there are other capable programs; the ones used in the following sections serve as
general examples and the principles apply to other programs which may be used by
your IT department or system administrator.
The screen shots are made for the current versions at the time the document was cre-
ated. Changes to the anti-virus software may also change the look and feel of the soft-
ware, and therefore outdate the screen shots.
Installing, configuring and using anti-virus software requires administrator rights.

Anti-Virus Software
1EF73_0e Rohde & Schwarz Malware Protection II - White Paper 17
4.1 Kaspersky™ Anti-Virus 2014
This section describes the notes and hints if you are using the anti-virus software
Kasperksy™ Anti-Virus 2014.
4.1.1 Installation and Requirements
As mentioned before you need to install the anti-virus software with administrator rights
on your instrument. Please make sure that you are logged in as an appropriate user.
R&S highly recommends that the firmware is not running during the installation, so
terminate the instrument firmware before you install the software.
For the installation the software needs at least 1,5 GBytes disk space on the instru-
ment hard disk. Please ensure that the instruments firmware can run properly. To
check this open the Windows explorer and click at the left side onto the "Local Disk
(C:)" and activate the context menu and select "Properties".

Anti-Virus Software
1EF73_0e Rohde & Schwarz Malware Protection II - White Paper 18
Afterwards Windows will display the available "Free space" on your instrument. Please
note that you need at least 1,5 GBytes of free space.
Also the Kaspersky Anti-Virus needs up to 400 MB of system memory. Please refer to
your firmware manual if this system memory can be used for anti-virus software.
Install the Kasperksy Anti-Virus 2014 software on the instrument as described in the
vendor’s manual.
Therefore, Rohde & Schwarz recommends that the firmware on the instrument is
stopped before starting update or a virus scan. Refer to the instrument’s manual for
how to stop execution of the instrument’s firmware.
Anti-Virus Software
1EF73_0e Rohde & Schwarz Malware Protection II - White Paper 19
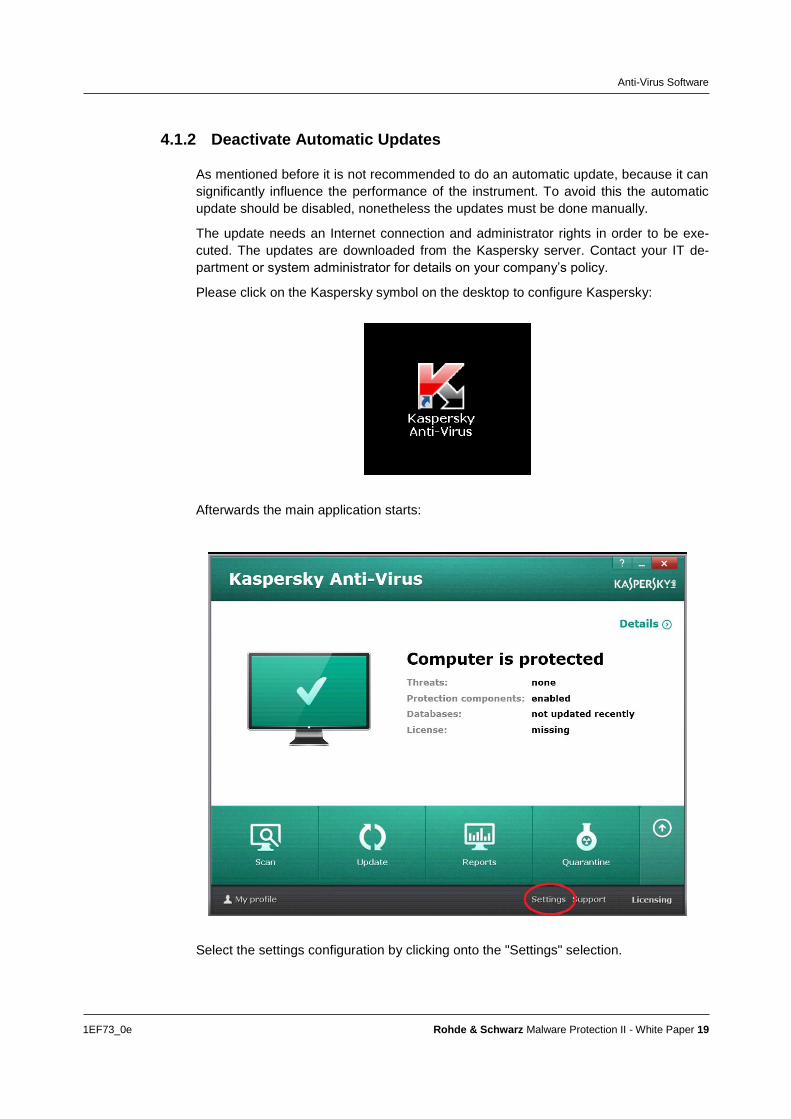
4.1.2 Deactivate Automatic Updates
As mentioned before it is not recommended to do an automatic update, because it can
significantly influence the performance of the instrument. To avoid this the automatic
update should be disabled, nonetheless the updates must be done manually.
The update needs an Internet connection and administrator rights in order to be exe-
cuted. The updates are downloaded from the Kaspersky server. Contact your IT de-
partment or system administrator for details on your company’s policy.
Please click on the Kaspersky symbol on the desktop to configure Kaspersky:
Afterwards the main application starts:
Select the settings configuration by clicking onto the "Settings" selection.
Anti-Virus Software
1EF73_0e Rohde & Schwarz Malware Protection II - White Paper 20
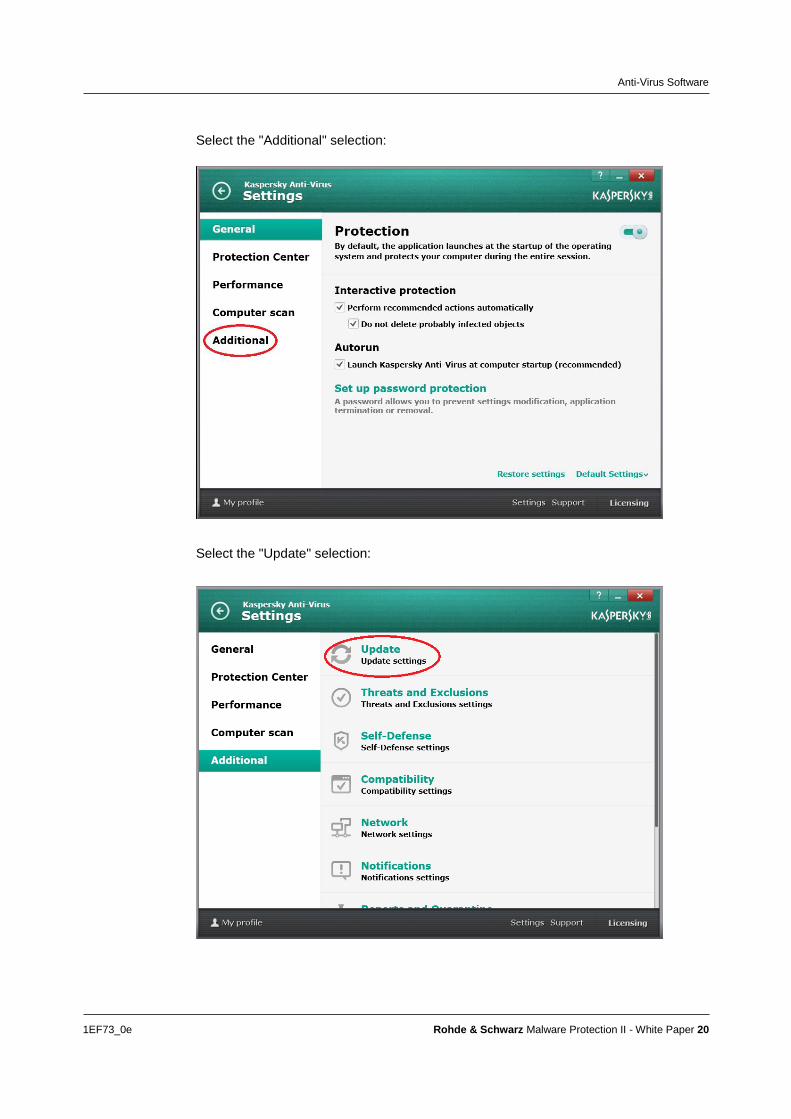
Select the "Additional" selection:
Select the "Update" selection:
Anti-Virus Software
1EF73_0e Rohde & Schwarz Malware Protection II - White Paper 21
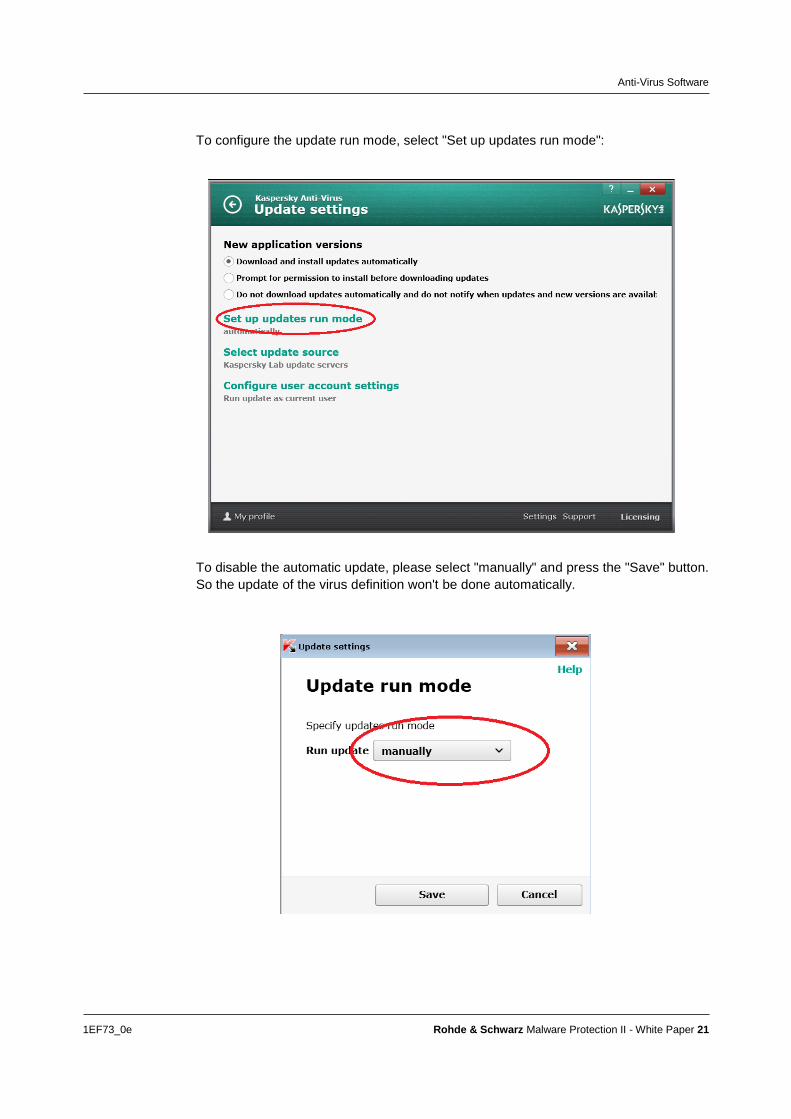
To configure the update run mode, select "Set up updates run mode":
To disable the automatic update, please select "manually" and press the "Save" button.
So the update of the virus definition won't be done automatically.
Anti-Virus Software
1EF73_0e Rohde & Schwarz Malware Protection II - White Paper 22
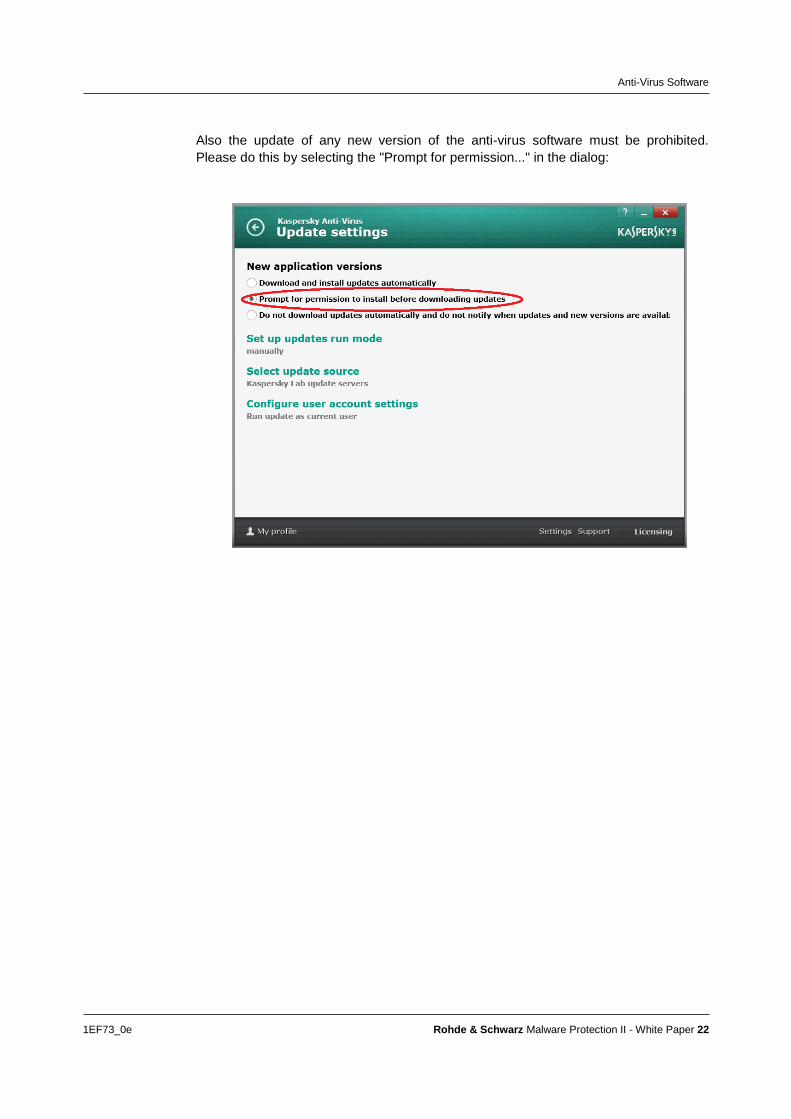
Also the update of any new version of the anti-virus software must be prohibited.
Please do this by selecting the "Prompt for permission..." in the dialog:

Anti-Virus Software
1EF73_0e Rohde & Schwarz Malware Protection II - White Paper 23
4.1.3 Virus Scans of removable drives on connection
Kaspersky supports the feature to scan removable devices after connection. R&S this
as it helps customers to protect the integrity of the instrument. Nonetheless the user
has the ability to turn of this feature. The feature can be found in the "Settings" dialog
under "Computer scan" (see above to navigate to the dialog).
Anti-Virus Software
1EF73_0e Rohde & Schwarz Malware Protection II - White Paper 24
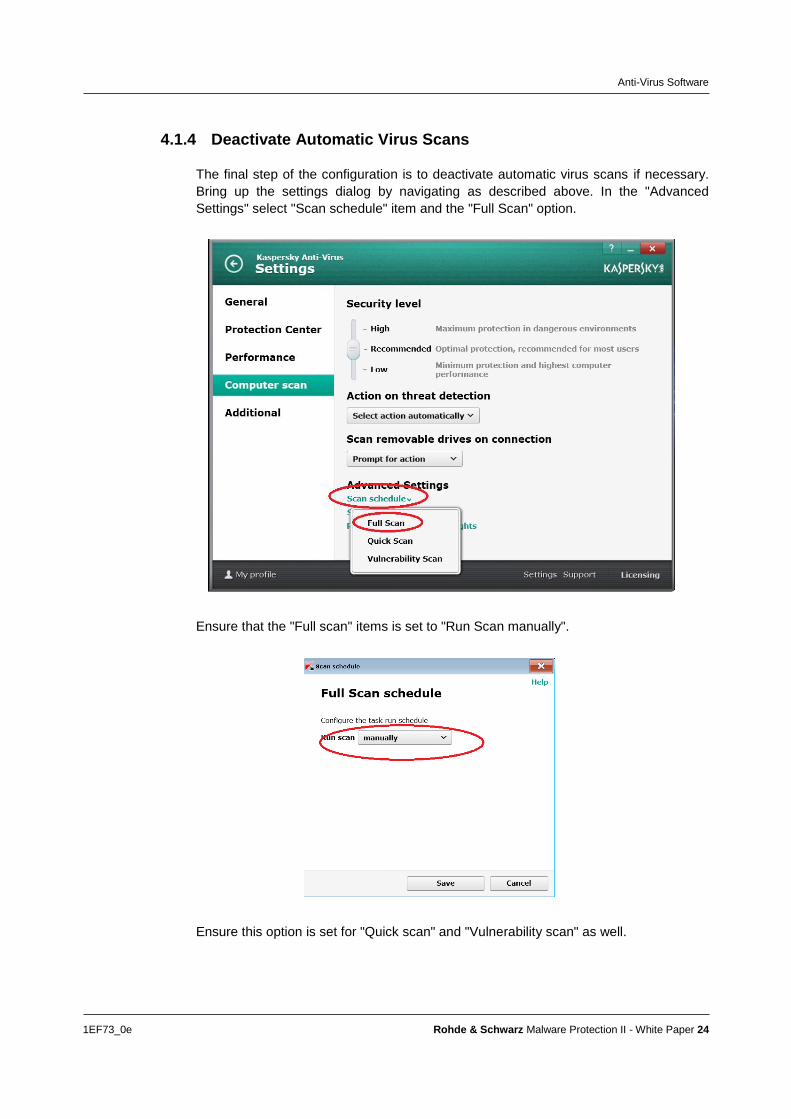
4.1.4 Deactivate Automatic Virus Scans
The final step of the configuration is to deactivate automatic virus scans if necessary.
Bring up the settings dialog by navigating as described above. In the "Advanced
Settings" select "Scan schedule" item and the "Full Scan" option.
Ensure that the "Full scan" items is set to "Run Scan manually".
Ensure this option is set for "Quick scan" and "Vulnerability scan" as well.

Anti-Virus Software
1EF73_0e Rohde & Schwarz Malware Protection II - White Paper 25
4.2 Bit Defender® Anti-Virus 2014
This section describes the notes and hints if you are using the anti-virus software Bit
Defender® Anti-Virus 2014.
4.2.1 Installation and Requirements
As mentioned before you need to install the anti-virus software with administrator rights
on your instrument. Please make sure that you are logged in as an appropriate user.
R&S highly recommends that during the installation the firmware is not running, so
terminate the instrument firmware before you install the software.
For the installation the software needs at least 200 MBytes disk space on the instru-
ment hard disk. Please ensure that the instruments firmware can run properly. To
check this open the Windows explorer and click at the left side onto the "Local Disk
(C:)", activate the context menu and select "Properties".
Anti-Virus Software
1EF73_0e Rohde & Schwarz Malware Protection II - White Paper 26
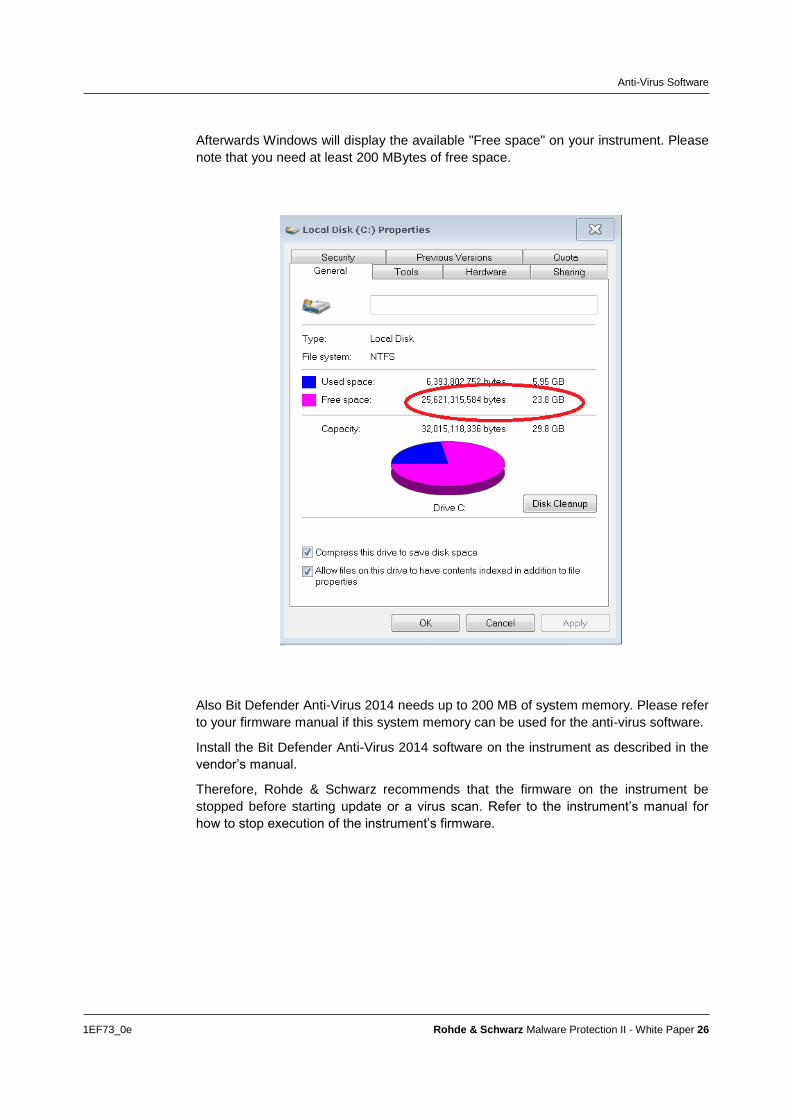
Afterwards Windows will display the available "Free space" on your instrument. Please
note that you need at least 200 MBytes of free space.
Also Bit Defender Anti-Virus 2014 needs up to 200 MB of system memory. Please refer
to your firmware manual if this system memory can be used for the anti-virus software.
Install the Bit Defender Anti-Virus 2014 software on the instrument as described in the
vendor’s manual.
Therefore, Rohde & Schwarz recommends that the firmware on the instrument be
stopped before starting update or a virus scan. Refer to the instrument’s manual for
how to stop execution of the instrument’s firmware.
Anti-Virus Software
1EF73_0e Rohde & Schwarz Malware Protection II - White Paper 27
4.2.2 Deactivate Automatic Updates
The automatic updates cannot be deactivated on this software.
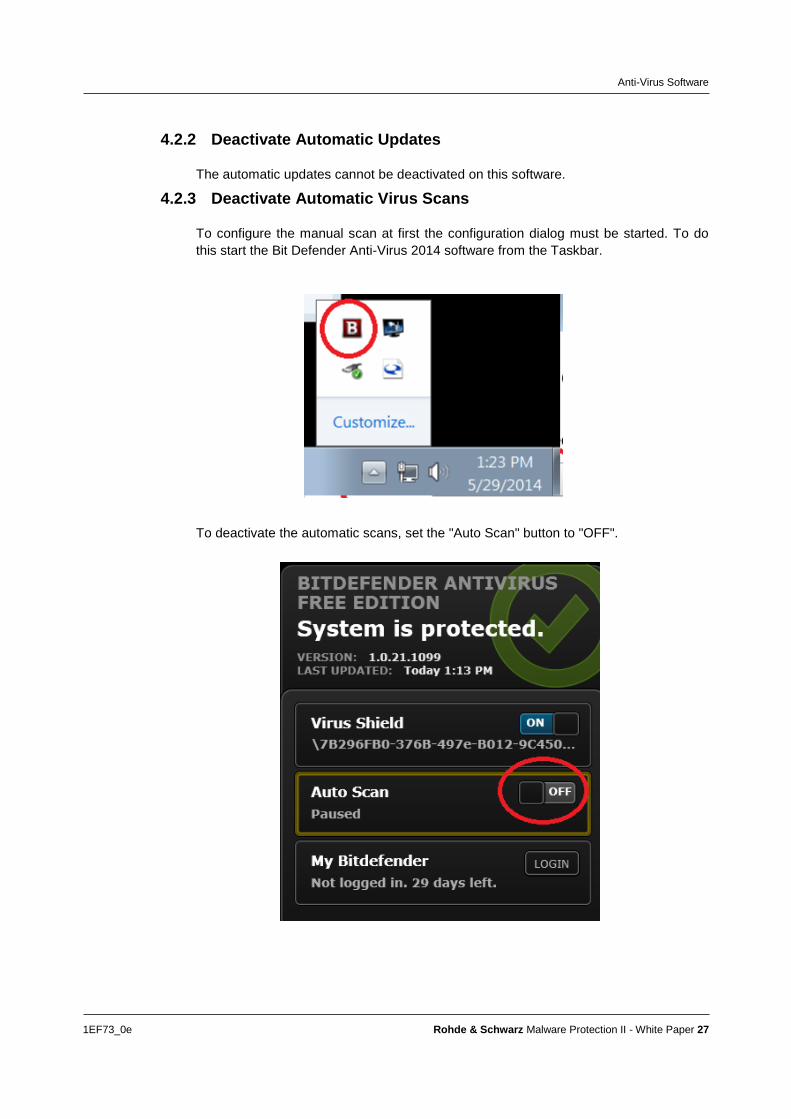
4.2.3 Deactivate Automatic Virus Scans
To configure the manual scan at first the configuration dialog must be started. To do
this start the Bit Defender Anti-Virus 2014 software from the Taskbar.
To deactivate the automatic scans, set the "Auto Scan" button to "OFF".
Anti-Virus Software
1EF73_0e Rohde & Schwarz Malware Protection II - White Paper 28
4.3 Avira™ Anti-Virus 2014
This section describes the notes and hints if you are using the anti-virus software Avi-
ra™ Anti-Virus 2014.
4.3.1 Installation and Requirements
As mentioned before you need to install the anti-virus software with administrator rights
on your instrument. Please make sure that you are logged in as an appropriate user.
R&S highly recommends that during the installation the firmware is not running, so
terminate the instrument firmware before you install the software.
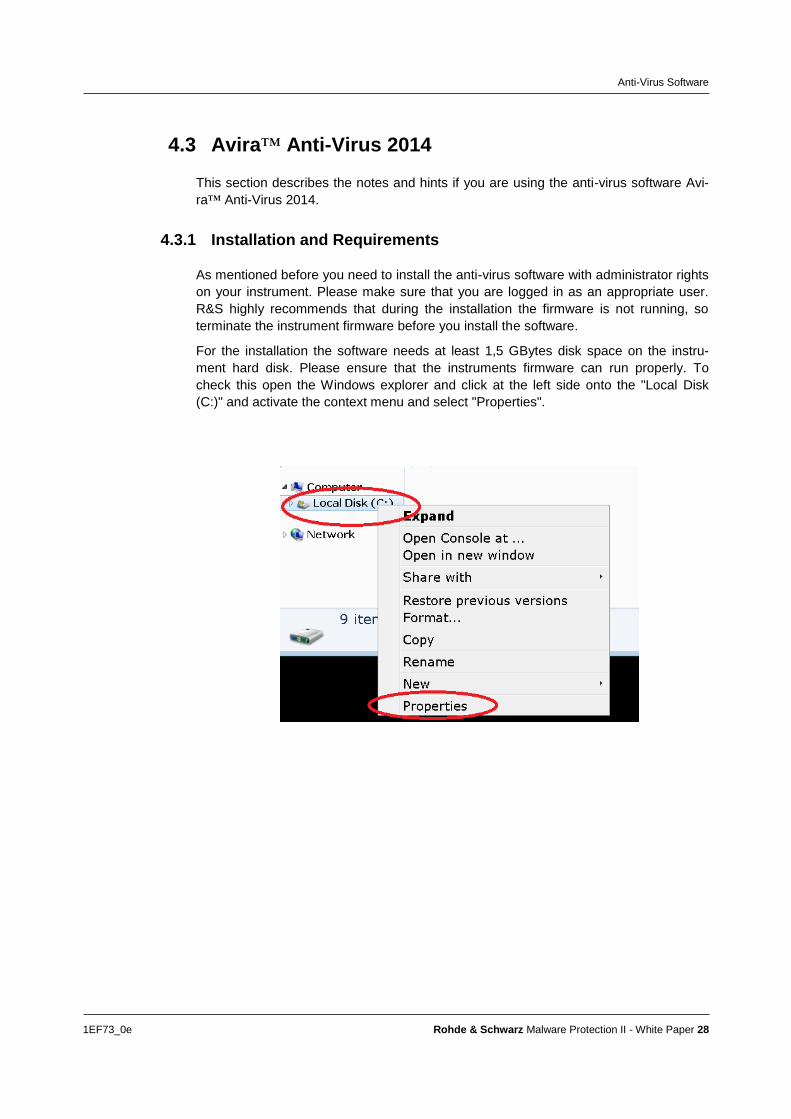
For the installation the software needs at least 1,5 GBytes disk space on the instru-
ment hard disk. Please ensure that the instruments firmware can run properly. To
check this open the Windows explorer and click at the left side onto the "Local Disk
(C:)" and activate the context menu and select "Properties".

Anti-Virus Software
1EF73_0e Rohde & Schwarz Malware Protection II - White Paper 29
Afterwards Windows will display the available "Free space" on your instrument. Please
note that you need at least 1,5 GBytes of free space.
Also Avira Anti-Virus 2014 needs up to 200 MB of system memory. Please refer to
your firmware manual if this system memory can be used for the anti-virus software.
Install the Avira Anti-Virus 2014 software on the instrument as described in the ven-
dor’s manual.
Therefore, Rohde & Schwarz recommends that the firmware on the instrument is
stopped before starting update or a virus scan. Refer to the instrument’s manual for
how to stop execution of the instrument’s firmware.
Anti-Virus Software
1EF73_0e Rohde & Schwarz Malware Protection II - White Paper 30
4.3.2 Deactivate Automatic Updates
The automatic updates cannot be deactivated on this software.
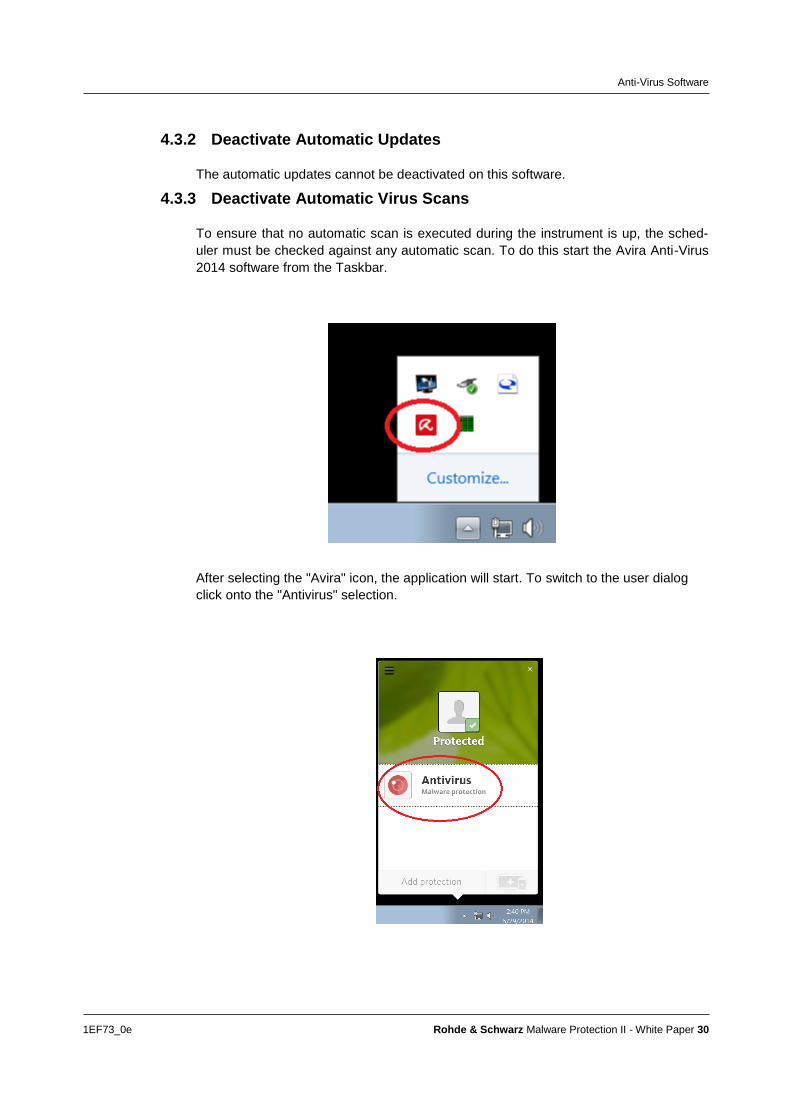
4.3.3 Deactivate Automatic Virus Scans
To ensure that no automatic scan is executed during the instrument is up, the sched-
uler must be checked against any automatic scan. To do this start the Avira Anti-Virus
2014 software from the Taskbar.
After selecting the "Avira" icon, the application will start. To switch to the user dialog
click onto the "Antivirus" selection.
Anti-Virus Software
1EF73_0e Rohde & Schwarz Malware Protection II - White Paper 31
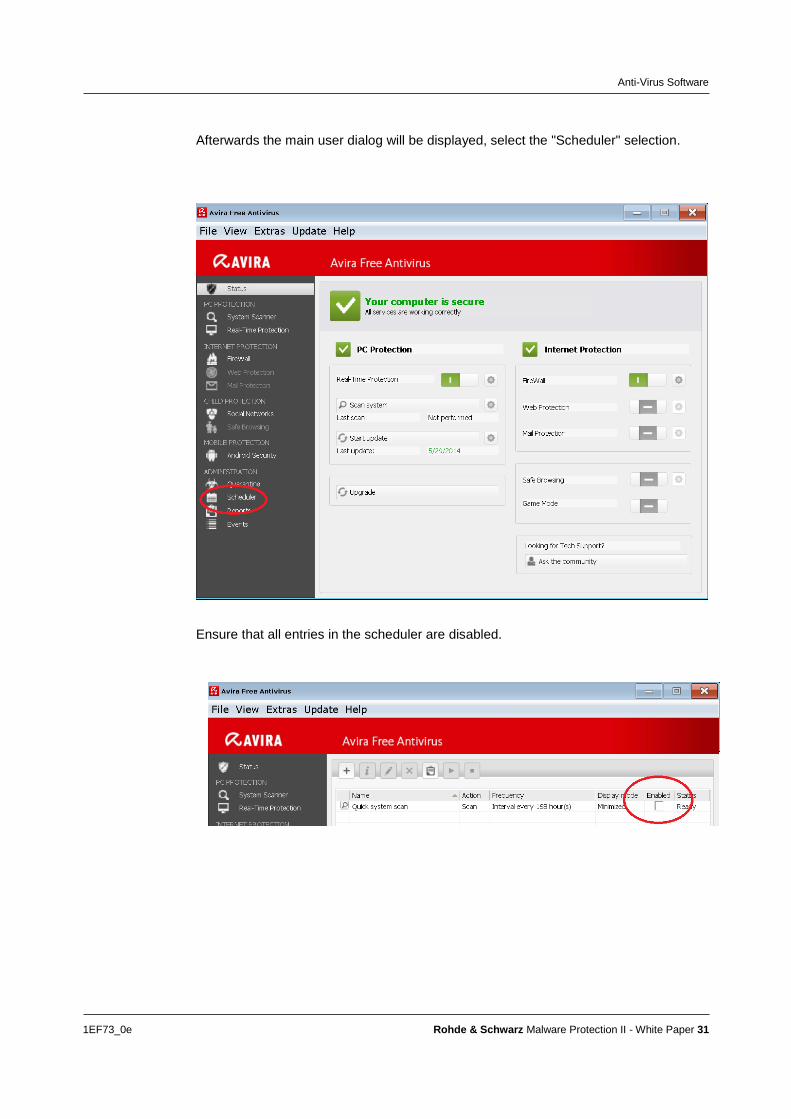
Afterwards the main user dialog will be displayed, select the "Scheduler" selection.
Ensure that all entries in the scheduler are disabled.
Anti-Virus Software
1EF73_0e Rohde & Schwarz Malware Protection II - White Paper 32
4.4 Scanning from another USB drive
There may be instruments that do not have the resources to have anti-virus software
installed. For these instruments some anti-virus vendors have the possibility to create
rescue or emergency drives, which contain the anti-virus software to scan your instru-
ment drive. Please refer to the anti-virus manual for usage.
4.5 Scanning Instruments from another PC
Another simple method to scan your instrument device drives is to mount the instru-
ment drives as network drives on another computer which has anti-virus software in-
stalled.
Before scanning with anti-virus software from another computer, the instrument has to
be mounted as a network drive.
Note: Scanning instrument hard drives remotely has some limitations and should only
be used if the other options are not available: only visible files can be scanned,
memory and processes will not be scanned and a rootkit could completely hide itself.
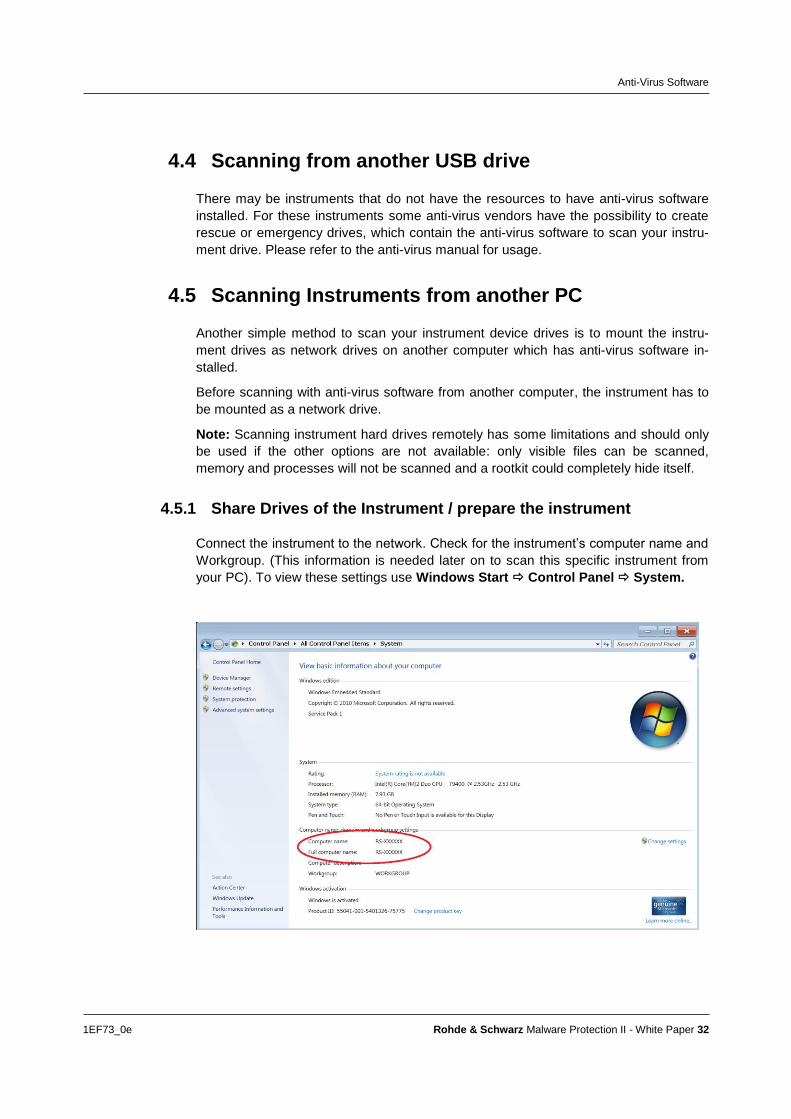
4.5.1 Share Drives of the Instrument / prepare the instrument
Connect the instrument to the network. Check for the instrument’s computer name and
Workgroup. (This information is needed later on to scan this specific instrument from
your PC). To view these settings use Windows Start Control Panel System.
Anti-Virus Software
1EF73_0e Rohde & Schwarz Malware Protection II - White Paper 33
In this case the instrument’s computer name is RS-XXXXXX and is part of the
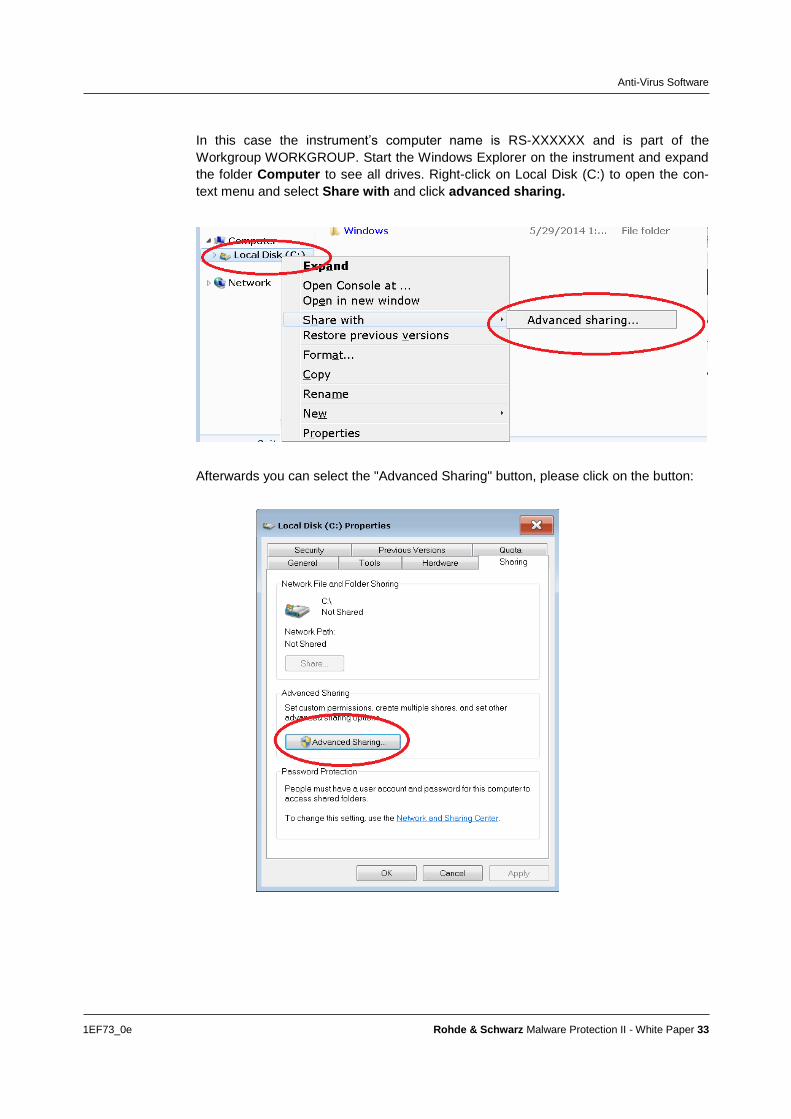
Workgroup WORKGROUP. Start the Windows Explorer on the instrument and expand
the folder Computer to see all drives. Right-click on Local Disk (C:) to open the con-
text menu and select Share with and click advanced sharing.
Afterwards you can select the "Advanced Sharing" button, please click on the button:
Anti-Virus Software
1EF73_0e Rohde & Schwarz Malware Protection II - White Paper 34
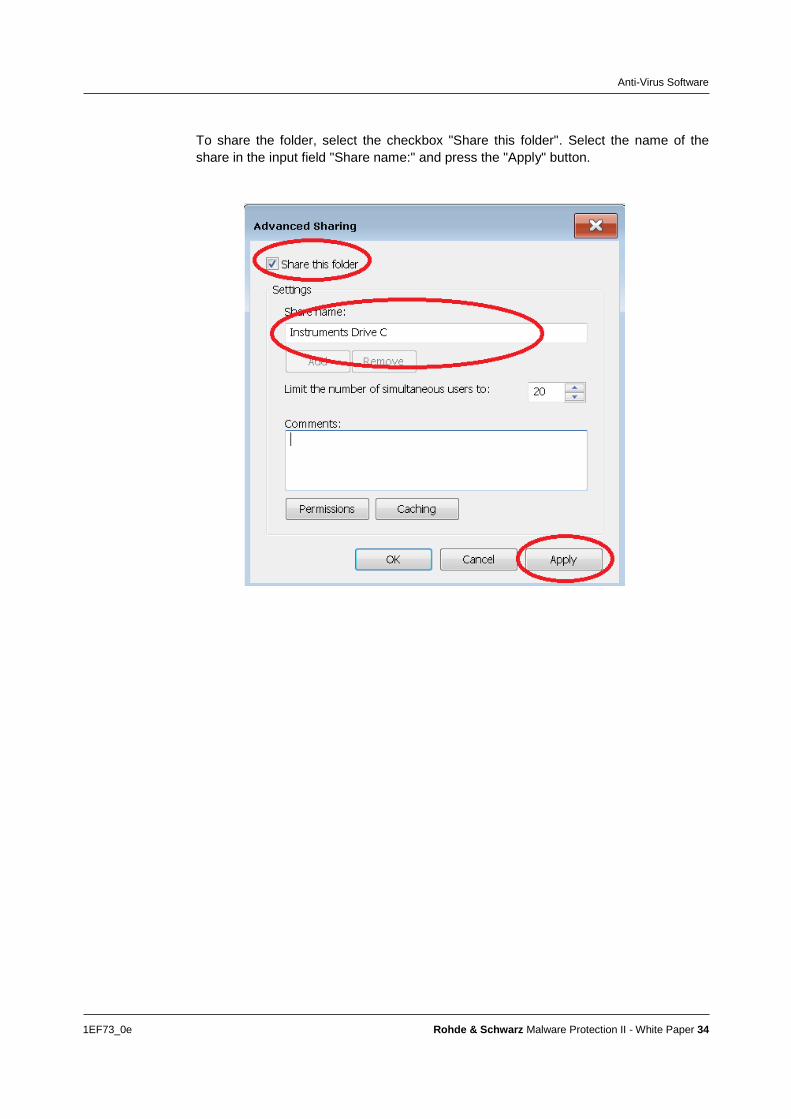
To share the folder, select the checkbox "Share this folder". Select the name of the
share in the input field "Share name:" and press the "Apply" button.
Anti-Virus Software
1EF73_0e Rohde & Schwarz Malware Protection II - White Paper 35
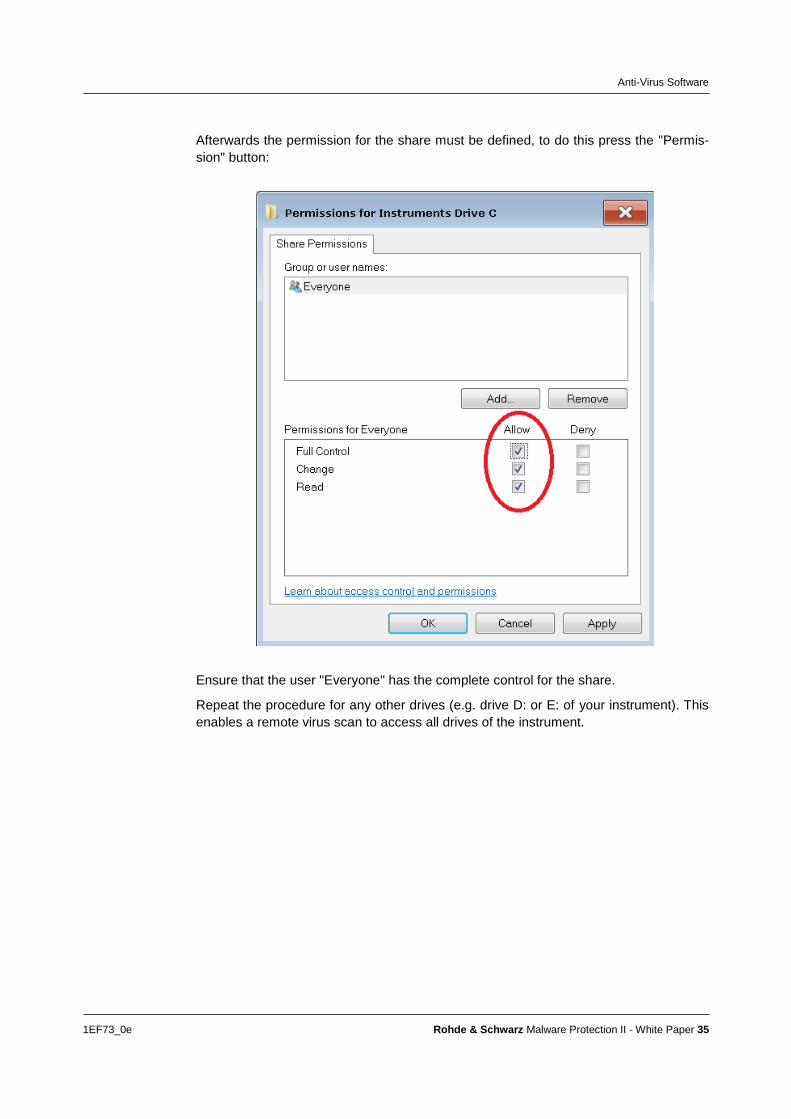
Afterwards the permission for the share must be defined, to do this press the "Permis-
sion" button:
Ensure that the user "Everyone" has the complete control for the share.
Repeat the procedure for any other drives (e.g. drive D: or E: of your instrument). This
enables a remote virus scan to access all drives of the instrument.
Anti-Virus Software
1EF73_0e Rohde & Schwarz Malware Protection II - White Paper 36
4.5.2 Mapping Instrument Drives on a computer with Windows 7®
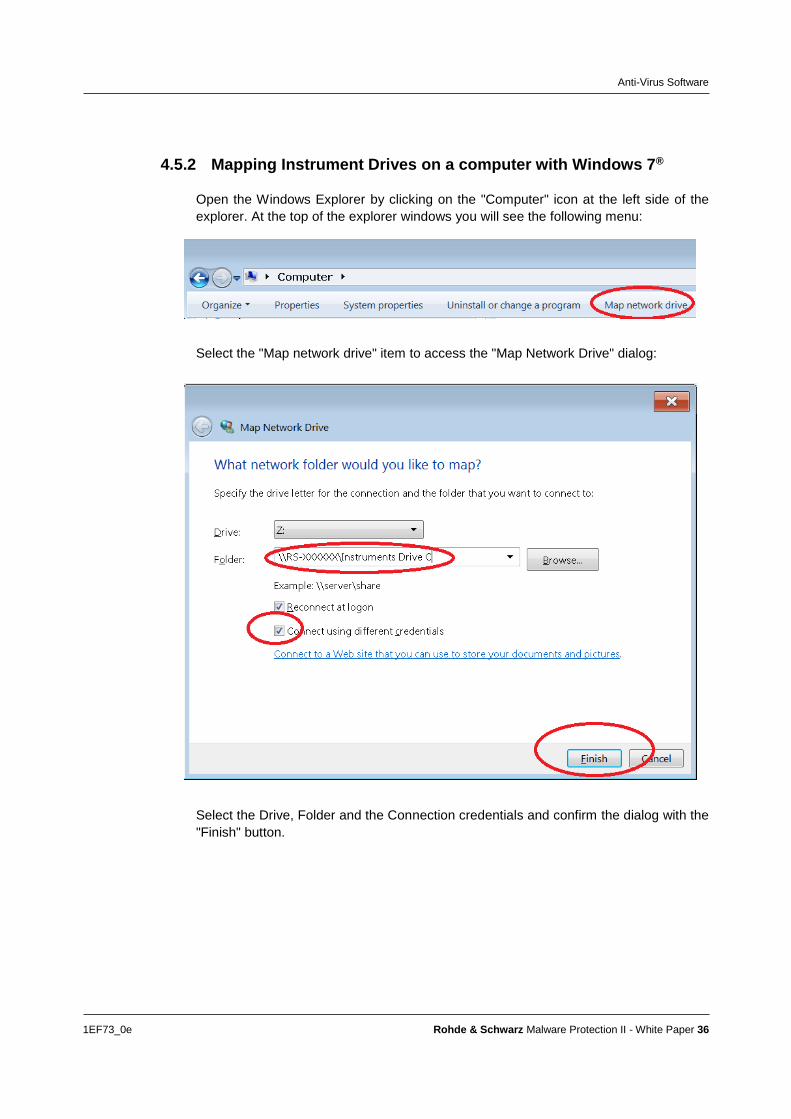
Open the Windows Explorer by clicking on the "Computer" icon at the left side of the
explorer. At the top of the explorer windows you will see the following menu:
Select the "Map network drive" item to access the "Map Network Drive" dialog:
Select the Drive, Folder and the Connection credentials and confirm the dialog with the
"Finish" button.
Anti-Virus Software
1EF73_0e Rohde & Schwarz Malware Protection II - White Paper 37
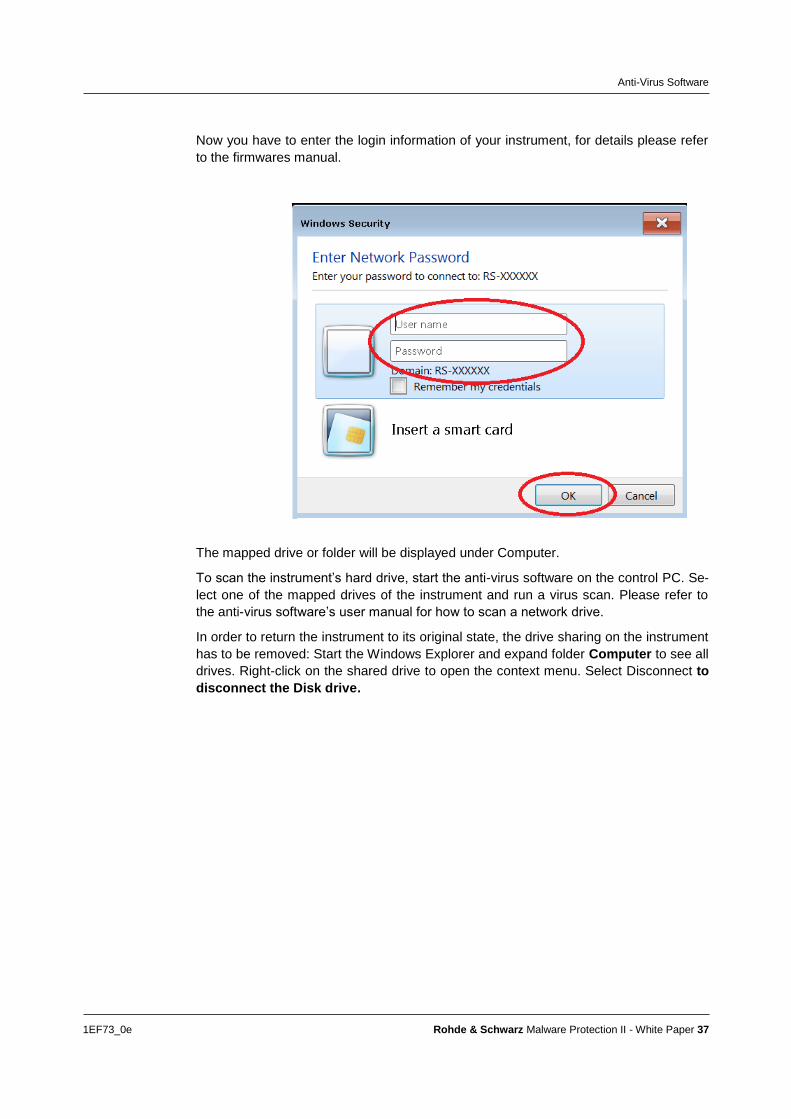
Now you have to enter the login information of your instrument, for details please refer
to the firmwares manual.
The mapped drive or folder will be displayed under Computer.
To scan the instrument’s hard drive, start the anti-virus software on the control PC. Se-
lect one of the mapped drives of the instrument and run a virus scan. Please refer to
the anti-virus software’s user manual for how to scan a network drive.
In order to return the instrument to its original state, the drive sharing on the instrument
has to be removed: Start the Windows Explorer and expand folder Computer to see all
drives. Right-click on the shared drive to open the context menu. Select Disconnect to
disconnect the Disk drive.
Anti-Virus Software
1EF73_0e Rohde & Schwarz Malware Protection II - White Paper 38
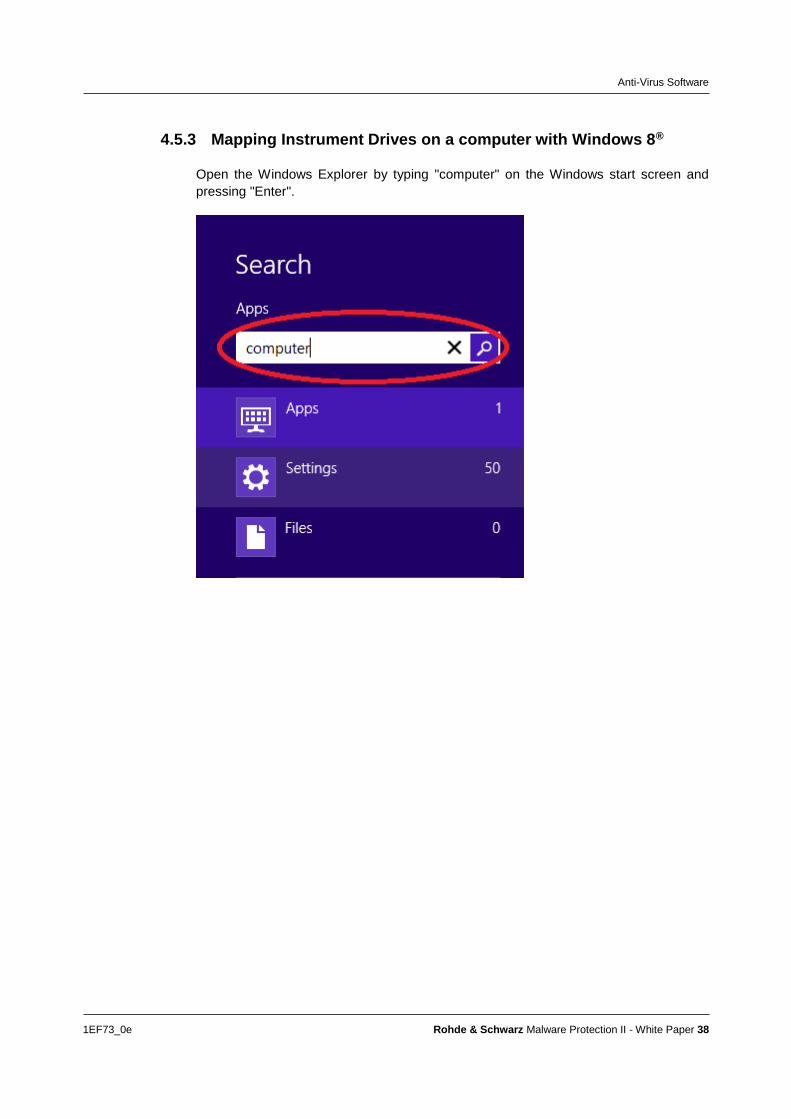
4.5.3 Mapping Instrument Drives on a computer with Windows 8®
Open the Windows Explorer by typing "computer" on the Windows start screen and
pressing "Enter".
Anti-Virus Software
1EF73_0e Rohde & Schwarz Malware Protection II - White Paper 39
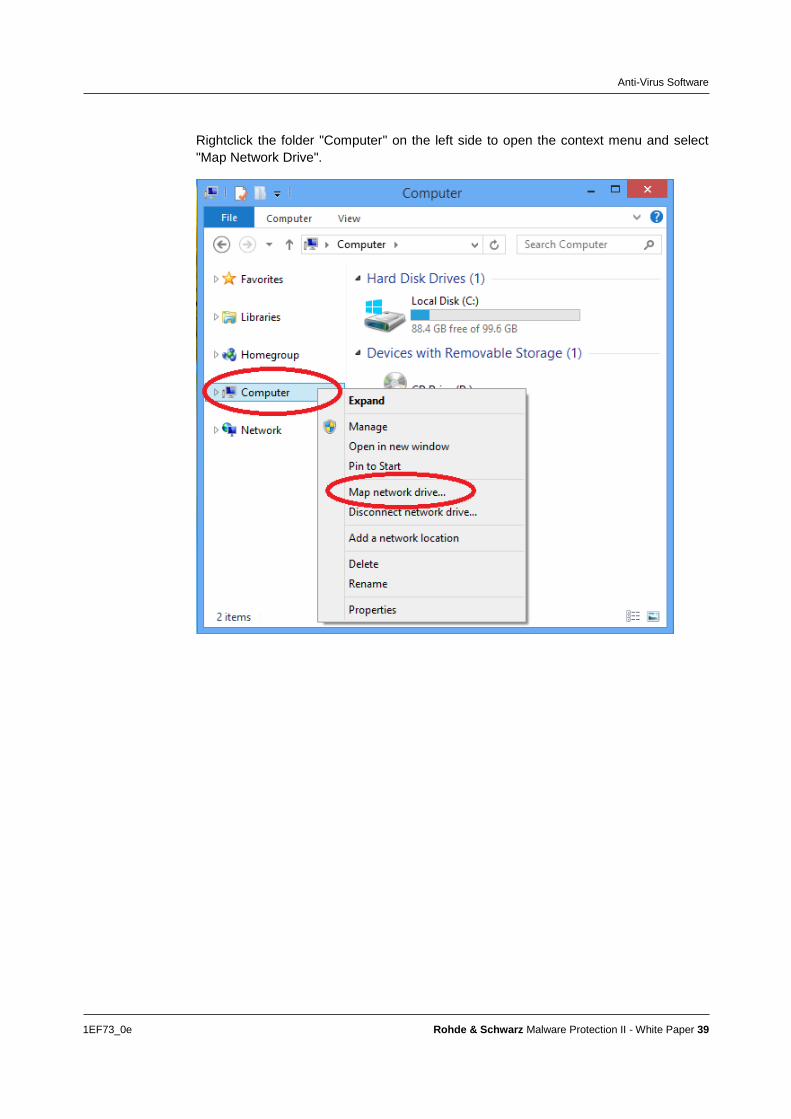
Rightclick the folder "Computer" on the left side to open the context menu and select
"Map Network Drive".
Anti-Virus Software
1EF73_0e Rohde & Schwarz Malware Protection II - White Paper 40
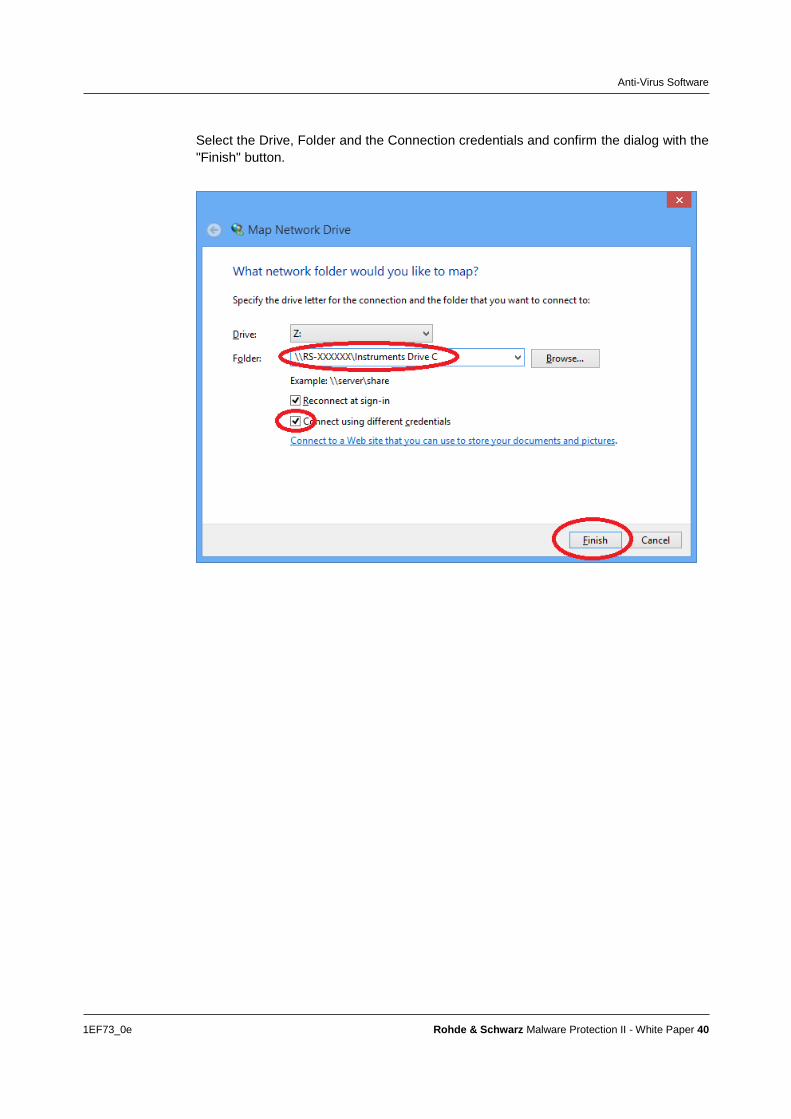
Select the Drive, Folder and the Connection credentials and confirm the dialog with the
"Finish" button.
Anti-Virus Software
1EF73_0e Rohde & Schwarz Malware Protection II - White Paper 41
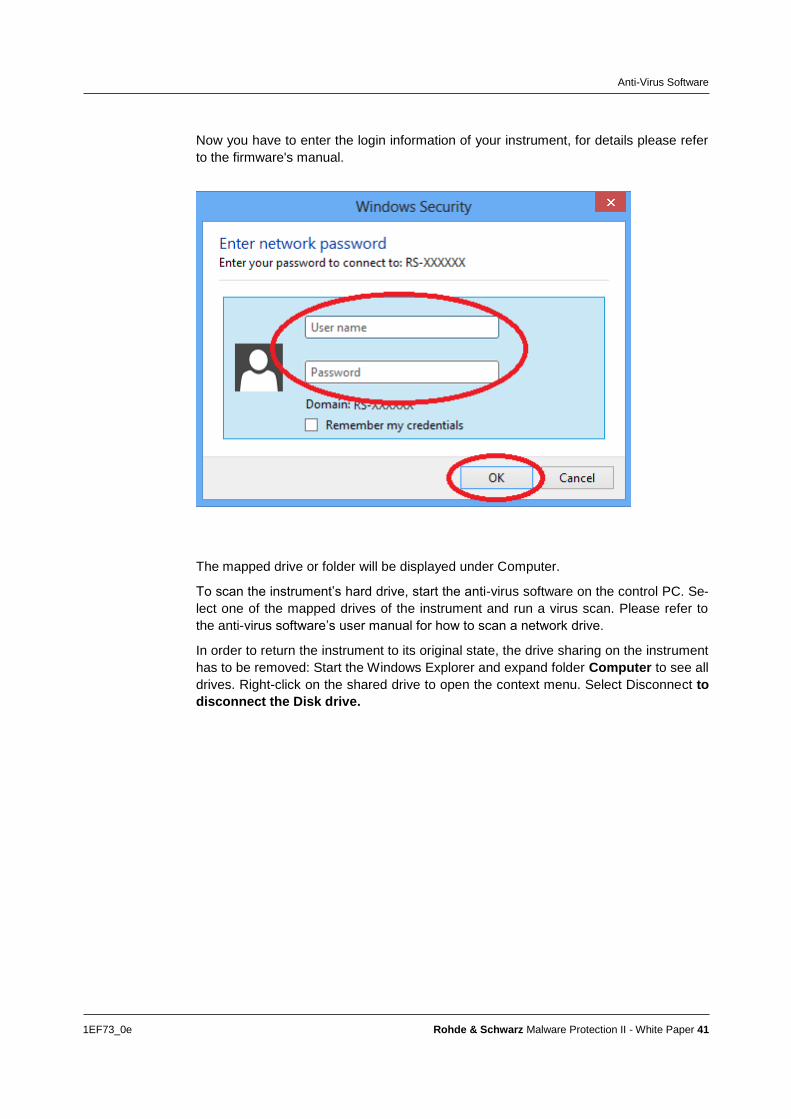
Now you have to enter the login information of your instrument, for details please refer
to the firmware's manual.
The mapped drive or folder will be displayed under Computer.
To scan the instrument’s hard drive, start the anti-virus software on the control PC. Se-
lect one of the mapped drives of the instrument and run a virus scan. Please refer to
the anti-virus software’s user manual for how to scan a network drive.
In order to return the instrument to its original state, the drive sharing on the instrument
has to be removed: Start the Windows Explorer and expand folder Computer to see all
drives. Right-click on the shared drive to open the context menu. Select Disconnect to
disconnect the Disk drive.
Microsoft® Patches and Updates
1EF73_0e Rohde & Schwarz Malware Protection II - White Paper 42
5 Microsoft® Patches and Updates Microsoft® regularly creates security updates and other patches to protect Windows-
based operating systems. Instruments using Windows 7, especially those that connect
to a network, should be updated regularly.
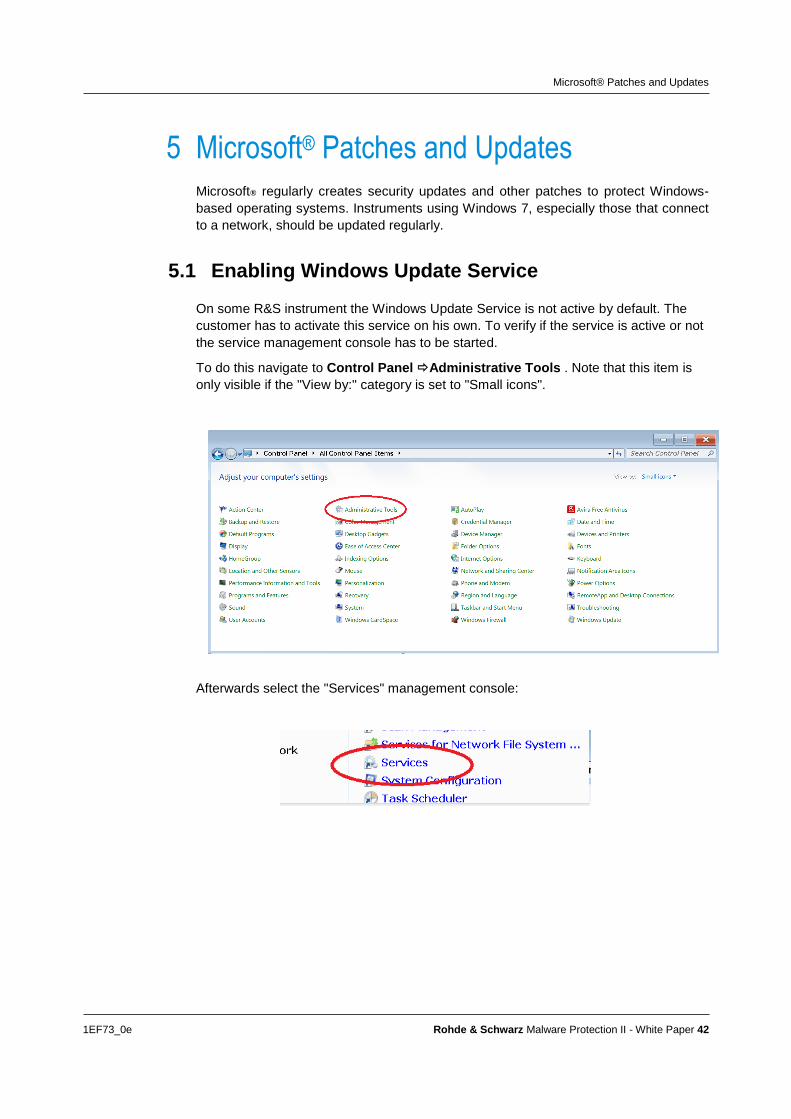
5.1 Enabling Windows Update Service
On some R&S instrument the Windows Update Service is not active by default. The
customer has to activate this service on his own. To verify if the service is active or not
the service management console has to be started.
To do this navigate to Control Panel Administrative Tools . Note that this item is
only visible if the "View by:" category is set to "Small icons".
Afterwards select the "Services" management console:
Microsoft® Patches and Updates
1EF73_0e Rohde & Schwarz Malware Protection II - White Paper 43
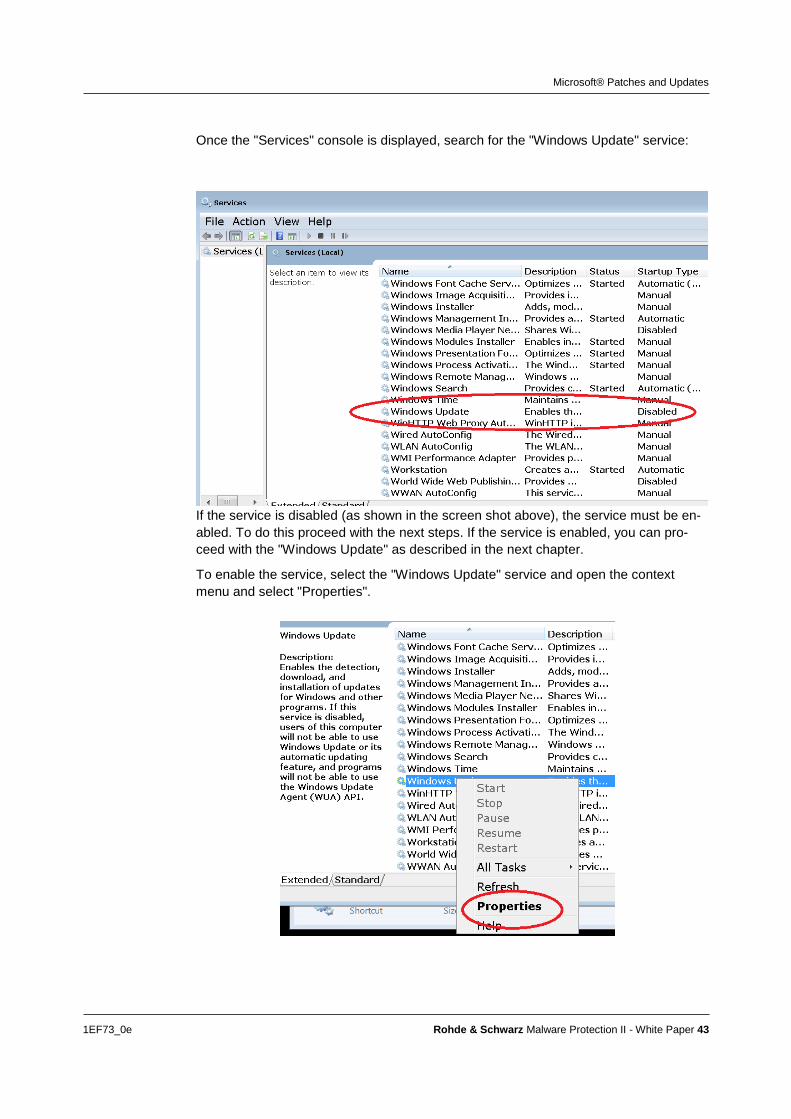
Once the "Services" console is displayed, search for the "Windows Update" service:
If the service is disabled (as shown in the screen shot above), the service must be en-
abled. To do this proceed with the next steps. If the service is enabled, you can pro-
ceed with the "Windows Update" as described in the next chapter.
To enable the service, select the "Windows Update" service and open the context
menu and select "Properties".
Microsoft® Patches and Updates
1EF73_0e Rohde & Schwarz Malware Protection II - White Paper 44
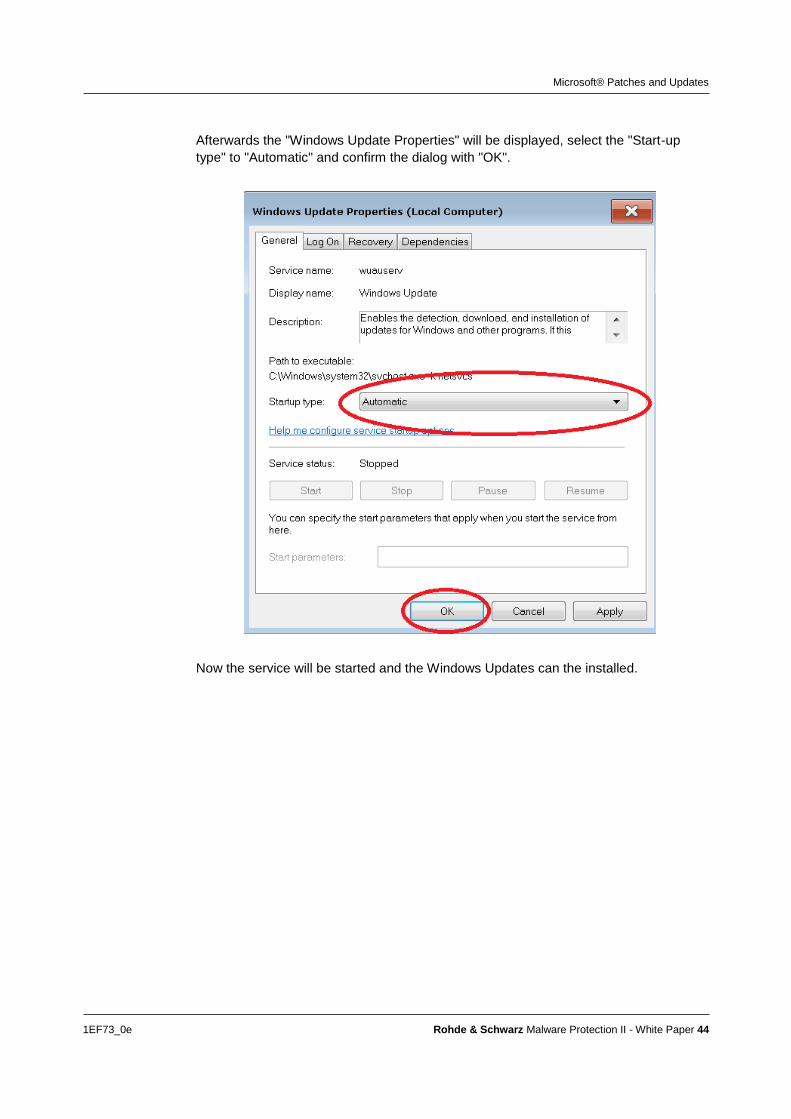
Afterwards the "Windows Update Properties" will be displayed, select the "Start-up
type" to "Automatic" and confirm the dialog with "OK".
Now the service will be started and the Windows Updates can the installed.
Microsoft® Patches and Updates
1EF73_0e Rohde & Schwarz Malware Protection II - White Paper 45
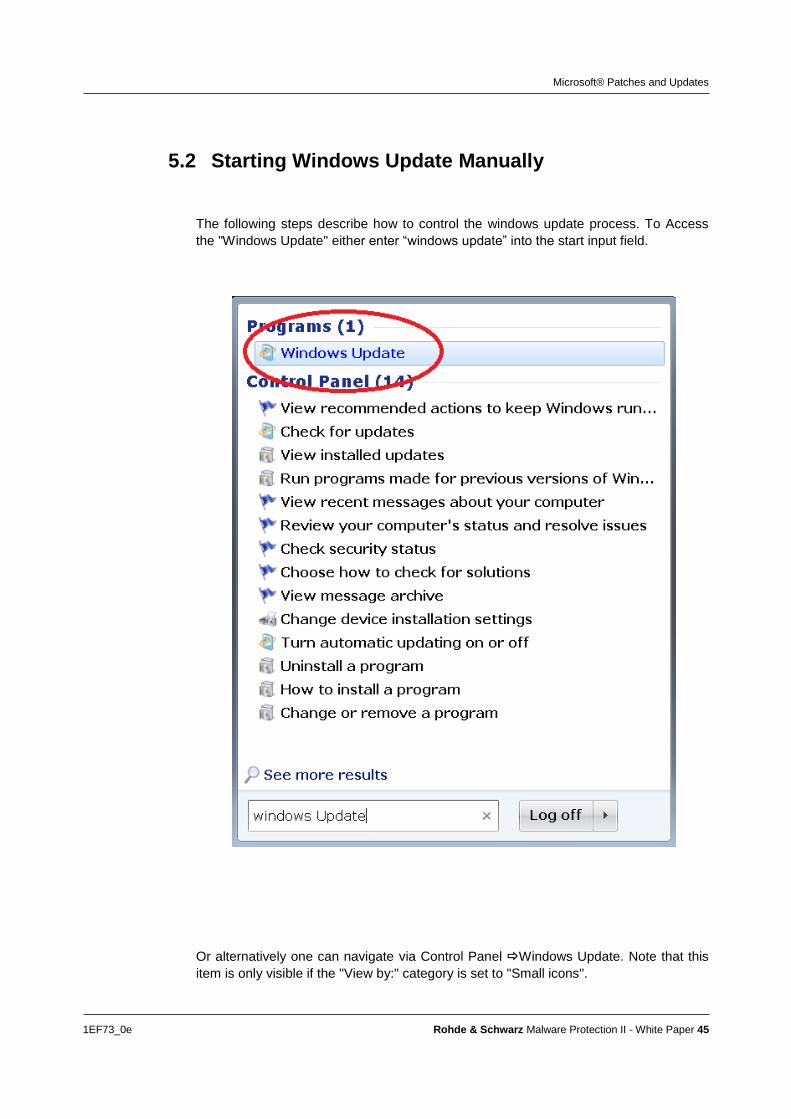
5.2 Starting Windows Update Manually
The following steps describe how to control the windows update process. To Access
the "Windows Update" either enter “windows update” into the start input field.
Or alternatively one can navigate via Control Panel Windows Update. Note that this
item is only visible if the "View by:" category is set to "Small icons".
Microsoft® Patches and Updates
1EF73_0e Rohde & Schwarz Malware Protection II - White Paper 46
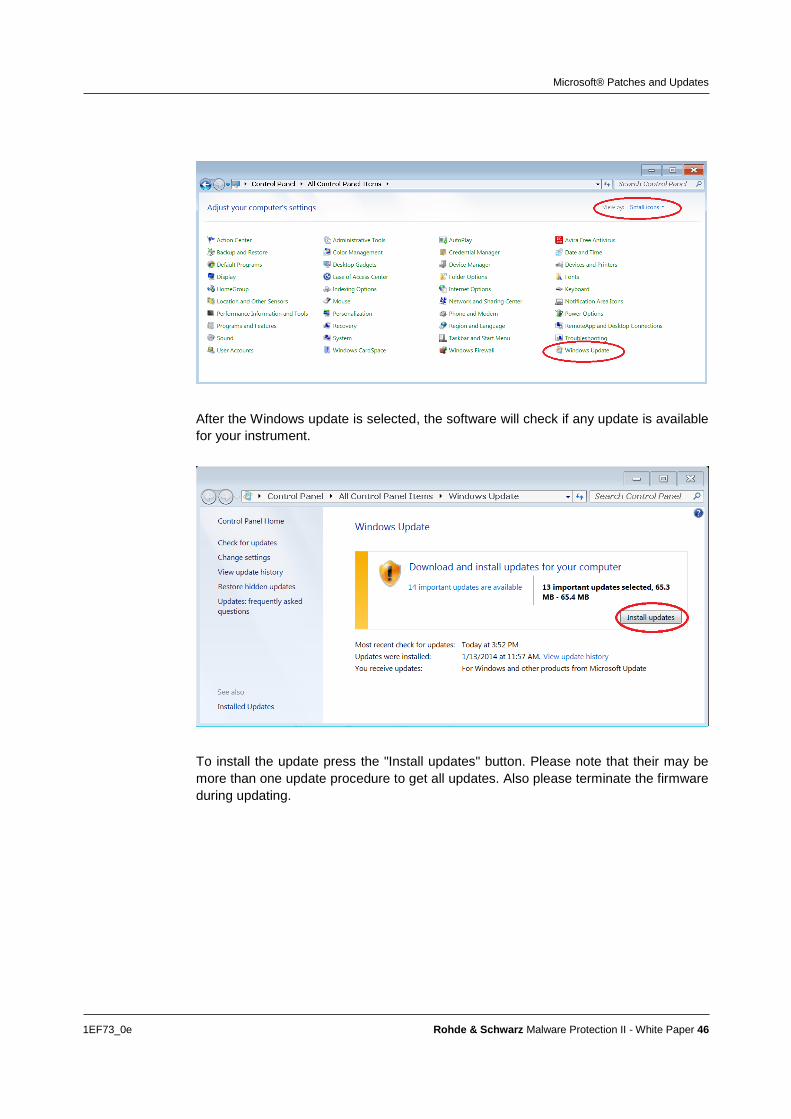
After the Windows update is selected, the software will check if any update is available
for your instrument.
To install the update press the "Install updates" button. Please note that their may be
more than one update procedure to get all updates. Also please terminate the firmware
during updating.
Microsoft® Patches and Updates
1EF73_0e Rohde & Schwarz Malware Protection II - White Paper 47
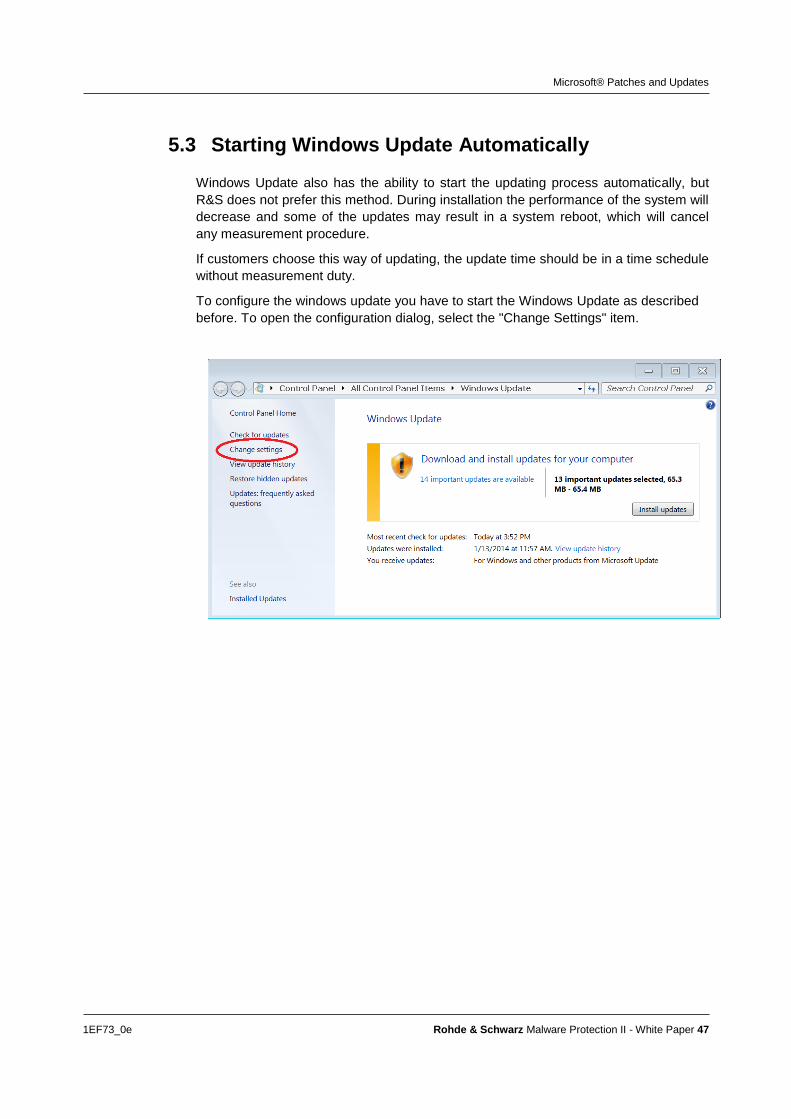
5.3 Starting Windows Update Automatically
Windows Update also has the ability to start the updating process automatically, but
R&S does not prefer this method. During installation the performance of the system will
decrease and some of the updates may result in a system reboot, which will cancel
any measurement procedure.
If customers choose this way of updating, the update time should be in a time schedule
without measurement duty.
To configure the windows update you have to start the Windows Update as described
before. To open the configuration dialog, select the "Change Settings" item.
Microsoft® Patches and Updates
1EF73_0e Rohde & Schwarz Malware Protection II - White Paper 48
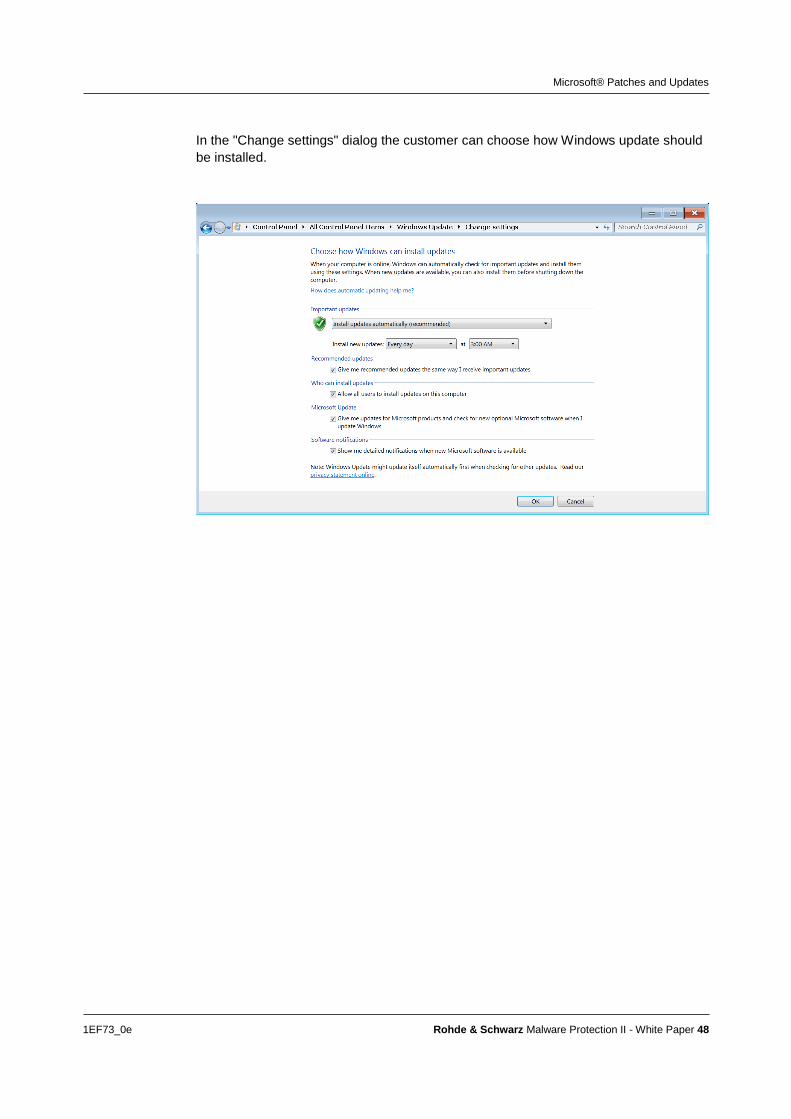
In the "Change settings" dialog the customer can choose how Windows update should
be installed.
Microsoft® Patches and Updates
1EF73_0e Rohde & Schwarz Malware Protection II - White Paper 49
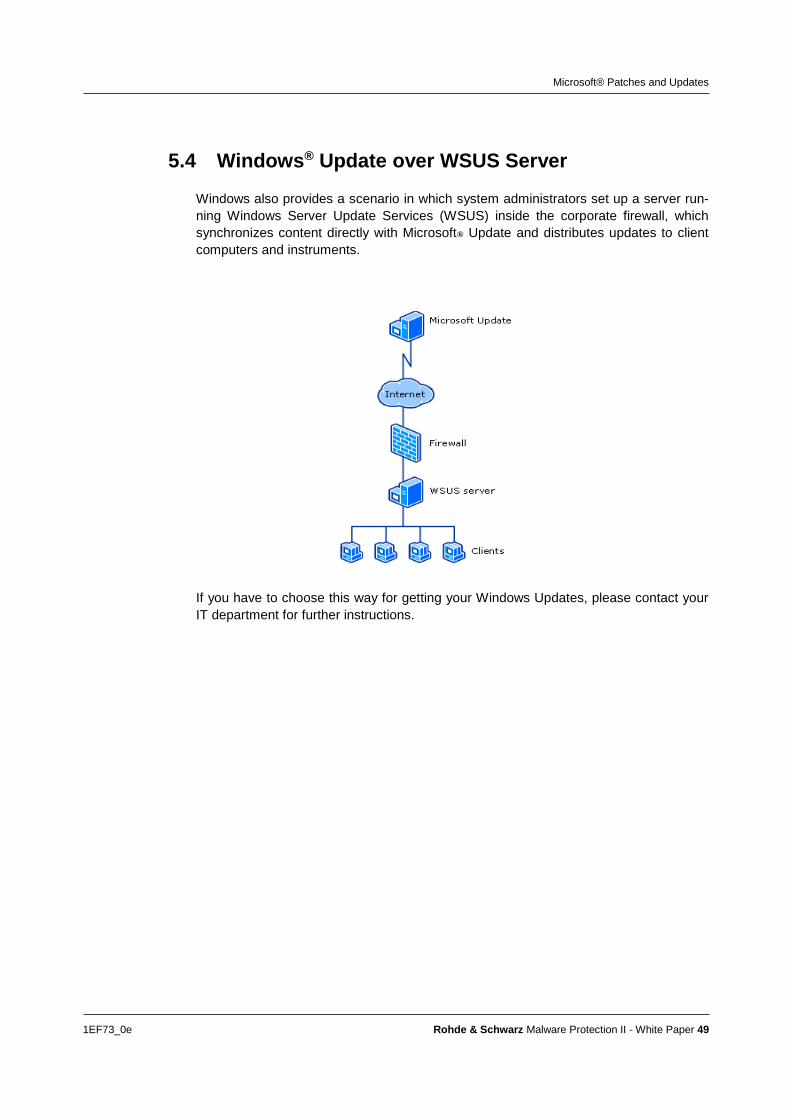
5.4 Windows® Update over WSUS Server
Windows also provides a scenario in which system administrators set up a server run-
ning Windows Server Update Services (WSUS) inside the corporate firewall, which
synchronizes content directly with Microsoft® Update and distributes updates to client
computers and instruments.
If you have to choose this way for getting your Windows Updates, please contact your
IT department for further instructions.
Related Documents and Links
1EF73_0e Rohde & Schwarz Malware Protection II - White Paper 50
6 Related Documents and Links News about Security threats
http://www.securityfocus.com/
Microsoft Support: How to disable the Autorun functionality in Windows
http://support.microsoft.com/kb/967715/en-us
Microsoft Support: Troubleshooting Windows Firewall settings in Windows 7
Service Pack 1
http://support.microsoft.com/kb/875357/en-us
Advanced Firewall settings for Windows 7, allowing certain Programs through
the firewall.
http://windows.microsoft.com/en-us/windows/communicate-through-windows-
firewall#1TC=windows-7
Firewall "New Rule" Wizard guides you through the creation steps.
http://technet.microsoft.com/en-us/library/cc771477(v=ws.10).aspx
The detailed description to unblock programs, can be find in the description for
firewall setup and configuration
http://msdn.microsoft.com/en-us/library/ms751530(v=vs.110).aspx
Trademarks
Microsoft and Windows 7 are U.S. registered trademarks of Microsoft Corporation.
Kaspersky and Kaspersky Anti-Virus 2014 are U.S. registered trademarks of
Kaspersky Lab ZAO.
Bit Defender Anti-Virus are registered trademarks of Bitdefender.
Avira and Avira Anti-Virus 2014 are registered trademarks of Avira Operations GmbH
& Co. KG.
About Rohde & Schwarz
Rohde & Schwarz is an independent group
of companies specializing in electronics. It is
a leading supplier of solutions in the fields of
test and measurement, broadcasting, radio-
monitoring and radiolocation, as well as se-
cure communications. Established 75 years
ago, Rohde & Schwarz has a global pres-
ence and a dedicated service network in
over 70 countries. Company headquarters
are in Munich, Germany.
Environmental commitment
● Energy-efficient products
● Continuous improvement in environ-
mental sustainability
● ISO 14001-certified environmental man-
agement system
Regional contact
USA & Canada
USA: 1-888-TEST-RSA (1-888-837-8772) from outside USA: +1 410 910 7800
East Asia
+65 65 13 04 88
Rest of the World
+49 89 4129 137 74
This white paper and the supplied programs
may only be used subject to the conditions
of use set forth in the download area of the
Rohde & Schwarz website.
R&S® is a registered trademark of Rohde & Schwarz GmbH & Co. KG. Trade names are trademarks of the owners.
.
Rohde & Schwarz GmbH & Co. KG
Mühldorfstraße 15 | D - 81671 München
Phone + 49 89 4129 - 0 | Fax + 49 89 4129 – 13777
www.rohde-schwarz.com