Embed Size (px)
Citation preview
Making our First Music Video in Adobe Premiere
PBP – Photos By Passy – How to Make a Music Clip with Adobe Premiere CC Page | 1
This document contains notes about how we made our first music video in Adobe Premiere Pro CC.
The Sony A77 DSLR shot the original video snippets as AVCHD 1080p at 25 fps and 1/50th sec Shutter, ISO
1250 and Aperture as 3.5 with a Sony 16-50mm F2.8 kit lens using manual focus peaking.
An external microphone, the Sony ECM-ALST1 was attached to the camera and set at 120 degrees capture.
You can view the final finished video at this link: https://vimeo.com/133007649
The dimensions for 1080p video are 1920x1080 pixels, which is conveniently the exact same size as my
computer monitor resolution.
In Adobe Premiere CC we first do File > New Project and then Save As into our own folder, not the C:Drive
one Adobe wants to use.
In Premiere we then did File > New Sequence, and selected AVCHD 1080p 24fps with square pixels (not
anamorphous) pixels. We then did Sequence > Settings” and changed it to 25fps.
However, there is also a Digital SLR folder in Sequences, that has a “DSLR 1080p25” setting, which is for 16:9
(like Canon Eos cameras) – not sure if this one would be better, maybe try it next time.
“Anamorphic” seems to be a cinema super wide angle thing, eg. 4:3, then 16:9, then Cinema Anamorphic,
but the camera's actual pixels can also be either square or rectangular.
This page from Vimeo suggests that pixels should be set to square for upload to Vimeo:
https://vimeo.com/videoschool/lesson/236/aspect-ratios-explained

Making our First Music Video in Adobe Premiere
PBP – Photos By Passy – How to Make a Music Clip with Adobe Premiere CC Page | 2
As noted previously In Premiere we did:
We then did Sequence > Sequence Settings and changed it to 25fps.
I think we had to do this because USA NTSC is 24fps but PAL is 25fps, and so Premiere does not have a 25fps
preset sequence.
When filming with DSLR we always use 25fps, so that we can set shutter speed as 1/50th to match with the
frames properly. This gives a cinema look to the video.
The File > Sequence process gives us a TIMELINE in our project, with 3 video tracks and 3 audio tracks.
How to Use Premiere – 10 minute Video
There is a good Gary Fong 10 minute video tutorial at this link:
https://www.youtube.com/watch?v=BlVWL26HK-8
It is a good tutorial and shows how to trim clips, as well as use a still picture in the timeline, and how to do
cross dissolves between items, and how to fade out audio.
Use the Media Browser in the bottom left corner of Premiere to Navigate to the folder containing the clips
and images that we have previously assembled for this Project.
As well as AVCHD clips out of the Camera, we have also Photoshopped some images to be 1920x1080 in size,
and added Text to them in Photoshop to see if we can save the time/hassle in Premiere of making titles all
over the place. We ended up using these images as slide ins, to break up the monotony of the Video at
various points, with a collage of Photographs as the Transition.

Making our First Music Video in Adobe Premiere
PBP – Photos By Passy – How to Make a Music Clip with Adobe Premiere CC Page | 3
When we right click and Import, on an item in the media browser (to bring it into our Project), we do not see
anything appear to happen. We need to click on the “Project” tab next to “Media Browser” tab to see what
we have in our Project. This is the standard Premiere layout and it is a pain! In the Gary Fong video he has a
much better work area than this.
He did Window > Workspaces > Editing > Editing CS5.5 but we do not have “Editing CS5.5” in Premiere CC.
So we did Window > Workspaces > Editing and then grabbed the project Tab and undocked it up above
the media like this:
After we had everything Imported, we then moved and re-docked the Project Items back to the bottom
next to Media Browser, so we will have room in the Source Window to work on items one by one.

Making our First Music Video in Adobe Premiere
PBP – Photos By Passy – How to Make a Music Clip with Adobe Premiere CC Page | 4
According to Gary Fong video, we first move our opening picture to the Source or Staging Area, then we drop
it down into the Timeline. If it gets cropped in the Timeline Preview window view on the top RHS, we click on
it in the timeline, and select and click in the pop up menu on “Scale to Frame Size”.
A problem with timeline that we are too zoomed in and cannot see where our 5 seconds of picture ends.
To zoom out and see all of the Timeline we press the minus key, and to zoom into the timeline and
magnify it is the plus key.
Next we bring in a Video Clip to the Source/Staging by double clicking it in the Project Window.
We want to extract just a segment of this video by marking in and out point while we are viewing it in the
staging/source window. We do this by pressing letter “I” for the start point and letting it play and then
pressing letter “o” for the out or end point. (Alternatively we can use the { and the } bracket symbols down
with the play controls, to mark ins and outs. After we have done this we can drag it to the timeline.
But we want to do something clever here and have the music playing and fading in for 5 seconds while the
opening slide is playing, and then cut to the band playing the song.
This is really easy, all we have to do is make sure our picture image (the pink one below) is on the V2 layer
above the V1 filmclip layer by moving them around on the timeline like this:
Audio Fade In and Fade Out

Making our First Music Video in Adobe Premiere
PBP – Photos By Passy – How to Make a Music Clip with Adobe Premiere CC Page | 5
On this first clip we want to add audio fade in, and audio fade out.
There is an excellent video on how to do this at the following link:
https://www.youtube.com/watch?v=4f_lZT65Fe8
Note the above video is for Premiere Pro (and not Premiere CC). For Premier CC it is not as easy to do and see:
you drag the effect in front of the audio, then use the + key to see it on the timeline.
It involves using the “Effects” tab, and “Audio Transitions” > “Cross Fade”:
Constant Gain is slid across onto the timeline for Fade In and Exponential Fade for Fade Out.
We can also stretch their length by grabbing and dragging their ends on the Timeline.
For the fade in, we found we had to stretch it quite a bit to the full length of our Image layer:
For placing the fade out, we had to drop it just after the end of the audio, then pan to that location, and +
key zoom in to see it and stretch it back to be a bit of a longer fade out than the default.
An interesting thing is that between two tracks you cannot put a fade at the end of one track, and a Fade In
at the start of the next track. Instead you just put a Gain Fade in at the start of the second track, and it kind
of fades out and fades in. This is because it is a “Cross Fade” effect, so there is only one cross over.
Another video that does it different ways is: https://www.youtube.com/watch?v=obTMKJGuiE0

Making our First Music Video in Adobe Premiere
PBP – Photos By Passy – How to Make a Music Clip with Adobe Premiere CC Page | 6
Video Clip Transitions
Like Audio, we go into the Effects tab in the bottom left hand corner, and then choose “Video Transitions”
(not “Video Effects”), and the simplest transition is under “Dissolve” as “Cross Dissolve”. There are other
ones like page split, wipe, and iris, that we could also use.
We slide the effect out we want, and hover it over the top of the timeline at the clips join point, and when it
highlights the transition point we let go of the mouse button.
This is all shown in the Gary Fong Video at:
https://www.youtube.com/watch?v=BlVWL26HK-8
HOWEVER in our Premiere Pro CC it does not work exactly like in his video.
It seems we have to drag it onto the transition point on the video track on the time line, and we can only
place it at the beginning of the second clip. There is a video that shows the new way for Cross Dissolves in
the CC version at this link:
https://www.youtube.com/watch?v=DASs21csVhI
He seems to be able to drag the cross dissolve so it is over both clips, but in my Premiere CC we were not
able to do this and could only put it at the start of the second clip; but the transition still seems to look okay.
However, you can select the end of one clip with a red square bracket on the timeline, and then move in the
cross dissolve and it will go on the end of that clip.
But if you can grab the actual cross dissolve item, then it is possible to move this item so that it does span
both clips. It is tricky at first, but fine once you get used to it. However, sometimes both Audio and Video
transitions are stubborn, and refuse to move from where Premiere wants to put them. To tell the truth, I
have just not managed to figure this out yet. But the transitions turn out okay, so it is not a huge problem.
Cross Dissolve it the most common professional transition, and probably the one to use 90% of the time.
The following video shows how to use the effect controls panel to modify Video transitions:
https://www.youtube.com/watch?v=hX8498NfBIY
Some transitions can be put in reverse (so dooors open the the next scene, rather than close the current
scene etc)
Eg. We used a Slide transition put into Reverse as our exit transition after we had pushed in a set of
photos JPG using the Push transition.
There is a good video on editing Transitions here:
http://tv.adobe.com/watch/learn-premiere-pro-cs6/adjusting-video-transitions/
It is Adobe CS6, but we assume it works okay in Adobe Premiere CC.

Making our First Music Video in Adobe Premiere
PBP – Photos By Passy – How to Make a Music Clip with Adobe Premiere CC Page | 7
There is a similar article about changing effect transitions at this link:
https://helpx.adobe.com/premiere-pro/using/modifying-customizing-transitions.html
The following video, about two thirds of the way in, shows what to do if you get a red line on your effect,
meaning Adobe cannot render it until you make a new preview video:
https://www.youtube.com/watch?v=Z2gc04zzH0A
Adding Titles / Sub Titles
Our Music Video of the live band needs titles at the bottom for each song, and these need to fade in and
then fade out.
There is a video about how to make Text Titles and add them to the Timeline here.
Like any other visual timeline item, we can add cross fades in and out, and stretch how long the title lasts
for. Nice and Easy.
Initially the Text Title you make is added to the Project Items. We can make one song title, then right click
and Duplicate it in the Project window and edit it to make our second title and so on.
Adjusting Audio Sound Tracks
To actually see the waveform, and the name of the audio track in Adobe Premiere, we need to click the
spanner tool icon in the timeline, and tick “Expand all Tracks” as well as ticking “Show Audio Names”.
We decided to look into using Adobe Audition to work on the sound tracks.
We have not been able to find a video yet which is specific to tweaking the sound for a live music video, but
we did find these tutorials on the web:
This video on Adobe Audition focuses mainly on voice overs but is a great overview of the Premiere
combined with Audition work flow:
https://www.youtube.com/watch?v=huvIczqdMJE
There is a great article on how to do Audio adjustments in Premiere Pro at this link:
https://larryjordan.com/articles/premiere-pro-cc-boost-and-smooth-audio-levels/
This guy also has a paid $50 very comprehensive course on Audition available at this link:
https://larryjordan.com/store/learn-adobe-audition-cc-download/
The following video demonstrates how to process a Guitar track in Adobe Audition (for multitrack recording,
not for our type of music video) https://www.youtube.com/watch?v=9dv3OzYS-qA
This video is about how to add background music to a spoken word video:
https://www.youtube.com/watch?v=iayqLPIefV4
Making our First Music Video in Adobe Premiere
PBP – Photos By Passy – How to Make a Music Clip with Adobe Premiere CC Page | 8
Adobe Audition seems to be more geared towards fixing up voice overs on the spoken word, but should
work on Music as well. However, Adobe Premiere itself has Graphic Eq, Compressor, and other audio effects,
and possibly these would be good enough for a music clip without using Audition.
For voice overs though, Audition looks to definitely be the best.
In Audition, we can either edit one Audio Clip for one song by right clicking the Audio in the Premiere
timeline, and doing Edit in Adobe Audition. OR if we want to edit the entire audio for the video in one go, we
can do top of screen edit, then Edit in Adobe Audition, then Sequence (to edit the entire audio sequence for
the whole video all at once.
To see what is done in Audition, refer to this video: https://www.youtube.com/watch?v=huvIczqdMJE
When a track is finished in Adobe Audition, we send it back to Premiere, by Multitrack > Export to Adobe
Premiere Pro as a new track, and it will put a new Audio Track into your Premiere Project.
We can then click “M” for mute next to the old track, and “S” for solo on the new track to check out the
difference in Premiere.
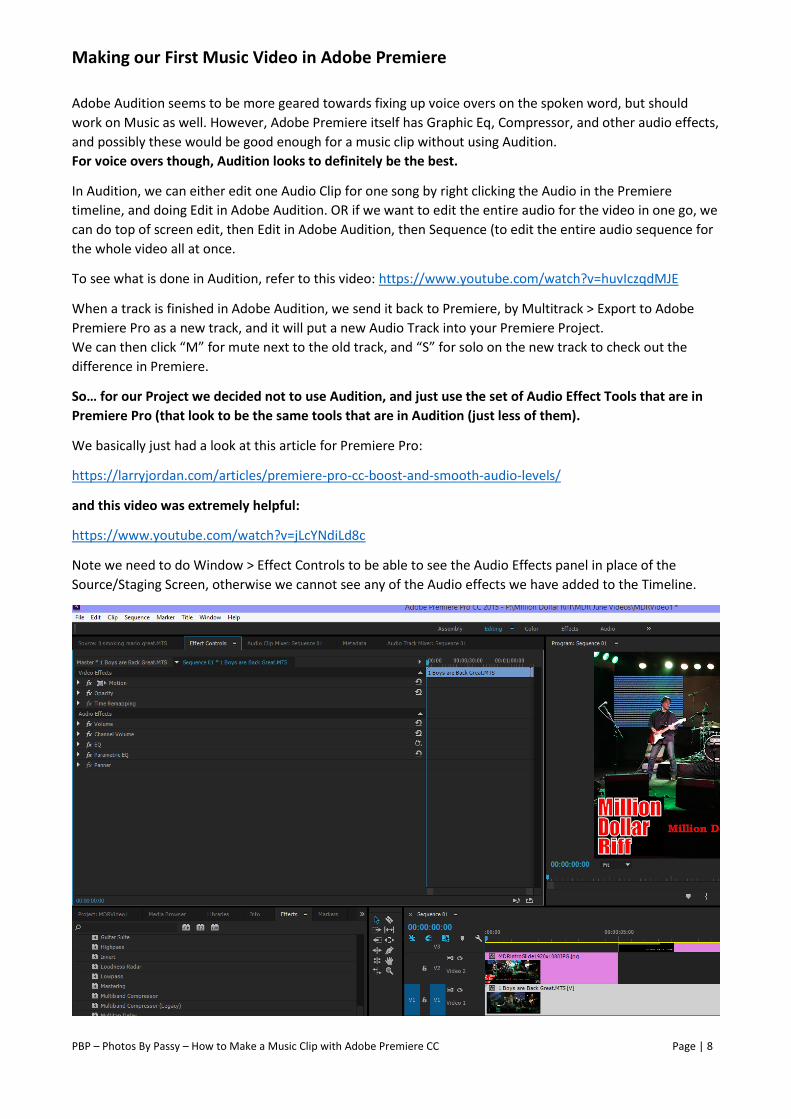
So… for our Project we decided not to use Audition, and just use the set of Audio Effect Tools that are in
Premiere Pro (that look to be the same tools that are in Audition (just less of them).
We basically just had a look at this article for Premiere Pro:
https://larryjordan.com/articles/premiere-pro-cc-boost-and-smooth-audio-levels/
and this video was extremely helpful:
https://www.youtube.com/watch?v=jLcYNdiLd8c
Note we need to do Window > Effect Controls to be able to see the Audio Effects panel in place of the
Source/Staging Screen, otherwise we cannot see any of the Audio effects we have added to the Timeline.

Making our First Music Video in Adobe Premiere
PBP – Photos By Passy – How to Make a Music Clip with Adobe Premiere CC Page | 9
Watch the video to see we have to click edit, then turn on the EQ dials we want to adjust and then pull them
on the graph points.
The audio on the first song was not bad, so I used the Bass Enhance preset and made some slight changes to
the curve like this:
Note that this causes clipping, so have to pull down that right hand Output Slider, so that on playback the
peak volumes are sitting at about -3db, because apparently will get distortion on rendering down if we do
not do this. It sounds better pumped up with red clipping occurring, but apparently this is not good when
we render down, as MP4 format needs some sound headroom of -6db or so.
The only effect we did was this EQ because we did not want to change the live audio that much, to try and
keep that live sound feel to the clip.
On the second track, the bass sounded quite good, so we did not use the bass boost preset, and simply
upped the midrange vocals a bit, and pulled down the high frequencies to make the drum hi hat and cymbals
not so hissy and tizzy like this:

Making our First Music Video in Adobe Premiere
PBP – Photos By Passy – How to Make a Music Clip with Adobe Premiere CC Page | 10
Again, we made sure we pulled down the master gain so that on playback the max peak of the sound meter
was at -3db, but not dropping below -6db. Hopefully this will give us loud clean non distorted sound on the
final rendered output video.
We got one glitch along the way where it says audio is missing from a certain point in the project, but when
we play it through there is no glitch anywhere.
The Audio is good, but could do more investigation of compression and Parametric EQ next time. No time to
do that this time around.
We did some more Audio Investigation, and found quite a bit of information, but none specific to Audio for
Live Music or Music Videos.
The following page goes through every audio effect that is available and the controls for it.
https://helpx.adobe.com/premiere-pro/using/audio-effects-transitions.html
Here is a good basic video about the difference between basic EQ and Parametric EQ
https://www.youtube.com/watch?v=GXIkWiB09rw
A Short article on EQ vs Parametric EQ
http://soundschematic.com/parametric-eq-vs-graphic-eq/
There is also this video we may have already listed that covers basic EQ in Premiere:
https://www.youtube.com/watch?v=jLcYNdiLd8c
Here is a video about the Audio Mastering Control for the overall Audio of the Video in Premiere Pro CC:
https://www.youtube.com/watch?v=yClZFswU5eg
In the end we just used very basic bass boost on the audio tracks, because we found as soon as you start
bumping up the 1K for vocals, we seemed to lose crispness and clarity on the guitars.
We also found that we can pump audio levels right up to the verge of clipping, (-1 and -2db), even with a
little very occasional red bar clipping, because either the rendering or upload to Vimeo seems to do some
compression anyway.
Exporting Video for Vimeo and YouTube
It should be simple according to: http://creativeclouduser.com/publishing-to-vimeo-or-youtube-from-
adobe-premiere-pro/
Choose File > Export > Media or press Cmd+M (Mac OS) or Ctrl+M (Windows). The Export Settings window
opens.
(See later on for how we did our own CUSTOM SETTINGS and saved them).
From the Format pop-up list, choose H.264.
Click the Preset list and choose the correct preset. You’ll find ready-to-use settings for both YouTube and
Vimeo. Be sure to choose the HD presets if your source video is HD.

Making our First Music Video in Adobe Premiere
PBP – Photos By Passy – How to Make a Music Clip with Adobe Premiere CC Page | 11
Select the Use Maximum Render Quality option. This will take a little longer to process, but the quality is
worth it.
Click the underlined text next to Output Name. This lets you name the file and specify a destination.
Click the Export button to create your file.
Here is how we set it up for Vimeo as 720p, since they render our 1080p ones down anyway:
Note we ticked Use Maximum Render Quality.
Our 7 minute video rendered in 3 minutes, with our Core Intel i7 5820K processor.
It created a 452 MB sized file which will take a very long time to upload!
The video is possibly too long at 8 songs, and maybe needed to be cut back to 5 songs.
When we did Render maximum Quality, it changed from the Vimeo setting to Custom!
Next we rendered for the Vimeo 1080p setting, without setting the Use Maximum Render Quality.
File size was a whopping 900MB. This will take 2 hours to load to Vimeo, and use up a lot of my weekly
quota of upload to Vimeo.

Making our First Music Video in Adobe Premiere
PBP – Photos By Passy – How to Make a Music Clip with Adobe Premiere CC Page | 12
Finally we rendered for YouTube1080p, which made an 840MB file. This file looked to be the best output
quality when played on the PC with Windows Media Player. However when we tried to upload this file to
YouTube, the video was immediately rejected by YouTube as being unsuitable for upload.
(What the Hell???) So we moved on to using Custom Export Settings, as described below.
Exporting Video Using Custom Settings
There is a great video about this on YouTube at this link:
https://www.youtube.com/watch?v=4FbTsk_3QD4
The video is for Premiere Pro CS6, but we will assume it is okay for Premiere Pro CC as well.
The settings are basically H2.64 but the video has frame rate of 29.97fps and NTSC, but I assume as my video
was shot at 25fps PAL, that I render it out as PAL at 25fps.
Video Settings we used were: Profile High, Level 5.1, VBR2 Pass, Target and Max bitrates of 18.
For Audio we used the AAC 44000KHz, and the maximum 320kbps (rather than 192) .
We also ticked “Use maximum render quality”, although apparently this is okay for 2 minute videos, so not
sure how it will go on our 7 minute video.
A full screen dump of our settings is shown below. (These are the web video settings for YouTube 1080p).
The rendering was certainly a lot slower than when we used Vimeo and YouTube presets.
Total Rendering time for the two passes in VBR 2 pass was 8 minutes, though we never saw 2nd pass occur.
However, the custom render total file size was not a whole lot bigger being 952MB.

Making our First Music Video in Adobe Premiere
PBP – Photos By Passy – How to Make a Music Clip with Adobe Premiere CC Page | 13
The quality of this Custom render seems to be about the same as the YouTube 1080p preset render we did
previously. We saved these settings in Premiere CC as “ExportCustom1080p”. (Button next to “Custom”)
Now came the tricky decision: Should we upload this custom render to Vimeo, or the Vimeo Preset Render
version we have also exported out of Premiere Pro CC ???
The preset “Vimeo1080p HD” rendering settings in Premiere do not look that different to the custom
settings we used above:

Making our First Music Video in Adobe Premiere
PBP – Photos By Passy – How to Make a Music Clip with Adobe Premiere CC Page | 14
There is an advice page from Vimeo:
https://vimeo.com/help/faq/uploading-to-vimeo/compression-tutorials
which suggests settings for Adobe Premiere Exports. The only difference they have compared to the
Premiere preset for Vimeo is that Vimeo advice uses VBR 2 Pass and Level as 4.1 not 4.2.
SO… who has the best settings… Adobe Preset or the Vimeo advice page ?
Well, since we figure VBR 2 pass should be better quality, we are going to go with some Custom settings,
where we put VBR 2 pass and Level as 4.1 . Hopefully this means Vimeo will not mess with our Video at all
and just load it straight up with no quality loss.
Here are the settings we used in Premiere CC to render 1080p for Vimeo:
File size was slightly bigger 980MB vs 950MB than our other Custom Level 5.1 render.
Quality looks about the same.
So we uploaded this video to Vimeo, then after it was on Vimeo, we went to the Video tab and set it to play
at 1080p, rather than the standard Vimeo 720p. Note that 1080p HD is only available for paid Vimeo Plus
and Vimeo Pro members. (We have a Vimeo Plus membership at present, which lets you load up 4Gig of
Video a week.

Making our First Music Video in Adobe Premiere
PBP – Photos By Passy – How to Make a Music Clip with Adobe Premiere CC Page | 15
Uploading to YouTube
We rendered out a YouTube 1080p version using the 5.1 quality setting (not the Premiere preset that
YouTube rejected).
It then uploaded okay to YouTube and the end result can be viewed here:
https://www.youtube.com/watch?v=z8wmwZDAk4A
The YouTube version looks to be the same quality as the Vimeo One.
However the YT version seems to be a lot better for playing on a Facebook page, as it plays on the page at
480p and has no load lagging. The Vimeo 1080p one lags like crazy on an FB page, and you need to walk off
for 5 minutes and wait for it to load in. However on the Vimeo web page direct at:
https://vimeo.com/133007649 it seems to load in and play a lot better / faster.
So if you are interested in making movies with Adobe Premiere, using DSLR footage, then we hope that
reading this document, and watching all the Tutorial Videos that are in it is of great help to you.
Enjoy,
Paul at Photos By Passy
www.photosbypassy.com