Embed Size (px)
Citation preview
7/15/2019 Making Music With Makeblock
http://slidepdf.com/reader/full/making-music-with-makeblock-5633839118e4f 1/34
http://www.instructables.com/id/Making-Music-with-Makeblock/
Food Living Outside Play Technology Workshop
Making Music with Makeblockby Makerworks on June 17, 2013
Table of Contents
Making Music with Makeblock ....................................................................................................
Intro: Making Music with Makeblock .............................................................................................
Step 1: Materials list ........................................................................................................
Step 2: Tools ..............................................................................................................
Step 3: Driven Pulley Holder ..................................................................................................
Step 4: Cut Link Rod ........................................................................................................ 1
Step 5: Slider Device and Music Play Arm ........................................................................................ 1
Step 6: Step motor and electronic modules Holder .................................................................................. 1
Step 7: Install to the Slider .................................................................................................... 1
Step 8: Add Electronic Modules ................................................................................................ 2
Step 9: Connect the Electronic Modules .......................................................................................... 2
Step 10: Add Timing Belt ..................................................................................................... 2
Step 11: Add Xylophone hammer .............................................................................................. 3
Step 12: Upload the Arduino Code and Play the Music ............................................................................... 3
Related Instructables ........................................................................................................ 3
Advertisements ............................................................................................................... 3
7/15/2019 Making Music With Makeblock
http://slidepdf.com/reader/full/making-music-with-makeblock-5633839118e4f 2/34
http://www.instructables.com/id/Making-Music-with-Makeblock/
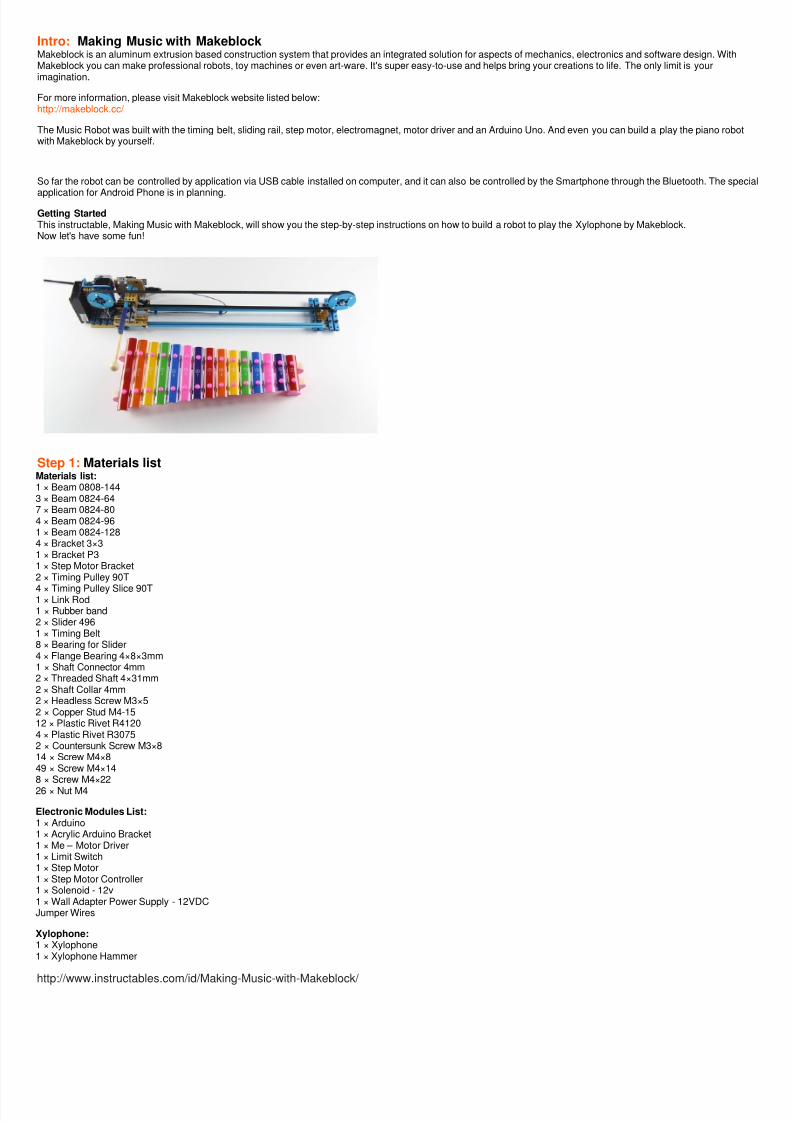
Intro: Making Music with MakeblockMakeblock is an aluminum extrusion based construction system that provides an integrated solution for aspects of mechanics, electronics and software design. WithMakeblock you can make professional robots, toy machines or even art-ware. It's super easy-to-use and helps bring your creations to life. The only limit is yourimagination.
For more information, please visit Makeblock website listed below:http://makeblock.cc/
The Music Robot was built with the timing belt, sliding rail, step motor, electromagnet, motor driver and an Arduino Uno. And even you can build a play the piano robowith Makeblock by yourself.
So far the robot can be controlled by application via USB cable installed on computer, and it can also be controlled by the Smartphone through the Bluetooth. The spe
application for Android Phone is in planning.
Getting StartedThis instructable, Making Music with Makeblock, will show you the step-by-step instructions on how to build a robot to play the Xylophone by Makeblock.Now let's have some fun!
Step 1:Materials listMaterials list:1 × Beam 0808-1443 × Beam 0824-647 × Beam 0824-804 × Beam 0824-961 × Beam 0824-1284 × Bracket 3×31 × Bracket P31 × Step Motor Bracket2 × Timing Pulley 90T
4 × Timing Pulley Slice 90T1 × Link Rod1 × Rubber band2 × Slider 4961 × Timing Belt8 × Bearing for Slider4 × Flange Bearing 4×8×3mm1 × Shaft Connector 4mm2 × Threaded Shaft 4×31mm2 × Shaft Collar 4mm2 × Headless Screw M3×52 × Copper Stud M4-1512 × Plastic Rivet R41204 × Plastic Rivet R30752 × Countersunk Screw M3×814 × Screw M4×849 × Screw M4×148 × Screw M4×2226 × Nut M4
Electronic Modules List:1 × Arduino1 × Acrylic Arduino Bracket1 × Me – Motor Driver1 × Limit Switch1 × Step Motor1 × Step Motor Controller1 × Solenoid - 12v1 × Wall Adapter Power Supply - 12VDCJumper Wires
Xylophone:1 × Xylophone1 × Xylophone Hammer

7/15/2019 Making Music With Makeblock
http://slidepdf.com/reader/full/making-music-with-makeblock-5633839118e4f 3/34
http://www.instructables.com/id/Making-Music-with-Makeblock/
Image Notes1. Jumper Wires2. Solenoid - 12v3. Rubber band
4. Step Motor Controller Screw Terminals5. Plastic Rivet R30756. Countersunk Screw M3×87. Bearing for Slider8. Flange Bearing 4×8×3mm9. Screw M4×810. Screw M4×1411. Screw M4×2212. Nut M413. Shaft Connector 4mm14. Threaded Shaft 4×31mm15. Shaft Collar 4mm16. Copper Stud M4-1517. Plastic Rivet R4120
Image Notes1. Xylophone2. Xylophone hammer
7/15/2019 Making Music With Makeblock
http://slidepdf.com/reader/full/making-music-with-makeblock-5633839118e4f 4/34
http://www.instructables.com/id/Making-Music-with-Makeblock/
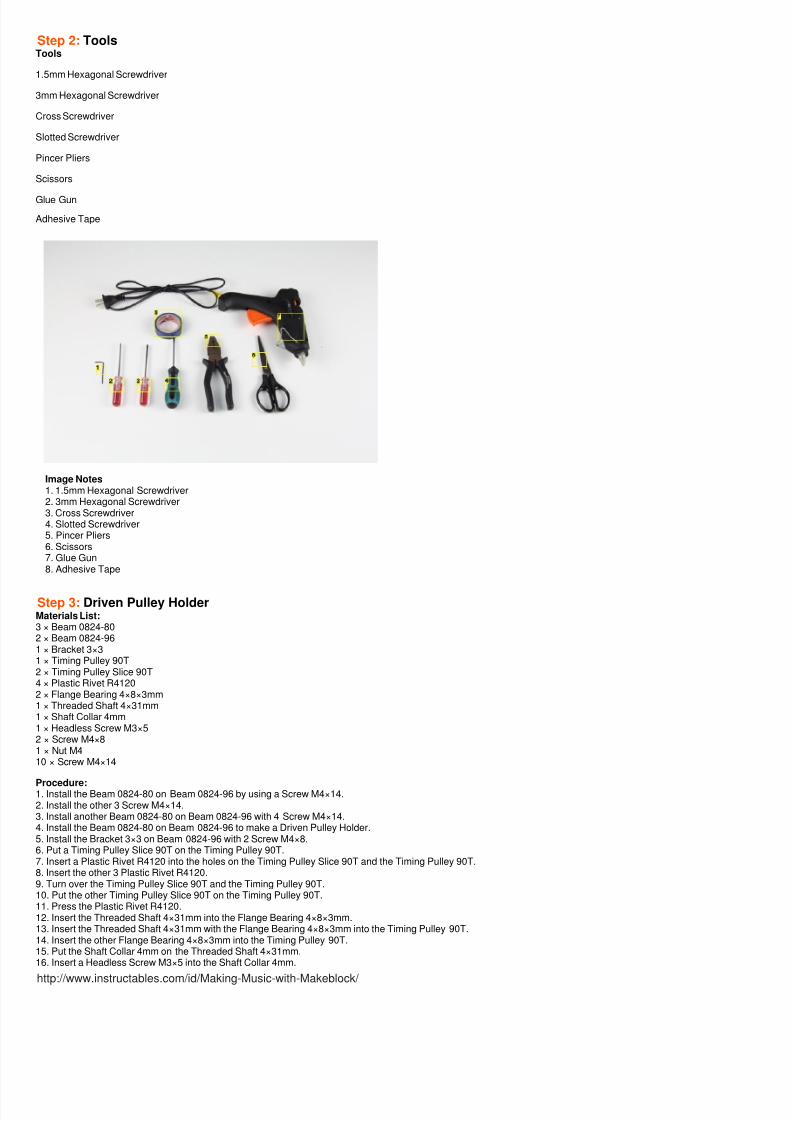
Step 2:ToolsTools
1.5mm Hexagonal Screwdriver
3mm Hexagonal Screwdriver
Cross Screwdriver
Slotted Screwdriver
Pincer Pliers
Scissors
Glue Gun
Adhesive Tape
Image Notes1. 1.5mm Hexagonal Screwdriver2. 3mm Hexagonal Screwdriver3. Cross Screwdriver4. Slotted Screwdriver5. Pincer Pliers6. Scissors7. Glue Gun8. Adhesive Tape
Step 3:Driven Pulley HolderMaterials List:3 × Beam 0824-802 × Beam 0824-961 × Bracket 3×31 × Timing Pulley 90T2 × Timing Pulley Slice 90T4 × Plastic Rivet R41202 × Flange Bearing 4×8×3mm1 × Threaded Shaft 4×31mm1 × Shaft Collar 4mm1 × Headless Screw M3×52 × Screw M4×81 × Nut M410 × Screw M4×14
Procedure:1. Install the Beam 0824-80 on Beam 0824-96 by using a Screw M4×14.2. Install the other 3 Screw M4×14.3. Install another Beam 0824-80 on Beam 0824-96 with 4 Screw M4×14.4. Install the Beam 0824-80 on Beam 0824-96 to make a Driven Pulley Holder.5. Install the Bracket 3×3 on Beam 0824-96 with 2 Screw M4×8.6. Put a Timing Pulley Slice 90T on the Timing Pulley 90T.7. Insert a Plastic Rivet R4120 into the holes on the Timing Pulley Slice 90T and the Timing Pulley 90T.8. Insert the other 3 Plastic Rivet R4120.9. Turn over the Timing Pulley Slice 90T and the Timing Pulley 90T.10. Put the other Timing Pulley Slice 90T on the Timing Pulley 90T.11. Press the Plastic Rivet R4120.12. Insert the Threaded Shaft 4×31mm into the Flange Bearing 4×8×3mm.13. Insert the Threaded Shaft 4×31mm with the Flange Bearing 4×8×3mm into the Timing Pulley 90T.14. Insert the other Flange Bearing 4×8×3mm into the Timing Pulley 90T.15. Put the Shaft Collar 4mm on the Threaded Shaft 4×31mm.16. Insert a Headless Screw M3×5 into the Shaft Collar 4mm.
7/15/2019 Making Music With Makeblock
http://slidepdf.com/reader/full/making-music-with-makeblock-5633839118e4f 5/34
http://www.instructables.com/id/Making-Music-with-Makeblock/
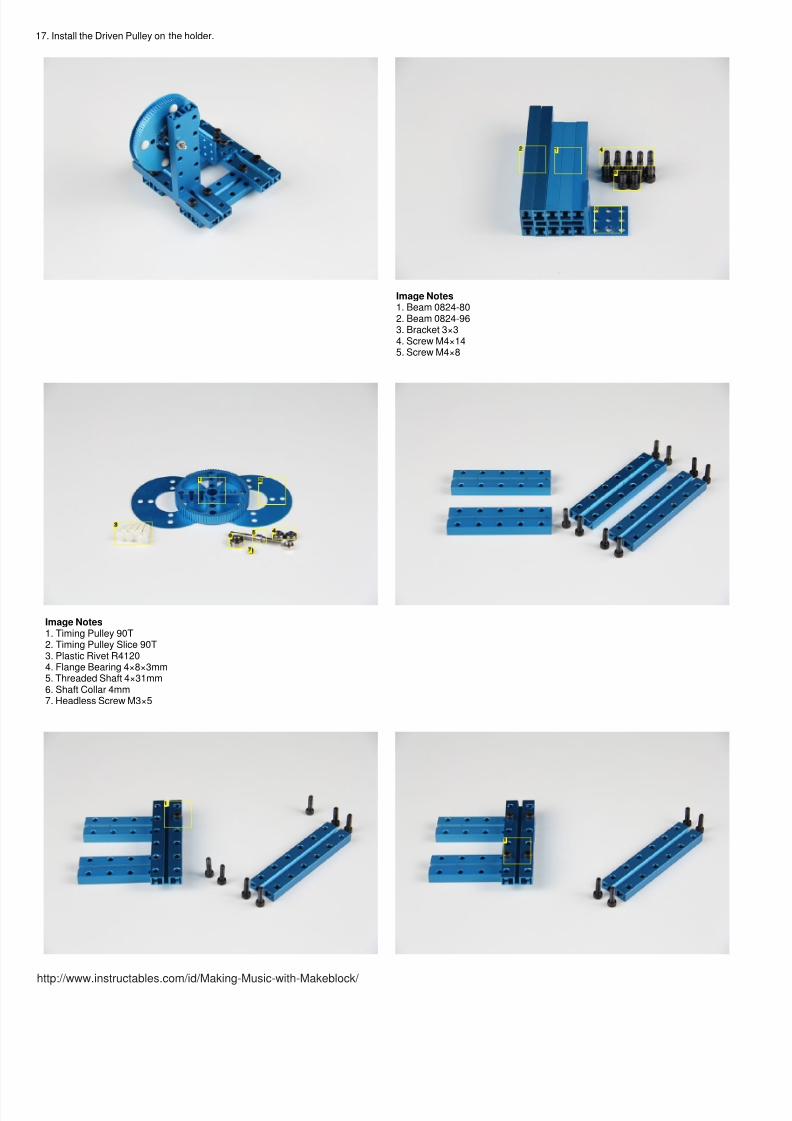
17. Install the Driven Pulley on the holder.
Image Notes1. Beam 0824-802. Beam 0824-963. Bracket 3×34. Screw M4×145. Screw M4×8
Image Notes1. Timing Pulley 90T2. Timing Pulley Slice 90T3. Plastic Rivet R41204. Flange Bearing 4×8×3mm5. Threaded Shaft 4×31mm6. Shaft Collar 4mm7. Headless Screw M3×5
7/15/2019 Making Music With Makeblock
http://slidepdf.com/reader/full/making-music-with-makeblock-5633839118e4f 6/34
http://www.instructables.com/id/Making-Music-with-Makeblock/
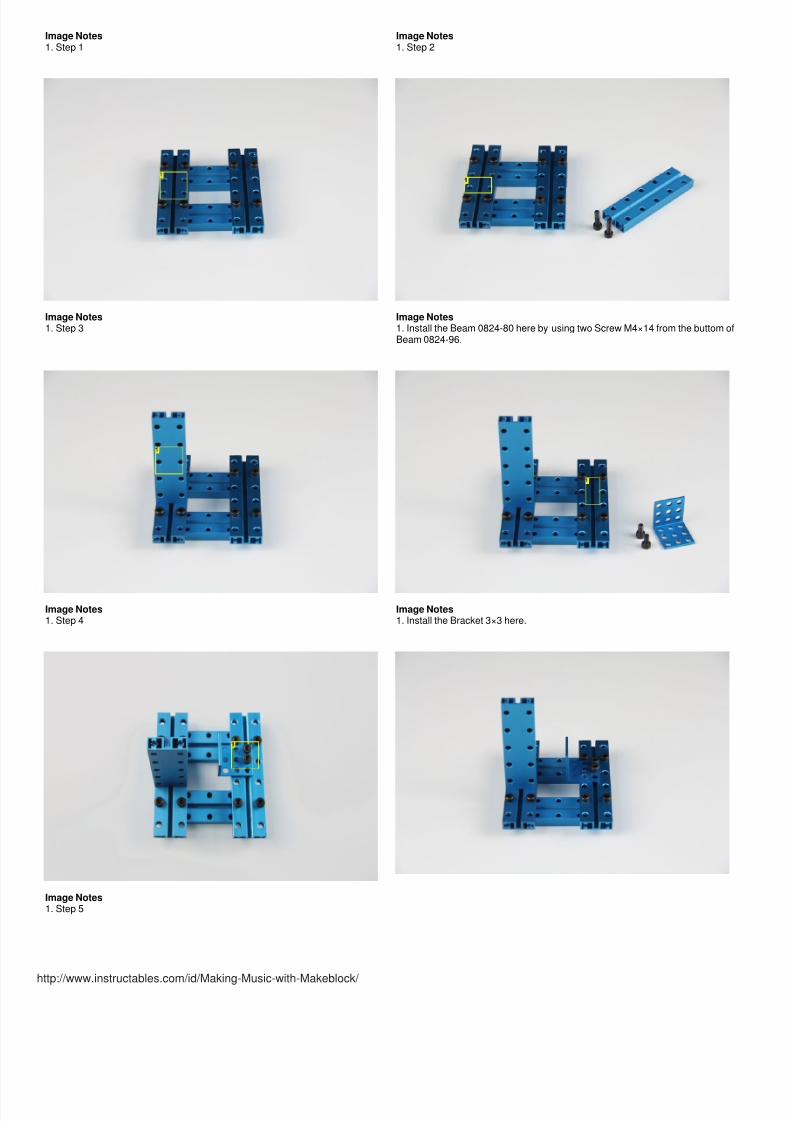
Image Notes1. Step 1
Image Notes1. Step 2
Image Notes1. Step 3
Image Notes1. Install the Beam 0824-80 here by using two Screw M4×14 from the buttom ofBeam 0824-96.
Image Notes1. Step 4
Image Notes1. Install the Bracket 3×3 here.
Image Notes1. Step 5
7/15/2019 Making Music With Makeblock
http://slidepdf.com/reader/full/making-music-with-makeblock-5633839118e4f 7/34
http://www.instructables.com/id/Making-Music-with-Makeblock/
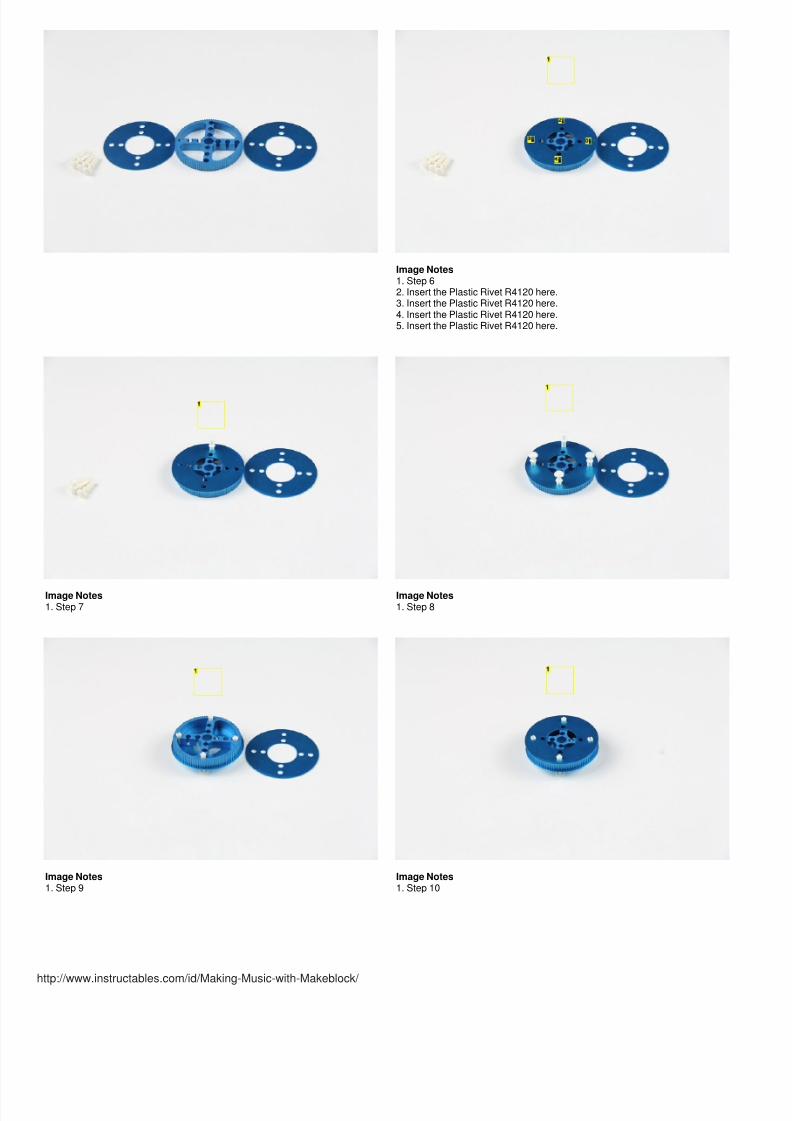
Image Notes1. Step 62. Insert the Plastic Rivet R4120 here.3. Insert the Plastic Rivet R4120 here.4. Insert the Plastic Rivet R4120 here.5. Insert the Plastic Rivet R4120 here.
Image Notes1. Step 7
Image Notes1. Step 8
Image Notes1. Step 9
Image Notes1. Step 10
7/15/2019 Making Music With Makeblock
http://slidepdf.com/reader/full/making-music-with-makeblock-5633839118e4f 8/34
http://www.instructables.com/id/Making-Music-with-Makeblock/
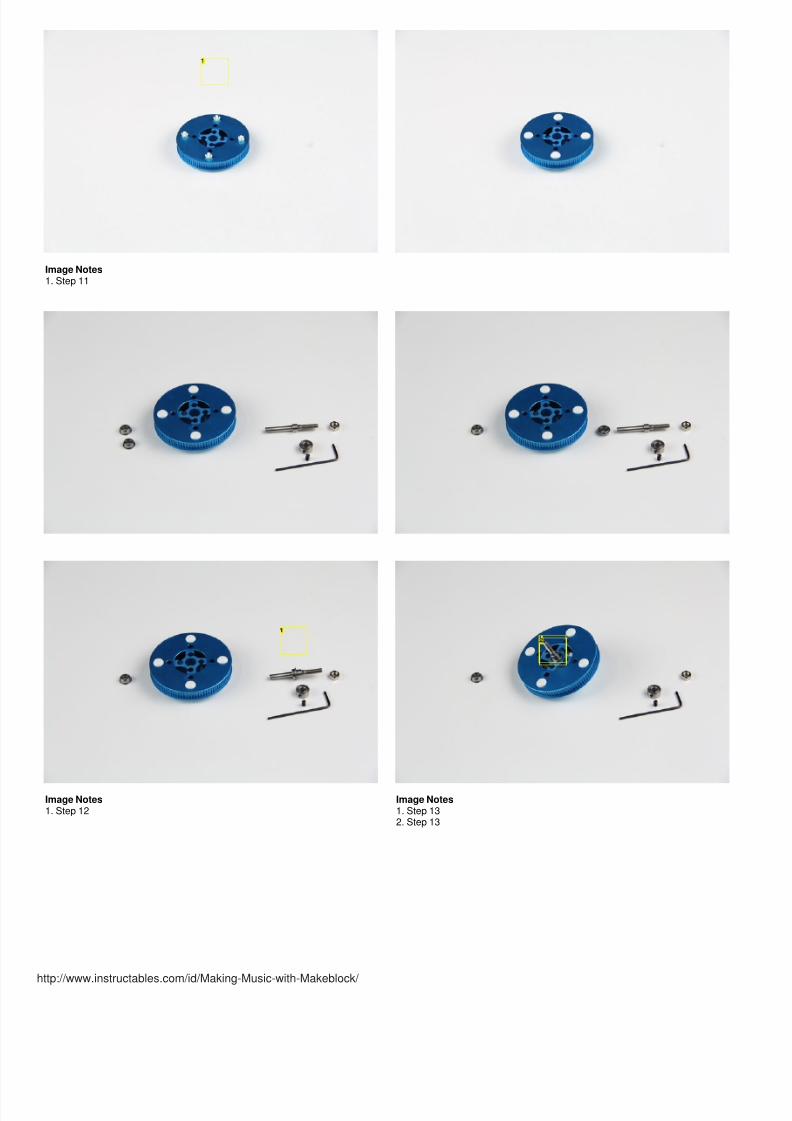
Image Notes1. Step 11
Image Notes1. Step 12
Image Notes1. Step 132. Step 13
7/15/2019 Making Music With Makeblock
http://slidepdf.com/reader/full/making-music-with-makeblock-5633839118e4f 9/34
http://www.instructables.com/id/Making-Music-with-Makeblock/
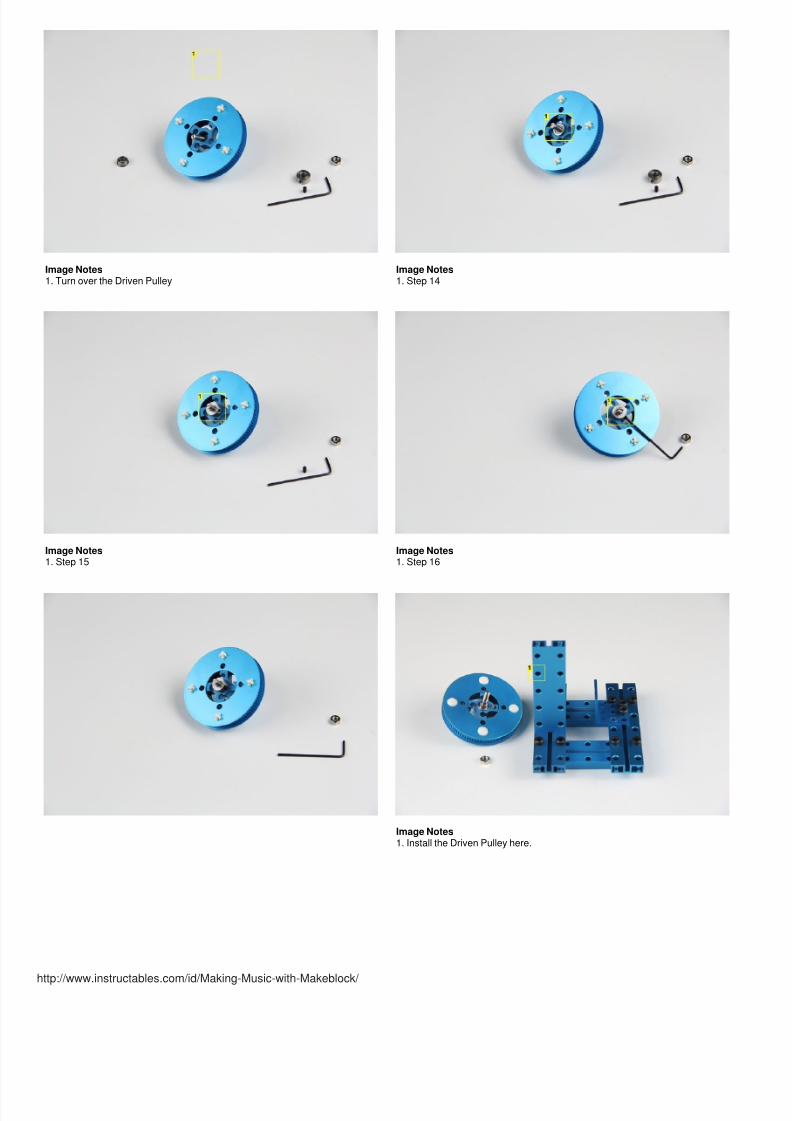
Image Notes1. Turn over the Driven Pulley
Image Notes1. Step 14
Image Notes1. Step 15
Image Notes1. Step 16
Image Notes1. Install the Driven Pulley here.
7/15/2019 Making Music With Makeblock
http://slidepdf.com/reader/full/making-music-with-makeblock-5633839118e4f 10/34
http://www.instructables.com/id/Making-Music-with-Makeblock/
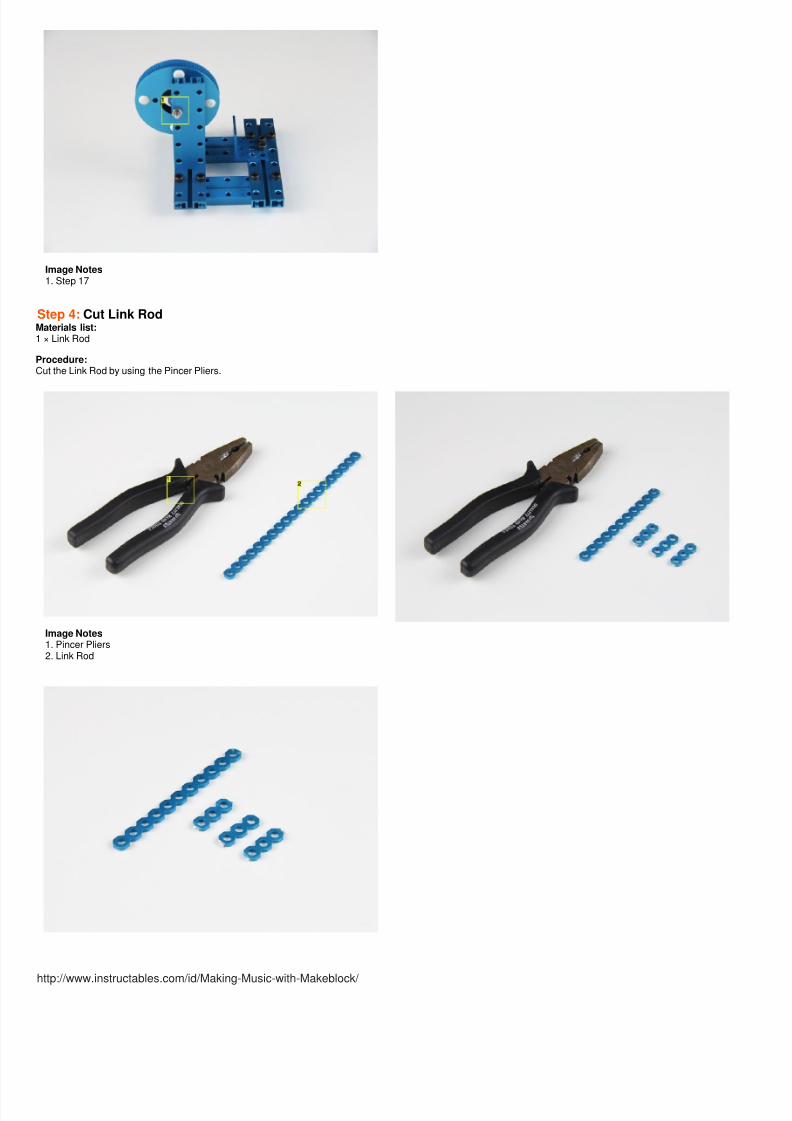
Image Notes1. Step 17
Step 4:Cut Link RodMaterials list:1 × Link Rod
Procedure:Cut the Link Rod by using the Pincer Pliers.
Image Notes1. Pincer Pliers2. Link Rod
7/15/2019 Making Music With Makeblock
http://slidepdf.com/reader/full/making-music-with-makeblock-5633839118e4f 11/34
http://www.instructables.com/id/Making-Music-with-Makeblock/
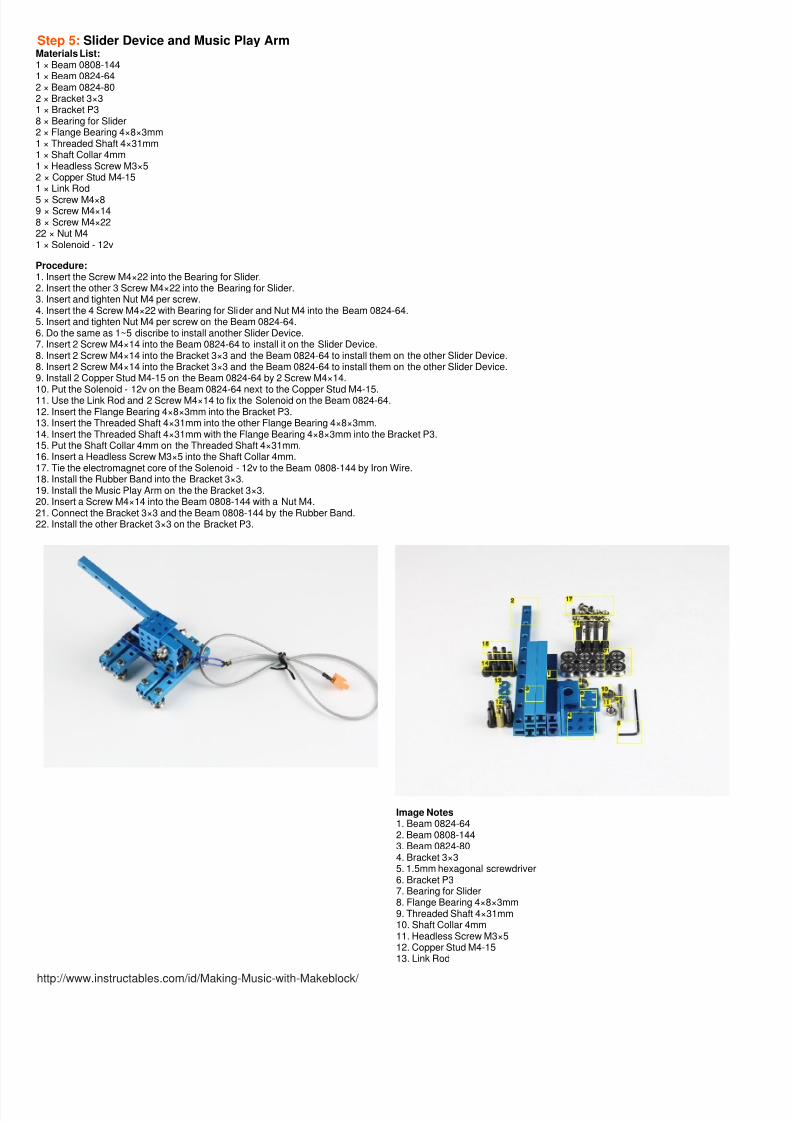
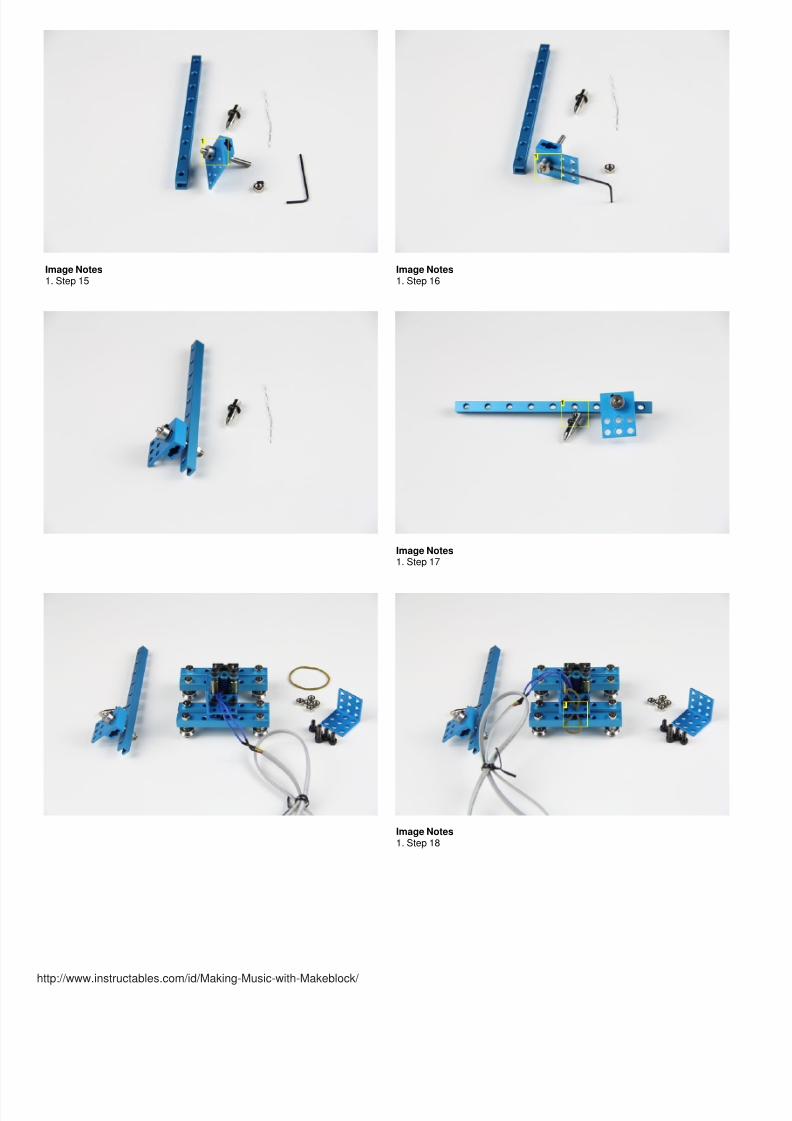
Step 5:Slider Device and Music Play ArmMaterials List:1 × Beam 0808-1441 × Beam 0824-642 × Beam 0824-802 × Bracket 3×31 × Bracket P38 × Bearing for Slider2 × Flange Bearing 4×8×3mm1 × Threaded Shaft 4×31mm1 × Shaft Collar 4mm1 × Headless Screw M3×52 × Copper Stud M4-151 × Link Rod
5 × Screw M4×89 × Screw M4×148 × Screw M4×2222 × Nut M41 × Solenoid - 12v
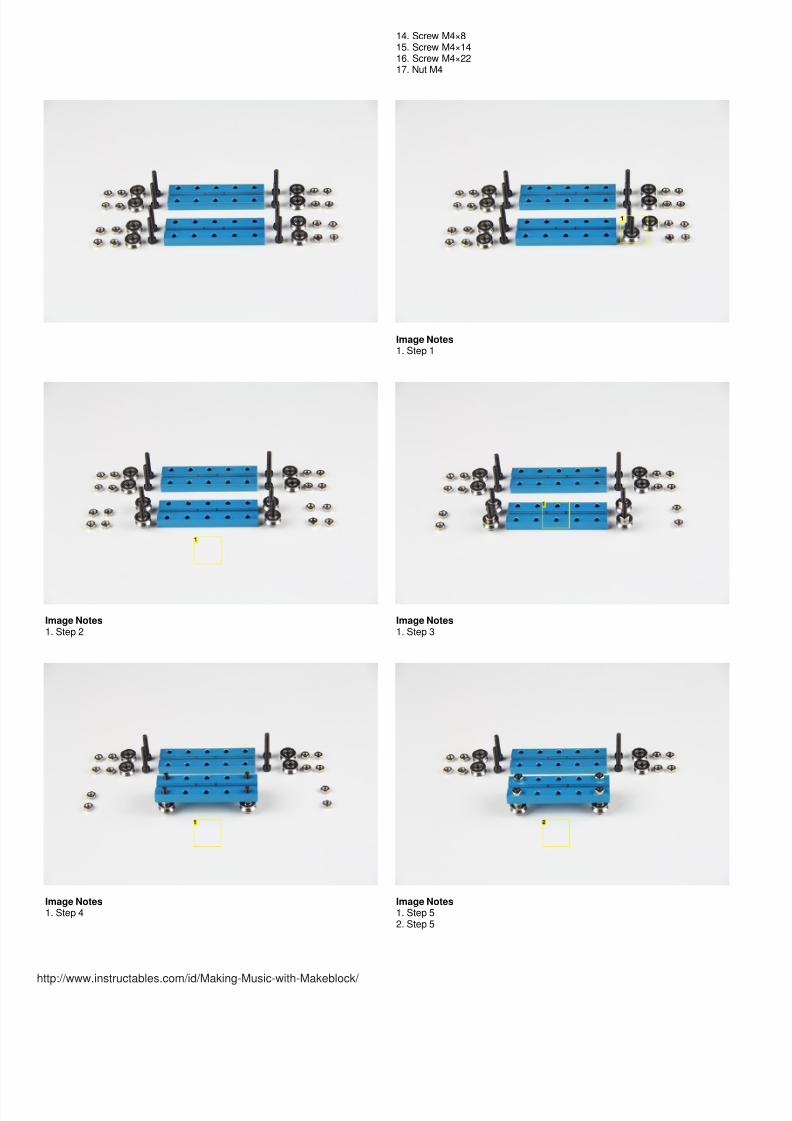
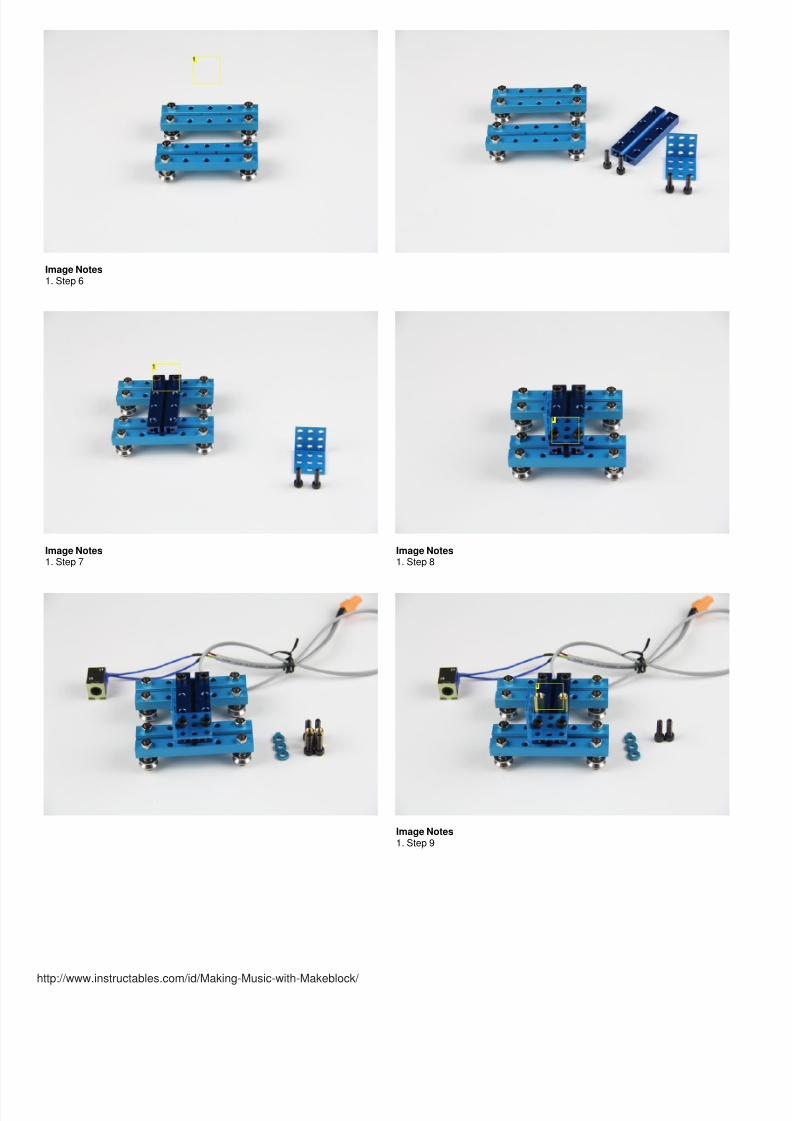
Procedure:1. Insert the Screw M4×22 into the Bearing for Slider.2. Insert the other 3 Screw M4×22 into the Bearing for Slider.3. Insert and tighten Nut M4 per screw.4. Insert the 4 Screw M4×22 with Bearing for Slider and Nut M4 into the Beam 0824-64.5. Insert and tighten Nut M4 per screw on the Beam 0824-64.6. Do the same as 1~5 discribe to install another Slider Device.7. Insert 2 Screw M4×14 into the Beam 0824-64 to install it on the Slider Device.8. Insert 2 Screw M4×14 into the Bracket 3×3 and the Beam 0824-64 to install them on the other Slider Device.8. Insert 2 Screw M4×14 into the Bracket 3×3 and the Beam 0824-64 to install them on the other Slider Device.9. Install 2 Copper Stud M4-15 on the Beam 0824-64 by 2 Screw M4×14.
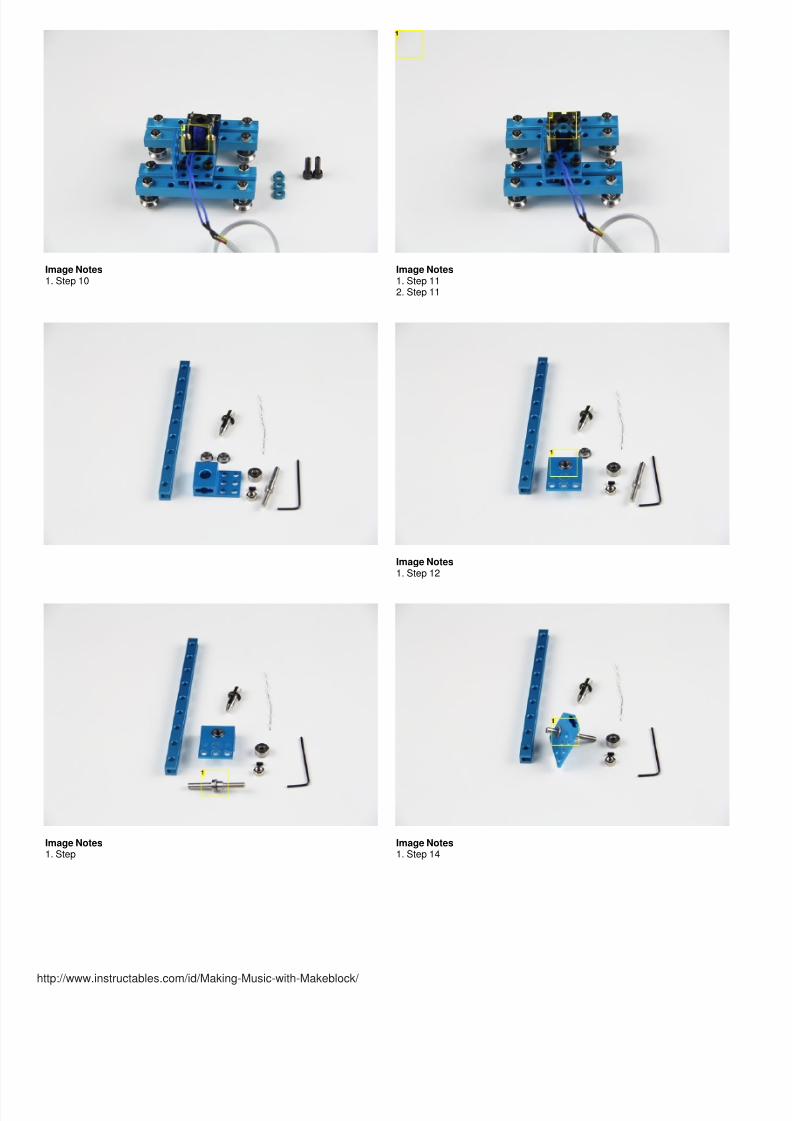
10. Put the Solenoid - 12v on the Beam 0824-64 next to the Copper Stud M4-15.11. Use the Link Rod and 2 Screw M4×14 to fix the Solenoid on the Beam 0824-64.12. Insert the Flange Bearing 4×8×3mm into the Bracket P3.13. Insert the Threaded Shaft 4×31mm into the other Flange Bearing 4×8×3mm.14. Insert the Threaded Shaft 4×31mm with the Flange Bearing 4×8×3mm into the Bracket P3.15. Put the Shaft Collar 4mm on the Threaded Shaft 4×31mm.16. Insert a Headless Screw M3×5 into the Shaft Collar 4mm.17. Tie the electromagnet core of the Solenoid - 12v to the Beam 0808-144 by Iron Wire.18. Install the Rubber Band into the Bracket 3×3.19. Install the Music Play Arm on the the Bracket 3×3.20. Insert a Screw M4×14 into the Beam 0808-144 with a Nut M4.21. Connect the Bracket 3×3 and the Beam 0808-144 by the Rubber Band.22. Install the other Bracket 3×3 on the Bracket P3.
Image Notes1. Beam 0824-642. Beam 0808-1443. Beam 0824-804. Bracket 3×35. 1.5mm hexagonal screwdriver6. Bracket P37. Bearing for Slider8. Flange Bearing 4×8×3mm9. Threaded Shaft 4×31mm10. Shaft Collar 4mm11. Headless Screw M3×512. Copper Stud M4-1513. Link Rod
7/15/2019 Making Music With Makeblock
http://slidepdf.com/reader/full/making-music-with-makeblock-5633839118e4f 12/34
http://www.instructables.com/id/Making-Music-with-Makeblock/
14. Screw M4×815. Screw M4×1416. Screw M4×2217. Nut M4
Image Notes1. Step 1
Image Notes1. Step 2
Image Notes1. Step 3
Image Notes1. Step 4
Image Notes1. Step 52. Step 5
7/15/2019 Making Music With Makeblock
http://slidepdf.com/reader/full/making-music-with-makeblock-5633839118e4f 13/34
http://www.instructables.com/id/Making-Music-with-Makeblock/
Image Notes1. Step 6
Image Notes1. Step 7
Image Notes1. Step 8
Image Notes1. Step 9
7/15/2019 Making Music With Makeblock
http://slidepdf.com/reader/full/making-music-with-makeblock-5633839118e4f 14/34
http://www.instructables.com/id/Making-Music-with-Makeblock/
Image Notes1. Step 10
Image Notes1. Step 112. Step 11
Image Notes1. Step 12
Image Notes1. Step
Image Notes1. Step 14
7/15/2019 Making Music With Makeblock
http://slidepdf.com/reader/full/making-music-with-makeblock-5633839118e4f 15/34
http://www.instructables.com/id/Making-Music-with-Makeblock/
Image Notes1. Step 15
Image Notes1. Step 16
Image Notes1. Step 17
Image Notes1. Step 18
7/15/2019 Making Music With Makeblock
http://slidepdf.com/reader/full/making-music-with-makeblock-5633839118e4f 16/34
http://www.instructables.com/id/Making-Music-with-Makeblock/
Image Notes1. Step 192. Step 20
Image Notes1. Step 21
Image Notes1. Step 22
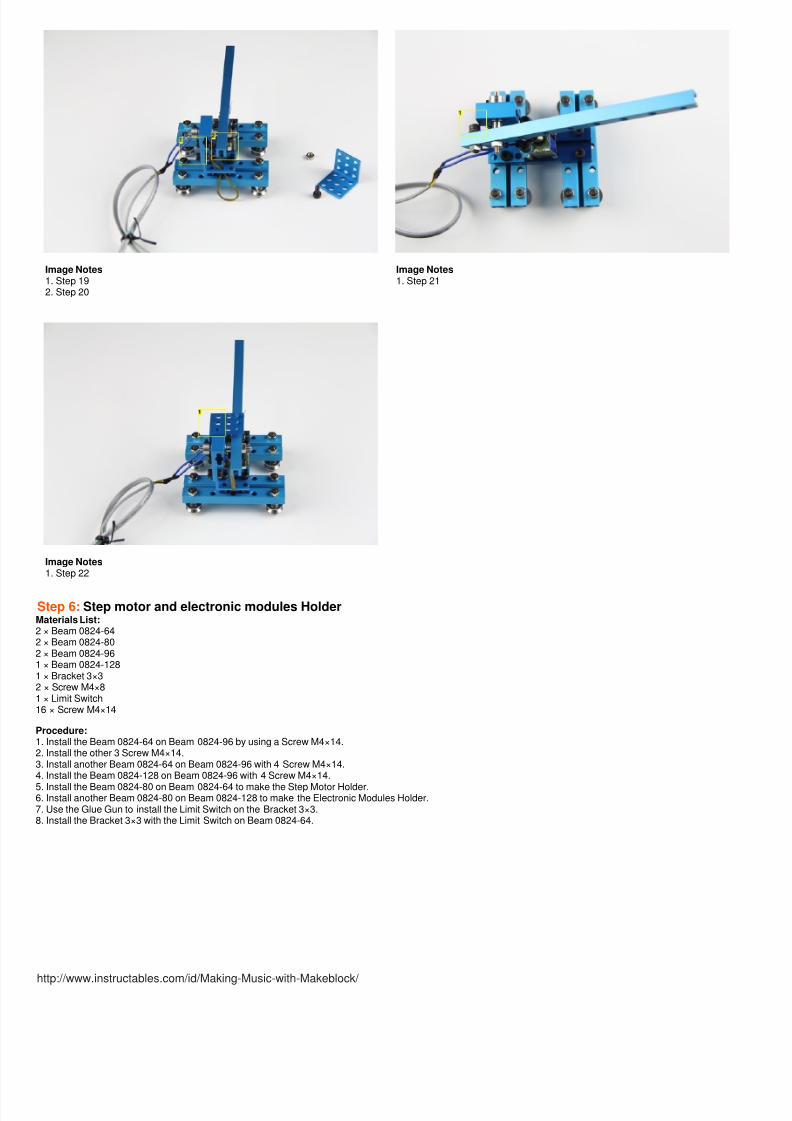
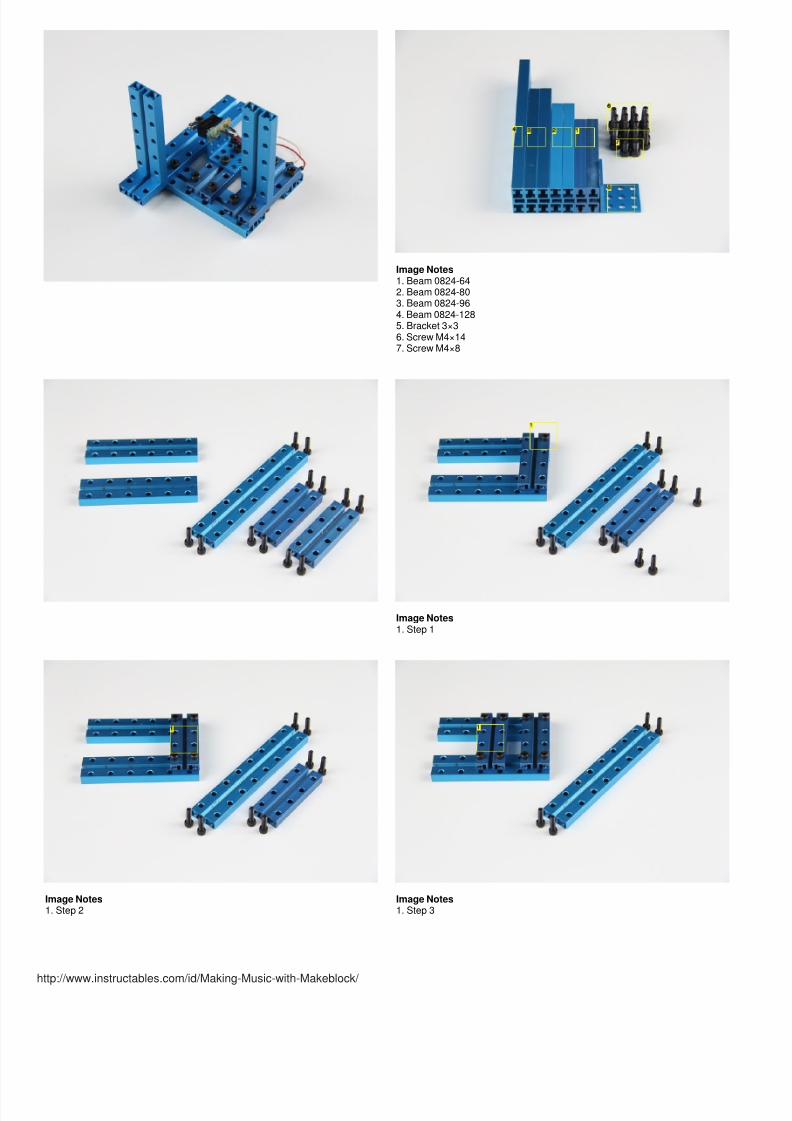
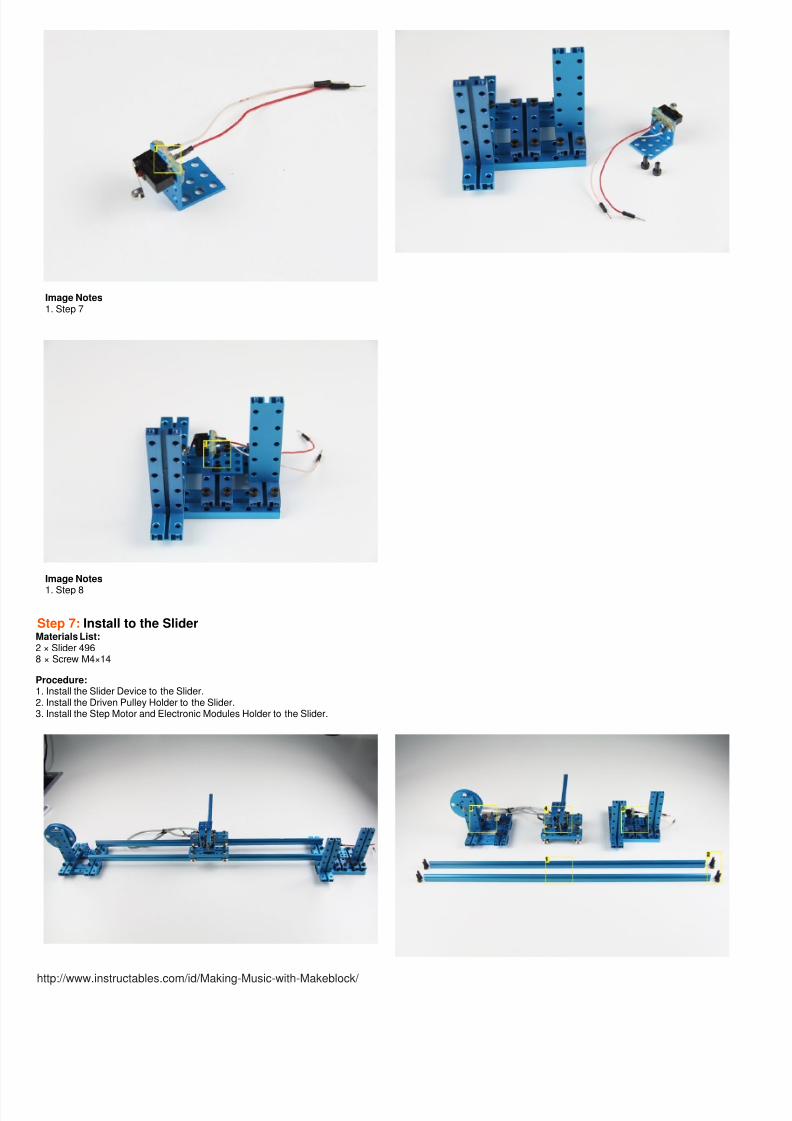
Step 6:Step motor and electronic modules HolderMaterials List:2 × Beam 0824-642 × Beam 0824-802 × Beam 0824-961 × Beam 0824-1281 × Bracket 3×32 × Screw M4×81 × Limit Switch16 × Screw M4×14
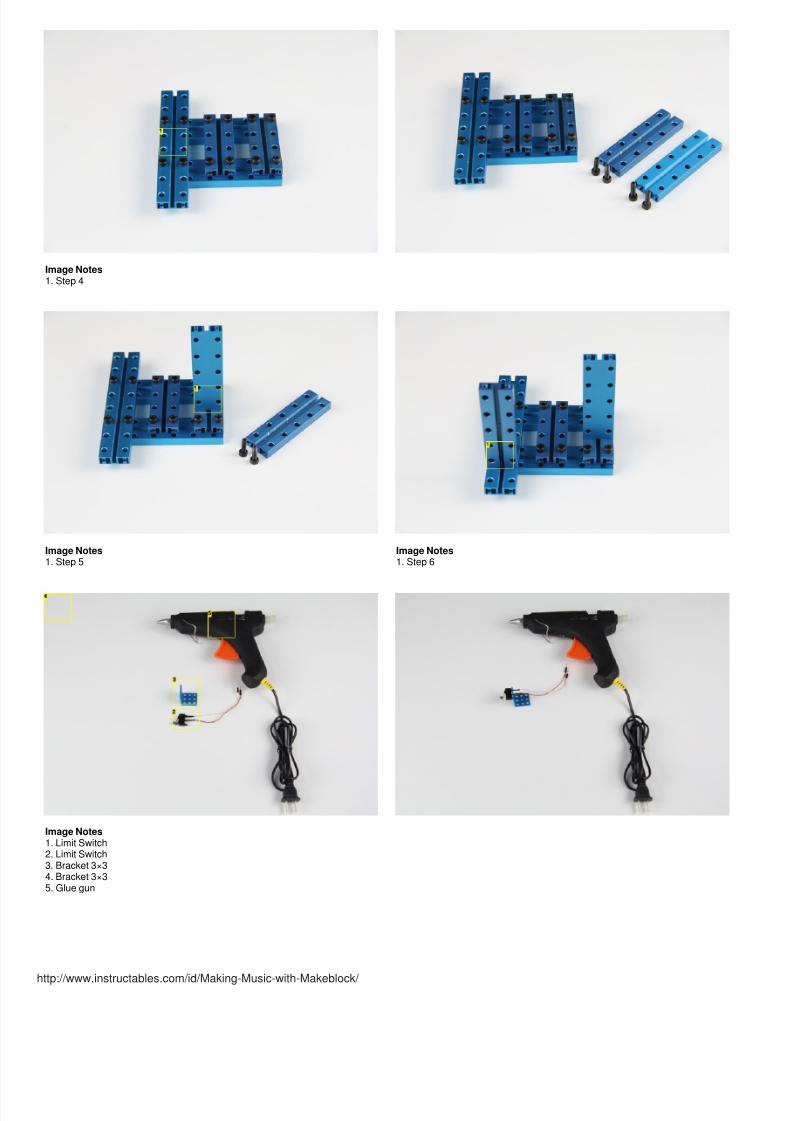
Procedure:1. Install the Beam 0824-64 on Beam 0824-96 by using a Screw M4×14.2. Install the other 3 Screw M4×14.3. Install another Beam 0824-64 on Beam 0824-96 with 4 Screw M4×14.4. Install the Beam 0824-128 on Beam 0824-96 with 4 Screw M4×14.
5. Install the Beam 0824-80 on Beam 0824-64 to make the Step Motor Holder.6. Install another Beam 0824-80 on Beam 0824-128 to make the Electronic Modules Holder.7. Use the Glue Gun to install the Limit Switch on the Bracket 3×3.8. Install the Bracket 3×3 with the Limit Switch on Beam 0824-64.
7/15/2019 Making Music With Makeblock
http://slidepdf.com/reader/full/making-music-with-makeblock-5633839118e4f 17/34
http://www.instructables.com/id/Making-Music-with-Makeblock/
Image Notes1. Beam 0824-642. Beam 0824-803. Beam 0824-964. Beam 0824-1285. Bracket 3×36. Screw M4×147. Screw M4×8
Image Notes1. Step 1
Image Notes1. Step 2
Image Notes1. Step 3
7/15/2019 Making Music With Makeblock
http://slidepdf.com/reader/full/making-music-with-makeblock-5633839118e4f 18/34
http://www.instructables.com/id/Making-Music-with-Makeblock/
Image Notes1. Step 4
Image Notes1. Step 5
Image Notes1. Step 6
Image Notes1. Limit Switch2. Limit Switch3. Bracket 3×34. Bracket 3×35. Glue gun
7/15/2019 Making Music With Makeblock
http://slidepdf.com/reader/full/making-music-with-makeblock-5633839118e4f 19/34
http://www.instructables.com/id/Making-Music-with-Makeblock/
Image Notes1. Step 7
Image Notes
1. Step 8
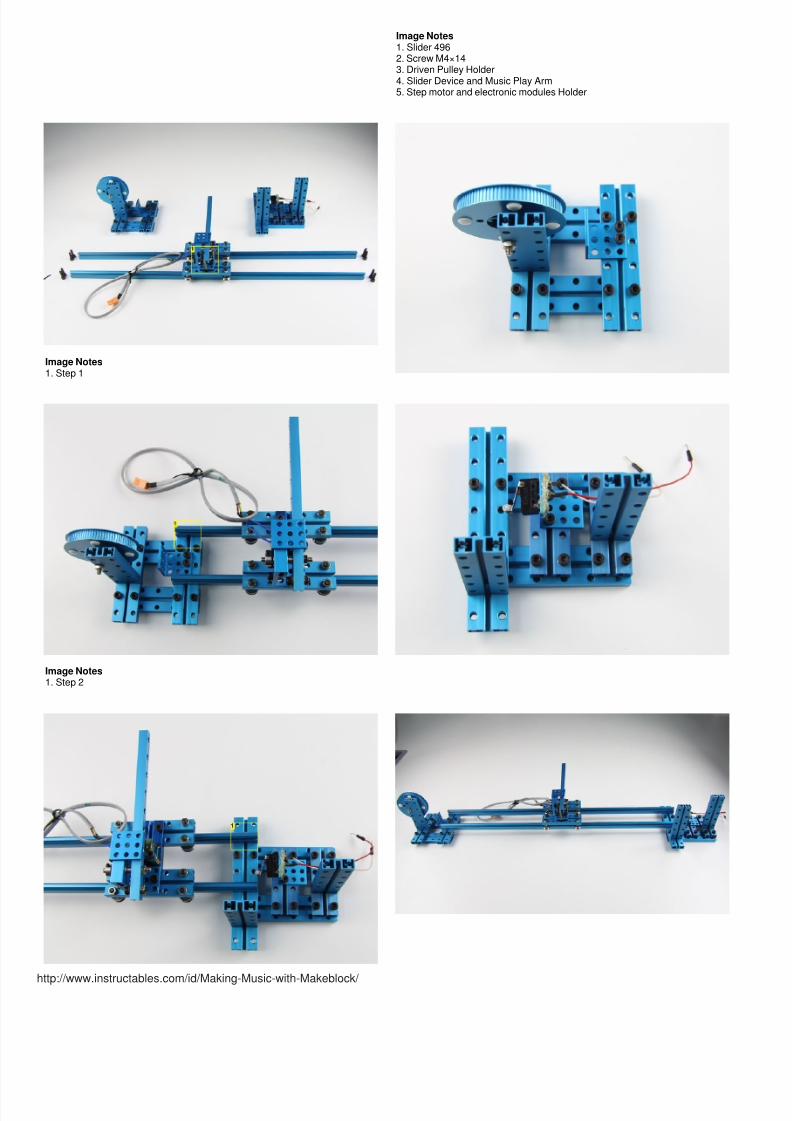
Step 7:Install to the SliderMaterials List:2 × Slider 4968 × Screw M4×14
Procedure:1. Install the Slider Device to the Slider.2. Install the Driven Pulley Holder to the Slider.3. Install the Step Motor and Electronic Modules Holder to the Slider.
7/15/2019 Making Music With Makeblock
http://slidepdf.com/reader/full/making-music-with-makeblock-5633839118e4f 20/34
http://www.instructables.com/id/Making-Music-with-Makeblock/
Image Notes1. Slider 4962. Screw M4×143. Driven Pulley Holder4. Slider Device and Music Play Arm5. Step motor and electronic modules Holder
Image Notes1. Step 1
Image Notes1. Step 2
7/15/2019 Making Music With Makeblock
http://slidepdf.com/reader/full/making-music-with-makeblock-5633839118e4f 21/34
http://www.instructables.com/id/Making-Music-with-Makeblock/
Image Notes1. Step 3
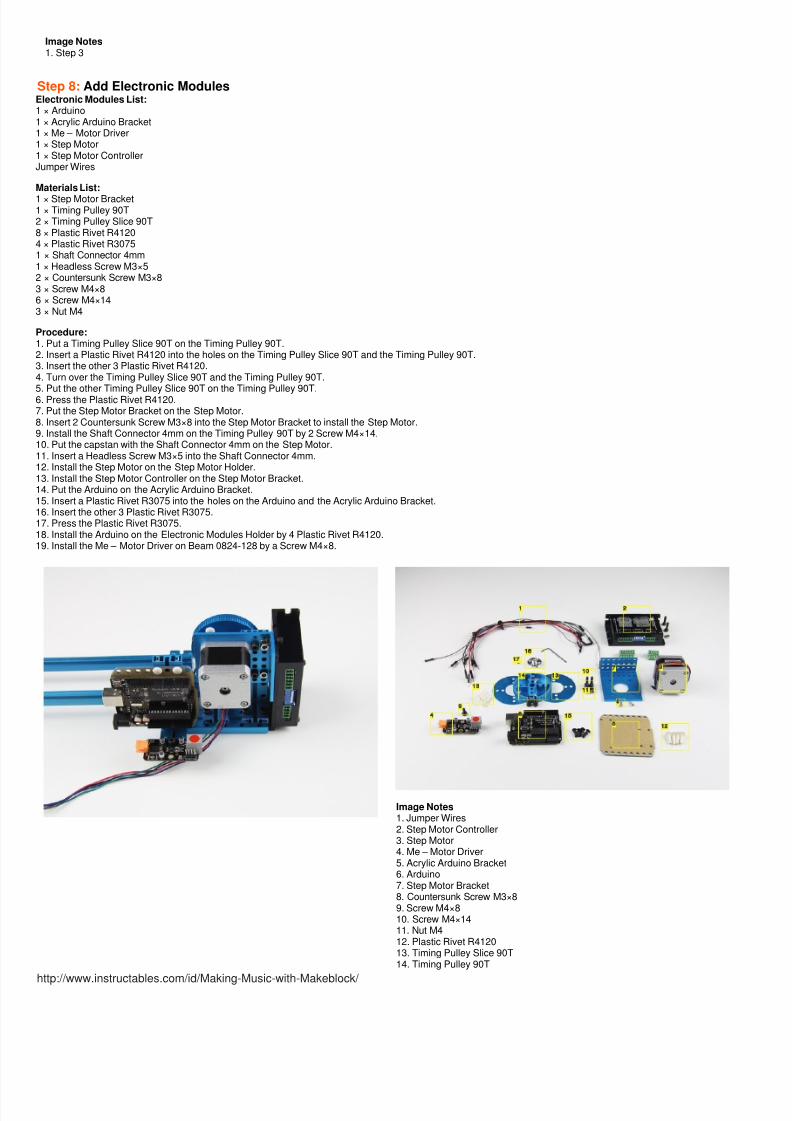
Step 8:Add Electronic ModulesElectronic Modules List:1 × Arduino1 × Acrylic Arduino Bracket1 × Me – Motor Driver1 × Step Motor1 × Step Motor ControllerJumper Wires
Materials List:
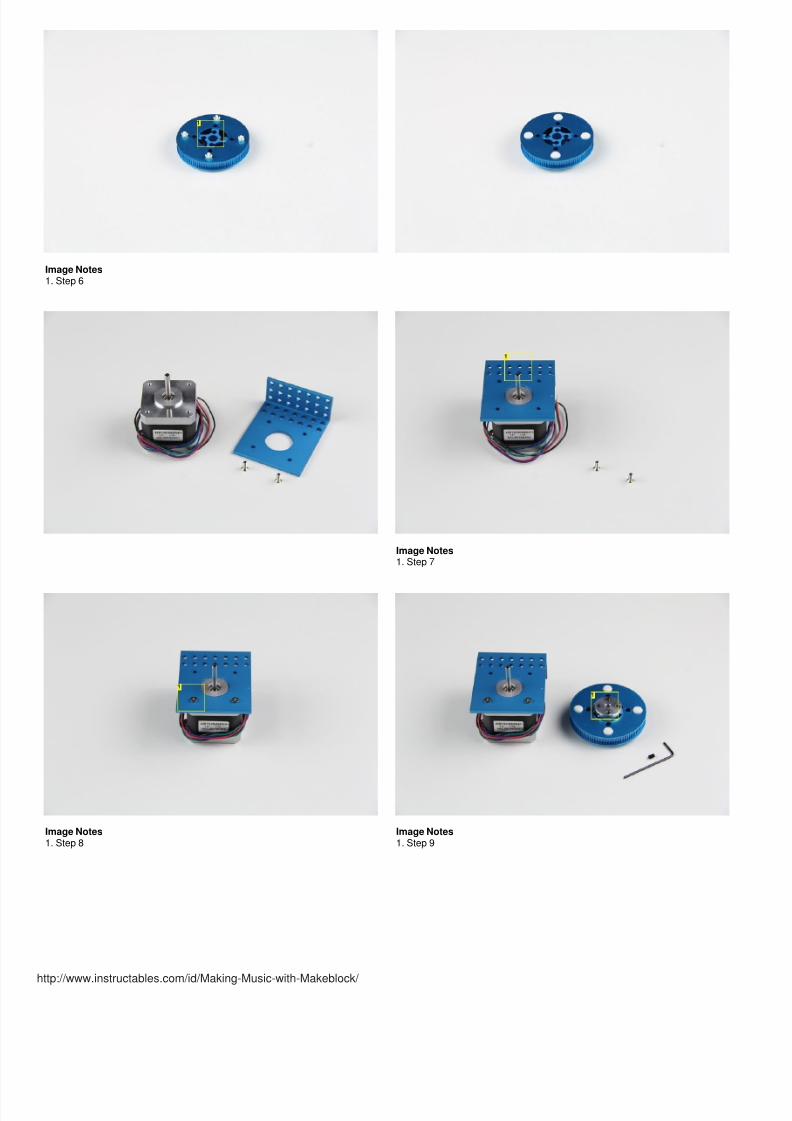
1 × Step Motor Bracket1 × Timing Pulley 90T2 × Timing Pulley Slice 90T8 × Plastic Rivet R41204 × Plastic Rivet R30751 × Shaft Connector 4mm1 × Headless Screw M3×52 × Countersunk Screw M3×83 × Screw M4×86 × Screw M4×143 × Nut M4
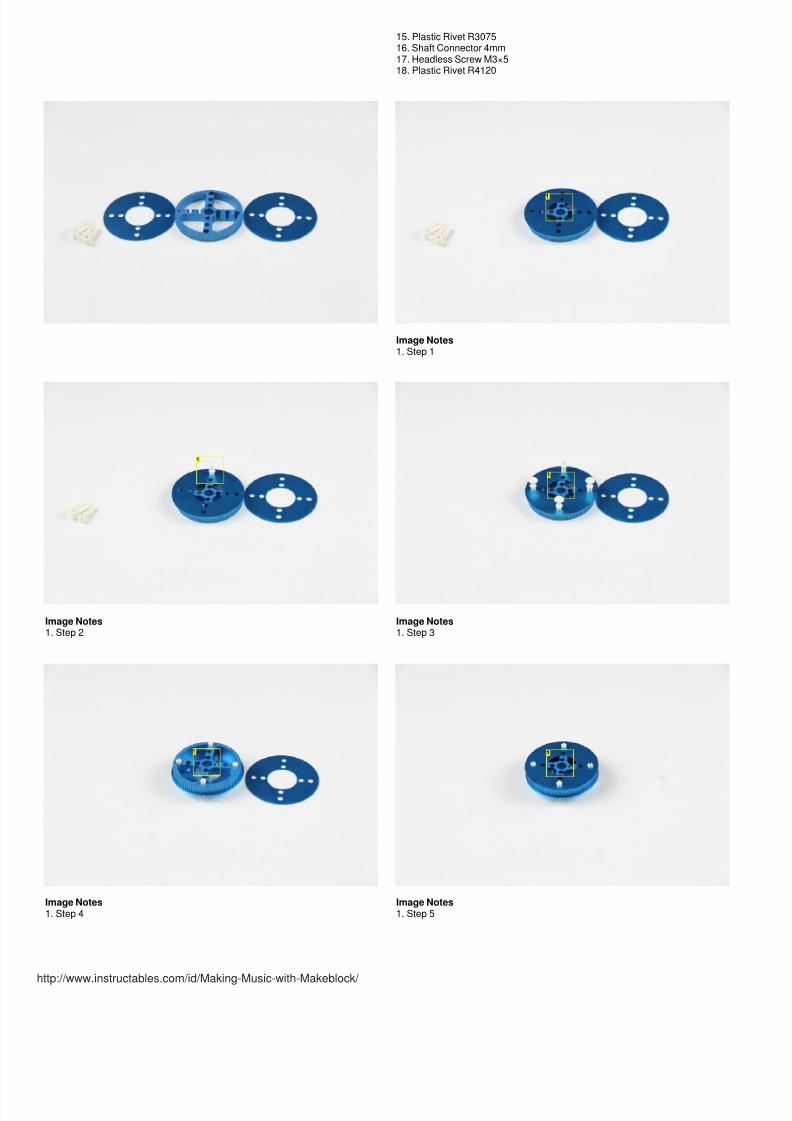
Procedure:1. Put a Timing Pulley Slice 90T on the Timing Pulley 90T.2. Insert a Plastic Rivet R4120 into the holes on the Timing Pulley Slice 90T and the Timing Pulley 90T.3. Insert the other 3 Plastic Rivet R4120.4. Turn over the Timing Pulley Slice 90T and the Timing Pulley 90T.
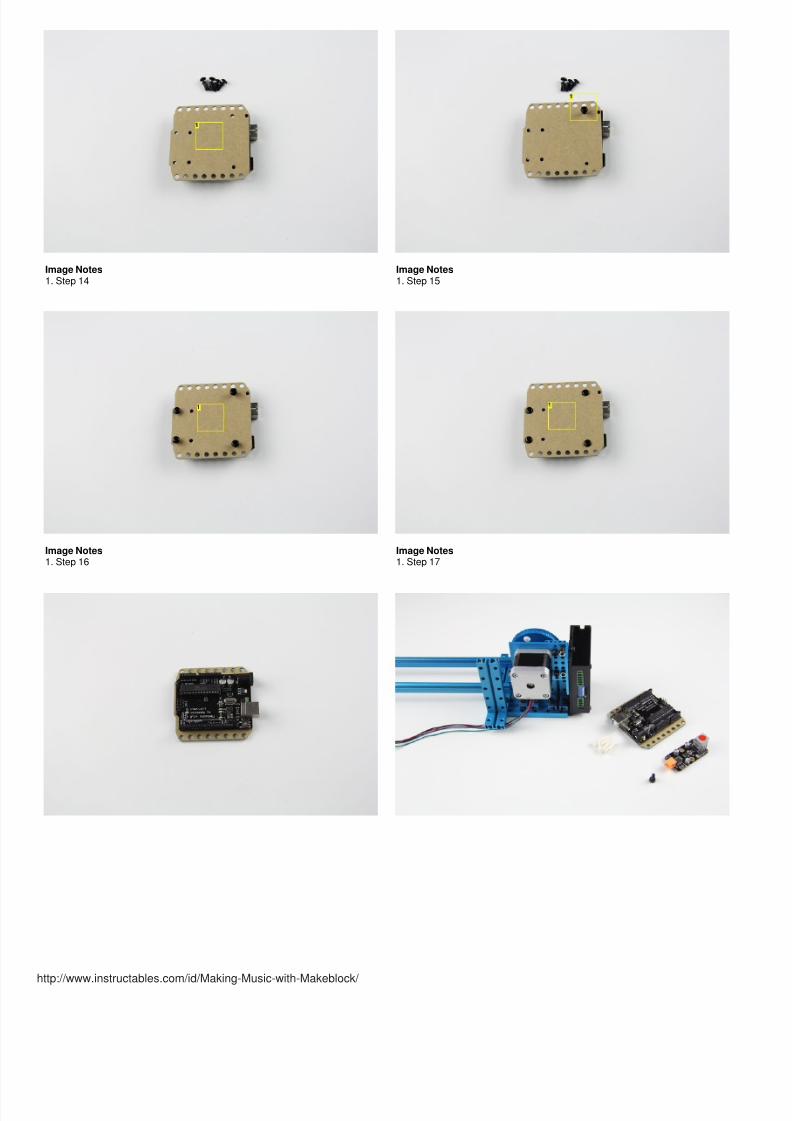
5. Put the other Timing Pulley Slice 90T on the Timing Pulley 90T.6. Press the Plastic Rivet R4120.7. Put the Step Motor Bracket on the Step Motor.8. Insert 2 Countersunk Screw M3×8 into the Step Motor Bracket to install the Step Motor.9. Install the Shaft Connector 4mm on the Timing Pulley 90T by 2 Screw M4×14.10. Put the capstan with the Shaft Connector 4mm on the Step Motor.11. Insert a Headless Screw M3×5 into the Shaft Connector 4mm.12. Install the Step Motor on the Step Motor Holder.13. Install the Step Motor Controller on the Step Motor Bracket.14. Put the Arduino on the Acrylic Arduino Bracket.15. Insert a Plastic Rivet R3075 into the holes on the Arduino and the Acrylic Arduino Bracket.16. Insert the other 3 Plastic Rivet R3075.17. Press the Plastic Rivet R3075.18. Install the Arduino on the Electronic Modules Holder by 4 Plastic Rivet R4120.19. Install the Me – Motor Driver on Beam 0824-128 by a Screw M4×8.
Image Notes1. Jumper Wires2. Step Motor Controller3. Step Motor4. Me – Motor Driver5. Acrylic Arduino Bracket6. Arduino7. Step Motor Bracket8. Countersunk Screw M3×89. Screw M4×810. Screw M4×1411. Nut M412. Plastic Rivet R412013. Timing Pulley Slice 90T14. Timing Pulley 90T
7/15/2019 Making Music With Makeblock
http://slidepdf.com/reader/full/making-music-with-makeblock-5633839118e4f 22/34
http://www.instructables.com/id/Making-Music-with-Makeblock/
15. Plastic Rivet R307516. Shaft Connector 4mm17. Headless Screw M3×518. Plastic Rivet R4120
Image Notes1. Step 1
Image Notes1. Step 2
Image Notes1. Step 3
Image Notes1. Step 4
Image Notes1. Step 5
7/15/2019 Making Music With Makeblock
http://slidepdf.com/reader/full/making-music-with-makeblock-5633839118e4f 23/34
http://www.instructables.com/id/Making-Music-with-Makeblock/
Image Notes1. Step 6
Image Notes1. Step 7
Image Notes1. Step 8
Image Notes1. Step 9
7/15/2019 Making Music With Makeblock
http://slidepdf.com/reader/full/making-music-with-makeblock-5633839118e4f 24/34
http://www.instructables.com/id/Making-Music-with-Makeblock/
Image Notes1. Step 10
Image Notes1. Step 11

7/15/2019 Making Music With Makeblock
http://slidepdf.com/reader/full/making-music-with-makeblock-5633839118e4f 25/34
http://www.instructables.com/id/Making-Music-with-Makeblock/
Image Notes1. Step 12
Image Notes1. Step 13
7/15/2019 Making Music With Makeblock
http://slidepdf.com/reader/full/making-music-with-makeblock-5633839118e4f 26/34
http://www.instructables.com/id/Making-Music-with-Makeblock/
Image Notes1. Step 14
Image Notes1. Step 15
Image Notes1. Step 16
Image Notes1. Step 17
7/15/2019 Making Music With Makeblock
http://slidepdf.com/reader/full/making-music-with-makeblock-5633839118e4f 27/34
http://www.instructables.com/id/Making-Music-with-Makeblock/
Image Notes1. Step 18
Image Notes1. Step 19
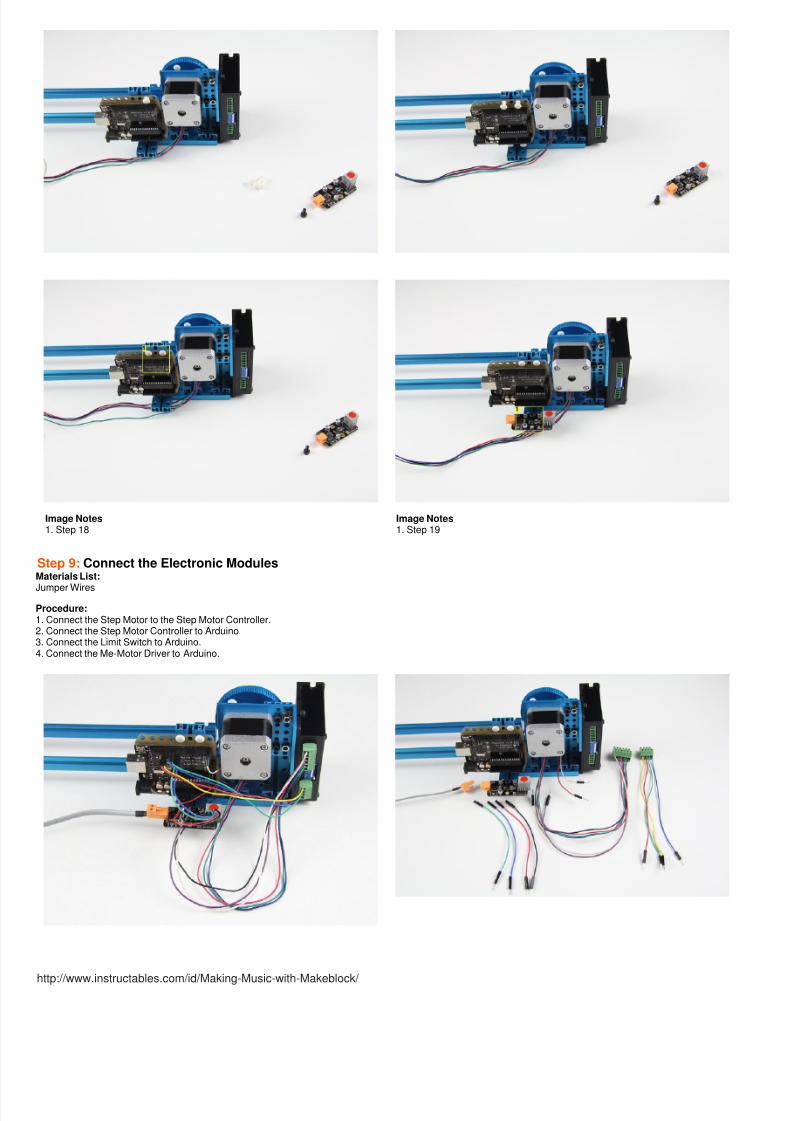
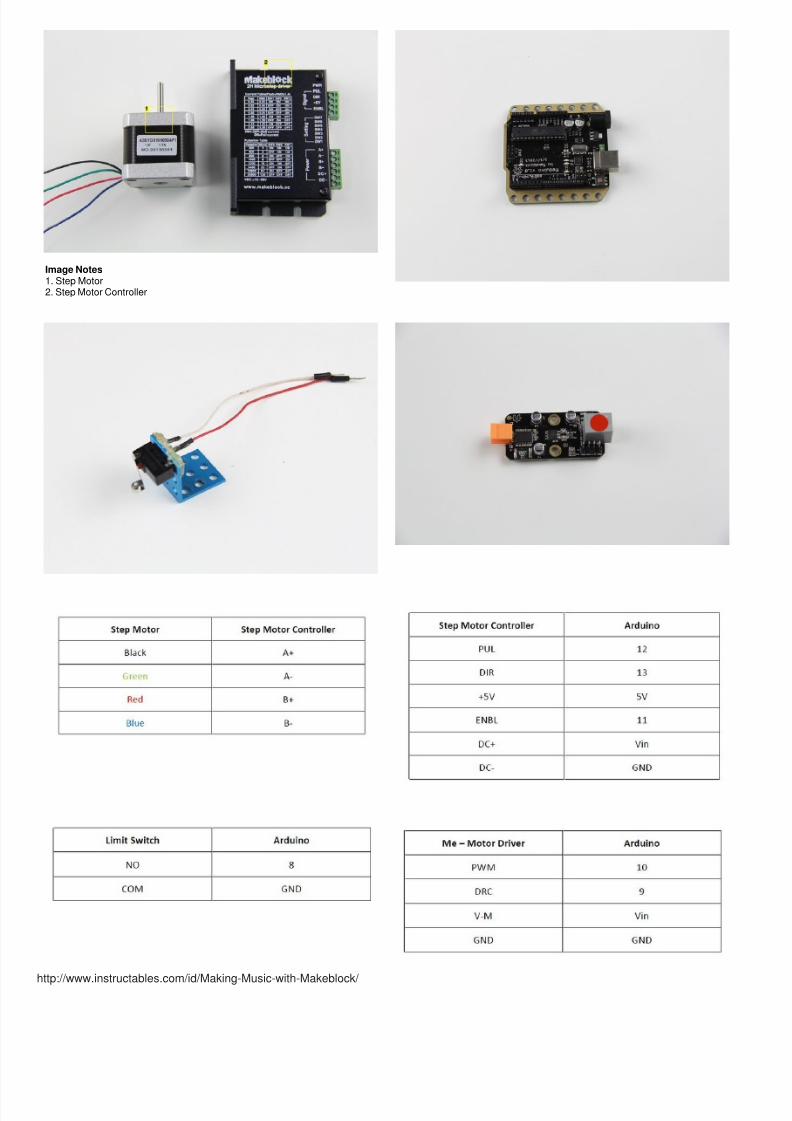
Step 9:Connect the Electronic ModulesMaterials List:
Jumper Wires
Procedure:1. Connect the Step Motor to the Step Motor Controller.2. Connect the Step Motor Controller to Arduino.3. Connect the Limit Switch to Arduino.4. Connect the Me-Motor Driver to Arduino.
7/15/2019 Making Music With Makeblock
http://slidepdf.com/reader/full/making-music-with-makeblock-5633839118e4f 28/34
http://www.instructables.com/id/Making-Music-with-Makeblock/
Image Notes1. Step Motor2. Step Motor Controller
7/15/2019 Making Music With Makeblock
http://slidepdf.com/reader/full/making-music-with-makeblock-5633839118e4f 29/34
http://www.instructables.com/id/Making-Music-with-Makeblock/
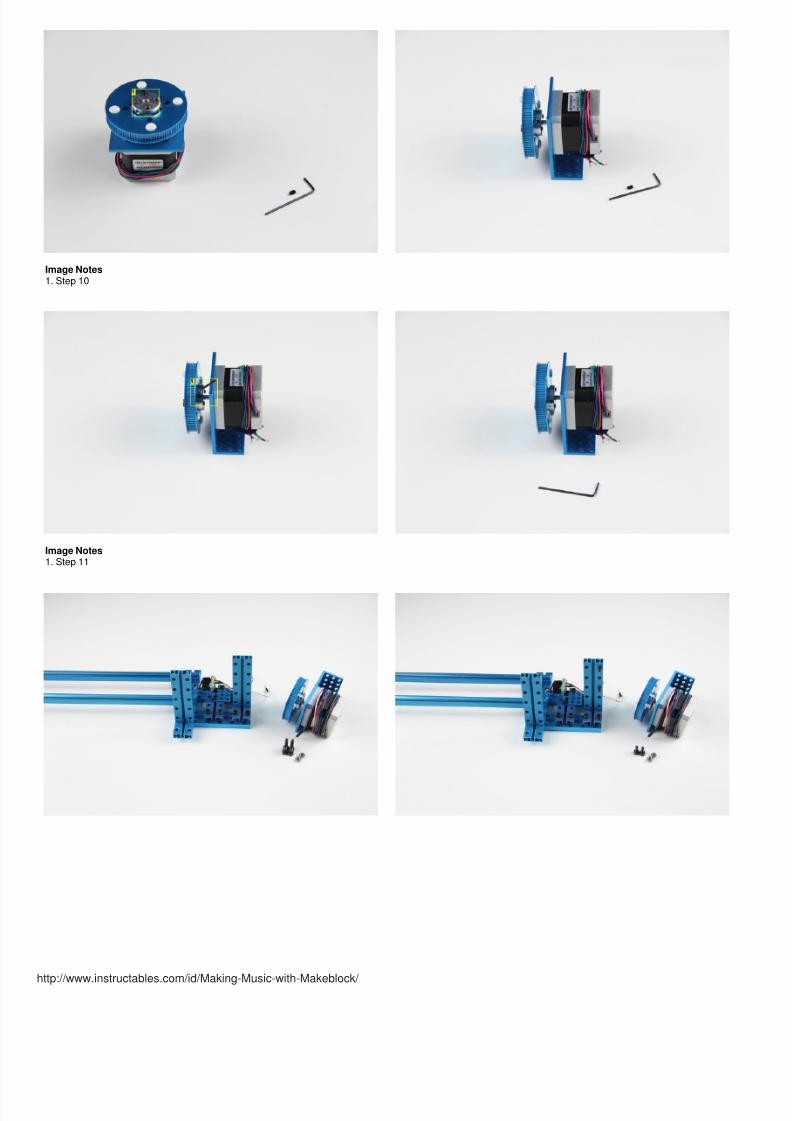
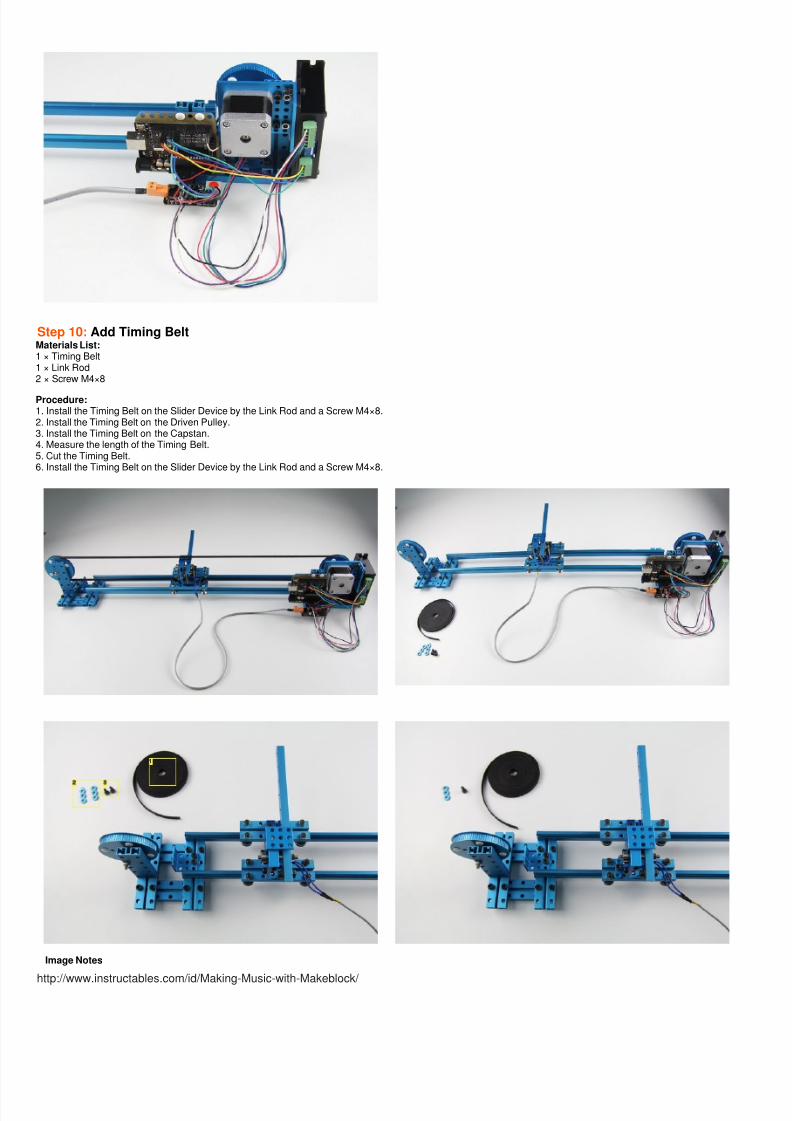
Step 10:Add Timing BeltMaterials List:1 × Timing Belt1 × Link Rod2 × Screw M4×8
Procedure:1. Install the Timing Belt on the Slider Device by the Link Rod and a Screw M4×8.2. Install the Timing Belt on the Driven Pulley.3. Install the Timing Belt on the Capstan.4. Measure the length of the Timing Belt.5. Cut the Timing Belt.6. Install the Timing Belt on the Slider Device by the Link Rod and a Screw M4×8.
Image Notes
7/15/2019 Making Music With Makeblock
http://slidepdf.com/reader/full/making-music-with-makeblock-5633839118e4f 30/34
http://www.instructables.com/id/Making-Music-with-Makeblock/
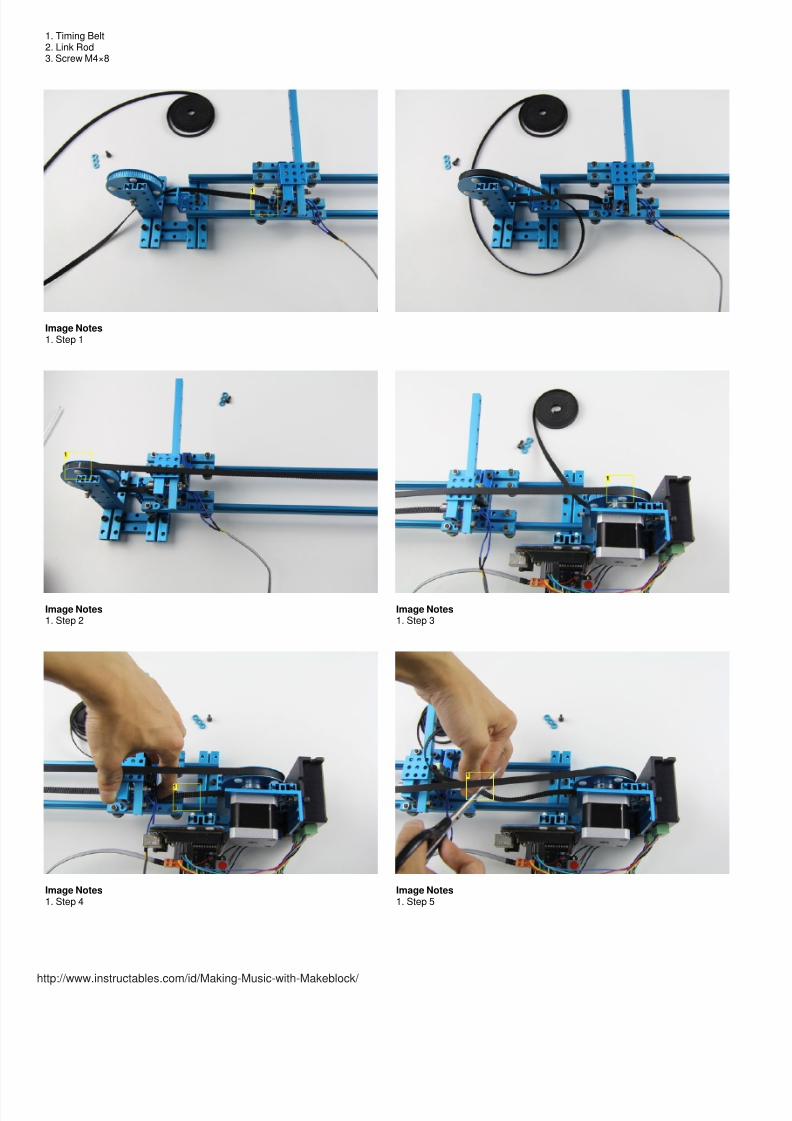
1. Timing Belt2. Link Rod3. Screw M4×8
Image Notes1. Step 1
Image Notes1. Step 2
Image Notes1. Step 3
Image Notes1. Step 4
Image Notes1. Step 5
7/15/2019 Making Music With Makeblock
http://slidepdf.com/reader/full/making-music-with-makeblock-5633839118e4f 31/34
http://www.instructables.com/id/Making-Music-with-Makeblock/
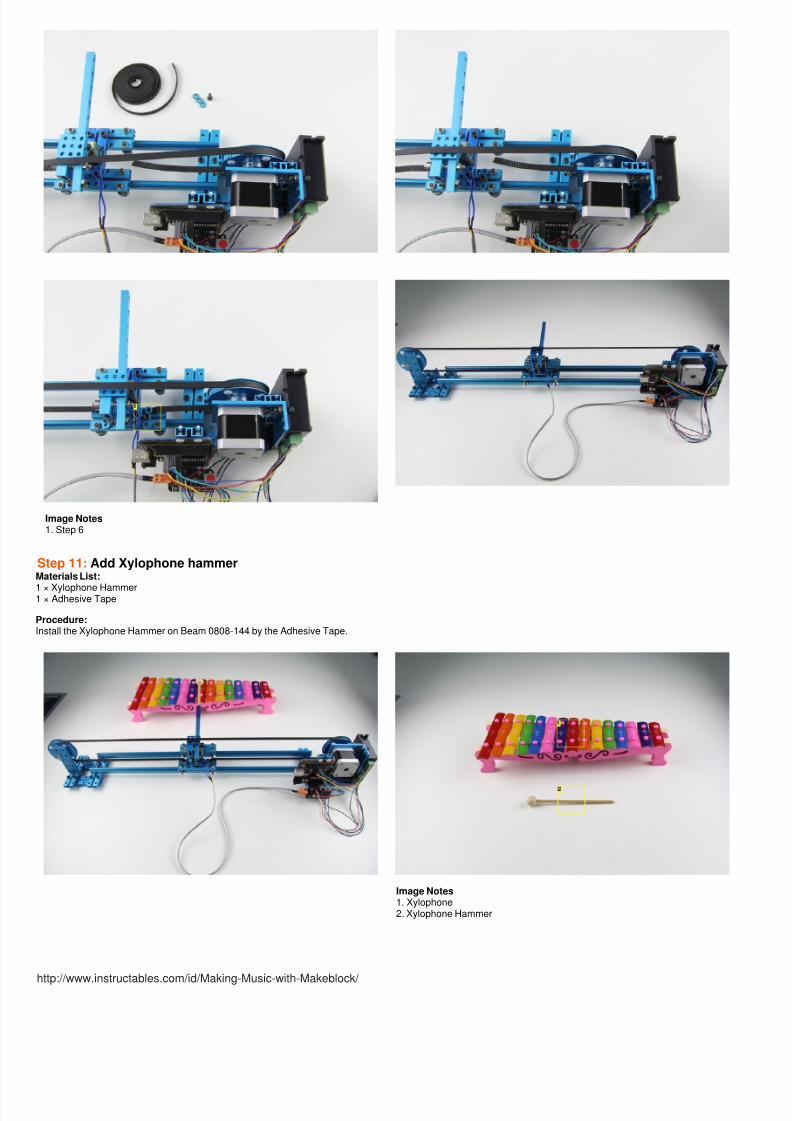
Image Notes1. Step 6
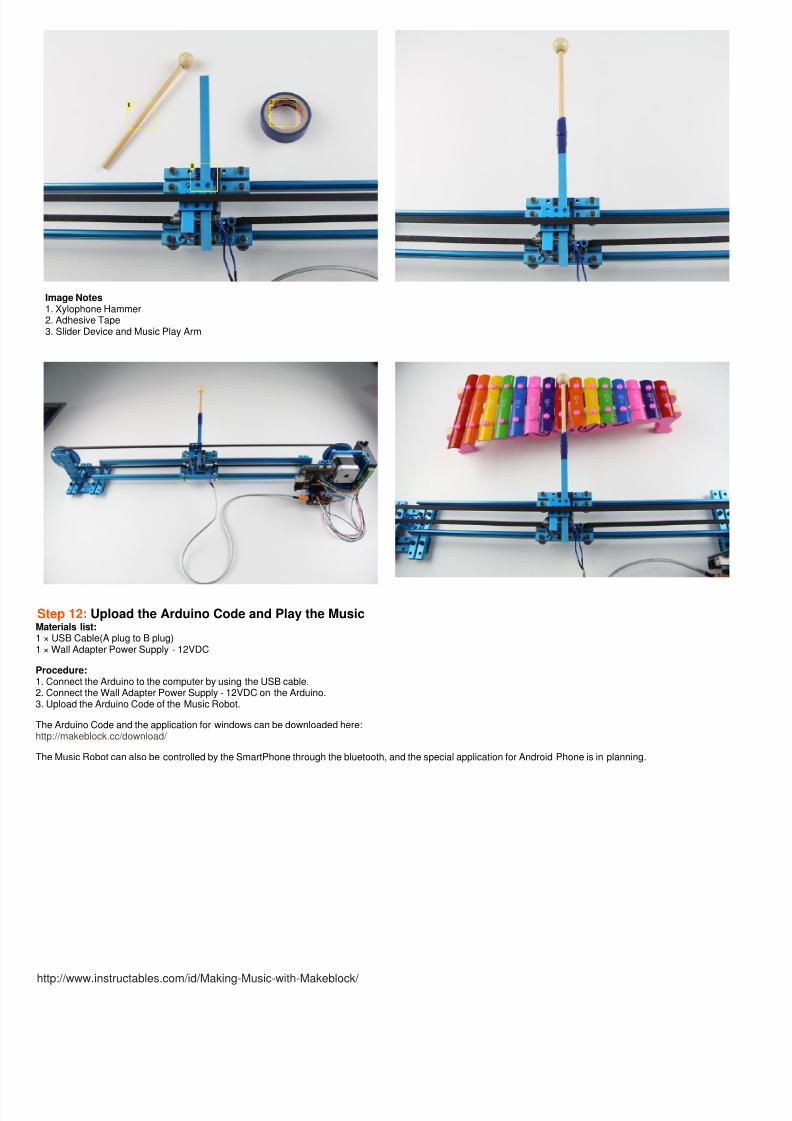
Step 11:Add Xylophone hammerMaterials List:
1 × Xylophone Hammer1 × Adhesive Tape
Procedure:Install the Xylophone Hammer on Beam 0808-144 by the Adhesive Tape.
Image Notes1. Xylophone2. Xylophone Hammer
7/15/2019 Making Music With Makeblock
http://slidepdf.com/reader/full/making-music-with-makeblock-5633839118e4f 32/34
http://www.instructables.com/id/Making-Music-with-Makeblock/
Image Notes1. Xylophone Hammer2. Adhesive Tape3. Slider Device and Music Play Arm
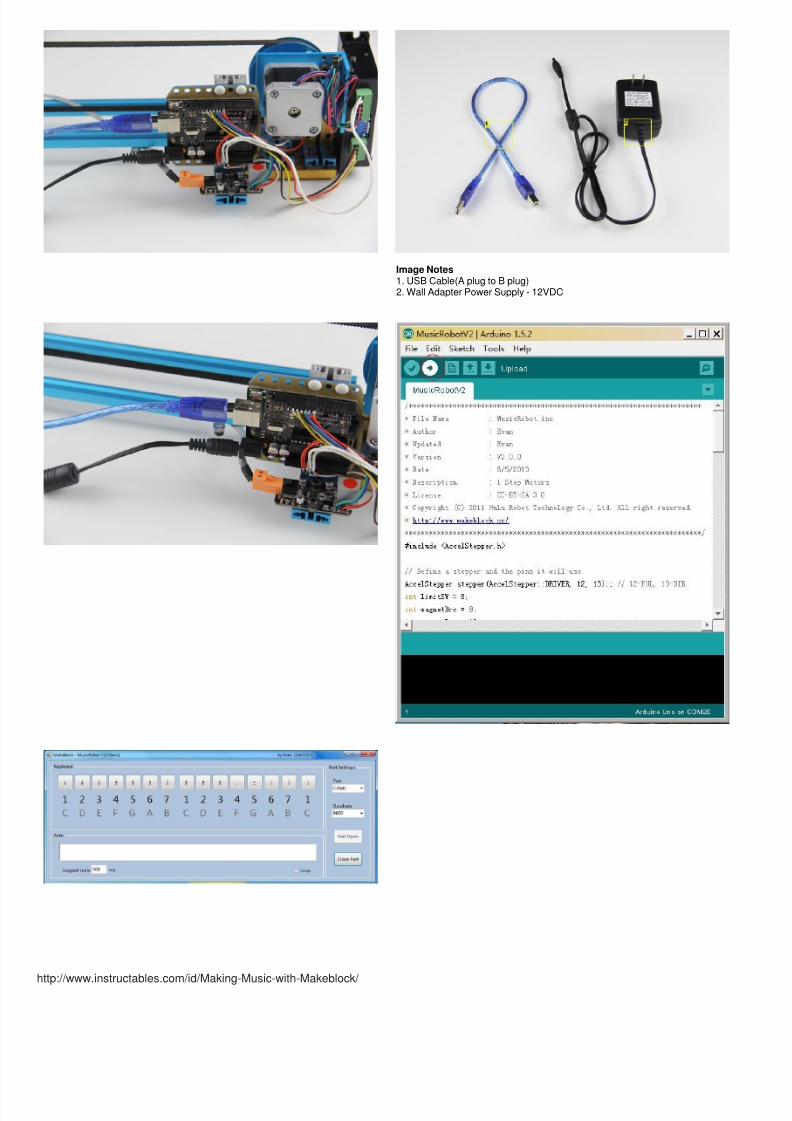
Step 12:Upload the Arduino Code and Play the MusicMaterials list:1 × USB Cable(A plug to B plug)1 × Wall Adapter Power Supply - 12VDC
Procedure:1. Connect the Arduino to the computer by using the USB cable.2. Connect the Wall Adapter Power Supply - 12VDC on the Arduino.3. Upload the Arduino Code of the Music Robot.
The Arduino Code and the application for windows can be downloaded here:http://makeblock.cc/download/
The Music Robot can also be controlled by the SmartPhone through the bluetooth, and the special application for Android Phone is in planning.
7/15/2019 Making Music With Makeblock
http://slidepdf.com/reader/full/making-music-with-makeblock-5633839118e4f 33/34
http://www.instructables.com/id/Making-Music-with-Makeblock/
Image Notes1. USB Cable(A plug to B plug)2. Wall Adapter Power Supply - 12VDC

7/15/2019 Making Music With Makeblock
http://slidepdf.com/reader/full/making-music-with-makeblock-5633839118e4f 34/34
Related Instructables
A New Way toMake anAluminium
Alloy Robot by
schang10
Cheap 2-WayBluetoothConnectionBetweenArduino and PC
by techbitar
Go Baby Go -Joystickcontrolledpowered device
by GoBabyGo
Arduino ANDBluetooth HC-05Connecting
easily by
MohannadRawashdeh
Beginners guideto buildingArduino robotswith Bluetooth
and Android by
ZRob314
Make a scary
scarab robot by
djsures
Advertisements