Embed Size (px)
Citation preview
8/10/2019 Making Horse Drawn Coaches 1800 Bw
http://slidepdf.com/reader/full/making-horse-drawn-coaches-1800-bw 1/455
8/10/2019 Making Horse Drawn Coaches 1800 Bw
http://slidepdf.com/reader/full/making-horse-drawn-coaches-1800-bw 2/455
8/10/2019 Making Horse Drawn Coaches 1800 Bw
http://slidepdf.com/reader/full/making-horse-drawn-coaches-1800-bw 3/455
8/10/2019 Making Horse Drawn Coaches 1800 Bw
http://slidepdf.com/reader/full/making-horse-drawn-coaches-1800-bw 4/455
8/10/2019 Making Horse Drawn Coaches 1800 Bw
http://slidepdf.com/reader/full/making-horse-drawn-coaches-1800-bw 5/455
H V f
8/10/2019 Making Horse Drawn Coaches 1800 Bw
http://slidepdf.com/reader/full/making-horse-drawn-coaches-1800-bw 6/455
>
8/10/2019 Making Horse Drawn Coaches 1800 Bw
http://slidepdf.com/reader/full/making-horse-drawn-coaches-1800-bw 7/455
8/10/2019 Making Horse Drawn Coaches 1800 Bw
http://slidepdf.com/reader/full/making-horse-drawn-coaches-1800-bw 8/455
8/10/2019 Making Horse Drawn Coaches 1800 Bw
http://slidepdf.com/reader/full/making-horse-drawn-coaches-1800-bw 9/455
8/10/2019 Making Horse Drawn Coaches 1800 Bw
http://slidepdf.com/reader/full/making-horse-drawn-coaches-1800-bw 10/455
8/10/2019 Making Horse Drawn Coaches 1800 Bw
http://slidepdf.com/reader/full/making-horse-drawn-coaches-1800-bw 11/455
THE
COACH-MAKERS' ILLUSTRATED
HAND-BOOK,SECONDEDITION,
CONTAINING
COMPLETE INSTRUCTIONS IN ALL THE DIFFERENT BRANCHES OP
CARRIAGE BUILDING.
ADAPTED TO THE WANTS OF EVERY PERSON DIRECTLY ORINDIRECTLY CONNECTED WITH THE MANUFACTUREOF CARRIAGES.
WRITTEN AND REVISED BY PRACTICAL MEN OF ACKNOWLEDGEDABILITY AND LONG EXPERIENCE IN THEIR SEVERAL
DEPARTMENTS.
PHILADELPHIA, PA.:
I. D. Ware, Publisher of The Carriage Monthly.
1875.
U\
8/10/2019 Making Horse Drawn Coaches 1800 Bw
http://slidepdf.com/reader/full/making-horse-drawn-coaches-1800-bw 12/455
Entered according to Act of Congress, in the year 1872, by
I. D. WAEE,in the Office of the Librarian of Congress, at Washington.
8/10/2019 Making Horse Drawn Coaches 1800 Bw
http://slidepdf.com/reader/full/making-horse-drawn-coaches-1800-bw 13/455
3- ^3
K
I
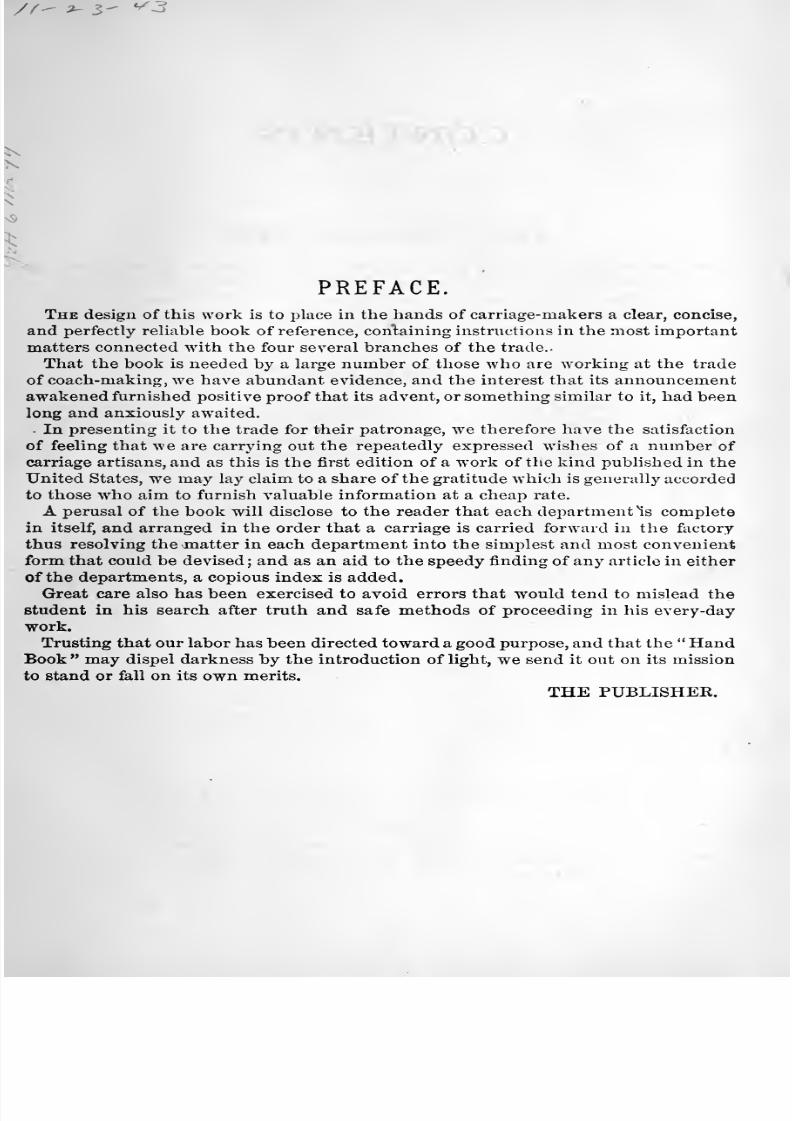
PREFACE.The design of this work is to place in the hands of carriage- makers a clear, concise,
and perfectly reliable book of reference, containing instructions in the most importantmatters connected with the four several branches of the trade..
That the book is needed by a large number of those who are working at the trade
of coach-making, we have abundant evidence, and the interest that its announcementawakened furnished positive proof that its advent, or something similar to it, had beenlong and anxiously awaited.
• In presenting it to the trade for their patronage, we therefore have the satisfaction
of feeling that we are carrying out the repeatedly expressed wishes of a number ofcarriage artisans, and as this is the first edition of a work of the kind published in the
United States, we may lay claim to a share of the gratitude which is generally accorded
to those who aim to furnish valuable information at a cheap rate.
A perusal of the book will disclose to the reader that each department's complete
in itself, and arranged in the order that a carriage is carried forward in the factory
thus resolving the matter in each department into the simi3lest and most convenient
form that could be devised; and as an aid to the speedy finding of any article in either
of the departments, a copious index is added.
Great care also has been exercised to avoid errors that would tend to mislead thestudent in his search after truth and safe methods of proceeding in his every-day
work.Trusting that our labor has been directed toward a good purpose, and that the Hand
Book may dispel darkness by the introduction of light, we send it out on its mission
to stand or fall on its own merits.
THE PUBLISHER.
8/10/2019 Making Horse Drawn Coaches 1800 Bw
http://slidepdf.com/reader/full/making-horse-drawn-coaches-1800-bw 14/455
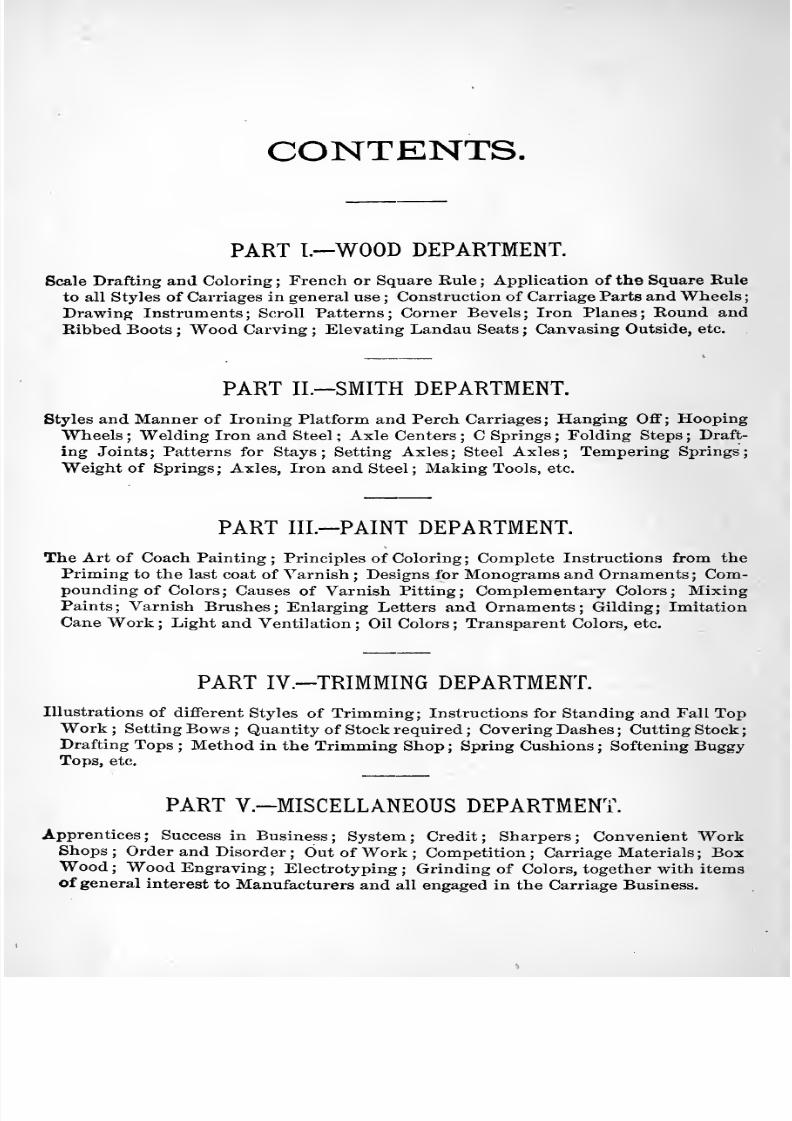
CONTENTS.
PART I.— WOOD DEPARTMENT.
Scale Drafting and Coloring ; French or Square Rule ; Application of the Square Rule
to all Styles of Carriages in general use ; Construction of Carriage Parts and WheelsDrawing Instruments; Scroll Patterns; Corner Bevels; Iron Planes; Round and
Ribbed Boots ; Wood Carving ; Elevating Landau Seats ; Canvasing Outside, etc.
PART II.-SMITH DEPARTMENT.
Styles and Manner of Ironing Platform and Perch Carriages; Hanging Off; HoopingWheels ; Welding Iron and Steel ; Axle Centers ; C Springs ; Folding Steps ; Draft-
ing Joints; Patterns for Stays; Setting Axles; Steel Axles; Tempering Springs;
Weight of Springs; Axles, Iron and Steel; Making Tools, etc.
PART III.-PAINT DEPARTMENT.
The Art of Coach Painting ; Principles of Coloring ; Complete Instructions from the
Priming to the last coat of Varnish ; Designs for Monograms and Ornaments; Com-pounding of Colors; Causes of Varnish Pitting; Complementary Colors; MixingPaints; Varnish Brushes; Enlarging Letters and Ornaments; Gilding; Imitation
Cane Work ; Light and Ventilation ; Oil Colors ; Transparent Colors, etc.
PART IV.-TRIMMING DEPARTMENT.
Illustrations of different Styles of Trimming; Instructions for Standing and Fall TopWork; Setting Bows; Quantity of Stock required ; Covering Dashes ; Cutting Stock
Drafting Tops ; Method in the Trimming Shop ; Spring Cushions ; Softening BuggyTops, etc.
PART V.-MISCELLANEOUS DEPARTMENT.
Apprentices; Success in Business; System; Credit; Sharpers; Convenient WorkShops ; Order and Disorder ; Out of Work ; Competition ; Carriage Materials ; BoxWood ; Wood Engraving ; Electrotyping ; Grinding of Colors, together with itemsof general interest to Manufacturers and all engaged in the Carriage Business.
8/10/2019 Making Horse Drawn Coaches 1800 Bw
http://slidepdf.com/reader/full/making-horse-drawn-coaches-1800-bw 15/455
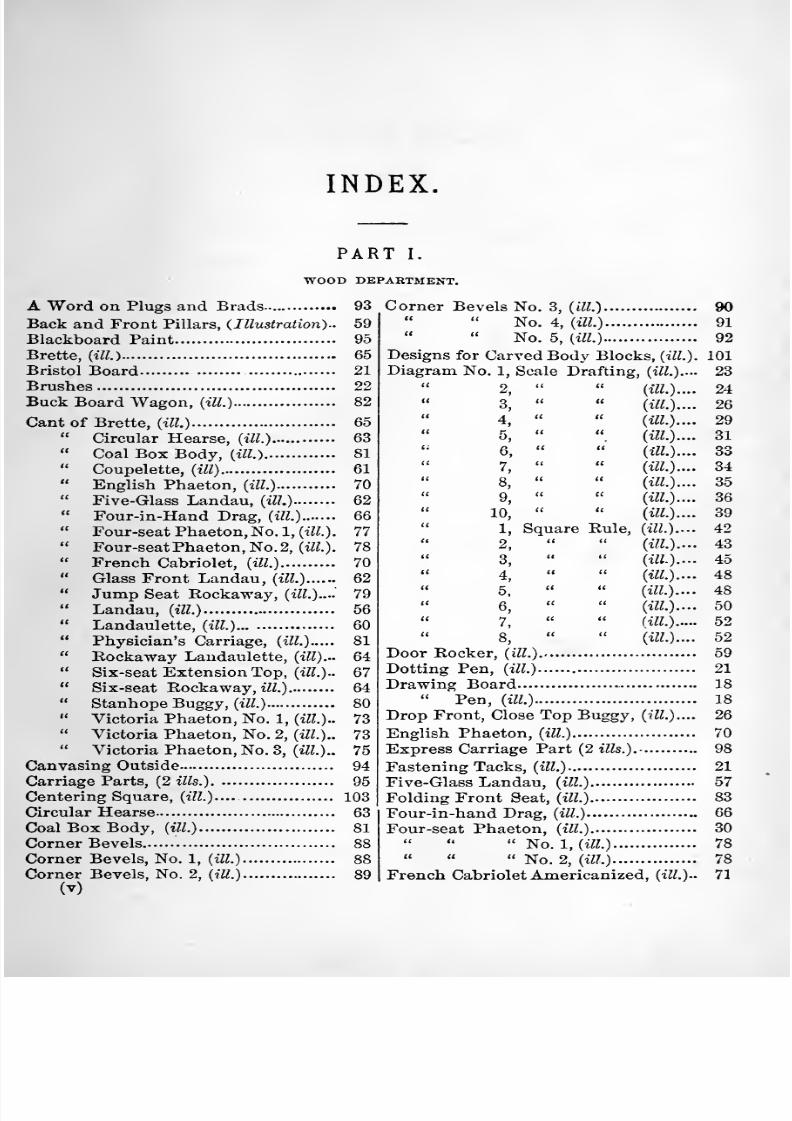
INDEX.
PART I.
WOOD DEPARTMENT.
A Word on Plugs and Brads- 93
Back and Front Pillars, (Illustration).. 59
Blackboard Paint 95
Brette, {ill.) 65
Bristol Board 21
Brushes 22
Buck Board Wagon, (ilL) 82
Cant of Brette, {ill) 65 Circular Hearse, {ill.) 63 Coal Box Body, {ill.) 81 Coupelette, {ill) 61 English Phaeton, {Ul.) 70 Five-Glass Landau, (ill) 62 Four-in-Hand Drag, {ill.) 66 Four-seat Phaeton, No. 1, {ill). 77 Four-seatPhaeton,No.2, (iZZ.). 78 French Cabriolet, {Ul) 70 Glass Front Landau, {ill) 62
Jump Seat Eockaway, {ill).... 79 Landau, {ill) 56 Landaulette, {ill) 60 Physician's Carriage, {ill) 81 Eockaway Landaulette, (ill)... 64 Six-seat Extension Top, (iZZ.) 67 Six-seat Eockaway, zZZ.) 64 Stanhope Buggy, (iZZ.) 80 Victoria Phaeton, No. 1, {ill).. 73 Victoria Phaeton, No. 2, {ill).. 73
Victoria Phaeton, No. 3, (i«.).. 75
Canvasing Outside 94
Carriage Parts, {2 ills.) 95
Centering Square, {ill) — 103
Circular Hearse 63
Coal Box Body, {ill) 81
Corner Bevels 88
Corner Bevels, No. 1, {ill) 88
Corner Bevels, No. 2, {ill) 89(V)
Corner Bevels No. 3, {ill) 90No. 4, {ill) 91
No. 5, (iZZ.) 92
Designs for Carved Body Blocks, {ill). 101
1, Scale D rafting r, {ill).... 23
2 u{ill).... 24
3,«
{ill).... 26
4,<(
{ill).... 29
5,(I
{Ul).... 31
6,(( {ill).... 33
7,((
{Ul).... 34
8,«
{ill).... 35
9,((
{ill).... 36
[0,((
{ill).... 39
1, Square Eule, {ill).... 42
2u
{ill).... 43
3,
(Ul).... 45
4,
{ill).... 48
5.li
{ill).... 48
6,<(
{ill).... 50
7,11
(ill) 52
8,
a ID
It{ill).... 52
59oor Eocker,
Dotting Pen,' {ill) 21
Drawing Board 18 Pen, {Ul) 18
Drop Front, Close Top Buggy, {ill).... 26
English Phaeton, {ill) 70
Express Carriage Part (2 ills.). 98
Fastening Tacks, {ill) 21
Five-Glass Landau, {ill) 57
Folding Front Seat, {ill) 83
Four-in-hand Drag, {ill) 06
Four-seat Phaeton, {ill) 30 No. 1, (iZZ.) 78
No. 2, {ill) 78
French Cabriolet Americanized, {ill).. 71
8/10/2019 Making Horse Drawn Coaches 1800 Bw
http://slidepdf.com/reader/full/making-horse-drawn-coaches-1800-bw 16/455
VI INDEX.
French or Square Rule 42
Glass Front Landau, (ill.) 62
Glue Brush 94
How to make a cheap Glue Brush 94
How to make It 87
India Ink 21
Insertion of Screws in Wood 94
Iron Planes 93
Irregular Curves, {ill.) 19
Its advantages over the wooden plane 94
Jump Seat Rockaway, (iW.) 79
Landau, {ill.) 40,56Landau Bows, {ill.) 86
Landaulette, {ill.) 60
Monitor Buggy, {ill.) 22
Origin and Composition 116
Panel Quarter, {ill.) 84Parallel Ruler, {ill) 20Pear Wood for Sweep Patterns 27Philadelphia Ribbed Boot, {ill.) 84
Physician's Carriage, {ill) 81Plain Dividers, {ill.) 20Platform Carriage for pole and shafts,
{ill.) 97
Plugs and Brads 93Portland Cutter 87
Practice with the Pen, {ill.) 25
Price of Drawing Instruments 25
Road Drawing Pen, {ill.) 19
Rockaway Landaulette,{ill.)
64Scale Drafting 17
Scroll Patterns for Bar Ends, (4 ills.).. 100
Six-seat Extension Top Phaeton, {ill.) 67Six-seat Rockaway, {ill.) 36, 64Six-seat Sociable, {ill.) 34Sizes for Wheels 102Slate Finish 94Spring Bow Pen with Pencil Point, {ill.) 19
Square Rule 42
Standing Boot Piece, {ill.) 59Stanhope Buggy, {ill.) 80Steel Spacing Dividers, {ill.) 19
Sweep Patterns, {ill.) 27, 28Sweep Patterns, {Sills.) 32
The Door 63
The Draft 87
The Length of the Curb 87
The Manner of Obtaining Corner Bev-
els, {ill.) 88
The Plain Dividers, {ill.) 2dThe Use of Glue 93To Imitate Mahogany 94
To Lower the Top 63Trammel for Ovals, {ill.) 85
Triangular Scale of Boxwood, {ill.) 20
T-square, {ill.) 18
Victoria Phaeton, No. 1, {ill.) 73
Victoria Phaeton, No. 2, {ill.) 73
Victoria Phaeton No. 3, {ill.) 75
Water Colors 22Wood Carving 99
Working Draft of Buck Board Wagon,{ill.) : 82
Working Draft of Brett, {ill.) 65 Circular Hearse, {ill.) 63
Coal Box Buggy, (iK.) 81 Coupelette, (i//.) 61 English Phaeton, (iZZ.) 70
Five-Glass Landau,{ill.) 57
Working Draft of Four-in-hand Drag,{ill.) 66
Working Draft of Four-seat Phaeton,No. 1, {ill.) 77
Working Draft of Four-seat Phaeton,
2, {Ul.) 78Working Draft of French Cabriolet,
{ill.) 70Working Draft of Glass Front Landau,
{ill.) 62
Working Draft of Jump Seat Rocka-way, {ill.) 79
Working Draft of Landau, {ill.) 56Working Draft of Landaulette, {ill.)... 60
Working Draft of Physician's Car-
riage, {ill.) 81
Working Draft of Rockaway Landau-lette, {ill) 64
Working Draft of Six-seat Extension,{Ul) 67
Working Draft of Six-seat Rockaway,{Ul) 64
Working Draft of Stanhope Buggy,{ill) 80
Working Draft of Victoria Phaeton,No. 1, (iZZ.) 73
Working Draft of Victoria PhaetonjNo. 2, {Ul) 73
Working Draft of Victoria Phaeton,No. 3, {ill) 75
Working Drafts 56
8/10/2019 Making Horse Drawn Coaches 1800 Bw
http://slidepdf.com/reader/full/making-horse-drawn-coaches-1800-bw 17/455
INDEX. VII
PART II.
SMITH DEPAETMENT.
A cheap way to make, etc 163
A Mandrel, (i«.) HIApplication of Body Loops 133
A Kule applicable to fifth wheels, {ill.) 146
Axle Centers 162
Back Bar, {Ul.) 127
Back Quarter Wings, Landau, {ill.) 144
Bob Punch, {ill.) 109
Body Loops 133
Bottom Bed, {ill) 122Brett, Hanging off, {ill.) 115
Carriage Part on C Springs, {ill)... 132
Springs 157
Coach Steps, {ill.) • 146
Cold Chisel 1()3
Cross Springs 158
C Springs 118
Curved Dash, {ill.) 142
Device for Elevating Landau Seat, {ill.) 149
Die Plate and Screw, {Sill.) 113
Direction of a Given Force 116 Bearing Straps 118
Double folding Coach Step, {ill.) 146
Drafting Joints, {ill.) 148
Drop Pole, (iZZ.) 122
Fifth Wheels, {ill.) 146
Flatter, {ill.) 109
for Clips, {ill.) 108
Folding Coach Step, {ill.) 246
Force of Power 116
Front Running Part, {ill.)...'. 129
Fuller, {ill.) 107
Fulling Block, {ill.) 107
Gauge Chisel, {ill.) 108
Gauges, {ill.) 112
Gea ing. No. 1, {ill.)
2, {ill.)
3, (3 ills.)
4, {ill.)
5, {2 ills.)
6, {Ul.)
7, {Ul.)
8, {ill.)
9, {Ul.)
10, {4: ills.)
llAill-)
12, (2 ills.) 132 IS, {ill.) 134
119
120
122123
125
126
127
129
129
129
129
Hand Hammer, (2 ills.) 106Hooping Wheels 150
How to Find the Right Sweep, etc., {ill.) 150
How Tools for Lamp Sockets are Made,{ill.) 169
Iron Back Bar, {ill.) 143
Iron Back Bar for Landaulette, {ill.).. 140
Iron for Axle Centers, , 162
Ironing Platform Express, {4:ills.) 139
Ironing Sulkeys 149Landau Seat, {ill.) 149
Landau, 8 Springs, {ill.) 115
Light Platform, {ill.) 134
Line of Draft, {ill.) 143
Lower part with King or Body Bolt,
(UL) 126
Lower part with Springs attached, {ill.) 123
Lower Tools, {ill.) 113
Mandrel Ill
Material 161
Monitor Dashes, 5 {ills.) 141
Origin and Composition 116
Parallel Forces : 116
Patterns of Straight Stays and Steps,
{Ul.) 115
Platform Spring Carriage 119 with Iron Perch,
{ill.) 132
Power or Strength of Springs.. 118
Riveting Hammer, {ill.) 107
Rocker Plates 162
Round Corner Dash, (i^^.) 141
Self-shutting Door Step, (2 ills.) 145
Setting Axles, {ill.) 154« when Cold, (i/Z.) 156
Shifting Seat Rail, {2 ills.) 144
Short and Easy Turning, {ill.) 135
Simultaneous Forces 116Skeleton Boots, {ill.) 137
Small Flat Iron 163
Square Dash —plain, {ill.) 142 Puncheon, {ill.) 107
Stay for Perch Carriage, {ill.) Ill, 113 Four-seat Rockaway, {ill.) 131
Steel 152 Axles 152
Swage Hammer, {ill.) 107 Iron, {ill.) 107
8/10/2019 Making Horse Drawn Coaches 1800 Bw
http://slidepdf.com/reader/full/making-horse-drawn-coaches-1800-bw 18/455
INDEX.
Tempering Drills 162
Springs 158
Thin Tools 162The Blacksmith 104
Height of Wheels, etc., {ill.) 143 Ironing of a carriage part, (ill.)... 136 Manner of producing Scrolls 134 Mode of Making Lamp Sockets... 109 Tidy Blacksmith 105
Tillbury Shaft, {ill) 122
To hang Brett or 8-Spring Landau, {ilL)
115
Tools, (12 ills.) 106 to 109 for making Lamp Sockets, (6
ills.) 109 to 112
Tools for welding pins in Shifting Rail,
(4iZ/s.) lis
Top Bed, {ill.) 123 Part of Carriage, {ill.) 124
Value of Iron .'
163
Wear Irons for Concave Bodies,
i'^U.) 147Weight of Bar Iron 163
Common Axles 164
Elliptic Springs 164 Round Iron 164 Square 164•' Wrought-iron and Steel 165
Wings of Landau, {ill.) 141
3>«^C
PART in.
PAINT DEPARTMENT.
ABC Monogram, {ill.) 210
A C G Monogram, {ill.) 215
Action of Water on Varnish 285
All Sharp Edges 280
Alphabets 295
A Mantle, {ill.) 210
American and English Painting 257
A Natural Palette 259
An Old Body 256
Another Method 274Apaumee, {ill.) 227
A P Monogram, {ill.) 212
Art of Coach Painting 171
Asphaltum 248
Axle Bed, Ornament and Stripe, {ill.). 235
Barred Helmet, {ill.) 229
Basket Work 263
B German Text, {ill.) 207
Bismarck 187, 252Blacks 170
Black Turning Green 285Blenders 174Bhstering 285
Blues 169, 203Breast Plate, {ill.) 229Brilliant Yellow 253Broad Stripe, {ill.) 233Browns 169, 203
Browns Follow Yellow 253Bronze Powder 254
Brushes 173Buck's Head, {ill.) 224Buff. 187, 202Burnt Sienna 248Burnt Umber 248
Cadmium Yellow 247
Canary Color 187, 203Cane 203
Work, (iZZ.) 244
Cans for Oil, Varnish 181
Care of Varnish Brushes 282Carmine 248, 253, 254
Carriage.... 253
Causes of Varnish Pitting 281
C. A. V. Monogram, {ill.) 214
C. B. {ill.) 213
Chairos —Curo. and Flat Tints 168
Chamois 178
Changeable colors 187Chatamuck Lake 248
Chocolate 187
Chrome Green 184, 248 Yellow 247 and Black 184
C. I. N. Monogram, {ill.) , 214
Cinnamon. 203
Citron 187
Claret Color 249
Coagulation of Mixed Paints 266Colored Grays 187
8/10/2019 Making Horse Drawn Coaches 1800 Bw
http://slidepdf.com/reader/full/making-horse-drawn-coaches-1800-bw 19/455
INDEX. LX
Color Items 253
Colors 182, 247
and the Eye 248
from Wolfram 255
Complementary Colors 167
Compound Colors 18H Striping Colors 202
Concerning Slush 261
Corn Color 202
Corner Patterns, (9 ills 231 to 233 Piece, {ill.) 233 Scroll, {ill.) 232
Cream Color 257Cremnitz White 247
Crimson Lake 248, 254
C. R. Monogram, {ill.) 214
C. T. B. {ill.) 213
Dark Rich Brown 187
Deep Buff..... 187, 202 Sea Green 252
D. E. F. Monogram, (ill.). 210
D. German Text, {ill.) 207
Drabs 203
Dragon's Blood 247
Drop Black 184, 248, 254
Dusters 174
Dutch Pink 247, 254
Emerald Green 248
English Black Japan 261'• Purple Lake 248
Enlarging Letters 207**
Ornaments 246Enriched Panel Stripe, {ill) 237Enrichment of a Hub, {ill.) 243E. P. Monogram, {ill.)... 215Escutcheon, {ill.) 222Extra Colors 170Facing a Body 267F. E. S. Monogram, (ill.) 215Finished Scroll, (ill.) 229Finishing Coat 196Fitch Hair 283Flake AVhite 247Flesh Color 187, 203Florentine Lake 253French Gray 187, 202, 252From Priming to the Finish 274Gall Stone 247Garter 221(hearings
265, 276
German Text 206G H I Monogram, {ill.) 210
Glazing 255
Goat's Head, {ill.) 238
Gold Beating 272 Color 187, 254 Leaf. 271, 272 Paint for Striping 249 Striping 252
Grass Green. 203
Green Leaf. 203
Greens 169, 187
G Roman Ornate, {ill.) 208
Ground and Striping Colors, etc 199
Colors 18 for Ultramarine Blue 253
Hairing Off 284
Heavy Felt 256 Varnishing 255
H R G Monogram, {ill.) 215
Imitation Cane AVork 244
Indian Red 183, 247
Initial Letters 206
'Letter B, {ill.) 207 D,{ill-) 207 G,{ill-) 208 P, {Ul.) 208 'R,{ill.) 209 S, {ill.) 209 Y,{ill.) 209
Irregularities on Surface of Varnishes 190
Is the Milky Appearance, etc 285
Ivory Black 248
Japans 188, 255
J E C Monogram, {ill.) 215
JK {Ul.) 210
King's Yellow 247
Lake 185, 248
Lamp Black 184, 248, 253
Laying Gold Leaf 272
Lead Color 187
Leafing, {ill.) 229Length of Time, etc 285
Less Japan and more Oil 260
Lettering Pencils 175
Leveling Varnish 196, 279
Light and Ventilation 172 Buff. 187, 202 Red 247
Lilac 187, 203
Linen Color 187
Little Things 290
L M Monogram, {ill.) 210
8/10/2019 Making Horse Drawn Coaches 1800 Bw
http://slidepdf.com/reader/full/making-horse-drawn-coaches-1800-bw 20/455
INDEX.
Magenta Lake 248
Maroon , 187
Lake 248Mas&icote - * 247
Mediums 170
Menhaden Oil 291
Method of Varnishing 277Milky appearance on Varnish 285
Milori Green 250
Miscellaneous Items 255Mixture of Striping Colors 201
Monograms 209
Monogram ABC {ill) 210« DEF 210
GH I 210 JK 210
L M 210 NOP 211
QR S 211
TUV 211
WXY 212 Z& '' 212
AP 212 PS 212
PSA 212
USA 213
ERA '' 213
SAP 213 CB 213
CTB 213 NIB 214
CR
214CA V 214 CIN 214 EP 215
FES 215 HRG 215
SNG 215 ACG ; 215 J EC 215 SK J : 216
MEV 216MS 216
NP 216 OML 217
VI « ... 217 OTS 217 OMT 217
VAT 217 T R A 217 SMT 217
SWB 218More Oil 260
Naples Yellow 247Neglect of the Person 289
New Apprentices 256New Colors 254New York Red 187
N I B Monogram, (ill) 214Noble & Hoare's Private Mark 279
Varnish 285
NOP Monogram, {ill) 211
Normal or Pure Gray 187
N P Monogram, {ill.)....., 216
Oil Colors inPatent Tubes.
• •
169Oils, Japan and Varnish 188
Olive 187
Olive Green 249, 250
ML Monogram, {ill.) 217
OMTMonogram, {ill) 217
Opera Board Scroll, {ill) 240
Orange 187, 203
Orange Mineral 254
Ornamental Panel Striping, {ill) 236
Ornamental Work for Sleighs 236Ornamented Alphabet 205
Ornamented Broad Lines, (7 ills.)..2M, 236
Ornament for Sleigh Panel, {ill) 24Qi
Ornamenting Pencils 174,
Ornaments, (41 tZZs.) 218 to 23^'
Ornaments composed of Scrolls, (5 ?
ills.) 238 to 24l
OTS Monogram, {ill) 2lfOVIMonogram, {ill) 2;L?
Paint Brushes 174Paint Cracking 257Paint Cracks 267Painters' Colic, 257Painting Bodies 263
Buggies 269 Coach 192 Irons 266
Paint Mills 176
Pots 175 Shop 171 Stone 177
Palette Knife 178
Panel Colors 182, 185 Stripe 237
Patched On 195
Patent Yellow 247
Pea Green 187, 203
Pearl Color 187
Pencil Grease 256
Pencils „ 174
8/10/2019 Making Horse Drawn Coaches 1800 Bw
http://slidepdf.com/reader/full/making-horse-drawn-coaches-1800-bw 21/455
INDEX.
Pencils for Striping 253
Permanent Wood Filling 2G5
Perspective 168
Pigment 253
Pink 203
Pitting 191 Checked 282
Practical application of Oil Colors 170Practice with the Pen 271
Principles of Coloring 166
Prussian Blue 247
PSA Monogram, (iZZ.) 212
P,Two
Styles, {ill.) 208
Pulverized Pumice Stone 259
Pumice Stone 255,256, 260
Pure Gray 187
Pure Toned Straw Color 250
Purple 187, 203, 254, 255 Lake 248
Putty 268
Puttying 276
Putty Knives 178
Q R S Monogram, (ill.) 211
Quick Drying Color 254 Putty 269
Rough Stuff 265
Raw TJmber 183, 248, 254
Red Lead 247 and Umber .267
Reds 169, 203
Removing Paint 262
Resolvents for Removing Paint 262Rigid or Stiff Ruler 245
R Ornamented, {ill) 209
Rose Lake 248 Pink 247
Rough Stuff 257,265, 275Royal Purple Lake 248
Red 254Rubbing Coats 197
Running Gear 198
Salmon Color 187SAPMonogram, {ill.) 213Saxon Green 248Screens 180, 263Scroll and Fine Lines, (4 ?7Zs.) 236Scrolled Ornament, {ill.) 241Scroll, {iills.) 223Sea Green 187, 252 i
Secondaries 166
Secondary Hues 166Shammy 178
Sharp Edges 280
Shield and Monogram, {ill.) 229Sienna 247
Silver Color 202, 254
Size of Rulers 245
Sizing for Gold Leaf 273
Skeleton, {ill.) 229
Sleigh Painting 256Slush 261
S MT Monogram, {ill.) .' 217
S N G Monogram, {ill.) 215
S Ornamented, {ill) 209
Spoke Face Ornaments, (11 ills.) 241 to 243Sponges 177
Spontaneous Combustion 269
Stone Color 187
Straw Color 187,202, 254Striping Colors 199, 201
'' in Gold 273Pencils 268
Pens 270Styles of Striping , 201
SUB Monogram, {ill.) 218Surface of Varnish 190
Tan Color 187
TerreVerte 248
Test for Japan 255
The Art of Coach Painting 171
The Captive Fly 286The Carriage Part 198, 276The Coloring 238
The Excessive Use of Tobacco.. 290The First Coat 279The Paint Shop 171
The Paint Stone 177
The Palette Knife 178
The Principles of Coloring 166The Rubbing or Leveling Varnish 279The Shammy 256Tiger Scroll, {ill.) 239Tobacco 290
To Color a Body 251To Fasten Hair in Pencils 267
To Lay Out Imitation Cane Work 244
To Mix Gold Bronze 251 • Paint a Light Carriage, three weeks 259 Carmine 264 Light Buggies 274 Prevent Gold Leaf Adhering 274 Remove Varnish Cracks 281
TR A Monogram, {ill) 213, 217
Transparent Colors 251, 253
Treatment of Spoke Face 241

8/10/2019 Making Horse Drawn Coaches 1800 Bw
http://slidepdf.com/reader/full/making-horse-drawn-coaches-1800-bw 22/455
INDEX.
Trestles 179
Tuscan Red 248, 254
TUV Monogram, {ill) 211
Ultramarine Blue 186, 248, 254Umber Toned Drabs 187
Unique Alphabet 205
USA Monogram, (ill.) 213
Vandyke Brown 248
Varnish 189 Brushes 173, 283 Cracks 281
Varnishing 201
Body 195 Carriage Part 278
Varnish Items 286
Pitting 281
VAT Monogram,(iZZ.) 217
Venetian Red 247
Ventilation 172, 287
Verdigris 186, 248
Vermilion 248
Violet 187
V Ornamented, (iW.) 209
Warm Feet 256Washing Windows 256
with Turpentine 256
Water Buckets 177 on Varnish 285
Wheel Board or Prop 181
Where should Varnish be kept 284
White and Straw Color, etc 250 Broad Line 202 Chalk 247 Lead 247, 255
Whites 169
Wine Color 187
Winged Eclipse, {illj220Wire Stand 187
Worthy a Passing Thought 288
WXY Monogram, (ill) 212Wyvern, [ill) 224
Yellow Arsenic 247 Ochre 247 Orpiment 247
Zanzibar Gum 257Zinc White 247
Z & Monogram, (ill.) 212
PART IV.
TRIMMING DEPARTMENT.
About Stock 340
Apron 321
Arm Piece and Quarter, {ill.) 299
A Simple Cutting Machine, {ill) 339
Back, {ill) 307 Boot,{ill) 338 Cushion and Fall, {ill) 307 for Landau Sleigh, {ill) 302 of Light Top, {ill) 333 Straps 330
Supporter 337 YSilence, {ill) 330 with Iron Armpiece, {ill) 309
Black Leather Varnish 337
Bows, To Prevent from Springing 323
Broad Lace 331
Buggy Seat and Fall, {ill) 311
Card Pocket 300
Cheap Back Straps for Hack 330
Clarence Doors, {2 ills.) 300
Cloth Broad Lace, etc., {2ills.) 331Corded Straps, {2 ills.) 330Covering Dashes 328Cushion for No-Top Buggy. 325
Hook 322 Top with Folds 325 and Fall, (iZZ.) 307,308 Sewed together,(iW.) 316
Cutting Machine, {ill) 339 Stock 340
Dash,. 321
Door Fall, {ill) 299
Drab Cloth 337
Draft of an Extension Top, {ill). 336
Drag Cushion and Fall, {ill) 313
Driving Cushion for Dog Cart, {ill).... 317
Drop Backs, {Ul) 305,307, 309
End Finish of Drop Backs 313
Extension Top, {ill) 336
Fall for Dickey Seat, {ill) 323
8/10/2019 Making Horse Drawn Coaches 1800 Bw
http://slidepdf.com/reader/full/making-horse-drawn-coaches-1800-bw 23/455
INDEX. XIII
Fall for Landau Sleigh, {ill.) 303 Coach or Phaeton Door 302
Fall Pattern, {ill.) 321
Fitting on Top after Stuffing 334Side Quarters 331
Form with which to Stitch KnobHoles, {ill.) , 339
Head Lining Close Tops 330Horse Shoe Back, {ill.) 309
How to Clean Drab Cloth 337 Make a Back Boot, {ill.) 338
the Cushion 316 the Fall 316
the Front Facing 326 the Valence, (t7;.) 332
'* Trimming for LazvBack 331
Improvement, Trimming Turn -overSeat, {ill.) 314
Inside Eound-front Clarence, {ill.) 301
Knife for Cutting Cord,(i;?.) 322Knob Holes 339
Landau Back Quarter, etc., {ill.) 298 Sleigh Trimming, {ill.) 302
Lazy Backs, {ill.) 312, 331
Leather Blacking 337
Leather Varnish 337Light Buggy Seat, {ill.) 310
Top, {ill.) 333
Method Applied to Close Top Gig, etc 297 No Top Wagon 295
Top Buggy 295 in Trimming Shop 294
Mixing and Cooking Paste 337
New Box Loop 313
Park Phaeton Seat, {ill.) 306Paste That Will Keep 337
Patent Leather 341
Patterns for Stick Seat Rolls, {ill.) 326
Plaited Welting, {ill.) 313
Roll Stick 321
Round Cross Straps, {ill.) 329
Rustic Trimming, {ill.) 320Scolloped Back Valence, {ill) 343
Setting Bows 335
Setting Tubular Bows by Draft, {ill.).. 335Softening Buggy Tops 336
Spring Cushion 324Squab Top Cushion 324
Stock 340Strips for Cording 337
Summer Tops 334
The Back Part of Close Tops 334 Cushion Front 304
Top and Fall 305 Door Fall, iill.) 299 Grecian Bend Drop Back, {ill.)... 310 Phoenix Shaft Straps 320 Pocket Fall, &c., (iZ^.) 324 Saratoga, {ill.) 303
Back 304
Star Top Cushion, &c., {ill.) 318 Swinging Holders 300
Three Edged Raiser Machine, {ill.)... 339
To Make Shell Work, &c 305
To Make the Back 303
To Mend a Broken Bow 340
Top of Cushion, {ill.) 315
To Prevent Front and Back Bows fromSpringing 323
To Prevent Head Lining, &c 330
To Prevent Tops of Dashes, &c 328
Trestle, {ill.) 296
Trimming for Landau Sleigh, {ill) 302 Light Road Wagon, (iZZ.) 319
Trimmer's Don't Use Sticks 336
Twisted Leather Seaming Cord, {ill)... 329
Valence 332
PART V.
MISCELLANEOUS DEPARTMENT.
A Safe and Profitable Investment 367
American Timber Interests 368
Apprentices 355
Are They Competent Judges 346A Word to Apprentices 355
Be Careful of Your Credit 346
Be Ready in Time 351
Beware of Sharpers 345
Blacksmithing in Germany 366Boxwood 356
8/10/2019 Making Horse Drawn Coaches 1800 Bw
http://slidepdf.com/reader/full/making-horse-drawn-coaches-1800-bw 24/455
INDEX.
Carriage Materials 362
Coldness 351
Competent Judges 346Competition 357
Convenient and Comfortable Shops.... 344
Credit 346
Electrotyping 356
From Farm Wagon to Landau 352
Goddard Method of Painting 363
Greasing 350
History of Wood Engraving 355
Order and Disorder 342
Out of Work 353
Sharpers 345
Sponges and Chamois 350
Success in Business 343
System 344System in Carriage Shops 360
The Cover 350The Electrotype 356The Grinding of Colors 359The Leather 350The Reins as Held by the Fair Sex... 364
The Washing 350
The First Operation 358
The Sarven Patent Wheel 365
To Employers 360
Water-Proof Glue 367
Where Carriages Should be Kept 366
Wood Engraving 356
Workshops 344
Wrenches 350
8/10/2019 Making Horse Drawn Coaches 1800 Bw
http://slidepdf.com/reader/full/making-horse-drawn-coaches-1800-bw 25/455
COACH-MAKERS
Illustrated Hand-Book>>»;«=
PART FIRST.-WOOD-WORK DEPARTMENT.
SCALE DRAFTING.
THIS, to the progressive body-maker, or learner, is one of the most important sub-
jects we could treat upon, and while we feel satisfied that we fully understand
the subject on which we are writing, we are aware of the difficulty before us of mak-
ing it plain to our readers. Our object is to give a clear and full illustration of the
whole system from the beginning to the end, showing the kind of instruments neces-
sary by cuts, with description, together with the kind of ir.iterial required to make a
perfect draft. New beginners will find much to discourage them, but by constant
practice and perseverance the object can be obtained.
Scale drafting is reducing a carriage, or any other object, to any given scale and re-
taining its proportions —half inch to the foot being generally used by coach draftsmen.
As a general rule, most of the present styles of carriages originate in the scale draft,
and are then transferred to the blackboard to full size.
We have divided the sets of drawing instruments into three classes, viz. : brass, fine
German silver, and extra fine Swiss. The brass instruments are intended for schools
the fine German silver and the extra fine Swiss instruments for practical carriage
draftsmen.
Without the aid of some drawing instrument, a student cannot obtain a thorough
knowledge of geometry or trigonometry ; but as very few who go over these branches
in youth ever make any practical use of them in after life, it is not necessary that the
drawing instruments VMihich are furnished to schools should be any finer in finish andquality than is sufficient for a clear demonstration of the problems.
But with the practical carriage draftsman his drawing instruments are next to his
head and hands, and they must be of the best material, well and accurately finished.
Being in constant use, and if they are not perfectly correct, the loss and delay occasioned
by them, in one instance, will be much greater than the cost of a good set of instru-
ments, which can be used his life-time.
The fine German silver drawing instruments meet the wants of the practical man.The extra fine Swiss drawing instruments are more nicely finished than the fine Ger-
man silver ; the metal of which they are made resembles more closely pure silver2 17
8/10/2019 Making Horse Drawn Coaches 1800 Bw
http://slidepdf.com/reader/full/making-horse-drawn-coaches-1800-bw 26/455
D
18 COACH-MAKERS' ILLUSTRATED HAND-BOOK.
they are more substantial in construction, and consequently more durable. As a gen-
eral rule, draftsmen give the preference to extra fine Swiss drawing instruments.
Having made these general remarks we will now proceed to describe each of the
instruments required, their use and how to use them :
DRAWING BaiRDis a rectagular frame of walnut, with an open center, in which a soft pine board,
carefully planed and perfectly smooth, is fitted and fastened with buttons. The frameis made of hard wood, so as not to wear easily and become incorrect, and the center of
soft wood, so the fastening pins can be easily put in. The angles and edges of the frameshould be as correct as possible, for resting the head of the T-square against.
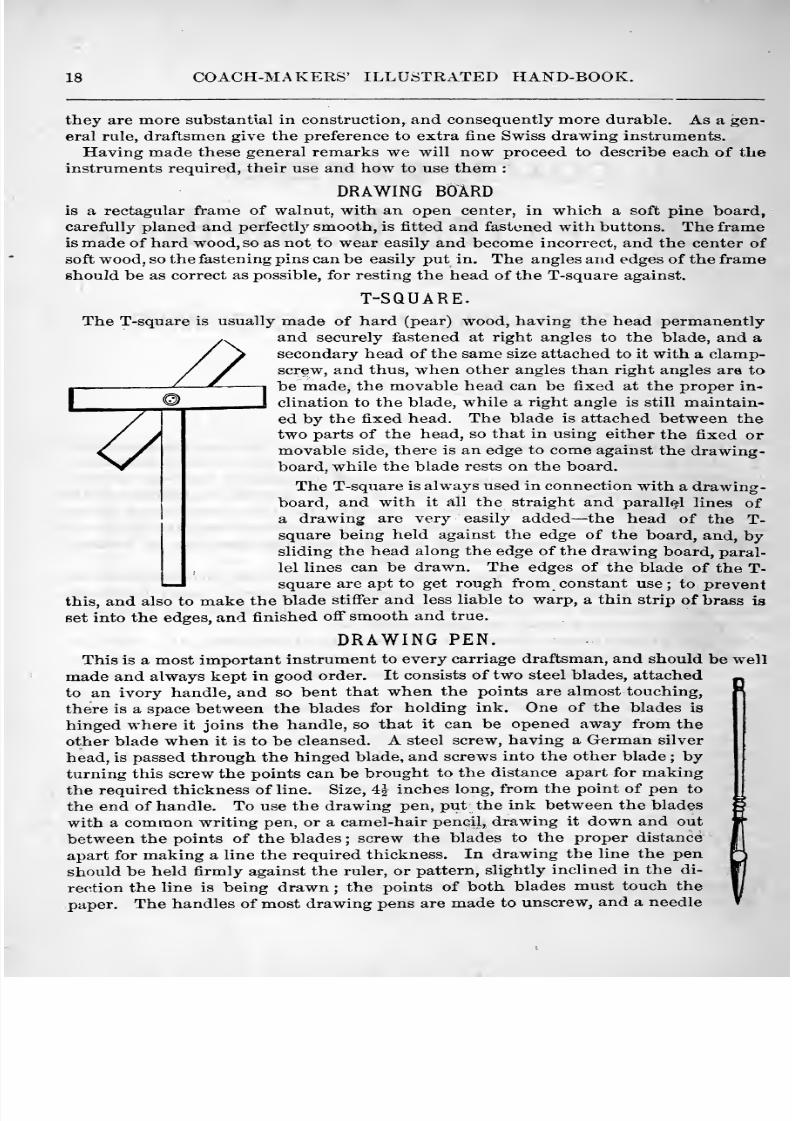
T-SQUARE.The T-square is usually made of hard (pear) wood, having the head permanently
and securely fastened at right angles to the blade, and a
secondary head of the same size attached to it with a clamp-screw, and thus, when other angles than right angles are to
be made, the movable head can be fixed at the proper in-
clination to the blade, while a right angle is still maintain-
ed by the fixed head. The blade is attached between the
two parts of the head, so that in using either the fixed or
movable side, there is an edge to come against the drawing-board, while the blade rests on the board.
The T-square is always used in connection with a drawing-board, and with it all the straight and parallel lines of
a drawing are very easily added —the head of the T-square being held against the edge of the board, and, bysliding the head along the edge of the drawing board, paral-
lel lines can be drawn. The edges of the blade of the T-
square are apt to get rough from constant use; to prevent
this, and also to make the blade stiff'er and less liable to warp, a thin strip of brass is
set into the edges, and finished off smooth and true.
DRAWING PEN.This is a most important instrument to every carriage draftsman, and should be well
made and always kept in good order. It consists of two steel blades, attached
to an ivory handle, and so bent that when the points are almost touching,
there is a space between the blades for holding ink. One of the blades is
hinged where it joins the handle, so that it can be opened away from the
other blade when it is to be cleansed. A steel screw, having a German silver
head, is passed through the hinged blade, and screws into the other blade ; byturning this screw the points can be brought to the distance apart for making
the required thickness of line. Size, 4 J inches long, from the point of pen to
the end of handle. To use the drawing pen, put the ink between the blades
with a common writing pen, or a camel-hair pencil,; drawing it down and out
between the points of the blades ; screw the blades to the proper distance
apart for making a Une the required thickness. In drawing the Hne the pen
should be held firmly against the ruler, or pattern, slightly inclined in the di-
rec^tion the line is being drawn ; the points of both blades must touch the
paper. The handles of most drawing pens are made to unscrew, and a needle
8/10/2019 Making Horse Drawn Coaches 1800 Bw
http://slidepdf.com/reader/full/making-horse-drawn-coaches-1800-bw 27/455
SCALE DRAFTING. 19
is fitted in the screw end, which can be used for pricking drawings from one paper to
another.
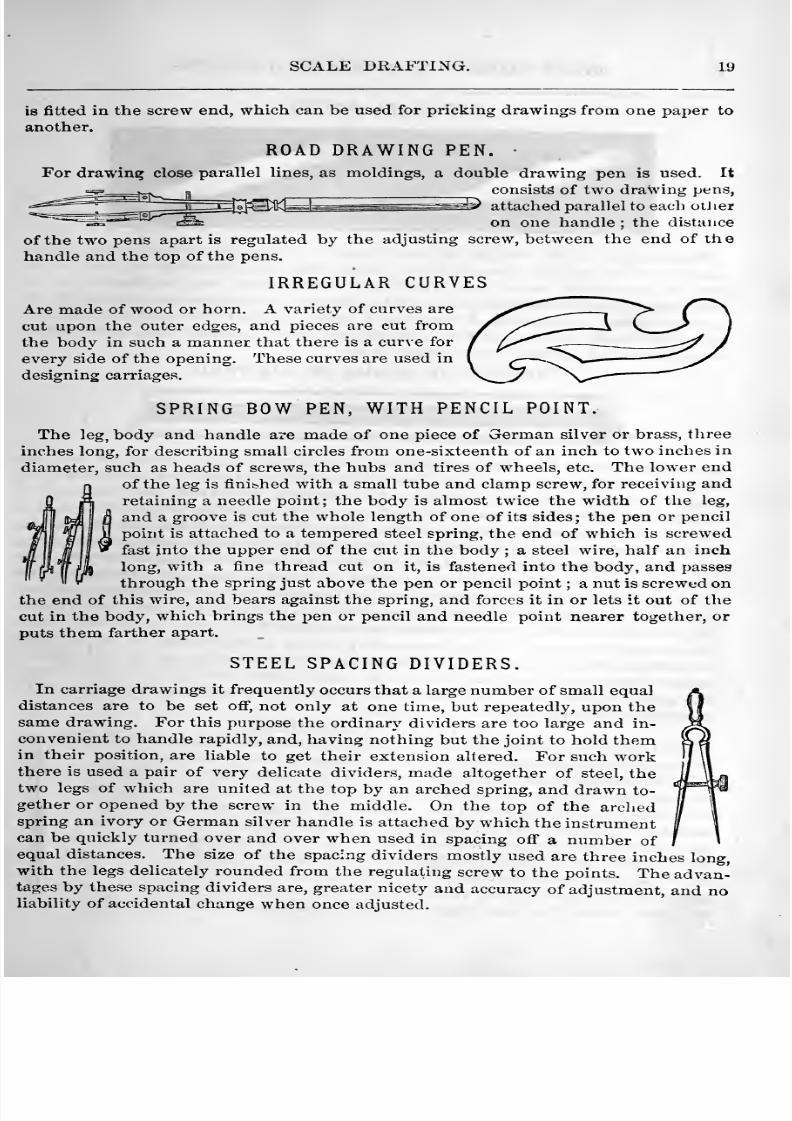
ROAD DRAWING PEN. •
For drawing close parallel lines, as moldings, a double drawing pen is used. It
consists of two drawing pens,
attached parallel to each oilier
on one handle ; the distance
of the two pens apart is regulated by the adjusting screw, between the end of the
handle and the top of the pens.
IRREGULAR CURVES
Are made of wood or horn. A variety of curves are
cut upon the outer edges, and pieces are cut from
the body in such a manner that there is a curve for
every side of the opening. These curves are used in
designing carriages.
SPRING BOW PEN, WITH PENCIL POINT.
The leg, body and handle are made of one piece of German silver or brass, three
inches long, for describing small circles from one-sixteenth of an inch to two inches in
diameter, such as heads of screws, the hubs and tires of wheels, etc. The lower end
of the leg is finifc.hed with a small tube and clamp screw, for receiving andretaining a needle point; the body is almost twice the width of the leg,
and a groove is cut the whole length of one of its sides; the pen or pencil
point is attached to a tempered steel spring, the end of which is screwed
fast into the upper end of the cut in the body ; a steel wire, half an inch
long, with a fine thread cut on it, is fastened into the body, and passes
through the spring just above the pen or pencil point ; a nut is screwed on
the end of this wire, and bears against the spring, and forces it in or lets it out of thecut in the body, which brings the pen or pencil and needle point nearer together, or
puts them farther apart.
STEEL SPACING DIVIDERS.
In carriage drawings it frequently occurs that a large number of small equal
distances are to be set off, not only at one time, but repeatedly, upon thesame drawing. For this purpose the ordinary dividers are too large and in-
convenient to handle rapidly, and, having nothing but the joint to hold themin their position, are liable to get their extension altered. For such workthere is used a pair of very delicate dividers, made altogether of steel, thetwo legs of which are united at the top by an arched spring, and drawn to-
gether or opened by the screw in the middle. On the top of the archedspring an ivory or German silver handle is attached by which the instrumentcan be quickly turned over and over when used in spacing off a number ofequal distances. The size of the spacing dividers mostly used are three inches long,with the legs delicately rounded from the regulating screw to the points. The advan-tages by these spacing dividers are, greater nicety and accuracy of adjustment, and noliability of accidental change when once adjusted.
8/10/2019 Making Horse Drawn Coaches 1800 Bw
http://slidepdf.com/reader/full/making-horse-drawn-coaches-1800-bw 28/455
20 COACH-MAKEKS' ILLUSTRATED HAND-BOOK.
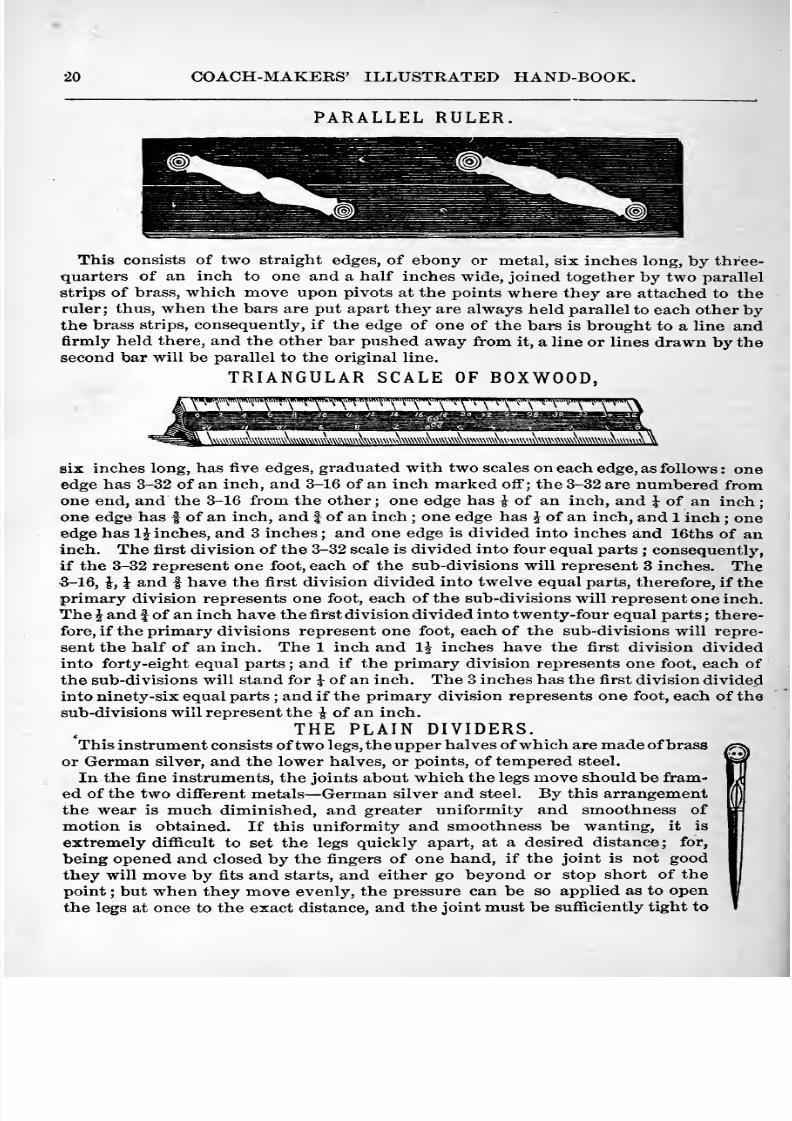
PARALLEL RULER
This consists of two straight edges, of ebony or metal, six inches long, by three-
quarters of an inch to one and a half inches wide, joined together by two parallel
strips of brass,which move upon
pivots atthe points where they are attached to the
ruler; thus, when the bars are put apart they are always held parallel to each other bythe brass strips, consequently, if the edge of one of the bars is brought to a line andfirmly held there, and the other bar pushed away from it, aline or lines drawn by thesecond bar will be parallel to the original line.
TRIANGULAR SCALE OF BOXWOOD,
six inches long, has five edges, graduated with two scales on each edge, as follows : oneedge has 3-32 of an inch, and 3-16 of an inch marked ofi ; the 3-32 are numbered fromone end, and the 3-16 from the other ; one edge has } of an inch, and J of an inch
one edge has | of an inch, and f of an inch ; one edge has J of an inch, and 1 inch ; oneedge has 1^ inches, and 3 inches ; and one edge is divided into inches and IBths of aninch. The first division of the 3-32 scale is divided into four equal parts ; consequently,
if the 3-32 represent one foot, each of the sub-divisions will represent 3 inches. The•3-16, i, J and | have the first division divided into twelve equal parts, therefore, if the
primary division represents one foot, each of the sub-divisions will represent one inch.
The i and f of an inch have the first division divided into twenty-four equal parts ; there-
fore, if the primary divisions represent one foot, each of the sub-divisions will repre-
sent the half of an inch. The 1 inch and 1^ inches have the first division divided
into forty-eight equal parts ; and if the primary division represents one foot, each of
the sub-divisions will stand for ^ of an inch. The 3 inches has the first division divided
into ninety-six equal parts ; and if the primary division represents one foot, each of the
sub-divisions will represent the i of an inch.
THE PLAIN DIVIDERS.
This instrument consists of two legs, the upper halves of which are made of brassor German silver, and the lower halves, or points, of tempered steel.
In the fine instruments, the joints about which the legs move should be fram-
ed of the two different metals —German silver and steel. By this arrangementthe wear is much diminished, and greater uniformity and smoothness of
motion is obtained. If this uniformity and smoothness be wanting, it is
extremely difficult to set the legs quickly apart, at a desired distance ; for,
being opened and closed by the fingers of one hand, if the joint is not good
they will move by fits and starts, and either go beyond or stop short of the
point ; butwhen
theymove
evenly, the pressure can be so applied as to open
the legs at once to the exact distance, and the joint must be sufficiently tight to
8/10/2019 Making Horse Drawn Coaches 1800 Bw
http://slidepdf.com/reader/full/making-horse-drawn-coaches-1800-bw 29/455
SCALE DRAFTI.NG. 21
hold them in this position, and not permit them to deviate from it in consequence of
a small amount of pressure which is inseparable from their use. The joints of the
dividers are tightened^or loosened by inserting the two steel points of the keyinto
the two small holes on one side of the head of the dividers, and turning from one to
tighten it, and in the opposite direction to loosen it.
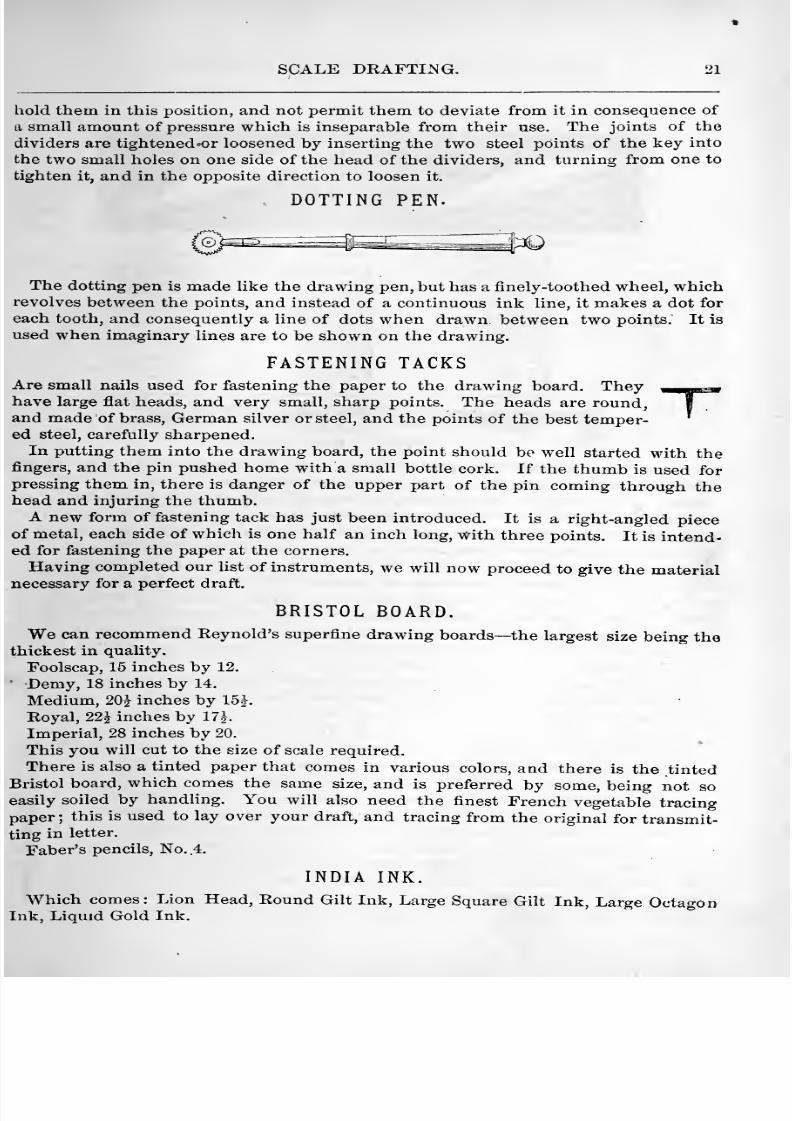
DOTTING PEN.
The dotting pen is made like the drawing pen, but has a finely -toothed wheel, whichrevolves between the points, and instead of a continuous ink line, it makes a dot for
each tooth, and consequently a line of dots when drawn between two points. It is
used when imaginary lines are to be shown on the drawing.
FASTENING TACKSAre small nails used for fastening the paper to the drawing board. Theyhave large flat heads, and very small, sharp points. The heads are round,and made of brass, German silver or steel, and the points of the best temper-ed steel, carefully sharpened.
In putting them into the drawing board, the point should be well started with thefingers, and the pin pushed home with a small bottle cork. If the thumb is used for
pressing them in, there is danger of the upper part of the pin coming through thehead and injuring the thumb.
A new form of fastening tack has just been introduced. It is a right-angled pieceof metal, each side of which is one half an inch long, with three points. It is intend-ed for fastening the paper at the corners.
Having completed our list of instruments, we will now proceed to give the materialnecessary for a perfect draft.
BRISTOL BOARD.
We can recommend Reynold's superfine drawing boards— the largest size being thethickest in quality.
Foolscap, 15 inches by 12.
' Demy, 18 inches by 14.
Medium, 20J inches by 15|.
Royal, 22 J inches by 17iImperial, 28 inches by 20.
This you will cut to the size of scale required.
There is also a tinted paper that comes in various colors, and there is the tintedBristol board, which comes the same size, and is preferred by some, being not soeasily soiled by handling. You will also need the finest French vegetable tracing
paper ; this is used to lay over your draft, and tracing from the original for transmit-
ting in letter.
Faber's pencils. No. .4.
INDIA INK.
Which comes: Lion Head, Round Gilt Ink, Large Square Gilt Ink, Large OctagonInk, Liquid Gold Ink.
8/10/2019 Making Horse Drawn Coaches 1800 Bw
http://slidepdf.com/reader/full/making-horse-drawn-coaches-1800-bw 30/455
22 COACH-MAKERS' ILLUSTRATED HAND-BOOK.
BRUSHES.For brushes,
youwill require fine brown sables in quills, brown dyed sables in tin
ferrules, with handles.WATER-COLORS.
In water-colors we give the entire list, which comes in whole and half cakes ; or
moist water-colors, which retain, from processes and treatment known only to them-selves, their solubility and dampness for an unlimited period, and a box of them,
though laid aside for two or three years, will be found, when required again, equally
moist and serviceable as when purchased.Antwerp Blue.Bistre.Burnt Sienna.
Brown Pink.Blue Black.British Ink.Brown Ochre.Burnt Roman Ochre.Burnt Umber.Chrome Yellow, 1, 2 and 3.
Cologne Earth.Dragon's Blood.Emerald Green.Gamboge.Hooker's Green, No. I.
Hooker's Green, No. 2.
Indigo.Indian Red.Italian Pink.Ivory Black.King's Yellow.
Lamp Black.Light Red.Neutral Tint.
Naples YellowNew Blue.Olive Green.Orpiment.Prussian. Blue.Prussian Green.Payne's Gray.Raw Sienna.Raw Umber.Roman Ochre.Red Lead.Red Ochre.Red Chalk.Saj) Green.TeiTe Vertt'.Vandyke Brown.Venitian Red.Vermilion.
Verditer.Yellow Ochre.Yellow Lake.
Sepia.Warm Sepia.Roman Sepia.Brown Madder.Constant White.Chinese White.Indian Yellow.Crimson Lake.Scarlet Lake.Purple Lake.Mars Brown.Mars Yellow.Scarlet Vermillion.Chalon's Brown.Black Lead.
Green Oxide of Chromium.Lemon Yellow.
Frriiich Blue.Pink Madder.Rose Madder.Intense Blue.
Mars Orange.Pure Scarlet.Barnt Carmine.Smalt.Purple Madder.Ultramarine Ash.Carmine.Gallstone.Cadmium Yellow.Orange Vermillioa.
Ultramarine.Ditto. Quarter Cake.obalt Blue.
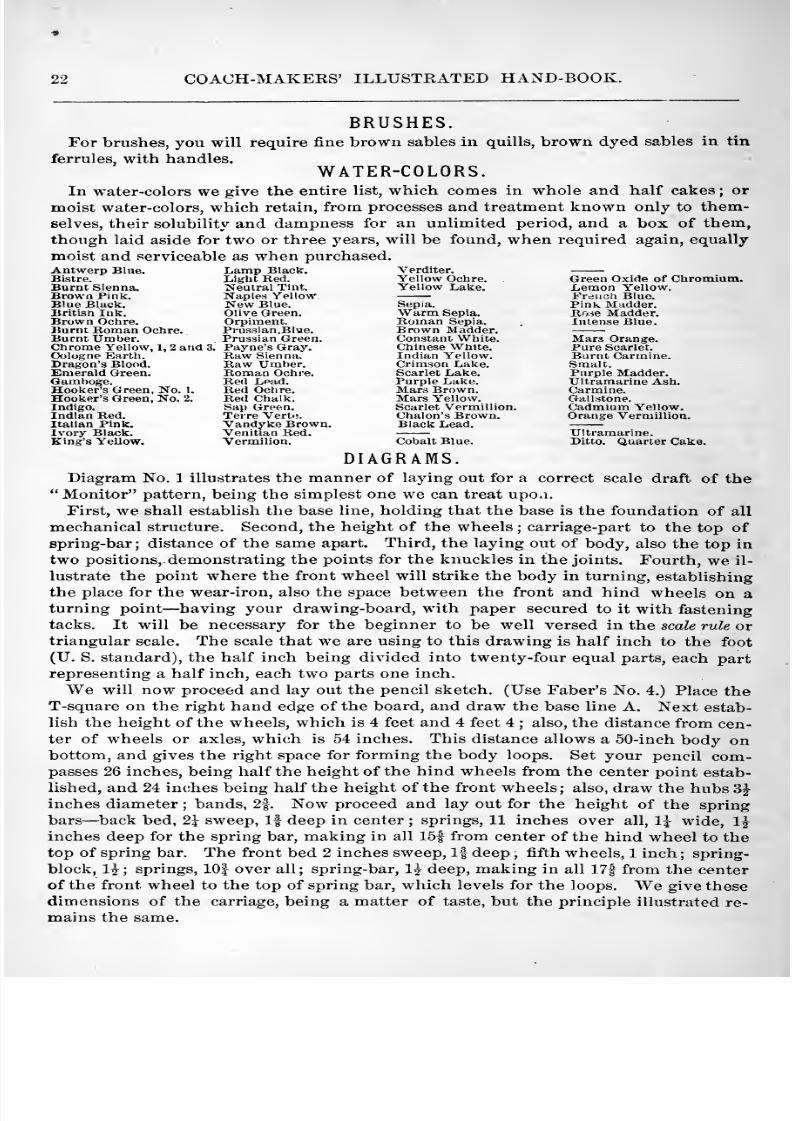
DIAGRAMS.Diagram No. 1 illustrates the manner of laying out for a correct scale draft of the
Monitor pattern, being the simplest one we can treat upoa.
First, we shall establish the base line, holding that the base is the foundation of all
mechanical structure. Second, the height of the wheels ; carriage-part to the top of
spring-bar; distance of the same apart. Third, the laying out of body, also the top in
two positions, demonstrating the points for the knuckles in the joints. Fourth, we il-
lustrate the point where the front wheel will strike the body in turning, establishing
the placefor
the wear-iron,also the space
between thefront
and hind wheels on aturning point —having your drawing-board, with paper secured to it with fastening
tacks. It will be necessary for the beginner to be well versed in the scale rule or
triangular scale. The scale that we are using to this drawing is half inch to the foot
(U. S. standard), the half inch being divided into twenty-four equal parts, each part
representing a half inch, each two parts one inch.
We will now proceed and lay out the pencil sketch. (Use Faber's No. 4.) Place theT-square on the right hand edge of the board, and draw the base line A. Next estab-
lish the height of the wheels, which is 4 feet and 4 feet 4 ; also, the distance from cen-ter of wheels or axles, which is 54 inches. This distance allows a 50-inch body onbottom, and gives the right space for forming the body loops. Set your pencil com-passes 26 inches, being half the height of the hind wheels from the center point estab-
lished, and 24 inches being half the height of the front wheels; also, draw the hubs 3Jinches diameter ; bands, 2f . Now proceed and lay out for the height of the spring
bars —back bed, 2\ sweep, If deep in center ; springs, 11 inches over all, 1^ wide, 1^inches deep for the spring bar, making in all 15| from center of the hind wheel to the
top of spring bar. The front bed 2 inches sweep. If deep , fifth wheels, 1 inch ; spring-
block, 12^; springs, 10| over all; spring-bar, IJ deep, making in all 17| from the center
of the front wheel to the top of spring bar, which levels for the loops. We give these
dimensions of the carriage, being a matter of taste, but the principle illustrated re-
mains the same.
8/10/2019 Making Horse Drawn Coaches 1800 Bw
http://slidepdf.com/reader/full/making-horse-drawn-coaches-1800-bw 31/455
SCALE DRAFTING.
DIAGRAM NO. 1. HALF- INCH SCALE,Proceed and lay out for the width of springs and draw them. Measure from base line
A 39 inches ; draw line B, which is the bottom line of body, which drops 2 J inches from
top of spring bar. Measure from B 10 inches, and draw line C, top line of body.
Measure on line B, from front and back springs, 2^- inches, and prick it off, whichleaves the body 4 feet 2 inches long on the bottom line. Now proceed and draw the
two ends, giving | inch bevel to each.
When they are drawn square, the top line of body C will appear shorter than bot-
tom line B. Measure from line B 2 inches, and draw the concave rocker ; also, sweepthe ends as represented by the diagram. You can now dot off the loops, steps, perch,
and lay out the dash, which is 11 inches from top of body. Measure from front of
body, on line C, 21 inches ; this being the front of the seat, 15| for the depth, seat
elevated sufficient to bring the bottom edge of skirting on top line of body. Measure4| inches from seat frame for seat panel
;give I inch slope, and draw this line. Lay
off the back and front bevels to suit taste. You will now lay out and draw the line
for shifting rail ; turn the gooseneck for the slat irons with the pencil string-bow pen.
Measure from top line, back of seat, 4 inches ; draw perpendicular line D ; also measure45 inches from top of seat frame ; draw the top line E ; measure from line D 42 inches.
8/10/2019 Making Horse Drawn Coaches 1800 Bw
http://slidepdf.com/reader/full/making-horse-drawn-coaches-1800-bw 32/455
24 COACH-MAKERS' ILLUSTRATED HAND-BOOK.
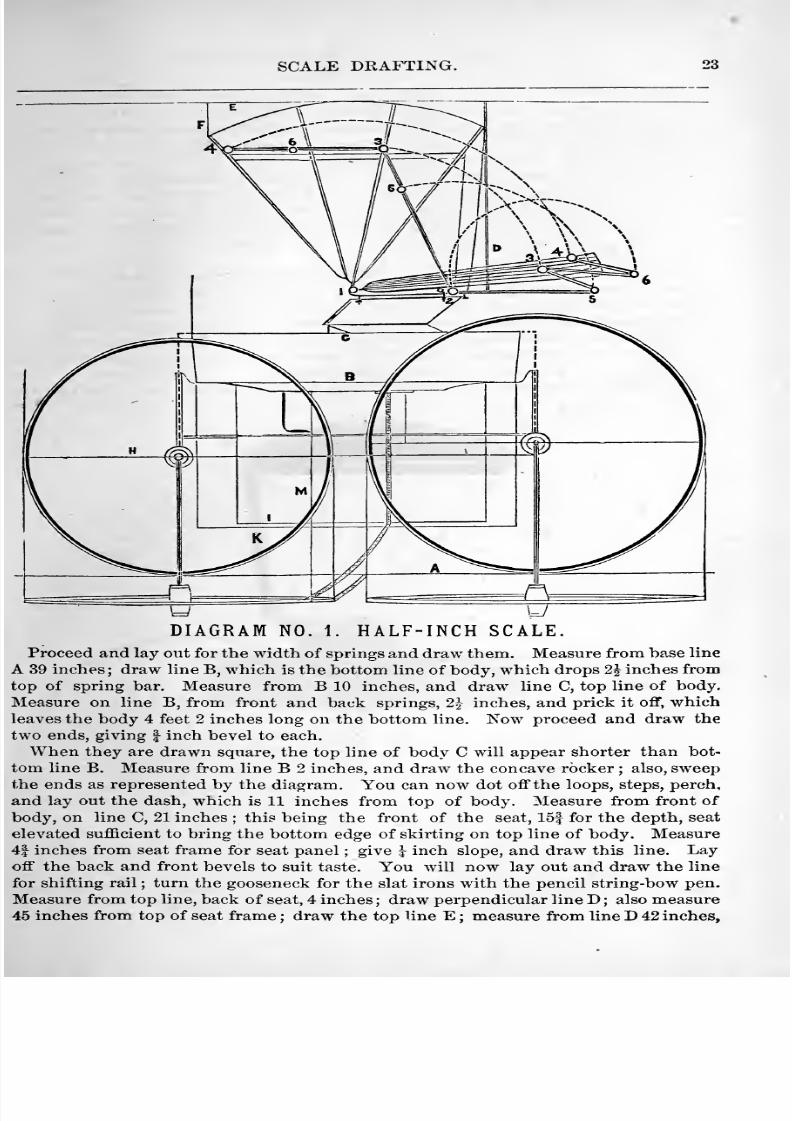
and draw line F, this being the height, length and back flare of top. The top sweephas 4^- inches round, 1 inch lower front than back ; it is on a circle of 75 inches. Theneedle point of compasses is placed at the center point of gooseneck for receiving the
slat irons ; this will strike the sweep. Proceed and space ofi and draw the bows, andestablish the props, NoS. 2, 3 and 4, and draw the joints for establishing the difl'erent
points for the stub joints, illustrated in top laying down by Nos. 5 and 6,
We will now lay oiat for establishing the point where the front wheel will strike the
concave rocker, and where the wear iron should be placed. You draw center line H,being the center of body, and the center point of the front wheel, representing the
center of king bolt and the center of axles. Line I represents the outside of concaverocker, and K the bod3^
Draw the wheels below line A, as represented in the diagram ; these represent half
the trRf'k from center line H. Draw perpendicular line M ; this takes the size of thewheel on a line with the concave rocker. Now, with the pencil compasses place the
needle point in center of front wheel, being the center of body -bolt, which strikes the
circle to Kne I, which represents the concave in the rocker. From this point, squaredto the body, will give the exact place for the wear iron. The short circle shows the
distance between the front and back wheels in turning.
This principle illustrates how close the front and back wheels can be brought to-
gether with safety.
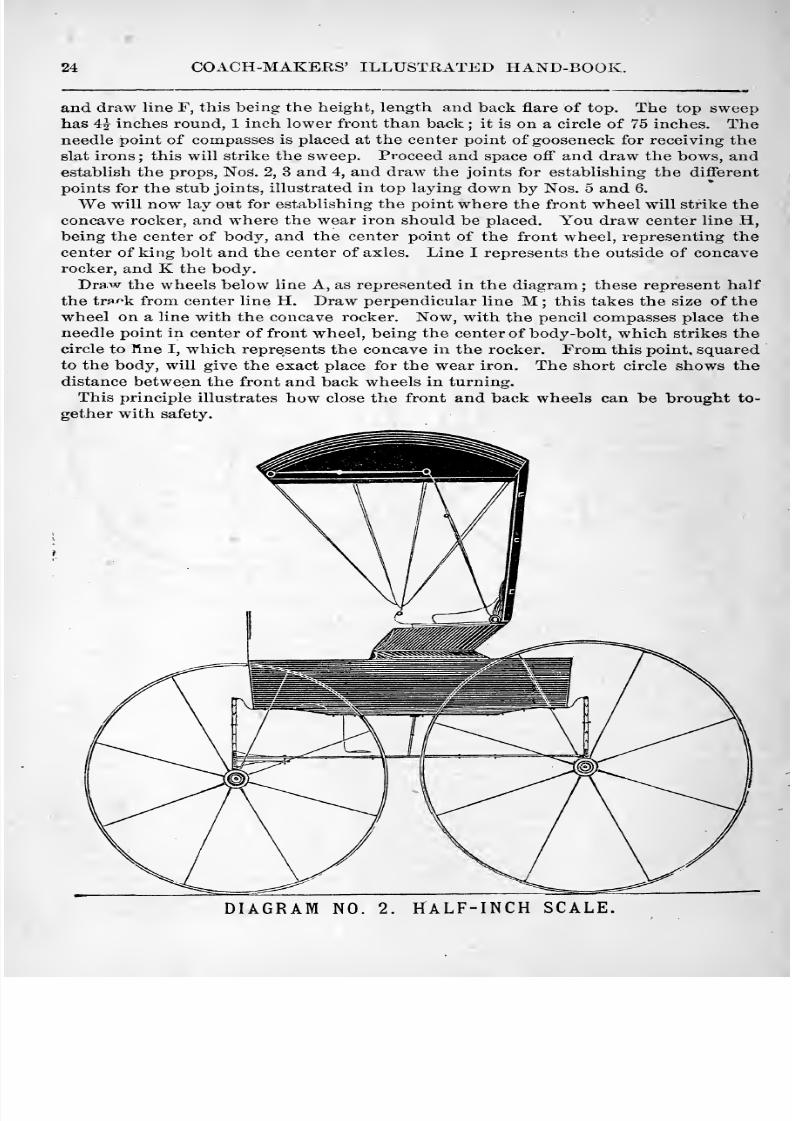
DIAGRAM HALF-INCH SCALE.
8/10/2019 Making Horse Drawn Coaches 1800 Bw
http://slidepdf.com/reader/full/making-horse-drawn-coaches-1800-bw 33/455
SCALE DRAFTING. 25
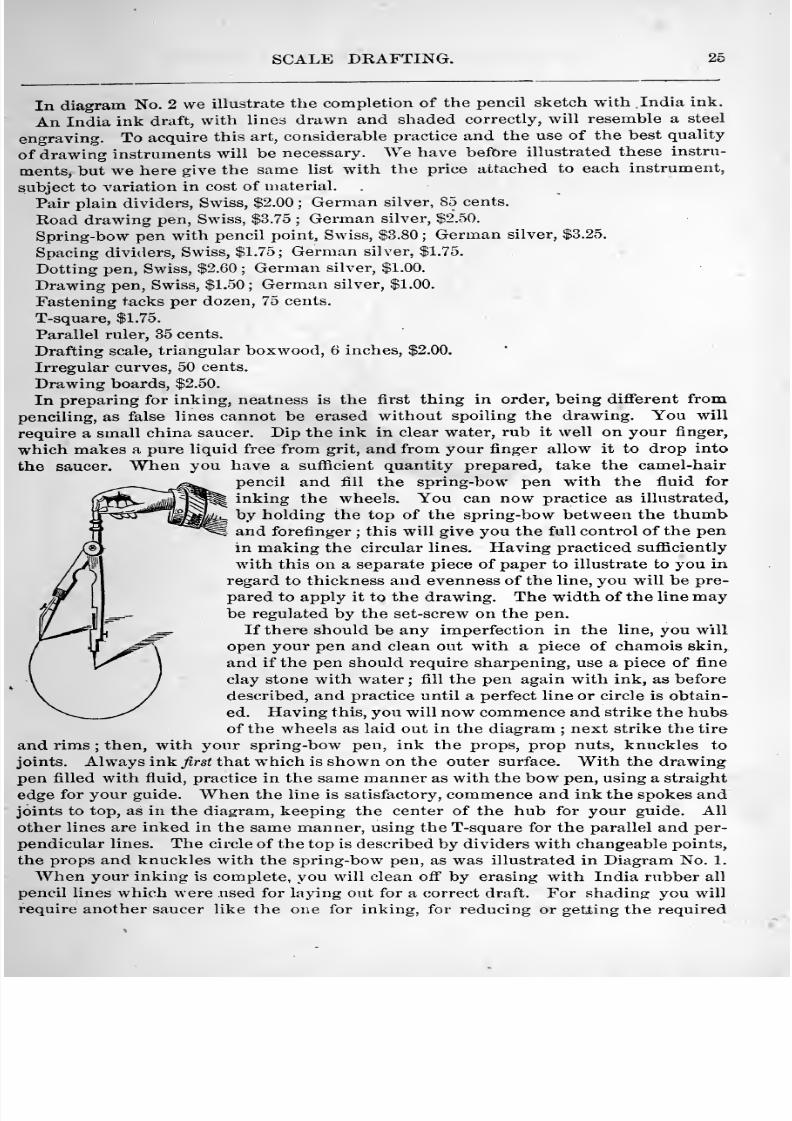
In diagram No. 2 we illustrate the completion of the pencil sketch with India ink.
An India ink draft, with lines drawn and shaded correctly, will resemble a steel
engraving. To acquire this art, considerable practice and the use of the best quality
of drawing instruments will be necessary. We have befDre illustrated these instru-
ments, but we here give the same list with the price attached to each instrument,
subject to variation in cost of material.
Pair plain dividers, Swiss, $2.00 ; German silver, 85 cents.
Road drawing pen, Swiss, $3.75 ; German silver, $2.50.
Spring-bow pen with pencil point, Swiss, $3.80 ; German silver, $3.25.
Spacing dividers, Swiss, $1.75; German silver, $1.75.
Dotting pen, Swiss, $2.60 ; German silver, $1.00.
Drawing pen, Swiss, $1.50; German silver, $1.00.
Fastening tacks per dozen, 75 cents.
T-square, $1.75.
Parallel ruler, 35 cents.
Drafting scale, triangular boxwood, 6 inches, $2.00.
Irregular curves, 50 cents.
Drawing boards, $2.50.
In preparing for inking, neatness is the first thing in order, being different from
penciling, as false lines cannot be erased without spoiling the drawing. You will
require a small china saucer. Dip the ink in clear water, rub it well on your finger,
which makes a pure liquid free from grit, and from your finger allow it to drop into
the saucer. When you have a sufiicient quantity prepared, take the camel-hair
pencil and fill the spring-bow pen with the fluid for
inking the wheels. You can now practice as illustrated,
by holding the top of the spring-bow between the thumband forefinger ; this will give you the full control of the penin making the circular lines. Having practiced sufficiently
with this on a separate piece of paper to illustrate to you in
regard to thickness and evenness of the line, you will be pre-
pared to apply it to the drawing. The width of the line maybe regulated by the set-screw on the pen.
If there should be any imperfection in the line, you will
open your pen and clean out with a piece of chamois ekin^
and if the pen should require sharpening, use a piece of fine
clay stone with water ; fill the pen again with ink, as before
described, and practice until a perfect line or circle is obtain-
ed. Having this, you will now commence and strike the hubsof the wheels as laid out in the diagram ; next strike the tire
and rims ; then, with your spring-bow pen, ink the props, prop nuts, knuckles tojoints. Always ink first that which is shown on the outer surface. With the drawingpen filled with fluid, practice in the same manner as with the bow pen, using a straight
edge for your guide. When the line is satisfactory, commence and ink the spokes andjoints to top, as in the diagram, keeping the center of the hub for your guide. All
other lines are inked in the same manner, using the T-square for the parallel and per-
pendicular lines. The circle of the top is described by dividers with changeable points,
the props and knuckles with the spring-bow pen, as was illustrated in Diagram No. 1.
When your inking is complete, you will clean off by erasing with India rubber all
pencil lines which were used for laying out for a correct draft. For shading you willrequire another saucer like the one for inking, for reducing or getting the required
8/10/2019 Making Horse Drawn Coaches 1800 Bw
http://slidepdf.com/reader/full/making-horse-drawn-coaches-1800-bw 34/455
26 COACH-MAKERS' ILLUSTRATED HAND-BOOK.
tints. With a small sable hair pencil reduce the ink with water to the shade you want.
This can be obtained by practicing on a separate piece of paper in spaces of the size of
panels of the body, also seat and top. All parts that stand in the foreground shouldbe light ; those that stand in the back, dark. The shading of this draft comes next in
art to the coloring of a draft, which, to a beginner, might seem discouraging, but he
will soon accomplish it by practice.
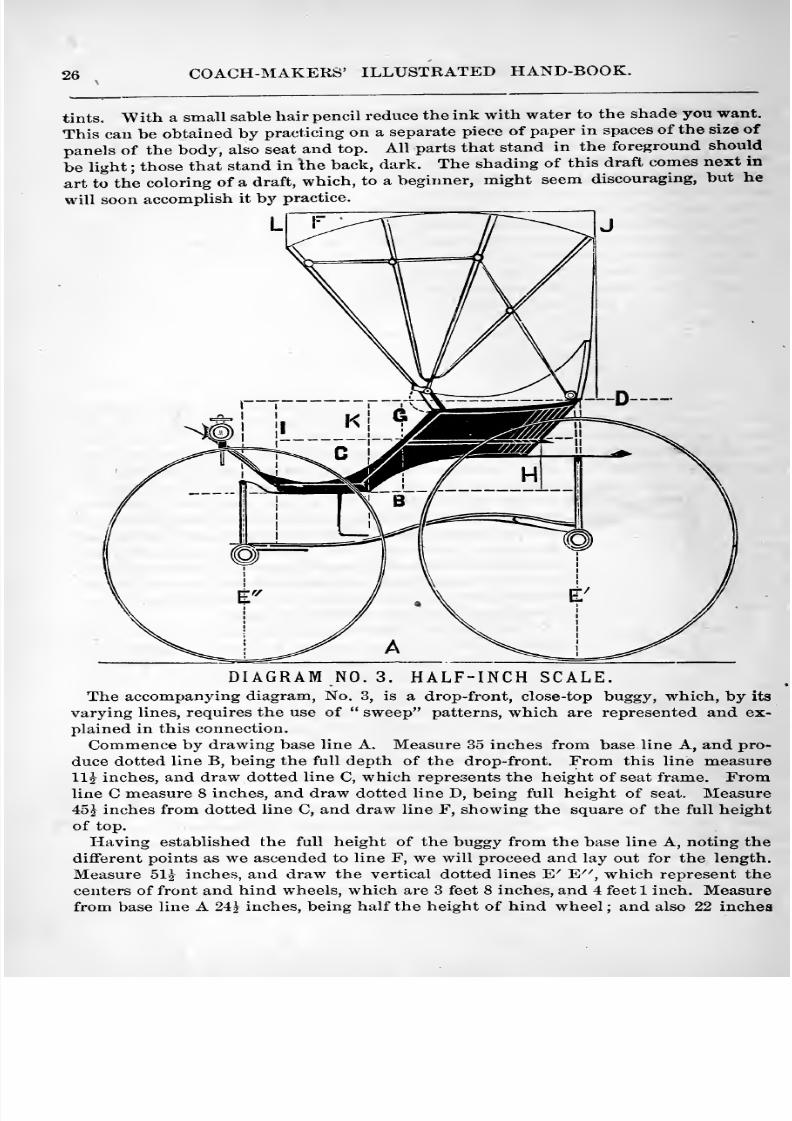
DIAGRAM NO. 3. HALF-INCH SCALE.The accompanying diagram, No. 3, is a drop-front, close-top buggy, which, by its
varying lines, requires the use of sweep patterns, which are represented and ex-
plained in this connection.
Commence by drawing base line A. Measure 35 inches from base line A, and pro-duce dotted line B, being the full depth of the drop-front. From this line measurellj inches, and draw dotted line C, which represents the height of seat frame. Fromline C measure 8 inches, and draw dotted line D, being full height of seat. Measure45^ inches from dotted line C, and draw line F, showing the square of the full height
of top.
Having established the full height of the buggy from the base line A, noting the
different points as we ascended to line F, we will proceed and lay out for the length.
Measure 51^ inches, and draw the vertical dotted lines E^ E^^, which represent the
centers of front and hind wheels, which are 3 feet 8 inches, and 4 feet 1 inch. Measurefrom base line A 24^ inches, being half the height of hind wheel ; and also 22 inches
8/10/2019 Making Horse Drawn Coaches 1800 Bw
http://slidepdf.com/reader/full/making-horse-drawn-coaches-1800-bw 35/455
SCALE DRAFTING. 27
from base line A, on line E^^ being half the height of front wheel. Now, with your
dividers carrying the pencil point, strike the wheels and afterward the hubs. (It
should be borne in mind that we are making a })encil sket(;h.)
We will now proceed, laying out for the height of pump-handle, the back bed arched
3 inches, Ij inches deep; springs, 11 inches over all; spring bar, Ij inches deep;
making in all 17 inches from the center of hind wheel to the bearing of pump-handleAt this point draw a horizontal line, which is the bottom of pump-handle.
Next, lay out for height of front spring bar. The front axle bed drops Ij inches, andis Ij inches deep. Fifth wheels, ^ inch each ; spring block, Ij inches ; springs, 11 inches
over all ; depth of front spring bar, Ij inches ; making in all 15 inches from center of
wheel to the bottom of body loop. Measure from vertical dotted line E^^ 4^ inches,
and draw vertical line I. This establishes the front bottom corner of body. From line
J measure 15 inches, and produce vertical dotted line K, which gives the front of thearch where it intersects baseline B. From dotted line I measure 20 inches, and drawvertical dotted line G, which, at its intersection of dotted line C, establishes a point
which is the front of seat.
Measure from line G 21 inches, and draw line H, which gives the depth of seat. This
is intended for a spring back. Lay off for the bevel of the seat and body, inclining
them as fancy may dictate.
On dotted horizontal line D, from its point of intersection with dotted vertical line
E^, measure off 3j inches ; and from this point erect the line J, and from line J pro-
duce line L, 47 inches distant, which gives the width of the top.
Having now completed the establishment of the main points, we will proceed to
apply the sweep patterns. But before we explain their use, let us remark that in
using irregular sweeps, it is the better plan to always use the round side of the pattern
as the pencil or pen follows it with more precision.
The carriage draftsman should make his own sweeps ; his first care being to select
suitable wood, as the evenness of the edge depends, in a great measure, on the close-
ness of the grain of the wood.
The patterns for body designing should be taken from pear-wood veneer, or tine
grain apple tree, the pear wood being preferable for its fine grain, and is not liable to
split. It is absolutely necessaryto
have a clean smooth edge on the sweep pattern,which cannot be obtained by the use of rosewood orany other coarse-grained veneers.
If the edge varies by being crossed with the grain, the trace of the pen will show animperfection which should be avoided.
This degree of nicety might not be apparent to the generality of persons, but should
you be required to dehneate for the engraver, whatever imperfections of lines were onthe blocks would be left, and the proof would plainly show the defects.
Irregular sweeps are also made of horn, which presents a true, firm edge, but the
body-designer should provide himself with veneers, and form his own sweeps, for
there are lines to be drawn which cannot be obtained in any other manner.
In finishing the sweep to suit the eye, use fine sand-paper, rounding the edge atrifie. Test the accuracy of the edge of the pattern on a separate piece of paper, andin no case apply it to the draft in hand until it is uniform throughout.
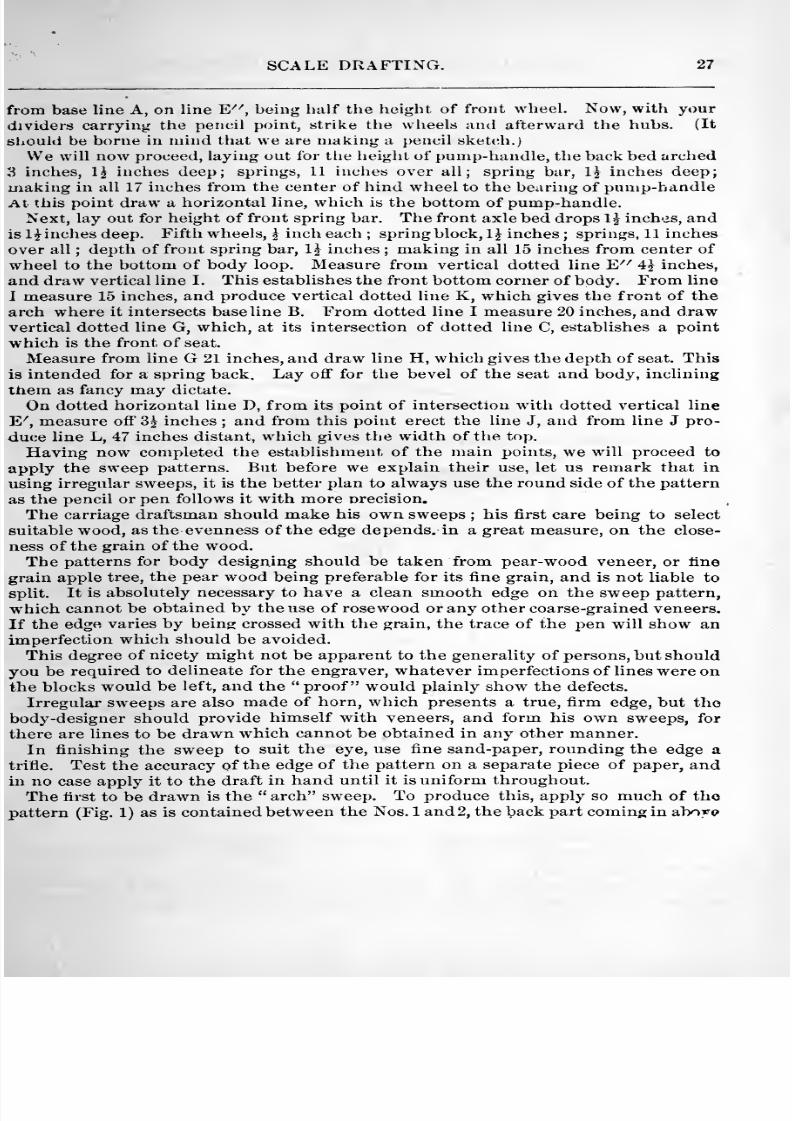
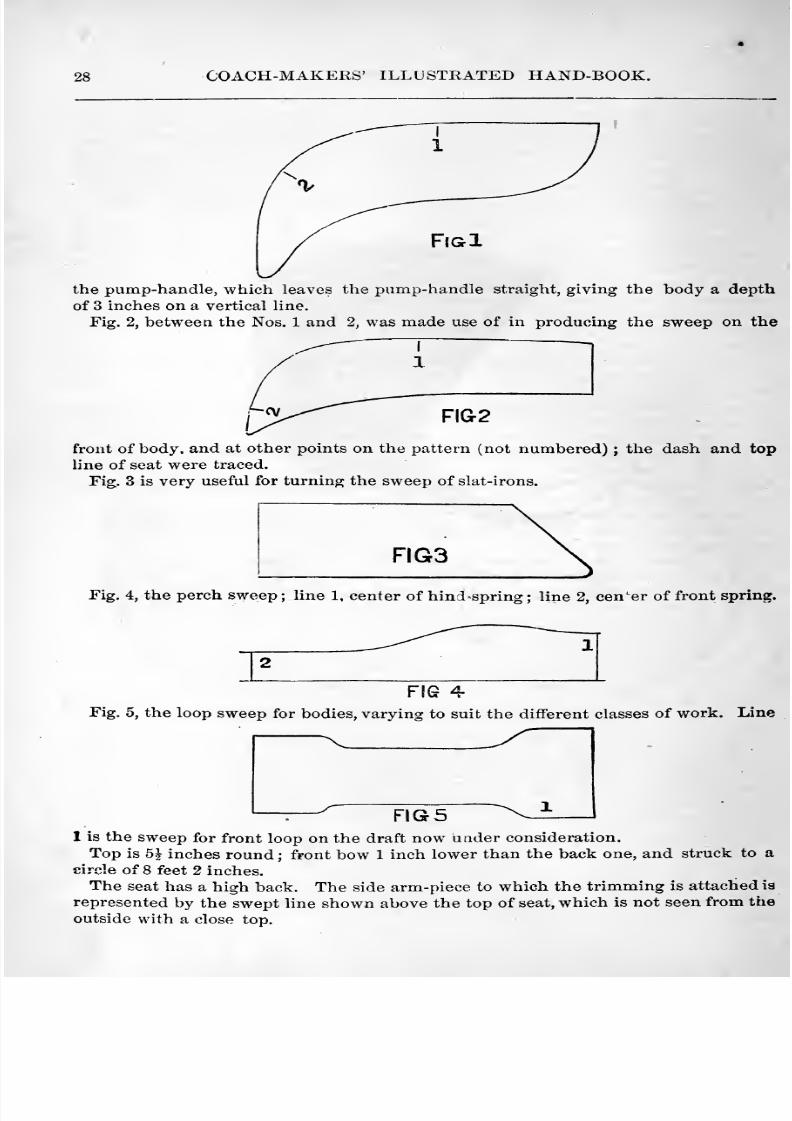
The first to be drawn is the arch sweep. To produce this, apply so much of tho
pattern (Fig. 1) as is contained between the Nos. 1 and2, the back part coming in aho^a
8/10/2019 Making Horse Drawn Coaches 1800 Bw
http://slidepdf.com/reader/full/making-horse-drawn-coaches-1800-bw 36/455
28 COACH-MAKERS' ILLUSTRATED HAND-BOOK.
the pump-handle, which leaves the pump-handle straight, giving the body a depth
of 3 inches on a vertical line.
Fig. 2, between the Nos. 1 and 2, was made use of in producing the sweep on the
front of body, and at other points on the pattern (not numbered) ; the dash and topline of seat were traced.
Fig. 3 is very useful for turning the sweep of slat-irons.
FIG3
Fig. 4, the perch sweep ; line 1, center of hind»spring ; line 2, center of front sprine.
FIG 4-
Fig. 5, the loop sweep for bodies, varving to suit the different classes of work. Line
—V^
yFIG5
1 is the sweep for front loop on the draft now uader consideration.
Top is 5^ inches round ; front bow 1 inch lower than the back one, and struck to a
circle of 8 feet 2 inches.
The seat has a high back. The side arm-piece to which the trimming is attached ia
represented by the swept line shown above the top of seat, which is not seen from the
outside with a close top.
8/10/2019 Making Horse Drawn Coaches 1800 Bw
http://slidepdf.com/reader/full/making-horse-drawn-coaches-1800-bw 37/455
SCALE DRAFTING. 2d
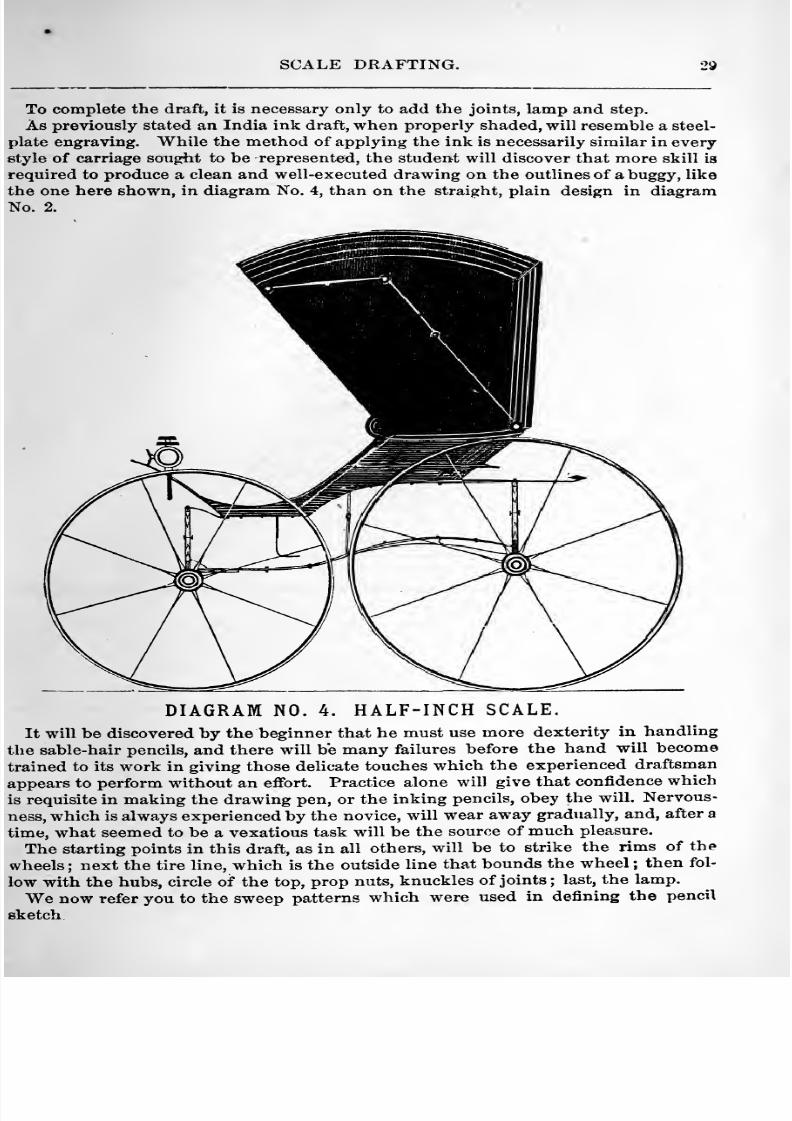
To complete the draft, it is necessary only to add the joints, lamp and step.
As previously stated an India ink draft, when properly shaded, will resemble a steel-
plate engraving. While the method of applying the ink is necessarily similar in every
style of carriage sought to be represented, the student will discover that more skill is
required to produce a clean and well-executed drawing on the outlines of a buggy, like
the one here shown, in diagram No. 4, than on the straight, plain design in diagramNo. 2.
DIAGRAM NO. 4. HALF-INCH SCALE.
It will be discovered by the beginner that he must use more dexterity in handling
the sable-hair pencils, and there will be many failures before the hand will becometrained to its work in giving those delicate touches which the experienced draftsman
appears to perform without an effort. Practice alone wil) give that confidence which
is requisite in making the drawing pen, or the inking pencils, obey the will. Nervous-
ness, which is always experienced by the novice, will wear away gradually, and, after a
time, what seemed to be a vexatious task will be the source of much pleasure.
The starting points in this draft, as in all others, will be to strike the rims of the
wheels ; next the tire line, which is the outside line that bounds the wheel ; then fol-
low with the hubs, circle of the top, prop nuts, knuckles of joints ; last, the lamp.
We now refer you to the sweep patterns which were used in defining the pencil
sketch
8/10/2019 Making Horse Drawn Coaches 1800 Bw
http://slidepdf.com/reader/full/making-horse-drawn-coaches-1800-bw 38/455
30 COACH-MAKERS' ILLUSTRATED HAND-BOOK.
The arch sweep. Fig. 1, may now be applied to the draft, using so much of it as is
contained between the figures 1 and 2, using the pen instead of the pencil, as in thefirst instance. The remaining patterns are to be applied in the same manner, theonly difference being to make sure work with the pen, for when ink becomes set in
the grain of the paper it cannot be erased. In drawings of this kind it is necessary,,
in some instances, to change your pattern and piece the line. Here is a nice opera-
tion to perform, for the contact of the lines, where joined together, must not be per-
ceptible. Practice alone, which gives a perfect control of the pen, will accomplish it.
Another point to which we would direct the attention is, that where lines intersect^
care should be taken to have them of the same size, also to avoid the defect of oneline overreaching the other. It is preferable to run on a line starting from the end
of the one already drawn, rather than to begin at a distant point on the pattern, andconclude the line at the intersecting point.
Having completed the inking of the lines laid down, erase all pencil marks, and thenproceed with the shading, as previously explained. The draft now under considera-
tion being a close-top buggy, it will require more skill to produce than the previous
one, which was a roll-up-top. The larger the surface over which a tint is to be laid,
the more difficult it will be found to lay on an even coating of ink, and graduate the
shades so as to represent the roundness and receding portions. The joints must bewhite. To do this, the paper will be left clear throughout their outline, the ink to be
worked up to the joints, forming them clean and sharp.Lighting and shading is governed by the following principles : When light falls upon
any object, it (the light) is reflected to a greater or less degree, according to the formof the object. A level surface would reflect light throughout its plane, with but a slight
modification. But a globe, cylinder, or a rounded surface, as the top or back corner of
this buggy, would appear lighter at the highest points ; and as the planes recede they
would gradually fall into shade. Any portion of a draft, then, which you wish to bring
forward, must be represented lighter than those parts which are retiring.
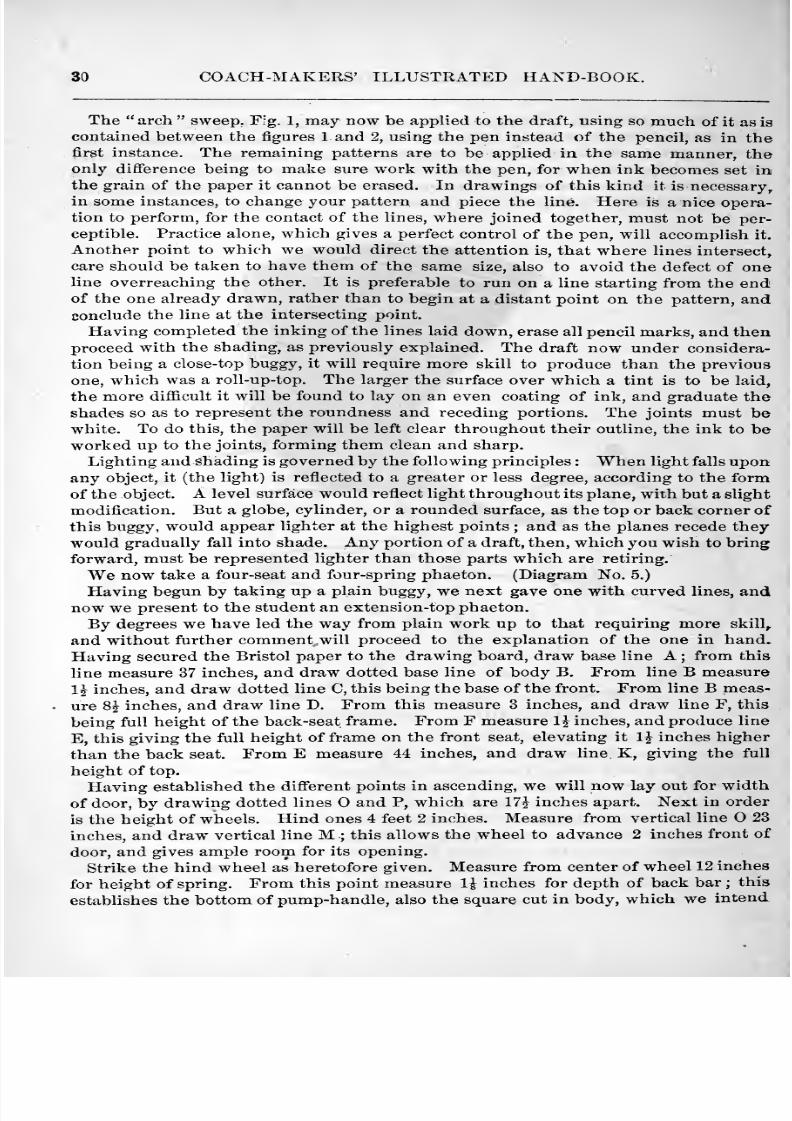
We now take a four-seat and four-spring phaeton. (Diagram No. 5.)
Having begun by taking up a plain buggy, we next gave one with curved lines, andnow we present to the student an extension-top phaeton.
By degrees we have led the way from plain work up to that requiring more skill,,
and without further comment will proceed to the explanation of the one in hand.
Having secured the Bristol paper to the drawing board, draw base line A ; from this
line measure 37 inches, and draw dotted base line of body B. From line B measure
1^ inches, and draw dotted line C, this being the base of the front. From line B meas-
ure 8^ inches, and draw line D. From this measure 3 inches, and draw line F, this
being full height of the back-seat frame. From F measure 1 J inches, and produce line
E, this giving the full height of frame on the front seat, elevating it IJ inches higher
than the back seat. From E measure 44 inches, and draw line K, giving the full
height of top.
Having established the different points in ascending, we will now lay out for width
of door, by drawing dotted lines O and P, which are 17J inches apart. Next in order
is the height of wheels. Hind ones 4 feet 2 inches. Measure from vertical line 23
inches, and draw vertical line M ; this allows the wheel to advance 2 inches front of
door, and gives ample room for its opening.
Strike the hind wheel as heretofore given. Measure from center of wheel 12 inches
for height of spring. From this point measure li inches for depth of back bar ; this
establishes the bottom of pump-handle, also the square cut in body, which we intend
8/10/2019 Making Horse Drawn Coaches 1800 Bw
http://slidepdf.com/reader/full/making-horse-drawn-coaches-1800-bw 39/455
SCALE DRAWING. 31
O
o
I
oCOo
W
to make harmonize with the carriage and body. Next we establish height of front
wheel, which is 3 feet 6 inches, and allows 4 inches clear on the line D when turnedunder the body. In fixing vertical line N, it depends on the width of track; this
principle is fully illustrated in the French rule, that is, the space required for thewheel to turn was regulated by width of track. Having established vertical line N,
strike the wheel. From center of wheel measure 12 inches, which gives the height
of spring, also bottom plate, bottom bed, fifth wheels, top bed, which is curved, throw-ing the king bolt 8 inches in advance of center, leaving room for a turned collar for
the body to rest upon.
Next lay out for the width of seats, the back one being 18 inches on seat frame, the
bevels to be laid ofi* according to the style in vogue. From the extreme point of backseat measure three inches, and draw vertical lineL; this line showing the flare of
the back of top. Lay out for the shifting rail, and draw vertical line H. From this
measure off 21^ inches, and draw vertical line I ; this giving the width of the two
8/10/2019 Making Horse Drawn Coaches 1800 Bw
http://slidepdf.com/reader/full/making-horse-drawn-coaches-1800-bw 40/455
32 COACH-MAKERS' ILLUSTRATED HAND-BOOK.
center bows. From front of front seat measure 6 inches, and draw vertical line J;
also, from same point, measure 22inches, and establish the dash line. Having now
noted all the points from base line upward, and from vertical line N to the dash line,
we will apply the sweep patterns, where the square and protractor have not been used.
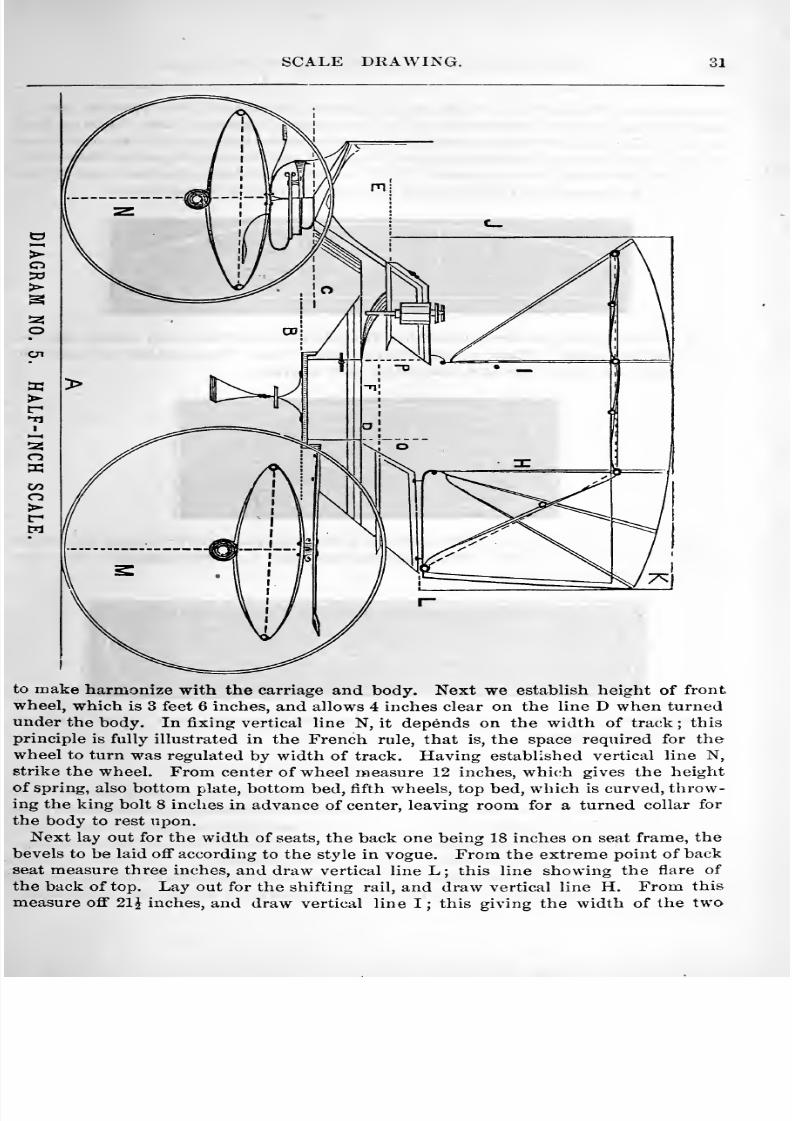
We will now apply «weep pattern (Fig. 6) to the top H, being the back part; it has
the back, center and front bows laid on it, the top having 4^ inches round.
Fig. 7 IS the spring pattern, dotted line No. 1 showing the horizontal center, and No2 the vertical center. These we draw in quarter sections. This pattern will suit for
the majority of elliptic springsf, where side view is given.
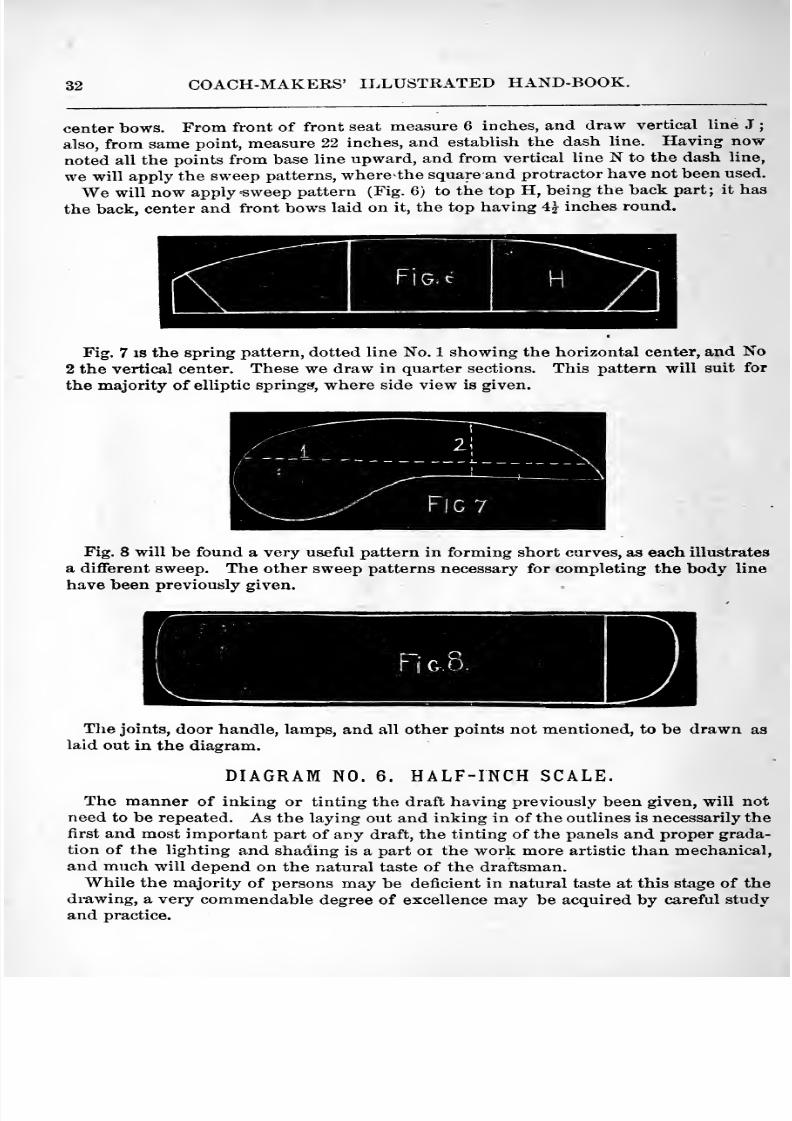
Fig. 8 will be found a very useful pattern in forming short curves, as each illustrates
a different sweep. The other sweep patterns necessary for completing the body line
have been previously given.
The joints, door handle, lamps, and all other points not mentioned, to be drawn as
laid out in the diagram.
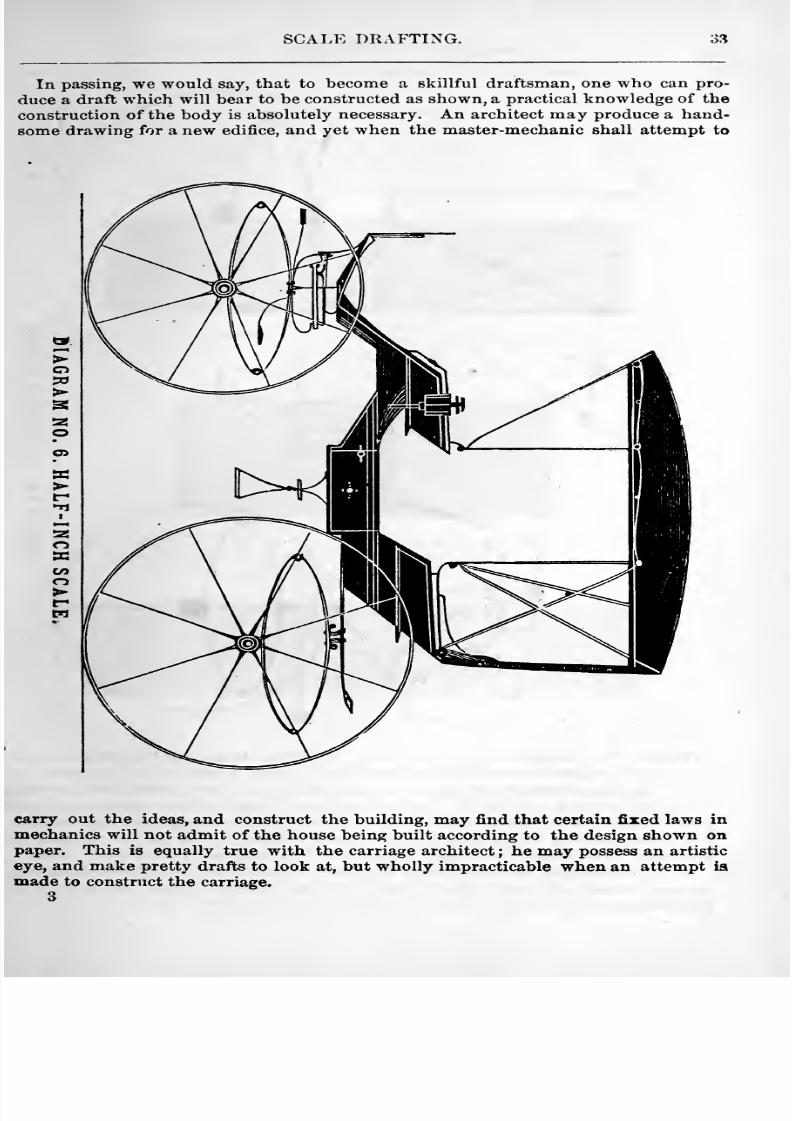
DIAGRAM NO. 6. HALF-INCH SCALE.
The manner of inking or tinting the draft having previously been given, will not
need to be repeated. As the laying out and inking in of the outlines is necessarily the
first and most important part of any draft, the tinting of the panels and proper grada-
tion of the lighting and shading is a part oi the work more artistic than mechanical,
and much will depend on the natural taste of the draftsman.
While the majority of persons may be deficient in natural taste at this stage of the
drawing, a very commendable degree of excellence may be acquired by careful studyand practice.
8/10/2019 Making Horse Drawn Coaches 1800 Bw
http://slidepdf.com/reader/full/making-horse-drawn-coaches-1800-bw 41/455
SCALE DRAFTING. 33
In passing, we would say, that to become a skillful draftsman, one who can pro-
duce a draft which will bear to be constructed as shown, a practical knowledge of the
construction of the body is absolutely necessary. An architect may produce a hand-some drawing for a new edifice, and yet when the master-mechanic shall attempt to
carry out the ideas, and construct the building, may find that certain fixed laws in
mechanics will not admit of the house being built according to the design shown onpaper. This is equally true with the carriage architect ; he may possess an artistic
eye, and make pretty drafts to look at, but wholly impracticable when an attempt ia
made to construct the carriage.
3
8/10/2019 Making Horse Drawn Coaches 1800 Bw
http://slidepdf.com/reader/full/making-horse-drawn-coaches-1800-bw 42/455
34 COACH-MAKERS' ILLUSTRATED HAND-BOOK.
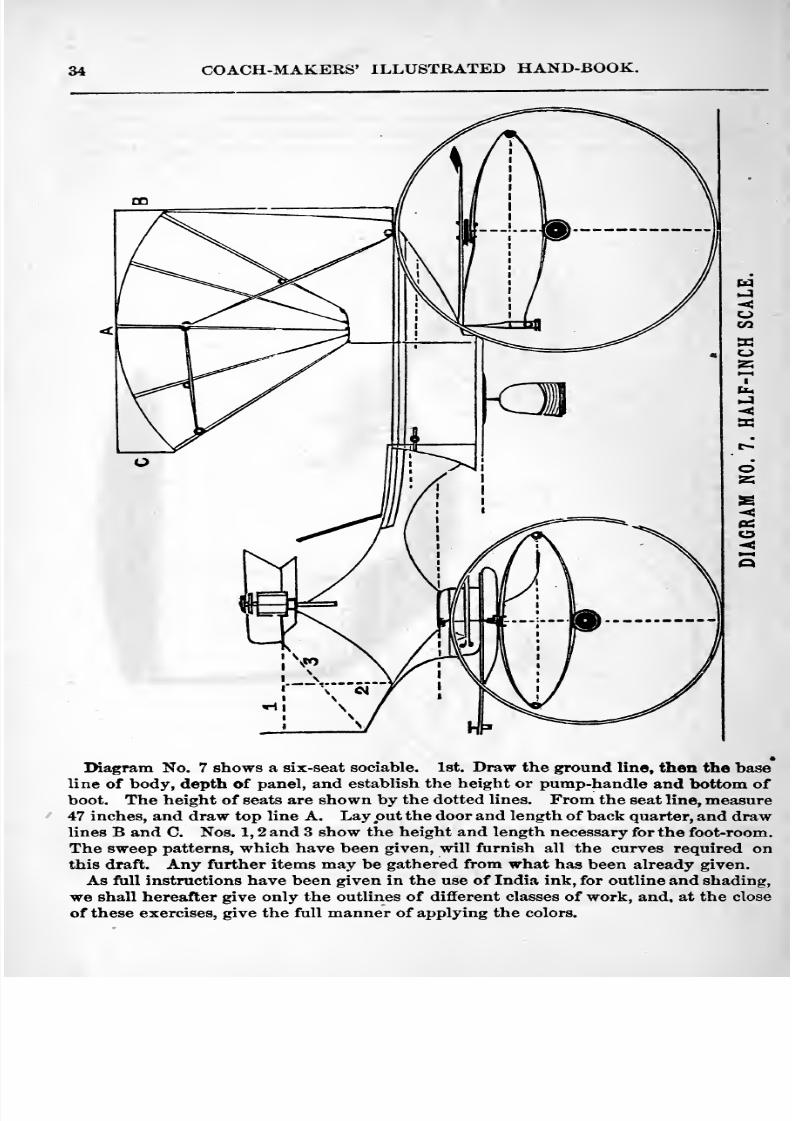
IMagram No. 7 shows a six-seat sociable. 1st. Draw the ground line, then the baseline of body, depth of panel, and establish the height or pump-handle and bottom of
boot. The height of seats are shown by the dotted lines. From the seat line, measure47 inches, and draw top line A. Lay put the door and length of back quarter, and drawlines B and C. Nos. 1, 2 and 3 show the height and length necessary for the foot-room.
The sweep patterns, which have been given, will furnish all the curves required onthis draft. Any further items may be gathered from what has been already given.
As full instructions have been given in the use of India ink, for outline and shading,
we shall hereafter give only the outlines of different classes of work, and, at the closeof these exercises, give the full manner of applying the colors.
8/10/2019 Making Horse Drawn Coaches 1800 Bw
http://slidepdf.com/reader/full/making-horse-drawn-coaches-1800-bw 43/455
SCALE DRAFTING. 35
It is a good plan for the body-builder to make a draft to the scale of everybody pos-
sessiDg anything novel, preserving them for future reference. The habit once formed,
the task will be a light and pleasant one. The time thus spent will bring its reward,
if not in dollars, direct, it will come indirectly through the superior skill and fertility
of imagination gained by continued practice, which will not fail to show itself on your
*)wn work, and be appreciated by the employer.
o00
I
n
8/10/2019 Making Horse Drawn Coaches 1800 Bw
http://slidepdf.com/reader/full/making-horse-drawn-coaches-1800-bw 44/455
36 COACH-MAKERS' ILLUSTRATED HAND-BOOK.
In the three concluding diagrams we give the method we employ in the drafting,
ground coloring and finishing a colored draft. We will aim to make ourselves under-
stood in this the concluding and most interesting part of our instructions, and trust
that they who have followed us thus far will, at the close of these instructions, feel
that they have been amply repaid.
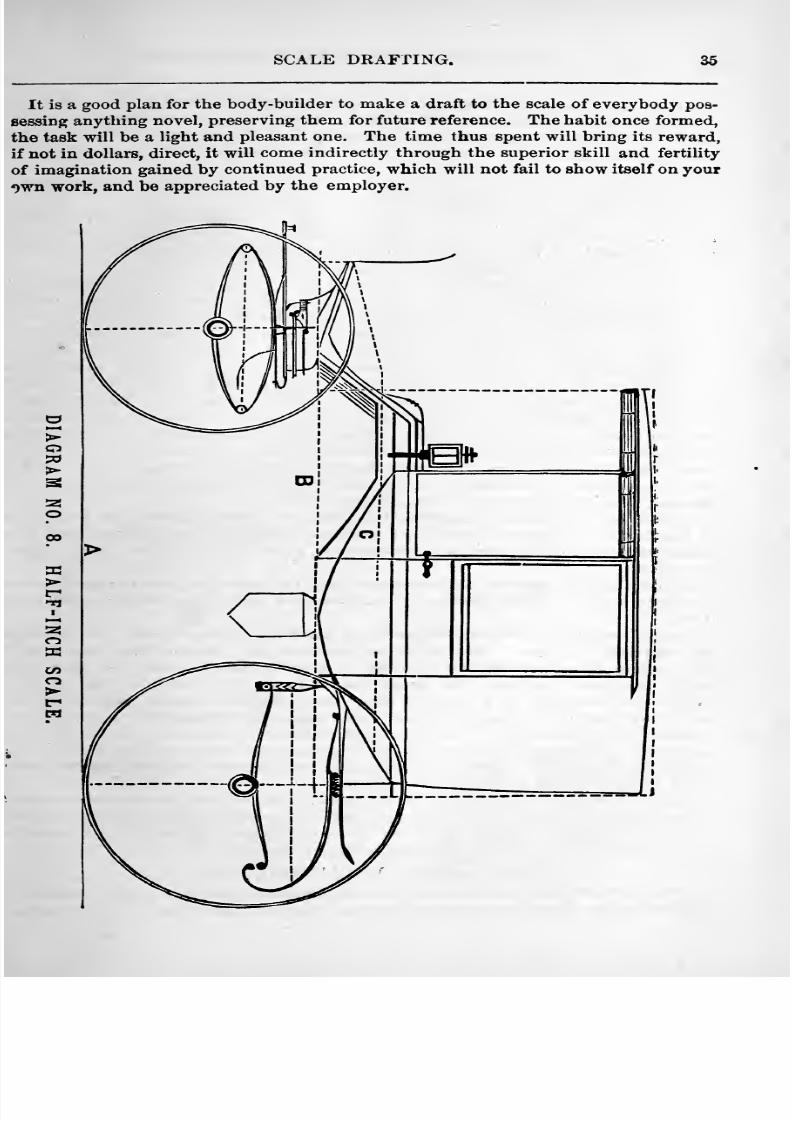
This being the first standing-top introduced in this connection, we herewith present
a six-seat rockaway, with sharp lines.
The body, to appear graceful, and reduce the rocker to an attractive size, the lines
should be carried out front and back on full quarters. In shop parlance, we would say,
that the sharp lines, in connection with the coupe pillar, give too much belly, and there-
fore does not produce the most pleasing exterior.
In laying out for this draft first draw base line A; then take in your dividers 36 in-
ches, and from the base line produce dotted line B. Next, draw dotted line C, which
is the height of seats, being 11 inches from dotted Une B. This brings the seats on a
line, the front seat forming the top panel of the arch. We secure, by this mode of
construction, a lighter appearance on side elevation, for when the front seat is raised
above the back one, the head room required above the front seat gives more than is
needed on the inside, producing a deep side elevation. And, further, the seat line Cstands 47 inches from base line A, allowing for a 42-inch front wheel, the hind wheel
being 50 inches. The hind spring is clipped on top of axle, is 12 inches open ; the depth
of spring and back bar added to this will establish the line of bottom of pump-handle.The front spring should be clipped underneath the axle ; the spring to be made 34 in-
shes long, with 9-inch open. We make the front spring shorter to gain more stiffness,
for it is necessary to calculate closely for the front platform carriage in the limited space
allowed, where the front seat is low, as in this draft.
To establish the height of side elevation, measure 3 feet 8^ inches from dotted line
C, front seat, deducting the swell of the roof from this, and draw the top dotted line.
Make the width of door 23 inches ; back quarter, at roof rail, 25 inches ; front quarter,
17 inches.
Both of the front seats should be made wide, as thetrimmings
are attachedto
a ver-tical back, which requires more seat room in order to add to the comfort of the occu-
pants.
Having established the different points on the body, we next draw the horizontal
and perpendicular lines. For this purpose we make use of the movable half of the T-
head square, set so as to elevate the body one inch higher in front, the same bevel
giving the proper direction of the perpendicular lines. The reason for this is that the
draft, when completed, will appear to hang level, whereas, were the lines drawn per-
fectly horizontal and vertical, the body would appear to drop in front, a fault too fre-
quently to be observed on drafts by professionals, who might improve in this
particular. The swept lines are produced from patterns formed to suit the curves; the
end of each line to be marked on the pattern as a guide in reproducing the pencil
lines, which in coloring are nearly obliterated.
We will also direct attention to the fact that no ink is to be used in preparing for acolored draft ; the horizontal and perpendicular lines are carried beyond the outlines
of the body, thus giving the true direction when the coloring has so far proceeded asto require that they should be added to complete the draft.
DIAGRAM NO. 9. HALF-INCH SCALE.
The draft given on next page is that of a Clarence coach, and as the manner oflaying out has been fully explained, we omit it here, as the principles are the same.
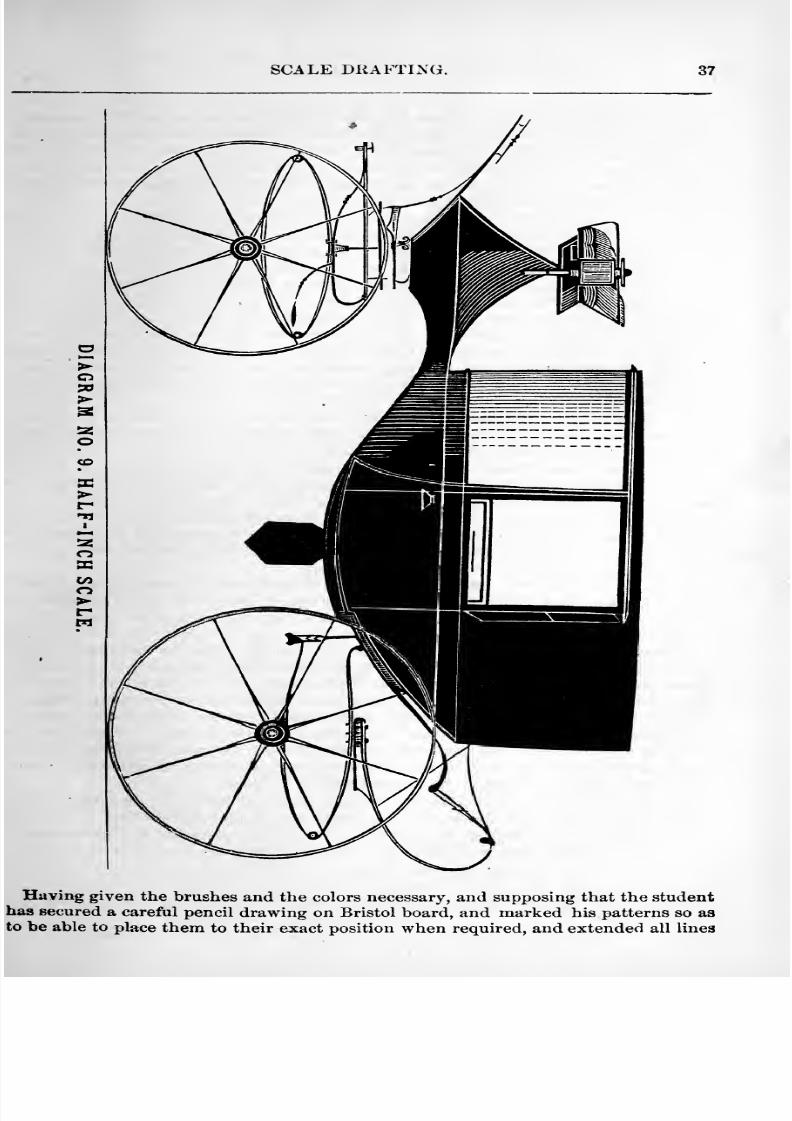
8/10/2019 Making Horse Drawn Coaches 1800 Bw
http://slidepdf.com/reader/full/making-horse-drawn-coaches-1800-bw 45/455
SCALE DRAFTING. 37
Haying given the brushes and the colors necessary, and supposing that the studenthas secured a careful pencil drawing on Bristol board, and marked his patterns so asto be able to place them to their exact position when required, and extended all lines
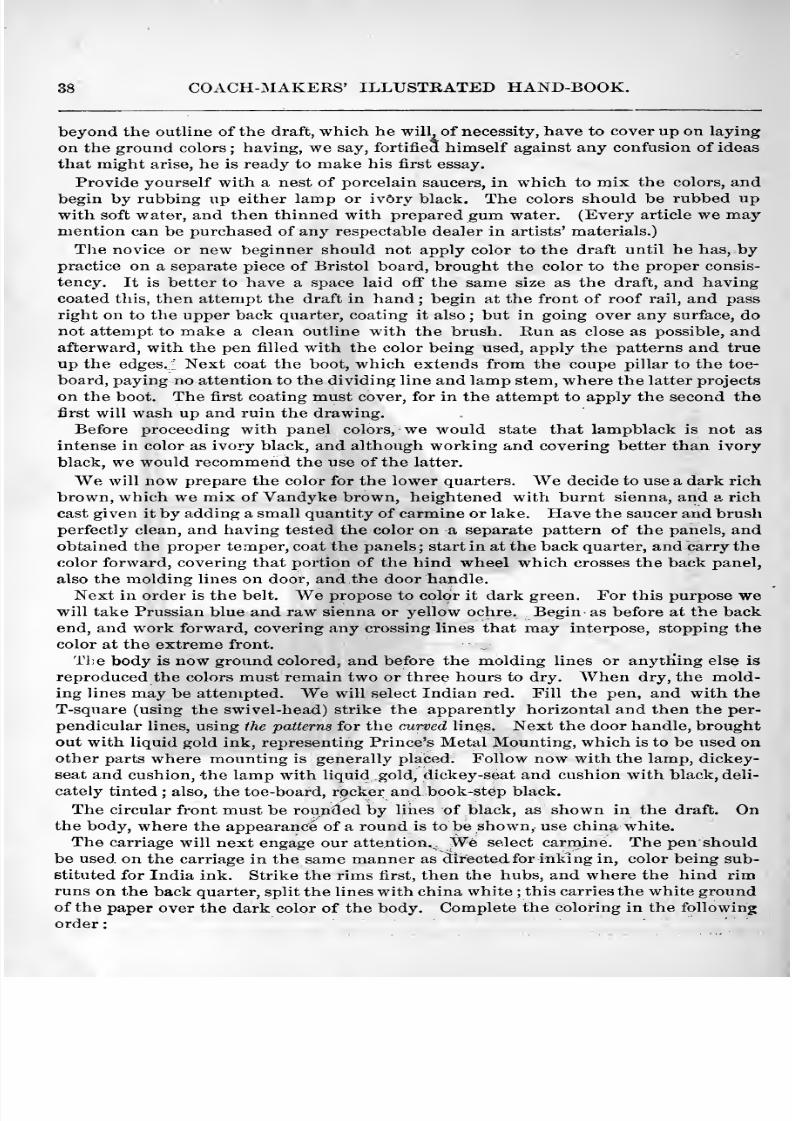
8/10/2019 Making Horse Drawn Coaches 1800 Bw
http://slidepdf.com/reader/full/making-horse-drawn-coaches-1800-bw 46/455
38 COACH-MAKERS' ILLUSTRATED HAND-BOOK.
beyond the outline of the draft, which he will, of necessity, have to cover up on laying
on the ground colors ; having, we say, fortified himself against any confusion of ideasthat might arise, he is ready to make his first essay.
Provide yourself with a nest of porcelain saucers, in which to mix the colors, andbegin by rubbing up either lamp or ivOry black. The colors should be rubbed upwith soft water, and then thinned with prepared gum water. (Every article we maymention can be purchased of any respectable dealer in artists' materials.)
The novice or new beginner should not apply color to the draft until he has, bypractice on a separate piece of Bristol board, brought the color to the proper consis-
tency. It is better to have a space laid off the same size as the draft, and having
coated this, then attempt the draft in hand ; begin at the front of roof rail, and passright on to the upper back quarter, coating it also ; but in going over any surface, donot attempt to make a clean outline with the brush. Run as close as possible, andafterward, with the pen filled with the color being used, apply the patterns and true
up the edges. : Next coat the boot, which extends from the coupe pillar to the toe-
board, paying no attention to the dividing line and lamp stem, where the latter projects
on the boot. The first coating must cover, for in the attempt to apply the second the
first will wash up and ruin the drawing.
Before proceeding with panel colors, we would state that lampblack is not as
intense in color as ivory black, and although working and covering better than ivoryblack, we would recommend the use of the latter.
We will now prepare the color for the lower quarters. We decide to use a dark rich
brown, which we mix of Vandyke brown, heightened with burnt sienna, and a rich
cast given it by adding a small quantity of carmine or lake. Have the saucer and brushperfectly clean, and having tested the color on a separate pattern of the panels, andobtained the proper temper, coat the panels ; start in at the back quarter, and carry the
color forward, covering that portion of the hind wheel which crosses the back panel,
also the molding lines on door, and the door handle.
Next in order is the belt. We propose to color it dark green. For this purpose wewill take Prussian blue and raw sienna or yellow ochre. Begin as before at the backend, and work forward, covering any crossing lines that may interpose, stopping the
color at the extreme front.
Tl;e body is now ground colored, and before the molding lines or anytKing else is
reproduced the colors must remain two or three hours to dry. When dry, the mold-ing lines may be attempted. We will select Indian red. Fill the pen, and with the
T-square (using the swivel-head) strike the apparently horizontal and then the per-
pendicular lines, using the patterns for the curved lines. Next the door handle, brought
out withliquid
gold ink, representing Prince's Metal Mounting, whichis to
be used onother parts where mounting is generally placed. Follow now with the lamp, dickey-
seat and cushion, the lamp with liquid gold, dickey-seat and cushion with black, deli-
cately tinted ; also, the toe-board, rocker and book-step black.
The circular front must be rounded by lines of black, as shown in the draft. Onthe body, where the appearance of a round is to be shown, use china white.
The carriage will next engage our attention. We select carmine. The pen should
be used on the carriage in the same manner as directed for inking in, color being sub-
stituted for India ink. Strike the rims first, then the hubs, and where the hind rimruns on the
backquarter, split
thelines
withchina white ; this carries the white ground
of the paper over the dark color of the body. Complete the coloring in the following
order:
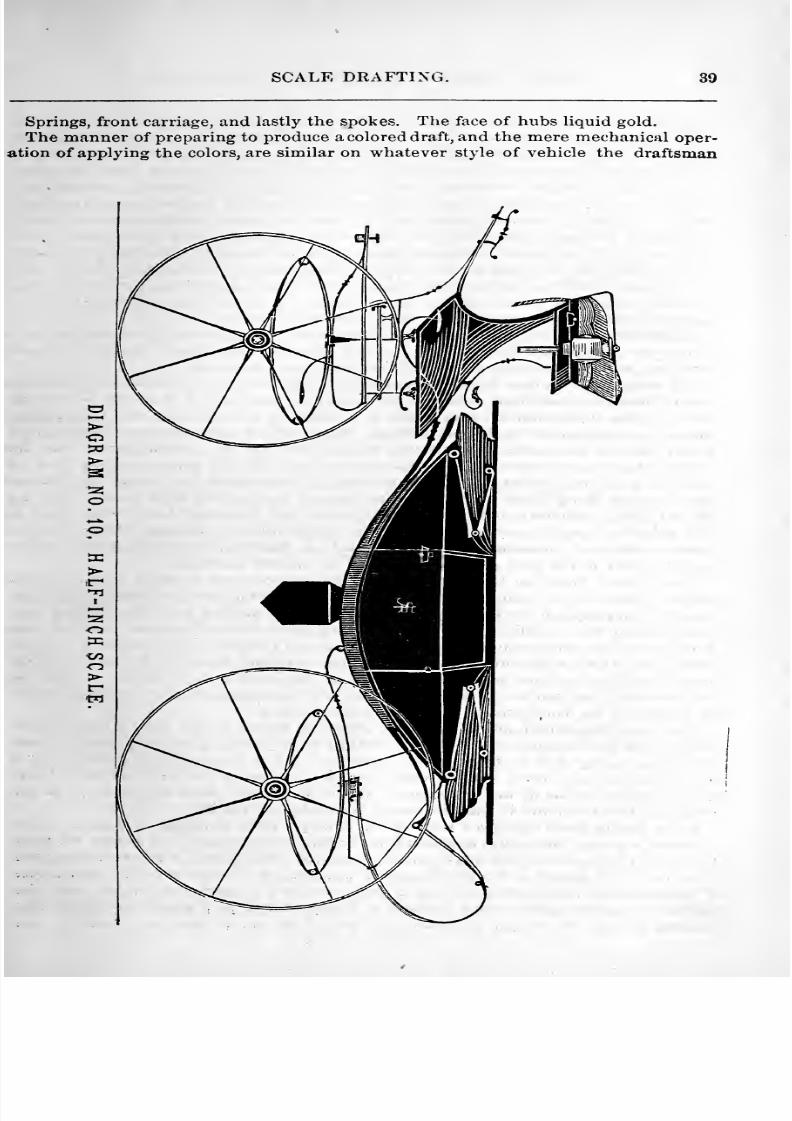
8/10/2019 Making Horse Drawn Coaches 1800 Bw
http://slidepdf.com/reader/full/making-horse-drawn-coaches-1800-bw 47/455
SCALE DRAFTING.
Springs, front carriage, and lastly the spokes. The foce of hubs liquid gold.
The manner of preparing to produce a colored draft, and the mere mechanical oper-ation of applying the colors, are similar on whatever style of vehicle the draftsman
8/10/2019 Making Horse Drawn Coaches 1800 Bw
http://slidepdf.com/reader/full/making-horse-drawn-coaches-1800-bw 48/455
40 COACH-MAKERS' ILLUSTRATED HAND-BOOK.
chooses to produce. But a variety of touch, and that delicate handling of the colors
employed, which at once stamps a colored draft as first-class in every particular, de-
pends not a little on artistic taste. On a standing-top coach, the colors require to belaid on evenly, and with clean edges, and as the greater part of the draft represents
wooden panels, there is no effect to be given other than to show solid, unchangeablesurface. A tassel or a festoon may be added, which would require some little know-ledge of shading, so as to represent properly the folds made by the cord, which serves
to loop the festoon up, or of the particular form of a tassel. But in the cut here shown(Diagram No. 10); with the top thrown down, it will be required of the student to repre-
sent a leather top, and that in the wrinkled appearance it has when lying down. Thisis a Landau, with the improved Saulsbury Boot. Having secured a correct draft withthe lead pencil, and further prepared for coloring, as previously laid down, you will
begin by addressing yourself to the representation of the top.
First strike the small circles, which represent the top props and the knuckles, withIndia ink or lampblack, and then ink or color in the joints ; these are colored
black, as are also the head pieces and the outlines of the bows.
We would here caution the student against carelessness in the matter of obtaining acorrect outline of anything which he may essay to draw, and it is of the first impor-tance, in the representation of an object in a folded or written form, that each portion
should be represented by distinct outlines, which will at once present to the eye ofa beholder the true form, the tinting to be governed by the outlines, or at least the
tinting should not confuse or obliterate the outlines. In the representation, then, ofthis top, a distinct outline is first to be secured, and afterward the tinting is introduced
with the pen, using India ink ; or shading, using a fine-pointed sable pencil. The top
having been completed, outline the dickey-stick, fall, lamp and boot, using black, as
this gives the correct coloring of that portion of the finished carriage. When the out-
lines are finished, commence shading the cushion, then tinge in the seat skirt, whichmay be black at the back part and lightened off toward the front.
Next follow down on to the boot, laying on an even coat of black over its wholesurface; also the toe-board. When the black is dry, bring out the division line, mold-ings and appearance of the round, with china-white, applied with the drafting pen.
The dividing line on side of boot and moulding lines should be drawn heavier thanthose which are employed to give the appearance of a round. The moulding lines onboot to be drawn with white are the inner lines running from top of boot to the toe-
board, and the front and bottom inner lines on the lower part of the boot. Now set
the pen finer, and put in the fine lines, which give the appearance of the upper round-
ed portion of the boot, using a pattern to guide the pen.
The front loop should next engage the attention, which is also put on with china-
white ; that is, so much of it as crosses over the boot, including the step, and so muchof the loop under it as is shown on this drawing. We will mention, in passing, that it
18 the better plan to use a color throughout every portion of the draft, where it is re-
quired, before taking up any other color ; therefore, all iron work connected with the
body and rocker should be painted before laying by the black.
Black having been dispensed with, the next step will be to decide on a panel color.
Carmine is a very rich color, and would be brilliant and showy ; but before we fully
decide to employ it on this heavy, stately carriage, let us stop a moment and inquire
whether it will accord well with its general appearance. Colors give the appearance
of lightness and heaviness, according as they are light or dark ; and as we wish theLandau to appear rather heavy because it is large, taken as a whole, we decide that
carmine or any other light brilliant color would be out of keeping. Further, the

8/10/2019 Making Horse Drawn Coaches 1800 Bw
http://slidepdf.com/reader/full/making-horse-drawn-coaches-1800-bw 49/455
SCALE DRAFTING. 41
trimmings should agree with the color used on the panels, and if carmine is suitable
for the panels, it, or something approaching to it in color, is suitable for the trimming
thus carried out practically, we should have a bloody or a fiery -looking piece of work,
ofi*ensive to persons of good taste.
Having set aside carmine, we will take quite a difierent color, one among several
which may be employed, namely, plum color. This color is produced by the use of
LAKE and BLACK ; we select purple lake, and by saddening it with black, produce the
required shade of plum color. It is to be applied to the panels of the body, and laid
on in the manner heretofore given. When dry, proceed with the mouldings, using for
the purpose, in this case, French blue.
The carriage part comes next. We will take for this draft a color a shade or twolighter than the panels, produced by a less proportion of black being add^d to purple
lake.
Next in order is the representation of gold mounting. The parts to be so brought out
are the lamp, dickey-seat handle, toe-board handle, door handle, face of hubs, and lastly
the top prop nuts and the joints. The top nuts to be gilt in the center, leaving a black
surrounding edge, and the joints to have a gold line through the center.
All that now remains to give a complete finish is to add an ornament or monogram.We propose to use a monogram as design on panel, and will employ French blue, light-
ened very delicately, if you please, with gold.
We have given illustrations of the principal drawing instruments and patterns, andten were drafts, ranging from a buggy, through different styles of carriages, conclud-
ing with a Landau. The drawings and explanations have been attended with manyhours of severe mechanical and mental labor, and we now feel a sense of relief as we penthe concluding sentences. From the careless and indifierent we do not expect to receive
any thanks, but wherever there is an earnest wood-worker, desirous of improving him-self in this particular, we feel assured that we shall receive our reward at his hands.
8/10/2019 Making Horse Drawn Coaches 1800 Bw
http://slidepdf.com/reader/full/making-horse-drawn-coaches-1800-bw 50/455
42 COACH-MAKERS' ILLUSTRATED HAND-BOOK.
French or Square Rule.
THE object is to impart that practical knowledge of the square rule and the generalsystem of drafting which is daily required in the workshop. This rule, as pre-
sented in the following pages, was selected as most important to the body-maker,being based on comprehensible principles, and becoming more and more necessary to
be well understood.
By this rule we obtain the points by which we draw the correct side-sweep for thediflferent pieces of the frame work, when the turn-under and side-swell is given bythe operation of right lines drawn over the side elevation and cant of body, illustrated
by diagrams in the drawing of a plain coach body. First. The design of the bady or
side elevation, with the ground plan for laying out the front carriage part, the height
of wheels and turning under of same, establishing the arch or wheel house of the body.Second. The manner of making the patterns for the body.
Third. The application of the square rule with the manner of construction fully
shown in the diagrams.
DIAGRAM NO. 1
Illustrates the drafting of a coach, the laying out of the carriage part, the height of
wheels and turning under of same.
You may now proceed to draw the ground line C. Measure 34 inches from ground
line C, that being the height we wish to hang this coach, and draw the base line ofbody A ; measure 3 inches from line A and draw line K, being the depth of rocker.
From line K measure 12 inches, being the height of your seat, dotted lines. From this
point measure 42 inches ; draw the line E, being the height of body. Lay off for the
width of the door, which is 22J inches; draw lines B and H. Measure from line B 26Jinches, and draw line F, being the width of back quarter. From line H draw line N;measure 24 inches, this being the width of front quarter. Now you can sweep the
body (with miniature patterns, scale drawing), and lay off for the guide rail of the door.
Measure 26 inches from the hinge pillar, and draw perpendicular line —this point be-
ing the center of the hind wheel, which is 4 feet 2 inches. You will strike thewheel this size. Next proceed to lay out for the spring, which is 2 inches, 5 plates 42
inches long, 12J inches opening ; this spring is clipped underneath the axle, which is
1^ inches; measure from underneath the axle 12J inches, being the opening of the
spring. Measure 11 inches for the five plates, being the depth of the top part of the
spring, 1| inches for the depth of the back bar, J inch for the brake or pump-handleplate. This point is the bottom of the brake ; sweep the brake as represented in the
diagram.
Now proceed to lay off for the front carriage, to ascertain the height of boot; the
width of track being 5 feet, spring 2 inches, 5 plates 40 inches long, opening 14 inches,
allowing IJ inches for the settling from the weight of the body. For the establish-
ment of the point where we want the wheel to stand, when turned square under the
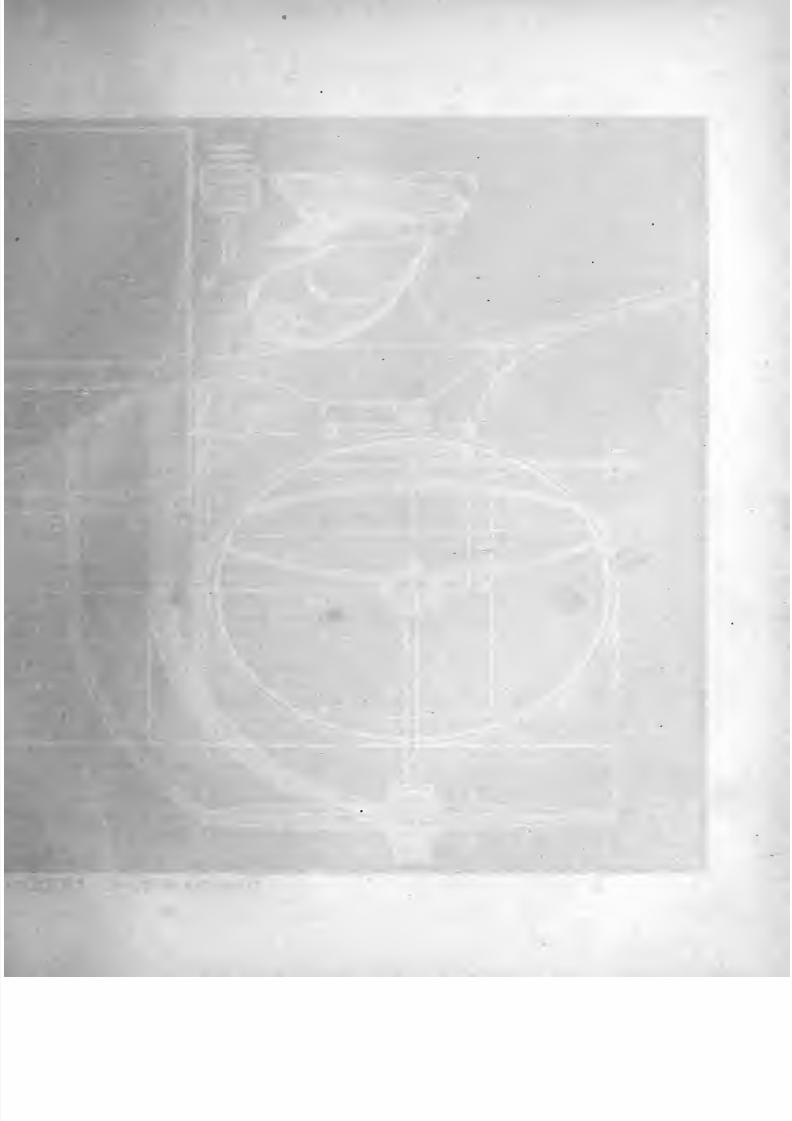
8/10/2019 Making Horse Drawn Coaches 1800 Bw
http://slidepdf.com/reader/full/making-horse-drawn-coaches-1800-bw 51/455
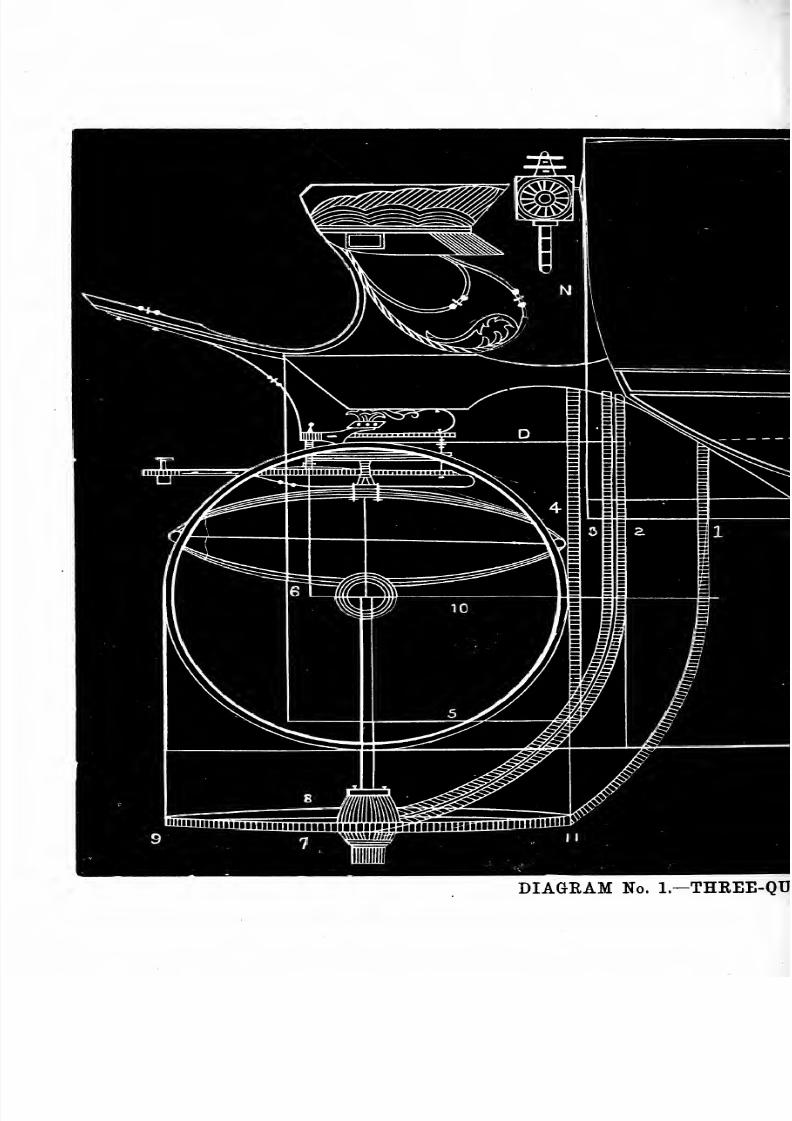
8/10/2019 Making Horse Drawn Coaches 1800 Bw
http://slidepdf.com/reader/full/making-horse-drawn-coaches-1800-bw 52/455
DIAGRAM No. l.-THREE-QU
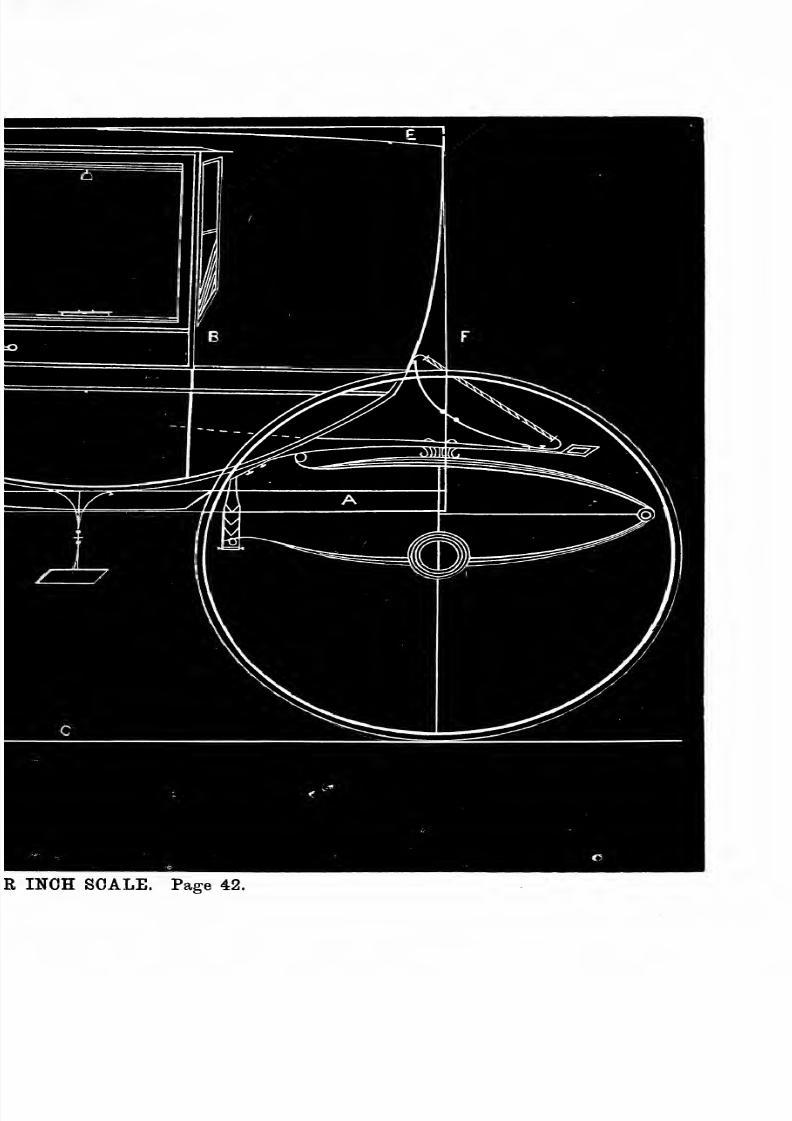
8/10/2019 Making Horse Drawn Coaches 1800 Bw
http://slidepdf.com/reader/full/making-horse-drawn-coaches-1800-bw 53/455
R INCH SCALE. Page 42.
8/10/2019 Making Horse Drawn Coaches 1800 Bw
http://slidepdf.com/reader/full/making-horse-drawn-coaches-1800-bw 54/455
I
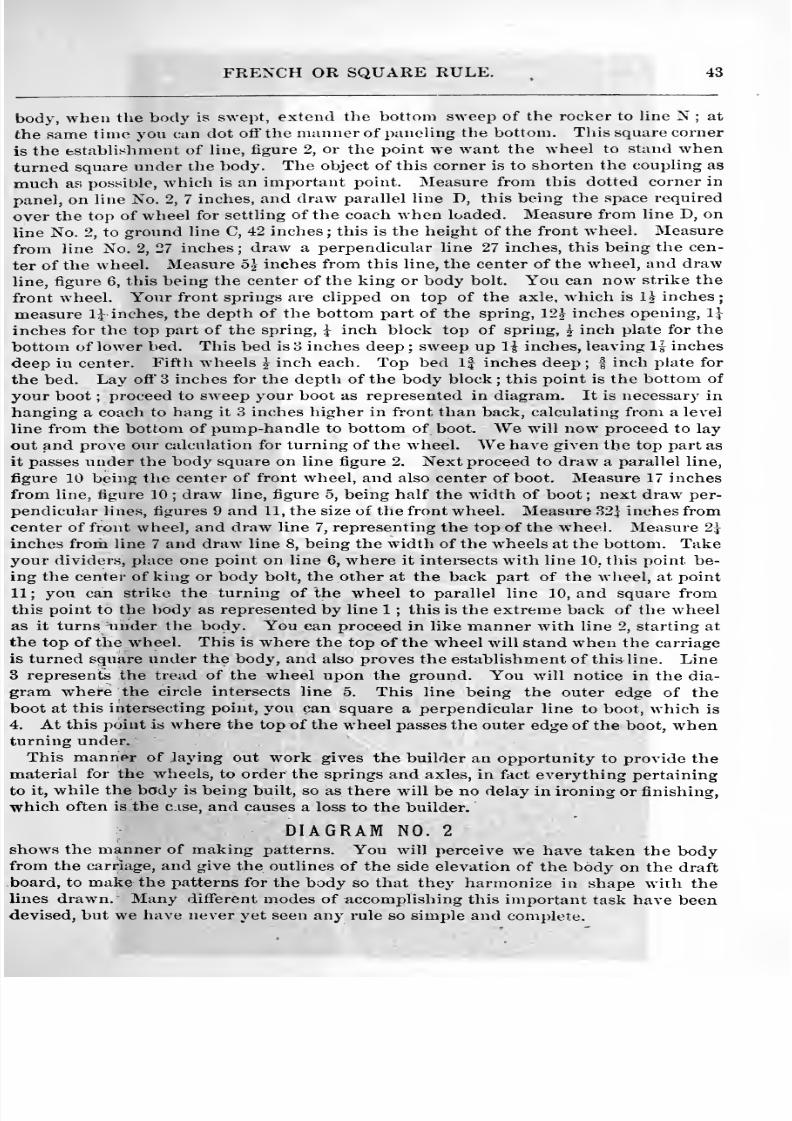
8/10/2019 Making Horse Drawn Coaches 1800 Bw
http://slidepdf.com/reader/full/making-horse-drawn-coaches-1800-bw 55/455
FRENCH OR SQUARE RULE. . 43
body, when tlie body is swept, extend the bottom sweep of the rocker to Une N ; at
the same time you can dot off the manner of paneHng the bottom. This square corner
is the establishment of line, figure 2, or the point we want the wheel to stand whenturned square under the body. The object of this corner is to shorten the coupling as
much as possible, which is an important point. Measure from this dotted corner in
panel, on line No. 2, 7 inches, and draw parallel line I), this being the space required
over the top of wheel for settling of the coach when loaded. Measure from line D, on
line No. 2, to ground line C, 42 inches ; this is the height of the front wheel. Measure
from line No. 2, 27 inches ; draw a perpendicular line 27 inches, this being the cen-
ter of the wheel. Measure 5.j inches from this line, the center of the wheel, and draw
line, figure 6, this being the center of the king or body bolt. You can now strike the
front wheel. Your front springs are clipped on top of the axle, which is H inches;measure U inches, the depth of the bottom part of the spring, 12^ inches opening, 1^
inches for the top part of the spring, I inch block top of spring, ^ inch plate for the
bottom of lower bed. This bed is o inches deep ; sweep up H inches, leaving li inches
deep in center. Fifth wheels ^ inch each. Top bed 1| inches deep; f inch plate for
the bed. Lay oft 3 inches for the depth of the body block ; this point is the bottom of
your boot ;proceed to sweep your boot as represented in diagram. It is necessary in
hanging a coach to hang it 3 inches higher in front than back, calculating from a level
line from the bottom of pump-handle to bottom of boot. We will now proceed to lay
out and prove our calculation for turning of the wheel. We have given the top part asit passes under the body square on line figure 2. Next proceed to draw a parallel line,
figure 10 being the center of front wheel, and also center of boot. Measure 17 inches
from line, figure 10 ; draw line, figure 5, being half the width of boot; next draw per-
pendicular lines, figures 9 and 11, the size of the front wheel. Measure 32] inches fromcenter of front wheel, and draw line 7, representing the top of the wheel. Measure 2^
inches from line 7 and draw line 8, being the width of the wheels at the bottom. Takeyour dividers, place one point on line 6, where it intersects with hue 10, this point be-
ing the center of king or body bolt, the other at the back part of the wheel, at point
11; you can strike the turning of the wheel to parallel line 10, and square fromthis point to the body as represented by line 1 ; this is the extreme back of the wheelas it turns under the body. You can proceed in like manner with line 2, starting at
the top of the wheel. This is where the top of the wheel will stand when the carriage
is turned square under the body, and also proves the establishment of this line. Line3 represents the tread of the wheel upon the ground. You will notice in the dia-
gram where the circle intersects line 5. This line being the outer edge of the
boot at this intersecting point, you can square a perpendicular line to boot, which is
4. At this point is where the top of the wheel passes the outer edge of the boot, whenturning under.
This manner of laying out work gives the builder an opportunity to provide thematerial for the wheels, to order the springs and axles, in fact everything pertaining
to it, while the body is being built, so as there will be no delay in ironing or finishing,
which often is the case, and causes a loss to the builder.
DIAGRAM NO. 2
shows the manner of making patterns. You will perceive we have taken the bodyfrom the carriage, and give the outlines of the side elevation of the body on the draft
board, to make the patterns for the body so that they harmonize in shape with the
lines drawn. Many different modes of accomplishing this important task have beendevised, but we have never yet seen any rule so simple and complete.
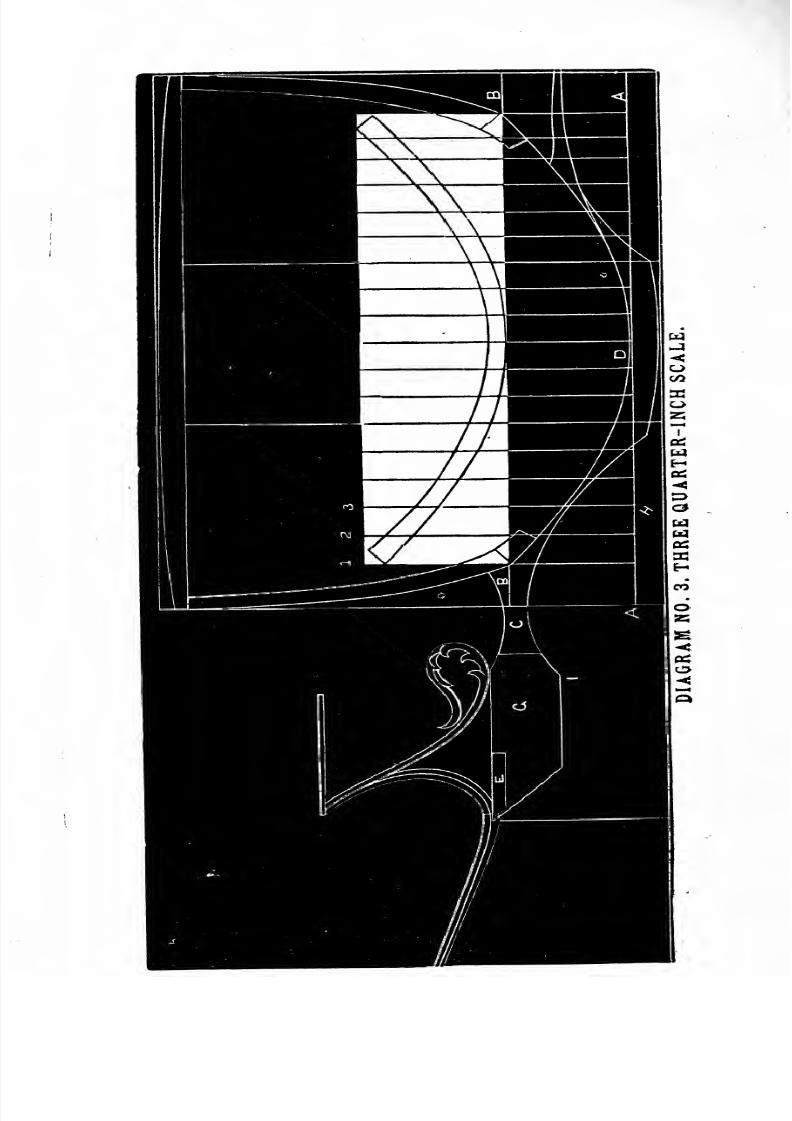
8/10/2019 Making Horse Drawn Coaches 1800 Bw
http://slidepdf.com/reader/full/making-horse-drawn-coaches-1800-bw 56/455
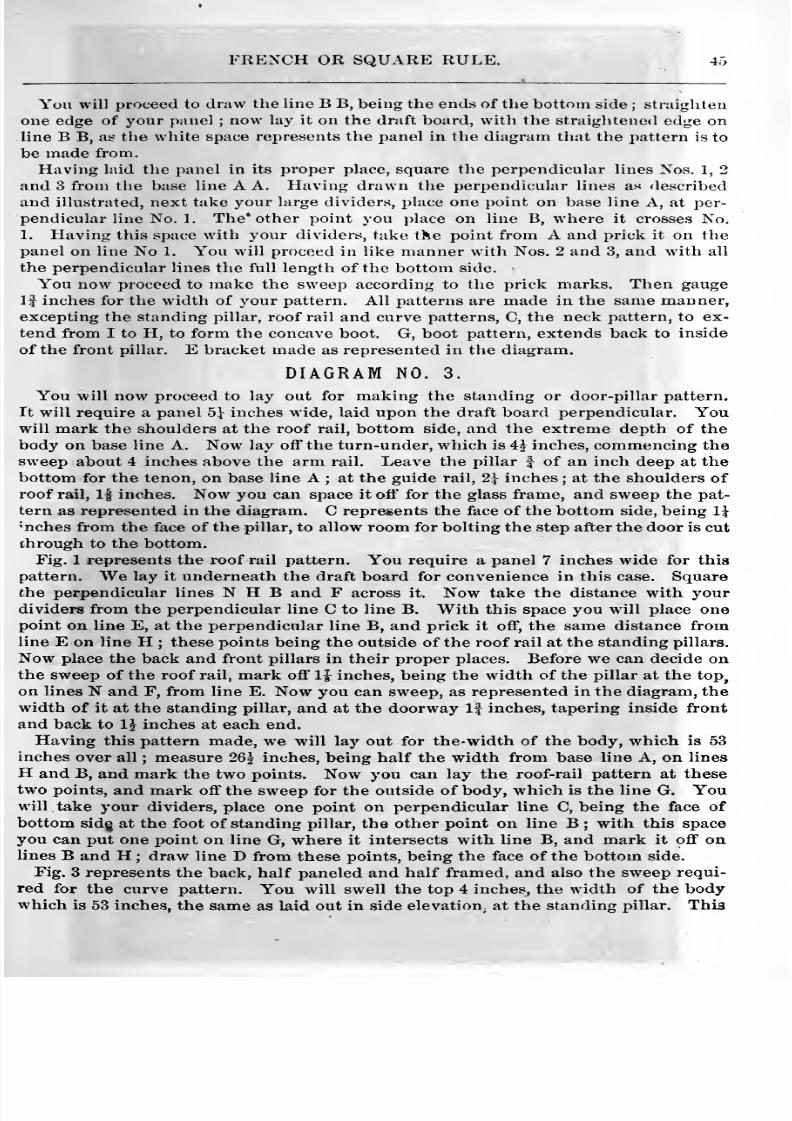
8/10/2019 Making Horse Drawn Coaches 1800 Bw
http://slidepdf.com/reader/full/making-horse-drawn-coaches-1800-bw 57/455
FRENCH OR SQUARE RULE. 45
Yon will proceed to draw the line B B, being the ends of the bottom side ; straighten
one edge of your panel ; now lay it on the draft board, with the straightened edge online B B, as the white space represents the panel in the diagram that the pattern is to
be made from.
Having laid the panel in its proper place, square the perpendicular lines Nos. 1, 2
and 3 from the base line A A. Having drawn the perpendicular lines as described
and illustrated, next take your large dividers, place one point on base line A, at per-
pendicular line No. 1. The' other point you place on line B, where it crosses No.1. Having this space with your dividers, take the point from A and prick it on the
panel on line No 1. You will proceed in like manner with Nos. 2 and 3, and with all
the perpendicular lines the full length of the bottom side.
You now proceed to make the sweep according to the prick marks. Then gauge
If inches for the width of your pattern. All patterns are made in the same manner,excepting the standing pillar, roof rail and curve patterns, C, the neck pattern, to ex-
tend from I to H, to form the concave boot. G, boot pattern, extends back to inside
of the front pillar. E bracket made as represented in the diagram.
DIAGRAM NO. 3.
You will now proceed to lay out for making the standing or door-pillar pattern.
It will require a panel 5^ inches wide, laid upon the draft board perpendicular. Youwill mark the shoulders at the roof rail, bottom side, and the extreme depth of the
body on base line A. Now lay off the turn-under, which is 4^ inches, commencing thesweep about 4 inches above the arm rail. Leave the pillar f of an inch deep at the
bottom for the tenon, on base line A ; at the guide rail, 2\ inches ; at the shoulders of
roof rail. If inches. Now you can space it oft for the glass frame, and sweep the pat-
tern as represented in the diagram. C represents the face of the bottom side, being 1
'nches from the face of the pillar, to allow room for bolting the step after the door is cut
through to the bottom.
Fig. 1 represents the roof rail pattern. You require a panel 7 inches wide for this
pattern. We lay it underneath the draft board for convenience in this case. Square
the perpendicular lines N H B and F across it. Now take the distance with yourdividers from the perpendicular line C to line B. With this space you will place onepoint on line E, at the perpendicular line B, and prick it off, the same distance fromline E on line H ; these points being the outside of the roof rail at the standing pillars.
Now place the back and front pillars in their proper places. Before we can decide onthe sweep of the roof rail, mark off 1| inches, being the width of the pillar at the top,
on lines N and F, from line E. Now you can sweep, as represented in the diagram, the
width of it at the standing pillar, and at the doorway If inches, tapering inside front
and back to 1^ inches at each end.
Having this pattern made, we will lay out for the-width of the body, which is 53
inches over all ; measure 26^ inches, being half the width from base line A, on lines
H and B, and mark the two points. Now you can lay the roof-rail pattern at these
two points, and mark off the sweep for the outside of body, which is the line G. Youwill take your dividers, place one point on perpendicular line C, being the face of
bottom sid§ at the foot of standing pillar, the other point on line B ; with this space
you can put one point on line G, where it intersects with line B, and mark it off onlines B and H ; draw line D from these points, being the face of the bottom side.
Fig. 3 represents the back, half paneled and half framed, and also the sweep requi-
red for the curve pattern. You will swell the top 4 inches, the width of the bodywhich is 53 inches, the same as laid out in side elevation^ at the standing pillar. This
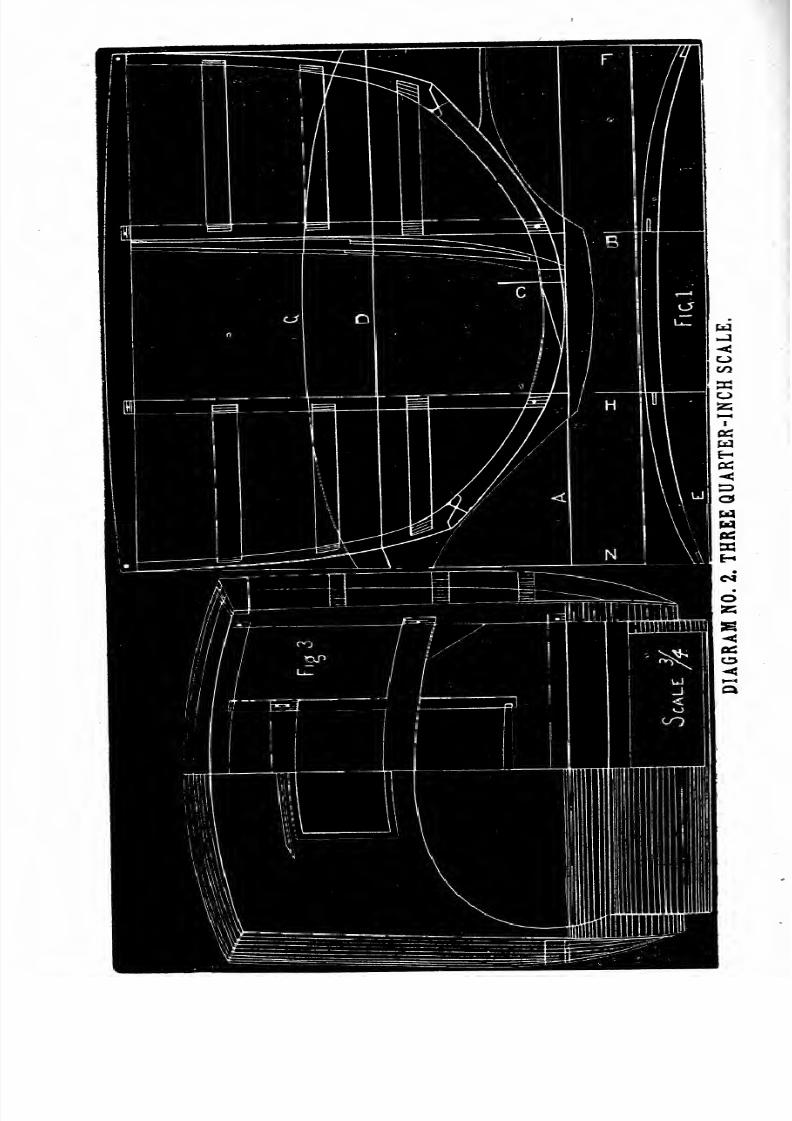
8/10/2019 Making Horse Drawn Coaches 1800 Bw
http://slidepdf.com/reader/full/making-horse-drawn-coaches-1800-bw 58/455
H

8/10/2019 Making Horse Drawn Coaches 1800 Bw
http://slidepdf.com/reader/full/making-horse-drawn-coaches-1800-bw 59/455
FRENCH OR SQUARE RULE. 47
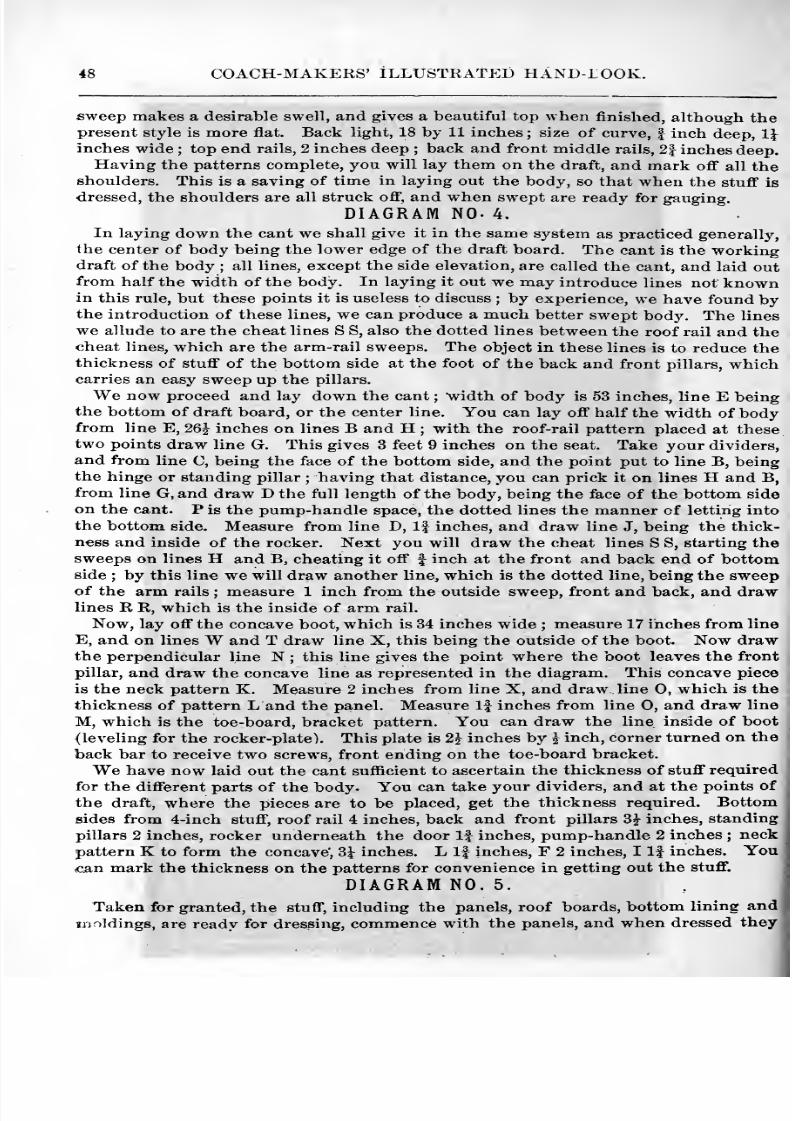
8/10/2019 Making Horse Drawn Coaches 1800 Bw
http://slidepdf.com/reader/full/making-horse-drawn-coaches-1800-bw 60/455
48 COACH-MAKERS' ILLUSTRATP]D HAND-LOOK.
sweep makes a desirable swell, and gives a beautiful top when finished, although thepresent style is more flat. Back light, 18 by 11 inches ; size of curve, | inch deep, IJ
inches wide ; top end rails, 2 inches deep ; back and front middle rails, 2| inches deep.Having the patterns complete, you will lay them on the draft, and mark off all the
shoulders. This is a saving of time in laying out the body, so that when the stuff is
dressed, the shoulders are all struck off, and when swept are ready for gauging.
DIAGRAM NO. 4.
In laying down the cant we shall give it in the same system as practiced generally,
the center of body being the lower edge of the draft board. The cant is the workingdraft of the body ; all lines, except the side elevation, are called the cant, and laid outfrom half the width of the body. In laying it out we may introduce lines not knownin this rule, but these points it is useless to discuss ; by experience, we have found bythe introduction of these lines, we can produce a much better swept body. The lines
we allude to are the cheat lines S S, also the dotted lines between the roof rail and thecheat lines, which are the arm-rail sweeps. The object in these lines is to reduce thethickness of stuff of the bottom side at the foot of the back and front pillars, whichcarries an easy sweep up the pillars.
We now proceed and lay down the cant ; width of body is 53 inches, line E beingthe bottom of draft board, or the center line. You can lay oft' half the width of bodyfrom line E, 26J inches on lines B and H ; with the roof-rail pattern placed at these
two points draw line G. This gives 3 feet 9 inches on the seat. Take your dividers,and from line C, being the face of the bottom side, and the point put to line B, beingthe hinge or standing pillar ; having that distance, you can prick it on lines H and B,
from line G, and draw D the full length of the body, being the face of the bottom side
on the cant. P is the pump-handle space, the dotted lines the manner of letting into
the bottom side. Measure from line D, If inches, and draw line J, being the thick-
ness and inside of the rocker. Next you will draw the cheat lines S S, starting the
sweeps on lines H and B, cheating it off f inch at the front and back end of bottomside ; by this line we will draw another line, which is the dotted line, being the sweepof the arm rails ; measure 1 inch from the outside sweep, front and back, and drawlines R R, which is the inside of arm rail.
Now, lay off the concave boot, which is 34 inches wide ; measure 17 inches from line
E, and on lines Wand T draw line X, this being the outside of the boot. Now drawthe perpendicular line N ; this line gives the point where the boot leaves the front
pillar, and draw the concave line as represented in the diagram. This concave piece
is the neck pattern K. Measure 2 inches from line X, and draw line 0, which is the
thickness of pattern L and the panel. Measure If inches from line 0, and draw line
M, which is the toe-board, bracket pattern. You can draw the line inside of boot
(leveling for the rocker-plate). This plate is 2^ inches by ^ inch, corner turned on the
back bar to receive two screws, front ending on the toe-board bracket.
We have now laid out the cant sufficient to ascertain the thickness of stuff required
for the different parts of the body. You can take your dividers, and at the points of
the draft, where the pieces are to be placed, get the thickness required. Bottomsides from 4-inch stuff, roof rail 4 inches, back and front pillars 3^ inches, standing
pillars 2 inches, rocker underneath the door If inches, pump-handle 2 inches ; neck
pattern K to form the concave', 3^ inches. L If inches, F 2 inches, I If inches. You<can mark the thickness on the patterns for convenience in getting out the stuff. I
DIAGRAM NO. 5. 1
Taken for granted, the stuff, including the panels, roof boards, bottom lining andiij Hidings, are ready for dressing, commence with the panels, and when dressed they
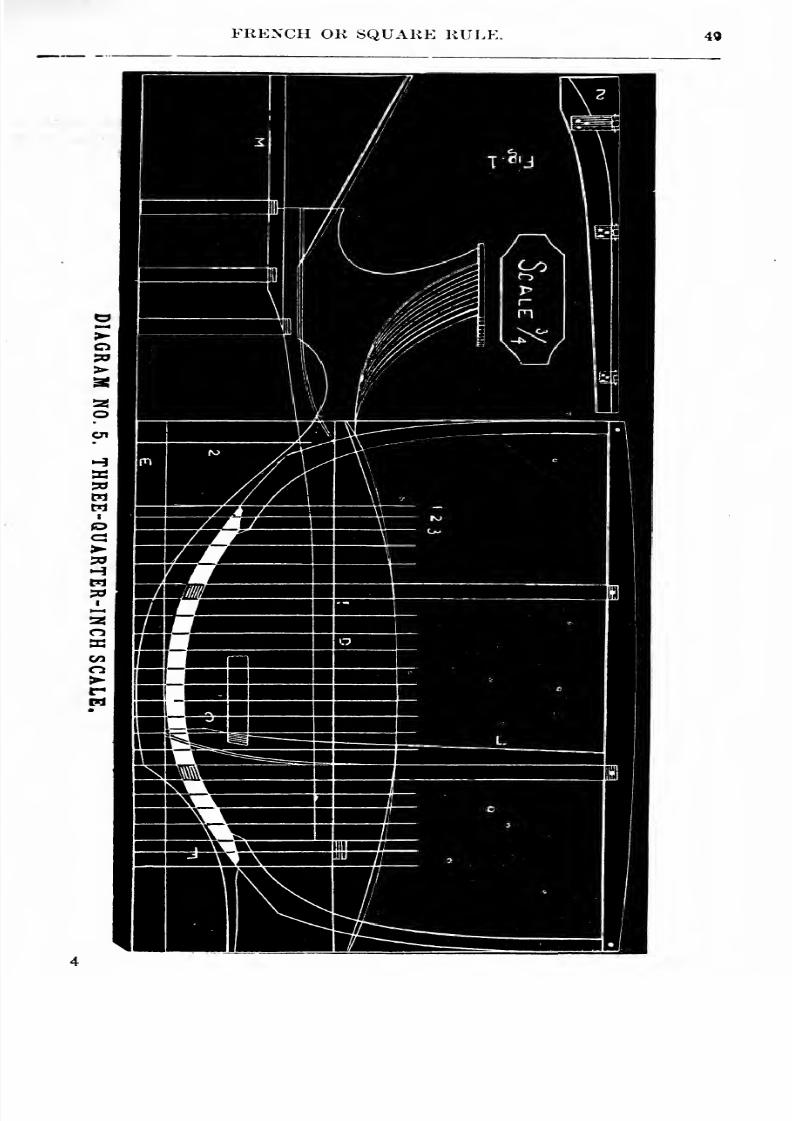
8/10/2019 Making Horse Drawn Coaches 1800 Bw
http://slidepdf.com/reader/full/making-horse-drawn-coaches-1800-bw 61/455
FRENCH OK SQUARE RULE. 49

8/10/2019 Making Horse Drawn Coaches 1800 Bw
http://slidepdf.com/reader/full/making-horse-drawn-coaches-1800-bw 62/455
60 COACH-MAKERS' ILLUSTRATED HAND-BOOK.
should be placed overhead on racks for this purpose, in a warm place, with sticks be-
tween. It being very important that they should be dry to prevent checking whenused— if you wish to build a good body. Next dress your cross rails ; when done, wewill strike the shoulders, commencing with the back bottom bar ; lay it on the draft
as represented in the diagram, at space F; E being the bottom of the draft board, or
the center of the body. D, the face of the bottom side on the cant. You will nowmark your shoulder from line D, allowing IJ inches for the tenon, ajud also the center
line from E on the bar. Now reverse your bar, keeping your center line at the bottomof the draft board, on line E, and mark the other shoulder in the same manner online D.
Proceed in this same manner with the seat rails ; with your dividers place one pointon line C, the top of the seat rail, the other to inside of the standing pillar on line L,
this space to be added to each end from the marks already taken. Bevel for theshoulders, from the top of the seat rail, inside of the pillar, on line L. Having this
bevel strike your shoulders. In this same manner you mark your front toe-board
rail, and all other cross rails, Mbeing the face of the bracket on the draft.
You perceive that in this manner you can get the length of all your rails without
the use of a rule, the draft being your guide. Next dress your bottom side, whichwhen ready, place one bottom side on the draft, as shown by the white space in the
diagram, ready to transfer the perpendicular lines on it ; this to be done by commencingwith the perpendicular line 1 at the foot of the front pillar, then marking it bothtop and bottom; also with 2 and 3, and so on the full length. You can at the
same time make your cuts for the width of the standing pillars ; square these marksacross top and bottom ; transfer these lines to the other bottom side in the samemanner.
Fig. 1 represents the manner of letting in of hinges for hanging doors. No. 2 a piece
of panel stuff swept inside to the standing pillar, the outside in width sufficient to
allow the pins of the hinges to clear the moldings of the doors, dressed perpendicu-
lar; by
placing thispattern
tothe
pillaryou
can square across foryour
hinges,both
standing and door pillar. We consider this a good idea for hanging calash doors, as
they require to be exact to prevent the upper part drawing, when opening.
DIAGRAM NO. 6.
You will perceive in this diagram we have left out the belt or arm rails, and all
other lines that are not needed for present consideration. We shall take up eachpiece separately, after being dressed, that is necessary to be pricked off, as this is themost difficult part for the beginner to understand. S S are the cheat lines to be used
for pricking off the bottom sides. Underneath the draft board we have, for conveni-ence, placed the two bottom sides, represented by the white space, with the bottomedge up, line F being their face, as laid together. These, you will perceive, are
pricked off from the prick marks on the cant, which we proceed to explain the man-ner of doing.
You will notice, in the turn-under of the standing pillar, an outside line, which is
the thickness of the molding to be left on the bottom side. You will take yourdividers, place qne point on perpendicular line C, where it intersects with the parallel
line No. 1 ; the other point place on the line of the turn-under of the standing pillar.
Having this space,with your dividers place one point on the cheat
line S,where
it
intersects with the perpendicular line No. 1. You prick off this space from the cheat
line S toward line D. From this prick to line D ; the face of the bottom side is the
thickness of the bottom side at the foot of the front pillar.
1
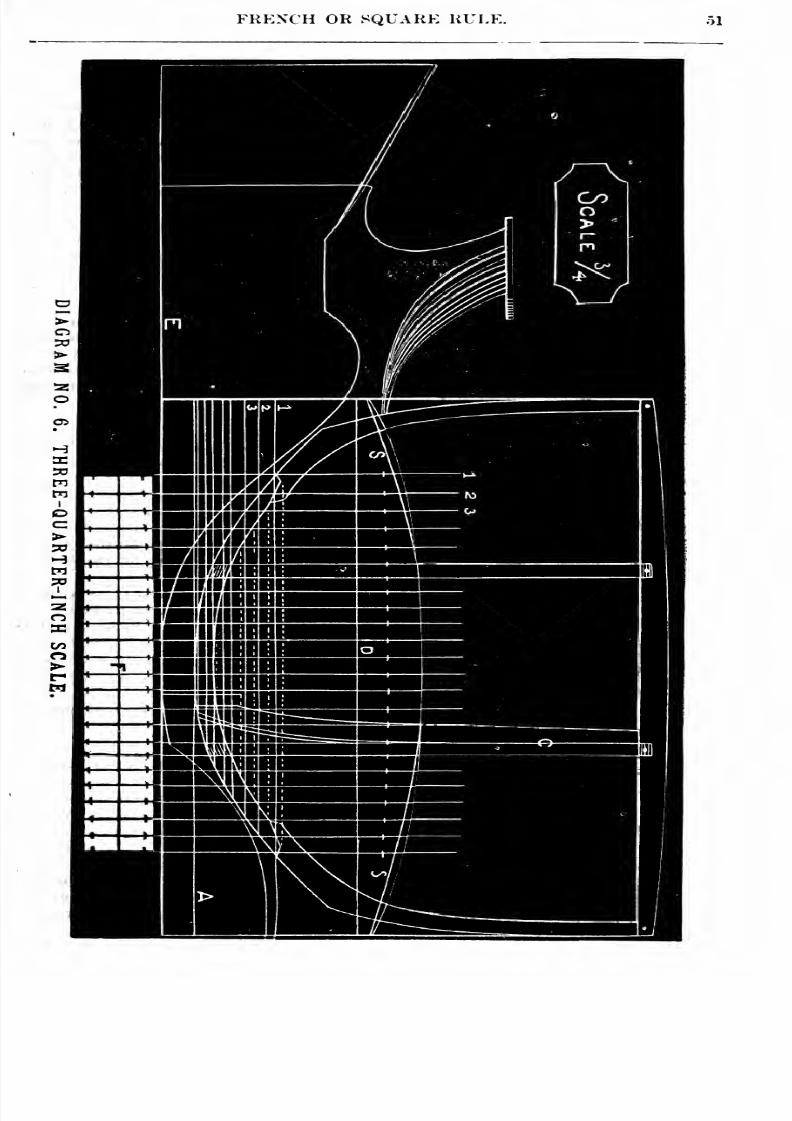
8/10/2019 Making Horse Drawn Coaches 1800 Bw
http://slidepdf.com/reader/full/making-horse-drawn-coaches-1800-bw 63/455
FRENCH OR SQUARE RULE. ol
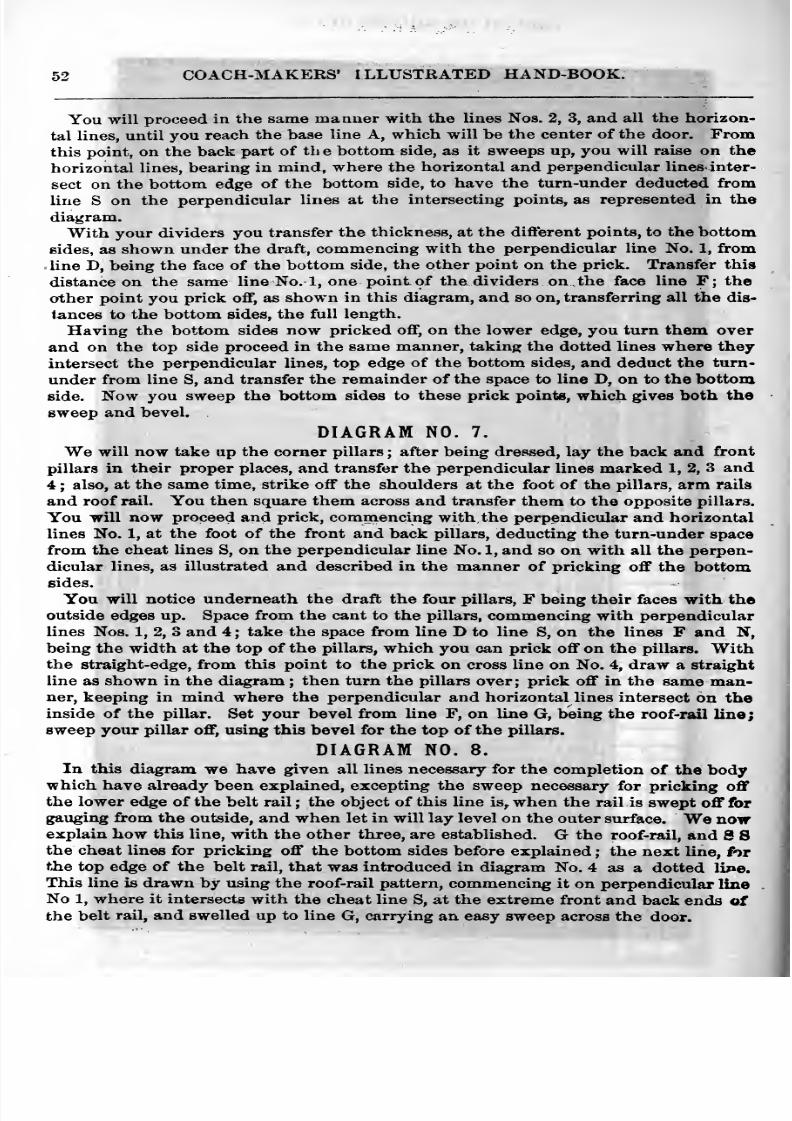
8/10/2019 Making Horse Drawn Coaches 1800 Bw
http://slidepdf.com/reader/full/making-horse-drawn-coaches-1800-bw 64/455
52 COACH-MAKERS' ILLUSTRATED HAND-BOOK.
You will proceed in the same manner with the lines Nos. 2, 3, and all the horizon-
tal lines, until you reach the base line A, which will be the center of the door. Fromthis point, on the back part of th e bottom side, as it sweeps up, you will raise on the
horizontal lines, bearing in mind, where the horizontal and perpendicular lines-inter-
sect on the bottom edge of the bottom side, to have the turn-under deducted from
line S on the perpendicular lines at the intersecting points, as represented in the
diagram.
With your dividers you transfer the thickness, at the diflerent points, to the bottom
sides, as shown under the draft, commencing with the perpendicular line No. 1, from
line D, being the face of the bottom side, the other point on the prick. Transfer this
distance on the same line No. 1, one point of the dividers on the face line F; the
other point you prick off, as shown in this diagram, and so on, transferring all the dis-
tances to the bottom sides, the full length.
Having the bottom sides now pricked off, on the lower edge, you turn them over
and on the top side proceed in the same manner, taking the dotted lines where they
intersect the perpendicular lines, top edge of the bottom sides, and deduct the turn-
under from line S, and transfer the remainder of the space to line D, on to the bottomside. Now you sweep the bottom sides to these prick points, which gives both the
sweep and bevel.
DIAGRAM NO. 7.
We will now take up the corner pillars ; after being dressed, lay the back and front
pillars in their proper places, and transfer the perpendicular lines marked 1, 2, 3 and
4 ; also, at the same time, strike off the shoulders at the foot of the pillars, arm rails
and roof rail. You then square them across and transfer them to the opposite pillars.
You will now proceed and prick, commencing with the perpendicular and horizontal
lines No. 1, at the foot of the front and back pillars, deducting the turn-under space
from the cheat lines S, on the perpendicular line No. 1, and so on with all the perpen-
dicular lines, as illustrated and described in the manner of pricking off the bottomsides.
You will notice underneath the draft the four pillars, F being their faces with theoutside edges up. Space from the cant to the pillars, commencing with perpendicular
lines Nos. 1, 2, 3 and 4 ; take the space from line D to line S, on the lines F and N,
being the width at the top of the pillars, which you can prick off on the pillars. Withthe straight-edge, from this point to the prick on cross line on No. 4, draw a straight
line as shown in the diagram ; then turn the pillars over ; prick off in the same man-ner, keeping in mind where the perpendicular and horizontal lines intersect on theinside of the pillar. Set your bevel from line F, on line G, being the roof-rail line;
sweep your pillar off, using this bevel for the top of the pillars.
DIAGRAM NO. 8.
In this diagram we have given all lines necessary for the completion of the bodywhich have already been explained, excepting the sweep necessary for pricking off
the lower edge of the belt rail ; the object of this line is, when the rail is swept off for
gauging from the outside, and when let in will lay level on the outer surface. We nowexplain how this line, with the other three, are established. G the roof-rail, and 8 Sthe cheat lines for pricking off the bottom sides before explained ; the next line, for
the top edge of the belt rail, that was introduced in diagram No. 4 as a dotted li^e.
This line is drawn by using the roof-rail pattern, commencing it on perpendicular line
No 1, where it intersects with the cheat line S, at the extreme front and back ends ofthe belt rail, and swelled up to line G, carrying an easy sweep across the door.
I
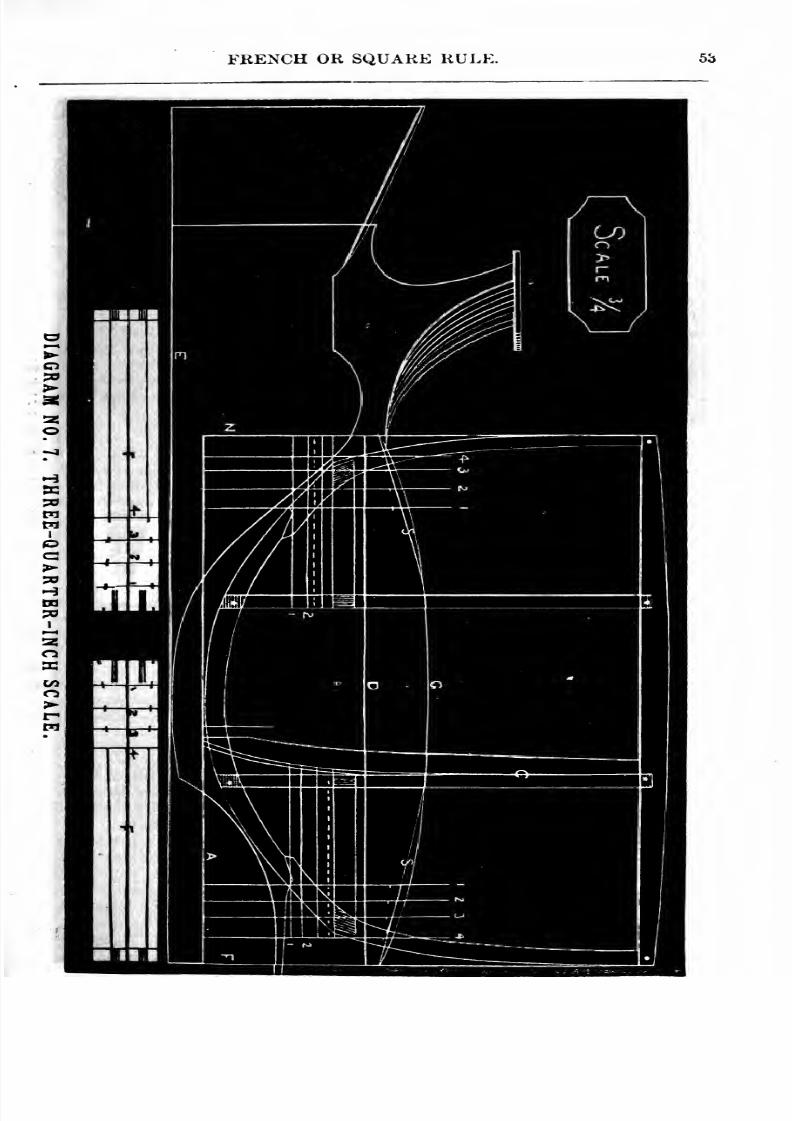
8/10/2019 Making Horse Drawn Coaches 1800 Bw
http://slidepdf.com/reader/full/making-horse-drawn-coaches-1800-bw 65/455
FRENCH OR SQUARE RULE.
•I
f _
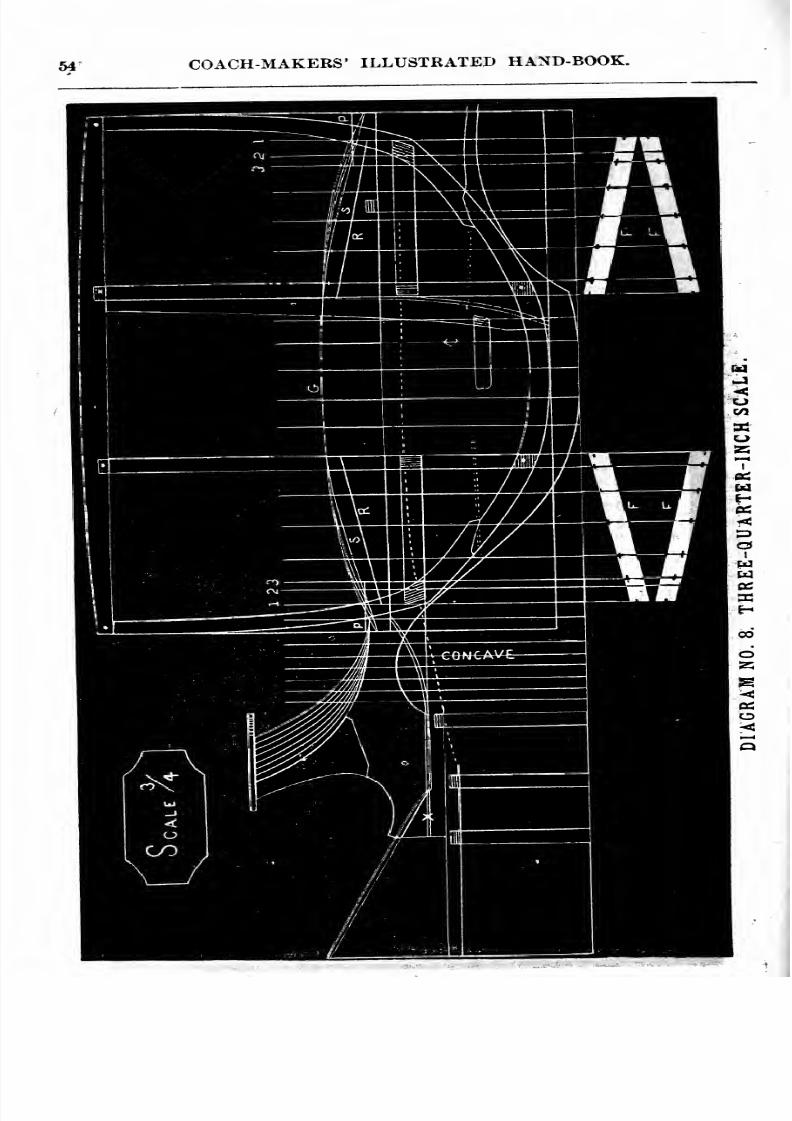
8/10/2019 Making Horse Drawn Coaches 1800 Bw
http://slidepdf.com/reader/full/making-horse-drawn-coaches-1800-bw 66/455
54^ COACH-MAKERS' ILLUSTRATED HAND-BOOK.
.K \ s
\
m
V^i-'
1 1\: \ V
n -M ^^tr-4.'
''
~^ =^
--V
o _.
::
I
-JW-U
^-^-^ J tk A
/ \ U COMCAV£
Ui
<
'
8/10/2019 Making Horse Drawn Coaches 1800 Bw
http://slidepdf.com/reader/full/making-horse-drawn-coaches-1800-bw 67/455
FRENCH OR SQUARE RULE. 55
The next is the establishment of the line for pricking off the lower edge of the belt
rail. With your dividers place one point on parallel line P, where it intersects withperpendicular line 3, the other point on the cheat line S. This space is obtained bythe horizontal line P, the distance from the top to the lower edge of the belt rail, aa
let into the front and back pillars ; add to this space already taken the difference in
the turn-under from the top to the lower edge of the belt, at the standing pillar. Pro-
ceed and prick it off from the cheat line S, on perpendicular line No. 1; from this prick
sweep into line G. Next proceed and lay the belt rail in the proper place and transfer
the perpendicular lines, setting your bevel from line R, being the face of the belt onthe cant, on to any of the perpendiciilar lines. This you can bevel across top and bot-
tom ;also for your shoulders, as represented by the white space below the draft, show-ing the same position as on the cant, F being their faces.
Now proceed and prick off the top of belt, commencing with perpendicular line No.1, deducting the turn-under from the line explained as the top of the belt, fromthis point to line R, being the face of the belt on a cant. This you can prick off, and80 on the full length of the belt, as illustrated and described in the manner of pricking
off the bottom sides and corner pillars. Having the top, turn over and prick the bot-
tom ; now they can be swept off, which gives you both the sweep and the bevel.
You will next prick off the neck piece for the concave, by laying it on the draft, in
its proper place ; transfer the perpendicular lines ; after being squared across, can be
pricked oft , X line being the face. In dressing the standing pillars, mark off and dress
the door pillars at the same time. Having all your stuff dressed, commence to lay outthe whole body, including the doors, gauging from the outside ; and when ready to
frame, you will do it all at once, also in lightening out, with the same system, this
being the quickest and most correct manner of constructing a body. Back and front
paneled, canvased, lined up and cleaned off, ready to be set up. This closes the ap-
plication of the French rule to a coach, being the plainest kind of a job.
In giving these explanations and drawings, we have endeavored to give it in a simple,
clear manner, and we think our readers will bear us out in the assertion that it has never
been given before where it can be so easily understood.
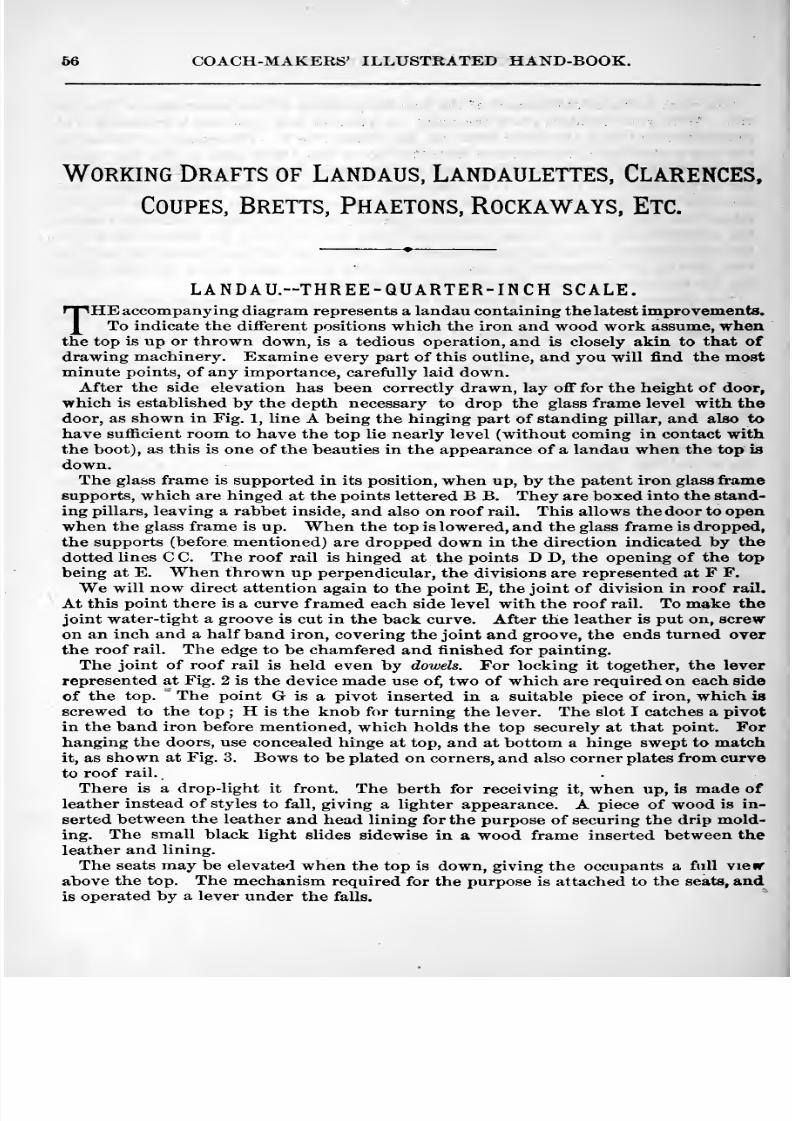
8/10/2019 Making Horse Drawn Coaches 1800 Bw
http://slidepdf.com/reader/full/making-horse-drawn-coaches-1800-bw 68/455
66 COACH-MAKERS' ILLUSTRATED HAND-BOOK.
Working Drafts of Landaus, Landaulettes, Clarences,
Coupes, Bretts, Phaetons, Rockaways, Etc.
LANDAU.-THREE-QUARTER-INCH SCALE.
THE accompanying diagram represents a landau containing the latest improvements.To indicate the different positions which the iron and wood work assume, when
the top is up or thrown down, is a tedious operation, and is closely akin to that ofdrawing machinery. Examine every part of this outline, and you will find the mostminute points, of any importance, carefully laid down.
After the side elevation has been correctly drawn, lay off for the height of door,
which is established by the depth necessary to drop the glass frame level with thedoor, as shown in Fig. 1, line A being the hinging part of standing pillar, and also to
have sufficient room to have the top lie nearly level (without coming in contact with
the boot), as this is one of the beauties in the appearance of a landau when the top is
down.The glass frame is supported in its position, when up, by the patent iron glass frame
supports, which are hinged at the points lettered B B. They are boxed into the stand-
ing pillars, leaving a rabbet inside, and also on roof rail. This allows the door to openwhen the glass frame is up. When the top is lowered, and the glass frame is dropped,
the supports (before mentioned) are dropped down in the direction indicated by the
dotted Unes C C. The roof rail is hinged at the points D D, the opening of the topbeing at E. When thrown up perpendicular, the divisions are represented at F F.
We will now direct attention again to the point E, the joint of division in roof rail.
At this point there is a curve framed each side level with the roof rail. To m«iike thejoint water-tight a groove is cut in the back curve. After the leather is put on, screwon an inch and a half band iron, covering the joint and groove, the ends turned overthe roof rail. The edge to be chamfered and finished for painting.
The joint of roof rail is held even by dowels. For locking it together, the lever
represented at Fig. 2 is the device made use of, two of which are required on each side
of the top. The point G is a pivot inserted in a suitable piece of iron, which is
screwed to the top ; H is the knob for turning the lever. The slot I catches a pivot
in the band iron before mentioned, which holds the top securely at that point. For
hanging thedoors,
use concealed hinge at top, and at bottom a hinge swept to matchit, as shown at Fig. 3. Bows to be plated on corners, and also corner plates from curveto roof rail.
There is a drop-light it front. The berth for receiving it, when up, is made ofleather instead of styles to fall, giving a lighter appearance. A piece of wood is in-
serted between the leather and head lining for the purpose of securing the drip mold-ing. The small black light slides sidewise in a wood frame inserted between theleather and lining.
The seats may be elevated when the top is down, giving the occupants a full vieur
above the top. The mechanism required for the purpose is attached to the seats, and
is operated by a lever under the falls.
8/10/2019 Making Horse Drawn Coaches 1800 Bw
http://slidepdf.com/reader/full/making-horse-drawn-coaches-1800-bw 69/455

8/10/2019 Making Horse Drawn Coaches 1800 Bw
http://slidepdf.com/reader/full/making-horse-drawn-coaches-1800-bw 70/455
LANDAU.-THEEE-QUi
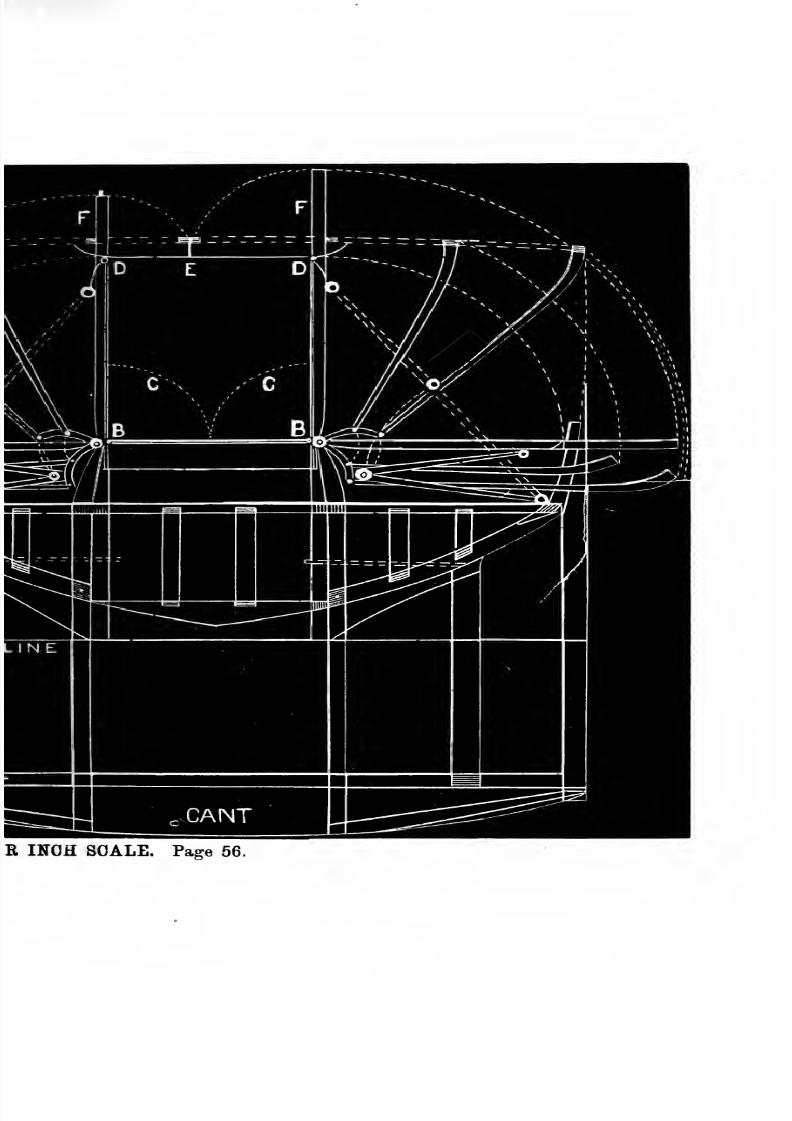
8/10/2019 Making Horse Drawn Coaches 1800 Bw
http://slidepdf.com/reader/full/making-horse-drawn-coaches-1800-bw 71/455
R INCH SOALE. Page 56.
8/10/2019 Making Horse Drawn Coaches 1800 Bw
http://slidepdf.com/reader/full/making-horse-drawn-coaches-1800-bw 72/455
8/10/2019 Making Horse Drawn Coaches 1800 Bw
http://slidepdf.com/reader/full/making-horse-drawn-coaches-1800-bw 73/455
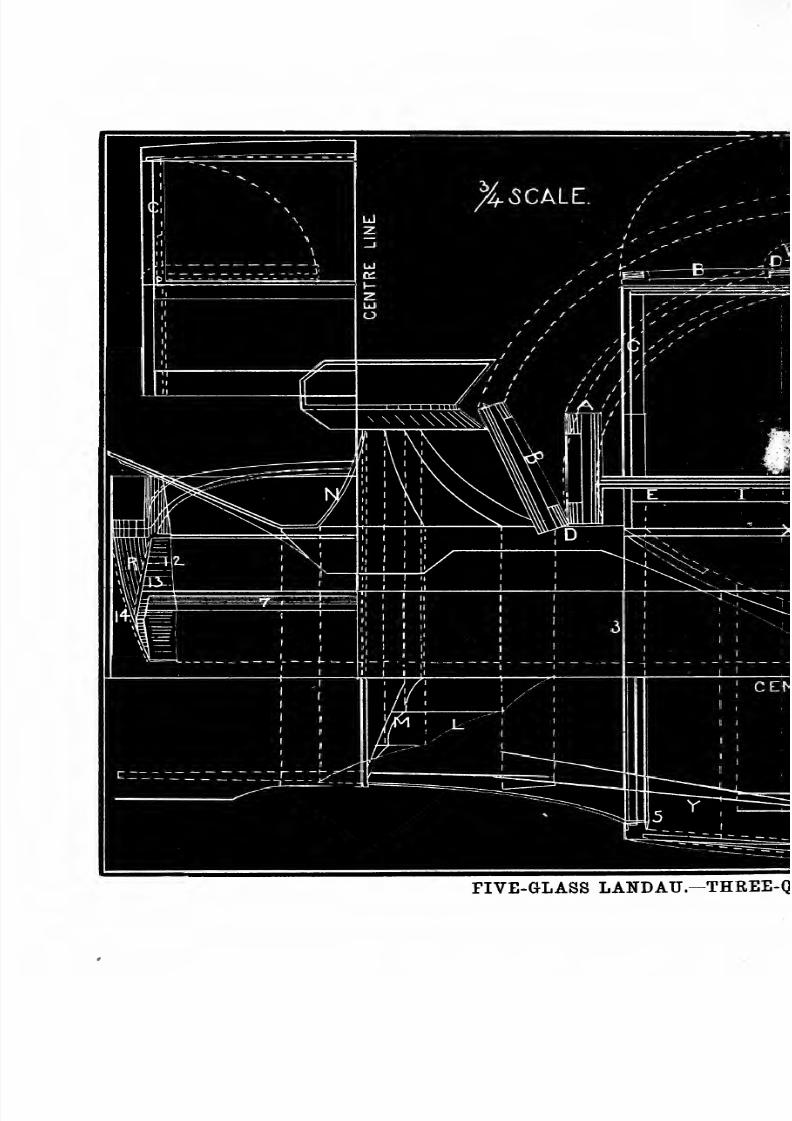
8/10/2019 Making Horse Drawn Coaches 1800 Bw
http://slidepdf.com/reader/full/making-horse-drawn-coaches-1800-bw 74/455
FIVE-GLASS LANDAU.-THREE-Q
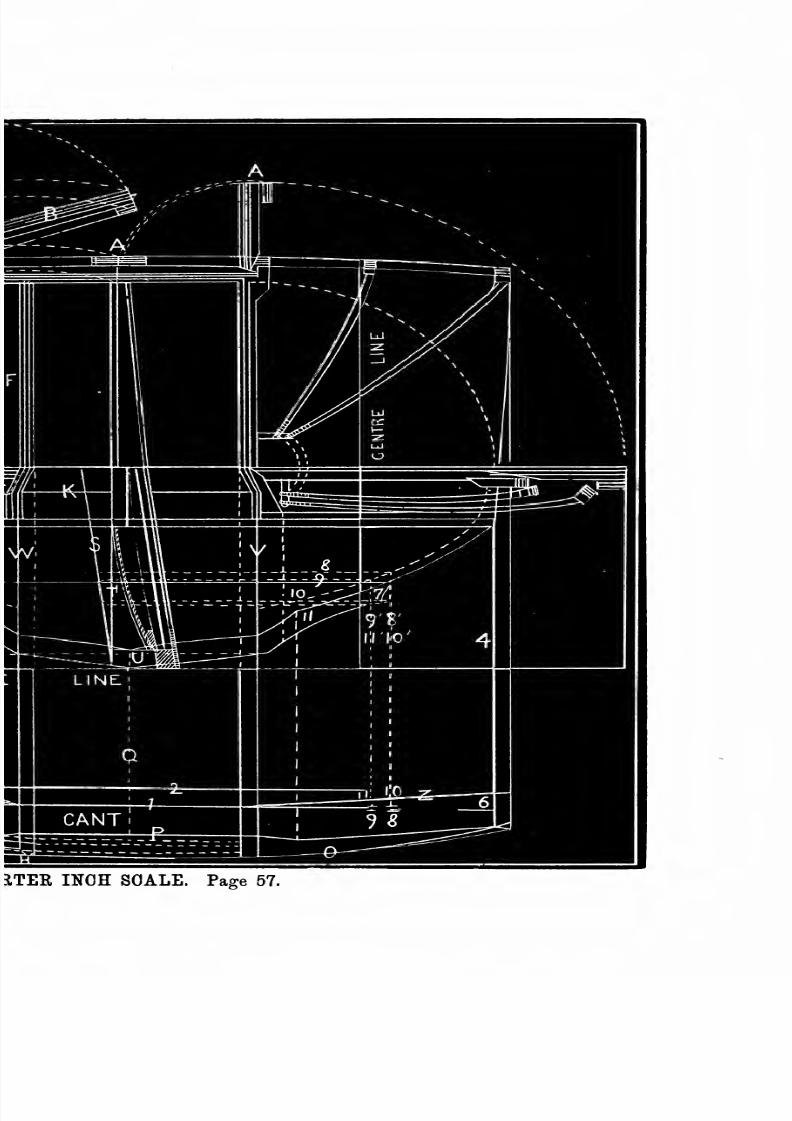
8/10/2019 Making Horse Drawn Coaches 1800 Bw
http://slidepdf.com/reader/full/making-horse-drawn-coaches-1800-bw 75/455
iTER INOH SCALE. Page 57.
8/10/2019 Making Horse Drawn Coaches 1800 Bw
http://slidepdf.com/reader/full/making-horse-drawn-coaches-1800-bw 76/455
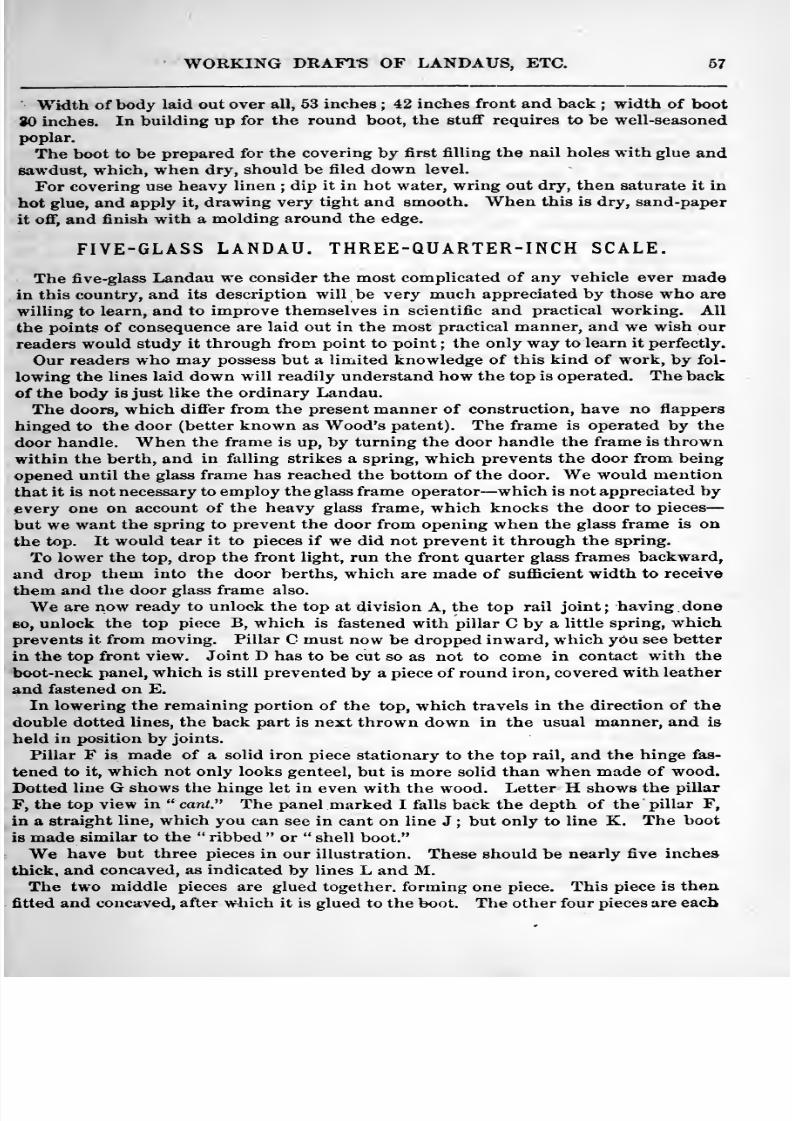
8/10/2019 Making Horse Drawn Coaches 1800 Bw
http://slidepdf.com/reader/full/making-horse-drawn-coaches-1800-bw 77/455
WORKING DHAFl-S OF LANDAUS, ETC. 67
Width of body laid out over all, 53 inches ; 42 inches front and back ; width of boot
30 inches. In building up for the round boot, the stuff requires to be well-seasoned
poplar.
The boot to be prepared for the covering by first filling the nail holes with glue andsawdust, which, when dry, should be filed down level.
For covering use heavy linen ; dip it in hot water, wring out dry, then saturate it in
hot glue, and apply it, drawing very tight and smooth. When this is dry, sand-paper
it off, and finish with a molding around the edge.
FIVE-GLASS LANDAU. THREE-QUARTER-INCH SCALE.
The five-glass Landau we consider the most complicated of any vehicle ever made
in this country, and its description will be very much appreciated by those who arewilling to learn, and to improve themselves in scientific and practical working. All
the points of consequence are laid out in the most practical manner, and we wish our
readers would study it through from point to point ; the only way to learn it perfectly.
Our readers who may possess but a limited knowledge of this kind of work, by fol-
lowing the lines laid down will readily understand how the top is operated. The back
of the body is just like the ordinary Landau.
The doors, which differ from the present manner of construction, have no flappers
hinged to the door (better known as Wood's patent). The frame is operated by the
door handle. Whenthe frame is up,
byturning the door handle the frame is thrown
within the berth, and in falling strikes a spring, which prevents the door from being
opened until the glass frame has reached the bottom of the door. We would mention
that it is not necessary to employ the glass frame operator —which is not appreciated by
every one on account of the heavy glass frame, which knocks the door to pieces
but we want the spring to prevent the door from opening when the glass frame is onthe top. It would tear it to pieces if we did not prevent it through the spring.
To lower the top, drop the front light, run the front quarter glass frames backward,
and drop them into the door berths, which are made of sufficient width to receive
them and the door glass frame also.
We are now ready to unlock the top at division A, the top rail joint; having doneBO, unlock the top piece B, which is fastened with pillar C by a little spring, whichprevents it from moving. Pillar C must now be dropped inward, which you see better
in the top front view. Joint D has to be cut so as not to come in contact with the
boot-neck panel, which is still prevented by a piece of round iron, covered with leather
and fastened on E.
In lowering the remaining portion of the top, which travels in the direction of the
double dotted lines, the back part is next thrown down in the usual manner, and is
held in position by joints.
Pillar F is made of a solid iron piece stationary to the top rail, and the hinge fas-
tened to it, which not only looks genteel, but is more solid than when made of wood.
Dotted line G shows the hinge let in even with the wood. Letter H shows the pillar
F, the top view in cant. The panel marked I falls back the depth of the pillar F,
in a straight line, which you can see in cant on line J ; but only to line K. The boot
is made similar to the ribbed or shell boot.
We have but three pieces in our illustration. These should be nearly five inches
thick, and concaved, as indicated by lines L and M.The two middle pieces are glued together, forming one piece. This piece is then
fitted and concaved, after which it is glued to the boot. The other four pieces are each

8/10/2019 Making Horse Drawn Coaches 1800 Bw
http://slidepdf.com/reader/full/making-horse-drawn-coaches-1800-bw 78/455
o8 COACH-MAKERS' ILLUSTRATED HAND-BOOK.
fitted separately, then concaved and glued to their respective places. This done, gluethe molding N at its place, projecting over the boot panel | of an inch, and | of a^inch thickness.
We now lay out the width of the body : back of body, 43 inches ; back door pillar,
under arm rail, 51 inches ; front lock pillar, 50^ inches ; front, 44 inches. This wil^
give you the arm rail sweep.
The dotted lines in cant show the top rail piece, and the wood to be taken out wherethe front glass travels. Line F indicates the sweep of the body, without deducting thethickness of the molding. In taking the turn-under on line Q, and bottom of thedoor panel, you will find the door a little more rounding than the arm-rail sweep, be-
cause it gives a better sweep from the middle of the door with the whole back andfront quarter. Line P from hinge pillar to the back is made in different ways ; somethat we have seen look very odd from the back ; for that reason we drew the wholeback view R, to show how odd it appears when you take the dotted line for the backpillar sweep ; and the opposite, if you take too much wood away, for then it will havea very bad sweep from the middle of the door to the back quarter. The best methodto obtain it is by making line P and pricking the whole length of the main sweepafter it.
Draw line S to intersect with line T, on the bottom of the back pillar, which has to
run in the same direction as the inside door pillar.
Place the compasses on dotted line U from inside door pillar line to line S, and prick
the distance obtained on lines V and W, from line O, and from these points strike
line 1, the outside line of the rocker, and line 2, the inside of the rocker, which is the
thickness of a rocker of two inches. Next mark the thickness you require front andback pillars on lines 3 and 4, the thickness from the belt-rail line 2^ inches ; then
take the distance between lines T and S on line X, and put it down on small
lines 5 and 6, and lines 3 and 4, and from that mentioned point strike lines Y and Z.
These are the two contracting lines of front and back pillars, and when the body is
set up, the pillars on lines X, 3 and 4 will have the width measured from center line
on lines 3 and 4, to small lines 5 and 6.
The center line of the back view is the same as the center line on ground view, for
it passes directly through the center of body ; and thus we have the plan for taking
the width of the back bar. Dotted line 8 is the highest point of bar 7 ; follow line 8
to the turn-under line, and take the distance between lines T and S. Now follow line
8 back again to perpendicular line 8^, and pass down to line Z, and add the distance
between lines T and S.
. The same operation is necessary with line 9 and 9', 10 and 10^, 11 and 11''. Small
lines 8, 9, 10 and 11 will give you the length of the bar ready pricked off . Proceed in
like manner in taking the width of the front and back bars above line X ; also in
taking the width of inside pillar 12, of the back. Main sweep 13, of back view, is
taken from center line to line P ; line 14 is taken from center line to arm-rail line P,
deducting the turn-under.
To combine the door rocker with back and front pillars and the square-standing
boot piece, we are obliged to make a separate draft, which we draw one inch scale, in
the same manner as is commonly drawn in the shop, and shows the contracting lines,
to mark out the wood for the door rocker, the front pillar and the inside rocker which
combines the front quarter with the boot. The only change is with the center line,
which is not in the center on this engraving ; 21 inches is deducted from the whole
width of the body, or 10^ inches cant, or half width of the body. For top and bottom
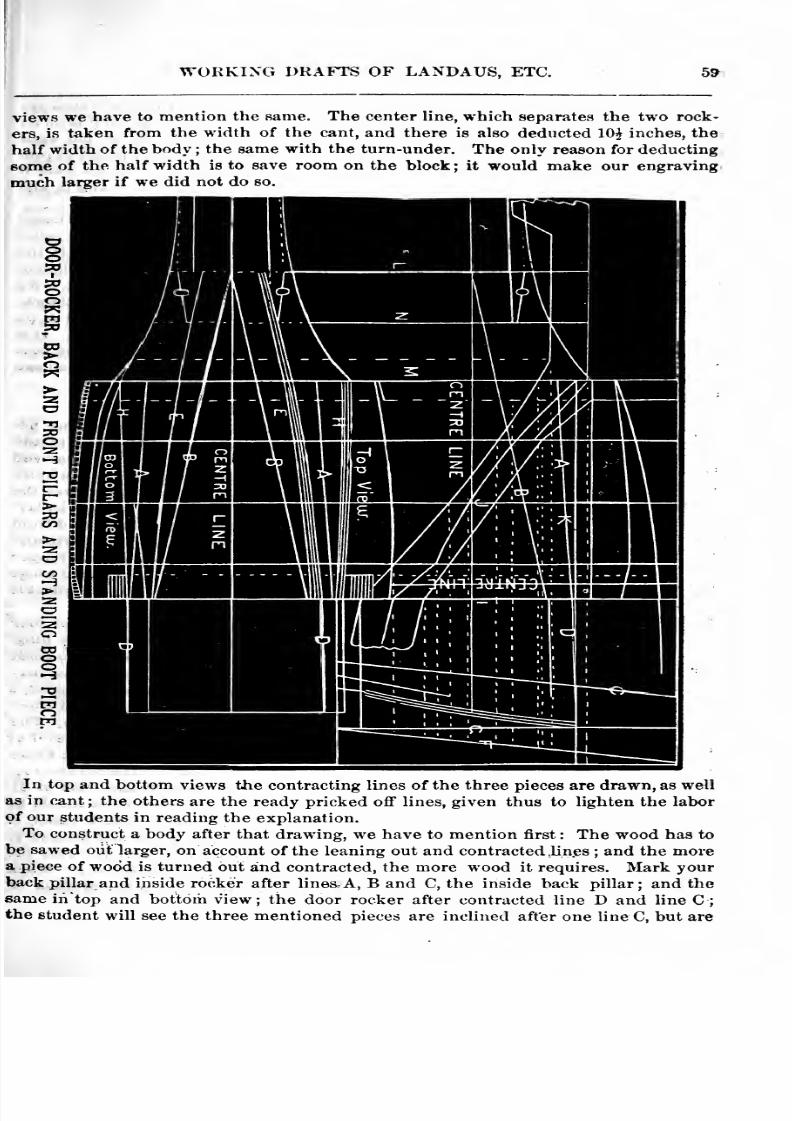
8/10/2019 Making Horse Drawn Coaches 1800 Bw
http://slidepdf.com/reader/full/making-horse-drawn-coaches-1800-bw 79/455
WORKING DRAFTS OF LANDAUS, ETC. 59
views we have to mention the same. The center line, which separates the two rock-
ers, is taken from the width of the cant, and there is also deducted 10^ inches, the
half width of the body ; the same with the turn-under. The only reason for deductingsome of the half width is to save room on the block; it would make our engraving
maich larger if we did not do so.
In top and bottom views the contracting lines of the three pieces are drawn, as well
as in cant; the others are the ready pricked off lines, given thus to lighten the labor
of our students in reading the explanation.To construct a body after that drawing, we have to mention first : The wood has to
be sawed out larger, on account of the leaning out and contracted lines ; and the morea piece of wood is turned out and contracted, the more wood it requires. Mark yourback pillar and inside rocker after lines. A, B and C, the inside back pillar ; and the
same in'top and bottom view; the door rocker after contracted line D and line C ;
the student will see the three mentioned pieces are inclined after one line C, but are
8/10/2019 Making Horse Drawn Coaches 1800 Bw
http://slidepdf.com/reader/full/making-horse-drawn-coaches-1800-bw 80/455
60 COACH-MAKERS' ILLUSTRATED HAND-BOOK.
contracted in three different lines —A, B and D. Lines E in top and bottom views are
the readypricked off lines. These lines sliow the inside rocker piece
whenit is
onits
place, and is established from lines F and G, and contracted line B. We do not wantthat line in fact, but we only want to show the variation of the different pieces as pro-
duced through the inclination line F. If it was laid out square we would not want it
at all. So it is with lines H, they are pricked off like the others from F and G, andcontracted line A.
To joint the door rocker with back pillar is now very simple, when the draft boardis well established. Suppose the joints are from I to J, door rocker D and back pillar
leaning out in one direction, we have to cut off' from the outside door Tocker D the
distance between line D and contracted line A from I to J ; which, to make it plainer,
we mark with letter K ; this gives the joint for the door rocker and back pillar. Wehave still the inside rocker, which extends from line I to L. The distance betweenlines B and A, on I, is the desired thictkness on that point ; and between B and A, online M, is the thickness on that place, -and will joint to the inside back pillar. It is
different with the joint on L and N, which combines the boot piece, because the boot
piece is standing square. Letter shows the joint —the best way to join it you cansee in top view ready pricked off.
LANDAULETTE. THREE-QUARTER-INCH SCALE.
A Landaulette is a style akin to the Clarence coach, the main point of difference be-tween the two being a leather back quarter and roof on the Landaulette, which is sub-
stituted for panel work, thus admitting of the front and top of doors being removedand the top thrown back, and when thus changed it presents the appearance of a brett.
Landaulettes vary in size, and are termed full, three-quarter and demi or half size, the
latter being capable of such a reduction in weight as to require but one horse. In lay-
ing out the body, the first measurements taken should be the width of doors and front
circle ; next, the back quarter. There is one point just here we would call particular
attention to, which is, that where the concealed hinge is used, and the joints droppedas shown, full allowance must be made for the space required for the concealed hingeto move in when the door is opened, so that it will not come in contact with the knuckleof the joint.
Next establish height of seats, as shown by the dotted lines, also height of roof.
Space off for the guide rail for the glass frame to drop level, which is shown by hing-
ing point B, and also in Fig. 1 at G. C C shows the boxes, which are hinged to guiderail B, which holds the glass frame when up, the advantage in this being, the door maybe opened while the glass frame remains elevated. When the frame is dropped, acomplete finish is secured by dropping the boxes, as shown by the dotted lines.
D is the hinging point of the roof rail to the standing pillar E, the division in top. Thestanding pillar L L is taken from one piece, of sufficient size to allow for the bevel ofdoor, and is framed up its full length without being cut at the hinge point. The hingeis screwed on, and the roof rail hinged at D, without being cut at E. The circular roofrail is lapped, as shown in the working draft, at K. The two bows at each side of di-
vision at E should be wide, to prevent springing ; these and all other bows should beplaced to their position. The stationary circle, which lies on top of deck panel, is
fitted, dressed and glued to the deck panel. The next circle is fitted and framed to
the pillar, but left unglued on line A, and has a molding worked on it to cover thejoint. These circles are gotten out in two pieces, and lapped as shown at J. When
-all points of the work are ready, with a fine saw we cut the pillar at the division M,the roof rail at E, and the standing pillar at B.
8/10/2019 Making Horse Drawn Coaches 1800 Bw
http://slidepdf.com/reader/full/making-horse-drawn-coaches-1800-bw 81/455
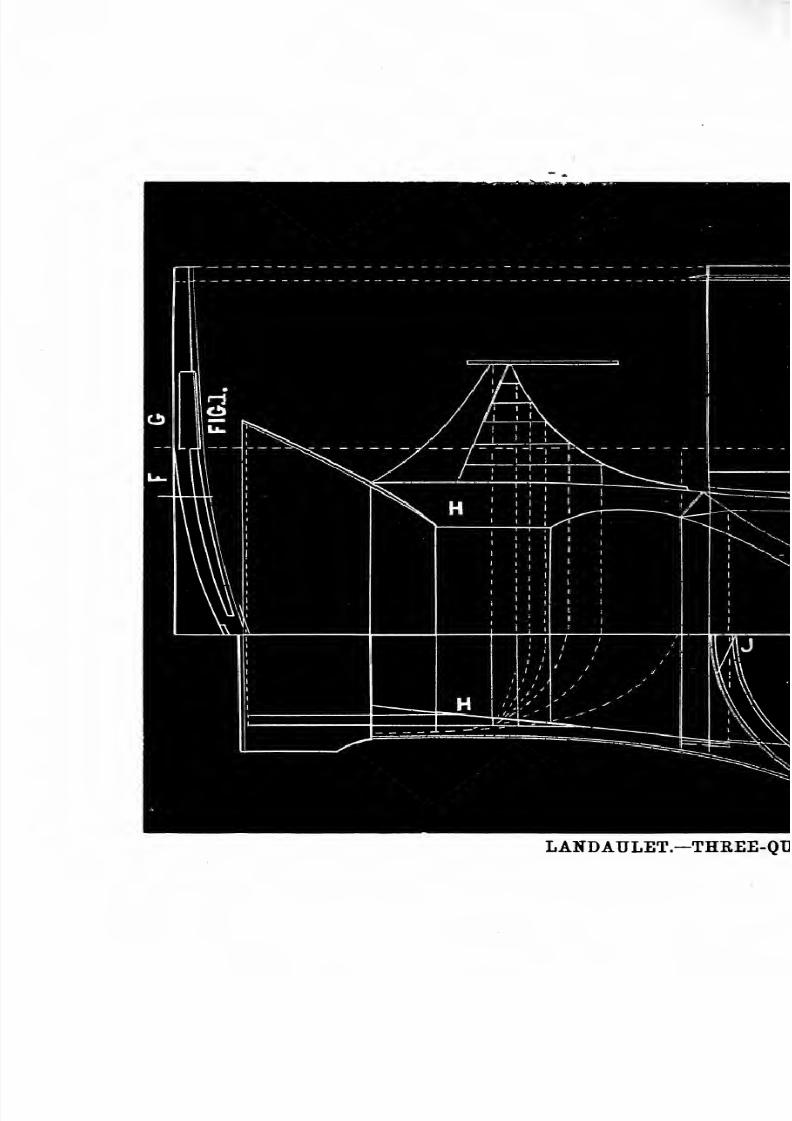
8/10/2019 Making Horse Drawn Coaches 1800 Bw
http://slidepdf.com/reader/full/making-horse-drawn-coaches-1800-bw 82/455
LANDAULET.-THREE-QI]
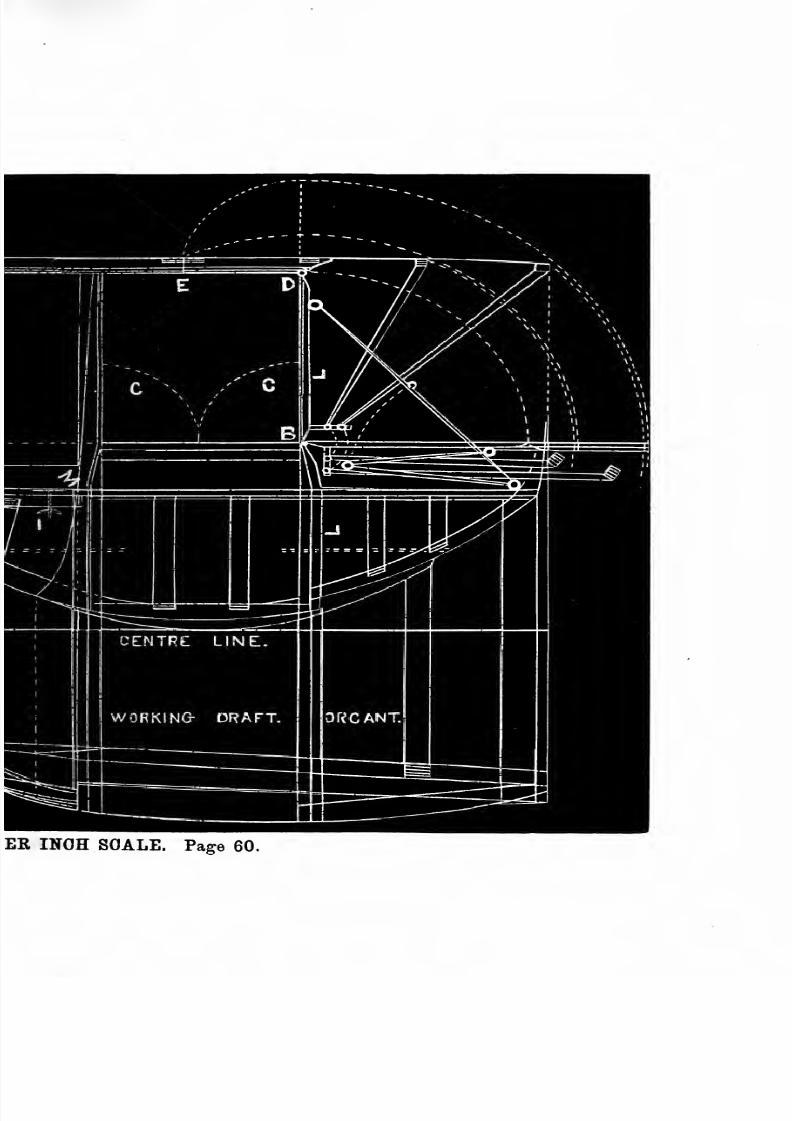
8/10/2019 Making Horse Drawn Coaches 1800 Bw
http://slidepdf.com/reader/full/making-horse-drawn-coaches-1800-bw 83/455
ER INOH SOALE. Page 60.
8/10/2019 Making Horse Drawn Coaches 1800 Bw
http://slidepdf.com/reader/full/making-horse-drawn-coaches-1800-bw 84/455
8/10/2019 Making Horse Drawn Coaches 1800 Bw
http://slidepdf.com/reader/full/making-horse-drawn-coaches-1800-bw 85/455
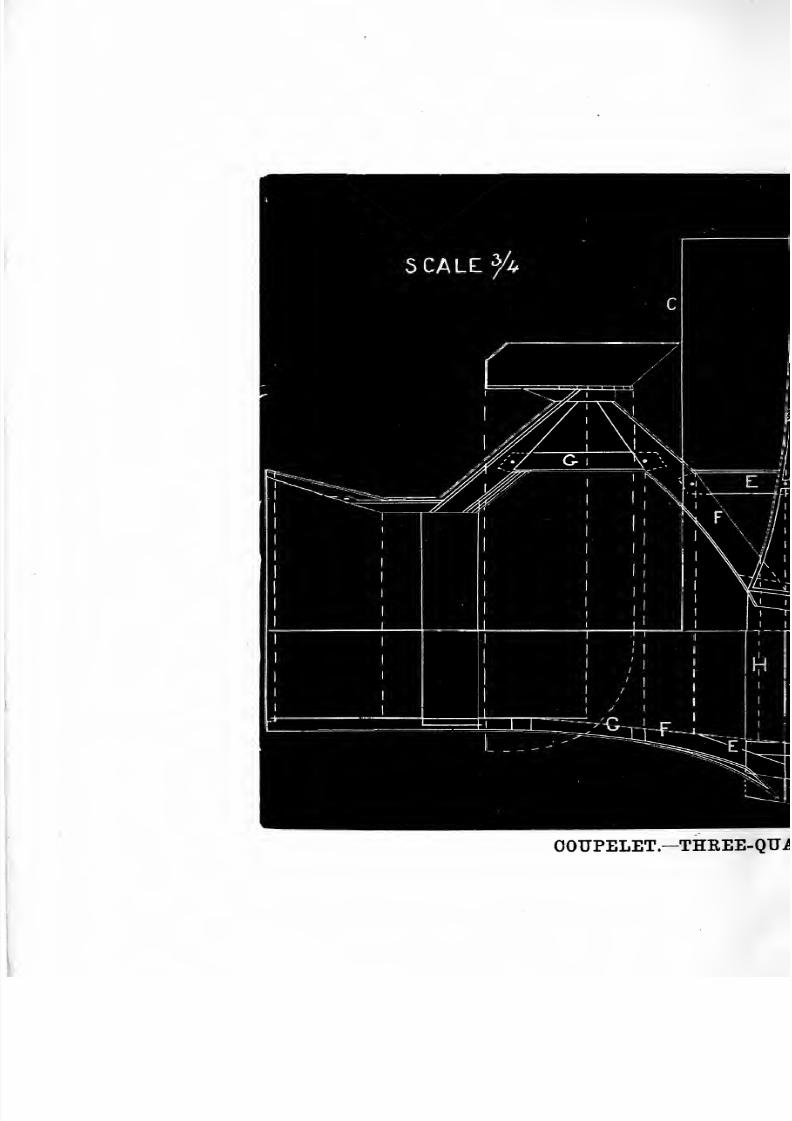
8/10/2019 Making Horse Drawn Coaches 1800 Bw
http://slidepdf.com/reader/full/making-horse-drawn-coaches-1800-bw 86/455
OOUPELET.-THEEE-QUi
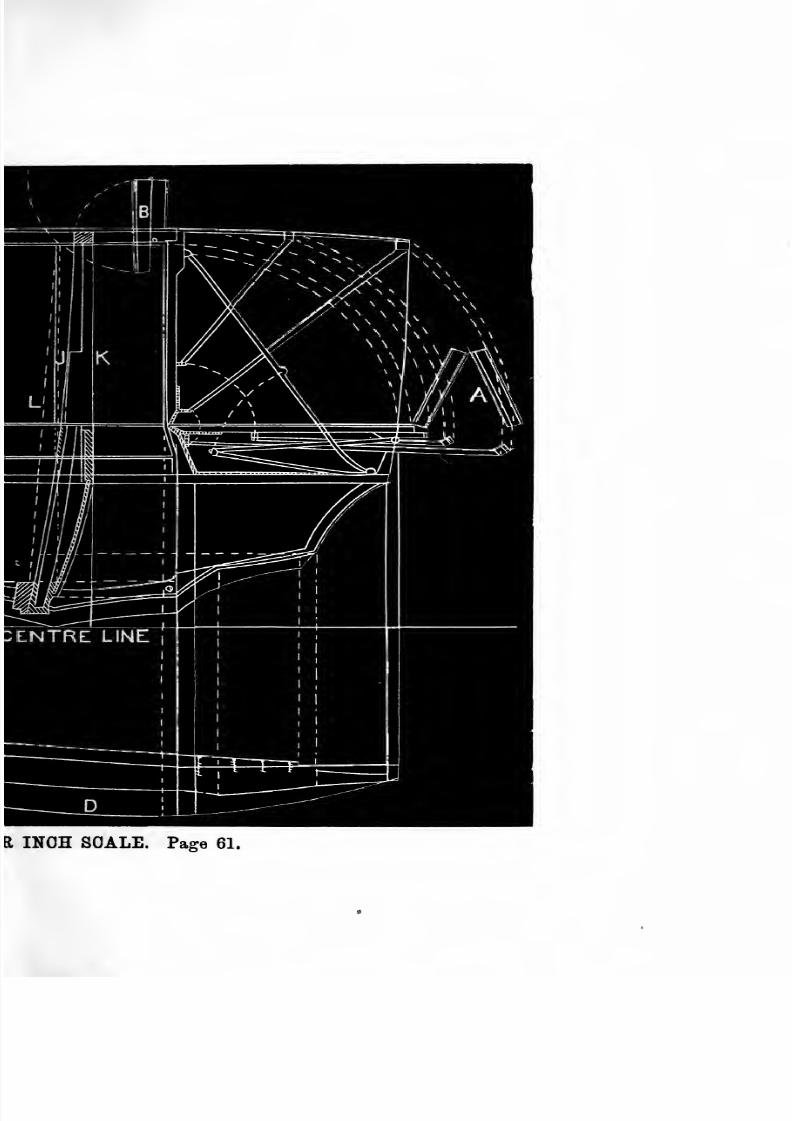
8/10/2019 Making Horse Drawn Coaches 1800 Bw
http://slidepdf.com/reader/full/making-horse-drawn-coaches-1800-bw 87/455
R INCH SCALE. Page 61.
8/10/2019 Making Horse Drawn Coaches 1800 Bw
http://slidepdf.com/reader/full/making-horse-drawn-coaches-1800-bw 88/455
8/10/2019 Making Horse Drawn Coaches 1800 Bw
http://slidepdf.com/reader/full/making-horse-drawn-coaches-1800-bw 89/455
WORKING DRAFTS OF LANDAUS, ETC. 61
In securing the front circle to the body, use on each side T-head bolts, with thumbscrews, as shown at I. The heads of these bolts are let in and screwed from under-
neath the top circle ; dowels are also required at intervals between the bolts. For
convenience in removing the circular front, the trimming should be left loose, suffi-
ciently to admit of the hand being inserted to operate the thumb screws. Having nowgiven full directions as to the circular front and its attachments, it only remains for us
to speak of the finish required when the front is removed.
There are two methods of forming a finish, one for mere appearance, and the other
wherein a back is arranged for the front seat ; each is secured by bolts and dowels as
in that first mentioned.
For finishing purposes, one of them is hinged in the center ; the other, forming the
back, is made 10 inches high, and rounded down at each end. The division of the
doors should be at line A, which is sawed open after being made as shown in Fig. 1,
line F. This division is secured by dowels, thumb screws and plates on the inside,
and plated to make a complete finish. When the upper part of doors are removed,finishing pieces are attached in the same manner.
In the working draft it is laid out for contraction, which requires the different pieces
to be dressed on a bevel. Line H is a face of boot piece H, and shows the concave as
framed into the front pillar.
COUPELETTE. THREE-QUARTER-INCH SCALE.The advantages in this design are its convenience for riding as in an open carriage
without the necessity of leaving the front at home, to be battered and scratched inlifting on or ofi*.
The back part A, which forms the top door piece in its erect position, is given in
two diflferent manners. Some may not like the position of the door, piece as given at
A ; we have, therefore, reversed the hinge, as at B, which shows it in its folded position.
It is necessary to joint the door piece in center, to prevent it coming in contact withthe C spring when folded.
The standing pillar we have drawn in the middle of the door, there being roomenough, and much more convenient and familiar to experienced body-makers.
LineC
is the half width of the cant, or ofthe hanging
pillar,which you
can see
by measuring from center line to arm-rail sweep, line D.
Each piece of the boot is laid out square, but three of them are contracted, whichE, F and G indicate. We will mention that each piece contracted requires to belengthened. Suppose we were to not lengthen piece E, which shortens nearly oneinch, the consequence would be it would lift the front of the boot about three incheshigher than the diagram.
Piece F starts from the door rocker up to the driver seat. It requires considerablethickness, nearly 5 inches on dotted line H. It can be made of 4-inch stuff or less, bygluing a piece of white wood on it to fill up the sweep of the boot. The front lockpillar will have to be jointed or hinged, so that the glass frame will not project abovethe joint.
The lock pillars I, from the jointing or hinging part to the top, must not be overhalf the width of the body, so they will not strike each other when folded over theglass frame. We will mention that the glass frame cannot fall farther than the rockers,
and must run into the back pillar (see dotted line J). We have to do so on accountof the thickness of pillar from K to J, which still has a thickness of four inches.
Dotted line L is the leaning-out line of the door lock pillar, which gives a thicknessof 5f inches. Not being able to procure wood of that thickness, take 6 inch or less,
and glue a piece on the bottom, but not on the top if you can help it.
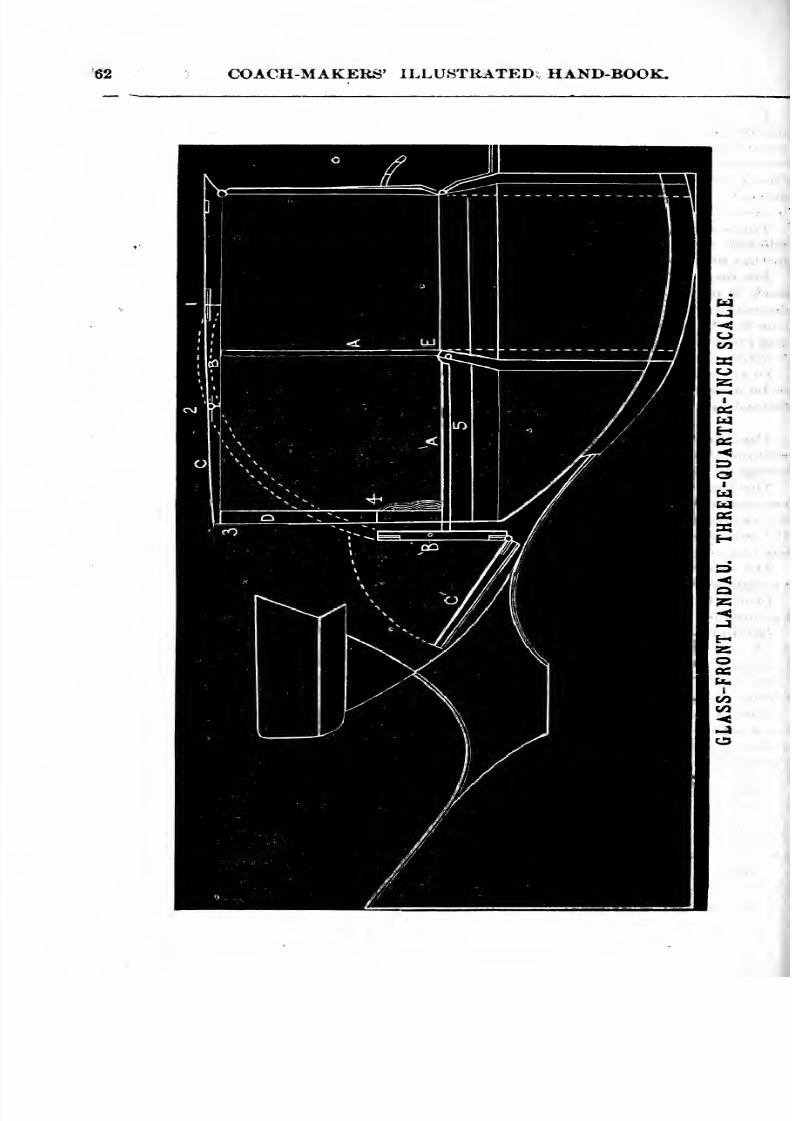
8/10/2019 Making Horse Drawn Coaches 1800 Bw
http://slidepdf.com/reader/full/making-horse-drawn-coaches-1800-bw 90/455
'62 COACH-MAKERS' ILLUSTRATED HAND-BOOK.
8/10/2019 Making Horse Drawn Coaches 1800 Bw
http://slidepdf.com/reader/full/making-horse-drawn-coaches-1800-bw 91/455
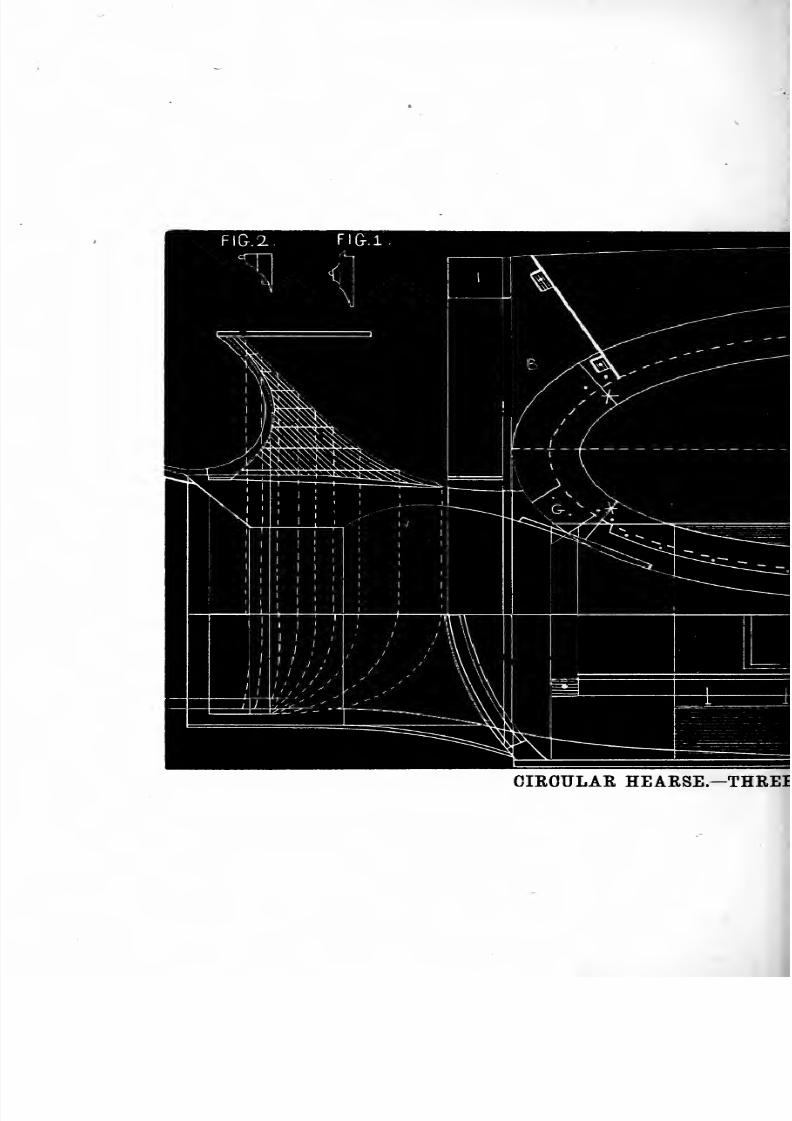
8/10/2019 Making Horse Drawn Coaches 1800 Bw
http://slidepdf.com/reader/full/making-horse-drawn-coaches-1800-bw 92/455
B ^^^^^S^^BB
1 SiH
iD^^^B^B^H
1^^
H i^^H
1 nHHHBQHHBli^H^H
BB^HOIROULAR HEAESE.-THEEI
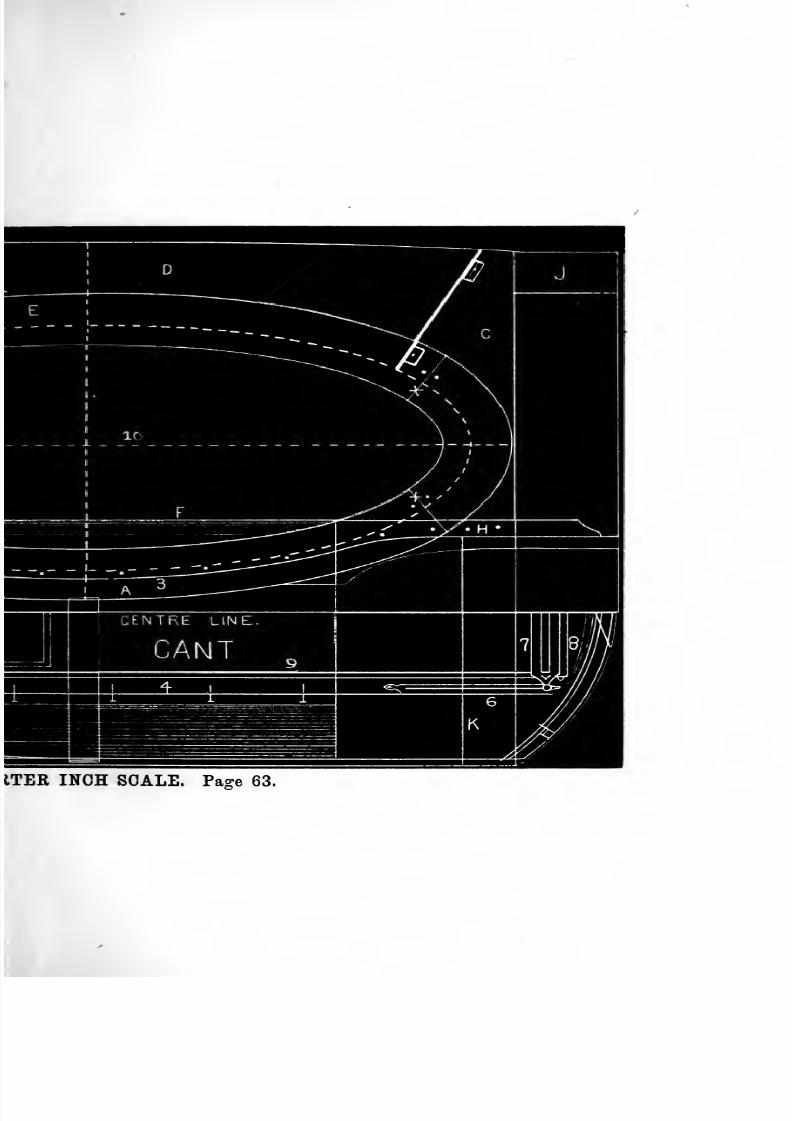
8/10/2019 Making Horse Drawn Coaches 1800 Bw
http://slidepdf.com/reader/full/making-horse-drawn-coaches-1800-bw 93/455
INCH SCALE
8/10/2019 Making Horse Drawn Coaches 1800 Bw
http://slidepdf.com/reader/full/making-horse-drawn-coaches-1800-bw 94/455
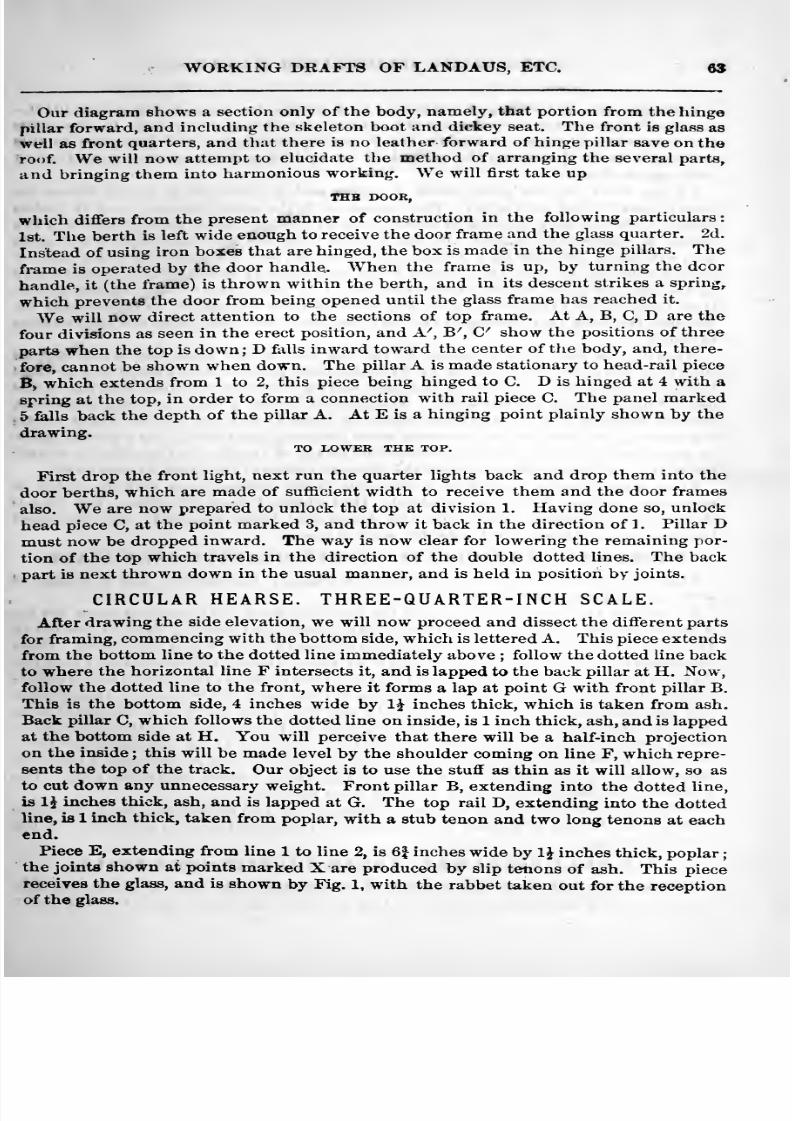
8/10/2019 Making Horse Drawn Coaches 1800 Bw
http://slidepdf.com/reader/full/making-horse-drawn-coaches-1800-bw 95/455
WORKING DRAFTS OF LANDAUS, ETC. 63
Our diagram shows a section only of the body, namely, that portion from the hinge
pillar forward, and including the skeleton boot and dickey seat. The front is glass as
well as frontquarters,
andthat there is no leather forward of hinge pillar save
on theroof. We will now attempt to elucidate the method of arranging the several parts^
and bringing them into harmonious working. We will first take up
THB DOOR,
wliich differs from the present manner of construction in the following particulars
1st. The berth is left wide enough to receive the door frame and the glass quarter. 2d.
Instead of using iron boxes that are hinged, the box is made in the hinge pillars. The
frame is operated by the door handle.. When the frame is up, by turning the door
handle, it (the frame) is thrown within the berth, and in its descent strikes a spring,
which prevents the door from being opened until the glass frame has reached it.
We will now direct attention to the sections of top frame. At A, B, C, D are the
four divisions as seen in the erect position, and A^, B^, C^ show the positions of three
parts when the top is down; D falls inward toward the center of the body, and, there-
fore, cannot be shown when down. The pillar A is made stationary to head-rail piece
B, which extends from 1 to 2, this piece being hinged to C. D is hinged at 4 with a
spring at the top, in order to form a connection with rail piece C. The panel marked
5 falls back the depth of the pillar A. At E is a hinging point plainly shown by the
drawing.
TO LOWER THE TOP.
First drop the front light, next run the quarter lights back and drop them into the
door berths, which are made of sufficient width to receive them and the door frames
also. We are now prepared to unlock the top at division 1. Having done so, unlock
head piece C, at the point marked 3, and throw it back in the direction of 1. Pillar Dmust now be dropped inward. The way is now clear for lowering the remaining por-
tion of the top which travels in the direction of the double dotted lines. The back
part is next thrown down in the usual manner, and is held in position by joints.
CIRCULAR HEARSE. THREE-QUARTER-INCH SCALE.After drawing the side elevation, we will now proceed and dissect the different parts
for framing, commencing with the bottom side, which is lettered A. This piece extends
from the bottom line to the dotted line immediately above ; follow the dotted line back
to where the horizontal line F intersects it, and is lapped to the back pillar at H. Now,follow the dotted line to the front, where it forms a lap at point G with front pillar B.
This is the bottom side, 4 inches wide by 1^ inches thick, which is taken from ash.
Back pillar C, which follows the dotted line on inside, is 1 inch thick, ash, and is lappedat the bottom side at H. You will perceive that there will be a half-inch projection
on the inside ; this will be made level by the shoulder coming on line F, which repre-
sents the top of the track. Our object is to use the stuff as thin as it will allow, so as
to cut down any unnecessary weight. Front pillar B, extending into the dotted line,
is IJ inches thick, ash, and is lapped at G. The top rail D, extending into the dottedline, is 1 inch thick, taken from poplar, with a stub tenon and two long tenons at eachend.
Piece E, extending from line 1 to line 2, is 6| inches wide by 1^ inches thick, poplarthe joints shown at points marked X are produced by slip tenons of ash. This piecereceives the glass, and is shown by Fig. 1, with the rabbet taken out for the reception
of the glass.
8/10/2019 Making Horse Drawn Coaches 1800 Bw
http://slidepdf.com/reader/full/making-horse-drawn-coaches-1800-bw 96/455
rt4 COACH-MAKERSV ILLUSTRATED HAND-BOOK.
The next piece to be applied is 3 inches by f ,poplar, the joints being at line 10 ; the
finishing of the center is by the use of a half-round molding, f by | inch. The concavea
and rounds are all shown at Fig. 1. Fig. 2, the top moldings. The first piece in this
molding is 5^ by If inches ; the second, 2^ by 1^ inches, finished with a half-round
molding, as shown.I is the front circular piece, width 6 inches, and 3 inches thick, which allows the
glass frames to pass each other. The bottom circle the same thickness, and 2\ inches
deep. J, the top back circle, is 6J inches deep by 2 inches thick, poplar, lapped in the
center, as represented in cant. On the bottom back bar the outer circle is the sameas J, extending into line K, is 2 inches thick, of ash, and is screwed to under part of
bottom side, and receives the circular doors, which are 1| inches thick. Next we take
up the concave piece, which extends from line F to line 3 ; it is 7 inches Square, poplar.
It is rabbeted into the bottom side, and screwed from the outside, as represented bythe dots, the back part resting on the back bar, the lower edge being the continuation
of line 3.
We will now turn your attention to the top view of the piece last mentioned, as
shown on the cant. Piece 4 is 3J by 2 inches thick, poplar ; this is glued and screwed
to the concave piece, as shown in the cant, leaving the track 9 inches from the center
line, 18 inches being the full width. The bottom boards f thick, running cross-wise,
grooved together and screwed from bottom of piece 4 ; 5 shows the lid, which covers
the opening left to draw oflf the water when cleansing the inside ; 6 is a slotted plate,in which plate 7 slides, which is screwed to the top of truck ; 8 is the roller ; 9 a half-
round iroA, which forms a track for the concave rollers of the truck to pass over.
From center line to outside of bottom side is 20^ inches, being half the width of
body, the molding of Fig. 1 to be added. Half width of boot, 15 inches. The boot is
shown free of hammer cloth, with the dickey-seat frame attached. The toe-board
brackets are not shown full length for want of space.
ROCKAWAY LANDAULETTE. THREE-QUARTER-INCH SCALE.
The accompanying diagram represents a Rockaway Landaulette, and is presented
with the latest improvements.To indicate the back position which the iron and wood-work assumes when the top
is up or thrown down, we would refer to explanation and working draft of Landau H.The joint which the molding J covers, is cut through to the hinging door pillar. Threefastenings are made and let into the circular pieces inside, represented by Fig. 3, also
three dowels between the joint to hold it even. Line K, shows the joint of the two circle
pieces. If the door wants to be cut, to bring it even with the front circle, these fasten-
ings and dowels have to be used to fasten to top door piece L. The molding will cover
the joint all around. If it is desired to ride with the front open, when the doors are cut
they have to be made so as to be taken off (as indicated at L) with the whole front.
When the front has been removed, the finish is made by pieces of white wood made the
shape of the top door and circle, with a molding around which covers the joint. Thesame dowel holes are made use of to hold it in its position.
For hanging the doors, use concealed hinges at top, and at bottom a hinge swept to
match it, so the pin will stand in a perpendicular position back and sidewise with the
concealed hinge.
SIX-SEAT ROCKAWAY. THREE-QUARTER-INCH SCALE.
This drawing will show the manner of constructing this class of work— the sideelevation being artistically drawn. By this we mean the outer, as well as the inner
8/10/2019 Making Horse Drawn Coaches 1800 Bw
http://slidepdf.com/reader/full/making-horse-drawn-coaches-1800-bw 97/455
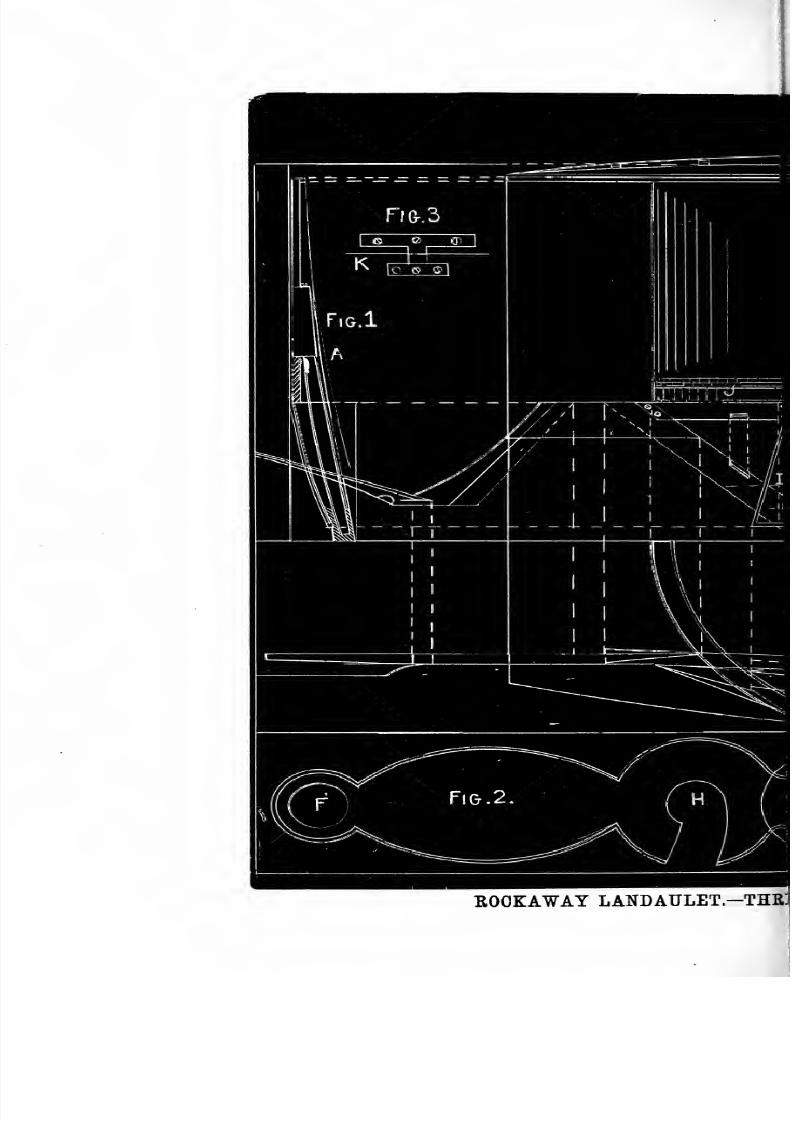
8/10/2019 Making Horse Drawn Coaches 1800 Bw
http://slidepdf.com/reader/full/making-horse-drawn-coaches-1800-bw 98/455
ROOKAWAY LATOAULET -THS:
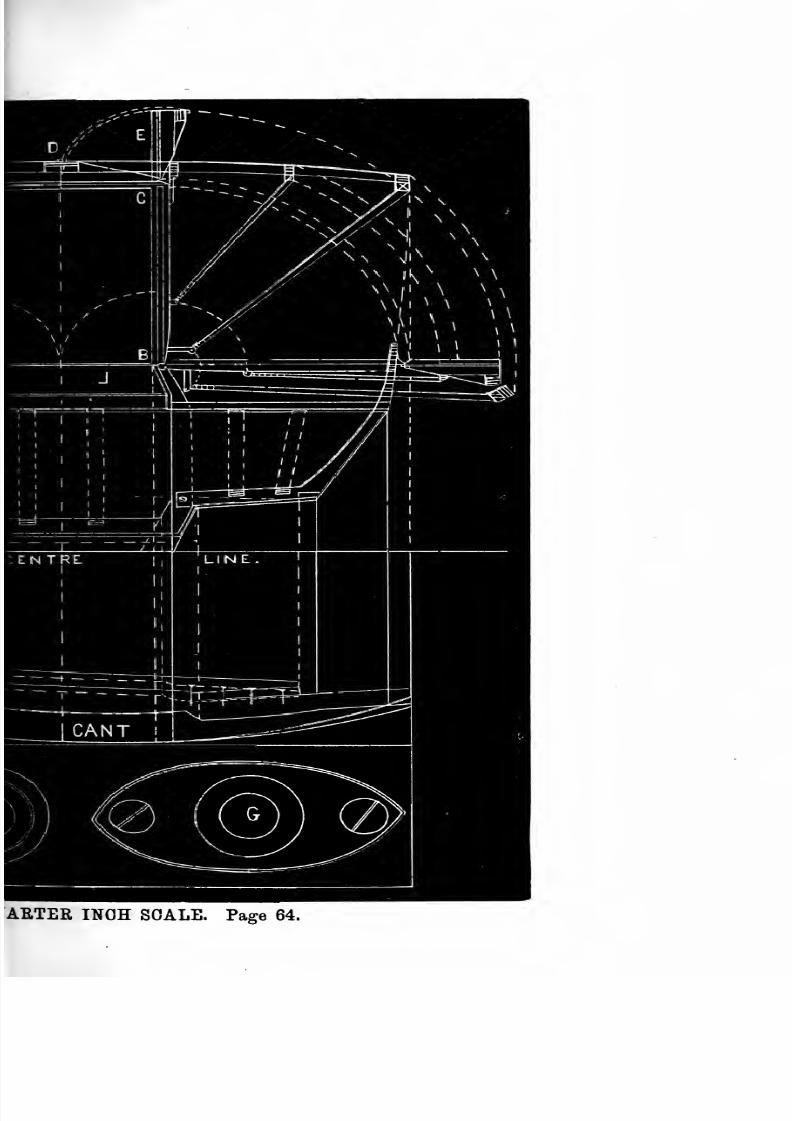
8/10/2019 Making Horse Drawn Coaches 1800 Bw
http://slidepdf.com/reader/full/making-horse-drawn-coaches-1800-bw 99/455
ARTER INOH SCALE. Page 64.
8/10/2019 Making Horse Drawn Coaches 1800 Bw
http://slidepdf.com/reader/full/making-horse-drawn-coaches-1800-bw 100/455
8/10/2019 Making Horse Drawn Coaches 1800 Bw
http://slidepdf.com/reader/full/making-horse-drawn-coaches-1800-bw 101/455

8/10/2019 Making Horse Drawn Coaches 1800 Bw
http://slidepdf.com/reader/full/making-horse-drawn-coaches-1800-bw 102/455
SIX-SEAT ROOKAWAY.-TH
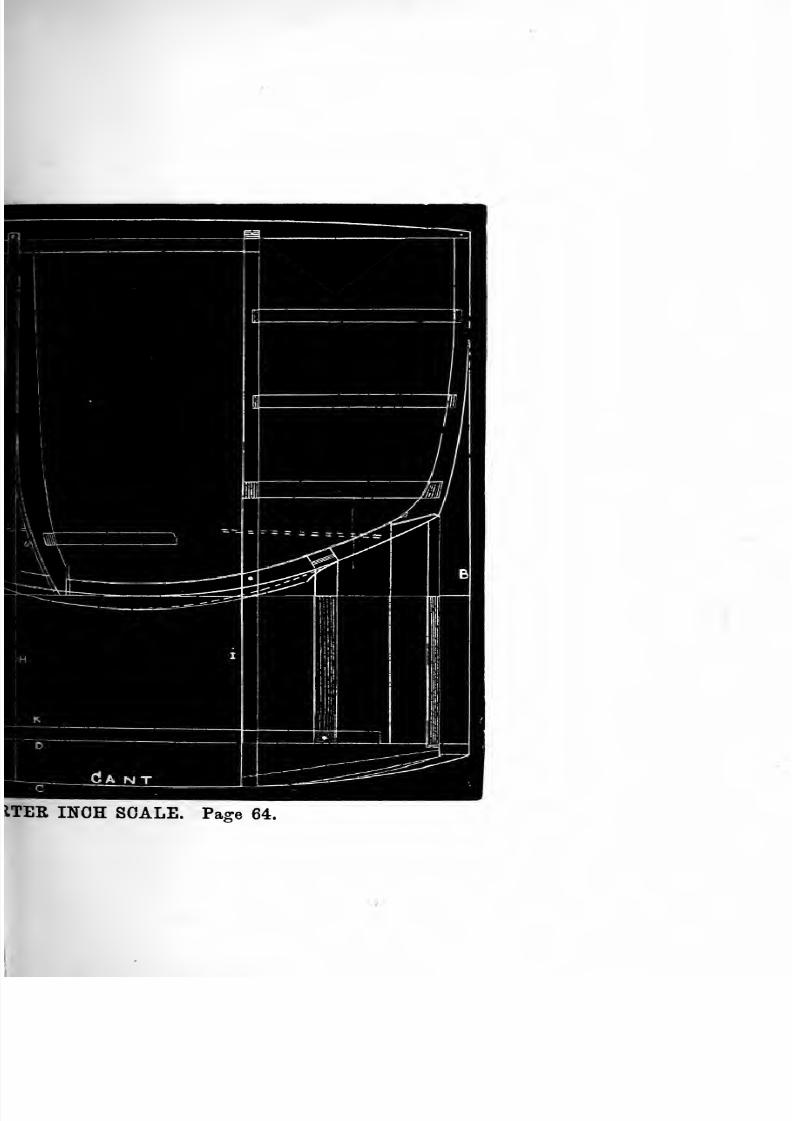
8/10/2019 Making Horse Drawn Coaches 1800 Bw
http://slidepdf.com/reader/full/making-horse-drawn-coaches-1800-bw 103/455
ITEE INCH SCALE. Pa^e 64.
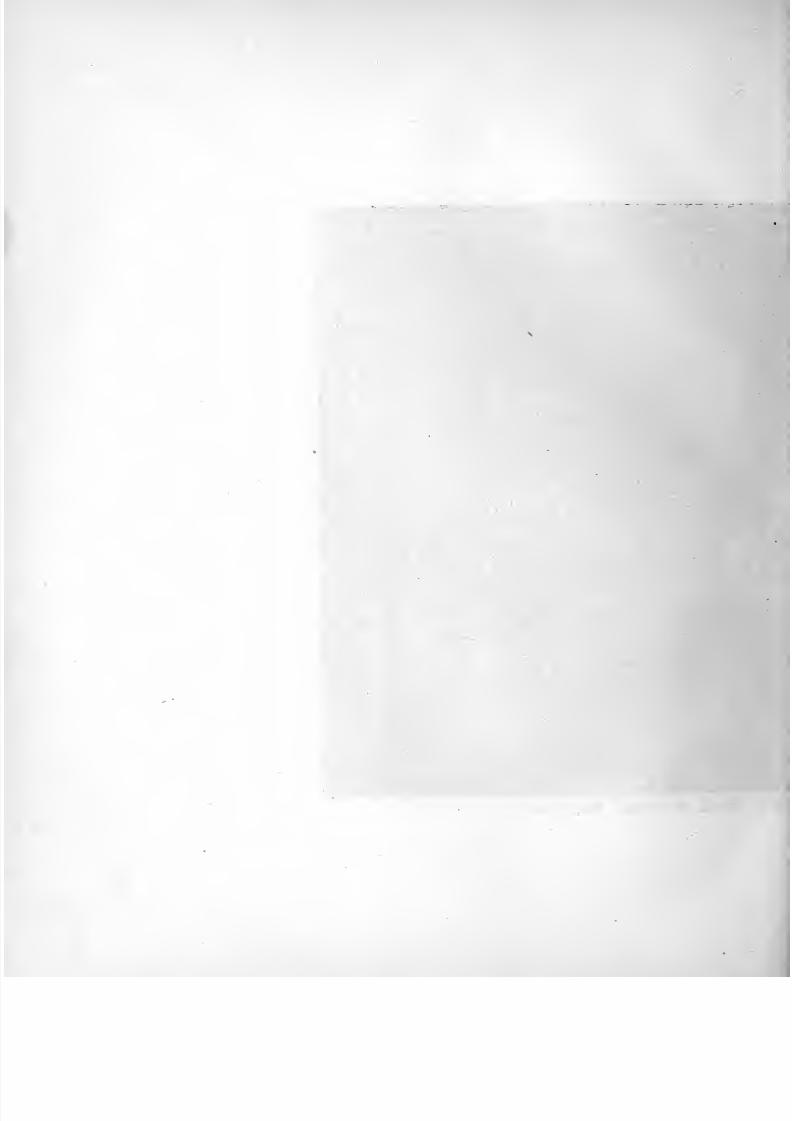
8/10/2019 Making Horse Drawn Coaches 1800 Bw
http://slidepdf.com/reader/full/making-horse-drawn-coaches-1800-bw 104/455

8/10/2019 Making Horse Drawn Coaches 1800 Bw
http://slidepdf.com/reader/full/making-horse-drawn-coaches-1800-bw 105/455
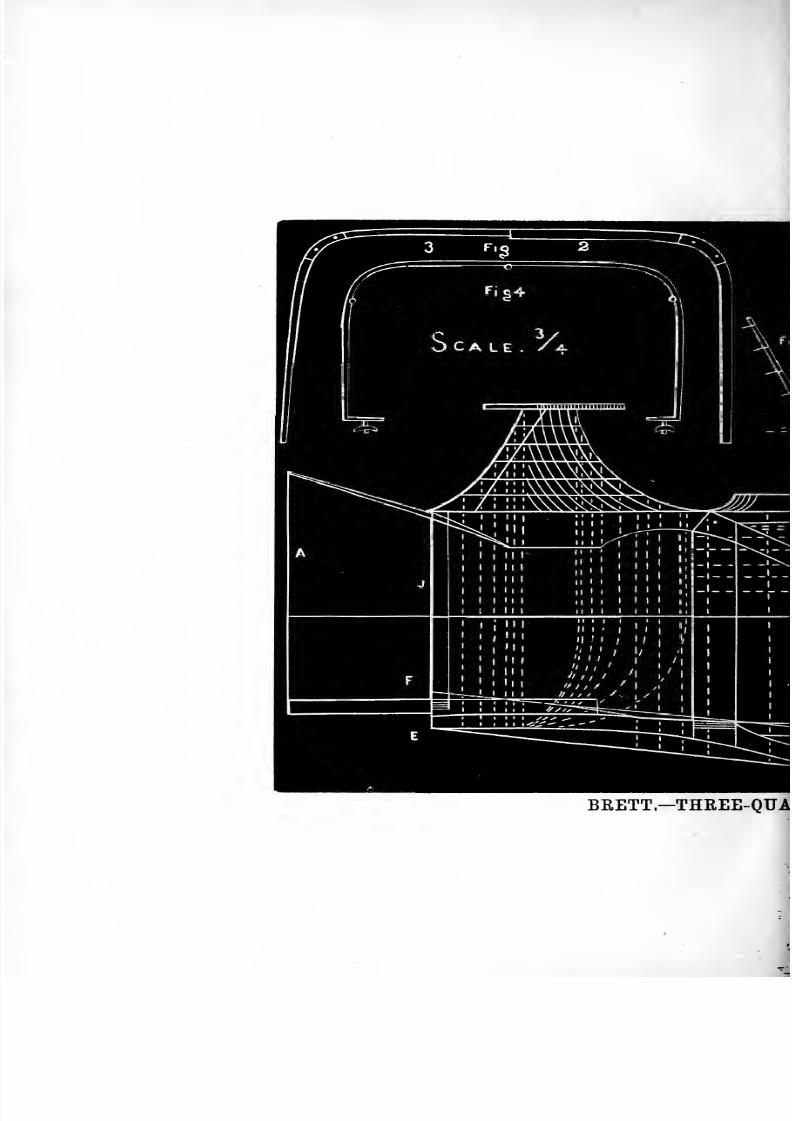
8/10/2019 Making Horse Drawn Coaches 1800 Bw
http://slidepdf.com/reader/full/making-horse-drawn-coaches-1800-bw 106/455
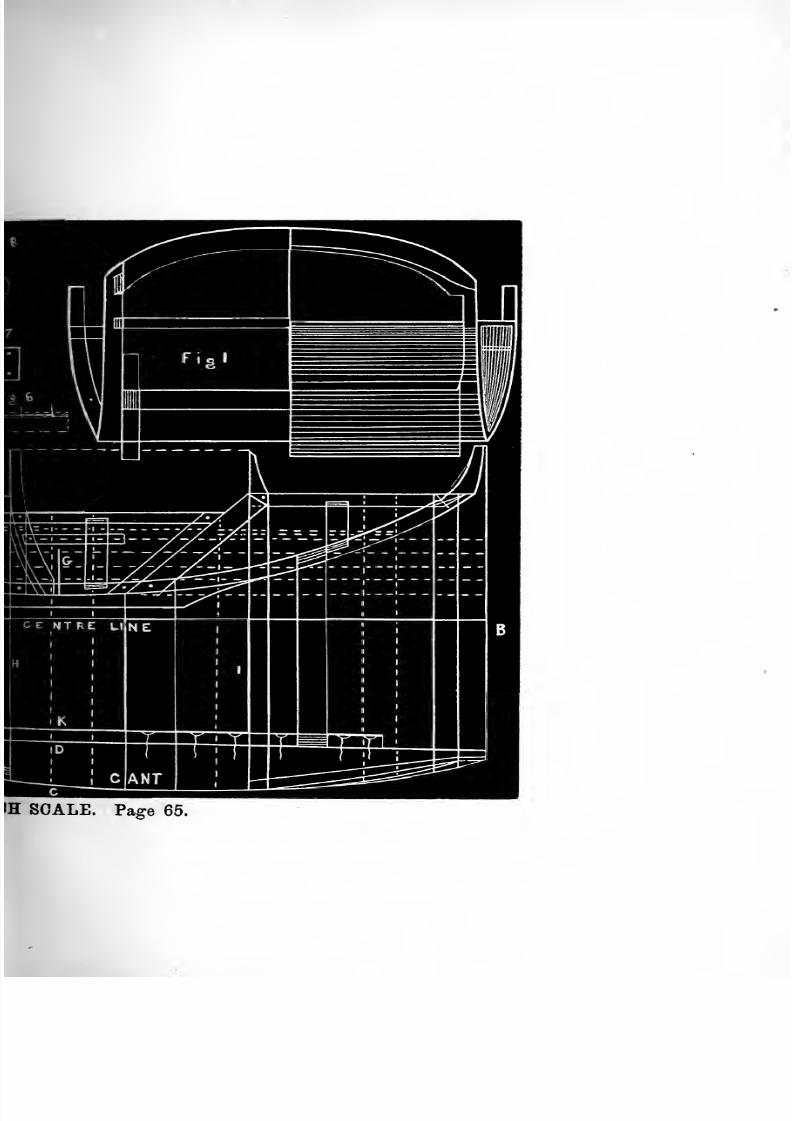
8/10/2019 Making Horse Drawn Coaches 1800 Bw
http://slidepdf.com/reader/full/making-horse-drawn-coaches-1800-bw 107/455
IH SCALE. Page 65.
8/10/2019 Making Horse Drawn Coaches 1800 Bw
http://slidepdf.com/reader/full/making-horse-drawn-coaches-1800-bw 108/455

8/10/2019 Making Horse Drawn Coaches 1800 Bw
http://slidepdf.com/reader/full/making-horse-drawn-coaches-1800-bw 109/455
WORKING DRAFTS OF LANDAUS, ETC. 65
or molding lines, to produce a correct piece of carriage architecture. In this we give
the latest and most improved manner of construction, doing away with the heavythickness of timber at the inside of the coupe pillar, lightening out clear to the bot-
tom side, thereby making, as the body-maker terms it, a better job. We also give
the manner of framing the front of door, doing away also with the deep rocker. This
frame-work is all paneled over, coming into a groove in the coupe pillar, making all
shoulders of the frame work to cross the grain of the panel. The scroll of pillar at
Jie cross line O is glued on when the body is being finished.
This body has 4^ inches turn-under, the doors shutting against the rocker. Thereshould be a berth cut into the bottom door rail, allowing the glass frame to drop as
near to the bottom of the rocker as possible ; this gives a low door panel.
The short bottom-side from the hinge pillar back, coming down to the bottom of the
rocker, the molding being boxed down, and the rocker being cut off, as represented bythe dotted lines, is for the purpose of bolting the iron pump-handle, or break, too, giving
it the appearance of growing out of the inside of the rocker. The rocker plates should
be 2J by ^-inch, with a flange to receive the cross stay for the cross spring, to take twobolts. It is also well to turn a corner on the back bar; this plate to be secured
with No. 20 screws, 4 inches apart.
You will now proceed to lay out the cant, which is from center line to roof-rail line
C, and from the top-rail line A to back-line B. Half the width of body on line B,
from center line to line C is 21 inches ; from the same points on line I, 26 inches
from same points on line H, 25J inches ; same on line A, 15 inches. This produces avery narrow front, at the same time it gives a wide front inside seat. This is obtained
in framing up ; in the bevel of the piece between the lines E and F, and as laid downin the cant, and shown by the front view of it in Fig. 2, it gives the carriage, whencompleted, a graceful and very stylish appearance.
The swelled panel at this point is produced by the grain running the same as the
lines drawn. We have given the width of the body at the difl'erent points, and also
have described our improved manner of construction. For establishing difl'erent lines
and points, we refer you to the French Rule.
Fig. 1 represents half view of the winter front. This is made with a wide centerrail, and fitted between the front pillars, and sawed in two at the dotted line. Thebottom part is made stationary, the top part dowled to it, and locked at the top, whichcan be removed for summer use.
BRETT. THREE-QUARTER-INCH SCALE.
You will perceive we have laid out the cant below the side elevation, for the pur-
pose of its being clearly understood.
The side elevation being artistically drawn, you will determine the turn-under,
which is three inchesand a
half,and also establish the depth of the
pillar,and
line
G, being the face of the bottom side ; this allows the doors to shut against the rocker.
Complete the patterns. Proceed and draw perpendicular lines A and B, the extremelength of the body, and also lines H and I ; then draw the horizontal center line.
Now lay out for the width of the body, which is 3 feet 11^ inches on line I. Proceedand measure from center line on line I 23| inches (this being half the width of thebody), and prick it off; this is one point of the establishment of line C. Measure off
on line H 22f inches, being another point for the establishment of line C. This con-
tracts the body two inches in the width of the door.
Take the dividers, place one point on line H, the other on line G ; having this space,
prick it off on lines H and I from the points last mentioned, which establii-hes line IV
8/10/2019 Making Horse Drawn Coaches 1800 Bw
http://slidepdf.com/reader/full/making-horse-drawn-coaches-1800-bw 110/455
COACH-MAKERS' ILLUSTRATED HAND-BOOK.
From these two points, lay the straight edge and draw line D. Measure If inches fromline D, and draw line K, which is the thickness of the rocker.
You will see by the diagram we have laid out the framing of the back pillar at the
arm rail, and also the framing of the back bar in the rocker, the same passing backsufficient to take two screws, making a much more durable job. Measure 1| inchesfrom line D on line B, and prick it off. Now proceed and lay out the width of boot,
which is 30 inches ; measure from the center line, on line J, 15 Inches, being half thewidth of boot.
Draw line G from the different points established as represented by the diagram.The belt or arm rail as before explained. The space between the two lines E and Frepresents the thickness of stuff required to form the concave boot, F line being theface, laid on the draft for pricking off.
In forming the round boot, use 2-inch white wood or poplar, one glued over theother, until the desired height is obtained. When cleaned off cover with raw hide or
linen.
Fig. 1 represents the back view, half paneled, half framed.
Fig. 2, half the front bow, the manner of framing. The two front bows should bethe same width ; the third, one inch narrow at the top, and so on, until the fifth bowis reached, which is Fig. 3, the back bow, which is the same width at the bottom, butthree inches narrow at the top. This contracts the bows with the sweep of the body
Fig. 4 represents the storm cover bow. This is made from half-inch round iron
use stump joints at the three different points for folding. This is secured to the backof the dickey seat with thumb nuts.
Fig. 5 represents the concealed hinge, with the crank up.
Fig. 6, with it down.Fig. 7, front view of the socket.
Fig. 8, side view, socket and crank attached.
In the construction of these hinges, there should be a wood model first made, for it
is necessary they should be exact, to work well, so as to prevent alteration afterward.
The sockets can be cast of brass, the crank made from the best wrought-iron,
FOUR-IN-HAND DRAG. THREE-QUARTER-INCH SCALE.This drawing represents side elevation and cant. The side elevation is drawn to the
I inch scale, and the manner of framing shown, with short bottom sides framing into the
lock and hinge pillar, the door shutting against the rocker. Panels put in a groove,
with deep chamfered moldings. Proceed by laying out the cant or working draft, bydrawing the center line, and also by squaring lines A and B.
Measure twenty inches from center line on lines A and B, and prick it off, whichestablishes two points on line C. Also half the width of the body, which is 40 inches
wide. Square lines D and E. Also draw line F. This line is established from the
points of line C by taking the space of the turn-under and depth of pillar, and prick it
off from the points of line C on lines A and B.
Measure on line D, from line F two inches, and prick it off, and also on line E fromthe same point. This establishes the four points of line C. This line can be swept with
an easy sweep, as shown in the diagram.
H and K shows the side flare of seats. This flare is obtained by the width required
for the bows, which is here laid out for 48 inches. The bows decrease in width, follow-
ing the variation of the seat line. The seat being narrowed behind, the bows should
be arranged accordingly, thus producing a top in harmony with the swell of the seat,
which are of the French pattern, with square corner. I and K shows the back and front
8/10/2019 Making Horse Drawn Coaches 1800 Bw
http://slidepdf.com/reader/full/making-horse-drawn-coaches-1800-bw 111/455
i
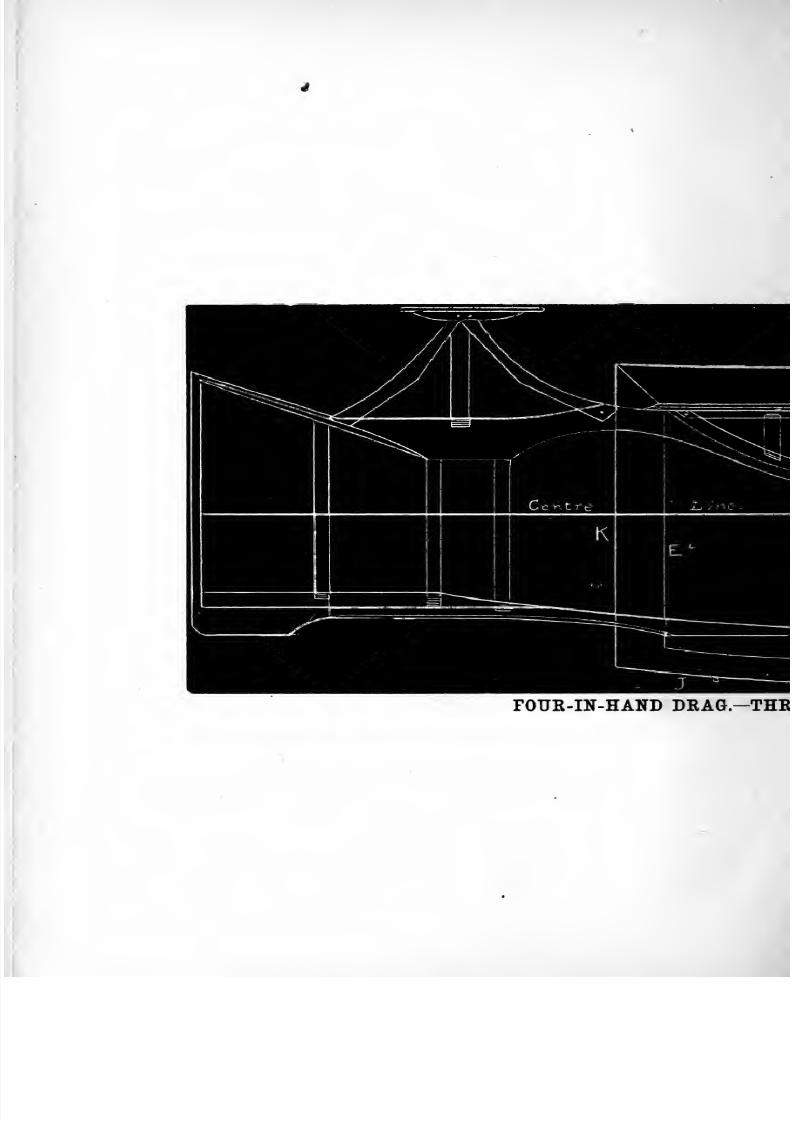
8/10/2019 Making Horse Drawn Coaches 1800 Bw
http://slidepdf.com/reader/full/making-horse-drawn-coaches-1800-bw 112/455
FOUR-IN-HAND DRAG.-THE
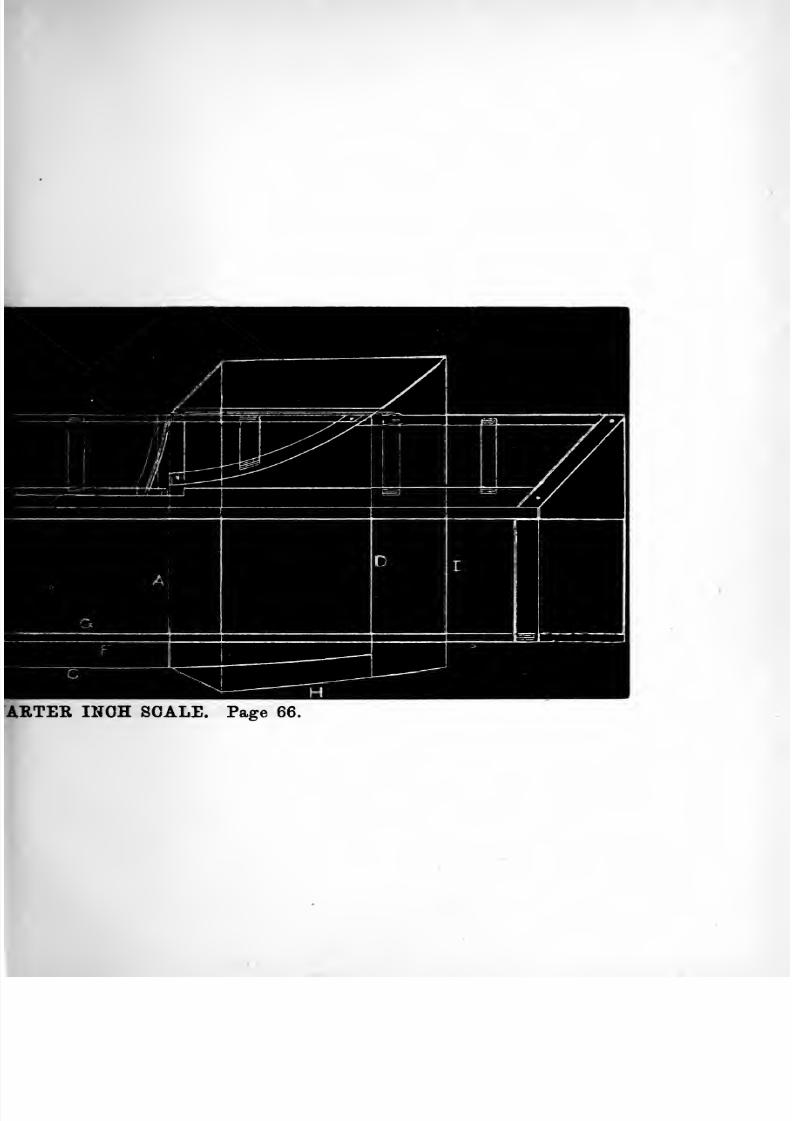
8/10/2019 Making Horse Drawn Coaches 1800 Bw
http://slidepdf.com/reader/full/making-horse-drawn-coaches-1800-bw 113/455
ARTER INOH SCALE. Page 66.
8/10/2019 Making Horse Drawn Coaches 1800 Bw
http://slidepdf.com/reader/full/making-horse-drawn-coaches-1800-bw 114/455
8/10/2019 Making Horse Drawn Coaches 1800 Bw
http://slidepdf.com/reader/full/making-horse-drawn-coaches-1800-bw 115/455
WORKING DRAFTS OF LANDAUS, ETC. 67
flare, and C the face of the rocker. The front is laid out for 28 inches, having a shght
concave ; also shows the manner of finishing the toe-board.
Thetop may be made either shifting or stationary. The stationary top has a high
wooden back, secured to the seat in the ordinary way. It is 22 inches high from the top
of the seat frame, and arched with wooden arm pieces, to which the trimming is attache<l.
The shifting top has the back and arm pieces secured to the rail by iron stays, which
admits of the whole being removed when required ; an extra back to be used for a no-top
presentation of this vehicle, fastened to the ordinary eyes.
For rocker plates use 2^ by ^ inch, and 2^ by | Bessemer steel. Half-inch steel should
be used in the door-way, running to the neck and any other weak points, but where
panels help to stiffen the work, use f inch steel. Turn a corner plate on to the back bar
this plate to be secured by No. 20 screws.
We have heard some objection to the use of Bessemer steel for the purposes named, but
where it has been used of a proper temper and sufficient weight, it is superior to iron, in
that it may be worked lighter than iron, and still contribute the requisite stiffness.
Rocker plates often fail to support the rocker because they are not properly bedded in
white lead, and securely screwed. The holes should be drilled to the exact size of the
body of the screws, and the heads sunk to the level of the rocker plate. The screws
should be, say four or four and a half inches apart.
SIX-SEAT EXTENSION-TOP PHAETON. THREE-QUARTER-INCH SCALE.
On next page we show the skeleton frame-work of side elevation and cant. We will di-rect attention first to the boot. It will be observed that we give a sectional view showingthe inside, whereas, in former drafts, we presented an outside view. The neck piece
of boot is taken from 1^-inch ash, and is paneled outside, giving a smooth surface for
painting. A B are the two holes cut in the neck piece from the inside to within aquarter of an inch of outer surface, to receive bolts for the carriage. The bolts are of
round iron, having square heads; they are inserted from beneath, the nuts beingdropped into the holes A and B before mentioned, and the wrench applied to the headof bolts ; C, in the side elevation, shows the inside view of toe-board bracket, and C in
the working draft the top view, which is concaved on the inside to receive the rockerplate. D shows the inside view of boot bracket, which is 2 inches thick, and is lappedfrom the inside of neck piece, falling back one inch from outside of panel, which re-
ceives the circular pieces 1, 2, 3, 4, 5, shouldered and lapped on the inside, making alevel surface on the outside with D. The joints are, of course, hidden by the canvaswith which the entire boot is covered. Next observe the point marked Fig. 1 gives
an inside view of the joint which supports the seat back, and shown in three positions.
When turned down the joint rests on top of the cushion.
Fig. 2 is the front view, showing the vertical line the joint must work on. These
joints can be laid out when the body is being drafted, thus furnishing the smith witha correct pattern to work from, as well as determining the width of end pieces of seat
lid. E indicates the standing pillar, showing a front view with turn-under ; shortbottom sides are formed into E, doors shutting against the rocker. The brake orpump-handle is a continuation of the rocker, the rockers being spliced at center ofdoor-way and at point marked F. In finishing the body there should be but onemolding, which is placed at the top of panels and passes around the body. The backpanel is mitered to the back quarter. Seats of the French pattern, square corners. Inpassing on to the working draft, the lines laid down are such as to require but a smallshare of attention compared
with theside
elevation.The center line is plainly marked, and at G the sweep of body is given, and H H
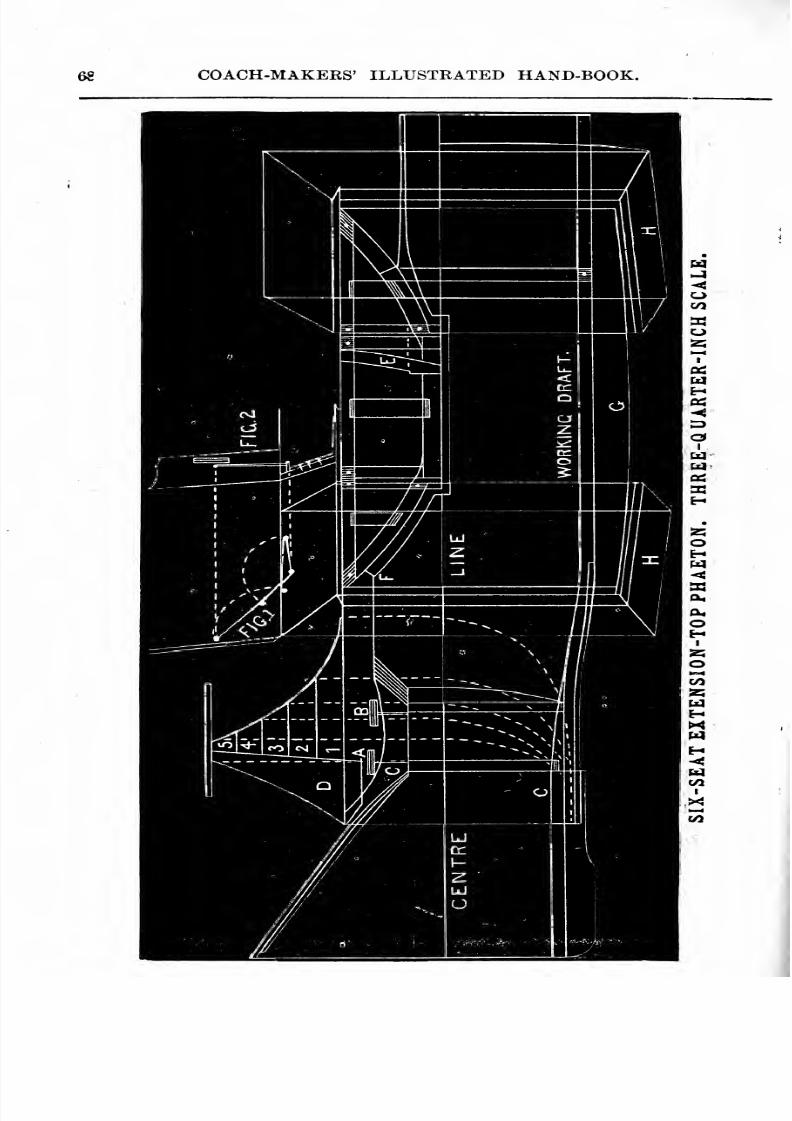
8/10/2019 Making Horse Drawn Coaches 1800 Bw
http://slidepdf.com/reader/full/making-horse-drawn-coaches-1800-bw 116/455
68 COACH-MAKEKS' ILLUSTRATED HAND-BOOK.
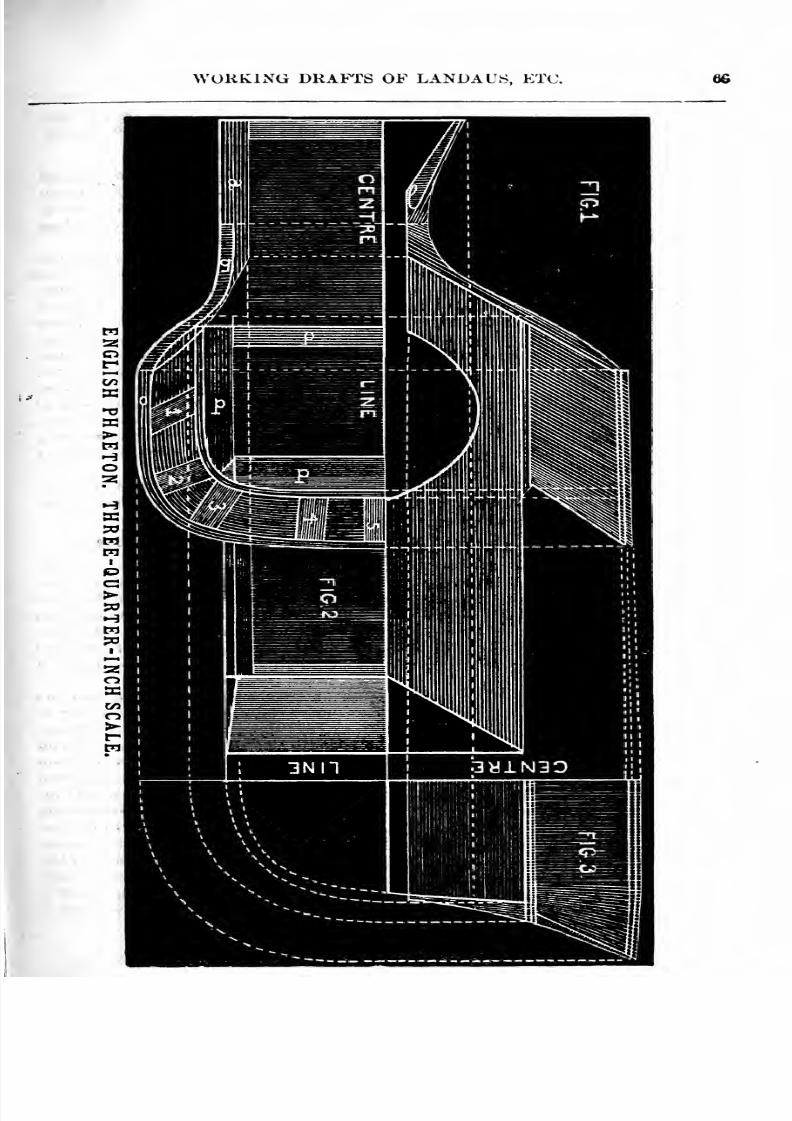
8/10/2019 Making Horse Drawn Coaches 1800 Bw
http://slidepdf.com/reader/full/making-horse-drawn-coaches-1800-bw 117/455
WORKING DRAFTS OF LANDAUS, ETC. 66
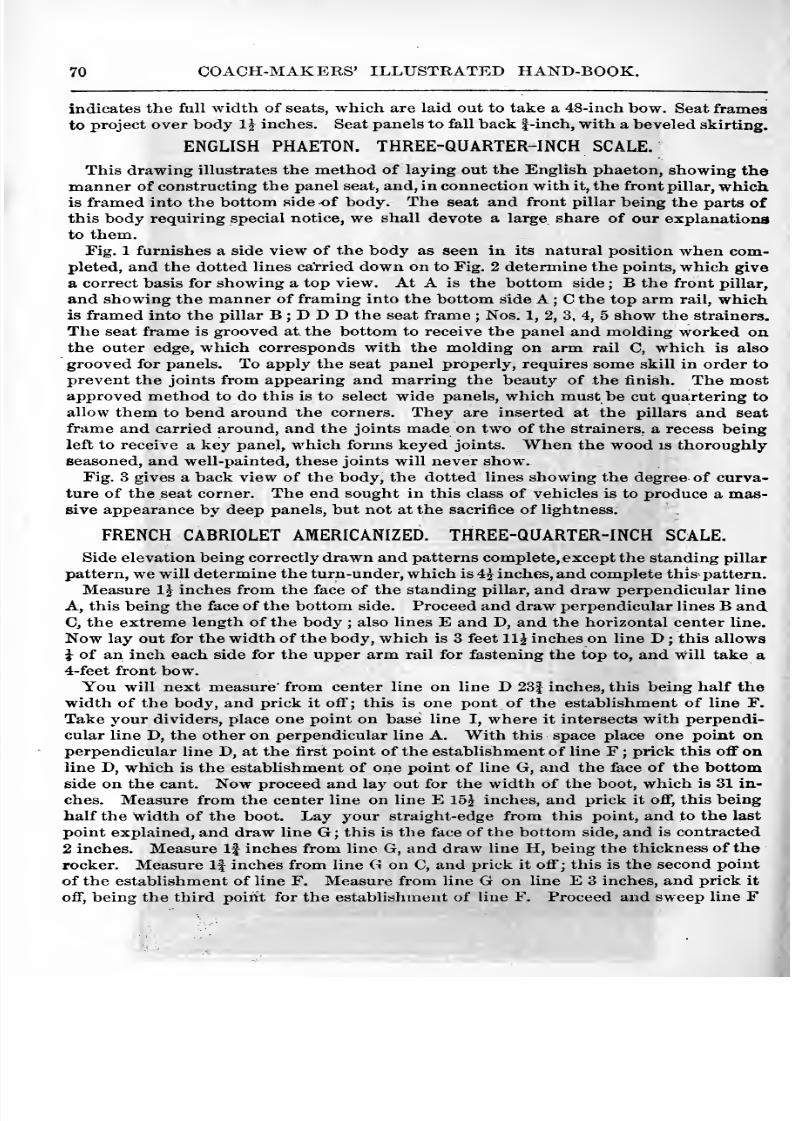
8/10/2019 Making Horse Drawn Coaches 1800 Bw
http://slidepdf.com/reader/full/making-horse-drawn-coaches-1800-bw 118/455
70 COACH-MAKEKS' ILLUSTRATED HAND-BOOK.
indicates the full width of seats, which are laid out to take a 48-inch bow. Seat frames
to project over body Ij inches. Seat panels to fall back |-inch, with a beveled skirting.
ENGLISH PHAETON. THREE-QUARTER-INCH SCALE.
This drawing illustrates the method of laying out the English phaeton, showing the
manner of constructing the panel seat, and, in connection with it, the front pillar, whichis framed into the bottom side of body. The seat and front pillar being the parts ofthis body requiring special notice, we shall devote a large share of our explanations
to them.Fig. 1 furnishes a side view of the body as seen in its natural position when com-
pleted, and the dotted lines carried down on to Fig. 2 determine the points, which give
a correct basis for showing a top view. At A is the bottom side ; B the front pillar,
and showing the manner of framing into the bottom side A ; C the top arm rail, whichis framed into the pillar B ; D D D the seat frame ; Nos. 1, 2, 3, 4, 5 show the strainers.
The seat frame is grooved at the bottom to receive the panel and molding worked onthe outer edge, which corresponds with the molding on arm rail C, which is also
grooved for panels. To apply the seat panel properly, requires some skill in order to
prevent the joints from appearing and marring the beauty of the finish. The mostapproved method to do this is to select wide panels, which must be cut quartering to
allow them to bend around the corners. They are inserted at the pillars and seat
frame and carried around, and the joints made on two of the strainers, a recess being
left to receive a key panel, which forms keyed joints. When the wood is thoroughlyseasoned, and well-painted, these joints will never show.
Fig. 3 gives a back view of the body, the dotted lines showing the degree of curva-
ture of the seat corner. The end sought in this class of vehicles is to produce a mas-sive appearance by deep panels, but not at the sacrifice of lightness.
FRENCH CABRIOLET AMERICANIZED. THREE-QQARTER-INCH SCALE.
Side elevation being correctly drawn and patterns complete, except the standing pillar
pattern, we will determine the turn-under, which is 4j inches, and complete this pattern.
Measure Ij inches from the face of the standing pillar, and draw perpendicular line
A, this being the face of the bottom side. Proceed and draw perpendicular lines B andG, the extreme length of the body ; also lines E and D, and the horizontal center line.
Now lay out for the width of the body, which is 3 feet 11^ inches on line D ; this allows
i of an inch each side for the upper arm rail for fastening the top to, and will take a4-feet front bow.
You will next measure' from center line on line D 23f inches, this being half the
width of the body, and prick it oft'; this is one pont of the establishment of line F.
Take your dividers, place one point on base line I, where it intersects with perpendi-
cular line D, the other on perpendicular line A. With this space place one point onperpendicular line D, at the first point of the establishment of line F ;
prick this off online D, which is the establishment of one point of line G, and the face of the bottomside on the cant. Now proceed and lay out for the width of the boot, which is 31 in-
ches. Measure from the center line on line E 15^ inches, and prick it oft , this being
half the width of the boot. Lay your straight-edge from this point, and to the last
point explained, and draw line G; this is the face of the bottom side, and is contracted
2 inches. Measure If inches from line G, and draw line H, being the thickness of the
rocker. Measure If inches from line G on C, and prick it oft'; this is the second point
of the establishment of line F. Measure from line G on line E 3 inches, and prick it
off , being the third point for the establishment of line F. Proceed and sweep line F
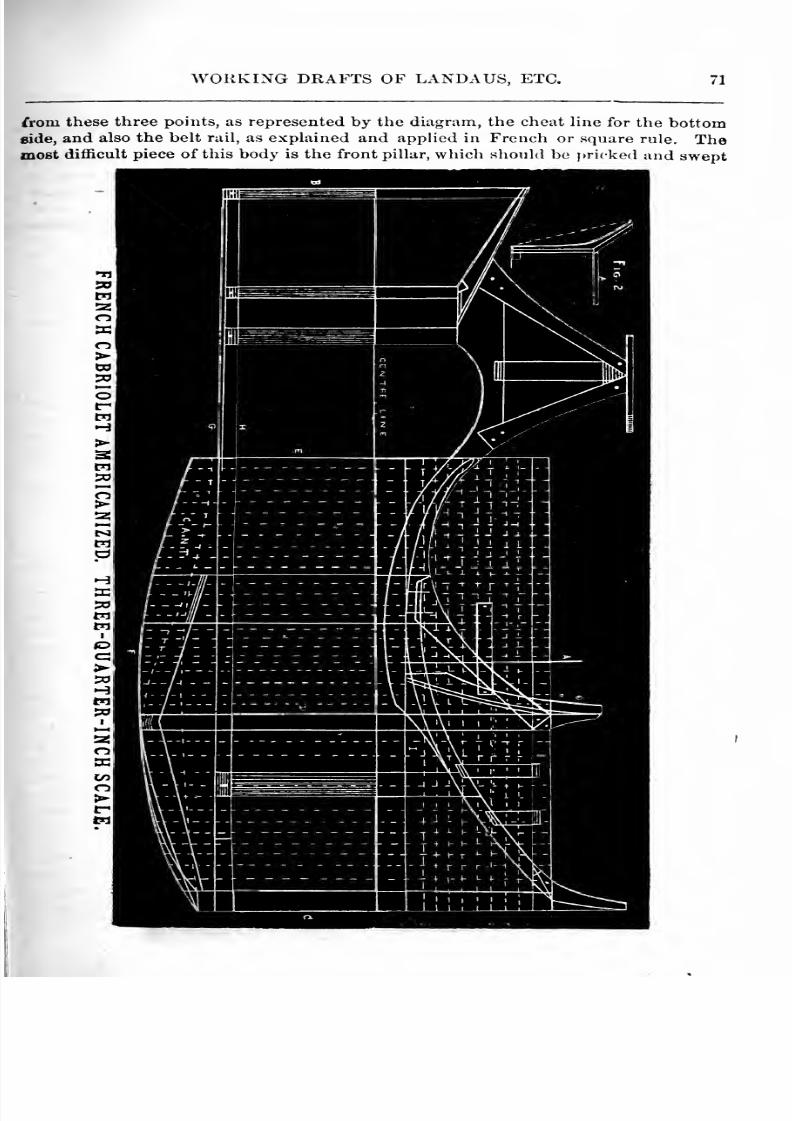
8/10/2019 Making Horse Drawn Coaches 1800 Bw
http://slidepdf.com/reader/full/making-horse-drawn-coaches-1800-bw 119/455
WORKING DRAFTS OF LANDAUS, ETC. 71
from these three points, as represented by the diagram, the cheat line for the bottomside, and also the belt rail, as explained and applied in French or square rule. Themost difficult piece of this body is the front pillar, which should be pricked and swept
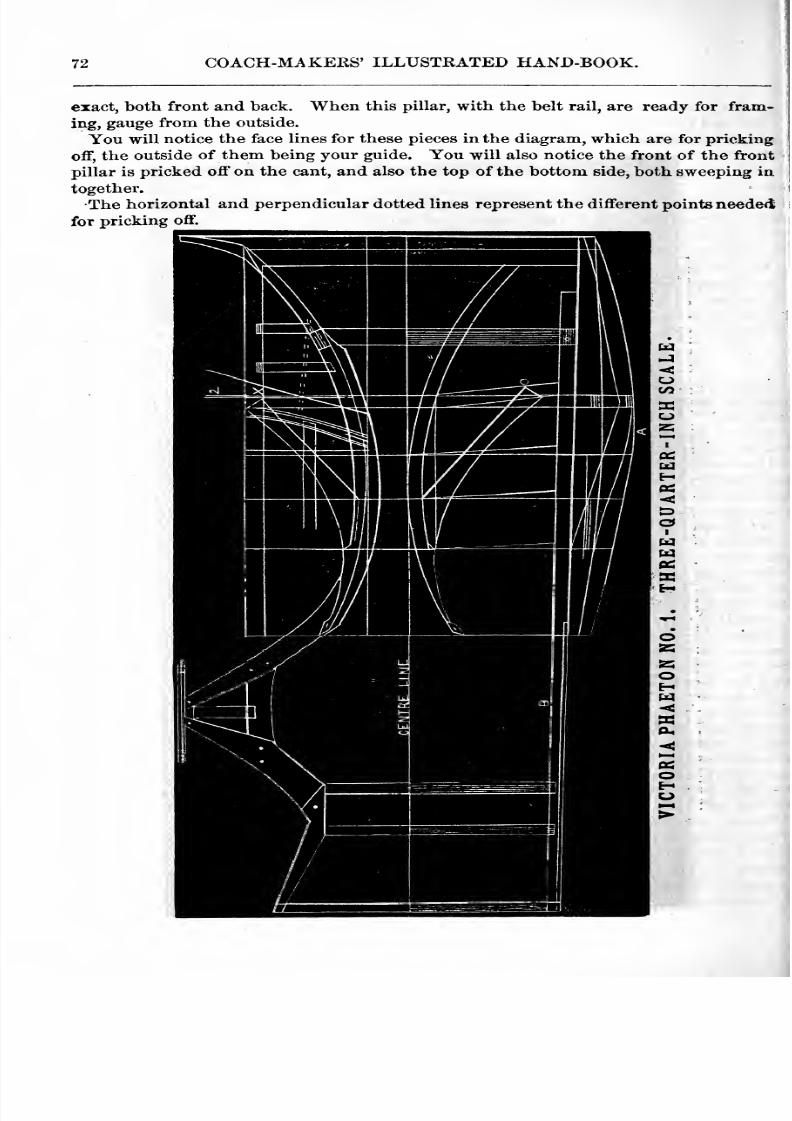
8/10/2019 Making Horse Drawn Coaches 1800 Bw
http://slidepdf.com/reader/full/making-horse-drawn-coaches-1800-bw 120/455
72 COACH-MAKERS' ILLUSTRATED HAND-BOOK.
exact, both front and back. When this pillar, with the belt rail, are ready for fram-
ing, gauge from the outside.
You will notice the face lines for these pieces in the diagram, which are for pricking
off, the outside of them being your guide. You will also notice the front of the front
pillar is pricked off on the cant, and also the top of the bottom side, both sweeping in
together.
The horizontal and perpendicular dotted lines represent the different points neede<l
for pricking off.
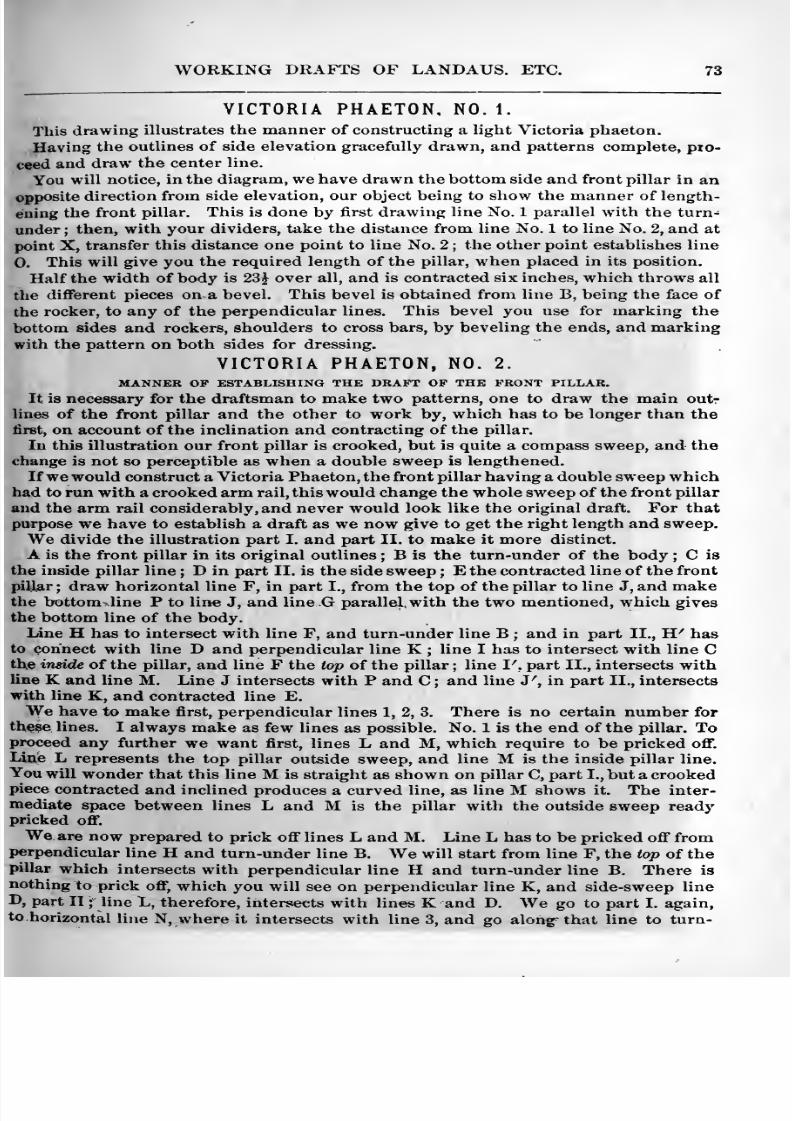
8/10/2019 Making Horse Drawn Coaches 1800 Bw
http://slidepdf.com/reader/full/making-horse-drawn-coaches-1800-bw 121/455
WORKING DRAFTS OF LANDAUS. ETC. 73
VICTORIA PHAETON, NO. 1.
This drawing illustrates the manner of constructing a light Victoria phaeton.
Having the outlines of side elevation gracefully drawn, and patterns complete, pio-ceed and draw the center line.
You will notice, in the diagram, we have drawn the bottom side and front pillar in anopposite direction from side elevation, our object being to show the manner of length-
ening the front pillar. This is done by first drawing line No. 1 parallel with the turn-
under ; then, with your dividers, take the distance from line No. 1 to line No. 2, and at
point X, transfer this distance one point to line No. 2 ; the other point establishes line
0. This will give you the required length of the pillar, when placed in its position.
Half the width of body is 23 J over all, and is contracted six inches, which throws all
the diflferent pieces on a bevel. This bevel is obtained from line B, being the face ofthe rocker, to any of the perpendicular lines. This bevel you use for marking the
bottom sides and rockers, shoulders to cross bars, by beveling the ends, and markingwith the pattern on both sides for dressing.
VICTORIA PHAETON, NO. 2.
MANNER OP ESTABLISHING THE DRAFT OF THE FRONT PILLAR.
It is necessary for the draftsman to make two patterns, one to draw the main out?
lines of the front pillar and the other to work by, which has to be longer than thefirst, on account of the inclination and contracting of the pillar.
In this illustration our front pillar is crooked, but is quite a compass sweep, and thechange is not so perceptible as when a double sweep is lengthened.
If we would construct a Victoria Phaeton, the front pillar having a double sweep whichhad to run with a crooked arm rail, this would change the whole sweep of the front pillar
and the arm rail considerably, and never would look like the original draft. For that
purpose we have to establish a draft as we now give to get the right length and sweep.We divide the illustration part I. and part II. to make it more distinct.
A is the front pillar in its original outlines ; B is the turn-under of the body ; C is
the inside pillar line ; D in part II. is the side sweep ; E the contracted line of the front
pillar ; draw horizontal line F, in part I., from the top of the pillar to line J, and makethe bottom line P to line J, and line.G parallel. with the two mentioned, which givesthe bottom line of the body.
Line H has to intersect with line F, and turn-under line B ; and in part II., H'' hasto connect with line D and perpendicular line K ; line I has to intersect with line Gthe inside of the pillar, and line F the top of the pillar ; line V, part II., intersects withline K and line M. Line J intersects with P and C ; and line J^, in part II., intersects
with line K, and contracted line E.
We have to make first, perpendicular lines 1, 2, 3. There is no certain number for
these lines. I always make as few lines as possible. No. 1 is the end of the pillar. To
proceed any further we want first, lines L and M, which require to be pricked oflT.
Line L represents the top pillar outside sweep, and line M is the inside pillar line.
You will wonder that this line M is straight as shown on pillar C, part I., but a crookedpiece contracted and inclined produces a curved line, as line M shows it. The inter-
mediate space between lines L and M is the pillar with the outside sweep readypricked oflf.
We are now prepared to prick off lines L and M. Line L has to be pricked off fromperpendicular line H and turn-under line B. We will start from line F, the top of thepillar which intersects with perpendicular line H and turn-under line B. There is
nothing to prick off, which you will see on perpendicular line K, and side-sweep line
D, part II ; line L, therefore, intersects with lines K and D. We go to part I. again,to horizontal line N, where it intersects with line 3, and go along^ that line to turn-

8/10/2019 Making Horse Drawn Coaches 1800 Bw
http://slidepdf.com/reader/full/making-horse-drawn-coaches-1800-bw 122/455
74 COACH-MAKERS' ILLUSTRATED HAND-BOOK.
under line B, take the intermediate space between lines H, and turn-under line B, andput it on line 3, part IL, from side-sweep line D, to line L.
We proceed to line 2, part L, where it intersects with line O, and go along that lineuntil we reach line B ; take the intermediate space between lines H and B, and put it
on line 2, part II., between side-sweep lines D and L, next to line 1, part I., where it
mtersects with line P ; go along that line to B ; take the space between lines H and B
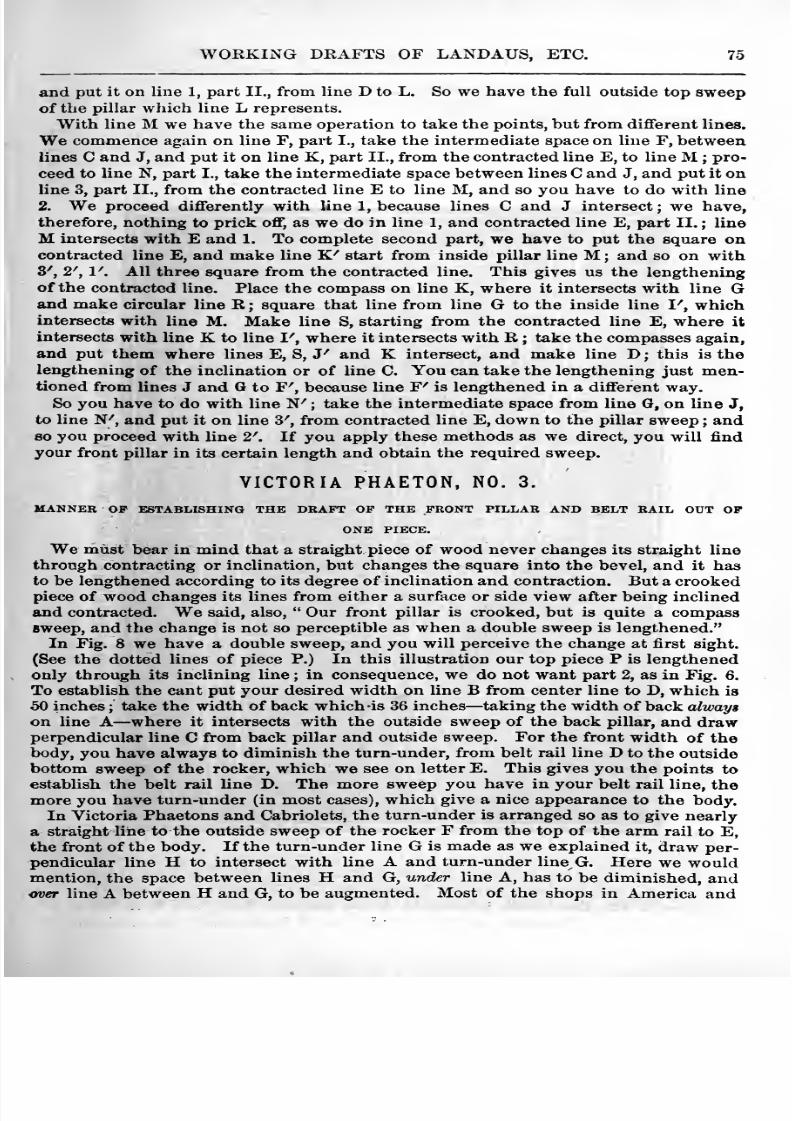
8/10/2019 Making Horse Drawn Coaches 1800 Bw
http://slidepdf.com/reader/full/making-horse-drawn-coaches-1800-bw 123/455
WORKING DRAFTS OF LANDAUS, ETC. 75
and put it on line 1, part II., from line D to L, So we have the full outside top sweepof the pillar which line L represents.
With line Mwe have the same operation to take the points, but from different lines.
We commence again on line F, part I., take the intermediate space on line F, betweenlines C and J, and put it on line K, part II., from the contracted line E, to line M ;
pro-
ceed to line N, part I., take the intermediate space between lines C and J, and put it online 3, part II., from the contracted line E to line M, and so you have to do with line
2. We proceed differently with line 1, because lines C and J intersect; we have,
therefore, nothing to prick off, as we do in line 1, and contracted line E, part II. ; line
M intersects with E and 1. To complete second part., we have to put the square oncontracted line E, and make line K'' start from inside pillar line M ; and so on with3', 2', y. All three square from the contracted line. This gives us the lengtheningof the contracted line. Place the compass on line K, where it intersects with line Gand make circular line R ; square that line from line G to the inside line V, whichintersects with line M. Make line S, starting from the contracted line E, where it
intersects with line K to line V, where it intersects with R ; take the compasses again,
and put them where lines E, S, J^ and K intersect, and make line D ; this is the
lengthening of the inclination or of line C. You can take the lengthening just men-tioned from lines J and G to F'', because line F'' is lengthened in a different way.
So you have to do with line N'' ; take the intermediate space from line G, on line J,
to line N'', and put it on line S% from contracted line E, down to the pillar sweep ; and80 you proceed with line 2'. If you apply these methods as we direct, you will find
your front pillar in its certain length and obtain the required sweep.
VICTORIA PHAETON, NO. 3.
MANNER OP ESTABLISHING THE DRAFT OF THE FRONT PILLAR AND BELT RAIL OUT OP
ONE PIECE.
We must bear in mind that a straight piece of wood never changes its straight line
through contracting or inclination, but changes th« square into the bevel, and it hasto be lengthened according to its degree of inclination and contraction. But a crooked
piece of wood changes its lines from either a surface or side view after being inclinedand contracted. We said, also, Our front pillar is crooked, but is quite a compasssweep, and the change is not so perceptible as when a double sweep is lengthened.
In Fig. 8 we have a double sweep, and you will perceive the change at first sight.
(See the dotted lines of piece P.) In this illustration our top piece P is lengthenedonly through its inclining line ; in consequence, we do not want part 2, as in Fig. 6.
To establish the cant put your desired width on line B from center line to D, which is
50 inches ; take the width of back which is 36 inches —taking the width of back always
on line A—where it intersects with the outside sweep of the back pillar, and drawperpendicular line C from back pillar and outside sweep. For the front width of thebody, you have always to diminish the turn-under, from belt rail line D to the outside
bottom sweep of the rocker, which we see on letter E. This gives you the points to
establish the belt rail line D. The more sweep you have in your belt rail line, themore you hav« turn-under (in most cases), which give a nice appearance to the body.
In Victoria Phaetons and Cabriolets, the turn-under is arranged so as to give nearly
a straight line to the outside sweep of the rocker F from the top of the arm rail to E,
the front of the body. If the turn-under line G is made as we explained it, draw per-
pendicular line H to intersect with line A and turn-under line G. Here we wouldmention, the space between lines H and G, under line A, has to be diminished, and
over line A between H and G, to be augmented. Most of the shops in America and
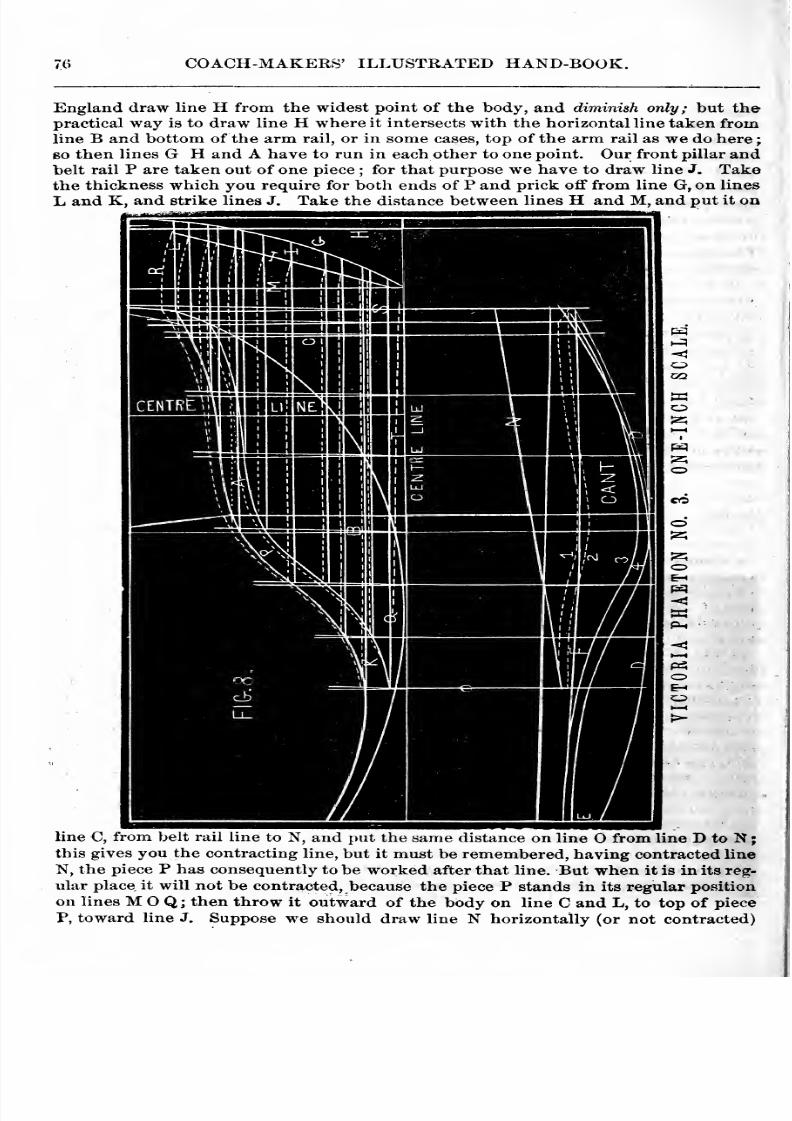
8/10/2019 Making Horse Drawn Coaches 1800 Bw
http://slidepdf.com/reader/full/making-horse-drawn-coaches-1800-bw 124/455
7« COACH-MAKERS' ILLUSTRATED HAND-BOOK.
England draw line H from the widest point of the body, and diminish only; but thepractical way is to draw line H where it intersects with the horizontal line taken fromline B and bottom of the arm rail, or in some cases, top of the arm rail as we do here;
80 then lines G H and A have to run in each other to one point. Our front pillar andbelt rail P are taken out of one piece ; for that purpose we have to draw line J. Takethe thickness which you require for both ends of P and prick off from line G, on lines
L and K, and strike lines J. Take the distance between lines H and M, and put it on
ill
line C, from belt rail line to N, and put the same distance on line from line D to Nthis gives you the contracting line, but it must be remembered, having contracted line
N, the piece P has consequently to be worked after that line. But when it is in its reg-
ular place it will not be contracted, because the piece P stands in its regular position
on lines MO Q ; then throw it outward of the body on line C and L, to top of piece
P, toward line J. Suppose we should draw line N horizontally (or not contracted)
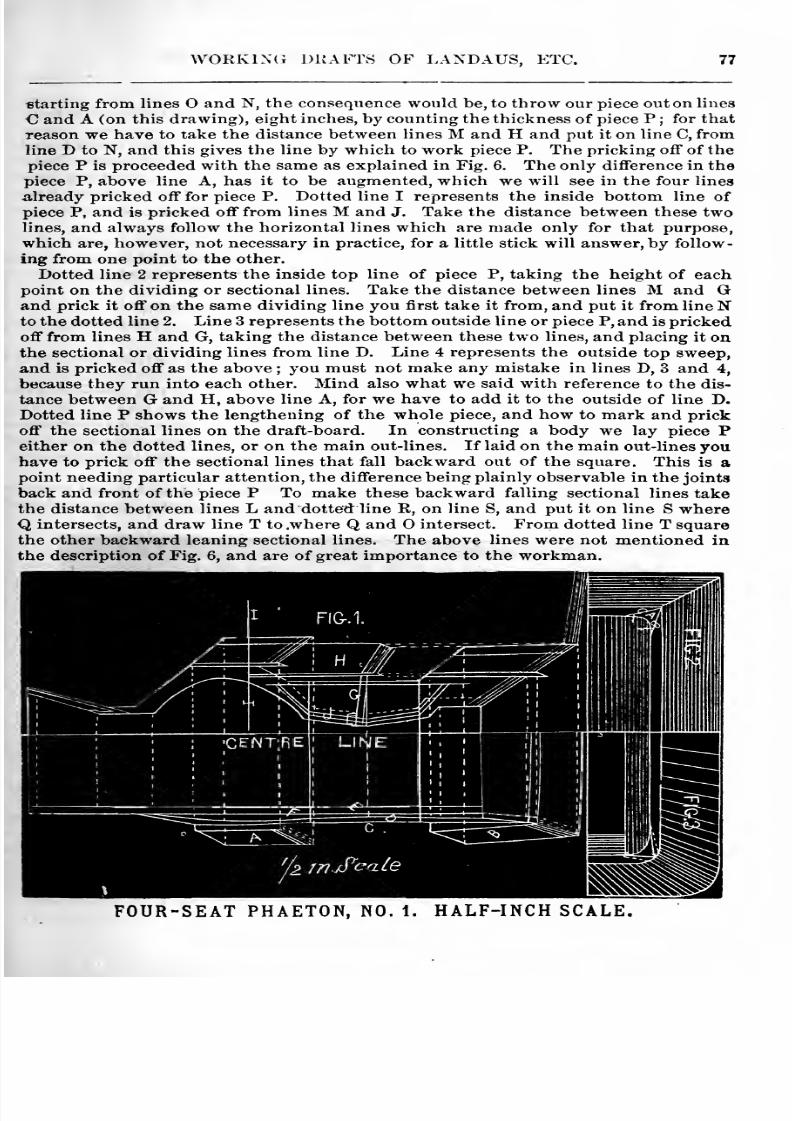
8/10/2019 Making Horse Drawn Coaches 1800 Bw
http://slidepdf.com/reader/full/making-horse-drawn-coaches-1800-bw 125/455
W0RK1N(; DRAFTS OF LANDAUS, ETC. 77
fitarting from lines and N, the consequence would be, to throw our piece out on lines
and A (on this drawing), eight inches, by counting the thickness of piece P ; for that
reason we have to take the distance between lines M and H and put it on line C, from
line D to N, and this gives the line by which to work piece P. The pricking off of thepiece P is proceeded with the same as explained in Fig. 6. The only difference in the
piece P, above line A, has it to be augmented, which we will see in the four lines
already pricked off for piece P. Dotted line I represents the inside bottom line of
piece P, and is pricked off from lines M and J. Take the distance between these twolines, and always follow the horizontal lines which are made only for that purpose,
which are, however, not necessary in practice, for a little stick will answer, by follow-
ing from one point to the other.
Dotted line 2 represents the inside top line of piece P, taking the height of eachpoint on the dividing or sectional lines. Take the distance between lines M and Gand prick it off on the same dividing line you first take it from, and put it from line Nto the dotted line 2. Line 3 represents the bottom outside line or piece P, and is prickedoff from lines H and G, taking the distance between these two lines, and placing it onthe sectional or dividing lines from line D. Line 4 represents the outside top sweep,and is pricked off as the above ;
you must not make any mistake in lines D, 3 and 4,
because they run into each other. Mind also what we said with reference to the dis-
tance between G and H, above line A, for we have to add it to the outside of line D.Dotted line P shows the lengthening of the whole piece, and how to mark and prick
off the sectional lines on the draft-board. In constructing a body we lay piece Peither on the dotted lines, or on the main out-lines. If laid on the main out-lines youhave to prick off the sectional lines that fall backward out of the square. This is apoint needing particular attention, the difference being plainly observable in the joints
back and front of the piece P To make these backward falling sectional lines takethe distance between lines L and dotted line R, on line S, and put it on line S whereQ intersects, and draw line T to .where Q and O intersect. From dotted line T squarethe other backward leaning sectional lines. The above lines were not mentioned inthe description of Fig. 6, and are of great importance to the workman.
'CENT'REI' LIME
'k fnjfcale
FOUR-SEAT PHAETON, NO. 1. HALF-INCH SCALE.
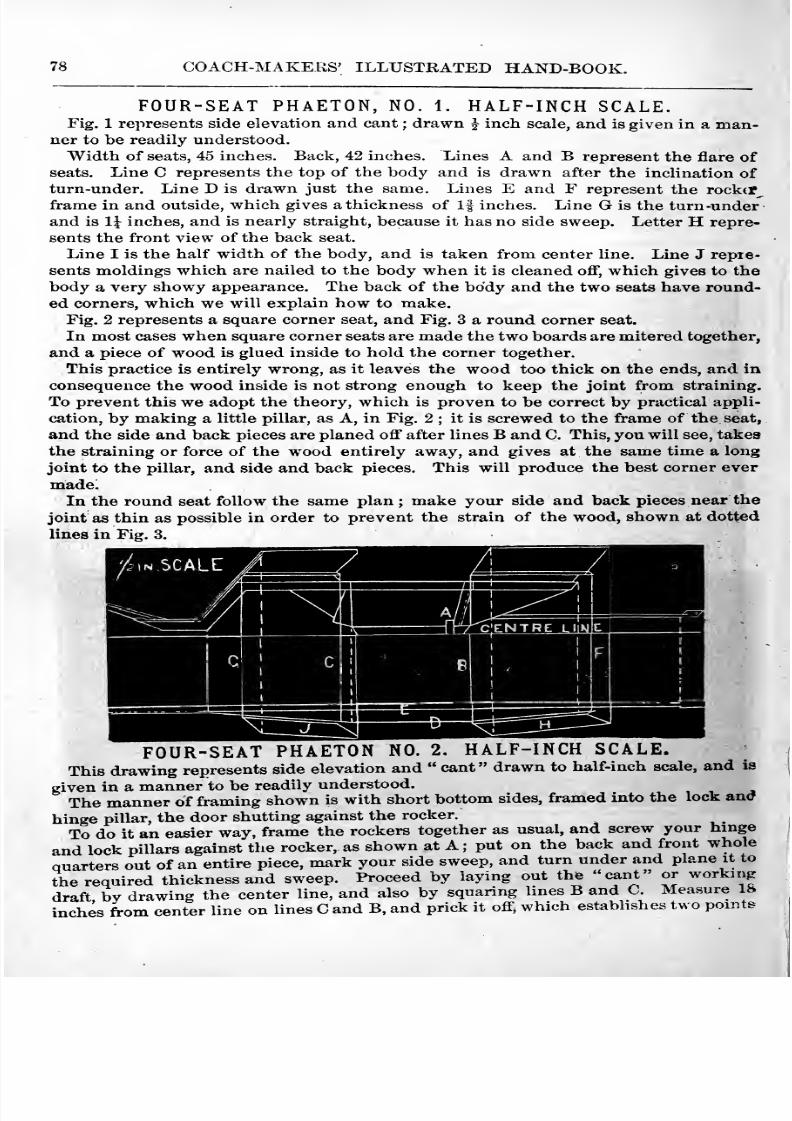
8/10/2019 Making Horse Drawn Coaches 1800 Bw
http://slidepdf.com/reader/full/making-horse-drawn-coaches-1800-bw 126/455
78 COACH-MAKERS' ILLUSTRATED HAND-BOOK.
FOUR-SEAT PHAETON, NO. 1. HALF-INCH SCALE.Fig. 1 represents side elevation and cant ; drawn 2^ inch scale, and is given in a man-
ner to be readily understood.
Width of seats, 45 inches. Back, 42 inches. Lines A and B represent the flare of
seats. Line C represents the top of the body and is drawn after the inclination of
turn-under. Line D is drawn just the same. Lines E and F represent the rock(f
frame in and outside, which gives a thickness of If inches. Line G is the turn -under
and is 1^ inches, and is nearly straight, because it has no side sweep. Letter H repre-
sents the front view of the back seat.
Line I is the half width of the body, and is taken from center line. Line J repre-
sents moldings which are nailed to the body when it is cleaned off, which gives to the
body a very showy appearance. The back of the body and the two seats have round-
ed corners, which we will explain how to make.Fig. 2 represents a square corner seat, and Fig. 3 a round corner seat.
In most cases when square corner seats are made the two boards are mitered together,
and a piece of w^ood is glued inside to hold the corner together.
This practice is entirely wrong, as it leaves the wood too thick on the ends, and in
consequence the wood inside is not strong enough to keep the joint from straining.
To prevent this we adopt the theory, which is proven to be correct by practical appli-
cation, by making a little pillar, as A, in Fig. 2 ; it is screwed to the frame of the seat,
and the side and back pieces are planed off after lines B and C. This, you will see, takes
the straining or force of the wood entirely away, and gives at the same time a long
joint to the pillar, and side and back pieces. This will produce the best corner ever
made.In the round seat follow the same plan ; make your side and back pieces near the
joint as thin as possible in order to prevent the strain of the wood, shown at dotted
lines in Fig. 3.
FOUR-SEAT PHAETON NO. 2. HALF-INCH SCALE.This drawing represents side elevation and cant drawn to half-inch scale, and is
given in a manner to be readily understood.
The manner of framing shown is with short bottom sides, framed into the lock and
hinge pillar, the door shutting against the rocker.
To do it an easier way, frame the rockers together as usual, and screw your hinge
and lock pillars against the rocker, as shown at A; put on the back and front whole
quarters out of an entire piece, mark your side sweep, and turn under and plane it to
the required thickness and sweep. Proceed by laying out thfe cant or working
draft by drawing the center line, and also bysquaring lines B and C. Measure IS
inches from center line on lines C and B, and prick it off, which establishes two ponits
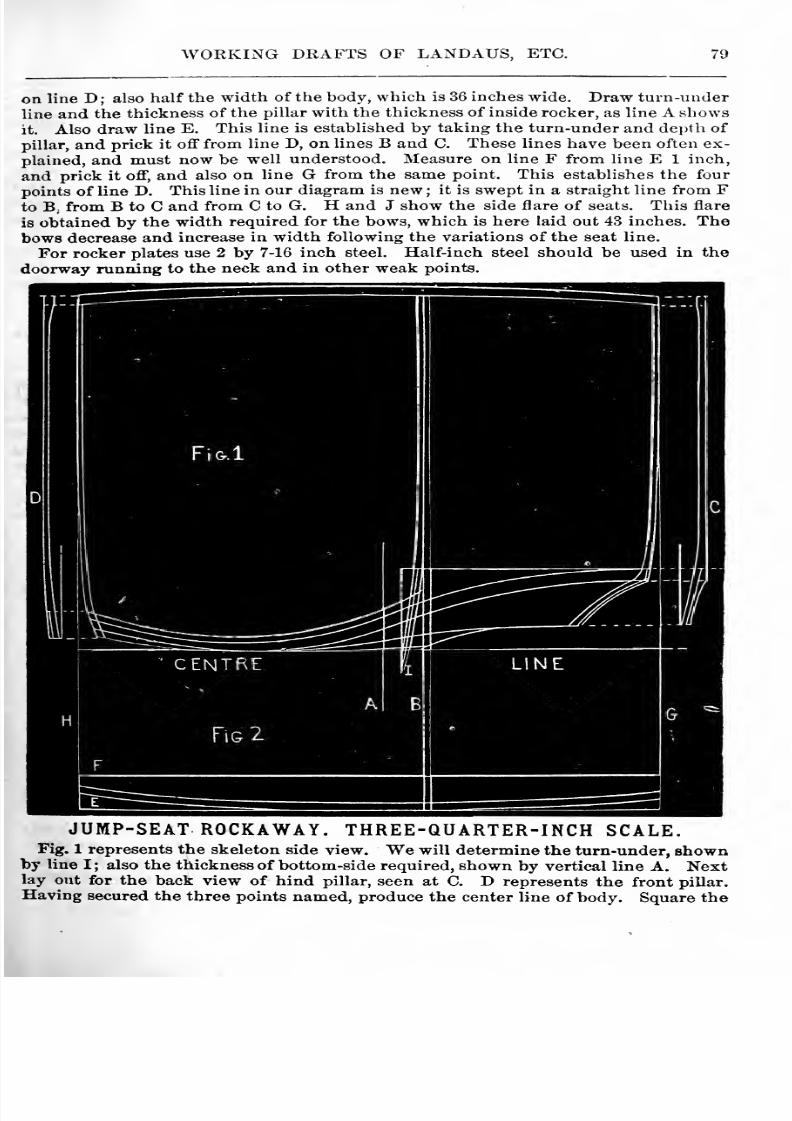
8/10/2019 Making Horse Drawn Coaches 1800 Bw
http://slidepdf.com/reader/full/making-horse-drawn-coaches-1800-bw 127/455
WORKING DRAFTS OF LANDAUS, ETC. 79
on line D ; also half the width of the body, which is 36 inches wide. Draw turn-under
line and the thickness of the pillar with the thickness of inside rocker, as line A showsit. Also draw line E. This line is established by taking the turn-under and depth of
pillar, and prick it oflf from line D, on lines B and C. These lines have been often ex-plained, and must now be well understood. Measure on line F from line E 1 inch,
and prick it off, and also on line G from the same point. This establishes the four
points of line D. This line in our diagram is new ; it is swept in a straight line from Fto B; from B to C and from C to G. H and J show the side flare of seats. This flare
is obtained by the width required for the bows, which is here laid out 43 inches. Thebows decrease and increase in width following the variations of the seat line.
For rocker plates use 2 by 7-16 inch steel. Half-inch steel should be used in the
doorway running to the neck and in other weak points.
JUMP-SEAT ROCKAWAY. THREE-QUARTER-INCH SCALE.Fig. 1 represents the skeleton side view. We will determine the turn-under, shown
by line I ; also the thickness of bottom-side required, shown by vertical line A. Nextlay out for the back view of hind pillar, seen at C. D represents the front pillar.
Having secured the three points named, produce the center line of body. Square the
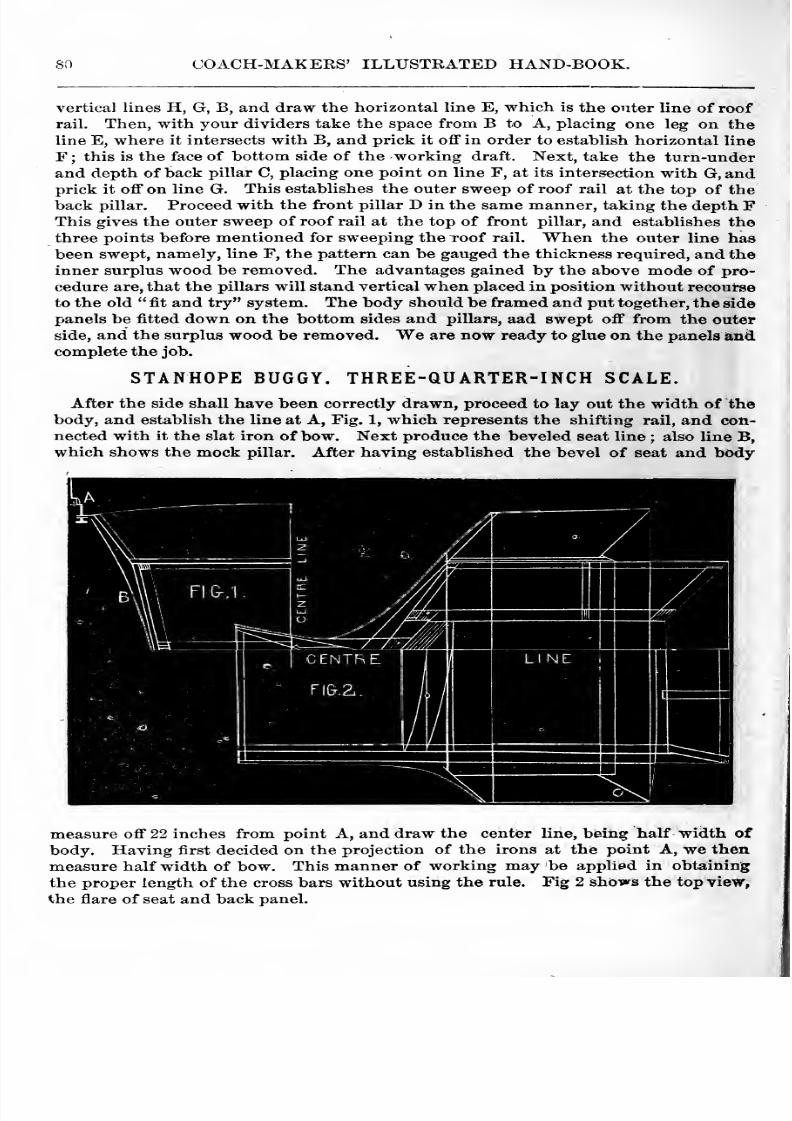
8/10/2019 Making Horse Drawn Coaches 1800 Bw
http://slidepdf.com/reader/full/making-horse-drawn-coaches-1800-bw 128/455
so COACH-MAKERS' ILLUSTRATED HAND-BOOK.
vertical lines H, G, B, and draw the horizontal line E, which is the outer line of roof
rail. Then, with your dividers take the space from B to A, placing one leg on the
line E, where it intersects with B, and prick it off in order to establish horizontal line
F ; this is the face of bottom side of the working draft. Next, take the turn-under
and depth of back pillar C, placing one point on line F, at its intersection with G,andprick it off on line G. This establishes the outer sweep of roof rail at the top of the
back pillar. Proceed with the front pillar D in the same manner, taking the depth FThis gives the outer sweep of roof rail at the top of front pillar, and establishes the
three points before mentioned for sweeping the roof rail. When the outer line hasbeen swept, namely, line F, the pattern can be gauged the thickness required, and the
inner surplus wood be removed. The advantages gained by the above mode of pro-
cedure are, that the pillars will stand vertical when placed in position without recourse
to the old fit and try system. The body should be framed and put together, the side
panels be fitted down on the bottom sides and pillars, aad swept off from the outer
side, and the surplus wood be removed. We are now ready to glue on the panels andcomplete the job.
STANHOPE BUGGY. THREE-QUARTER-INCH SCALE.
After the side shall have been correctly drawn, proceed to lay out the width of the
body, and establish the line at A, Fig. 1, which represents the shifting rail, and con-
nected with it the slat iron of bow. Next produce the beveled seat line ; also line B,
which shows the mock pillar. After having established the bevel of seat and body
measure off 22 inches from point A, and draw the center line, being half width of
body. Having first decided on the projection of the irons at the point A, we then
measure half width of bow. This manner of working may be applied in obtaining
the proper length of the cross bars without using the rule. Fig 2 shows the top view,
the flare of seat and back panel.
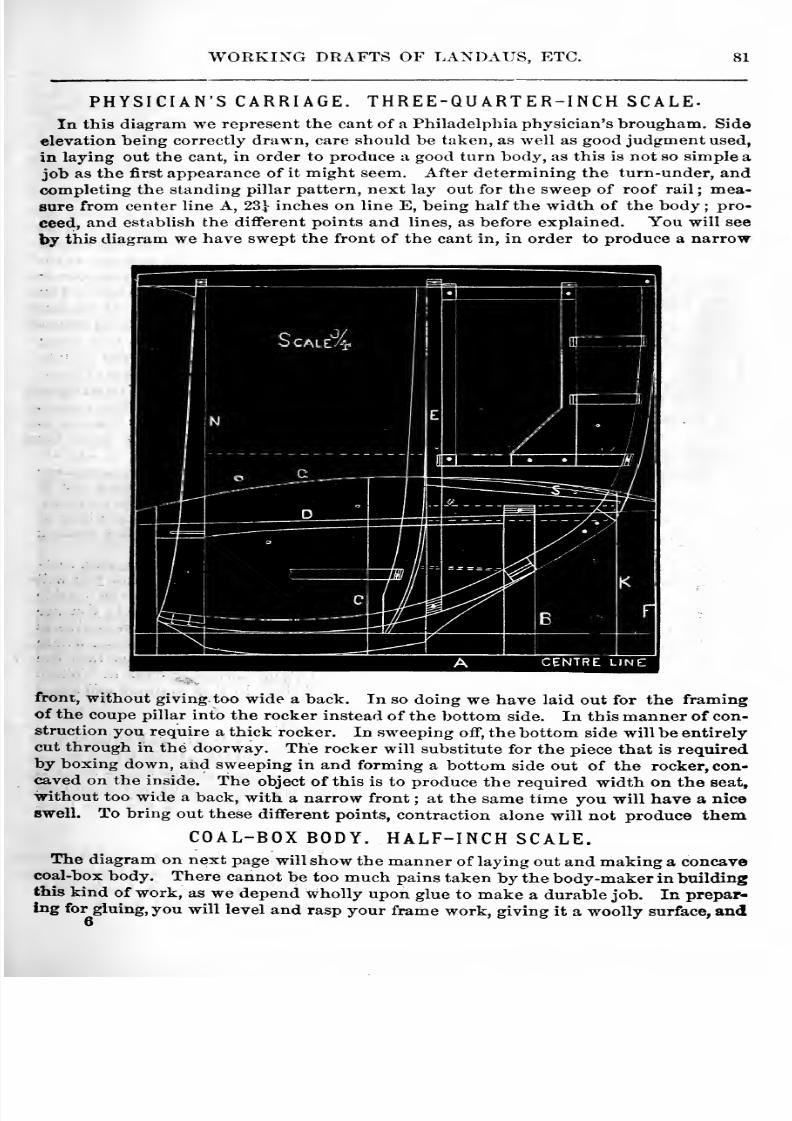
8/10/2019 Making Horse Drawn Coaches 1800 Bw
http://slidepdf.com/reader/full/making-horse-drawn-coaches-1800-bw 129/455
WORKING DRAFTS OF LANDAUS, ETC. 81
PHYSICIAN'S CARRIAGE. THREE-QUARTER-INCH SCALE-
In this diagram we represent the cant of a Philadelphia physician's brougham. Sid©
elevation being correctly drawn, care should be taken, as well as good judgment used,
in laying out the cant, in order to produce a good turn body, as this is not so simple a
job as the first appearance of it might seem. After determining the turn-under, andcompleting the standing pillar pattern, next lay out for the sweep of roof rail ; mea-sure from center line A, 23^ inches on line E, being half the width of the body ;
pro-
ceed, and establish the different points and lines, as before explained. You will see
by this diagram we have swept the front of the cant in, in order to produce a narrow
front, without giving too wide a back. In so doing we have laid out for the framingof the coupe pillar into the rocker instead of the bottom side. In this manner of con-struction you require a thick rocker. In sweeping off, the bottom side will be entirely
cut through in the doorway. The rocker will substitute for the piece that is requiredby boxing down, and sweeping in and forming a bottom side out of the rocker, con-caved on the inside. The object of this is to produce the required width on the seat,
without too wide a back, with a narrow front ; at the same time you will have a niceswell. To bring out these different points, contraction alone will not produce them
COAL-BOX BODY. HALF-INCH SCALE.The diagram on next page will show the manner of laying out and making a concave
coal-box body. There cannot be too much pains taken by the body -maker in buildingthis
kind of work, as we depend wholly upon glue to make a durable job. In prepar-ing for gluing, you will level and rasp your frame work, giving it a woolly surface, and
6
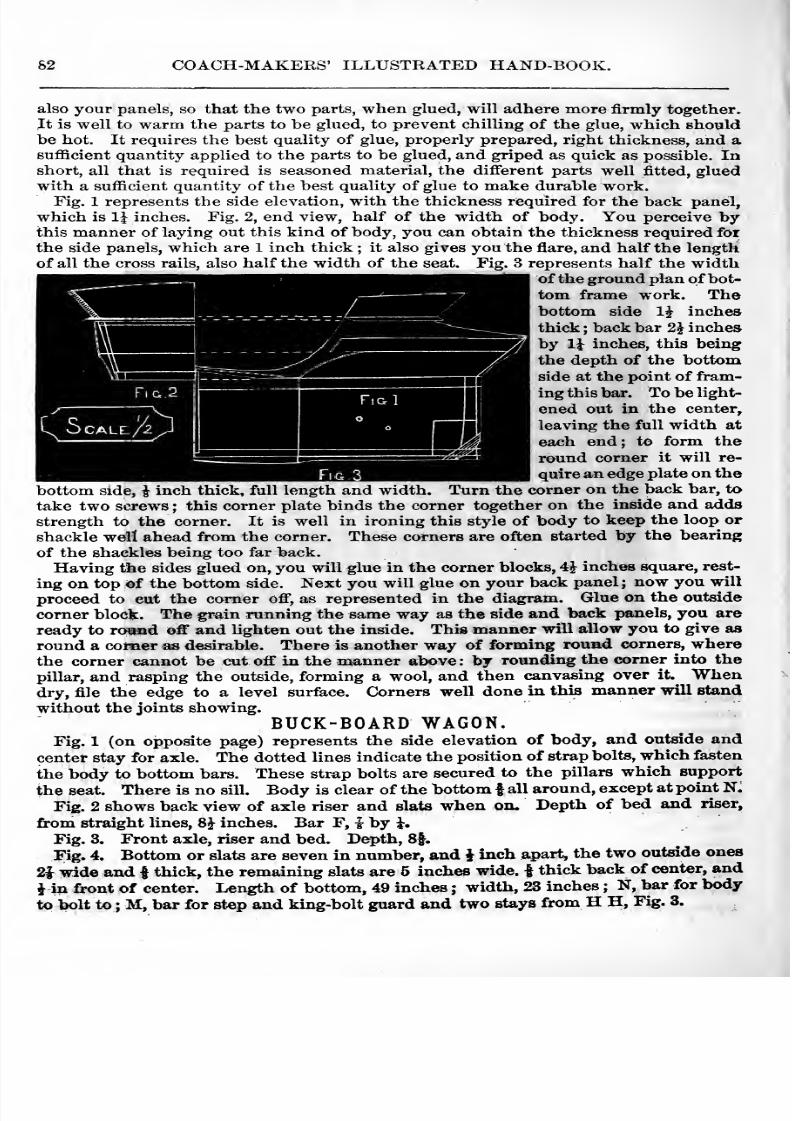
8/10/2019 Making Horse Drawn Coaches 1800 Bw
http://slidepdf.com/reader/full/making-horse-drawn-coaches-1800-bw 130/455
82 COACH-MAKERS' ILLUSTRATED HAND-BOOK.
also your panels, so that the two parts, when glued, will adhere more firmly together^It is well to warm the parts to be glued, to prevent chilling of the glue, which shouldbe hot. It requires the best quality of glue, properly prepared, right thickness, and asufficient quantity applied to the parts to be glued, and griped as quick as possible. Inshort, all that is required is seasoned material, the different parts well fitted, gluedwith a sufficient quantity of the best quality of glue to make durable work.
Fig. 1 represents the side elevation, with the thickness required for the back panel,
which is li inches. Fig. 2, end view, half of the width of body. You perceive bythis manner of laying out this kind of body, you can obtain the thickness required for
the side panels, which are 1 inch thick ; it also gives you the flare, and half the lengthof all the cross rails, also half the width of the seat. Fig. 3 represents half the width
of the ground plan of bot-
tom frame work. Thebottom side 1^ inches
thick ; back bar 2J inches
by IJ inches, this being
the depth of the bottomside at the point of fram-
ing th is bar. To be light-
ened out in the center,
leaving the full width at
each end; to form the
round corner it will re-
quire an edge plate on the
bottom side, i inch thick, full length and width. Turn the corner on the back bar, to
take two screws ; this corner plate binds the corner together on the inside and adds
strength to the corner. It is well in ironing this style of body to keep the loop or
shackle well ahead from the corner. These corners are often started by the bearing
of the shackles being too far back.
Having tlie sides glued on, you will glue in the corner blocks, 4J inches square, rest-
ing on top of the bottom side. Next you will glue on your back panel; now you will
proceed to cut the comer ofi , as represented in the diagram. Glue on the outsidecomer block. The grain running the same way as the side and back panels, you are
ready to roand ofi and hghten out the inside. This manner will allow you to give as
round a corner as desirable. There is another way of forming round comers, wherethe corner cannot be cut off in the manner above: by rounding the comer into the
pillar, and rasping the outside, forming a wool, and then canvasing over it.^ Whendry, file the edge to a level surface. Corners well done in this manner will stand
without the joints showing.
BUCK-BOARD WAGON.Fig. 1 (on opposite page) represents the side elevation of body, and outside and
center stay for axle. The dotted lines indicate the position of strap bolts, which fasten
the body to bottom bars. These strap bolts are secured to the pillars which support
the seat. There is no sill. Body is clear of the bottom | all around, except at point N.
Fig. 2 shows back view of axle riser and slats when on. Depth of bed and riser,
from straight lines, 8J inches. Bar F, I by J.
Fig. 3. Front axle, riser and bed. Depth, 8f.
Fig. 4. Bottom or slats are seven in number, and J inch apart, the two outside ones
2i wide and | thick, the remaining slats are 6 Inches wide. | thick back of center, and
i in front of center. Length of bottom, 49 inches ; width, 23 inches ; N, bar for body
to bolt to ; M, bar for st«p and king-bolt guard and two stays from H H, Fig. 3.
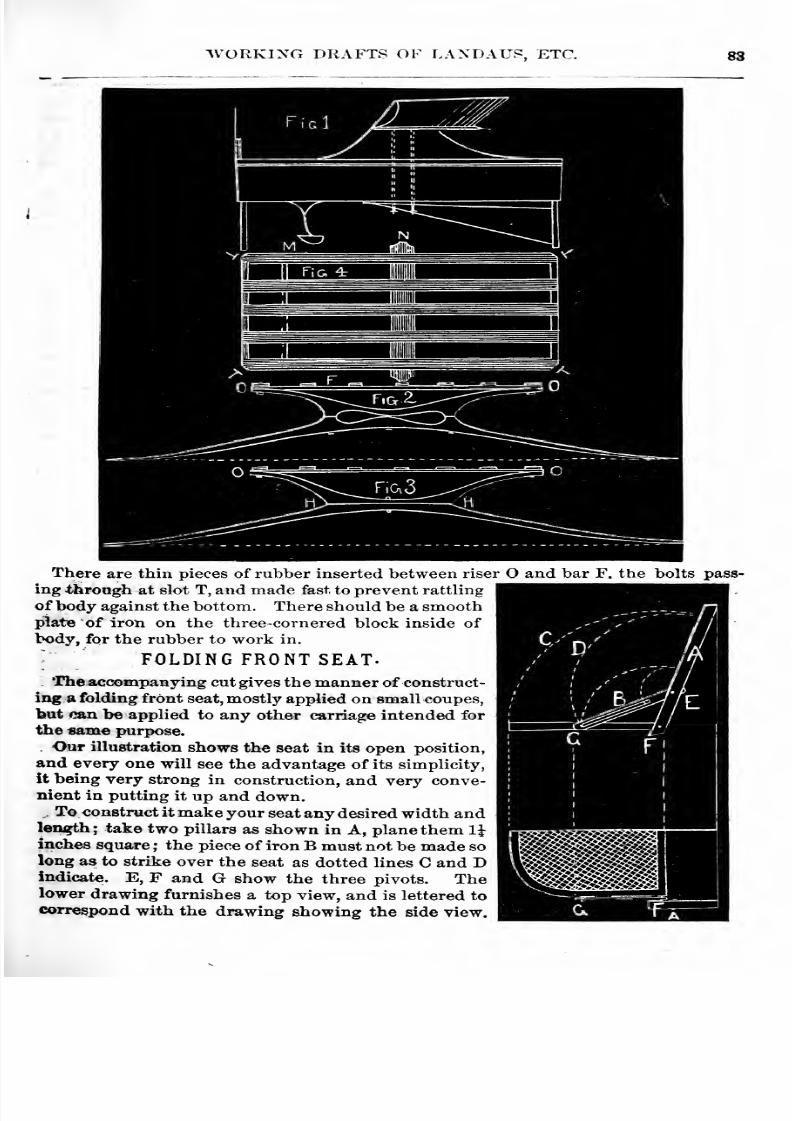
8/10/2019 Making Horse Drawn Coaches 1800 Bw
http://slidepdf.com/reader/full/making-horse-drawn-coaches-1800-bw 131/455
WORKING DRAFTS OF LANDAUS, ETC. 88
There are thin pieces of rubber inserted between riser O and bar F. the bolts
ing through at slot T, and made fast to prevent rattling
of body against the bottom. There should be a smoothplate of iron on the three-cornered block inside of
body, for the rubber to work in.
FOLDING FRONT SEAT.The accompanying cut gives the manner of construct-
ing a folding front seat, mostly applied on small coupes,
but can be applied to any other carriage intended for
the same purjwse.
Our illustration shows the seat in its open position,and every one will see the advantage of its simplicity,
it being very strong in construction, and very conve-nient in putting it up and down.
To construct it make your seat any desired width andlen^h; take two pillars as shown in A, plane them 1^inches square ; the piece of iron B must not be made solong as to strike over the seat as dotted lines C and Dindicate. E, F and G show the three pivots. The
lower drawing furnishes a top view, and is lettered tocorrespond with the drawing showing the side view.

8/10/2019 Making Horse Drawn Coaches 1800 Bw
http://slidepdf.com/reader/full/making-horse-drawn-coaches-1800-bw 132/455
84 COACH-MAKERS' ILLUSTRATED HAND-BOOK.
PHILADELPHIA RIBBED BOOT. THREE-QUARTER-INCH SCALE.Fig. 1 represents the side elevation of boot ; it will serve to convey an idea of the
appearance of the ribbed portion.
Fig. 2 shows the variety and degree of curvature, and the pieces required in the con-fitruction, which are ten in number. Unlike the circular boot, which is constructed
by building up with pieces laid horizontally, this has the sections placed in an inclined
position, agreeing with the bevel of the boot. They are properly fitted, glued andscrewed, so as to form a solid, substantial piece of work, and when the several pieces
have been rounded up and finished, there is no canvasing required, thus presenting afoundation for the painting the same as the remainder of the body. The joints, whenproperly fitted, remain solid.
PANEL QUARTER.
The cut Fig. 3 (opposite page) represents the hind panel quarter of heavy-class workillustrating the method of obtaining the bevels of the four points of the wide belt rail,
so that when it is swept off on the outside and tenoned it will lie level on the frame work.
Probably some body -builders have experienced a difficulty in this particular, and wherethis has been the case, our effort to enlighten them will be fully appreciated. A shows the
belt rail, H the standing pillar line, B the turn-under, E the sweep of roof rail on bedof body, F the face of belt, D the sweep of the bottom side. To establish line E, we

8/10/2019 Making Horse Drawn Coaches 1800 Bw
http://slidepdf.com/reader/full/making-horse-drawn-coaches-1800-bw 133/455
WORKING DRAFTS OF LANDAUS, ETC. 85
take in the dividers from line H to B on line C, and prick it off from line D on line H,and sweep it off where it intersects with Hne J. Line F is established by the thick-ness required for the belt. To obtain the bevel on standing pillar, we take in thedividers the space on line A, from B to H; then prick it off on line H from line F,which gives one point of line G
;place one point of dividers on line J (being the vertical
line of bottom of belt), where it intersects with line F, and the other point on line E atits intersection with D. Having obtained this space, put one point of dividers on line
K, at its intersection with vertical line F, and prick it off' toward line D, which willshow by the dot on the line. From this dot on line K, take the remainder of the spaceto line D ; we will now prick this off on line K from line F, giving us the other pointof line G. This line may be now drawn, which is G, it being the top, and F the bot-tom line of belt.
TRAMMEL FOR OVALS.The adjoining is a diagram
of a frame for striking an oval-
This will strike a perfect oval
of any size. As ovals arealways used by coach-makers,it is necessary to know thequickest and most correct
manner of obtaining them. -
The method of drawing by a'
string is defective, as the pen-cil varies in traversing thestring. There is another
mode of obtaining one, bysquaring the length and widthof the size required ; then spac-
y- ^A 0^ ^ \
WKfmm /w^mM /.K^<
^

8/10/2019 Making Horse Drawn Coaches 1800 Bw
http://slidepdf.com/reader/full/making-horse-drawn-coaches-1800-bw 134/455
86 COACH-MAKERS' ILLUSTRATED HAND-BOOK.
ing the squai-e into a given number of lines, and tracing to the intersecting points
This mode requires too much time at the present day. The manner of making thetrammel is as follows : A A, two pieces, one inch square, lapped together in the center
with a one-fourth -inch groove on the top to receive the dowels of C E. It requires apricker or pin near each end on the bottom of A A to prevent it slipping from its place.
B is the shaft, half-inch square. C E are the sockets with the mortises cut large enoughto slide on shaft B. Insert a dowel in the bottom of the two sockets C E, with a screwon top to prevent slipping on the shaft. P is the hole to receive a pencil in shaft B.
Now it is ready for use Slip sockets C and E on shaft B. Supposing your oval is to
be 13 by 21, you set the dowel in socket C 6.j inches from pencil P, being half the widthof the oval. Place E lOo inches from pencil P, being half the length of the oval ; tighten
the screws to prevent the sockets from slipping on the shaft. Next take shaft B, and
place dowels of C E in grooves A A. Now you are ready for turning the shaft B,keeping the dowels C E in grooves A A, they being your guide ; which will strike anoval represented in diagram.
LANDAU BOWS. ONE-INCH SCALE.The French excel all others in point of gaining time, as well as in durabilty, in the
construction of Landau bows , and, if you demand our reason, we reply, the side piecesare gotten out straight, not curved, as the majority of our carriage-makers see fit to
make them. The straight ones give to the tenon greater strength than the crooked orcurved piece, which runs against the grain. The tenon also does not pass through the curb perpendicularly ; but, on the contrary, in the same line with the bows, whichwin convince any one who grives it a thought that greater strength is secured thereby.The straight pieces are w^orked out in half the time that it takes to get out a set of thecrooked ones.
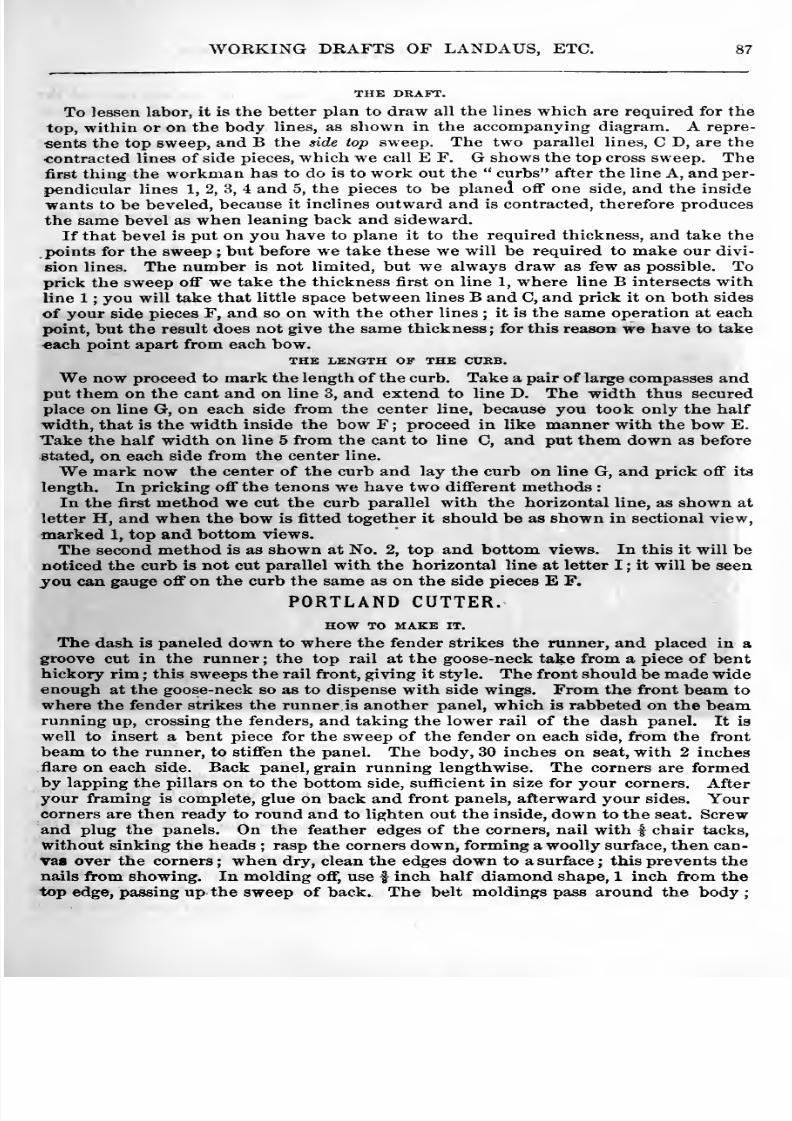
8/10/2019 Making Horse Drawn Coaches 1800 Bw
http://slidepdf.com/reader/full/making-horse-drawn-coaches-1800-bw 135/455
WORKING DRAFTS OF LANDAUS, ETC. 87
THE DRAFT.
To lessen labor, it is the better plan to draw all the lines which are required for the
top, within or on the body lines, as shown in the accompanying diagram. A repre-
sents the top sweep, and Bthe side top sweep. The two parallel lines,
CD, are the
-contracted lines of side pieces, which we call E F. G shows the top cross sweep. Thefirst thing the workman has to do is to work out the curbs after the line A, and per-
pendicular lines 1, 2, 3, 4 and 5, the pieces to be planed oflf one side, and the inside
wants to be beveled, because it inclines outward and is contracted, therefore produces
the same bevel as when leaning back and sideward.
If that bevel is put on you have to plane it to the required thickness, and take the
points for the sweep ; but before we take these we will be required to make our divi-
sion lines. The number is not limited, but we always draw as few as possible. Toprick the sweep off we take the thickness first on line 1, where line B intersects with
line 1 ; you will take that little space between lines B and C, and prick it on both sidesof your side pieces F, and so on with the other lines ; it is the same operation at eachpoint, but the result does not give the same thickness; for this reason we have to take
€ach point apart from each bow.THE LENGTH OP THE CURB.
We now proceed to mark the length of the curb. Take a pair of large compasses andput them on the cant and on line 3, and extend to line D. The width thus secured
place on line G, on each side from the center line, because you took only the half
width, that is the width inside the bow F ; proceed in like manner with the bow E.
Take the half width on line 5 from the cant to line C, and put them down as before
stated, on each side from the center line.
We mark now the center of the curb and lay the curb on line G, and prick off its
length. In pricking off the tenons we have two different methods :
In the first method we cut the curb parallel with the horizontal line, as shown at
letter H, and when the bow is fitted together it should be as shown in sectional view,
marked 1, top and bottom views.
The second method is as shown at No. 2, top and bottom views. In this it will benoticed the curb is not cut parallel with the horizontal line at letter I ; it will be seen
you can gauge off on the curb the same as on the side pieces E F.
PORTLAND CUTTER.HOW TO MAKE IT.
The dash is paneled down to where the fender strikes the runner, and placed in agroove cut in the runner ; the top rail at the goose-neck take from a piece of benthickory rim ; this sweeps the rail front, giving it style. The front should be made wideenough at the goose-neck so as to dispense with side wings. From the front beam to
where the fender strikes the runner is another panel, which is rabbeted on the beamrunning up, crossing the fenders, and taking the lower rail of the dash panel. It is
well to insert a bent piece for the sweep of the fender on each side, from the front
beam to the runner, to stiffen the panel. The body, 30 inches on seat, with 2 inchesflare on each side. Back panel, grain running lengthwise. The corners are formedby lapping the pillars on to the bottom side, sufficient in size for your corners. Afteryour framing is complete, glue on back and front panels, afterward your sides. Yourcorners are then ready to round and to lighten out the inside, down to the seat. Screwand plug the panels. On the feather edges of the corners, nail with | chair tacks,
without sinking the heads ; rasp the corners down, forming a woolly surface, then can-
vaB over the corners ; when dry, clean the edges down to a surface ; this prevents thenails from showing. In molding off, use | inch half diamond shape, 1 inch from the
top edge, passing up the sweep of back. The belt moldings pass around the body
8/10/2019 Making Horse Drawn Coaches 1800 Bw
http://slidepdf.com/reader/full/making-horse-drawn-coaches-1800-bw 136/455
88 COACH-MAKERS' ILLUSTRATED HAND-BOOK.
the same on the hottom edge. These moldings are striped. On the top edge of the
front corner of body, screw on a corner plate. Use light bolts instead of screws to
fasten the body to the beams. The running part should be made light and strong
, nothing but the best of timber being used throughout. The knees should be about |inch thick, by 1^ at the top, and the same thickness as the runner at bottom ; middleknees should not be less than 18 inches long between shoulders ; runners 1 inch square.
CORNER BEVELS.THE MANNER OF OBTAINING THE COERECT CORNER BEVELS OR PIECES CONTRACTED OR
INCLINED.
To take the bevel of a corner stick, or a seat corner without a stick, is an operation
simple enough to those who are acquainted with geometrical lines. To render the
explanation easy to be understood, we will endeavor at present to give it in the sim-plest manner, and follow with other lines, through which to obtain the bevel. We
would remark that in the principle here given it will not matter how much bevel you
put on from one side or the other, for through these lines you will always obtain thecorrect inclination. Referring to the accompanying diagram, Fig. 1, the lines A B in-
dicate the bevel of back and side pieces. Now place the square on line A, and, at its
intersection with top line 1 produce the line laid down. Again, we put the square onthe square line 3, to obtain line C. For the next we have still the vertical line D,
starting from top line 1, and line B, and running to bottom line 2. Now we have the
intermediate space between lines B and D. On the bottom line at E, take that widthand place it on line C. Next, take the straight-edge and make a line F, from, that
point to the top line ; thus on the lines A and F you will obtain the correct bevel.
Suppose line No. 1, Fig. 2, to be the back piece bevel, and No. 2 the leaningout of the side pieces. Take your compasses and start fron. point O, and draw dotted
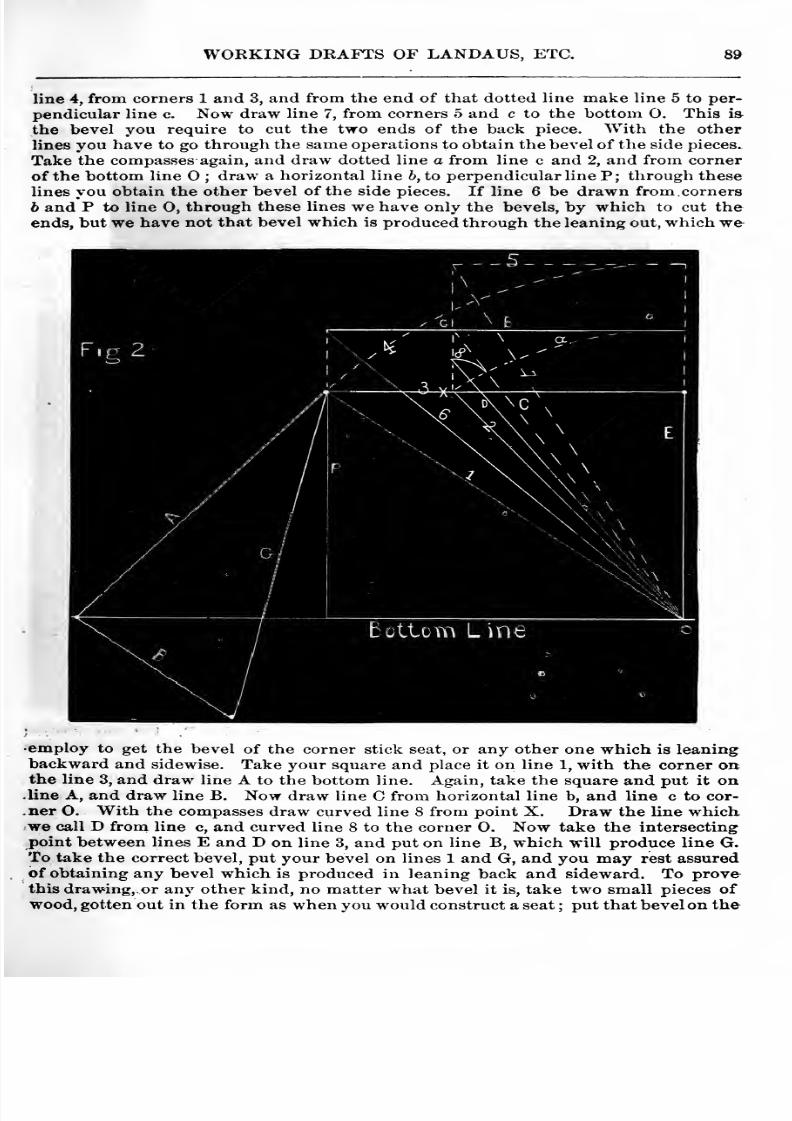
8/10/2019 Making Horse Drawn Coaches 1800 Bw
http://slidepdf.com/reader/full/making-horse-drawn-coaches-1800-bw 137/455
WORKING DRAFTS OF LANDAUS, ETC.
line 4, from corners 1 and 3, and from the end of that dotted line make line 5 to per-
pendicular line c. Now draw line 7, from corners 5 and c to the bottom O. This is
the bevel you require to cut the two ends of the back piece. With the other
lines you have to go through the same operations to obtain the bevel of the side pieces.Take the compasses again, and draw dotted line a from line c and 2, and from corner
of the bottom line O ; draw a horizontal line 6, to perpendicular line P; through these
lines you obtain the other bevel of the side pieces. If line 6 be drawn from corners
h and P to line 0, through these lines we have only the bevels, by which to cut theends, but we have not that bevel which is produced through the leaning out, which we
•employ to get the bevel of the corner stick seat, or any other one which is leaningbackward and sidewise. Take your square and place it on line 1, with the corner onthe line 3, and draw line A to the bottom line. Again, take the square and put it on
.line A, and draw line B. Now draw line C from horizontal line b, and line c to cor-
.ner O. With the compasses draw curved line 8 from point X. Draw the line which,
we call D from line c, and curved line 8 to the corner 0. Now take the intersecting
point between lines E and D on line 3, and put on line B, which will produce line G.To take the correct bevel, put your bevel on lines 1 and G, and you may rest assuredof obtaining any bevel which is produced in leaning back and sideward. To provethis drawing, or any other kind, no matter what bevel it is, take two small pieces of
wood, gotten out in the form as when you would construct a seat ; put that bevel on the

8/10/2019 Making Horse Drawn Coaches 1800 Bw
http://slidepdf.com/reader/full/making-horse-drawn-coaches-1800-bw 138/455
90 COACH-MAKERS' ILLUSTRATED HAND-BOOK.
bottom of the back piece on line 7 and the bottom line, and on the side pieces to lines
2 and bottom line. Take line 7 and the bottom line, and cut the ends of back piece.
Now take the bevel from line 6 and bottom line, and cut ends of the side pieces. By
placing the square over D and 7 you will find the bevel of line 1 and G without takingit, because the square produced it through line 1 and bottom line, and line 2 and bot-
tom line, and the same bevel lines 1 and G give you the miter.
Fig. 3. First draw horizontal line A, and perpendicular line B. Put any desired
?bevel in the direction of line C, so it is with line D ; any contracted or inclined lin«
-will answer. With these two lines we have the two inclinations.
Make the top line E to have a point to start from. Strike perpendicular line F, com-mencing at intersection of lines E and C, running to line D. To make line G, square
line B from intersection of lines D and F. Place the compasses in the small circle wherelines C and D intersect on line B, and strike line Hfrom intersection of lines D,F andG to line A, and continue line H square, until you reach line E ; from this point dratW
line I down to small circle. Place the compasses in small circle and sweep line J, com-mencing at intersection of lines E and H until you reach line G. From small circle to
intersection of line« G and J, draw line K. Put the square on line D, at intersection
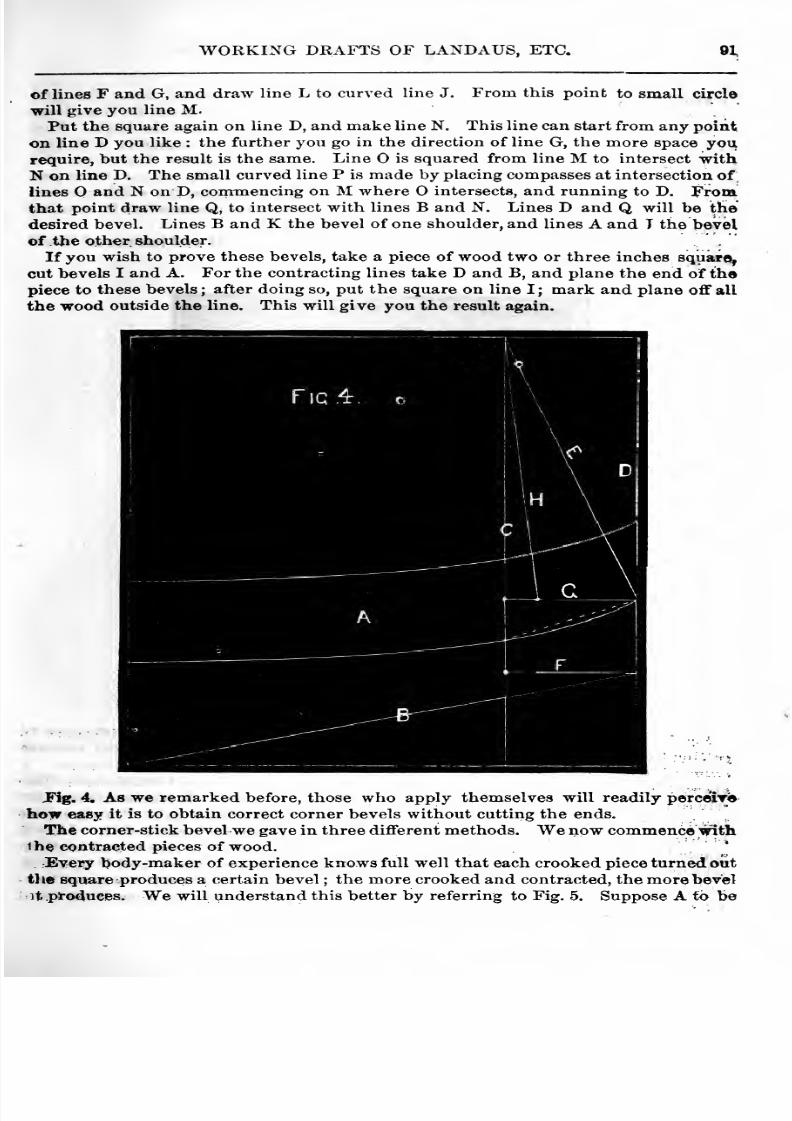
8/10/2019 Making Horse Drawn Coaches 1800 Bw
http://slidepdf.com/reader/full/making-horse-drawn-coaches-1800-bw 139/455
WORKING DRAFTS OF LANDAUS, ETC. 91
of lines F and G, and draw line L to curved line J. From this point to small circle
will give you line M.Put the square again on line D, and make line N. This line can start from any point
on line D youlike : the further you go in the direction of line G, the
morespace
yourequire, but the result is the same. Line is squared from line M to intersect with
N on line D. The small curved line P is made by placing compasses at intersection of
lines and N on D, commencing on M where intersects, and running to D. Fromthat point draw line Q, to intersect with lines B and N. Lines D and Q will be thedesired bevel. Lines B and K the bevel of one shoulder, and lines A and T the bevel
of the other shoulder.
If you wish to prove these bevels, take a piece of wood two or three inches square,
cut bevels I and A. For the contracting lines take D and B, and plane the end of the
piece to these bevels; after doing so, put the square on line I; mark and plane off all
the wood outside the line. This will give you the result again.
jFig 4.
1
i
1
1
\
VIh \i \
i
A
•
\ c Jr
'
JFig. 4. As we remarked before, those who apply themselves will readily perc^Mlhow easy it is to obtain correct corner bevels without cutting the ends.
The corner-stick bevel we gave in three diflferent methods. We now commence with1 he contracted pieces of wood.
*
Every body-maker of experience knows full well that each crooked piece turned out
tlie square produces a certain bevel ; the more crooked and contracted, the more bevel
it produces. We will understand this better by referring to Fig. 5. Suppose A to be
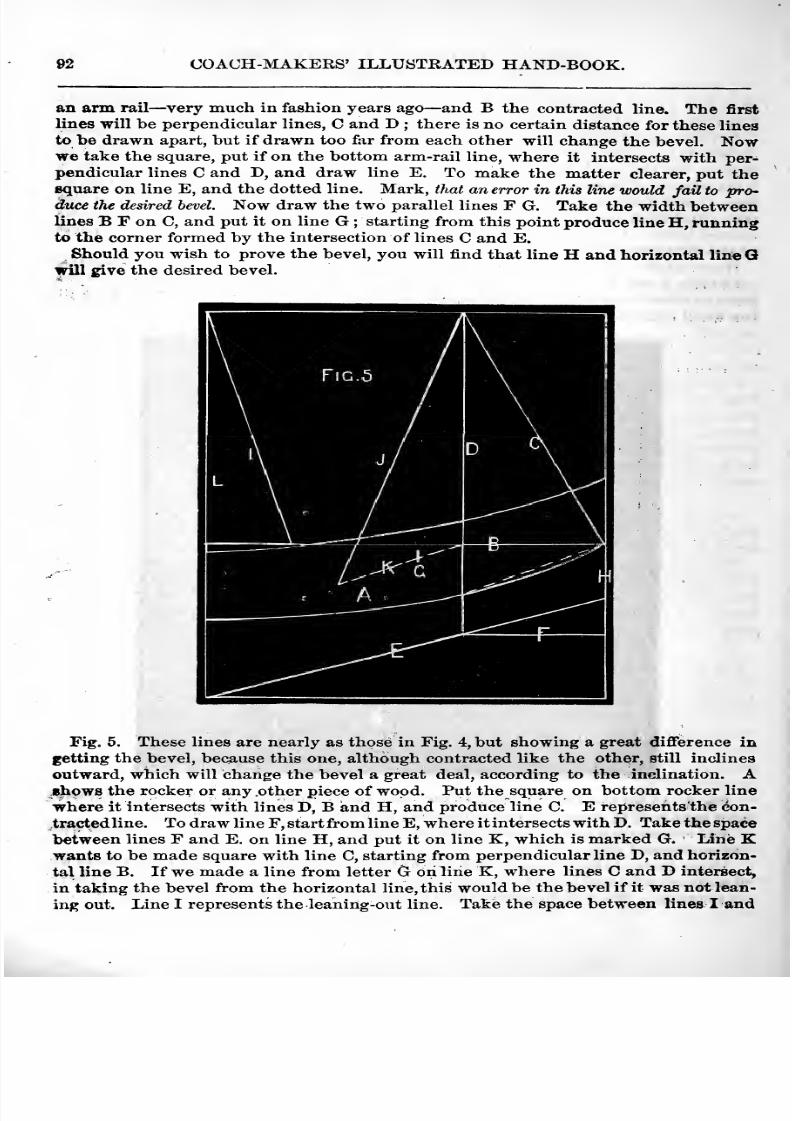
8/10/2019 Making Horse Drawn Coaches 1800 Bw
http://slidepdf.com/reader/full/making-horse-drawn-coaches-1800-bw 140/455
92 COACH-MAKERS' ILLUSTRATED HAND-BOOK.
an arm rail —very much in fashion years ago— and B the contracted line. The first
lines will be perpendicular lines, C and D ; there is no certain distance for these lines
to be drawn apart, but if drawn too far from each other will change the bevel.Nowwe take the square, put if on the bottom arm-rail line, where it intersects with per-
pendicular lines C and D, and draw line E. To make the matter clearer, put thesquare on line E, and the dotted line. Mark, that an error in this line would fail to pro^duce the desired bevel. Now draw the two parallel lines F G. Take the width betweenlines B E on C, and put it on line G ; starting from this point produce line H, runningto the corner formed by the intersection of lines C and E.
Should you wish to prove the bevel, you will find that line H and horizontal line Qwill give the desired bevel.
Fig.5.
Theselines
are nearly as those in Fig. 4, but showing agreat
difference ingetting the bevel, because this one, although contracted like the other, still inclines
outward, which will change the bevel a great deal, according to the inclination. A.shows the rocker or any .other piece of wood. Put the square on bottom rocker line
where it intersects with lines D, B and H, and produce line C. E represents the con-
tracted line. To draw line F, start from line E, where it intersects with D. Take the space
between lines F and E. on line H, and put it on line K, which is marked G. Line Kwants to be made square with line C, starting from perpendicular line D, and horizon-
tal line B. If we made a line from letter G on line K, where lines C and D intersect,
in taking the bevel from the horizontal line, this would be the bevel if it was not lean-
ing out. Line I represents the leaning-out line. Takie the space between lines I and
8/10/2019 Making Horse Drawn Coaches 1800 Bw
http://slidepdf.com/reader/full/making-horse-drawn-coaches-1800-bw 141/455
WORKING DRAFTS OF LANDAUS, ETC. 93
L on line B, and put it on line K, starting from G, and from that point make line I.
If you put your bevel on line J, and horizontal line B, you will have the desired bevel
of a piece of wood which inclines in three different ways.
THE USE OF GLUE.It is the practice with body-makers, of late years, to omit the use of screws ; but un-
less the panels are properly put on, and certain other conditions adhered too, whichare noticed in what follows, it were better to cling to the old method.
To well understand the use of glue requires practice and considerable experience ;
it is surprising to see the want of this in country carriage shops.
First. —To do good gluing it requires thorough seasoned wood, and work well fitted.
Second. —In preparing for gluing use a scratch plane or rasp, to form a woolly sur-
face upon thepieces to
bejoined
together;
the shop must be warm —and the pieces tobe united must be heated well so as to allow the glue to flow freely. Having the glue
properly prepared, spread it upon the parts so as to fill up all the pores and grain ofthe wood, and put the pieces together, then apply iron clamps which will force outall glue not required to hold the parts joined.
A great cause of bad gluing is caused by using an inferior quality of glue, and usingit too thick. Before using a new quality of glue, the body-maker should always test
it by taking a piece of poplar and ash and glue them together, and if, when dry, thejoints give way under the force of the chisel, the glue is unfit for use. It must chipout into solid
woodbefore giving
way whereglued together. This is
asevere test,
but by practicing it you will be amply repaid for your care in the stability of yourwork,
A WORD ON PLUGS AND BRADS.In plugging screw holes, glue the edge of the plug
; put no glue in the hole. Bythis means the surplus glue is left on the surface, and if the plug does not hit thescrew it will seldom show.
Where brads are used the head should be well set in ; then pass a sponge well satur*
ated with hot water over them, filling the holes with water. This brings the wood
more toits natural position,
andcloses
by degrees over the bradheads.
The bradmust have a chance to expand when exposed to the heat of the sun, and not hit theputty ; if it does it will force the putty out so as to show after finished.
IRON PLANES.The introduction of iron planes into carriage wood shops is, so far as our knowledge
extends, of recent date. Piano and furniture manufacturers, however, have been using
them for some time, and from the letters of recommendation they have given, lead us
to believe that the wooden plane has lost much of its former prestige. But we will ans-
wer you more directly, giving our own experience after using an iron plane six months.
Our first impression was that it could not possibly excel the wooden plane, and as wegrasped it, and attempted to put it into service, did not admire its working ; and then it
felt oddly in the hand, and appeared much more so in comparison with the familiar old
wooden ones lying on the bench. So we hung up the iron plane, and did no more for atime than to cast odd glances at it. Finally, one day when not very busy, our attention
was again directed to it, and after gazing for a few moments, decided to give it anothertrial ; and, taking it from the rack, sharpened the bit, set it, oiled the face, and set to workin earnest to test its merits. We were pleased beyond all expectations, and since that
have adopted it into our plane family. Curiosity led the hands in the shop to try the
new comer, much to our annoyance ; for at the moment when it was wanted for a certainkind of work, it was on a visit to a distant work-bench.
8/10/2019 Making Horse Drawn Coaches 1800 Bw
http://slidepdf.com/reader/full/making-horse-drawn-coaches-1800-bw 142/455
U COACH-MAKERS' ILLUSTRATED HAND-BOOK.
'
ITS ADVANTAGES OVER THE OLD WOODEN PLANE.1st. It is self-adjustable in every respect.
2d. The parts are made interchangeable, and can be replaced at a trifling cost.
3d. The bits are of solid cast-steel of the finest quality and temper, rendering themFfestty superior to the bits furnished with the old style wooden plane.
4th. For leveling panels, cutting mitfers, cutting end wood, and leveling surfaioes for'
gluing, it, in our opinion, has lio equal. Our candid opinion is, that the time is notial ' distsiiit when they will wholly supiesreede the wooden planes.
SLATE FINISH.
A blackboard which will take the chalk pleasantly, and, when the draft is no longerseeded, part with the chalk without leaving stains, is very desirable.
Piearce's Slate Surface is an article which will furnish a coating far superior to theordinary method of preparing the draft board.
CANVASING OUTSIDE.• Heavy linen, and the best quality of scrims, are both used. The best shops Uise heavy
lineii. The threads of scrims being more open than linen, it is not so well adapted to
painting over ; and as surface is Eought after nowadays fully as much as any other
go6d quality in a carriage, we find that no pains are spared to secure that result. Before
applying the linen, or scrims, rasp up the panel or corner to be covered. Cut thegoods,dip it in hot water, and wring out dry, which shrinks it and removes the dressing.
Then saturate in hot glue. Apply it, rubbing it down smoothly. When dry, file the
edges to a surface and sandpaper canvas all over.
}': INSERTION OF SCREWS IN WOOD.When screws are driven into soft wood and subjected to considerable strain they are
eyy Mkely to work loose, a»d it is often difficult to make them hold. In such cases it
lis said that the use of glue i« of service. A stick of about half the diameter of the
screw to be used is to be first immersed in athick glue, and then inserted in the hole
prepared for the screw, which is then to be driven home as quickly as possible. Whenan article of furniture is to be hastily repaired and no glue is at hand, insert the stick,
fill the rest of the cavity with pulverized resin, then heat the screw sufficiently to melt
the resin as it is driven in. Chairs, tables, lounges, etc., are continually getting out of
order in every house, and the proper time to repair them is when first noticed. The
matter grows worse by neglect, and finally results in laying aside the article as worth-
less. If screws are driven into wood for a temporary purpose they can be remoTed
naore easily if dipped in oil before being inserted.
TO IMITATE MAHOGANY.; The surface of any close-grained wood is planed smooth, and then rubbed with a
solution of nitrous acid. Next apply, with a soft brush, a mixture of one ounce of
dragon's blood, dissolved in a pint of alcohol, and with the addition of one-third of
an ounce of carbonate of soda. When the polish diminishes in brilliancy, it may be
restored by the use of a little cold-drawn linseed oil.
HOW TO MAKE A CHEAP GLUE BRUSH.
Take a piece of linn bark, and soak the end well in hot water, then pouad it lightly
with a hammer. We have tried it, and can vouch for its answering a very good purpose.
8/10/2019 Making Horse Drawn Coaches 1800 Bw
http://slidepdf.com/reader/full/making-horse-drawn-coaches-1800-bw 143/455
WORKING DRAFTS OF LANDAUS, ETC. 95
BLACKBOARD PAINT.
For 1 quart of paint, use 1 quart of alcohol, 3 ounces pulverized pumicestone, 1^
ounces pulverized rotten stone, and 3 ounces lamp-black. Mix with some of the alco-
hol into a paste, grind, and add 3 J ounces dissolved shellac, and add balance of alcohol.
Wipe out the old marks with a dry chamois.
CARRIAGE PARTS.
No part of a coach is more worthy of attention, and receives less, than that knownas the carriage or carriage part. It has always been the custom of bosses to givethis work to apprentices and pretended journeymen, who could do nothing else, andthe result was, instead of making carriages, they made what might with more propriety
be called miscarriages, for the half-formed, ill-shaped things were worthy of no othername ; and, we are sorry to say, that too many such workmen are still employed at this
branch of our trade, not only in cheap shops, but in shops which, in all otherrospects, turn out first-class work.
Good carriage-makers are scarce, and will be until employers are willing to pay aprice that will induce competent men to devote themselves to this particular part
and then the supply will never be greater than the demand, for to be a good carriage-
maker a man must first be a good mechanic. He must have some knowledge of body-making, ironing and carving, besides having a well-cultivated eye ; and if he is some-thing of a machinist so much the better, for the carriage is a machine made for theexpress purpose of carrying the body, and a little knowledge of the principles of ma-chinery will often be a great benefit. But above all, he should have a good eye, for
patterns are of but little use except to assist in getting sweeps, so the greater part mustb« done with the eye only as a guide ; then again, he needs it in giving the carriage a
proportion to correspond with the body, for each part should be in harmony with the
oUier, and not look, when it is done, as though it was made of remnants from several
different kinds of jobs. This is one of the secrets of making a nice coach. No matter
hov well shaped the body, how tasty the carriage, how finely painted or elegantly
trimmed the job may be, if there is no harmony in th€ different parts there will be nobeauty in the whole. .
Faults of this kind may be seen in every repository, and often prevent the sale of
a job. The customer may aot be able to tell where the fault lies, but he knows it is
there, although he admits that is a well-shaped body, and well finished all through
but when he stands off and looks at it he don't like it, and nine times out of ten youwill find the fault to be a hadly proportioned carriage.
Although guess-work is not as common as it once was it is still practiced, and bymen professing to be good mechanics, and who perhaps are, but practice it because
they were so taught, and know of no other way in which certain things can be done.
This way of working is a disgrace to any journeyman, and we hope soon to see it dis-
carded by every respectable mechanic.
Guess-work is not confined to any one particular trade ; all are affected by it, andnone more so, perhaps, than our own. This is not because coach-makers are moreignorant or stupid than others, but because their calling requires more skill and know-ledge of geometry than almost any other trade. Yet it must be admitted that, as a
class, we are slow to use the means and opportunities which we have for our improve-
ment, preferring to do everything in the old way (by main strength and stupidity),
rather than adopt any new-fangled notion. How long this state of things will exist

8/10/2019 Making Horse Drawn Coaches 1800 Bw
http://slidepdf.com/reader/full/making-horse-drawn-coaches-1800-bw 144/455
96 COACH-MAKERS' ILLUSTRATED HAND-BOOK.
we cannot tell, but we know that the publications of the present day are doing a goodwork in exciting the ambition of some to become better informed, more skillful and
consequently more valuable workmen than their indiflferent shopmates.The point where the stay on a perch carriage part should connect with the perch, is
one of the points which carriage-makers have been accustomed to guess at, but we will
endeavor to explain the manner of doing it.
To ascertain that point, we will first take one of the front wheels, and find at whatpoint it will strike the body in turning, which we do by measuring the height of thebody from the ground on the wheel, as line A, Fig. 1 ; the top point of the Une is the
point where it will strike, and line B is the distance which the wheel will reach under the
body in the direction of the perch ; line C is the height of the perch from the ground. Nowall that remains is to find where, and at what angle, the wheel will be when turned
under, which we will endeavor to do by giving half section of carriage part, Fig. 2.
Line A represents the front axle turned until the wheel strikes the body, which is
represented by line B. Line C is the distance which the wheel reaches under the body,
as we ascertained by Fig. 1, and will compare in length to line B in that figure, which
is the important thing to remember. Now by drawing a line for the stay from the
given point of attachment on the back axle D, so that it will just touch the wheel, we
find that the front end will meet the perch at the king bolt E. This is the correct wayof ascertaining where the stay should strike the perch.
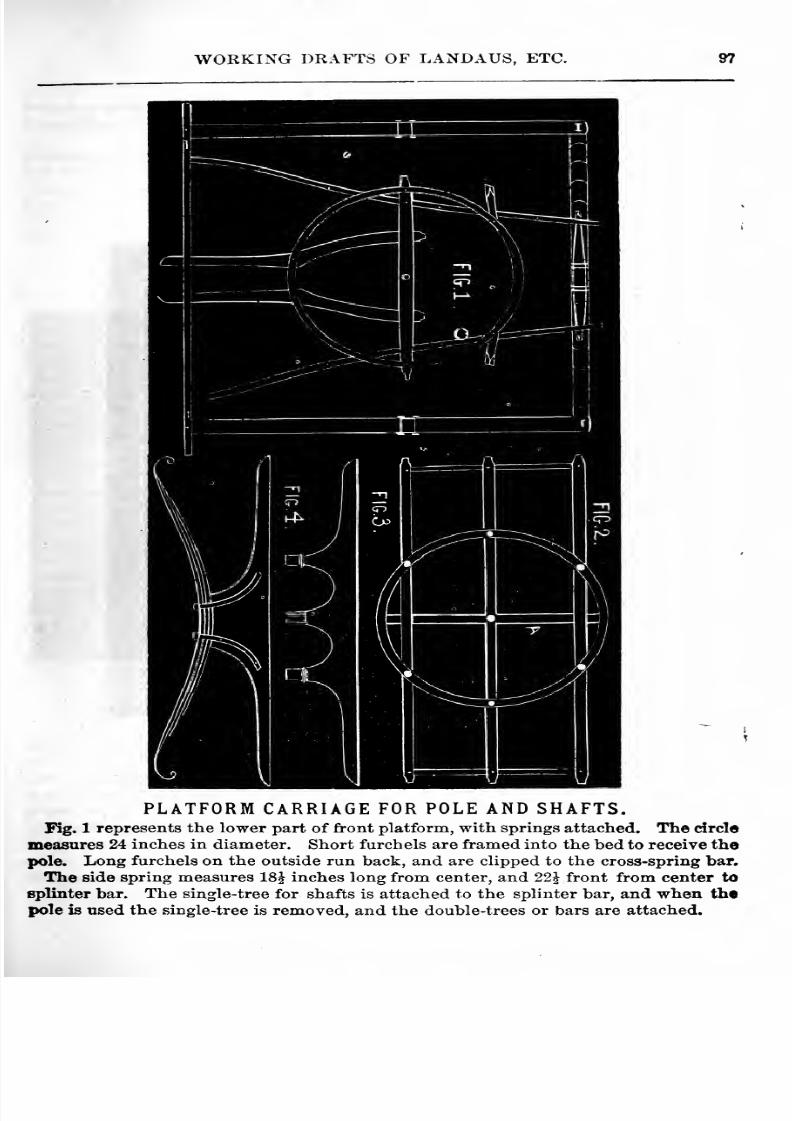
8/10/2019 Making Horse Drawn Coaches 1800 Bw
http://slidepdf.com/reader/full/making-horse-drawn-coaches-1800-bw 145/455
WORKING DRAFTS OF LANDAUS, ETC. 97
PLATFORM CARRIAGE FOR POLE AND SHAFTS.Fig. 1 represents the lower part of front platform, with springs attached. The circle
measures 24 inches in diameter. Short furchels are framed into the bed to receive thepole. Long furchels on the outside run back, and are clipped to the cross-spring bar.
The side spring measures 18^ inches long from center, and 22^ front from center to
splinter bar. The single-tree for shafts is attached to the splinter bar, and when thepole is used the single-tree is removed, and the double-trees or bars are attached.
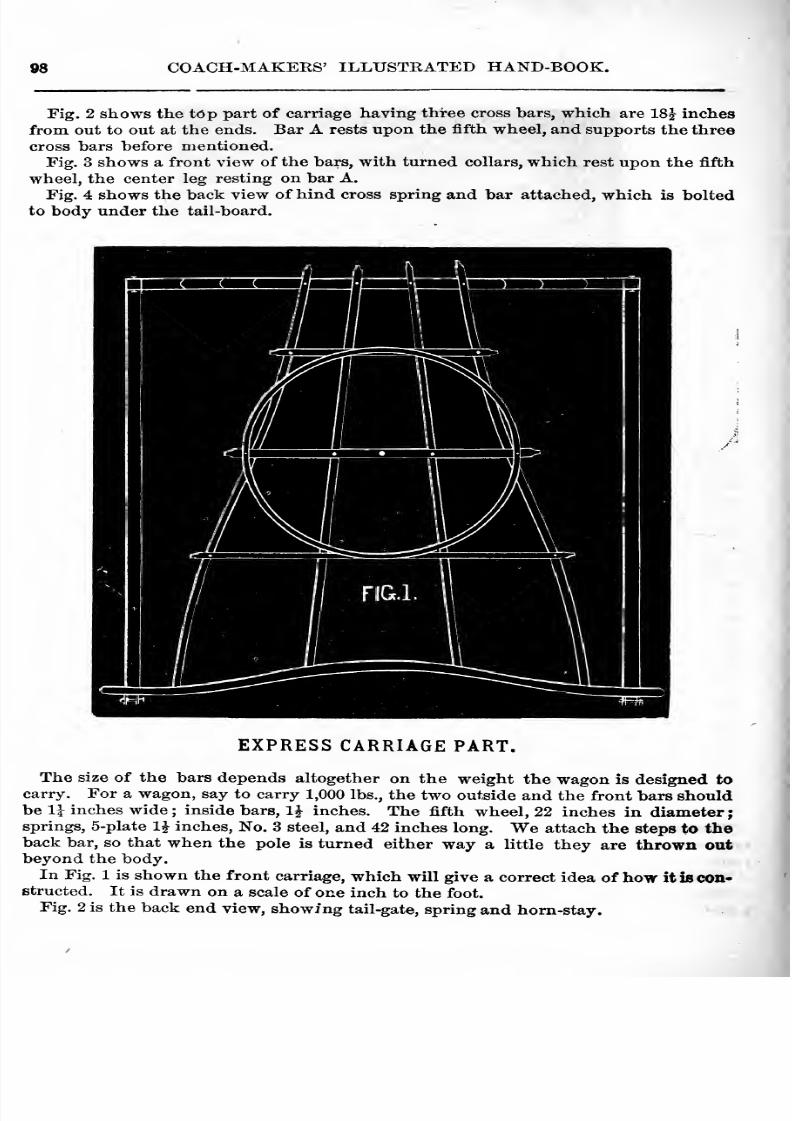
8/10/2019 Making Horse Drawn Coaches 1800 Bw
http://slidepdf.com/reader/full/making-horse-drawn-coaches-1800-bw 146/455
98 COACH-MAKERS' ILLUSTRATED HAND-BOOK.
Fig. 2 shows the tdp part of carriage having three cross bars, which are 18^ inches
from out to out at the ends. Bar A rests upon the fifth wheel, and supports the three
cross bars before mentioned.Fig. 3 shows a front view of the bars, with turned collars, which rest upon the fifth
wheel, the center leg resting on bar A.
Fig. 4 shows the back view of hind cross spring and bar attached, which is bolted
to body under the tail-board.
EXPRESS CARRIAGE PART.
The size of the bars depends altogether on the weight the wagon is designed tocarry. For a wagon, say to carry 1,000 lbs., the two outside and the front bars shouldbe 11 inches wide; inside bars, IJ inches. The fifth wheel, 22 inches in diameter;springs, 5-plate 1^ inches. No. 3 steel, and 42 inches long. We attach the steps to theback bar, so that when the pole is turned either way a little they are thrown outbeyond the body.
In Fig. 1 is shown the front carriage, which will give a correct idea of how it is con*etructed. It is
drawn on a scale of one inch to the foot.Fig. 2 is the back end view, showing tail-gate, spring and horn-stay. I
8/10/2019 Making Horse Drawn Coaches 1800 Bw
http://slidepdf.com/reader/full/making-horse-drawn-coaches-1800-bw 147/455
WORKING DRAFTS OF LANDAUS, ETC. 99
WOOD CARVING.
Jhe taste for ornamentation in wood and other materials haying been practiced fromthe eariiest times, it is safe to condude that it is a natural gift. The variety of formspresented by nature among plants and flowers was the free school to which man, evenin the savage state, was welcome. In his first artistic attempts he may have felt thelack of proper materials for copying nature, but a stick would serve in the place of
chalk, and mother earth would furnish a substitute for paper, for, in all probability,
drawing on a flat surface preceded any attempt at reproducing objects in nature bymolding them, or carving in either wood or stone. Plants and flowers appear to havebeen the favorite studies, and deemed the most appropriate for decorations of all
kinds ; nor have they, down to the present time, entirely lost their charm. TheEgyptian is termed the primary style of art, as we possess no knowledge of any other
anterior to it.
In nature's free school the artists drew their inspirations from the organic formsabout them —the lotus, papyrus and palm tree furnishing them with studies in har-
mony with their symbolism, and sufficiently beautiful, when artistically arranged, to
satisfy their notions of what was proper. We would not, however, care to copy the
models they have left to posterity, if those we generally meet with are fair samples.
The Greeks possessed great skill in seizing upon suggestions in nature, and producing
therefrom ornamental carving. They seem to have been endowed by the Creator
with the fullest measure of artistic know^ledge, and, in the range of subjects which theytreated, left succeeding generations to take the position of copyists. The art of embel-lishing wood by richly carved patterns has been confined principally to the adorn-ment of private residences, public buildings and churches. Furniture at different pe-
riods has claimed a share of attention, and the indications are that we are again
entering upon another term when carving wall be in great demand, and if so, the
manufacturers of carriages will be compelled to introduce it in order to satisfy theprevailing taste. The ornamentation of certain parts of the carriage, by means of
carving, was quite fashionable fifteen or twenty years ago. We cannot, however,claim for it, in its palmiest days, any degree of skill worth naming. Occasionally, at
that time, one in his travels would find a coach shop where a skilled carver was em-ployed, but the large majority of shops depended alone on some one or more of their
workmen who happened to have a little taste in that direction, but not sufficient
energy to procure good models of carving, and, by close study and practice, catch the
spirit they contained, and breathe it over their own productions. The consequence

8/10/2019 Making Horse Drawn Coaches 1800 Bw
http://slidepdf.com/reader/full/making-horse-drawn-coaches-1800-bw 148/455
100 COACH-MAKERS' ILLUSTRATED HAND-BOOK.
was, spring bars, axle beds, head blocks, pump-handles and body blocks were tortured
into a resemblance of vines and leaves, possessing little or no variety, and certainly no
beauty.It was not uncommon to see leaves carved as if growing out of each other, the painter
finding, when he attempted to cut up the carving, a leaf or more too many to carry
out the main design. Instead of the beautiful flowing lines, the plumpness and variety
of forms given by a skilled workman, carriage work was, and continues to be, so far as
carving is used, afflicted with a gaunt, lean style of leafing, and great poverty in de-
sign. What the trade lacked was a knowledge of drawing and designing. There werebut a few who could take the pencil and sketch the simplest form from a natural ob-
ject, or copy a good model with fidelity. Too frequently a first-class piece of carving,
taken as a pattern, lost some of its beauty at the hands of the first copyist, and thosewho copied from i/iis departed still further, until, at length, there was left no resem-blance to the original.
It is not required of the carriage-maker that he should be able to carve equal to
England's first sculptor, Gibbons, of whom it has been said, he exhibited a pot of
flowers so exquisitely carved that the individual leaves quivered and shook with the
motion of passing coaches, and under whose chisel stone seemed touched withvegetable life, and wood became lilies of the valley and fruit from the tree.
The coach and carriage of smaller dimensions will not admit of great boldness in
design, but every portion requiring decoration will admit of a well-conceived design anddelicacy of workmanship. Should carving again become popular, we trust we may wit-
ness a change for the better. Our free drawing schools may have already done a goodwork in teaching our young wood-workers, and with a good eye, correct taste and free
pencil, they may, when the necessity arises, be prepared to produce ornamental workworthy of the trade.
SCROLL PATTERNS FOR BAR ENDS.
KoB. 1 and 2 are designed for light carriage parts, and make a very neat finifih.
No.l.
No. 2.
No. 3 is a new style of scroll end for front bar, or bed piece on platform work. When
earned as shown, and tastily striped up by the painter, it will not fail to please the eye,and add much to the appearance of the carriage part.
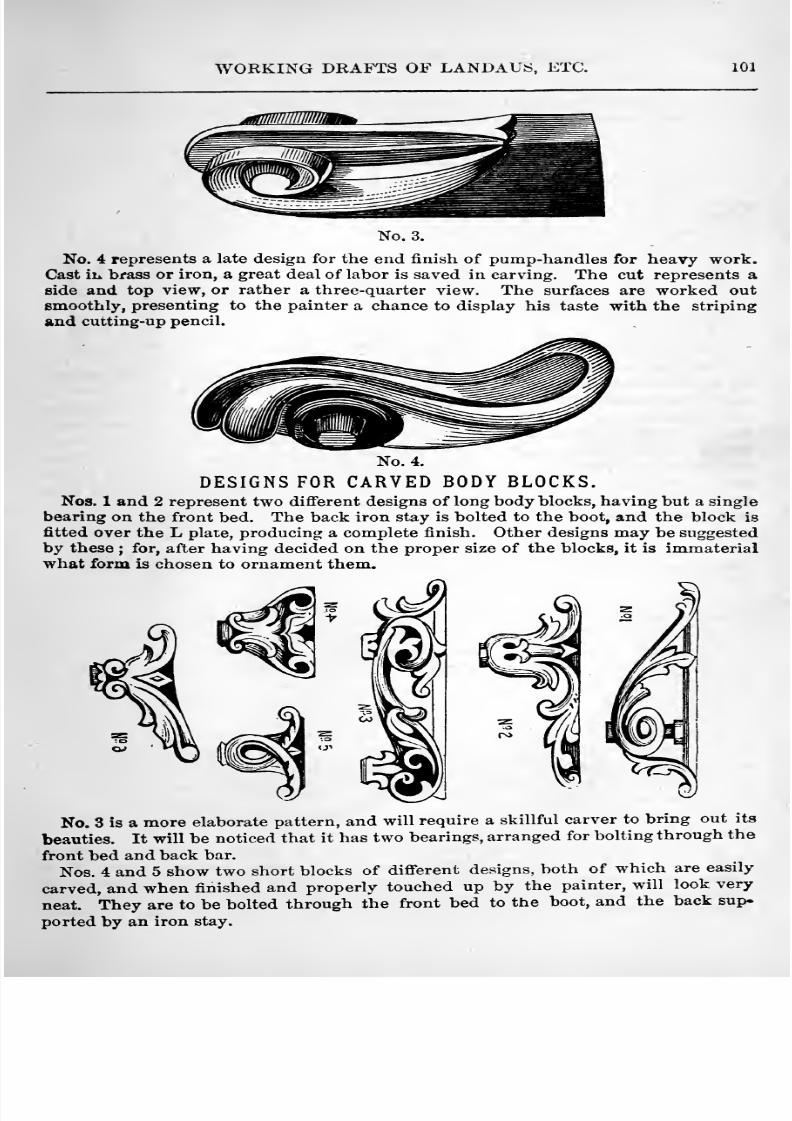
8/10/2019 Making Horse Drawn Coaches 1800 Bw
http://slidepdf.com/reader/full/making-horse-drawn-coaches-1800-bw 149/455
WORKING DRAFTS OF LANDAUS, ETC. 101
No. 3.
No. 4 represents a late design for the end finish of pump-handles for heavy work.Cast Ik brass or iron, a great deal of labor is saved in carving. The cut represents aside and top view, or rather a three-quarter view. The surfaces are worked outemoothly, presenting to the painter a chance to display his taste with the striping
and cutting-up pencil.
No. 4.
DESIGNS FOR CARVED BODY BLOCKS.Nos. 1 and 2 represent two different designs of long body blocks, having but a single
bearing on the front bed. The back iron stay is bolted to the boot, and the block is
fitted over the L plate, producing a complete finish. Other designs may be suggested
by these ; for, after having decided on the proper size of the blocks, it is immaterialwhat form is chosen to ornament them.
No. 3 is a more elaborate pattern, and will require a skillful carver to bring out its
beauties. It will be noticed that it has two bearings, arranged for bolting through the
front bed and back bar.
Nos. 4 and 5 show two short blocks of different designs, both of which are easily
carved, and when finished and properly touched up by the painter, will look very
neat. They are to be bolted through the front bed to the boot, and the back sup-
ported by an iron stay.
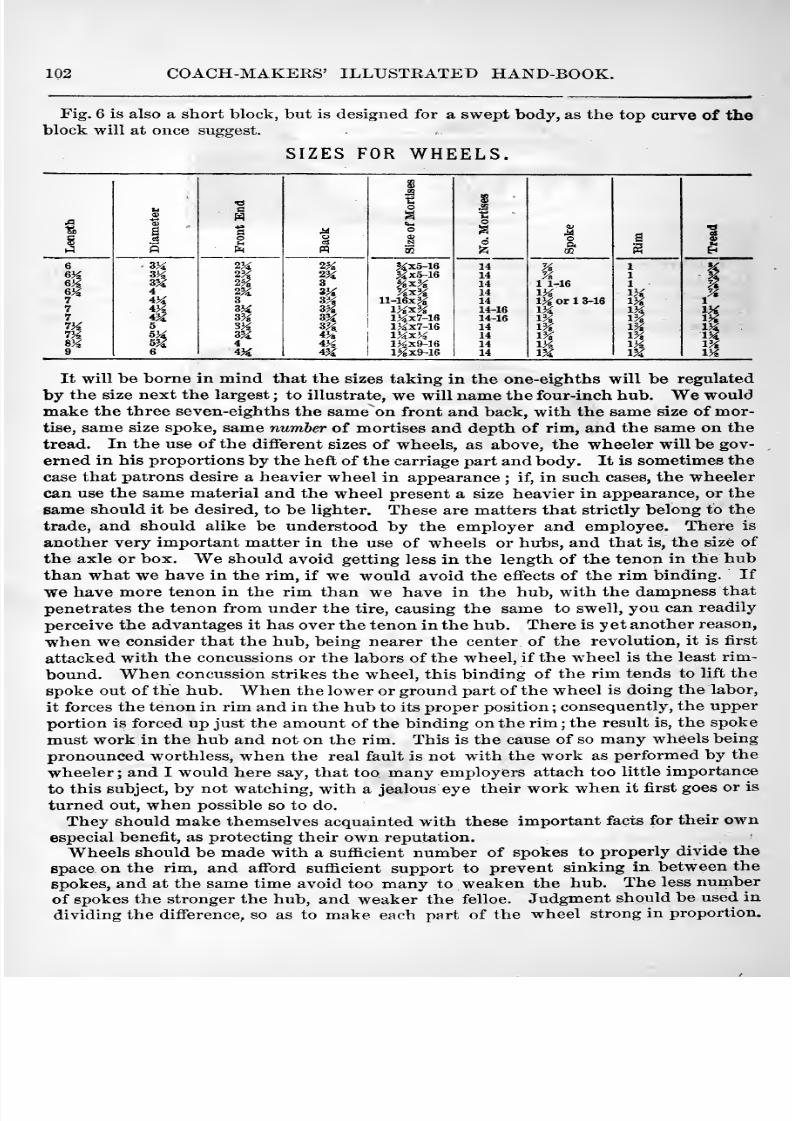
8/10/2019 Making Horse Drawn Coaches 1800 Bw
http://slidepdf.com/reader/full/making-horse-drawn-coaches-1800-bw 150/455
102 COACH-MAKERS' ILLUSTRATED HAND-BOOK.
Fig. 6 is also a short block, but is designed for a swept body, as the top curve of the
SIZES FOR WHEELS.
11
t a
1W
go 1 M ^
^ ^ 150 i 1
as 1
6 • 3Ji 2}^ 2^8 %x5-16 14 % 1 %6J^ 3^4 m 2M ?ix5-16 14 % 1 ^6^4 SK 3
SxH14 11-16 1 7?
6}4 4 2m 3>^ 14 V/s. V4 %7 % 3
g|ll-16x?^ 14 l>j^ or 13-16 1^ 1
7 % 3ii l>^x% 14-16 IJi iM \\i7 4K 3/^ 35i 1^x7-16 14-16 1% 1?^ IJ^7H 5^ 3J^ 3^ lMx7-16 14 1% 1?^ s%
^133^ 4^4 lMx>^ 14 1% 1%
s^4 4 4^ lj^x9-16 14 IK i>^ IJ^9 6 4M 43i 1^x9-16 14 IX IM 1>^
It will be borne in mind that the sizes taking in the one-eighths will be regulated
by the size next the largest ; to illustrate, we will name the four-inch hub. We wouldmake the three seven-eighths the same on front and back, with the same size of mor-tise, same size spoke, same number of mortises and depth of rim, and the same on the
tread. In the use of the different sizes of wheels, as above, the wheeler will be gov-erned in his proportions by the heft of the carriage part and body. It is sometimes the
case that patrons desire a heavier wheel in appearance ; if, in such cases, the wheeler
can use the same material and the wheel present a size heavier in appearance, or the
same should it be desired, to be lighter. These are matters that strictly belong to the
trade, and should alike be understood by the employer and employee. There is
another very important matter in the use of wheels or hubs, and that is, the size of
the axle or box. We should avoid getting less in the length of the tenon in the hubthan what we have in the rim, if we would avoid the effects of the rim binding. If
We have moretenon in the
rim than we have in the hub,with the dampness that
penetrates the tenon from under the tire, causing the same to swell, you can readily
perceive the advantages it has over the tenon in the hub. There is yet another reason,
when we consider that the hub, being nearer the center of the revolution, it is first
attacked with the concussions or the labors of the wheel, if the wheel is the least rim-
bound. When concussion strikes the wheel, this binding of the rim tends to lift the
spoke out of the hub. When the lower or ground part of the wheel is doing the labor,
it forces the tenon in rim and in the hub to its proper position ; consequently, the upper
portion is forced up just the amount of the binding on the ritn ; the result is, the spoke
must work in the hub and not on the rim. This is the cause of so many wheels being
pronounced worthless, when the real fault is not with the work as performed by the
wheeler ; and I would here say, that too many employers attach too little importance
to this subject, by not watching, with a jealous eye their work when it first goes or is
turned out, when possible so to do.
They should make themselves acquainted with these important facts for their ownespecial benefit, as protecting their own reputation.
Wheels should be made with a suflacient number of spokes to properly divide the
space on the rim, and afford sufficient support to prevent sinking in between the
spokes, and at the same time avoid too many to weaken the hub. The less number
of spokes the stronger the hub, and weaker the felloe. Judgment should be used individing the difference, so as to make each part of the wheel strong in proportion.

8/10/2019 Making Horse Drawn Coaches 1800 Bw
http://slidepdf.com/reader/full/making-horse-drawn-coaches-1800-bw 151/455
AVOKKING DRAFTS OF LANDAUS, ETC. 103
For wheels from 3 feet 10 inches to 4 feet 2 inches fourteen spokes will be a proper
number, but as the size of the wheel increases or decreases, add or diminish the num-ber of spokes, being careful to reduce your tenon proportionately, in order to not
weaken the hub.
CENTERING SQUARE.This is a useful instrument for centering of all circular work, especially in shops
where they mortise their own hubs. Its con-
struction is very simple, being but a T-square
whose stock is a portion of a circle. Let AC be the stock made of one piece of hard woodwell seasoned (the extremities of which at Aand C should have a small piece of steel affixedso that it should not be subject to wear by use),
into which stock the blade B D is tenanted, so
that A B is exactly equal to B C, and at the same time perpendicular or square to the
cord A C. It is evident that if this instrument is applied to any circle, so that the
parts A and C touch it, the blade B D will pass through the center of the circle, andby two applications the center will be found.
8/10/2019 Making Horse Drawn Coaches 1800 Bw
http://slidepdf.com/reader/full/making-horse-drawn-coaches-1800-bw 152/455
104 COACH-MAKEKS' ILLUSTRATED HAND-BOOK.
PART II.-BLACKSMITH DEPARTMENT.
»<Ke
THE BLACKSMITH.•• Ho, ye who at the anvil toil, and strike the sounding blow,
Where, from the burning iron's breast, the sparks fly to and fifo,
While answering to the hammer's ring, and fire's intenser glow —Oh, while ye feel 'tis hard to toil and sweat the long day through,Bemember, it is harder still to have no work to dot
WEimagine we hear the sons of Vulcan throughout the land bemoaning their hardfate. Oh, who, they say, are doomed to lead such a fiery life as we. Although
the sun may pour his sultry rays, causing the atmosphere to quiver above the parched
earth, we may not cool the forge's heated breath. Enfeebled by the atmosphere fromwithout, we must nevertheless keep up an intense heat in the shop, and for ten long
hours stand between these two fires, while the violent exercise which our trade de-
mands causes the blood to boil almost within our veins. Very true, my fellow shop-
mate, but while you may think your calling is one full of hard work, and rendered
more unpleasant in summer by the ever-glowing forge, the flowing perspiration andthe soot, nature comes to your aid, and repays you with glowing health and muscles
well nigh as firm as the metal you work. The sounding blows delivered by the black-
smith make music wherever civilization extends, bringing into proper shape both iron
and steel, adapting them to the numberless purposes for which they alone are fitted.
The tools required by the various trades, the implements of husbandry, the shoes
which give to the horse a sure footing, enabling him to apply his strength to better
advantage, vehicles for pleasure or profit, vessels engaged in commerce, and their
guardians, the men-of-war, all have been dependent for strength, durability andefficiency on the workers in iron. Yes, there is music in the ringing anvil, and beautyin the sparks as they fly to and fro from beneath the forming hammers; and then thesmithy has furnished artists with many fine subjects. The Village Blacksmith is acharming picture. The statuette by Rogers, How the Fort was Taken ; the scene is
laid in a smith shop, and, besides its life-like beauty, possesses a national interest.
These, 'tis true, do not represent the glare of the forges, and the activity of the work-men, but the scenes are laid in the smith shop —the work shop above all others withwhich the masses are well acquainted. Wherever the pioneer pushes out into thewilderness the blacksmith must soon follow, for without him there could be no pro-gress made. Artificers in metals other than iron and steel occupy honorable positions,
and their products are of great value, but the metals they manipulate could be dispen-sed without entailing on the world such serious consequences as would ensue shouldiron be annihilated. The blacksmith may well be proud of his calling, for the eyes ofall are upon him, paying him homage in their inner thoughts, if they are too proud to
acknowledge it openly.
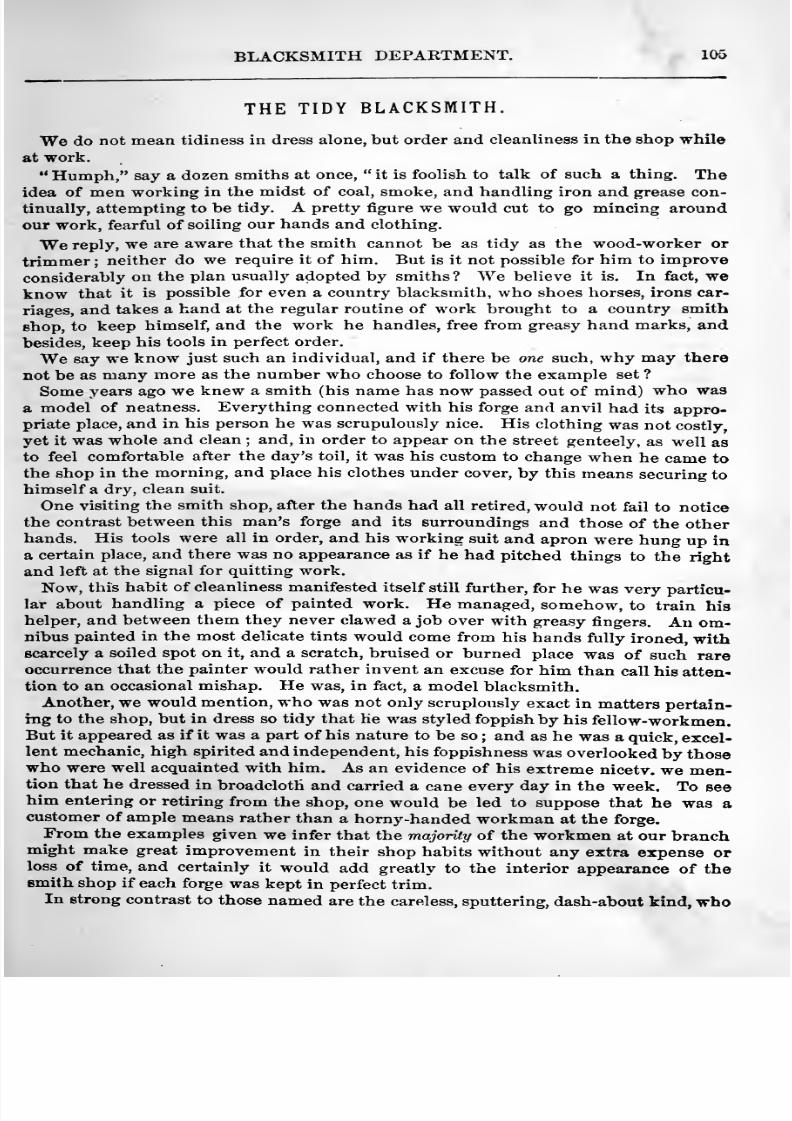
8/10/2019 Making Horse Drawn Coaches 1800 Bw
http://slidepdf.com/reader/full/making-horse-drawn-coaches-1800-bw 153/455
BLACKSMITH DEPARTMENT. 106
THE TIDY BLACKSMITH.
Wedo not mean tidiness in dress alone, but order and cleanliness in the shop while
at work. Humph, say a dozen smiths at once, it is foolish to talk of such a thing. The
idea of men working in the midst of coal, smoke, and handling iron and grease con-
tinually, attempting to be tidy. A pretty figure we would cut to go mincing around
our work, fearful of soiling our hands and clothing.
We reply, we are aware that the smith cannot be as tidy as the wood-worker or
trimmer; neither do we require it of him. But is it not possible for him to improve
considerably on the plan usuall)'^ adopted by smiths ? We believe it is. In fact, we
know thatit is possible for
evena country blacksmith,
whoshoes horses, irons car-
riages, and takes a hand at the regular routine of work brought to a country smith
shop, to keep himself, and the work he handles, free from greasy hand marks, and
besides, keep his tools in perfect order.
We say we know just such an individual, and if there be one such, why may there
not be as many more as the number who choose to follow the example set ?
Some years ago we knew a smith (his name has now passed out of mind) who was
a model of neatness. Everything connected with his forge and anvil had its appro-priate place, and in his person he was scrupulously nice. His clothing was not costly,
yet it was whole and clean ; and, in order to appear on the street genteely, as wellas
to feel comfortable after the day's toil, it was his custom to change when he came to
the shop in the morning, and place his clothes under cover, by this means securing to
himself a dry, clean suit.
One visiting the smith shop, after the hands had all retired, would not fail to notice
the contrast between this man's forge and its surroundings and those of the otherhands. His tools were all in order, and his working suit and apron were hung up in
a certain place, and there was no appearance as if he had pitched things to the right
and left at the signal for quitting work.
Now, this habit of cleanliness manifested itself still further, for he was very particu-
lar about handling a piece of painted work. He managed, somehow, to train hishelper, and between them they never clawed a job over with greasy fingers. An om-nibus painted in the most delicate tints would come from his hands fully ironed, withscarcely a soiled spot on it, and a scratch, bruised or burned place was of such rareoccurrence that the painter would rather invent an excuse for him than call his atten-tion to an occasional mishap. He was, in fact, a model blacksmith.
Another, we would mention, who was not only scruplously exact in matters pertain-ing to the shop, but in dress so tidy that he was styled foppish by his fellow- workmen.But it appeared as if it was a part of his nature to be so ; and as he was a quick, excel-lent mechanic, high spirited and independent, his foppishness was overlooked by thosewho were well acquainted with him. As an evidence of his extreme nicetv. we men-tion that he dressed in broadcloth and carried a cane every day in the week. To seehim entering or retiring from the shop, one would be led to suppose that he was acustomer of ample means rather than a horny-handed workman at the forge.
From the examples given we infer that the majjorify of the workmen at our branchmight make great improvement in their shop habits without any extra expense orloss of time, and certainly it would add greatly to the interior appearance of thesmith shop if each forge was kept in perfect trim.
In strong contrast to those named are the careless, sputtering, dash-about kind, who
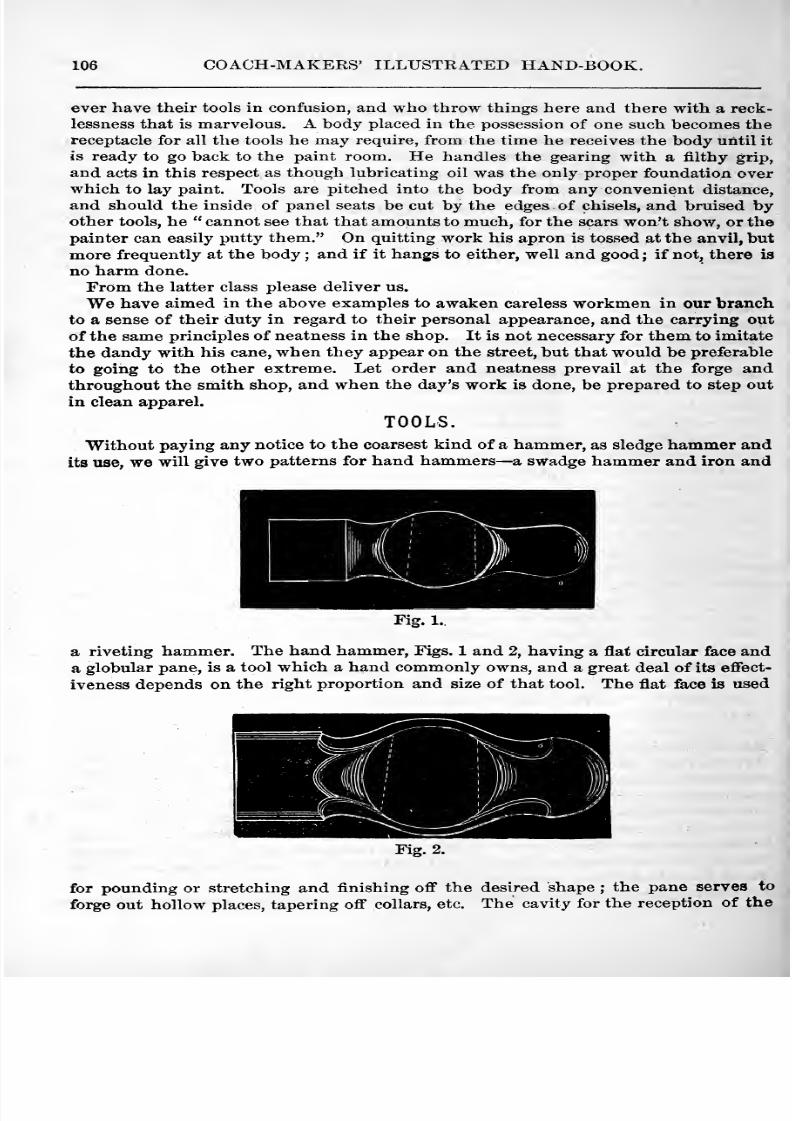
8/10/2019 Making Horse Drawn Coaches 1800 Bw
http://slidepdf.com/reader/full/making-horse-drawn-coaches-1800-bw 154/455
106 COACH-MAKERS' ILLUSTRATED HAND-BOOK.
ever have their tools in confusion, and who throw things here and there with a reck-
lessness that is marvelous. A body placed in the possession of one such becomes the
receptacle for all the tools he may require, from the time he receives the body until it
is ready to go back to the paint room. He handles the gearing with a filthy grip,
and acts in this respect as though lubricating oil was the only proper foundation overwhich to lay paint. Tools are pitched into the body from any convenient distance,
and should the inside of panel seats be cut by the edges of chisels, and bruised byother tools, he cannot see that that amounts to much, for the scars won't show, or the
painter can easily putty them. On quitting work his apron is tossed at the anvil, but
more frequently at the body ; and if it hangs to either, well and good; if not, there is
no harm done.
From the latter class please deliver us.
We have aimed in the above examples to awaken careless workmen in our branchto a sense of their duty in regard to their personal appearance, and the carrying out
of the same principles of neatness in the shop. It is not necessary for them to imitate
the dandy with his cane, when they appear on the street, but that would be preferable
to going to the other extreme. Let order and neatness prevail at the forge andthroughout the smith shop, and when the day's work is done, be prepared to step out
in clean apparel.
TOOLS.
Without paying any notice to the coarsest kind of a hammer, as sledge hammer andits use, we will give two patterns for hand hammers— a swadge hammer and iron and
Fig. 1.
a riveting hammer. The hand hammer. Figs. 1 and 2, having a flat circular face anda globular pane, is a tool which a hand commonly owns, and a great deal of its effect-
iveness depends on the right proportion and size of that tool. The flat face is used
Fig. 2.
for pounding or stretching and finishing off the desired shape ; the pane serves to
forge out hollow places, tapering off collars, etc. The cavity for the reception of the
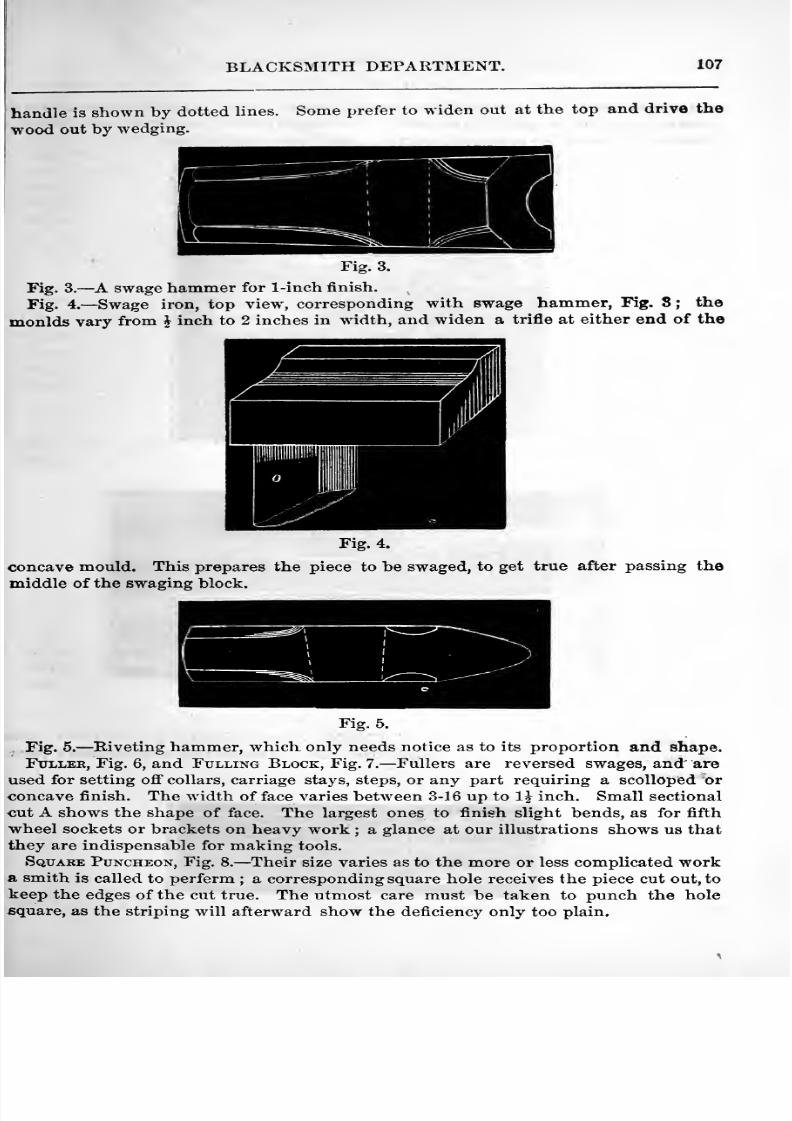
8/10/2019 Making Horse Drawn Coaches 1800 Bw
http://slidepdf.com/reader/full/making-horse-drawn-coaches-1800-bw 155/455
BLACKSMITH DEPARTMENT. 107
handle is shown by dotted lines.
wood out by wedging.
Some prefer to widen out at the top and drive the
Fig. 3.
Fig. 3. —A swage hammer for 1-ineh finish.
Fig. 4. —Swage iron, top view, corresponding with swage hammer, Fig. 8; the
monlds vary from J inch to 2 inches in wddth, and widen a trifle at either end of the
rig. t.
concave mould. This prepares the piece to be swaged, to get true after passing the
middle of the swaging block.
Fig. 5.
Fig. 5. —Biveting hammer, which only needs notice as to its proportion and shape.Fuller, Fig. 6, and Fulling Block, Fig. 7. —Fullers are reversed swages, and' are
used for setting off collars, carriage stays, steps, or any part requiring a scolloped or
concave finish. The width of face varies between 3-16 up to Ij inch. Small sectional
cut A shows the shape of face. The largest ones to finish slight bends, as for fifth
wheel sockets or brackets on heavy work ; a glance at our illustrations shows us that
they are indispensable for making tools.
Square Puncheon, Fig. 8. —Their size varies as to the more or less complicated worka smith is called to perferm ; a corresponding square hole receives the piece cut out, to
keep the edges of the cut true. The utmost care must be taken to punch the holesquare, as the striping will afterward show the deficiency only too plain.
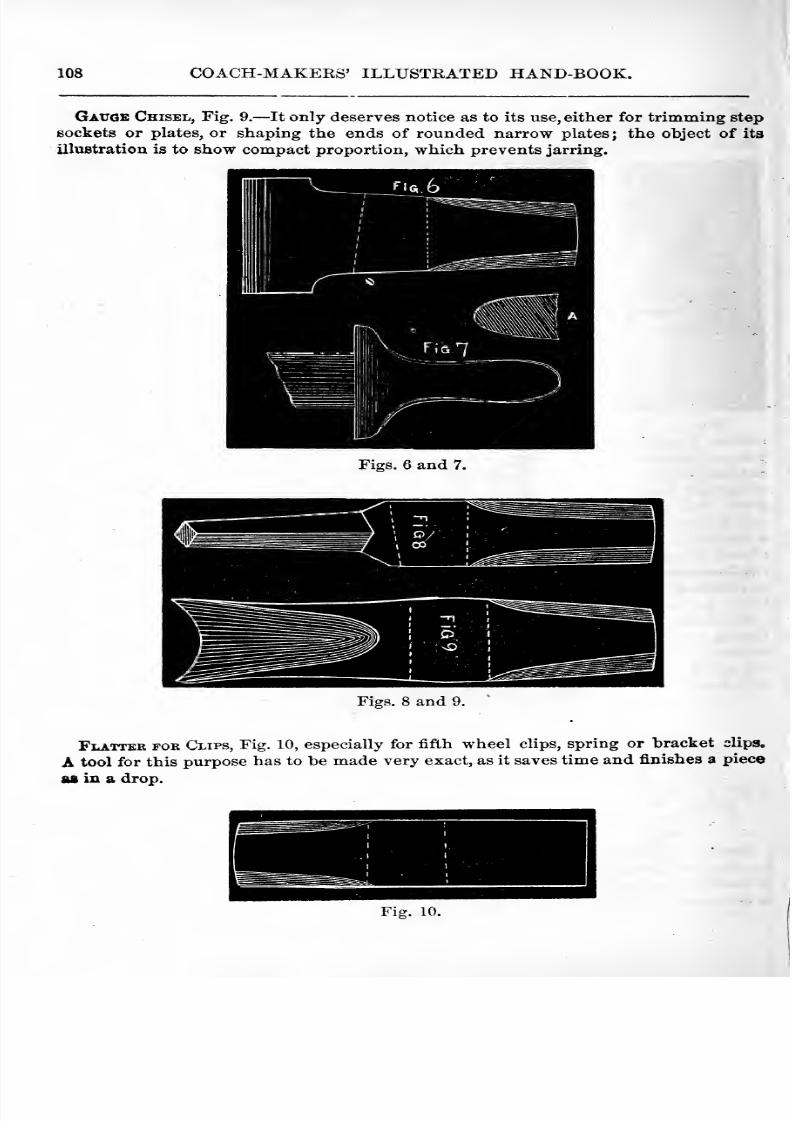
8/10/2019 Making Horse Drawn Coaches 1800 Bw
http://slidepdf.com/reader/full/making-horse-drawn-coaches-1800-bw 156/455
108 COACH-MAKEES' ILLUSTRATED HAND-BOOK.
Gauge Chisel, Fig. 9. —It only deserves notice as to its use, either for trimming step
sockets or plates, or shaping the ends of rounded narrow plates ; the object of its
illustration is to show compact proportion, which prevents jarring.
Figs. 6 and 7.
Figs. 8 and 9.
Flatter for Clips, Fig. 10, especially for fifth wheel clips, spring or bracket clips.
A tool for this purpose has to be made very exact, as it saves time and finishes a piece
AS in a drop.
Fig. 10.
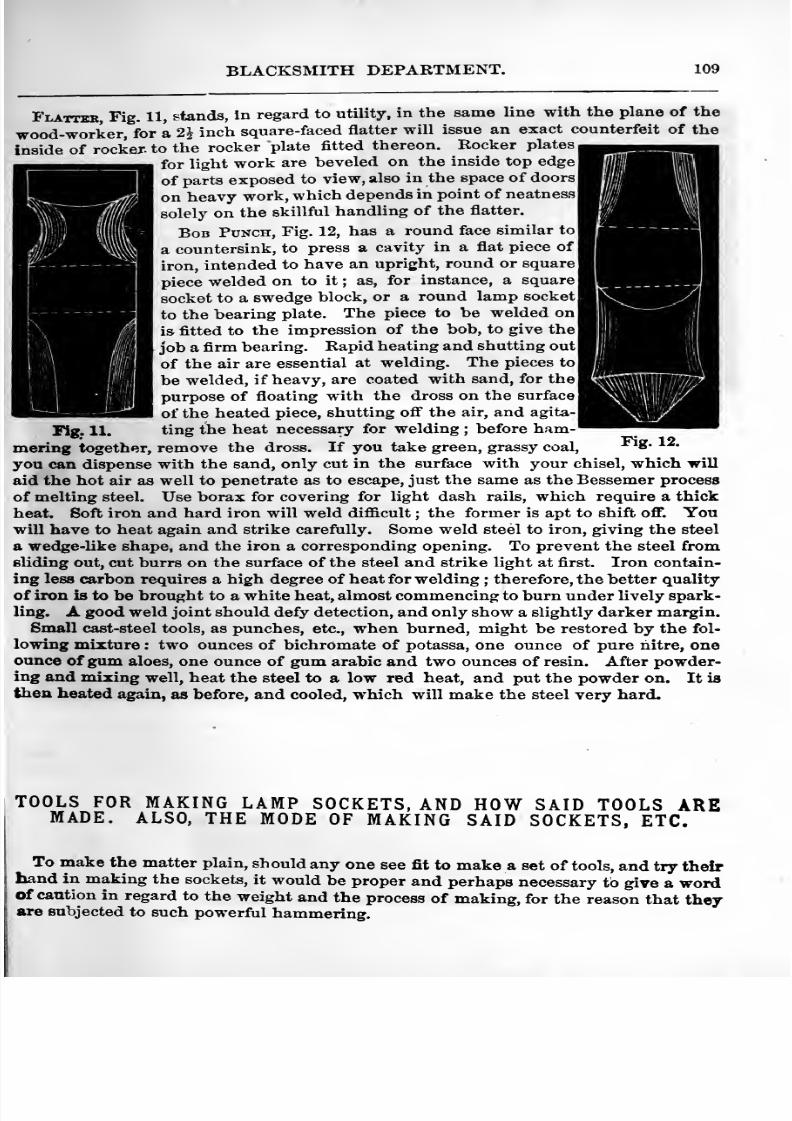
8/10/2019 Making Horse Drawn Coaches 1800 Bw
http://slidepdf.com/reader/full/making-horse-drawn-coaches-1800-bw 157/455
BLACKSMITH DEPARTMENT. 109
Flattee, Fig. 11, stands, In regard to utility, in the same line with the plane of the
wood-worker, for a 2^ inch square-faced flatter will issue an exact counterfeit of the
inside of rocker, to the rocker plate fitted thereon. Rocker plates
,
for light work are beveled on the inside top edge
of parts exposed to view, also in the space of doors
on heavy work, which depends in point of neatness
solely on the skillful handling of the flatter.
Bob Punch, Fig. 12, has a round face similar to|
a countersink, to press a cavity in a flat piece of
iron, intended to have an upright, round or square|
piece welded on to it ; as, for instance, a square
socket to a swedge block, or a round lamp socketto the bearing plate. The piece to be welded on
is fitted to the impression of the bob, to give the
job a firm bearing. Rapid heating and shutting out
of the air are essential at welding. The pieces to
be welded, if heavy, are coated with sand, for the
purpose of floating with the dross on the surface
of the heated piece, shutting ofi* the air, and agita-
Fig. 11. ting the heat necessary for welding ; before ham-
mering together, remove the dross. If you take green, grassy coal, *^^'^**
you can dispense with the sand, only cut in the surface with your chisel, which will
aid the hot air as well to penetrate as to escape, just the same as the Bessemer process
of melting steel. Use borax for covering for light dash rails, which require a thick
heat. Soft iron and hard iron will weld difficult ; the former is apt to shift off. Youwill have to heat again and strike carefully. Some weld steel to iron, giving the steel
a wedge-like shape, and the iron a corresponding opening. To prevent the steel fromsliding out, cut burrs on the surface of the steel and strike light at first. Iron contain-
ing less carbon requires a high degree of heat for welding ; therefore, the better quality
of iron is to be brought to a white heat, almost commencing to burn under lively spark-ling. A good weld joint should defy detection, and only show a slightly darker margin.
Small cast-steel tools, as punches, etc., when burned, might be restored by the fol-
lowing mixture : two ounces of bichromate of potassa, one ounce of pure nitre, oneounce of gum aloes, one ounce of gum arable and two ounces of resin. After powder-ing and mixing well, heat the steel to a low red heat, and put the powder on. It is
then heated again, as before, and cooled, w^hich will make the steel very hard.
TOOLS FOR MAKING LAMP SOCKETS, AND HOW SAID TOOLS AREMADE. ALSO, THE MODE OF MAKING SAID SOCKETS, ETC.
To make the matter plain, should any one see fit to make a set of tools, and try theirhand in making the sockets, it would be proper and perhaps necessary to give a wordof caution in regard to the weight and the process of making, for the reason that theyare subjected to such powerful hammering.
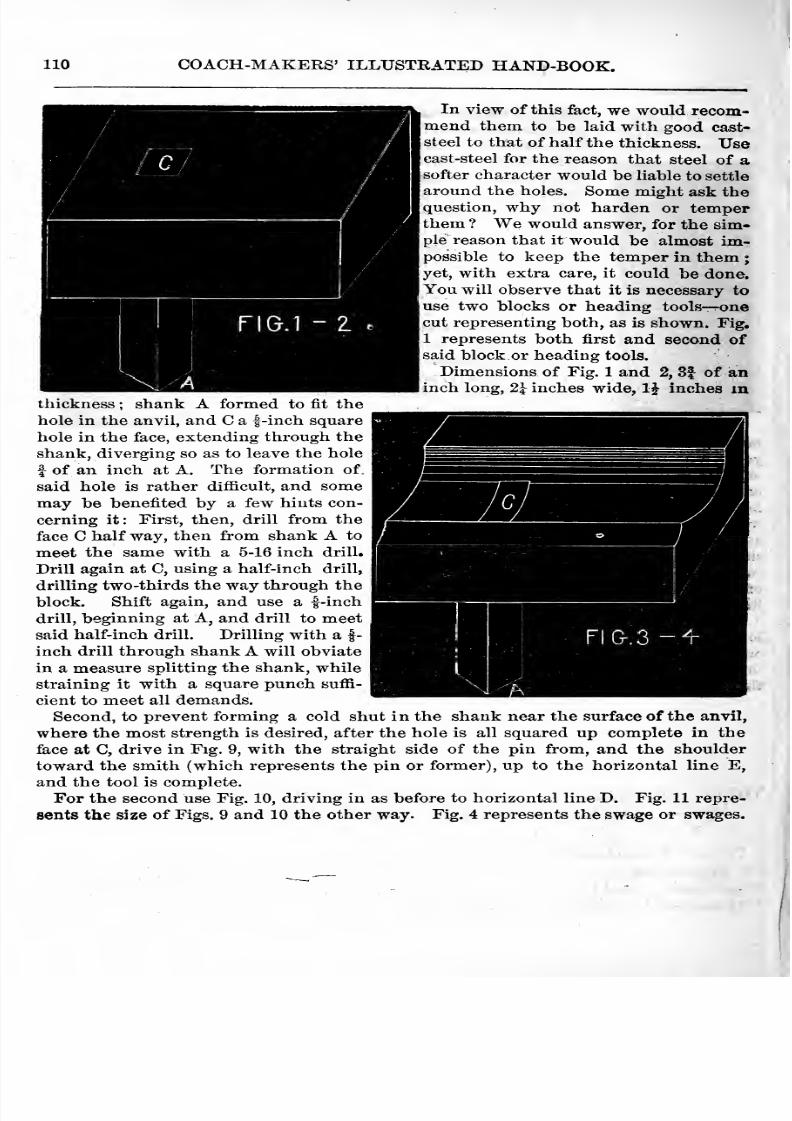
8/10/2019 Making Horse Drawn Coaches 1800 Bw
http://slidepdf.com/reader/full/making-horse-drawn-coaches-1800-bw 158/455
no COACH-MAKERS' ILLUSTRATED HAND-BOOK.
In view of this fact, we would recom-mend them to be laid with good cast-
steel to that of halfthe thickness. Usecast-steel for the reason that steel of a
softer character would be liable to settle
around the holes. Some might ask thequestion, why not harden or temperthem ? We would answer, for the sim-ple reason that it would be almost im-possible to keep the temper in them ;
yet, with extra care, it could be done.You will observe that it is necessary to
use two blocks or heading tools— onecut representing both, as is shown. Fig.
1 represents both first and second ofsaid block or heading tools.
Dimensions of Fig. 1 and 2, 3f of aninch long, 2^ inches wide, 1^ inches m
thickness ; shank A formed to fit the
hole in the anvil, and C a |-inch square
hole in the face, extending through the
shank, diverging so as to leave the hole
f of an inch at A. The formation of.
said hole is rather difficult, and somemay be benefited by a few hints con-
cerning it: First, then, drill from the
face C half way, then from shank A to
meet the same with a 5-16 inch drill.
Drill again at C, using a half-inch drill,
drilling two-thirds the way through the
block. Shift again, and use a |-inch
drill, beginning at A, and drill to meetsaid half-inch drill. Drilling with a f-
inch drill through shank A will obviate
in a measure splitting the shank, while
straining it with a square punch suffi-
cient to meet all demands.
Second, to prevent forming a cold shut in the shank near the surface of the anvil,
where the most strength is desired, after the hole is all squared up complete in the
face at C, drive in Fig. 9, with the straight side of the pin from, and the shouldertoward the smith (which represents the pin or former), up to the horizontal line E,
and the tool is complete.
For the second use Fig. 10, driving in as before to horizontal line D. Fig. 11 repre-
sents the size of Figs. 9 and 10 the other way. Fig. 4 represents the swage or swages.
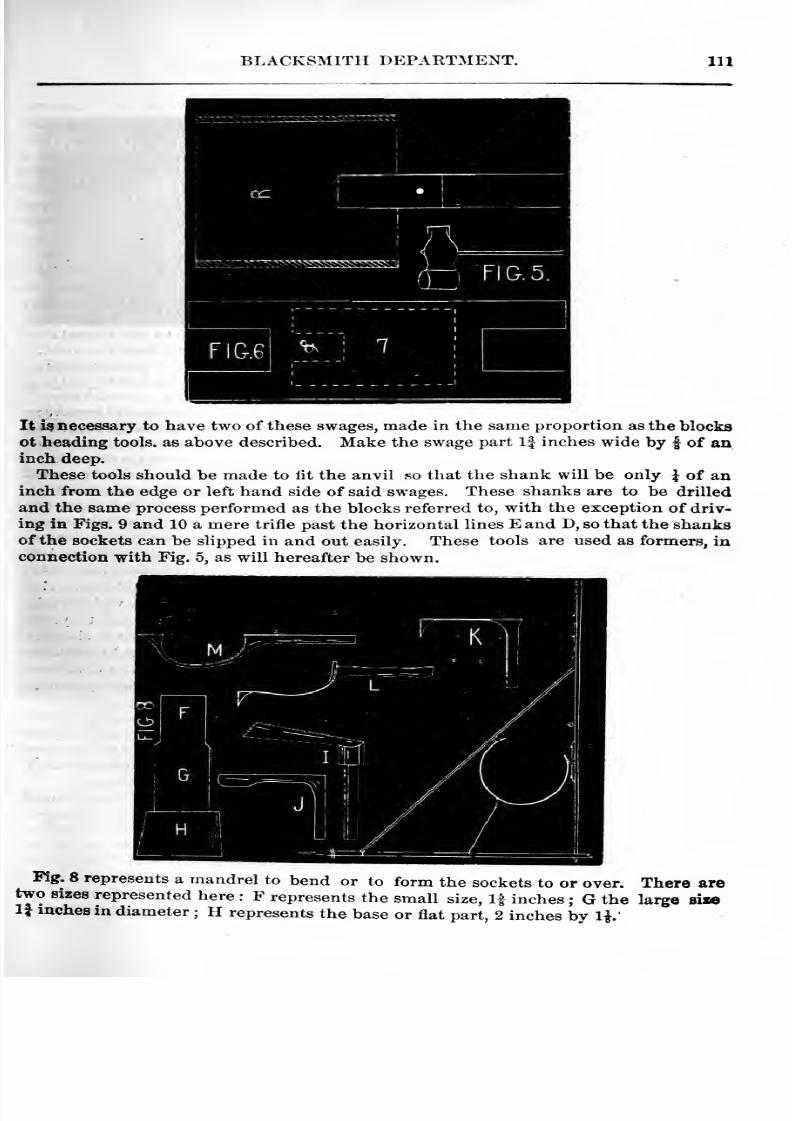
8/10/2019 Making Horse Drawn Coaches 1800 Bw
http://slidepdf.com/reader/full/making-horse-drawn-coaches-1800-bw 159/455
BLACKSMITH DEPARTMENT. Ill
It i? necessary to have two of these swages, made in the same proportion as the blocks
otheading
tools, asabove
described.Make the swage
partIf
inches wideby | of aninch deep.
These tools should be made to lit the anvil so that the shank will be only ^ of aninch from the edge or left hand side of said swages. These shanks are to be drilled
and the same process performed as the blocks referred to, with the exception of driv-
ing in Figs. 9 and 10 a mere trifle past the horizontal lines E and D, so that the shanksof the sockets can be slipped in and out easily. These tools are used as formers, in
connection with Fig. 5, as will hereafter be shown.
Fig. 8 represents a mandrel to bend or to form the sockets to or over. There are
two sizes represented here : F represents the small size. If inches ; G the large siieIf inches in diameter ; H represents the base or flat part, 2 inches by li'
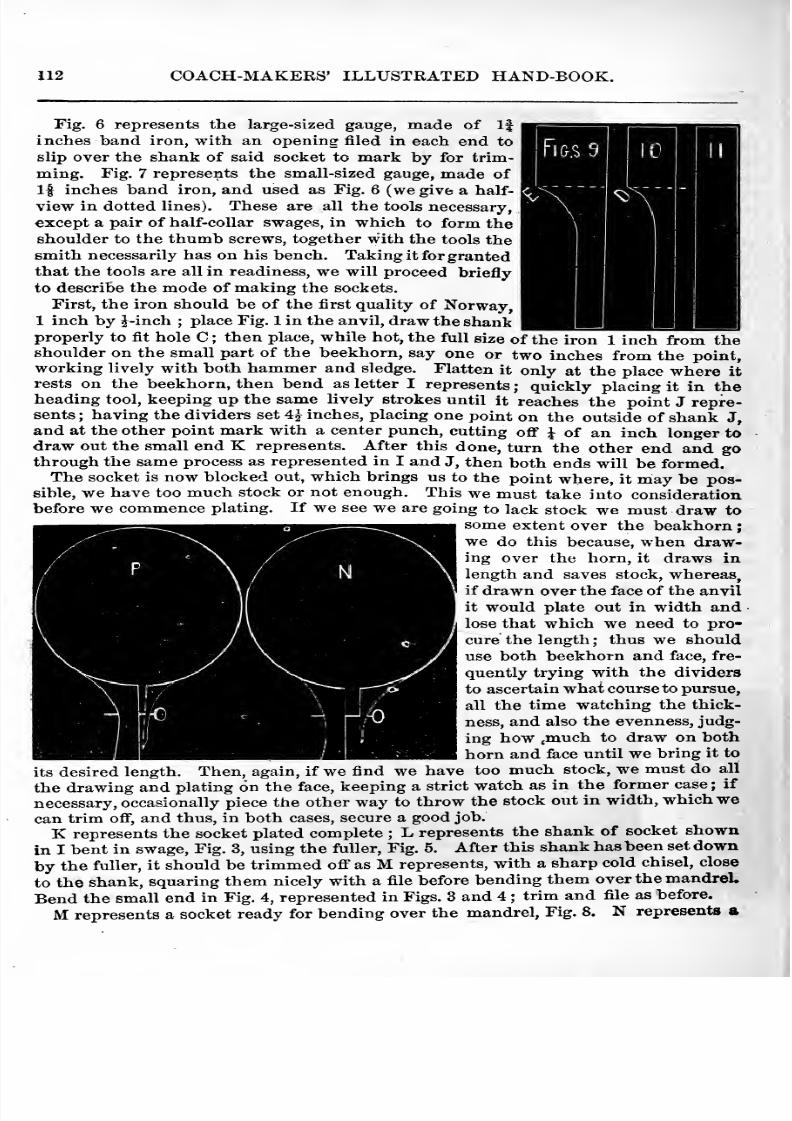
8/10/2019 Making Horse Drawn Coaches 1800 Bw
http://slidepdf.com/reader/full/making-horse-drawn-coaches-1800-bw 160/455
112 COACH-MAKERS' ILLUSTRATED HAND-BOOK.
slllG
Fig. 6 represents the large-sized gauge, made of If
inches band iron, with an opening filed in each end to
slip over the shank of said socket to mark by for trim-
ming. Fig. 7 represents the small-sized gauge, made of
If inches band iron, and used as Fig. 6 (we give a half-
view in dotted lines). These are all the tools necessary,
except a pair of half-collar swages, in which to form theshoulder to the thumb screws, together with the tools thesmith necessarily has on his bench. Taking it for grantedthat the tools are all in readiness, we will proceed briefly
to describe the mode of making the sockets.
First, the iron should be of the first quality of Norway,1 inch by J-inch ;
place Fig. 1 in the anvil, draw the shankproperly to fit hole C ; then place, while hot, the full size of the iron 1 inch from theshoulder on the small part of the beekhorn, say one or two inches from the point,working lively with both hammer and sledge. Flatten it only at the place where it
rests on the beekhorn, then bend as letter I represents; quickly placing it in the
heading tool, keeping up the same lively strokes until it reaches the point J repre-sents ; having the dividers set 4^ inches, placing one point on the outside of shank J,and at the other point mark with a center punch, cutting off \ of an inch longer to
draw out the small end K represents. After this done, turn the other end and gothrough the same process as represented in I and J, then both ends will be formed.
The socket is now blocked out, which brings us to the point where, it may be pos-sible, we have too much stock or not enough. This we must take into considerationbefore we commence plating. If we see we are going to lack stock we must draw to
some extent over the beakhornwe do this because, when draw-ing over the horn, it draws in
length and saves stock, whereas,if drawn over the face of the anvil
it would plate out in width andlose that which we need to pro-
cure the length ; thus we should
use both beekhorn and face, fre-
quently trying with the dividers
to ascertain what course to pursue,
all the time watching the thick-
ness, and also the evenness, judg-
ing how <much to draw on both
horn and face until we bring it to
its desired length. Then, again, if we find we have too much stock, we must do all
the drawing and plating on the face, keeping a strict watch as in the former case ; if
necessary, occasionally piece the other way to throw the stock out in width, which wecan trim off, and thus, in both cases, secure a good job.
K represents the socket plated complete ; L represents the shank of socket shown
in I bent in swage. Fig. 3, using the fuller. Fig. 5. After this shank has been set down
by the fuller, it should be trimmed off as M represents, with a sharp cold chisel, close
to the shank, squaring them nicely with a file before bending them over the mandrel.
Bend the small end in Fig. 4, represented in Figs. 3 and 4 ; trim and file as before.
M represents a socket ready for bending over the mandrel, Fig. 8. N represents a
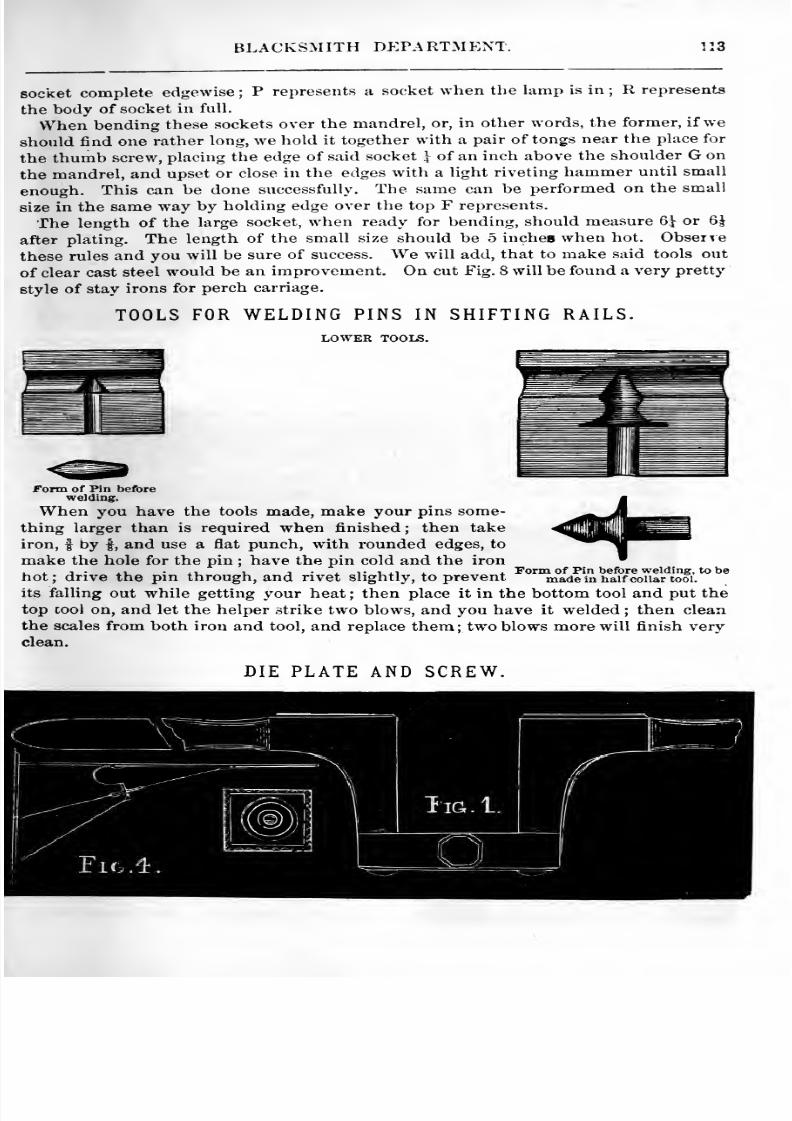
8/10/2019 Making Horse Drawn Coaches 1800 Bw
http://slidepdf.com/reader/full/making-horse-drawn-coaches-1800-bw 161/455
BLACKSMITH DEPARTMENT. 113
socket complete edgewise ; P represents a socket when the lamp is in ; R represents
the body of socket in full.
When bending these sockets over the mandrel, or, in other words, the former, if we
should find one rather long, we hold it together with a pair of tongs near the place for
the thumb screv/, placing the edge of said socket } of an inch above the shoulder G on
the mandrel, and upset or close in the edges with a light riveting hammer until small
enough. This can be done successfully. The same can be performed on the small
size in the same way by holding edge over the top F represents.
The length of the large socket, when ready for bending, should measure 6^ or 6|
after plating. The length of the small size should be 5 inches when hot. Obsenethese rules and you will be sure of success. We will add, that to make said tools out
of clear cast steel would be an improvement. On cut Fig. 8 will be found a very pretty
style of stay irons for perch carriage.
TOOLS FOR WELDING PINS IN SHIFTING RAILS.
LOWER TOOI^.
Form of Pin beforewelding.
When you have the tools made, make your pins some-
thing larger than is required when finished; then take
iron, I by |, and use a flat punch, with rounded edges, to
make the hole for the pin ; have the pin cold and the iron
hot
its falling out while getting your heat ; then place it in the bottom tool and put thetop cool on, and let the helper strike two blows, and you have it welded ; then clean
the scales from both iron and tool, and replace them; two blows more will finish very
clean.
, . ., • xu u J • X T 1 ii i. i Form of Pin before welding, to bedrive the pin through, and rivet slightly, to prevent made in haifcouar tool.
DIE PLATE AND SCREW.
c XT::'m.I
IlG.l. r^ ^^^''^ \
^yy/^ 1
^~=^\\ C^ 1 1
'^ Fig. 4. _iJ ^
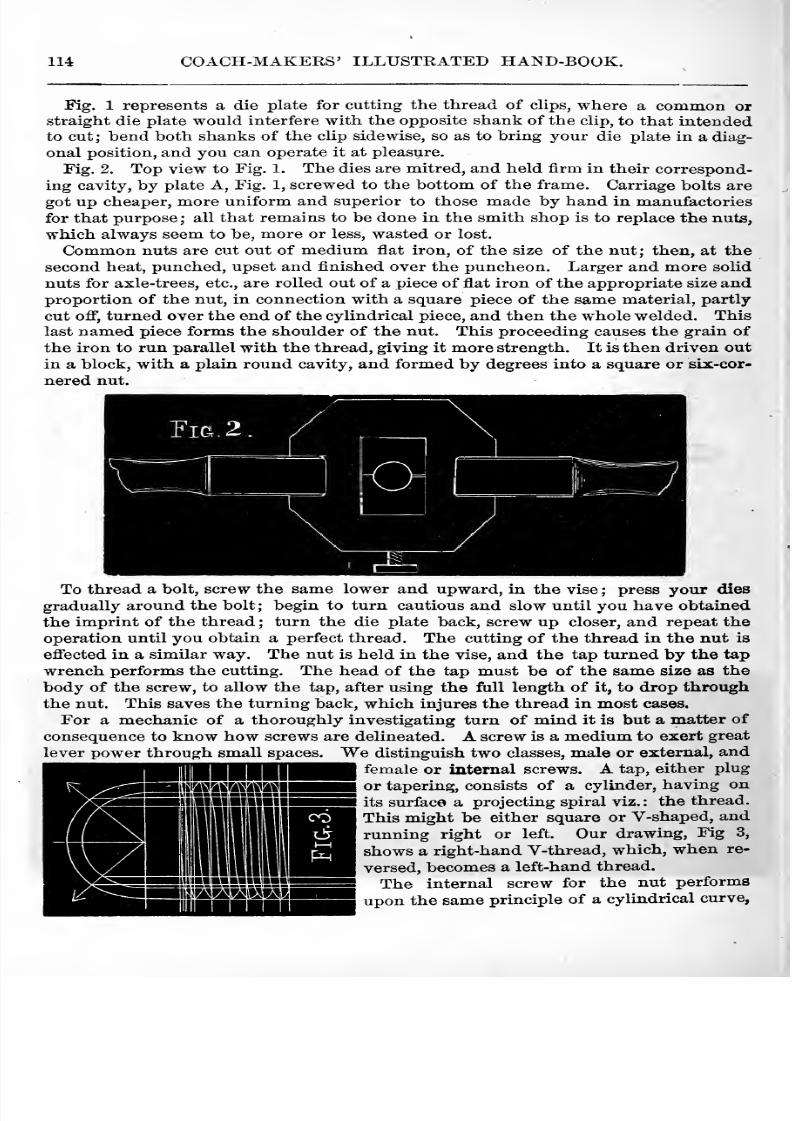
8/10/2019 Making Horse Drawn Coaches 1800 Bw
http://slidepdf.com/reader/full/making-horse-drawn-coaches-1800-bw 162/455
114 COACH-MAKERS' ILLUSTRATED HAND-BOOK.
Fig. 1 represents a die plate for cutting the thread of clips, where a common or
straight die plate would interfere with the opposite shank of the clip, to that intendedto cut; bend both shanks of the clip side wise, so as to bring your die plate in a diag-
onal position, and you can operate it at pleasure.
Fig. 2. Top view to Eig. 1. The dies are mitred, and held firm in their correspond-
ing cavity, by plate A, Fig. 1, screwed to the bottom of the frame. Carriage bolts are
got up cheaper, more uniform and superior to those made by hand in manufactories
for that purpose; all that remains to be done in the smith shop is to replace the nuts,
which always seem to be, more or less, wasted or lost.
Common nuts are cut out of medium flat iron, of the size of the nut; then, at the
second heat, punched, upset and finished over the puncheon. Larger and more solid
nuts for axle-trees, etc., are rolled out of a piece of flat iron of the appropriate size and
proportion of the nut, in connection with a square piece of the same material, partly
cut ofl , turned over the end of the cylindrical piece, and then the whole welded. Thislast named piece forms the shoulder of the nut. This proceeding causes the grain of
the iron to run parallel with the thread, giving it more strength. It is then driven out
in a block, with a plain round cavity, and formed by degrees into a square or six-cor-
nered nut.
To thread a bolt, screw the same lower and upward, in the vise ; press your dies
gradually around the bolt; begin to turn cautious and slow until you have obtained
the imprint of the thread ; turn the die plate back, screw up closer, and repeat the
operation until you obtain a perfect thread. The cutting of the thread in the nut is
efiected in a similar way. The nut is held in the vise, and the tap turned by the tap
wrench performs the cutting. The head of the tap must be of the same size as the
body of the screw, to allow the tap, after using the full length of it, to drop throughthe nut. This saves the turning back, which injures the thread in most cases.
For a mechanic of a thoroughly investigating turn of mind it is but a matter of
consequence to know how screws are delineated. A screw is a medium to exert great
lever power through small spaces. We distinguish two classes, male or external, andfemale or internal screws. A tap, either plug
or tapering, consists of a cylinder, having on
its surface a projecting spiral viz.: the thread.
This might be either square or V-shaped, and
running right or left. Our drawing, Fig 3,
shows a right-hand V-thread, which, when re-
versed, becomes a left-hand thread.
The internal screw for the nut performs
upon the same principle of a cylindrical curve,
HHIHIRi^HH^iikIW Vin¥lVI|iVIB|^^^HHlliH iiMimi^B^BB
1 IHBJiSJol lifliSinlmiBBB
HHIIH uuj^^ta
8/10/2019 Making Horse Drawn Coaches 1800 Bw
http://slidepdf.com/reader/full/making-horse-drawn-coaches-1800-bw 163/455
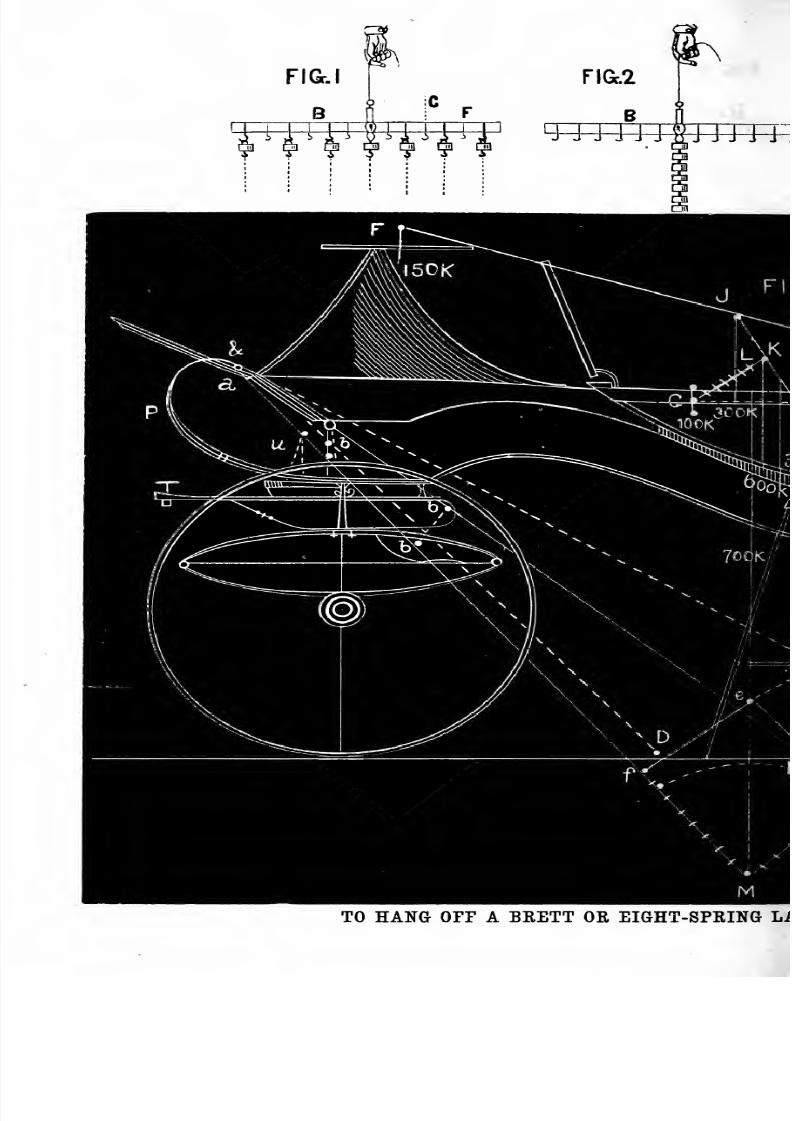
8/10/2019 Making Horse Drawn Coaches 1800 Bw
http://slidepdf.com/reader/full/making-horse-drawn-coaches-1800-bw 164/455
FIGr.
B
WfWI
n&.2
TO HANG OFF A BEETT OE EIGHT-SPEING LJ
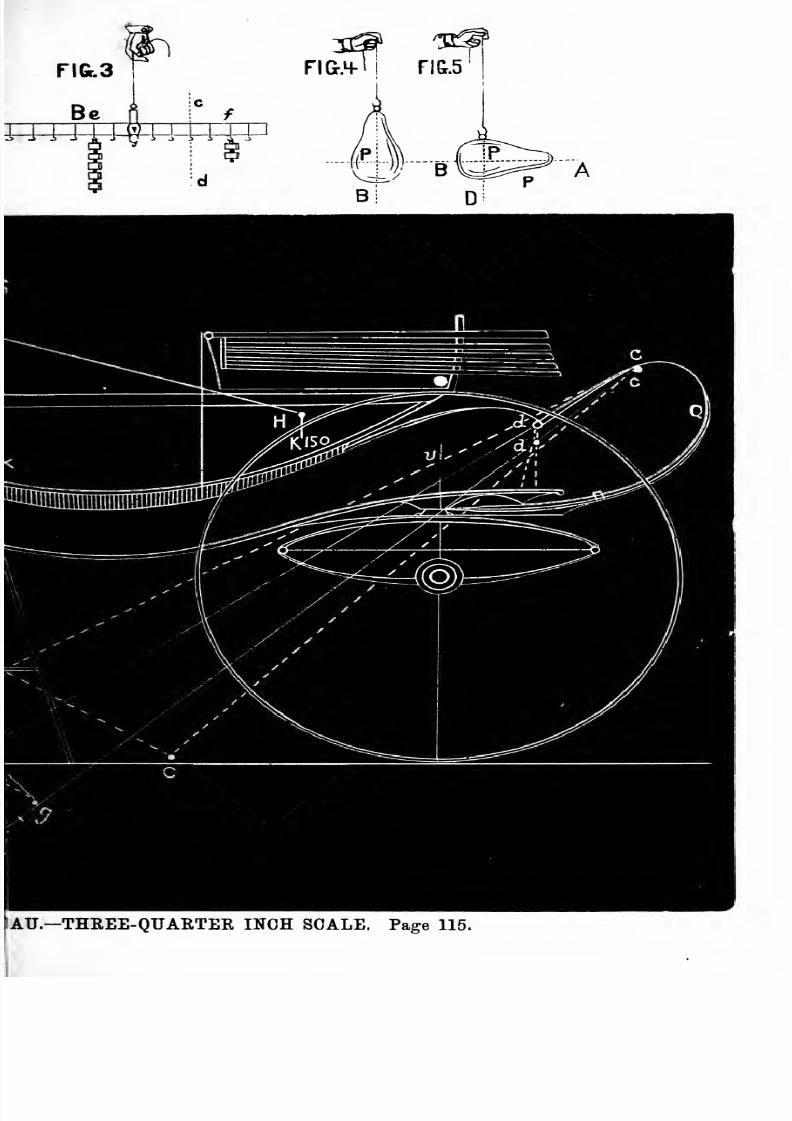
8/10/2019 Making Horse Drawn Coaches 1800 Bw
http://slidepdf.com/reader/full/making-horse-drawn-coaches-1800-bw 165/455
AU.-THREE-QUARTEE INCH SCALE. Page 115.
8/10/2019 Making Horse Drawn Coaches 1800 Bw
http://slidepdf.com/reader/full/making-horse-drawn-coaches-1800-bw 166/455
8/10/2019 Making Horse Drawn Coaches 1800 Bw
http://slidepdf.com/reader/full/making-horse-drawn-coaches-1800-bw 167/455
BLACKSMITH DEPARTMENT. 115
revolving around a certain point, and parallel to the axis, reaching that point after
a full turn. The larger semi-circle, Fig. 3, is equal to the diameter ; the smaller
semi-circle measures the depth of the thread. We then divide both circles into four
equal spaces, which might be increased if the curve of the thread requires a peculiar
delineation. Vertical lines are drawn from those five points, at the intersecting of
both semi-circles, as long as required. Next set ofi the space between the thread, anddivide into six equal parts, marked at our diagram by seven horizontal lines. Theselines will aid to find the true curve of the screw, by connecting the difi'erent points
of intersection through diagonals, which, if repeated at each interval, will delineate the
correct outline for the whole length of the screw. To find the bottom curve of the
thread, draw a diagonal line from the outside of thread to the horizontal line, mark-ing the bottom of thread, where it intersects the vertical line, projecting from smaller
semi-circle.
A practical eye will enable the student to work out the longer curves by drawing
them parallel with the first one, by the aid of horizontal lines crossing top and center
of the thread.
Fig. 4 represents patterns of straight stay and step. The smith may display con-
siderable taste on this stay, and produce a piece of work which will be very pleasing
to the eye. The step, worked out as shown, makes a very genteel finish.
TO HANG OFF A BRETT OR EIGHT-SPRING LANDAU. THREE-QUARTER-INCH SCALE.
In the accompanying diagram is illustrated the method of hanging an eight-spring
Brett, which is applicable to all vehicles having C springs connected with platform andelliptic springs. This is one of the most important subjects to be considered in the
construction of this class of carriages. The body may be faultless in outline, and per-
fect in its individual adaptation to the comfort of the occupants. But if the draftsman
be ignorant of the proper method of hanging the body, and does not calculate under-
standingly as to the bearing of the body on the supports, or springs, with and without
its weight when fully loaded, the carriage will prove to be worthless, until it be re-
hung by one seeing the faults, and is competent to apply the proper remedy. Thedifficulties besetting the pathway of every builder ignorant of the principles laid downin the following treatise, will be in equalizing the bearings so that the springs will
remain level when the weight is added. For, when the bearings are unequal, the
springs will turn in, and cause the opening of the leaves.
In our experiemie we have seen instances of this kind, the mechanics in charge
being unable to apply the proper remedy at once, but sought to search it out by alter-
ing and re-fitting certain parts, every change serving only to lead further from the
right way, thus making the matter worse instead of better ; and not until a skilled
mechanic was consulted could the defective part be rectified.With these preliminary remarks we pass on to consider the direction and length
of the suspension straps, and the strength of C springs in vehicles having eight springs,
and others with supporting straps in front and behind.
EXPLANATION.
1. To aid the reader in comprehending the rule herein laid down, it will be necessary
to give some explanations in regard to the technicalities used in the mechanicaltreatise. These explanations will be found very useful in order to prove the propor-
tion of resistance to the tension of the supporting straps. We will number all the
paragraphs, so that the student will more readily understand the whole treatise.
8/10/2019 Making Horse Drawn Coaches 1800 Bw
http://slidepdf.com/reader/full/making-horse-drawn-coaches-1800-bw 168/455
116 C OACH-MAKEKS' ILLUSTRATED HAND-BOOK.
2. Force or power. —We apply the term force to all causes capable of producing mo-tion, or moderating the same. There are different kinds of forces. The force whichis created or formed by gravity, and is measured by the aid of the pressure, or that of
tension, for the purpose of determining weight, is termed the molecular and magneticforces. We shall, however, confine ourselves in the explanation to that kind of force
which is produced by gravity.
3. Direction of a given force.— The direction of a force, and the direction ot a motionwhich this force has communicated to a body in a case where this force was the only
agent. If a leaden ball were suspended by a thread, and the thread were broken at
the extreme end, the ball would fall to the ground in a vertical or straight downwardline. This vertical force determines the direction of the leaden bullet in its fall.
4. Parallel forces. —We apply the term parallel to such forces as move alongside of
one another on the same body. For instance, if we take the case of the hook, whichseems to suspend the seven weights, according to square B, Fig. 1, were missing (to
give way), the weights would all fall to the ground at the same time, and would de-
scribe respectively the vertical lines 1, 2, 3, 4, 5, 6, 7. These lines are all parallel, andwe conclude that weights or forces move in parallel directions.
5. Simultaneous forces are such as act at the same time and point, where we had in-
tended to produce a given effect. The bearing straps a, 6, c, d (Fig. 6), are simulta-
neous forces. The forces which exert themselves on b and d, have the same action
on the bearing straps, if the weight were intended to be concentrated on point b,
which is the focus or center of power of the direction of the bearing straps.
6. Origin and Composition. —All forces which produce the same effect, as several forces
combined, is called their origin ; the other antagonistic forces are called composite parts.
When we lift the body (Fig. 6) by means of the moving forces in the direction of the
bearing straps a, 6, c, d, it is evident that the body cannot be lifted in both directions
at one and the same time, but will move in the line A B, which is the origin of the
forces a, b, c, d. We could, therefore, replace the forces a, 6, c, d, by a single force
A B, applied in the same manner as to weight in b and d. This single force produces
by itself the same effect as those applied in the direction of the bearing straps whenthe body is in motion. We will now give a few examples of the union and separationof parallel forces by means of the apparatus marked 1, 2 and 3. A beam is suspended
horizontally by means of a hook, and tapers off like a knife-blade. Commencing at
the suspended axis, the beam is divided into six equal divisions ; each division has
little hooks attached to it on which to suspend the weights, which are also provided
with rings to hang them on any hook we please.
If we now suspend seven weights along the whole length of the beam, each weigh-
ing one pound, one at the point where the beam is suspended, and the others at equal
distances apart, commencing at the center, you will find that it will always hang in a
horizontal line. Both sides are therefore subject to the six even forces, which arearranged parallel and symmetrically on both ends of the beam.
If we now take the weights off which were suspended on both sides of the center,
and hang them all one under the other on the middle hook, as shown in Fig. 2, the
beam will still be horizontal. Therefore, in both cases, we find that the pressure is
concentrated on the axis.
Again, let us take the beam (Fig. 1) and divide the weights which it carries into twogroups by means of the lines c and d. Now we can proceed as before, and take the
weights off each group, and concentrate their force on the points e and /, which are
themselvesat
equal distances from the middle. We have herethe result as shown in
8/10/2019 Making Horse Drawn Coaches 1800 Bw
http://slidepdf.com/reader/full/making-horse-drawn-coaches-1800-bw 169/455
BLACKSMITH DEPARTMENT. 117
Fig. 3, without changing the horizontal position of the beam. By accompanying Figs.
2 and 3 we will find only two weights, one weighing five pounds, the other two pounds,which, being suspended at e and /, produce the same efiect as the weight designated
at 0. It will be seen that the distance from e, the point of suspension to the point
where five weights are suspended, contains two divisions, which means that as manydivisions as there are, that there are a like number of weights. Now /, and the dis-
tance /, contains five divisions, as many as there are hooks at e. These terms(words) are given in a mechanical treatise through the following presentation :
1st. Two parallel forces attached to a solid body, having a parallel origin in both are
alike in weight.
2d. This attached point of this origin divides the distance of the attached points of
these ingredients into two parts, which are in inverse proportion to the forces of this
ingredient.
3d. Center of gravity.
The phenomena which are produced by these weights in the mechanical system are
often the same when these weights were united at one single point in the interior of
the body. This is the point called the center of gravity. This center of gravity of asolid body will always be found to be in the same position as the direction of the origin
of the weights of all the parts of the body. For instance, if we place a suspended body P,
consecutively in two difierent positions, as shown in Figs. 4 and 5, the center of gravity
win be found at g, the position of the thread C D ; and in the second position inter-
sects the direction which the thread A B has in the first.
The knowledge of the center of gravity facilitates the operations and divisions whichwe will have to make in the direction of the suspension straps. We might also con-
centrate the following weights of the carriage and the persons upon one point, throughwhich the whole origin of the weights and all the parts have to pass.
We will here apply the foregoing origin to a Landau. The weight of the persons in
this carriage changes considerably the direction of the bearing straps. All that maybe said in regard to this carriage can be applied to that which relates to the direction
of the suspension straps.
For the purpose of fulfilling all the conditions in hanging a carriage well in thedirection of the suspension straps, it is necessary to calculate exactly the length andstrength of the springs, so that all points of the body fall vertically. For instance, if
the point d, Fig. 6, the shackle head or eye should descend three inches down to d,
caused by the weight of the persons, it must also fall three inches in front, so that it
may remain in the vertical line. In short it is necessary that, being loaded or empty,
the body must rest squarely on the wheels.
The direction of the suspension straps and the strength and length of the springs
can be determined without resort to the weights and the suspended object, and with-
out knowledge of the style of hanging the weights. Let us suppose that the wholebody, together with all appendages, will weigh about 600 pounds. For the purpose of
placing it in proper balance we will find the point R at the point 0, through which
the origin A B o/ the v)eights of all the parts of the body has to go. This origin passes
through the center of gravity (3), and should, above all, be vertical. The direction '/
B and c B of the bearing straps fall on the origin a B at any point above or below B,
just according to the inclination of difierent views.
The tension, which is exerted on the bearing straps, by no means depends upontheir length, but upon the sum of their inclination from their origin. So, also, the
forces of all the parts of the body produce the same effect, as shown at 6 and d.
8/10/2019 Making Horse Drawn Coaches 1800 Bw
http://slidepdf.com/reader/full/making-horse-drawn-coaches-1800-bw 170/455
118 COACH-MAKEES' ILLUSTRATED HAND-BOOK.
The whole weight being stated at 600 lbs. (shown at B), on the lengthened bearingstraps, the body will be held where it was first placed. The bearing straps should
converge to the point of origin of the weights, and all the parts of the body attracted.For, were it otherwise, if, for instance, it should tend toward a C, c C, or a D, c D, theorigin would have to go through one of the points C or D, which are just the contraryof those we mentioned before.
Direction of the bearing straps under the weight of body and the persons. —Taking the M'^eight
of the body to be 600 lbs., as indicated at E, and the two persons sitting on the driver's
seat at 300 lbs., as shown at F, and the two persons sitting on the hind seat at 300 lbs.,
seen at H, and furthermore, the two persons on the front seats at 200 lbs., indicated at
G, all the forces and weights tend in the same parallel direction. Now, we mustascertain the origin of all these forces, and in order to do this, we must first find
theorigin of two of them, and from this follows the origin of a third force, and so on until
the whole origin is found.
The two forces, F and H, each at 300 lbs. make an aggregate of 600 lbs. This force
has for its origin the point J, midway between their distances. This new force of 600lbs. can be added to the same sum shown at E, by which we get a force of 1,200 lbs., as
shown at K, the middle between the points J and E. There yet remains two forces to
be added together, one of 1,200 lbs., and the other of 200 lbs. The greater of these is
six times that of the smaller one; we may therefore divide the aggregate into sevendivisions. If G, K, the point of application, be divided into seven equal parts, it will
be found that from the point of application to the whole equal origin will make 1,400
lbs. at L, upon the first division from the point K. The change, which is in the posi-
tion of the origin, which afterward acts upon the new force, necessarily causes achange in the direction of the suspension straps. In the beginning the point of inter-
section should be at the new origin, but afterward the increase of the forces causes thesprings to bend, and consequently the body descends. Suppose we take the points Aand C the heads of the spring would have reached A and C, and suppose the case that
the middle of the hindermost shackle-head had fallen down to D, a distance of 3
inches. Now, we will direct or lead C, D, through the direction of the suspension
straps to the oppositeorigin,
M, and unite the points at A, M;in
this way we have thenew direction of the suspension straps. Now we compare these iiew directions of the
suspension straps with the old ones, which will remain different as to length. In the
addition of the new forces the bearing straps have altogether changed their direction,
but their distance from the heads of the springs to the middle of the shackle-head,
will be seen to be the same in the same position. For the purpose of satisfying our
conditions, those which we mentioned in paragraph 10, the middle of the shackle-
head must be in a vertical direction, b, b, and by means of this we get the length be-
tween the connections, of the length and direction of the bearing straps, which we have
given at 3 inches; otherwise the length a, b, and c, d, of the bearing straps in the first
direction should be exactly like the direction of the length of a, b, c, d, in the second.
The length of the front suspension straps is 11 inches. If made of any other length,
say, for instance, 30 inches from a, b, to b, and carry the distance over from a to b, in
this manner it will be seen that the shackle-head could never go in the vertical direc-
tion ; for in such conditions the coach would be very badly hung —not only would the
body be altogether inclined forward, but it would lean more to one side than our ver-
tical position would allow.
Powers or strength of the C springs.— In order that the two C springs, P and Q, can
properly play under the total weight of the body, they must possess the requisite
8/10/2019 Making Horse Drawn Coaches 1800 Bw
http://slidepdf.com/reader/full/making-horse-drawn-coaches-1800-bw 171/455
BLACKSMITH DEPARTMENT. 119
strength, proportionate to the tension of the bearing straps, upon which the body rests.
Now suppose we take a point e, on the Hne of origin, L, M, and draw two lines, e»
/, and e, g, running parallel to the bearing straps, and two others m, e, and m a.
We have a parallelogram e, f, and m, g, of which the sides of/, m, and m,^' are propor-tioned to the tension of the bearing straps, a, b, c, d. In other words, let us suppose
/, m, 7J inches long, and m, g, is Q\ inches, the weight of the body 1,400 lbs. The side
m, /, is subjected to a pressure of 750 lbs., and the opposite side, m, g, to a pressure of
650 lbs., which taken together makes the aggregate 1,400 lbs. It follows, therefore,
that the spring P has to bear 750 lbs., and the spring Q 650 lbs.
PLATFORM SPRING CARRIAGE.
Before enteringin detail
uponthe description
and measurementof
thedifferent
parts constituting a platform carriage, we will define in a few words what would beexpected of a mechanic, of either experience or gifted with a well cultivated eye, to fit
him to work out his job in proportion to the body, from a heavy coach to a light
calash or six-seat phaeton. A graceful, yet strongly ironed, carriage part, will make a
job saleable, for the customer, who is every day becoming more familiar with the
requisite qualities of a stylish turnout, will bestow a large share of attention to the
finish and proportion of the carriage part. Why is it that we find only a limited
number of mechanics of general good judgment capable of forging a carriage in perfect
harmony with the body, and tasty in its different parts ? Because few have a knowl-
edge of body-making— or the action of a carriage as a machine, designed to carry the
body —as some understanding of the principles of machinery will materially assist to
combine lightness and strength in the different parts of a carriage —and, lastly, for wantof a schooled eye, for patterns are of but little use, except to assist in altering sweeps,
as necessity demands.
GEARING NO. 1.
The annexed drawing (Gearing No. 1) illustrates a light fore carriage, with dFop
pole and shafts, suitable for light phaetons, coupes, Victorias and other light carriages.
It was taken from an original French drawing, which is very clumsy in appearance,
and remodeled, or, in other words, Americanized to suit the wants of our builders.
Fig. 1 represents the lower part or under section. The new mode of constructing
this carriage is the doing away with the bent furchells, and using puncheons in their
places ; the inside front stay is worked in one piece ; in the center is formed the socket
to receive the king or body bolt. This stay rests on top of the two puncheons. Thereis a T plate formed solid with these stays running back to the bed, and at A forms the
inner part of the socket for receiving the shafts. The back stay passes around under
the puncheons, crossing the bed to the front, and bolted where the front stay crossesthe puncheons ; the other end extending to the front, forming the outside of thesocket for receiving the shafts. A A represents a piece of hickory bolted between thetwo stays.
Springs 1^ inches, four plates, 37 inches long, 11} opening, or vary to suit the bodythe carriage is intended for. Lower bed 1} by 1^; | plate on the bottom. Wheel or
stay iron ^-inch, round, increasing in size to the puncheons. The box clips over thebottom bed, with clip bars, are worked solid. The clips are put from underneath thesprings, and nutted on top. The size of half fifth wheel 1 inch by ^-inch flat, with
brass scrolls riveted on.
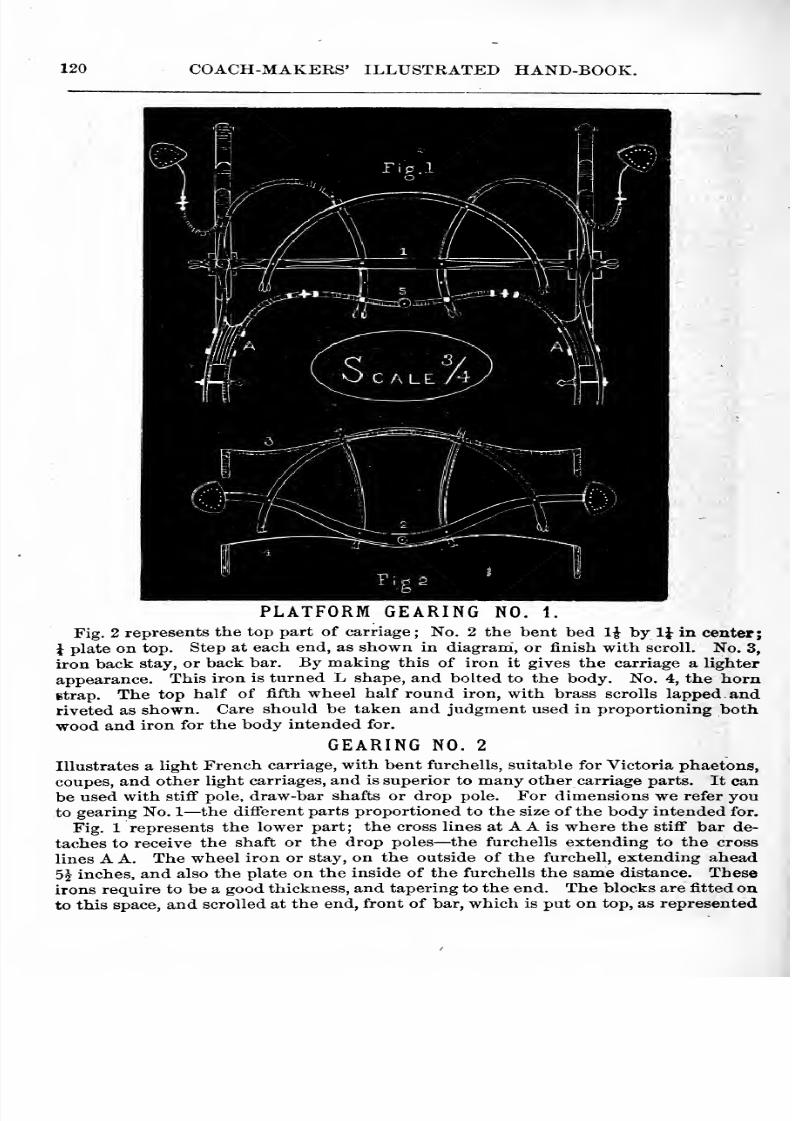
8/10/2019 Making Horse Drawn Coaches 1800 Bw
http://slidepdf.com/reader/full/making-horse-drawn-coaches-1800-bw 172/455
120 COACH-MAKERS' ILLUSTRATED HAND-BOOK.
PLATFORM GEARING NO. 1.
Fig. 2 represents the top part of carriage ; No. 2 the bent bed li by IJ in center;
\ plate on top. Step at each end, as shown in diagram, or finish with scrolL No. 3,
iron back stay, or back bar. By making this of iron it gives the carriage a lighter
appearance. This iron is turned L shape, and bolted to the body. No. 4, the hornBtrap. The top half of fifth wheel half round iron, with brass scrolls lapped andriveted as shown. Care should be taken and judgment used in proportioning bothwood and iron for the body intended for.
GEARING NO. 2
Illustrates a light French carriage, with bent furchells, suitable for Victoria phaetons,
coupes, and other light carriages, and is superior to many other carriage parts. It canbe used with stiff pole, draw-bar shafts or drop pole. For dimensions we refer youto gearing No. 1 —the different parts proportioned to the size of the body intended for.
Fig. 1 represents the lower part; the cross lines at A A is where the stiff bar de-
taches to receive the shaft or the drop poles —the furchells extending to the cross
lines A A. The wheel iron or stay, on the outside of the furchell, extending ahead
5^ inches, and also the plate on the inside of the furchells the same distance. Theseirons require to be a good thickness, and tapering to the end. The blocks are fitted onto this space, and scrolled at the end, front of bar, which is put on top, as represented
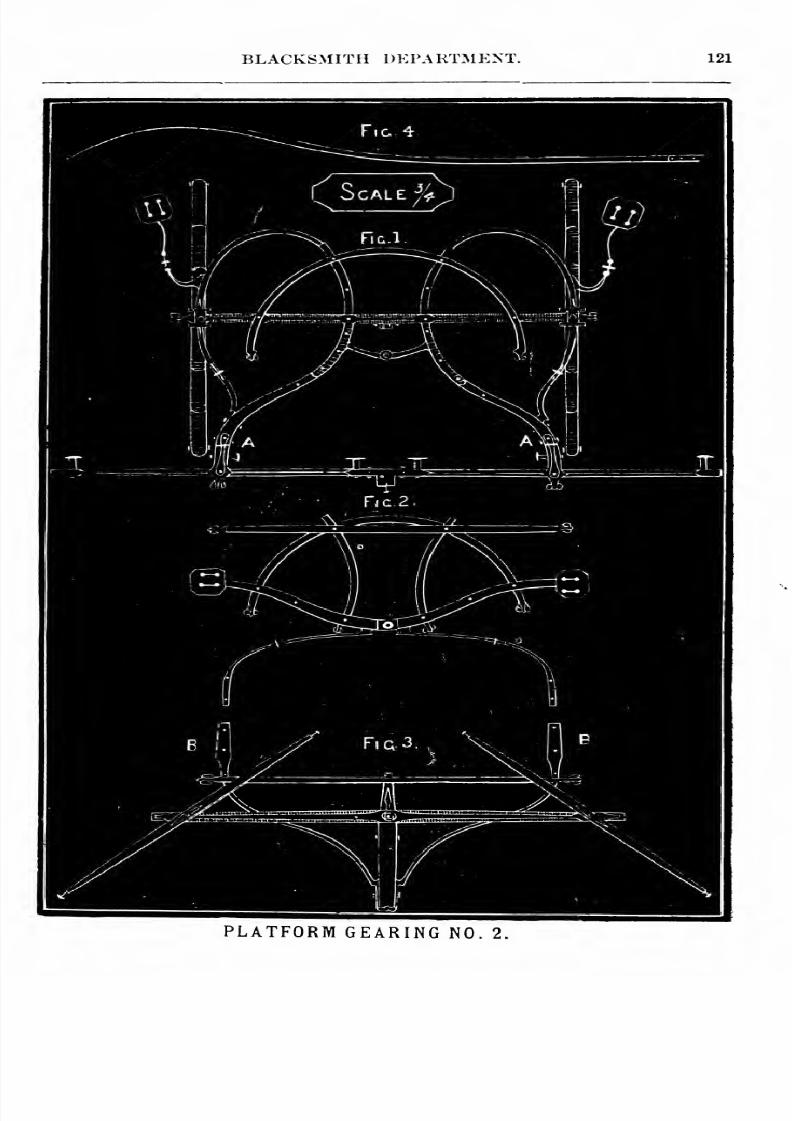
8/10/2019 Making Horse Drawn Coaches 1800 Bw
http://slidepdf.com/reader/full/making-horse-drawn-coaches-1800-bw 173/455
BLACKSMITH DEPARTMENT. 121
PLATFORM GEARING NO. 2.
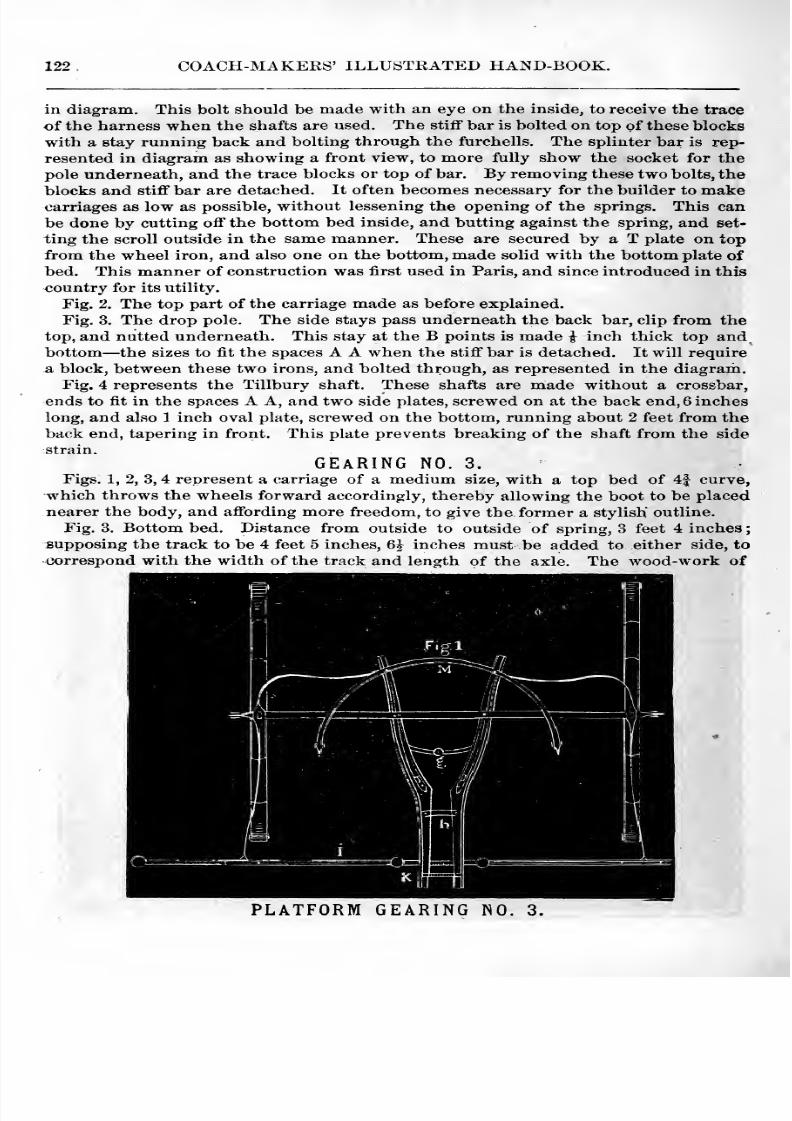
8/10/2019 Making Horse Drawn Coaches 1800 Bw
http://slidepdf.com/reader/full/making-horse-drawn-coaches-1800-bw 174/455
122 COACH-MAKERS' ILLUSTRATED HAND-BOOK.
in diagram. This bolt should be made with an eye on the inside, to receive the trace
of the harness when the shafts are used. The stiff bar is bolted on top of these blocks
with a stay running back and bolting through the furchells. The splinter bar is rep-
resented in diagram as showing a front view, to more fully show the socket for the
pole underneath, and the trace blocks or top of bar. By removing these two bolts, the
blocks and stiff bar are detached. It often becomes necessary for the builder to makecarriages as low as possible, without lessening the opening of the springs. This can
be done by cutting off the bottom bed inside, and butting against the spring, and set-
ting the scroll outside in the same manner. These are secured by a T plate on top
from the wheel iron, and also one on the bottom, made solid with the bottom plate of
bed. This manner of construction was first used in Paris, and since introduced in this
country for its utility.
Fig. 2. The top part of the carriage made as before explained.
Fig. 3. The drop pole. The side stays pass underneath the back bar, clip from the
top, and nutted underneath. This stay at the B points is made ^ inch thick top and.
bottom —the sizes to fit the spaces A A when the stiff bar is detached. It will require
a block, between these two irons, and bolted through, as represented in the diagram.
Fig. 4 represents the Tillbury shaft. These shafts are made without a crossbar,
ends to fit in the spaces A A, and two side plates, screwed on at the back end, 6 inches
long, and also 1 inch oval plate, screwed on the bottom, running about 2 feet from the
back end, tapering in front. This plate prevents breaking of the shaft from the side
strain.
GEARING NO. 3.
Figs. 1, 2, 3, 4 represent a carriage of a medium size, with a top bed of 4| curve,
which throws the wheels forward accordingly, thereby allowing the boot to be placed
nearer the body, and affording more freedom, to give the former a stylish outline.
Fig. 3. Bottom bed. Distance from outside to outside of spring, 3 feet 4 inches;
supposing the track to be 4 feet 5 inches, 6J inches must be added to either side, to
correspond with the width of the track and length of the axle. The wood-work of
PLATFORM GEARING NO. 3.
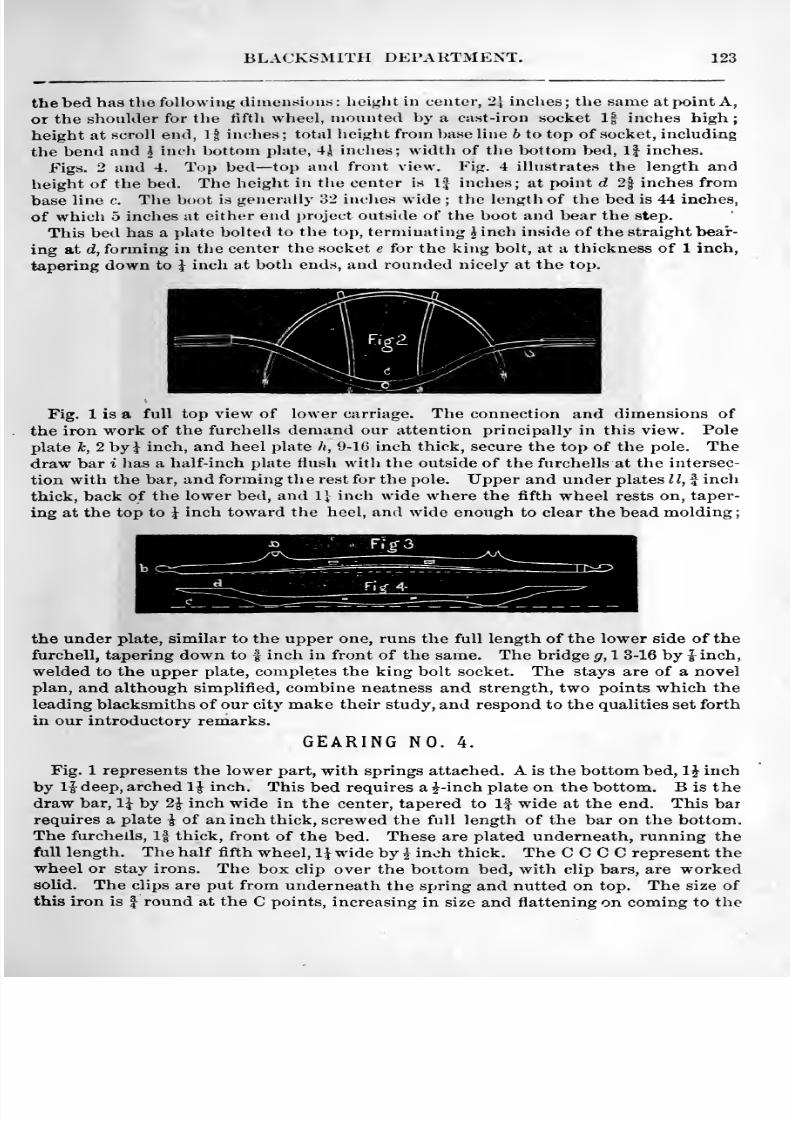
8/10/2019 Making Horse Drawn Coaches 1800 Bw
http://slidepdf.com/reader/full/making-horse-drawn-coaches-1800-bw 175/455
BLACKSMITH DEPARTMENT. 123
the bed has the following dimensions: heij^htin center, 2\ inches; the same at point A,
or the shoulder for the fifth wheel, mounted by a cast-iron socket If inches high
height at scroll end, 1 1 inches ; total height from base line b to top of socket, including
the bend and \ inch bottom j)late, 4i inches; width of the Ixjttom bed, 1| inches.
Figs. 2 and 4. Top bed —top and front view. Fig. 4 illustrates the length and
height of the l)ed. The height in the center is IJ inches; at point d 2| inches from
base line c. The boot is generally o2 inches wide ; the length of the bed is 44 inches,
of which 5 inches at either end project outside of the boot and bear the step.
This bed has a j)late bolted to the top, terminating i inch inside of the straight beai*-
ing at d, forming in the center the socket e for the king bolt, at a thickness of 1 inch,
tapering down to I inch at both ends, and rounded nicely at the top.
Fig. 1 is a full top view of lower carriage. The connection and dimensions of
the iron work of the furchells demand our attention principally in this view. Pole
plate ^, 2 by ^ inch, and heel plate h, 9-16 inch thick, secure the top of the pole. Thedraw bar i has a half-inch plate flush with the outside of the furchells at the intersec-
tion with the bar, and forming the rest for the pole. Upper and under plates H, f inch
thick, back of the lower bed, and 11 inch wide w^here the fifth wheel rests on, taper-
ing at the top to J inch toward the heel, and wide enough to clear the bead molding
the under plate, similar to the upper one, runs the full length of the lower side of the
furchell, tapering down to | inch in front of the same. The bridge g, 1 3-16 by l^inch,
welded to the upper plate, completes the king bolt socket. The stays are of a novel
plan, and although simplified, combine neatness and strength, two points which the
leading blacksmiths of our city make their study, and respond to the qualities set forth
in our introductory remarks.
GEARING NO. 4.
Fig. 1 represents the lower part, with springs attached. A is the bottom bed, 1| inch
by l^deep, arched 1^ inch. This bed requires a ^^-inch plate on the bottom. B is thedraw bar, 1^ by 2^ inch wide in the center, tapered to If wide at the end. This bar
requires a plate i of an inch thick, screwed the full length of the bar on the bottom.
The furchells, If thick, front of the bed. These are plated underneath, running the
full length. The half fifth wheel, 1\ wdde by ^ inch thick. The C C C C represent the
wheel or stay irons. The box clip over the bottom bed, with clip bars, are workedsoUd. The clips are put from underneath the spring and nutted on top. The size of
this iron is | round at the C points, increasing in size and flattening on coming to the
8/10/2019 Making Horse Drawn Coaches 1800 Bw
http://slidepdf.com/reader/full/making-horse-drawn-coaches-1800-bw 176/455
124 COACH-MAKERS' ILLUSTRATED HAND-BOOK.
PLATFORM GEARING NO. 4.
bed. It is necessary that this iron should be of a good size at the back part, to pre-
vent the weight of the pole bending it, causing the front of the springs and pole to
drop.
Fig. 2 represents the top part of the carriage. E, the front or bent bed, 1| deepby 1 11^ in the center, with a f plate on the top, steps at each end, as represented in
the diagram. Fig, F is the back bar, 1^ by IJ deep, 1^ square at the ends. This barwill require plating on the front side. Size of the plate, i by the full depth of the
bar, screwed on by one-inch No. 12 screws. This edge plate prevents the bar fromspringing in the center, which causes the drooping of the pole and springs. This half
tifth wheel is made 11 half round, with brass scrolls lapped and riveted, as represented
in the diagram. Whiffletrees, 34 inches long. Size of pole at the draw bar, 3^ deepby 2| wide ; length, 9 feet from the same point.

8/10/2019 Making Horse Drawn Coaches 1800 Bw
http://slidepdf.com/reader/full/making-horse-drawn-coaches-1800-bw 177/455
BLACKSMITH DEPARTMENT. 125
PLATFORM GEARING NO. 5
This carriage is intended for hard service, although it does not have the style ofother carriages. With this kind of fifth wheel we get a good bearing when it is turnedunder the body. These are made solid with a plate on the two beds. Fig. 1 repre-sents the lower part. A A the king or body bolt ; for dimensions we refer you to
Gearing No. 4, half fifth wheel coach carriage. Fig. 2, the top part of carriage.
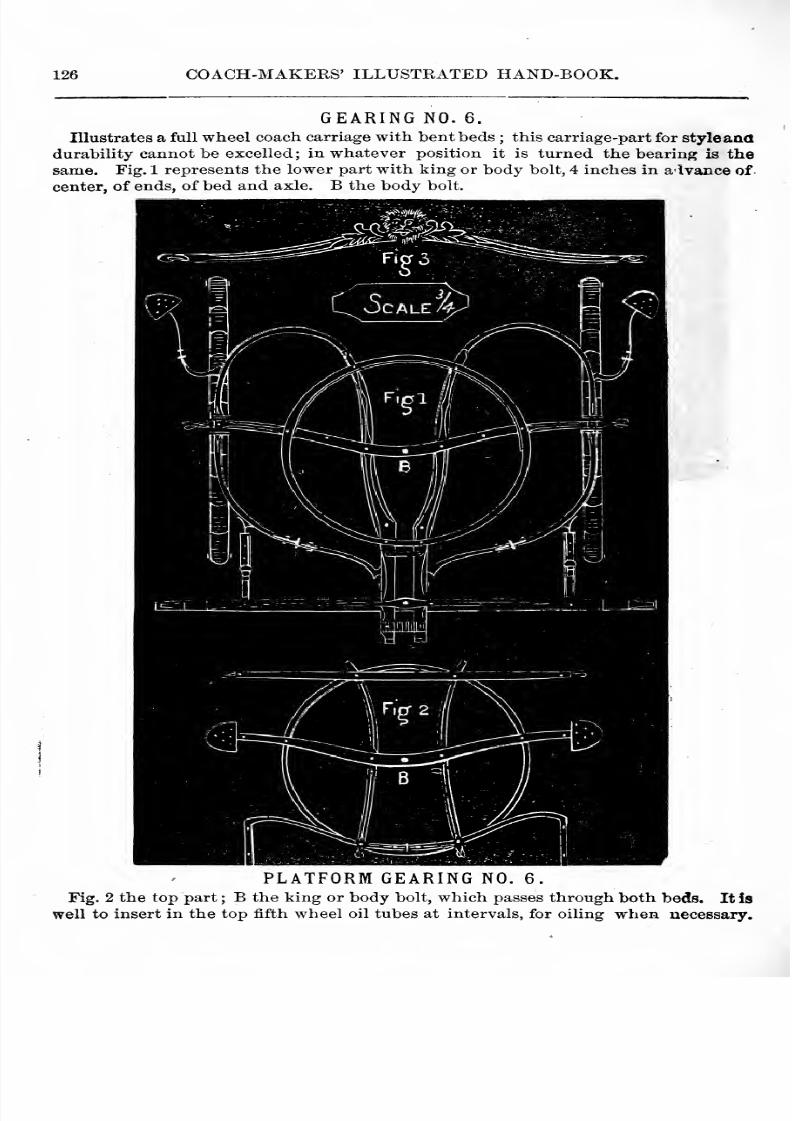
8/10/2019 Making Horse Drawn Coaches 1800 Bw
http://slidepdf.com/reader/full/making-horse-drawn-coaches-1800-bw 178/455
126 COACH-MAKERS' ILLUSTRATED HAND-BOOK.
GEARING NO. 6.
Illustrates a full wheel coach carriage with bent beds ; this carriage-part for styleaaddurability cannot be excelled; in whatever position it is turned the bearing is the
same. Fig. 1 represents the lower part with king or body bolt, 4 inches in advance of
center, of ends, of bed and axle. B the body bolt.
PLATFORM GEARING NO. 6.
Fig. 2 the top part ; B the king or body bolt, which passes through both beds. It is
well to insert in the top fifth wheel oil tubes at intervals, for oiling when necessary.
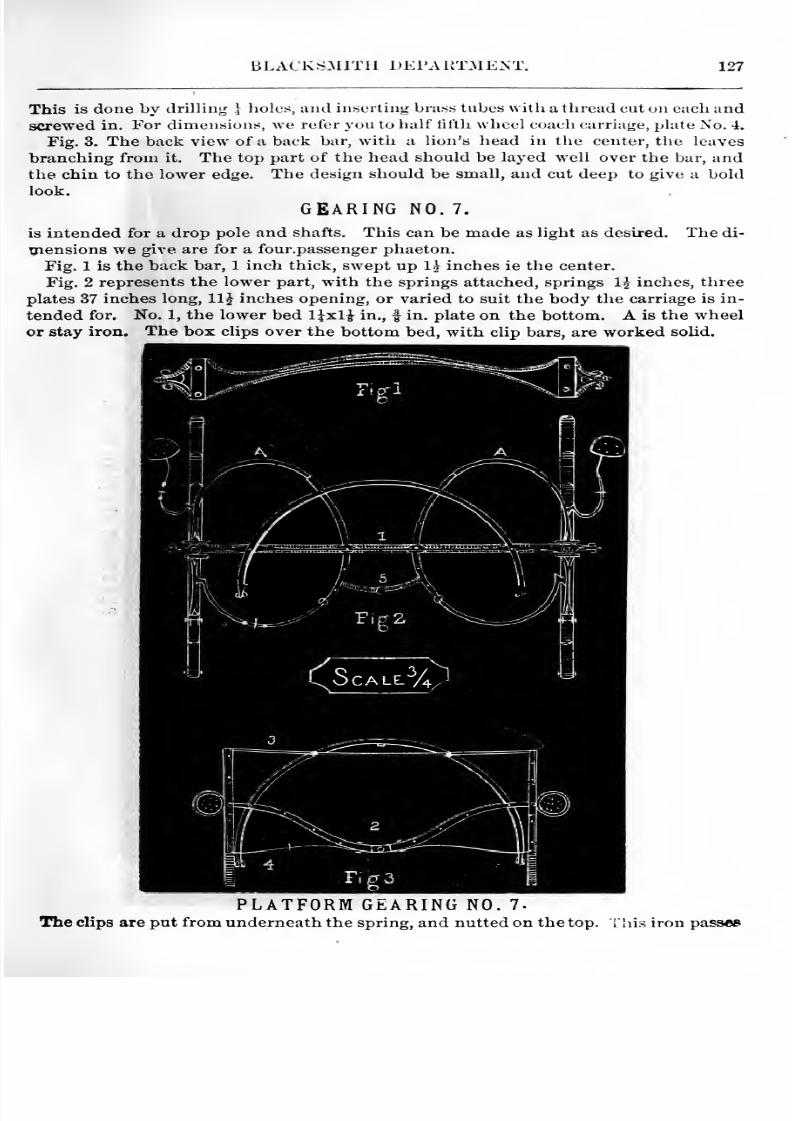
8/10/2019 Making Horse Drawn Coaches 1800 Bw
http://slidepdf.com/reader/full/making-horse-drawn-coaches-1800-bw 179/455
BLACKSMITH DEPARTMENT. 127
This is done by drilling } holes, and inserting brass tubes with a thread cut on each andscrewed in. For dimensions, we refer you to luilf tifth wheel coach carriage, plate No. 4.
Fig. 3. The back view of a back bar, with a lion's head in the center, the leaves
branching from it. The top part of the head should be layed well over the bar, andthe chin to the lower edge. The design should be small, and cut deep to give a bold
look.
GEARING NO, 7.
is intended for a drop pole and shafts. This can be made as light as desired. The di-
xnensions we give are for a four.passenger phaeton.
Fig. 1 is the back bar, 1 inch thick, swept up IJ inches ie the center.
Fig. 2 represents the lower part, with the springs attached, springs H inches, three
plates 37 inches long, llj inches opening, or varied to suit the body the carriage is in-
tended for. No. 1, the lower bed 1^x1^ in., f in. plate on the bottom. A is the wheelor stay iron. The box clips over the bottom bed, with clip bars, are worked solid.
PLATFORM GEARING NO. 7-
The clips are put from underneath the spring, and nutted on the top. [lis iron passes
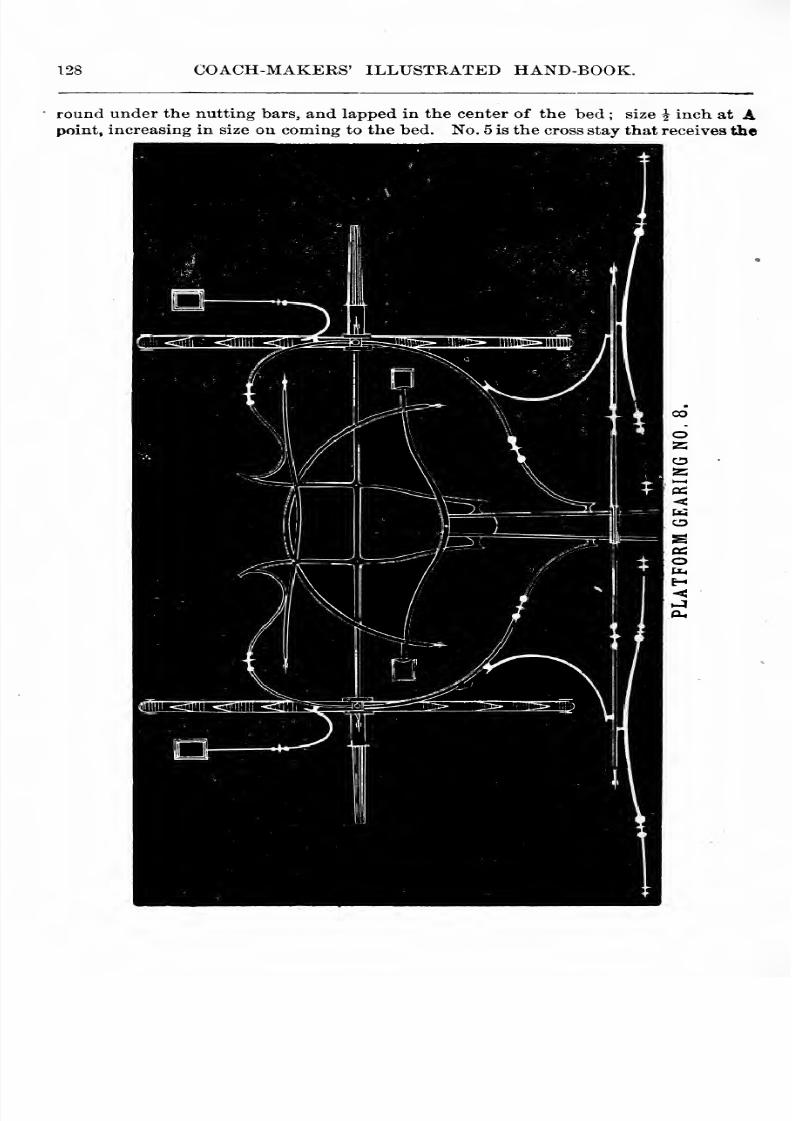
8/10/2019 Making Horse Drawn Coaches 1800 Bw
http://slidepdf.com/reader/full/making-horse-drawn-coaches-1800-bw 180/455
128 COACH-MAKERS' ILLUSTRATED HAND-BOOK.
round under the nutting bars, and lapped in the center of the bed ; size ^ inch at Apoint, increasing in size on coming to the bed. No. 5 is the cross stay that receives the
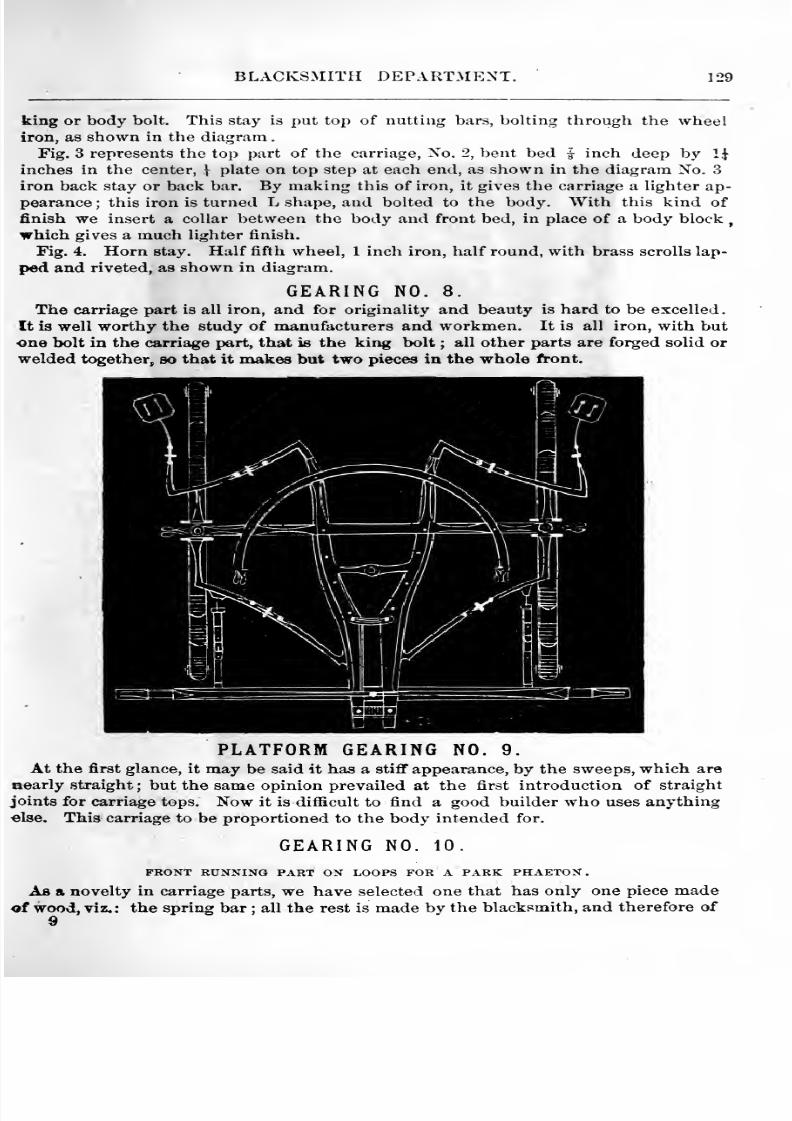
8/10/2019 Making Horse Drawn Coaches 1800 Bw
http://slidepdf.com/reader/full/making-horse-drawn-coaches-1800-bw 181/455
BLACKSxMITH DEPARTMENT. 129
king or body bolt. This stay is put top of nutting bars, bolting through the wheeliron, as shown in the diagram
Fig. 3 represents the top part of the carriage, No. 2, bent bed I inch deep by 1^^
inches in the center, } plate on top step at each end, as shown in the diagram No. 3
iron back stay or back bar. By making this of iron, it gives the carriage a lighter ap-
pearance ; this iron is turned L shape, and bolted to the body. With this kind of
finish we insert a collar between the body and front bed, in place of a body block
which gives a much lighter finish.
Fig. 4. Horn stay. Half fifth wheel, 1 inch iron, half round, with brass scrolls lap-
ped and riveted, as shown in diagram.
GEARING NO.8.
The carriage part is all iron, and for originality and beauty is hard to be excelled
It is well worthy the study of manufacturers and workmen. It is all iron, with but
one bolt in the carriage part, that is the king bolt ; all other parts are forged solid or
welded together, so that it makes but two pieces in the whole front.
PLATFORM GEARING NO. 9.
At the first glance, it may be said it has a stiff appearance, by the sweeps, which are
nearly straight ; but the same opinion prevailed at the first introduction of straight
joints for carriage tops. Now it is difficult to find a good builder who uses anythingelse. This carriage to be proportioned to the body intended for.
GEARING NO. 10.
FRONT RUNNING PART ON LOOPS FOR A PARK PHAETON.
Asa novelty in carriage parts,
we haveselected one that has only one piece made
of wood, viz.: the spring bar ; all the rest is made by the blacksmith, and therefore of
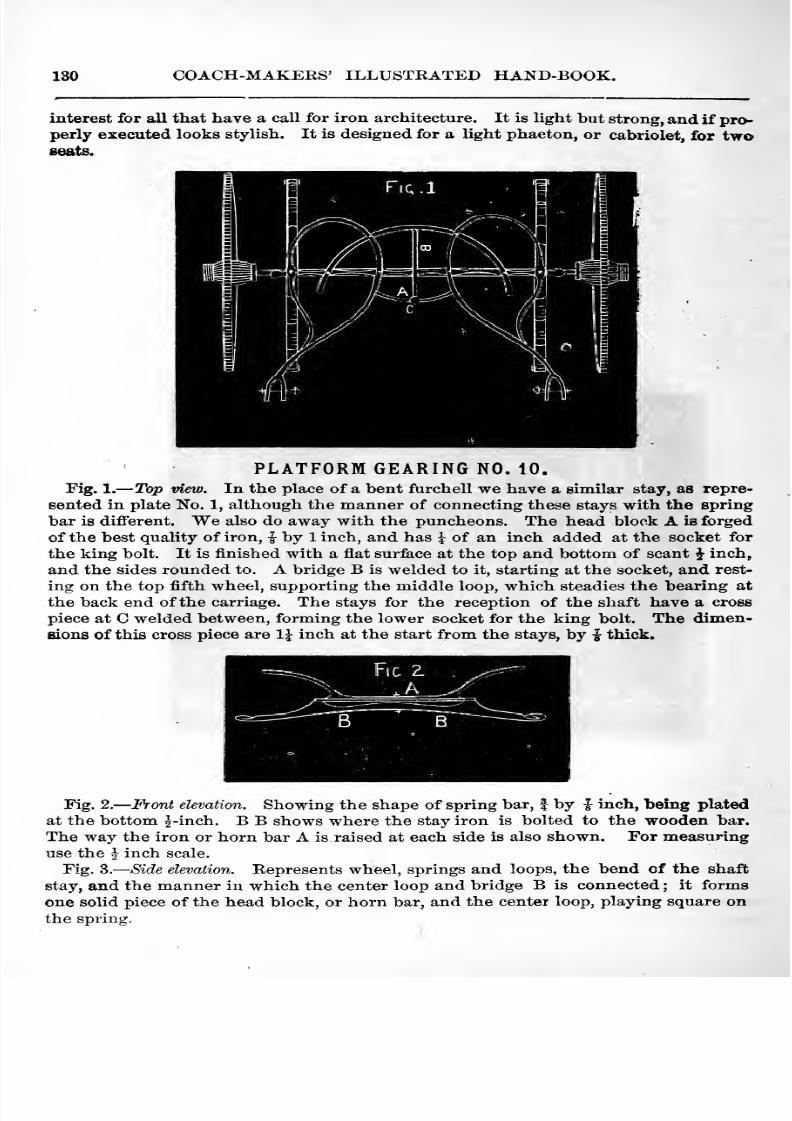
8/10/2019 Making Horse Drawn Coaches 1800 Bw
http://slidepdf.com/reader/full/making-horse-drawn-coaches-1800-bw 182/455
130 COACH-MAKERS' ILLUSTRATED HAND-BOOK.
interest for all that have a call for iron architecture. It is light but strong, and if pro-perly executed looks stylish. It is designed for a light phaeton, or cabriolet, for twoseats.
PLATFORM GEARING NO. 10.
Fig. 1. Top view. In the place of a bent furchell we have a similar stay, as repre-
sented in plate No. 1, although the manner of connecting these stays with the spring
bar is different. We also do away with the puncheons. The head block A is forged
of the best quality of iron, f by 1 inch, and has \ of an inch added at the socket for
the king bolt. It is finished with a flat surface at the top and bottom of scant J inch,
and the sides rounded to. A bridge B is welded to it, starting at the socket, and rest-
ing on the top fifth wheel, supporting the middle loop, which steadies the bearing at
the back end of the carriage. The stays for the reception of the shaft have a cross
piece at C welded between, forming the lower socket for the king bolt. The dimen-sions of this cross piece are 1\ inch at the start from the stays, by i thick.
Fig. 2. Front elevation. Showing the shape of spring bar, f by |- inch, being plated
at the bottom ^-inch. B B shows where the stay iron is bolted to the wooden bar.
The way the iron or horn bar A is raised at each side is also shown. For measuringuse the J inch scale.
Fig. 3. Side elevation. Represents wheel, springs and loops, the bend of the shaft
stay, and the manner in which the center loop and bridge B is connected ; it forms
one solid piece of the head block, or horn bar, and the center loop, playing square onthe spring.
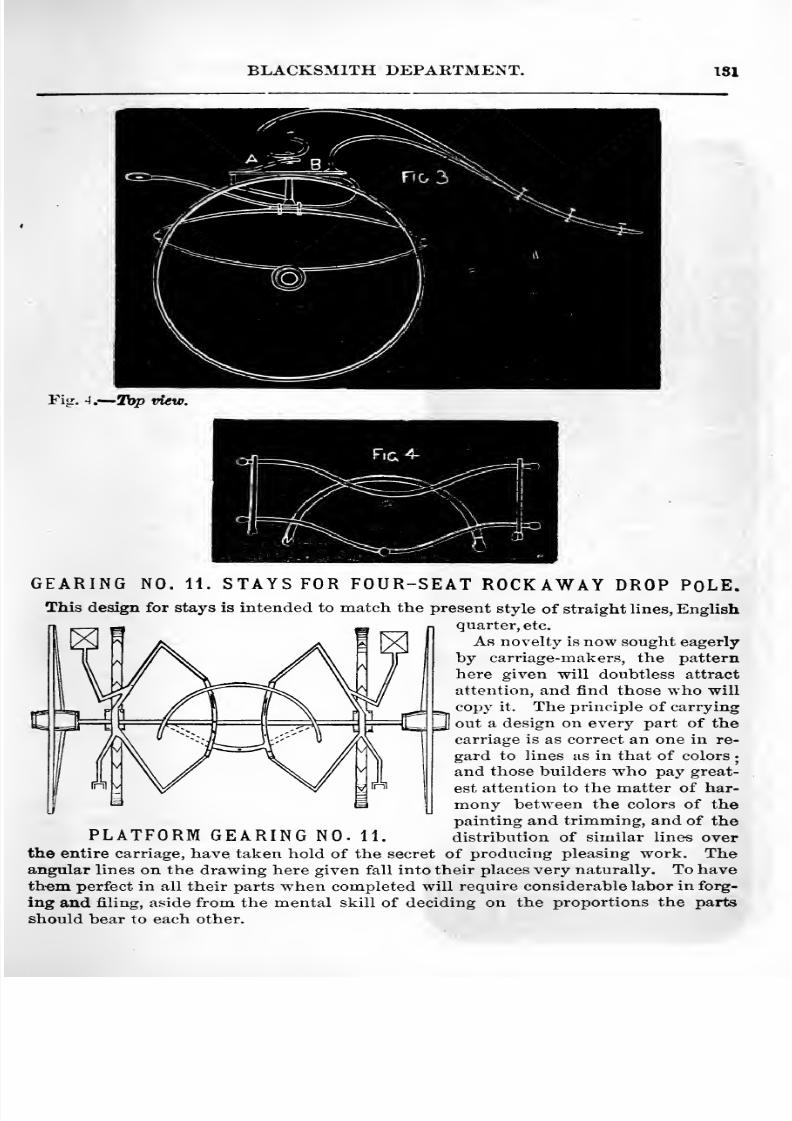
8/10/2019 Making Horse Drawn Coaches 1800 Bw
http://slidepdf.com/reader/full/making-horse-drawn-coaches-1800-bw 183/455
BLACKSMITH DEPARTMENT. 181
Fig. 4,— 2l>p vUw.
c
GEARING NO. 11. STAYS FOR FOUR-SEAT ROCKAWAY DROP POLE.
This design for stays is intended to match the present style of straight lines, Englishquarter, etc.
As novelty is now sought eagerly
by carriage-makers, the pattern
here given will doubtless attract
attention, and find those who will
copy it. The principle of carrying
_J out a design on every part of the
carriage is as correct an one in re-
gard to lines as in that of colors;
and those builders who pay great-
est attention to the matter of har-
mony between the colors of the
painting and trimming, and of thePLATFORM GEARING NO. 11. distribution of similar lines over
the entire carriage, have taken hold of the secret of producing pleasing work. Theangular lines on the drawing here given fall into their places very naturally. To haveth-em perfect in all their parts when completed will require considerable labor in forg-
ing and filing, aside from the mental skill of deciding on the proportions the parts
should bear to each other.
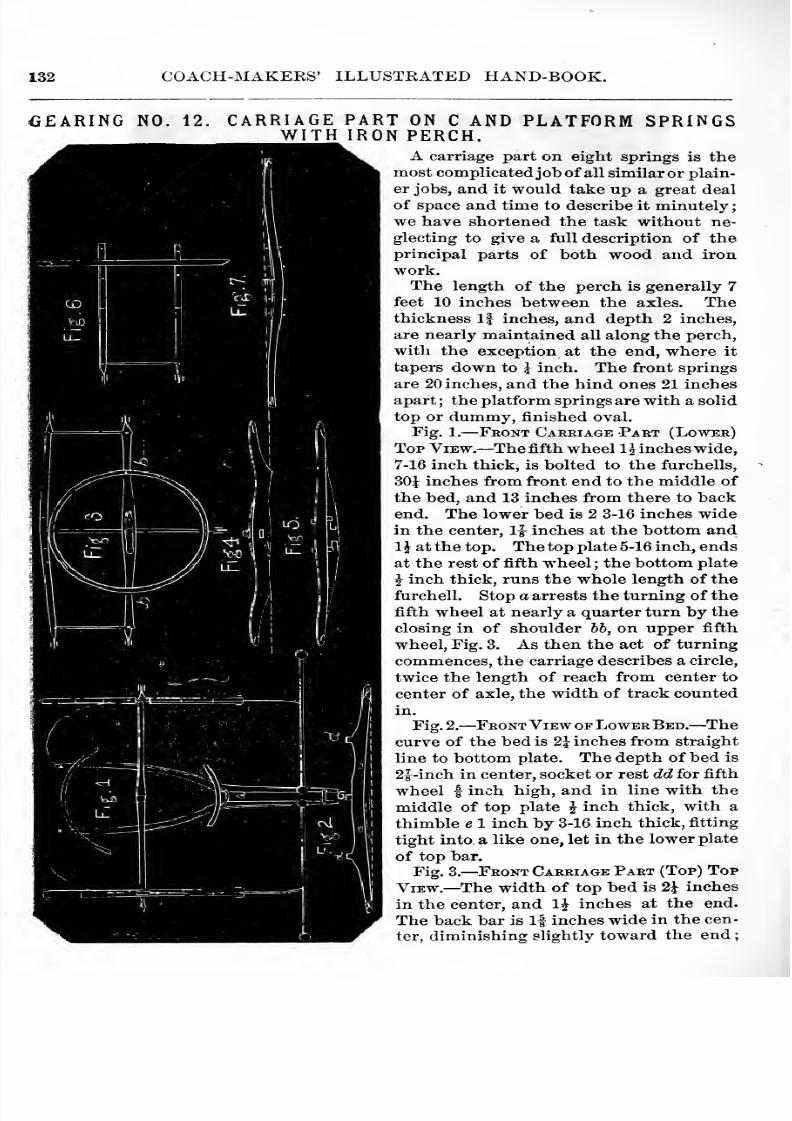
8/10/2019 Making Horse Drawn Coaches 1800 Bw
http://slidepdf.com/reader/full/making-horse-drawn-coaches-1800-bw 184/455
132 COACH-MAKERS' ILLUSTRATED HAND-BOOK.
BEARING NO. 12. CARRIAGE PART ON C AND PLATFORM SPRINGSWITH IRON PERCH.
A carriage part on eight springs is themost complicatedjobof all similar or plain-
er jobs, and it would take up a great deal
of space and time to describe it minutelywe have shortened the task without ne-
glecting to give a full description of the
principal parts of both wood and iron
work.The length of the perch is generally 7
feet 10 inches between the axles. Thethickness If inches, and depth 2 inches,
are nearly maintained all along the perch,
with the exception at the end, where it
tapers down to ^ inch. The front springs
are 20 inches, and the hind ones 21 inches
apart ; the platform springs are with a solid
top or dummy, finished oval.
Fig. 1. Front Carriage Part (Lower)
Top View. —The fifth wheel 1^ inches wide,7-16 inch thick, is bolted to the furchells,
30| inches from front end to the middle of
the bed, and 13 inches from there to backend. The lower bed is 2 3-16 inches widein the center, 1|- inches at the bottom and
1 J at the top. The top plate 5-16 inch, endsat the rest of fifth wheel ; the bottom plate
i inch thick, runs the whole length of the
furchell. Stop a arrests the turning of thefifth wheel at nearly a quarter turn by the
closing in of shoulder bb, on upper fifth
wheel. Fig. 3. As then the act of turning
commences, the carriage describes a circle,
twice the length of reach from center to
center of axle, the width of track counted
in.
Fig. 2. Front View op Lower Bed. —The
curveof the bed is
2|inches from straight
line to bottom plate. The depth of bed is
2|-inch in center, socket or rest dd for fifth
wheel I inch high, and in line with the
middle of top plate J inch thick, with a
thimble e 1 inch by 3-16 inch thick, fitting
tight into a like one, let in the lower plate
of top bar.
Fig. 3.— Front Carriage Part (Top) TopView.— The width of top bed is 2i inches
in the center, and 1^ inches at the end.
The back bar is If inches wide in the cen-
ter, diminishing slightly toward the end
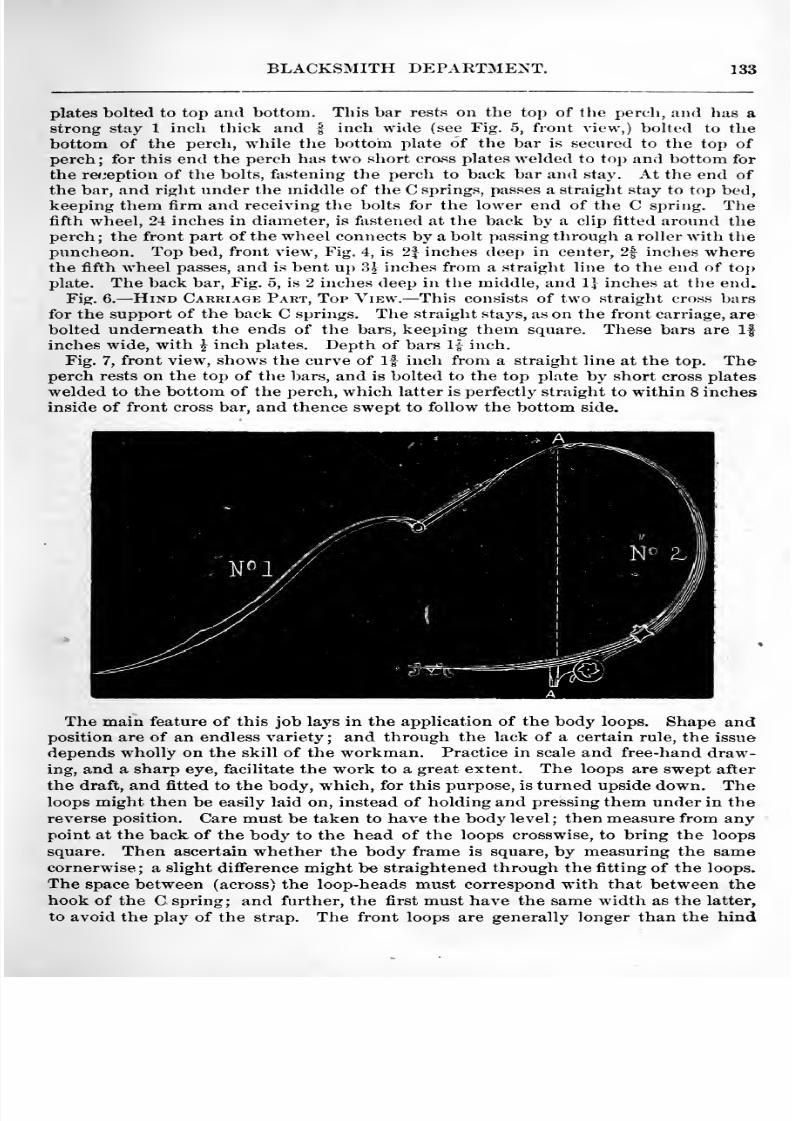
8/10/2019 Making Horse Drawn Coaches 1800 Bw
http://slidepdf.com/reader/full/making-horse-drawn-coaches-1800-bw 185/455
BLACKSMITH DEPARTMENT. 133
plates bolted to top and bottom. This bar rests on the top of the perch, and has astrong stay 1 inch thick and | inch wide (see Fig. 5, front view,) bolted to the
bottom of the perch, while the bottom plate of the baris
secured to the top ofperch; for this end the perch has two short crass plates welded to top and bottom for
the re<.'eption of the bolts, fastening the perch to back bar and stay. At the end of
the bar, and right under the middle of the C springs, passes a straight stay to top bed,
keeping them firm and receiving the bolts for the lower end of the C spring. Thefifth wheel, 24 inches in diameter, is fastened at the back by a clip fitted around theperch ; the front part of the wheel connects by a bolt passing through a roller with thepuncheon. Top bed, front view, Fig. 4, is 2| inches deep in center, 2f inches wherethe fifth wheel passes, and is bent up 83 inches from a straight line to the end of to])
plate. The back bar. Fig. 5, is 2 inches deep in the middle, and 1] inches at the end*
Fig. 6. Hind Carriage Part, Top View. —This consists of two straight cross barsfor the support of the back C springs. The straight stays, as on the front carriage, are
bolted underneath the ends of the bars, keeping them square. These bars are Ifinches wide, with ^ inch plates. Depth of bars 1-^ inch.
Fig. 7, front view, shows the curve of If inch from a straight line at the top. Theperch rests on the top of the bars, and is bolted to the top plate by short cross plates
welded to the bottom of the perch, which latter is perfectly straight to within 8 inchesinside of front cross bar, and thence swept to follow the bottom side.
The main feature of this job lays in the application of the body loops. Shape andposition are of an endless variety; and through the lack of a certain rule, the issue
depends wholly on the skill of the workman. Practice in scale and free-hand draw-ing, and a sharp eye, facilitate the work to a great extent. The loops are swept after
the draft, and fitted to the body, which, for this purpose, is turned upside down. Theloops might then be easily laid on, instead of holding and pressing them under in the
reverse position. Care must be taken to have the body level ; then measure from anypoint at the back of the body to the head of the loops crosswise, to bring the loops
square. Then ascertain whether the body frame is square, by measuring the samecornerwise ; a slight difference might be straightened through the fitting of the loops.
The space between (across) the loop-heads must correspond with that between the
hook of the C spring; and further, the first must have the same width as the latter,
to avoid the play of the strap. The front loops are generally longer than the hind
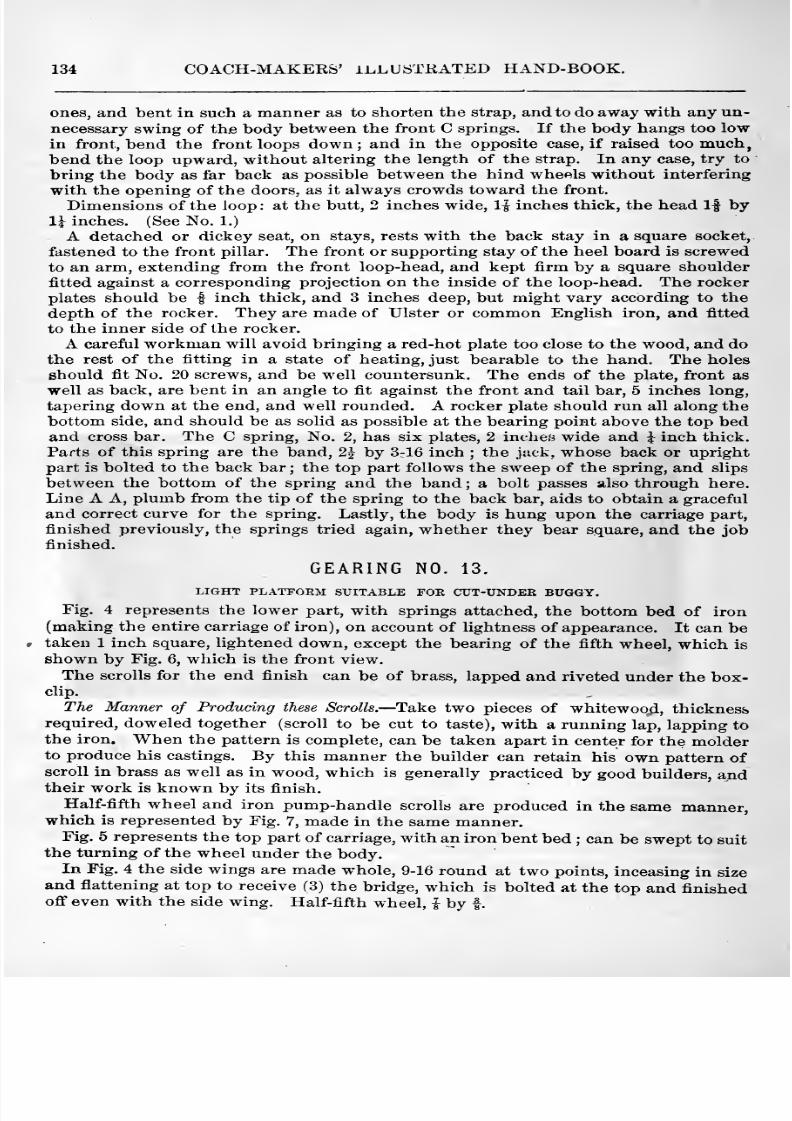
8/10/2019 Making Horse Drawn Coaches 1800 Bw
http://slidepdf.com/reader/full/making-horse-drawn-coaches-1800-bw 186/455
134 COACH-MAKERS' ILLUSTKATED HAND-BOOK.
ones, and bent in such a manner as to shorten the strap, and to do away with any un-necessary swing of the body between the front C springs. If the body hangs too low
in front, bend the front loops down; and in the opposite case, if raised too much,bend the loop upward, without altering the length of the strap. In any case, try to
bring the body as far back as possible between the hind wheels without interfering
with the opening of the doors, as it always crowds toward the front.
Dimensions of the loop : at the butt, 2 inches wide, 1| inches thick, the head If by1^ inches. (See No. 1.)
A detached or dickey seat, on stays, rests with the back stay in a square socket,
fastened to the front pillar. The front or supporting stay of the heel board is screwedto an arm, extending from the front loop-head, and kept firm by a square shoulder
fitted against a corresponding projection on the inside of the loop-head. The rocker
plates should be | inch thick, and 3 inches deep, but might vary according to thedepth of the rocker. They are made of Ulster or common English iron, and fitted
to the inner side of the rocker.
A careful workman will avoid bringing a red-hot plate too close to the wood, and dothe rest of the fitting in a state of heating, just bearable to the hand. The holes
should fit No. 20 screws, and be well countersunk. The ends of the plate, front as
well as back, are bent in an angle to fit against the front and tail bar, 5 inches long,
tapering down at the end, and well rounded. A rocker plate should run all along thebottom side, and should be as solid as possible at the bearing point above the top bedand cross bar. The C spring. No. 2, has six plates, 2 incliew wide and i inch thick.
Parts of this spring are the band, 2 J by 3-16 inch ; the jjick, whose back or upright
part is bolted to the back bar ; the top part follows the sweep of the spring, and slips
between the bottom of the spring and the band ; a bolt passes also through here.
Line A A, plumb from the tip of the spring to the back bar, aids to obtain a graceful
and correct curve for the spring. Lastly, the body is hung upon the carriage part,
finished previously, the springs tried again, whether they bear square, and the jobfinished.
GEARING NO. 13.
LIGHT PLATTORM SUITABLE FOU CUT-UNDER BUGGY.
Fig. 4 represents the lower part, with springs attached, the bottom bed of iron
(making the entire carriage of iron), on account of lightness of appearance. It can betaken 1 inch square, lightened down, except the bearing of the fifth wheel, which is
shown by Fig. 6, which is the front view.
The scrolls for the end finish can be of brass, lapped and riveted under the box-clip.
Tfie Manner of Producing these Scrolls.— Take two pieces of whitewood, thicknessrequired, doweled together (scroll to be cut to taste), with a running lap, lapping to
the iron. When the pattern is complete, can be taken apart in center for the molderto produce his castings. By this manner the builder can retain his own pattern ofscroll in brass as well as in wood, which is generally practiced by good builders, andtheir work is known by its finish.
Half-fifth wheel and iron pump-handle scrolls are produced in the same manner,which is represented by Fig. 7, made in the same manner.
Fig. 5 represents the top part of carriage, with an iron bent bed ; can be swept to suitthe turning of the wheel under the body.
In Fig. 4 the side wings are made whole, 9-16 round at two points, inceasing in sizeand flattening at top to receive (3) the bridge, which is bolted at the top and finishedoff even with the side wing. Half-fifth wheel, i by f
8/10/2019 Making Horse Drawn Coaches 1800 Bw
http://slidepdf.com/reader/full/making-horse-drawn-coaches-1800-bw 187/455
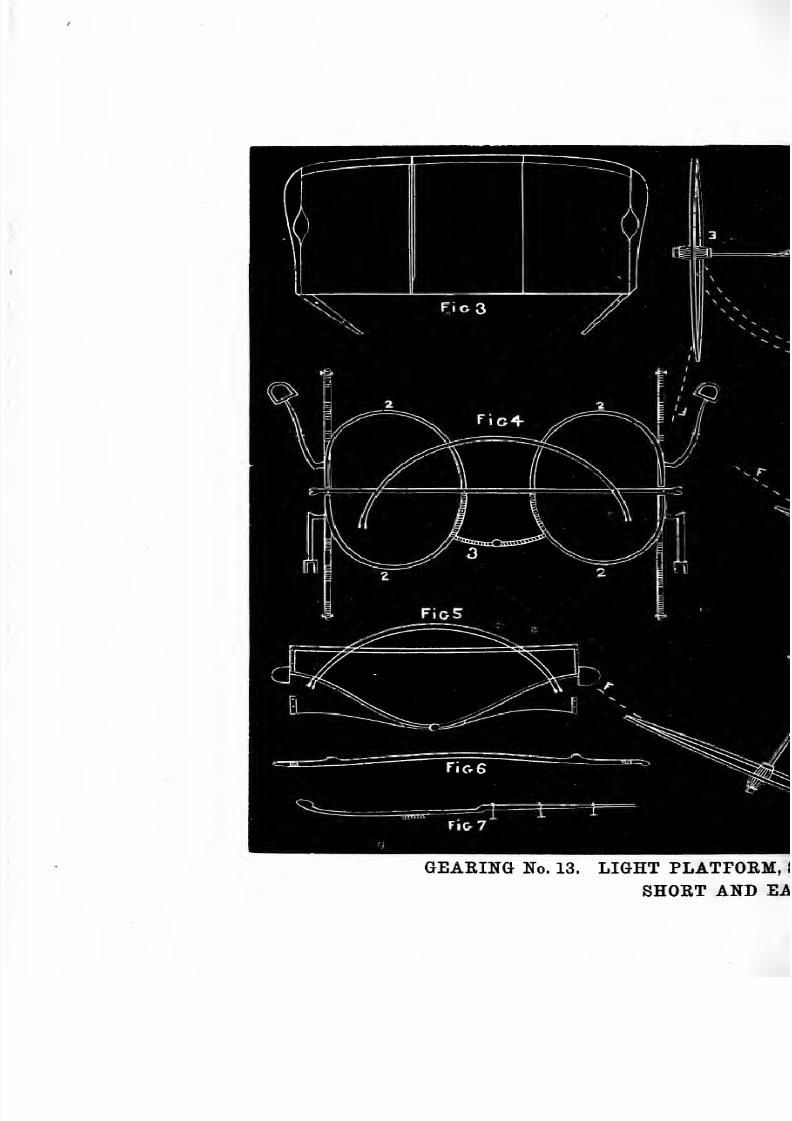
8/10/2019 Making Horse Drawn Coaches 1800 Bw
http://slidepdf.com/reader/full/making-horse-drawn-coaches-1800-bw 188/455
GEARING No. 13. LIGHT PLATPOEM, I
SHORT AND EA
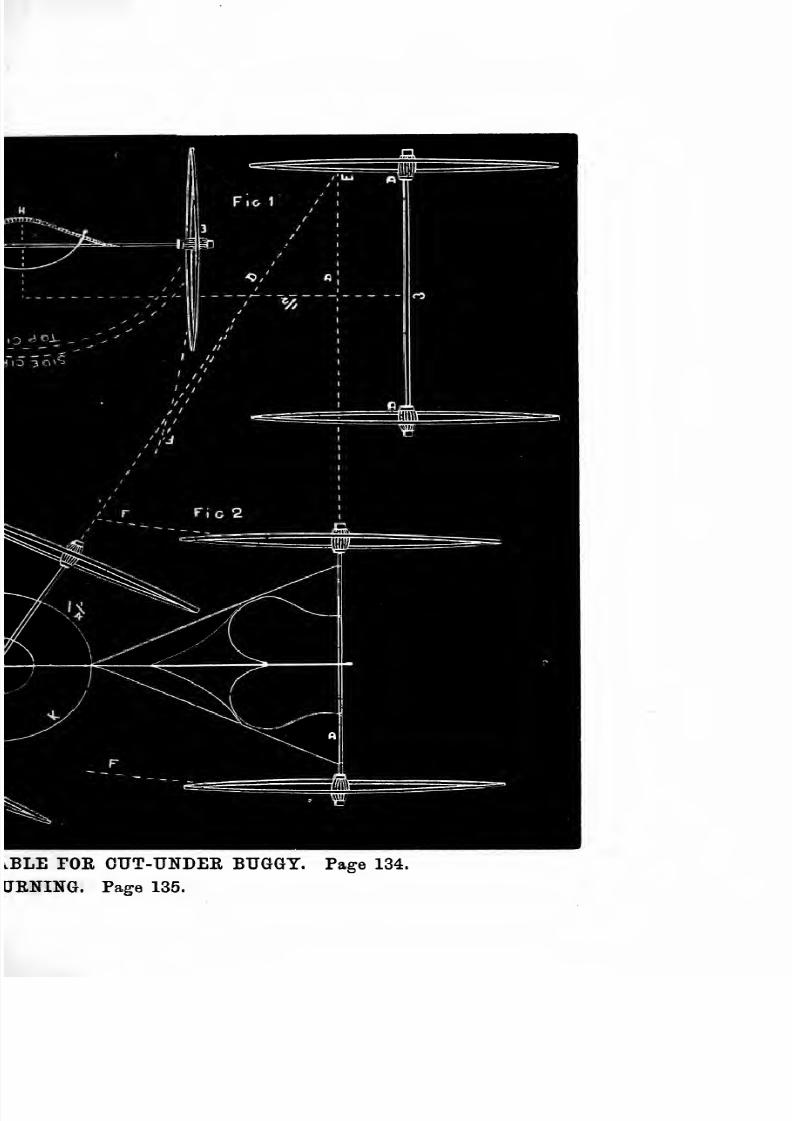
8/10/2019 Making Horse Drawn Coaches 1800 Bw
http://slidepdf.com/reader/full/making-horse-drawn-coaches-1800-bw 189/455
lBLE rOK CUT-UNDEE BUGGY.
JENING. Page 135.
Page 134.
8/10/2019 Making Horse Drawn Coaches 1800 Bw
http://slidepdf.com/reader/full/making-horse-drawn-coaches-1800-bw 190/455
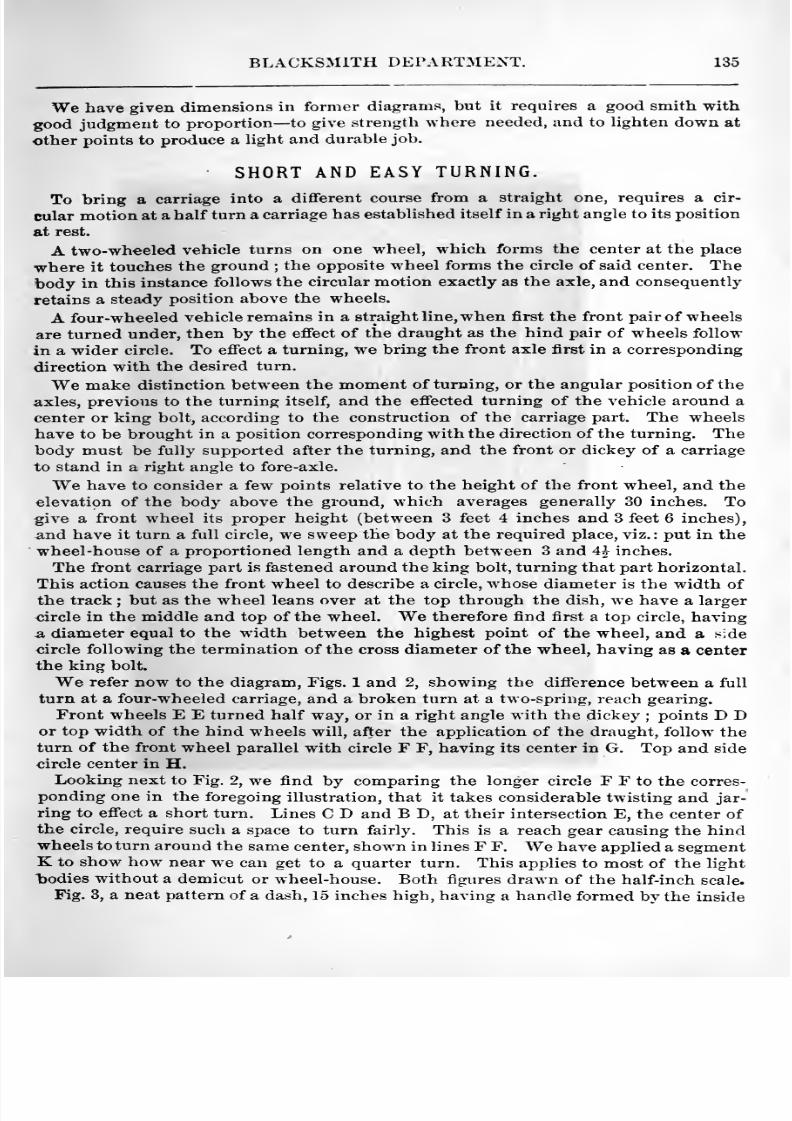
8/10/2019 Making Horse Drawn Coaches 1800 Bw
http://slidepdf.com/reader/full/making-horse-drawn-coaches-1800-bw 191/455
BLACKSMITH DEPARTMENT. 135
We have given dimensions in former diagrams, but it requires a good smith with
good judgment to proportion— to give strength where needed, and to lighten down at
other points to produce a light and durable job.
SHORT AND EASY TURNING.
To bring a carriage into a different course from a straight one, requires a cir-
cular motion at a half turn a carriage has established itself in a right angle to its position
at rest.
A two-wheeled vehicle turns on one wheel, which forms the center at the place
where it touches the ground ; the opposite wheel forms the circle of said center. Thebody in this instance follows the circular motion exactly as the axle, and consequently
retains a steady position above the wheels.
A four-wheeled vehicle remains in a straight line, when first the front pair of wheels
are turned under, then by the effect of the draught as the hind pair of wheels follow
in a wider circle. To effect a turning, we bring the front axle first in a corresponding
direction with the desired turn.
We make distinction between the moment of turning, or the angular position of the
axles, previous to the turning itself, and the effected turning of the vehicle around a
center or king bolt, according to the construction of the carriage part. The wheels
have to be brought in a position corresponding with the direction of the turning. The
body must be fully supported after the turning, and the front or dickey of a carriage
to stand in a right angle to fore-axle.
We have to consider a few points relative to the height of the front wheel, and the
elevation of the body above the ground, which averages generally 30 inches. Togive a front wheel its proper height (between 3 feet 4 inches and 3 feet 6 inches),
and have it turn a full circle, we sweep the body at the required place, viz.: put in the
wheel-house of a proportioned length and a depth between 3 and 4i inches.
The front carriage part is fastened around the king bolt, turning that part horizontal.
This action causes the front wheel to describe a circle, whose diameter is the width of
the track ; but as the wheel leans over at the top through the dish, we have a larger
circle in the middle and top of the wheel. We therefore find first a top circle, having
a diameter equal to the width between the highest point of the wheel, and a side
circle following the termination of the cross diameter of the wheel, having as a center
the king bolt.
We refer now to the diagram. Figs. 1 and 2, showing the difference between a full
turn at a four-wheeled carriage, and a broken turn at a two-spring, reach gearing.
Front wheels E E turned half way, or in a right angle with the dickey;
points D J)
or top width of the hind wheels will, after the application of the draught, follow the
turn of the front wheel parallel with circle F F, having its center in G. Top and sidecircle center in H.
Looking next to Fig. 2, we find by comparing the longer circle F F to the corres-
ponding one in the foregoing illustration, that it takes considerable twisting and jar-
ring to effect a short turn. Lines C D and B D, at their intersection E, the center ofthe circle, require such a space to turn fairly. This is a reach gear causing the hindwheels to turn around the same center, shown in lines F F. We have applied a segmentK to show how near we can get to a quarter turn. This applies to most of the light
hodies without a demicut or wheel-house. Both figures drawn of the half-inch scale.
Fig. 3, a neat pattern of a dash, 15 inches high, having a handle formed by the inside
8/10/2019 Making Horse Drawn Coaches 1800 Bw
http://slidepdf.com/reader/full/making-horse-drawn-coaches-1800-bw 192/455
136 COACH-MAKERS' ILLUSTRATED HAND-BOOK.
rail, welded to the outside rail. This dash might be covered entirely, leavino' thehandle open, or from the second rail.
THE IRONING OF A CARRIAGE PART.The carriage part of a rockaway is a fit specimen for plain ironing, inasmuch as it is
closely connected with the higher order of four-spring and eight-spring carriages.
Our job, drawn out, has bent axle beds, wheels 3 feet 4 inches by 4 feet, hub 7 inches
by 4f inches, li by If inch felloes, spokes If by 1 inch.
The axle bed serves as a pattern, not only for the shape of the axle, but for the
width of track, which is calculated to be 4 feet 8 inches. Supposing a smith wouldhave to iron a carriage different from such as he has already patterned out, then hemust set himself to work out just such a drawing as the one in Fig. 1. It is a mediumbent axle, but just enough to give it a graceful curve at the shoulder of the axle, whichwould degenerate into an ugly kink if bent shorter.
8/10/2019 Making Horse Drawn Coaches 1800 Bw
http://slidepdf.com/reader/full/making-horse-drawn-coaches-1800-bw 193/455
BLACKSMITH DEPARTMENT. 137
The axle arm is 7 inches long, even with the back of the hub and the flange of the-
nut let into the front of the hub. It has scant f inch taper, while the wheel has ^
inch dish. This gives 4 inches more width at the top than the bottom of the wheel,
and brings the lowest spoke plumb. As the welding of an axle shank is familiar toevery smith, we need only say that the bottom side of the axle is slightly roundedand left square at the places designed for the clip. The reach generally runs parallel
with the bottom of the body, at a distance between 10 and 11 inches from the latter.
The hind wheel is 4 inches higher than the front one. Bodies of a straight or slightly
curved bottom side have these 2 inches, or half the difierence in the height of wheelsmade up by the lessening of the bend of the hind axle | inch, shown by dotted lines
a, a (Figs. 1 and 2). The bearing of the fifth wheel clip 1^ inch, the thickness of upperand lower fifth wheel, made of |-inch half round iron -«- inch, and the mortis e in head,
block I inch above fifth wheel, making 2| inches in all;
from which deduct | inchless bend of hind axle bed, further the mortise in hind axle bed, being finch higher
than that of head block, measuring from bottom of head block and axle bed, whichleaves the two ends of the perch at the same distance from your base line. Thisanswers for our special case. Very irregular bottom sides demand crooked reaches ;.
one tenon as much as 5 inches above the other, then the shape of the box loop regu-
lates the space for the spring.
The iron plate, lining the under side of the perch is made of 1-inch half-oval iron,
left flat 12 inches from the head block, where it is welded to the plate of the headblock, and gathered up to 5-16 inch in the middle, forming the socket for the kingbolt. Measure angling from head block to end of hind axle bed to get it perfectly
square. The flat space of the reach plate, mentioned before, forms the surface for thefitting of the fifth wheel clip, bolted to it ; also the king bolt stay. The reach plate
also forms a clamp at the back end, fitted tight around the hind axle, running up to
the bottom of axle bed, rounded and finished half oval.
Place a strong straight edge under the wheels, and measure up to the axle, at equal
distances, to get your curve true. The springs are made to range, and to stand square,
by measuring to end or bolt from a straight edge placed on the floor. This done,,
measure crosswise, from bolt to bolt, to get them square. The springs are set drooping
I inch to have them come plumb after the body rests on them. The sprijig bars are
handled in the same manner, and in line with the face of spring. The two bolt
holes weaken a spring bar ; and in good shops narrow clips are used in place of the bolts.
Fig. 3 shows the manner in which the stays, made of half-round iron, are applied.
The cross rods are steadied by small scolloped flanges at their intersection, of the samethickness as the stays, and round edged. The long stay strikes the reach 26 inches
from the hind axle.
SKELETON BOOTS.
This sketch represents an angular and straight lined Landau. We will give a brief
outline only, with the chief points of government, which are about as follows
Wrepresents the front quarter (as per sketch) of the Landau ; the obliquely dotted
line represents the main front bow (let down) ; the continuation of the same is that
part which forms the upper portion of the doorway, when the top is up ; the vertical,
obliquely dotted lines P is the position occupied by O, when letting the top down.The dotted lines B and C are the two remaining bows. X is the front post or pillar
to which the hinge is adjusted, Y is the case for the front glass frame, when the top is
down ; the circular dotted line R denotes the circle described by the lower bow C, in
raising or lowering the top; the dotted line H H the seat valance or skirt, N the seat
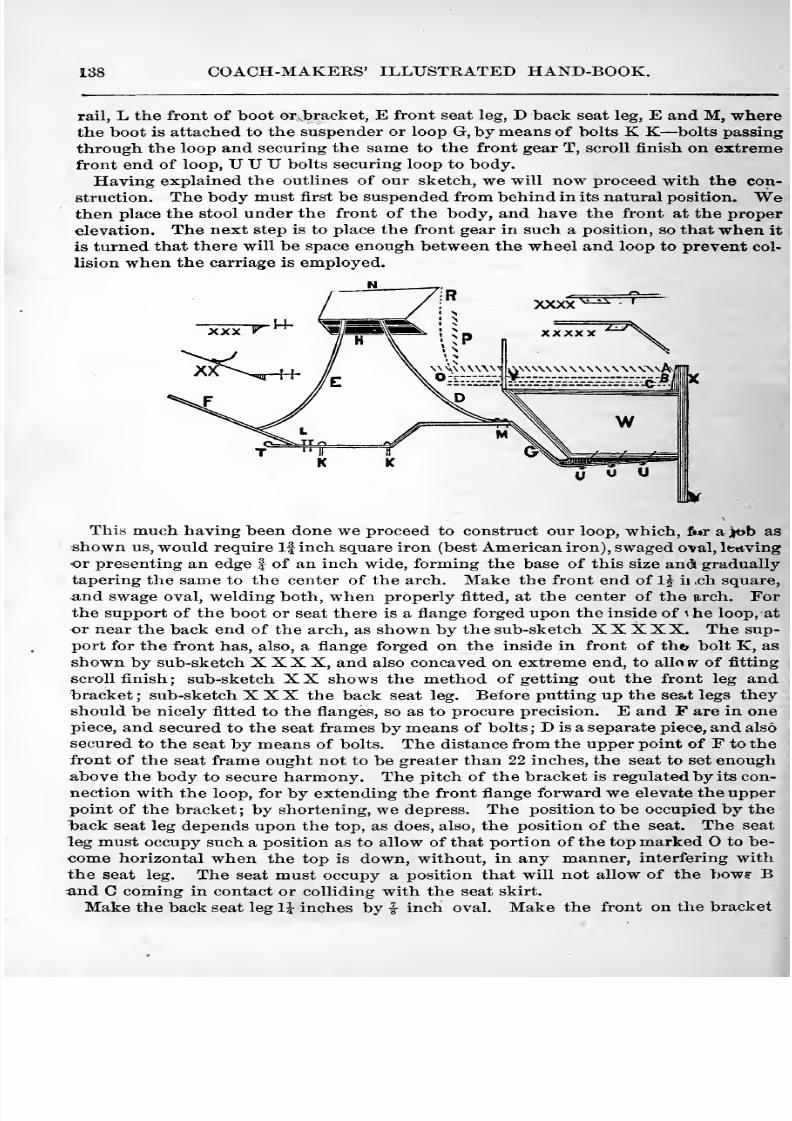
8/10/2019 Making Horse Drawn Coaches 1800 Bw
http://slidepdf.com/reader/full/making-horse-drawn-coaches-1800-bw 194/455
138 COACH-MAKEES' ILLUSTRATED HAND-BOOK.
rail, L the front of boot or. bracket, E front seat leg, D back seat leg, E and M, wherethe boot is attached to the suspender or loop G, by means of bolts K K—bolts passing
through the loop and securing the same to the front gear T, scroll finish on extremefront end of loop, U U U bolts securing loop to body.
Having explained the outlines of our sketch, we will now proceed with the con-
struction. The body must first be suspended from behind in its natural position. Wethen place the stool under the front of the body, and have the front at the proper
elevation. The next step is to place the front gear in such a position, so that when it
is turned that there will be space enough between the wheel and loop to prevent col-
lision when the carriage is employed.
This much having been done we proceed to construct our loop, which, fwr a j^b as
shown us, would require If inch square iron (best American iron), swaged o\n\, Ifctiving
or presenting an edge | of an inch wide, forming the base of this size an(S gradually
tapering the same to the center of the arch. Make the front end of IJ ii.ch square,
and swage oval, welding both, when properly fitted, at the center of the arch. Forthe support of the boot or seat there is a flange forged upon the inside of \ he loop, at
or near the back end of the arch, as shown by the sub-sketch X X X XX. The sup-
port for the front has, also, a flange forged on the inside in front of th«^ bolt K, as
shown by sub-sketch X X X X, and also concaved on extreme end, to alio jv^ of fitting
scroll finish ; sub-sketch X X shows the method of getting out the front leg andbracket ; sub-sketch XXX the back seat leg. Before putting up the se&t legs theyshould be nicely fitted to the flanges, so as to procure precision. E and F are in onepiece, and secured to the seat frames by means of bolts ; D is a separate piece, and also
secured to the seat by means of bolts. The distance from the upper point of F to thefront of the seat frame ought not to be greater than 22 inches, the seat to set enoughabove the body to secure harmony. The pitch of the bracket is regulated by its con-
nection with the loop, for by extending the front flange forward we elevate the upperpoint of the bracket ; by shortening, we depress. The position to be occupied by the
T3ack seat leg depends upon the top, as does, also, the position of the seat. The seat
leg must occupy such a position as to allow of that portion of the top marked to be-
come horizontal when the top is down, without, in any manner, interfering with
the seat leg. The seat must occupy a position that will not allow of the bows' Band
Ccoming in contact or colliding with the seat skirt.
Make the back seat leg 1^^ inches by i inch oval. Make the front on the bracket
i
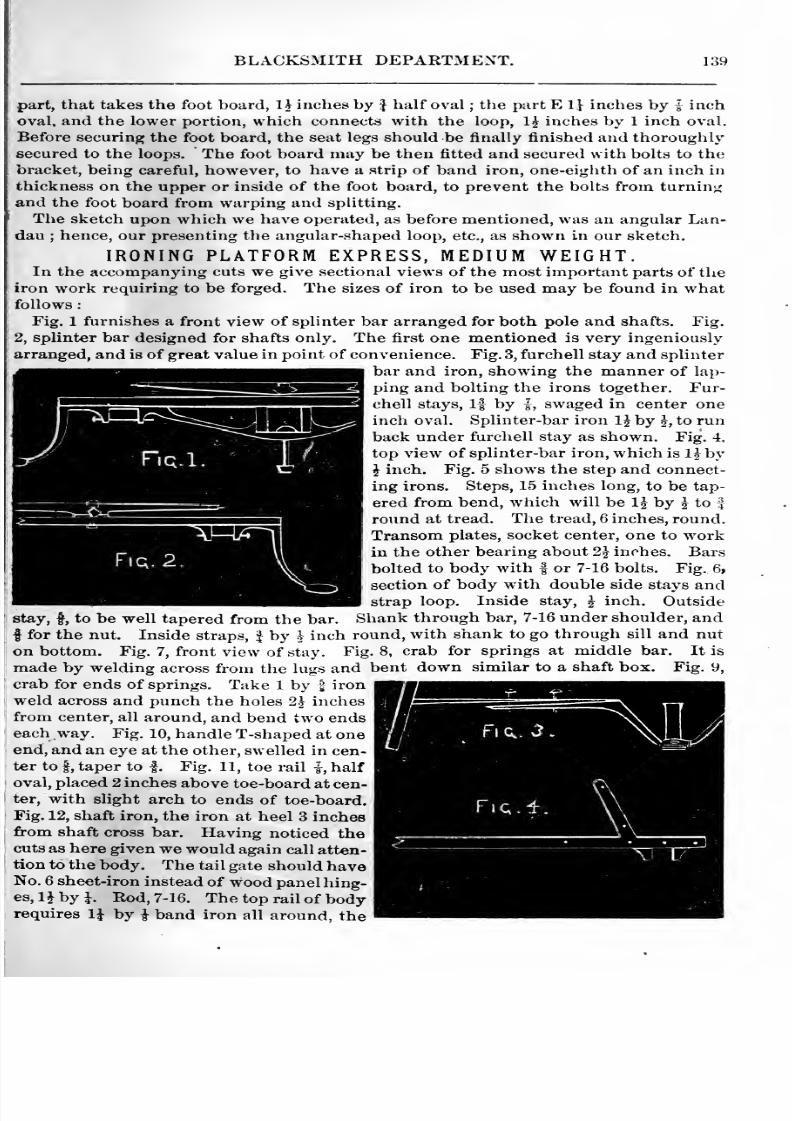
8/10/2019 Making Horse Drawn Coaches 1800 Bw
http://slidepdf.com/reader/full/making-horse-drawn-coaches-1800-bw 195/455
BLACKSMITH DEPARTMENT. 139
part, that takes the foot board, U inches by f half oval ; the part E 1} inches by | inch
oval, and the lower portion, which connects with the loop, Ih inches by 1 inch oval.
Before securing the foot board, the seat legs should be finally finished and thoroughlysecured to the loops. The foot board may be then fitted and secured with bolts to the
bracket, being careful, however, to have a strip of band iron, one-eighth of an inch in
thickness on the upper or inside of the foot board, to prevent the bolts from turning
and the foot board from warping and splitting.
The sketch upon which we have operated, as before mentioned, was an angular Lan-dau ; hence, our presenting the angular-shaped loop, etc., as shown in our sketch.
IRONING PLATFORM EXPRESS, MEDIUM WEIGHT.In the accompanying cuts we give sectional views of the most important parts of the
iron work requiring to be forged. The sizes of iron to be used may be found in whatfollows
Fig. 1 furnishes a front view of splinter bar arranged for both pole and shafts. Fig.
2, splinter bar designed for shafts only. The first one mentioned is very ingeniously
arranged, and is of great value in point of convenience. Fig. 3, furchell stay and splinter
bar and iron, showing the manner of laj)-
ping and bolting the irons together. Fur-
chell stays, 1| by |, swaged in center oneinch oval. Splinter-bar iron 1^ by ^, to runback under furchell stay as shown. Fig. 4,
top view of splinter-bar iron, which is 1^ by
J inch. Fig. 5 shows the step and connect-
ing irons. Steps, 15 inches long, to be tap-
ered from bend, wliich will be 1^ by ^ to f
round at tread. The tread, 6 inches, round.
Transom plates, socket center, one to workin the other bearing about 2^ inches. Bars
bolted to body with | or 7-16 bolts. Fig. 6,
section of body with double side stays andstrap loop. Inside stay, J inch. Outside
stay, t, to be well tapered from the bar. Shank through bar, 7-16 under shoulder, and
I for the nut. Inside straps, | by ^ inch round, with shank to go through sill and nut
on bottom. Fig. 7, front view of stay. Fig. 8, crab for springs at middle bar. It is
made by welding across from the lugs and bent down similar to a shaft box. Fig. 9,
I
crab for ends of springs. Take 1 by | iron
weld across and punch the holes 2} inches
from center, all around, and bend two endseach way. Fig. 10, handle T-shaped at oneend, and an eye at the other, swelled in cen-
ter to f , taper to |. Fig. 11, toe rail |, half
I
oval, placed 2 inches above toe-board at cen-
ter, with slight arch to ends of toe-board.
Fig. 12, shaft iron, the iron at heel 3 inchesfrom shaft cross bar. Having noticed thecuts as here given we would again call atten-
tion to the body. The tail gate should haveNo. 6 sheet-iron instead of wood panel hing-
es, H by i Rod, 7-16. The top rail of bodyrequires li by ^ band iron all around, the
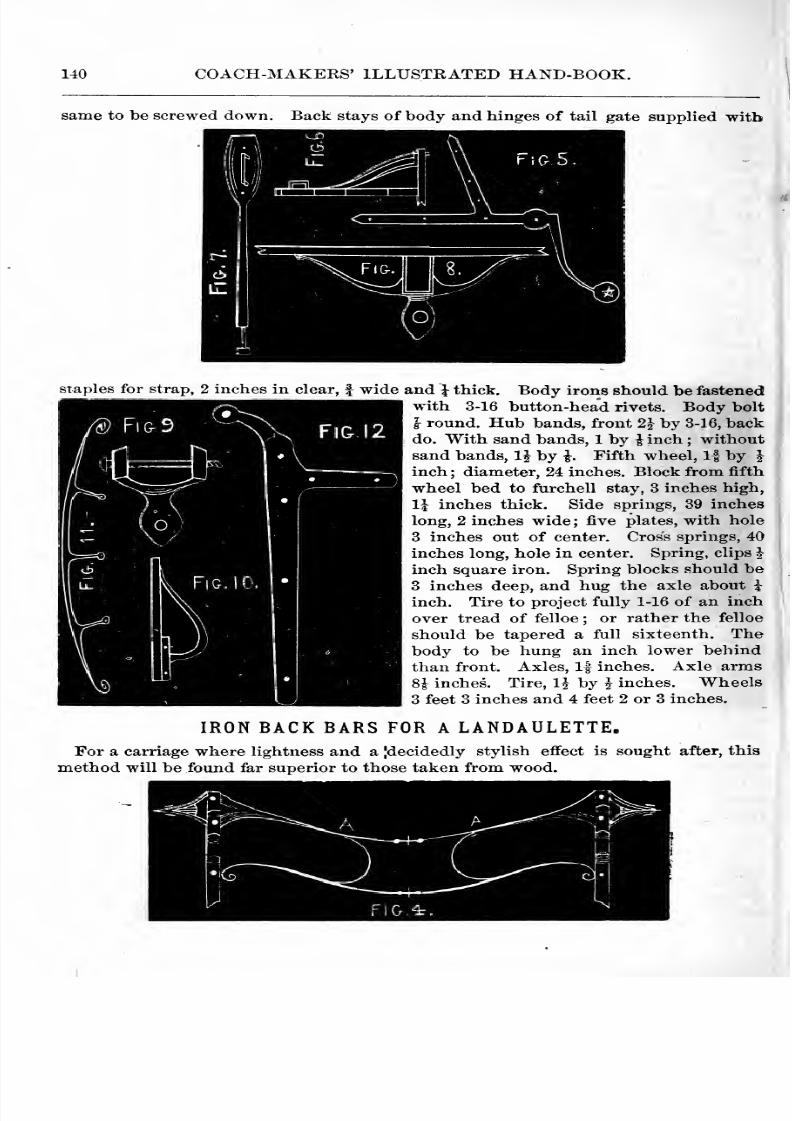
8/10/2019 Making Horse Drawn Coaches 1800 Bw
http://slidepdf.com/reader/full/making-horse-drawn-coaches-1800-bw 196/455
140 COACH-MAKERS' ILLUSTRATED HAND-BOOK.
same to be screwed down. Back stays of body and hinges of tail gate supplied with
staples for strap, 2 inches in clear, | wide and ^ thick. Body irons should be fastened
with 3-16 button-head rivets. Body bolt
g round. Hub bands, front 2^ by 3-16, backdo. With sand bands, 1 by i inch ; without
sand bands, 1| by i. Fifth wheel, If by J
inch ; diameter, 24 inches. Block from fifth
wheel bed to furchell stay, 3 inches high,
1^ inches thick. Side springs, 39 inches
long, 2 inches wide ; five plates, with hole
3 inches out of center. Cross springs, 40
inches long, hole in center. Spring, clips J
inch square iron. Spring blocks should be3 inches deep, and hug the axle about J
inch. Tire to project fully 1-16 of an inch
over tread of felloe ; or rather the felloe
should be tapered a full sixteenth. Thebody to be hung an inch lower behindthan front. Axles, If inches. Axle arms81- inches. Tire, IJ by J inches. Wheels3 feet 3 inches and 4 feet 2 or 3 inches.
IRON BACK BARS FOR A LANDAULETTE.
For a carriage where lightness and a jdecidedly stylish effect is sought after, this
method will be found far superior to those taken from wood.
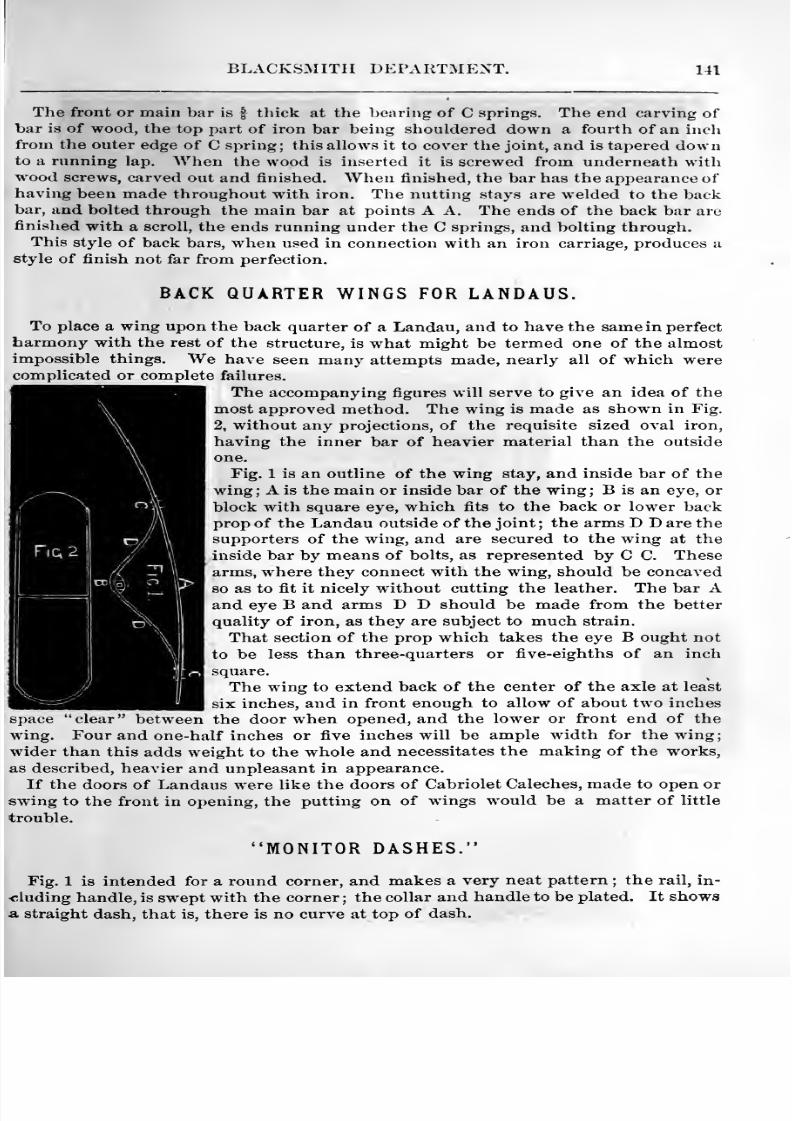
8/10/2019 Making Horse Drawn Coaches 1800 Bw
http://slidepdf.com/reader/full/making-horse-drawn-coaches-1800-bw 197/455
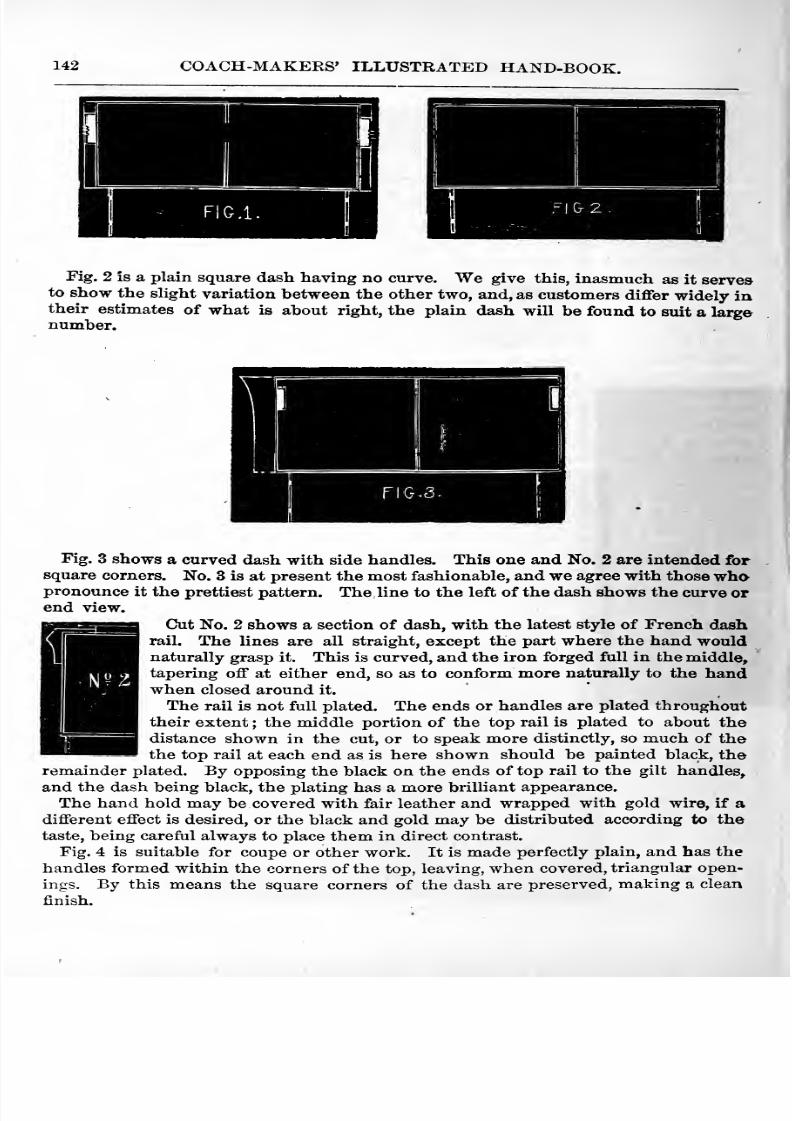
8/10/2019 Making Horse Drawn Coaches 1800 Bw
http://slidepdf.com/reader/full/making-horse-drawn-coaches-1800-bw 198/455
142 COACH-MAKERS' ILLUSTRATED HAND-BOOK.
Fig. 2 is a plain square dash having no curve. We give this, inasmuch as it serverto
show the sHght variation between the other two, and, as customers differ widely intheir estimates of what is about right, the plain dash will be found to suit a largenumber.
Fig. 3 shows a curved dash with side handles. This one and No. 2 are intended forsquare corners. No. 3 is at present the most fashionable, and we agree with those whapronounce it the
prettiest pattern. The line to theleft
of the dash shows the curve opend view.
Cut No. 2 shows a section of dash, with the latest style of French dashrail. The lines are all straight, except the part where the hand wouldnaturally grasp it. This is curved, and the iron forged full in the middle,
tapering off at either end, so as to conform more naturally to the handwhen closed around it.
The rail is not full plated. The ends or handles are plated throughouttheir extent ; the middle portion of the top rail is plated to about thedistance shown in the cut, or to speak more distinctly, so much of thethe top rail at each end as is here shown should be painted black, the
remainder plated. By opposing the black on the ends of top rail to the gilt handles,
and the dash being black, the plating has a more brilliant appearance.
The hand hold may be covered with fair leather and wrapped with gold wire, if adifferent effect is desired, or the black and gold may be distributed according to the
taste, being careful always to place them in direct contrast.
Fig. 4 is suitable for coupe or other work. It is made perfectly plain, and has the
handles formed within the corners of the top, leaving, when covered, triangular open-
ings. By this means the square corners of the dash are preserved, making a clean
finish.
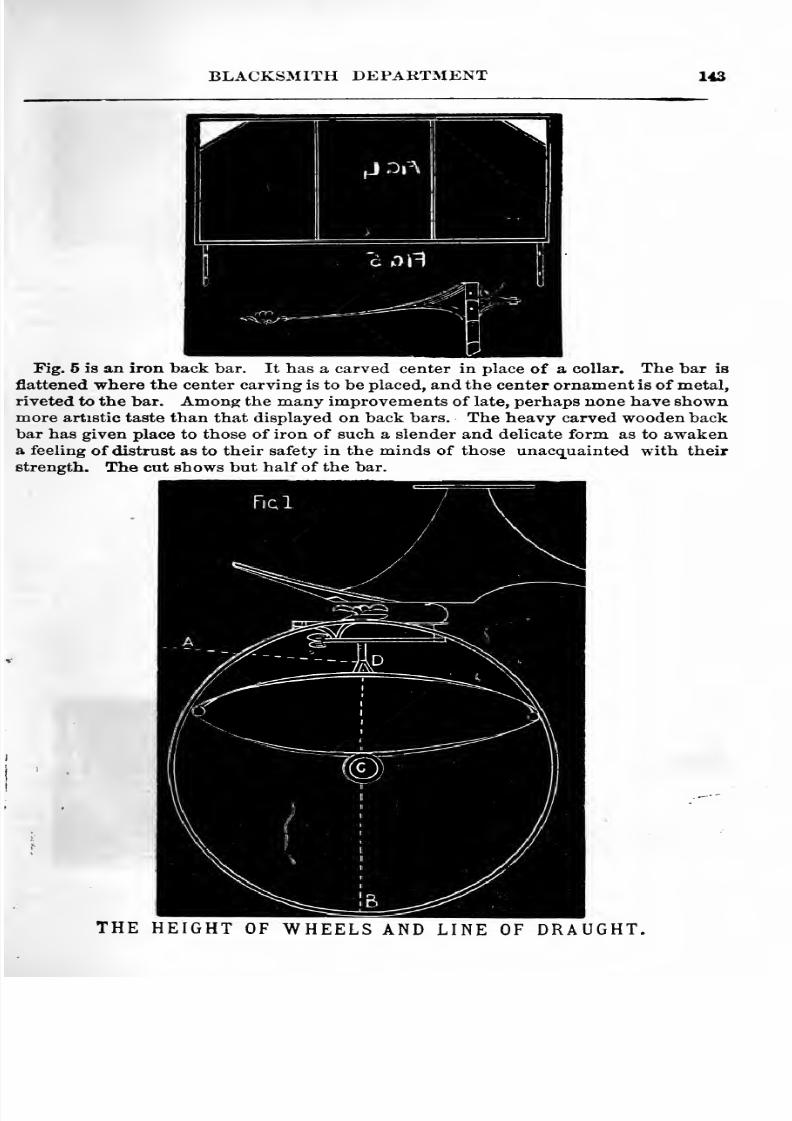
8/10/2019 Making Horse Drawn Coaches 1800 Bw
http://slidepdf.com/reader/full/making-horse-drawn-coaches-1800-bw 199/455
BLACKSMITH DEPARTMENT 143
Fig. 6 is an iron back bar. It has a carved center in place of a collar. The bar is
flattened where the center carving is to be placed, and the center ornament is of metal,
riveted to the bar. Among the many improvements of late, perhaps none have shownmore artistic taste than that displayed on back bars. The heavy carved wooden backbar has given place to those of iron of such a slender and delicate form as to awakena feeling of distrust as to their safety in the minds of those unacquainted with their
strength. The cut shows but half of the bar.
THE HEIGHT OF WHEELS AND LINE OF DRAUGHT.
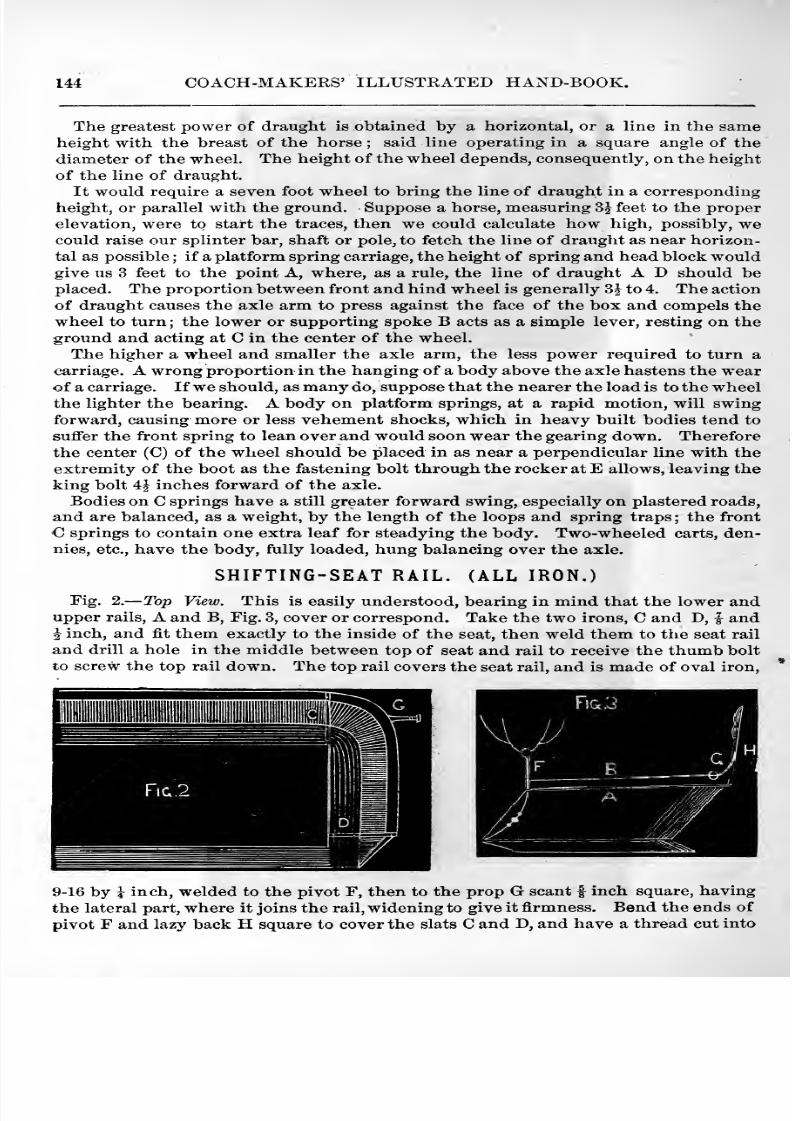
8/10/2019 Making Horse Drawn Coaches 1800 Bw
http://slidepdf.com/reader/full/making-horse-drawn-coaches-1800-bw 200/455
144 COACH-MAKERS' ILLUSTRATED HAND-BOOK.
The greatest power of draught is obtained by a horizontal, or a line in the same
height withthe breast of the horse ; said line operating in a square angle of
thediameter of the wheel. The height of the wheel depends, consequently, on the height
of the line of draught.
It would require a seven foot wheel to bring the line of draught in a corresponding
height, or parallel with the ground. Suppose a horse, measuring 3^ feet to the proper
elevation, were to start the traces, then we could calculate how high, possibly, wecould raise our splinter bar, shaft or pole, to fetch the line of draught as near horizon-
tal as possible ; if a platform spring carriage, the height of spring and head block wouldgive us 3 feet to the point A, where, as a rule, the line of draught A D should beplaced. The proportion between front and hind wheel is generally 3| to 4. The action
of draught causes the axle arm to press against the face of the box and compels the
wheel to turn ; the lower or supporting spoke B acts as a simple lever, resting on the
ground and acting at C in the center of the wheel.
The higher a wheel and smaller the axle arm, the less power required to turn a
carriage. A wrong proportion in the hanging of a body above the axle hastens the wearof a carriage. If we should, as many do, suppose that the nearer the load is to the wheelthe lighter the bearing. A body on platform springs, at a rapid motion, will swingforward, causing more or less vehement shocks, which in heavy built bodies tend to
suffer the front spring to lean over and would soon wear the gearing down. Therefore
the center (C) of the wheel should be placed in as near a perpendicular line with the
extremity of the boot as the fastening bolt through the rocker at E allows, leaving the
king bolt 4J inches forward of the axle.
Bodies on C springs have a still greater forward swing, especially on plastered roads,
and are balanced, as a weight, by the length of the loops and spring traps; the front
C springs to contain one extra leaf for steadying the body. Two-wheeled carts, den-nies, etc., have the body, fully loaded, hung balancing over the axle.
SHIFTING-SEAT RAIL. (ALL IRON.)
Fig. 2. Top View. This is easily understood, bearing in mind that the lower andupper rails, A and B, Fig. 3, cover or correspond. Take the two irons, C and D, I andJ inch, and fit them exactly to the inside of the seat, then weld them to the seat rail
and drill a hole in the middle between top of seat and rail to receive the thumb bolt
to screw the top rail down. The top rail covers the seat rail, and is made of oval iron.
19-16
by \inch,
weldedto
the pivotF,
thento the prop
Gscant
|inch square, having
the lateral part, where it joins the rail, widening to give it firmness. Bend the ends of
pivot F and lazy back H square to cover the slats C and D, and have a thread cut into
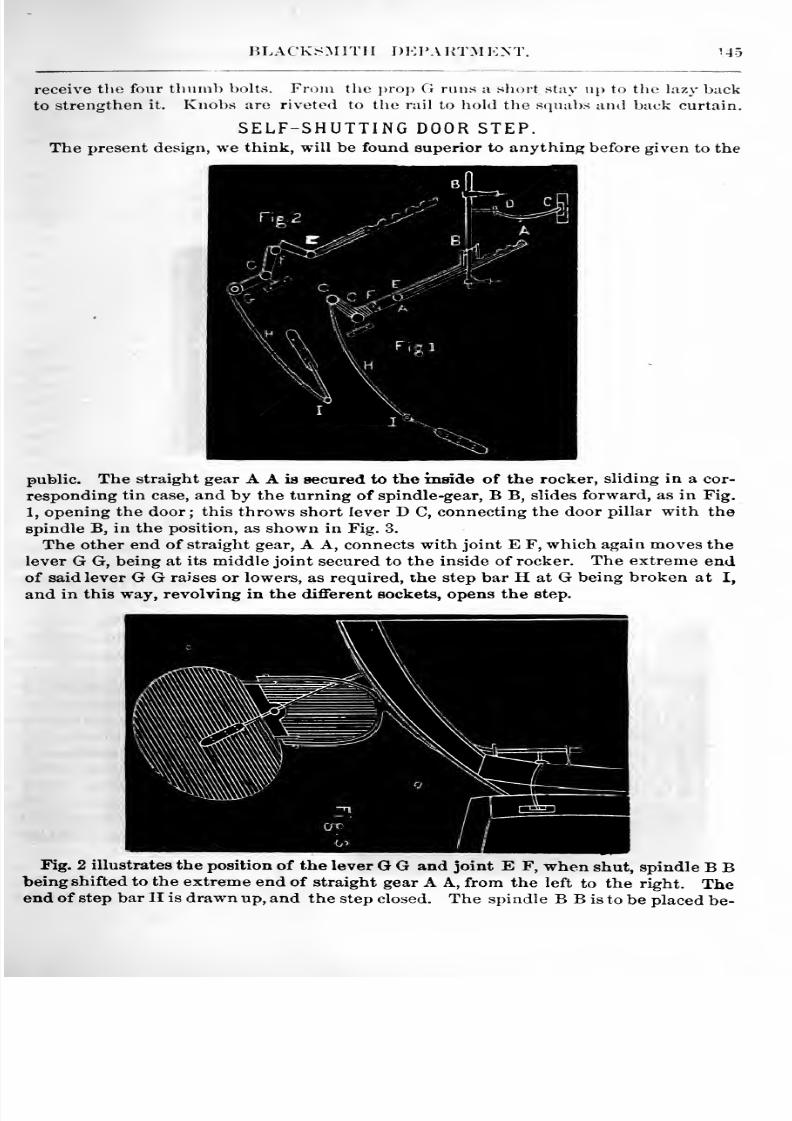
8/10/2019 Making Horse Drawn Coaches 1800 Bw
http://slidepdf.com/reader/full/making-horse-drawn-coaches-1800-bw 201/455
BLACKSMITH DKrAKTMKXT. 1.45
receive the four thumb bolts. From the prop G runs a short stay up to the hxzy back
to strengthen it. Knobs are riveted to the rail to hold the squabs and back curtain.
SELF-SHUTTING DOOR STEP.
The present design, we think, will be found superior to anything before given to the
public. The straight gear A A is secured to the inside of the rocker, sliding in a cor-
responding tin case, and by the turning of spindle-gear, B B, slides forward, as in Fig.
1, opening the door; this throws short lever D C, connecting the door pillar with the
spindle B, in the position, as shown in Fig. 3.
The other end of straight gear, A A, connects with joint E F, which again moves the
lever G G, being at its middle joint secured to the inside of rocker. The extreme endof said lever G G raises or lowers, as required, the step bar H at G being broken at I,
and in this way, revolving in the diflferent sockets, opens the step.
Fig. 2 illustrates the position of the lever G G and joint E F, when shut, spindle B Bbeing shifted to the extreme end of straight gear A A, from the left to the right. Theend of step bar II is drawn up, and the step closed. The spindle B B is to be placed be-
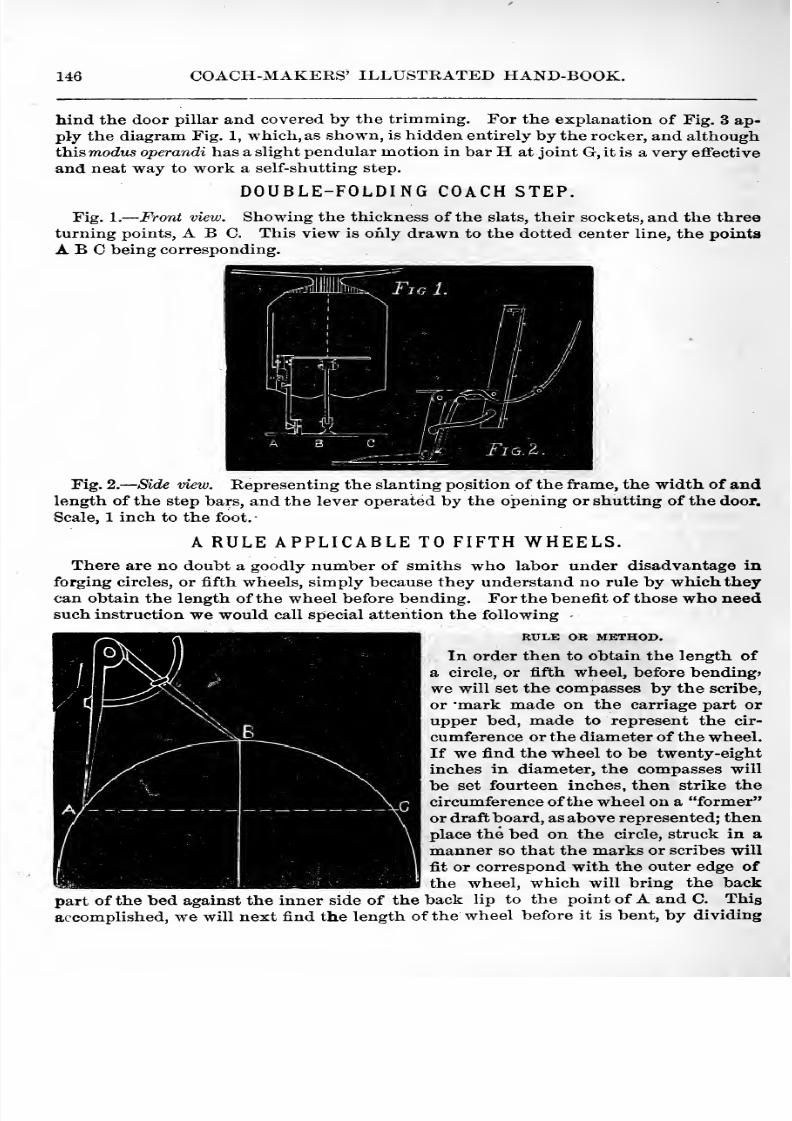
8/10/2019 Making Horse Drawn Coaches 1800 Bw
http://slidepdf.com/reader/full/making-horse-drawn-coaches-1800-bw 202/455
146 COACH-MAKERS' ILLUSTRATED HAND-BOOK.
hind the door pillar and covered by the trimming. For the explanation of Fig. 3 ap-
ply the diagram Fig. 1, which, as shown, is hidden entirely by the rocker, and althoughthis modus operandi has a slight pendular motion in bar H at joint G, it is a very effective
and neat way to work a self-shutting step.
DOUBLE-FOLDING COACH STEP.
Fig. 1. Front view. Showing the thickness of the slats, their sockets, and the three
turning points, ABC. This view is only drawn to the dotted center line, the points
ABC being corresponding.
Fig. 2. Side view. Representing the slanting position of the frame, the width of andlength of the step bars, and the lever operated by the opening or shutting of the door.
Scale, 1 inch to the foot.
A RULE APPLICABLE TO FIFTH WHEELS.There are no doubt a goodly number of smiths who labor under disadvantage in
forging circles, or fifth wheels, simply because they understand no rule by which they
can obtain the length of the wheel before bending. For the benefit of those who needsuch instruction we would call special attention the following
RULE OR METHOD.
In order then to obtain the length of
a circle, or fifth wheel, before bending*
we will set the compasses by the scribe,
or mark made on the carriage part or
upper bed, made to represent the cir-
cumference or the diameter of the wheel.
If we find the wheel to be twenty-eight
inches in diameter, the compasses will
be set fourteen inches, then strike the
circumference of the wheel on a former
or draft board, as above represented; then
place the bed on the circle, struck in a
manner so that the marks or scribes will
fit or correspond with the outer edge of
the wheel, which will bring the back
part of the bed against the inner side of the back lip to the point of A and C. ThisaccompHshed, we will next find the length of the wheel before it is bent, by dividing
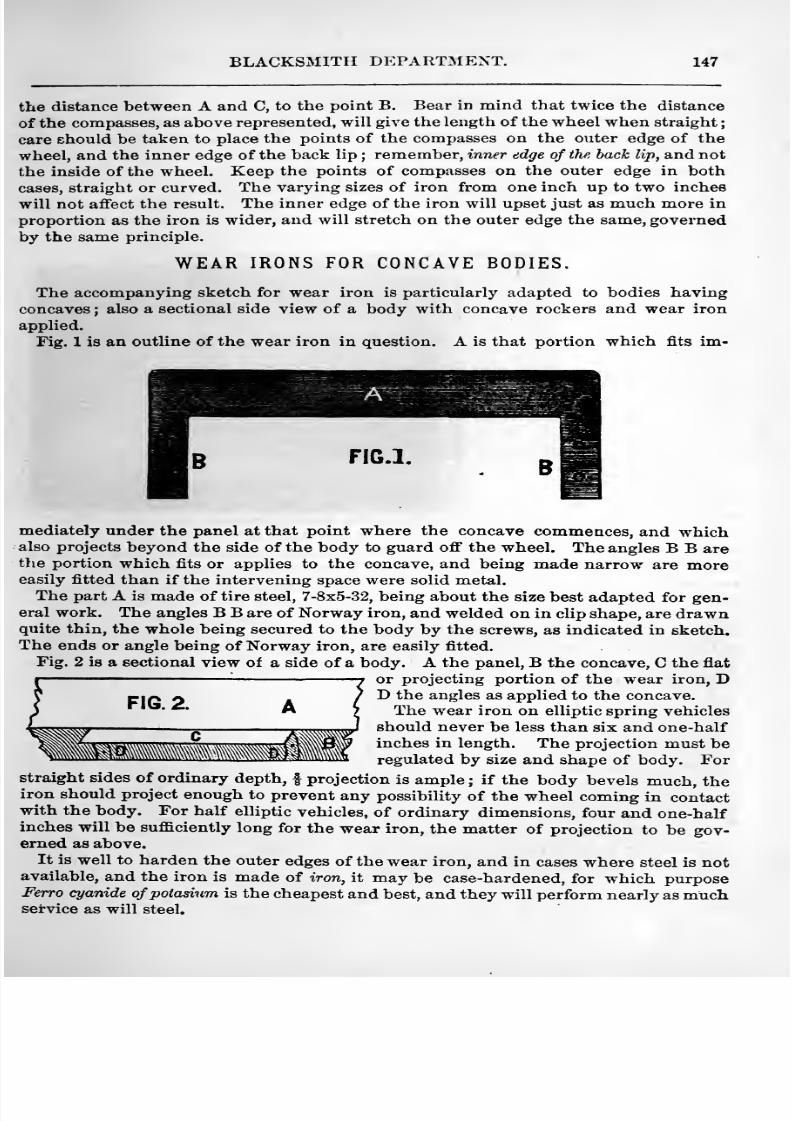
8/10/2019 Making Horse Drawn Coaches 1800 Bw
http://slidepdf.com/reader/full/making-horse-drawn-coaches-1800-bw 203/455
BLACKSMITH DEPARTMENT. 147
the distance between A and C, to the point B. Bear in mind that twice the distance
of the compasses, as above represented, will give the length of the wheel when straight
care should be taken to place the points of the compasses on the outer edge of the
wheel, and the inner edge of the back lip ; remember, inner edge of the back lip, and not
the inside of the wheel. Keep the points of compasses on the outer edge in both
cases, straight or curved. The varying sizes of iron from one inch up to two inches
will not affect the result. The inner edge of the iron will upset just as much more in
proportion as the iron is wider, and will stretch on the outer edge the same, governed
by the same principle.
WEAR IRONS FOR CONCAVE BODIES.
The accompanyingsketch for
weariron is particularly
adaptedto bodies
havingconcaves ; also a sectional side view of a body with concave rockers and wear iron
applied.
Fig. 1 is an outline of the wear iron in question. A is that portion which fits im-
mediately under the panel at that point where the concave commences, and whichalso projects beyond the side of the body to guard off the wheel. The angles B B arethe portion which fits or applies to the concave, and being made narrow are moreeasily fitted than if the intervening space were solid metal.
The part A is made of tire steel, 7-8x5-32, being about the size best adapted for gen-eral work. The angles B B are of Norway iron, and welded on in clip shape, are drawnquite thin, the whole being secured to the body by the screws, as indicated in sketch.
The ends or angle being of Norway iron, are easily fitted.
Fig. 2 is a sectional view of a side of a body. A the panel, B the concave, C the flat
or projecting portion of the wear iron, DD the angles as applied to the concave.
The wear iron on elliptic spring vehicles
should never be less than six and one-half
inches in length. The projection must beregulated by size and shape of body. For
straight sides of ordinary depth, | projection is ample ; if the body bevels much, theiron should project enough to prevent any possibility of the wheel coming in contactwith the body. For half elliptic vehicles, of ordinary dimensions, four and one-halfinches will be sufficiently long for the wear iron, the matter of projection to be gov-erned as above.
It is well to harden the outer edges of the wear iron, and in cases where steel is notavailable, and the iron is made of iron, it may be case-hardened, for which purpose
Ferro cyanide ofpoiasium is the cheapest and best, and they will perform nearly as muchsei-vice as will steel.
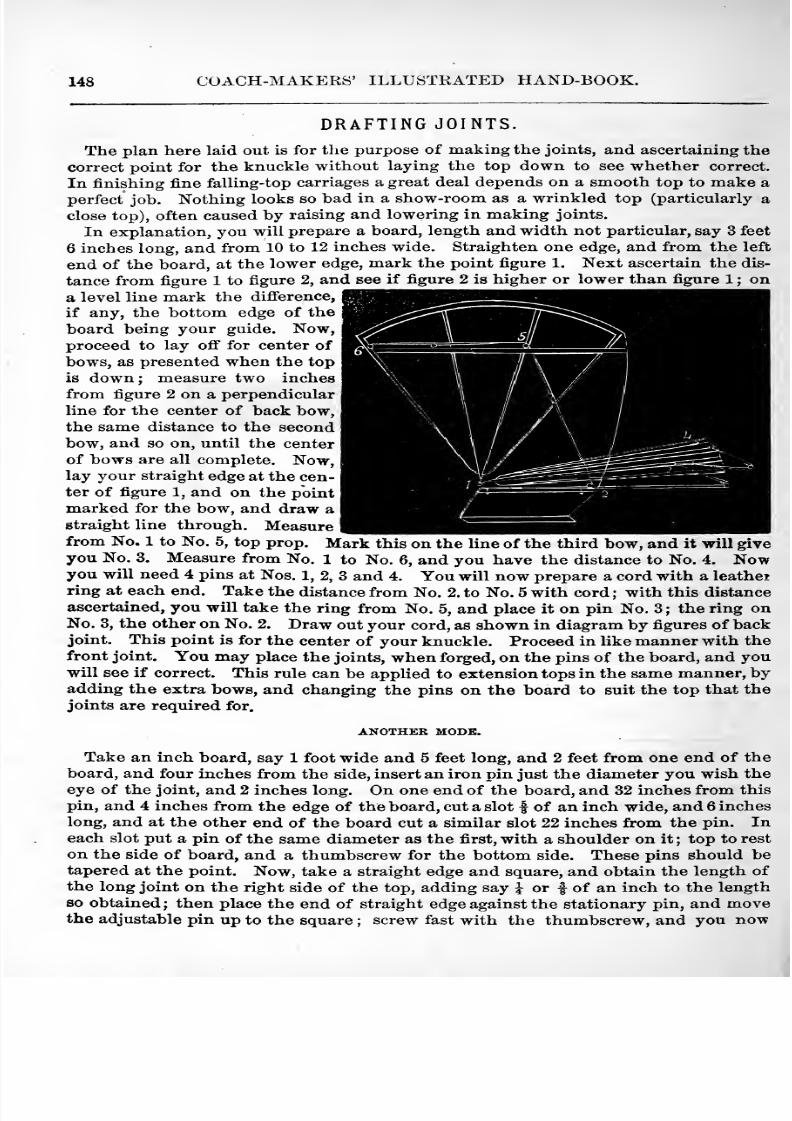
8/10/2019 Making Horse Drawn Coaches 1800 Bw
http://slidepdf.com/reader/full/making-horse-drawn-coaches-1800-bw 204/455
148 COACH-MAKERS' ILLUSTRATED HAND-BOOK.
DRAFTING JOINTS.
The plan here laid out is for the purpose of making the joints, and ascertaining thecorrect point for the knuckle without laying the top down to see whether correct.
In finishing fine falling-top carriages a great deal depends on a smooth top to make a
perfect job. Nothing looks so bad in a show-room as a wrinkled top (particularly a
close top), often caused by raising and lowering in making joints.
In explanation, you will prepare a board, length and width not particular, say 3 feet
6 inches long, and from 10 to 12 inches wide. Straighten one edge, and from the left
end of the board, at the lower edge, mark the point figure 1. Next ascertain the dis-
tance from figure 1 to figure 2, and see if figure 2 is higher or lower than figure 1 ; on
a level line mark the difi'erence,if any, the bottom edge of the
board being your guide. Now,proceed to lay ofi for center of
bows, as presented when the top
is down; measure two inches
from figure 2 on a perpendicular
line for the center of back bow,the same distance to the second
bow, and so on, until the centerof bows are all complete. Now,lay your straight edge at the cen-
ter of figure 1, and on the pointmarked for the bow, and draw astraight line through. Measurefrom No. 1 to No. 5, top prop. Mark this on the line of the third bow, and it will giveyou No. 3. Measure from No. 1 to No. 6, and you have the distance to No. 4. Nowyou will need 4 pins at Nos. 1, 2, 3 and 4. You will now prepare a cord with a leathei
ring at each end. Take thedistance from No. 2. to No. 5 with cord
;
with thisdistance
ascertained, you will take the ring from No. 5, and place it on pin No. 3 ; the ring onNo. 3, the other on No. 2. Draw out your cord, as shown in diagram by figures of backjoint. This point is for the center of your knuckle. Proceed in like manner with the
front joint. You may place the joints, when forged, on the pins of the board, and youwill see if correct. This rule can be applied to extension tops in the same manner, byadding the extra bows, and changing the pins on the board to suit the top that the
joints are required for.
ANOTHER MODE.
Take an inch board, say 1 foot wide and 5 feet long, and 2 feet from one end of the
board, and four inches from the side, insert an iron pin just the diameter you wish the
eye of the joint, and 2 inches long. On one end of the board, and 32 inches from this
pin, and 4 inches from the edge of the board, cut a slot | of an inch wide, and 6 inches
long, and at the other end of the board cut a similar slot 22 inches from the pin. Ineach slot put a pin of the same diameter as the first, with a shoulder on it ; top to rest
on the side of board, and a thumbscrew for the bottom side. These pins should betapered at the point. Now, take a straight edge and square, and obtain the length of
the long joint on the right side of the top, adding say i or | of an inch to the length
so obtained; then place the end of straight edge against the stationary pin, and movethe adjustable pin up to the square ; screw fast with the thumbscrew, and you now
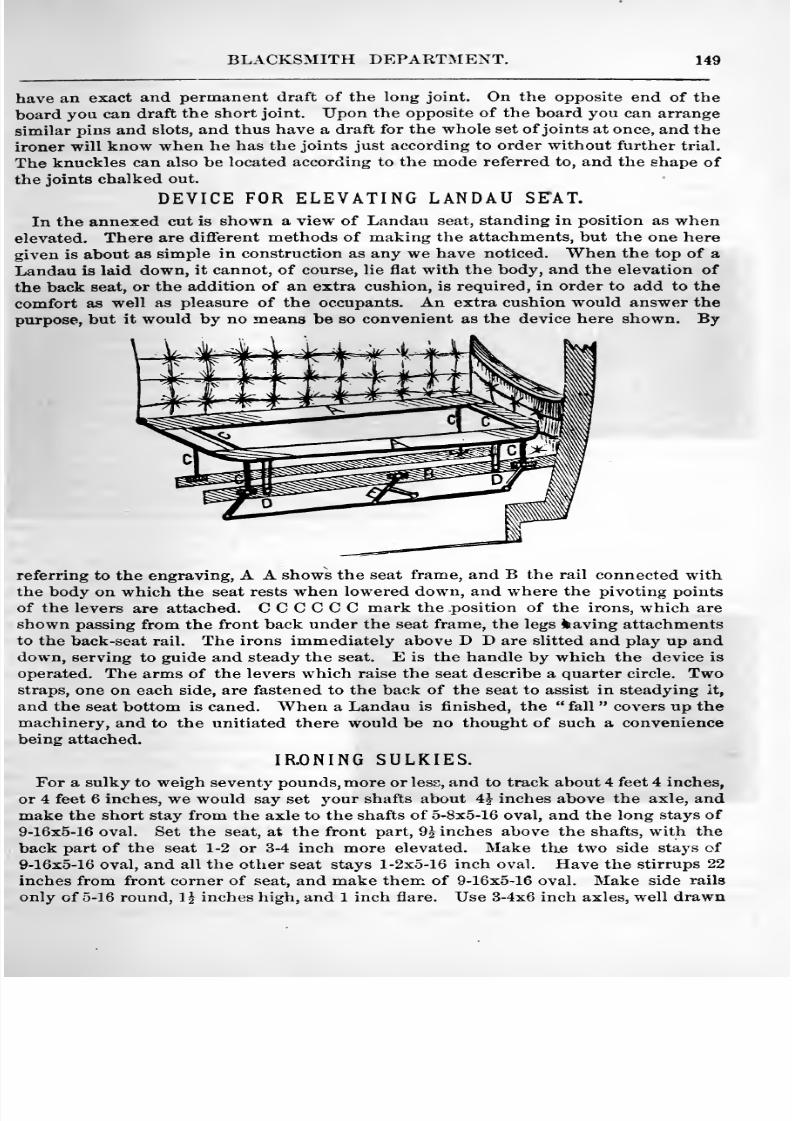
8/10/2019 Making Horse Drawn Coaches 1800 Bw
http://slidepdf.com/reader/full/making-horse-drawn-coaches-1800-bw 205/455
BLACKSMITH DEPARTMENT. 149
have an exact and permanent draft of the long joint. On the opposite end of the
board you can draft the short joint. Upon the opposite of the board you can arrange
similar pins and slots, and thus have a draft for the whole set of joints at once, and the
ironer will know when he has the joints just according to order without further trial.
The knuckles can also be located according to the mode referred to, and the shape of
the joints chalked out.
DEVICE FOR ELEVATING LANDAU SEAT.
In the annexed cut is shown a view of Landau seat, standing in position as whenelevated. There are different methods of making the attachments, but the one here
given is about as simple in construction as any we have noticed. When the top of a
Landau is laid down, it cannot, of course, lie flat with the body, and the elevation of
the back seat, or the addition of an extra cushion, is required, in order to add to the
comfort as well as pleasure of the occupants. An extra cushion would answer the
purpose, but it would by no means be so convenient as the device here shown. By
referring to the engraving, A A shows the seat frame, and B the rail connected with
thebody on which
the seat rests when lowered down, and where the pivoting points
of the levers are attached. C C C C C C mark the position of the irons, which are
shown passing from the front back under the seat frame, the legs Shaving attachments
to the back-seat rail. The irons immediately above D D are slitted and play up anddown, serving to guide and steady the seat. E is the handle by which the device is
operated. The arms of the levers which raise the seat describe a quarter circle. Twostraps, one on each side, are fastened to the back of the seat to assist in steadying it,
and the seat bottom is caned. When a Landau is finished, the fall covers up the
machinery, and to the unitiated there would be no thought of such a convenience
being attached.
IR.ONING SULKIES.
For a sulky to weigh seventy pounds, more or less, and to track about 4 feet 4 inches,
or 4 feet 6 inches, we would say set your shafts about 4^ inches above the axle, andmake the short stay from the axle to the shafts of 5-8x5-16 oval, and the long stays of
9-16x5-16 oval. Set the seat, at the front part, 9^ inches above the shafts, with the
back part of the seat 1-2 or 3-4 inch more elevated. Make th.e two side stays of
9-16x5-16 oval, and all the other seat stays 1-2x5-16 inch oval. Have the stirrups 22
inches from front corner of seat, and make them of 9-16x5-16 oval. Make side rails
only of 5-16 round, 1 J inches high, and 1 inch flare. Use 3-4x6 inch axles, well drawn
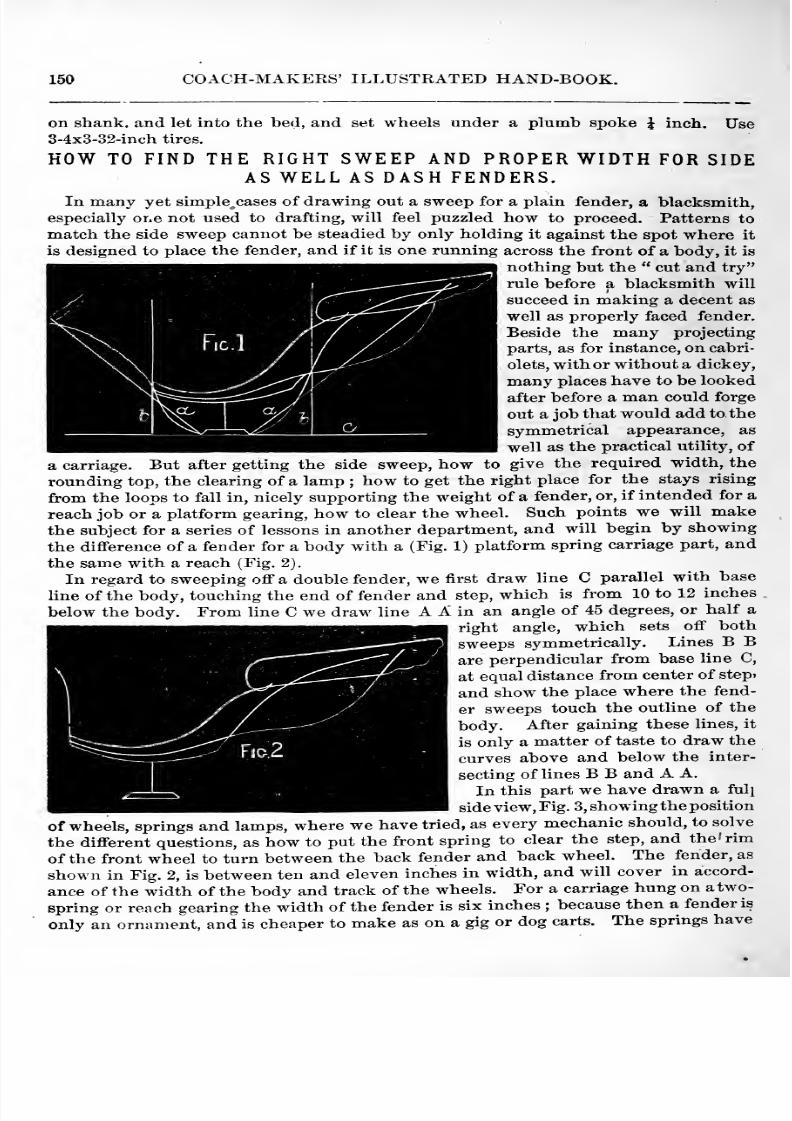
8/10/2019 Making Horse Drawn Coaches 1800 Bw
http://slidepdf.com/reader/full/making-horse-drawn-coaches-1800-bw 206/455
150 COACH-MAKERS' ILLUSTRATED HAND-BOOK.
on shank, and let into the bed, and set wheels under a plumb spoke J inch. Use3-4x3-32-inch tires.
HOW TO FIND THE RIGHT SWEEP AND PROPER WIDTH FOR SIDEAS WELL AS DASH FENDERS.
In many yet simple^cases of drawing out a sweep for a plain fender, a blacksmith,
especially one not used to drafting, will feel puzzled how to proceed. Patterns to
match the side sweep cannot be steadied by only holding it against the spot where it
is designed to place the fender, and if it is one running across the front of a body, it is
nothing but the cut and try
rule before a blacksmith will
succeed in making a decent as
well as properly faced fender.
Beside the many projecting
parts, as for instance, on cabri-
olets, with or without a dickey,
many places have to be looked
after before a man could forge
out a job that would add to the
symmetrical appearance, as
well as the practical utility, ofa carriage. But after getting the side sweep, how to give the required width, the
rounding top, the clearing of a lamp ; how to get the right place for the stays rising
from the loops to fall in, nicely supporting the weight of a fender, or, if intended for a
reach job or a platform gearing, how to clear the wheel. Such points we will makethe subject for a series of lessons in another department, and will begin by showing
the difference of a fender for a body with a (Fig. 1) platform spring carriage part, and
the same with a reach (Fig. 2).
In regard to sweeping off a double fender, we first draw line C parallel with base
line of the body, touching the end of fender and step, which is from 10 to 12 inchesbelow the body. From line C we draw line A A in an angle of 45 degrees, or half a
right angle, which sets off both
sweeps symmetrically. Lines B Bare perpendicular from base line C,
at equal distance from center of step>
and show the place where the fend-
er sweeps touch the outline of the
body. After gaining these lines, it
isonly a
matter of taste to draw the
curves above and below the inter-
secting of lines B B and A A.
In this part we have drawn a ful}
side view, Fig. 3, showing the position
of wheels, springs and lamps, where we have tried, as every mechanic should, to solve
the different questions, as how to put the front spring to clear the step, and the •' rim
of the front wheel to turn between the back fender and back wheel. The fender, as
shown in Fig. 2, is between ten and eleven inches in width, and will cover in accord-
ance of thewidth
of thebody
and track of the wheels. For a carriage hung on a two-
spring or reach gearing the width of the fender is six inches ; because then a fender is
only an ornament, and is cheaper to make as on a gig or dog carts. The springs have
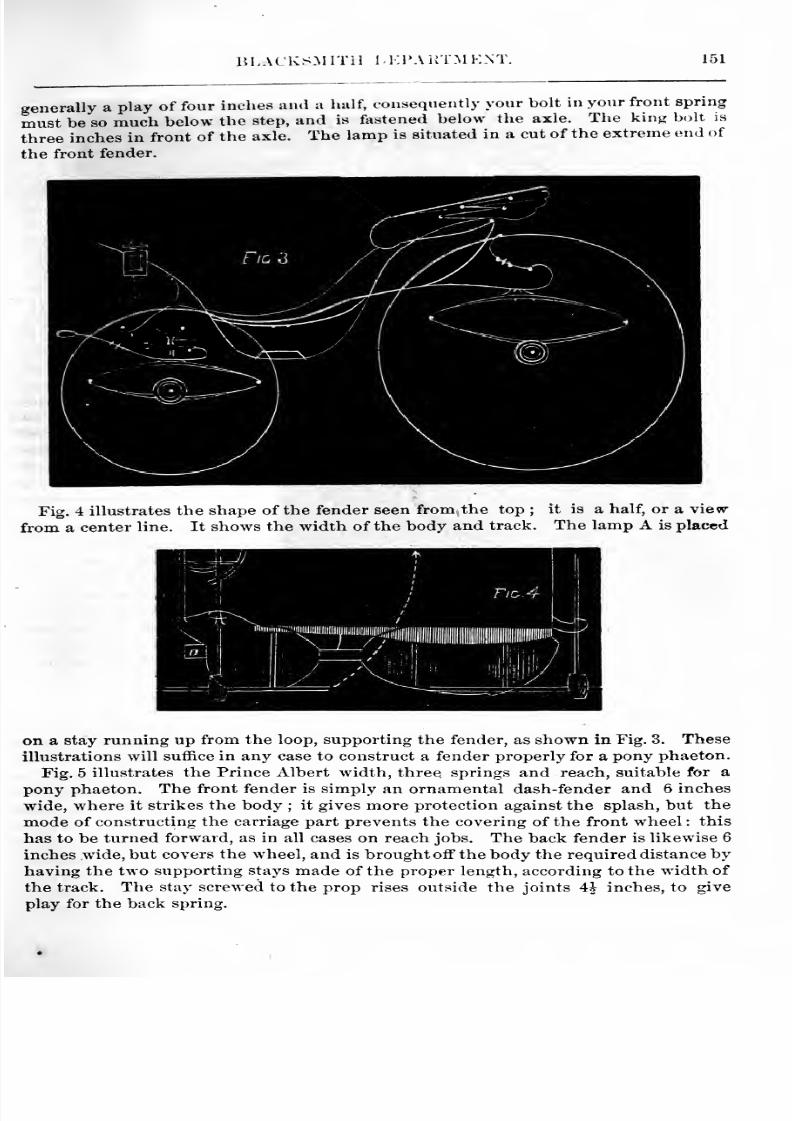
8/10/2019 Making Horse Drawn Coaches 1800 Bw
http://slidepdf.com/reader/full/making-horse-drawn-coaches-1800-bw 207/455
BLACKSMITH iKPAKTMKNT. 151
generally a play of four inches and a half, consequently your bolt in your front spring
must be'so much below the step, and is fastened below the axle. The king bolt is
three inches in front of the axle. The lamp is situated in a cut of the extreme end of
the front fender.
Fig. 4 illustrates the shape of the fender seen from the top ; it is a half, or a vie^
from a center line. It shows the width of the body and track. The lamp A is placed
on a stay running up from the loop, supporting the fender, as shown in Fig. 3. These
illustrations will suffice in any case to construct a fender properly for a pony phaeton.
Fig. 5 illustrates the Prince Albert width, three springs and reach, suitable for a
pony phaeton. The front fender is simply an ornamental dash-fender and 6 inches
wide, where it strikes the body ; it gives more protection against the splash, but the
mode of constructing the carriage part prevents the covering of the front wheel : this
has to be turned forward, as in all cases on reach jobs. The back fender is likewise 6
inches wide, but covers the wheel, and is brought off the body the required distance byhaving the two supporting stays made of the proper length, according to the width of
the track. The stay screwed to the prop rises outside the joints 4^ inches, to give
play for the back spring.
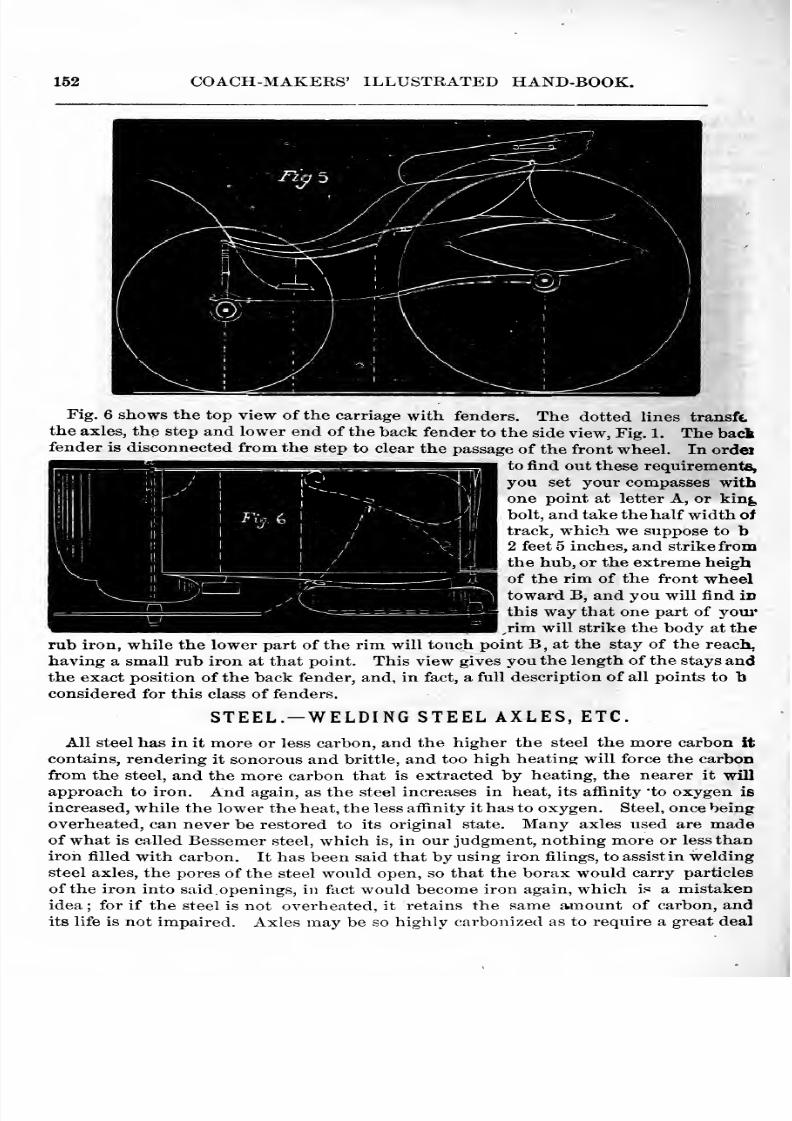
8/10/2019 Making Horse Drawn Coaches 1800 Bw
http://slidepdf.com/reader/full/making-horse-drawn-coaches-1800-bw 208/455
152 COACH-MAKERS' ILLUSTRATED HAND-BOOK.
Fig. 6 shows the top view of the carriage with fenders. The dotted lines transftthe axles, the step and lower end of the back fender to the side view, Fig. 1. The back
fender is disconnected from the step to clear the passage of the front wheel. In ordeito find out these requirements,
you set your compasses withone point at letter A, or king
bolt, and take the half width of
track, which we suppose to b2 feet 5 inches, and strike fromthe hub, or the extreme heighof the rim of the front wheel
toward B, and you will find inthis way that one part of youi'
rim will strike the body at the
rub iron, while the lower part of the rim will touch point B, at the stay of the reach,
having a small rub iron at that point. This view gives you the length of the stays andthe exact position of the back fender, and, in fact, a full description of all points to bconsidered for this class of fenders.
STEEL. -WELDING STEEL AXLES, ETC.
All steel has in it more or less carbon, and the higher the steel the more carbon itcontains, rendering it sonorous and brittle, and too high heating will force the carbon
from the steel, and the more carbon that is extracted by heating, the nearer it will
approach to iron. And again, as the steel increases in heat, its aflinity to oxygen is
increased, while the lower the heat, the less affinity it has to oxygen. Steel, once being
overheated, can never be restored to its original state. Many axles used are madeof what is called Bessemer steel, which is, in our judgment, nothing more or less thaniron filled with carbon. It has been said that by using iron filings, to assist in weldingsteel axles, the pores of the steel would open, so that the borax would carry particles
of the iron into said. openings, in fact would become iron again, which is a mistakenidea ; for if the steel is not overheated, it retains the same amount of carbon, andi ts l ife is not impaired. Axles may be so highly carbonized as to require a great deal
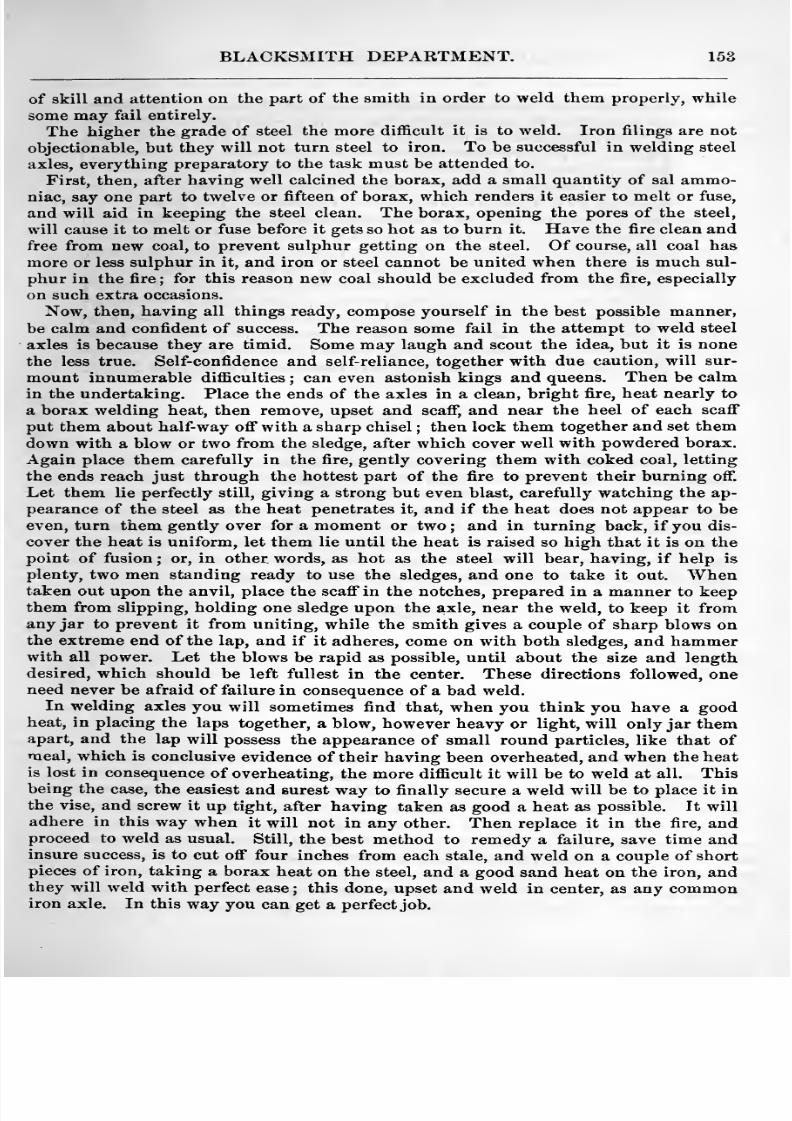
8/10/2019 Making Horse Drawn Coaches 1800 Bw
http://slidepdf.com/reader/full/making-horse-drawn-coaches-1800-bw 209/455
BLACKSMITH DEPARTMENT. 153
of skill and attention on the part of the smith in order to weld them properly, while
some may fail entirely.
The higher the grade of steel the more diflficult it is to weld. Iron filings are not
objectionable, but they will not turn steel to iron. To be successful in welding steel
axles, everything preparatory to the task must be attended to.
First, then, after having well calcined the borax, add a small quantity of sal ammo-niac, say one part to twelve or fifteen of borax, which renders it easier to melt or fuse,
and will aid in keeping the steel clean. The borax, opening the pores of the steel,
will cause it to melt or fuse before it gets so hot as to burn it. Have the fire clean andfree from new coal, to prevent sulphur getting on the steel. Of course, all coal has
more or less sulphur in it, and iron or steel cannot be united when there is much sul-
phur in the fire ; for this reason new coal should be excluded from the fire, especially
on such extra occasions.Now, then, having all things ready, compose yourself in the best possible manner,
be calm and confident of success. The reason some fail in the attempt to weld steel
axles is because they are timid. Some may laugh and scout the idea, but it is none
the less true. Self-confidence and self-reliance, together with due caution, will sur-
mount innumerable difficulties ; can even astonish kings and queens. Then be calmin the undertaking. Place the ends of the axles in a clean, bright fire, heat nearly to
a borax welding heat, then remove, upset and scaflf, and near the heel of each scaff
put them about half-way off with a sharp chisel ; then lock them together and set them
down with a blow or two from the sledge, after which cover well with powdered borax.Again place them carefully in the fire, gently covering them with coked coal, letting
the ends reach just through the hottest part of the fire to prevent their burning off.
Let them lie perfectly still, giving a strong but even blast, carefully watching the ap-
pearance of the steel as the heat penetrates it, and if the heat does not appear to beeven, turn them gently over for a moment or two ; and in turning back, if you dis-
cover the heat is uniform, let them lie until the heat is raised so high that it is on the
point of fusion ; or, in other words, as hot as the steel will bear, having, if help is
plenty, two men standing ready to use the sledges, and one to take it out. Whentaken out upon the anvil, place the scaff in the notches, prepared in a
mannerto keep
them from slipping, holding one sledge upon the axle, near the weld, to keep it fromany jar to prevent it from uniting, while the smith gives a couple of sharp blows onthe extreme end of the lap, and if it adheres, come on with both sledges, and hammerwith all power. Let the blows be rapid as possible, until about the size and lengthdesired, which should be left fullest in the center. These directions followed, oneneed never be afraid of failure in consequence of a bad weld.
In welding axles you will sometimes find that, when you think you have a goodheat, in placing the laps together, a blow, however heavy or light, will only jar themapart, and the lap will possess the appearance of small round particles, like that of
meal, which is conclusive evidence of their having been overheated, and when the heatis lost in consequence of overheating, the more difficult it will be to weld at all. Thisbeing the case, the easiest and surest way to finally secure a weld will be to place it in
the vise, and screw it up tight, after having taken as good a heat as possible. It will
adhere in this way when it will not in any other. Then replace it in the fire, andproceed to weld as usual. Still, the best method to remedy a failure, save time andinsure success, is to cut off four inches from each stale, and weld on a couple of shortpieces of iron, taking a borax heat on the steel, and a good sand heat on the iron, andthey will weld with perfect ease; this done, upset and weld in center, as any commoniron axle. In this way you can get a perfect job.

8/10/2019 Making Horse Drawn Coaches 1800 Bw
http://slidepdf.com/reader/full/making-horse-drawn-coaches-1800-bw 210/455
154 COACH-MAKERS' ILLUSTRATED HAND-BOOK.
There has been more trouble among smiths to get good welds, in consequence ofusing borax too freely, than in any other way. It is very necessary, when weldingsteel axles, to be cautious, and not use borax so as to allow it to drip in the fire, for
the borax and the dirt will immediately settle upon the tweer iron, and form a crust
over the mouth, and shut off a portion of the blast, which will often render it abso-
lutely impossible to make a good weld. Borax possesses the property of iron, andwhen it has thus settled upon the tweer iron, it resembles that of iron. We haveheard smiths attribute their bad luck in welding steel axles to there being melted iron
covering up the mouth of the tweer iron, when it was nothing but melted borax anddirt, and rather difficult to remove. To get rid of it, all the coal and dirt must beremoved from the fire, for the reason, live coals will retain the borax, and just the
idea of removing the dirt and cinders from the fire will not remove all the difficulty ;
and, to a certain extent, it will be only a repetition of the former. To sum up the
whole thing in reference to steel axles, they are not worth one straw when iron can behad ; they are not reliable, neither durable, and never ought to be used. One break-
down may cost the manufacturer two or three Imndred dollars, and the buyer muchtrouble. Steel cannot be case hardened, for the reason that it will break, while iron
can be case hardened, and be made more durable.
SETTING AXLES.
The wheels should be boxed and ready before the axles are welded up. If a plat-
form job, get the length of the axle. Say you wish to track your axles to suit the city
railroad, 5 feet 2J inches, which is the given or starting point ; then take the dish of
your wheels, by laying a straight edge on the face of the felloe, and measure from the
straight edge to the back end of hub, which we will say is 5 inches in each wheel ; 10
inches is then to be taken from the 5 feet 2} inches, which gives you the length of
your wheels standing plumb; add half your swing, 2 inches (if your wheels are high
if low you will not want so much swing), you will then have the length properly.
Your wheels should first be hooped to insure the proper length.
EXAMPLE.
Inches.
Width of track, 5 feet 2J inches 62JDish of wheels deducted 1©—52i
Swing, 4 inches, add 2 inches 2
54^
Reduced to feet, makes 4 feet 6^ inches.
The annexed cut represents the gauge or axle set. A and B represents the side we
use to give the pitch or set in the axle. This gauge should be set so as to give the arm
I pitch ; that is, on seven inches ; or in other words, if the arm is 7 inches long it must be
dropped | of an inch. It makes no difference if the arm is five, six or eight inches
long, the proportion of f of an inch will answer for all. As you have them set by this
gauge while warm slip the wheels on the axle, keeping the wheels snug to the should-
ers; roll the axle bottom side up; that will throw the track on the upper side or top
of the wheels; then measure to see how near right you have the track. If you find
the track half an inch or more too wide, measure with a small rod of iron, say fromthe off shoulder of the axle to the top edge of the tire on the near wheel ; then revfr -^e
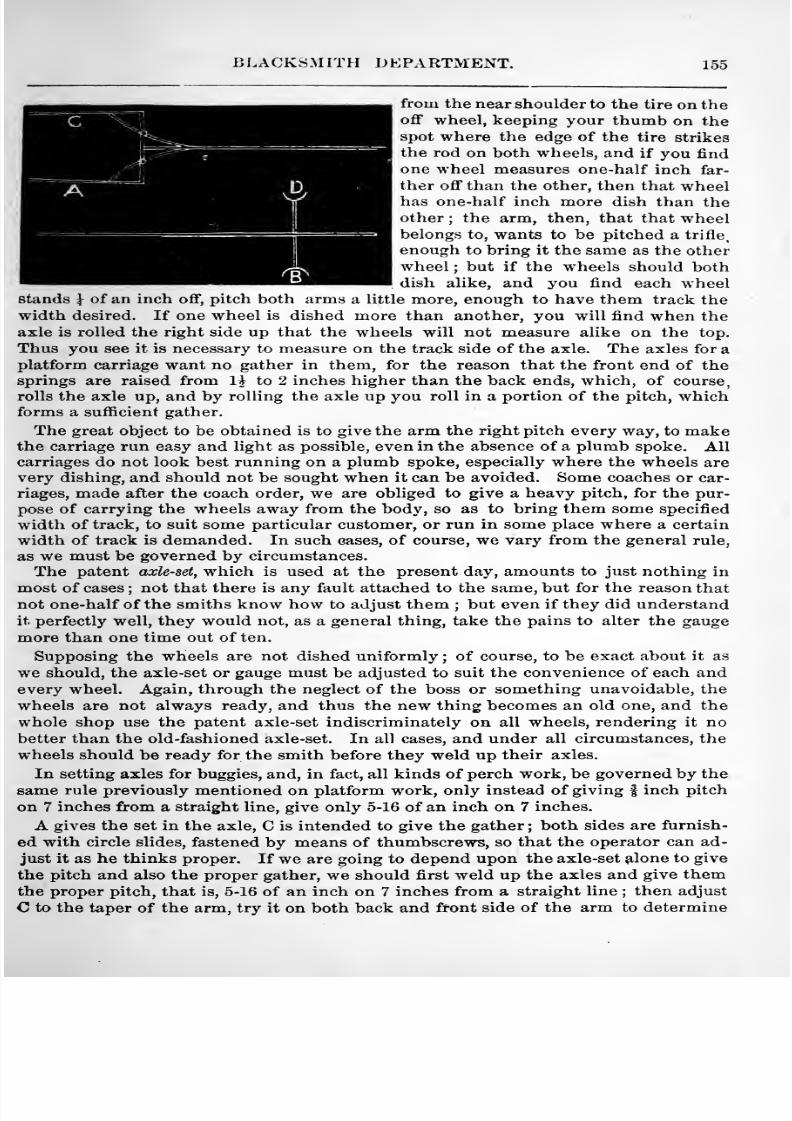
8/10/2019 Making Horse Drawn Coaches 1800 Bw
http://slidepdf.com/reader/full/making-horse-drawn-coaches-1800-bw 211/455
BLACKSMITH DEPARTMENT. 155
from the near shoulder to the tire on theoff wheel, keeping your thumb on thespot where the edge of the tire strikes
the rod on both wheels, and if you find
one wheel measures one-half inch far-
ther off than the other, then that wheelhas one-half inch more dish than theother ; the arm, then, that that wheelbelongs to, wants to be pitched a trifle,
enough to bring it the same as the other
wheel ; but if the wheels should bothdish alike, and you find each wheel
stands \ of an inch off, pitch both arms a little more, enough to have them track thewidth desired. If one wheel is dished more than another, you will find when the
axle is rolled the right side up that the wheels will not measure alike on the top.
Thus you see it is necessary to measure on the track side of the axle. The axles for a
platform carriage want no gather in them, for the reason that the front end of thesprings are raised from 1^ to 2 inches higher than the back ends, which, of course,
rolls the axle up, and by rolling the axle up you roll in a portion of the pitch, whichforms a sufficient gather.
The great object to be obtained is to give the arm the right pitch every way, to make
the carriage run easy and light as possible, even in the absence of a plumb spoke. Allcarriages do not look best running on a plumb spoke, especially where the wheels are
very dishing, and should not be sought when it can be avoided. Some coaches or car-
riages, made after the coach order, we are obliged to give a heavy pitch, for the pur-
pose of carrying the wheels away from the body, so as to bring them some specified
width of track, to suit some particular customer, or run in some place where a certain
width of track is demanded. In such cases, of course, we vary from the general rule,
as we must be governed by circumstances.
The patent axle-set, which is used at the present day, amounts to just nothing in
most of cases ; not that there is any fault attached to the same, but for the reason that
not one-half of the smiths know how to adjust them ; but even if they did understandit perfectly well, they would not, as a general thing, take the pains to alter the gauge
more than one time out of ten.
Supposing the wheels are not dished uniformly ; of course, to be exact about it as
we should, the axle-set or gauge must be adjusted to suit the convenience of each andevery wheel. Again, through the neglect of the boss or something unavoidable, the
wheels are not always ready, and thus the new thing becomes an old one, and the
whole shop use the patent axle-set indiscriminately on all wheels, rendering it nobetter than the old-fashioned axle-set. In all eases, and under all circumstances, the
wheels should be ready for the smith before they weld up their axles.
In setting axles for buggies, and, in fact, all kinds of perch work, be governed by the
same rule previously mentioned on platform work, only instead of giving | inch pitch
on 7 inches from a straight line, give only 5-16 of an inch on 7 inches.
A gives the set in the axle, C is intended to give the gather ; both sides are furnish-
ed with circle slides, fastened by means of thumbscrews, so that the operator can ad-
just it as he thinks proper. If we are going to depend upon the axle-set {ilone to give
the pitch and also the proper gather, we should first weld up the axles and give themthe proper pitch, that is, 5-16 of
aninch
on7 inches from a straight line ; then adjust
C to the taper of the arm, try it on both back and front side of the arm to determine
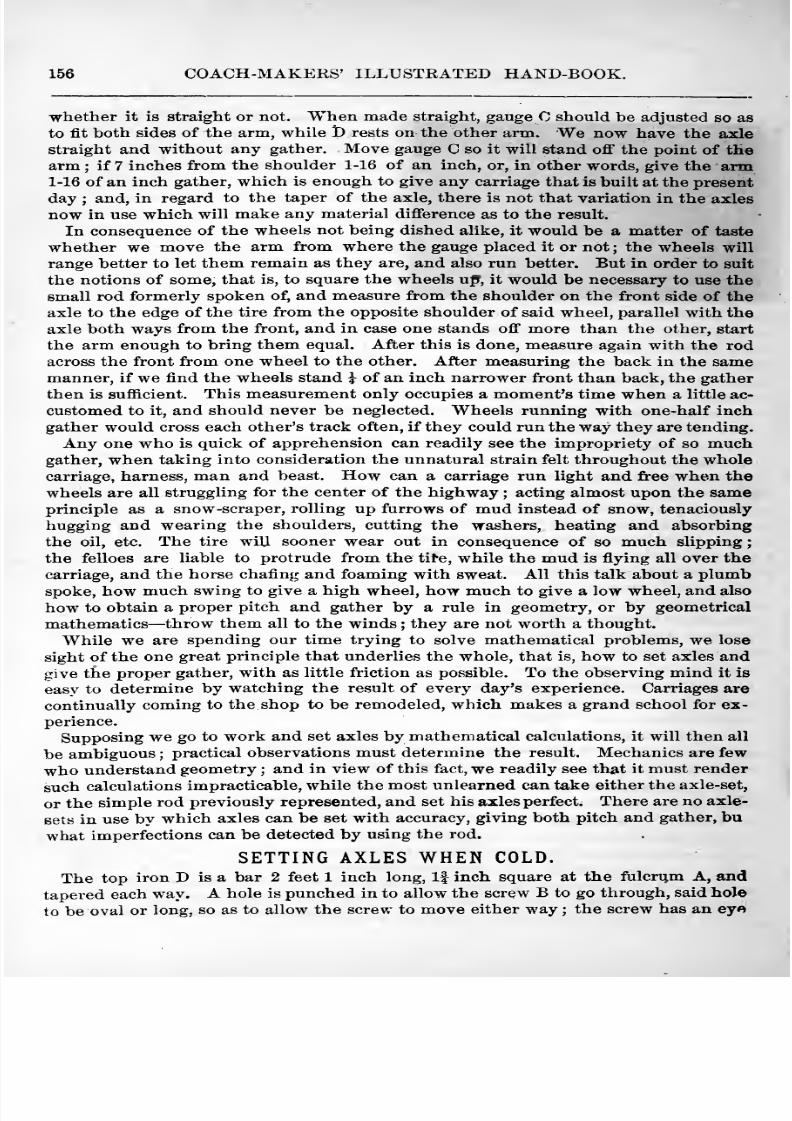
8/10/2019 Making Horse Drawn Coaches 1800 Bw
http://slidepdf.com/reader/full/making-horse-drawn-coaches-1800-bw 212/455
156 COACH-MAKERS' ILLUSTRATED HAND-BOOK.
whether it is straight or not. When made straight, gauge C should be adjusted so as
to fit both sides of the arm, while JD rests on the other arm. We now have the axle
straight and without any gather. Move gauge C so it will stand off the point of thearm ; if 7 inches from the shoulder 1-16 of an inch, or, in other words, give the arm1-16 of an inch gather, which is enough to give any carriage that is built at the present
day ; and, in regard to the taper of the axle, there is not that variation in the axles
now in use which will make any material difference as to the result.
In consequence of the wheels not being dished alike, it would be a matter of taste
whether we move the arm from where the gauge placed it or not ; the wheels will
range better to let them remain as they are, and also run better. But in order to suit
the notions of some, that is, to square the wheels up, it would be necessary to use the
small rod formerly spoken of, and measure from the shoulder on the front side of theaxle to the edge of the tire from the opposite shoulder of said wheel, parallel with the
axle both ways from the front, and in case one stands off more than the other, start
the arm enough to bring them equal. After this is done, measure again with the rod
across the front from one wheel to the other. After measuring the back in the samemanner, if we find the wheels stand i of an inch narrower front than back, the gather
then is sufficient. This measurement only occupies a moment's time when a little ac-
customed to it, and should never be neglected. Wheels running with one-half inch
gather would cross each other's track often, if they could run the way they are tending.
Any one who is quick of apprehension can readily see the impropriety of so muchgather, when taking into consideration the unnatural strain felt throughout the wholecarriage, harness, man and beast. How can a carriage run light and free when the
wheels are all struggling for the center of the highway ; acting almost upon the sameprinciple as a snow -scraper, rolling up furrows of mud instead of snow, tenaciously
hugging and wearing the shoulders, cutting the washers, heating and absorbing
the oil, etc. The tire wiU sooner wear out in consequence of so much slipping
the felloes are liable to protrude from the tite, while the mud is flying all over the
carriage, and the horse chafing and foaming with sweat. All this talk about a plumbspoke, how much swing to give a high wheel, how much to give a low wheel, and also
how to obtain a proper pitch and gather by a rule in geometry, or by geometrical
mathematics —throw them all to the winds ; they are not worth a thought.
While we are spending our time trying to solve mathematical problems, we lose
sight of the one great principle that underlies the whole, that is, how to set axles andgive the proper gather, with as little friction as possible. To the observing mind it is
easy to determine by watching the result of every day's experience. Carriages are
continually coming to the shop to be remodeled, which makes a grand school for ex-
perience.
Supposing we go to work and set axles by mathematical calculations, it will then all
be ambiguous ;practical observations must determine the result. Mechanics are few
who understand geometry ; and in view of this fact, we readily see that it must render
such calculations impracticable, while the most unlearned can take either the axle-set,
or the simple rod previously represented, and set his axles perfect. There are no axle-
sets in use by which axles can be set with accuracy, giving both pitch and gather, bu
what imperfections can be detected by using the rod.
SETTING AXLES WHEN COLD.
The top iron D is a bar 2 feet 1 inch long. If inch square at the fulcriim A, and
tapered each way. A hole is punched in to allow the screw B to go through, said holeto be oval or long, so as to allow the screw to move either way ; the screw has an eye
8/10/2019 Making Horse Drawn Coaches 1800 Bw
http://slidepdf.com/reader/full/making-horse-drawn-coaches-1800-bw 213/455
BLACKSMITH DEPARTMENT. 157
large enough to go on the axle arm ; slip it
on to about the center of arm, then place
the clevis C on the back end of the bar, or
lever D; place the fulcrum A either on topof the clip at the shoulder, or underneath,
as you may want to set the axle in or out
When you place the fulcrum on top, place
a strip of harness leather on the axle bedand on top of that an iron, say six inches
long, hollow to fit the shape of the axle bedon that set the fulcrum, and you havepower enough with the screw to draw the
arm where you want it. When you wantto reverse it, put the leather and hollow iron under the clevis. With this machineyou can either put in, gather, or take it out the same way.
CARRIAGE SPRINGS.
We know of no rule whereby one can be governed in making springs sufficient to
carry any certain load or number of pounds. Neither do we believe there is or can beany such rule, although we do not profess to be better versed in the mechanical line
than thousands of others. But if there is any such rule in existence, or even could be,
it might be changed into something near as many shapes and forms as the letters ofthe English alphabet. For instance, we want a set of springs for a market wagon,where the load will be mostly over the back spring. The back spring must, of course
be the heaviest. The question is, how much ? This we determine by an actual test.
If we find the spring or springs too limber, we change them for heavier ones, and in
the country add new leaves until they are stiff enough for the use to which they are
intended. The test in country places is often made by putting them into actual service,
and if we find they meet the required demands we make a record of it, recording
length of spring, width of steel, the proportion of said springs from ears up, on bothforward and back springs, also the thickness and quality of steel. There is a quality
of steel that will not stand up under a load into one-third as much as a first-rate
quality ; and even if we had no more to contend with than the mere quality of steel,
it would be almost impossible to be governed by any rule that would be reliable. Ex-perience and good judgment, together with the record above mentioned, will make us
successful manufacturers, as far as the springs are concerned, which is one of the mostessential points in the construction of a wagon or a nice carriage. All carriage manu-facturers gain their knowledge of what is requisite in a set of springs, to be used in
the particular class of work they are in the habit of building, from the lightest to the
heaviest work. The buggy, phaeton, rockaway, landaalet, landau and clarence, after
they are hung up, and while in the smith's shop, are tested by loading them downwith from two to five and eight men, and then springing them up and down, at first
carefully, while the foreman or superintendent watches the result, and if everything
appears right, increase the force of the test ; if so far satisfactory, cramp the forward
wheels under the body and spring as before, to see if the body will spring clear of the
wheels ; but if we find by this test that the springs are too limber, we remove themand put under stiffer ones. Perhaps the springs will differ only in length, say one or
two inches shorter, as the case may be, or it may be in the proportion of said springs,
each leaf running down a trifle lower on its own bed, which will render the springs
stiffer, or the failure may be in the tempering or quality of steel, and by putting under
8/10/2019 Making Horse Drawn Coaches 1800 Bw
http://slidepdf.com/reader/full/making-horse-drawn-coaches-1800-bw 214/455
158 COACH-MAKERS' ILLUSTRATED HAND-BOOK.
another set of the same dimensions, but of first-rate quality, would obviate thewrong.
If all these things were taken into consideration, and the results recorded, it wouldafford practical experience, such as every mechanic, as well as manufacturer of car-
riages, should give heed to and lay up —a knowledge which at some future day maybe of use to them. But supposing the above-mentioned springs, after changing, provedto be all right, and while riding them down again we found that there appearedanother difficulty, such as the rolling of the hind axle, what would be the cause ofsuch motion ?
The carriages are not few that are turned out yearly with this difficulty, and notice
when we will, if we see such a carriage, the C springs are limber, perhaps made toolight. The springs should be made in this proportion : if the back springs shouldmeasure three feet in length, that is, from ear to ear, with five leaves, one inch and ahalf wide, No. 2 steel ; that is, a very plump quarter of an inch thick, the C spring
should be made of one inch and three-quarters steel, No. 2, with six leaves, and there
will be no danger of rocking. The axle will never rock or roll under a stiff C spring
no matter if too stiff, it will not roll, but will always roll with a C spring too light.
Yet the carriage manufacturers learn by actual tests, and order their springs, giving
the dimensions and proportions.
And now, as we know of no rule to be governed by in making springs, although there
.nay be, we will just mention what we think would be adequate to hold up 1,500 lbs.;
built with three springs ; such a set of springs ought to weigh some 80 lbs., the front
spring be made of five leaves, and 38 inches long, the two back springs 36 inches long,
four leaves on each spring, all made of If No. 2 steel, and of the first-rate quality. It
will not answer to bolt on the springs ; they should be clipped on.
CEOSS SPRINGS.
Upon the length of the cross spring, and the amount of weight which it will have to
sustain, depends in a great measure the number of plates which it should contain.
If your side springs contain four plates, and your cross spring be not more thanthirty-six inches long, four plates would be sufficient for all ordinary purposes. If
you increase the length of your spring, it becomes absolutely necessary to increase the
number of plates, or the width of the steel entering into its construction. We woulduse —if the cross spring were thirty-eight inches long, and there were four plates in theside spring— a cross spring with five plates.
The foregoing would apply to carriages of the heavier grades. For a pony phaeton,
victorias, or a light platform buggy —or in cases where the amount of direct weight is
not great —with side springs with four plates, and the cross spring thirty -six inches or
less in length, we would have but three plates in the cross spring.
The cross spring ought to be set high enough, so that when the full weight is upon
it, it is above the horizontal. Three and one-half inches, or four inches for a thirty-six inch spring, increasing the height as the spring increases in length.
TEMPERING SPRINGS.
A knowledge of the art of tempering springs is of some importance to the mechanic.
There is, perhaps, no kind of tempering that requires so much care in manipulation
as getting a good spring temper. It is necessary that the spring be carefully forged
not over-heated, and not hammered too cold. The one is as detrimental as the other.
To insure a spring that will not warp in tempering, it is requisite also that both sides
of the forging be equally wrought upon with the hammer ; if not by the compression
of the metal on one side more than another, it will be sure to warp and twist. Wewill suppose that the article has been carefully forged, finished up, and is ready for
8/10/2019 Making Horse Drawn Coaches 1800 Bw
http://slidepdf.com/reader/full/making-horse-drawn-coaches-1800-bw 215/455
BLACKSMITH DEPARTMENT. 159
tempering. Clean out the forge, and make a brisk fire with good clean charcoal ; or,
if bituminous coal must be used, see that it is well burned to a coke, in order to free it
from the sulphur that it contains, as sulphur will destroy the life of the metal ; then
carefully insert the steel in the fire, and slowly heat it evenly throughout its entirelength. Give it time to heat through its thickness, and when the color shows a light
red, plunge it evenly into lukewarm water, or water from which the cold chill has
been taken ofi*, so as not to chill the surface of the metal too quick before the inside
can also harden, and let it lie in the water until it is of the same temperature as the
water. A much better substitute for water is a good quality of animal oil —whale oil or
lard oil is best ; as a substitute, we have used lard, by melting it before we inserted the
heated steel in it. The advantage of using oil is, that it does not chill the steel so sud-
denly as water, and there is less liability to crack it. Remove the hardened spring fromthe water after it is sufficiently cooled, and prepare to temper it. To do this make a
brisk fire with plenty of live coals, and then smear the hardened spring with tallow andhold it over the coals, but do not urge the draught of the fire with the bellows while so
doing ; let the fire heat the steel very gradually and evenly ; if the spring is long moveit slowly over the fire so as to receive the heat equally. In a few moments the tallow
will melt ; then take fire and blai:e for some time ; while the blaze continues, incline
the spring, or carefully elevate either end, so that the blaze will freely circulate fromend to end, and completely envelop it. The blaze will soon die out ; then smear it again
with tallow, and blaze it ofi as before. If the spring is to be subjected to a great strain,
or it will be required to perform much labor, it maybe lightly blazed ofl'a third time •
and if it is to be exposed to the vicissitudes of heat and cold, it must be left to cool off
itself upon a corner of the forge, and not cooled by putting it in water or throwing it
on the ground.
TEMPERING SPIRAL SPRINGS.
Spiral springs of steel wire are tempered by heating them in a close vessel withanimal charcoal, or with bone-dust packed around them, similar to the process of case-
hardening ; and when thoroughly heated, cool them in a bath of oil, and proceed totemper them by putting a handful of them in a sheet-iron pan, with tallow or oil, andagitate them over a brisk fire. The tallow will soon blaze, and the agitation will cause
them to heat very evenly. The steel springs for fire-arms are tempered in this man-ner, and may be said to be literally fried in oil. If a long slender spring is neededthat requires a low temper, it can be made by simply beating the soft forging on asmooth anvil with a smooth-faced hammer. By this means the metal will be suffi-
ciently compressed to form a very good spring without further tempering. Use a lighthammer in the process and many blows, and a spring will be made that will last fora long time, where it has to bear no great portion of labor in its action.
SETTING AND TEMPERING OLD SPRINGS.
In setting up old springswhere they are inclined to settle, first take the bed leaf andbring it into shape ; then heat it about two feet in the center, plump to a cherry red
then cool it off in cold water, as quick as possible. This will give the steel such a de-gree of iiardness as to be liable to break, if let fall on the floor. To draw the temper,hold it oyer the blaze, carrying back and forward through the fire, until it becomes sahot that it will sparkle when the hammer handle is drawn across the edge ; then cooloff, or not, just as you please.
Another mode is to harden the steel, as before stated, and draw the temper with oilor tallow
;tallow is the best. Say, take a candle, carry the spring as before through
the fire, and occasionally draw the tallow the length hardened, until the tallow will
bum off in a blaze, then cool. Every leaf is served alike.
8/10/2019 Making Horse Drawn Coaches 1800 Bw
http://slidepdf.com/reader/full/making-horse-drawn-coaches-1800-bw 216/455
160 COACH-MAKERS' ILLUSTRATED HAND-BOOK.
HOOPING WHEELS.What we call straight wheels are those which, by laying a straight edge across the
face of the wheel, having both the felloes and spokes touch the straight edge.
First, then, we will examine them, and see what condition they are in for the tire, so
that we can determine what draft to give them. See if the felloes are down snug onthe shoulder of the spokes, and how much open there is in the rim. For instance, oneset we will suppose to be IJ inch felloe, open 3-16 inch, give good iinch draft, If inchfelloe, 3-16 inch open, just i inch draft ; 11 inch felloe, 3-16 inch open, 3-16 inch draft
1^ and 1 inch felloe, i inch open, ^ inch draft.
Now, in determining what draft to give the above wheels, we supposed them to be all
good, sound, hard hickory felloes. If the felloes are rather soft timber, give just a mere
trifle more draft. If the wheels should be above ^ inch dish, the felloes would wantonly one-half of the opening, but give the same draft as the above. In running thetire, lay all the above tire in sets on the floor, roll the wheels on them, and allow 1
inch for taking up in bending ; then mark the end of hub with chalk, 1, 2, 3, 4,»etc.,
and the tire with a sharp cold chisel, mark thus, I, II, III, IV, and so on ; thenstraighten on a block set up endwise, about 2 feet high, little concave or lowest in
center of block ; letting the helper strike while the smith manages the tires, until thekinks are all taken out of them ; bend one end a little, so that it can be got in themachine, and take pains to get them round as possible.
In running the wheels with the traveler, a wedge must be driven in one of the
joints of the felloe, for the purpose of tightening the other joint or joints in the rim;then get the length of the felloe, and in running the tire, cut it ^ inch shorter than the
rim measures. In this explanation we are supposed to have steel tire, and we have akind of steel tire now that is very high, and difficult to weld, and there are manysmiths that will profit by this lesson, if they will use the precaution we give. Thistire steel will not stand as heavy heat as even cast-steel, and if it is overheated in the
least, it will crack or break in two while hot.
There is one peculiar fact connected with it we find in no other kind of steel, andthat is this : It is apt to slip, however good the heat, and to obviate this, after scaffing
the ends down to a sharp edge, make a rather short lap, and while hot, take a sharp-
pointed punch, and punch a hole nearly through both laps, and drive in a sharp pin,
made of 3-16 inch steel wire, J inch. long. This will not show on the outside of the
tire when on the wheel ; neither does it weaken the tire like a rivet. We have often
seen tires broken where the rivet went through.
In welding, first have your fire perfectly clean, your coal pretty well charred, andthe fire hot but rather small, for the smaller the fire, if hot, the less it will waste yourtire each side of the weld; have the borax charred
; put a little on the weld while hotpull the fire open carefully with the poker, and place the lap in the hottest part ; roll a
few pieces of coked coal on the weld ; blow steadily, carrying your tire back and forward
through the fire, or stop the blast a moment, until the lap is heated alike all through ;
take it out and weld with hammer and sledge. With this precaution you will neverfail getting a good welding heat, and need not upset your tire before welding. If thetire is upset before welding, it makes the lap so much thicker, that before it can bebe heated through alike there is liability to overheat, and waste away the tire eachside of the weld.
Some practice the rule of cutting ofif the tire the proper length, upsetting, scaffing,
and punching the hole for the rivet before bending, getting the length by three timesthe thickness of the tire, etc. ; but this rule is not reliable for three reasons: First, in
the thickness it makes the lap. Second, the exact measurement we have to be subjected
to in determining the length of tire, in consequence of the opening in the felloe, etc.
Third, a limber or soft tire will take up more in bending than a stiff or hard tire ; and
8/10/2019 Making Horse Drawn Coaches 1800 Bw
http://slidepdf.com/reader/full/making-horse-drawn-coaches-1800-bw 217/455
BLACKSMITH DEPARTMENT. 161
the consequence is some of the laps or welds will have to be left thick and bungling,
while others will have to be drawn thinner than the rest of the tire to make themreach the desired length.
In laying the tires down, the heaviest should be laid at the bottom, and leveled withbrick, so that the tire will rest permanently on every brick or bearing, and the rest laid
on top the way they will fit the best, to prevent warping the tire in the fire. A level
stone should be used to lay the wheel on when the tire is put on. If the tires don't get
warped in the fire, don't hammer them at all, without there are some kinks left in the
tires in fitting them ; avoid hammering, if possible, for it marks the tire ; cool off grad-
ually, pouring the water on out of the spout of a tea-kettle, until it shrinks enough so it
can be taken up ; then roll it in soap water to prevent it from hardening, until it is so
cool it will not burn the felloes, truing up while the helper is rolling it in the water,
with a mallet covered with thick leather, at both ends ; let the third person take thewh^el and finish truing the tire with a leather-covered mallet as above ; while it is so
hot that you can't bear your hand on it, the felloes move easily then under the tire,
and should not be moved after they get cooled off, if it can be otherwise avoided ; for
this reason, when the tire gets cold, all its roughness and imperfections become imbed-ded in the felloe.
The tire once moved will move the easier next time. After the tires are all on, ex-
amine the wheels, and see if there are any crooked spots in the tire that do not set
down to the rim ; should there be any, heat a short piece of iron, and lay on the tire ;
it will soon heat it, so as to burn the felloe, but take it off before that time, and rap it
down with a hammer. It is a bad practice to heat the tires on a forge as some do, for,
in truing them in fitting, we have to bend them cold, and if heated on the forge, andone place red hot, you will often find there a short crook edge-wise. If some of the
wheels are dished more than others, put them on the off-side of the carriage. Nevertake a tire off, if it can be avoided, without it is so loose or tight; as to spoil the wheelwhen run.
MATERIAL.
The quality of wrought-iron can hardly be ascertained on its surface. The best wayto judge the texture is to have it cut apart ; when cold, brittle iron will break after a
few blows, and show a coarse grained, short cut ; while a superior quality of iron
bends, resists separation, and shows a fibrous cut, having either a light color, with adull luster, or a dark color with a bright luster. Inferior iron will appear either bright
and glistening, or dull and grayish at the cutting.
Iron heated bright red will also show breaks or flaws when bent, punched or upset.
Steel is considerably harder than iron, but can be filed or drilled. If cooled off in
water when red hot, it attains the hardness of glass, and is tempered by heating thepolished surface to a bright yellow, and cooled in water, and has then the right tem-per for cold chisels, hammers, swages, etc. Steel for springs must have a degree of
hardness between that just described and wrought-iron. The manner by whicharticles of wrought-iron become a steel-like surface, consists in heating the iron in afire-proof box, filled with pulverized charcoal and wood ashes, creating carbon, whichunites the more readily with the iron the longer it is exposed to the heat. Steel
manufactured on this plan appears inferior after this first issue, and is refined by weld-ing and hammering out, and by repeating the same process of heating as before, gives
the refined steel. Steel moltened in an air-tight vessel, consolidating breaks or un-
sound spots, and being thoroughly saturated with carbon, makes the cast-steel.
11
8/10/2019 Making Horse Drawn Coaches 1800 Bw
http://slidepdf.com/reader/full/making-horse-drawn-coaches-1800-bw 218/455
162 COACH-MAKERS' ILLUSTRATED HAND-BOOK.
AXLE CENTERS.WHAT IRON TO USE IN THEM.
The center of an axle of the lighter class of vehicle —more commonly known as a buggy —is a subject that will not bear much tampering with. If too rigid it is afailure ; if too elastic or weak, it is also a failure ; therefore it becomes necessary that weshould employ an agent that is elastic, tenacious, and, ^^'itha^, flexible —the latter in
order that in cases of collision, etc., the axle may bend rather than break. Werewe to construct a thousand vehicles every year, we should never employ any other
agent for axle centers than Low Moor iron. This comprises all the qualities re-
quired, and is far superior to steel in every sense, and if given a fair trial will provesatisfactory to those trying it.
TEMPERING DRILLS.If the drill is a small one, hold it in a jet of gas till a cherry-red heat appears ; then
dip the point, or as far up as you wish it tempered, into water or oil immediately.
Then try if a smooth file will bite or file it ; if it does, it must be done over again, butif it does not bite, but slips over the face without making any impression on it, it will
do. Next clean the point or side of the face carefully on an oil-stone ; then twist a
piece of wire round the end of the drill, or hold the end of the drill in pillars in a candleor gas light till you see it (on the clean piece of the face) gradually turn from a light
to a dark straw color ; withdraw from the heat and allow it to cool gradually. If it
goes past the dark straw color to a blue, it will be rather soft, and must be dipped in
water or oil at once, or else the process gone over again. The above dark straw color
will bore brass beautifully. If it is to bore steel or iron, have it just as hard as
when it comes out of the water or oil in the first process, but care needs to be takenwith it if very small in that condition, as it is very brittle
TEMPERING THIN TOOLS.
To prevent thin steel tools from warping requires no small amount of skill and
practice on the part of the smiths who may attempt to give them the proper temper.The tempering of thin blades in a satisfactory manner being so delicate an operation,
even with the edge-tool maker, it is not surprising that so many carriage-smiths, with
but limited experience in the art, are unable to give the required temper, so as to pre-
vent warping. Our manner of tempering such tools is to coat the blade with chalk.
After heating, cool it in linseed oil. Next take a block of hot iron, and by applying
the tool to the iron draw out the temper of the blade, until it attains a heat known as bird's-eye blue. Cool it off again in the oil, and the process is completed. Thereis a solution for tempering thin steel tools, but not having had occasion to use it, we
cannotspeak from our
ownexperience as to its merits.
ROCKER PLATES. Bessemer steel is the best material for rocker plates for any carriage, and more
especially for such as Landaus, where the points of bearing are so wide apart, and hungupon the platform gearings or carriage. The size used being generally 4 inches by |,
although in some bodies 3^ by | inch would do as well as 4 inches by | would in
others. It depends greatly upon the style of body in one case, and the construction
of the rockers in another. Some body-makers, either from a want of knowledge or
care, make the splices too near the door, so that all the strain is on the plates, instead
of the rocker bearing its fair share of the work.Then, again, it is an easy matter to have a good pair of plates spoiled in the drilling.
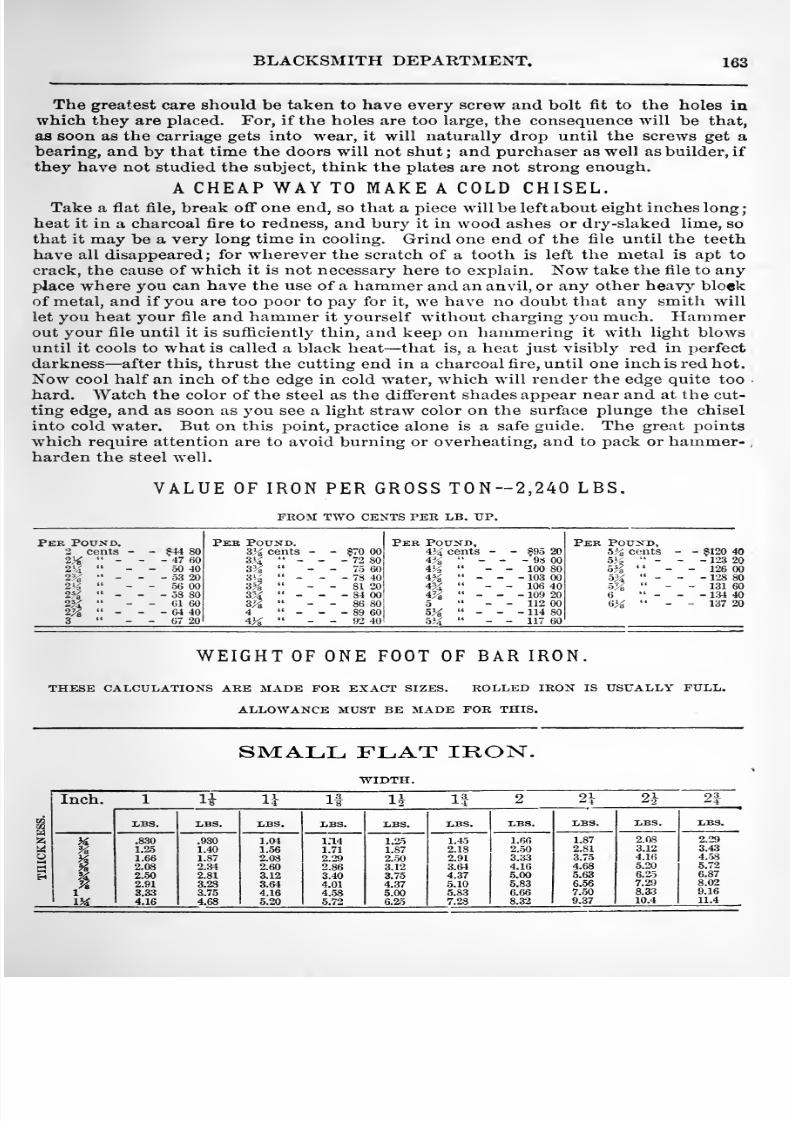
8/10/2019 Making Horse Drawn Coaches 1800 Bw
http://slidepdf.com/reader/full/making-horse-drawn-coaches-1800-bw 219/455
BLACKSMITH DEPARTMENT. 163
The greatest care should be taken to have every screw and bolt fit to the holes in
which they are placed. For, if the holes are too large, the consequence will be that,
as soon as the carriage gets into wear, it will naturally drop until the screws get abearing, and by that time the doors will not shut; and purchaser as well as builder, if
they have not studied the subject, think the plates are not strong enough.
A CHEAP WAY TO MAKE A COLD CHISEL.Take a flat file, break ofi*one end, so that a piece will be left about eight inches long;
heat it in a charcoal fire to redness, and bury it in wood ashes or dry -slaked lime, so
that it may be a very long time in cooling. Grind one end of the file until the teeth
have all disappeared; for wherever the scratch of a tooth is left the metal is apt to
crack, the cause of which it is not necessary here to explain. Now take the file to anyplace where you can have the use of a hammer and an anvil, or any other heavy bloek
of metal, and if you are too poor to pay for it, we have no doubt that any smith will
let you heat your file and hammer it yourself without charging you much. Hammerout your file until it is sufficiently thin, and keep on hammering it with light blowsuntil it cools to what is called a black heat —that is, a heat just visibly red in perfect
darkness —after this, thrust the cutting end in a charcoal fire, until one inch is red hot.
Now cool half an inch of the edge in cold water, which will render the edge quite too
hard. Watch the color of the steel as the diff'erent shades appear near and at the cut-
ting edge, and as soon as you see a light straw color on the surface plunge the chisel
into cold water. But on this point, practice alone is a safe guide. The great points
which require attention are to avoid burning or overheating, and to pack or hammer-,
harden the steel well.
VALUE OF IRON PER GROSS TON-2,240 LBS.
FROM TWO CENTS PER LB. UP.
Per Pound. Peb Pound. Peb Pound, Peb Pound,2 cents - - $44 80 Z% cents - - §70 00 4>^ cents - - $95 20 5:J^ cents - -?120 402X - - - 47 60 3>i - - - 72 80 4J^ - - - 98 00 by^ - - -123 202>4^ - - 50 40 ^X - - 75 60 4^ - - 100 80 b% - -126 002J^ - - - 53 20 3I2 - - - 78 40 4% - - -103 00 b% - - -128 801y^ - - 56 00 •i% - - 81 20 4?i - - 106 40 yX - 131 60
2%•'
- - -58 80 35i -- -
- 84 00 4% - - - 109 20 6 -
- -134 4025i - - 61 60 3i| - - 86 80 5 - - 112 00 6>^ - - 137 202^ - - - 64 40 4 - - • - 89 60 5>^ - - - 114 803 - - 67 20 4>^ - - 92 40 534^ - - 117 60
WEIGHT OF ONE FOOT OF BAR IRON.
THESE CALCULATIONS ARE MADE FOR EXACT SIZES. ROLLED IRON IS USUALLY FULL.
ALLOWANCE MUST BE MADE FOR THIS.
SMALL FLAT IRON.WIDTH.
Inch. 1 U U 11 Ij 11 2 2i 2^ 2f
55
I-BS. LBS. LBS. LBS. liBS. LBS. LBS. LBS. LBS. LBS.
M .830 .930 1.04 1.14 1.25 1.4.5 1.66 1.87 2.08 2.29
)^ 1.2.5 1.40 1.56 1.71 1.87 2.18 2..50 2.81 3.12 3.43 • 1.66 1.87 2.08 2.29 2.50 2.91 3.33 3.75 4.16 iM
d % 2.08 2.34 2.60 2.86 3.12 3.64 4.16 4.68 5.20 5.72
^2.50 2.81 3.12 3.40 3.75 4.37 5.00 5.63 6.25 6.87
2.91 3.28 3.64 4.01 4.37 5.10 5.83 6.56 7.29 8.02
1 ' 3.33 3.75 4.16 4.58 5.00 5.83 6.66 7..50 8.a3 9.16
IM 4.16 5.20 5.72 6.2.5 7.28 8.32 9.37 10.4 11.4
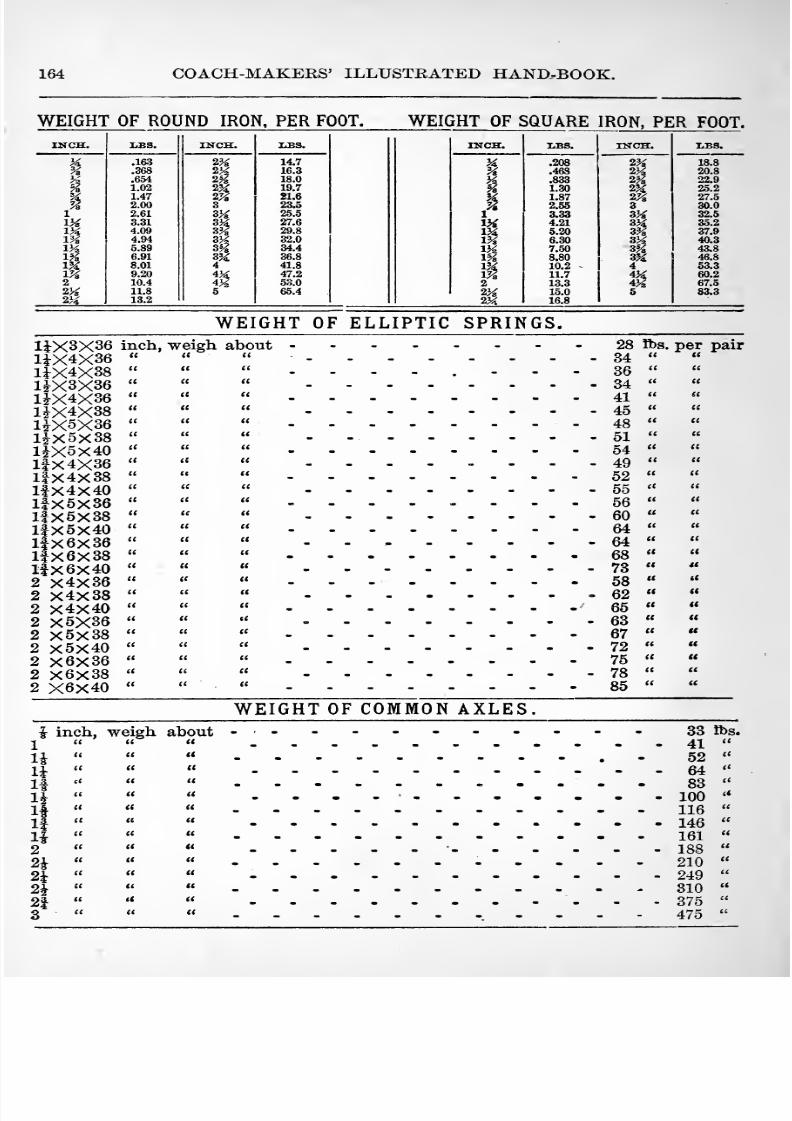
8/10/2019 Making Horse Drawn Coaches 1800 Bw
http://slidepdf.com/reader/full/making-horse-drawn-coaches-1800-bw 220/455
164 COACH-MAKERS' ILLUSTRATED HAND-BOOK.
WEIGHT OF ROUND IRON, PER FOOT. WEIGHT OF SQUARE IRON. PER FOOT.
WEIGHT OF ELLIPTIC SPRINGS.
11X3X36 inch, weigh aboutliX4X36
liX4X38
1^X3X36
UX4X36
1^X4X38
1^X5X36
liX5x38
1^X5X40
11X4X36
11X4X38
11X4X40
11X5X36
11X5X38
11X5X40
lfX6x36
lfX6x38
lfX6x40
2 X4X36
2 X4X38
2 X4X40
2 X5X36
2 X5X38
2 X5X40
2 X6X36
2 X6X38
2 X6X40
((
<(
((
It
(I
t(
« ((
It tc
It tt
u (t
28 lbs.
34 per pair
36
34
41
It
45
48 1^1
5449525556606464687358
6265636772757885
WEIGHT OF COMMONAXLES.
tt utt it
tt tt
tt tl
i inch, weigh about
2
2i2k2^2|3
It it
It tt
tt It
tt it
tl tl
(( It
33 tt)s.
41((
52 ((
64 «
83 «
100 ((
116 ((
146 it
161 tt
188 Cl
210 tl
249 11
310 It
375a
8/10/2019 Making Horse Drawn Coaches 1800 Bw
http://slidepdf.com/reader/full/making-horse-drawn-coaches-1800-bw 221/455
BLACKSMITH DEPARTMENT. 305
WEIGHT OF DIFFERENT FIGURES OF WROUGHT-IRON AND STEEL.Rule I. For Round Iron. —Multiply the square of the diameter in inches, by the
length in feet, and by 2.63, and the product will be the weight in pounds, avoirdupois,nearly.
Rule 2. For Square Iron. —Multiply the area of the end of the bar in inches, by the
length in feet, and by 3.36 ; the product will be the weight in pounds, avoirdupois,
nearly.
Rule 3. For Square, Angled, T. Convex or any figure of Beam Iron. —Ascertain the
area of the end of each figure of the bar in inches ; then multiply the area by the length
in feet, and that product by 10, and divide by 3 ; the remainder will be the weight in
pounds, avoirdupois, nearly.
Rule. 4. For SquareCast-steel.
—Multiply the area of the end of the bar in inchesby the length in feet, and that product by 3.4 ; the product will be the weight in pounds,avoirdupois, nearly.
Rule 5. For Round Cast-steel. —Multiply the square of the diameter in inches, bythe length in feet, and that product by 2.67 ; the product will give the weight in pounds,avoirdupois, nearly.
8/10/2019 Making Horse Drawn Coaches 1800 Bw
http://slidepdf.com/reader/full/making-horse-drawn-coaches-1800-bw 222/455
166 COACH-MAKEKS' ILLUSTRATED HAND-BOOK.
PART IIL-PAINTING DEPARTMENT,
THE PRINCIPLES OF COLORING IN PAINTINGii COLORS are distinguished by artists as pure, broken, reduced, gray or dull, etc.
The pure colors comprehend those which are called simple, or primary —red,
yellow and blue ; and those which are formed from their mixture in pairs (binary
compounds) which are termed secondaries, viz.: orange, violet, green, and their hues.
The broken colors are formed by the mixture of black with the pure colors, fromthe highest to the deepest tone.
A normal color is that color in its integrity, unmixed with white, black or anyother color.
Tints, shades and hues of color are terms used in speaking of colors. Charles Martel,
from whom we quote, says These modifications may be comprised under two kinds, one in which a given
color is modified by the addition of a small quantity of another color (hues); the other
where a normal color is modified by the addition of white or black {tints and shades.)
Red, yellow and blue are termed primaries, because they are the source from whenceall other colors are derived by mixture.
The mixture of primaries in pairs are termed secondaries.
SECONDARIES.
By mixing two parts of red and two of yellow produces orange. By mixing twoparts of yellow and two of blue produces green. By mixing two parts of red and twoof blue produces violet.
SECONDARY HUES.
By mixing three parts red and one of blue produces violet-red. By mixing three
parts red and one of yellow produces red-orange. By mixing one part red and three
of yellow produces orange-yellow. By mixing three parts yellow and one of blue pro-duces yellow-green. By mixing one part yellow and three of blue produces green-blue.
By mixing one part red and three of blue produces blue-violet.
By adding to red, 1st, blue, we produce violet and its hues ; 2d, yellow, we produce
green and its hues ; 3d, white, various light tones of red ; 4th, black, various dark tones
of red ; 5th, gray, various broken tones —red-grays or browns ; 6th, green, gray
By adding to blue, 1st, red, we produce violet and its hues ; 2d, yellow, we produce
green and its hues ; 3d, white, various light tones of blue ; 4th, black, various dark
tones of blue ; 5th, gray, various broken tones —blue-grays ; 6th, orange, gray.
Normal gray is black mixed with white in various proportions, producing numer-
ous tones of pure gray.
8/10/2019 Making Horse Drawn Coaches 1800 Bw
http://slidepdf.com/reader/full/making-horse-drawn-coaches-1800-bw 223/455
THE PRINCIPLES OF COLORING IN PAINTING. 16/
Lamp and gaslights throw out yellowish-colored rays, causing a great many light
colors to appear of a different tone than when viewed by sunlight. Certain shades of
green and blue are not easily distinguised by lamplight. A blue fabric will appear to
be green, or of a greenish cast, caused by the yellow rays falling upon it. Green beingformed by the mixture of blue and yellow, whatever contributes yellow to blue, as in
the case cited, or by mixture of pigments, the hue will be green.
When colored rays fall on a colored surface which is lighted by diffused daylight, the
colored surface is changed ; the effect being similar to that produced by adding to it a
pigment of the same color as the colored light. When red rays fall upon a black stuff,
they make it appear of a purple black ; white stuff, they make it appear red ;yellow
stuff, they make it appear orange ; light blue stuff, they make it appear violet.
COMPLEMENTARY COLORS.
*' The color required with another color to form white light, is called the complement-
ary of that color: thus, green is the complementary of red, and vice versa; blue is the
complementary of orange, and vice versa; yellow is the complementary of violet, and
vice versa; because blue and orange, red and green, and yellow and violet, each makeup the full complement of rays necessary to form white light.
The foregoing, it must be borne in mind, result from experiments with a prism of
flint glass. When a ray of sunlight is passed through a prism of flint glass, and the
image received on a sheet of white paper, numerous rays of different color will be
noticed. Red, yellow and blue, called primary colors, are made visible. The red rays
will be modifled by the pure yellow, which, by mixture, produce orange. The yellow
rays, being modified or mixed with the blue rays, become greenish, and increase until
we arrive at pure green ; this hue becomes bluer until we arrive at pure blue.
Place before the eye a bright red object. After looking at it a few seconds, direct
the eye upon a sheet of white paper; a faint green image will be seen. By looking at
green, red will be called up. Blue will excite the eye to see orange, and orange blue.
This is termed successive contrast. In placing colors near each other, it is of the first
importance to the painter to bear in mind the above fixed laws. The coach-painter
may derive some useful hints from the foregoing. In ornamenting and striping, bear
in mind that colors that are complementary purify each other.
The effect of placing white near a colored body is to heighten that color. Black
placed near a color tends to lower the tone of the color. Gray increases the brilliancy
and purity of the primary colors, and forms harmonies of contrast with red, orange,
yellow and light green.
If green is juxtaposed with black, its complementary red added to the black makesit appear rusty. Orange, yellow, blue and violet associate much better. Red and blue,
or green and blue, placed together, are less pleasing than red and green, or blue andorange, where no other colors intervene to separate them.
Take for example our starry banner, which is composed of red, white and blue.
If, instead of separating the lower edge of the blue field by a white stripe we shoulduse red, the effect would be coarse and offensive to the eye. Why ? Because the com-plementary of blue is orange, and the complementary of red is green, which producesa confused effect. Therefore, red and blue not being complementary, do not purify
each other. By the contiguous white stripe, the colors blue and red are separated, and,as we have before shown, that white heightens a color when placed near it, the effect
in this instance is to separate and purify the colors in question. And so throughoutthe flag, the white stripes alternating with the red stripes clear up and increase the
brilliancy of the whole.
8/10/2019 Making Horse Drawn Coaches 1800 Bw
http://slidepdf.com/reader/full/making-horse-drawn-coaches-1800-bw 224/455
168 COACH-MAKEES' ILLUSTRATED HAND-BOOK.
CHIAROS-CURO AND FLAT TINTS.
There are two systems of painting : one in chiaros-curo and the other in flat tints.
The first consists in representing, as accurately as possible, upon the flat surface of
canvas, wood, stone, metal, walls, etc., an object in relief in such manner that the
image makes an impression on the eye of the spectator similar to that produced bythe object itself. Therefore, every part of the image which in the model receives
direct light, and which reflects it to the eye of a spectator viewing the object from the
same point in which the painter himself viewed it, must be painted with white andbright colors. While the other parts of the image, which do not reflect to the specta-
tor as much light as the first, must appear in colors more or less dimmed with black,
or what is the same thing, by shade.
Painting in flat tints is a method of imitating colored objects, much simpler by its
simplicity of execution than the preceding, which consists in tracing the outline of
the different parts of the model, and in coloring them uniformly with their peculiar
colors.
PERSPECTIVE.
In painting we have two kinds of perspective, the linear and the mrial.
The first is the art of producing upon a plain surface the lineaments and contours
of objects, and their various parts in the relations to position and size, in which the
eye perceives them.The second is the art of distributing in a painted imitation, light and shade, as the
eye of the painter perceives them in objects placed in different planes, and in each
particular object which he wishes to imitate upon a surface.
When we.regard attentively two colored objects at the same time, neither of themappears of the color peculiar to it ; that is to say, such as it would appear if viewedseparately, but of a tint resulting from its peculiar color, and the complementary of
the color of the other object.
On the other hand, if the colors of the objects are not of the same tone, the lightest
tone will be weakened, and the deepest tone deepened.In fact, by juxtaposition they will appear different from what they really are.
The first conclusion to be deduced from this is, that the painter will rapidly appreciate
in his model the color peculiar to each part, and the modifications of tone and of color
which they may receive from contiguous colors. He will then be much better pre-
pared to imitate what he sees than if he was ignorant of this law.
The eye, after observing one color for a certain time, having acquired a tendencyto see its complementary, and as this tendency is of some duration, it follows, not onlythat the eye of the painter, thus modified, cannot see correctly the color which he had
for some time looked at, but also another which might strike them while this modifi-cation lasts. So that, conformably to what we know of mixed contrasts, the eye will
see, not the color which strikes him in the second place, but the result of this colo r^
and of the complementary of that first seen.
Suppose a painter has to imitate a white stuff , with two contiguous borders, one redthe other blue ; he perceives that each of them is changed by virtue of their reciprocal
contrast ; thus, the red becomes more and more orange, in proportion as it approachesthe blue, as the blue becomes more and more green as it approaches the red. Thepainter, knowing by the law of contrast the effect of blue upon red, and reciprocally
the red upon blue, will always reflect that the green hues of the blue, and the orangehues of the red, result from contrast ; consequently,, in painting the borders simply

8/10/2019 Making Horse Drawn Coaches 1800 Bw
http://slidepdf.com/reader/full/making-horse-drawn-coaches-1800-bw 225/455
THE PRINCIPLES OF COLORING IN PAINTING.
red and blue, reduced in some parts by white or by shade, the effect he wishes to imi-
tate, will be reproduced.
The effect of placing gray upon a yellow ground, according to its contrast, the pattern
Rill appear of a lilac or a violet color. The painter wishing lo imitate this object canfeproduce it faithfully with gray. The painter who is ignorant of the law of contrast
Df colors, and the reciprocal influence of one color upon another when placed near each
other, would attempt to imitate the colors as presented to the eye ; blue and red, for
instance, if placed near each other would appear different in color to the eye than whatthey really are. The sight of red would call up its complementary green, which, being
added to the blue, would tinge it. If, in imitating the pattern, the painter should addgreen to his blue, he would have an exaggerated pattern. Or, should he add orange,
the complementary of blue, to his red, a like result would follow.
Whena color is put on a canvas it not only colors that part of the canvas to which
the pencil has been applied, but it also colors the surrounding space with the comple-
mentary of that color.
Thus, a red circle appears to be surrounded with a green aureola. A green circle,
with circular rays of red. An orange circle is surrounded with blue. A blue circle
with orange. A yellow circle is surrounded with violet. A violet circle with a yellow
aureola.
To place white beside a color is to heighten its tone. Put black beside a color and it
weakens its tone. Gray placed beside a color renders it more brilliant, and the gray
is tinted by the complementary of the color.
Hence, if the painter wishes to imitate this gray, which appears tinted with the
complementary of the pure color, he aeed. not use a colored gray.
To put a dark color near a different, but lighter color, will heighten the tone of the
tirst, and lower that of the second.
A light blue placed beside a yellow tinges it orange, and, consequently, heightens its
tone. While the darker shades of blue would weaken it, not only hiding the orangetint, but to very sensitive eyes appear of a greenish hue.
The Greek painters, whose palette was composed of white, black, red, yellow andblue, executed some very fine pictures.
It has been remarked that it was probably the method of Titian to paint with onecolor, such as umber and white, and when the chiaros-curo, or light and shading, wascomplete, he glazed over it the color of each object.
The instructions we have given under the heading of The Principles of Coloringin Painting, if properly understood, will be found of incalculable value to the painter.
We will conclude by giving a list of the colors in general use, which may be pur-
chased of any respectable color house.
OIL COLORS IN PATENT COLLAPSIBLE TUBES.
Whites. —Flake white, Nottingham white, blanc d'argent, permanent white.^^ues.— Antwerp blue, indigo, Prussian blue, permanent blue.
Yellows.— Brown ochre, chrome yellow, chrome deep, chrome orange, Italian pink,king's yellow, Naples yellow, light ; Naples yellow, deep ; orpiment, patent yellow,Roman ochre, raw sienna, transparent gold ochre, yellow lake, yellow ochre.
Browns. —Asphaltum, bone brown, burnt umber, brown pink, cappah brown, Cologneearth, mummy, raw umber, Verona brown, Vandyke brown.
Greens, —Emerald green, olive lake, terre verte, chrome green, verdigris.
Reds. —Burnt sienna, burnt Roman ochre, crimson lake, Indian red, Indian lake,
light red, scarlet lake, Venetian red, Chinese vermilion.
8/10/2019 Making Horse Drawn Coaches 1800 Bw
http://slidepdf.com/reader/full/making-horse-drawn-coaches-1800-bw 226/455
170 COACH-MAKERS' ILLUSTRATED HAND-BOOK.
Slacks,— Blue black, black lead, ivory black, lamp black.
Mediums. —Megilp, sugar of lead.
Extra Colors.— Burnt lake, vermilion, cobalt, French ultramarine, Indian yellowrose madder, pink madder, Rubens madder, brown madder. Mars madder. Mars violet,
Mars scarlet. Mars yellow, Mars orange, oxide of chromium, malachite g reen, mineral
gray, lemon yellow, orange vermilion, ultramarine ash, carmine, cadmium yellow,
burnt carmine, purple madder.
PRACTICAL APPLICATION OP THE FOREGOING.
Having selected the colors named, and provided a palette-board, pal«tte-knife, anda piece of canvas, tin or board, and a half dozen pencils, proceed to experiment in the
mixture of colors as laid down in the above table. A small quantity only will beneeded of each. Having placed the three primaries —red, yellow and blue —on the
palette, proceed to mix them according to the table, placing them on the canvas or
prepared panel in the order named above. A space of one inch square laid off on the
canvas will be sufficient, being careful to keep the colors as pure as possible. To dothis it will be necessary to keep the pencils clean. When the pencils are to be changedfrom one color to another rinse them out well in turpentine, or wash them with soap
and water, wiping them dry on a piece of soft rag. It may be found more convenient
to use only turpentine while at the work, as it frees the hair more readily of color, andleaves the pencil in condition to continue the work without any delay. When youwish to lay the work by, cleanse the pencils thoroughly with soap and water, clean
off the palette-board, and put everything snugly away for another time. A short timespent in this manner, as opportunity offers, will repay the trouble and expense, andbe of incalculable benefit. Tube colors will be most convenient if you wish to use oil
colors. Water colors would answer the purpose, but, as the coach-painter needs nowater colors in his work, it is better to practice with oil colors.
White and black represent light and shade. By adding white to any color we pro-
duce various light tones of that color ; by adding black to any color we produce various
dark tones. All light colors bring forward, according to their strength, every part of
the pattern being painted, while dark colors are employed to represent the more re-
mote parts; in other words, those parts of the object which reflect the most light
would be painted in light tones, and the more remote parts of a deeper or darker hue.
Place before you a cylinder of wood, painted, say red, and varnished. A white stripe
will be seen at the highest point on the surface, running the length of the cylinder,
parallel to its axis. The more remote parts will appear of different shades of red, as
less light is reflected. To paint the object named on a plain surface, so as to appear in
relief, it would be necessary to mix three or four hues of red, placing the lightest in
the center, the deeper tones to the right and left of the first, and the darkest to the
extreme right and left. By drawing a fine line of white through the center, and a palereddish tint at each side for the reflected light, always to be seen on circular objects,
you will have produced, on a plain surface, the appearance of a cylinder in relief.
It is by light we are enabled to distinguish colors. The light of the sun, or solar
light, is white, yet subject to modifications from different states of the atmosphere.
The prevailing colors in nature are what are termed cool colors, and are tempered so
as to present to the eye nothing injurious. Green, which abounds in almost every
natural landscape, and the ethereal blue above us, are cool in color. In the woods in
summer you may notice a great variety of green, but none are dazzling. The close
observer of nature will observe in his rambles that grays are abundant. Thetrunks and branches of many trees, the dead twigs scattered about over the ground
8/10/2019 Making Horse Drawn Coaches 1800 Bw
http://slidepdf.com/reader/full/making-horse-drawn-coaches-1800-bw 227/455
THE ART OF COACH PAINTING. 171
and also the rocks that jut out here and there partake of this tint. Rich browns are
found on the old decaying trunks of fallen timber, and by light and shade among the
foliage of the trees may be seen a great variety of olive greens. At this season of the
year the forests put on their gayest attire. We will be compelled to admit, too, that
Jack Frost has a good eye for color. See the rich yellows, olives, scarlet crimson andother hues he has spread over the landscape. The lovliest sight is to stand on somerustic bridge, and look forward over a smooth meandering streamlet, where the distant
view is inclosed by a heavy growth of timber. The drooping branches kiss the water,
and sway gently as if ashamed of their own reflected beauty.
The gray of the morning has its charm, and the golden hues of sunset, dripping at
times by the overflow of their own loveliness, are modifications of natural light. Thewaters reflect the sky and surrounding objects, repeating their colors. Thus we find
but little in nature of a glaring cast.
THE ARTOF COACH PAINTING.
In the following treatise we do not promise to lay down rules to govern the painter
under all circumstances, or to set up oiir notions in opposition to other painters, whohave, through years of toil in the paint room, discovered modes of working, probablydiflerent from our own, equally as good, and, it may be, better.
Now it cannot be expected that every manufacturer of carriages will be able to fur-
nish the painter with rooms well adapted to turning out first-class work. Employerswith small capital are compelled to put up with many inconveniences, and they find
the painter louder in his demands for more room than either of the other branches. Wehave often heard the remark made, that the '^painters are the most troublesome set
of fellows in the shop ; that they are never satisfied, etc.
We will not deny the charge, but merely say in reply, that they are the subjects of
more fault finding than the other hands, and expected, in many instances, to performmiracles almost. This is especially true in small shops through the country, wherethey require a painter and a green boy to rush out the work, new and old, giving as
good a finish on new work as a first-class shop in New York, Philadelphia or Cin-
cinnati, in which the work is divided out among different grades of workmen.THE PAINT SHOP.
The paint shop should be roomy, well lighted and ventilated. Bodies and gearings
should not be painted in the same room if it can possibly be avoided, and the roughwork on bodies should be done in a room separate from the coloring room.
In a well-regulated paint shop will be found a good assortment of brushes, suited to
the difierent kinds of work ; paint pots in abundance, two paint mills, a marble slab
on which to mix colors, and also a stone to be used exclusively for making putty onwater buckets, sponges, chamois, palette knives and putty knives. Light tressels,
set on castors, for light bodies ; and heavy tressels, with two wheels and pole, for
heavy bodies.
Screens, covered with heavy paper, or enameled cloth, to protect varnished workfrom flying motes, and from the unsightly marks made by flies in summer.
An assortment of colors, wet and dry lead, whiting, lump and ground pumice stone,
English rubbing stone, leather shavings for cleaning the paint mill, sand-paper, brooms,and a ley kettle for dirty paint pots.
Shelving sufficient to hold the cups that are in use, and also small drawers to hold
loose dry colors to prevent wastage. On the walls should be placed two or three
wooden boxes —one for old sand-paper, one for new sand-paper, and one for odd nuts,
bolts, screws, etc., which will gather during the course of the year.
8/10/2019 Making Horse Drawn Coaches 1800 Bw
http://slidepdf.com/reader/full/making-horse-drawn-coaches-1800-bw 228/455
172 COACH-MAKERS' ILLUSTRATED HAND-BOOK.
Wrenches, hammers, screw-drivers, etc., etc., should have each an appropriate place.
Narrow strips of leather should be tacked up along the windows, and at different
places through the room, in which to place the dusters, to avoid the necessity of
throwing them on the floor, or placing in a position where they will be easily thrown
down in the dirt.
Light stools for holding the paint and varnish cups, made broader at the bottom
than at the top, so as not to be easily upset ; wheel-boards or props, covered cans for
varnish brushes, and wire stands to lay the brushes on when varnishing.
Having thus given a general idea of the wants of the voracious painter, we will nowenter into the details, and place before the reader the e very-day workings of the paint
shop in the order in which we have stated them in the commencement of this
article.
LIGHT AND VENTILATION.
We know of nothing more annoying to a painter than a dark room to work in. Inmixing various shades, or compound colors, one should have good light to insure the
tone required. But as the paint stone may be placed close by a window, and fixed
permanently on a bench (as it should be), the compounding of colors would not be the
most serious objection to a dark paint room.
In the busy season, when the painter is often compelled to work on some jobs at a
distance from the windows, many imperfections may be overlooked on the surface,
and in touching up old work, the wrong shade may be given to bruised places for
the want of sufficient light. These trifles may seem hardly worthy of notice, yet everypainter is aware that much trouble is occasioned thereby.
In striping a gearing or body, ornamenting, coloring, rubbing varnish and varnish-
ing, one should have good light. If a shop cannot be lighted from the sides, thenthere should be sky-lights, for good light a painter must have to insure work which will
not look as if it was grained when it is subjected to the severe test of the clear sunlight.
The paint room should have a means of ventilation which would continually carry
off the noxious vapors arising from poisonous lead and colors and the fumes of tur-
pentine. As not one in a hundred of the carriage shops are thus ventilated, the fore-
man in the shop should see to it that the windows are opened daily in the winter,
season, and a current of fresh air allowed to pass through the shop. Good light andventilation would add greatly to the health of the painter, and secure to employersthe services of men skilled in their trade, who, under the present system, are com-pelled to seek other employment, through failing health, at that period in life whentheir services are most valuable.
Bodies and gearings should be painted in separate apartments, as it is impossible to
keep the tires from coming in contact with bodies as the carriages are moved aboutfrom time to time. Bodies are also liable to be spattered with lead and filling, and
are often bruised byapprentices,
who, at the dinner hour, enter into a general friendlycombat, by throwing at each other the remnants of their dinners, dusters, or any-thing else that comes handy.
Boys cannot be expected to tliink much while engaged in their sports, and it happensthat serious damage is done by them.
The rough work on bodies should be done in a room kept for that purpose ; theprocess of rubbing out work demands the use of a great deal of water, w.hich, mixedwith the filling, flows over the floor, making it wet and disagreeable to those who maybe working near by, and not unfrequently finds its way through into the room below,annoying those who are there at work.
In small establishments it will be useless to attempt a complete division of work,
8/10/2019 Making Horse Drawn Coaches 1800 Bw
http://slidepdf.com/reader/full/making-horse-drawn-coaches-1800-bw 229/455
8/10/2019 Making Horse Drawn Coaches 1800 Bw
http://slidepdf.com/reader/full/making-horse-drawn-coaches-1800-bw 230/455
174 COACH-MAKEKS' ILLUSTRATED HAND-BOOK.
Having mentioned the different kinds in use, it remains with the workman to select
those best adapted to his wants. ^
PAINT BRUSHES.
For carriage work the medium sizes should be used. For lead and rough coatings
on bodies a larger brush is required than for carriage parts. Body brushes should bekept separate from those for carriage parts, and not used, as is too often the case, at onetime on a body, at another on the gearing. Gearings wear a brush out hollow in themiddle of the point, which unfits them for laying on a level coat on a body.
We think it cheaper in the end to buy oval or round varnish brushes for lead andfilling coats, as they wear longer, and do the work better from the start. When theyare worn sufficiently to be fit for color they will render good service until the bristles
are worn down too short for any purpose.
A new paint brush should be bridled. This is done by covering it with a piece
of leather, extending from the heel to about midway of the bristles, and stitched to-
gether, drawing the leather tight enough to keep the bristles straight. By this meansa new brush may be put into immediate use on rough coatings. When the end is
worn down, cut away the leather, and the brush will preserve its shape.
Of these there are also two or three qualities. The cheaper kinds will answer every
purpose for the lead and rough coatings. The black are best for colored and varnishedsurfaces. Neither the varnish nor color duster should be used on lead, nor the lead
duster on color or varnish coats. In the varnish room, more particularly, it is abso-
lutely necessary to keep a clean duster. Flat and round dusters are each useful to the
finisher ; the flat one is best suited to narrow places, and will avoid bruises which mayhappen in the attempt to dust out with the round brush.
The duster used for finishing should be washed out occasionally with soap andwater ; and from day to day, as work may require finishing, it should be rinsed out in
cl»an water, and dried before dusting off the work.
MOTTLEES OR BLENDEES.
These are flat camel-hair brushes, bound in tin, which are now used by all coach-
painters in coloring bodies, and not unfrequently on carriage parts. Those with short
handles we have found the best. Sizes ranging from J inch to 3 inches are as large as
the coach-painter requires. The 1 inch, 2 inch and 2J inch are full large for buggy,
barouche and rock away bodies ; but for heavy coaches, with close quarters, the 3 inch
should be added to the set. The i inch blender is useful in touching up on bodies where a
narrow place is to be colored, as it lays the color on thin and level, avoiding laps and
ridges; also, in blacking off irons, etc., on the carriage parts.
Color, properly applied with a blender, will be free of brush marks, and the surface
gained by rubbing out the body improved. They are worthless as varnish brushes.
The small brushes used for striping, ornamenting, lettering, etc., are called pencils.
The stripers are m*ade of sable, camel and cow hair. Sable hair is of two colors, viz.
red and black, either of which is superior to any hair now being used. The red sable
hair is somewhat the finest, and is probably the best for ornamenting pencils. For
large, broad stripers we think the black ones are superior.
For fine lining either kind may be used, but we prefer the black.
8/10/2019 Making Horse Drawn Coaches 1800 Bw
http://slidepdf.com/reader/full/making-horse-drawn-coaches-1800-bw 231/455
THE ART OF COACH PAINTING. 175-
Camel-hair pencils work very pleasantly for broad lines, and are preferred by some
Qrst-class stripers. The hair being weaker than the sable, they should be shorter.
Those made from cow hair are worthless.
ORNAMENTING PENCILS.
These may be had in quill, imthout handles, or tin-bound, vnth handles. Those with-
out handles are in goose, duck, crow and swan quills. The sizes are various— suited to
the most delicate touching, or the larger ornamental work. The best are those
with handles, tin bound. The ornamenter will need both flat and round pencils
round pencils for laying color on heavy, the flat ones for thin and crispy touches.
They should be kept perfectly clean, greased, and laid away in a box, so arranged
that the points will notbecome bent. AVhen the smallest quantity of paint dries in
the hair, the pencil will not work well.
LETTERING PENCILS.
Sable and camel hair are both used ; they should be from ^ inch to 1 inch or more
long. Buy them in quills, making handles to suit them. The shorter ones for filling
in, after the outlines are traced.
PAINT POTS.
Pint and quart cups are the most convenient sizes for general use.
The shop should be well supplied— but it is seldom the case— and painters resort to
empty oyster cans, fruit cans, mustard boxes, etc. The coarser paints may be kept in
empty whitelead kegs, cut down and supplied with rope or wire handles. Cups for
fine colors should be kept clean on the edges. When they are set away, cover them
up with paper, which will keep out dirt, prevent the paint, in a measure, from skin-
ning over, and last, but not least, be a notice to meddlers that the cup and color are in
use, and are to be let alone.
Quart cups are best for varnishing on carriage parts. Pint cups are as large as is
necessary for body work. All varnish cups should be kept perfectly clean. To do
this, it will be necessary, after using, to rinse them out with turpentine, and with astifi'-bristle tool work up the varnish that collects on the side of the cups, and with a
piece of hair, soap and water, cleanse them thoroughly, rinse them in clean water, wipe
dry with chamois skin, and hang them up in a clean place. If you have got stuck,
and haven't time to clean the cups, put them in water until the following day.
The finisher should have at least three varnish cups ; four will not be too great a
number. If the employer will not furnish them, then buy them yourself, and youwill not lose anything by it ; for it will be folly to attempt to get on a clean coat
without a sufficient number of cups. One will be needed for clean varnish for the
panels, one for the clean second-hand varnish which is generally used for the top,arch^ rockers and inside edges, and one for a wiping cup. The fourth cup is required
in case of any accident wherein it may be necessary to cleanse the brushes, or removethe varnish from a panel, or panels, when it is dirty, or where a run or a heavy flow
has appeared.
It is a very good plan to have a set of varnish cups made with false bottoms filled
with lead, which prevents them from being easily overturned and when, in the process
of varnishing, it may be necessary to wipe out the brush while the left hand is in anawkward position relative to the work, or when it may be actually in use, it will be
found very convenient. The cup sitting firmly, the painter may wipe out the brushwithout using the left hand to steady it (the cup).
8/10/2019 Making Horse Drawn Coaches 1800 Bw
http://slidepdf.com/reader/full/making-horse-drawn-coaches-1800-bw 232/455
176 COACH-MAKEKS' ILLUSTRATED HAND-BOOK.
In the carriage varnish room, cups made in the manner described will be foundvery handy and economical. In varnishing a carriage part, the cup is not held in the
hand so much as on body work, and the brush is wiped out more frequently while the
cup sits on the stool.
Besides the cups named, the painter should provide himself with several small ves-
sels for holding striping color, and the panel colors, which may be needed to touch upthe panels during the progress of the painting.
PAINT MILLS.
There is no better friend to the painter than a good paint mill, and no greater cause
of vexation than to be compelled to use an old worn out one. It is a tedious operation,
at best, to grind out a cup of paint by hand, and although the work generally falls onan apprentice, or some rough hand, still there is always dissatisfaction manifested
when the paint mill is ordered up. There are three or four kinds of mills manufac-tured, Harris' patent being the most popular.
They vary in size and price, and, therefore, are suited to the wants of large or small
factories. Where several painters are employed there should be two paint mills ; onekept exclusively for grinding colors, and another for lead, filling, pumice stone, etc.
By this means, the colors are not so liable to be soiled by mixture with lead color, or
other rough, heavy paints, which clog the mill up so rapidly. For it is useless to at-
tempt to keep a mill perfectly clean in the hurried season, where the different hands
and boys grind out drop black, vermilion, green, lead color and filling, on the same
day, and all in a hurry.
Scenes like the following are common in a shop where there is but one paint mill
Jour. —Johnny, what have you got in that mill ?
Johnny. —Dark lead color, sir, for my gearing.
Jour. —Well, hurry up and run it through, and clean the mill out nicely ; I want to
grind some carmine.
Johnny hurries up, not in the grinding out of his dark lead, but in the manner of
cleaning the mill. The mill gets a wipe and a promise, and the jour gets in a passion,
it may be, and soundly berates the cub for leaving the mill so dirty. The appren-
tice replies very tartly, and for a short time, at least, there are unpleasant feelings on
both sides.
The paint mill should be fastened solidly to the bench on which the stone rests,
and near enough to it to allow of the paint being put in without being compelled to
walk half way across the shop.
A tin scoup should he found in every paint shop for conveying the color from the
stone to the mill. With the scoup all of the paint can be taken from the stone, also
the turpentine which the painter may use in cleaning it.
The mill should have a close cover, to be used while grinding out colors, etc., as a
protection to the health of the painter. The mill, in motion, geherates more or less
heat, which, added to the odor from the mixed color, is sometimes sickening, and at
all times offensive.
When the mill is run by steam, the speed should not be much greater than whenturned by hand. For, being continually in motion the mill soon gets hot, and heats upthe color, causing it to become like liver, and we think prevents drop black, and prob-
ably other colors, from drying well.
The color also hardens in the grooves on thegrinding surfaces, which prevents the
color from running out ; if turpentine is added it may destroy the body of the color.
8/10/2019 Making Horse Drawn Coaches 1800 Bw
http://slidepdf.com/reader/full/making-horse-drawn-coaches-1800-bw 233/455
THE ART OF COACH PAINTING. 177
When the mill becomes hot so that the color will not drop, the belt should be thrown
off until it (the mill) has cooled.
To avoid accidents, there should be a wrench made to fit the regulating screw, to
obviate the necessity of placing the hand in a dangerous position. We have seen serious
accidents from carelessness in this particular. One, in which a young man had his
fingers crushed between the cogs, requiring a surgeon's attention. It was a loss of
several weeks' time to the young man ; the doctor's bill however was very generously
paid by his employer. The price of a suitable wrench, in this instance, was not less
than $10.
THE PAINT STONE
should be a marble slab, about two feet square, set in a wooden frame, and securely
fastened to the bench, at the left of the mill. It should have a cover to protect it from
dirt, and from being daubed up by having paint and varnish cups set on it. A well-
kept stone is an unusual sight among carriage painters; not because there are not
those in every shop who are tidy and would like to have everything in order, but mengrow weary of cleaning up after the slovenly ones, and, in time, add their share to the
dirty appearance.
In a well-regulated shop there will always be found a man whose business it is to
attend to the grinding of paint, and the work connected therewith. It is folly to de-
pend on apprentices, and, in a large shop, we do not think it is right to demand of a
boy the labor which is severe even on a stout man. There is always work enoughabout a paint room to keep a hand busy, should he not be employed at the paint mill.
He may sweep the rooms, attend to fires (in winter), put on priming coats on wheels
and gearing, clean off grease, sand-paper, etc.
Putty should not be mixed on the stone used for colors. There should be a putty
stone kept for the purpose. The palette knife, mill duster, oil, turpentine, japan, leather
shavings, etc., should have a place near the mill and stone.
WATER BUCKETS.
Of these there should be a good supply. Those used in th« varnish rooms should be
kept free from grease by having a wash place, or buckets kept expressly for washingin. It is a very filthy practice to use oil on the hands, then catch up the soap and washin a bucket used for washing ofi' bodies, or gearings, preparatory to varnishing. Thosewho are so thoughtless generally 2npe their hands and face on the chamois, thus fill-
ing up the measure of their tilthiness.
The shop that furnishes but, say one water bucket to two or three hands, may get
along after a fashion, but wall, during the year, lose the price of a cart load of them,
by the hands waiting on each other.
SPONGES.
These should be selected with care, and as they are in such constant use by the
painter, it is economical to buy those of a good quality. They differ somewhat in color
and size —the cup-sponge being the smallest and finest, the larger sizes being of globular, conical and cylindrical forms, and varying in softness and strength. Thoseof a pale yellowish tint w^e have found the most serviceable.
The dirty brown sponge, which is of a reddish cast inside, is generally rotten. Buythose which will be of a convenient size without cutting, or that will need to be cut
only in two. 12
8/10/2019 Making Horse Drawn Coaches 1800 Bw
http://slidepdf.com/reader/full/making-horse-drawn-coaches-1800-bw 234/455
178 COACH-MAKERS' ILLUSTRATED HAND-BOOK.
The body sponges should not be used on the carriage part, and vice versa. It is afilthy practice to wash the face, neck, or person with the sponges designed for the sur-
face work, as they become greasy, and may be the means of ruining a piece of work.The sponge is a very curious and interesting animal or vegetable, we do not pretend
to know which, as that question seems to be in dispute. It is found far down in oceandepths, clinging to the rock and shells, and is gathered in the Mediterranean and inthe West Indies. Under a powerful microscope, the sponge presents a singular ap-
pearance, and it is affirmed that it is actually pinned together by metallic pins, withheads and points similar to those used at the toilet. These microscopic pins are set
at every conceivable angle, thus securely holding the parts together.
CHAMOIS.
The shammy, called the wash leather, by some painters, is used for drying off
the surface of work, after washing it with water.
The chamois is an animal of the antelope kind, the hide of which furnishes a verysuperior quality of leather, and was probably used originally for the purpose abovestated, as well as for many others. But the skins now in general use are not of that
kind, and might be more appropriately named sheepies, as they are what is termedalum-dressed sheep-skins.
They are different in quality ; the best being compact, yet soft. The cheaper kindsare spongy and almost worthless. The shammy gives off furze when it is first put into
use, which may be kept down in a measure, by wetting it in water, wring out, andhang up until dry. Repeat this once or twice before using it.
The shammy should be kept clean and free from grease. The hands and face should
never be wiped with it. When it will not dry up the water readily, spread it out ona clean, smooth piece of board, and with soap, water, and a piece of curled hair, scour
it well on each side, and rinse it in clean water until the soap and dirt are removed.
Those used in the finishing rooms are to be kept for that purpose alone. They im-
prove by use, and are generally more highly prized when worn to shreds. When a
good piece of skin has two or three small holes worn in the center, it may be preserved
for a considerable length of time, by sewing up the holes with sewing silk. Place theedges together, whip them over neatly, then open the shammy, and pound the seamdown flat. We have saved a favorite piece of leather for months of usefulness by this
method. There is no fear of it scratching the surface.
THE PALETTE KNIFE.
This instrument is generally made of steel, should be highly tempered, thin and flex-
ible. They are also made of ivory, horn and bone.
The carriage painter requires but one kind, as the colors used are mostly of that
nature, which are not affected by the action of steel. A steel palette knife, with a
blade from nine to twelve inches long, will suit for all the purposes of mixing the
colors used for bodies and carriage parts.
Those with blades about five or six inches long are best adapted for handling strip-
ing and ornamenting colors. Ivory, horn and bone are used by artists who wish to
keep the colors pure that contain any portion of arsenic. Realgar, orpiment and
lemon yellow are of this nature— the steel knife causing them to assume a greenish
hue.PUTTY KNIVES.
The putty knife is one of those indispensable tools with the painter which should
be well made and rightly tempered. The carriage painter requires qiiite a different
one from the house painter.
8/10/2019 Making Horse Drawn Coaches 1800 Bw
http://slidepdf.com/reader/full/making-horse-drawn-coaches-1800-bw 235/455
THE AKT OF COACH PAINTING. 179
They should have enough spring in the blade to give slightly under the pressure required
to fill holes, or to plaster grain. Those made flexible only at a point near the handle
are a nuisance.
The blade should spring from the jDoint through its whole length, not a great deal
but sufhcient to be perceptible. One thus tempered will do the work far better, besides
relieving the wrist and hand from a good deal of the strain on them.
For the ordinary puttying on carriage work the knife should be, say one and a quar-
ter inches across the bevel at end of blade. Sizes ranging from half an inch to twoand a half inches are useful at times. The half-inch knife will be found convenient
in puttying narrow places on bodies.
It is well to have three sizes. One, say half an inch across the beveled end of the
blade ; one, an inch and a quarter, and another two inches and a-half. The smallest
and largest size here given you will probably have to order made. The half-inch
blade will be useful in puttying narrow places, the inside edges of rockaway door
with drop lights, coaches, etc. The largest size for plastering large panels, whicheconomizes time and labor, as well as making a better job. The medium size will
answer all ordinary purposes.
The point of the blade should be kept free from dents or nicks, and when it wearsout hollow in the middle, grind it off even. The edge requires to be sharp, but not in
the sense that we speak of a pocket-knife ; it should be rounding to prevent scratching,
or cutting the surface. Keep it free from putty and paint, handle and blade.
TRESTLES.
The trestles required by the painter differ from those best adapted to the other
branches. While the wood-worker, blacksmith and trimmer wish their work to stand
solid until finished, the painter must be continually moving. He must daily be movingbodies in and out, up to the windows for light, and back from the windows when coat-
ed or rubbed. If the trimmer wants a body, light or heavy, he generally notifies the
painter, who is expected to carry it, by help of other painters, or roll it, if he has asuitable trestle, up to the trimmer's bench ; and thus it goes from day to day, move
move move Now, to lessen this wear and tear on the painter, he should be supplied
with wheeled trestles without stint. True, the light buggy bodies may be handled onbarrels, to which we are very partial. But barrels will not answer the purpose whenbodies are to be moved from one room to another.
We prefer the square framed trestle, set on four heavy castors, for bodies, other thansix-passenger rockaways and coaches. They should be well braced with iron on twosides at least, and the braces placed so as to admit of the steps having ample space to
play in. It not unfrequently occurs that a new body has to be finished with the steps
attached, and it is found diflicult to set the body solidly on account of the steps or backbraces of the same coming in contact with the top bars of the trestle giving a rockingmotion. But as new work is generally painted with the steps off, the manner of brac-ing mentioned will be found of greater advantage on old work. In the hurried seasonit is a waste of time to take off the steps, which has to be done unless the trestles usedadmit of the body sitting level.
Trestles for heavy work are constructed differently, varying according to the ideasentertained as to which style is best suited to the wants of the painter. Those madelong enough to support a coach-body, back and front, save a great deal of trouble in
bolstering up the body with plank, boxes, etc. The front is made the highest, oradjustable, that it may be regulated to suit the variation in the height of fronts ; it hastwo wheels, and is operated by a pole.
8/10/2019 Making Horse Drawn Coaches 1800 Bw
http://slidepdf.com/reader/full/making-horse-drawn-coaches-1800-bw 236/455
180 COACH-MAKERS' ILLUSTRATED HAND-BOOK.
Another kind, which is framed only to the size of the bottom of the body proper,will answer every purpose, and take up less space, which is no small item in the paint
room. It should be made very strong, and have two wheels fifteen inches in diameter,with two inch tread, if made of wood. It requires a pole, or the pole may be dispens-
ed with by bolting the body and trestle together, and the job moved around by thedash, or a stick screwed across the front. The body may remain on the trestle until
it is ready to be hung off.
For light bodies we think there is no trestle equ^l to those made with a turn-table
on top. The top of the trestle need be only eighteen inches square, and the height
two feet six inches, when completed. It may be set on castors, or not, as the painter
may choose. With castors, the body may be rolled back to a suitable place after hav-
ing been finished, without the aid of another hand.
The screen is a device for protecting finished work from flying motes or dust, whichmay be raised thoughtlessly by any one about the shop, the unavoidable accidents
resulting from high winds, and the marks and blotches caused by flies. They shouldbe light, yet so braced as to prevent sagging down when placed in position. The framemay be covered with enameled cloth, or heavy brown paper. The latter may be hadat any paper warehouse, of various widths, and of any length required.
Having covered the frame, attach wings on each side, tacking the edge of the paperto the frame, using strips of leather or enameled cloth to tack through, to strengthen
the paper. The end wings may be separate, and used or not, as circumstances maj'^
require. Eyelets, strengthened by leather, and small nails in the frame to attach the
wings, complete the description.
The buggy screen should be at least five feet long, and three and a-half or four feet
wide. Larger sizes, for covering the back and hind quarters of heavy bodies, need
only side wings. The painter should have also small screens to cover the deck panel
on standing top, and non-shifting, falling top buggies.
There are a few varnish rooms in the larger cities whichmay
not need anything of
the kind, but the majority of them throughout the country are very defective, causing
imperfectly finished work.
In using a screen to cover a buggy, first varnish the inside of seat and front ; then
set a box or empty varnish can on the seat, and lay the screen over, allowing it to rest
on the box or can, and on the dash (if on) or balanced by a weight laid on top. The
wings being folded, when a side is varnished, let down the wing carefully, and follow
on around the body, covering up as you finish. Buggies, with deck panels behind,
which are so difficult to bring out clean, should be turned over and the panel varnish-
ed from beneath. In this case, varnish the inside of seat and front of body first ; turn
the body over and lay the screen on. Commence on one side, following around, finish-
ing the deck panel last, of the body proper ; the outside of seat being the last part
varnished. The wings may now be let down gently, and the body be safe from acci-
dents.
Standing-top work, or non-shifting falling-tops, with deck panels, &\io\i\6.'bQ finished by
completing the body before attempting to varnish the deck panel. Having fastened
the small screen to the prop blocks, raise it up, and varnish the panel under the
screen ; let it down gently, and set the body in a position to prevent any draft of air
passing across the panel. On round cornered work, let the screen down after the
backis
varnished, before completing the remainingside.
Wespeak of the round
cornered deck panel.
8/10/2019 Making Horse Drawn Coaches 1800 Bw
http://slidepdf.com/reader/full/making-horse-drawn-coaches-1800-bw 237/455
THE ART OF COACH PAINTING. 181
When the screens are not in use they should be hung up, and before using themthey should be well dusted off, outside of the varnish room.
Coaches, rockaways and other styles having back and quarter panels to be pro-tected (especially from flies), should, after being varnished, be covered by setting the
screen up behind on boxes or a low bench made for the purpose, and the wings be
brought around the quarters, and tacked at some convenient point. The body should
be in such position that it will not need to be moved after having been covered.
The deck panel, on the front of heavy work, should be varnished under the screen
not finished, an.d the screen laid on afterward. This panel should also be varn-
ished last of all, except the sides of the boot or front, and the dash if paneled.
By this means the deck panel will not catch any dust that may be falling while the
painter is moving the body aboutin
working on therest
of the job.
CANS FOR VARNISH BRUSHES
should be made of tin, with a close-fitting hinged lid. They should be wide and deepenough to hold two sets of brushes, suspended by the handles, the points clearing the
bottom at least an inch, and the brushes not allowed to touch each other. Or the can
may be made with a flange on the outside, the cover fitting down on to it, and having
a handle on top to operate it.
WIRE STAND.
The wire stand is used for laying the varnish brushes on to keep them from getting
dirty, and also as the most convenient place for them while varnishing. Take stout
wire and bend it into the form of a small bench with four legs. The top wires should
run lengthwise, four in number.
The brushes are laid on with the points extending over the outside wire. The wires
being few in number, they cannot collect much varnish, and are readily cleaned. It
is light, always ready for use, and, in fact, the best varnish stand we have ever used.
WHEEL BOARD OR PROP
is used by the carriage-part painter to elevate the wheels. Is made of wood, and ofsufficient length to raise the hind wheel about four inches from the floor, and notched
down to adapt it to the front axle. It should be broader at the bottom than at the
top, to prevent it being easily overturned. The line of weight should pass throughthe middle of the board ; to do this, it is only necessary to have the highest point in
the middle, notching down on each side. Made thus, it will be almost impossible to
upset it. The bottom of the board to have a V-shaped cut in it.
As wheel boards cost but little, it is well to have a full supply of them. Those usedin the finishing room, if planed smooth and coated with lead, will be easily dusted or
washed ofi before using.It is not advisable to finish gearings with the single wheel boards, although a great
many painters do so. The objections are that but two wheels can be raised at a time,
and in the handling of the gearing during the process of varnishing there is greater
liability to accident, such as the gearing running backward or forward, by an unduepressure on a wheel while varnishing it. It is a better plan to raise the gearing clear
of the floor, by means of barrels or light trestles, made expressly for this purpose.
The front trestle should have a bearing for the axle to play on, to admit of thewheels being moved forward or back, when the painter has occasion to work on the
inside of the wheels or gearing. When the wheels are all raised clear of the floorthere is no trouble shifting wheel boards ; the washing, dusting off' and varnishing are
8/10/2019 Making Horse Drawn Coaches 1800 Bw
http://slidepdf.com/reader/full/making-horse-drawn-coaches-1800-bw 238/455
182 COACH-MAKERS' ILLUSTRATED HAND-BOOK.
all done to better advantage, and the wheels may be turned occasionally until thevarnish is set, which will correct a tendency to runs or sagging of the varnish frombetween the spokes at the hub, or at the felloe.
The Sarvin patent wheel is more Hable to collect the varnish between the spokes,and allow it to flow out when the wheels are at rest, than those which are made withstaggered spokes, or spokes with space between them at the hub. So that it is best tohave the wheels all elevated, that each one may be turned half way round, occasionallyallowing the flows or runs to settle back again.
Having given a detailed description of the tools and appliances to assist the painterin his laborious work, we now approach a more difficult part of our instructions, viz.the compounding of colors. But before we use the palette knife, it will be proper to
give the names and qualities of the pigments used.The carriage painter does not need a great variety of paints or colors to complete a
vehicle, so that it will be acceptable to those of reflned taste. Should he employ onlyblack, without a stripe or ornament, he way produce a piece of work which will pleasethe eye and satisfy the majority of persons. In our opinion, dark colors are far morein accordance with good taste than the gaudy ones which have been in use of lateyears. But we must be governed by the fashions, very often, without regard to ourbetter judgment.
COLOKS.
The colors generally found in a respectable carriage paint shop may be divided intothree classes, viz. : those more commonly used for the rough coatings, such as— 1st.
'
Keg or wet lead, dry whitelead, whiting, yellow ochre and redlead. 2d. Groundcolors, or those which the painter uses in combination with other pigments, as chromeyellow, Indian red, raw umber, chrome green, Prussian blue, lamp-black, drop-black,
etc. 3d. Panel colors, as carmine, lake of various hues, ultramarine blue, verdigris,
milori green, etc., etc.
Keg or wet lead is of the first importance in the paint shop, for it is not only usedas the foundation, but enters largely into the mixture of various colors used, as drabs,
straw and stone colors, etc.
In the mixture of rough stuff or filling, whitelead gives elasticity and life to theochre, and when properly used, forms the tenacious part of the under coatings. Butoil whitelead should not be used where there is not sufficient time allowed for it to
dry thoroughly.
After a good foundation has been secured, and smooth coatings of lead are desired,
•which will sand-paper smoothly and leave a pleasant surface to color over, the dry
whitelead should be used.
It may be mixed with or without oil, a small quantity of japan, and thinned with
turpentine. In making putty it cannot well be dispensed with.
We prefer it to wet lead in the mixture of drabs, straw and other light colors, for
the reason that the color works smoother, and is not so liable to skin over, or hang onthe sides and edges of the cup.
Whiting is not used to any great extent among carriage painters, dry whitelead
answering every purpose. Whiting and whitelead make good putty, and probably it
would be far better if carriage painters would use it more than they do.
Yellow ochre, when used by carriage painters, enters almost exclusively into the
mixture of rough coatings. It is a kind of clay, working and drying well, but of late
8/10/2019 Making Horse Drawn Coaches 1800 Bw
http://slidepdf.com/reader/full/making-horse-drawn-coaches-1800-bw 239/455
THE ART OF COACH PAINTING. 183
has been superseded by the introduction of mineral paints which furnisli a less porous
surface.
Redlead is a good dryer, and might be employed to advantage in the mixture of
rough coatings, thereby dispensing with the use of so much japan. If japan could bedepended on as a safe article to mix paints with, it would be quite different ; but as it
is, nowadays, the painter must bear all the blame of cracked and blistered work,
when it is too often the fault of the japan.
Redlead needs to be ground in oil where it is used for a foundation for vermilion.
GROUND COLORS.
Chrome yellow is seldom used clear, except for line striping. There are diff'ereut
shades ofit
aswell
asqualities,
the best being thecheapest, having more body.
Lemon and orange are all that the carriage painter requires; with these he can mix upany hues needed by the addition of reds.
AVith white, yellow forms straw colors of different kinds ; with red, orange tints
and with blue, green, lighter or darker, according to the proportions used.
In using yellow with blue or black, to form green, the painter should be careful to
select a yellow which is free from red. An orange chrome will not produce, in com-bination with blue or black, a clear green; and, on the other hand, where a green tint
is not wanted, no color should be used wherein there is a tendency toward yellow.
Any color partaking of a yellow cast, when mixed with other dark colors, except reds
and browns, tend to form greenish tints. If beginners will bear this in mind, it will
save them a great many failures in the attempt to produce clear tones.
INDIAN RED
is a very strong color, and always of service to the carriage painter, especially in
forming the ground work for transparent colors, such as lakes of a reddish or purple
cast, carmine and the darker shades of Bismarck. Mixed with lamp-black it formsthe most durable under-coatings that can be obtained, where a brow^n is needed.
With white a flesh color is formed, making a good gi'ound work for American, Chi-nese, or English vermilion.
It covers and works well for broad line striping on black grounds, but is not rich
enough in color of itself, except on cheap work. By adding lake, a richer tone is
secured, which will cover well, and save the time and expense of glazing, when it is
important to gain time.
It serves well as a shade for vermilion on letters, scroll work or shaded striping.
On straw color and other light grounds, it assumes a darker appearance in contrast,
which may be corrected by changing the color by the addition of vermilion.
The best Indian red is of purple cast.
RAW UMBER
is used to a considerable extent, and is indispensable to the painter. With blue andyellow, it forms a very pleasant range of modest greens.
In combination with white and yellow, gives drab tints, or stone color, which maybe saddened with black, or enriched with vermilion or lake. In mixing a light
striping color, which may be too much of a raw, yellowish cast, a small quantity of rawumber will correct the defect. It is a useful color in shading on w^hite, and may be
classed among our most useful colors.
8/10/2019 Making Horse Drawn Coaches 1800 Bw
http://slidepdf.com/reader/full/making-horse-drawn-coaches-1800-bw 240/455
184 COACH-MAKERS' ILLUSTRATED HAND-BOOK.
CHEOME GEEEN,
Used clear, has a coarse and offensive appearance to the majority of persons, and is
seldom used by the carriage painter, except in combination with other colors, andeven then very sparingly.
Mixed with Prussian blue, drop and lamp-black, the greens obtained are dull, andnot to be compared with those from the .iiixture of Prussian blue with Dutch pink
;
but as a ground work it answers every purpose. And greens, like lakes and othertransparent colors, have to be glazed to obtain richness. With white, various delicate
pea-green and other tints may be made. It can be heightened with yellow, formingbrighter tones of green, or saddened with black.
It will be found useful in correcting a color which is too red, and mixed in small
quantities with white, gives a purer appearance to that color, although it is inferior tothe addition of ultramarine blue for the same purpose.
LAMP-BLACK,
although possessing a greater body than perhaps any other black, is not suited to the
wants of the carriage painter, for the outside black coatings on good work.
Its wearing qualities are superior, but the color is not intense enough to make a
passable piece of work. It may be used as a foundation coating, but this plan is not
followed by the generality of painters ; being, naturally, of a greasy nature, it is not
safe for the carnage painter to use much oil in mixing it.
DEOP-BLACK
is of a deeper tone (or should be, which is not the case with a great deal of it of late,)
and, therefore, is used for the outer coatings. Drop-black, when of a dull broWnshade, may be partially corrected by the addition of Prussian blue, in the proportion
of one part blue to three of black ; but this, in the sun, is apt to show changeable, the
Prussian blue giving it that tendency. Where the best English drop-black can be had wewould advise that it be used clear. White and black forms grays of different degrees
according to the proportions used. Grays may be enriched with yellow orred,
addedin only suflScient quantity to change the tint. In ornamenting, these colored grays
will be found of great value.
CHEOME YELLOW AND BLACK
produce green, which is of a somber hue, compared with chrome yellow and bluej
still they are used a great deal, and are better suited to the wants of the carriage
painter, in that they are not so grassy.
Black saddens all colors to which it is added, and is useful in toning them downwhere any other color would only increase the difficulty in which the painter often
finds himself when attempting to match a color.
Black added to any color of a yellowish cast tends to form green ; added to any color
of reddish tone it produces brown. It darkens blues, but sullies the colors, and so onwith other colors, it really saddens, and, we might say, robs the color to a certain ex-
tent of its purity.
Black may be truthfully named as the most important color in the hands of thepainter. A carriage would look in shocking bad taste were it painted all white, or
yellow, or red, or green, or blue, with no relief by striping ; but with black, plain blacky
what style of vehicle may not be turned out which will be at least acceptable, and not
attract the remarks of the majority of persons as to its unsightly appearance ?
8/10/2019 Making Horse Drawn Coaches 1800 Bw
http://slidepdf.com/reader/full/making-horse-drawn-coaches-1800-bw 241/455
THE ART OF COA( II PAINTING. 185
PANEL COLORS.
Carmine is a red far surpassing vermilion in richness of tone, yet similar to the best
deep English vermilion in height of color. It is often adulterated with vermilion by-
color men, which, of course, injures its purity. Pure carmine will dissolve in aqua am-monia, leaving no sediment.
The various grades of carmine are numbered from No. 1 on up. No. 40 being the
quality used by the carriage painter. It is a slow drier and should be mixed with either
varnish or a pale japan. Raw oil and sugar of lead will answer where the work to be
painted is in no hurry. Carmine has not sufficient body to cover, and therefore mustbe laid over a ground work. It partakes of the color of the ground, giving a variety
of rich hues. It tones down the brightness of vermilion, and in turn vermilion brings
out the full richness of the carmine.
When laid on Indian red it is proportionally darker, over dark brown it produces a
deep, rich tone. It should be painted over a ground mixed of durable colors ; laid
over rose-pink, or any similar cheap and perishable color, will be time and moneythrown away, which includes, of course, a good reputation.
Although classed with the panel colors, we would not advise its use for panels, ex-
cept on very light buggies, and then but sparingly. For producing a rich, bright red
stripe it has no equal.
Madder carmine, made from the madder plant, although not in general use for sur-
face painting, is a better drier and retains its freshness and purity longer than the
color from cochineal.Carmine is of great service in ornamenting. Mixed with asphaltum, verdigris, deli-
cate greens, olives, drabs, etc., etc., it imparts a warm tinge without injuring the color.
With white it gives a delicate pink. White, Naples yellow, and carmine, a flesh color
tint. Washed over green it gives a warm shade. Mixed with vermilion in different
proportions, the ornamenter may produce a very rich center to any ornament re-
quiring a red field. It is indispensable in flower painting.
LAKE.
Of this pigment there are several qualities. Those in common use are English purple
lake ; Munich, Florence lake ; chatamuck or carmine lake, and rose lake. There are
finer qualities than those named, and other colors, as royal purple, and those of a
brown shade, which are seldom required. The light purple may be imitated with a
good quality of lake, ultramarine blue, and white, and the browns with umber, yellow
and lake. These gay mixtures are not durable, and do not find much favor.
English purple lake will bear some raw oil in mixing it ; the rest are better without
oil.
All these transparent colors need to be laid on a ground work similar to their owncolor when wet up. Two coats of color, and one of color and varnish, should cover
on a solid ground work. But if an extra coat is needed, put it on rather than have thepanels grained.
Munich or chatamuck lake may be used as a substitute for carmine, if you wish to
practice a little deception, or do the work according to the price paid. The colors
mentioned above should be ground very fine, so that their full strength may be ob-
tained, thus reducing the actual cost. Fine paint will spread over a greater surface
than that which is coarse, to say nothing of the trouble and vexation of having a
transparent color rub down, showing specks.
Grind your lake heavier than opaque colors, and do not mix up more than the
quantity needed for the work in hand. Use a clean cup and clean brushes. If you
8/10/2019 Making Horse Drawn Coaches 1800 Bw
http://slidepdf.com/reader/full/making-horse-drawn-coaches-1800-bw 242/455
]SB COACH-MAKERS' ILLUSTRATED HAND-BOOK.
pick up a paint cup that has had some other color in it, and half clean it, then snatchup a dirty brush and attempt to lay on a pure, solid color, you will be disappointed.
Do as little patch work as possible in laying on transparent colors. Go over the panelsat once, finishing all while yet wet.
Where the panels are very large use a broad brush and work rapidly, blending in
the edges while wet. Lay your color on up and down.
ULTRAMARINE BLUE,
when pure, is a very durable color. It is prepared from the mineral. Lapis lazuli
•called ultramarine (over the sea), because it resembles the beautiful blue seen in a very
clear atmosphere above the waters.
Weare not partial to it as a panel color unless it is used clear on a heavy body.
Mixed with the red lakes it tones them down without serious injury to the purity of
the color.
It requires a ground work, which should be as near the color you intend to lay over
it as possible.
For clear ultramarine a dark lead-colored ground will answer, or take Antwerp or
Prussian blue and white, and mix a tint that will match the ultramarine when mixed.It will be found a difficult color to handle by the novice.
The only secret in laying it on solidly is to have sufficient varnish or boiled oil in
the color to prevent it flying off, or, in other words, drying too dead.
The brushes and cups should be perfectly clean, to avoid muddying the color. A^ood quality of this blue is so pure in tone that it possesses a beauty unsurpassed. Twocoats, and one of color and varnish, should cover solidly. Ultramarine, like other
transparent colors, should be kept air-tight in the cup when not in use, and the groundwork be free from roughness or grit. If your color is not clean and free from skins or
^rit, or if the ground color be coarse, you may expect trouble when you begin rubbingyour varnish coats.
Specks will appear which will not be easily touched up and hidden.
Ultramarine, in combination with white, forms sky-blue tints; with white and black,
steel colors; with red, purple and violet. In painting clear white, ultramarine shouldbe added to counteract the effect of the oil or varnish. It will give to whitelead a
purer appearance.
VERDIGRIS.
Bust of copper, an acetate of copper. It is very transparent, of a bluish color, and
requires a ground work. On the panels of a heavy carriage it gives a rich tone of
green. It is not used to any great extent as a panel color —greens not being desired
by the majority of persons. Milori green, or green lake, is a color resembling chrome
green when dry, but is much richer than chrome green when mixed up. It has a
strongbody, covers well, and with white forms pleasant light greens for sleigh or other
fancy work. As a ground color for emarald green or verdigris it will serve a good
purpose.
COMPOUND COLORS, OR THOSE COMPOSED OP TWO OR MORE COLORS MIXED TOGETHER.
. The carriage painter is not required to produce a great variety of colors, hues or tints,
the panel colors being generally of the proper shade without any addition, and when..a change is required, for bodies especially, it results from simple mixtures, such as
have already been noticed. On carriage parts, of late years, there has been a run of
8/10/2019 Making Horse Drawn Coaches 1800 Bw
http://slidepdf.com/reader/full/making-horse-drawn-coaches-1800-bw 243/455
THE ART OF COACH PAINTING. 18;
drabs, and umber-colored browns, which have called on the painter for the exercise
of an unusual amount of skill in their mixture, and the mixture of striping colors to
harmonize. Some beautiful effects have been produced, while a great many glaring and
offensive combinations have annoyed sensitive eyes.
As there cannot be the slightest mixture of any two or more colors, without produc-
ing a change of hue, it follows that there is no limit to number of hues and tints which
may be produced. But as only a certain class are acceptable to the eye, the . painter
need use only a good selection.
formal or pure gray. —White and black in various proportions.
Colored grays. —Red and green, blue and orange, and red, yellow and blue.
Straw color. —White, chrome yellow and raw umber; white, yellow ochre, vermilion
and ra^ umber, or white, yellow ochre and vermilion.
Light buff'.— White and yellow ochre.Deep buff. —White, yellow ochre and red.
Salmon color. —White, yellow and vermilion, or white, yellow, vermilion and lake.
Flesh color. —White, Naples yellow and vermilion ; white, raw sienna and light red.
Orange. —Equal parts of red and yellow.
Gold color. —White, yellow, red and raw umber, blue or black.
Pearl color. —White, black and vermilion, or Indian red.
Lead color. —White, blue and small portion of black.'
Stone color. —White, yellow and umber ; black, umber and yellow.
Canary color. —White and chrome yellow.French gray. —White and drop black.
Tan color. —Burnt sienna, yellow and raw umber.
Linen color. —Black and white, warmed with umber in the shadows, or heightened
with yellow and reds, where in the painting any part should approach the skin.
Pea green. —White and chrome green.
Sea green. —Prussian blue and yellow, Prussian blue and Dutch pink, Prussian blue
yellow and Dutch pink.
Citron. —Green and orange, or which is the same, yellow, blue and red —green being
formed by yellow and blue, and orange by the mixture of red and yellow.Neiv York red. —Carmine and vermilion.
Chocolate. —Black and Spanish brown.
Umber-toned drabs. —White, raw umber, lemon yellow, and lake ; white, burnt umber,
and orange chrome ; white, umber, yellow, red and a little black.
Olive. —Umber, yellow and black ; raw umber and yellow;
green, umber and yellow.
London smoke. —Burnt umbe'r, yellow, white and red ; Vandyke brown, yellow, whiteand lake.
Lilac. —White, carmine and ultramarine blue.
Purple. —Ultramarine blue, whiting and carmine, blue and red.Violet. —Blue, red and black ; or blue and red.
Wine coZor.— Purple lake and ultramarine blue, lake blue and black.
Bismarck.— Burnt sienna, yellow and lake ; Dutch pink, burnt umber and vermilion;
Dutch pink, umoer, yellow^ and vermilion or lake.
Dark rich 6ro2wi.— Vandyke brown, burnt sienna and lake.
Green.— Blue and yellow, mixed in different proportions, give an endless variety ofgreens ; drop black and yellow produce a green well suited to heavy carriages.
Changeable color.— Clear Prussian blue ; it must not be color and varnished.Jfaroon.— Carmine,
yellow and burnt umber, or crimson lake and burnt umber.
8/10/2019 Making Horse Drawn Coaches 1800 Bw
http://slidepdf.com/reader/full/making-horse-drawn-coaches-1800-bw 244/455
188 COACH-MAKERS' ILLUSTRATED HAND-BOOK.
The foregoing list will enable the painter to mix up about all the colors required in
coach painting. A great many shades may be made of each, of those given, and com-binations formed which will be acceptable. The fashions do not always allow the
painter to use colors that may be to himself most pleasing, and he is often pained byan order to paint and stripe a carriage with glaring and raw colors ; but these coarse
effects soon grow into disrepute, and we find that on the average the colors used by car-
riage-makers are in good keeping.
OILS, JAPAN AND VARNISH.
Oil is an unctuous substance, animal or vegetable. There are what is termed fixfed
and essential oils. The fixed oils most commonly used are linseed (flaxseed), poppyand nut oils. Turpentine is an essential oil. In the use of oil the painter desires to
add a wearing quality to the pigments used, knowing full well that if his paints are
mixed without a fatty substance there will be no adhesiveness imparted, and but little
power to resist the action of the atmosphere in its changes.
Oil is used in a less or greater quantity, according to the kind of work to be painted
and the time allowed for completing the work in hand. The house painter may, withsafety, coat outside work with color mixed in oil alone, as he aims, or should, to pro-
tect the walls and other exposed parts from changes of atmosphere. Using no varnish
to finish with, the coatings have the full strength and flexibility of the oil to keep themfirm, and are not so liable to crack.
In coach painting the case is quite different. Oil must be used sparingly, else thebody of paint laid on will not dry thoroughly ; then, when it is inclosed by varnish,
there is a brittle surface imparted, which checks the drying of the oily coats for a timeresulting in cracks.
Linseed oil is considered the best for general purposes, on account of its strength andflexibility.
Oil is influenced in drying by the colors with which it is combined, some of whichhasten while others retard it. For carriage painting a good quality of raw linseed oil
should be used, as it works pleasantly, dries dead when not used in excess, and is free
from that gumminess too often found in the use of boiled oil. Raw oil, simmered overa gentle fire for two or three hours, adds to its drying qualities, and if certain oxides
and salts of lead are added, they impart a power to dry very rapidly.
Striping colors, mixed in boiled oil, work kindly, and dry well over night.
It has been stated that the drying of oils depends on the following conditions: Thepresence of oxygen, which, by an incipient combustion of the hydrogenous oils, fixes
them, whence, whatever contributes oxygen to oil dries it, as pure air, sunshine, etc.
hence, all the perfect oxides of metals dry oils. Imperfect oxides, by extracting oxygenfrom oil, retard drying ; hydrogenous substances are ill dryers in oil.
The best dryers are those which contain oxygen in excess, as litharge (which is an
oxyd of lead), sugar of lead, minium (the red oxyd of lead), massicot (also an oxyd of
lead), manganese, umbers, sulphate of zinc, or white copperas or verdigris.
Oxygen was named from its property of generating acids ; it is the supporter of or-
dinary combustion.Hydrogen is a gas constituting one of the elements of water. A moment's thought
on the part of those who have not given this matter any attention will fix in the mindthe reasonableness of the foregoing statements. We might make this very plain bysaying that oxygen is fire, and hydrogen water.
JAPAN.
Japan, which is used by the carriage-maker only as a dryer, is made by boiling lin-seed oil with one or more of the articles named above.
8/10/2019 Making Horse Drawn Coaches 1800 Bw
http://slidepdf.com/reader/full/making-horse-drawn-coaches-1800-bw 245/455
THE ART OF COACH PAINTING. 189
It is too often the case that our japans are made so dark that they sully the purity
of fine transparent colors. The manufacturers of japan are not at fault in this matter,
as the demand on them of late years has been to produce dryers which would not fail
to fasten the paints in a few hours. Hurry, hurry, is the word ; and, as a quick andpowerful dryer is necessarily dark, the painter must have recourse to varnish, or l3oiled
oil, in the mixture of transparent and delicate colors. Japan, as we generally find it
on the market, cannot add any tenacity to the paints in which it is mixed, and should
be tempered with oil where the painter lays on but one coat a day. Where two or
tluee coats a day are applied, it is best to use no oil, but depend on the varnish coats
to hold all solid.
An article called japanner's gold size, better known to English than American painters,
is made as follows : Powder finely of asphaltum, litharge or redlead, each one ounce ;
stir them into a pint of linseed oil, and simmer the mixture over a gentle fire, or on asand bath, till solution has taken place, scum ceases to rise, and the fluid thickens oncooling.
VARNISH.
Any viscid, glossy liquid is a varnish; but as the carriage painter has no use
for those kinds, which are made in alcohol, or any other liquid which does not im-
part a gloss and good wearing quality, we need not mention them here. All that a car-
riage painter requires is to be furnished with a solid-drying rubbing varnish, and a
tenacious, pleasant-working and durable finishing varnish.
Varnishes made by the use of oils vary so much in their natures that it is bewilder-ing to even think of them. That there is a difference in the quality of gums used,
which add to or detract from the good quality of varnishes, there can be no doubt, but
when we are told that Zanzibar gum alone is used, that the oil was the purest and best,
that the whole process of making the varnish was in the keeping of old and experienced
hands, and then, after trying the varnish, we find it Avorthless, we are at a loss to ac-
count for it. The wearing of any varnish depends on the quality and quantity of the
oil used, and the time allowed it to ripen after being racked off .
Rubbing varnishes are required to dry firmly in from two to five days ; consequently
less oil enters- into their composition. A good wearing rubbing varnish should not berubbed until the fourth or fifth day after being laid on. When rubbed, it should not
sweat out (become glossy) soon after, even in hot weather. Slow-drying rubbing var-
nish, when allowed to stand a day or so after having been rubbed down, will sweat out
in hot weather, and should again be'run over with the rub rag and fine pumice be-
fore another coat is applied.
Rubbing varnish that sweats at all times, soon after being rubbed, is liable to crack,
and should not be used.
By the use of hard-drying varnish the painter is enabled to level his work down and
prepare for the last coat or finishing varnish. This last coating must be of an oppositenature to that on which it is laid if great brilliancy is sought after, and as its surface
must ever be exposed to the action of heat and cold, sunshine and shower, it mustpossess an elasticity, or oily nature, that will resist these changes for a great length of
time.
The English varnish manufacturers possess a secret which seems to be hidden, so
far, from others; for, while oils may be used in equal quantities by two varnishmakers, and the same quality of gum, the result of the two separate days' work are far
J liferent.
Finishing varnishes are considered good or worthless by the finisher according as
they work freely, are free from particles of gum, flow out well, and generally remain as
8/10/2019 Making Horse Drawn Coaches 1800 Bw
http://slidepdf.com/reader/full/making-horse-drawn-coaches-1800-bw 246/455
190 COACH-MAKERS' ILLUSTRATED HAND-BOOK.
they are left when the job is completed. This much having been secured, the wearingproperties are almost always found to follow.
Varnishes are subject to many changes after being spread on a surface, and occasion
the painter a vast amount of trouble and vexation.
We cannot give a satisfactory reason why varnish should be so sensitive ; for, if wecould, we need not labor for a living —the secret would be worth a fortune. We will,
however, give a few hints which may be of service to the painter.
IRKEGULARITIES 01^ SURFACE OP VARNISH.
Varnish is subject to various changes after having been applied to a body or carriage
part. It crawls, runs, enamels, pits, blotches, sags down and hangs on the lower edges
of the panels, smokes or clouds over, has the appearance as if dust had been dredged
on it through a piece of fine mull ; or, as happens with carriage parts, gathers up andhangs in heavy ridges or beads along the center of the spokes.
These irregularities will happen at times with the best quality of varnish in the
market, and while being used by workmen of undoubted skill, surrounded with every-
thing necessary to insure perfect work, proving, conclusively, that atmospheric influ-
ences alone often cause irregularities on the surface, known by the terms mentionedabove. But, while this may be true, there is no doubt that the finisher may be to
blame in some cases for an imperfect job.
Extreme heat in the summer, and cold in the winter, each exert an influence. Heat,
by melting down the varnish, or, when charged with electricity, as when a storm is
brewing, causing pits. In winter, the cold retards varnish from setting equally, andmay occasion enameling and blotches.
By crawling, the painter means that his varnish, immediately after having beenbrushed on, does not cling to the surface equally, but shrinks away from it in spots.
This feature, presenting itself before the panel or space is completed, does not occasion
much trouble. The application of water, by means of a sponge, or a damp chamois,
will remove the tendency at once. Spots on the panel already coated may be corrected
by blowing the breath on them, which will contribute enough dampness to make the
varnish cohere when again brushed over. A glossy surface must be haired or rubbeddown with ground pumice and water. Varnish crawls more frequently when the sur-
face to which it is applied is cold. Whether the act of brushing produces electricity,
or the surface was already excited by some mysterious agency, we are unable to say.
The varnish is repelled by some means, and behaves as when poured on a piece of
glass that has been slightly rubbed with paper. '
Runs should not always be charged to the finisher, although we admit that, in the
majority of instances, he is to blame. We have seen varnish that would sag, or run,
when applied in the usual manner by the most skillful workmen ; sometimes on a
bodyafter a few hours, and on carriage parts after several weeks had elapsed.
Thevarnish referred to was too soft, not possessing the property of increasing in volume oncoming in contact with the air, and supporting itself by adhering in a continuous
body.
When a heavy coat of varnish has been laid on, and any portion of it slighted by the
brush, the part slighted will be very apt to run, because the varnish has not beenblended in with that which immediately surrounds it ; it hangs alone, and somewhatheavier, and seeks a level or space to incorporate itself with the other varnish, but,
except in a few instances, fails to find it.
A finishing varnish that will accommodate itself to the space required to swallow upa run, without assistance from the painter, is prized very highly. Runs under themoldings, and out of corners, are occasioned by the manner of laying on the varnish.
8/10/2019 Making Horse Drawn Coaches 1800 Bw
http://slidepdf.com/reader/full/making-horse-drawn-coaches-1800-bw 247/455
THE ART OF COACH PAINTING. 101
A surface cut up by moldings into large and small spaces should not have an equally
heavy coating, as the smaller spaces will not support as much varnish as the larger
ones; and where the moldings join, forming corners, allowance should be made for
the tendency of the varnish to collect, and by its own weight follow along, guided bythe moldings, and at length sag down. It is better to lay on a heavy mass of varnish
on the large spaces, and afterward work it up toward and on the moldings, than to
begin on the moldings first.
Enameling is an appearance as if a piece of enameled leather had been pressed onto the surface of the varnish. The term is used by carriage painters only ; or, at least,
it originated among carriage painters.
A coat of varnish, put on another which is not hard, will often shrivel up, because it
has no chance to set evenly ; the under coat being checked in drying, the outer coat
will sink in, and the two coats combine, forming, as it were, one coat, neither of whichcan dry properly.
Rubbing varnish, added to a finishing varnish, will act in the same manner, unless
they be thoroughly incorporated by remaining together for several hours.
Rubbing varnish drawn oflfat the bottom of the can will be apt to enamel.
PITTING.
'* Pits, or pock-marks occur under the following circumstances :
1st. When japan is added to force the drying.
2d. When a quick-drying varnish is added to one of a high grade.
3d, When a storm is gathering in hot weather, before the rain falls, varnish that hasbeen applied will often pit.
4th. Steam rising from a wet floor, in a close room, and having no means of escape.
5th. Difi'erence in the temperature (in winter) between the varnish and body, or the
room cooling off at night before the varnish is set.
6th. Laying on the varnish too heavy without properly brushing it through.
7th. When the walls attract dampness in summer.A varnish that pits will first appear dull ; the next change that follows will be col-
lapsing of the surface.
. When a job has pitted, take a varnish brush, and, beginning at the top, lay on a
heavy coat of turpentine, and as the varnish is softened up, scrape it off with a piece
of harness leather sharpened on the edge like a chisel. Scrape the varnish up and put
it in a cup. Continue this until all is removed, then with soft rags and clean turpen-
tine wipe it over again ; the stickiness of the turpentine remaining on the surface re-
move with a mild soap. The pumice stone and rag must follow, and when the job is
perfectly clean, and again touched up, a second trial will probably produce a perfect
finish. It is a waste of time to attempt to rub out the pits.
Sagging down off the panel is wholly the fault of the varnish ; it is too oily, and
will not remain where it is put. Remedy —send it back. Fine dirt. When a varnish is laid on clean, and looks full and rich when finished,
and the following day appears as if it had been sprinkled with dust, it lacks body,either from being too new, or from the process of manufacturing.
A high grade varnish, that has become very cold while in the tanks, will some-times act thus, we have been informed, but we cannot speak from our own experi-ence.
A very heavy coat of varnish, on a body or gearing, or a very light one, neitherproduce the best work ; a medium coat should be the rule.
Having overlooked the cause of varnish clouding or smoking over,we
will here give
attention to it.-
8/10/2019 Making Horse Drawn Coaches 1800 Bw
http://slidepdf.com/reader/full/making-horse-drawn-coaches-1800-bw 248/455
192 COACH-MAKERS' ILLUSTRATED HAND-BOOK.
Rubbing or leveling varnishes, and the best quality of finishing varnish, each pre-
sents this appearance at times. In answer to a question we asked an old experienced
varnish maker, some years ago, he replied, that there were some qualities of gumthat would invariably cloud when spread on a surface, and that it was an evidence of
inferiority in the gum. We will not deny the statement, but our observations in this
direction do not bear out its truthfulness.
Finished work clouds over while standing in the wareroom or repository, because
it is kept from sunlight and air, and is more or less exposed to the sulphurous vapors
from coal smoke —the best English varnishes forming no exception.
Exposure to sun and frequent washings will restore the gloss in a great measurebut when a carriage has stood for several months, the better plan is to re-varnish it,
PAINTING COACH.
Having previously spoken of the tools and appliances used in the paint room, and of
colors, oil, varnishes and japans, we will take up a coach and carry it through fromthe priming to the finishing coat of varnish. We select a coach, for the simple reason
that it will cover all lesser styles of work. The bottom, top and inside painting or
slushing is generally done in the wood shop, so that when the body arrives in the
paint room, those parts are one coat in advance of the remaining surface.
As the top and inside of the panels require more attention than some manufacturers
give to them, it will not be out of place to mention them in passing.
The painter cannot be held responsible for green timber in a top, which causes the
covering to rise up in ridges or blisters, nor for carelessness on the part of those whodraw on the muslin, in not rubbing it down to prevent air from getting under it ; but
he should feel sufficient interest in his work to see that the inside of the top shall
have a good, heavy coating of slush or oil lead, to preserve the wood from dampness,and on the outside of the top that it is properly primed— not with dirty or skinnypaint, but clean, smooth lead. When this is dry, the nail-holes and low places should
be puttied with a firm drying putty, which will bear blocking down with sand-paper,
leaving the top as level as possible. When this is dusted off* clean, apply a heavy
coating of smooth lead in oil, with sufficient varnish in it to hold the lead together, sothat when the muslin is drawn on it may be rubbed down, and, as it were, beddedinto the paint. The roof will then be perfectly air-tight, and in good condition for
filling in. If, on the other hand, the muslin is drawn on over a rough, uneven coat-
ing, the highest points will be rubbed through before the surrounding surface is
brought down level ; the water gets under, and puttying will not prevent the cloth
from raising up after the coach is exposed to the weather.
The inside of the body should be well coated, which is a great protection to the
panels, especially in the process of rubbing out the rough stuff . The priming coat
should be mixed of the best pure keg lead and oil, with only a small quantity of dryer,and allowed at least one week in which to dry. This first coating is a very importantone. It should be thin ; we do not mean that the paint should be very thin, but that
the lead should be well worked into the nail-holes and grain of the wood, leaving only
a thin film on the outside. A well-worn, springy brush is the best. When this coat-
ing is dry, sand-paper it carefully, and apply the second coat of lead, using less oil.
The third day thereafter putty the nail-holes half full. The second day after puttying
apply the third coat of lead, mixing to dry firmly, using no oil except what the keglead furnishes. When dry finish puttying the nail-holes, and plaster up the grain
that may be very open, leavingno putty on
the outside ; or, rub into the grain lead
mixed up heavy.
8/10/2019 Making Horse Drawn Coaches 1800 Bw
http://slidepdf.com/reader/full/making-horse-drawn-coaches-1800-bw 249/455
THE ART OF COACH PAINTING. 193
The body has received three coats of lead, and is puttied. It may now stand two,
three or five days, as time will permit. When again taken in hand, sand-paper off anyputty that may be above the level of the surface ; dust off and brush on a level coat
of lead, which must also dry hard and firm. Each coat of lead should be laid on as
level as possible, and be made to do its share of filling the grain. The roof should not
be slighted, but the bottom and inside of doors may have one coat less. The bodymay now be set aside for three or four days, when it will be ready for the rough stuff.
The rough coatings should dry very firmly, possessing only sufficient elasticity to
bind them to the surface. The first coat will bear a trifle more oil than the remaining
three or four, and should stand about four days ; the other coats can be put on every
second day. Four coats and a guide coat should fill up well. The foundation coats fill
better by being laid on cross-wise alternately.
If English filling is used, mix one i)art of keg or oil lead and four parts English fill-
ing; mix up stiff in a good brown japan and raw oil. The oil should be in the propor-
tion of one-fourth to three-fourths japan. Varnish may be added or not, as the painter
may think best. We have serious doubts as to its adding any to the good qualities of
rough stuff. It tends to hold the particles of paint closer together, and probably makesthe rough stuff rub tougher. But it cannot be doubted that varnish is more liable to
crack when exposed to the weather than oil, and to whatever extent varnish is addedto paints, to that extent is it more liable to crack. But the common practice is to addvarnish to rough stuff, some painters holding that American and others that English
varnish is the best. In this country, where painting is done (by steam) we wereabout to say, it cannot be expected that it will wear any great length of time.
The time allowed for filling in a coach body, as laid down in the preceding number,may be extended as far as circumstances will permit. We do not think, however,there is any positive gain in the wearing of the foundation coats by allowing weeks to
intervene between coatings. When a coat is hard, it is ready for another ; and it is
far better to have the body filled and set aside, than to divide the time between coat-
ings, and probably be compelled to rub out the body before the last coat is firm. TheEnglish method of using a large proportion of oil would require considerable time for
each coat to harden ; but as our practice is so different, there can be no necessity for it.
The first coat of rough stuff should be applied somewhat thinner than the others, and,
in some instances, would be improved by being mixed one-half white lead. It should
also be made more elastic than the succeeding ones, as it will then take a firmer hold
on the dead lead coat over which it is placed, contributing a portion of its elasticity
tb that coat, and also cling more firmly to the hard-drying coats which follow.
'1 he first coat should cover every portion of the lead surface ; be well brushed in
yet not allowed to lie on heavy along the moldings or in the corners. It should be
fine, and laid on smoothly, as it is better in rubbing out to leave on as much of it as
possible. The remainingcoats
should be applied reasonably heavy,laid off level,
andkept from lapping over the edges, or rounding the sharp corners, thus destroying the
sharp, clean lines given by the body-maker.
Any defects noticed, while filling in, should be puttied ; ever keeping in mind that
the perfection of finish aimed at is secured only by care at every step taken. Theguide coat is a mere stain, put on thin, and intended to assist the rubber in detecting
the unevenness of the surface.
The body having been filled in, may be set aside to harden ; or, if the smith is ready
for it, now is the best time for him to take it, as any dents, burns, or other mishaps
may be remedied without being detected. When it has returned from the smith shop
examine it closely. If there are anv bruises, puttv them ; anv burned places which13
8/10/2019 Making Horse Drawn Coaches 1800 Bw
http://slidepdf.com/reader/full/making-horse-drawn-coaches-1800-bw 250/455
8/10/2019 Making Horse Drawn Coaches 1800 Bw
http://slidepdf.com/reader/full/making-horse-drawn-coaches-1800-bw 251/455
8/10/2019 Making Horse Drawn Coaches 1800 Bw
http://slidepdf.com/reader/full/making-horse-drawn-coaches-1800-bw 252/455
196 COACH-MAKERS' ILLUSTRATED HAND-BOOK.
quantity over every part, he will not care so much for that as to be certain that hehas a sufficient quantity applied to insure it against setting before he has properly
manipulated it.
His next care will be to remove a portion of the varnish above and beneath thedrip molding, and around the back light, to prevent it from sagging, after which heagain addresses himself to the panels, this time with a view to the proper leveling of
the whole. His quick eye detects those portions where the varnish is heaviest, andby up and down or by cross brushing, as it may require, the varnish is leveled off.
Again the tool (small varnish brush) is passed around, or under the moldings, andthen the panels are brushed horizontally over every part, and finished by vertical
strokes.
During this whole operation the painter must work quickly, and aim to finish the
portion in hand before the varnish sets, so as to allow it to flow out. In the pro-
cess of leveling off the brush should be occasionally cleaned out, by wiping it on the
wiping cup ; for, as we stated before, more varnish has been applied than it is designedto leave on.
Varnish laid on in this manner will show no laps ; for, having been finished together
over the panel, it will flow out together, and appear as one undivided whole.
3d. When a narrow space connects ivith a large panel, the whole should he completed to-
gether.
We mention this separately from the second proposition, because it is the practice
with some varnishers to finish each part separately, thus giving a broken connection,
as where the head rail space joins the back quarter. As the remedy has been laid
down in the plan of varnishing the upper back panels, it will need no further explan-
ation here.
4th. The varnish should he hrushed up and down.
That is, it is to be brushed vertically. Up and down is the language of the shop,
and, of course, it comes natural to use it. Now, a panel an inch or two wide, a narrowbelt, or space, cannot be so brushed ; but experience has proven that larger panels
require to be laid off in this manner.
The advantages are, that a greater quantity of varnish can be laid on with less liabil-
ity to run or sag ; the varnish flows better, and the result is, better work is produced.5th. In ruhhing, or leveling, all hrush marks and faults must he corrected.
When the first coat of varnish is being rubbed, it is neccessary to merely removethe gloss, as in the attempt to remove grit, etc., the color might be disturbed. Thesecond and third coats will bear to be well rubbed. The second coat will hide the
defects of the first coat, and the third improve on the second, thus preparing the sur-
face for that season of anxiety —the preparation for, and the applying successfully of,
the finishing coat.
Before this interesting period in the history of every carriage has been reached,
much hard labor of body and mind must be endured. Runs, bruises and burns mayhave to be corrected. Runs on the second coat are more easily corrected than whenthey appear on the third, as they get two coats, which is also true in regard to other
defects. If, after a job is varnished, a run is discovered which cannot be corrected
with the brush, it (the run) should be rubbed over as soon as the varnish is hardenough to bear it, allowing it to dry until the body is rubbed for the next coat. Bythis means half the run is destroyed, and the next rubbing will remove it entirely.
If this course is not pursued, the run will be softer than the level portions of the sur-
face, and will not come down under the leveling block.
In leveling the coats of varnish, use pieces ofcork,
woodor
lump pumicestone, cut
to suit the various spaces, and covered with two thicknesses of cloth. Block down
8/10/2019 Making Horse Drawn Coaches 1800 Bw
http://slidepdf.com/reader/full/making-horse-drawn-coaches-1800-bw 253/455
THE ART OF C0AC4 PATNTIXG. 197
both small and lar^'e s{)aces, using a somewhat coarse, though even grade, of ground
pumice, rub])ing across the brush marks. Pumice stone should be used freely, and
the strength of the arms and shoulders laid out on the work. Brush marks, and other
defects, must be rubbed out. To do this, it is not necessary to draw the finger over the
panel every moment to look at something you know not what. The wet panel will
show the ridges far better than the part dried oft by the finger. By drawing the rub-
bing block across the ridges, they will show whether they are rubbed enough or not.
If you have laid on a proper second coat, you need not be afraid to lay out your
strength on it. Cut it down well, slighting no part. To rub close n\) to the moldings,
and in sharp corners, have a stick of hard wood cut at one end in the form of a knife
blade, and place the cloth over it (one thickness) placing the sharp edge up to the
molding, which will, by a few strokes, remove the grit that may be there. The coarse
pumice will growfiner in the process of rubbing,
whichwill
answerto finish with.
Or a fine grade may be used, kept for the purpose. No pumice should be allowed to
dry anywhere in the corners.
Hub next to the moldings last, for there is more danger of rubbing through, as there
is less varnish here than out on the panel. Having slighted no part, wash oft' clean,
touch up where any sharp edges have been cut through, and apply the third coat,
which should be as carefully handled as the finishing one. When this has stood a few
days, give it a light rubbing, and let it stand until ready for the finish. It will then be
well dried and cut down nicely ; the grit, if any, will not tear out. If the third coat
has been laid on properly, it will not require so much rubbing as the second. Thepumice should be tine and even, so as to avoid scratching. The sharp edges should
not be rubbed oft bare, for it is preferable to slight them in the rubbing rather than
to be compelled to touch them up. The practice of having to touch up the edges all
over a body, previous to laying on a coat of varnish, is a very foolish one, and may be
avoided in a great measure by rounding them slightly w hen the body first comes from
the woodshop.
The after coatings will sharpen them sufficiently not to be detected ; but where this
precaution has not been taken, slight them in rubbing, as the third coat should be
well nigh as perfect as the last or finishing. The experienced rubber will look care-
fully over each panel before putting on any pumice ; and where there may be grit, or
any slight defect, he will give these his especial attention.
Having leveled the surface, less pumice should be used, and finally scarcely any.
The panels should be finished off by passing the rub cloth throughout their length,
bringing them to a polish. A body that has passed through the hands of a first-class
rubber will, when washed clean and dried oft , present a beautiful appearance. Thefinisher, as he surveys it, will feel a sense of pleasure, and at once decide to spare nopains in the eftbrt to complete the job. In our largest and best regulated shops the
finisher is not a man of all work —one day with a pot of lead in his hand, the next
coloring; now in the body room, and then in the gearing room. Oh, no, nothing ofthe kind. He is a finisher in the truest sense, and is not even required to rub varnish.
Still further, he does not varnish the roof, arch and inside edges of the body. He has
help in the finishing room, which varnish all except the panels. These he attends to,
and through his skill, attained by daily practice, the finishing coat is put on so nearly
perfect that, to painters who have never had like advantages, surprise and mortifica-
tion will be mingled as they gaze at the beautiful w^ork, and remember their own wavyand dirty jobs.
The method adopted in laying the finishing coat is similar to that in the use of rub-
bing varnish. The varnish is applied heavily, leveled by repeated brushings, and care-fully examined during the operation to detect any foreign particles that may appear.
8/10/2019 Making Horse Drawn Coaches 1800 Bw
http://slidepdf.com/reader/full/making-horse-drawn-coaches-1800-bw 254/455
198 COACH-MAKERS' ILLUSTRATED HAND-BOOK.
A picker is used, made of whalebone, sharpened to a point, or any other device that
will remove the particles of dirt or gum. Having brushed the varnish throughout a
given surface, let it stand a few moments, when the bubbles will evaporate, thus leav-ing the hard particles remaining, which must be removed. The finishing strokes are
given lightly.
As it is beyond the power of words to give a perfect description of the manner of
laying off this last coat, we will have to leave the inexperienced to gather whatevermay be of value from the foregoing, and by care, good taste, and an unbending purpose,
supplement our hints by practice.
In conclusion we would remark, that to secure a perfectly clean piece of work, the
Toom^ body, cups and brushes, and the clothing of the vamisher himself, must be scrupulously
clean ; for, without these precautions, it will be madness to make the attempt.
THE CARRIAGE PART, OR RUNNING GEAR.
Having previously directed attention to the body only, we will now devote a certain
amount of space to the carriage ; for in all well-appointed shops the bodies and carri-
ages are painted in separate apartments by a distinct set of hands.
This division of labor is not only productive of more perfect work, but it is more profit-
able to the employer, and, we may add, gives better satisfaction to the employees.As, in the body room, it is requisite to portion the diflerentpartsof the work among
different hands, so also in the carriage room there must be a systematic division of
labor. We have known employers who would sacrifice a part of their profits on a
foreman getting twenty -five dollars a week, to satisfy their whim that a foreman should
not be afraid to sand-paper, lead and putty, grind paint, and do other dirty work whichcould be done as well by an apprentice or a half-way painter, earning from three to
seven or eight dollars a week.
In the carriage room, then, there should be those who attend to the rough work,
others who color and varnish, and one or more stripers. (We are speaking of factories
where several painters are employed.) To secure good and profitable hands, menshould be selected to perform those parts best suited to their natural tastes.
A man who may have no taste for striping may make an excellent finisher, and it is
not uncommon to find a good striper who cannot, on a carriage part, lay a passable coat
of varnish.
The carriage part, presenting only narrow surfaces, and the greater part of these
convex in form, does not require the time or labor that has to be bestowed on a body.
A most important part of carriage part painting is to have the work well primed
when the priming is entrusted to careless or inexperienced persons it is seldom that
the wood is coated as it should be. Where the spokes join the hubs and felloes, bare
spots will be left, giving the water a chance to soak in and scale up the paint. Theafter coatings of lead, color and varnish will protect the wood as long as they remainfirm ; but when they crack, the water will search out the slighted spots, scaling the
paint ofi down to the wood.
Oil lead for priming has, of late years, been replaced to some extent by the use of
different kinds of what are termed wood fillers, which penetrate and fill up the pores
of the wood. The carriage part, after having been primed, should go into the smith
shop; and when it returns, if there are any greasy finger marks, remove them, and,after a careful sand-papering, dust off and apply the second coat.
8/10/2019 Making Horse Drawn Coaches 1800 Bw
http://slidepdf.com/reader/full/making-horse-drawn-coaches-1800-bw 255/455
THE ART OF COACH PAINTING. 199
Putty on the second coat of lead, sand-paper when dry, and give a third and some-
times a fourth coat. Whatever plan is adopted, the aim must be to fill the grain perfectly
and produce a serviceable and a perfect finish throughout.
The carriage part, being more flexible than the body, and required to bear up theweight as well as perform all the rough part of the work, it cannot be expected of it
that the painting should wear as well as that on the body. Almost every portion of
the carriage part is brought under heavy strain. The wheels are subjected to severe
concussions at times, and the felloes and outer ends of the spokes to the grinding and
bruising of gravel and paving stones. The springs, being composed of separate leaves
or plates, and required to be ever changing their position according to the state of the
road, the coatings of paint and varnish cannot long remain as perfect as when they
were finished. The face edges of the leaves being rounded, there is formed longitudi-
nal grooves between them, which retain more paint and varnish than the faces ; andwhen the springs are in motion it is apt to flake ofi .
The coatings on a carriage part should be possessed of sufficient elasticity to cling
firmly to each other, and not be applied so dead as to form only an enamel over the
priming. The first and second coats should dry glossy, the third and fourth coats
dead, the colors to be laid a coat ever}'- day. If both broad and fine lines are to beput on, give the last coat of color sufl&cient varnish to bear hairing off . On this coat
run the broad lines, and when dry give a coat of rubbing varnish. Rub this coat with
ground pumice stone and water, and run on the fine lines. Finish on this with a me-
dium heavy coat of American or English Elastic Gear Varnish. All the parts of acoach or carriage should be equally well finished ; for nothing detracts so much fromthe beauty of a piece of painting as to see a well finished body and wheels, while other
parts look rough and slighted.
Those parts requiring to be much handled in hanging ofi should not be finished
until they are on and screwed up, when they may have a touch of the rub cloth, andreceive a coat which will not be soiled by finger prints.
Thus, by care and forethought, the job may be sent to the wareroom perfect through-
out, giving satisfaction to the employer, and he in turn w^ll feel warranted in recom-
mendingto a customer a piece of
workequally well finished wherever attention
maybe directed.GROUND AND STRIPING COLORS AND VARNISHING.
The ground colors for the carriage part vary according to the freaks of fashion,
therefore do not always follow the color of the panels on the body. During the late
unpleasantness, when money circulated freely, and the gay trappings of the military
created a taste for flashy colors, we had quite a run of staring patterns to follow.
The cavalry suggested yellow, orange and gold ; the artillery, red ; the zouaves, in
their uniform, copied from the barbarians, gave us crimson, and it may be that weinsensibly preferred blood colors, imitated with carmine, because our daily papers
teemed with the recital of gory battle-fields. Whatever occasioned our wild and crude
taste, no one will deny that it then existed. AVe are now returning to colors moresubdued in tone, and less striping is being put on.
The method generally adopted is to paint the carriage parts one or two tones lighter
than the color of the panels of the body, except where the panel color is of a hue that will
not admit of it. Certain shades of green, blue and red may be used on panels, but
would not, when made a tint or two lighter, be suitable for a carriage part. Darkbrowns, claret and purple lake would not be open to this objection, because, to the
majority of persons, they are colors which are pleasing to the eye in both their deepand medium tones.
8/10/2019 Making Horse Drawn Coaches 1800 Bw
http://slidepdf.com/reader/full/making-horse-drawn-coaches-1800-bw 256/455
200 COACH-MAKERS' ILLUSTRATED HAND-BOOK.
When the panels are to be painted green, blue or red, and the painter wishes to
carry these colors on to the carriage part, it is the better plan to use them for striping
only, and this but sparingly —the ground color to be black.
A carriage part painted black may be made to harmonize with any color used onthe body, as the striping colors can be selected so as to produce any desired effect.
Brilliant striping can be brought out on dark colors only, while if the ground color belight, recourse must be had to dark colors in striping in order to form a contrast. On heavywork we prefer dark colors ; on very light work, light colors, rich in tone, are appro-
priate. The carriage part should not detract from the appearance of the body ; that
is, there should be sufficient contrast between the two to bring out the beauties of the
body. A plainly finished body will appear to better advantage on a showy gearing,
and a richly painted body on one that is not overwrought. Ground colors, of anyhue that may be given, will accord passably well with a black stripe ; but with theexception of Avhite, straw color and similar delicate tints, drop-black of the best quality
should be used, for lamp-black will appear gray or of a greenish cast. Lamp-black is
cleared up, and appears dark enough on the light colored grounds above mentioned^
From black the painter may ascend through colored grounds by various mixtures.
Browns are formed by the admixture of reds with black, and are dark or light accord-
ing to the tone of the red and the proportions mixed. Drop or lamp-black, andIndian red, and vermilion, are used for ordinary purposes. Other shades of brownare formed from black and burnt sienna, Vandyke brown and burnt sienna, burntumber and black, etc., and a richer tone of each is secured by the addition of a small
quantity of lake. Lighter shades of brown require yellow to heighten them. Thesecannot be mixed where black is an ingredient, as yellow and black produce green.
Burnt umber, Vandyke brown, and others of this class, must be used, and whenmixed with reds and yellows, give a range of brown tints well adapted to carriage
parts. Burnt umber and orange chrome produce a handsome ground work, and whenstriped with drop-black and gold is very attractive. A very pretty style of striping for
a dark brown of the above mixture would be to mix the broad line a shade or twolighter than the ground color, fine lining it with black and gold, or black and red,
orange or tan color. Black striping may be omitted, but, in our opinion, to the injury
of the ground colors.
Lakes, of the different hues manufactured, form a richer type of colors, and may be
used pure, or mixed together when lighter tones are required. English purple lake,
by adding to it carmine, Munich lake, and others w^hich are brilliant, preserves t he-
richness so desirable. Vermilion and inferior reds destroy their beauty.
Drop-black, used for striping on these colors, is very pleasing. Rich brown shades^
either dark or light, relieved by fine lines that harmonize, are also very handsome.
Greens of a dark shade are used more or less, but this color is not so much admired
by the majority of persons as to warrant its use to any extent on carriage parts. Olive-
toned greens are considered the best adapted to coach work. A bright green is offensive
to the large majority of persons ; a dark, rich green, admired by but a few. Milori
green, glazed with verdigris, or Emerald green, and striped black, should be the limit
adopted, as the cheap mixtures are unsaleable.
Tan, straw, corn, Jonquil yellow, and all very bright tints, give a clean, fresh and
light appearance, and are well adapted to light work. They are generally striped with-
black, browns and lake. Neutral tints may be used with good effect also.
In striping carriage parts, the painter should use bright colors very sparingly when
he is ordered to put on the full amount of striping. A fine line placed on the face ofthe spokes and hubs, and distributed over the inside carriage, would bear to be far-
8/10/2019 Making Horse Drawn Coaches 1800 Bw
http://slidepdf.com/reader/full/making-horse-drawn-coaches-1800-bw 257/455
THE AET OF COACH PAINTING. 201
brighter in color than when each side of the spokes and the face, the hubs, the felloes,
on both sides, etc., are to be striped.
Colors, such as clear chrome yellow, chrome green and cheap reds, should not be
used on good work.
Mellow down chrome, and other bright yellows, with white, or give them an orange
east with red. Greens should be mixed of a pea green tint rather than those of a yel-
lowish green. A green tint may be toned down with carmine or lake, and still pre-
serve sufficient of a green cast. For striping white, use French zinc white, cremnitz,
flake or china white. The first mentioned will be found to grind easily under the
palette knife, and produce softer tints than those whites made from lead. The proper
arrangement of colors having been noticed in our articles on the Principles of Color-
ing, it will not be necessary to recapitulate them.
VARNISHING.
The coatings of varnish contribute largely to the durability as well as beauty of acarriage part. The ground and striping colors are shown in their purity only after
they are varnished and have a good surface ; and the after test of wearing depends onthe quantity and quality of the varnish applied.
Every carriage part should have at least two coats of clear varnish. The first coat
of clear varnish to be applied over the color and varnish ; the second, a finishing coat,,
possessing k good body and wearing qualities. Ground pumice and water must be
used to cut down the varnish, otherwise the finishing coat will be robbed of its
beauty.
In laying on the finishing coat, apply it neither very heavy or very light. Put on a
medium coat —a thin one will appear gritty and rough ; one too heavy will sink in and'
grow dim. Use the best American or English elastic gear varnish for finishing.
STYLES OF STRIPING, AND THE MIXTURE OP STRIPING COLORS.
The variety of styles in striping carriage work are limited to a few in number, whenwe discard those which lessen rather than increase the beauty of the work, for a
painter may spend two or three days in hand scrolling and striping a job,, and afterall his pains produce only a display of labor, without having added any real beauty.
In calling to mind the different patterns that have been and are being used, wenotice, first, the fine line. In times past it was considered in bad taste to stripe abuggy or carriage with a heavy line, and to have then attempted to sell a job striped
on both sides of spokes, felloes and other parts, would have laid the carriage-makeropen to severe criticism. When the demand arose for a greater display, the fine line
was enlivened by being dotted at the ends of each stripe, or in the middle, using thesame color as that of the stripe, no striping being put on the sides of the spokes. Wehave, since then, the following styles :
A fine line on each side and front of spokes.
A fine line dotted at ends, or in the middle of stripes.
A fine line dotted and finished at ends with fine scroll.
A fine line finished with large open scroll.
Two fine lines of the same color, running parallel to each other, representing abroad line edged.
Three fine lines (triple stripe), representing a broad line edged and centered withfine lines.
These prepared the way for broad lines on the spokes and other parts, giving us,
eventually, first, a single heavy line on the center of spokes, felloes, hubs, etc., and

8/10/2019 Making Horse Drawn Coaches 1800 Bw
http://slidepdf.com/reader/full/making-horse-drawn-coaches-1800-bw 258/455
202 COACH-MAKERS' ILLUSTRATED HAND-BOOK.
calling out the genius of the painter in studying up variations, among which we notice
the following
A quarter or three-eighths broad line of a modest color.The same, centered with a contrasting fine line.
The broad line, centered and striped on front edge.
Broad line, centered and striped on both edges.
Broad line, centered, and fine lines placed at a distance from the edge.
As these gradual changes took place in the quantity of striping run on, the desire
arose for gaudy colors, and modest and retiring colors were in a great measure aban-doned, ushering in straw, orange, red and crimson, and these were followed and ac-
companied with a perfect shower of gold leaf. The flash style still obtains in somesections of the country, it being a ditficult matter to sell work plainly finished.
Broad lines having been introduced on the spokes and every other presenting face
front or back, over the gearing, the only change that could be made was in the man-ner of running the stripes.
1st. They were started at the hub and* carried to a convenient distance from the
felloe, the end squared by cutting them off with the ground color, and then followed
2d. Centering, edging and distance fine lines, all cut ofi an inch or so from the felloe.
3d. The same, except that the edging lines were connected across the end of broadstripe, as were the distance lines.
Then the stripes were carried from a point an inch or so distant from the hub to the
same distance from felloe.'
From hub to felloe, the entire length of spoke, then centered, edged and distanced.
Carmine glazed on vermilion was introduced, and had almost unbounded sway for
a time. Half and half, as it was called, was short lived. This style consisted in striping
one-half of each spoke, etc., with a color contrasting with the ground color.
The ground colors ranged from white through almost every mixture the fertile brain
of the painter could invent, and often the puzzle was to select a suitable color withwhich to stripe a gearing.
Bodies were introduced with bowls, cut-under, or wheel-houses, and paneled
off so that diflferent colors could be brought near each other. Striping both heavy andfine lines became fashionable, and on the bowls and cut-under a vast amount of labor
was expended. During the late war there appeared to be a frenzy for display, and the
efforts of carriage architects and artists to keep pace with it well nigh exhausted their
ability to produce anything new, handsome and striking.
The compounding of the colors used for striping during these years which witnessed
such a variety, may not be uninteresting. We will begin with white, and endeavor to
mention the greater number used.
White Broad Line, which was mixed of clear china, flake, zinc, or cremnitz white.
The last named possesses the purest tone.Silver Color —White and a minute portion of drop or blue-black.
French Gray —White and drop-black.
Straiu Color —White and chrome yellow. No. 2 ; white, chrome yellow and raw umber;white, chrome yellow and vermilion; white and yellow ochre; white and Oxfordochre.
Corn Color— White, yellow ochre and umber ; white, yellow ochre, umber and a little
black.
Light Buff—W\iiie and lemon chrome ; white and yellow ochre.
DeepBuff—
White, orange chrome and raw umber; white, lemon chrome and ver-
milion; white, chrome yellow. No. 2, and light red.
8/10/2019 Making Horse Drawn Coaches 1800 Bw
http://slidepdf.com/reader/full/making-horse-drawn-coaches-1800-bw 259/455
THE ART OF COACH PAINTING. 203
Cinnamon —AVhite, yellow, light red and umber; burnt sienna, yellow and umber.Canary Color —AVhite and lemon chrome; poonah yellow glazed on white; white and
dro}) ochre.
Cane Color —White, ochre, a little umber or black.
White being the principal ingredient in all of the light colors made use of, it will be
readily noticed that a great variety of tints and shades may be produced by the quan-
tity of any color that may be added. Therefore in compounding light colors white
should be first placed on the palette or stone, and the colors added in small quantities,
until the required tint is produced ; and it is likewise necessary to compare the tint
with the ground work on which it is to be placed. If the ground color is dark, the tint
will appear, in contrast, to part with some of its color, and must be strengthened.
AVhite, mixed with the various pigments termed yellow, gives tints lighter or darker,
according to the tone of the pigment employed. White and light chrome yellow,
mixed and compared with white and medium, or deep chrome, present considerable
difierence ; and when the darker yellows are made use of, the change is still greater.
The same is true of other colors mixed with white. Zinc white produces softer tints
than whitelead.
Pink —White and vermilion; white and light red; white and Indian red; white andcarmine, etc.
Flesh Color —White, vermilion and Naples yellow ; white, Indian red and ochre.
Orange —Vermilion and lemon chrome ; carmine and lemon chrome.
Drabs —White and raw umber; raw umber and yellow; white, raw umber and red;
white, umber, yellow and black.
Blues —White and ultramarine blue ; white and ultramarine blue, glazed with clear
ultramarine; ultramarine blue, glazed over straw color; ultramarine blue, glazed over
white.
Lilacs and Purples —White, vermilion and ultramarine blue; white, carmine and ul-
tramarine blue ; carmine and ultramarine blue.
Pea Green —White and chrome green; white and verdigris; white, blue and yellow.
Grass Greens —Chrome yellow and Prussian blue ; chrome yellow, blue and black;
chrome yellow, Prussian blue and Dutch pink.
Browns —Burnt sienna and yellow ; burnt umber, yellow and vermilion ; burnt umber,
yellow and lake ; burnt umber and orange chrome ; burnt umber, yellow and Indian
or light red ; Vandyke brown, burnt sienna and yellow ; drop-black and Indian red,
black and vermilion ; black, vermilion and carmine. A great variety of shades maybe had by varying the proportions of the colors named, and by the use of others not
necessary to mention.
Reds —Clear English Trieste vermilion ; English vermilion and carmine ; English
vermilion, glazed with carmine ; English vermilion, glazed with Munich lake ; carmine
glazed on Indian red; carmine, glazed on dark brown ; carmine and Indian red.
The foregoing list comprises the majority of the hues and shades made use of ; while
in the attempt to find something new, other colors were accidentally formed, the mix-tures of which would puzzle the painter to mix again, were he called upon to do so.
Green Leaf was very freely used, degenerating at length into bronze and paint imita-
tions of gold leaf.
On all dark and medium grounds the light contrasting colors, either as fine or coarse
lines, were used; on light grounds, various shades darker than the ground color.
Wherever fine colors, either for ground color or striping, were employed, the finished
work was greatly admired ; while imitations condemned the work on sight.
In the proper selection of striping colors it would be well to remember the effect
8/10/2019 Making Horse Drawn Coaches 1800 Bw
http://slidepdf.com/reader/full/making-horse-drawn-coaches-1800-bw 260/455
204 COACH-MAKERS' ILLUSTRATED HAND-BOOK.
produced by the mixture of their complementaries. The eye, when directed at a
color, is, after a few seconds, excited to see a faint image of another color. Greenwill call up red, and red green. Blue will excite the eye to see orange, and orangeblue. If, then, you should place green and blue side by side, a confused effect wouldbe produced. It would be similar to mixing green, red, blue and orange on the pal-
ette, which will at once convince the painter that a poor color would be the result.
Red and blue, or green and blue, are less pleasing than red and green, blue and orange.
Red and blue and green and blue should be separated by white. Yellow, orange,
blue and violet associate well with black, while green would give to the black a rusty
appearance, on account of the eye being excited to see red.
The painter should experiment with different colors, and keep a memorandum of
the mixture of those which associate best, and keep samples of every job he fin-
ishes. These will also be of value in assisting a customer in selecting, and in speedily
settling any objections he may make when his carriage is finished.
In conclusion, we would remark, the purity of striping colors depends greatly on the
color of the liquids with which they are mixed. Dark brown japan should be seldom,
if ever, used. Varnish —varnish, oil and japan, oil and sugar of lead ; boiled oil ; rawoil, and redlead simmered over a gentle fire for an hour or two, or any other light-
colored mixture. Carmine and lakes requiring a more powerful dryer than any other
colors.
Panel colors vary but little from one generation to another, so that the coach painter
readily acquires the art of compounding those shades which are produced by the mix-ture of a few different pigments. Carriage parts and striping colors present a widerfield for the exercise of good taste in coloring, but these, too, are subject to the ca-
prices of fashion —a season of display being often followed by that of the plainest sort
of work.
During the continuance of the instructions given, we have touched upon the paint
shop, as it should be, calling particular attention to light, ventilation, the tools and de-
vices requisite, the proper division of the work, the care of brushes, pencils, etc.,
economy in the use of stock, the nature of oils, japan and varnish, compound colors,
etc., and also carried a coach through from the priming to the finishing coat of varnish.
Wherever our descriptions of the working of the paint room may seem to be slighted,
it must be remembered that language is too poor to express certain manipulations
which are acquired by daily practice, and which cannot be communicated to another
except by or through his powers of imitation. It is one thing to sit down and write
out an article explanatory of laying the finishing coat of varnish, and quite another
matter for he who reads the explanation to possess himself of that indescribable some-
thing which is the result of large experience, and which the writer has no more power
of communicating with pen and ink than if he scribbled his paper without properly
forming a single word. While this is true, valuable hints may be given which will
tend to greatly improve those who have had no opportunity to see work finished in
good style, and in the anxiety to bring their work as near perfection as possible, they
will adopt a mode of handling the brush and varnish peculiar to themselves— different
in non-essentials, it may be —yet producing what each one desires, a clean, level coat
of varnish.
In conclusion, we remark that it has been far from an easy task to present the Art
of Coach Painting in the form adopted; and, defective as it may be, they who attempt
a similar exercise will probably learn that very simple things, done by the aid of
tools, are often the most difficult to explain with pen and ink.

8/10/2019 Making Horse Drawn Coaches 1800 Bw
http://slidepdf.com/reader/full/making-horse-drawn-coaches-1800-bw 261/455
OUXAMKNTAL ALPHABETS. 205
ALPHABETS.In this connection is given three ali)hiibets, viz. :
The Unique, The Ornamented
and the German Text.Of the
Unique style we may say the letters are novel indesign, and when singly placed or arranged into words, are very attractive. Theletters are of an ornamental block pattern, being formed as if made of narrow strii)sof wood, beveled on the ends, and the pieces then placed in a position to form eacJiletter.
Their beauty or oddity, whichever you please to call it, consists in their irregularity,relieved by a light line to the left. The proportions may be ascertained by measure-ment with the dividers. Square the letters, then take in the dividers the width, andascertain how many times it is contained in the height. Having secured the properproportions, you may enlarge them to any required size.
By drawing horizontal lines through the ditierent corners or angles of each letter,the exact position of every part of them will be disclosed, and in enlarging, theselines will greatly assist in securing to every letter its precise form.
UNIQUE ALPHABET.
T
ALPHABET ORNAMENTED.
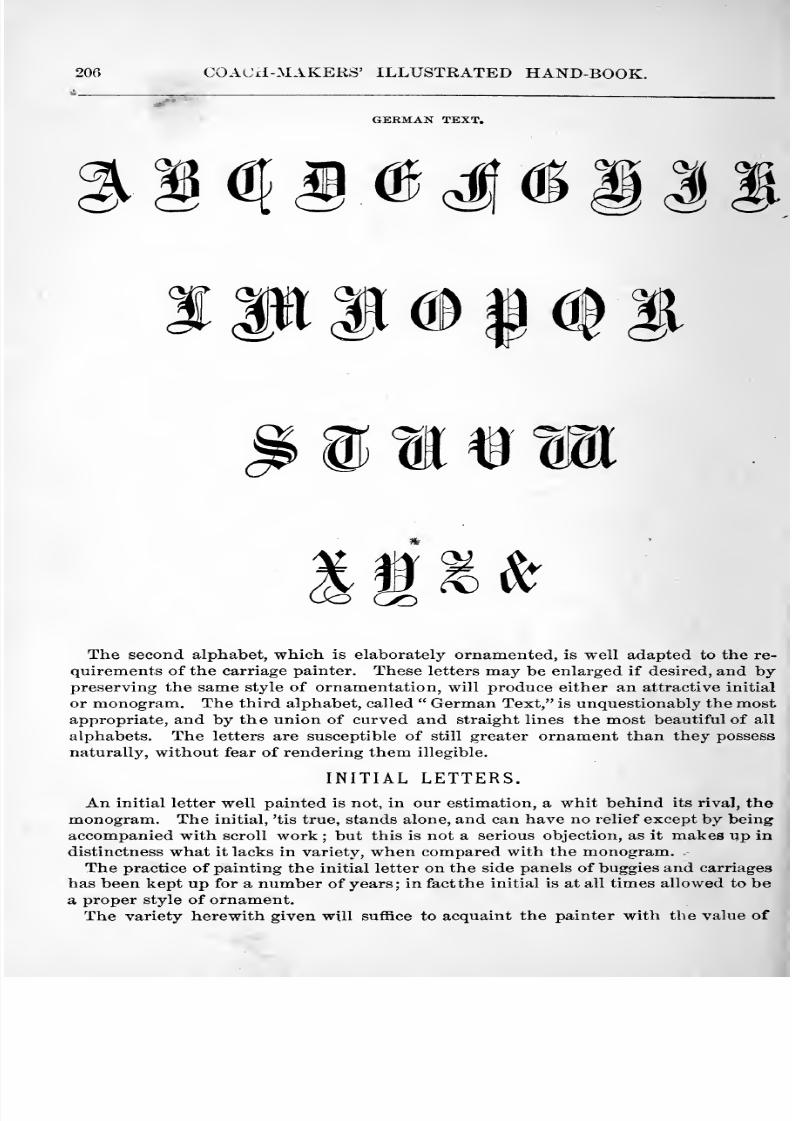
8/10/2019 Making Horse Drawn Coaches 1800 Bw
http://slidepdf.com/reader/full/making-horse-drawn-coaches-1800-bw 262/455
200 COACH-MAKERS' ILLUSTRATED HAND-BOOK.
GERMAN TEXT.
^gc^S^MM
P|l#|f I
®if aThe second alphabet, which is elaborately ornamented, is well adapted to the re-
quirements of the carriage painter. These letters may be enlarged if desired, and bypreserving the same style of ornamentation, will produce either an attractive initial
or monogram. The third alphabet, called German Text, is unquestionably the mostappropriate, and by the union of curved and straight lines the most beautiful of all
alphabets. The letters are susceptible of still greater ornament than they possess
naturally, without fear of rendering them illegible.
INITIAL LETTERS.
An initial letter well painted is not, in our estimation, a whit behind its rival, the
monogram. The initial, 'tis true, stands alone, and can have no relief except by being
accompanied with scroll work ; but this is not a serious objection, as it makes up in
distinctness what it lacks in variety, when compared with the monogram.The practice of painting the initial letter on the side panels of buggies and carriages
has been kept up for a number of years ; in fact the initial is at all times allowed to be
a proper style of ornament.The variety herewith given will suffice to acquaint the painter with the value of

8/10/2019 Making Horse Drawn Coaches 1800 Bw
http://slidepdf.com/reader/full/making-horse-drawn-coaches-1800-bw 263/455
PAINTING DEPARTMENT. 20;
single letters as ornaments, when they are properly enriched. The initial may beused also beneath a crest.
ENLARGING LETTERS.
To enlarge letters of any kind, inclose them by straight lines, which shall touchtheir height and width. This process will give you the squares of the letters. Dividethis figure by two diagonal lines, carrying them beyond its corners to any distance
you may please, and then mark above the figure mentioned the size to which youwould have the letter enlarged ; and through the point marked produce a straight
line, which shall intersect with diagonal lines, and from these two points of intersec-
tion complete the outline of the enlarged figure.
This enlarged figure will be in exact proportion with the smaller one. Continuethe horizontal lines to any required extent, and this fixes the height of all the letters.
The width of the enlarged figure will give the square of the remaining letters, withinwhich they should be laid off; remembering to make M and Wsomewhat larger thanletters A, B, N, P, etc.
The most expeditious method is to use the compasses. If your letter is one inchhigh, and two-thirds of an inch wide, and you wish to enlarge it, take in the com-passes its height, and step ofl one, two, or more times its height (or any fractional part
of it) ; the height of one letter gives the height of all on the same line. The enlarged
width of the letters is obtained by increasing them in the same ratio as the heightperpendicularly was increased.
INITIAL LETTER B—GERMAN TEXT.
A form in w^hich an initial letter may be ornamented. The dart and the center line
of the letter divide the whole equally, and in jjroducing
this pattern were the first lines laid down. The outline
of the letter followed, the two main curves which standperpendicularly next, and from these the remainingscrolls were added.
In the attempt to paint this on a panel the novice
would probably fail to produce a good ornament, for thesimple reason that he would be compelled to mark in all
the scrolls, and as it is impossible to give them their ex-
act place on the panel, he would confuse the design or
lose sight of it. The skillful ornamenter would mark onthe main curves only, and afterward fill in according to the spaces that remained.
Lay in letter, dart and cord, gold. The rest with a purple tint, mixed of flake
white, ultramarine blue and carmine ; the lights with pink, made of carmine andwhite.
D—GERMAN TEXT,
possesses all the grace and beauty of lines that could be de-
sired in a single letter. Its character as an ornament also
must enhance its value with he who may be the possessor
of the letter D as an initial.
In painting this letter on a panel it would be better to
make the hair lines somewhat heavier than our engraving
shows them, and correct also any defects in the curves.
Observe the proportions carefully, and endeavor to re-pro-
duce them. The letter would appear extremely neat in
gold, shaded with asphaltum and lighted with white ; but as
colors Tio^' r.re all tlie rase, we advise the use of a color
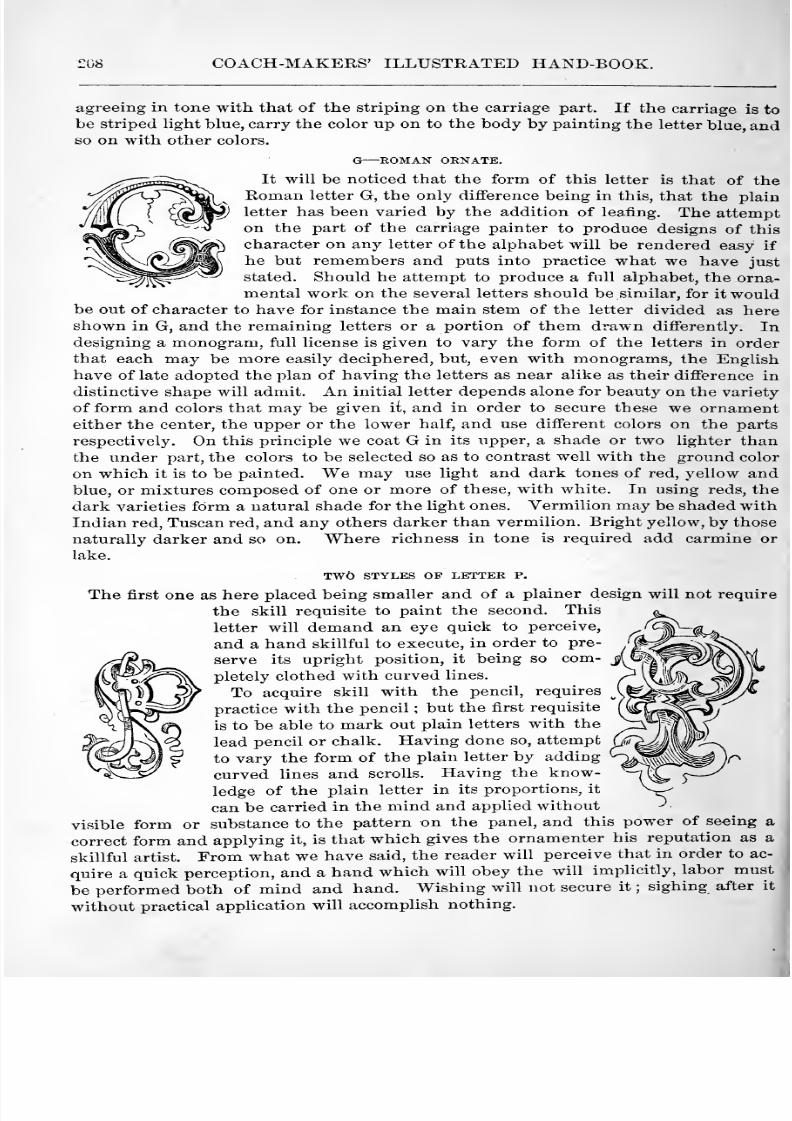
8/10/2019 Making Horse Drawn Coaches 1800 Bw
http://slidepdf.com/reader/full/making-horse-drawn-coaches-1800-bw 264/455
r08 COACH-MAKERS' ILLUSTRATED HAND-BOOK.
agreeing in tone with that of the striping on the carriage part. If the carriage is to
be striped light blue, carry the color up on to the body by painting the letter blue, andso on with other colors.
G—EOMAN ORNATE.
It will be noticed that the form of this letter is that of theRoman letter G, the only difference being in this, that the plain
letter has been varied by the addition of leafing. The attempton the part of the carriage painter to produce designs of this
character on any letter of the alphabet will be rendered easy if
he but remembers and puts into practice what we have just
stated. Should he attempt to produce a full alphabet, the orna-
mental work on the several letters should be similar, for it wouldbe out of character to have for instance the main stem of the letter divided as hereshown in G, and the remaining letters or a portion of them drawn differently. Indesigning a monogram, full license is given to vary the form of the letters in order
that each may be more easily deciphered, but, even with monograms, the English
have of late adopted the plan of having the letters as near alike as their difference in
distinctive shape will admit. An initial letter depends alone for beauty on the variety
of form and colors that may be given it, and in order to secure these we ornamenteither the center, the upper or the lower half, and use different colors on the parts
respectively. On this principle we coat G in its upper, a shade or two lighter than
the under part, the colors to be selected so as to contrast well with the ground color
on which it is to be painted. We may use light and dark tones of red, yellow andblue, or mixtures composed of one or more of these, with white. In using reds, the
dark varieties form a natural shade for the light ones. Vermilion may be shaded with
Indian red, Tuscan red, and any others darker than vermilion. Bright yellow, by those
naturally darker and so on. Where richness in tone is required add carmine or
lake.
TW6 STYLES OP LETTER P.
The first one as here placed being smaller and of a plainer design will not requirethe skill requisite to paint the second. This
letter will demand an eye quick to perceive,
and a hand skillful to execute, in order to pre-
serve its upright position, it being so com-
pletely clothed with curved lines.
To acquire skill with the pencil, requires
practice with the pencil ; but the first requisite
is to be able to mark out plain letters with the
leadpencil or chalk. Having done so, attempt
to vary the form of the plain letter by adding
curved lines and scrolls. Having the know-
ledge of the plain letter in its proportions, it
can be carried in the mind and applied without
visible form or substance to the pattern on the panel, and this power of seeing a
correct form and applying it, is that which gives the ornamenter his reputation as a
skillful artist. From what we have said, the reader will perceive that in order to ac-
quire a quick perception, and a hand which will obey the will implicitly, labor must
be performed both of mind and hand. Wishing will not secure it ; sighing after it
without practical application will accomplish nothing.
I
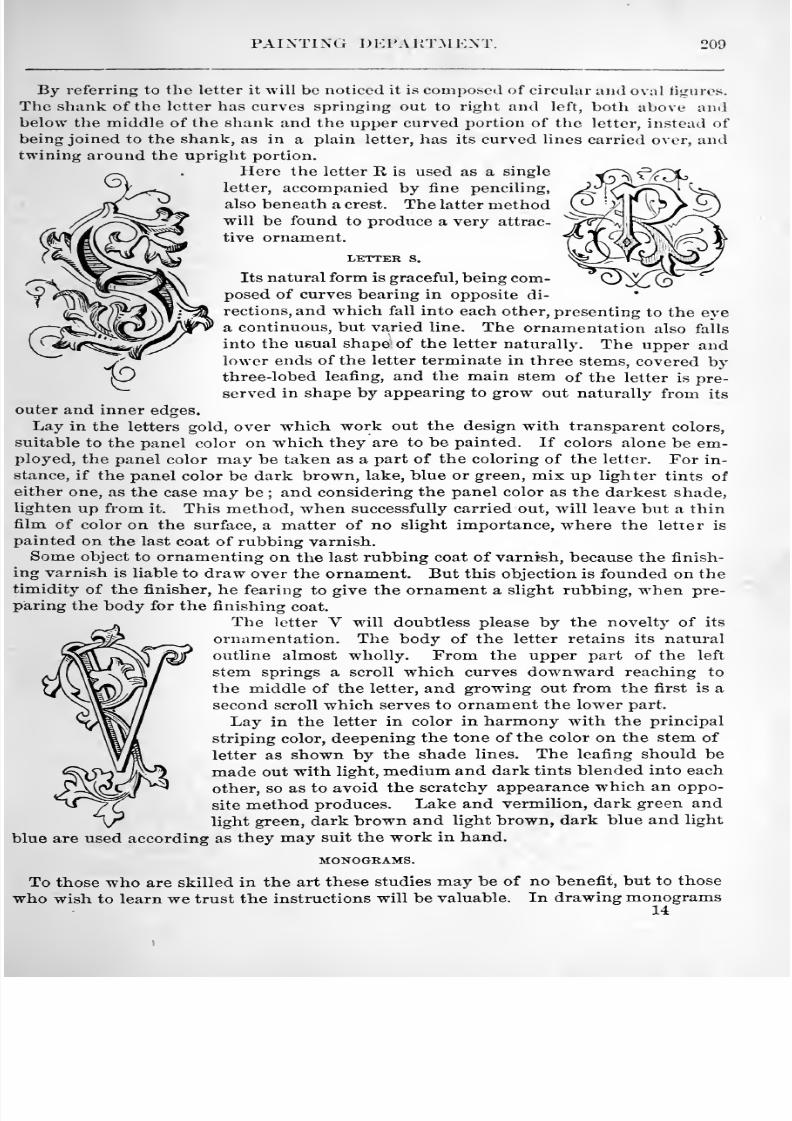
8/10/2019 Making Horse Drawn Coaches 1800 Bw
http://slidepdf.com/reader/full/making-horse-drawn-coaches-1800-bw 265/455
PAINTING DEPAKTMKNT. >09
By referring to the letter it will be noticed it is composed of circular and oval figures.
The shank of the letter has curves springing out to right and left, both above andbelow the middle of the shank and the upper curved portion of the letter, instead of
being joined to the shank, as in a plain letter, has its curved lines carried over, andtwining around the upright portion.
Here the letter R is used as a single
letter, accompanied by fine penciling,
also beneath a crest. The latter methodwill be found to produce a very attrac-
tive ornament.
LETTER S.
Its natural form is graceful, being com-
posed of curves bearing in opposite di-rections, and which fall into each other, presenting to the eyea continuous, but varied line. The ornamentation also falls
into the usual shape of the letter naturally. The upper andlower ends of the letter terminate in three stems, covered bythree-lobed leafing, and the main stem of the letter is pre-
served in shape by appearing to grow out naturally from its
outer and inner edges.
Lay in the letters gold, over which work out the design with transparent colors,
suitable to the panel color on which theyare to
bepainted. If colors
alone be em-ployed, the panel color may be taken as a part of the coloring of the letter. For in-
stance, if the panel color be dark brown, lake, blue or green, mix up lighter tints of
either one, as the case may be ; and considering the panel color as the darkest shade,lighten up from it. This method, when successfully carried out, will leave but a thin
film of color on the surface, a matter of no slight importance, where the letter is
painted on the last coat of rubbing varnish.
Some object to ornamenting on the last rubbing coat of varnish, because the finish-
ing varnish is liable to draw over the ornament. But this objection is founded on thetimidity of the finisher, he fearing to give the ornament a slight rubbing, when pre-
paring the body for the finishing coat.
The letter V will doubtless please by the novelty of its
ornamentation. The body of the letter retains its natural
outline almost wholly. From the upper part of the left
stem springs a scroll which curves downward reaching to
the middle of the letter, and growing out from the first is a
second scroll which serves to ornament the lower part.
Lay in the letter in color in harmony with the principal
striping color, deepening the tone of the color on the stem of
letter as shown by the shade lines. The leafing should be
made out with light, medium and dark tints blended into each
other, so as to avoid the scratchy appearance which an oppo-
site method produces. Lake and vermilion, dark green and
light green, dark brown and light brown, dark blue and light
blue are used according as they may suit the work in hand.
MONOGRAMS.
To those who are skilled in the art these studies may be of no benefit, but to those
who wish to learn we trust the instructions will be valuable. In drawing monograms14
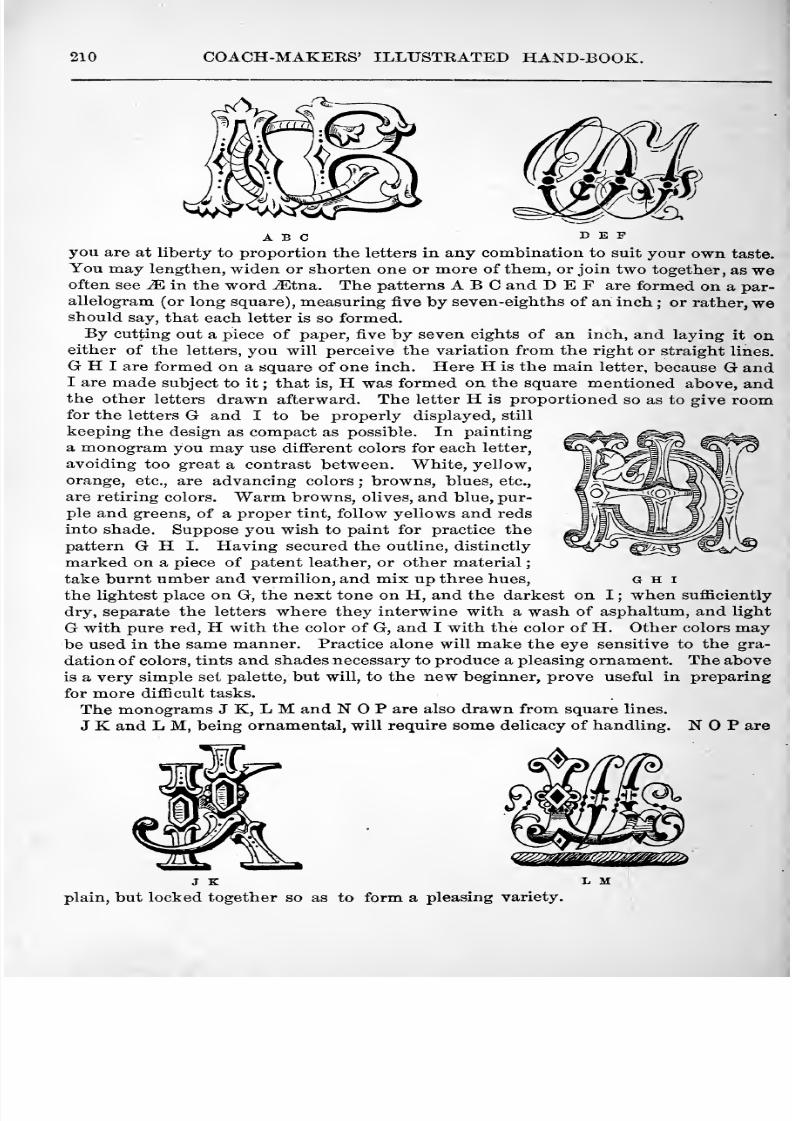
8/10/2019 Making Horse Drawn Coaches 1800 Bw
http://slidepdf.com/reader/full/making-horse-drawn-coaches-1800-bw 266/455
210 COACH-MAKERS' ILLUSTRATED HAND-BOOK.
ABC D E P
you are at liberty to proportion the letters in any combination to suit your own taste.
You may lengthen, widen or shorten one or more of them, or join two together, as weoften see M in the word ^Etna. The patterns ABC and D E F are formed on a par-
allelogram (or long square), measuring five by seven-eighths of an inch ; or rather, weshould say, that each letter is so formed.
By cutting out a piece of paper, five by seven eights of an inch, and laying it oneither of the letters, you will perceive the variation from the right or straight lines.
G H I are formed on a square of one inch. Here H is the main letter, because G andI are made subject to it ; that is, H was formed on the square mentioned above, andthe other letters drawn afterward. The letter H is proportioned so as to give roomfor the letters G and I to be properly displayed, still
keeping the design as compact as possible. In painting
a monogram you may use different colors for each letter,
avoiding too great a contrast between. White, yellow,
orange, etc., are advancing colors ; browns, blues, etc.,
are retiring colors. Warm browns, olives, and blue, pur-
ple and greens, of a proper tint, follow yellows and reds
into shade. Suppose you wish to paint for practice the
pattern G H I. Having secured the outline, distinctly
marked on a piece of patent leather, or other material
take burnt umber and vermilion, and mix up three hues, g h i
the lightest place on G, the next tone on H, and the darkest on I ; when sufficientlydry, separate the letters where they interwine with a wash of asphaltum, and light
G with pure red, H with the color of G, and I with the color of H. Other colors maybe used in the same manner. Practice alone will make the eye sensitive to the gra-
dation of colors, tints and shades necessary to produce a pleasing ornament. The above
is a very simple set palette, but will, to the new beginner, prove useful in preparing
for more difficult tasks.
The monograms J K, L M and NOP are also drawn from square lines.
J K and L M, being ornamental, will require some delicacy of handling. NOP are
^^fmm^mmr^psm
J E L M
plain, but locked together so as to form a pleasing variety.
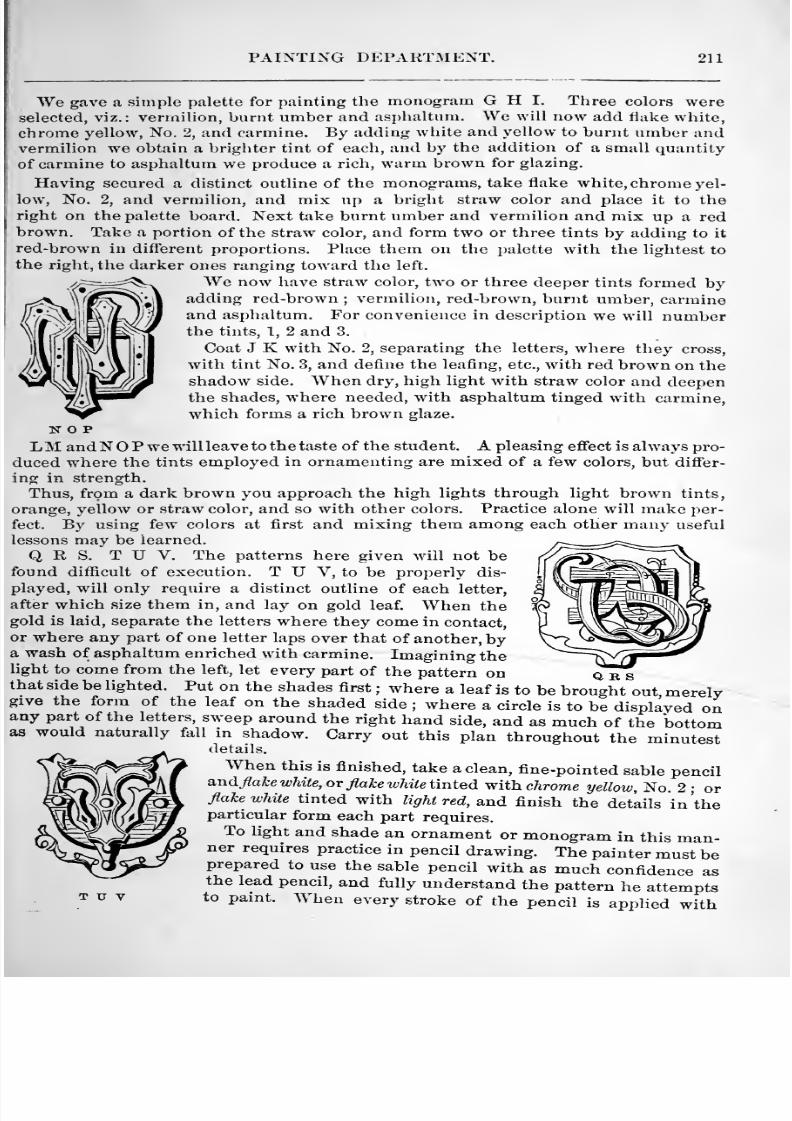
8/10/2019 Making Horse Drawn Coaches 1800 Bw
http://slidepdf.com/reader/full/making-horse-drawn-coaches-1800-bw 267/455
PAINTING DEPARTMENT. 211
We gave a simple palette for painting the monogram G H I. Three colors wereselected, viz.: vermilion, burnt umber and asi)haltum. We will now add flake white,
chrome yellow, No. 2, and carmine. By adding white and yellow to burnt umber and
vermilion we obtain a brighter tint of each, and by the addition of a small quantityof carmine to asphaltum we produce a rich, warm brown for glazing.
Having secured a distinct outline of the monograms, take flake white, chrome yel-
low, No. 2, and vermilion, and mix up a bright straw color and place it to the
right on the palette board. Next take burnt umber and vermilion and mix up a redbrown. Take a portion of the straw color, and form two or three tints by adding to it
red-brown in different proportions. Place them on the palette with the lightest to
the right, the darker ones ranging toward the left.
We now have straw color, two or three deeper tints formed by
adding red-brown ; vermilion, red-brown, burnt umber, carmineand asphaltum. For convenience in description we will numberthe tints, 1, 2 and 3.
Coat J K with No. 2, separating the letters, where they cross,
with tint No. 3, and define the leafing, etc., with red brown on the
shadow side. When dry, high light with straw color and deepenthe shades, where needed, with asphaltum tinged with carmine,
which forms a rich brown glaze.
NOP
LM and N P we will leave to the taste of the student. A pleasing efiect is always pro-duced where the tints employed in ornamenting are mixed of a few colors, but differ-
ing in strength.
Thus, from a dark brown you approach the high lights through light brown tints,
orange, yellow or straw color, and so with other colors. Practice alone will make per-
fect. By using few colors at first and mixing them among each other many useful
lessons may be learned.
Q R S. T U V. The patterns here given will not befound difficult of execution. T U V, to be properly dis-
played, will only require a distinct outline of each letter,
after which size them in, and lay on gold leaf. When thegold is laid, separate the letters where they come in contact,
or where any part of one letter laps over that of another, bya wash of asphaltum enriched with carmine. Imagining thelight to come from the left, let every part of the pattern onthat side be lighted. Put on the shades first ; where a leaf is to be brought out merelygive the form of the leaf on the shaded side ; where a circle is to be displayed onany part of the letters, sweep around the right hand side, and as much of the 'bottomas would naturally fall in shadow. Carry out this plan throughout the minutest
details.
When this is finished, take a clean, fine-pointed sable penciland flake white, or flake white tinted with chrome yellow, No. 2 ; orflake white tinted with light red, amd finish the detkils in 'theparticular form each part requires.
To light and shade an ornament or monogram in this man-ner requires practice in pencil drawing. The painter must beprepared to use the sable pencil with as much confidence asthe lead pencil, and fully understand the pattern he attempts
to pamt. When every stroke of the pencil is applied with
Q R S
T U V
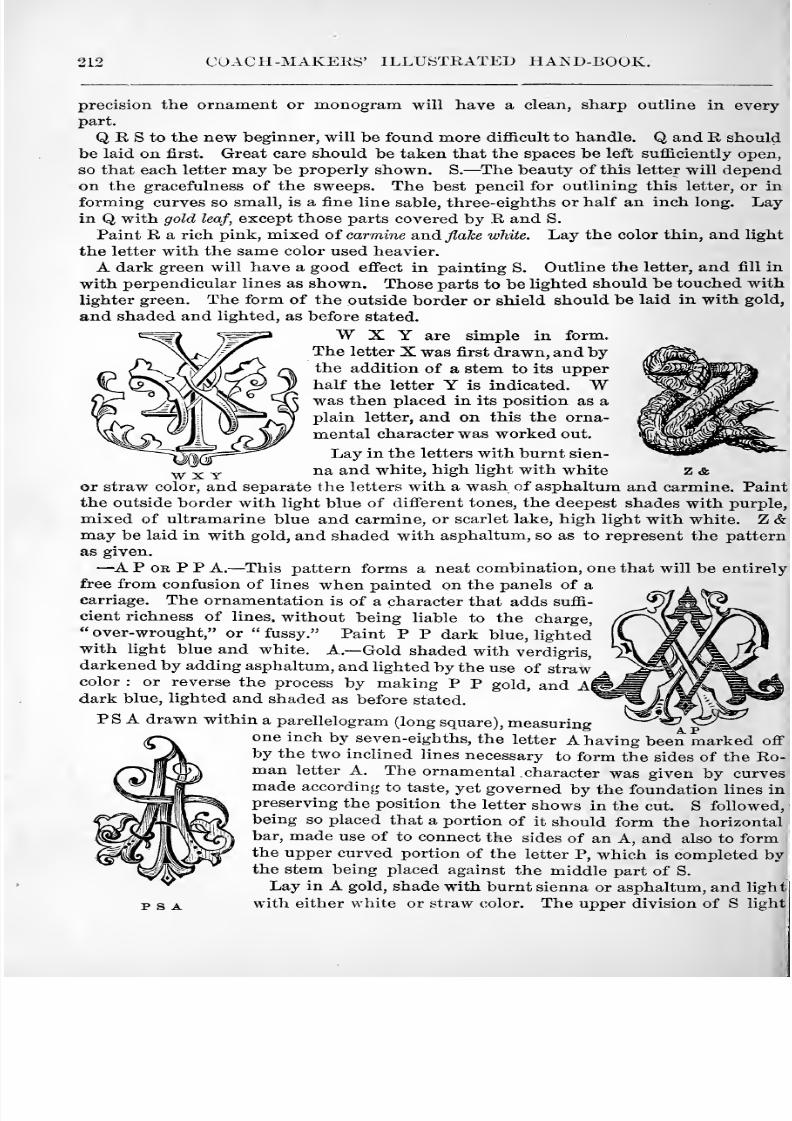
8/10/2019 Making Horse Drawn Coaches 1800 Bw
http://slidepdf.com/reader/full/making-horse-drawn-coaches-1800-bw 268/455
212 COACH-MAKEKS' ILLUSTRATED HA^^D-BOOK.
precision the ornament or monogram will have a clean, sharp outline in everypart.
Q R S to the new beginner, will be found more diflEicult to handle. Q and R should
be laid on first. Great care should be taken that the spaces be left sufficiently open,
so that each letter may be properly shown. S. —The beauty of this letter will dependon the gracefulness of the sweeps. The best pencil for outlining this letter, or in
forming curves so small, is a fine line sable, three-eighths or half an inch long. Layin Q with gold leaf, except those parts covered by R and S.
Paint R a rich pink, mixed oi carmine and j^aA;e white. Lay the color thin, and light
the letter with the same color used heavier.
A dark green will have a good effect in painting S. Outline the letter, and fill in
with perpendicular lines as shown. Those parts to be lighted should be touched with
lighter green. The form of the outside border or shield should be laid in with gold,
and shaded and lighted, as before stated.
W X Y are simple in form.
The letter X was first drawn, and bythe addition of a stem to its upperhalf the letter Y is indicated. Wwas then placed in its position as a
plain letter, and on this the orna-
mental character was worked out.
Lay in the letters with burnt sien-
^ -jj. Y na and white, high light with white z &or straw color, and separate the letters with a wash of asphaltum and carmine. Paintthe outside border with light blue of different tones, the deepest shades with purple,
mixed of ultramarine blue and carmine, or scarlet lake, high light with white. Z &may be laid in with gold, and shaded with asphaltum, so as to represent the pattern
as given.
—A P OE P P A. —This pattern forms a neat combination, one that will be entirely
free from confusion of lines when painted on the panels of a
carriage. The ornamentation is of a character that adds suffi-
cient richness of lines, without being liable to the charge,*' over-wrought, or fussy. Paint P P dark blue, lightedwith light blue and white. A.— Gold shaded with verdigris,darkened by adding asphaltum, and lighted by the use of strawcolor : or reverse the process by making P P gold, and A|dark blue, lighted and shaded as before stated.
PSA drawn within a parellelogram (long square), measuringone inch by seven-eighths, the letter A having been marked off
by the two inclined lines necessary to form the sides of the Ro-man letter A. The ornamental character was given by curvesmade according to taste, yet governed by the foundation lines inpreserving the position the letter shows in the cut. S followed,being so placed that a portion of it should form the horizontalbar, made use of to connect the sides of an A, and also to formthe upper curved portion of the letter P, which is completed bythe stem being placed against the middle part of S.
Lay in A gold, shade with burnt sienna or asphaltum, and light
PSA with either white or straw color. The upper division of S light
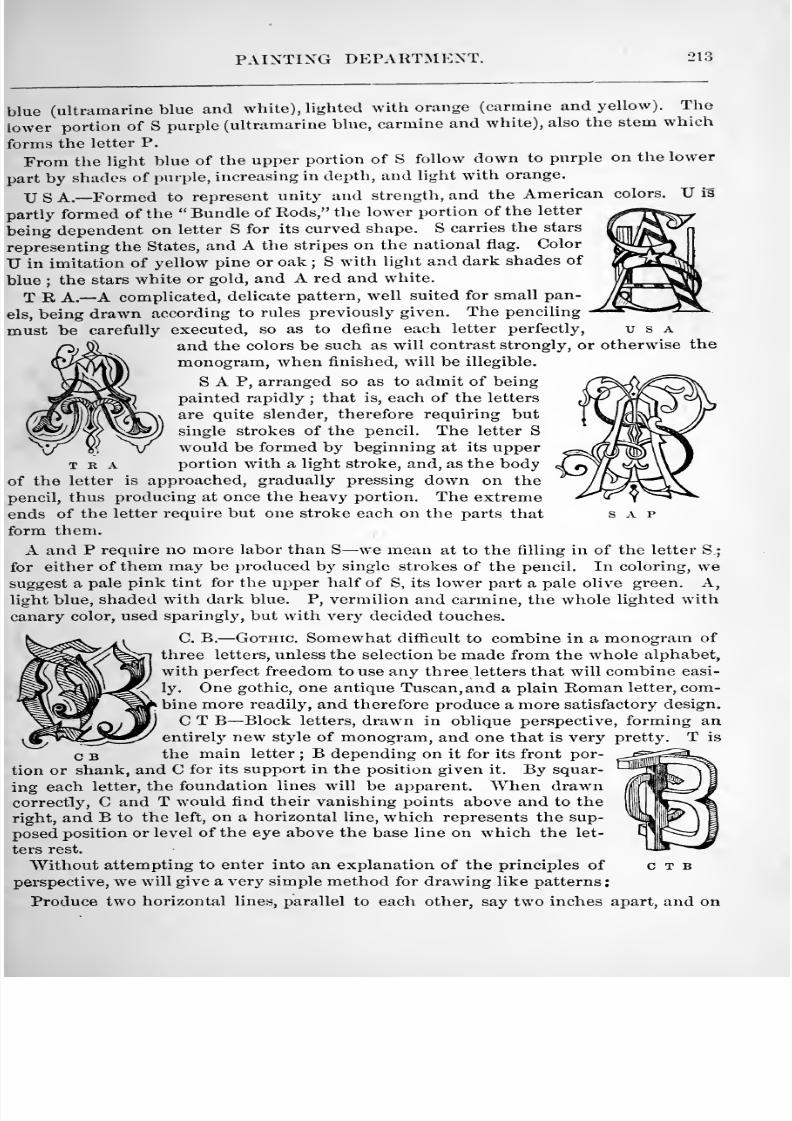
8/10/2019 Making Horse Drawn Coaches 1800 Bw
http://slidepdf.com/reader/full/making-horse-drawn-coaches-1800-bw 269/455
PAINTING DEPARTMENT. 213
blue (ultramarine blue and white), lighted with orange (carmine and yellow). The
lower portion of S purple (ultramarine blue, carmine and white), also the stem which
forms theletter P.
From the light blue of the upper portion of S follow down to purple on the lower
part by shades of purple, increasing in depth, and light with orange.
XJ s A.— Formed to represent unity and strength, and the American colors. TJ is
partly formed of the Bundle of Rods, the lower portion of the letter
being dependent on letter S for its curved shape. S carries the stars
representing the States, and A the stripes on the national flag. Color
XJ in imitation of yellow pine or oak ; S with light and dark shades of
blue ; the stars white or gold, and A red and white.
T R A.— A complicated, delicate pattern, well suited for small pan-els, being drawn according to rules previously given. The penciling
must be carefully executed, so as to define each letter perfectly, u s a
and the colors be such as will contrast strongly, or otherwise the
monogram, when finished, will be illegible.
SAP, arranged so as to admit of being
painted rapidly ; that is, each of the letters
are quite slender, therefore requiring but
single strokes of the pencil. The letter S
would be formed by beginning at its upperT R A portion with a light stroke, and, as the body
of the letter is approached, gradually pressing down on the
pencil, thus producing at once the heavy portion. The extreme
ends of the letter require but one stroke each on the parts that
form them.
A and P require no more labor than S —we mean at to the filling in of the letter S.;
for either of them may be produced by single strokes of the pencil. In coloring, wesuggest a pale pink tint for the upper half of S, its lower part a pale olive green. A,
light blue, shaded with dark blue. P, vermilion and carmine, the whole lighted withcanary color, used sparingly, but with very decided touches.
C. B. Gothic. Somewhat difficult to combine in a monogram of
three letters, unless the selection be made from the whole alphabet,
with perfect freedom to use any three letters that will combine easi-
ly. One gothic, one antique Tuscan, and a plain Roman letter, com-bine more readily, and therefore produce a more satisfactory design.
C T B—Block letters, drawn in oblique perspective, forming anentirely new style of monogram, and one that is very pretty. T is
the main letter ; B depending on it for its front por-
tion or shank, and C for its support in the position given it. By squar-
ing each letter, the foundation lines will be apparent. When drawncorrectly, C and T would find their vanishing points above and to the
right, and B to the left, on a horizontal line, which represents the sup-
posed position or level of the eye above the base line on which the let-
ters rest.
Without attempting to enter into an explanation of the principles of c t b
perspective, we will give a very simple method for drawing like patterns:
Produce two horizontal lines, parallel to each other, say two inches apart, and on
c B
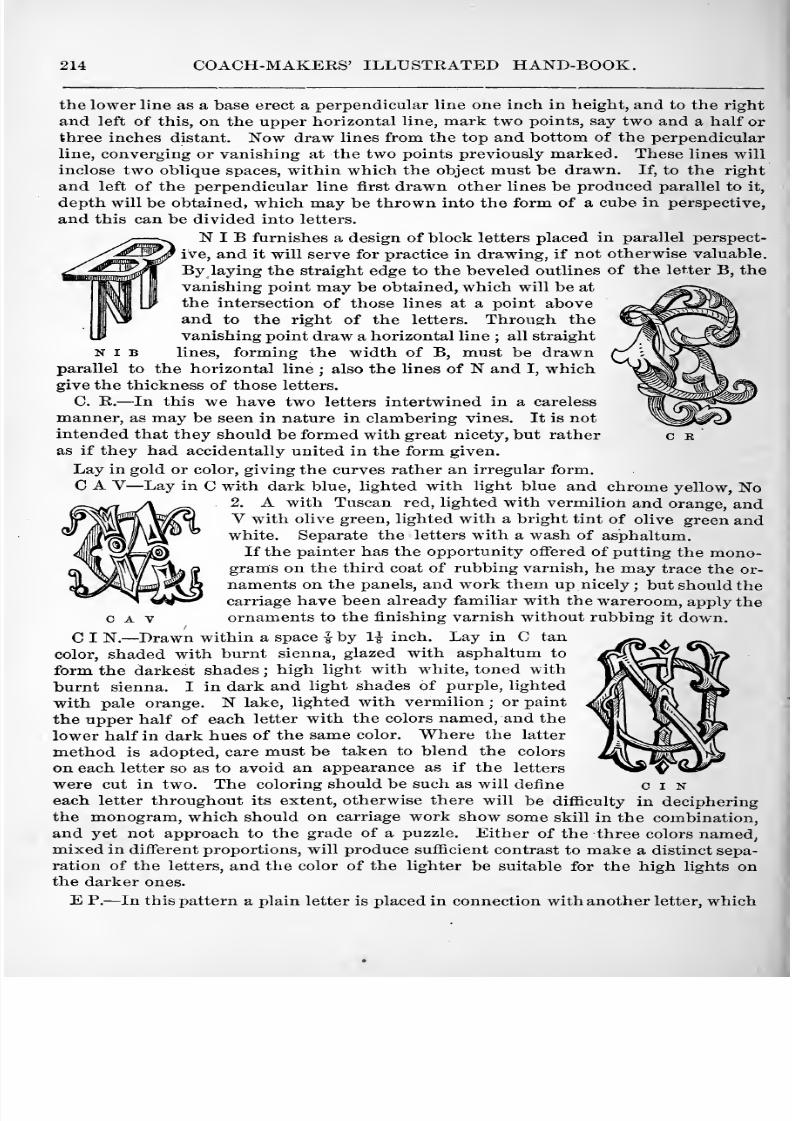
8/10/2019 Making Horse Drawn Coaches 1800 Bw
http://slidepdf.com/reader/full/making-horse-drawn-coaches-1800-bw 270/455
214 COACH-MAKEKS' ILLUSTEATED HAND-BOOK.
the lower line as a base erect a perpendicular line one inch in height, and to the right
and left of this, on the upper horizontal line, mark two points, say two and a half or
three inches distant. Now draw lines from the top and bottom of the perpendicular
line, converging or vanishing at the two points previously marked. These lines will
inclose two oblique spaces, w^ithin which the object must be drawn. If, to the right
and left of the perpendicular line first drawn other lines be produced parallel to it,
depth will be obtained, which may be thrown into the form of a cube in perspective,
and this can be divided into letters.
NIB furnishes a design of block letters placed in parallel perspect-
ive, and it will serve for practice in drawing, if not otherwise valuable.
By laying the straight edge to the beveled outlines of the letter B, the
vanishing point may be obtained, which will be at
the intersection of those lines at a point aboveand to the right of the letters. Through the
vanishing point draw a horizontal line ; all straight
NIB lines, forming the width of B, must be drawnparallel to the horizontal line ; also the lines of N and I, whichgive the thickness of those letters.
C. R. —In this we have two letters intertwined in a careless
manner, as may be seen in nature in clambering vines. It is not
intended that they should be formed with great nicety, but rather
as if they had accidentally united in the form given.
Lay in gold or color, giving the curves rather an irregular form.
C A V—Lay in C with dark blue, lighted with light blue and chrome yellow, No2. A with Tuscan red, lighted with vermilion and orange, andV with olive green, lighted with a bright tint of olive green and
white. Separate the letters with a wash of asphaltum.
If the painter has the opportunity offered of putting the mono-grams on the third coat of rubbing varnish, he may trace the or-
naments on the panels, and work them up nicely ; but should the
carriage have been already familiar with the wareroom, apply the
c A V ornaments to the finishing varnish without rubbing it down.
C I N.— Drawn within a space i by 1^ inch. Lay in C tan
color, shaded with burnt sienna, glazed with asphaltum to
form the darkest shades ; high light with white, toned with
burnt sienna. I in dark and light shades of purple, lighted
with pale orange. N lake, lighted with vermilion ; or paint
the upper half of each letter with the colors named, and the
lower half in dark hues of the same color. Where the latter
method is adopted, care must be taken to blend the colors
on each letter so as to avoid an appearance as if the letters
were cut in two. The coloring should be such as will define c i neach letter throughout its extent, otherwise there will be difficulty in decipheringthe monogram, which should on carriage work show some skill in the combination,
and yet not approach to the grade of a puzzle. Either of the three colors named^mixed in different proportions, will produce sufficient contrast to make a distinct sepa-
ration of the letters, and the color of the lighter be suitable for the high lights onthe darker ones.
E P. —In this pattern a plain letter is placed in connection with another letter, which

8/10/2019 Making Horse Drawn Coaches 1800 Bw
http://slidepdf.com/reader/full/making-horse-drawn-coaches-1800-bw 271/455
PAINTING DEPARTMENT. 15
PES
H R G
is ornamented. By this means the pattern is not confused ; the
plain letter E gives full force to the ornamented letter P.
F E S. —Lay in F E with gold, shaded with as])haltum and ver-
digris, mixed so as to form greenish tints, varying in strengthto suit the number of shades required ; high light with straw
color, mixed of flake white and chromeyellow, No. 2 ;
put in the dots with
carmine, shaded with carmine, darken-
ed with black. The high lights, clear
white. Outline S with a dark, rich
brown, filling in the body of the letter with
the same color by use of perpendicular lines,
as shownin the engraving. Light with tan
color. Form the diamond shaped center
with clear carmine.
H R G—will require delicate handling. H and R lay in olive,
lighted with yellow, toned down with olive. G, lake, lighted with
vermilion. The dark markings on G may be done with lake and
black, forming a rich brown.
S N G.—Drawn within a space -} by 1 inch. The ornamentation
of the letters G and N is peculiarly adapted to producing a pleasing '
effect, when painted on the panels of a carriage. S is made very plain,
and as applied in this design, serves to bind together the letters Nand G. Outline N with dark brown, using light lines on the left
side of the details of the letter, and heavy lines to form the shaded
parts. Put in the diagonal lines with vermilion, and when the colors
are dry glaze over with carmine. G may be done in gold leaf. The s n g
center glazed with verdigris, and the ends of the letters washed with verdigris, dark-
ened a trifle by the addition of asphaltum. Paint S olive green, the parts receiving
light with pale light green. High light G with pale pea green, and insinuate a small
portion of red on the letter G.
A C G. —In this design we have made use of a pair of compasses, the calipers and
an iron hand screw —three tools very familiar to the wood worker. The compasses
furnish an approximation at least to the letter A ; the calipers to the
letter C, and the iron hand screw to that of G. As considerable
license is granted to the designer, in the selection and formation of
the letters composing a monogram, we have availed ourself of this
license and brought into service the tools named. We do not claim
for the design any beauty, but merely a slight degree of novelty. Acarriage wood-worker, happening to possess initials agreeing with
^ c G *tie above, in the order we have placed them, or either of the changesthat may be made, might adopt this style of monogram for his coach door (?), or if hebe fond of outward adornments, may have a breast or coat pin, made in silver or gold,
and thus advertise himself, as do some members of secret societies.
J E C. —Lay in all gold, then wash over E with verdigris, and C withcarmine, except the star center. High light J and the center of C withstraw color, and E with a pale green —white and verdigris. This will
make a beautiful contrast, and be readily appreciated by admirers ofmonograms.
S K J. —This pattern was drawn on a rectangle, one and a quarter byone inch. Lav in each letter different in color, using darker tints of
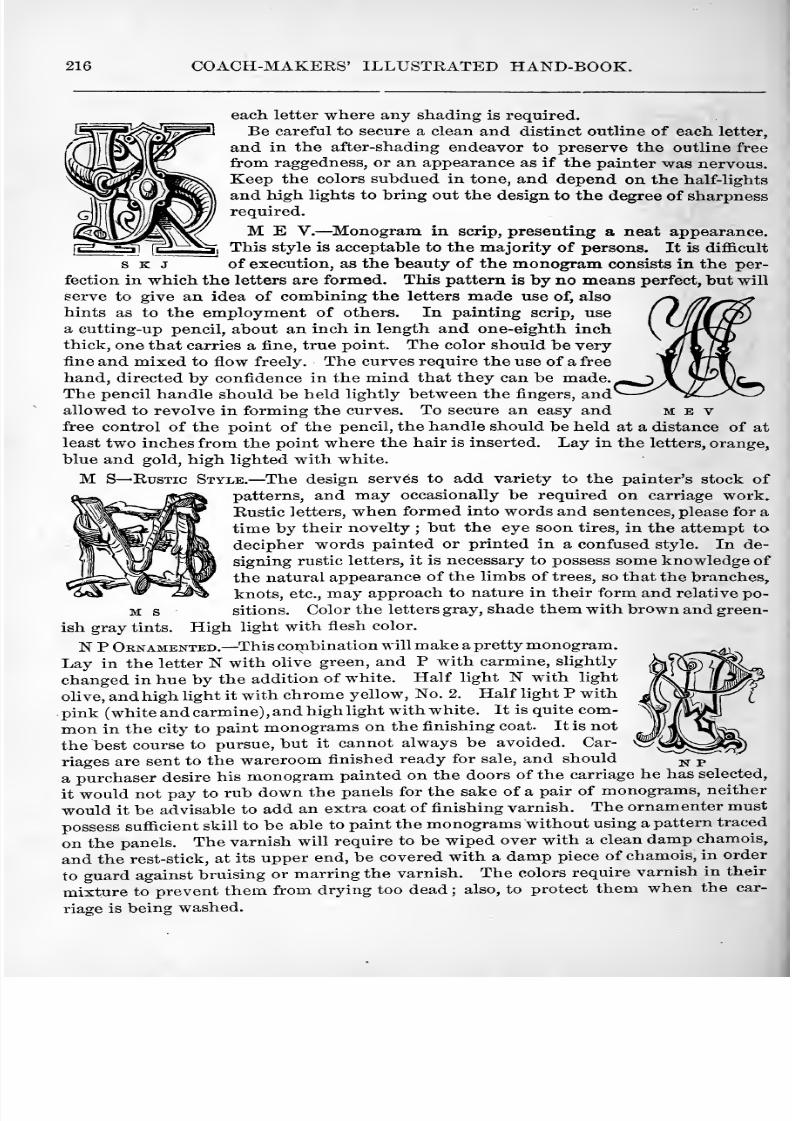
8/10/2019 Making Horse Drawn Coaches 1800 Bw
http://slidepdf.com/reader/full/making-horse-drawn-coaches-1800-bw 272/455
216 COACH-MAKERS' ILLUSTRATED HAND-BOOK.
each letter where any shading is required.
Be careful to secure a clean and distinct outline of each letter,
and in the after-shading endeavor to preserve the outline freefrom raggedness, or an appearance as if the painter was nervous.
Keep the colors subdued in tone, and depend on the half-lights
and high lights to bring out the design to the degree of sharpnessrequired.
M E V. —Monogram in scrip, presenting a neat appearance.
This style is acceptable to the majority of persons. It is diflGLcult
K J of execution, as the beauty of the monogram consists in the per-
fection in which the letters are formed. This pattern is by no means perfect, but will
serve to give an idea of combining the letters made use of, alsohints as to the employment of others. In painting scrip, use
a cutting-up pencil, about an inch in length and one-eighth inchthick, one that carries a fine, true point. The color should be veryfine and mixed to flow freely. The curves require the use of a free
hand, directed by confidence in the mind that they can be made.The pencil handle should be held lightly between the fingers, and'
allowed to revolve in forming the curves. To secure an easy and m e vfree control of the point of the pencil, the handle should be held at a distance of at
least two inches from the point where the hairis
inserted. Lay in the letters, orange,blue and gold, high lighted with white.
M S—Rustic Style. —The design serves to add variety to the painter's stock of
patterns, and may occasionally be required on carriage work.
Rustic letters, when formed into words and sentences, please for a
time by their novelty ; but the eye soon tires, in the attempt to
decipher words painted or printed in a confused style. In de-
signing rustic letters, it is necessary to possess some knowledge of
the natural appearance of the limbs of trees, so that the branches,
knots, etc., may approach to nature in their form and relative po-M s sitions. Color the letters gray, shade them with brown and green-
ish gray tints. High light with flesh color.
N P Oenamented.— This coi^bination will make a pretty monogram.
Lay in the letter N with olive green, and P with carmine, slightly
changed in hue by the addition of white. Half light N with light ^^ iijw/7oUve, and high light it with chrome yellow. No. 2. Half light P with 4V^^JTf^{,pink (white and carmine), and high light with white. It is quite com-
mon in the city to paint monograms on the finishing coat. It is not
the best course to pursue, but it cannot always be avoided. Car-riages are sent to the wareroom finished ready for sale, and should j^ pa purchaser desire his monogram painted on the doors of the carriage he has selected,
it would not pay to rub down the panels for the sake of a pair of monograms, neither
would it be advisable to add an extra coat of finishing varnish. The ornamenter must
possess sufficient skill to be able to paint the monograms without using a pattern traced
on the panels. The varnish will require to be wiped over with a clean damp chamois,
and the rest-stick, at its upper end, be covered with a damp piece of chamois, in order
to guard against bruising or marring the varnish. The colors require varnish in their
mixtureto prevent them from drying too dead ; also, to protect them when the car-
riage is being washed.
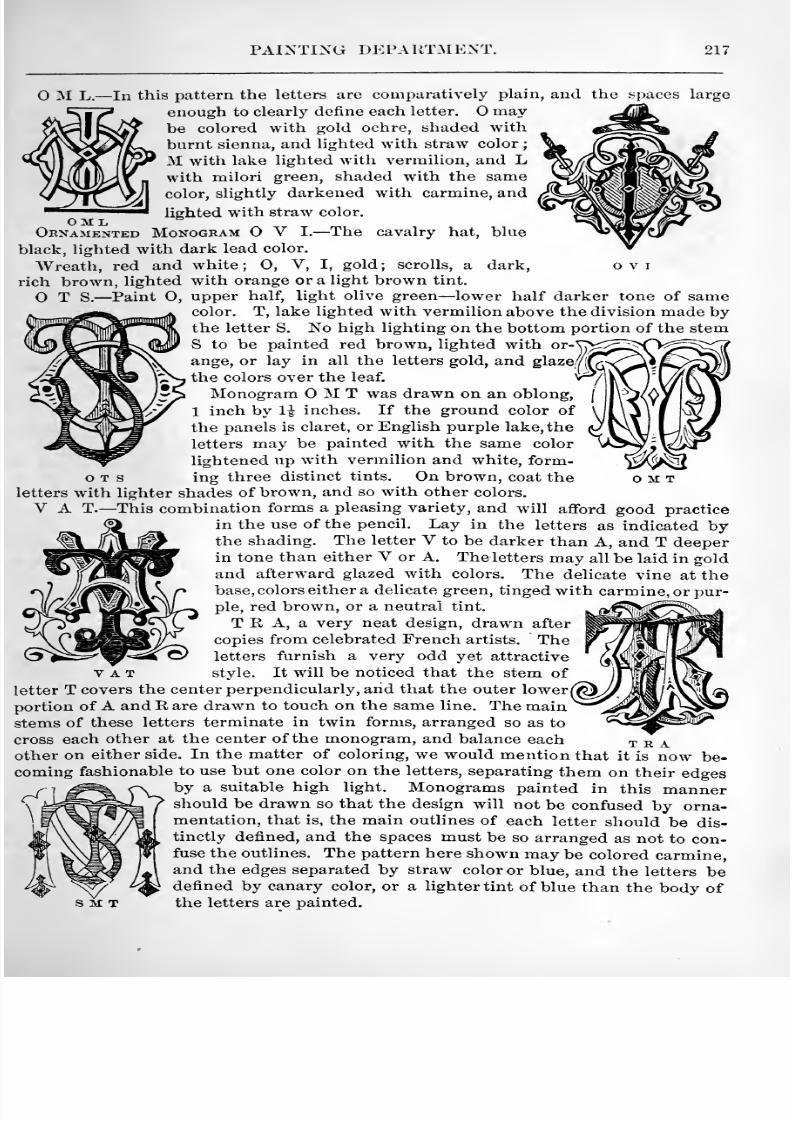
8/10/2019 Making Horse Drawn Coaches 1800 Bw
http://slidepdf.com/reader/full/making-horse-drawn-coaches-1800-bw 273/455
PAINTING DEPARTMENT. 217
M L. In this pattern the letters are comparatively plain, and the
enough to clearly define each letter. maybe colored with gold ochre, shaded with
burnt sienna, and lighted with straw color ;
M with lake lighted with vermilion, and Lwith milori green, shaded with the samecolor, slightly darkened with carmine, and
lighted with straw color.
Monogram V I. —The cavalry hat, blue
black, lighted with dark lead color.
Wreath, red and white; 0, V
spaces large
OMLOrnamented
dark, o v I
o M T
I, gold; scrolls, a
rich brown, lighted with orange or a light brown tint.
T S. —Paint O, upper half, light olive green —lower half darker tone of samecolor. T, lake lighted with vermilion above the division made bythe letter S. No high lighting on the bottom portion of the stemS to be painted red brown, lighted with or-^
ange, or lay in all the letters gold, and glaze/j
the colors over the leaf.
Monogram O M T was drawn on an oblong,
1 inch by 1^ inches. If the ground color of
the panels is claret, or English purple lake, the
letters may be painted with the same colorlightened up with vermilion and white, form-
T s ing three distinct tints. On brown, coat theletters with lighter shades of brown, and so with other colors.
V A T.— This combination forms a pleasing variety, and will afford good practice
in the use of the pencil. Lay in the letters as indicated bythe shading. The letter V to be darker than A, and T deeperin tone than either V or A. Theletters may all be laid in goldand afterward glazed with colors. The delicate vine at thebase, colors either a delicate green, tinged with carmine, or pur-
ple, red brown, or a neutral tint.
T R A, a very neat design, drawn after
copies from celebrated French artists. Theletters furnish a very odd yet attractive
VAT style. It will be noticed that the stem of
letter T covers the center perpendicularly, and that the outer lower(
portion of A and R are drawn to touch on the same line. The mainstems of these letters terminate in twin forms, arranged so as to
cross each other at the center of the monogram, and balance eacht r aother on either side. In the matter of coloring, we would mention that it is now be-
coming fashionable to use but one color on the letters, separating them on their edgesby a suitable high light. Monograms painted in this mannershould be drawn so that the design will not be confused by orna-mentation, that is, the main outlines of each letter should be dis-
tinctly defined, and the spaces must be so arranged as not to con-fuse the outlines. The pattern here shown may be colored carmine,and the edges separated by straw color or blue, and the letters bedefined by canary color, or a lighter tint of blue than the body of
s M T the letters are painted.
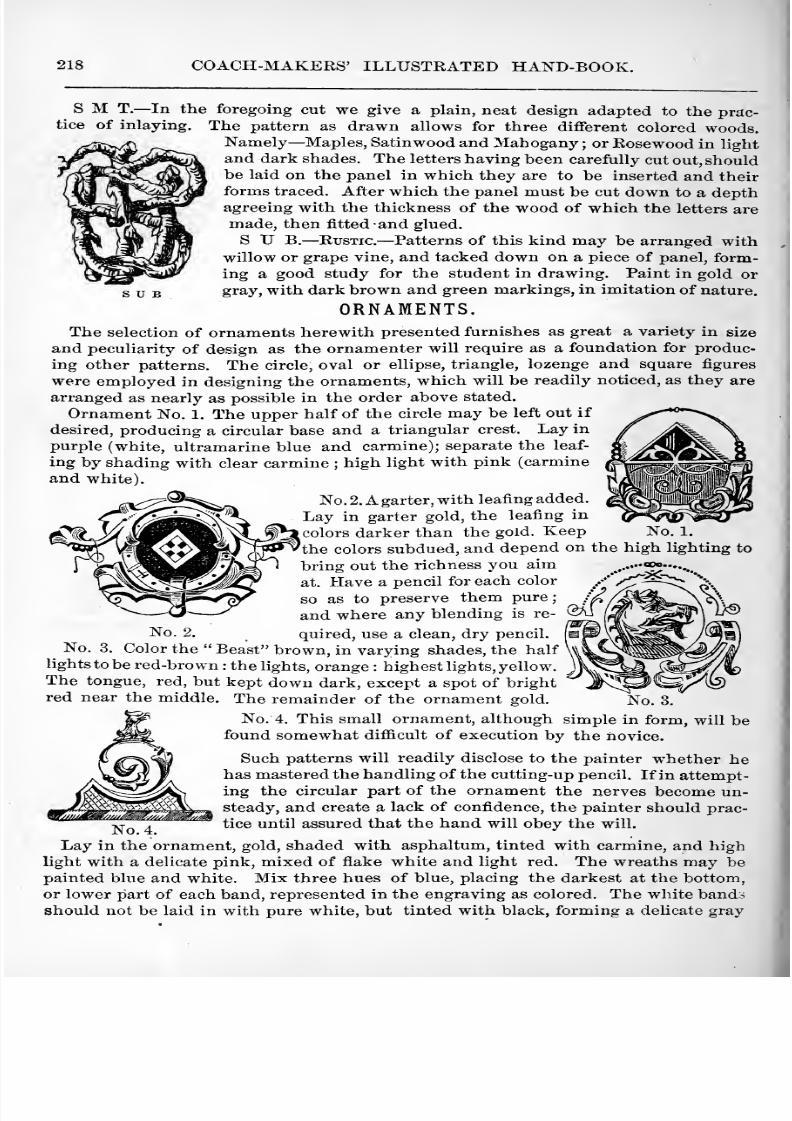
8/10/2019 Making Horse Drawn Coaches 1800 Bw
http://slidepdf.com/reader/full/making-horse-drawn-coaches-1800-bw 274/455
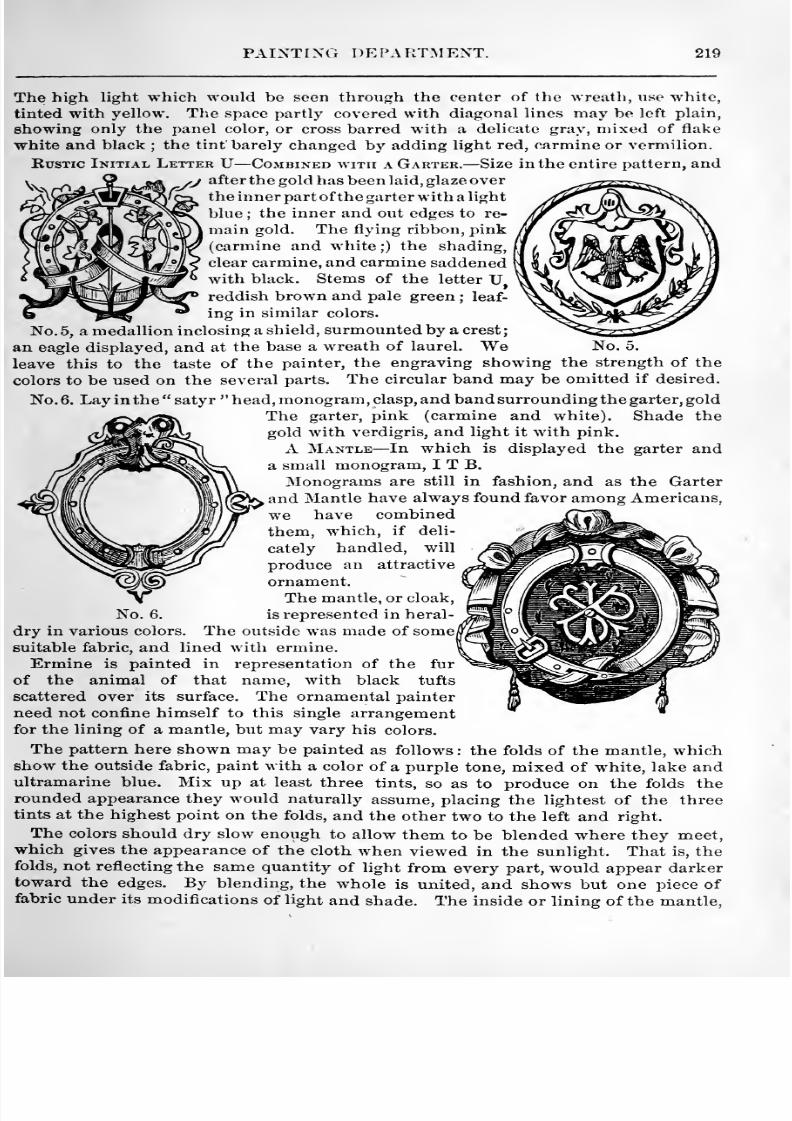
8/10/2019 Making Horse Drawn Coaches 1800 Bw
http://slidepdf.com/reader/full/making-horse-drawn-coaches-1800-bw 275/455
PAINT [ NG DE PA RTM ENT. 219
The high light which would be seen through the center of the wreath, use white,
tinted with yellow. The space partly covered with diagonal lines may be left plain,
showing only the panel color, or cross barred with a delicate gray, mixed of flake
white and black ; the tint barely changed by adding light red, carmine or vermilion.Rustic Initial Letter U—Combined with a Garter. —Size in the entire pattern, and
V ,v^ ..-5LaJW V y-^ after the gold has been laid, glaze over
the inner part ofthe garter with a light
blue ; the inner and out edges to re-
main gold. The flying ribbon, pink
(carmine and white ;) the shading,
clear carmine, and carmine saddenedwith black. Stems of the letter Ureddish brown and pale green ; leaf-
ing in similar colors.
No. 5, a medallion inclosing a shield, surmounted by a crest;
an eagle displayed, and at the base a wreath of laurel. We No. 5.
leave this to the taste of the painter, the engraving showing the strength of the
colors to be used on the several parts. The circular band may be omitted if desired.
No. 6. Lay in the satyr head, monogram , clasp, and band surrounding the garter, gold
The garter, pink (carmine and white). Shade the
gold with verdigris, and light it with pink.
A Mantle —In which is displayed the garter anda small monogram, I T B.
Monograms are still in fashion, and as the Garter
and Mantle have always found favor among Americans,
we have combined
them, which, if deli-
cately handled, will
produce an attractive
ornament.
The mantle, or cloak,
No. 6. is represented in heral-
dry in various colors. The outside was made of some/
suitable fabric, and lined with ermine.
Ermine is painted in representation of the fur
of the animal of that name, with black tufts
scattered over its surface. The ornamental painter
need not confine himself to this single arrangementfor the lining of a mantle, but may vary his colors.
The pattern here shown may be painted as follows : the folds of the mantle, whichshow the outside fabric, paint with a color of a purple tone, mixed of white, lake andultramarine blue. Mix up at least three tints, so as to produce on the folds therounded appearance they would naturally assume, placing the lightest of the threetints at the highest point on the folds, and the other two to the left and right.
The colors should dry slow enough to allow them to be blended where they meet,which gives the appearance of the cloth when viewed in the sunlight. That is, thefolds, not reflecting the same quantity of light from every part, would appear darkertoward the edges. By blending, the whole is united, and shows but one piece of
fabric under its modifications of light and shade. The inside or lining of the mantle,

8/10/2019 Making Horse Drawn Coaches 1800 Bw
http://slidepdf.com/reader/full/making-horse-drawn-coaches-1800-bw 276/455
220 COACH-MAKERS' ILLUSTRATED HAND-BOOK.
paint a delicate gray, the lights white, the tufts with burnt umber, shaded with as-
phaltum.
The monogram, garter and cord, on the mantle, gold. Having traced a correct out-line of the pattern on the panels, size in those parts to be covered with gold leaf, andwhen the leaf is laid, proceed with the colors.
When the mantle has been colored and blended in, and becomes dry, high light it
with pink, mixed of carmine and white, and touch over the deepest part of the
shadows with asphaltum.
The gold cord should pe put on of a uniform width, which is best secured by the use
of a fine cutting-up pencil. Remember that the cord is round, and must be shadedaccordingly.
Having washed on the shade, produce the efi'ect of the strands of cord with the color
you use for lighting the gold parts of the ornament.
This is done by diagonal lines placed on the light parts
of the cords which were not washed over. Never
carry the lights on to the shaded part.
No. 7. In painting this style of ornament, select dark
rich colors, which can best be secured by glazing.
The cap crimson, wreath green and gray, lighted
,with a delicate pink.
The circular part gold, shaded with asphaltum tinted
with carmine ; also, outside border of shield gold, up-
per division of shield red, dark and rich in tone,
instead of a staring light red, such as clear vermilion
gives. Chevron white, not pure white, but a deli-
cate gray, lighted with clear white. The lower di-
vision blue, the deep shades of a purple hue.
The leafing at the base paint with a color mixed of
burnt umber, yellow and lake ; shade with asphaltum,
tinted with carmine ; high light with orange or vermilion.
The accompanying pattern is after Gustave Dore, the cele-
brated French artist
It is a winged ellipse, which produces an odd and still a very
pretty design. Lay in all gold, shade the details with verdi-
gris, darkened with asphaltum, and high hght with pink (light'
red and white). The escutcheon may be colored with light
brown, carmine and dark brown. The edges of diagonal bar
to be dotted minutely with vermilion.
No. 8. This pattern is suitable for a space | of an inch square.
The middle portion of the semi-circular band is varied by dancette, or zig-zag
work. Lay in all gold ; shade with asphaltum, enriched with a small
portion of carmine; high light with white. .The semi-circular
space to be glazed with purple, (carmine and ultramarine blue);
dancette work (canary color chrome yellow No. 2 and white) in
the center, and graduated toward either corner with a darker tint of
yellow ; wreath which supports the crescent, blue and white.
No. 9. An odd pattern, but one which will work up nicely. Main
No. 8. outlines drawn by use of the side and end of an oval pattern; scrolling
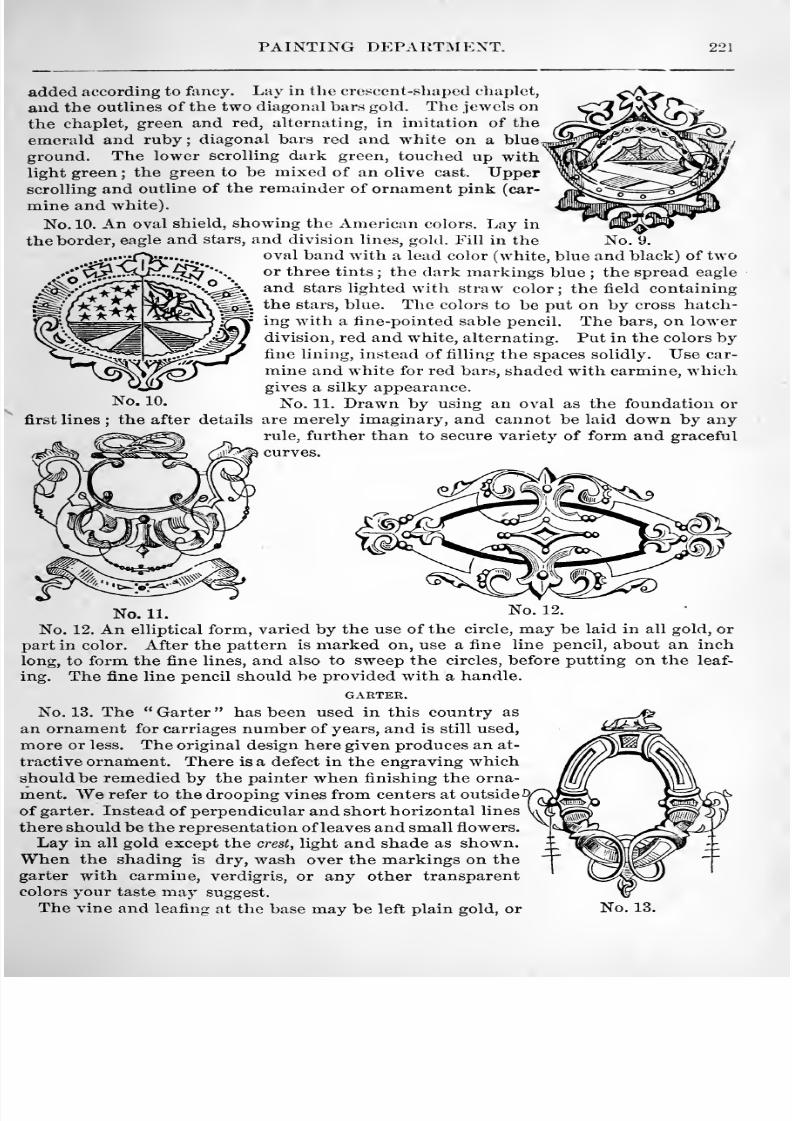
8/10/2019 Making Horse Drawn Coaches 1800 Bw
http://slidepdf.com/reader/full/making-horse-drawn-coaches-1800-bw 277/455
PAINTING DEPARTMENT. 221
added according to fancy. Lay in the crescent-sliaped chaplet,
and the outlines of the two diagonal bars gold. The jewels on
the chaplet, green and red, alternating, in imitation of the
emerald and ruby ; diagonal bars red and white on a blue
ground. The lower scrolling dark green, touched up withlight green ; the green to be mixed of an olive cast. Upperscrolling and outline of the remainder of ornament pink (car-
mine and white).
No. 10. An oval shield, showing the American colors. Lay in
the border, eagle and stars, and division lines, gold. Fill in the No. U.
oval band with a lead color (white, blue and black) of twoor three tints ; the dark markings blue ; the spread eagle
and stars lighted with straw color; the field containing
the stars, blue. The colors to be put on by cross hatch-
ing with a fine-pointed sable pencil. The bars, on lowerdivision, red and white, alternating. Put in the colors byfine lining, instead of filling the spaces solidly. Use car-
mine and white for red bars, shaded with carmine, whichgives a silky appearance.
^o« 10. ]N^o. 11. Drawn by using an oval as the foundation or
first lines ; the after details are merely imaginary, and cannot be laid down by anyrule, further than to secure variety of form and graceful
curves.
No. 11. No. 12.
No. 12. An elliptical form, varied by the use of the circle, may be laid in all gold, or
part in color. After the pattern is marked on, use a fine line pencil, about an inch
long, to form the fine lines, and also to sweep the circles, before putting on the leaf-
ing. The fine line pencil should be provided with a handle.
GARTER.
No. 13. The Garter has been used in this country as
an ornament for carriages number of years, and is still used,
more or less. The original design here given produces an at-tractive ornament. There is a defect in the engraving whichshould be remedied by the painter when finishing the orna-
ment. We refer to the drooping vines from centers at outside^l^
of garter. Instead of perpendicular and short horizontal lines
there should be the representation of leaves and small flowers.
Lay in all gold except the crest, light and shade as shown.When the shading is dry, wash over the markings on the
garter with carmine, verdigris, or any other transparent
colorsyour
tastemay suggest.
The vine and leafing at the base may be left plain gold, or

8/10/2019 Making Horse Drawn Coaches 1800 Bw
http://slidepdf.com/reader/full/making-horse-drawn-coaches-1800-bw 278/455
222 COACH-MAKERS' ILLUSTRATED HAND-BOOK.
washed over with a delicate pea-green tint. White, grayof two or three tints, and burnt umber will be sufficientto delineate the hound; the wreath, paint with colors tocontrast with those nearest to it on the garter.
No. 14. A new and decidedly handsome ornament. Out-line the garter with gold. The buckle and slide gold also.Fill in the garter with light and dark tints of blue, andhigh light with canary color. The floral gorgons, paintin brown shades, and hght with orange and clear yellow;a small portion of lake added to these browns will causethem to bear out richly when varnished. Let the me-
No. 14. dium lights and shades predominate, and the high lights
be added by first carefully considering their true positions, and then touching themon with confident strokes of the pencil ; which will give sharpness to all the details.The pendant stems with leaves and berries may be colored olive green, and shadedwith russet. When the ornament is dry, glazing will improve it.
No. 15. The center is filled in with the Caudces, a Roman emblem.The rod, or center staff , on which the wings are represented displayed, and around
which two serpents are twined, signifies _pow;er; the wings, fleetness ; the serpentswisdom.
This pattern will please the eye if every part be laid
in gold ; but there is an opportunity afforded for a dis-
play of coloring, which for practice, if for no other pur-
pose, should be seized upon.
In sweeping the curves, pay no attention to the minordetails, for on the gracefulness of these lines of beauty,
as Hogarth termed them, the appearance of the orna-
ment must depend.
Having secured the outlines, fill in on them whateverleafing is shown.
No. 16. This pattern is best suited to panels which are
wide in proportion to the depth. Will look well on a light
wagon, sleigh, or other gaily painted piece of work.
Lay in all gold, or gold and color. Having secured the No. 15.
outline, distinctly marked on the panel
size in the pattern, without reference to
details, which should be brought out
(after the gold is laid. Let the shades
be well blended down, and the lights
clear and sharp. Escutcheon highly or-
namented ; volant or flying. The pat-tern is drawn for panels which are some-
what wider than deep, but will answer
No. 16.
for panels of any shape. Lay in all gold except the
center of the escutcheon. Having marked the pat-
tern on the panels with great exactness, size in care-
fully, and when ready apply the gold ; burnishing it
up well with soft, clean raw cotton. The gold leaf
having been laid, proceed to color the center field.
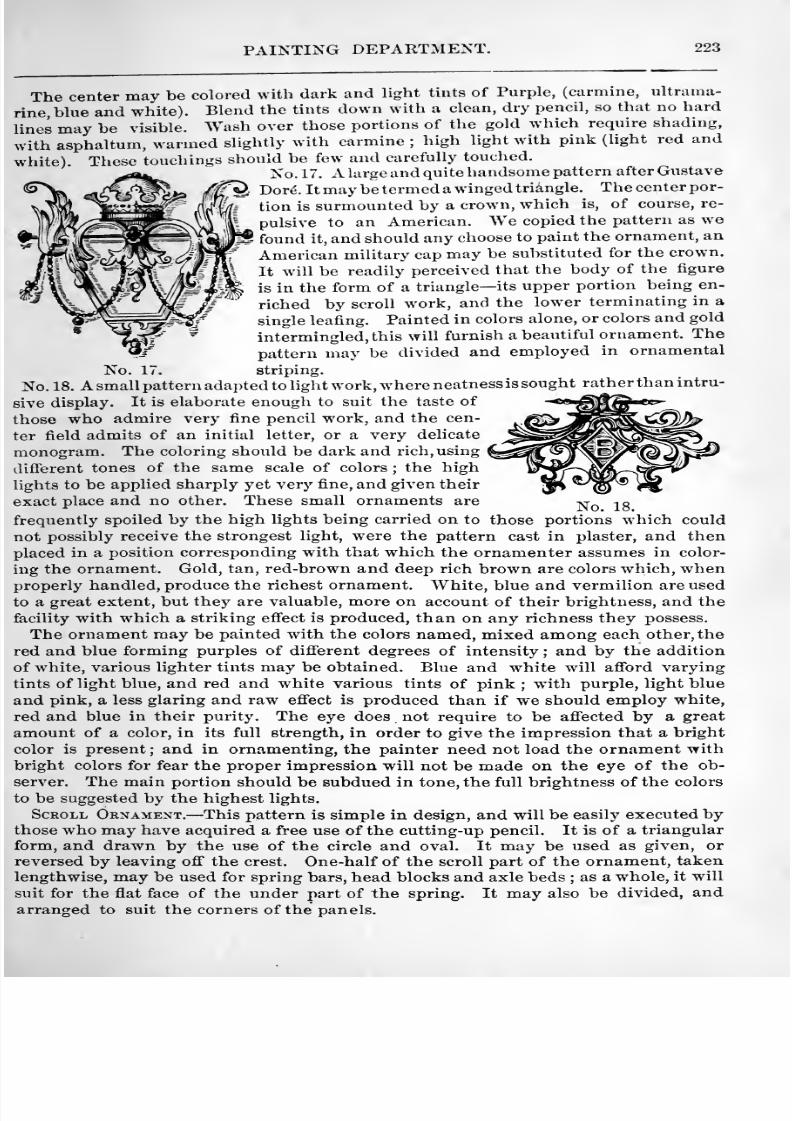
8/10/2019 Making Horse Drawn Coaches 1800 Bw
http://slidepdf.com/reader/full/making-horse-drawn-coaches-1800-bw 279/455
PAINTING DEPARTMENT. 223
The center may be colored with dark and light tints of Purple, (carmine, ultrama-
rine, blue and white). Blend the tints down with a clean, dry pencil, so that no hard
lines may be visible. Wash over those portions of the gold which require shading,
with asphaltum, warmedslightly with carmine ; high light with pink (light red and
white). These touchings should be few and carefully touched.
No. 17. A large and quite handsome pattern after Gustave
Dor6. It may be termed a winged triangle. The center por-
tion is surmounted by a crown, which is, of course, re-
pulsive to an American. We copied the pattern as we
found it, and should any choose to paint the ornament, an
American military cap may be substituted for the crown.
It will be readily perceived that the body of the figure
is in the form of a triangle— its upper portion being en-
riched by scroll work, and the lower terminating in a
single leafing. Painted in colors alone, or colors and gold
intermingled, this will furnish a beautiful ornament. The
pattern may be divided and employed in ornamental
No. 17. striping.
No. 18. A small pattern adapted to light work, where neatness is sought rather than intru-
sive display. It is elaborate enough to suit the taste of
those who admire very fine pencil work, and the cen-
ter field admits of an initial letter, or a very delicate
monogram. The coloring should be dark and rich, using
different tones of the same scale of colors ; the high
lights to be applied sharply yet very fine, and given their
exact place and no other. These small ornaments are ^^^ -j^g
frequently spoiled by the high lights being carried on to those portions w hich could
not possibly receive the strongest light, were the pattern cast in plaster, and then
placed in a position corresponding with that which the ornamenter assumes in color-
ing the ornament. Gold, tan, red-brown and deep rich brown are colors which, whenproperly handled, produce the richest ornament. White, blue and vermilion are used
to a great extent, but they are valuable, more on account of their brightness, and the
facility with which a striking eS'ect is produced, than on any richness they possess.
The ornament may be painted with the colors named, mixed among each other, the
red and blue forming purples of different degrees of intensity ; and by the addition
of white, various lighter tints may be obtained. Blue and white will afford varying
tints of light blue, and red and white various tints of pink ; w^ith purple, light blue
and pink, a less glaring and raw effect is produced than if we should employ white,
red and blue in their purity. The eye does not require to be affected by a great
amount of a color, in its full strength, in order to give the impression that a bright
color is present ; and in ornamenting, the painter need not load the ornament withbright colors for fear the proper impression will not be made on the eye of the ob-
server. The main portion should be subdued in tone, the full brightness of the colors
to be suggested by the highest lights.
Scroll Ornament. —This pattern is simple in design, and will be easily executed bythose who may have acquired a free use of the cutting-up pencil. It is of a triangular
form, and drawn by the use of the circle and oval. It may be used as given, or
reversed by leaving off the crest. One-half of the scroll part of the ornament, takenlengthwise, may be used for spring bars, head blocks and axle beds ; as a whole, it will
suit for the flat face of the under part of the spring. It may also be divided, andarranged to suit the corners of the panels.
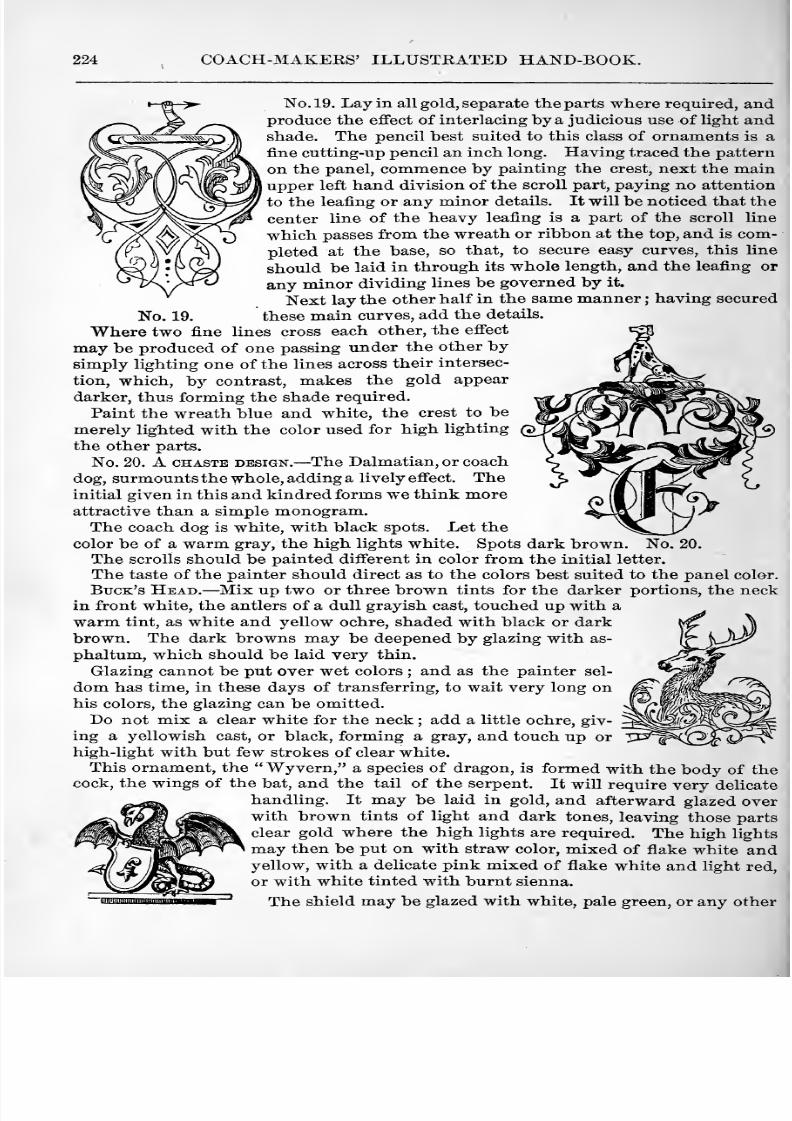
8/10/2019 Making Horse Drawn Coaches 1800 Bw
http://slidepdf.com/reader/full/making-horse-drawn-coaches-1800-bw 280/455
224 COACH-MAKERS' ILLUSTRATED HAND-BOOK.
No. 19. Lay in all gold, separate the parts where required, andproduce the effect of interlacing by a judicious use of light andshade. The pencil best suited to this class of ornaments is a
fine cutting-up pencil an inch long. Having traced the pattern
on the panel, commence by painting the crest, next the mainupper left hand division of the scroll part, paying no attention
to the leafing or any minor details. It will be noticed that the
center line of the heavy leafing is a part of the scroll line
which passes from the wreath or ribbon at the top, and is com-
pleted at the base, so that, to secure easy curves, this line
should be laid in through its whole length, and the leafing or
any minor dividing lines be governed by it.
Next lay the other half in the same manner ; having securedNo. 19. these main curves, add the details.
Where two fine lines cross each other, the effect
may be produced of one passing under the other bysimply lighting one of the lines across their intersec-
tion, which, by contrast, makes the gold appear
darker, thus forming the shade required.
Paint the wreath blue and white, the crest to be
merely lighted with the color used for high lighting
the other parts.No. 20. A CHASTE DESIGN. —The Dalmatian, or coach
dog, surmounts the whole, adding a lively effect. Theinitial given in this and kindred forms we think moreattractive than a simple monogram.
The coach dog is white, with black spots. Let the
color be of a warm gray, the high lights white. Spots dark brown. No. 20.
The scrolls should be painted different in color from the initial letter.
The taste of the painter should direct as to the colors best suited to the panel color.
Buck's Head. —Mix up two or three brown tints for the darker portions, the neckin front white, the antlers of a dull grayish cast, touched up with a
warm tint, as white and yellow ochre, shaded with black or dark
brown. The dark browns may be deepened by glazing with as-
phaltum, which should be laid very thin.
Glazing cannot be put over wet colors ; and as the painter sel-
dom has time, in these days of transferring, to wait very long onhis colors, the glazing can be omitted.
Do not mix a clear white for the neck ; add a little ochre, giv-
ing a yellowish cast, or black, forming a gray, and touch up or
high-light with but few strokes of clear white.
This ornament, the Wyvern, a species of dragon, is formed with the body of thecock, the wings of the bat, and the tail of the serpent. It will require very delicate
handling. It may be laid in gold, and afterward glazed overwith brown tints of light and dark tones, leaving those parts
clear gold where the high lights are required. The high lights
may then be put on with straw color, mixed of flake white andyellow, with a delicate pink mixed of flake white and light red,
or with white tinted with burnt sienna.
The shield may be glazed with white, pale green, or any other
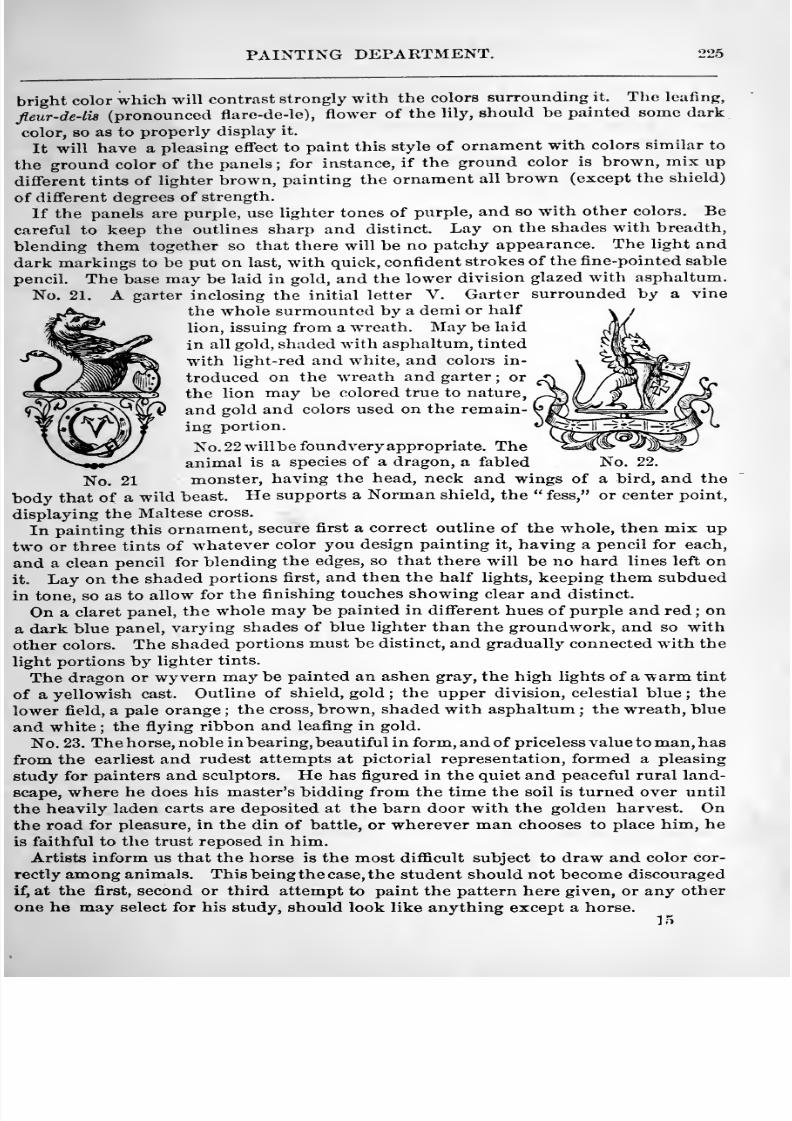
8/10/2019 Making Horse Drawn Coaches 1800 Bw
http://slidepdf.com/reader/full/making-horse-drawn-coaches-1800-bw 281/455
PAINTING DEPARTMENT. 225
bright color which will contrast strongly with the colors surrounding it. The leafing,
fleur-de-lis (pronounced fiare-de-le), flower of the lily, should be painted some dark
color, 80 as to properly display it.
It will have a pleasing effect to paint this style of ornament with colors similar to
the ground color of the panels ; for instance, if the ground color is brown, mix up
different tints of lighter brown, painting the ornament all brown (except the shield)
of different degrees of strength.
If the panels are purple, use lighter tones of purple, and so with other colors. Be
careful to keep the outlines sharp and distinct. Lay on the shades with breadth,
blending them together so that there will be no patchy appearance. The light and
dark markings to be put on last, with quick, confident strokes of the fine-pointed sable
pencil. The base may be laid in gold, and the lower division glazed with asphaltum.
No. 21. A garter inclosing the initial letter V. Garter surrounded by a vinethe whole surmounted by a demi or half
lion, issuing from a wreath. May be laid
in all gold, shaded with asphaltum, tinted
with light-red and white, and colors in-
troduced on the wreath and garter ; or
the lion may be colored true to nature,
and gold and colors used on the remain-
ing portion.
No. 22 will be foundvery appropriate. Theanimal is a species of a dragon, a fabled No. 22.
No. 21 monster, having the head, neck and wings of a bird, and the
body that of a wild beast. He supports a Norman shield, the fess, or center point,
displaying the Maltese cross.
In painting this ornament, secure first a correct outline of the whole, then mix up
two or three tints of whatever color you design painting it, having a pencil for each,
and a clean pencil for blending the edges, so that there will be no hard lines left on
it. Lay on the shaded portions first, and then the half lights, keeping them subdued
in tone, so as to allow for the finishing touches showing clear and distinct.On a claret panel, the whole may be painted in different hues of purple and red ; on
a dark blue panel, varying shades of blue lighter than the groundwork, and so with
other colors. The shaded portions must be distinct, and gradually connected with the
light portions by lighter tints.
The dragon or wyvern may be painted an ashen gray, the high lights of a warm tint
of a yellowish cast. Outline of shield, gold; the upper division, celestial blue; the
lower field, a pale orange ; the cross, brown, shaded with asphaltum ; the wreath, blue
and white ; the flying ribbon and leafing in gold.
No. 23. The horse, noble in bearing, beautiful in form, and of priceless value to man, hasfrom the earliest and rudest attempts at pictorial representation, formed a pleasing
study for painters and sculptors. He has figured in the quiet and peaceful rural land-
scape, where he does his master's bidding from the time the soil is turned over until
the heavily laden carts are deposited at the barn door with the golden harvest. Onthe road for pleasure, in the din of battle, or wherever man chooses to place him, he
is faithful to the trust reposed in him.
Artists inform us that the horse is the most difficult subject to draw and color cor-
rectly among animals. This being the case, the student should not become discouraged
if, at the first, second or third attempt to paint the pattern here given, or any other
one he may select for his study, should look like anything except a horse.15
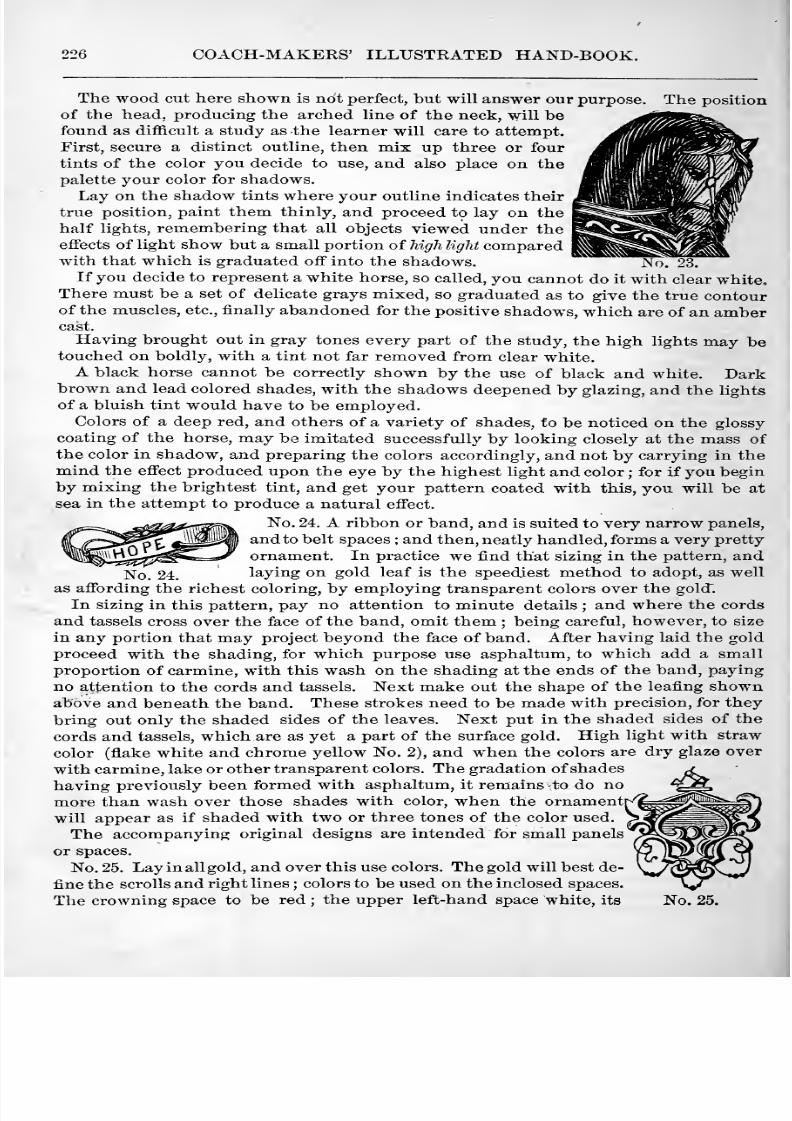
8/10/2019 Making Horse Drawn Coaches 1800 Bw
http://slidepdf.com/reader/full/making-horse-drawn-coaches-1800-bw 282/455
COACH-MAKERS' ILLUSTRATED HAND-BOOK.
The wood cut here shown is not perfect, but will answer our purpose. The position
of the head, producing the arched line of the neck, will befound as difficult a study as the learner will care to attempt.
First, secure a distinct outline, then mix up three or fourtints of the color you decide to use, and also place on thepalette your color for shadows.
Lay on the shadow tints where your outline indicates their
true position, paint them thinly, and proceed to lay on the
half lights, remembering that all objects viewed under theeffects of light show but a small portion of high light comparedwith that which is graduated off into the shadows.
If you decide to represent a white horse, so called, you cannot do it with clear white.
There must be a set of delicate grays mixed, so graduated as to give the true contourof the muscles, etc., finally abandoned for the positive shadows, which are of an ambercast.
Having brought out in gray tones every part of the study, the high lights may betouched on boldly, with a tint not far removed from clear white.
A black horse cannot be correctly shown by the use of black and white. Darkbrown and lead colored shades, with the shadows deepened by glazing, and the lights
of a bluish tint would have to be employed.Colors of a deep red, and others of a variety of shades, f o be noticed on the glossy
coating of the horse, may be imitated successfully by looking closely at the mass of
the color in shadow, and preparing the colors accordingly, and not by carrying in themind the eflPect produced upon the eye by the highest light and color ; for if you begin
by mixing the brightest tint, and get your pattern coated with this, you will be at
sea in the attempt to produce a natural efi'ect.
rr'^^ii_.„j y^^^'^1ilM% ^^' ^^' ^ ^i^^<^^ ^^ band, and is suited to very narrow panels,
Kj^^^^^^^^% and to belt spaces ; and then, neatly handled, forms a very pretty
^^^^^^^1^^^=^ ornament. In practice we find that sizing in the pattern, and~^Q^ 24. laying on gold leaf is the speediest method to adopt, as well
as afibrding the richest coloring, by employing transparent colors over the gold .
In sizing in this pattern, pay no attention to minute details ; and where the cords
and tassels cross over the face of the band, omit them ; being careful, however, to size
in any portion that may project beyond the face of band. After having laid the gold
proceed with the shading, for which purpose use asphaltum, to which add a small
proportion of carmine, with this wash on the shading at the ends of the band, paying
no attention to the cords and tassels. Next make out the shape of the leafing shownabove and beneath the band. These strokes need to be made with precision, for they
bring out only the shaded sides of the leaves. Next put in the shaded sides of the
cords and tassels, which are as yet a part of the surface gold. High light with straw
color (flake white and chrome yellow No. 2), and when the colors are dry glaze over
with carmine, lake or other transparent colors. The gradation of shades
having previously been formed with asphaltum, it remains\to do no
more than wash over those shades with color, when the ornament[
will appear as if shaded with two or three tones of the color used.
The accompanying original designs are intended for small panels
'
or spaces.
No. 25. Lay in all gold, and over this use colors. The gold will best de-
fine the scrolls and right lines ; colors to be used on the inclosed spaces.
The crowning space to be red ; the upper left-hand space white, its No. 25.
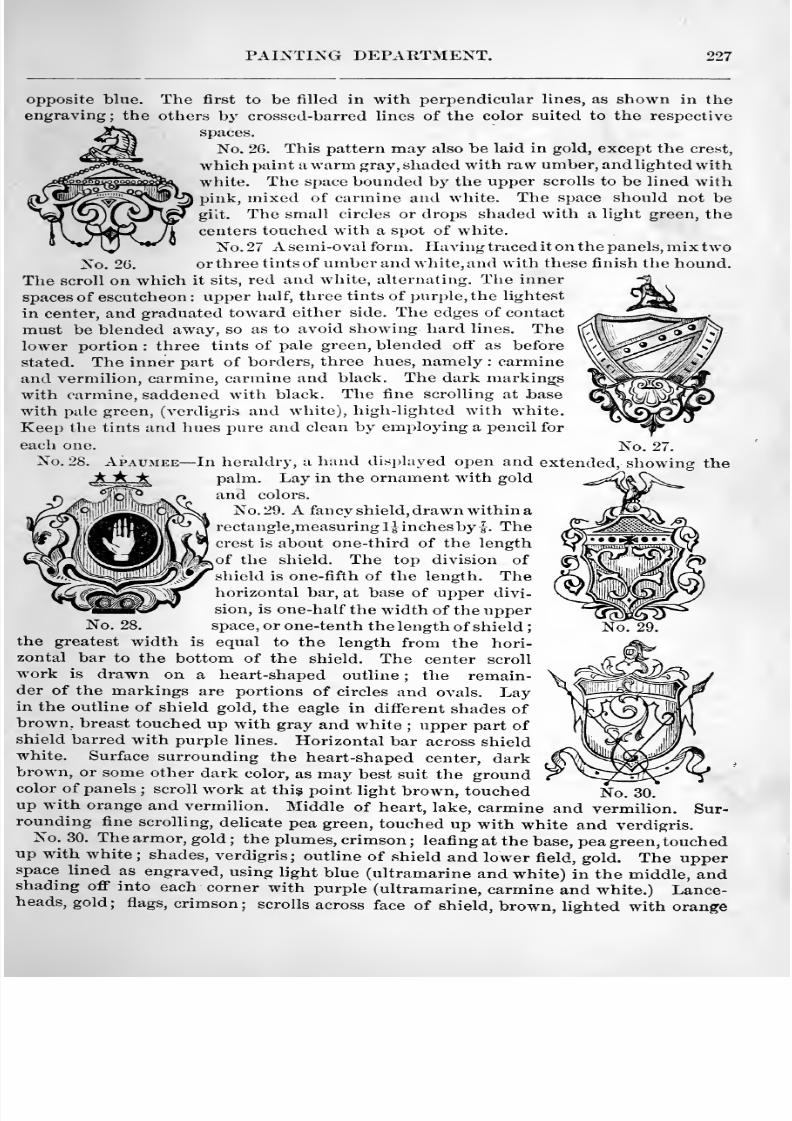
8/10/2019 Making Horse Drawn Coaches 1800 Bw
http://slidepdf.com/reader/full/making-horse-drawn-coaches-1800-bw 283/455
PAINTING DEPARTMENT. 227
opposite blue. The first to be filled in with perpendicular lines, as shown in the
engraving ; the others by crossed-barred lines of the color suited to the respective
spaces.
No. 26. This pattern may also be laid in gold, except the crest,
which paint a warm gray, shaded with raw umber, and lighted with
white. The space bounded by the upper scrolls to be lined with
pink, mixed of carmine and white. The space should not be
gilt. The small circles or drops shaded with a light green, the
centers touched with a spot of white.
No. 27 A semi-oval form. Having traced it on the panels, mix two
No. 2G. or three tints of umber and white, and with these finish the hound.
The scroll on which it sits, red and white, alternating. The inner
spaces of escutcheon : upper half, three tints of purple, the lightestin center, and graduated toward either side. The edges of contact
must be blended away, so as to avoid showing hard lines. Thelower portion : three tints of pale green, blended ofl' as before
stated. The inner part of borders, three hues, namely ; carmine
and vermilion, carmine, carmine and black. The dark markings
with carmine, saddened with black. The fine scrolling at base
with pale green, (verdigris and white), high-lighted with white.
Keep the tints and hues pure and clean by employing a pencil for
each one. No. 27.No. 28. Apau.mee— In heraldry, a hand displayed open and extended, showing the
palm. Lay in the ornament with gold
and colors.
No. 29. A fancy shield, drawn within a
rectangle,measuringljinchesby|. Thecrest is about one-third of the length
^of the shield. The top division of
shield is one-fifth of the length. The
horizontal bar, at base of upper divi-sion, is one-half the width of the upper
space, or one-tenth the length of shieldthe greatest width is equal to the length from the hori-zontal bar to the bottom of the shield. The center scroll
work is drawn on a heart-shaped outline ; the remain-der of the markings are portions of circles and ovals. Layin the outline of shield gold, the eagle in difi'erent shades ofbrown, breast touched up with gray and white ; upper part ofshield barred with purple lines. Horizontal bar across shieldwhite. Surface surrounding the heart-shaped center, darkbrown, or some other dark color, as may best suit the groundcolor of panels ; scroll work at thi$ point light brown, touched No. 30.up with orange and vermilion. Middle of heart, lake, carmine and vermilion. Sur-rounding fine scrolling, delicate pea green, touched up with white and verdigris.
No. 30. The armor, gold ; the plumes, crimson ; leafing at the base, pea green, touchedup with white
; shades, verdigris ; outline of shield and lower field, gold. The upperspace lined as engraved, using light blue (ultramarine and white) in the middle, andshading off into each corner with purple (ultramarine, carmine and white.) Lance-heads, gold; flags, crimson; scrolls across face of shield, brown, lighted with orange
No. 28.
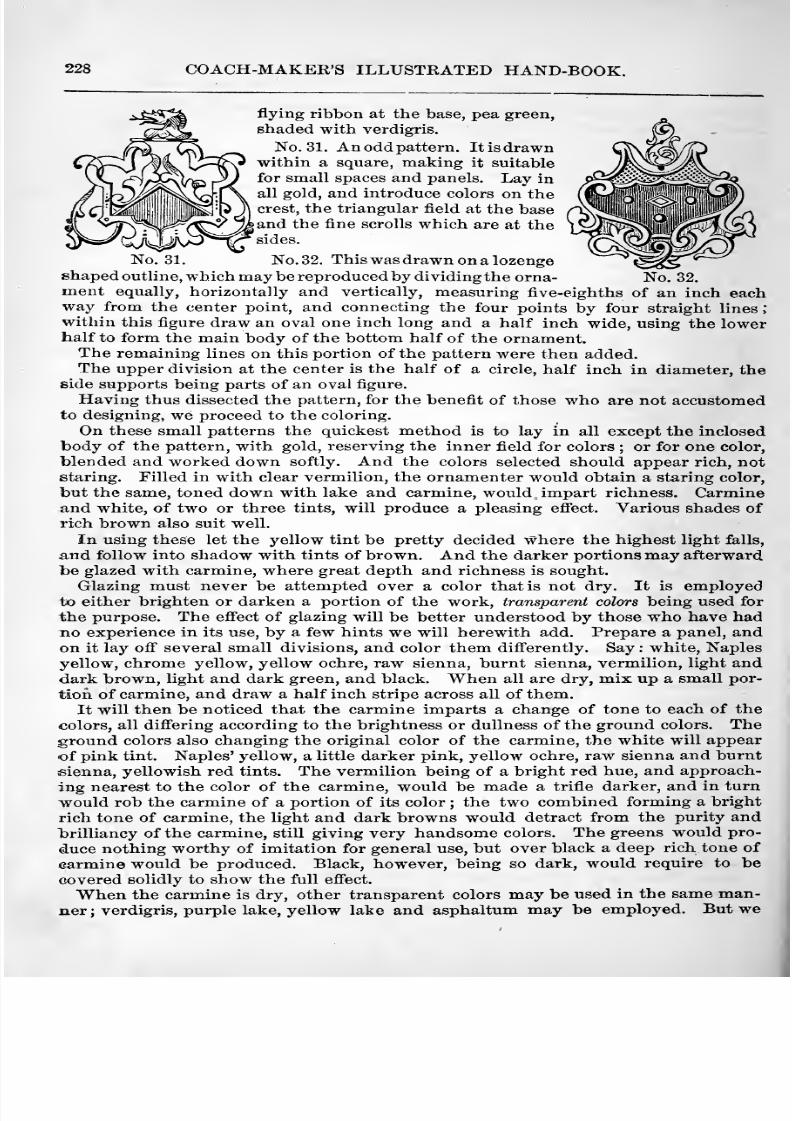
8/10/2019 Making Horse Drawn Coaches 1800 Bw
http://slidepdf.com/reader/full/making-horse-drawn-coaches-1800-bw 284/455
228 COACH-MAKER'S ILLUSTRATED HAND-BOOK.
flying ribbon at the base, pea green,
shaded with verdigris.
No. 31. Anoddpattern. Itisdrawnwithin a square, making it suitable
for small spaces and panels. Lay in
all gold, and introduce colors on thecrest, the triangular field at the baseand the fine scrolls which are at thesides.
No. 31. No. 32. This was drawn on a lozengeshaped outline, which may be reproduced by dividing the orna- No. 32.
ment equally, horizontally and vertically, measuring five-eighthsof an inch eachway from the center point, and connecting the four points by four straight lines;
within this figure draw an oval one inch long and a half inch wide, using the lowerhalf to form the main body of the bottom half of the ornament.
The remaining lines on this portion of the pattern were then added.The upper division at the center is the half of a circle, half inch in diameter, the
side supports being parts of an oval figure.
Having thus dissected the pattern, for the benefit of those who are not accustomedto designing, we proceed to the coloring.
On these small patterns the quickest method is to lay in all except the inclosed
body of the pattern, with gold, reserving the inner field for colors ; or for one color,blended and worked down softly. And the colors selected should appear rich, notstaring. Filled in with clear vermilion, the ornamenter would obtain a staring color,
but the same, toned down with lake and carmine, would impart richness. Carmineand white, of two or three tints, will produce a pleasing efiect. Various shades of
rich brown also suit well.
In using these let the yellow tint be pretty decided where the highest light falls,
and follow into shadow with tints of brown. And the darker portions may afterwardbe glazed with carmine, where great depth and richness is sought.
Glazing must never be attempted over a color that is not dry. It is employedto either brighten or darken a portion of the work, transpareM colors being used for
the purpose. The efi'ect of glazing will be better understood by those who have hadno experience in its use, by a few hints we will herewith add. Prepare a panel, andon it lay ofi several small divisions, and color them diff'erently. Say : white, Naplesyellow, chrome yellow, yellow ochre, raw sienna, burnt sienna, vermilion, light anddark brown, light and dark green, and black. When all are dry, mix up a small por-
tion of carmine, and draw a half inch stripe across all of them.It will then be noticed that the carmine imparts a change of tone to each of the
colors, all differing according to the brightness or dullness of the ground colors. Theground colors also changing the original color of the carmine, the white will appear
of pink tint. Naples' yellow, a little darker pink, yellow ochre, raw sienna and burnt
sienna, yellowish red tints. The vermilion being of a bright red hue, and approach-
ing nearest to the color of the carmine, would be made a trifle darker, and in turn
would rob the carmine of a portion of its color ; the two combined forming a bright
rich tone of carmine, the light and dark browns would detract from the purity and brilliancy of the carmine, still giving very handsome colors. The greens would pro-
duce nothing worthy of imitation for general use, but over black a deep rich tone of
carmine would be produced. Black, however, being so dark, would require to becovered solidly to show the full efi'ect.
When the carmine is dry, other transparent colors may be used in the same man-ner ; verdigris, purple lake, yellow lake and asphaltum may be employed. But we
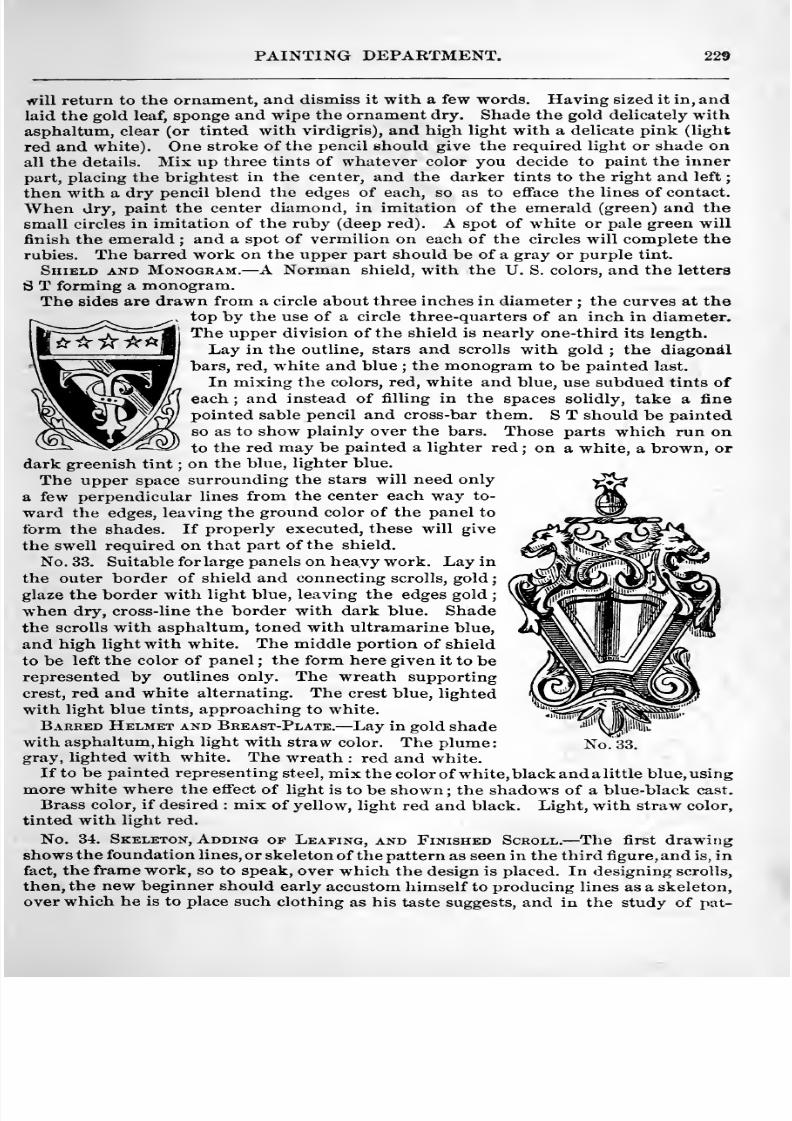
8/10/2019 Making Horse Drawn Coaches 1800 Bw
http://slidepdf.com/reader/full/making-horse-drawn-coaches-1800-bw 285/455
PAINTING DEPARTMENT. 22«
will return to the ornament, and dismiss it with a few words. Having sized it in, andlaid the gold leaf, sponge and wipe the ornament dry. Shade the gold delicately with
asphaltum, clear (or tinted with virdigris), and high light with a delicate pink (light
red and white). One stroke of the pencil should give the required light or shade onall the details. Mix up three tints of whatever color you decide to paint the inner
part, placing the brightest in the center, and the darker tints to the right and left
then with a dry pencil blend the edges of each, so as to efface the lines of contact.
When dry, paint the center diamond, in imitation of the emerald (green) and the
small circles in imitation of the ruby (deep red). A spot of white or pale green will
finish the emerald ; and a spot of vermilion on each of the circles will complete therubies. The barred work on the upper part should be of a gray or purple tint.
Shield and Monogram. —A Norman shield, with the U. S. colors, and the letters
S T forming a monogram.
The sides are drawn from a circle about three inches in diameter ; the curves at thetop by the use of a circle three-quarters of an inch in diameter.
The upper division of the shield is nearly one-third its length.
Lay in the outline, stars and scrolls with gold ; the diagondl
bars, red, white and blue ; the monogram to be painted last.
In mixing the colors, red, white and blue, use subdued tints of
each ; and instead of filling in the spaces solidly, take a fine
pointed sable pencil and cross-bar them. S T should be painted
so as to show plainly over the bars. Those parts which run on
to the red may be painted a lighter red ; on a white, a brown, ordark greenish tint ; on the blue, lighter blue.
The upper space surrounding the stars will need only
a few perpendicular lines from the center each way to-
ward the edges, leaving the ground color of the panel to
form the shades. If properly executed, these will give
the swell required on that part of the shield.
No. 33. Suitable for large panels on heavy work. Lay in
the outer border of shield and connecting scrolls, gold
glaze the border with light blue, leaving the edges goldwhen dry, cross-line the border with dark blue. Shadethe scrolls with asphaltum, toned with ultramarine blue,
and high light with white. The middle portion of shield
to be left the color of panel ; the form here given it to berepresented by outlines only. The wreath supporting
crest, red and white alternating. The crest blue, lighted
with light blue tints, approaching to white.
Barred Helmet and Breast-Plate. —Lay in gold shade
with asphaltum,high light
with straw color. The plume:gray, lighted with white. The wreath : red and white.If to be painted representing steel, mix the color of white, black and a little blue, using
more white where the effect of light is to be shown; the shadows of a blue-black cast.
Brass color, if desired : mix of yellow, light red and black. Light, with straw color,
tinted with light red.
No. 34. Skeleton, Adding of Leafing, and Finished Scroll. —The first drawingshows the foundation lines, or skeleton of the pattern as seen in the third figure, and is, in
fact, the frame work, so to speak, over which the design is placed. In designing scrolls,
then, the new beginner should early accustom himself to producing lines as a skeleton,
over which he is to place such clothing as his taste suggests, and in the study of pat-
No. 33.

8/10/2019 Making Horse Drawn Coaches 1800 Bw
http://slidepdf.com/reader/full/making-horse-drawn-coaches-1800-bw 286/455
230 COACH-MAKER'S ILLUSTRATED HAND-BOOK.
terns, of whatever degree of elaboration, he must look at them, not as a whole, butfirst direct the attention to the center lines, and having obtained their sweeps or curves,take up the details according to their prominence in giving character to the study.
In the simple pattern here set, no difficulty will be ex-perienced in fully understanding it— the skeleton show-ing distinctly that three circles have been connected byflowing lines, on which are placed leafing agreeing withthe parts of the skeleton in which they are placed. Wecannot lay down rules to govern the taste in clothing the
skeleton, as on the same lines a great variety of patternsmay be produced, each one depending on that innatesomething, called natural gift, or genius, which suggestsforms to the mind as if a hidden power was exertedwholly separate from the will. By practice, however,those having no natural taste may acquire a commenda-ble degree of proficiency in designing. Whatever formsare used to enrich the skeleton they should be such as
flow easily and naturally with its shape, and the spaces
be so arranged as to bring out distinctly each member ofthe scroll pattern.
Variety of forms and curves must be sought. This is a
plain running scroll, that is, it is not varied by intertwin-
ing parts or members, and will be sufficient for our pres-
ent purpose in arresting the attention of those who desire
to practice drawing. The second figure gives the leafing
without any attempt at shading, showing the outline
within which other varieties of form are Introduced in
completing the pattern. The student must imagine theleafing as standing out in relief, as a piece of wood-carving
or a plaster cast would not, under the effects of light,
show any positive lines, such as the painter is at liberty
to use in bringing out an imitation ; we mean lines with-
in the outlines of each leaf. Some of our best scrollers
give the form by graduated tints and shades, but this
method requires a vast amount of skill in making a sharp
and attractive scroll. A medium course seems to be the
better plan. On smallpatterns, suited to carriage work,
we generally dismiss them by merely lighting up the
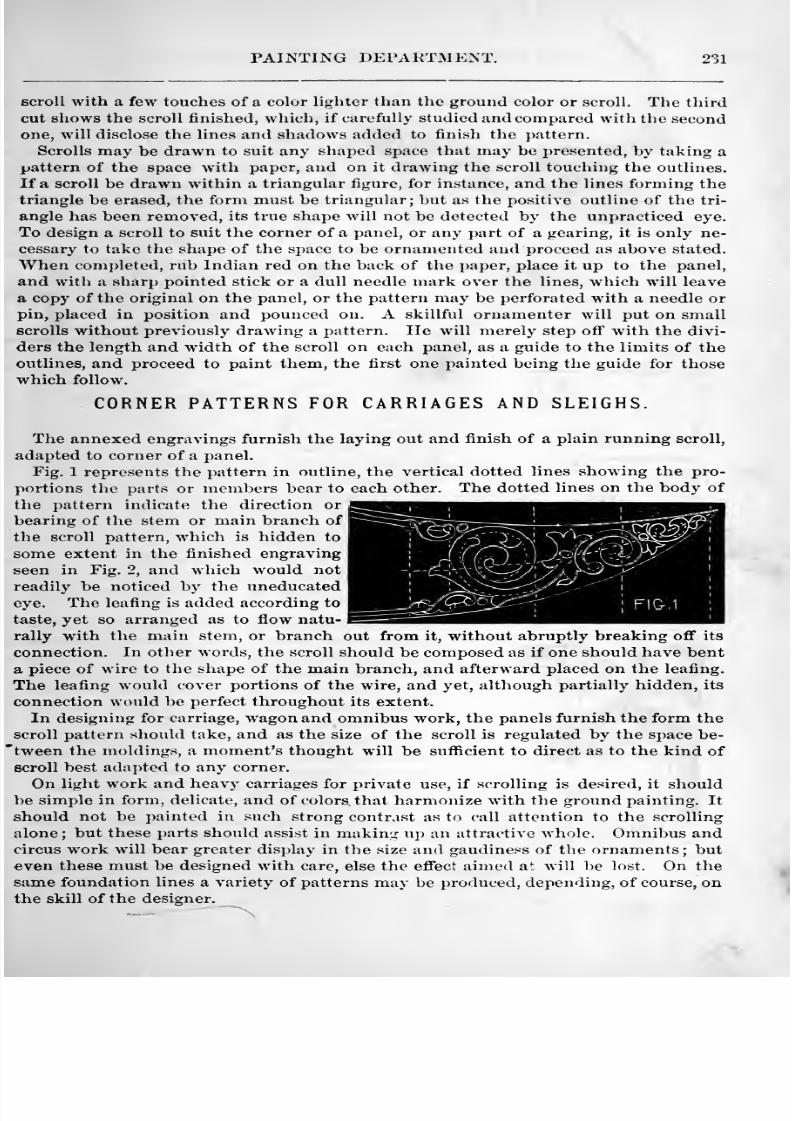
8/10/2019 Making Horse Drawn Coaches 1800 Bw
http://slidepdf.com/reader/full/making-horse-drawn-coaches-1800-bw 287/455
PAINTING DEPAKTiMENT. 231
scroll with a few touches of a color lighter than the ground color or scroll. The third
cut shows the scroll finished, which, if curefully studied and compared with the secondone, will disclose the lines and shadows added to finish the imttern.
Scrolls may be drawn to suit any shaped space that may be presented, by taking a
pattern of the space with paper, and on it drawing the scroll touching the outlines.
If a scroll be drawn within a triangular figure, for instance, and the lines forming the
triangle be erased, the form must be triangular; but as the positive outline of the tri-
angle has been removed, its true shape will not be detected by the unpracticed eye.
To design a scroll to suit the corner of a panel, or any part of a gearing, it is only ne-
cessary to take the shape of the space to be ornamented and proceed as above stated.
When com})leted, rub Indian red on the back of the paper, place it up to the panel,
and with a sharp pointed stick or a dull needle mark over the lines, which will leave
a copy of the original on the panel, or the pattern may be perforated with a needle orpin, placed in position and pounced on. A skillful ornamenter will put on small
scrolls without previously drawing a pattern. lie will merely step off with the divi-
ders the length and width of the scroll on each panel, as a guide to the limits of the
outlines, and proceed to paint them, the first one painted being the guide for those
which follow.
CORNER PATTERNS FOR CARRIAGES AND SLEIGHS.
The annexed engravings furnish the laying out and finish of a plain running scroll,
adapted to corner of a panel.
Fig. 1 represents the pattern in outline, the vertical dotted lines showing the pro-
portions the parts or members bear to each other. The dotted lines on the body of
the pattern indicate the direction or
bearing of the stem or main branch of
the scroll pattern, which is hidden to
some extent in the finished engraving
seen in Fig. 2, and which would not
readily be noticed by the uneducated
eye. The leafing is added according to
taste, yet so arranged as to flow natu-
rally with the main stem, or branch out from it, without abruptly breaking off its
connection. In other words, the scroll should be composed as if one should have bent
a piece of wire to the shape of the main branch, and afterward placed on the leafing.
The leafing would cover portions of the wire, and yet, although partially hidden, its
connection would be perfect throughout its extent.
In designing for carriage, wagon and omnibus work, the panels furnish the form the
scroll pattern should take, and as the size of the scroll is regulated by the space be-
'tween the moldings, a moment's thought will be suflficient to direct as to the kind of
scroll best ada])ted to any corner.
On light work and heavy carriages for private use, if scrolling is desired, it should
be simple in form, delicate, and of colors that harmonize with the ground painting. It
should not be ])ainted in such strong contrast as to call attention to the scrolling
alone ; but these parts should assist in makinix up an attractive whole. Omnibus andcircus work will bear greater disi)lay in the size and gaudiness of the ornaments; but
even these must be designed with care, else the effect aimed at will be lost. On the
same foundation lines a variety of patterns may be produced, depending, of course, on
the skill of the designer.
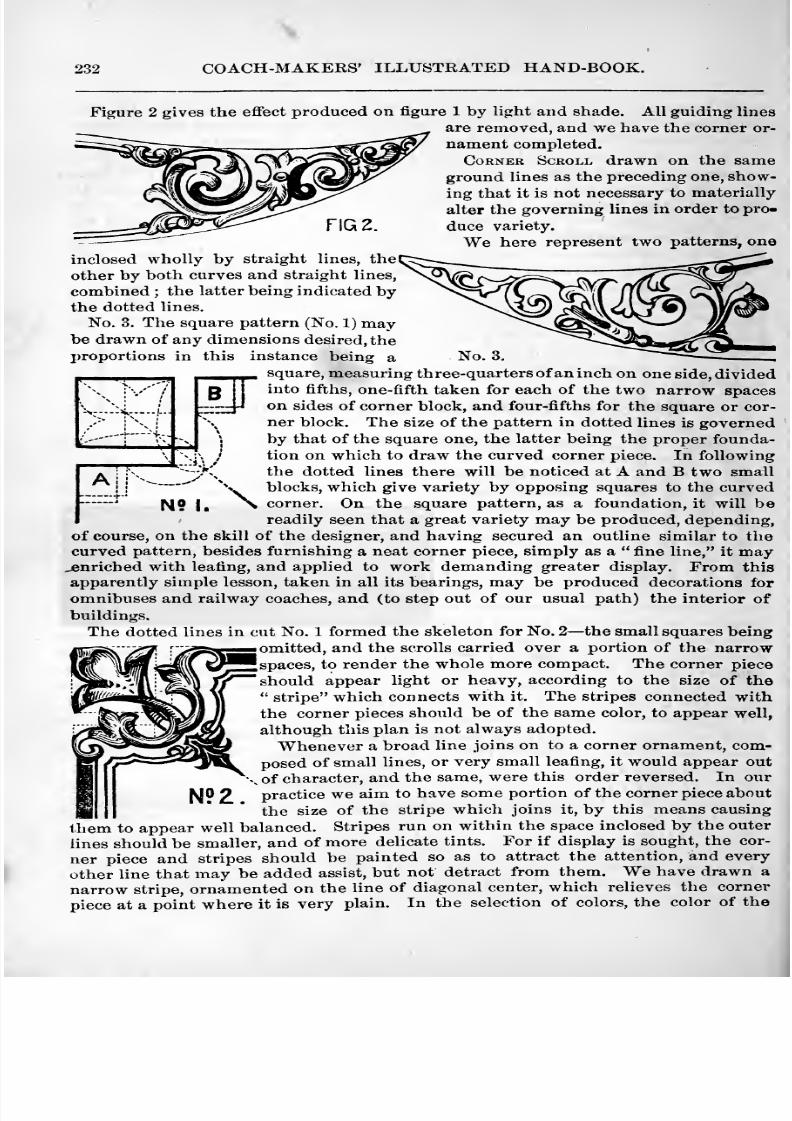
8/10/2019 Making Horse Drawn Coaches 1800 Bw
http://slidepdf.com/reader/full/making-horse-drawn-coaches-1800-bw 288/455
232 COACH-MAKERS' ILLUSTRATED HAND-BOOK.
Figure 2 gives the effect produced on figure 1 by light and shade. All guiding lines
are removed, and we have the corner or-
nament completed.Corner Scroll drawn on the same
ground lines as the preceding one, show-ing that it is not necessary to materially
alter the governing lines in order to pro-
duce variety.
We here represent two patterns, one
inclosed wholly by straight lines, the
other by both curves and straight lines,
combined ; the latter being indicated bythe dotted lines.
No. 3. The square pattern (No. 1) maybe drawn of any dimensions desired, the
I)roportions in this instance being a
. \ ''''''
i
^
1
\..:4 \
.^i\--^ 9 1.
51
\
square, measuring three-quarters of an inch on one side, dividedinto fifths, one-fifth taken for each of the two narrow spaces
on sides of corner block, and four-fifths for the square or cor-
ner block. The size of the pattern in dotted lines is governedby that of the square one, the latter being the proper founda-
tion on which to draw the curved corner piece. In following
the dotted lines there will be noticed at A and B two smallblocks, which give variety by opposing squares to the curvedcorner. On the square pattern, as a foundation, it will bereadily seen that a great variety may be produced, depending,
of course, on the skill of the designer, and having secured an outline similar to thecurved pattern, besides furnishing a neat corner piece, simply as a fine line, it may
jenricbed with leafing, and applied to work demanding greater display. From this
apparently simple lesson, taken in all its bearings, may be produced decorations for
omnibuses and railway coaches, and (to step out of our usual path) the interior ofbuildings.
The dotted lines in cut No. 1 formed the skeleton for No. 2—the small squares beingI omitted, and the scrolls carried over a portion of the narrow[spaces, to render the whole more compact. The corner piece
should appear light or heavy, according to the size of the stripe which connects with it. The stripes connected with
the corner pieces should be of the same color, to appear well,
although this plan is not always adopted.
Whenever a broad line joins on to a corner ornament, com-posed of small lines, or very small leafing, it would appear out
of character, and the same, were this order reversed. In our
practice we aim to have some portion of the corner piece about
the size of the stripe which joins it, by this means causing
them to appear well balanced. Stripes run on within the space inclosed by the outer
lines should be smaller, and of more delicate tints. For if display is sought, the cor-
ner piece and stripes should be painted so as to attract the attention, and every
other line that may be added assist, but not detract from them. We have drawn a
narrow stripe, ornamented on the line of diagonal center, which relieves the corner
piece at a point where it is very plain. In the selection of colors, the color of the
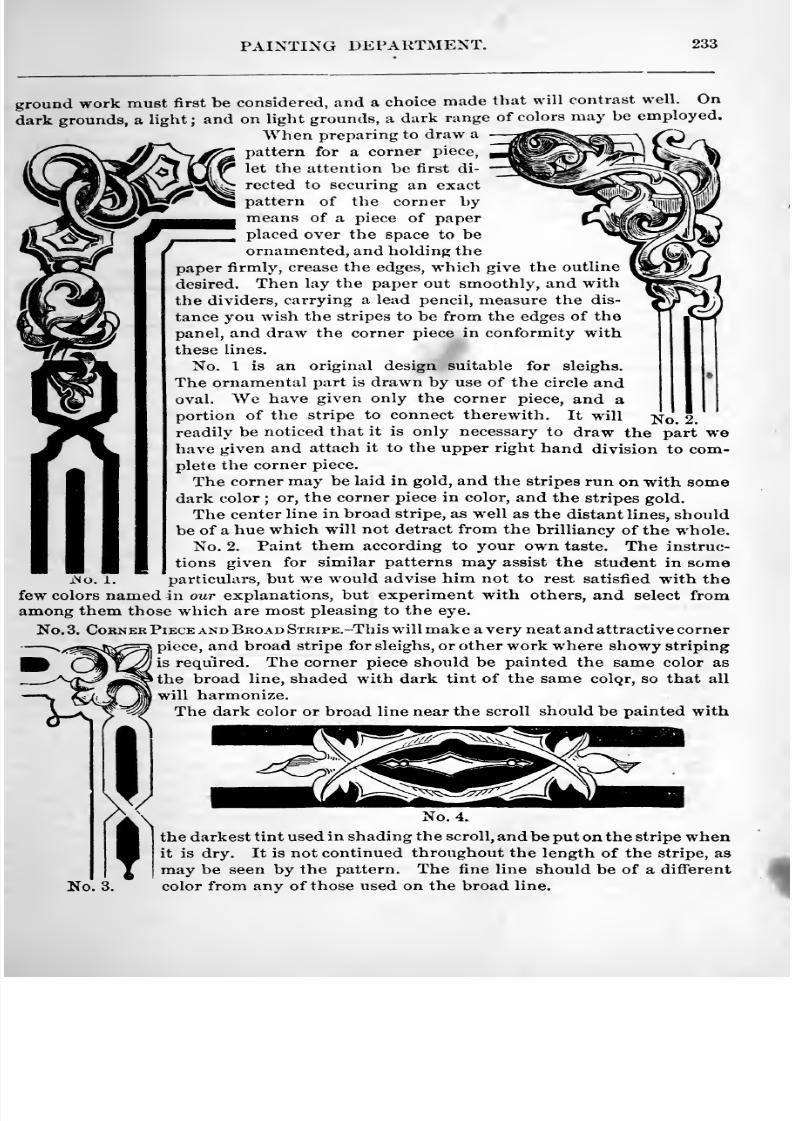
8/10/2019 Making Horse Drawn Coaches 1800 Bw
http://slidepdf.com/reader/full/making-horse-drawn-coaches-1800-bw 289/455
PAINTING DEPARTMENT. 233
ground work must first be considered, and a choice made that will contrast well. On
dark grounds, a light; and on light grounds, a dark range of colors may be employed.
When preparing to draw a
pattern for a corner piece,
let the attention be first di-
rected to securing an exact
pattern of the corner bymeans of a piece of paperplaced over the space to beornamented, and holding the
paper firmly, crease the edges, which give the outline
desired. Then lay the paper out smoothly, and with
the dividers, carrying a lead pencil, measure the dis-
tance you wish the stripes to be from the edges of the
panel, and draw the corner piece in conformity with
these lines.
No. 1 is an original design suitable for sleighs.
The ornamental part is drawn by use of the circle andoval. We have given only the corner piece, and a
portion of the stripe to connect therewith. It will j^q 2.
readily be noticed that it is only necessary to draw the part wehave given and attach it to the upper right hand division to com-plete the corner piece.
The corner may be laid in gold, and the stripes run on with somedark color ; or, the corner piece in color, and the stripes gold.
The center line in broad stripe, as well as the distant lines, should
be of a hue which will not detract from the brilliancy of the whole.
No. 2. Paint them according to your own taste. The instruc-
tions given for similar patterns may assist the student in some'particulars, but we would advise him not to rest satisfied with the
few colors named in our explanations, but experiment with others, and select fromamong them those which are most pleasing to the eye.
No. 3. Corner Piece and Broad SxRiPE.-This will make a very neat and attractive corner
piece, and broad stripe for sleighs, or other work where showy striping
is required. The corner piece should be painted the same color as
the broad line, shaded with dark tint of the same colqr, so that all
—>j f^^ Mwill harmonize.
\ ^ Y ^ The dark color or broad line near the scroll should be painted with
iNo. i.
No. 3.
No. 4.
the darkest tint used in shading the scroll, and be put on the stripe whenit is dry. It is not continued throughout the length of the stripe, as
may be seen by the pattern. The fine line should be of a different
color from any of those used on the broad line.
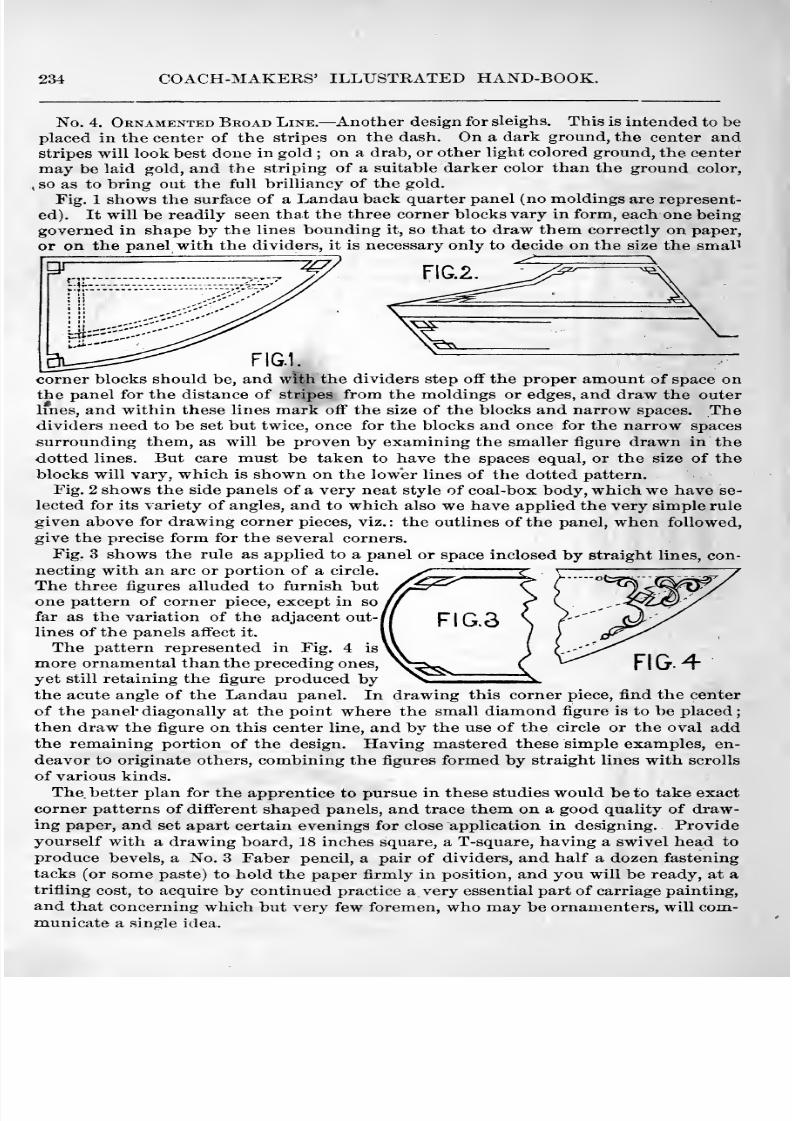
8/10/2019 Making Horse Drawn Coaches 1800 Bw
http://slidepdf.com/reader/full/making-horse-drawn-coaches-1800-bw 290/455
234 COACH-MAKERS' ILLUSTRATED HAND-BOOK.
No. 4. Ornamented Broad Line. —Another design for sleighs. This is intended to beplaced in the center of the stripes on the dash. On a dark ground, the center andstripes will look best done in gold ; on a drab, or other light colored ground, the center
may be laid gold, and the striping of a suitable darker color than the ground color,
so as to bring out the full brilliancy of the gold.
Fig. 1 shows the surface of a Landau back quarter panel (no moldings are represent-
ed). It wull be readily seen that the three corner blocks vary in form, each one beinggoverned in shape by the lines bounding it, so that to draw them correctly on paper,
or on the panel with the dividers, it is necessary only to decide on the size the smal^
corner blocks should be, and with the dividers step off the proper amount of space onthe panel for the distance of stripes from the moldings or edges, and draw the outer
lines, and within these lines mark off the size of the blocks and narrow spaces. Thedividers need to be set but twice, once for the blocks and once for the narrow spaces
surrounding them, as will be provenby
examining the smaller figure drawn in the
dotted lines. But care must be taken to have the spaces equal, or the size of the
blocks will vary, which is shown on the lower lines of the dotted pattern.
Fig. 2 shows the side panels of a very neat style of coal-box body, which we have se-
lected for its variety of angles, and to which also we have applied the very simple rule
given above for drawing corner pieces, viz.: the outlines of the panel, when followed,
give the precise form for the several corners.
Fig. 3 shows the rule as applied to a panel or space inclosed by straight lines, con-
necting with an arc or portion of a circle.
The three figures alluded to furnish butone pattern of corner piece, except in so
far as the variation of the adjacent out-j
lines of the panels affect it.
The pattern represented in Fig. 4 is
more ornamental than the preceding ones,
yet still retaining the figure produced bythe acute angle of the Landau panel. In drawing this corner piece, find the center
of the panel' diagonally at the point where the small diamond figure is to be placed
then draw the figure on this center line, and by the use of the circle or the oval add
the remaining portion of the design. Having mastered these simple examples, en-deavor to originate others, combining the figures formed by straight lines with scrolls
of various kinds.
The better plan for the apprentice to pursue in these studies would be to take exact
corner patterns of different shaped panels, and trace them on a good quality of draw-ing paper, and set apart certain evenings for close application in designing. Provideyourself with a drawing board, 18 inches square, a T-square, having a swivel head to
produce bevels, a No. 3 Faber pencil, a pair of dividers, and half a dozen fastening
tacks (or some paste) to hold the paper firmly in position, and you will be ready, at atrifling cost, to acquire by continued practice a very essential part of carriage painting,
and that concerning which but very few foremen, who may be ornamenters, will com-municate a sinsrle idea.
FIG. 4
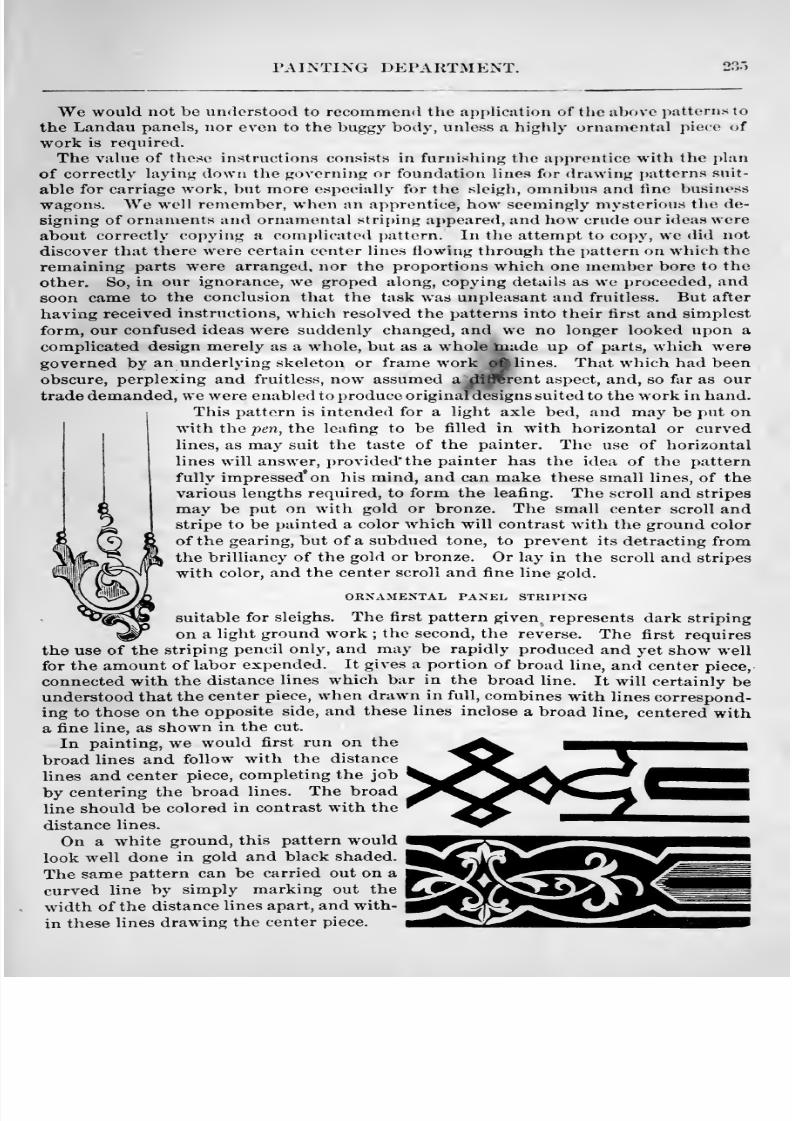
8/10/2019 Making Horse Drawn Coaches 1800 Bw
http://slidepdf.com/reader/full/making-horse-drawn-coaches-1800-bw 291/455
PAINTING DEPARTMENT. 23:
We would not be understood to recommend the application of the above patterns to
the Landau panels, nor even to the buggy body, unless a highly ornamental piece of
workis required.
The value of these instructions consists in furnishing the apprentice with the plan
of correctly laying down the governing or foundation Hues for drawing i)atterns suit-
able for carriage work, but more especially for the sleigh, omnibus and fine business
wagons. AVe well remember, when an apprentice, how seemingly mysterious the de-
signing of ornaments and ornamental striping appeared, and how crude our ideas wereabout correctly copying a com})licated pattern. In the attempt to copy, we did not
discover that there were certain center lines flowing through the i)attern on which the
remaining parts were arranged, nor the proportions which one member bore to the
other. So, in our ignorance, we groped along, copying details as we proceeded, and
soon came to the conclusion that the task was unpleasant and fruitless. But afterhaving received instructions, which resolved the patterns into their first and simplest
form, our confused ideas were suddenly changed, and we no longer looked upon a
complicated design merely as a whole, but as a whole liiade up of parts, which weregoverned by an underlying skeleton or frame work oA lines. That which had beenobscure, perplexing and fruitless, now assumed a dfflirent aspect, and, so far as our
trade demanded, we were enabled to produce originafdesigns suited to the work in hand.
This pattern is intended for a light axle bed, and may be put onwith the pen, the leafing to be filled in with horizontal or curved
lines, as may suit the taste of the painter. The use of horizontallines will answer, provided* the painter has the idea of the pattern
fully impressed* on his mind, and can make these small lines, of the
various lengths required, to form the leafing. The scroll and stripes
may be put on with gold or bronze. The small center scroll andstripe to be painted a color which will contrast with the ground color
of the gearing, but of a subdued tone, to prevent its detracting fromthe brilliancy of the gold or bronze. Or lay in the scroll and stripes
with color, and the center scroll and fine line gold.
ORNAMENTAL PANEL STRIPING
suitable for sleighs. The first pattern given represents dark striping
on a light ground work ; the second, the reverse. The first requires
the use of the striping pencil only, and may be rapidly produced and yet show well
for the amount of labor expended. It gives a portion of broad line, and center piece,
connected with the distance lines which bar in the broad line. It will certainly beunderstood that the center piece, when drawn in full, combines with lines correspond-ing to those on the opposite side, and these lines inclose a broad line, centered witha fine line, as shown in the cut.
In painting, we wouldfirst
run onthe
broad lines and follow with the distance
lines and center piece, completing the job
by centering the broad lines. The broad
line should be colored in contrast with the
distance lines.
On a white ground, this pattern would
look well done in gold and black shaded.
The same pattern can be carried out on a
curved line by simply marking out the
width of the distance lines apart, and with-
in these lines drawing the center piece.
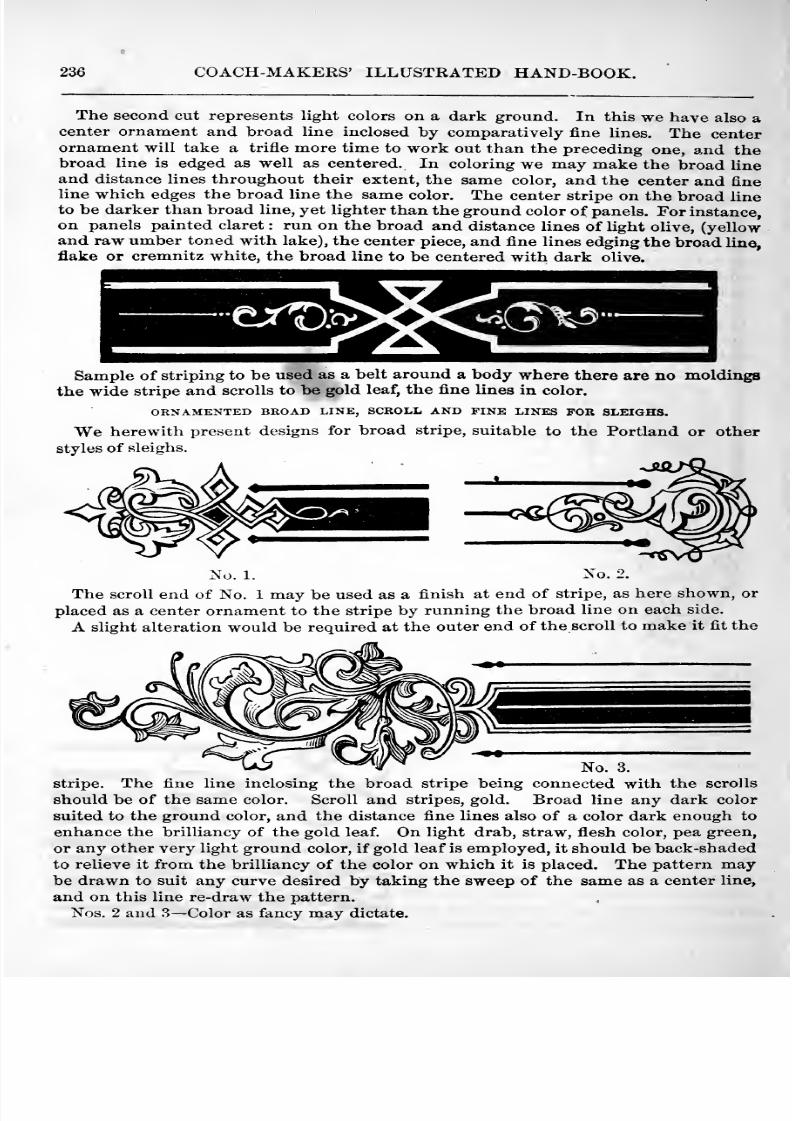
8/10/2019 Making Horse Drawn Coaches 1800 Bw
http://slidepdf.com/reader/full/making-horse-drawn-coaches-1800-bw 292/455
236 COACH-MAKERS' ILLUSTRATED HAND-BOOK.
The second cut represents light colors on a dark ground. In this we have also acenter ornament and broad line inclosed by comparatively fine lines. The center
ornament will take a trifle more time to work out than the preceding one, and thebroad line is edged as well as centered. In coloring we may make the broad line
and distance lines throughout their extent, the same color, and the center and fineline which edges the broad line the same color. The center stripe on the broad lineto be darker than broad line, yet lighter than the ground color of panels. For instance,on panels painted claret : run on the broad and distance lines of light olive, (yellowand raw umber toned with lake), the center piece, and fine lines edging the broad line,
flake or cremnitz white, the broad line to be centered with dark olive.
^XD:< 5(I\^-
Sample of striping to be used as a belt around a body where there are no moldingsthe wide stripe and scrolls to be gold leaf, the fine lines in color.
ORNAMENTED BROAD LINE, SCROLL AND PINE LINES FOR SLEIGHS.
We herewith present designs for broad stripe, suitable to the Portland or other
styles of sleighs.
No. 2.
The scroll end of No. 1 may be used as a finish at end of stripe, as here shown, orplaced as a center ornament to the stripe by running the broad line on each side.
A slight alteration would be required at the outer end of the scroll to make it fit the
No. 3.
stripe. The fine line inclosing the broad stripe being connected with the scrolls
should be of the same color. Scroll and stripes, gold. Broad line any dark color
suited to the ground color, and the distance fine lines also of a color dark enough to
enhance the brilliancy of the gold leaf. On light drab, straw, fiesh color, pea green,
or any other very light ground color, if gold leaf is employed, it should be back-shadedto relieve it from the brilliancy of the color on which it is placed. The pattern maybe drawn to suit any curve desired by taking the sweep of the same as a center line,
and on this line re-draw the pattern.Nos. 2 and 8 —Color as fancy may dictate.
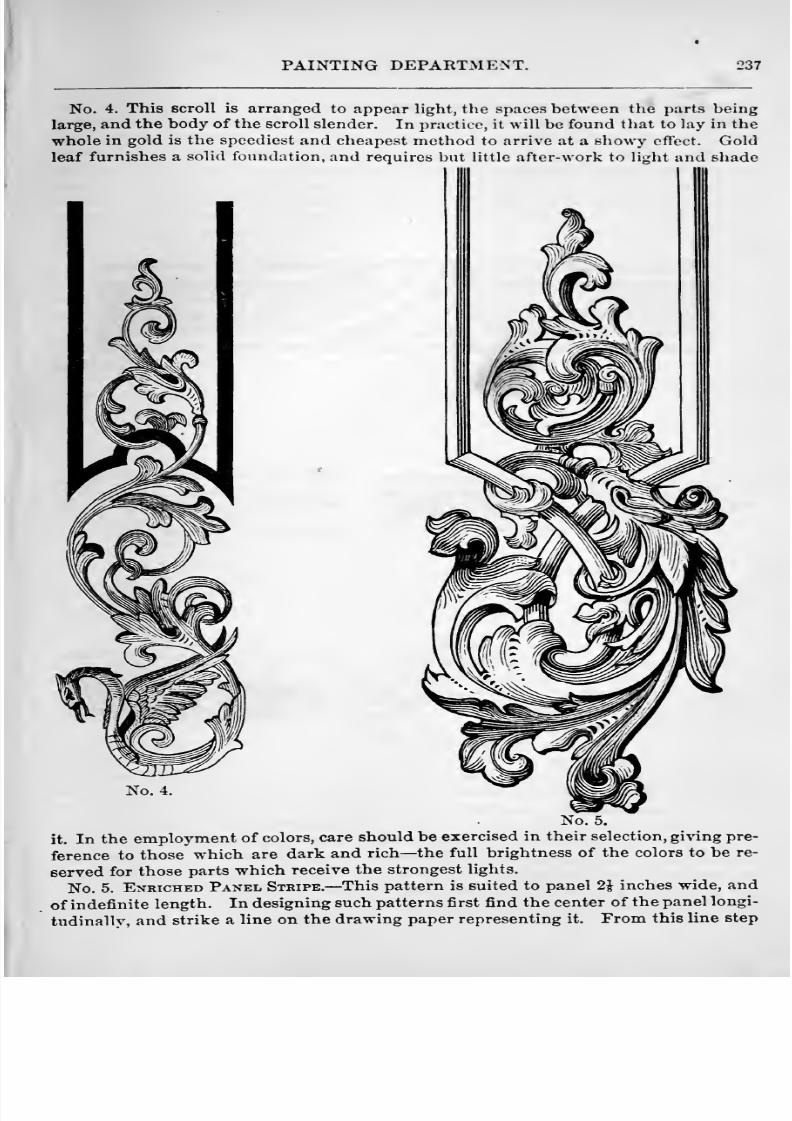
8/10/2019 Making Horse Drawn Coaches 1800 Bw
http://slidepdf.com/reader/full/making-horse-drawn-coaches-1800-bw 293/455
PAINTING DEPARTMENT. 237
No. 4. This scroll is arranged to appear light, the spaces between the parts being
large, and the body of the scroll slender. In practice, it will be found that to lay in the
whole in gold is the speediest and cheapest method to arrive at a showy effect. Goldleaf furnishes a solid foundation, and requires but little after-work to light and shade
4.
No. 5.
it. In the employment of colors, care should be exercised in their selection, giWng pre-
ference to those which are dark and rich— the full brightness of the colors to be re-
served for those parts which receive the strongest lights.
No. 5. Enriched Panel Stripe. —This pattern is suited to panel 2J inches wide, and
of indefinite length. In designing such patterns first find the center of the panel longi-
tudinallv, and strike a line on the drawing paper representing it. From this line step
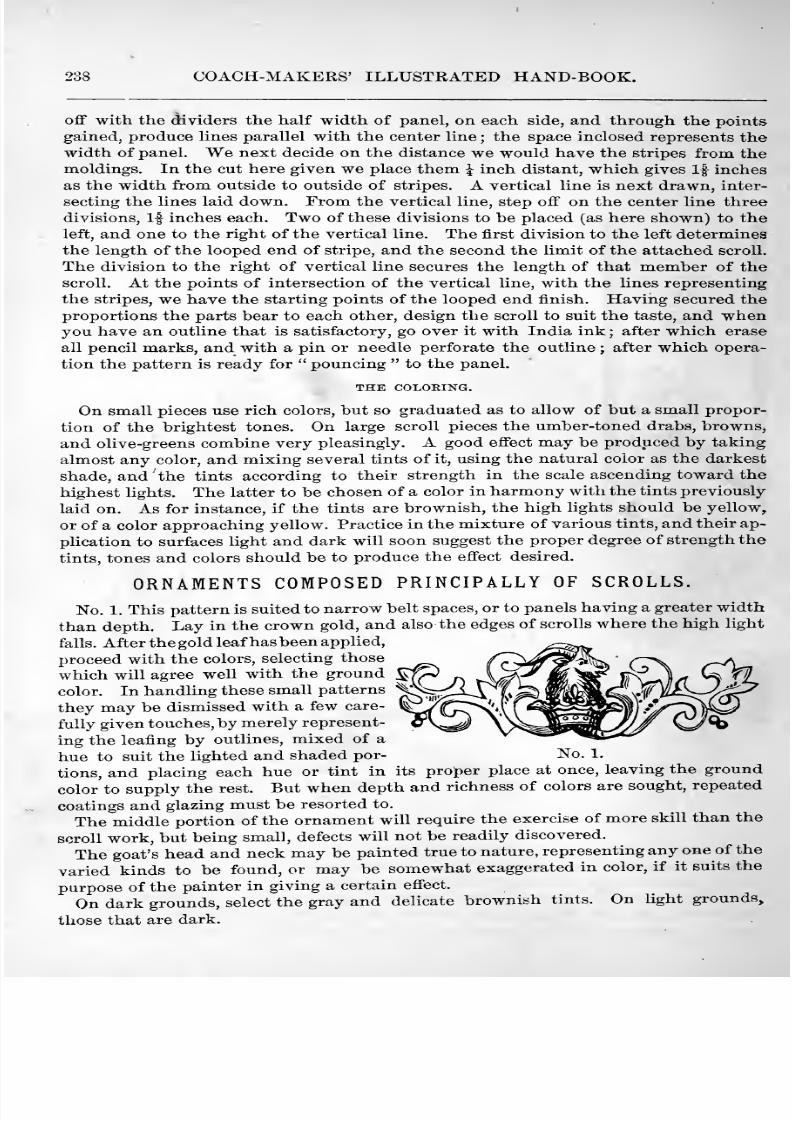
8/10/2019 Making Horse Drawn Coaches 1800 Bw
http://slidepdf.com/reader/full/making-horse-drawn-coaches-1800-bw 294/455
COACH-MAKERS' ILLUSTRATED HAND-BOOK.
off with the dividers the half width of panel, on each side, and through the points
gained, produce lines parallel with the center line ; the space inclosed represents thewidth of panel. We next decide on the distance we would have the stripes from themoldings. In the cut here given we place them \ inch distant, which gives If inches
as the width from outside to outside of stripes. A vertical line is next drawn, inter-
secting the lines laid down. From the vertical line, step off on the center line three
divisions, If inches each. Two of these divisions to be placed (as here shown) to theleft, and one to the right of the vertical line. The first division to the left determines
the length of the looped end of stripe, and the second the limit of the attached scroll.
The division to the right of vertical line secures the length of that member of the
scroll. At the points of intersection of the vertical line, with the lines representing
the stripes, we have the starting points of the looped end finish. Having secured theproportions the parts bear to each other, design the scroll to suit the taste, and whenyou have an outline that is satisfactory, go over it with India ink ; after which erase
all pencil marks, and with a pin or needle perforate the outline ; after which opera-
tion the pattern is ready for pouncing to the panel.
THE COLORING.
On small pieces use rich colors, but so graduated as to allow of but a small propor-
tion of the brightest tones. On large scroll pieces the umber-toned drabs, browns^
and olive-greens combine very pleasingly. A goodeffect
may beproduced
bytaking
almost any color, and mixing several tints of it, using the natural color as the darkest
shade, and the tints according to their strength in the scale ascending toward the
highest lights. The latter to be chosen of a color in harmony with the tints previously
laid on. As for instance, if the tints are brownish, the high lights should be yellow,
or of a color approaching yellow. Practice in the mixture of various tints, and their ap-
plication to surfaces light and dark will soon suggest the proper degree of strength the
tints, tones and colors should be to produce the effect desired.
ORNAMENTS COMPOSED PRINCIPALLY OF SCROLLS.
No. 1. This pattern is suited to narrow belt spaces, or to panels having a greater width
than depth. Lay in the crown gold, and also the edges of scrolls where the high light
falls. After thegold leaf has been applied,
proceed with the colors, selecting those
which will agree well with the ground
color. In handling these small patterns
they may be dismissed with a few care-^ _
fully given touches, by merely represent- v\^0 \/^J^^nL^^ Qb/^ing the leafing by outlines, mixed of a
hue to suit the lighted and shaded por- No. 1.
tions, and placing each hue or tint in its proper place at once, leaving the ground
color to supply the rest. But when depth and richness of colors are sought, repeated
coatings and glazing must be resorted to.
The middle portion of the ornament will require the exercise of more skill than the
scroll work, but being small, defects will not be readily discovered.
The goat's head and neck may be painted true to nature, representing any one of the
varied kinds to be found, or may be somewhat exaggerated in color, if it suits the
purpose of the painter in giving a certain effect.
On dark grounds, select the gray and delicate brownish tints. On light grounds,
those that are dark.
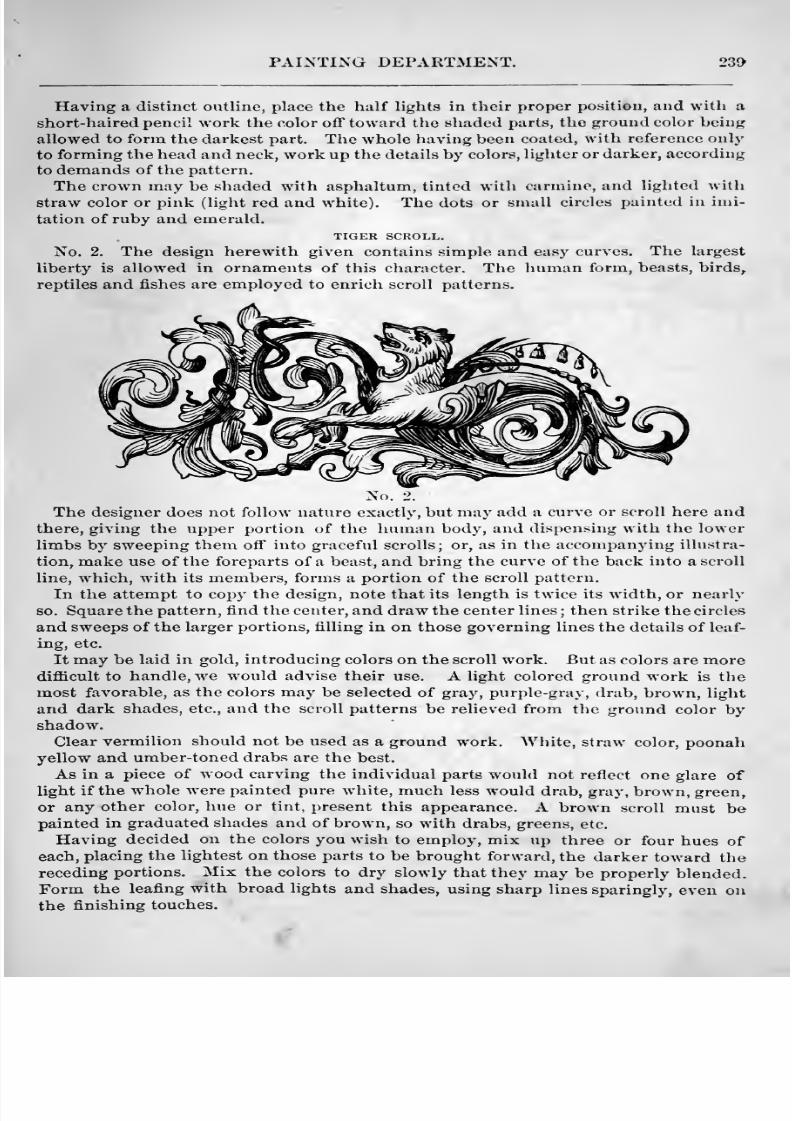
8/10/2019 Making Horse Drawn Coaches 1800 Bw
http://slidepdf.com/reader/full/making-horse-drawn-coaches-1800-bw 295/455
PAINTING DEPARTMENT. 239
Having a distinct outline, place the half lights in their proper position, and with a
short-haired pencil work the color off toward the shaded parts, the groundcolor being
allowed to form the darkest part. The whole having been coated, with reference only
to forming the head and neck, work up the details by colors, lighter or darker, according
to demands of the pattern.
The crown may be shaded with asphaltum, tinted with carmine, and lighted with
straw color or pink (light red and white). The dots or small circles painted in imi-
tation of ruby and emerald.
TIGER SCROLL.
No. 2. The design herewith given contains simple and easy curves. The largest
liberty is allowed in ornaments of this character. The human form, beasts, birds,
reptiles and fishes are employed to enrich scroll patterns.
No. 2.
The designer does not follow nature exactly, but may add a curve or scroll here andthere, giving the upper portion of the human body, and dispensing with the lower
limbs by sweeping them off into graceful scrolls; or, as in the accompanying illustra-
tion, make use of the foreparts of a beast, and bring the curve of the back into a scroll
line, which, with its members, forms a portion of the scroll pattern.
In the attempt to copy the design, note that its length is twice its width, or nearlyso. Square the pattern, find the center, and draw the center lines ; then strike the circles
and sweeps of the larger portions, filling in on those governing lines the details of leaf-
ing, etc.
It may be laid in gold, introducing colors on the scroll work. But as colors are moredifficult to handle, we would advise their use. A light colored ground work is the
most favorable, as the colors may be selected of gray, purple-gray, drab, brown, light
and dark shades, etc., and the scroll patterns be relieved from the ground color byshadow.
Clear vermilion should not be used as a ground work.White,
straw color,poonahyellow and uraber-toned drabs are the best.
As in a piece of wood carving the individual parts would not reflect one glare oflight if the whole were painted pure white, much less would drab, gray, brown, green,
or any other color, hue or tint, present this appearance. A brown scroll must bepainted in graduated shades and of brown, so with drabs, greens, etc.
Having decided on the colors you wish to employ, mix up three or four hues ofeach, placing the lightest on those parts to be brought forward, the darker toward thereceding portions. Mix the colors to dry slowly that they may be properly blended.Form the leafing with broad lights and shades, using sharp lines sparingly, even onthe finishing touches.
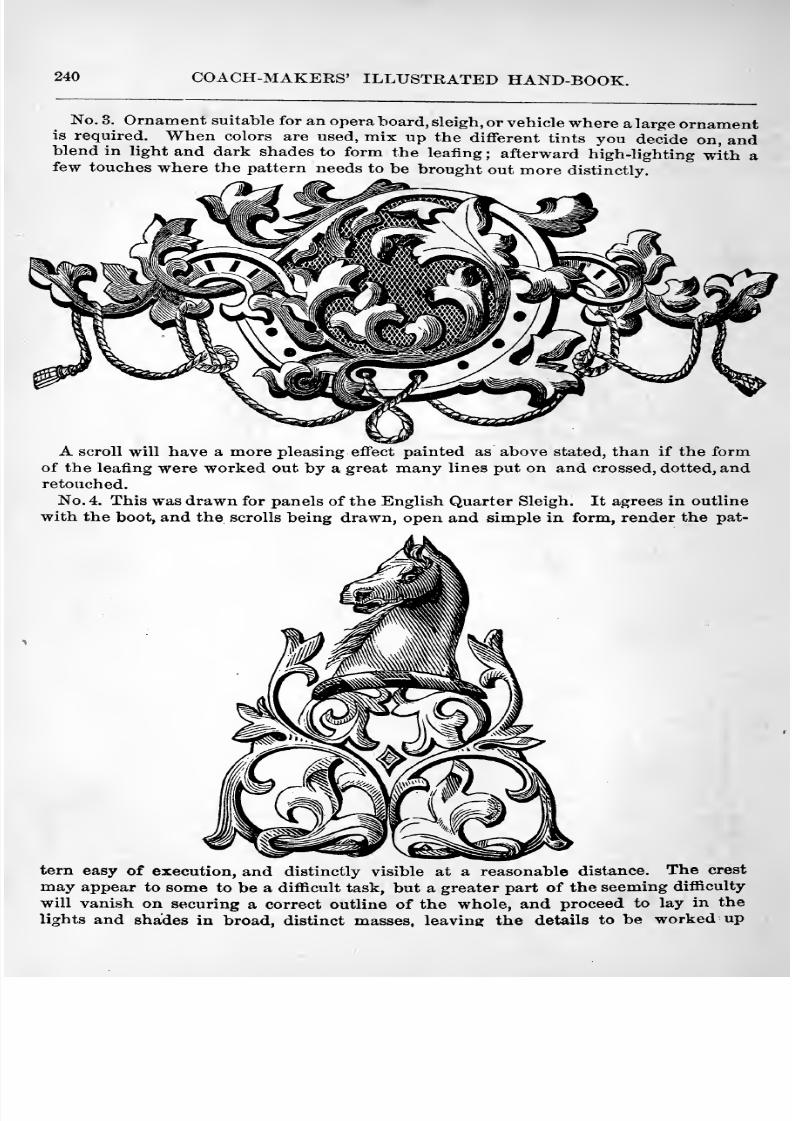
8/10/2019 Making Horse Drawn Coaches 1800 Bw
http://slidepdf.com/reader/full/making-horse-drawn-coaches-1800-bw 296/455
240 COACH-MAKERS' ILLUSTRATED HAND-BOOK.
No. 3. Ornament suitable for an opera board, sleigh, or vehicle where a large ornamentis required. When colors are used, mix up the different tints you decide on, andblend in light and dark shades to form the leafing ; afterward high-lighting with afew touches where the pattern needs to be brought out more distinctly.
A scroll will have a more pleasing effect painted as above stated, than if the formof the leafing were worked out by a great many lines put on and crossed, dotted, andretouched.
No. 4. This was drawn for panels of the English Quarter Sleigh. It agrees in outline
with the boot, and the scrolls being drawn, open and simple in form, render the pat-
tern easy of execution, and distinctly visible at a reasonable distance. The crest
may appear to some to be a difficult task, but a greater part of the seeming difficulty
will vanish on securing a correct outline of the whole, and proceed to lay in the
lights and shades in broad, distinct masses, leaving the details to be worked up
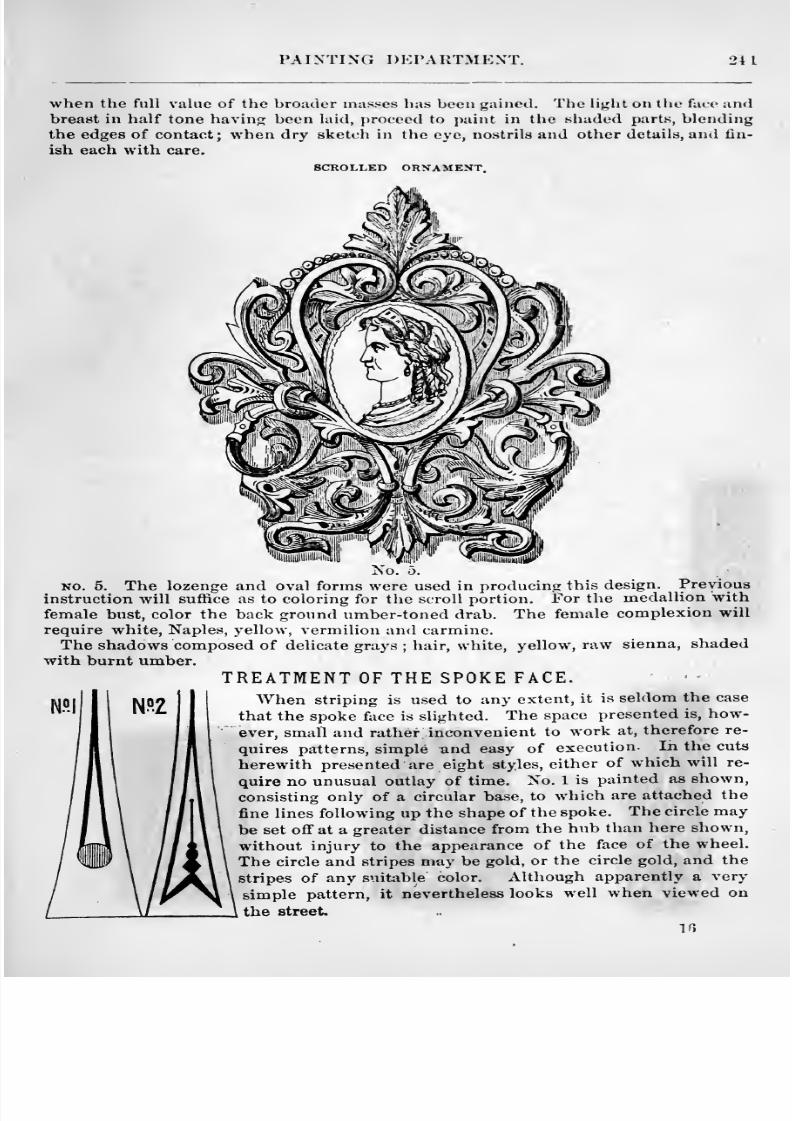
8/10/2019 Making Horse Drawn Coaches 1800 Bw
http://slidepdf.com/reader/full/making-horse-drawn-coaches-1800-bw 297/455
PAINTING DEPARTMENT. 241
when the full value of the broader masses has been gained. The light on the face andbreast in half tone having been laid, proceed to paint in the shaded parts, blendingthe edges of contact; when dry sketch in the eye, nostrils and other details, and lin-
ish each with care.
SCROLLED ORNAMENT.
No. 5.
NO. 5. The lozenge and oval forms were used in producing this design. Previous
instruction will suffice as to coloring for the scroll portion. For the medallion withfemale bust, color the back ground iimber-toned drab. The female complexion will
require white, Naples, yellow, vermilion and carmine.The shadows composed of delicate grays ; hair, white, yellow, raw sienna, shaded
with burnt umber.
TREATMENT OF THE SPOKE FACE.
When striping is used to any extent, it is seldom the case
that the spoke foce is slighted. The space presented is, how-
ever, small and rather inconvenient to work at, therefore re-
quires patterns, simple and easy of execution. In the cuts
herewith presented are eight styles, either of which will re-
quire no unusual outlay of time. No. 1 is painted as shown,
consisting only of a circular base, to which are attached the
fine lines following up the shape of the spoke. The circle maybe set off at a greater distance from the hub than here shown,
without injury to the appearance of the face of the wheel.
The circle and stripes may be gold, or the circle gold, and the
stripes of any suitable color. Although apparently a very
simple pattern, it nevertheless looks well when viewed onthe street.
10
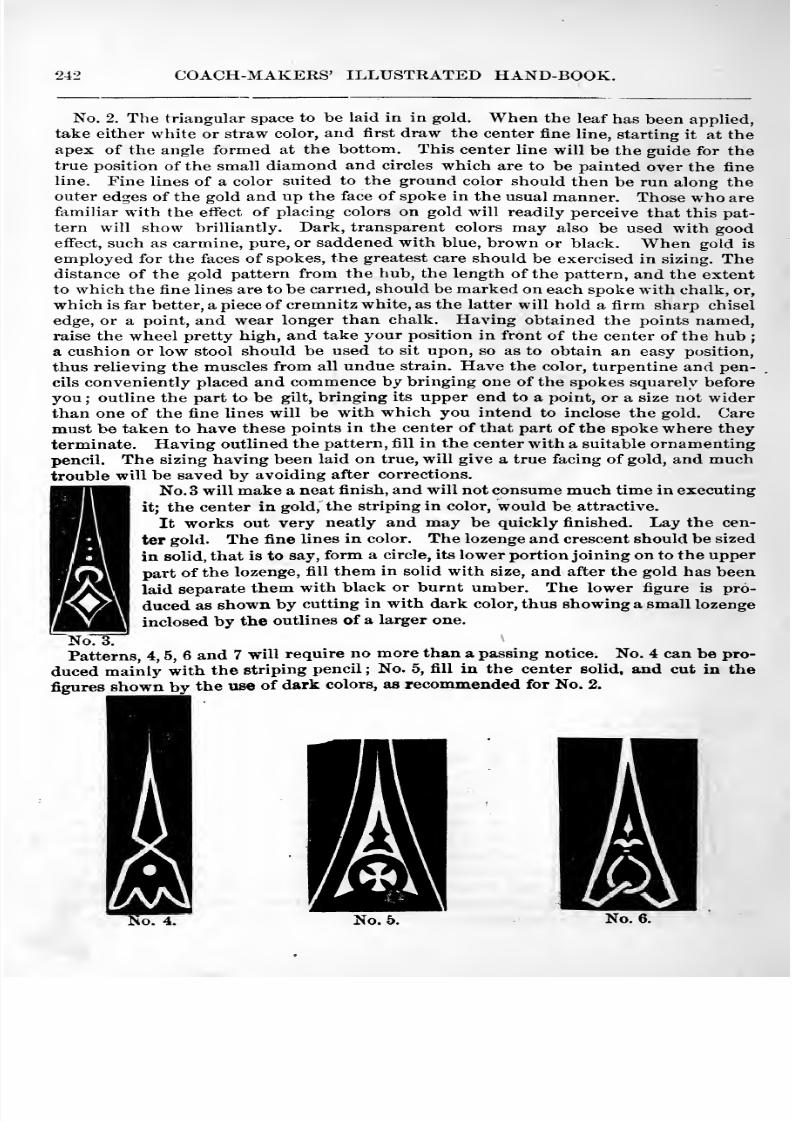
8/10/2019 Making Horse Drawn Coaches 1800 Bw
http://slidepdf.com/reader/full/making-horse-drawn-coaches-1800-bw 298/455
242 COACH-MAKERS' ILLUSTRATED HAND-BOOK.
No. 2. The triangular space to be laid in in gold. When the leaf has been applied,
take either white or straw color, and first draw the center fine line, starting it at the
apex of the angle formed at the bottom. This center line will be the guide for thetrue position of the small diamond and circles which are to be painted over the fine
line. Fine lines of a color suited to the ground color should then be run along theouter edges of the gold and up the face of spoke in the usual manner. Those who arefamiliar with the effect of placing colors on gold will readily perceive that this pat-
tern will show brilliantly. Dark, transparent colors may also be used with goodeffect, such as carmine, pure, or saddened with blue, brown or black. When gold is
employed for the faces of spokes, the greatest care should be exercised in sizing. Thedistance of the gold pattern from the hub, the length of the pattern, and the extentto which the fine lines are to be carried, should be marked on each spoke with chalk, or,
which is far better, a piece of cremnitz white, as the latter will hold a firm sharp chisel
edge, or a point, and wear longer than chalk. Having obtained the points named,raise the wheel pretty high, and take your position in front of the center of the hub
;
a cushion or low stool should be used to sit upon, so as to obtain an easy p(jsition,
thus relieving the muscles from all undue strain. Have the color, turpentine and pen-cils conveniently placed and commence by bringing one of the spokes squarely before
you ; outline the part to be gilt, bringing its upper end to a point, or a size not widerthan one of the fine lines will be with which you intend to inclose the gold. Caremust be taken to have these points in the center of that part of the spoke where they
terminate. Having outlined the pattern, fill in the center with a suitable ornamentingpencil. The sizing having been laid on true, will give a true facing of gold, and muchtrouble will be saved by avoiding after corrections.
No. 3 will make a neat finish, and will not consume much time in executing
it; the center in gold, the striping in color, would be attractive.
It works out very neatly and may be quickly finished. Lay the cen-
ter gold. The fine lines in color. The lozenge and crescent should be sized
in solid, that is to say, form a circle, its lower portion joining on to the upper
part of the lozenge, fill them in solid with size, and after the gold has been
laid separate them with black or burnt umber. The lower figure is pro-
duced as shown by cutting in with dark color, thus showing a small lozenge
inclosed by the outlines of a larger one.
Patterns, 4, 5, 6 and 7 will require no more than a passing notice. No. 4 can be pro-
duced mainly with the striping pencil ; No. 5, fill in the center solid, and cut in the
figures shown by the use of dark colors, as recommended for No. 2.
No. 5. No. 6.
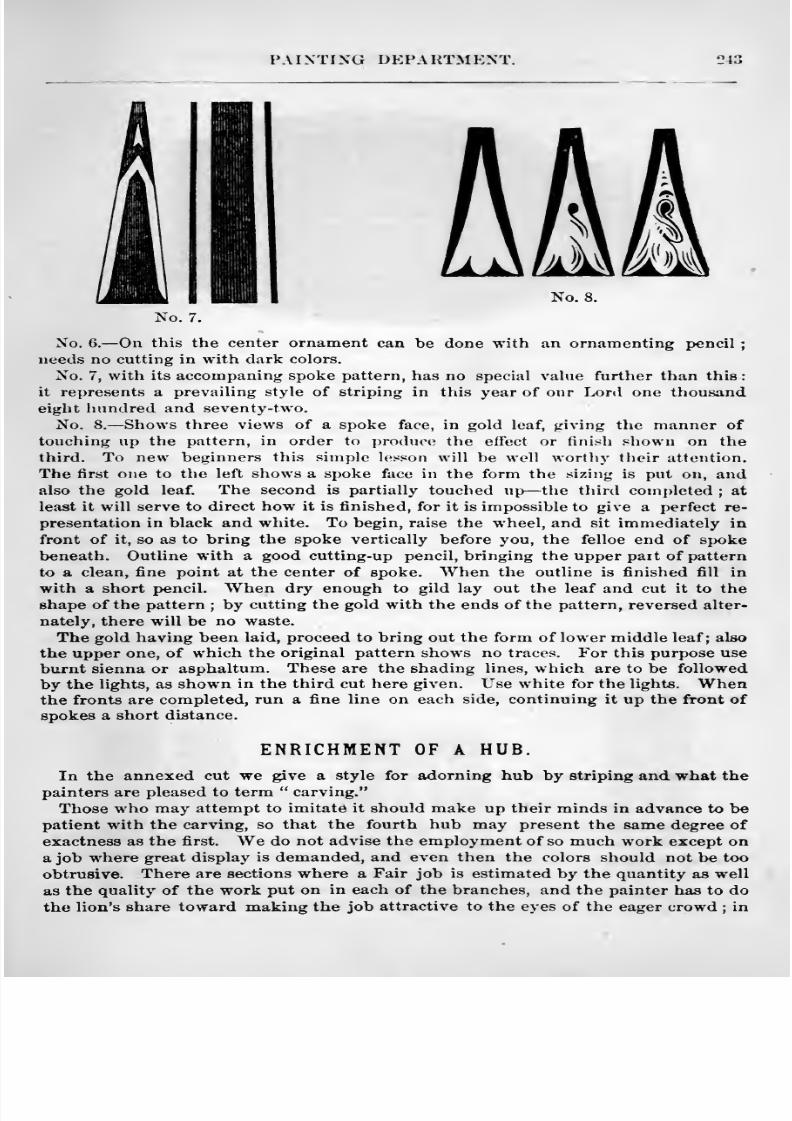
8/10/2019 Making Horse Drawn Coaches 1800 Bw
http://slidepdf.com/reader/full/making-horse-drawn-coaches-1800-bw 299/455
PA I NTI NG DKPA UTMENT. 243
No. 8.
No. 6. —On this the center ornament can be done with an ornamenting pencil
needs no cutting in with dark colors.
No. 7, with its accompaning spoke pattern, has no special value further than this
it represents a prevailing style of striping in this year of our Lord one thousandeight hundred and seventy-two.
No. 8. —Shows three views of a spoke face, in gold leaf, giving the manner of
touching up the pattern, in order to produce the effect or finish shown on the
third. To new beginners this simple lesson will be well worthy their attention.
The first one to the left shows a spoke face in the form the sizing is put on, andalso the gold leaf. The second is partially touched up —the third completed ; at
least it will serve to direct how it is finished, for it is impossible to give a perfect re-
presentation in black and white. To begin, raise the wheel, and sit immediately in
front of it, so as to bring the spoke vertically before you, the felloe end of spokebeneath. Outline with a good cutting-up pencil, bringing the upper part of pattern
to a clean, fine point at the center of spoke. When the outline is finished fill in
with a short pencil. When dry enough to gild lay out the leaf and cut it to the
shape of the pattern ; by cutting the gold with the ends of the pattern, reversed alter-
nately, there will be no waste.
The gold having been laid, proceed to bring out the form of lower middle leaf; also
the upper one, of which the original pattern shows no traces. For this purpose use
burnt sienna or asphaltum. These are the shading lines, which are to be followed
by the lights, as shown in the third cut here given. Use white for the lights. Whenthe fronts are completed, run a fine line on each side, continuing it up the front of
spokes a short distance.
ENRICHMENT OF A HUB.
In the annexed cut we give a style for adorning hub by striping and what the
painters are pleased to term carving.
Those who may attempt to imitate it should make up their minds in advance to bepatient with the carving, so that the fourth hub may present the same degree of
exactness as the first. We do not advise the employment of so much work except ona job where great display is demanded, and even then the colors should not be too
obtrusive. There are sections where a Fair job is estimated by the quantity as well
as the quality of the work put on in each of the branches, and the painter has to do
the lion's share toward making the job attractive to the eyes of the eager crowd ; in
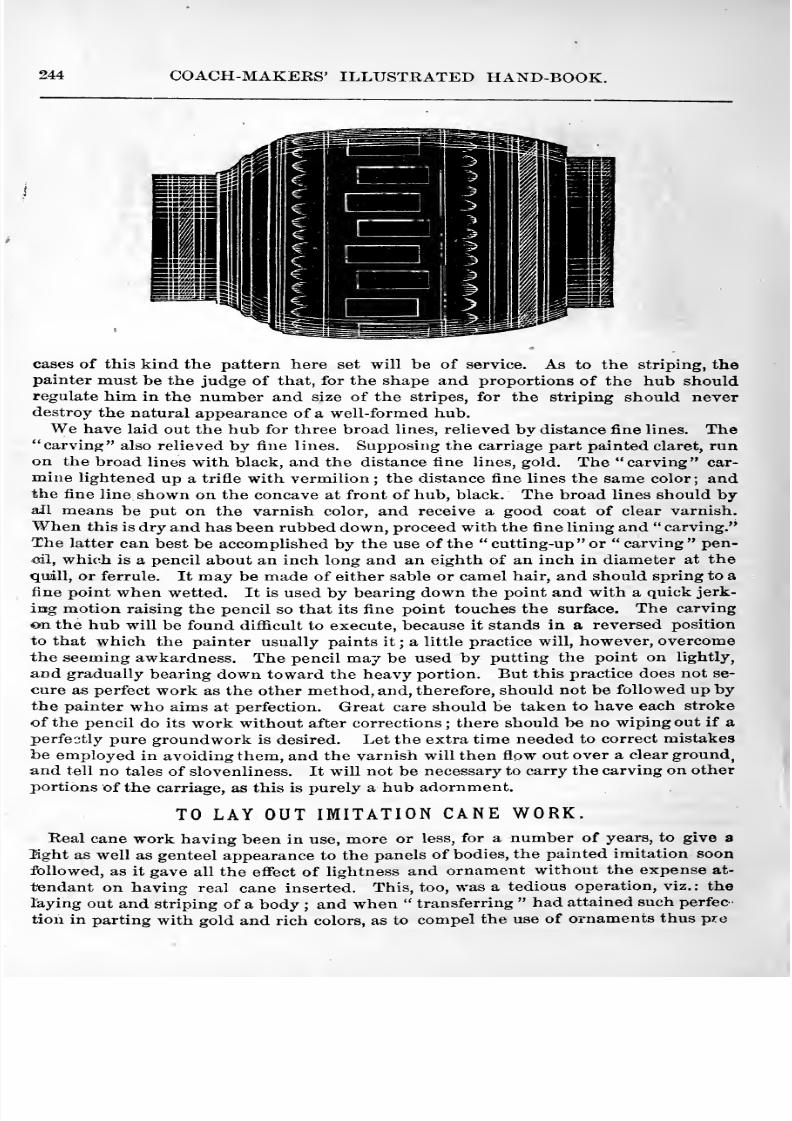
8/10/2019 Making Horse Drawn Coaches 1800 Bw
http://slidepdf.com/reader/full/making-horse-drawn-coaches-1800-bw 300/455
244 COACH-MAKERS' ILLUSTRATED HAND-BOOK.
cases of this kind the pattern here set will be of service. As to the striping, thepainter must be the judge of that, for the shape and proportions of the hub shouldregulate him in the number and size of the stripes, for the striping should neverdestroy the natural appearance of a well-formed hub.
We have laid out the hub for three broad lines, relieved by distance fine lines. The
carving also relieved by fine lines. Supposing the carriage part painted claret, runon the broad lines with black, and the distance fine lines, gold. The carving car-
mine lightened up a trifle with vermilion ; the distance fine lines the same color; andthe fine line shown on the concave at front of hub, black. The broad lines should byall means be put on the varnish color, and receive a good coat of clear varnish.
When this is dry and has been rubbed down, proceed with the fine lining and carving.
The latter can best be accomplished by the use of the cutting-up or carving pen-
oil, which is a pencil about an inch long and an eighth of an inch in diameter at the
quail, or ferrule. It may be made of either sable or camel hair, and should spring to a
finepoint when wetted. It
isused by bearing down the point and with a
quick jerk-
ing motion raising the pencil so that its fine point touches the surface. The carving
cm the hub will be found difiicult to execute, because it stands in a reversed position
to that which the painter usually paints it ; a little practice will, however, overcomethe seeming awkardness. The pencil may be used by putting the point on lightly,
and gradually bearing down toward the heavy portion. But this practice does not se-
cure as perfect work as the other method, and, therefore, should not be followed up bythe painter who aims at perfection. Great care should be taken to have each stroke
of the pencil do its work without after corrections ; there should be no wiping out if a
perfectly pure groundwork is desired. Let the extra time needed to correct mistakes
be employed in avoiding them, and the varnish will then flow out over a clear ground^
and tell no tales of slovenliness. It will not be necessary to carry the carving on other
portions of the carriage, as this is purely a hub adornment.
TO LAY OUT IMITATION CANE WORK.Real cane work having been in use, more or less, for a number of years, to give a
light as well as genteel appearance to the panels of bodies, the painted imitation soon
followed, as it gave all the effect of lightness and ornament without the expense at-
tendant on having real cane inserted. This, too, was a tedious operation, viz.: the
Ijaying out and striping of a body ; and when transferring had attained such perfec
tion in parting with gold and rich colors, as to compel the use of ornaments thus pre
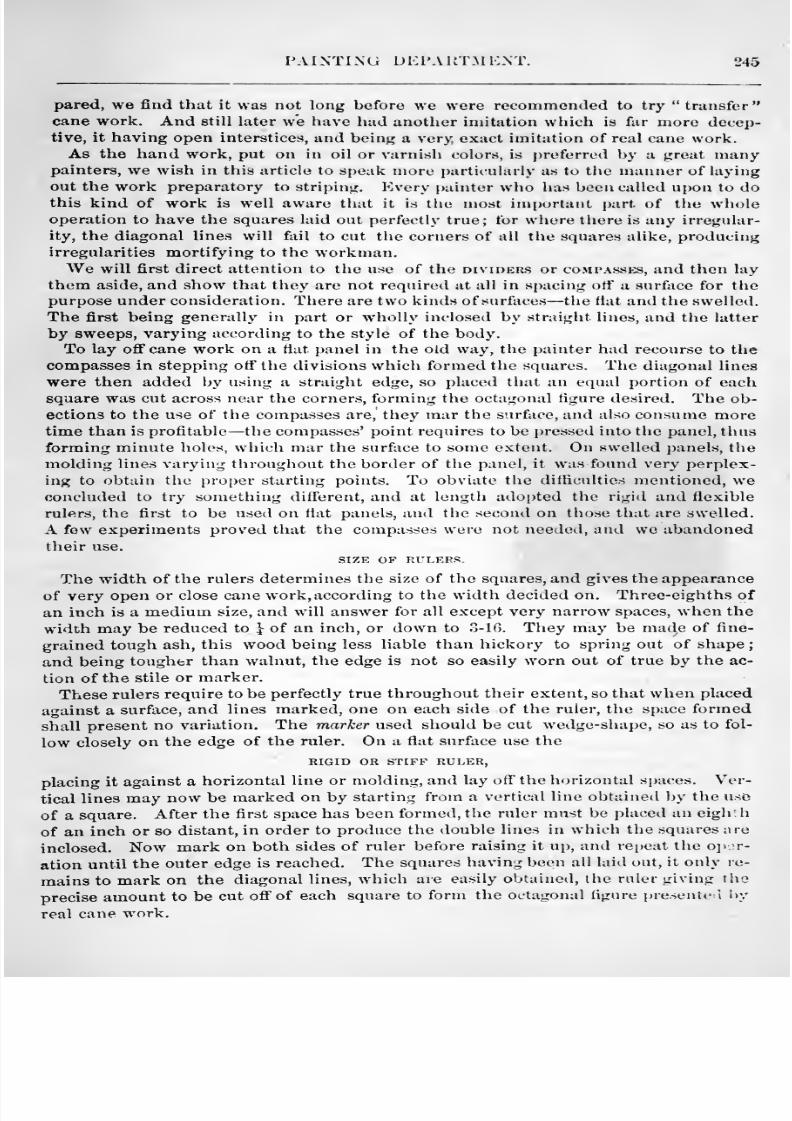
8/10/2019 Making Horse Drawn Coaches 1800 Bw
http://slidepdf.com/reader/full/making-horse-drawn-coaches-1800-bw 301/455
PAINTING DEPAKT.MKNT. 245
pared, we find that it was not long before we were recommended to try transfer
cane work. And still later we have had another imitation which is far more decep-
tive, it having open interstices, and being a very exact imitation of real cane work.As the hand work, put on in oil or varnish colors, is preferred by a great many
painters, we wish in this article to speak more particularly as to the manner of laying
out the work preparatory to striping. Every i)ainter who has been called upon to dothis kind of work is well aware that it is the most im{)ortant part of the wholeoperation to have the squares laid out perfectly true; for where there is any irregular-
ity, the diagonal lines will fail to cut the corners of all the squares alike, producing
irregularities mortifying to the workman.We will first direct attention to the use of the dividers or co.mpassks, and then lay
them aside, and show that they are not required at all in spacing off a surface for the
purpose under consideration. There are two kinds of surfaces —the fiat and the swelled.
The first being generally in part or wholly inclosed by straight lines, and the latter
by sweeps, varying according to the style of the body.
To lay off cane work on a flat panel in the old way, the painter had recourse to the
compasses in stepping off the divisions which formed the squares. The diagonal lines
were then added by using a straight edge, so placed that an equal portion of eachsquare was cut across near the corners, forming the octagonal figure desired. The ob-
ections to the use of the compasses are, they mar the surface, and also consume moretime than is profitable— the compasses' point requires to be pressed into the panel, thus
forming minute holes, which mar the surface to some extent. On swelled panels, themolding lines varying throughout the border of the panel, it was found very perplex-
ing to obtain the proper starting points. To obviate the difficulties mentioned, weconcluded to try something different, and at length adopted the rigid and flexible
rulers, the first to be used on fiat panels, and the second on those that are swelled.
A few experiments proved that the compasses were not needed, and we abandonedtheir use.
SIZE OF RULERS.
The width of the rulers determines the size of the squares, and gives the appearance
of very open or close cane work, according to the width decided on. Three-eighths ofan inch is a medium size, and will answer for all except very narrow spaces, when the
width may be reduced to } of an inch, or down to 3-16. They may be made of fine-
grained tough ash, this wood being less liable than hickory to spring out of shape;
and being tougher than walnut, the edge is not so easily worn out of true by the ac-
tion of the stile or marker.
These rulers require to be perfectly true throughout their extent, so that when placed
against a surface, and lines marked, one on each side of the ruler, the space formed
shall present no variation. The marker used should be cut wedge-shape, so as to fol-
low closely onthe edge of the ruler. On a flat surface use the
RIGID OR STIFF RULER,
placing it against a horizontal line or molding, and lay off the h<3rizontal spaces. Ver-
tical lines may now be marked on by starting from a vertical line obtained by the use
of a square. After the first space has been formed, the ruler must be placed an eigh: h
of an inch or so distant, in order to produce the double lines in which the squares are
inclosed. Now mark on both sides of ruler before raising it up, and repeat the oji or-
ation until the outer edge is reached. The squares having been all laid out, it only re-
mains to mark on the diagonal lines, which aie easily obtained, the ruler giving tiio
precise amount to be cut ofi'of each square to form the octagonal figure pre.sente i i>y
real cane w^ork.
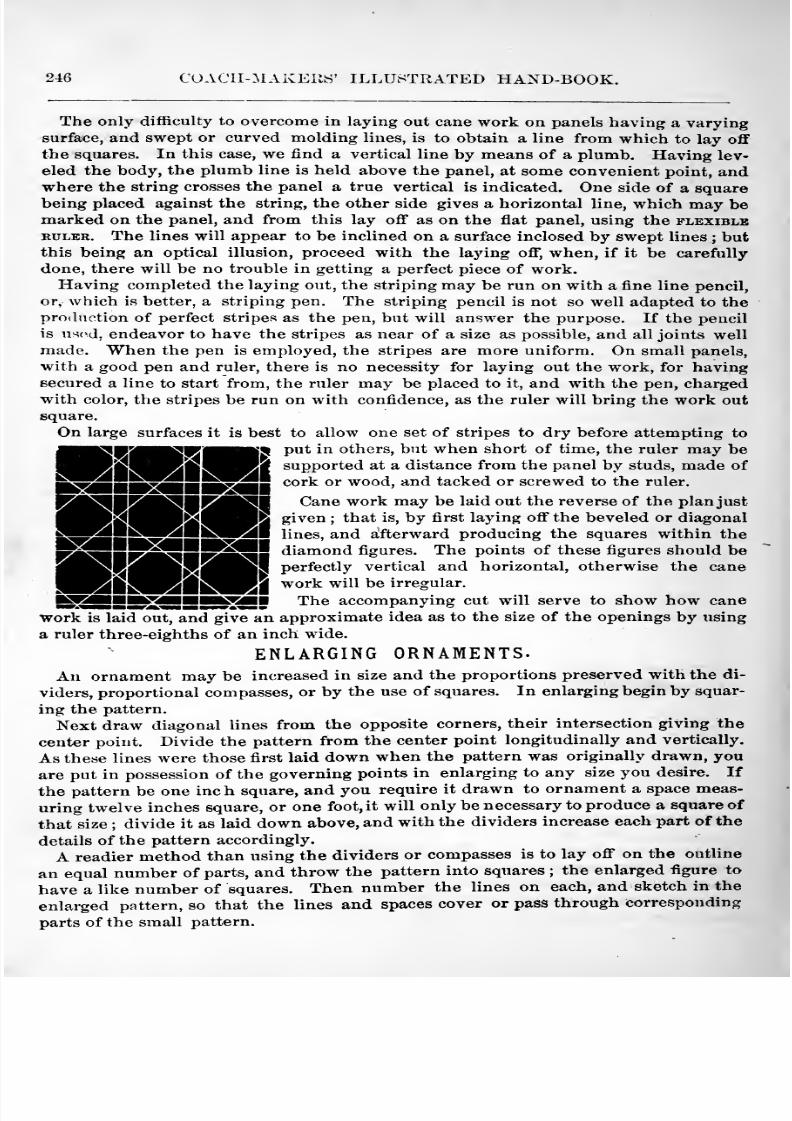
8/10/2019 Making Horse Drawn Coaches 1800 Bw
http://slidepdf.com/reader/full/making-horse-drawn-coaches-1800-bw 302/455
246 COACII-.MAKEitS' ILLUSTRATED HAND-BOOK.
The only difficulty to overcome in laying out cane work on panels having a varyingsurface, and swept or curved molding lines, is to obtain a line from which to lay off
the squares. In this case, we find a vertical line by means of a plumb. Having lev-
eled the body, the plumb line is held above the panel, at some convenient point, andwhere the string crosses the panel a true vertical is indicated. One side of a squarebeing placed against the string, the other side gives a horizontal line, which may bemarked on the panel, and from this lay off as on the flat panel, using the flexibleRULER. The lines will appear to be inclined on a surface inclosed by swept lines ; butthis being an optical illusion, proceed with the laying off, when, if it be carefully
done, there will be no trouble in getting a perfect piece of work.Having completed the laying out, the striping may be run on with a fine line pencil,
or, which is better, a striping pen. The striping pencil is not so well adapted to theproduction of perfect stripes as the pen, but will answer the purpose. If the pencil
is used, endeavor to have the stripes as near of a size as possible, and all joints well
made. When the pen is employed, the stripes are more uniform. On small panels,
with a good pen and ruler, there is no necessity for laying out the work, for havingsecured a line to start from, the ruler may be placed to it, and with the pen, chargedwith color, the stripes be run on with confidence, as the ruler will bring the work out
square.
On large surfaces it is best to allow one set of stripes to dry before attempting to
put in others, but when short of time, the ruler may besupported at a distance from the panel by studs, made of
cork or wood, and tacked or screwed to the ruler.
Cane work may be laid out the reverse of the plan just
given ; that is, by first laying off the beveled or diagonal
lines, and afterward producing the squares within the' diamond figures. The points of these figures should be
vertical and horizontal, otherwise the cane
work will be irregular.
The accompanying cut will serve to show how canework is laid out, and give an approximate idea as to the size of the openings by using
a ruler three-eighths of an inch wide.
ENLARGING ORNAMENTS.An ornament may be increased in size and the proportions preserved with the di-
viders, proportional compasses, or by the use of squares. In enlarging begin by squar-
ing the pattern.
Next draw diagonal lines from the opposite corners, their intersection giving the
centerpoint. Divide the pattern from the center point longitudinally and vertically.
As these lines were those first laid down when the pattern was originally drawn, you
are put in possession of the governing points in enlarging to any size you desire. If
the pattern be one inc h square, and you require it drawn to ornament a space meas-
uring twelve inches square, or one foot, it will only be necessary to produce a square of
that size ; divide it as laid down above, and with the dividers increase each part of the
details of the pattern accordingly.
A readier method than using the dividers or compasses is to lay off on the outline
an equal number of parts, and throw the pattern into squares ; the enlarged figure to
have a like number of squares. Then number the lines on each, and sketch in the
enlarged pattern, so that the lines and spaces cover or pass through corresponding
parts of the small pattern.
JHSimmI^^RSHBI perfectly
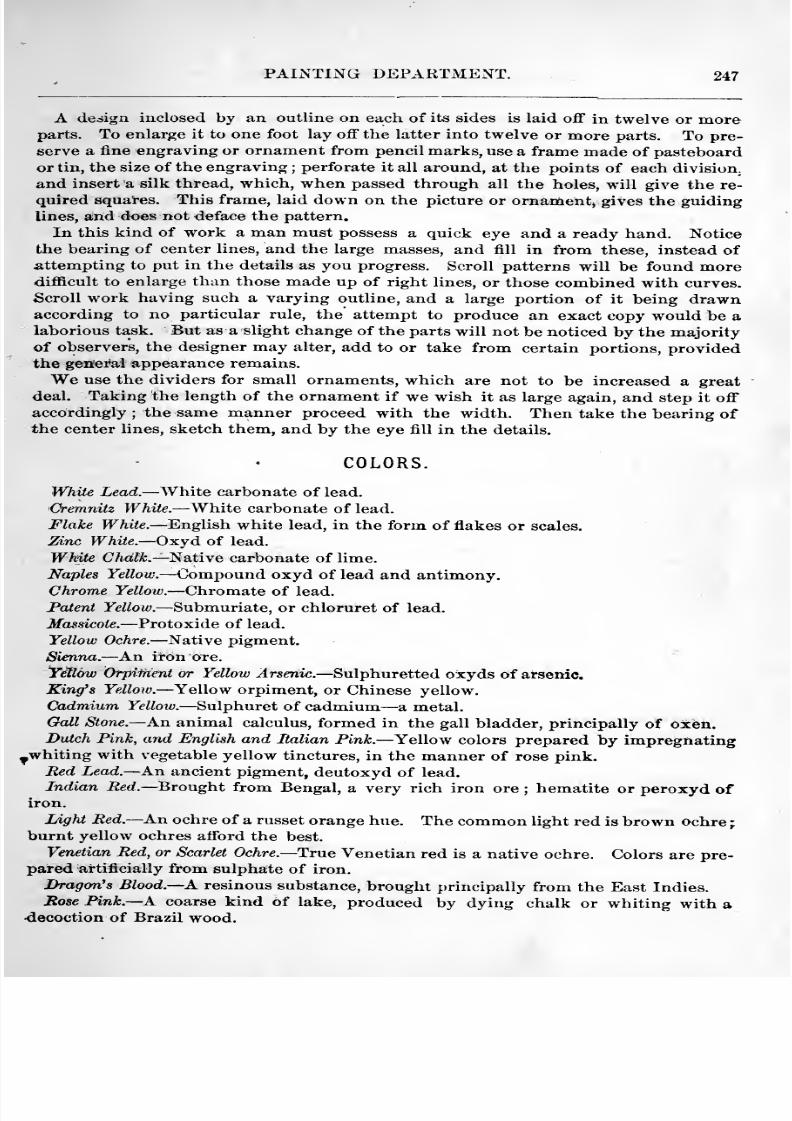
8/10/2019 Making Horse Drawn Coaches 1800 Bw
http://slidepdf.com/reader/full/making-horse-drawn-coaches-1800-bw 303/455
PAINTING DEPARTMENT. 247
A design inclosed by an outline on each of its sides is laid off in twelve or moreparts. To enlarge it to one foot lay off the latter into twelve or more parts. To pre-
serve a fine engraving or ornament from pencil marks, use a frame made of pasteboardor tin, the size of the engraving
;perforate it all around, at the points of each division,
and insert a silk thread, which, when passed through all the holes, will give the re-
quired squares. This frame, laid down on the picture or ornament, gives the guidinglines, and does not deface the pattern.
In this kind of work a man must possess a quick eye and a ready hand. Noticethe bearing of center lines, and the large masses, and fill in from these, instead of
iittempting to put in the details as you progress. Scroll patterns will be found moredifficult to enlarge than those made up of right lines, or those combined with curves.
Scroll work having such a varying outline, and a large portion of it being drawnaccording to no particular rule, the attempt to produce an exact copy would be alaborious task. But as a slight change of the parts will not be noticed by the majorityof observers, the designer may alter, add to or take from certain portions, providedthe general appearance remains.
We use the dividers for small ornaments, which are not to be increased a greatdeal. Taking the length of the ornament if we wish it as large again, and step it off
accordingly ; the same manner proceed with the width. Then take the bearing ofthe center lines, sketch them, and by the eye fill in the details.
COLORS.
White Lead. —White carbonate of lead.
Cremyiitz White. —AVhite carbonate of lead.
Flake White. —English white lead, in the form of flakes or scales.
Zinc White. —Oxyd of lead.
White Chalk. —Native carbonate of lime.
Naples Yellow. —Compound oxyd of lead and antimony.Chrome Yellow.
—Chromate of lead.
Patent Yellow. —Submuriate, or chloruret of lead.
Masaicote. —Protoxide of lead.
Yellow Ochre. —Native pigment.
Sienna. —An iron ore.
Yitlow Orpitnent or Yellow Arsenic. —Sulphuretted oxyds of arsenic.
King^s Yellow. —Yellow orpiment, or Chinese yellow.
Cadmium Yellow. —Sulphuret of cadmium —a metal.
Gall Stone. —An animal calculus, formed in the gall bladder, principally of oxen.Dutch Pink, and English and Italian Pink. —Yellow colors prepared by impregnating
^whiting with vegetable yellow tinctures, in the manner of rose pink.
Red Lead. —An ancient pigment, deutoxyd of lead.
Indian Bed. —Brought from Bengal, a very rich iron ore ; hematite or peroxyd ofiron.
Light Red.— An ochre of a russet orange hue. The common light red is brown ochre ;
burnt yellow ochres afford the best.
Venetian Red, or Scarlet Ochre.— True Venetian red is a native ochre. Colors are pre-pared artificially from sulphate of iron.
Dragon's Blood. —A resinous substance, brought principally from the East Indies.
Rose Pink.— A coarse kind of lake, produced by dying chalk or whiting with a•decoction of Brazil wood.
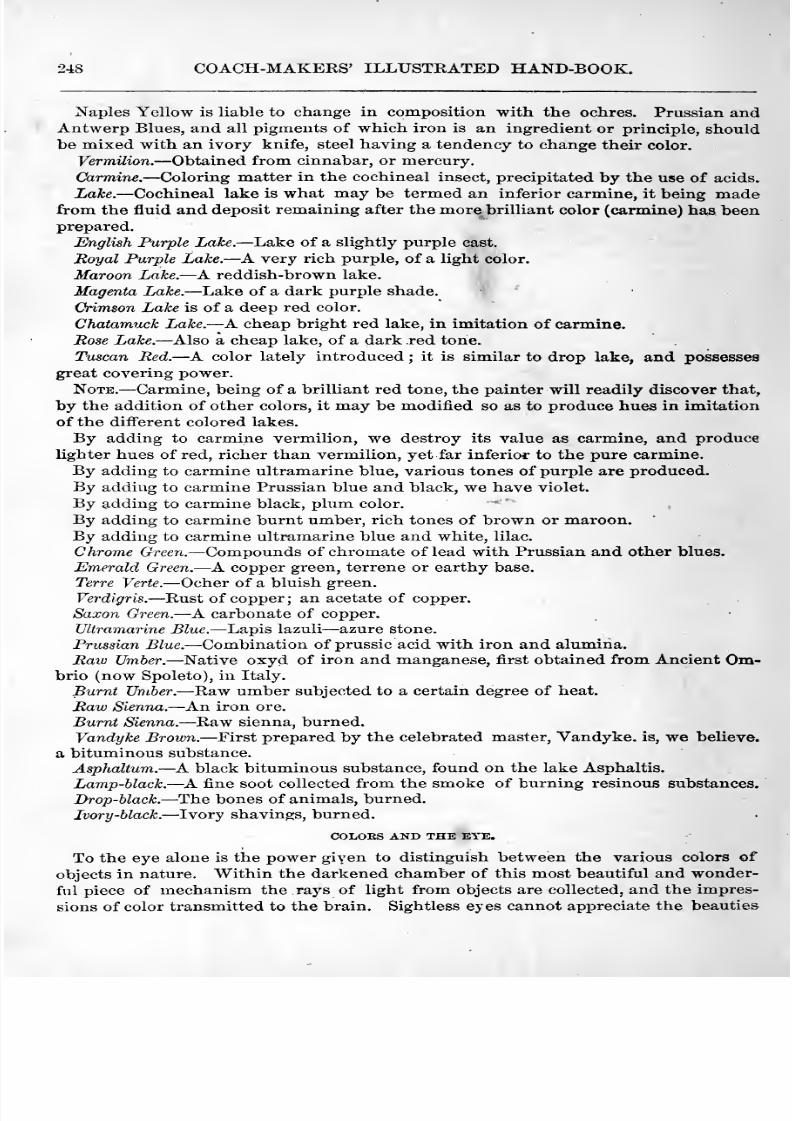
8/10/2019 Making Horse Drawn Coaches 1800 Bw
http://slidepdf.com/reader/full/making-horse-drawn-coaches-1800-bw 304/455
248 COACH-MAKEES' ILLUSTRATED HAND-BOOK.
Naples Yellow is liable to change in composition with the ochres. Prussian andAntwerp Blues, and all pigments of which iron is an ingredient or principle, should
be mixed with an ivory knife, steel having a tendency to change their color.Vermilion. —Obtained from cinnabar, or mercury.
Carmine. —Coloring matter in the cochineal insect, precipitated by the use of acids.
Lake. —Cochineal lake is what may be termed an inferior carmine, it being madefrom the fluid and deposit remaining after the more brilliant color (carmine) has beenprepared.
English Purple Lake. —Lake of a slightly purple cast.
Boyal Purple Lake. —A very rich purple, of a light color.
Maroon Lake. —A reddish-brown lake.
Magenta Lake.
—Lake of a dark purple shade.
Crimson Lake is of a deep red color.
Chatamuck Lake. —A cheap bright red lake, in imitation of carmine.
Rose Lake. —Also a cheap lake, of a dark red tone.
Tuscan Red. —A color lately introduced ; it is similar to drop lake, and possesses
great covering power.
Note. —Carmine, being of a brilliant red tone, the painter will readily discover that,
by the addition of other colors, it may be modified so as to produce hues in imitation
of the different colored lakes.
By adding to carmine vermilion, we destroy its value as carmine, and produce
lighter hues of red, richer than vermilion, yet far inferior to the pure carmine.
By adding to carmine ultramarine blue, various tones of purple are produced.
By adding to carmine Prussian blue and black, we have violet.
By adding to carmine black, plum color.
By adding to carmine burnt umber, rich tones of brown or maroon.By adding to carmine ultramarine blue and white, lilac.
Chrome Green. —Compounds of chromate of lead with Prussian and other blues.
Emerald Green. —A copper green, terrene or earthy base.
Terre Verte. —Ocher of a bluish green.
Verdigris. —Rust of copper ; an acetate of copper.Saxon Green. —A carbonate of copper.
Ultramarine Blue. —Lapis lazuli —azure stone.
Prussian Blue. —Combination of prussic acid with iron and alumina.
Raw Umber. —Native oxyd of iron and manganese, first obtained from Ancient Om-brio (now Spoleto), in Italy.
Burnt Umber. —Raw umber subjected to a certain degree of heat.
Raw Sienna. —An iron ore.
Burnt Sienna. —Raw sienna, burned.
Vandyke Brown. —First prepared by the celebrated master, Vandyke, is, we believe,
a bituminous substance.
Asphaltum. —A black bituminous substance, found on the lake Asphaltis.
Lamp-black. —A fine soot collected from the smoke of burning resinous substances.
Drop-black. —The bones of animals, burned.
Ivory-black. —Ivory shavings, burned.
COLORS AND THE EYE,
To the eye alone is the power giyen to distinguish between the various colors of
objects in nature. Within the darkened chamber of this most beautiful and wonder-
ful piece of mechanism the rays of light from objects are collected, and the impres-
sions of color transmitted to the brain. Sightless eyes cannot appreciate the beauties
8/10/2019 Making Horse Drawn Coaches 1800 Bw
http://slidepdf.com/reader/full/making-horse-drawn-coaches-1800-bw 305/455
PAINTING DEPARTMENT. 249
flo lavishly .s])read out in nuture, because to no other one of tlie five senses was this
crowning glory given. The blind may enjoy the fragrance of the flowers, sit en-
tranced by strains of delightful nuisir, with the ejjicure divide the j>leasure of a ricii
repast, and by the sense of touch form very correct ideas of the contour of objects, andthrough this means may acquire some knowledge of beauty in proportions; but bywhat method can be communicated to them a just concreption of colors? At tliis
point all efforts fail ; darkness sits immovable, and pleasing sensations produced bycolors are to them as though they had no existence.
The painter's art appeals to the eye and depends on the sense of seeing only as its
means of affording pleasure or profit. AVhat would it profit a Bierstadt, after havingtransferred to canvas the sublime grandeur of the Yo Semite Valley, to place it be-
fore a company of blind persons at mid-day? Through the sense of hearing, and bynone other, could they be interested by the artist. The relative heights of the peaks,
the depth of the valley, the beauty of the waterfalls, might be communicated ; but the
representation of the scene on the canvas before them would have no greater beauty
than that presented to the perfect eye when peering at night in a dark cavern. Bythe sense of touch the blind would be unable even to trace out the proportions of
the several parts of the picture ; the size of the canvas and the frame, when carefully
handled, would be the only knowledge they could gain.
But the perfect human eye does not in all cases possess the power of discovering
beauties where they in reality exist. There are persons, not a few in number, whoare incapable of beholding any beauty, even in a gorgeous sunset, and, like the horseor the ox, they merely use the coloreil rays to light them toward their destination.
Others possess a love for colors that are glaring ; nothing is pleasing to them excei)t red,
blue, green, etc. ; a color modified by mixture with other colors, and neutral tints,
they pronounce flat, tame. Savage tribes, and the people inhabiting extreme southern
countries, are naturally fond of gay colors and highly ornamental apparel ; why, we donot profess to know; but such appears to be the case.
The eye requir(^s to be educated in order to be sensitive to harmonies in color, anduntil appeals have been made to the judgment, aided by contrasts shown between that
which is coarse and glaring and the truly beautiful, there can be no great advance-ment made by the masses.
GOLD PAINT FOR STRIPING.
WiNSOR & Newton, 38 Rathbone Place, London, England, manufacture an article
they term liquid gold. It is designed for fine line gold striping, its use removingthe necessity of laying on size. It may be purchased of any respectable dealer in
coach painters' supplies.
claret color.
English Purple Lake, mixed up and applied clear, produces a color which may betermed claret. It may be lightened by the addition of carmine or Munich lake, andstill represent claret wine in high light, or saddened into black and represent it in deepshadow. To observe the shades pour the wine into a goblet and view it in difierent
positions with reference to the strength of the rays of light allowed to fall in on it.
olive green.
Brandon Yellow and Drop Black produce a very nice shade of olive green, or take
umber, yellow and black, the yellow and umberto
befirst
mixed up and the blackadded in a greater or less quantity, according to the shade desired.
8/10/2019 Making Horse Drawn Coaches 1800 Bw
http://slidepdf.com/reader/full/making-horse-drawn-coaches-1800-bw 306/455
250 COACH-MAKERS' ILLUSTRATED HAND-BOOK.
MILORI GREEN.
Milori green or green lake is a color resembling in its dry state the familiar color
known as chrome green, but when mixed, milori green by far surpasses chrome greenin richness. It possesses a good body, covers and dries well. When mixed with
^ white in varying proportions forms cheerful pea greens. It serves well as a groundcolor for emerald green and verdigris.
Three shades may be purchased,
OLIVE GREEN,
green and purple ; burnt umber, yellow and black ; raw umber and yellow, green,
umber and yellow. The last named gives various tones, according to the proportions
used, and is the cheapest.Strictly speaking, olive is a green, compounded of blue and a small quantity of yellow
and red ; but carriage painters do not confine themselves strictly to these niceties.
Either of those given above will produce a good color, and as tastes difler so widely,
we must leave the decision to the painter.
PURE-TONED STRAW COLOR.
Having prepared a suitable ground work, take either china or flake white (dry), andOxford ochre. Or, use flake white, lemon chrome, and a very small quantity of ver-
milion. Delicate colors are more or less influenced by the color of the ground workon which they are laid ; so that, to secure a clear, pure tone of straw, and similar
colors, the under coatings should be white or nearly so, yet having no tendency to-
ward lead color. A flesh colored ground work would not be objectionable, still not as
good as clear white or a pale yellow.
Having purchased the best quality of the colors above named, to prevent sullying
them by mixture use no dark brown japan as a dryer; oil and sugar of lead, or var-
nish answers the purpose better. The paint mill and the cup into which the paint is
ground, as well as the brushes, should be perfectly clean. Having taken these precau-
tions, the color should be applied somewhat heavier than those having more opacity.
Two coats and color and varnish should cover solidly.
Use the palest varnishes ; the dark, hard-drying rubbing varnish will give a streaked
appearance. The finishing coat mast not (on a carriage part) be laid on as heavy as
for darker colors ; for, if there are any laps or runs, they will appear darker than the
surrounding colors, thus giving a muddied appearance.
WHITE AND STRAW COLOR FINE LINES.
In mixing white for striping, use French zinc, cremnitz, or china white, as they pos-
sess more body than white lead. If the white line is to be run on a dark groundworkadd a small quantity of lamp-black to the white, making it a silver color. Lamp-blackgives the white more body, and is not detected by the eye. The stripes will also ap-
pear of the same shade throughout. A white line when run on a bright color wouldnot bear the lampblack, as the contrast would not be great enough to hide the silver-
colored tint. Chrome green or ultramarine blue would answer better.
Straw color, for striping, is certainly a delicate color to handle. As the principal
ingredient is white, it is of the first importance to use the best. (See above.) Theyellow should be the best lemon chrome. A small portion of vermilion or Indian red
will give it more body and not be detected. To prevent the appearance of light and
dark portions, the color must be used heavy enough to cover well. The pencil mustbe filled with the same quantity of color each time, and when the stripe begins to ap-
8/10/2019 Making Horse Drawn Coaches 1800 Bw
http://slidepdf.com/reader/full/making-horse-drawn-coaches-1800-bw 307/455
PAINTING DEPARTMENT. 251
pear thin, run over it again with the pencil partly filled. By this means a thin layer
of color is added to that which is already on ; the two coats being equal to one put on
with a full pencil.
A broad line of straw color requires two coats to produce a perfect finish. The abovecolors to be mixed in varnish, or oil and sugar of lead.
TO MIX GOLD BRONZE.
Gold bronze may be mixed in boiled oil, raw oil and japan, raw oil and sugar of lead
or varnish. Raw oil and japan, with a small quantity of orange chrome, groundvery fine, and mixed with the bronze, will help to give it body, and stripe and cover
very nicely.
The bronze should be used from a small pan or box lid, and be kept stirred, as it
settles rapidly. Use the mixture as thick as possible, so as to secure the particles ofbronze in sufficient quantity to have each stripe well covered. Either the coarse or
fine line pencil may be used, the only diflFerence being in the quantity required to
complete the work.
CREAM COLOR.
Cream color is compounded of white, yellow and red. In mixing all light colors
such as cream, buff, straw, corn, etc., take of white the largest proportion, and tint it
with other colors. Cream color may be imitated with white, a small portion of yellow
ocher, and a minute portion of red. As varnish imparts a yellow tone to all light color,
they should be mixed a tint or two lighter than is desired, so that when finished thecolor will appear of the proper depth.
TO COLOR A BODY.
Buy a set of good flat camel-hair blenders (Mottler's), and when you have properly
dusted your panels, apply the color as thin as it will bear according to its body. Don't
mince around over an ordinary sized panel, or even on a large one, but apply the color
quickly, spreading it over the panel, and finishing or laying it off while wet. Use as
large brushes as possible on the panels. Don't commence on a panel with an inch or
two-inch brush when a three inch could be used as well. We have seen paintersmake three laps on a small panel, when a quick application of the color, with the
proper sized brush, would have laid on a more level coat, in half the time.
TRANSPARENT COLORS.
The ground color, over which any transparent color is to be laid, should be of a
tone similar to the color of the lake to be used when wet up, provided you wish to
preserve the full richness of the lake, and secure its color exactly.
Drop, Munich and English purple lake, and others of similar hue, may be painted
on dark lead color, Indian red, browns of various shades, and black.
As these transparent colors partake more or less of the color of the ground work, it
is essential to have the under coatings mixed of colors which are durable
We know of no ground color superior to brown, mixed of Indian red, and lamp-black.
In mixing the ground color it is preferable to have it a shade or two darker, rather
than lighter than the panel color.
Lakes, painted on black, are Viery deep and rich in tone. The ground color should
be ground out perfectly fine and painted solidly. If the ground is streaked it will beuseless to attempt to make a good, solid piece of painting.
One coat of color, and two coats of color and varnish is the best manner of painting
lakes.
8/10/2019 Making Horse Drawn Coaches 1800 Bw
http://slidepdf.com/reader/full/making-horse-drawn-coaches-1800-bw 308/455
252 COACH-MAKER'S ILLUSTRATED HAND-BOOK.
BISMARC BROWN.
Bismarc brown may be compounded of various pigments; the richest shades arethose made from burnt umber, Dutch pink and lake. Purchase the best EngUshDutch pink (a kind of yellow lake,) and having laid a ground work of brown on thepanels or carriage part to be painted, take out on the stone a certain quantitj'^ of Dutchpink, pulverize it, and wet it up ; then add burnt umber in such quantity as you de-
sire to have the shade of brown ; the addition of a small portion of lake imparts rich-
ness. Dutch pink, being very transparent, care must be taken in adding any darkcolor to it. The beauty of this shade of brown, or Bismarc, will not be fully apparentuntil the varnish has been applied, varnish adding to its depth and beauty more thanto most other colors.
Burnt sienna, yellow and lake ; burnt sienna, burnt umber, yellow and lake, in va-rying proportions; will also give shades termed Bismarc, and as either color predomi-nates, so will the shade of Bismarc be toned,
GOLD STRIPING.
Take the finest gold bronze powder and mix it up in hard-drying varnish, or rawoil and japan, or raw oil and japan and a small quantity of orange chrome, either of
which mixtures will answer. Put the mixture in a clean porcelain cup or box lid, anduse it therefrom, keeping it stirred up so that the pencil will be charged with each in-
sertion with like quantities of the gold bronze. The particles of bronze settle very
rapidly, and unless the mixture is kept agitated the striping will not present a uni-
form brilliancy.
An imitation of gold striping may be produced by using white, chrome yellow, andlight red, toned down with raw umber or black. Take white and add a small quan-tity chrome yellow. The tint obtained will be too yellow, and by adding a small
quantity of raw umber the tone is lowered without serious change of the tint, and asmall portion of light red will give the redness of tone required. ' Black in minutedoses will correct a tendenc)-^ to too great brilliancy. There are various methods of
obtaining an imitation of gold, but the colors given will make as perfect an imitation
as will be necessary. The painter should imitate gold leaf in shadow if he wouldavoid a cheap appearance, especially on a carriage part where there is a great amountof striping run on.
FRENCH GRAY.
French gray, so far as we have any knowledge of it, is nothing more than lead color.
To make a good color, which would have more purity than the ordinary mixture of
black and white lead, use flake or cremnitz white mixed with drop black ; a very smallquantity of black only is needed, merely enough to turn the white a silvery gray.
This mixture will make a cold-looking gray. If you wish it richer, use drop ochre, or
yellow and red, merely tinging the gray, but not allowing the yellow or red cast topredominate. On ordinary work, we used to mix only drop black and white lead(lead color), which, after being striped up nicely, and finished, passed for Frenchgray. Varnish darkens it somewhat, so that the painter must make calculation for
the shade he desires, by taking into account the difference of a tone or two deeperafter being varnished.
DEEP SEA GREEN.
Mix the ground work for deep sea green of drop black and chrome green, or chromeyellow, about one part of green or yellow to three parts black. The color mix ofbest English Dutch pink, to which is added Prussian blue, in about the same propor-
tion as given for the ground work, viz. : one part blue to three of Dutch pink. Thetone may be raised if desired by adding lemon chrome.
8/10/2019 Making Horse Drawn Coaches 1800 Bw
http://slidepdf.com/reader/full/making-horse-drawn-coaches-1800-bw 309/455
PAINTING DEPARTMENT. 253
LONDON SMOKE.
London smoke is mixed of burnt umber, yellow, white, red, and where in the mix-ing either of the brighter colors should be too prominent, black will be found useful
to tone them down. Vandyke brown, burnt sienna, and yellow may also be used to
make an imitation of London smoke. Let the brown shade predominate, but it
must be of a yellowish cast.
GROUND FOR ULTRAMARINE BLUE.
Ultramarine blue is painted on a ground work of blue, mixed as near as possible to
the shade of blue desired.
If you use the ultramarine blue clear, make a dark ground work ; if you lighten it
up any with white, the ground work must be lighter. Mix the ground work with
Prussian or Antwerp blue and white, either lighter or darker, according to the shade
you wish the color. In painting ultramarine blue, having secured your surface in the
usual manner, grind out the ultramarine blue in varnish or boiled oil, and apply with
a soft, flat, bristle brush. The camel-hair blender may be used on narrow panels, but
on large surfaces the bristle brush will be found to work pleasantly, especially wherethe blue is ground in varnish. Two coats and a coat of color and varnish will be suf-
ficient to cover solidly.
FLORENTINE LAKE.
Florentine lake and vermilion mixed and laid as a ground work for carmine doesnot produce a foundation suitable for anything bat the commonest kind of work, andis hardly fit for even that. It is liable to very strange actions, one of which is to turn
gray under the action of water and pumice stone. A case of this kind was recently
brought to our notice. The carriage part in question had been color varnished, and in
rubbing it down preparatory to laying on the carmine the foundation turned gray.
The painter remedied the defect by going over the job with turpentine. After this
coating had been applied, and the carmine was laid on, the grayish spots were not
visible.
COLOR ITEMS.
Carmine when used on a carriage part may be dismissed with one coat ; if the
ground work be solid, and the color laid on by one who is an expert. One coat, how-ever, will not cover perfectly.
A VERY brilliant yellow, suitable for carriage part under a one-man body, may be
secured by painting Poonah yellow over a ground of white. Stripe the carriage part
with black.
Browns Follow Yellow into Shade. —The carriage part painter may learn fromthis : if his ground color is dark brown, he may mix harmonious striping colors byusing lighter brown shades, and at length arrive at pure yellow for fine lining.
A carriage part to be painted carmine may be striped with vermilion on the ground
work, and when dry, the carmine glazed over all.
Lamp-black is pure carbon, in its uncrystalized or amorphuous (without form)
state.
Pigment, a paint ; color for painting.
Transparent colors require suflBcient varnish, or boiled oil, in their mixture, to pre-
vent them from drying dead.
In striping with quick drying color, use shorter pencils than when you have time to
use oil color. On carriage parts have short pencils of the same size as your regular
stripers, in order that you may be enabled to work more rapidly around the headblock and any other places where short curves are required.
8/10/2019 Making Horse Drawn Coaches 1800 Bw
http://slidepdf.com/reader/full/making-horse-drawn-coaches-1800-bw 310/455
254 COACH-MAKERS' ILLUSTRATED HAND-BOOK.
Never use quick drying color from the palette in a quantity sufficient to stripe abody or gearing. Keep the color in a small pan or box lid, so. that it, will have but a
small amount of its surface exposed to the air.
Drop black is made by charring the bones of animals. The beet drop black is madefrom ivory shavings.
Coach-Painters' Green, both light and deep in tone, may be purchased wet, incans.
A RICH shade of crimson lake may be obtained by glazing clear lake over a groundmade of four parts Tuscan red and one part drop black.
Raw Umber, blue and chrome yellow, produce various tones of tea green.
Dutch Pink or yellow lake is a most useful color in the formation of delicate drabs.
With burnt umber it gives rich shades of brown, and in combination with Prussian blueand lemon chrome, produces decidedly pleasing tones of green.
Royal Red is an artificial ochre, composed mostly of iron ore. It serves as a
ground work for vermilion, and produces good browns in combination with blue andblack.
Ultramarine Blue added in small quantity will give to white lead a clear tone. Inpainting white grounds tone the paint with ultramarine blue, and use varnish color,
except on the last coat, which should be a pale finishing varnish.
Carmine and the lakes may be darkened by adding ultramarine or Prussian blue.
The former, we think, is the most desirable.
Straw Colors, and all others largely composed of white lead, cover better and workmore pleasantly by the addition of a small quantity of rubbing varnish.
Gold Colored Paint. —Yellow, or Oxford orchre, burnt sienna, raw umber andwhite, may be mixed so near the color of gold in half shadow, that a gold pattern uponit will not show in some lights.
New Colors.— Red, brown, and taca, or tackaranda brown, are among the latest
now being used in Philadelphia. They answer a very good purpose, but do not pos-
sess any great degree of richness. The red brown has somewhat the appearance of
rose lake, and taca brown resembles burnt umber.
Orange Minbiial is another name for red lead, and is produced by the slow calci^
nation of white lead in iron trays.
Tuscan Red is a color resembling Indian red, though rather deeper iQ..tojpie>. It affords
excellent grounds for carmine and purple lakes.
Silver White, Dutch pink, and a small portion of lemon chrome yellaw, produce a
very rich tone of olive drab or amber color.Superior Bronze Powder, prepared especially for striping carriage parts, may be
purchased in twenty different shades.
Raw Umber is most useful for toning down a color that is too yellow ; and, in com-position with white, chrome yellow and lake, forms, beautiful drabs.
Purple is a color which will be rich or dull, according to the quality of the pigments
used. Purple mixed of Prussian blue, vermilion and white, would cover well without
any ground work. But a rich tint of purple cannot be obtained without using fine lake,
ultramarine blue and white lead or whiting. Use about one part blue to five parts of
lake, adding white lead or whiting sufficient to change the tint to the shade desired ;
paint it on a ground work of lead color of a purple cast
8/10/2019 Making Horse Drawn Coaches 1800 Bw
http://slidepdf.com/reader/full/making-horse-drawn-coaches-1800-bw 311/455
PAINTING DEPARTMENT. 255
Glazing, when applied to colors, by the carriage painter, signifies the act of laying
transparent colors over a previously prepared ground work. Carmine, the variouscolored lakes, and verdigris have not sutlicient covering power or body to produce
a soUd piece of painting, therefore they require a foundation suited to their respectivecolors. All painting of this kind is called glazing. In the Eastern cities painters
speak of glazing with putty ; by this they mean the act of puttying a surface all over,
so as to speedily fill up the grain and pores of the wood. In the Western States car-
riage painters generally term it plastering.
Japan Dryer. —Take of linseed oil, 5 gallons ; red lead and litharge, each 3^ lbs; rawumber, 1 J lbs.; sugar of lead, ^ lb. Pulverize and mix together the ingredients name* ,
and add them to the oil, and boil or simmer over a steady tire for two or three houi-s.
Remove the kettle, and when the oil has become cooled down to a certain degree, add
5 gallons of turpentine. Having stirred the mixture thoroughly, allow it to remainquiet for ten or twelve hours ; then pour it off carefully and can it, when it will beready for use.
MISCELLANEOUS ITEMS.
PuRPLE,;rHK Emblem op Royalty. —Julius Caesar was the first person who forbade the use
of purple to other mortals, which was indeed but just, for he had sacrificed a million
of lives to earn the right to do so. Nero, still more jealous of his blood-colored robe,
seeing one day in the theater a noble lady dressed in showy purple, ordered her
to be dragged upon the stage and stripped of her dress, and then confiscated herproperty so that she might not purchase another. Ludwig Pfau.
Colors from Wolfram. —The mineral colors from Wolfram are obtained by decom-posing soluble tungstate by means of salts of the metals yielding insoluble phosphates.
The tungstate of nickel produces a light green, tungstate of chromium a dark gray,
tungstate of cobalt a violet or indigo blue, and tungstate of barium a bright white color-
Tungstic acid alone gives a fine light greenish yellow. All these colors may be em.ployed for water or oil color paints. The last is a really desirable and probably quite
unchangeable color.
A Bodydivided
bymoldings into small panels will not admit of heavy varnishing.
The better plan is to lay the varnish lightly and add an extra coat. If four coats in
all are generally given on plain paneled work, let the number be five on a body with
small panels. By this means runs are avoided and the full amount of varnish applied,
the difference in time amounting to nothing worth naming, when compared with the
certainty of results.
White Lead. —Until within the present century, the manufacture of lead was con-
fined principally to Holland, and what is known as the Dutch process is now the modeof operation in its production in most of the lead works in Europe and America.
Lump pumice stone may be kept clean and sharp by rubbing it occasionally on apiece of English rubbing stone.
The trade of coach painting is daily growing in importance, and the apprentices of
to-day should strive to become well acquainted with the nature of the pigments they
must use from year to year.
Test for Japan. —Pour out a few drops of japan on the stone or a piece of glass,
and add two or three drops of raw linseed oil. Stir the two together, and if the oil
readily combines with the japan, the dryer is of a quality safe to b© used on carriage
-work. If the japan repels the oil, and the end of the stick becomes gummy, the japan
is ^ orthless. We have the above from a varnish and japan maker of large experience.
8/10/2019 Making Horse Drawn Coaches 1800 Bw
http://slidepdf.com/reader/full/making-horse-drawn-coaches-1800-bw 312/455
256 COACH-MAKERS' ILLUSTRATED HAND-BOOK.
The importance of having dry, warm feet, during cold weather, should not be under-estimated. The painter is required to use water in rubbing, almost daily ; and he cannot well avoid standing on a floor continually wet. Protect the feet with large, coarseleather shoes, having hard wood or cork soles, if you would avoid severe colds.
The analysis of linseed oil shows it to contain both albumen and resin, which in their
normal state are elastic, but subjected to boiling it becomes brittle by age.
Painters should seldom wash their hands in turpentine, as the practice, if persisted
in, will lead to the most serious results, even to the loss of power in the wrist joints.
Sleigh painting in New England presents a fine field for design. The ground colors
used are carmine, lake, brown, light and dark green, cinnamon and a range of light
colors composed of varying proportions of white, chrome yellow, umber and lake.
On bodies, the broad gold line, edged, is very popular. Fine lines are arranged ac-
cording to taste. A very large proportion of the ornaments used are transfers.
A certain painter in New Haven gives his carriage parts but one sand-papering.
He leads, putties, and puts on a coat of Ohio paint, and when all are dry he sand-
papers with No. 2 sand-paper. His carriage parts were well filled up and of course pre-
sented a smooth finish.
An old body that is badly cracked and ordered to be re-painted without burning ofi
should not be coated with oil lead, nor puttied with a slow-drying putty. Put on quick-
drying coats and quick-drying putty.
When a new apprentice is taken into the paint shop, his first introduction will beto sandpaper, and a gearing in lead color. Now to make of him at once a good handat sandpapering, set him at work; first at the hub between the spokes ; then let himproceed with the hub front and back; next the inside of fellows where the spokes are
inserted. Having finished the parts named the remainder of the wheel will be com-pleted with but little fear of its being slighted. On the inside carriage set him at
work on the most difiicult parts ; training him to leave the plain surfaces to the last
Cold Weather Pencil Grease. —Take beef tallow, and having rendered it, add a
small quantity of sweet oil, stirring the mixture well together while warm.
The shammy (chamois), when greasy from constant use, may be cleaned very
speedily by laying it out on a piece of board with a smooth face, and rubbing it with
white curled hair and soap, first on one side and then on the other. Rinsethrough two waters, wring out dry, and the leather will again grasp the wet panel
pleasantly.
Probably at no time in the history of carriage painting in the United States has
there been so many methods employed in painting, and so great a variety of articles
put on the market for the painters' use, as in the last three years.
Bring your elbows together and hold them up before a looking glass at least oncea day, and then —don't spare the soap.
Heavy Felt renders excellent service when employed in rubbing or leveling downvarnish. Mr. Landers at Newport, R. I., brought it to our notice.
Don't delay washing the paint-shop windows early in the Fall. Nor the glazing of
any broken or defective lights of glass. If you use stoves for heating, see that the
grates are in good condition, and the pipe sound. A steady heat and safeguards
against fire are items well worthy of attention.
Artificial lump pumice stone is being used in Philadelphia, which cuts rapidly, fur-
nishes its own grit, and does not clog ; neither is it liable to chip off and producescratches by getting under the stone.
8/10/2019 Making Horse Drawn Coaches 1800 Bw
http://slidepdf.com/reader/full/making-horse-drawn-coaches-1800-bw 313/455
PAINTING DEPAKTMENT. 267
If you chose to throw an t'lnpty h>a<l kv-' i«»tu a hot Jirc, yon may witness the effect
of heat on the white lead adlierini,' to the staves. I'nre metal will drip ont at the
grate.
Painter's Colic. —For the henofit of those who may he affected hy that mneh dreaded
disease, we give the following recipe. During ten years' experience I have not found
a single case it did not cure :
Iodide of potassium ...--.-J^oz.Water 4
Mix and take one teaspoonful in a little water, three times a day, immediately after
meals, until all pain is gone. If it cause a hurning sensation in the stomach, diminish
the dose. The principle on which it acts is, the iodide neutralizes the poison of the
paint, and carries it out of the system.There are at present four different makes of filling on the market, which are in
competition with P^nglish filling.
Zanzibar Gum is the most valuable for varnish making. Benguela gum stands next
in value, and an inferior gum is known as kowrie.
An English coach painter lately wrote to a brother residing in this country, asking
of him that he would ascertain what method American painters adopt in order to
produce the brilliant finish which he had noticed on American coaches sent over to
England. The reply was: The Americans build up a firm foundation, free from tacki-
ness, and the finishing coat thereby retains all its brilliancy. At home you use every
coating too elastic, from the priming up.
The painter need not be surprised at possessing a trembling hand, when striping or
ornamenting, if he be addicted to the use of alcoholic drinks.
A STRIPE cannot of itself run straight, but if the hand that guides the quill keeps it
(the quill) directly on a line with the center of the hair, the stripe will behave pro-
perly.
The carriage painter who habitually makes use of the chamois in place of a towel
may be set down as a slouch.
The English method of painting requires twenty coatings to complete a coach body.
In America our best work does not receive above sixteen coats, and a great deal of
work coming from good shops does not receive over ten coats.
A FINE line of clear white over a dark ground is not easily put on so as to avoid theappearance of laps and varying tints. By adding a small portion of lamp-black the
diflSculty is overcome.
We are acquainted with a lady in Kentucky who, although blind from early child-
hood, had the rare faculty of distinguishing colors by the sense of feeling. When she
called at a store and demanded goods of a certain color, she could not be deceived byplacing before her any other color. Her eyes were open, but devoid of color.
Use pencils of a good length for drawing long stripes, and shorter ones for those
parts which require short curved lines.
Rough Stuff. —Take one part each of red led and umber to three parts white lead
and ten of ochre. Mix stifl' in oil or rubbing varnish ; thin with turpentine.
PAINT CRACKING.What is the cause of paint cracking? You may ask a dozen painters that
question and get about as many different answers. A says it has got too much oil in17
8/10/2019 Making Horse Drawn Coaches 1800 Bw
http://slidepdf.com/reader/full/making-horse-drawn-coaches-1800-bw 314/455
258 COACH-MAKERS' ILLUSTRATED HAND-BOOK.
it; B says there is too much japan in it; C says there is not enough oil in it;
D says that it dried tooquick,
andso
we mightfill
pages, if we were to under-take to give all the different ideas that are advanced by different painters. We havehad more than an ordinary chance to find out the difierent views of difierent paint-
ers, as we not only have had a number of years of experience in the shop, but havetraveled among the coach shops both east and west, amounting to several hundred in
number, and we must say that it is astonishing to see and hear the heartrending ideas,
theories and scientifics that are advanced about this one thing. We hardly knowwhere to commence or where to leave off on this question. As we stated above, to
undertake to give every one's idea it would fill many pages and make our article so
long that we would tire the reader, so we will confine ourself to our own ideas.
Our idea about paint cracking is, there is more paint cracks from the use of oil andhasty work than anything else. Some, in fact a good many painters, persist in mixingtheir paint very elastic all through, thinking that they will have a tough, elastic coat
like rubber, that will give to the swelling and shrinking of the wood, without crackingand scarcely break apart, if the panel of a buggy were split in two. Well, we will ad-
mit that in that way they can get a very elastic coat, and if it would remain so
and never dry, it would be the thing, but the paint will dry some time. Any material
will contract in drying. Their elastic body of paint will continue to dry and contract
until its elasticity gets to its utmost limits, then it will give away and spread apart in
great gaping cracks. To paint up a job with elastic coats of paint, it should go througha very long process, and the difierent coats be put on very thin and not put on a coat
of paint until the previous coat is perfectly dry. Putting on a number of heavy coats
of any kind of paint or rough stuff as fast as they are fairly set, will cause cracking of
the worst kind either before or after varnishing. Paint is too often supposed to be dry
when it is really not half dry. Six months of good drying weather would be a short
time to get a coach body ready for the varnish on the elastic or tacky principle, andthis is not all there is to contend with, in the oil process ; the oil will sweat throughthe varnish and cause it to lose its brilliancy or luster —cause it to have a dull,
greasy looking gloss.The quick process, or flat coating, can be hurried so that it will crack, and crack
badly. Our few limited ideas about obviating cracking are all summed up in a very
few words, viz. : let every part of the wood be thoroughly primed with a good fresh
priming; prime inside and out, so the weather cannot act on the wood; let the
priming get perfectly dry ; then mix every coat of lead and rough stuff with japans
and varnishes that will dry firm and hard;
put enough in to bind the paint well, andno more ; have every coat dead color ; do not put on the coats too heavy ; let every
coat get bone dry before putting on another ; put on enough of coats to fill the grain
of the wood, and make a perfect surface, and no more ; then you will have on a bodyof paint that is firmly bound together, and thoroughly dry, and when paint is thor-
oughly dry it can shrink no more (it only shrinks when drying); and if it don't shrink
it cannot crack, and in this kind of a body of paint there is no moisture or oil to sweat
out and destroy the luster of the varnish. Painting of this description will not crack
until the joints of the wood begin to give away and let the water and damp atmos-
phere in and swell the wood along the edges of the joints, and cause the paint to crack
from the swelling and shrinking of the wood. Varnish may crack on top of the best
painting.
If the paint is not well protected by varnish it will perish in time, sooner or later,
owing to how well it is protected. The ravages of time will destroy anything that is
temporal.
8/10/2019 Making Horse Drawn Coaches 1800 Bw
http://slidepdf.com/reader/full/making-horse-drawn-coaches-1800-bw 315/455
PAINTINC; DF.rAKTMKNT. 259
A NATURAL PALETTE.The palette used by painters is for the purpose of holding their colors while en-
gaged in portrait, landscape or ornamental painting. It is generally made of wood, to
whi( h successive coats of oil have been applied until the grain of the wood is fillctl.
White porcelain palettes are also employed, which are i)ecuharly well adapted to show-ing the strength of the colors. The carriage painter, who makes any pretentions to
ornamenting, is not unfamiliar with the palette, although too many neglect to provide
themselves with one, employing, instead, a piece of glass or patent leather. Now, na-
ture has provided a palette of translucent horn, which every painter may find placed
conveniently nigh. True, it is not large enough to hold many colors; in fact, not morethan one color can be conveniently placed upon it at the same time, but in ornament-
ing, this little natural palette will be found of great service, by obviating the necessityof holding the wooden palette and mahl, or rest-stick, both at the same time. Thecarriage ornamenter seldom holds the palette balanced on the thumb, lest he may in-
advertently strike it (the palette) against tlie panel, and bruise its surface; he must,
therefore, reach down to take up each penciful of color, and thus wastes time. Thenatural palette is not open to this objection. Another use to which this palette maybe put, is that of sketching. Hogarth, England's great caricaturist, availed himself of
its ever-presence, and on several occasions secured a fleeting exi)ression of counte-
nance which would otherwise have been lost. The natural palette of translucent
horny substance, ever-readyand
at times very convenient, is nothingmore
nor less
than the thumb nail.
TO PAINT A LIGHT CARRIAGE IN THREE WEEKS-To finish a light carriage in three weeks, the body should be ready to rub on the
eighth day after the priming is put on. First day, priming ; third day, second coat of
lead ; fourth, puttying up; fifth and sixth, three coats of rough stuff; rub out on the
ninth. Use quick colors, putting on the first coat of varnish on the tenth. Use clear
varnish, laying it on heavy. The second coat on the thirteenth, and the finishing
coat on the seventeenth.
The carriage-part will, of course, be completed during the painting of the body, andtherefore has not been mentioned.
We have allowed for but two coats of lead, and three coats of varnish, which will
insure a passable job in the hands of a first-class painter.
PULVERIZED PUMICE STONE-Pulverized pumice, in a perfectly pure state, that is, unadulterated with quartz,
barytes, or whatever else may be added to give weight, cannot always be pur(;hased,
unless one buys of a firm that has it ground under their own eye, and are honest
enough to give you pumice done, and nothing else. The process of grinding and bolt-
ing pumice is a tedious one, requiring an amount of care and attention little dreamedof by those who have not inquired into the matter closely. The pumice, after it is
broken up and ground between burr stones, requires to be passed through bolting
cloths of a degree of fineness suitable to the grade of pumice required. That whichis suitable for leveling down varnish is called Xo. 1, and that for the final rubbing ona body, medium and polishing. This last is passed through silk bolting cloth of ex-
ceeding fineness, in order to free it from the slightest particle of coarse grit ; andwhen unadulterated is an article the painter will highly prize.
The coarser grade should be free from any grit larger than the mass, else this will
tear ugly scratches in the varnish, and the utmost care is necessary in preparing this
grade to see that the bolting cloths are perfect, and that by no carelessness any foreign
substance should accidently get into it.
8/10/2019 Making Horse Drawn Coaches 1800 Bw
http://slidepdf.com/reader/full/making-horse-drawn-coaches-1800-bw 316/455
269 COACH-MAKERS' ILLUSTRATED HAND-BOOK.
Pumice may be ground pretty coarse, but if It be uniform in the size of its particles,
il will not tear the varnish if in the hands of a careful rubber. Coarse pumice stone,
when first applied to the panel, should not be swept around in a circle, but ratherworked across, and up and down, not bearing on very hard. It will soon become finer,
when the strength of the arms may be safely put upon it.
A large per cent, of the pulverized pumice on the market is rendered next to worth-less by the addition of quartz, barytes and other substances which are mixed with it
to add to the weight, the pure pumice being very light, and taking too much in bulkto satisfy the wants of grasping dealers. The pure is worth from eight to twelve cents,
while the adulterated may be had for two or three cents less on the pound. To avoidscratches, buy the pure pumice, and having taken out a sufficient quantity to last for
a time, in a box prepared to hold it, see to it that it is kept free from dust or the flint
from sand-paper.While on the subject of pumice, we have thought it not out of place to add some
facts connected with it.
PUMICE, OR PUMICE STONE,
is a substance frequently ejected from volcanoes, the name being given originally
from its fancied resemblance to foam. In the lump it certainly has very much that ap-
pearance. It is the lava which is belched up from the deep recesses of the earth, andoften in such enormous quantities as to cause the destruction of the property and lives
of thousands who live within its reach. Lava is classed into the light and dark vari-
eties, according to the predominance of the two minerals, feldspar and augite, the
former producing the light colored, the latter the dark varieties ; the colors beinggray, white, redish brown and black.
Feldspar consists of silica, alumina and potash, and is one of the essential constitu-
ents of granite, gneiss, mica-slate and porphyry, and enters into the constitution of
nearly all volcanic rocks. Augite consists chiefly of silica, magnesia and lime, with oxydof iron, and sometimes oxyd of manganese. Lava, after being ejected, is influenced bythe conditions under which it may be placed. When cooled under pressure it becomescompact, and, in some cases, changed into solid rock. But the opposite is the result
when it is allowed to cool in the open air. It then presents the form and structure ofthe article of commerce which is familiar to every painter. It is porous, and appar-
ently made up of parallel fibres, owing to the parallelism and minuteness of the
crowded cells, and supposed to be produced by the disengagement of gas, in whichthe lava is in a plastic state. It is specifically lighter than water, and large masses are
found sometimes floating in the midst of the ocean. That which we import comes
from the neighborhood of Mount Vesuvius.
LESS JAPAN AND MORE OIL.
During the summer less japan is required than at any other time during the
year, and where the use of oil is of real value in any coat, the quantity may beincreased with safety. What are termed quick-drying colors, both for surfaces
and striping, do not need to be mixed to work so short. Air and sunlight come in,
and contribute oxygen in increased quantities, and if the painter studies his ownpleasure, he will allow the weather to assist him. Where the habit has been ac-
quired of dosing colors largely with japan, it is often the case that the state of the
weather is not taken into consideration— the same quantity of drier being added in
July as in January. A body is to be coated with quick-drying color, which usually
means color ground in japan alone. The thermometer stands at 95° in the shade, and
nowthe painter prepares his cup of color (say black) by mixing it with japan and tur-
pentine, and a trifle of varnish. The heated atmosphere searches in the cup for some-
8/10/2019 Making Horse Drawn Coaches 1800 Bw
http://slidepdf.com/reader/full/making-horse-drawn-coaches-1800-bw 317/455
PAINTING DEPARTMENT. 261
thing to work on, ami the tiiri>eiitine8ay8, here am I, a Hght volatile fluid, ever readyto fly off . And when tlie color is being spread it do^s fly ofi to ii great extent, and thenthe excess of driers causes the paint to work very unpleas;intly. A small quantity of
oil added would have corrected the matter, by allowing the color to work smoothly,
and spread on evenly. It is not best to lay on color in a ilraft of air ; close the windowsand open them again immediately the body is completed. Quick-drying striping
colors are still more annoying when mixed in japan and turpentine. The color will
not run from the pencil smoothly, and if the work in hand requires to be varnishedthe same day, the workman may in his hurry become greatly irriUited by the contin-
ual dragging of the pencil. We have been amused at times, in hot weather, to see
good painters fret themselves over a hurrie<l piece of striping, because they had beenso thoughtless as to mix their striping color in japan alone; whereas, had they takeninto account the rapidity with which the heatetl air acts as a drier, suflicient oil wouldhave been added to render the operation pleasant.
We would suggest that quick-drying striping color, for fine lining, be ground stiff in
oil, and then turpentine and japan be mixed, and kept in a small vessel, so that in the
operation of striping each pencilful of color may be supplied with the quantity of drier
requisite to insure its drying. By this method the mass of color remains .soft until the
work is completed. Fine lining, run on in the morning, will be ready to varnish over
in the afternoon, if the work be properly aired. The oil will assist in binding the color,
rendering it less liable to work up under the brush. Tube colors are the best andcheapest for fine lining, and contain sulhcient oil for the purpose named, and in keep-ing the driers separate from the color, we are freeil from the annoyance of having it
continually hardening on the palette.
ENGLISH BLACK JAPAN.This is an article which was introduced into carriage shops in the United States
twenty-three years ago, to our certain knowledge, but how much earlier weare not prepared to state. When first imported it was employed almost ex-
clusively for the iron work or bodies. The advantage possessed over color
andvarnish was, it contained no grit or grains of color, was intensely black
whenlaid over a dark ground color, flowed out full and rich and dried rapidly. Subsequentlyit was used to intensify the color of all black work. It replaced the coat of blackvarnish, and entered into the first and second coats of clear varnish in a quantity
sufficient to tone them with black, the purpose being to secure a black which, whenfinished, should not, in a clear light, appear of a greenish tinge. Black japan, whenapplied instead of black varnish color, repuires to be handled very carefully, for if it
is cut through the spots will look green, and cannot be retouched so as to make afinish equal to the original color. Black japan requires varnishing with durable var-
nish, as it possesses poor wearing qualities.
CONCERNING SLUSH.It is the practice with some painters to take the slush wliioh has accumulated
and pour it in a kettle, adding raw linseed oil suflficient to soften up the whole mass,
and then boil it until the skins, etc., have discharged their fatty matter. Afterwardstrain the product, and use it for any purpose for which it is fit. It will dry wc'l,
and may be mixed with rough paints, to be used on such parts of the work as <lo
not demand anything better —as the insides of bodies, the roofs of standing top work,
bottoms, etc. We do not claim that any profit is derived from boiling down .slush.'*
The oil, firewood and time, computed against the value of the i^roduct, would not makea very good showing.
8/10/2019 Making Horse Drawn Coaches 1800 Bw
http://slidepdf.com/reader/full/making-horse-drawn-coaches-1800-bw 318/455
262 COACH-MAKERS' ILLUSTRATED HAND-BOOK.
The paint shop need not be annoyed by having a great amount of slush on hand,if the foreman, or some other man, will see to it that in the daily use of colors and var-
nish each hand is economical. Black or any other color of which considerable is usedshould be ground (in japan only) in a large vessel, and from this removed to the ordi-
nary paint cup, in about the quantity required for coating the work in hand. Turpen-tine, oil and varnish should never be thrown into the slush keg. Cans should beprovided for each of them, and when either are gritty or soiled, pour them into thecans, allowing them to settle, and then use them in mixing rough paints.
As in the every day workings of the paint room there will be of necessity a certain
amount of slush made, provide two half barrels, and in one scrape only the driedskins, which cling to the cups or pots, and in the other the more liquid refuse. This
last may be used up about as rapidly as it gathers ; the other is next to worthless.The slush keg, if it could speak, would disclose many mishaps on the part of
hands in mixing colors; for, unsightly as it is, it has ever served to swallow up andhide from view these failures, and therefore can claim to be somewhat of a friend to
the painter, and he in return is not unmindful of its real worth.
Grain Raising on New Work. —It is not unfrequently the case that new work whichstands for two or three months in a dark wareroom develops the unsightly appearance
of the grain of each kind of wood of which the body is composed. The ash may beplainly distinguished from poplar, and their junction will be clearly defined. This is
no evidence of cheap and hurried painting, as it occurs on work that has been sixmonths in course of completion. Sunlight, fresh air, and repeated washings will
correct the defect.
RESOLVENTS FOR REMOVING PAINT.
Resolvents are not to any great extent resorted to by carriage painters in the
removal of old paint. Doubtless the majority of painters have experimented with
chemical mixtures claiming to be a great improvement over the old plan of
softening the paint by heat, but we think our experience will agree with others
in this, that while a chemical mixture may perform its work well and speedilyin so far as dissolving the paint is concerned, it also goes further and attacks
the wood, leaving it in a furzy and gummy condition, on which it is difl&cult to get
paint to dry firmly. House painters use chemical burners to but a limited extent*
although their work is not required to be so perfect as that of the coach-maker. Thecharcoal furnace appears to be the favorite means with them of laying bare the wood,
and when properly made it certainly performs its part well. The furnace is simple in
construction, being nothing more than a small sheet-iron box, with handle. One per-
son can do the work, but generally two persons are employed, one to hold the furnace?
and another who is skillful with the chisel or knife, to remove the paint and regulatethe distance to which the furnace shall be held from the paint ; an important item ; for
when the body of old paint becomes very hot it vitrifies, and when again it becomes
cold it clings with greater tenacity than before it was heated. The furnace would be
the most economical device in a shop not supplied with gas. But shops lighted with
gas can have nothing more economical, speedy and free from deleterious efiects than
that of a gas jet. All that is required is a few yards of rubber tubing arranged to suit
one of the gas pendants. The tube can be held in the left hand and knife or chisel in
the right. The jet or flame is then made to strike the surface, and when the paint is
warmthrough, the knife is used quickly in removing it. The gas jet does not give out
a great amount of heat, and therefore does not injure the joints of the body, or draw
8/10/2019 Making Horse Drawn Coaches 1800 Bw
http://slidepdf.com/reader/full/making-horse-drawn-coaches-1800-bw 319/455
PAINTING DKIW KTMKNT
out the oil from the wood to an extent that dehiys the after painting. In removingpaint, tlie heat should never be so intense as to quickly raise it up into blisters ; it is
only necessary to warm it through.
PAINTING BODIES.First —Let the priming be patent filling or lead color, as best suits the whim of
the painter, but if the latter, little or no japan should be used, unless the job is in a
great hurry.
Second —Let the second coat, whether of red or rough stiiff, be of sufficient elasticity
to adhere and be durable, but not to that extent as to prevent its drying in at least
two or three days ; and so with subsequent coats.
Third —Putty should be used very sparingly and as little left on the surface as
possible.
Fourth —Every coat of paint or varnish, whether elastic or otherwise, should bethoroughly dry before applying the next coat.
It appears to us that this point is of more importance than all others. It matters
not how good or what kind of material is used ; if one or more of the under coats is
not in a proper condition to receive its successor the job will fail to stand ; it will
crack in some cases; in others it will sweat out and become dull, or show the grain
of the wood. We have seen bodies painted in four weeks that did better service than
Bome others that took several months, simply because the paint was prepared to dry,
and did dry before the next coat was applied.
We don't wish to encourage the plan of hurrying the work through, but it is a well-
known fact that many jobs are spoiled by overexertion to make an extra durable
piece of work. The reason is obvious. The paint is put on that never dries thoroughly,
consequently the failure.
BASKET WORK.
Of course, in a department devoted to painting, we refer to the imitation only
of basket work. Should any propose to try their skill at imitating the basket
work as used on ponj'^ phaetons, a hint may not be out of place. The first point
to determine will be whether the copy shall be basket work in straw color, or someshade of brown. However, whatever color is decided on, the ground work should beof a tint agreeing with the shaded sides of the basket work. Straw color in shadowmay be mixed of white, yellow ocher and raw umber. On this groundwork lay out
with chalk the form of the basket work, and bring out the features of the willow as
interwoven, by using brown, or burnt umber for the darkest markings, and the nat-
ural color of straw on the parts receiving light. Proceed with the other colors on the
same plan. A piece of basket work should be used as a model, and its peculiarities
carefully studed.
SCREENS.Screens, as a protection to finished bodies —especially during the warm weather,
when the air is filled with flying insects —are not appreciated as fully as they
should be. The varnish room may be perfect in every particular as to excluding dust,
and be well ventilated, and yet a single house fly may mar the beauty of an exposedpanel, and cause vexation, tedious delay and extra expense.
We are aware that objections are urged against them ; some say they concentrate
the heat about the body, and render the varnish more liable to wrinkle, or to set with
a dull appearance ; others, that they collect dust, and are difficult to keep clean enoughto place above or around a body.
8/10/2019 Making Horse Drawn Coaches 1800 Bw
http://slidepdf.com/reader/full/making-horse-drawn-coaches-1800-bw 320/455
264 COACH-MAKERS' ILLUSTRATED HAND-BOOK.
To these objections we reply, that it is not necessary to inclose a body by placingthe screens close up to the sides. They may be placed twelve inches or more distant,
which will give a free circulation around the body,and
at thesame prevent flies from
alighting on the panels —for it seems to be the nature of these little tormentors to dis-
like a dark, confined place. In a poorly arranged carriage shop, where the varnishroom partakes of the general poverty in conveniences, screens are an absolute neces-
sity if passable work is demanded of the painter, for he must battle with dust fromwithin, and dust from without. In a shop of this kind there should be provided sin-
gle screens, large and small, and others having wings, capable of being folded up andlet down, when required. Different styles of bodies require different kinds of screens.
Standing-top work, such as Jenny Linds, which have a deck panel exposed, require
the screen frame to be made to fit in between the back part of seat and the hind pil-
lars, and when covered should be supplied with end wings. Buggy bodies, with deckpanels, may be turned upside down, and varnished in that position, and to protect
the rest of the body and the seat, a screen with four wings should he placed on the
bottom of the body, and when a side is varnished, let down the wing on that side,
continuing around the body until it is finished. Rockaways can be protected by hav-
ing a screen made of a height sufficient to cover the back panel, and with wings long
enough to reach forward and cover the doors, to be there fastened by tacking them to
wooden pins, previously inserted in the door-handle holes (provided the doors are
not detached). Deck panels, on heavy work, may be protected by large screens hav-
ing two side wings. In using the screen for deck panels, the better plan is to place it
over the panel to be varnished, and raise it sufficiently to give room to work beneath
it ; varnish the panel, and then let the screen carefully down. In making screens use
hard, stiff wood, bracing the large frames diagonally, making them light, yet strong.
Cover with a good quality of heavy brown paper, and along the edges, where the wingsare subject to the wear of raising and lowering, tack a strip of enamel leather, three-
eighths wide. Brown roll paper may be purchased at the paper dealers, of suitable
width and any length desired. We know from actual observation that in many small
shops throughout the country there is trouble with the finishing coats, which the in-
troduction of good screens would speedily dissipate. The vexation, delay and expenseattendant on the limping promenade of one fly across the panel would be greater
than the cost of a full set of screens, therefore every varnish room that is not finished
in the best manner should be supplied with them.
TO PAINT CARMINE.
Carmine being very transparent, it is of the first importance to obtain a solid
groundwork on which to paint it. After the groundwork is secured it will befound somewhat difficult to make the carmine cover well, without showing streaks,
which would look in the sunlight as if it had been grained. When the surface hasbeen gained take dry white lead and Indian red, and mix up a pink or flesh-col-
ored tint. Grind it out very fine, and apply with a .flat camel hair mottler (blender).
Two coats of this will be necessary, except on very small panels. Hair off each coat
to remove any minute particles of grit that may be found on the surface, or, which is
better, take sand-paper, and after having rubbed the sanded faces of the paper
together, use without doubling it, going over the surface lightly. If the color is dry it
will not cut through; this will remove grit which hair could glide over.
Next, give the body a coat of English vermilion, if you desire a brilliant shade of car-
mine, and Indian red, if you wish a more subdued color. Take of the best carmine,No. 40, and mix in oil with sugar of lead for dryer; grind out fine, and add a small
8/10/2019 Making Horse Drawn Coaches 1800 Bw
http://slidepdf.com/reader/full/making-horse-drawn-coaches-1800-bw 321/455
PAINTING DEPARTMENT. 265
quantity of variiis? to prevent the color drying ofl' dead, or mix in varnish ; somepainters prefer the hitter. Apply the carmine with a blender, if you have one of the
best quality ; if not, use a bear-hair or soft bristle brush. The color must work freely
be brushed on rapidly, and tinished while wet.
Patching the carmine on the width of the brush at a tinie is the main cause of .so
much streaked work. Put on the color freely, spread it and linish up and down. If
the panels are too large to linish at once, make as few laps as j^o.ssible.
One coat, and a strong coat of color and varnish should cover solidly. AVhen the
color and varnish coat is dry, take otY the gloss with a sponge and water and tine
pumice, rubbing lightly to avoid disturbing the color.
Put the first coat of rubbing varnish on comparatively thin, rubbing it lightly whendry. The next coat will bear a good rubbing, without fear of disturbing the color, or
showing anyred specks.
Carmine may be painted on dark browns, or even black, but the richness it
possesses is shown to best advantage on a groundwork which is light.
QUICK DRYIXG ROUGH STUFF.
Take equal parts of whiting, dry white lead and ocher, mix them up with a gooddrying japan, and run the mass through the mill, using sufficient turpentine to
facilitate the grinding. AVhen ground out, add rubbing varnish and dry groundpumice stone in the proportion of about a teacupful of each to a half gallon of
rough stufi , and thin down with turpentine. When ready to apply to a body, it
must be brushed on quickly, with a short, stiff brush. If you desire it, three coats aday may be put on, and the body be rubbed the second day after; or, put on one coat
a day, and rub the body the day following the application of the last coat. Wheretwo or three coats are put on the same day, brush the first co.tt on thin, the secondheavier, and so on. Keep the rough stufi covered with water when not in use.
PERMANENT WOOD FILLING.Directions for its Use —Bodies of carriages dispensing with lead, but using rough
stuff: When the body is received from the v»'oodshop, rub with lump pumice(should the panels not be smooth), dust off, and apply a'ery thin and even coat
of permanent woodfilling, dark or light shade, according to
the work. Allowthis to dry two or three days, then apply a coat of rough stuff, made elastic with
oil, varnisli and japan gold size used in equal parts. When dry, putty up where needed,
and when the putty dries add one or two coats of ordinary hard rough stuff, and rub
down, when dry, in the usual way ; over this color and varnish, as in the old methodof lead painting.
Another is to dispense with the use of both lead and rough stuff, by putting on twocoats of the permanent wood filling, then a coat of elastin color; putty on this, andwhen dry finish as under the old method.
GEARINGS.
Sand-paper smooth, dust off, and apply a very thin and even coat of the fill-
ing to the wood parts; when dry, sand-paper smooth, dust off, and apply a very
thin coat of filling over all, wood-work and iron ; w^hen dry, putty up, and whenputty dries sand-paper lightly, to remove dust and runs ; then dust off, apply an elastic
coat of color, ground in oil and varnish (no dead colors should be used on gears), andfinish in the usual way. One coat of the filling on the springs and iron work is
sufficient, and it should be as thin as possible.
For repair work, the parts renewed may be finished as quickly as by the lead
method.
8/10/2019 Making Horse Drawn Coaches 1800 Bw
http://slidepdf.com/reader/full/making-horse-drawn-coaches-1800-bw 322/455
266 COACH-MAKERS' ILLUSTRATED HAND-BOOK.
PAINTING IRONS.If there is any part of a carriage which the painter should pride himself on,
it is that the ironsshow a
finish equal to theother parts. In our largest andbest managed shops men are employed who pay special attention to the irons, and
'when a body is hung oflf, and the irons all screwed up to their places, the finisher
cleans every nut that requires it, leads, blacks, and color and varnishes, and finally
coats them with wearing body or gear varnish. Those parts of the body loops, or
other irons which require handling, should hot be finished until they have beensecurely fastened in their respective places.
Irons on a body should be primed, leaded, puttied, and have one coat of filling orrough stuff; then sand-papered, colored and varnished the same as the body. If it is
the custom to remove the body loops when the job comes from the smith shop, finish
them except the last coat of varnish ; rub them down and put them on the body be-fore it is ready for the finishing coat ; touch up the nuts and bare places, and finish
when you do the body. English or American black japan may be used instead ofcolor and varnish, as they produce a more intense black, but they will not answerfor finishing on good work —black japan possessing poor wearing qualities when notprotected by wearing varnish.
On cheap work the irons may be speedily finished, by giving them a coat of lamp-black color and varnish as soon as they come from the smith shop, and finish with aheavy coat of., old drop black, color and varnish.
COAGULATION OF MIXED PAINTS.A pigment unmixed cannot thicken up. That point gained, we must look in
another direction for the cause. A pigment mixed in water will not become fat,
for the simple reason that water possesses nothing of a fatty nature, and the action
of the atmosphere has no further effect than to draw ofi the water in the form of
vapor, leaving the paint a dry, cracked mass. A pigment mixed in turpentine alonewould possess but slight adhesiveness, on account of the volatility of the turpentine,
and if the pigment so mixed be allowed to remain exposed to a heated atmosphere, theturpentine would soon evaporate, leaving the paint destitute of moisture, dry and flaky.
A pigment mixed in oil alone, and allowed to remain exposed to the air undergoeschanges quite difierent from that mentioned in the preceding examples. The oil, byabsorption of oxygen from the atmosphere, undergoes chemical changes, which tendto alter it from a liquid to a solid. In shop parlance, it grows fat, and should youlet it remain without the addition of anything, it would in time become a resinous
mass.
The Remedy. —Avoid grinding colors in oil during the heated term, using only the
dryer and the least possible quantity of turpentine to aid the passage of the color fromthe mill. When ground out cover the color with water to render it air-tight ; andcups containing lake or carmine add a cover of enameled cloth, tied tightly around
the rim of the cup. The color thus protected is put in a cool place. When a coat is
to be applied requiring the addition of oil, remove sufficient color for the work in
hand, and place the remainder under its former protection from the air. The paint-
mill generates considerable heat while in motion, and often ruins paint containing oil,
before it has all passed through.Paint-mills, actuated by steam-power, run so steadily that after a few revolutions
the paint will exude smoking hot, causing drop black and other paints of a fatty
nature to become livered and worthless, and, in fact, workingunfavorably on every
other kind of mixture. Paint-mills run by steam-power should be inclosed in a water
tight case, and, besides, be timed down to a slow, regular motion. By this means the
heat generated would be kept in subjection, and good results follow.
8/10/2019 Making Horse Drawn Coaches 1800 Bw
http://slidepdf.com/reader/full/making-horse-drawn-coaches-1800-bw 323/455
PAINTING DEPARTxMENT. 267
TO FASTEN THE HAIR IN STRIPING PENCILS.Pencils, by constant use, are like everythin«; else, liable to wt'ar out and become
worthless. A well-made pencil, however, should not pive off the hairs after having
been used but two or three times. At first there will be a few loose hairs, wliich is
nothing unusual. Pencils are often spoiled in greasinp them, preparatory to laying
them away, by using hard grease, which must be j)ulled on the ])encil between the
thumb and finger. This stretches the hairs, also loosens them, and when put into
service they pull out. A drop or two of glue, or shellac varnish, put into the quill,
will cement the hairs together, and prevent them from drawing out.
When a pencil curls, draw it gently over a piece of warm iron, whi(;h has
been greased.
RED LEAD AND UMBER VS. LAMP-BLACK FOR THE LEAD COATS.
Red lead and umber are excellent driers, and answer a very good purpose whenmixed with white lead, but are inferior to lamp-black, because they add nothing to
the tenacity of the lead coatings. I^amp-black is of a greasy nature, and when pure
almost indestructible. It also has the property of smoothness in the working of
white lead, which is not true of red lead and umber, when substituted for it and em-ployed as the carriage painter is required to do.
The coats of lead on a body or gearing need not be made lead color, as some are in
the habit of doing, but by merely changing the lead to a pearl or silver-gray, it will
dry firmly and wear equal to work filled with any other mixture. In using read lead
or umber, use less japan and more oil
—one-fourth japan and three-fourths oil and
one part each of red lead and umber to three parts of lead, thinning down with tur-
pentine to suit the work you may be doing.
FACING A BODY.To face a body use lump pumice stone and water, going over the surface lightly, so
as to level down the putty and lead, and also to force the lead into the pores of the
filling. The facing is done after you ftave put on a coat of lead, and puttied up any dents,
bruises or other defects noticed on the surface after the filling has been rubbed. Thefacing is only done to prepare the body for a more perfect surface, and while it is un-
doubtedly the best way to fill up the pores of the rough stuff, many shops do not
practice it ; some because it takes a little more time, and others because they havenever seen a body so prepared. We would advise the use of English rubbing stone
instead of a file, to keep the pumice stone sharp and free of lead; by rubbing the
pumice stone on a level piece of English stone the pumice will take up some of the
grit, and work more pleasantly. In speaking of a bod}' in filling or rough stuff,
we say rub out, rub doum, or cut down the body ; after the filling or rough stuff is cut
down, sand-papered, leaded, and puttied where needed, we use the word face, because
the rubbing is only done on the face of the surface gained by the former rubbing of
the body.
PAINT CRACKS.Paint may crack because too much oil was used ; and again may crack on account
of the oily principle being dried out.
The cracking in the first instance mentioned would result from the under coatings
not being thoroughly dry when the carriage was completed. Afterward, as the drying
proceeded, space was required for the evaporation going on, which manifested itself
on the outer surface.
When paint or varnish has been long exposed to the action of the weather, the oily
principle becomes dried out, the resinous parts only remaining, which contract, pro-
ducing cracks.
8/10/2019 Making Horse Drawn Coaches 1800 Bw
http://slidepdf.com/reader/full/making-horse-drawn-coaches-1800-bw 324/455
268 COACH-MAKERS' ILLUSTRATED HAND-BOOK.
Japan, in which gum shellac forms a part, is very liable to crack, because the gumswells in dissolving, and contracts a great deal in drying. This is true, to a certain
extent, with other gums.Paint cracks are similar to the mud in a creek bottom. The summer freshet rises
up over the soil, saturating it ; the water falls, leaving the pasty mass exposed to thesun's rays, which draw off the water by evaporation. The surface would at first becrusted over, and as the heat continued, the under-wetted mass, by evaporation, wouldbreak through the surface crust, and find vent in ever)'^ direction, generally breakingthrough in straight lines, which incline toward the circular form.
On patent leather the circular form of cracks is very perfect.
STRIPING PENCILS.
The red and black sable are preferred by the majority of painters, especially for
fine line pencils. The sable hair being more springy, it bears the pencil up better
toward the point.
For broad lines, on carriage parts, a good quality of camel-hair pencils will workvery pleasantly, and is preferred by some good stripers.
PUTTY.
For new work, take keg lead and work it into as much dry white lead as will formit into a stiff dough, adding a small quantity of good brown japan as a dryer. The dry
white lead should be well pulverized and pounded into or with the wet lead until it
clings together, forming a tough mass. This putty should be allowed from two to four
days to dry.
Quick-dry hig putty, for general purposes, is mixed with japan and dry white lead.
For bruised places on panels, after the surftice has been obtained, mix the putty of
dry white lead and varnish, and a small proportion of japan. It will dry in twenty-
four hours hard enough to bear leveling down with lamp pumice stone. Deep bruises
should be puttied two or three times, allowing a day for each to dry.
For smooth putty, which does not require to be sand-papered, take one-third whiting
or dry white lead, and two-thirds lamp-black, mixed in oil. This to be used to correctthe defects in the iron work not fitting closely, as, for instance, under the arch, or cut-
under, or any other curved surface. It clings more tenaciously than putty mixed in
the usual manner ; and while it would be far better to have no putty in such places,
the painter must nevertheless putty up to keep the pumice stone and water out, if for
no other purpose.
Bedding putty for quarter lights or glass frames. Take whiting or dry white lead,
pulverize them finely, so that there shall be no grit remaining. Have the stone clean.
Mix up half whiting, or dry white lead, and lamp-black in japan, forming a pasty
mass. There is no putty used which should be so free from grit, as it often happens
that a costly glass is broken by the presence of a grain of flint.
Black putty is the ordinary putty used for nail holes, etc., to which is added lamp-
black (dry) sufficient to darken it. It assists the painter in completing hurried and
old work, as it is more easily covered by the color coats. It is very convenient to use
about new work where moldings and irons have to be put on, as it may be touched
over with quick black, and the moldings and irons colored and varnished, making a
passable finish.
Quick putty. —To fill small bruised places which may have been made on the surface
while preparing to finish a piece of work, burnt umber and whiting mixed in japan.
Whiting will not stain or wash up as readily as dry white lead.
8/10/2019 Making Horse Drawn Coaches 1800 Bw
http://slidepdf.com/reader/full/making-horse-drawn-coaches-1800-bw 325/455
PAINTING DEPARTMENT. 2r.9
QUICK-DRYING PUTTY.Dry white lead, mixed in rubbing varniah, dries flrinly over night, so that it may
be leveled down with lump puinioe stone. It innst be kept under water; an<l iak»';i
out in small quantities to prevent wastage ; or use dry white lead, red lead and whiting
mixed with japan. For puttying l)ruised places on a body which is about eonjplete<i,
whiting and lamp-black, mixed in japan, will dry (juickly, and not be so apt to stain
when touching up on it.
In puttying as well as painting, where a job is in a great hurry, recourse must be
had to hard, tirm-drying putty ; but in using it, it will be found the better plan to
putty the holes twice ; for in.stance, if the job is in a hurry, and only two coats of lead
are to be applied, putty the holes half full on the priming coat, and finish puttying
them on the next coat of lead. By this means the putty dries through, and will notbe so Uable to shrink.
SPONTANEOUS COMBUSTION.Any substance that will take fire and burn is a combustible, and combustion is a
burning or the act of burning. Flame must be applied to produce ordinary combus-
tion, while spontaneous combustion is produced without the application of flame, the
word spontaneous signifying voluntary —acting by its own impulse. Damp goods lying
piled up will sometimes catch fire, caused by fermentiition from heat and dam}). Car-
bonic acid gas is formed, which is attended with combustion. Greasy rags, especially
those containing oil and lamp-black very readily ferment and throw off inflammable
gases. Lamp-black mixed with linseed oil is also very liable to spontaneous combus-tion.
The palette or putty knife when oily should not be thru.st into dry lamp-black, as
the oil may cause spontaneous combustion. The carriage painter will see from the
foregoing that no small amount of responsibility rests upon him if he be acquainted
with the above facts, and still allows greasy rags to accumulate in the paint room, andlie for any length of time stowed away in a corner.
PAINTING BUGGIES. One who can paint a Buggry well, should be able to get up a good Job on heavy worlc.
In the above quotation it is implied that he who can bring up light work to a high
degree of finish has the necessary qualifications to immediately change his hand,
without having had any previous experience, and produce a good finish on a coach.
Our experience in the shop proves the contrary to be true. It may appear unrea.son-
able to those unacquainted with the facts that such should be the case, but neverthe-
less that does not alter the matter in the least. The process of filling and carrying
forward a buggy or light rockaway is the same as that on a coach, in so far as the
nature of the coatings is concerned, and their application with paint and varnishbrushes, but the great difference between the two classes of work is in the greater size
of the coach panels, as well as the various positions they present. In order to becomeskillful as a heavy-body painter, the mind must be continuously occupied with heavywork until a certain degree of skill and patience are acquired. Those w^ho have spent
years working on light work, find that when a heavy job is taken in hand they dread
not only the size and shape of the panels, but they feel this lack of patience. On light
work one may have in hand several bodies at a time. To clean off a body after it has
been rubbed out, does not consume a great deal of time, and thus the painter becomes
habituated to short tasks. A few hours on one body, then a few hours on another, bythis means he acquires a habit which has the appearance of moving things along rap-
8/10/2019 Making Horse Drawn Coaches 1800 Bw
http://slidepdf.com/reader/full/making-horse-drawn-coaches-1800-bw 326/455
270 COACH-MAKERS' ILLUSTRATED HAND-BOOK.
idly. Now admitting that the workman is quite skillful, suppose we hand into hischarge a coach. There it stands. Its dimensions are such as to require space sufficient
for three or four light bodies, and there are frames and extra pieces wholly dissimilarto anything on light work; and then it is a ponderous affair. To handle it at all
requires an entirely different kind of trestle, and there are no conveniences for hand-ling doors and windows.
Having made the necessary arrangements for moving the body into any desired
position, the light-body painter will shrink from the task of cleaning the body ready for
the first coat of color. The color coats may not be a source of much anxiety, but whenthe varnish coats are to be applied, a feeling of distrust in one's ability to lay them onproperly will so operate on the nerves as to make the hands tremble violently. We
have heardfirst-class painters on light work assert that they
detested the sight of acoach in the shop, and the feeling was but natural, for they felt certain that they hadneither the skill nor patience to complete the body in the manner it should be done.A most signal failure in painting a coach body came under our notice a few years ago,
wherein a light workman with no experience on heavy work had taken up the idea
that he could dash off a coach body with as much certainty in result as he could that
of light work. A coach body was given in his charge, and he went at it with a will,
but from the laying on the color until the third coat of rubbing varnish each step ren-
dered the body in a worse condition. The body was at last placed in other hands, andafter a large amount of extra time and trouble had been expended, the finish wasrendered passable. The fault did not lie in a lack of intelligence and ability as apainter on the lighter class of work, but having had no actual experience in painting
heavy work, he had not mastered the secrets connected with it, which secrets are
acquired by practice, and cannot be communicated by language to the hand of the
novice.
Light and heavy work, then, it will be seen, are not to be classed as one and the
same kind, which could be further proven if necessary, by bringing forward the woodworker, smith and trimmer, each one of whom would testify that large experience is
required in order to fully cope with the difficulties presented in the construction andfinish of heavy work.
STRIPING PENS.
This instrument is capable of producing lines of extreme fineness and perfection. It
should be of the best quality. The large size German silver lining pen is the proper
kind to purchase. The points of the new pen will probably be too sharp, as it is madeto be used on paper, and not on a varnished surface. To put it in good working con-
dition when the points are as stated, it is necessary to round them off by rubbing
them on an oil stone. This operation requires the greatest care. In order to get the
points perfectly true a magnifying glass (every painter should own one) will be foundof service in detecting the slightest variation. A straight-edge is required to guide the
pen when straight lines are needed, and curved patterns for sweep lines. Either oil
or distemper colors can be employed, oil colors, however, being the only kind which
the carriage painter should use.
The compasses pen should be used for panels bounded by curved lines. Considerable
practice and patience are necessary to put the operator on good terms with these sen-
sitive but valuable instruments. But having obtained the mastery, the advantages
gained over the hair pencil will be at once apparent in such work as the imitation of
finely woven cane, plaid work, and any otherstyle requiring the repetition of lines
which should be of the same width.
8/10/2019 Making Horse Drawn Coaches 1800 Bw
http://slidepdf.com/reader/full/making-horse-drawn-coaches-1800-bw 327/455
PAINTING DEPARTMENT.
The striping pen cannot wholly replace striping pencils made of hair, but whenskillfully handled, on certain kinds of work, the hair pencil can never approach it in
perfection of lines and the rapidity with which they may be produced.
PRACTICE WITH THE PEN.
The striping color should be ground out in a small vessel, as it will have to be used
somewhat thinner than for ordinary Btrij)ing. The color may be mixed with or with-
out oil, but it works more pleasantly with a small quantity in it.
Fill the pen with a camel-hair pencil, wiping otf any color that may flow outside
with a piece of cloth, which will not give olf lint or furz.
When the pen has been set, and the striping color reduced to the j)roper consistency,
so that it runs freely, making the sized stripe desired, do not alter the set screw. If
the pen refuses to allow the color to flow out, pass a slip of writing paper, from theinside, through the point of the jaws, which will remove any minute particles of var-
nish which may have been taken up in its track across the surface. Wipe the point
on a piece of silk, soft old chamois or the hand, to avoid furz or lint.
The pen should be thoroughly cleansed when the job of striping is completed, andlaid away in a secure place, where there will be no possibility of anything striking the
points. After a few weeks' practice in lining, fine scrool work may be attempted, such
as is used in some sections of the country in corners of panels, or on the spring bar
and axle beds of gearing, to connect with fine stripes.
Larger scrolls can be formed by outlining with the pen, and filling in the body of
the leafing with curved lines of the shape each leaf may require, forming the shades
by leaving the ground color clear. With the color properly mixed, and the pen in
good order, a hair line may be run on a panel from three to four feet in length before
lifting the pen.
GOLD LEAF.
The metal gold has been known from the remotest times.
It is the sol or sun of the alchemists, who represented it by the circle, the emblemof perfection. When pure it is nearly as soft as lead, and is the most malleable and
ductile of all the metals, but inferior to many in its tenacity. It is not afi ected by airor water at any temperature. Perfectly pure gold is denominated gold of 24 karats (a
karat is a weight of four grains), or fine gold. Gold containing two parts of alloy in
twenty-four, is said to be 22 karats fine. Perfectly pure gold is too soft for use as coins,
vessels, ornaments, etc., and is therefore alloyed with copper and silver.
As to the origin of the idea of foliating or beating gold, we have been unable to
search it out. As the metal has been known from the remotest times, doubtless its
malleability was early discovered ; this would lead naturally to folliating or beating
the ingot, it being a more economical method of using the precious metal, and lessen-
ing the cost when employed for ornamental purposes. The Bible mentions beaten
gold as early as 1491 B. C. The Lord directed Moses concerning an offering from the
people, in order to erect a tabernacle. The offering he was to take was gold, silver,
brass, fine linen, dyed goat skins, etc. Among the directions to Moses as to the ma-terials to be used, and the form of the sacred furniture for the tabernacle, we find the
following: And thou shalt make two cherubims of gold : of beaten w^ork shalt thou
make them, in the two ends of the mercy-seat. The golden candlestick also, with
his shaft and his branches, his bowls, his knops and his flowers, were to be one
beaten work of gold. (Ex. xxv. 18, 31, 36.)
It is not clear what was meant by beaten work, for other portions of the sacred fur-
niture were covered with plates of gold, which must have been drawn out under the
8/10/2019 Making Horse Drawn Coaches 1800 Bw
http://slidepdf.com/reader/full/making-horse-drawn-coaches-1800-bw 328/455
272 COACH-MAKERS' ILLUSTRATED HAND-BOOK.
hammer, or rolled by some form of pressure applied. Of one fact we may rest assured,
that at that early day the malleability and ductility of metals was well known. The
people had intheir possession silver chargers,
golden bowls, andspoons,
which wereprobably of Egyptian manufacture, and their offerings were taken from among these,
cast into ingots, and then beaten or rolled, according as the command directed.
The Egyptians were experts in foliating gold, they being able, it is said, to surpass
us at this day in reducing the leaf to an extreme degree. Mummies have been ex-
humed that had been buried three thousand years, the finger nails of which werecoated with gold leaf of a very fine quality and exceeding thinness, the gold leaf being
a mark, probably, of the wealth of its possessor in his life-time.
GOLD BEATING
is the process by which gold is extended to thin leaves used for gilding. Attemptshave been made to apply machinery to gold beating, but though very ingenious, their
application is very limited. Most of the gold leaf is still beaten by hand, as follows :
The gold is first cast into oblong ingots about three-fourths of an inch wide, and weigh-ing two ounces. The ingot is flattened out into a ribbon of about l-800ths of an inchin thickness, by passing it between polished steel rollers. This is annealed or soft-
ened by heat, and then cut into pieces of oiie inch square ; 150 of these are placed
between leaves of vellum —each piece of gold in the center of a square vellum leaf,
another placed above, and so on, till the pile 6f 150 is formed. This pile is inclosed
in a double parchment case, and beaten with a 16-pound hammer. The elasticity of
the packet considerably lightens the labor of beating, by causing the hammer to re-
bound with each blow. The beating is continued until the inch pieces are spread out
to four-inch squares ; they are then taken out and cut into four pieces, and squaresthus produced are placed between gold heaters' skin instead of vellum, made into piles
and inclosed in a parchment case, and beaten as before, but with a lighter hammer.Another quartering and beating produces 2,400 leaves, having an area of about 190
times that of the ribbon, or a thickness of about l-200,000ths of an inch. An ounce of
gold is thus extended to a surface of about one hundred square feet. A still greater
degree of thinness may be attained, but not profitably. After the last beating, the
leaves are taken up with wood pinchers, placed on a cushion, blown out flat and their
ragged edges cut away, by which they are reduced to squares of 3^ inches ; 25 of these
are placed between the leaves of a paper book, previously rubbed with red chalk to
prevent adhesion of the gold, and are sold in this form.
LAYING GOLD LEAF.
In handling gold leaf, much depends on the kind of work in hand. Scroll work,and all large patterns and plain surfaces require only that the book be opened and a
whole leaf put on at once ; this is repeated, allowing each leaf to overlap the other
about an eighth of an inch, and whensufficient
has been applied to cover the work,rub it down with raw cotton or rabbit's paw, being careful not to get any size on them.Small gold ornaments, less than the size of a leaf of gold, we gild direct from the book,
any pieces of gold worth saving is allowed to drop back into the book when we re-
move the loose gold. To do this, without wrinkling or crushing the remnants, the
leaf must be handled gently, and be broken away from the size around the edges,
placing the book directly under the ornaments and catch it as it falls. For striping
and lettering, the leaf should be cut a trifle wider than the sizing, and applied with a
tip or from the leaves of the book, cut of a proper width. To handle gold leaf, it
is well to provide a gold cushion, gold knife and a tip. The cushion is designed to
hold the leaf while being cut, and during the operation of applying the leaf with the
8/10/2019 Making Horse Drawn Coaches 1800 Bw
http://slidepdf.com/reader/full/making-horse-drawn-coaches-1800-bw 329/455
PAINTING DEPARTMENT. 273
tip. The knife is a thin V)hi(le of steel, set in ;i h;indK', :intl in;i<h' f«»r the purpose andfor no other. The tip is nuule by inserting tamel's hair between two pieces of paste-
board, and should be two and a half or three inches wide. The gold is removed from
the book to the cushion by turning back a leaf and cxpi^sing the g<dd, then invert the
book and press the gold on the cushion. If it should wrinkle, a pull' of the breath directly
over it will straighten it. The knife should be made to do its work by one cut. Thetip may be drawn across the hair or beard, and excited by friction, or be slightly
greased.
In using the tip, take up as much gold as it will carry, lirst i)lacing on the size the
piece at the outer end of the tip, and following down toward the heel. By practice,
leaf may be laid on very rapidly with the tip, especially on tine lining, but there are
other methods employed which work fully as well if not better. The most approved
of these is to take an empty gold book, and draw a leaf of it across the hair or beard,(or apply a minute portion of viscid matter in any other form) and press this greased
leaf upon the gold. It will adhere throughout its surface and may be cut to any size
required, and applied more rapidly than by using the tip. Every leaf of gold requires
to be thus treated, when they may be laid together and several cut at once.
Striping and ornamenting in gold requires practice in the mixture and use of sizing, as
the gold leaf is rendered brilliant, or dull and lifeless, according as the sizing is clean,
thin and evenly laid, or gritty, thick and laid on with overlapping edges. Size madeof either varnish, or ftit oil, should be run on very thin, and the leaf be laid when the
size retains but a slight tack. Varnish size must be gilded w^hile the tackiness is moredecided than that of fat oil, for varnish, after it begins to set, soon forms an outer pel-
licle, or thin skin, which incloses the under body of the varnish, and prevents the
proper adhesion of any kind of leaf, or even bronze. Fat oil dries slowly, and retains
a tackiness sufficient to take leaf, even when it requires pressure to cause the leaf to
adhere. When the gold has been laid, it may be rubbed down with clean raw cotton,
until it shows a bright, even surface.
Gold powder or bronze may be laid on with a camel-hair pencil, and to do it onlyrequires that the bronze be mixed in a vessel containing as little acid as possible.
In the every-day routine of the shop we use raw oil and japan, japan gold size,
boiled oil and varnish, either of which will answer the purpose. We prefer, however,raw oil and a small portion of japan, in which we rub up a little orange chrome andadd the bronze in the proportion of two-thirds bronze to one-third color, or use thebronze clear, mixed in an oil drier or varnish. The Bessemer gold paint is now verypopular, and comes prepared for immediate use.
Bronze is notsuitable for ornamenting, but striping and fine scrolls will admit of itsuse.
Having prepared your work for striping, obtain a small stoneware or porcelain ves-
sel, mix the bronze as directed, and when using the striping fluid stir it occasionally
in order to keep th-e particles of bronze afloat, for the pencil must take a like quantity
of the mixture charged with the same amount of bronze (as nearly as possible) at everydipping, to produce stripes of equal brilliancy. Do not be disappointed if, when thework is finished, you find it inferior to gold leaf. Bronze used in this way answers avery good purpose, saving the time and trouble of sizing in ; but to assert that it pro-
duces as good work as gold leaf would be to mislead those who have not seen it. Bes-semer's gold paint is put up in packages, containing two ounce bottles ; one containingfine gold bronze, the other a liquid in which to mix it. Price, $1.25. Fine gold bronzeis worth $1 an ounce.
SIZING FOR GOLD LEAF.
Use fat oil, with sugar of lead for a dryer, if you desire a good wearing job. You
may add a small quantity of chrome yellow to thefiit
oil to assist in tracing the Unes,or the oil may be used clear, which, we think, is the better plan.
18
8/10/2019 Making Horse Drawn Coaches 1800 Bw
http://slidepdf.com/reader/full/making-horse-drawn-coaches-1800-bw 330/455
274 COACH-MAKERS' ILLUSTRATED HAND-BOOK.
For all ordinary purposes on> carriage work a size mixed of varnish, to which a fewdrops of fat oil is to be added, will be found good enough. Fat oil prevents the var-nish
from drying out on the edges and other parts, and will save the painter a greatdeal of trouble.
Sizing should always be put on as thin as possible to prevent the gold from being drowned, that is, sinking into the size. The size should have tack sufficient only to
to take the gold.
The leaf may be laid with a tip, by cutting the books to the sizes required, or byturning down the leaf of the gold book to the size you wish ; then pass the finger nail
across the gold leaf and apply it to the sizing ; rub down the leaf with cotton, or rab-bit's paw.
There is no economy in attempting to cut the leaf to the exact size of stripes or
other work ; let it be a little full, and you will obtain clean edges and a perfect pieceof work.
TO PREVENT LEAP PROM ADHERING.
The white of eggs will effectually prevent gold leaf from adhering to the surface sur-
rounding sizing, if laid on heavy enough to form an even thin film. If it is a var-
nished surface, we rub the varnish down as level as it will bear, and having ejected
the white of an egg into a clean cup, add a small quantity of water to it, sufficient onlyto cut the albumen, without destroying its body. Then with a clean piece of spongemix them, by dipping in the sponge, filling and squeezing it out, until the albumen is
thinned out to a ropy consistence ; this, when applied, leaves a thin film on the sur-
face after the water has evaporated.
When an excess of water is used, the adhesive part of the egg is destroyed. In hotweather, when varnished surfaces sweat out soon after being leveled down, the egg
size should be used somewhat heavier than under more favorable circumstances.
Egg size should be laid on some distance outside of the scroll pattern, letters or
ornaments, so as to avoid the possibility of the leaf adhering should it be necessary to
let it overlap the pattern.
ANOTHER METHOD.
Take ball liquorice and dissolve it in water, and with a flat camel-hair brush size over
the portion you would gild. Make the solution weak. The fluid may be prepared
and kept in a bottle ready for use. Made thick will preserve ornaments or work to
be repainted.
Whiting and water, mixed and applied with a sponge, and when dry brushed over
with a duster, to remove the superfluous particles, may be made use of to prevent gold
from adhering, but we would not recommend its use, because it is apt to cloud the
work, by fastening itself to the varnish ; and further, it requires a great care in re-
moving it, especially on a carriage part.
TO PAINT LIGHT BUGGIES.PROM PRIMING TO THE PINISH.
The Body— Thia may be primed with either oil lead or permanent wood filling. Thelatter requires no mixing, and when properly applied furnishes a very elastic anddurable priming coat.
When lead is used mix it in oil, and a small quantity of japan, adding only sufficient
turpentine to cut the oil slightly. Coat the body inside as well as outside, for there
should be no portion of the body exposed to the action of the water used when rub-
bing down the rough stuff*.
The priming coat should be allowed from three to six days to dry.
8/10/2019 Making Horse Drawn Coaches 1800 Bw
http://slidepdf.com/reader/full/making-horse-drawn-coaches-1800-bw 331/455
PAINTING DEPARTMENT. 276
When thoroughly hardened, sand-paper the surfaces Hghtly, and lay on the secondcoat of lead, which should contain less oil than the priming coat, and be spread on
somewhat stiffer. Set the body aside for three days, after which give it the third coatof lead, mixed to dry firmly.
PUTTYING.
The third coat of lead having been allowed two or three days to harden, the putty-
ing should follow. Mix the putty of keg lead and dry lead, adding red lead and japanas dryers, or japan alone. Having placed a certain quantity of wet lead on the putty
stone, incorporate the dry lead by use of the palette knife and putty hammer, addingdry lead gradually and pounding the mass until it is rendered tough enough not to
adhere to the hands. Putty for nail holes should be worked up very firmly by the
process just named, and should not contain an excess of dryer, as this would cause it
to shrink. Deep holes, if puttied twice, will insure a thorough and equal drying of
the putty. But this is not necessary when the lead coats have been given their full
value in assisting in the work of filling the holes.
The open-grained ash portions of the surface should be plastered or knifed in
with soft putty, allowing no putty to remain on the surface. The putty should beallowed from two to three days in which to harden, after which the body should becarefully examined, making use of old sand-paper and the putty knife in removingany putty remaining on the surface.
ROUGH STUFF.
Coralline, Tully's Filler, Reno's French Umber, English Filling and yel-
low ochre mixed with white lead, are employed to fill the grain and give a smoothand level surface. The first two named require no preparation except thinning with
turpentine to the proper working consistency. Reno's French Umber is furnished
in a dry pulverized state, and requires the addition of no other pigment in order to
fit it for the work of filling. English Filling, and the ordinary mixing of yellow
ochre and white lead are so well known as to require no special mention.
NUMBER OF COATS.
Give the body at least three coats ; four is the usual number for first-class work.
The fourth coat, however, need not be carried over any surface but the main outside
panels. A guide coat is generally put on after the body is filled up, its ofiice being
that of furnishing a guide to the rubber —as it plainly indicates by its color anylow places which the pumice stone has not yet reached. On a dark colored roughstuff yellow ochre may be employed for the guide coat, while on a rough stuff of alight shade Indian red or brown may be used.
The guide coat requires to be nothing more than a stain, therefore is to be mixed
withvarnish and turpentine, or japan and turpentine, and brushed on quite thin.
The body should now be allowed to stand at least a week, when the rubbing may be
attempted.
Pumice Stone and English Rubbing Stone should be used. The English stone cuts
faster than pumice, and is not so liable to become clogged up. It is used principally
for the first rubbing, the pumice stone following after, which gives a more perfect
surface. Select pumice stone that is light and porous ; it will cut better, and not
leave scratches. Keep it clean by rubbing it on a flat file, or a piece of English rub-
bing stone.
Commence on the moldings, rubbing the panels afterward. Where the panels are
rubbed out first, the process of rubbing the moldings is apt to cut a groove or channel
along the panel, which will show when the body is varnished, if not before.
8/10/2019 Making Horse Drawn Coaches 1800 Bw
http://slidepdf.com/reader/full/making-horse-drawn-coaches-1800-bw 332/455
276 COACH-MAKERS' ILLUSTRATED HAND-BOOK.
Do not allow the water to stand inside for any length of time. Sponge it up repeat-
edly, which will save the joints and corners from injury. When the rubbing is com-pleted, sponge the body off clean, wipe it dry, and let it stand until the following day,
when it will be ready for fine sand-papering and a coat of dark lead. When the lead
is dry, hair or sand-paper it lightly, which will show any defects in the surface, the
dents, or hojes appearing darker than the surface disturbed by sand-papering. Nowputty up, mixing the putty of dry white lead and varnish, keeping it in water to pre-
vent drying out. When the putty is dry, face the body down with pumice stone,
which will force the lead into the pores of the filling and level down the putty, giving
a perfect surface.
Next, go over the surface with No. 1 sand-paper ; clean out the corners with a dull
pocket knife, and proceed to coloring. Mix all colors, except the lakes, with one-
third oil and two-thirds japan (the lakes may be ground in varnish or boiled in oil),
thinning down with turpentine. Put on one coat a day ; hair off each coat to removegrit, etc.
Three coats of clear color, or tv/o coats and color and varnish, will color if properly
applied. Three coats of rubbing varnish, and one of finishing, should make a first-
class job.
Let each coat of rubbing varnish stand from three to five days before rubbing the
body. A good wearing varnish will not bear rubbing any sooner. To level down thesurface, we use a piece of cork, or pumice stone, beveled on the edges to admit of its
being brought up close under the moldings, and to prevent rubbing them. Place over thistwo thicknesses of cloth, and with fine, even-ground pumice and water, cut down thevarnish until dirt and brush marks are removed. Rub the first coat of varnish verylightly; the second and third will bear a great deal more if the varnish has beenproperly laid on. Keep turpentine out of the rubbing varnish, unless it is very heavyand hard to work.
Finish with English Varnish. Harland & Sons give the best satisfaction, and is nowpreferred to Noble & Hoare's, because it is not so liable to curdle or draw up. Wecannot advise as to the best make of rubbing. There is such a diversity of opin-
ion among painters about varnish that one would have to pronounce them all bestfor they all have their favorites.
Brushes. —For laying on color, use the fiat camel-hair blender (mottler), sizes ranging
from half-inch up to three inches, and for finishing there is no brush equal to Thum'shalf elastic.
THE GEARING OR CARRIAGE PART.
To Paint a Gearing so that it will not Crack or Peel off in a Reasonable Length of Time.
—1st. See to it that the wheels and other wood work are well seasoned, and .that at the
time you prime there is no water or dampness on the surface, especially of the wheels.
Mix the priming coat of keg lead, thinned down with raw linseed oil, and add a small
quantity of japan sufficient to dry it in about four or five days. Where you haveplenty of time, use no japan. Brush the lead well into the grain of the wood, leaving
only a thin coat on the surface. (Thin painting wears best.) Be very careful to workthe lead well into the wood between the spokes at the hub ; also where each spokejoins the felloe. Carelessness at these two points is the just cause of a great deal of
complaint ; the water having a better chance to lodge and soak in at these places, wegenerally see the peeling commence at the points named.
Mix the second coat of lead with less oil than the priming, but still sufiicient to bindthe paint to the metal parts of the gearing (or carriage) which now receive their first
8/10/2019 Making Horse Drawn Coaches 1800 Bw
http://slidepdf.com/reader/full/making-horse-drawn-coaches-1800-bw 333/455
PAINTING DEPARTMENT.
coating. Don't paint over rust or grease. See that the iron work is free from every-
thing that would hinder the proper drying of the lead. Lay on the second coat of
lead somewhat heavier than the tirst, leaving a good body of it on the wood parts,
driving it rather thinner on the iron work. Let the job stand forty-eight hours. Nowputty up with a firm drying i)utty ; lot this stand for two days. Sand-paper putty downwith No. 2 sand-paper (a coarser sand-paper will tear out the putty), leaving as muchlead on the wood as possible. Dust off, and apply a coat of dead lead, ground out fine.
Lay this coat on smoothly, and of a body sufiicient to cover the wood perfectly ; whendry, sand-paper with No. 1 sand-paper, being careful not to cut through. You may nowapply the color.
For all ordinary colors, mix them with one-third oil and two-thirds japan, thin down
with turpentine as the progress of painting may require, laying on but one coat a day.Two coats of color, and one of color and varnish, with only enough varnish to admitof hairing the gearing ofl', is the best mode, we think. After two days, hair or moss off
th« varnish, and run on (if to be striped) the broad line. Next day lay on a mediumheavy coat of rubbing varnish. The gearing should now stand four or five days ; then
rub down with ground pumice and water, and fine line according to the taste. Thefollowing day lay on a heavy coat of English varnish.
METHOD OF VARNISHING.
In order to be able to do a good job of varnishing, one must have had no small
amount of practice in laying on the rubbing coats, and of rubbing them down and pre-
paring for the last or finishing coat. He must be sensitive to the most minute parti-
cles of pumice stone or dust that may be lodged anywhere on the body. The careful
finisher never allows pumice stone to dry in the corners or along on the bottom edges
at any point, but with the water tool searches it out, knowing that one little crevice
overlooked may ruin the entire coat of finishing varnish.
The room, body, cups and brushes, must be perfectly clean, and used for finhhing
only. Two sets of brushes and not less than three clean cups should be used. Thepanel brushes to be used on the panels and nowhere else. The second set of brushes
are for the rockers, inside of seats, doors, and other places.
In one tin cup draw off varnish for the panels ; in the second, that which you re-
quire for the other surfaces —the third to be used as a wiping cup. Never wipe the
brush you are using on the cup from which you are taking varnish. Provide yourself
with a wire stand to lay the brushes on, and a light stool to hold cups and brushes.
The sponge, shammy and dusters should never be used on any other work. If the var-
nish room is not well arranged and fitted up, have screens made for covering the
work.
See to it that the varnish room is kept quiet and free from the visits of any of the
hands, or even the employer himself. Should any one take offense at the rules youhave laid down, let them see that you are not to be moved from your purpose ; defendthe varnish room from intrusion until the work is safe from harm.
Pour out sufficient varnish or leave the cork out of the can so as to give tne varnish
air at least half hour before using. Begin by going over those surfaces separate frojn
the panels. Lay on the varnish in sufficient quantity to admit of its being spread,
working down and leveled without dragging on the brush.
Having spread the varnish over a surface, allow it to rest a moment or so and evapo-rate, then put the brush through it back and forth and up and down, and let it rest
again ; in the meantime wipe out around the moldings, then brush the panel horizon-
tally from top to bottom with lighter strokes than before, run the tool along under the
moldings, go over this with the large brush, and from the bottom of the panel str) <.^

8/10/2019 Making Horse Drawn Coaches 1800 Bw
http://slidepdf.com/reader/full/making-horse-drawn-coaches-1800-bw 334/455
278 COACH-MAKERS' ILLUSTRATED HAND-BOOK.
it upward, blending the varnish off toward the upper part near the molding or upperedges. Do not brush under the moldings as a finishing stroke.
Finish every coat of varnish up and down, except on very narrow panels or
Leave on a sufficient body of varnish to flow out full, which will drown the fine
specks ; the large grit, if any, must be picked out while working the varnish. Use apointed whalebone, quill, or a small stiff pencil, for picking.
Cleanse the cups with turpentine, then take soap and water, which, with a piece of
hair, scour them perfectly clean, rinse them, dry out with the shammy and hang upin a clean place.
VARNISHING CARRIAGE PART.
The carriage part should be raised upon trestles, made expressly for the purpose, so
that all the wheels clear the floor at least three inches.Wash
off perfectly clean, dust,
and then place your stool, with cups and brushes, near one of the front wheels, andyou ;ire ready to begin the work. Commence on the spokes, laying on the varnishheavily, and carrying it over as many spokes as the varnish will admit. Finishing
varnish should be put over all the spokes, or all except one, left as a guide when fin-
ished off. The general practice is to begin at the front part of the wheel, coating first
one side of the spokes all the way round, and then the other side, and lastly the backpart ; the hub may, or may not, be coated at the same time, as suits the convenienceof the varnisher. If the varnish has been applied in about equal quantity over each
spoke and brushed with a view to leveling it, it will be necessary only to clean out be-
tween the spokes, and then draw the brush with a single stroke throughout their
length, following up the varnish in the same order in which it was laid on. With the
tool straighten up the face of spokes ; then level off the hub, finishing it with the point
of the brush while the wheel is made to revolve rapidly.
The felloe may be coated between the spokes, finishing each space as you progress,
or coat it entire, and finish and clean up the varnish afterward. A soft, flat brush is
well adapted to this part of the work, as it lays on the varnish nicely, and does not re-
quire attention afterward. The faces of the felloe may also be coated with the samebrush, being careful, however, to lay on the varnish by keeping the wheel turned so
that the varnish will not drop on the spokes. When a wheel is finished, turn it overoccasionally until the varnish is set to prevent it from running. Having completed
the wheels, varnish the hind part of the inside carriage, next the front, and lastly the
perch and stays ; coat the spring bar, springs and axle bed, and then come backand clean out the corners, cross brush and lay off with light strokes with the point of
the brush, and so on with the other parts. The shafts should be coated on the bottom
as well as top, and the varnish laid off so as to prevent a heavy edge underneath.
A platform carriage is more troublesome to handle, but where suitable devices are
at hand to support the parts, the work may be speedily and well done. The wheels
should be varnished last, and if arranged so that they can be removed, the inside workcan be done quicker and better.
Painters adopt various modes of applying and laying off the varnish, and whereequally perfect work is attained, in a reasonable length of time, it is useless to ques-
tion the method of brushing.
The rule is to lay on a sufficient quantity to flow out and present a solid body, con-
nected throughout every part, showing no laps, which is obtained by working quickly,
and brushing the varnish as little as possible.
A very thin coat of varnish will not make a good finish, because it has no depth, andan extra heavy coat will not remain brilliant, because it cannot set or harden through
equally. A medium between the two is what is required.
8/10/2019 Making Horse Drawn Coaches 1800 Bw
http://slidepdf.com/reader/full/making-horse-drawn-coaches-1800-bw 335/455
PAINTING DEPARTMENT. 279
NOBLE & HOARE'S PRIVATE MARK.On the label attached to each can of Noble & Hoare's varnisli is a private mark
whichgives the date the varnish is made. Tims: 17-3-8 signifies the day of the month,
the number of the month, and the year, which would read, the seventeenth day,
third month, 1868; 12-2-2, twelfth day, second month, 1872, or March 17, 1868 and Feb-
ruary 12, 1872. By observing the marks the age of the varnish may be determined,
THE RUBBING OR LEVELING OF VARNISH.
Next in importance to the laying varnish properly is that of rubbing or leveling it
with pumice stone, preparatory to ap})lying a subsequent coat; for it is not unfre-
quently the case that a body which has been well varnished throughout the rubbing
coats, does not produce aline finish, while on the other hand a body indifferently var-
nished, when taken in hand by a competent workman, will be so corrected as to give
perfect satisfaction.
A body in color, no matter how level its surface, still lacks that beauty of finish
which varnish gives, and until the skillful varnisher, and equally skillful rubber, haveperformed their parts, no great beauty may be expected. A coach body, for instance,
is ready for the first coat of varnish. It is the purpose of the painter to apply three
coats of rubbing varnish, add then a coat of English, or its American imitation. Onthe three rubbing coats the main labor must be expended, which shall produce a per-
fect finish. The first coat being generally put on comparatively light in body, does
not require a great deal of rubbing; and just here a careless rubber begins his work of•detracting from the beauty and extreme perfection of the finish.
We care not how free from runs and faults this first coat may be; it is in the powerof the rubber to damage it. But
HOW DOES HE PROCEE
in order to do it? Our answer is, he takes the body in hand as a piece of work to beperformed without having any particular interest in its final appearance. He does
not survey the body before applying pumice stone, in order to note whether the dif-
ferent parts of the surface will each bear a like amount of rubbing. He is careless asto the quality of the pumice stone he is about using. In short, he feels that he is
merely preparing to do a very ordinary kind of work, that of getting the body ready
for another coat of varnish '' The consequence is, the edges are laid bare, and the
panels rubbed through to the color at different points, and thus the first coat of var-
nish is deprived of a portion of its value in contributing to a perfect finish, and in suchhands the second and third coats will fare no better.
Wherein, then, does the painter fail in properly leveling the rubbing varnish ? Wereply, he does so either by ignorance of the proper way to treat the three coats men-tioned, or through positive carelessness or laziness, if he understands just how eachcoat should be rubbed, and still fails to produce a foundation, on which the finishing
coat will be borne out in the full beauty which it is capable of producing.
But as work is spoiled oftener through ignorance on the part of the workman, as to
manner of leveling down the varnish, we will endeavor to give, in what follows, the
proper method of treating the first, second and third coats.
THE FIRST COAT.
This should be laid on comparatively light ; and just here we remark that color should
be fine, and free from grit, for if the first coat of varnish is laid over coarse, or dirty
•color, it is robbed of a portion of its value in making up a good surface. The color
8/10/2019 Making Horse Drawn Coaches 1800 Bw
http://slidepdf.com/reader/full/making-horse-drawn-coaches-1800-bw 336/455
280 COACH-MAKEE'S ILLUSTEATED HAND-BOOK.
will always absorb more or less varnish, and unless it is clean, the roughness it con-
tains will project sufficiently to prevent the proper rubbing of the varnish, through
fear, on the part of the painter, of producing a speckled appearance. The same is truerespecting varnish color when it is applied as a first coat.
The first coat having been laid and allowed to stand until hardened, the body shouldbe brought to the light and examined, to ascertain in what condition are the several
spaces and panels, as regards runs, grit in the varnish, and places that may possibly
have been missed. The pumice stone should be fine, and entirely free from coarse
particles ; the sponge, shammy and water free from grease. If, on examination of the
body, a run is discovered, which lies above the surface, cut ofi the top of it carefully,
and in rubbing avoid putting pumice stone on it until it is dry. On this coat it is
necessary to do no more than remove the gloss, for an attempt to proceed further
would endanger the solidity of the colors. When rubbed and washed perfectly clean,
the moldings are to be blacked —if not previously done. The color for moldingsshould dry glossy, so as to bear out well under the second coat of varnish.
ALL SHARP EDGES
should be slighted. The practice of cutting them through and touching upon everycoat is a foolish and needless one. If they are rubbed through and then touched upwith color they are not in as good condition as when slighted, and the varnish allowedto remain on them untouched. But, if the habit has been contracted of laying thembare at every rubbing, let them remain bare, until the final touching up for the finish-
ing coat ; but be careful when you do touch them to have the color very fine, andmixed to dry firuily and with a slight gloss. The second coat of varnish should belaid quite heavy, and especial care taken to have it clean. Some painters act as if theythought it of no importance to secure clean varnishing, except on the finishing coat.
With such the color is often laid bare in the eflbrt to remove the grit, or at least the
surface marred by the scars left on it. The pumice stone employed should be of me-dium grade, yet of even grain or grit, for, if too fine, time is wasted, and the labor of
rubbing needlessly increased. In careful hands a medium grade of pumice will not
scratch the surface, and as it becomes finer as the rubbing proceeds it will remove theheavier marks it leaves at first on the varnish.
The most approved plan of rubbing on this coat is to apply the pumice stone freely
at first, giving the panel a coarse rubbing all over, then come back and go over it
again, using the pumice on the panel, which has in the meantime become finer, andfinally polishing the panel by rubbing it throughout its length with the rub cloth anda small quantity of fine pumice. Around near the edges of the panel the rubbing
should beat first omitted, for if the same amount of labor is here expended, there will
be danger of cutting through, and further it would not be proper to allow the pumiceto dry along edges defined by moldings.
Now it is important to know just how far to carry the rubbing on this coat. Paint-
ers may be seen who rub a little time and then draw the finger across the panel to
look at something they know not what. We speak thus plainly from the fact that noone can know how the rubbing is proceeding toward leveling the varnish on the dryspot left on the panel, where the finger has passed over it. It is only on the panel
while wet that brush marks and roughness can be seen.
We will suppose a large panel is being rubbed, the varnish has been laid up anddown. Now the brush marks, if there be any, will follow the same direction. Tolevel the surface the pumice should be applied freely, and the principal rubbing begiven cross wise. The pumice and water being thus carried in an opposite direction
8/10/2019 Making Horse Drawn Coaches 1800 Bw
http://slidepdf.com/reader/full/making-horse-drawn-coaches-1800-bw 337/455
PAIXTING DEPARTMENT. 281
to the ridges in the varnish, will render them plainly visible. If the varnish thenshows defects, either horizontally or perpendicularly, it is only necessary to stroke the
rub cloth transversely, in order to note the progress of the rubbing.When the ridges can no longer be seen, the panel has had sufficient labor expended
on it, and may then be polished uj) with a small quantity of fine pumice. To facili-
tate the labor, as well as to give the best results, the rub cloth should be backed by a
piece of cork, or lump pumice, having a flat face, and the edge beveled. Two thick-
nesses of cloth are necessary over the block. All body surfaces, small and large,
should be blocked down, and the rub cloth, backed by the hand alone, used only in
the finishing up of the panels.
Every part of the body having been attended to according to the necessities of each
part, and the whole washed clean and touched up where required, the painter shouldprepare for the third and last coat of hard drying varnish, with all the watchfulness
and care he would exercise for the finishing coat ; for on the perfection of the third
coat rests, in a great measure, the beauty of the finish.
The third coat is to be laid in sufficient body to permit it to flow out full. It mustnot be teased with the brushes until there is no life remaining in it. Runs and grit
must be carefully guarded against. And now supposing that it has been well done^and is ready for rubbing, we will take it in hand. First of all we inspect it, more par-
ticularly this time to look after the grit the varnish may contain. The rubbing thenproceeds with fine pumice, and is carried but little further than that necessary to cut
out the grit. On this coat the finger may be used to good advantage, in watching thethe progress of the rubbing, for the principle object is to remove grit. Thus a goodbody of varnish remains on which to ap])ly the finishing coat. The body being nowready for the finish, the purpose of the above article is fulfilled.
TO REMOVE VARNISH CRACKS-
Aqua ammonia, applied with a sponge, will soften the varnish, when it may be removedwith a putty knife or steel scraper made and kei)t for the purpose. The sponge shouldbe fastened to a stick to prevent bringing the fingers in contact with the ammonia.
This method of removing the varnish will also be found convenient and economicalwhen it is determined to remove paint cracks, by rubbing them out with lump pumicestone, instead of burning off the old paint. The painter is well aware that the mosttedious part of the operation is in getting through the varnish. But by the use ofammonia the varnish is speedily removed and the rubbing is begun on the coatings ofpaint, which speedily give way under the action of the pumice stone.
CAUSES OF VARNISH PITTING.
As no shop, from the largest and best appointed down to the most humble, is en-
tirely free from the annoyance of having varnish pit, we are forced to the conclusion
that it is caused in very many cases by changes in the atmosphere. But as varnish
will pit under such a variety of changes in the atmosphere, and as the atmosphereseems to be capable of such a variety of mixtures, being charged with a greater or less
quantity of electricity (which determines the chemical qualities of the atmosphere), wecan do no more than give the result of our own observations.
In the first place we would advise to buy the best quality of rubbing and finishing
varnishes. Endeavor to obtain rubbing varnish which is not too new ; new varnish is
more likely to pit and draw up than that which has had six months or a year's age.
Avoid using the rubbing varnish too close down to the bottom of the barrel or can, as
the dryers and sediment, being there in excess, will, in all probability, cause the var-nish to appear dull, shriveled and pitted in a few hours after it has been laid on .
8/10/2019 Making Horse Drawn Coaches 1800 Bw
http://slidepdf.com/reader/full/making-horse-drawn-coaches-1800-bw 338/455
282 COACH-MAKERS' ILLUSTRATED HAND-BOOK.
2d. The mixture of two different kinds of varnish will cause pitting, or, at least,
shriveling of the surface, when the varnishes are of different natures.
3d. Varnishing over color, or varnish which is not dry.
4th. In summer, when the varnish room is closed tightly, the thermometer indi-
' eating 85° to 90°, if the floor is wet down, the steam arising therefrom may cause
pitting.
5th. Varnishing in the early spring, fall or winter, in a cold room, where the workto be varnished is chilled, or should the room, varnish and body be of the same tem-perature, allowing the room to cool down before the varnish has set.
6th. On a hot summer's day, when a storm is gathering, English varnish is apt to
pit if laid on before the rain descends.
7th. A varnish room, which attracts dampness, shown by the walls and window
panes sweating, will occasion pitting.8th. High grades of varnish, employed for finishing coats, when laid one over the
other, will almost certainly pit or enamel.
9th. Using English varnish, or its imitation, direct from the can, without previously
airing it.
10th. Using varnish that is not ripened, or new varnish.
The above may appear to be a formidable array of reasons why varnish misbehaves, andlead the painter to conclude that where there is so much uncertainty, and no positive
cure given, that it will be as well to heed none of them, and trust to luck. Many
more might be added had we the notes of painters who keep memoranda of the var-nish room, but those given will cover the large majority of cases.
PITTING CHECKED.Mr. W. B., a leading Philadelphia painter, checked English varnish from completing
its work of pitting, by opening the ventilator, and allowing the heated air to escape.
He had two coach bodies in the varnish room, one of which was finished with Ameri-can wearing body, and the other with English. Shortly after the bodies were com-pleted, in surveying the one coated with English, he noticed that it showed signs of pitting, He opened the ventilator, then seated himself behind the body intently
watching the result. In a few moments the cool air was felt, and under its influence
the varnish again flowed out, the pits disappearing, of course. The ventilator required
to be closed during the night, and an inspection of the body the following morningshowed that the pitting had proceeded again, under the effects o. the heated and foul
air. The body coated with American wearing body remained perfect.
The value of good ventilation is plainly set forth in the above test. The only difli-
culty to be overcome is to provide for night ventilation, without risk of damage to the
work from storms. The room in which the above named bodies were finished is
ventilated through an opening in the center of the ceiling, which serves also as a sky-
light. A cupola, with swinging shutters, operated by cords, surmounts the roof abovethe opening in ceiling. This is very effective but far from being perfect. A perfect
ventilator will come in good time, for it has been but two or three years since atten-
tion has been given at all to upward ventilation in carriage shops, and already we find
a goodly number provided with either pipes, flues, or cupolas. Having once beeninduced to provide the means which are the simplest, a more perfect system will beaccepted whenever it has been planned and proven.
CARE OF VARNISH BRUSHES.All varnish brushes should be kept in air-tight vessels. Those used for finishing to
be especially provided for. For the latter the can should be of dimensions adequate

8/10/2019 Making Horse Drawn Coaches 1800 Bw
http://slidepdf.com/reader/full/making-horse-drawn-coaches-1800-bw 339/455
PAINTING DEPARTMENT. 283
to hold two sets of brushes without danger of their touching each other. The ends
of bristles to clear the bottom of can at least three-fourths of an inch. The brushes
may be suspended on wire in the usual manner, or on wire studs soldered to the in-side of can at distances apart suitable to the size of brushes. A piece of heavy wire
should be soldered in.side at top of can, on which to wipe the brushes whenever they
are to be removed. Use English wearing body varnish to preserve the brushes from
hardening; being careful to keej) the liciuid above the bristles. Should the varnish
show a tendency to skin over, raw oil .should be added. Clean the can out occasion-
ally, for sediment is rai)idly deposited.
VARNISH BRUSHES.
There is nothing, probably, that painters have differed more widely on than thebest kind of a brush with which to apply the finishing coat of varnish. Our veteran
})ainters, to whom we are wont to look up to with no small degree of reference, claim
that no brush can be made to equal the good old round bristle brush. Well, every
one to their own notion. We think that improvements have been made in varnish
brushes, as well as in many other tools used by mechanics. The black sable and bad-
ger hair brushes are far superior to the old-fiishioned bristle brushes in many respects*
and in some sections of the country are used altogether for the finishing coats. Thefavorite brushes now among painters who have tested them is the half elastic, madeby Mr. Thum, of Philadelphia.
Theelastic
brushis
muchsofter, but we prefer the
half elastic, because it has a good spring, and takes better hold of the varnish, whenit works toughly, as is sometimes the case. The flat bristle brush, by the same maker,
designed for American or rubbing varnish, works very pleasantly for finishing coats
and is far superior to any other bristle brush we have ever tried.
FITCH HAIR IS I NVARIABLY USED FOR BODY VARNISIHNG.Ah since when did fitch hair varnish brushes come into universal favor among
finishers?
We are aware that in some sections, where light work forms the major part of the
styles manufactured, the fitch brushes are popular, but to assert that they are invaria-
bly used, is to make a very unguarded statement. We would not underrate these soft
hair britshes, for we know that with them good work may be done. But, then, there
are such things as good work, better work, and best work, and if we take into the ac-
count the manner in which the under coats of varnish are applied, in the use of the
fitch hair brushes, we will be compelled to say that the better and best work cannot be
produced except with first-class bristle brushes.
The reasons are, 1st. That with the bristle brush the rubbing coats can be applied
without diluting them with turpentine. We will not declare that a small quantity of
turpentine is injurious to a varnish which is exceedingly heavy bodied, but the prac-
tice of cutting with turpentine the body of all rubbing varnishes, in order to limber
down to agree with the limber qualities of the fitch brush, is very wide of being the
best method. For, a varnish much reduced with turpentine, loses not only in fullness
and brilliancy, but in elasticity, which, we claim, is its wearing quality.
2d. The bristle brush enables the varnisher to work more rapidly, and when coat-
ing large surfaces, to apply the varnish over the entire panel and finish it off without
forming joints or laps.
3d. It is not so liable to throw off drops of varnish as the fitch, and when varnish-
ing the under panels of coaches, even the friends of fitch hair brushes must resort to
the bristle brush, unless they think it fully as pleasant to have the varnish dropping
8/10/2019 Making Horse Drawn Coaches 1800 Bw
http://slidepdf.com/reader/full/making-horse-drawn-coaches-1800-bw 340/455
284 COACH-MAKERS' ILLUSTRATED HAND-BOOK.
down on their hands as to be free from this annoyance. And further, the bristle
brush —Thum's half-elastic particularly —is more easily kept clean.
We lately called on one of our foreman painters in Philadelphia,and it happened he wasprepared to apply the second coat of rubbing varnish to an old Clarence coach, the quar*
ter panels of which were solid and quite large. We instinctively glanced at the brushes
he brought out, which were a 2^ inch Thum's half-elastic flat, and an inch black sable
tool. A hand who was assisting him by attending to inside edges of door pillars, boot,
arch, etc., had the same kind of a set. The varnish was a heavy-bodied Americanrubbing. As the foreman placed himself before the solid quarter-panel, our curiosity
was excited to w^itness his method of applying the varnish. We felt pretty sure that
he was a bold, confident varnisher, from the kind of brush he held in his hand, butnever having had an opportunity of seeing him apply a coat, we, of course, could not
determine what his exact method would be. He used the brush in his left hand ;
with the tool he dashed on a heavy border of varnish around near the edges of thepanel, and with the large brush worked the varnish out to the edges, then spread ona heavy coating, going over the entire panel. He stroked the panel its full length,
then cross brushed it, working out into the cup the varnish the brush took up, and fin-
ished by going over the panel twice with up and down strokes. He worked in perfect
confidence, and was but a few moments in completing the panel. We remarkedto him : We see you do no not patch your varnish on timidly. He replied :
No, sir,
the timid varnisher can never produce first-class work. Confidence is required in
order to put on a sufiicent quantity of varnish, and manipulate so as to avoid runsand other defects. Now, we hold that the kind of brushes made use of have somewhatto do with the matter of inspiring confidence or causing timidity. A well-filled, elas-
tic bristle brush, when put into service, takes hold of and spreads with ease a heavyvarnish, when applied to large surfaces, while a comparatively weak hair brush worksdirectly the opposite. One awakens confidence, while the other leads the painter
into a timid and patch-work style.
When reasonably heavy coats of the best American varnish have been applied to a
body pure, and each coat allowed fropa four to six day^ to harden before being rubbed
down,and
thenthe finish given with a
good wearing bodyvarnish, the whole will
form a serviceable protection to the underlying paint, besides possessing a fullness andbrilliancy unattainable by using the under coats of varnish thinned much with tur-
pentine. The fitch hair brushes lead to the use of turpentine in excess. The half-
elastic bristle brushes remove the necessity for its use, and we leave the reader to
choose between them.
HAIRING OFF.
The terms hairing off and mossing off refer to the practice among painters of
removing the gloss of varnish, and also the smoothing of color coats; moss is coarse
and otherwise not suitable.
White cow-tail hair is the best, it being long, and when rolled up keeps together in
a bunch, and does not shed dirt, or break off into little bits, covering the work.In painting, we hair off each coat of color, except the last one, and on carriage
parts and cheap body work, hair off varnish color.
Clear varnish may be haired off, but good work cannot be had except by rubbing
down with ground pumice.
WHERE SHOULD VARNISH BE KEPT?Varnishes are influenced by heat and cold, heat causing varnish that is kept air-
tight to become thinner, and the cold to thicken it up.
8/10/2019 Making Horse Drawn Coaches 1800 Bw
http://slidepdf.com/reader/full/making-horse-drawn-coaches-1800-bw 341/455
PAINTING DEPARTMENT. 285
There is no advantage gained by keeping varnish in a cellar, unless it be that whenbought by the barrel and not drawn off into large tin tanks, the dampness in the cellar
keeps the barrel from shrinking and causing wastage. Our best arranged shops havetin or zinc tanks in which to keep all varnishes —except English, or its Americanimitation —the tanks being placed convenient to the workmen, in one of the paint
rooms.
BLISTERING.New work, when run out in hot weather, will blister easily if the last coat of
varnish was not hard when first exposed to the direct rays of the sun, or to the
reflection from a heated pavement where the carriage may have stood for some length
of time.
Work painted during the winter, which has ample time in which to dry, both inthe color and the varnish coats, should not blister so readily; still, it cannot beproof against the extreme degrees of heat to which our climate is at times subject.
ACTION OF WATER ON VARNISH.IS THE MILKY APPEARANCE AN EVIDENCE OF POOR VARNISH?
The cause of varnish turning white when washed, is, we think, the contact of the
water with the oil in the varnish. A temporary chemical change takes place, whichis, however, removed by the heat of the sun. The practical painter is well aware that
if he mixes water with varnish (which generally happens accidentally), the water will
assume a whitish appearance on the work he may be doing wherever it is spread over
the surface. As soon as the water has evaporated, the varni sh will be free from streaks
and show its natural color.
Again, take a small quantity of raw linseed oil, and rub it with the finger on a piece
of black leather, or any other material ; then dip the finger in water, and rub the oil andwater together, and you will perceive that the mixture (if mixture it may be called)
will assume a whitish appearance.
The action of water on varnishes, especially the finishing varnishes, causing, whenwashed, or exposed to wet weather, a white or bluish-white appearance on the sur-
face, is no evidence of an inferior varnish. The English wearing-body varnishes, andthe best American imitations of the same, present the appearance, to a greater degree
than the American rubbing varnishes, because of their greater elasticity.
BLACK, TURNING GREEN.A black body appears green after a time, because the black surface is covered with
varnish coats, each one of which contributes a portion of its yellow color to the black,
and as the black absorbs a portion of the varnish, its color is gradually changed to a
greenish hue. Black and yellow produce green, whether in the mixture of those pig-
ments on the palette, or by any other means whereby the two colors are so brought
together, as for one to be added to the other. We view the black groundwork through
a superimposed yellow media, and the black color is lost. If we cut down the varnish
to the color, we will find it is still black, proving that the varnish —especially the
English —has made the change from black to a somber green. The remedy wouldbe to stain each coat of rubbing varnish with black, and finish with but one clear coat
of varnish.
LENGTH OF TIME TO ALLOW NOBLE & HOAR'S VARNISH TOHARDEN.Noble & Hoar's varnish should not be handled (that is to hang off a body) in less
than 48 hours after having been applied. In favorable weather the carriage shouldnot be put into service in less than two weeks. The wearing varnish, we may say,
8/10/2019 Making Horse Drawn Coaches 1800 Bw
http://slidepdf.com/reader/full/making-horse-drawn-coaches-1800-bw 342/455
286 COACH-MAKERS' ILLUSTRATED HAND-BOOK.
never dries. The surface hardens to a certain extent, but so great is its elasticity, that
pumice stone will adhere to it during the process of leveling it down, even after oneor two years of hard out-door service.
VARNISH ITEMS.Varnish Cups should be kept as clean as when they were new. Wash them off with
turpentine (using a short bristle tool) as soon as you have finished work for the day.
Then give them a good scouring inside and outside with soap, water, and a piece of
curled hair —don't miss the handles above and beneath, nor the bottoms of the cups
rinse them in clean water, wipe them dry with a chamois and place them bottom upon a wire rack, in a closely covered box or a cupboard.
The body painter who depends much on the varnish coats to produce a level sur-
face, will never hold the position of a first-class painter. The surface of the bodyshould be brought up as near perfection as possible, before the color is applied, and the
color be laid level and entirely free from grit. The varnish coats will then improvethe surface to a surprising degree, for they will be required to do no more than addto the beauty of the surface, while over a rough body their value would in part belost.
At Goddard's shop, in Boston, each coat of rubbing varnish is allowed from oneweek to ten days in which to harden, before it is rubbed. The rubbing coats are
mixed, half American and half English varnish. The varnish cuts down toughly and
slowly, and is by no means pleasant to work on. No shop in America allows so muchtime for finishing a job as the one named.
Our best varnishers finish off with up and down strokes, on all panels where it
is possible to do so. By this means a heavier body of varnish can be left on the
panels, with but slight liability to runs and waves. The opposite method requires that
the varnish be worked down very flat, leaving but a very small quantity on the panels.
If a coat of varnish is not rubbed down level, and freed from all grit and scratches,,
it may not be expected of the next coat that it will be perfect.
Very cheap varnish is dosed with a material in great favor with Ole Bull and all
other violinists, which they use to prevent the bow from slipping.
Varnish should be blocked down, for a rub cloth cannot be held level under the
pressure of the fingers.
A VERY cheap varnish must, of necessity, be dear at any price, for it is certainly moreprofitable to give the customer a varnish that will wear well, and save one's self the
trouble and expense of repainting thus doing two jobs for the price that should bereceived for but one.
THE CAPTIVE FLY.
While recently on a friendly visit to one of our coach painters, the annoyances to
which the finisher is subject, especially during warm weather, were freely discussed.
Ventilation, dust, and the annoyance from flying insects, came in for a share in the
conversation. Our friend related a circumstance which occurred in New York someyears ago, which will serve to show how much damage may be done by a single flyjon
a body unprotected by a screen, and the vexation and delay occasioned before the
damaged surface could be restored. In looking back over annoyances past, that whichexcited anger at the time often becomes food for merriment in the recital; and so it
was in this case : A fine coach built to order approached completion, and the purchaser
was anxious to hitch to it at the earliest possible moment in which it would be safe to
do so. The day arrived on which the finishing coat was to be laid on the body, and.
8/10/2019 Making Horse Drawn Coaches 1800 Bw
http://slidepdf.com/reader/full/making-horse-drawn-coaches-1800-bw 343/455
PAINTING DEPARTMENT. 287
as a guard against possible accidents, one of the employers searched the varnish roomcarefully, and, as he supposed, killed or removed all the flies in the room. The body
was varnished, and the finisher before retiring from the shop took a last look to seethat all was right. The varnish was clean, full, and in every way satisfactory. Butmorning came, and with it also came the employer —before mentioned —quite early to
examine the coach body. There it was, perfect with the exception of one-quarter
panel, on the middle of which a fly had lit, and been captured by the sticky varnish.
In its struggles for freedom it had blowed the varnish around its body, and fly andfly blows were a fixed defect.
What expletives were indulged in, in that upper room, as the employer stood gaz-
ing at the lifeless insect, does not appear; but on our friend the painter arriving at
the shop, he was greeted by the aforesaid employer with a most doleful story of howmatters were with the body up stairs, ending his remarks by bitter curses on the fly
that had escaped him on the previous day. Together, boss and jour ascended to the
finishing room, and there began the consultation as to what should be done, resulting
finally in the decision that the job would have to stand two or three weeks before it
would be in a condition to admit of re-varnishing the panel. The body was hung ofi;
the coach lowered down into the wareroom, and day after day cold water was applied
to the defective panel until it became hard enough to take a light rubbing. After four
or five careful rubbings the scars disappeared. The panel was again varnished, andthe job at length turned out.
How true it is that the weak things have been chosen to trouble the strong. Onefly —in the case above cited —caused additional expenses and most vexatious delay,
and made three persons at least very ill-natured —the owner, the builder and the
finisher. And now we ask which one of the sister branches in the coach shop is liable
to be tormented by so small and insignificant a creature as a single house-fly ? Andis it at all surprising that the painter should be a very sensitive creature —a man whosteps softly —is ofi'ended at dust and insects, no matter where he may be, and dislike
the noise and clatter of hammers —that he is, in short, a high strung, sensitive crea-
ture?
VENTILATION.The renewal of fresh air to the paint and varnish rooms has engaged the attention of
a few carriage-makers throughout the country, but we question whether a shop in the
land has made provision for thorough ventilation. As a general statement our paint
and varnish rooms are situated in the top story, which on high buildings has the low-
est ceiling. The upper story is chosen because it is supposed to present few liabilities
to dirt from the street, as well as to have the painters above rather than beneath eith-
er of the shops, to avoid dirt and dust from this source, also. The paint shop then, ac-
cordingto present usage, must occupy the top story, which being directly under the roof,
and having the lowest ceiling of any room in the building, is doomed to be the hottest
place in the factory. And in these days of flat shed roofs, covered with the barbar-
ous tar and sand, which under a July sun become almost red hot, the paint and var-
nish rooms have become the dread of the workmen, as warm weather approaches.
A few shops are partially ventilated, and in these the finisher is not compelled to breathe
over and over again all the poisonous gases that escape in the room ; and so far so
good, but as no provision has been made for supplying fresh air near the floor, the
thorough ventilation of the room is not secured. A room cannot be cleansed of foul
air and supplied with that which is best suited to the lungs and to the varnish with-
out having the means above for the heated and rarefied air to escape, and its place (or
the vacuum formed) filled by pure outward air flowing in near the floor. Heated air
8/10/2019 Making Horse Drawn Coaches 1800 Bw
http://slidepdf.com/reader/full/making-horse-drawn-coaches-1800-bw 344/455
288 COACH-MAKERS' ILLUSTRATED HAND-BOOK
rises toward the ceiling, and if it there finds a means of escape, will pass out into the
open air, but if retained in the room, there can be no inflow of fresh air, and the roomsoon becomes filled with poisonous gases, very deleterious to health. We have beenmade sick at the stomach in a few moments, when working in a close varnish roomhaving a low ceiling, by merely mounting a stool to varnish the top of a coach. Thestratum of air near the ceiling was so vitiated that it was impossible to breathe it
without immediate bad efi'ects.
The objection raised to thorough ventilation is that the current of air passing throughthe room would be fatal to the finishing coat, by introducing dust into the room. Wethink the objection wholly unfounded, for it would not be necessary to keep up a con-tinuous draft while laying on the varnish, but pure air might be admitted three orfour times during the day. During July and August the finisher shows plainly in his
haggard countenance the enervating effects of a poorly ventilated varnish room, andthe finishing varnish itself shrivels under the streaming atmosphere before it hadtime to set.
Of nothing are we more positive than this, namely : that English and fine Ameri-can finishing varnishes require during hot weather to be laid in a well-ventilated room,experiments proving that high grade varnish is very sensitive and dislikes heatedfoul air. Two-thirds of the trouble with English varnish during the hot weatherarises from want of proper ventilation, and so summer comes and goes, year after
year, dreaded by both employer and painter, and the true cause of the vexations andexpense of re- varnishing is overlooked.
Well says an employer who had spent considerable money in making his varnishroom air-tight :
My painters were always charging the imperfections in the varnishto the lack of an air-tight room and now, having gone to a great deal of expense to secure
one, I am advised to break through the solid walls and put in ventilators. Even so,
for the varnish room must be kept as cool as possible in the summer, and at all timesfree from poisonous gases.
Varnish in the can becomes much thinner in hot weather, when put in the coolest
place to be found about the shop, but when the body and varnish are subjected to aheat of from 85 to 100 degrees, in an air-tight room, is it at all strange that the varnishshould fail to flow out and appear full and rich ? Let the varnish and paint roomsthen be remodeled so as to admit of a continual change of air, and we shall soon fail
to hear the coach painters' trade charged with being the most unhealthy of the four
branches, and through its annoyances with being the least profitable.
WORTHY A PASSING THOUGHT.The atmosphere of the paint room is unwholesome at all times —the pallid counte-
nances of the majority of painters giving positive proof of the fact, and in summerfully as much so as in winter, although in the former the windows are open a portion
of the time. The winter months improve the general health, and enable the painter
to take more nourishing food, and this assists in warding off the evil effects of the
paint room.During hot weather the appetite fails, and, as the evenings are the pleasantest part
of the day, the temptation is strong to keep late hours. Insufficient sleep and wantof appetite weaken the system, reduce the flesh, and render the individual more sus-
ceptible to attacks of colic, or derangements having that tendency. Now, it is worthy
a passing thought from every carriage painter in the land to look after his health
during the heated term, and inquire into the best plan for preserving it.
Without assuming any guardianship over men who are of age, we would, neverthe-
less, throw out a few suggestions, which, if heeded, will result in no harm or special
8/10/2019 Making Horse Drawn Coaches 1800 Bw
http://slidepdf.com/reader/full/making-horse-drawn-coaches-1800-bw 345/455
PAINTING DEPARTMENT. 289
inconvenience to them ; and 1st, we would caution the painter against the practice,
which is common, of bringing his dinner into the paint room and allowing it there to
remain during five hours at least, and, at the noon hour, sitting down and eating it in
the same room. If he must carry his cold bite, because he cannot afford to go out andobtain warm, untainted dinners, then he should provide a proper place to hang the
dinner bucket or basket outside of the work-room ; that was our practice for several
years. We carried dinner from late in the fall until spring had fairly opened, andthen, during the warm weather, took the noon meal at a restaurant. The change
of <;lothing, the walk, and the warm dinner, assisted in giving a variety to the day's
toil, and, on returning to the shop again, we felt in good spirits, and better prepared
to close down the windows, if necessary, and enter the suffocating atmosphere of the
varnish room. We were led to the practice of airing the dinner basket by the re-peated assertions of our better-half that bread left in the basket retained a strong
odor of the paint room.The sense of smell would not be so keen with the painter as to make such nice dis-
tinctions; but persons whose olfactories are not blunted very readily pronounce sen-
tence against anything contaminated by paints, oil and varnish. Any portion of the
dinner not eaten shotild be thrown away, for, in no case, should children be allowedto get possession of it. How common it is for little children to want to peep into
papa's basket when he returns and sets it down at home. At such times they prize
a dry crustmore
highlythan
temptingsweetmeats
;
butit is far
betterto
disappointthan to allow them to partake of the tainted bread. 2d.
NEGLECT OF THE PERSON,
or uncleanness of the skin. During the mild seasons there is no excuse for any onenot possessing a clean body. A basin of water, a sponge, soap and towel, will answerthe purpose, if it be impossible to secure better convenience ; but at whatever cost nopainter should fail to take at least three baths during the week. We are bitterly op-
posed to the practice of some who seem to think it a waste of soap to wash abovetheir wrists, or below the pit of the neck, and, without exaggeration, we have known
painters to carry colors on their arms, near the elbows, for weeks together ; such filthi-
ness must hasten the undermining of the constitution by inviting disease. Over thesurface of the body are innumerable pores, which carry off matter no longer required
by the system, and when this operation is checked disease ensues. Cleanliness of per-
son, then, is one of the most essential matters for the painter to attend to ; for, witha good supply of wholesome food and a clean skin, he is well fortified against dis-
ease. 3d.LOSS OF REST.
As we stated before, there is a strong temptation to sit up late and enjoy the night
air. The practice is injurious, and, besides, occasionsill
feelings and loss of time inthe morning. The practice of setting up late is more common among single men, for
they seek out jovial company and take no notice of passing time. Twelve, one andtwo o'clock are not unusual hours for retiring. The consequence is, they are in deepsleep just at that time in the morning when they should be up and stirring about. Ahurried breakfast, or none at all, a cold bite hastily put up for dinner, and a feverish
excitement to get to the shop before the call to work, or within fifteen minutes there-
after : all this flurry comes from loss of rest, from the lack of a system in the affairs of
each day and night. The painter, then, needs wholesome food; he must be cleanly,
and he must not be deprived of at least six hours of rest during the night. fTature de-
mands this, and if disobeyed for any great length of time will surely punish the guilty
one. 4th.39
8/10/2019 Making Horse Drawn Coaches 1800 Bw
http://slidepdf.com/reader/full/making-horse-drawn-coaches-1800-bw 346/455
290 COACH-MAKERS' ILLUSTRATED HAND-BOOK.
THE EXCESSIVE USE OF TOBACCO.In the three foregoing items we have spoken of the abuse of certain natural laws
under which every individual is held. The use of stimulants we look upon as an arti-
ficial means of weakening the system, and, therefore, stimulants may be wholly aban-
doned without a particle of injury to the persons in the habit of using them. Tobaccochewers and smokers should curb their appetites, and be satisfied with a small amountof the delightful but noxious weed. When the painter indulges in tobacco to excess,
heartburn, nervousness and lack of ambition and strength to go through with the
day's work ensue. A person thus suffering is a very miserable creature, for he notonly suffers bodily pain, but he also suffers from the knowledge of the fact that hehas been the foolish author of his uneasiness; and while the use of tobacco is moreor less injurious (we know it by experience) at all times, we know it to be much moreso during the summer ; therefore, we would advise the painter to use it very moder-ately.
We have directed attention in the above to the four leading enemies of the paint-
ter's health, namely : —Unwholesome food, uncleanness of person, loss of rest and theuse of stimulants, tobacco especially; and while individuals following the otherbranches may not, with impunity, defy the laws of health, they are not so suscepti-
ble to injury as the painter, because they breathe purer air during the ten hours in theshop. Painters, you who are suffering from a feeling of lassitude, suppose you examineinto your mode of life, and, if any remark we have made covers your case, try the ex-
periment of reforming in that particular. To counteract, then, the effects of the paintroom in hot weather, do not destroy the appetite by drinking, smoking ol* chewing.Take a good night's rest, and keep the person cleanly.
LITTLE THINGS.
In no branch of the carriage business is it more important that attention should begiven to what may be termed little things, than in the paint shop ; and we may be notwide of the mark to go further and say that it is attention to little things that
gives superiority of finish to the painting in one establishment, and the neglect of small
matters (so called) , which st amps the work of another establishment as inferior. Were it
possible to find two paint shops, built exactly alike, having like conveniences for doingwork, and these two shops were then opened and placed in charge of two foremen,one of whom was scrupulously nice in little things, and the other careless, we wouldfind, at the end of six months or a year, should we visit them, that the careful fore-
man had added greatly to his stock of little conveniences for doing work nicely andwith ease to himself and his help, and that cleanliness and order were stamped oneverything about him. His work would be well and carefally finished in minutest de-
tails.
Shouldwe now pay a visit to the shop under the control of the man who considers
that great nicety is womanish, and be always planning to render things more conve-nient as an intolerable bore, we would not be surprised to find a work-room in disor-
der, the hands fretful, the stock being wasted, and the finished work mussy.But you may inquire what am I to understand by little things ? We answer : On en-
tering the shop in the morning, greeting the hands with a smile and a kind word,which puts them on good terms with you and themselves for the day. Should an ac-
cident happen, even though it be chargeable to the lowest apprentice, do not get into
a passion and abuse the boy, because he is a boy, while had the same occurred with a
hand but abrade below you, you would have said nothing. Do not put an apprentice
to an inconvenience in his work to save yourself a few steps, for by your example youteach him to do the same. A foreman under whom we worked some years ago had
8/10/2019 Making Horse Drawn Coaches 1800 Bw
http://slidepdf.com/reader/full/making-horse-drawn-coaches-1800-bw 347/455
PAINTING DEPARTMENT. 291
complete control of his journeymen and apprentices, and all through politeness andkindness. As an instance in point he borrowed a wheel-board for a few moments from
a new apprentice, and on returning it set up the wheel as it was when he had askedthe accommodation. This was a trifling matter in itself, and yet it made such a last-
ing impression on the boy that he was ready at any time to accommodate his foremanor his fellow shop-mates.
These are among the little things in the govornment of the shop, and we will nownotice others connected with its mechanical workings, wherein the foreman should di-
rect as to what he considers essential, and demand of each one under his direction
that he do his share toward preserving and keeping in its proper place whatever hemay provide. We may begin at the paint stone. Here the careless workman mightconsider it but a trifling matter that he leave but a little paint adhering to the surface
at the corners ; and another with the varnish cup in his hand think it but over nicety
for his attention to be called to the fact that on setting his varnish cup on the stone aring of varnish from the bottom of the cup was left there. The little bit of paint
left on the stone from time to time soon amounts to a good deal, until there is
barely room in the center to mix up a small cup of paint ; and the practice of setting
cups on the stone also adds to its filthiness. Correction is only required at the be-
ginning ; the small amount of paint not being left, the greater is never seen ; and thus
we might direct attention to every portion of the work room. But in the varnish
room we may see more plainly the efl'ects of carelessness in minor things. The ne-
glect to prepare the room at the proper time, to wash off the body perfectly clean,
or to have the cups and brushes in proper condition are of trifling importance to the
thoughtless finisher, yet on attention to these small matters depends the beauty of
the finishing coat.
The apprentice who has the reputation of being careful and extremely nice will,
when free, be selected to take a good position at good wages. And a journeyman bear-
ing a like character will seldom be found out of employment. Take care, then, of whatthe heedless term trifling matters, and the weightier matters will take care of themselves.
MENHADENOIL.
The Menhaden is a North American fish, striking the coast near Cape Hatterasand sporting in all the coast waters as far north as Maine, where it leaves for the deepwaters of the ocean. The fish usually appear in May and leave in October. Themenhaden oil is extensively used, being an adulterant of both olive and linseed oils.
The fishery and production of oil is prosecuted along the coast and require a capital
of more than a million of dollars.
Well, that will do pretty well. The olive oil we may use on our dish of crabs, or, at
the proper time, on salid, is, after all, fishy. Again, we learn from the above choice
scrap that Menhaden oil forms a component of much of the linseed oil sold. Purennseed oil is known to be the fattest of all the oils manufactured, and, from its pow-Irs of resistance to atmospheric influences, the best adapted to the painter's use when
used either on house work or by the coach painter. But if much of the linseed oil sold
is adulterated with fishy fat, and much of it adulterated with cotton-seed oil, anotheradulterant, pray tell us what quantity of pure linseed oil is furnished the coach painter,
in the use of which he is expected to produce work of great durability. What a sorryspectacle the painter presents in these days of vile compounds in the way of oils, ja-
pans, varnishes, colors, etc. Let us see of what his materials for coating work are
composed. We will begin with wet or keg lead. The employer pays a good roundprice for that which is nicely labeled pure lead. The expert painter removes thehead of the keg, and inserting the palette knife, raises up a quantity of the so-called
8/10/2019 Making Horse Drawn Coaches 1800 Bw
http://slidepdf.com/reader/full/making-horse-drawn-coaches-1800-bw 348/455
292 COACH-MAKERS' ILLUSTRATED HAND-BOOK.
pure lead, and instead of its dropping off ropy from the palette knife, as in yearsgone by, the lead is flaky and short, like first-class pie crust.
Barytes, a heavy earthy substance, is present. The oil in which this pure lead is
mixed is pure linseed oil, provided the menhaden fish oil, or cotton-seed oil, formno part of it. The turpentine used in thinning the paint may have a strong smell ofbenzine. The japan drier cannot be made without using oil, and who knows but that
the menhaden fish fat and benzine may not form component parts of this importantarticle, to say nothing of that crac^-generating ingredient —gum shellac. Varnishesare dependent on pure, refined linseed oil for their good wearing qualities, and whymay not varnish contain fish or cotton-seed oil ? And then, as to colors : Vermilionis adulterated with read lead, and often we find that that which is purchased for the
best English vermilion will, when mixed, fall to the bottom of the paint cup, as heavyalmost as if it were red lead ground in japan. Carmine called No. 40, which should bethe best, often shows the presence of vermilion. Ivory drop-black, which, when pure,
is intense in color, and covers and dries well, will often be furnished only in name, it
being replaced by a color which looks gray, when compared with a good quantity of
lamp-black, and as for covering well or drying properly, it is entirely innocent. TJl-
tramine blue and other colors also come in for their share of adulteration; ground
pumice stone, when pure and bolted to a proper degree of fineness is costly, and being
very light, requires so much to weigh an honest pound that we find there are those
who do not scruple to dose it with barytes to add weight, leading the varnish rubberto exclaim at times, what can be the cause of this pumice cutting so slowly ? it slips
over the surface like soap.
Gold bronze is innocent of gold ; silver leaf is only Dutch metal —and so on to theend of the chapter : there is difficulty of obtaining any article that is pure ; and in
the face of these facts the poor painter is charged very often with being a botch, be-
cause his painting does not stand. Perplexed beyond measure, and unable, it maybe, to give a satisfactory reason why all this trouble should follow him, he may call
for a settlement, and be off to some distant point in the hope of retrieving his reputa-
tion for turning out good work-^if he does not take a bolder step and quit the trade
forever. The body maker soon learns to distinguish at a glance between the qualities
of the timber he uses ; and whether it be well seasoned or not. The glue, canvas,
screws, brads, etc., are not of so mysterious a nature as to cause him any trouble. Thesmith readily detects any poor qualities in the stock he uses, the trimmer has the sameadvantage, and the employer soon acquires an aptness in judgment concerning those
three branches, which compels him to agree with the statement of the workmen. Buthow different in regard to the painter's supplies. The lead is marked pure lead,
and he takes it for granted that it must be pure ; the oil he cannot analyze, and as for
varnishes, they are a liquid mystery.
The wood worker may say to the employer, this panel stuff is not thoroughly Rea-
soned, and therefore unfit for working, when the answer will probably be : You must
use it. I can furnish no better at present, and this work must be pushed ahead. Noresponsibility, then, attaches to the body maker, should trouble ensue. The smith
and the trimmer have a like advantage. But the painter cannot say of the varnish
that it will not wear, before he has applied it, nor can he always state positively
that the colors and the vehicle in which they are mixed will not produce first-class
work.
The paints and varnish are applied, and at length, when the work is completed (and
it may be spoiled), the painter has no previous words of warning to fall back on, butmust stand speechless; or should he put in a plea in his own defense, will fail to con-
8/10/2019 Making Horse Drawn Coaches 1800 Bw
http://slidepdf.com/reader/full/making-horse-drawn-coaches-1800-bw 349/455
PAINTING DEPARTMERT.
vince his employer, for the simple reason that he is ignorant of the real quality of the
stock furnished him. What we have said in defense of the painter we trust will
be carefully weighed by those who are hasty in charging their painters with being
wholly at fault, whenever they fail to produce the most perfectly finished and mostdurable work.
8/10/2019 Making Horse Drawn Coaches 1800 Bw
http://slidepdf.com/reader/full/making-horse-drawn-coaches-1800-bw 350/455
COACH-MAKERS' ILLUSTRATED HAND-BOOK.
TRIMMING DEPARTMENT-PART IV.
METHOD IN THE TRIMMING SHOP.
Without a system of some kind, it is impossible to conduct any business in a cor-
rect or economical manner. A method must be adopted ; some rule or set of rules
laid down by which you should be governed in your business relations, and whichrules could be understood by those doing business with or for you, whether as a mer-
chant, a manufacturer, a foreman, a superintendent, or as a plain journeyman. Asystem will be of advantage, and will eventually tend to simplify and render easy that
which has otherwise been difl&cult and troublesome. And in our trade, how neces-
sary it is that workmen should adopt a given routine in their daily round of duty.
Whether as piece workmen or as day workmen, this will be found advantageous.
Now take two men equally matched as to speed, on a job. One of them does every-
thing by guess or chance. One time he will commence at this end of the job (to trim)
at another time he will commence at the other end ; his tools are scattered about his
bench in happy confusion ; he has only a very indistinct idea of where anything he
may need can be found ; and when he gets in a hurry {ne is seldom out of one), it is
worrying to see and hear him. He rushes from his job to the bench to look for sometool he needs, but in the litter he cannot get his eye on it. He frantically turns
everything over, and cannot find it. Perhaps it dropped on the floor or under the
bench. Down he goes on his knees to the floor. Can't find it. He peers under the
bench it ain't there. He tries among the litter again —it is not there. He sings out,
in a fretful manner, did any one take my claw -tool ? No one took it, and back herushes to his bench again, and takes another good look. This time he (perhaps)
finds it. He grabs it up, makes a dive at the nail he wants to draw ; but he has lost
so much time hunting up the claw-tool, that he does not take time to do it right, andten chances to one but he digs the top of his finger ofl , and slaps down the ofiending
tool. And thus he goes on all the way through ; always in a hurry, always anxious,
always on the hunt for something mislaid or forgotten, alternately losing and finding.
Now, the man along side of him has a much easier way of getting along. He has
no trouble about trying to remember where he left his tools, or where this or that
article is. He has no rushing to look for this or that ; no diving under the bench, andraking up the scraps for lost things ; no pettish queries as to who has this or that tool ;
or where is this or that tool ? No such a thing. He has no need for any trouble, sim-
ply because he knows where every article can be found. He can always lay his handon anything he wants to use. And how does he do it ? Very easily, because he has
a place for everything, and takes time to have everything in its place. The time
8/10/2019 Making Horse Drawn Coaches 1800 Bw
http://slidepdf.com/reader/full/making-horse-drawn-coaches-1800-bw 351/455
TRIMMING DEPARTEENT. 206
lost by the careless no-method man in hunting up his stray tools is greater by far than
is lost by the methodical workman in keeping his conveniently handy, not to speak of
the worry and annoyance saved by havingthings where he can find them.
Andthen,
again, in the method or routine, or want of either, evinced by each. Now, the careless
man is always forgetting to paste out this or that part of his job until just when hehappens to want it ; then he rushes it through, dries it at the stove in a hurry, and vrhile he is doing something else in an equally big fluster, he is reminded of the piece
he left drying behind the stove only when he smells it burning. And thus he goes,
always in a hurry, always in trouble ; and he really does not get on as fast as ourplacid man of method, who never allows himself to be put out, and who has a system or
order which he follows on each job. He begins with a certain part, and follows it upall the way through the job. Remember, hurry is not speed.
METHOD APPLIED TO A NO-TOP ROAD WAGON.
Begin by fitting the enameled cloth for the foundation of the fall; then fit the cush-
ion, bottom to the seat, and get the correct flare of the seat with the cushion facing
patterns ; now cut and fit the facings, and paste them out ; advance them as far as
you can, because you will need them before anything else ; next paste out the fall, andif it is to be sewed into the cushion front, advance it as far as you can ; now cut andfit the carpets ready for binding, also the pocket to go under the seat, and now, while
the pasted-out-stufl is drying, you can be working to advantage in covering the dash,
and when it is done, if the pasted stufi is not yet dry, you can work along at bindingthe carpets ; then get the tips put on to the shafts, and trim them, so that the painters
will not be delayed by waiting your convenience to do them ; now stitch the cushion
front and the fall, and make up cushion complete, and to prevent the possibility of
mistaking one cushion for another, or putting a wrong cushion in a job, mark the
number of the job on a piece of paper, and paste to the bottom of cushion ; now makeup the shaft and body (check) straps
;put them on and put in the carpet, whip socket,
seat pocket, and finish up, if possible, so as to get that job entirely off of your mind,
and thus leave you mentally free to commence another job without being compelled
to carry a part of the last one on your mind ; by doing this way you will have moretime and be in better condition to think of improvements in the piece of work youare about to commence.
And here we must call attention to the habit some trimmers have of stufling acushion as hard as they possibly can. We have seen men cramming (not stuffing) the
moss and hair into an unfortunate cushion until the corners were bursting out, andstill they crammed away for dear life, like they could never get enough into it, or
ever get it to shape until it was as hard as a brick. Now there is no need of all this
hard stuffing ; if a cushion is properly made and stuffed fairly, it will keep its shapea stuffing stick is hardly to be tolerated when stuffing a cushion, unless to lift the hair
into the corners between the false top and top proper —use your hands, and you will
judge better where the stuffing is needed.
METHOD APPLIED TO A TOP BUGGY.
In this class of shifting rail work it is rather difficult to lay down a fixed rule of
progression, because different shops have each a rule of their own, as to how the trim-
mer shall manage to work at the job. Some shops always give the body to the trim-
mer, and let him keep it until it is trimmed ; then other shops will not let the bodygo to the trimming room at all, and we have to put our tops on the rail alone ; with
this plan there are some advantages for the shop, because the painter can have thebody painted, while the rail and top are getting tailored ; but there is an evident dis-
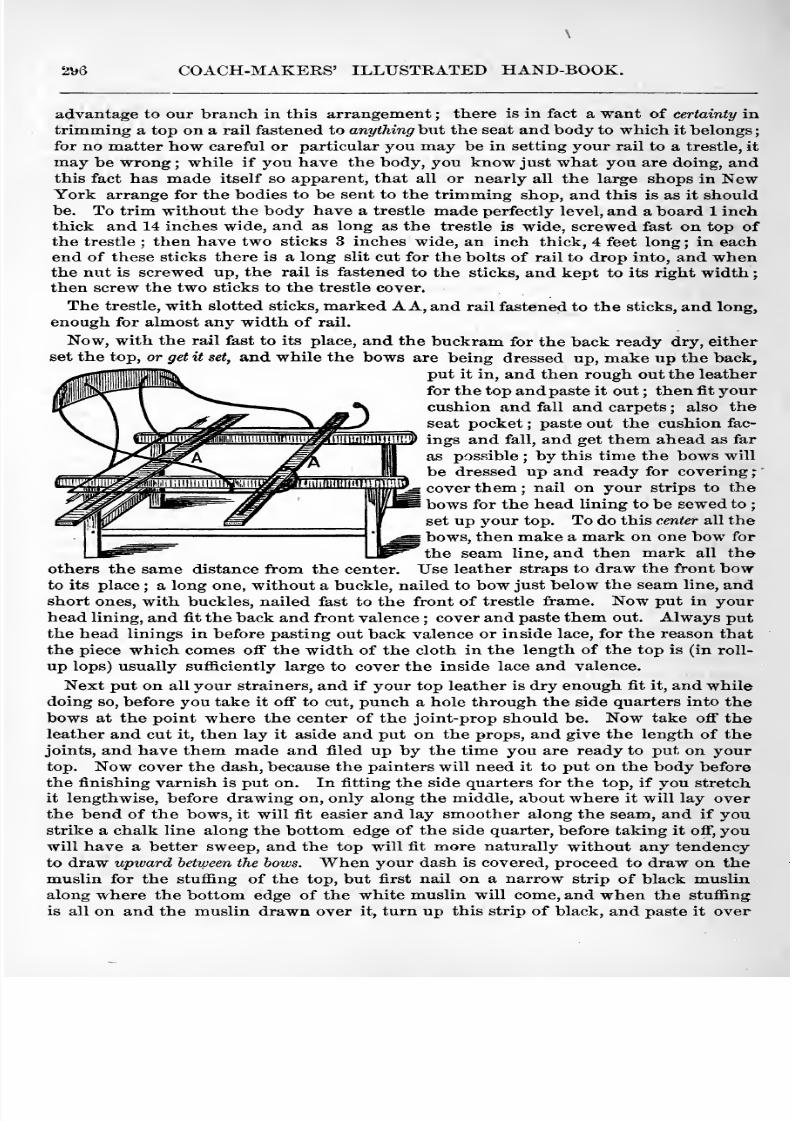
8/10/2019 Making Horse Drawn Coaches 1800 Bw
http://slidepdf.com/reader/full/making-horse-drawn-coaches-1800-bw 352/455
2^6 COACH-MAKERS' ILLUSTRATED HAND-BOOK.
advantage to our branch in this arrangement ; there is in fact a want of certainty in
trimming a top on a rail fastened to anything but the seat and body to which it belongs
for no matter how careful or particular you may be in setting your rail to a trestle, it
may be wrong ; while if you have the body, you know just what you are doing, andthis fact has made itself so apparent, that all or nearly all the large shops in NewYork arrange for the bodies to be sent to the trimming shop, and this is as it shouldbe. To trim without the body have a trestle made perfectly level, and a board 1 inchthick and 14 inches wide, and as long as the trestle is wide, screwed fast on top of
the trestle ; then have two sticks 3 inches wide, an inch thick, 4 feet long ; in eachend of these sticks there is a long slit cut for the bolts of rail to drop into, and whenthe nut is screwed up, the rail is fastened to the sticks, and kept to its right widththen screw the two sticks to the trestle cover.
The trestle, with slotted sticks, marked A A, and rail fastened to the sticks, and long,
enough for almost any width of rail.
Now, with the rail fast to its place, and the buckram for the back ready dry, either
set the top, or get it set, and while the bows are being dressed up, make up the back,
put it in, and then rough out the leather
for the top and paste it out ; then fit yourcushion and fall and carpets ; also the
seat pocket;
paste out the cushion fac-
ings and fall, and get them ahead as far
as possible ; by this time the bows will
be dressed up and ready for covering
cover them ; nail on your strips to the
bows for the head lining to be sewed to;
set up your top. To do this center all the
bows, then make a mark on one bow for
the seam line, and then mark all theothers the same distance from the center. Use leather straps to draw the front bowto its place ; a long one, without a buckle, nailed to bow just below the seam line, andshort ones, with buckles, nailed fast to the front of trestle frame. Now put in yourhead lining, and fit the back and front valence ; cover and paste them out. Always putthe head linings in before pasting out back valence or inside lace, for the reason that
the piece which comes ofi the width of the cloth in the length of the top is (in roll-
up lops) usually sufficiently large to cover the inside lace and valence.
Next put on all your strainers, and if your top leather is dry enough fit it, and whiledoing so, before you take it off to cut, punch a hole through the side quarters into the
bows at the point where the center of the joint-prop should be. Now take off theleather and cut it, then lay it aside and put on the props, and give the length of thejoints, and have them made and filed up by the time you are ready to put on yourtop. Now cover the dash, because the painters will need it to put on the body before
the finishing varnish is put on. In fitting the side quarters for the top, if you stretch
it lengthwise, before drawing on, only along the middle, about where it will lay overthe bend of the bows, it will fit easier and lay smoother along the seam, and if youstrike a chalk line along the bottom edge of the side quarter, before taking it off, youwill have a better sweep, and the top will fit more naturally without any tendencyto draw upward between the bows. When your dash is covered, proceed to draw on the
muslin for the stuffing of the top, but first nail on a narrow strip of black muslin
along where the bottom edge of the white muslin will come, and when the stuffingis all on and the muslin drawn over it, turn up this strip of black, and paste it over

8/10/2019 Making Horse Drawn Coaches 1800 Bw
http://slidepdf.com/reader/full/making-horse-drawn-coaches-1800-bw 353/455
TRIMMING DEPARTMENT. 297
the edge of the white muslin. This is for the purpose of hiding the white stuff whenthe top is let down.
Now bind the back valence and inside lace and front valence ; nail them on, but letthe back valence lap one fourth of an inch lower than the bottom edge of the inside lace.
Now fit up the back stays and back curtain by tacking them on to their places on the
top. We are aware that some trimmers are in the habit of fitting up these on the
bench ; that is, marking them off for the loops and curtain straps, but we do not ap-
prove of the plan, because a top is not like a fixed piece of frame work, and it willgive or spring more or less ; we have noticed jobs fitted up in this way which cameout anything but right. The best way, as a rule, is to fit everything where it belongs.
Stitch on your loops, rivet in the knobs in the back stays, and line them as well as the
curtain. It is best to tear off a piece the full width of the cloth, just the length of theback curtain ; the over width from the curtain will line the stays, and leave a strip for
a cushion border. While these are drying, stitch and close your top, and cut off the
basting stitches, then hammer down the seam on a smooth, hard board (hammer the
wrong side) ; then rub very hard with a slicker, and, if convenient, get some one to
hold one end of the seam while you nib and stretch it up.
Now draw on the leather, commencing in front, then pull backward, then again at
the front, and tack down to its place. Now put on your joints, and stitch the edges
of backstays, and then nail them on with fourorsixoz. tacks, at the inner up edge, wherethe tacks will be covered by the curtain. (Always be careful that the back stays,
when up, measure the same across from the bottom inside corner of one to the upperinside corner of the other; if they do not the whole top will look lop-sided) ; baste onthe stays, and with one needle stitch the inside quarters to them ; finish the back cur-
tain, baste it on, let it hang loosely; fasten the inside lace to the head lining, either
with paste or by sewing. Now fit the side curtains, and then give the joints to the
painter;
proceed to stitch (or bind off) the top ; when done, unscrew the rail from the
trestle, and turn the top upside down, and rivet the knobs in the rail. Now paste out
the side curtains, and while they are drying make up and finish the cushion and fall
and carpets; trim the shafts, and make up the side curtains.
And now finish up all small things as prop blocks, whip socket, apron and straps ; butbefore the painters put on the finishing varnish, nail in the seat pocket. AlwaysFINISH up each job completely, so that no part of it will remain undone, to be an an-
noyance to you when the job is sold and about to be sent away. Do this way, andmany a growl with the boss will be saved.
METHOD APPLIED TO A CLOSE-TOP GIG OR PHAETON.
If it is to be a shifting-top, proceed as for a roll-top. When the body is trimmed,set up the bows ; and when the top is in its place, proceed to put in the head lining.
Fit on the cloth smoothly over the bows, then mark the lower edge of the rail withchalk, on the cloth, from the edge of the back stay line around to a point two inches
in front of the prop-block ; also from a point about five inches back from the slat-iron
prop to the line of the front bow, and four inches above the slat-iron prop. Paste thin
enameled leather, four inches wide, on the back part of the head lining, the bottomedge of the leather to come down to the chalk mark already made ; but in front it will
be necessary for the leather to be wide enough to extend to the mark, four inches
above the slat-iron prop ; also mark the point of the slat-iron prop. If you intend to
slip the head lining on the prop, you should stich a hole in it for that purpose, but it
is best to use the half-bow cap finish, as it appears to obviate all danger of the head lin-
ing tearing out at that point ; and we also use the piece of wood screwed to the side of
the rail, and projectinfr out flush with the eiVje of the seat, for fcis'euin',' tlie head lin-
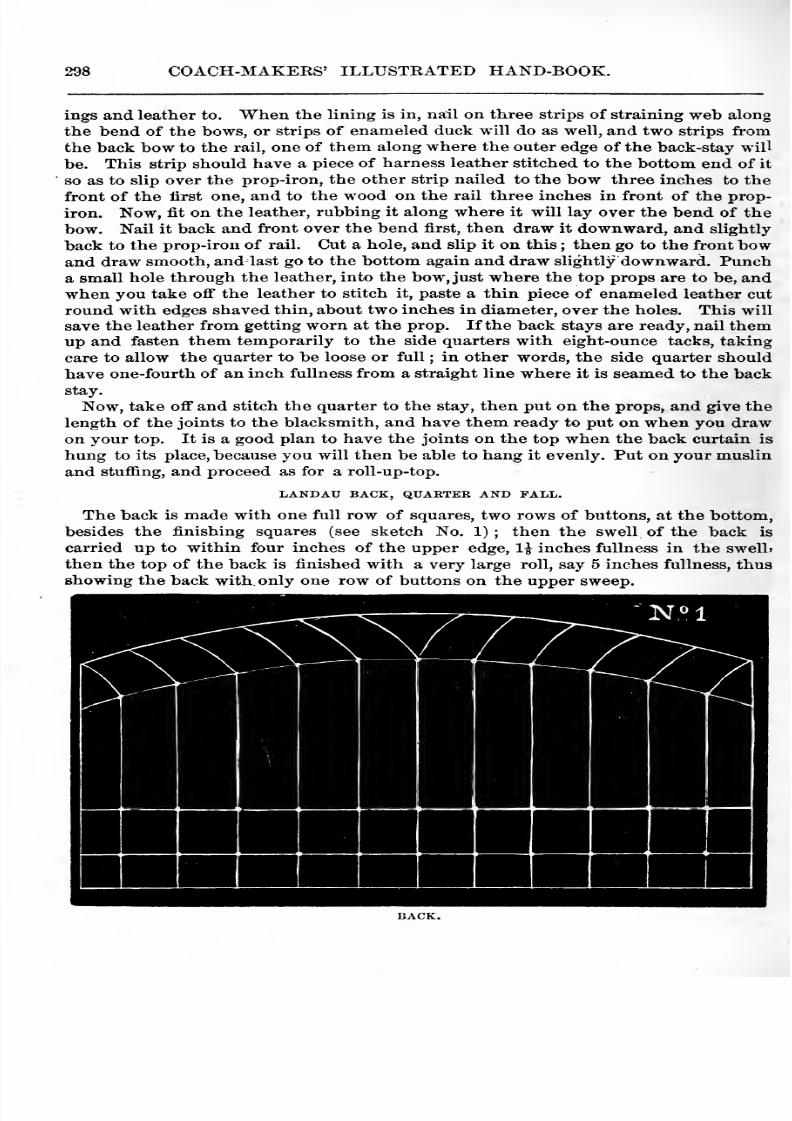
8/10/2019 Making Horse Drawn Coaches 1800 Bw
http://slidepdf.com/reader/full/making-horse-drawn-coaches-1800-bw 354/455
298 COACH-MAKERS' ILLUSTRATED HAND-BOOK.
ings and leather to. When the lining is in, nail on three strips of straining web along
the bend of the bows, or strips of enameled duck will do as well, and two strips from
the back bow to the rail, one of them along where the outer edge of the back-stay willbe. This strip should have a piece of harness leather stitched to the bottom end of it
so as to slip over the prop-iron, the other strip nailed to the bow three inches to the
front of the iirst one, and to the wood on the rail three inches in front of the prop-
iron. Now, fit on the leather, rubbing it along where it will lay over the bend of the
bow. Nail it back and front over the bend first, then draw it downward, and slightly
back to the prop-iron of rail. Cut a hole, and slip it on this ; then go to the front bowand draw smooth, and last go to the bottom again and draw slightly downward. Puncha small hole through the leather, into the bow, just where the top props are to be, and
when you take off the leather to stitch it, paste a thin piece of enameled leather cutround with edges shaved thin, about two inches in diameter, over the holes. This will
save the leather from getting worn at the prop. If the back stays are ready, nail themup and fasten them temporarily to the side quarters with eight-ounce tacks, taking
care to allow the quarter to be loose or full ; in other words, the side quarter should
have one-fourth of an inch fullness from a straight line where it is seamed to the backstay.
Now, take off and stitch the quarter to the stay, then put on the props, and give the
length of the joints to the blacksmith, and have them ready to put on when you drawon your top. It is a good plan to have the joints on the top when the back curtain is
hung to its place, because you will then be able to hang it evenly. Put on your muslin
and stuffing, and proceed as for a roll-up-top.
LANDAU BACK, QUARTER AND FALL.
The back is made with one full row of squares, two rows of buttons, at the bottom,
besides the finishing squares (see sketch No. 1) ; then the swell of the back is
carried up to within four inches of the upper edge, 1^ inches fullness in the swelbthen the top of the back is finished with a very large roll, say 5 inches fullness, thus
showing the back with only one row of buttons on the upper sweep.
BACK.
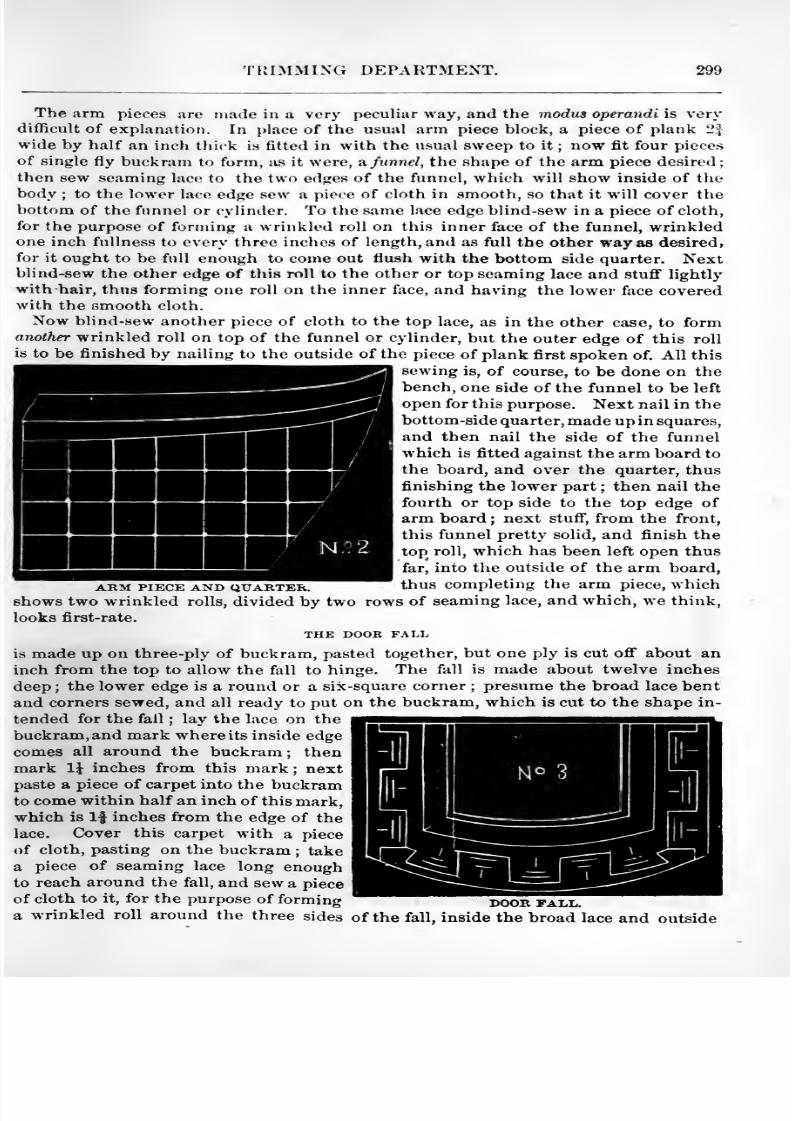
8/10/2019 Making Horse Drawn Coaches 1800 Bw
http://slidepdf.com/reader/full/making-horse-drawn-coaches-1800-bw 355/455
TRIMMING DEPARTMENT. 299
The arm pieces are made in a very peculiar way, and the modus operandi is verydifficult of explanation. In place of the usual arm piece block, a piece of plank 2]
wide by half an inch thick is fitted in with the usual sweep to it ;
now fit four piecesof single fly buckram to form, jis it were, & funnel, the shape of the arm piece desired
then sew seaming lace to the two edges of the funnel, which will show inside of the
body ; to the lower lace edge sew a piece of cloth in smooth, so that it will cover thebottom of the funnel or cylinder. To the same lace edge blind-sew in a piece of cloth,
for the purpose of forming a wrinkled roll on this inner face of the funnel, wrinkledone inch fullness to every three inches of length, and as full the other way as desired,
for it ought to be full enough to come out flush with the bottom side quarter. Nextblind-sew the other edge of this roll to the other or top seaming lace and stufi lightly
with hair, thus forming one roll on the inner face, and having the lower face coveredwith the smooth cloth.
Now blind-sew another piece of cloth to the top lace, as in the other case, to formanother wrinkled roll on top of the funnel or cylinder, but the outer edge of this roll
is to be finished by nailing to the outside of the piece of plank first spoken of. All this
sewing is, of course, to be done on the
bench, one side of the funnel to be left
open for this purpose. Next nail in the
bottom-side quarter, made up in squares,
and then nail the side of the funnel
which is fitted against the arm board to
the board, and over the quarter, thus
finishing the lower part ; then nail the
fourth or top side to the top edge of
arm board ; next stuff , from the front,
this funnel pretty solid, and finish the
top roll, which has been left open thus
far, into the outside of the arm board,
ARM PIECE AND QUARTER. thus Completing the arm piece, which
shows two wrinkled rolls, divided by two rows of seaming lace, and which, we think,
looks first-rate.
THE DOOR FALL
is made up on three-ply of buckram, pasted together, but one ply is cut off about aninch from the top to allow the fall to hinge. The fall is made about twelve inches
deep ; the lower edge is a round or a six-square corner;
presume the broad lace bent
and corners sewed, and all ready to put on the buckram, which is cut to the shape in-
tended for the fall ; lay the lace on the
buckram, and mark where its inside edge
comes all around the buckram ; thenmark 1\ inches from this mark; nextpaste a piece of carpet into the buckramto come within half an inch of this mark,which is 1| inches from the edge of the
lace. Cover this carpet with a piece
of cloth, pasting on the buckram ; take
a piece of seaming lace long enoughto reach around the fall, and sew a piece
of cloth to it, for the purpose of forming door pall.a wrinkled roll around the three sides of the fall, inside the broad lace and outside
•
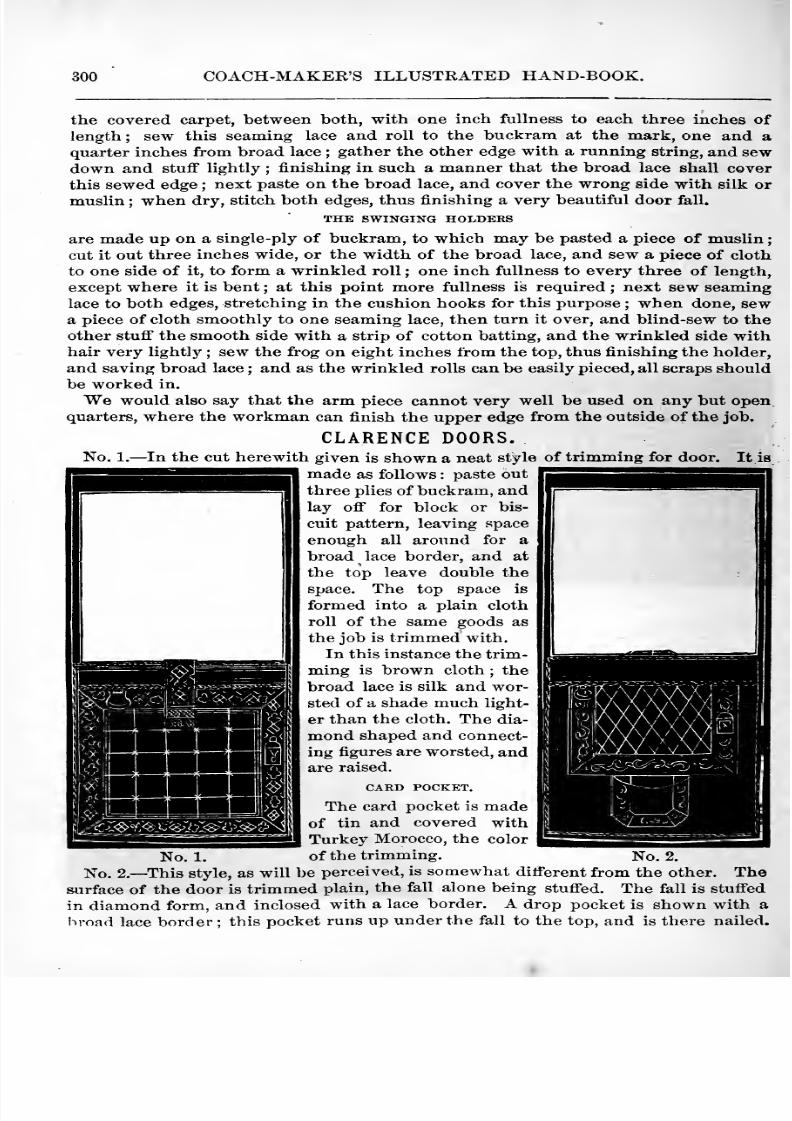
8/10/2019 Making Horse Drawn Coaches 1800 Bw
http://slidepdf.com/reader/full/making-horse-drawn-coaches-1800-bw 356/455
300 COACH-MAKER'S ILLUSTRATED HAND-BOOK.
the covered carpet, between both, with one inch fullness to each three inches of
length ; sew this seaming lace and roll to the buckram at the mark, one and a
quarter inches from broad lace ; gather the other edge with a running string, and sewdown and stuff lightly ; finishing in such a manner that the broad lace shall cover
this sewed edge ; next paste on the broad lace, and cover the wrong side with silk or
muslin ; when dry, stitch both edges, thus finishing a very beautiful door fall.
THE SWINGING HOLDERS
are made up on a single -ply of buckram, to which may be pasted a piece of muslin
cut it out three inches wide, or the width of the broad lace, and sew a piece of cloth
to one side of it, to form a wrinkled roll ; one inch fullness to every three of length,
except where it is bent; at this point more fullness is required; next sew seaminglace to both edges, stretching in the cushion hooks for this purpose ; when done, sewa piece of cloth smoothly to one seaming lace, then turn it over, and blind-sew to the
other stuff the smooth side with a strip of cotton batting, and the wrinkled side withhair very lightly ; sew the frog on eight inches from the top, thus finishing the holder,
and saving broad lace ; and as the wrinkled rolls can be easily pieced, all scraps shouldbe worked in.
We would also say that the arm piece cannot very well be used on any but openquarters, where the workman can finish the upper edge from the outside of the job.
CLARENCE DOORS.No. 1. —In the cut herewith given is shown a neat style of trimming for door. It is
made as follows : paste out
three plies of buckram, andlay off for block or bis-
cuit pattern, leaving space
enough all around for a
broad lace border, and at
the top leave double the
space. The top space is
formed into a plain cloth
roll of the same goods as
the job is trimmed with.
In this instance the trim-
ming is brown cloth ; the
broad lace is silk and wor-
sted of a shade much light-
er than the cloth. The dia-
mond shaped and connect-
ing figures are worsted, andare raised.
CARD POCKET.
The card pocket is madeof tin and covered with
Turkey Morocco, the color
No. 1. of the trimming. No. 2.
No. 2.— This style, as will be perceived, is somewhat different from the other. Thesurface of the door is trimmed plain, the fall alone being stuffed. The fall is stuffed
in diamond form, and inclosed with a lace border. A drop pocket is shown with a
hroad lace border ; this pocket runs up under the fall to the top, and is there nailed.
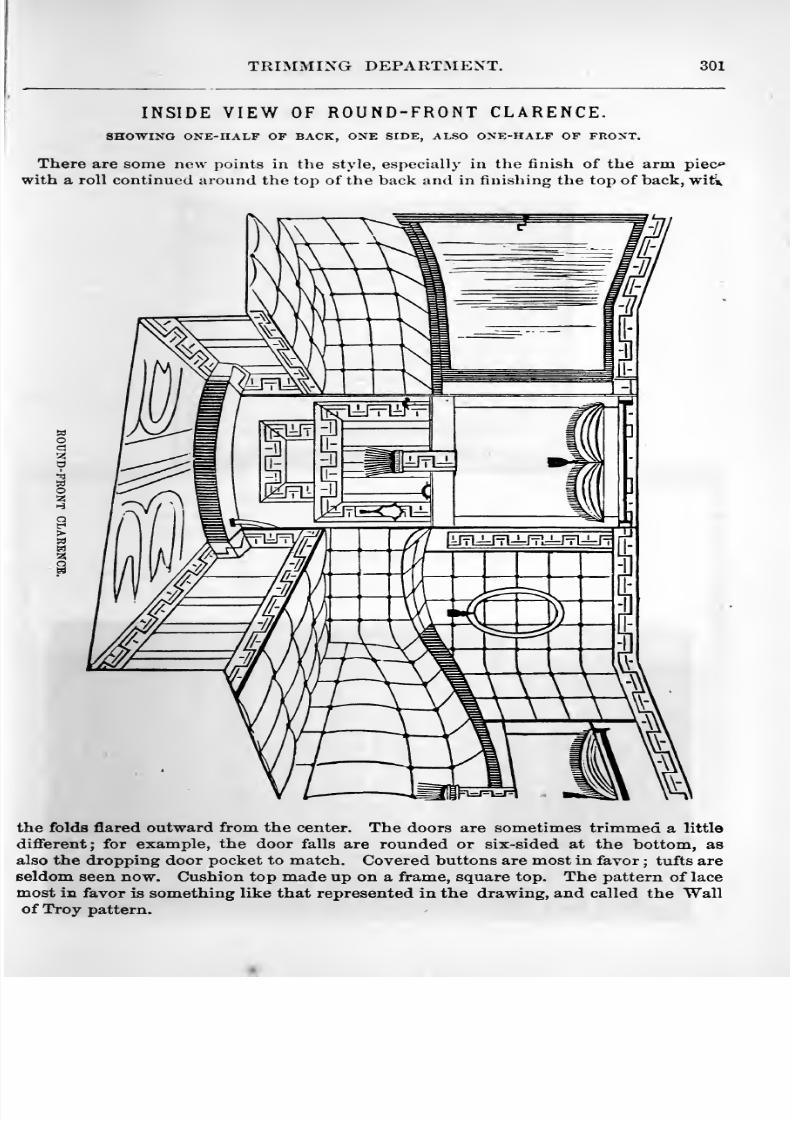
8/10/2019 Making Horse Drawn Coaches 1800 Bw
http://slidepdf.com/reader/full/making-horse-drawn-coaches-1800-bw 357/455
TRIMMING DEPARTMENT. 301
INSIDE VIEW OF ROUND-FRONT CLARENCE.SHOWING ONE-HALF OF BACK, ONE SIDE, ALSO ONE-HALF OF FRONT.
There are some new points in the style, especially in the finish of the arm piec^
with a roll continued around the top of the back and in finishing the top of back, wit*
the folds flared outward from the center. The doors are sometimes trimmed a little
different; for example, the door falls are rounded or six-sided at the bottom, as
also the dropping door pocket to match. Covered buttons are most in favor ; tufts are
seldom seen now. Cushion top made up on a frame, square top. The pattern of lace
most in favor is something like that represented in the drawing, and called the Wallof Troy pattern.
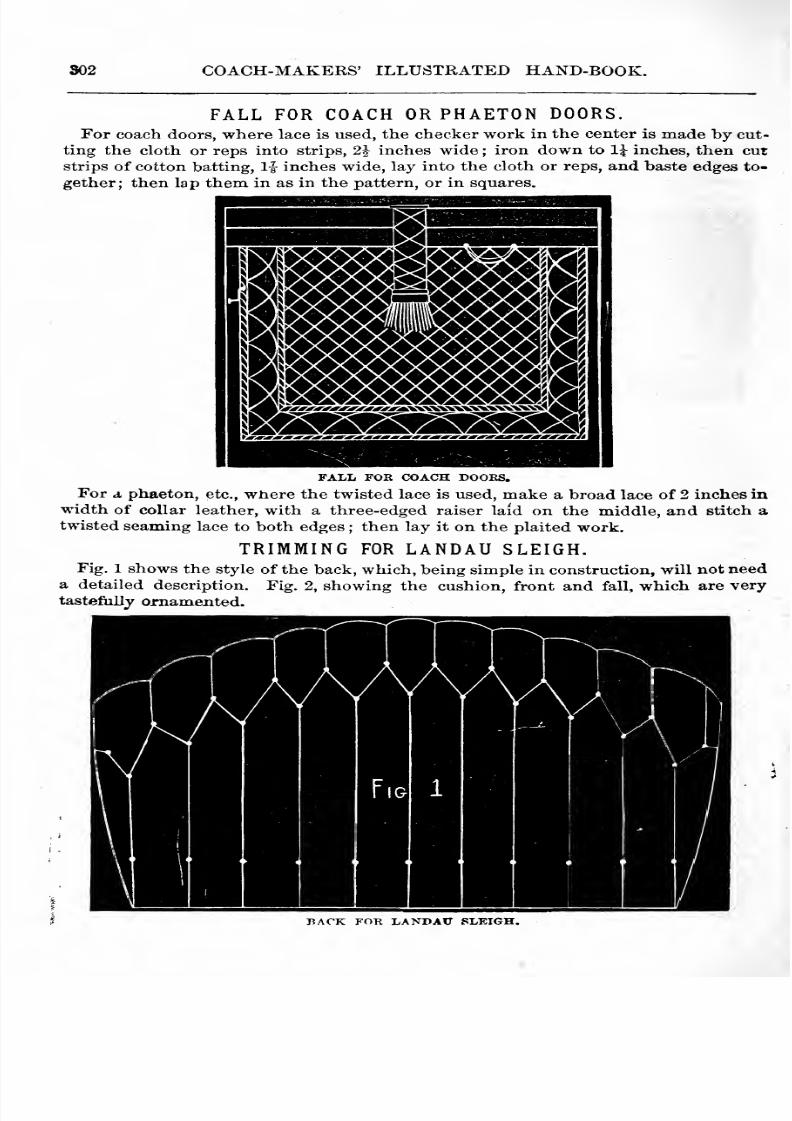
8/10/2019 Making Horse Drawn Coaches 1800 Bw
http://slidepdf.com/reader/full/making-horse-drawn-coaches-1800-bw 358/455
302 COACH-MAKERS' ILLUSTRATED HAND-BOOK.
FALL FOR COACH OR PHAETON DOORS.For coach doors, where lace is used, the checker work in the center is made by cut-
ting the cloth or reps into strips, 2J inches wide ; iron down to 1^ inches, then cutstrips of cotton batting, li inches wide, lay into the cloth or reps, and baste edges to-
gether; then lap them in as in the pattern, or in squares.
FALL FOR COACH DOORS.
For a phaeton, etc., where the twisted lace is used, make a broad lace of 2 inches in
width of collar leather, with a three-edged raiser laid on the middle, and stitch atwisted seaming lace to both edges ; then lay it on the plaited work.
TRIMMING FOR LANDAU SLEIGH.Fig. 1 shows the style of the back, which, being simple in construction, will not need
a detailed description. Fig. 2, showing the cushion, front and fall, which are verytastefully ornamented.
^MBACK FOR LANDAU SLEIGH.
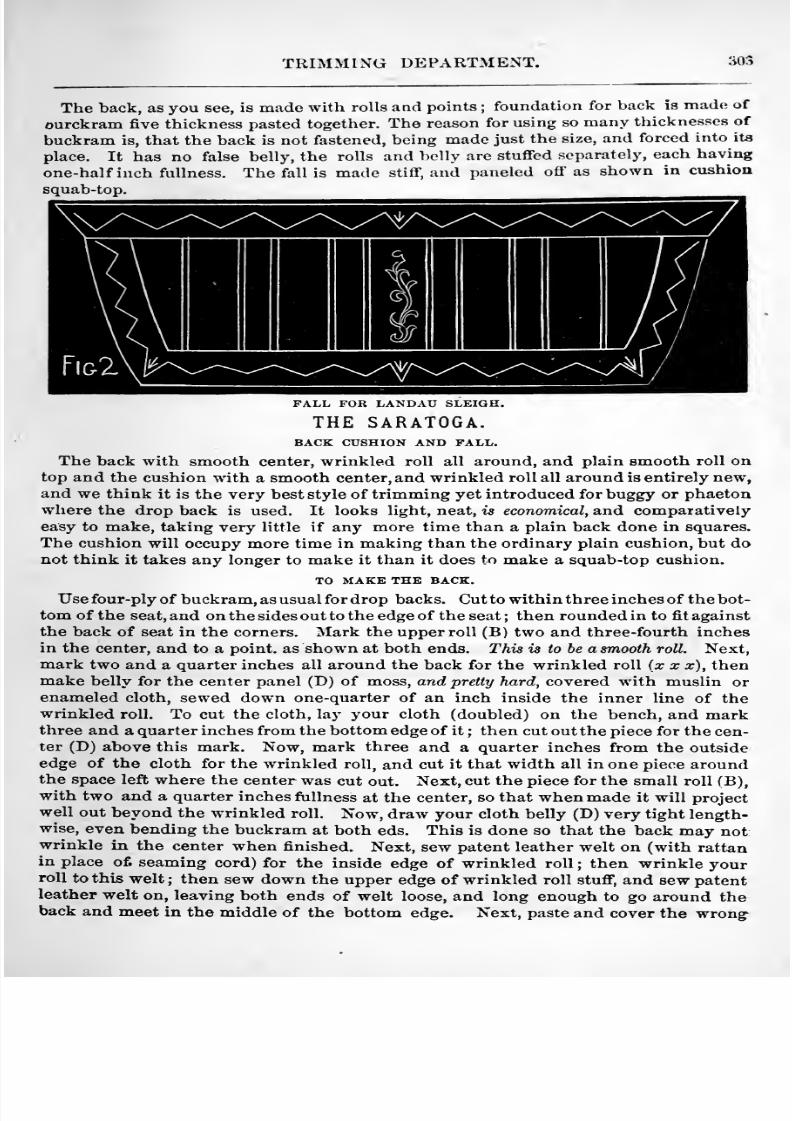
8/10/2019 Making Horse Drawn Coaches 1800 Bw
http://slidepdf.com/reader/full/making-horse-drawn-coaches-1800-bw 359/455
TRIMMING DEPARTMENT. 303
The back, as you see, is made with rolls and points ; foundation for back is made of
ourckram five thickness pasted together. The reason for using so many thicknesses of
buckram is, that the back is not fastened, being made just the size, and forced into ita
place. It has no false belly, the rolls and belly are stuffed separately, each having
one-half inch fullness. The fall is made stiff, and paneled off as shown in cushion
squab-top.
FALL FOR LANDAU SLEIGH.
THE SARATOGA.BACK CUSHION AND FALL.
The back with smooth center, wrinkled roll all around, and plain smooth roll ontop and the cushion with a smooth center, and wrinkled roll all around is entirely new,and we think it is the very best style of trimming yet introduced for buggy or phaetonwhere the drop back is used. It looks light, neat, is economical, and comparatively
easy to make, taking very little if any more time than a plain back done in squares.
The cushion will occupy more time in making than the ordinary plain cushion, but donot think it takes any longer to make it than it does to make a squab-top cushion.
TO MAKE THE BACK.
Use four-ply of buckram, as usual for drop backs. Cut to within th ree inches of the bot-tom of the seat, and on the sides outto the edge of the seat; then rounded in to fit against
the back of seat in the corners. Mark the upper roll (B) two and three-fourth inches
in the center, and to a point, as shown at both ends. This is to be a smooth roll. Next,mark two and a quarter inches all around the back for the wrinkled roll (x x ar), thenmake belly for the center panel (D) of moss, and pretty hard, covered with muslin or
enameled cloth, sewed down one-quarter of an inch inside the inner line of thewrinkled roll. To cut the cloth, lay your cloth (doubled) on the bench, and markthree and a quarter inches from the bottom edge of it ; then cut out the piece for the cen-
ter (D) above this mark. Now, mark three and a quarter inches from the outsideedge of the cloth for the wrinkled roll, and cut it that width all in one piece aroundthe space left where the center was cut out. Next, cut the piece for the small roll fB),
with two and a quarter inches fullness at the center, so that when made it will projectwell out beyond the wrinkled roll. Now, draw your cloth belly (D) very tight length-wise, even bending the buckram at both eds. This is done so that the back may notwrinkle in the center when finished. Next, sew patent leather welt on (with rattanin place of. seaming cord) for the inside edge of wrinkled roll ; then wrinkle yourroll to this welt ; then sew down the upper edge of wrinkled roll stuff, and sew patent
leather welt on, leaving both ends of welt loose, and long enough to go around theback and meet in the middle of the bottom edge. Next, paste and cover the wrong
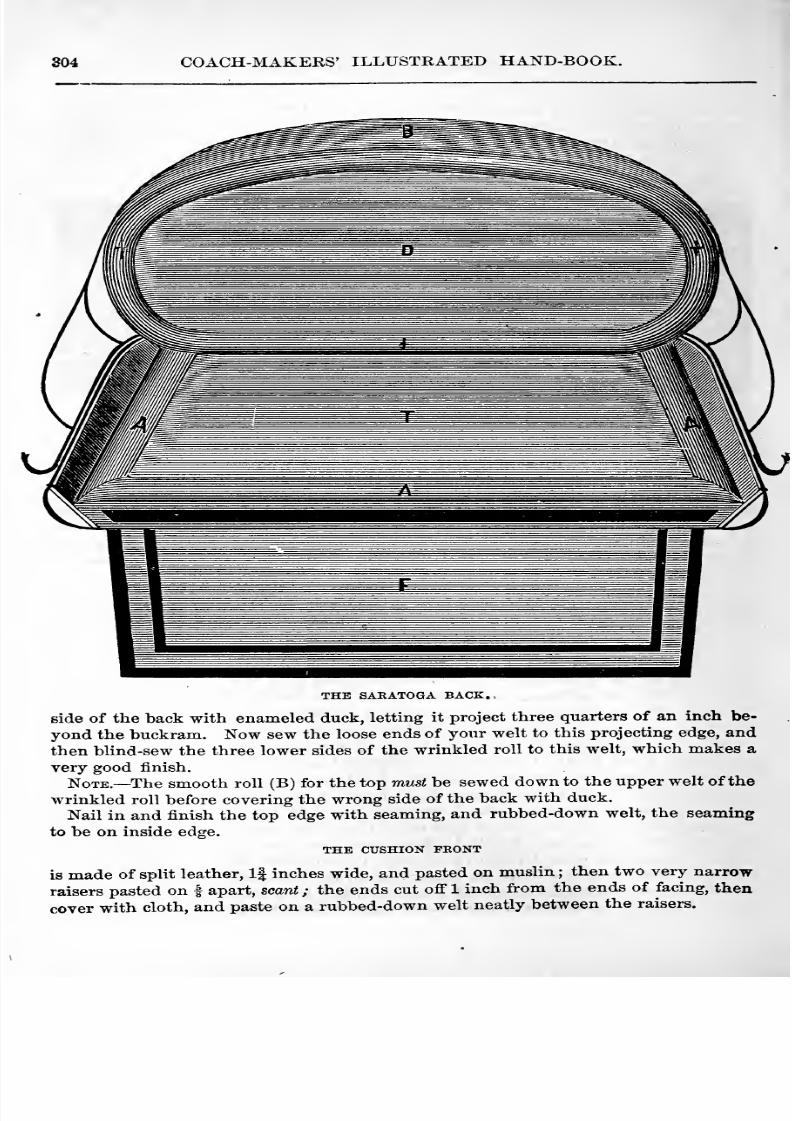
8/10/2019 Making Horse Drawn Coaches 1800 Bw
http://slidepdf.com/reader/full/making-horse-drawn-coaches-1800-bw 360/455
804 COACH-MAKERS' ILLUSTRATED HAND-BOOK.
THE SARATOGA BACK..
side of the back with enameled duck, letting it project three quarters of an inch be-
yond the buckram. Now sew the loose ends of your welt to this projecting edge, and
then blind-sew the three lower sides of the wrinkled roll to this welt, which makes avery good finish.
Note.— The smooth roll (B) for the top must be sewed down to the upper welt of the
wrinkled roll before covering the wrong side of the back with duck.
Nail in and finish the top edge with seaming, and rubbed-down welt, the seaming
to be on inside edge.
THE CUSHION FRONT
is made of split leather, 1| inches wide, and pasted on muslin ; then two very narrow
raisers pasted on | apart, scant ; the ends cut off 1 inch from the ends of facing, then
cover with cloth, and paste on a rubbed-down welt neatly between the raisers.
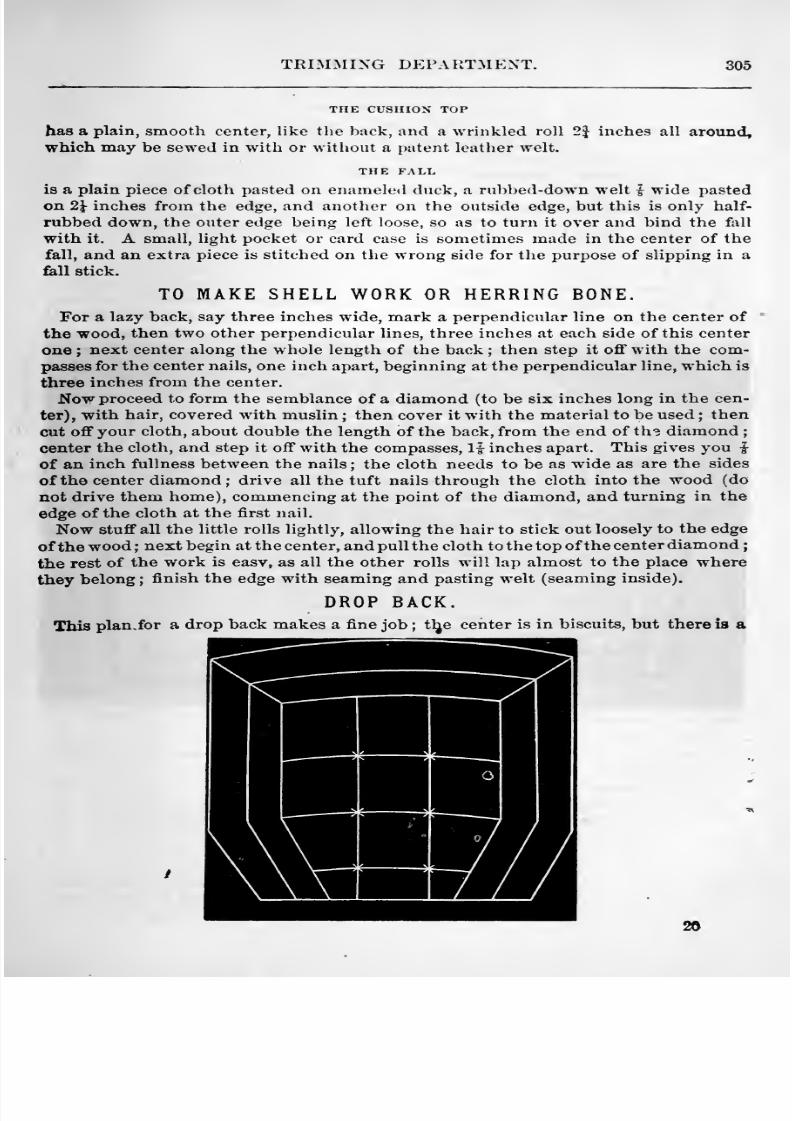
8/10/2019 Making Horse Drawn Coaches 1800 Bw
http://slidepdf.com/reader/full/making-horse-drawn-coaches-1800-bw 361/455
TRIMMING DEPARTMENT. 305
THE CUSHION TOP
has a plain, smooth center, like the back, and a wrinkled roll 2i inches all around,
which may be sewed in with or without a patent leather welt.
THE FALL
is a plain piece of cloth pasted on enameled duck, a rubbed-down welt i wide pasted
on 2|- inches from the edge, and another on the outside edge, but this is only half-
rubbed down, the outer edge being left loose, so as to turn it over and bind the fall
with it. A small, light pocket or card case is sometimes made in the center of the
fall, and an extra piece is stitched on the wrong side for the purpose of slipping in a
fall stick.
TO MAKE SHELL WORK OR HERRING BONE.For a lazy back, say three inches wide, mark a perpendicular line on the center of
the wood, then two other perpendicular lines, three inches at each side of this center
one ; next center along the whole length of the back ; then step it off with the com-passes for the center nails, one inch apart, beginning at the perpendicular line, which is
three inches from the center.
Now proceed to form the semblance of a diamond (to be six inches long in the cen-
ter), with hair, covered with muslin ; then cover it with the material to be used ; then
cut off your cloth, about double the length of the back, from the end of th3 diamond ;
center the cloth, and step it off with the compasses, 1| inches apart. This gives you |of an inch fullness between the nails ; the cloth needs to be as wide as are the sides
of the center diamond ; drive all the tuft nails through the cloth into the wood (do
not drive them home), commencing at the point of the diamond, and turning in the
edge of the cloth at the first nail.
Now stuff all the little rolls lightly, allowing the hair to stick out loosely to the edge
of the wood ; next begin at the center, and pull the cloth to the top of the center diamond;
the rest of the work is easy, as all the other rolls will lap almost to the place where
they belong ; finish the edge with seaming and pasting welt (seaming inside).
DROP BACK.This plan, for a drop back makes a fine job ; tl^e center is in biscuits, but there is a
20
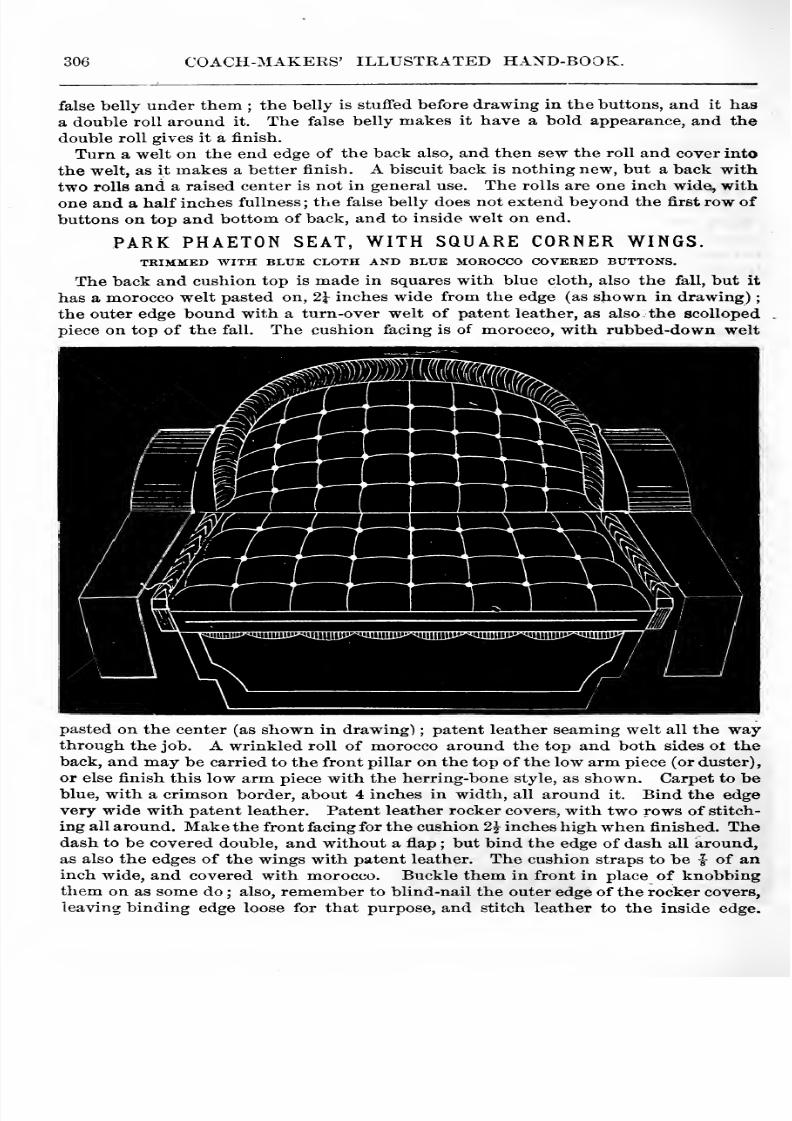
8/10/2019 Making Horse Drawn Coaches 1800 Bw
http://slidepdf.com/reader/full/making-horse-drawn-coaches-1800-bw 362/455
306 COACH-MAKERS' ILLUSTRATED HAND-BOOK.
false belly under them ; the belly is stuffed before drawing in the buttons, and it has
a double roll around it. The false belly makes it have a bold appearance, and the
double roll gives it a finish.
Turn a welt on the end edge of the back also, and then sew the roll and cover into
the welt, as it makes a better finish. A biscuit back is nothing new, but a back with
two rolls and a raised center is not in general use. The rolls are one inch wide, with
one and a half inches fullness; the false belly does not extend beyond the first row of
buttons on top and bottom of back, and to inside welt on end.
PARK PHAETON SEAT, WITH SQUARE CORNER WINGS.TRIMMED WITH BLUE CLOTH AND BLUE MOROCCO COVERED BUTTONS.
The back and cushion top is made in squares with blue cloth, also the fall, but it
has a morocco welt pasted on, 21 inches wide from the edge (as shown in drawing)the outer edge bound with a turn-over welt of patent leather, as also the scolloped
piece on top of the fall. The cushion facing is of morocco, with rubbed-down welt
pasted on the center (as shown in drawing) ; patent leather seaming welt all the way
through the job. A wrinkled roll of morocco around the top and both sides ot theback, and may be carried to the front pillar on the top of the low arm piece (or duster),
or else finish this low arm piece with the herring-bone style, as shown. Carpet to beblue, with a crimson border, about 4 inches in width, all around it. Bind the edgevery wide with patent leather. Patent leather rocker covers, with two rows of stitch-
ing all around. Make the front facing for the cushion 2^ inches high when finished. Thedash to be covered double, and without a flap ; but bind the edge of dash all around,
as also the edges of the wings with patent leather. The cushion straps to be i of aninch wide, and covered with morocco. Buckle them in front in place of knobbingthem on as
some do; also,
rememberto blind-nail
theouter
edge of the rockercovers,
leaving binding edge loose for that purpose, and stitch leather to the inside edge.
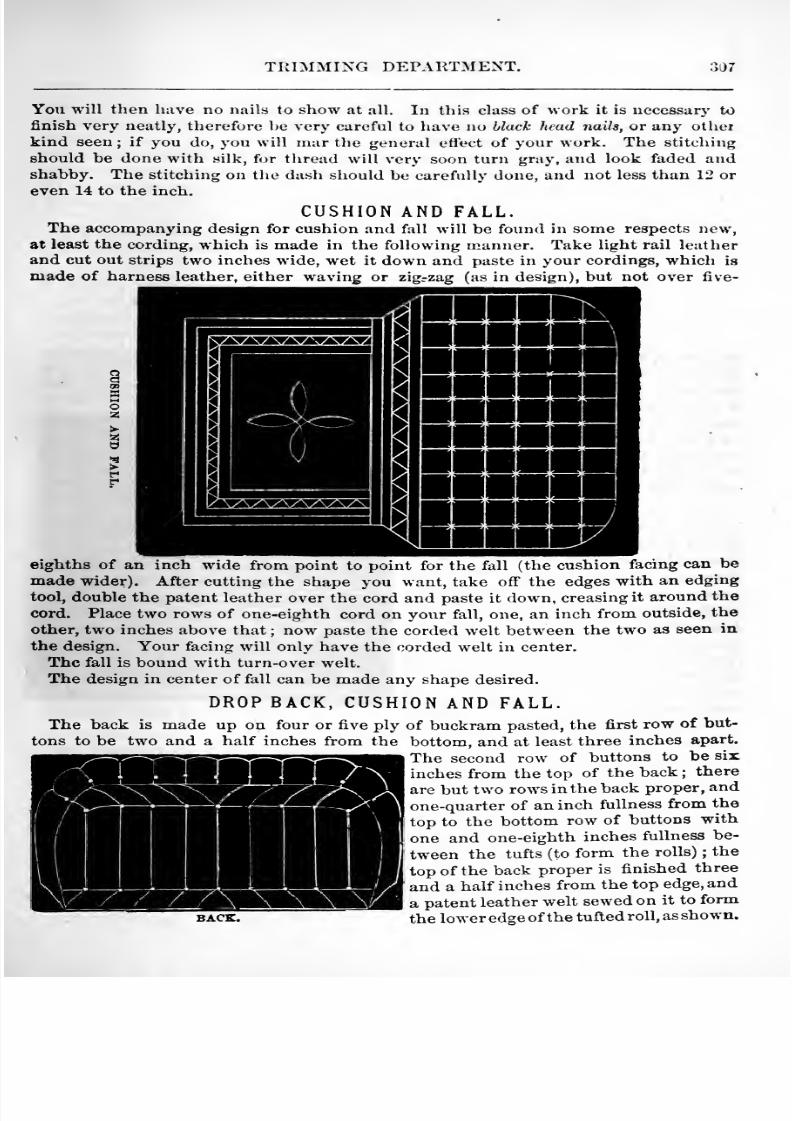
8/10/2019 Making Horse Drawn Coaches 1800 Bw
http://slidepdf.com/reader/full/making-horse-drawn-coaches-1800-bw 363/455
TRIMMING DEPARTMENT. W7
You will then have no nails to show at all. In this class of work it is necessary to
finish very neatly, theref(jre be very careful to have no black head naiU, or any other
kind seen; if you do, you will mar the general etiect of your work. The stitching
should be done with silk, for thread will very soon turn gray, and look faded andshabby. The stitching on the dash should be carefully done, and not less than 12 or
even 14 to the inch.
CUSHION AND FALL.The accompanying design for cushion and fall will be found in some respects new,
at least the cording, which is made in the following uianner. Take light rail leather
and cut out strips two inches wide, wet it down and paste in your cordings, which is
made of harness leather, either waving or zigrzag (as in design), but not over five-
eighths of an inch wide from point to point for the fall (the cushion facing can be
made wider). After cutting the shape you want, take ofi the edges with an edging
tool, double the patent leather over the cord and paste it down, creasing it around thecord. Place two rows of one-eighth cord on your fall, one, an inch from outside, the
other, two inches above that ; now paste the corded welt between the two as seen in
the design. Your facing will only have the corded welt in center.
The fall is bound with turn-over welt.
The design in center of foil can be made any shape desired.
DROP BACK, CUSHION AND FALL.The back is made up on four or five ply of buckram pasted, the first row of but-
tons to be two and a half inches from the bottom,and
at least three inches apart.
The second row of buttons to be sir
inches from the top of the back ; there
are but two rows in the back proper, and
one-quarter of an inch fullness from the
top to the bottom row of buttons with
one and one-eighth inches fullness be-
tween the tufts (to form the rolls) ; the
top of the back proper is finished three
and a half inches from the top edge, and
a patent leather welt sewed on it to formBACK. the lower edge of the tufted roll, as shown.
I
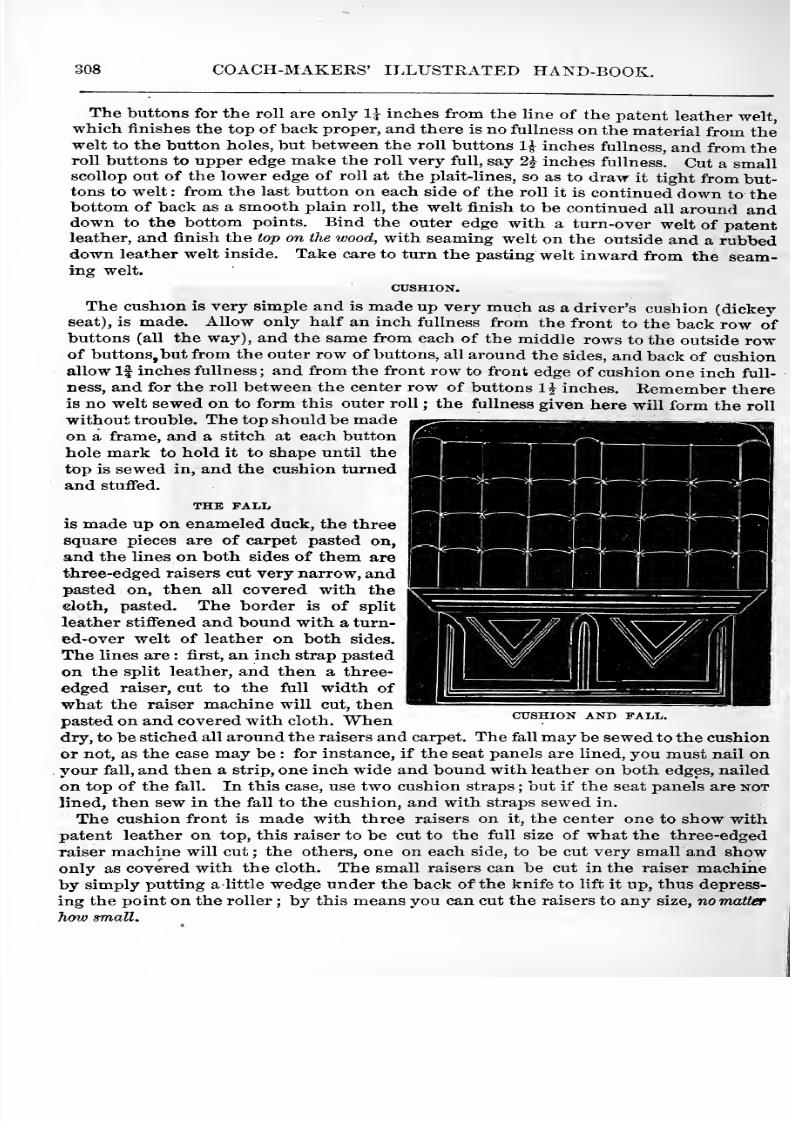
8/10/2019 Making Horse Drawn Coaches 1800 Bw
http://slidepdf.com/reader/full/making-horse-drawn-coaches-1800-bw 364/455
308 COACH-MAKERS' IT.LUSTRATED HAND-BOOK.
The buttons for the roll are only 1^ inches from the hne of the patent leather weltwhich finishes the top of back proper, and there is no fullness on the material from the
welt to the button holes, but between the roll buttons 1^ inches fullness, and from theroll buttons to upper edge make the roll very full, say 2J inches fullness. Cut a smallscollop out of the lower edge of roll at the plait-lines, so as to draw it tight from but-tons to welt : from the last button on each side of the roll it is continued down to thebottom of back as a smooth plain roll, the welt finish to be continued all around anddown to the bottom points. Bind the outer edge with a turn-over welt of patentleather, and finish the top on the wood, with seaming welt on the outside and a rubbeddown leather welt inside. Take care to turn the pasting welt inward from the seam-ing welt.
CUSHION.
The cushion is very simple and is made up very much as a driver's cushion (dickeyseat), is made. Allow only half an inch fullness from the front to the back row ofbuttons (all the way), and the same from each of the middle rows to the outside rowof buttons, but from the outer row of buttons, all around the sides, and back of cushionallow If inches fullness; and from the front row to front edge of cushion one inch full-
Dess, and for the roll between the center row of buttons 1^ inches. Remember thereis no welt sewed on to form this outer roll ; the fullness given here will form the roll
without trouble. The top should be madeon a frame, and a stitch at each button
hole mark to hold it to shape until the
top is sewed in, and the cushion turned
and stufied.
THE FALL
is made up on enameled duck, the three
square pieces are of carpet pasted on,
and the lines on both sides of them are
three-edged raisers cut very narrow, andpasted on, then all covered with thecloth, pasted. The border is of split
leather stiffened and bound with a turn-
ed-over welt of leather on both sides.
The lines are : first, an inch strap pasted
on the split leather, and then a three-
edged raiser, cut to the full width of
what the raiser machine will cut, then
pasted on and covered with cloth. Whendry, to be stiched all around the raisers and carpet. The fall may be sewed to the cushion
or not, as the case may be : for instance, if the seat panels are lined, you must nail onyour fall, and then a strip, one inch wide and bound with leather on both edges, nailed
on top of the fall. In this case, use two cushion straps ; but if the seat panels are notlined, then sew in the fall to the cushion, and with straps sewed in.
The cushion front is made with three raisers on it, the center one to show withpatent leather on top, this raiser to be cut to the full size of what the three-edged
raiser machine will cut ; the others, one on each side, to be cut very small and showonly as covered with the cloth. The small raisers can be cut in the raiser machineby simply putting a little wedge under the back of the knife to lift it up, thus depress-
ing the point on the roller ; by this means you can cut the raisers to any size, no matter
how small.
CUSHION AND FALL.
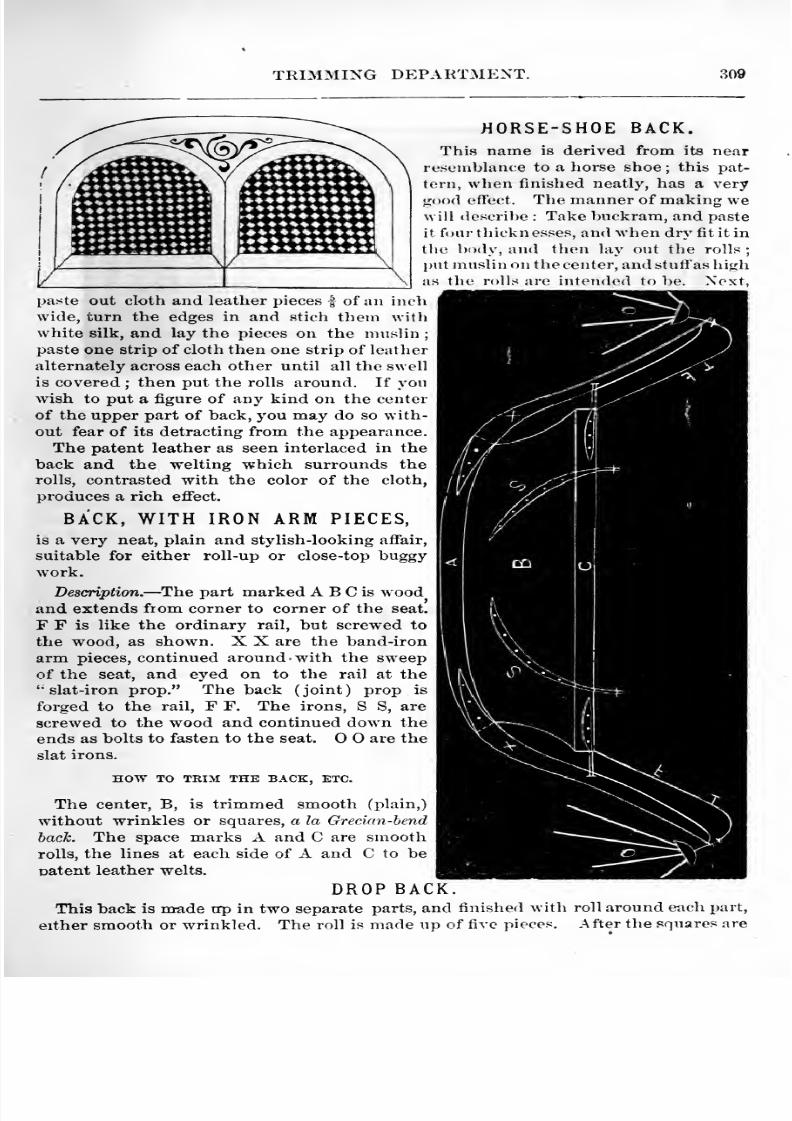
8/10/2019 Making Horse Drawn Coaches 1800 Bw
http://slidepdf.com/reader/full/making-horse-drawn-coaches-1800-bw 365/455
TRIMMING DEPARTMENT. 300
^?l^^'
1/
>%«%%#HORSE-SHOE BACK.
This name is derived from its nearresemblance to a horse shoe ; this pat-
tern, when finished neatly, has a very
•rood effect. The manner of making wewill describe : Take buckram, and paste
it four thicknesses, and when dry fit it in
the body, and then lay out the rolls
put muslin on the center, and stuff as high
as the rolls are intended to l)e. Next,
paste out cloth and leather pieces ^ of an inchwide, turn the edges in and stich them with
white silk, and lay the pieces on the muslin;
paste one strip of cloth then one strip of leather
alternately across each other until all the swell
is covered ; then put the rolls around. If youw-ish to put a figure of any kind on the center
of the upper part of back, you may do so with-
out fear of its detracting from the appearance.
The patent leather as seen interlaced in theback and the welting which surrounds the
rolls, contrasted with the color of the cloth,
produces a rich effect.
BACK, WITH IRON ARM PIECES,
is a very neat, plain and stylish-looking affair,
suitable for either roll-up or close-top buggywork.
Description. —The partmarked A B C
is
woodand extends fiom corner to corner of the seat.
F F is like the ordinary rail, but screwed to
the wood, as shown. X X are the band-iron
arm pieces, continued around with the sweepof the seat, and eyed on to the rail at the
slat-iron prop. The back (joint) prop is
forged to the rail, F F. The irons, S S, are
screwed to the wood and continued down the
ends as bolts to fasten to the seat. are the
slat irons.
HOW TO TRIM THE BACK, ETC.
The center, B, is trimmed smooth (plain,)
without wrinkles or squares, a la Grecian-bend
hack. The space marks A and C are smoothrolls, the lines at each side of A and C to be
patent leather welts.
DROP BACK.This hack is made up in two separate parts, and finished with roll around ench part,
either smooth or wrinkled. The roll is made up of five pieces. After the squares are
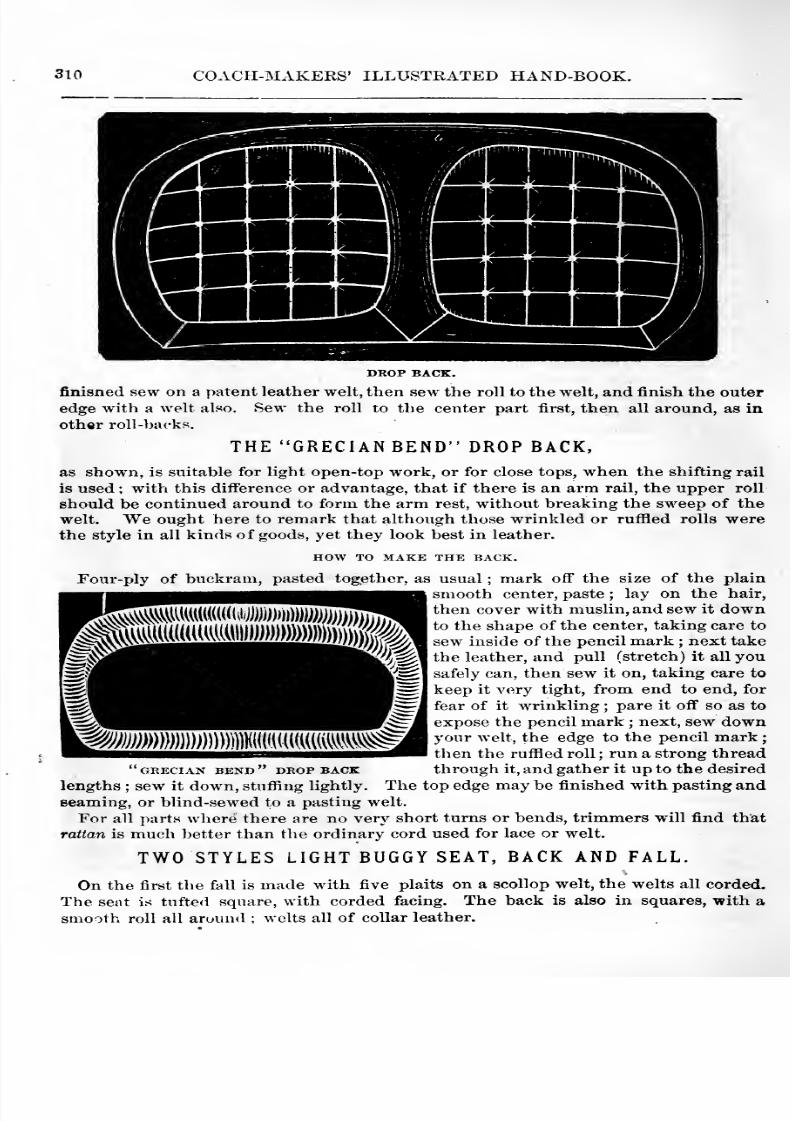
8/10/2019 Making Horse Drawn Coaches 1800 Bw
http://slidepdf.com/reader/full/making-horse-drawn-coaches-1800-bw 366/455
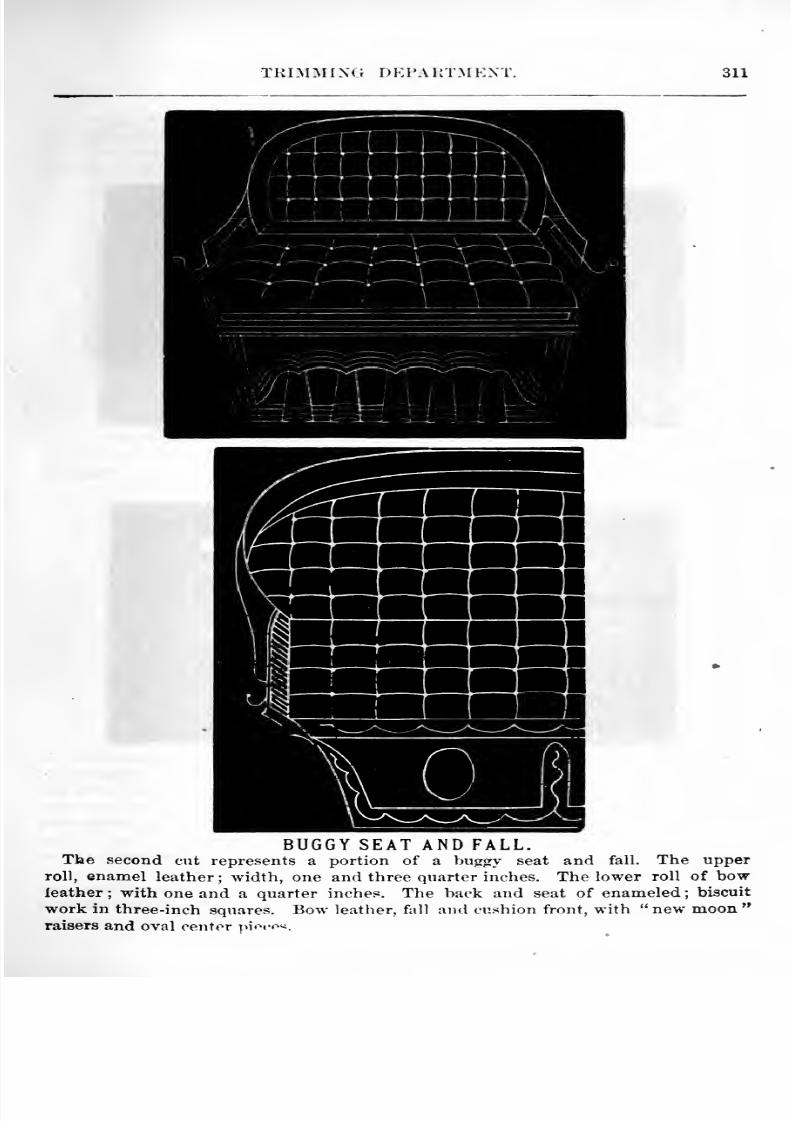
8/10/2019 Making Horse Drawn Coaches 1800 Bw
http://slidepdf.com/reader/full/making-horse-drawn-coaches-1800-bw 367/455
TRIMMING DEPARTMENT. 8U
i^J-—-
1
/f^J
1 1
[ ,
J
i —h\
4^ i i 1
r/ [\AV/ \; A \
^,^^. ^.-e-^m^a-^^- -.^-i .-L - J
BUGGY SEAT AND FALL.The second cut represents a portion of a bugory seat and falL The upper
roll, enamel leather; width, one and three quarter inches. The lower roll of bow
leather;
with one and a quarter inches. The back and seat of enameled;
biscuitwork in three-inch squares. Bow leather, fall and cushion front, with new moonraisers and oval center i^ioco^.
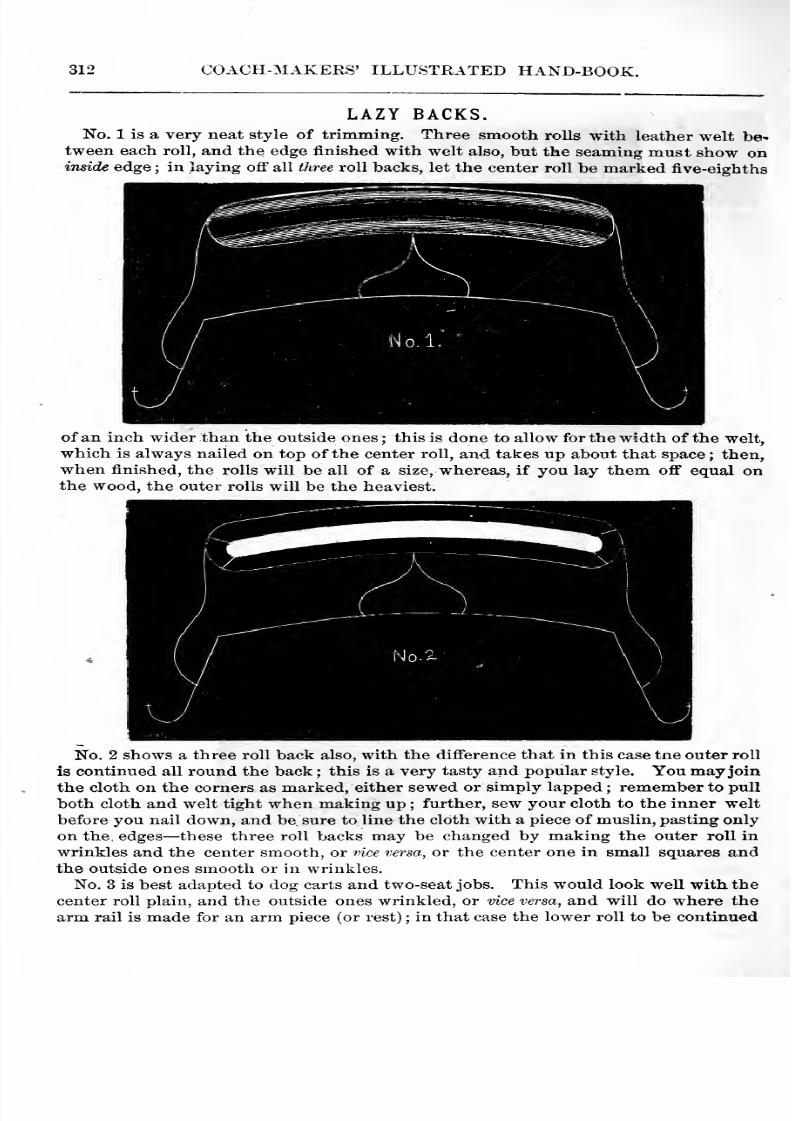
8/10/2019 Making Horse Drawn Coaches 1800 Bw
http://slidepdf.com/reader/full/making-horse-drawn-coaches-1800-bw 368/455
312 COACH-MAKERS' ILLUSTRATED HAND-BOOK.
LAZY BACKS.No. 1 is a very neat style of trimming. Three smooth rolls with leather welt be-
tween each roll, and the edge finished with welt also, but the seaming must show oninside edge ; in laying off all three roll backs, let the center roll be marked five-eighths
of an inch wider than the outside ones ; this is done to allow for the width of the welt,
which is always nailed on top of the center roll, and takes up about that space ; then,
when finished, the rolls will be all of a size, whereas, if you lay them off equal onthe wood, the outer rolls will be the heaviest.
No. 2 shows a three roll back also, with the difference that in this case tne outer roll
is continued all round the back ; this is a very tasty and popular style. You may join
the cloth on the corners as marked, either sewed or simply lapped ; remember to pull
both cloth and welt tight when making up ; further, sew your cloth to the inner welt
before you nail down, and be sure to line the cloth with a piece of muslin, pasting only
on the, edges —these three roll backs may be changed by making the outer roll in
wrinkles and the center smooth, or mce versa, or the center one in small squares andthe outside ones smooth or in wrinkles.
No. 3 is best adapted to dog carts and two-seat jobs. This would look well with the
center roll plain, and the outside ones wrinkled, or vice versa, and will do where the
arm rail is made for an arm piece (or rest) ; in that case the lower roll to be continued
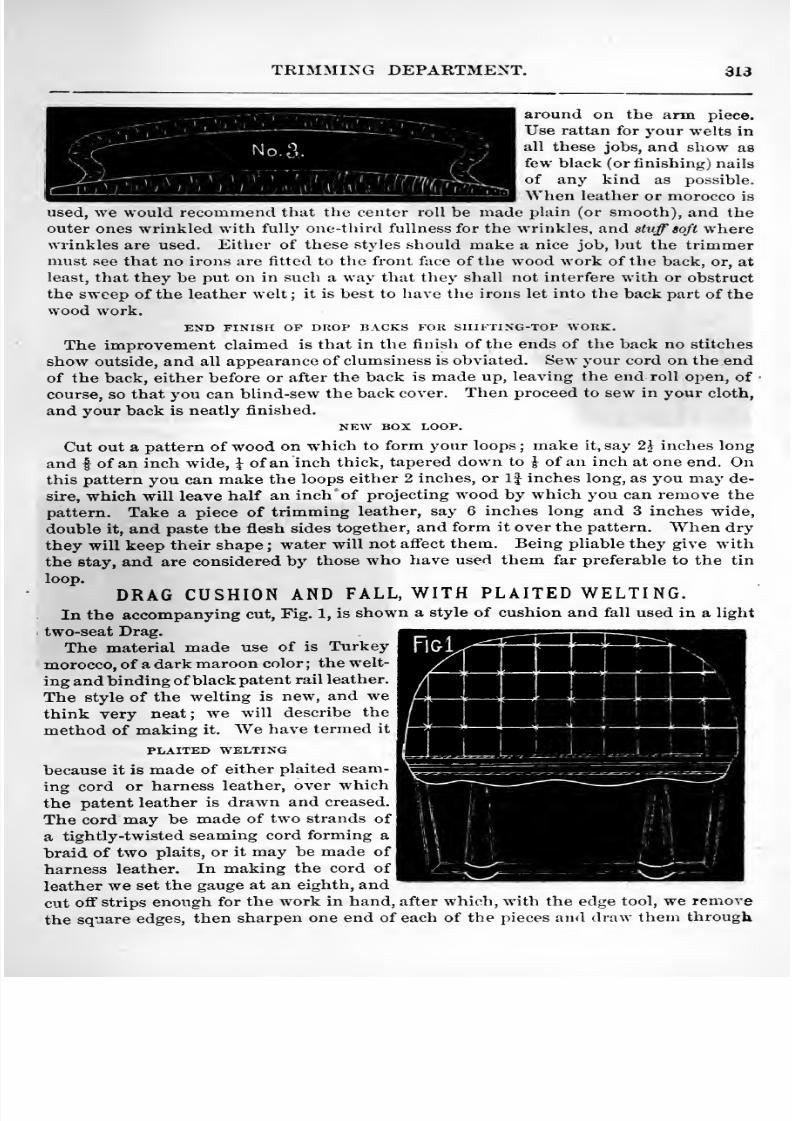
8/10/2019 Making Horse Drawn Coaches 1800 Bw
http://slidepdf.com/reader/full/making-horse-drawn-coaches-1800-bw 369/455
TRIMMING DEPARTMENT. did
around on the arm piece.
Use rattan for your welts in
all these jobs, and show a8few black (or finishing) nails
of any kind as possible.
When leather or morocco is
used, we would recommend that the center roll be made plain (or smooth), and the
outer ones wrinkled with fully one-third fullness for the wrinkles, and stuff soft wherewrinkles are used. Either of these styles should make a nice job, but the trimmermust see that no irons are fitted to the front face of the wood work of the back, or, at
least, that they be put on in such a way that they shall not interfere with or obstruct
the sweep of the leather welt; it is best to have the irons let into the back part of thewood work.
END FINISH OF DROP BACKS FOR SIIIFTING-TOP WORK.
The improvement claimed is that in the finish of the ends of the back no stitches
show outside, and all appearance of clumsiness is obviated. Sew your cord on the end
of the back, either before or after the back is made up, leaving the end roll open, of
course, so that you can blind-sew the back cover. Then proceed to sew in your cloth,
and your back is neatly finished.
NEW BOX LOOP.
Cut out a pattern of wood on which to form your loops ; make it, say 2J inches longand ^ of an inch wide, \ of an inch thick, tapered down to ^ of an inch at one end. Onthis pattern you can make the loops either 2 inches, or If inches long, as you may de-
sire, which will leave half an inch of projecting wood by which you can remove the
pattern. Take a piece of trimming leather, say 6 inches long and 3 inches wide,
double it, and paste the flesh sides together, and form it over the pattern. When dry
they will keep their shape ; water will not afi'ect them. Being pliable they give with
the stay, and are considered by those who have used them far preferable to the tin
loop.
DRAG CUSHION AND FALL, WITH PLAITED WELTING.In the accompanying cut, Fig. 1, is shown a style of cushion and fall used in a light
two-seat Drag.
The material made use of is Turkey
morocco, of a dark maroon color ; the welt-
ing and binding of black patent rail leather.
The style of the welting is new, and wethink very neat; we will describe the
method of making it. We have termed it
PLAITED WELTING
because it is made of either plaited seam-
ing cord or harness leather, over which
the patent leather is drawn and creased.
The cord may be made of two strands of
a tightly-twisted seaming cord forming a
braid of two plaits, or it may be made of
harness leather. In making the cord of
leather we set the gauge at an eighth, and
cut off strips enough for the work in hand, after which, with the edge tool, we remove
the square edges, then sharpen one end of each of the pieces and draw them through
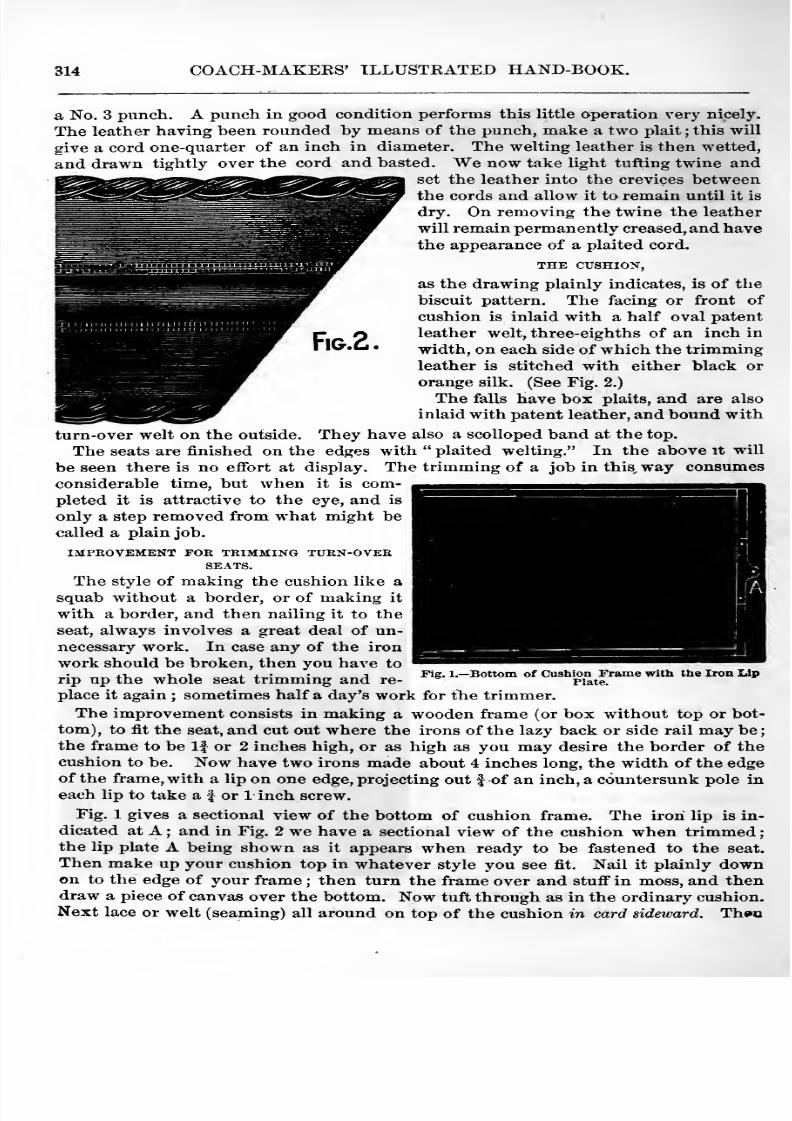
8/10/2019 Making Horse Drawn Coaches 1800 Bw
http://slidepdf.com/reader/full/making-horse-drawn-coaches-1800-bw 370/455
314 COACH-MAKEES' ILLUSTEATED HAND-BOOK.
a No. 3 punch. A punch in good condition performs this little operation very nicely.
The leather having been rounded by means of the punch, make a two plait ; this will
give a cord one-quarter of an inch in diameter. The welting leather is then wetted,and drawn tightly over the cord and basted. We now take light tufting twine and
set the leather into the crevices betweenthe cords and allow it to remain until it is
dry. On removing the twine the leather
will remain permanently creased, and havethe appearance of a plaited cord.
THE CUSHION,
as the drawing plainly indicates, is of the
biscuit pattern. The facing or front of
cushion is inlaid with a half oval patent
leather welt, three-eighths of an inch in
width, on each side of which the trimmingleather is stitched with either black or
orange silk. (See Fig. 2.)
The falls have box plaits, and are also
inlaid with patent leather, and bound with
turn-over welt on the outside. They have also a scolloped band at the top.
The seats are finished on the edges with plaited welting. In the above it will
be seen there is no effort at display. The trimming of a job in this, way consumes
considerable time, but when it is com-pleted it is attractive to the eye, and is
only a step removed from what might be
called a plain job.
IMPROVEMENT FOE TRIMMING TURN-OVERSEATS.
The style of making the cushion like a
squab without a border, or of making it
with a border, and then nailing it to the
seat, always involves a great deal of un-
necessary work. In case any of the iron
work should be broken, then you have to
rip up the whole seat trimming and re-Fig. -Bottom of Cushion Frame with the Iron Lip
Plate.
place it again ; sometimes half a day's work for the trimmer.
The improvement consists in making a wooden frame (or box without top or bot-
tom), to fit the seat, and cut out where the irons of the lazy back or side rail may be;
the frame to be If or 2 inches high, or as high as you may desire the border of thecushion to be. Now have two irons made about 4 inches long, the width of the edgeof the frame, with a lip on one edge, projecting out f of an inch, a countersunk pole in
each lip to take a f or 1 inch screw.
Fig. 1 gives a sectional view of the bottom of cushion frame. The iron lip is in-
dicated at A ; and in Fig. 2 we have a sectional view of the cushion when trimmedthe lip plate A being shown as it appears when ready to be fastened to the seat.
Then make up your cushion top in whatever style you see fit. Nail it plainly downon to the edge of your frame ; then turn the frame over and stuff in moss, and then
draw a piece of canvas over the bottom. Now tuft through as in the ordinary cushion.Next lace or welt (seaming) all around on top of the cushion in card sideward. Th^o
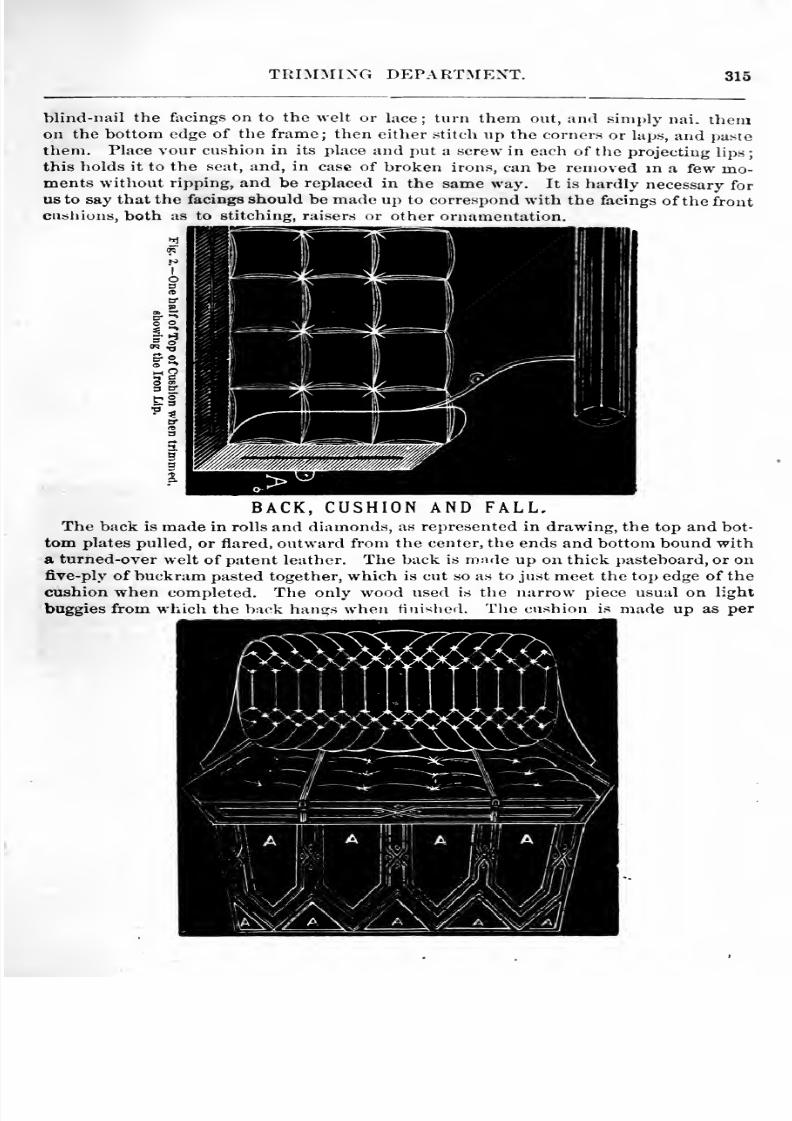
8/10/2019 Making Horse Drawn Coaches 1800 Bw
http://slidepdf.com/reader/full/making-horse-drawn-coaches-1800-bw 371/455
TRIMMING DEPARTMENT. 316
blind-nail the facings on to the welt or lace; turn them out, and simply nai. themon the bottom edge of the frame; then either stitch up the corners or laps, and paste
them. Place vour cushion in its place and put a screw in each of the projecting lips
this holds it to the seat, and, in case of broken irons, can be removed in a few mo-ments without ripping, and be replaced in the same way. It is hardly necessary for
us to say that the facings should be made up to correspond with the facings of the frontciisli ions, both as to stitching, raisers ..r otluT ornamentation.
BACK, CUSHION AND FALL,The back is made in rolls and diamonds, as represented in drawing, the top and bot-
tom plates pulled, or flared, outward from the center, the ends and bottom bound witha turned-over welt of patent leather. The back is made up on thick pasteboard, or onfive-ply of buckram pasted together, which is cut so as to just meet the top edge of the
cushionwhen completed. The only wood used
isthe narrow piece usual on
light
buggies from which the back hanes when finished. The cushion is made up as per
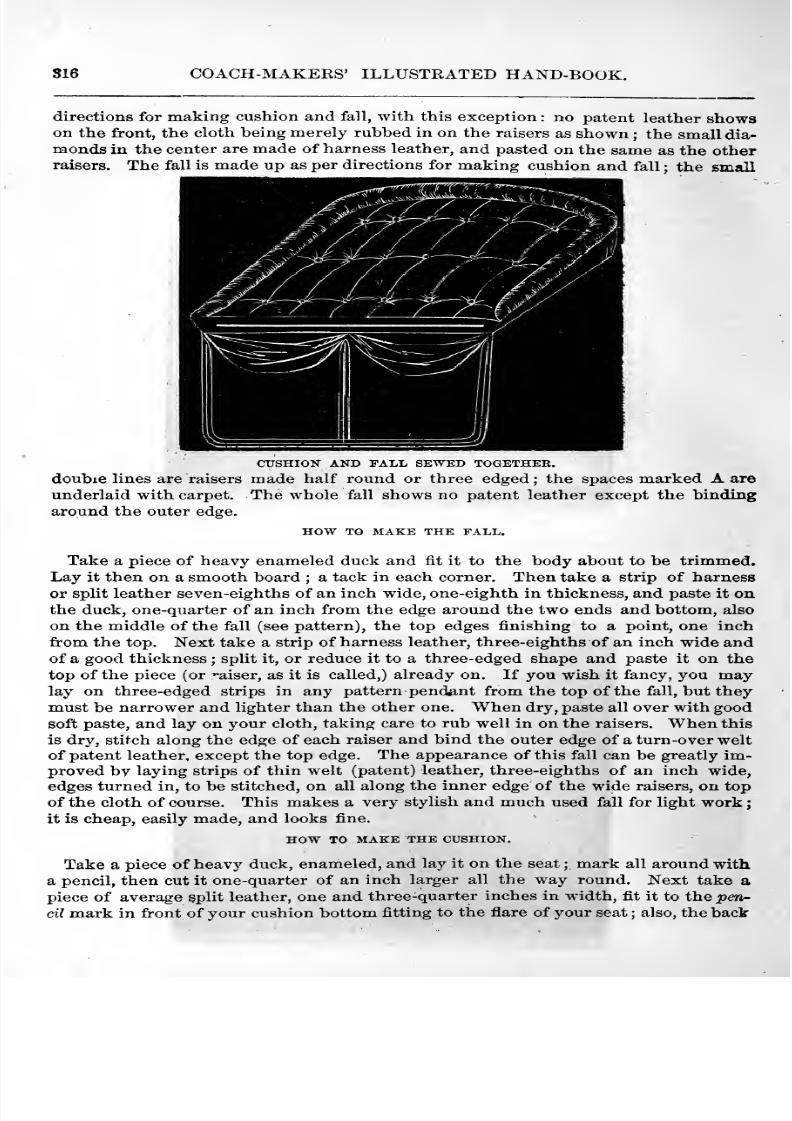
8/10/2019 Making Horse Drawn Coaches 1800 Bw
http://slidepdf.com/reader/full/making-horse-drawn-coaches-1800-bw 372/455
816 COACH-MAKEKS' ILLUSTRATED HAND-BOOK.
directions for making cushion and fall, with this exception : no patent leather showson the front, the cloth being merely rubbed in on the raisers as shown ; the small dia-
monds in the center are made of harness leather, and pasted on the same as the otherraisers. The fall is made up as per directions for making cushion and fall ; the small
CUSHION AND FALL SEWED TOGETHER.
double lines are raisers made half round or three edged; the spaces marked A are
underlaid with carpet. The whole fall shows no patent leather except the binding
around the outer edge.
HOW TO MAKE THE FALL.
Take a piece of heavy enameled duck and fit it to the body about to be trimmed.Lay it then on a smooth board ; a tack in each corner. Then take a strip of harness
or split leather seven-eighths of an inch wide, one-eighth in thickness, and paste it onthe duck, one-quarter of an inch from the edge around the two ends and bottom, also
on the middle of the fall (see pattern), the top edges finishing to a point, one inch
from the top. Next take a strip of harness leather, three-eighths of an inch wide andof a good thickness ; split it, or reduce it to a three-edged shape and paste it on the
top of the piece (or ^aiser, as it is called,) already on. If you wish it fancy, you maylay on three-edged strips in any pattern pendant from the top of the fall, but they
must be narrower and lighter than the other one. When dry, paste all over with goodsoft paste, and lay on your cloth, taking care to rub well in on the raisers. When this
is dry, stitch along the edge of each raiser and bind the outer edge of a turn-over weltof patent leather, except the top edge. The appearance of this fall can be greatly im-proved by laying strips of thin welt (patent) leather, three-eighths of an inch wide,
edges turned in, to be stitched, on all along the inner edge of the wide raisers, on top
of the cloth of course. This makes a very stylish and much used fall for light workit is cheap, easily made, and looks fine.
HOW TO MAKE THE CUSHION.
Take a piece of heavy duck, enameled, and lay it on the seat ; mark all around with
a pencil, then cut it one-quarter of an inch larger all the way round. Next take a
piece of average split leather, one and three-quarter inches in width, fit it to the pen-cil mark in front of your cushion bottom fitting to the flare of your seat ; also, the back
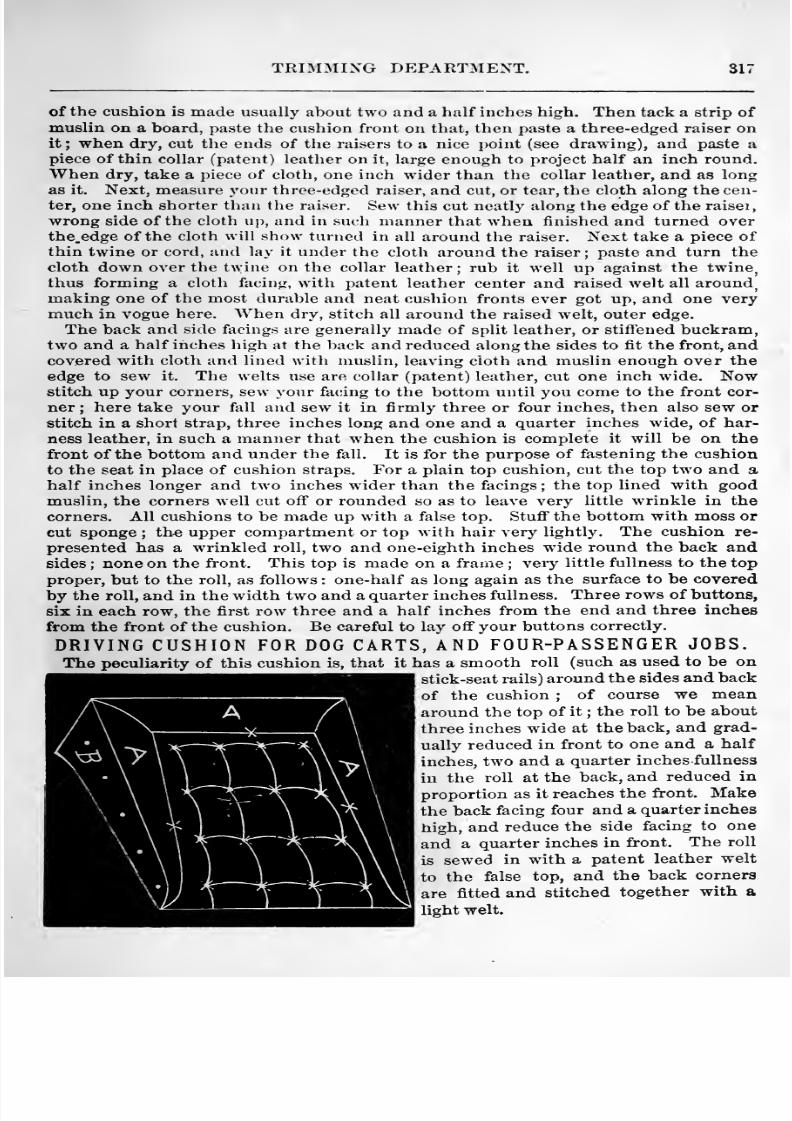
8/10/2019 Making Horse Drawn Coaches 1800 Bw
http://slidepdf.com/reader/full/making-horse-drawn-coaches-1800-bw 373/455
TRIMMING DEPARTMENT. S17
of the cushion is made usually about two and a half inches high. Then tack a strip of
muslin on a board, paste the cushion front on that, then paste a three-edged raiser on
it;
when dry, cut the ends of the raisers to a nice point (see drawing), and paste apiece of thin collar (patent) leather on it, large enough to project half an inch round.When dry, take a piece of cloth, one inch wider than the collar leather, and as long
as it. Next, measure your three-edged raiser, and cut, or tear, the cloth along the cen-
ter, one inch shorter than the raiser. Sew this cut neatly along the edge of the raisei,
wrong side of the cloth up, and in such manner that when finished and turned overthe.edge of the cloth will show turned in all around the raiser. Next take a piece ofthin twine or cord, and lay it under the cloth around the raiser; paste and turn thecloth down over the twine on the collar leather ; rub it well up against the twine,
thus forming a cloth facing, with patent leather center and raised welt all around,
making one of the most durable and neat cushion fronts ever got up, and one verymuch in vogue here. AVhen dry, stitch all around the raised welt, outer edge.
The back and side fticings are generally made of split leather, or stiffened buckram,two and a half inches high at the back and reduced along the sides to fit the front, andcovered with cloth and lined with muslin, leaving cloth and muslin enough over the
edge to sew it. The welts use are collar (patent) leather, cut one inch wide. Nowstitch up your corners, sew your facing to the bottom until you come to the front cor-
ner ; here take your fall and sew it in firmly three or four inches, then also sew or
stitch in a short strap, three inches long and one and a quarter inches wide, of har-
ness leather, in such a manner that when the cushion is complete it will be on thefront of the bottom and under the fall. It is for the purpose of fastening the cushion
to the seat in place of cushion straps. For a plain top cushion, cut the top two and ahalf inches longer and two inches wider than the facings ; the top lined with goodmuslin, the corners well cut off or rounded so as to leave very little wrinkle in the
corners. All cushions to be made up with a false top. Stuff the bottom with moss or
cut sponge ; th-e upper compartment or top with hair very lightly. The cushion re-
presented has a wrinkled roll, two and one-eighth inches wide round the back andsides ; none on the front. This top is made on a frame ; very little fullness to the top
proper, but to the roll, as follows : one-half as long again as the surface to be covered
by the roll, and in the width two and a quarter inches fullness. Three rows of buttons,six in each row, the first row three and a half inches from the end and three inches
from the front of the cushion. Be careful to lay off your buttons correctly.
DRIVING CUSHION FOR DOG CARTS, AND FOUR-PASSENGER JOBS.The peculiarity of this cushion is, that it has a smooth roll (such as used to be on
stick-seat rails) around the sides and back
of the cushion ; of course we mean;around the top of it ; the roll to be about
three inches wide at the back, and grad-
ually reduced in front to one and a halfinches, two and a quarter inches-fullness
in the roll at the back, and reduced in
proportion as it reaches the front. Makethe back facing four and a quarter inches
high, and reduce the side facing to one
and a quarter inches in front. The roll
is sewed in with a patent leather welt
to the false top, and the back corners
are fitted and stitched together with alight welt.
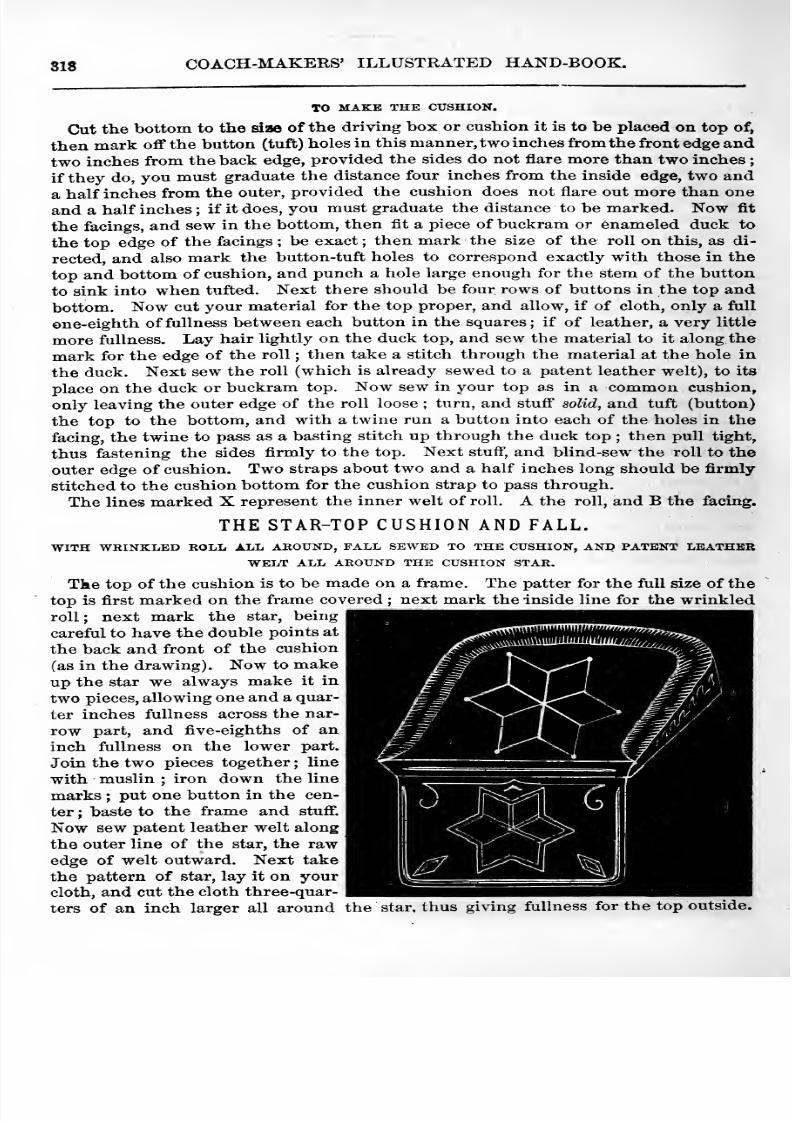
8/10/2019 Making Horse Drawn Coaches 1800 Bw
http://slidepdf.com/reader/full/making-horse-drawn-coaches-1800-bw 374/455
SIS COACH-MAKERS' ILLUSTRATED HAND-BOOK.
TO MAKE THE CUSHION.
Cut the bottom to the siae of the driving box or cushion it is to be placed on top of,
then mark off the button (tuft) holesin this
manner, two inches from the front edge andtwo inches from the back edge, provided the sides do not flare more than two inches
if they do, you must graduate the distance four inches from the inside edge, two and
a half inches from the outer, provided the cushion does not flare out more than one
and a half inches ; if it does, you must graduate the distance to be marked. Now fit
the facings, and sew in the bottom, then fit a piece of buckram or enameled duck to
the top edge of the facings ; be exact; then mark the size of the roll on this, as di-
rected, and also mark the button-tuft holes to correspond exactly with those in the
top and bottom of cushion, and punch a hole large enough for the stem of the button
to sink into when tufted. Next there should be four rows of buttons in the top and
bottom. Now cut your material for the top proper, and allow, if of cloth, only a full
one-eighth of fullness between each button in the squares; if of leather, a very little
more fullness. Lay hair lightly on the duck top, and sew the material to it along the
mark for the edge of the roll ; then take a stitch through the material at the hole in
the duck. Next sew the roll (which is already sewed to a patent leather welt), to its
place on the duck or buckram top. Now sew in your top as in a common cushion,
only leaving the outer edge of the roll loose ; turn, and stuff solid, and tuft (button)
the top to the bottom, and with a twine run a button into each of the holes in the
facing, the twine to pass as a basting stitch up through the duck top ; then pull tight,
thus fastening the sides firmly to the top. Next stuff , and blind-sew the roll to the
outer edge of cushion. Two straps about two and a half inches long should be firmly
stitched to the cushion bottom for the cushion strap to pass through.
The lines marked X represent the inner welt of roll. A the roll, and B the facing,
THE STAR-TOP CUSHION AND FALL.
WITH WRINKLED ROLL ALL AROUND, PALL SEWED TO THE CUSHION, AND PATENT LEATHERWELT ALL AROUND THE CUSHION STAR.
The top of the cushion is to be made on a frame. The patter for the full size of the
top is first marked on the frame covered ; next mark the inside line for the wrinkledroll; next mark the star, being
careful to have the double points at
the back and front of the cushion
(as in the drawing). Now to makeup the star we always make it in
two pieces, allowing one and a quar-
ter inches fullness across the nar-
row part, and five-eighths of an
inch fullness on the lower part.
Join the two pieces together ; line
with muslin ; iron down the line
marks ;put one button in the cen-
ter ; baste to the frame and stuff.
Now sew patent leather welt along
the outer line of the star, the rawedge of welt outward. Next take
the pattern of star, lay it on your
cloth, and cut thecloth three-quar-
ters of an inch larger all around the star, thus giving fullness for the top outside.
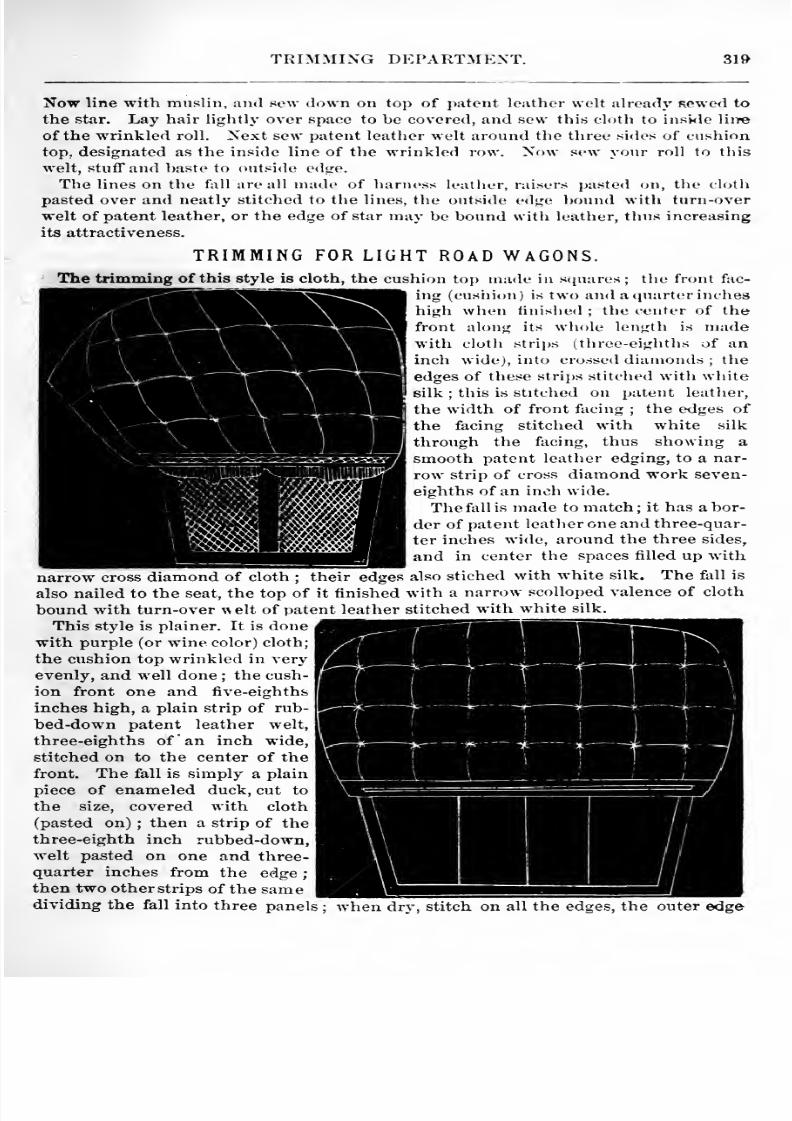
8/10/2019 Making Horse Drawn Coaches 1800 Bw
http://slidepdf.com/reader/full/making-horse-drawn-coaches-1800-bw 375/455
TRIMMING DEPARTMENT. 81»
Now line with muslin, and sew down on top of patent leather welt already sewed to
the star. Lay hair lightly over space to be covered, and sew this cloth to inskle line
of the wrinkled roll. Next sew patent leather welt around the three sides of cushion
top. designated as the inside line of the wrinkled row. Now sow your roll to this
welt, stuff and baste to outside edge.
The lines on the fall are all made of harness leather, raisers pasted on, the cloth
pasted over and neatly stitched to the lines, the outside edge bound with turn-over
welt of patent leather, or the edge of star may be bound with leather, thus increasing
its attractiveness.
TRIMMING FOR LIGHT ROAD WAGONS.The trimming of this style is cloth, the cushion top made in squares ; the front fac-
ing (cushion) is two and a quarter incheshigh when tinished ; the center of the
front along its whole length is madewith cloth strips (three-eighths of aninch wide), into crossed diamonds ; the
edges of these strips stitched with white
eilk ; this is stitched on patent leather,
the width of front facing ; the edges of
the facing stitched with white silk
through the facing, thus showing a
smooth patent leather edging, to a nar-
row strip of cross diamond work seven-
eighths of an inch wide.
The fall is made to match ; it has a bor-
der of patent leather one and three-quar-
ter inches wide, around the three sides^
and in center the spaces filled up with
narrow cross diamond of cloth ; their edges also stiched with white silk. The fall is
also nailed to the seat, the top of it tinished with a narrowscolloped valence of cloth
bound with turn -over welt of patent leather stitched with white silk.
This style is plainer. It is donewith purple (or wine color) cloth;
the cushion top wrinkled in very
evenly, and well done ; the cush-
ion front one and five-eighths
inches high, a plain strip of rub-
bed-down patent leather welt,
three-eighths of an inch wide,
stitched on to the center of the
front. The fall is simply a plain
piece of enameled duck, cut to
the size, covered with cloth
(pasted on) ; then a strip of the
three-eighth inch rubbed-down,welt pasted on one and three-
quarter inches from the edge ;
then two other strips of the samedividing the fall into three panels when dry, stitch on all the edges, the outer edge
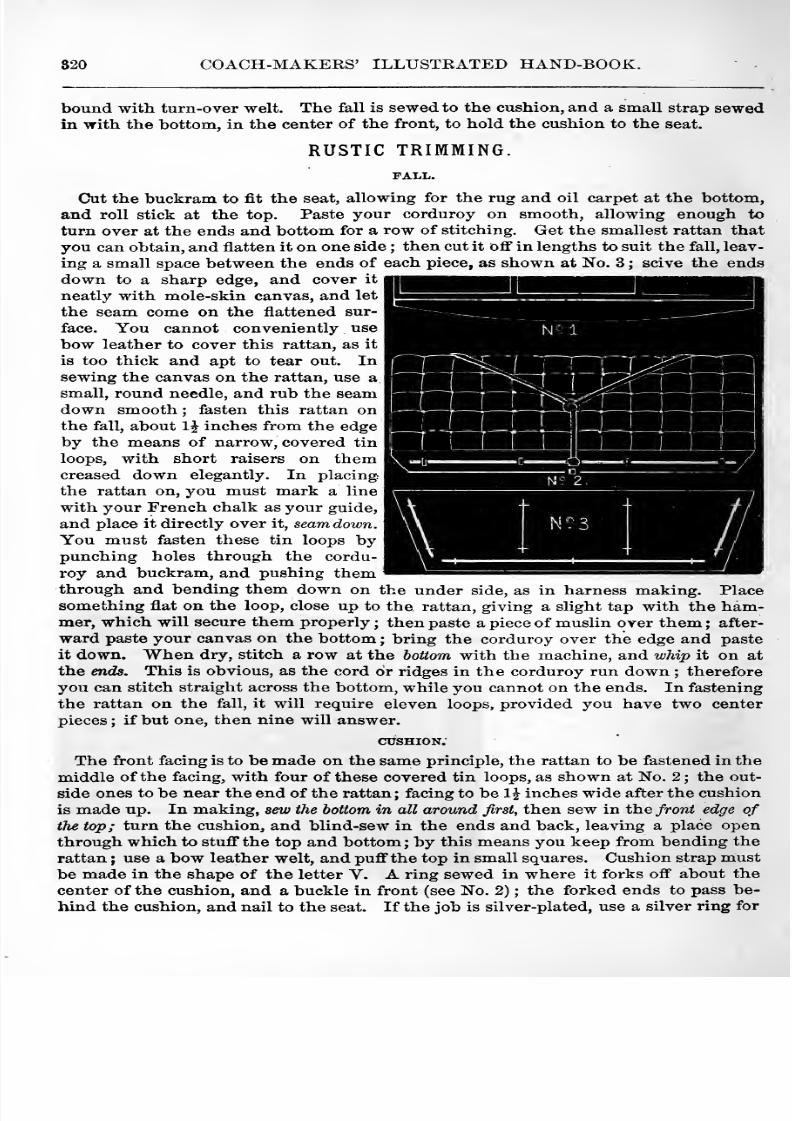
8/10/2019 Making Horse Drawn Coaches 1800 Bw
http://slidepdf.com/reader/full/making-horse-drawn-coaches-1800-bw 376/455
S20 COACH-MAKERS' ILLUSTEATED HAND-BOOK.
bound with turn-over welt. The fall is sewed to the cushion, and a small strap sewedin with the bottom, in the center of the front, to hold the cushion to the seat.
RUSTIC TRIMMING.
CJut the buckram to fit the seat, allowing for the rug and oil carpet at the bottom,
and roll stick at the top. Paste your corduroy on smooth, allowing enough to
turn over at the ends and bottom for a row of stitching. Get the smallest rattan that
you can obtain, and flatten it on one side ; then cut it off in lengths to suit the fall, leav-
ing a small space between the ends of each piece, as shown at No. 3 ; scive the ends
down to a sharp edge, and cover it
neatly with mole-skin canvas, and letthe seam come on the flattened sur-
face. You cannot conveniently use
bow leather to cover this rattan, as it
is too thick and apt to tear out. Insewing the canvas on the rattan, use a
small, round needle, and rub the seamdown smooth ; fasten this rattan onthe fall, about 1^ inches from the edge
bythe
meansof
narrow, coveredtin
loops, with short raisers on themcreased down elegantly. In placing
the rattan on, you must mark a line
with your French chalk as your guide,
and place it directly over it, seam down.
You must fasten these tin loops bypunching holes through the cordu-
roy and buckram, and pushing themthrough and bending them down on the under side, as in harness making. Placesomething flat on the loop, close up to the rattan, giving a slight tap with the ham-mer, which will secure them properly ; then paste a piece of muslin over them ; after-
ward paste your canvas on the bottom ; bring the corduroy over the edge and paste
it down. When dry, stitch a row at the bottom with the machine, and whip it on at
the ends. This is obvious, as the cord or ridges in the corduroy run down ; therefore
you can stitch straight across the bottom, while you cannot on the ends. In fastening
the rattan on the fall, it will require eleven loops, provided you have two center
pieces ; if but one, then nine will answer.
CUSHION.
The front facing is to be made on the same principle, the rattan to be fastened in the
middle of the facing, with four of these covered tin loops, as shown at No. 2 ; the out-
side ones to be near the end of the rattan; facing to be 1^ inches wide after the cushion
is made up. In making, sew the bottom in all around first, then sew in the front edge of
the top; turn the cushion, and blind-sew in the ends and back, leaving a place open
through which to stuff the top and bottom ; by this means you keep from bending the
rattan ; use a bow leather welt, and puff the top in small squares. Cushion strap mustbe made in the shape of the letter V. A ring sewed in where it forks off about the
center of the cushion, and a buckle in front (see No.2)
; the forked ends to pass be-
hind the cushion, and nail to the seat. If the job is silver-plated, use a silver ring for
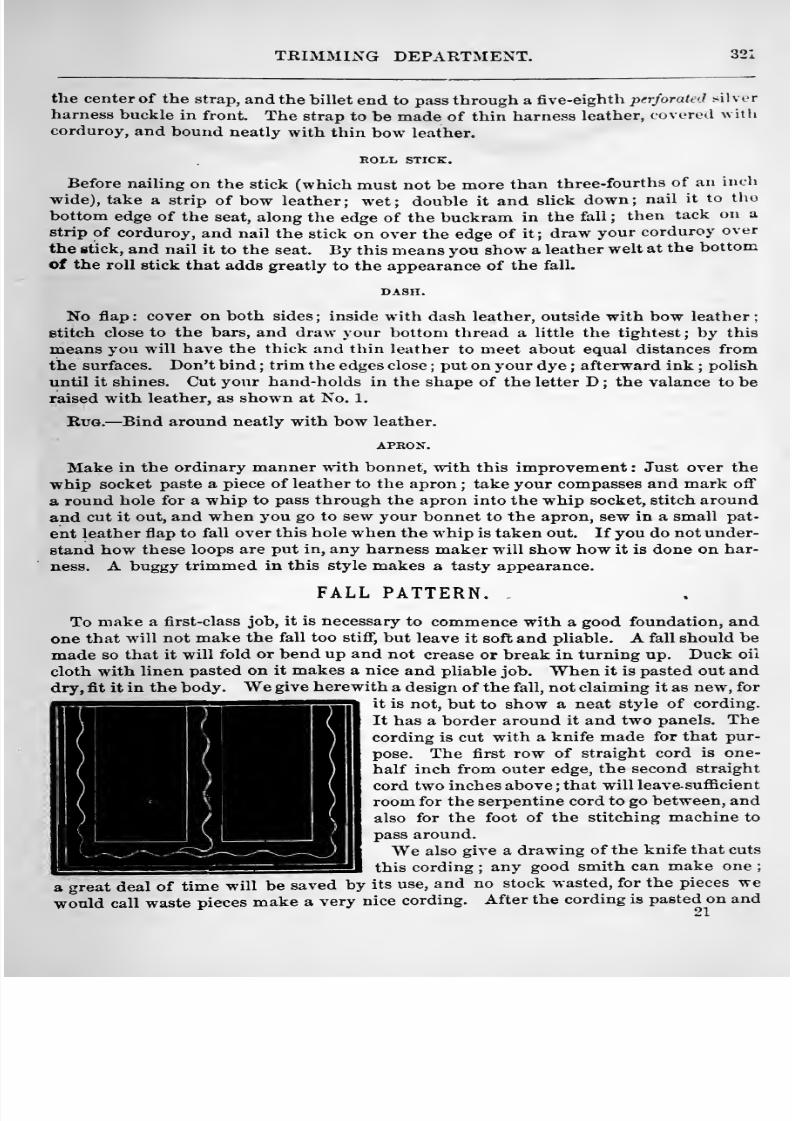
8/10/2019 Making Horse Drawn Coaches 1800 Bw
http://slidepdf.com/reader/full/making-horse-drawn-coaches-1800-bw 377/455
TRIMMING DEPARTMENT. 321
the center of the strap, and the billet end to pass through a five-eighth perforated silver
harness buckle in front. The strap to be made of thin harness leather, covered with
corduroy, and bound neatly with thin bow leather.
ROLL STICK.
Before nailing on the stick (which must not be more than three-fourths of an inch
wide), take a strip of bow leather; wet; double it and slick down; nail it to the
bottom edge of the seat, along the edge of the buckram in the fall ; then tack on a
strip of corduroy, and nail the stick on over the edge of it; draw your corduroy over
the stick, and nail it to the seat. By this means you show a leather welt at the bottom
of the roll stick that adds greatly to the appearance of the fall.
DASH.
No flap: cover on both sides; inside with dash leather, outside with bow leather;
stitch close to the bars, and draw your bottom thread a little the tightest ; by this
means you will have the thick and thin leather to meet about equal distances fromthe surfaces. Don't bind ; trim the edges close
;put on your dye ; afterward ink
;polish
until it shines. Cut your hand-holds in the shape of the letter D ; the valance to beraised with leather, as shown at No. 1.
Rug.— Bind around neatly with bow leather.
APRON.
Make in the ordinary manner with bonnet, with this improvement : Just over the
whip socket paste a piece of leather to the apron ; take your compasses and mark off
a round hole for a whip to pass through the apron into the whip socket, stitch around
and cut it out, and when you go to sew your bonnet to the apron, sew in a small pat-
ent leather flap to fall over this hole when the whip is taken out. If you do not under-
stand how these loops are put in, any harness maker will show how it is done on har-
ness. A buggy trimmed in this style makes a tasty appearance.
FALL PATTERN.To make a first-class job, it is necessary to commence with a good foundation, and
one that will not make the fall too stiff, but leave it soft and pliable. A fall should be
made so that it will fold or bend up and not crease or break in turning up. Duck oil
cloth with linen pasted on it makes a nice and pliable job. When it is pasted out and
dry, fit it in the body. We give herewith a design of the fall, not claiming it as new, for
it is not, but to show a neat style of cording.
It has a border around it and two panels. Thecording is cut with a knife made for that pur-
pose. The first row of straight cord is one-
half inch from outer edge, the second straight
cord two inches above ; that will leave-sufficient
room for the serpentine cord to go between, andalso for the foot of the stitching machine to
pass around.
We also give a drawing of the knife that cuts
this cording ; any good smith can make one ;
a great deal of time will be saved by its use, and no stock wasted, for the pieces we
would call waste pieces make a very nice cording. After the cording is pasted on and
8/10/2019 Making Horse Drawn Coaches 1800 Bw
http://slidepdf.com/reader/full/making-horse-drawn-coaches-1800-bw 378/455
322 COACH-MAKERS' ILLUSTRATED HAND-BOOK.
dry, witli the edging tool take off the sharp edges to prevent them from cutting thecloth.
In pasting the cloth in the fall, spread the paste on the cloth ; it will crease down so
much better than spreading it on the fall. After it is dry, stitch all the rows but theouter one; trim off the edges and line the back with muslin oil cloth, and bind theouter edge with turn-over welt, and stitch it. Also before tacking in the fall in theseat, get a stick made 1^^ inches wide, and oUe-fourth inch thick, beveled on one side;
slip it between the lining and the fall, and drive several 2^ oz. tacks through the lining
of the fall into the stick, which will keep it firm, then the fall is ready to be tacked onlining of seat. Some shops paint the seat, but we don't think they look as neat andcomfortable as a trimmed seat. To line the seat properly, cut the back piece with the
nap running down ; the side pieces, nap running to the front ; fit them in and join
them in the corners nicely with a welt. Don't line vour cloth with muslin, but line
the seat separately with muslin, padding the seat lightly with hair or cotton. Ourreason for not lining the cloth but putting it on separate is, if you blind-sew in thecloth it will make a neater finish. In trimming shifting-top seats where the irons are
set in level with the seat, you can finish them in different ways from blind-sewingthem in. Paste out a flat welt ; crease it ; and when dry, stitch one edge down andloosen the other edge from the paste and blind-tack it on. Be careful and draw it
tight, then turn it over and paste it down ; drive a few gimp tacks in it, then take someleather varnish on a cushion awl, and drop sufficient on the tacks to cover the heads,
and they will not be noticed. For a change it looks well and makes a neat finish.
KNIFE FOR CUTTING CORD.
In the annexed illustration is shown at A a section of knife or punch, natural size,
viewed standing erect. This view gives the exact size in width and depth of shoulders,
and the size of shank or handle just above
the head or cutter. The shank to be tapered
up, and made of any convenient length. At Bis shown the precise shape of the cutting edge,
and represents the impression the edge wouldleave when pressed gently on a piece of leather.
It will be seen at a glance that in the use of the
knife it is only necessary to move it forward
after the first cut, placing the curved end in
position to continue the sweep. In cutting ser- \^ Bpentine cord it saves much time and labor, andtherefore will be a valuable addition to the trimmer's kit of tools.
CUSHION HOOK.j
The drawing is for full size, and will suit almost any cushion, high or low. They
can be made either of steel or iron. To fasten the hook insert the hook into the
long slot A, and a strap into the other slot, and fasten to bench, and you will be well
paid for your time of making them.
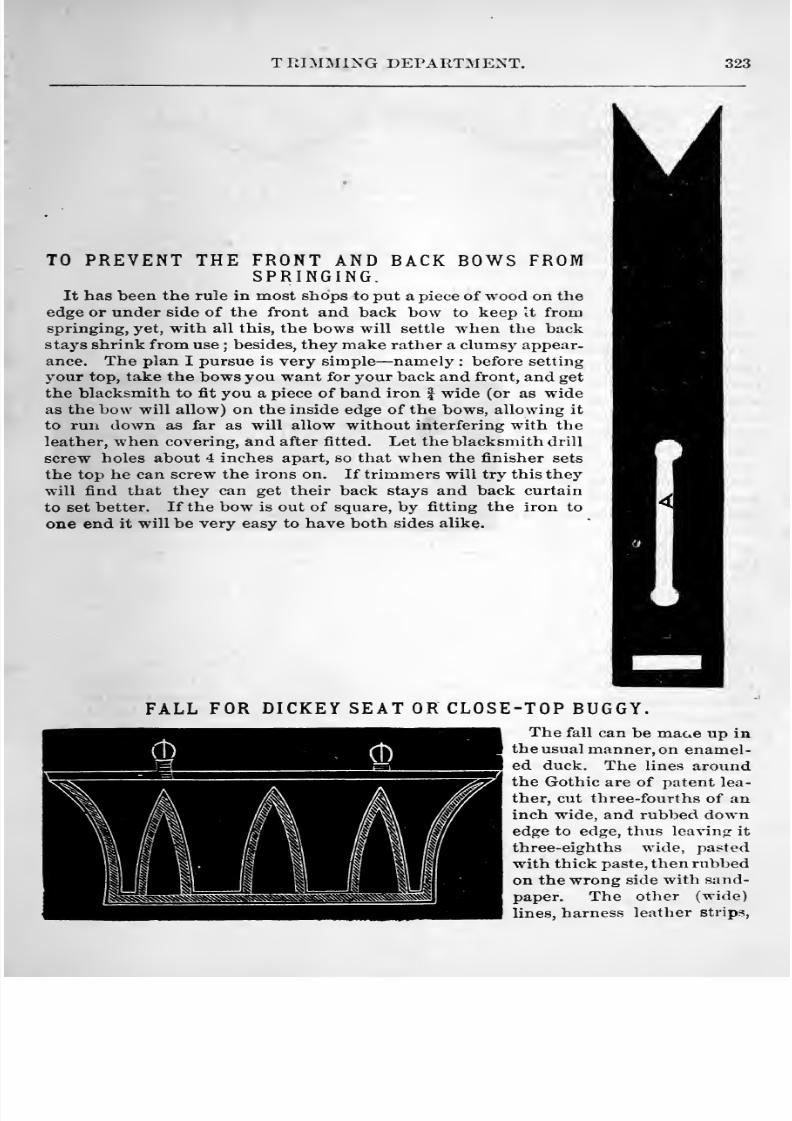
8/10/2019 Making Horse Drawn Coaches 1800 Bw
http://slidepdf.com/reader/full/making-horse-drawn-coaches-1800-bw 379/455
TRIMMING DEPARTMENT. 323
TO PREVENT THE FRONT AND BACK BOWS FROMSPRINGING.
It has been the rule in most shops to put a piece of wood on theedge or under side of the front and back bow to keep it froro
springing, yet, with all this, the bows will settle when the backstays shrink from use ; besides, they make rather a clumsy appear-
ance. The plan I pursue is very simple —namely : before setting
your top, take the bows you want for your back and front, and get
the blacksmith to fit you a piece of band iron J wide (or as wideas the bow will allow) on the inside edge of the bows, allowing it
to run down as far as will allow without interfering with the
leather, when covering, and after fitted. Let the blacksmith drill
screw holes about 4 inches apart, so that when the finisher sets
the top he can screw the irons on. If trimmers will try this they
will find that they can get their back stays and back curtain
to set better. If the bow is out of square, by fitting the iron to
one end it will be very easy to have both sides alike.
FALL FOR DICKEY SEAT OR CLOSE-TOP BUGGY.
The fall can be maae up in
the usual manner, on enamel-ed duck. The lines aroundthe Gothic are of patent lea-
ther, cut three-fourths of aninch wide, and rubbed downedge to edge, thus leaving it
three-eighths wide, pasted
with thick paste, then rubljed
on the wrong side with sand-
paper. The other (wide)lines, harness leather strips,
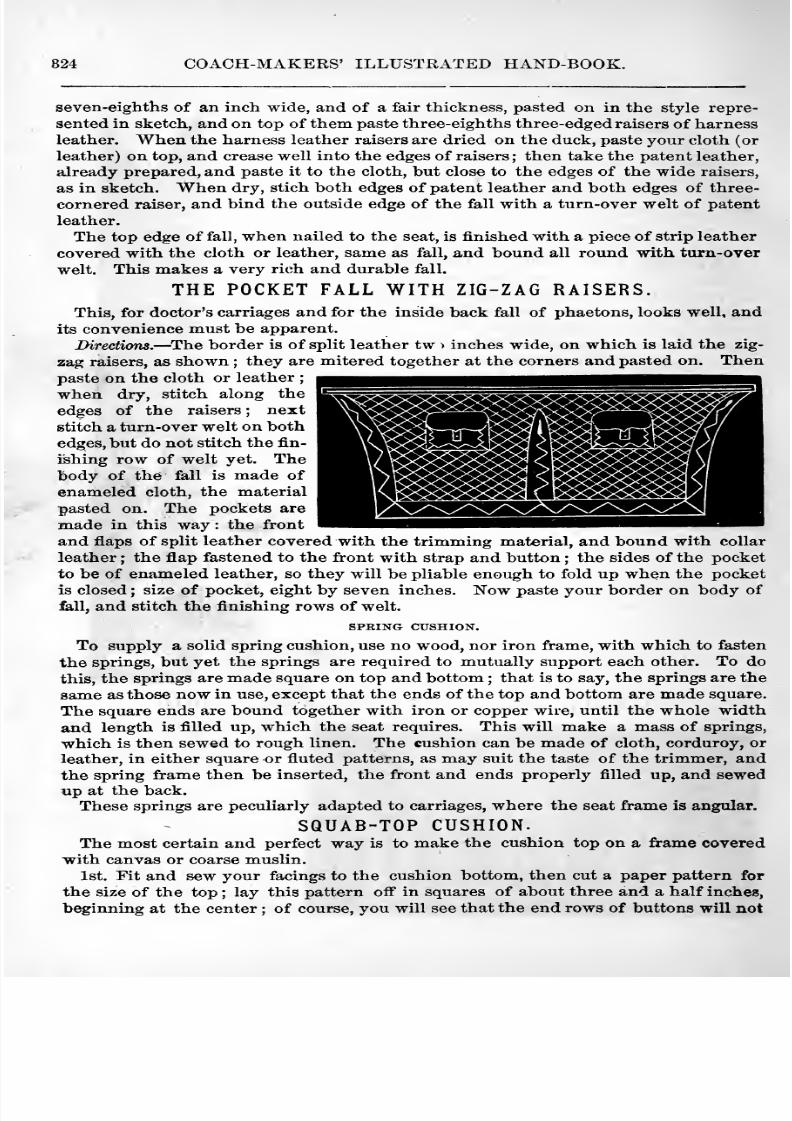
8/10/2019 Making Horse Drawn Coaches 1800 Bw
http://slidepdf.com/reader/full/making-horse-drawn-coaches-1800-bw 380/455
824 COACH-MAKERS' ILLUSTRATED HAND-BOOK.
seven-eighths of an inch wide, and of a fair thickness, pasted on in the style repre-
sented in sketch, and on top of them paste three-eighths three-edged raisers of harnessleather. When the harness leather raisers are dried on the duck, paste your cloth (or
leather) on top, and crease well into the edges of raisers ; then take the patent leather,
already prepared, and paste it to the cloth, but close to the edges of the wide raisers,
as in sketch. When dry, stich both edges of patent leather and both edges of three-
cornered raiser, and bind the outside edge of the fall with a turn-over welt of patent
leather.
The top edge of fall, when nailed to the seat, is finished with a piece of strip leather
covered with the cloth or leather, same as fall, and bound all round with turn-over
welt. This makes a very rich and durable fall.
THE POCKET FALL WITH ZIG-ZAG RAISERS.
This, for doctor's carriages and for the inside back fall of phaetons, looks well, andits convenience must be apparent.
Directions. —The border is of split leather tw > inches wide, on which is laid the zig-
zag raisers, as shown ; they are mitered together at the corners and pasted on. Thenpaste on the cloth or leather
when dry, stitch along the
edges of the raisers; nextstitch a turn-over welt on both
edges, but do not stitch the fin-ishing row of welt yet. Thebody of the fall is made of
enameled cloth, the material
pasted on. The pockets are
made in this way: the front
and flaps of split leather covered with the trimming material, and bound with collar
leather ; the flap fastened to the front with strap and button ; the sides of the pocket
to be of enameled leather, so they will be pliable enough to fold up when the pocket
is closed ; size of pocket, eight by seven inches. Now paste your border on body of
lall, and stitch the finishing rows of welt.
SPRING CUSHION.
To supply a solid spring cushion, use no wood, nor iron frame, with which to fasten
the springs, but yet the springs are required to mutually support each other. To do
this, the springs are made square on top and bottom ; that is to say, the springs are the
same as those now in use, except that the ends of the top and bottom are made square.
The square ends are bound together with iron or copper wire, until the whole width
and length is filled up, which the seat requires. This will make a mass of springs,
which is then sewed to rough linen. The cushion can be made of cloth, corduroy, orleather, in either square or fluted patterns, as may suit the taste of the trimmer, andthe spring frame then be inserted, the front and ends properly filled up, and sewedup at the back.
These springs are peculiarly adapted to carriages, where the seat frame is angular.
SQUAB-TOP CUSHION.The most certain and perfect way is to make the cushion top on a frame covered
with canvas or coarse muslin.
1st. Fit and sew your facings to the cushion bottom, then cut a paper pattern for
the size of the top;
lay this patternoff in squares of
aboutthree
and ahalf inches,
beginning at the center ; of course, you will see that the end rows of buttons will not
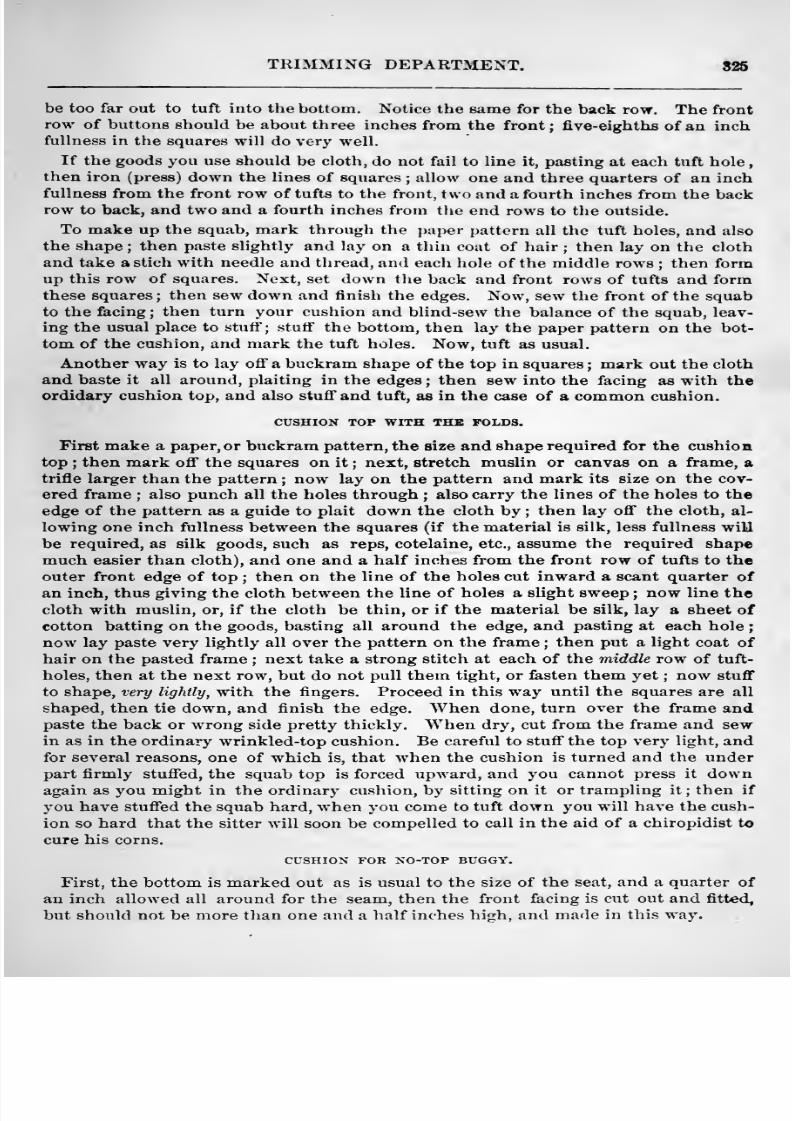
8/10/2019 Making Horse Drawn Coaches 1800 Bw
http://slidepdf.com/reader/full/making-horse-drawn-coaches-1800-bw 381/455
TRIMMING DEPARTMENT. 816
be too far out to tuft into the bottom. Notice the same for the back ro\r. The front
row of buttons should be about three inches from the front; five-eighths of an inchfullness in the squares will do very well.
If the goods you use should be cloth, do not fail to line it, pasting at each tuft holethen iron (press) down the lines of squares ; allow one and three quarters of an inchfullness from the front row of tufts to the front, two and a fourth inches from the backrow to back, and two and a fourth inches from the end rows to the outside.
To make up the squab, mark through the paper pattern all the tuft holes, and also
the shape; then paste slightly and lay on a thin coat of hair ; then lay on the cloth
and take astich with needle and thread, and each hole of the middle rows ; then formup this row of squares. Next, set down the back and front rows of tufts and form
these squares ; then sew down and finish the edges. Now, sew the front of the squabto the facing; then turn your cushion and blind-sew the balance of the squab, leav-
ing the usual place to stuff ; stuff the bottom, then lay the paper pattern on the bot-
tom of the cushion, and mark the tuft holes. Now, tuft as usual.
Another way is to lay off a buckram shape of the top in squares ; mark out the cloth
and baste it all around, plaiting in the edges ; then sew into the facing as with theordidary cushion top, and also stuff* and tuft, as in the case of a common cushion.
CUSHION TOP WITH THE FOLDS.
First make a paper, or buckram pattern, the size and shape required for the cushiontop ; then mark off the squares on it ; next, stretch muslin or canvas on a frame, atrifle larger than the pattern ; now lay on the pattern and mark its size on the cov-
ered frame ; also punch all the holes through ; also carry the lines of the holes to the
edge of the pattern as a guide to plait down the cloth by ; then lay off the cloth, al-
lowing one inch fullness between the squares (if the material is silk, less fullness will
be required, as silk goods, such as reps, cotelaine, etc., assume the required shape
much easier than cloth), and one and a half inches from the front row of tufts to the
outer front edge of top ; then on the line of the holes cut inward a scant quarter of
an inch, thus giving the cloth between the line of holes a slight sweep;
now line thecloth with muslin, or, if the cloth be thin, or if the material be silk, lay a sheet of
cotton batting on the goods, basting all around the edge, and pasting at each hole ;
now lay paste very lightly all over the pattern on the frame ; then put a light coat of
hair on the pasted frame ; next take a strong stitch at each of the middle row of tuft-
holes, then at the next row, but do not pull them tight, or fasten them yet ; now stuff
to shape, very lightly, with the fingers. Proceed in this way until the squares are all
shaped, then tie down, and finish the edge. When done, turn over the frame andpaste the back or wrong side pretty thickly. When dry, cut from the frame and sewin as in the ordinary wrinkled-top cushion. Be careful to stuff the top very light, andfor several reasons, one of which is, that when the cushion is turned and the underpart firmly stuffed, the squab top is forced upward, and you cannot press it downagain as you might in the ordinary cushion, by sitting on it or trampling it ; then if
you have stuffed the squab hard, when you come to tuft down you will have the cush-
ion so hard that the sitter will soon be compelled to call in the aid of a chiropidist to
cure his corns.
CUSHION FOR NO-TOP BUGGY.
First, the bottom is marked out as is usual to the size of the seat, and a quarter of
an inch allowed all around for the seam, then the front facing is cut out and fitted,
but should not be more than one and a half inches high, and made in this way.
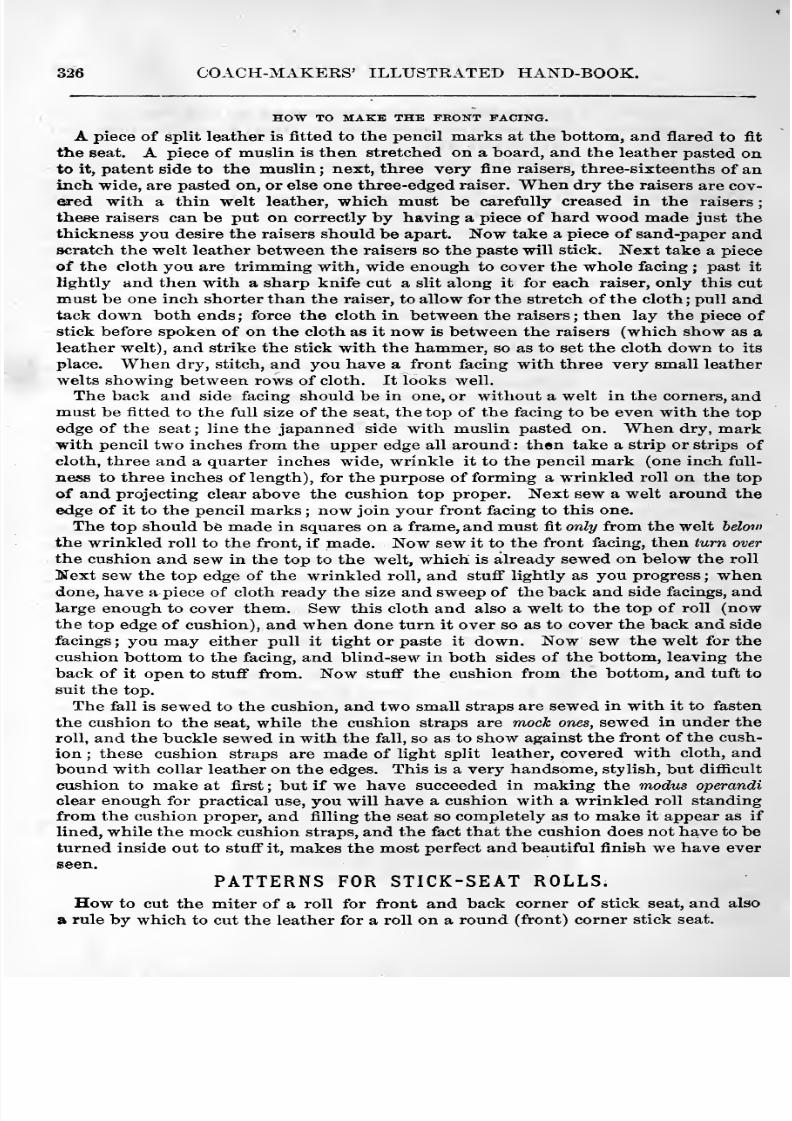
8/10/2019 Making Horse Drawn Coaches 1800 Bw
http://slidepdf.com/reader/full/making-horse-drawn-coaches-1800-bw 382/455
326 COACH-MAKERS' ILLUSTRATED HAND-BOOK.
HOW TO MAKE THE FEONT FACING.
A piece of split leather is fitted to the pencil marks at the bottom, and flared to fit
the seat. A piece of muslin is then stretched on a board, and the leather pasted onto it, patent side to the muslin ; next, three very fine raisers, three-sixteenths of aninch wide, are pasted on, or else one three-edged raiser. When dry the raisers are cov-
ered with a thin welt leather, which must be carefully creased in the raisers
these raisers can be put on correctly by having a piece of hard wood made just the
thickness you desire the raisers should be apart. Now take a piece of sand-paper andscratch the welt leather between the raisers so the paste will stick. Next take a piece
of the cloth you are trimming with, wide enough to cover the whole facing; past it
lightly and then with a sharp knife cut a slit along it for each raiser, only this cut
must be one inch shorter than the raiser, to allow for the stretch of the cloth ; pull andtack down both ends; force the cloth in between the raisers; then lay the piece of
stick before spoken of on the cloth as it now is between the raisers (which show as a
leather welt), and strike the stick with the hammer, so as to set the cloth down to its
place. When dry, stitch, and you have a front facing with three very small leather
welts showing between rows of cloth. It looks well.
The back and side facing should be in one, or without a welt in the corners, andmust be fitted to the full size of the seat, the top of the facing to be even with the top
edge of the seat ; line the japanned side with muslin pasted on. When dry, mark
with pencil two inches from the upper edge all around : then take a strip or strips ofcloth, three and a quarter inches wide, wrinkle it to the pencil mark (one inch full-
ness to three inches of length), for the purpose of forming a wrinkled roll on the top
of and projecting clear above the cushion top proper. Next sew a welt around the
edge of it to the pencil marks ; now join your front facing to this one.
The top should be made in squares on a frame, and must fit only from the welt belovi
the wrinkled roll to the front, if made. Now sew it to the front facing, then turn over
the cushion and sew in the top to the welt, which is already sewed on below the roll
Next sew the top edge of the wrinkled roll, and stuff lightly as you progress ; whendone,
have apiece
of cloth ready thesize
and sweep ofthe
back andside facings, and
large enough to cover them. Sew this cloth and also a welt to the top of roll (nowthe top edge of cushion), and when done turn it over so as to cover the back and side
facings; you may either pull it tight or paste it down. Now sew the welt for the
cushion bottom to the facing, and blind-sew in both sides of the bottom, leaving the
back of it open to stuff from. Now stuff the cushion from the bottom, and tuft to
suit the top.
The fall is sewed to the cushion, and two small straps are sewed in with it to fasten
the cushion to the seat, while the cushion straps are mock ones, sewed in under the
roll, and the buckle sewed in with the fall, so as to show against the front of the cush-
ion ; these cushion straps are made of light split leather, covered with cloth, andbound with collar leather on the edges. This is a very handsome, stylish, but difiicult
cushion to make at first ; but if we have succeeded in making the modus operandi
clear enough for practical use, you will have a cushion with a wrinkled roll standing
from the cushion proper, and filling the seat so completely as to make it appear as if
lined, while the mock cushion straps, and the fact that the cushion does not have to beturned inside out to stuff it, makes the most perfect and beautiful finish we have ever
seen.
PATTERNS FOR STICK-SEAT ROLLS.
How to cut the miter of a roll for front and back corner of stick seat, and also
a rule by which to cut the leather for a roll on a round (front) corner stick seat.
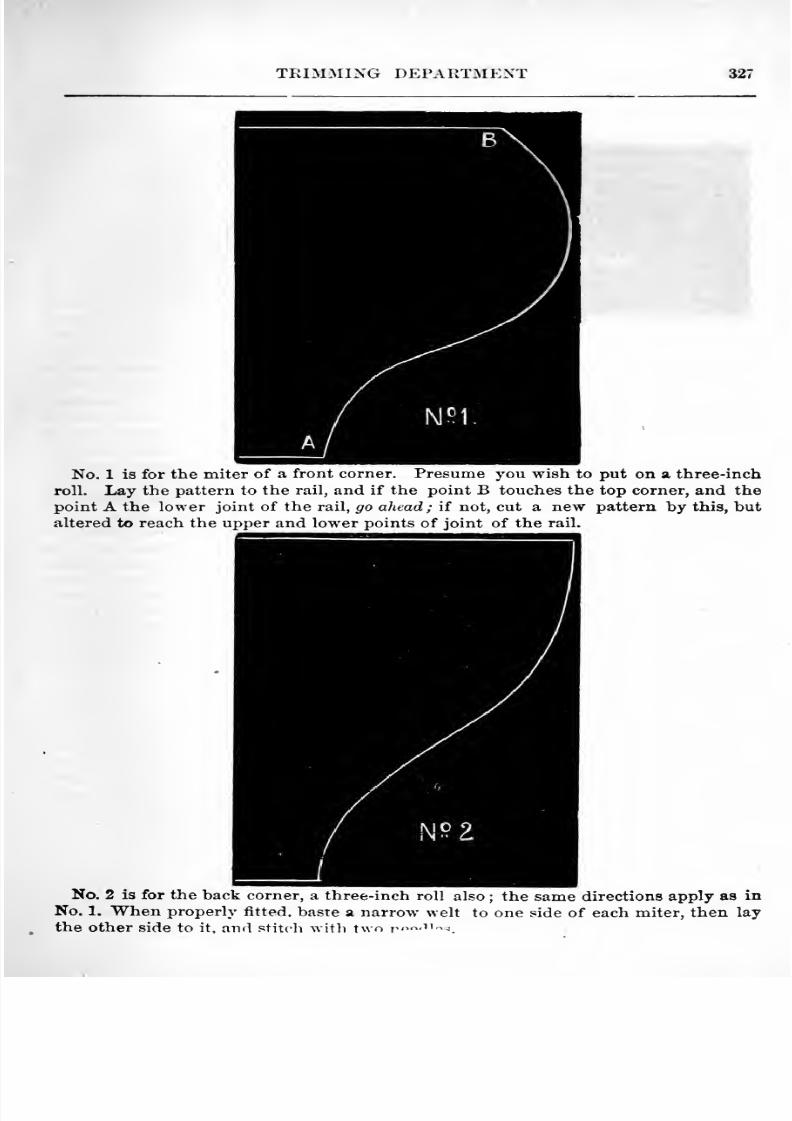
8/10/2019 Making Horse Drawn Coaches 1800 Bw
http://slidepdf.com/reader/full/making-horse-drawn-coaches-1800-bw 383/455
TRIMMING DEPARTMENT 327
No. 1 is for the miter of a front corner. Presume you wish to put on a three-inch
roll. Lay the pattern to the rail, and if the point B touches the top corner, and the
point A the lower joint of the rail, go ahead; if not, cut a new pattern by this, butaltered to reach the upper and lower points of joint of the rail.
No. 2 is for the back corner, a three-inch roll also ; the same directions apply as inNo. 1. When properly fitted, baste a narrow welt to one side of each miter, then lay
the other side to it. and stitch with two t^'^-^'^'--'.
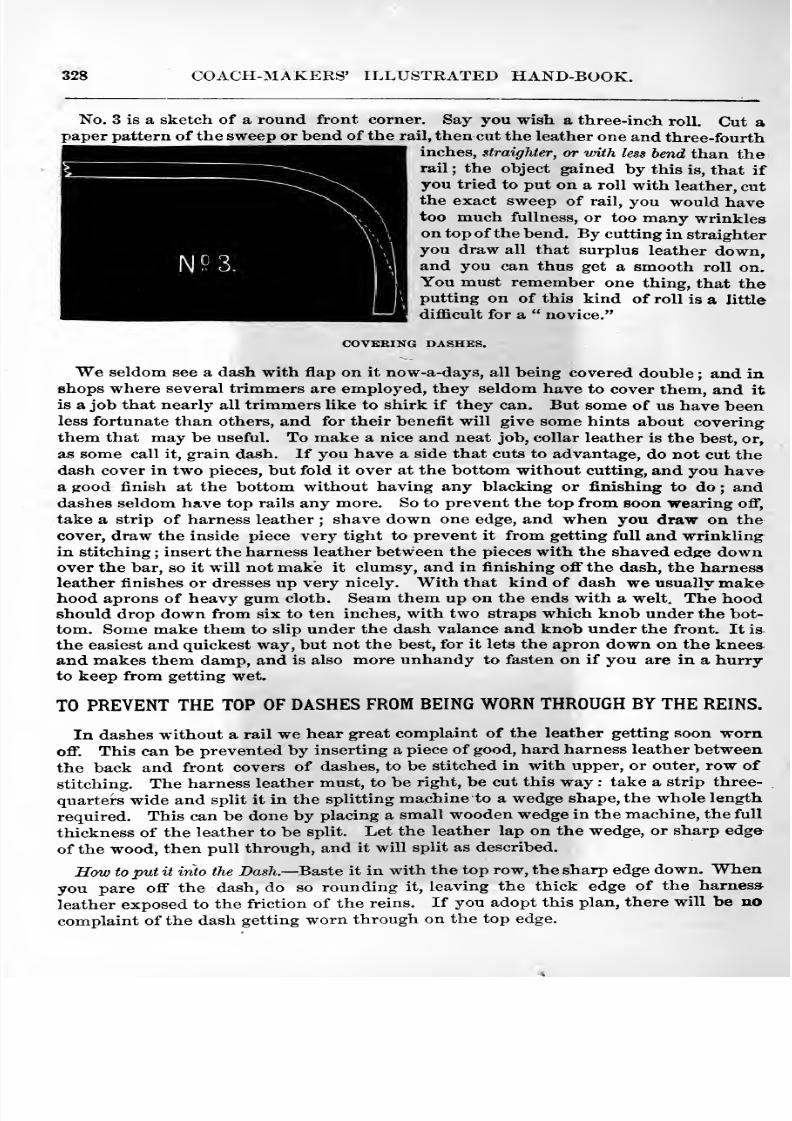
8/10/2019 Making Horse Drawn Coaches 1800 Bw
http://slidepdf.com/reader/full/making-horse-drawn-coaches-1800-bw 384/455
328 COACH-MAKERS' ILLUSTRATED HAND-BOOK.
No. 3 is a sketch of a round front corner. Say you wish a three-inch roll. Cut apaper pattern of the sweep or bend of the rail, then cut the leather one and three-fourth
inches, straighter, or with less bend than therail ; the object gained by this is, that if
you tried to put on a roll with leather, cutthe exact sweep of rail, you would havetoo much fullness, or too many wrinkleson top of the bend. By cutting in straighter
you draw all that surplus leather down,and you can thus get a smooth roll on.
You must remember one thing, that the
putting on of this kind of roll is a little
difficult for a novice.
COVERING DASHES.
We seldom see a dash with flap on it now-a-days, all being covered double ; and in
shops where several trimmers are employed, they seldom have to cover them, and it
is a job that nearly all trimmers like to shirk if they can. But some of us have beenless fortunate than others, and for their benefit will give some hints about coveringthem that may be useful. To make a nice and neat job, collar leather is the best, or,
as some call it, grain dash. If you have a side that cuts to advantage, do not cut the
dash cover in two pieces, but fold it over at the bottom without cutting, and you havea good finish at the bottom without having any blacking or finishing to do ; anddashes seldom have top rails any more. So to prevent the top from soon wearing off,
take a strip of harness leather ; shave down one edge, and when you draw on the
cover, draw the inside piece very tight to prevent it from getting full and wrinkling
in stitching ; insert the harness leather between the pieces with the shaved edge downover the bar, so it will not make it clumsy, and in finishing oflf the dash, the harnessleather finishes or dresses up very nicely. With that kind of dash we usually makehood aprons of heavy gum cloth. Seam them up on the ends with a welt. The hoodshould drop down from six to ten inches, with two straps which knob under the bot-
tom. Some make them to slip under the dash valance and knob under the front. It is
the easiest and quickest way, but not the best, for it lets the apron down on the kneesand makes them damp, and is also more unhandy to fasten on if you are in a hurryto keep from getting wet.
TO PREVENT THE TOP OF DASHES FROM BEING WORNTHROUGH BY THE REINS.
In dashes without a rail we hear great complaint of the leather getting soon wornoff. This can be prevented by inserting a piece of good, hard harness leather betweenthe back and front covers of dashes, to be stitched in with upper, or outer, row of
stitching. The harness leather must, to be right, be cut this way : take a strip three-
quarters wide and split it in the splitting machine to a wedge shape, the whole length
required. This can be done by placing a small wooden wedge in the machine, the full
thickness of the leather to be split. Let the leather lap on the wedge, or sharp edge
of the wood, then pull through, and it will split as described.
How to put it into the Dash.— Baste it in with the top row, the sharp edge down. Whenyou pare off the dash, do so rounding it, leaving the thick edge of the harness
leather exposed to the friction of the reins. If you adopt this plan, there will be nocomplaint of the dash getting worn through on the top edge.
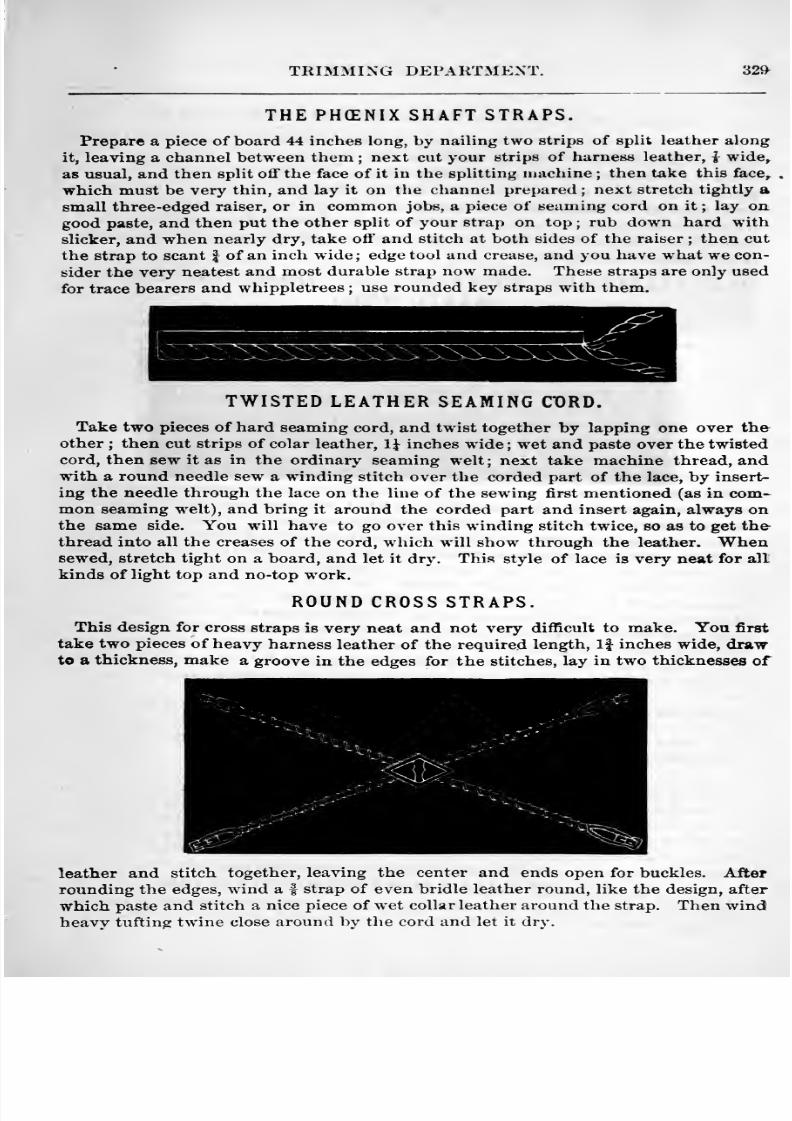
8/10/2019 Making Horse Drawn Coaches 1800 Bw
http://slidepdf.com/reader/full/making-horse-drawn-coaches-1800-bw 385/455
TRIMMING DEPARTMENT. 32^
THE PHdNIX SHAFT STRAPS.
Prepare a piece of board 44 inches long, by nailing two strips of split leather along
it, leaving a channel between them ; next cut your strips of harness leather, { wide,
as usual, and then split off the face of it in the splitting machine ; then take this face,,
which must be very thin, and lay it on tlie channel prepared ; next stretch tightly a
small three-edged raiser, or in common jobs, a piece of seaming cord on it ; lay on
good paste, and then put the other split of your strap on top ; rub down hard with
slicker, and when nearly dry, take off and stitch at both sides of the raiser ; then cut
the strap to scant | of an inch wide; edge tool and crease, and you have what we con-
sider the very neatest and most durable strap now made. These straps are only used
for trace bearers and whippletrees ; use rounded key straps with them.
TWISTED LEATHER SEAMING ClORD.
Take two pieces of hard seaming cord, and twist together by lapping one over the
other ; then cut strips of colar leather, 1\ inches wide ; wet and paste over the twistedcord, then sew it as in the ordinary seaming welt; next take machine thread, andwith a round needle sew a winding stitch over the corded part of the lace, by insert-
ing the needle through the lace on the line of the sewing first mentioned (as in com-^
mon seaming w^elt), and bring it around the corded part and insert again, always onthe same side. You will have to go over this winding stitch twice, so as to get the-
thread into all the creases of the cord, which will show through the leather. Whensewed, stretch tight on a board, and let it dry. This style of lace is very neat for all
kinds of light top and no-top work.
ROUND CROSS STRAPS.
This design for cross straps is very neat and not very difficult to make. You first
take two pieces of heavy harness leather of the required length. If inches wide, drawto a thickness, make a groove in the edges for the stitches, lay in two thicknesses of
leather and stitch together, leaving the center and ends open for buckles. After
rounding the edges, wind a | strap of even bridle leather round, like the design, after
which paste and stitch a nice piece of wet collar leather around the strap. Then windheavv tuftino; twine close around by the cord and let it dry.
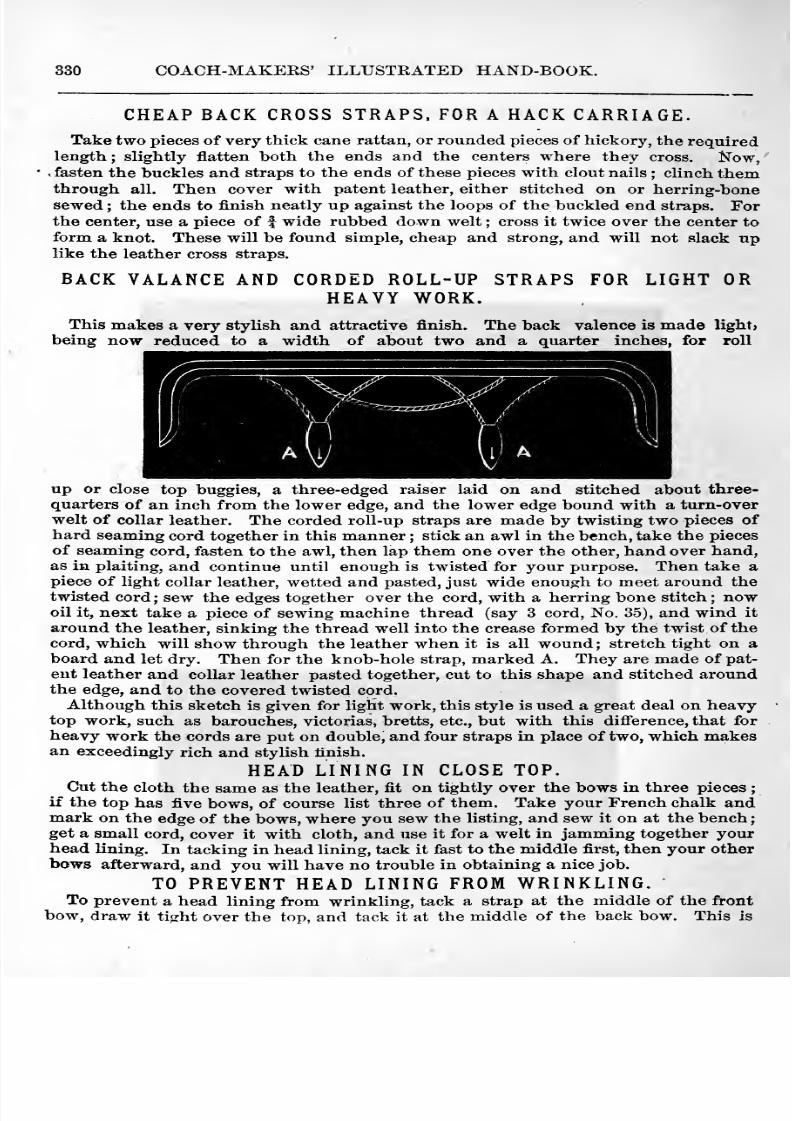
8/10/2019 Making Horse Drawn Coaches 1800 Bw
http://slidepdf.com/reader/full/making-horse-drawn-coaches-1800-bw 386/455
COACH-MAKEKS' ILLUSTEATED HAND-BOOK.
CHEAP BACK CROSS STRAPS, FOR A HACK CARRIAGE.
Take two pieces of very thick cane rattan, or rounded pieces of hickory, the requiredlength; slightly flatten both the ends and the centers where they cross. Now,
. fasten the buckles and straps to the ends of these pieces with clout nails ; clinch themthrough all. Then cover with patent leather, either stitched on or herring-bone
sewed ; the ends to finish neatly up against the loops of the buckled end straps. Forthe center, use a piece of f wide rubbed down welt ; cross it twice over the center to
form a knot. These will be found simple, cheap and strong, and will not alack uplike the leather cross straps.
BACK VALANCE AND CORDED ROLL-UP STRAPS FOR LIGHT OR
HEAVY WORK.This makes a very stylish and attractive finish. The back valence is made light,
being now reduced to a width of about two and a quarter inches, for roll
up or close top buggies, a three-edged raiser laid on and stitched about three-
quarters of an inch from the lower edge, and the lower edge bound with a turn-overwelt of collar leather. The corded roll-up straps are made by twisting two pieces ofhard seaming cord together in this manner ; stick an awl in the bench, take the pieces
of seaming cord, fasten to the awl, then lap them one over the other, hand over hand,as in plaiting, and continue until enough is twisted for your purpose. Then take apiece of light collar leather, wetted and pasted, just wide enough to meet around the
twisted cord ; sew the edges together over the cord, with a herring bone stitch ; nowoil it, next take a piece of sewing machine thread (say 3 cord, No. 35), and wind it
around the leather, sinking the thread well into the crease formed by the twist of thecord, which will show through the leather when it is all wound ; stretch tight on aboard and let dry. Then for the knob-hole strap, marked A. They are made of pat-
ent leather and collar leather pasted together, cut to this shape and stitched aroundthe edge, and to the covered twisted cord.
Although this sketch is given for light work, this style is used a great deal on heavytop work, such as barouches, victorias, bretts, etc., but with this difi'erence, that for
heavy work the cords are put on double, and four straps in place of two, which makesan exceedingly rich and stylish finish.
HEAD LINING IN CLOSE TOP.Cut the cloth the same as the leather, fit on tightly over the bows in three pieces ;
if the top has five bows, of course list three of them. Take your French chalk andmark on the edge of the bows, where you sew the listing, and sew it on at the benchget a small cord, cover it with cloth, and use it for a welt in jamming together yourhead lining. In tacking in head lining, tack it fast to the middle first, then your other
bows afterward, and you will have no trouble in obtaining a nice job.
TO PREVENT HEAD LINING FROM WRINKLING.To prevent a head lining from wrinkling, tack a strap at the middle of the front
bow, draw it tight over the top, and tack it at the middle of the back bow. This is
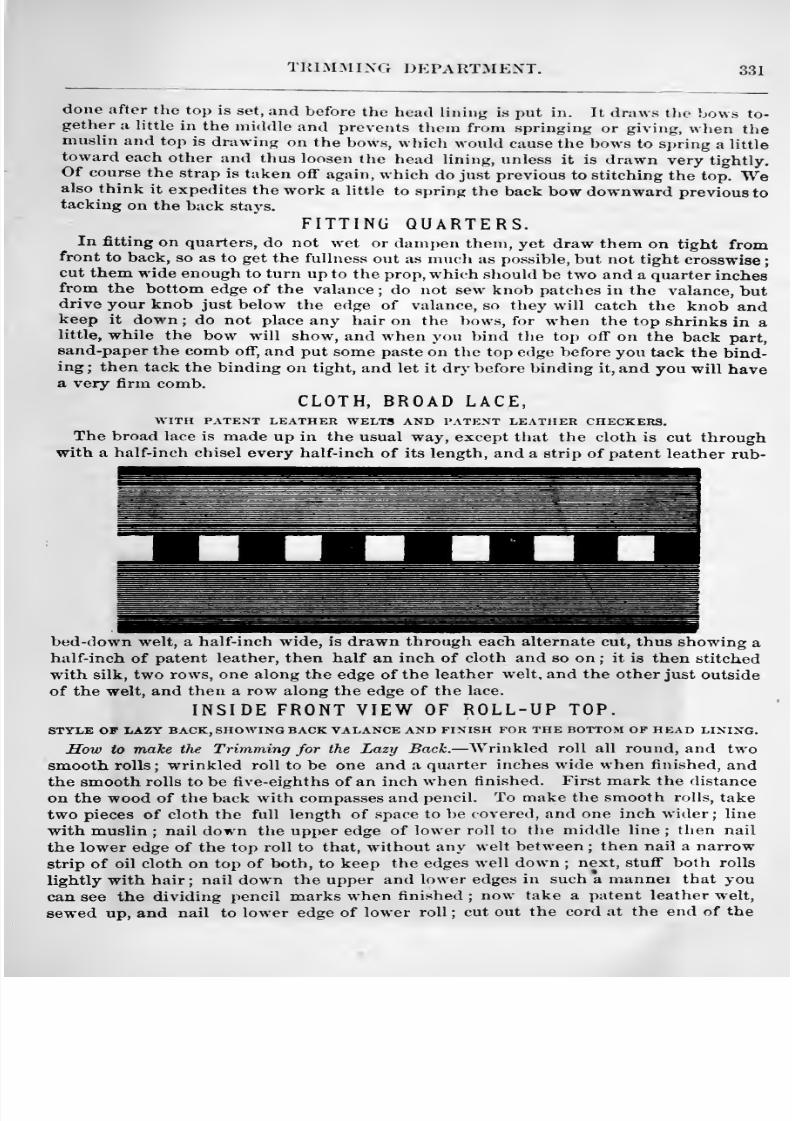
8/10/2019 Making Horse Drawn Coaches 1800 Bw
http://slidepdf.com/reader/full/making-horse-drawn-coaches-1800-bw 387/455
TRIMMING DEPARTMENT. 331
done after the top is set, and before the head lining is put in. It draws the bows to-gether a little in the middle and prevents tluMn from springing' or giving, when themuslin and top is drawing on the bows,
which would cause the bows to spring a littletoward each other and thus loosen the head lining, unless it is drawn very tightly.Of course the strap is taken off again, which do just previous to stitching the top. Wealso think it expedites the work a little to spring the back bow downward previous totacking on the back stays.
FITTING QUARTERS.In fitting on quarters, do not wet or dam})en them, yet draw them on tight from
front to back, so as to get the fullness out as much as possible, but not tight crosswisecut them wide enough to turn up to the prop, which should be two and a quarter inchesfrom the bottom edge of the valance; do not sew knob patches in the valance, butdrive your knob just below the edge of valance, so they will catch the knob andkeep it down ; do not place any hair on the bows, for when the top shrinks in alittle, while the bow will show, and when you bind the top off on the back part,sand-paper the comb off, and put some paste on the top edge before you tack the bind-ing; then tack the binding on tight, and let it dry before binding it, and you will havea very firm comb.
CLOTH, BROAD LACE,WITH PATENT LEATHER WELTS AND PATENT LEATHER CHECKERS.
The broad lace is made up in the usual way, except that the cloth is cut throughwith a half-inch chisel every half-inch of its length, and a strip of patent leather rub-
bed-down welt, a half-inch wide, is drawn through each alternate cut, thus showing ahalf-inch of patent leather, then half an inch of cloth and so on ; it is then stitched
with silk, two rows, one along the edge of the leather welt, and the other just outside
of the welt, and then a row along the edge of the lace.
INSIDE FRONT VIEW OF ROLL-UP TOP.STYLE OF LAZY BACK, SHOWING BACK VALANCE AND FINISH FOR THE BOTTOM OF HEAD LINING.
How to make tlie Trimming for the Lazy Back. —Wrinkled roll all round, and twosmooth rolls ; wrinkled roll to be one and a quarter inches wide when finished, andthe smooth rolls to be five-eighths of an inch when finished. First mark the distance
on the wood of the back with compasses and pencil. To make the smooth rolls, take
two pieces of cloth the full length of space to be covered, and one inch wider; line
with muslin ; nail down the upper edge of lower roll to the middle line ; then nail
the lower edge of the top roll to that, without any welt between ; then nail a narrow
strip of oil cloth on top of both, to keep the edges well down ; next, stuff both rolls
lightly with hair ; nail down the upper and lower edges in such a mannei that you
can see the dividing pencil marks when finished ; now take a patent leather welt,sewed up, and nail to lower edge of lower roll ; cut out the cord at the end of the
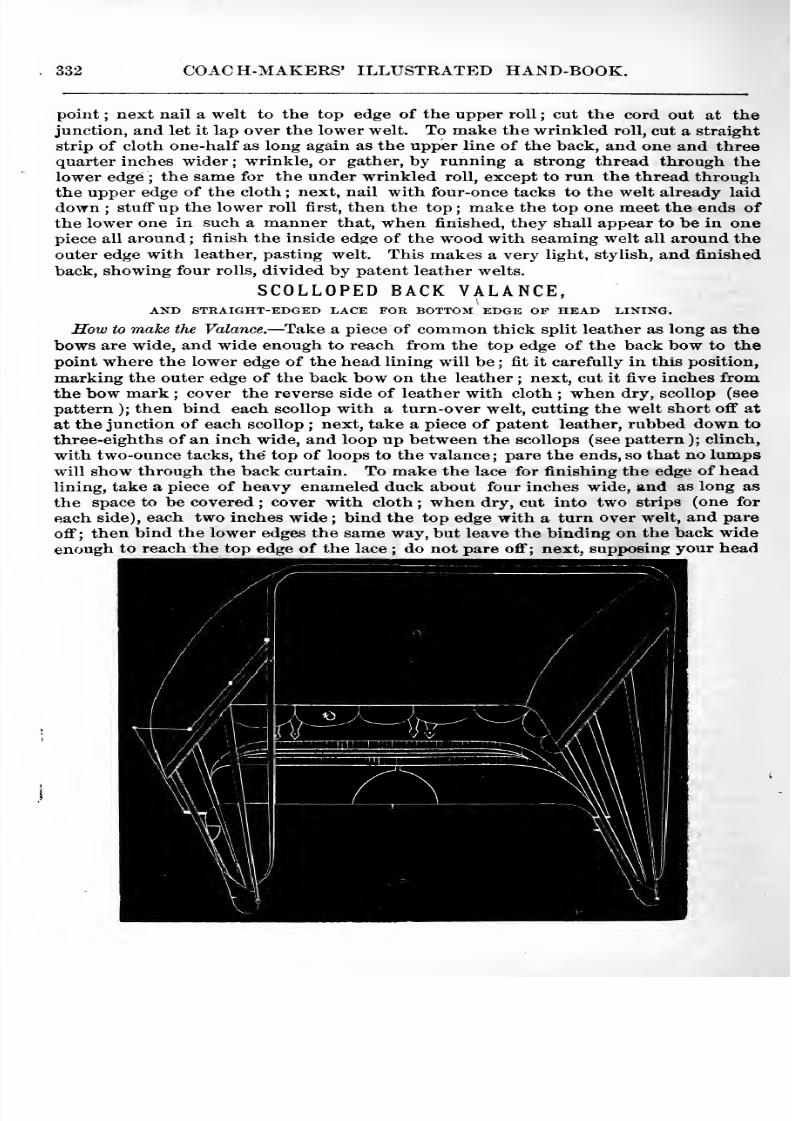
8/10/2019 Making Horse Drawn Coaches 1800 Bw
http://slidepdf.com/reader/full/making-horse-drawn-coaches-1800-bw 388/455
332 COACH-MAKERS' ILLUSTRATED HAND-BOOK.
point ; next nail a welt to the top edge of the upper roll ; cut the cord out at the
junction, and let it lap over the lower welt. To make the wrinkled roll, cut a straight
strip of cloth one-half as long again as the upper line of the back, and one and threequarter inches wider ; wrinkle, or gather, by running a strong thread through thelower edge ; the same for the under wrinkled roll, except to run the thread throughthe upper edge of the cloth ; next, nail with four-once tacks to the welt already laid
down ; stuff up the lower roll first, then the top ; make the top one meet the ends ofthe lower one in such a manner that, when finished, they shall appear to be in onepiece all around ; finish the inside edge of the wood with seaming welt all around the
outer edge with leather, pasting welt. This makes a very light, stylish, and finished
back, showing four rolls, divided by patent leather welts.
SCOLLOPEDBACK VALANCE,AND STEAIGHT-EDGED LACE FOR BOTTOM EDGE OF HEAD LINING.
How to make the Valance. —Take a piece of common thick split leather as long as the
bows are wide, and wide enough to reach from the top edge of the back bow to the
point where the lower edge of the head lining will be ; fit it carefully in this position,
marking the outer edge of the back bow on the leather ; next, cut it five inches fromthe bow mark ; cover the reverse side of leather with cloth ; when dry, scollop (see
pattern ); then bind each scollop with a turn-over welt, cutting the welt short oflf at
at the junction of each scollop ; next, take a piece of patent leather, rubbed down to
three-eighths of an inch wide, and loop up between the scollops (see pattern ); clinch,
with two-ounce tacks, the top of loops to the valance;
pare the ends, so that no lumpswill show through the back curtain. To make the lace for finishing the edge of headlining, take a piece of heavy enameled duck about four inches wide, and as long as
the space to be covered ; cover with cloth ; when dry, cut into two strips (one for
each side), each two inches wide ; bind the top edge with a turn over welt, and pare
ofi ; then bind the lower edges the same way, but leave the binding on the back wideenough to reach the top edge of the lace ; do not pare off; next, supposing your head
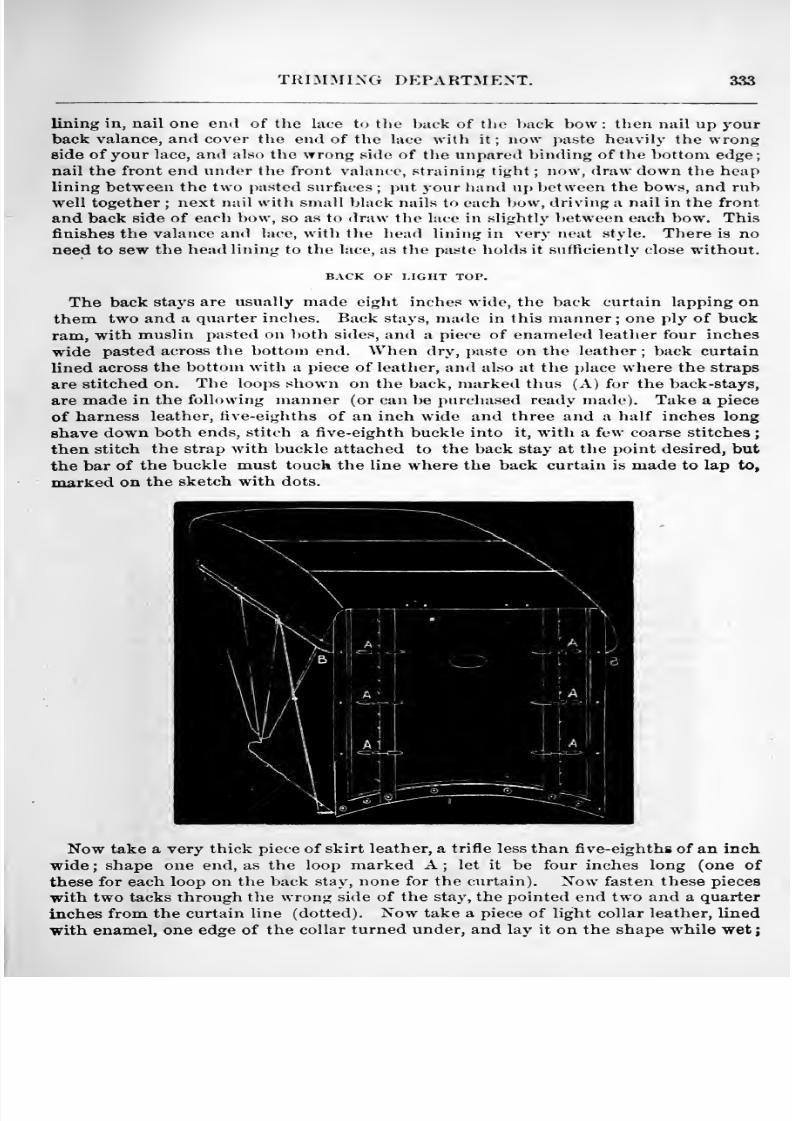
8/10/2019 Making Horse Drawn Coaches 1800 Bw
http://slidepdf.com/reader/full/making-horse-drawn-coaches-1800-bw 389/455
TRIMMING DEPARTMENT. 383
lining in, nail one end of the lace to the back of the ))ack bow : then nail up yourback valance, and cover the end of the lace with it ; now paste heavily the wrongside of your lace, and also the wrong side of the unpared binding of the Ixjttom edge;
nail the front end under the front valance, straining tight ; now, draw down the heaplining between the two pasted surfaces
; put 3'our hand uj) between the bows, and rubwell together ; next nail with small black nails to each bow, driving a nail in the front
and back side of each bow, so as to draw the lace in slightly between each bow. Thisfinishes the valance and lace, with the head lining in very neat style. There is noneed to sew the head lining to the lace, as the paste holds it sufficiently close without.
BACK OF LIGHT TOP.
The back stays are usually made eight inches wide, the back curtain lapping onthem two and a quarter inches. Back stays, ma<le in this manner; one ply of buckram, with muslin pasted on both sides, and a piece of enameled leather four inches
wide pasted across the bottom end. When dry, paste on the leather ; back curtain
lined across the bottom with a piece of leather, and also at the place where the straps
are stitched on. The loops shown on the back, marked thus (A) for the back-stays,
are made in the following manner (or can be purchased ready made). Take a piece
of harness leather, five-eighths of an inch wide and three and a half inches long
shave down both ends, stitch a five-eighth buckle into it, with a few coarse stitches
then stitch the strap with buckle attached to the back stay at the point desired, butthe bar of the buckle must touch the line where the back curtain is made to lap to,
marked on the sketch with dots.
Now take a very thick piece of skirt leather, a trifle less than five-eighths of an inch
wide ; shape one end, as the loop marked A ; let it be four inches long (one of
these for each loop on the back stay, none for the curtain). Now fasten these pieces
with two tacks through the wrong side of the stay, the pointed end two and a quarterinches from the curtain line (dotted). Now take a piece of light collar leather, lined
with enamel, one edge of the collar turned under, and lay it on the shape while wet
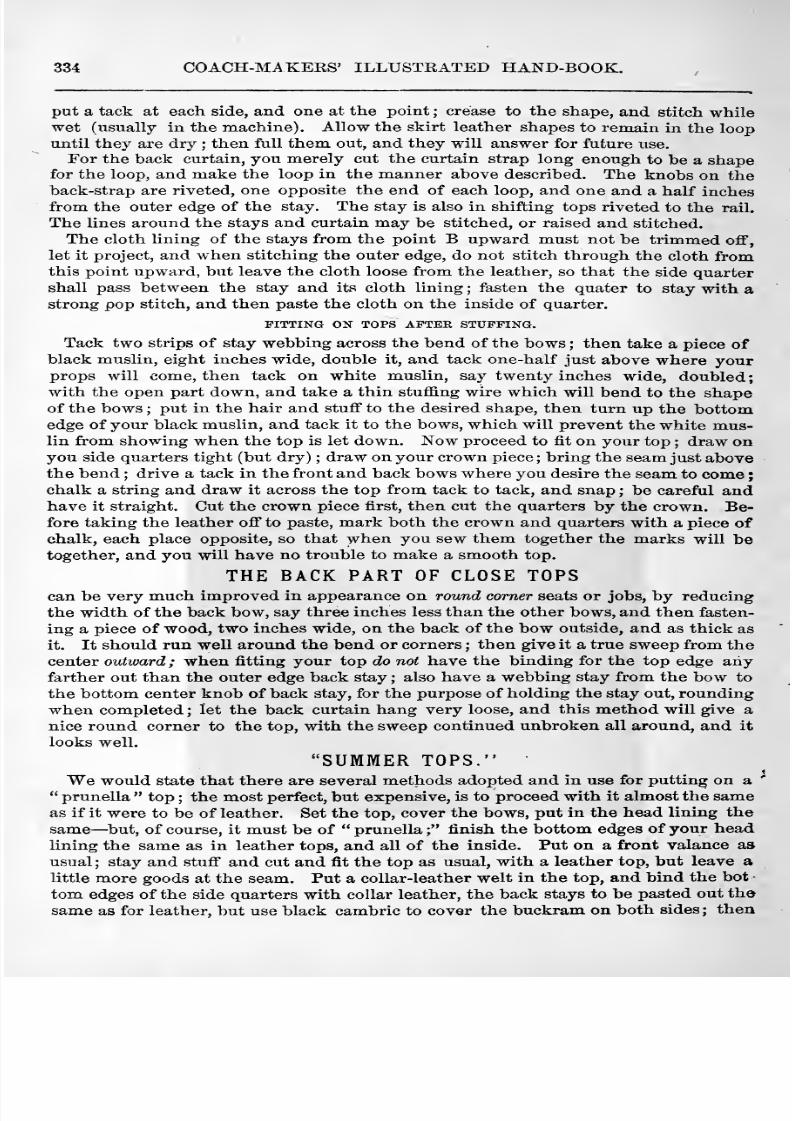
8/10/2019 Making Horse Drawn Coaches 1800 Bw
http://slidepdf.com/reader/full/making-horse-drawn-coaches-1800-bw 390/455
334 COACH-MAKERS' ILLUSTRATED HAND-BOOK.
put a tack at each side, and one at the point ; crease to the shape, and stitch whilewet (usually in the machine). Allow the skirt leather shapes to remain in the loop
until they are dry ; thenfull
them out, and they will answer for future use.For the back curtain, you merely cut the curtain strap long enough to be a shape
for the loop, and make the loop in the manner above described. The knobs on theback-strap are riveted, one opposite the end of each loop, and one and a half inchesfrom the outer edge of the stay. The stay is also in shifting tops riveted to the rail.
The lines around the stays and curtain may be stitched, or raised and stitched.
The cloth lining of the stays from the point B upward must not be trimmed off,
let it project, and when stitching the outer edge, do not stitch through the cloth fromthis point upward, but leave the cloth loose from the leather, so that the side quartershall pass between the stay and its cloth lining ; fasten the quater to stay with astrong pop stitch, and then paste the cloth on the inside of quarter.
FITTING ON TOPS AFTER STUFFING.
Tack two strips of stay webbing across the bend of the bows ; then take a piece ofblack muslin, eight inches wide, double it, and tack one-half just above where yourprops will come, then tack on white muslin, say twenty inches wide, doubled;with the open part down, and take a thin stuffing wire which will bend to the shapeof the bows
;put in the hair and stuff to the desired shape, then turn up the bottom
edge of your black muslin, and tack it to the bows, which will prevent the white mus-lin from showing when the top is let down. Now proceed to fit on your top ; draw onyou side quarters tight (but dry) ; draw on your crown piece; bring the seam just abovethe bend ; drive a tack in the front and back bows where you desire the seam to comechalk a string and draw it across the top from tack to tack, and snap ; be careful andhave it straight. Cut the crown piece first, then cut the quarters by the crown. Be-fore taking the leather off to paste, mark both the crown and quarters with a piece of
chalk, each place opposite, so that when you sew them together the marks will betogether, and you will have no trouble to make a smooth top.
THE BACK PART OF CLOSE TOPS
can be very much improved in appearance on round corner seats or jobs, by reducingthe width of the back bow, say three inches less than the other bows, and then fasten-
ing a piece of wood, two inches wide, on the back of the bow outside, and as thick as
it. It should run well around the bend or corners ; then give it a true sweep from the
center outward ; when fitting your top do not have the binding for the top edge anyfarther out than the outer edge back stay ; also have a webbing stay from the bow to
the bottom center knob of back stay, for the purpose of holding the stay out, roundingwhen completed ; let the back curtain hang very loose, and this method will give a
nice round corner to the top, with the sweep continued unbroken all around, and it
looks well. SUMMER TOPS. '
We would state that there are several methods adopted and in use for putting on a prunella top ; the most perfect, but expensive, is to proceed with it almost the sameas if it were to be of leather. Set the top, cover the bows, put in the head lining the
same— but, of course, it must be of prunella ; finish the bottom edges of your headlining the same as in leather tops, and all of the inside. Put on a front valance as
usual ; stay and stuff and cut and fit the top as usual, with a leather top, but leave alittle more goods at the seam. Put a collar-leather welt in the top, and bind the bot
tom edges of the side quarters with collar leather, the back stays to be pasted out thesame as for leather, but use black cambric to cover the buckram on both sides ; then
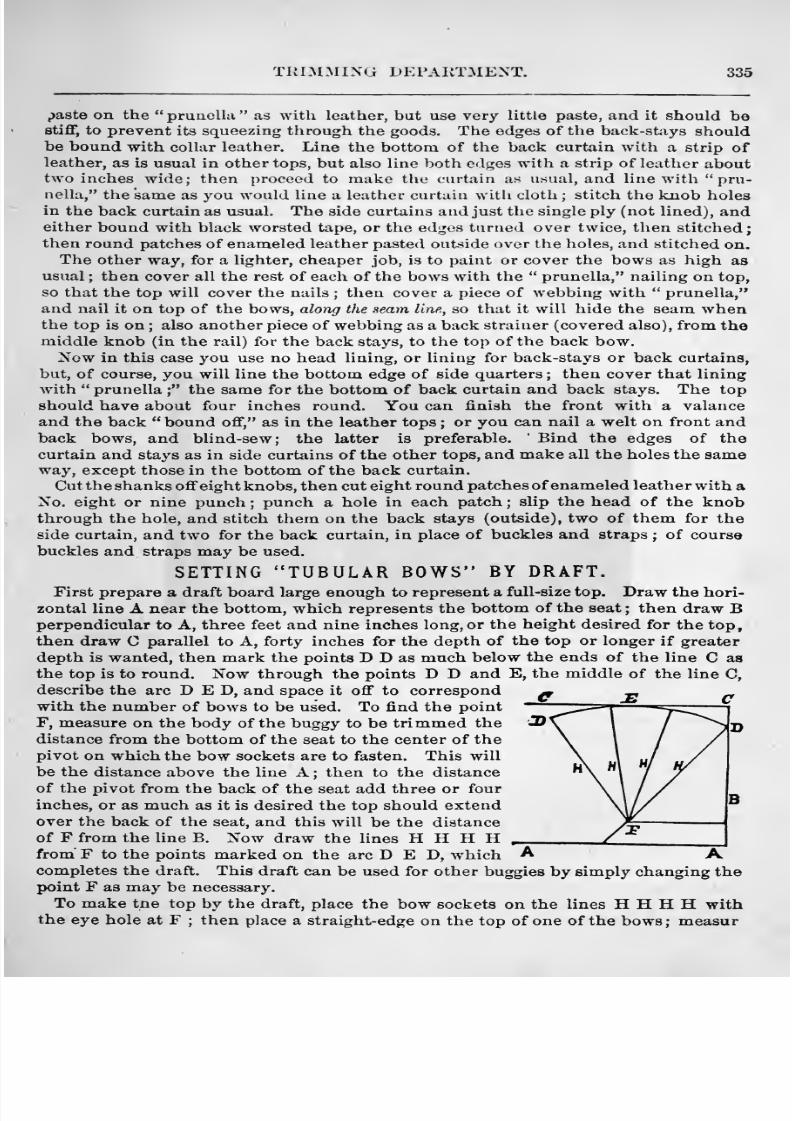
8/10/2019 Making Horse Drawn Coaches 1800 Bw
http://slidepdf.com/reader/full/making-horse-drawn-coaches-1800-bw 391/455
TRIMMING DEPARTMENT. 336
paste on the prunella as with leather, but use very little paste, and it should bestiff, to prevent its squeezing through the goods. The edges of the back-stays should
be bound with collar leather. Line the bottom of the back curtain with a strip ofleather, as is usual in other tops, but also line both edges with a strip of leather abouttwo inches wide; then proceed to make the curtain as usual, and line with pru-nella, the same as you would line a leather curtain witli cloth; stitch the knob holes
in the back curtain as usual. The side curtains and just the single ply (not lined), andeither bound with black worsted tape, or the edges turned over twice, then stitched;
then round patches of enameled leather pasted outside over the holes, and stitched on.
The other way, for a lighter, cheaper job, is to paint or cover the bows as high as
usual ; then cover all the rest of each of the bows with the ** prunella, nailing on top,
so thatthe
top willcover the
nails; then cover a piece
ofwebbing with
prunella,and nail it on top of the bows, along the seam line, so that it will hide the seam when
the top is on ; also another piece of webbing as a back strainer (covered also), from the
middle knob (in the rail) for the back stays, to the top of the back bow.Now in this case you use no head lining, or lining for back-stays or back curtains,
but, of course, you will line the bottom edge of side quarters ; then cover that lining
with prunella ; the same for the bottom of back curtain and back stays. The top
should have about four inches round. You can finish the front with a valance
and the back bound off, as in the leather tops ; or you can nail a welt on front andback bows, and blind-sew; the latter is preferable. ' Bind the edges of the
curtain and stays as in side curtains of the other tops, and make all the holes the sameway, except those in the bottom of the back curtain.
Cut the shanks off eight knobs, then cut eight round patches of enameled leather with aNo. eight or nine punch
;punch a hole in each patch ; slip the head of the knob
through the hole, and stitch them on the back stays (outside), two of them for the
side curtain, and two for the back curtain, in place of buckles and straps ; of course
buckles and straps may be used.
SETTING TUBULAR BOWS BY DRAFT.First
prepare adraft
boardlarge
enough to represent afull-size top.
Draw the hori-zontal line A near the bottom, which represents the bottom of the seat ; then draw Bperpendicular to A, three feet and nine inches long, or the height desired for the top,
then draw C parallel to A, forty inches for the depth of the top or longer if greater
depth is wanted, then mark the points D D as much below the ends of the line C as
the top is to round. Now through the points D D and E, the middle of the line C,
describe the arc D E D, and space it off to correspond
with the number of bows to be used. To find the point
F, measure on the body of the buggy to be trimmed the
distance from the bottom of the seat to the center of the
pivot on which the bow sockets are to fasten. This will
be the distance above the line A ; then to the distance
of the pivot from the back of the seat add three or four
inches, or as much as it is desired the top should extendover the back of the seat, and this will be the distance
of F from the line B. Now draw the lines H H H Hfrom' F to the points marked on the arc D E D, which A Acompletes the draft. This draft can be used for other buggies by simply changing thepoint F as may be necessary.
To make tne top by the draft, place the bow sockets on the lines H H H H withthe eye hole at F ; then place a straight-edge on the top of one of the bows; measur
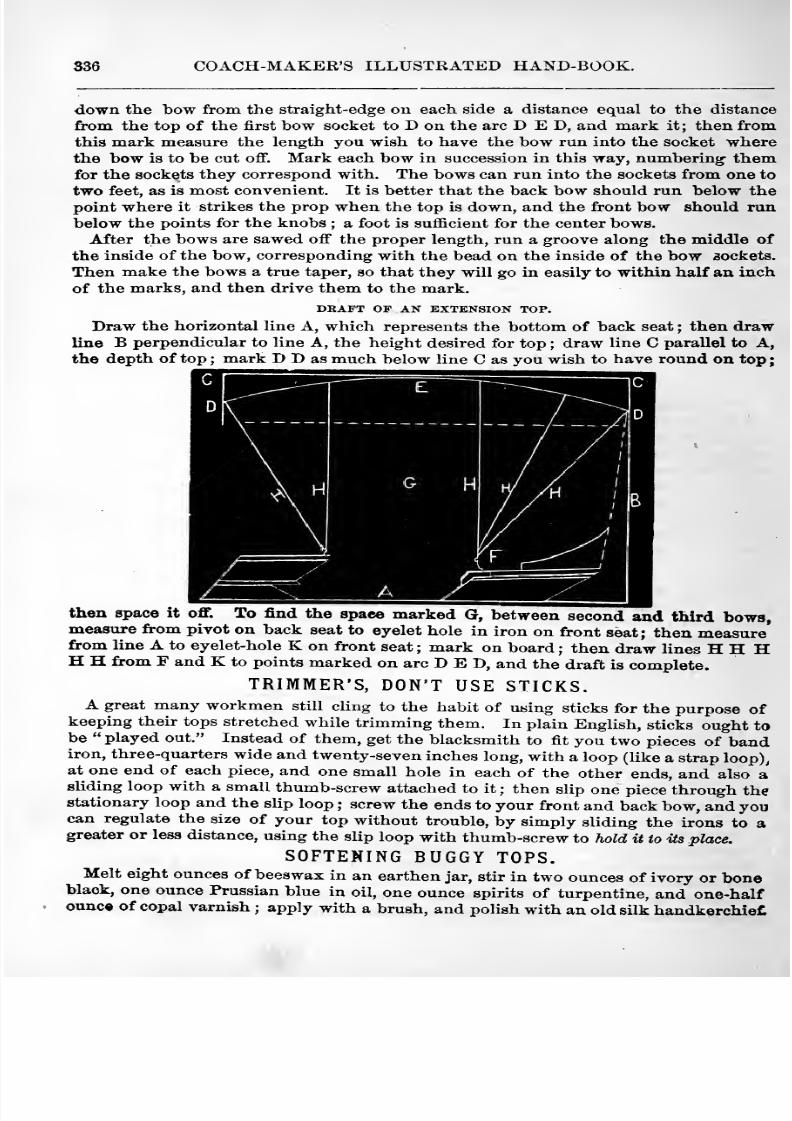
8/10/2019 Making Horse Drawn Coaches 1800 Bw
http://slidepdf.com/reader/full/making-horse-drawn-coaches-1800-bw 392/455
336 COACH-MAKER'S ILLUSTRATED HAND-BOOK.
down the bow from the straight-edge on each side a distance equal to the distance
from the top of the first bow socket to D on the arc D E D, and mark it ; then fromthis mark measure the length you wish to have the bow run into the socket wherethe bow is to be cut off. Mark each bow in succession in this way, numbering themfor the sockets they correspond with. The bows can run into the sockets from one to
two feet, as is most convenient. It is better that the back bow should run below the
point where it strikes the prop when the top is down, and the front bow should runbelow the points for the knobs ; a foot is sufficient for the center bows.
After the bows are sawed off the proper length, run a groove along the middle of
the inside of the bow, corresponding with the bead on the inside of the bow sockets.
Then make the bows a true taper, so that they will go in easily to within half an inch
of the marks, and then drive them to the mark.
DRAFT OP AN EXTENSION TOP.
Draw the horizontal line A, which represents the bottom of back seat ; then drawline B perpendicular to line A, the height desired for top ; draw line C parallel to A,
the depth of top; mark D D as much below line C as you wish to have round on top;
then space it off. To find the space marked G, between second and third bows,measure from pivot on back seat to eyelet hole in iron on front seat; then measurefrom line A to eyelet-hole K on front seat ; mark on board ; then draw lines H H HH H from F and K to points marked on arc D E D, and the draft is complete.
TRIMMER'S, DON'T USE STICKS.A great many workmen still cling to the habit of using sticks for the purpose of
keeping their tops stretched while trimming them. In plain English, sticks ought tobe played out. Instead of them, get the blacksmith to fit you two pieces of
bandiron, three-quarters wide and twenty-seven inches long, with a loop (like a strap loop),at one end of each piece, and one small hole in each of the other ends, and also asliding loop with a small thumb-screw attached to it ; then slip one piece through thestationary loop and the slip loop ; screw the ends to your front and back bow, and youcan regulate the size of your top without trouble, by simply sliding the irons to agreater or less distance, using the slip loop with thumb-screw to hold it to its place,
SOFTENING BUGGY TOPS.Melt eight ounces of beeswax in an earthen jar, stir in two ounces of ivory or bone
black, one ounce Prussian blue in oil,one ounce spirits of turpentine, and one-halfounce of copal varnish ; apply with a brush, and polish with an old silk handkerchief:
8/10/2019 Making Horse Drawn Coaches 1800 Bw
http://slidepdf.com/reader/full/making-horse-drawn-coaches-1800-bw 393/455
TRIMMING DEPARTMENT. 3S7
MIXING AND COOKING PASTE-
First put into tht^ pot the desired quiintity of good flour, and add water in small
quantities, and keep stirring until you have the mass the thickness of dough. This
method prevents the flour remaining in small lumps, for the tenacity of the mass is
such as to pull the lumps apart, and distribute the dry flour they contain. Afterward
thin down the mass gradually until it is the consistency of cream; then stir in a table-
spoonful of pulverized alum. The alum prevents the paste from souring, keeps flies
away from it, and adds to its adhesive qualities. Do not cook the paste long after it
gathers if you wish it to hold firmly. Your paste made, set it by until it cools.
PASTE THAT WILL KEEP.
Take one tablespoonful of flour ; add gradually one pint of cold water ; boil slowly,
and stir well to prevent burning till it thickens. Keep it boiling till it becomes thin
then add one teaspoonful of nitro-muriatic acid, and boil till it again thickens, whenit is ready forjuse.
HOW TO CLEAN DRAB CLOTH LININGS.
Put one pound of pearl ash in a pailful of hot water, then with a brush wash the
lining all over ; rub well with the brush after the lining is well wetted. Next put
three ounces of oil of vitriol in a half pailful of cold water ; taste it ; if it bites reduce it
with water until it tastes a little sour ; wash the cloth with vitriol water while it is wetwith the pearl ash water. The cost will be : for one pound pearl ash, 20 cents ; three
ounces oil vitriol, 7 cents.
STRIPS FOR CORDING.
It is simple and very handy ; and if you are a piece worker it will greatly advance
you. Say you want an eighth of an inch strip, and use harness leather ; cut ofi an inch
strip, and run it through your splitting knife, being careful to hold it square on its edge,
and you will be surprised how nicely it is done, and am sure you will be better pleased
with the time you have saved.
LEATHER BLACKING.
Three ounces extract logwood, three ounces copperas, one-half ounce bichromate
potash ;pulverize and add half gallon warm water. An earthen pot will be found
the most convenient to keep it in.
BLACK LEATHER VARNISH.
One gallon alcohol, two ounces gum shellac;
pulverize, mix and shake it well ; keepit warm near the stove, or in the hot sun, until melted, which will take about one daythen add three-fourths pound Venice turpentine, three ounces good lamp-black, andkeep it well corked.
BACK SUPPORTER.
Screw the two holders to the bottom of the seat, about eighteen inches apart, plac-
ing the perpendicular line A just even with the back edge of the seat. The line Bshows the angle and position of the back stay. The lazy back is laid in the notch C,
and tightened with a little wedge. This contrivance holds the lazy back at the properheight and distance back of the seat, and also gives it the right cast over at the top,
so that all the pressure does not come on the top roll.
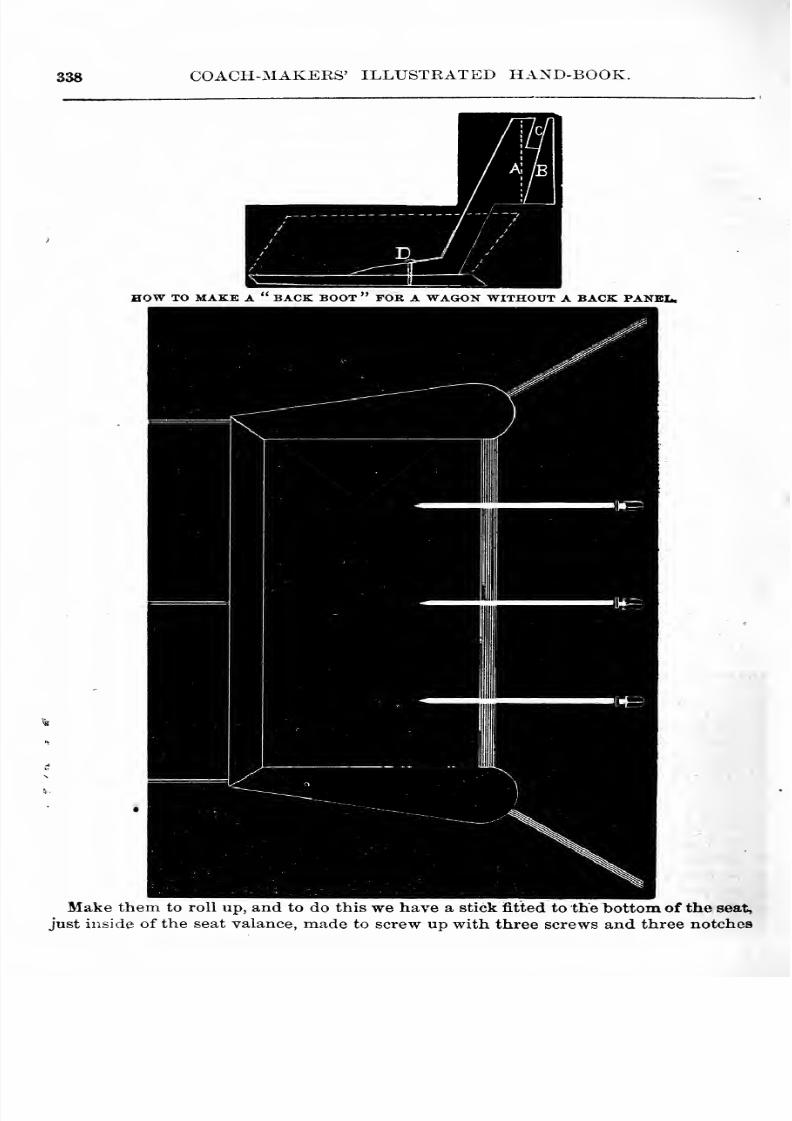
8/10/2019 Making Horse Drawn Coaches 1800 Bw
http://slidepdf.com/reader/full/making-horse-drawn-coaches-1800-bw 394/455
338 COACH-MAKERS' ILLUSTRATED HAND-BOOK.
HOWTO MAKE A BACK BOOT FOR A WAGON WITHOUT A BACK PANEL,
Make them to roll up, and to do this we have a stick fitted to the bottom of the seat,
just inside of the seat valance, made to screw up with three screws and three notches
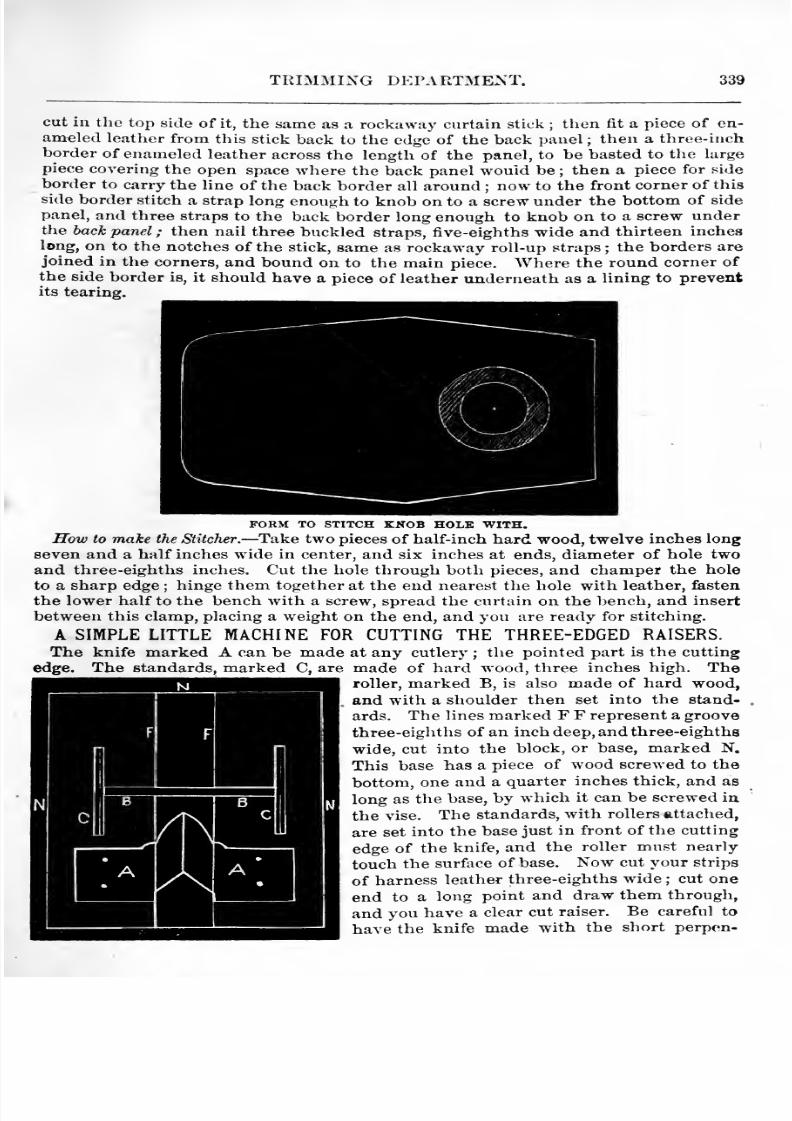
8/10/2019 Making Horse Drawn Coaches 1800 Bw
http://slidepdf.com/reader/full/making-horse-drawn-coaches-1800-bw 395/455
TRIMMING DEPARTMEINT.
cut in the top side of it, the same as a rockaway curtain stick ; then fit a piece of en-ameled leather from this stick back to the edge of the back panel ; then a three-inchborder of enameled leather across the length of the panel, to be basted to the large
piece covering the open space where the back panel would be; then a piece for side
border to carry the line of the back border all around ; now to the front corner of this
side border stitch a strap long enough to knob on to a screw under the bottom of side
panel, and three straps to the back l)order long enough to knob on to a screw underthe back panel ; then nail three buckled straps, five-eighths wide and thirteen incheslong, on to the notches of the stick, same as rockaway roll-up straps ; the borders arejoined in the corners, and bound on to the main piece. Where the round corner ofthe side border is, it should have a piece of leather underneath as a lining to preventits tearing.
FORM TO STITCH KNOB HOLE WITH.How to make the Stitcher. —Take two pieces of half-inch hard wood, twelve inches long
seven and a half inches wide in center, and six inches at ends, diameter of hole twoand three-eighths inches. Cut the hole through both pieces, and champer the hole
to a sharp edge ; hinge them together at the end nearest the hole with leather, fasten
the lower half to the bench with a screw, spread the curtain on the bench, and insert
between this clamp, placing a weight on the end, and you are ready for stitching.
A SIMPLE LITTLE MACHINE FOR CUTTING THE THREE-EDGED RAISERS.The knife marked A can be made at any cutlery ; the pointed part is the cutting
edge. The standards, marked C, are made of hard wood, three inches high. Theroller, marked B, is also made of hard wood,
and with a shoulder then set into the stand-
ards. The lines marked F F represent a groove
three-eighths of an inch deep, and three-eightha
wide, cut into the block, or base, marked N,This base has a piece of wood screwed to the
bottom, one and a quarter inches thick, and as
long as the base, by which it can be screwed in
the vise. The standards, with rollers attached,
are set into the base just in front of the cutting
edge of the knife, and the roller must nearly
touch the surface of base. Now cut your strips
of harness leather three-eighths wide ; cut one
end to a long point and draw them through,and you have a clear cut raiser. Be careful to
have the knife made with the short perpen-
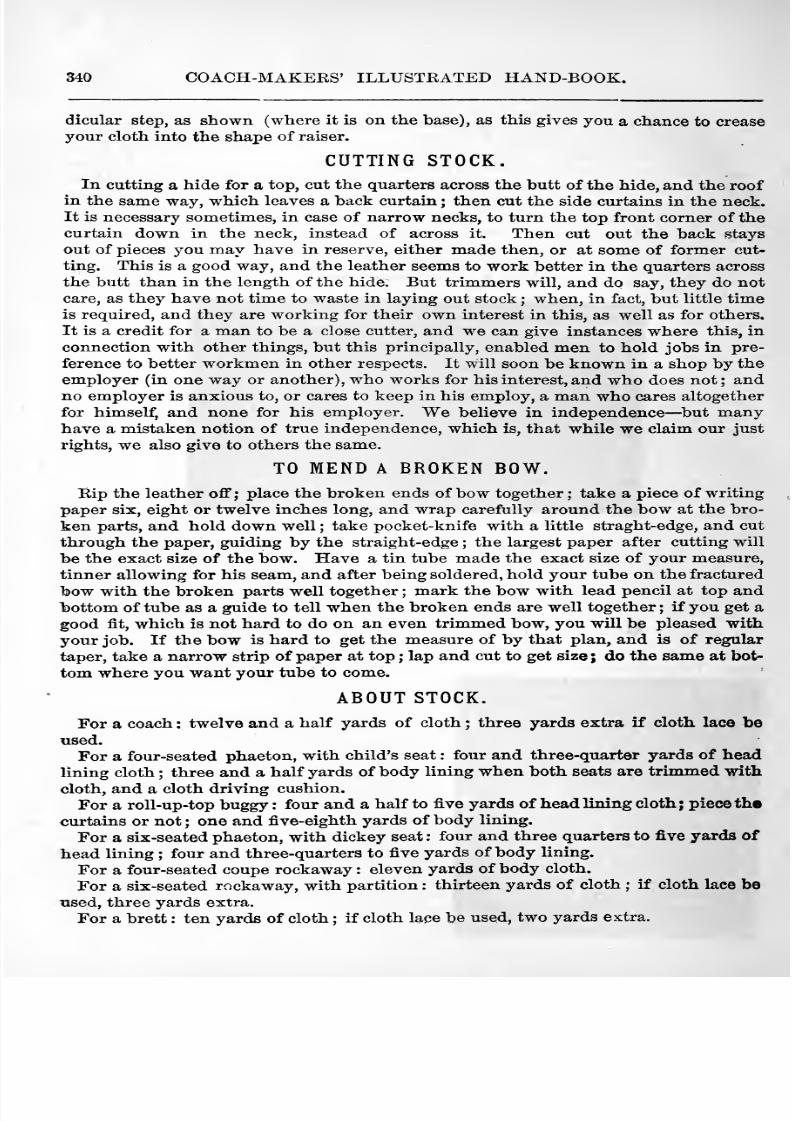
8/10/2019 Making Horse Drawn Coaches 1800 Bw
http://slidepdf.com/reader/full/making-horse-drawn-coaches-1800-bw 396/455
340 COACH-MAKEES' ILLUSTKATED HAND-BOOK.
dicular step, as shown (where it is on the base), as this gives you a chance to crease
your cloth into the shape of raiser.
CUTTING STOCK.In cutting a hide for a top, cut the quarters across the butt of the hide, and the roof
in the same way, which leaves a back curtain ; then cut the side curtains in the neck.
It is necessary sometimes, in case of narrow necks, to turn the top front corner of thecurtain down in the neck, instead of across it. Then cut out the back stays
out of pieces you may have in reserve, either made then, or at some of former cut-
ting. This is a good way, and the leather seems to work better in the quarters across
the butt than in the length of the hide. But trimmers will, and do say, they do not
care, as they have not time to waste in laying out stock ; when, in fact, but little timeis required, and they are working for their own interest in this, as well as for others.
It is a credit for a man to be a close cutter, and we can give instances where this, in
connection with other things, but this principally, enabled men to hold jobs in pre-
ference to better workmen in other respects. It will soon be known in a shop by the
employer (in one way or another), who works for his interest, and who does not; andno employer is anxious to, or cares to keep in his employ, a man who cares altogether
for himself, and none for his employer. We believe in independence— but manyhave a mistaken notion of true independence, which is, that while we claim our just
rights, we also give to others the same.
TO MEND A BROKEN BOW.
Bip the leather oflP ; place the broken ends of bow together; take a piece of writing
paper six, eight or twelve inches long, and wrap carefully around the bow at the bro-
ken parts, and hold down well ; take pocket-knife with a little straght-edge, and cut
through the paper, guiding by the straight-edge ; the largest paper after cutting will
be the exact size of the bow. Have a tin tube made the exact size of your measure,
tinner allowing for his seam, and after being soldered, hold your tube on the fractured
bowwith the broken parts well together ; mark the bow with lead pencil at top and
bottom of tube as a guide to tell when the broken ends are well together ; if you get a
good fit, which is not hard to do on an even trimmed bow, you will be pleased with
your job. If the bow is hard to get the measure of by that plan, and is of regular
taper, take a narrow strip of paper at top ; lap and cut to get size; do the same at bot-
tom where you want your tube to come.
ABOUT STOCK.
For a coach : twelve and a half yards of cloth ; three yards extra if cloth lace be
used.
For a four-seated phaeton, with child's seat : four and three-quarter yards of headlining cloth ; three and a half yards of body lining when both seats are trimmed with
cloth, and a cloth driving cushion.
For a roll-up-top buggy : four and a half to five yards of head lining cloth; piece the
curtains or not ; one and five-eighth yards of body lining.
For a six-seated phaeton, with dickey seat: four and three quarters to five yards of
head lining ; four and three-quarters to five yards of body lining.
For a four-seated coupe rockaway : eleven yards of body cloth.
For a six-seated rockaway, with partition : thirteen yards of cloth ; if cloth lace be
used, three yards extra.
For a brett : ten yards of cloth ; if cloth lace be used, two yards extra.

8/10/2019 Making Horse Drawn Coaches 1800 Bw
http://slidepdf.com/reader/full/making-horse-drawn-coaches-1800-bw 397/455
TRIMMING DEPARTMENT. 841
For a full clarence : thirteen yards of cloth.
For a circular front coupe : eight yards of cloth; if cloth lace be need, two and a
half yards extra.
PATENT LEATHER.The patent leather, so called, used in the manufacture of fine boots and shoes, for
the skirting of saddles, for carriage tops and dash boards, for fancy styles of harness,
and many other uses, is made by methods quite distinct from ordinary tanning; andit embraces some twenty -five or thirty diflerent varieties, including those colored red,
green, blue, amber, bronze and other colors.
The hides are generally tanned with hemlock, and require high liming and weak, sour
liquor to secure a soft grain, and are but lightly stufled. They are then run through
splitting machines to bring them to the desired thickness. Some of the heavier hides
are passed through the machine as much as five or six times. The inner and outer,
that is, the grain and flesh-side splits, are commonly sold to the trunk-makers, andbring from twenty-five to upward of thirty cents per pound.
The great essential in making superior patent leather consists in properly applying
the polishing substance, technically termed sweetmeat, and which is composed for
the most part of linseed oil. The hides, previously well-dried and softened by beating,
with pine blocks and by what is known as boarding, are stretched on frames pro-
vided for the purpose. The sweetmeat is applied in successive coats, which are
fixed by exposure to a high temperature, alternating with the several applications ofthe material. In order to secure this, the frames are slid into properly constructed
ovens, heated by steam-pipes to sixty or seventy degrees, and are left there until the sweetmeat or varnish is set. Any roughness that may be found at any stage of the
process is polished ofi with pumice-stone, the dust being very carefully removed bymeans of a wet brush, followed by a dry one. The entire operation occupies fromone to three weeks. That variety known as enameled leather requires additional
manipulation, being passed through a graining machine, in which a heavy brass roller
with a slightly currugated face is pressed forcibly upon the leather to perform a por-
tion of the work of finishing the article, the balance being done by a peculiar systemof boarding by hand.

8/10/2019 Making Horse Drawn Coaches 1800 Bw
http://slidepdf.com/reader/full/making-horse-drawn-coaches-1800-bw 398/455
S42 COACH-MAKERS' ILLUSTRATED HAND-BOOK.
MISCELLANEOUS-PART V.
>S^c
ORDER AND DISORDER. Let everything be done directly and in order is a commanc A Holy Writ ; but
we fear a great many persons have either never heard the comm»,id, or, having heardit, have cast it aside as worthless. The words used as our heading have an extensiveapplication ; but whenever applied, they present to the mind two different states or
modes of conduct directly opposed to each other. Order reigns where wise and goodmen conduct the affairs of a nation or state, while disorder is the offspring of the
jealousies and ambitions of demagogues. Contentment, profitable employment, and a
steady advancement in the arts and sciences, and of morality and religion, are the
fruits of peace and quiet. Disorder, on the contrary, ig * .le parent of discontent, indo-
lence, extravagance, and everything having a tend**ne/ to destroy the frame work of
society, unlock the passions of bad men, and eat out the substance of the people.
What is true with reference to a state or nation is equally true among individuals andfamilies.
The tidy housewife generally has a smiling and agreeable husband ; and, on the
other hand, a man who is careful of his personal appearance, and makes it his study
to provide little conveniences and comforts about his home, may rest assured he will
find a loving and attentive wife.
To be a careful observer whose calling throws him in contact with men of business
in different sections of the country, he observes that the thrifty merchants, manufac-
turers and farmers are those who do business systematically.
When we pass by a farm, and see a comfortable residence, a good barn, well-trimmed
orchards, and clean fence corners, we at once decide that the owner is an honest, in-
dustrious and trustworthy farmer. When we enter a manufacturing establishment,
and find a neat office, well-swept stairways and work rooms, good light and ventila-
tion, and a studied method in every department, an evidence is before us that the
proprietor will take a pride in producing first-class work.
The merchant who is deficient in taste, and careless of the interior and exterior ap-
pearance of his place of business, thoughtless in selecting suitable clerks and assist-
ants, and slovenly in the display of his goods, may not be surprised to find buyers
pass his door, and drop in at his neighbor's store to make their purchases.
But as we have to deal principally with carriage-makers,let
us lookin
upon someof the establishments not a thousand miles away. We are sorry to record that a large
8/10/2019 Making Horse Drawn Coaches 1800 Bw
http://slidepdf.com/reader/full/making-horse-drawn-coaches-1800-bw 399/455
8/10/2019 Making Horse Drawn Coaches 1800 Bw
http://slidepdf.com/reader/full/making-horse-drawn-coaches-1800-bw 400/455
344 COACH-MAKERS' ILLUSTRATED HAND-BOOK.
While we would say nothing against an individual choosing to retire from active
pursuits, and enjoy the fruits of his labor, we do think that the example thusset has
a tendency to create in others a desire to speedily arrive at a like position, careless ofthe means used to attain the end.
We hear occasionally of a man who, by a bold speculation, has made a fortune '^
in a few months; but the majority of business men are not gifted with that keenforesight and courage which are so essential to the speculator, and must, therefore, becontent with small gains, accumulating but slowly year after year.
It is well that it is so ; for the cares and disappointments attendant on the conduct-
ing of any business keep down pride of heart, and secure to society a majority of that
class of men who can sympathize with the unfortunate and downtrodden, and who
give moreliberally
to therearing of
thoseinstitutions
which benefit and improve the
Success depends, in a great measure, on a knowledge of the business engaged in, theproper application of industry to the materials required, frugality, promptness in
meeting engagements, and good moral character.
In no occupation we can name are these more essential than to those who engagein the manufacture of carriages ;
yet how few out of the whole number, who claim to-
be carriage-makers, have a good general knowledge of the business. Four distinct
branches are to be looked after— wood-work, blacksmithing, painting and trimming*
The material used by the respective branches are entirely dissimilar and costly, andrequires the utmost vigilance on the part of the proprietor to see that there is no un-
neccessary waste.
We shall therefore notice, as briefly as possible, some of the principal points to beconsidered in successfully conducting the manufacture of carriages.
CONVENIENT AND COMFORTABLE WORK-SHOPS.Men can, if they choose, do a grdater amount of work, with more satisfaction to-
themselves and employers, in a clean, well- ventilated shop that they can in the oppo-
site. How often is it the case that the sniith.4epartment is in some cold shed, or in a
damp, dark and poorly -ventilated cellar, with ground floor, and seldom, in either case,do we find, during a long cold winter, any fire or heat save what comes from the forge.
Allowing that the forger and helper can, by constant exertion, and the little warmththey receive from the forge, keep passably warm (except the feet), with what little
spirit does the filer or finisher enter upon his work on a cold morning. His tools
cold, the iron he touches sticks to his fingers, and between rubbing his hands andstamping his feet many hours are actually lost to the employer during the day. Handsbecome dissatisfied with their situations, and when business revives obtain employ-
ment elsewhere, just at the time when the employer can least spare them and good
hands arescarce.
Muchloss is occasioned by introducing new hands, supposing they
can be easily obtained, which is seldom the case in busy seasons.
Much can be said respecting all the difierent departments, but none are so much ne-
glected as the smith-shop. Make each department comfortable, light and well venti-
lated, and when you have hands that suit you change as seldom as possible.
SYSTEM.
Much loss is occasioned by a want of system in the shop. There should be in every
well-regulated shop a set of hands especially for repairing ; these, of course, it is
better to hire by the week, and have some common jobs for them to work on when
repairing is slack. But hands for new work should be kept as much as possible on thesame class of work : it is better for both employer and employed. In many shops it
8/10/2019 Making Horse Drawn Coaches 1800 Bw
http://slidepdf.com/reader/full/making-horse-drawn-coaches-1800-bw 401/455
MISCELLANEOUS DEPARTMENT. 846
is impossible to do so, but much dissatisfaction could be avoided by the employerstudying to make as few changes from one class of work to another as the interests
of his business will allow. Have a place for everything, and see that each one learns
to keep things in order around him. This, of course, should be the duty of the fore-
men of the different departments ; they should be careful, systematic men, and tho-
roughly acquainted with the branch in which they are engaged. If the plank pile is
torn down, or a carriage is taken apart for repairs, it should be the duty of the fore-
man to see that each one rearranges everything after him at once, and not leave things
go at loose ends for a week or a month, then take a general clearing up, accumulating
scraps and pieces of stock that could have been used to the saving of uncut stuff.
For new work, hire by the piece ; it is more satisfactory to the hands, pays better,
and saves a great deal of care and watching that is necessary with many hands. Youknow just what the job costs you, while hands working by the week will, more or
less, take it it easy when they are not in a working humor.
DO FIRST-CLASS WORK EMPLOY FIRST-CLASS HANDS, AND PAY FIRST-CLASS WAGES.
The curse of coach-making is the auction shops of our cities, of which, we are sorry
to say, too many can be found. It may seem profitable to some for a time, but ourexperience is that very few ever accumulate any property. It is a continual drive of
every one in their employ to their utmost, poor pay, poor hands, poor stock, and, con-
sequently, poor job and poor price for it, flooding the country with carriages that are
not safe to go five miles from home with. The employer is not making any reputa-
tion for himself, and in dull times his business stops. This portion of our subject is
worthy ten times the space we can devote to it, for, of all things, we detest the manwho will, for the sake of a few dollars profit on each job, force men to work for a small
pittance, waste the stock, and turn on the community a worthless thing in the shapeof a carriage, while he might, at the same time, be making for himself a reputation
that would stand by him and give him his full share during dull times, and be afford-
ing a comfortable subsistence to those in his employ. Good work, good hands andgood wages pay best, and is more respectable. The men should be kindly and re-
spectfully treated by the employer, which will induce them to take a greater interest
in his business, and in the production of the proper kind of work.The best hands are invariably the cheapest, and a few dollars extra invested as wages
pays much better than advertising and filling the places of competent hands with those
wholly unacquainted with the shop and your manner of working.
The employer should make himself acquainted with the quality of all the material
he uses, and purchase it himself in as large quantities as circumstances and the wantsof his business may require. The habit of buying in small quantities, and of sending
boys after what is wanted, is productive of no good to any one, only the dealer, who,in most instances, takes some advantage, either in quality or price of goods. Better
select some honest dealer and send direct to him than trust to an incompetent person.When living at some distance from the market, time and money are often saved bysending your orders to some disinterested person in whom you have confidence intheir ability to judge of the quality of the articles desired.
Practice strict economy in all departments; see that your materials are used upas closely as possible, and be careful not to accumulate a large quantity of unavailable
stock. Endeavor to produce a neat, convenient class of work, that will find a readysale.
BEWARE OF SHARPERS.
Many persons are continually on the watch for men commencing in the business.Frequently livery stable men profess to have great influence in controlling custom
8/10/2019 Making Horse Drawn Coaches 1800 Bw
http://slidepdf.com/reader/full/making-horse-drawn-coaches-1800-bw 402/455
346 COACH-MAKERS' ILLUSTRATED HAND-BOOK.
apart from their own, and ask for special favors on that ground ; and in many instances
the new beginner finds that he has, after being induced to do his work for one-third
less than it was worth, lost the most of the balance, and his customer leaveshim
to
try the same on some one else. Better do less business and be sure to get good prices,
' and as much as possible sell for cash ; at all events settle often.
BE CAREFUL OP YOUR CREDIT.
It is a mistaken idea for any man to think it to his advantage to defer paying for his
stock until he is forced to do so. It is much better to always buy for cash. A fewcents per foot discount on leather, or a fraction per pound on iron, and all other kindsof material, will tell in the course of the year in the profits. There are very few that
have the means always at hand, but next to paying cash fix the time for your payments
when you know you can meet them, and regard your promise as sacred. Let thosewith whom you deal understand that you are prompt according to agreement ; andshould necessity require it, you will have many favors shown you that you otherwise
would not receive.
A dollar saved here and there by paying cash, or meeting your notes promptly, will
help to sw«ll the profits of each succeeding year, and in time place one in easy
circumstances. Wealth is acquired by small but oft-repeated accumulations. Thegross amount of these sums will be decided by your skill, industry and frugality, for,
though a man earn much, yet if he spend all he will grow no richer. There is a
class of m^i who are prepared to pay promptly, yet ruin their credit by negligence,and assist in adding to the cares and perplexities of business life.
A man of good moral character will be mindful of his promises, and if misfortune
overtake him, will find many a helping hand to assist him to rise again.
ARE THEY COMPETENT JUDGES?Carriage-makers who seldom, if ever, take the lines in their hands, and ride out in
carriages of their own manufacture —are they competent to judge of the merits or de-
merits of the vehicles which they with confidence recommend to others? We think
not. It is one thing to oversee and pay well for the building of a fine buggy, or any
other kind of vehicle, and quite another matter to experience the sensations produced
by putting them into actual wear. A buggy may be handsome in general appearance,
and composed of the best material, yet defective in ease of motion and comfort to the
occupants. The set of the axles may cause the vehicle to run heavy, and communicate
to the rider an unpleasant jarring motion, at the same time add unnecessary labor to the
horse. The springs may be too stiff for their length, and fail to vibrate sufficiently
under the greatest weight they may be called upon to sustain. The seat may be too
low —the back placed in a position or so trimmed as to be a continual source of un-
easiness ; the foot-room be cramped. These and other defects may exist, while the
carriage-maker, who seldom rides out, remains in total ignorance of them, in so far as
his own personal experience extends. Now, an individual having purchased a buggy
of such an one, might drive up to his shop door and inform him that this or that de-
fect existed and needed to be remedied, and fail to convince the maker that such wasthe case. He would probably plead the skill of his workmen, the care with which-every buggy was carried forward to completion, and thus fortify himself in his ownopinions, through gross ignorance of what constituted comfort while seated in a vehi-
cle carried along over roads of different degrees of smoothness.
The tendency of such a course is toward a stand-still point in the way of needed im-
provement, and must certainly work adversely to the carriage-maker's interests. Sofar as our observation extends, we are well satisfied that the builder who adopts an
8/10/2019 Making Horse Drawn Coaches 1800 Bw
http://slidepdf.com/reader/full/making-horse-drawn-coaches-1800-bw 403/455
MISCELLANEOUS DEPARTMENT. 347
opposite course is by far the most successful. Becoming sensible to defects by per-
sonal experience, he is keenly sensitive and anxious to remove any cause of complaint
brought to his notice by others. With such an one the customer feels that he is deal-
ing with a manufacturer alive to his convenience and comfort, and will not be apt to
go elsewhere to purchase, although he may have had occasion to point out several
weak points.
The truly progressive carriage-maker tests his own work by frequently taking air-
ings, and criticisms by those who ride a great deal he gives a careful examination.
No matter who may suggest a new idea of value, he puts it away as so much gained.
He gathers here a little and there a little, which, in the aggregate, when applied as
little things, amount to something so important as to give to his work an indescribable
tomething which marks it as superior, in short, a distinctive character.
COMPETITION.
Competition is a contest or rivalry between two individuals, companies or govern-
ments, for the purpose of profit. It is, in reality, the life of trade, when carried onwithin reasonable bounds, otherwise it is ruinous to the contestants. The desire of
possession is natural to every human being, and sufficient selfishness has been added
to make us careful of our own, and careless to others' interests, to a certain extent.
It would be an endless task to attempt the enumeration of the forms in which com-
petition presents itself. No trade, profession or calling that can be named but whathas to be on the alert lest those who may be in the same line discover or purchase
some improvement which may work injuriously, by taking money out of their pockets,
and placing it in the purse of another. There was a time when men of superior skill
might reap the full benefits of their productions, but the introduction of steam andlabor-saving machinery have placed all nearer on a level.
The manufacturer of to-day, who does not employ the most perfect machinery, need
not attempt to compete with his more enterprising rival. He may struggle along in
a half-dead-and-alive manner, but must finally feel himself pushed aside to make room
for those who are fully alive to their vocation. Among carriage-makers there is astrong spirit of rivalry which will not fail to show itself in the country town wherethere are but two shops, as well as in the metropolis, amongst the heavy manufac-
turers, and on down to those who run but one fire.
Builders very often allow themselves to be led away into bankruptcy, by being moreanxious to sell for the sake of selling, rather than to wait and obtain a living price.
They will sell at a sacrifice, rather than allow a customer to go elsewhere, especially
if he should mention the name of a rival, stating that Mr. so-and-so would furnish a
vehicle at the price he was now ofi*ering. This is all wrong, and, by whomsoever prac-
ticed, if persisted in, must lead to failure.
The builder should know the first cost of every carriage in his wareroom, and, hav-
ing added a living per cent, to that, obtain as much more as possible, yet never take
less than first cost. The prices of carriages built in different parts of the country
necessarily vary, on account of the advantages one section may have over another in
securing stock and labor cheaper. This fact leads to rivalry between cities ; desperate
struggles are made to build up a trade, where natural advantages may be all against a
place, and a few years only are necessary to prove the folly of the attempt.
This kind of competition is ruinous, evidence of which is being continually brought
to our notice. Prices vary so much between the large cities, both for new work andrepairs, that builders in those towns, which are farther inland are often at a loes to
8/10/2019 Making Horse Drawn Coaches 1800 Bw
http://slidepdf.com/reader/full/making-horse-drawn-coaches-1800-bw 404/455
348 COACH-MAKERS' ILLUSTRATED HAND-BOOK.
know what value they should set on their finished work ; and the journeyman is
equally in the dark as to what would be a fair price for his labor.
In the cities we find a great many small shops struggling to get a foothold, whichare compelled to take whatever may be offered, and between this class and the prince
in the business, are those who lay some claim to respectability, yet who have no set-
tled prices on their work.
In answering such questions as What is the price for all kinds of iron or woodwork, painting and trimming ? a satisfactory reply cannot be given, there being sucha variety of circumstances under which the value of labor may be viewed. A compar-ison between two first-class shops would probably disclose the fact that one set ofhands would be required to perform a certain amount of extra work in order to pleasethe particular fancy of their employer, and, for this extra labor, would receive one-fourth more wages than those employed at a factory where equally serviceable workwas built, yet deficient in certain little matters not aflecting the real value of the car-
riage to the customer. Here the difference in wages would be balanced by the unequa-amount of labor required.
Again, two shops may require of their hands an equal amount of work on each part,
and yet, to piece-workers, more money could be made in one than the other, at less
wages, on account of the facilities afforded in producing the work. The wood-worker,on having an abundance of seasoned stuff, kept in a dry and convenient place, thetimber sawed and planed, a warm shop, etc. The blacksmith, by being provided withthe sizes of iron and steel, requiring the least amount of labor to forge the parts, andnot to be compelled to draw down a heavy bar, in order to obtain the sJze required.
The trimmer, by being supplied with good stock and an abundance of it, so that heshould not be compelled to waste his time for the want of a little bit of muslin, hair,
or a certain kind of leather best adapted to his wants. This will apply also to thepainter.
It would not be just for an employer to demand of a piece-worker an unusual amountof work for a very low price ; neither would it be fair for the journeyman to claim anexorbitant price for his labor, when surrounded with every convenience for complet-
ing his work in a short time. The question of wages and piece-work prices can neverbe settled satisfactorily without a bill of prices, agreed upon between the employer andemployee, and even then there would be conditions in which disputes would arise.
In a country town, where rents are low and living cheap, a man can afford to take
a trifle less for his labor ;yet, if his employer receives city prices for finished work,
city prices should be paid the journeyman. Wages have much to do in the matter
of competition between rival manufacturers ; those who pay the least for skilled work-men being able to undersell all others. When this discovery is made by those placed
at a disadvantage, their first attack will be at the wages paid their hands ; the cost of
the carriage must be reduced by some means, and as the material required in its con-struction cannot be bought at a less figure than that charged by the dealer in carriage
goods, the workman must submit to a reduction, or seek other employment.
Competition should not be attempted between widely separated localities, whereone section has a decided natural advantage over the other. Living profits should belooked after, regardless of what other firms may or may not obtain for their work.
Cincinnati or St. Louis would be foolish to attempt competing in price with New Ha-ven and other Eastern cities. But, by building equally as good or superior work, they
may supply a large demand in their section, and obtain handsome profits.
Were every kind of business conducted on a safe basis, and less jealousy and rivalrymanifested, there would be fewer failures to record.
8/10/2019 Making Horse Drawn Coaches 1800 Bw
http://slidepdf.com/reader/full/making-horse-drawn-coaches-1800-bw 405/455
MISCELLANEOUS DEPARTMENT. 349
THE PROPER CARE OF CARRIAGES.What can be more pleasing to the eye, among the productions of the mechanic, than
a carriage built by a first-class manufacturer, who has spared neither time nor moneyto place before the buyer a finely proportioned and elaborately finished piece of
work.
Weeks and months have elapsed since the draftsman had applied his patterns to
the unsightly plank, and transformed it into the graceful form presented.
The wheeler and carriage-part maker added their share of skill. The blacksmith
strengthened the weak points, and by sturdy blows wrought into forms of beauty anddurability the stubborn iron and steel. The trimmer, with costly fabrics of delicate
texture, rich laces, carpets, etc., arranged for the comfort of the passenger ; and, lastly,
the painter, through months of hard and perplexing labor, finally put on the finishingstroke, and the carriage stands forth a thing of beauty.
Now this carriage which is so delicate in its construction, and so easily damaged byheat and cold, and neglect, in many ways on the part of the owner, should be properly
taken care of
But how often is it the case that the carriage is shamefully abused through ignor-
ance or carelessness of the coachman ? The owner of a fine private carriage, havingprovided everything necessary for keeping it in good order, may have in his employa man who either does not understand his business, or if he does, is too heedless to
attend to it properly. While every part of the carriage should receive proper atten-
tion, the surface work will require the nicest judgment.
One of the most attractive features of a carriage is the exterior finish. It is well
known that the painting either adds to, or detracts from the appearance, according as
it is w^ell or poorly executed. Varnish, which forms the lustrous surface, is easily
soiled. The fine gloss, for which the carriages of America are noted, is so easily
dimmed by careless washing, and the coating of varnish itself ruined by scratches andhand-marks, that we have thought it would be well for manufacturers to have printed
instructions ready to accompany every carriage sold, giving full instructions as to the
proper care of the carriage. To the majority of city customers this might not be neces-
sary, but to a large class of buyers it would be beneficial, and often save both parties
from considerable ill-feeling.
We remember an instance to the point.
A few years ago a wealthy farmer purchased a fine carriage, in a certain city, in
Kentucky. After enjoying a drive out with his family, he took the carriage to a creek,
drove in, and with an old stub broom scoured the mud ofl , working, no doubt, in good
earnest (judging from the appearance of the job when it was brought back to the
shop.) The surface wasruined.
Theback panel looked as if
somethoughtless
school-boys had attempted to draw a map of the world on it, with nails and brick-bats.
The owner hurried into town, and charged Mr. , with having finished his
carriage with inferior varnish. The scene which ensued may easily be imagined.
Angry words were exchanged, but there was but one remedy ; the carriage had to bere-varnished ; the customer footing the bill.
A dry, clean carriage-house, entirely separated from any stable manure, should be
the first thing attended to. A closet to keep the harness free from dust and dirt,
should always be found in a well-planned carriage-house.
A wheel-jack, buckets, sponges, chamois, wrenches, cover, feather duster, axle
grease, etc., should have each an appropriate place.
8/10/2019 Making Horse Drawn Coaches 1800 Bw
http://slidepdf.com/reader/full/making-horse-drawn-coaches-1800-bw 406/455
S50 COACH-MAKERS' ILLUSTRATED HAND-BOOK.
THE WASHING.
When a carriage has been run in the summer season, use the water freely, so as to
remove the dust or mud before using the sponge and chamois skin. We have seencarriages ruined on the exterior by scratches in the varnish, caused by carelessness or
ignorance in this particular. Mud should not be allowed to dry on the varnish if it
can be avoided. The English varnishes, with which most carriages are finished, re-
tain their elasticity for a great length of tinie, and mud or filth of any kind drying onthem, fastens upon the body of the varnish, and the stains cannot be removed withoutre-varnishing.
In the winter season it is not best to wash ofi the mud when the water freezes whilebeing applied. Warm water should never be used in winter time, as it will be apt to
remove the varnish,or
causeit
to crack and peelofi .
A great deal of bad feeling, and sometimes angry disputes, arise between the manu-facturer and the owner of a coach, growing out of thoughtlessness on the part of the
coachman who had allowed water to freeze on the panels.
GREASING.
For greasing the axles and fifth wheel, use castor-oil. It is not necessary to put ona great deal. Frequent applications and less in quantity should be the rule, for whenthere is an excess of oil, it oozes out, and finds its way on to the hub, and from the
nub is thrown over the wheels, when the vehicle is in motion. The grease is thenliable to be taken up on the sponge when washing, and also on the chamois, giving avast amount of trouble and vexation. The fifth wheel should be looked after, and not
be allowed to become entirely dry.
THE LEATHER.
Enameled leather should be kept soft and pliable, with sweet or sperm-oil. It will
only be necessary while the leather is new to cleanse the top and curtains from dirt,
and rub them with a greased rag. When the leather shows signs of drawing up andbecoming hard and lifeless, wash it with warm water and castile soap, and with a stiff
brush force the oil into the leather until the grain is filled.
SPONGES AND CHAMOIS.
Two sponges and chamois should be kept on hand, one of each for the body andgearing. The reason for this is that after the carriage has been used there is a liability
to get grease on the sponge and chamois when cleansing the wheels and front axle
bed. Another reason of some importance is, the gearing soon destroys a sponge, andmakes it worthless for washing large panels.
WRENCHES.
Beside the axle wrench, a monkey wrench will be found of great service in looking
after the nuts at those points where there is the greatest liability to accidents. Hun-dreds of dollars have been spent in repairs, limbs broken, and even lives lost, through
neglect to inspect the carriage before starting out.
THE COVER.
When the vehicle has been washed and housed, it should be covered with an en-
ameled cloth cover, fitted to it so as to keep it free from dust, inside and out. To pre-
serve the wood and save expense, it should be re-painted or varnished once a year.
There is no economy in saving a few dollars this year on your carriage and spendingthree times as much the year following.
8/10/2019 Making Horse Drawn Coaches 1800 Bw
http://slidepdf.com/reader/full/making-horse-drawn-coaches-1800-bw 407/455
MISCELLANEOUS DEPARTMENT. 361
While we have thus far spoken only of the care of the carriage after it had passed
into the hands of the purchaser, a few words may not be out of place to the builder
with reference to the ware-room. In cities like New York, Philadelphia, Wilmington,Cincinnati, etc., we find the ware-rooms all that could be desired ; but in too manyfactories we find little or no pains taken to keep the finished work free from dust,
smoke and the finger-marks of persons who are strolling about, buying nothing, butleaving their finger-marks, or writing their names in the dust which may have settled
on some of the panels. We have in our mind a model ware room. It is well lighted,
clean and neat. The doors and windows are closely fitted, excluding dust and smoke.
A double floor, between which is a layer of plaster, prevents the smoke from the smithshop from finding its way into the room. The work is completed before being lower-
ed down, and no oneis
admitted but those who are on business. The roomis
keptquiet, and no finger-marks are left on the work by mere sight-seers.
COLDNESS.In the strife among manufacturers in the same line to excel each other in the qual-
ity, convenience, and adaptability of their products, as well as to compete in prices
there is observable, too often, a coldness, a want of sociability, which is far from being
pleasant to contemplate, and except in extreme cases, has no just cause for continu-
ance. With reference to carriage-makers, where an undue advantage has been taken
by one builder over another, by seUing to a customer below living prices, through the
customer having stated at what price he could purchase at a rival shop, allowance
may be made for unfriendliness on the part of the injured party. Also, in cases whereone builder speaks slightingly of a rival's work, which he knows to be equal to his
own, and in those acts of doubtful honesty and good faith, the tolling off good hands,
or sending spies through a shop to ascertain the secret of doing a certain portion of
the work.
Where such acts have been committed, due allowance should be made for coldness
between the rival firms. But, on the other hand, where nothing of that character has
transpired, we must ascribe the matter to jealousy alone. We have frequently heardthe remark made, that carriage-builders are more jealous of each other, and conse-
quently less sociable, than those engaged in any other kind of business. That there
is by far too much jealousy we will admit, but with even our limited knowledge of
other trades, and the professions, we stoutly deny the above assertion. We are all
apt to judge hastily of, and censure severely the faults in our own, because we are not
in position to ascertain the truth in regard to other trades or professions. The news-
papers often make public property of quarrels among politicians, lawyers and doctors,
but very rarely are they called upon to record acts of violence, as committed by rival
manufacturers, and certainly the carriage-builders can show as clean a record as any
that may be named. We have said there is by far too much jealousy— a word whichWebster defines to be, the fear of losing some good that another may obtain. This
fear, then, when harbored and nurtured, promotes unsociability, and defeats the endaimed at by the rival parties, namely : the securing of a good run of trade at living
prices. For were there no jealousies, a warm friendship might be kindled, whichwould result in united action on matters pertaining to the good of all, and at the sametime leave the true independence of each untouched.
BE READY IN TIME.It is by no means uncommon to hear carriage-builders regretting their lack of energy
during the winter, when the spring trade opens and finds them with but a small quan-tity of new work finished.

8/10/2019 Making Horse Drawn Coaches 1800 Bw
http://slidepdf.com/reader/full/making-horse-drawn-coaches-1800-bw 408/455
COACH-MAKEES' ILLUSTRATED HAND-BOOK.
We are well aware that lack of capital prevents a good many from running a full
force of hands during the winter when there are but few if any sales of work. Thesemerely regret that they are placed at a disadvantage for the want of sufficient capital
to push forward their work during the dull season ; and have therefore a consolingexcuse. But there are builders having ample capital, or credit —which amounts to
about the same— who begin croaking as soon as the leaves begin to fall. Ah, saythey, I am fearful this will be a hard winter, and I have serious doubts about therebeing much call for work. Let me see, I must reduce my force of hands to the lowestnumber possible and have the work move on slowly. The calculation is then madeas to how small a force may be retained. This having been decided on, the new orderof things is inaugurated, and soon throughout the shop there is an atmosphere of dull-
ness, which affects all who have been fortunate enough to retain their situations, and
the shop does in reality move slowly, and the profits much slower. In too many in-stances the shop is almost wholly given over into the hands of apprentices and insight
workers, and the desired result on the part of the employer is reached very naturally,
namely, that of having but a small amount of work ready at the proper time ; but nosooner do the cheerful spring days begin to revive trade, than we hear again the self-
accusations of lack of foresight, want of confidence in the future of trade, and so on,
Now it is absolutely necessary for the carriage-builder to be ready in time, would hesupply the fullest demand that may probably be made on him, and to do this ad vanage must be taken of the winter season. The question should not be how small a forceof hands can I get through the winter with, but after carefully considering the pros-
pects of the coming year, ascertain how large a number of men may be kept busy. It
should be understood by the employees that the winter months will be lively in prepa-ration for the coming spring season, and if there is any lack of work, the extra time to bemade up by adding a greater value to that which is in hand. The anvils should bekept ringing, for their very sound gives life and animation to the whole factory. Ourhighly successful carriage-builders, almost without exception, have been men of nerveand they have achieved success through a determination to be fully prepared, at theearliest possible time, for the opening of trade. If one or more customers be lost this
year because they could not obtain of you what they desired, you may count your loss
as double that number at least, for if they obtained good work their influence amongtheir friends will be thrown in favor of your rival. The month of February presents
a favorable time to look into the condition of work in the shop and make the calcula-
tion how much of it can be pushed forward to completion within a time which will in-
sure its readiness for the earliest customer who may call.
FROM THE FARM WAGON TO THE LANDAU.We desire to take a glance backward, and call to mind the gradual development of
the desire for vehicles of pleasure. In this hasty review of the past, as affecting car-
riage-making, we shall deal only in generalities.
The farmer in former days owned his plows and farm wagons, and when he with
his family prepared for church on a Sabbath morning, hitched up the team to a wagonin which chairs were placed to accommodate a portion of the family, while the sons
and daughters, if he were blessed with them> mounted their horses, and the companymoved off, with no visions of the latest style of buggy or stately family carriage. Ajourney to a distant point was accomplished in like manner. But, as the resources
of the whole country became more fully developed, and the frequent transportation
of freights between cities and towns became a matter of necessity, attention was di-
rected to the laying out of turnpikes, the better to accommodate business intercourse,
and to furnish more speedy and agreeable modes of travel. From the cities, turnpikes
were built, radiating out to distant interior towns, and lines of stages were run legu-larlv. to accommodate the business public.
8/10/2019 Making Horse Drawn Coaches 1800 Bw
http://slidepdf.com/reader/full/making-horse-drawn-coaches-1800-bw 409/455
IMISCELLANEOUS DEPARTMENT. 353
The stage coach, in its day, was considered a very agreeable means of traveling, anddoubtless induced many persons to decide on visiting from place to place ; whereas,
in its absence, they would have been contented to remain at home. Good roads werealso conducive to travel by private conveyance, and farmers at length, onehere and another there, ventured to purchase from the city a family carriage, despite
the jeers of their neighbors, who looked upon the matter as a piece of foolish pride.
This feeling gradually wore away, and the carriage trade increased correspondingly.
As wealth flowed in, the cities began to move in the matter of securing more speedy
means of transporting goods and passengers than were afforded by rivers and canals,
and the railroad was introduced. Steam carriages were made the land rivals of all
other conveyances on land as well as those on the water. The stage coach gradually
melted away from before this powerful rival, and sought occupation farther out on the
frontier. If there had been attractions in the stage coach, which induced many per-
sons to travel, the railroad, presenting such incomparable advantages, could not fail
to increase the desire to be on the go ; and thus, by degrees, the people were educated
up to seeking their pleasure, or pushing their business bymeans of the steam carriage.
The introduction of railway carriages was looked upon by carriage-makers with
rather a jealous eye, for they were fearful that persons would prefer to take the cars
in going between points on the line of the railroad, and thus greatly reduce the demandfor vehicles drawn by horses. To what extent this may have been true, on the firs
introduction of railways, we are unable to say ; but time has proven that, instead of
lessening the demand for private vehicles, railways have been the means of greatly
increasing it. Intercourse between the States, and the different sections of the indi-
vidual States, has been quickened. The farmer who formerly was distant from a goodmarket was brought nigh, and encouraged to lay out his best energies in order to pro-
cure large crops. By means of railroads new life was infused into every kind of busi-
ness, and the material wealth of the country greatly increased.
The carriage-builder soon became convinced that in the railway he had found a
friend instead of an enemy, and that the desire to own private conveyances was aug-
mented, not lessened. During this development in the means of travel, and the trans
portation of the products of the country, the farmer was being gradually weaned fromhis earlier prejudices, and as his children grew up to manhood and womanhood, they
declared in very positive terms that to ride horseback, or in a farm wagon, was dis-
graceful : yes, and more than this, they began to speak slightingly of vehicles ownedby their neighbors, because they were not of modern style. Now, just in the propor-
tion in which farmers and the residents in interior towns became better judges of car-
riage work, did the city carriage-makers find it necessary to take advanced steps, andthus there has been going on a gradual development in the tastes of our people, until
there is scarcely a village in the whole country but what has its vehicles of modern
Btyle.
Our metropolitan cities, determined on eclipsing everything in the way of stylo that
might be attempted in the smaller cities, at length accepted European fashions, andwe are now made familiar with liveried drivers and footmen in every section of our
knd.There has been accomplished, then, within less than a century, a change in the
tastes of the riding public, in which the farm wagon filled with chairs represents the
past, and the landau in its splendor, the present degree of taste and refinement.
OUT OF WORK.The causes that place a person in this position are the first to be looked after. Dull-
ness of trade is the leading cause, but for this the journeyman is not responsible.23
8/10/2019 Making Horse Drawn Coaches 1800 Bw
http://slidepdf.com/reader/full/making-horse-drawn-coaches-1800-bw 410/455
354 COACH-MAKERS' ILLUSTRATED HAND-BOOK.
During the spring and summer months, coach-making is generally brisk, and with thelarge amount of repairing usual, an extra number of hands is required, and the con-sequence is that
whenfall comes the force is necessarily reduced,
and many areobliged, for months, to give vent to the expression out of work, and, as a general
rule, it is that class of'.persons, who, during the busy season, have been improvident,
spending their earnings —in many instances uselessly. Few know the extent of suf-
fering and deprivation to those thus situated.
It is a well-known fact, that there is, and always will be, a surplus of hands in the
winter season, or a deficiency in the spring and summer, and the question that inte-
rests each one, individually, is how can I conduct myself so as to secure steady em-ployment?
In the first place, perfect yourself as much as possible in the branch in which youare engaged ; make yourself useful to your employers.
Because hands are scarce, do not assume too much of an independent spirit, and be-
cause your employer cannot well do without you, make exactions that are not just andproper. It is not necessary for one to sacrifice manliness in order to be obliging or
accommodating. A willingness to do will be remembered by the employer when heis reducing his force.
Reliability is another important trait in the character of any person. If, when heleaves the shop, his employer feels there is no dependence to be placed on seeing himthe following day, and his job is delayed in consequence, it is treasured up against
him, and in the end works greatly to his disadvantage.
If a man is at his post during the busy season, unless something special prevents,
and his employer can safely trust him in promising a customer, he becomes an im-portant auxiliary. Look, for instance, through the shops where you are acquainted.
What is the character of the men who retain their situations winter and summer, andreceive the best pay ? Are they not men who take an interest in their employer's
welfare? Who are obliging and anxious to please? Who have not such straight
notions of independence as to believe and act in busy seasons as though the boss wastheir servant? Who are reliable and can be depended upon? Who are competent
workmen ?
In how manv instances do we find that hands are kept on only because they have dis
charged their duties faithfully, when their services were most needed. There is, andalways will be, in the minds of some, a false pride of independence ; it is shown bothin the employer and journeyman. In the busy season the jour feels that his services
cannot be dispensed with, and he takes the opportunity to pay off some old grudge, or
supposed wrong he has received when work was slack, and as the result, in many in-
stances, it is remembered against him, and he is obliged to sit in his cheerless and cold
chamber, shivering out of work, out of money, no friends, and wishing for an op-
portunity to wreak vengeance on those he has forced to cast him off . How much bet-
ter it would be for each one to try and make his services indispensable where he is
engaged, securing the good will of all, and, as a consequence, better remuneration.
There are some employers always in want of hands ; their names have become aregular by-word among the workmen. If a person is out of work, his comrades say Go to 's shop, he always wants hands.
A few of the causes are, false independence, overbearing disposition, using those in
their employ as as though they were slaves, forcing all the manliness out of them, or
obliging them to leave;
poor pay— they want their work done for about half what it is
worth, and are disposed to find fault in order to save a few dollars ; they take advan-
tage of the necessities of those in their employ by reducing wages in dull seasonsvery slow pay, obliging their men to wait and get along as best they can, etc.
8/10/2019 Making Horse Drawn Coaches 1800 Bw
http://slidepdf.com/reader/full/making-horse-drawn-coaches-1800-bw 411/455
MISCELLANEOUS DEPARTMENT. 855
As a consequence, you very seldom find a hand stopping with them long ; it affords
a kind of holding-on place until there is an opening, and then he is left without hands,
his customers disappointed, and his prospects of success greatly lessened ; besides themany discouragements and losses attending the constant introduction of new hands,and of a class generally the poorest.
It is a mistaken policy on the part of boss or jour to act as though they were not
dependent on each other. There is a certain amount of respect due from each posi-
tion, and those who fail to discover it are themselves the losers.
A WORD TO APPRENTICES.
How great are the advantages of the present day for a mechanical education com-pared with the time when our forefathers lived, yet how few comparatively avail
themselves of the opportunities surrounding them. Take, for instance, tlie apprenticedcoach-makers, and how few of them ever carry their business farther than the shop
door. When leaving their work, their minds are taken up with the momentary en-
joyments of the hour ; they spend their evenings at the theater or drinking saloon,
and in many instances even worse sinks of iniquity, that soon drag tlu-m down to an
untimely grave. If, perchance, we find one fond of reading, how often is it the case
that he spends his golden moments straining his eyes over tlie light literature of the
day, destroying every spark of taste for substantial reading that may perchance havebeen lingering within.
With the increased advantages for improvement come additional allurements to
trifling and foolish pastime.
Go to any of our library rooms and you find works suited to the elevation of the
seeker of knowledge in any branch of mechanism. See the many useful periodicals
of the day, imparting knowledge invaluable to the young and future mechanics of the
nation. Although the advantages for improvement are so great, we fear sometimes
the tendency of mechanical ingenuity is to go backward. The chances for an appren-
tice who embraces every opportunity to improve himself in his particular avocation
are, we think, very great. Look at it at the present time. Where you find a manwell skilled in his business, he can command almost any price, while those who tell
us there is no need of their knowing more than they do, for the boss has the workdone his own way. The boss don't pay him enough wages, for he knows more now
than the boss will let him do. This class generally are obliged to work for low
wages, and so soon as their services can be dispensed with, they are set adrift to look
for another job.
The apprenticeship is the best time to study and improve yourself. If you fritter
away your time until you reach manhood, the attractions from study are much greater,
and when the cares of a family are pressing you, but little inclination is felt to im-
prove. Depend upon it, your employer will not be slow in finding out your ability to
do, and in proportion to your usefulness will you receive compensation. Save up yourlittle earnings, and expend it in something that you can store in your mind, and it
will return to you sixty or an hundred-fold.
Where is the apprentice that could not, by a little economy or self-denial, save suf-
ficient to procure a copy of the Scientific American American Artisan or other
periodicals devoted to the dissemination of mechanical ingenuity ?
Take, for instance, our own publications, devoted to the interest of coach-makers,
and who will say there cannot be much instruction gained by a careful study of the
productions of these very able editors and correspondents. Are you a body-maker, or
learning that branch ? follow, practically, through the explanations of the system ofdrafting. Are you a smith, a wheeler, a trimmer, or a painter ? then carefully note
8/10/2019 Making Horse Drawn Coaches 1800 Bw
http://slidepdf.com/reader/full/making-horse-drawn-coaches-1800-bw 412/455
356 COACH-MAKERS' ILLUSTRATED HAND-BOOK.
the points laid down in the department you are interested in, and if you are in earn-
est, you cannot fail to be greatly benefited.
Remember, no difficulty can be overcome by simply wishing I knew how to do it.
Up and at it with a determination to conquer, and it is yours.
If this article should meet the eye of any one who has heretofore neglected to im-prove himself, commence at once. Cast off your slothful associates, curtail all useless
expenditures, procure a share in some good library, and subscribe for those periodi-
cals that will afford you the greatest assistance. Set your mark high, and strive to
reach it. But remember you must put your mind on what you undertake, and thenstudy.
BOXWOOD.
It is surprising to what perfection engraving on wood has been brought. A fewyears ago a wood cut might have been readily distinguished from all other illustra-
tions by the coarseness of the engraving. At present we find some of the best artists
devoting their time to delineating on wood ; and such is the delicacy of the drawingsthe highest skill of the engraver is required to preserve the effect produced by the
masterly use of India ink, the lead-pencil and China white. The fashion plates andsmaller illustrations in the Coach-Makers' International Journal, the pictures in
the illustrated newspapers, such as Leslie's, Harper's, American Agriculturist, Apple-
ton's Journal, Scientific American and others, are all cut in boxwood.Boxwood, as is well known, grows in different parts of the world. The bulk, how-
ever, of that which is used in this country is imported from Turkey. The growth of
the. tree is slow. If it be twelve inches in diameter, its age is to be numbered by cen-
turies, for it is above five hundred years old. Those trees which attain a diameter of
eighteen inches are about one thousand years old. Block-makers prefer trees eight
to ten inches in diameter. The wood is sold by the ton, is very costly, and is of such
various qualities that not more than an eighth or a tenth part of a ton is suitable for
the finest engravings.
The best quality of wood is of a bright canary color, the texture fine and close, andthe surface free from dark markings ;
great care is required in preparing the blocks.
After the wood in the log has been sawed up into sections of a proper thickness, andbecomes thoroughly seasoned, it is ready to be cut into blocks, and here one may see
what an amount of waste wood there is. Checks and other imperfections require close
cutting of the sound wood, and as these pieces are necessarily small, several must bejoined together to form a large block.
Blocks four or five inches square are composed of from four to six different pieces,
fitted, doweled and glued together with such extreme nicety as to present the appear-
ance of a solid piece. Large blocks are generally joined together with screws, so as
to admit of being taken apart for engraving, and re-united when ready for the printer.
WOODENGRAVING-XYLOGRAPHY.
We would state, in the outset, that the wood engraver is not required to be a de-
lineator. The block-maker furnishes the blocks of a size suitable to the design to beplaced upon it —his orders from the designer or engraver always insuring the properdimensions. The blocks are | of an inch thick, which is the depth required by theprinter, in order to have the face of the block to come level with the face of the typein the form. A block that may happen to be too thick, must be planed downtherefore, it is preferable to have it scant, for it may then be raised to the proper level
by attaching pasteboard to the bottom of the block. The block-maker is required to
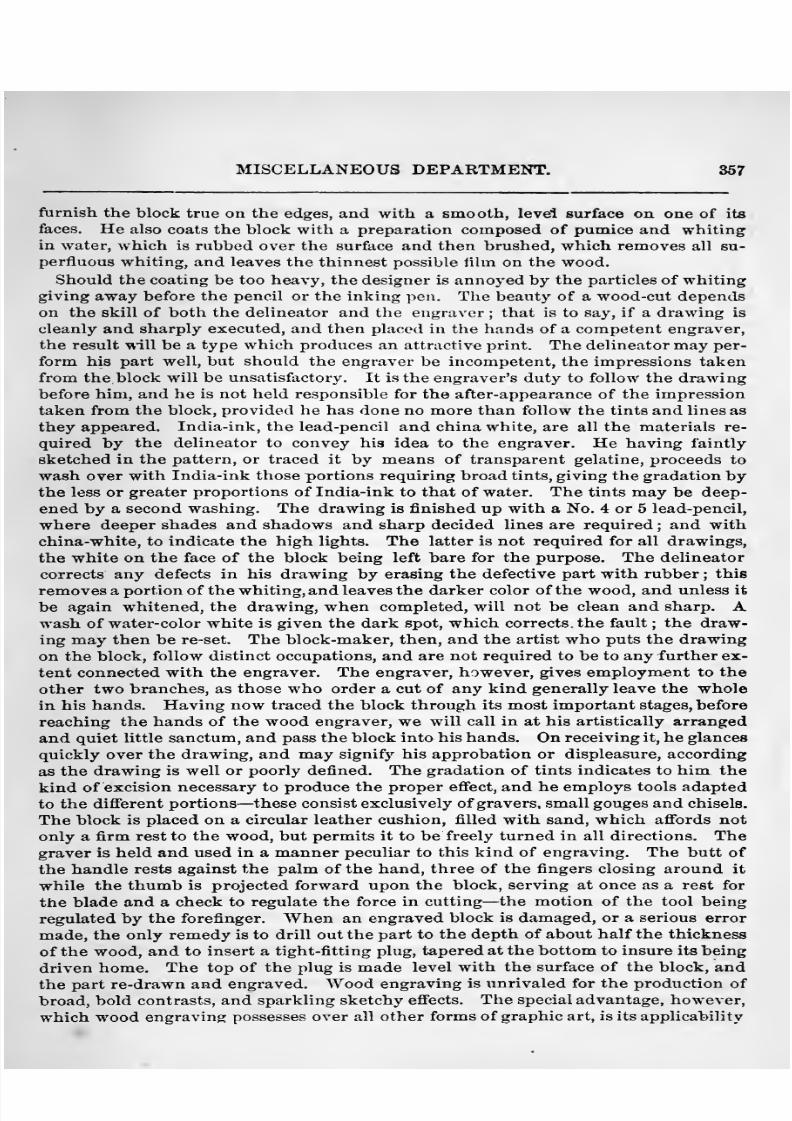
8/10/2019 Making Horse Drawn Coaches 1800 Bw
http://slidepdf.com/reader/full/making-horse-drawn-coaches-1800-bw 413/455
MISCELLANEOUS DEPARTMENT. 867
furnish the block true on the edges, and with a smooth, levei surface on one of its
faces. He also coats the block with a preparation composed of pumice and whitingin water, which is rubbed over the surface and then brushed, which removes all su-
perfluous whiting, and leaves the thinnest possible lihn on the wood.
Should the coating be too heavy, the designer is annoyed by the particles of whiting
giving away before the pencil or the inking pen. The beauty of a wood-cut dependson the skill of both the delineator and the engraver ; that is to say, if a drawing is
cleanly and sharply executed, and then placed in the hands of a competent engraver,
the result will be a type which produces an attractive print. The delineator may per-
form his part well, but should the engraver be incompetent, the impressions taken
from the block will be unsatisfiictory. It is the engraver's duty to follow the drawingbefore him, and he is not held responsible for the after-appearance of the impression
taken from the block, provided he has done no more than follow the tints and lines as
they appeared. India-ink, the lead-pencil and china white, are all the materials re-
quired by the delineator to convey his idea to the engraver. He having faintly
sketched in the pattern, or traced it by means of transparent gelatine, proceeds to
wash over with India-ink those portions requiring broad tints, giving the gradation bythe less or greater proportions of India-ink to that of water. The tints may be deep-
ened by a second washing. The drawing is finished up with a No. 4 or 5 lead-pencil,
where deeper shades and shadows and sharp decided lines are required ; and with
china-white, to indicate the high lights. The latter is not required for all drawings,the white on the face of the block being left bare for the purpose. The delineator
corrects any defects in his drawing by erasing the defective part with rubber ; this
removes a portion of the whiting, and leaves the darker color of the wood, and unless it
be again whitened, the drawing, when completed, will not be clean and sharp. Awash of water-color white is given the dark spot, which corrects, the fault ; the draw-
ing may then be re-set. The block-maker, then, and the artist who puts the drawing
on the block, follow distinct occupations, and are not required to be to any further ex-
tent connected with the engraver. The engraver, however, gives employm-ent to the
other two branches, as those who order a cut of any kind generally leave the wholein his hands. Having now traced the block through its most important stages, before
reaching the hands of the wood engraver, we will call in at his artistically arranged
and quiet little sanctum, and pass the block into his hands. On receiving it, he glances
quickly over the drawing, and may signify his approbation or displeasure, according
as the drawing is well or poorly defined. The gradation of tints indicates to him the
kind of excision necessary to produce the proper eflfect, and he employs tools adapted
to the different portions —these consist exclusively of gravers, small gouges and chisels.
The block is placed on a circular leather cushion, filled with sand, which affords not
only a firm rest to the wood, but permits it to be freely turned in all directions. Thegraver is held and used in a manner peculiar to this kind of engraving. The butt of
the handle rests against the palm of the hand, three of the fingers closing around it
while the thumb is projected forward upon the block, serving at once as a rest for
the blade and a check to regulate the force in cutting —the motion of the tool being
regulated by the forefinger. When an engraved block is damaged, or a serious error
made, the only remedy is to drill out the part to the depth of about half the thickness
of the wood, and to insert a tight-fitting plug, tapered at the bottom to insure its being
driven home. The top of the plug is made level with the surface of the block, and
the part re-drawn and engraved. Wood engravingis unrivaled for the production
ofbroad, bold contrasts, and sparkling sketchy effects. The special advantage, however,
which wood engraving possesses over all other forms of graphic art, is its applicability
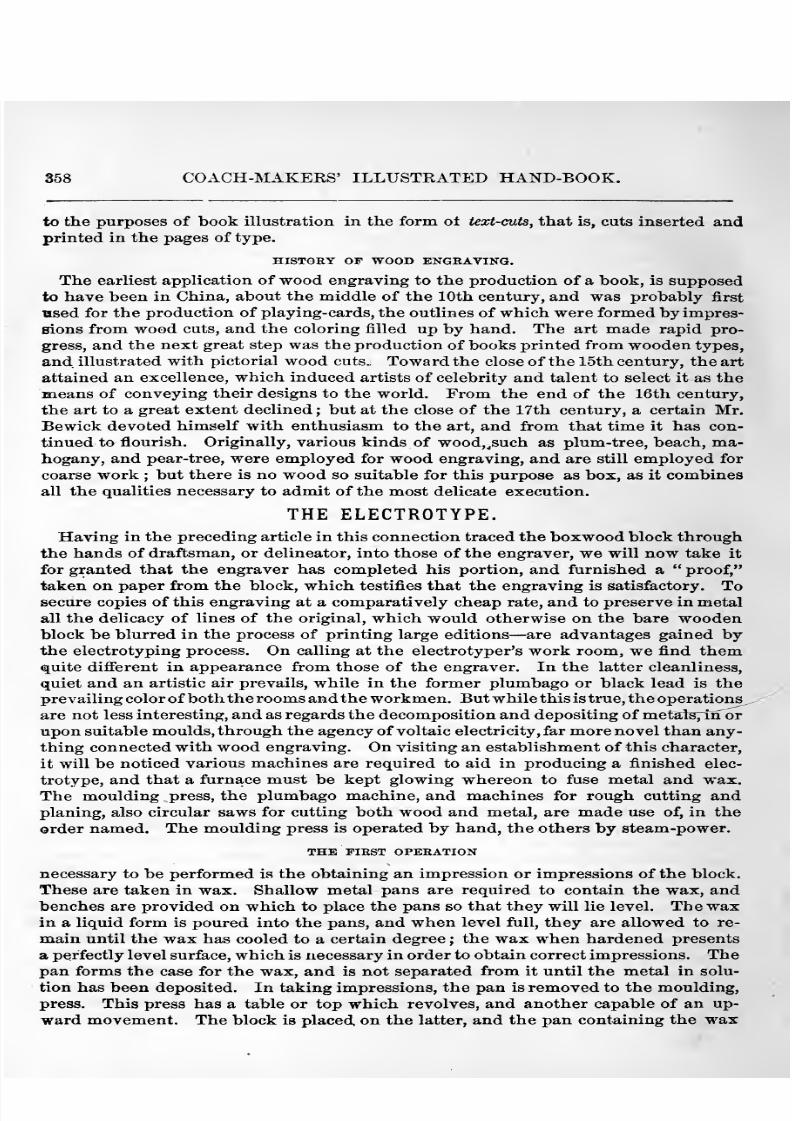
8/10/2019 Making Horse Drawn Coaches 1800 Bw
http://slidepdf.com/reader/full/making-horse-drawn-coaches-1800-bw 414/455
358 COACH-MAKEKS' ILLUSTRATED HAND-BOOK.
to the purposes of book illustration in the form of text-cuts, that is, cuts inserted andprinted in the pages of type.
HISTORY OF WOOD ENGRAVING.
The earliest application of wood engraving to the production of a book, is supposedto have been in China, about the middle of the 10th century, and was probably first
used for the production of playing-cards, the outlines of which were formed by impres-
sions from wood cuts, and the coloring filled up by hand. The art made rapid pro-
gress, and the next great step was the production of books printed from wooden types,
and illustrated with pictorial wood cuts. Toward the close of the 15th century, the art
attained an excellence, which induced artists of celebrity and talent to select it as the
meansof conveying their designs to the
world. From the end of the 16thcentury,
the art to a great extent declined ; but at the close of the 17th century, a certain Mr.Bewick devoted himself with enthusiasm to the art, and from that time it has con-
tinued to flourish. Originally, various kinds of wood„such as plum-tree, beach, ma-hogany, and pear-tree, were employed for wood engraving, and are still employed for
coarse work ; but there is no wood so suitable for this purpose as box, as it combinesall the qualities necessary to admit of the most delicate execution.
THE ELECTROTYPE.Having in the preceding article in this connection traced the boxwood block through
the hands of draftsman, or delineator, into those of the engraver, we will now take it
for granted that the engraver has completed his portion, and furnished a proof,
taken on paper from the block, which testifies that the engraving is satisfactory. Tosecure copies of this engraving at a comparatively cheap rate, and to preserve in metalall the delicacy of lines of the original, which would otherwise on the bare woodenblock be blurred in the process of printing large editions —are advantages gained bythe electrotyping process. On calling at the electrotyper's work room, we find themquite different in appearance from those of the engraver. In the latter cleanliness,
quiet and an artistic air prevails, while in the former plumbago or black lead is the
prevailing color of both the rooms and the workmen. But while this is true, the operationsare not less interesting, and as regards the decomposition and depositing of metalsTlhorupon suitable moulds, through the agency of voltaic electricity, far more novel than any-
thing connected with wood engraving. On visiting an establishment of this character,
it will be noticed various machines are required to aid in producing a finished elec-
trotype, and that a furnace must be kept glowing whereon to fuse metal and wax.
The moulding press, the plumbago machine, and machines for rough cutting andplaning, also circular saws for cutting both wood and metal, are made use of, in the
order named. The moulding press is operated by hand, the others by steam-power.
THE FIRST OPERATION
necessary to be performed is the obtaining an impression or impressions of the block.
These are taken in wax. Shallow metal pans are required to contain the wax, andbenches are provided on which to place the pans so that they will lie level. The waxin a liquid form is poured into the pans, and when level full, they are allowed to re-
main until the wax has cooled to a certain degree ; the wax when hardened presents
a perfectly level surface, which is necessary in order to obtain correct impressions. Thepan forms the case for the wax, and is not separated from it until the metal in solu-
tion has been deposited. In taking impressions, the pan is removed to the moulding,
press. This press has a table or top which revolves, and another capable of an up-
ward movement. The block is placed, on the latter, and the pan containing the wax
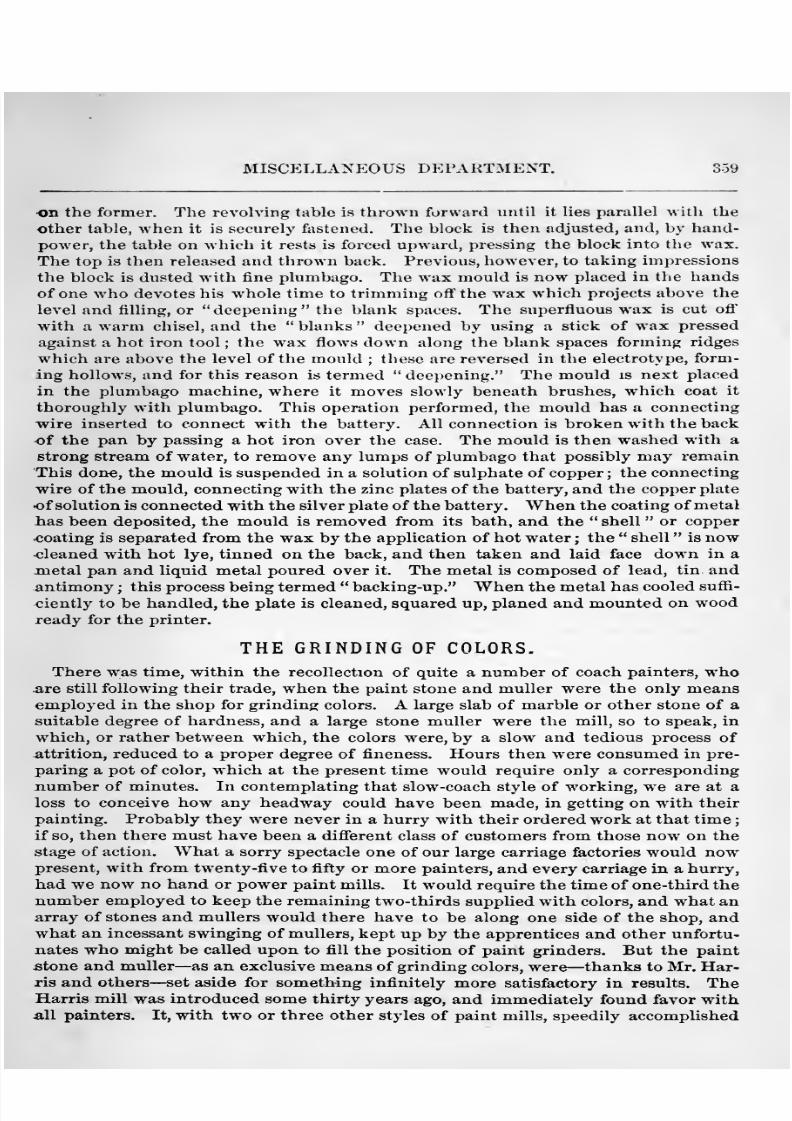
8/10/2019 Making Horse Drawn Coaches 1800 Bw
http://slidepdf.com/reader/full/making-horse-drawn-coaches-1800-bw 415/455
MISCELLANEOUS DEPARTMENT. 359
•on the former. The revolving table is thrown forward until it lies parallel with the
other table, when it is securely fastened. The block is then adjusted, and, by hand-
power, the table on which it rests is forced upward, pressing the block into the wax.The top is then released and thrown back. Previous, however, to taking impressions
the block is dusted with fine plumbago. The wax mould is now placed in the handsof one who devotes his whole time to trimming off the wax which projects above the
level and filling, or ** deepening the blank spaces. The superfluous wax is cut off
with a warm chisel, and the blanks deepened by using a stick of wax pressed
against a hot iron tool ; the wax flows down along the blank spaces forming ridges
which are above the level of the mould ; these are reversed in the electrotype, form-
ing hollows, and for this reason is termed deepening. The mould is next placed
in the plumbago machine, where it moves slowly beneath brushes, w^hich coat it
thoroughly with plumbago. This operation performed, the mould has a connecting
wire inserted to connect with the battery. All connection is broken with the back
•of the pan by passing a hot iron over the case. The mould is then washed with a
strong stream of water, to remove any lumps of plumbago that possibly may remain
This done, the mould is suspended in a solution of sulphate of copper ; the connecting
wire of the mould, connecting with the zinc plates of the battery, and the copper plate
-of solution is connected with the silver plate of the battery. When the coating of metal
has been deposited, the mould is removed from its bath, and the shell or copper
.coating is separated from the wax by the application of hot water ; the shell is nowcleaned with hot lye, tinned on the back, and then taken and laid face down in a
metal pan and liquid metal poured over it. The metal is composed of lead, tin andantimony ; this process being termed backing-up. When the metal has cooled suffi-
ciently to be handled, the plate is cleaned, squared up, planed and mounted on woodready for the printer.
THE GRINDING OF COLORS.
There was time, within the recollection of quite a number of coach painters, who
are still following their trade, when the paint stone and muller were the only meansemployed in the shop for grinding colors. A large slab of marble or other stone of asuitable degree of hardness, and a large stone muller were the mill, so to speak, in
which, or rather between which, the colors were, by a slow and tedious process of
attrition, reduced to a proper degree of fineness. Hours then were consumed in pre-
paring a pot of color, which at the present time would require only a corresponding
number of minutes. In contemplating that slow-coach style of w^orking, we are at a
loss to conceive how any headway could have been made, in getting on with their
painting. Probably they were never in a hurry with their ordered work at that time
if so, then there must have been a difierent class of customers from those now on thestage of action. What a sorry spectacle one of our large carriage factories would nowpresent, with from twenty-five to fifty or more painters, and every carriage in a hurry,
had we now no hand or power paint mills. It would require the time of one-third the
number employed to keep the remaining two-thirds supplied with colors, and what anarray of stones and mullers would there have to be along one side of the shop, andwhat an incessant swinging of mullers, kept up by the apprentices and other unfortu-
nates who might be called upon to fill the position of paint grinders. But the paint
stone and muller —as an exclusive means of grinding colors, were —thanks to Mr. Har-ris and others
—set aside for something infinitely more satisfactory in results. The
Harris mill was introduced some thirty years ago, and immediately found favor withall painters. It, with two or three other styles of paint mills, speedily accomplished
8/10/2019 Making Horse Drawn Coaches 1800 Bw
http://slidepdf.com/reader/full/making-horse-drawn-coaches-1800-bw 416/455
360 COACHMAKERS' ILLUSTRATED HAND-BOOK.
the labor of uprooting the old method of grinding colors, and the paint stone and mitl-
ler soon fell into disuse for the purpose named.
The paint mill, by hand power, has held the sway for over a quarter of a century, andwith the exception of the attachment of belting in factories employing steam-power,there have been no marked changes until very recently. It now appears probable
that the paint mill will soon be wholly superseded, and pass out of sight, through the
introduction of coach painters* colors ready ground.
Wet colors have been furnished to house painters for several years, but all attempts
to introduce any of these colors into carriage shops were signal failures. Failures, not
because painters were prejudiced against them, or would not give them a fair trial,
but from the fact that the colors were not adapted to carriage work, through the man-
ner in which they were prepared. The process of grinding, and the vehicle in whichthey were mixed, rendered them worthless, and to this day the majority of coachpainters are suspicious of all colors ground and canned ready for use. But this mis-
trust must soon give place to confidence in wet colors, as now prepared, for they havebeen tested by excellent painters, and pronounced superior in fineness, covering powerand working qualities.
The paint mill, operated either by hand or steam-power, will, however, pass slowly
into disuse, on account of its convenience in supplying color, at any time, of a suitable
degree of fineness, and from the fact that painters have become so firmly settled in
their convictions, that it is more economical to keep on hand dry colors, and the propervehicle in which to mix them, and prepare them at the time they want to use them,and in just the quantity they require. To what degree the objections may be sus-
tained by the facts in the case, we are not prepared to say ; but judging from the im-provements already made in grinding and mixing coach painters' colors, and canningthem, we are firm in the belief that the time is near at hand when coach painters
throughout the United States will abandon the use of the paint mill through the supe-
riority in every particular of colors furnished in a wet state. The laborious and dis-
couraging task of grinding colors with a stone and muller, having^long since beenabandoned through the introduction of the hand mill, the latter must in turn give
place to that which reduces labor, and gives more satisfactory results.
TO EMPLOYERS.Those of you who have provided no means of ventilation, suppose you call upon the
finisher during extremely hot weather, and for a few moments breathe the stifiing air
and submit your body to the melting heat of the varnish rooms, and then notice the
haggard appearance of the painter, also the dullness of the finishing coat of varnish,
and whatever good resolutions may be formed at that time, put them in force at once.
In short, lay out a plan for supplying the painter with a change of air.
SYSTEM IN CARRIAGE SHOPS.Me. Editor: —Three other persons beside myself— in all four of us, representing the
four direct branches of the trade —are about forming a co-partnership for the manu-facture of first-class work only, and in the conducting of our business wish to becomeas thoroughly systematic as possible. While I have been chosen as chief director ofthe whole, each of us will superintend that department to which he professionallybelongs. As we are beginners, and having never had direct practice in the business,
we shall willingly and thankfully accept all advice of a thorough business naturewhich may be given us, and are inclined to believe that from the many factories
which you have visited in your connection with them as a journalist, that you mayhave seen and become thoroughly acquainted with many good systems, and that jouwould be the proper person for us to address ourselves to, is the cause of our writing
you on the subject ; and we would ask that youfavor us with such answers as are atyour command. W. T. and Associates.
8/10/2019 Making Horse Drawn Coaches 1800 Bw
http://slidepdf.com/reader/full/making-horse-drawn-coaches-1800-bw 417/455
MISCELLANEOUS DEPARTMENT. 361
We have, indeed, in our career as a journalist, visited many factories, and amongthem the leading ones of this country, and have never lost sight of an advantage of
storing our memory with all the useful knowledge which might present itself to us.Therefore, we are at present prepared to answer the question of our correspondentreadily.
Were we to be similarly placed with our correspondent, after having located the
diflferent departments advantageously, studying economy in constructing the forges,
benches, etc., with a view to light, space, etc., and the comfort of the operatives, weshould begin in this wise: Commencing with the wood shop —body room, wheel roomand gear room —purchase a fair-sized blank book, and enter therein the number ofthe body, all its immediate dimensions, the dimensions of all the timbers entering
intoit,
and by whombuilt.
We would also pursue the same course with the wheelsand gear, being careful to enter the full dimensions and shape of the gear, the numberand size of spokes, size of hub-rim, and height of wheels.
After, or when the job reaches the blacksmith shop, we would adopt the samecourse ; enter the dimensions of all irons, height from floor, height of steps from floor,
size of axles and quality of same, length, width and open and grade of steel of springs,
size of tire, track of axles, width of pole and shafts, size of fifth wheel, jack bolts, andall else, together with the name of the producer.
In the paint room we would keep a complete tally of how painted, number of coats,
color, striping, by whom, and when done and how done, how the varnish acted, etc.
In the trimming shop the same system should prevail, the quality and color of cloth,
or other material used, height of top, width of curtains, height of cushions, etc., andname of trimmer.
And lastly, when the whole was completed and ready for the salesroom or delivery,
take a general outline of the whole, or a brief synopsis of what had already beenrecorded in the various departments, and record the weight of the same and numberand, when sold, the name of the purchaser.
Our correspondent will readily see the advantage to be gained by following the
above-mentioned systems and rules. It at once enables you to know the complete
history of every vehicle you may build. If one of your customers, living at a dis-
tance, meets with an accident, by which one of his wheels becomes broken, you are
at once able, upon the receipt of his letter, to build and completely finish his wheelwithout fear of being wrong, by having recourse to your history of his wagon. Youcan prepare him a new axle, build him a pole, send him a new spring, make a newcushion, or apron, or curtain, and be sure of that whatever is done will fit exactly, nomatter if the carriage be Russia or Japan.
By this method you also acquire a knowledge of the materials entering into a car-
riage of a certain weight, and can easily tell how to proceed to construct a carriage of
any description possible, and have the same be of the weight ordered, and without
fear of having some nondescript job thrown upon your hands, that would otherwise
be the case when you could illy afibrd it.
Again, it will afford you ample legal protection when doing business upon credit
with unworthy persons that might make attempts at defrauding you of your hard-
earned production. Were you forced to claim protection at the hands of the law,
your complete history of the production of your handiwork in all its minute detail
would prove conclusively to every fair-minded juryman or judge the justness of your
claim, and your right to your own property, until such times as you shall have received
an equivalent for the same.There are.many other little details which we might mention in connection with the
8/10/2019 Making Horse Drawn Coaches 1800 Bw
http://slidepdf.com/reader/full/making-horse-drawn-coaches-1800-bw 418/455
362 COACH-MAKERS' ILLUSTRATED HAND-BOOK.
present advice, but owing to the press of other matter will have to forego the samebut would say to our correspondent, that by strictly adhering to the rules we have
offered, other rules and systems would suggest themselves at the proper period, andthe whole, when interwoven into your business, will prove such a net-work of regu-
larities, each and every one depending in a measure upon its fellow or neighbors,
enough so as to force a thoroughness of your business of such a nature as to relieve
you of many of the cares and perplexities that would be otherwise entailed uponyou ; allowing you more time for the cultivation of your mind and the developmentof your business interests.
CARRIAGE MATERIALS. -THE CHANGES TWENTY-FIVE YEARSHAVE WROUGHT.
Carriage materials, comprise a great variety of articles manufactured from manydifferent substances, out of the number of which we mention iron, steel, brass, tin,
lead, gold, silver, oroide, wood, leather, silk, wool, cotton, hemp, minerals, seeds, gums,ivory, bone, etc., etc. The finished carriage is required to possess strength, durability,
comfort and beauty.
Iron, steel and wood contribute the necessary strength to render the vehicle strongenough to bear the load imposed, as well as to give the shape the several parts musthave in order to make up in general form what is known as a carriage. Leather, silk,
wool, cotton and hemp, enter into the manufacture of those materials which add com-fort and beauty, without in any way contributing to. the strength required for thesafety of those who would ride. Gold, silver, brass, oroide, ivory and bone, addbeauty and excellence of finish, and are of still less absolute value. Paints, oils andvarnishes, made from lead, minerals, seeds and gums, are employed principally as
preservatives of the surfaces of the exposed portions of the carriage, but may be so
arranged and applied as to contribute largely to its attractiveness. But while we havein the foregoing comparisons given to iron, steel and wood, the highest value, in so far
as the form, strength and durability of the vehicle is concerned, we must allow that
to those, articles capable of supplying comfort, beauty and excellence, are necessary
to produce a perfect whole.But let us glance at the changes wrought in the manufacture of carriage goods.
The increasing wealth of our country, during the last twenty-five years, added so
greatly to the demand for vehicles for pleasure and business, that attention was naturally
directed toward lessening the time and trouble of producing a finished piece of work.Formerly, there were but a few sizes of iron to be had, and as for clips, bolts, jack-
clips, shaft-eyes, slat-irons, fifth wheels, steps, etc., no one ventured to make their man-ufacture a specialty. With reference to those parts of the carriage composed of
wood, the body plank had to be sawed out by hand, and the spokes dressed out of the
rough.The supplying the carriage-maker with turned spokes was the first innovation in
the wood department. Factory-made wheels followed, and still later the carriage
parts were made a distinct branch of manufacture. But the divisions and sub-divi-
sions in the manufacture of the parts composed of wood appeared to be a morenatural one than that, of those parts composed of iron and steel, hence the manufac-
ture of tires of various sizes, to suit the different grades of work, followed more slowly,
as did also that of bar iron of sizes exactly adapted for stays, dash rods and steps.
But even these were in advance of what we are now familiar with, viz., bolts, clips,
fifth wheels, shaft-eyes, slat-irons, etc ., etc., made in the best manner of the finest
^juality of iron.
8/10/2019 Making Horse Drawn Coaches 1800 Bw
http://slidepdf.com/reader/full/making-horse-drawn-coaches-1800-bw 419/455
MISCELLANEOUS DEPARTMENT. 363
On entering a carriage-shop at present, and examining the stock of materials onhand, we find that but Uttle more comparatively is required of the builder than to
place in the hands of his workmen the several parts to be joined together. For thebuilder may now order the body, wheels, carriage part, tires, si)rings, axles, exact
sizes of iron and steel, the fifth wheel, clips suitable to every part, steps, clip-bars^
shaft-eyes, slat-irons, top-props, and joints, and those articles which have been sup-
plied a greater length of time, as whip sockets, bands, door-handles, locks, hinges,
buckles, buttons, laces, cord, etc., etc., thus almost making up a carriage in detached
parts, many of them being complete in themselves, and requiring only to be joined
together, and the carriage painted and trimmed.
The hasty glance given to the changes wrought in the manufacture of carriage
materials, may serve to awaken a passing thought concerning the advantages pos-sessed by the carriage builder, over those in the same line in times past, and pride, as
he remembers that the United States oiTers these advantages to an extent far exceed-
ing other countries.
GODDARD METHOD OF PAINTING.Thos. Goddard, of Boston, well known to our readers as a builder of first-class car-
riages, carries on his shop after a fashion of his own, and each department presents
singular methods of working. The paint shop is the only one we will notice at pres-
ent. On entering the paint rooms nothing remarkable presents itself; in fact one is
disappointed at finding so little in the arrangements and conveniences of the roomsworthy of noting down.
But in the method of carrying forward a body, there is much to interest painters
unacquainted with a slow process of painting. Lead, rough-stuff, and American andEnglish varnishes, are used. Japan and turpentine also. But a certain make andgrade of each must be had ; for instance, English lead alone is counted worthy of a
place in the shop ; then follows English filling and English varnish, Minett's Americanrubbing, and Noble & Hoare's English, are the varnishes in favor, these having been
tested and pronounced reliable by the head of the concern.English filling also having proven to the proprietor's satisfaction to be good enough,
holds sway against all competitors; the old time-honored yellow ochre sharingits honors.
Not a gill of japan is bought from any maker of japan ; on the contrary, the article
used is cooked by the foreman of paint shop after a method of his own. This article
is comparatively pale, and possesses suflScient oil to avoid the necessity of adding anymore oil when paints are being mixed.
When a body is ready for priming, it receives a coat of English lead, mixed to dryslowly. The body, after standing until hard, receives thereafter
twocoats
more of lead
;
is puttied and rough-stufled. The rough-stuff is mixed in about the proportions of ^English lead, dry, J English filling, and | yellow ochre, in japan and a good quality ofrubbing varnish, and reduced to the (proper working consistency with turpentine.
Lead is used in larger proportion in the first coats, while the ocher predominates in
the last coats. There is no such word as hurry known in the shop, therefore eachcoating remains a week, if necessary, to insure its being hard. When the varnishingprocess is reached, there is more novelty in store for the painter from a distance.
Instead of employing American rubbing varnish, which will dry firmly and cutdown pleasantly, American and English rubbing are mixed half and half,
and from aweek to ten days allowed between each coat for hardening. The idea entertained is
that each coat of varnish shouhi l)e so mixed as to retain considerable tackiness
8/10/2019 Making Horse Drawn Coaches 1800 Bw
http://slidepdf.com/reader/full/making-horse-drawn-coaches-1800-bw 420/455
364 COACH-MAKERS' ILLUSTRATED HAND-BOOK.
which, while it may sacrifice a full silky luster, fully compensates for this deficiencyon the new carriage, by wearing much better when put into hard service.
The rubbing coats cut down very unpleasantly on account of their tackiness, andthe painter who stands by and witnesses the operation grows nervous at the tedious
process. After two or three coats of rubbing varnish have been applied, the finish is
given with Noble & Hoare's wearing body.
The carriage part is carried forward with similar care, the whole when finished pre-
senting a good appearance ; but by far inferior in luster to the opposite method ofpainting. The Goddard painting has the reputation of wearing exceedingly well, notbeing liable to crack, peel or blister, thus apparently setting at nought the theory that
the under coats of varnish should be free from tackiness in order to insure a durable
finish.
THE REINS, AS HELD BY THE FAIR SEX.The introduction of that cosy, convenient and showy little article known as the Pony
Phaeton, has given to the fashionable class of females a comparatively new, and, wesuppose, delightful means of taking their airings and attracting the attention of thedashing fellows who are courageous enough to drive their own high-mettled animals,
and the envy of those gents who invariably walk, through fear of sitting astride orbehind a horse. Ladies reared in the city, who, as a general thing, have not had anopportunity to become proficient horse-women, and yet desire to follow closely the
fashions as they are presented, must find it very difficult to overcome their naturaldread of taking charge of a horse with no masculine hand and strong arm near by to
check any ugliness that may be exhibited. But we suppose that it is with this, as withall other demands of fashion, which require of its votaries the sacrifice of health, andeven life, if they would prove themselves true worshipers At any rate, it is quite
certain that females drive out in our parks, who are not capable of managing a horse
when he becomes in the least frightened or excited, and they risk their limbs and life
in the attempt to appear in the drive in the latest approved mode. We must give
them credit for their spirit of independence, and would by no means say aught against
the custom of ladies enjoying the fresh air and the beauties of nature and art, as ex-hibited at the parks. But those who drive out for mere fashion sake, and are inca-
pable of managing a horse, endanger not only their own lives, but those of others. It
is proverbial that women are reckless drivers, and no one doubts it who has seen a
buxom Indiana or Kentucky farmer's daughter start ofi alone on a visit to a friend
living a few miles distant. Go long, is the word with her, and the family horse
must reach out to the full extent of his metal. Women favorably situated to acquire
control of and management of the horse, display all the courage of man, and many of
them add to courage great recklessness.
We remember well a case in point:
In a western city a carriage-maker sought andwon the hand of a beautiful country girl, who resided some eight or ten miles fromthe city. She had been familiar with the management of horses from childhood, and,
country girl fashion, had taken her first lesson in riding by mounting old Tom or Pete bare-backed, and putting him through over the fields. After marrying, she, of
course, moved into the city, and occasionally felt anxious to pay a short visit to her old
home, and as men of business cannot always lay down their cares and be ready to
accompany their wives at just the time they must go or die, Mrs. at such times
had a horse and buggy ordered for her, and snapped her fingers at the idea of being
disappointed. Through the city she drove at a lively pace, but having reached the
country road she gave her horse the reins and dashed away at a frightful pace, causing
persons to rush out and attempt to stop what they supposed to be a runaway horse.
8/10/2019 Making Horse Drawn Coaches 1800 Bw
http://slidepdf.com/reader/full/making-horse-drawn-coaches-1800-bw 421/455
MISCELLANEOUS DEPARTMENT. 365
The same spirit is occasionally exhibited in our parks, resulting at times in pretty
serious damage to horse and driver.
Recently an accident occurred in Fairmount Park.Two
young ladies hadbeentaking an airing, aud on returning from the park the horse took fright, and plunged
forward down the road, regardless of consequences. The driveress headed for the
Lincoln Monument —a pile of granite surmounted by a hideous bronze statue of Lin-
coln —and brought the horse up standing, as we say. The horse and the fair occu-
pants of the phaeton were badly injured, and the whole was doubtless due to reckless
driving, or lack of skill on the part of the fair hands that held the reins.
] ; would be well for city ladies who lack courage and presence of mind at a time
when it is most needed, to ascertain beyond a doubt, if possible, the reputation or
character of the horse they venture to drive. A lady venturing to drive to a large
park must calculate on falling in company with a great variety of persons, amongthem no small share of a class who are careless of the convenience of others, and who,
to make a great display on the road, cause an otherwise gentle horse to become restive.
There should be driving schools, where city ladies could be taught to manage the
horse when he is quiet and obedient, and also when frightened and in a bad humor.
A few simple rules to guide them, and the exj^erience and confidence gained by hold-
ing the reins and driving alone in a safe enclosure w^ould soon give courage to the
most timid. We are always pleased to meet the jaunty pony phaetons at the park,
with their burden of fair occupants, but at the same time have an instinctive fear that
some accident may overtake them.
THE SARVEN PATENT WHEEL.AN IMPORTANT DECISION IN ITS FAVOR.
On April 23d, 1872, the United States District Court sat in New Haven, Conn., and in
the case of James D. Sarven vs. Elihu Hall & Co., which was a bill in equity, to restrain
the defendants from using certain improvements, patented to the plaintifi , for makingwheels. Judge Woodruff read an opinion deciding in favor of the plaintiff, with anorder for an injunction.
The New Haven Wheel Company appear as one of the principal plaintiffs against
Elihu Hall & Co., who are manufacturing the so-called Warner patent. The decision
of the court sustained the Sarven patent as against many other so-called patent wheels,
and was therefore a test case. All infringing patents are, therefore, enjoined fromfurther manufacturing. For a considerable time the plaintiffs have been injured by a
large number of infringements which the success of the wheel has induced ; sometwenty -five or thirty have sprung up in the course of three or four years. The matter
was such an important one that a special term of the United States District Court,
Judges Woodruff and Shipman sitting, was held in Hartford last December, to try the
case, and the trial excited considerable attention, on account of the extensive inter-
ests involved. The ablest patent lawyers in the country, including Judge Fisher, late
Commissioner of Patents, Keller and Blake of New York, Thurston, of Providence,
Beach, Ingersoll and Earle, of New Haven, were engaged. Such experts as the Ren-nicks and Treadwell, of New York, and Waters, of Boston, were also employed. Thecase has been a long one, but it is probable that the decision given wi\l be final
By private letter, we learn that the court has given E. Hall & Co. until September,
1872, close up, and has appointed a master to receive statement of all wheels madeby them, assess damages, and report same at next term of the court. E. Hall & Co. go
under bonds until September, when the injunction takes effect. It is expected that
all other infringements will be enjoined immediately.
8/10/2019 Making Horse Drawn Coaches 1800 Bw
http://slidepdf.com/reader/full/making-horse-drawn-coaches-1800-bw 422/455
366 COACH-MAKERS' ILLUSTRATED HAND-BOOK.
BLACKSMITHING IN GERMANY.
The following may prove amusing to some of our vulcanites, and is furnished us byone of our German subscribers.
In the interior towns and villages of Germany, it has been the custom, for manyyears, for the farmer to purchase the iron for his tire and horse-shoes, and in someinstances, when having a new wagon built, to purchase all the iron entering into thesame, the lengths of every piece being furnished him by the smith. One part ofthe contract is, that the smith shall return to the farmer all ends and cuttings fromthe iron, and it frequently occurs that the farmer remains at the shop until the ironis all cut up, in order that the smith shall not indulge in too much cabbage. Eachsmith-shop has what is termed the hell, and in cutting off a set of tires, if the far-
mer be not present, the largest half of the end cut off finds its way to the hell ; theduty in putting it there devolves upon the youngest apprentice. From this alwaysplentiful store, the smith furnishes his material for the manufacture of bolts, horse-shoes, etc., for transient customers.
The horse-shoeing part is also a feature. The farmer will bring with him the end ofsome piece of iron or tire, with which to make the shoes, or perhaps a dozen or moreold horse-shoes to be converted into new ones. The farmer must blow the bellowsuntil the work is forged or the shoes all made, and must then hold up the horse's
foot while the shoes are being driven on, or fitted, or taken off, and invariably carries
the old shoes home with him, or if he prefers, he can give the old shoes in paymentfor the apprentices' services in holding up the feet.
WHERE CARRIAGES SHOULD BE KEPT.It is a common and very vexatious complaint from parties who store their carriages
in the same building with their horses, or in damp and close brick carriage-houses,
that the varnish becomes soft, and cracks. This will happen, even after the very best
material and varnish have been used. Then the owner blames the poor painter, who has endured the stifling fumes of a close varnish room trying his best, and
also informs the builder that he is using vile trash instead of good serviceablevarnish, when in most cases they are both innocent, for no varnish ever was made, or
ever can be made, that will stand the steam arising in a stable where horses are kept.
Oils, by contact with alkalies, are more or less readily converted into soaps soluble
in water (among the most easily saponified oils is linseed, used largely in the manu-facture of varnish), which when shaken up with a solution of ammonia unites withthe alkali ; forming a thick solution of soft soap. Ammonia is a gas, and occurs in
the air wherever organic fermentation is in progress. When a varnished carriage is
exposed to an atmosphere of ammonia, arising from manure or decaying vegetable
matter, the alkali unites with the oil of the varnish, forming an almost imperceptiblefilament of soap, which, when the carriage is washed, dissolves in the water, and is
removed, leaving a fresh surface to be again acted on by the ammonia, so that the
oil is gradually removed from the varnish, leaving the brittle gum to look like rosin
and crumble away.Therefore, a dry, clean carriage-house, entirely separated from the stable or stable manure,
is the first thing required ; and, secondly, to have it revarnished when it is required, not the house but the carriage, for there is nothing saved by letting a carriage runthree or four years without varnishing and then spending five times the amount in
having it repainted. In fact, a carriage that is used continually should be varnishedonce a year.
8/10/2019 Making Horse Drawn Coaches 1800 Bw
http://slidepdf.com/reader/full/making-horse-drawn-coaches-1800-bw 423/455
MISCELLANEOUS DEPARTMENT. 367
WATER-PROOF GLUE.
It is often found that joints glued together, will allow water to dissolve the glue,
and thereby destroy its adhesive power. It may have been well painted, and every
care taken to it make impervious to water, but owing to its exposed position, water has
managed to get in. Often where screws are put in, the glue around them will be dis-
solved, caused by the screws sweating; and we have almost always found that wherethe screws are inserted in a panel, that the glue loses its strength and allows the
joint to open, and the wood is clear of all glue, which shows that moisture hasabsorbed the glue. Ordinary glue can be rendered insoluble by water, by adding to
the water with which glue is mixed, when required for use, a small quantity of bichro-
mate of potash. Chromic acid has the property of rendering glue or gelatine insol-
uble ; and as the operation of heating the glue-pot is conducted in the light, nospecial exposure of the pieces joined is necessary.
Glue prepared in this manner is preferable in gluing the panels on bodies wherethere is danger of water affecting the glue. The strength of glue is not diminished
by the addition of the potash.
A SAFE AND PROFITABLE INVESTMENTIs always sought by the capitalist, and so alive is he to his own interests that he will
not suffer his money to remain idle a moment. If a high rate of interest cannot berealized, he takes a lesser rate, and thus ever insures to himself some return frommoney which is dead unless kept in motion. Those who possess very large meansseek out those investments which require heavy expenditures of money to set theminto profitable operation, and which, at the same time, promise the handsomest re-
turns. Men of small capital are compelled to move more cautiously, and be satisfied
with small returns. But no matter how large or small the amount of money one pos-
sesses, there can be nothing added to it without it is kept in motion. Now, supposeone has no capital except his knowledge of a good trade, what shall he do ? Sit downand repine, and determine to shut out all further knowledge of his trade, or, to say the
least, refuse to search out hidden things, or by a small outlay of his money receive the
fruits of other men's labors? Alas, we fear —we may speak more positively —we know
a large number of mechanics whose only capital is in their knowledge of a trade, whoare ever ready to pour out their complaints in one's ear, and bemoan their lot, whohave not yet been faithful in that which is least. They have been satisfied with a
partial knowledge of their vocation, and that, too, when the means were just at hand,
which when supplemented with a little energy on their part, would add materially to
their capital; and through persevering effort, industry and economy, eventually place
in their hand capital in the more potent form of money. The carriage artisan of to-
day, who stands still and gazes at empty space, while the sound of printing presses is
thundering in his ears, and printed sheets filled with carriage literature are falling
cheaply at his side, is not investing either his muscular or brain capital, and should
not be disappointed if he grows poorer as the years roll past. There are to-day hun-dreds of journeymen carriage-makers in the States, and a large number of employers,
who are wrapped up in a thick cloak of self-conceit, and many others who appear to
be dreaming away their time. The first class named, look out from beneath their
mantle with disdain upon one who should present to them for inspection the thoughts
of fellow-craftsmen, arranged in the form of a periodical. They have no need of books
to instruct them, their styles are all original, and they mean to keep in advance ofrivals by continuing to do their own thinking and drafting. The second class are
8/10/2019 Making Horse Drawn Coaches 1800 Bw
http://slidepdf.com/reader/full/making-horse-drawn-coaches-1800-bw 424/455
368 COACH-MAKEKS* ILLUSTKATED HAND-BOOK.
equally indifferent to their own best interests, but receive you without a dissenting
word, and hear without heeding; in fact, assent to a proposition through lack of spirit
to reply. As opposite to these, we could name several carriage artisans, if we chose to
do so, who some four or five years ago invested their brain and muscular capital in the
right way, that to-day are receiving as interest, not only honors for their skill, butsalaries which richly repay them for their toils. The way lies open for others to enter,
and although all cannot occupy the best paying positions, each one, without exception,
may increase his capital by using the means at hand for self-improvement.
AMERICAN TIMBER INTERESTS.We are threatened with a want of sufficient quantity of timber to meet the actual
necessities of life. Twenty million of people are living in dwellings chiefly con-
structed of wood. Their barns and out-buildings are of wood ; and the fencing of
their farms, more expensive than their other improvements, is of wood ; and all these
are perishable with time. Moreover, our sixty thousand miles of railroad consumeannually immense quantities of timber. Twenty-one thousand six hundred cords of
wood are daily consumed in running railway trains three hundred and twenty thou-
sand miles each twenty-four hours. Sixty thousand miles of road require twenty-five
hundred ties to the mile, and as they must be replaced every five years, an annualconsumption of thirty million ties is required. We will soon construct each year tenthousand miles of new road, requiring twenty-five million more ties, and, when weadd to all these sources of forest destruction, the wood required in the fencing of theserailroads, the half million telegraph poles which each year will be required, and thevast amount of the destruction of forests by flood or fire, we must be absolutely star-
tled with the conviction that whole provinces of woods which have required a hundredyears to grow, are each year being swept away, while nothing is done by either public
authority or private zeal to supply the place of that which is destroyed, or protect in
any measure that which exists. These are hard facts, and whether people mindthem or not to-day, they will give them some thought hereafter. In France, the
forests were cut down with the utmost recklessness, and for the last thirty years her
fertile valleys have been swept by terrible floods, carrying away all kinds of property,and covering the rich soil with gravel and sand. In Russia, the forests are beginning
to disappear, and a law is now in force making it illegal to use anything but coal for
fuel on the railroads. The timber lands of Germany are under the special protection
of the government, while in Japan every one who cuts down a tree is compelled at
once to plant another. The experience of these countries foreshadows that of ourthoughtless men and reckless corporations may go on stripping the land of its forests,
but at last every one will be convinced of the necessity of a change.
8/10/2019 Making Horse Drawn Coaches 1800 Bw
http://slidepdf.com/reader/full/making-horse-drawn-coaches-1800-bw 425/455
HAND-BOOK ADVERTISER.
Felton, Rau & Sibley,
ITos. 136, 138 and 14:0 ITorth. Fourth. Street,
MANUFACTURERS OF SUPERIOR
4 i i i I i
AND IMPORTERa OF
FINE COLORS, BRUSHES, ETC.OUR MR. BAU HAS BEEN A PRACTICAL, TARNISH MAHKR FOR OVER TWENTY-FIVE
TEARS. HIS LONG EXPERIENCE AND CLOSE APPLICATION TO THE BUSINESSENABLES US TO PRODUCE A CLASS OF GOODS UNSURPASSED BY ANT
IN THE MARKET. WE ASK ALL CONCERNED TO GIVE THEMA FAIR AND IMPARTIAL TRIAL, WHICH WOULD BE
CONVINCING PROOF OF OUR ASSERTION.
OUR FINE PAINTSAre prepared and selected with special reference to the
requirements of the best ivorktnen —no man cando a first-class job ivith inferior stock.
We make it a point to keep thebest of all goods needed
in the Paint Shop.
We invite attention to our Price List in the Coach-Makers' International Journal,which is corrected monthly.
N.B. —Sole Manufacturers of TuUy's Unrivaled Pat. Paint Filling.
8/10/2019 Making Horse Drawn Coaches 1800 Bw
http://slidepdf.com/reader/full/making-horse-drawn-coaches-1800-bw 426/455
HAND-BOOK ADVERTISER.
H. D. SMITH. GEO. F. SMITH. E. W. TWICHELL.
a D. SMITH & CO.,MANUFACTURERS OF
Carriage-Makers' Hardware,
Established 1850.
Trade Mark. I ,^^^ I Trade Mark
MANUFACTURERS OF FIRST-CLASS FORGED CARRIAGE IRONS,
consisting in part of a large variety of patterns and sizes of Shaft Couplings, Clip King
Bolts ; Axle, Spring Bar, Saddle and French Coach Clips ; Plain, Embossed and OpenStep Pads, Gridiron Coach Steps, Fifth Wheels, Smith's Milled Stump Joints, Steeland Iron Felloe Plates, Patent Perch Bed and Plates, Forged Slat Irons, Clip King Boltand Axle Clip Yokes, Brewster & Co.'s Patent Whiflietree Plates, Whiflietree Bolts^Thomas' Patent Top Props, etc., etc., etc.
ASK ¥OUB DEALER FOR THE ENCIRCLED S MAKE OP GOODS
It will Insure to Tou the Best Workmanship and Material.
For a few Illustrations of our Carriage Irons, see opposite page.
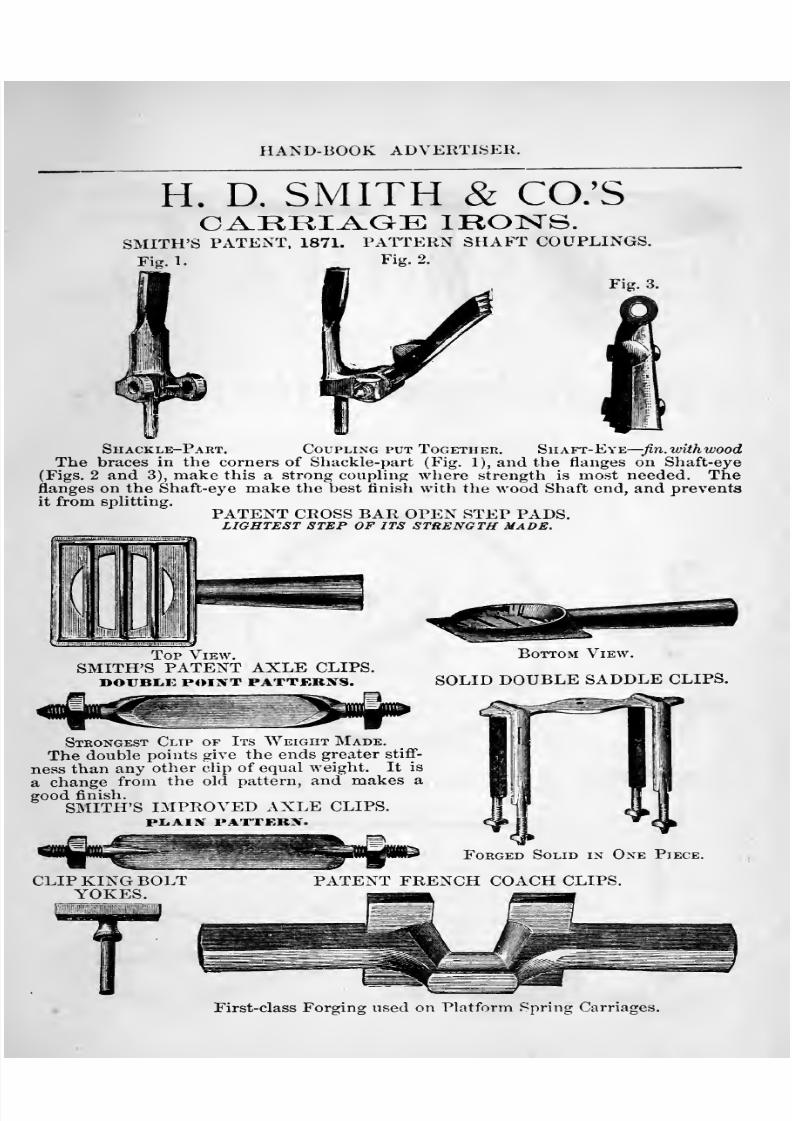
8/10/2019 Making Horse Drawn Coaches 1800 Bw
http://slidepdf.com/reader/full/making-horse-drawn-coaches-1800-bw 427/455
HAND-BOOK ADVERTISER.
H. D, SMITH & CO;SCiS^RRI^aE IRONS.SMITH'S PATENT, 1871. PATTERN SHAFT COUPLINGS.
Fig. 1. I'^ig. 2.
Fig. 3.
Shackle-Part. Coupling put Together. Shaft-Eye— Jin. ivith woodThe braces in the corners of Shackle-part (Fig. 1), and the flanges on Shaft-eye
(Figs. 2 and 3), make this a strong coupling wliere strength is most needed. Theflanges on the Shaft-eye make the best finish with the wood Shaft end, and preventsit from splitting.
PATENT CROSS BAR OPEN STEP PADS.
LIGHTEST STEP OF ITS STRENGTH MADE.
Top View.SMITH'S PATENT AXLE CLIPS.
DOUBIii: POINT PATTKRXS.
Bottom View.
SOLID DOUBLE SADDLE CLIPS.
Strongest Clip of Its Weight Made.The double points give the ends greater stiff-
ness than any other clip of equal weight. It is
a change from the old pattern, and makes a
good finish.
SMITH'S IMPROVED AXLE CLIPS.PliAIN PATTERN.
Forged Solid in One Piece.
First-class Forging used on Platform Spring Carriages.
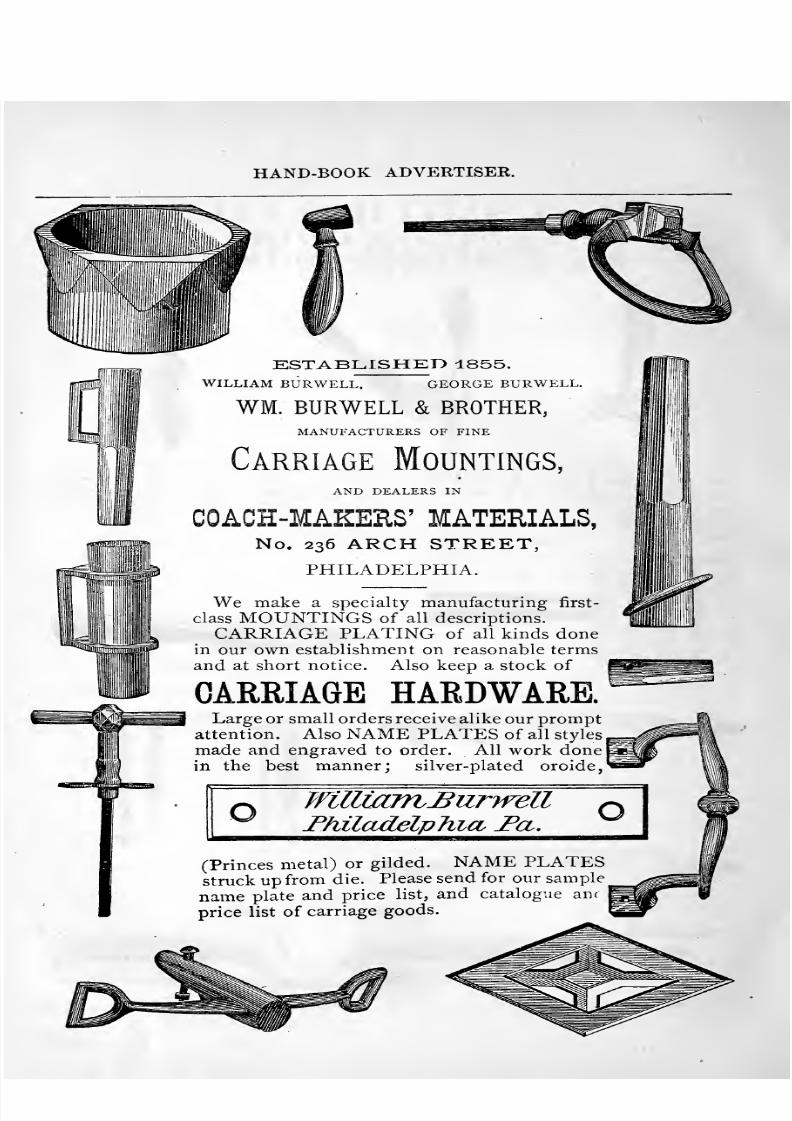
8/10/2019 Making Horse Drawn Coaches 1800 Bw
http://slidepdf.com/reader/full/making-horse-drawn-coaches-1800-bw 428/455
HAND-BOOK ADVERTISER.
ESTABLISHED 1855.WILLIAM BURWELL. GEORGE BURWELL.
WM. BURWELL & BROTHER,MANUFACTURERS OF FINE
Carriage Mountings,AND DEALERS IN
COACH-MAKEHS' MATERIALS,
No. 236 ARCH STREET,PHILADELPHIA.
We make a specialty manufacturing first-
class MOUNTINGS of all descriptions.
CARRIAGE PLATING of all kinds donein our own establishment on reasonable termsand at short notice. Also keep a stock of
CARRIAGE HARDWARE.Large or small orders receive alike our promptattention. Also NAME PLATES of all styles
made and engraved to order. All work donein the best manner; silver-plated oroide
WiUmjnBurwelljPhiladelphia Fa,
(Princes metal) or gilded. NAME PLATESstruck up from die. Please send for our sample
name plate and price list, and catalogue anr
price list of carriage goods.
8/10/2019 Making Horse Drawn Coaches 1800 Bw
http://slidepdf.com/reader/full/making-horse-drawn-coaches-1800-bw 429/455
HAND-BOOK ADVERTISER.
B. DaTzoTT i^ Sons,
SOUTH EGREMONT, BERKSHIRE COUNTY, MASSACHUSETTS,
MANUFACTURERS OF
FIRST QXJA^LITY
STEEL AND IRON AXLESWe would especially call the attention of Carriage-Makers to our Patent
Wrought-Iron Case-Hardened Axle Box, which, for the purpose of running a
carriage easily and perfectly, surpasses any box ever used —making no cost or
trouble to the owner, and will always out-last the carriage.
We take pleasure in presenting a few letters (from the many which we have)
showing the opinion of parties who have used them:
Indianapolis, June ist, 1872.Messrs. D. Dalzell ^s' Sons —Gents : We have used your Patent Wrought-Iron Axle Box, in connection with your
Steel Axles, on all our light carriages since you first began to supply the trade with them, with perfect success,and regard them as almost indispensable, when perfection is aimed at in the manufacture of Light, Strong a7idDurable Carriages. SHA IV &= LIPPINCOTT Q.^xxxv^'g^ Manufacturing Co.
OwEGO, N. Y., June 1st, 1872,Messes. D. Dalzell &' Sons —Gents : We have used your Patent Wrought-Iron Axle Box for over a year and a
half, and find them very superior. They have proved even better than you recommend —as it is impossible to stickor heat them, and we think that your Steel Axles, with the Wrought Box on, are the best in the market, especiallyfor the patent wheel with small hub now in use. To use an expression of one of our customers in regard to them, They areas fine as silk. Yours truly, yxXO- BARKV &= CO.
Mount Carmell, Conn., June ist, 1S72.Messrs. D. Dalzell d^ Sons —Gents: The Wrought-Iron Axle Boxes you have furnished us have given most
perfect satisfaction to our customers, and too much cannot be said in their praise. We believe they are as near per-fection for the purpose as it is possible to reach. We will use them largely on our axles.
Yours truly, F. IVES ^r CO.; Axle Manufacturers.Auburn, N. Y., June 1st, 1872.
Messrs. D. Dalzell <5r» Sons —Gerts : After a thorough test of the Wrought-Iron Case-Hardened Axle Boxes,we can say that they have given entire satisfaction to our customers, and the demand for them is steadily increasing.Considering strength, durability and lightness, they cannot be excelled.
Yours respectfully, SHELDON &= CO.,Manufacturers of First Quality Axles.
fi^^We might present many m^re testimonials as to their merits, but consider
the above sufficient. We would suggest they are equally good on heavy as well
as light work, and we manufacture for all styles and sizes of Axles, up to i^ in.
Axle Manufacturers fuinished with Wrought Boxes on liberal terms.
A.11 A.xles AVarranted.JPLBASE SEND FOll CIRCVLAR AND I^RICE LIST.
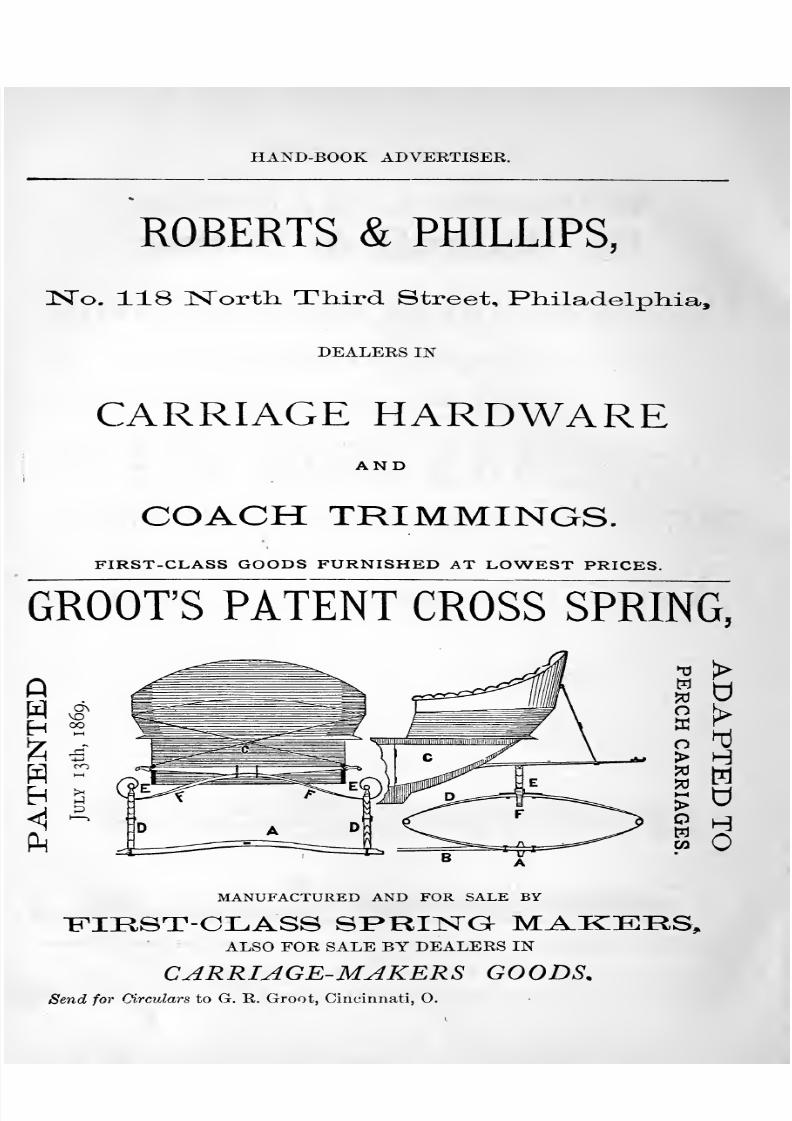
8/10/2019 Making Horse Drawn Coaches 1800 Bw
http://slidepdf.com/reader/full/making-horse-drawn-coaches-1800-bw 430/455
HAND-BOOK ADVERTISER.
ROBERTS & PHILLIPS,
ISTo. 118 Nortli TMrd Street, Pliiladelpliia,
DEALERS IN
CARRIAGE HARDWAREAND
COACH TRIMMINGS.FIRST-CLASS GOODS FURNISHED AT LOWEST PRICES.
GROOT'S PATENT CROSS SPRING,
o
o>
>QmCO
d
w
H
MANUFACTURED AND FOR SALE BY
FIHST-CLASS SFRINQ MAKERS,ALSO FOR SALE BY DEALERS IN
CARRIAGE-MAKERS GOODS.Send for Circulars to G. R. Groot, Cincinnati, O.
8/10/2019 Making Horse Drawn Coaches 1800 Bw
http://slidepdf.com/reader/full/making-horse-drawn-coaches-1800-bw 431/455
HAND-BOOK ADVEliTLSKK.
WILSON & HAYDEN,Importers and Manufacturers of
COACH & SADDLERY HARDWAREAND
CARRIAGE TRIMMINGS./ Noble & Hoare's English VarnisheB,\ Valentine's Varnishes,
AGrENTS FOR I J. W. Masury's Mixed Paints,
/ Mowry's Springs and Axles,
\ Groot's Patent Cross Springs.
ISrOS. 32 & 24 MA.IN stre£:t,CINCINNATI, OHIO.
Anchor Brand Axles,FOR ALL STYLES OF CARRIAGES.
TRADE /i=^i^> MARK.
SHELDON & CO.,AUBURN, N. Y.
DUE OLD WORKS AEE DEVOTED EXCLUSIVELY TO GEADES KNOWN TO THE TRADEAS NO:. 1 TO 4 1-2.
JUR NEW WORKS AEE DEVOTED EXCLUSIVELY TO THE FINEST GEADES (Warranted to
be Fully Equal to the Best in the World,) KNOWN AS NOS- 5 TO 17.
ALL STYLES WITH CAST, WROUGHT-IRON ANDCOMPOSITION BOXES.
8/10/2019 Making Horse Drawn Coaches 1800 Bw
http://slidepdf.com/reader/full/making-horse-drawn-coaches-1800-bw 432/455
HAND-BOOK ADVERTISER.
EST^A^BILISHEID 1849.
MANUFACTURER OF FINE COACH, CAR AND OTHER
VARNISHES,354 MULBERRY STREET, NEWARK, N. J.
The above having been a regularly apprenticed and trained coach painter, andperfectly familiar with the difficulties and vexations of the Varnishing departmentof the craft, has, with the aid of his experience as a painter, and assiduous appli
cation as a Varnish manufacturer, succeeded in producing a RUBBING varnish^
in which is combined all the requisites for the expeditious and perfect surfacing
of the work.Also a WEARING BODY Varnish, which, for luster and durability, stands
unrivaled, after the severest trials, by any of foreign or American manufacture.
Prices always as low as the use of the best materials, skillful workmanship, andproper age, will admit of.
We ask for a trial of these ai^ticles, because we have earned the right to do so.
B. K. MILLS & CO.,
MANUFACTURERS OF
COACH LACES, FRINGES,
Gimps, Tassels, Speaking-Tubes, Etc
NOS. 56 AND 58 CANNON STREET.
BRIDQEFORT, OOISriS'.
We have lately introduced a style of Lace after the French, which for nnenessof texture and workmanship is unequaled by any produced in this country. Wehave been at a heavy expense in getting ready to produce these fine qualities oflaces, but still offer them to the trade at our ordinary prices.
8/10/2019 Making Horse Drawn Coaches 1800 Bw
http://slidepdf.com/reader/full/making-horse-drawn-coaches-1800-bw 433/455
HAND-BOOK ADVERTISER.
Get the Best.
CHARLES D. THUM,
Brush Manufacturer,NO. 150 NORTH THIRD STREET,
PHILADELPHIA.
SUPERIOR TO ANY NOW IN USE.
IN USE BY ALL THE LEADING COACH AND CARRIAGE MANU-
FACTORIES AND RAILROAD SHOPS.They are warranted to stand, and the peculiarity in them is, they are so pointed and prepared
that they can be immediately used for finishing, without being previously worn down. Theyare of three qualities —Elastic or Soft, Half Elastic or Medium, and Bristle or Stiff. Circular
containing Certificate of Varnishers' Association, References and Prices, sent by Mail, whenrequested.
Copper Bound (all white hair) Varnish Brushes, suitable for Coach-Makers' Paint Brushes.Also, the ordinary Paint and Sash Tools, Pitch, Badger and Camel Hair Varnish Brushes,
extra thick and strong, Camel and Sable Hair Pencils and Liners, Chamois Skins, FeatherDusters, &c.
Manufacturer of Improved Brushes for color and putting on Piotrowski's Permanent WoodFilling.
Please send your orders (by mail or otherwise) direct to 150 NORTH THIRD ST.
8/10/2019 Making Horse Drawn Coaches 1800 Bw
http://slidepdf.com/reader/full/making-horse-drawn-coaches-1800-bw 434/455
HAND-BOOK ADVERTISER.
ESTABLISHED 1847.] [INCORPORATED 1869.
Ug' Hilffi
feWi »S
MAKERSOF
Carriage Wheels, Hubs, Spokes,
AND
Bent Material,
S. N. BROWN Si, COMANUFACTURE,
FOR CARRIAGE-MAKERS,
THE TRADE WAGON,
DA-STTOIT, OHIO
8/10/2019 Making Horse Drawn Coaches 1800 Bw
http://slidepdf.com/reader/full/making-horse-drawn-coaches-1800-bw 435/455
HAND-BOOK ADVERTISER.
(Established 1816.)
C. Schrack & Co.,152, 154, 156 & 158 NORTH FOURTH STREET,
PHILADELPHIA, PA.r
__iac. SCHRACK 8.C0.IEl.i£I_,
VARNISH & COLOR HAJiUFACTORYl
Oo
S2;
so
MANUFACTUKERS, IiMPORTERS AND DEALERS IN
COACH VARNISHESAND DRYING JAPANe.
Also Manufactukers of the Celebrated
CORALLINE COACH FILLING.Intense Ivory Black in Japan,
A full assortment of
Coach-Painters' Supplies,OF THE VERY BEST QUALITIES AND AT REASONABLE PRICLS.
8/10/2019 Making Horse Drawn Coaches 1800 Bw
http://slidepdf.com/reader/full/making-horse-drawn-coaches-1800-bw 436/455
HAND-BOOK ADVERTISER.
PhiladelphiaCarriage Bolt
WorksESTABLISHED 1855.
Hand-made Axle Clip.
Carritige Bolt.
T. SKELLY,MANUFACTUIvER OF FINEST QUALITY OF
Carriage and Tire Bolts,
HAl\DHIADE AXLE CLIPS,
Improved T-Head, Gone, Cheese, Square and Diamond-Head
BOLTS,AND ALL THE DIFFERENT VARIETIES USED BY MAKERS
OF FINE CARRIAGES,
TWENTY-FOURTH ST., BEL. CALLOWHILL,
PHILADELPHIA PA.EVERY BOLT MADE AT THIS ES rAELISHMENT WARRANTED
TO BE MANUFACTURED FRO 31
TfrSft. BEST QUALITY NORWAY IRON,And of Superior Workmanship, and every Bolt and Nut made true
to s ize and tit.Elliptic Head
WROUGHT BLANK NUT S from 3-16 to 1-2 inch constantly on hand. I'ercli Bolt.
Skelly's New StyleImproved T-Heador Shaft Bolt.
8/10/2019 Making Horse Drawn Coaches 1800 Bw
http://slidepdf.com/reader/full/making-horse-drawn-coaches-1800-bw 437/455
HAND-BOOK A I)\'KRTISKH.
NEAVE, WARD & COMPANYImporters and Dealers in
AND
«*s»f- - - **^ *'
^: , r I n g e ir^ r i mm i it g gFIFTH WHEELS, SPRING SADDLES, AXLES, SPRINGS, WOOD-
WORK FOR CARRIAGES, &c.
Also, Curtis' Patent Perch, Body-Loop and Bash Moulding,
And Agents for Mander Bros. English Coach Yarnish,
T//£ BEST IN THE MARKET.
No8. 37 and 39 3IAIJS^ STBEET, CINCINNATI, OHIO,
CHARLES T.~TOWNSENIXJVIanufacturer
OF
FIRST-CLASS
CARRIAGE BODIES iMmALL KINDS. ^91^^^^^^
l ^o. 116 Dixwell Avenue,NEW HAVEN, CONN.
8/10/2019 Making Horse Drawn Coaches 1800 Bw
http://slidepdf.com/reader/full/making-horse-drawn-coaches-1800-bw 438/455
HAND-BOOK ADVERTISER.
Pure Carriage and Car Body Paints.
Masury's Superfine Colors,FOR COACH, CARRIAGE AND CAR WORK,
Are now STANDARD GOODS, and are used in the BEST SHOPS throughoutthe country. These PURE PAINTS effect a
Saving of from 20 to 50 Per Cent.,both in labor and material, over the paints heretofore m use.
They are guaranteed to be absolutely pure, and are selected with great care fromthe best products of the home and foreign markets.
Send stamp for Sample book, containing forty colors, with full price list.
CAUTION.Beware of Fraud and Imitations. —Consumers of our superfine colors, for their ownprotection, and as a matter of simple justice to the manufacturer, are requested to ob-serve particularly that every package bears our full name and address. In several in-stances a trial order of our goods has brought a second order which has been filled bythe dealer with some attempted imitation of our goods, and being speedily condemned,has resulted in prejudice to us, the consumer not noticing the absence of our name onpackage. Let it be borne in mind that these colors are now Standard Goods ; and when theimitators offer you paints which they claim are equal to these, do not forget that atbest they are, in the nature of things, untried and unreliable. To be tempted by so-called cheapness in such matters is not wise. To paint a job with our best Jet Black
win cost at most only a shilling or two more than to use the commonest stuff in themarket ; and this extra cost is only apparent, as the less quantity required and thesaving in labor will more than compensate for the extra first cost.
NEWBOOK FOR CARRIAGE PAINTERS.
Carriage Painter's Companion.Containing samples of the lakes, carmines, and other glazing and body colors, with
directions for making grounds for the same, and best mode of applying, with otheruseful information. 130 pages.
Copies sent by mail on receipt of 75 cents.^
N. B. —This valuable book is not sold at a profit, the price asked barely coveringcost and postage.
Jl^^Special attention of Coach Painters and the trade generally is called to the fact
that we have just issued a sample book of 12 pages containing forty (40) samples ofour coach colors, with full price lists. The book is nchly worth a dollar to any painter,and we offer a copy free by mail to any address on receipt of a three-cent stamp. Besure to write the directions plainly, giving name, town, county and State. A businesscard should in all cases accompany the application, if possible.
P.O. Box 3499. JOHN W. MASUJ<Y & SON,III DUANE ST., NEW YORK.
8/10/2019 Making Horse Drawn Coaches 1800 Bw
http://slidepdf.com/reader/full/making-horse-drawn-coaches-1800-bw 439/455
HAND-BOOK ADVERTISER.
PARKER & GILLESPIEMANUFACTURERS OF
FINE
COACH VARNISHES,
Nos. 554 TO 562 West 25TH Street,
NEW YORK.CHAS. MOSER, FRED. RENNER, JOHN KOLBE
CHAS. MOSER &CO.,
MANUFACTURERS OF
WHITE LEAD, PAINTS,AND
ARTISTS' COLORS.IMPORTERS OF
FINE DRY COLORS, COACH VARNISHES AND CARRIAGEPAINTERS' MATERIALS OF EVERY DESCRIPTION.
2Vo. 61 MAIN STREET, CINCINNATI, OHIO.

8/10/2019 Making Horse Drawn Coaches 1800 Bw
http://slidepdf.com/reader/full/making-horse-drawn-coaches-1800-bw 440/455
HAND-BOOK ADVP:KTISER.
JANENTZKY & CO.,MANUFACTUKEKS OF
IMPORTERS AND PUBLISHERS OF
thansfer omamehts,For Buggies, Carriages, Coaches, Sleighs, Omnibusses, Rail-road Cars, Safes, Tinware, etc., in the greatest variety.
DEALERS IN SIGN AND
OACH-rAINTERS' Materi ALS.BRUSHES, STRIPING AND LETTERING PENCILS,
BOOKS OF ALPHABETS, SIGN-PAINTERS ANDGRAINERS-CARPENTERS AND .JOINERS
HAND-BOOK, ALSO, MECHANICALINSTRUCTOR, SCROLLS AND
OTHER DESIGNS, Etc.
IMPORTERS OFArtists, Engineers & Draftsman's Materials & Instruments.
1135 CHESTISTXJT STREET,JPHILADELrHIA.
ZIEGLER&
SMITHTNOS. 125 AND 127 NORTH FOURTH STREET,
SOUTH-EAST CORNER OF CHERRY STREET,
MANUFACTURERS OF
Pure White Lead, Zinc Colors, Varnishes, Brushes,>
WITH A FULL LINE OF
COACH-MAKERS' MATERIALS.IMPOKTEES OF
LAKES, CARMINES, FINE COLORS, ENGLISH VARNISHES, ETC.
OO^OH aL^SS A. 8I>EOI^LTY.BENT GLASS TO ANY CURVE.
8/10/2019 Making Horse Drawn Coaches 1800 Bw
http://slidepdf.com/reader/full/making-horse-drawn-coaches-1800-bw 441/455
HAND-BOOK ADVERTISER.
FOR
FINE WHEELS,Either Plain Style or Dorman Patent,
AND FOR
WHEEL STOCK
Shafts and Carriage-Parts
FINE AATORK,ADDRESS
HOOPES, BRO. & DARLINGTON,WEST CHESTER^ PA.
1 B.-SeM for Price List aiifl
Blait fleel Drier.qjjiH
8/10/2019 Making Horse Drawn Coaches 1800 Bw
http://slidepdf.com/reader/full/making-horse-drawn-coaches-1800-bw 442/455
HAm)-BOOK ADVERTISER.
COACH MAKERS'MATERIALS FOR THE PAINT SHOP
Sherwin, Williams & Co.IMPORTERS AND MANUF'S
CLEVELAND, O.
Office, 126 Superior St. Paint Works on Cuyahoga River.
FINE COLORS & LAK ES }D'y- Ground i„Oil or japan.
PTTT? TT AA/TT THTPr T In A T^ 1 Manufactured expressly for coach and carXU±Vl^VYlJ.J.±J^J^J^i-lJ^( ^gg. ^,Qj.ji^ ^Q ^i^g Coach-Maker twice as[GROUND IN OIL.] J much as any other Pure Lead made.
^ Murphy, Sherwin & Co.'s, V\^. Har-
VARNISHES & JAPANSi-^ & so„>s [English], Nobi« &
J Hare's [English.]
T) -p T TQTT T7Q ) Finest Varnish Brushes, Improved Color Brushes, Sable, Ox-hair,-t> JA. KJ O ±1. XlfO J and Camel-hair Striping Pencils.
Transfers, Fillers,
Pumice Stone, Gold Leaf,
Rubbing Stone, Gold Paint,
Rubbing Felt, Bronzes,Sand Paper, Tube Colors.
Chamois Skins, Glue,&c.
And everything else used in the Paint Shop, each the best of its kind
SEND FOR CATALOGUE.
8/10/2019 Making Horse Drawn Coaches 1800 Bw
http://slidepdf.com/reader/full/making-horse-drawn-coaches-1800-bw 443/455
HAND-BOOK ADVERTISER.
JosiAH G. RousR. George Tiel. James W. Downey. Henry S. Sill.
J. G. ROUSE & CO,Manufacturers, Agents, Importers and Dealers in
COACH AND CARRIAGE
Hardware and Trimmings,
1=4
s
€/^
I
i
Pi
^a
ITo. 413 Arch Street, Philadelphia.
Sole Agents for Mo wry' s Celebrated Steel and Steel -converted Axles, and Skelly*8
Norway Iron Hand-made Carriage and Tire Bolts; S. Halsey & Son's Patent and Enam-eled Leather; Prentice & Heath's Enameled Cloth: Rowland's Swedes Steel Oil-
Tempered Springs, and finest Swedes Tire Steel. This is the only Steel Tire that carriage
smiths can rely on. Sole Agents in the East for Peel & Elster's Gold, Silver and Japan-
ned Patent Dash Molding.
8/10/2019 Making Horse Drawn Coaches 1800 Bw
http://slidepdf.com/reader/full/making-horse-drawn-coaches-1800-bw 444/455
HAND-BOOK ADVERTISER.
o
10 ««r^ C/3
^-^ U>^^ 1
d -d
5 ^OP P>• >O o
s<? ©
8/10/2019 Making Horse Drawn Coaches 1800 Bw
http://slidepdf.com/reader/full/making-horse-drawn-coaches-1800-bw 445/455
n A N I )- r.( )( ) K A DVERTISER.
IS® FEECH m.JOHN STKEET, BHinaEPORT, CONN.,
MANUFACTURERS OF FIRST QUALITY
CARRIAGE SPRINGS AND AXLES,
ALSO
Q^0©f s PAWipi^T C^oss Bf^ifiq
EDWARD STERLING, Pres. F. B. IIAWLEY, Treas. E. IV MARSH, SiC.
MINETT & CO.,
MANUFACTURERS OF
FINE COACH AND RAILWAY
VARNISHES, ^,^
JAPANS, ETC0T?T?Tr<T?O . I 6^ PEARL STREET, NEW YORK,1 X lljlliO . I 16 NORTH 12th STREET, PHILA.

8/10/2019 Making Horse Drawn Coaches 1800 Bw
http://slidepdf.com/reader/full/making-horse-drawn-coaches-1800-bw 446/455
HAND-BOOK ADVERTISER.
Wrought-Iron and Steel
DROP FORGIITGS>
Of every description, at reasonable prices.
The value of the drop press for producing wrought-iron and
steel forgings in quantities, each being an exact duplicate of the
other, was never so fully understood and appreciated as now. By
this process, any piece, duplicates of which are used to the
extent of hundreds or even thousands, can be made of best
Norway iron at about the price per pound as malleable iron,
and at less than one-half the cost of hand wrought work. Wedesire to call the attention of large carriage and wagon-makers
to this process, as being of special value to them. Howeverlarge and coarse, or however small and fine the piece may be,
we want a model piece to figure on, upon receipt of which, and
a statement of the quality of iron or steel required, and the
number of pieces that can be ordered at a time, we will at once
name the lowest price at which the work can be produced
THE HULL &, BELDEN CO.,
DANBURY, CONN.
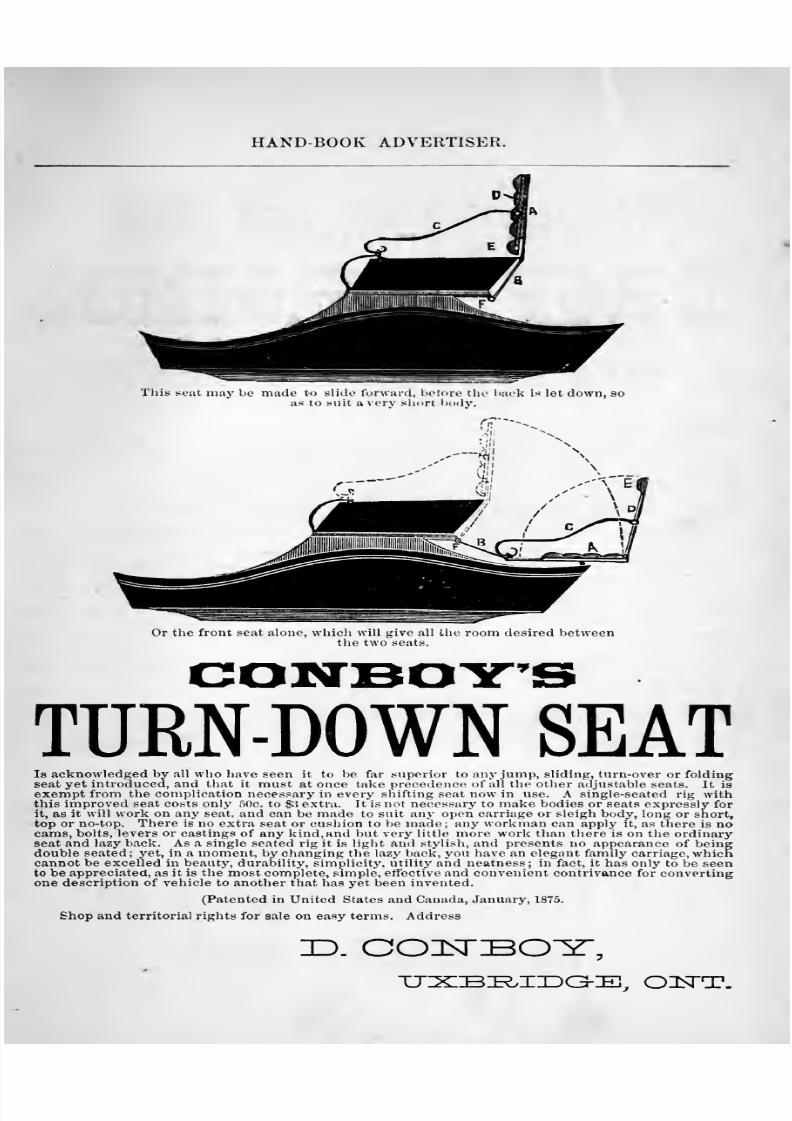
8/10/2019 Making Horse Drawn Coaches 1800 Bw
http://slidepdf.com/reader/full/making-horse-drawn-coaches-1800-bw 447/455
HAND-BOOK ADVERTISER.
PlPil aas
ap^iSfl^isss
Tlut^ MMt may be nuuk- to slide luiwaid, iK-luie itic l>:ick i < let down, soas to suit a very short body.
Or the front seat alone, whicli will give all the room desired betweenthe two seats.
TURN-DOWN SEATIs acknowledged by all who have seen it to be far superior to any jump, sliding, turn-over or foldingseat yet introduced, and that it must at once take precedence of all the other adjustable seats. It isexempt from the complication necessary in every shifting seat now in use. A single-seated rig withthis improved seat costs only 50c. to $} extra. It is not necessary to make bodies or seats expressly for
it, as it will work on any seat, and can be made to suit any open carriage or sleigh body, long or short,top or no-top. There is no extra seat or cushion to be made; any workman can apply it, as tliere is nocams, bolts, levers or castings of any kind, and but very little more work than there is on the ordinaryseat and lazy back. As a single seated rig it is light and stylish, and presents no appearance of beingdouble seated; yet, in a moment, by changing the lazy back, you have an elegant family carriage, whichcannot be excelled in beauty, durability, simplicity, utility and neatness; in fact, it has only to be seento be appreciated, as it is the most complete, simple, effective and convenient contrivance for convertingone description of vehicle to another that has yet been invented.
(Patented in United States and Canada, January, 1875.
Shop and territorial rights for sale on easy terms. Address
T). COIsTBO^
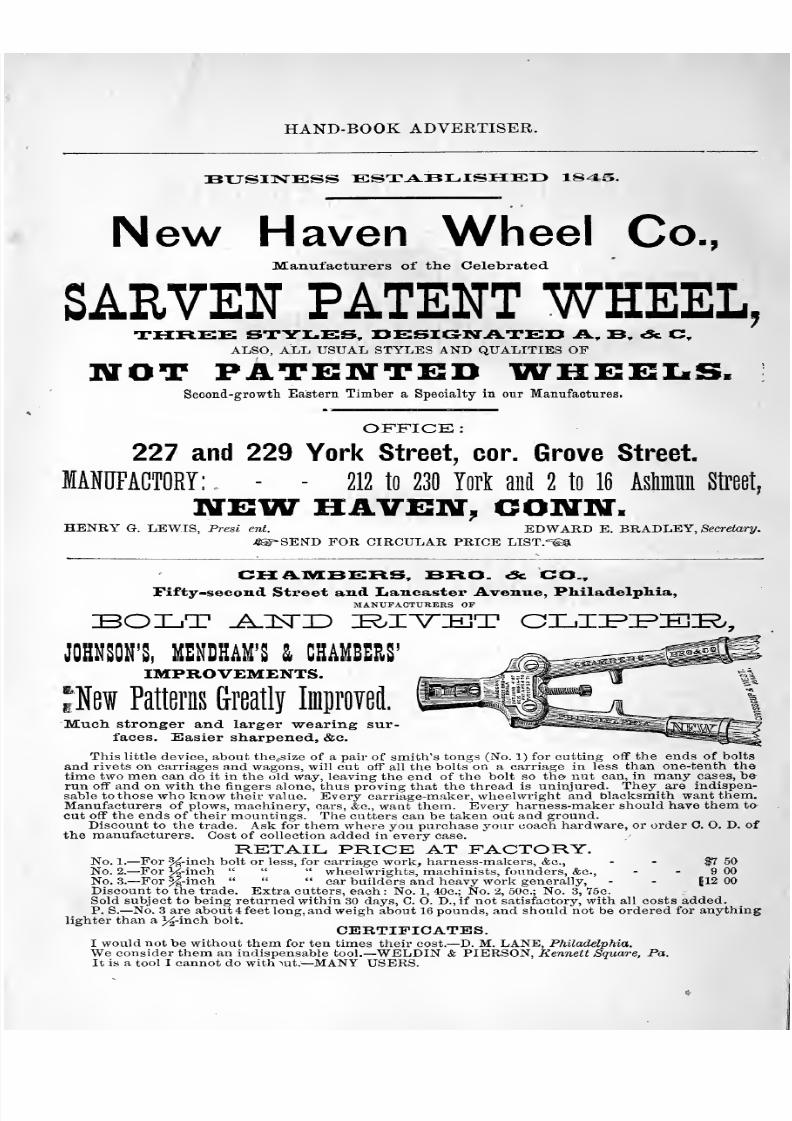
8/10/2019 Making Horse Drawn Coaches 1800 Bw
http://slidepdf.com/reader/full/making-horse-drawn-coaches-1800-bw 448/455
HAND-BOOK ADVERTISER.
BUSINESS ESTABLISKEID 184S.
New Haven Wheel Co.,Manufacturers of the Celebrated
SAEVEN PATENT WHEEL,ALSO, ALL USUAL STYLES AND QUALITIES OFNOT PATENTED VimBSlMS.
Second-growth Eastern Timber a Specialty in onr Manufactures.
OFFICE :
227 and 229 York Street, cor. Grove Street.
MANIIFACTORY: . - - 212 to 230 Yorlc and 2 to 16 AsMm Street,
NEWHAVEN^ CONN.HENRY G. LEWIS, Presi ent. EDWARD E. BRADLEY, Secretary.
J^-SEND FOR CIRCULAR PRICE LIST.-=®|1
CIZ AulVEBERS, BRO. <Sc CO.,Fifty-second Street and Liancaster Avenue, PhiladelpKia,
MANUFACTURERS OF
BOLT JL.l<nD E^I^EIT CXJ.F:B:ErR,
\mn mmn a chaueers'IMPROVEMENTS.
'New Patterns Greatly Improvei-
Much stronger and larger wearing sur-faces. Easier sharpened, &c.
This little device, about the size of a pair of smith's tougs (No. 1) for cutting off the ends of boltsand rivets on carriages and wagons, -will cut off all the bolts on a carriage in less than one-tenth thetime two men can do it in the old way, leaving the end of the bolt so the nut can, in many cases, berun off and on with the fingers alone, thus proving that the thread is uninjured. They are indispen-sable to those who know their value. Every carriage-maker, wheelwright and blacksmith want them.Manufacturers of plows, machinery, cars, &e., want them. Every harness-maker should have them tocut off the ends of their mountings. The cutters can be taken out and ground.
Discount to the trade. Ask for them where you purchase your coach hardware, or order C. O. D. ofthe manufacturers. Cost of collection added in every case.
RETAIL PRICE AT FACTORY.No. 1. —For 5^-inch bolt or less, for carriage work, harness-makers, &c., - - $7 50No. 2. —For %-inch wheelwrights, machinists, founders, &c., - - 9 00No. 3. —For %-ineh car builders and heavy work generally, - - |12 00Discount to the trade. Extra cutters, each : No. 1, 40c.; No. 2, 50c.; No. 3,75c.Sold subject to being returned within 30 days, C. 0. D., if not satisfactory, with all costs added.P. S. —No. 3 are about 4 feet long, and weigh about 16 pounds, and should not be ordered for anything
lighter than a l^-inch bolt.
CERTIFICATES.I would not be without them for ten times their cost.— D. M. LANE, Philadelphia.
We consider them an indispensable tool.— WELDIN & PIERSON, Kennett Square, Pa.It is a tool I cannot do with >ut.— MANY USERS.
8/10/2019 Making Horse Drawn Coaches 1800 Bw
http://slidepdf.com/reader/full/making-horse-drawn-coaches-1800-bw 449/455
HAND-BOOK ADVERTISER.
Manufacturers of Fine
Carriage Springs and Axles,
EAST WASHINGTON AVE.,
Careful attention given to Special Orders to be made
from Customers' Patterns.
SEND FOR CATALOGUE AND PRICE LIST.
W. H. ROCKWELL, Sec. EDWIN BANKS, Treas.
THE CARRIAaE MONTHLY,The LARGEST, BEST and CHEAPEST
TJRAI>E JOXir^IVAL IIV THE TTOR^LO.Office, 737 Sansom Street, Phila.
The Carriage Monthly is published exclusively in the interest of Carriage Builders, andshould be found in every carriage factory and office throughout the country.
Price only S:i.()0 per year, in advance, post-paid. Ciubs of two or rnore, $2.50 each. Single orspecimen numbers, 30 cents each.
THE CARRIAGE MONTHLT PRINTING HOUSE.Letter-Heads,
Bill-Heads,Envelopes,
Cards,Charts,
Catalogrues, Statements, &c., &c.,
Every kind of printing required by carriage builders can be obtained at short notice, and weguarantee a better }cyo ior less money tJian can be obtained elsewhere.
^WOOD ENGRAVINO,We are prepared to fill orders for engraving of every description, machinery, buildings, carriages
Ac, in the best style of the art, at reasonable prices. Having established printing and engraving inconnection with the publication of the Monthly, we claim that with the large assortment of the lateststyles of type, over G<)0 different cuts of carriages, both largo and small, and with the long experiencewe have had, we are better prepared to do carriage-makers' printing and engraving than any otherhouse in America. Information and prices given on application. Address
I. 3D. 'W^E/E,Publisher, Printer and Engraver,
Box 2769, PhUadelphia.
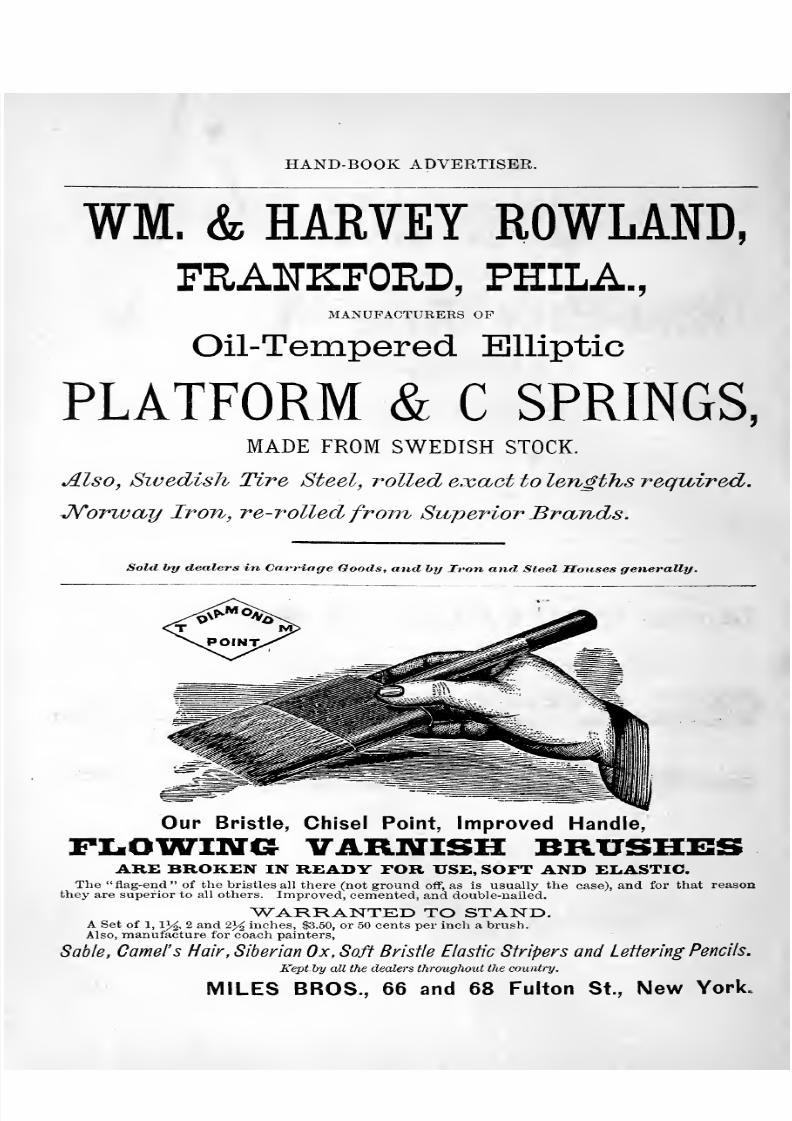
8/10/2019 Making Horse Drawn Coaches 1800 Bw
http://slidepdf.com/reader/full/making-horse-drawn-coaches-1800-bw 450/455
HAND-BOOK ADVERTISER.
WM. & HARVEY ROWLAND,FUAITEFOUD, PHILA,
MANUFACTURERS OF
Oil-Tempered Elliptic
PLATFORM & C SPRINGS,MADE FROM SWEDISH STOCK.
Also, Swedish Tire Steel, rolled exact to lengths required,
J^orway Iron, re-rolled from Superior Brands.
Sold by dealers in Carriage Goods, and by Iron and Steel Souses generally.
Our Bristle, Chisel Point, Improved Handle,
FlMOJKTINa VARHISH BRUSHESARE BROKEN IN READY FOR USE, SOFT AND ELASTIC.The flag-end of the bristles all there (not ground off, as is usually the case), and for that reason
they are superior to all others. Improved, cemented, and double-nailed.
^WARRANTED TO STAND.A Set of 1, 13^, 2 and 2^^ inches, $3.50, or 50 cents per inch a brush.Also, manufacture for coach painters,
Sable, Camel's Hair, Siberian Ox, Soft Bristle Elastic Stripers and Lettering Pencils.
Kept by all the dealers throughout the country.
MILES BROS., 66 and 68 Fulton St., New YorL
8/10/2019 Making Horse Drawn Coaches 1800 Bw
http://slidepdf.com/reader/full/making-horse-drawn-coaches-1800-bw 451/455
HAND-BOOK ADVERTISER.
SAVE TIME SAVE TROUBLE
SAVE MONEYBY USING THE
Raw-Hide Axle Washers.Patented July 28th, 1868.
These WASHERS are used by thousands, and are pronounced a success, and are theONLY AXLE WASHERS that find a ready sale upon their own merits. They are
CHEAPER THAN LEATHER, FAR MORE DURABLE, and have the great merit
of always being ready for use. They do not compress like leather, but keep the wheelin its place, preventing end-play and keeping out sand and grit.
/t Set of Axles will last a third longei^ if kept well-fitted WITH THE RaW-MiDE WaSHEI^S.
Put up in half-gross boxes, and for sale by the trade generally.
For Circulars and Price List, address
Darrow Maifactirini Co., Bristol, Coi.
Morse Twist Drill and Machine Co.,3IANUFACTUREltS OF
MORSE PATENT STRAIGHT-LIP INCREASE TWIST DRILL,
Beach's Patent Self-Centering and Self-TigMeniug Drill CMcte.
ISolid and Shell Reamers, Adjustable Chucks, Center Drill Chucks, Bees*Patent Taps & Dies, Screvir Plates, Tap Wrenches, and Special Tools.
S/A%ltaS: NEW BEDFORD, MASS.
8/10/2019 Making Horse Drawn Coaches 1800 Bw
http://slidepdf.com/reader/full/making-horse-drawn-coaches-1800-bw 452/455
HAND-BOOK ADVERTISER.
Scott Sc Day,SuccessoRs TO W. P. Wilstach
&Co.,
Coach-Makers Materials
AND
SADDLERY HARDWAREOF EVERT DESCRIPTION.
The Largest Stock in the United States.
NO. 38 NORTH THIRD STREET,
Philadelphia.
Charles Scott. Conrad B. Day.
I
8/10/2019 Making Horse Drawn Coaches 1800 Bw
http://slidepdf.com/reader/full/making-horse-drawn-coaches-1800-bw 453/455

8/10/2019 Making Horse Drawn Coaches 1800 Bw
http://slidepdf.com/reader/full/making-horse-drawn-coaches-1800-bw 454/455
8/10/2019 Making Horse Drawn Coaches 1800 Bw
http://slidepdf.com/reader/full/making-horse-drawn-coaches-1800-bw 455/455