Embed Size (px)
Citation preview
Making formalin-fixed cell line plugs for incorporation into paraffin blocks General Considerations:
The more cells you have, the better! For adherent cells, this protocol is not worth doing unless you have at least one confluent T175 (175 cm2) of cells. There is variation in cell size and density, so for some cell lines even a T-175 may not give an adequate cell yield; thus, if it is little added trouble or expense it is best to shoot for 2 T175 flasks worth of cells.
Some cell lines will naturally form thick and stable pellets, others won’t. There’s almost no way to tell how well a cell line will pellet- or how big the pellet will be- until you try it.
The final step involves slicing the microfuge tube with a razor blade or scalpel. Exercise caution here!
Remember that when your fixed pellet goes in for processing with ethanol and xylene, it will shrink significantly (by about 30-50%). This means that if your initial pellet is 5 millimeters thick, after processing it will only be about 2.5-3 mm. Again, more cells/bigger pellets to start with are preferred.
We typically fix in 10% neutral buffered formalin at room temperature for 24 or 48 hours. Not sure that this is optimal for all purposes.
The size of the microfuge tube can be changed, depending on the expected size of the cell pellet. We generally use 0.5 ml PCR-type tubes. <0.5 ml size tubes can be used if the cell pellet is small.
A useful option for too few cells is to admix your cells of interest with a bolus of carrier cells (e.g. an easily grown cancer cell line). We have had very good success with this modification. Best strategy is to select a carrier that is significantly different than your cells of interest, especially for the particular marker(s) you will be trying to stain for, so that the two cell types will be easily distinguished from one another following staining.
Pros: Better preserves cell architecture Greater density of cells Does not require the cells to be resuspended in hot agarose, minimizing damage and
inhomogeneity in cell density Cons Requires lots of cells (but can use the carrier cell option described above) Requires cutting your tube with a razor- safety hazard Procedure:
1. Make up a solution of 2% agarose in PBS and pipet ~200 uL of molten agarose into the bottom of a 0.5 mL microfuge tube (Other size tubes can be used. Smaller tubes are easier to cut open later, but give smaller cell pellets).
2. Harvest the cells by scraping or trypsinization and pellet.
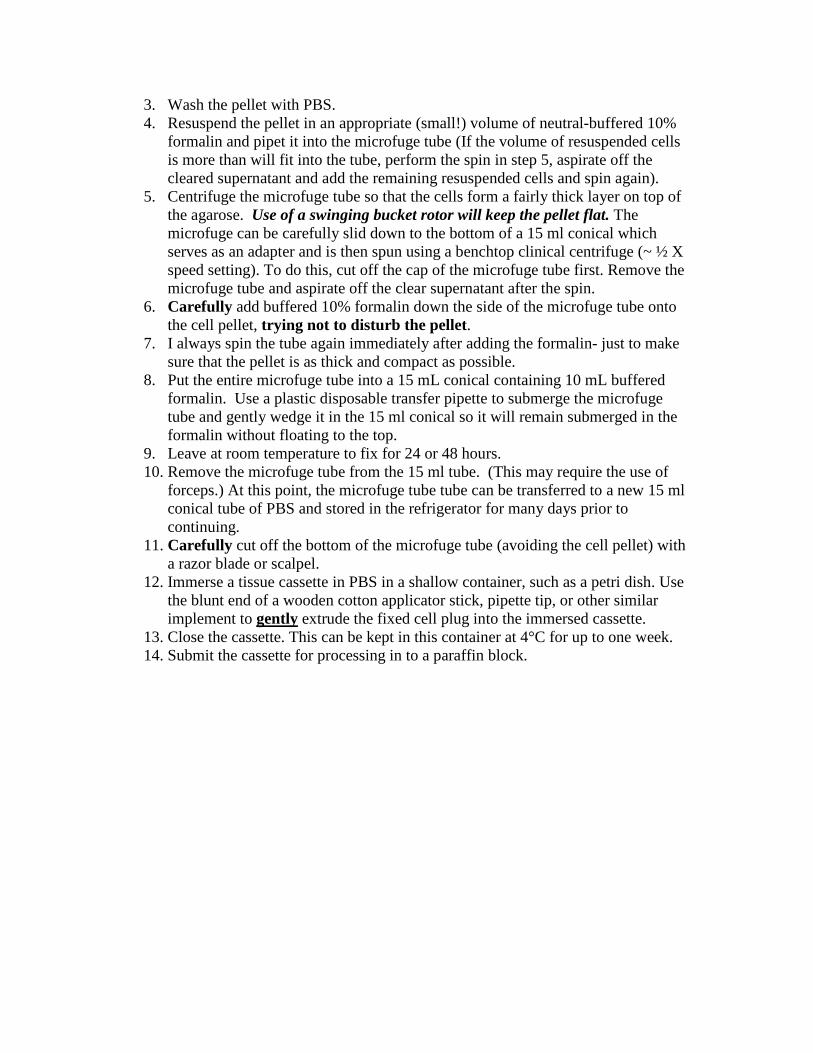
3. Wash the pellet with PBS. 4. Resuspend the pellet in an appropriate (small!) volume of neutral-buffered 10%
formalin and pipet it into the microfuge tube (If the volume of resuspended cells is more than will fit into the tube, perform the spin in step 5, aspirate off the cleared supernatant and add the remaining resuspended cells and spin again).
5. Centrifuge the microfuge tube so that the cells form a fairly thick layer on top of the agarose. Use of a swinging bucket rotor will keep the pellet flat. The microfuge can be carefully slid down to the bottom of a 15 ml conical which serves as an adapter and is then spun using a benchtop clinical centrifuge (~ ½ X speed setting). To do this, cut off the cap of the microfuge tube first. Remove the microfuge tube and aspirate off the clear supernatant after the spin.
6. Carefully add buffered 10% formalin down the side of the microfuge tube onto the cell pellet, trying not to disturb the pellet.
7. I always spin the tube again immediately after adding the formalin- just to make sure that the pellet is as thick and compact as possible.
8. Put the entire microfuge tube into a 15 mL conical containing 10 mL buffered formalin. Use a plastic disposable transfer pipette to submerge the microfuge tube and gently wedge it in the 15 ml conical so it will remain submerged in the formalin without floating to the top.
9. Leave at room temperature to fix for 24 or 48 hours. 10. Remove the microfuge tube from the 15 ml tube. (This may require the use of
forceps.) At this point, the microfuge tube tube can be transferred to a new 15 ml conical tube of PBS and stored in the refrigerator for many days prior to continuing.
11. Carefully cut off the bottom of the microfuge tube (avoiding the cell pellet) with a razor blade or scalpel.
12. Immerse a tissue cassette in PBS in a shallow container, such as a petri dish. Use the blunt end of a wooden cotton applicator stick, pipette tip, or other similar implement to gently extrude the fixed cell plug into the immersed cassette.
13. Close the cassette. This can be kept in this container at 4°C for up to one week. 14. Submit the cassette for processing in to a paraffin block.
2% agarose (in PBS)
cells
Step 1
Snip off cap
10% formalin-buffered phosphate
PBS
Embed