Embed Size (px)
Citation preview
© Crafted by The Customs House
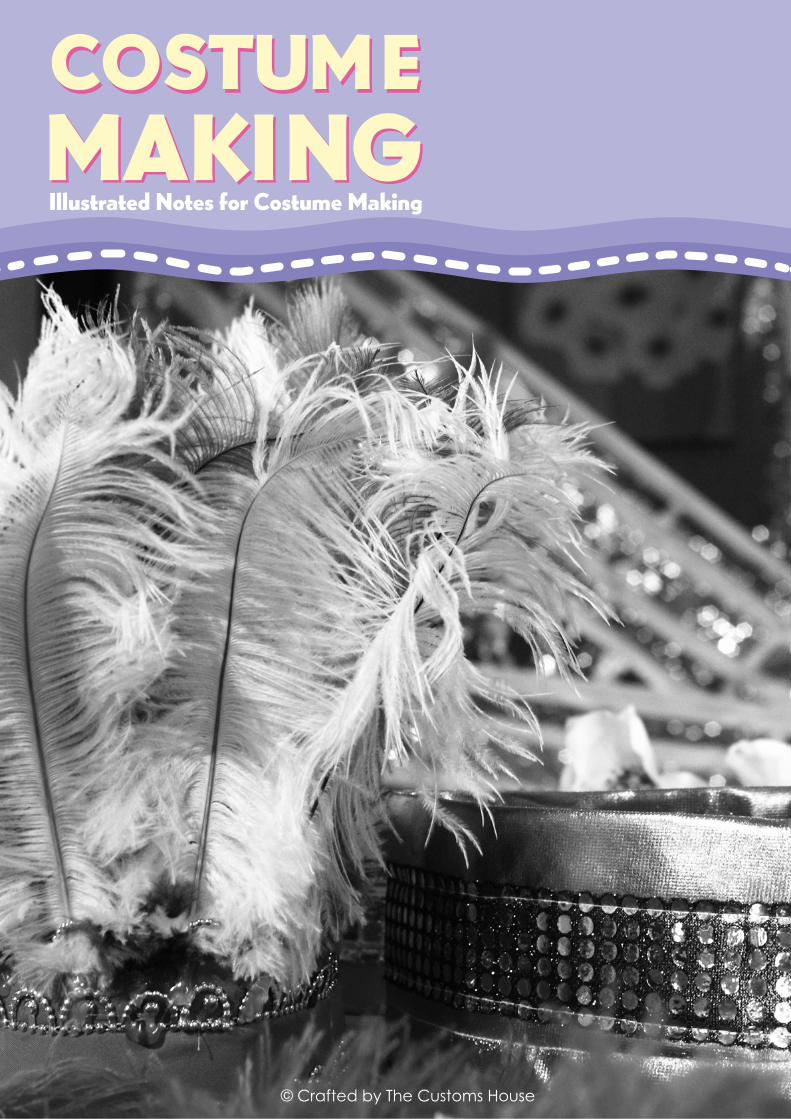
COSTUMEMAKINGCOSTUMEMAKING
© Crafted by The Customs House
COSTUMEMAKINGCOSTUMEMAKINGIllustrated Notes for Costume Making
© Crafted by The Customs House
© Crafted by The Customs House
COSTUMEMAKINGCOSTUMEMAKING
Costume Making
Schools often have plenty to celebrate and performances are a regular part of the school calendar. With this in mind, The Custom’s House Cultural Development Team have created this resource pack in partnership with South Tyneside Council, Sandy Harris and Shoofly Publishing, to support teachers who would like to add extra colour to their celebrations!
Before we begin let’s look at ‘Sandy’s top tips’
• Keep costume-making simple. • Buy inexpensive t-shirts or customise existing t-shirts as a basis for costumes. Stencil on patterns and add ‘sparkle’ with glitter, sequins and ribbons to transform t-shirts into wonderful costumes.
• Use fabrics that reflect light (e.g. satin).
• Remember, ‘Many hands make light work’, so involve families when making the costumes.
• Shop around for bargains – ‘Poundshops’ and ‘The Works’ are great for double-sided tape, glue, scissors and jolly-sparkly things like sequins and glitter paint.
• South Shields Saturday market is fantastic for cheap fabrics and trimmings.
• ‘Dainty Supplies’ in Crowther Industrial Estate in Washington is slightly more expensive, but great for specialist fabrics like Lycra.
01
© Crafted by The Customs House
COSTUMEMAKINGCOSTUMEMAKING
Let’s begin with summer…
Every year South Tyneside Council (like many other local authorities across the UK) organise summer events. In South Tyneside, it’s the Summer Parade to which all local schools are invited to take part. In the summer of 2012, the theme celebrated the ‘Olympics’ and Sandy Harris, Costume Designer, was asked to deliver a ‘beginners costume making’ session based on this theme. The teachers from local schools who attended had a wonderful time making beautiful flags that could be carried or worn as part of a costume.
You can see the outcomes created by the teacher in the image files … they are pretty spectacular we think!
Although the theme of the workshop was the ‘Olympics’, the skills and techniques the teachers learnt are transferable to other celebrations and performances.
Getting started with the basics…
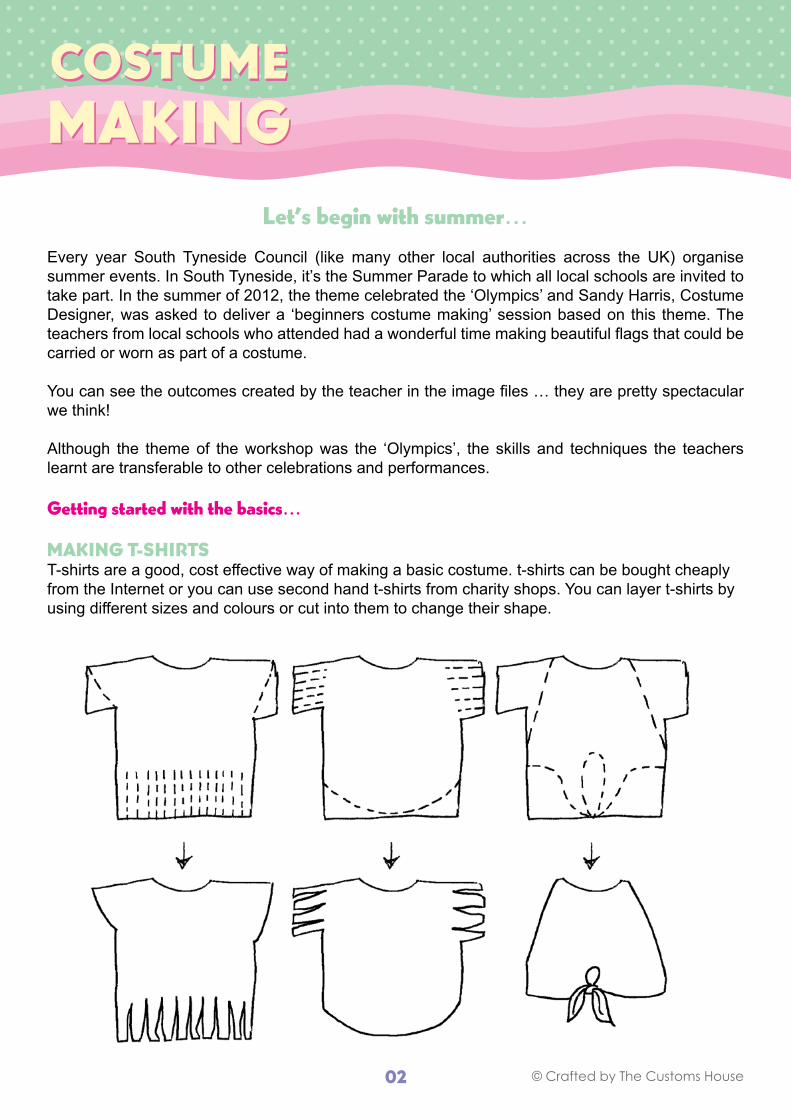
MAKING T-SHIRTST-shirts are a good, cost effective way of making a basic costume. t-shirts can be bought cheaply from the Internet or you can use second hand t-shirts from charity shops. You can layer t-shirts by using different sizes and colours or cut into them to change their shape.
02
© Crafted by The Customs House
COSTUMEMAKINGCOSTUMEMAKINGDyesCold water dyes are perfect for experimenting with tie-dying. You can buy cold-water dyes in your local hardware store or online.
Natural dyes:If you want to be REALLY adventurous then try making your own dye using plants. Children can learn that, in the past before there were chemical dyes, people had to make natural dyes from plants.
Working with natural dyes can lead to creating a programme of study combining science, art and history. This might be useful if children are studying the Anglo Saxons, when wool was dyed using plants that could be found locally in the countryside.
The following ‘dye’ plants can be grown in the school garden:
• Weld (pale yellow/green) • Woad (blue) • Coreopsis (strong yellow/orange) • Madder (red/orange)
You can purchase all of the above dyes online at www.dyeing-crafts.co.uk
Tie-dying Tie-dying is a simple and effective way of transforming old t-shirts and the technique can also be used to transform large pieces of fabric for cloaks, flags etc.
There are lots of step-by-step workshops and videos on Youtube that demonstrate a variety of tie-dying processes.
Here is one simple way of doing tie-dye:
• Begin by twisting the t-shirt. Tie the t-shirt in various places using string, knots or elastic bands. You can start by doing this randomly and then once you have seen what happens when you untie the t-shirt, you will have a better idea of the patterns you can create.
• You can use elastic bands wrapped around stones or objects to make beautiful circle patterns.
• Mix up a batch of coldwater dye and soak the t-shirt. Leave it to dry then untie the knots.
• Repeat the tie-dying process with more colours.
03
© Crafted by The Customs House
COSTUMEMAKINGCOSTUMEMAKINGThis method will work with restricted colour palettes, such as various shades of green. Using a range of greens and browns would create a camouflage effect.
These t-shirts could be used as a basic costume for children as ‘trees’ or ‘woodland creatures’.
A more vibrant colour palette would create a great starting point to create exotic bird costumes.
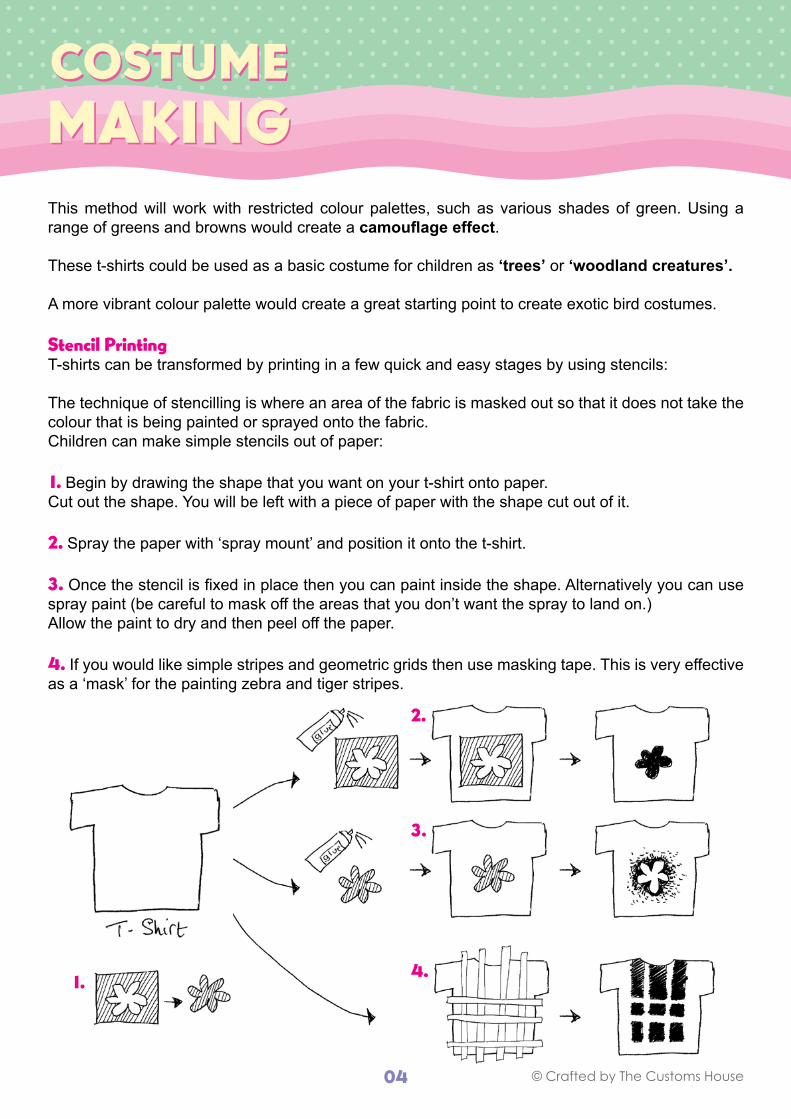
Stencil PrintingT-shirts can be transformed by printing in a few quick and easy stages by using stencils:
The technique of stencilling is where an area of the fabric is masked out so that it does not take the colour that is being painted or sprayed onto the fabric.Children can make simple stencils out of paper:
1. Begin by drawing the shape that you want on your t-shirt onto paper. Cut out the shape. You will be left with a piece of paper with the shape cut out of it.
2. Spray the paper with ‘spray mount’ and position it onto the t-shirt.
3. Once the stencil is fixed in place then you can paint inside the shape. Alternatively you can use spray paint (be careful to mask off the areas that you don’t want the spray to land on.)Allow the paint to dry and then peel off the paper.
4. If you would like simple stripes and geometric grids then use masking tape. This is very effective as a ‘mask’ for the painting zebra and tiger stripes.
1.
2.
3.
4.
04
© Crafted by The Customs House
COSTUMEMAKINGCOSTUMEMAKINGSplatter paintingSplatter painting is really simple and children really enjoy it. This technique can be used on colourful, abstract costumes for a circus or pageant.
Dip old toothbrushes into paint and flick the toothbrush with your finger.
Splatter painting is very effective when combined with stencils.
Printing with natural objectsYou can create simple patterns by cutting out pieces of potato and then use to print on the t-shirts.
As well as potatoes try using other fruit to print with, such as apples and peppers.
In Autumn you can use leaves to make prints.
Don’t forget, you can also use your hands and feet.
These techniques can be used for cultural celebrations, such as Harvest Festival and Halloween or to celebrate other countries such as Africa and South America.
Printing with recycled objects Try printing using disposable coffee cups and their lids to create circles of various sizes.
Polystyrene packaging is great for printing and often comes unusual shapes.
Use coffee stirrers dipped in paint to create straight lines.
The ends of cotton reels can be used to make circles to create ‘Polka Dot’ patterns for ‘Children in Need’ events.
Low relief printingMake simple block prints by starting off with a piece of card and then gluing on additional bits of card or objects such as the lids of coffee cups and jars. (Make sure all the objects are the same ‘height’ from the background card or you won’t get an even print.)
Use a roller or carefully paint the card that is ‘standing proud’ of the background.
Place the ‘block’ carefully onto the t-short and then use a roller of press down hard.
Low relief printing can be used to create a ‘mechanical’ feel to costumes and used to create robots or machines.
05
© Crafted by The Customs House
COSTUMEMAKINGCOSTUMEMAKINGMono-PrintingMono-printing is a very easy technique for children to use and every t-shirt will be different!
• Use inks or paint and paint directly onto a smooth washable surface.
• Draw directly into the surface with a stick or piece of card.
• Make a piece of card to fit inside the t-shirt (this will stop the ink from coming onto the back of the shirt).
• Press the t-shirt onto the inked surface.
• Remove carefully and then leave to dry.
Children can use this technique to make personalised t-shirts e.g. their favourite animal.
06
© Crafted by The Customs House
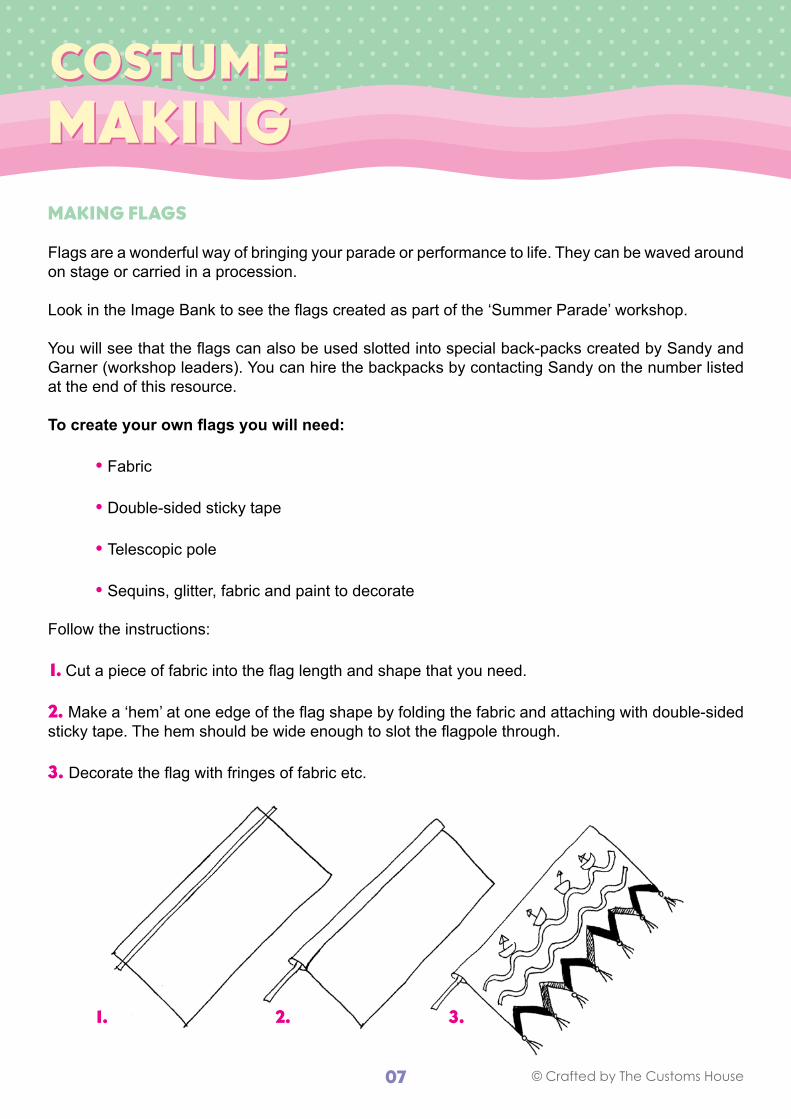
COSTUMEMAKINGCOSTUMEMAKINGMAKING FLAGS
Flags are a wonderful way of bringing your parade or performance to life. They can be waved around on stage or carried in a procession.
Look in the Image Bank to see the flags created as part of the ‘Summer Parade’ workshop.
You will see that the flags can also be used slotted into special back-packs created by Sandy and Garner (workshop leaders). You can hire the backpacks by contacting Sandy on the number listed at the end of this resource.
To create your own flags you will need:
• Fabric
• Double-sided sticky tape
• Telescopic pole
• Sequins, glitter, fabric and paint to decorate
Follow the instructions:
1. Cut a piece of fabric into the flag length and shape that you need.
2. Make a ‘hem’ at one edge of the flag shape by folding the fabric and attaching with double-sided sticky tape. The hem should be wide enough to slot the flagpole through.
3. Decorate the flag with fringes of fabric etc.
1. 2. 3.
07
© Crafted by The Customs House
COSTUMEMAKINGCOSTUMEMAKINGYou can buy 1 x 3 metre telescopic pole for £3.99 plus postage from:
www.windcreations.co.uk
Tel. 01296 481113
Specialist fabrics and Haberdashery can be purchased locally from:
Dainty Supplies32 Phoenix RoadWashingtonNE38 0ADTel. 0191 416 7886
You can also buy bright coloured satin fabric at £2.50 per metre from South Shields Market (Mondays and Saturdays).
Contact Sandy and Garner to hire the ‘backpacks’ that carry the flags.
Sandy (costume) tel. 07920107479Garner (dance) tel. 07725267478
08
© Crafted by The Customs House
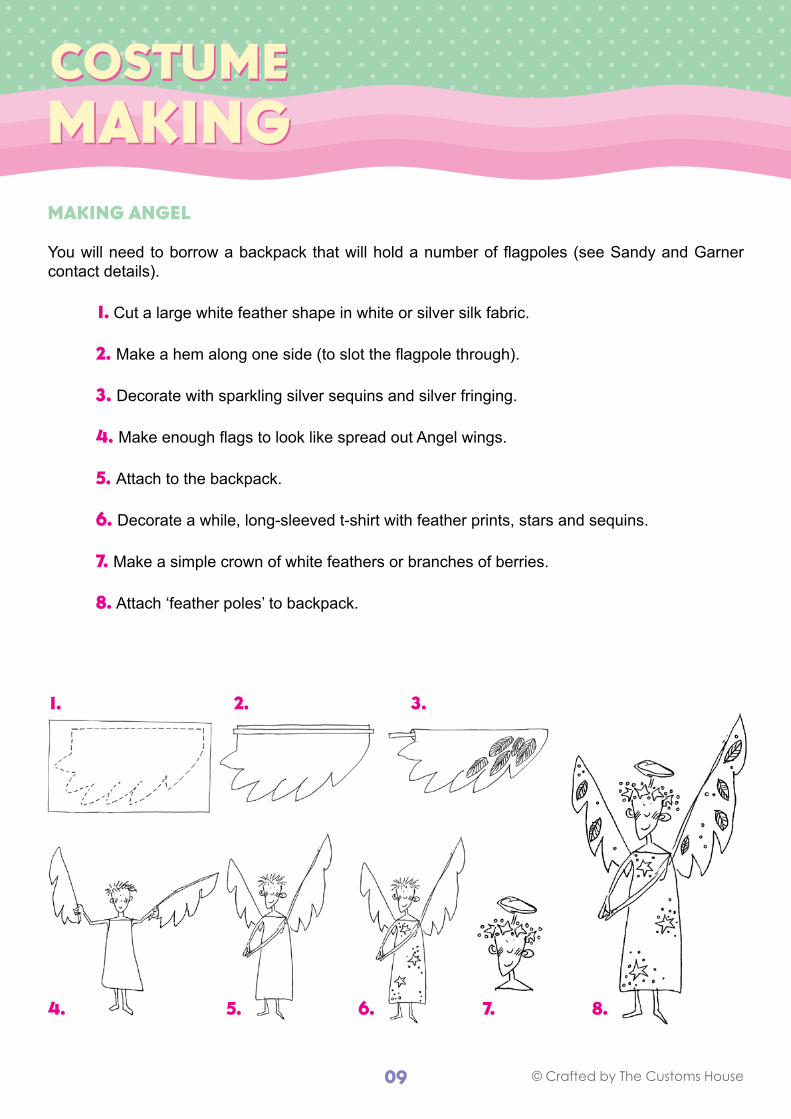
COSTUMEMAKINGCOSTUMEMAKINGMAKING ANGEL
You will need to borrow a backpack that will hold a number of flagpoles (see Sandy and Garner contact details).
1. Cut a large white feather shape in white or silver silk fabric.
2. Make a hem along one side (to slot the flagpole through).
3. Decorate with sparkling silver sequins and silver fringing.
4. Make enough flags to look like spread out Angel wings.
5. Attach to the backpack.
6. Decorate a while, long-sleeved t-shirt with feather prints, stars and sequins.
7. Make a simple crown of white feathers or branches of berries.
8. Attach ‘feather poles’ to backpack.
1. 2. 3.
4. 5. 6. 7. 8.
09
© Crafted by The Customs House
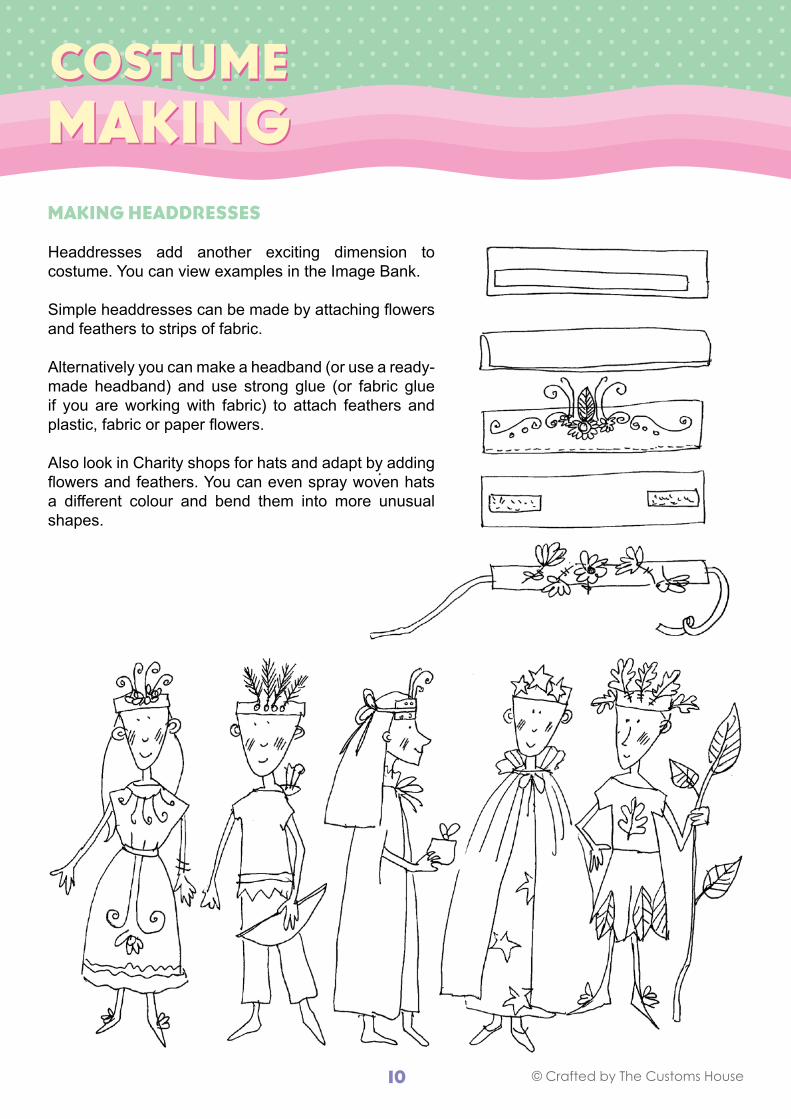
COSTUMEMAKINGCOSTUMEMAKINGMAKING HEADDRESSES
Headdresses add another exciting dimension to costume. You can view examples in the Image Bank.
Simple headdresses can be made by attaching flowers and feathers to strips of fabric.
Alternatively you can make a headband (or use a ready-made headband) and use strong glue (or fabric glue if you are working with fabric) to attach feathers and plastic, fabric or paper flowers.
Also look in Charity shops for hats and adapt by adding flowers and feathers. You can even spray woven hats a different colour and bend them into more unusual shapes.
10
© Crafted by The Customs House
COSTUMEMAKINGCOSTUMEMAKING
Winter Costume Workshop
Christmas is a wonderful opportunity to put on your own show. Here are some of the ideas from Sandy and Garner’s Winter Costume Workshop. The Snow Queen costume can be adapted in different colours to create a wide variety of characters.
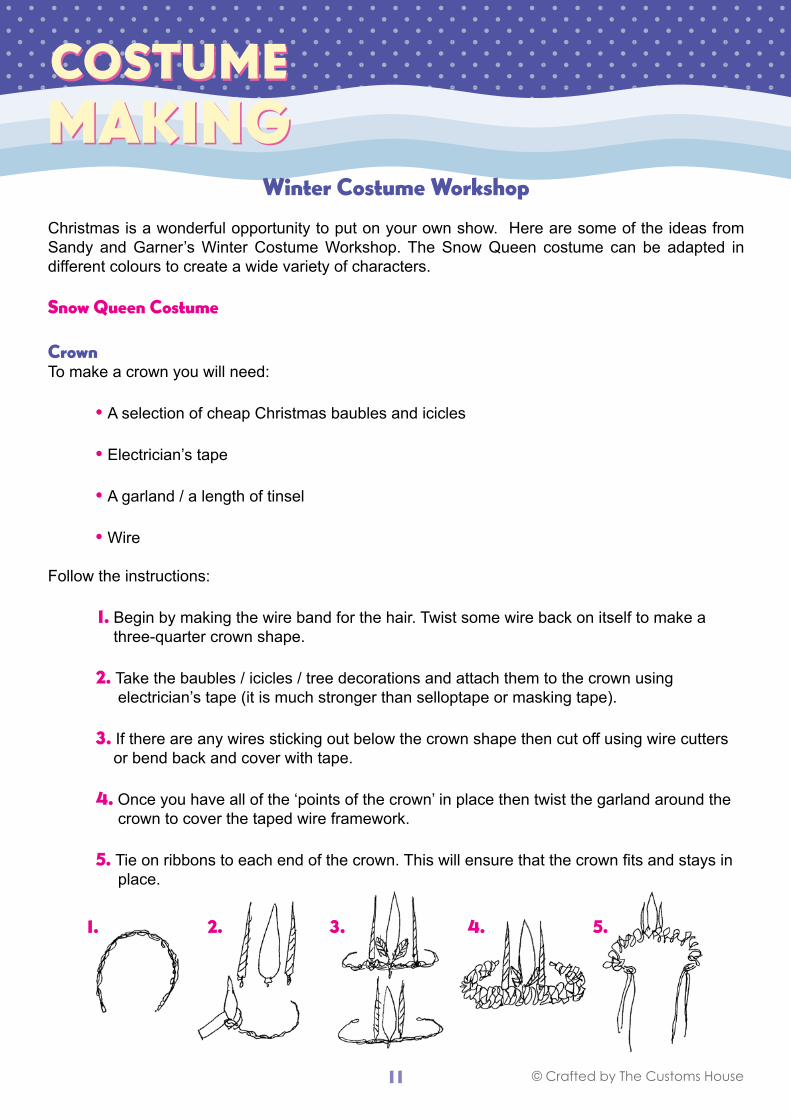
Snow Queen Costume
CrownTo make a crown you will need:
• A selection of cheap Christmas baubles and icicles
• Electrician’s tape
• A garland / a length of tinsel
• Wire
Follow the instructions:
1. Begin by making the wire band for the hair. Twist some wire back on itself to make a three-quarter crown shape.
2. Take the baubles / icicles / tree decorations and attach them to the crown using electrician’s tape (it is much stronger than selloptape or masking tape).
3. If there are any wires sticking out below the crown shape then cut off using wire cutters or bend back and cover with tape.
4. Once you have all of the ‘points of the crown’ in place then twist the garland around the crown to cover the taped wire framework.
5. Tie on ribbons to each end of the crown. This will ensure that the crown fits and stays in place.
1. 2. 3. 4. 5.
11
© Crafted by The Customs House
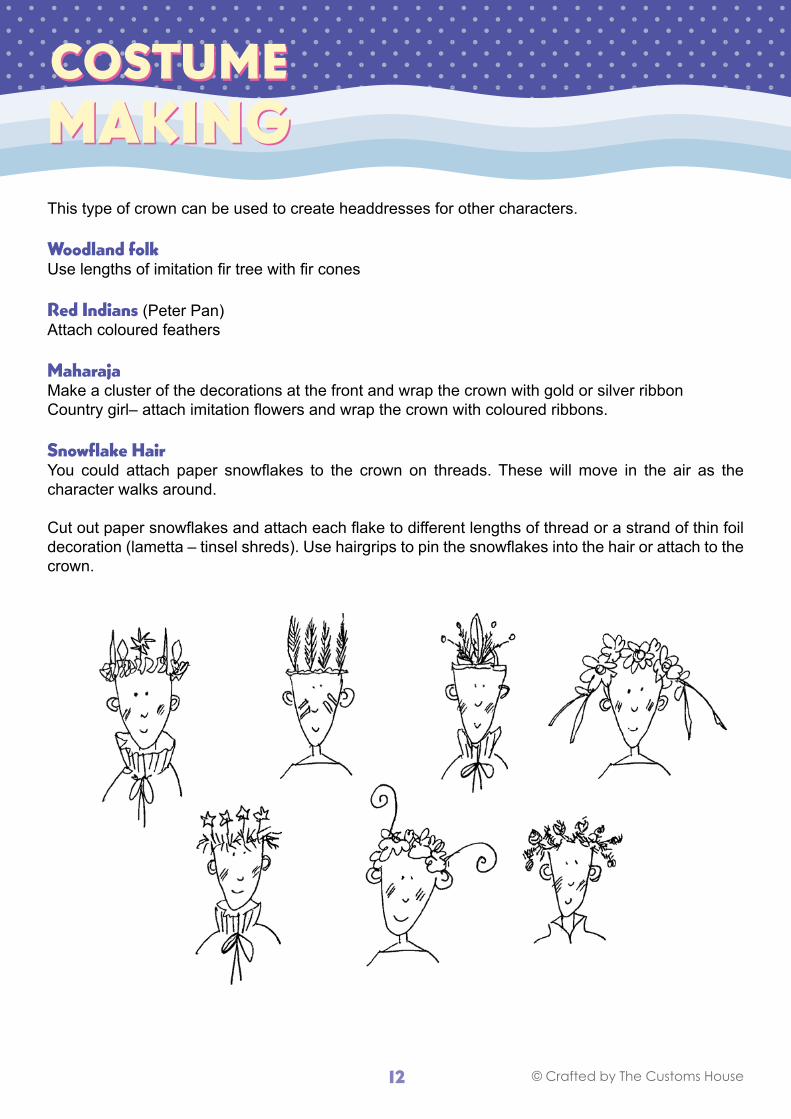
COSTUMEMAKINGCOSTUMEMAKINGThis type of crown can be used to create headdresses for other characters.
Woodland folkUse lengths of imitation fir tree with fir cones
Red Indians (Peter Pan)Attach coloured feathers
MaharajaMake a cluster of the decorations at the front and wrap the crown with gold or silver ribbonCountry girl– attach imitation flowers and wrap the crown with coloured ribbons.
Snowflake HairYou could attach paper snowflakes to the crown on threads. These will move in the air as the character walks around.
Cut out paper snowflakes and attach each flake to different lengths of thread or a strand of thin foil decoration (lametta – tinsel shreds). Use hairgrips to pin the snowflakes into the hair or attach to the crown.
12
© Crafted by The Customs House
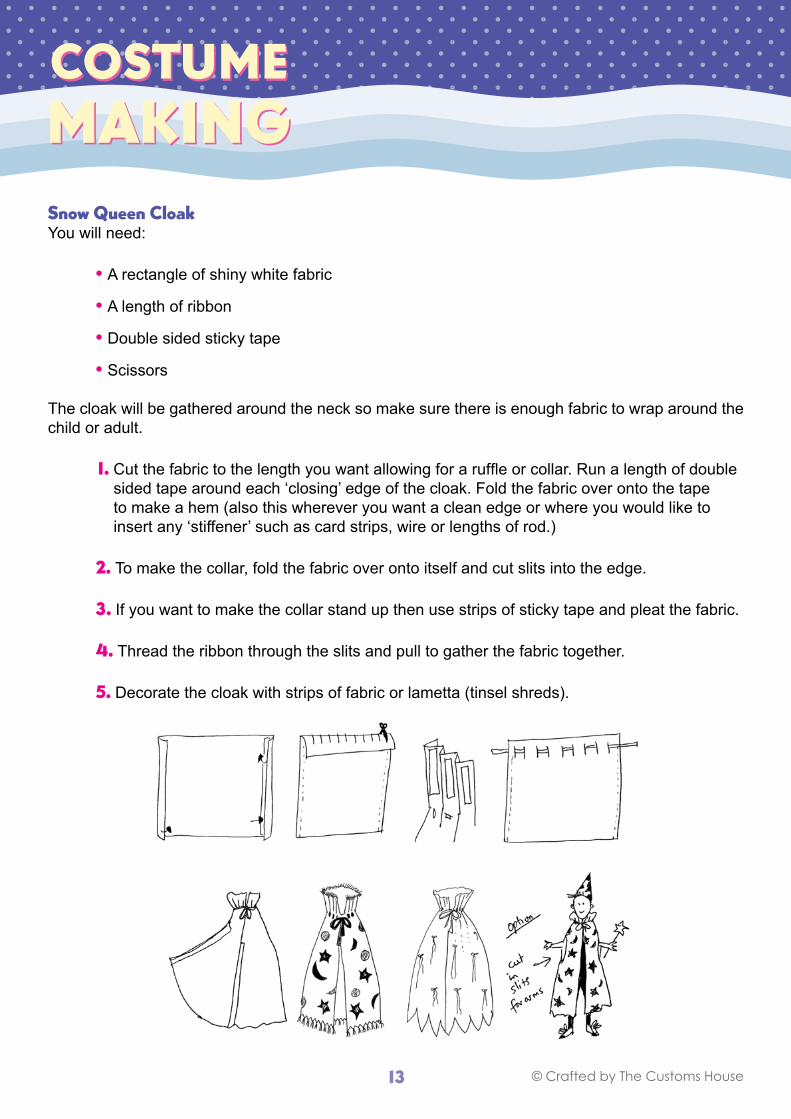
COSTUMEMAKINGCOSTUMEMAKINGSnow Queen CloakYou will need:
• A rectangle of shiny white fabric
• A length of ribbon
• Double sided sticky tape
• Scissors
The cloak will be gathered around the neck so make sure there is enough fabric to wrap around the child or adult.
1. Cut the fabric to the length you want allowing for a ruffle or collar. Run a length of double sided tape around each ‘closing’ edge of the cloak. Fold the fabric over onto the tape to make a hem (also this wherever you want a clean edge or where you would like to insert any ‘stiffener’ such as card strips, wire or lengths of rod.)
2. To make the collar, fold the fabric over onto itself and cut slits into the edge.
3. If you want to make the collar stand up then use strips of sticky tape and pleat the fabric.
4. Thread the ribbon through the slits and pull to gather the fabric together.
5. Decorate the cloak with strips of fabric or lametta (tinsel shreds).
13
© Crafted by The Customs House
COSTUMEMAKINGCOSTUMEMAKINGThis type of cloak can be used to create costumes for other characters such as:
ClownAdd stars and circles of different sizes and colour. Cut slits in the sides of the cloak to put hands through.
AngelCut the bottom edge of the cloak into a half circle curve and cut in feather shapes and attach feathers with thread so that they can float when the child walks. Slot rods into the hems to stiffen the wings the child can wave these around to good effect.
BirdAs for angel but use lots of bright colours. Add additional feather shapes in coloured fabric using double-sided tape. Only attach the feathers at one end so that there is some movement.
Magician / Wizard / WitchAdd stars and moons in coloured fabric. Add rods so that the magician can ‘sweep’ around in his cloak. Stiffen the collar so that it stands up.
Wise manAdd lots of rich details – such as strips of gold fabric.
KingAs above and add fake fur around the edges.
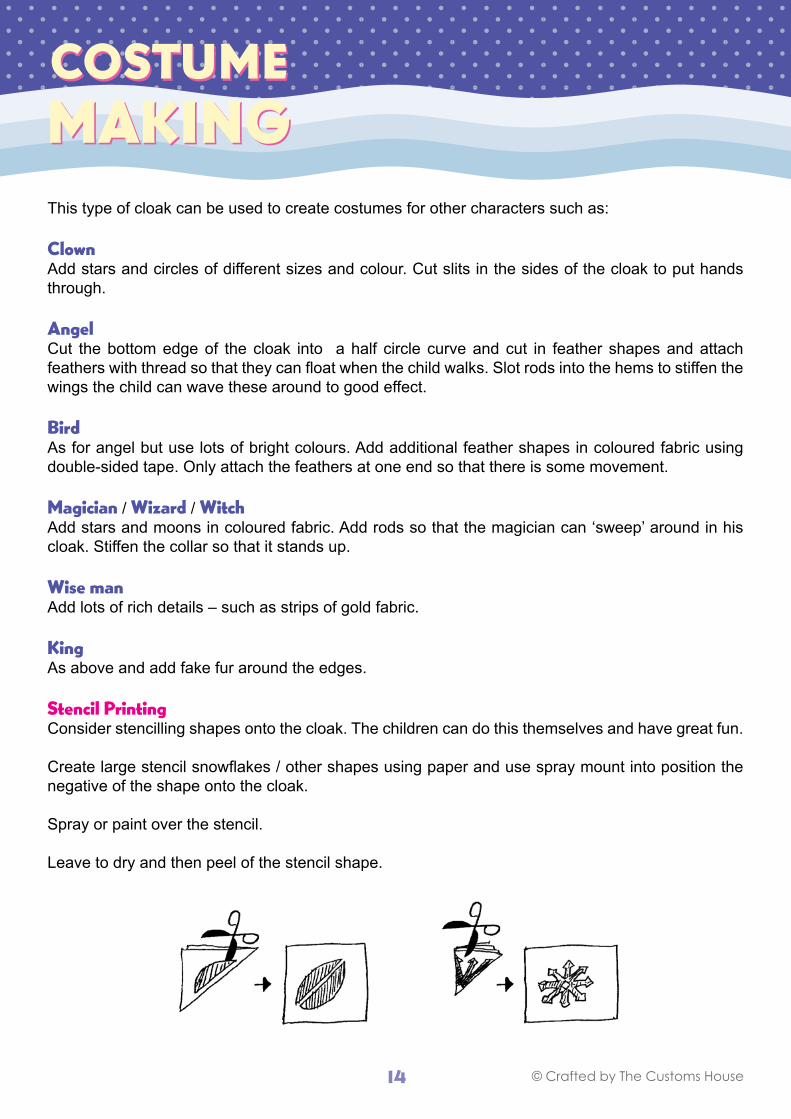
Stencil PrintingConsider stencilling shapes onto the cloak. The children can do this themselves and have great fun.
Create large stencil snowflakes / other shapes using paper and use spray mount into position the negative of the shape onto the cloak.
Spray or paint over the stencil.
Leave to dry and then peel of the stencil shape.
14
© Crafted by The Customs House
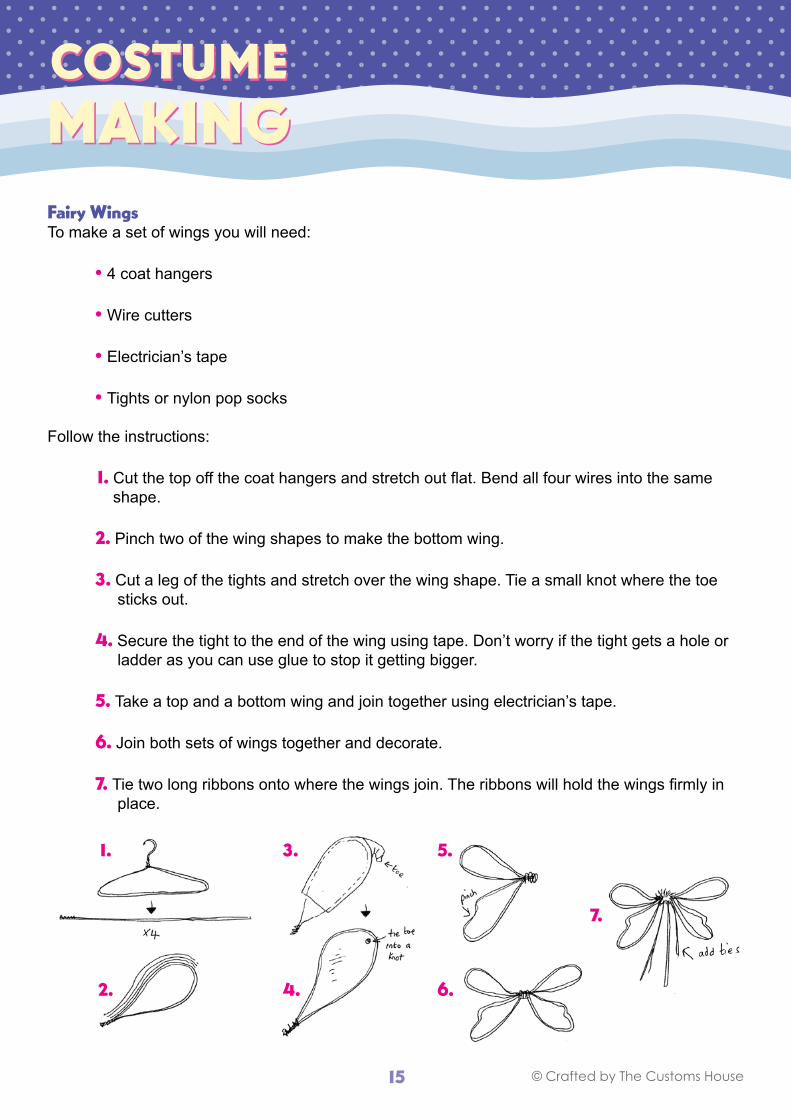
COSTUMEMAKINGCOSTUMEMAKINGFairy WingsTo make a set of wings you will need:
• 4 coat hangers
• Wire cutters
• Electrician’s tape
• Tights or nylon pop socks
Follow the instructions:
1. Cut the top off the coat hangers and stretch out flat. Bend all four wires into the same shape.
2. Pinch two of the wing shapes to make the bottom wing.
3. Cut a leg of the tights and stretch over the wing shape. Tie a small knot where the toe sticks out.
4. Secure the tight to the end of the wing using tape. Don’t worry if the tight gets a hole or ladder as you can use glue to stop it getting bigger.
5. Take a top and a bottom wing and join together using electrician’s tape.
6. Join both sets of wings together and decorate.
7. Tie two long ribbons onto where the wings join. The ribbons will hold the wings firmly in place.
1.
2.
3.
4.
5.
6.
7.
15
© Crafted by The Customs House
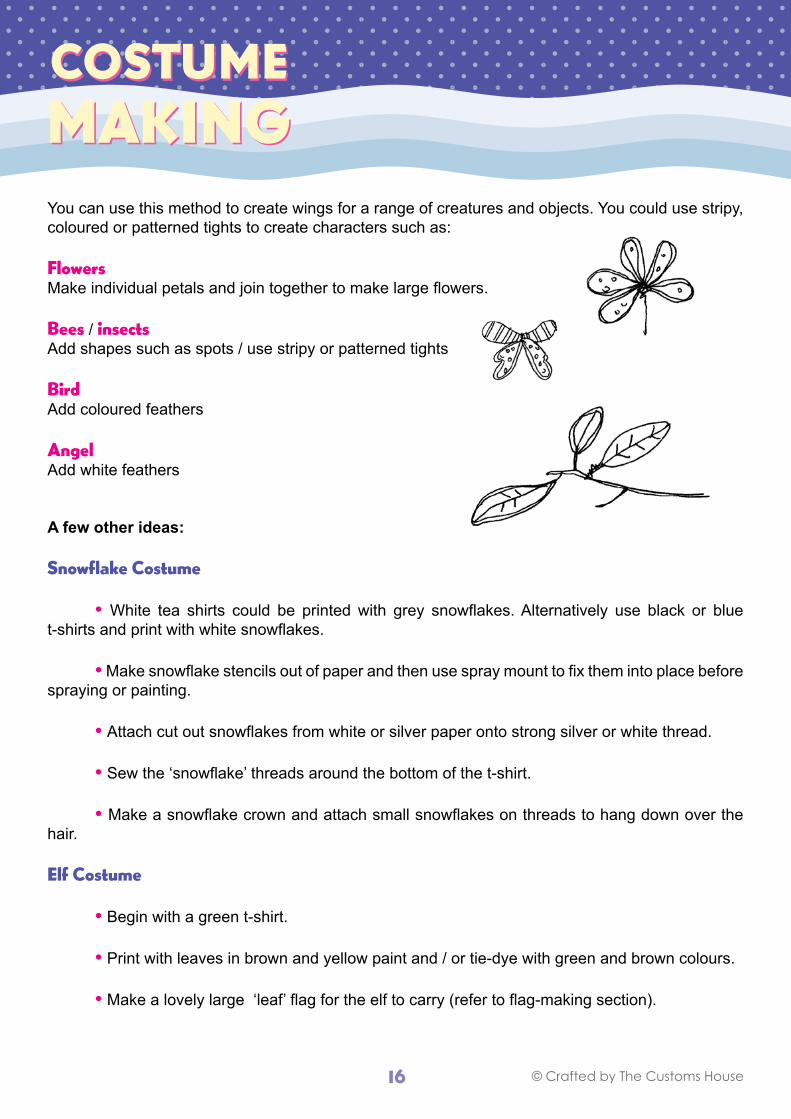
COSTUMEMAKINGCOSTUMEMAKINGYou can use this method to create wings for a range of creatures and objects. You could use stripy, coloured or patterned tights to create characters such as:
FlowersMake individual petals and join together to make large flowers.
Bees / insectsAdd shapes such as spots / use stripy or patterned tights
BirdAdd coloured feathers
AngelAdd white feathers
A few other ideas:
Snowflake Costume
• White tea shirts could be printed with grey snowflakes. Alternatively use black or blue t-shirts and print with white snowflakes.
• Make snowflake stencils out of paper and then use spray mount to fix them into place before spraying or painting.
• Attach cut out snowflakes from white or silver paper onto strong silver or white thread.
• Sew the ‘snowflake’ threads around the bottom of the t-shirt.
• Make a snowflake crown and attach small snowflakes on threads to hang down over the hair.
Elf Costume
• Begin with a green t-shirt.
• Print with leaves in brown and yellow paint and / or tie-dye with green and brown colours.
• Make a lovely large ‘leaf’ flag for the elf to carry (refer to flag-making section).
16
© Crafted by The Customs House
COSTUMEMAKINGCOSTUMEMAKING • Cut a piece of green material into a large simple leaf shape.
• Make a hem on one curved side of the leaf (to slot the flagpole through).
• Decorate the leaf with printed patterns and / or draw on leaf veins
Alternatively make leaves using the ‘tights’ method above.
For a very realistic effect use a real branch from a tree and add large paper leaves.
Hurrah it’s Panto Time!
Pantomime is a wonderful subject to explore as part of a programme of learning leading up to Christmas. You can download this fabulous resource ‘Pantomime’ from the ch-arted website. This resource supports children in creating their own pantomime and includes lots of background information about the history of pantomime and its traditions as well as Activity Sheets for costune design and make-up.
Children can also use ‘Panto Maker’ software, using characters, backgrounds and objects from previous Custom House pantomimes to learn about sequencing ‘scenes’ and writing their own scripts.
Panto Dame costumeTo make a pantomime dame costume, you need a bright and floral material – the more OUTRAGEOUS the better! The costume comprises of big puffed sleeves, a dress with a hoop, a belt with a large matching hat and bloomers.
FabricsYou should try and use very bright coloured poly-cottons in hot, bright colours that can be plain or patterned. Buy sticky-backed velcro to use for fastenings.
Hooped skirtMake ‘channels’ wide enough to take the foam used to insulate pipes, as this is soft, light and yet gives the tip up skirt that you probably want when she’s bending over. Buy it as a single length by the metre lengths.
Try to exaggerate the dame’s shape. If the child is tall then use vertical stripes and a long narrow dress, if they are short and cuddly, then use horizontal stripes and a short, hooped skirt with bloomers underneath.
17
© Crafted by The Customs House
COSTUMEMAKINGCOSTUMEMAKINGStripy socksUse knee length socks or tights.
Silly shoes Decorate sandshoes or slippers with 3-D fabric paints and sequins.
Big hatsYou can make a simple mop cap by cutting out a large circle of fabric and make a gathering thread in another smaller circle. Pad with wadding so that it keeps it’s ‘over-the-top shape.
Adapt hats from charity shops by spraying different colours and add imitation birds and flowers.
WigTop it all off with the most outrageous wig you can find!Finally, add ‘over-the-top accessories such as huge earrings and other jewellery.
ENJOY!
18