Embed Size (px)
Citation preview

2
CONTENTS FOREWORD ........................................................................................................................................................... 3
INTRODUCTION ..................................................................................................................................................... 5
EXERCISES .............................................................................................................................................................. 6
EDITING ................................................................................................................................................................. 7
CONTROLLED SCENE LENGTH ............................................................................................................................................. 9
ESTABLISHING SHOTS ..................................................................................................................................................... 11
FAST CUTS VS SLOW CUTS ............................................................................................................................................... 13
MATCHING EYELINES...................................................................................................................................................... 15
ASSEMBLY ................................................................................................................................................................... 17
FADE THROUGH BLACK ................................................................................................................................................... 19
FADE THROUGH WHITE ................................................................................................................................................... 21
L CUT .......................................................................................................................................................................... 23
CUTTING ON ACTION ...................................................................................................................................................... 25
CUTTING ON SHAPE ....................................................................................................................................................... 27
SUPERIMPOSITION ......................................................................................................................................................... 29
CUTTING ON THEME ...................................................................................................................................................... 31
CUT THROUGH SKY ........................................................................................................................................................ 33
WALKING INTO CAMERA ................................................................................................................................................. 35
PHOTO TO SCENE .......................................................................................................................................................... 37
INTERCUTTING .............................................................................................................................................................. 39
MONTAGE ................................................................................................................................................................... 41
VISUAL METAPHOR ........................................................................................................................................................ 43
ABOUT MOVIESTORM ......................................................................................................................................... 45
©Matt Kelland 2011. All rights reserved.
“Anybody making not just machinima, but any sort of live action or
animated films, will benefit from this informative book."
Kate Lee, Chat Noir Studios
“Great tips on filmmaking techniques."
Earl Saxton, filmmaker
3
FOREWORD by Phil South
When I was asked to write the foreword to the Making Better Movies With Moviestorm series, I jumped at the chance
for two reasons. One is that it was Matt Kelland asking me. The other is that I love a chance to talk about movies.
Ask anyone. Ignore their eye rolling; they always do that. It's a sign of their deep fondness for me.
Matt and I have been friends for many years, and I often think that one of the reasons that we are still friends after
all these years is that he’s one of the very few people I've ever met who cares as much about films as I do.
I recall the genesis of Moviestorm very well. It was called Machinemascope back then, and the whole reason it got
created in the first place was to answer the question "is it possible to make movies on a home computer." Of course,
we now know the answer to that. It is – and not only is it possible, but many thousands of people have welcomed
the chance to make their own films, for fun, for education and personal development and for profit.
The problem though, as you’re probably aware, is that merely producing great tools and putting them cheaply and
easily in the hands of anyone who wants to use them does not guarantee good work. You can hand anyone a page
layout program like InDesign or a music sequencer like Logic, or even a video editing software like Final Cut Pro, but
you can't make what they produce any good. You rely on their talent and experience to make good software produce
great work.
There are a lot of safety nets in Moviestorm which correct most of the common mistakes that beginning movie
makers always make. A lot of composition and lighting elements have been taken care of, allowing you to focus (pun
intended) on the job in hand. And no, the job is not making movies. Nope, the job in hand is telling stories.
It doesn't matter if what you are making is factual rather than fictional. News editors talk about stories too. A story
has a beginning, middle and end, and the structure helps you to "get" what the creator is talking about and enjoy the
story they are telling.
But how do you get good at telling stories with movies? It comes down to experience, of course, and experience
comes through practice. So how do you get experience in film making, when it takes so much time and effort to
make even the simplest piece of film? You have to find actors and crew, then there are lights and cameras to buy,
writers to bully, locations to find… and there are some scenes you just can’t film at all without a crazy budget. It’s a
problem filmmakers have faced for a hundred years. But now there’s a solution in the form of Moviestorm.
You see, Moviestorm doesn’t just allow you to make finished movies if you are already an accomplished storyteller. It
allows you to grow your own storytelling talent by putting in movie-making hours. As I said above, in the world of
filmmaking, practice usually involves a lot of equipment, money and mostly time, both yours and other people's. It's
hard for most people to put in the hours. It’s a lot like a pilot who hasn't got easy access to a plane. So what does
he do? He books time in a simulator. Even if a trainee pilot has regular access to a plane, he still books a lot of time
in a simulator because it's much cheaper and safer than using a real plane. He can practice whenever it’s convenient,
and by logging enough hours he improves his skills almost automatically.
The same is true of any technical ability which has some art to it. The more you do it, the better you get. It's a
creative muscle memory. It's the same with creativity and mastery of your storytelling chops. The more you do it, the
better you will get. Shots flow to shots in a seamless hypnotic glide, because you know what you are doing and you
know exactly where to go at any one time, in the service of your story.
4
This excellent series of books will guide your development. In each of the carefully structured and easy to follow
exercises Matt leads you through all the movie making tricks you will need, from the most common to the most
difficult. It's a simple regime to follow: just read what's on the page and do it. Then do the next one, and the next,
and keep working your way through. Pretty soon you'll be flying through them, and your mastery of both
Moviestorm and film technique will grow. Most importantly, you can please yourself as to when you log the hours in
your virtual movie-making cockpit. Take your time, and stagger the sessions across a number of weeks rather than
trying to do it all at once.
Don’t make the mistake of thinking that all you need to do is read how it’s done. You’ve got to actually do the
exercises. Try all the variants, review your work critically, and then do the follow-ups. The whole point is that when
you start filming for real, you’ve done this so many times that you’re instinctively falling back on hundreds of hours of
real, practical, hands-on experience in the simulator.
Always remember, learning how to make films to tell stories is not about theory. It's about practice. If you want to
get good at telling stories with films, there is absolutely no substitute for putting in the hours. I won't scare you by
telling you how many hours they say it takes to become a genius, but it's a lot. Genius will take time, but getting
good at telling your own stories just became a lot easier.
Phil South
Phil South is a professional writer, creative writing teacher and filmmaker, based
in the South West of England. He taught filmmaking to wide-eyed first year
technical students at the Bristol Old Vic Theatre School for seven years after a
long career in writing and animation. He currently shares his energies between
his creative writing blog http://goingdownwriting.wordpress.com and his band
The Sinatra Test http://sinatratest.ideasdigital.com.
5
INTRODUCTION This series of books grew out of a selection of articles I wrote for the Moviestorm blog in 2009-2011 on how you can
use Moviestorm to practice film techniques. Several people contacted us to ask whether we had any specific
examples of how to do it. I realized I’d talked a lot about theory, but very little about practice. I therefore decided to
put together this collection of simple exercises you can do to learn individual techniques.
There are several volumes in the series, covering a range of techniques including camerawork, staging, editing,
lighting, sound, and more.
These exercises aren't in any way specific to making movies with Moviestorm. They're standard techniques that apply
to all forms of film. For example, one exercise focuses on filming a scene without moving cameras, and then filming
it again but allowing the camera to move. Another, in the volume on staging, requires you to shoot the same scene
with and without extras. You can take what you've learned to any other film-making medium - full CG animation,
live action, or whatever. It’s about learning skills, not about learning to use specific tools or media.
The main advantage of using Moviestorm as a training tool is that you can practice whenever it's convenient for you,
and you don't need to assemble a cast and crew each time. And if you're not happy with what you've done, you can
easily go back and do it again and again until you're satisfied – reshoots are cheap easy!
The other benefit of using Moviestorm is that you’re not constrained by the usual problems of the student film-
maker. You don’t have to worry about shutting down city streets to film in the middle of Manhattan or London. You
can have a huge crowd of extras. You can use cranes, helicopters or other equipment, and film stunt scenes, car
chases, and explosions without worrying about insurance or cost. Moviestorm is a versatile tool that will give you a
chance to learn the kind of things that most novice filmmakers can’t ever do in real life.
The exercises are all fairly adaptable. Generally, you won't need any particular packs or content: any version of
Moviestorm will do. Most of them work on the same principle: take a single scene, and film it in several different
ways. You can use the same scene over and over again if you want - I often use a short scene from one of Per
Holmes's training DVDs, and another, slightly longer one, from a parody soap opera I was working on some years
ago. This is actually a pretty good way of working, as you can focus explicitly on the one aspect you're practicing,
and reuse much of what you've previously done; sets, characters, recorded dialog, and so on. You'll also develop an
increasing empathy with the scene, and you'll find each take getting better and better, rather like a musician
practicing the same piece over and over. When you've worked your way through several exercises, go back and
compare all the different versions with your first attempt, and see what you've achieved.
This series of exercises isn’t a substitute for practicing with real kit. You’ll still need to get familiar with real cameras
and lights, and you’ll have to get used to working with real actors and crew on real sets. Practicing this way simply
gets you used to knowing what you’re going to shoot and developing a sense of how it’s going to look when it’s cut
into your final film.
Although most of the book is written primarily for directors, it’s useful for others as well. It’s an easy method for
editors to generate the footage they need to practice cutting scenes in many different ways. It’s a good way for
scriptwriters to understand how their written words can be portrayed on the screen. It’s a useful way for camera
operators to practice filming, or for producers to understand how creative choices affect the production costs.
Most importantly, though, it’s a way to ensure that when you start making movies for real, you’ll know exactly what
you’re doing, and you won’t be wasting everyone else’s time and money trying to figure out the basics. As we’re fond
of saying at Moviestorm, “shoot first, ask questions later” is the maxim of the unprepared filmmaker, and “fix it in
post” is just another way of making trouble for your editor.
6
EXERCISES How to use this book
The book is set out in a workbook format. Each exercise uses a standard structure:
Technique: what you’re going to focus on
Scenario: what type of scene works best for this
Exercise: what you do
Review: you critically analyze your work and see how the different versions compare
Follow-up exercises: more things you can try to develop this technique
The first three volumes of the series focused on getting great footage. This volume is all about putting everything
together and turning everything you’ve done so far into a finished movie.
You will get more from this volume if you’ve already completed some of the exercises in the previous volumes. The
aim is to combine the various skills, and understand the relationship between what you need to do when you’re
filming and how it will turn out when it’s all in place.
To get the best from this book, it’s important that you do two things.
First, you must actually do the exercises.
Reading them won’t make you a better film-maker any more than reading about sports will make you an athlete.
While developing Moviestorm, I’ve shot literally hundreds of hours of animated footage over the last few years.
Looking back at the things I made early on, the improvement is obvious. Now, when I need to film something like a
simple dialog or a walk, I’m not wasting time. As I read the script, I instinctively know how I want to film it. Camera
angles and moves, cuts, staging, lighting, and even sound come alive in my head. These days I don’t even make a
storyboard; I simply go straight to Moviestorm and quickly block out a rough version. That kind of fluency comes
from having shot the same type of scenes over and over again.
Second, you must be super-critical with yourself when it comes to the reviews.
The aim isn’t to complete all the exercises as fast as possible. It’s to learn from them and find ways to improve. In
most cases, there are no right and wrong ways to shoot these scenes (although there are accepted conventions it’s
useful to be familiar with). It’s about trying out different things to see what happens. Even if they don’t work, you’ve
learned something. So don’t just give yourself a pat on the back and move on. Be picky. Find the things you don’t
like. Ask yourself if that scene could possibly be any better. At some point, you won’t find anything more you can do
to it. So move on, but come back to it later when you’ve practiced some new techniques. I’ll guarantee you’ll see
new ways to film the scene.
7
EDITING The popular perception of films is that they’re a creative collaboration between the director, the writer and the
actors. It’s the director who always gets the credit for how a film turns out – or gets blamed if it’s a box office flop.
Most aspiring filmmakers dream of being directors, because they want the creative control that directing seems to
offer.
But it’s not the director who makes the film that the audience actually sees. The director decides what to shoot and
tells his actors and crew what to do. It’s the editor who assembles everything into a completed movie – the footage,
the sounds, the special effects, the titles and credits and anything else. In the editing stage, the pace of the story
can be changed completely, and even the story-telling structure can be switched around to put emphasis on different
characters or reveal key plot points in a different structure. Scenes can be removed to keep the story moving, and
some of the director’s best work can end up as nothing more than a DVD extra.
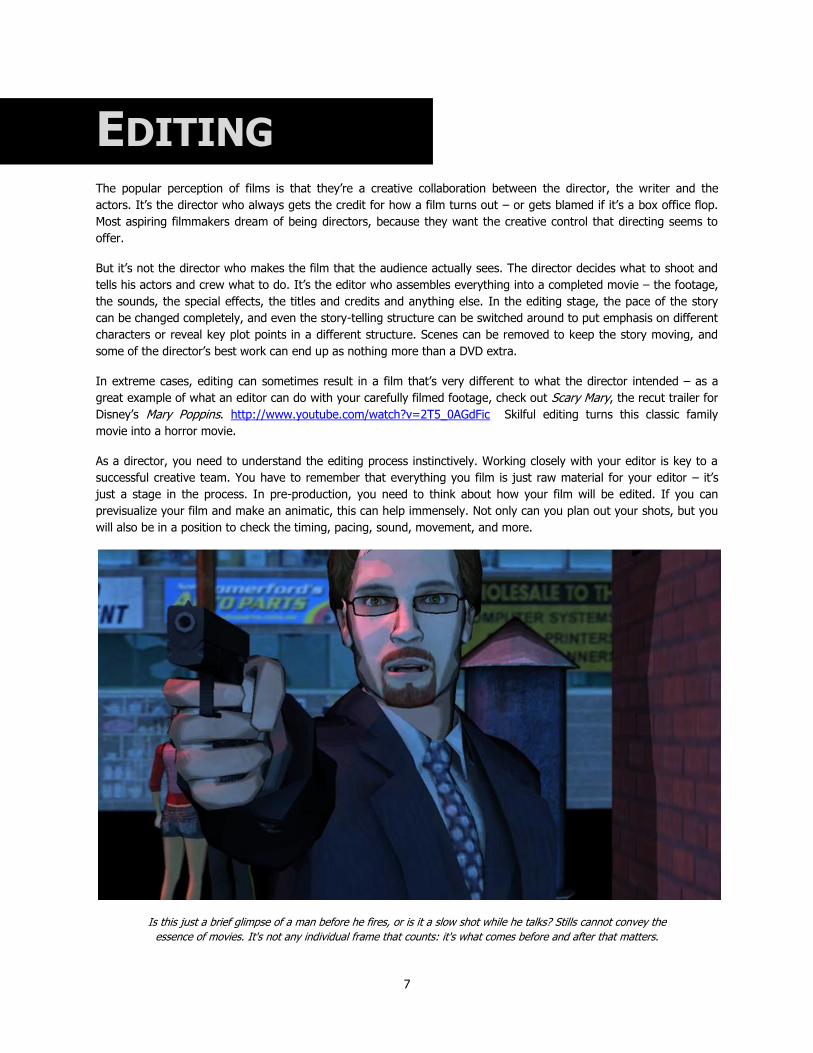
In extreme cases, editing can sometimes result in a film that’s very different to what the director intended – as a
great example of what an editor can do with your carefully filmed footage, check out Scary Mary, the recut trailer for
Disney’s Mary Poppins. http://www.youtube.com/watch?v=2T5_0AGdFic Skilful editing turns this classic family
movie into a horror movie.
As a director, you need to understand the editing process instinctively. Working closely with your editor is key to a
successful creative team. You have to remember that everything you film is just raw material for your editor – it’s
just a stage in the process. In pre-production, you need to think about how your film will be edited. If you can
previsualize your film and make an animatic, this can help immensely. Not only can you plan out your shots, but you
will also be in a position to check the timing, pacing, sound, movement, and more.
Is this just a brief glimpse of a man before he fires, or is it a slow shot while he talks? Stills cannot convey the
essence of movies. It's not any individual frame that counts: it's what comes before and after that matters.

8
The following exercises are all designed to help you think about different ways of cutting the same film. They will
help you develop a sense of what you have to do to make the editor’s job easier, and to ensure that you are giving
the editor what they need to create the film you envisage.
With live action film, you often find yourself making creative compromises when the footage you shot turns out not
to be quite right. Reshoots are expensive, usually prohibitively so, and you're forced to work with whatever you have.
Using Moviestorm makes it easy to go back and forth between all stages of the film, so it’s easy to adjust anything
that doesn’t work once it’s been in final edit. You can see how a scene turns out, and if you think you can do better,
you can quickly make changes to the camerawork, the staging, or anything else, and try it again.
Note: You may need to use a third party video editing tool such as Premiere, Final Cut or Avid.
It’s not the director who makes the film
that the audience actually sees

9
CONTROLLED SCENE LENGTH
Technique
Make a scene so it’s an exact number of seconds long.
This is a highly technical exercise that forces you to work within very specific constraints. This is useful if, for
example, you’re making a commercial, or working within the constraints of a specified TV format. You will inevitably
do the final work in editing, but you also need to adjust your shots and staging to make exact use of the time.
There’s no point wasting time filming things that aren’t going to be used, and if you’re working with very short
formats, you need to be very economical and efficient with your footage.
Some filming styles can give an editor a lot of problems when trying to hit an exact length. If you film a dialog
sequence with a single continuous shot from a moving camera, there is nothing they can cut to reduce the duration
without creating an awkward jump cut, even if there are suitable pauses in the dialog. If you supply your editor with
reaction shots, inserts, and other useful footage, they can easily expand the scene or cover edits by cutting away to
something else. You should aim to address any duration issues in pre-production as far as possible. If you just shoot
and hope you’re giving your editor what they’re going to need, that’s just asking for problems in post-production.
You could keep the scene short by just filming the dialog. Lengthen it by adding in an establishing shot and the
man's entrance. Put in a kiss, and then have them move to another part of the set. Cutting back to show the
other couple in the foreground gives the editor more options for ending the scene.
Take a scene in a single location – either interior or exterior. Use a dialog scene for this. Read it through, and make sure you can fit all the dialog into 45-50
seconds with no pauses between lines.
10
CONTROLLED SCENE LENGTH
Shoot and edit the scene, and make it exactly 58 seconds.
Shoot and edit it again, and make it exactly 110 seconds. You may not add dialogue. You may add an establishing
shot, but this shouldn’t be the only thing you do.
Review
What did you have to do to lengthen the scene? How much of it was done in
shooting, and how much was done in post-production?
What changes in choreography were required? Did you add in stage business
that wasn’t in the script (for example, John gets a glass of water, Amy stares out
of the window)?
Were all the additions at the start or end of the scene, or did you slow down the
whole scene by adding pauses between lines?
Did the actors deliver their lines the same way (could you re-use the same dialog
audio files), or did you need to re-do the dialog to match the slower speed?
Could you use the same sound and music?
Could you use the same storyboard and just lengthen each shot, or did you have
to create a whole new storyboard?
Is the scene still as interesting when it’s nearly a minute longer?
How does it affect your approach to making the scene when you’re aware of this
constraint, rather than shooting it any way you like?
Followup exercises
Shoot the scene any way you like, and see how long it comes out naturally.
Shoot the scene long first, and then cut it down to 58 seconds. Compare what you have to do differently in terms of
workflow, and how this changes your approach. You may well be able to do everything in post, but is the result as
good?
Shoot the scene even shorter (around 30-40 seconds) so that you have to cut some of the dialog. How much can you
cut and still have a good scene?
Allow yourself the flexibility to add in “meaningless” filler dialog or adjust what’s there. What difference does this
make?
Do this using several scenes, and work to a fixed duration for all of them.
11
ESTABLISHING SHOTS
Technique
Use different ways to show the audience where a scene is happening, without using dialog.
It’s often - though not always - important to tell the audience where a scene is taking place. There are many ways to
do this, using a combination of words, images, and dialog. If it’s not in the dialog, then it’s down to the director to
figure out how to convey something as simple as
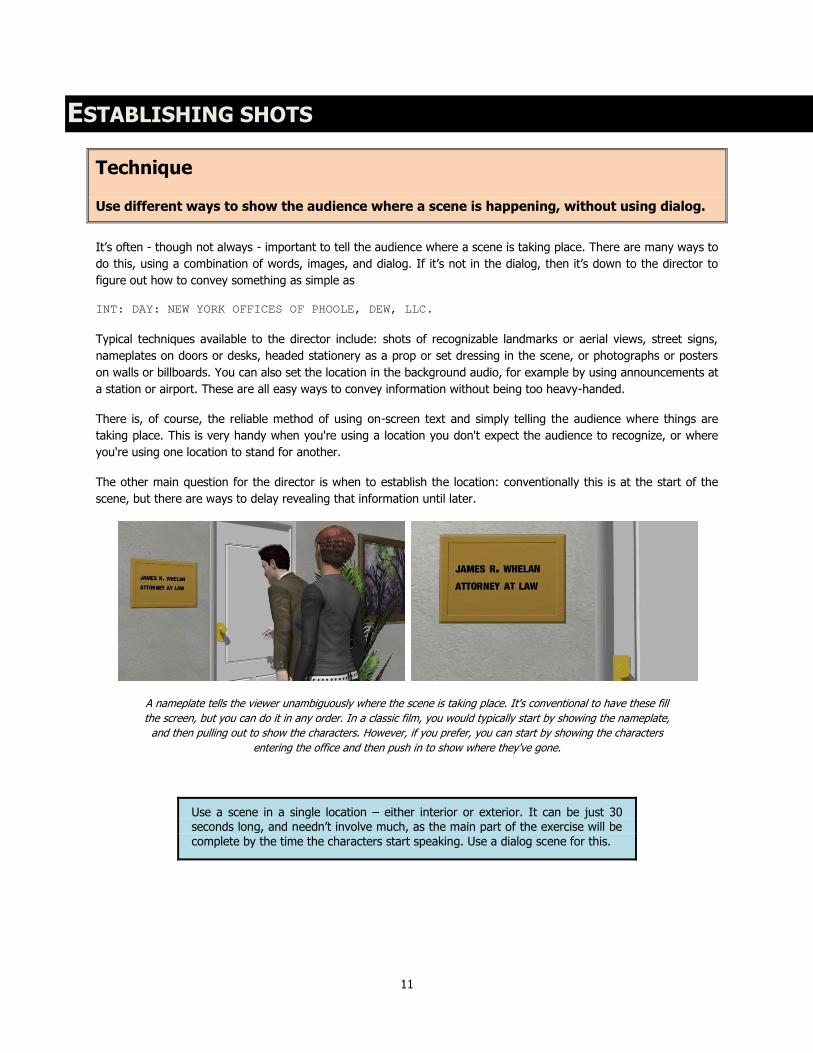
INT: DAY: NEW YORK OFFICES OF PHOOLE, DEW, LLC.
Typical techniques available to the director include: shots of recognizable landmarks or aerial views, street signs,
nameplates on doors or desks, headed stationery as a prop or set dressing in the scene, or photographs or posters
on walls or billboards. You can also set the location in the background audio, for example by using announcements at
a station or airport. These are all easy ways to convey information without being too heavy-handed.
There is, of course, the reliable method of using on-screen text and simply telling the audience where things are
taking place. This is very handy when you're using a location you don't expect the audience to recognize, or where
you're using one location to stand for another.
The other main question for the director is when to establish the location: conventionally this is at the start of the
scene, but there are ways to delay revealing that information until later.
A nameplate tells the viewer unambiguously where the scene is taking place. It's conventional to have these fill
the screen, but you can do it in any order. In a classic film, you would typically start by showing the nameplate,
and then pulling out to show the characters. However, if you prefer, you can start by showing the characters
entering the office and then push in to show where they've gone.
Use a scene in a single location – either interior or exterior. It can be just 30 seconds long, and needn’t involve much, as the main part of the exercise will be
complete by the time the characters start speaking. Use a dialog scene for this.
12
ESTABLISHING SHOTS
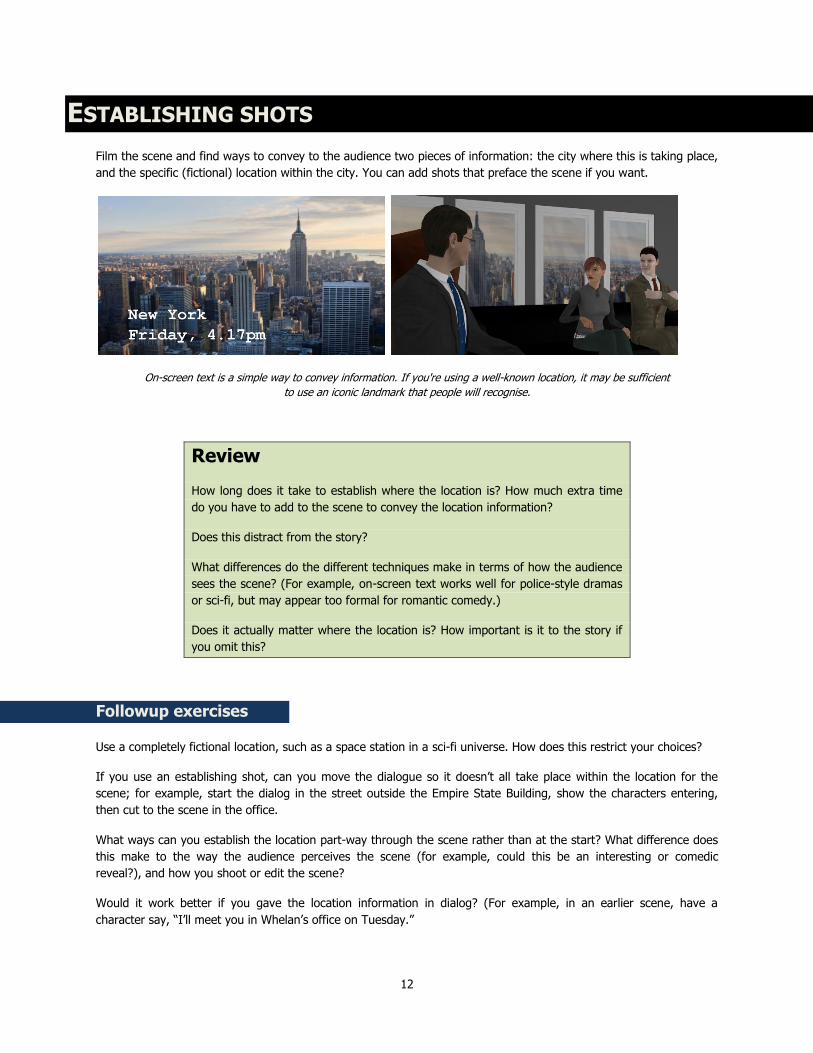
Film the scene and find ways to convey to the audience two pieces of information: the city where this is taking place,
and the specific (fictional) location within the city. You can add shots that preface the scene if you want.
On-screen text is a simple way to convey information. If you're using a well-known location, it may be sufficient
to use an iconic landmark that people will recognise.
Review
How long does it take to establish where the location is? How much extra time
do you have to add to the scene to convey the location information?
Does this distract from the story?
What differences do the different techniques make in terms of how the audience
sees the scene? (For example, on-screen text works well for police-style dramas
or sci-fi, but may appear too formal for romantic comedy.)
Does it actually matter where the location is? How important is it to the story if
you omit this?
Followup exercises
Use a completely fictional location, such as a space station in a sci-fi universe. How does this restrict your choices?
If you use an establishing shot, can you move the dialogue so it doesn’t all take place within the location for the
scene; for example, start the dialog in the street outside the Empire State Building, show the characters entering,
then cut to the scene in the office.
What ways can you establish the location part-way through the scene rather than at the start? What difference does
this make to the way the audience perceives the scene (for example, could this be an interesting or comedic
reveal?), and how you shoot or edit the scene?
Would it work better if you gave the location information in dialog? (For example, in an earlier scene, have a
character say, “I’ll meet you in Whelan’s office on Tuesday.”
13
FAST CUTS VS SLOW CUTS
Technique
Experiment with cutting rhythm to compare how different editing approaches affect the
scene.
The frequency at which you cut affects how your scene comes across. The more frequently you cut, the more fast
the scene appears to be. Action scenes generally require quick cutting, while lengthy expositions call for a slower
cuts. However, you don't need to stick with this as a hard and fast rule: you can cut dialog scenes fast if you have a
lot to show, or you can cut action scenes slowly to make it easier for the audience to see what's going on.
Cutting style is not just a stylistic choice, though. There are practical production issues to consider. A faster cutting
style can also affect how many different shots you need, and how long it will take to shoot the scene, as well as how
much work will be required in post-production.
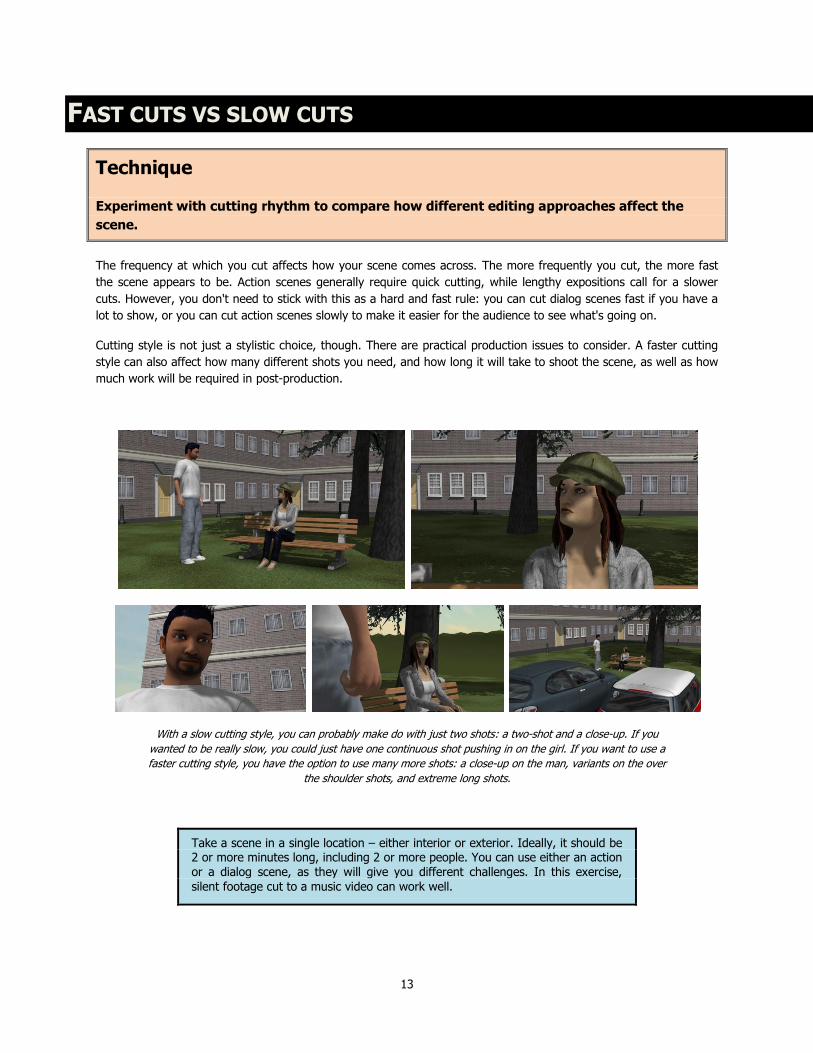
With a slow cutting style, you can probably make do with just two shots: a two-shot and a close-up. If you
wanted to be really slow, you could just have one continuous shot pushing in on the girl. If you want to use a
faster cutting style, you have the option to use many more shots: a close-up on the man, variants on the over
the shoulder shots, and extreme long shots.
Take a scene in a single location – either interior or exterior. Ideally, it should be 2 or more minutes long, including 2 or more people. You can use either an action or a dialog scene, as they will give you different challenges. In this exercise,
silent footage cut to a music video can work well.
14
FAST CUTS VS SLOW CUTS
Film the scene, and edit it so that you’re cutting fairly infrequently (at most, every 20-30 seconds). Use minimal
camera movement, except to reframe or track a moving character.
Film it again, and edit it so that you’re cutting frequently (no more than 5 seconds per shot).
Film it a third time, and edit it using a mixture of fast and slow cuts as you wish.
Review
How does the cutting speed change the scene? Does this change whether the
audience is focused on one character more than another? Does the cutting speed
support the story properly?
What difference does it make having a constant cutting frequency through the
scene versus a mixture?
How does this affect your choice of long shots or close shots, and one-shots
versus two-shots or master shots?
When cutting between different shots, do you need to match the audio volume
to what you see, or do you create a constant audio level? Does this feel artificial
when they don’t match? Is this different depending on the cutting speed?
How many different camera set-ups and lighting set-ups did you need? What
effect does this have on your shooting schedule? When cutting fast, did it get
boring reusing the same shots?
Followup exercises
Try this again using a variety of different scenes, and analyze what difference the genre, mood and length of the
scene make to the optimum cutting frequency.
Fast tempo music video
Slow tempo music video
Fight scene
Film noir exposition
Romantic kiss or “fall in love” moment
Romantic drama argument
Slapstick-style comedy
Witty comedy relying on dialogue
Boardroom scene with ten or more characters arguing
Boardroom scene with ten or more characters listening to a presentation
Try it again with different music, and see what difference that makes. Pick the music in advance, so you know what
mood you have in mind – for example, use a piece of romantic classical music or jazz, and then again with something
more upbeat and faster.
15
MATCHING EYELINES
Technique
Ensure the eyelines between shots match.
This is a technical but extremely basic exercise.
When cutting between shots of different characters, the eyelines need to match to meet two basic requirements,
particularly in close-up. Firstly, the eyes should not jump around on the screen; they should be at a constant height.
Secondly, the viewer should be able to understand what the characters are looking at. It’s conventional that if a
character looks off-screen, the next shot shows what they are looking at.
This means that the director needs to be aware of how the shots will cut together and choose shots that work well
together. It's a simple exercise in framing and planning: good storyboarding or previsualization will address this
problem with ease.
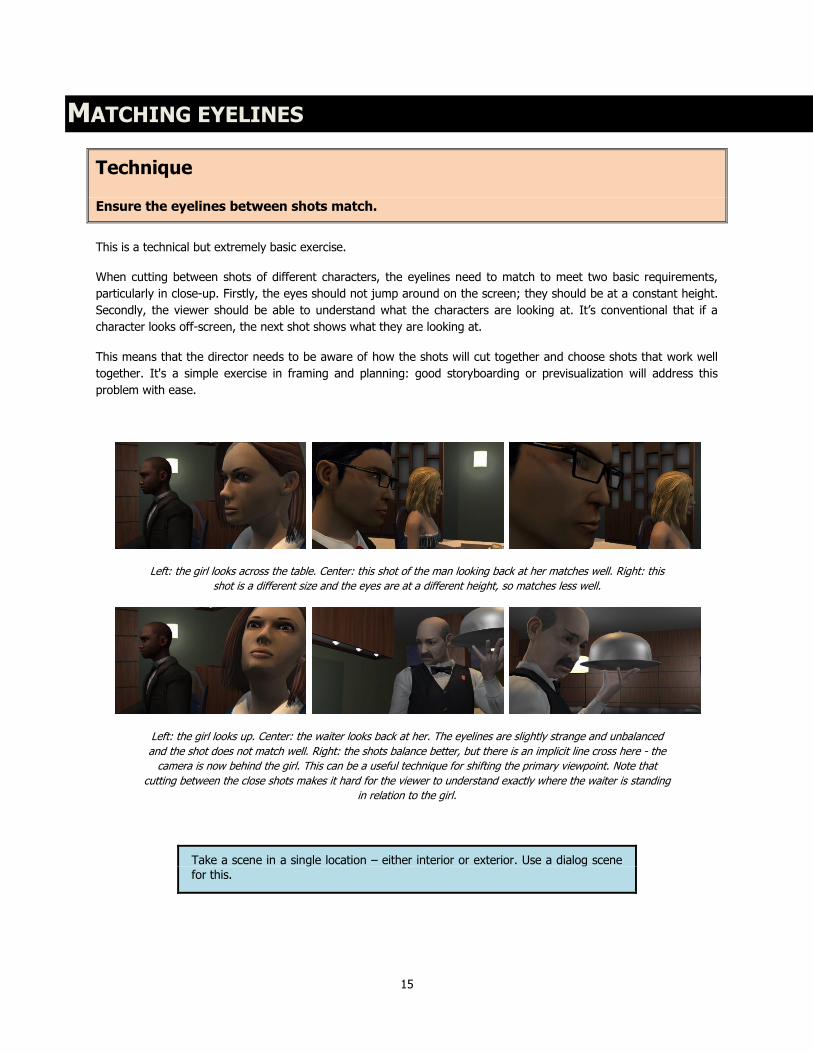
Left: the girl looks across the table. Center: this shot of the man looking back at her matches well. Right: this
shot is a different size and the eyes are at a different height, so matches less well.
Left: the girl looks up. Center: the waiter looks back at her. The eyelines are slightly strange and unbalanced
and the shot does not match well. Right: the shots balance better, but there is an implicit line cross here - the
camera is now behind the girl. This can be a useful technique for shifting the primary viewpoint. Note that
cutting between the close shots makes it hard for the viewer to understand exactly where the waiter is standing
in relation to the girl.
Take a scene in a single location – either interior or exterior. Use a dialog scene
for this.
16
MATCHING EYELINES
Film the scene mostly in close-up, with plenty of cuts between the characters. Track where the eyes are on the
screen and ensure they are at the same height except when you deliberately choose to go to a different shot size.
Review
How does this constrain your choice of shots?
Can you mix different shot sizes?
Is the viewer able to understand what the characters are looking at?
Followup exercises
Use a different scene and shoot it without storyboarding or previsualization: just use a basic shot list. How well did
your shots match?
17
ASSEMBLY
Technique
Create an impression of an event or situation by editing together footage of small parts of
the whole.
Assembly is a technique made famous by Hitchcock, most notably in the shower scene in Psycho. Rather than show
the complete scene of Janet Leigh getting murdered, he used very short shots of extreme close-ups and inserts: her
feet, her hands, silhouettes, the knife, the shower head, water and blood draining away, and so on. The viewer’s
imagination fills in the rest. Incredibly, many people believe they’ve seen the knife sticking into Leigh’s body, but
there is no actual shot of that. It’s implied so effectively with the editing and sound that Hitchcock didn’t need to put
it on screen.
On a different scale, you can use assembly to suggest large events. This is a technique developed by early Soviet
directors in the silent era, such as Eisenstein or Pudovkin. If you can’t film massive crowd scenes, you can use
assembly to suggest much more than you show. Use footage of individuals in a crowd, particularly in close-up,
intercut with small, personal events and vignettes, and then use sound to convey the rest.
This has the effect of putting the viewer right in the middle of the action. By disorienting them and only giving them
glimpses of the overall situation, they get a sense of what it’s like to be there. They don’t get an idealized bird’s eye
view of what’s going on; they get a participant’s view.
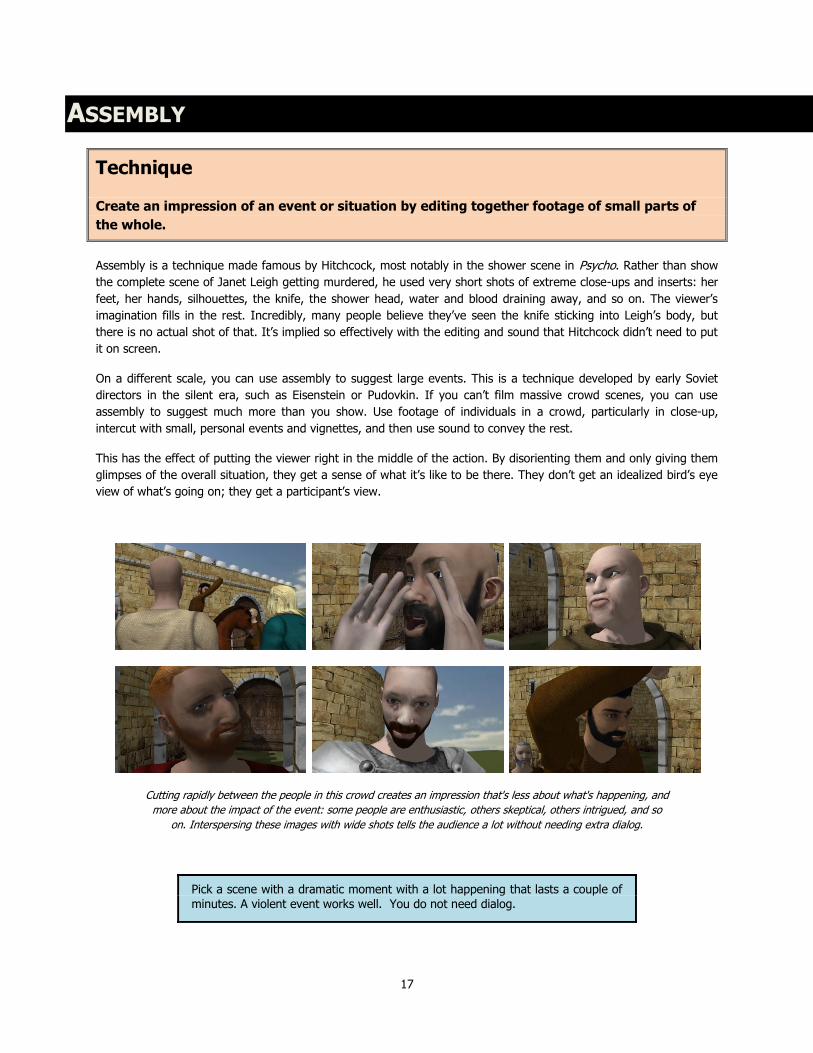
Cutting rapidly between the people in this crowd creates an impression that's less about what's happening, and
more about the impact of the event: some people are enthusiastic, others skeptical, others intrigued, and so
on. Interspersing these images with wide shots tells the audience a lot without needing extra dialog.
Pick a scene with a dramatic moment with a lot happening that lasts a couple of
minutes. A violent event works well. You do not need dialog.

18
ASSEMBLY
Film and edit the scene conventionally, using long shots and making it clear to the viewer what’s going on.
Film and edit the scene again, using assembly to create a more disjointed sequence.
Review
Compare the two versions. How does assembly change the way the viewer
interprets the scene?
How many of the shots in the two versions were the same? How many different
shots did you use, and how was your rate of cutting affected?
What would the impact be in terms of production and shooting time?
What did you do differently in terms of sound? What could you imply with sound
without showing it?
How did you end the sequence and restore a “normal” viewing style?
What sort of scenes would work well with an assembly style? What wouldn’t?
Followup exercises
Film a scene that starts off conventionally filmed but switches into assembly style; for example, a conversation that
turns into violence.
Use assembly to create a flashback that tells us something about the character.
19
FADE THROUGH BLACK
Technique
Join two scenes by going through a black screen.
This is possibly the oldest and most common form of cut after the straight cut. It was originally used in silent movies
to indicate a new scene: cuts within a scene were straight cuts, while a fade suggested a change of time or location.
With the invention of the dissolve, the fade to black became less popular, although it is still widely used, particularly
at the opening or closing of a movie. It is often used to signifiy waking up or falling asleep.
Unlike the dissolve, which has a continuous image, the fade creates a short visual pause while the screen is blank.
This gives the audience a breathing space, and offers you an opportunity to reset the scene and the tempo. You can
do this with silence, or with a change in music or audio.
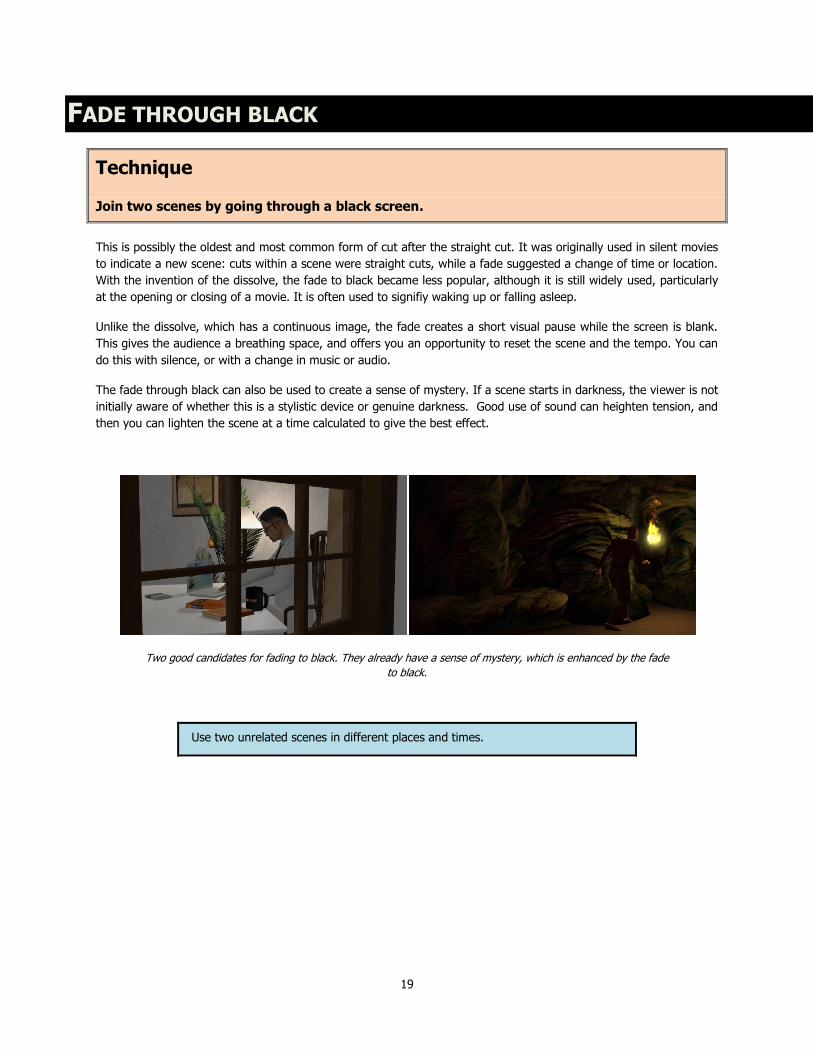
The fade through black can also be used to create a sense of mystery. If a scene starts in darkness, the viewer is not
initially aware of whether this is a stylistic device or genuine darkness. Good use of sound can heighten tension, and
then you can lighten the scene at a time calculated to give the best effect.
Two good candidates for fading to black. They already have a sense of mystery, which is enhanced by the fade
to black.
Use two unrelated scenes in different places and times.

20
FADE THROUGH BLACK
Film the scenes, and join them with a dissolve.
Now join them with a fade through black.
Review
Compare the two: how are they different?
When would you use a fade instead of a dissolve?
How long does the screen stay black? How quickly do you fade in and out?
What happens while the screen is black?
What are you doing with the sound?
Followup exercises
Use an iris effect to close down and open up the screen, in the style of a silent movie..
21
FADE THROUGH WHITE
Technique
Join two scenes by fading to a white screen..
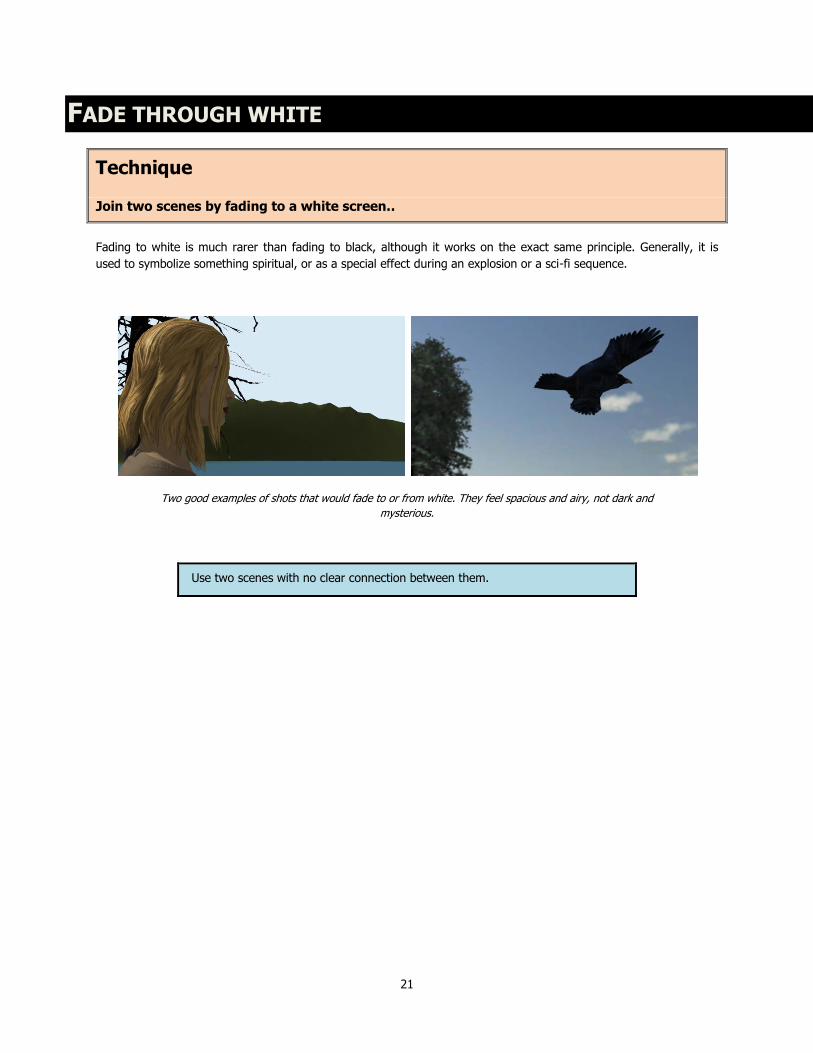
Fading to white is much rarer than fading to black, although it works on the exact same principle. Generally, it is
used to symbolize something spiritual, or as a special effect during an explosion or a sci-fi sequence.
Two good examples of shots that would fade to or from white. They feel spacious and airy, not dark and
mysterious.
Use two scenes with no clear connection between them.
22
FADE THROUGH WHITE
Film the two scenes and join them with a fade through black.
Join the scenes using a fade through white. Use the same footage or reshoot it as you please.
Review
Compare the two. What difference does it make using white instead of black?
When would it be appropriate to use a fade through white?
Followup exercises
Create a fade to white to end a scene. Now fade that to black, and start the next scene with a fade from black.
23
L CUT
Technique
Join two scenes but cut the audio and video at separate times.
The L cut, also known as the split cut or split edit, is one of the oldest editing techniques from the sound era. Instead
of cutting the audio and video simultaneously, you cut the audio slightly in advance of the video. This eases the
transition into the next shot or scene. This is far more commonly used than you may realize – it’s not until you start
watching and listening closely that you become aware how much this is done.
You can just cut to the ambience of the new location, or you can start the dialog for the next scene over the video
for the current scene. This requires forethought, so that you allow time at the end of the first scene to cover the
introductory audio for the next scene.
Generally a split edit bridges two scenes. For example, if you have an interior scene, you may bring in some traffic
and crowd noises just before cutting to an exterior street scene. Another common use is that as one scene ends, you
hear the dialog for the next scene.
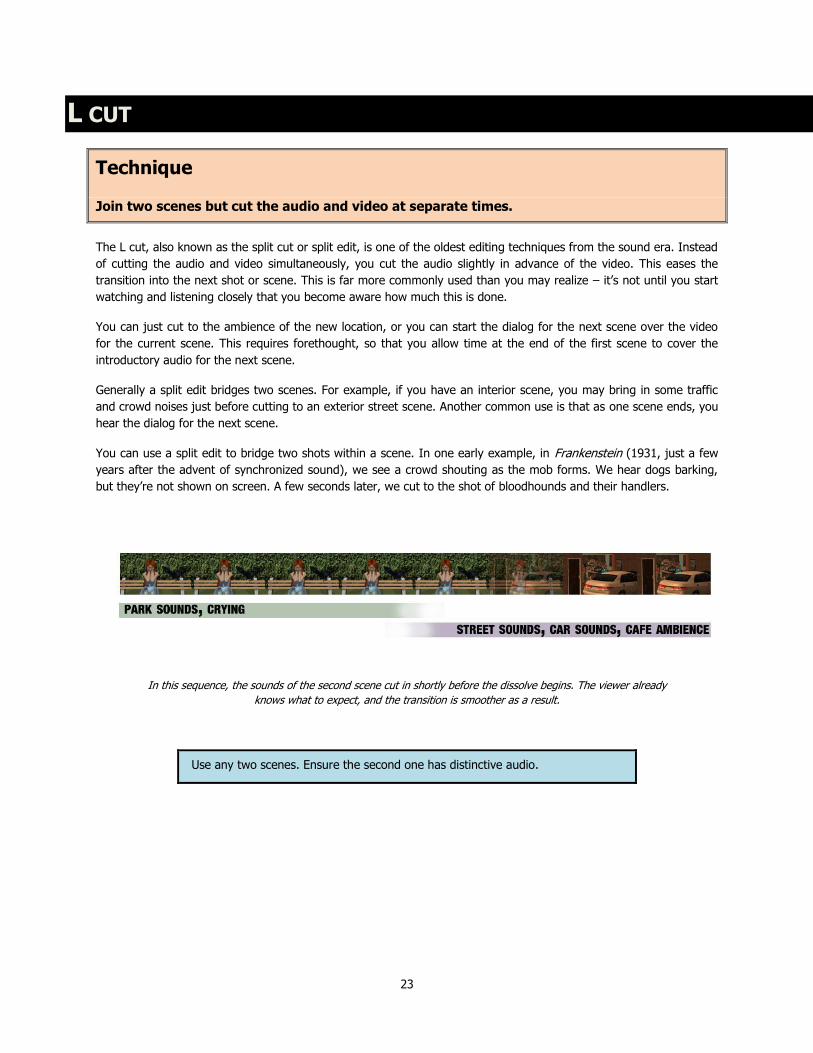
You can use a split edit to bridge two shots within a scene. In one early example, in Frankenstein (1931, just a few
years after the advent of synchronized sound), we see a crowd shouting as the mob forms. We hear dogs barking,
but they’re not shown on screen. A few seconds later, we cut to the shot of bloodhounds and their handlers.
In this sequence, the sounds of the second scene cut in shortly before the dissolve begins. The viewer already
knows what to expect, and the transition is smoother as a result.
Use any two scenes. Ensure the second one has distinctive audio.
24
L CUT
Join the scenes with a straight cut or dissolve, cutting the audio and video at the same time.
Join them with an L cut.
Review
What difference does the L cut make? How does it affect the pacing of the film.
What audio are you using during the overlap: background audio or dialog? Why
did you do it that way?
What visual transition did you use: a straight cut or dissolve?
Is it clear to the audience what’s going on, or does the result appear confused?
How much time do you have between the audio and video cuts?
In a live shoot, how much time would you leave at the end to ensure the editor
has enough to work with?
When would it be appropriate to use an L cut, and when should you use a
straight cut?
Followup exercises
Combine L cuts with different visual transitions (dissolve, straight cut, etc) and compare the effects.
Use L cuts at the end of an opening title sequence.
25
CUTTING ON ACTION
Technique
Edit a scene so that the cuts take place during the action.
One of the most basic techniques of apparently seamless editing is to make a straight cut in the middle of something
happening. The viewer sees the beginning of the action in one shot, and then sees the end of the action in another
shot. Since they are focused on the continuity of the action itself, they are not consciously aware of the cut. This
makes the scene feel smoother, since the action functions as a bridge between the two shots. If you allow the move
to complete and then cut to the next shot, the scene can feel amateurish and the editing becomes more intrusive.
This applies to all types of action, not just to extreme action such as fighting. Something as simple as opening a
door, picking up a drink, or shaking hands can be sufficient. Even a head turn can be enough: we see the character
turning their head in one shot, then we cut to a different shot as they finish the movement.
Cutting on the action requires great precision on exactly when to make the cut. A few frames one way or the other
can make all the difference. You need to allow enough time for the viewer to see the move begin, and then enough
time to see it complete in the new shot.
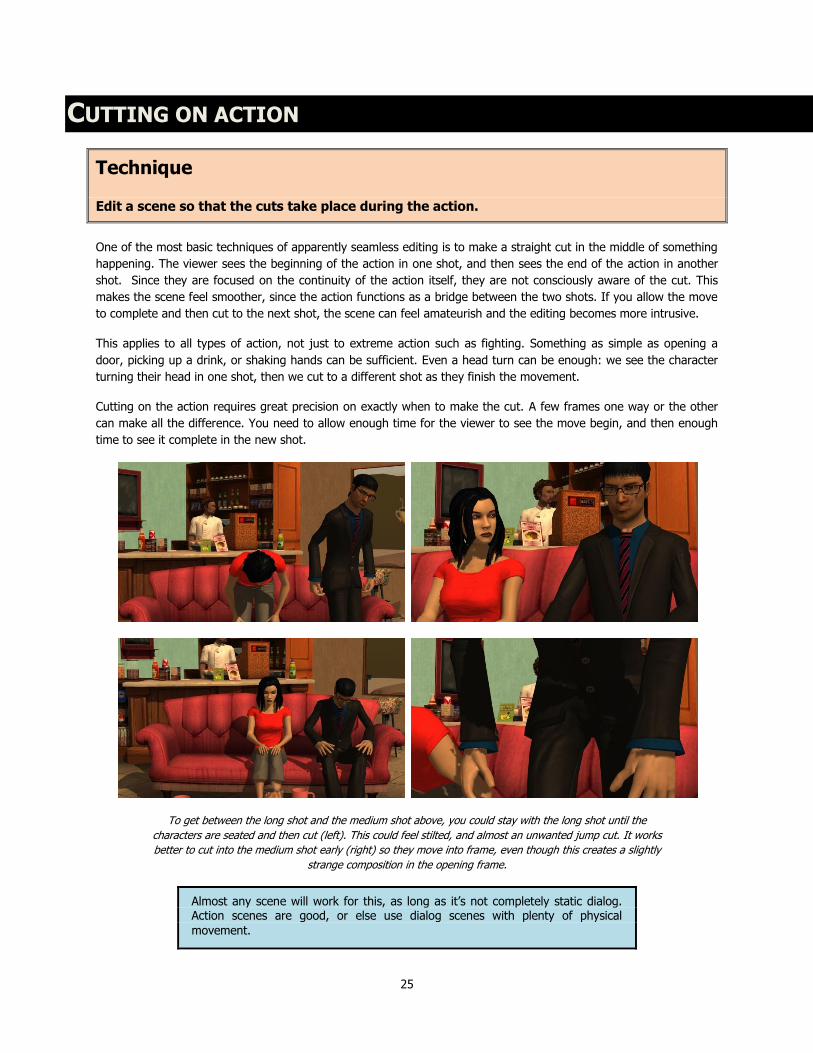
To get between the long shot and the medium shot above, you could stay with the long shot until the
characters are seated and then cut (left). This could feel stilted, and almost an unwanted jump cut. It works
better to cut into the medium shot early (right) so they move into frame, even though this creates a slightly
strange composition in the opening frame.
Almost any scene will work for this, as long as it’s not completely static dialog. Action scenes are good, or else use dialog scenes with plenty of physical
movement.
26
CUTTING ON ACTION
Film the scene, and make the cuts after (or before) the actions.
Film the scene again, using the same exact shot sequence, but cutting on the action.
Review
Compare the two versions. What makes them different?
How much leeway do you have in the timing of your cuts?
If you were filming this live action, how much time before and after each shot do
you need to leave in order to give your editor enough to work with?
How accurately do you need to match the sound between the cuts?
When would you avoid cutting on action?
Followup exercises
How can you add unscripted action to scenes to give you more or better editing options?
Try repeating some parts of the movement in both shots if you need to extend it: generally, this is something you
would ensure the viewer doesn’t notice this, but it can also be used for stylistic effect. This is quite common in Asian
action films: we see someone kick in a door, then we cut to another shot of the door being kicked in and see the
impact twice – or sometimes more!
27
CUTTING ON SHAPE
Technique
Cut between scenes using objects of the same approximate shape as a link.
Strong visual composition can be a useful and elegant editing technique. By closing one scene with an image of a
clear shape, you can transition smoothly to the next scene by starting with a shot that looks similar. Even if there is
no clear thematic or plot link between the scenes, the viewer does not feel disoriented, but is carried smoothly along.
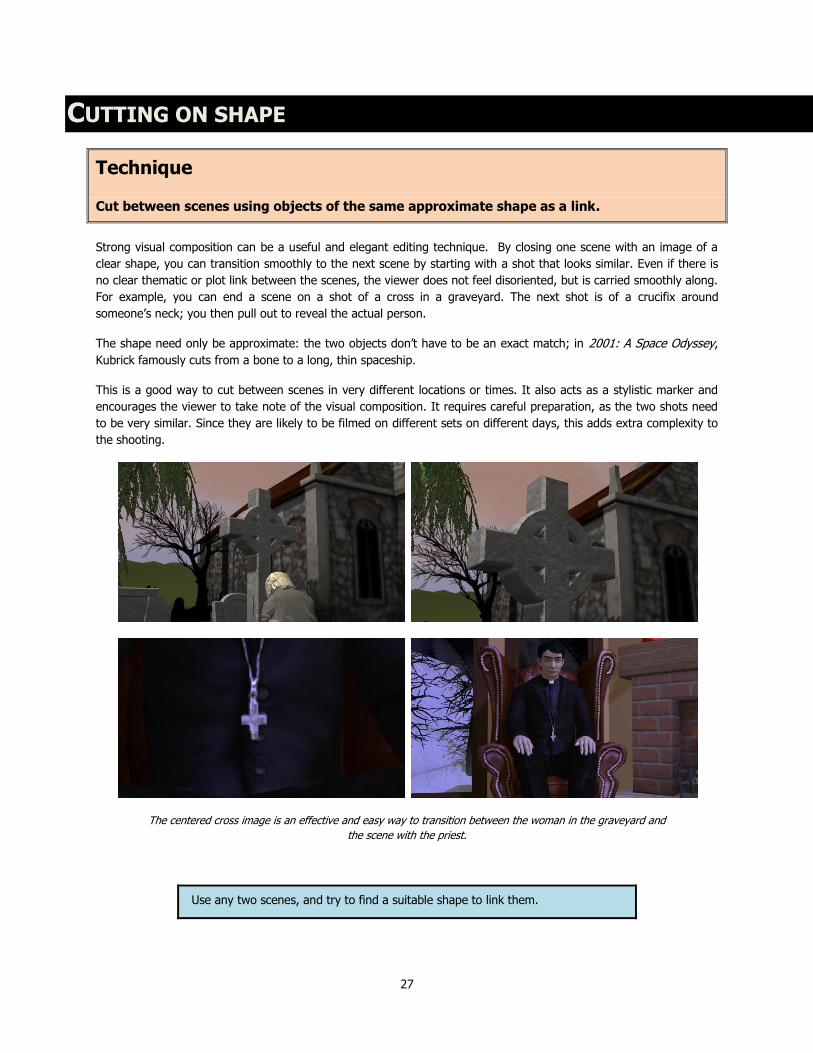
For example, you can end a scene on a shot of a cross in a graveyard. The next shot is of a crucifix around
someone’s neck; you then pull out to reveal the actual person.
The shape need only be approximate: the two objects don’t have to be an exact match; in 2001: A Space Odyssey,
Kubrick famously cuts from a bone to a long, thin spaceship.
This is a good way to cut between scenes in very different locations or times. It also acts as a stylistic marker and
encourages the viewer to take note of the visual composition. It requires careful preparation, as the two shots need
to be very similar. Since they are likely to be filmed on different sets on different days, this adds extra complexity to
the shooting.
The centered cross image is an effective and easy way to transition between the woman in the graveyard and
the scene with the priest.
Use any two scenes, and try to find a suitable shape to link them.

28
CUTTING ON SHAPE
Film the two scenes and join them with a straight cut or dissolve.
Film them again and join them using a match cut. You should only need to change the opening and closing shots.
Review
Does the match feel artificial or forced?
What sort of cut works best: dissolve, straight cut, or something else?
How important is it to match color and other elements of the matched form?
How much of the screen space does the matched form need to take in order for
the transition be effective?
How important is it to match other elements of the visual composition?
Followup exercises
What shapes work well? What shapes don’t work?
Film dissimilar objects from unusual angles to create unexpected match cuts: for example, cut from a shot on the
wheel of a car to a champagne glass seen from above, using the circular shape.
Use body parts such as hands or feet.
Use negative shapes such as doors or windows.
Insert an additional image between the two matched forms to create a disrupted match cut. For example, a shot of a
tree, then a cut to a woman’s face to end the scene, then cut back to a similar tree to start the next scene. The
viewer will still retain a sense of continuity.
29
SUPERIMPOSITION
Technique
Dissolve between scenes from one shot to a shot with similar or compatible visual
composition.
This is a similar technique to a match cut, but it puts much more emphasis on the transition between the two shapes
rather than the similarity. The closing image dissolves into another image that is broadly similar, but different. If you
close on a shot of a lonely tower in a fantasy movie, you can then transition to a shot of a lonely warrior in the
distance walking towards the camera. The profile of the tower and the warrior are broadly similar, which makes for a
pleasing edit.
Superimposition is extremely useful for showing a long change in time: for example you can show someone aging by
dissolving between two identical shots of them in the same pose. These may or may not be in the same set: in the
first shot, they may be in an armchair, then we dissolve to a shot of them in a wheelchair.
More subtle and sophisticated uses of this technique involve shots that are very different, but which create a striking
interim image. You could dissolve from the tower mentioned above to a close-up on the warrior’s face; the interim
shot will have his eyes either side of the tower, which may be seen as an extension of his helmet.
This differs from a normal dissolve in that it is more carefully constructed. You can dissolve between any two shots to
create a simple transition. This, however, involves a conscious attempt to create a visual effect or interim image.
This requires careful planning at the storyboard or previsualization stage, as it is essential to create two shots that
blend together well.
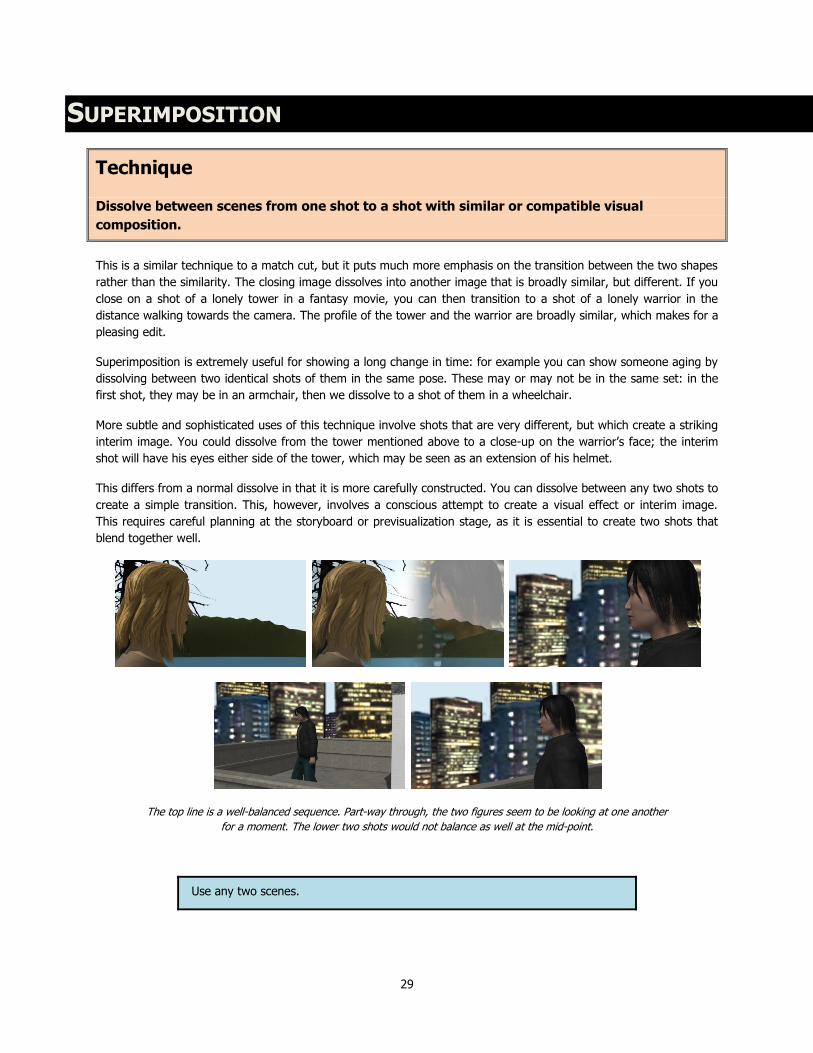
The top line is a well-balanced sequence. Part-way through, the two figures seem to be looking at one another
for a moment. The lower two shots would not balance as well at the mid-point.
Use any two scenes.

30
SUPERIMPOSITION
Film the two scenes and join them with a straight cut.
Film them again and join them using superimposition. You should only need to change the opening and closing
shots.
Review
How fast or slow do you need to make the dissolve to work well?
Does the transition feel smooth, or is there an obvious stylistic join?
What relationship is there between the two images in terms of both visual
structure and story?
What sort of scenes work well?
Followup exercises
Change the speed of the dissolve and see what effect it has.
Experiment with different styles of superimposition.
Use a join based on moving cameras, rather than static images. Do you need to match the movement speed? What
extra complexity does this involve?
31
CUTTING ON THEME
Technique
Bridge a cut between scenes by starting one scene with a similar theme to the end of a
previous scene.
Keeping a common theme between adjacent scenes is a good way to move smoothly between different characters
and locations, or even different times. The continuing theme tells the audience that there is a relationship between
the two scenes, even if it’s not entirely clear what that is.
For example, we may have a scene of a man working in a chain gang, digging a ditch. We then cut to a scene of a
woman in her garden, digging a small hole to plant roses. The contrast between the two similar activities
emphasizes the difference between the characters’ situations, but suggests that there is a relationship between
them. If this took place in the early part of a film, the viewer would probably surmise that the man is going to
escape and meet up with the woman – and will then start guessing as to whether they have a prior relationship or
whether she is going to befriend him. (Yes, all that implied story from one cut.)
While activities are the commonest type of theme to carry across, any commonality between the opening and closing
shots can suffice. Vehicles and weather are both commonly used themes. For example, we see a car driving away at
the end of one scene. We then see another car driving into shot at the start of the next scene. Or we end with a shot
of heavy rain, then dissolve to rain in a new place.
This type of cut can be used to cover huge gaps in time or space elegantly and efficiently. We close one scene seeing
a young man on horseback, riding through fields. In the next shot, we see him still on horseback, but now he’s older,
and commanding a regiment of cavalry in some far-distant country. The viewer doesn’t need a lengthy exposition of
how he got there or what happened in the intervening time. Combined with cutting on shape and an L-cut, this can
be a very effective technique.
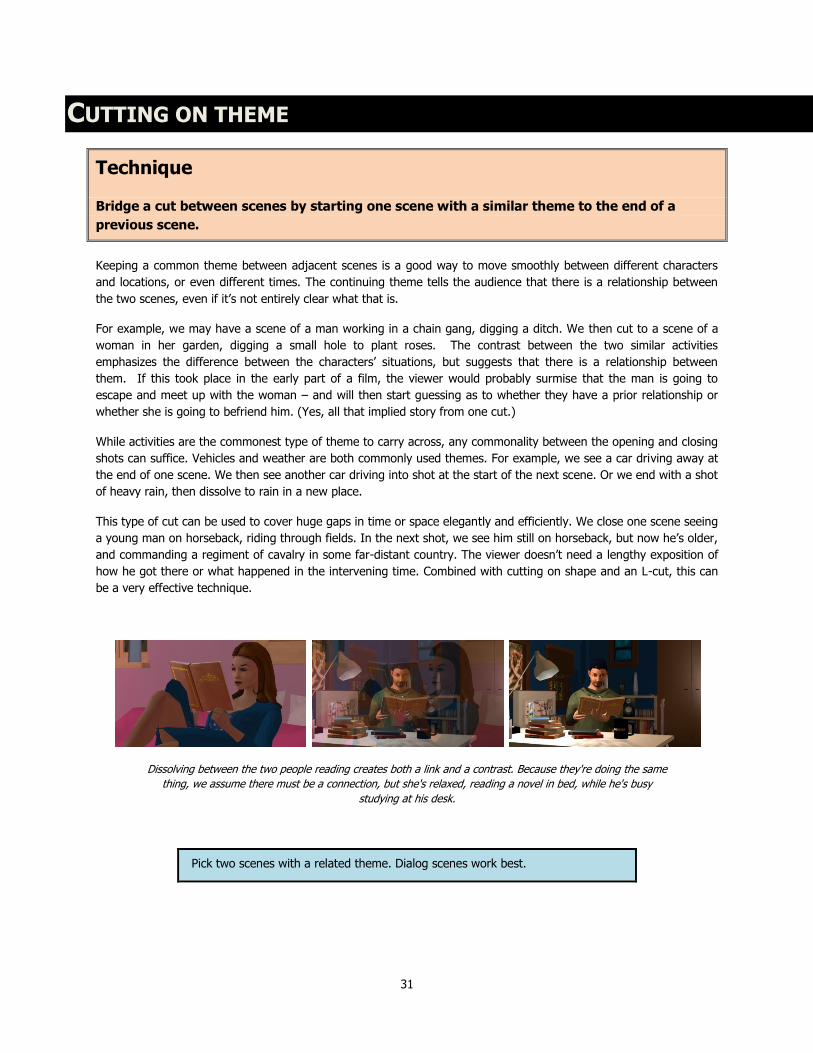
Dissolving between the two people reading creates both a link and a contrast. Because they're doing the same
thing, we assume there must be a connection, but she's relaxed, reading a novel in bed, while he's busy
studying at his desk.
Pick two scenes with a related theme. Dialog scenes work best.

32
CUTTING ON THEME
Film the two scenes and edit them together using the theme.
Review
What does the thematic bridge add to the story?
What does the viewer assume about the relationship between the scenes and
the characters?
What sort of visual transitions work best for this: fade through black, dissolves,
or straight cut? Why?
Is it important to match the visual composition of the two shots?
If the bridge isn’t explicitly scripted, how would you determine when to use this
technique?
Followup exercises
Do this with other scenes and experiment with different types of theme.
Use background characters to provide the thematic bridge. For example, a character passes through a checkpoint,
where his papers are stamped by an official. The next shot shows more papers being stamped; we now see a junior
clerk in a law office, which acts as an establishing shot for the next scene.
Make the cut more seamless and intriguing by not making it obvious when you change scene. For example, we see a
man practicing his guitar alone in his room. By pushing in on the guitar and then pulling out again to a longer shot,
we transition smoothly to him performing the song in front of an audience in a different venue, perhaps some time
later.
33
CUT THROUGH SKY
Technique
Cut between two scenes by using the sky.
This is one of the simplest editing tricks for joining exterior scenes. End the first scene with a pan up to the sky.
Begin the next scene with a pan down from the sky. You can then almost effortlessly take the viewer from one
location to the next without them being aware of the join: they simply end in one place and begin again in another.
As long as you don’t over-use this, it can be surprisingly effective in almost any type of movie.
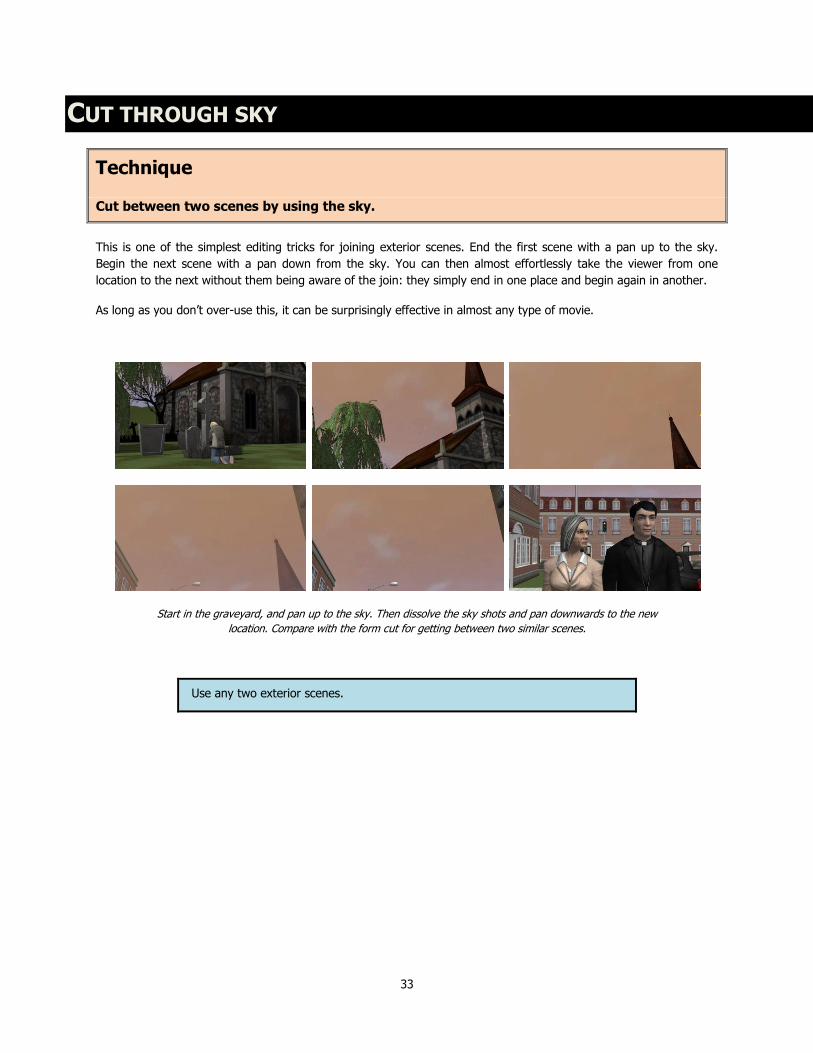
Start in the graveyard, and pan up to the sky. Then dissolve the sky shots and pan downwards to the new
location. Compare with the form cut for getting between two similar scenes.
Use any two exterior scenes.
34
CUT THROUGH SKY
Film the scenes and join them with a straight cut or dissolve.
Film them again, but join them with a sky shot.
Review
How long do you need to spend looking at the sky?
How fast do you move the camera? Is it important to match the camera speed
on the two sky shots?
How do you join the two sky shots effectively?
In a live action situation, how would you cope with clouds or other weather
conditions?
When would this technique work well? When would it not be effective?
Followup exercises
Can you use this technique with interior scenes by using ceilings, skylights or windows?
How can you join scenes with different sky types (e.g. cloudy grey European skies to bright Caribbean sunshine, day
to night, or dry to rain)?
35
WALKING INTO CAMERA
Technique
Use an actor’s body to create a join between scenes.
One of the most common tricks is to end a scene by having an actor walk into the camera and completely fill the
screen. This creates a black screen which can then be used in a similar way to a fade through black. You can join
almost any two scenes this way. The effect can be a little artificial, but it makes a useful variation on a straight cut,
fade, or dissolve.
It is common to start the next scene by having an actor walk away from the camera. This need not be the same
character, but it creates a sense of continuity between the scenes.
Another common use of this technique is to indicate a character being knocked out. The victim falls into the camera,
which goes black. The next scene has them waking up in a new place, starting with a fade out of black.
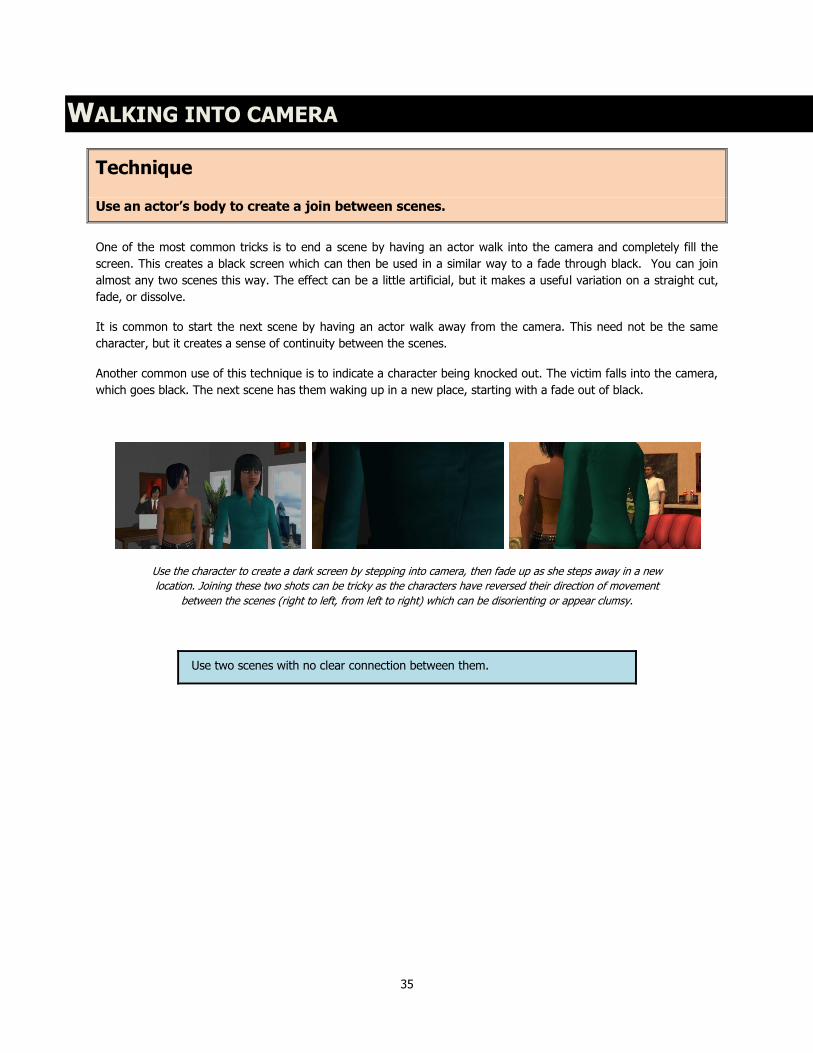
Use the character to create a dark screen by stepping into camera, then fade up as she steps away in a new
location. Joining these two shots can be tricky as the characters have reversed their direction of movement
between the scenes (right to left, from left to right) which can be disorienting or appear clumsy.
Use two scenes with no clear connection between them.
36
WALKING INTO CAMERA
Film the two scenes and join them with a straight cut.
Film them again and join them using a walk into camera. You should only need to change the opening and closing
shots.
Review
How do you need to choreograph the scene to make the movement look natural?
Why would you use this technique rather than a fade to black?
What part of the actor’s body comes into contact with the camera: torso, face, or
something else? Is this significant?
Followup exercises
Use a vehicle rather than a person.
Move the camera into the person rather than have the person moving into the camera.
37
PHOTO TO SCENE
Technique
Cut between scenes by focusing on a picture of the next scene and pushing into it.
This is a very neat editing technique that gets you seamlessly from one location to another, and can also be used to
cut between different time periods. It's common in fantasy movies, children's movies, or romance.
It looks very stylish and adds production value, but needs careful setup to manage and needs to be well thought out
in order for the audience not to aware of the join and find it disorienting. You need to ensure that the composition of
the photo exactly matches the beginning of the scene, or else cover it with a suitable visual effect.
It is quite normal for the visual tone to shift as you move into the photo: this clues the viewer into understanding
that this is just a storytelling device, and the picture hasn’t actually come alive. Adding color to an old picture is a
very common technique.
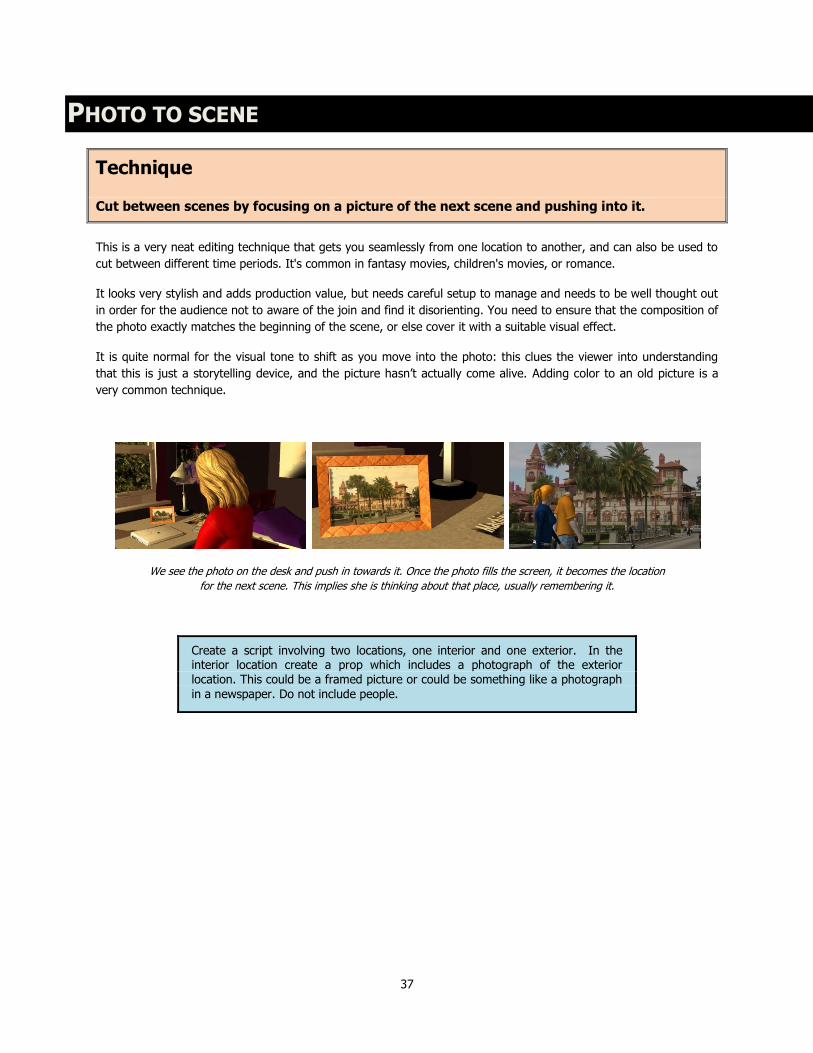
We see the photo on the desk and push in towards it. Once the photo fills the screen, it becomes the location
for the next scene. This implies she is thinking about that place, usually remembering it.
Create a script involving two locations, one interior and one exterior. In the interior location create a prop which includes a photograph of the exterior location. This could be a framed picture or could be something like a photograph
in a newspaper. Do not include people.
38
PHOTO TO SCENE
Film the first scene, ending on a close up shot of the picture. Now move smoothly to the next scene, using the
picture as the opening shot.
Review
How well does it work?
When would you use this technique effectively? Can you go straight into a
second scene, or is the picture just an establishing shot?
Does it make a difference if the same characters are in both scenes (e.g. John
looks at a picture of a cabin in the woods, we push in, and he’s in the cabin)
What did you have to set up when shooting the first scene in order to get a good
transition?
What camera angles work well for this?
What sound did you use to enhance the effect?
Followup exercises
Do it with a picture that includes people, such as a framed family photograph of the character’s father to go into a
flashback sequence.
Use a black and white picture and use a desaturated image for the second scene to suggest old times.

39
INTERCUTTING
Technique
Cut back and forth rapidly between two scenes.
Intercutting is a very powerful storytelling technique. Rather than showing one scene, and then showing the next
scene, you show bits from both scenes one after the other. This has two main effects. On a practical level, it allows
you to develop two parts of the story in parallel, preserving time continuity, but suggesting a link between the two
scenes.
On a more visceral level, it allows you to create an emotional contrast between the two scenes. The viewer is
effectively able to experience two emotions at once. The effect of switching back and forth between the two
emotions not only heightens the intensity, but sets up conflict and contrast which can be interpreted in different
ways.
The scenes may not be written this way in the script, as the intercuts may be very short, possibly without dialog. This
will often be the case when intercutting between dialog and action. For example, a dialog sequence in a guard house
can be intercut with shots of attackers preparing. This builds tension effectively.
A woman is in a police station reporting her husband as missing, and a kindly desk sergeant is comforting her
and promising to help. This is intercut with shots of her husband being beaten up and interrogated in the cells.
The viewer is left wondering whether the cop upstairs actually knows what’s going on, and wants to find out
whether the woman can do something before the man breaks. Dialog can add to this: the desk cop asks,
"where was your husband last night?" while downstairs the interrogator yells, "where were you last night?"
Use a sequence with two scenes that happen simultaneously.

40
INTERCUTTING
Film the two scenes, and edit them sequentially.
Re-edit the existing footage so that the two scenes are intercut. This simulates deciding in post-production to do the
intercutting.
Now reshoot the two scenes so that they are intended to be intercut and edit them that way.
Review
How does intercutting change the pacing of the scene?
How do you ensure that the two scenes cut together well? Is it necessary to
match shot sizes, lighting, etc?
What did you do differently when you reshot the scenes for intercutting.
How do you cut the audio so it doesn’t sound jerky or disjointed?
How would you identify scenes that would benefit from intercutting?
Followup exercises
Film a sequence from a thriller intercutting between two groups of people in a complex action sequence spanning
multiple locations; for example, one group of people is breaking in through the back of a house to steal an object
while another is disabling the security systems.
Film a sequence intercutting three or more scenes.
41
MONTAGE
Technique
Tell a segment of a story very quickly using a series of short disconnected images or scenes.
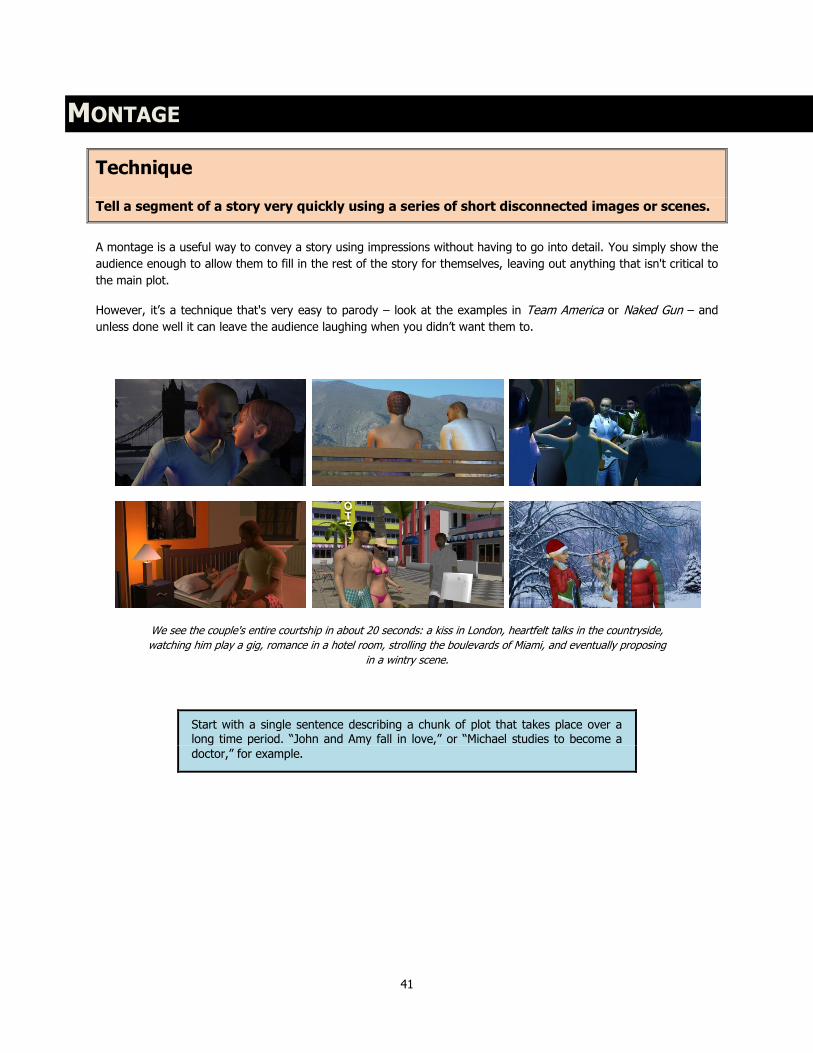
A montage is a useful way to convey a story using impressions without having to go into detail. You simply show the
audience enough to allow them to fill in the rest of the story for themselves, leaving out anything that isn't critical to
the main plot.
However, it’s a technique that's very easy to parody – look at the examples in Team America or Naked Gun – and
unless done well it can leave the audience laughing when you didn’t want them to.
We see the couple's entire courtship in about 20 seconds: a kiss in London, heartfelt talks in the countryside,
watching him play a gig, romance in a hotel room, strolling the boulevards of Miami, and eventually proposing
in a wintry scene.
Start with a single sentence describing a chunk of plot that takes place over a long time period. “John and Amy fall in love,” or “Michael studies to become a
doctor,” for example.
42
MONTAGE
Film the scene without dialog using music and montage techniques. Use different sets and costumes as required.
Review
How well does the montage work: does it feel coherent?
How long does each shot or sequence last?
How long does the whole montage last? What difference would it make if it were
longer or shorter?
What issues did you face with continuity?
Do the camera angles and shots need to match?
What transitions did you use between shots? Does it make a difference whether
you cut or dissolve?
How did you choose what images you needed to convey the story?
Did you use action sequences or predominantly static poses (e.g. John and Amy
gazing out at the sea or John and Amy running through the park)? If you mixed
them together, how does this affect pacing?
How many different scenes were in the montage? What was in each scene?
What would be involved in filming this?
Followup exercises
Build the scene into a longer piece to see how well the montage section works in context.
Create a parody montage. What makes it funny?
43
VISUAL METAPHOR
Technique
Use footage to convey ideas and imagery instead of strict story.
You don’t always need to be completely literal when telling a film. As a visual artist, you can employ metaphors to
create visual puns or add in new ideas.
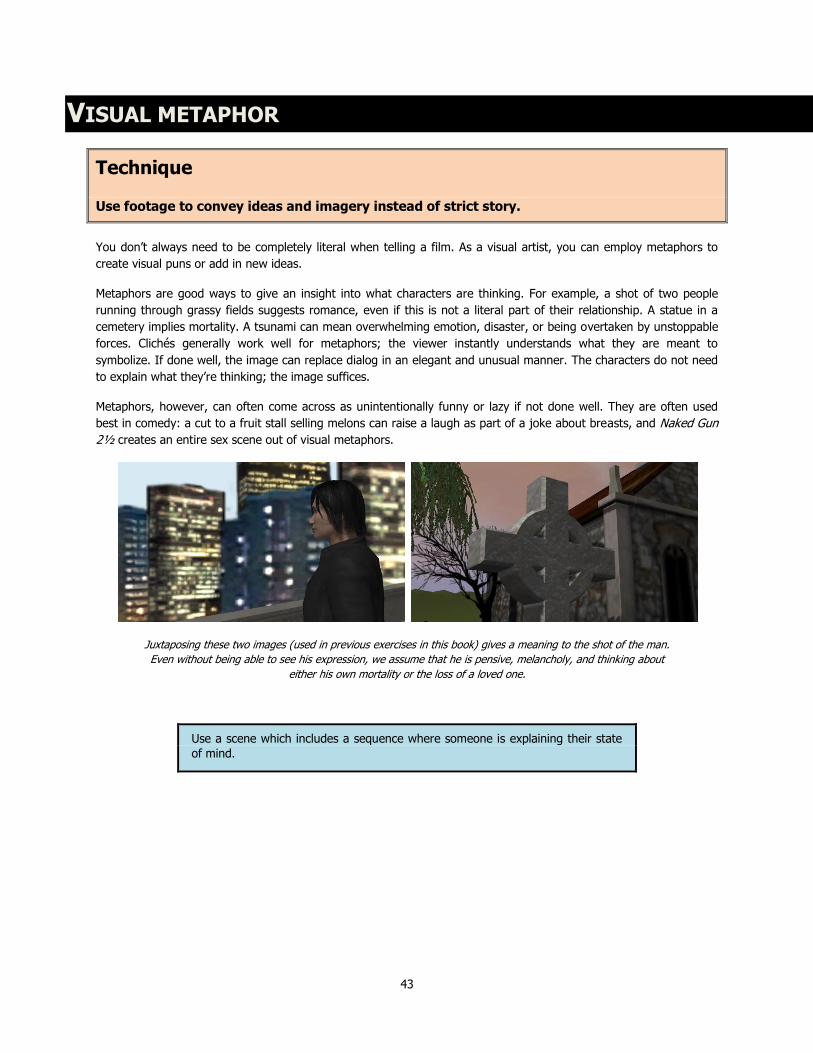
Metaphors are good ways to give an insight into what characters are thinking. For example, a shot of two people
running through grassy fields suggests romance, even if this is not a literal part of their relationship. A statue in a
cemetery implies mortality. A tsunami can mean overwhelming emotion, disaster, or being overtaken by unstoppable
forces. Clichés generally work well for metaphors; the viewer instantly understands what they are meant to
symbolize. If done well, the image can replace dialog in an elegant and unusual manner. The characters do not need
to explain what they’re thinking; the image suffices.
Metaphors, however, can often come across as unintentionally funny or lazy if not done well. They are often used
best in comedy: a cut to a fruit stall selling melons can raise a laugh as part of a joke about breasts, and Naked Gun
2½ creates an entire sex scene out of visual metaphors.
Juxtaposing these two images (used in previous exercises in this book) gives a meaning to the shot of the man.
Even without being able to see his expression, we assume that he is pensive, melancholy, and thinking about
either his own mortality or the loss of a loved one.
Use a scene which includes a sequence where someone is explaining their state
of mind.

44
VISUAL METAPHOR
Film the scene conventionally.
Film the scene again, this time including a metaphor. You may alter the dialog if the scene works better.
Review
Does it work, or does it come across as labored and artificial?
How did you choose what metaphor to use?
Does it change the way the viewer sees the film or the characters?
What are the advantages and disadvantages of using metaphor? When is it
appropriate?
How much dialog did you replace?
Was the scene duration affected?
What would be the effect on production cost of having to film the extra
sequence?
Followup exercises
Use metaphor for deliberately comic effect.
Use metaphor to create a dream sequence.
45
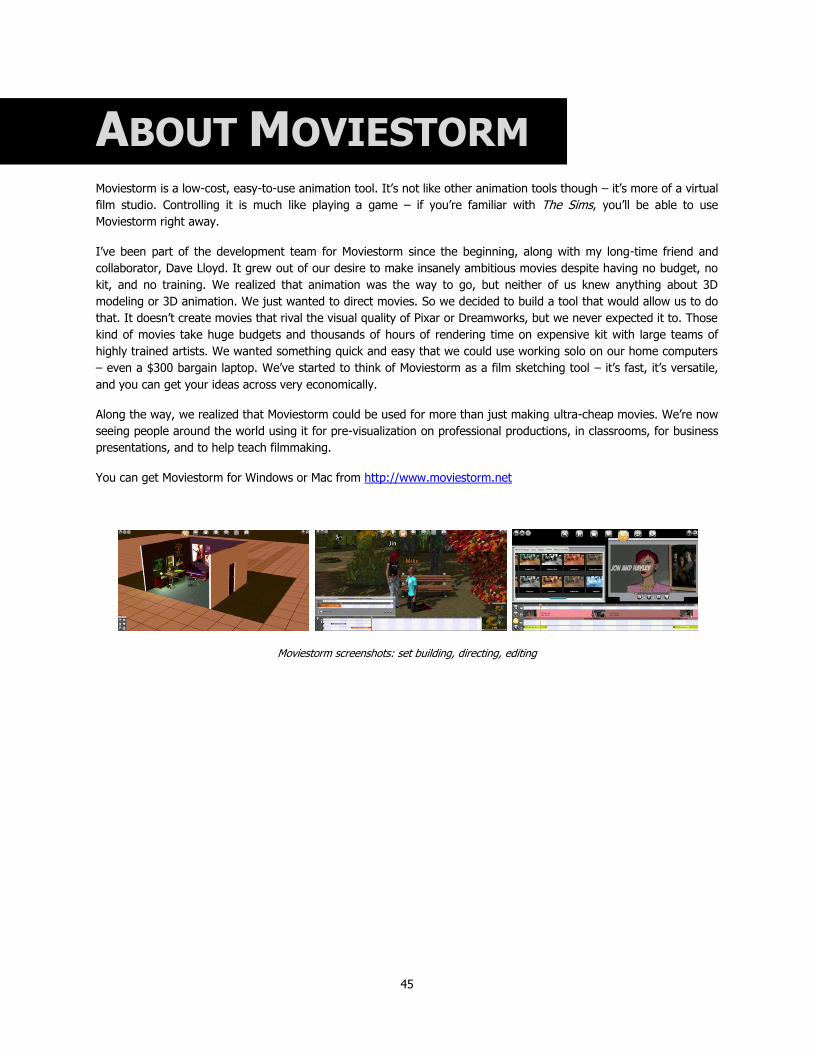
ABOUT MOVIESTORM Moviestorm is a low-cost, easy-to-use animation tool. It’s not like other animation tools though – it’s more of a virtual
film studio. Controlling it is much like playing a game – if you’re familiar with The Sims, you’ll be able to use
Moviestorm right away.
I’ve been part of the development team for Moviestorm since the beginning, along with my long-time friend and
collaborator, Dave Lloyd. It grew out of our desire to make insanely ambitious movies despite having no budget, no
kit, and no training. We realized that animation was the way to go, but neither of us knew anything about 3D
modeling or 3D animation. We just wanted to direct movies. So we decided to build a tool that would allow us to do
that. It doesn’t create movies that rival the visual quality of Pixar or Dreamworks, but we never expected it to. Those
kind of movies take huge budgets and thousands of hours of rendering time on expensive kit with large teams of
highly trained artists. We wanted something quick and easy that we could use working solo on our home computers
– even a $300 bargain laptop. We’ve started to think of Moviestorm as a film sketching tool – it’s fast, it’s versatile,
and you can get your ideas across very economically.
Along the way, we realized that Moviestorm could be used for more than just making ultra-cheap movies. We’re now
seeing people around the world using it for pre-visualization on professional productions, in classrooms, for business
presentations, and to help teach filmmaking.
You can get Moviestorm for Windows or Mac from http://www.moviestorm.net
Moviestorm screenshots: set building, directing, editing
46
Matt Kelland is one of the founders of Moviestorm. He’s also founded several
other companies, including one of the first ISPs in Britain way back in the early
90s, one of the first mobile phone games companies, a digital & transmedia
publishing house based in Los Angeles, and an events promotion company in
Orlando, Florida. Matt has also written or contributed to several books, designed
computer, board and card games, and has had his animations shown at film
festivals around the world, including Sundance. He now lives in Orlando, and
spends his free time cooking, listening to local blues bands, and avoiding the
theme parks as much as possible.
He blogs, irreverently, on a range of topics, occasionally including films, at
http://mattkelland.blogspot.com