Embed Size (px)
Citation preview
2
CONTENTS FOREWORD ........................................................................................................................................................... 3
INTRODUCTION ..................................................................................................................................................... 5
EXERCISES .............................................................................................................................................................. 6
DEEP STAGING ................................................................................................................................................................ 7
PLANES OF ACTION .......................................................................................................................................................... 9
BIG SET, SMALL SET ....................................................................................................................................................... 11
ICONIC LOCATIONS VS GENERIC LOCATIONS ......................................................................................................................... 13
FAKE A SET ................................................................................................................................................................... 15
USING EXTRAS .............................................................................................................................................................. 17
CHANGE OF PACE .......................................................................................................................................................... 19
DRAMATIC CONVERSATIONS ............................................................................................................................................ 21
GOING THROUGH DOORWAYS .......................................................................................................................................... 23
ACTION SCENES ............................................................................................................................................................ 25
TIME COMPRESSION ...................................................................................................................................................... 27
CHANGE OF TIME .......................................................................................................................................................... 29
USING COMPUTERS ....................................................................................................................................................... 31
TV MONITORS .............................................................................................................................................................. 33
FILMING MUSIC ............................................................................................................................................................ 35
SEX SCENES .................................................................................................................................................................. 37
ABOUT MOVIESTORM ......................................................................................................................................... 39
©Matt Kelland 2011. All rights reserved.
"A really good primer for any film student."
Andrew Segal, Carshalton College
"This series is useful to all filmmakers - not only Moviestorm users."
Michael Cornetto, Simply Scripts
'If someone goes through the book and does the exercises, they're
going to come out a better filmmaker, no question."
Hugh Hancock, Guerilla Showrunner
3
FOREWORD by Phil South
When I was asked to write the foreword to the Making Better Movies With Moviestorm series, I jumped at the chance
for two reasons. One is that it was Matt Kelland asking me, the other is that I love a chance to talk about movies.
Ask anyone. Ignore their eye rolling, they always do that. It's a sign of their deep fondness for me.
Matt and I have been friends for many years and I often think that one of the reasons that we are still friends after
all these years is that he is one of the very few people I've ever met who cares as much about films as I do.
I recall the genesis of Moviestorm very well. It was called Machinemascope back then, and the whole reason it got
created in the first place was to answer the question, "is it possible to make movies on a home computer". Of course
we now know the answer to that question. It is, and not only is it possible but many thousands of people have
welcomed the chance to make their own films, for fun, for education and personal development and for profit.
The problem though, as you’re probably aware, is that merely producing great tools and putting them cheaply and
easily in the hands of anyone who wants to use them does not guarantee good work. You can hand anyone on Earth
a page layout program like InDesign or a music sequencer like Logic, or even a video editing software like Final Cut
Pro, but you can't make what they produce any good. You rely on their talent and experience to make good software
produce great work.
Now there are a lot of safety nets in Moviestorm, which correct most of the common mistakes that beginning movie
makers always make. A lot of composition and lighting stuff has been taken care of, allowing you to focus (pun
intended) on the job in hand. And no, the job is not making movies. Nope, the job in hand is telling stories.
It doesn't matter if what you are making is factual rather than fictional. News editors talk about stories too. And a
story has a beginning, middle and end, and the structure helps you to "get" what the creator is talking about and
enjoy the story they are telling. (And hopefully go out and buy all their other films, but hey – that's just a
suggestion.)
But how do you get good at telling stories with cinema? It comes down to experience, of course, and experience
comes through practice. So how do you get experience in film making, when it takes so much to make even the
simplest piece of film? You have to find actors and crew, there are lights and cameras to buy, writers to bully,
locations to find… and there are some scenes you just can’t film at all without a crazy budget. It’s a problem
filmmakers have faced for a hundred years. But now there’s a solution, in the form of Moviestorm.
You see, Moviestorm doesn’t just allow you to make finished movies if you are already an accomplished storyteller. It
allows you to grow your own talent by putting in movie making hours.
As I said earlier, in the world of filmmaking, practice usually involves a lot of equipment, money and mostly time,
both yours and other people's. It's hard for most people to put in the hours. It’s a lot like a pilot who hasn't got easy
access to a plane. So what does he do? He books time in a simulator. Even if a trainee pilot has regular access to a
plane, he still books a lot of time in a simulator because it's cheaper and safer than using a real plane. He can
practice whenever it’s convenient, and by logging enough hours he improves his skills almost automatically.
The same is true of any technical ability which has some art to it. The more you do it, the better you get. It's a
creative muscle memory. It's the same with creativity and mastery of your storytelling chops. The more you do it, the
better you will get. Shots flow to shots in a seamless hypnotic glide, because you know what you are doing and you
know exactly where to go at any one time, in the service of your story.
4
This excellent series of books will guide your development. In each of the carefully structured and easy to follow
exercises Matt leads you through all the movie making tricks you will need, from the most common to the most
difficult. It's an easy regime to follow: just read what's on the page and do it. Then do the next one, and the next,
and work your way through Pretty soon you'll be flying through them and your mastery of both Moviestorm and film
technique will grow.
Most importantly, you can please yourself and as to when you log the hours in your virtual movie-making cockpit.
Take your time, and stagger the sessions across a number of weeks when it’s convenient rather than try do it all at
once. Don’t make the mistake of thinking that all you need to do is read how it’s done. You’ve got to actually do the
exercises. Try all the variants, review your work critically, and then do the follow-ups. The whole point is that when
you start filming for real you’ve done this so many times that you’re instinctively falling back on hundreds of hours of
experience.
Always remember, learning to make films to tell stories is not about theory. It's about practice. If you want to get
good at telling stories with films, there is absolutely no substitute for putting in the hours. I won't scare you by telling
you how many hours they say it takes to become a genius, but it's a lot. Genius will take time, but getting good at
telling your own stories just became a lot easier.
Phil South
Phil South is a professional writer, creative writing teacher and filmmaker based
in the South West of the England. He taught filmmaking to wide eyed first year
technical students at the Bristol Old Vic Theatre School for seven years after a
long career in writing and animation. He currently shares his energies between
his creative writing blog http://goingdownwriting.wordpress.com and his band
The Sinatra Test http://sinatratest.ideasdigital.com.
5
INTRODUCTION This series of books grew out of a selection of articles I wrote for the Moviestorm blog in 2009-2011 on how you can
use Moviestorm to practice film techniques. Several people contacted us to ask whether we had any specific
examples of how to do it. I realized I'd talked a lot of theory, but very little practical information. I therefore decided
to put together this collection of simple exercises you can do to learn individual techniques.
There will be several volumes in the series, covering a range of techniques including camerawork, editing, lighting,
sound, and more. This second volume covers staging - what actually happens on the set.
These exercises aren't specific to making movies with Moviestorm. They're standard techniques that apply to all
forms of film. For example, one exercise in this volume requires you to shoot the same scene with and without
extras. One from the previous volume on camerawork focuses on filming a scene without moving cameras, and then
filming it again but allowing the camera to move. You can take what you've learned to any other film-making
medium - full CG animation, live action, or whatever.
The main advantage of using Moviestorm is that you can practice whenever it's convenient for you, and you don't
need to assemble a cast and crew each time. And if you're not happy with what you've done, you can easily go back
and do it again and again until you're satisfied – reshoots are easy!
The other advantage of using Moviestorm is that you’re not constrained by the usual problems of the student film-
maker. You don’t have to worry about shutting down city streets to film in the middle of Manhattan or London. You
can have a huge crowd of extras. Use cranes, helicopters or other equipment. Film stunt scenes, car chases, and
explosions without worrying about insurance or cost. It’s a versatile tool that will give you a chance to learn the kind
of things that most novice filmmakers can’t ever do in real life.
The exercises are all fairly adaptable. Generally, you won't need any particular packs or content: any version of
Moviestorm will do. Most of them work on the same principle: take a single scene, and film it in several different
ways. You can use the same scene over and over again if you want - I often use a short scene from one of Per
Holmes's training DVDs, and another, slightly longer one, from a parody soap opera I was working on some years
ago. This is actually a pretty good way of working, as you can focus explicitly on the one aspect you're practicing,
and reuse much of what you've previously done; sets, characters, recorded dialog, and so on. You'll also develop an
increasing empathy with the scene, and you'll find each take getting better and better, rather like a musician
practicing the same piece over and over. When you've worked your way through several exercises, you can compare
all the different versions with your first attempt, and see what you've achieved.
This isn’t a substitute for practicing with real kit. You’ll still need to get familiar with real cameras and lights, and
you’ll have to get used to working with real actors and crew on real sets. Practicing this way simply gets you used to
knowing what you’re going to shoot and developing a sense of how it’s going to look when it’s cut into your final film.
Although most of the book is written primarily for directors, it’s useful for others as well. It’s an easy method for
editors to generate the footage they need to practice cutting scenes in many different ways. It’s a good way for
scriptwriters to understand how their written words can be portrayed on the screen. It’s a useful way for camera
operators to practice filming, or for producers to understand how creative choices affect the production costs.
Most importantly, though, it’s a way to ensure that when you start making movies for real, you’ll know exactly what
you’re doing, and you won’t be wasting everyone else’s time and money trying to figure out the basics. As we’re fond
of saying at Moviestorm, “shoot first, ask questions later” is the maxim of the unprepared filmmaker, and “fix it in
post” is just another way of making trouble for your editor.
6
EXERCISES How to use this book
The book is set out in a workbook format. Each exercise uses a standard structure:
Technique: what you’re going to focus on
Scenario: what type of scene works best for this
Exercise: what you do
Review: you critically analyze your work and see how the different versions compare
Follow-up exercises: more things you can try to develop this technique
In the first volume of the series, we focused on camerawork and how your choice of shots affects your story. This
volume is concerned more with what happens on the set and what you are actually shooting.
Of course, camerawork is still critically important, and you will get more from this volume if you’ve already completed
some of the exercises in the previous volume (available at http://is.gd/2ZrjLs). The aim is to combine the two skills,
and understand the relationship between what you are filming and what the viewer sees.
To get the best from this book, it’s important that you do two things.
First, you must actually do the exercises.
Reading them won’t make you a better film-maker any more than reading about sports will make you an athlete.
While developing Moviestorm, I’ve shot literally hundreds of hours of animated footage over the last few years.
Looking back at the things I made early on, the improvement is obvious. Now, when I need to film something like a
simple dialog or a walk, I don’t waste time. As I read the script, I instinctively know how I want to film it. Camera
angles and moves, cuts, staging, lighting, and even sound come alive in my head. These days I don’t even make a
storyboard; I simply go straight to Moviestorm and block out a rough version - it's faster and more powerful. That
kind of fluency comes from having shot the same type of scenes over and over again.
Second, you must be super-critical with yourself when it comes to the reviews.
The aim isn’t to complete all the exercises as fast as possible. It’s to learn from them and find ways to improve. In
most cases, there are no right or wrong ways to shoot these scenes (although there are accepted conventions it’s
useful to be familiar with). It’s about trying out different things to see what happens. Even if they don’t work, you’ve
learned something. So don’t just give yourself a pat on the back and move on. Be picky. Find the things you don’t
like. Ask yourself if that scene could possibly be any better. At some point, you won’t find anything more you can do
to it. So move on, but then come back to it later when you’ve practiced some new techniques. I guarantee you’ll see
new ways to film the scene.
7
DEEP STAGING
Technique
Create shots that make maximum use of the space by having main characters in both the
extreme foreground and background.
Deep staging is a compositional technique that literally “adds depth” to your movie. One of the early exponents of
this was Orson Welles in his groundbreaking Citizen Kane. Many of the shots in that movie include characters in the
far distance as well as near to the camera, which has four effects. Firstly, it gives the impression of a huge space,
which differentiated Kane from movies that looked as though they were shot on a small set. This adds immensely to
the production value. Secondly, it creates emotional distance between the characters; they appear isolated and
detached. Thirdly, it creates an interesting visual composition, since one character is so much smaller than the other.
Lastly, it enables the viewer to focus intimately on just one of the characters by bringing their facial expressions right
to the front.
In the first volume of this series, Basic Camerawork, we used foreground objects to create an elementary form of
deep staging. Deep staging for characters works in a slightly different way; the foreground character is not just there
for visual balance, but is a key part of the story. The background character is usually in much longer shot, which
presents challenges for lighting, set design, and costuming if the viewer is to be able to distinguish them clearly. The
camera must also keep both characters in focus, unlike filming scenes with extras in the background. Finally, there is
a challenge for the actors; the foreground actor is reliant on facial emotion, while the background actor has to use
more expansive body movements. This creates a huge contrast which can look awkward if not handled well.
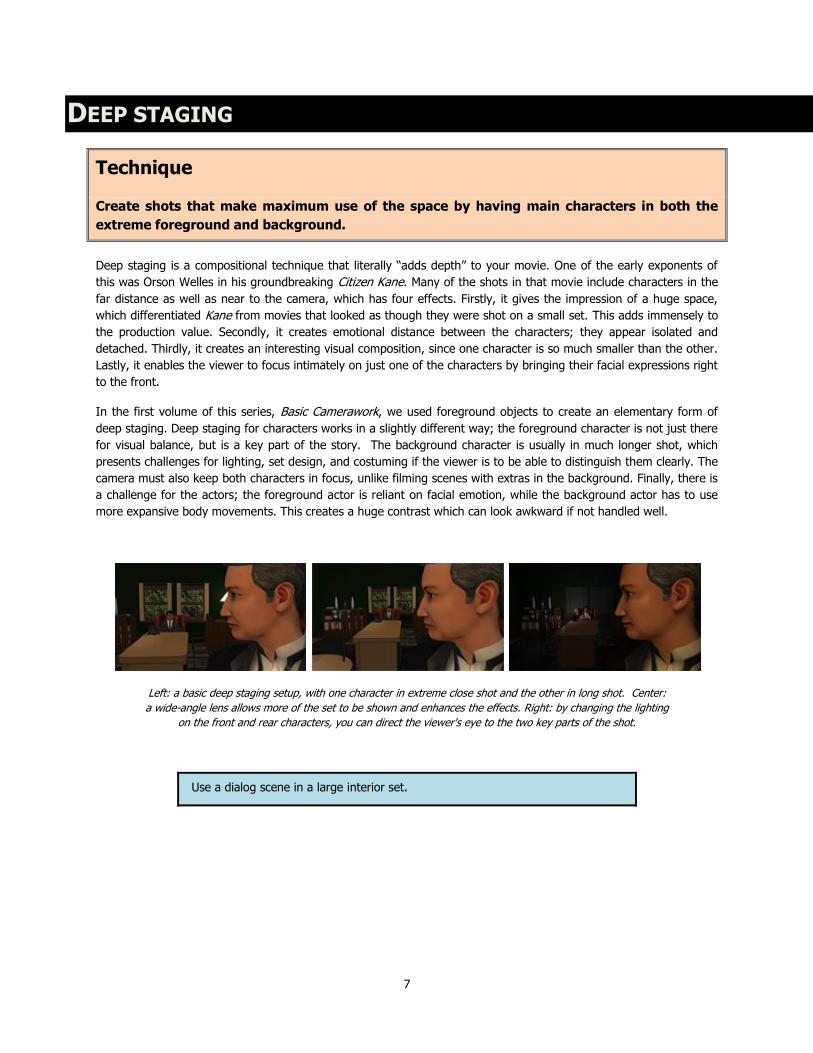
Left: a basic deep staging setup, with one character in extreme close shot and the other in long shot. Center:
a wide-angle lens allows more of the set to be shown and enhances the effects. Right: by changing the lighting
on the front and rear characters, you can direct the viewer's eye to the two key parts of the shot.
Use a dialog scene in a large interior set.
8
DEEP STAGING
Film the scene with a conventional conversation staging.
Film it again, but use deep staging to place one character in the foreground.
Review
How does the deep staging affect the way the viewer understands the scene?
Does the background character still feel significant?
What do you need to do in terms of lighting, set design, and placement to
ensure that the background character is distinguishable?
How loud does the background character’s audio need to be? Is it realistically
quiet or at the same volume as the foreground character?
Is this staging “realistic”? Is this a way people would normally converse?
What sort of scenes benefit from deep staging?
How does deep staging constrain the foreground actor’s movements?
How does the acting style of the foreground and background actors differ in the
way they convey emotion?
Followup exercises
Film it again, but with the other character in the foreground. What difference does this make to the scene?
Deep stage a three-person conversation. Put two characters in the foreground, two in the background, or all three at
different distances.
Can you deep stage action scenes? What sort of scene would work for this?
9
PLANES OF ACTION
Technique
Have two things going on simultaneously at different distances.
This is a further variant on deep staging. However, instead of having just a conversation between foreground and
background, you will have two different things happening at the same time. Typically this consists of dialog in the
foreground and some sort of activity in the background. For example, a man talks to a cop in the street, while
behind them the paramedics are rushing into a house.
This has several important effects. First, it condenses the scene, since you’re now showing the viewer two things at
once instead of showing them one after the other. Secondly, it creates an interesting visual composition, as there’s
plenty to look at. However, and perhaps most importantly, it creates complexity in the story-telling, as the viewer
isn’t necessarily sure where to look. When several things are happening, you’re asking the viewer to assess which is
most important, even if the two elements appear unrelated. The result is that the viewer becomes increasingly
involved in the story: they are looking around the shots, making judgments about what’s significant.
Controlling this complexity is the main art of using planes of action. When watching a scene staged this way, the
viewer could potentially react in any of the following ways:
“I just noticed something going on in the background that’s probably significant. I’m smart.”
“Wow, you can clearly see that happening in the background. I totally missed that the first time I watched
it. That’s neat!”
“I was too busy watching what was happening in the background and missed what they were talking
about.”
“What the hell was going on there?”
Any of the first three reactions can be good: it just depends on how you want your viewer to react. Sometimes you
want them to feel smart; sometimes you want them to feel outsmarted. The “hiding in plain view” trick works well for
mysteries and thrillers, where you put something in the background but misdirect the viewer so they don’t notice it.
The challenge is to direct their attention to one or both of the two elements as you wish. You can do this using focus,
lighting, and movement. The human eye is naturally attracted to movement, particularly contrary movement, so you
can draw someone to notice something by making it move. The effect is magnified if you have things moving in
opposite directions.
The risk is that by adding visual complexity you end up overwhelming the viewer and you end up with the fourth
reaction. Unless you are deliberately setting out to create a chaotic image, you need to approach this technique with
elegance and clarity.
This is easiest in an exterior set where you have plenty of space to work with.
The scene should include dialog and some additional background activity.
10
PLANES OF ACTION
Film the scene initially cutting between the two elements.
Film it again combining the two elements into one shot.
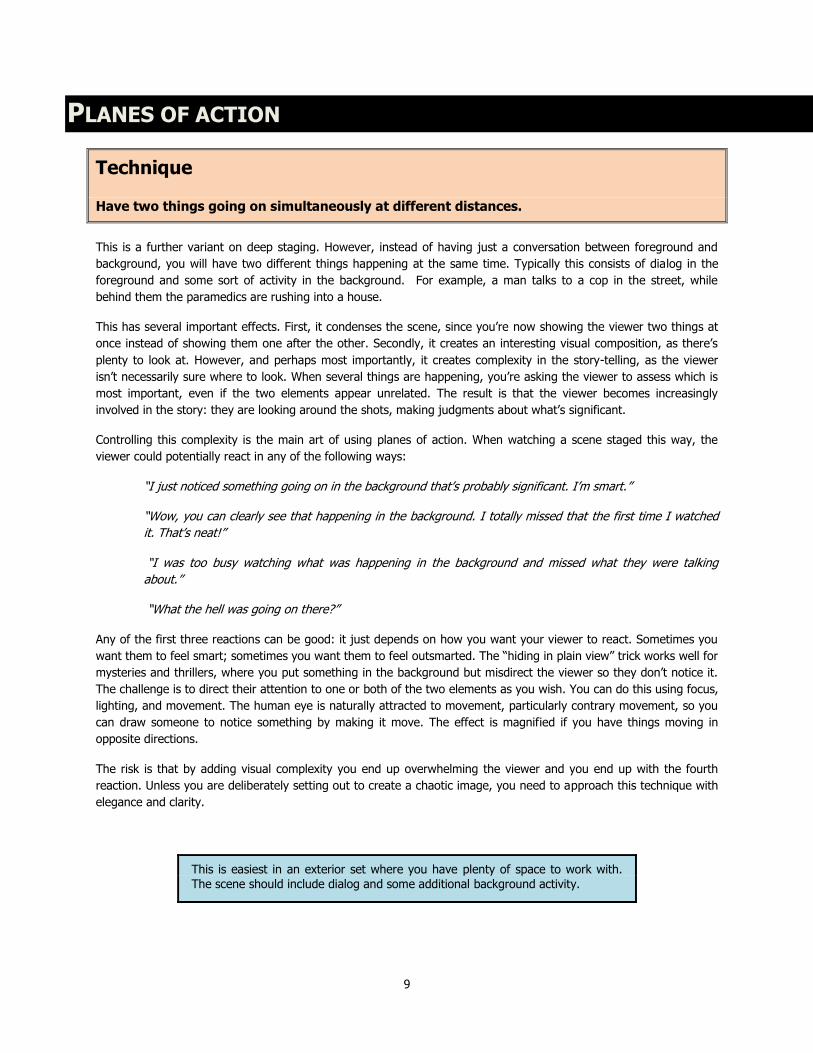
You could cut between the officer speaking to the reporter and the cops arresting the perp, or you can combine
them into one shot. Framing the background action between the two speakers creates a "window" the viewer is
looking through. Framing them on different sides of the screen requires the viewer to focus on one side or the
other. When shooting in low light, it can be hard to ensure that the background action is visible.
Review
How does using this technique affect the story?
Is it clear where the viewer should be looking?
Can you control at what point you can direct the viewer from the foreground to
the background and back again?
How do you frame the shots so you can see both planes clearly?
How does this affect the frequency and type of cuts?
How do you balance the sound between the two planes?
What kind of scenes work well for this technique?
Followup exercises
Use physical barriers such as doors or windows to clearly delineate the front and back planes.
Create scenes with three or more simultaneous planes of activity.
Stage the scene so the main focus is on the back plane.
11
BIG SET, SMALL SET
Technique
Shoot & edit the same scene on two different sets and see how the physical size of the
location affects the way you film the scene.
You may have little control over the location you’re going to film in, so you need to be conversant with the
constraints imposed by the physical size of the set. You may need very different choreography, and this may affect
both your camerawork and editing decisions.
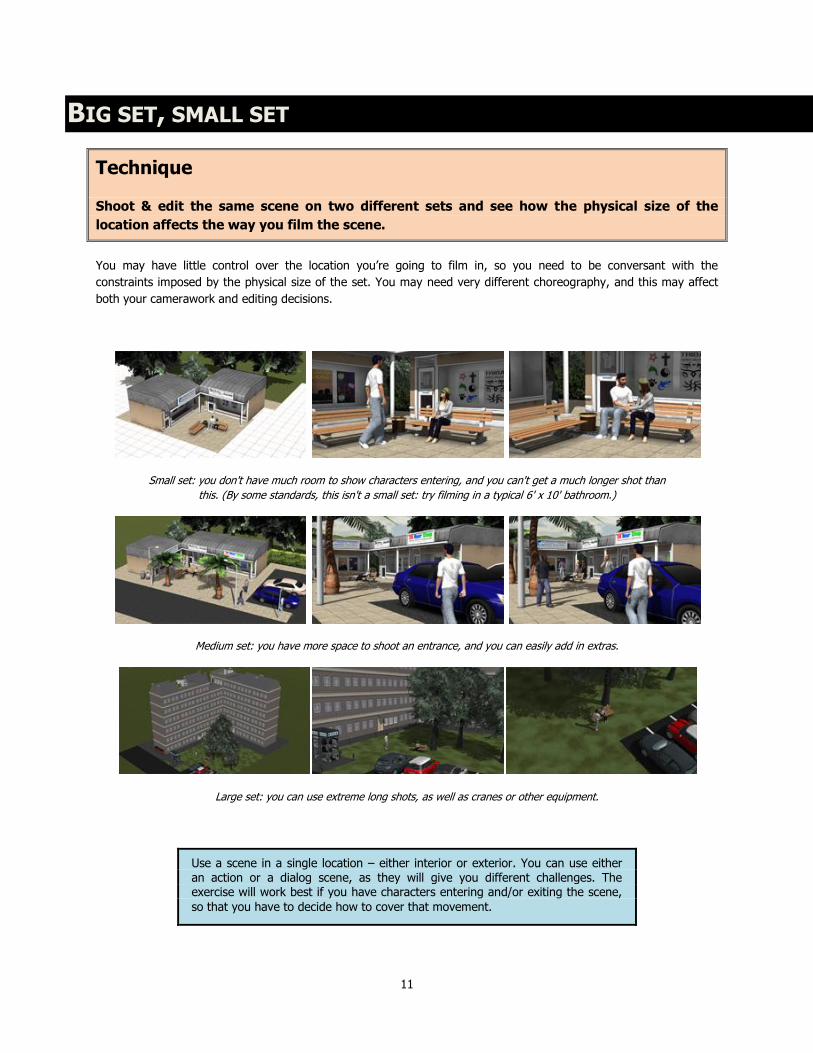
Small set: you don't have much room to show characters entering, and you can't get a much longer shot than
this. (By some standards, this isn't a small set: try filming in a typical 6' x 10' bathroom.)
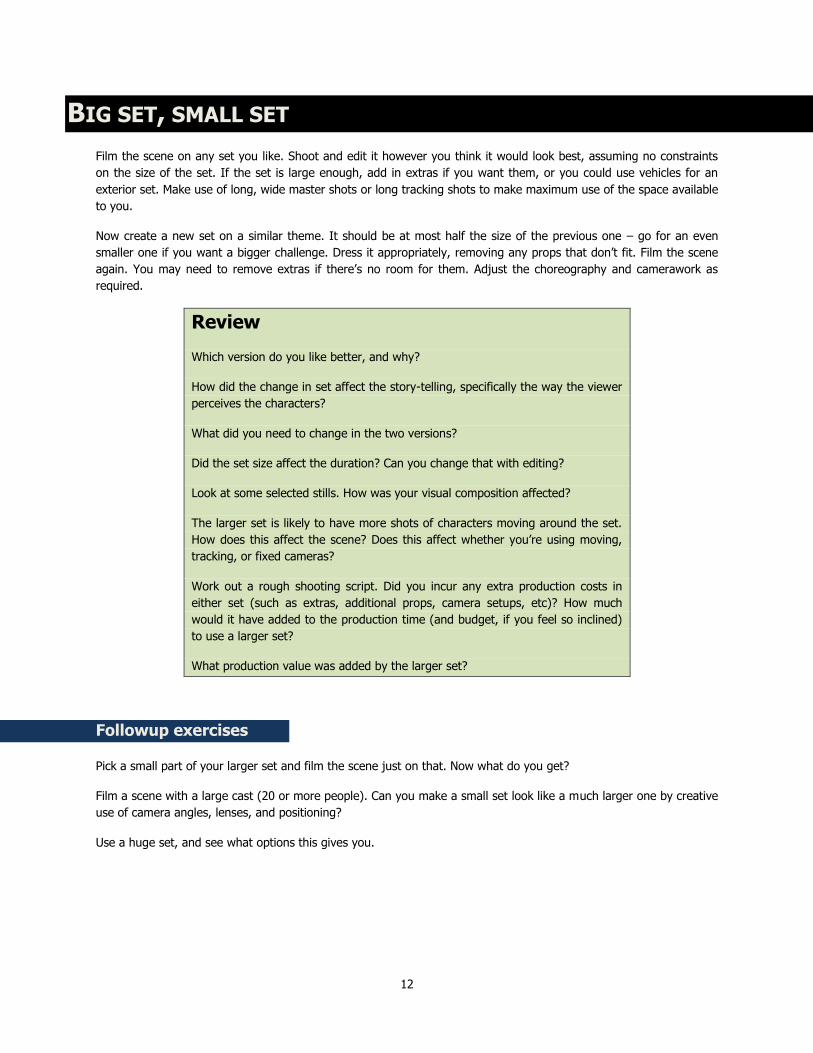
Medium set: you have more space to shoot an entrance, and you can easily add in extras.
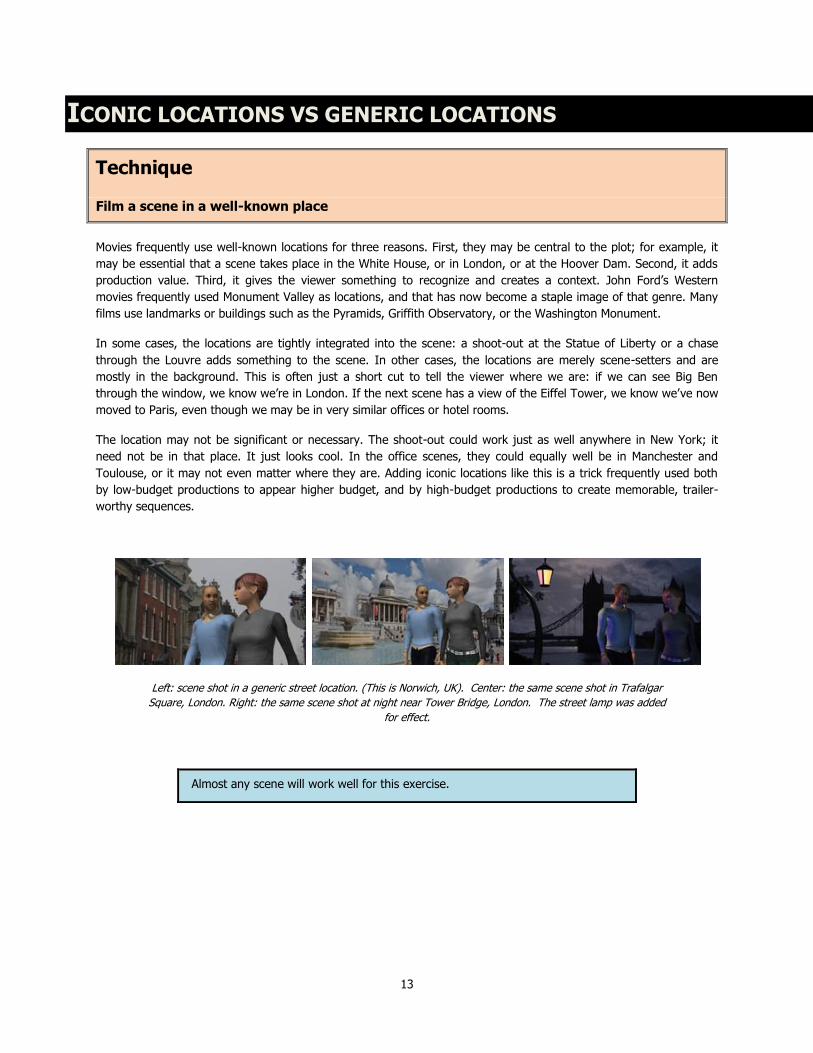
Large set: you can use extreme long shots, as well as cranes or other equipment.
Use a scene in a single location – either interior or exterior. You can use either an action or a dialog scene, as they will give you different challenges. The exercise will work best if you have characters entering and/or exiting the scene,
so that you have to decide how to cover that movement.
12
BIG SET, SMALL SET
Film the scene on any set you like. Shoot and edit it however you think it would look best, assuming no constraints
on the size of the set. If the set is large enough, add in extras if you want them, or you could use vehicles for an
exterior set. Make use of long, wide master shots or long tracking shots to make maximum use of the space available
to you.
Now create a new set on a similar theme. It should be at most half the size of the previous one – go for an even
smaller one if you want a bigger challenge. Dress it appropriately, removing any props that don’t fit. Film the scene
again. You may need to remove extras if there’s no room for them. Adjust the choreography and camerawork as
required.
Review
Which version do you like better, and why?
How did the change in set affect the story-telling, specifically the way the viewer
perceives the characters?
What did you need to change in the two versions?
Did the set size affect the duration? Can you change that with editing?
Look at some selected stills. How was your visual composition affected?
The larger set is likely to have more shots of characters moving around the set.
How does this affect the scene? Does this affect whether you’re using moving,
tracking, or fixed cameras?
Work out a rough shooting script. Did you incur any extra production costs in
either set (such as extras, additional props, camera setups, etc)? How much
would it have added to the production time (and budget, if you feel so inclined)
to use a larger set?
What production value was added by the larger set?
Followup exercises
Pick a small part of your larger set and film the scene just on that. Now what do you get?
Film a scene with a large cast (20 or more people). Can you make a small set look like a much larger one by creative
use of camera angles, lenses, and positioning?
Use a huge set, and see what options this gives you.
13
ICONIC LOCATIONS VS GENERIC LOCATIONS
Technique
Film a scene in a well-known place
Movies frequently use well-known locations for three reasons. First, they may be central to the plot; for example, it
may be essential that a scene takes place in the White House, or in London, or at the Hoover Dam. Second, it adds
production value. Third, it gives the viewer something to recognize and creates a context. John Ford’s Western
movies frequently used Monument Valley as locations, and that has now become a staple image of that genre. Many
films use landmarks or buildings such as the Pyramids, Griffith Observatory, or the Washington Monument.
In some cases, the locations are tightly integrated into the scene: a shoot-out at the Statue of Liberty or a chase
through the Louvre adds something to the scene. In other cases, the locations are merely scene-setters and are
mostly in the background. This is often just a short cut to tell the viewer where we are: if we can see Big Ben
through the window, we know we’re in London. If the next scene has a view of the Eiffel Tower, we know we’ve now
moved to Paris, even though we may be in very similar offices or hotel rooms.
The location may not be significant or necessary. The shoot-out could work just as well anywhere in New York; it
need not be in that place. It just looks cool. In the office scenes, they could equally well be in Manchester and
Toulouse, or it may not even matter where they are. Adding iconic locations like this is a trick frequently used both
by low-budget productions to appear higher budget, and by high-budget productions to create memorable, trailer-
worthy sequences.
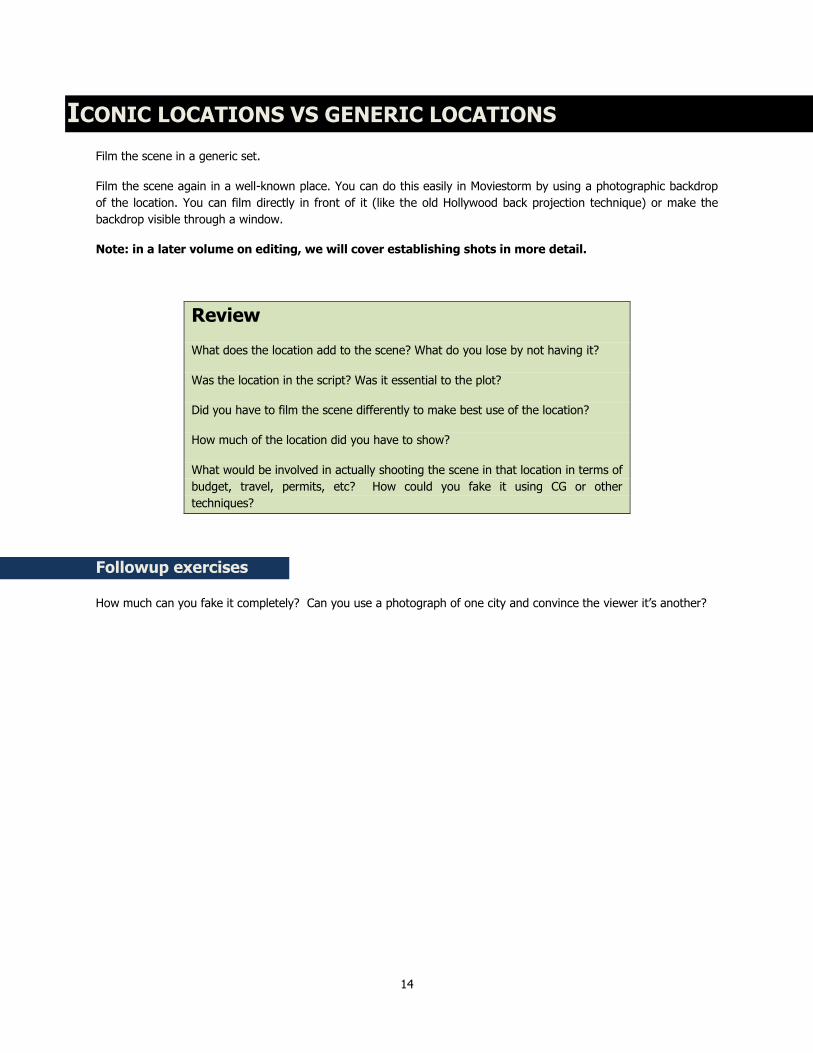
Left: scene shot in a generic street location. (This is Norwich, UK). Center: the same scene shot in Trafalgar
Square, London. Right: the same scene shot at night near Tower Bridge, London. The street lamp was added
for effect.
Almost any scene will work well for this exercise.
14
ICONIC LOCATIONS VS GENERIC LOCATIONS
Film the scene in a generic set.
Film the scene again in a well-known place. You can do this easily in Moviestorm by using a photographic backdrop
of the location. You can film directly in front of it (like the old Hollywood back projection technique) or make the
backdrop visible through a window.
Note: in a later volume on editing, we will cover establishing shots in more detail.
Review
What does the location add to the scene? What do you lose by not having it?
Was the location in the script? Was it essential to the plot?
Did you have to film the scene differently to make best use of the location?
How much of the location did you have to show?
What would be involved in actually shooting the scene in that location in terms of
budget, travel, permits, etc? How could you fake it using CG or other
techniques?
Followup exercises
How much can you fake it completely? Can you use a photograph of one city and convince the viewer it’s another?
15
FAKE A SET
Technique
Create the illusion of one seamless set by splicing together shots taken on different sets.
In an ideal world, you can find (or create) your perfect set and simply film in that space. In practice, however, you
may well find that reality isn’t that convenient, and you need to construct an artificial set from carefully edited and
well planned shots.
If you’re filming in a studio, each room may be a separate set, even if your script calls for them to be physically
connected. When filming on location, you can adjust the actual spatial geography to create the set you need; in
extreme cases, your shots may be taken in completely different locations.
As a simple example, you can have a character walk down a corridor on one set, and go through a door. The next
shot shows him entering a room on another set, but the viewer perceives them as part of the same space, and infers
the physical relationship, as long as the continuity does not do anything to break that illusion.
Here’s a more complex example from Robin Hood, Prince of Thieves. We see Robin approaching a castle; this shot
was filmed at Highclere Castle. We then cut to a brief shot of Marian by a doorway, which was filmed at Old Wardour
Castle. Robin and Marian then have a brief conversation; this shot was filmed at Hulne Priory. Finally they go inside
together; the rest of the scene was filmed in Alnwick Castle. The viewer, unless they are intimately familiar with
English castles – and are paying more attention to the set than the story – won’t notice the discontinuity.
In order to make this work, you need to conceal the join by ensuring that lighting, sound, and camera angles all
match, and by ensuring that the actors’ movements are consistent. It is also critical to make sure that you don’t have
mismatches between details of the set: if your character is entering a house from a tree-lined suburban cul-de-sac,
you can’t have a view of a terraced street through the window when you get inside. You also need to try to match
the weather: it can’t be cloudy in one shot and sunny in another. (This is something you often see in the “goofs”
section, as it’s next to impossible for the director to control. Judicious use of close-up is the best way to cover this.)
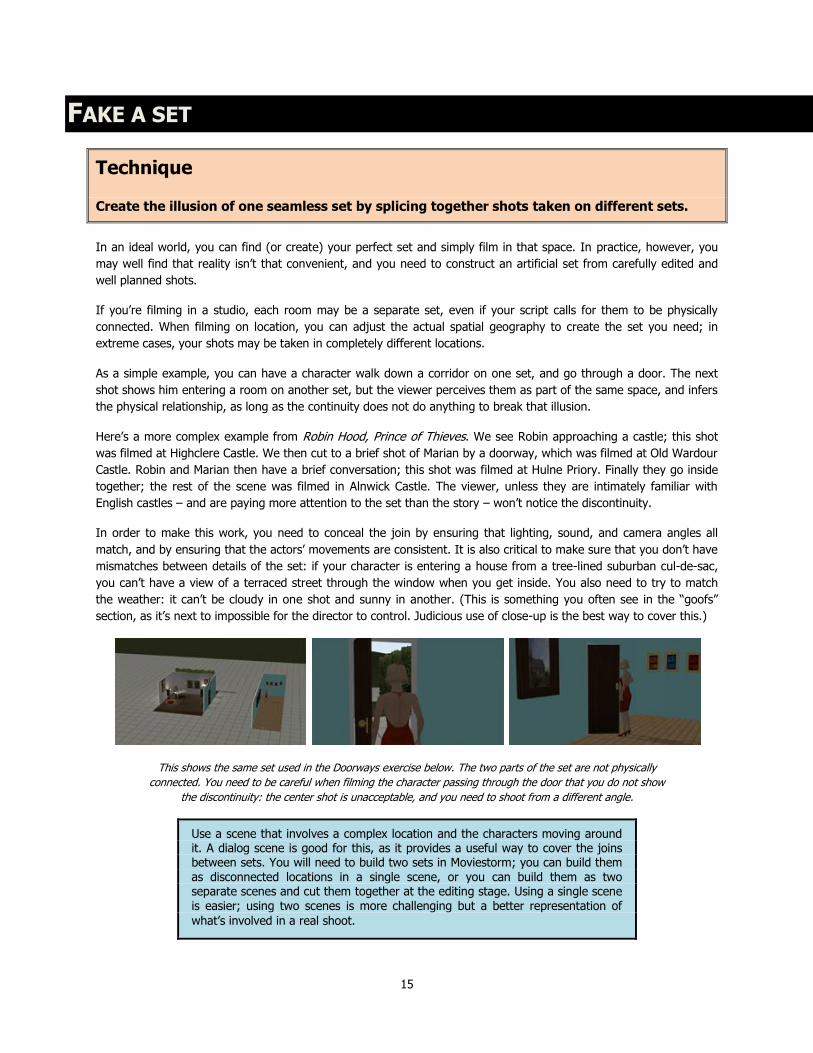
This shows the same set used in the Doorways exercise below. The two parts of the set are not physically
connected. You need to be careful when filming the character passing through the door that you do not show
the discontinuity: the center shot is unacceptable, and you need to shoot from a different angle.
Use a scene that involves a complex location and the characters moving around it. A dialog scene is good for this, as it provides a useful way to cover the joins between sets. You will need to build two sets in Moviestorm; you can build them as disconnected locations in a single scene, or you can build them as two separate scenes and cut them together at the editing stage. Using a single scene is easier; using two scenes is more challenging but a better representation of
what’s involved in a real shoot.
16
FAKE A SET
Film the scene and make it appear that the separate locations are part of the same space.
Review
Does the join work effectively?
What did you have to do in terms of sound, music, editing and lighting to make
the effect work?
How do you ensure that character motion is in a consistent direction? What
happens if you don't?
How did you have to film it?
How much planning did you do?
What advantages and disadvantages are there to using this technique? When
would you use it?
Followup exercises
Join three or more locations into a single set.
Create a scene where you cut between actors in two locations repeatedly; for example, one actor outside a house
trying to get in, intercut with shots of another actor inside, but maintain the illusion that they are the same place.
17
USING EXTRAS
Technique
Film the same scene with and without extras, and see how that changes the feel of the scene
and the way you shoot it.
One of the things that adds realism, especially to exteriors and public locations, is the addition of extras. However,
this requires a different approach to a scene so that the extras add interest but without interfering with the main
characters or plot.
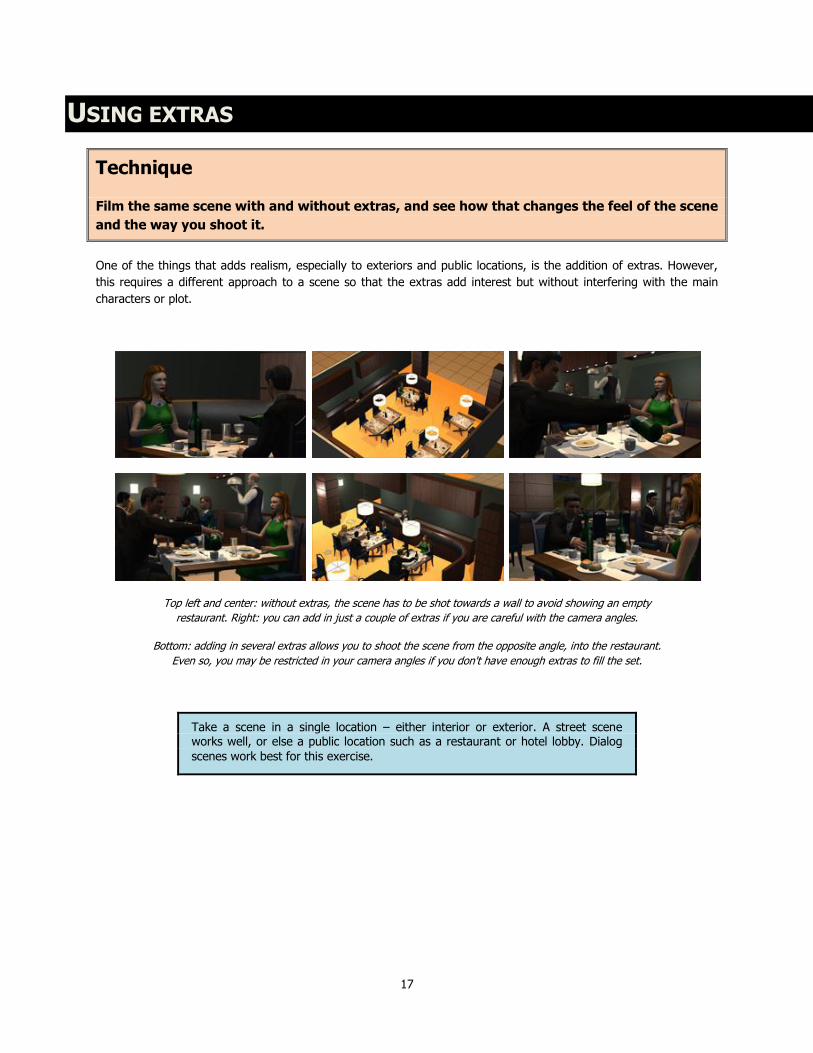
Top left and center: without extras, the scene has to be shot towards a wall to avoid showing an empty
restaurant. Right: you can add in just a couple of extras if you are careful with the camera angles.
Bottom: adding in several extras allows you to shoot the scene from the opposite angle, into the restaurant.
Even so, you may be restricted in your camera angles if you don't have enough extras to fill the set.
Take a scene in a single location – either interior or exterior. A street scene works well, or else a public location such as a restaurant or hotel lobby. Dialog
scenes work best for this exercise.
18
USING EXTRAS
Film the scene with just the protagonists.
Now film it again in the same set, but this time include several extras (as many as you need, but more than 10 is
probably unnecessary for this exercise). Change the choreography if you need to, and change the set dressing, but
work with the same basic set as far as possible. Reshoot and re-edit it any way you feel appropriate.
Review
What extras did you choose, and why? Did you have any cliché characters (cop,
janitor, nun, waiter) or were they all nondescript?
How did adding extras affect the story-telling and the feel of the scene &
location? Did you use them for reaction shots? Did you use them as transitional
characters to get into or out of the scene?
What did you need to change in the two versions?
How was the space affected: did the set feel too large or too small when you
changed the number of characters?
What effect did it have on the sound design?
Look at some selected stills. How was your visual composition affected?
Did you focus on the extras, or did you just use them as human set dressing?
Did this affect the duration?
Work out a rough shooting script. Did you incur any extra production costs in
either version (such as extras, additional props, camera setups, etc)?
Followup exercises
Repeat the exercise changing the number of extras until you find the best number for the scene.
If you’re filming an exterior scene, add in vehicles and see what effect that has.
Try it different ways using the extras as if they’re important people in the story, and as if they’re just uninvolved
passers-by. For example, in a hotel lobby, you can have the concierge appear to be listening in to the conversation
or not.
Change the extras’ costumes and give them different roles to see what the effect is.
Experiment with the sound design to include or exclude sound from the extras. Try putting in additional sound to
imply more extras than you can see.
19
CHANGE OF PACE
Technique
Film a scene in different ways to make it all slower or faster.
Keeping your viewer’s interest for a sustained period of time means not only having an interesting story, but also
mixing up the way you tell it. Some scenes need to be fast, others need to be more slow and languid. The balance
between them and the frequency at which you switch determines the overall pace of the film. Much of this will come
from the script, but you can also amplify this with direction.
In Vol 1: Basic Camerawork we looked at ways in which to make a scene take more or less time. This, although
superficially similar, is a very different exercise. You can change the duration of a scene by adding in or taking out
chunks of time or by adding in extra stage business. Changing pace involves doing the same thing at a different
speed, or using pauses for dramatic effect. Slowing down a scene can act as a breather after an action scene prior to
some exposition, or create an air of menace before an explosive action sequence.
In a Western, for example, a gunman might stride into a saloon, walk to the bar, and order a whiskey. You could
slow this right down by having him pause at the doorway and look around before entering, using dramatic
backlighting to create an iconic image and POV shots to set the scene. He then walks in, slowly. Shots of his boots on
the floor, with the sound of clinking spurs, create a slow, measured pace. He then arrives at the bar, and looks
around again at the other patrons. Reaction shots add to the atmosphere. He nonchalantly adopts a posture leaning
on the bar, and there’s a short, silent interaction with the barkeep. Finally, maybe a minute after he’s first arrived, he
orders his drink. The viewer is now ready for him to start asking questions. It’s the exact same script, but it’s a very
different interpretation.
You can do the same with dialog by inserting pauses and reaction shots. You will normally want your actors to slow
down their delivery as well; simply adding pauses in post will seem unnatural and staged.
Increasing the pace of a scene usually involves cutting more often, using fast moving cameras, and using more body
language. For example, in a scene involving a group of people planning their escape, you can use camera movement
and actor movement to make it seem hurried and under pressure.
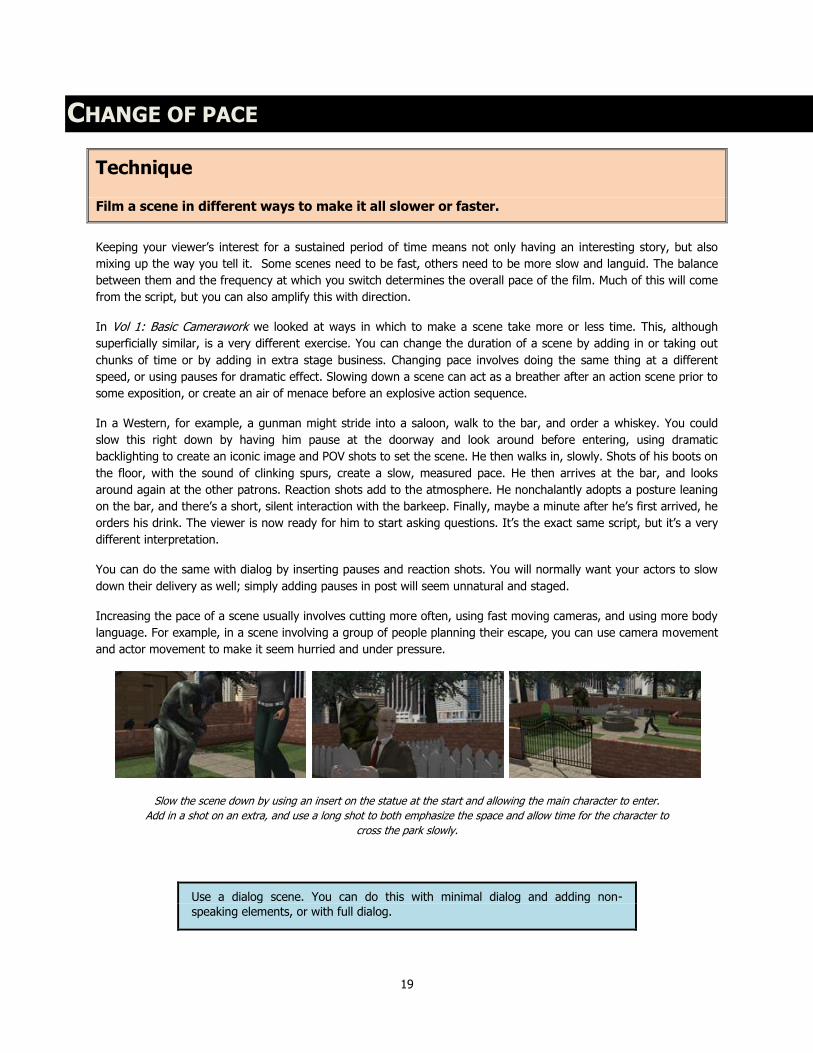
Slow the scene down by using an insert on the statue at the start and allowing the main character to enter.
Add in a shot on an extra, and use a long shot to both emphasize the space and allow time for the character to
cross the park slowly.
Use a dialog scene. You can do this with minimal dialog and adding non-
speaking elements, or with full dialog.
20
CHANGE OF PACE
Film the scene at a “normal” pace.
Then film it again, slowing it down or speeding it up as appropriate.
Review
How does this affect the way the scene comes across? Does the viewer perceive
the characters differently?
What did the characters do differently?
How did the camerawork change? Did you use the same shots and cutting
sequence?
What extra material did you show or cut out?
How was the duration affected? Is the scene now too long or too short?
How does music and sound affect the pacing?
Followup exercises
Put scenes into context by filming a sequence of scenes and changing pace between them.
Change pace mid-scene: start with a slow set-up and then turn it into an action scene, or start with an argument and
then have the participants resolve it and slowly reconcile.
Change the pace of a scene without changing the duration.
Change the pace of an action scene: try creating a slow-motion fight scene, for example.
21
DRAMATIC CONVERSATIONS
Technique
Film a conversation in a way that looks good on screen but would be unnatural in real life.
In Vol 1, Basic Camerawork, we covered the standard methods of filming a conversation. The conventional staging
for this is to have the two characters more or less facing each other, typically three to six feet apart. This is the way
people generally talk in real life; it’s just polite. However, this isn’t always what you want for films. The main criterion
is what looks good on screen, even if that means the actors are in positions they wouldn’t normally adopt.
A typical example is where one character is speaking to another’s back. This enables you to show both characters’
faces straight on, giving the viewer a clear look at their emotions. Seen from the side or in long shot, this would look
extremely odd, and the implication would be that one character is ignoring the other. When presented from the
front, it merely indicates a level of emotional detachment. This is often staged by having one character staring out
of a window.
You can create a different emotional state with the actors in the same positions by having the front character turn
their head back to face the rear character: this indicates both emotional detachment and engagement.
Another common unnatural staging is to have characters deliberately facing away from each other. This can create a
striking visual image, particularly if you have one character in profile and one full face. This would normally suggest
that they do not wish to interact, but in film it does not necessarily have the same implication.
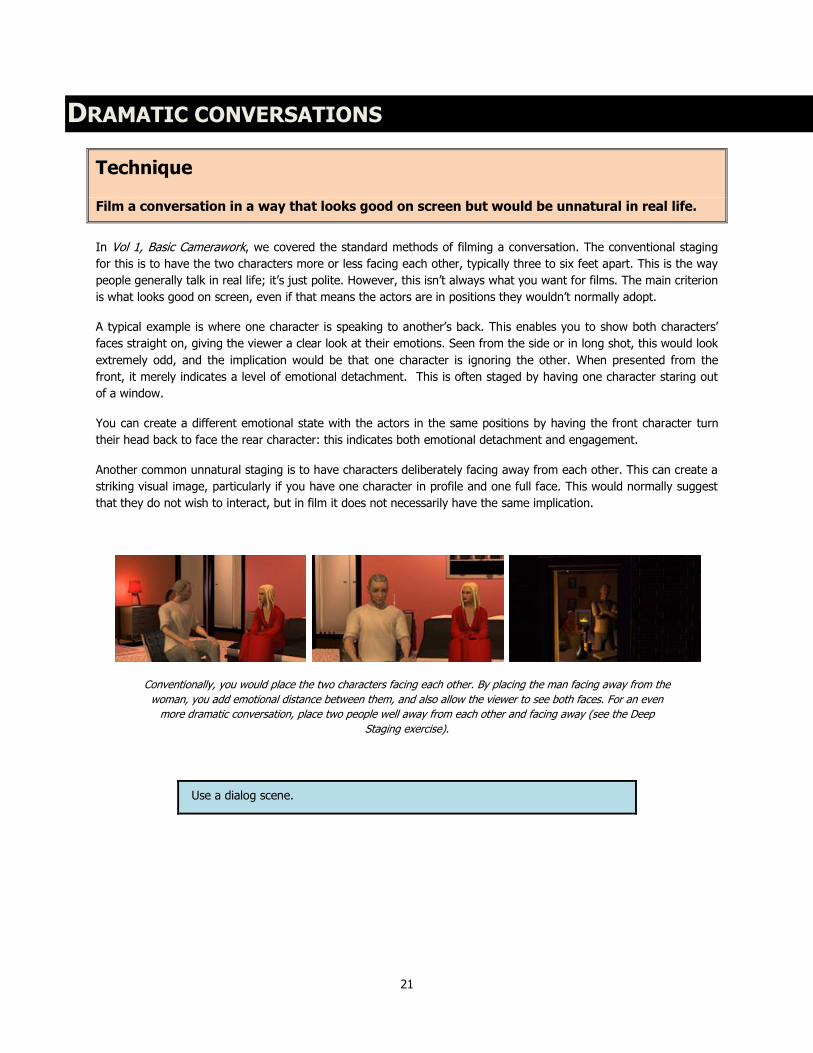
Conventionally, you would place the two characters facing each other. By placing the man facing away from the
woman, you add emotional distance between them, and also allow the viewer to see both faces. For an even
more dramatic conversation, place two people well away from each other and facing away (see the Deep
Staging exercise).
Use a dialog scene.
22
DRAMATIC CONVERSATIONS
Film the conversation using conventional staging.
Film it again using unnatural staging.
Review
Does the staging feel odd to the viewer? If so, does it come across as a stylistic
choice or a mistake?
What does the staging add to the perception of the relationship between the
characters?
How do you get the characters to arrive in those positions without it seeming
odd?
Do you need to keep absolute continuity between the master shot and the
unnatural shots? How can you use set design to make the actors appear to be in
sensible places?
What types of dialog call for this staging?
Does this work equally well with static and moving cameras?
What can you do with lighting to enhance the shot?
What framings work well? Does it work better with close or long shots?
Followup exercises
Experiment with unnatural staging for conversations involving three or more people.
23
GOING THROUGH DOORWAYS
Technique
Film someone walking through a doorway.
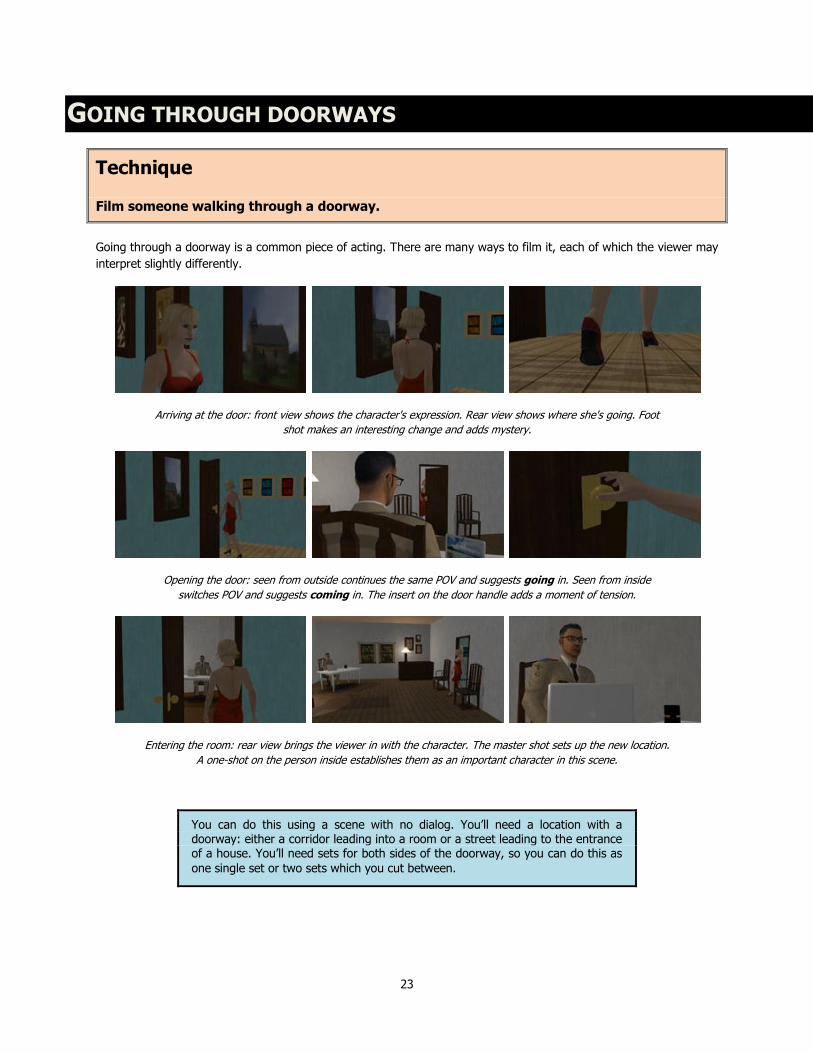
Going through a doorway is a common piece of acting. There are many ways to film it, each of which the viewer may
interpret slightly differently.
Arriving at the door: front view shows the character's expression. Rear view shows where she's going. Foot
shot makes an interesting change and adds mystery.
Opening the door: seen from outside continues the same POV and suggests going in. Seen from inside
switches POV and suggests coming in. The insert on the door handle adds a moment of tension.
Entering the room: rear view brings the viewer in with the character. The master shot sets up the new location.
A one-shot on the person inside establishes them as an important character in this scene.
You can do this using a scene with no dialog. You’ll need a location with a doorway: either a corridor leading into a room or a street leading to the entrance of a house. You’ll need sets for both sides of the doorway, so you can do this as
one single set or two sets which you cut between.
24
GOING THROUGH DOORWAYS
Film a single character walking along the street or corridor and into a house or room. Film it several different ways,
using different shot sizes. You should end up with at least 12 different versions of the same piece of action.
Static camera on the doorway as the character walks into shot
Static camera panning with the character to track them to the doorway
Dolly to keep the character in frame
Follow the character through the door
Precede the character through the door
Cut to the inside as the character walks through the door
Review
Compare all the versions. What feels different between them?
What difference does it make whether you show the door opening from the
inside, the outside, or cut on the action?
Do you need to do anything to tell the viewer where the character has just gone?
How many camera setups does it take in each case? Which is easiest to achieve?
What physical constraints might affect how you film this movement?
What issues do you face when using two separate sets rather than one complete
set?
Followup exercises
Have someone inside open the door. How does this affect your shot selection and editing?
Have a brief dialog in the doorway before the person enters.
Have two people conversing as they enter a room. How do you film this?
How would you shoot the movement without actually showing the door opening by using well chosen shots, editing,
and sound? (e.g. reaching for the door then cutting to a shot of the interior)
25
ACTION SCENES
Technique
Film an action scene so that it's clear what's happening.
Filming convincing action scenes is one of the hardest things a filmmaker has to do. It’s not enough simply to show
action happening on the screen. The filmmaker has to make the viewer feel involved, and give them a sense of the
tension. Simply delivering an effects-laden adrenaline jolt isn’t sufficient either: if the viewer doesn’t care about the
outcome, they won’t experience the emotional ride you want them to have.
This has to come mostly from a combination of staging, acting, camerawork and editing, but a lot also comes from
audio. Music and sound effects help the viewer to become more than a spectator.
A major challenge when filming action scenes is to establish spatial continuity and awareness. Occasionally you may
choose to disorient the viewer, but most of the time, you need to ensure that they know what is happening and
where. This requires close observance of the 180º rule and skilful use of long shots to set the scene, interspersed
with close-ups and inserts on specific bits of action.
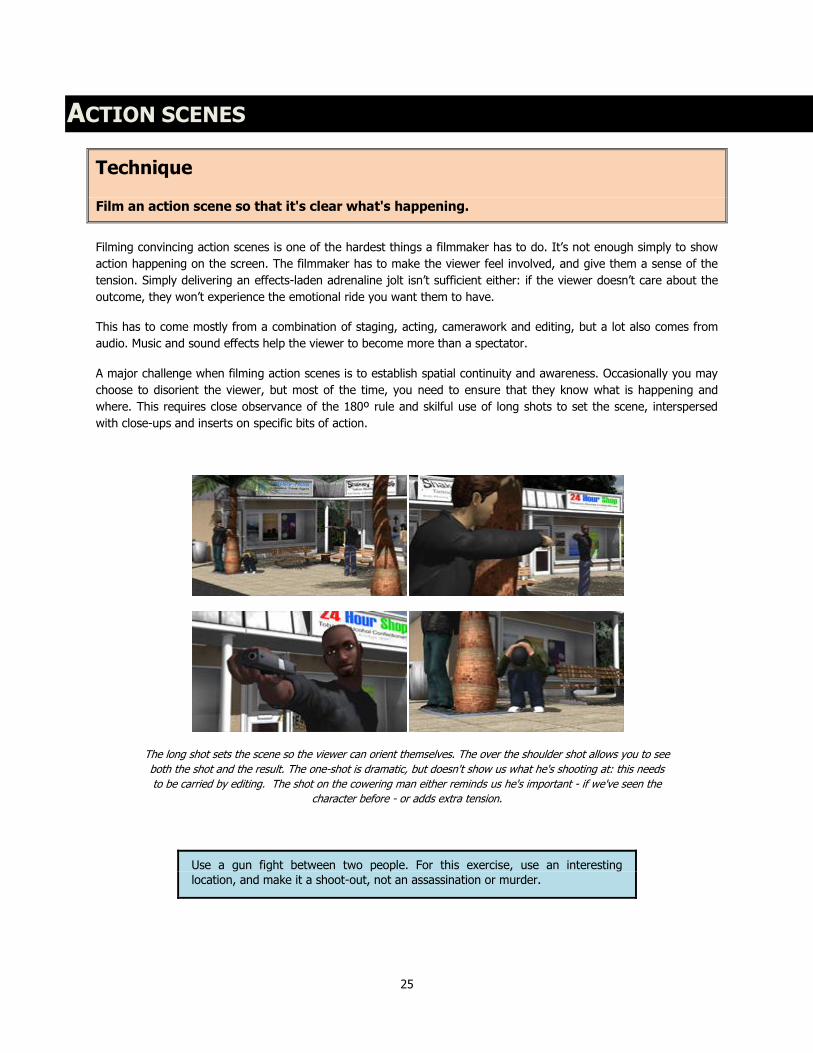
The long shot sets the scene so the viewer can orient themselves. The over the shoulder shot allows you to see
both the shot and the result. The one-shot is dramatic, but doesn't show us what he's shooting at: this needs
to be carried by editing. The shot on the cowering man either reminds us he's important - if we've seen the
character before - or adds extra tension.
Use a gun fight between two people. For this exercise, use an interesting
location, and make it a shoot-out, not an assassination or murder.
26
ACTION SCENES
Film the scene using mostly long shots with minimal editing and minimal actor movement.
Film the scene again, but use more close-ups, faster edits, and more actor movement; you may wish to add in an
element of chase.
Review
Compare the two versions. Which is more exciting? Which is easier to follow?
How much time do you spend on one-shots, how much on two-shots, and how
much on other shots?
What difference does it make using moving or static cameras?
How consistent do you need to be with the action to create an exciting
sequence? Can you violate strict continuity and get away with it? (For example,
firing too many shots without reloading, or moving the action around the set
without showing it?)
How “realistic” is your scene? Is that how people would fight in real life?
How do you work dialog into the scene, and what does it add?
If this was live action, where would you need to employ professional stunt crew?
Followup exercises
Reshoot the scene and make the viewer root for the other guy – without changing the script or the audio.
Add in extras and film the scene in a crowded location.
Add in a third main character who doesn’t participate in the fight (typically trying to hide or escape, but may be a
boss or neutral observer).
Film a fist fight, a large scale gun battle, a chase scene, and a car chase.
Experiment with slow motion.
Mismatch the audio and use slow, evocative music over a high-speed sequence.
27
TIME COMPRESSION
Technique
Shoot a scene or sequence in such a way that time is distorted, but without this being
obvious to the viewer or affecting the flow of the story.
One common film editing trick is to cut the film in such a way that parts of time are removed, so you can get quickly
from one setup to another, but without really appearing to do so.
One typical example is if you have a person entering a large room. It would take too long to film them walking the
full length of it to get to their mark, so you cut away during the walk and cut back when they are almost in place. If
you mask the cut with dialogue, the viewer probably won’t spot that they couldn’t have travelled that distance that
quickly.
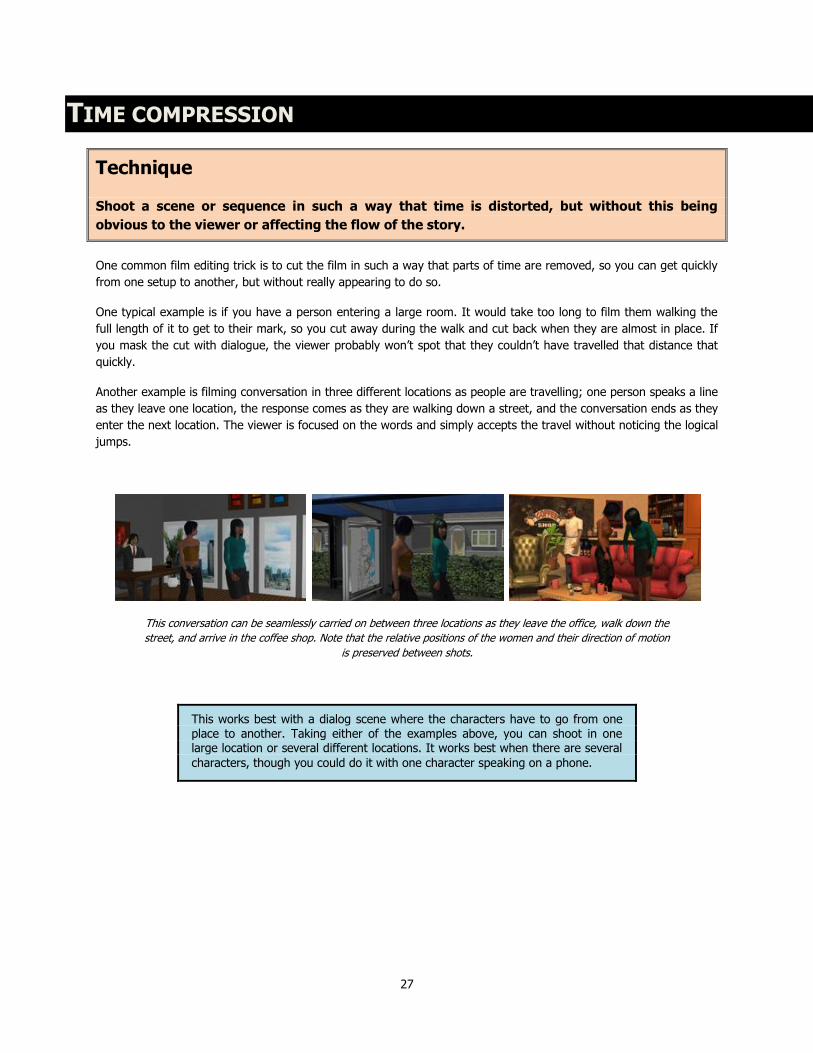
Another example is filming conversation in three different locations as people are travelling; one person speaks a line
as they leave one location, the response comes as they are walking down a street, and the conversation ends as they
enter the next location. The viewer is focused on the words and simply accepts the travel without noticing the logical
jumps.
This conversation can be seamlessly carried on between three locations as they leave the office, walk down the
street, and arrive in the coffee shop. Note that the relative positions of the women and their direction of motion
is preserved between shots.
This works best with a dialog scene where the characters have to go from one place to another. Taking either of the examples above, you can shoot in one large location or several different locations. It works best when there are several
characters, though you could do it with one character speaking on a phone.
28
TIME COMPRESSION
Film the scene in real time. If it’s in a single location, fix it so that the characters move between marks in the actual
time taken to make the movement. If it’s in several locations, film it so that the conversation takes place without
being cut.
Now re-edit it and re-shoot it with time compression, so that the action takes place faster.
Review
How does this affect the flow of the scene?
Does it appear to be a goof? Does the viewer say “huh, how’d they get there so
quick?”
Does it make a difference whether you cut during a line or between lines?
In the case of a single location, does it make a difference what you cut away to?
Another speaker, another object, or a different view?
In the case of a single location, when should you use master shots and when
should you use close-ups for effective masking?
Did you use the same camera angles and movements for both versions? If not,
which work better for each version?
What issues do you have with foley to make the footsteps sound continuous?
In the case of multiple locations, how do you cope with different ambience
between sets?
How much time can you lose using this technique?
When is it appropriate to use this technique? Why not just film everything in real
time as if it were live or documentary television?
Followup exercises
Experiment with more scenes to see where you can add more movement without adding time or the viewer noticing.
29
CHANGE OF TIME
Technique
Indicate the passage of hours, days, months or years as quickly as possible.
Many movies include a piece in the story where a significant amount of time passes. In order to avoid confusing the
viewer, you need to tell them that this has happened. One easy solution is to use on-screen text to say something
like “Five years later”. However, this can appear clumsy, and it can be more elegant to use some visual device to
indicate the same thing.
One of the most common tricks is to use a calendar or clock. This has the same effect as on-screen text, but is a
little less stark. For short durations, typically hours, you can use a series of shots of a character in the same set: sat
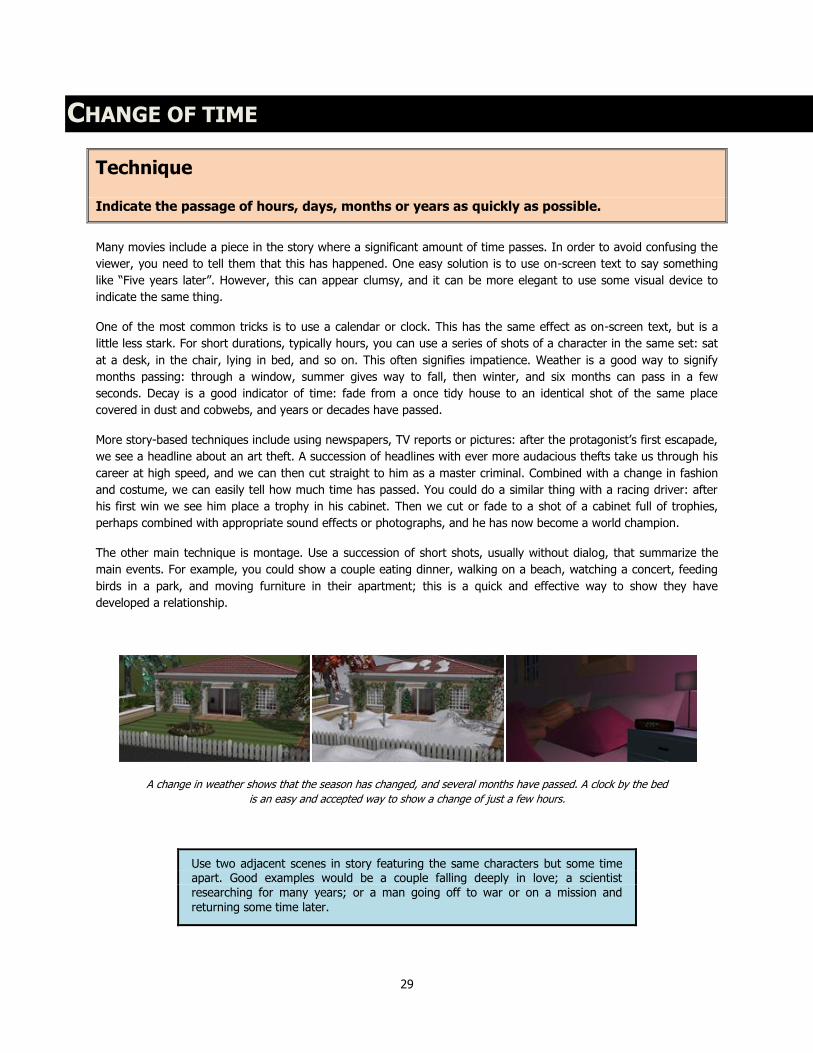
at a desk, in the chair, lying in bed, and so on. This often signifies impatience. Weather is a good way to signify
months passing: through a window, summer gives way to fall, then winter, and six months can pass in a few
seconds. Decay is a good indicator of time: fade from a once tidy house to an identical shot of the same place
covered in dust and cobwebs, and years or decades have passed.
More story-based techniques include using newspapers, TV reports or pictures: after the protagonist’s first escapade,
we see a headline about an art theft. A succession of headlines with ever more audacious thefts take us through his
career at high speed, and we can then cut straight to him as a master criminal. Combined with a change in fashion
and costume, we can easily tell how much time has passed. You could do a similar thing with a racing driver: after
his first win we see him place a trophy in his cabinet. Then we cut or fade to a shot of a cabinet full of trophies,
perhaps combined with appropriate sound effects or photographs, and he has now become a world champion.
The other main technique is montage. Use a succession of short shots, usually without dialog, that summarize the
main events. For example, you could show a couple eating dinner, walking on a beach, watching a concert, feeding
birds in a park, and moving furniture in their apartment; this is a quick and effective way to show they have
developed a relationship.
A change in weather shows that the season has changed, and several months have passed. A clock by the bed
is an easy and accepted way to show a change of just a few hours.
Use two adjacent scenes in story featuring the same characters but some time apart. Good examples would be a couple falling deeply in love; a scientist researching for many years; or a man going off to war or on a mission and
returning some time later.
30
CHANGE OF TIME
Film the two scenes using a cut and on-screen text to show the time change.
Film them again, using various techniques to indicate the time change. You can add in extra shots or stills as
required to create montage. Do not use on-screen text.
Review
How does using visual techniques instead of text affect the flow of the story?
What additional information can you carry using montage as well as the time
change?
Which techniques work best for different lengths of time?
How much time do you add to the movie by using these techniques?
Do you need to use a different visual style for the intermediate sections?
What music works well?
How long is each clip in a montage sequence?
How did you decide what to put into the montage? How did you ensure they
would edit well together?
In a montage sequence, how many clips did you use? How much would it add to
the production budget and schedule to do it that way?
Followup exercises
Create a sequence that works effectively over narration or dialog.
Create a sequence with a long duration, so that the characters now appear physically different. How does the viewer
know that they’re the same people?
31
USING COMPUTERS
Technique
Film a scene in which someone uses a computer.
Computers are so tightly integrated into our everyday lives that it’s almost inevitable they’ll pop up in any
contemporary movie. They’re no longer something you only find in hacker movies, hi-tech thrillers or sci-fi; even if
you’re making a romcom you’ll probably need to shoot scenes where people are sending emails, looking things up
online, or writing diaries. However, movie computers aren’t anything like real computers, as any programmer or
interface designer will tell you. They’re not designed to function; they’re designed to look good on screen.
The most obvious difference is that generally the text is much larger so that the viewer can actually read what’s on
the screen. While it’s normal for most of us to have several windows open at once, this is rarely the case in the
movies unless you want to indicate that someone’s a hardcore geek. Then, there are all the added sounds. Movie
computers – like most gadgets in movies – make a lot of noise. It would drive you crazy in real life, but it’s a good
way to tell the viewer that “something technical is happening”. And lastly, there’s the actual design. Take, for
example, passwords. Real computers have a password box which shows a bunch of asterisks as you type and then
lets you in or doesn’t. When you crack into a movie computer, it probably has some kind of fancy design that swirls
around as you gradually unlock it. It’s totally absurd, but it adds tension as you see the hacker getting nearer and
nearer. It works even better if you have a computer voice counting down, telling you “18 seconds to enter correct
password… 14 seconds to enter correct password…”
Creating computer screens for movies is an interesting challenge. Your actors, of course, are not controlling the
computers. They’re just pretending to do it, and what’s on screen is a pre-recorded video that they synchronize with.
You therefore need to create that entire sequence in advance and play it back, allowing for all the cuts you’re going
to use. The more you show the screen, the more you have to build.
How much you show the actual computer is a stylistic decision. You can often get away with filming the people and
not showing the screen at all if the dialog can carry the story adequately. This also tells the viewer that what’s
important is what’s happening to the person, not what’s happening on screen. However, this can look weak, and
you’re missing an opportunity to give the viewer a lot of information. If a cop is hunting for data about a criminal, the
computer screen can show several pictures, and a load of background information; although the viewer can’t take it
all in, they can still pick up a lot. (And, if they’re so inclined, they can rewind the movie, pause it, and see all the
extra data you packed in there. It's a nice place to have some fun.)
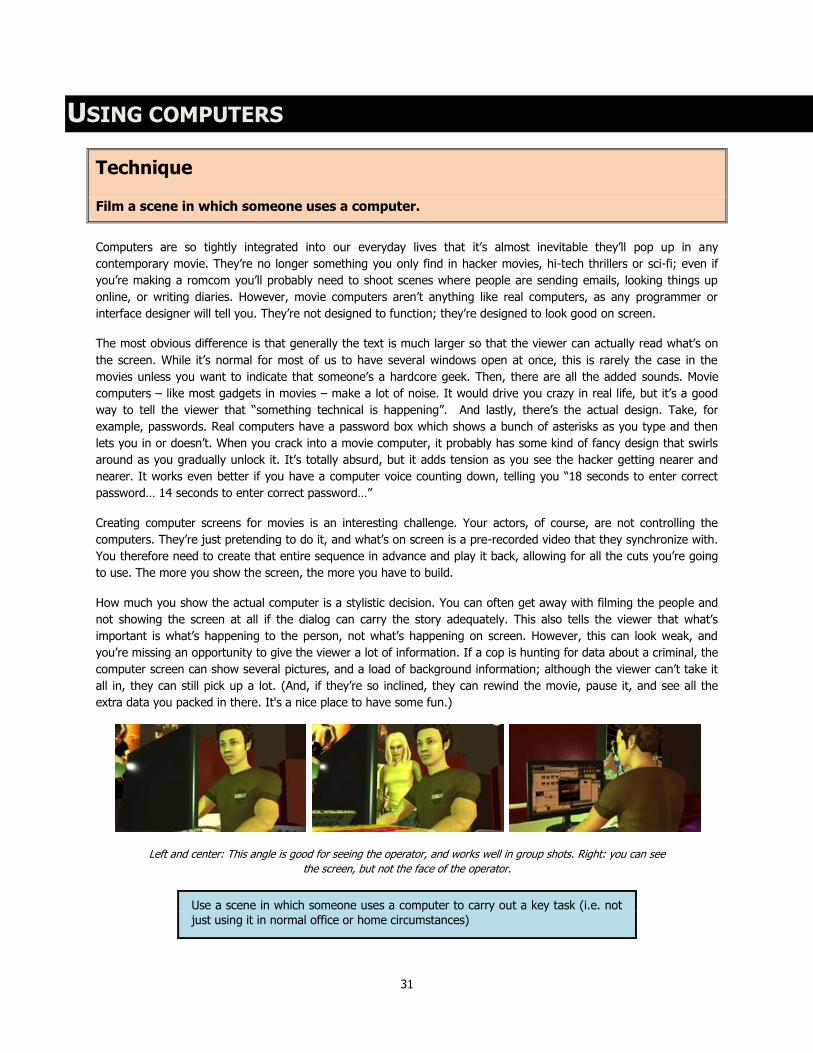
Left and center: This angle is good for seeing the operator, and works well in group shots. Right: you can see
the screen, but not the face of the operator.
Use a scene in which someone uses a computer to carry out a key task (i.e. not
just using it in normal office or home circumstances)
32
USING COMPUTERS
Film the scene showing the computer screen as little as possible.
Film the scene again showing the computer screen as much as possible.
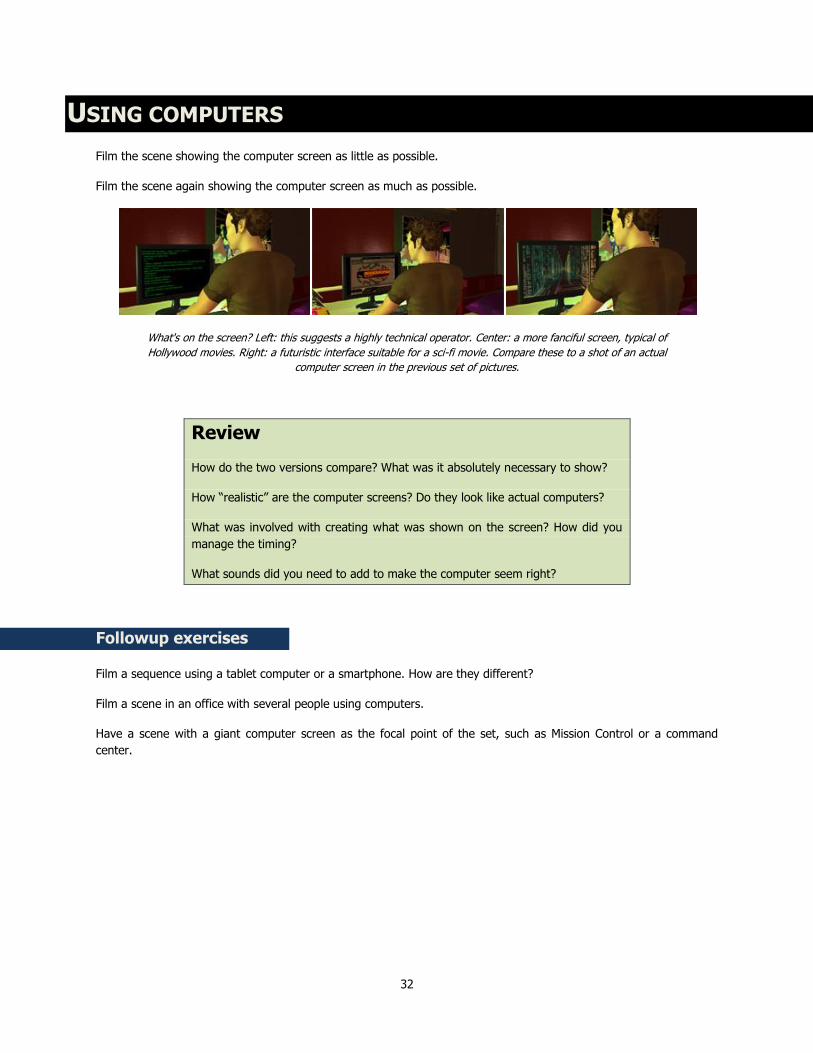
What's on the screen? Left: this suggests a highly technical operator. Center: a more fanciful screen, typical of
Hollywood movies. Right: a futuristic interface suitable for a sci-fi movie. Compare these to a shot of an actual
computer screen in the previous set of pictures.
Review
How do the two versions compare? What was it absolutely necessary to show?
How “realistic” are the computer screens? Do they look like actual computers?
What was involved with creating what was shown on the screen? How did you
manage the timing?
What sounds did you need to add to make the computer seem right?
Followup exercises
Film a sequence using a tablet computer or a smartphone. How are they different?
Film a scene in an office with several people using computers.
Have a scene with a giant computer screen as the focal point of the set, such as Mission Control or a command
center.
33
TV MONITORS
Technique
Film a scene including a TV monitor or similar screen showing action in some other location.
Computers aren’t the only type of screen the filmmaker has to deal with. Televisions are equally common, as are
monitors for security cameras or similar devices. These are useful for showing what’s happening elsewhere, and also
for creating a relationship between the events in the two locations. This is most often seen in thrillers or sci-fi
movies, but could equally well be used in many other types of movie. One simple example might be a video camera
showing who’s at the door.
Creating the footage to be shown on the monitor requires some forethought. In theory, you could use a real camera
and get the two sets of actors to coordinate their actions. In reality, though, this is usually impractical, as the two
locations could be far apart and the shooting could take place on different days. As a result, you need to shoot the
TV footage in advance and let the main actors work with it. This is made more complex if you have several cameras
filming the same place: the action has to be perfectly synchronized, or it will jar badly.
The action on the monitor needs to be timed carefully so that it meshes well with the main dialog: for example, if the
main characters are watching an intruder breaking in, you may have specific dialog that covers his initial arrival and
then him picking a lock. The actor playing the intruder needs to know exactly how long to spend working on the lock
so that the dialog fits; alternatively, you need to cut carefully to hide any discrepancies. You generally won’t get the
opportunity for reshoots if it doesn’t work first time.
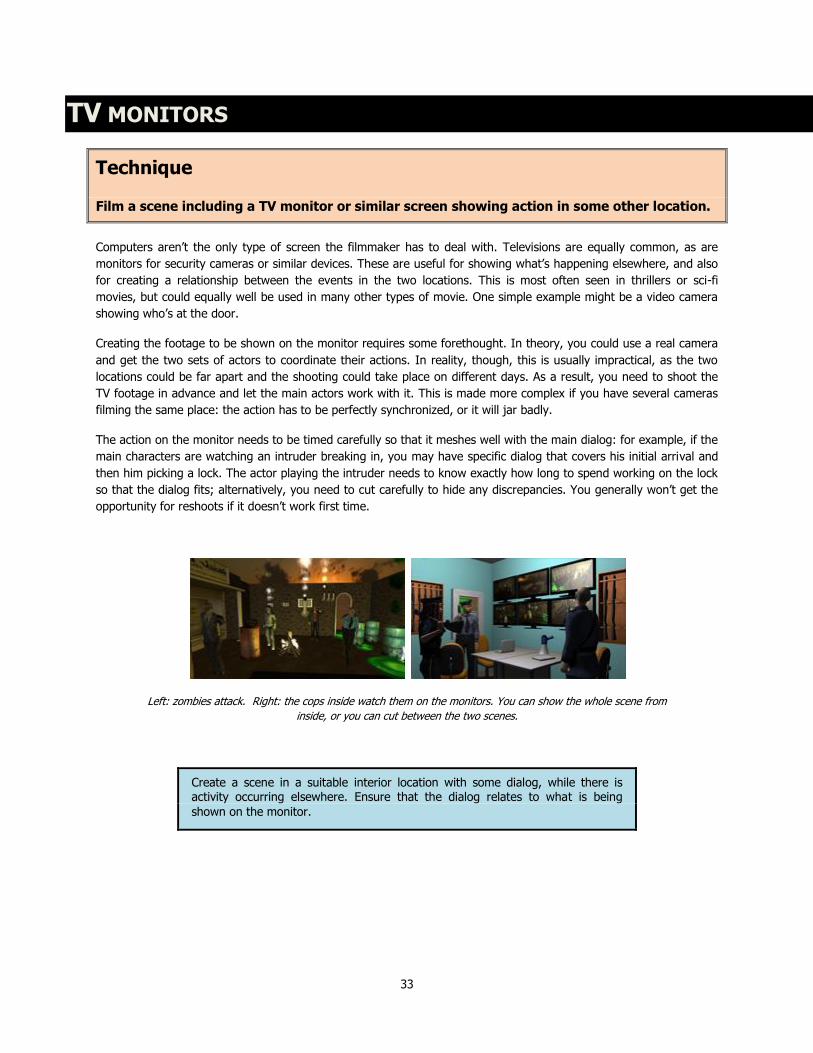
Left: zombies attack. Right: the cops inside watch them on the monitors. You can show the whole scene from
inside, or you can cut between the two scenes.
Create a scene in a suitable interior location with some dialog, while there is activity occurring elsewhere. Ensure that the dialog relates to what is being
shown on the monitor.
34
TV MONITORS
Film the scene so that the viewer can see action in both locations using the monitor.
Review
Is it easy for the viewer to see what’s going on?
How do you film the monitor: do you use close shots or do you place it in the
background of the shots?
How did you create the monitor feed and ensure the timing matched the action
in the main scene? What issues did you encounter?
What difference does it make if there is sound coming from the monitor?
Followup exercises
How well does it work if you cut between the external action shown on the monitor and the actual location where the
action is taking place? What problems does this create?
Create a scene where the character in the main set is directly interacting with the characters in the monitor, i.e. is
giving them orders or conversing with them.
Use a computer, laptop, or handheld device as the monitor.
Create a scene with several monitors simultaneously showing the same or different locations.
Create a scene with several monitors all showing POV shots of the same location, e.g. a group of soldiers with
helmet-mounted cameras.
35
FILMING MUSIC
Technique
Film a music sequence
Even if you’re not making a musical or a music video, you may need to film a sequence that involves musicians. They
could be in the background to the scene, such as the cantina band in Star Wars or performers at a nightclub.
Alternatively, they could be the focus of the scene, such as Jane Horrocks’ character in Little Voice or Joaquin
Phoenix as Johnny Cash in Walk the Line. These sequences generally call for a very different technique to making
music videos, and treating music in these two contexts requires two different approaches.
The key thing for the director to remember is that when filming background music, the aim is to create context for
the scene. Very little of the music may be shown on screen, and it is often dropped into the background of the audio
to allow the main dialog to dominate.
When filming a story-focused sequence, the viewer needs to be focused on the performer (and the reactions to the
performance). The actual music may well be heavily edited, instead of a full routine. It’s not unusual for a whole
concert to consist of just one song, often trimmed down to two or three minutes.
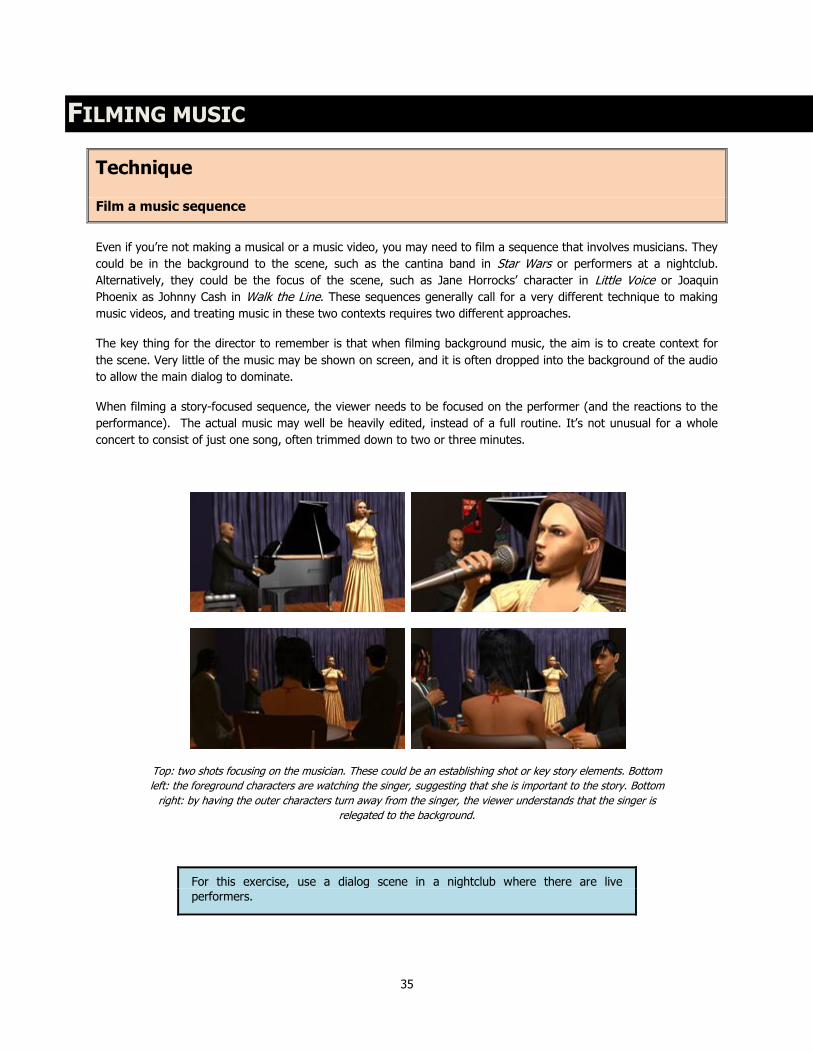
Top: two shots focusing on the musician. These could be an establishing shot or key story elements. Bottom
left: the foreground characters are watching the singer, suggesting that she is important to the story. Bottom
right: by having the outer characters turn away from the singer, the viewer understands that the singer is
relegated to the background.
For this exercise, use a dialog scene in a nightclub where there are live
performers.
36
FILMING MUSIC
Film the scene, incorporating shots of the live performances.
Next, add a sequence where one of the speaking characters gets on the stage and either sings or plays an
instrument, as if this were a significant part of the story.
Review
How did you film the two sequences differently?
How much screen time did you give the musicians versus the audience or main
characters?
What did you do to the audio?
Followup exercises
Imagine you have a famous musician doing a cameo appearance in a background music sequence. How would you
film it differently to make best use of that person but without detracting from the scene?
Film a scene in a large concert hall or similar venue instead of a nightclub.
Make a music video to the same song in a variety of styles.
Film a complete gig.
Film a concert using montage to edit it down to a few minutes but incorporating several songs and an encore.
37
SEX SCENES
Technique
Film a sex scene suitable for an R-rated (18-rated) or PG-13 rated (15-rated) movie.
It’s often necessary to depict sex in movies. This doesn’t mean that the movie is about sex or is pornographic. It’s
just a part of the story, and could turn up in a romantic comedy, a thriller, a horror film, or a historical drama. This is
something that needs to be handled sensitively and with very careful regard for both the intended audience and the
story. Sometimes, just a few well-chosen shots can convey that sex is taking place – or has taken place – and this
may be quite sufficient for the purpose. In other cases, you may wish to show more if it is appropriate, but even so,
you still need to balance explicit content with the needs of the story and any ratings issue.
The main thing to realize when shooting a sex scene is that it’s usually not about sex. It’s about the people, their
feelings for each other, and how it affects the story and their relationship. As a result, a lot of what you film may be
implied, rather than explicit. You can use lighting to suggest more than you show, or soft focus to create a romantic
atmosphere, film cutaways to discarded clothing, or have much of the action taking place under sheets. You may
also be constrained by nudity clauses in the actors’ contracts, or you may have to cut in shots using body doubles.
Sex scenes as they appear on screen are often very short: you show the beginning, and then dissolve to another
scene or afterwards and let the viewer’s imagination fill in the rest.
Of course, this is one thing they don’t teach you in film school, for obvious reasons. It’s important for your actors to
feel comfortable while filming a sex scene; although they may be used to the idea of kissing another actor, shooting
a naked sequence in front of a film crew is a stressful experience, and you need to reassure them. If you’re nervous
and unsure what you want to get on film, everyone else will be nervous too. So here’s a way to find out what works
without embarrassing yourself or anyone else.
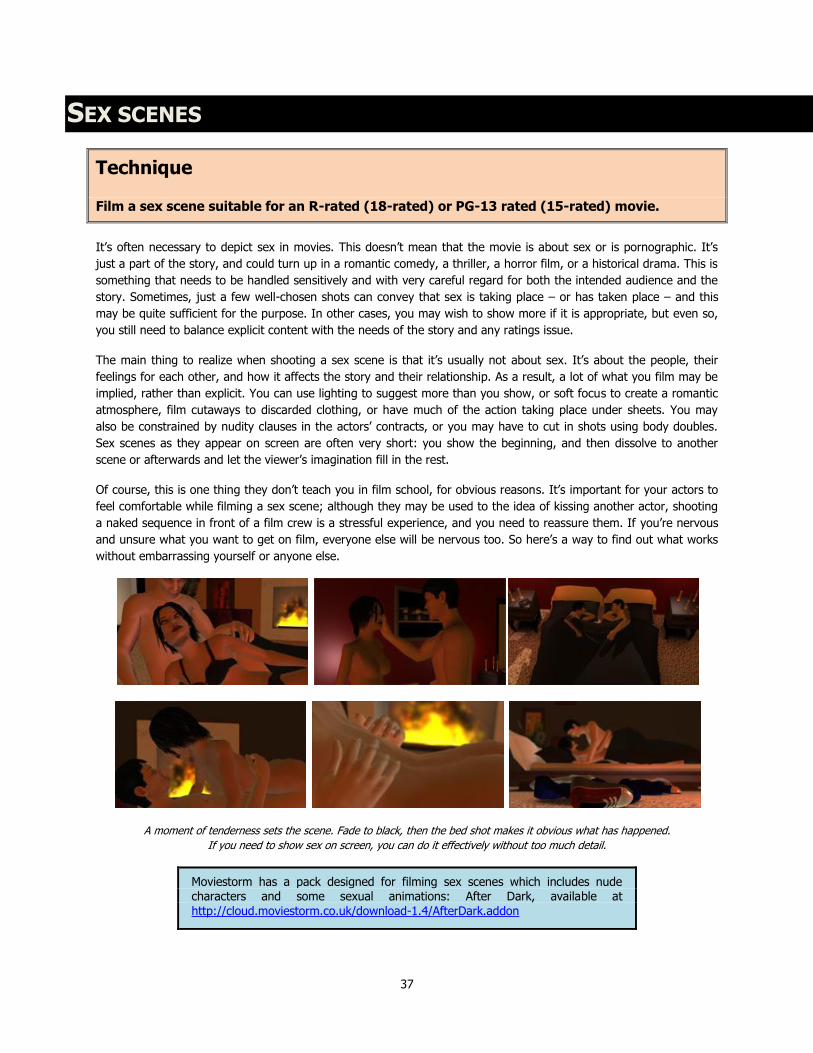
A moment of tenderness sets the scene. Fade to black, then the bed shot makes it obvious what has happened.
If you need to show sex on screen, you can do it effectively without too much detail.
Moviestorm has a pack designed for filming sex scenes which includes nude characters and some sexual animations: After Dark, available at
http://cloud.moviestorm.co.uk/download-1.4/AfterDark.addon
38
SEX SCENES
Film the scene showing as little physical contact and nudity as possible but make it obvious what’s happened.
Film it again using more explicit shots to make the scene titillating but not pornographic.
Review
Does the scene get across the emotions you wanted?
Did the sex feel like an integral part of the story or was it unnecessary?
How much intimate detail did you have to show to make the scene work?
How long is the scene?
Compare the two versions: did the characters do different things, or did you just
film and edit them differently?
What did music and sound effects add to the scene? How much can you imply
using these instead of visuals?
Did you feel comfortable planning, shooting and editing the sequence?
What would you do differently if you were filming with real actors?
Followup exercises
Film scenes trying to evoke specific emotions: pity, disgust, love or comedy.
39
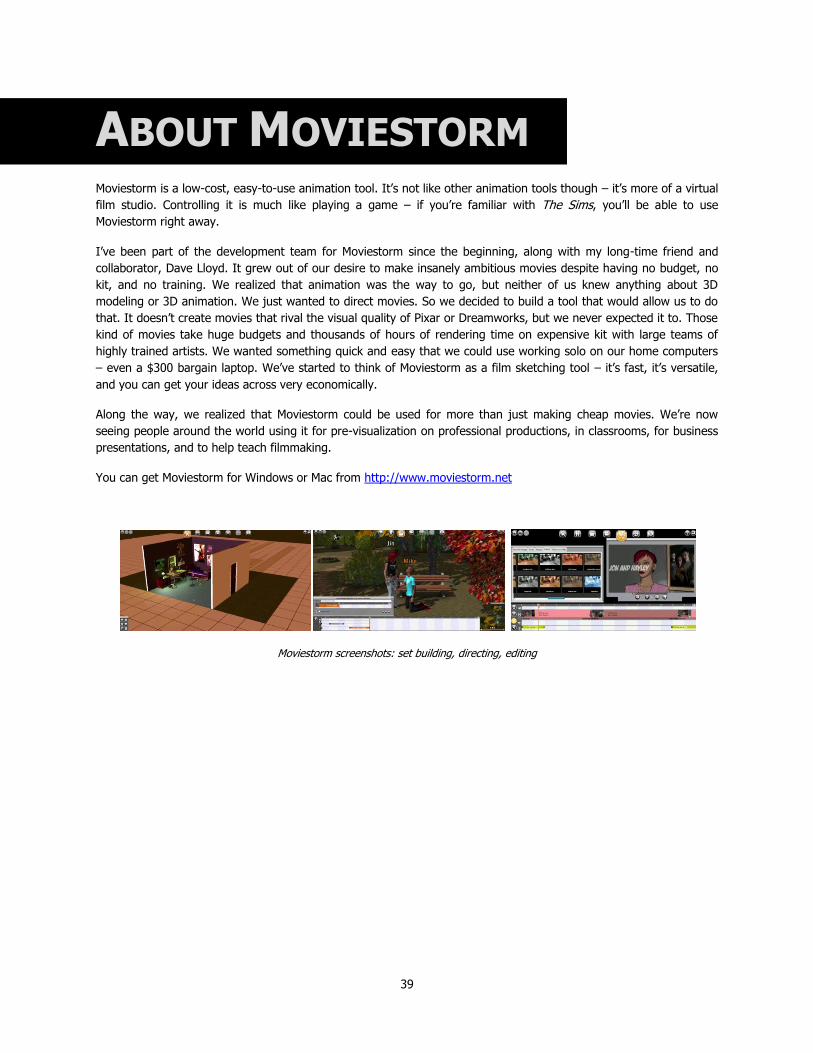
ABOUT MOVIESTORM Moviestorm is a low-cost, easy-to-use animation tool. It’s not like other animation tools though – it’s more of a virtual
film studio. Controlling it is much like playing a game – if you’re familiar with The Sims, you’ll be able to use
Moviestorm right away.
I’ve been part of the development team for Moviestorm since the beginning, along with my long-time friend and
collaborator, Dave Lloyd. It grew out of our desire to make insanely ambitious movies despite having no budget, no
kit, and no training. We realized that animation was the way to go, but neither of us knew anything about 3D
modeling or 3D animation. We just wanted to direct movies. So we decided to build a tool that would allow us to do
that. It doesn’t create movies that rival the visual quality of Pixar or Dreamworks, but we never expected it to. Those
kind of movies take huge budgets and thousands of hours of rendering time on expensive kit with large teams of
highly trained artists. We wanted something quick and easy that we could use working solo on our home computers
– even a $300 bargain laptop. We’ve started to think of Moviestorm as a film sketching tool – it’s fast, it’s versatile,
and you can get your ideas across very economically.
Along the way, we realized that Moviestorm could be used for more than just making cheap movies. We’re now
seeing people around the world using it for pre-visualization on professional productions, in classrooms, for business
presentations, and to help teach filmmaking.
You can get Moviestorm for Windows or Mac from http://www.moviestorm.net
Moviestorm screenshots: set building, directing, editing
40
Matt Kelland is one of the founders of Moviestorm. He’s also founded several
other companies, including one of the first ISPs in Britain way back in the early
90s, one of the first mobile phone games companies, a digital & transmedia
publishing house based in Los Angeles, and an events promotion company in
Orlando, Florida. Matt has also written or contributed to several books, designed
computer, board and card games, and has had his animations shown at film
festivals around the world, including Sundance. He now lives in Orlando, and
spends his free time cooking, listening to local blues bands, and avoiding the
theme parks as much as possible.
He blogs, irreverently, on a range of topics, occasionally including films, at
http://mattkelland.blogspot.com