Embed Size (px)
Citation preview
Project: Go Nuts
Pattern may be downloaded for personal use only. No electronic or printed reproduction permitted without the prior written consent of Meredith Corporation. ©Meredith Corporation 2015. All rights reserved. 1
American Patchwork & Quilting | Quilt Sampler | Quilts and More
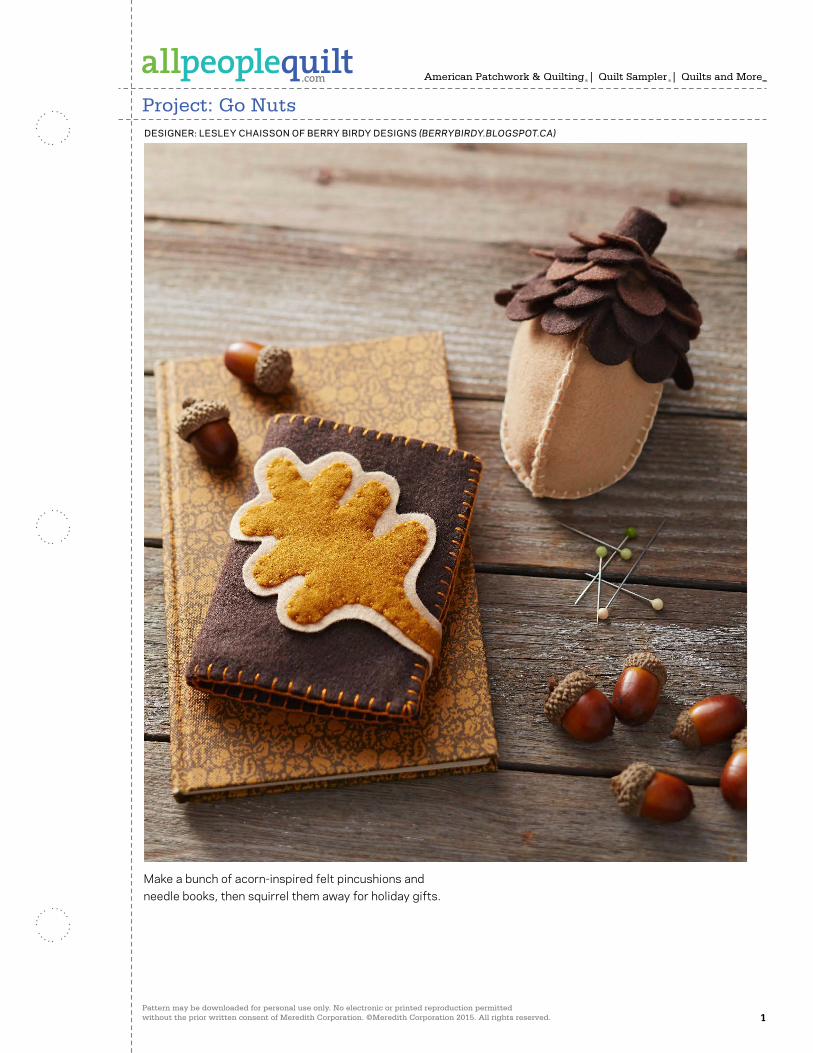
DESIGNER: LESLEY CHAISSON OF BERRY BIRDY DESIGNS (BERRYBIRDY.BLOGSPOT.CA)
Make a bunch of acorn-inspired felt pincushions and needle books, then squirrel them away for holiday gifts.
Project: Go Nuts
Pattern may be downloaded for personal use only. No electronic or printed reproduction permitted without the prior written consent of Meredith Corporation. ©Meredith Corporation 2015. All rights reserved. 2
American Patchwork & Quilting | Quilt Sampler | Quilts and More
MaterialsFOR ACORN PINCUSHION• 6×10" piece tan felt (acorn body)• 5×10" piece dark brown felt
(acorn top, stem)• 21⁄2×10" piece brown felt (acorn
top)• Freezer paper• Embroidery floss: tan and brown• Polyester fiberfill
Finished pincushion: 21⁄2×43⁄4"
About FeltCommercial crafts felt, available at crafts stores, is made of polyester and/or wool. If you use polyester felt, be careful when pressing with a hot iron; it can melt the fibers.
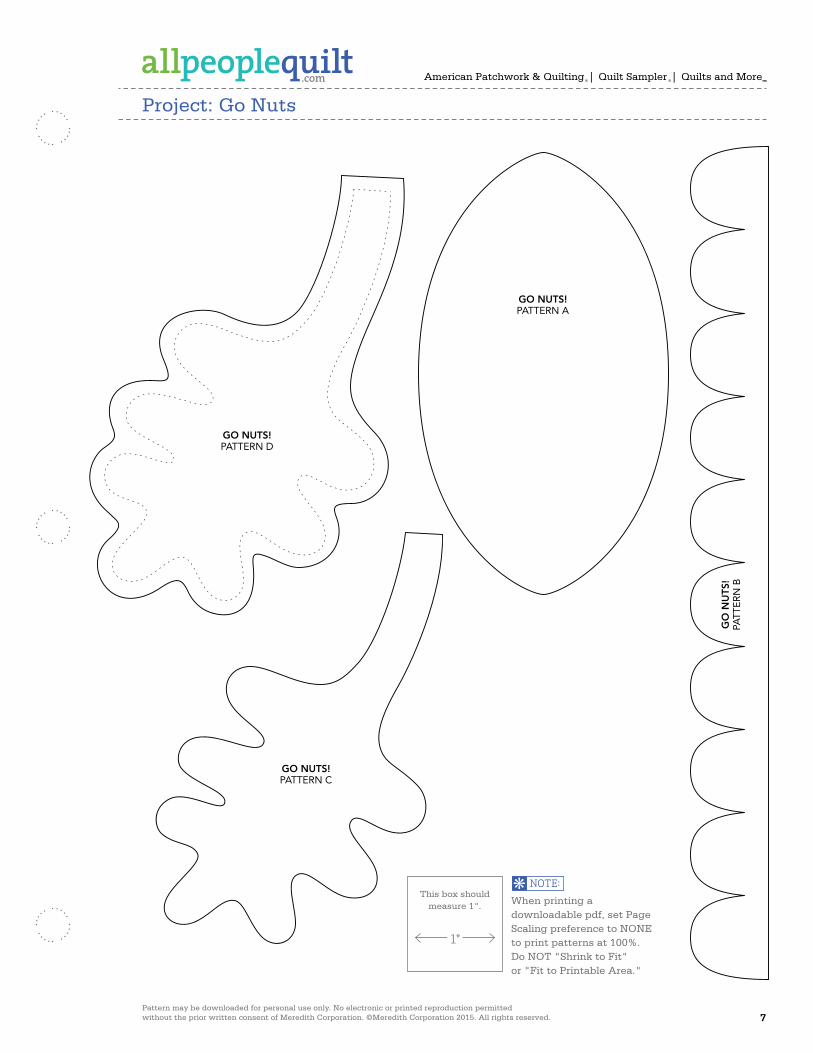
Cut FabricsCut pieces in the following order. Patterns are on page 7. To use freezer paper for cutting A and B pieces, complete the following steps.
1. Lay freezer paper, shiny side down, over patterns. Use a pencil to trace each pattern the number of times indicated in cutting instructions, leaving 1⁄2" between tracings. Cut out each freezer-paper shape roughly 1⁄4" outside traced lines.
2. Using a hot dry iron, press each freezer-paper shape, shiny side down, onto designated felt; let cool. Cut out felt shapes on drawn lines. Peel off freezer paper.
From tan felt, cut: • 3 of Pattern AFrom dark brown felt, cut: • 3 of Pattern B• 1—3⁄4×3" stripFrom brown felt, cut: • 2 of Pattern B
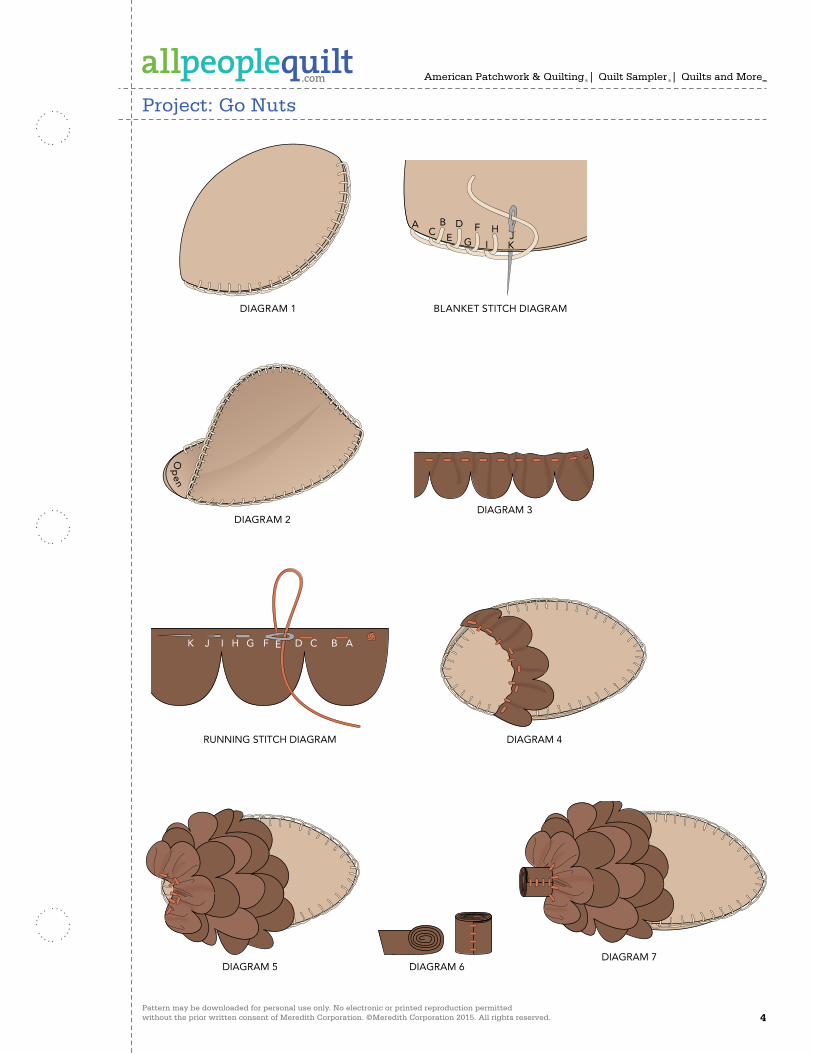
Assemble Pincushion1. Layer two tan felt A pieces.
Using two strands of tan embroidery floss, blanket-stitch edges together along one curve (Diagram 1).
To blanket-stitch, pull needle up at A, form a reverse L shape with floss, and hold angle of L shape in place with your thumb (Blanket Stitch Diagram). Push needle down at B and come up at C to secure the stitch. Continue in the same manner around curved edge. Do not cut thread.
2. Pull apart remaining curved edges of Step 1 unit. Align one edge of remaining tan felt A piece with an edge of Step 1 unit and blanket-stitch together.
3. Referring to Diagram 2, repeat Step 2 with remaining curved edges, leaving a 2" opening at end for stuffing. Do not cut thread. Stuff with fiberfill. Continue blanket-stitching to close opening and make acorn body.
4. Using brown embroidery floss, hand-sew a running stitch along straight edge of a dark brown felt B piece (Diagram 3).
To make a running stitch, pull needle up at A and insert it back in at B (Running Stitch Diagram). Continuein the same manner.
5. Slightly gather Step 4 piece and place around acorn body about 1" from top (Diagram 4). Whipstitch to acorn body along gathered edge.
6. Referring to Diagram 5, repeat steps 4 and 5 with remaining dark brown and brown felt B pieces, covering stitching of
previous row, to make acorn top. If desired, trim excess B scallops as you work your way toward top of acorn.
7. Starting on one short end, tightly roll dark brown felt 3⁄4×3" strip; secure with a few whipstitches to make stem (Diagram 6).
8. Whipstitch stem onto acorn top to complete pincushion (Diagram 7).
MaterialsFOR NEEDLE BOOK• 4×5" rectangle gold felt (small
leaf)• 12" square tan felt (large leaf,
pages)• 9" square dark brown felt
(needle book body)• Freezer paper• 1⁄2×3⁄4" piece hook-and-loop tape• Embroidery floss: gold
Finished needle book: 31⁄2×41⁄2"
About FeltCommercial crafts felt, available at crafts stores, is made of polyester and/or wool. If you use polyester felt, be careful when pressing with a hot iron; it can melt the fibers.
Cut FabricsCut pieces in the following order. Patterns are on page 7. To use freezer paper for cutting C and D pieces, refer to Cut Fabrics, steps 1 and 2.
From gold felt, cut: • 1 of Pattern CFrom tan felt, cut: • 2—4×63⁄8" rectangles• 1 of Pattern DFrom dark brown felt, cut: • 2—41⁄2×67⁄8" rectangles
Project: Go Nuts
Pattern may be downloaded for personal use only. No electronic or printed reproduction permitted without the prior written consent of Meredith Corporation. ©Meredith Corporation 2015. All rights reserved. 3
American Patchwork & Quilting | Quilt Sampler | Quilts and More
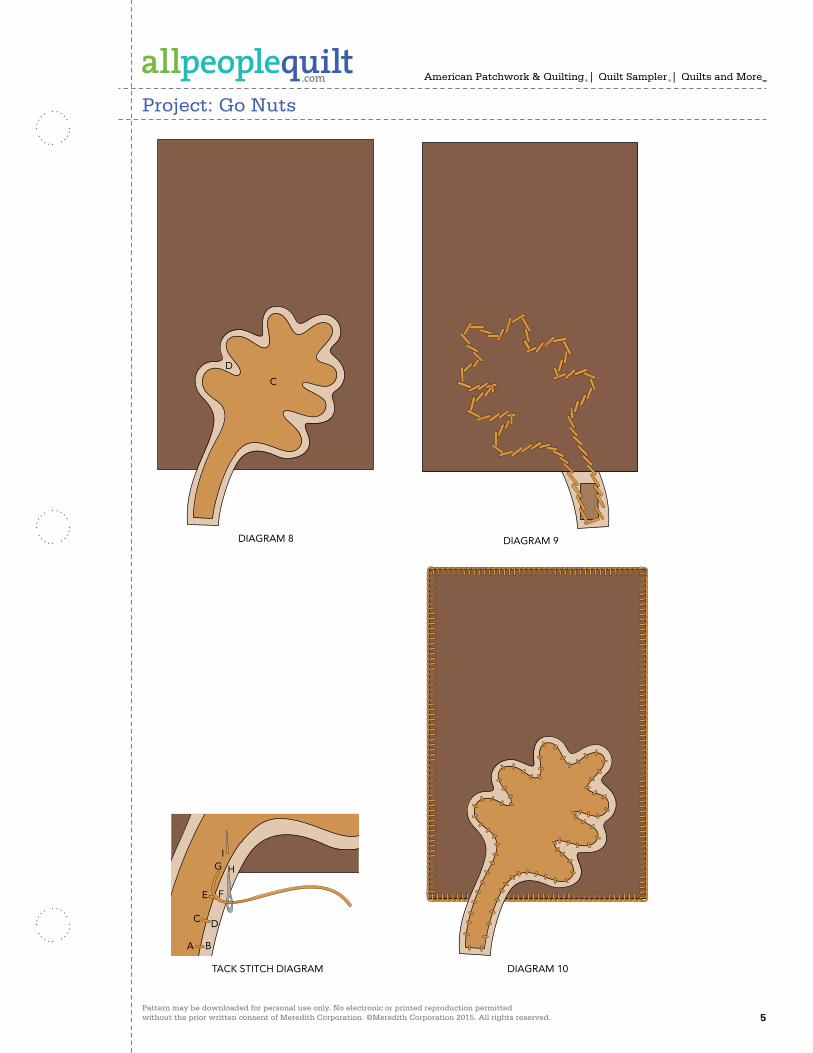
Assemble Needle Book1. Center gold felt C small leaf over
tan felt D large leaf; pin pieces together.
2. Referring to Diagram 8, position layered leaf pieces on a dark brown felt 41⁄2×67⁄8" rectangle, leaving 1" of stem extending beyond a short end of rectangle; pin in place.
3. Place one side of hook-and-loop tape on wrong side of tan leaf stem that extends beyond rectangle (Diagram 9). Using two strands of gold embroidery floss, tack-stitch around gold small leaf through all layers, including hook-and-loop tape, to make needle book front. (The tan large leaf will not have any stitching around outer edges.)
To tack-stitch, bring needle up at A and push it down at B (Tack Stitch Diagram). Come up at C to start next stitch and continue in the same manner around entire shape.
4. Layer needle book front atop remaining dark brown felt 41⁄2×67⁄8" rectangle. Starting and stopping under the stem, blanket-stitch edges together using gold embroidery floss to make needle book body (Diagram 10).
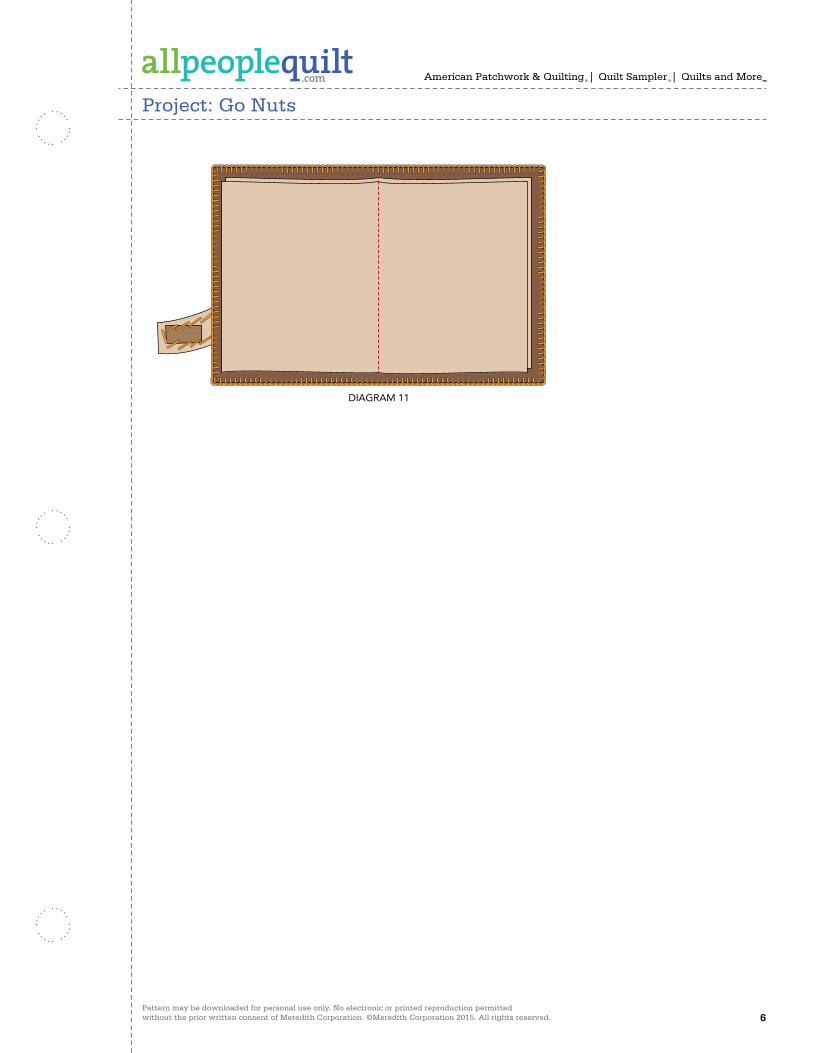
5. Layer and center two tan felt 4×63⁄8" rectangles on wrong side of needle book body (Diagram 11). Mark a vertical centerline on tan felt rectangles. Machine-stitch on centerline through all layers to make pages. Designer Lesley Chaisson used dark brown thread in her bobbin and tan thread on top so the stitches would match the felt colors.
6. Fold needle book body in half along centerline. Wrap stem to back side and position remaining hook-and-loop piece under the stem end. Hand-stitch hook-and-loop piece in place to complete needle book.
Project: Go Nuts
Pattern may be downloaded for personal use only. No electronic or printed reproduction permitted without the prior written consent of Meredith Corporation. ©Meredith Corporation 2015. All rights reserved. 4
American Patchwork & Quilting | Quilt Sampler | Quilts and More
DIAGRAM 1
Quilts and More Fall 2013CMRAcorn PincushionDiagram 1C. Neubauer 5-15-13100546092
E G I KC
A DB F HJ
BLANKET STITCH DIAGRAM
Quilts and More Fall 2013CMRAcorn PincushionBlanket StitchC. Neubauer 5-15-13100546093
Op
en
DIAGRAM 2
Quilts and More Fall 2013CMRAcorn PincushionDiagram 2C. Neubauer 5-15-13100546094
DIAGRAM 3
Quilts and More Fall 2013CMRAcorn PincushionDiagram 3C. Neubauer 5-15-13100546095
ABCDEFGHIJK
RUNNING STITCH DIAGRAM
Quilts and More Fall 2013CMRAcorn PincushionRunning StitchC. Neubauer 5-15-13100546096
Quilts and More Fall 2013CMRAcorn PincushionDiagram 4C. Neubauer 5-15-13100546097
DIAGRAM 4
DIAGRAM 6
Quilts and More Fall 2013CMRAcorn PincushionDiagram 6C. Neubauer 5-15-13100546099
DIAGRAM 7
Quilts and More Fall 2013CMRAcorn PincushionDiagram 7C. Neubauer 5-15-13100546100
DIAGRAM 5
Quilts and More Fall 2013CMRAcorn PincushionDiagram 5C. Neubauer 5-15-13100546098
Project: Go Nuts
Pattern may be downloaded for personal use only. No electronic or printed reproduction permitted without the prior written consent of Meredith Corporation. ©Meredith Corporation 2015. All rights reserved. 5
American Patchwork & Quilting | Quilt Sampler | Quilts and More
C
D
DIAGRAM 8
Quilts and More Fall 2013CMRLeaf NeedlekeeperDiagram 1C. Neubauer 5-15-13100546102
A
C
E
B
D
F
G H
I
TACK STITCH DIAGRAM
Quilts and More Fall 2013CMRLeaf NeedlekeeperTack StitchC. Neubauer 5-15-13100546103
Quilts and More Fall 2013CMRLeaf NeedlekeeperDiagram 2C. Neubauer 5-15-13100546104
DIAGRAM 9
DIAGRAM 10
Quilts and More Fall 2013CMRLeaf NeedlekeeperDiagram 3C. Neubauer 5-15-13100546105
Project: Go Nuts
Pattern may be downloaded for personal use only. No electronic or printed reproduction permitted without the prior written consent of Meredith Corporation. ©Meredith Corporation 2015. All rights reserved. 6
American Patchwork & Quilting | Quilt Sampler | Quilts and More
DIAGRAM 11
Quilts and More Fall 2013CMRLeaf NeedlekeeperDiagram 4C. Neubauer 5-15-13100546107
Project: Go Nuts
Pattern may be downloaded for personal use only. No electronic or printed reproduction permitted without the prior written consent of Meredith Corporation. ©Meredith Corporation 2015. All rights reserved. 7
American Patchwork & Quilting | Quilt Sampler | Quilts and More
When printing a downloadable pdf, set Page Scaling preference to NONE to print patterns at 100%. Do NOT "Shrink to Fit" or "Fit to Printable Area."
This box should measure 1".
GO NUTS!PATTERN A
GO NUTS!PATTERN B
Quilts and More Fall 2013CMRAcorn PincushionFull-Size PatternsC. Neubauer 5-15-13100546091
GO
NU
TS!
PATT
ER
N A
GO
NU
TS!
PATT
ER
N B
Qui
lts
and
Mo
re F
all 2
013
CM
RA
corn
Pin
cush
ion
Full-
Size
Pat
tern
sC
. Neu
bau
er 5
-15
-13
1005
4609
1
GO NUTS!PATTERN D
GO NUTS!PATTERN C
Quilts and More Fall 2013CMRLeaf NeedlekeeperFull-Size PatternsC. Neubauer 5-15-13100546101
GO NUTS!PATTERN D
GO NUTS!PATTERN C
Quilts and More Fall 2013CMRLeaf NeedlekeeperFull-Size PatternsC. Neubauer 5-15-13100546101