Embed Size (px)
Citation preview
4 / 6
DÜRR NDT GmbH & Co. KG
Höpfigheimer Strasse 22 74321 Bietigheim-Bissingen, Germanywww.duerr-ndt.de
5.
6.
NOTICE
Damage or malfunction of the com-ponents due to incorrectly plugged in cables
• Remember the position of all contacts and cables, or mark them with a pen.
• Note the position of the cables when installing the cables.
3.
4.
1.
2
1
2.
EN
Replacing the drive belt - CR 7 Plus
The following information is supplementary to the appliance Installation and Operating Instructions.
Always refer to the Installation and Operating Instructions of the appropriate appliance in which important information is detailed, e. g. Safety Instruc-tions, Set-up, Electrical Connections, Disinfection, Cleaning, etc.
Repairs above and beyond simple maintenance may only be car-ried out by a qualified technician or one of our service technicians.
Prior to working on the appliance or in case of danger, disconnect it from the mains (e. g. pull the plug).
Delivery Contents
The following articles are included in the scope of delivery (possible varia-tions due to country-specific conditions and/or import regulations):
Drive belt . . . . . . . . . . . . . . . . . . . . . . . . . . . . . . . . . . . . . . 2137-993-00 – Drive belt
– 2 x pull spring
Required tools
– Allen key SW 2
– Allen key SW 2.5
– Curved pair of needle-nose pliers
Maintenance and repair instructions
9000-608-143/01
1406V001
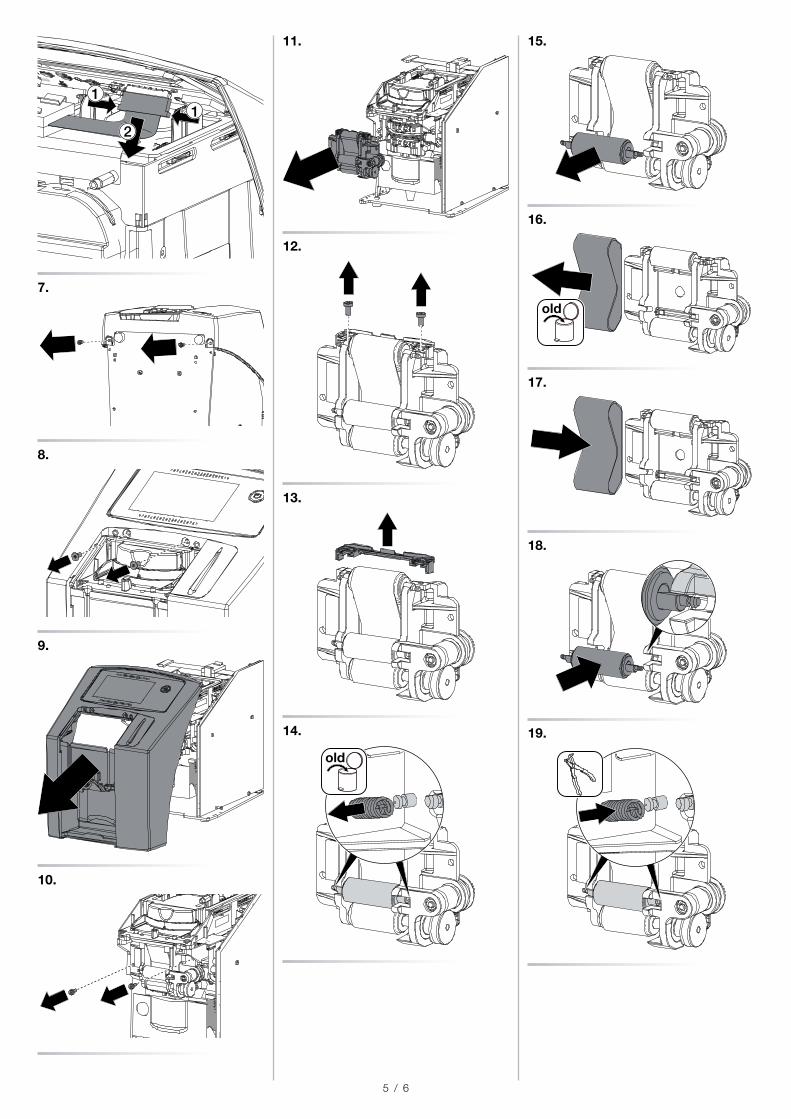
5 / 6
15.
16.
old
17.
18.
19.
11.
12.
13.
14.
old
2
11
7.
8.
9.
10.
6 / 6
Tests
Monitoring the initialisation1. • Switch on the appliance.
2. • Monitor the initialisation (display functions, all
parts move perfectly, drives run perfectly, era-sure unit illuminates).
There must be no unusual noises and noth-ing that is not expected from the unit should appear on the display.
Function of the components1. • Expose the image plate with any object (e.g.
key).
2. • Read the image plate with erasure switched
on.
3. • Delete the read X-ray image.
4. • Homogeneously expose the same image plate
and read again.
No artefacts or irregularities (e. g. ghost im-ages, shadows) may be present.
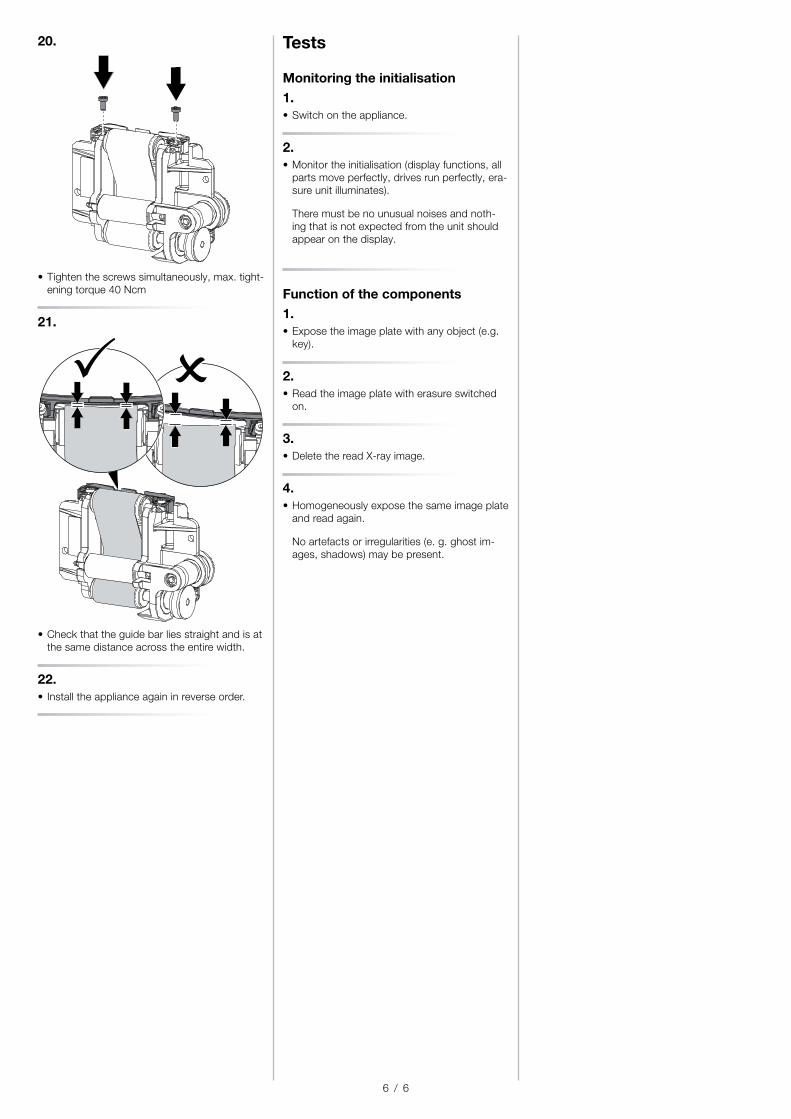
20.
• Tighten the screws simultaneously, max. tight-ening torque 40 Ncm
21.
• Check that the guide bar lies straight and is at the same distance across the entire width.
22. • Install the appliance again in reverse order.


![VLTfi 5000 FLUX - fbk · Manual initialisation Press the [CHANGE DATA] + [MENU] + [OK] keys at the same time as power-up to carry out manual initialisation. See also Parameter 620](https://img.pdfslide.us/doc/110x75/5ec0bde796bf57724f352af7/vlti-5000-flux-manual-initialisation-press-the-change-data-menu-ok.jpg)