Embed Size (px)
Citation preview

DAVE™ Death Module Training Exercises
Funeral Home User 1 of 119
LexisNexis VitalChek Network, Inc. Proprietary and Confidential Information (c) 2010. All rights reserved.
DAVE ™
One Integrated System for All Your Vital Record Business Needs
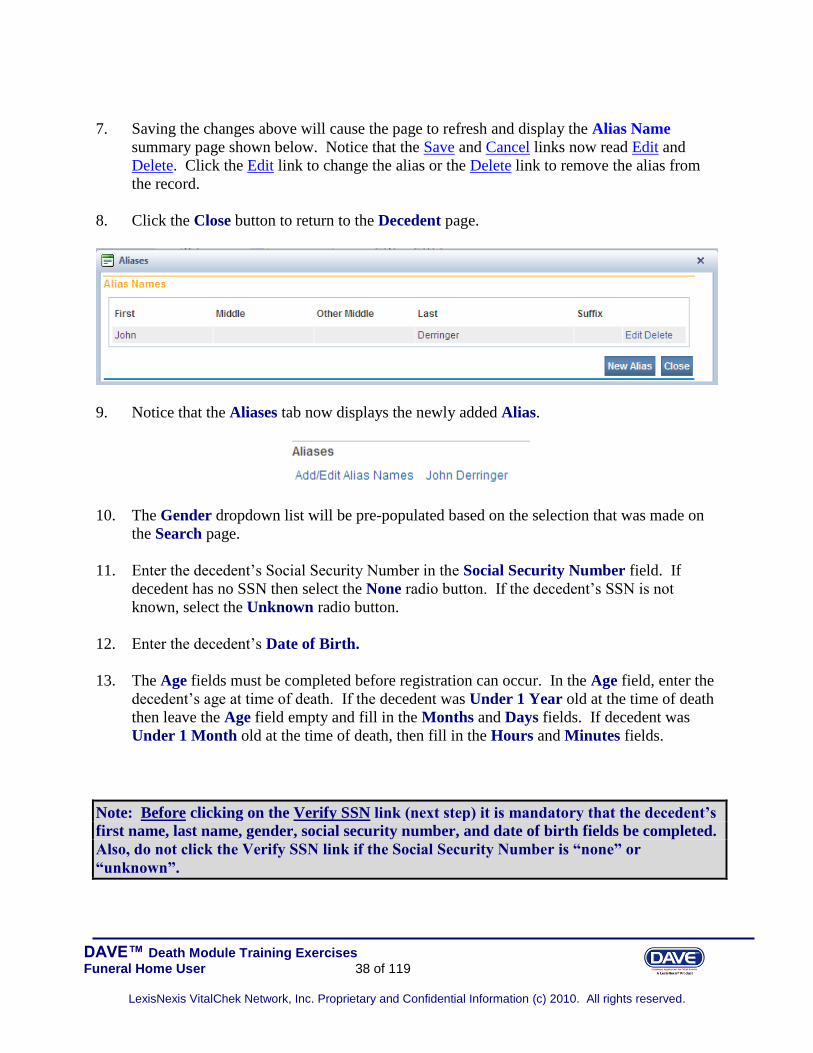
LexisNexis VitalChek Network, Inc. 6 Creekside Crossing
Six Cadillac Drive Brentwood, TN 37027
Maine Death Module
Funeral Home User Training Exercises
All Material Copyrighted LexisNexis VitalChek Network, Inc.
January 2010 (Updated September, 2014)

DAVE™ Death Module Training Exercises
Funeral Home User 2 of 119
LexisNexis VitalChek Network, Inc. Proprietary and Confidential Information (c) 2010. All rights reserved.
Table of Contents
Section 1: General DAVE™ Navigation.......................................................................... 4 Exercise 1.1 – Logging Into DAVE™ .......................................................................... 4
Exercise 1.2 – Messages .............................................................................................. 5 Exercise 1.3 – Current Activities ................................................................................ 10
Exercise 1.4 – Change/Forget Password ...................................................................... 12 Exercise 1.5 – Logging out of DAVE™ ...................................................................... 15
Section 2: Page Controls and Features ........................................................................... 16
Exercise 2.1 – Dropdown Lists ................................................................................... 16 Exercise 2.2 – Standard Date Format .......................................................................... 17
Exercise 2.3 – Using Calendars .................................................................................. 18
Exercise 2.4 – Lookup Controls ................................................................................. 20
Exercise 2.5 – Clear Data Controls ............................................................................. 21
Section 3: Record Validation ........................................................................................ 23 Exercise 3.1 – Status Bar ........................................................................................... 23
Exercise 3.2 – Record Validation and Error Correction ................................................. 23 Exercise 3.3 – Duplicate Record Resolution ................................................................ 31
Section 4: Start/Edit New Case as Funeral Home User .................................................... 34 Exercise 4.1 – Required Fields ................................................................................... 34
Exercise 4.2 – Decedent ............................................................................................ 36 Exercise 4.3 – Residence Address……………………………………………………………...………………40
Exercise 4.4 – Family Members ................................................................................. 40
Exercise 4.5 – Informant ........................................................................................... 41 Exercise 4.6 – Disposition ......................................................................................... 43
Exercise 4.7 – Decedent Attributes ............................................................................. 46
Exercise 4.8 – Sign ................................................................................................... 48
Exercise 4.9 – Un-Sign .............................................................................................. 49
Exercise 4.10 –Pronouncement .................................................................................. 50 Exercise 4.11 –Place of Death .................................................................................... 52
Exercise 4.12 –Cause of Death ................................................................................... 54 Exercise 4.13 –Other Factors ..................................................................................... 55
Exercise 4.14 –Certifier ............................................................................................. 56 Exercise 4.15 –Locate Case ....................................................................................... 57
Exercise 4.16 –Preview Case ..................................................................................... 60 Section 5: Other Links ................................................................................................. 63
Exercise 5.1 – Comments .......................................................................................... 63
Exercise 5.2 – Attachments ........................................................................................ 66 Exercise 5.3 – Cremation Clearance - Funeral Director ................................................. 69
Exercise 5.4 – Order Certified Copies ......................................................................... 73 Exercise 5.5 – Print Forms - Working Copy ................................................................ 81
Exercise 5.6 – Print Forms - Drop to Paper .................................................................. 83 Exercise 5.7 – Print Forms – Medical Examiner Release Form ...................................... 85 Exercise 5.8 – Refer To Medical Examiner .................................................................. 87
Exercise 5.9 – Relinquish Case .................................................................................. 88

DAVE™ Death Module Training Exercises
Funeral Home User 3 of 119
LexisNexis VitalChek Network, Inc. Proprietary and Confidential Information (c) 2010. All rights reserved.
Exercise 5.10 – Request Medical Certification ............................................................. 89
Exercise 5.11 – Trade Calls ....................................................................................... 93
Exercise 5.12 – Transfer Case .................................................................................... 95
Section 6: Work Queues .............................................................................................. 98
Exercise 6.1 – Work Queue Summary ......................................................................... 98 Exercise 6.2 – Work Queues - Search ......................................................................... 99
Section 7: Amendments....................................................................................................................99
Exercise 7.1 – Amendment List.................................................................................................100
Exercise 7.2 – Amendments…………………………………………………………… ……102
Appendices ................................................................................................................ 115 Appendix 1 – Glossary of Icons and Controls ............................................................ 115
Appendix 2 – Usage and Common Conventions ........................................................ 117

DAVE™ Death Module Training Exercises
Funeral Home User 4 of 119
LexisNexis VitalChek Network, Inc. Proprietary and Confidential Information (c) 2010. All rights reserved.
Section 1: General DAVE™ Navigation
Exercise 1.1 – Logging Into DAVE™
Skill Learned: How to log into the DAVE™ application.
1. Double click the DAVE™ icon on your desktop or select DAVE™ from the Favorites
Bookmark) from within your web-browser.
2. Enter your User Name and Password.
3. Click the Login button.
4. If your User Name is associated with more than one office or location, then you must also
make a selection from the Office dropdown list.

DAVE™ Death Module Training Exercises
Funeral Home User 5 of 119
LexisNexis VitalChek Network, Inc. Proprietary and Confidential Information (c) 2010. All rights reserved.
5. Click on the office selection, to finish logging into the DAVE™ application.
You should now be logged into the DAVE™ application Home page with the Current
Activities and Messages frames displayed.
Exercise 1.2 – Messages
Skill Learned: Basic Navigation within the Messages window.
The Messages window is one of the fast links that display upon logging into DAVE™. Initially,
this window is minimized. Click on the Messages fast link to open the Messages window.
Some Messages are text messages sent from one system user to another, while others are
automatically system generated during the registration process.
The Messages window is a grid that displays all of the messages that have been sent to the user
or current office (the office selected at login.) To read a message, click the underlined link in the
From column. The Message Text column displays all or a portion of the message that was sent,

DAVE™ Death Module Training Exercises
Funeral Home User 6 of 119
LexisNexis VitalChek Network, Inc. Proprietary and Confidential Information (c) 2010. All rights reserved.
depending on message length. Date Sent displays the date and time the message was sent.
Notice that the Remove from List button is initially grayed out or disabled.
1. Click any of the underlined links in the From column of the Messages window to read that
particular message.
2. The Message window is a popup that appears on top of the DAVE™ page. After reading
the message, click the Close button.
3. Place a checkmark in the checkbox next to the Date Sent column header.
Placing a checkmark here activates
the “Remove from List” button.

DAVE™ Death Module Training Exercises
Funeral Home User 7 of 119
LexisNexis VitalChek Network, Inc. Proprietary and Confidential Information (c) 2010. All rights reserved.
4. Notice that the Remove from List button is now active. Clicking the Remove from List
button with the Date Sent checkbox selected will delete all selected messages from the list.
Note: Deleted messages cannot be restored. Do not delete messages unless you are sure
that you will not need them.
5. Remove the checkmark from the checkbox next to the Date Sent column header and place
a checkmark in any of the boxes next to a single message.
6. Click the Remove from List button to remove a single message from the list.
7. To create a message select the Send Message button. The Send Message box will expand.
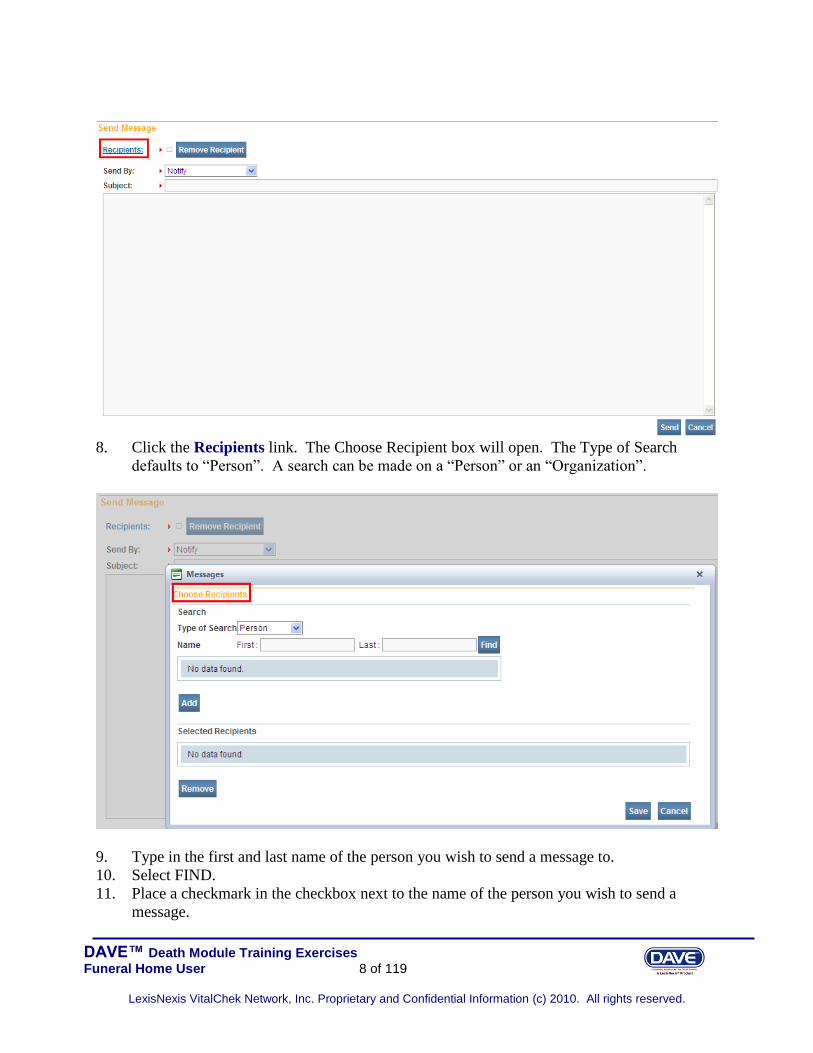
DAVE™ Death Module Training Exercises
Funeral Home User 8 of 119
LexisNexis VitalChek Network, Inc. Proprietary and Confidential Information (c) 2010. All rights reserved.
8. Click the Recipients link. The Choose Recipient box will open. The Type of Search
defaults to “Person”. A search can be made on a “Person” or an “Organization”.
9. Type in the first and last name of the person you wish to send a message to.
10. Select FIND.
11. Place a checkmark in the checkbox next to the name of the person you wish to send a
message.

DAVE™ Death Module Training Exercises
Funeral Home User 9 of 119
LexisNexis VitalChek Network, Inc. Proprietary and Confidential Information (c) 2010. All rights reserved.
12. Click the “Add” button.
13. Click SAVE. The name will appear near the “Recipients” link.

DAVE™ Death Module Training Exercises
Funeral Home User 10 of 119
LexisNexis VitalChek Network, Inc. Proprietary and Confidential Information (c) 2010. All rights reserved.
14. To remove a name, place a checkmark in the checkbox next to the name in the Selected
Recipients section, and click on the Remove Recipient button, and click SAVE. The Send
Message screen will show you the recipients selected.
15. To send the message, select the Send By dropdown to indicate if the message should be
sent using both Email and Notification, Email only or Notify only.
Selecting Notification and/or Notify will send an “internal” message.
16. Type the message in the message box.
17. Select the Send button.
Exercise 1.3 – Current Activities
Skill Learned: Basic navigation within the Current Activities pane.
The Current Activities window is one of the fast links that display upon logging into DAVE™.
Initially, this window is minimized.
1. Select the Current Activities fast link to open the Current Activities window.
To remove a recipient, place a checkmark in the checkbox next to the name and select “Remove Recipient”.

DAVE™ Death Module Training Exercises
Funeral Home User 11 of 119
LexisNexis VitalChek Network, Inc. Proprietary and Confidential Information (c) 2010. All rights reserved.
The Current Activities window displays a listing of the Queues that contain records
requiring immediate attention. (See Work Queues for more information). In the example
below, there are 11 records in the Personal Pending queue needing attention. The oldest
record in that queue is 56 days old.
2. Click the Personal Pending link to open the Personal Pending Work Queue page allowing
access to the records in the queue.
3. Review the various fields on the Personal Pending Work Queue. We will look at how to
access and edit records in the DAVE™ application elsewhere in these exercises.
4. Click the Return button to close this page and return to the Home page.
Click on the Current Activities fast link to open the Current Activities window.
Your DAVE™ login may provide a different set of Registration Work Queues.

DAVE™ Death Module Training Exercises
Funeral Home User 12 of 119
LexisNexis VitalChek Network, Inc. Proprietary and Confidential Information (c) 2010. All rights reserved.
Exercise 1.4 – Change/Forgot Password
Skill Learned: How to change your DAVE™ system password.
The EDRS Application Support Specialist will provide you with a password that will enable you
to log into DAVE™. This is a temporary password that must be changed when you login for the
first time.
To change your password:
1. From the Home page, select Main menu -> Change Password.
2. Enter your old or temporary password into the Old Password text entry box.
3. Enter your new password into the New Password text entry box. Passwords must be at
least 8 characters in length and should contain at least one number, one uppercase and one
lowercase character.
4. Re-enter the new password in the Confirm Password text entry box. Note: you must enter
the exact same password both times.
5. Answer the Security Question and Security Answer.
6. Click the Save button.

DAVE™ Death Module Training Exercises
Funeral Home User 13 of 119
LexisNexis VitalChek Network, Inc. Proprietary and Confidential Information (c) 2010. All rights reserved.
Forgot your Password
1. At the Login screen, type in your username.
2. Click the “Forgot your password?” link.
3. Type in your username and code from the image as shown below.
4. Select the Next button.
5. At “Please answer your security question below”, type in the answer to the security
question you completed earlier in Step 5 above of the “Change Your Password” section.
6. Select the Next button.
7. A message will appear stating a temporary password has been sent to your email address.

DAVE™ Death Module Training Exercises
Funeral Home User 14 of 119
LexisNexis VitalChek Network, Inc. Proprietary and Confidential Information (c) 2010. All rights reserved.
8. Select Continue.
9. You will be returned to the Login screen.
10. Retrieve the automated email message with the temporary password.
11. Copy and paste (or type in) the temporary password onto your login screen.

DAVE™ Death Module Training Exercises
Funeral Home User 15 of 119
LexisNexis VitalChek Network, Inc. Proprietary and Confidential Information (c) 2010. All rights reserved.
Exercise 1.5 – Logging out of DAVE™
Skill Learned: How to Log out of the DAVE™ application.
1. Locate and select the Logout button in the upper right corner of the Home DAVE™ page.
Upon selection of the upper-right hand corner Logout button, DAVE™ will return you to
the login screen.
2. Another way to Logout from DAVE™ is to select Logout from the Main Menu.
3. DAVE™ will prompt you to make sure you intend to exit the system. Click OK to logout
of DAVE™ or Cancel to remain in the application.
4. From the DAVE™ login window shown below you can enter your username and password
to log back in.

DAVE™ Death Module Training Exercises
Funeral Home User 16 of 119
LexisNexis VitalChek Network, Inc. Proprietary and Confidential Information (c) 2010. All rights reserved.
Section 2: Page Controls and Features
Exercise 2.1 – Dropdown Lists
Skill Learned: How to navigate through DAVE™ using the various fields and icons.
Dropdown lists provide you with a pre-defined list of choices. This eliminates the need to
manually type in data, prevents inappropriate data from being entered, and prevents spelling
errors.
1. One of the first dropdown lists you are likely to encounter is the Gender dropdown list on
the Start/Edit New Case page. To view all options in the list, click the down-arrow on the
right side of the field.
2. Notice that clicking the down arrow will reveal the list of options that can be selected from
to populate the field. Some dropdown lists will have more selectable options than can be
displayed on one page. In those cases, a scroll bar will appear on the right side of the list.

DAVE™ Death Module Training Exercises
Funeral Home User 17 of 119
LexisNexis VitalChek Network, Inc. Proprietary and Confidential Information (c) 2010. All rights reserved.
3. It is possible to select an option from the list without actually dropping the list down. If
you already know the option you want to select, just tab to the dropdown, and type the first
letter of the name of the option.
Note: If more than one word in the list starts with the same letter, typing that letter again
will scroll through the list for you.
4. Once the list is highlighted, it is possible to navigate up and down through the list using the
directional arrow keys on your keyboard.
With the list highlighted and “Female” selected, press the down-
arrow button on the keyboard.
Pressing the down-arrow with “Female” highlighted scrolls down the
list to “Male”. Now press the up-arrow button.
Pressing the up-arrow with “Male” highlighted scrolls back up the list
to “Female”.
Exercise 2.2 – Standard Date Format
Skill Learned: How to properly enter dates into the DAVE™ system. While processing death
registrations, you will frequently be inputting dates. DAVE™ allows you much flexibility in
using several different date formats.
1. Practice entering dates using the various allowable formats shown below. Note the date
format displayed is always the same regardless of the format entered.
If user enters: System will display:
MM-DD-YYYY:
MM/DD/YYYY:
MMDDYYYY:
MONDDYYYY:
By typing “F”, Female was automatically selected.

DAVE™ Death Module Training Exercises
Funeral Home User 18 of 119
LexisNexis VitalChek Network, Inc. Proprietary and Confidential Information (c) 2010. All rights reserved.
Note: In all cases a 2 digit must be entered for the Month and Day, and 4 digits for Year.
The only exception is the MonDDYYYY format that allows the entry of a 3-letter
abbreviation for the Month. The MonDDYYYY format also supports Mon/DD/YYYY and
Mon-DD-YYYY formats.
Exercise 2.3 – Using Calendars
Skill Learned: How to use the Calendar control to input dates without entering them in
manually.
1. In addition to manual date entry, you can also click the Calendar icon next to a date entry
box to bring up a Calendar control.

DAVE™ Death Module Training Exercises
Funeral Home User 19 of 119
LexisNexis VitalChek Network, Inc. Proprietary and Confidential Information (c) 2010. All rights reserved.
2. Once displayed, there are two drop-down lists
within the Calendar control; one for selecting
the month and the other for selecting the year.
3. By default, the current Month, Day, and Year are
displayed. Clicking the down arrow next to the month
(in this example, November), will open the full list.
Or, type the first letter of a month for
quick select or the up and down arrows on the keyboard
can be used to scroll to the desired selection.
4. Selection of any day of any month will populate
that date in the corresponding Date Entry text box
in the MON-DD-YYYY format. For example, using
“May” and “2013” in the dropdown lists and
clicking on “27” will display the date format:
Calendar icon

DAVE™ Death Module Training Exercises
Funeral Home User 20 of 119
LexisNexis VitalChek Network, Inc. Proprietary and Confidential Information (c) 2010. All rights reserved.
.
Date Entry Shortcut: Place the cursor inside a date field and press the F12 button on your
computer keyboard. Pressing F12 will automatically populate the date field with the
current system date.
Exercise 2.4 – Lookup Controls
Skill Learned: How to use Lookup Controls that launch Lists of Values that display a grid of
selectable data.
1. On the Disposition page shown in the example below, locate the Lookup button. The
Lookup control appears onscreen as a magnifying lens ( ). Click the Lookup control to
launch the Name search field.
2. If the exact name of the Funeral Director is known, enter the first and last name and click
the Search button. The Last Name field also supports Wild Card (%) searches. Entering
the letter “S” with a trailing percent sign (%) character and clicking Search will return a
list of all potentially matching funeral practitioners with last names that begin with the
letter “S.” Note that First Name is not a required field.
Clicking the Lookup control will launch the List of Values search page.

DAVE™ Death Module Training Exercises
Funeral Home User 21 of 119
LexisNexis VitalChek Network, Inc. Proprietary and Confidential Information (c) 2010. All rights reserved.
3. The List of Values (LOV) control above lists all of the funeral practitioners in the system
beginning with the letter “S”. Click the Select link next to any corresponding name to
auto-populate the funeral practitioner’s name and address fields on the Disposition page.
4. The Funeral Director tab is now complete.
Exercise 2.5 – Clear Data Controls
Skill Learned: In the previous exercise, we saw how to use the Lookup control ( ) to
quickly locate a funeral practitioner and enter that funeral practitioner’s data into a record. The
Clear button ( ), is used to clear data from a page.
1. Locate and click the Clear button.
2. DAVE™ displays a warning message. Select OK to clear the facility data or Cancel to
keep the data as displayed.
The Clear button is used to Erase data from onscreen controls.

DAVE™ Death Module Training Exercises
Funeral Home User 22 of 119
LexisNexis VitalChek Network, Inc. Proprietary and Confidential Information (c) 2010. All rights reserved.
3. Selecting OK above will clear the Funeral Director name data.

DAVE™ Death Module Training Exercises
Funeral Home User 23 of 119
LexisNexis VitalChek Network, Inc. Proprietary and Confidential Information (c) 2010. All rights reserved.
Section 3: Record Validation
Exercise 3.1 – Status Bar
Skill Learned: How to use the Status Bar to help you track missing data that can prevent a
death record from being properly registered. It is also a valuable tool for tracking the status of a
death case.
DAVE™ provides work flow and data quality management through the assignment of statuses.
The death registration process consists of several sub-processes that are often completed by
different users. In order to track these steps DAVE™ assigns one or more statuses to the record
when an action is performed (e.g., the Validate Page button is clicked) or an event occurs (e.g.,
a validation rule fails).
The initial status assigned to a new electronic death record is /New Event/New Event/Not
Registered/NA/NA/NA. The goal of all parties in the registration process is to obtain a ‘perfect’
status. A perfect status indicates the highest data quality and completion of all steps in the
registration process (e.g. Personal Valid/ Medical Valid/Registered). Sometimes a death
record may contain values which are valid; however, those values cause soft edit rule failures.
Therefore, it is also possible to have a registered record with a Personal Valid with exceptions /
Medical Valid with exceptions / Registered status or any combination of valid and valid with
exceptions.
1. The Status Bar is viewable from any of the Death Registration Menu data entry pages.
Simply locate the bar at the top of the page that displays the case number, registrant name,
and date of death.
Exercise 3.2 – Record Validation and Error Correction
Skill Learned: How to validate death records and prepare them for registration.
1. Click the Validate Page button to validate the registration data entered into the system.

DAVE™ Death Module Training Exercises
Funeral Home User 24 of 119
LexisNexis VitalChek Network, Inc. Proprietary and Confidential Information (c) 2010. All rights reserved.
2. When you click the Validate Page button, the Validation Results frame will list all of the
errors associated with that page.
Clicking the Validate Page button reveals two types of errors: “Hard” edit rule failures (highlighted in red) and “Soft” edit rule failures (highlighted in yellow)
DAVE™ Death Module Training Exercises
Funeral Home User 25 of 119
LexisNexis VitalChek Network, Inc. Proprietary and Confidential Information (c) 2010. All rights reserved.
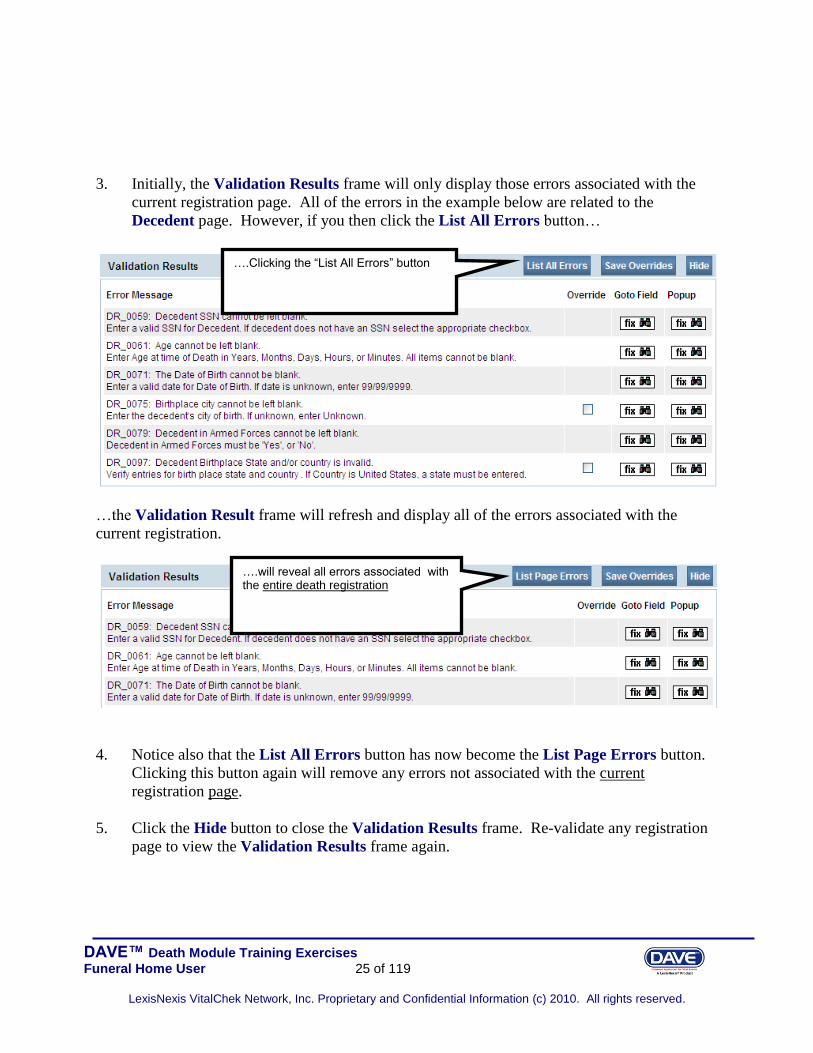
3. Initially, the Validation Results frame will only display those errors associated with the
current registration page. All of the errors in the example below are related to the
Decedent page. However, if you then click the List All Errors button…
…the Validation Result frame will refresh and display all of the errors associated with the
current registration.
4. Notice also that the List All Errors button has now become the List Page Errors button.
Clicking this button again will remove any errors not associated with the current
registration page.
5. Click the Hide button to close the Validation Results frame. Re-validate any registration
page to view the Validation Results frame again.
….Clicking the “List All Errors” button
….will reveal all errors associated with the entire death registration
DAVE™ Death Module Training Exercises
Funeral Home User 26 of 119
LexisNexis VitalChek Network, Inc. Proprietary and Confidential Information (c) 2010. All rights reserved.
Error Correction Using the Goto Field Button
6. To correct an error, click the button in the Goto Field column of the Validation
Results page. This will place the cursor or “focus” in the field that needs to be corrected.
Use this option if you are on a single registration page with many errors to correct.
Note: “Focus” determines which onscreen element is the target of action. If a text box
“has the focus”, then anything typed on the keyboard appears in the text box. If a
dropdown list “has the focus”, the down-arrow will open the list and the up-arrow will
close the list.
Error Correction Using the Popup Icon
7. Another method of correcting errors is to click the icon in the Popup column
Click the Hide button to temporarily remove the Validation Results frame. Re-validate any page to review the Results frame again.
By clicking the Goto Field “Fix” icon……
…..the focus was sent to this control

DAVE™ Death Module Training Exercises
Funeral Home User 27 of 119
LexisNexis VitalChek Network, Inc. Proprietary and Confidential Information (c) 2010. All rights reserved.
to launch a popup window containing the error or errors to be corrected. This functionality is
useful when an error is caused by conflicting entries across multiple registration pages. Rather
than searching across many pages trying to determine which field contains the error, Popup
presents all of the conflicting fields in one window.
In the example below, a conflict between two separate fields generated error number DR_6020.
Correcting either of the entries may correct the issue; however, more than one correction may be
needed in some cases.
8. Correct the error and click the Save button to submit your changes. The popup will close
and your changes will appear on the registration page. Click the Cancel button to close the
popup without making any changes.

DAVE™ Death Module Training Exercises
Funeral Home User 28 of 119
LexisNexis VitalChek Network, Inc. Proprietary and Confidential Information (c) 2010. All rights reserved.
Overridable Errors
In certain instances, a record may still be registered, even if it contains types of errors. For those
errors, a checkbox will be provided in the Override column.
9. Place a checkmark ( ) in the Override box next to the error to be overridden and click the
Save Overrides button. Select the Validate Page button again. This allows you to process
a death record even if some errors are present.
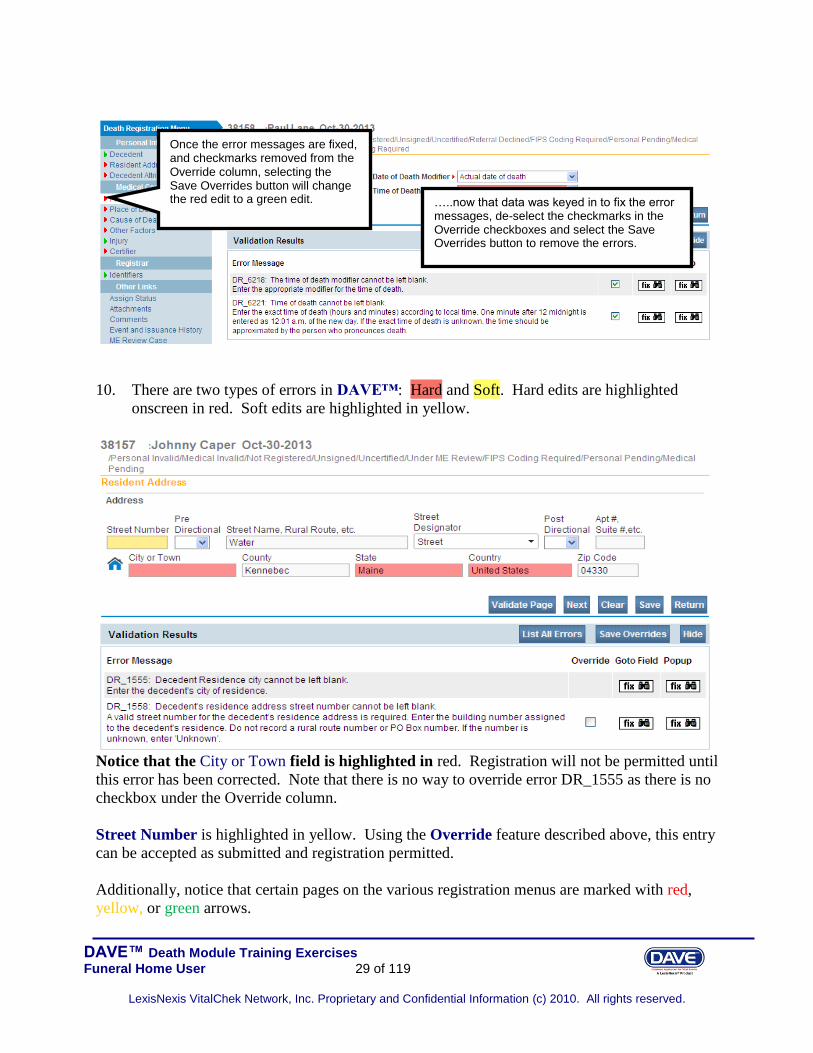
Note: If a checkmark is placed in the Override checkbox, and later the error is fixed, take the checkmark out of the checkbox, and select the Save Override button again. This will remove the error from the Validation Results page, and remove the hard edit (highlighted in red).
In the example below a checkmark was placed in the two Override checkboxes as the missing
data was not available. Eventually, the missing data was keyed in (Time of Death and Time of
Death Modifier). The checkmarks were then removed from the checkboxes, and the Save
Overrides button was selected.
DAVE™ Death Module Training Exercises
Funeral Home User 29 of 119
LexisNexis VitalChek Network, Inc. Proprietary and Confidential Information (c) 2010. All rights reserved.
10. There are two types of errors in DAVE™: Hard and Soft. Hard edits are highlighted
onscreen in red. Soft edits are highlighted in yellow.
Notice that the City or Town field is highlighted in red. Registration will not be permitted until
this error has been corrected. Note that there is no way to override error DR_1555 as there is no
checkbox under the Override column.
Street Number is highlighted in yellow. Using the Override feature described above, this entry
can be accepted as submitted and registration permitted.
Additionally, notice that certain pages on the various registration menus are marked with red,
yellow, or green arrows.
…..now that data was keyed in to fix the error messages, de-select the checkmarks in the Override checkboxes and select the Save Overrides button to remove the errors.
Once the error messages are fixed, and checkmarks removed from the Override column, selecting the Save Overrides button will change the red edit to a green edit.

DAVE™ Death Module Training Exercises
Funeral Home User 30 of 119
LexisNexis VitalChek Network, Inc. Proprietary and Confidential Information (c) 2010. All rights reserved.
These arrows serve as indicators as to which pages contain errors and which pages pass
validation.
For example, pages marked with a green arrow contain no errors.
Pages marked with a red arrow contain hard edit rule failures that must be corrected before
registration can be completed.
Pages marked with a yellow error contain soft edit rule failures that may be overridden or that
have already been overridden.
Note: Anytime the Validate Page button is clicked the system will evaluate all pages and
mark them accordingly with red, yellow, or green arrows.
Pages containing no errors are noted by green arrows. No further action is necessary.
Pages containing overridable errors are noted by yellow arrows. Correct errors or override as needed.
Pages containing non-overridable errors are noted by red arrows. These errors must be corrected.
DAVE™ Death Module Training Exercises
Funeral Home User 31 of 119
LexisNexis VitalChek Network, Inc. Proprietary and Confidential Information (c) 2010. All rights reserved.
Exercise 3.3 – Duplicate Record Resolution
Skill Learned: How to use the Potential Duplicates link to resolve duplicate records.
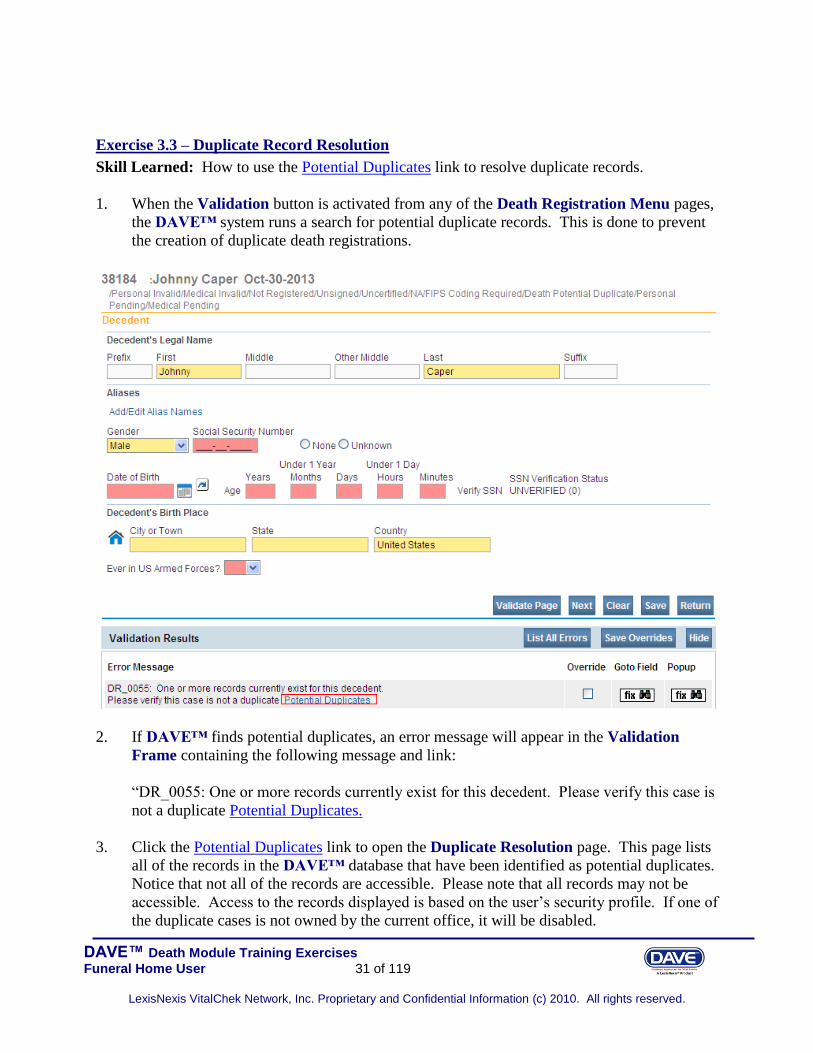
1. When the Validation button is activated from any of the Death Registration Menu pages,
the DAVE™ system runs a search for potential duplicate records. This is done to prevent
the creation of duplicate death registrations.
2. If DAVE™ finds potential duplicates, an error message will appear in the Validation
Frame containing the following message and link:
“DR_0055: One or more records currently exist for this decedent. Please verify this case is
not a duplicate Potential Duplicates.
3. Click the Potential Duplicates link to open the Duplicate Resolution page. This page lists
all of the records in the DAVE™ database that have been identified as potential duplicates.
Notice that not all of the records are accessible. Please note that all records may not be
accessible. Access to the records displayed is based on the user’s security profile. If one of
the duplicate cases is not owned by the current office, it will be disabled.

DAVE™ Death Module Training Exercises
Funeral Home User 32 of 119
LexisNexis VitalChek Network, Inc. Proprietary and Confidential Information (c) 2010. All rights reserved.
4. Click the Compare link to open a Preview window. This will display a summary of the
record to help you determine whether or not the record you are currently working on is, in
fact, a duplicate record.
5. If the Preview window does not provide enough information, then click the Decedent’s
Name link to open the actual record.
6. When you have finished looking over the opened record, click the Return button at the
bottom of the page to return to the Duplicate Resolution window.
7. If you are certain that the record you are working on is not a duplicate, then click the
Return to Rule Failures button to return to the new record.

DAVE™ Death Module Training Exercises
Funeral Home User 33 of 119
LexisNexis VitalChek Network, Inc. Proprietary and Confidential Information (c) 2010. All rights reserved.
8. Place a checkmark in the checkbox located in the Override column and click the Save
Overrides button.

DAVE™ Death Module Training Exercises
Funeral Home User 34 of 119
LexisNexis VitalChek Network, Inc. Proprietary and Confidential Information (c) 2010. All rights reserved.
Section 4: Start/Edit New Case as Funeral Home User
Exercise 4.1 – Required Fields
Skill Learned: Completion and execution of the Start/Edit New Case page.
1. From the Home page, select Life Events -> Death -> Start/Edit New Case.
2. This will bring up the Start/Edit New Case page shown below. Notice that First:, Last:,
Date of Death:, and Gender are all marked with red arrows( ). Fields denoted by red
arrows are required entries that must be completed before you will be allowed to proceed.
Note: Before you create a new Death Record you must first search for a possible existing
record by selecting the Start/Edit New Case. This is to prevent the creation of duplicate
Death Records.
3. Once you have filled in the required fields, click the Search button to proceed or, if you
need to, click the Clear button to clear all entries and start over.

DAVE™ Death Module Training Exercises
Funeral Home User 35 of 119
LexisNexis VitalChek Network, Inc. Proprietary and Confidential Information (c) 2010. All rights reserved.
4. If no matching records are found, you will be allowed to begin creating a new record by
clicking the Start New Case button. To begin a new search, click the New Search button.
5. If a matching event was found, click the Decedent’s Name to open the record, or the
Preview link to check if this record could possibly be a duplicate record.
6. For the purposes of this exercise, select Start New Case.
Note: All of the column headers on the search Results page are underlined links. Clicking
any of these links will re-sort the table data accordingly.
7. Clicking the Start New Case button above will launch the Decedent page, as shown
below. The Home page collapses and the Death Registration Menu expands.
If no matching records were found, click the “Start New Case” to create a new record.
To begin a new search with new search criteria click the “New Search” button

DAVE™ Death Module Training Exercises
Funeral Home User 36 of 119
LexisNexis VitalChek Network, Inc. Proprietary and Confidential Information (c) 2010. All rights reserved.
Exercise 4.2 – Decedent
Skill Learned: How to complete the Decedent page.
1. The Will medical institution be responsible for final disposition? defaults to Yes.
Note: Currently this question is “not visible”.
This question is no longer visible on the Decedent’s page at this time.

DAVE™ Death Module Training Exercises
Funeral Home User 37 of 119
LexisNexis VitalChek Network, Inc. Proprietary and Confidential Information (c) 2010. All rights reserved.
2. Complete the Decedent’s Legal Name tab. Prefix is used to record titles such as Mr.,
Mrs., Father, Sister, Monsignor (Msgr), etc. Enter the First, Middle, and Last name of the
decedent. If the decedent had more than one middle name, include it in the Other Middle
field. Suffix is used to record generational suffixes such as Jr., III, etc.
3. If the decedent was known by more than one name, click the Add/Edit Alias Names on the
Aliases tab.
4. The Aliases pop-up page will appear onscreen. To add a new alias, click the New Alias
button.
5. Clicking the New Alias button will open the Alias Names page shown below.
6. Once you have entered the New Alias information, click the Save link to save your
changes. Click Cancel to close the page without saving changes.
DAVE™ Death Module Training Exercises
Funeral Home User 38 of 119
LexisNexis VitalChek Network, Inc. Proprietary and Confidential Information (c) 2010. All rights reserved.
7. Saving the changes above will cause the page to refresh and display the Alias Name
summary page shown below. Notice that the Save and Cancel links now read Edit and
Delete. Click the Edit link to change the alias or the Delete link to remove the alias from
the record.
8. Click the Close button to return to the Decedent page.
9. Notice that the Aliases tab now displays the newly added Alias.
10. The Gender dropdown list will be pre-populated based on the selection that was made on
the Search page.
11. Enter the decedent’s Social Security Number in the Social Security Number field. If
decedent has no SSN then select the None radio button. If the decedent’s SSN is not
known, select the Unknown radio button.
12. Enter the decedent’s Date of Birth.
13. The Age fields must be completed before registration can occur. In the Age field, enter the
decedent’s age at time of death. If the decedent was Under 1 Year old at the time of death
then leave the Age field empty and fill in the Months and Days fields. If decedent was
Under 1 Month old at the time of death, then fill in the Hours and Minutes fields.
Note: Before clicking on the Verify SSN link (next step) it is mandatory that the decedent’s
first name, last name, gender, social security number, and date of birth fields be completed.
Also, do not click the Verify SSN link if the Social Security Number is “none” or
“unknown”.

DAVE™ Death Module Training Exercises
Funeral Home User 39 of 119
LexisNexis VitalChek Network, Inc. Proprietary and Confidential Information (c) 2010. All rights reserved.
14. Click the Verify SSN link as shown below.
When the user clicks the Verify SSN link, the DAVE™ application sends a request to the
Social Security Administration (SSA) to verify that the social security number (SSN) on
the case matches their records. The Social Security Administration will return a status
code indicating the success or failure of the verification request. All requests sent to the
SSA are encrypted ensuring both the security and integrity of the data.
The Decedent page will refresh and the SSN Verification Status code will change from
UNVERIFIED(0) to PENDING (0) , or another status code depending on the situation.
Once the SSN has been verified or failed verification, the page will refresh once more
with an appropriate status code such as, “Passed”, “Invalid”, etc.
15. The Decedent’s Birth Place tab is used to record the decedent’s birth place.
16. Lastly, select Yes or No from the Ever in US Armed Forces? dropdown list.
The SSN Verification Status code defaults to “Unverified”. Once the Verify SSN link is selected the SSN Verification Status code will change accordingly.

DAVE™ Death Module Training Exercises
Funeral Home User 40 of 119
LexisNexis VitalChek Network, Inc. Proprietary and Confidential Information (c) 2010. All rights reserved.
17. Click the Validate Page button to check this page for errors, the Next button to proceed to
the Resident Address page, the Clear button to clear all entries, the Save button to save
changes without leaving this page, or the Return button to return to the Home page.
Exercise 4.3 – Residence Address
Skill Learned: How to complete the Resident Address page.
1. Make sure that the Resident Address page records the decedent’s last known address.
2. If the street address has a Pre-Directional indicator, i.e. East Eastern St. West, then
indicate that by selecting “E” from the Pre-Directional dropdown list. Do NOT type the
Pre-Directional indicator in the Street Name field.
3. If the street address has a Post-Directional indicator, i.e. East Eastern St. W, then indicate
that by selecting “W” from the Post-Directional dropdown list. Do NOT type the Post-
Directional indicator in the Street Name field.
4. Click the Validate Page button to check this page for errors, the Next button to proceed to
the Family Members page, the Clear button to clear all entries, the Save button to save
changes without leaving this page, or the Return button to return to the Home page.
Exercise 4.4 – Family Members
Skill Learned: How to complete the Family Members page.
1. First, make a selection from the Marital Status dropdown list. Above the Surviving
Spouse Name field is a dropdown list entitled Marital Status. The decedent’s marital
status must be entered here. If status is not known, then select Unknown.
Use the directional indicator control for addresses. Do not type directional indicators in the Street Name text box.

DAVE™ Death Module Training Exercises
Funeral Home User 41 of 119
LexisNexis VitalChek Network, Inc. Proprietary and Confidential Information (c) 2010. All rights reserved.
2. Most of the fields on this page are self-explanatory. If, however, the Surviving
Spouse’s/Partner’s Name is that of the wife, then her maiden name must be used in the
Last name field.
3. Likewise, the decedent’s Mother’s Maiden Name Prior to First Marriage must also be
completed.
Note: If surviving spouse is the wife, then her Maiden name must be entered. Likewise,
decedent’s mother’s maiden name must also be used.
4. Click the Validate Page button to check this page for errors, the Next button to proceed to
the Informant page, the Clear button to clear all entries, the Save button to save changes
without leaving this page, or the Return button to return to the Home page.
Exercise 4.5 – Informant
Skill Learned: How to complete the Informant page. The Informant page is used to gather
information concerning the person reporting the death.
DAVE™ Death Module Training Exercises
Funeral Home User 42 of 119
LexisNexis VitalChek Network, Inc. Proprietary and Confidential Information (c) 2010. All rights reserved.
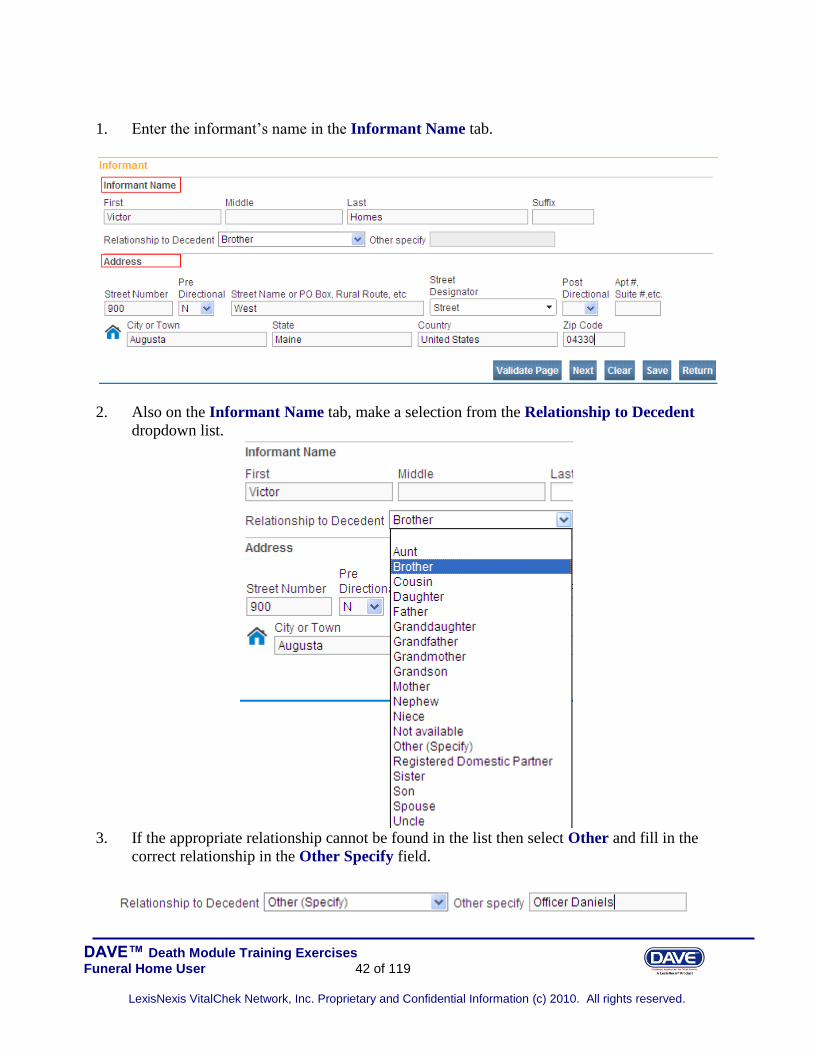
1. Enter the informant’s name in the Informant Name tab.
2. Also on the Informant Name tab, make a selection from the Relationship to Decedent
dropdown list.
3. If the appropriate relationship cannot be found in the list then select Other and fill in the
correct relationship in the Other Specify field.

DAVE™ Death Module Training Exercises
Funeral Home User 43 of 119
LexisNexis VitalChek Network, Inc. Proprietary and Confidential Information (c) 2010. All rights reserved.
4. Complete the Address tab by entering the informant’s address information.
5. Click the Validate Page button to check this page for errors, the Next button to proceed to
the Disposition page, the Clear button to clear all entries, the Save button to save changes
without leaving this page, or the Return button to return to the Home page.
Exercise 4.6 –Disposition
Skill Learned: How to complete the Disposition page. For funeral home users, the fields on
this page will be auto-filled based on the facility with which the user is associated. If the user is
associated with more than one facility, then the fields on this page will be auto-filled based on
the office selected at login.
1. Make a selection from the Method of Disposition dropdown list. In the example above,
we have chosen Burial. If the method used does not appear on the list, then select Other
and enter the correct method of disposition in the Other Specify field.

DAVE™ Death Module Training Exercises
Funeral Home User 44 of 119
LexisNexis VitalChek Network, Inc. Proprietary and Confidential Information (c) 2010. All rights reserved.
2. Next, enter a valid Date of disposition manually or use the Calendar icon ( ) to launch
the Calendar control (see Using Calendars).
3. Clicking the Place of disposition Lookup ( ) control will launch the Facility Name
search tool shown below. Enter all or a portion of the facility name in the field and click
the Search button. Note: Facility Name lookup controls are compatible with Wild Card
searches.
4. Clicking the select link will auto-fill the Place of Disposition field.

DAVE™ Death Module Training Exercises
Funeral Home User 45 of 119
LexisNexis VitalChek Network, Inc. Proprietary and Confidential Information (c) 2010. All rights reserved.
The Funeral Director and Funeral Home information will be system filled based on the office
the user selected at login. However, if one funeral home were completing a case for another
funeral home as part of a Trade Call then this data may need to change. In those instances, there
are two ways these fields can be changed and the data re-entered. One way is to use the standard
LookUp controls as described in Lookup Controls. Alternatively, you can enter the Funeral
Director License Number or the Funeral Home Business Registration Number and use the
auto-populate button ( ) to complete the fields.
5. Locate and click the Clear button ( ) to erase current Funeral Director and Funeral
home data.
6. In the example below, we have entered a known license number: 9871. Clicking the auto-
complete button ( ) will automatically locate the funeral director corresponding to that
license number and insert that funeral practitioner’s data into the fields. Notice that both
the Funeral Director and the Funeral Home data are auto-populated.
Note: Auto-population of the funeral home data will only occur if the funeral practitioner
selected is associated with a single funeral home. If the funeral director is associated with
multiple funeral homes, the funeral home data must be entered here.
Click on the clear button to erase current data.
The auto-populate button was used to complete both of these sections (Funeral Director and Funeral Home) based on a single piece of information ---the Funeral Director license number.

DAVE™ Death Module Training Exercises
Funeral Home User 46 of 119
LexisNexis VitalChek Network, Inc. Proprietary and Confidential Information (c) 2010. All rights reserved.
7. Click the Validate Page button to check this page for errors, the Next button to proceed to
the Decedent Attributes page, the Clear button to clear all entries, the Save button to save
changes without leaving this page, or the Return button to return to the Home page.
Exercise 4.7 – Decedent Attributes
Skill Learned: How to complete the Decedent Attribute page. All information entered on this
page should be relative to the decedent.
1. Complete the top portion of this page by entering the decedent’s last known Occupation,
Industry, and Employer. Also, make a selection from the Decedent’s education
dropdown list.
2. If the mother/parent is of Hispanic origin, click the Hispanic (Mexican, Puerto Rican,
Cuban, Dominican, etc.) radio button and make a selection from the Decedent of
Hispanic Origin dropdown list. If Yes, Other Spanish/Hispanic/Latino is selected, then
the Hispanic, Specify field will be activated and must also be completed.

DAVE™ Death Module Training Exercises
Funeral Home User 47 of 119
LexisNexis VitalChek Network, Inc. Proprietary and Confidential Information (c) 2010. All rights reserved.
3. If the decedent is of non-Hispanic origin, select the Non Hispanic (Italian, African
American, Pakistani, Ukrainian, Nigerian, Taiwanese, etc) radio button. This will
activate the LookUp Non-Hispanic field. Click the magnifying lens icon to launch the
ancestry LookUp control.
4. From the ancestry LookUp control, enter the ancestry type associated with the
mother/parent and click Search. If you are unsure of the ancestry spelling, a Wild Card
character can be used. By entering “F%” and clicking the Search button, the user is
instructing DAVE™ to LookUp and return a list of all ancestry types that begin with the
letter “F”. Once the ancestry type has been located, click the select link to auto-fill the
Ancestry controls on the Decedent Attributes page.
Click on the magnifying glass to bring up the Non-Hispanic dialog box shown below.
DAVE™ Death Module Training Exercises
Funeral Home User 48 of 119
LexisNexis VitalChek Network, Inc. Proprietary and Confidential Information (c) 2010. All rights reserved.
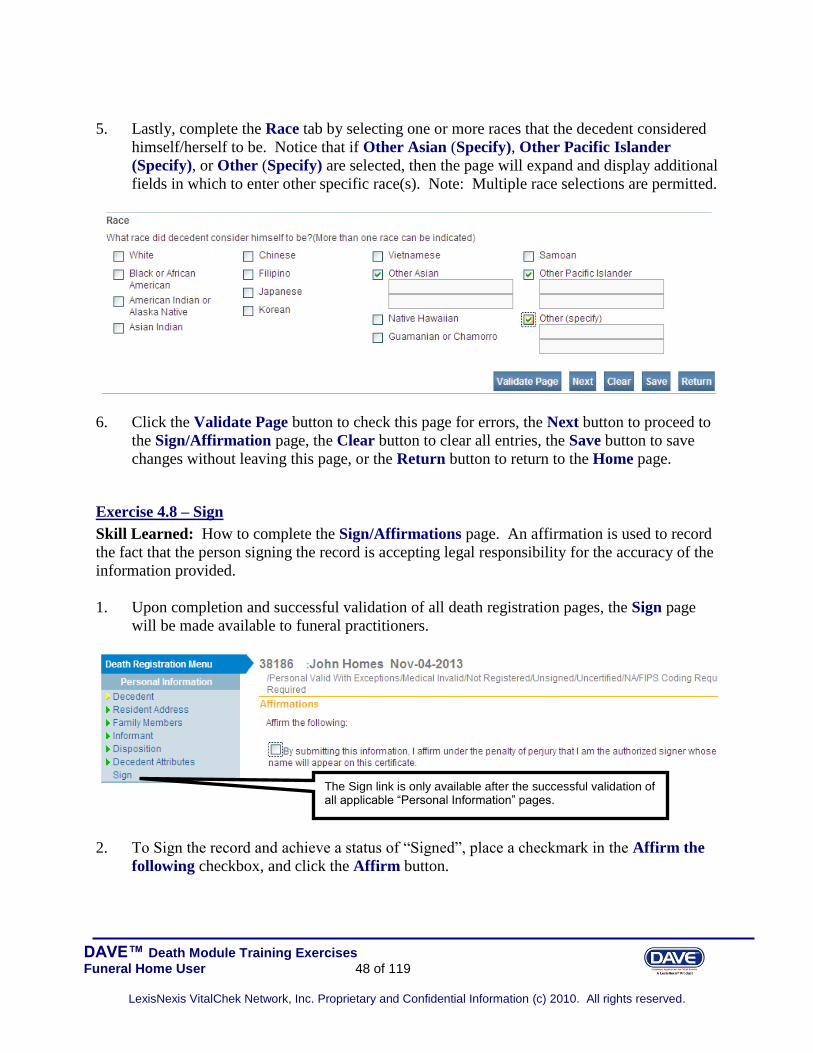
5. Lastly, complete the Race tab by selecting one or more races that the decedent considered
himself/herself to be. Notice that if Other Asian (Specify), Other Pacific Islander
(Specify), or Other (Specify) are selected, then the page will expand and display additional
fields in which to enter other specific race(s). Note: Multiple race selections are permitted.
6. Click the Validate Page button to check this page for errors, the Next button to proceed to
the Sign/Affirmation page, the Clear button to clear all entries, the Save button to save
changes without leaving this page, or the Return button to return to the Home page.
Exercise 4.8 – Sign
Skill Learned: How to complete the Sign/Affirmations page. An affirmation is used to record
the fact that the person signing the record is accepting legal responsibility for the accuracy of the
information provided.
1. Upon completion and successful validation of all death registration pages, the Sign page
will be made available to funeral practitioners.
2. To Sign the record and achieve a status of “Signed”, place a checkmark in the Affirm the
following checkbox, and click the Affirm button.
The Sign link is only available after the successful validation of all applicable “Personal Information” pages.

DAVE™ Death Module Training Exercises
Funeral Home User 49 of 119
LexisNexis VitalChek Network, Inc. Proprietary and Confidential Information (c) 2010. All rights reserved.
3. Click the Return button to return to the Decedent page.
Exercise 4.9 – Un-Sign
Skill Learned: How to remove the Affirmation from the Personal Information. Once the
Personal Information has been signed, the information is locked and can no longer be changed.
If the user decides that further record updates are necessary, he/she can un-sign the record, make
the changes, and sign again.
Please note: A record cannot be un-signed after it has been Registered or Dropped to Paper.
1. To un-sign a record, click on the Sign link as shown below.
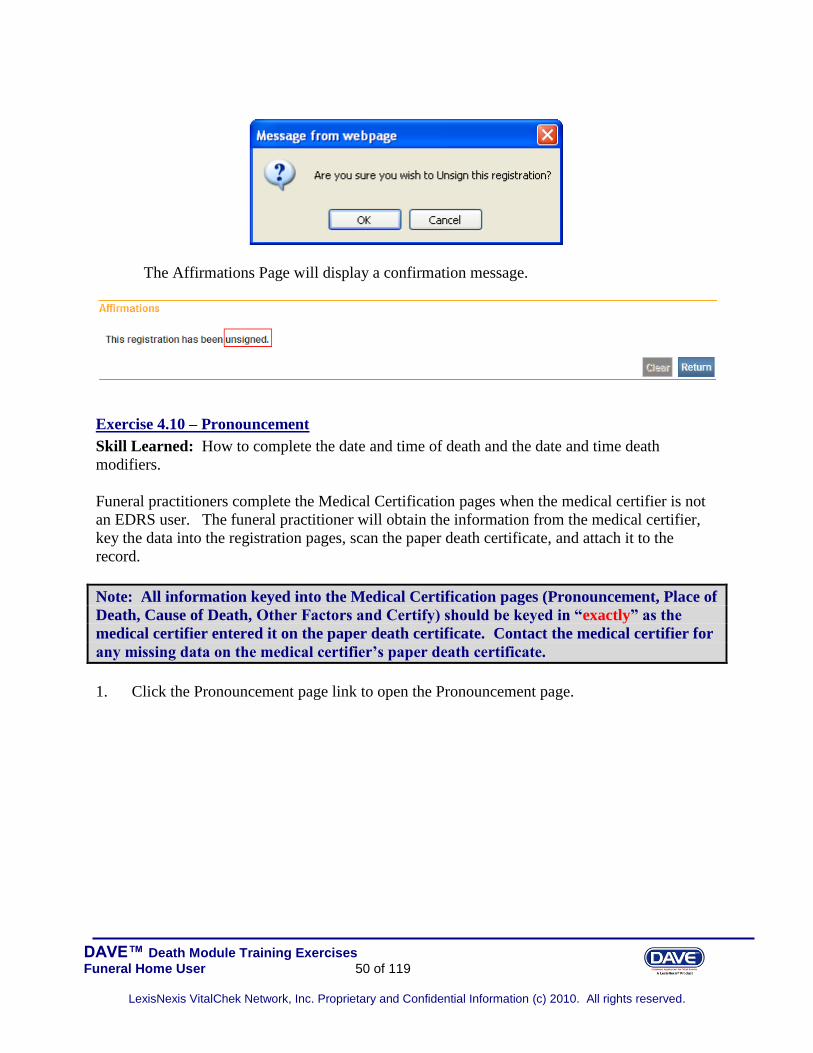
2. The Affirmations Page will be displayed. Select the Unsign button to remove the
affirmation and un-sign the case.
3. The user will be prompted with a confirmation pop-up. Click OK to continue or Cancel to
leave the case as is.
DAVE™ Death Module Training Exercises
Funeral Home User 50 of 119
LexisNexis VitalChek Network, Inc. Proprietary and Confidential Information (c) 2010. All rights reserved.
The Affirmations Page will display a confirmation message.
Exercise 4.10 – Pronouncement
Skill Learned: How to complete the date and time of death and the date and time death
modifiers. Funeral practitioners complete the Medical Certification pages when the medical certifier is not
an EDRS user. The funeral practitioner will obtain the information from the medical certifier,
key the data into the registration pages, scan the paper death certificate, and attach it to the
record.
Note: All information keyed into the Medical Certification pages (Pronouncement, Place of
Death, Cause of Death, Other Factors and Certify) should be keyed in “exactly” as the
medical certifier entered it on the paper death certificate. Contact the medical certifier for
any missing data on the medical certifier’s paper death certificate.
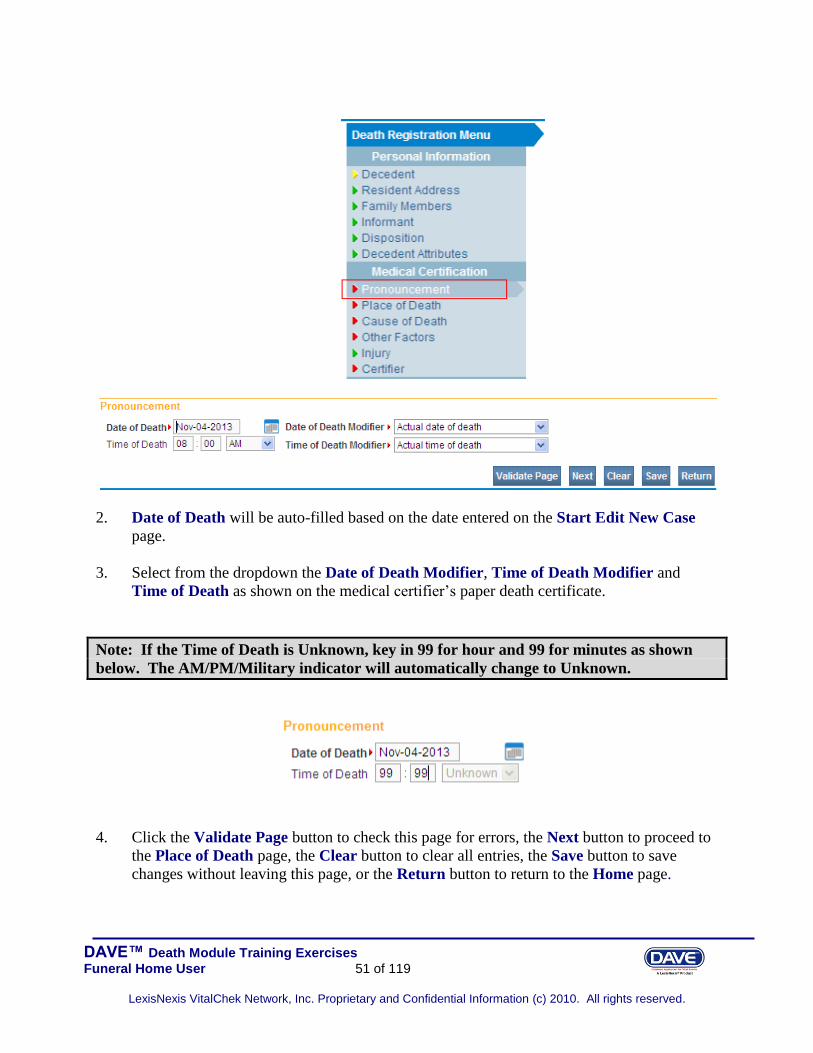
1. Click the Pronouncement page link to open the Pronouncement page.
DAVE™ Death Module Training Exercises
Funeral Home User 51 of 119
LexisNexis VitalChek Network, Inc. Proprietary and Confidential Information (c) 2010. All rights reserved.
2. Date of Death will be auto-filled based on the date entered on the Start Edit New Case
page.
3. Select from the dropdown the Date of Death Modifier, Time of Death Modifier and
Time of Death as shown on the medical certifier’s paper death certificate.
Note: If the Time of Death is Unknown, key in 99 for hour and 99 for minutes as shown
below. The AM/PM/Military indicator will automatically change to Unknown.
4. Click the Validate Page button to check this page for errors, the Next button to proceed to
the Place of Death page, the Clear button to clear all entries, the Save button to save
changes without leaving this page, or the Return button to return to the Home page.

DAVE™ Death Module Training Exercises
Funeral Home User 52 of 119
LexisNexis VitalChek Network, Inc. Proprietary and Confidential Information (c) 2010. All rights reserved.
Exercise 4.11 – Place of Death
Skill Learned: How to complete the Place of Death page.
Note: All information keyed into the Medical Certification pages (Pronouncement, Place of
Death, Cause of Death, Other Factors and Certify) should be keyed in “exactly” as the
medical certifier entered it on the paper death certificate. Contact the medical certifier for
any missing data on the medical certifier’s paper death certificate.
1. First, make a selection from the Type of place of death dropdown list.
2. If Other (specify) is selected as the Type of place of death, complete the Other Specify
field as well.
3. Use the Lookup Place of Death Facility (LOV) control to locate and assign the
correct facility to the death record.

DAVE™ Death Module Training Exercises
Funeral Home User 53 of 119
LexisNexis VitalChek Network, Inc. Proprietary and Confidential Information (c) 2010. All rights reserved.
4. Click on the LOV
5. Key in the name of the Facility or use a Wild Card (%) to locate the facility. In the
example below (M%) will search for all facilities that begin with the letter “M”.
6. Click Search.
7. On the search results page, click on “select” on the same row as the desired facility. The
page will auto-fill with the facility selected.
8. Enter the decedent’s Medical Record Number in the space provided.

DAVE™ Death Module Training Exercises
Funeral Home User 54 of 119
LexisNexis VitalChek Network, Inc. Proprietary and Confidential Information (c) 2010. All rights reserved.
9. Click the Validate Page button to check this page for errors, the Next button to proceed to
the Cause of Death page, the Clear button to clear all entries, the Save button to save
changes without leaving this page, or the Return button to return to the Home page.
Exercise 4.12 – Cause of Death
Skill Learned: How to complete the Cause of Death page.
Note: All information keyed into the Medical Certification pages (Pronouncement, Place of
Death, Cause of Death, Other Factors and Certify) should be keyed in “exactly” as the
medical certifier entered it on the paper death certificate. Contact the medical certifier for
any missing data on the medical certifier’s paper death certificate.
Note: If the Medical Certifier’s paper death certificate shows abbreviations, please type in
the abbreviations exactly as written by the Medical Certifier. DO NOT spell out the
abbreviations.
1. The Cause of Death page is composed of text boxes used to enter the cause(s) of death, the
approximate interval onset to death, and any other contributing factors.

DAVE™ Death Module Training Exercises
Funeral Home User 55 of 119
LexisNexis VitalChek Network, Inc. Proprietary and Confidential Information (c) 2010. All rights reserved.
2. Key in the Cause of Death exactly the way the medical certifier has written it on the paper
death certificate.
3. Click the Validate Page button to check this page for errors, the Next button to proceed to
the Other Factors page, the Clear button to clear all entries, the Save button to save
changes without leaving this page, or the Return button to return to the Home page.
Exercise 4.13 – Other Factors
Skill Learned: How to complete the Other Factors page.
Note: All information keyed into the Medical Certification pages (Pronouncement, Place of
Death, Cause of Death, Other Factors and Certify) should be keyed in “exactly” as the
medical certifier entered it on the paper death certificate. Contact the medical certifier for
any missing data on the medical certifier’s paper death certificate.
1. The Other Factors page is used to record other data relevant to the death: Autopsy
Performed, Tobacco Use, Manner of Death, etc.
2. Key in the data on the Other Factors page exactly as shown on the paper death certificate
from the medical certifier.
Note: If the case was referred to a medical examiner, the “Was ME Contacted?” field will
be auto-filled once the Medical Examiner has performed a referral action such as “accept”,
“pending”, etc.

DAVE™ Death Module Training Exercises
Funeral Home User 56 of 119
LexisNexis VitalChek Network, Inc. Proprietary and Confidential Information (c) 2010. All rights reserved.
Exercise 4.14 – Certifier
Skill Learned: The Certifier page is used to record the name and other data related to the
person legally responsible for certifying the decedent’s cause of death.
Note: All information keyed into the Medical Certification pages (Pronouncement, Place of
Death, Cause of Death, Other Factors and Certify) should be keyed in “exactly” as the
medical certifier entered it on the paper death certificate. Contact the medical certifier for
any missing data on the medical certifier’s paper death certificate.
1. Select the Certifier type from the Certifier Type dropdown.
2. Select the Certifier Name and Certifier Address from the LOV ( ) as shown on the
medical certifier’s paper death certificate.
3. Key in the Date Signed as shown on the medical certifier’s paper death certificate.
4. Click the Validate Page button to check this page for errors, the Clear button to clear all
entries, the Save button to save changes without leaving this page, or the Return button to
return to the Home page.

DAVE™ Death Module Training Exercises
Funeral Home User 57 of 119
LexisNexis VitalChek Network, Inc. Proprietary and Confidential Information (c) 2010. All rights reserved.
Exercise 4.15 – Locate Case
Skill Learned: How data providers such as funeral practitioners, clinicians and medical
examiners can use the Locate Case page to locate pre-existing cases “owned” by the office to
which the current user is associated.
1. From the Home page, select Life Events -> Death -> Locate Case.
2. The Locate Case page offers many different identifiers on which to base a record search.
While there are no required fields, as when using the Start/Edit New Case page, it is
recommended that as much information as possible be included in each search in order to
minimize the number of records returned.
3. In the example below, we are searching only on Last name. Enter the decedent’s last name
and click the Search button.
4. Searching on Last name returns the following results:
5. Click the New Search button in the lower, right-hand corner of the Results window.

DAVE™ Death Module Training Exercises
Funeral Home User 58 of 119
LexisNexis VitalChek Network, Inc. Proprietary and Confidential Information (c) 2010. All rights reserved.
6. For this search, enter both the decedent’s First and Last name, then click the Search
button.
7. Notice that this search returned only the specific record desired.
8. Locate and click the Preview link in the far right column of the Results window.
9. Clicking the Preview link will open a preview window offering a brief summary of the
selected record.

DAVE™ Death Module Training Exercises
Funeral Home User 59 of 119
LexisNexis VitalChek Network, Inc. Proprietary and Confidential Information (c) 2010. All rights reserved.
10. If, after examining the preview pane, you are confident that you have located the desired
record, then click the Decedent’s Name link or the Select link to open the record.
11. With the record open, it can now be reviewed and/or edited.

DAVE™ Death Module Training Exercises
Funeral Home User 60 of 119
LexisNexis VitalChek Network, Inc. Proprietary and Confidential Information (c) 2010. All rights reserved.
Exercise 4.16 – Preview Case
Skill Learned: How to preview a record prior to opening it.
1. Still not sure if you have located the desired record? Simply locate and click the Preview
link in any of the search result entries. This will generate a Preview page of that particular
registration.
2. Once you have previewed the registration and are sure that you have located the correct
record, click the decedent’s name to open the actual record.
This preview window will help determine whether or not the desired record has been located.
Click here to preview the case.
DAVE™ Death Module Training Exercises
Funeral Home User 61 of 119
LexisNexis VitalChek Network, Inc. Proprietary and Confidential Information (c) 2010. All rights reserved.
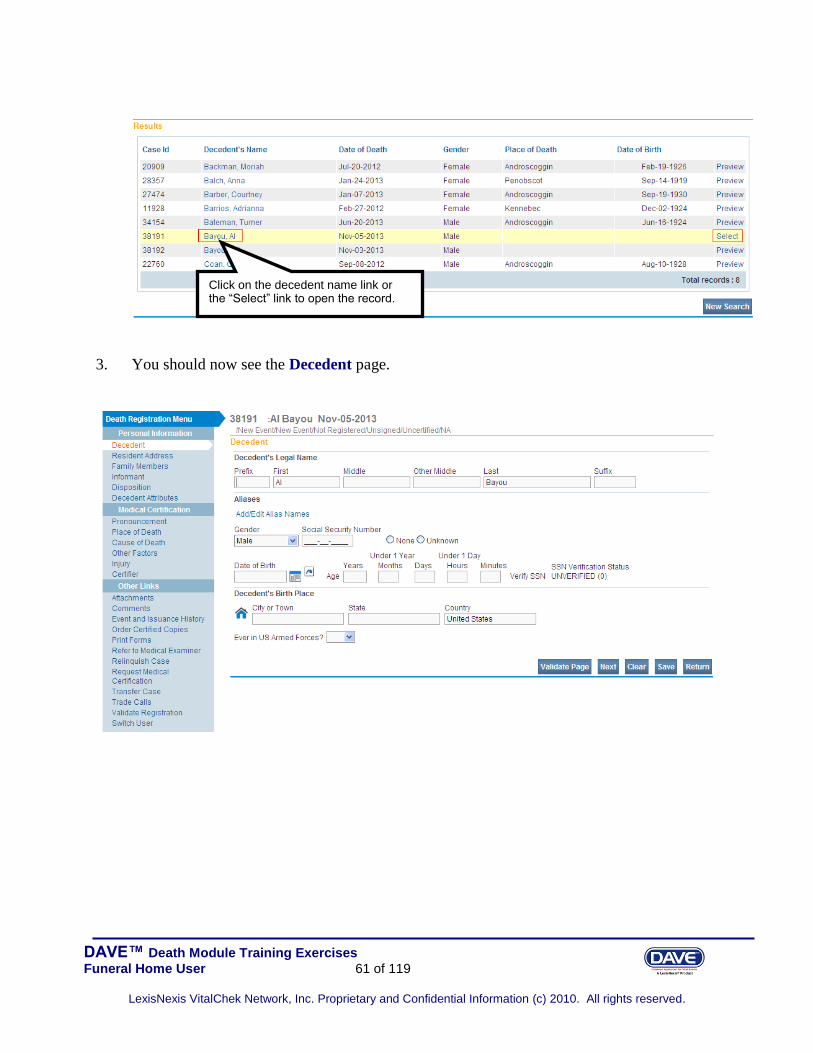
3. You should now see the Decedent page.
Click on the decedent name link or the “Select” link to open the record.


DAVE™ Death Module Training Exercises
Funeral Home User 63 of 119
LexisNexis VitalChek Network, Inc. Proprietary and Confidential Information (c) 2010. All rights reserved.
Section 5: Other Links
Exercise 5.1 – Comments
Skill Learned: How to read and enter comments. During the process of entering and registering
death records, it is sometimes necessary to store comments or remarks about a case. These
comments can serve as reminders or as instructions to others who will work on the case.
1. From the Death Registration Menu select -> Other Links-> Comments.
2. The Comments dialog will appear onscreen as a pop-up window. To add a new comment,
click the New Comment button located at the bottom of the Comments window.
Click the “New Comment” button to add a new comment.

DAVE™ Death Module Training Exercises
Funeral Home User 64 of 119
LexisNexis VitalChek Network, Inc. Proprietary and Confidential Information (c) 2010. All rights reserved.
3. The Enter New Comment tab will open allowing you to enter new comments.
4. The first step in adding a new comment is to select a Comment Type. Every comment
must have a type assigned to it.
5. Comments are limited to 4000 characters. Fortunately, DAVE™ keeps track of the
number of characters used and displays that information onscreen.
Select a Comment Type here. Note: Comment types are based on security privileges.

DAVE™ Death Module Training Exercises
Funeral Home User 65 of 119
LexisNexis VitalChek Network, Inc. Proprietary and Confidential Information (c) 2010. All rights reserved.
6. When you have finished entering the comment, select the Save button to save the
comment, Clear to clear the entry, or Cancel to close the comment window without saving
changes.
7. Selecting Save above will write the comment to the DAVE™ database and return you to
the main Comments window, shown below. Notice that a portion of the comment can be
read in the Comment window. Lengthy comments will have to be opened in order to be
read in their entirety. Clicking the Edit link will open the Update Existing Comment tab
for you to view and, if necessary, edit the comment.
8. Once a comment has been added to a record, a checkmark will appear next to the
Comments link. This serves as a visual cue to all users that comment(s) exist on a record.
Maximum number of characters that can be included in a comment.
Number of remaining characters that can be added to the current comment.
These links are used to edit or delete existing comments.

DAVE™ Death Module Training Exercises
Funeral Home User 66 of 119
LexisNexis VitalChek Network, Inc. Proprietary and Confidential Information (c) 2010. All rights reserved.
Note: The ability to Edit or Delete comments is determined by the individual user’s
security configuration.
Exercise 5.2 – Attachments
Skill Learned: How to add attachments. It is sometimes necessary to attach documents to a
case. If the attachment is too large, reduce the size of the document in your copier, scan the
attachment and save it to your computer file directory prior to attaching the document to the
case.
Note: There is a 4MB size limitation on attachments.
1. Scan the document and save it to your computer file directory.
2. Open the case the attachment belongs to.
3. From the Death Registration Menu select Other Links ->Attachments.
The checkmark here serves as a visual indicator that one or more comments have been added to this registration.
DAVE™ Death Module Training Exercises
Funeral Home User 67 of 119
LexisNexis VitalChek Network, Inc. Proprietary and Confidential Information (c) 2010. All rights reserved.
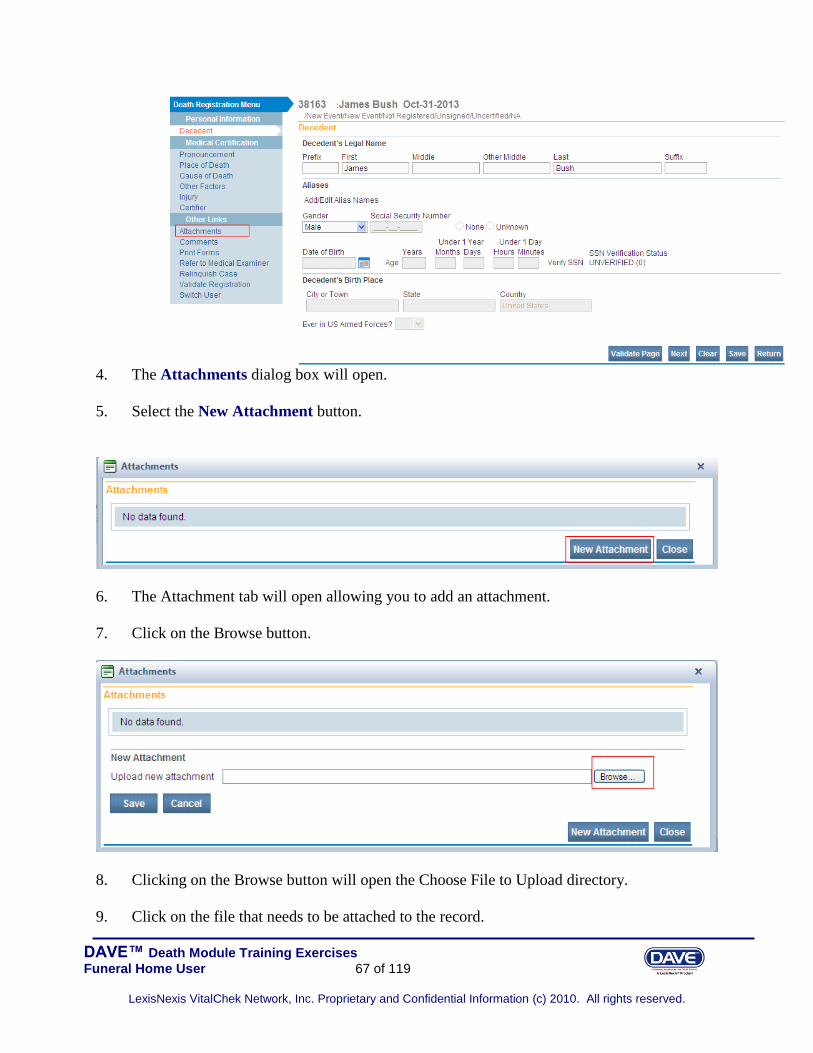
4. The Attachments dialog box will open.
5. Select the New Attachment button.
6. The Attachment tab will open allowing you to add an attachment.
7. Click on the Browse button.
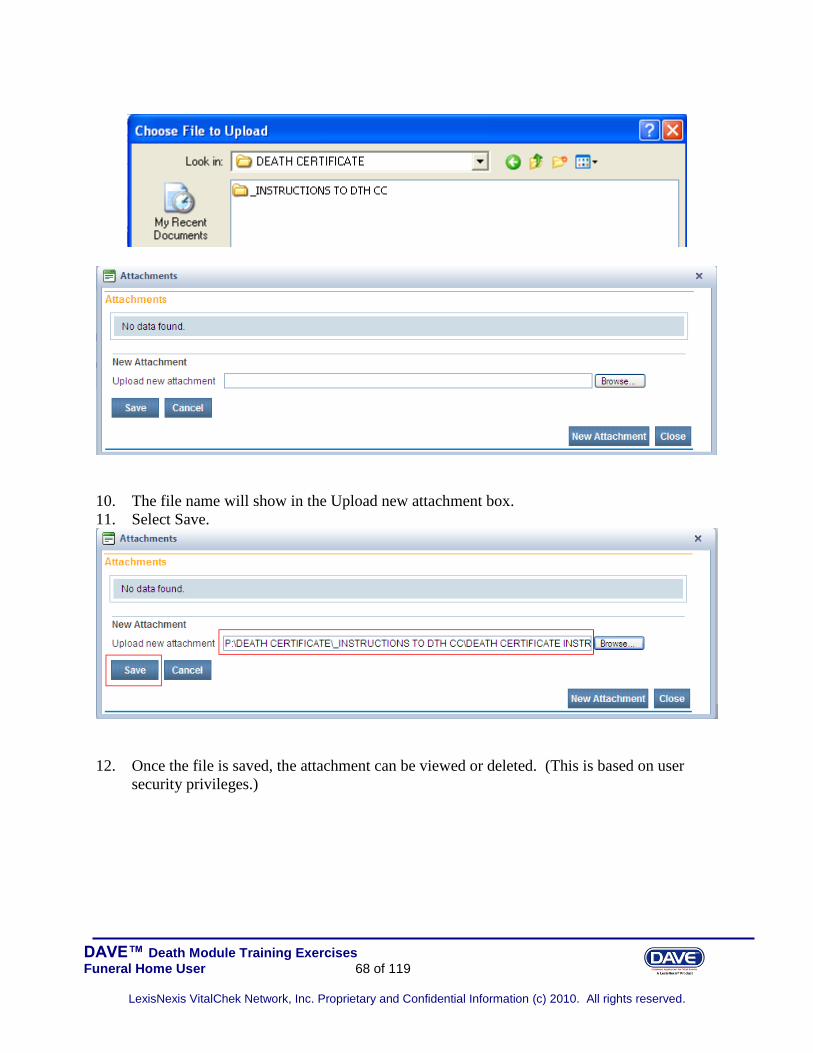
8. Clicking on the Browse button will open the Choose File to Upload directory.
9. Click on the file that needs to be attached to the record.
DAVE™ Death Module Training Exercises
Funeral Home User 68 of 119
LexisNexis VitalChek Network, Inc. Proprietary and Confidential Information (c) 2010. All rights reserved.
10. The file name will show in the Upload new attachment box.
11. Select Save.
12. Once the file is saved, the attachment can be viewed or deleted. (This is based on user
security privileges.)

DAVE™ Death Module Training Exercises
Funeral Home User 69 of 119
LexisNexis VitalChek Network, Inc. Proprietary and Confidential Information (c) 2010. All rights reserved.
13. A checkmark indicator will be shown in front of the Attachments link when there is an
attachment included with the case.
Exercise 5.3 – Cremation Clearance - Funeral Director
Skill Learned: How to complete the Cremation Clearance page from the perspective of a
funeral home practitioner.
Note: The ability to request a cremation clearance from the medical examiner is
determined by the system configuration. This feature may or may not be turned on.
1. Login to DAVE™ as a funeral practitioner and begin a new case. On the Disposition
page, select Cremation as the Method of Disposition.
A checkmark will appear in front of the Attachments link indicating one or more attachments are included in the registration.

DAVE™ Death Module Training Exercises
Funeral Home User 70 of 119
LexisNexis VitalChek Network, Inc. Proprietary and Confidential Information (c) 2010. All rights reserved.
2. Save or click the Next button and a new option, “Cremation Clearance”, will become
available from the Other Links sub-menu. Click the Cremation Clearance link to
proceed.
The Cremation Clearance link becomes visible only after Method of Disposition (Cremation, Use by Medical Science, Removal from State or Burial at Sea) is selected and saved, or the Next button is selected.

DAVE™ Death Module Training Exercises
Funeral Home User 71 of 119
LexisNexis VitalChek Network, Inc. Proprietary and Confidential Information (c) 2010. All rights reserved.
3. The Authorizing Individual Name should be the family member or party requesting
cremation of the remains. In addition, a selection must be made from the Relationship to
Deceased dropdown list.
4. Complete the Authorizing Individual Address tab and click the Save button.
5. The page will refresh and change the Medical Examiner Review Status to Requested.
Additionally, a new Cancel Cremation Clearance Request link will appear onscreen.
Clicking this link will cancel this request.
When the funeral practitioner requests a cremation clearance, the medical examiner
will automatically receive an email and an internal message. However, if the funeral
practitioner requests a cremation clearance, but decides to cancel the request, the
medical examiner will not receive an email and/or internal message. (Please contact
the medical examiner if the request is cancelled.)

DAVE™ Death Module Training Exercises
Funeral Home User 72 of 119
LexisNexis VitalChek Network, Inc. Proprietary and Confidential Information (c) 2010. All rights reserved.
6. The Status bar will indicate that a Cremation Clearance is required. Once the Medical
Examiner has selected the “approved” or “pending” status, the “Cremation Clearance
Required” will no longer show in the status bar.
7. Click on the Disposition page to check the Medical Examiner Status.
Currently, the status is “Requested” by the funeral practitioner.
In this example, the medical examiner has “approved” the cremation clearance.

DAVE™ Death Module Training Exercises
Funeral Home User 73 of 119
LexisNexis VitalChek Network, Inc. Proprietary and Confidential Information (c) 2010. All rights reserved.
If the Medical Examiner does NOT approve the cremation clearance, both an email and an
internal message will be sent to the funeral practitioner.
If the Medical Examiner selects “Pending” an email and internal message is NOT sent to
the funeral practitioner.
The funeral practitioner can check the status of the cremation clearance by checking the
Medical Examiner Review Status on the Disposition page as shown above.
Note: The remaining fields on this page (ME Case Number, Cremation Clearance
Authorized By, and Medical Examiner Reject Reason) can only be completed by a Medical
Examiner.
8. Click the Return button to return to the Home page.
Exercise 5.4 – Order Certified Copies
Skill Learned: How funeral home practitioners may use the Order Certified Copies feature of
DAVE™ to place orders on behalf of their customers.
One of the many services offered by funeral homes is the placement of orders for certified copies
of death certificates on behalf of their clientele. To facilitate this service, DAVE™ offers a link
exclusively to funeral home users: Order Certified Copies.
1. From the Death Registration Menu select Other Links-> Order Certified Copies.
In this example, the medical examiner did NOT approve of the cremation clearance.

DAVE™ Death Module Training Exercises
Funeral Home User 74 of 119
LexisNexis VitalChek Network, Inc. Proprietary and Confidential Information (c) 2010. All rights reserved.
Applicant Page
2. Notice that the Applicant page is now displayed and that:
the Applicant radio button is automatically set to Organization,
the Organization tab is auto-populated with the name of the Funeral Home
associated with the current user, and
the Address tab is auto-populated with the address of the Funeral Home associated
with the current user.

DAVE™ Death Module Training Exercises
Funeral Home User 75 of 119
LexisNexis VitalChek Network, Inc. Proprietary and Confidential Information (c) 2010. All rights reserved.
3. The Contact Information tab contains optional, order-specific contact information such as
the person who placed the order and the phone numbers and/or e-mail address at which
they can be contacted.
4. By default, requested certificates are mailed to the originating Funeral Home’s address on
file. However, the DAVE™ application allows Funeral Homes to request a certificate and
have it mailed to the original requestor. This is accomplished by deselecting the Shipping
Information Same as Applicant checkbox and completing the Shipping Information tab
that displays. The Shipping Information tab is used to capture the third party’s Name,
Address and Contact Information.
5. Re-select the Shipping Information Same as Applicant checkbox to hide the additional
Shipping Information tab.
6. Locate the navigational buttons located at the bottom of the Applicant page and click Next
to save entries and proceed to the Services page.
Services Page
The Services page is used to define the type of service requested. This page is also used to
describe the source of the application and the office that will issue the certificate.
Deselecting this checkbox will refresh the page and display the Shipping Information fields shown here. Complete this information if the requested certificate is to be shipped to an address other than that of the requesting funeral home.

DAVE™ Death Module Training Exercises
Funeral Home User 76 of 119
LexisNexis VitalChek Network, Inc. Proprietary and Confidential Information (c) 2010. All rights reserved.
7. When the Services page is loaded, notice that the Received Date and Fee Effective Date
are auto-populated and disabled.
8. Make a selection from the Source dropdown list. In this example, Internet has been
selected.
Please Note: The Will this order be paid for by Credit Card checkbox is pre-selected
and disabled. Funeral Homes must pay for any services which are ordered online by credit
card.
9. Select an Issuing Office for where it is desired to have the services processed as shown
below.
NOTE: ONLY THE OFFICE OF VITAL RECORDS CAN DO
INTERNET/CREDIT CARD ORDERS.
10. The page is redrawn as shown below. Click the Add Service button to proceed.
Currently, only the Office of Vital Records can process credit card orders.
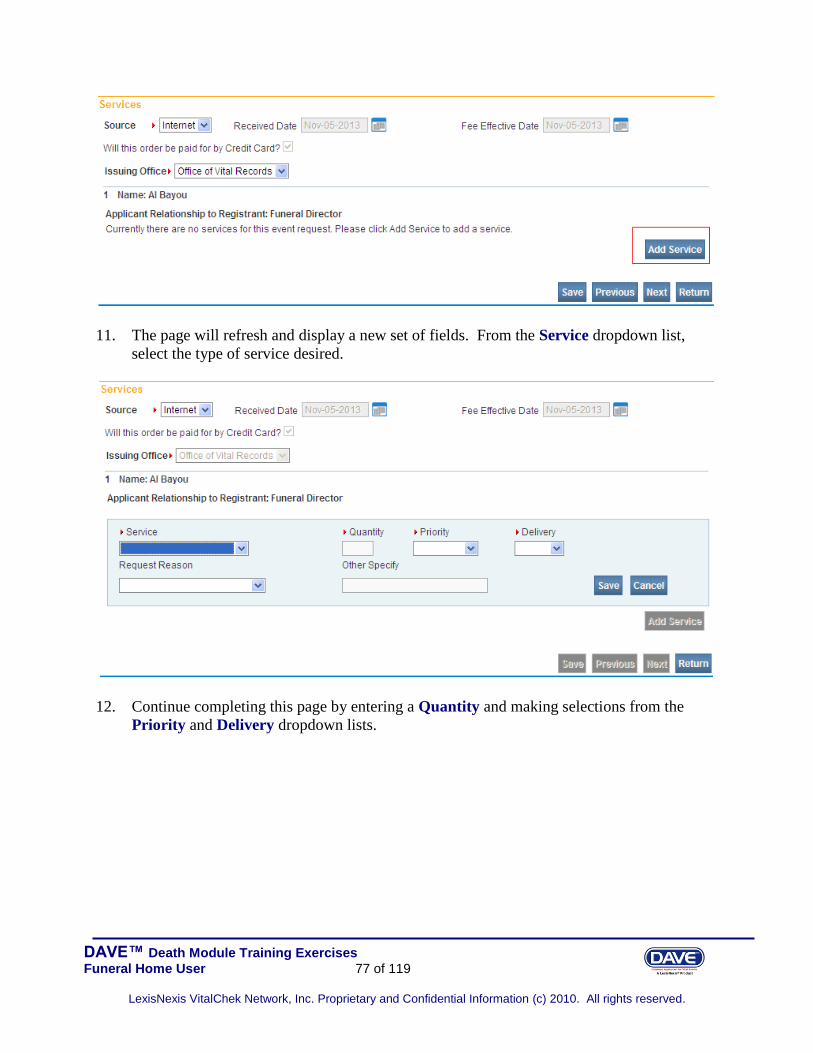
DAVE™ Death Module Training Exercises
Funeral Home User 77 of 119
LexisNexis VitalChek Network, Inc. Proprietary and Confidential Information (c) 2010. All rights reserved.
11. The page will refresh and display a new set of fields. From the Service dropdown list,
select the type of service desired.
12. Continue completing this page by entering a Quantity and making selections from the
Priority and Delivery dropdown lists.

DAVE™ Death Module Training Exercises
Funeral Home User 78 of 119
LexisNexis VitalChek Network, Inc. Proprietary and Confidential Information (c) 2010. All rights reserved.
13. Complete the Services page by selecting a Request Reason and clicking the Save button.
14. Again, the page will refresh and replace the various fields with a grid containing the details
of this service(s) requested.
Please Note: Fees may be different; this is only an example.
15. Click the Add Service button to continue adding services to the order or click the Next
button to proceed to the Payments page.
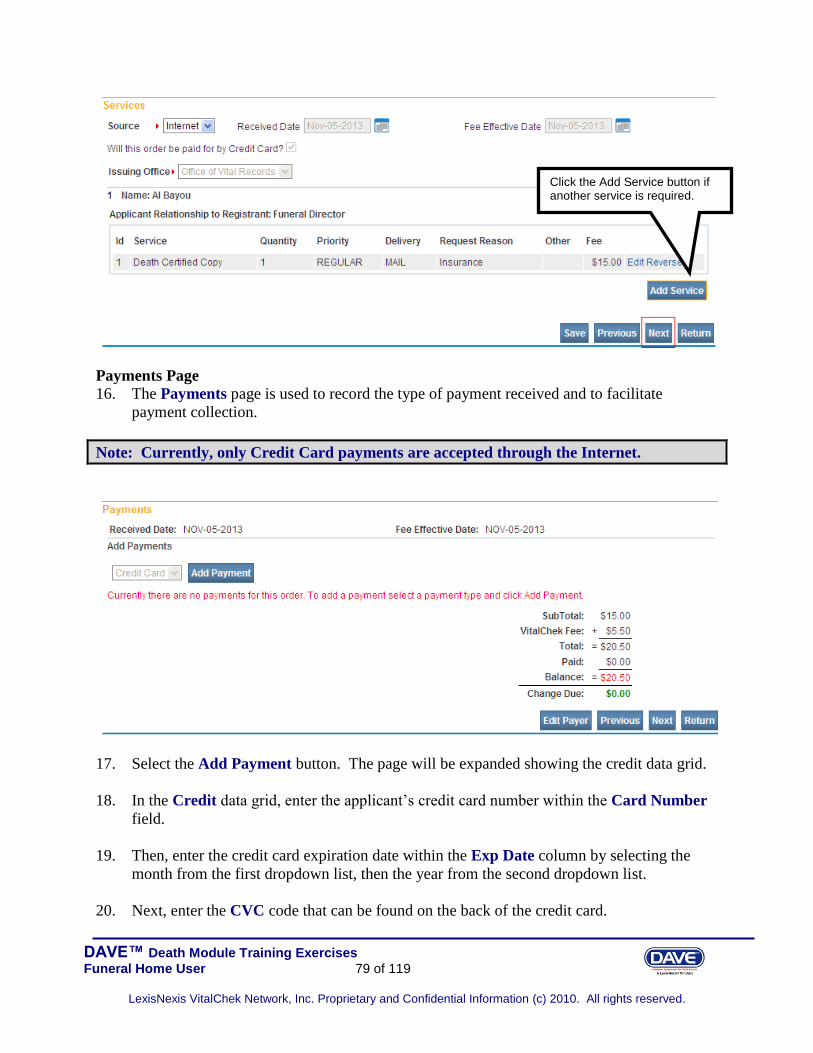
DAVE™ Death Module Training Exercises
Funeral Home User 79 of 119
LexisNexis VitalChek Network, Inc. Proprietary and Confidential Information (c) 2010. All rights reserved.
Payments Page 16. The Payments page is used to record the type of payment received and to facilitate
payment collection.
Note: Currently, only Credit Card payments are accepted through the Internet.
17. Select the Add Payment button. The page will be expanded showing the credit data grid.
18. In the Credit data grid, enter the applicant’s credit card number within the Card Number
field.
19. Then, enter the credit card expiration date within the Exp Date column by selecting the
month from the first dropdown list, then the year from the second dropdown list.
20. Next, enter the CVC code that can be found on the back of the credit card.
Click the Add Service button if another service is required.

DAVE™ Death Module Training Exercises
Funeral Home User 80 of 119
LexisNexis VitalChek Network, Inc. Proprietary and Confidential Information (c) 2010. All rights reserved.
21. Upon entering the CVC code, select Authorize or Cancel to confirm entries.
Note: The “Authorize” button must be selected. If the authorize button is not selected, the
payment will not be recorded.
Once the “Authorize” button is selected, the Status will indicate “Approved” as shown below if
the credit card has been approved.
22. Select the Next button to proceed to the Order Summary page.
Click on Authorize to confirm entries.
Check the Status after selecting the “Authorize” button to insure the credit card has been approved.

DAVE™ Death Module Training Exercises
Funeral Home User 81 of 119
LexisNexis VitalChek Network, Inc. Proprietary and Confidential Information (c) 2010. All rights reserved.
Order Summary Page
The Order Summary page provides a brief summary of all order data collected and is used to
submit the order for processing.
23. Click the Submit Order button located at the bottom of the page to submit the order for
processing.
Exercise 5.5 – Print Forms - Working Copy
Skill Learned: How to send working copies of death certificates to an installed printer.
Note: The ability to print a Working Copy of a registration is based on user security
privileges.
1. Select Death Registration Menu -> Other Links ->Print Forms.
2. Locate the underlined Working Copy link.
Be sure the amount shows “Paid”. If there is still a balance due, then go back to the Payment page and confirm that the “Authorize” button was selected and the status shows “Approved”.

DAVE™ Death Module Training Exercises
Funeral Home User 82 of 119
LexisNexis VitalChek Network, Inc. Proprietary and Confidential Information (c) 2010. All rights reserved.
3. Clicking any form link will open the File Download dialog box and launch the document
for printing.
4. Click the Open button to open the death certificate.
5. Click on the Printer icon only once in the top left-hand corner of the death certificate to
print all copies of the form.
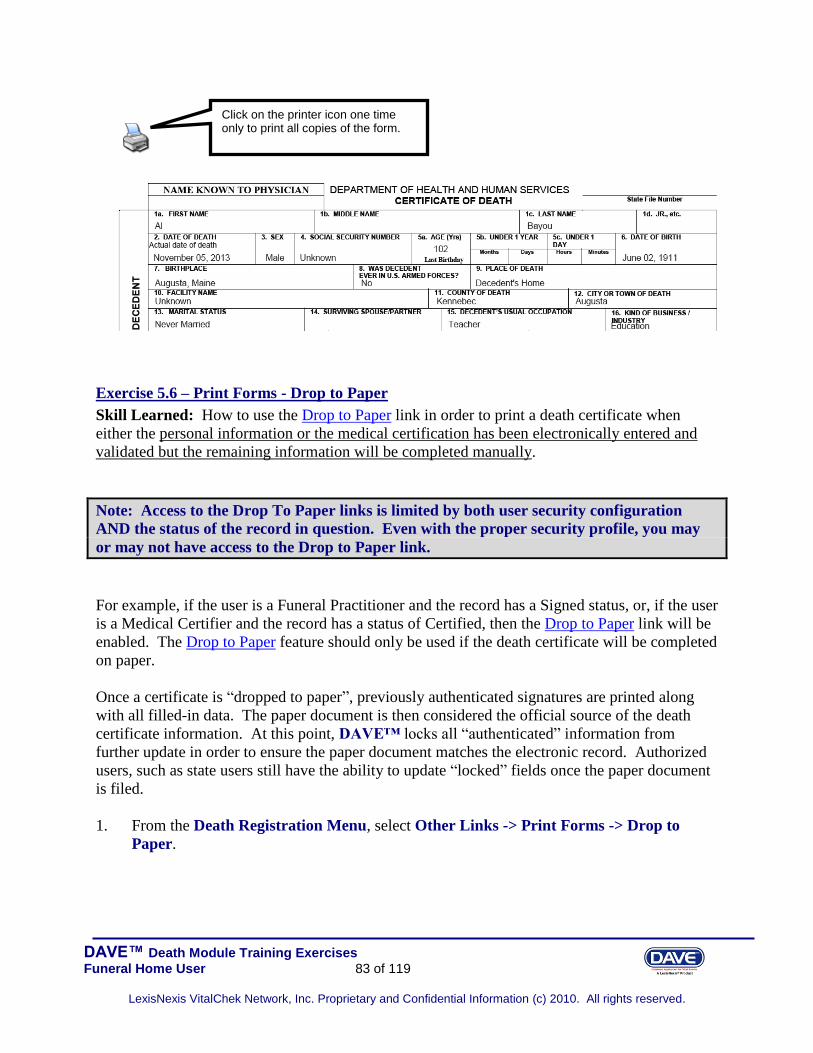
DAVE™ Death Module Training Exercises
Funeral Home User 83 of 119
LexisNexis VitalChek Network, Inc. Proprietary and Confidential Information (c) 2010. All rights reserved.
Exercise 5.6 – Print Forms - Drop to Paper
Skill Learned: How to use the Drop to Paper link in order to print a death certificate when
either the personal information or the medical certification has been electronically entered and
validated but the remaining information will be completed manually.
Note: Access to the Drop To Paper links is limited by both user security configuration
AND the status of the record in question. Even with the proper security profile, you may
or may not have access to the Drop to Paper link.
For example, if the user is a Funeral Practitioner and the record has a Signed status, or, if the user
is a Medical Certifier and the record has a status of Certified, then the Drop to Paper link will be
enabled. The Drop to Paper feature should only be used if the death certificate will be completed
on paper.
Once a certificate is “dropped to paper”, previously authenticated signatures are printed along
with all filled-in data. The paper document is then considered the official source of the death
certificate information. At this point, DAVE™ locks all “authenticated” information from
further update in order to ensure the paper document matches the electronic record. Authorized
users, such as state users still have the ability to update “locked” fields once the paper document
is filed.
1. From the Death Registration Menu, select Other Links -> Print Forms -> Drop to
Paper.
Click on the printer icon one time only to print all copies of the form.

DAVE™ Death Module Training Exercises
Funeral Home User 84 of 119
LexisNexis VitalChek Network, Inc. Proprietary and Confidential Information (c) 2010. All rights reserved.
2. In the example above, the Personal Information has been entered, validated and signed.
We are going to drop this record to paper in order to complete the Medical Certification
information. From the Print Forms page, locate and click the Drop to Paper link.
3. The File Download box will open. Click the Open button to open the form in pdf format
for printing.
4. The form will launch in PDF format for printing.
Click on the Printer icon to send the form to the printer.

DAVE™ Death Module Training Exercises
Funeral Home User 85 of 119
LexisNexis VitalChek Network, Inc. Proprietary and Confidential Information (c) 2010. All rights reserved.
Exercise 5.7 – Print Forms – Medical Examiner Release Form
Skill Learned: How to use the Medical Examiner Release Form link in order to print the
Medical Examiner’s Release of Human Remains form.
1. From the Death Registration Menu, select Other Links -> Print Forms -> Medical
Examiner Release Form.
2. The File Download box will open. Click the Open button to open the form in pdf format
for printing.

DAVE™ Death Module Training Exercises
Funeral Home User 86 of 119
LexisNexis VitalChek Network, Inc. Proprietary and Confidential Information (c) 2010. All rights reserved.
3. The form will launch in PDF format for printing.

DAVE™ Death Module Training Exercises
Funeral Home User 87 of 119
LexisNexis VitalChek Network, Inc. Proprietary and Confidential Information (c) 2010. All rights reserved.
Exercise 5.8 – Refer To Medical Examiner
Skill Learned: How to refer a case to the medical examiner for official review. The purpose of
the Refer to Medical Examiner page is to notify a medical examiner of a death that was due or
may have been due to unnatural causes.
1. From the Death Registration Menu select Other Links -> Refer to Medical Examiner
link.
2. This will launch the Refer to Medical Examiner page as shown below. Notice, that the
Message field is auto-filled with a pre-formatted message. This message can be sent as is,
edited, or deleted and replaced entirely.
3. Click Save to complete the referral process. The next time the medical examiner logs in,
this case will appear in their work queue and/or messages.
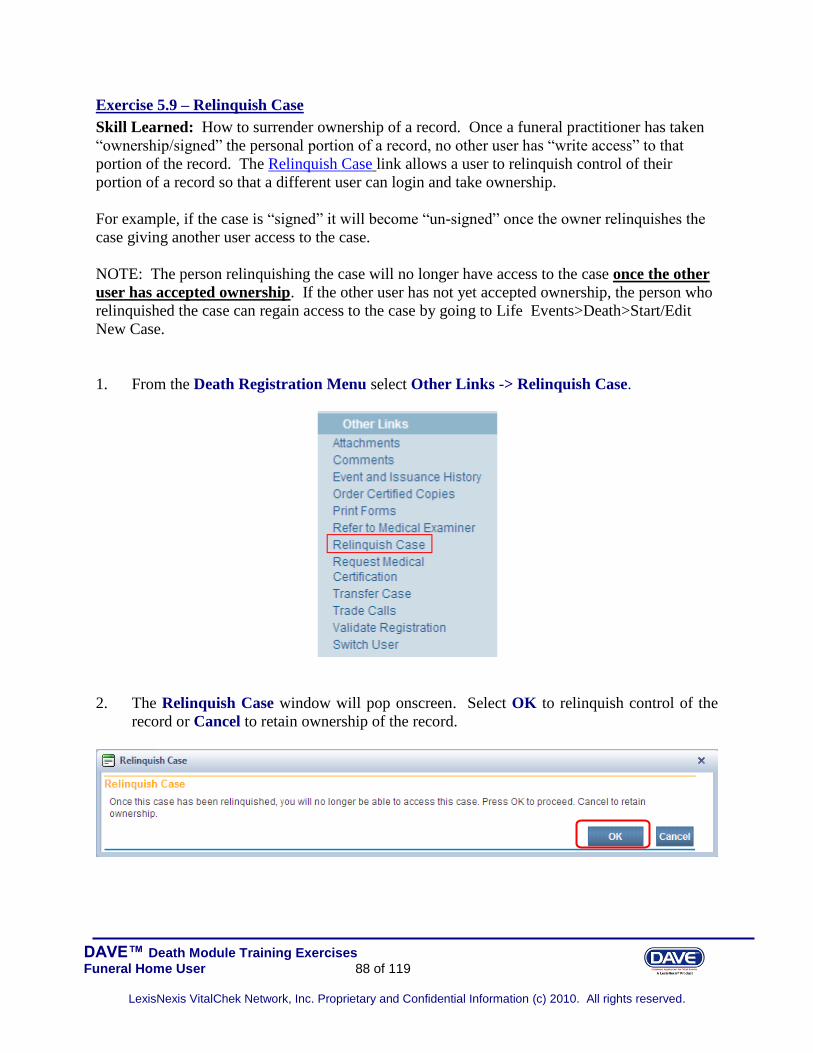
DAVE™ Death Module Training Exercises
Funeral Home User 88 of 119
LexisNexis VitalChek Network, Inc. Proprietary and Confidential Information (c) 2010. All rights reserved.
Exercise 5.9 – Relinquish Case
Skill Learned: How to surrender ownership of a record. Once a funeral practitioner has taken
“ownership/signed” the personal portion of a record, no other user has “write access” to that
portion of the record. The Relinquish Case link allows a user to relinquish control of their
portion of a record so that a different user can login and take ownership.
For example, if the case is “signed” it will become “un-signed” once the owner relinquishes the
case giving another user access to the case.
NOTE: The person relinquishing the case will no longer have access to the case once the other
user has accepted ownership. If the other user has not yet accepted ownership, the person who
relinquished the case can regain access to the case by going to Life Events>Death>Start/Edit
New Case.
1. From the Death Registration Menu select Other Links -> Relinquish Case.
2. The Relinquish Case window will pop onscreen. Select OK to relinquish control of the
record or Cancel to retain ownership of the record.

DAVE™ Death Module Training Exercises
Funeral Home User 89 of 119
LexisNexis VitalChek Network, Inc. Proprietary and Confidential Information (c) 2010. All rights reserved.
Exercise 5.10 – Request Medical Certification
Skill Learned: How to use the Request Medical Certification page. The Request Medical
Certification page is used when the Funeral Practitioner has finished inputting their data and is
ready to hand the case off to a physician for certification. A medical facility user may also use
the Request Medical Certification feature to notify a physician that a case is ready for review.
1. From within any death record, select from the Death Registration Menu->Other Links->
the Request Medical Certification link.
2. This will launch the Request Medical Certification page as shown below. Notice, that the
Message field is auto-filled with a pre-formatted message. This message can be sent as is,
edited, or deleted and replaced entirely.

DAVE™ Death Module Training Exercises
Funeral Home User 90 of 119
LexisNexis VitalChek Network, Inc. Proprietary and Confidential Information (c) 2010. All rights reserved.
3. Next, locate the appropriate medical certifier by clicking the LookUp control ( ).
4. Search for a certifier from the Search Certifiers dialog, shown above, by entering all or a
portion of the last name and the wildcard character “%”. Click the Search button to
perform the search.

DAVE™ Death Module Training Exercises
Funeral Home User 91 of 119
LexisNexis VitalChek Network, Inc. Proprietary and Confidential Information (c) 2010. All rights reserved.
5. From the resulting list, choose the Medical Certifier by clicking the corresponding select
link. This will close the Search Certifiers dialog and insert the certifier name into the
Name field.
6. Next, select the Facility/Office Name in the same manner. Click on the lookup icon next to
the Facility/Office Name as shown above.

DAVE™ Death Module Training Exercises
Funeral Home User 92 of 119
LexisNexis VitalChek Network, Inc. Proprietary and Confidential Information (c) 2010. All rights reserved.
7. Enter a few characters of the facility name along with the wild card, (%), character or just
the wild card character alone to show all facilities the selected certifier is associated with.
8. Use the Select link to choose a facility and load the information.
9. Select Clear to clear all entries and begin again, Save to save changes and request
certification or Return to leave this page without saving changes and return to the previous
page. If you select Save, the next time the selected certifier logs into DAVE™, the current
record will appear in their Current Activities work queues.
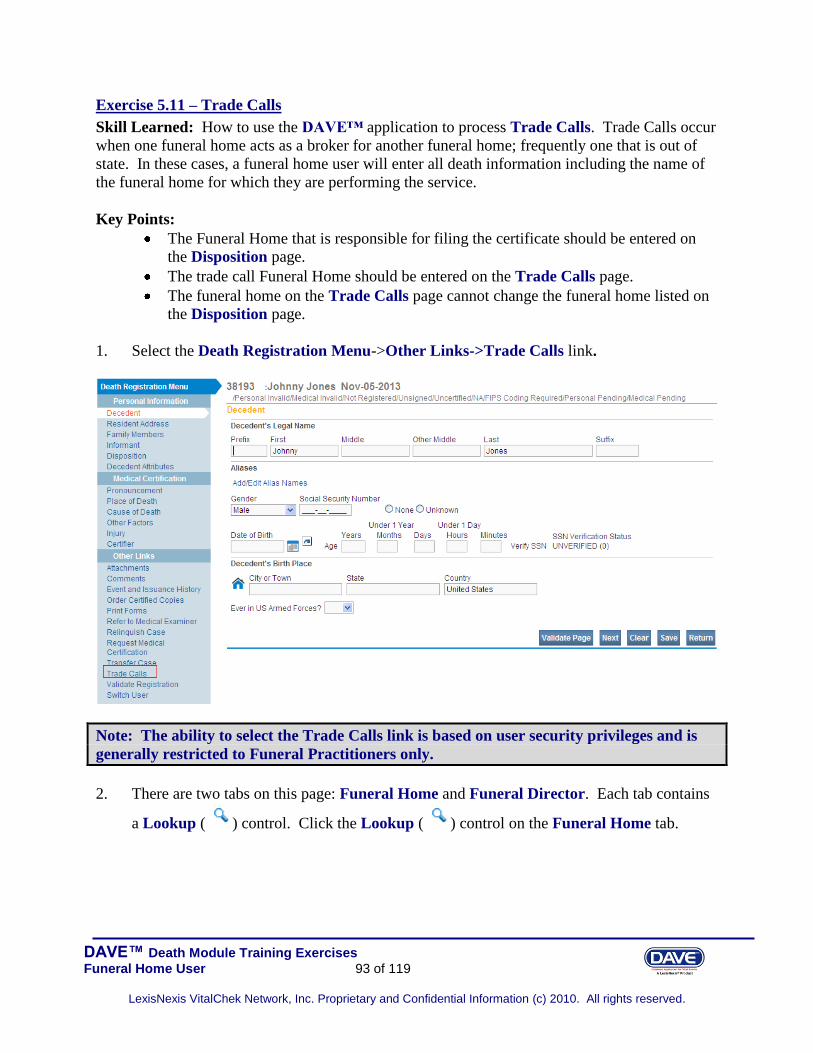
DAVE™ Death Module Training Exercises
Funeral Home User 93 of 119
LexisNexis VitalChek Network, Inc. Proprietary and Confidential Information (c) 2010. All rights reserved.
Exercise 5.11 – Trade Calls
Skill Learned: How to use the DAVE™ application to process Trade Calls. Trade Calls occur
when one funeral home acts as a broker for another funeral home; frequently one that is out of
state. In these cases, a funeral home user will enter all death information including the name of
the funeral home for which they are performing the service.
Key Points:
The Funeral Home that is responsible for filing the certificate should be entered on
the Disposition page.
The trade call Funeral Home should be entered on the Trade Calls page.
The funeral home on the Trade Calls page cannot change the funeral home listed on
the Disposition page.
1. Select the Death Registration Menu->Other Links->Trade Calls link.
Note: The ability to select the Trade Calls link is based on user security privileges and is
generally restricted to Funeral Practitioners only.
2. There are two tabs on this page: Funeral Home and Funeral Director. Each tab contains
a Lookup ( ) control. Click the Lookup ( ) control on the Funeral Home tab.

DAVE™ Death Module Training Exercises
Funeral Home User 94 of 119
LexisNexis VitalChek Network, Inc. Proprietary and Confidential Information (c) 2010. All rights reserved.
3. From the Facility Name window select the funeral home associated with the Trade
Company involved in this Trade Call.
4. Click the Lookup ( ) control on the Funeral Director tab to launch the Search
Funeral Directors window. Select the trade company from this list of funeral homes.
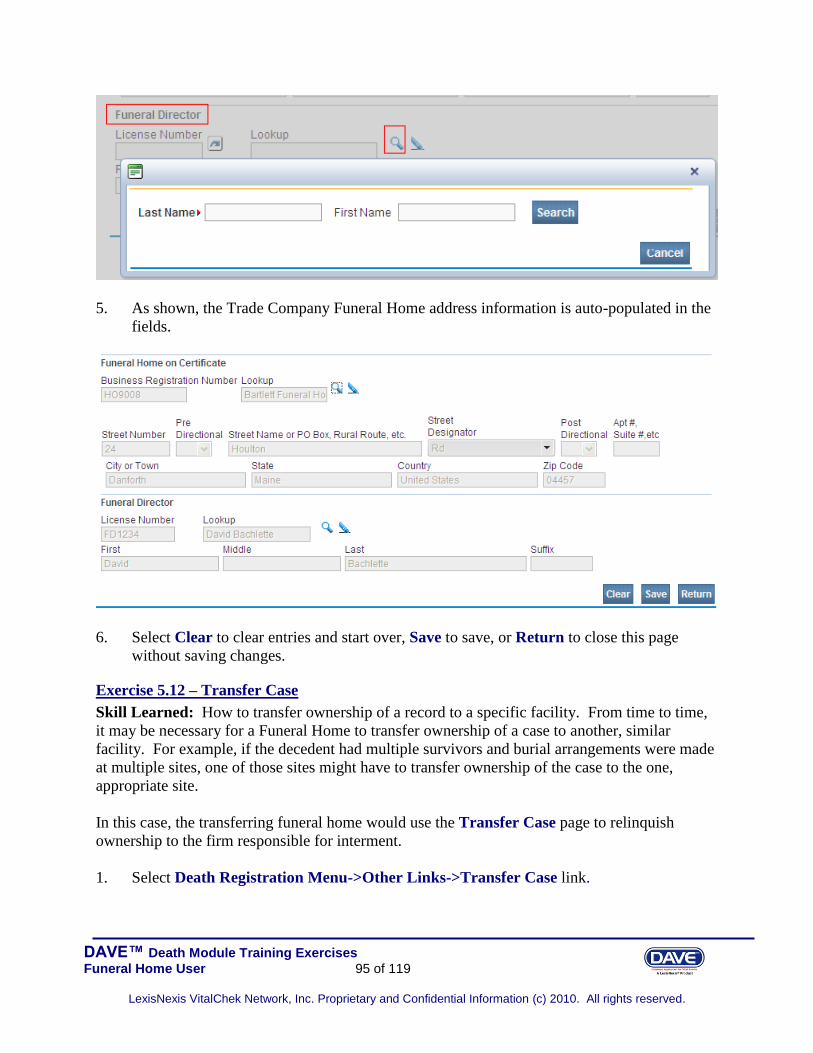
DAVE™ Death Module Training Exercises
Funeral Home User 95 of 119
LexisNexis VitalChek Network, Inc. Proprietary and Confidential Information (c) 2010. All rights reserved.
5. As shown, the Trade Company Funeral Home address information is auto-populated in the
fields.
6. Select Clear to clear entries and start over, Save to save, or Return to close this page
without saving changes.
Exercise 5.12 – Transfer Case
Skill Learned: How to transfer ownership of a record to a specific facility. From time to time,
it may be necessary for a Funeral Home to transfer ownership of a case to another, similar
facility. For example, if the decedent had multiple survivors and burial arrangements were made
at multiple sites, one of those sites might have to transfer ownership of the case to the one,
appropriate site.
In this case, the transferring funeral home would use the Transfer Case page to relinquish
ownership to the firm responsible for interment.
1. Select Death Registration Menu->Other Links->Transfer Case link.

DAVE™ Death Module Training Exercises
Funeral Home User 96 of 119
LexisNexis VitalChek Network, Inc. Proprietary and Confidential Information (c) 2010. All rights reserved.
Note: There are two types of ownership: Personal, which is controlled at the Funeral
Home, and Medical, which is controlled by the governing medical facility. The availability
of each is dynamically controlled based on user security profile.
2. To Transfer Personal Ownership, place a checkmark in the Transfer Personal
Ownership To: checkbox.
3. Next, use the Lookup control ( ) to select the receiving facility.
Place a checkmark here to transfer ownership of the personal portion of this case.

DAVE™ Death Module Training Exercises
Funeral Home User 97 of 119
LexisNexis VitalChek Network, Inc. Proprietary and Confidential Information (c) 2010. All rights reserved.
4. Enter a portion of the Funeral Home name followed by the wild card character, “%”, then
click the Search button.
5. Click the Select link next to the Funeral Home to which the case shall be transferred to.
The selection window will close.
6. Finally, select Save to save changes and transfer ownership of the record, Clear to clear all
entries and begin again, or Return to leave this page without saving changes and return to
the previous page.

DAVE™ Death Module Training Exercises
Funeral Home User 98 of 119
LexisNexis VitalChek Network, Inc. Proprietary and Confidential Information (c) 2010. All rights reserved.
Section 6: Work Queues
In this section, you will learn how to navigate through the various DAVE™ work queues. From
the Home page, select Queues. Queues are used to group death cases together based on the
amount of work that has been done with them and the amount of work that still needs to be done.
This grouping is accomplished through the assignment of work queue statuses based on
validation rule failures.
Exercise 6.1 – Work Queue Summary
Skill Learned: How to access records via work queues. As registrations work their way
through DAVE™, they will pass from one work queue to another. Queues represent the statuses
assigned to records in DAVE™.
1. From the Home page, select Queues. This will bring up a listing of all the available work
queues containing cases. Queues contain registrations, orders, or amendments having a
work queue status. If a queue does not contain any cases it will not be displayed in the list.
2. The default sort order is by Queue Name. Notice however, that the column headers in the
summary table are all blue links. Clicking any of these links will change the sort order of
the table based on that column’s content.
3. Type indicates the kind of record being presented.
4. Count indicates how many cases are in the queue. Age of Oldest in Days indicates the age
of the oldest record in the queue.
5. On the Search by Registration Work Queue page, select Personal Pending – Death
from the Queue dropdown list, then select Search.

DAVE™ Death Module Training Exercises
Funeral Home User 99 of 119
LexisNexis VitalChek Network, Inc. Proprietary and Confidential Information (c) 2010. All rights reserved.
In the example shown here there are 14 cases in the Personal Pending queue.
6. Click any Registrant name or Case Id link to open that record for review or editing.
Exercise 6.2 – Work Queues - Search
Skill Learned: How to search for cases based on their queue status.
1. From the Home page select Queues -> Registration Work Queues. This will open the
Search by Registration Work Queue window.

DAVE™ Death Module Training Exercises
Funeral Home User 100 of 119
LexisNexis VitalChek Network, Inc. Proprietary and Confidential Information (c) 2010. All rights reserved.
Note: The actual work queues available will vary based on user type and user security
setup.
2. Select one of the available queues from the Queue dropdown and click the Search button.
This will return a list of all cases in the selected queue.
3. Click the Return button to return to the Search by Registration Work Queue window.
4. Click the Registrant name or Case Id link to open the record for review or editing.
Section 7: Amendments
Exercise 7.1 – Amendment List
Skill Learned: How to use the Amendment List to retrieve existing Amendments.
Note: Access to the Amendment List link is based on user security privileges.
1. From within an amended record, under the Registrar sub-menu select Amendment List.
Click on Registrant name or Case ID to open the record.

DAVE™ Death Module Training Exercises
Funeral Home User 101 of 119
LexisNexis VitalChek Network, Inc. Proprietary and Confidential Information (c) 2010. All rights reserved.
2. The Amendment List page will display a listing of all amendments associated with the
current record. Notice that the Amendment Id column contains links to specific
amendments. Click on an Amendment Id link to view the amendment.
3. The Amendment Page will display with the details of the amendment including the
Amendment Status.
The status bar will show “Amendment Exists” if an amendment has been done on the record.
Click on the amendment id link to view the amendment.
Amendment list

DAVE™ Death Module Training Exercises
Funeral Home User 102 of 119
LexisNexis VitalChek Network, Inc. Proprietary and Confidential Information (c) 2010. All rights reserved.
4. Click the Return button to return to the Amendment List page.
Exercise 7.2 – Amendments
Skilled learned: How to request amendments to registered death records.
Note: An amendment can only be created on a case that has been registered. Please check
the status bar to make sure the case is “Registered”. If the case is not registered the
amendment link will not be available.
The following requirements must be met before an amendment will be approved.
1. A VS-7 which has been witnessed, notarized and signed must be attached to the amended
record. The original VS-7 does not need to be mailed to the Vital Records office as long as
a copy is attached to the record. The signature of the funeral practitioner or informant must
be the same person shown on the record.
2. Changes to “Last Name” must be accompanied by two (2) pieces of documentation
supporting this change, and attached to the amended record.
3. Funeral practitioners cannot process corrections that are over ninety (90) days from the file
date*. Please submit to Vital Records the VS-7, two (2) pieces of documentation
supporting this change, and a check for $60 made payable to the Treasurer, State of Maine.
Late fees will not be waived.
*Note: The file date can be found on the Working Copy.
Amendment status
Details of amendment.

DAVE™ Death Module Training Exercises
Funeral Home User 103 of 119
LexisNexis VitalChek Network, Inc. Proprietary and Confidential Information (c) 2010. All rights reserved.
4. Any changes on the record that have previously been amended will require that the
informant submits a court order to Vital Records.
Create an Amendment Request:
1. Open the “registered” case that needs to be amended.
2. In the Death Registration Menu select from the Other Links sub-menu the
Amendments link. The Amendments Page will open.
Notice when the Amendments link is selected the Death Registration Menu is removed
from the page, and the Amendment Page is displayed.
3. The amendment Type dropdown will default to Personal as shown below.
Amendments link
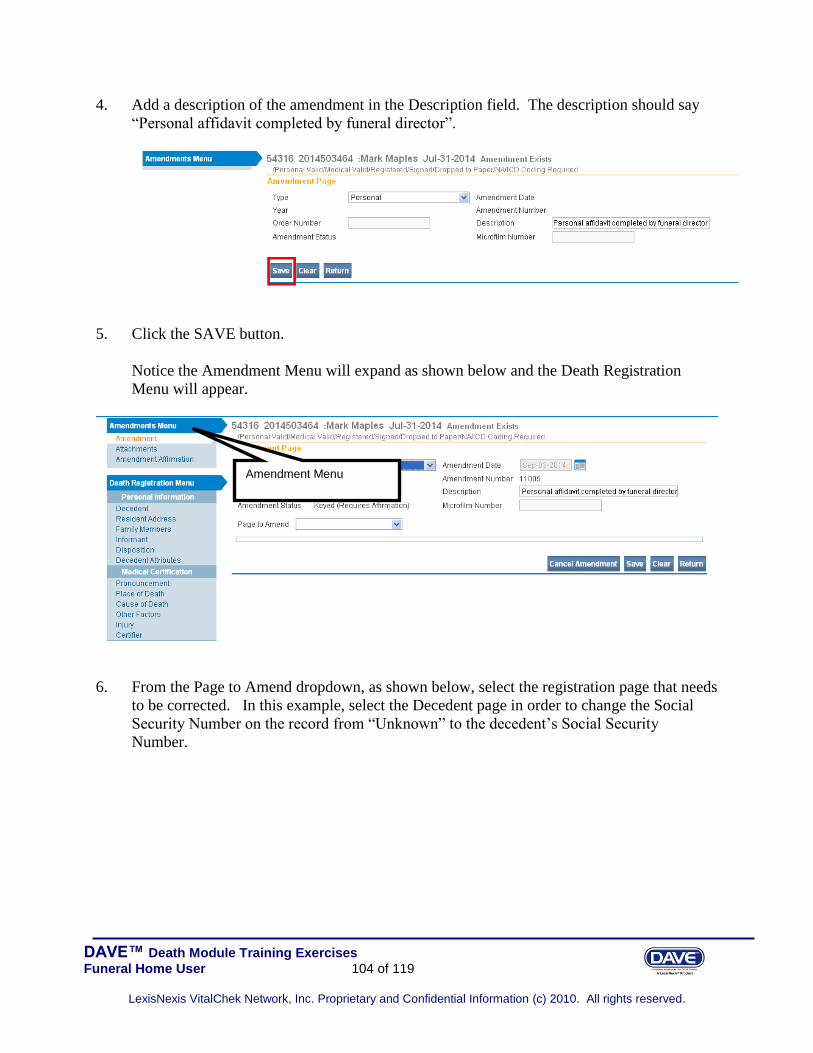
DAVE™ Death Module Training Exercises
Funeral Home User 104 of 119
LexisNexis VitalChek Network, Inc. Proprietary and Confidential Information (c) 2010. All rights reserved.
4. Add a description of the amendment in the Description field. The description should say
“Personal affidavit completed by funeral director”.
5. Click the SAVE button.
Notice the Amendment Menu will expand as shown below and the Death Registration
Menu will appear.
6. From the Page to Amend dropdown, as shown below, select the registration page that needs
to be corrected. In this example, select the Decedent page in order to change the Social
Security Number on the record from “Unknown” to the decedent’s Social Security
Number.
Amendment Menu

DAVE™ Death Module Training Exercises
Funeral Home User 105 of 119
LexisNexis VitalChek Network, Inc. Proprietary and Confidential Information (c) 2010. All rights reserved.
7. When the Decedent page is selected from the Page to Amend dropdown, the Decedent page
will appear as shown below.
8. Click into the field that needs to be corrected. In this example, the Social Security Number
field.
9. Type in the correct Social Security Number.

DAVE™ Death Module Training Exercises
Funeral Home User 106 of 119
LexisNexis VitalChek Network, Inc. Proprietary and Confidential Information (c) 2010. All rights reserved.
Note: The Social Security Number (SSN) cannot be verified with the Social Security
Administration during the amendment process. The SSN will need to be verified after the
amendment has been approved by selecting the Decedent registration page and clicking the
Verify SSN link. Should the amended SSN be incorrect, the informant will need to provide
Vital Records with the appropriate court documentation before a correction can be made.
10. Click the Validate Page button.
In the example above, clicking the Validate Page button did not bring up the Error Message
frame because no other fields were affected by this change. However, below is an example
where one change (Date of Birth) affected another field (Decedent’s education) and,
The social security number was changed from “unknown” to the correct social security number.
Validate Page button. Selecting the Validate Page button will bring up all
errors, if any, on the current registration page.
If there is more than one registration page being corrected, the Validate
Amendment button will bring
up errors, if any, on all pages.
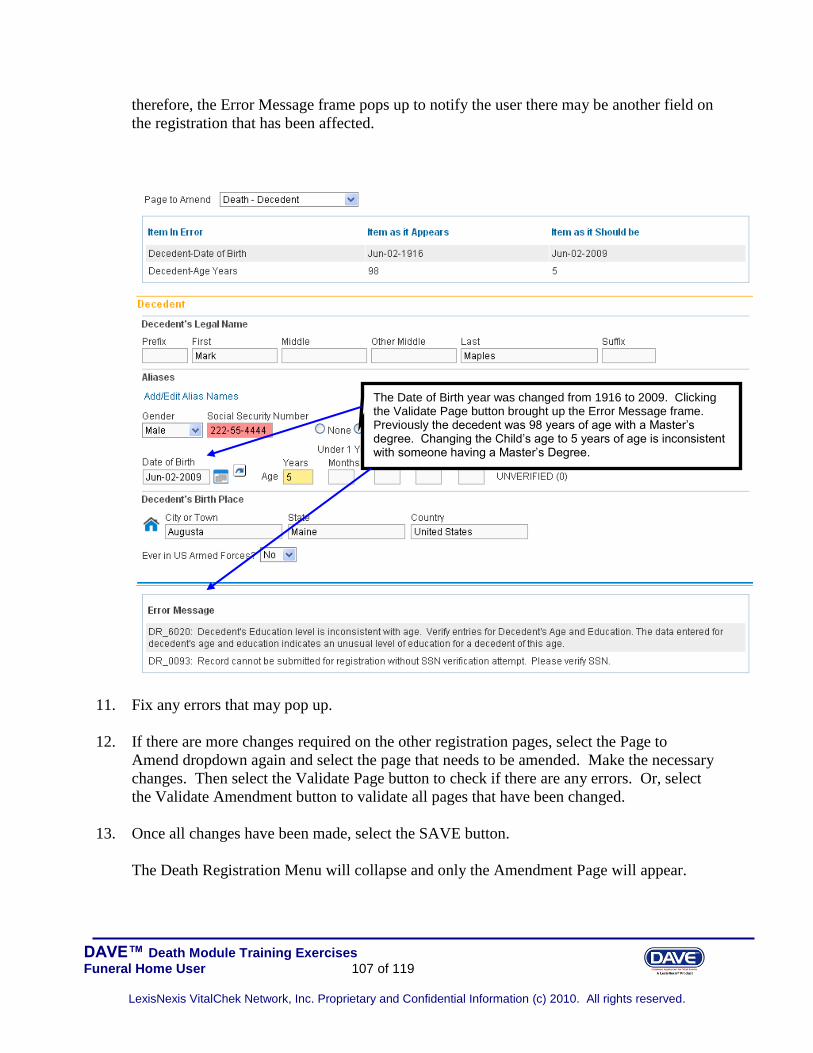
DAVE™ Death Module Training Exercises
Funeral Home User 107 of 119
LexisNexis VitalChek Network, Inc. Proprietary and Confidential Information (c) 2010. All rights reserved.
therefore, the Error Message frame pops up to notify the user there may be another field on
the registration that has been affected.
11. Fix any errors that may pop up.
12. If there are more changes required on the other registration pages, select the Page to
Amend dropdown again and select the page that needs to be amended. Make the necessary
changes. Then select the Validate Page button to check if there are any errors. Or, select
the Validate Amendment button to validate all pages that have been changed.
13. Once all changes have been made, select the SAVE button.
The Death Registration Menu will collapse and only the Amendment Page will appear.
The Date of Birth year was changed from 1916 to 2009. Clicking the Validate Page button brought up the Error Message frame. Previously the decedent was 98 years of age with a Master’s degree. Changing the Child’s age to 5 years of age is inconsistent with someone having a Master’s Degree.

DAVE™ Death Module Training Exercises
Funeral Home User 108 of 119
LexisNexis VitalChek Network, Inc. Proprietary and Confidential Information (c) 2010. All rights reserved.
Attachments:
It is recommended that you attach the necessary documentation to an amendment prior to
affirming the amendment. Once an amendment is affirmed by the funeral practitioner, the Vital
Records office will automatically receive the request to approve the amendment. Therefore, the
necessary documentation should be attached at this time.
Note: Attachments related to Amendments should be attached using the Attachments link
in the Amendment Menu. Do not use the Attachment link under Other Links.
1. Select the Attachments link in the Amendment Menu to attach the VS-7. The VS-7 must
be notarized, witnessed and signed.
Note the Amendment Status shows the amendment has been “Keyed and Requires Affirmation”.
The Item in Error grid shows the Item as it Appears and Item as it Should be.

DAVE™ Death Module Training Exercises
Funeral Home User 109 of 119
LexisNexis VitalChek Network, Inc. Proprietary and Confidential Information (c) 2010. All rights reserved.
2. The attachment dialog box will open. Select the New Attachment button.
3. The Attachments window will open. Click on the Browse button to go search for the
attachment in your hard drive.
4. When the attachment has been uploaded, click the SAVE button.
Attachments link

DAVE™ Death Module Training Exercises
Funeral Home User 110 of 119
LexisNexis VitalChek Network, Inc. Proprietary and Confidential Information (c) 2010. All rights reserved.
Affirm the Amendment:
1. Click on the Amendment Affirmation link in the Amendments Menu.
The Affirmation page will appear as shown below.
2. Click the affirmation checkbox.
3. Click the Affirm button.
The Affirmation page will show “Authentication successful” as shown below.
The funeral practitioner will automatically receive an email, as shown below, indicating that an
amendment has been submitted.
Amendment Affirmation link
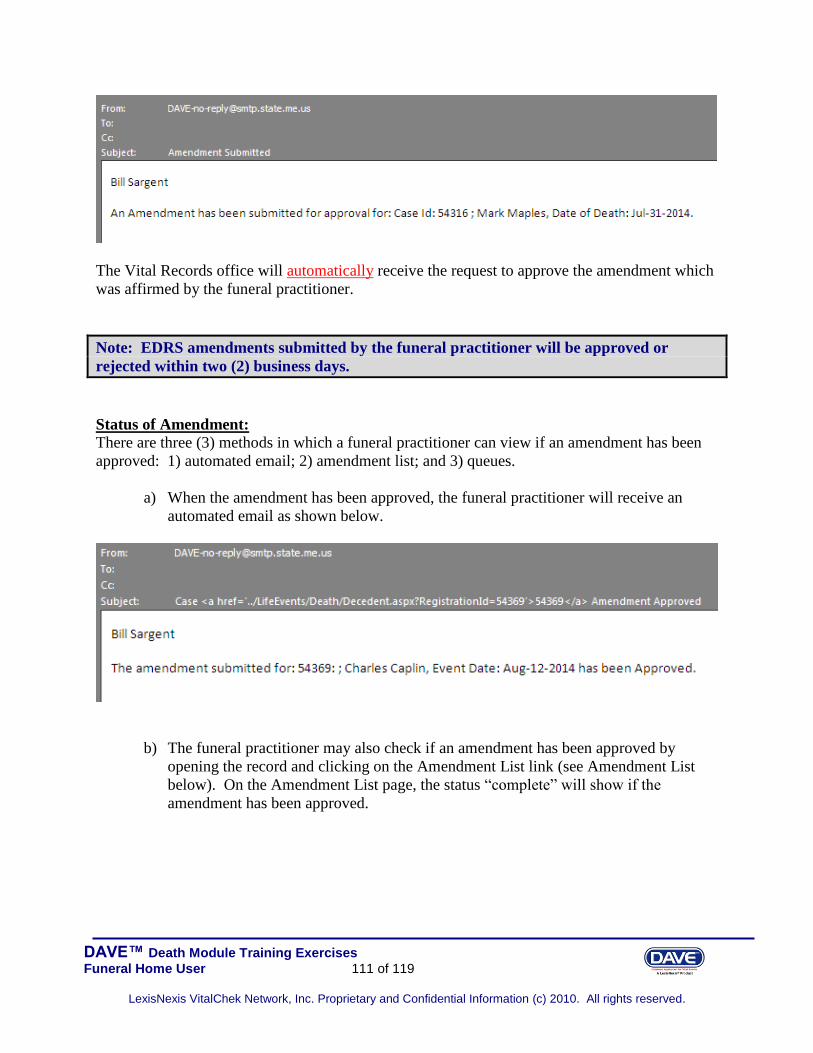
DAVE™ Death Module Training Exercises
Funeral Home User 111 of 119
LexisNexis VitalChek Network, Inc. Proprietary and Confidential Information (c) 2010. All rights reserved.
The Vital Records office will automatically receive the request to approve the amendment which
was affirmed by the funeral practitioner.
Note: EDRS amendments submitted by the funeral practitioner will be approved or
rejected within two (2) business days.
Status of Amendment:
There are three (3) methods in which a funeral practitioner can view if an amendment has been
approved: 1) automated email; 2) amendment list; and 3) queues.
a) When the amendment has been approved, the funeral practitioner will receive an
automated email as shown below.
b) The funeral practitioner may also check if an amendment has been approved by
opening the record and clicking on the Amendment List link (see Amendment List
below). On the Amendment List page, the status “complete” will show if the
amendment has been approved.

DAVE™ Death Module Training Exercises
Funeral Home User 112 of 119
LexisNexis VitalChek Network, Inc. Proprietary and Confidential Information (c) 2010. All rights reserved.
c) In addition, funeral practitioners can check their Amendment queue to see if the
amendment has been approved by the Vital Records office.
On the Home page, click on Queues>Amendment Work Queues.
Select from the queue dropdown “Amendment Approval Complete” as shown below.
Click Search.
Note: To limit the number of records returned from the Search results page, select the
Search Type dropdown and select “Case Number”. Then, type in the case number in the
Value field.
The Amendment Status “Complete” means the amendment has been approved.

DAVE™ Death Module Training Exercises
Funeral Home User 113 of 119
LexisNexis VitalChek Network, Inc. Proprietary and Confidential Information (c) 2010. All rights reserved.
Amendment List
How to use the Amendment List to retrieve/view existing Amendments.
1. From within an amended record, under the Registrar sub-menu, select the Amendment
List link.
2. The Amendment List page will display a listing of all amendments associated with the
current record. Notice that the Amendment Id column contains links to specific
amendments. Click on an Amendment Id link to view the amendment.
Limit the search results by searching by case number.
The status bar will show “Amendment Exists” if an amendment has been done on the record.
Amendment list

DAVE™ Death Module Training Exercises
Funeral Home User 114 of 119
LexisNexis VitalChek Network, Inc. Proprietary and Confidential Information (c) 2010. All rights reserved.
3. The Amendment Page will display with the details of the amendment including the
Amendment Status.
4. Click the Return button to return to the Amendment List page.
To attach documentation to an already existing amendment – Record is closed:
1. To attach a document to an already existing amendment, open the case you wish to add an
attachment. Click on the Amendment List link in the Death Registration Menu.
Click on the amendment id link to view the amendment.
Amendment status
Details of amendment.

DAVE™ Death Module Training Exercises
Funeral Home User 115 of 119
LexisNexis VitalChek Network, Inc. Proprietary and Confidential Information (c) 2010. All rights reserved.
2. The Amendment List page will open.
3. Click on the appropriate Amendment ID number to open the Amendment menu.
4. Select the Attachment link. The attachment dialog box will open.
5. Select the New Attachment button. The Attachments window will open.
6. Click on the Browse button to go search for the attachment in your hard drive. When the
attachment has been uploaded, click the SAVE button.
Appendices
Appendix 1 – Glossary of Icons and Controls
There are several different types of icons and controls used in DAVE™. Many of these are
industry-standard or universal controls that you may already be familiar with from using other
programs and/or websites. Other controls, are DAVE™ specific controls that you will not find
anywhere else.
- Auto-populate Button – this control can be clicked on using your mouse’s left click
button. This control is used in conjunction with a dropdown list to auto-fill information relevant
to the entity selected within the dropdown list.

DAVE™ Death Module Training Exercises
Funeral Home User 116 of 119
LexisNexis VitalChek Network, Inc. Proprietary and Confidential Information (c) 2010. All rights reserved.
- Auto-populate Tool Tip: this is an onscreen tool-tip that appears whenever the
cursor is allowed to ‘hover’ over an Auto-populate button. This is simply a visual indicator that
the auto-populate feature can be used.
Calendar: this is an onscreen control
containing several other controls. There are
two dropdown lists, one for selecting the
month and the other for selecting the year. The
default calendar displayed will be for the
current month and year with the current day
displayed in red. Clicking any day of any date
will cause that date to be displayed in the
corresponding Date Entry text box using a
MMDDYYYY format.
- Calendar Icon: this is an onscreen control that can be clicked on using your mouse’s left
click button. This icon is used in conjunction with Date Entry text boxes. Clicking this icon will
bring up the Calendar control that can be used to select a specific date.
- Checkboxes: these are universal, onscreen controls that can be clicked on using your
mouse’s left click button. Checkboxes are used for making selections among various onscreen
options. More than one checkbox can be selected at a time (compared to Radio Buttons that can
only be selected one at a time.) Checkboxes exist in two states: Checked and Unchecked. To
Check a checkbox just click in the box with your mouse. Clicking unchecked checkboxes will
place a checkmark ( ) in the checkbox. Clicking a checked checkbox will remove the
checkmark.
- Click Buttons: these are universal controls that
can be clicked on using your mouse’s left click button. They are used to accept data inputs, write
information to databases and usually trigger the processing of underlying system code.
- Dropdown Lists: these are universal, onscreen controls
that can be selected from using your mouse’s left click button. Clicking the down-arrow button
will cause a list of selectable options to dropdown. Clicking any option in the list will select it
and display it in the text box field.
- Fix Icons: this is an onscreen icon that appears only
in the DAVE™ Validation Frame. Clicking this icon will
send the cursor to the field containing invalid information so
that it can be corrected.

DAVE™ Death Module Training Exercises
Funeral Home User 117 of 119
LexisNexis VitalChek Network, Inc. Proprietary and Confidential Information (c) 2010. All rights reserved.
Labels –are universal controls or fields. Actually, most
fields have labels. A Label tells you what type of information is displayed in a field or what
type of information to place in a field. In our example here, the field has a label containing the
word First. That tells you to place the Decedent’s first name in this text box field.
- Radio Buttons: these are universal controls that can be selected using your mouse’s left
click button. Clicking a radio button will fill in (●) the circle. Unlike Checkboxes, which allow
for multiple selections, only one Radio Button per group of buttons may be selected at one time.
For example, you might use a radio button to select a brand of car to purchase, but use
checkboxes to add all the features you want.
- Text Entry Boxes: these are universal controls used to
record information. Text Entry Boxes can be formatted to accept only text, a combination of
text and numbers, numbers only or dates. In this example, the Text Box is being used to record
someone’s First name. In this case, the text entry box is formatted to prevent the entry of any
numbers or special characters. Some Text-Entry Boxes are display only.
- Validation Arrow-Green: this is a display only icon. Clicking it has no effect. This icon is
used in the Death Registration Menu and indicates that a DAVE™ information page contains
valid information.
- Validation Arrow-Red: this is a display only icon. Clicking it has no effect. This icon is
used in the Death Registration Menu and indicates that a DAVE™ information page contains
invalid information that must be corrected before certification will be allowed.
- Validation Arrow-Yellow: this is a display only icon. Clicking it has no effect. This icon
is used in the Death Registration Menu and indicates that a DAVE™ information page
contains information that may be invalid and must be corrected or overridden before certification
will be allowed.
Appendix 2 – Usage and Common Conventions
This appendix consists of useful tips and tricks to help you become a more efficient user of the
DAVE™ application. These hints will actually help you with almost any Windows based
application.
1. Focus – Focus determines which field on the page will receive the action. For example, if
an empty text box has the focus then a flashing cursor will appear in the far left hand side
of the box. Anything you type will appear in the text box.
The presence of the cursor tells you that this box has the Focus.

DAVE™ Death Module Training Exercises
Funeral Home User 118 of 119
LexisNexis VitalChek Network, Inc. Proprietary and Confidential Information (c) 2010. All rights reserved.
If a pre-filled textbox has the focus then the text in that box will be highlighted. If you type here
with the text highlighted, the current text will be deleted.
If a Checkbox or Radio Button receives the focus then a dotted line will surround the checkbox
or radio button.
2. Passing the Focus There are two ways to pass the focus to a field: clicking the field with
your mouse or pressing the Tab key until the desired field is highlighted.
The most common way of placing the focus on a field is by clicking the field with your
mouse. This is also the slowest and least efficient way of passing the focus from one field
to the next.
Instead, learn to use Tab and Shift-Tab to pass the focus back and forth among the fields.
Using Tab will advance the focus forwards. Shift-Tab, which is triggered by holding
down the Shift key while pressing the Tab key, will pass the focus back to the previous
field.
The highlighted text within this box indicates this control has the Focus.

DAVE™ Death Module Training Exercises
Funeral Home User 119 of 119
LexisNexis VitalChek Network, Inc. Proprietary and Confidential Information (c) 2010. All rights reserved.
Every page is structured a little differently. Exactly where Tab and Shift-Tab sends the
Focus will vary, but it should always advance you logically from one field to the next.
3. Keyboard Shortcuts – Now that you understand what Focus is and how to pass it from
one field to the next, let’s see how you can use it to become a more efficient DAVE™ user.
If a Text Entry Box has the Focus, then just start typing to fill in the box. Note: If the text
entry box already contains text, then when it receives the focus that text will be highlighted.
Anything typed while the text is highlighted will replace the old text.
If a Checkbox has the Focus, then pressing the spacebar will check or uncheck the control.
If a Dropdown List receives the Focus then you have several options:
Use the mouse to click the down-arrow to reveal the list of selectable options.
However, try to avoid using the mouse.
If you know the first letter of the option you want to select, then just type that letter.
The focus will then shift down to the first option in the list beginning with that
letter.
If there are multiple selections beginning with that letter, then keep typing it until
your desired option shows up. Then, Tab off of the list to save that selection.
Use the Up and Down Arrows on your keyboard to scroll through the list of
options. When the correct option is highlighted, use the Tab key to save that
selection and move to the next field.
Hold down the Alt key and press the Down-Arrow button on your keyboard to
reveal the list. Then, using either your mouse or the Up and Down Arrows, make
your selection and Tab off to the next field or hit the Enter button.
If a Click Button receives the focus you have two options:
- Use the Spacebar to “press” the button, or
- Use the Enter key to “press” the button