Embed Size (px)
Citation preview

MAILMAN
GETTING STARTED GUIDE
Version 8.0
August 2002
Revised September 2006

Department of Veterans AffairsVistA Health Systems Design & Development (HSD&D)
Infrastructure and Security Services (ISS)
Installation Instructions
August 2002 MailMan Getting Started Guide iiiRevised September 2006 Version 8.0
Revision History
Documentation Revisions
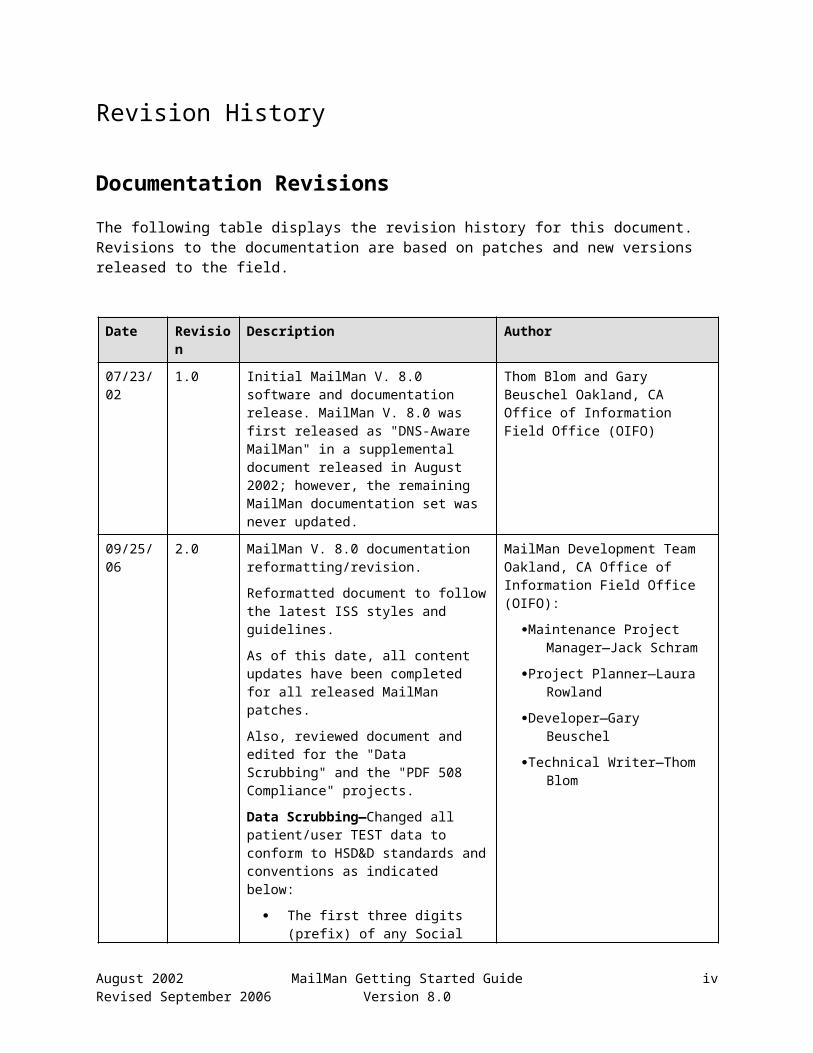
The following table displays the revision history for this document. Revisions to the documentation are based on patches and new versions released to the field.
Date Revision Description Author
07/23/02 1.0 Initial MailMan V. 8.0 software and documentation release. MailMan V. 8.0 was first released as "DNS-Aware MailMan" in a supplemental document released in August 2002; however, the remaining MailMan documentation set was never updated.
Thom Blom and Gary Beuschel Oakland, CA Office of Information Field Office (OIFO)
09/25/06 2.0 MailMan V. 8.0 documentation reformatting/revision.
Reformatted document to follow the latest ISS styles and guidelines.
As of this date, all content updates have been completed for all released MailMan patches.
Also, reviewed document and edited for the "Data Scrubbing" and the "PDF 508 Compliance" projects.
Data Scrubbing—Changed all patient/user TEST data to conform to HSD&D standards and conventions as indicated below:
The first three digits (prefix) of any Social Security Numbers (SSN) start with "000" or "666."
Patient or user names are formatted as follows: XMPATIENT,[N] or XMUSER,[N] respectively, where the N is a number written out and incremented with each new entry (e.g., XMPATIENT, ONE, XMPATIENT, TWO, etc.).
Other personal demographic-related data (e.g., addresses, phones, IP addresses, etc.) were also changed to be generic.
PDF 508 Compliance—The final PDF document was recreated and now supports the minimum requirements to
MailMan Development Team Oakland, CA Office of Information Field Office (OIFO):
Maintenance Project Manager—Jack Schram
Project Planner—Laura Rowland
Developer—Gary Beuschel
Technical Writer—Thom Blom
August 2002 MailMan Getting Started Guide ivRevised September 2006 Version 8.0
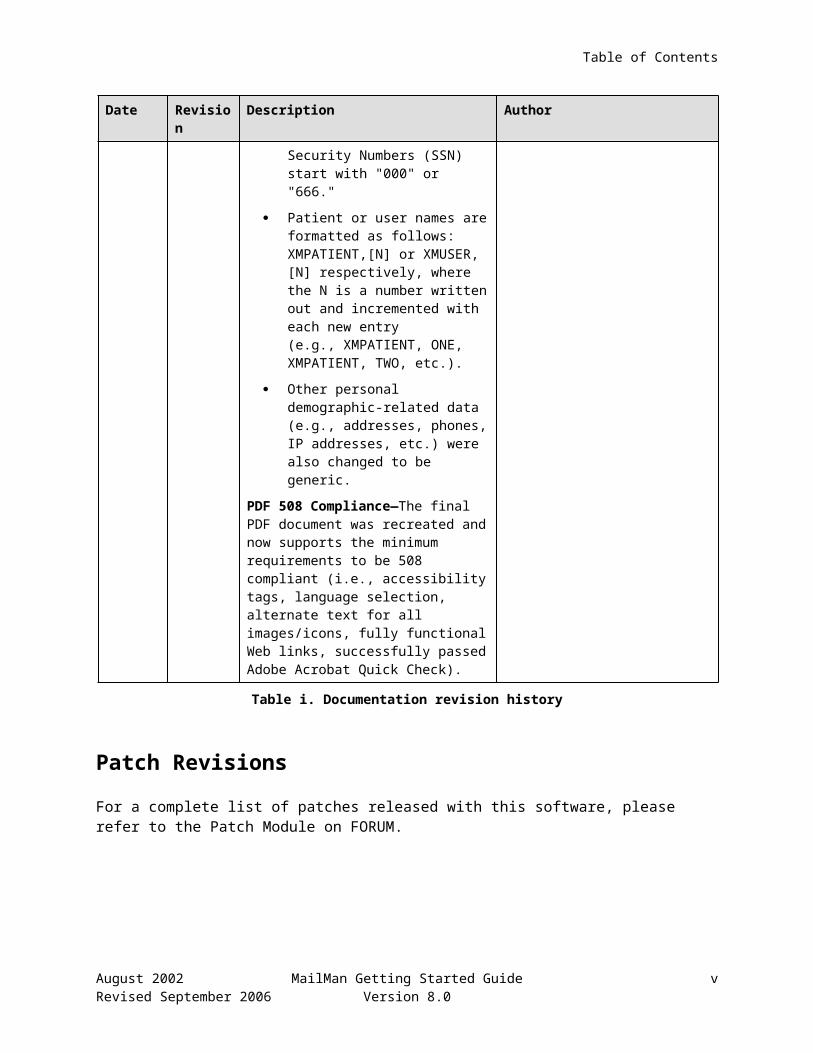
Table of Contents
Date Revision Description Author
be 508 compliant (i.e., accessibility tags, language selection, alternate text for all images/icons, fully functional Web links, successfully passed Adobe Acrobat Quick Check).
Table i. Documentation revision history
Patch Revisions
For a complete list of patches released with this software, please refer to the Patch Module on FORUM.
August 2002 MailMan Getting Started Guide vRevised September 2006 Version 8.0

Contents
Revision History........................................................................................................................................... iii
Figures and Tables.......................................................................................................................................vii
Acknowledgements.......................................................................................................................................xi
Orientation..................................................................................................................................................xiii
1. Introduction—Customizing Your MailMan Message Center........................................................1-1
2. Choosing Your Default Message Reader..........................................................................................2-1
Classic Message Reader.......................................................................................................................2-3
Detailed Full Screen Message Reader.................................................................................................2-9
Summary Full Screen Message Reader.............................................................................................2-14
Set Your Default Message Reader......................................................................................................2-16
3. Organizing Your Mail Baskets and Messages..................................................................................3-1
Name Your Mail Baskets.....................................................................................................................3-3
Set Your Delivery Basket Privileges....................................................................................................3-5
Set Your Mail Basket Prompt...............................................................................................................3-9
Choose Your Message Display Order................................................................................................3-12
Choose Your New Messages Read Order..........................................................................................3-15
Choose Your New Messages Default Option.....................................................................................3-17
4. Designating Other Preference Entries..............................................................................................4-1
Personal Preferences............................................................................................................................4-3
Banners..........................................................................................................................................4-3
Message Action Default..............................................................................................................4-10
Show Titles..................................................................................................................................4-11
Priority Responses.......................................................................................................................4-13
P-MESSAGE From.....................................................................................................................4-21
MailMan Institution.....................................................................................................................4-23
Network Signature.......................................................................................................................4-27
Introduction.................................................................................................................................4-32
Preferred Editor...........................................................................................................................4-37
Contact Information.....................................................................................................................4-40
August 2002 MailMan Getting Started Guide viRevised September 2006 Version 8.0
Table of Contents
5. Managing Your Mail—Overview......................................................................................................5-1
Reading/Managing New Messages and Responses..............................................................................5-2
Reading/Managing All Messages and Responses................................................................................5-4
Basket Action Codes......................................................................................................................5-6
Individual Messages Action Commands.....................................................................................5-12
Sending Mail......................................................................................................................................5-15
Glossary..........................................................................................................................................Glossary-1
Index....................................................................................................................................................Index-1
August 2002 MailMan Getting Started Guide viiRevised September 2006 Version 8.0
Figures and Tables
Table i. Documentation revision history.......................................................................................................iv
Table ii. Documentation symbol descriptions............................................................................................xiii
Figure 2-1. Preview feature in Classic MailMan........................................................................................2-4
Figure 2-2. An example using the Preview feature in Classic MailMan....................................................2-4
Figure 2-3. An example not using the Preview feature in Classic MailMan..............................................2-5
Figure 2-4. Setting the Message Preview prompt.......................................................................................2-5
Figure 2-5. Ignore action code in the Classic Message Reader..................................................................2-6
Figure 2-6. Classic Message Reader with summary information...............................................................2-7
Figure 2-7. Classic Message Reader with detailed information.................................................................2-8
Figure 2-8. Detailed Full Screen Message Reader.....................................................................................2-9
Figure 2-9. Sample list of available action commands using the Detailed or Summary Full Screen Message Readers..............................................................................................................................2-11
Figure 2-10. Paging commands on the first page when a mail basket has more than one page of messages..........................................................................................................................................................2-12
Figure 2-11. Paging commands on a middle page when a mail basket has more than one page of messages..........................................................................................................................................................2-12
Figure 2-12. Paging commands on the last page when a mail basket has more than one page of messages..........................................................................................................................................................2-12
Figure 2-13. Summary Full Screen Message Reader...............................................................................2-14
Figure 2-14. Choosing your Message Reader..........................................................................................2-16
Figure 2-15. Setting your Message Reader default..................................................................................2-17
Figure 3-1. Creating a new mail basket beginning with a number.............................................................3-3
Figure 3-2. Choosing a basket by basket number.......................................................................................3-4
Figure 3-3. Delivery Basket Edit option.....................................................................................................3-5
Figure 3-4. Setting your delivery basket privileges....................................................................................3-7
Figure 3-5. Choosing to be prompted for a mail basket.............................................................................3-9
Figure 3-6. Choosing a mail basket when sending messages to oneself..................................................3-10
Figure 3-7. Choosing not to be prompted for a mail basket.....................................................................3-10
Figure 3-8. Sending messages to oneself (mail basket defaults to "IN").................................................3-11
Figure 3-9. Setting your message display order in a basket.....................................................................3-13
Figure 3-10. Sample list of messages.......................................................................................................3-14
Figure 3-11. Setting your new messages read order.................................................................................3-15
Figure 3-12. Setting your new messages default option...........................................................................3-18
August 2002 MailMan Getting Started Guide viiiRevised September 2006 Version 8.0
Figures and Tables
Figure 4-1. Other User Options Edit settings.............................................................................................4-2
Figure 4-2. Banners are displayed in the main MailMan Menu.................................................................4-3
Figure 4-3. Banners are displayed when addressing mail..........................................................................4-3
Figure 4-4. Banners are displayed when displaying MailMan user information.......................................4-4
Figure 4-5. User Options Edit option—Banner entry edit..........................................................................4-5
Figure 4-6. Modifying your MailMan banner using the User Options Edit option....................................4-6
Figure 4-7. Banner Edit option...................................................................................................................4-7
Figure 4-8. Modifying your MailMan banner using the Banner Edit option.............................................4-8
Figure 4-9. Deleting your MailMan banner................................................................................................4-9
Figure 4-10. MailMan banner has been deleted.........................................................................................4-9
Figure 4-11. Setting the Message Action Default.....................................................................................4-10
Figure 4-12. An example of the Message Action Default prompt in use.................................................4-11
Figure 4-13. Setting the Show Titles prompt............................................................................................4-12
Figure 4-14. An example of showing the sender's title............................................................................4-12
Figure 4-15. Setting the Priority Responses Flag default.........................................................................4-14
Figure 4-16. Setting the Priority Responses Prompt default....................................................................4-16
Figure 4-17. Choosing to have future responses to a priority message delivered as priority (1 of 3)......4-17
Figure 4-18. Next response to priority mail is delivered as priority (2 of 3)............................................4-18
Figure 4-19. Next response to priority mail is delivered as ordinary (3 of 3)..........................................4-19
Figure 4-20. Toggle the way replies are delivered for priority messages.................................................4-20
Figure 4-21. Setting the P-MESSAGE FROM field default....................................................................4-21
Figure 4-22. An example of the P-MESSAGE FROM prompt in use.....................................................4-22
Figure 4-23. An example displaying the MailMan Institution.................................................................4-23
Figure 4-24. Setting the MailMan Institution prompt..............................................................................4-24
Figure 4-25. An example displaying the MailMan Institution.................................................................4-24
Figure 4-26. Modifying your MailMan Institution...................................................................................4-25
Figure 4-27. Deleting your MailMan Institution......................................................................................4-26
Figure 4-28. MailMan Institution has been deleted..................................................................................4-26
Figure 4-29. Including your Network Signature when answering a message..........................................4-27
Figure 4-30. An example displaying the Network Signature lines...........................................................4-28
Figure 4-31. Setting the Network Signature prompts...............................................................................4-29
Figure 4-32. Modifying your Network Signature.....................................................................................4-30
Figure 4-33. Deleting your Network Signature........................................................................................4-31
Figure 4-34. Network Signature has been deleted....................................................................................4-31
Figure 4-35. Text displayed when you must enter an Introduction..........................................................4-32
August 2002 MailMan Getting Started Guide ixRevised September 2006 Version 8.0

Figures and Tables
Figure 4-36. An example displaying the Introduction..............................................................................4-33
Figure 4-37. Setting the MailMan Introduction prompt...........................................................................4-34
Figure 4-38. Modifying your Introduction...............................................................................................4-35
Figure 4-39. Deleting your Introduction...................................................................................................4-36
Figure 4-40. Introduction has been deleted..............................................................................................4-37
Figure 4-41. An example of using the editor............................................................................................4-37
Figure 4-42. Setting the MailMan Preferred Editor prompt.....................................................................4-38
Figure 4-43. Deleting your Preferred Editor............................................................................................4-39
Figure 4-44. Preferred Editor has been deleted........................................................................................4-39
Figure 4-45. An example displaying the Contact Information.................................................................4-41
Figure 4-46. Setting your Contact Information prompts..........................................................................4-43
Figure 4-47. Modifying your Contact Information..................................................................................4-44
Figure 4-48. Deleting your Contact Information......................................................................................4-45
Figure 5-1. Main MailMan Menu options..................................................................................................5-1
Figure 5-2. NML—New Messages and Response option..........................................................................5-3
Figure 5-3. RML—Read/Manage Messages option...................................................................................5-4
Figure 5-4. Managing your mail in your mail baskets...............................................................................5-4
Figure 5-5. Displaying the command action list—Using the Detailed or Summary Full Screen Message Reader................................................................................................................................................5-6
Figure 5-6. Displaying the command action list—Using the Classic Message Reader.............................5-8
Table 5-1. Action codes—Basket message lists.......................................................................................5-11
Figure 5-7. Displaying the message command action list—Using any Message Reader........................5-12
Table 5-2. Action codes—Messages.........................................................................................................5-14
Figure 5-8. SML—Send a Message option..............................................................................................5-15
Table 5-3. Action codes—Sending messages...........................................................................................5-16
x MailMan Getting Started Guide August 2002Version 8.0 Revised September 2006

Figures and Tables
August 2002 MailMan Getting Started Guide xiRevised September 2006 Version 8.0

Acknowledgements
The Domain Name Service (DNS)-Aware MailMan V. 8.0 Project Team consists of the following Infrastructure and Security Services (ISS) personnel:
ISS Program Director—Larry Weldon
ISS DNS-Aware MailMan Project Manager—Jean Sheppard
Lead Developer—Gary Beuschel
Software Quality Assurance (SQA) and Software Tester—Gurbir Singh
Technical Writer—Thom Blom
The DNS-Aware MailMan Project Team would like to thank the following sites/organizations/personnel for their assistance in reviewing and/or testing the DNS-Aware MailMan V. 8.0 software and documentation (names within teams are listed alphabetically):
Albany Office of Information Field Office (OIFO)—Rick Esposito
Central Alabama HCS—Tom Ash
FORUM Administrator—Milt Roberson
Independent Verification & Validation (IV&V) Team
Oakland Office of Information Field Office (OIFO)—All Staff
San Francisco VAMC—John Clemens
August 2002 MailMan Getting Started Guide xiiRevised September 2006 Version 8.0
Figures and Tables
August 2002 MailMan Getting Started Guide xiiiRevised September 2006 Version 8.0

Orientation
This MailMan Getting Started Guide is intended for use in conjunction with Veterans Health Information Systems and Technology Architecture (VistA) MailMan. It outlines the MailMan user interface, the actions users can take in order to customize the user interface, and gives basic/summary guidelines on how the software is used within VistA.
The intended audience of this manual is all primary (key) stakeholders. The primary stakeholders include:
All VistA MailMan end users.
VistA Infrastructure and Security Services (ISS) Development Team.
Other VistA project development teams and programmers.
Information Resource Management (IRM) personnel responsible for maintaining MailMan.
Enterprise VistA Support (EVS).
How to Use this Manual
Throughout this manual, advice and instructions are offered regarding the use of MailMan V. 8.0 and the functionality it provides for Veterans Health Information Systems and Technology Architecture (VistA) software products. This manual discusses the use of electronic network communication software and covers network features for sending and receiving transmissions, responding, and transmitting mail. Many user actions are available for completing specific tasks.
There are no special legal requirements involved in the use of MailMan.
This manual uses several methods to highlight different aspects of the material:
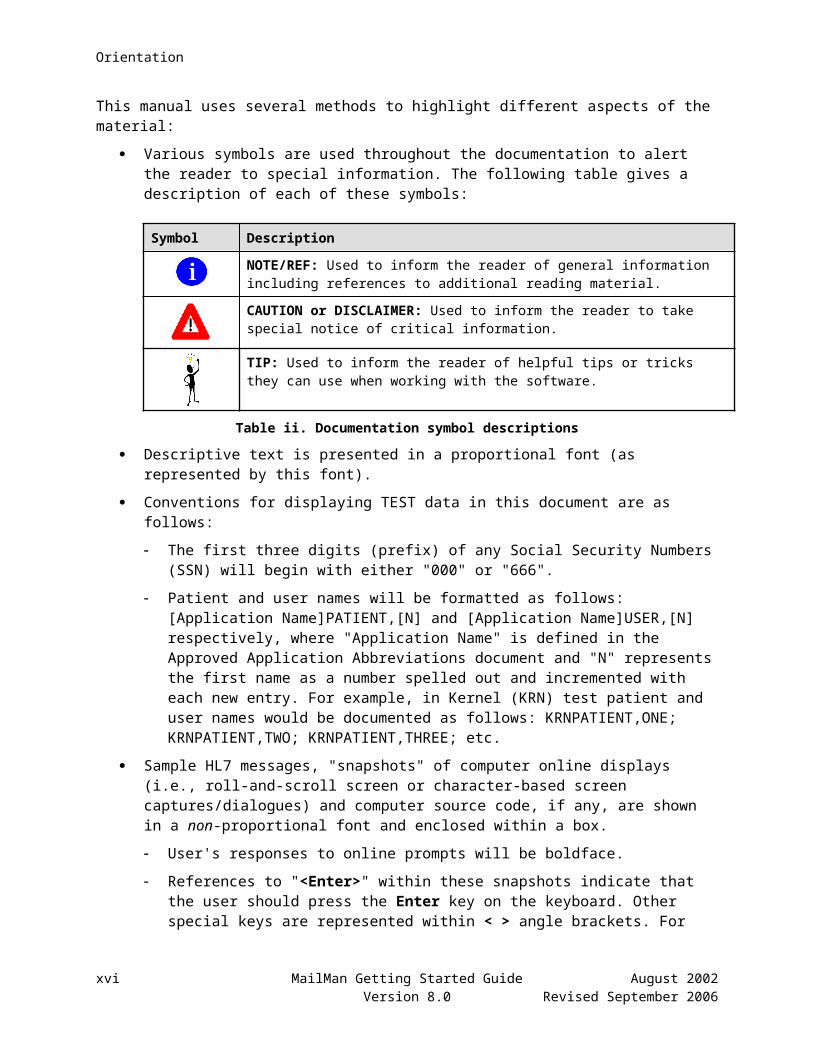
Various symbols are used throughout the documentation to alert the reader to special information. The following table gives a description of each of these symbols:
Symbol Description
NOTE/REF: Used to inform the reader of general information including references to additional reading material.
CAUTION or DISCLAIMER: Used to inform the reader to take special notice of critical information.
TIP: Used to inform the reader of helpful tips or tricks they can use when working with the software.
Table ii. Documentation symbol descriptions
Descriptive text is presented in a proportional font (as represented by this font).
August 2002 MailMan Getting Started Guide xivRevised September 2006 Version 8.0
Orientation
Conventions for displaying TEST data in this document are as follows:
The first three digits (prefix) of any Social Security Numbers (SSN) will begin with either "000" or "666".
Patient and user names will be formatted as follows: [Application Name]PATIENT,[N] and [Application Name]USER,[N] respectively, where "Application Name" is defined in the Approved Application Abbreviations document and "N" represents the first name as a number spelled out and incremented with each new entry. For example, in Kernel (KRN) test patient and user names would be documented as follows: KRNPATIENT,ONE; KRNPATIENT,TWO; KRNPATIENT,THREE; etc.
Sample HL7 messages, "snapshots" of computer online displays (i.e., roll-and-scroll screen or character-based screen captures/dialogues) and computer source code, if any, are shown in a non-proportional font and enclosed within a box.
User's responses to online prompts will be boldface.
References to "<Enter>" within these snapshots indicate that the user should press the Enter key on the keyboard. Other special keys are represented within < > angle brackets. For example, pressing the PF1 key can be represented as pressing <PF1>.
Author's comments, if any, are displayed in italics or as "callout" boxes.
NOTE: Callout boxes refer to labels or descriptions usually enclosed within a box, which point to specific areas of a displayed image.
NOTE: Unless otherwise noted, all sample screen captures/dialogue boxes in this manual are derived from using either MailMan's Detailed or Summary Full Screen message readers.
This manual refers in many places to the M programming language. Under the 1995 American National Standards Institute (ANSI) standard, M is the primary name of the M programming language, and M will be considered an alternate name. This manual uses the name M.
All uppercase is reserved for the representation of M code, variable names, or the formal name of options, field and file names, and security keys (e.g., the XUPROGMODE key).
How to Obtain Technical Information Online
Exported file, routine, and global documentation can be generated through the use of Kernel, MailMan, and VA FileMan utilities.
NOTE: Methods of obtaining specific technical information online will be indicated where applicable under the appropriate topic.
Help at Prompts
VistA M Server-based software provides online help and commonly used system default prompts. Users are encouraged to enter question marks at any response prompt. At the end of the help display, you are
August 2002 MailMan Getting Started Guide xvRevised September 2006 Version 8.0
Orientation
immediately returned to the point from which you started. This is an easy way to learn about any aspect of the software.
In addition to the "question mark" help, you can use the Help (User/Group Info., etc.) menu option on the main MailMan Menu to access the MailMan Help Frames through the following options:
New Features in MailMan
General MailMan Information
Questions and Answers on MailMan
Manual for MailMan Users
REF: For more information on obtaining MailMan online help, please refer to Chapter 12, "Online Help/Information" in the MailMan User Guide.
Obtaining Data Dictionary Listings
Technical information about VistA M Server-based files and the fields in files is stored in data dictionaries (DD). You can use the List File Attributes option on the Data Dictionary Utilities submenu in VA FileMan to print formatted data dictionaries.
REF: For details about obtaining data dictionaries and about the formats available, please refer to the "List File Attributes" chapter in the "File Management" topic of the VA FileMan Advanced User Guide.
Assumptions About the Reader
This manual is written with the assumption that the reader is familiar with the following:
VistA computing environment:
Kernel—VistA M Server software
VA FileMan data structures and terminology—VistA M Server software
Microsoft Windows environment
M programming language
This manual provides an overall explanation of MailMan and the changes contained in MailMan V. 8.0; however, no attempt is made to explain how the overall VistA programming system is integrated and maintained. Such methods and procedures are documented elsewhere. We suggest you look at the various VA home pages on the World Wide Web (WWW) and VA Intranet for a general orientation to VistA. For example, go to the Veterans Health Administration (VHA) Office of Information (OI) Health Systems Design & Development (HSD&D) Home Page at the following Intranet Web address:
http://vista.med.va.gov/
xvi MailMan Getting Started Guide August 2002Version 8.0 Revised September 2006

Orientation
Reference Materials
Readers who wish to learn more about MailMan should consult the following:
MailMan Release Notes
MailMan Installation Guide
MailMan Getting Started Guide (this manual)
MailMan Developer's Guide
MailMan User Guide
MailMan Network Reference Guide
MailMan Package Security Guide
MailMan Systems Management Guide
MailMan Technical Manual
MailMan Home Page at the following Web address:
http://vista.med.va.gov/mailman/index.asp
This site contains other information and provides links to additional documentation.
VistA documentation is made available online in Microsoft Word format and in Adobe Acrobat Portable Document Format (PDF). The PDF documents must be read using the Adobe Acrobat Reader (i.e., ACROREAD.EXE), which is freely distributed by Adobe Systems Incorporated at the following Web address:
http://www.adobe.com/
REF: For more information on the use of the Adobe Acrobat Reader, please refer to the "Adobe Acrobat Quick Guide" at the following Web address:
http://vista.med.va.gov/iss/acrobat/index.asp
VistA documentation can be downloaded from the Health Systems Design and Development (HSD&D) VistA Documentation Library (VDL) Web site:
http://www.va.gov/vdl/
VistA documentation and software can also be downloaded from the Enterprise VistA Support (EVS) anonymous directories:
Albany OIFO ftp.fo-albany.med.va.gov
Hines OIFO ftp.fo-hines.med.va.gov
Salt Lake City OIFO ftp.fo-slc.med.va.gov
Preferred Method download.vista.med.va.gov
This method transmits the files from the first available FTP server.
August 2002 MailMan Getting Started Guide xviiRevised September 2006 Version 8.0

Orientation
DISCLAIMER: The appearance of external hyperlink references in this manual does not constitute endorsement by the Department of Veterans Affairs (VA) of this Web site or the information, products, or services contained therein. The VA does not exercise any editorial control over the information you may find at these locations. Such links are provided and are consistent with the stated purpose of this VA Intranet Service.
xviii MailMan Getting Started Guide August 2002Version 8.0 Revised September 2006

Orientation
August 2002 MailMan Getting Started Guide xixRevised September 2006 Version 8.0
1. Introduction—Customizing Your MailMan Message Center
This manual describes how you can customize the MailMan V. 8.0 interface.
MailMan has always given you the opportunity to customize the interface to best suit your needs. This flexibility saves you time and frustration when dealing with your e-mail.
The topics covered in this manual include:
Chapter 1—"Choosing Your Default Message Reader"
Chapter 2—"Organizing Your Mail Baskets and Messages"
Chapter 3—"Designating Other Preference Entries"
Chapter 4—"Managing Your Mail—Overview"
You might find it more helpful to customize the MailMan interface before you start using it; however, you can customize the interface and set your preferences at anytime. As you become more familiar with the MailMan interface, you may decide to go back and reset your preferences based on your experience.
August 2002 MailMan Getting Started Guide 1Revised September 2006 Version 8.0

Introduction—Customizing Your MailMan Message Center
2 MailMan Getting Started Guide August 2002Version 8.0 Revised September 2006

2. Choosing Your Default Message Reader
The following topics are discussed in this chapter:
Classic Message Reader
Detailed Full Screen Message Reader
Summary Full Screen Message Reader
Set Your Default Message Reader
There are several ways to read and manage your messages. You should first choose the message reader that best suits your needs.
MailMan gives you the opportunity to choose how to display your messages when using the Read/Manage Messages option [synonym RML]. In addition to the original version of the MailMan reader (i.e., Classic), two other readers are available. Thus, you can choose from the following three message readers:
Classic (default)
Detailed Full Screen
Summary Full Screen
These three message readers are described in greater detail below.
REF: For more information on the Read/Manage Messages option [RML], please refer to Chapters 2 and 3 in the MailMan User Guide.
August 2002 MailMan Getting Started Guide 1Revised September 2006 Version 8.0

Choosing Your Default Message Reader
2 MailMan Getting Started Guide August 2002Version 8.0 Revised September 2006

Choosing Your Default Message Reader
Classic Message Reader
The Classic message reader is basically the same reader you saw with earlier versions of MailMan (i.e., prior to MailMan Version 8.0) but with a few improvements. It is "classic" in that it is the reader with which early MailMan users are most familiar (i.e., the only one that was available in the past). We suggest that you try either of the two other message readers (i.e., Detailed Full Screen or Summary Full Screen), because they give you more choices and additional functionality that can prove beneficial when working with MailMan.
NOTE: Prior to initially configuring your MailMan interface, the reader is set to default to the Classic reader.
The following summary information is available with the Classic message reader (after you choose a mail basket from which to read and entering one question mark):
Basket—Basket containing the messages (e.g., "IN").
Message Totals:
How many messages in the basket
Range of message numbers in the basket
How many message are new in the basket
Flags—Any special flags associated with the messages in the basket (e.g., Priority ["!"] or New ["*"] flags).
Message Numbers—The numbers associated with the messages (meaningful for this list only).
Subject—Subject of each message in the mail basket.
From—The name of the person who sent each message in the mail basket.
The following detailed information is available with the Classic message reader (after you choose a mail basket from which to read and enter two question marks):
Basket—Basket containing the messages (e.g., "IN").
Message Totals:
How many messages in the basket
Range of message numbers in the basket
How many message are new in the basket
Flags—Any special flags associated with the messages in the basket (e.g., Priority ["!"] or New ["*"] flags).
Message Numbers—The numbers associated with the messages (meaningful for this list only).
MailMan Internal Message Identification Number—The MailMan message numbers generated internally for each message (displayed in brackets).
Message Sent Date—The date each message was sent (i.e., day, month, year).
Subject—Subject of each message in the mail basket.
August 2002 MailMan Getting Started Guide 3Revised September 2006 Version 8.0
Choosing Your Default Message Reader
Lines—Number of lines of text for each message in the mail basket.
From—The name of the person who sent each message in the mail basket.
Read/Rcvd—Total number of responses read and received for a message. If there are no responses to a message, no totals will be indicated.
MailMan continues to read messages sequentially depending on the message order you've specified. You set the message order display through the User Options Edit option on the Personal Preferences menu (i.e., "MESSAGE ORDER?:" prompt).
REF: For more information on the "MESSAGE ORDER?:" prompt, please refer to the "Choose Your Message Display Order" topic in Chapter 3 in this manual.
Preview Messages
The Classic message reader can "preview" the next message to be read in a mail basket by displaying the message subject, sender, mail basket, and message number in that basket on two lines. For example:
Subj: Local: biweekly info exchange message # 84 From: POSTMASTERMailMan Basket Message: 21//
Figure 2-1. Preview feature in Classic MailMan
When you are scrolling through the messages in a basket, you can choose whether or not MailMan should display (preview) the message subject and sender before you read the message.
Seeing the message subject and sender may help you decide whether or not you wish to read the message. If you decide not to read the message, you can "Ignore" it and move on to the next message.
4 MailMan Getting Started Guide August 2002Version 8.0 Revised September 2006
Choosing Your Default Message Reader
The following is a sample dialogue showing the message preview feature:
Select MailMan Menu Option: R <Enter> Read/Manage MessagesSelect message reader: Detailed Full Screen// ClassicRead mail in MAIL BASKET: IN// <Enter> (199 messages, 1 new)Last message number: 248 Messages in basket: 199 (1 new)Enter ??? for help.
Subj: MESSAGE A From: USER,ONEIN Basket Message: 248// I <Enter> Ignore this message
Subj: MESSAGE B From: USER,TWOIN Basket Message: 247// I <Enter> Ignore this message
Subj: MESSAGE C From: USER,THREEIN Basket Message: 246//
Figure 2-2. An example using the Preview feature in Classic MailMan
The following is a sample dialogue without message preview. It is more difficult to decide whether to read the message or to ignore it:
Select MailMan Menu Option: R <Enter> Read/Manage Messages Select message reader: Detailed Full Screen// Classic Read mail in MAIL BASKET: IN// <Enter> (199 messages, 1 new) Last message number: 248 Messages in basket: 199 (1 new) Enter ??? for help. IN Basket Message: 248// I <Enter> Ignore this message IN Basket Message: 247// I <Enter> Ignore this message IN Basket Message: 246//
Figure 2-3. An example not using the Preview feature in Classic MailMan
August 2002 MailMan Getting Started Guide 5Revised September 2006 Version 8.0
With "Preview" turned on, you can "Ignore" (skip) messages in a basket until you come to a message you want to read based on the subject and sender of the message shown (previewed).
With "Preview" turned off, you can still "Ignore" messages, however, you cannot see the subject and sender of the message before reading it.
Choosing Your Default Message Reader
You can use the User Options Edit option to decide whether or not you want MailMan to preview messages when using the Classic message reader, as shown below:
Select Personal Preferences Option: user <Enter> Options Edit
Editing data in the MAILBOX file:BANNER: ISS Technical Writer Replace <Enter>MESSAGE ORDER: Newest First// <Enter>NEW MESSAGES READ ORDER: Newest First// <Enter>MESSAGE READER: Detailed Full Screen// <Enter>MESSAGE READER PROMPT: Yes, ask me// <Enter>NEW MESSAGES DEFAULT OPTION: LIST ALL NEW MESSAGES // <Enter>SHOW MESSAGE PREVIEW: NO, DO NOT SHOW IT// ? Do you want to see a preview of the message subject and sender? Choose from: Y YES, SHOW MESSAGE PREVIEW N NO, DO NOT SHOW ITSHOW MESSAGE PREVIEW: NO, DO NOT SHOW IT// yes <Enter> YES, SHOW MESSAGE PREVIEW
Figure 2-4. Setting the Message Preview prompt
After choosing the User Options Edit option (Figure 2-4), the user pressed the <Enter> key until he reached the "SHOW MESSAGE PREVIEW: NO, DO NOT SHOW IT//" prompt.
In order to see the options, the user entered a single question mark ("?") at the prompt. MailMan indicated that entering a "Yes" would preview messages when using the Classic message reader. Entering a "No" would not preview messages. In this case, the user chose to preview the messages by entering "Yes" at the "SHOW MESSAGE PREVIEW:" prompt.
NOTE: This only applies to the Classic message reader.
6 MailMan Getting Started Guide August 2002Version 8.0 Revised September 2006
Here the user chose to preview the messages when using the Classic message reader.

Choosing Your Default Message Reader
Ignore Action
Another feature with the Classic message reader is the Ignore ("I") action code. You can enter the "I" action code after the default message to be read and MailMan automatically ignores that message and prepares to display the next message in the basket, as shown below:
Select MailMan Menu Option: rml <Enter> Read/Manage MessagesSelect message reader: Detailed Full Screen// c <Enter> ClassicRead mail in MAIL BASKET: IN// <Enter> (5 messages, 1 new)Last message number: 5 Messages in basket: 5 (1 new)Enter ??? for help.
Subj: Local: biweekly info exchange message # 58 From: POSTMASTERIN Basket Message: 5// ?
IN Basket, 5 messages (1-5), 1 new*=New/!=Priority.......Subject.........................From.................... *5. Local: biweekly info exchange message # 58 POSTMASTER 4. XU*8*141 TEST v1 <"NPM [#30846990]"@FOR 3. Kernel Documentation XMUSER.ZERO 2. DSM VERSION FORMAT VON BLACKANDWHITE,HANS 1. BROKER OPTIONS MISSISNG FROM OPED BLACK,DONALD
Subj: Local: biweekly info exchange message # 58 From: POSTMASTERIN Basket Message: 5// I <Enter> Ignore this message
Subj: XU*8*141 TEST v1 From: <"NPM [#30846990]"@FORUM.VA.GOV>IN Basket Message: 4//
Figure 2-5. Ignore action code in the Classic Message Reader
In the previous example (Figure 2-5), the user chose the Classic message reader to read messages in the "IN" mail basket.
The user first chose to get a summary list of all messages in the "IN" basket by entering a question mark ("?") at the "IN Basket Message: 5//" prompt. MailMan displayed all of the messages in the basket. As a default, MailMan displayed the newest message first (i.e., number 5, "Local: biweekly info exchange message # 58").
By entering an "I" (Ignore) at the "IN Basket Message: 5//" prompt, MailMan ignored this message and changed the default to the next message (i.e., number 4, "XU*8*141 TEST v1").
Also, when you are using the Classic message reader, you can still enter a message number for a message you know does not exist in your mail basket and MailMan will automatically move you to the next message in the basket.
For example, if you have messages numbers 1-27 and 29-40 in a mail basket and your message display order is from newest to oldest, when you enter number 28 at the message action prompt, MailMan will display message number 27.
REF: For more information on the message display order, please refer to the "Choose Your Message Display Order" topic in Chapter 3 in this manual.
August 2002 MailMan Getting Started Guide 7Revised September 2006 Version 8.0

Choosing Your Default Message Reader
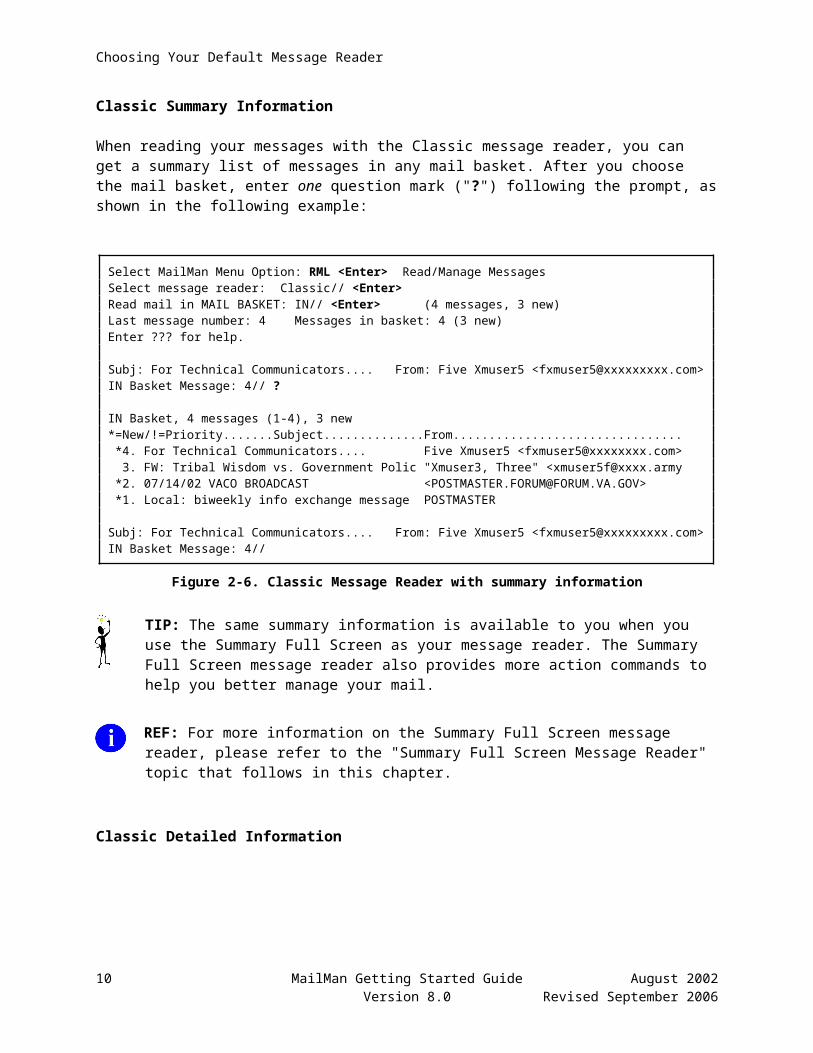
Classic Summary Information
When reading your messages with the Classic message reader, you can get a summary list of messages in any mail basket. After you choose the mail basket, enter one question mark ("?") following the prompt, as shown in the following example:
Select MailMan Menu Option: RML <Enter> Read/Manage MessagesSelect message reader: Classic// <Enter>Read mail in MAIL BASKET: IN// <Enter> (4 messages, 3 new)Last message number: 4 Messages in basket: 4 (3 new)Enter ??? for help.
Subj: For Technical Communicators.... From: Five Xmuser5 <[email protected]>IN Basket Message: 4// ?
IN Basket, 4 messages (1-4), 3 new*=New/!=Priority.......Subject..............From................................ *4. For Technical Communicators.... Five Xmuser5 <[email protected]> 3. FW: Tribal Wisdom vs. Government Polic "Xmuser3, Three" <[email protected] *2. 07/14/02 VACO BROADCAST <[email protected]> *1. Local: biweekly info exchange message POSTMASTER
Subj: For Technical Communicators.... From: Five Xmuser5 <[email protected]>IN Basket Message: 4//
Figure 2-6. Classic Message Reader with summary information
TIP: The same summary information is available to you when you use the Summary Full Screen as your message reader. The Summary Full Screen message reader also provides more action commands to help you better manage your mail.
REF: For more information on the Summary Full Screen message reader, please refer to the "Summary Full Screen Message Reader" topic that follows in this chapter.
8 MailMan Getting Started Guide August 2002Version 8.0 Revised September 2006
Choosing Your Default Message Reader
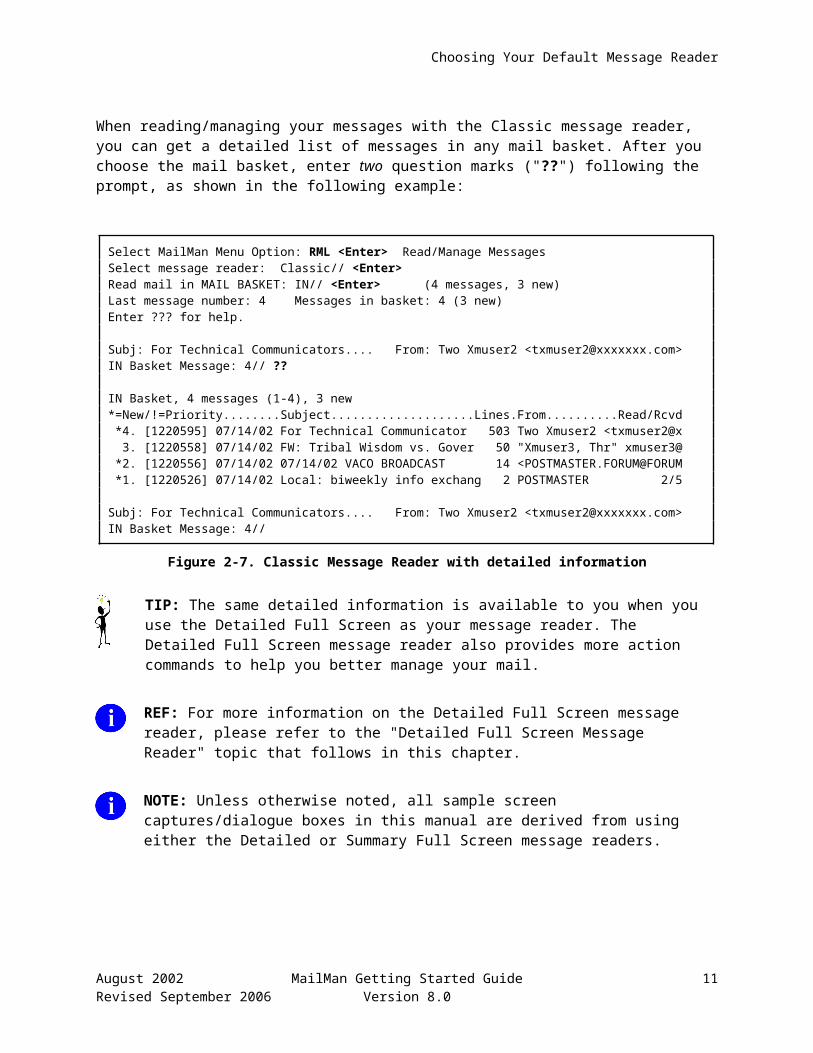
Classic Detailed Information
When reading/managing your messages with the Classic message reader, you can get a detailed list of messages in any mail basket. After you choose the mail basket, enter two question marks ("??") following the prompt, as shown in the following example:
Select MailMan Menu Option: RML <Enter> Read/Manage MessagesSelect message reader: Classic// <Enter>Read mail in MAIL BASKET: IN// <Enter> (4 messages, 3 new)Last message number: 4 Messages in basket: 4 (3 new)Enter ??? for help.
Subj: For Technical Communicators.... From: Two Xmuser2 <[email protected]>IN Basket Message: 4// ??
IN Basket, 4 messages (1-4), 3 new*=New/!=Priority........Subject....................Lines.From..........Read/Rcvd *4. [1220595] 07/14/02 For Technical Communicator 503 Two Xmuser2 <txmuser2@x 3. [1220558] 07/14/02 FW: Tribal Wisdom vs. Gover 50 "Xmuser3, Thr" xmuser3@ *2. [1220556] 07/14/02 07/14/02 VACO BROADCAST 14 <POSTMASTER.FORUM@FORUM *1. [1220526] 07/14/02 Local: biweekly info exchang 2 POSTMASTER 2/5
Subj: For Technical Communicators.... From: Two Xmuser2 <[email protected]>IN Basket Message: 4//
Figure 2-7. Classic Message Reader with detailed information
TIP: The same detailed information is available to you when you use the Detailed Full Screen as your message reader. The Detailed Full Screen message reader also provides more action commands to help you better manage your mail.
REF: For more information on the Detailed Full Screen message reader, please refer to the "Detailed Full Screen Message Reader" topic that follows in this chapter.
NOTE: Unless otherwise noted, all sample screen captures/dialogue boxes in this manual are derived from using either the Detailed or Summary Full Screen message readers.
August 2002 MailMan Getting Started Guide 9Revised September 2006 Version 8.0

Choosing Your Default Message Reader
Detailed Full Screen Message Reader
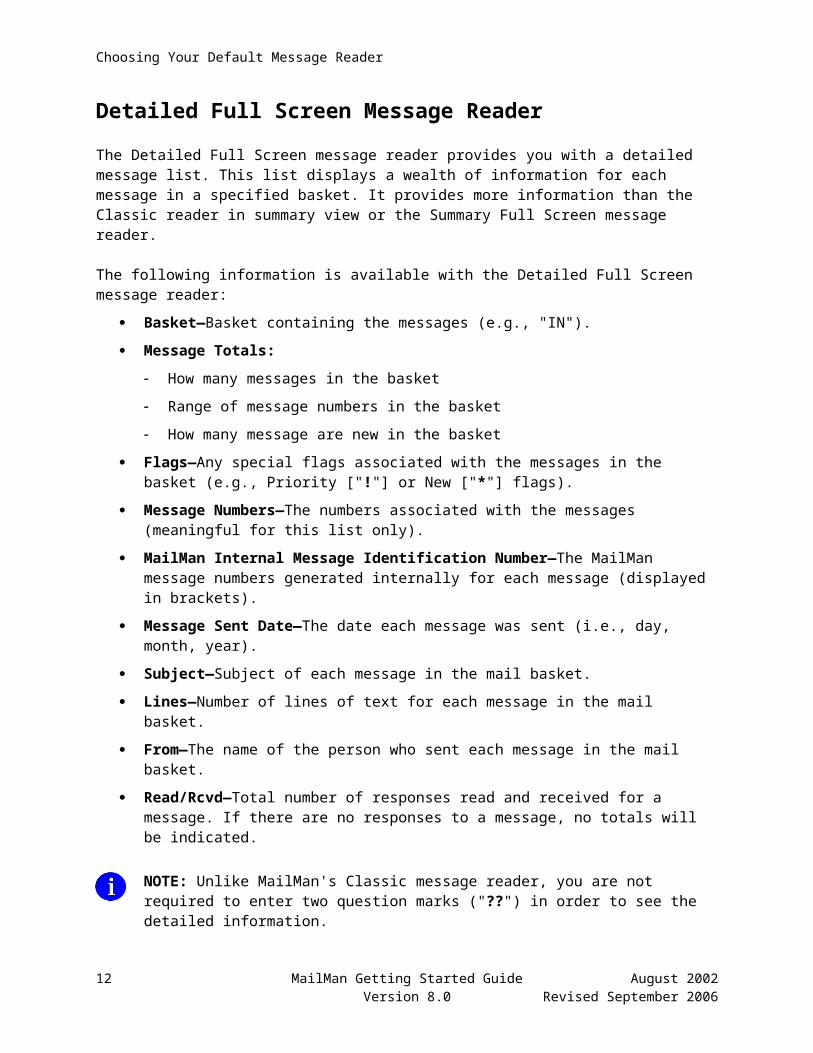
The Detailed Full Screen message reader provides you with a detailed message list. This list displays a wealth of information for each message in a specified basket. It provides more information than the Classic reader in summary view or the Summary Full Screen message reader.
The following information is available with the Detailed Full Screen message reader:
Basket—Basket containing the messages (e.g., "IN").
Message Totals:
How many messages in the basket
Range of message numbers in the basket
How many message are new in the basket
Flags—Any special flags associated with the messages in the basket (e.g., Priority ["!"] or New ["*"] flags).
Message Numbers—The numbers associated with the messages (meaningful for this list only).
MailMan Internal Message Identification Number—The MailMan message numbers generated internally for each message (displayed in brackets).
Message Sent Date—The date each message was sent (i.e., day, month, year).
Subject—Subject of each message in the mail basket.
Lines—Number of lines of text for each message in the mail basket.
From—The name of the person who sent each message in the mail basket.
Read/Rcvd—Total number of responses read and received for a message. If there are no responses to a message, no totals will be indicated.
NOTE: Unlike MailMan's Classic message reader, you are not required to enter two question marks ("??") in order to see the detailed information.
10 MailMan Getting Started Guide August 2002Version 8.0 Revised September 2006
Choosing Your Default Message Reader
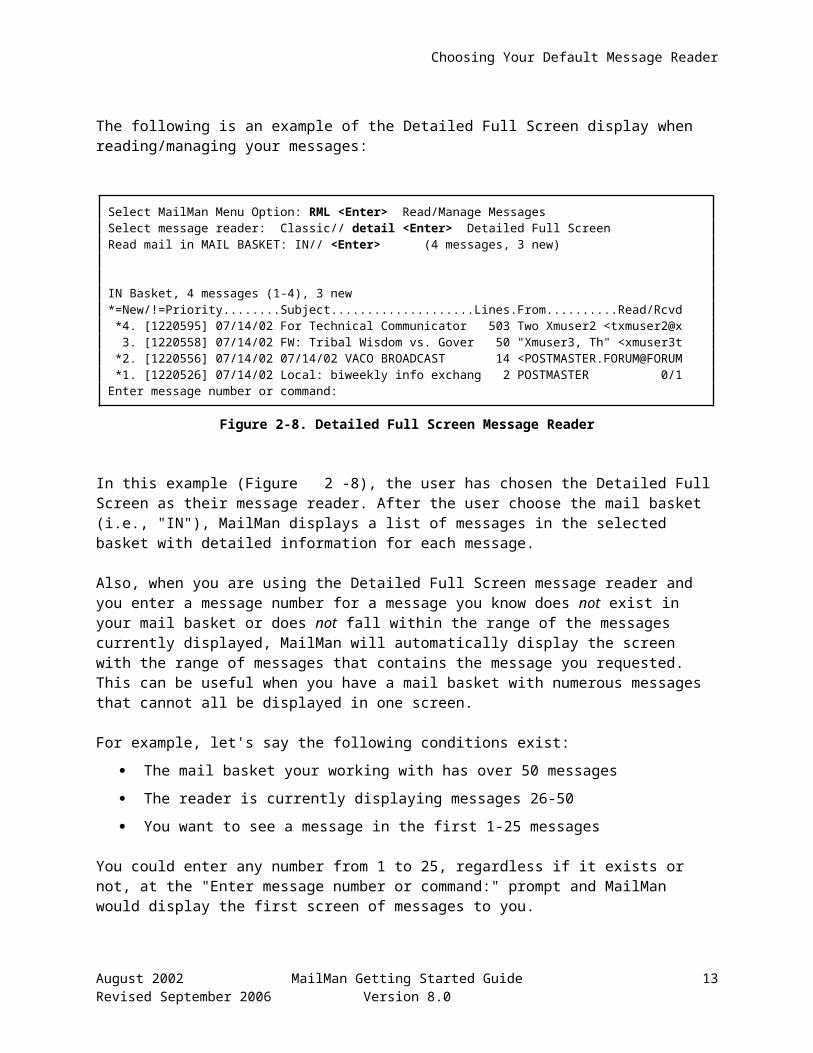
The following is an example of the Detailed Full Screen display when reading/managing your messages:
Select MailMan Menu Option: RML <Enter> Read/Manage MessagesSelect message reader: Classic// detail <Enter> Detailed Full ScreenRead mail in MAIL BASKET: IN// <Enter> (4 messages, 3 new)
IN Basket, 4 messages (1-4), 3 new*=New/!=Priority........Subject....................Lines.From..........Read/Rcvd *4. [1220595] 07/14/02 For Technical Communicator 503 Two Xmuser2 <txmuser2@x 3. [1220558] 07/14/02 FW: Tribal Wisdom vs. Gover 50 "Xmuser3, Th" <xmuser3t *2. [1220556] 07/14/02 07/14/02 VACO BROADCAST 14 <POSTMASTER.FORUM@FORUM *1. [1220526] 07/14/02 Local: biweekly info exchang 2 POSTMASTER 0/1Enter message number or command:
Figure 2-8. Detailed Full Screen Message Reader
In this example (Figure 2-8), the user has chosen the Detailed Full Screen as their message reader. After the user choose the mail basket (i.e., "IN"), MailMan displays a list of messages in the selected basket with detailed information for each message.
Also, when you are using the Detailed Full Screen message reader and you enter a message number for a message you know does not exist in your mail basket or does not fall within the range of the messages currently displayed, MailMan will automatically display the screen with the range of messages that contains the message you requested. This can be useful when you have a mail basket with numerous messages that cannot all be displayed in one screen.
For example, let's say the following conditions exist:
The mail basket your working with has over 50 messages
The reader is currently displaying messages 26-50
You want to see a message in the first 1-25 messages
You could enter any number from 1 to 25, regardless if it exists or not, at the "Enter message number or command:" prompt and MailMan would display the first screen of messages to you.
August 2002 MailMan Getting Started Guide 11Revised September 2006 Version 8.0
Choosing Your Default Message Reader
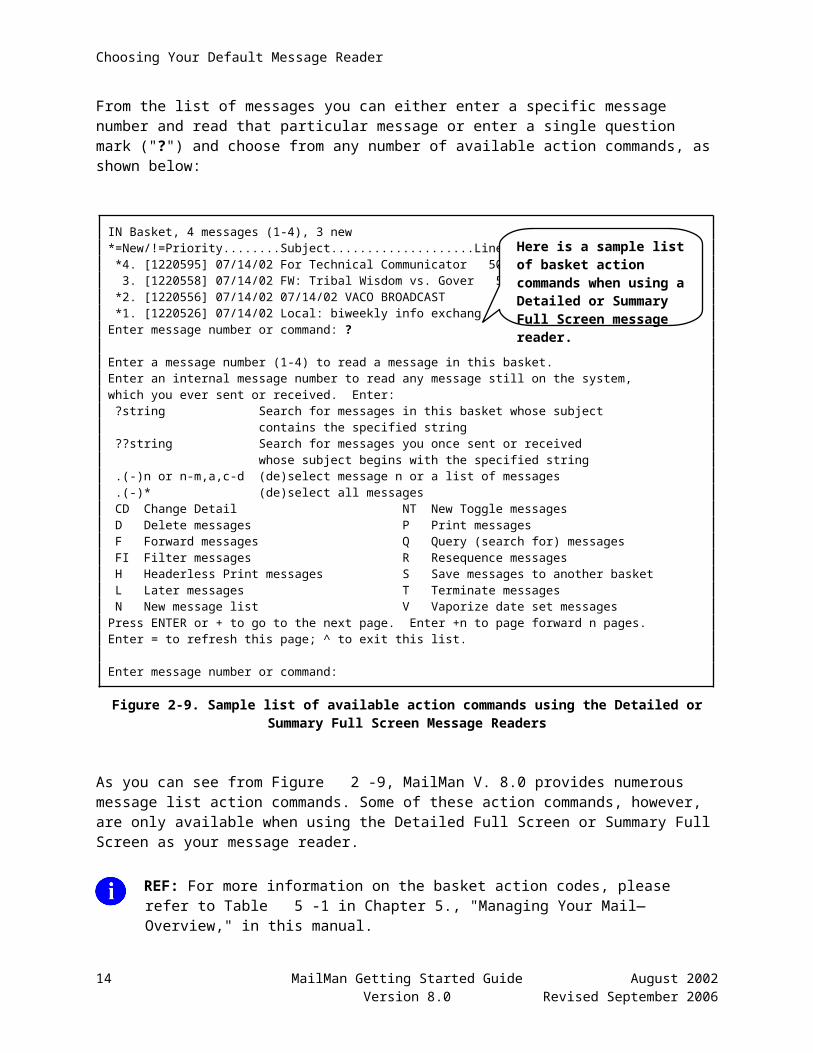
From the list of messages you can either enter a specific message number and read that particular message or enter a single question mark ("?") and choose from any number of available action commands, as shown below:
IN Basket, 4 messages (1-4), 3 new*=New/!=Priority........Subject....................Lines.From..........Read/Rcvd *4. [1220595] 07/14/02 For Technical Communicator 503 Five Xmuser5 <fxmuser5@ 3. [1220558] 07/14/02 FW: Tribal Wisdom vs. Gover 50 "Xmuser3, Th" <xmuser3t *2. [1220556] 07/14/02 07/14/02 VACO BROADCAST 14 <POSTMASTER.FORUM@FORUM *1. [1220526] 07/14/02 Local: biweekly info exchang 2 POSTMASTER 12/15Enter message number or command: ?
Enter a message number (1-4) to read a message in this basket.Enter an internal message number to read any message still on the system,which you ever sent or received. Enter: ?string Search for messages in this basket whose subject contains the specified string ??string Search for messages you once sent or received whose subject begins with the specified string .(-)n or n-m,a,c-d (de)select message n or a list of messages .(-)* (de)select all messages CD Change Detail NT New Toggle messages D Delete messages P Print messages F Forward messages Q Query (search for) messages FI Filter messages R Resequence messages H Headerless Print messages S Save messages to another basket L Later messages T Terminate messages N New message list V Vaporize date set messagesPress ENTER or + to go to the next page. Enter +n to page forward n pages.Enter = to refresh this page; ^ to exit this list.
Enter message number or command:
Figure 2-9. Sample list of available action commands using the Detailed or Summary Full Screen Message Readers
As you can see from Figure 2-9, MailMan V. 8.0 provides numerous message list action commands. Some of these action commands, however, are only available when using the Detailed Full Screen or Summary Full Screen as your message reader.
REF: For more information on the basket action codes, please refer to Table 5-1 in Chapter 5, "Managing Your Mail—Overview," in this manual.
12 MailMan Getting Started Guide August 2002Version 8.0 Revised September 2006
Here is a sample list of basket action commands when using a Detailed or Summary Full Screen message reader.
Choosing Your Default Message Reader
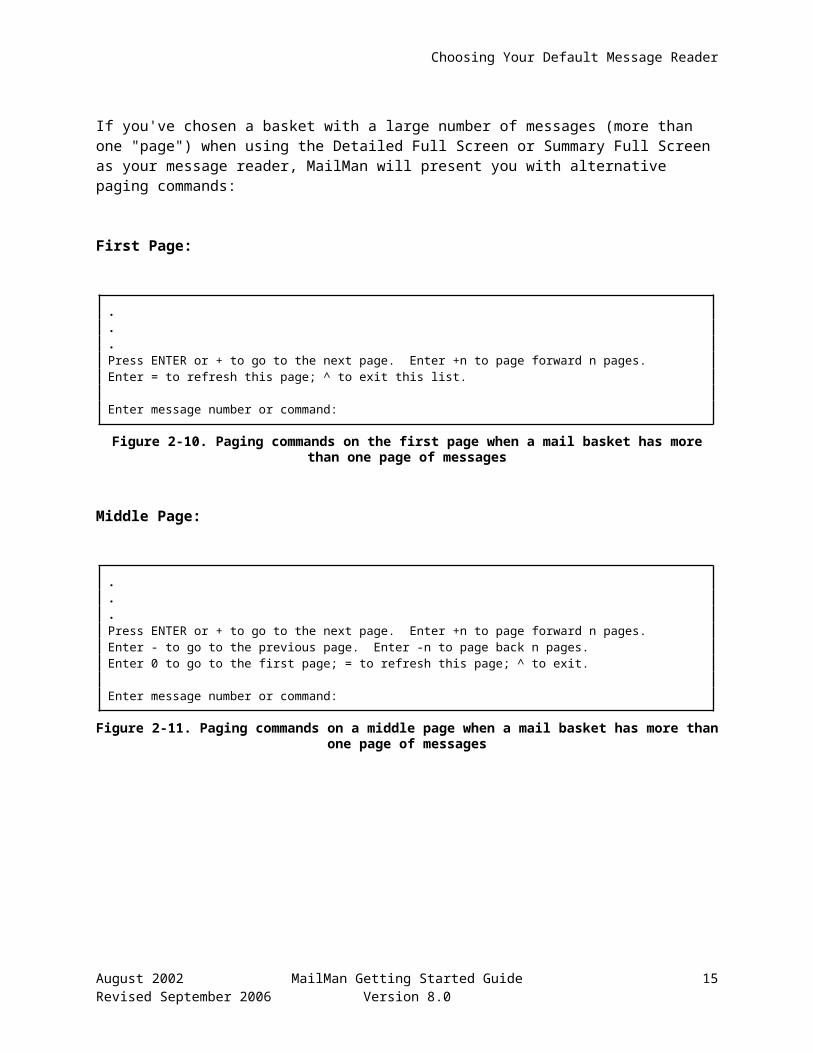
If you've chosen a basket with a large number of messages (more than one "page") when using the Detailed Full Screen or Summary Full Screen as your message reader, MailMan will present you with alternative paging commands:
First Page:
.
.
.Press ENTER or + to go to the next page. Enter +n to page forward n pages.Enter = to refresh this page; ^ to exit this list.
Enter message number or command:
Figure 2-10. Paging commands on the first page when a mail basket has more than one page of messages
Middle Page:
.
.
.Press ENTER or + to go to the next page. Enter +n to page forward n pages.Enter - to go to the previous page. Enter -n to page back n pages.Enter 0 to go to the first page; = to refresh this page; ^ to exit.
Enter message number or command:
Figure 2-11. Paging commands on a middle page when a mail basket has more than one page of messages
Last Page:
.
.
.Press ENTER or ^ to exit this list.Enter - to go to the previous page. Enter -n to page back n pages.Enter 0 to go to the first page; = to refresh this page.
Enter message number or command:
Figure 2-12. Paging commands on the last page when a mail basket has more than one page of messages
TIP: Use the Detailed Full Screen message reader instead of the Classic reader in order to save time when displaying basket message lists with detailed information. Also, the Detailed Full Screen message reader allows you to better manage your mail by giving you more action commands from which to choose.
August 2002 MailMan Getting Started Guide 13Revised September 2006 Version 8.0
Choosing Your Default Message Reader
NOTE: Unless otherwise noted, all sample screen captures/dialogue boxes in this manual are derived from using either the Detailed or Summary Full Screen message readers.
14 MailMan Getting Started Guide August 2002Version 8.0 Revised September 2006
Choosing Your Default Message Reader
Summary Full Screen Message Reader
The Summary Full Screen message reader provides a summary view of all messages in all baskets. It provides less information than the Detailed Full Screen.
The following information is available with the Summary Full Screen reader:
Basket—Basket containing the messages (e.g., "IN").
Message Totals:
How many messages in the basket
Range of message numbers in the basket
How many message are new in the basket
Flags—Any special flags associated with the messages in the basket (e.g., Priority ["!"] or New ["*"] flags).
Message Numbers—The numbers associated with the messages (meaningful for this list only).
Subject—Subject of each message in the mail basket.
From—The name of the person who sent each message in the mail basket.
NOTE: To display summary information using the Classic message reader, you must enter one question mark ("?").
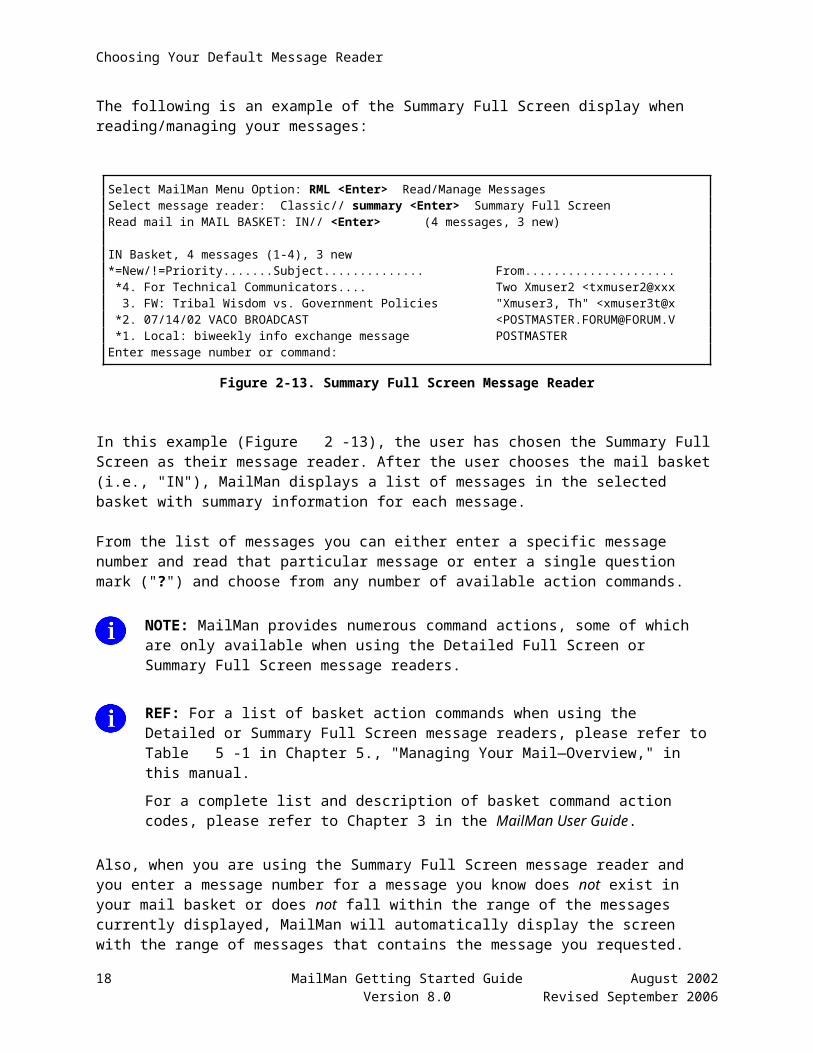
The following is an example of the Summary Full Screen display when reading/managing your messages:
Select MailMan Menu Option: RML <Enter> Read/Manage MessagesSelect message reader: Classic// summary <Enter> Summary Full ScreenRead mail in MAIL BASKET: IN// <Enter> (4 messages, 3 new)
IN Basket, 4 messages (1-4), 3 new*=New/!=Priority.......Subject.............. From..................... *4. For Technical Communicators.... Two Xmuser2 <txmuser2@xxx 3. FW: Tribal Wisdom vs. Government Policies "Xmuser3, Th" <xmuser3t@x *2. 07/14/02 VACO BROADCAST <[email protected] *1. Local: biweekly info exchange message POSTMASTEREnter message number or command:
Figure 2-13. Summary Full Screen Message Reader
In this example (Figure 2-13), the user has chosen the Summary Full Screen as their message reader. After the user chooses the mail basket (i.e., "IN"), MailMan displays a list of messages in the selected basket with summary information for each message.
From the list of messages you can either enter a specific message number and read that particular message or enter a single question mark ("?") and choose from any number of available action commands.
August 2002 MailMan Getting Started Guide 15Revised September 2006 Version 8.0
Choosing Your Default Message Reader
NOTE: MailMan provides numerous command actions, some of which are only available when using the Detailed Full Screen or Summary Full Screen message readers.
REF: For a list of basket action commands when using the Detailed or Summary Full Screen message readers, please refer to Table 5-1 in Chapter 5, "Managing Your Mail—Overview," in this manual.
For a complete list and description of basket command action codes, please refer to Chapter 3 in the MailMan User Guide.
Also, when you are using the Summary Full Screen message reader and you enter a message number for a message you know does not exist in your mail basket or does not fall within the range of the messages currently displayed, MailMan will automatically display the screen with the range of messages that contains the message you requested. This can be useful when you have a mail basket with numerous messages that cannot all be displayed in one screen.
For example, let's say the following conditions exist:
The mail basket your working with has over 50 messages
The reader is currently displaying messages 26-50
You want to see a message in the first 1-25 messages
You could enter any number from 1 to 25, regardless if it exists or not, at the "Enter message number or command:" prompt and MailMan would display the first screen of messages to you.
TIP: Use the Summary Full Screen message reader instead of the Classic reader in order to save time when displaying basket message lists with summary information. Also, the Summary Full Screen message reader allows you to better manage your mail by giving you more action commands from which to choose.
NOTE: Unless otherwise noted, all sample screen captures/dialogue boxes in this manual are derived from using either the Detailed or Summary Full Screen message readers.
16 MailMan Getting Started Guide August 2002Version 8.0 Revised September 2006
Choosing Your Default Message Reader
Set Your Default Message Reader
User Options Edit Option
August 2002 MailMan Getting Started Guide 17Revised September 2006 Version 8.0

Choosing Your Default Message Reader
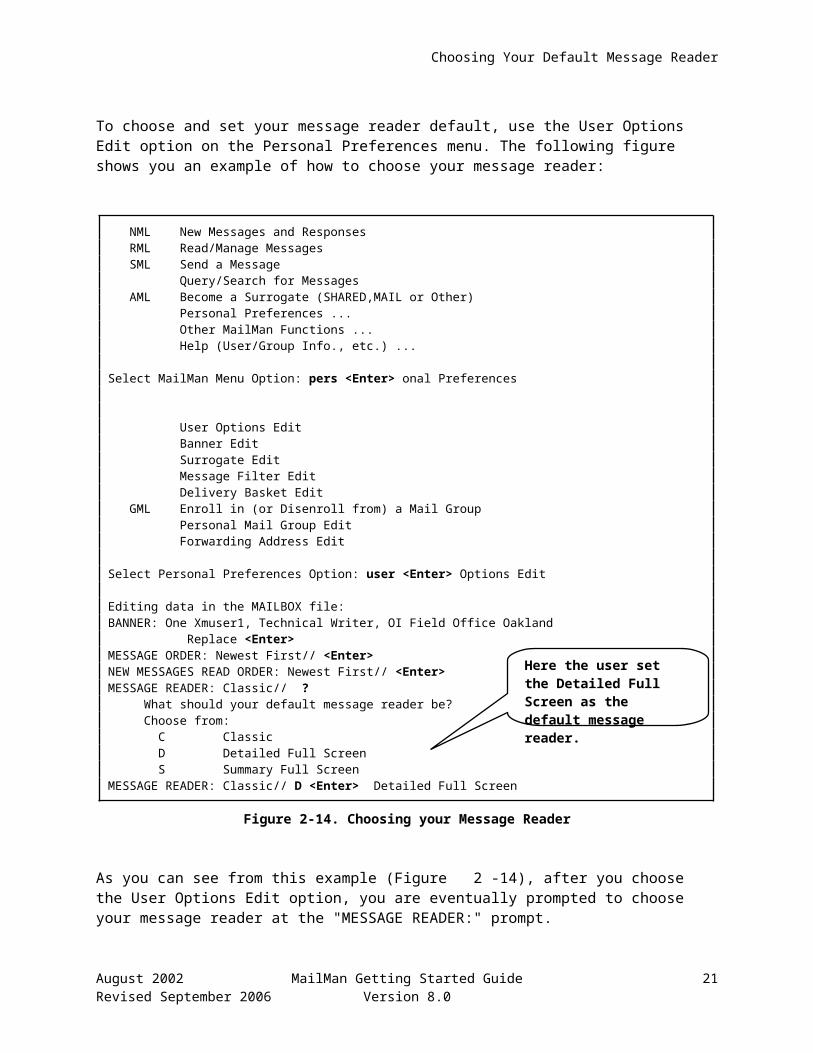
To choose and set your message reader default, use the User Options Edit option on the Personal Preferences menu. The following figure shows you an example of how to choose your message reader:
NML New Messages and Responses RML Read/Manage Messages SML Send a Message Query/Search for Messages AML Become a Surrogate (SHARED,MAIL or Other) Personal Preferences ... Other MailMan Functions ... Help (User/Group Info., etc.) ...
Select MailMan Menu Option: pers <Enter> onal Preferences
User Options Edit Banner Edit Surrogate Edit Message Filter Edit Delivery Basket Edit GML Enroll in (or Disenroll from) a Mail Group Personal Mail Group Edit Forwarding Address Edit
Select Personal Preferences Option: user <Enter> Options Edit
Editing data in the MAILBOX file:BANNER: One Xmuser1, Technical Writer, OI Field Office Oakland Replace <Enter>MESSAGE ORDER: Newest First// <Enter>NEW MESSAGES READ ORDER: Newest First// <Enter>MESSAGE READER: Classic// ? What should your default message reader be? Choose from: C Classic D Detailed Full Screen S Summary Full ScreenMESSAGE READER: Classic// D <Enter> Detailed Full Screen
Figure 2-14. Choosing your Message Reader
As you can see from this example (Figure 2-14), after you choose the User Options Edit option, you are eventually prompted to choose your message reader at the "MESSAGE READER:" prompt.
To choose your reader, enter either: Classic ("C"), Detailed ("D"), or Summary ("S"). For this example, the user chose the Detailed Full Screen message reader as their default.
Message Reader Prompt
Once you have decided on a message reader, you can specify whether the reader that you just chose should be used all the time or that you want to be asked each time you use the Read/Manage Messages option [synonym RML].
18 MailMan Getting Started Guide August 2002Version 8.0 Revised September 2006
Here the user set the Detailed Full Screen as the default message reader.
Choosing Your Default Message Reader
While still using the User Options Edit option to configure your MailMan interface, at the "MESSAGE READER:" question, you are asked to set the "MESSAGE READER PROMPT:." The default for this prompt is "Yes, ask me." By answering "No" to this prompt, you avoid being asked each time to choose a MailMan message reader when reading your messages.
For example, if you wish to use the Detailed Full Screen reader exclusively, set the MESSAGE READER to "Detailed Full Screen" and the MESSAGE READER PROMPT to "No, don't ask me, just use the default" via the User Options Edit option, as shown below:
MESSAGE READER PROMPT: Yes, ask me// ?? You have chosen a default 'message reader' in the previous selection. You chose either the 'classic' reader or one of the 'full-screen' readers. (If you didn't choose, then your default is the 'classic' reader.) In this selection, you must decide whether you want MailMan to ask you every time you use the message reader which reader to use, or not to ask you and just go ahead and use your default message reader. Answer 'Yes' if you want to be prompted for your reader choice every time you go to read messages in a basket. This is the default answer, and is recommended until you have tried each reader and decided that you want to settle on using just one. Answer 'No" if you don't want to be prompted, and you just want to use your default reader every time. Choose from: Y Yes, ask me N No, don't ask me, just use the default
MESSAGE READER PROMPT: Yes, ask me// n <Enter> No, don't ask me, just use the default
Figure 2-15. Setting your Message Reader default
NOTE: Remember, you can change your message reader anytime by using the User Options Edit option and changing the MESSAGE READER and MESSAGE READER PROMPT values to whatever you want.
TIP: Set the "MESSAGE READER PROMPT:" to No to save you time when reading your messages. You will avoid being prompted to choose your message reader and automatically use your default message reader.
August 2002 MailMan Getting Started Guide 19Revised September 2006 Version 8.0
Here the user chose to always use the default message reader.
Choosing Your Default Message Reader
20 MailMan Getting Started Guide August 2002Version 8.0 Revised September 2006

3. Organizing Your Mail Baskets and Messages
The following topics are discussed in this chapter:
Name Your Mail Baskets
Error: Reference source not found Set Your Mail Basket Prompt Choose Your Message Display Order Choose Your New Messages Read Order
In addition to the existing functionality, MailMan provides numerous features when working with your mail baskets in your MailMan mailbox. Besides helping you to organize your mail baskets, MailMan also allows you to better organize your messages within those mail baskets.
All current functionality and features available with MailMan V. 8.0 are described in greater detail in this chapter.
August 2002 MailMan Getting Started Guide 1Revised September 2006 Version 8.0

Organizing Your Mail Baskets and Messages
2 MailMan Getting Started Guide August 2002Version 8.0 Revised September 2006
Organizing Your Mail Baskets and Messages
Name Your Mail Baskets
MailMan allows you to give your mail baskets names starting with numbers. Also, when you list your baskets, they will be sorted in alphabetical order (those baskets beginning with numbers will be listed first). Mail basket names can be from 2 to 30 characters in length.
There are two methods of creating a new mail basket:
1. Save a Message to a New Basket—Save a message to a mail basket that does not yet exist (i.e., a new mail basket).
2. Create a New Filter Basket—Use the Message Filter Edit option to create a new filter mail basket.
For example, when you want to save a message into a new mail basket you can name that new mail basket beginning with a number, as shown below:
MailMan Basket, 3 messages (1-3), 1 new*=New/!=Priority........Subject....................Lines.From..........Read/Rcvd 3. [1212448] 05/14/02 TEST DELIVERY ZERO M 4/4 *2. [1190657] 11/07/02 I'm so excited. ZERO 722/723 1. [1028185] 04/02/96 MAILMAN CUSTOM XMUSER2,TW 2/2Enter message number or command: 3
Subj: TEST DELIVERY BASKET [#1212448] From: XMUSER.ZERO - PROGRAMMER ice)4 of 4 responses read. In 'MailMan' basket. Page 1-------------------------------------------------------------------------------
Enter message action (in MailMan basket): IGNORE// saveSave message into basket: 1 Mail Test Are you adding '1 Mail Test' as a new BASKET (the 73RD for this MAILBOX)? No// y <Enter> (Yes)Message saved.
Figure 3-16. Creating a new mail basket beginning with a number
REF: For more information on saving messages to a new basket or for filtering your mail, please refer to the MailMan User Guide.
TIP: You may find it easier to start your mail basket names with a number to help you better organize or categorize your mail baskets. For example, you may want to precede a mail basket name with the year (e.g., 2002 – budget).
August 2002 MailMan Getting Started Guide 3Revised September 2006 Version 8.0
Here, the user has created a new mail basket whose name begins with a number (i.e., "1 Mail Test").
Organizing Your Mail Baskets and Messages
When you wish to choose a mail basket by its basket number (e.g., ".5" for the "WASTE" basket), you must now precede the mail basket number with a grave accent mark or back tick (`), as shown below:
NML New Messages and Responses RML Read/Manage Messages SML Send a Message Query/Search for Messages AML Become a Surrogate (SHARED,MAIL or Other) Personal Preferences ... Other MailMan Functions ... Help (User/Group Info., etc.) ...
Select MailMan Menu Option: RML <Enter> Read/Manage MessagesSelect message reader: Detailed Full Screen// <Enter>Read mail in MAIL BASKET: IN// .5 <Enter> ??Read mail in MAIL BASKET: IN// `.5 <Enter> WASTE (1 message)
WASTE Basket, 1 message*=New/!=Priority........Subject....................Lines.From..........Read/Rcvd 1. [1221318] 07/20/02 Changes to routines 4 <[email protected] message number or command:
Figure 3-17. Choosing a basket by basket number
As you can see by this example (Figure 3-17), by simply entering the basket number .5 without the accent grave (i.e., `.5) the user got an error. In order to specify the .5 ("WASTE") basket, the user had to precede the .5 with an grave accent.
When you wish to choose a mail basket by its name (e.g., "INFRASTRUCTURE"), MailMan only requires that you enter the first portion of the name (case sensitive); MailMan will find the appropriate mail basket based on your partial entry and automatically display the rest of the basket name to you. If more than one basket is found based on your partial entry, MailMan will allow you to choose from a list; however, you'll narrow your choices by entering more characters of the name.
4 MailMan Getting Started Guide August 2002Version 8.0 Revised September 2006
Error ("??"): MailMan could not find the mail basket number because the user forgot the accent grave.

Organizing Your Mail Baskets and Messages
Set Your Delivery Basket Privileges
MailMan provides the ability for senders of mail messages to specify or target the mail basket into which a message should be delivered for all recipients. Recipients of such messages can decide whether to accept or reject delivery to any targeted basket. This topic discusses how you, as a recipient, can set the mail basket delivery privileges that work best for you.
To set up your mail delivery privileges, use the Delivery Basket Edit option on the Personal Preferences menu, as shown below:
NML New Messages and Responses RML Read/Manage Messages SML Send a Message Query/Search for Messages AML Become a Surrogate (SHARED,MAIL or Other) Personal Preferences ... Other MailMan Functions ... Help (User/Group Info., etc.) ...
Select MailMan Menu Option: personal <Enter> Preferences
User Options Edit Banner Edit Surrogate Edit Message Filter Edit Delivery Basket Edit GML Enroll in (or Disenroll from) a Mail Group Personal Mail Group Edit Forwarding Address Edit
Select Personal Preferences Option: delivery <Enter> Basket Edit
Figure 3-18. Delivery Basket Edit option
The Delivery Basket Edit option allows you to customize the way you receive messages from other MailMan users who have targeted messages for delivery to specific baskets. With this option you can, for example, permit other MailMan users to direct mail to a specific mail basket in your mailbox and/or create new baskets for you automatically. Specifically, you can choose to do any of the following:
YES, ACCEPT IT—Choose this response if you will accept the mail in whatever mail basket is specified by the sender. If the mail basket specified does not already exist, it will automatically be created in your mailbox and the message will be delivered to this new mail basket. This is the most permissive setting.
NO, DON'T ACCEPT IT (default)—Choose this response if you will not accept the mail in the mail basket specified by the sender. Thus, regardless of what the sender specifies, the mail will be delivered as usual (i.e., to your "IN" basket or, via your mail filters, to a different mail basket). With this default setting, no new mail baskets can be created by others in your mailbox. This is the least permissive setting.
EXISTING BASKETS ONLY—Choose this response if you will accept the mail in the specified mail basket, only if that mail basket already exists in your mailbox. Otherwise, if the specified mail basket does not exist, the mail will be delivered as usual (i.e., to your "IN" basket
August 2002 MailMan Getting Started Guide 5Revised September 2006 Version 8.0

Organizing Your Mail Baskets and Messages
or, via your mail filters, to a different mail basket). With this setting, no new mail baskets can be created by others in your mailbox.
SELECTED BASKETS ONLY—Choose this response if you will accept the mail in the specified mail basket, only if that mail basket already exists in your mailbox and you have specified that the basket will accept such messages. These mail baskets are also specified through the Delivery Basket Edit option. Otherwise, if the specified mail basket does not exist or is not set to accept the mail, the mail will be delivered as usual (i.e., to your "IN" basket or, via your mail filters, to a different mail basket). With this setting, no new mail baskets can be created by others in your mailbox.
REF: For more information on setting the delivery basket when sending a message, please refer to the "Delivery Basket Set ('D') Action" topic in Chapter 5 in the MailMan User Guide.
For more information on mail filters, please refer to Chapter 7 in the MailMan User Guide.
CAUTION: Besides the Delivery Basket Edit option, you can also use mail filters to automatically redirect your mail to a specified mail basket based on certain criteria (i.e., subject, sender, recipients); however, be aware that the settings you choose with the Delivery Basket Edit option that accept mail to a specific basket will override any mail filters you may have established.
6 MailMan Getting Started Guide August 2002Version 8.0 Revised September 2006
Organizing Your Mail Baskets and Messages
The following figure shows you the various message delivery controls you can set. For this example, no mail filters have been established:
Select Personal Preferences Option: delivery <Enter> Basket EditACCEPT DELIVERY BASKET?: NO, DON'T ACCEPT IT// ? Accept message delivery into sender-specified baskets? Choose from: Y YES, ACCEPT IT N NO, DON'T ACCEPT IT E EXISTING BASKETS ONLY S SELECTED BASKETS ONLYACCEPT DELIVERY BASKET?: NO, DON'T ACCEPT IT// S <Enter> SELECTED BASKETS ONLYSelect BASKET: Reports// <Enter> DELIVERY BASKET?: ?? The sender of a message may specify the *basket* into which the message should be delivered for all recipients. This field is relevant only if you have set ACCEPT DELIVERY BASKET? to 'SELECTED baskets only'. Is this basket one of those baskets which will accept messages from senders who have specified target delivery baskets? Choose from: Y YES N NO DELIVERY BASKET?: y <Enter> YESSelect BASKET: Budget Info DELIVERY BASKET?: YES// <Enter>Select BASKET: Supervisor Messages DELIVERY BASKET?: YES// <Enter>Select BASKET: <Enter>
Figure 3-19. Setting your delivery basket privileges
In this example (Figure 3-19), the user chose to limit the mail baskets that will accept delivery of mail to specified baskets by choosing the "SELECTED BASKETS ONLY" response to the "ACCEPT DELIVERY BASKET?:" prompt.
Previously, the default was set to "NO, DON'T ACCEPT IT," which meant the mail basket specified by the sender would be ignored and the mail would be delivered as usual. In this case, the user chose to give senders limited privileges by only accepting mail delivery to the following mail baskets, if specified by the sender:
Reports
Budget Info
Supervisor Messages
If the sender sends a message and specifies the delivery mail basket as "Reports," the message will be accepted into the "Reports" mail basket, since the user allowed the "Reports" mail basket to accept mail from senders. If the sender specifies any basket other than those three acceptable baskets (e.g., "Documents"), the mail will have to go through normal channels. In this case, since no mail filters exist, the mail will automatically be delivered to the "IN" basket.
August 2002 MailMan Getting Started Guide 7Revised September 2006 Version 8.0
Here the user is choosing additional mail baskets that allow them to accept mail when specified by the sender.
Organizing Your Mail Baskets and Messages
TIP: When selecting specific mail baskets to accept mail you can create new mail baskets in your mailbox by entering a new mail basket name at the "Select BASKET:" prompt.
REF: For information on how you can specify a mail basket when sending a message, please refer to the "Delivery Basket Set ('D') Action" topic in Chapter 5 in the MailMan User Guide.
8 MailMan Getting Started Guide August 2002Version 8.0 Revised September 2006

Organizing Your Mail Baskets and Messages
Set Your Mail Basket Prompt
MailMan allows you to decide up front whether you want to be prompted each time to choose a mail basket whenever you send yourself e-mail. You can either choose to be prompted at each occurrence or automatically have the mail default to the "IN" basket.
August 2002 MailMan Getting Started Guide 9Revised September 2006 Version 8.0

Organizing Your Mail Baskets and Messages
To set your mail basket prompt, use the User Options Edit option on the Personal Preferences menu to answer the "ASK BASKET?:" question, as shown below:
NML New Messages and Responses RML Read/Manage Messages SML Send a Message Query/Search for Messages AML Become a Surrogate (SHARED,MAIL or Other) Personal Preferences ... Other MailMan Functions ... Help (User/Group Info., etc.) ...
Select MailMan Menu Option: personal <Enter> Preferences
User Options Edit Banner Edit Surrogate Edit Message Filter Edit Delivery Basket Edit GML Enroll in (or Disenroll from) a Mail Group Personal Mail Group Edit Forwarding Address Edit
Select Personal Preferences Option: user <Enter> Options Edit
Editing data in the MAILBOX file:BANNER: One Xmuser1, Technical Writer, OI Field Office Oakland Replace <Enter>MESSAGE ORDER: Newest First// <Enter>NEW MESSAGES READ ORDER: Newest First// <Enter>MESSAGE READER: Detailed Full Screen// <Enter>MESSAGE READER PROMPT: Yes, ask me// <Enter>NEW MESSAGES DEFAULT OPTION: LIST ALL NEW MESSAGES // <Enter>SHOW MESSAGE PREVIEW: <Enter>MESSAGE ACTION DEFAULT: IGNORE// <Enter>ASK BASKET?: YES// ?? If this is NO, MailMan will not ask for a basket name when the user sends a message to himself. Choose from: y YES n NOASK BASKET?: YES// <Enter>
Figure 3-20. Choosing to be prompted for a mail basket
In this example (Figure 3-20), the user chose to be asked each time he sends a message to himself by answering "Yes" at the "ASK BASKET?:" prompt. In this case, the default response was already set to "Yes" so he pressed the <Enter> key to accept the default.
10 MailMan Getting Started Guide August 2002Version 8.0 Revised September 2006
Press the <Enter> key until you reach this question.

Organizing Your Mail Baskets and Messages
Thus, whenever the user composes a message and send it to himself, he will be prompted to choose the mail basket to which he wants the message sent, as shown below:
Send mail to: XMUSER1,ONE // <Enter>Select basket to send to: IN// TESTAnd Send to: <Enter>
Select Message option: Transmit now// <Enter> Sending [1221582]... Sent
Figure 3-21. Choosing a mail basket when sending messages to oneself
In this case (Figure 3-21), the user chose to send the message to the "TEST" mail basket rather than the "IN" basket; however, you can choose any of your existing mail baskets or send it to a new basket that you can create on the fly.
NOTE: You can also use mail filters to automatically redirect any mail based on certain criteria (e.g., subject, sender, recipient, etc.) to a specified mail basket. For instance, you might create a filter to send all mail from yourself to a special mail basket.
REF: For more information on mail filters, please refer to Chapter 7 in the MailMan User Guide.
TIP: Whenever you think you might want to name a specific mail basket to receive mail you send to yourself, you should set the "ASK BASKET?:" prompt to "Yes."
August 2002 MailMan Getting Started Guide 11Revised September 2006 Version 8.0
Here the user is asked to choose the mail basket.
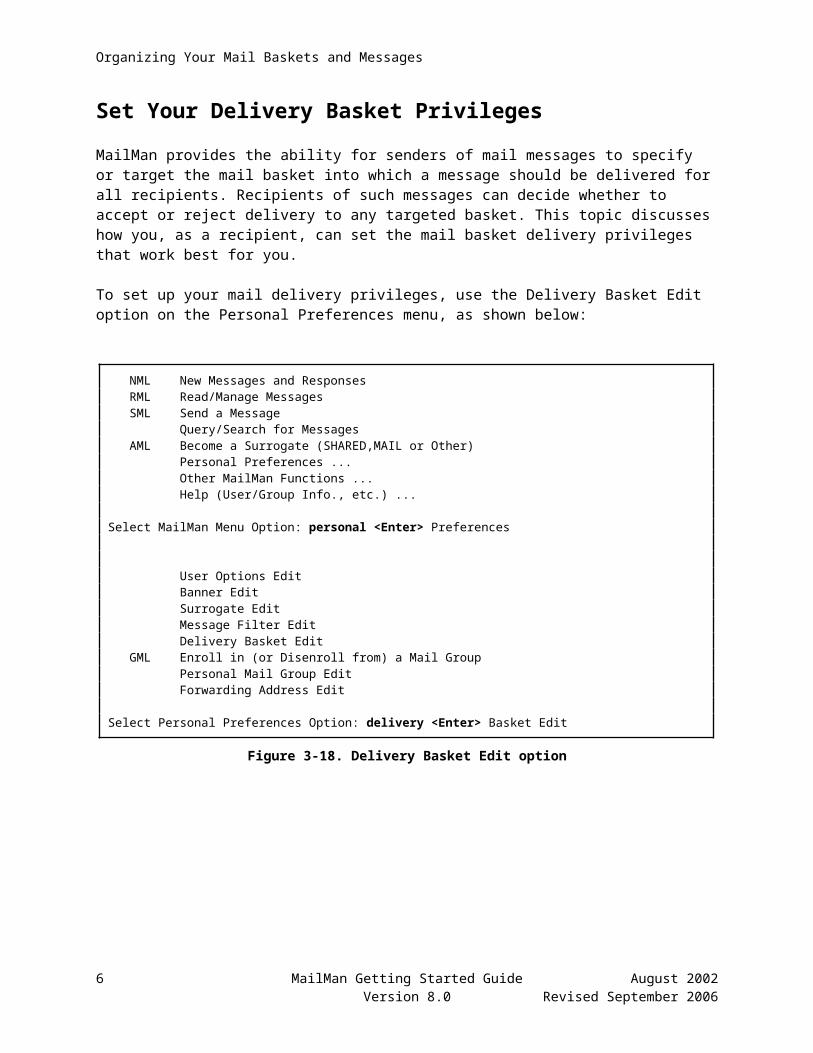
Organizing Your Mail Baskets and Messages
In the next example (Figure 3-22), the user chose not to be asked each time she sends a message to herself by answering "No" at the "ASK BASKET?:" prompt, as shown below:
Select Personal Preferences Option: user <Enter> Options Edit
Editing data in the MAILBOX file:BANNER: One Xmuser1, Technical Writer, OI Field Office Oakland Replace <Enter>MESSAGE ORDER: Newest First// <Enter>NEW MESSAGES READ ORDER: Newest First// <Enter>MESSAGE READER: Detailed Full Screen// <Enter>MESSAGE READER PROMPT: Yes, ask me// <Enter>NEW MESSAGES DEFAULT OPTION: LIST ALL NEW MESSAGES // <Enter>SHOW MESSAGE PREVIEW: <Enter>MESSAGE ACTION DEFAULT: IGNORE// <Enter>ASK BASKET?: YES// n <Enter> NO
Figure 3-22. Choosing not to be prompted for a mail basket
Thus, whenever the user composes a message and sends it to herself, she will not be prompted to choose the mail basket to which she wants the message sent, as shown below:
Send mail to: XMUSER1,ONE // <Enter>And Send to: <Enter>
Select Message option: Transmit now// <Enter> Sending [1221583]... Sent
Figure 3-23. Sending messages to oneself (mail basket defaults to "IN")
To see the difference in these two scenarios, compare this figure (Figure 3-23) with Figure 3-21.
12 MailMan Getting Started Guide August 2002Version 8.0 Revised September 2006
Press the <Enter> key until you reach this question.
Here the user is not asked to choose the mail basket.

Organizing Your Mail Baskets and Messages
Choose Your Message Display Order
MailMan lets you choose in which order to display your messages in a mail basket. This helps you to better organize your messages by keeping the basket message lists more orderly and, thus, more usable. You have two choices:
N—Newest First. This means that your messages are displayed in reverse order (i.e., highest to lowest basket message sequence number order).
O—Oldest First. This means that your messages are displayed in message number order (i.e., lowest to highest basket message sequence number order).
Generally, the basket message sequence number order will correspond to the message date sent order with the following exceptions:
Messages not originally sent to you but forwarded to you at a later date.
Messages sent from another location via the network (e.g., messages from a different site, FORUM messages).
August 2002 MailMan Getting Started Guide 13Revised September 2006 Version 8.0
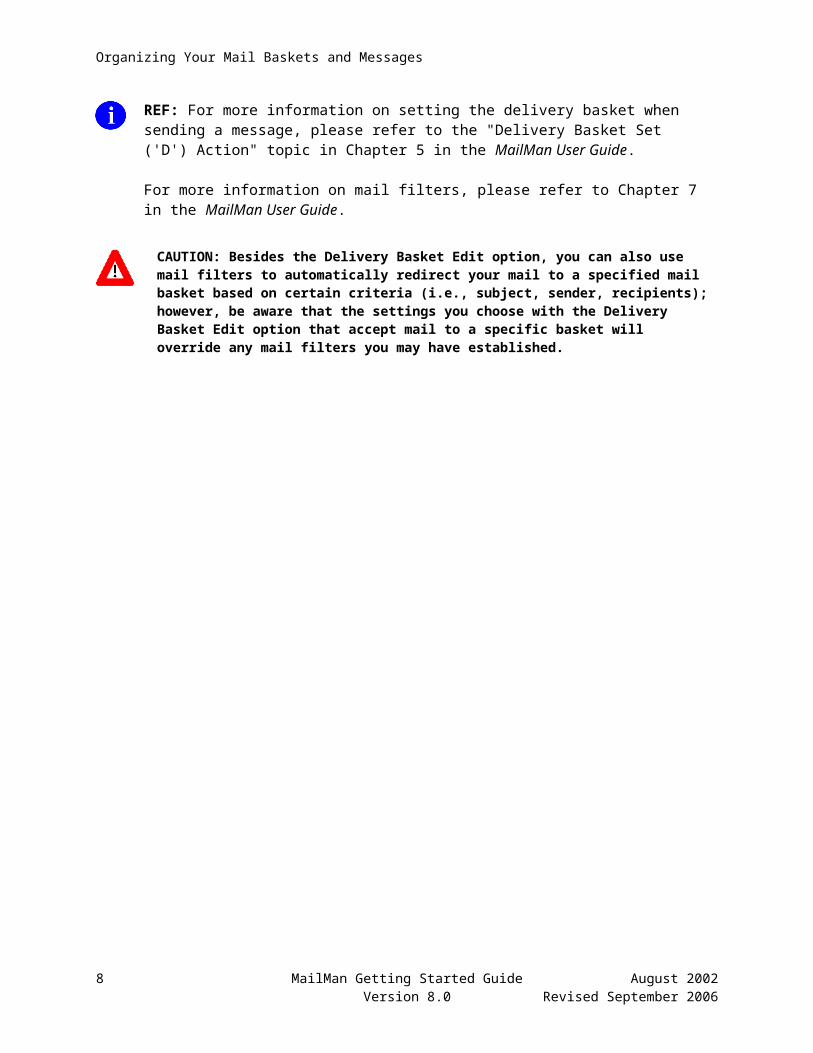
Organizing Your Mail Baskets and Messages
To set your message order, use the User Options Edit option on the Personal Preferences menu to answer the "MESSAGE ORDER?:" question, as shown below:
NML New Messages and Responses RML Read/Manage Messages SML Send a Message Query/Search for Messages AML Become a Surrogate (SHARED,MAIL or Other) Personal Preferences ... Other MailMan Functions ... Help (User/Group Info., etc.) ...
Select MailMan Menu Option: personal <Enter> Preferences
User Options Edit Banner Edit Surrogate Edit Message Filter Edit Delivery Basket Edit GML Enroll in (or Disenroll from) a Mail Group Personal Mail Group Edit Forwarding Address Edit
Select Personal Preferences Option: user <Enter> Options Edit
Editing data in the MAILBOX file:BANNER: One Xmuser1, Technical Writer, OI Field Office Oakland Replace <Enter>MESSAGE ORDER: Newest First// ?? 'Newest First' means messages are displayed in reverse message number order. 'Oldest First' means messages are displayed in message number order. Choose from: N Newest First O Oldest FirstMESSAGE ORDER: Newest First// <Enter>
Figure 3-24. Setting your message display order in a basket
As you can see from Figure 3-24, the user has chosen to have their messages listed from newest to oldest (reverse order or Newest First). In this case, the default response was already set to "Newest First" so the user pressed the <Enter> key to accept the default.
14 MailMan Getting Started Guide August 2002Version 8.0 Revised September 2006
Press the <Enter> key until you reach this question.

Organizing Your Mail Baskets and Messages
The following figure shows a sample list of messages with detailed information that includes the basket message number from newest to oldest order and the date the message was sent:
Infrastructure Basket, 10 messages (1-10)*=New/!=Priority.........Subject....................Lines.From.........Read/Rcvd 10. [1214831] 06/04/02 IMF Team's Weekly Status Rep 3 POSTMASTER 13/13 9. [1213879] 05/28/02 WEEKLY REPORT FOR FOUR 20 XMUSER4,FOUR 6/6 8. [1212315] 05/13/02 Notice of New Programmer To 25 <XMUSER6.SIX@FO- 2/2 7. [1212504] 05/14/02 WEEKLY REPORT FOR FOUR 14 XMUSER4,FOUR 7/7 6. [1211599] 05/07/02 WEEKLY REPORT FOR FOUR 19 XMUSER4,FOUR 7/7 5. [1210794] 04/30/02 Infrastructure Weekly Repor 10 XMUSER5,FIVE 21/21 4. [1209902] 04/23/02 Infrastructure Weekly Repor 10 XMUSER1,ONE 6/6 3. [1209099] 04/16/02 WEEKLY REPORT FOR FOUR 16 XMUSER4,FOUR 3/3 2. [1202475] 02/25/02 National IRM Conference Ca 346 <XMUSER.SEVEN_M@FORUM 1. [1207414] 04/02/02 WEEKLY REPORT FOR FOUR 11 XMUSER4,FOUR 6/6
Figure 3-25. Sample list of messages
As you can see from this example (Figure 3-25), the basket message numbers display in descending order from 10 to 1 and the message sent dates display in descending order from June 4, 2002 to April 2, 2002. This helps show how the basket message sequence numbers correspond to the dates the message was sent. You will also notice that the user highlighted basket message number two in the list, because its date is not in date sequence compared to the others in the list. This is due to the fact that message number two was not sent locally but sent from a different location (i.e., FORUM). All other messages were sent locally so their dates and basket message sequence numbers correspond to the same order.
August 2002 MailMan Getting Started Guide 15Revised September 2006 Version 8.0
This column indicates the basket message number.
This column shows the date the message was sent.
Organizing Your Mail Baskets and Messages
Choose Your New Messages Read Order
MailMan lets you choose the order in which you read your new messages in a mail basket. This allows you to decide in what order you want to read your new messages. You have two choices:
Newest First (N)—This means that your new messages are read in reverse order (i.e., most recent date to oldest date).
Oldest First (O, default)—This means that your messages are displayed in message number order (i.e., oldest date to most recent date).
16 MailMan Getting Started Guide August 2002Version 8.0 Revised September 2006
Organizing Your Mail Baskets and Messages
To set your new message order, use the User Options Edit option on the Personal Preferences menu to answer the "NEW MESSAGE ORDER?:" question, as shown below:
NML New Messages and Responses RML Read/Manage Messages SML Send a Message Query/Search for Messages AML Become a Surrogate (SHARED,MAIL or Other) Personal Preferences ... Other MailMan Functions ... Help (User/Group Info., etc.) ...
Select MailMan Menu Option: personal <Enter> Preferences
User Options Edit Banner Edit Surrogate Edit Message Filter Edit Delivery Basket Edit GML Enroll in (or Disenroll from) a Mail Group Personal Mail Group Edit Forwarding Address Edit
Select Personal Preferences Option: user <Enter> Options Edit
Editing data in the MAILBOX file:BANNER: One Xmuser1, Technical Writer, OI Field Office Oakland Replace <Enter>MESSAGE ORDER: Newest First// <Enter>NEW MESSAGES READ ORDER: Newest First// ?? 'Newest First' means new messages are read in reverse order. 'Oldest First' means new messages are read in the order in which they were sent. If you don't choose, your new messages will be read 'Oldest First'. Note: When you display a list of new messages, they will be displayed in the order you selected in the previous field 'MESSAGE ORDER'. Choose from: N Newest First O Oldest FirstNEW MESSAGES READ ORDER: Newest First// <Enter>
Figure 3-26. Setting your new messages read order
As you can see from Figure 3-26, the user has chosen to have their new messages read from newest to oldest (reverse order or Newest First). In this case, the default response was already set to "Newest First" so the user pressed the <Enter> key to accept the default.
August 2002 MailMan Getting Started Guide 17Revised September 2006 Version 8.0
Press the <Enter> key until you reach this question.

Organizing Your Mail Baskets and Messages
Choose Your New Messages Default Option
MailMan lets you choose the default selection to the prompt that appears with the New Messages and Responses option [XMNEW]. You have several choices:
LB—LIST BASKETS WITH NEW MAIL Option. This means that the default response is to list all baskets with new mail.
LN—LIST ALL NEW MESSAGES (default). This means that the default response is to list of all of your new messages for every basket.
P—PRINT ALL NEW MESSAGES. This means that the default response is to print all of your new messages.
R—READ NEW MAIL BY BASKET. This means that the default response is to read all of your new messages basket by basket.
NOTE: You can also edit the priority order for reading baskets with new messages. You do not need priority ordering, however, unless you want to change the default "read new messages" basket from the "IN" basket to other baskets.
To change the priority use the User Options Edit option on the Personal Preferences menu to answer the "Select BASKET:" question.
18 MailMan Getting Started Guide August 2002Version 8.0 Revised September 2006
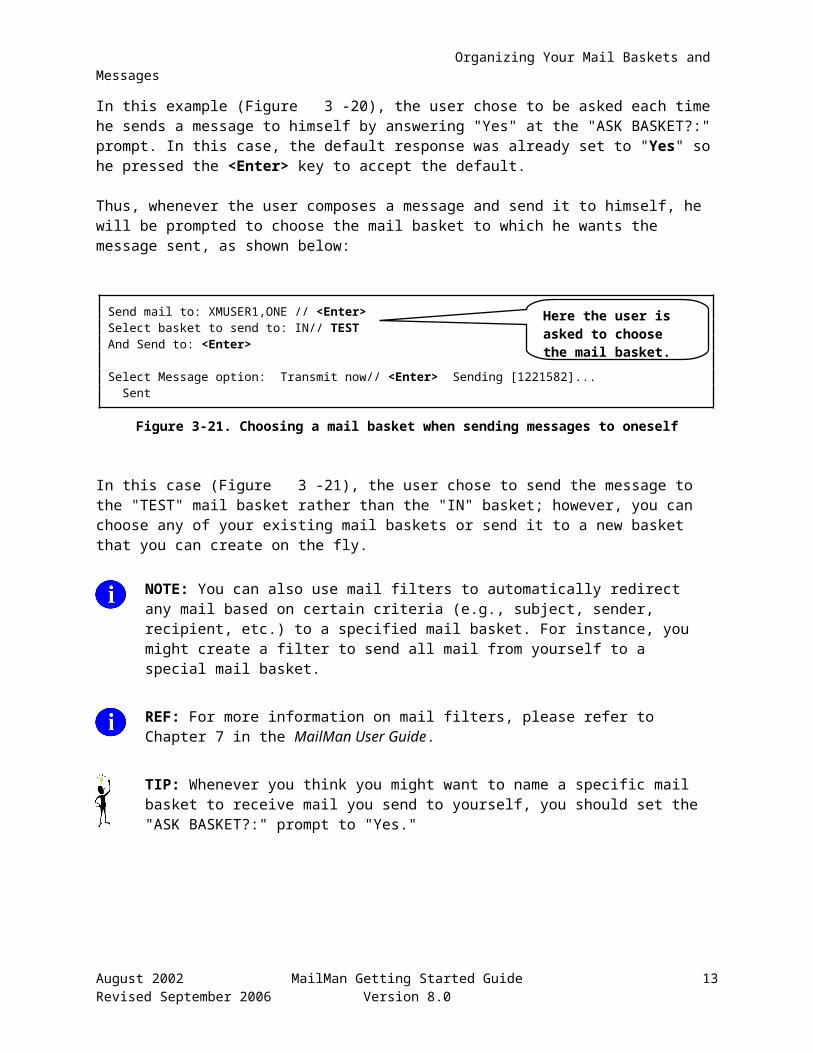
Organizing Your Mail Baskets and Messages
To set your new messages default option, use the User Options Edit option on the Personal Preferences menu to answer the "NEW MESSAGES DEFAULT OPTION:" question, as shown below:
NML New Messages and Responses RML Read/Manage Messages SML Send a Message Query/Search for Messages AML Become a Surrogate (SHARED,MAIL or Other) Personal Preferences ... Other MailMan Functions ... Help (User/Group Info., etc.) ...
Select MailMan Menu Option: personal <Enter> Preferences
User Options Edit Banner Edit Surrogate Edit Message Filter Edit Delivery Basket Edit GML Enroll in (or Disenroll from) a Mail Group Personal Mail Group Edit Forwarding Address Edit
Select Personal Preferences Option: user <Enter> Options Edit
Editing data in the MAILBOX file:BANNER: One Xmuser1, Technical Writer, OI Field Office Oakland Replace <Enter>MESSAGE ORDER: Newest First// <Enter>NEW MESSAGES READ ORDER: Newest First// <Enter>MESSAGE READER: Detailed Full Screen// <Enter>MESSAGE READER PROMPT: Yes, ask me// <Enter>NEW MESSAGES DEFAULT OPTION: LIST ALL NEW MESSAGES // ?? This is the default choice which will appear when you select the 'New Messages and Responses' option. If you don't choose a default, the default will be 'Read new mail by basket'. Choose from: LB LIST BASKETS WITH NEW MAIL LN LIST ALL NEW MESSAGES P PRINT ALL NEW MESSAGES R READ NEW MAIL BY BASKETNEW MESSAGES DEFAULT OPTION: LIST ALL NEW MESSAGES // <Enter>
Figure 3-27. Setting your new messages default option
As you can see from Figure 3-27, the user chose to list all new messages as the default when using the New Messages and Responses option [XMNEW]. In this case, the default response was already set to "LIST ALL NEW MESSAGES" so the user pressed the <Enter> key to accept the default.
August 2002 MailMan Getting Started Guide 19Revised September 2006 Version 8.0
Press the <Enter> key until you reach this question.
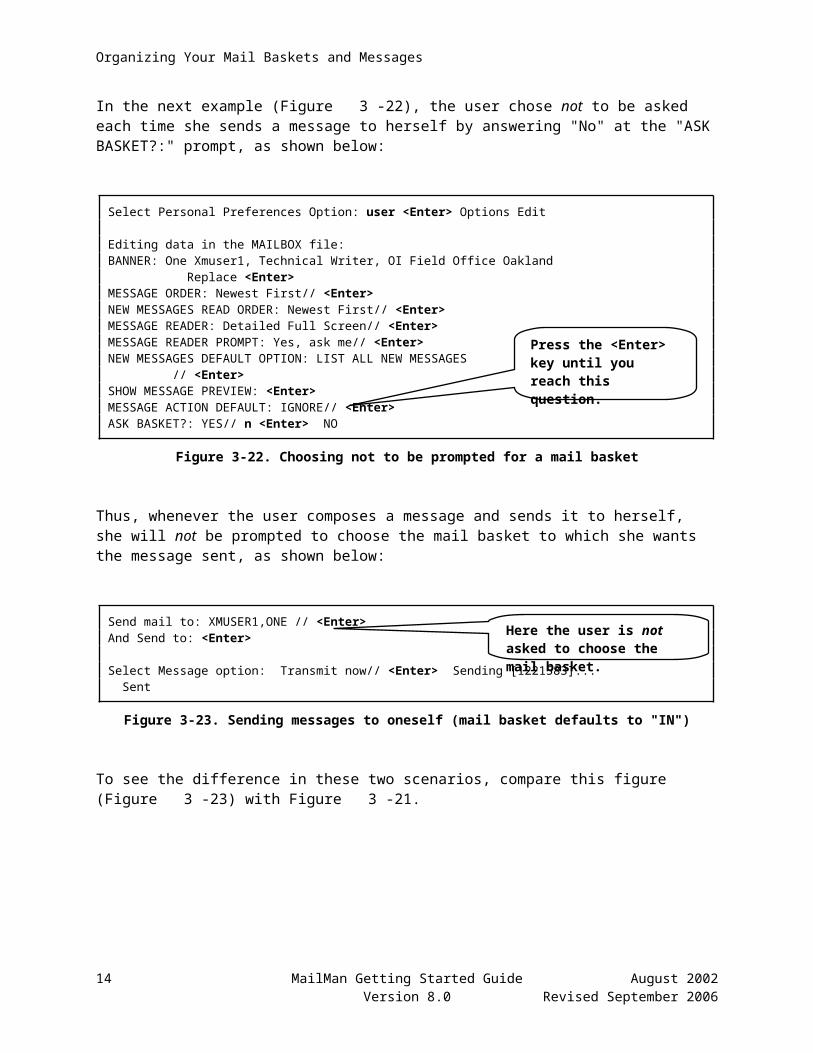
4. Designating Other Preference Entries
The following topics are discussed in this chapter:
Banners
Message Action Default
Show Titles
Priority Responses
P-MESSAGE From
MailMan Institution
Network Signature
Introduction
Preferred Editor
Contact Information
In addition to choosing your message reader and message preview settings (Chapter 2), mail basket settings and message order settings (Chapter 3), the User Options Edit option on the Personal Preferences menu allows you to choose the following:
Banner—Create or edit your banner.
NOTE: You can also use the Banner Edit option on the Personal Preferences menu to do the same thing.
Message Action Default—Choose your default message action for the "IN" basket (e.g., ignore or delete messages).
Show Titles—Enter or edit your option to display a sender's title.
Priority Responses Flag—Choose if you want to have responses to priority mail automatically delivered to you as priority or ordinary responses.
Priority Responses Prompt—Choose if you want to be prompted each time to decide how future responses to a priority message are delivered to you.
P-MESSAGE From—Choose whether messages sent to the P-MESSAGE device appear to be sent from you or the Postmaster.
MailMan Institution—Enter or edit your MailMan institution.
Network Signature—Enter or edit your Network Signature (three lines).
Introduction—Enter or edit your MailMan introduction.
Preferred Editor—Choose your preferred MailMan editor when sending new or responding to messages.
Contact Information—Enter or edit your contact information (e.g., business address, telephone).
August 2002 MailMan Getting Started Guide 1Revised September 2006 Version 8.0

Designating Other Preference Entries
All of these settings can be configured using the User Options Edit option on the Personal Preferences menu, as shown below:
NML New Messages and Responses RML Read/Manage Messages SML Send a Message Query/Search for Messages AML Become a Surrogate (SHARED,MAIL or Other) Personal Preferences ... Other MailMan Functions ... Help (User/Group Info., etc.) ...
Select MailMan Menu Option: personal <Enter> Preferences
User Options Edit Banner Edit Surrogate Edit Message Filter Edit Delivery Basket Edit GML Enroll in (or Disenroll from) a Mail Group Personal Mail Group Edit Forwarding Address Edit
Select Personal Preferences Option: user <Enter> Options Edit
Figure 4-28. Other User Options Edit settings
The current functionality associated with setting your personal preferences is described in greater detail in this chapter.
2 MailMan Getting Started Guide August 2002Version 8.0 Revised September 2006

Designating Other Preference Entries
Personal Preferences
Banners
The MailMan Banner is used to display any information that you want other MailMan users to see. Banners can be used to list business information, personal information, favorite quotes, etc., whatever you feel is appropriate in a business environment. You are not required to have a MailMan Banner; it is up to you to decide.
Where is Your Banner Information Displayed?
Banners are displayed in the following three instances:
1. Your MailMan Banner and other information are displayed to you when you enter the main MailMan Menu, as shown below:
Select ISC OFFICE MENU OPTIONS Option: MailMan Menu
VA MailMan 8.0 service for [email protected] last used MailMan: 08/26/02@15:25Your current banner: MailMan Version 8.0, It'll Change Your Life!You have 5 new messages.
NML New Messages and Responses RML Read/Manage Messages SML Send a Message Query/Search for Messages AML Become a Surrogate (SHARED,MAIL or Other) Personal Preferences ... Other MailMan Functions ... Help (User/Group Info., etc.) ...
Figure 4-29. Banners are displayed in the main MailMan Menu
2. Your MailMan Banner is displayed to others when they are addressing mail to you, as shown below:
Send mail to: XMUSER1,ONE // <Enter>Select basket to send to: IN// <Enter> And Send to: xmuser0,zero <Enter> INFORMATION SYSTEMS CENTER Last used MailMan: 07/24/02@10:32 If wishes were horses, beggars would ride.
Figure 4-30. Banners are displayed when addressing mail
NOTE: When addressing mail to yourself, you will not see your own banner displayed.
August 2002 MailMan Getting Started Guide 3Revised September 2006 Version 8.0
Your banner, if any, is displayed here on the MailMan Menu.
The mail recipient's banner, if any, will be displayed here.

Designating Other Preference Entries
TIP: If you will be out of the office and unable to check your mail for awhile, change your banner to let others know when you will return. That way when anyone addresses mail to you, they'll see your banner and know when they might expect a response.
3. Your MailMan Banner is also displayed to you or others when using the User Information option on the Help (User/Group Info., etc.) menu to obtain information about you, as shown below:
Select MailMan Menu Option: help <Enter> (User/Group Info., etc.)
User Information Group Information Remote User Information New Features in MailMan General MailMan Information Questions and Answers on MailMan Manual for MailMan Users
Select Help (User/Group Info., etc.) Option: user info <Enter> rmation
User name: xmuser1,one <Enter> INFORMATION SYSTEMS CENTER Last used MailMan: 07/24/02@11:11 MailMan Version 8.0, It'll Change Your Life!
XMUSER1,ONE Current Banner: MailMan Version 8.0, It'll Change Your Life!Last used MailMan: 07/24/02@11:11This user has 5 NEW messages (4 in the IN basket)...
Figure 4-31. Banners are displayed when displaying MailMan user information
4 MailMan Getting Started Guide August 2002Version 8.0 Revised September 2006
After entering a MailMan user, you will see their Banner, if any.
Designating Other Preference Entries
Creating/Editing Your Banner
Banners can range from 2 to 200 characters in length and can contain any combination of numbers, alphabetic characters, symbols (e.g., #, $, %, &, *), and punctuation marks.
You can enter or change your banner using either of two methods:
Use the User Options Edit option with the "BANNER:" prompt
Use the Banner Edit option on the Personal Preferences menu
User Options Edit Option—Banner Entry
The User Options Edit option on the Personal Preferences menu provides one method of entering or modifying your MailMan Banner via the "BANNER:" prompt, as shown below:
Select MailMan Menu Option: personal <Enter> Preferences
User Options Edit Banner Edit Surrogate Edit Message Filter Edit Delivery Basket Edit GML Enroll in (or Disenroll from) a Mail Group Personal Mail Group Edit Forwarding Address Edit
Select Personal Preferences Option: user <Enter> Options Edit
Editing data in the MAILBOX file:BANNER: One Xmuser1, MailMan Version 8.0, It'll Change Your Life! Replace ? ANSWER MUST BE 2-200 CHARACTERS IN LENGTHBANNER: One Xmuser1, MailMan Version 8.0, It'll Change Your Life! Replace ?? The banner is displayed to others whenever they address mail to you.
Figure 4-32. User Options Edit option—Banner entry edit
In this figure (Figure 4-32), the first user edit prompt in the User Options Edit option is the "BANNER:" prompt. Your current MailMan Banner, if any, is displayed to you, and you are given the opportunity to make changes.
In this example (Figure 4-32), the user entered question marks ("?" and "??") in order to display the online help associated with this option.
August 2002 MailMan Getting Started Guide 5Revised September 2006 Version 8.0
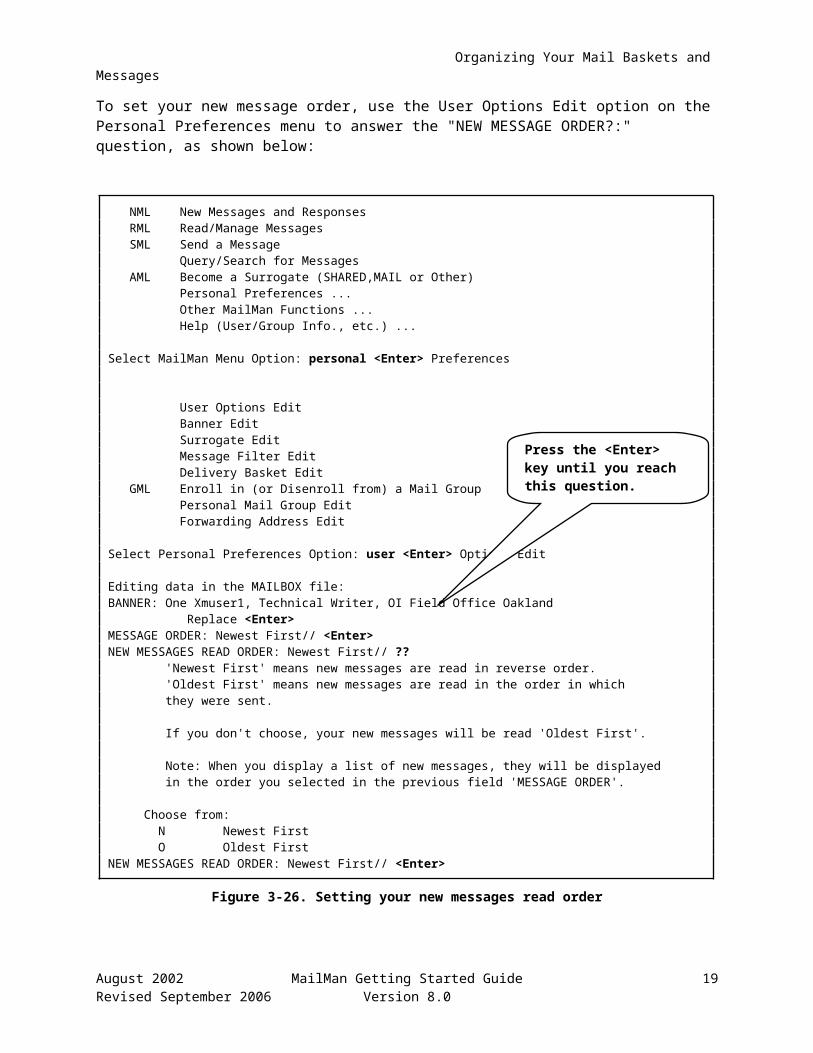
Designating Other Preference Entries
The following figure demonstrates how you can modify an already existing MailMan Banner:
User Options Edit Banner Edit Surrogate Edit Message Filter Edit Delivery Basket Edit GML Enroll in (or Disenroll from) a Mail Group Personal Mail Group Edit Forwarding Address Edit
Select Personal Preferences Option: user <Enter> Options Edit
Editing data in the MAILBOX file:BANNER: MailMan XM*7.1*50, It'll Change Your Life! Replace xm*7.1*50 <Enter> ?? Replace XM*7.1*50 <Enter> With Version 8.0 <Enter> Replace <Enter> MailMan Version 8.0, It'll Change Your Life!MESSAGE ORDER: Newest First// <Enter>
Figure 4-33. Modifying your MailMan banner using the User Options Edit option
In this example (Figure 4-33), the user wanted to change their banner from "MailMan XM*7.1*50, It'll Change Your Life!" to "MailMan Version 8.0, It'll Change Your Life!". Thus, the user specifically wanted to replace "XM*7.1*50" in their banner with the phrase "Version 8.0." You'll notice, however, that when the user entered "xm*7.1*50" in lowercase, he got an error (indicated by two question marks—"??"). Those lowercase characters did not match any existing characters in the current banner. Thus, the user was prompted to re-enter characters that matched other characters in the banner (i.e., uppercase "XM").
When the user entered the characters in the correct case, a match was found and he was prompted to enter the replacement information (i.e., at the "With" prompt). In this case, he entered the phrase "Version 8.0."
At this point the user was finished with their changes and pressed the <Enter> key after the next "Replace" prompt without entering any text.
MailMan then displayed the user's modified banner before proceeding to the next user edit prompt.
NOTE: The "Replace" and "With" prompts are case sensitive. If you want to replace the entire entry, you can enter ellipsis points—three periods (...) at the "Replace" prompt and then type in the new entry at the "With" prompt. Also, these prompts are only presented to you when an entry is greater than or equal to 20 characters in length. If the entry is less than 20 characters, you will merely be shown the current default entry, if any, and you must type in your entire new entry after the prompt. These are VA FileMan conventions.
6 MailMan Getting Started Guide August 2002Version 8.0 Revised September 2006
Error ("??"): Nothing in the current Banner matched the lowercase characters entered.

Designating Other Preference Entries
Banner Edit Option
The Banner Edit option provides another method of entering or modifying your MailMan Banner. The process of entering or editing your MailMan Banner is exactly the same as when using the User Options Edit option with the "BANNER:" prompt. Unlike the User Options Edit option, however, the Banner Edit option is only used to create or modify your MailMan Banner.
The Banner Edit Option is available on the Personal Preferences menu, as shown below:
Select MailMan Menu Option: personal <Enter> Preferences
User Options Edit Banner Edit Surrogate Edit Message Filter Edit Delivery Basket Edit GML Enroll in (or Disenroll from) a Mail Group Personal Mail Group Edit Forwarding Address Edit
Select Personal Preferences Option: banner <Enter> EditBANNER: One Xmuser1, Technical Writer, OI Field Office Oakland Replace ? ANSWER MUST BE 2-200 CHARACTERS IN LENGTHBANNER: One Xmuser1, Technical Writer, OI Field Office Oakland Replace <Enter>
Figure 4-34. Banner Edit option
In this figure (Figure 4-34), the Banner Edit option displays your current MailMan Banner, if any, at the "BANNER:" prompt. You are given the opportunity to make any changes you want. In this example, the user entered a single question mark ("?") at the "BANNER:" prompt in order to display the online Help.
NOTE: The functionality of the Banner Edit option is the same as when using the User Options Edit option with the "BANNER:" prompt (previously described).
August 2002 MailMan Getting Started Guide 7Revised September 2006 Version 8.0
Designating Other Preference Entries
As with the User Options Edit option and the "BANNER:" prompt, you would enter or modify your MailMan Banner in the same way:
Select Personal Preferences Option: banner <Enter> EditBANNER: MailMan XM*7.1*50, It'll Change Your Life! Replace XM*7.1*50 <Enter> With Version 8.0 <Enter> Replace <Enter> MailMan Version 8.0, It'll Change Your Life!
User Options Edit Banner Edit Surrogate Edit Message Filter Edit Delivery Basket Edit GML Enroll in (or Disenroll from) a Mail Group Personal Mail Group Edit Forwarding Address Edit
Figure 4-35. Modifying your MailMan banner using the Banner Edit option
In this example (Figure 4-35), the user, again, changed their banner just as he did when using the User Options Edit option at the "BANNER:" prompt (Figure 4-33).
8 MailMan Getting Started Guide August 2002Version 8.0 Revised September 2006
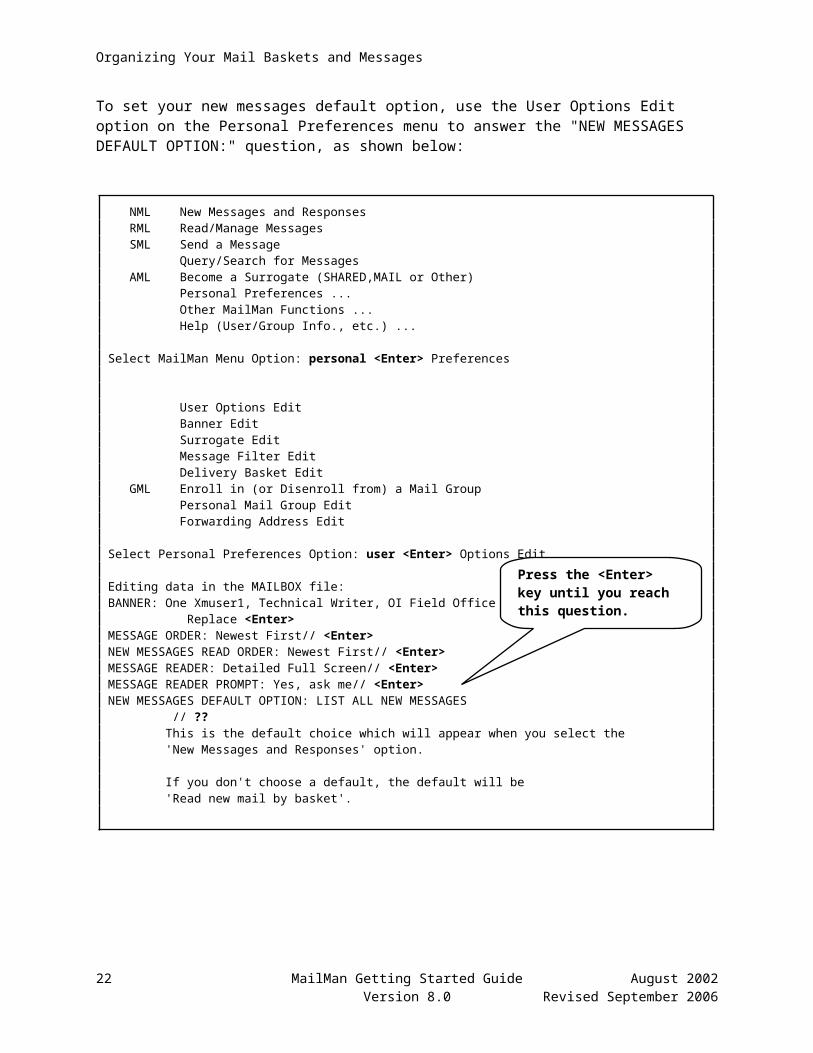
Designating Other Preference Entries
Deleting Your Banner
The following figure demonstrates how you can delete an already existing MailMan Banner:
Select Personal Preferences Option: user <Enter> Options Edit
Editing data in the MAILBOX file:BANNER: MailMan Version 8.0, It'll Change Your Life! Replace @ SURE YOU WANT TO DELETE? y <Enter> (Yes)MESSAGE ORDER: Newest First// ^
Figure 4-36. Deleting your MailMan banner
In this example (Figure 4-36), the user deleted their current banner simply by entering the at-sign ("@") at the "Replace" prompt.
MailMan then asked the user to confirm their delete request. She confirmed the delete by entering "Yes" at the "SURE YOU WANT TO DELETE?" prompt.
When she went back to see her banner, she saw that it had in fact been deleted:
Select Personal Preferences Option: user <Enter> Options Edit
Editing data in the MAILBOX file:BANNER:
Figure 4-37. MailMan banner has been deleted
As you can see from this example (Figure 4-37), the MailMan Banner has been deleted (i.e., no banner default response is displayed at the "BANNER:" prompt).
August 2002 MailMan Getting Started Guide 9Revised September 2006 Version 8.0
Enter the "@" here to delete your Banner.
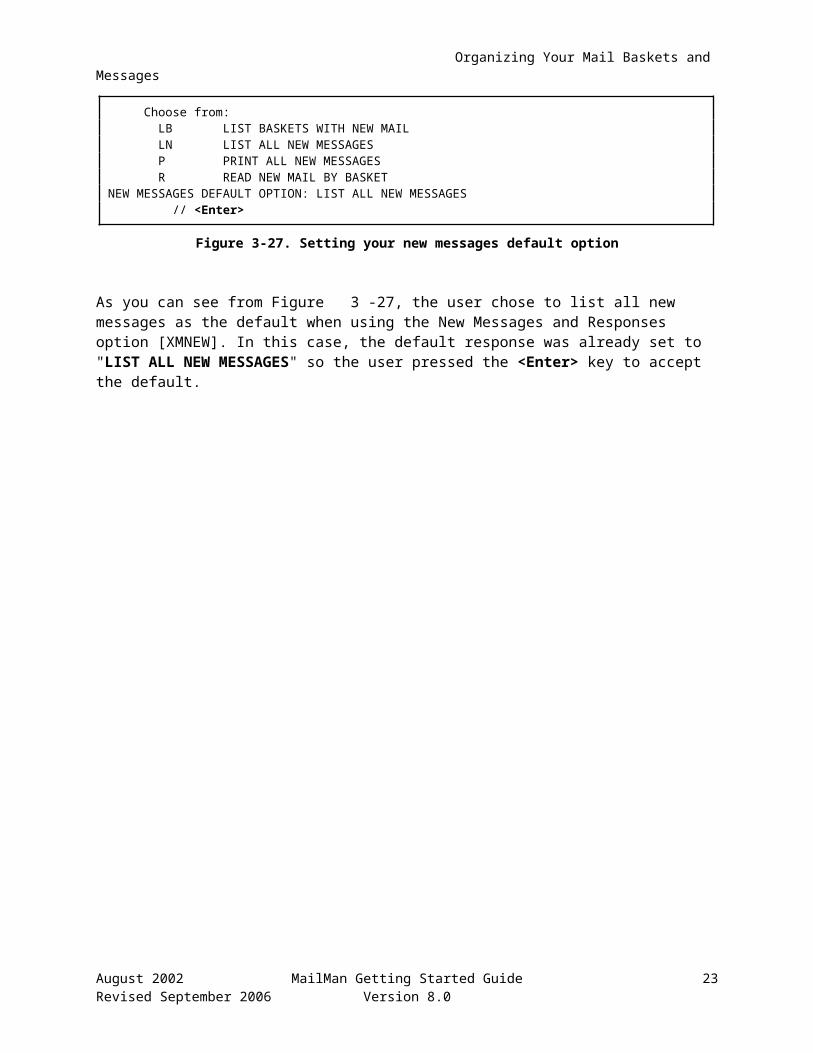
Designating Other Preference Entries
Message Action Default
MailMan allows you to decide the default response after reading a message in your "IN" mail basket via the "MESSAGE ACTION DEFAULT:" prompt. Whatever you enter into this field will control the default for the "Enter message action" prompt that you answer after reading each MailMan message in your "IN" mail basket.
There are two possible responses:
1. Ignore (default)—Leaves the message in the same MailMan basket.
2. Delete—Moves the message to your MailMan "WASTE" basket.
If you do not enter anything in this field, the default will be whatever IRM has set for your site in the MAILMAN SITE PARAMETERS file (#4.3). If IRM has not set a value, the default will be "Ignore."
The "MESSAGE ACTION DEFAULT:" prompt can be set through the User Options Edit option on the Personal Preferences menu, as shown below:
Select Personal Preferences Option: user <Enter> Options Edit
Editing data in the MAILBOX file:BANNER: One Xmuser1, Technical Writer, OI Field Office Oakland Replace <Enter>MESSAGE ORDER: Newest First// <Enter>NEW MESSAGES READ ORDER: Newest First// <Enter>MESSAGE READER: Detailed Full Screen// <Enter>MESSAGE READER PROMPT: Yes, ask me// <Enter>NEW MESSAGES DEFAULT OPTION: LIST ALL NEW MESSAGES // <Enter>SHOW MESSAGE PREVIEW: <Enter>MESSAGE ACTION DEFAULT: IGNORE// ? Enter an 'I' for 'Ignore' or a 'D' for 'Delete'. Choose from: I IGNORE D DELETEMESSAGE ACTION DEFAULT: IGNORE// <Enter>
Figure 4-38. Setting the Message Action Default
As you can see from the previous figure (Figure 4-38), the user has chosen to ignore his messages in the "IN" basket after reading them. Thus, if he chose the default response (i.e., Ignore) after reading each of his messages, the messages will remain in the same mail basket.
10 MailMan Getting Started Guide August 2002Version 8.0 Revised September 2006
Press the <Enter> key until you reach this question.
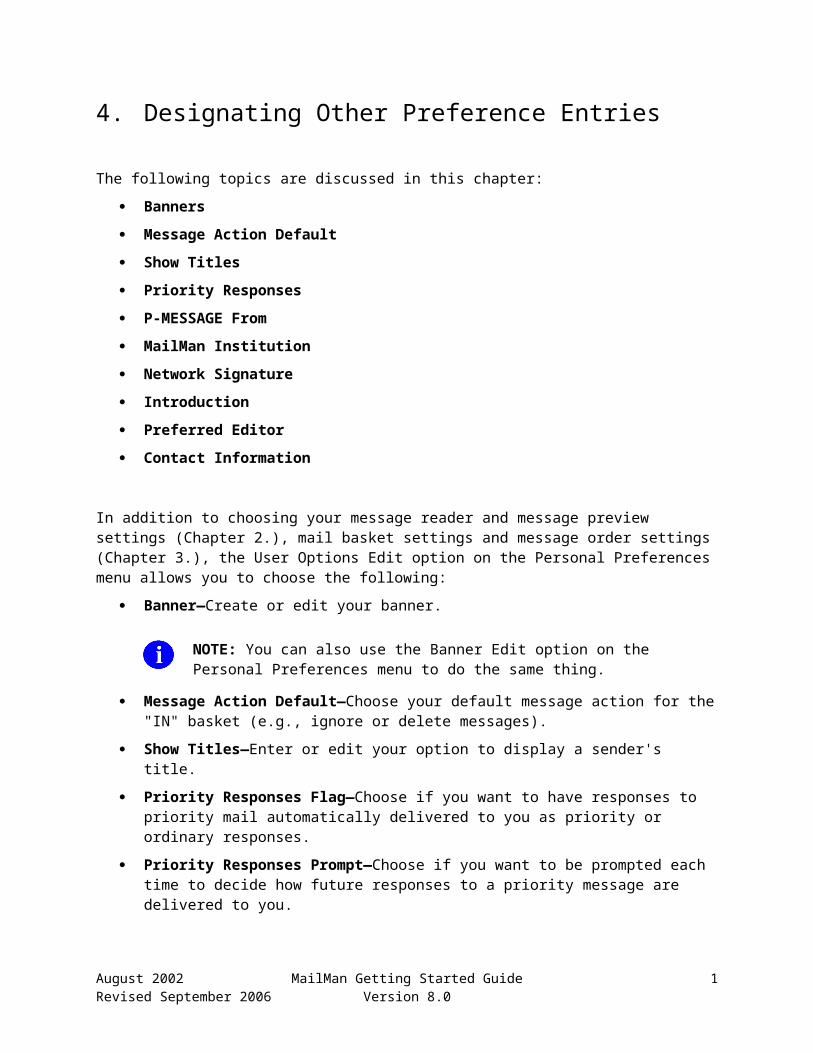
Designating Other Preference Entries
For example, after reading a message, you are given the option of performing an action on the message:
Subj: Local: biweekly info exchange message # 122 [#1220526]07/14/02@09:38 2 linesFrom: POSTMASTER 23 of 23 responses read. In 'IN' basket.-----------------------------------------------------------
You are at the end of this message. Enter 'B' to Backup and review it.
Enter message action (in IN basket): IGNORE// <Enter>
Figure 4-39. An example of the Message Action Default prompt in use
From this example (Figure 4-39), you can see that Ignore is the default response the user set previously (Figure 4-38). Thus, when he presses the <Enter> key to accept the default, the message will remain in his "IN" basket.
NOTE: This field only allows you to set the default for the "IN" mail basket. All other mail baskets will automatically have a default of "Ignore."
Show Titles
MailMan allows you to decide if you want a message sender's title to be displayed in the message header. If you elect to show titles, they will be preceded by a hyphen (i.e., generated by MailMan) and appear after the sender's name in the "From" portion of the message header.
There are two possible responses to this question:
Yes—Display a sender's title in the message header.
No (default)—Do not display a sender's title in the message header.
If you do not set this field, the sender's title will not appear in the message header.
NOTE: The Title field is entered and maintained in the NEW PERSON file (#200).
August 2002 MailMan Getting Started Guide 11Revised September 2006 Version 8.0
The MESSAGE ACTION DEFAULT is set to "IGNORE."
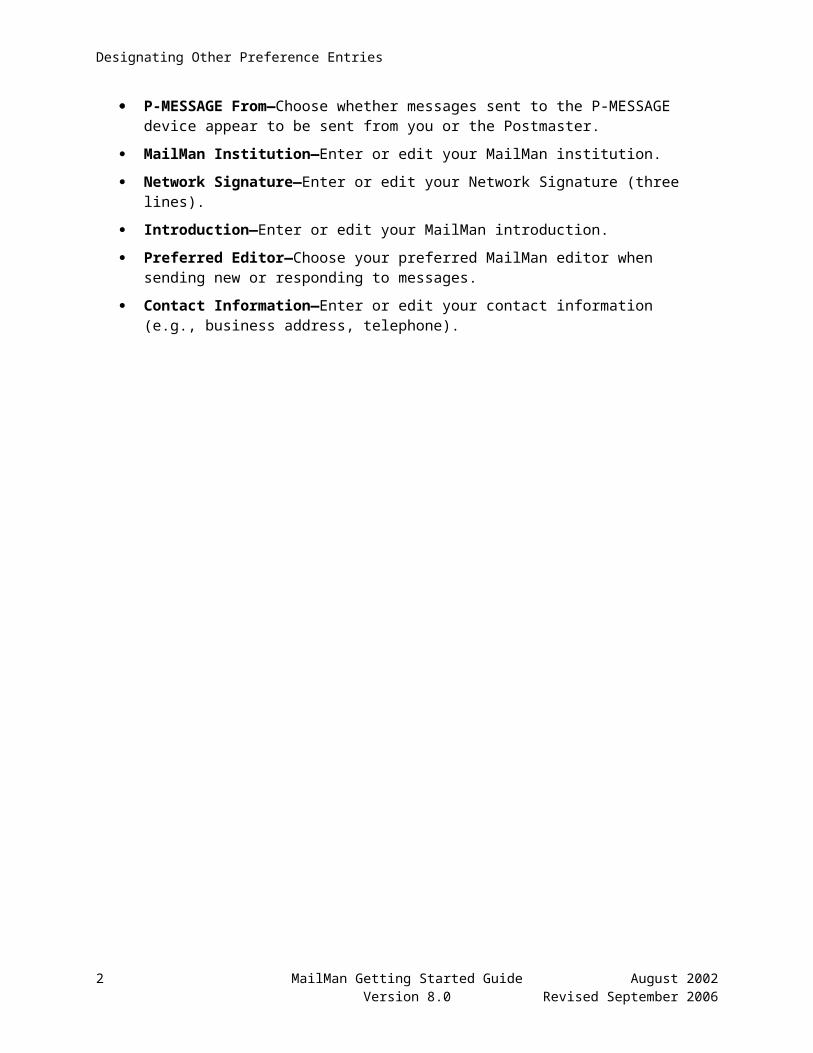
Designating Other Preference Entries
The "SHOW TITLES:" prompt can be set through the User Options Edit option on the Personal Preferences menu, as shown below:
Select Personal Preferences Option: user <Enter> Options Edit
Editing data in the MAILBOX file:BANNER: One Xmuser1, Technical Writer, OI Field Office Oakland Replace <Enter>MESSAGE ORDER: Newest First// <Enter>NEW MESSAGES READ ORDER: Newest First// <Enter>MESSAGE READER: Detailed Full Screen// <Enter>MESSAGE READER PROMPT: Yes, ask me// <Enter>NEW MESSAGES DEFAULT OPTION: LIST ALL NEW MESSAGES // <Enter>SHOW MESSAGE PREVIEW: <Enter>MESSAGE ACTION DEFAULT: IGNORE// <Enter>ASK BASKET?: YES// <Enter>SHOW TITLES: YES// ? Enter 'Yes' if you want to see senders' and recipients' titles. Choose from: 1 YES 0 NOSHOW TITLES: YES// <Enter>
Figure 4-40. Setting the Show Titles prompt
As you can see from the previous figure (Figure 4-40), the user has chosen to show a sender's title in the message header by pressing the <Enter> key and accepting the "Yes" default response. Thus, when she reads a message, the sender's title will be displayed following their name in the "From" portion of the message header.
The following figure (Figure 4-41) illustrates what you would see if you chose to show titles:
Subj: Test Message to Myself #2 [#1221583] 07/22/02@10:42 1 lineFrom: XMUSER1,ONE - COMPUTER SPECIALIST 1 of 1 response read. In 'TEST' basket. Page 1----------------------------------------------------------
Enter message action (in TEST basket): IGNORE//
Figure 4-41. An example of showing the sender's title
In this example (Figure 4-41), the user sent herself a message so her own information will be displayed in the header. Since she elected to show a sender's title in the message header (Figure 4-40), she sees the sender's title displayed (i.e., COMPUTER SPECIALIST) preceded by a hyphen and following the sender's name (i.e., XMUSER1,ONE ) in the "From" portion of the message header.
12 MailMan Getting Started Guide August 2002Version 8.0 Revised September 2006
Here you see the message sender's title in the message header.
Press the <Enter> key until you reach this question.
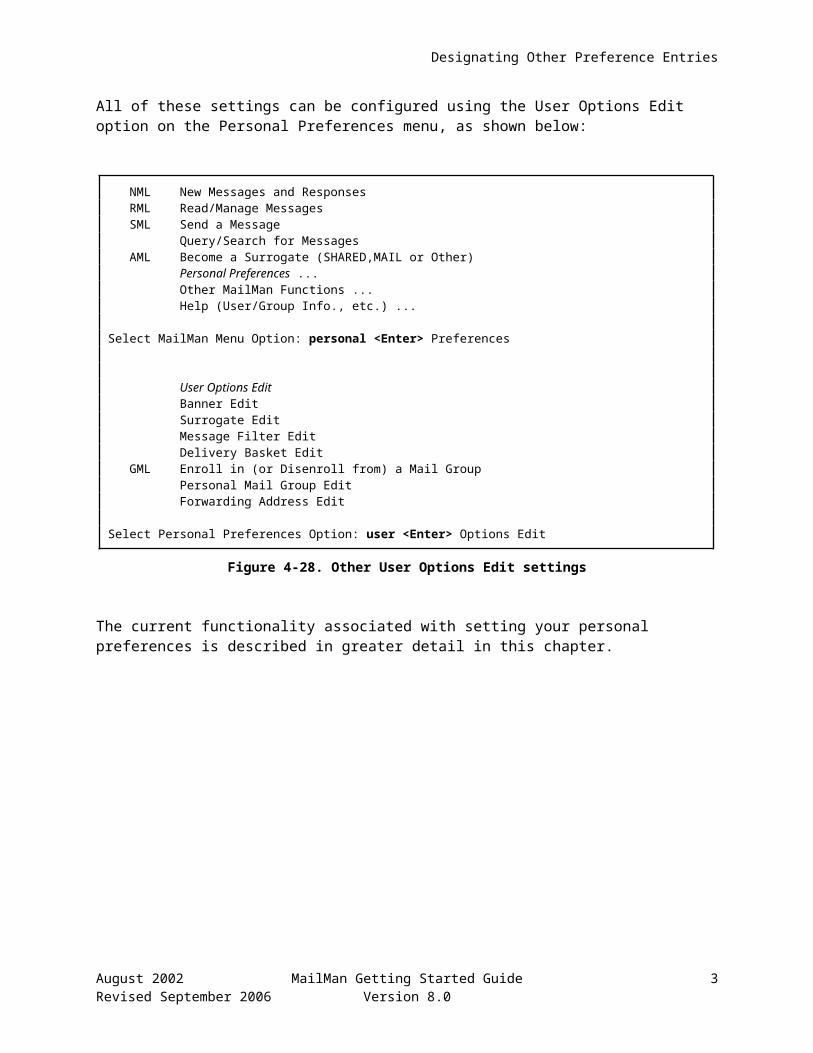
Designating Other Preference Entries
Priority Responses
MailMan users sending a message have the capability of designating their mail as priority mail. By sending mail priority, the sender indicates the message is very important and should take precedence over any other mail in your mailbox. Because of that, MailMan notifies you when you have new priority mail by:
Highlighting priority mail in your list of messages by placing an exclamation point ("!") next to the priority messages.
Displaying priority messages to you before other new messages, when you read new messages.
MailMan also provides you with the ability to control the way responses to priority mail are handled via the following user prompts:
PRIORITY RESPONSES FLAG
PRIORITY RESPONSES PROMPT
These prompts work in conjunction with one another and can be set through the User Options Edit option available on the Personal Preferences menu. Each of these prompts are discussed in this topic.
Priority Responses Flag
MailMan allows you to decide whether or not you want to have responses to priority mail delivered to you as priority or ordinary responses. Setting the PRIORITY RESPONSES FLAG field allows you to choose what your default should be.
There are two possible values from which to choose when answering the "PRIORITY RESPONSES FLAG:" question:
0, Responses are PRIORITY (default)—Responses to priority mail will be delivered to you as priority responses.
1, Responses are ORDINARY—Responses to priority mail will be delivered to you as ordinary responses.
If you do not set this field, then responses will be priority.
NOTE: Once you enter a value for the PRIORITY RESPONSES FLAG field, you set the default value for all responses to priority mail; however, you can use the PRIORITY RESPONSES PROMPT field to let you override the default for individual priority mail.
REF: For more information on the PRIORITY RESPONSES PROMPT field, please refer to the "Priority Responses Prompt" topic that follows in this chapter.
August 2002 MailMan Getting Started Guide 13Revised September 2006 Version 8.0

Designating Other Preference Entries
The PRIORITY RESPONSES FLAG field default can be set through the User Options Edit option on the Personal Preferences menu, as shown below:
Select Personal Preferences Option: user <Enter> Options Edit
Editing data in the MAILBOX file:BANNER: ISS Technical Writer Replace <Enter>MESSAGE ORDER: Newest First// <Enter>NEW MESSAGES READ ORDER: Newest First// <Enter>MESSAGE READER: Detailed Full Screen// <Enter>MESSAGE READER PROMPT: Yes, ask me// <Enter>NEW MESSAGES DEFAULT OPTION: LIST ALL NEW MESSAGES // <Enter>SHOW MESSAGE PREVIEW: <Enter>MESSAGE ACTION DEFAULT: IGNORE// <Enter>ASK BASKET?: YES// <Enter>SHOW TITLES: YES// <Enter>PRIORITY RESPONSES FLAG: Responses are ORDINARY// ? Choose from: 0 Responses are PRIORITY 1 Responses are ORDINARYPRIORITY RESPONSES FLAG: Responses are ORDINARY// <Enter>
Figure 4-42. Setting the Priority Responses Flag default
In this example (Figure 4-42), the user chose to set the PRIORITY RESPONSES FLAG to "Responses are ORDINARY" by pressing the <Enter> key to accept the "Responses are ORDINARY" default response. Thus, any responses to a priority message sent to the user will be delivered to their mailbox as ordinary mail. MailMan will treat the responses as any other responses.
If the user had set this flag to "Responses are PRIORITY," any response(s) to a priority message would be delivered to the user as priority mail. MailMan would notify the user that he has priority mail and highlight the priority message.
TIP: If you set the PRIORITY RESPONSES FLAG default to Responses are ORDINARY, you can override it on a message-by-message basis by setting the PRIORITY RESPONSES PROMPT default to "ASK EACH TIME MESSAGE IS READ." This gives you the opportunity to choose to receive future responses to a particular priority message as priority even though your default is set to treat responses to priority messages as ordinary.
14 MailMan Getting Started Guide August 2002Version 8.0 Revised September 2006
Press the <Enter> key until you reach this question.
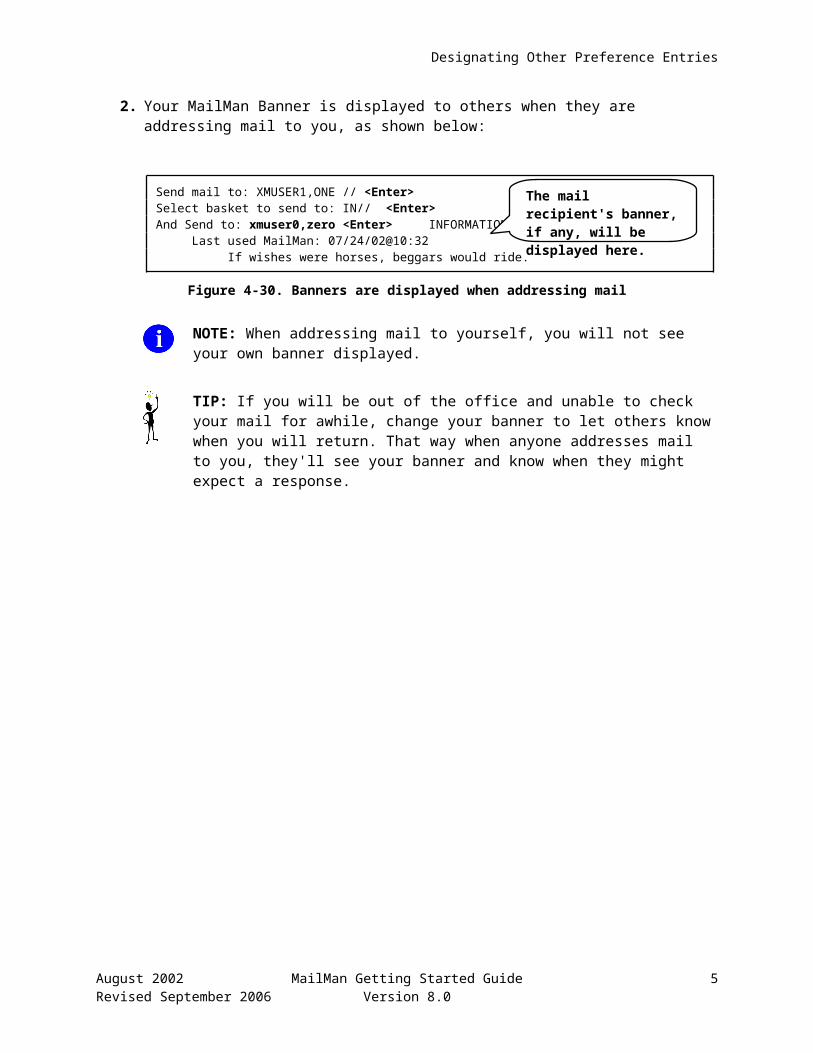
Designating Other Preference Entries
Priority Responses Prompt
MailMan also allows you to decide whether or not you will be prompted to choose to have future responses to an individual priority message delivered to you as priority or ordinary mail. The answer you give here determines whether or not MailMan will ask you to choose each time a priority message is delivered. Setting the PRIORITY RESPONSES PROMPT field allows you to choose what your default will be.
This prompt allows you to determine on a message-by-message basis whether or not MailMan will deliver responses to a priority message as priority mail, regardless of what your default is for the PRIORITY RESPONSES FLAG. MailMan will either ask or not ask you for a new value for this flag each time you read a priority message, depending on what you enter in the PRIORITY RESPONSES PROMPT field.
NOTE: Internally, MailMan marks the recipient information on that particular priority message appropriately. Thus, MailMan will know whether it should or should not deliver future responses to that same message as priority mail.
For example, if you are reading a priority message and you decide to have responses delivered as priority for this particular priority message, MailMan will internally tag that message to always deliver responses to you as priority mail until you decide otherwise.
There are two possible choices when answering the "PRIORITY RESPONSES PROMPT:" question:
0, ASK EACH TIME MESSAGE IS READ (default)—MailMan will prompt you to decide each time you read a priority mail message whether you want the future responses to be delivered as priority mail. This value allows you to override the default value you set in the PRIORITY RESPONSES FLAG field.
1, DO NOT ASK EACH TIME MESSAGE IS READ—MailMan will not prompt you to decide each time you read a priority mail message whether you want the future responses to be delivered as priority mail. The default value you set in the PRIORITY RESPONSES FLAG field will be in effect.
If you do not set this field, then you will be prompted to choose whether future responses will be delivered as priority or not.
August 2002 MailMan Getting Started Guide 15Revised September 2006 Version 8.0

Designating Other Preference Entries
The PRIORITY RESPONSES PROMPT field can be set through the User Options Edit option on the Personal Preferences menu, as shown below:
Select Personal Preferences Option: user <Enter> Options Edit
Editing data in the MAILBOX file:BANNER: ISS Technical Writer Replace <Enter>MESSAGE ORDER: Newest First// <Enter>NEW MESSAGES READ ORDER: Newest First// <Enter>MESSAGE READER: Detailed Full Screen// <Enter>MESSAGE READER PROMPT: Yes, ask me// <Enter>NEW MESSAGES DEFAULT OPTION: LIST ALL NEW MESSAGES // <Enter>SHOW MESSAGE PREVIEW: <Enter>MESSAGE ACTION DEFAULT: IGNORE// <Enter>ASK BASKET?: YES// <Enter>SHOW TITLES: YES// <Enter>PRIORITY RESPONSES FLAG: Responses are ORDINARY// <Enter>PRIORITY RESPONSES PROMPT: DO NOT ASK EACH TIME MESSAGE IS READ// ? Enter 'Ask' or 'Do not ask'. Choose from: 0 ASK EACH TIME MESSAGE IS READ 1 DO NOT ASK EACH TIME MESSAGE IS READPRIORITY RESPONSES PROMPT: DO NOT ASK EACH TIME MESSAGE IS READ // 0 <Enter> ASK EACH TIME MESSAGE IS READ
Figure 4-43. Setting the Priority Responses Prompt default
In this example (Figure 4-43), the user chose to set the PRIORITY RESPONSES PROMPT to "ASK EACH TIME MESSAGE IS READ," by entering a zero ("0") and pressing the <Enter> key. Thus, after reading any responses to a priority message in her mailbox, MailMan will prompt the user to decide whether she want any future responses to that priority message delivered as priority mail.
If the user had set this field to "DO NOT ASK EACH TIME MESSAGE IS READ," MailMan would not prompt her to choose how to handle any future responses to that particular priority message. Responses would be delivered based on the default value she entered in the PRIORITY RESPONSES FLAG field.
REF: For more information on the PRIORITY RESPONSES FLAG field, please refer to the "Priority Responses Flag" topic previously described in this chapter.
16 MailMan Getting Started Guide August 2002Version 8.0 Revised September 2006
Press the <Enter> key until you reach this question.
Designating Other Preference Entries
The following series of screen captures (Figure 4-44, Figure 4-45, and Figure 4-46) better illustrates how the PRIORITY RESPONSES PROMPT field functions in conjunction with the PRIORITY RESPONSES FLAG:
Subj: test priority [#1222296] 07/28/02@09:10 1 lineFrom: XMUSER.ZERO - PROGRAMMER (Oakland OI Field Office)0 of 1 response read. In 'TEST' basket. Page 1 !Priority!-------------------------------------------------------------------------------original
1) XMUSER.ZERO - PROGRAMMER (Oakland OI Field Office)07/28/02@09:10 1 line
response 1
Enter message action (in TEST basket): IGNORE// <Enter>
This message is a priority message.Deliver future responses to this message as Priority Mail? No// y <Enter> YESResponses will be delivered as Priority Mail.
Figure 4-44. Choosing to have future responses to a priority message delivered as priority (1 of 3)
In this example (Figure 4-44), the user previously set the PRIORITY RESPONSES FLAG field to "Responses are ORDINARY" (Figure 4-42) and the PRIORITY RESPONSES PROMPT field to "ASK EACH TIME MESSAGE IS READ" (Figure 4-43). After reading the original text and first response, the user chose to ignore the message and leave it in her "TEST" basket.
MailMan then asked the user if she wanted any future responses to this message to be delivered as priority mail. You'll notice that the initial default response is "No" based on the user's "Responses are ORDINARY" setting in the PRIORITY RESPONSES FLAG field (Figure 4-42). For this example, the user chose to have future responses delivered as priority mail by answering "Yes" to the prompt. Thus, the user is overriding, for this particular message, her default of "Responses are ORDINARY" in the PRIORITY RESPONSES FLAG field.
August 2002 MailMan Getting Started Guide 17Revised September 2006 Version 8.0
This message was sent and delivered as priority mail.
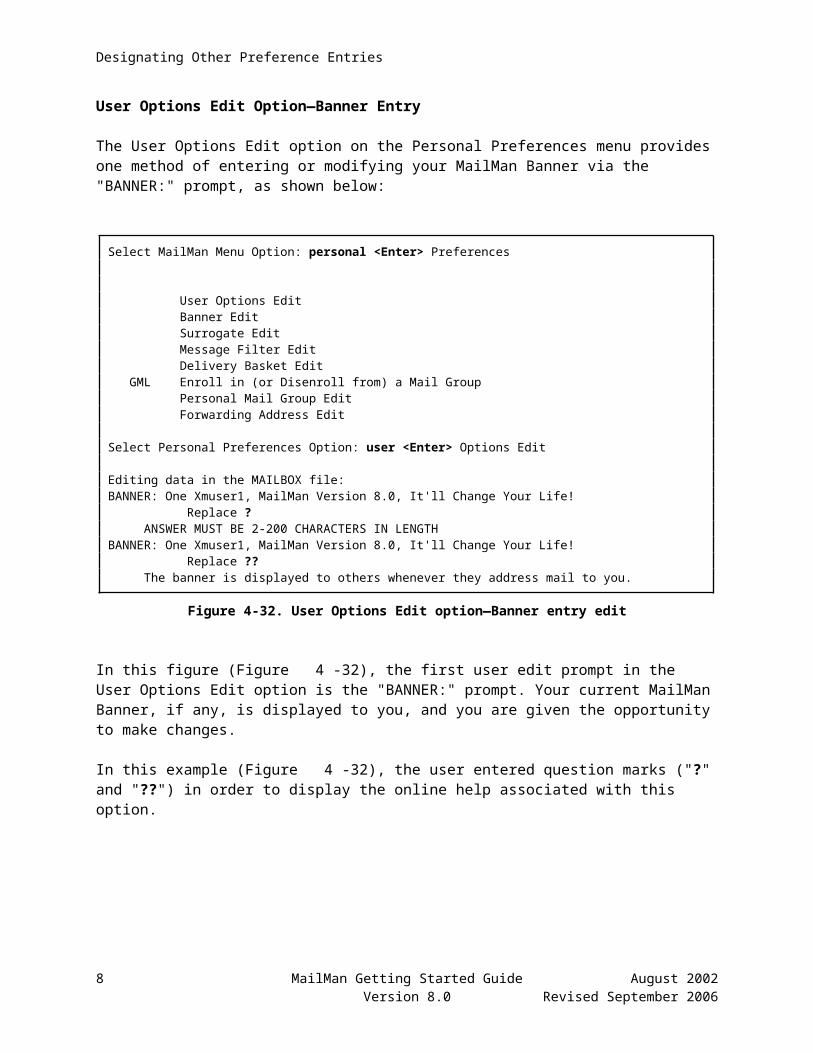
Designating Other Preference Entries
The following figure illustrates what happens when the next response to the priority message is delivered to the mailbox:
!3. IN [1454246] 08/27/02 Priority Message 1 XMUSER.ZERO
VA MailMan 8.0 service for [email protected] last used MailMan: 08/27/02@14:39Your current banner: ISS Technical WriterYou have 7 new messages.
NML New Messages and Responses RML Read/Manage Messages SML Send a Message Query/Search for Messages AML Become a Surrogate (SHARED,MAIL or Other) Personal Preferences ... Other MailMan Functions ... Help (User/Group Info., etc.) ...
You've got PRIORITY mail!
Select MailMan Menu Option: NML <Enter> New Messages and Responses
Subj: test priority [#1222296] 07/28/02@09:10 1 lineFrom: XMUSER.ZERO - PROGRAMMER (Oakland OI Field Office)1 of 2 responses read. In 'TEST' basket. Page 1 !Priority!-------------------------------------------------------------------------------
2) XMUSER.ZERO - PROGRAMMER (Oakland OI Field Office)07/28/02@09:19 1 line
RESPONSE 2
Enter message action (in TEST basket): IGNORE// <Enter>
This message is a priority message.Deliver future responses to this message as Priority Mail? Yes// n <Enter> NOResponses will not be delivered as Priority Mail.
Figure 4-45. Next response to priority mail is delivered as priority (2 of 3)
In this example, while the PRIORITY RESPONSES FLAG field was set to "Responses are ORDINARY," the user previously chose to have future responses to this particular priority message to be delivered as priority (Figure 4-44). Thus, when the next response came in (i.e., #2) it was, in fact, delivered as priority. After reading this second response, the user again chose to ignore the message and leave it in her "TEST" basket.
MailMan, again, asked the user if she wants any future responses to this message to be delivered as priority mail. You'll notice that the default response is now "Yes," since the user previously wanted the future responses for this particular message delivered as priority mail (Figure 4-44). In this case (Figure 4-45), the user chose not to have future responses delivered as priority mail by answering "No" to the prompt.
18 MailMan Getting Started Guide August 2002Version 8.0 Revised September 2006
Here's another priority mail notification from MailMan.
MailMan, again, prompts the user to choose how to handle future responses to this message.
The next response comes in and MailMan notifies the user that she has priority mail.

Designating Other Preference Entries
As you can see in the following figure, when the next response came in it was delivered as an ordinary response:
Subj: test priority [#1222296] 07/28/02@09:10 1 lineFrom: XMUSER.ZERO - PROGRAMMER (Oakland OI Field Office)2 of 3 responses read. In 'TEST' basket. Page 1 *New*-------------------------------------------------------------------------------
3) XMUSER.ZERO - PROGRAMMER (Oakland OI Field Office)07/28/02@09:34 1 line
response 3
Enter message action (in TEST basket): IGNORE// <Enter>
This message is a priority message.Deliver future responses to this message as Priority Mail? No// <Enter> NO
Figure 4-46. Next response to priority mail is delivered as ordinary (3 of 3)
In this last example of the series (Figure 4-46), the user received the third response to the priority mail as ordinary, since she previously chose to have future responses delivered as ordinary (Figure 4-45).
You'll notice, however, MailMan continues to ask the user each time if she wants to receive any future response to this priority message delivered to her as priority mail. To avoid this prompt, you will have to change the value for the PRIORITY RESPONSES PROMPT field to "DO NOT ASK EACH TIME MESSAGE IS READ."
August 2002 MailMan Getting Started Guide 19Revised September 2006 Version 8.0
This message was delivered as ordinary mail. (Compare this header to Figure 417.)
Designating Other Preference Entries
You can toggle the value of the PRIORITY RESPONSES PROMPT field from "No" to "Yes" or vice versa, by entering "K" at the "Enter message action" prompt, as shown below:
Subj: test priority [#1222296] 07/28/02@09:10 1 lineFrom: XMUSER.ZERO - PROGRAMMER (Oakland OI Field Office)3 of 3 responses read. In 'TEST' basket. Page 1-------------------------------------------------------------------------------
Enter message action (in TEST basket): IGNORE// ?
Enter a code from the list.
A Answer P Print B Backup Q Query BR Print to the Browser Q xxx Query recipient(s) xxx C Copy QC Query Current D Delete QD Query Detailed E Edit QN Query Network F Forward QNC Query Not Current H Headerless Print QT Query Terminated HG Help:Group Information R Reply HU Help:User Information RI Reply and Include responses I Ignore S Save IN Information only T Terminate K Priority replies V Vaporize date edit L Later W Write N New
Enter message action (in TEST basket): IGNORE// kResponses will be delivered as Priority Mail.
Enter message action (in TEST basket): IGNORE//
Figure 4-47. Toggle the way replies are delivered for priority messages
By entering a "K" at the "Enter message action (in TEST basket): IGNORE//" prompt, the user toggled the way she wants responses for this priority message to be delivered from "No—do not want future responses delivered as priority" (Figure 4-46) to "Yes—deliver future responses as priority." This also sets the default answer the next time you are presented with the "Deliver future responses to this message as Priority Mail?" prompt.
TIP: If you set the PRIORITY RESPONSES FLAG default to "Responses are PRIORITY" and you know you will always want responses to priority messages to be delivered to you as priority mail, you should set the PRIORITY RESPONSES PROMPT default to "DO NOT ASK EACH TIME MESSAGE IS READ." This avoids your being prompted each time you read a response to a priority message to choose the way you want to see future responses to that message.
20 MailMan Getting Started Guide August 2002Version 8.0 Revised September 2006
Here the "K" action code will set replies to be priority. Conversely, if replies were already set to be priority, the "K" action code would say "Un Priority replies," thus, making future replies ordinary.
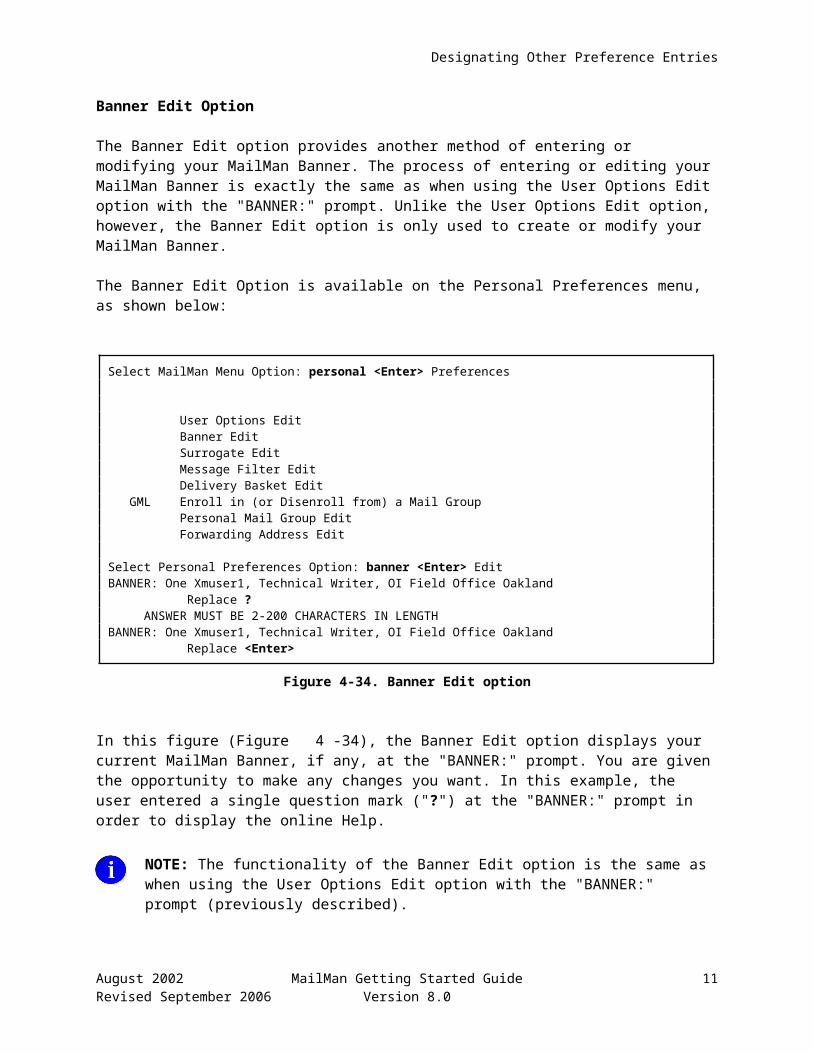
Designating Other Preference Entries
P-MESSAGE From
The "P-MESSAGE FROM:" prompt pertains to anything you may print to the P-MESSAGE device. MailMan allows you to decide from whom the message is sent. The result is a message sent to you.
If you queue the print, this is from whom the message is sent. If you do not queue the print, this is the default that will appear in a dialogue with MailMan to determine from whom the message will be.
There are two possible responses:
1. ME (default)—Answer ME if the message should be from you. It will not be delivered new to you, but you will be able to edit it.
2. POSTMASTER—Answer POSTMASTER if the message should be from the Postmaster. It will be delivered new to you, but you will not be able to edit it.
NOTE: If you do not enter anything in this field, the default will be "ME."
August 2002 MailMan Getting Started Guide 21Revised September 2006 Version 8.0
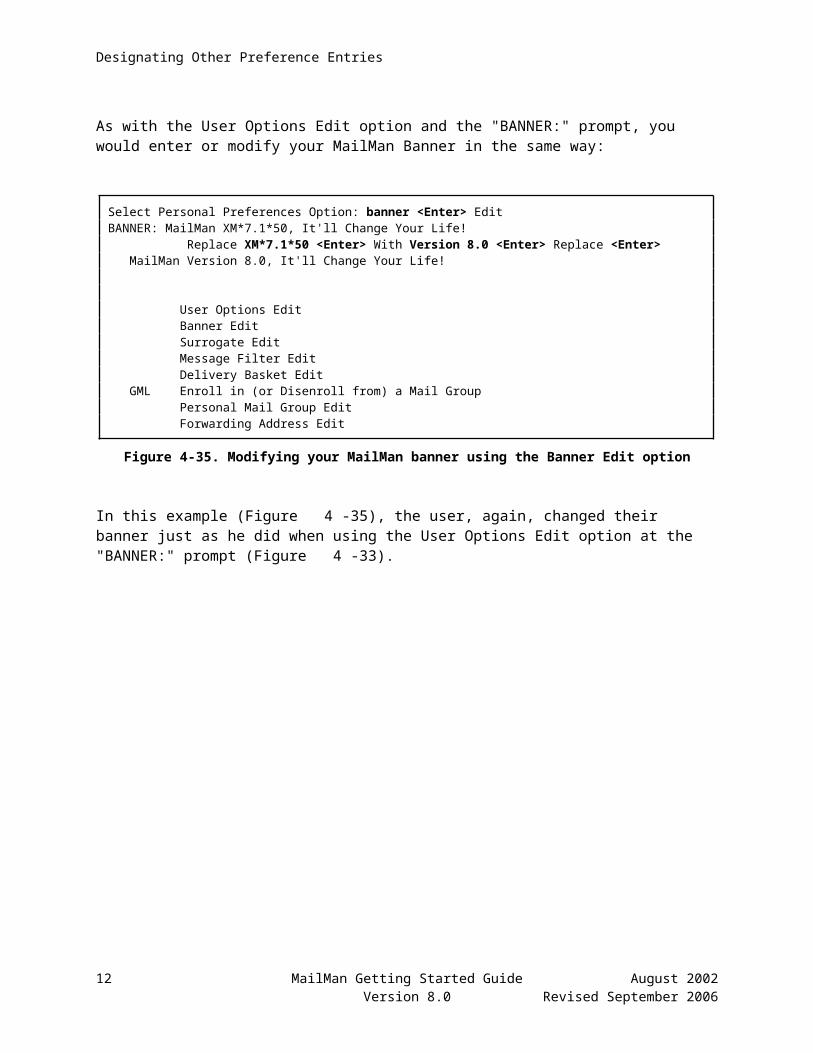
Designating Other Preference Entries
The "P-MESSAGE FROM:" prompt can be set through the User Options Edit option on the Personal Preferences menu, as shown below:
Select Personal Preferences Option: user <Enter> Options Edit
Editing data in the MAILBOX file:BANNER: ISS Technical Writer Replace <Enter>MESSAGE ORDER: Newest First// <Enter>NEW MESSAGES READ ORDER: Newest First// <Enter>MESSAGE READER: Detailed Full Screen// <Enter>MESSAGE READER PROMPT: Yes, ask me// <Enter>NEW MESSAGES DEFAULT OPTION: LIST ALL NEW MESSAGES // <Enter>SHOW MESSAGE PREVIEW: <Enter>MESSAGE ACTION DEFAULT: IGNORE// <Enter>ASK BASKET?: YES// <Enter>SHOW TITLES: YES// <Enter>PRIORITY RESPONSES FLAG: Responses are ORDINARY// <Enter>PRIORITY RESPONSES PROMPT: ASK EACH TIME MESSAGE IS READ // <Enter>P-MESSAGE FROM: ? From whom should your P-MESSAGEs be? Choose from: M ME P POSTMASTERP-MESSAGE FROM: p <Enter> POSTMASTER
Figure 4-48. Setting the P-MESSAGE FROM field default
As you can see from the previous figure (Figure 4-48), the user has chosen to have messages sent to the P-MESSAGE device to appear to be sent from the Postmaster as the default response.
22 MailMan Getting Started Guide August 2002Version 8.0 Revised September 2006
Press the <Enter> key until you reach this question.
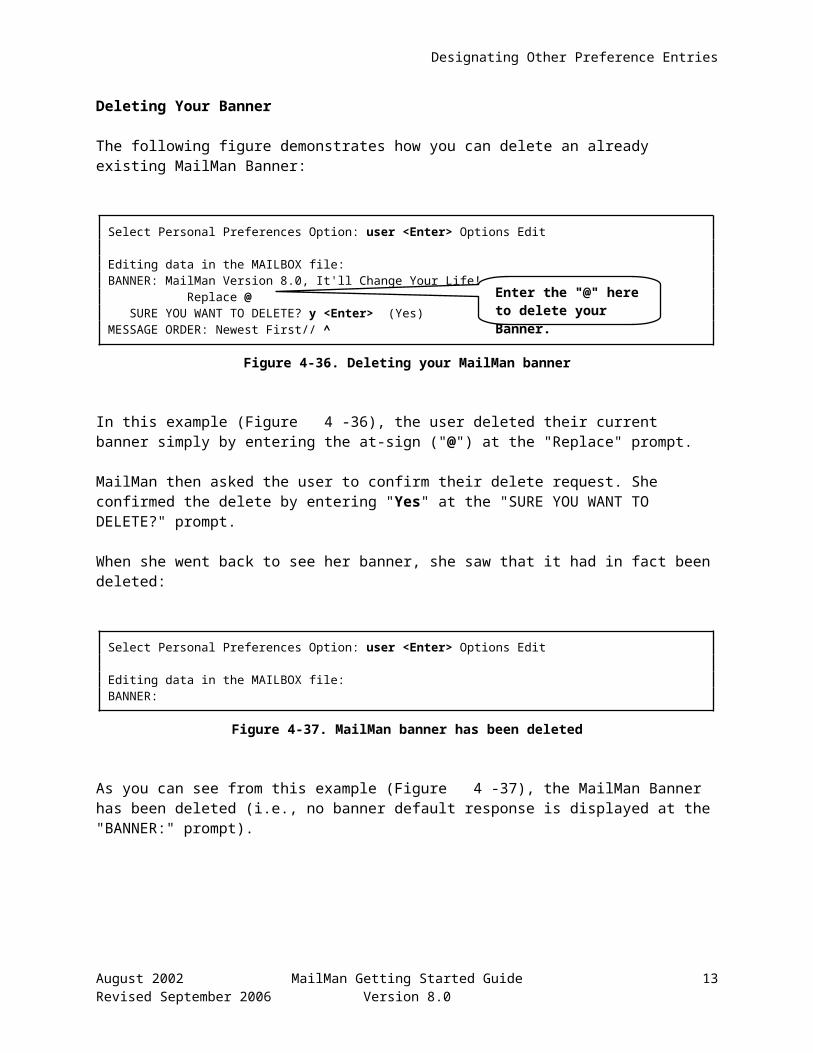
Designating Other Preference Entries
For example, after reading a message, the user decides to send it to the P-MESSAGE device. MailMan will ask you the following:
Subj: Test [#1211500] 05/06/02@14:30 1 lineFrom: XMUSER1,ONE - COMPUTER SPECIALIST (Oakland OI Field Office)In 'TEST' basket. Page 1-------------------------------------------------------------------------------this is a test message
Enter message action (in TEST basket): IGNORE// pPrint recipient list? No// <Enter> NODEVICE: HOME// p-message <Enter> P-MESSAGE-HFS HFS FILE=>MESSAGE
Moving text to MailMan message... (Creating now) Subject: Testing the P-MESAGE FROM prompt.End of file reached
Select one of the following:
M Me P Postmaster
From whom: Postmaster// <Enter>Send mail to: XMUSER1,ONE // <Enter> XMUSER1,ONE And Send to: <Enter>Message subject: Testing the P-MESAGE FROM prompt, Message number: 1360357
Enter message action (in TEST basket): IGNORE//
Figure 4-49. An example of the P-MESSAGE FROM prompt in use
Previously (Figure 4-48), the user had chosen to have messages sent to the P-MESSAGE device to appear to be sent from the Postmaster. Thus, when the user was sending a message to the P-MESSAGE device (Figure 4-49), MailMan displayed "Postmaster" as the default response at the "From whom:" prompt.
At this point the user can choose to accept the default (Postmaster) by pressing the <Enter> key or entering "ME" at the "From whom: Postmaster//" prompt. In this case, he chose to have the message appear to be sent from the Postmaster. Thus, the message will appear as "new" in his mailbox.
REF: For more information on the P-MESSAGE device, please refer to the "Sending Mail Using the P-MESSAGE Device" topic in Chapter 5 in the MailMan User Guide.
August 2002 MailMan Getting Started Guide 23Revised September 2006 Version 8.0
Here, MailMan gives the user the opportunity to either accept the default sender of the message to the P-MESSAGE device ("From whom: Postmaster") or lets the user change it to be sent from him.
Printing a message to the P-MESSAGE device.
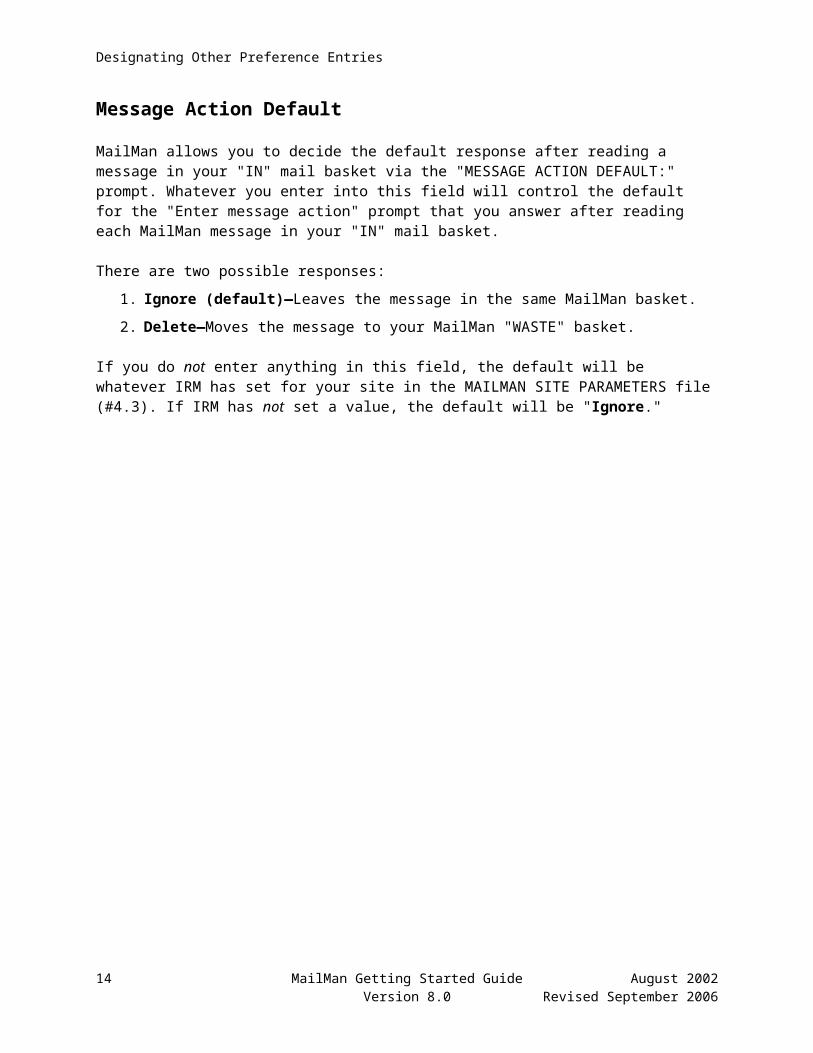
Designating Other Preference Entries
MailMan Institution
The MailMan Institution is another piece of information that helps identify you to other MailMan users. It is usually the office or site where you are located (i.e., your physical location) and is most useful in systems such as FORUM where people from many different sites interact.
MailMan allows you to enter your own MailMan Institution that will be displayed to other users. You are not required to enter a MailMan Institution on local mail; however, on FORUM, it is a policy that all users must enter a MailMan Institution to better identify themselves.
NOTE: The MailMan Institution is shown in MailMan when the SHOW INSTITUTIONS IN MAILMAN field (#5) in the MAILMAN SITE PARAMETERS file (#4.3) indicates it.
Where is Your MailMan Institution Displayed?
Your MailMan Institution is displayed to others when they receive messages from you. It is shown in parentheses following your name and title in the heading of every local message or response that you send, as shown below:
Subj: Test Message to Myself #2 [#1221583] 07/22/02@10:42 1 lineFrom: XMUSER1,ONE - COMPUTER SPECIALIST (Oakland OI Field Office)1 of 1 response read. In 'TEST' basket. Page 1------------------------------------------------------------------------------
Enter message action (in TEST basket): IGNORE//
Figure 4-50. An example displaying the MailMan Institution
NOTE: MailMan generates the parentheses enclosing the MailMan Institution.
24 MailMan Getting Started Guide August 2002Version 8.0 Revised September 2006
MailMan displays the Institution in the message header.
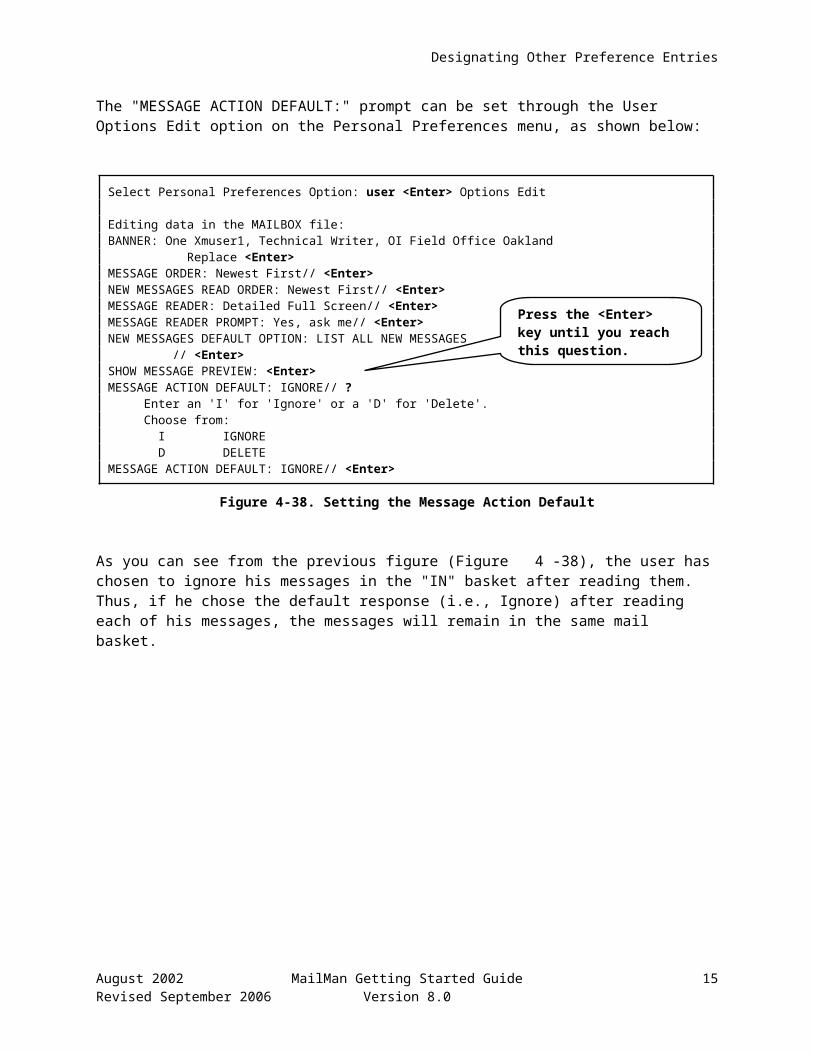
Designating Other Preference Entries
Creating/Editing Your MailMan Institution
The MailMan Institution can range from 3 to 30 characters in length and can contain any combination of numbers, alphabetic characters, symbols (e.g., #, $, %, &, *), and punctuation marks.
The "MAILMAN INSTITUTION:" field can be set through the User Options Edit option on the Personal Preferences menu, as shown below:
Select Personal Preferences Option: user <Enter> Options Edit
Editing data in the MAILBOX file:BANNER: ISS Technical Writer Replace <Enter>MESSAGE ORDER: Newest First// <Enter>NEW MESSAGES READ ORDER: Newest First// <Enter>MESSAGE READER: Detailed Full Screen// <Enter>MESSAGE READER PROMPT: Yes, ask me// <Enter>NEW MESSAGES DEFAULT OPTION: LIST ALL NEW MESSAGES // <Enter>SHOW MESSAGE PREVIEW: <Enter>MESSAGE ACTION DEFAULT: IGNORE// <Enter>ASK BASKET?: YES// <Enter>SHOW TITLES: YES// <Enter>PRIORITY RESPONSES FLAG: Responses are ORDINARY// <Enter>PRIORITY RESPONSES PROMPT: ASK EACH TIME MESSAGE IS READ // <Enter>P-MESSAGE FROM: <Enter>MAILMAN INSTITUTION: ? Answer must be 3-30 characters in length.MAILMAN INSTITUTION: Oakland OI Field Office
Figure 4-51. Setting the MailMan Institution prompt
As you can see from the previous figure (Figure 4-51), the user did not have a MailMan Institution entered. For this example, the user chose to enter a new MailMan Institution by entering "Oakland OI Field Office" at the "MAILMAN INSTITUTION:" prompt. Thus, the new MailMan Institution will be displayed to others when a message is sent.
August 2002 MailMan Getting Started Guide 25Revised September 2006 Version 8.0
Press the <Enter> key until you reach this question.
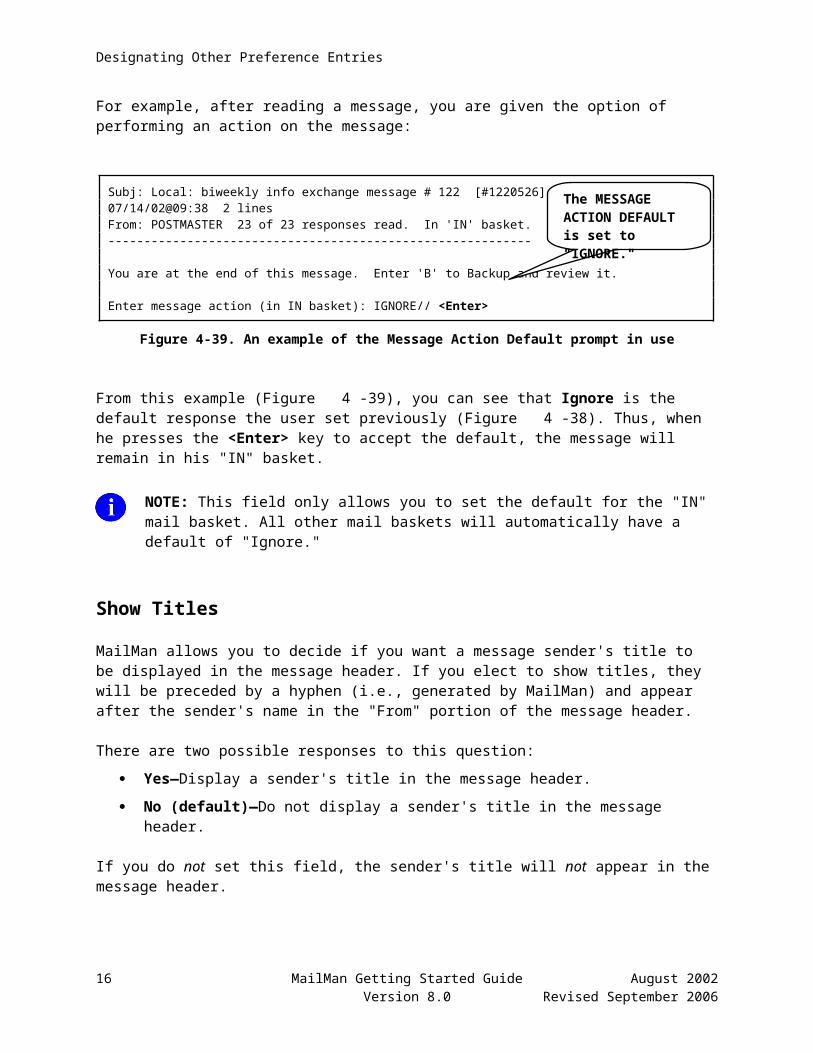
Designating Other Preference Entries
The following figure () illustrates what you would see if you entered a MailMan Institution and sent a message:
Subj: Test Message to Myself #2 [#1221583] 07/22/02@10:42 1 lineFrom: XMUSER1,ONE - COMPUTER SPECIALIST (Oakland OI Field Office)1 of 1 response read. In 'TEST' basket. Page 1-------------------------------------------------------------------------------
Enter message action (in TEST basket): IGNORE//
Figure 4-52. An example displaying the MailMan Institution
In the previous example (Figure 4-52), the user sent herself a message so her own information will be displayed in the header. Since the user previously chose to enter a MailMan Institution (Figure 4-51), she will see the MailMan Institution (i.e., Oakland OI Field Office) enclosed within parentheses, following her name (i.e., XMUSER1,ONE ) and title (i.e., COMPUTER SPECIALIST) displayed in the "From" portion of the message header.
26 MailMan Getting Started Guide August 2002Version 8.0 Revised September 2006
Here you see the MailMan Institution entered displayed in the message header.
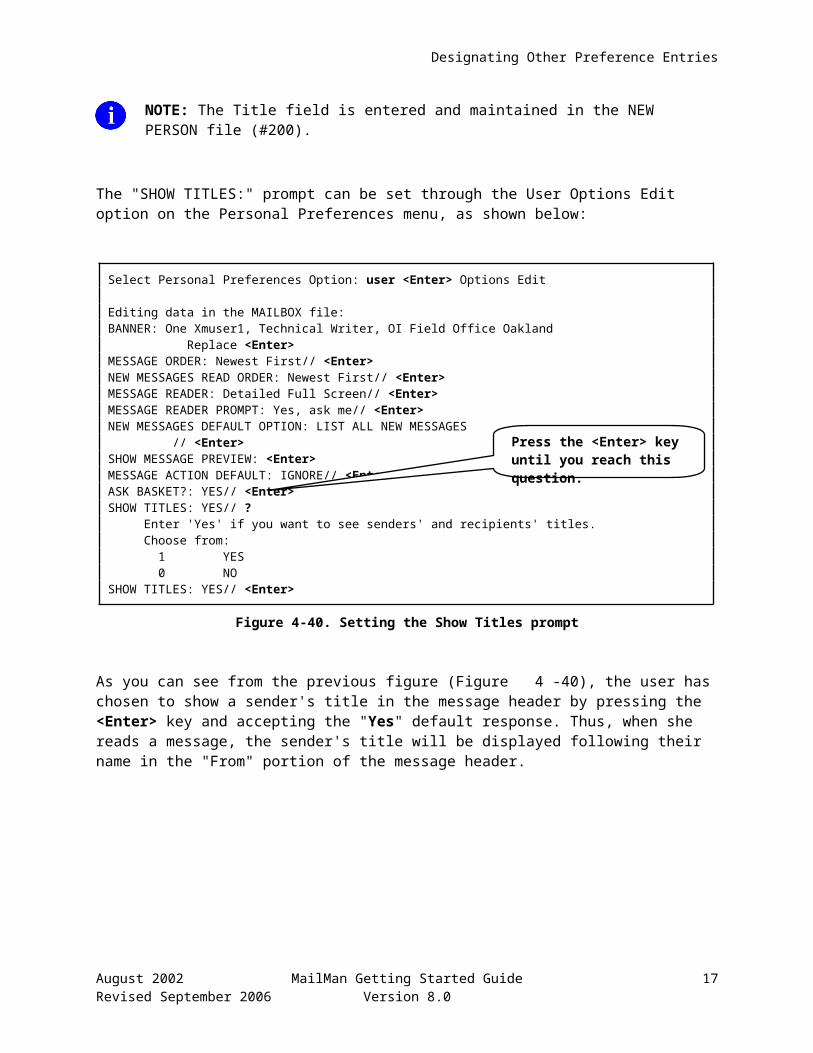
Designating Other Preference Entries
Modifying Your MailMan Institution
You can modify your MailMan Institution at anytime. If you choose to edit your MailMan Institution, simply use the User Options Edit option and move to the "MAILMAN INSTITUTION:" prompt. As with other prompts, if the current institution is 20 characters or more, you will be presented with the "Replace" and "With" prompts to change the value, as demonstrated below:
Select Personal Preferences Option: user <Enter> Options Edit
Editing data in the MAILBOX file:BANNER: ISS Technical Writer Replace <Enter>MESSAGE ORDER: Newest First// <Enter>NEW MESSAGES READ ORDER: Newest First// <Enter>MESSAGE READER: Detailed Full Screen// <Enter>MESSAGE READER PROMPT: Yes, ask me// <Enter>NEW MESSAGES DEFAULT OPTION: LIST ALL NEW MESSAGES // <Enter>SHOW MESSAGE PREVIEW: <Enter>MESSAGE ACTION DEFAULT: IGNORE// <Enter>ASK BASKET?: YES// <Enter>SHOW TITLES: YES// <Enter>PRIORITY RESPONSES FLAG: Responses are ORDINARY// <Enter>PRIORITY RESPONSES PROMPT: ASK EACH TIME MESSAGE IS READ // <Enter>P-MESSAGE FROM: <Enter>MAILMAN INSTITUTION: Oakland OI FO Replace FO <Enter> With Field Office <Enter> Replace <Enter> Oakland OI Field OfficeNETWORK SIGNATURE LINE 1 OF 3:
Figure 4-53. Modifying your MailMan Institution
In this example (Figure 4-53), the user wanted to change her MailMan Institution from "Oakland OI FO" to "Oakland OI Field Office". Thus, she specifically wanted to replace "FO" in her institution with the phrase "Field Office." To do this, she entered the "FO" characters in the correct case at the "Replace" prompt and she then entered the phrase "Field Office" at the "With" prompt.
At this point the user had finished her changes and pressed the <Enter> key after the next "Replace" prompt without entering any text.
MailMan then displayed the user's modified MailMan Institution before proceeding on to the next user edit prompt.
NOTE: The "Replace" and "With" prompts are case sensitive. If you want to replace the entire entry, you can enter ellipsis points—three periods (...) at the "Replace" prompt and then type in the new entry at the "With" prompt. Also, these prompts are only presented to you when an entry is greater than or equal to 20 characters in length. If the entry is less than 20 characters, you will merely be shown the current default entry, if any, and you must type in your entire new entry after the prompt. These are VA FileMan conventions.
August 2002 MailMan Getting Started Guide 27Revised September 2006 Version 8.0
Press the <Enter> key until you reach this question.
The "Replace" and "With" prompts are shown here.

Designating Other Preference Entries
Deleting Your MailMan Institution
The following figure demonstrates how you can delete an already existing MailMan Institution:
Select Personal Preferences Option: user <Enter> Options Edit...MAILMAN INSTITUTION: Oakland OI Field Office Replace @ SURE YOU WANT TO DELETE? y <Enter> (Yes)NETWORK SIGNATURE LINE 1 OF 3: ^
Figure 4-54. Deleting your MailMan Institution
In this example (Figure 4-54), the user deleted the current MailMan Institution simply by entering the at-sign ("@") at the "Replace" prompt.
MailMan will then ask you to confirm your delete request. The user confirmed the delete by entering "Yes" at the "SURE YOU WANT TO DELETE?" prompt.
When you go back to the MAILMAN INSTITUTION field, you'll see that it has in fact been deleted (i.e., no MailMan Institution default response is displayed at the "MAILMAN INSTITUTION:" prompt):
Select Personal Preferences Option: user <Enter> Options Edit...MAILMAN INSTITUTION:
Figure 4-55. MailMan Institution has been deleted
28 MailMan Getting Started Guide August 2002Version 8.0 Revised September 2006
Enter the "@" here to delete your MailMan Institution.
Press the <Enter> key until you reach this question.

Designating Other Preference Entries
Network Signature
The Network Signature is yet another piece of information that helps identify you to other MailMan users. It consists of up to three separate lines of information. MailMan allows you to enter your own Network Signature. You must enter a Network Signature in order to use the "Answer" command on a message.
REF: For more information on the "Answer" command, please refer to the "Answer ('A') Action" topic in Chapter 4 in the MailMan User Guide.
Where is Your Network Signature Displayed?
The Network Signature field is used when a user chooses to "Answer" a message rather than "Reply" to a message or uses the Network Signature (NS) action code to append a Network Signature to a message before sending it.
REF: For more information on the "Network Signature" command, please refer to the "Network Signature ('NS') Action" topic in Chapter 5 in the MailMan User Guide.
August 2002 MailMan Getting Started Guide 29Revised September 2006 Version 8.0

Designating Other Preference Entries
The "Answer" command issues a new message that is sent to the sender of the original message. This new message will contain your Network Signature, which will appear at the end of your answer, as shown below:
Enter message action (in TEST basket): IGNORE// aSubject: Re: Test// <Enter>Copying original message and network signature...You may edit the text of the message...
==[ WRAP ]==[ INSERT ]==============< Re: Test >============[ <PF1>H=Help ]=====>Original Msg: 'Test' From: XMUSER1,ONE >>here is a test
Here is the answer.
--------------------------------------------------------------------------------One Xmuser1Technical WriterOakland OI Field Office
<======T=======T=======T=======T=======T=======T=======T=======T=======T=>=====T
Figure 4-56. Including your Network Signature when answering a message
NOTE: MailMan generates the dashed line preceding your Network Signature.
30 MailMan Getting Started Guide August 2002Version 8.0 Revised September 2006
Here you see the Network Signature, which is displayed after a dashed line when answering a message.
Designating Other Preference Entries
This is how the message would appear to the recipient:
Subj: Re: Test [#1222500] 07/29/02@11:29 12 linesFrom: XMUSER1,ONE - COMPUTER SPECIALIST (Oakland OI Field Office)In 'IN' basket. Page 1------------------------------------------------------------------------------->Original Msg: 'Test' From: XMUSER1,ONE>>here is a test Here is the answer. -------------------------------------------------------------------------------One Xmuser1Technical WriterOakland OI Field Office
Enter message action (in IN basket): IGNORE//
Figure 4-57. An example displaying the Network Signature lines
August 2002 MailMan Getting Started Guide 31Revised September 2006 Version 8.0
Designating Other Preference Entries
Creating/Editing Your Network Signature
Each of the three lines comprising the Network Signature can range from 3 to 70 characters in length and can contain any combination of numbers, alphabetic characters, symbols (e.g., #, $, %, &, *), and punctuation marks. In order to have a valid Network Signature recognized by MailMan, you must enter data in at least one of the three Network Signature lines. Any line of the three is acceptable as long as one line contains data.
The "NETWORK SIGNATURE LINE n OF 3:" field (where n equals one, two, or three) can be set through the User Options Edit option on the Personal Preferences menu, as shown below:
Select Personal Preferences Option: user <Enter> Options Edit
Editing data in the MAILBOX file:BANNER: ISS Technical Writer Replace <Enter>...NETWORK SIGNATURE LINE 1 OF 3: ? Answer must be 3-70 characters in length.NETWORK SIGNATURE LINE 1 OF 3: One Xmuser1NETWORK SIGNATURE LINE 2 OF 3: ? Answer must be 3-70 characters in length.NETWORK SIGNATURE LINE 2 OF 3: Technical WriterNETWORK SIGNATURE LINE 3 OF 3: ? Answer must be 3-70 characters in length.NETWORK SIGNATURE LINE 3 OF 3: Oakland OI Field Office
Figure 4-58. Setting the Network Signature prompts
As you can see from the previous figure (Figure 4-58), the user initially did not have a Network Signature entered (no default values set). Then, he entered data into all three lines of the Network Signature.
For this example, the user chose to enter the following information:
At the "NETWORK SIGNATURE LINE 1 OF 3:" prompt, he entered "One Xmuser1"
At the "NETWORK SIGNATURE LINE 2 OF 3:" prompt, he entered "Technical Writer"
At the "NETWORK SIGNATURE LINE 3 OF 3:" prompt, he entered "Oakland OI Field Office"
The user's new Network Signature will be included at the end of an "Answer" to a message.
REF: For an example of a how the Network Signature will appear when answering a message, please refer to Figure 4-56 in this chapter.
32 MailMan Getting Started Guide August 2002Version 8.0 Revised September 2006
Press the <Enter> key until you reach these questions.
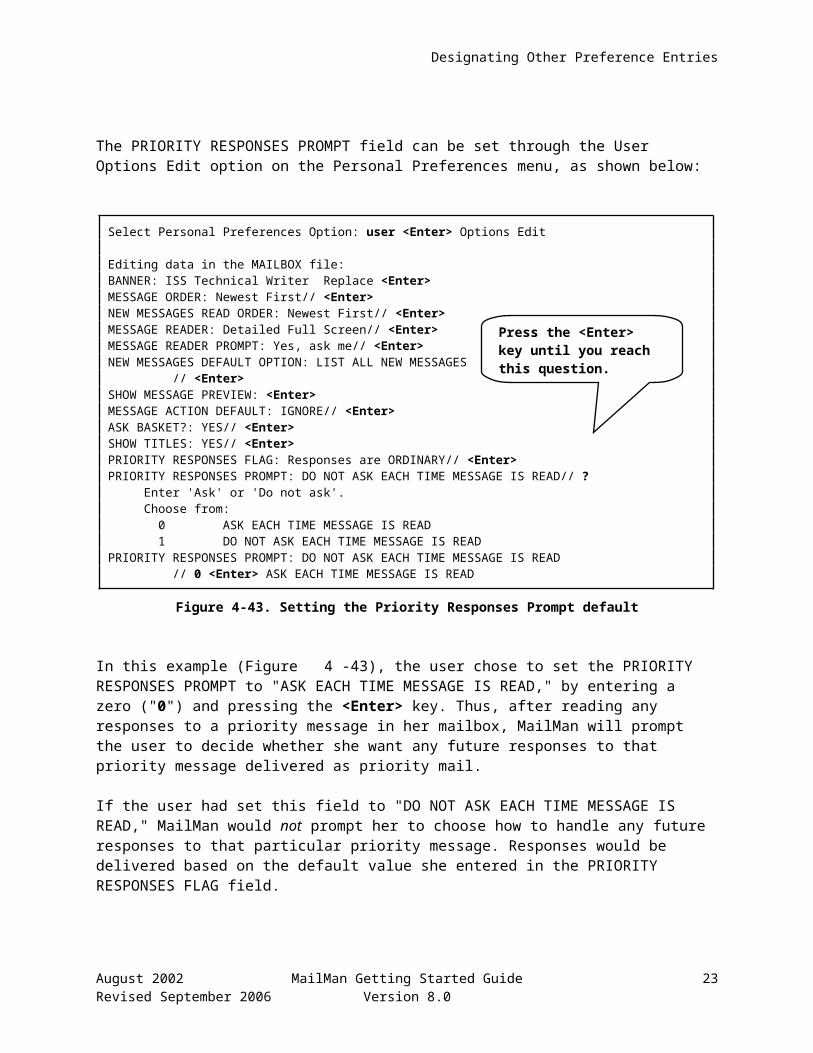
Designating Other Preference Entries
Modifying Your Network Signature
You can modify your Network Signature at anytime. If you choose to edit your Network Signature simply use the User Options Edit option and move to "NETWORK SIGNATURE LINE n OF 3:" field (where n equals one, two, or three). As with other prompts, if your current signature information in a line is 20 characters or more, you will be presented with the "Replace" and "With" prompts to change the value, as demonstrated below:
Select Personal Preferences Option: user <Enter> Options Edit
Editing data in the MAILBOX file:BANNER: ISS Technical Writer Replace <Enter>...NETWORK SIGNATURE LINE 1 OF 3: One Xmuser1// NETWORK SIGNATURE LINE 2 OF 3: Technical Writer// NETWORK SIGNATURE LINE 3 OF 3: Oakland OI FO Replace FO <Enter> With Field Office <Enter> Replace <Enter> Oakland OI Field OfficeINTRODUCTION: No existing text Edit? NO// <Enter>
Figure 4-59. Modifying your Network Signature
In this example (Figure 4-59), the user wanted to change the third line of his Network Signature from "Oakland OI FO" to "Oakland OI Field Office". Thus, he specifically wanted to replace "FO" in his signature with the phrase "Field Office." To do this, he entered the "FO" characters in the correct case at the "Replace" prompt and he then entered the phrase "Field Office" at the "With" prompt.
At this point the user was finished with his changes and pressed the <Enter> key after the next "Replace" prompt without entering any text.
MailMan then displayed the user's modified third line of his Network Signature before proceeding on to the next user edit prompt.
NOTE: The "Replace" and "With" prompts are case sensitive. If you want to replace the entire entry, you can enter ellipsis points—three periods (...) at the "Replace" prompt and then type in the new entry at the "With" prompt. Also, these prompts are only presented to you when an entry is greater than or equal to 20 characters in length. If the entry is less than 20 characters, you will merely be shown the current default entry, if any, and you must type in your entire new entry after the prompt. These are VA FileMan conventions.
August 2002 MailMan Getting Started Guide 33Revised September 2006 Version 8.0
Press the <Enter> key until you reach these questions.
The "Replace" and "With" prompts are shown here.

Designating Other Preference Entries
Deleting Your Network Signature
The following figure demonstrates how you can delete an already existing Network Signature:
Select Personal Preferences Option: user <Enter> Options Edit
Editing data in the MAILBOX file:BANNER: ISS Technical Writer Replace <Enter>...NETWORK SIGNATURE LINE 1 OF 3: One Xmuser1// @ SURE YOU WANT TO DELETE? y <Enter> (Yes)NETWORK SIGNATURE LINE 2 OF 3: Technical Writer// @ SURE YOU WANT TO DELETE? y <Enter> (Yes)NETWORK SIGNATURE LINE 3 OF 3: Oakland OI Field Office Replace @ SURE YOU WANT TO DELETE? y <Enter> (Yes)
Figure 4-60. Deleting your Network Signature
In this example (Figure 4-60), the user deleted all three lines of his current Network Signature simply by entering the at-sign ("@") after each prompt.
MailMan asked the user to confirm the delete request. The user confirmed the delete by entering "Yes" at the "SURE YOU WANT TO DELETE?" prompt for all three lines.
When you go back to the Network Signature fields, you'll see that they have in fact been deleted:
Select Personal Preferences Option: user <Enter> Options Edit...NETWORK SIGNATURE LINE 1 OF 3: NETWORK SIGNATURE LINE 2 OF 3: NETWORK SIGNATURE LINE 3 OF 3:
Figure 4-61. Network Signature has been deleted
As you can see from this example (Figure 4-61), the user's Network Signature has been deleted (i.e., no Network Signature default responses are displayed after any of three "NETWORK SIGNATURE LINE n OF 3:" prompts).
34 MailMan Getting Started Guide August 2002Version 8.0 Revised September 2006
Press the <Enter> key until you reach these questions.
Press the <Enter> key until you reach this question.
Enter the "@" after each Network Signature line prompt to delete your entire Network Signature.
Designating Other Preference Entries
Introduction
The Introduction field provides you with the opportunity to "introduce" yourself to other MailMan users. Since it is a word processing field, MailMan allows you to enter as much information as you wish. You may or may not be required to enter an Introduction depending on your site's policy.
IRM has the option to set the REQUIRE INTRODUCTIONS? field in the MAILMAN SITE PARAMETERS file (#4.3) to require users to enter an Introduction before using MailMan. If users at your site are required to enter an Introduction, you will see the following display when trying to use MailMan:
You have not yet introduced yourself to the group.Please enter a short introduction, so that others may usethe HELP option to find out more about you.
You may change your INTRODUCTION laterunder 'Personal Preferences|User Options Edit.
Figure 4-62. Text displayed when you must enter an Introduction
You will then immediately be placed into your editor to enter your Introduction before you are allowed to access the MailMan menu. Upon entering an Introduction, you will then be allowed to use MailMan.
August 2002 MailMan Getting Started Guide 35Revised September 2006 Version 8.0
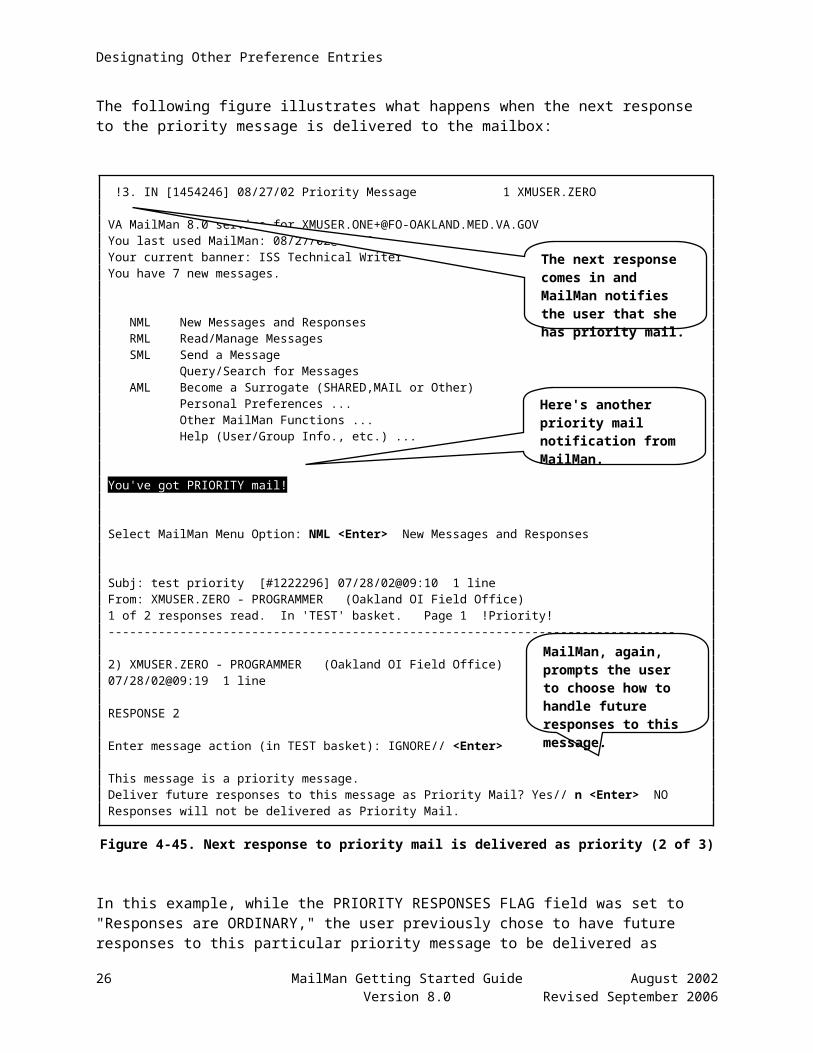
Designating Other Preference Entries
Where is Your Introduction Displayed?
Your Introduction is only displayed when users do a lookup on you via the User Information option on the Help (User/Group Info., etc.) menu, as shown below:
Select MailMan Menu Option: help <Enter> (User/Group Info., etc.)
User Information Group Information Remote User Information New Features in MailMan General MailMan Information Questions and Answers on MailMan Manual for MailMan Users
Select Help (User/Group Info., etc.) Option: user info <Enter> rmation
User name: xmuser1,one <Enter> INFORMATION SYSTEMS CENTER Last used MailMan: 07/29/02@16:04 ISS Technical Writer
XMUSER1,ONECurrent Banner: ISS Technical WriterLast used MailMan: 07/29/02@16:04This user has 1 NEW message (1 in the IN basket)
Introduction: My name is One and I am the Technical Writer for all Infrastructure products.
Figure 4-63. An example displaying the Introduction
36 MailMan Getting Started Guide August 2002Version 8.0 Revised September 2006
Here you see an Introduction displayed after doing a lookup.

Designating Other Preference Entries
Creating/Editing Your Introduction
Since the Introduction field is a word processing field there is no upper limit on the number of characters you can enter. You can also include any combination of numbers, alphabetic characters, symbols (e.g., #, $, %, &, *), and punctuation marks.
The "INTRODUCTION:" field can be set through the User Options Edit option on the Personal Preferences menu, as shown below:
Select Personal Preferences Option: user <Enter> Options Edit
Editing data in the MAILBOX file:BANNER: ISS Technical Writer Replace <Enter>...INTRODUCTION: No existing text Edit? NO// y <Enter> YES
==[ WRAP ]==[ INSERT ]============< INTRODUCTION >===========[ <PF1>H=Help ]====My name is One and I am the Technical Writer for all Infrastructureproducts.
<======T=======T=======T=======T=======T=======T=======T=======T==
Figure 4-64. Setting the MailMan Introduction prompt
As you can see from the previous figure (Figure 4-64), MailMan indicated to the user that she did not currently have an Introduction entered ("No existing text"). Thus, the user answered "Yes" to edit her Introduction and she was put into the editor.
In the editor, the user entered a short descriptive sentence, saved her entry, and closed the editor.
The user's new Introduction will be displayed to other MailMan users when a lookup is performed.
REF: For an example of how the Introduction will appear when doing a lookup on a message (i.e., User Information option), please refer to Figure 4-63 in this chapter.
August 2002 MailMan Getting Started Guide 37Revised September 2006 Version 8.0
Press the <Enter> key until you reach this question.
In the editor, the user added their new introductory text.
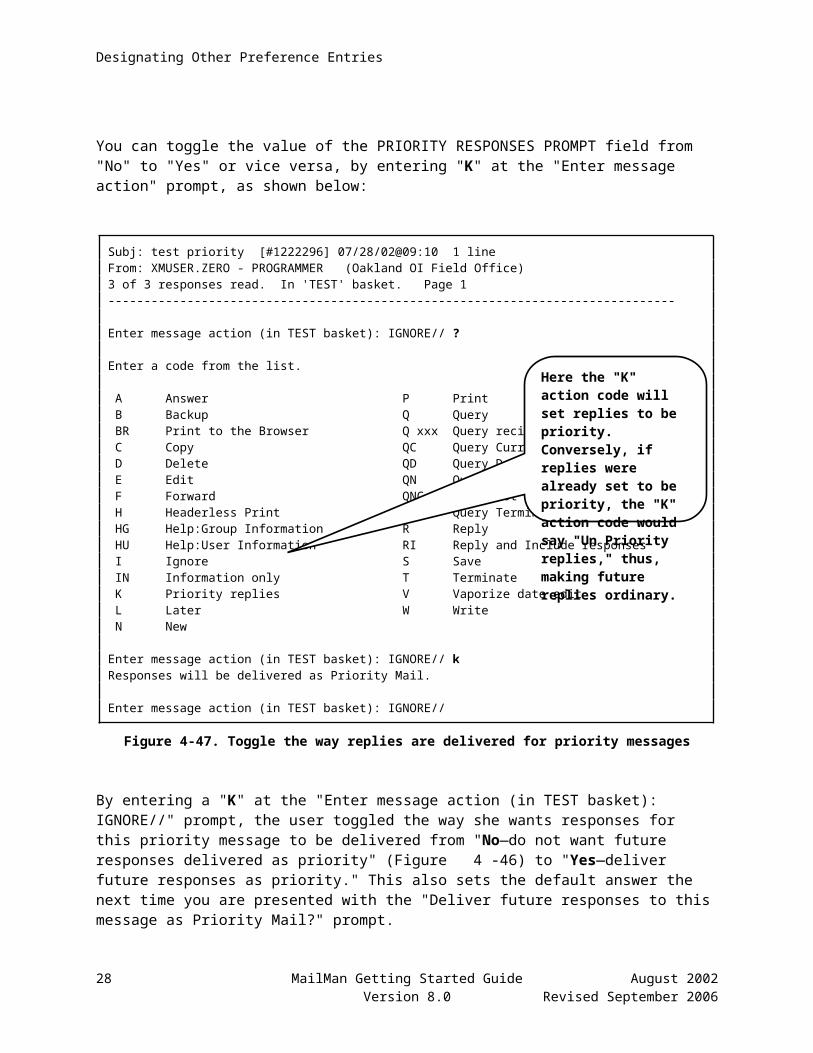
Designating Other Preference Entries
Modifying Your Introduction
You can modify your Introduction at anytime. If you choose to edit your Introduction, simply use the User Options Edit option and move to the "INTRODUCTION:" prompt. Answer "Yes" at the "Edit? NO//" prompt, as demonstrated below:
Select Personal Preferences Option: user <Enter> Options Edit
Editing data in the MAILBOX file:BANNER: ISS Technical Writer Replace <Enter>...INTRODUCTION:My name is One and I am the Technical Writer for all Infrastructureproducts.
Edit? NO// y <Enter> YES
==[ WRAP ]==[ INSERT ]============< INTRODUCTION >=======My name is One and I am the Technical Writer for all Infrastructureproducts (e.g., Kernel, VA FileMan, MailMan, Toolkit).
<======T=======T=======T=======T=======T=======T=======T===
Editing the priority order for reading baskets with new messages.Note: You don't need priority ordering unless you want to change thedefault 'read new messages' basket from IN to other basket(s).
Select BASKET:
Figure 4-65. Modifying your Introduction
In this example (Figure 4-65), the user wanted to add more information at the end of her Introduction, specifically: "(e.g., Kernel, VA FileMan, MailMan, and Toolkit)". To do this, the user answered "Yes" at the "Edit? NO//" prompt and she was placed back into the editor (e.g., Screen Editor).
In the editor, the user typed in the phrase she wanted to add after the existing text. When the user was finished, she saved her modifications and closed the editor.
MailMan then returned the user to the next user edit prompt.
38 MailMan Getting Started Guide August 2002Version 8.0 Revised September 2006
Press the <Enter> key until you reach this question.
In the editor, the user typed in the new/additional text.
MailMan displays the user's current introductory text.

Designating Other Preference Entries
Deleting Your Introduction
The following figure demonstrates how you can delete an already existing Introduction:
Select Personal Preferences Option: user <Enter> Options Edit
Editing data in the MAILBOX file:BANNER: ISS Technical Writer Replace <Enter>...INTRODUCTION:My name is One and I am the Technical Writer for all Infrastructureproducts (e.g., Kernel, VA FileMan, MailMan, Toolkit).
Edit? NO// y <Enter> YES==[ WRAP ]==[ INSERT ]============< INTRODUCTION >===========[ <PF1>H=Help ]====My name is One and I am the Technical Writer for all Infrastructureproducts (e.g., Kernel, VA FileMan, MailMan, Toolkit).
<======T=======T=======T=======T=======T=======T=======T======
Editing the priority order for reading baskets with new messages.Note: You don't need priority ordering unless you want to change thedefault 'read new messages' basket from IN to other basket(s).
Select BASKET:
Figure 4-66. Deleting your Introduction
In this example (), the user again got back into the editor by answering "Yes" at the "Edit? NO//" prompt. While in the editor, the user deleted her Introduction by deleting all of the introductory text. When the user had deleted everything, she closed the editor and MailMan returned her to the next user edit prompt.
August 2002 MailMan Getting Started Guide 39Revised September 2006 Version 8.0
Press the <Enter> key until you reach this question.

Designating Other Preference Entries
When the user went back in to see her Introduction, she saw that it had in fact been deleted (i.e., MailMan displayed "No existing text" at the "INTRODUCTION:" prompt):
Select Personal Preferences Option: user <Enter> Options Edit
Editing data in the MAILBOX file:BANNER: ISS Technical Writer Replace <Enter>...INTRODUCTION: No existing text Edit? NO//
Figure 4-67. Introduction has been deleted
Preferred Editor
The Preferred Editor field provides you with the opportunity to choose the editor you wish to use while in MailMan. You use an editor when editing a VA FileMan word-processing field (e.g., when you respond to or type a new message). If you have chosen a Preferred Editor and you are editing a word-processing field, MailMan will automatically transfer you into your Preferred Editor. If you do not enter a specific editor in the Preferred Editor field, MailMan will default to either the VA FileMan screen editor when editing within ScreenMan or the VA FileMan Line Editor in all other cases.
When will You Use Your Preferred Editor?
Your Preferred Editor is used whenever you must enter text into a word-processing field in MailMan. For example, when composing a new message or replying to a message, as shown below:
Select MailMan Menu Option: send <Enter> a MessageSubject: Preferred Editor TestYou may enter the text of the message...
==[ WRAP ]==[ INSERT ]========< Preferred Editor Test >======[ <PF1>H=Help ]====Here you use your Preferred Editor.
<======T=======T=======T=======T=======T=======T=======T=======T=======T=>=====T
Figure 4-68. An example of using the editor
Another example of using your Preferred Editor is when you are creating or editing your MailMan Introduction (previously described in the "Introduction" topic in this chapter, Figure 4-64).
40 MailMan Getting Started Guide August 2002Version 8.0 Revised September 2006
Press the <Enter> key until you reach this question.
The Introduction has been successfully deleted.
When sending a new message, you are placed into your Preferred Editor to enter the text of the message.

Designating Other Preference Entries
Choosing Your Preferred Editor
Your choice of editors is based on the editors available at your particular location. MailMan lets you choose from the list of available editors.
The "PREFERRED EDITOR:" field can be set through the User Options Edit option on the Personal Preferences menu, as shown below:
Select Personal Preferences Option: user <Enter> Options Edit
Editing data in the MAILBOX file:BANNER: ISS Technical Writer Replace <Enter>...
Editing data in the NEW PERSON file:PREFERRED EDITOR: LINE EDITOR - VA FILEMAN// ? Answer with ALTERNATE EDITOR NAMEChoose from: KERMIT LOAD LINE EDITOR - VA FILEMAN SCREEN EDITOR - VA FILEMAN VMSEDT WPSE - LETTERMAN PREFERRED EDITOR: LINE EDITOR - VA FILEMAN// screen <Enter> EDITOR - VA FILEMAN
Figure 4-69. Setting the MailMan Preferred Editor prompt
As you can see from the previous figure (Figure 4-69), the user entered a single question mark ("?") at the "PREFERRED EDITOR: LINE EDITOR - VA FILEMAN//" prompt in order to display a list of available editors. Currently, the default editor is set to use the VA FileMan Line Editor.
For this example, the user chose to change his editor to the VA FileMan Screen Editor by entering it at the "PREFERRED EDITOR:" prompt.
NOTE: You can change your Preferred Editor at anytime. If you want to change your editor, simply use the User Options Edit option and move to the "PREFERRED EDITOR:" prompt and enter a new editor from the available list.
August 2002 MailMan Getting Started Guide 41Revised September 2006 Version 8.0
Press the <Enter> key until you reach this question.
This is just a sample list, your choices may vary.

Designating Other Preference Entries
Deleting Your Preferred Editor
The following figure demonstrates how you can delete your Preferred Editor:
Select Personal Preferences Option: user <Enter> Options Edit...
Editing data in the NEW PERSON file:PREFERRED EDITOR: SCREEN EDITOR - VA FILEMAN// @ SURE YOU WANT TO DELETE? y <Enter> (Yes)STREET ADDRESS 1: 1301 Clay Street.// ^
Figure 4-70. Deleting your Preferred Editor
In this example (Figure 4-70), the user deleted his current Preferred Editor simply by entering the at-sign ("@") at the "PREFERRED EDITOR: SCREEN EDITOR - VA FILEMAN//" prompt.
MailMan will then ask you to confirm your delete request. The user confirmed the delete by entering "Yes" at the "SURE YOU WANT TO DELETE?" prompt.
When you go back in to see your Preferred Editor, you'll see that it has in fact been deleted:
Select Personal Preferences Option: user <Enter> Options Edit...
Editing data in the NEW PERSON file:PREFERRED EDITOR:
Figure 4-71. Preferred Editor has been deleted
As you can see from this example (Figure 4-71), the Preferred Editor has been deleted (i.e., no Preferred Editor default response is displayed at the "PREFERRED EDITOR:" prompt). Without a Preferred Editor entry, MailMan will automatically default to either the VA FileMan Screen Editor when editing within ScreenMan or the VA FileMan Line Editor in all other cases.
42 MailMan Getting Started Guide August 2002Version 8.0 Revised September 2006
Enter the "@" here to delete your Preferred Editor.
Press the <Enter> key until you reach this question.
Press the <Enter> key until you reach this question.

Designating Other Preference Entries
Contact Information
Your contact information is comprised of the following fields, which reside in the NEW PERSON file (#200):
STREET ADDRESS 1—This is the first line of the street address of the permanent address of the user.
STREET ADDRESS 2—This is the second line of the street address.
STREET ADDRESS 3—This is the third line of the street address.
CITY—This is the user's city.
STATE—This is the user's state.
ZIP CODE—This is the user's postal ZIP code.
OFFICE PHONE—This is the user's business/office contact telephone number.
FAX NUMBER—This field contains the telephone number for a user's FAX machine. It needs to be in a format that can be understood by a sending modem.
VOICE PAGER—This field contains the telephone number for a user's analog pager. It needs to be in a format that can be understood by a sending modem.
DIGITAL PAGER—This field contains the telephone number for a user's digital page. It needs to be a format that can be understood by a sending modem.
ADD'L PHONE 1—This is an alternate (additional) telephone number where the user might also be reached.
ADD'L PHONE 2—This is another alternate (additional) telephone number where the user might also be reached.
These fields are all self-explanatory. You can use these fields to store your business (or personal) information. You are not required to enter any information into these fields; it is up to you to decide.
August 2002 MailMan Getting Started Guide 43Revised September 2006 Version 8.0
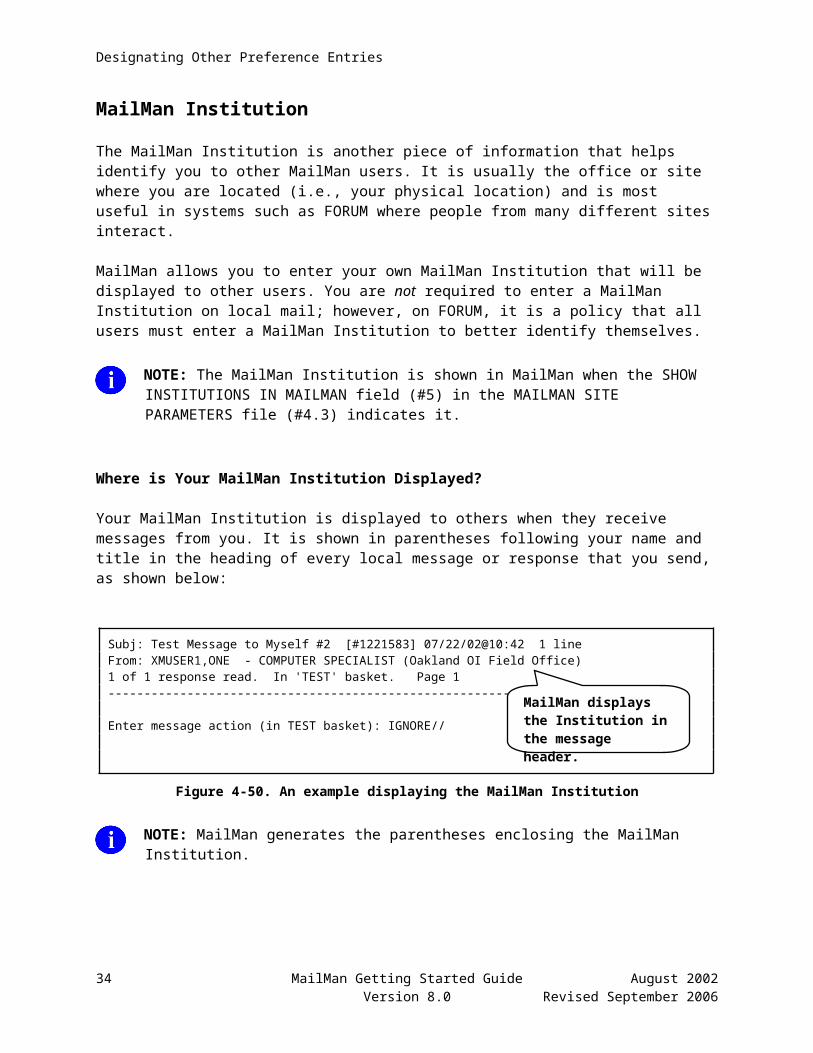
Designating Other Preference Entries
Where is Your Contact Information Displayed?
Your contact information is only displayed when users do a lookup on you through the User Information option on the Help (User/Group Info., etc.) menu, as shown below:
Select MailMan Menu Option: help <Enter> (User/Group Info., etc.)
User Information Group Information Remote User Information New Features in MailMan General MailMan Information Questions and Answers on MailMan Manual for MailMan Users
Select Help (User/Group Info., etc.) Option: user information
User name: xmuser1,o <Enter> XMUSER1,ONE INFORMATION SYSTEMS CENTER Last used MailMan: 08/28/02@07:29 ISS Technical Writer
XMUSER1,ONE - COMPUTER SPECIALIST (Oakland OI Field Office)Current Banner: ISS Technical WriterLast used MailMan: 08/28/02@07:29NEW messages: 7 (7 in the IN basket)
Office phone: (510) 555-5555Fax: (510) 555-5555Voice pager: (510) 555-5555Digital pager: (510) 555-5555Add'l phone: (510) 555-5555Add'l phone: (510) 555-5555
Address: Department of Veterans Affairs 1301 Clay Street Suite 1350N Oakland, CA 94612
Introduction: My name is One Xmuser1 and I am one of the Technical Writers for the Infrastructure Security Services (ISS) products/projects (e.g., Broker, Components, Kernel, VA FileMan, MailMan, Toolkit).
Mail Groups: ISC STAFF (Public) ISC - SAN FRANCISCO BASED (Public) . . .
User name:
Figure 4-72. An example displaying the Contact Information
44 MailMan Getting Started Guide August 2002Version 8.0 Revised September 2006
Here you see the user's contact telephone information displayed after doing a lookup on himself.
Here we see a list of the mail groups to which the user belongs after doing a lookup on himself.
Here you seethe user's contact address information displayed after doing a lookup on himself. The address is only shown if the SHOW ADDRESS ON USER LOOKUP field (#7.4) in the MAILMAN SITE PARAMETERS file (#4.3) is set to "Yes." Some sites store home address information and do not want that displayed when doing a lookup.

Designating Other Preference Entries
Creating/Editing Your Contact Information
The contact information consists of several fields; the list of allowable entries for each field is listed below:
STREET ADDRESS 1, 2, and 3—Answer must be from 2 to 50 characters in length. It can contain any combination of alphabetic characters, numbers, symbols, and punctuation marks.
CITY—Answer must be from 2 to 30 characters in length. It can contain any combination of alphabetic characters, numbers, symbols, and punctuation marks.
STATE—Answer with the state number, name, or abbreviation. You also have the option of displaying the list of acceptable state entries and choosing from that list.
ZIP CODE—Answer must contain exactly five numbers (Zip Code) or five numbers, a hyphen, and four additional numbers (Zip Code+4). Other symbols, punctuation marks, or alphabetic characters are not allowed.
OFFICE PHONE—Answer must be from 4 to 20 characters in length. It can only contain numbers, symbols, and punctuation marks. Alphabetic characters are not allowed.
FAX NUMBER—Answer must be from 7 to 20 characters in length. It can only contain numbers, symbols, and punctuation marks. Alphabetic characters are not allowed.
VOICE PAGER—Answer must be from 3 to 20 characters in length. It can only contain numbers, symbols, and punctuation marks. Alphabetic characters are not allowed.
DIGITAL PAGER—Answer must be from 3 to 20 characters in length. It can only contain numbers, symbols, and punctuation marks. Alphabetic characters are not allowed.
ADD'L PHONE 1—Answer must be from 4 to 20 characters in length. It can only contain numbers, symbols, and punctuation marks. Alphabetic characters are not allowed.
ADD'L PHONE 2—Answer must be from 4 to 20 characters in length. It can only contain numbers, symbols, and punctuation marks. Alphabetic characters are not allowed.
August 2002 MailMan Getting Started Guide 45Revised September 2006 Version 8.0

Designating Other Preference Entries
The contact information fields start with the "STREET ADDRESS 1:" field through the "ADD'L PHONE 2:" field and can be set through the User Options Edit option on the Personal Preferences menu, as shown below:
Select Personal Preferences Option: user <Enter> Options Edit
Editing data in the MAILBOX file:BANNER: ISS Technical Writer Replace <Enter>...
Editing data in the NEW PERSON file:PREFERRED EDITOR: SCREEN EDITOR - VA FILEMAN// <Enter>STREET ADDRESS 1: Department of Veterans AffairsSTREET ADDRESS 2: 1301 Clay StreetSTREET ADDRESS 3: Suite 1350NCITY: OaklandSTATE: ? Answer with STATE NUMBER, or NAME, or ABBREVIATION Do you want the entire 62-Entry STATE List? n <Enter> (No)STATE: CALIFORNIAZIP CODE: 94612OFFICE PHONE: (510) 555-5555FAX NUMBER: (510) 555-5555VOICE PAGER: (510) 555-5555DIGITAL PAGER: (510) 555-5555ADD'L PHONE 1: (510) 555-5555ADD'L PHONE 2: (510) 555-5555
Figure 4-73. Setting your Contact Information prompts
As you can see from the previous figure (Figure 4-73), the user entered the appropriate contact information for each of the 12 prompts comprising the contact information. When asked to enter the STATE information, the user entered a question mark ("?") where he could choose to display the list of acceptable state entries.
The user's new contact information will be displayed to other MailMan users when a lookup is performed.
REF: For an example of how the contact information will appear when doing a lookup on a user, please refer to Figure 4-72 in this chapter.
46 MailMan Getting Started Guide August 2002Version 8.0 Revised September 2006
Press the <Enter> key until you reach these questions.
You can display a list from which to choose the acceptable State information.
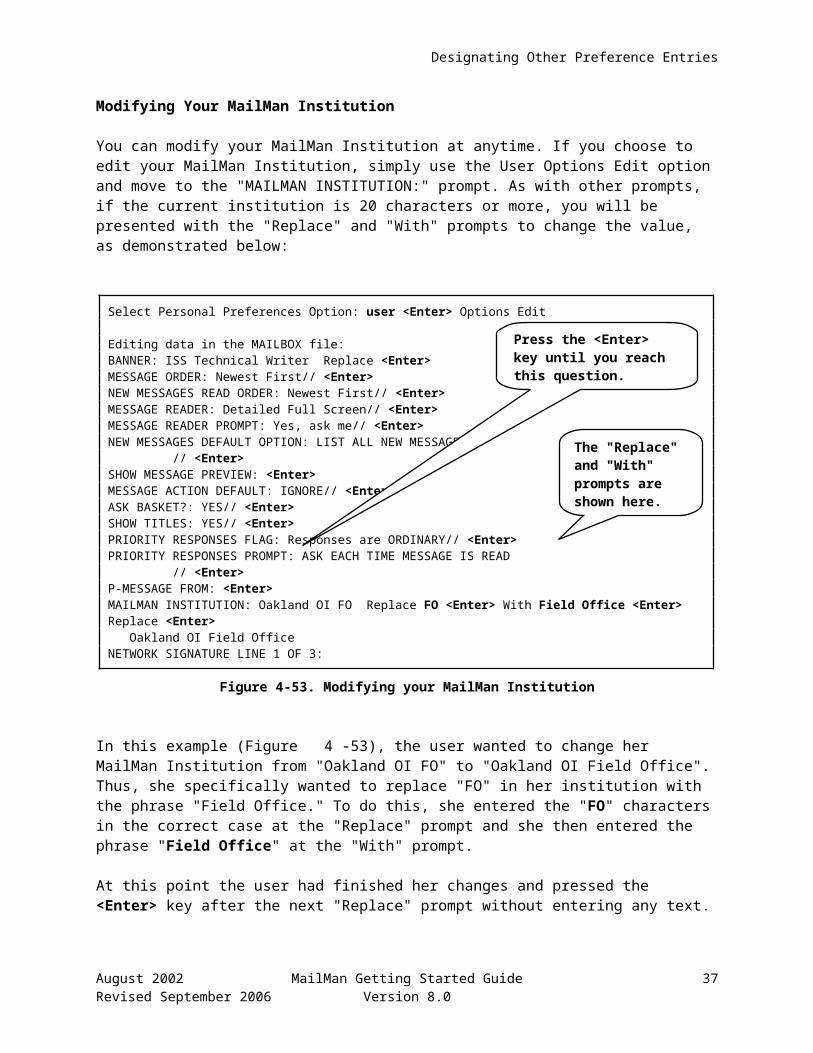
Designating Other Preference Entries
Modifying Your Contact Information
You can modify your contact information at any time. If you choose to edit your contact information, simply use the User Options Edit option and move to the first prompt of your contact information (i.e., "STREET ADDRESS 1:" prompt), as shown below:
Select Personal Preferences Option: user <Enter> Options Edit
Editing data in the MAILBOX file:BANNER: ISS Technical Writer Replace <Enter>...
Editing data in the NEW PERSON file:PREFERRED EDITOR: SCREEN EDITOR - VA FILEMAN// <Enter>STREET ADDRESS 1: Department of Veterans Affairs Replace Department <Enter> With Dept. <Enter> Replace <Enter> Dept. of Veterans AffairsSTREET ADDRESS 2: 1301 Clay Street// <Enter>STREET ADDRESS 3: Suite 1350N// <Enter>CITY: Oakland// <Enter>STATE: CALIFORNIA// <Enter>ZIP CODE: 94612// <Enter>OFFICE PHONE: (510) 555-5555// <Enter>FAX NUMBER: (510) 555-5555// <Enter>VOICE PAGER: (510)555-5555// <Enter>DIGITAL PAGER: (510) 555-5555// <Enter>ADD'L PHONE 1: (510) 555-5555// <Enter>ADD'L PHONE 2: (510) 555-5555// <Enter>
Figure 4-74. Modifying your Contact Information
In this example (Figure 4-74), the user wanted to change the STREET ADDRESS 1 field from "Department of Veterans Affairs" to "Dept. of Veterans Affairs". Thus, the user specifically wanted to replace "Department" with the abbreviation "Dept." To do this, he entered the "Department" characters in the correct case at the "Replace" prompt and then entered the phrase "Dept." at the "With" prompt.
At this point the user was finished with his changes and pressed the <Enter> key after the next "Replace" prompt without entering any text.
MailMan then displayed the user's modified STREET ADDRESS 1 field of his contact information before proceeding on to the next user edit prompt. Since the user did not want to change any other contact information entries, he kept pressing the <Enter> key.
NOTE: The "Replace" and "With" prompts are case sensitive. If you want to replace the entire entry, you can enter ellipsis points—three periods (...) at the "Replace" prompt and then type in the new entry at the "With" prompt. Also, these prompts are only presented to you when an entry is greater than or equal to 20 characters in length. If the entry is less than 20 characters, you will merely be shown the current default entry, if any, and you must type in your entire new entry after the prompt. These are VA FileMan conventions.
August 2002 MailMan Getting Started Guide 47Revised September 2006 Version 8.0
Press the <Enter> key until you reach these questions.
The "Replace" and "With" prompts are shown here.

Designating Other Preference Entries
Deleting Your Contact Information
The following figure demonstrates how you can delete your already existing contact information:
Select Personal Preferences Option: user <Enter> Options Edit
Editing data in the MAILBOX file:BANNER: ISS Technical Writer Replace <Enter>...
Editing data in the NEW PERSON file:PREFERRED EDITOR: SCREEN EDITOR - VA FILEMAN// <Enter>STREET ADDRESS 1: Dept. of Veterans Affairs Replace @ SURE YOU WANT TO DELETE? y <Enter> (Yes)STREET ADDRESS 2: 1301 Clay Street// @ SURE YOU WANT TO DELETE? y <Enter> (Yes)STREET ADDRESS 3: Suite 1350N// @ SURE YOU WANT TO DELETE? y <Enter> (Yes)CITY: Oakland// @ SURE YOU WANT TO DELETE? y <Enter> (Yes)STATE: CALIFORNIA// @ SURE YOU WANT TO DELETE? y <Enter> (Yes)ZIP CODE: 94612// @ SURE YOU WANT TO DELETE? y <Enter> (Yes)OFFICE PHONE: (510) 555-5555// @ SURE YOU WANT TO DELETE? y <Enter> (Yes)FAX NUMBER: (510) 555-5555// @ SURE YOU WANT TO DELETE? y <Enter> (Yes)VOICE PAGER: (510)555-5555// @ SURE YOU WANT TO DELETE? y <Enter> (Yes)DIGITAL PAGER: (510) 555-5555// @ SURE YOU WANT TO DELETE? y <Enter> (Yes)ADD'L PHONE 1: (510) 555-5555// @ SURE YOU WANT TO DELETE? y <Enter> (Yes)ADD'L PHONE 2: (510) 555-5555// @ SURE YOU WANT TO DELETE? y <Enter> (Yes)
Figure 4-75. Deleting your Contact Information
In this example (Figure 4-75), the user deleted all 12 lines of his current contact information simply by entering the at-sign ("@") after each prompt.
MailMan asked the user to confirm the delete request. The user confirmed the delete by entering "Yes" at the "SURE YOU WANT TO DELETE?" prompt for all 12 lines.
When you go back in to see your contact information fields, you'll see that they have in fact been deleted (i.e., no contact information default responses are displayed after any of the contact information prompts).
48 MailMan Getting Started Guide August 2002Version 8.0 Revised September 2006
Press the <Enter> key until you reach these questions.
Enter the "@" after each contact information line prompt to delete your entire contact information.

Designating Other Preference Entries
August 2002 MailMan Getting Started Guide 49Revised September 2006 Version 8.0

5. Managing Your Mail—Overview
The following topics are discussed in this chapter:
Reading/Managing New Messages and Responses
Reading/Managing All Messages and Responses
Error: Reference source not found
Sending Mail
Sending Mail Action Commands
The MailMan interface provides several options to read, send, and manage your mail:
New Messages and Responses [synonym NML]
Read/Manage Messages [synonym RML]
Send a Message [synonym SML]
Query/Search for Messages
Become a Surrogate (SHARED,MAIL or Other) [synonym AML]
Personal Preferences
Other MailMan Functions
Help (User/Group Info., etc.)
These options are located on the main MailMan Menu, as shown below:
NML New Messages and Responses RML Read/Manage Messages SML Send a Message Query/Search for Messages AML Become a Surrogate (SHARED,MAIL or Other) Personal Preferences ... Other MailMan Functions ... Help (User/Group Info., etc.) ...
Select MailMan Menu Option:
Figure 5-76. Main MailMan Menu options
August 2002 MailMan Getting Started Guide 1Revised September 2006 Version 8.0

Managing Your Mail—Overview
The current functionality and features of these options are described in greater detail in the MailMan User Guide:
Chapter 2—"Reading/Managing Messages—New Messages and Responses"
Chapter 3—"Reading/Managing Messages—In a Basket"
Chapter 4—"Reading/Managing Messages—Individual Messages"
Chapter 5—"Sending Mail"
Chapter 6—"Searching for Mail"
Chapter 7—"Filtering Mail"
Chapter 8—"Mail Groups"
Chapter 9—"Surrogates"
Chapter 10—"Forwarding Mail"
Chapter 11—"Reports and Lists"
Chapter 12—"Online Help/Information"
This chapter gives a brief overview of the following options:
New Messages and Responses [XMNEW; synonym NML]
Read/Manage Messages [XMREAD; synonym RML]
Send a Message [XMSEND; synonym SML]
Reading/Managing New Messages and Responses
Use the New Messages and Responses option [XMNEW; synonym NML] when you specifically wish to process new mail in your mailbox.
It provides you with the following choices of how you choose to read your new mail:
LB—List Baskets with new mail
LN—List all New messages
LP—List all Priority messages
P—Print all new messages
Q—Quit
R—Read new mail by basket (default)
S—Scan all new messages
2 MailMan Getting Started Guide August 2002Version 8.0 Revised September 2006

Managing Your Mail—Overview
The New Messages and Responses option [XMNEW; synonym NML] is available on the main MailMan menu, as shown below:
NML New Messages and Responses [XMNEW] RML Read/Manage Messages SML Send a Message Query/Search for Messages AML Become a Surrogate (SHARED,MAIL or Other) Personal Preferences ... Other MailMan Functions ... Help (User/Group Info., etc.) ...
Select MailMan Menu Option: NML <Enter> New Messages and ResponsesSelect New mail option: Read new mail by basket// ?
Enter a code from the list.
Select one of the following:
LB List Baskets with new mail LN List all New messages LP List all Priority messages P Print all new messages Q Quit R Read new mail by basket S Scan all new messages
Select New mail option: Read new mail by basket//
Figure 5-77. NML—New Messages and Response option
NOTE: Besides the New Messages and Responses option [XMNEW, synonym NML], you can also use the Read/Manage Messages option [XMREAD; synonym RML] to read all of your messages in your mailbox, including the new messages.
REF: For more information on the Read/Manage Messages option [XMREAD; synonym RML], please refer to Chapters 3 and 4 in the MailMan User Guide.
When listing new messages, all new message information is displayed in detail, regardless of the message reader you choose. Also, the list of messages will be displayed in the order you set when using the User Options Edit option to set your preferences.
REF: For more information on setting your preferences, please refer to Chapters 1-3 in this manual.
For a more detailed explanation of the New Messages and Responses option [NML], please refer to Chapter 2 in the MailMan User Guide.
NOTE: Some command actions are only available when using the Detailed or Summary Full Screen message readers.
August 2002 MailMan Getting Started Guide 3Revised September 2006 Version 8.0
You can choose how you read your new mail by choosing from this list of options.

Managing Your Mail—Overview
Reading/Managing All Messages and Responses
Use the Read/Manage Messages option [synonym RML] to better manage your e-mail. It allows you to perform numerous actions on both new and existing messages stored on the system (e.g., in a particular mail basket, mailbox, etc.).
NOTE: The number of actions available to you depends on whether you are using the Detailed/Summary Full Screen message readers or the Classic message reader.
As long as a message is still in the MESSAGE file (#3.9) and you were a recipient or sender of the message, it is available to you.
The Read/Manage Messages option [XMREAD; synonym RML] is available on the main MailMan Menu, as shown below:
NML New Messages and Responses RML Read/Manage Messages [XMREAD] SML Send a Message Query/Search for Messages AML Become a Surrogate (SHARED,MAIL or Other) Personal Preferences ... Other MailMan Functions ... Help (User/Group Info., etc.) ...
Select MailMan Menu Option: RML <Enter> Read/Manage Messages
Figure 5-78. RML—Read/Manage Messages option
After selecting the Read/Manage Messages option [XMREAD; synonym RML], you can begin to manage your mail within each of your mail baskets, for example:
Select MailMan Menu Option: RML <Enter> Read/Manage MessagesSelect message reader: Detailed Full Screen// <Enter>Read mail in MAIL BASKET: IN// MailMan <Enter> (5 messages)
MailMan Basket, 5 messages (1-5)*=New/!=Priority........Subject....................Lines.From..........Read/Rcvd 5. [1225160] 08/17/98 MailMan surprise 3 XMUSER43,FORTY3 1/1 4. [1190657] 11/07/97 I'm so excited... 59 XMUSER2,TWO 733/733 3. [1182059] 08/29/97 RFC 822 Sender 355 <[email protected]> 1/1 2. [1028185] 04/02/96 MAILMAN CUSTOM HEADERS 20 XMUSER43,FORTY3 2/2 1. [1019674] 03/15/96 imap.vs.pop (fwd) 717 <[email protected]> Enter message number or command:
Figure 5-79. Managing your mail in your mail baskets
In the previous example (Figure 5-79), after selecting the Read/Manage Messages option (RML), MailMan prompted the user to choose a message reader. The user chose the Detailed Full Screen message reader (default) as the message reader by pressing the <Enter> key at the "Select message reader: Detailed Full Screen//" prompt.
4 MailMan Getting Started Guide August 2002Version 8.0 Revised September 2006

Managing Your Mail—Overview
MailMan then prompted the user to choose the mail basket. The user entered "MailMan" at the "Read mail in MAIL BASKET: IN//" prompt. Because the user chose the Detailed Full Screen message reader, MailMan displayed a detailed list of all new and existing messages in the "MailMan" mail basket. For this example, in this basket, the user did not have any new messages (no asterisk to the left of any message number).
At this point, the user can take any number of actions on any or all of the messages in this basket (e.g., read a message).
August 2002 MailMan Getting Started Guide 5Revised September 2006 Version 8.0

Managing Your Mail—Overview
Basket Action Codes
Detailed/Summary Full Screen Message Reader Command Actions
The following example (Figure 5-80) illustrates how you would display the available actions for a particular mail basket list of messages when using either the Detailed or Summary Full Screen message readers:
Select MailMan Menu Option: RML <Enter> Read/Manage MessagesSelect message reader: Detailed Full Screen// <Enter>Read mail in MAIL BASKET: IN// Transportation News (4 messages, 4 new)
Transportation News Basket, 4 messages (1-4), 4 new*=New/!=Priority........Subject....................Lines.From..........Read/Rcvd *4. [1223680] 08/06/02 Digest bat-list.v004.n187 563 [email protected] *3. [1223730] 08/04/02 Digest bat-list.v004.n181 584 [email protected] *2. [1223731] 08/06/02 Digest bat-list.v004.n183 738 [email protected] *1. [1223733] 08/04/02 Digest bat-list.v004.n182 954 [email protected] message number or command: .1-4
Transportation News Basket, 4 messages (1-4), 4 new*=New/!=Priority........Subject....................Lines.From..........Read/Rcvd>*4. [1223680] 08/06/02 Digest bat-list.v004.n187 563 [email protected]>*3. [1223730] 08/04/02 Digest bat-list.v004.n181 584 [email protected]>*2. [1223731] 08/06/02 Digest bat-list.v004.n183 738 [email protected]>*1. [1223733] 08/04/02 Digest bat-list.v004.n182 954 [email protected] message number or command: ?
Enter a message number (1-4) to read a message in this basket.Enter an internal message number to read any message still on the system,which you ever sent or received. Enter: .(-)n or n-m,a,c-d (de)select message n or a list of messages .(-)* (de)select all messages C Change the name of this basket CD Change Detail D Delete messages F Forward messages FI Filter messages H Headerless Print messages L Later messages NT New Toggle messages O Opposite selection toggle P Print messages S Save messages to another basket T Terminate messages Z Zoom selection togglePress ENTER or ^ to exit this list. Enter = to refresh this page.
Enter message number or command:
Figure 5-80. Displaying the command action list—Using the Detailed or Summary Full Screen Message Reader
In the previous figure (Figure 5-80), the user chose the Detailed Full Screen message reader to manage messages in his "Transportation News" mail basket.
6 MailMan Getting Started Guide August 2002Version 8.0 Revised September 2006
Enter a question mark here to display the list of action commands with the Detailed or Summary Full Screen message readers.
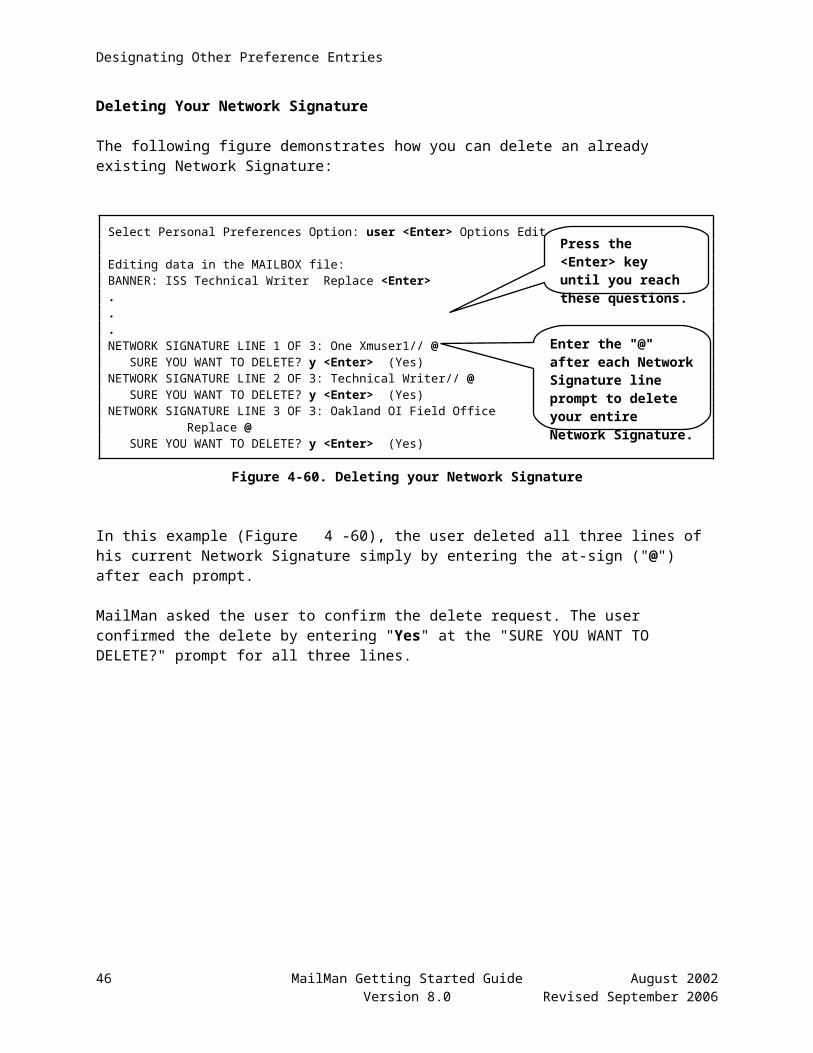
Managing Your Mail—Overview
The user first selected messages using the message selection functionality, so he could subsequently perform group actions on the selected messages. For this example, the user chose to select all four messages by entering ".1-4" at the "Enter message number or command:" prompt.
After selecting the messages, the user entered a single question mark ("?") at the "Enter message number or command:" prompt. MailMan displayed the list of available action codes.
REF: For more information on selecting messages for subsequent group action, please refer to the action codes described in the "Message Selection Actions" topic in Chapter 3 in the MailMan User Guide.
NOTE: The list of action codes available with the Detailed or Summary Full Screen message readers will differ from those action codes available with MailMan's Classic message reader. Also, some action codes are only available when certain conditions exist (e.g., messages selected for subsequent group action).
REF: For a complete list of action commands available with basket message lists, please refer to Table 5-1 that follows in this chapter.
August 2002 MailMan Getting Started Guide 7Revised September 2006 Version 8.0
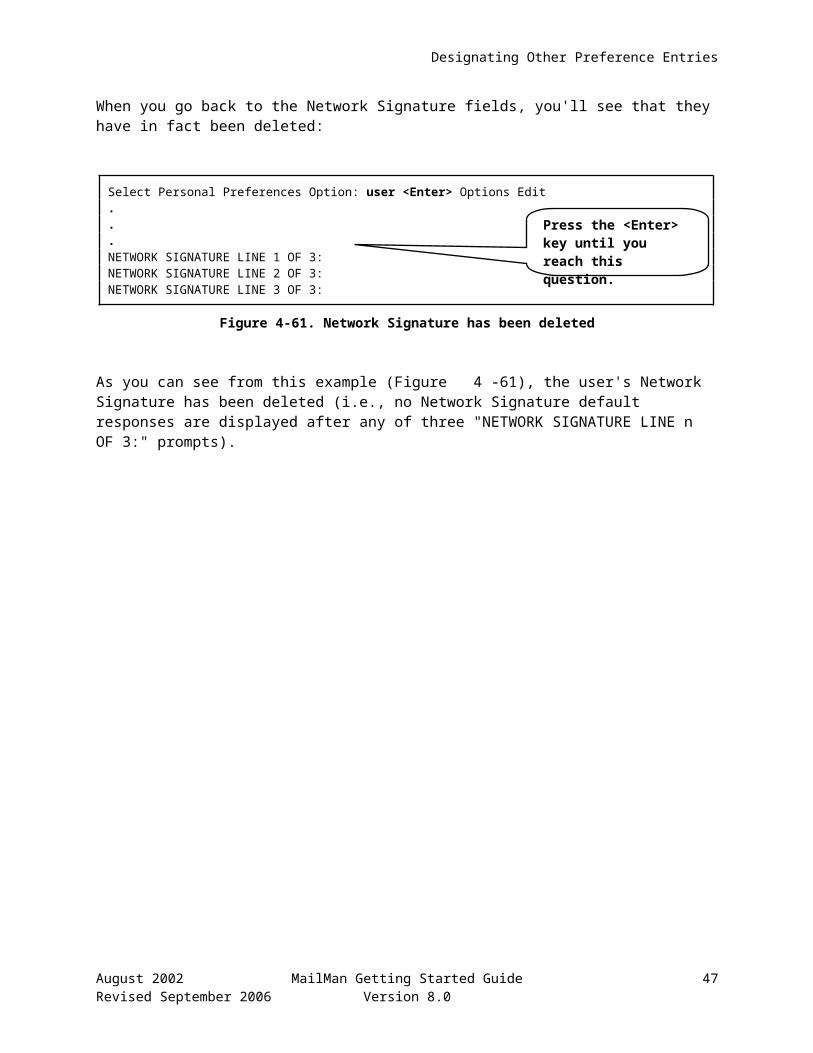
Managing Your Mail—Overview
MailMan's Classic Message Reader Command Actions
The following example (Figure 5-81) illustrates how you would display the available actions for a particular mail basket when using MailMan's Classic message reader:
Select MailMan Menu Option: rml <Enter> Read/Manage MessagesSelect message reader: Detailed Full Screen// cla <Enter> ClassicRead mail in MAIL BASKET: IN// TEST <Enter> II (4 messages, 1 new)Last message number: 4 Messages in basket: 4 (1 new)Enter ??? for help.
Subj: TEST BROADCAST From: POSTMASTERTEST II Basket Message: 4// ???
Press ENTER to read message 4. Enter a message number (1-4) to reada message in this basket. Enter an internal message number to read anymessage still on the system, which you ever sent or received. Enter: ? or ?? Display a summary or detailed list of messages in this basket ???? or ?HELP Display detailed help ?string Search for messages in this basket whose subject contains the specified string ??string Search for messages you once sent or received whose subject begins with the specified string C Change the name of this basket N New message list D Delete messages NT New Toggle messages F Forward messages P Print messages FI Filter messages Q Query (search for) messages H Headerless Print messages R Resequence messages I Ignore this message S Save messages to another basket L Later messages T Terminate messages
Subj: TEST BROADCAST From: POSTMASTERTEST II Basket Message: 4//
Figure 5-81. Displaying the command action list—Using the Classic Message Reader
In this figure (Figure 5-81), the user chose the MailMan's Classic message reader to manage messages in her "TEST II" mail basket. Upon entering three question marks ("???") at the "TEST II Basket Message: 4//" prompt, MailMan displayed the list of available action codes.
NOTE: The list of action codes available with MailMan's Classic message reader will differ from those action codes available with the Detailed or Summary Full Screen message readers.
REF: For a complete list of action commands available with basket message lists, please refer to Table 5-1 that follows in this chapter.
8 MailMan Getting Started Guide August 2002Version 8.0 Revised September 2006
Enter three question marks here to display the list of action commands available with the Classic message reader.
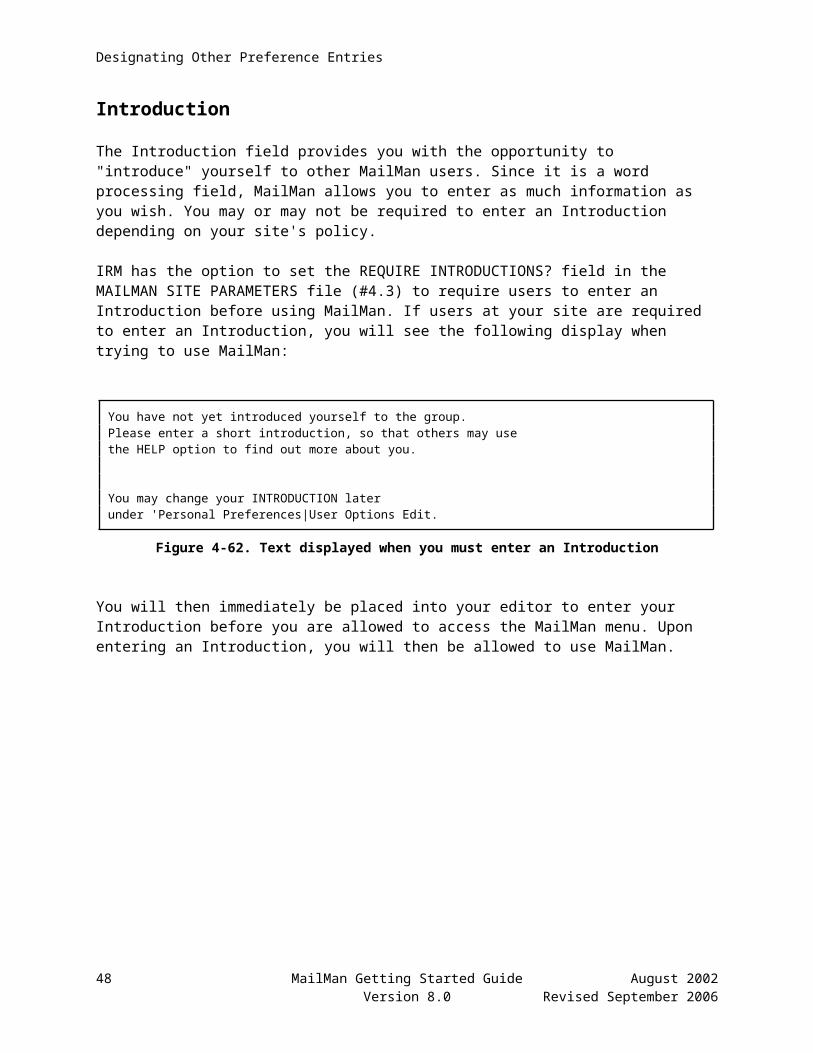
Managing Your Mail—Overview
Action Codes—Baskets
The following table lists all of the possible actions that you can perform after listing messages in a particular mail basket when using either the Detailed or Summary Full Screen message reader. Many, but not all, of these action codes are also available with MailMan's Classic message reader (exceptions are noted below):
Action Code Description
n Message Number ("n")—Enter the message number "n" from the list or the MailMan internal message identification number in order to read a specific message located anywhere on the system.(Available with all message readers.)
.n Select Message "n" (for subsequent action)—The decimal point ("." period) before the message number ("n") tells MailMan to select the message for subsequent action.(Not available with the Classic message reader.)
.-n Deselect Message "n"—The decimal point ("." period) and minus sign ("-" hyphen) before the message number ("n") tells MailMan to deselect a previously selected message.(Not available with the Classic message reader.)
.n-m,a,c-d Select a List of Messages (for subsequent group action)—The decimal point ("." period) before the message numbers ("n-m,a,c-d") tells MailMan to select messages for subsequent group action.(Not available with the Classic message reader.)
.-n-m,a,c-d Deselect a List of Messages—The decimal point ("." period) and minus sign ("-" hyphen) before the message numbers ("n-m,a,c-d") tells MailMan to deselect messages.(Not available with the Classic message reader.)
.* Select All Messages (for subsequent group action)—The decimal point ("." period) before the asterisk ("*") tells MailMan to select all messages for subsequent group action.(Not available with the Classic message reader.)
.-* Deselect All Messages—The decimal point ("." period) and minus sign ("-" hyphen) before the asterisk ("*") tells MailMan to deselect all messages previously selected.(Not available with the Classic message reader.)
C Change the Name of This Basket—Change the name of any mail basket in your mailbox except the "IN" and "WASTE" baskets.(Available with all message readers.)
CD Change Detail—Switch between Summary and Detailed Full Screen displays.(Not available with the Classic message reader; however, accomplishes what one or two question marks do at the message action prompt with the Classic message reader.)
August 2002 MailMan Getting Started Guide 9Revised September 2006 Version 8.0
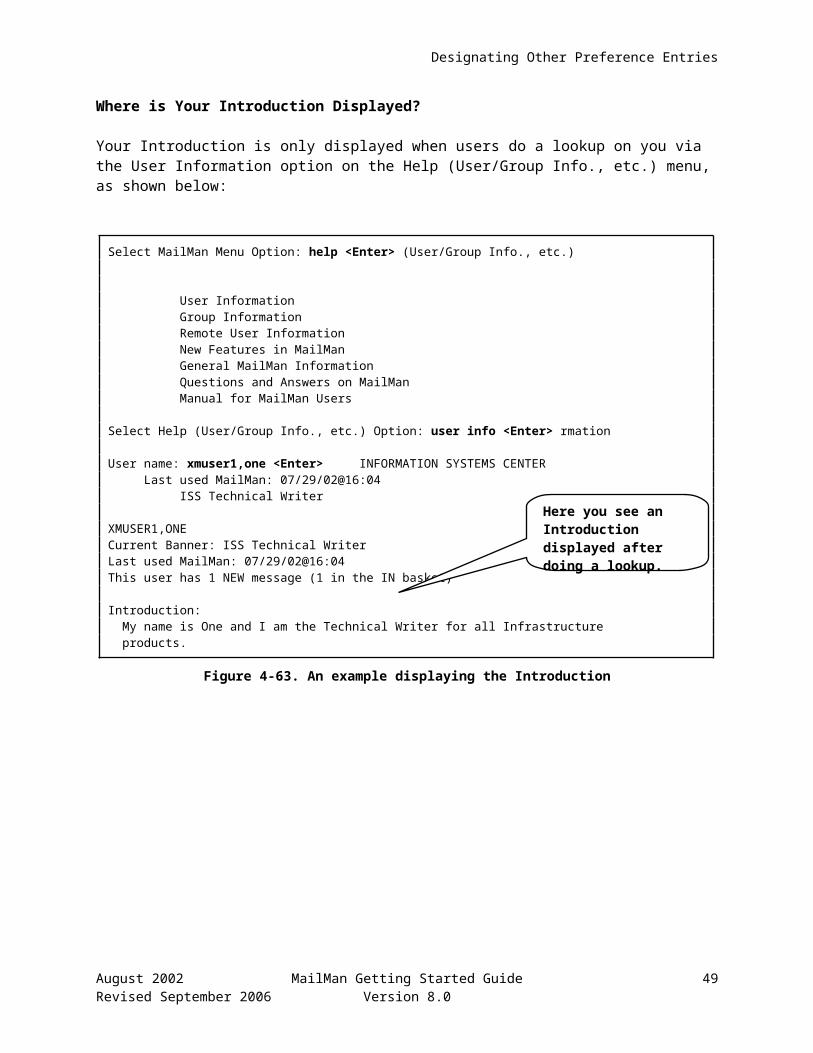
Managing Your Mail—Overview
Action Code Description
D Delete Messages—MailMan allows you to specify a range or list of messages for deletion from a basket. Moves messages to the "WASTE" basket. The messages are not permanently deleted from your mailbox or the system until all recipients delete or terminate the message.(Available with all message readers.)
F Forward Messages—MailMan allows you to specify a range or list of messages to be forwarded from a basket. Sends messages to another individual or group of individuals specified at the "Forward mail to:" prompt.(Available with all message readers.)
FI Filter Messages—Filter messages in a basket based on mail filters you've previously established for your mailbox.(Available with all message readers.)
H Headerless Print Messages—Print messages to any device that you choose without the print and header information. MailMan only prints the body of the message.(Available with all message readers.)
L Later Messages—MailMan allows you to specify a range or list of messages to be "latered" in a basket. Makes messages "new" for a specified later date and time; it can act as a reminder or tickler.(Available with all message readers.)
N New Messages—MailMan displays all "new" messages in a basket (i.e., asterisk appears to the left of the message).(Available with all message readers.)
NT New Toggle Messages—Use this toggle to make messages "new" or "not new."(Available with all message readers.)
O Opposite Selection Toggle (for subsequent group action)—Use this toggle to deselect previously selected messages and select previously unselected messages from a list of messages. This action code is only available when messages have been selected for subsequent group action.(Not available with the Classic message reader.)
P Print Messages—Print messages to any device you choose.(Available with all message readers.)
Q Query (Search for) Messages in This Basket—Search for messages based on criteria you enter.(Available with all message readers.)
R Resequence Messages—Resequence the order of messages in a mail basket. All messages will be resequenced in the order of their MailMan internal message identification numbers.(Available with all message readers.)
S Save Messages to Another Basket—Save messages to another existing mail basket or create a new mail basket.(Available with all message readers.)
T Terminate Messages—Move messages to the "WASTE" basket and permanently delete the messages from your mailbox. You will not receive further replies to those messages. Messages are not permanently deleted from the system until all recipients of the messages have deleted or terminated them.(Available with all message readers.)
10 MailMan Getting Started Guide August 2002Version 8.0 Revised September 2006
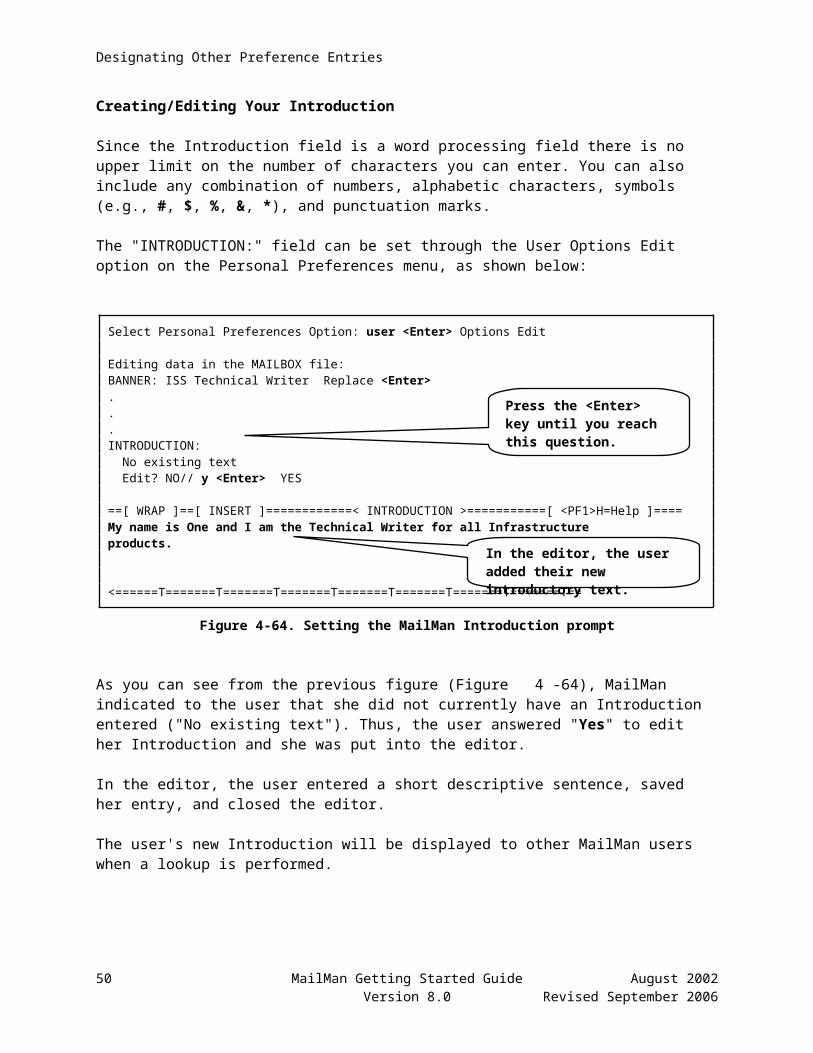
Managing Your Mail—Overview
Action Code Description
X Toggle the transmit priority in remote message queues.(Postmaster Only)
Z Zoom Selection Toggle (for subsequent group action)—Use this toggle to zoom in and only display selected messages or zoom out and display all messages. This action code is only available when messages have been selected for subsequent group action.(Not available with the Classic message reader.)
= Refresh Page—The equal sign ("=") tells MailMan to redisplay the basket message list page you were viewing ("refresh" the page/screen).(Not available with the Classic message reader.)
+ Next Page—The plus sign ("+") tells MailMan to go to the next page. This action code is only available when you have more than one "page" of messages when using the Detailed or Summary Full Screen message readers.(Use the <Enter> key with the Classic message reader.)
+n Page Forward "n" Pages—The plus sign ("+") before a number ("n") tells MailMan to go forward "n" pages. This action code is only available when you have more than one "page" of messages when using the Detailed or Summary Full Screen message readers.(Use the <Enter> key with the Classic message reader.)
- Previous Page—The minus sign ("-" hyphen) tells MailMan to go to the previous page. This action code is only available when you have more than one "page" of messages.(Not available with the Classic message reader.)
-n Page Back n Pages—The minus sign ("-" hyphen) before a number ("n") tells MailMan to go back "n" pages. This action code is only available when you have more than one "page" of messages.(Not available with the Classic message reader.)
0 First Page—A zero tells MailMan to go to the first page. This action code is only available when you have more than one "page" of messages.(Not available with the Classic message reader.)
?string Search for messages in the basket whose subject contains the string entered.(Available with all message readers.)
??string Search for messages anywhere on the system, which you ever sent or received, whose subject begins with the string entered.(Available with all message readers.)
^ Exit the List (caret, "^")—Exit from the list of messages.(Available with all message readers.)
Table 5-1. Action codes—Basket message lists
NOTE: Please remember that not all action codes are available with every message list or with every message reader. Some action codes are only available when certain conditions exist.
REF: For a detailed explanation of each action code, please refer to Chapter 3 in the MailMan User Guide.
August 2002 MailMan Getting Started Guide 11Revised September 2006 Version 8.0

Managing Your Mail—Overview
Individual Messages Action Commands
Displaying Action Codes
The following example (Figure 5-82) illustrates how you would display the available actions for a particular message you are reading when using any three of the message readers. For this example, the user was using the Detailed Full Screen message reader:
Subj: Local: biweekly info exchange message # 122 [#1220526]07/14/02@09:38 2 linesFrom: POSTMASTER 12 of 12 responses read. In 'IN' basket. -------------------------------------------------------------
Enter message action (in IN basket): IGNORE// ?
Enter a code from the list.
A Answer Q Query B Backup Q xxx Query recipient(s) xxx BR Print to the Browser QC Query Current C Copy QD Query Detailed D Delete QN Query Network F Forward QNC Query Not Current H Headerless Print QT Query Terminated HG Help:Group Information R Reply HU Help:User Information RI Reply and Include responses I Ignore S Save L Later T Terminate N New V Vaporize date edit P Print W Write
Enter message action (in IN basket): IGNORE//
Figure 5-82. Displaying the message command action list—Using any Message Reader
In this example (Figure 5-82), the user is currently reading message #1220526. In order to get the command list of actions, he simply enter a single question mark ("?") at the "Enter message action (in IN basket): IGNORE//" prompt.
MailMan then displays the available actions the user can take with this particular message; however, not all of the action codes provided by MailMan are available (listed) with this particular message.
NOTE: Please remember that some action codes are only available when certain conditions exist (e.g., Priority messages, PackMan messages).
REF: For a complete list of message action commands, please refer to Table 5-2 that follows in this chapter.
12 MailMan Getting Started Guide August 2002Version 8.0 Revised September 2006
Enter a question mark here to display the list of action commands available after reading a message.
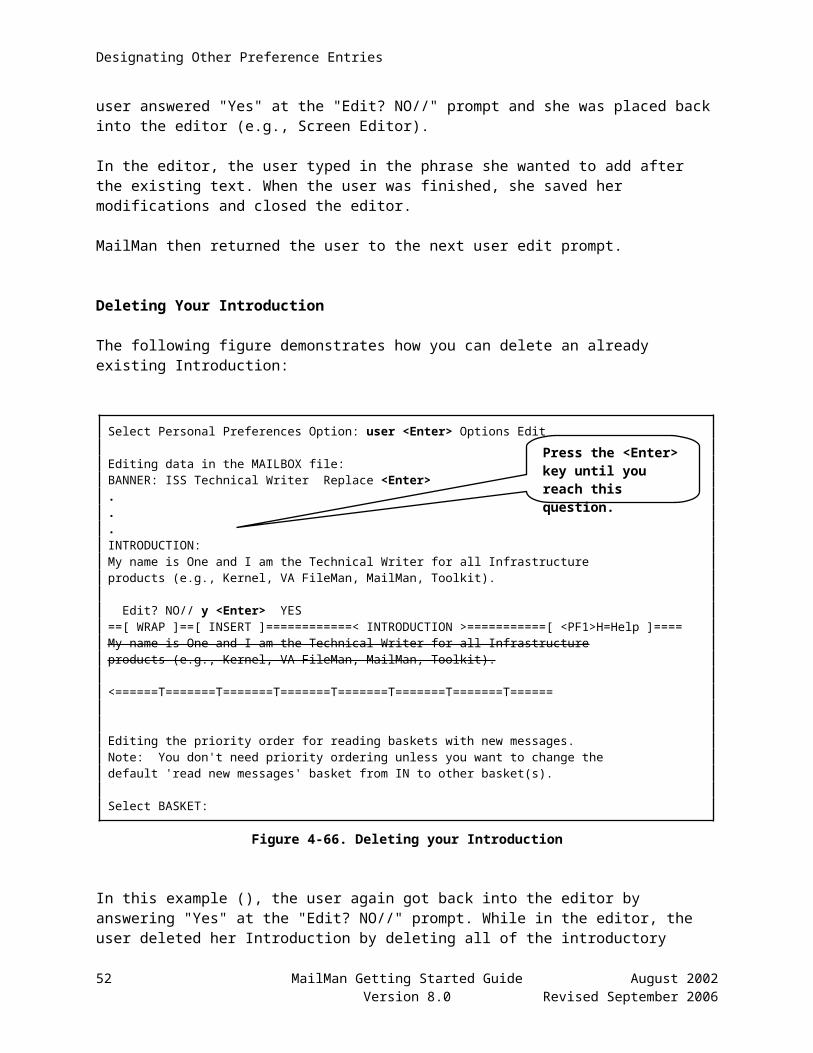
Managing Your Mail—Overview
Action Codes—Individual Messages
The following table lists all of the possible message action codes that you can perform after reading a particular message. All of these action codes are available when using any of the three message readers (i.e., the Detailed Full Screen, Summary Full Screen, or Classic message readers):
Action Code Description
A Answer—The "Answer" command issues a new message to send to the sender of the original message.
B Backup—Back up to the original text of the message or to a particular response.
BR Print to the Browser.
C Copy—Create a copy of a message.
D Delete—Delete a message by moving it to your "WASTE" basket.
E Edit—Edit a message you sent.
F Forward—Forward a message to different recipients.
H Headerless Print—Print a message without print or header information (i.e., no Subject and From lines).
HG Help: Group Information—Access mail group help to get information about a mail group.
HU Help: User Information—Access user help to get information about a user.
I Ignore—Ignore the message and leave it in the current mail basket.
IN Information Only Toggle—Toggle whether or not a message, sent by you, is Information Only. Recipients cannot respond to Information Only messages.
K Priority Replies Toggle—Toggle whether or not all future replies to this priority message are received as priority or ordinary.
L Later—Have the message made "new" in your mailbox at a specified later date and time.
N New/Un New Toggle—Toggle a message to be new or not new.
P Print—Print a message to a specified device.
Q Query—Obtain general recipient information on a message.
Q xxx Query Recipient(s) xxx—Obtain information on a specified recipient of a message, where "xxx" represents the name of the recipient.
QC Query Current—Obtain information on local recipients who are current (i.e., read all of the responses) on a message.
QD Query Detailed—Obtain detailed recipient information on a message.
QN Query Network—Obtain network and detailed recipient information on a message.
QNC Query Not Current—Obtain information on local recipients who are not current (i.e., have not read all of the responses) on a message.
August 2002 MailMan Getting Started Guide 13Revised September 2006 Version 8.0

Managing Your Mail—Overview
Action Code Description
QT Query Terminated—Obtain information on local recipients who have terminated from a message.
R Reply—Compose and send a reply to a message.
RI Reply and Include responses—Compose and send a reply to a message with previous responses included in your reply.
S Save—Save a message to an existing mail basket or to a new basket that you create on the fly.
T Terminate—Terminate a message by putting it in your "WASTE" basket and stop receiving any future replies to that message.
V Vaporize Date Edit—Set a specified date and time to vaporize (delete) a message from your mail basket.
W Write—Send a new message while reading another message.
X Extract KIDS or PackMan Messages—Provides a list of specific actions you can perform on these types of messages (for IRM personnel or developers).
^ Exit the Message (caret, "^")—Acts like the Ignore action code.
Table 5-2. Action codes—Messages
NOTE: Please remember that not all action codes are available with every message. Some action codes are only available when certain conditions exist.
REF: For a detailed explanation of each action code, please refer to Chapter 4 in the MailMan User Guide.
14 MailMan Getting Started Guide August 2002Version 8.0 Revised September 2006
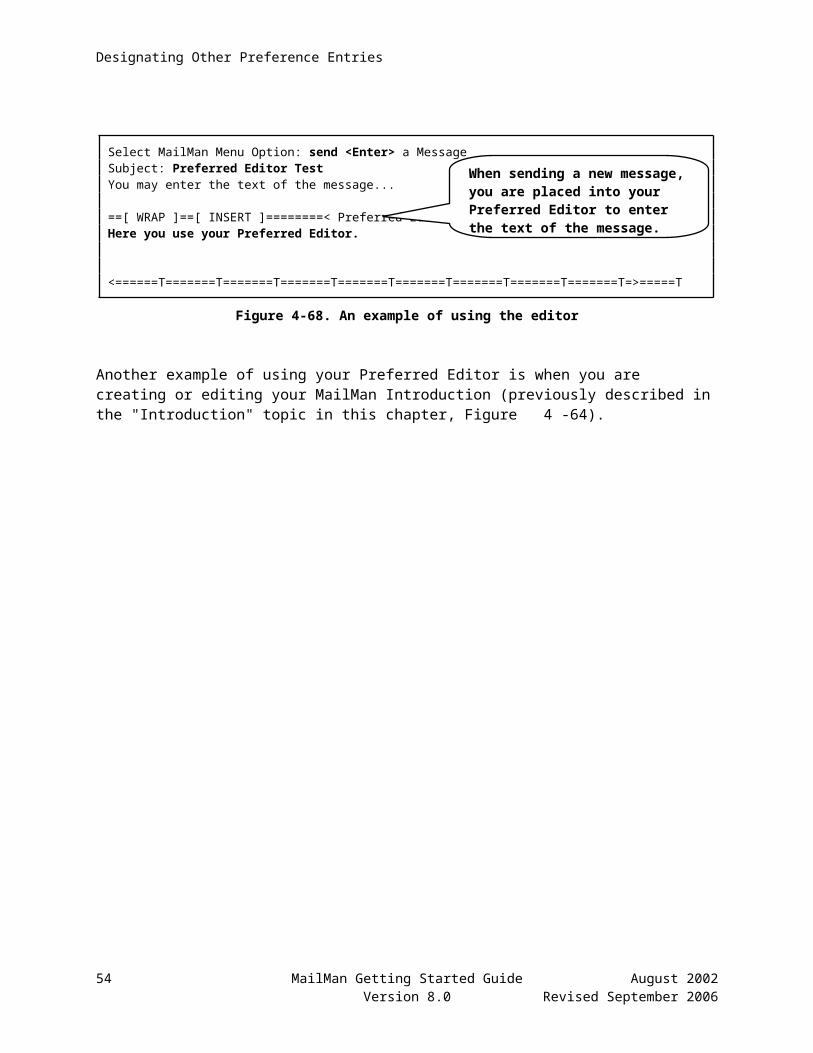
Managing Your Mail—Overview
Sending Mail
Sending messages gives you the opportunity to obtain or disseminate information. In addition to replying to an existing message, the MailMan interface provides the Send a Message option [synonym SML] for you to send new mail.
Use the Send a Message option when you wish to send new messages to any number of recipients. It is available on the MailMan Menu, as shown below:
NML New Messages and Responses RML Read/Manage Messages SML Send a Message Query/Search for Messages AML Become a Surrogate (SHARED,MAIL or Other) Personal Preferences ... Other MailMan Functions ... Help (User/Group Info., etc.) ...
Select MailMan Menu Option: SML <Enter> Send a Message
Figure 5-83. SML—Send a Message option
Once you select the Send a Message option, MailMan allows you to send new mail in four easy steps:
1. Enter the subject of your message.
2. Compose your message (i.e., enter the text of your message).
3. Address your message (e.g., send it to individual recipients or a mail group).
4. Send your message. You can further customize your message before sending it using action commands (e.g., make it: priority, closed, confidential, information only, etc.).
REF: For a complete list of message action commands when sending a message, please refer to Table 5-3 that follows in this chapter.
The functionality and features associated with sending mail are described in greater detail in Chapter 5 in the MailMan User Guide.
August 2002 MailMan Getting Started Guide 15Revised September 2006 Version 8.0
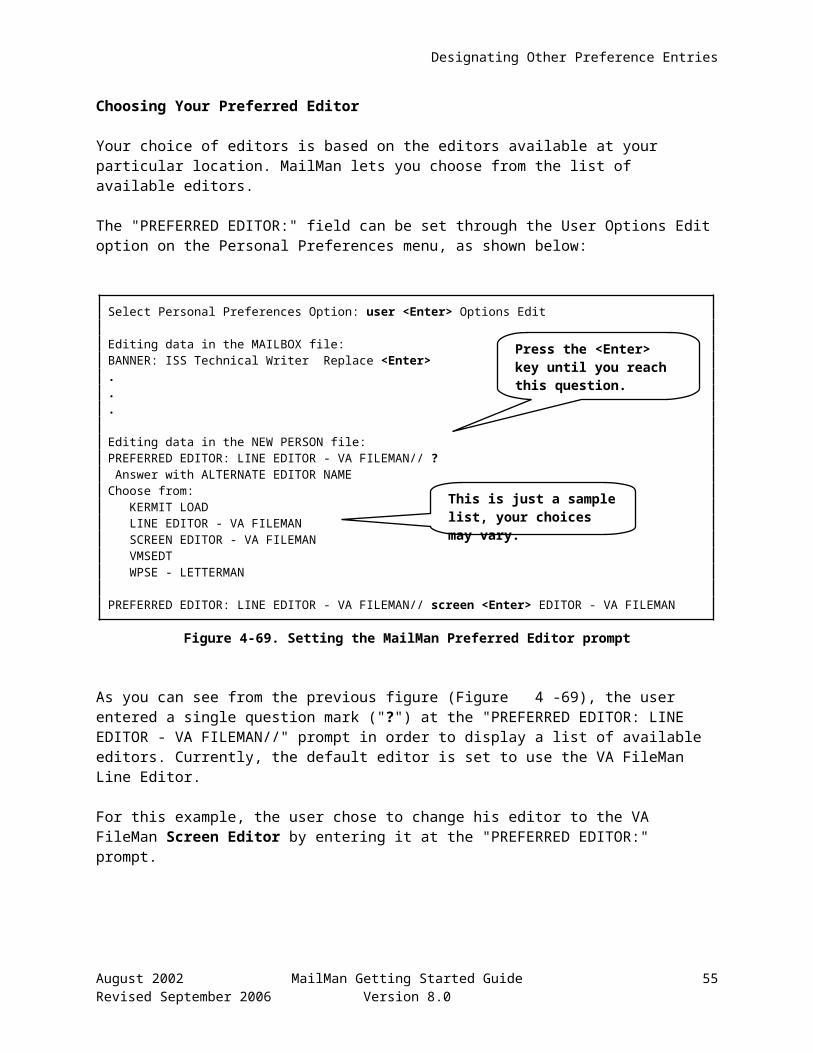
Managing Your Mail—Overview
Action Codes—Sending Messages
The following table lists all of the possible actions that you can perform when sending a message (entered at the "Select Message option: Transmit now//" prompt):
Action Code Description
B Backup—Back up to review the message you were just editing before you send it.
C Confidential Toggle—Toggle whether or not a message can only be read by the designated recipient and not their surrogate(s).
D Delivery Basket Set—Specify the delivery basket to send the message for all recipients; however, each recipient controls how they actually will receive the mail.
ER Edit Recipients—Edit just the recipients of your message.
ES Edit Subject—Edit just the text in the subject of your message.
ET Edit Text—Edit just the text in the body of your message.
I Information Only Toggle—Toggle whether or not a message prevents recipients from replying.
IM Include Message—Include any combination of responses from another message in the new message being created.
L Transmit later—Send your message to all addressees at a specified date and time.
NS Network Signature—Append a Network Signature to the text of your message.
P Priority Delivery Toggle—Toggle whether or not a message is sent as priority mail.
R Confirm Receipt Toggle—Toggle whether or not a message will send you a notification message when a recipient has opened your message.
S Scramble Text With Password—Scrambles your message text when passing sensitive or private information. Recipient(s) must be given a "Scramble Hint" to decipher the password to unscramble and read the message.
T Transmit Now—Immediately send your message to all addressees.
V Vaporize date set—Automatically set your message for deletion from all recipients' mailboxes at a specified date and time; however, recipients can edit this date for themselves.
X Closed Message Toggle—Toggle whether or not a message prevents recipients from forwarding your message.
^ Caret ("^")—Cancel your message before sending it. (Available at any prompt during the send process.)
Table 5-3. Action codes—Sending messages
REF: For a detailed explanation of each action code, please refer to Chapter 5 in the MailMan User Guide.
16 MailMan Getting Started Guide August 2002Version 8.0 Revised September 2006

Glossary
BANNER A line of text with a user's name and domain, which is displayed to everyone who sends mail to the user.
BLOB Binary Large Objects.
BSCP Block Mode Simple Communications Protocol. A procedure used for message transmission with error checking.
BULLETIN Electronic mail messages that are automatically delivered by MailMan under certain conditions. For example, a bulletin can be set up to fire when database changes occur, such as adding a record to the file of users.
DOMAIN A site for sending and receiving mail.
LOCAL The system to which a user is currently signed on.
MAIL BASKET Mail baskets provide a way of saving messages in a sorted fashion similar to a filing system. Mail baskets are created at the "message action" prompt by typing an "S" to save and then the name you wish to call the basket. If the basket already exists, the message will be put in it. If the basket does not exist, you will be asked if you want it created. Placing a message in a mail basket other than the "IN" or "WASTE" baskets protects the message from being automatically purged when the IN BASKET PURGE is run.
MAILMAN The VistA software that provides a mechanism for handling electronic communication, whether it is user-oriented mail messages, automatic firing of bulletins, or initiation of server-handled data transmissions.
MESSAGE-ID A message identifier which shows the message number and the domain name of the message.
MIME Multipurpose Internet Mail Extension. A standard that allows you to create structured message bodies.
MULTIMEDIA MAIL Multimedia Mail gives the capability of attaching Binary Large Objects (BLOBs) to electronic messages so that images, spreadsheets, graphs, and other operating system files that are not pure ASCII text, can be sent and received either locally or across the network.
PERIPHERAL DEVICE Any hardware device other than the computer itself (central processing unit plus internal memory). Typical examples include card readers, printers, CRT units, and disk drives.
August 2002 MailMan Getting Started Guide Glossary-1Revised September 2006 Version 8.0
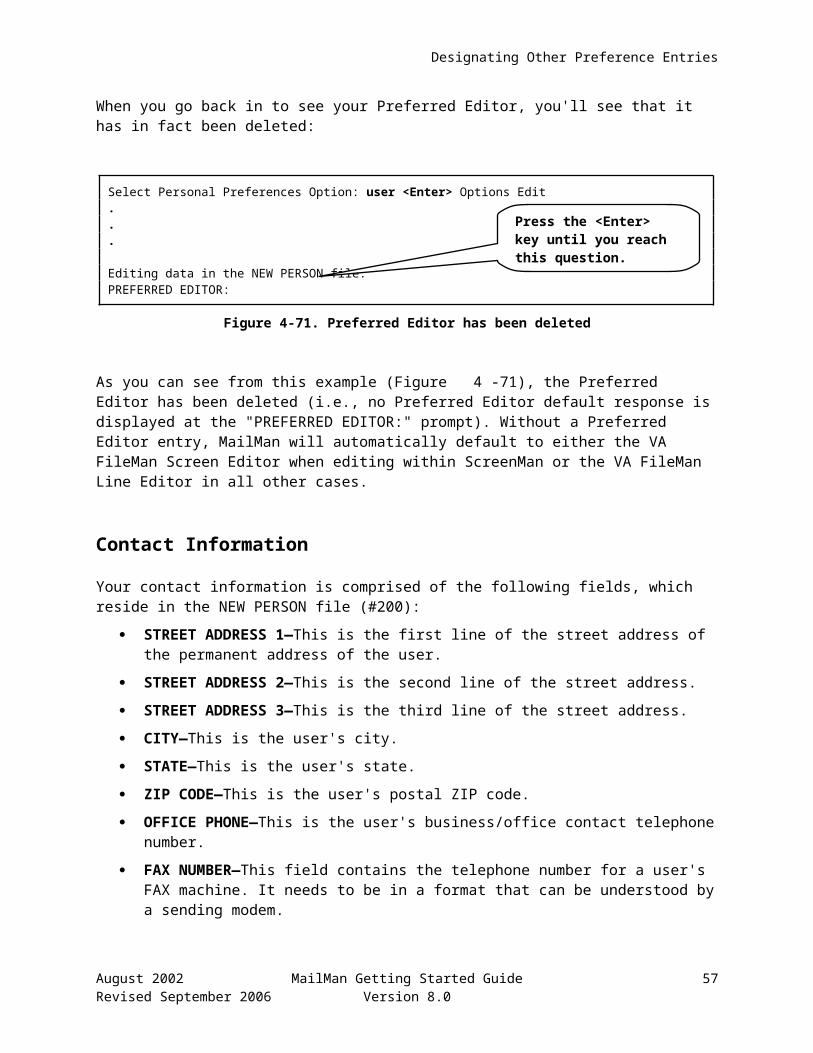
Glossary
PHYSICAL LINK DEVICE Hardware used to establish outgoing communication.
"PLAYING A SCRIPT" A method of opening a transmission link for a message. It is used to force message transmission and testing.
POLLER An option that opens the transmission line to all domains with "P" in the Flags field.
POSTMASTER The basket where message queues are stored. Also, the person who manages this basket for a particular site.
PROTOCOL Code containing logic for opening and closing links, and for sending/receiving transmissions.
PURGE In VistA MailMan, a procedure used to delete messages or message pointers.
QUEUE A list that stores messages destined for a given domain.
QUEUING Requesting that a job be processed in the background rather than in the foreground within the current session. Jobs are processed sequentially (first-in, first-out). The Kernel's TaskMan handles the queuing of tasks.
REMOTE Any system which a user is not signed on to.
SCRIPT A set of MailMan commands and transmission scripts to a remote domain in the DOMAIN file (#4.2).
SERVER In VistA MailMan, an automatic mail reader for internal messages.
SMTP Simple Mail Transport Protocol. The primary transport protocol for MailMan
SURROGATE A person who is authorized to read and/or send mail in another user's name.
TRANSMISSION SCRIPT List of commands for directing a message stored in the TRANSMISSION SCRIPT field.
VALIDATION NUMBER A security check number that must be in both the sending and receiving sites' domains.
WRAP-AROUND MODE Text that is fit into available column positions and automatically wraps to the next line, sometimes by splitting at word boundaries (spaces).
Glossary-2 MailMan Getting Started Guide August 2002Version 8.0 Revised September 2006

Glossary
REF: For a comprehensive list of commonly used infrastructure- and security-related terms and definitions, please visit the ISS Glossary Web page at the following Web address:
http://vaww.vista.med.va.gov/iss/glossary.asp
For a comprehensive list of acronyms, please visit the ISS Acronyms Web site at the following Web address:
http://vaww.vista.med.va.gov/iss/acronyms/index.asp
August 2002 MailMan Getting Started Guide Glossary-3Revised September 2006 Version 8.0
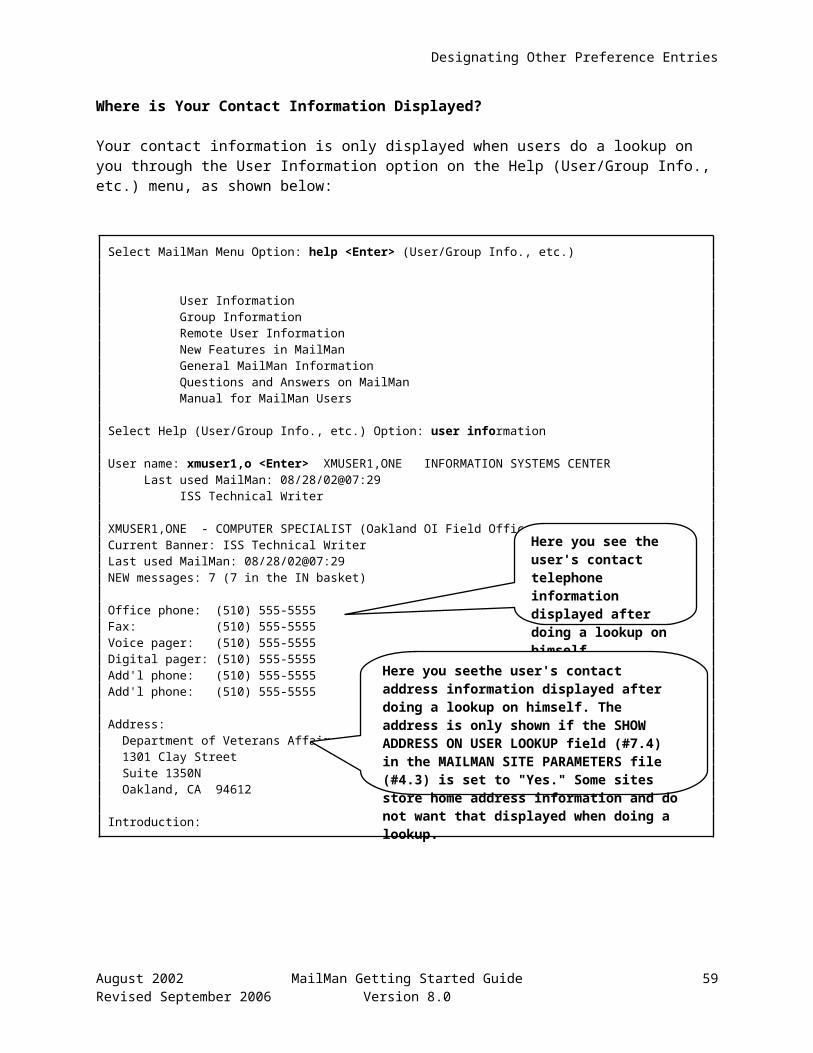
Glossary
Glossary-4 MailMan Getting Started Guide August 2002Version 8.0 Revised September 2006
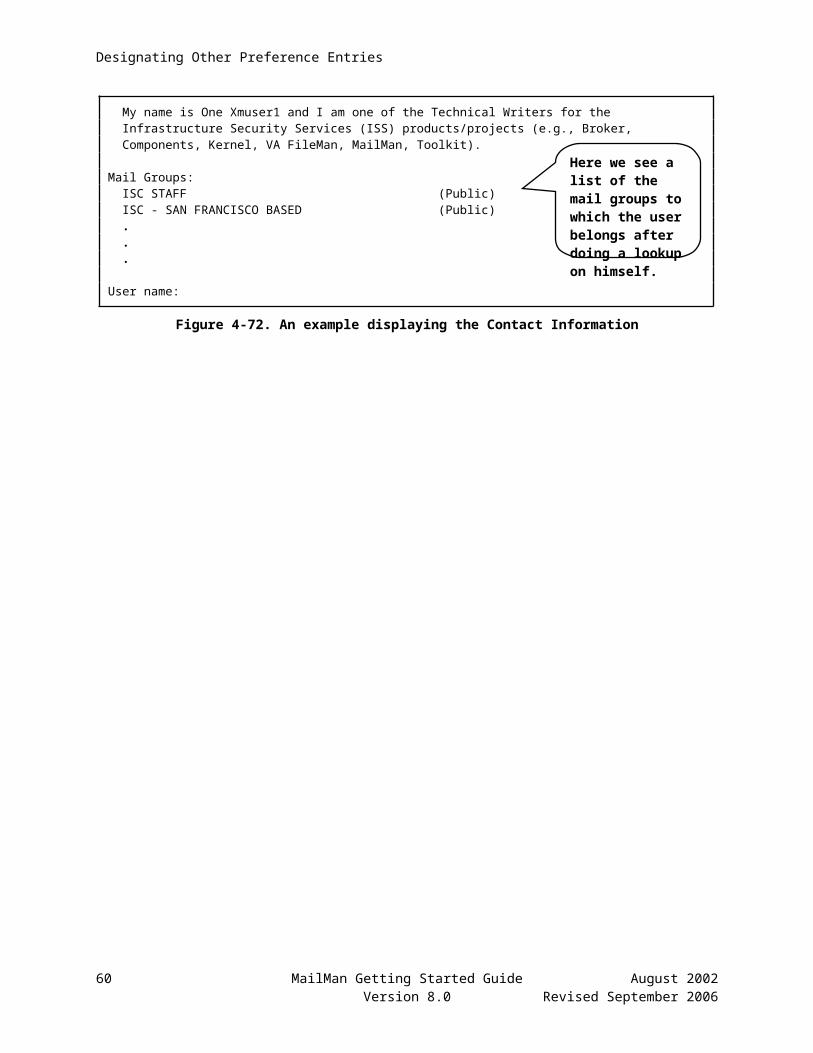
Index
AAcknowledgements, xiAcronyms (ISS)
Home Page Web Address, Glossary, 3Action Codes
All Codes forBasket Message Lists, 5-9
Baskets, 5-6Classic Message Reader, 5-8Detailed/Summary Full Screen Message
Readers, 5-6Displaying All Codes for
Messages, 5-12Messages, 5-12, 5-13Sending Messages, 5-16
ADD'L PHONE 1 Field, 4-40Creating or Editing, 4-42
ADD'L PHONE 2 Field, 4-40Creating or Editing, 4-42
Adobe Acrobat Quick Guide Web Address, xviAdobe Home Page Web Address, xviAll Action Codes
Basket Message Lists, 5-9AML, Become a Surrogate (SHARED,MAIL or
Other) Option, 5-1ASK BASKET Field, 3-9ASK EACH TIME MESSAGE IS READ
(Default Response For PRIORITY RESPONSES PROMPT Field), 4-15
Assumptions About the Reader, xv
BBanner Edit Option, 4-1, 4-5, 4-7BANNER Field, 4-3
Creating or Editing, 4-5Deleting, 4-9Where is It Displayed?, 4-3
Basket Number, 3-4Baskets
Action Codes, 5-6, 5-9Delivery Privileges, 3-5Message List Action Codes, 5-9Message Location, 2-3, 2-9, 2-14Naming, 3-3
Organizing, 3-1Set Your Mail Basket Prompt, 3-9
Become a Surrogate (SHARED,MAIL or Other) [AML] Option, 5-1
CCallout Boxes, xivCaret, 5-11, 5-14, 5-16Choosing
Default Message Reader, 2-1Message Display Order, 3-12New Messages Default Option, 3-17New Messages Read Order, 3-15Preferred Editor, 4-38
CITY Field, 4-40Creating or Editing, 4-42
Classic Detailed Information, 2-3, 2-8Classic MailMan Message Reader, 2-3Classic Summary Information, 2-3, 2-7Command Action Codes
Basket Message Lists, 5-9Baskets, 5-6Classic Message Reader, 5-8Detailed/Summary Full Screen Message
Readers, 5-6Message, 5-12Messages, 5-13Sending Messages, 5-16
ConfigureBanner Edit Option, 4-1, 4-5, 4-7Delivery Basket Edit Option, 3-5User Options Edit Option, 2-4, 2-16, 3-9, 3-
13, 3-15, 3-18, 4-1, 4-3, 4-10, 4-11, 4-13, 4-15, 4-21, 4-23, 4-27, 4-32, 4-37, 4-40
Contact Information, 4-40Creating or Editing, 4-42Deleting, 4-45Modifying, 4-44Where is It Displayed?, 4-41
Contents, vCreating
Banners, 4-1, 4-5, 4-7Contact Information, 4-42Introduction, 4-34
August 2002 MailMan Getting Started Guide Glossary-1Revised September 2006 Version 8.0
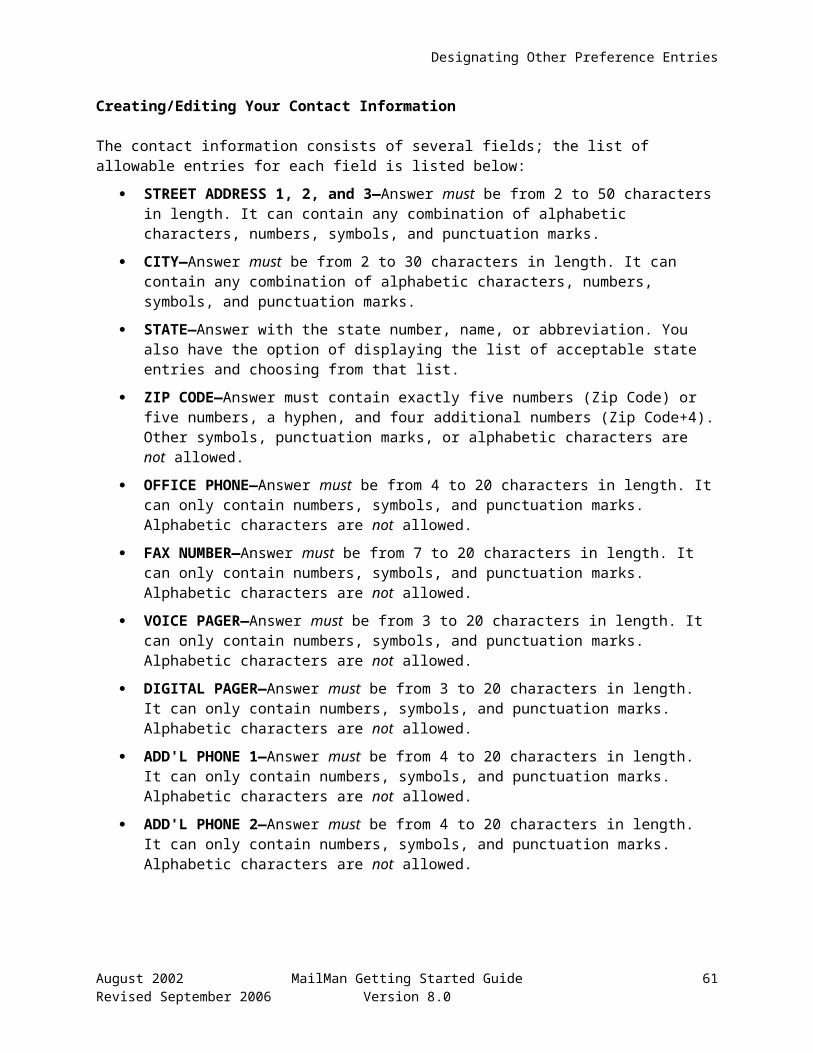
Index
MailMan Institution, 4-24Network Signature, 4-29
Customizing Your MailMan Message Center, 1-1
DData Dictionary
Data Dictionary Utilities Menu, xvListings, xv
Default Message Reader, How to Set, 2-16Delete, MESSAGE ACTION DEFAULT Field
Value, 4-10Deleting
Banners, 4-9Contact Information, 4-45Introduction, 4-36MailMan Institution, 4-26Network Signature, 4-31Preferred Editor, 4-39
Delivery Basket Edit Option, 3-5Delivery Basket Privileges, How to Set, 3-5Designating
Other Preference Entries, 4-1Detailed Full Screen Message Reader, 2-9Detailed Information
Classic, 2-3, 2-8Detailed Full Screen, 2-9
DIGITAL PAGER Field, 4-40Creating or Editing, 4-42
Displaying Command Action CodesMessage, 5-12
DO NOT ASK EACH TIME MESSAGE IS READ (Response For PRIORITY RESPONSES PROMPT Field), 4-15
DocumentationHistory, iiiSymbols, xiii
EEditing
Banners, 4-1, 4-5, 4-7Contact Information, 4-42Delivery Basket, 3-5Introduction, 4-34Mail Filters, 3-3MailMan Institution, 4-24Network Signature, 4-29
Editor, Preferred, 4-37EVS Anonymous Directories, xvi
EXISTING BASKETS ONLY (Response For Delivery Basket Privileges), 3-5
FFAX NUMBER Field, 4-40
Creating or Editing, 4-42Fields
NEW MESSAGES DEFAULT OPTION, 3-18Figures and Tables, viiFiles
MAILMAN SITE PARAMETERS (#4.3), 4-23
MESSAGE (#3.9), 5-4Flags, 2-3, 2-9, 2-14From, 2-4, 2-9, 2-14FTP, xvi
GGlossary, 1
ISS Home Page Web Address, Glossary, 3
HHeader, 4-11, 4-25Help
At Prompts, xivOnline, xivQuestion Marks, xiv
Help (User/Group Info., etc.) Option, 4-4, 4-33, 4-41, 5-1User Information Option, 4-4, 4-33, 4-34, 4-
41History, Revisions to Documentation and
Patches, iiiHome Pages
Adobe Acrobat Quick Guide Web Address, xvi
Adobe Web Address, xviHSD&D Home Page Web Address, xvISS
Acronyms Home Page Web Address, Glossary, 3
Glossary Home Page Web Address, Glossary, 3
MailMan Home Page Web Address, xviVistA Documentation Library (VDL) Home
Page Web Address, xviHow to
Choose Your Message Display Order, 3-12
Index-2 MailMan Getting Started Guide August 2002Version 8.0 Revised September 2006
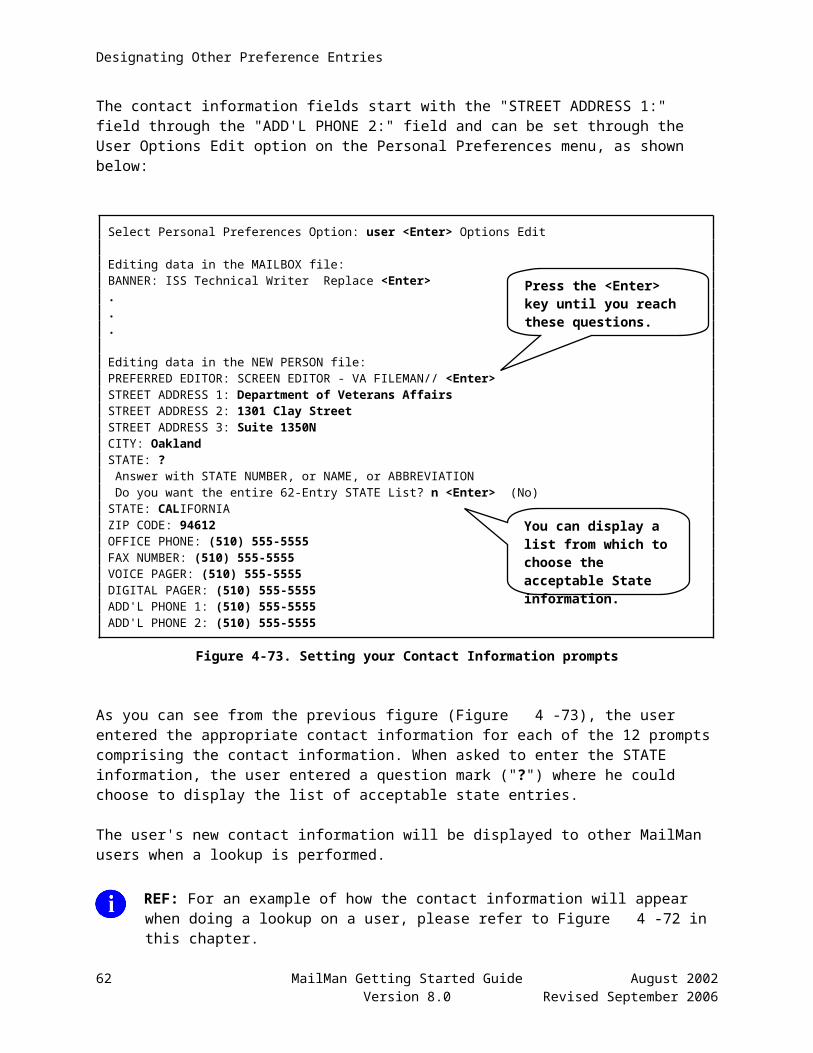
Index
Choose Your New Messages Default Option, 3-17
Choose Your New Messages Read Order, 3-15Name Your Mail Baskets, 3-3Obtain
Technical Information Online, xivSet Your Default Message Reader, 2-16Set Your Delivery Basket Privileges, 3-5Set Your Mail Basket Prompt, 3-9Use this Manual, xiii
HSD&DHome Page Web Address, xv
IIgnore Action
Classic Message Reader, 2-6Ignore, MESSAGE ACTION DEFAULT Field
Value, 4-10Internal Message Identification Number, 2-3, 2-
9, 5-9, 5-10Introduction
Managing Your Mail, 5-1INTRODUCTION Field, 4-32
Creating or Editing, 4-34Deleting, 4-36Modifying, 4-35Where is It Displayed?, 4-33
Introduction to MailMan Getting Started Manual, 1-1
ISSAcronyms
Home Page Web Address, Glossary, 3Glossary
Home Page Web Address, Glossary, 3
LLines, 2-4, 2-9LIST ALL NEW MESSAGES, 3-17LIST BASKETS WITH NEW MAIL Option, 3-
17List File Attributes Option, xv
MMail Basket Prompt, How to Set, 3-9MailMan Home Page Web Address, xviMAILMAN INSTITUTION Field, 4-23
Creating or Editing, 4-24Deleting, 4-26Modifying, 4-25
Where is It Displayed?, 4-23MAILMAN SITE PARAMETERS File (#4.3),
4-10, 4-23, 4-32Managing Your Mail
Introduction, 5-1ME, P-MESSAGE FROM Field Value, 4-21Menus
Data Dictionary Utilities, xvMESSAGE ACTION DEFAULT Field, 4-10MESSAGE File (#3.9), 5-4Message Filter Edit Option, 3-3Message Numbers, 2-3, 2-9, 2-14, 5-9MESSAGE ORDER Field, 2-4, 3-13, 3-15Message Reader
How toSet Your Default, 2-16
MESSAGE READER Field, 2-16MESSAGE READER PROMPT Field, 2-17Message Readers, 2-1
Classic, 2-3Action Codes, 5-8
Detailed Full Screen, 2-9Action Codes, 5-6
Summary Full Screen, 2-14Action Codes, 5-6
Message Sent Date, 2-3, 2-9Messages
Action Codes, 5-12, 5-13Displaying Action Codes, 5-12Header, 4-11, 4-25Organizing, 3-1
ModifyingContact Information, 4-44Introduction, 4-35MailMan Institution, 4-25Network Signature, 4-30
NName Your Mail Baskets, How to, 3-3Network Signature, 4-27
Creating or Editing, 4-29Deleting, 4-31Modifying, 4-30Where is It Displayed?, 4-27
NETWORK SIGNATURE FieldLINE 1 OF 3, 4-27LINE 2 OF 3, 4-27LINE 3 OF 3, 4-27
New Messages and Responses Option, 3-17, 3-18, 5-1, 5-2, 5-3
August 2002 MailMan Getting Started Guide Index-3Revised September 2006 Version 8.0
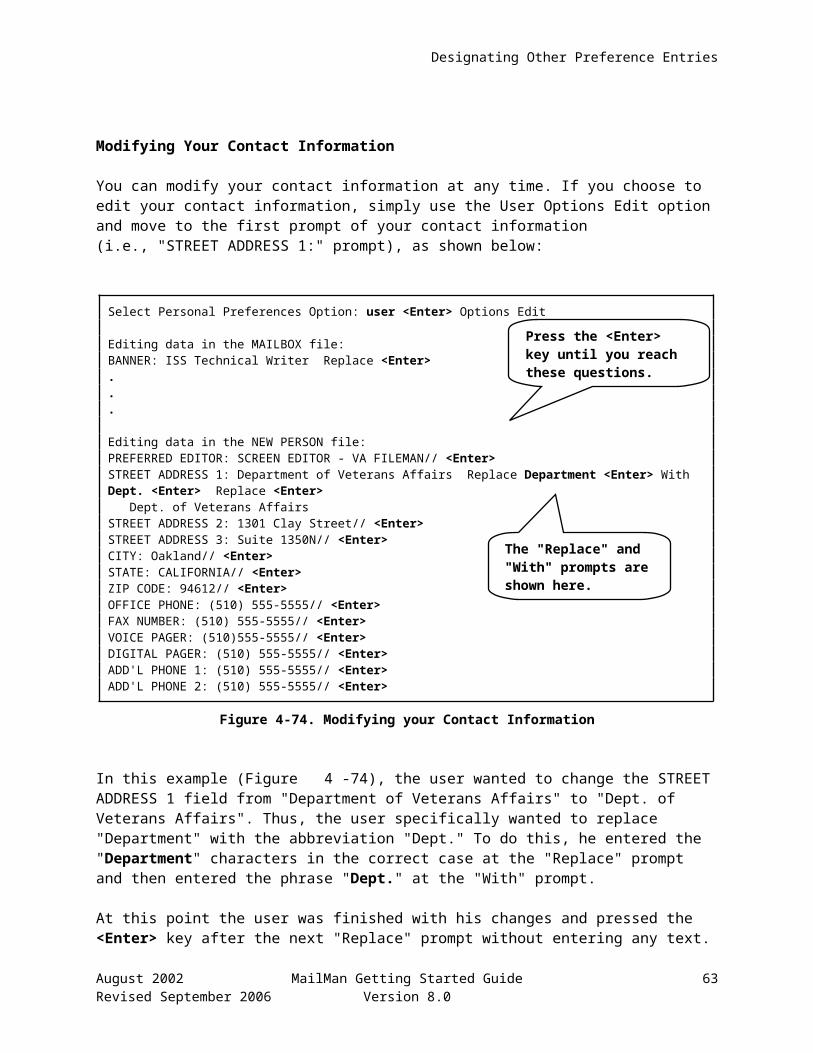
Index
NEW MESSAGES DEFAULT OPTION Field, 3-18
Newest First Message Order, 3-12, 3-15NML
New Messages and Responses Option, 5-1, 5-2, 5-3
NO, DON'T ACCEPT IT (Default Response For Delivery Basket Privileges), 3-5
OOFFICE PHONE Field, 4-40
Creating or Editing, 4-42Oldest First Message Order, 3-12, 3-15Online
Documentation, xivTechnical Information, How to Obtain, xiv
OptionsBanner Edit, 4-1, 4-5, 4-7Become a Surrogate (SHARED,MAIL or
Other), 5-1Data Dictionary Utilities, xvDelivery Basket Edit, 3-5Help (User/Group Info., etc.), 4-4, 4-33, 4-41,
5-1LIST BASKETS WITH NEW MAIL, 3-17List File Attributes, xvMessage Filter Edit, 3-3New Messages and Responses, 3-17, 3-18, 5-
1, 5-2, 5-3Other MailMan Functions, 5-1Personal Preferences, 2-4, 2-16, 3-5, 3-9, 3-
13, 3-15, 3-17, 3-18, 4-1, 4-2, 4-3, 4-5, 4-7, 4-10, 4-12, 4-13, 4-14, 4-16, 4-21, 4-24, 4-29, 4-34, 4-38, 4-43, 5-1
Query/Search for Messages, 5-1Read/Manage Messages, 2-1, 2-17, 5-1, 5-2,
5-4Send a Message, 5-1, 5-2, 5-15User Information Option, 4-4, 4-33, 4-34, 4-
41User Options Edit, 2-4, 2-5, 2-16, 3-9, 3-13,
3-15, 3-17, 3-18, 4-1, 4-2, 4-3, 4-5, 4-7, 4-10, 4-11, 4-13, 4-15, 4-21, 4-23, 4-27, 4-32, 4-37, 4-40
XMNEW, 3-17, 3-18, 5-2, 5-3XMREAD, 5-4
Organizing Your Mail Baskets and Messages, 3-1
Orientation, xiiiOther MailMan Functions Option, 5-1
OverviewReading/Managing All Messages and
Responses, 5-4Reading/Managing New Messages and
Responses, 5-2Sending Mail, 5-15
PPatches
History, ivPersonal Preferences Option, 2-4, 2-16, 3-5, 3-9,
3-13, 3-15, 3-17, 3-18, 4-1, 4-2, 4-3, 4-5, 4-7, 4-10, 4-12, 4-13, 4-14, 4-16, 4-21, 4-24, 4-29, 4-34, 4-38, 4-43, 5-1Banner Edit Option, 4-1, 4-5, 4-7Delivery Basket Edit Option, 3-5User Options Edit Option, 2-4, 2-16, 3-9, 3-
13, 3-15, 3-18, 4-1, 4-3, 4-10, 4-11, 4-13, 4-15, 4-21, 4-23, 4-27, 4-32, 4-37, 4-40
P-MESSAGE FROM Field, 4-21POSTMASTER, P-MESSAGE FROM Field
Value, 4-21Preferences
Banner Edit Option, 4-1, 4-5, 4-7Delivery Basket Edit Option, 3-5User Options Edit Option, 2-4, 2-16, 3-9, 3-
13, 3-15, 3-18, 4-1, 4-3, 4-10, 4-11, 4-13, 4-15, 4-21, 4-23, 4-27, 4-32, 4-37, 4-40
PREFERRED EDITOR Field, 4-37Choosing, 4-38Deleting, 4-39When Will You Use It?, 4-37
Preview Messages (Classic Message Reader), 2-4
Priority Mail, 2-3, 2-9, 2-14, 4-13, 4-15Priority Responses, 4-13PRIORITY RESPONSES FLAG Field, 4-13PRIORITY RESPONSES PROMPT Field, 4-15
QQuery/Search for Messages Option, 5-1Question Mark Help, xiv
RRead/Manage Messages Option, 2-1, 2-17, 5-1,
5-2, 5-4Read/Rcvd, 2-4, 2-9Reader, Assumptions About the, xvReading/Managing All Messages and Responses
Index-4 MailMan Getting Started Guide August 2002Version 8.0 Revised September 2006
Index
Overview, 5-4Reading/Managing New Messages and
ResponsesOverview, 5-2
Reference Materials, xviREQUIRE INTRODUCTIONS Field, 4-32Responses are ORDINARY (Response For
PRIORITY RESPONSES FLAG Field), 4-13Responses are PRIORITY (Response For
PRIORITY RESPONSES FLAG Field), 4-13Revision History, iii
Documentation, iiiPatches, iv
RMLRead/Manage Messages Option, 2-1, 2-17, 5-
1, 5-2, 5-4
SScreenMan, 4-39SELECTED BASKETS ONLY (Response For
Delivery Basket Privileges), 3-6Send a Message
Action Codes, 5-16ASK BASKET Field, 3-9MailMan Institution, 4-24SML Option, 5-15
Send a Message Option, 5-1, 5-2, 5-15Sending Mail, Overview, 5-15Set Your Delivery Basket Privileges, 3-5Setting
Default Message Reader, 2-16Mail Basket Prompt, 3-9
SHOW TITLES Field, 4-11SML
Send a Message Option, 5-1, 5-2, 5-15STATE Field, 4-40
Creating or Editing, 4-42STREET ADDRESS 1 Field, 4-40
Creating or Editing, 4-42STREET ADDRESS 2 Field, 4-40
Creating or Editing, 4-42STREET ADDRESS 3 Field, 4-40
Creating or Editing, 4-42Subject of the Message, 2-3, 2-9, 2-14, 5-16Summary Full Screen Message Reader, 2-14Summary Information
Classic, 2-3, 2-7Summary Full Screen, 2-14
SymbolsFound in the Documentation, xiii
TTable of Contents, vToggles
Priority Replies Action Code, 4-20
UURLs
Adobe Acrobat Quick Guide Web Address, xvi
Adobe Home Page Web Address, xviHSD&D Home Page Web Address, xvISS
Acronyms Home Page Web Address, Glossary, 3
Glossary Home Page Web Address, Glossary, 3
MailMan Home Page Web Address, xviVistA Documentation Library (VDL) Home
Page Web Address, xviUse this Manual, How to, xiiiUser Information Option, 4-4, 4-33, 4-34, 4-41User Options Edit Option, 2-4, 2-5, 3-9, 3-13, 3-
15, 3-17, 3-18, 4-1, 4-2, 4-5, 4-7ADD'L PHONE 1 Field, 4-40ADD'L PHONE 2 Field, 4-40ASK BASKET Field, 3-9BANNER Field, 4-3CITY Field, 4-40DIGITAL PAGER Field, 4-40FAX NUMBER Field, 4-40INTRODUCTION Field, 4-32MAILMAN INSTITUTION Field, 4-23MESSAGE ACTION DEFAULT Field, 4-10MESSAGE ORDER Field, 2-4, 3-13, 3-15, 3-
18MESSAGE READER Field, 2-16MESSAGE READER PROMPT Field, 2-17NETWORK SIGNATURE Field
LINE 1 OF 3, 4-27LINE 2 OF 3, 4-27LINE 3 OF 3, 4-27
OFFICE PHONE Field, 4-40P-MESSAGE FROM Field, 4-21PREFERRED EDITOR Field, 4-37PRIORITY RESPONSES FLAG Field, 4-13PRIORITY RESPONSES PROMPT Field, 4-
15SHOW TITLES Field, 4-11STATE Field, 4-40
August 2002 MailMan Getting Started Guide Index-5Revised September 2006 Version 8.0

Index
STREET ADDRESS 1 Field, 4-40STREET ADDRESS 2 Field, 4-40STREET ADDRESS 3 Field, 4-40VOICE PAGER Field, 4-40ZIP CODE Field, 4-40
VVA FileMan Line Editor, 4-39VA FileMan Screen Editor, 4-39VistA Documentation Library (VDL)
Home Page Web Address, xviVOICE PAGER Field, 4-40
Creating or Editing, 4-42
WWeb Pages
Adobe Acrobat Quick Guide Web Address, xvi
Adobe Home Page Web Address, xviHSD&D Home Page Web Address, xv
ISSAcronyms Home Page Web Address,
Glossary, 3Glossary Home Page Web Address,
Glossary, 3MailMan Home Page Web Address, xviVistA Documentation Library (VDL) Home
Page Web Address, xvi
XXMNEW Option, 3-17, 3-18, 5-2, 5-3XMREAD Option, 5-4
YYES, ACCEPT IT (Response For Delivery
Basket Privileges), 3-5
ZZIP CODE Field, 4-40
Creating or Editing, 4-42
Index-6 MailMan Getting Started Guide August 2002Version 8.0 Revised September 2006