Embed Size (px)
Citation preview

Designed and programmed
by
N. Higgins
OverviewThere are times during designing a scene that you need to fill an area with many objects but them objects do not need precise placement, think of areas in the background of landscapes such as woods, fields, forests.
In the case of wooded areas it would be nice if we could select the area (boundary of which is a spline) followed by a few different types of trees, shrubs and grasses we would like in that area, set the amount then click a button and have it filled for us in seconds…. If that sounds a handy feature to have then keep reading because that’s basically what Magic Filler can do for you.
Make sure you read the rest of this manual and complete the tutorial to get the best out of Magic Filler.
Cheers.
1

Installation
Magic Filler should work in any version of 3DS Max right back to version 2012, however it was not possible to test it in all versions.
Installation may be slightly different for older versions so this applies to more recent versions of 3DS Max.
Toolbar Icon…. because of the many changes to the folder locations where UserInterface icons are placed, an icon for the toolbar button is not included. This means you can use any icon you want (including your own) or just stick with the default button with text…...
Close 3DS Max.
Unzip the contents of the zip file anywhere on your computer.
Copy ALL the files you unzipped into your 3DS Max > scripts > Startup folder.
For a default installation you should find the path to the Startup folder is something similar to this:
C:\Program Files\Autodesk\3ds Max 2020\scripts\Startup
After copying all the files from the .zip file into that folder...
Start 3DS Max.
To add a Toolbar button... right click over a Toolbar and select Customize...
Under the Category: dropdown find Magic Software and select it.
You should see 'Magic Filler' under Action.
Using your mouse... click and hold the mouse button on the Magic Filler text and drag upto the Toolbar where you want the button.
The new button should have the text ‘M-Filler’ on it.
You can now use the button to start Magic Filler.
Note that Magic Filler opens up on the Command Panel which needs to be open.
The Command Panel can usually be turned on/off via the menu...
Customize > Show UI > Show Command Panel
2

Quick Tutorial
This tutorial will give you an idea of what Magic Filler can do and should be completed by all new users.
Start a new scene in 3DS Max.
Set your viewport to one large Perspective view and set shading so you can seethe objects properly…. Such as Default Shading.
We will work in Meters for this so the first thing to do is change the display units, so on the main menu, select...
Customize > Units Setup… then under Display Unit Scale click the Metric radiobutton and then in the dropdown select Meters.
We will also set the Grid spacing, to do that, select on the main menu...
Tools > Grids and Snaps > Grid and Snap Settings...
Click Home Grid and set Grid Spacing to 10.0m, done.
We will create a few simple objects in this tutorial, but you can imagine these objects in real life as any objects in your own scenes. For example the area we create to fill could be an area in your own scene that has come in from a CAD drawing, and the objects we use to fill it could be 3D Trees or Shrubs etc.
Okay, lets create the area we shall fill…. Create a Shape > Rectangle and on the Command Panel set its Parameters as…. Length: 30.0m, Width: 30.0m and Corner Radius: 0.0m
Select the rectangle, right click over it and on the pop-up menu select… Convert To: > Convert to Editable Spline
The areas to fill can only be Editable Splines or Nurbs curves.
Magic Filler cannot fill areas that are meshes, however it is fairly easy to do thisusing a combination of Magic Filler and Magic Mover, please look in this manualfor a separate tutorial which tells you how to do this.
Now we shall create a couple of objects we will use to fill it with…. Create a Standard Primitive Cone and set its Parameters on the Command Panel to….Radius 1: 0.5m, Radius 2: 3.0m, Height: 7.0m
You could imagine this cone as being a small tree.
3
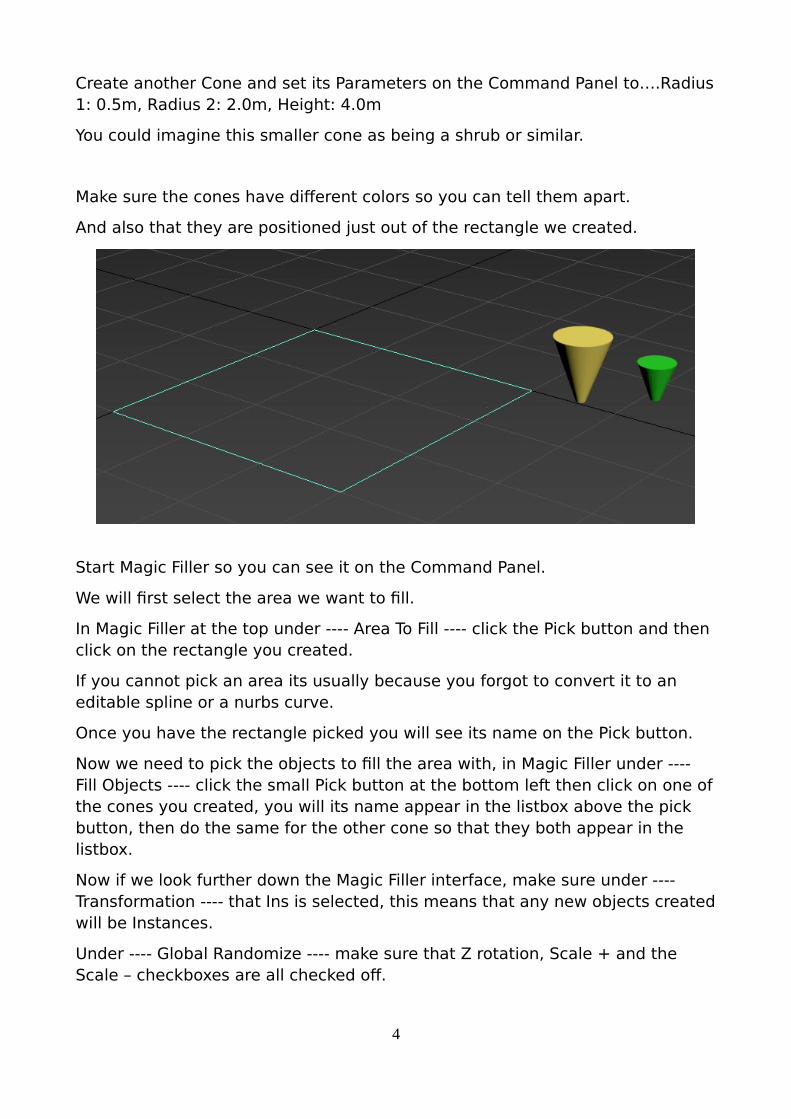
Create another Cone and set its Parameters on the Command Panel to….Radius1: 0.5m, Radius 2: 2.0m, Height: 4.0m
You could imagine this smaller cone as being a shrub or similar.
Make sure the cones have different colors so you can tell them apart.
And also that they are positioned just out of the rectangle we created.
Start Magic Filler so you can see it on the Command Panel.
We will first select the area we want to fill.
In Magic Filler at the top under ---- Area To Fill ---- click the Pick button and then click on the rectangle you created.
If you cannot pick an area its usually because you forgot to convert it to an editable spline or a nurbs curve.
Once you have the rectangle picked you will see its name on the Pick button.
Now we need to pick the objects to fill the area with, in Magic Filler under ---- Fill Objects ---- click the small Pick button at the bottom left then click on one ofthe cones you created, you will its name appear in the listbox above the pick button, then do the same for the other cone so that they both appear in the listbox.
Now if we look further down the Magic Filler interface, make sure under ---- Transformation ---- that Ins is selected, this means that any new objects createdwill be Instances.
Under ---- Global Randomize ---- make sure that Z rotation, Scale + and the Scale – checkboxes are all checked off.
4

Moving further down the Magic Filler interface, under ---- Fill Total ---- there is a spinner, this is the total amount of new fill objects that will be randomly positioned inside the area, you can set this to what ever amount you want, remembering that each one adds a new fill object to your scene, so never set ittoo high… for this tutorial we will set it to 40.
Under the spinner you will see a Fill button, click this, a progress bar will appearat the bottom of the Max window (the progress bar will quickly appear and disappear for this tutorial since the scene does not have many objects in it) andwhen complete you will see 40 new cones, all selected, inside the fill area.
Note that the positions of the cones in your scene will be different than shown here because they are all chosen at random each time a new fill is done….
If you do not like the placement of some these cones then you can click the Undo button (to the right of the Fill button) and then click the Fill button again to create another 40 cones. You can do this as many times as you like until you are happy with the placement of the cones.
Note that Undo will only undo the most recent fill, however there is also the History... button if you need to get rid of a few previous fills, you can read aboutthat in another section of this manual.
One thing you may notice is that the cones come right to the edge of the rectangle, this is because they are positioned using there pivot points, howeverin certain situations this may not be desirable, for example you could have other objects close to the area you are filling such as a building and if them cones were real trees then we wouldn't want any of the branches disappearing into the side of a building, not cool!
5

Dealing with problems like that on the fly is not easy since it involves mesh detection which would dramatically slow Magic Filler down, you could of course check yourself and then manually move any object that is not where you want it, however doing that for many objects could take a while, luckily, Magic Filler has an option called Border Size that can help, we will try that now.
First of all, delete all the new cones that have been added to the scene from any previous fill (do not delete the 2 cones you created at the start of the tutorial)
To do this you may be able to simply click the Undo button next to the Fill button.
Now if you look on the Magic Filler UI under ------ BORDER SIZE ------ you will seea spinner, type 3m into this and press Enter.
What this does is create an imaginary boundary inside the rectangle that is the border size from the edge of the rectangle, and because we entered 3.0 metersinto this we are basically saying do not place any of the cones nearer than 3 meters to the edge of the rectangle.
So how would we know what border size to use in our own scenes? Well basically its partly trial and error but for a starting point you could enter what would roughly be half the size (plus some allowance) of the biggest object you intend to fill the area with.
So for example say you were filling with some trees and you knew that the biggest tree had a maximum width or span (bounding box size will tell you this which you can get with the Measure tool on the Utility panel) of 10 meters, then you could try a Border Size of 6 meters to begin with.
You will also need to take into account using random scale if you have them turned on in Magic Filler.
Okay, back to the tutorial, click the Fill button and you should now see that none of the cones are positioned right next to the rectangle edges….
Note again that your scene will look different than here because random positions are chosen by Magic Filler each time a fill is done….
6

That concludes this quick tutorial on using Magic Filler, please read the rest of this manual where you can learn other features such as how to set the random options of each fill object individually, creating presets that can be saved with the scene and other cool things.
7
Magic Filler UI
Area To Fill
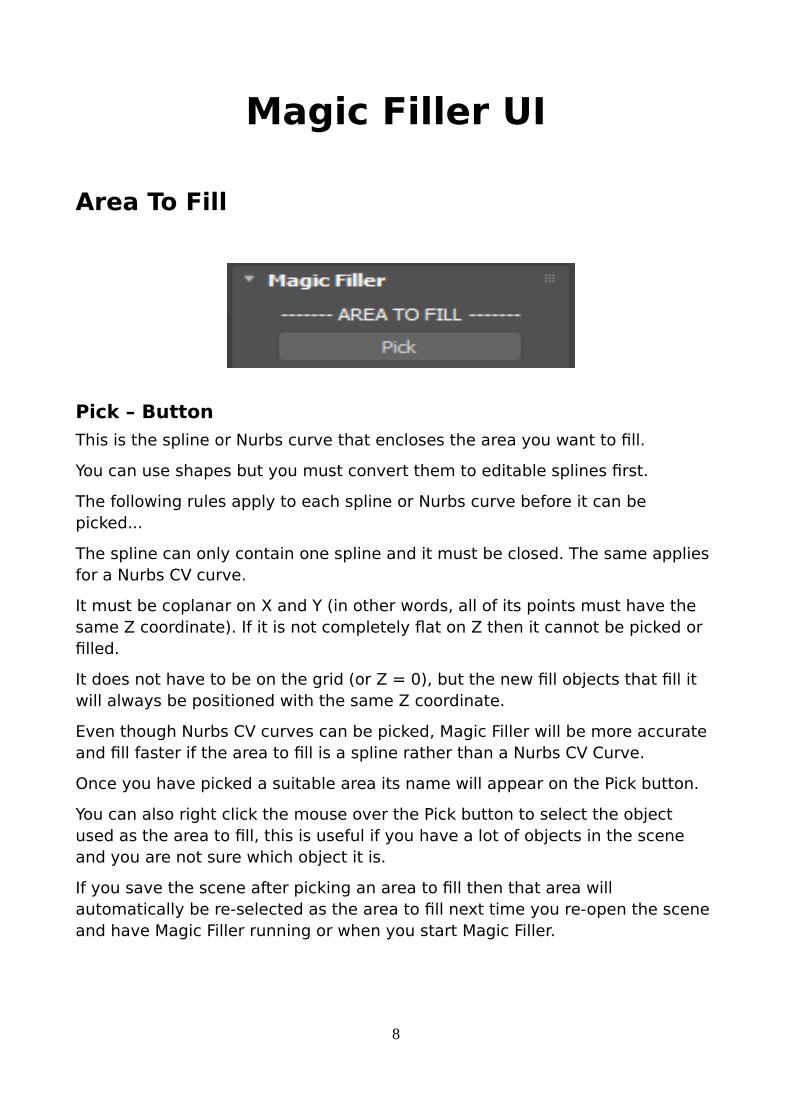
Pick – Button
This is the spline or Nurbs curve that encloses the area you want to fill.
You can use shapes but you must convert them to editable splines first.
The following rules apply to each spline or Nurbs curve before it can be picked...
The spline can only contain one spline and it must be closed. The same applies for a Nurbs CV curve.
It must be coplanar on X and Y (in other words, all of its points must have the same Z coordinate). If it is not completely flat on Z then it cannot be picked or filled.
It does not have to be on the grid (or Z = 0), but the new fill objects that fill it will always be positioned with the same Z coordinate.
Even though Nurbs CV curves can be picked, Magic Filler will be more accurate and fill faster if the area to fill is a spline rather than a Nurbs CV Curve.
Once you have picked a suitable area its name will appear on the Pick button.
You can also right click the mouse over the Pick button to select the object used as the area to fill, this is useful if you have a lot of objects in the scene and you are not sure which object it is.
If you save the scene after picking an area to fill then that area will automatically be re-selected as the area to fill next time you re-open the scene and have Magic Filler running or when you start Magic Filler.
8
Fill Objects
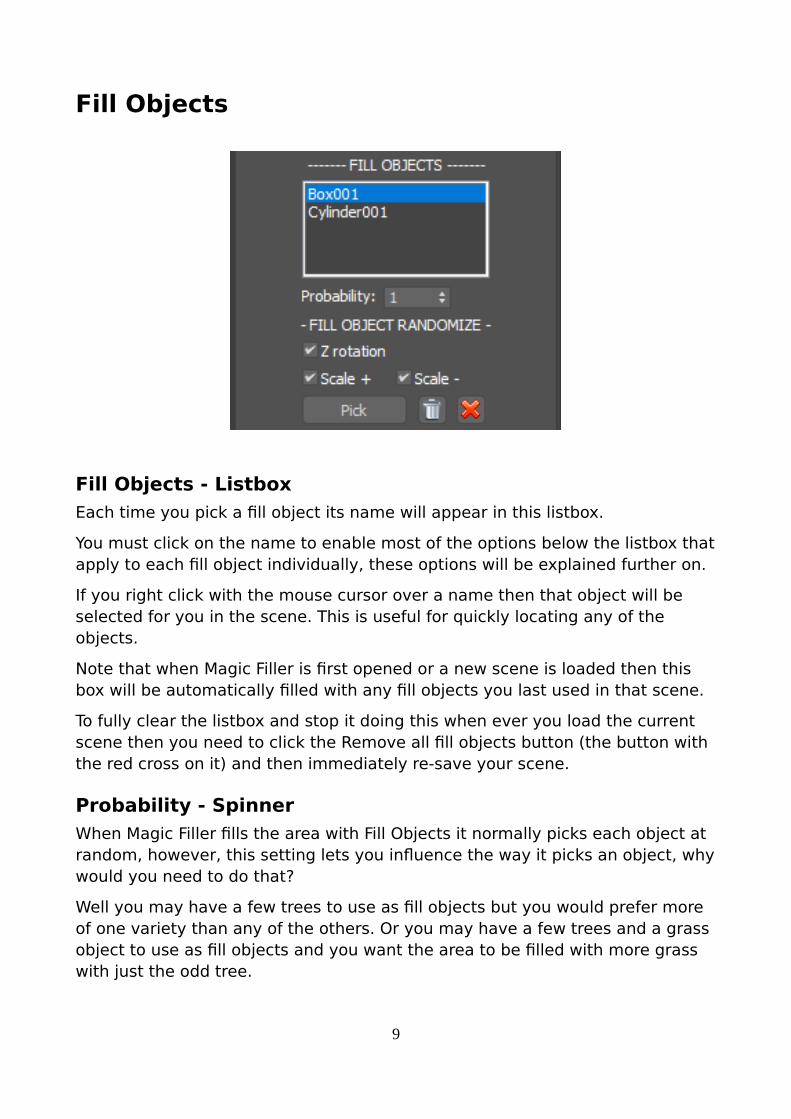
Fill Objects - Listbox
Each time you pick a fill object its name will appear in this listbox.
You must click on the name to enable most of the options below the listbox thatapply to each fill object individually, these options will be explained further on.
If you right click with the mouse cursor over a name then that object will be selected for you in the scene. This is useful for quickly locating any of the objects.
Note that when Magic Filler is first opened or a new scene is loaded then this box will be automatically filled with any fill objects you last used in that scene.
To fully clear the listbox and stop it doing this when ever you load the current scene then you need to click the Remove all fill objects button (the button with the red cross on it) and then immediately re-save your scene.
Probability - Spinner
When Magic Filler fills the area with Fill Objects it normally picks each object at random, however, this setting lets you influence the way it picks an object, whywould you need to do that?
Well you may have a few trees to use as fill objects but you would prefer more of one variety than any of the others. Or you may have a few trees and a grass object to use as fill objects and you want the area to be filled with more grass with just the odd tree.
9

This setting lets you do that. It can even be used to switch an object off entirelyso it doesn't get used as a Fill Object.
The default probability for each object is 1, if you increase this then that object has more chance of being picked (so long as its probability is higher than other objects) than any of the others.
If you set this to zero then that object will not be used as a Fill Object, this is useful to test various objects by turning them off/on without removing them as fill objects.
Fill Object Randomize – Z rotation
Every fill object has its own settings for if it gets randomly rotated on the Z axisduring a fill.
If this option is checked on then this object will be randomly rotated on the Z axis so long as the checkbox for Z rotation is also turned on under Global Randomize.
If this option is checked off then no matter what is turned on/off under Global Randomize this object will not be rotated at random on the Z axis.
Fill Object Randomize – Scale +
Every fill object has its own settings for if it gets randomly scaled with a positive value, in other words to randomly increase its size.
If this option is checked on then this object will be randomly scaled to increase its size so long as the checkbox for Scale + (plus) is also turned on under Global Randomize.
If this option is checked off then no matter what is turned on/off under Global Randomize this object will not be randomly scaled to increase its size.
Fill Object Randomize – Scale -
Every fill object has its own settings for if it gets randomly scaled with a negative value, in other words to randomly make it smaller in size.
If this option is checked on then this object will be randomly scaled to decreaseits size so long as the checkbox for Scale – (minus) is also turned on under Global Randomize.
If this option is checked off then no matter what is turned on/off under Global Randomize this object will not be randomly scaled to decrease its size.
Pick – Button
Click this button and in any viewport pick the object you want to use as a Fill Object.
10

After you pick an object its name will appear in the Fill Objects listbox.
You can pick as many objects as you want.
You can even pick the same object more than once, why would you do that?
If an object appears more than once then it will be chosen more when the fill operation takes place, in other words you can slightly influence the chances of one object being picked more than another.
However, rather than keep picking the same object to do that you should consider using the Probability spinner which does a similar thing but you only need to pick the object once.
You can pick any object or group as a Fill Object so long as it has a Position Rotation Scale Controller on it or a Look At Controller.
Cameras, Lights and any other object that cannot be converted to a mesh cannot be picked as a Fill Object.
Open groups or members of open groups cannot be picked, you must close the group or detach the member of the group first.
Remove selected fill object – button (on right of pick button)
You can remove a fill object from the listbox by first selecting its name in the listbox and then clicking this button.
Remove all fill objects – button (on right of pick button)
You can remove all fill objects from the listbox by clicking this button.
A message box will pop-up asking you to confirm.
11
Scene Presets
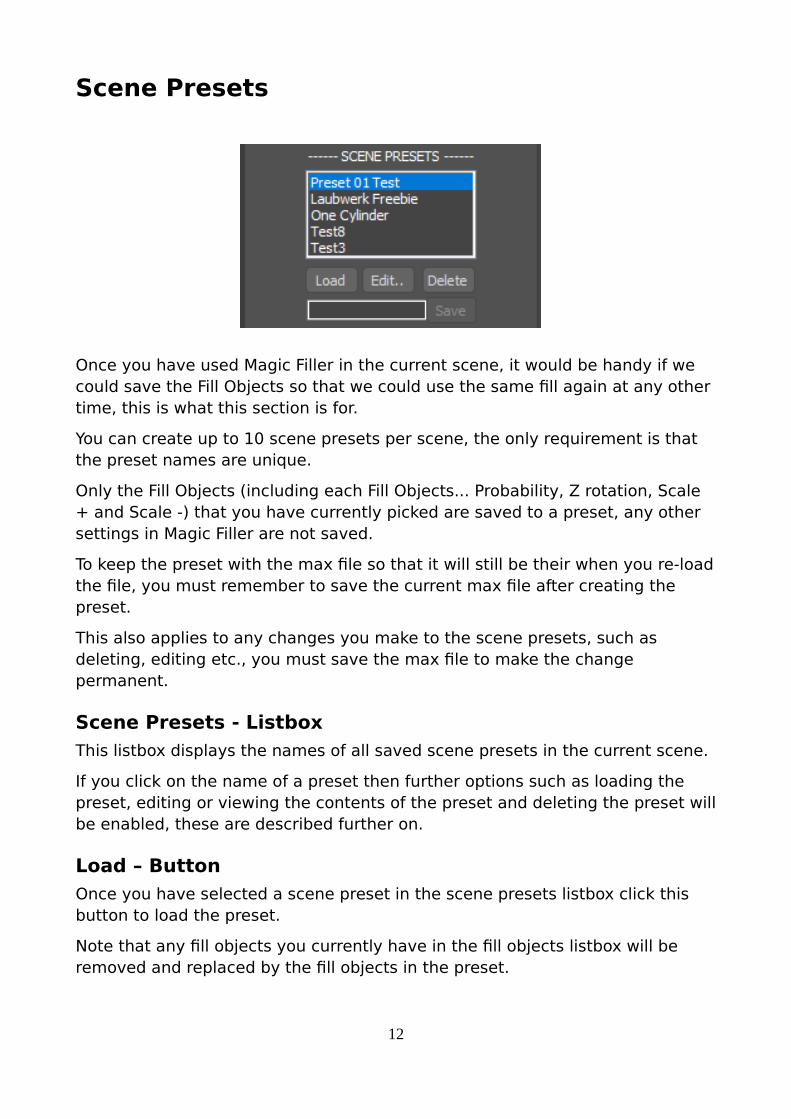
Once you have used Magic Filler in the current scene, it would be handy if we could save the Fill Objects so that we could use the same fill again at any other time, this is what this section is for.
You can create up to 10 scene presets per scene, the only requirement is that the preset names are unique.
Only the Fill Objects (including each Fill Objects... Probability, Z rotation, Scale + and Scale -) that you have currently picked are saved to a preset, any other settings in Magic Filler are not saved.
To keep the preset with the max file so that it will still be their when you re-loadthe file, you must remember to save the current max file after creating the preset.
This also applies to any changes you make to the scene presets, such as deleting, editing etc., you must save the max file to make the change permanent.
Scene Presets - Listbox
This listbox displays the names of all saved scene presets in the current scene.
If you click on the name of a preset then further options such as loading the preset, editing or viewing the contents of the preset and deleting the preset willbe enabled, these are described further on.
Load – Button
Once you have selected a scene preset in the scene presets listbox click this button to load the preset.
Note that any fill objects you currently have in the fill objects listbox will be removed and replaced by the fill objects in the preset.
12
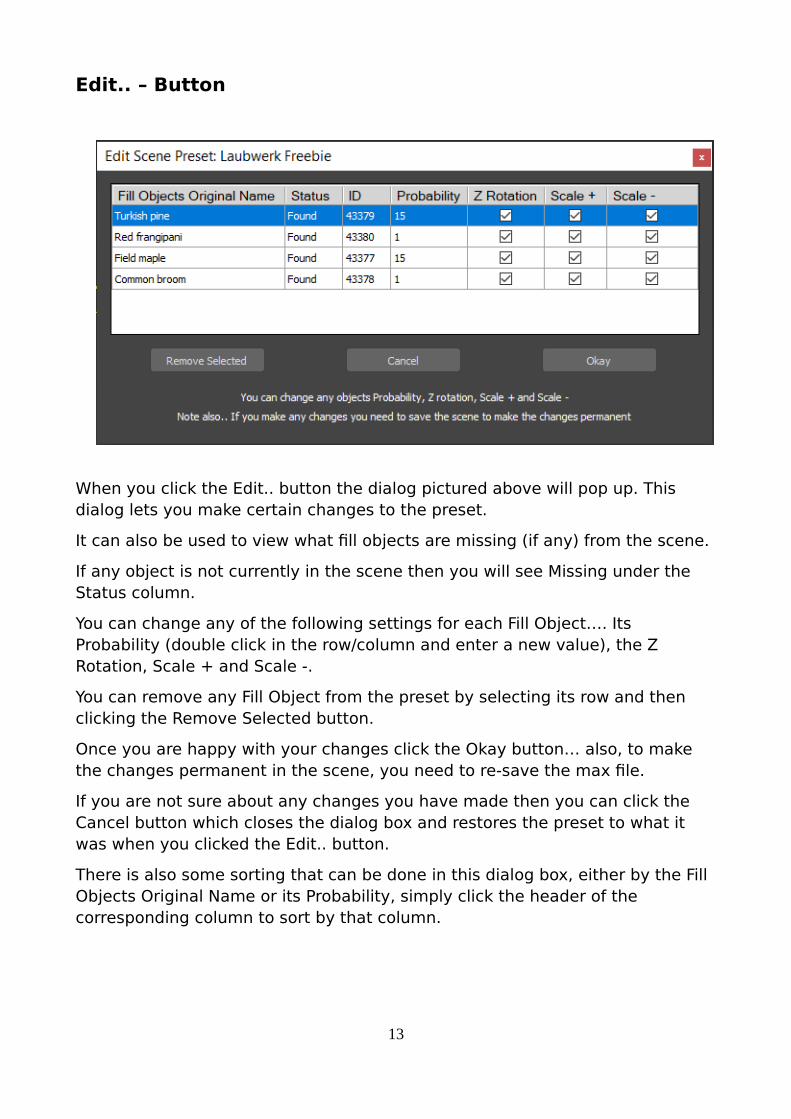
Edit.. – Button
When you click the Edit.. button the dialog pictured above will pop up. This dialog lets you make certain changes to the preset.
It can also be used to view what fill objects are missing (if any) from the scene.
If any object is not currently in the scene then you will see Missing under the Status column.
You can change any of the following settings for each Fill Object…. Its Probability (double click in the row/column and enter a new value), the Z Rotation, Scale + and Scale -.
You can remove any Fill Object from the preset by selecting its row and then clicking the Remove Selected button.
Once you are happy with your changes click the Okay button… also, to make the changes permanent in the scene, you need to re-save the max file.
If you are not sure about any changes you have made then you can click the Cancel button which closes the dialog box and restores the preset to what it was when you clicked the Edit.. button.
There is also some sorting that can be done in this dialog box, either by the Fill Objects Original Name or its Probability, simply click the header of the corresponding column to sort by that column.
13
Delete – Button
Clicking the delete button will delete the selected preset, note that there is no confirmation asking if you want to delete, the preset is deleted as soon as you press the button.
And you must save the current max file to permanently remove the preset.
Save – Button
When you have some fill objects you want to save as a preset, click with your mouse in the edit text box to the left of the Save button and type in a name for your new preset… then click the Save button.
The preset name will appear in the Scene Presets list box and you will be able to use it at any time in the current scene.
Again, like any changes with scene presets you must remember to save your max scene file to keep the preset for future edits.
14
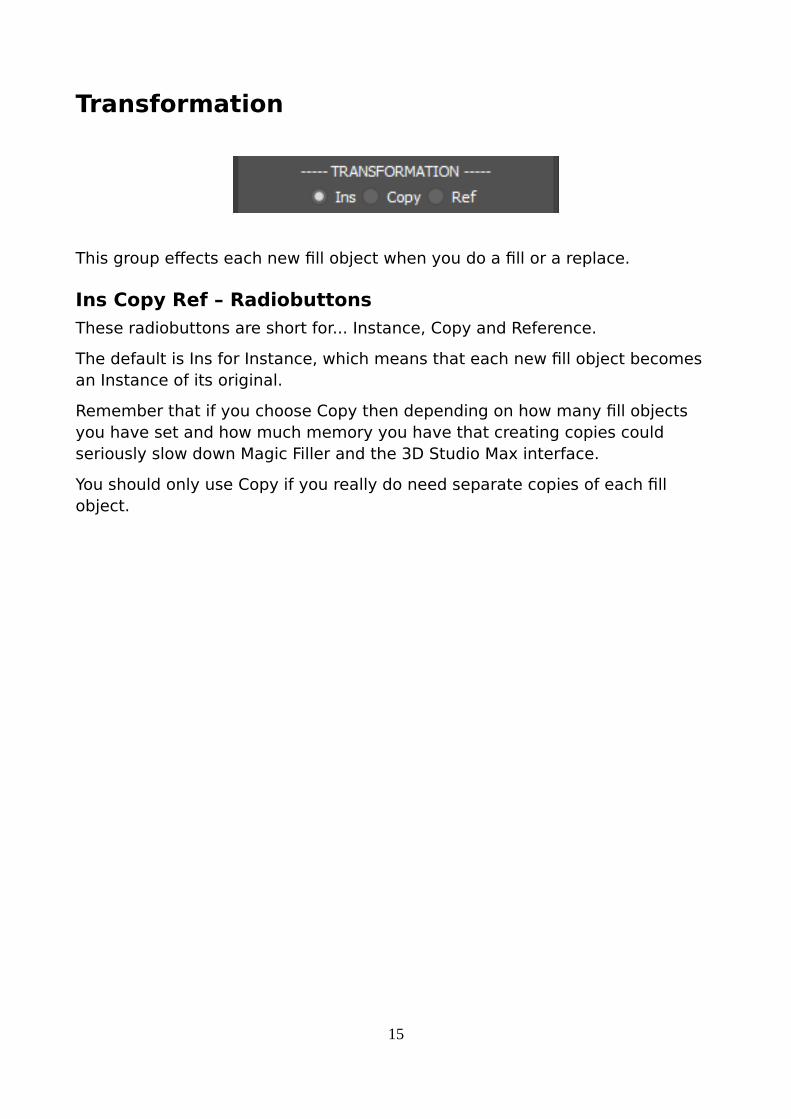
Transformation
This group effects each new fill object when you do a fill or a replace.
Ins Copy Ref – Radiobuttons
These radiobuttons are short for... Instance, Copy and Reference.
The default is Ins for Instance, which means that each new fill object becomes an Instance of its original.
Remember that if you choose Copy then depending on how many fill objects you have set and how much memory you have that creating copies could seriously slow down Magic Filler and the 3D Studio Max interface.
You should only use Copy if you really do need separate copies of each fill object.
15
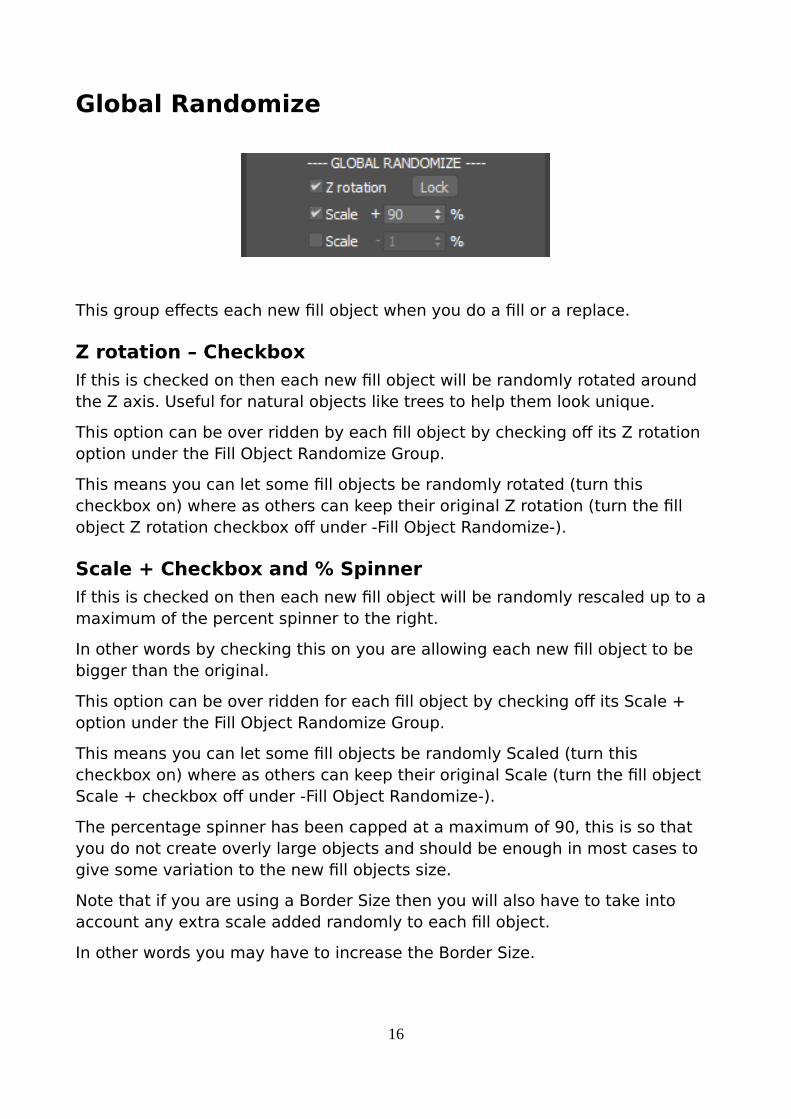
Global Randomize
This group effects each new fill object when you do a fill or a replace.
Z rotation – Checkbox
If this is checked on then each new fill object will be randomly rotated around the Z axis. Useful for natural objects like trees to help them look unique.
This option can be over ridden by each fill object by checking off its Z rotation option under the Fill Object Randomize Group.
This means you can let some fill objects be randomly rotated (turn this checkbox on) where as others can keep their original Z rotation (turn the fill object Z rotation checkbox off under -Fill Object Randomize-).
Scale + Checkbox and % Spinner
If this is checked on then each new fill object will be randomly rescaled up to a maximum of the percent spinner to the right.
In other words by checking this on you are allowing each new fill object to be bigger than the original.
This option can be over ridden for each fill object by checking off its Scale + option under the Fill Object Randomize Group.
This means you can let some fill objects be randomly Scaled (turn this checkbox on) where as others can keep their original Scale (turn the fill object Scale + checkbox off under -Fill Object Randomize-).
The percentage spinner has been capped at a maximum of 90, this is so that you do not create overly large objects and should be enough in most cases to give some variation to the new fill objects size.
Note that if you are using a Border Size then you will also have to take into account any extra scale added randomly to each fill object.
In other words you may have to increase the Border Size.
16
Scale - Checkbox and % Spinner
If this is checked on then each new fill object will be randomly rescaled down toa minimum of the percent spinner to the right.
In other words by checking this on you are allowing each new fill object to be smaller than the original.
This option can be over ridden for each fill object by checking off its Scale - option under the Fill Object Randomize Group.
This means you can let some fill objects be randomly Scaled (turn this checkbox on) where as others can keep their original Scale (turn the fill object Scale - checkbox off under -Fill Object Randomize-).
The percentage spinner has been capped at a maximum of 90, this is so that you do not create very small objects and should be enough in most cases to give some variation to the new fill objects size.
Lock – Checkbutton
A button you can switch on or off. It only affects the Scale + % and Scale - % spinners.
When switched on (pressed in) any value you enter in the Scale + % spinner will be copied into the Scale - % spinner and vice versa.
When its switched off you can enter separate values in the Scale + % and the Scale - % spinners.
17
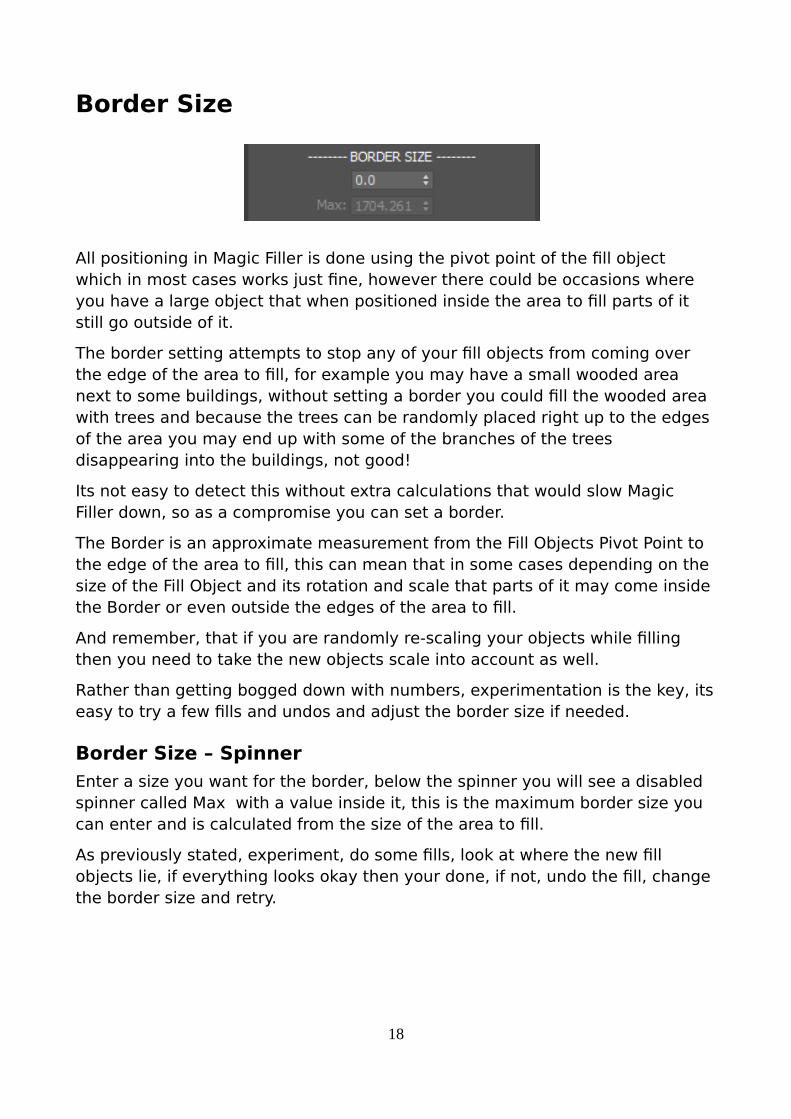
Border Size
All positioning in Magic Filler is done using the pivot point of the fill object which in most cases works just fine, however there could be occasions where you have a large object that when positioned inside the area to fill parts of it still go outside of it.
The border setting attempts to stop any of your fill objects from coming over the edge of the area to fill, for example you may have a small wooded area next to some buildings, without setting a border you could fill the wooded area with trees and because the trees can be randomly placed right up to the edges of the area you may end up with some of the branches of the trees disappearing into the buildings, not good!
Its not easy to detect this without extra calculations that would slow Magic Filler down, so as a compromise you can set a border.
The Border is an approximate measurement from the Fill Objects Pivot Point to the edge of the area to fill, this can mean that in some cases depending on the size of the Fill Object and its rotation and scale that parts of it may come inside the Border or even outside the edges of the area to fill.
And remember, that if you are randomly re-scaling your objects while filling then you need to take the new objects scale into account as well.
Rather than getting bogged down with numbers, experimentation is the key, itseasy to try a few fills and undos and adjust the border size if needed.
Border Size – Spinner
Enter a size you want for the border, below the spinner you will see a disabled spinner called Max with a value inside it, this is the maximum border size you can enter and is calculated from the size of the area to fill.
As previously stated, experiment, do some fills, look at where the new fill objects lie, if everything looks okay then your done, if not, undo the fill, change the border size and retry.
18
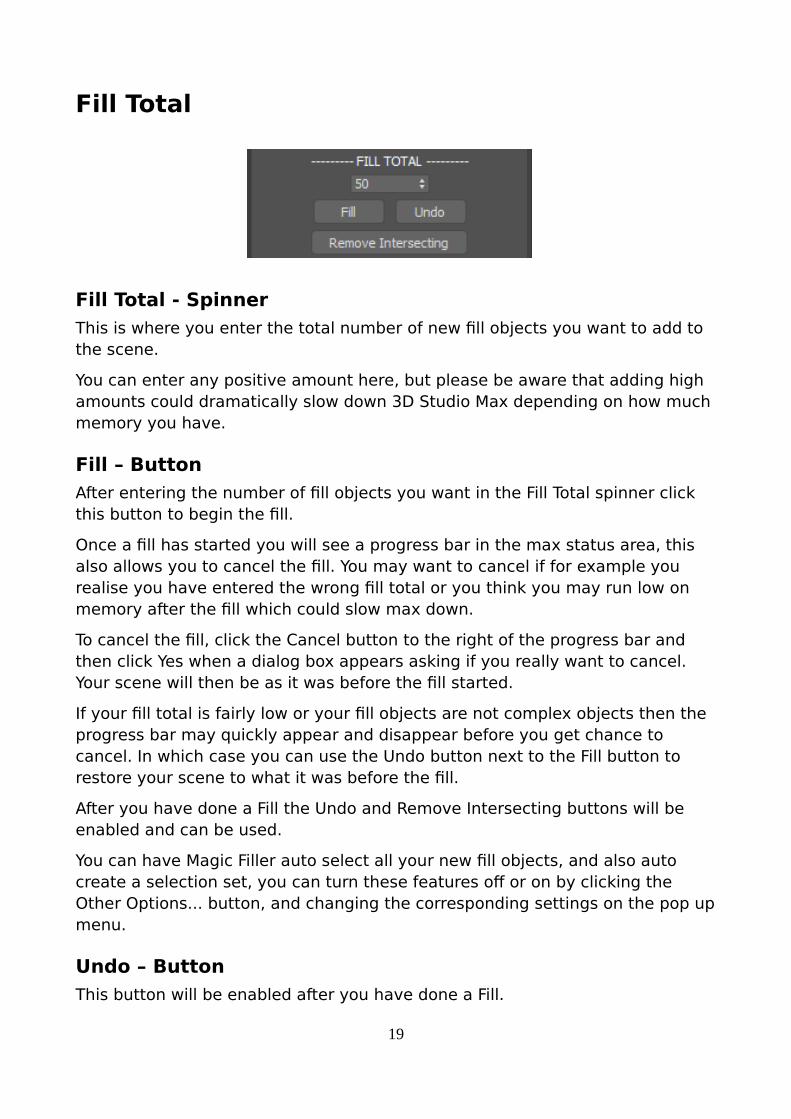
Fill Total
Fill Total - Spinner
This is where you enter the total number of new fill objects you want to add to the scene.
You can enter any positive amount here, but please be aware that adding high amounts could dramatically slow down 3D Studio Max depending on how much memory you have.
Fill – Button
After entering the number of fill objects you want in the Fill Total spinner click this button to begin the fill.
Once a fill has started you will see a progress bar in the max status area, this also allows you to cancel the fill. You may want to cancel if for example you realise you have entered the wrong fill total or you think you may run low on memory after the fill which could slow max down.
To cancel the fill, click the Cancel button to the right of the progress bar and then click Yes when a dialog box appears asking if you really want to cancel. Your scene will then be as it was before the fill started.
If your fill total is fairly low or your fill objects are not complex objects then the progress bar may quickly appear and disappear before you get chance to cancel. In which case you can use the Undo button next to the Fill button to restore your scene to what it was before the fill.
After you have done a Fill the Undo and Remove Intersecting buttons will be enabled and can be used.
You can have Magic Filler auto select all your new fill objects, and also auto create a selection set, you can turn these features off or on by clicking the Other Options... button, and changing the corresponding settings on the pop upmenu.
Undo – Button
This button will be enabled after you have done a Fill.
19

To save on system resources you cannot use Max built in undo after doing a fill so you must use this option or alternatively you can use the History… button.
The Undo button will only undo the last Fill.
Also once Magic Filler is closed then any undo will be lost until you do another fill, however you can still select or delete objects in any previous fill (even after closing and re-opening 3D Studio Max) via the Scene Fill History dialog which you can access any time by clicking the History... button.
Remove Intersecting – Button
Magic Filler creates a new position inside the area to fill for each new fill object at random which means there will be times when objects intersect each other.
Sometimes this will not matter or if its only one or two objects its easy to manually delete the offending fill objects yourself.
And this is where the Remove Intersecting button comes in, if you need to make sure that no new fill object intersects another new fill object then just click this button after doing a fill.
Depending on how many fill objects were created it could take some time to check, when it has finished you will see in the viewports the objects being removed and in the prompt line at the bottom of the max window it will tell youthe total number of intersecting objects that were deleted.
Sometimes it could appear that more objects have been deleted than what youexpected, this is mainly because of the way Remove intersecting works, it uses more of a brute force way of detecting intersecting objects by looking for bounding boxes that cross each other and not the more accurate (but a lot slower way) of checking the actual meshes against each other.
Remove intersecting will only work on the objects created with the last fill, and only while Magic Filler is open, if you close Magic Filler then you will not be ableto use it until you do another fill.
There is also an option on the Other Options… pop up menu that can effect Remove Intersecting called: Remove Intersecting Includes Previous Fills…. Normally when using Remove Intersecting it only takes into account the objectscreated in the most recent fill and not any objects created in fills before it, however if this menu option is turned on then it will include all objects from previous fills when it looks for intersecting objects as well as the objects in the most recent fill.
20
Further Options
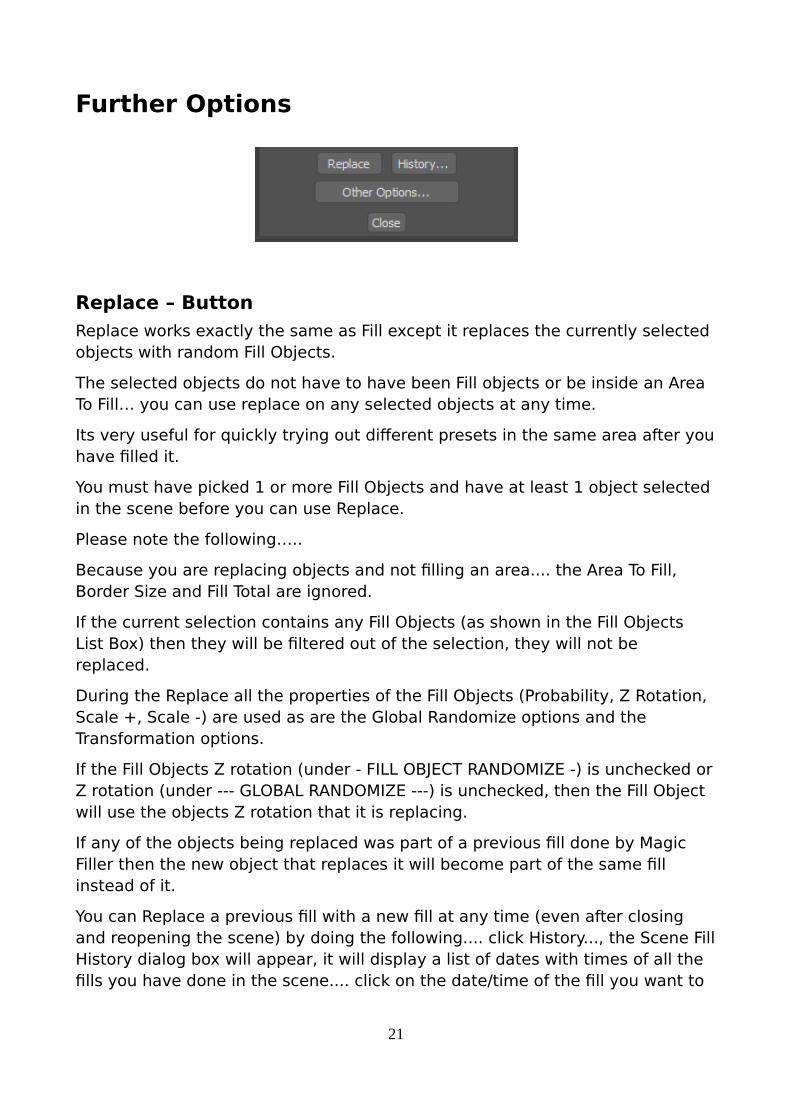
Replace – Button
Replace works exactly the same as Fill except it replaces the currently selected objects with random Fill Objects.
The selected objects do not have to have been Fill objects or be inside an Area To Fill… you can use replace on any selected objects at any time.
Its very useful for quickly trying out different presets in the same area after youhave filled it.
You must have picked 1 or more Fill Objects and have at least 1 object selected in the scene before you can use Replace.
Please note the following…..
Because you are replacing objects and not filling an area.... the Area To Fill, Border Size and Fill Total are ignored.
If the current selection contains any Fill Objects (as shown in the Fill Objects List Box) then they will be filtered out of the selection, they will not be replaced.
During the Replace all the properties of the Fill Objects (Probability, Z Rotation, Scale +, Scale -) are used as are the Global Randomize options and the Transformation options.
If the Fill Objects Z rotation (under - FILL OBJECT RANDOMIZE -) is unchecked orZ rotation (under --- GLOBAL RANDOMIZE ---) is unchecked, then the Fill Object will use the objects Z rotation that it is replacing.
If any of the objects being replaced was part of a previous fill done by Magic Filler then the new object that replaces it will become part of the same fill instead of it.
You can Replace a previous fill with a new fill at any time (even after closing and reopening the scene) by doing the following.... click History..., the Scene FillHistory dialog box will appear, it will display a list of dates with times of all the fills you have done in the scene.... click on the date/time of the fill you want to
21
change, click the Select button which will select all the fill objects in the scene that were in that fill, then click Close.
Back on the Magic Filler rollout, setup your fill objects that you want to use like you would when doing a normal fill (or load a Scene Preset) and then click the Replace button. Replace only works on selected objects so its important not to change the selection after you close the Scene Fill History dialog box if you onlywant to replace the objects that were in the original fill.
You can keep clicking the Replace button until you get the fill objects how you want.
22
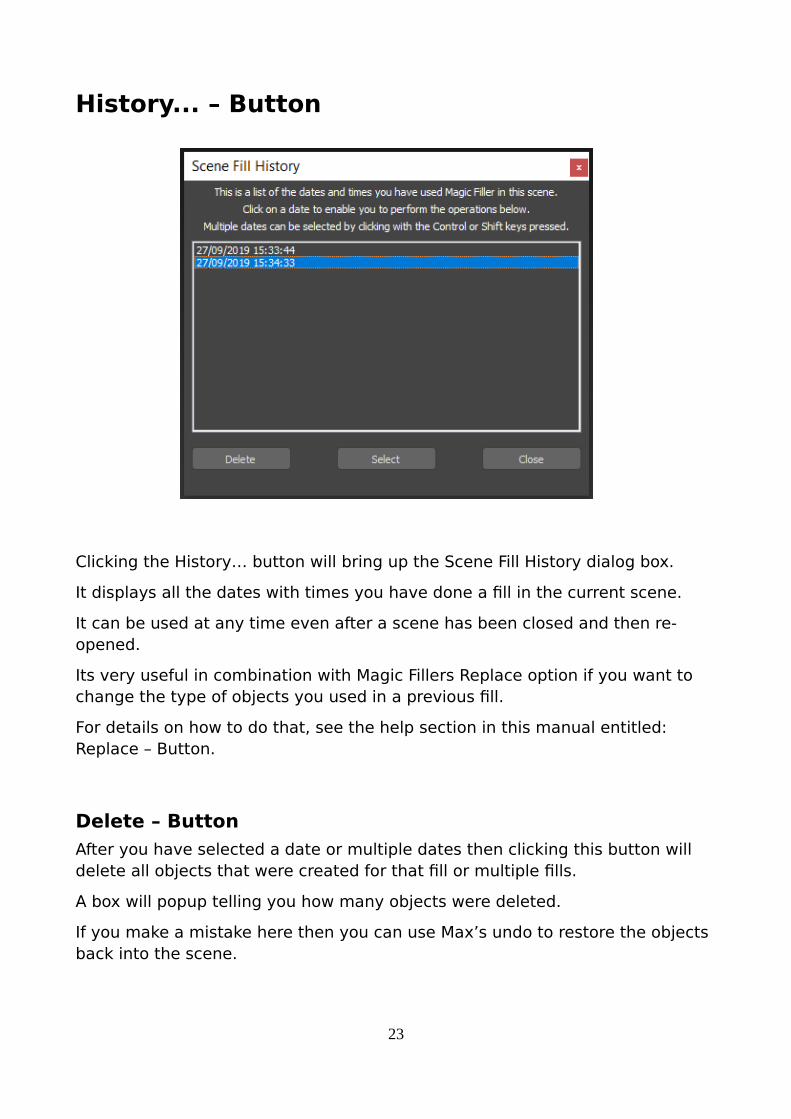
History... – Button
Clicking the History… button will bring up the Scene Fill History dialog box.
It displays all the dates with times you have done a fill in the current scene.
It can be used at any time even after a scene has been closed and then re-opened.
Its very useful in combination with Magic Fillers Replace option if you want to change the type of objects you used in a previous fill.
For details on how to do that, see the help section in this manual entitled: Replace – Button.
Delete – Button
After you have selected a date or multiple dates then clicking this button will delete all objects that were created for that fill or multiple fills.
A box will popup telling you how many objects were deleted.
If you make a mistake here then you can use Max’s undo to restore the objects back into the scene.
23

Select – Button
After you have selected a date or multiple dates then clicking this button will select all objects that were created for that fill or multiple fills.
Only objects that are still left in the scene will be selected.
This is very useful in combination with Magic Fillers Replace option say if you want to change the type of objects you used in a previous fill at a later date.
24

Other Options…- ButtonPops up a menu with the following options….
Unhide new fill objects
If your fill objects are hidden then if this menu option is checked on they will beunhidden when used to fill.
If this option is checked off then new fill objects that are hidden will be left hidden.
Select new fill objects after fill
If this is checked on then the new fill objects are all selected after a new fill.
Note that even if you leave this off you can still re-select all objects in a fill by using the History… option.
Create new selection set for every fill
If this is checked on then each time you do a fill a new selection set will be created for it.
You should be careful with this option because its easy to fill your scene with lots of selection sets.
You could easily use the History… feature in Magic Filler in place of this.
Remove intersecting includes previous fills
If this option is checked on then when ever you use the Remove Intersecting button it will also take into account the objects from previous fills.
If this is checked off then Magic Filler will only check the objects added in the latest fill to see if they intersect.
Open PDF Help Manual
Opens a help manual in pdf format using your default application for pdf files.
25
About
Displays a dialog box about Magic Filler with website links.
26

Tutorial
How To Put Objects On A Terrain Or Mesh Using Magic Filler and Magic MoverMagic Filler can only fill areas that are closed splines or nurbs curves, but their may be occasions when you wish you could fill a mesh surface instead, this quick tutorial will show you how that can be done….
-- 1. Select the Terrain or Mesh, and make a Copy of it. Do not move the copy.
-- 2. Make sure you have the copy selected right click and select Convert to: an Editable Mesh
-- 3. With the Editable Mesh copy selected, Open the Modify Panel and in the Edit Geometry rollout click the Grid Align button.
-- 4. Go into Edge Sub Object Mode and in the Edit Geometry rollout click the Select Open Edges button and then the Create Shape From Edges Button, in the Create Shape dialog that pops up make sure you select the correct Shape Type, for example if your mesh has all straight edges then select Linear, if the mesh has curved edges then select Smooth, then click OK.
-- 5. Exit sub-object mode and delete the Editable Mesh copy that you created in step 1 to free up some ram.
-- 6. Start Magic Filler and check that the option ‘Create new selection set for every fill’ is turned on by clicking the Other Options… button, if it is not on thenturn it on….now Fill the shape you just created with the objects you would wanton the surface.
-- 7. Start Magic Mover, select the Mesh you want to put the objects on (the mesh needs to be above all the fill objects, on the Z axis, if it isn't then move it now) and in Magic Mover under 'Lock To' click the Selected button, bring back the Selection Set you previously made in step 6 and click the Up-to Surface button.
Done!
27
Things To Be Aware Of
The Area to fill must be coplanar on X and Y (in other words all of its points must have the same Z coordinate). If it is not completely flat on Z then it cannot be selected or filled.
If the Area to fill is a spline, then it can only contain one spline and it must be closed. The same applies for a Nurbs CV curve.
The Area to fill does not have to be on the grid (or Z = 0), but the new fill objects will always be positioned at the same Z position as the Area to fill.
Cameras, Lights and any other object that can't be converted to a mesh cannotbe picked as a Fill Object.
The Undo button will only undo the last Fill. You cannot undo previous multiple fills. Also once Magic Filler is closed then any undo will be lost until you do another fill. However you can still select or delete objects in any previous fill viathe Scene Fill History dialog which you can access any time by clicking the History... button.
Right-clicking over the name of any object in the Fill Objects Listbox will select that object in the scene. This is useful for quickly locating any of the objects. The same can be done for the Area To Fill by right clicking over the Area To Fill pick button.
The program will be more accurate and fill faster if the area to fill is a spline rather than a Nurbs CV Curve.
Scene Presets: All scene presets are stored in the scene, this means that after creating a preset you need to save the scene to keep it. Likewise after deleting or editing a preset you need to re-save your scene again to make the changes permanent.
28

There is no direct way to rename a preset, however its fairly easy to do using this work around: In the Scene Presets listbox select the preset you want to rename, click the Load button, in the new preset name edit box type in the newname you want and click the Save button. Now we just need to delete the original preset, so select it in the Scene Presets listbox again and then click the Delete button. Done.
Scene Fill History dialog notes..... When deleting any previous fill objects all fill objects will be deleted even if you have moved them out of the area to fill. However, if you use Max to make a Clone (such as a Copy, Instance or Reference) of a fill object then the new clone will not be deleted.
Once a fill has started you will see a progress bar in the max status area, this also allows you to cancel the fill. You may want to cancel if for example you realise you have entered the wrong fill total or you think you may run low on memory after the fill which could slow max down. To cancel the fill, click the Cancel button to the right of the progress bar and then click Yes when a dialog box appears asking if you really want to cancel. Your scene will then be as it was before the fill started.
If your fill total is fairly low or your fill objects are not complex objects then the progress bar may quickly appear and disappear before you get chance to cancel. In which case you can use the Undo button next to the Fill button to restore your scene to what it was before the fill.
Replace..... You can use this to replace any object(s) in your scene with random fill objects. Its very useful for quickly trying out different presets in the same area after you have filled it.
You must have picked 1 or more fill objects and have at least 1 object selected in the scene before you can use Replace. Please note the following, because you are replacing objects and not filling an area.... the Area To Fill, Border Size and Fill Total are ignored. If the current selection contains any fill objects then they will be filtered out of the selection, they will not be replaced.
During the Replace all the properties of the fill objects (Probability, Z Rotation, Scale +, Scale -) are used as are the Global Randomize options and the Transformation options. If the Fill Objects Z rotation (under - FILL OBJECT RANDOMIZE -) is unchecked or Z rotation (under --- GLOBAL RANDOMIZE ---) is unchecked, then the Fill Object will use the objects Z rotation that it is replacing. If any of the objects being replaced was part of a previous fill done
29

by Magic Filler then the new object that replaces it will become part of the same fill instead of it.
You can Replace a previous fill with a new fill at any time by doing the following.... click History..., the Scene Fill History dialog box will appear, it will display a list of dates with times of all the fills you have done in the scene.... click on the date/time of the fill you want to change, click the Select button which will select all the fill objects in the scene that were in that fill, then click Close. Back on the Magic Filler rollout, setup your fill objects that you want to use like you would when doing a normal fill (or load a Scene Preset) and then click the Replace button. Replace only works on selected objects so its important not to change the selection after you close the Scene Fill History dialog box if you only want to replace the objects that were in the original fill. You can keep clicking the Replace button until you get the fill objects how you want.
Notes about using Undo... If you manually delete the object being used as the Area To Fill and then Undo the deletion, the object will be restored as the Area To Fill provided you have not picked another Area To Fill.
The same applies to a Fill Object..... if you manually delete a Fill Object in the scene and then Undo the deletion, the object will be restored as a Fill Object.
30

Other Plug-ins
Magic Filler has been tested with the free versions of the following....
Laubwerk PlantsMagic Filler works fine with these, and they are highly recommended if you want detailed Trees and Plants in your scene.
Magic Filler has been tested with the Freebie kit, and its best to set the Laubwerk plant Viewport Mode to either Convex Hull or Skeleton, before using Magic Filler.
You can find these settings by selecting the plant and then opening the Modify panel.
31

This program is free but if you like it then you can always:
Thanks!
More Magic Here
32


![FIVE, the notes [PDF 2] - Higher Intellectcdn.preterhuman.net/texts/manuals/magic/Dan and Dave Buck - Five... · CONTENTS Introduction - davebuck Foreword - danbuck Subway Rotated](https://img.pdfslide.us/doc/110x75/5af9ec947f8b9ae92b8d0c8b/five-the-notes-pdf-2-higher-and-dave-buck-fivecontents-introduction-.jpg)