Embed Size (px)
Citation preview

GENOVATION
ControlPad / MacroMaster 68x User Guide
Revision 5.2 November 2008

2
WARRANTY REPAIR SERVICE AND LICENSE Genovation, Incorporated ("Genovation") warrants this product to be in good working order and free of defects in materials and workmanship under normal use for a period of one year from the date of purchase. Any implied warranties, including warranties of merchantability and fitness for a particular purpose, are limited in duration to a period of thirty (30) days from date of purchase. Any abuse including opening the case will void the warranty. Your sole remedy and Genovation's entire liability for this product will be repair or replacement as provided for above, or at Genovation's option, the refund of your purchase price. A RETURN MATERIAL AUTHORIZATION (RMA) number is absolutely required before returning a product. Any shipment received without an RMA will be returned unopened. Please contact Customer Service for instructions before returning any product. Genovation makes software available and licenses its use to you for world wide for use. FCC CERTIFICATION This product has been certified to comply with FCC, EC, TUV and other test standards. See label on the product for confirmation. FCC CERTIFICATION REQUIRED STATEMENT WARNING: This equipment has been certified to comply with the limits for a Class B Computing Device, pursuant to Subpart J of Part 15 of the FCC rules. Only peripherals (computer, computer input/output devices, terminals, printers, etc.) certified to comply with the Class B limits may be attached to this device. Operation with non-certified peripherals is likely to result in interference to radio and TV reception. NOTE: This equipment generates and uses radio frequency energy and if not installed and used properly, that is, in strict accordance with the manufacturer's instructions, may cause interference to radio and television reception. It has been type tested and found to comply with the limits for Class B computing devices in accordance with the specifications in Subpart J of part 15 of the FCC Rules, which are designed to provide reasonable protection against such interference in a particular installation. If this equipment does cause interference to radio or television reception, which can be determined by turning the equipment off or on, the user is encouraged to try to correct the interference by one or more of the following measures:
o Reorient the receiving antennas o Relocate the computer with respect to the receiver o Move the computer away from the receiver o Plug the computer and receiver into different circuits

3
If necessary, the user should consult the dealer or an experienced radio/television technician for additional suggestions. The user may find the following booklet prepared by the Federal Communications Commission helpful: “How to identify and Resolve Radio-TV Interference Problems". This booklet is available from the U.S. Government Printing Office, Washington, DC 20402. (Stock #004-000-00345-4). TECHNICAL SUPPORT If you require technical support or if you wish to make suggestions about the product, don’t hesitate to contact us. We can be reached Monday though Friday from 7:30 AM to 11:00 AM and from 11:30 AM to 4:00 PM Pacific Time. If the customer support lines are busy or if you are calling after hours, leave a message or send a FAX or E-MAIL and a representative will respond, typically within 24 hours. VOICE NUMBER: (949) 833-3355 ext. 112 FAX NUMBER: (949) 833-0322 EMAIL: [email protected] WEB: http://www.genovation.com FORUM: http://www.genovation.com/forum/ POST: Genovation, Inc.
17741 Mitchell North Irvine, CA 92614 USA

4
CONTENTS 1: Installation and Quick Start Guide................................................................ 5
Before You Begin.......................................................................................... 5 Install Software.............................................................................................. 6 Install Hardware ............................................................................................ 8 Launch MacroMaster .................................................................................... 8 Download File to Keypad .............................................................................. 9 Test Keypad.................................................................................................. 9 Restoring Factory Defaults.......................................................................... 10 Un-Installing and Re-Installing .................................................................... 11
2: Using MacroMaster68x................................................................................ 12
Running MacroMaster68x ........................................................................... 12 Creating and Saving your first CKD file....................................................... 14 The Green Keys.......................................................................................... 15 Correcting Mistakes .................................................................................... 15 Key Codes .................................................................................................. 15 Modifiers ..................................................................................................... 16 Inserting Delays .......................................................................................... 18 Two-Level Programming ............................................................................. 19 Keypad Properties....................................................................................... 20 Double Size Keys........................................................................................ 21 Keycap Labels............................................................................................. 21 Uninstalling MacroMaster............................................................................ 22 Customization Is Standard .......................................................................... 22
3: Advanced Topics ......................................................................................... 23
LED Programming....................................................................................... 23 Multimedia Keys.......................................................................................... 24 Even More Keys.......................................................................................... 26 Keypad Macro Modes ................................................................................. 26 Separate Up Codes..................................................................................... 27 Macro Mode ................................................................................................ 27 Literal Mode ................................................................................................ 28 Rapid Reconfiguration................................................................................. 29
4: Technical Specifications ............................................................................. 34 A: Appendix ...................................................................................................... 35
Scan Code Table ........................................................................................ 35

5
1: Installation and Quick Start Guide Before You Begin Your ControlPad 682 or 683 packages should include the following items:
o A Quick Start page o Product/Installation CD o ControlPad 682 or 683 PS2/USB keypad o PS/2 to USB adapter o Double size keycaps (2) and keycap puller
The ControlPad is designed to connect to the keyboard port or PS/2 port of an IBM PC or compatible computer or any USB port (USB 2.0 or earlier). The MacroMaster program is designed to work with computers running Microsoft Windows 98SE/ME, 2000/XP or 32-bit Vista operating systems. Once programmed, the keypad will work with any computer or operating system that supports USB human interface devices and/or PS/2 keyboard devices. The female PS/2 receptacle on the attached PS/2 cable is designed to “wedge” or “pass-through” another PS/2 device under certain circumstances:
o If the ControlPad is connected to a PC/laptop via the PS/2 port then a standard PS/2 keyboard can be connected to the “wedge” input.
o If the ControlPad is connected to a PC/laptop via the USB port, then a
standard PS/2 keyboard can be connected to the “wedge” input.
The ControlPad may also operate in stand-alone mode. In this mode the ControlPad will successfully boot and operate a PC in PS/2 or USB mode. In addition, the ControlPad supports USB boot protocol (this allows the ControlPad to navigate the BIOS screens).

6
Install Software If you have a Genovation CD, insert the CD into the target computer’s CD drive. If the Installation program does not start immediately, navigate to the CD using Explorer and run Setup.exe. If you downloaded the software, unzip the file if required and then run Setup.exe. If you are installing MacroMaster on Microsoft Vista, you may see the following warning:
Click on Allow. Once Setup begins you should see the following screen:

7
Click on Next as required and choose the path you would like to use for storing the PC applications. Click Install to copy the files to your computer from the CD. Click on Finish when prompted.
The following files will be installed on your computer: File Description MacroMaster.pdf This document. MacroMaster68x.exe[1] Keypad macro creator/editor (redefinition application). WinLoad68x.exe Downloader utility for copying macros to the keypad. KeyTest.exe Keyboard testing application. Getting Started.pdf Quick start guide. \Macro Files\*.ckd Sample Custom Keypad Definition (.ckd) files. \Keycap Labels\*.* Pages for printing custom keycap labels. The Setup procedure will create the necessary icons on your Start Menu.
1 The “x” in this document represents either a “2” or “3” depending on which product you purchased. For example, the actual file installed will be MacroMaster683.exe if you purchased a ControlPad683 or MacroMaster682.exe if you purchased a ControlPad682.

8
Install Hardware You may plug in new hardware at any time. If you have not already plugged in your ControlPad keypad, do so now. You should see a few notifications on the bottom right corner of the screen as the automated install proceeds:
Launch MacroMaster If you have not started your MacroMaster application, do so now. Click on:
Start >> Programs >> Genovation >> MacroMaster >> Genovation MacroMaster68x You should see a screen similar to the following (MacroMaster683 shows a 24 key keypad, MacroMaster682 shows a 35 key keypad):

9
The picture above shows the file Default683.ckd is opened for editing. You should open that file now following these steps. If your keypad is a ControlPad 682, then open the Default682.ckd file. Click on the Open button at the top right. The open file dialog appears. Click on the file named Default683.ckd (or Default682.ckd) and then click the Open button. This file contains a few simple keys that can be used to verify the correct operation of your keypad and software installation. Download File to Keypad Click on Download. This will launch the WinLoad68x.exe utility that will in turn copy the Default68x.ckd file to the keypad.
Test Keypad Click on the Test button. This will launch the KeyTest.exe utility that can by used to test the operation of your keypad and the correctness of your macros.
10
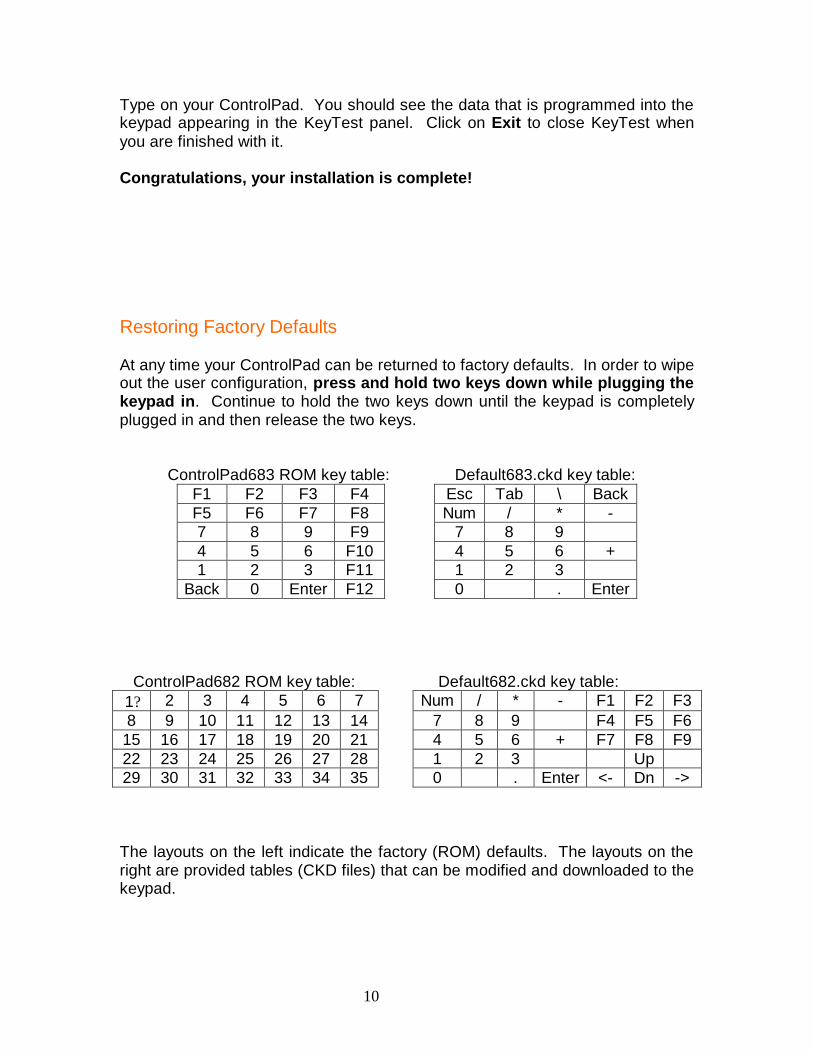
Type on your ControlPad. You should see the data that is programmed into the keypad appearing in the KeyTest panel. Click on Exit to close KeyTest when you are finished with it. Congratulations, your installation is complete! Restoring Factory Defaults At any time your ControlPad can be returned to factory defaults. In order to wipe out the user configuration, press and hold two keys down while plugging the keypad in. Continue to hold the two keys down until the keypad is completely plugged in and then release the two keys.
ControlPad683 ROM key table: Default683.ckd key table: F1 F2 F3 F4 Esc Tab \ Back F5 F6 F7 F8 Num / * - 7 8 9 F9 7 8 9 4 5 6 F10 4 5 6 + 1 2 3 F11 1 2 3
Back 0 Enter F12 0 . Enter ControlPad682 ROM key table: Default682.ckd key table: 1? 2 3 4 5 6 7 Num / * - F1 F2 F3 8 9 10 11 12 13 14 7 8 9 F4 F5 F6
15 16 17 18 19 20 21 4 5 6 + F7 F8 F9 22 23 24 25 26 27 28 1 2 3 Up 29 30 31 32 33 34 35 0 . Enter <- Dn -> The layouts on the left indicate the factory (ROM) defaults. The layouts on the right are provided tables (CKD files) that can be modified and downloaded to the keypad.

11
Un-Installing and Re-Installing It’s a quick and simple matter to remove, re-install or upgrade MacroMaster. To un-install MacroMaster, click on: Start >> Programs >> Genovation >> MacroMaster68x >> Uninstall MacroMaster68x The un-installer will NOT remove any macro files you have created. If you are not installing a newer version, you may delete the macro files and directories manually. If you are installing a newer version (upgrading), your macro files will be saved for you.

12
2: Using MacroMaster68x Running MacroMaster68x To program the ControlPad key codes or change the keypad properties use the MacroMaster application. To begin, click on the following (assumes default installation directories):
Start >> Programs >> Genovation >> MacroMaster v5.0 >> Genovation MacroMaster68x
The title bar contains the name of the application and the name of the file that is opened.
If the file had been modified but not saved, a * character follows the filename. The * will go away once the file is saved or a new file is loaded.

13
The top row of buttons accesses the major functions of the program.
At the center left of the screen is a Virtual Keypad. It is a series of gray squares that represent the keys on the actual keypad hardware (682 or 683).
To the right of this is a black grid of rectangles is the Key Data Editor. It holds the data associated with each key on the keypad.
Every time you select a new gray keypad key, a new set of black grid cells is available to fill with keystroke data. The bottom of the screen shows a rendition of a PC keyboard. This Virtual PC Keyboard can be used to place the data into the black boxes. You may also type the data in.

14
Creating and Saving your first CKD file The file type used by MacroMaster is a .CKD file. CKD stands for Custom Keypad Definition file. The file is simply a collection of key macros. Its contents are arranged in standard INI file format. To start a new project, click New at the top left. This will provide a completely blank template with no keys assigned. 1. Select a key to program. Click on one of the keys on the virtual keypad. Note
that whenever you select a new key, the Key Data Editor reflects the key number, for example: . Each key on the virtual keypad can contain 111 bytes of macro data (per level). We will discuss levels later, but for now you can assume that you may assign up to approximately 100 characters per key.
2. Enter some key data. Try typing in the phrase “hello world” (without the
quotes). You should see something like the following.
3. Provide a description. Although it’s optional you should consider typing in a
short description for your macro. For example, . 4. Select repeat mode. If you want the macro to repeat over and over when you
hold the keypad key down, click the repeat checkbox: 5. Save the file. Once you are happy with your macro, save the file by clicking
on the Save As button at the top left. Name the file something appropriate and click Save.

15
Congratulations, you have completed your first macro! It’s only one key, but you now understand the basics of macro programming. The Green Keys MacroMaster’s virtual PC keyboard has keys that are standard gray color and keys that are green. The green keys can be used to enter macro data directly by typing on your real PC keyboard. The gray keys can be used to enter macro data only by clicking the virtual keys with the mouse. The gray keys on your real PC keyboard retain their original function. For instance, the arrow keys allow you to navigate the cells in the black grid. Correcting Mistakes If you make a mistake while entering your key macro data, there are several ways to correct it.
o If you want to erase only one cell in the grid, double-click the mouse on that cell. Remember to select the cell at the end of the macro before you begin typing again. The dashed blue box indicates where new data will go.
o If you want to erase only one cell in the grid, use the Backspace key on your PC keyboard. Recall that this is a gray key so it does not generate a macro entry.
o For a given macro, if you want to start over, right-click on the grid and
select “Erase all key codes for this macro”. This operation only affects the current Level.
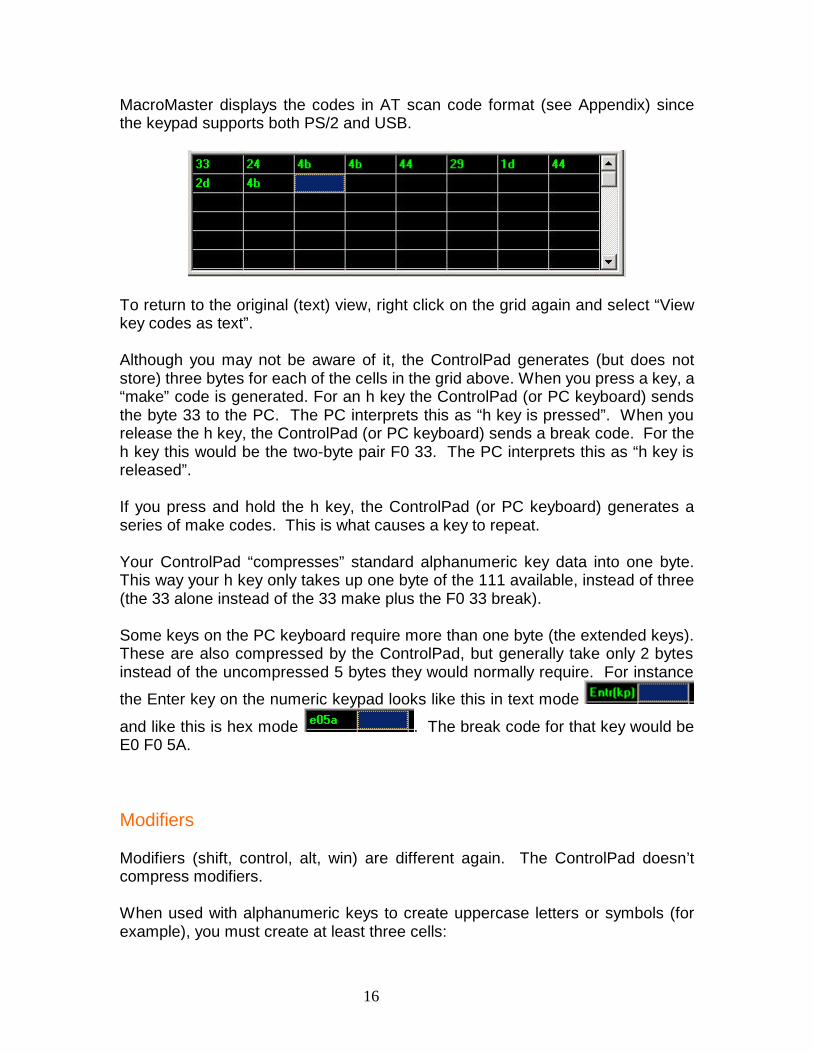
Key Codes The macro you created at the start of this section is very simple. Each square in the black grid contains exactly one byte. You can reveal the underlying codes at any time by right clicking on the grid and selecting “View key codes as hex”.
16
MacroMaster displays the codes in AT scan code format (see Appendix) since the keypad supports both PS/2 and USB.
To return to the original (text) view, right click on the grid again and select “View key codes as text”. Although you may not be aware of it, the ControlPad generates (but does not store) three bytes for each of the cells in the grid above. When you press a key, a “make” code is generated. For an h key the ControlPad (or PC keyboard) sends the byte 33 to the PC. The PC interprets this as “h key is pressed”. When you release the h key, the ControlPad (or PC keyboard) sends a break code. For the h key this would be the two-byte pair F0 33. The PC interprets this as “h key is released”. If you press and hold the h key, the ControlPad (or PC keyboard) generates a series of make codes. This is what causes a key to repeat. Your ControlPad “compresses” standard alphanumeric key data into one byte. This way your h key only takes up one byte of the 111 available, instead of three (the 33 alone instead of the 33 make plus the F0 33 break). Some keys on the PC keyboard require more than one byte (the extended keys). These are also compressed by the ControlPad, but generally take only 2 bytes instead of the uncompressed 5 bytes they would normally require. For instance
the Enter key on the numeric keypad looks like this in text mode
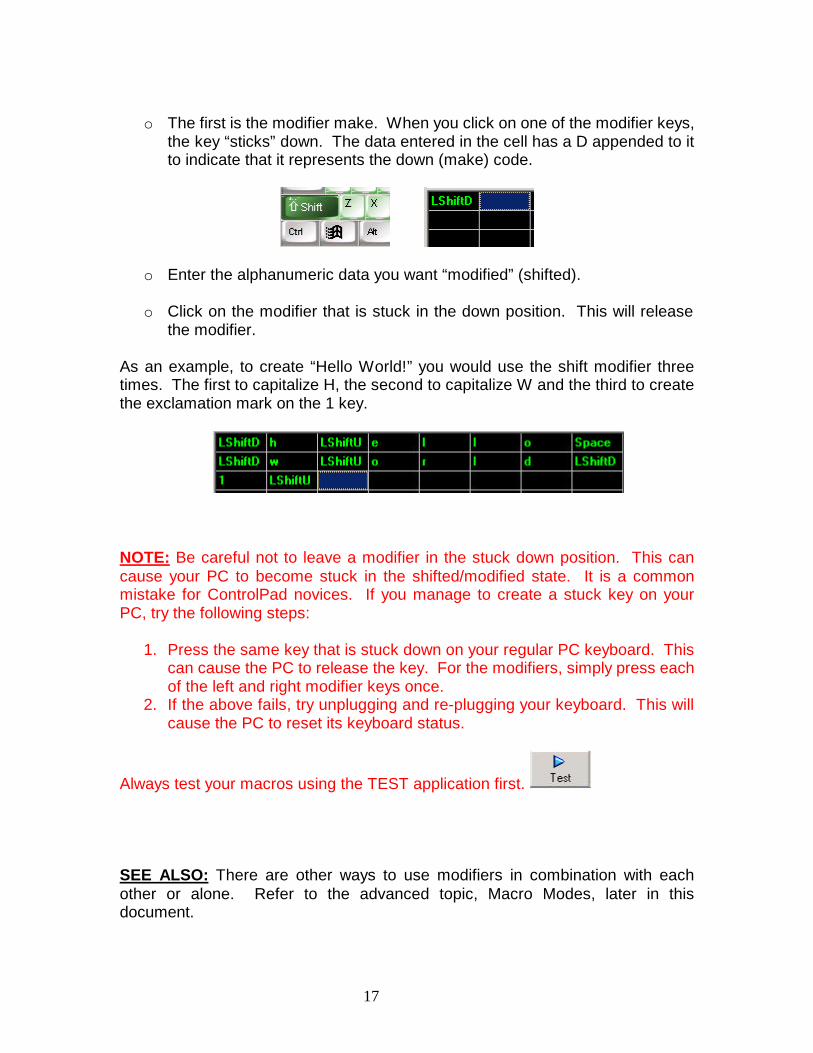
and like this is hex mode . The break code for that key would be E0 F0 5A. Modifiers Modifiers (shift, control, alt, win) are different again. The ControlPad doesn’t compress modifiers. When used with alphanumeric keys to create uppercase letters or symbols (for example), you must create at least three cells:
17
o The first is the modifier make. When you click on one of the modifier keys,
the key “sticks” down. The data entered in the cell has a D appended to it to indicate that it represents the down (make) code.
o Enter the alphanumeric data you want “modified” (shifted). o Click on the modifier that is stuck in the down position. This will release
the modifier. As an example, to create “Hello World!” you would use the shift modifier three times. The first to capitalize H, the second to capitalize W and the third to create the exclamation mark on the 1 key.
NOTE: Be careful not to leave a modifier in the stuck down position. This can cause your PC to become stuck in the shifted/modified state. It is a common mistake for ControlPad novices. If you manage to create a stuck key on your PC, try the following steps:
1. Press the same key that is stuck down on your regular PC keyboard. This can cause the PC to release the key. For the modifiers, simply press each of the left and right modifier keys once.
2. If the above fails, try unplugging and re-plugging your keyboard. This will cause the PC to reset its keyboard status.
Always test your macros using the TEST application first. SEE ALSO: There are other ways to use modifiers in combination with each other or alone. Refer to the advanced topic, Macro Modes, later in this document.

18
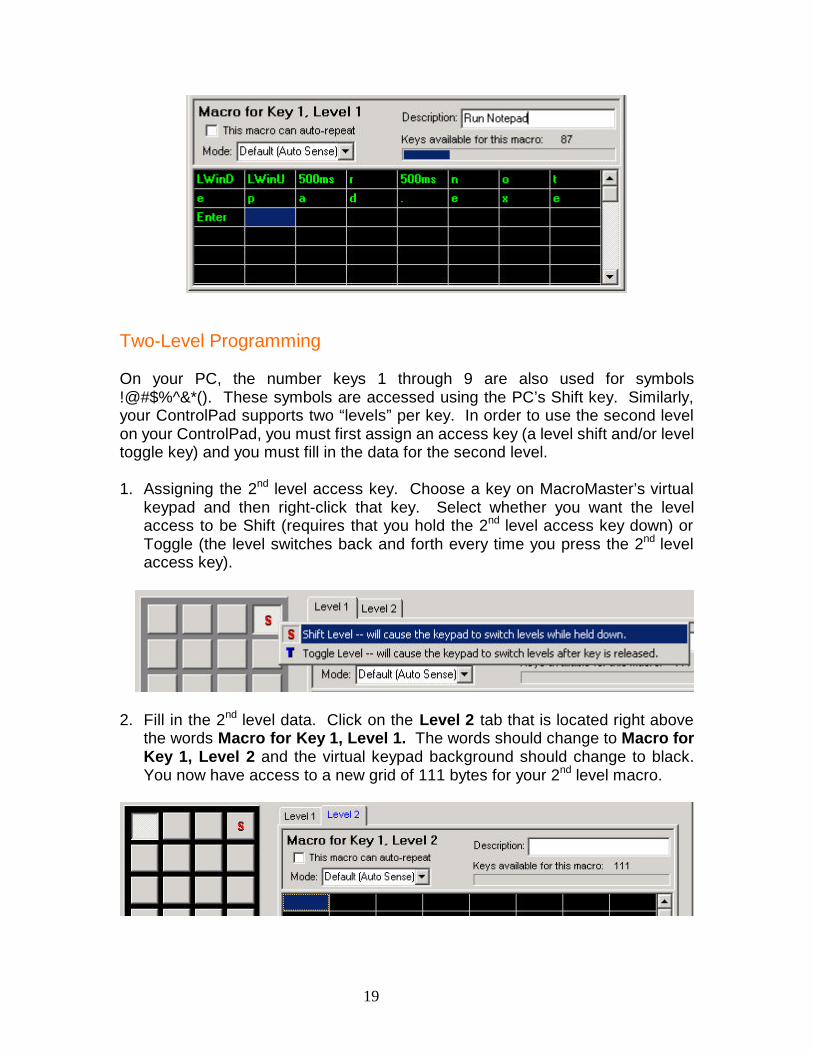
Inserting Delays The ControlPad can rapidly send a long series of keystrokes to the PC. At times the PC, no matter how fast, will not be able to keep up. To give the PC a breather, you can insert delays between your keystrokes. An example of where this is useful is when launching programs from the Windows Run command line. If you wanted to launch Notepad.exe by strictly typing, you would press and
release the Windows key , followed by r for Run, then notepad.exe and finally Enter to activate the OK button.
Compared to your ControlPad, it may take your PC quite a while to perform some of these steps. Inserting delays will make the operation successful every time. To the right of MacroMaster’s virtual PC keyboard is a small box with an Insert
Delay button. The delay is adjustable over a range of 4ms to 500ms (half a second) using the slider. Hovering your mouse over the slider tells you how long the inserted delay will be. The default is 200ms (one fifth of a second). Click
the Insert Delay button to pause the ControlPad for that amount of time. If you need extremely long delays, click it several times in a row. For our notepad example above, the finished macro might look like this:
19
Two-Level Programming On your PC, the number keys 1 through 9 are also used for symbols !@#$%^&*(). These symbols are accessed using the PC’s Shift key. Similarly, your ControlPad supports two “levels” per key. In order to use the second level on your ControlPad, you must first assign an access key (a level shift and/or level toggle key) and you must fill in the data for the second level. 1. Assigning the 2nd level access key. Choose a key on MacroMaster’s virtual
keypad and then right-click that key. Select whether you want the level access to be Shift (requires that you hold the 2nd level access key down) or Toggle (the level switches back and forth every time you press the 2nd level access key).
2. Fill in the 2nd level data. Click on the Level 2 tab that is located right above the words Macro for Key 1, Level 1. The words should change to Macro for Key 1, Level 2 and the virtual keypad background should change to black. You now have access to a new grid of 111 bytes for your 2nd level macro.
20
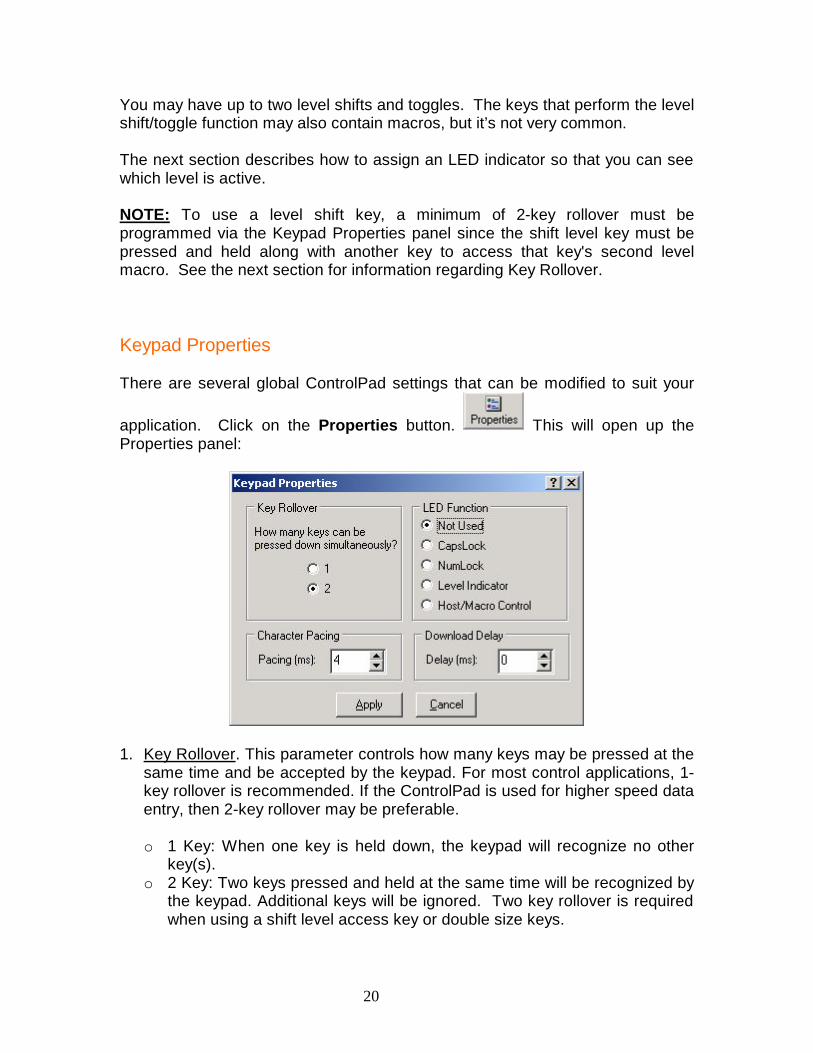
You may have up to two level shifts and toggles. The keys that perform the level shift/toggle function may also contain macros, but it’s not very common. The next section describes how to assign an LED indicator so that you can see which level is active. NOTE: To use a level shift key, a minimum of 2-key rollover must be programmed via the Keypad Properties panel since the shift level key must be pressed and held along with another key to access that key's second level macro. See the next section for information regarding Key Rollover. Keypad Properties There are several global ControlPad settings that can be modified to suit your
application. Click on the Properties button. This will open up the Properties panel:
1. Key Rollover. This parameter controls how many keys may be pressed at the
same time and be accepted by the keypad. For most control applications, 1-key rollover is recommended. If the ControlPad is used for higher speed data entry, then 2-key rollover may be preferable.
o 1 Key: When one key is held down, the keypad will recognize no other
key(s). o 2 Key: Two keys pressed and held at the same time will be recognized by
the keypad. Additional keys will be ignored. Two key rollover is required when using a shift level access key or double size keys.

21
2. Inter-character Pacing. This parameter inserts a short pause between all bytes sent to the PC. The range for this parameter is 2ms to 20ms. It has the effect of slowing down the typing slightly in case you are working with a slow PC.
3. LED Function. You may select one of 5 modes for the LED in your
ControlPad. The default is for the LED to perform no function (Not Used). You may assign the LED to duplicate the PC’s internal LED (Caps Lock or Num Lock) or you may assign it to illuminate when the keypad’s own 2nd level is active (Level Indicator). You may also control the LED from within a macro or from the Host PC.
4. Download Delay. If you are connected via USB you may ignore this
parameter. If you are connected via PS/2 you may include short pauses in the download process to give the host PC and keypad time to synchronize during the download operation. Normally you should not have to adjust this unless you are having trouble performing downloads to your keypad.
Double Size Keys Genovation sells an accessory kit for those who wish to utilize double size keys.
When programming double size keys it is recommended to program only one of the two keys that are combined into the double size key. In addition, you should select a key rollover of 2 on the Keypad Properties page. Keycap Labels
Click on the Key Labels button . The ControlPad keys have clear lenses which allow for labels may be inserted under the lens to indicate the key function. A template is provided for Wordpad or Word in the "Keycap Files" folder. Text, images or icons may be inserted in the template. The resulting file can be printed and saved. The labels can then be cut with scissors and placed under the lens caps.

22
Uninstalling MacroMaster Before you uninstall the application you should backup and remove any .CKD files or keycap labels you have created. This will allow the uninstaller to completely remove the MacroMaster application and all folders. Once you have done that, click on the following (assumes default installation path):
Start >> Programs >> Genovation >> MacroMaster >> Uninstall MacroMaster68x
There is no need to reboot your computer. Customization Is Standard The ControlPad product line has been designed with customization in mind. Contact our sales or technical support staff for full-custom or semi-custom variations of our products.
23
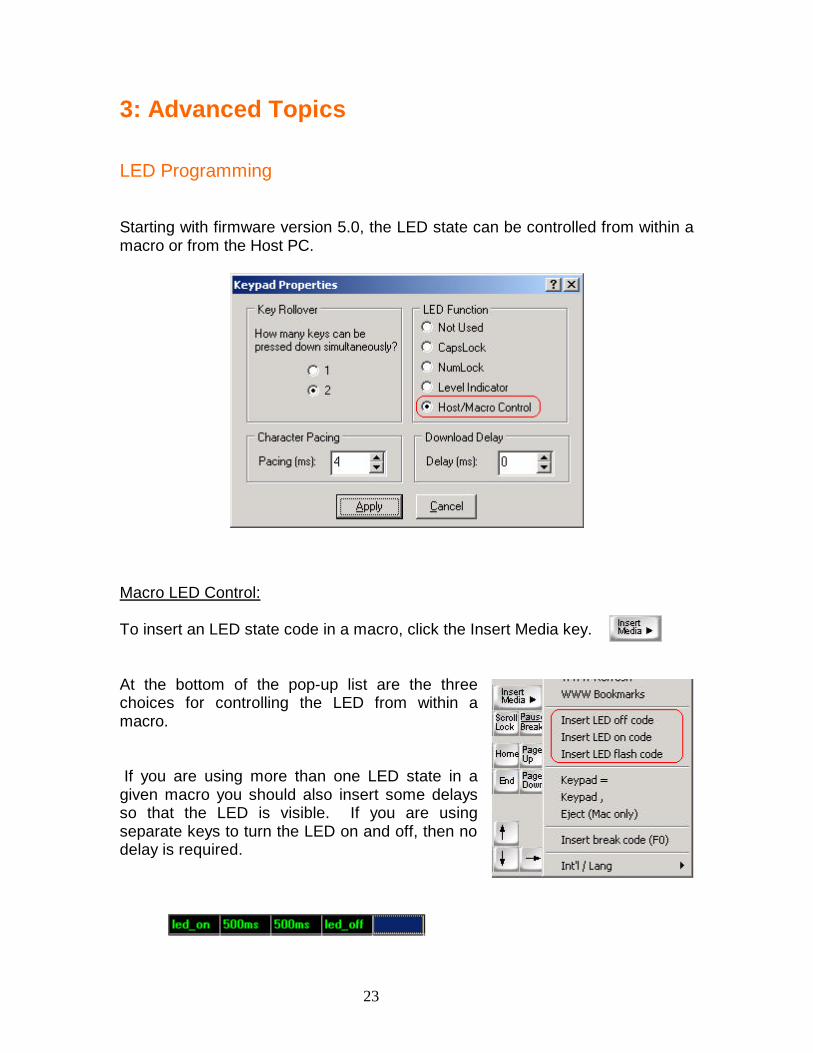
3: Advanced Topics LED Programming Starting with firmware version 5.0, the LED state can be controlled from within a macro or from the Host PC.
Macro LED Control: To insert an LED state code in a macro, click the Insert Media key. At the bottom of the pop-up list are the three choices for controlling the LED from within a macro. If you are using more than one LED state in a given macro you should also insert some delays so that the LED is visible. If you are using separate keys to turn the LED on and off, then no delay is required.
24
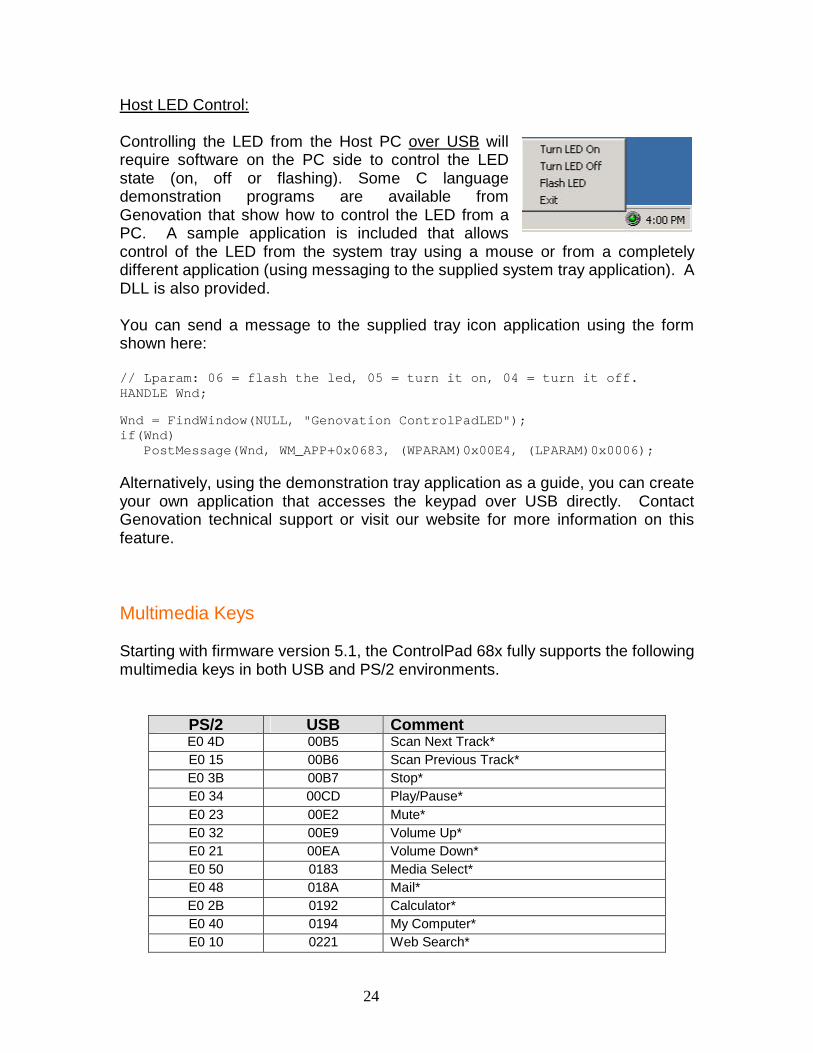
Host LED Control: Controlling the LED from the Host PC over USB will require software on the PC side to control the LED state (on, off or flashing). Some C language demonstration programs are available from Genovation that show how to control the LED from a PC. A sample application is included that allows control of the LED from the system tray using a mouse or from a completely different application (using messaging to the supplied system tray application). A DLL is also provided. You can send a message to the supplied tray icon application using the form shown here: // Lparam: 06 = flash the led, 05 = turn it on, 04 = turn it off. HANDLE Wnd; Wnd = FindWindow(NULL, "Genovation ControlPadLED"); if(Wnd) PostMessage(Wnd, WM_APP+0x0683, (WPARAM)0x00E4, (LPARAM)0x0006); Alternatively, using the demonstration tray application as a guide, you can create your own application that accesses the keypad over USB directly. Contact Genovation technical support or visit our website for more information on this feature. Multimedia Keys Starting with firmware version 5.1, the ControlPad 68x fully supports the following multimedia keys in both USB and PS/2 environments.
PS/2 USB Comment E0 4D 00B5 Scan Next Track* E0 15 00B6 Scan Previous Track* E0 3B 00B7 Stop* E0 34 00CD Play/Pause* E0 23 00E2 Mute* E0 32 00E9 Volume Up* E0 21 00EA Volume Down* E0 50 0183 Media Select* E0 48 018A Mail* E0 2B 0192 Calculator* E0 40 0194 My Computer* E0 10 0221 Web Search*

25
E0 3A 0223 Web Browser/Home* E0 38 0224 Web Back* E0 30 0225 Web Forward* E0 28 0226 Web Stop* E0 20 0227 Web Refresh* E0 18 022A Web Favourites* E0 3B 00B7 USB Eject**
* Please note that the Multimedia values are only available with firmware v5.10 or higher. ** USB Eject requires firmware version 5.20. Only Mac supports USB Eject at this time. Not all operations are available on all operating systems. In order to insert a multimedia key into a macro, select the key, select the cell and then click on the Insert Media key. Click on the desired multimedia action.

26
Even More Keys As of version 5.20 a few more keys, defined by the USB specification, have been added. They are also added to a macro using the Insert Media key.
PS/2 USB Comment 0F 67 Keypad =* 6D 85 Keypad , (Brazil Keypad . )* 51 87 Int’l 1* (Ro) 13 88 Int’l 2 (a: Katakana/Hiragana)* 6A 89 Int’l 2 (b: Yen)* 64 8A Int’l 4 (Henkan)* 67 8B Int’l 5 (Muhenkan)* 27 8C Int’l 6 (PC9800 Keypad , )* 63 92 Lang 3 (Katakana)* 62 93 Lang 4 (Hiragana)* 61 64 Europe 2*
* Please note that these values are only available with firmware v5.20 or higher. Not all operations are available on all operating systems. Keypad Macro Modes The ControlPad plays back macros for the keys in one of three modes. Every macro can have it’s own mode and the setting is adjusted via the Mode drop down box:
Note that the three modes are Separate Up Codes, Macro Mode and Literal Mode. The first item on the list, Default (Auto Sense) is not a mode. The default setting actually tells MacroMaster to choose one of the following two modes for you automatically (Separate Up Codes or Macro Mode). Normally MacroMaster will make the correct decision for you, but there are times you may want to override this setting and specify one of the three modes yourself. If you find that your macro is not operating as you intended, you may have to dig under the hood a little to either select the correct mode and/or modify some of the codes in your macro. The following section describes the three modes in detail.

27
Separate Up Codes This mode is used to generate combinations of keys or individual keys that may be used in combination with other keys. In this mode your macro supplies the standard code for:
o All modifier key make codes (only) o Alphanumeric make codes only
In this mode the make codes are all played at once on ControlPad key down (and repeats if enabled). On ControlPad key up, the macro is rewound to the beginning and this time the break codes are generated. For musicians this is like a “chording” style. If you had a macro containing the letters t h and e, then it would be implemented as: t make, h make, e make, … repeat(s) … t break, h break, e break. This is not normal for the PC because it allows multiple alphanumeric keys to be pressed at once (which can have it’s uses, though rare). It works well for true single keys or modifiers or for combinations of modifiers, etc. If you only have a single key in your macro, this is the best way to implement it. The “Default (Auto Sense)” feature of MacroMaster selects this automatically when it detects a macro that is a single key. Macro Mode This mode is used to emulate normal typing. Or more accurately, the typing that a “two-fingered peck and poke” typist would do. In this mode your macro supplies the standard code for:
o All modifier key make and break codes o Alphanumeric make codes only
When the keypad plays the macro back, the modifier codes are played literally but the alphanumeric codes are “uncompressed” to create make codes followed by break codes. The alphanumeric codes are played one at a time. For our earlier Hello World! example the keypad would generate the following keys: shift make, h make, h break, shift break, e make, e break, etc… All of the operations described above happen on the ControlPad key down (and repeats, if enabled). Nothing happens when you release the key on your ControlPad. The “Default (Auto Sense)” feature of MacroMaster selects this automatically when it detects a macro that has more than a single key.

28
Literal Mode In this mode you know exactly what you want, byte-for-byte. In this mode your macro supplies:
o Everything The macro is played literally on ControlPad key down (and repeats). Nothing happens on ControlPad key up. There are two ways to edit the codes literally. The first method is to edit the CKD (INI) file by hand. You will need to look at the key table in the appendix to enter the correct codes. The second method is to use MacroMaster, though it may have some limitations since there is no “hex editor”. The most important tool here is the “Manually Insert a break code” operation. This is selected by clicking on the Insert Media key.
As a simple example, here is the literal macro for “Hi” (not including the quotes):
Remember that you need to supply all of the break codes too. So for each key you will have make code, F0, make code.

29
Here is the hex view of the same macro:
The above macro was all done inside MacroMaster. The CKD file entry for this macro looks like this:
Level_1_Codes=1233f033f01243f043 Rapid Reconfiguration If you would like to have several keypad layouts defined, and quickly switch between them, then follow the steps below for each layout.
o Build your keypad layout with MacroMaster and test it with your ControlPad.
o Create a new shortcut in a handy location, for instance right-click on the
desktop.

30
o Browse to the MacroMaster folder and choose WinLoad.exe. The location will normally be C:\Program Files\Genovation\MacroMaster68x or similar.

31
o Click on OK and then Next.
o Enter a suitable name for the shortcut, for instance Gaming.
o Click Finish. You should now have a new shortcut called Gaming.
32
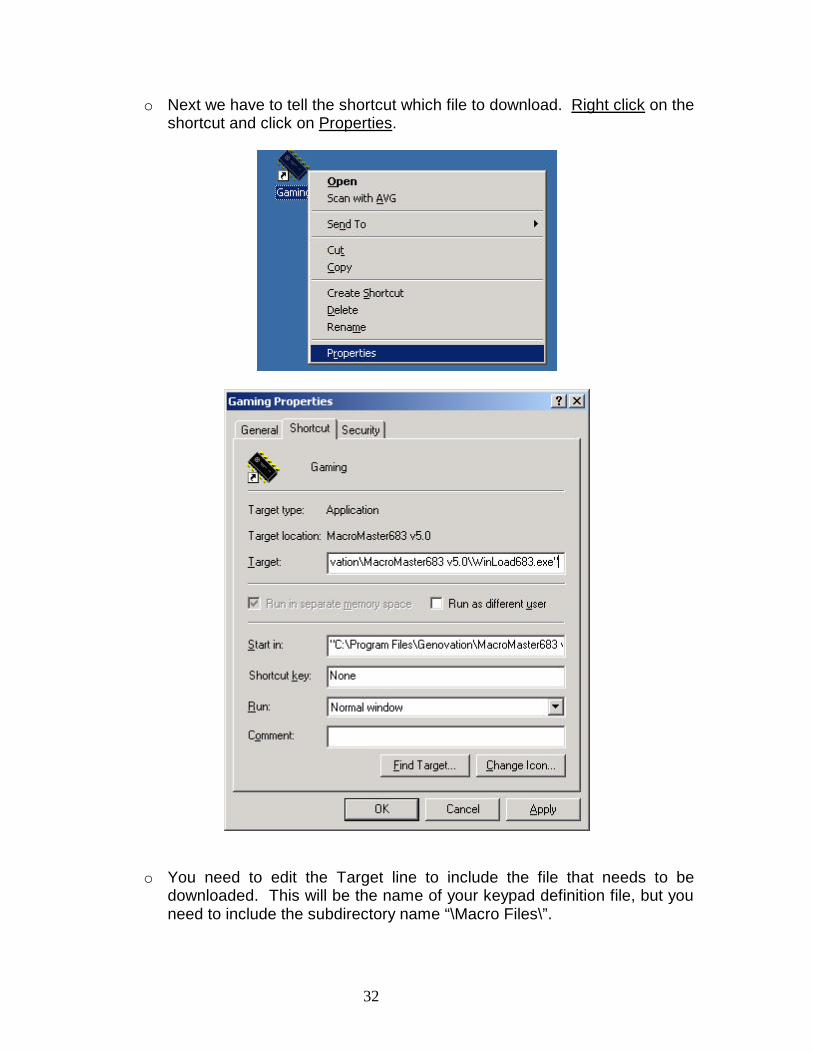
o Next we have to tell the shortcut which file to download. Right click on the shortcut and click on Properties.
o You need to edit the Target line to include the file that needs to be downloaded. This will be the name of your keypad definition file, but you need to include the subdirectory name “\Macro Files\”.

33
o Type in (space) “\Macro Files\Gaming.ckd” including the quotes. Finally, click on OK.
Now your shortcut is complete. When you double-click on it, WinLoad will launch and it will send the Gaming.ckd file to the ControlPad. After the download is complete the ControlPad will reboot so wait a few moments while the PC re-initializes the connection.

34
4: Technical Specifications
ControlPad
683 ControlPad
682 Page 854
Number of Keys
24 relegendable, mounted on an industrial strength
metal sub panel.
35 relegendable, mounted on an industrial strength
metal sub panel.
120
Key Type Gold plated industrial quality Cherry MX key switches. Travel 3.5 mm (0.14").
Operating force is 0.686N (79gf). Life 5 X 10⁷ Cycles.
Gold plated industrial quality Cherry MX key switches. Travel 3.5 mm (0.14").
Operating force is 0.686N (79gf). Life 5 X 10⁷ Cycles.
120 sealed tactile membrane switches in an easy-to-update 8.5 x
11 inch page format
USB Port USB 1.0, 1.1 and USB 2.0 compatible. HID keyboard
and multimedia.
USB 1.0, 1.1 and USB 2.0 compatible. HID keyboard
and multimedia.
n/a
Keyboard Port
Connects to standard PS/2 keyboard port.
Connects to standard PS/2 keyboard port.
Connects to standard PS/2 keyboard port.
Wedge Capability
Will pass-thru a PS/2 device to a PS/2 or USB host.
Will pass-thru a PS/2 device to a PS/2 or USB host.
Will pass-thru a PS/2 device to a PS/2 host.
Power Self powered from the keyboard port or USB port. No external power supply
required.
Self powered from the keyboard port or USB port. No external power supply
required.
Self powered from the keyboard port. No
external power supply required.
Number of LEDs
1 1 0
LED Modes CapsLock, NumLock, Level, Host/Macro control.
CapsLock, NumLock, Level, Host/Macro control.
n/a
Temperature 0C to 70C (32F to 158F) 0C to 70C (32F to 158F) 0C to 60C (32F to 140F) Dimensions 6 x 3.75 x 1.25 (inches) 6 x 4.5 x 1.25 (inches) 8.7 x 13.8 x 2 (inches)
Weight 1.1 lbs. shipping weight 1.1 lbs. shipping weight 5.0 lbs shipping weight Macro
Storage Two levels, 111 bytes per level, 222 bytes per key.
Two levels, 111 bytes per level, 222 bytes per key.
Two levels, 30 bytes per level, 60 bytes per key.
Level shift keys
0, 1 or 2 assignable. 0, 1 or 2 assignable. 0, 1 or 2 assignable.
Level toggle keys
0, 1 or 2 assignable. 0, 1 or 2 assignable. 0, 1 or 2 assignable.
Storage Type High reliability EEPROM High reliability EEPROM High reliability EEPROM Endurance 1 million write cycles 1 million write cycles 1 million write cycles
Data Retention
100 years 100 years 100 years
Program Method
MacroMaster 683 Windows application
MacroMaster 682 Windows application
MacroMaster 854 Windows application
TSR/Driver Requirements
None None None
MacroMaster OS
Requirements
Windows 98se, ME, 2000, XP, 32-bit Vista
Windows 98se, ME, 2000, XP, 32-bit Vista
Windows 98se, ME, 2000, XP
Keypad OS Supported
All (PS/2 or USB)
All (PS/2 or USB)
All (PS/2 only)
Will boot PC in standalone
mode
Yes (PS/2 or USB)
Yes (PS/2 or USB)
Yes (PS/2 only)

35
A: Appendix Scan Code Table All values are hexadecimal AT (PS/2) scan codes.
Function Make Code(s) Break Codes F9 01 F0 01 F5 03 F0 03 F3 04 F0 04 F1 05 F0 05 F2 06 F0 06 F12 07 F0 07
F13 (new) 08 F0 08 F10 09 F0 09 F8 0A F0 0A F6 0B F0 0B F4 0C F0 0C
TAB 0D F0 0D ` ~ 0E F0 0E
Keypad = 0F F0 0F Function Make Code(s) Break Codes F14 (new) 10 F0 10
L Alt 11 F0 11 L Shift 12 F0 12
Int’l 2 (a) 13 F0 13 L Ctrl 14 F0 14 q Q 15 F0 15 1 ! 16 F0 16
F15 (new) 18 F0 18 z Z 1A F0 1A s S 1B F0 1B a A 1C F0 1C
w W 1D F0 1D 2 @ 1E F0 1E
Function Make Code(s) Break Codes F16 20 F0 20 c C 21 F0 21 x X 22 F0 22 d D 23 F0 23 e E 24 F0 24 4 $ 25 F0 25 3 # 26 F0 26
Int’l 6 27 F0 27

36
F17 28 F0 28 Space 29 F0 29 v V 2A F0 2A f F 2B F0 2B t T 2C F0 2C r R 2D F0 2D 5 % 2E F0 2E
F13 (old) 2F F0 2F Function Make Code(s) Break Codes
F18 30 F0 30 n N 31 F0 31 b B 32 F0 32 h H 33 F0 33 g G 34 F0 34 y Y 35 F0 35 6 ^ 36 F0 36
F14 (old) 37 F0 37 F19 38 F0 38 m M 3A F0 3A j J 3B F0 3B
u U 3C F0 3C 7 & 3D F0 3D 8 * 3E F0 3E
F15 (old) 3F F0 3F Function Make Code(s) Break Codes
F20 40 F0 40 , < 41 F0 41 k K 42 F0 42 i I 43 F0 43
o O 44 F0 44 0 ) 45 F0 45 9 ( 46 F0 46 F21 48 F0 48 . > 49 F0 49 / ? 4A F0 4A l L 4B F0 4B ; : 4C F0 4C p P 4D F0 4D - _ 4E F0 4E
Function Make Code(s) Break Codes F22 50 F0 50
Int’l 1 51 F0 51 ‘ “ 52 F0 52 [ { 54 F0 54 = + 55 F0 55

37
F23 57 F0 57 Caps Lock 58 F0 58
R Shift 59 F0 59 Enter 5A F0 5A
] } 5B F0 5B \ | 5D F0 5D
F24 5F F0 5F Function Make Code(s) Break Codes Europe 2 61 F0 61 Lang 4 62 F0 62 Lang 3 63 F0 63 Int’l 4 64 F0 64
Backspace 66 F0 66 Int’l 5 67 F0 67
Keypad 1 69 F0 69 Int’l 2 (b) 6A F0 6A Keypad 4 6B F0 6B Keypad 7 6C F0 6C Keypad , 6D F0 6D Function Make Code(s) Break Codes Keypad 0 70 F0 70 Keypad . 71 F0 71 Keypad 2 72 F0 72 Keypad 5 73 F0 73 Keypad 6 74 F0 74 Keypad 8 75 F0 75 Escape 76 F0 76
Num Lock 77 F0 77 F11 78 F0 78
Keypad + 79 F0 79 Keypad 3 7A F0 7A Keypad - 7B F0 7B Keypad * 7C F0 7C Keypad 9 7D F0 7D
Scroll Lock 7E F0 7E Function Make Code(s) Break Codes
F7 83 F0 83 Function Make Code(s) Break Codes
R Alt E0 11 E0 F0 11 R Ctrl E0 14 E0 F0 14 L Win E0 1F E0 F0 1F R Win E0 27 E0 F0 27 App E0 2F E0 F0 2F
Power E0 37 E0 F0 37 Keypad / E0 4A E0 F0 4A

38
Keypad Enter E0 5A E0 F0 5A Wake E0 5E E0 F0 5E End E0 69 E0 F0 69 Left E0 6B E0 F0 6B
Home E0 6C E0 F0 6C Insert E0 70 E0 F0 70 Delete E0 71 E0 F0 71 Down E0 72 E0 F0 72 Right E0 74 E0 F0 74 Up E0 75 E0 F0 75
Page Down E0 7A E0 F0 7A Page Up E0 7D E0 F0 7D
Media Function Make Code(s) Break Codes Search E0 10 E0 F0 10
Prev Track E0 15 E0 F0 15 WWW Favorites E0 18 E0 F0 18
Eject (mac) E0 1A E0 F0 1A WWW Refresh E0 20 E0 F0 20 Volume Down E0 21 E0 F0 21
Mute E0 23 E0 F0 23 WWW Stop E0 28 E0 F0 28 App 1 (Calc) E0 2B E0 F0 2B
WWW Forward E0 30 E0 F0 30 Volume Up E0 32 E0 F0 32 Play/Pause E0 34 E0 F0 34
WWW Back E0 38 E0 F0 38 WWW Home E0 3A E0 F0 3A
Stop E0 3B E0 F0 3B App 2 (My PC) E0 40 E0 F0 40
Mail E0 48 E0 F0 48 Next Track E0 4D E0 F0 4D
Media Select E0 50 E0 F0 50 Additional information can be found in “translate.pdf” (courtesy of Microsoft) and “Hut1_12.pdf” (courtesy of USB.org).