Embed Size (px)
Citation preview

MACOMB COUNTY COMMUNITY
MENTAL HEALTH
FOCUS EMR UPDATES
OCTOBER 1ST,2012

SYSTEM NAVIGATION ............................................................................................................................................................................... 1
CONSUMER CHART .............................................................................................................................................................................. 1
CHART LINKS TAB - SCANNED DOCUMENTS .................................................................................................................................... 1
CHART DOCUMENT TAB - ‘SEND COPY TO…’ ................................................................................................................................... 2
APPOINTMENTS TAB ........................................................................................................................................................................ 5
DATA ISSUES TAB ............................................................................................................................................................................. 6
CONSUMER HEADER ............................................................................................................................................................................ 6
CHART DOCUMENTS ........................................................................................................................................................................ 7
ELIGIBILITY/INSURANCE ................................................................................................................................................................... 8
HEALTH/PHCP INFO.......................................................................................................................................................................... 9
CONSUMER CALENDAR .................................................................................................................................................................... 9
ALERTS ............................................................................................................................................................................................ 10
DIAGNOSIS (VIEWING) ................................................................................................................................................................... 10
DOCUMENT DISCLOSURE/RELEASE QUEUE ........................................................................................................................................... 13
CONSUMERS WITH OPEN CASES........................................................................................................................................................ 13
CONSUMERS WITH CLOSED CASES .................................................................................................................................................... 13
VIEWING CONSENTS TO EXCHANGE INFORMATION & THE DOCUMENT DISCLOSURE RECORD ...................................................... 14
RELEASING THE INFORMATION ......................................................................................................................................................... 15
UPDATING THE DISCLOSURE RECORD ............................................................................................................................................... 15
ADMISSIONS AND ASSIGNMENTS .......................................................................................................................................................... 16
PRIMARY PROGRAM/CASE HOLDER .................................................................................................................................................. 16
PROGRAM AND STAFF ASSIGNMENTS ............................................................................................................................................... 16

STAFF ASSIGNMENTS ......................................................................................................................................................................... 18
WORKING WITH ADMISSIONS ........................................................................................................................................................... 19
ADDING A NEW ADMISSION AND ASSIGNING THE PRIMARY PROGRAM/PROVIDER ................................................................... 19
ADDING A NEW NON-PRIMARY PROGRAM ASSIGNMENT ............................................................................................................ 20
ADDING AN EXPIRATION DATE TO A PROGRAM ASSIGNMENT ..................................................................................................... 21
CHANGING THE PRIMARY PROGRAM ASSIGNMENT ..................................................................................................................... 22
ADDING A NEW NON-PRIMARY STAFF ASSIGNMENT .................................................................................................................... 23
ADDING AN EXPIRATION DATE TO A STAFF ASSIGNMENT ............................................................................................................ 24
CHANGING THE PRIMARY STAFF ASSIGNMENT ............................................................................................................................. 25
DISCHARGING THE CONSUMER - ADDING A DISCHARGE SUMMARY ........................................................................................... 26
DISCHARGING THE CONSUMER WITHOUT A DISCHARGE SUMMARY – ACCESS CENTER/RECORDS USE ONLY ........................... 26
AUTHORIZATIONS .................................................................................................................................................................................. 27
SCANNED DOCUMENTS ......................................................................................................................................................................... 29
SCANNING/UPLOADING A DOCUMENT NOT ATTACHED TO AN ELECTRONIC DOCUMENT .............................................................. 29
ATTACHING A SCANNED/UPLOADED DOCUMENT TO AN ELECTRONIC DOCUMENT ....................................................................... 30
SCANNING A DOCUMENT WITH A BAR CODE .................................................................................................................................... 32
SCANNING A DOCUMENT WITH AN UNREADABLE BAR CODE .......................................................................................................... 32
VIEWING A SCANNED/UPLOADED DOCUMENT ATTACHED TO AN ELECTRONIC DOCUMENT ......................................................... 33
CALENDAR .............................................................................................................................................................................................. 34
‘WEEK’ VIEW ...................................................................................................................................................................................... 34
‘MULTI’ VIEW ..................................................................................................................................................................................... 35
PRINTING THE CALENDAR .................................................................................................................................................................. 36

INVITING MULTIPLE STAFF TO ATTEND AN APPOINTMENT .............................................................................................................. 37
SENDING A MESSAGE TO MULTIPLE STAFF INVITIED TO ATTEND AN APPOINTMENT ...................................................................... 38
PROVIDERS/VENDORS ............................................................................................................................................................................ 39
ADDRESS BOOK ...................................................................................................................................................................................... 40
AUTOMATED MESSAGES/ALERTS .......................................................................................................................................................... 41
ALERTS ................................................................................................................................................................................................ 41
MESSAGES .......................................................................................................................................................................................... 41
‘INBOX’ TAB .................................................................................................................................................................................... 42
‘SENT’ TAB ...................................................................................................................................................................................... 46
‘SAVED’ TAB ................................................................................................................................................................................... 46
‘SEARCH’ TAB ................................................................................................................................................................................. 47
DASHBOARD REPORTS ........................................................................................................................................................................... 48
REFRESHING THE DATA THAT APPEARS IN A DASHBOARD PANEL .................................................................................................... 48
RESIZING A DASHBOARD PANEL ........................................................................................................................................................ 48
REMOVING A DASHBOARD PANEL ..................................................................................................................................................... 49
ADDING A DASHBOARD PANEL .......................................................................................................................................................... 49
AVAILABLE DASHBOARD PANELS ....................................................................................................................................................... 50
AP CLAIMS PROCESSING STATISTICS .............................................................................................................................................. 50
CONTRACT PROVIDER STATISTICS ................................................................................................................................................. 51
MEDICAL STATISTICS ...................................................................................................................................................................... 52
MY CASE LOAD ............................................................................................................................................................................... 53
RECENTLY ACCESSED CONSUMERS ................................................................................................................................................ 54

TODAY’S APPOINTMENTS .............................................................................................................................................................. 55
UNSIGNED DOCUMENTS ................................................................................................................................................................ 56
CLINICAL STATISTICS ...................................................................................................................................................................... 57
LAB RESULTS PENDING REVIEW ..................................................................................................................................................... 58
MESSAGES ...................................................................................................................................................................................... 58
QUICK LINKS ................................................................................................................................................................................... 59
MY THERAPY GROUPS .................................................................................................................................................................... 62
TO DO ITEMS .................................................................................................................................................................................. 63
LAB ORDERS ........................................................................................................................................................................................... 64
ADDING A LAB ORDER ........................................................................................................................................................................ 64
ORDERING A TEST THAT IS NOT LISTED ON THE MAIN SCREEN ........................................................................................................ 66
VIEWING LAB ORDERS........................................................................................................................................................................ 67
LAB RESULTS........................................................................................................................................................................................... 68
SCANNING A LAB RESULT ................................................................................................................................................................... 68
VIEWING LAB RESULTS ....................................................................................................................................................................... 71
REVIEWING LAB RESULTS ................................................................................................................................................................... 71
PATIENT EDUCATION ............................................................................................................................................................................. 72
ACCESSING INFORMATION ON A CURRENT MEDICATION, DIAGNOSIS, OR LAB TEST ...................................................................... 72
ACCESSING INFORMATION ON ANY TOPIC ........................................................................................................................................ 74
CONSUMER EXPLANATION OF BENEFITS (EOB)/SUMMARY OF SERVICE REPORT ................................................................................ 75
ADDING A CONSUMER EOB ............................................................................................................................................................... 75
PRINTING A CONSUMER EOB ............................................................................................................................................................. 76

VIEWING A CONSUMER EOB .............................................................................................................................................................. 76
DUE PROCESS LETTERS/ACTION NOTICES .............................................................................................................................................. 77
ADDING A DUE PROCESS LETTER FROM THE SCREENING, INITIAL INTAKE, OR ANNUAL ASSESSMENT ........................................... 77
VIEWING A DUE PROCESS LETTER FROM THE SCREENING, INITIAL INTAKE, OR ANNUAL ASSESSMENT .......................................... 77
ADDING DUE PROCESS/ACTION NOTICE INFORMATION ON THE PERSON CENTERED PLAN (PCP) .................................................. 78
VIEWING DUE PROCESS/ACTION NOTICE INFORMATION ON THE PERSON CENTERED PLAN (PCP)................................................. 78
ADDING/VIEWING ACTION NOTICES FROM THE 'CONSUMER DUE PROCESS LETTERS/ACTION NOTICES' MENU ........................... 78
GUARDIANSHIP ...................................................................................................................................................................................... 79
PARENT(S) OF MINOR CHILD AUTHORIZED TO CONSENT TO TREATMENT ....................................................................................... 80
MOTHER ......................................................................................................................................................................................... 81
FATHER ........................................................................................................................................................................................... 81
DIVORCE INFORMATION ................................................................................................................................................................ 82
COURT APPOINTED GUARDIAN, CO-GUARDIAN, STANDBY GUARDIAN ............................................................................................ 83
RISK ASSESSMENT .................................................................................................................................................................................. 84
SUICIDAL ............................................................................................................................................................................................. 84
HOMICIDAL ........................................................................................................................................................................................ 85
TRAUMA ............................................................................................................................................................................................. 85
HARM ................................................................................................................................................................................................. 86
ACTION TAKEN ................................................................................................................................................................................... 86
SUBSTANCE ABUSE CHART ..................................................................................................................................................................... 87
DIAGNOSIS (ADDING/UPDATING) .......................................................................................................................................................... 88
ADDING A NEW PRIMARY DIAGNOSIS CODE ..................................................................................................................................... 88

ADDING A NEW NON-PRIMARY DIAGNOSIS CODE ............................................................................................................................ 89
UPDATING A DIAGNOSIS CODE .......................................................................................................................................................... 90
ADDITIONAL INFORMATION – CO-OCCURRING CONSUMER QUADRANT......................................................................................... 91
SERVICE ACTIVITY LOGS ......................................................................................................................................................................... 93
VIEWING ANY COMBINATION OF DOCUMENTS TOGETHER ............................................................................................................. 94
SIGNATURES ........................................................................................................................................................................................... 95
SIGNATURE QUEUE SORT OPTIONS ................................................................................................................................................... 95
BATCH REVIEW/SIGN ......................................................................................................................................................................... 96
AMENDED DOCUMENTS AWAITING SIGNATURE .............................................................................................................................. 97
DOCUMENT AMENDMENT NOTIFICATION ........................................................................................................................................ 97
DIGITAL IMAGE OF A HAND SIGNATURE............................................................................................................................................ 98
DESIGNATING WHICH STAFF WILL CAPTURE THE IMAGE OF THE HAND SIGNATURE .................................................................. 98
STARTING THE SIGNATURE CAPTURE PROCESS ............................................................................................................................. 99
CAPTURING THE IMAGE OF THE HAND SIGNATURE USING A MOUSE OR TOUCH SCREEN DEVICE............................................ 102
CAPTURING THE IMAGE OF THE HAND SIGNATURE USING A SIGNATURE PAD .......................................................................... 104
FORM REVISIONS ................................................................................................................................................................................. 106
SELF-PAY POLICY / FEE DETERMINATION AGREEMENT ................................................................................................................... 106
ADDING A SELF-PAY POLICY/FEE DETERMINATION AGREEMENT ............................................................................................... 106
SCANNING DOCUMENTION RELATED TO A SELF-PAY POLICY/FEE DETERMINATION AGREEMENT............................................ 108
UPDATING THE SELF-PAY POLICY/FEE DETERMINATION AGREEMENT FOLLOWING A FULL FINANCIAL .................................... 109
CHILD DEVELOPMENTAL MILESTONES ............................................................................................................................................ 109
COORDINATION OF CARE ................................................................................................................................................................. 110

INITIAL INTAKE/ANNUAL ASSESSMENT ........................................................................................................................................... 112
MEDICATION REVIEW ...................................................................................................................................................................... 113
PSYCHIATRIC EVALUATION .............................................................................................................................................................. 114
PERSON CENTERED PLANS (PCPs) .................................................................................................................................................... 114
AUTHORIZATIONS ........................................................................................................................................................................ 116
DUE PROCESS/ACTION NOTICE .................................................................................................................................................... 118
PERIODIC REVIEW ........................................................................................................................................................................ 118
ADDENDUM ................................................................................................................................................................................. 118
SCREENING ....................................................................................................................................................................................... 119
SPECIALIZED NURSING ASSESSMENT ............................................................................................................................................... 120
SUPPORTS NEEDS WORKSHEET ....................................................................................................................................................... 120
NEW FORMS ......................................................................................................................................................................................... 121
DLA-20 DD VERSION ......................................................................................................................................................................... 121
DEATH REPORT ................................................................................................................................................................................. 121
DIAGNOSIS UPDATE ......................................................................................................................................................................... 121
SYSTEM TIME-OUT DISPLAY ................................................................................................................................................................. 122
SYSTEM CONVERSION INFORMATION ................................................................................................................................................. 123
USING THE NEW FOCUS SYSTEM IN A TEST ENVIRONMENT ........................................................................................................... 124
REMINDERS .......................................................................................................................................................................................... 124
‘I FORGOT MY PASSWORD’ LINK ...................................................................................................................................................... 124
‘MY PAGE’ ........................................................................................................................................................................................ 125
ADDING A SUB-MENU TO ‘MY PAGE’ .......................................................................................................................................... 125

REMOVING A SUB-MENU FROM ‘MY PAGE’ ................................................................................................................................ 125
FOCUS SYSTEM ACCESS REQUEST FORM ......................................................................................................................................... 126
DIRECT PROVIDERS....................................................................................................................................................................... 126
CONTRACT PROVIDERS ................................................................................................................................................................ 126
DOCUMENT REMOVAL REQUEST FORM .......................................................................................................................................... 127
MCO & DIRECT PROVIDER STAFF ................................................................................................................................................. 127
CONTRACT PROVIDER STAFF........................................................................................................................................................ 127
NEED HELP WITH FOCUS? .................................................................................................................................................................... 127

1
SYSTEM NAVIGATION
CONSUMER CHART (‘Consumers’ menu)
CHART LINKS TAB - SCANNED DOCUMENTS
The Chart Links tab includes links to all List screens, including scanned documents.
Note:
- Some scanned documents and categories of scanned documents will appear as their own link in the consumer chart (for example,
‘Behavioral Data Sheets’ and ‘DHS/SSA Documents’).
- Other scanned documents will be attached to an electronic document generated in FOCUS (for example, a hospital discharge packet
attached to a Certificate of Need, or a PCP signature page attached to the PCP).
Note: A complete list of scanned documents and their location in the consumer chart is available at:
- MCO/Direct Provider Staff: MCCMH intranet (http://intranet/). Press the ‘FOCUS Training ’ button.
- Contract Provider Staff: MCCMH website (http://www.mccmh.net/), ‘Provider Links’, ‘FOCUS Training’ section.

2
CHART DOCUMENT TAB - ‘SEND COPY TO…’
The Chart Documents tab includes the ability to send copies of clinical documentation to internal staff for review and to request a document be
released to an external entity. Most clinical documents also include a ‘Send Copy To’ page that can be completed at the time the document is
added.
Note:
- The copies and request(s) to release will be sent once the document has been signed.
- ‘Send Copy To’ does not replace ‘co-sign’ functionality.
- Since ‘Send Copy To’ tracks the release of records, there will no longer be a ‘fax’ link next to documents that include ‘Send Copy To’
Add a check mark next to the document(s) to be sent
Click the ‘Send Copy To…’ link

3
SEND COPY TO INTERNAL STAFF
Click the ‘Send to Staff’ link
Use the ‘Lookup’ button to search for/select staff
Press the ‘Save and Send Copies’ button
Note:
- To send to additional staff, press the ‘Send to Staff’ link again.
- There may be more than one staff with the same or similar name. To ensure the document is sent to the correct staff, verify the staff’s
‘Primary Provider’ listed on the ‘Lookup’ screen.
- Staff receiving the copy will be notified via their ‘To-Do Items’. The document can be viewed by clicking the ‘View Document’ link. When
done, click the ‘Mark item as Completed’.

4
REQUEST RELEASE TO EXTERNAL STAFF
Note: For all documents to be sent outside your agency, be sure there is a valid Authorization for Release of Information before adding the
request.
Click the ‘Send External Copy’ link
Use the ‘Lookup’ button to search for/select location
Note:
- If you can’t find the location, you will be able to add it. However, ensure you search using broad criteria to prevent duplicate entries
- To send to additional external locations, press the ‘Send External Copy’ link again
- To send to internal staff in the same step, press the ‘Send to Staff’ link
Press the ‘Save and Send Copies’ button
5
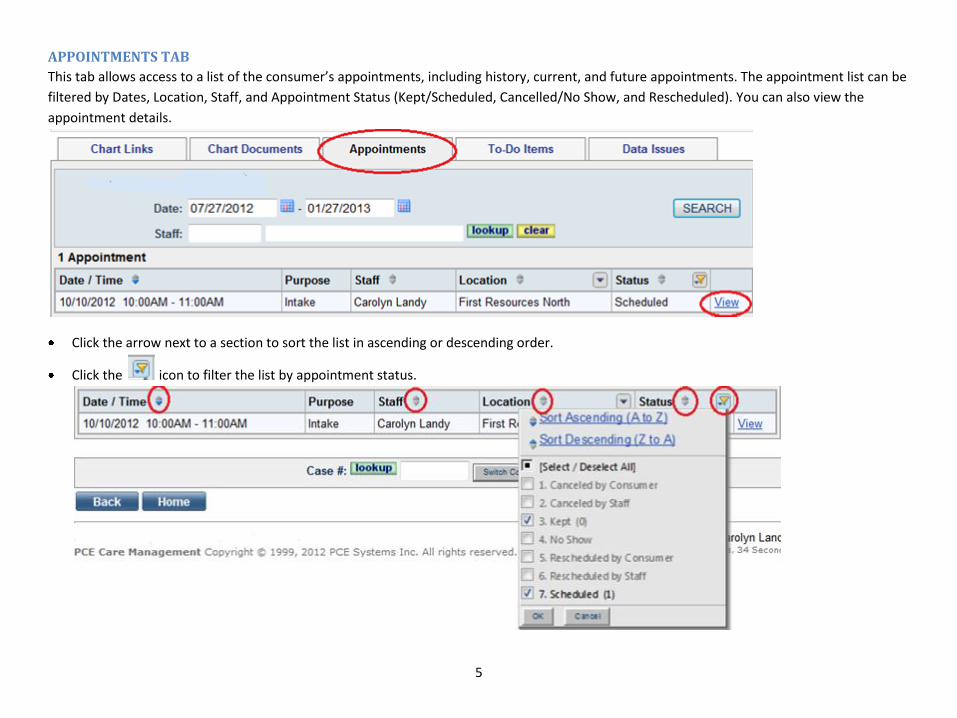
APPOINTMENTS TAB
This tab allows access to a list of the consumer’s appointments, including history, current, and future appointments. The appointment list can be
filtered by Dates, Location, Staff, and Appointment Status (Kept/Scheduled, Cancelled/No Show, and Rescheduled). You can also view the
appointment details.
Click the arrow next to a section to sort the list in ascending or descending order.
Click the icon to filter the list by appointment status.

6
DATA ISSUES TAB
This tab will list any errors in the data stored in the consumer’s record.
Click on the error to review/correct it
Note: - ‘Show Fixed’ displays data issues fixed by the user and manually marked as ‘Corrected’ by clicking the link on the issue.
- ‘Show Resolved’ displays data issues fixed by the user and automatically marked as ‘Resolved’ by the nightly FOCUS process that checks
for data issues.
CONSUMER HEADER
The consumer’s age and gender will display next to their name. If the consumer has a court appointed guardian, will display next to
their name.

7
CHART DOCUMENTS
This link provides access to all of the consumer’s clinical documentation in an Adobe PDF format from most consumer specific screens in the
system. This eliminates the need to exit the current record in order to access historical records.
Click the ‘Chart Documents’ link
Click the ‘PDF’ link

8
ELIGIBILITY/INSURANCE
This link provides access to:
The last 6 months of Medicaid/ABW eligibility per the Michigan Public Health Institute (MPHI). Note – This is updated weekly.
Medicaid/ABW enrollment per the Michigan Department of Community Mental Health (MDCH). Note – This is updated monthly.
MI Child enrollment per MDCH. Note – This is updated monthly.
Insurance policies. Note – This information is manually entered/maintained.
Real-time Medicaid/ABW eligibility information per MPHI via the ‘Medicaid Eligibility Inquiry’ link.

9
HEALTH/PHCP INFO
This link allows ‘one-click’ access to the consumer’s current prescribed medications, current non-CMH medications, primary health care provider
(PHCP), preferred pharmacy, and latest vital signs.
CONSUMER CALENDAR
This link provides access to the consumer’s calendar. The user can view the consumer’s appointments, reschedule appointments, and update
appointments.
Note:
- This link may not be available on all screens.

10
ALERTS
This link displays alerts specific to the consumer (for example: expiring Person Centered Plan, expiring authorizations, etc). The icon will appear
green when there are no alerts and red when there are alerts.
DIAGNOSIS (VIEWING)
This link provides the user with ‘one-click’ access to the consumer’s current diagnosis, diagnosis by clinical document, and diagnosis history by
diagnosis code.
11
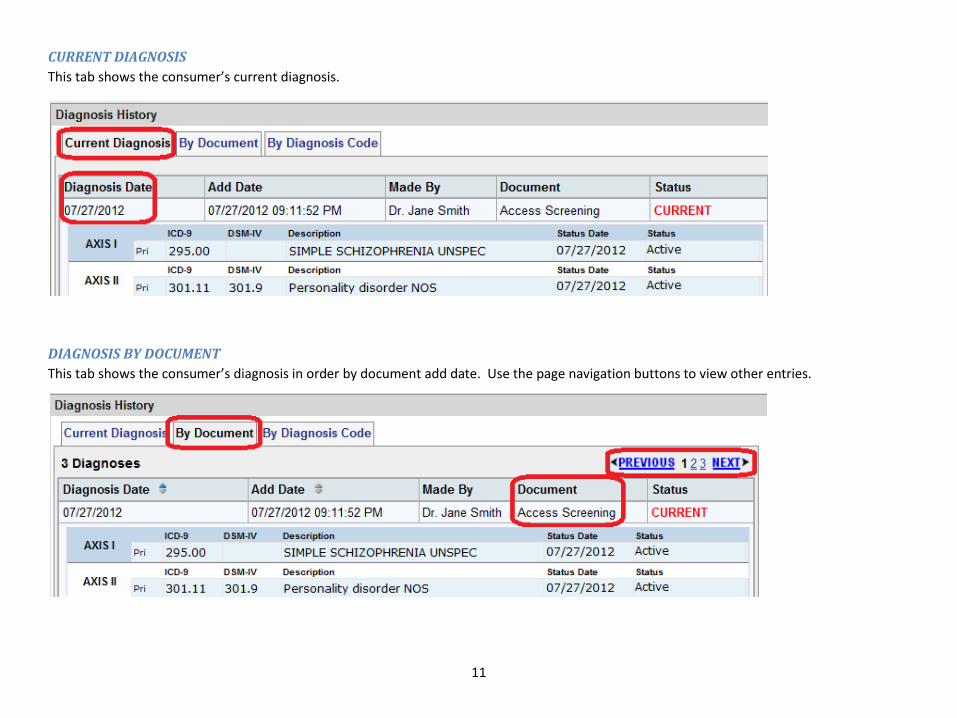
CURRENT DIAGNOSIS
This tab shows the consumer’s current diagnosis.
DIAGNOSIS BY DOCUMENT
This tab shows the consumer’s diagnosis in order by document add date. Use the page navigation buttons to view other entries.

12
DIAGNOSIS BY DIAGNOSIS CODE
This tab shows the consumer’s diagnosis in numeric order by code.
Note:
- Only diagnosis codes with a status other than inactive (ie ‘active’, ‘in remission’, ‘resolved’, ‘ruled out’, ‘rule out’) will be listed by
default. Remove the check from the ‘Only Show Current Diagnosis Codes’ box to see ‘inactive’ diagnosis codes.

13
DOCUMENT DISCLOSURE/RELEASE QUEUE (‘Records’ menu)
This queue will list documents requested to be copied and sent to other agencies. Documents will appear in the queue after they have been
signed. From the queue, you can print or fax selected documents and mark the status of disclosure.
CONSUMERS WITH OPEN CASES For consumers with open cases, the consumer’s primary assigned program (the agency coordinating the consumer’s services - typically a case
management or supports coordination agency) will manage the release of the consumer’s records*. Any documents requested to be released to
external agencies for consumers with open cases will be routed to the consumer’s primary assigned program for review/release.
*Note:
- For consumers whose primary assigned agency is a hospital, the request to release the document will be forwarded to the MCCMH
Records Department for review/release regardless of case status.
CONSUMERS WITH CLOSED CASES For consumers with closed cases, MCCMH’s Medical Records Department will manage the release of the consumer’s records. Any documents
requested to be released to external agencies for consumers with closed cases will be routed to the MCCMH’s Medical Records Department for
review/release.

14
VIEWING CONSENTS TO EXCHANGE INFORMATION & THE DOCUMENT DISCLOSURE RECORD Click the ‘View’ link to view the detail of the document disclosure record
Click the ‘Consents to Exchange Information’ link to view Release of Information forms on file

15
RELEASING THE INFORMATION If it is appropriate to release the information, click the ‘Print’ or ‘Fax’ link to send the information
To fax multiple documents at one time to the same entity, check the box to the left of the documents and click the ‘Fax Selected
Requests’ link.
UPDATING THE DISCLOSURE RECORD After the document has been sent, click the ‘Mark as Sent’ link to update the disclosure record
If it is not appropriate to release the information, click the ‘Unable to Send’ link to update the disclosure record
Note:
- If the document is marked as ‘Unable to Send’ in the disclosure record, FOCUS will automatically notify the staff who made the request.
If the document is marked as ‘Sent’, no automatic notice is sent to staff.

16
ADMISSIONS AND ASSIGNMENTS (‘Consumers’ menu)
PRIMARY PROGRAM/CASE HOLDER Effective 10/1/2012, FOCUS will use a new admission model. In the new model, a consumer will have a single, open ‘primary’ or ‘umbrella’
admission to the agency that is managing the consumer’s services (typically a case management or supports coordination agency).
‘MCCMH Admission’ in the old admission model = ‘Primary Program Assignment’ in the new admission model
PROGRAM AND STAFF ASSIGNMENTS Agencies and staff involved in the consumer’s care during the course of their admission will be listed on the ‘Program Assignments’ and ‘Staff
Assignments’ tabs of the admission record.
Click on the ‘Program Assignments’ tab to see a list of all agencies involved in the consumer’s care. Ancillary service providers (any agency other
than the case management or supports coordination agency) will appear under this tab as non-primary assigned programs. The primary
program will also appear here. For ancillary programs no longer involved in the consumer’s care during this admission, an expiration date will be
listed.
‘Program Admission’ in the old admission model = ‘Non-Primary Program Assignment’ in the new admission model

17
Note:
- Access Center staff will add the Primary Assignment for a new consumer (unless starting services through walk-in clinic). After that, staff
at the primary assigned program are responsible for maintaining ALL program/staff assignments in the consumer’s admission record.
- The new admission model will include program assignments for CLS, respite, and skill building providers. For the 10/1/2012 system
implementation, assignments for these providers will be automatically generated based on authorizations. However, on/after
10/1/2012, these assignments will be maintained manually by staff at the consumer’s primary assigned program.
- Effective 10/1/2012, admissions will control access to the consumer’s record. Staff working at a provider agency will only be able to
access a consumer’s record in FOCUS if one of the assigned locations in their FOCUS staff record matches a program assignment in the
consumer’s admission. Staff do not need to be assigned in the ‘Staff Assignments’ section of the admission in order to access the
consumer’s record.
- Staff from a given agency will have access to a consumer’s record for up to 1 year after the consumer’s assignment to their agency’s
location has expired.
If you need to access a consumer’s record in the new FOCUS system, but are not able to access the record, contact the consumer’s case
management/supports coordination agency to request a program assignment for your agency be added to the consumer’s admission.

18
Note:
- Due to the differences between the old and new admission model, each ‘MCCMH’ and ‘Program’ admission imported from the old
FOCUS system that is closed prior to 10/1/2012 will appear as a ‘primary’ or ‘umbrella’ admission in the new model. However, any
‘MCCMH’ and ‘Program’ admissions imported from the old FOCUS system that are open as of 10/1/2012, will appear under a single
‘primary’ or ‘umbrella’ admission in the new model.
STAFF ASSIGNMENTS Click on the ‘Staff Assignments’ tab to see a list of staff involved in the consumer’s care. The staff who is the primary case holder (typically the
case manager or supports coordinator) will be identified. Each staffs’ role in the consumer’s care can be identified by their ‘Staff Type’. For staff
no longer involved in the consumer’s care, an expiration date will be listed.
Note:
- Staff for certain types of ancillary providers (for example: CLS, respite, and skill building) will not be listed on the ‘Staff Assignments’ tab.
19
WORKING WITH ADMISSIONS
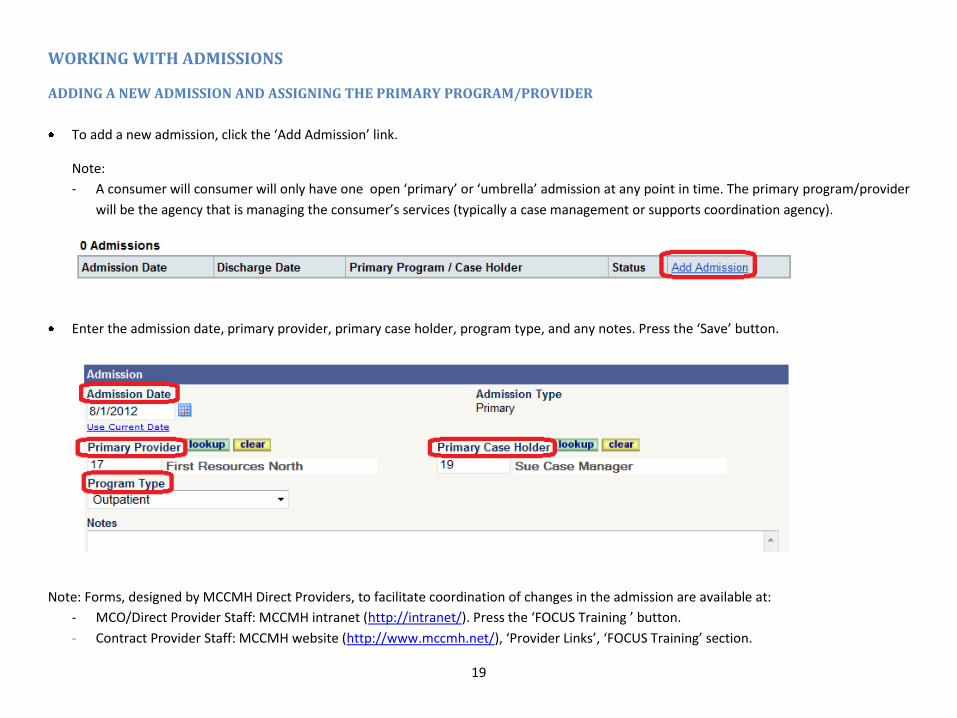
ADDING A NEW ADMISSION AND ASSIGNING THE PRIMARY PROGRAM/PROVIDER
To add a new admission, click the ‘Add Admission’ link.
Note:
- A consumer will consumer will only have one open ‘primary’ or ‘umbrella’ admission at any point in time. The primary program/provider
will be the agency that is managing the consumer’s services (typically a case management or supports coordination agency).
Enter the admission date, primary provider, primary case holder, program type, and any notes. Press the ‘Save’ button.
Note: Forms, designed by MCCMH Direct Providers, to facilitate coordination of changes in the admission are available at:
- MCO/Direct Provider Staff: MCCMH intranet (http://intranet/). Press the ‘FOCUS Training ’ button.
- Contract Provider Staff: MCCMH website (http://www.mccmh.net/), ‘Provider Links’, ‘FOCUS Training’ section.

20
ADDING A NEW NON-PRIMARY PROGRAM ASSIGNMENT
To add a new non-primary program assignment, click the ‘Program Assignments’ tab and click the ‘Add Program Assignment’ link.
Enter the program, program type, and effective date. Press the ‘Save’ button.
21
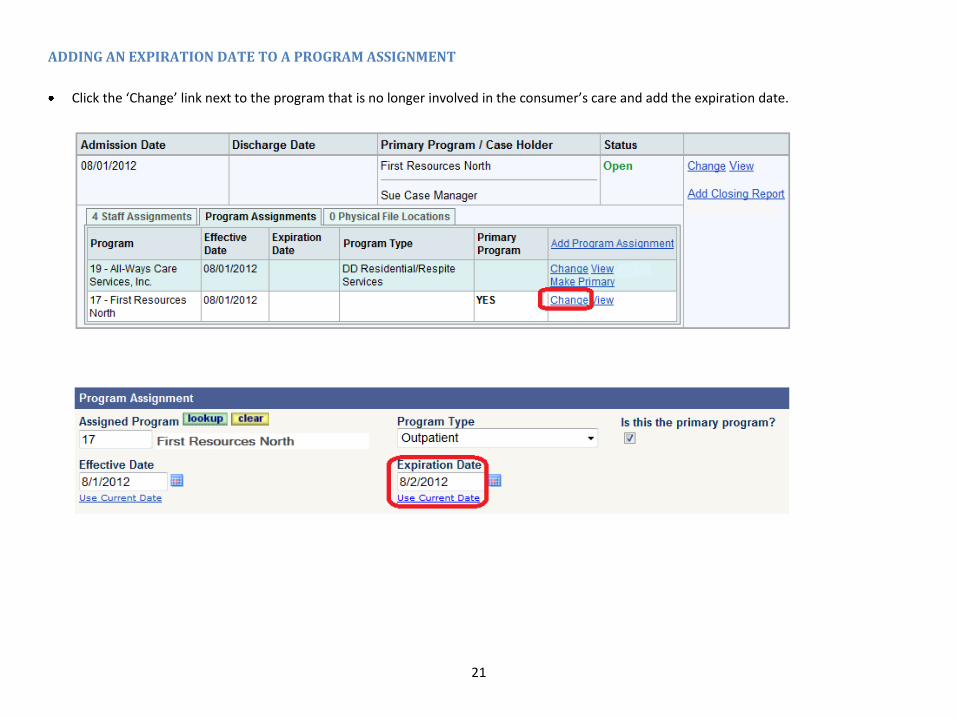
ADDING AN EXPIRATION DATE TO A PROGRAM ASSIGNMENT
Click the ‘Change’ link next to the program that is no longer involved in the consumer’s care and add the expiration date.
22
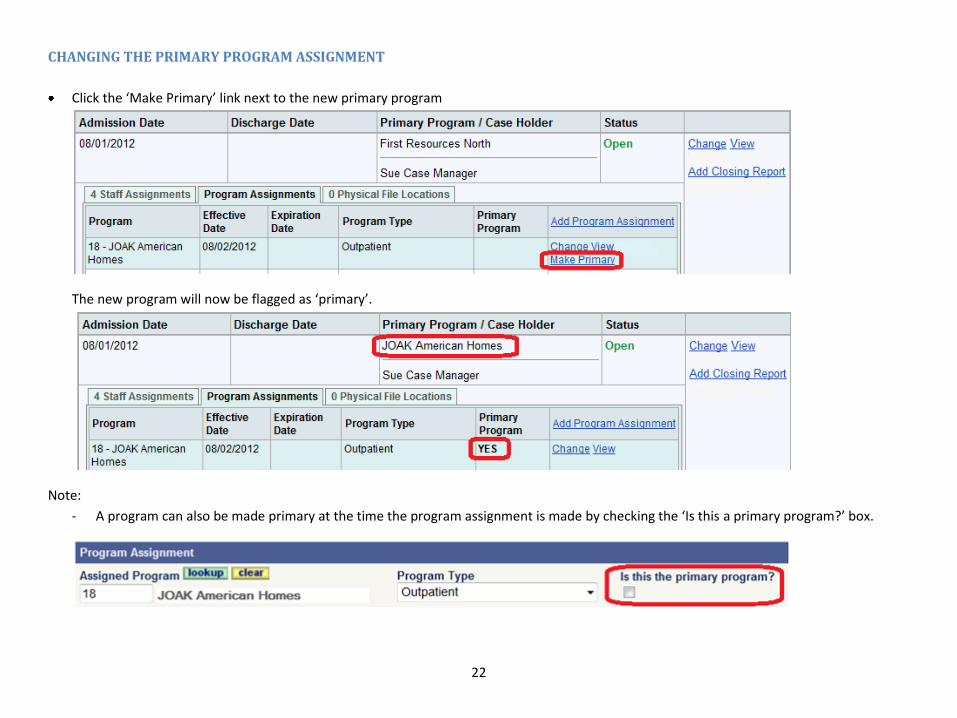
CHANGING THE PRIMARY PROGRAM ASSIGNMENT
Click the ‘Make Primary’ link next to the new primary program
The new program will now be flagged as ‘primary’.
Note:
- A program can also be made primary at the time the program assignment is made by checking the ‘Is this a primary program?’ box.

23
ADDING A NEW NON-PRIMARY STAFF ASSIGNMENT
To add a non-primary staff assignment, click the ‘Staff Assignments’ tab and click the ‘Add Staff Assignment’ link.
Enter the staff and effective date. Press the ‘Save’ button.

24
ADDING AN EXPIRATION DATE TO A STAFF ASSIGNMENT
Click the ‘Change’ link next to the staff that is no longer involved in the consumer’s care and add the expiration date.
25
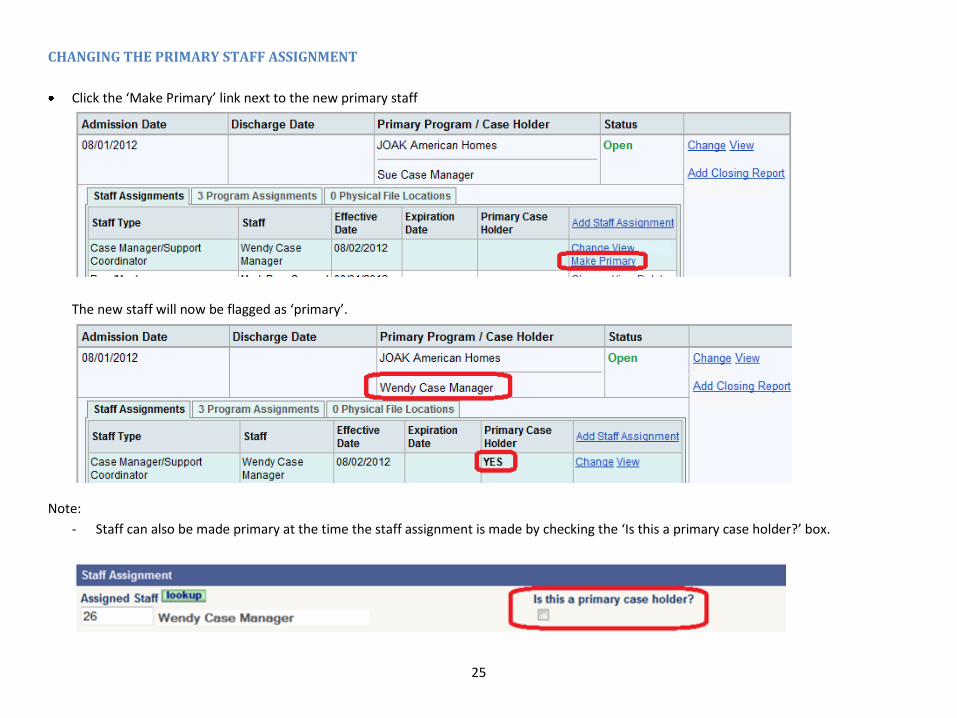
CHANGING THE PRIMARY STAFF ASSIGNMENT
Click the ‘Make Primary’ link next to the new primary staff
The new staff will now be flagged as ‘primary’.
Note:
- Staff can also be made primary at the time the staff assignment is made by checking the ‘Is this a primary case holder?’ box.

26
DISCHARGING THE CONSUMER - ADDING A DISCHARGE SUMMARY
When the consumer is no longer receiving services from any MCCMH provider, click the ‘Add Discharge Summary’ link to complete the
clinical documentation and close the admission.
Note:
- The primary assigned staff is responsible for completing the Discharge Summary.
- If the consumer is no longer receiving services from the currently assigned primary program, but is still receiving services from
another MCCMH program, change the consumer’s primary assigned program. Do not discharge the consumer.
DISCHARGING THE CONSUMER WITHOUT A DISCHARGE SUMMARY – ACCESS CENTER/RECORDS USE ONLY
Access Center and Records Department staff have an option to discharge the consumer from all services without adding a Discharge Summary.
Click the ‘Close Admission’ link.
Enter the ‘Closure Date’ any notes and press the ‘Save’ button.

27
AUTHORIZATIONS (‘Authorizations’ menu)
When requesting an authorization, you will be required to specify which Person Centered Plan (PCP) goal(s) the authorization relates to.*
Click the ‘Related Goals’ link under the service being requested
Check the goal(s) the authorization relates to and press the ‘Update Related Goals’ button.
Note: The related goal will now display in the ‘Related Goals’ section of the authorization.

28
Note:
- With the exception of authorization of emergency and initial services by the Access Center, authorizations will be requested using the
new ‘Authorization’ page of the PCP, PCP Periodic Review, and PCP Addendum.
- *Certain circumstances, such as authorization of emergency and initial services by the Access Center , do not require the ‘Related Goals’
section of the authorization be completed.

29
SCANNED DOCUMENTS (‘Consumers’, ‘Consumer Chart’ menu)
Some scanned documents will appear as their own link in the consumer chart (ex. ‘DHS/SSA Documents’). Other scanned documents will be
attached to an electronic document in FOCUS (ex. a PCP signature page attached to the PCP).
SCANNING/UPLOADING A DOCUMENT NOT ATTACHED TO AN ELECTRONIC DOCUMENT Open the ‘Consumer Chart’, ‘Chart Links’ tab.
Click on the scanned document/scanned document category.
Click the link to add the document.
Enter the document date and any notes. Where applicable, select the document type from the drop down list.
Press the ‘Upload Document’ or ‘Scan Document’ and follow the prompts. When done, press ‘Save’.

30
ATTACHING A SCANNED/UPLOADED DOCUMENT TO AN ELECTRONIC DOCUMENT
Open the ‘Consumer Chart’, ‘Chart Links’ tab.
Click on the electronic document you would like to attach the scanned or uploaded document to.
Click on the ‘Attachments’ tab.

31
Click the ‘Scan Attachment’ or ‘Upload Attachment’ link.
Select the attachment type using the drop down list

32
SCANNING A DOCUMENT WITH A BAR CODE (‘Consumers’, ‘Bar Code Document Upload’ menu)
Documents generated by FOCUS that may be hand signed will print with a bar code. Use the ‘Bar Code Document Upload’ menu to scan the bar
codes page. The scanned document will be automatically associated with the applicable consumer and electronic document.
Open the ‘Bar Code Document Upload’ menu
Press the ‘Scan’ link and follow the prompts
SCANNING A DOCUMENT WITH AN UNREADABLE BAR CODE If FOCUS is unable to read the bar code on a FOCUS document, use the ‘Unreadable Bar Code Document Upload’ menu (‘Consumers’ main
menu) to manually enter the information from the bar code and scan the document.
Open the ‘Unreadable Bar Code Document Upload’ menu
Enter the text from the bar code, press the ‘Scan’ link and follow the prompts
33
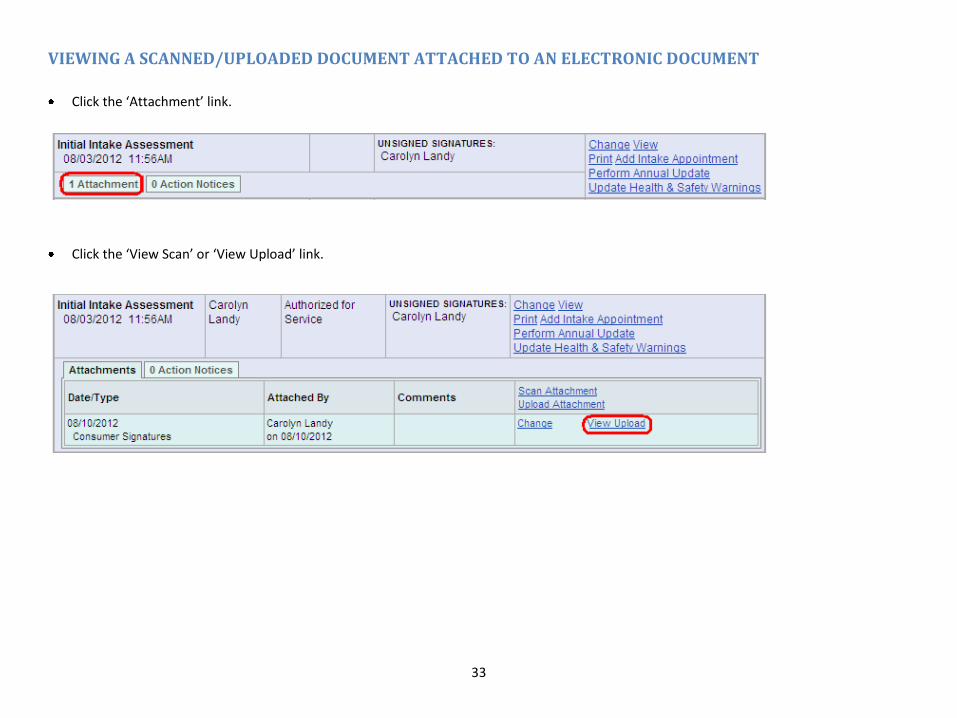
VIEWING A SCANNED/UPLOADED DOCUMENT ATTACHED TO AN ELECTRONIC DOCUMENT
Click the ‘Attachment’ link.
Click the ‘View Scan’ or ‘View Upload’ link.

34
CALENDAR (‘Calendar’ menu)
‘WEEK’ VIEW The ‘week’ view allows you to view appointments by week. You can choose to display weekends.
From the month view, click on ‘Week’.
Check box ‘Show Weekends’ if needed.

35
‘MULTI’ VIEW ‘Multi’ view allows you to view multiple staff calendars side-by-side.
With multiple staff selected in the ‘Staff’ section.
Click the day you would like to view.
When viewing the day, press the ‘Multi’ button to display staff schedules side by side.
36
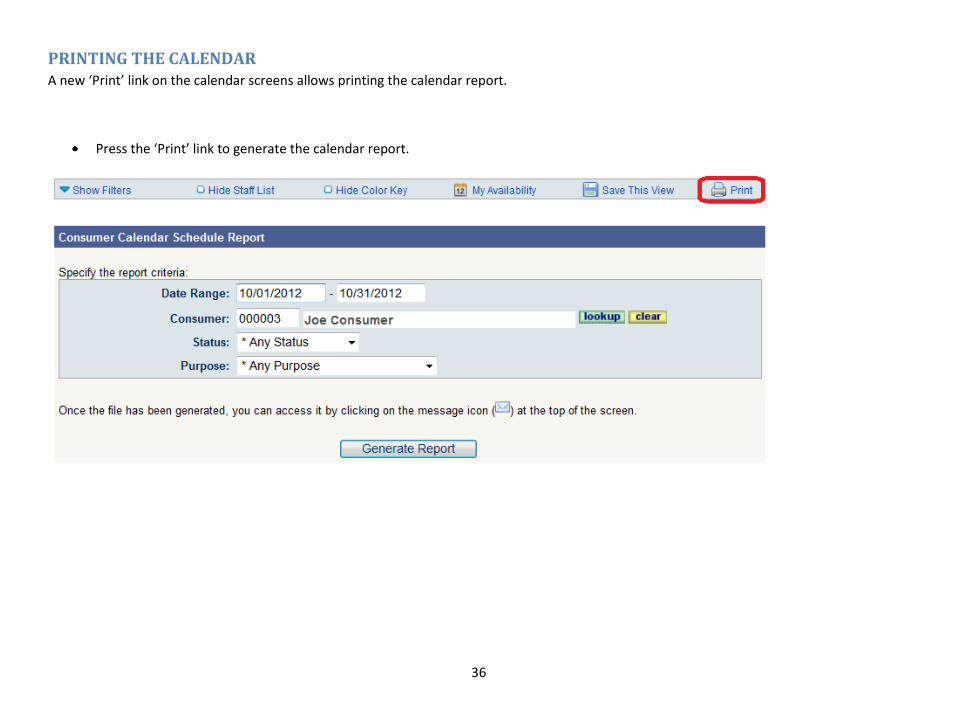
PRINTING THE CALENDAR A new ‘Print’ link on the calendar screens allows printing the calendar report.
Press the ‘Print’ link to generate the calendar report.

37
INVITING MULTIPLE STAFF TO ATTEND AN APPOINTMENT Click the ‘Invite Attendee’ link in the new ‘Attendees’ section of the appointment details page.
Search for/select the staff to invite.
Use the drop down list to specify staff’s attendance as required or optional.
Note:
- Upon saving, a notification of the meeting will be sent to the attendee. The attendee will also be notified of any status updates to the
appointment.
- Upon saving/at the time the invitation is sent, an appointment with a ‘tentative’ status will also be added to the calendar of the staff
who was invited. The status will remain ‘tentative’ until the staff accepts or declines the invitation.
- The inviter will receive notification when an invitee accepts/declines. The status of attendees can also be checked by viewing the
‘Response’ section of the appointment details page.

38
SENDING A MESSAGE TO MULTIPLE STAFF INVITIED TO ATTEND AN APPOINTMENT
Click the ‘Send Message to Attendees’ link in the ‘Attendees’ section of the appointment details page.
Compose the message. When done, press the ‘Send Message’ button.
39
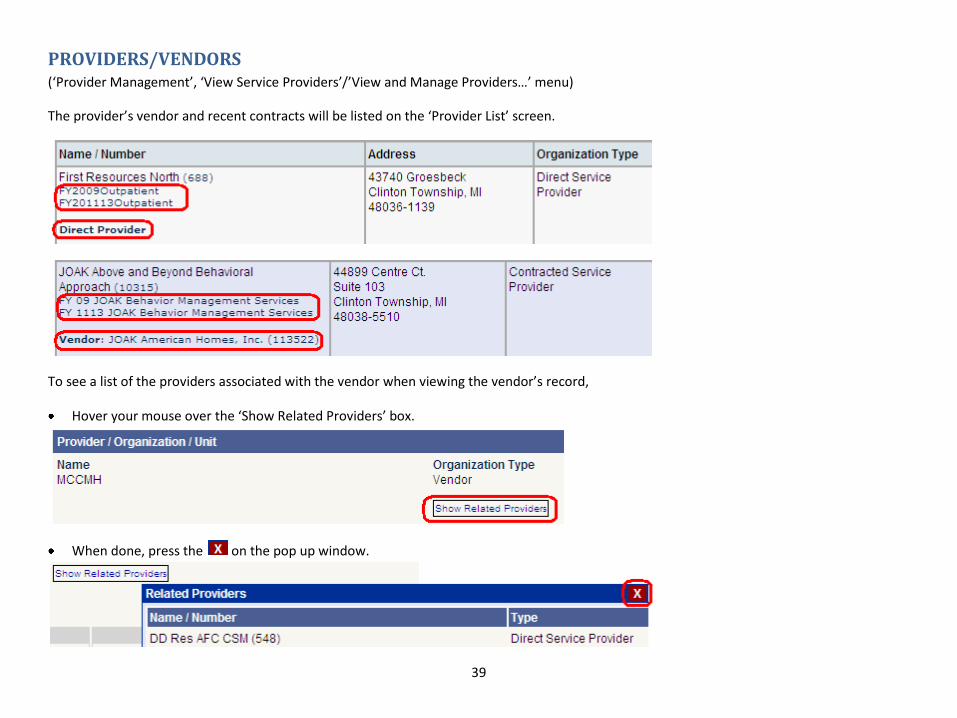
PROVIDERS/VENDORS (‘Provider Management’, ‘View Service Providers’/’View and Manage Providers…’ menu)
The provider’s vendor and recent contracts will be listed on the ‘Provider List’ screen.
To see a list of the providers associated with the vendor when viewing the vendor’s record,
Hover your mouse over the ‘Show Related Providers’ box.
When done, press the on the pop up window.

40
ADDRESS BOOK Contact information for primary health care providers (PHCPs) and qualified health plans (QHPs) will be stored in a central address book. The
address book will be used when entering PHCP or QHP information on documents and when requesting a document be released to a PHCP or
QHP.
When entering a PHCP or QHP on a document, use the ‘lookup’ button to search for/select the contact information.
Note:
- In case the contact information you have is slightly different than the information in FOCUS, start your search using broad criteria.
If you don’t find the contact you are looking for, you can add it. However, before adding a new contact, make sure you have searched
thoroughly for an existing contact to prevent duplicate entries.

41
AUTOMATED MESSAGES/ALERTS Effective 10/1/2012, you will no longer be sent automated messages from FOCUS via e-mail. This information will now be sent via internal
FOCUS system messages and alerts.
ALERTS FOCUS will automatically generate alerts based on various date driven activities (for example - when the PCP expiration date is approaching in 3
weeks).
Access any consumer specific alerts using the ‘Alerts’ link in the Consumer Header or the ‘Clinical Statistics’ dashboard panel.
MESSAGES FOCUS will automatically generate messages based on various event driven activities (for example - when an authorization is approved, denied,
early terminated or voided). You can also send messages to and receive messages from other FOCUS users.
Access your messages using the icon at the top of the FOCUS screen.
The icon will change to when there are new messages.
42
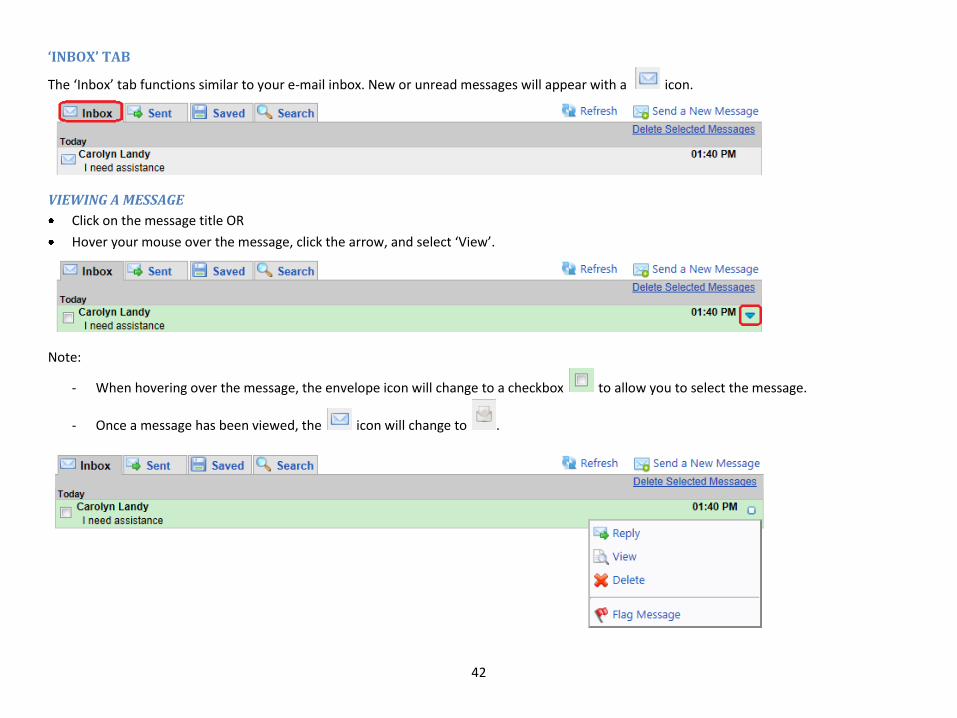
‘INBOX’ TAB
The ‘Inbox’ tab functions similar to your e-mail inbox. New or unread messages will appear with a icon.
VIEWING A MESSAGE
Click on the message title OR
Hover your mouse over the message, click the arrow, and select ‘View’.
Note:
- When hovering over the message, the envelope icon will change to a checkbox to allow you to select the message.
- Once a message has been viewed, the icon will change to .
43
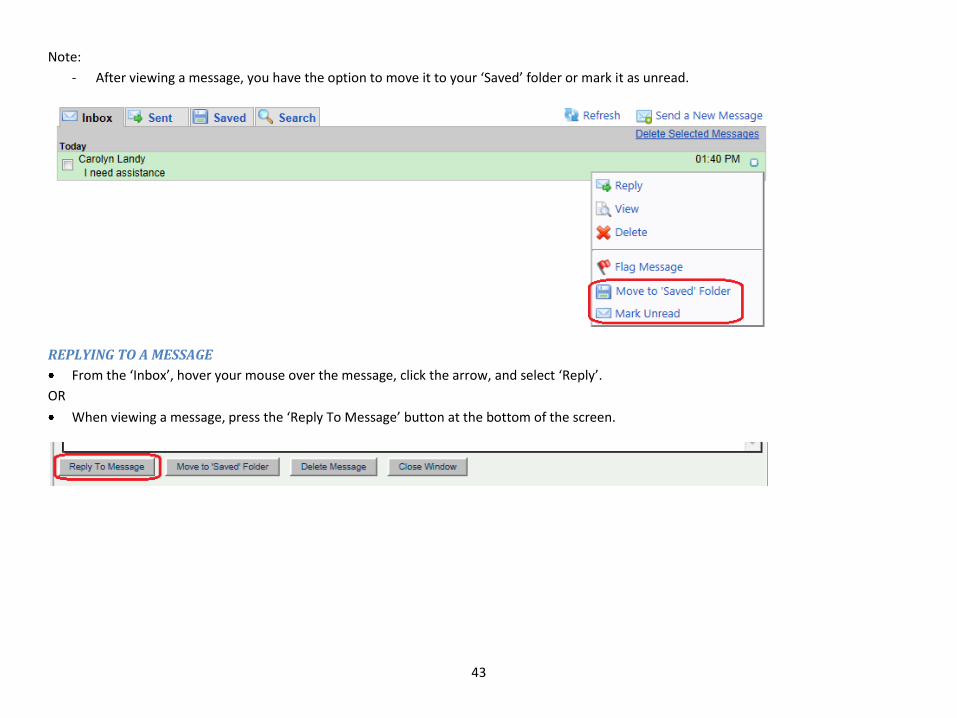
Note:
- After viewing a message, you have the option to move it to your ‘Saved’ folder or mark it as unread.
REPLYING TO A MESSAGE
From the ‘Inbox’, hover your mouse over the message, click the arrow, and select ‘Reply’.
OR
When viewing a message, press the ‘Reply To Message’ button at the bottom of the screen.

44
SENDING A NEW MESSAGE
Click the ‘Send a New Message’ link
Click to search for/select the recipients. When done composing the message, press the ‘Send Message’ button at the bottom of the
screen.
FLAGGING A MESSAGE
Hover your mouse over the message, click the arrow, and select ‘Flag Message’.
Note:
- The flagged message will appear with a flag to the right of the message.

45
REMOVING A FLAG FROM A MESSAGE
Hover your mouse over the message, click the arrow, and select ‘Remove Flag’.
DELETING A MESSAGE
Hover your mouse over the message, click the arrow, and select ‘Delete’.
OR
Hover over the message, check the checkbox, and click the ‘Delete Selected Messages’ link.

46
‘SENT’ TAB
The ‘Sent’ tab functions similar to your e-mail sent folder.
Forward or view messages from the ‘Sent’ tab by hovering your mouse over the message, clicking the arrow, and selecting ‘Forward’ or
‘View’.
Note:
- Messages generated automatically by FOCUS as a result of running a report will be deleted after 1 year. Messages generated manually
by staff will not be deleted (unless done manually by staff).
‘SAVED’ TAB
The ‘Saved’ tab functions similar to an email subfolder. Move messages from the ‘Inbox’ to the ‘Saved’ tab to refer to them at a later date. From
the ‘Saved’ tab, you have options to reply, view, delete, flag, and move the message to the inbox.

47
‘SEARCH’ TAB
Use the ‘Search’ tab to search messages by date and content and filter by type (received/sent). Click the ‘Search’ link after specifying your search
criteria. From the ‘Search’ tab, you have options to reply, view, delete, flag, and move the message to the inbox.
Note: A complete list of system messages and alerts is available at:
- MCO/Direct Provider Staff: MCCMH intranet (http://intranet/). Press the ‘FOCUS Training ’ button.
- Contract Provider Staff: MCCMH website (http://www.mccmh.net/), ‘Provider Links’, ‘FOCUS Training’ section.

48
DASHBOARD REPORTS (‘Dashboard’ menu) Additional reports/statistics are available on the ‘Dashboard’ menu in FOCUS.
REFRESHING THE DATA THAT APPEARS IN A DASHBOARD PANEL Click the ‘Options’ link on the panel
Click the ‘Refresh Panel Data’ link
RESIZING A DASHBOARD PANEL A panel may require you use the scroll bar to view all the content. To resize the panel so scrolling is no longer needed…
Click the ‘Options’ link on the panel
Click the ‘Resize to Content’ link

49
REMOVING A DASHBOARD PANEL You can customize which panels appear on your dashboard.
Click the ‘Options’ link on the panel
Click the ‘Remove Panel’ link
To save the change, scroll to the bottom of the screen and press ‘Save Dashboard Layout’.
ADDING A DASHBOARD PANEL
Scroll to the bottom of the screen and press ‘Add Panel to Dashboard’.
Select the panel from the drop down list. The screen will refresh automatically.
To save the change, scroll to the bottom of the screen and press ‘Save Dashboard Layout’.
You can drag and drop any panel that appears on screen to customize the layout.

50
AVAILABLE DASHBOARD PANELS Note:
- Your system permissions control which panels you have access to.
- Reports monitoring case loads, unsigned documents, therapy groups, etc are not currently available to supervisory staff.
AP CLAIMS PROCESSING STATISTICS
This panel is available to MCCMH/MCO claim processing staff.
Click a link for more information or to view details

51
CONTRACT PROVIDER STATISTICS
This panel is available to contract provider billing staff.

52
MEDICAL STATISTICS
This panel is available to doctors, nurses, and clinicians.
Additional items coming soon…
Next Lab Order Due
This Week
Next Week
In Two Weeks
Note:
- Statistics for hospitalization and discharge are based on CONs/CSRs in FOCUS.
- Discharges without Documentation indicate the consumer has been discharged per the CON in FOCUS, but no discharge documentation
has been scanned/attached to the CON in FOCUS

53
MY CASE LOAD
This panel is available to clinicians, nurses, and doctors.
Hover your mouse over a record and press the icon
Click a link for more information

54
RECENTLY ACCESSED CONSUMERS
This panel is available to all staff.
Hover your mouse over a record and press the icon.
Click a link for more information

55
TODAY’S APPOINTMENTS
This panel is available to all staff.
Hover your mouse over an appointment and press the icon.
Click a link to update the appointment or for more information

56
UNSIGNED DOCUMENTS
This panel is available to all staff.
Click on a given date, type, or consumer to review and sign the document.
Note:
- Press the icon to sort by date, type, or consumer.
- Press ‘Previous’ or ‘Next’ to move from page to page if needed.

57
CLINICAL STATISTICS
This panel is available to clinicians and nurses.
Click a link for more information

58
LAB RESULTS PENDING REVIEW
This panel is available to doctors.
Click on a given date, type, or consumer to review and sign the lab result.
Note:
- Press the icon to sort by date, type, or consumer.
MESSAGES
This panel is available to all staff.
Hover your mouse over a message and press the icon.
Click a link to work with the message.
59
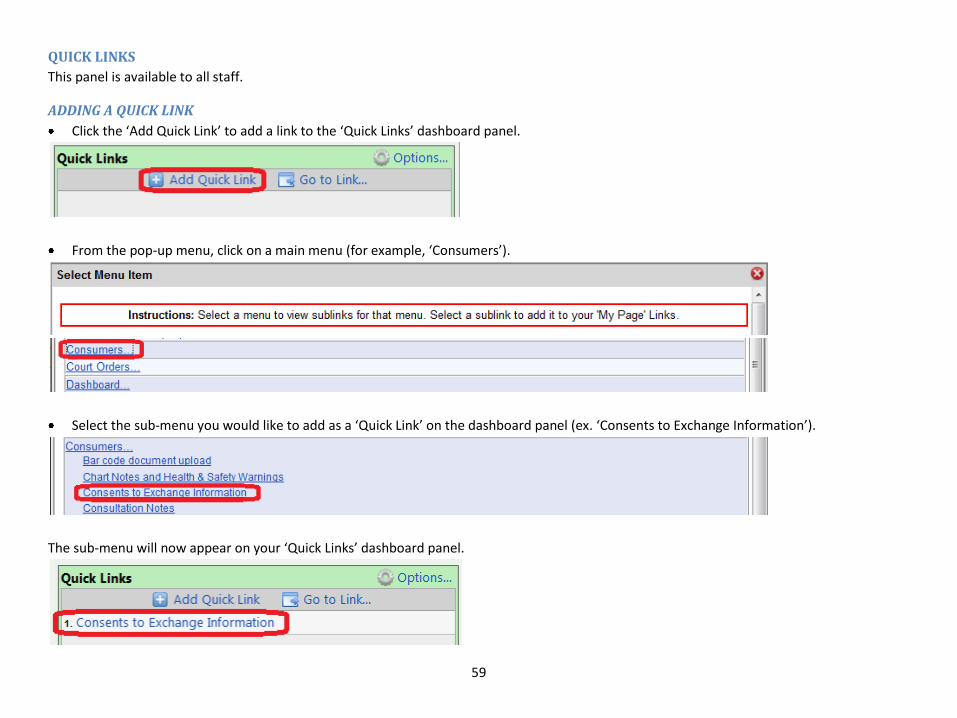
QUICK LINKS
This panel is available to all staff.
ADDING A QUICK LINK
Click the ‘Add Quick Link’ to add a link to the ‘Quick Links’ dashboard panel.
From the pop-up menu, click on a main menu (for example, ‘Consumers’).
Select the sub-menu you would like to add as a ‘Quick Link’ on the dashboard panel (ex. ‘Consents to Exchange Information’).
The sub-menu will now appear on your ‘Quick Links’ dashboard panel.

60
USING A QUICK LINK
Click a link to access the menu
DELETING A QUICK LINK
Hover your mouse over the link and press the icon.
Click ‘Delete Link’. The screen will refresh automatically and the link will be removed from the panel.

61
GOING TO LINK WITHOUT ADDING IT TO THE QUICK LINKS DASHBOARD PANEL
Click ‘Go to Link…’ to go to a link without adding the link to the ‘Quick Links’ dashboard panel.
From the pop-up menu, click on a main menu (for example, ‘Progress Notes’) and select the sub-menu (aka sublink) you would like to go to
(for example, ‘Manage Therapy/Class Groups’).

62
MY THERAPY GROUPS
This panel is available to clinicians.
Hover your mouse over the group and press the icon.
Click on a link to work with the group.

63
TO DO ITEMS
This panel is available to all staff.
Click at the top of the panel to view your To-Do Items.
Note:
- By default, To-Do Items for the upcoming week will appear. Enter a new date range and press the ‘Refresh’ link to view To-Do Items to
view additional items.

64
LAB ORDERS (‘Medical – Health Services’, ‘Consumer Medical Chart’ menu, ‘Labs’/’Orders’ tab)
Note – Lab Orders will be available in FOCUS soon after 10/1/2012.
ADDING A LAB ORDER
From the ‘Orders’ section on the ‘Labs’ tab of the Medical Chart, click the ‘Rapid Lab Orders’ link

65
Enter the order date, applicable diagnosis code(s), priority, due date, and any other applicable information.
Add a check mark to one or more of the standard panels to order the test. Enter any notes in the text box next to the panel name.
Note:
- To request the lab fax a copy of the result to the consumer’s Primary Care Physician, include the PCP’s fax number where indicated.

66
ORDERING A TEST THAT IS NOT LISTED ON THE MAIN SCREEN Click the ‘Add Panel’ link shown on the previous page to search for/select the panel.
Note - Click to see more detail and click to see less detail about the panel.
When done, press the ‘Save And Print’ button.
Check the order to print and select the printer.
Press the ‘Print Selected Orders’ button.
Hand-sign the printed lab order.

67
VIEWING LAB ORDERS
Open the ‘Orders’ section on the ‘Labs’ tab of the Medical Chart
Use to filter the list and to sort the list as needed
To work with an order, hover your mouse over the order and press the arrow to the right of the order.

68
LAB RESULTS (‘Medical – Health Services’, ‘Consumer Medical Chart’ menu, ‘Labs’/’Results’ tab)
Note – Features related to Lab Orders will be available in FOCUS soon after 10/1/2012.
SCANNING A LAB RESULT Lab results received in hard copy can be scanned directly into the Medication Module and viewed in date order with electronic lab results from
Quest.
Note:
- MCCMH direct providers recently started receiving lab results from Quest electronically via FOCUS. Contract providers interested in
receiving lab results for MCCMH consumers electronically via FOCUS can contact [email protected] to set this up for their
agency.
From the ‘Results’ section on the ‘Labs’ tab of the Medical Chart, click the ‘Add Lab Result’ link

69
Enter the date received
Click ‘Scan’ and follow the prompts
Click the ‘Add Panel’ link to manually specify the panel(s) ordered
OR
Link the result to an existing Lab Order by selecting the order from the list
Note:
- The panel(s) ordered can only be specified manually on the result until Lab Orders are being entered in FOCUS (expected soon after
10/1/2012).
- Adding the panel(s) is not required. However, adding the panel(s) will allow users to identify which labs are in the scanned result without having to open the details of the result.

70
If manually specifying the panel(s) ordered…
Search for/select the appropriate panel(s)
Click to expand and to collapse sections as needed
Add a checkmark if the result is abnormal and add any notes
Add a checkmark if the result is critical
Use the ‘lookup’ button to specify which doctor will review and sign the results. Press ‘Save’

71
VIEWING LAB RESULTS Lab panels are now hidden by default when viewing lab results.
To display panels, check the ‘Show Panels’ box.
Use the sort and filter options as needed to search results. The sort and filter options have replaced various checkboxes in the search criteria
section.
REVIEWING LAB RESULTS Lab results will no longer be marked as reviewed by checking a ‘Reviewed’ check box. Doctors will now mark lab results as reviewed by
electronically signing the results using their FOCUS password. Lab results awaiting a doctor’s signature will appear in the doctor’s signature
queue along with any other documents awaiting their signature.

72
PATIENT EDUCATION (‘Medical – Health Services’, ‘Patient Education’ menu)
The ‘Patient Education’ menu provides a link to a consumer specific screen with ‘quick links’ to the consumer’s current prescribed medications,
non-CMH medications, diagnoses, lab orders, and lab results. Staff can search the Micromedex CareNotes database by keyword to access
information relating to standard treatments for a variety of conditions. CareNotes cover general information on the condition, possible causes,
signs and symptoms, and standard means of care. Information in CareNotes is available in multiple languages.
ACCESSING INFORMATION ON A CURRENT MEDICATION, DIAGNOSIS, OR LAB TEST Click on the name of the medication, diagnosis, or lab

73
Click on the name of the appropriate title
Click the link for the desired language
With your mouse over the pop-up window, right click and select ‘Print’
When done, press the ‘Log Out’ button

74
ACCESSING INFORMATION ON ANY TOPIC Type the topic in the box shown below.
Press the ‘Search’ button
Click on the name of the appropriate title
Click the desired language
With your mouse over the pop-up window, right click and select ‘Print’
When done, press the ‘Log Out’ button

75
CONSUMER EXPLANATION OF BENEFITS (EOB)/SUMMARY OF SERVICE REPORT (‘Reports and Downloads’, ‘Consumer EOB/Summary of Services’ menu)
ADDING A CONSUMER EOB Search for/select the consumer
Click the ‘Add Summary of Service Report’ link
Specify the report date, service from date, service thru date, and method of delivery (by hand, by mail)
Press the ‘Save’ button to run the report
Press the icon to refresh the status

76
When the report status changes to ‘Processed Successfully’, click the ‘View Report’ link.
Note:
- If needed, the ‘Change’ link can be used to update the method of delivery.
PRINTING A CONSUMER EOB
Press the icon in the web browser to print the report.
VIEWING A CONSUMER EOB Search for/select the consumer
Click the ‘View Report’ link
77
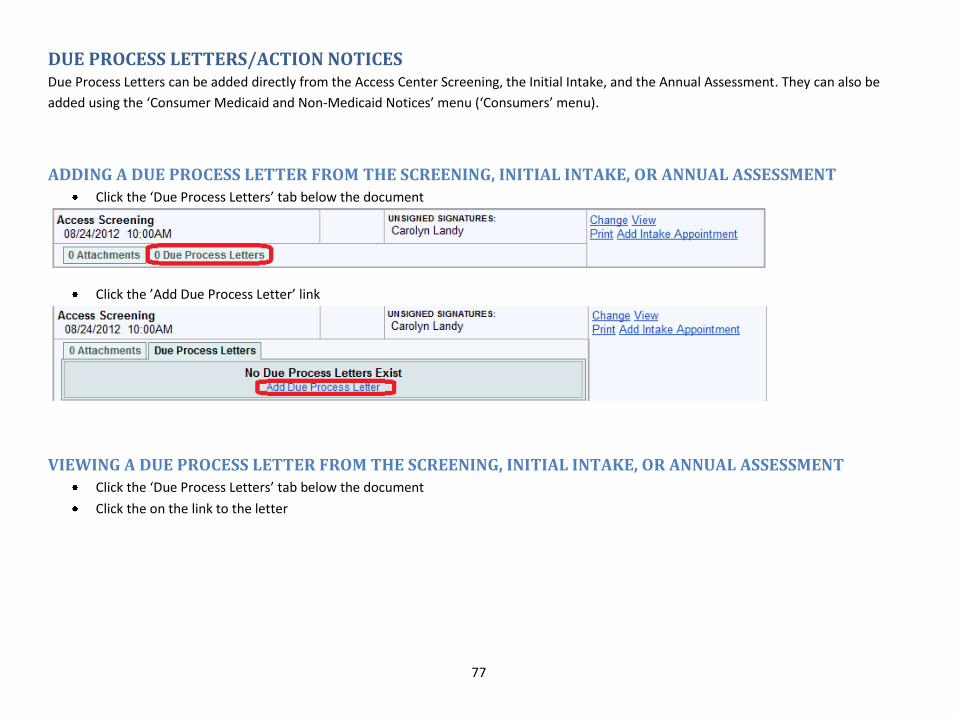
DUE PROCESS LETTERS/ACTION NOTICES Due Process Letters can be added directly from the Access Center Screening, the Initial Intake, and the Annual Assessment. They can also be
added using the ‘Consumer Medicaid and Non-Medicaid Notices’ menu (‘Consumers’ menu).
ADDING A DUE PROCESS LETTER FROM THE SCREENING, INITIAL INTAKE, OR ANNUAL ASSESSMENT Click the ‘Due Process Letters’ tab below the document
Click the ’Add Due Process Letter’ link
VIEWING A DUE PROCESS LETTER FROM THE SCREENING, INITIAL INTAKE, OR ANNUAL ASSESSMENT Click the ‘Due Process Letters’ tab below the document
Click the on the link to the letter
78
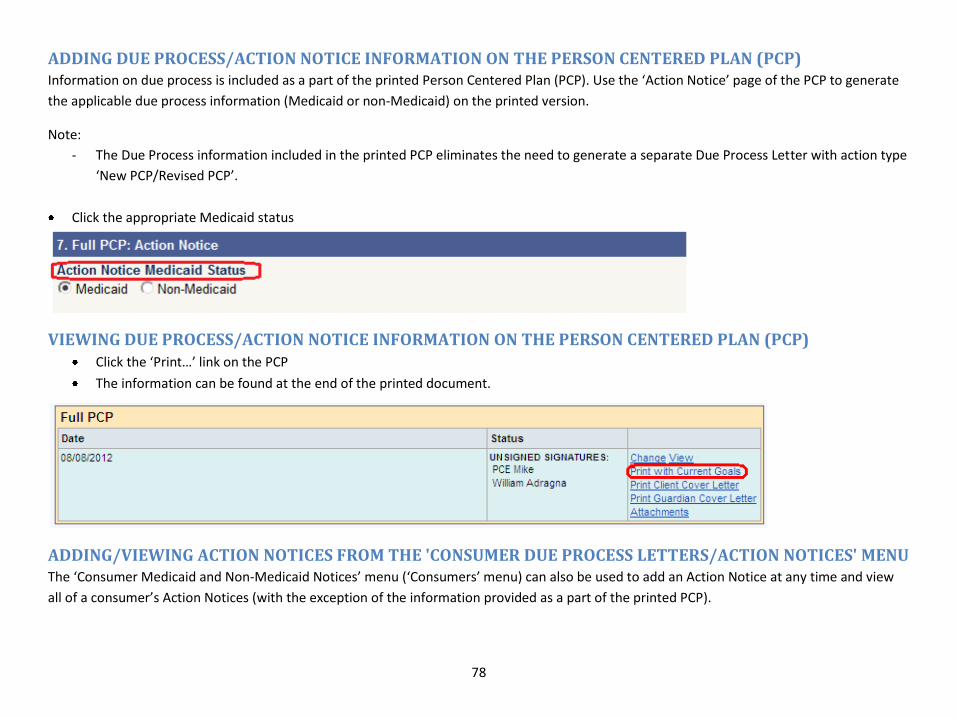
ADDING DUE PROCESS/ACTION NOTICE INFORMATION ON THE PERSON CENTERED PLAN (PCP) Information on due process is included as a part of the printed Person Centered Plan (PCP). Use the ‘Action Notice’ page of the PCP to generate
the applicable due process information (Medicaid or non-Medicaid) on the printed version.
Note:
- The Due Process information included in the printed PCP eliminates the need to generate a separate Due Process Letter with action type
‘New PCP/Revised PCP’.
Click the appropriate Medicaid status
VIEWING DUE PROCESS/ACTION NOTICE INFORMATION ON THE PERSON CENTERED PLAN (PCP) Click the ‘Print…’ link on the PCP
The information can be found at the end of the printed document.
ADDING/VIEWING ACTION NOTICES FROM THE 'CONSUMER DUE PROCESS LETTERS/ACTION NOTICES' MENU The ‘Consumer Medicaid and Non-Medicaid Notices’ menu (‘Consumers’ menu) can also be used to add an Action Notice at any time and view
all of a consumer’s Action Notices (with the exception of the information provided as a part of the printed PCP).

79
GUARDIANSHIP The ‘Guardianship’ section found on various clinical forms consists of 4 sections:
- Parent(s) of Minor Child Authorized to Consent to Treatment
- Court Appointed Guardian
- Co-Guardian
- Standby Guardian
Press the ‘Enter Information’ button to expand each section
Note:
- Where possible, guardianship information from the ‘old’ FOCUS system has been imported. Please review this information for accuracy.

80
PARENT(S) OF MINOR CHILD AUTHORIZED TO CONSENT TO TREATMENT The ‘Parent(s) of Minor Child Authorized to Consent to Treatment’ section consists of 3 sections:
- Mother
- Father
- Divorce Information
Click the ‘Parent(s) of Minor Child Authorized to Consent to Treatment’ radio button shown above
Press the ‘Enter Information’ button to expand the appropriate section(s)
Note:
- If a section was expanded in error, press the ‘Clear Information’ button

81
MOTHER
FATHER
Other than the radio buttons below, the ‘Father’ section is the same as the section shown above.

82
DIVORCE INFORMATION

83
COURT APPOINTED GUARDIAN, CO-GUARDIAN, STANDBY GUARDIAN
Click the ‘Court Appointed Guardian’ radio button and press the ‘Enter Information’ button. Note the ‘Types of Guardianship’ have changed.

84
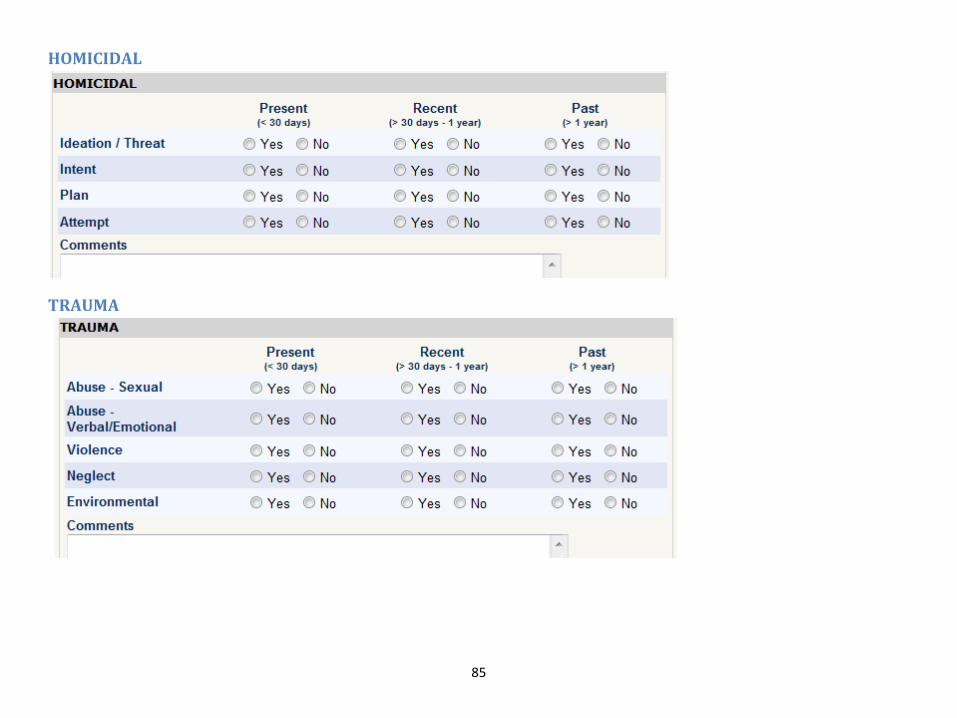
RISK ASSESSMENT The risk assessment found on various clinical documents consists of 5 sections: ‘Suicidal’, ‘Homicidal’, ‘Trauma’, ‘Harm’, and ‘Action Taken’.
Assessment is made for the following time periods:
- Present (within the last 30 days)
- Recent (within the last 30 days to 1 year)
- Past (more than a year ago)
SUICIDAL
Note:
- Responses to the following items are required
o ‘Ideation/Threat’: present, recent, and past
o ‘Attempt’: present, recent, and past
85
HOMICIDAL
TRAUMA
86
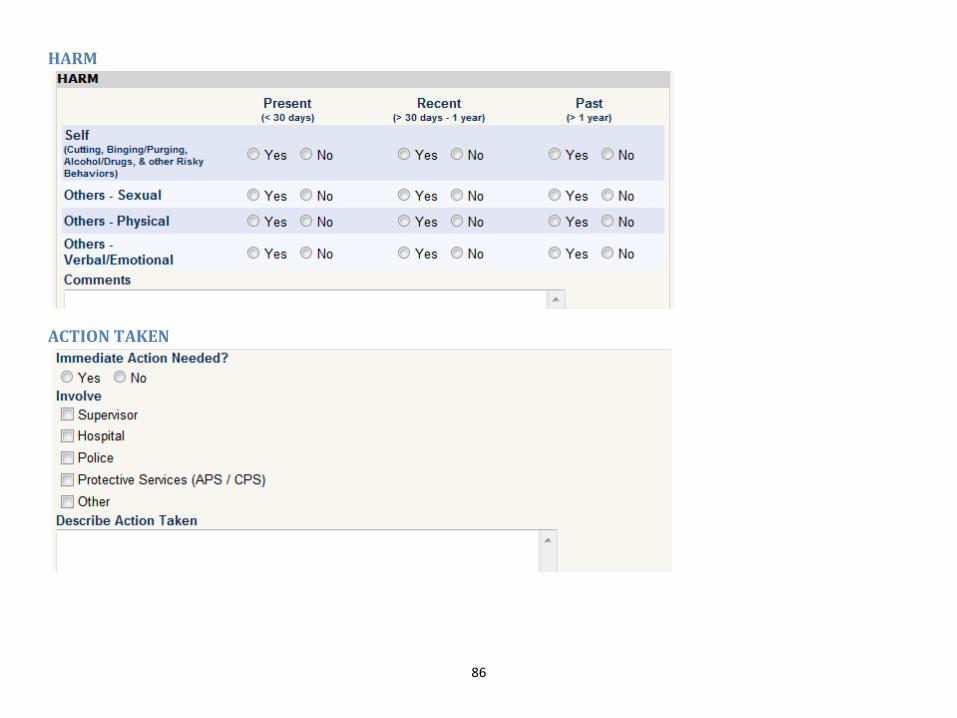
HARM
ACTION TAKEN

87
SUBSTANCE ABUSE CHART On the Substance Abuse Chart that is found on various clinical documents, drugs are added using a drop down list.
Use the ‘Select a Drug to Add’ drop down list to select the drug.
When done, press the ‘Add Drug to List’ button
Enter the information
To add another drug, repeat the steps listed above
Note:
- If a drug was added in error, press the button

88
DIAGNOSIS (ADDING/UPDATING)
ADDING A NEW PRIMARY DIAGNOSIS CODE
Press the button on the appropriate axis.
Search for/select the diagnosis code.
Update the ‘Status Date’ and ‘Status’ if needed.

89
Note:
- The diagnosis status can be ‘active’, ‘inactive’, ‘in remission’, ‘resolved’, ‘ruled out’, or ‘rule out’.
ADDING A NEW NON-PRIMARY DIAGNOSIS CODE
Press the button on the appropriate axis.
Search for/select the diagnosis code.
Update the ‘Status Date’ and ‘Status’ if needed.
Note:
- Up to 10 diagnosis codes can now be entered per Axis.

90
UPDATING A DIAGNOSIS CODE
Hover your mouse over the diagnosis record to be changed and click the arrow on the right.
Select ‘Change Diagnosis Code’, ‘Delete’ (if added in error), or update sequence to ‘Secondary’ (or any other sequence – tertiary, etc).
Note:
- ‘Deleted’ diagnosis codes are removed from the diagnosis array, but can be viewed at a later time if needed.
- Diagnosis codes with a status of ‘inactive’, ‘resolved’, and ‘ruled out’ will appear with a strikethrough in grey text as soon as the status is
updated. At this point, the status cannot be changed. If the status was changed in error, use the ‘Delete’ option shown above to remove
the code.

91
ADDITIONAL INFORMATION – CO-OCCURRING CONSUMER QUADRANT
Select from the following options in ‘Co-Occurring Consumer Quadrant’ field:

92
Note:
- Hover your mouse over the icon for instructions on how to work with the diagnosis section. When done reading the instructions,
press the .
Note:
- Changes to a diagnosis will only appear as the consumer’s most recent diagnosis throughout the rest of FOCUS (ie pre-fill on new
documents) after the document updating the diagnosis has been signed.

93
SERVICE ACTIVITY LOGS The service activity log (SAL) has been incorporated into most clinical documents. Progress Notes remain available for charting as needed, but
Progress Notes are no longer required to be completed when a SAL has already been completed documenting the service that was provided.

94
VIEWING ANY COMBINATION OF DOCUMENTS TOGETHER To view any combination of document types together in order by date, use the ‘Chart Documents’, ‘Documents by Date’ tab of the ‘Consumer
Chart’.
Select the desired document types from the list on the left
Press the ‘Refresh List’ link

95
SIGNATURES (‘Staff To-Do List’, ‘View and Sign Documents Awaiting My Signature’ menu)
SIGNATURE QUEUE SORT OPTIONS
Sort the documents using the option on the date, type, and consumer columns.
Note:
- The consumer’s name/ID is now listed.

96
BATCH REVIEW/SIGN On documents that require co-signature by a supervisor and psychiatrist, the supervisor and psychiatrist are able to review and sign the
documents in a batch.
Check the box to the left of the documents to be reviewed and signed.
Press the ‘Sign Selected Documents’ button at the bottom of the screen
Review each document using the ‘View Document’ link to the right of the document.
When done reviewing all documents, enter your password at the top of the screen.
Press the ‘Sign Documents’ button.
97
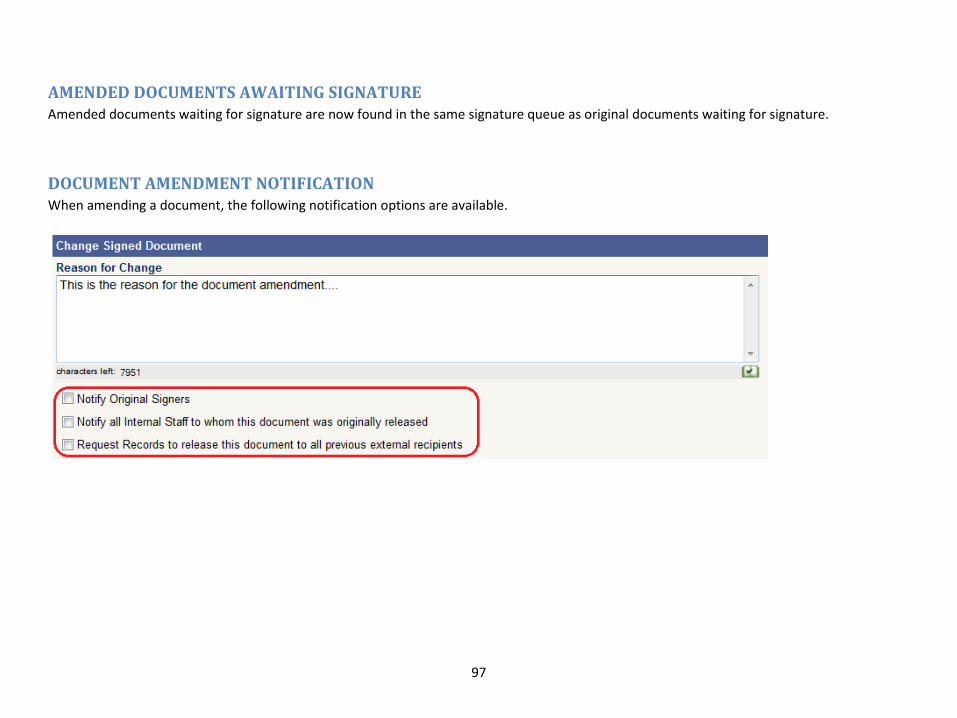
AMENDED DOCUMENTS AWAITING SIGNATURE Amended documents waiting for signature are now found in the same signature queue as original documents waiting for signature.
DOCUMENT AMENDMENT NOTIFICATION When amending a document, the following notification options are available.

98
DIGITAL IMAGE OF A HAND SIGNATURE The hand signature of a consumer, parent/guardian, and witness can now be captured on FOCUS documents using a mouse, signature pad, or
touch screen device.
DESIGNATING WHICH STAFF WILL CAPTURE THE IMAGE OF THE HAND SIGNATURE
On the signature page of documents that require a hand signature,
In the ‘Digital Signature To Be Obtained By’ section, use the ‘lookup’ button to specify who will obtain the signature (you or another staff)
In the ‘To Be Signed By’ section, use the drop down list to select ‘Consumer’, ‘Parent/Guardian’, or ‘Witness’

99
STARTING THE SIGNATURE CAPTURE PROCESS
Once the document has been signed by staff, click the ‘Obtain Consumer Signature’, ‘Obtain Parent/Guardian Signature’, or ‘Obtain Witness
Signature’ link.
Note:
- The link will only be available to the staff designated to obtain the signature.
The following message will appear at the top of the screen while the PDF version of the document is being generated.

100
Once the print (Adobe PDF) version of the document appears below the message, use the arrow buttons at the top of the page or scroll bar
at the side of the document to review the document with the consumer / parent / guardian / witness.
When the consumer/parent/guardian/witness is done reviewing the document, use the web browser scroll bar (to the right of the scroll bar
shown above) to scroll to the bottom of the screen
Click the ‘Capture Signature’ link

101
When the following message appears,
Ensure the source is from software company PCE (look for ‘…pce..’ in the web address)
Check the ‘Always trust content from this publisher’ check box.
Press the ‘Run’ button.
Note:
- The following message may appear again if the applet changes. When this happens, follow the steps above.
- Capturing the image of hand signatures on a computer with a Windows operating system requires Java. To install Java, visit
www.java.com.

102
CAPTURING THE IMAGE OF THE HAND SIGNATURE USING A MOUSE OR TOUCH SCREEN DEVICE
Have the consumer/parent/guardian/witness use the mouse or touch screen device to sign their name
Use the ‘Clear’ link as needed to start over
When done, press the ‘Accept’ button
Note:
- ‘Draw It’ will appear on screen when capturing a signature using the mouse or touch screen device. If your screen does not display ‘Draw
It’, click the ‘Switch Capture Method’ link.

103
After pressing the ‘Accept’ button, the ‘Signature Name’ and ‘Signature Status’ in the Digital Image section of the document will be updated as
shown below.
Press the ‘Save’ button
NOTE:
- THE SIGNATURE WILL NOT BE CAPTURED IN FOCUS UNLESS YOU PRESS ‘SAVE’ AT THIS STEP.

104
CAPTURING THE IMAGE OF THE HAND SIGNATURE USING A SIGNATURE PAD
Ensure the signature pad is connected to the computer
Have the consumer / parent / guardian / etc sign their name on the signature pad
When done, press the ‘Accept’ button
Note:
- The ‘Start’, ‘Stop’, ‘Clear’ buttons will appear on screen when capturing a signature using a signature pad. If your screen does not display
these buttons, click the ‘Switch Capture Method’ link.
- Use the ‘Clear’ button as needed to start over. You do not need to use the ‘Start’ and ‘Stop’ buttons.
- Ensure the signature pad’s drivers are installed on your computer, tested, and compatible with your network environment before
attempting to capture the image of a hand signature using the signature pad.

105
After pressing the ‘Accept’ button, the ‘Signature Name’ and ‘Signature Status’ in the Digital Image section of the document will be updated as
shown below.
Press the ‘Save’ button
NOTE:
- THE SIGNATURE WILL NOT BE CAPTURED IN FOCUS UNLESS YOU PRESS ‘SAVE’ AT THIS STEP.

106
FORM REVISIONS
SELF-PAY POLICY / FEE DETERMINATION AGREEMENT The Self-Pay Policy and Fee Determination Agreement have been combined into a single document.
ADDING A SELF-PAY POLICY/FEE DETERMINATION AGREEMENT
From the ‘Insurance Policies/Funding Sources’ menu, click the ‘Click here to add Self-Pay Policy/Fee Determination Agreement’ link.
Complete the policy, noting the following:
o Total Annual Household Income is a state-required data field. It is not used in the fee calculation, so the information may be provided
verbally without supporting documentation.
o Be sure to check all of the Income Documentation utilized in calculating the fee. The documentation should be scanned and attached to
the Self-Pay Policy.

107
o Taxable Income and Sliding Fee Calculation (Non-residential Services):
To calculate the Monthly Ability To Pay (ATP), complete either Section A, based upon annual taxable income (Line 16 of the
individual’s state tax return), or Section B, based on gross income less Exemptions (IE using recent pay stubs).
Note – In Section B, the first 5 exemptions are numbers (IE number of veterans); however, the last exemption is the dollar
amount that the consumer received from unemployment.
After completing Section A or B, press the ‘Calculate’ button. The monthly maximum charge will be calculated by the system
and entered into the field.
Note - If the individual says that s/he cannot afford the maximum amount calculated by the system, explain the full financial
process. If the individual requests a full financial, indicate the date the documentation for the full financial is due in the field
provided (no longer than 10 days out).
Save and print the Self-Pay Policy/Fee Determination Agreement. Have the consumer/guardian sign the printed Fee Determination
Agreement and scan the signed copy into FOCUS. The electronic policy will be routed to MCCMH administration for verification by staff.
Note:
- If the individual requests a full financial, MCCMH administration will expect the Self Pay Policy/Fee Determination Agreement to be
updated at the 10-day mark. If it has not been updated at that time, the calculated sliding fee will be utilized.

108
SCANNING DOCUMENTION RELATED TO A SELF-PAY POLICY/FEE DETERMINATION AGREEMENT
Click the ‘Scanned Documents’ link next to the policy.
Click the ‘…scan a document…’ or ‘…upload a file…’ link.
Select the document type, date, and add any notes,
Click ‘Scan’ and follow the prompts. When done, press ‘Save’.
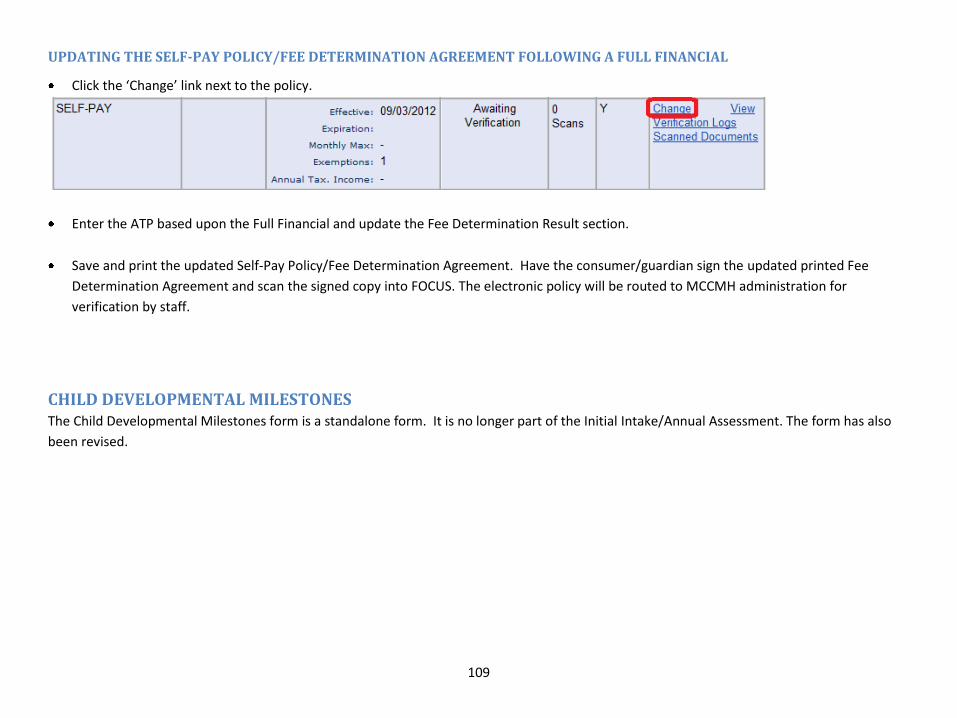
109
UPDATING THE SELF-PAY POLICY/FEE DETERMINATION AGREEMENT FOLLOWING A FULL FINANCIAL
Click the ‘Change’ link next to the policy.
Enter the ATP based upon the Full Financial and update the Fee Determination Result section.
Save and print the updated Self-Pay Policy/Fee Determination Agreement. Have the consumer/guardian sign the updated printed Fee
Determination Agreement and scan the signed copy into FOCUS. The electronic policy will be routed to MCCMH administration for
verification by staff.
CHILD DEVELOPMENTAL MILESTONES The Child Developmental Milestones form is a standalone form. It is no longer part of the Initial Intake/Annual Assessment. The form has also
been revised.

110
COORDINATION OF CARE The format of the Coordination of Care form (COC) form has been revised to be an agreement between 2 entities – the CMHSP and either a QHP
or physician (primary care or other).
Mark a radio button to select the organization to coordinate care with from a list of the consumer’s current physicians and QHP on record.
Once the entity/organization is identified, the QHP or physician’s contact information (name, contact, phone, fax, address) is pre-filled on
the COC

111
Note:
- If the consumer does not have a QHP or physician on record, the following error will appear. To correct this, open the ‘Consumer
Information’ menu (‘Consumers’ main menu) and enter the QHP or physician on page 6.
Use the ‘Send Copy To’ page of the Coordination of Care form (COC) to send a copy to internal staff or request the document be released to
an external agency.
Note:
- The ‘Send Copy To’ functionality tracks the document’s release and replaces having a ‘Fax’ link on the document.
- A ‘copy’ feature has been added that will copy information from the ‘CMH’ section from the existing Coordination of Care form into a
new Coordination of Care form. When using the ‘copy’ feature, the consumer’s medications and diagnosis will pre-fill with the most
current information on record.

112
INITIAL INTAKE/ANNUAL ASSESSMENT The Initial Intake/Annual Assessment has been shortened to 14 pages (previously 26). Items assessing the consumer’s health have also been
incorporated into the Intake/Annual Assessment.
Initial Intake/Annual Assessment Page ordering:
New Page # Old Page # Name Population Also stand-alone
form?
1 1 Demographics All
2 2 Medical Information All
3 3 Health Conditions All
4 6 Education & Employment All
5 7 Legal All
6 8 Presenting Problems All
7 10 Risk Assessment All
8 15 Mental Status MI/SED
9 16 Psychiatric & Substance Abuse History MI/SED
10 17 Substance Abuse Chart MI/SED X
11 21 DD Proxy Measures DD X
12 23 Service Eligibility Criteria (DD) DD
13 19 Diagnosis All
14 26 Disposition Designation All
Removed from Initial Intake/Annual Assessment, but will remain as stand-alone form:
Old Page # Name
9 Developmental Milestones (revised format)
11 Supports Needs Worksheet (revised format)
22 Challenging Behaviors

113
Removed from Initial Intake/Annual Assessment and no stand-alone form:
Old Page # Name
4 Financial Information
18 Mood Altering Questions
20 Service Eligibility Criteria (MI)
24 Service Eligibility Criteria (Child)
25 Service Eligibility Criteria (IMH)
Combined with other pages:
Old Page # Name
5 Guardian/Parent
12 Cultural Considerations
13 Strengths
14 Barriers to Service
MEDICATION REVIEW Revisions on the Medication Review include:
- ‘Address Book’ used to identify Primary Health Care Provider (PHCP) and other physicians
- ‘Suicidal’ and ‘Homicidal’ portions of the Risk Assessment
- Updated diagnosis section
- ‘Send Copy To…’ page allows sending copy to internal staff and requesting release to external agency

114
PSYCHIATRIC EVALUATION Revisions on the Psychiatric Evaluation include:
- ‘Address Book’ used to identify Primary Health Care Provider (PHCP) and other physicians
- Updated Substance Abuse section
- Updated ‘Family History of Mental Illness and Substance Abuse’ section
- ‘Suicidal’ and ‘Homicidal’ portions of the Risk Assessment
- Updated diagnosis section
- ‘Send Copy To…’ page allows sending copy to internal staff and requesting release to external agency
PERSON CENTERED PLANS (PCPs) Each of the 3 versions of the PCP can be added using a link at the top of the ‘PCP List’ screen.
PCP versions:
- Full
- Single Service
- Crisis Team/Clubhouse/Medication Management
Note: - In comparison to the ‘Full’ PCP…
o The ‘Single Service PCP’ does not include a pre-planning meeting section and has a streamlined meeting section.
o The ‘Crisis Team/Clubhouse/Medication Management PCP’ does not include a pre-planning meeting section
- Also, the ‘Reason(s) for Delay’ section has been incorporated into the PCP Meeting section.

115
For PCPs with ‘Outcomes’ not completed or discontinued prior to 10/1/2012 in the old FOCUS system, due to the revised format in the new
system, only the following information will be imported into the new system:
SECTION FOCUS PCP FIELD(S) – OLD VERSION
FOCUS PCP FIELD(S) – NEW VERSION
PCP Header ‘Effective Date’ (PCP) Effective Date
PCP Header ‘This Plan Expires On’ This Plan Expires On
PCP Header ‘Next Periodic Review Date’ Next (PCP) Review Date
PCP Meeting ‘Outcome Established Date’ (Goal) Effective Date & (Objective) Effective Date
PCP Meeting ‘Outcome’ Goal
PCP Meeting ‘Targeted Completion Date’
(Goal) Targeted Completion Date & (Objective) Targeted Completion Date
PCP Meeting
Consumer: ‘Describe Steps and How Often’ + ‘Adjustments To Plan’ Objective
PCP Meeting
Natural Supports : ‘Describe Steps and How Often’ + ‘Adjustments To Plan’ Objective
PCP Meeting
Community Integration and Supports: ‘Describe Steps and How Often’ + ‘Adjustments To Plan’ Objective
PCP Meeting
Service Provider Supports: ‘Describe Steps and How Often’ + ‘Adjustments To Plan’ Intervention/Supports
PCP Meeting ‘Staff Assigned’ Intervention/Supports
PCP Meeting ‘Face to Face Contact Frequency’ Intervention/Supports

116
AUTHORIZATIONS
A new ‘Authorization’ page in the PCP streamlines the authorization request process. When requesting an authorization, the corresponding PCP
goal will need to be specified.
Click the ‘Related Goals’ link under the service being requested
Check the goal(s) the authorization relates to and press the ‘Update Related Goals’ button.

117
Note:
- The related goal will now display in the ‘Related Goals’ section of the authorization.
Note:
- Authorizations will be included in the printed PCP. Given the authorizations may not be approved at the time the PCP is signed and
printed, the printed PCP will include the following statement:
“These are the services recommended during the Person Centered Planning process. The final services to be delivered are subject to
MCCMH approval.”
- The ‘Authorization’ page, used to request authorizations, is also available in the PCP Periodic Review and PCP Addendum.
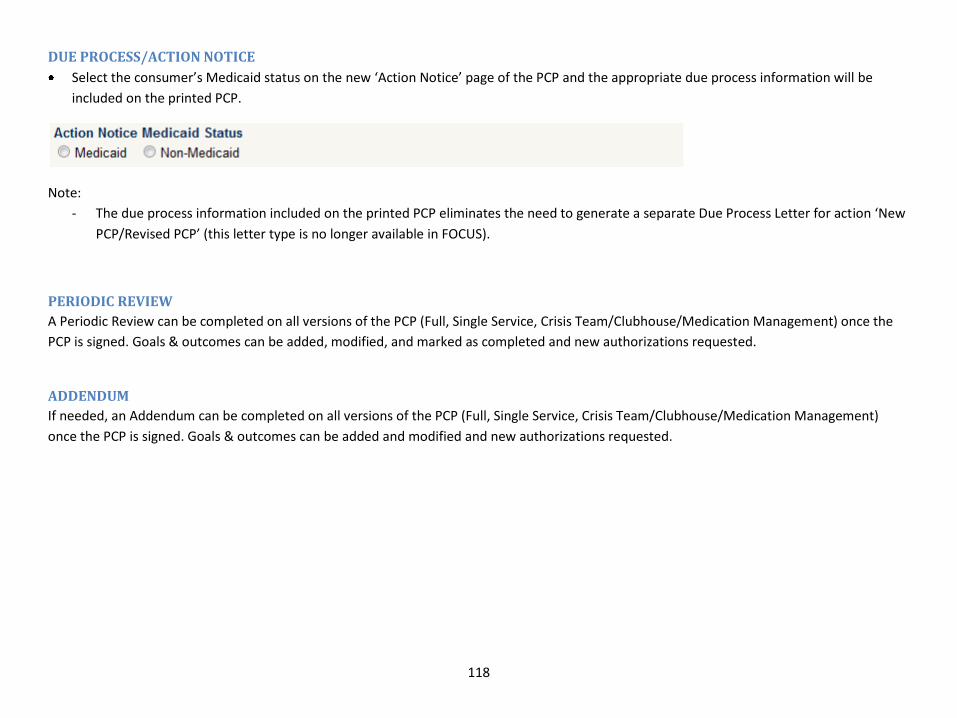
118
DUE PROCESS/ACTION NOTICE
Select the consumer’s Medicaid status on the new ‘Action Notice’ page of the PCP and the appropriate due process information will be
included on the printed PCP.
Note:
- The due process information included on the printed PCP eliminates the need to generate a separate Due Process Letter for action ‘New
PCP/Revised PCP’ (this letter type is no longer available in FOCUS).
PERIODIC REVIEW
A Periodic Review can be completed on all versions of the PCP (Full, Single Service, Crisis Team/Clubhouse/Medication Management) once the
PCP is signed. Goals & outcomes can be added, modified, and marked as completed and new authorizations requested.
ADDENDUM
If needed, an Addendum can be completed on all versions of the PCP (Full, Single Service, Crisis Team/Clubhouse/Medication Management)
once the PCP is signed. Goals & outcomes can be added and modified and new authorizations requested.

119
SCREENING The format of the Screening has been revised to be consistent with the Initial Intake/Annual Assessment.
Screening Page ordering:
New Page # Old Page
#
Name Population Also stand-alone form?
1 1 Demographics All
2 2 Triage Information All
3 3 Medical Information All
4 4 Risk Assessment All
5 7 Psychiatric & Substance Abuse History All
6 8 Substance Abuse Chart MI/SED
7 10 Diagnosis and Treatment Readiness All
8 11 Disposition Designation All
Removed from Screening and no stand-alone form:
Old Page # Name
9 Mood Altering Questions
Combined with other pages:
Old Page # Name
5 Cultural Considerations
6 Barriers to Service

120
SPECIALIZED NURSING ASSESSMENT Revisions on the Specialized Nursing Assessment include:
- Non-CMH medications are listed on the ‘Medications’ page in a ‘view-only’ format
- New options in many sections on the ‘Body Systems Assessment’ page
- Reordering of items on the ‘Exam/Immunizations’ page
- The ‘calendar’ feature is available for adding dates on the ‘Exam/Immunizations’ page
- A ‘copy’ feature has been added that will copy the following fields to a new assessment:
Page 1 ‘Initial Information’ - ‘Pertinent Medical History’ field
Page 6 ‘Exam / Immunizations’ - All fields
Page 7 ‘Recommendations’ - ‘Safety Concerns’ & ‘Barriers to Care’ fields
Note:
- Non-CMH medications should continue to be updated directly via the ‘Consumer Medical Chart’.
SUPPORTS NEEDS WORKSHEET Revisions on the Supports Needs Worksheet include:
- ‘Narrative’ box and ‘Criteria Met’ question added to each section
- A new ‘Learning’ section
- Options removed from the ‘Mobility’ section
- Options added to the ‘Self-Determination’ section
- Options revised in sections ‘Independent Living’ and ‘Economic Self-Sufficiency’
Note: Review all revised forms at:
- MCO/Direct Provider Staff: MCCMH intranet (http://intranet/). Press the ‘FOCUS Documents ’ button.
- Contract Provider Staff: MCCMH website (http://www.mccmh.net/), ‘Provider Links’, ‘FOCUS Documents’ section.

121
NEW FORMS
DLA-20 DD VERSION (‘Assessments and Screenings’, ‘DLA 20 Assessment’ menu)
Use the DLA-20 DD version to assess consumers with developmental disabilities.
DEATH REPORT (‘Consumers’ menu)
Use the Death Report to document a consumer’s date of death. The date of death can no longer be added directly via the demographic section.
DIAGNOSIS UPDATE (‘Consumers’ menu)
The Diagnosis Update form can be used to update a consumer’s diagnosis at any time. If a change is made to Axis I or II, a doctor’s signature is
required on the form. The diagnosis can no longer be added or changed directly via the demographic section.
Note: Review new forms at:
- MCO/Direct Provider Staff: MCCMH intranet (http://intranet/). Press the ‘FOCUS Documents ’ button.
- Contract Provider Staff: MCCMH website (http://www.mccmh.net/), ‘Provider Links’, ‘FOCUS Documents’ section.

122
SYSTEM TIME-OUT DISPLAY The system time-out display will display in the lower right corner of the FOCUS screen. It is no longer dependent on the Internet browser and is
visible for all users regardless of the type of Internet browser used.
A warning will appear 10 minutes before your session will time out.
Click the window showing the warning
To restart the clock, press a button or click a link in FOCUS
Note:
- After pressing a button or clicking a link, the ‘TIME-OUT IN’ will reset to 60 minutes.
- Due to FOCUS being a web-based program, typing does not reset the ‘TIME-OUT’ clock.

123
SYSTEM CONVERSION INFORMATION
Due to extensive revisions or discontinued use, the following documents were not converted from the old FOCUS system to the new FOCUS
system when the new system was implemented on 10/1/12:
- Person Centered Plans that expire prior to 10/1/12* and associated Periodic Reviews
- Personal Health Reviews (Adult/Child)
*For PCPs that expire on/after 10/1/12, plan dates and goals/objectives were converted to the new system.
Due to extensive revisions, the following documents from the old FOCUS system are viewable in PDF format only in the new FOCUS system:
- Initial Intakes
- Annual Assessments
Any incomplete Initial Intakes, Annual Assessments, Person Centered Plans (that expire prior to 10/1/12) and associated Periodic Reviews, and
Personal Health Reviews not completed/signed prior to 10/1/2012, required they be printed from the old FOCUS system, completed/signed by
hand, and scanned into the new FOCUS system.
All other documents not listed above and system data was converted from the old FOCUS system to the new FOCUS system on Sunday,
September 30th 2012. Any incomplete/unsigned documents in the old FOCUS system, other than those listed above, at the time the system was
taken off line for conversion, could be completed and signed in the new system on/after Monday, October 1st 2012.
Historical data not converted to the new FOCUS can be viewed/printed using the old FOCUS system. A link to the old FOCUS system is available
on the MCCMH intranet and Internet website. Effective Monday, October 1st 2012, access to the old FOCUS system is limited to ‘view’ and ‘print’
only.

124
USING THE NEW FOCUS SYSTEM IN A TEST ENVIRONMENT E-mail [email protected] for more information.
REMINDERS
‘I FORGOT MY PASSWORD’ LINK If you have forgotten your password, use the ‘I forgot my password’ link on the login screen. After verifying your identity, a temporary password
will be sent to you via e-mail.
Note:
- In order to use the ‘I forgot my password’ feature, MCCMH must have your current e-mail address on record. If your contact information
changes, have your supervisor complete and forward a FOCUS System Access Request Form, identifying the changes, to MCCMH.

125
‘MY PAGE’ Create a custom menu with the sub-menus you use most frequently.
ADDING A SUB-MENU TO ‘MY PAGE’
Click the next to the sub-menu to be added to your custom ‘My Page’ menu.
Access your custom menu using the new ‘My Page’ menu
REMOVING A SUB-MENU FROM ‘MY PAGE’
From the ‘My Page’ menu, click the next to the sub-menu to be removed from your custom ‘My Page’ menu.
Note:
- To make the ‘My Page’ menu appear by default when you login to FOCUS, e-mail the FOCUS Help Desk at [email protected]

126
FOCUS SYSTEM ACCESS REQUEST FORM This form is used to request access for new staff and to notify MCCMH of changes in staff information (including changes in name, credentials,
etc) and of staff no longer needing access to FOCUS.
DIRECT PROVIDERS
Access the request form from the MCCMH intranet (http://intranet/). Press the ‘FOCUS Documents’ button.
The form is available in several versions
CONTRACT PROVIDERS
Access the request form from the MCCMH website (http://www.mccmh.net/), ‘Provider Links’, ‘FOCUS Documents’ section
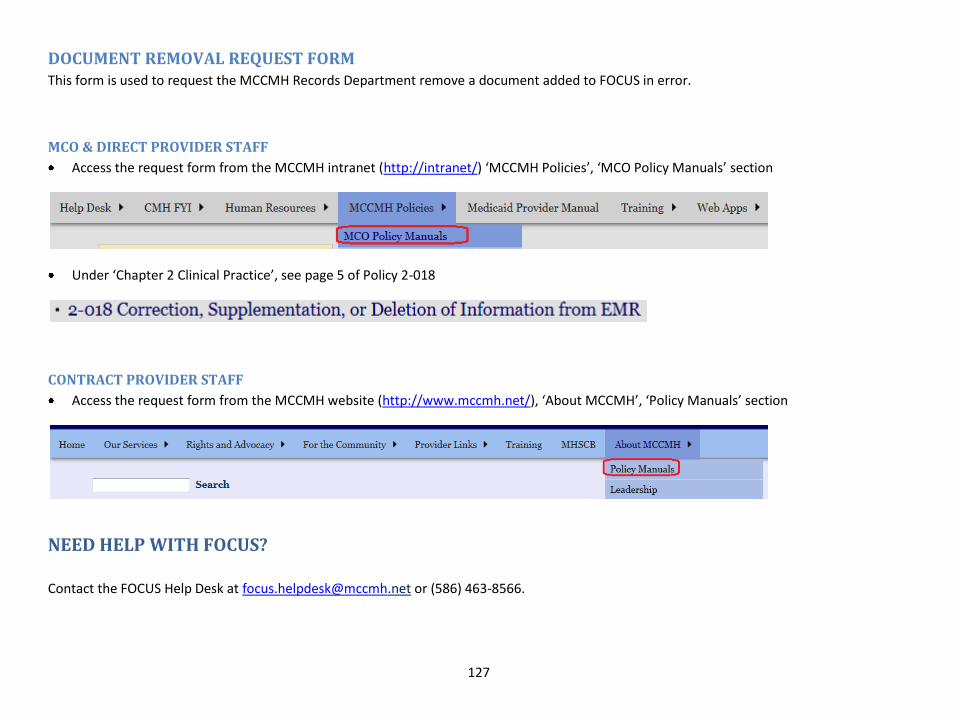
127
DOCUMENT REMOVAL REQUEST FORM This form is used to request the MCCMH Records Department remove a document added to FOCUS in error.
MCO & DIRECT PROVIDER STAFF
Access the request form from the MCCMH intranet (http://intranet/) ‘MCCMH Policies’, ‘MCO Policy Manuals’ section
Under ‘Chapter 2 Clinical Practice’, see page 5 of Policy 2-018
CONTRACT PROVIDER STAFF
Access the request form from the MCCMH website (http://www.mccmh.net/), ‘About MCCMH’, ‘Policy Manuals’ section
NEED HELP WITH FOCUS?
Contact the FOCUS Help Desk at [email protected] or (586) 463-8566.