Embed Size (px)
DESCRIPTION
guia mayormente para los sims 2 pero valida para cualquier game engine
Citation preview
by Hugh Hancock and Johnnie Ingram
MachinimaFOR
DUMmIES‰
01_096918 ffirs.qxp 7/20/07 11:07 AM Page iii

01_096918 ffirs.qxp 7/20/07 11:07 AM Page ii

MachinimaFOR
DUMmIES‰
01_096918 ffirs.qxp 7/20/07 11:07 AM Page i

01_096918 ffirs.qxp 7/20/07 11:07 AM Page ii

by Hugh Hancock and Johnnie Ingram
MachinimaFOR
DUMmIES‰
01_096918 ffirs.qxp 7/20/07 11:07 AM Page iii

Machinima For Dummies®
Published byWiley Publishing, Inc.111 River StreetHoboken, NJ 07030-5774www.wiley.com
Copyright © 2007 by Wiley Publishing, Inc., Indianapolis, Indiana
Published by Wiley Publishing, Inc., Indianapolis, Indiana
Published simultaneously in Canada
No part of this publication may be reproduced, stored in a retrieval system or transmitted in any form orby any means, electronic, mechanical, photocopying, recording, scanning or otherwise, except as permit-ted under Sections 107 or 108 of the 1976 United States Copyright Act, without either the prior writtenpermission of the Publisher, or authorization through payment of the appropriate per-copy fee to theCopyright Clearance Center, 222 Rosewood Drive, Danvers, MA 01923, (978) 750-8400, fax (978) 646-8600.Requests to the Publisher for permission should be addressed to the Legal Department, Wiley Publishing,Inc., 10475 Crosspoint Blvd., Indianapolis, IN 46256, (317) 572-3447, fax (317) 572-4355, or online athttp://www.wiley.com/go/permissions.
Trademarks: Wiley, the Wiley Publishing logo, For Dummies, the Dummies Man logo, A Reference for theRest of Us!, The Dummies Way, Dummies Daily, The Fun and Easy Way, Dummies.com, and related tradedress are trademarks or registered trademarks of John Wiley & Sons, Inc., and/or its affiliates in the UnitedStates and other countries, and may not be used without written permission. All other trademarks are theproperty of their respective owners. Wiley Publishing, Inc., is not associated with any product or vendormentioned in this book.
LIMIT OF LIABILITY/DISCLAIMER OF WARRANTY: THE PUBLISHER AND THE AUTHOR MAKE NO REP-RESENTATIONS OR WARRANTIES WITH RESPECT TO THE ACCURACY OR COMPLETENESS OF THE CON-TENTS OF THIS WORK AND SPECIFICALLY DISCLAIM ALL WARRANTIES, INCLUDING WITHOUTLIMITATION WARRANTIES OF FITNESS FOR A PARTICULAR PURPOSE. NO WARRANTY MAY BE CRE-ATED OR EXTENDED BY SALES OR PROMOTIONAL MATERIALS. THE ADVICE AND STRATEGIES CON-TAINED HEREIN MAY NOT BE SUITABLE FOR EVERY SITUATION. THIS WORK IS SOLD WITH THEUNDERSTANDING THAT THE PUBLISHER IS NOT ENGAGED IN RENDERING LEGAL, ACCOUNTING, OROTHER PROFESSIONAL SERVICES. IF PROFESSIONAL ASSISTANCE IS REQUIRED, THE SERVICES OF ACOMPETENT PROFESSIONAL PERSON SHOULD BE SOUGHT. NEITHER THE PUBLISHER NOR THEAUTHOR SHALL BE LIABLE FOR DAMAGES ARISING HEREFROM. THE FACT THAT AN ORGANIZATIONOR WEBSITE IS REFERRED TO IN THIS WORK AS A CITATION AND/OR A POTENTIAL SOURCE OF FUR-THER INFORMATION DOES NOT MEAN THAT THE AUTHOR OR THE PUBLISHER ENDORSES THE INFOR-MATION THE ORGANIZATION OR WEBSITE MAY PROVIDE OR RECOMMENDATIONS IT MAY MAKE.FURTHER, READERS SHOULD BE AWARE THAT INTERNET WEBSITES LISTED IN THIS WORK MAY HAVECHANGED OR DISAPPEARED BETWEEN WHEN THIS WORK WAS WRITTEN AND WHEN IT IS READ.
For general information on our other products and services, please contact our Customer CareDepartment within the U.S. at 800-762-2974, outside the U.S. at 317-572-3993, or fax 317-572-4002.
For technical support, please visit www.wiley.com/techsupport.
Wiley also publishes its books in a variety of electronic formats. Some content that appears in print maynot be available in electronic books.
Library of Congress Control Number: 2007932469
ISBN: 978-0-470-09691-8
Manufactured in the United States of America
10 9 8 7 6 5 4 3 2 1
01_096918 ffirs.qxp 7/20/07 11:07 AM Page iv

About the AuthorsHugh Hancock, one of the two people who coined the word Machinima in1999, has worked in the medium for more than a decade running StrangeCompany (www.strangecompany.org), the world’s oldest professionalMachinima production company. He has lectured on Machinima on three continents, had his work shown on five (we’re still waiting for Antarctica),had his films featured in Entertainment Weekly, on Suicide Girls (www.suicidegirls.com), and in The New York Times, and produced Machinima films forthe BBC, BAFTA, Electronic Arts, and many others. In 2007, he was awardedthe first Award for Outstanding Contribution to Machinima by the OnlineMachinima Film Festival. Most recently, he completed work on BloodSpell(www.bloodspell.com), Strange Company’s first feature film, and is cur-rently working on Strange Company’s next major project. He lives inEdinburgh and is intermittently single.
Johnnie Ingram is the former site editor of Machinima.com and holds degreesin both drama and computer science. He lives with his computers in a con-verted church hall in Scotland. He has previously worked as a theater director,an online journalist, and a drama teacher, as well as once dressing up as apriest in order to sell washing powder. He was first assistant director forBloodSpell. He is now a self-employed Web designer and Strange Company’sHead Of Beverage Acquisition and Caffeine Development. He is married withone cat.
01_096918 ffirs.qxp 7/20/07 11:07 AM Page v

01_096918 ffirs.qxp 7/20/07 11:07 AM Page vi

DedicationHugh: This book is dedicated to the Strange Company Volunteer Corps, whohave selflessly given many hours’ work to help Strange Company make filmsin computer games, and to the Machinima community, who have been won-derful people to know for a decade, and without whom there’d not be muchpoint in writing this book. That might sound sappy, but I mean it.
Johnnie: To Laura, for the obvious reasons, and all the other reasons as well.It’s only time. Also for Heidi Burkitt, Richard Killian, Neville Wijeyeratnam,and Mike Caden.
01_096918 ffirs.qxp 7/20/07 11:07 AM Page vii

01_096918 ffirs.qxp 7/20/07 11:07 AM Page viii

Authors’ AcknowledgmentsWe’d like to thank Phil “Overman” Rice, our technical reviewer, both for hiswork on the book and for being, as we say in the UK, a top bloke.
At Wiley, Melody Layne, our acquisitions editor, came up with the idea for thebook in the first place, made it happen, and has been a brilliant contactthroughout. Kelly Ewing, our project editor, has done a fantastic job polishingour prose and coped admirably with the sudden crash course in geek culture.Chris Morris was great editing the first part of the book, and it was a pleasureworking with him.
We’d like to thank our agent, not just because we’ve always wanted to saythat, but also because she did a great and highly professional job guiding twonovice authors through the publishing minefield. Thanks, Caitlin.
We’d like to thank all the people we landed on with zero seconds’ notice tohelp proofread our tortured prose: Martin Page, Paul Marino, Matt Kelland,Dave Lloyd, Ben Sanders, Peter Brophy, Friedrich Kirschner, Ezra Fergusson,Stuart Brown, Eric Call, and Jennifer Urban.
Thanks to everybody in the Machinima community for all their help and support.
And finally, we’d like to thank all our other friends who we neglected, missedcoffee with, and, in extreme cases, concussed with large piles of paper.Thanks to all of them, and in particular to Alex Nuttgens, Amanda andGordon McDonald, Paul AJ Hamilton, Steve Wallace, Caroline Dunford andGraham Gibson, Jehane Barbour, Ian Mulliner, Barry Martin, Charlie Stross,Martin Page, Clare Brady, Paul Caden, Eleanor Dickenson, Nicola Freize, Joe Gibson, Rachel Holmes, Keiran Leach, Chris and Mary Ingram, Simon Ingram, JD Smith, Trudy Wijeyeratnam, David Wright, everybody at Edinburgh’s Open Roleplaying Community, and the person who we’ve forgotten and will now be paranoid that we secretly don’t like them.
01_096918 ffirs.qxp 7/20/07 11:07 AM Page ix

Publisher’s AcknowledgmentsWe’re proud of this book; please send us your comments through our online registration formlocated at www.dummies.com/register/.
Some of the people who helped bring this book to market include the following:
Acquisitions, Editorial, and Media Development
Project Editor: Kelly Ewing
Sr. Acquisitions Editor: Melody Layne
Technical Editor: Phil Rice
Editorial Manager: Jodi Jensen
Media Development and Quality Assurance:Kate Jenkins
Media Development Coordinator:Jenny Swisher
Media Project Supervisor:Laura Moss-Hollister
Editorial Assistant: Amanda Foxworth
Sr. Editorial Assistant: Cherie Case
Cartoons: Rich Tennant (www.the5thwave.com)
Composition Services
Project Coordinator: Adrienne Martinez
Layout and Graphics: Carl Byers, Joyce Haughey, Shane Johnson, Stephanie D. Jumper, Heather Ryan, Alicia B. South, Ronald Terry, Christine Williams
Proofreader: Aptara
Indexer: Potomac Indexing, LLC
Anniversary Logo Design: Richard Pacifico
Publishing and Editorial for Technology Dummies
Richard Swadley, Vice President and Executive Group Publisher
Andy Cummings, Vice President and Publisher
Mary Bednarek, Executive Acquisitions Director
Mary C. Corder, Editorial Director
Publishing for Consumer Dummies
Diane Graves Steele, Vice President and Publisher
Joyce Pepple, Acquisitions Director
Composition Services
Gerry Fahey, Vice President of Production Services
Debbie Stailey, Director of Composition Services
01_096918 ffirs.qxp 7/20/07 11:07 AM Page x

Contents at a GlanceIntroduction .................................................................1
Part I: Introducing Machinima.......................................7Chapter 1: Getting to Know Machinima...........................................................................9Chapter 2: Your First Machinima Movie ........................................................................25
Part II: Getting Serious ...............................................33Chapter 3: Filmmaking 101 ..............................................................................................35Chapter 4: Storytelling and Scriptwriting......................................................................59Chapter 5: Engines, Engines Everywhere......................................................................79Chapter 6: Making Your World: Set Design and Texturing ..........................................97Chapter 7: The Casting Couch: In-Engine Character Design in The Sims 2 ............115Chapter 8: Cut! Directing Machinima with The Sims 2 ..............................................131Chapter 9: Get Out the Scissors: Editing Machinima.................................................153Chapter 10: Fifteen Minutes of Fame: Distributing Your Movie................................167
Part III: Advanced Machinima Creation......................187Chapter 11: Massively Multiplayer Machinima: World of Warcraft..........................189Chapter 12: Lord of the Rings on $50 — Mass Battles
with Medieval II: Total War .........................................................................................215Chapter 13: Noise! Sound Design and Recording for a Great Film ...........................239Chapter 14: Get It Out There! Publicizing Your Movie...............................................255Chapter 15: You’re Nicked, My Son: Machinima and the Law ..................................273
Part IV: The Final Frontier: Pro Machinima.................283Chapter 16: Making Things That Don’t Exist: 3D Modeling and Animation............285Chapter 17: A Storm Is Brewing: Moviestorm.............................................................305Chapter 18: Build a Better Mousetrap: Going Beyond Engine Limitations .............331Chapter 19: Pro Machinima? .........................................................................................349
Part V: The Part of Tens ............................................355Chapter 20: Ten Machinima Films You Must Watch...................................................357Chapter 21: Ten Ways to Ruin Your Machinima Movie..............................................365Chapter 22: Ten Machinima Sites to Bookmark..........................................................371
02_096918 ftoc.qxp 7/20/07 11:08 AM Page xi

Appendix: About the DVD ..........................................375Index .......................................................................381
End-User License Agreement ........................Back of Book
02_096918 ftoc.qxp 7/20/07 11:08 AM Page xii
Table of ContentsIntroduction .................................................................1
About This Book...............................................................................................2Foolish Assumptions .......................................................................................2How This Book Is Organized...........................................................................3
Part I: Introducing Machinima ..............................................................3Part II: Getting Serious ...........................................................................3Part III: Advanced Machinima Creation...............................................4Part IV: The Final Frontier: Pro Machinima.........................................4Part V: The Part of Tens.........................................................................4
Conventions Used in This Book .....................................................................4Icons Used in This Book..................................................................................5Where to Go from Here....................................................................................6
Part I: Introducing Machinima .......................................7
Chapter 1: Getting to Know Machinima . . . . . . . . . . . . . . . . . . . . . . . . . .9The Future Is Here: Machinima Arrives.........................................................9Shooting in a Virtual World...........................................................................10Machiniwhatnow? ..........................................................................................12Using Machinima to Make Films...................................................................13
What Machinima does well .................................................................14What Machinima does less well .........................................................15
Making a Machinima Film..............................................................................17Controlling the Action: Live Versus Scripted..............................................20
Chapter 2: Your First Machinima Movie . . . . . . . . . . . . . . . . . . . . . . . . .25Installing Moviestorm....................................................................................25Walk before Running......................................................................................26Making Winston Drunk ..................................................................................27Time for a Witty Retort..................................................................................28A Quick Exit.....................................................................................................30Cinematography! ............................................................................................30And That’s All, Folks! .....................................................................................32
Part II: Getting Serious................................................33
Chapter 3: Filmmaking 101 . . . . . . . . . . . . . . . . . . . . . . . . . . . . . . . . . . . . .35Film Is a Language..........................................................................................35
Faking the eye .......................................................................................36Painting with light ................................................................................37
02_096918 ftoc.qxp 7/20/07 11:08 AM Page xiii

Interpreting Animation ..................................................................................37Making the Film: Anatomy of a Scene..........................................................38
Style........................................................................................................38Blocking .................................................................................................39Camera positioning ..............................................................................40Micro-flow..............................................................................................41Framing ..................................................................................................43Filming ...................................................................................................43
Thinking about Aspect Ratios ......................................................................44Framing Your Movie.......................................................................................45
Painterly composition .........................................................................45Framing characters ..............................................................................47
Mastering Shot Flow ......................................................................................47The Components of a Film ............................................................................49
Shot types: Wide...................................................................................50Shot functions: Establishing ...............................................................50Shot types: Two-shot ...........................................................................51Shot types: Reverse..............................................................................51Shot types: Point of View (POV).........................................................52Shot types: Close-up ............................................................................52Shot types: Medium shot.....................................................................53Shot types: General Visual (GV) .........................................................54Shot types: Reveal ................................................................................55Shot types: Insert .................................................................................55Moving camera: Pan.............................................................................56Moving camera: Dolly/crane ...............................................................56Moving camera: Zoom .........................................................................56Moving camera: Handheld ..................................................................57
Chapter 4: Storytelling and Scriptwriting . . . . . . . . . . . . . . . . . . . . . . . .59Debunking Storytelling Myths ......................................................................59
You can’t learn to tell a story..............................................................59You’ll ruin your storytelling by learning story structure................60There’s one true way to write a story................................................60Writing a story is easy .........................................................................61You don’t need to write like the pros do ...........................................61Fire hot. . . fan films bad .......................................................................61
Outlining the Form of a Story .......................................................................62Getting the Scoop on Reversals ...................................................................63
Sizing your reversals............................................................................64Beats.......................................................................................................64Scenes ....................................................................................................67Act ..........................................................................................................69
Developing Your Characters.........................................................................70
Machinima For Dummies xiv
02_096918 ftoc.qxp 7/20/07 11:08 AM Page xiv

Actually Writing a Script — Or Not! .............................................................731. The pitch ...........................................................................................732. The skeleton......................................................................................743. The narrative ....................................................................................744. The script ..........................................................................................755. The s****ing editing ........................................................................75
Writing Natural Dialogue...............................................................................75Adhering to Script Format ............................................................................76
Chapter 5: Engines, Engines Everywhere . . . . . . . . . . . . . . . . . . . . . . . .79Exploring Key Features..................................................................................80The Sims 2 .......................................................................................................83The Movies......................................................................................................83Half-Life 2.........................................................................................................84Halo 2 ...............................................................................................................85Unreal Tournament ........................................................................................86Neverwinter Nights........................................................................................87Neverwinter Nights 2.....................................................................................88Medieval II: Total War ....................................................................................89DooM 3.............................................................................................................89Grand Theft Auto ...........................................................................................90Moviestorm.....................................................................................................92IClone...............................................................................................................92Second Life......................................................................................................93World of Warcraft ...........................................................................................94Battlefield 2 .....................................................................................................95Company Of Heroes .......................................................................................95
Chapter 6: Making Your World: Set Design and Texturing . . . . . . . . .97Knowing What Game Engines You Can Use ................................................97The Design Phase...........................................................................................98Creating a Set..................................................................................................99Entering the Modern Age ............................................................................101Creating a Set in The Sims 2........................................................................102Landscaping for the Win .............................................................................104Build Me Up, Buttercup ...............................................................................106Adding the Finishing Touches ....................................................................107Grabbing Props from the “Intarweb”.........................................................107
Finding mods.......................................................................................108Installing a mod ..................................................................................109
Making a Quality Set ....................................................................................109Research ..............................................................................................110Color and light ....................................................................................110Space....................................................................................................111Practicalities .......................................................................................112
xvTable of Contents
02_096918 ftoc.qxp 7/20/07 11:08 AM Page xv

Chapter 7: The Casting Couch: In-Engine Character Design in The Sims 2 . . . . . . . . . . . . . . . . . . . . . . . . . . . . . . .115
How Do They Do That?................................................................................115Creating Characters in The Sims 2.............................................................118Customizing Your Character.......................................................................120
Genetics: A new pair of genes...........................................................120Faces: Tragedy, comedy, or chimp...................................................120Modifiers: The real power awaits you .............................................122Facial hair, makeup, and glasses ......................................................122Clothing ...............................................................................................124
Designing a Character’s Look .....................................................................125Mastering Visual Character Design............................................................127
Chapter 8: Cut! Directing Machinima with The Sims 2 . . . . . . . . . . .131Making Movies in The Sims: The Advantages ..........................................131Checking Out The Sims Disadvantages .....................................................132Preparing to Film with The Sims ................................................................133Getting Your Sims onto Your Lot................................................................134Configuring The Sims 2 for Machinima .....................................................137
Adding a community add-on.............................................................138Adding game cheats...........................................................................138
Starting to Film .............................................................................................140Static shots..........................................................................................141Lights, camera, action!.......................................................................143I like to move it — moving shots......................................................144
Diving in to Character Filming....................................................................147Using Advanced Animation Tools ..............................................................148Creating Character Interaction...................................................................149Case Study: The Snow Witch ......................................................................150
Chapter 9: Get Out the Scissors: Editing Machinima . . . . . . . . . . . . .153Understanding What You’re Achieving with Your Edits..........................153Figuring Out How to Edit.............................................................................155Getting Started with Vegas Video...............................................................156Importing a Clip............................................................................................157Adding a Clip to the Video Track ...............................................................157Trimming a Clip ............................................................................................157Adding Transitions.......................................................................................158Working with Sound.....................................................................................161Speeding Up or Slowing Down a Clip.........................................................161Adding Title Sequence or Credits ..............................................................162Rendering Video...........................................................................................163Identifying New Shots..................................................................................163Editing an Action Sequence ........................................................................164Editing a Conversation ................................................................................164Editing a Romantic Sequence .....................................................................165Editing a Suspense Sequence .....................................................................166
Machinima For Dummies xvi
02_096918 ftoc.qxp 7/20/07 11:08 AM Page xvi

Chapter 10: Fifteen Minutes of Fame: Distributing Your Movie . . . .167Codecs, Codecs Every . . . What? ...............................................................167Video Formats ..............................................................................................168
QuickTime ...........................................................................................168AVI ........................................................................................................169WMV.....................................................................................................170
Thinking about Bitrates...............................................................................171Encoding Your Video ...................................................................................172
QuickTime ...........................................................................................172AVI ........................................................................................................175WMV.....................................................................................................176
Streaming Video ...........................................................................................179External hosting..................................................................................180Personal hosting.................................................................................181
Getting Your Video Out There ....................................................................182Standard (paid) Web hosting ............................................................182Internet Archive..................................................................................183Web video sites...................................................................................184Peer-to-peer distribution...................................................................184
Publicizing Your Movie................................................................................186
Part III: Advanced Machinima Creation ......................187
Chapter 11: Massively Multiplayer Machinima: World of Warcraft . . . . . . . . . . . . . . . . . . . . . . . . . . . . . . . . . . . . . . . . . . .189
World of Warcrack — er, Warcraft..............................................................190World of Warcraft and Machinima....................................................191Tools of the MMO trade.....................................................................193
Writing for WoW ...........................................................................................196Decide what sort of story you want to tell......................................197Write your story .................................................................................197
LFG 3,745 More 4 Helm’s Deep PST!...........................................................198Executive producer ............................................................................198Permissions agent ..............................................................................199Casting agent.......................................................................................200Costume department .........................................................................200Crowd control .....................................................................................201Transport coordinator.......................................................................201
Shooting in WoW ..........................................................................................202Record pans in WoW..........................................................................202Record tracks in WoW........................................................................203Shoot characters acting in WoW ......................................................203
xviiTable of Contents
02_096918 ftoc.qxp 7/20/07 11:08 AM Page xvii

Model Viewer FTW! ......................................................................................204And Now, View That Map! ...........................................................................207Mastering Post-Production Effects ............................................................208
Layering ...............................................................................................209Other compositing techniques.........................................................213
Chapter 12: Lord of the Rings on $50 — Mass Battles with Medieval II: Total War . . . . . . . . . . . . . . . . . . . . . . . . . . . . . . . . . . .215
The Ups and Downs of Medieval II: Total War..........................................216The Filming Process in MTW2....................................................................217Getting Started .............................................................................................218Getting to Know the Battle Editor..............................................................219Making a Map................................................................................................223Recording the Action...................................................................................226Shooting the Carnage ..................................................................................226
1: The Medieval II: Total War window..............................................2282: The Visible Elements window.......................................................2283: The Curves View.............................................................................2284: The Playback controls ...................................................................2305: The Interpolation controls ............................................................2306: Zooming functions .........................................................................231
Creating Camera Paths ................................................................................231Adding a zoom ....................................................................................232Creating a close-up hand-held camera ............................................233Rendering a camera ...........................................................................234
Rendering a Shot ..........................................................................................235Getting the Scoop on Tips and Tricks .......................................................236
Chapter 13: Noise! Sound Design and Recording for a Great Film . . . . . . . . . . . . . . . . . . . . . . . . . . . . . . . . . . . . . . . . . . . . . .239
Figuring Out What Sound You Need ..........................................................240Winning a Losing Battle...............................................................................241Understanding the Basics of Sound...........................................................241Getting the Kit — Recommendations for Cheap Equipment
and Free Software .....................................................................................243Microphone .........................................................................................243Mixing desk .........................................................................................243Headphones ........................................................................................244Software ...............................................................................................244Sound damping ...................................................................................245
Setting Up a Recording Studio in Your Bedroom .....................................245Makin’ Yer Aktual Recording!......................................................................247Recording from Different Locations...........................................................248Cleaning Up Voices and Balance Levels ....................................................248Finding Foley Sounds and Effects ..............................................................250Locating Music .............................................................................................252
Machinima For Dummies xviii
02_096918 ftoc.qxp 7/20/07 11:08 AM Page xviii

Chapter 14: Get It Out There! Publicizing Your Movie . . . . . . . . . . . .255There’s No Such Thing as Bad Publicity ...................................................255Why You Should Always Lie........................................................................256Spin ................................................................................................................257Word-of-Mouth and Word-of-Mouse...........................................................259Can I Get a Second Opinion, Doctor?.........................................................260Online: The Key Sites...................................................................................260
Cast your net wider............................................................................261Other sites...........................................................................................261Create an RSS feed..............................................................................262
Offline Media.................................................................................................263Press Releases ..............................................................................................264
Writing your own press release........................................................264Hiring a PR agency .............................................................................268Trying a PR distribution agency.......................................................268
The Life-Cycle of the Lesser Spotted Publicity Machine ........................269Before you start ..................................................................................269Right in the thick of it ........................................................................269Almost done ........................................................................................270Release day .........................................................................................270About a month later ...........................................................................271Scraping the bottom of the barrel....................................................271
Chapter 15: You’re Nicked, My Son: Machinima and the Law . . . . .273The Lawyers Made Me Do It .......................................................................274Get ’im, Guvnor!............................................................................................274Get Your Knickers On, Love — You’re Nicked..........................................276
EULA-reading: The fine print.............................................................276Copyright: It’s back ............................................................................278
If You May Be Infringing . . ..........................................................................279Finding a Lawyer ..........................................................................................280Making Legal Machinima.............................................................................281Checking into Creative Commons..............................................................282
Part IV: The Final Frontier: Pro Machinima .................283
Chapter 16: Making Things That Don’t Exist: 3D Modeling and Animation . . . . . . . . . . . . . . . . . . . . . . . . . . . . . . . . . .285
Figuring Out Whether You Need to Model ................................................286Exploring 3D Packages ................................................................................286
Blender.................................................................................................287Milkshape ............................................................................................287GMax ....................................................................................................287
xixTable of Contents
02_096918 ftoc.qxp 7/20/07 11:08 AM Page xix
Getting Your Model into Your Game ..........................................................288Creating Your First Model ...........................................................................291
Working with Blender ........................................................................291Creating a simple cube ......................................................................292Editing model points..........................................................................294Adding texture to your model ..........................................................297
Importing into The Sims!.............................................................................301Cloning a package...............................................................................301Checking the scale .............................................................................302Adding the model and texture to your game..................................303
Chapter 17: A Storm Is Brewing: Moviestorm . . . . . . . . . . . . . . . . . . .305Using Moviestorm ........................................................................................305Movie-Making in Moviestorm: The Basic Principles................................307Creating Your Set..........................................................................................308Adding Props to Your Set ............................................................................310Creating Characters in Moviestorm...........................................................312Creating a Scene ...........................................................................................314Blocking with the Timeline .........................................................................316Creating Camerawork ..................................................................................320
Editing your shot ................................................................................321Adding a camera on a character ......................................................322
Editing Camera Sequences with the Master Monitor ..............................323Adjusting Your Set While Filming...............................................................324Using a Matte Backdrop ..............................................................................325Changing a Texture ......................................................................................326Rendering Out the Final Version ................................................................329Going Further................................................................................................329
Chapter 18: Build a Better Mousetrap: Going Beyond Engine Limitations . . . . . . . . . . . . . . . . . . . . . . . . . . . . .331
Improving Your Engine’s Utility..................................................................331Fiddling with Tools.......................................................................................333What Can You Do with Tools?.....................................................................335Scripting in Your Engine..............................................................................336Developing Tools: An Example ...................................................................338Considering Hardware Add-Ons.................................................................340Removing Limitations..................................................................................342
Interpreting data.................................................................................343Hex editing ..........................................................................................344
Trying New Angles .......................................................................................346
Chapter 19: Pro Machinima? . . . . . . . . . . . . . . . . . . . . . . . . . . . . . . . . . .349Getting Hired by a Games Company..........................................................349Starting Your Own Machinima Company ..................................................352
Machinima For Dummies xx
02_096918 ftoc.qxp 7/20/07 11:08 AM Page xx

Part V: The Part of Tens .............................................355
Chapter 20: Ten Machinima Films You Must Watch . . . . . . . . . . . . . .357Anna...............................................................................................................357Hardly Workin’..............................................................................................358The Internet Is For Porn ..............................................................................358BloodSpell .....................................................................................................359The Snow Witch............................................................................................360Red vs Blue ...................................................................................................360Still Seeing Breen..........................................................................................361The Journey ..................................................................................................362Edge of Remorse...........................................................................................362The Return ....................................................................................................363
Chapter 21: Ten Ways to Ruin Your Machinima Movie . . . . . . . . . . . .365Don’t Plan! .....................................................................................................365Don’t Spend Time on Your Script...............................................................366Get Your Friends to Act ...............................................................................366Ignore Camerawork......................................................................................367Don’t Cut It Down to Size ............................................................................367Don’t Get Help ..............................................................................................368Copy Existing Machinima Movies ..............................................................368Don’t Read About Filmmaking....................................................................369Don’t Release Unless It’s Perfect................................................................369Don’t Tell Anyone about It ..........................................................................369
Chapter 22: Ten Machinima Sites to Bookmark . . . . . . . . . . . . . . . . . .371Machinima Premiere....................................................................................371Sims99............................................................................................................371Machinima.com ............................................................................................372Machinima Film Festival..............................................................................372Thinking Machinima ....................................................................................372Machinima For Dummies Blog....................................................................372Machinifeed ..................................................................................................373The Overcast ................................................................................................373The Internet Archive Machinima Section .................................................373WarcraftMovies.com....................................................................................374
Appendix: About the DVD...........................................375System Requirements..................................................................................375Using the DVD...............................................................................................376
xxiTable of Contents
02_096918 ftoc.qxp 7/20/07 11:08 AM Page xxi

What You’ll Find on the DVD ......................................................................376Tutorial material.................................................................................377Moviestorm .........................................................................................377Our top films .......................................................................................377Open-source utilities..........................................................................378Freeware utilities ................................................................................378Trial software ......................................................................................379
Troubleshooting...........................................................................................379
Index .......................................................................381
End-User License Agreement ........................Back of Book
Machinima For Dummies xxii
02_096918 ftoc.qxp 7/20/07 11:08 AM Page xxii

Introduction
If you ever meet either Hugh or Johnnie, your humble authors (who verymuch enjoy writing in the third person), there’s a simple way to have
some fun. Ask them “What is Machinima?” Then watch as they stumble overtheir words.
Machinima is the maverick film-making process that evolved from hackersmessing with the insides of their favorite computer games. At last count, ithad attracted the attention of everyone from The New York Times to GeorgeLucas and Stephen Spielberg.
It’s a philosophy, a fervent belief, a technique, and, last of all, a technology.
As a philosophy, it’s about taking advantage of the technologies used in videogames and twisting, tweaking, and reusing them to make movies. It’s a philos-ophy that says, “Hey, these virtual worlds look pretty neat. Why not justshoot our movies in them and do things we can’t do in the real world?”
As a belief, it holds that everyone, everywhere, should be able to makemovies. Not just cute indie movies or things that you can shoot with a cam-corder, but any movie you want to make. Starships. Guns. Action. Cast ofthousands. Anything.
As a technique, or rather a body of techniques, it’s — well, it’s this book. It’sa whole bunch of tips, hints, and occasionally downright dirty tricksdesigned to fool software that really was not designed for filmmaking intomaking darn good movies anyway.
And as a technology? Well . . .
At the risk of showing you the man behind the curtain, the text you’re read-ing now was actually one of the last things we wrote for this book. On the daywe wrote this introduction, we’d already written more than 8,000 words forthe book. We also shot 25 seconds of movie footage that day. The scene weshot is a huge, dramatic battle sequence. A column of mounted knights ridesdown a hill, through cannon fire, past a column of war elephants, and plungesinto the back of a pack of fleeing peasants. It’s about seven shots that wouldhave taken days — and tens, if not hundreds, of thousands of dollars — toshoot in conventional video.
We conceived, designed, shot, and wrapped the entire thing in our lunch hour.
That is Machinima.
03_096918 intro.qxp 7/20/07 11:08 AM Page 1
About This BookNo matter how much we guide you along the way, by far the best way to learnabout Machinima is to sit down at your keyboard and make some. Machinimais a hacker’s technique at its core, and it’s about as hands-on as you can get.We encourage you to experiment; to play with the game engines and toolsthat we’ll talk about; to get your hands dirty; and to have fun.
There’s no need to read the book from cover to cover. We certainly wouldn’trecommend that as your first task. We’re going to be delving deeply into themurky waters of Machinima movie-making. The entire book is probably toomuch for anyone to swallow in one go. For those who do want to start at thebeginning and work diligently through to the very end, we’ve tried to coverthe basics in the early chapters and let you get stuck into making a movie assoon as we can. Later chapters focus on some of the more advanced theoryand practice behind movie-making and Machinima.
Above all, though, this book is designed as a reference that you can dip intoat random. Machinima is a field containing a huge range of potential subjects.We’ve tried to cover them all while still producing a tome that you can liftwithout the aid of heavy machinery.
Foolish AssumptionsWe don’t know you (although we’re sure that you’re very nice) and we’ve noidea how you’re planning to approach this book. We don’t know if you’re anexperienced Machinima maker, an interested geek, or a complete newcomer.Wherever you lie on the scale, we hope this book will be useful to you. If you’llforgive the presumption, though, we’ve made a few assumptions about you:
� You want to find out how to tell stories using Machinima techniques.We don’t expect you to have any specific ideas yet, just a desire to create.
� You’re pretty new to all this stuff. You may already have made someMachinima, but you’re still looking for a solid grounding in Machinimatechniques, using several different engines.
Of course, if even the word Machinima was new to you before you pluckedthis book from the shelf, that’s fine, too. Welcome to the revolution!
� You have access to a computer (probably a PC). You need a reasonablymodern computer to run most of the games that we reference in this
2 Machinima For Dummies
03_096918 intro.qxp 7/20/07 11:08 AM Page 2

book. Although some Machinima-capable games run under Mac OS orLinux, the vast majority require a PC running Microsoft Windows (prefer-ably Windows 2000 or later).
You don’t need a bleeding-edge system with all the mod-cons, but if yourmachine is more than a couple of years old, it’ll struggle with some ofthe more demanding engines. The faster the better, of course — you cannever have too much power.
� You have broadband Internet access. Machinima is a technique thatwas born on the Internet and still lives happily under its parents’ roof tothis day. Without a broadband Internet connection, you’re going to findbits of this book a little tricky. We recommend Web sites to you, ask youto download the latest game patches, or recommend that you watch thenewest Machinima movies over video-sharing sites.
How This Book Is OrganizedThis book has four major parts, each covering a meaty chunk of Machinimaknowledge, plus the “bonus” fifth, The Part of Tens. If you’re looking for some-thing specific, a quite terrifyingly detailed Table of Contents at the start ofthe book and the Index at the back of book can help you out.
Part I: Introducing MachinimaIn this part, we take you through very basics of how Machinima is createdand give you the chance to make your first movie. If you were James Bond,this part would be the bit where M calls you into her office and gives you apotted ten-minute summary of the latest threat to the British Crown.
Part II: Getting SeriousIn our second part, we go deep into film-making and give you everything youneed to know to make a very competent movie — even a feature film, if you sodesire. We introduce you to The Sims 2, arguably the most popular Machinimaengine in the world. We tell you about cinematography and film-making, sto-rytelling, editing, and distribution, show you how to make characters andsets, and give you an overview of all the technologies available to you as aMachinima filmmaker.
3Introduction
03_096918 intro.qxp 7/20/07 11:08 AM Page 3
Part III: Advanced Machinima CreationIn Part III, we introduce more advanced topics. We discuss two moreMachinima creation engines, the hyper-popular World of Warcraft and thehyper-spectacular Medieval II: Total War, which you can use to make radicallydifferent movies to those possible in The Sims 2. We talk about sound editingand sound recording, as well as how to publicize your movie to make yourselfa household name. And finally, we cover some of the legal issues that afflictMachinima in the hope that you can avoid becoming a household name in,you know, a bad way.
Part IV: The Final Frontier: Pro MachinimaThis part contains the hard-core material. It’s deep. It’s serious. It probablyhad a liberal arts education and can quote Allen Ginsberg from memory.
We look into 3D modeling and how to create 3D objects using the same tech-niques that are used in top-name animation companies. We discuss becominga Machinima professional — and whether you should. We take you deepinside the technology: recoding, hacking, and tweaking it for your own endsusing programming languages and more. Finally, we come full circle as wereintroduce Moviestorm, the engine we use in Part I, this time as the mostfully featured and professional Machinima production tool available.
Part V: The Part of TensIn venerable For Dummies tradition, we end the book with a list of lists. TenMachinima movies you must watch, ten Machinima sites you must visit, andten Machinima mistakes you must avoid.
Conventions Used in This BookWhen we say conventions, we don’t mean a large meeting in a hotel wheresomeone dresses up as Darth Vader. Just in case you were unsure:
� We’ve written each chapter of this book as a self-contained whole.If they were plants, they would be those freaky things that live on airalone.
4 Machinima For Dummies
03_096918 intro.qxp 7/20/07 11:08 AM Page 4

� We don’t write code very often, because Machinima isn’t incrediblycoding-heavy. When we do, you can distinguish it from text because itlooks like this:
SET Machinima_For_Dummies = 1337
� We quote movie scripts at various points in the book. When we doquote, we use conventional script format. We discuss script format inmore detail in Chapter 4.
Icons Used in This BookEvery so often, we felt something in this book was especially noteworthy, sowe highlight those points with icons:
This icon points out helpful tidbits or pointers — anything that’s a quick tipfor the topic on hand.
All your base may shortly be overrun by hideous aliens if you fail to heedthese warnings! Or at least something may crash or go a bit funny.
As you may expect, it’s a good idea not to forget these points.
Coming to you live from the School of Hard Knocks, these are practical pointsthat we’ve learned through real-world experience. Hopefully, they’ll help youavoid or engineer similar circumstances.
This icon marks hard-core techie material. You don’t need to know it tounderstand the rest of the book. If you’re as geeky as us, though, you’ll prob-ably find it interesting.
This icon shows you when you can find items included on this book’s DVD.
5Introduction
03_096918 intro.qxp 7/20/07 11:08 AM Page 5
Where to Go from HereOnward! To victory! We few, we lucky few, we band of Machinimators. . . .
You could dive straight in to Chapter 1, if you like. We promise that within 50 pages, you’ll have completed your first movie. Or if there’s something particularly interesting to you — perhaps you’re a World of Warcraft addict(Chapter 11) or really want to get to the big battles in Medieval II: Total War(Chapter 12) — feel free to skip ahead.
But most importantly, try Machinima out for yourself! This book is great(your authors say modestly), but you’ll discover more techniques faster byactually diving in and creating movies yourself. Moviestorm is on the coverDVD, so go install, play, create, stick it up on YouTube, get discovered, andmake a million bucks! Or, you know, at least get a few hundred views, and atemporary stalker named Boris. Either way, read, make, enjoy. Good luck andwelcome to the Machinima revolution.
6 Machinima For Dummies
03_096918 intro.qxp 7/20/07 11:08 AM Page 6

Part IIntroducingMachinima
04_096918 pt01.qxp 7/20/07 11:08 AM Page 7

In this part . . .
What the heck is this Machinima stuff anyway? It’s notas easy an answer as you may think. But, amazingly
enough, the obvious next question, “How do I make some?”is actually easier.
In this part, we introduce you to Machinima, explain howit came to have that silly name, and help you make yourfirst movie — all within the space of two chapters!
04_096918 pt01.qxp 7/20/07 11:08 AM Page 8
Chapter 1
Getting to Know MachinimaIn This Chapter� Understanding why you should care about Machinima
� Filming Machinima
� Choosing projects that are appropriate for Machinima
You may be a Machinima enthusiast already. If so, you can probably skipthis chapter — you already know why Machinima is great, you already
know at least roughly how it’s made, and you’ve probably heard Hugh’s funnystory about how the name came to be.
But if you’re just flicking through this book in the bookstore, or you’ve had itrecommended to you, you’re probably thinking, Machiniwhat? It’s that thingwhere kids make movies with video games, isn’t it? Why would you need anentire book on that?
The Future Is Here: Machinima ArrivesIt’s getting hard to find anything that isn’t easy to do. Publishing went first,arguably, with the word processor and printer turning any guy with a $400 PCinto a publishing house. Hugh remembers “publishing” his first role-playinggame at age 12 using a ZX Spectrum.
Next, it was music. Professional recording quality came down in price, untilsuddenly it was possible to record and mix pro-quality audio in your bed-room. Johnnie has committed some music in his time, but prefers it strickenfrom the record.
And latest, it’s been film. Cheap, digital video cameras and even cheaper hard drives mean that shooting and editing capabilities that would have hadLucasfilm drooling 25 years ago are available on the desktop. And with therise of video-sharing sites like YouTube, you can even end-run the distribu-tion chains and become a superstar from your own backyard.
05_096918 ch01.qxp 7/20/07 11:08 AM Page 9

Hollywood still holds the high ground, though. Unlike writing or music, manyfilms require more than recording equipment. They need stunts. Effects.Locations. A cast of hundreds. A thousand elephants. And only Hollywoodfilms can shell out the money for that. Hence, if you want to make Clerks onyour own, you can do that, but to make The Matrix, you need Hollywood.
Enter Machinima.
Shooting in a Virtual WorldMachinima is the technique of making films inside virtual realities (see Figure1-1). At its heart, lungs, liver, gall bladder, or other major organ, Machinima is a very simple concept. It’s the moment when anyone — and this has hap-pened over and over again — looks at a modern 3D computer game and says,“We could make a film in that!”.
Machinima isn’t a technology. There’s no piece of software called Machinima.It’s a technique — the technique of taking a viewpoint on a virtual world, andrecording that, editing it, and showing it to other people as a film.
Using Machinima, you can create virtually any locations and any charactersyou can imagine, all within the same technology that powers 3D computergames. And inside those locations, you can do whatever you want.
Figure 1-1:As StrangeCompany’sBloodSpell
shows, you can dothings withMachinimathat would
cost millionsin othermedia.
10 Part I: Introducing Machinima
05_096918 ch01.qxp 7/20/07 11:08 AM Page 10

Need a firefight? Games engines are good at them. How about a sweepingvista? Not a problem. How about a gigantic battleship swooping from theskies, firing plasma charges from its cannon, crewed by the ghosts of thosewho died to its guns, whilst below a thousand Vikings battle their way up amountain pass? No worries, pal. Would you like fries with that?
Of course, you can already do all these things in conventional 3D animationpackages. But normal 3D has two problems: It’s expensive ($900 minimum fora good 3D package, and much more for most industry-standard tools), andmore problematic yet, it’s slow. To create a five-minute animated film takes asingle animator a year or more. The Matrix is well out of sight.
Machinima, by contrast, is fast. It takes about as long to shoot a film inMachinima as it does on Digital Video. And that means you can shoot a shortfilm without giving up your life to it. In fact, it’s quite possible for a bunch ofdedicated people to produce an epic, Star Wars–scale feature film using itstechnology.
We know because we did it. Hugh and Johnnie originally began workingtogether on the virtual set of BloodSpell, Hugh’s first feature film (see Figure1-2). Using Machinima, and with a core crew of five part-time volunteers (plusHugh), they completed shooting a script that would have cost well over $10million in conventional filmmaking for a total cost of approximately $5,000, inunder three years.
Figure 1-2:BloodSpell,by StrangeCompany.
11Chapter 1: Getting to Know Machinima
05_096918 ch01.qxp 7/20/07 11:08 AM Page 11

And that was using 2004 technology. Machinima has gotten a lot better sincethen, which means a feature film should take a lot less time.
Perhaps two years? One year? Go try it and find out.
We did it. We’re going to spend the rest of the book showing you how you cando it, too.
Machiniwhatnow?Where on earth did that term Machinima come from? To answer that, we’llhave to cut back a few years. Boodliboop . . . Boodliboop . . . Boodliboop . . .It’s 1999. The dot-com boom is in full flow. And on a small mailing list calledq2demos, a small group of people dream of global domination for their newfilmic medium, which uses computer game technology to make films, and wasborn about three years before. Only one thing’s standing in the way of theirtriumph: the fact that said artform is currently known as Quake Movies.
Machinima grew out of hacks made to the game Quake, which allowed play-ers to edit recordings of their gameplay into real movies. And while most ofthese movies were the equivalent of hip-hop songs explaining how tough andmacho the game player was and how he would slap you down and steal yourwoman, or, you know, shoot you with an imaginary rocket and then laugh intohis Jolt Cola, some filmmakers were using these Quake Movie hacks to makereal films.
Among the early advocates of whatever-the-heck-we-were-going-to-call-it wasAnthony Bailey, a frighteningly smart mathematics postgrad and the directorof arguably the first Machinima hit, Quake done Quick. Anthony had beendoing some thinking, and he’d come up with an idea. Combining the conceptsof Machine and Cinema, he — very diffidently — proposed to the list that per-haps, maybe, they could call this new artform Machinema.
Also on this list was one Hugh Hancock — probably less smart, definitely lessdiffident (and one of the authors on this book). Hugh thought this new termwas a great idea and started using it everywhere — in e-mails, in Web post-ings, in the name of his new super-site.
Some time later, Anthony contacted him and said he was very pleased withthe fact that Hugh had adopted the name and popularized it, and that hereally liked the change Hugh had made, in changing the e to an i, becausenow it didn’t just contain Machine and Cinema, it also contained Anima, life,
12 Part I: Introducing Machinima
05_096918 ch01.qxp 7/20/07 11:08 AM Page 12
which Anthony really thought, was the missing element in his original namingconcept.
Hugh, meanwhile, hadn’t realized he had made a change. He’d just not readAnthony’s original message very carefully. He hadn’t changed Machinema toMachinima, so much as misspelled it. And so he did what any decent personwould have done — he took a deep breath and said, “Yes. I thought it was animportant change, too. Glad you liked it.”
And that, ladies, gentlemen, and things of all ages, is how the wordMachinima was born.
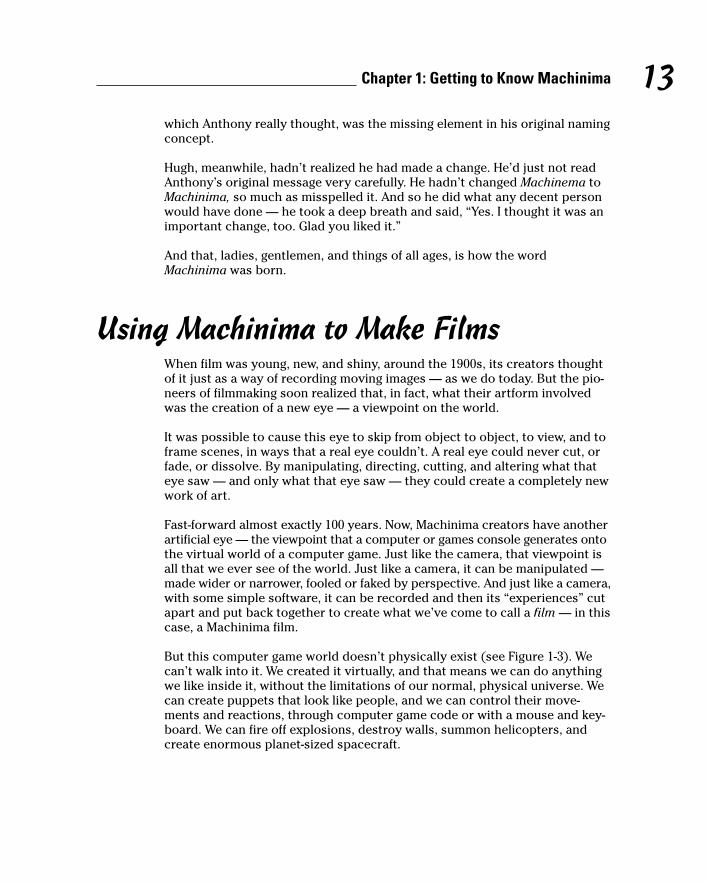
Using Machinima to Make FilmsWhen film was young, new, and shiny, around the 1900s, its creators thoughtof it just as a way of recording moving images — as we do today. But the pio-neers of filmmaking soon realized that, in fact, what their artform involvedwas the creation of a new eye — a viewpoint on the world.
It was possible to cause this eye to skip from object to object, to view, and toframe scenes, in ways that a real eye couldn’t. A real eye could never cut, orfade, or dissolve. By manipulating, directing, cutting, and altering what thateye saw — and only what that eye saw — they could create a completely newwork of art.
Fast-forward almost exactly 100 years. Now, Machinima creators have anotherartificial eye — the viewpoint that a computer or games console generates ontothe virtual world of a computer game. Just like the camera, that viewpoint isall that we ever see of the world. Just like a camera, it can be manipulated —made wider or narrower, fooled or faked by perspective. And just like a camera,with some simple software, it can be recorded and then its “experiences” cutapart and put back together to create what we’ve come to call a film — in thiscase, a Machinima film.
But this computer game world doesn’t physically exist (see Figure 1-3). Wecan’t walk into it. We created it virtually, and that means we can do anythingwe like inside it, without the limitations of our normal, physical universe. Wecan create puppets that look like people, and we can control their move-ments and reactions, through computer game code or with a mouse and key-board. We can fire off explosions, destroy walls, summon helicopters, andcreate enormous planet-sized spacecraft.
13Chapter 1: Getting to Know Machinima
05_096918 ch01.qxp 7/20/07 11:08 AM Page 13

Machinima is, in essence, the simple realization that whenever we look at acomputer game or virtual world, what we’re seeing is a set, and that we’relooking at it through a camera.
To put it another way, Machinima is making films with computer games.Choose the game you like, film what you want to happen, and turn it into afilm. It’s fast, cheap, fun, and cool.
What Machinima does wellSo, why would you want to make a movie using Machinima instead of using avideo camera and real, live, human actors?
� It’s cheap. First and foremost, Machinima is cheap. In fact, it’s stupidlycheap. To make Machinima, you need a computer and a computer game.Personal computers are so prevalent that you’ll have one already, or atleast access to one, so your only real expenditure is the cost of yourgame of choice. If it’s your favorite game, you may already own it as well,so your total costs are a very bank-balance friendly zero. We discuss thecurrent choices for Machinima games in Chapter 5.
Of course, you can spend more money if you want, purchasing sepa-rate video-capture solutions, expensive video-editing packages, and the
Figure 1-3:A virtual set.
14 Part I: Introducing Machinima
05_096918 ch01.qxp 7/20/07 11:08 AM Page 14

like. All these things can be useful, but you can make your movie with-out them.
� It’s not limited by scale. We can (and do) use Machinima to makemovies that would require, a multimillion-dollar Hollywood budget if wewere using any other technology. Huge, dramatic vistas, epic battles,and breathtaking stunts: Machinima can tackle all of these features with-out breaking a sweat.
� It’s great for learning. Machinima is a great learning tool for a potentialfilmmaker. If you film something that you don’t like, you’ve wasted noth-ing more than your time. There’s no financial cost and no deadline otherthan whatever you impose upon yourself. That means that you’re free totry different techniques and approaches and learn from your mistakes.
� It handles action sequences well. The nature of video games is suchthat they tend to lend themselves toward exciting gun battles, or vehicleracing, or huge magical duels between rival wizards. You can harnessthose features for your Machinima: If that’s the sort of story you want totell, then Machinima is the perfect tool for you.
� It’s quick and dirty. Machinima is fast. You’ll still get frustrated bytedious, fiddly things that you have to correct, but in comparison toother filmmaking techniques, Machinima is darn speedy. It’s faster than3D-rendered animation (the sort of thing that was used to make ToyStory and Shrek). It’s far, far faster than traditional hand-drawn anima-tion. Most impressively of all, it’s still fast if you’re the sole member ofyour production team. One person with one computer can produce amovie faster than entire teams of conventional animators.
What Machinima does less wellNothing! We’re awesome! Honest. Okay, we’ll fess up:
� It’s not great on people. Honestly, there’s one big disadvantage of usingMachinima over using live film: Computer-generated characters arenever going to be as convincing in the role of a person as, well, a person.
We’ve borrowed ideas from Hanna-Barbera, Japanese limited-animationanime, stop-motion video, ’80s cartoons, and pioneers of filmmaking. Weuse camera technique, high-quality animation, advanced puppeteeringtechnology, the latest advances in game characters, brilliant voiceactors, and psychological techniques. There are a lot of tricks you canuse to get around Machinima’s limitations.
But, if you’re making Machinima, your visual actors aren’t going to beable to carry a shot in the same way that a great human actor can. Workingaround that drawback is one of the hallmarks of a great Machinimadirector.
15Chapter 1: Getting to Know Machinima
05_096918 ch01.qxp 7/20/07 11:08 AM Page 15

Or, as at least one well-known Machinima director has done, you can justtell stories about robots.
� Small isn’t beautiful. Actually, Machinima’s great at doing small. If youwant to make the next Bug’s Life, consider making it in Machinima. Whenwe say “small” here, we mean in budgetary terms. If you want to makethe next Dogville or Clerks, Machinima is the wrong choice for you.
If all you want to do is to shoot a film of two guys talking, it will be fasterto shoot the film in real life than to use Machinima, and it will look better.There’s no point using Machinima when you don’t need its unique advan-tages (see preceding section). If you’ve already got access to the locationyou want to use, you’ve got the actors you want to play the characters,and there’s nothing that you can’t easily do in real life in your script, thenwe heartily recommend pulling up the Real Life engine. The resolutionon that thing is amazing.
� You’re no oil painting. If you want to compete with Pixar head-to-head,Machinima won’t let you do it. Sorry.
Machinima leverages technology that’s like nothing the world’s everseen, and it produces amazing visual results. At their best, Machinimavisuals are in many ways equivalent to the best Hollywood 3D studioscould produce seven or eight years ago.
Note the “seven or eight” bit there. Machinima uses games technology,which tends to look about as good as conventional computer graphicsdid about five years beforehand. And it takes a year or so before anygame is sufficiently well-supported and understood for really goodMachinima to be produced in it. Hence, if you’re creating Machinima,you’re not going to be producing cutting-edge visuals.
But, honestly, seven or eight years ago, computer graphics looked prettygood. And in three years’ time, seven years back from then will look evenbetter. So you can produce some slick-looking stuff using Machinima, asfilms like Still Seeing Breen and The Return demonstrate. But no matterhow you cut it, Machinima isn’t likely to have Pixar quaking in its boots.
� Some things aren’t cheaper. Lots and lots of things are cheaper to do inMachinima. But some things aren’t. For example, if you want to createentirely new, custom characters, it’ll be as hard and as expensive as ifyou were working on a conventional 3D production. If you want to pro-duce detailed animations of things that aren’t in the game, that’ll have tobe done in conventional animation software, too. Some things are justhard, no matter how you do them.
� You don’t have total control. Hugh sometimes complains that he feels likehe spends half his life saying, “Machinima isn’t animation! It’s puppetry!”
3D animation offers its users total control over everything they see onthe screen. Want that head turn a quarter of a second earlier? No prob-lem. Machinima, on the other hand, doesn’t offer anything like that
16 Part I: Introducing Machinima
05_096918 ch01.qxp 7/20/07 11:08 AM Page 16

degree of control. You’re not animating every facet of the characters’movement, you’re using puppetry to control as much as you can,quickly and live. Some stuff will go wrong. Some stuff won’t be possible.And some stuff will come out differently than how you expected and willlook even better.
Machinima filmmaking demands a certain amount of flexibility and for-giveness in its shooting, as well as the ability to be patient about the pointyou’re saying, “Okay, take 17, guys. Let’s try and get it right this time.”
On BloodSpell, individual shots would regularly have to be taken morethan ten times to get the result Hugh was looking for. However, evencounting that, we managed to shoot more than a minute of highly com-plex footage a day, with a crew of two or three people — a speed of pro-duction that George Lucas would envy.
� You may not be able to make money. Most game-licensing agreements —you know, the things that you click through when you install the game,the ones that contain clauses like “If your computer explodes as a resultof this game, it’s not Publisher’s fault” — prohibit using that game forcommercial purposes. That means, practically, that you can’t makeMachinima and sell it if you’re using that game. That’s a downer. Havingsaid that, an increasing number of Machinima environments, such asSecond Life, IClone, and Moviestorm, do allow you to make money fromyour creations. So, if you’re interested in doing this as a living, just makesure to use one of them.
Making a Machinima FilmYou can make Machinima in dozens of game engines in a whole bunch of dif-ferent ways. There are tips, tricks, shortcuts, round-about routes, break-throughs, and holy wars over how it’s best to make a Machinima movie.
The basic process for making a Machinima film is much the same regardlessof the film.
No matter what movie you’re making, you’ll go through the following steps:
1. Write the story.
Stop. Seriously, now, stop. Before you go any further, before you press Wto move your character forward, before you set up your first shot, youreally, really need to know what you actually want to film.
It’s amazing how often Machinima creators miss this first step, but it’scrucial. For more on storytelling and scriptwriting, see Chapter 4.
17Chapter 1: Getting to Know Machinima
05_096918 ch01.qxp 7/20/07 11:08 AM Page 17
For a short film, you’ll spend maybe a week writing the script. That weekwill be the most important factor in whether your movie ends up beinggood or bad.
Consider what your chosen game engine can do. If you’re filming inBattlefield 2, a fantasy epic will probably be a little tricky to achieve. Ifyou’re in The Sims 2, it may not be the time to bust out the script forStar Wars 7 — Return of Return of the Jedi.
2. Create your cast.
Before you do anything else, you’ll need your actors. In Machinima,these guys are your puppets. You’ll move them around in your virtualworld with mouse and keyboard, or with programmed scripts, just as ifyou were moving them around dangling from strings in a Punch andJudy show.
Some game engines will have a fixed selection of characters, and if youwant to create more, you’ll need to jump into a 3D modeling package, orat least a image editor. In other game engines, you’ll be able to edit andalter characters inside the game itself, lowering their brows and tweak-ing their noses to your heart’s desire. (See Chapter 7 for more informa-tion on casting.)
3. Create your sets.
Next, you create the locations in which your film takes place. Much likea set designer in the real world, you’ll be putting your locations togetherfrom simple building blocks; instead of plywood and nails, you’ll havepolygons, and instead of paint and wallpaper, you’ll be using Photoshopor the GIMP.
Some game engines require that you make your locations up from verysimple primitives — cubes, pyramids and so on, textured and placed toform the world — while others allow you to place down pre-created “tiles”and decorate them from libraries of existing props. (See Chapter 6 formore on set design.)
4. Record your actors.
Yes, actual actors. Because Machinima is often quite limited in terms ofhow much you can express with your characters, a lot of the work of aMachinima film is done by the voice actors. Whether drama or comedy,a group of good actors are vital to a strong Machinima film.
It’s fairly simple to record quality dialogue these days — a $40 microphone,a PC, and a duvet do the job quite well. And a lot of very talented actorsin stage schools, amateur dramatics, and student theatre are desperatefor the chance to practice their craft. For Strange Company, recordingvoice actors is one of the most fun and rewarding parts of the entireMachinima production process.
18 Part I: Introducing Machinima
05_096918 ch01.qxp 7/20/07 11:08 AM Page 18
5. Set your game up for filming.
Machinima creators record the visuals of their chosen game in many different ways. It’s possible, for example, to take the output of your computer’s TV connector — the one you usually use to watch your oh-so-entirely-legal downloaded Buffy episodes on your big screen —and hook that up to a camcorder or a video recorder.
You can also download a piece of software, such as the well-knownFRAPS (www.fraps.com), that will record whatever’s on your screen toa video file on your PC. Or you can buy a frame grabber — a moderatelyexpensive piece of hardware that allows you to record from your videocard’s high-quality computer video output.
Finally, some games and programs, such as The Sims 2 or Moviestorm,have in-built video recorders. These recorders are the simplest and high-est-quality way of all to record your Machinima video.
You’ also need to make sure that you’ve got a good “camera” to recordfrom in the game. For BloodSpell, for example, we had to write a script tomake our RPG character invisible, allowing us to film shots without a bigpink dwarf in the way!
6. Record!
Here, you work just like a conventional film director. First, you set upyour shot, you give instructions to your actors, and then you shout“Action!” and let the cameras roll. (It looks a bit funny shouting “Action”if you’re the only guy working on the film, but Hugh likes to do it anyway.)
Depending on your chosen game and how you’ve decided to work, you’lleither be giving instructions to your actors via scripts — simple com-puter programs that anyone can write, or graphical programs that dothe same job — or you’ll actually be talking to other people and tellingthem how to control your characters. These approaches have differentadvantages and disadvantages. It’s quicker to explain what you want to ahuman, but they get it wrong more often, too!
You record the results to either a tape or a PC, and then you have yourraw footage.
7. Edit.
Machinima films are mostly edited just like real films. Some games offerin-game editing, where you can take your recorded footage and modify itinside the game engine itself, but most of the time you’ll be editing yourwork in an external package, such as Adobe Premiere, Avid Free DV,iMovie, or Sony Vegas. See Chapter 9 for more on editing your movie.
With the growth in powerful home-video editing software, there’s a lotyou can do during the editing process. You can add titles, special effects,
19Chapter 1: Getting to Know Machinima
05_096918 ch01.qxp 7/20/07 11:08 AM Page 19

and a huge variety of transitions between shots. You can compositeshots on top of each other, or modify how they look through paint-liketechniques. You can even take static shots and animate them in yourvideo editor for shots that you just couldn’t create any other way!
8. Release.
Personally, we think that you’ve only really made a film when you’vereleased it to an audience and heard their reactions. Fortunately, withthe boom in Internet video fostered by YouTube and similar sites (seeChapter 10), that’s easier than ever.
You can either upload your finished movie to a movie-hosting site likeYouTube, or you can host it yourself. Either way, there are dozens offorums and Web sites out there whose viewers will be eager to watchand comment on your film — perhaps you’ll become famous, or perhapsyou’ll just learn more about being a filmmaker so that you can make aneven better film next time!
Controlling the Action: Live Versus Scripted
When making a Machinima movie, you can control the action you’re filming in two ways: scripted or live. Each has its advocates and detractors. Whichmethod you use is essentially up to you, but your choice will probably be dictated (at least in part) by the game engine in which you choose to makeyour movie.
� Scripted sequences: Scripting allows you to preprogram the sequenceyou want to film. When we use the word scripting here, we don’t meanwriting the lines and dialog of your film, but rather writing a series ofcomputer code instructions (a script) that tells your actors, cameras,and other peripherals what to do (see Figure 1-4).
Although writing line upon line of computer code may seem pretty intim-idating, many games provide an editor program or some other similarinterface. By using the editor, the amount of actual code that you needto write is reduced dramatically. Often, an editor will eliminate the needfor manual scripting altogether.
When you come to shoot the footage, you simply trigger the script, sitback, and record the on-screen action. If you run the script a secondtime, the resultant action will be (or at least should be) exactly the same.
20 Part I: Introducing Machinima
05_096918 ch01.qxp 7/20/07 11:08 AM Page 20
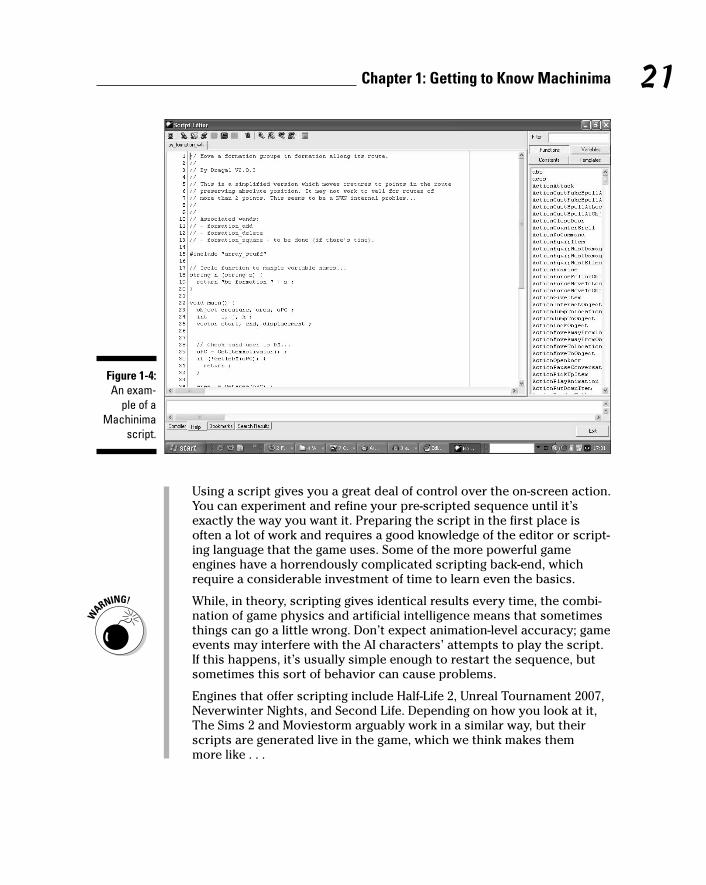
Using a script gives you a great deal of control over the on-screen action.You can experiment and refine your pre-scripted sequence until it’sexactly the way you want it. Preparing the script in the first place isoften a lot of work and requires a good knowledge of the editor or script-ing language that the game uses. Some of the more powerful gameengines have a horrendously complicated scripting back-end, whichrequire a considerable investment of time to learn even the basics.
While, in theory, scripting gives identical results every time, the combi-nation of game physics and artificial intelligence means that sometimesthings can go a little wrong. Don’t expect animation-level accuracy; gameevents may interfere with the AI characters’ attempts to play the script.If this happens, it’s usually simple enough to restart the sequence, butsometimes this sort of behavior can cause problems.
Engines that offer scripting include Half-Life 2, Unreal Tournament 2007,Neverwinter Nights, and Second Life. Depending on how you look at it,The Sims 2 and Moviestorm arguably work in a similar way, but theirscripts are generated live in the game, which we think makes them more like . . .
Figure 1-4:An exam-
ple of aMachinima
script.
21Chapter 1: Getting to Know Machinima
05_096918 ch01.qxp 7/20/07 11:08 AM Page 21

� Live recording or virtual puppeteering: The other way of filming is tocontrol the on-screen action live, in real time. When you’re playing thegame you’re using to film with, for example, you might use the mouse tochange your in-game character’s viewpoint. When you’re using the gameto make Machinima, you’d use the same mouse movement to pan yourvirtual camera about your set. The footage that you record will feature acamera pan at the same speed that you chose to move.
Likewise, you issue commands to your virtual actors by moving themaround in the game and record the results as they happen. That’s whywe call this method virtual puppeteering — you’re controlling the actorsas you film, just like you would if you were making a puppet show.
If you use this technique to record a sequence that you don’t like, you’veno option but to go back and do it all again. The results won’t be exactlythe same the second time around, which can be a good or a bad thing.Using this technique on anything but the simplest shots requires prac-tice, particularly if you’re on your own.
Most movies made in this way are made by a team of people, all ofwhom control characters within the same multiplayer game. Controllingand instigating action live gives your movie more of an organic feel andcan often inject life into your characters, but you sacrifice a degree ofcontrol over the precise on-screen action.
Engines that allow live filming include World of Warcraft, UnrealTournament 2007, Battlefield 2, and Halo 2.
There’s actually a third option for Machinima production. The third option isdownright devious, but can produce some great results if used properly.
Many games provide a model viewer tool that allows you to examine each ofthe game’s character models without loading the game itself. Often, you canalso trigger any of the model’s animations from within the model viewer pro-gram. If you capture this footage, you can then mix it onto a background at alater date. It’s like a virtual green-screen studio!
If the game you’re using doesn’t come with a model viewer, it’s quite possiblethat an enterprising fan of the game has written one. Search online. You maybe surprised at what you can find.
You can use this same technique to generate a background, using a mapviewer program. A map viewer program lets you view any of the games maps(the sets, from our point of view) and move around it. Composite footagefrom a model view and a map viewer, and you’ve got yourself a film. Engineswith map and model viewers include World of Warcraft and Half-Life 2.
22 Part I: Introducing Machinima
05_096918 ch01.qxp 7/20/07 11:08 AM Page 22

In practice, you might not use any one of these techniques exclusively. ManyMachinima creators adopt a combination of these techniques, scripting themore complicated aspects of their movie, instigating the rest of the actionlive, and faking anything they have to.
BloodSpell was shot in this manner. Although we filmed the entire movie livein the game, many of the more complicated sequences were (at least partially)pre-scripted. As well as that, we wrote scripts to control much of the game’sbehavior, as well as scripts to control the camera and to return a character toa specific location.
Wondering which to use? Use live filming if
� You like working quickly and spontaneously.
� You’ve got friends who want to help.
� You’re working in a Massively Multiplayer game.
� You’re shooting shorter shots without complex camerawork.
� Your engine doesn’t support scripting!
� You’ve got film experience or want to work in a way similar to conven-tional filmmaking.
� You want split-second control.
Use scripting if
� You’re working alone.
� You’re a computer programmer or enjoy programming.
� You’re shooting very complex shots, particularly ones with complexcamerawork.
� You want as much control as possible over your Machinima.
� You’re working in an engine where multiplayer control is impractical, orwhere you can’t easily pause the game action.
� You want to control some aspects of a live filmed shoot, such as camera-work or background characters.
Remember, you don’t have to stick to just using scripting or just using livefilming. Many engines, like Neverwinter Nights, Unreal Tournament 2007, andHalf-Life 2, support both. We list which engines can use which method of film-ing in Chapter 5.
23Chapter 1: Getting to Know Machinima
05_096918 ch01.qxp 7/20/07 11:08 AM Page 23

24 Part I: Introducing Machinima
05_096918 ch01.qxp 7/20/07 11:08 AM Page 24

Chapter 2
Your First Machinima MovieIn This Chapter� Creating your first Machinima movie
� Using Moviestorm to make a simple scene
To quote Morpheus in The Matrix, “No one can be told what Machinima is.You have to see it for yourself.” (Actually, we think he was talking about,
you know, the other thing. But we wear black leather coats sometimes, so it’snearly the same.)
In this chapter, we make a simple movie. We choreograph characters, recorddialogue (if you’ve got a microphone), add cameras, and edit the end result.You create your first Machinima movie in about 15 minutes.
Because we’re just giving you an introduction to the power of Machinimahere, this is the only chapter where we’re going to stick to a fixed script. Ifyou want to change anything you see, Chapter 17 covers Moviestorm, theengine we use, and you can find out how to change our movie there!
Installing MoviestormThe installation of Moviestorm on the DVD that comes with this book con-tains the set and characters we’re using for this film. Installing Moviestormon your computer is an easy task. Just navigate to the Moviestorm folder on the DVD and double-click the file moviestorm.exe. The Moviestorminstallation process starts.
After Moviestorm is installed, you can start the program by double-clickingthe icon on your desktop or through the Start menu. The first time you runthe software, Moviestorm will probably prompt you to download a new andupdated version of itself. If you do so, you’ll have access to all the latest fea-tures and improvements in Moviestorm, but you’ll also probably find thatparts of the program have changed since we wrote these tutorials. If youwant to follow along with this tutorial, don’t update. If you have access to the
06_096918 ch02.qxp 7/20/07 11:09 AM Page 25

Internet right now, you can download an updated version of the tutorial(which will probably be compatible with the latest version of Moviestorm upto at least the start of 2008) from www.machinimafordummies.com.
Walk before RunningBefore you can do anything else, you have to tell your characters where tostand and where to walk. In Moviestorm, choose Your First Machinima Moviefrom the opening menu. A “Please Wait” sign appears, and then you find your-self in a 3D set, with pictures of two characters up at the top-left, a lot likeFigure 2-1.
The set in Figure 2-1 is our rendition of a back corridor in the UK’s Houses ofParliament. Currently, the walls aren’t visible, but don’t worry. They’re there.
We’re dramatizing a moment from history — to be precise, a moment from thelife of Winston Churchill. In our characters selection, we have Mr. Churchillhimself, somewhat sleeker and more svelte than in real life, and an elderly,disapproving lady, who will be playing the formidable Lady Astor, with whomthe famous politician had more than a few disagreements.
You may suspect that we’re playing a trick on you here, and that we’ve spenthours creating this set and characters to give you a slick, fast demo. We’retoo lazy for that. The set and characters took Hugh less than an hour tocreate from scratch in Moviestorm.
Figure 2-1:A Machin-
ima set,ready forshooting.
26 Part I: Introducing Machinima
06_096918 ch02.qxp 7/20/07 11:09 AM Page 26

To get your characters into position:
1. Right-click the ground near one of the hard wooden chairs next to thedoor and choose Place Here.
The Disapproving Lady Astor appears on that spot, as she’s the charac-ter who is selected by default.
2. Right-click the chair next to her and choose Sit Down.
Lady Astor sits down. A line moves along the blue rectangle at thebottom, and some things appear on it. That’s the timeline; it’s a record of everything that happens in the scene. Don’t worry about the timelinefor now — if you do want to know more, Chapter 17 is your friend.
If you need to move your viewpoint to see what you’re doing, you canuse the following controls:
• Right-click, hold, and drag the mouse to look around.
• Click the middle mouse button, hold, and drag to move around the set.
• Use the mousewheel to zoom in and out.
Now you’re ready to add Churchill into the scene.
3. Click Winston’s portrait at the left side of the screen.
Notice that a blue box appears whenever you move your mouse to theleft of the screen. That’s the Character pane, and it contains a list of allthe characters that you can use in your current scene.
4. Right-click behind the door with the bookcase next to it and choosePlace Here.
Winston duly appears.
5. Right-click about six feet in front of your Disapproving Lady andchoose Move Here.
Winston walks to the door, opens it, walks through, and stops in front ofDisapprove-O-Woman.
Making Winston DrunkWinston’s striding confidently. He looks like a man who’s in charge, a manwho gives V-signs, and most importantly not at all like a man who has justconsumed his own body weight in 25-year-old single-malt Talisker.Fortunately, we can fix that.
27Chapter 2: Your First Machinima Movie
06_096918 ch02.qxp 7/20/07 11:09 AM Page 27

1. Drag the time marker back until just after Winston comes through the door.
You’ll probably have noticed a vertical bar or rule moving along thetimeline as Winston walks. That’s the time marker, and it controls the timeyou’re currently seeing the scene from. To watch Winston walk again,drag it left along the timeline — you’ll see him rewind. Now, press thePlay button over at the bottom right, and you see him walk once more.
2. Rewind to the start, and then right-click the light blue line on thetimeline, just to the right of the time marker.
This light blue line represents Winston’s walk, and the menu thatappears gives you the option of deleting it or customizing it.
3. Choose Customize.
The Customize window, shown in Figure 2-2, appears.
4. From the Gait drop-down list, select the Tired walk.
Winston’s walk alters appropriately, all the way across his walk action.
5. Drag the Stride slider to about the middle of the slider.
Winston’s strides become shorter, making him look drrrrr . . . rrrr . . . unk.
6. Close the Customize window by clicking the cross.
Time for a Witty RetortHistoriophiles (if that’s a word) will already have guessed what you’re aboutto reenact. There’s a famous retort from Winston Churchill to Lady Astor,when the latter came upon the great politician, uhh, tired and emotional.
Lady Astor: Mr. Churchill, you are exceedingly drunk.
Churchill: And you, madam, are ugly. But in the morning, I shall be sober.
In common with filmmakers everywhere, we’ve not allowed anything as mun-dane as the facts to stand in our way whilst re-imagining this scene, so if thisisn’t how the event occurred, or indeed how either Churchill or Lady Astorappeared, we apologize in advance.
Figure 2-2:Customizing
a walk.
28 Part I: Introducing Machinima
06_096918 ch02.qxp 7/20/07 11:09 AM Page 28

Lady Astor will presumably want to start her insult a little while before 250pounds of drunken Prime Minister staggers past her:
1. Select Lady Astor by clicking her portrait at the left side of the screen.
2. Right-click Lady Astor and choose Say.
The Record Line dialog box, shown in Figure 2-3, appears.
3. Record Lady Astor’s line.
Here’s how:
• If you’ve got a microphone and you fancy that you’ve got a pretty decentdisapproving-old-woman voice, you can record the line yourself. Get yourmicrophone ready to record by clicking the red button. Say your line,“Mr. Churchill, you are exceedingly drunk,” and then click the red buttonagain to stop recording. Click the white space and type the line you justsaid, so that you remember which line you just recorded and to help theprogram figure out its lipsynching. Then click the check to accept the line.
• If you don’t have a microphone or want to hear your humble authors’thespian ability, click the teeny, tiny button on the right of the redRecord button. Open Lady Astor.wav from the DVD that accompaniesthis book. Now click the white space and type the line into it. Then clickthe check to accept the line.
Figure 2-3:The RecordLine dialog
box.
29Chapter 2: Your First Machinima Movie
06_096918 ch02.qxp 7/20/07 11:09 AM Page 29

4. When you come back to the main Moviestorm window, click the Playbutton to hear your line.
If you move your viewpoint so that you can see the Disapproving Ladyas you do so, you see that she’s lipsynching to the line.
5. Add Churchill’s devastating response.
To do so, drag the time marker as far as it will go to the right, selectChurchill’s portrait, right-click Churchill, and choose Say. Either recordChurchill’s line — “And you, madam, are ugly. But in the morning, I shallbe sober.” — or select Churchill.wav (see Step 3 for the details).
6. Play Churchill’s line.
Like Lady Astor, Winston lipsynchs automatically.
A Quick ExitThis scene looks a bit static. You can do a lot to animate the scene usingMoviestorm (see Chapter 17 if you want to know more), but for now, justhave Churchill walk off, delivering his cutting final remark over his shoulder.
1. Rewind the scene a bit with the time marker and then play throughuntil just after Churchill says, “And you, madam, are ugly . . .”
You want to have the time marker just before he says, “. . . but in themorning . . .”
2. Right-click the floor next to the door in front of Churchill and chooseMove here.
Churchill walks off while delivering his final quip. Even more, because heis talking, Lady Astor automatically looks at him.
If you want to, you can also adjust Winston’s walk so that he walks drunkenly.See the section “Making Winston Drunk,” earlier in this chapter.
Cinematography!Something’s missing — a camera! This movie is not ready yet! You need toadd a simple wide shot to cover the scene as a whole.
1. Drag the time marker right back to the start of the film.
30 Part I: Introducing Machinima
06_096918 ch02.qxp 7/20/07 11:09 AM Page 30

2. Right-click the ground near the potted plant and choose Place Camera Here.
Your view changes. You’re now looking through a widescreen camera,and you’ve almost certainly got an exciting view of a floor, wall, or basi-cally anything but what you want to look at.
3. Click the Set Up A New Shot icon.
Everything but your viewpoint goes dark, and you see a black gridappear. (Johnnie’s had evenings like that after too many vodka tonics.)
4. Use the same controls you use in the Director’s view to change yourshot to a shot of the room as a whole.
You want a shot that shows Lady Astor, the corridor, and (when hewalks in to shot) Churchill.
5. When you’re happy, click the check sign to accept the shot.
You can click Play, and you see your entire movie through that camera! It sud-denly looks like a film, doesn’t it?
Finally, you cut to the camera after Lady Astor has sat down, and then renderyour film out as a movie that you can view in Windows Media Player (or theplayer of your choice).
1. Move the time marker to just before Winston walks through the doorand click Insert A Cut To This Camera.
2. Click the window in the bottom right.
It has the Moviestorm logo in it. Now you’re viewing the Master Monitor,which shows you what the film will look like when it’s rendered.
3. Click Play to see that you’re now viewing the entire film through yourcamera.
Notice that the section before you cut to the first camera is white.Normally, you’d edit the movie in a standard video-editing package —see Chapter 9.
4. Finally, render your movie to an .avi that anyone can view.
Move your mouse to the top of the screen.
5. Click the Film Reel icon.
The Render Settings window appears. Choose the directory you’d like torender to by using the Browse button and then choose a filename tosave your movie as.
31Chapter 2: Your First Machinima Movie
06_096918 ch02.qxp 7/20/07 11:09 AM Page 31
6. Click the green check to start the rendering process.
Don’t do anything! Your movie will now render out. If you use your com-puter for anything else while this is happening, the render won’t workproperly.
And That’s All, Folks!You may be worried that your first Machinima movie looks a little simple.Well, currently it is. But the techniques used in this chapter are the samebasic techniques you use to refine your film, fine-tune it, or make anything afeature-length movie. Congratulations — you’re now a Machinima filmmaker.
32 Part I: Introducing Machinima
06_096918 ch02.qxp 7/20/07 11:09 AM Page 32

Part IIGetting Serious
07_096918 pt02.qxp 7/20/07 11:09 AM Page 33

In this part . . .
In this part, we cover the basics of filmmaking in depth,including cinematography, storytelling, and scriptwrit-
ing. We also take a look at each of the major Machinimaengines at the time of writing and weigh the pros and consof each. We help you to choose the right engine for yournew project.
Then we cover the rest of the filmmaking process, includ-ing how to create a virtual set, design your characters, andget your hands dirty with your first real piece of directing,using The Sims 2 to shoot a short, simple movie. Not onlydo you edit the resulting footage, you also explore thenumerous distribution options available for your finishedmovie.
07_096918 pt02.qxp 7/20/07 11:09 AM Page 34

Chapter 3
Filmmaking 101In This Chapter� Using Cinematic Language
� Planning and shooting a film
� Applying filmmaking technique to Machinima
Just to warn you: This is the chapter in the book where we confidentlyexpect, unless you’re already an experienced filmmaker, you’ll come out
feeling like you know less than when you went in. Sorry about that. But film-making is a huge, huge topic.
Both Hugh and Johnnie learned their filmmaking via the School of Hard Knocks,or in this case the School of Poor Shots. Hugh discovered early in 1997 thathyperactive Quake players on three liters of filter coffee make better camera-men when they’re not trying to dodge the invisible rockets. It took anothertwo or three films for Strange Company to start making movies that lookedlike, you know, actual cinema.
The reason isn’t that Hugh’s an idiot, although it’s always worth consideringthat as a potential cause. It’s because he didn’t realize, until about two monthsafter he made his first movie, that in order to make a movie, you have tospeak a new language.
Film Is a LanguageWe’re used to thinking of language as verbal. However, cinematography is alanguage, with a vocabulary of shots and techniques, and a grammar of edit-ing and spatial awareness. If you can’t speak the language at least a little bit,you can’t make a film. Hugh and Johnnie speak it well enough to order acoffee and find the nearest toilet. Meanwhile, Ridley Scott and David Lynchare the equivalent of Graham Greene and Ernest Hemingway.
08_096918 ch03.qxp 7/20/07 11:09 AM Page 35

To shoot a film that will make sense, much less have an emotional impact,you need to unlearn a lot of obvious potential mistakes with a camera. Youneed to know how the eye interprets the camera’s vision, and how the brainwill assume that one shot should flow from another, or how it will interpret asingle frame.
This stuff isn’t Machinima-specific. It’s applicable to all forms of filmmaking,and some people have forgotten more than either Hugh or Johnnie knows onthe subject. We give you some pointers to further sources of filmmakingexpertise at the end of the chapter.
Faking the eyeTo watch a film is not a natural act. The brain isn’t designed for it. We’re fool-ing our audience’s brains and eyes into thinking they’re watching actualevents, when they’re seeing nothing of the kind.
If you’re making cinema, you need to know how the brain will attempt to makesense of the sequence of disjointed images you’re creating. Some movementsand some shots will smoothly slot into each other, while others will jar andconfuse their audience.
Here’s a quick thought experiment. A brown sedan races across the screenfrom left to right, followed by a police car. Then, in the next shot, the brownsedan shoots across in the opposite direction, again followed by the cop car.That means that the chase has turned around, right?
Not necessarily. It could just mean that the director has failed to take accountof the line of action (see the section “Mastering Shot Flow,” later in this chap-ter) and as a result you’ve misinterpreted his intentions. You’ll get more con-fused later on in the movie, as you’re now working under an interpretationthat the director hadn’t taken into account.
A shot doesn’t stand alone, any more than the word “artichoke” stands alonein a story. “Hugh hit Johnnie with the artichoke” is a totally different sentencefrom “steam the artichoke lightly with butter.” In just the same way, a shot ofa guy looking up, followed by a shot of a girl at a window, suggests one thing.A shot of a falling piano, followed by a shot of a guy looking up, suggestssomething else; it’s a different sentence in the language.
Not only action, but intent, and even mood, carry across shots. A sequence ofshots carries meaning that a single shot never can.
36 Part II: Getting Serious
08_096918 ch03.qxp 7/20/07 11:09 AM Page 36
Painting with lightJust to make things even more challenging, you’re not just about to learn anew language. You’re also about to become a painter.
filmmaking is an audio-visual medium. And that means that your movie willfirst be judged on its visual appeal. Does it look attractive? Do the visualsyou’ve created stir emotion in your viewers?
Some of this appeal is down to the quality of your engine, obviously, but farmore of it is down to the skill of the director or cinematographer. Whichmeans you need to learn to paint, too. You’ll discover how to draw the eye,balance a portrait, strike a balance between empty space and a clutteredscreen, and use light and shadow as your paintbrushes on a scene.
The best advice Hugh ever received as a filmmaker was to make sure thatevery shot stands on its own as a piece of art. Now, to be fair, he hasn’t man-aged that. Indeed, he’d say a fair number of his shots are a piece of somethingelse entirely. But as soon as he started trying to achieve that, the quality ofhis filmmaking dramatically improved.
Film is audio-visual, not just visual. Sound plays a vital role in a movie, andwithout it, your movie won’t — or shouldn’t — make sense. You can usesound to tell the story, or to provide elements that aren’t otherwise present.Never, ever forget about it. See Chapter 13 for more on sound.
Interpreting AnimationYou’re not using conventional film and conventional actors here, you’re usingMachinima. That means three things:
� You don’t have brilliant acting to rely on. Whereas The West Wing canjust sit on a shot of Martin Sheen for 35 seconds while he does all thework of the scene, you’ll need to draw emotion from your franklywooden actors, using intelligent cinematography and framing.
� Your film looks like animation, not real life. Humans have millions ofyears of evolution to fall back on when trying to interpret pictures ofreal life — we can do so fast and effectively. By contrast, humans aren’tnearly so fast or effective at interpreting drawn images, meaning weneed more time for the brain to figure out what they mean.
37Chapter 3: Filmmaking 101
08_096918 ch03.qxp 7/20/07 11:09 AM Page 37
� You have to convince your viewers that what they’re seeing is real.Computer-Generated Imagery (CGI) filmmakers try very hard to mimicthe look of real film, paying attention to how real cameras look, move,and act.
Making the Film: Anatomy of a SceneCinematography and shooting descend in complexity just like a story. Inorder, here are the levels to consider, consciously or subconsciously.
1. Style
2. Blocking
3. Camera positioning and shot flow
4. Micro-flow
5. Framing
6. Action
The preceding steps describe how we shoot a film, not The One True Way. Itworks for us, but different ways work for other people, many of them muchmore famous than us. We heartily, enthusiastically, and without even a hint of profit-sharing recommend you pick up as many books on filmmaking asyou can!
StyleStyle is the most obvious and arguably least vital element of a film. Peoplelike this level — it’s broad, sweeping, and sexy, and it makes good coffee conversation.
Style is also probably the last thing you should be thinking about. Sure, it’sgood to make some stylistic decisions (like BloodSpell’s punk theme), and it’sworth thinking about the symbolism you’re using in your film (David Lynch isa master of this sort of filmmaking), but a lot of the style of your movie willcome from your subconscious preferences and your view of the world.
Your personal preferences and view will affect you as you plan individualshots, but they’ll be consistent through the movie, and before you know ityou’ll have a style. Later, when you’re a more experienced filmmaker, you canstart to tweak that.
38 Part II: Getting Serious
08_096918 ch03.qxp 7/20/07 11:09 AM Page 38

Confused? Here’s a (mostly) hypothetical example:
Hugh: “Okay, so I’m thinking that this is a very fantastic film, so we need toshoot in a very realistic way. I’m thinking Firefly and Battlestar Galacticahere — handheld shots, shakey cam, not a lot of crane shots, keep it allvery grounded.”
Johnnie: “Shaky cameras? In Machinima? Kill me now.”
Hugh: “No, seriously, it’ll be cool. We can totally do that. Dragal can write usa tool.”
Dragal: *Splutter* “I can?”
Hugh: “Relax. It’ll be fine.”
BlockingNow we descend to a scene level. The first thing you need to do when you’replanning a scene — and we do mean planning, well before you point a cameraat anything — is to decide how your characters move and react in each scene.In theater, these decisions are referred to as blocking.
We’re talking about the broad stuff. Where are your characters standing? Wheredo they walk to? Where do they fight? How does the flow of the fight work?
You need to think about the characters’ motivations. Where does your char-acter want to end up standing, and why? You need to think about the way thescene will look; will the character be framed against a dramatic backdrop?
You need to think about keeping the scene interesting. How do you avoid twocharacters standing in the same place talking for five minutes? Can theymove around? Step closer to each other? Turn away from each other?
Blocking is hard, because you’re acting for your characters at the same timeas you are starting to design your shot flow. At the same time, remember thatwhat you’re doing is about effect, not about physical realism: The characters’locations should be chosen to interest the viewer and give them clues aboutthe characters’ relationships. Think dramatic and symbolic.
Here’s an example:
Hugh: “And now they’re getting pretty intense, but I’m looking at this, andwe’ll have been swapping back and forward in a couple of two-shots forabout a minute here. So, Jered’s looking scared, the Master’s getting reallyangry, what’s happening?”
39Chapter 3: Filmmaking 101
08_096918 ch03.qxp 7/20/07 11:09 AM Page 39

Johnnie: “Er. . . . They move closer?”
Hugh: “Naah, dull, dull. Barely changes the shot. Okay, here we go. You’reJered, right? And . . . *Rustling* This coat on a stick is the Master. Now, see,he’s getting angry, he’s intimidating.”
Johnnie: “Hugh, it’s a coat on a stick. I’m worried that you’re going to hit mewith the blunt end.”
Hugh: “Work with me here.”
Johnnie: “Okay. So Jered’s feeling like he can’t show he’s scared, right? Soperhaps he deliberately turns his back.”
Hugh: “. . . And that moves us into a new two-shot!”
Camera positioningAfter you know where your characters are, you need to think about whereyou position your cameras. Note that you’re not actually looking through acamera at any point here, except maybe to scout the location. Plan your cam-eras on paper, for the entire scene. Then, and only then, move onto the nextstage.
Of course, this is Machinima. You can put a camera anywhere you darn wellwant. You can use a different camera for each shot in a 200-shot sequence.You can shoot the entire thing from a spinning crane shot. And you reallydon’t want to do that.
Humans thrive on consistency. We’re also really good at spotting when some-thing isn’t real, even when we’re trying to pretend it is. Real-life cameraworktends to be as simple as possible for cost reasons, so if you want to mimicreal life, you should start there.
In addition, overly complex camerawork gets in the way of the story. Asdirector, your job is to shoot the scene in the simplest way that gets the storyand its emotional content across — but, under no circumstances, to get anysimpler than that.
Imagine an invisible producer shouting about the cost of crane shots in yourear. Can you shoot that conversation more simply? Do you really need a craneshot there? Can you trim five close-ups elsewhere into a single long dollysequence? Simple and elegant.
Of course, sometimes you’ve just got to crank the special effects up to 11 andget with the Peter Jackson mad flying camera action. But the less you useawesome-mad shots, the cooler they’ll look — and the more time you’ll haveto make sure that your uber-camera shot looks incredibly awesome.
40 Part II: Getting Serious
08_096918 ch03.qxp 7/20/07 11:09 AM Page 40

Here’s what we mean:
Hugh: “So I’m thinking that we shoot this conversation a bit like this.”
*Slaps Figure 3-1 down on the table*
Johnnie: “Good. Because I can totally understand all of those randomsquiggles.”
Hugh: “No, look, it’s simple. We’ve got a wide shot, a two-shot, and a reversecovering this conversation, and then when Jered turns, we’ll just dollyaround to face him.”
Johnnie: “Into the coffee stain?”
Hugh: “Yup.”
Micro-flowAfter you decide your camera positioning, you can start thinking about twoor three shots at a time — maybe up to 12. This is the point where Hugh willgenerally start storyboarding — by which we mean drawing out roughimages of his intended camera shots (see Figure 3-2).
Figure 3-1:Camera
positioningdiagram
fromBloodSpell.
41Chapter 3: Filmmaking 101
08_096918 ch03.qxp 7/20/07 11:09 AM Page 41

In conventional films, storyboarding is a way of saving money — it’s cheaperto draw your shots than to crank up a film camera and get Sir Ian McKellenon set just to figure out what you want.
However, this is Machinima. We don’t have to pay for film by the foot, andeven if by some miracle you’ve got the man we call Gandalf in your film, he’llbe looking confused in a closet lined with duvets (see Chapter 13), rather thanon an actual stage. There’s very little point drawing detailed storyboards.
But rough drawings of the shots you’re trying to achieve are still useful, sothat you can remember what you’re trying to shoot, and so that you cancheck that your proposed shot sequence will work visually.
Your storyboards don’t have to look good! Provided you as director canunderstand them and visualize the end shot, that’s all that matters.
Hugh will usually draw out a dozen or so shots at a time, in his inimitable —not to say unintelligible — artistic style, and then close his eyes and fly hishand around like he’s pretending it’s an airplane:
Hugh: “Okay, here’s a quick storyboard of the next dozen shots. Questions?”
Steve: “A squiggle attacks another squiggle, and then there’s . . . anincontinent elephant?”
Hugh: “Oh, shut up.”
Figure 3-2:Rough
storyboardfrom
BloodSpell.You really
don’t haveto be a fine
artist!
42 Part II: Getting Serious
08_096918 ch03.qxp 7/20/07 11:09 AM Page 42
FramingNow we’re cooking with gas. Unless we’re using Neverwinter Nights. Thenwe’re cooking with ghast. My, that’s geeky even for us.
Finally, after all that nonsense, we get to actually shoot some darn shots.You’re in the map, you’ve got any assistants you need, er, assisting you. It’stime to figure out how each individual shot will look.
You’ll need to sort out framing — exactly where are your characters in yourshot, and how does that relate to your background? If you’ve got movingcharacters or a moving shot, you’ll need to check your framing and composi-tion at each key point within the movement and sort out the intended timing.
Now’s also the time to cue up speech and animations, either in the game orby discussing with your filming assistants. And lastly, you need to move andarrange your lighting, in whatever form you have it, to make your shot lookboth pretty and clear.
This is the “painting with light” part.
Hugh: *Tap* “Okay, Johnnie, left a bit.” *Tap* “Right a bit.” *Tap* “Okay,now back.” *TAP* “He’s nearly there — just move him back a bit more.”*TAP!* “Oops. I meant forward.”
Johnnie: “I kill you. With my mind.”
Hugh: “And we’re done with the framing. Now, lighting. Someone get me aninvisible glowing badger and put it next to Jered’s bottom.”
FilmingThe next step is to shoot. Or rather, to try to shoot. Filming is where it allgoes horribly wrong. In real film, and ten times more so in Machinima, this iswhere Mr. Reality stomps in the door, bleary-eyed and hung over, and pro-ceeds to do something unmentionable to your lovely theoretical planning —which is why you planned in the first place.
Characters who just won’t go to the right place, timings that require yourassistants to have the dexterity of a concert pianist, poor understanding ofexactly what’s meant to happen — all these things will force you to re-do, re-try, think laterally, re-think the shot, or, in extreme cases, write entire newtools just to make this shot possible.
Given all these factors, you absolutely don’t want to be trying to figure outthe creative details of the film at the same time! The actual process of filmingwill stretch your creativity to the limits, not to mention your patience. On
43Chapter 3: Filmmaking 101
08_096918 ch03.qxp 7/20/07 11:09 AM Page 43

BloodSpell, it wasn’t uncommon for complex shots to take upward of an hourand ten takes to get right.
Hugh: “And, rolling. Take 14. And, action. Cue Jered!”
*CLICK*
Hugh: “Cue the Master.”
*CLICK*
Hugh: “And animation 3 at the same time as he looks . . .”
*CLICK* *CLICKCLICKCLICKCLICK*
Various crew members: “OH, S***** (*&(£!!! O*&(*!! @@@!”
Hugh: “And the Master turns into a giraffe rather than, as we’d hoped,playing his bow animation. Again. More coffee, anyone?”
Thinking about Aspect RatiosYou should make one very important decision when you start making your film:the aspect ratio you’ll be shooting in. By aspect ratio, we mean the shape ofthe screen. Figure 3-3 shows three popular aspect ratios you should consider.
Figure 3-3:Common
aspectratios for
film.
44 Part II: Getting Serious
08_096918 ch03.qxp 7/20/07 11:09 AM Page 44

� 16:9: We generally recommend 16:9. It’s the most commonly used ratioin film and TV and provides a nice filmic feel without the intimidatingsize of Cinemascope. Plus, if you’ve got a widescreen monitor, you canshoot in this resolution without cropping your footage later. If you can,you should aim to shoot at a high-definition resolution like 1,280x720.
� 4:3: The old TV format, 4:3 is also the format used by a lot of onlinevideo sites, notably YouTube. If you’re aiming primarily for YouTube, a4:3 aspect ratio (800x600, 640x480, 320x240) ensures that you get themost use out of your available screen space.
� Cinemascope is the high-end format used by blockbuster films. If you’reshooting something seriously epic, it can look great in Cinemascope.However, its size means that it’s difficult to display on non-widescreenmonitors, and it’ll suck horribly on YouTube. The sheer available screensize can also feel quite empty if you don’t have epic vistas to deploy onit. And by vistas, we don’t, nor will we ever, mean Windows.
Framing Your MovieEvery time you set up a shot, you’re essentially painting. You’re constructinga 2D image that should convey both information and emotion. And you canensure that both come across by improving your shot composition.
Painterly compositionYou can learn a lot from painters and photographers. Here are some tips oncreating an artistic scene:
� Keep it simple! Don’t crowd your shot. A shot should have at most threeimportant elements — more often one or two. Your audience won’t beable to follow more than three separate elements in a shot at the sametime.
Keeping it simple doesn’t mean that you can’t have a flight of 50 dragonsin shot — that’s a single element! But if you try to shoot a battle betweendragons and eagles as your hero cleaves his way through an army towardthe heroine, all in one static shot, your audience may get confused.
� But don’t make it too simple. Most shots will work better with more thanone element contrasting. That’s not a hard-and-fast rule; close-ups ofcharacters, for example, are definitely the exception. But if you can, tryto capture two elements in shot at once — a contrasting or important
45Chapter 3: Filmmaking 101
08_096918 ch03.qxp 7/20/07 11:09 AM Page 45

element of the background, part of a crowd or passers-by, or two of yourcharacters.
� Remember the Rule of Thirds. Divide your frame into thirds horizon-tally and vertically. You’ll have four points where the dividing linescross. If you center key elements of your shot — a character’s face, forexample — on one of those four points, you will tend to create a strongimage. You can also sometimes center an element on one of the pointswhere the lines meet the edge of the screen — for example, if you’reframing one character with another.
� Break the frame. If you’re shooting a crowd sequence, it’s tempting toshoot in such a way that all the background characters are neatlyenclosed by the frame, rather than having arms or legs cut off by theframe. But that’s exactly the wrong way to shoot! If you arrange yourframe so that key characters are in frame but background charactersoverlap the frame, it suggests a bigger, more continuous crowd.
� Be dark or light — don’t be brown. Don’t be afraid to use total dark-ness as part of your frame. Shooting through a doorway, for example,where only half the frame is light, is fine. If only the key character’s faceis light and the rest of the frame is dark, great.
However, don’t shoot if the key element of your shot is poorly lit. If thereis even a chance the audience won’t be able to see the action, add morelight. It’s always better to be over-lit than to be a gray mush.
� Use quick and dirty lighting. You can write an entire book about light-ing (and many people have). If you want a quick-and-dirty way to makeyour lighting look good, make sure that one side of your character’s faceis darker than the other or lit in a slightly different color. Contrastbetween the sides of the face nearly always looks dramatic.
� Include lines. Diagonal lines look dynamic on-screen. If you can, shootwalls, doors, and pylons so they aren’t straight in frame. You can usesuggested lines to point to key elements of your frame: a horizon point-ing to your key character or shadows on the floor lining up to pointtoward your villain.
� Shoot curvy lines! Curves look great on-screen. In particular, paths thatform an S-shape heading away from the camera look very nice indeed.See Lord of the Rings for about a million examples. Human shapes andsilhouettes, particularly, ah, the kind of female silhouette you’ll get frommany computer games, also look great.
� Hang it on your wall. Before you take any shot, ask yourself this ques-tion: Would you be happy to take a still from it, have it printed, and dis-play it on your wall? If so, you’ve got a good shot.
46 Part II: Getting Serious
08_096918 ch03.qxp 7/20/07 11:09 AM Page 46

� Change your Field Of View (FOV). The default field-of-view for mostgames is 90 degrees. To make your work look less like a game and morelike a film, if you have an engine that can change FOV, try changing to anangle closer to 40 degrees. Changes in FOV also alter how close objectsappear to each other laterally. If you want to fit two objects into yourshot but can’t quite manage it, try changing your FOV.
Framing charactersKnowing how and where to place your characters in frame governs the kindof story you can tell with them:
� Don’t center your characters on-screen. Most of the time, your charac-ter should be on the left or right of the screen, talking either to thecenter screen or past the center screen. Only put them center-screen ordirectly facing the camera if you’re sure you know what you’re doing.
� Handle sympathy. As a rough general rule, the closer a characterappears to the center of the screen, and the more head-on he is shot, themore sympathetic he will appear to the audience. This effect is subtlebut powerful. Set up two shots, one where your hero is talking from a bitright of center, almost head-on to the camera, and another where yourvillain is right on the left of screen, talking across to the hero. Suddenly,your hero and villain will feel heroic and villainous, respectively.
� Frame! If you can frame a character with natural features, such as anarch, in the background it will make the image stronger. Likewise, on awide shot, finding something — a rock, a candle, a doorhandle — to placein the foreground to give depth to the shot often improves your shot, too.
� Shoot from up and down. You can dramatically change the impact andovertone of a shot by changing the vertical angle you’re shooting from.In general, shooting down on a character will often make him look vul-nerable, while shooting up at him will make him look impressive.
Even in a field full of unreliable advice, this piece is particularly unreli-able. For example, if you have a character look down (so that you’reshooting him effectively from above) and then have him look up at thecamera, he’ll look menacing, in a Hannibal Lecter–style.
Mastering Shot FlowOn the other side of the filmmaking coin are shot flow and storytelling. If yourshots don’t tell your story, you’re in trouble, no matter how beautiful they are.
47Chapter 3: Filmmaking 101
08_096918 ch03.qxp 7/20/07 11:09 AM Page 47

Fortunately, you can follow a few simple rules to help ensure that your shotsmake sense:
� How will your audience know what’s going on? Make sure that you’vegot shots that establish everything important in the scene. You don’t haveto use them immediately — it’s an old trick to start on a series of close-upsand then go to an establishing shot that explains their relationship —but make sure that you know how and when your audience will find outwhat’s going on.
� Be consistent with direction of action. If your character runs out of theshot from left to right, and the next shot is of him running in the samedirection, he should run from left to right on-screen again. Direction ofaction is super-important in making a sequence viewable: Anything thatmoves out of shot moving one way across the screen should nearlyalways move the same way in the next shot.
(There are a few exceptions to this rule — notably if you’re pulling outfrom a close-up to a new wide shot, or if you’re going from a characterrunning into screen to the same character running out of screen.)
� Follow eyelines. Viewers follow the direction a character is looking. Ifyou’re going to go from one character to a new character entering thescene, it’ll make a lot more sense if the first character looks around inthe direction of the second character’s entrance before you cut. Likewise,if you’re setting up two characters who are talking to each other, makesure that they look like they’re talking to each other. Watch out for eyeheights in frame in particular.
That doesn’t mean they actually have to be looking at each other.Perception is king. If your character is in reality looking right at his co-conversationalist, but it looks a bit funny when you shoot it, by allmeans move him around until it looks right on film, even if he’s now staring at your lighting badger’s left nipple.
� Left, then right! If you’re shooting two characters, an easy way to makethe scene make sense is to put one on the right and one on the left. Thispositioning holds if you’re shooting a close-up, a wide shot, or a two-shot. At some point, if it’s a long scene, you’ll want to swap them aroundsomehow (see the sidebar “The line”). But until then, shoot them left,right, left.
� Remember the details. Forgetting to shoot close-ups of items, charac-ters holding items, characters opening doors, and other such things iseasy to do. But these little elements really add a lot to the intelligibilityof the scene. If you can, shoot close-up inserts of action that may beeven slightly unclear — or even just action that looks cool. It’ll help theflow of your sequence.
48 Part II: Getting Serious
08_096918 ch03.qxp 7/20/07 11:09 AM Page 48

The Components of a FilmBefore you construct your novel, you need to know what words you have towork with. Here’s a whistle-stop tour through the varieties of shots availableto you.
You’ll notice that we very rarely give specific details as to how to shoot a particular shot. Most shot types are more general categories than specific
49Chapter 3: Filmmaking 101
The lineIt seems that every area of technical knowledgehas one deeply arcane and highly specificpiece. With the programming language C, it’spointers. With Machinima, it’s Half-Life 2. Andwith filmmaking in general, it’s the line.
The basic rule is this. Any time two charactersare interacting, an invisible line of action extendsthrough both of them (see figure). If you ever cutover that line, you’ll confuse your audience.
Now, nothing stops a camera from moving overthe line, using a dollying shot, or the line frommoving over your camera, if one of the charac-ters moves. Both methods are reliable ways tochange the line — if you want to reverse the
positions of characters on-screen, for example.But you must never, ever (well, almost never)cut over the line, or everything will reverseplaces, and you’ll confuse your viewers.
Sounds simple, right? Well, it is — provided thatyou’re dealing with only two characters. If fiveor six characters are all talking to each other,determining where the line is at any time is dif-ficult. As a general rule, the line is between thetwo most active characters at any time. Butreally, once you’re past fairly simple scenes,you’ve just got to take your best guess, go for it,and fix the results in pickups!
08_096918 ch03.qxp 7/20/07 11:09 AM Page 49

framings. The way you frame each shot layers on top of its general intentionto give the meaning and purpose of that shot and that sequence.
Sounds complicated? Don’t worry. Just come up with a rough idea, try it, andthen junk it if it doesn’t work. You’ll get the hang of filming soon enough.
Shot types: WideArguably the simplest type of camera shot, a wide shot, shown in Figure 3-4,captures an entire scene or large part of a scene. A wide shot shows spatialrelationships, gives the viewer an emotional break in intense scenes, showsaction happening over a wide area (or full-body action, as in a martial-artsfight), and establishes a scene.
Whatever else you do during filming, make sure that you take a wide shot ofyour action. You’ll never know when you need it.
Shot functions: EstablishingAbove all else, your film must establish in the viewer’s mind what’s going on,and where it is happening. Your establishing shot, or shots, set the scene. Itmay be a single wide shot that shows the area and the characters, or It mayconsist of a close-up shot of a sign or other salient detail, followed by a wideshot. Your establishing shots may even be a series of close shots followed bya wide shot (à la the bar scene in Star Wars), or a mixture of general visualshots around an area.
Figure 3-4:A wide
shot fromBloodSpell.
50 Part II: Getting Serious
08_096918 ch03.qxp 7/20/07 11:09 AM Page 50

A new establishing shot is often required after a period of action. Cut to awide shot to update the viewers on what’s happening now, who’s still up, andwho’s lying down bleeding.
Shot types: Two-shotA two-shot (see Figure 3-5) is, unsurprisingly, any shot with two characterswho are significant to the shot in frame. This type of shot is typically used forinteractions between those characters.
A particularly strong type of two-shot is one arranged so that both characters’faces are visible. While this type of shot is sometimes a nightmare to shoot,being able to see both characters’ interaction makes for a very strong image.
The infamous over-the-shoulder shot is arguably a type of two-shot. In thisshot, part of one character’s body (usually shoulder and head, hence thename) is used to frame another character in shot. This shot is usually usedduring dialoged sequences. Many directors hate it, but it’s still worth havingin your toolbox.
Shot types: ReverseA reverse shot is — er, well — how do we put this? It’s like the shot before it,but backward. So, for example, if you’re shooting two characters head-on,looking out over some battlements, and then you go to a shot from behindthem looking out over their shoulders, you’re shooting a reverse.
Figure 3-5:A two-shot
from the end of
BloodSpell.
51Chapter 3: Filmmaking 101
08_096918 ch03.qxp 7/20/07 11:09 AM Page 51

Reverses can be useful for revealing plot elements — a shadow appears atyour heroine’s shoulder as you’re looking at her from behind, and you thenreverse to a shot in front of her. Reverses are also a rare example of a shotthat is acceptable to use even though they (often) cross the line. (For moreabout the line, see the earlier sidebar in this chapter.)
A reverse has to have some obvious clue that you’ve reversed. So, if bothcharacters are looking forward and you’re cutting from looking at their facesto looking at their backs, that’s okay. But if they’re facing each other, and youcut from one side of them to the other, that shot will jar as you cross the line,because the visual clues aren’t obvious enough.
That’s not the only meaning of the term reverse in filmmaking. As distinctfrom a reverse shot, filmmakers or editors will sometimes refer to a reverse,which is an opposing shot in a conversation sequence. Which might some-times also be a reverse shot. Or not. Aargh!
Shot types: Point of View (POV)A Point of View (POV) shot is taken as if from the point of view of a character,usually just after or just before a close-up on that character, which cues theviewer as to which character’s POV you’re using. You can break all sorts of rulesin a POV shot. Most notably, you can shoot other characters head-on, as you’resaying to the viewer, “Okay, so this is what it looks like for this character.”
Use a POV shot when you want to put the viewer in the character’s place —when the character’s creeping through a shadowy house, when an authorityfigure is shouting at him, or when he’s watching his love interest anxiouslyafter she’s been shot.
Shot types: Close-upYou know what a close-up is — a shot with only a character’s face in shot (seeFigure 3-6). These shots are great — they’re emotionally intense, and they’resimple to shoot because there’s rarely more than one or two elements in frame.
There’s another use for a close-up, too: When you’re short on time and needto get a scene wrapped. A close-up is almost always the easiest type of shot totake — there’s not a lot else in the scene.
52 Part II: Getting Serious
08_096918 ch03.qxp 7/20/07 11:09 AM Page 52
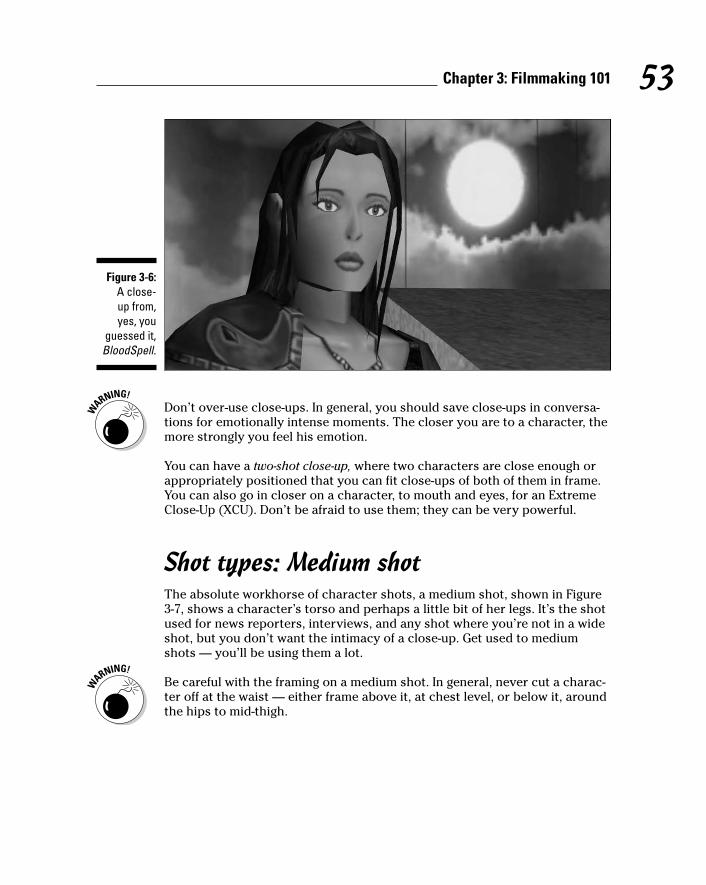
Don’t over-use close-ups. In general, you should save close-ups in conversa-tions for emotionally intense moments. The closer you are to a character, themore strongly you feel his emotion.
You can have a two-shot close-up, where two characters are close enough orappropriately positioned that you can fit close-ups of both of them in frame.You can also go in closer on a character, to mouth and eyes, for an ExtremeClose-Up (XCU). Don’t be afraid to use them; they can be very powerful.
Shot types: Medium shotThe absolute workhorse of character shots, a medium shot, shown in Figure3-7, shows a character’s torso and perhaps a little bit of her legs. It’s the shotused for news reporters, interviews, and any shot where you’re not in a wideshot, but you don’t want the intimacy of a close-up. Get used to mediumshots — you’ll be using them a lot.
Be careful with the framing on a medium shot. In general, never cut a charac-ter off at the waist — either frame above it, at chest level, or below it, aroundthe hips to mid-thigh.
Figure 3-6:A close-up from,yes, you
guessed it,BloodSpell.
53Chapter 3: Filmmaking 101
08_096918 ch03.qxp 7/20/07 11:09 AM Page 53
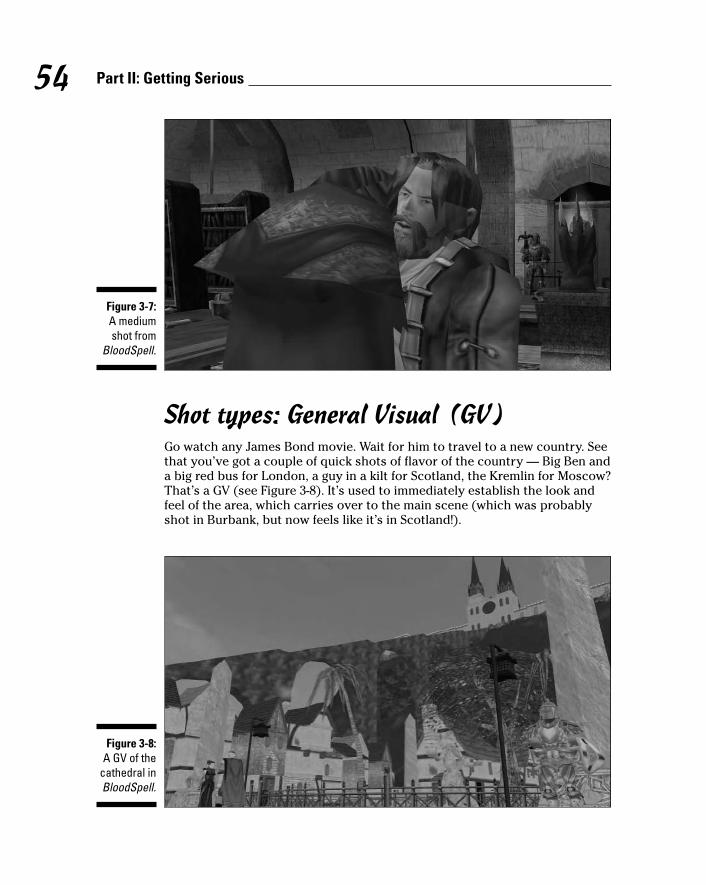
Shot types: General Visual (GV)Go watch any James Bond movie. Wait for him to travel to a new country. Seethat you’ve got a couple of quick shots of flavor of the country — Big Ben anda big red bus for London, a guy in a kilt for Scotland, the Kremlin for Moscow?That’s a GV (see Figure 3-8). It’s used to immediately establish the look andfeel of the area, which carries over to the main scene (which was probablyshot in Burbank, but now feels like it’s in Scotland!).
Figure 3-8:A GV of the
cathedral inBloodSpell.
Figure 3-7:A mediumshot from
BloodSpell.
54 Part II: Getting Serious
08_096918 ch03.qxp 7/20/07 11:09 AM Page 54
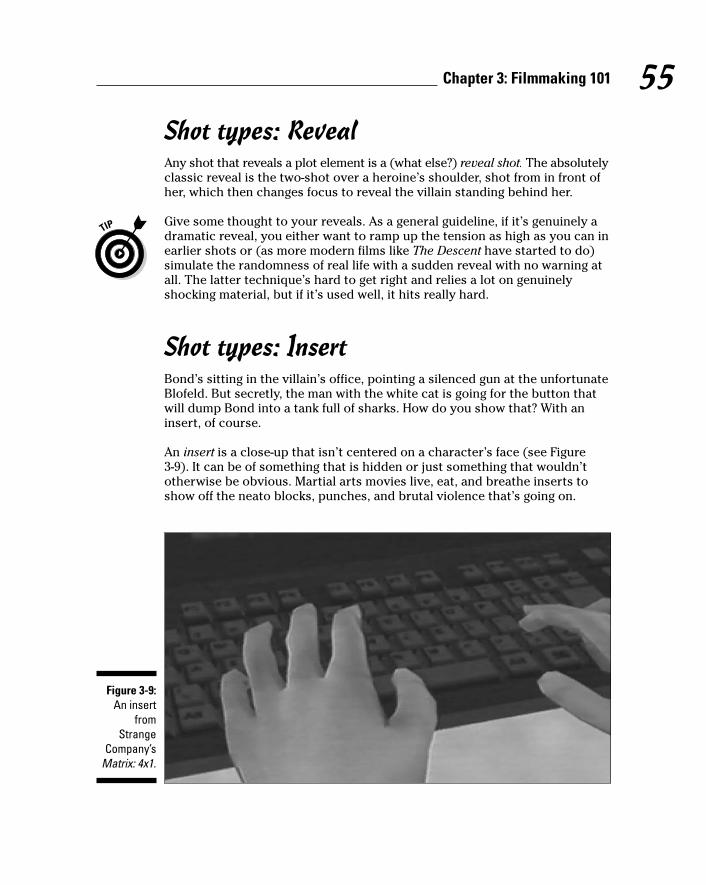
Shot types: RevealAny shot that reveals a plot element is a (what else?) reveal shot. The absolutelyclassic reveal is the two-shot over a heroine’s shoulder, shot from in front ofher, which then changes focus to reveal the villain standing behind her.
Give some thought to your reveals. As a general guideline, if it’s genuinely adramatic reveal, you either want to ramp up the tension as high as you can inearlier shots or (as more modern films like The Descent have started to do)simulate the randomness of real life with a sudden reveal with no warning atall. The latter technique’s hard to get right and relies a lot on genuinelyshocking material, but if it’s used well, it hits really hard.
Shot types: InsertBond’s sitting in the villain’s office, pointing a silenced gun at the unfortunateBlofeld. But secretly, the man with the white cat is going for the button thatwill dump Bond into a tank full of sharks. How do you show that? With aninsert, of course.
An insert is a close-up that isn’t centered on a character’s face (see Figure3-9). It can be of something that is hidden or just something that wouldn’totherwise be obvious. Martial arts movies live, eat, and breathe inserts toshow off the neato blocks, punches, and brutal violence that’s going on.
Figure 3-9:An insert
fromStrange
Company’sMatrix: 4x1.
55Chapter 3: Filmmaking 101
08_096918 ch03.qxp 7/20/07 11:09 AM Page 55

You nearly always need more inserts than you’ve got. Sprinkle them in liber-ally. If a scene doesn’t quite flow and you don’t know why, chances are thatyou either need another wide shot or another insert.
Moving camera: PanWhen you’re turning the camera without moving it, you’re panning. Pans areamong the cheapest of camera moves in real life — all they need is a tripod.They’re also quite hard to use well.
In general, a character’s movement should suggest a pan — panning to tracka character through a crowd, for example, or panning to follow a character’seyeline as she looks off-screen. They can also serve to introduce a scene. Other-wise, pans with no obvious cause and no other movement tend to look forced.
Moving camera: Dolly/craneAny time you’re moving the camera in two dimensions, without changingheight, you’re dollying — so called because the platform on which a realcamera is moved is called a dolly. Add height to that mix and you’re probablylooking at a crane shot, so called because — oh, right, you got it.
Both dolly and crane shots are comparatively cheap and common in real film,meaning that you can afford to use them relatively freely in your Machinima,too. It’s worth thinking about how a crane, in particular, actually moves — it’s a platform on the end of a long lever. Try to fake this movement for morerealistic-looking shots.
Cameras moving in real 3D space are great for adding life and movement to ascene; many Machinima filmmakers have made a style out of continual subtlemovement within a scene. They’re also great ways to change your position inrelation to the line, move between a wide shot or medium shot and a close-up, or shift from one character shot to another.
Moving camera: ZoomA zoom isn’t actually a camera movement at all, but a change in the FOV ofthe camera, which appears to make some things closer and other things fur-ther away. Zooms went out of fashion through the ’90s, but the handheldstyle of series like 24 and Firefly have ensured their return to popularity, atleast in hand-held-shot series.
56 Part II: Getting Serious
08_096918 ch03.qxp 7/20/07 11:09 AM Page 56

Zooms tend to look rather clunky, which you can sometimes use as a deliber-ate feature. You can effectively use a subtle zoom to heighten tension in ascene, à la classic Sergio Leone Westerns. Otherwise, you won’t have a lot ofuses for them unless you’re going for a hand-held style.
It’s worth noting that by zooming in one direction while tracking in the opposite direction, you can achieve a very weird effect, as the entire sceneappears to foreshorten or lengthen. Peter Jackson is a particular fan of thistrick, called a dolly zoom, which was pioneered in the film Vertigo.
Moving camera: HandheldJerky, blurred hand-held camerawork has become increasingly prevalent inmodern filmmaking and TV. Handheld camerawork is almost more of a styleunto itself than a technique, and it’s very hard to replicate in Machinima.While you can achieve something similar using mouse control, the typical
57Chapter 3: Filmmaking 101
Where to find more on filmmakingYou can find dozens of good books on film-making. Here are a few that we’ve found par-ticularly valuable over the years:
� The Guerilla Film Maker’s Handbook —Chris Jones and Genevive Joliffe, pub-lished by Continuum International. Morefocused on filmmaking as a whole packagethan shooting in particular, and quite UK-focused, this book is our bible for all aspectsof real filmmaking. Use it to learn abouteverything from funding to filming to publicity.
� Shot by Shot — Steven Katz, published byMichael Wiese Productions. One of theclassic tomes covering the basics of cam-erawork, the book is a bit dry, but very infor-mative. The techniques it shows aren’tparticularly flashy, but they work well andare a good basis for springboarding yourown work while being confident that you’vegot the bases covered.
� Hollywood Camerawork — Per Holmes(www.hollywoodcamerawork.us).This isn’t a book — it’s a set of DVDs, and a pricey set at that. But you get a fan-tastic introduction to some very sophisti-cated camerawork techniques, from thevery basics to Hollywood-level shooting.
� The Grammar of the Shot by Roy Thompson,published by Focal Press. Comes to ushighly recommended as a story- and edit-focused guide to shooting.
Other than these books, watch movies and TV.In particular, turn the sound off and then watchthem. You’ll pick up a lot more of the techniquethat way because you won’t be distracted bythe story.
And don’t be afraid to try to copy sequencesshot-by-shot for your own education — you’lllearn fast by doing what your heroes do, andlearning what works and why.
08_096918 ch03.qxp 7/20/07 11:09 AM Page 57

handheld shake really has to be added in post-production or camera control.Medieval II: Total War does particularly fantastic handheld simulation (seeChapter 12).
Nonetheless, a handheld feel — characterized by rapid swish pans betweensubjects, fast crash zooms, and jerkiness — is a great way to achieve a feelingof realism, particularly in Machinima. If your film would benefit from such astyle, it’s worth considering, particularly for fast action and fight scenes,where the blurriness and jerkiness of the style can conceal a thousand dodgyMachinima animations. See the trailer for The Return 2 by Rufus Cubed for avery good example of handheld simulation in Machinima.
58 Part II: Getting Serious
08_096918 ch03.qxp 7/20/07 11:09 AM Page 58
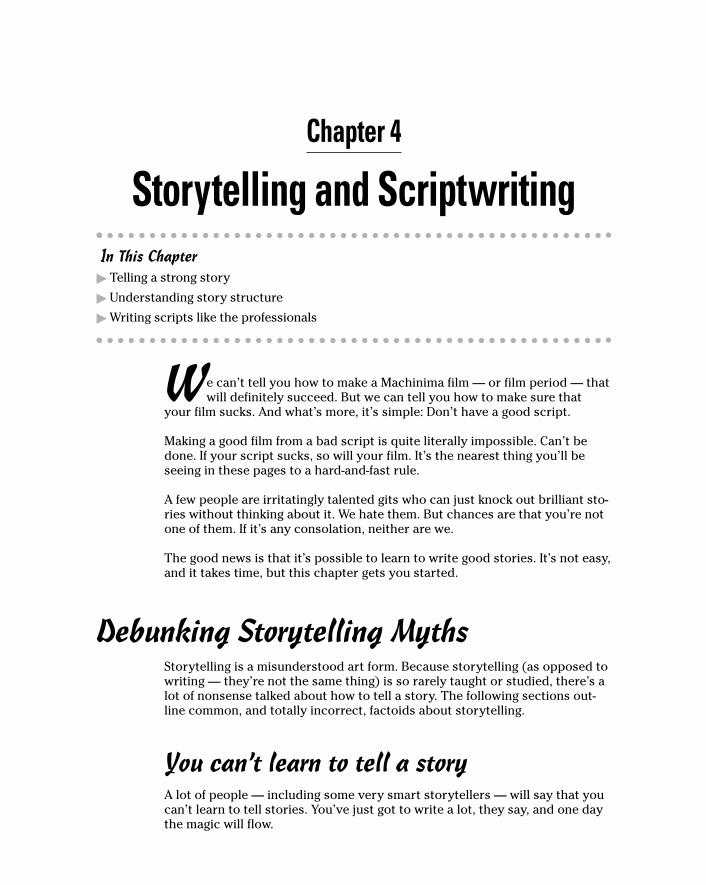
Chapter 4
Storytelling and ScriptwritingIn This Chapter
� Telling a strong story
� Understanding story structure
� Writing scripts like the professionals
We can’t tell you how to make a Machinima film — or film period — thatwill definitely succeed. But we can tell you how to make sure that
your film sucks. And what’s more, it’s simple: Don’t have a good script.
Making a good film from a bad script is quite literally impossible. Can’t bedone. If your script sucks, so will your film. It’s the nearest thing you’ll beseeing in these pages to a hard-and-fast rule.
A few people are irritatingly talented gits who can just knock out brilliant sto-ries without thinking about it. We hate them. But chances are that you’re notone of them. If it’s any consolation, neither are we.
The good news is that it’s possible to learn to write good stories. It’s not easy,and it takes time, but this chapter gets you started.
Debunking Storytelling MythsStorytelling is a misunderstood art form. Because storytelling (as opposed towriting — they’re not the same thing) is so rarely taught or studied, there’s alot of nonsense talked about how to tell a story. The following sections out-line common, and totally incorrect, factoids about storytelling.
You can’t learn to tell a storyA lot of people — including some very smart storytellers — will say that youcan’t learn to tell stories. You’ve just got to write a lot, they say, and one daythe magic will flow.
09_096918 ch04.qxp 7/20/07 11:10 AM Page 59

Well, like any skill, you have to practice storytelling to learn it. You can readabout storytelling until you’re blue in the face, but unless you actually writestories you’ll never become a good storyteller.
And you really do need life experience to tell great stories. When you write astory, you’re recreating the world as you see it. The more penetrating yourinsights into the world, the more likely your story is to touch people.
But to say you can’t learn storytelling is baloney. You can learn how a goodstory is constructed, just as you can learn any other skill. Sure, you canbecome a great football player by playing a lot of football. But if you’ve got afootball coach who teaches you tactics and technique, you’ll become moreskilled, much faster. It’s the same with storytelling.
You’ll ruin your storytelling by learning story structureHugh was infected with this particular meme for years. He worried that if heread how-to guides on storytelling, his writing would become stale and for-mulaic. He worried he’d end up struggling to fit his writing into rigid, prede-fined structures.
That’s a potent fear. It’s not helped by the number of guides that claim there’sone true way to write a story. If you try to write every story the same way,you certainly will feel constricted.
Story techniques are tools, nothing more. You can use them if they help yourwork, you can ignore them if you feel you need to. By ignoring that informa-tion, you’re trying to reinvent an art form that a lot of other people havealready gotten very good at. Reading about storytelling gives you access tofaster, neater, more involving, and more powerful ways to tell your stories.
There’s one true way to write a storyYou’ll encounter a lot of books promising to show you The Hidden Story-Form Behind All The Blockbusters! Some of these guys will be abusing poorJoseph Campbell’s Hero’s Journey. Others will be peddling some stinking, half-rotted monstrosity of their own creation. We’re not very fond of these guys.Can you tell?
There. Is. No. One. Way. To. Write. A. Story.
Find us any book that claims all great films fit into one specific story struc-ture, and we’ll find you a counter-example. There are tips, and tricks, and
60 Part II: Getting Serious
09_096918 ch04.qxp 7/20/07 11:10 AM Page 60
generalities, and useful general rules; but there ain’t no magic bullet. Thankgoodness. Otherwise writing stories would be darn boring.
Writing a story is easyImagine that you’ve decided to go and compete in a tennis match. You’veplayed a bit of tennis; your friends say you’re pretty good. So you’ve signedup for a tournament. You’re standing at the side of the court, and you lookdown the list of your competitors. And said list goes a bit like this: Agassi,Becker, Sampras, Henman, McEnroe . . .
Welcome to storytelling. Any time you throw your hat into this particular ring,it’s time to look at the competition you’re facing for your audience. There’sStephen Spielberg leaning against the wall over there. J.R.R. Tolkien’s on thegreen smoking a pipe. Ernest Hemingway’s having an argument with the ball-boy, and in the distance there’s a guy with silly hair called Will Shakespeare.
The standard of storytelling to which your audience is accustomed has beenset by legions of stories from artists at the very top of their game. Handily,you can just learn the techniques they had to invent, but still — you’re gonnabe needin’ some phat skillz.
You don’t need to write like the pros doWe’ve heard this one from professional filmmakers, believe it or not. “Youdon’t need to write in conventional script format if you’re directing the filmyourself.” “There’s no point doing a focus test unless you’ve got thousands tospend on it”.
If you hear about a technique that your storytelling heroes use to make betterfilms, chances are it’ll work for you, too. Sure, there are fewer reasons to usea standard script format if you’re not submitting it to a $10-million productionteam. Sure, your focus group may not be so focused. But these techniquesare in use because they work. The magic ingredient that makes them work israrely money.
Fire hot . . . fan films badA lot of people choose to set their first stories, or indeed later work, in afavorite fictional world. Some people — we won’t name names here becausethey’ve embarrassed themselves quite enough already — claim these storiesare somehow inferior to original work, or that it’s impossible to learn story-telling by writing fan-fiction. That is patent nonsense.
61Chapter 4: Storytelling and Scriptwriting
09_096918 ch04.qxp 7/20/07 11:10 AM Page 61

Apprenticing by copying the work of the masters has been an accepted wayto learn to create art since before the Renaissance. Shakespeare wrote whatwould today be considered fan-fiction, if not outright plagiarism. Hunter SThompson learned to write by copying the works of his heroes word forword. And anyone who has worked in the television or comics industry hasalmost certainly worked on universes and characters created by others.
Fan-fiction is as valid a form of storytelling as any other. If you want to writeit, do.
Outlining the Form of a StorySo, what is a story, and what is a script? A story is the collected events, emo-tional changes, and action that form the skeleton of the script. A story can beexpressed in any storytelling form.
The story of Casablanca, for example, could be told in a comic, a novel, apoem, or a film. The actions behind Casablanca are the story. The scaffold ontop, the stuff that makes this version of Casablanca a film or a book — that’sthe script.
A story, in its most basic form, is just a sequence of events. In the movieWhen Harry Met Sally, for example, Harry meets Sally when they’re bothyoung. They don’t get on. They meet again over the years. They come to careabout each other. They try to find each other partners. Then one day theysleep together, and for some reason, the friendship’s ruined — until they real-ize they’re in love with each other.
If the story of a film is worth re-telling like When Harry Met Sally, you knowit’s good. Anyone can make up a series of events, but to know how to create acompelling series of events is the craft of storytelling.
But there’s more to When Harry Met Sally than just the main story. The char-acters each have a story of their own, a story within a story. The themes andaction of these sub-stories, or “spines”, make the story resonate with theaudience. We’re interested in people and how their lives relate to ours.
Harry spends the film trying to convince himself that men and women can’tbe friends, when it turns out that the only woman he wants to be with is theone who is his friend. Meanwhile, Sally claims to be horrified by the idea thatmen and women can’t be friends without sex getting in the way, when shebelieves just that, and she has to overcome the belief that sex and friendshipcan’t coexist in order to be happy. (At least, that’s our interpretation. We maybe, and in fact almost certainly are, wrong.)
62 Part II: Getting Serious
09_096918 ch04.qxp 7/20/07 11:10 AM Page 62

Then there’s the setting of the story. Contrast the world of When Harry MetSally with the background of another so-called real-world drama — the televi-sion series 24. Just think about the backgrounds — which are both ostensiblythe real world — being transposed.
“I’ll have what she’s hav- — aargh, terrorists!”
The background itself has a story — which many people would call a theme.In When Harry Met Sally, the story is that people will stress a lot about beingsingle. They’ll get together with some people, and it won’t work out. Thenfinally they’ll meet someone special. It’ll be up and down, and at times, it’lllook like it won’t work out, but then it will. And before you know it, they’llhave been married for 45 years.
In 24, the story is that most of life isn’t very important. But every so often,something Very Bad happens, and a number of people will conspire to harmothers. Then the complexities of life will intervene to ensure that no one’splans, good or bad, go as expected, and everyone involved will go throughhorrible trauma that they have no choice but to endure.
All of these stories depend upon things not happening as expected. That’sthe most fundamental aspect of a story — the reversal.
Getting the Scoop on ReversalsStories are made up of a series of reversals on varying levels. Robert McKee,the author of Story, says that a story happens when a gap occurs between theexpectations of a protagonist and reality.
24’s Jack Bauer gets up expecting to spend another pleasant day hiding fromthe Chinese — but someone’s trying to kill him. Okay, okay, this is 24. They’retrying to kill him more than usual.
Sally expects to spend a pleasant, but unmemorable, day driving to New Yorkwith her friend’s boyfriend. Instead, he’s a charming jerk who tries to sleepwith her, but who she can’t forget.
Zornhau, who writes about storytelling at http://zornhau.livejournal.com, describes this fundamental element of storytelling as a QABN: Question,Answer, But Now.
Can Jack Bauer continue to ever-so-politely try to get into the underwear ofthe cute single mother? No, because someone knows where he is and is tryingto kill him. Now he needs to go after them before they come for him.
63Chapter 4: Storytelling and Scriptwriting
09_096918 ch04.qxp 7/20/07 11:10 AM Page 63

We used the word “pleasant” to describe both our heroes’ expectations. Somepart of a reversal — the question, the answer, or the But Now — always sucks.That’s what drives the story — the avoidance of suckitude.
But the reversal doesn’t work unless the characters are constantly trying toimprove their lot. They’re not just sitting waiting for the story to happen tothem; they’re actively searching for whatever they think will improve theirlives. Your characters are made understandable and sympathetic by whatthey want. And when searching for wants meets incoming suckiness, theensuing crash scatters story all over the sidewalk. So — the protagonist triesto improve his lot. Something happens that either sucks or has the potentialto suck. But now. And we move on.
Conflict is drama — one of the oldest storytelling rules, dating back to Aristotle.
Sizing your reversalsReversals come in a variety of sizes, like particularly dramatic washingpowder. There’s the cute li’l-laundrette–sized reversal: Can Jack get to the ele-vator before the guards come around the corner? Yes — but now the eleva-tor’s under control of the terrorists and is in a free-fall!
Then there’s the average-size single-guy-who-actually–remembered-to-buy-washing-powder-shocker! reversal: Can Harry and Sally manage to pair eachother off with their respective best friends? No — the friends end up hookingup, leaving Harry and Sally together again.
And then there’s the super-economy you’ll-still-have-most-of-the-box-left-when-the-kids-go-to-college–size reversal: Can the Fellowship take the Ring to Mordor?No, the Ring’s power corrupts the Fellowship. Now Frodo and Sam musttravel on without protection.
These three levels of reversal — called beat, scene, and act respectively — arethe keys to most stories.
If you’re working on a gigantic project — the length of a full TV season ormore — there’s a higher level still, called arc. At that point, you’re way pastour experience, and frankly, you’re out there on your own.
BeatsThe beat is the smallest practical unit of story, just like a beat in music. It con-sists of a single reversal — someone does something, it doesn’t turn out asexpected.
64 Part II: Getting Serious
09_096918 ch04.qxp 7/20/07 11:10 AM Page 64
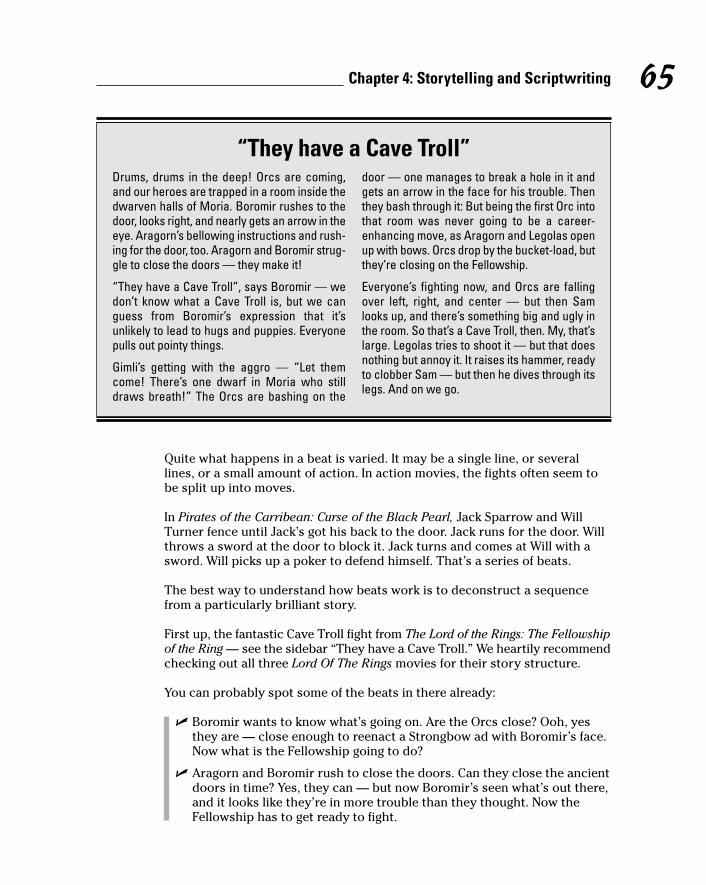
Quite what happens in a beat is varied. It may be a single line, or severallines, or a small amount of action. In action movies, the fights often seem tobe split up into moves.
In Pirates of the Carribean: Curse of the Black Pearl, Jack Sparrow and WillTurner fence until Jack’s got his back to the door. Jack runs for the door. Willthrows a sword at the door to block it. Jack turns and comes at Will with asword. Will picks up a poker to defend himself. That’s a series of beats.
The best way to understand how beats work is to deconstruct a sequencefrom a particularly brilliant story.
First up, the fantastic Cave Troll fight from The Lord of the Rings: The Fellowshipof the Ring — see the sidebar “They have a Cave Troll.” We heartily recommendchecking out all three Lord Of The Rings movies for their story structure.
You can probably spot some of the beats in there already:
� Boromir wants to know what’s going on. Are the Orcs close? Ooh, yesthey are — close enough to reenact a Strongbow ad with Boromir’s face.Now what is the Fellowship going to do?
� Aragorn and Boromir rush to close the doors. Can they close the ancientdoors in time? Yes, they can — but now Boromir’s seen what’s out there,and it looks like they’re in more trouble than they thought. Now theFellowship has to get ready to fight.
65Chapter 4: Storytelling and Scriptwriting
“They have a Cave Troll”Drums, drums in the deep! Orcs are coming,and our heroes are trapped in a room inside thedwarven halls of Moria. Boromir rushes to thedoor, looks right, and nearly gets an arrow in theeye. Aragorn’s bellowing instructions and rush-ing for the door, too. Aragorn and Boromir strug-gle to close the doors — they make it!
“They have a Cave Troll”, says Boromir — wedon’t know what a Cave Troll is, but we canguess from Boromir’s expression that it’sunlikely to lead to hugs and puppies. Everyonepulls out pointy things.
Gimli’s getting with the aggro — “Let themcome! There’s one dwarf in Moria who stilldraws breath!” The Orcs are bashing on the
door — one manages to break a hole in it andgets an arrow in the face for his trouble. Thenthey bash through it: But being the first Orc intothat room was never going to be a career-enhancing move, as Aragorn and Legolas openup with bows. Orcs drop by the bucket-load, butthey’re closing on the Fellowship.
Everyone’s fighting now, and Orcs are fallingover left, right, and center — but then Samlooks up, and there’s something big and ugly inthe room. So that’s a Cave Troll, then. My, that’slarge. Legolas tries to shoot it — but that doesnothing but annoy it. It raises its hammer, readyto clobber Sam — but then he dives through itslegs. And on we go.
09_096918 ch04.qxp 7/20/07 11:10 AM Page 65

� The Orcs want to get to tasty human meat, so they’re getting rid of thedoor. Can the Orcs break down the door? Yes — and even though they’llget facefuls of arrows for their troubles, they’re in the room.
� Can the Fellowship beat the Orcs up? Yes, because the Fellowship collec-tively kicks ass. But now they’ve got more than Orcs to deal with.
� Legolas would like that Cave Troll to stop its annoying living. CanLegolas drop the Cave Troll in one shot? No — this thing is a lot tougherthan any Orc around here. Now Sam has to face its wrath.
� Can Sam avoid becoming Hobbit pâté courtesy of an irritated Cave Troll?Yes — he can dive through its legs. But now he’s on the ground, and theCave Troll’s still on him.
If you can re-watch this sequence while reading this book, you’ll notice thatthese beats vary enormously in length. Some of what you’re seeing wasn’t inthe script, but was added later in filming (see Chapter 3). All the shots ofpeople waiting for the Orcs to break down the door, for example, were addedin the storyboard. But some of the apparently nonbeat action was in thescript — Gimli’s line, for example, or Aragorn’s instructions.
It’s important to allow the characters time around each beat to react to theevents of that beat. A story structure is a framework — characters shouldboth react to events and plan ahead for their next action.
When Gimli’s shouting about how he wants the Orcs to come so that he cankill them, he’s thinking, “Well, that’s arguably a bad reversal, but these guyskilled my friends, so I can look on this as a revenge-crazed, combat-junkieupside.”
And when Aragorn starts shouting orders, he’s thinking, “Oops, this is aboutto get a bit eventful. Better take charge and start giving everyone plans andinstructions so that we can, you know, not die.”
It’s not just the events of the story that make people enjoy it. It’s the charac-ters’ reactions to those events. Around every beat, you should be weavingthe characters’ personal stories and reactions. Beats also vary in length toboost suspense. There’s jeopardy in each one, but in the first three beats,you’re really hanging suspense off the beat question in each case. Thesebeats work best if you’ve got time to wonder and worry: What is out there?Let’s see some worrying shadows.
Character reactions heighten the suspense as you see your heroes gettingscared. Face it: If Gandalf’s looking worried, anyone else should probablyadvance straight to panic.
But the last two beats in the sequence work precisely because of their speed.Aargh, Troll! Oh, no, he’s — phew. He’s out of — oh, no, tha — phew. Here, you
66 Part II: Getting Serious
09_096918 ch04.qxp 7/20/07 11:10 AM Page 66

don’t want any extraneous reaction or action, because it’s all in the thinkingtime. If that hammer is coming down right now, you panic. If it’s coming downsome time next Tuesday, no worries.
All the preceding advice applies to scenes that aren’t big fights, too. Drama isbuilt on conflict, so virtually every scene is a fight in some way or another,whether physical, verbal, or even internal.
ScenesAt the next level up from the beat, we’ve got the scene. A scene is a largerreversal within the story — it’s about as low in the structure as you’d go ifyou were telling your story in a few minutes. Often, your scene will be limitedto one location (the theatrical definition of scene), but sometimes it’ll bespread over several locations, as in a chase — er — scene.
A scene is a single unit of story. So, any scene should have one importantchange — one major expectation gap, which breaks down into beats.
Let’s take a look at the third act of The Lord of the Rings: The Fellowship of the Ring:
1. Frodo has brought the Ring safely to Rivendell. Can he now go home? No — the Ring is causing chaos in Rivendell, and the only way Frodo cansee to avoid disaster is to volunteer to take the Ring himself. Now he anda few others must attempt to carry it all the way to Mordor.
2. Can the Fellowship reach Mordor via the Gap of Rohan? No — Saruman’sbirds are watching the Gap. Now they must cross the mountain Caradhras.
3. When Frodo falls in the snow, and the Ring slips from his grasp, willBoromir take it for himself? No — but it is clear he wants to. Now theFellowship must guard against one of their own.
4. Will the Fellowship make it over Caradhras? No — Saruman’s hold overthe weather is too strong. Now, they must face whatever it is thatGandalf fears in the dark of the Mines of Moria.
5. The doors are shut. Can Gandalf even open the door to Moria? Yes —but something that lives outside Moria is awoken at the same time, andthe ensuing fight brings down a landslide on the doors. Now, theFellowship must go forward, because it can’t go back.
6. In amidst the wonders of Moria, Frodo notices Gollum following them.Will they turn to deal with this threat? No — Gandalf advises againstkilling Gollum, believing he has a further part to play. Now Frodo mustgo on, both aware of Gollum and considering Gandalf’s words.
7. The Fellowship comes across the tomb of Balin. Will they face the samethreat that killed him? Yes — Pippin makes a mistake, alerts the Orcs,and now the party must fight.
67Chapter 4: Storytelling and Scriptwriting
09_096918 ch04.qxp 7/20/07 11:10 AM Page 67
8. The Fellowship is fleeing Orcs — can they escape? No — they are sur-rounded. But then the Orcs flee in turn, as a greater threat emerges fromthe Mines — the Balrog.
9. Can the Fellowship flee down the steps of Kazad-dum before they col-lapse? Yes, but only through Aragorn’s athleticism.
10. Can the Fellowship escape Moria and the Balrog? No, not before theBalrog arrives. Now Gandalf must face the creature he fears.
11. Can Gandalf defeat the Balrog? Yes, by shattering the stone under it andcasting it into the pit. But at the last minute, the Balrog drags Gandalf downto his doom, too — and now the Fellowship must continue without him.
The first thing to notice about this structure is how many scenes aren’t there.There are whole heaps of the Fellowship’s journey that are barely touchedon, or skipped over altogether. The Fellowship walk for nearly a hundredmiles without a single scene. Entire movies have been made about climbing amountain, but it’s only two short scenes in the film.
Those scenes that made it into the movie are there because they have impor-tant roles to play in the story. Each of the scenes starts as late as possible —straight into the terrible weather and Saruman from Boromir returning theRing — and ends as soon as it can. It’s always better to start in the middle ofthe action than to include pointless buildup.
The first draft of BloodSpell included an entire four-minute introductionscene that was cut from the feature version. We simply didn’t need those fourminutes, but cut straight to the action.
You’ll run into the problem of how to rescue your characters from someplight again and again. In Scene 8, the Fellowship is “rescued” from the Orcsby the appearance of the Balrog.
Normally, it’s a bad idea to have your characters rescued by an outside force,as it gives the audience the sense that the writer has just arbitrarily decidedto save them! However, in Scene 8, we move from “In Danger” to “In EvenMore Danger,” as a result of temporarily saving them, which means therescue doesn’t feel cheap. You might call this a Frying Pan to Fire reversal.
Scene 11 is the classic end-of-act setup. In general, each act ending will esca-late from the last. So after a series of comparatively small scenes, we nowhave an absolute humdinger, drawn directly from the act structure, withwhich to go on to the first scene of the next act.
There’s no fixed number of scenes that appear per act. When you’re writing,you can aim for as many or as few scenes as will fit your act questions.
68 Part II: Getting Serious
09_096918 ch04.qxp 7/20/07 11:10 AM Page 68

You may not agree with our scene breakdown here — and that’s exactly as itshould be. What we’re doing here is reverse-engineering a structure that nor-mally disappears as a script is written. Were you to write The Fellowship ofthe Ring yourself, you might start by writing a structure like this, but as youadd detail and flavor to the script, the exact scene lines will blur.
Nonetheless, this sort of analysis is very useful because it allows you to lookat the mechanics of a great story and get at least some idea of why it worksso well. You’re losing a lot of the story’s greatness, but you can still see someof what makes it such a powerful and viewable sequence.
It works the other way around, too. If you find a film that really sucks, youcan learn a lot about why and how stories suck, and how to avoid those prob-lems in your own stories, by analyzing it as we’re doing here.
ActActs are the big questions. They encode the point of your film. If your actstructure isn’t totally kick-ass, everything below it will be weak.
There is no hard and fast rule as to how many acts you need in a film. Threeis the norm for a standard-length feature film, while U.S.-format TV dramatends to work on a four-act structure.
Lord of the Rings: The Fellowship of the Ring is arguably a four-act structure:
1. The Baggins family of hobbits own a Ring of Power, which is arguablythe most dangerous item in Middle-Earth. Will they manage to under-stand its danger before it is too late? Yes, just. Now Frodo Baggins mustflee with the servants of Mordor on his heels.
2. Will Frodo meet up with Gandalf and travel to Rivendell safely? Barely —he delivers the Ring to Rivendell on the edge of death from an encounterwith the Ringwraiths. Now he must decide whether he will carry it fur-ther still, all the way to Mordor.
3. Frodo can’t give up the ring to the Wise. Will he succeed in carrying it toMordor? Not yet — the Fellowship’s enemies force the Fellowship totravel through the dangerous Mines of Moria, where Gandalf falls. Nowthe Fellowship must go on without its guide.
4. With Gandalf gone, can the Fellowship fulfill its mission? No — the Ringis working its evil again, and the party turns upon each other as Orcsattack. Now some of the broken Fellowship must search for their cap-tured companions, while Frodo must travel on, with only Sam’s compan-ionship, toward Mordor.
69Chapter 4: Storytelling and Scriptwriting
09_096918 ch04.qxp 7/20/07 11:10 AM Page 69
With these big reversals, you’ve got to be especially careful that they’restrong, and that the audience can’t predict them in advance.
In particular, any reversal or climax that depends on a decision by the protag-onist must be one that can be decided either way.
Frodo deciding whether to give the Ring to Sauron isn’t a strong decision tohang an act on. The audience knows perfectly well he’s not going to do it.
On the other hand, Frodo’s decision of whether to stay with the Fellowship isa really strong climax — there are huge dangers on both sides, and it’s a deci-sion that the audience simply can’t guess ahead of time.
With any reversal, but particularly on the Act level, you must also be carefulnot to go back on yourself. If, for example, Act 3 ended with Gandalf dying,and Act 4 ended with him returning to lead the Fellowship onward, that wouldbe a very weak structure. The third and fourth acts would essentially cancelthemselves out, leaving the Fellowship exactly as they were at the start.
Finally, if your Act structure doesn’t grip people if you tell it in your localcoffee shop, it’s not yet strong enough.
Developing Your CharactersYour audience comes for the action. That’s a given. But they stay for theheroes and the villains — the characters of the piece.
There’s an argument (one thing you may have noticed about storytelling bynow is that there’s always an argument) that the function of a story is toallow viewers to understand a character — an imaginary person — in a waythat they generally can’t understand someone else in real life. All the trialsand tribulations (or, as the case may be, tribbleations, if you’re writing StarTrek fanfic) your characters go through are purely there to expose thechoices your characters make in steadily more extreme circumstances.
You’ll already have ideas for your characters as part of the base-line plotyou’ve constructed. But how do you fill them out?
� Character = opposition. If you want to make your hero cooler, makeyour villain scarier. Heroes, in particular, are reflections of their antago-nists: the bigger and scarier their opposition, the cooler and moreimpressive your hero will look, by simply overcoming the odds.
Hans Gruber, the villain from Die Hard, is a super-impressive villain. He’s smart, he has overwhelming force, and he keeps out-thinking his
70 Part II: Getting Serious
09_096918 ch04.qxp 7/20/07 11:10 AM Page 70
opposition. Bruce Willis’s hero gains points just from being the only manwho can face him off.
Be aware: A villain who makes stupid decisions, overlooks obvious pit-falls in his plans, and fails to do anyone any harm is never going toappear impressive, no matter how theoretically overwhelming hisresources.
� Character versus characterization. Don’t get these two things confused.You need both of them to make a strong character, but they serve funda-mentally different roles. Characterization is the trappings of a character —Jack Bauer is a devoted father, husband, and highly trained ex-specialforces counterterrorist officer. Kinda cool — certainly good material fora hero.
But what made him the driving force for the juggernaut of 24 was hischaracter — the choices he makes when he’s put under pressure. Will helet his daughter die at the hands of terrorists? No, he’ll do anything upto, and including, shooting at a U.S. senator — despite the fact that he’salso clearly a man of duty. Conflict is drama. How a character reacts toconflict is dramatic.
� Passive isn’t interesting. Take your favorite hero or villain. Buffy, Aragorn,James Bond, Rambo. Now, stick them inside a locked room and leave themthere. What do they do? Well, they’ll all react differently, but you candarn well expect to meet them outside about 15 minutes later. They’reall men and women of action. Make sure that your heroes are action-driven. They can make good choices, they can make bad choices, theycan hurt people or make them better. Just have them do something!
If you’re very clever, you can produce a character who appears to bepassive, but actually is anything but — it’s just that all his conflict ishappening internally. See Stephen Donaldson’s Chronicles of ThomasCovenant for a fantastic example of the apparently passive character. Butwatch out — this one is very hard to do well.
� Injustice is a winner. This almost falls under the dirty-tricks-to-make-your-audience-like-you playbook. The modern Western audience hatesto see anyone unjustly oppressed. If you want your audience on yourcharacter’s side, make them the victim of injustice. Have the school prin-cipal think your star is a delinquent when she’s actually a superhero(Buffy the Vampire Slayer). Have him hunted not only by the bad guys,but also by his own team who believes he’s a traitor (24).
� No one is a villain. No one gets up in the morning and thinks, “Aha, nowI shall do hideous evil!” No one. And no good fictional villain does, either.Your villain should be doing what he’s doing for very good reasons.Perhaps he believes that he can’t stand against the powers of Darknessand must join them to survive (Saruman in Lord of the Rings). Or perhaps
71Chapter 4: Storytelling and Scriptwriting
09_096918 ch04.qxp 7/20/07 11:10 AM Page 71

he believes he can earn incredible riches with minimal, acceptable levelsof violence (Hans Gruber in Die Hard).
How does your villain live with himself? Does he blame others for whathe has become? Operate under a compulsion he can’t control? See him-self as a reasonable man doing what he must?
� Don’t write chicks. Or dudes. Or black people. Or Native Americans. It’shard to write people who aren’t quite like you — say, if they’re the oppo-site gender, or from a different ethic background. So don’t.
Ignore the bits that are different (at least for now) and write the bits thatyou understand. Don’t write a spunky female sidekick, for example; writea geek who’s good with a gun and ignore gender. Then, later on, changethe name in the script to one that’s appropriate and ask someone who isfamiliar with the character’s unique identifier to check that there’s noth-ing in there she feels a girl/black guy/Native American from that situa-tion wouldn’t do. This is a cheat, but it’s one that works a lot better thanstruggling to write the unknown and ending up with a cliché.Fundamentally, people are people.
� Make your hero understandable, not likable. This is a mistake Hughmakes all the time — he tries to write a hero people will like and ends upwith a guy who’s a bit bland and for some reason, whiny.
Think about the great heroes of film and books. Think Gandalf — grumpy,mysterious, secretive old git that he is. Think Han Solo. Would you buy aused TIE Fighter from this man? Think Jack Bauer. “Hi. I’m Jack. We’re ingrave danger from terrorists, so I’m going to attach you to mains elec-tricity on the off-chance you know something about it.”
Heroes tend to be understandable — we can see why they’re how theyare, and we forgive them. Jack’s doing what he has to. Gandalf’s nottelling all because it would put people in danger. Han knows he can onlyrely on himself. Heroes do the right thing in the crunch. But you’d rarelywant to go out for a drink with them.
A corollary to this last point is that when heroes meet, they rarely get on.Don’t forget to have Hero A distrust/flee from/hit with a poker Hero B.
� It’s all about layers. You discover more about any interesting characteras you go on throughout the film. This doesn’t necessarily mean backstory — we don’t know anything about James Bond that we didn’t knowfour films ago. But it does mean that we reveal new layers to the charac-ter’s personality — what they care about (Oh, so Jack Sparrow really isquite bitter about that whole mutiny thing!), what they will or won’t do (Mygosh, there’s someone Jack Bauer won’t shoot!), or what they hold dear(Who’d have thought Buffy would care so much about a school prom?).
� Do the smart thing. Try not to have your characters be stupid. Thisone’s hard, we know — there’s an ongoing joke about Jered, the hero ofBloodSpell, being the stupidest man in the entire film — but do try. Talk
72 Part II: Getting Serious
09_096918 ch04.qxp 7/20/07 11:10 AM Page 72

over their plans and try to remove any obvious flaws. Brainstorm solu-tions to their problems.
Making characters super-smart is hard, but if you can manage it, you’vegot a chance to create a filmic moment that will live forever. Rememberthe end of Die Hard? We do.
Actually Writing a Script — Or Not!So you’re brim-full of acts, themes, beats and all that good stuff. How do youactually write a script?
Well, the one thing you don’t do, under any circumstances, is start writing ascript. That’s putting the cart before the horse in a big way. Rather thantrying to write everything about your story all at the same time, you shouldwork on one thing at once.
1. The pitchFirst, you need to figure out the grand structure of your story. Just how high-level you start depends on the scale of your movie. If you’re aiming to write a feature-length movie, start working on act-level plot. If you’re aiming for afive-or-ten-minute short, you’ll only have about three to five scenes, so youcan start out at the scene level; in a film that short, acts and scenes areessentially the same thing.
Start with your overall idea and decide what you already know. How long astory are you writing? (Shorter is a lot easier.) Do you know what the endingis? If so, does it kick ass? Who are your characters?
Now, get yourself a whole pile of paper or, ideally, index cards. Come up withideas for each of your scenes or acts. What are the biggest reversals that youcan find? What are the most exciting events? Don’t worry about fitting thisstuff together — instead, just concentrate on getting the ideas down onpaper.
Now start winnowing your ideas until you’ve got a series of events that com-bine to give you the fastest, deepest, most moving and yet exciting story youcan work out of your raw materials. Write it up as a short story (and we meanone page or less), practice until you can remember it, and then go tell yourfriends this story and listen to their reactions. Watch their expressions. Whenare they rapt? When are they bored? If you stop halfway through, do theyprompt you as to what happens next or go to the bar?
73Chapter 4: Storytelling and Scriptwriting
09_096918 ch04.qxp 7/20/07 11:10 AM Page 73

Then go back and improve it based on what worked and what didn’t. Andrepeat. You know you’re ready to move on to the next section when you’regetting complaints if you don’t finish the story.
2. The skeletonNow you lay the entire movie out in structure form, down to the individualbeats of each scene. If it’s a big movie, lay it out at scene level first. Again,brainstorm all you’re worth, then winnow down, brainstorm again, thenwinnow, then seek criticism, then brainstorm, and winnow some more. Youshould end up with a series of scenes for each Act.
And now go down to the level of the individual beats, and carry out the brain-storming and winnowing process again as you lay out beats for each scene.Think about your characters. Think about how they would react, but also abouthow they could react. What would happen if they did something wildly out of character? What if the heroine suddenly turned on the hero? What if thevillain revealed a sensitive side? If you come up with a particularly cool twist,work it in there if you possibly can. You may have to do some re-engineeringat higher levels to make it work, but it’ll be worth it.
You’ll notice we say engineering. That’s what you’re doing at this point.Storytelling is a craft just like carpentry, and currently you’re sawing woodfor the legs and planing the top smooth. It should be fun, but also exhausting,as you explore every possibility you can, to make the best story possible.
3. The narrativeOkay, you’ve got your scenes. Now, you write each of those scenes up as mini-stories, paying particular attention to what the characters are thinking andfeeling — but absolutely do not write any dialog at all! Explain what the char-acters mean, how they say it, and what they’re thinking, but don’t under anycircumstances write a word of dialog. You’ll probably find that the storiesend up being quite long — a few pages for each scene. That’s a lot of writing,but it’ll pay off.
What you’re doing here is deciding exactly what’s happening in the scene, fromthe point of view of all your characters. When you’ve finished writing, you knowwhat they’re thinking and feeling. It’ll be a real struggle not to write their speechhere — and that’s good. You should be bursting to make them talk by thetime you’ve finished, now you know who they are and what they’d say.
74 Part II: Getting Serious
09_096918 ch04.qxp 7/20/07 11:10 AM Page 74
You may find that the story wants to change at this point. Perhaps a charac-ter’s choice feels wrong, or you want something else to happen than whatyou’ve planned. Listen, and listen carefully, to these instincts. Go back andalter your structure to accommodate them.
Hugh didn’t do this bit the first time he worked on the BloodSpell script — heonly started doing it for the rewrites. And he’s here to tell you that this stepis an absolute must. It may seem like going through all these steps is verytime-consuming, but you’ll actually save time working this way, rather thanwriting and then trying to edit a flawed script.
4. The scriptAnd now, and only now, do you write the script. By this time, actually writingthe script will seem like a breeze — and it should, because you’ve done all thehard work already. Because you already know what’s happening behind thescenes, and you know you’ve got a strong story, the writing will be a pleasure.
5. The s****ing editingYour script’s sitting there, fresh, pristine, and beautiful. And your job, fromnow until the end of the film, is to keep going through it, cutting, changing,and adding, until you’ve gotten rid of all the hidden shoddy bits.
This process takes up all the rest of the production, starting right now.Ruthlessly cut anything that doesn’t add to your movie. In particular, lookout for points where characters go through a beat sequence and come backto the same point they started. Remove them without question or doubt.
Keep cutting and changing as you cast your actors. Cut and trim as you recordyour dialog. Chop like a mad axeman on a caffeine high when you’re editing.
You stop editing about five minutes before you release your film. And eventhen, three months later, you’ll want to release a Director’s Cut.
Writing Natural DialogueBut how do you write natural dialog? How do you make the characters soundcool? Well, the process described in the preceding sections will help. You’ll
75Chapter 4: Storytelling and Scriptwriting
09_096918 ch04.qxp 7/20/07 11:10 AM Page 75

be gagging to get at the page by the time you’ve finished, and the chances areyou’ll know exactly what you want your characters to say.
But there are still a lot of tricks to writing convincing dialogue — more thanwe have time to write about here. Here are a few quick pointers:
� Interrupt me, please! Real people don’t wait patiently for each other tofinish speeches, particularly if they’re trying to kill or seduce each otherat the time. Have your characters interrupt each other. Have them cutoff each other’s speeches. Have them start to say something and thenrealize that they didn’t want to because it revealed too much. Have themsound convincingly impatient and flawed.
� They don’t all sound the same. Make very sure that you can tell whichcharacter is speaking at any one time. Your characters should have dif-ferent mannerisms, different favored phrases, and different levels ofvocabulary. Would the posh Englishman really say that our hero fanciesthe villain, or would he say he has “a certain regard” for her? Or wouldhe just go all Hugh Grant and say something like, “Well, of course, I don’treally know for sure, but, well, he might well have, oh, you know, somekind of — oh, never mind.”
Hugh finds it sometimes helps to thing of a specific Hollywood actor andwrite as if you’re writing the part for them to play — you’ll write differ-ently for Alan Rickman than The Rock.
� Subtext, subtext, subtext. People don’t say what they mean. You’ll knowthat if you’ve ever asked or been asked on a date. If a character’s talkingabout something that’s important to him, he should talk around the sub-ject, talk through it, talk in metaphors, be unclear, and talk about some-thing else entirely. Anything but actually say what he’s thinking.
� Listen to your actors. Your actors are the best tool you’ve got for polish-ing characters if they’re already pretty strong. Listen to their sugges-tions and listen in particular for lines they have trouble saying. Why isthat? Can you say something else? Does the actor have a favored phraseor turn of speech that would work for the character, too?
Adhering to Script FormatThere’s a standard format for Hollywood scripts. People who are aiming tobreak into Hollywood writing obsess over it and follow it slavishly, to theextent that you can find arguments on writers’ forums about the type of man-uscript binding that will best help your chances of getting picked up by anagent or a studio. That level of obsession is silly. But the standard scriptformat, shown in Figure 4-1, is there for a reason, and it’s worth following.
76 Part II: Getting Serious
09_096918 ch04.qxp 7/20/07 11:10 AM Page 76

Your scripts should:
� Be written in 12-point Courier or Courier New font.
� Have dialog indented and character names (when speaking) bold, cen-tered and capitalized
� Have action directions left-margin aligned.
� Capitalize major character action verbs and camera directions.
� Scenes should be marked as such and should include directions as tothe location they take place, and the lighting there.
JERED
What’s the stupidest thing I could possibly do here?
He turns around and PUNCHES the metal golem.
CUT TOAct 2, Scene 3INT, HOSPITAL – SOME HOURS LATER
Figure 4-1:A standard
scriptformat.
77Chapter 4: Storytelling and Scriptwriting
More informationThere’s a wealth of information out there on sto-rytelling and scriptwriting. Despite the length of this chapter, we’ve barely scratched the surface.
Story, by Robert McKee. This is It. This is TheTome. It’s The Daddy. It’s huge, and it’s kinda dry,and it has a ton of graphs, but it’s the bestresource for understanding and writing story onthis or any other planet.
Adventures in the Screen Trade and Which LieDid I Tell? by William Goldman. The PrincessBride. Butch Cassidy and the Sundance Kid. AllThe Presidents Men. He wrote them all, andnow he’s written about writing them. Fantasticinsights on every page.
The Complete Book of Scriptwriting by J.Michael Straczynski. The writer of Babylon 5
gives us the low-down on, in particular, televi-sion writing. Fantastic for, amongst other things,a very clear and pretension-free guide to thestandard episodic TV format.
www.janeespenson.comby Jane Espenson.One of the most experienced and talented writ-ers working in TV today, Jane Espenson hasworked on Buffy the Vampire Slayer, BattlestarGalactica, The O.C., and a whole bunch more.And now she’s writing a blog on how to write.Particularly brilliant info on humor and charac-terization here.
www.wordplayer.com. One of the topscriptwriting forums on the Internet, with awhole pile of helpful articles and some greatdiscussion boards.
09_096918 ch04.qxp 7/20/07 11:10 AM Page 77

Everything else is more or less optional, but if your script looks like the oneshown in Figure 4-1, you’ll find it’s easier to read and understand. You’ll alsobe able to use the old script-reader’s trick of estimating duration — one pageof properly formatted script, all else being equal, is about one minute of film.
Finally, you can compare your scripts with those of your heroes. You canlearn a lot even from looking at how your script is laid out on the page, com-pared to, say, Peter Jackson’s work, or a script by Quentin Tarantino.
Are your blocks of dialogue shorter or longer? Why? How do they lay outaction? Why? Are your action scenes too short, or your dialogue not fullenough of changes of speaker? Look at their work, look at yours, and com-pare. You’ll learn more that way than we can teach you in a few thousandwords, that’s for sure!
78 Part II: Getting Serious
09_096918 ch04.qxp 7/20/07 11:10 AM Page 78

Chapter 5
Engines, Engines EverywhereIn This Chapter� Choosing the right engine for your project
� Reviewing the available Machinima engines
“Machinima sounds great, but I can’t find a link to it anywhere. Wheredo I download this software?”
Of course, Machinima isn’t a piece of software, but a technique that can beemployed using a variety of computer game engines. In this chapter, we takea look at some of the most popular and most promising engines and tools anddiscuss their suitability for Machinima.
We list the pros and cons for a Machinima maker, suggest the most commongenres of movie to which the engine lends itself, and rate each engine forMachinima usage.
We’ve tried to make the information in this chapter as up-to-date as possible,but clever modders and generous games designers reveal new game tools andfeatures on an almost weekly basis. We keep a list of updates to this chapter onthe Machimima For Dummies Web site at www.machinimafordummies.com.
10_096918 ch05.qxp 7/20/07 11:10 AM Page 79
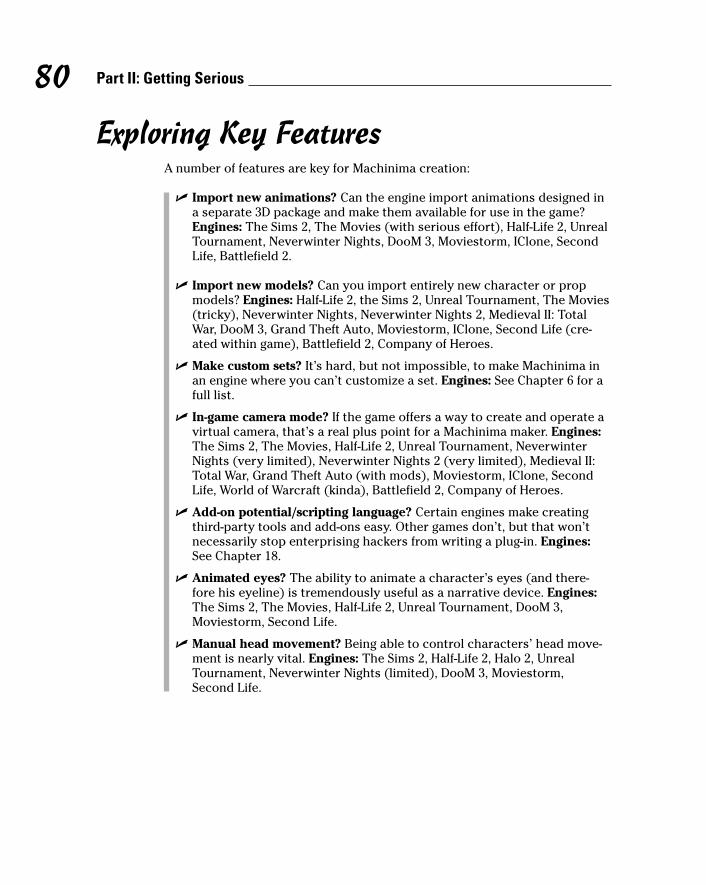
Exploring Key FeaturesA number of features are key for Machinima creation:
� Import new animations? Can the engine import animations designed ina separate 3D package and make them available for use in the game?Engines: The Sims 2, The Movies (with serious effort), Half-Life 2, UnrealTournament, Neverwinter Nights, DooM 3, Moviestorm, IClone, SecondLife, Battlefield 2.
� Import new models? Can you import entirely new character or propmodels? Engines: Half-Life 2, the Sims 2, Unreal Tournament, The Movies(tricky), Neverwinter Nights, Neverwinter Nights 2, Medieval II: TotalWar, DooM 3, Grand Theft Auto, Moviestorm, IClone, Second Life (cre-ated within game), Battlefield 2, Company of Heroes.
� Make custom sets? It’s hard, but not impossible, to make Machinima inan engine where you can’t customize a set. Engines: See Chapter 6 for afull list.
� In-game camera mode? If the game offers a way to create and operate avirtual camera, that’s a real plus point for a Machinima maker. Engines:The Sims 2, The Movies, Half-Life 2, Unreal Tournament, NeverwinterNights (very limited), Neverwinter Nights 2 (very limited), Medieval II:Total War, Grand Theft Auto (with mods), Moviestorm, IClone, SecondLife, World of Warcraft (kinda), Battlefield 2, Company of Heroes.
� Add-on potential/scripting language? Certain engines make creatingthird-party tools and add-ons easy. Other games don’t, but that won’tnecessarily stop enterprising hackers from writing a plug-in. Engines:See Chapter 18.
� Animated eyes? The ability to animate a character’s eyes (and there-fore his eyeline) is tremendously useful as a narrative device. Engines:The Sims 2, The Movies, Half-Life 2, Unreal Tournament, DooM 3,Moviestorm, Second Life.
� Manual head movement? Being able to control characters’ head move-ment is nearly vital. Engines: The Sims 2, Half-Life 2, Halo 2, UnrealTournament, Neverwinter Nights (limited), DooM 3, Moviestorm, Second Life.
80 Part II: Getting Serious
10_096918 ch05.qxp 7/20/07 11:10 AM Page 80

� Create new characters on the fly? If you can just click Create NewCastle Guard rather than having to shut down the game, open the editor,drag a guard to the castle steps, save, and reload, your filming will be amuch smoother and speedier process. Engines: Half-Life 2 (with script-ing or add-ons), Neverwinter Nights, Neverwinter Nights 2, Grand TheftAuto (with mods), Moviestorm, IClone.
� Pause mode? If you’re trying to control eight characters at once, cue upa magical explosion, and start your camera track all at the same time,you’ll appreciate a Pause button. Engines: The Sims 2, NeverwinterNights, Neverwinter Nights 2, Medieval II: Total War, Grand Theft Auto(with mods), Company of Heroes.
� Control more than one character? A game that provides the facility tocontrol only one character at a time is quite limiting for Machinima pur-poses. A much better scenario is one in which the game allows you toswap between several characters, or even control a squad of charactersat the same time. Engines: The Sims 2, The Movies, Half-Life 2 (withmods), Neverwinter Nights, Neverwinter Nights 2, Medieval II: Total War,Unreal Tournament, Grand Theft Auto (with mods), Moviestorm, IClone,Company of Heroes.
� Multiplayer? Does the game have a facility for more than one person tocontrol aspects of the game at once? In other words, can you have yourfriends control the actors in your film while you control the camera?Engines: Half-Life 2, Halo 2, Unreal Tournament, Neverwinter Nights,Neverwinter Nights 2, Medieval II: Total War, DooM 3, Grand Theft Auto(with mods), Second Life, World of Warcraft, Battlefield 2, Company ofHeroes.
� Commercial license? Most Machinima engines have legal hurdles (seeChapter 15) preventing you from selling or otherwise commerciallyexploiting your film. However, some engines allow you to sell your work.Engines: Unreal Tournament (expensive — $5,000), Moviestorm, IClone,Second Life.
Beyond these features, you’re likely to care about a few general features of anengine. Table 5-1 lays out our opinions. Remember, 10 is the highest rating anengine can receive.
81Chapter 5: Engines, Engines Everywhere
10_096918 ch05.qxp 7/20/07 11:10 AM Page 81
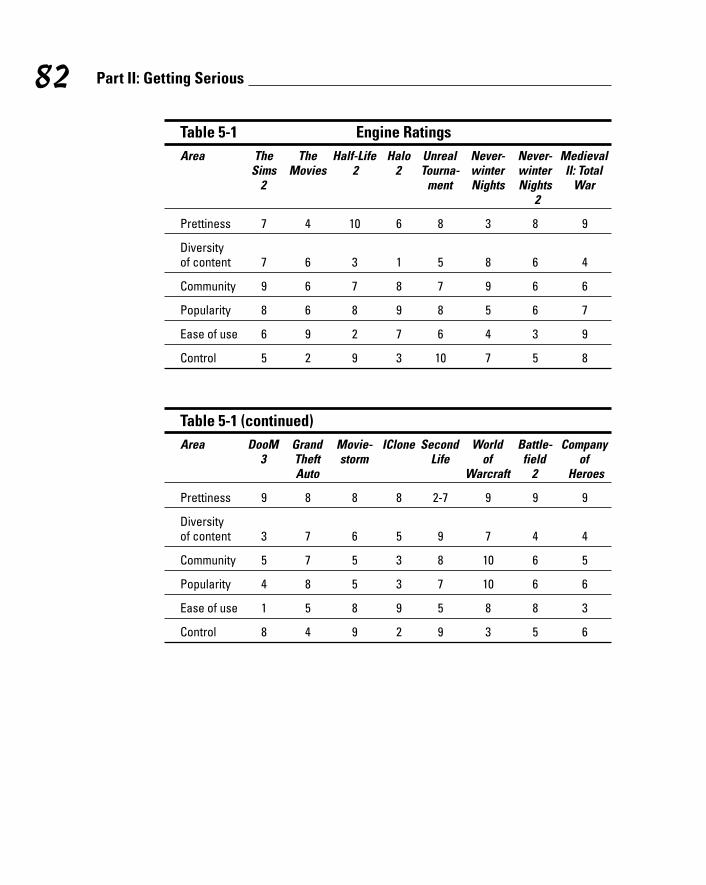
82 Part II: Getting Serious
Table 5-1 Engine RatingsArea The The Half-Life Halo Unreal Never- Never- Medieval
Sims Movies 2 2 Tourna- winter winter II: Total 2 ment Nights Nights War
2
Prettiness 7 4 10 6 8 3 8 9
Diversity of content 7 6 3 1 5 8 6 4
Community 9 6 7 8 7 9 6 6
Popularity 8 6 8 9 8 5 6 7
Ease of use 6 9 2 7 6 4 3 9
Control 5 2 9 3 10 7 5 8
Table 5-1 (continued)Area DooM Grand Movie- IClone Second World Battle- Company
3 Theft storm Life of field of Auto Warcraft 2 Heroes
Prettiness 9 8 8 8 2-7 9 9 9
Diversityof content 3 7 6 5 9 7 4 4
Community 5 7 5 3 8 10 6 5
Popularity 4 8 5 3 7 10 6 6
Ease of use 1 5 8 9 5 8 8 3
Control 8 4 9 2 9 3 5 6
10_096918 ch05.qxp 7/20/07 11:10 AM Page 82

The Sims 2You’d think that a game that comes with its own built-in story mode and abunch of filming tools would be a Machinima maker’s dream come true.
We cover The Sims 2 as a Machinima engine, including pros, cons, and threechapters of tutorial, in Chapters 6, 7, and 8. Table 5-1, though, gives you ourratings of the engine.
Use this engine if you want to make a low-violence, modern-day movie,preferably without too much dialog.
The MoviesA game in which you play a movie executive and get to create your ownmovies using a dedicated movie creation tool? Is The Movies the greatestMachinima tool ever? Well, sadly, no, although it does have its pros:
� Ridiculously simple: The Movies is probably the easiest engine in whichyou can make Machinima. You can churn out your first movie in lessthan an hour. It will, mark our words, be utterly dire, but it’s still animpressively quick turn-around.
� Widely adaptable: The Movies is one of only a few game engines thatare as suited to corny science-fiction as it is to a modern-day rom-comor a slapstick comedy. You can tackle an astonishingly wide range of pro-jects with The Movies.
Ah, but the cons:
� Filming by numbers: The very simplicity of this game makes it hard tocreate something stunning. You need to buy the expansion pack to evenchoose your own camera angles freely, and even then, you’re quite heav-ily restricted. It’s very hard to avoid creating a movie that just screams“I’ve been made using The Movies!”
� Basic edits only: Although The Movies does ship with a simple videoeditor, it’s very basic. There’s no way it can compete with a “real” videoeditor.
� One-stop-shop: The game is reluctant to allow you to use any externaltools, including video and audio editors, to edit your movie. It’s possiblewith effort, but you’ll be swimming against the current.
� Oh, look, it’s that living room again: Imagine if every show on TV usedthe same 20 or so sets. Thus it is with The Movies. The sets, costumes,camera shots, and props soon become all-too-familiar.
83Chapter 5: Engines, Engines Everywhere
10_096918 ch05.qxp 7/20/07 11:10 AM Page 83
It’s also worth knowing:
� You can import new models into The Movies, although to do so requiresa lot of complicated hacking and a knowledge of 3D model formats.
� Even with the additional camera controls provided by the Stunts AndEffects add-on pack, the precision control that you’ll have over yourcamera is severely limited.
� Manual head movement is only partially achievable. It’s possible to askthe characters very nicely to look in a certain direction, but there’s noguarantee that they’ll listen.
� The Movies community has been hard at work creating tools to over-come its limitations. They’re pretty technical, but you can find out moreat http://dcmodding.com/main.
� The lack of a pause mode shouldn’t be considered a negative point forthis game. The nature of The Movies is such that is has no need of one.
You can use The Movies for virtually any genre. Use The Movies if you’ve gota specific idea you know you can pull off, or you just want a very basic intro-duction to Machinima.
Half-Life 2Half-Life 2 may have been the most anticipated game of all time, and it’s stillone of the most technologically advanced. It’s also a modder’s dream: Thegame is supplied with a lot of tremendously powerful, and mind-bogglinglycomplicated, modding tools, including Machinima utilities.
In many ways, Half-Life 2 is the polar opposite of The Movies (see precedingsection). It’s possible to do just about anything you can imagine in thisengine to an incredibly high degree of quality, but even the simplest thingsmay be a huge struggle.
The pros include
� Ooh, it’s pretty! Half-Life 2 looks visually incredible. Produce a movie inthis engine, and it will look good, no two ways about it.
� It’s phenomenal. Half-Life 2 includes an incredibly advanced lip-synchingtool, called Faceposer. It can create lipsynch automatically for speech inany language, and if that’s not enough for you, you can then tweak thatspeech down to the finest details.
� Yes, there is a tool for it. Half-Life 2 features tools for everything. There’sa full camerawork tool, just for Machinima. The Garrysmod add-on,
84 Part II: Getting Serious
10_096918 ch05.qxp 7/20/07 11:10 AM Page 84

available on the Internet, adds tons of new functionality equal to othergames’ Dungeon Master modes. And so on.
� See whether you can balance the Jeep on top of the wall! The Half-Life2 in-game physics were justifiably lauded by all and sundry upon thegame’s release. Clever use of the game’s physics can add a level of real-ism to even the most uncomplicated movie.
But, unfortunately, there are some cons:
� Error: Brain is out of swap space. Please restart. Half-Life 2 is very,very, very complex. Strange Company’s regular video editor, Dr RossBambrey (who once interviewed for a job as Stephen Hawking’s assis-tant), has been struggling with Half-Life 2 for a couple of years and stillranks himself as a beginner. Yikes.
� Not him again! It’s not impossible to add new characters to Half-Life 2.Technically. True, to do so requires so much 3D modeling and texturingexpertise that you should probably quit this Machinima thing and goand work for Pixar. But it’s not impossible.
� Engine coding from the future. Editor from the Stone Age. There’s onearea where Half-Life 2 isn’t super-advanced, and that’s in its map/scripteditor, Hammer, the original Half-Life editor from 1999. It’s utterly horri-ble for anyone who has used another gaming editor this decade.
Half-Life 2 works best for near-future dystopian science-fiction only. However,the game assets can be cleverly employed for other genres. Randall Glass’ A Few Good G-Men is a modern-day courtroom drama, for example, thatworks well.
Most Machinima that has been produced in Half-Life 2 to date has used theGarrysmod add-on (www.garrysmod.org). If you want to make Machinimain Half-Life 2, Garrysmod is probably the easiest way.
Use Half-Life 2 if you want the best possible quality, you can use the existingcharacters, and you’re prepared to work hard on very technical software.
Halo 2Red vs Blue is responsible for introducing more people to the Machinima com-munity (both as producers and consumers) than anything else. It’s astonishinghow many people watch RvB and think “I want to make something like that”.
But be warned: Rooster Teeth, the makers of Red vs Blue, are very good atwhat they do. You can create a movie using Halo 2 with comparative ease, butcreating something as accomplished as RvB is trickier than you may think.
85Chapter 5: Engines, Engines Everywhere
10_096918 ch05.qxp 7/20/07 11:10 AM Page 85
Here are the pros of Halo 2:
� Faceplates: Most computer game characters, let’s be honest, are notreally capable of competing with Johnny Depp for the full gamut ofhuman emotions. But if all your characters are wearing helmets, as inHalo 2, that’s a whole lot of emoting you don’t have to worry about.
� Big audience: There’s a big audience for Halo Machinima, thanks mainlyto Red vs Blue. Chances are, if your movie is any good, it’ll attract view-ers almost immediately.
� Simple enough: It’s easy to control and manipulate Halo 2 to achievemost of the shots you’ll need. The tricky shots really tax your ingenuity,but you’ll quickly get the hang of the basics.
And here are the cons:
� Hard to hack: As a primarily console-based game, Halo 2 is hard to hackor modify. Running the game on a PC rather than an X-Box can help, butit won’t entirely alleviate the problem.
� Very, very, very limited scope: You’re going to be making a film withMarines and aliens. They’ll either be in futuristic corridors or outdoorsycountryside bits.
� No facial animation: Well, no faces, period. It’s great if you can justifywithin your plot the fact that your characters never remove their hel-mets. If you want Bob to wink at Susie, though, forget it.
� You’re not as funny as Rooster Teeth: Deal with it.
Halo 2 works well for self-referential comedy set within the game world.Again. Or a range of science fiction.
Use Halo 2 if you want to make a quick sci-fi movie, or you want to tell a storyspecifically set in the Halo universe.
Unreal TournamentA great multiplayer game, and also a potentially great Machinima engine,Unreal Tournament (UT) is heavily customizable and highly robust. It’s alsocontinually updated. We’re looking at the 2004 version here, but the 2007 ver-sion, due to come out soon, looks super-slick.
Unreal Tournament’s pros:
� UnrealEd just rocks: It really does. The UnrealEd editor (free with thegame) can be used to create very detailed and impressive maps. A tal-ented modder can modify the game in amazing ways.
86 Part II: Getting Serious
10_096918 ch05.qxp 7/20/07 11:10 AM Page 86

� Mountains and corridors: UT is traditionally associated with low-litmetal corridors, but now includes the ability to create great-looking out-door sets as well. Trees, lakes, and mountains are all achievable.
� Built-in Machinima package: UT includes a specially designed andhighly regarded cinematics creation package, called Matinée, which waspartially designed in consultation with Machinima creators.
And UT’s cons:
� Guns, big guns: UT’s biggest disadvantage is its available set of charac-ter models. Because it’s a first-person battling game, they’re a wide vari-ety of heavily muscled space Marine and alien types.
� No lipsynch on player models: UT ships with a high-quality lipsynchtool called Impersonator and a couple of high-detail models. However,the player models aren’t lipsynched by default, and these features aregenerally hard to use.
UT works best with sci-fi. However, lots of people have created mods,models, sets and art for UT. Lots and lots of people. If you want new content,go check the Internet first — someone may have already created it.
If you want to create new art, meanwhile, pretty much anything is possible.
You’ll need to investigate the headache-inducing world of scripting if youwant to animate characters’ eyes or create new characters in-game. You don’tneed to do any scripting to control as many characters as you like, though —you can do that through the Matinée Machinima tool.
You can commercially license a version of the Unreal engine that doesn’tinclude any of the art assets usually bundled with the game, for a few thou-sand dollars.
Use UT if you want to do something you can’t do in any other Machinimapackage, and you’re pretty technically adept.
Neverwinter NightsYour humble authors are quite familiar with Neverwinter Nights, having spentthe last three years using it to make a feature film. It’s quite an old enginenow, and it’s quirkier than a British sitcom character. But it does do somethings better than just about anything else:
� Dungeon Master Client: NWN’s Dungeon Master tool is one of the bestMachinima production environments we’ve ever seen. It allows multipleusers to spawn and destroy characters as needed, control every charac-ter in the set, place special effects, and so on.
87Chapter 5: Engines, Engines Everywhere
10_096918 ch05.qxp 7/20/07 11:10 AM Page 87

� Lots of characters: NWN is one of the best available engines in which toshoot complex scenes with many active characters. We frequently shotfight scenes with upward of 30 combatants.
� Huuuuuge range of (fantasy) content: There are literally tens of thou-sands of custom models, sets, and props available for NeverwinterNights. Most of them are targeted at the fantasy genre that NWN inhab-its, but given that, you can find almost anything you want.
� Fantastic set editor: NWN’s Aurora editor is incredibly fast and easy touse. Based on a tile and prop system, it can be fiddly to achieve preci-sion, but for sheer speed and user-friendliness, it’s hard to beat.
Now the cons:
� No lipsynch without TOGLFaceS: NWN doesn’t have any sort of lip-synching available, at all. We wrote a tool to get around that, whichwe’re happy to share (e-mail us at [email protected]), but it’sfiddly and very technical. See Chapter 18 for the story.
� Old: NWN isn’t the prettiest engine on all the Earth. It’s possible toachieve some astonishing results with it, but straight out of the box,these days, it looks kinda ugly.
� Horrible camera. The camera controls for Neverwinter Nights are justplain horrible. Because the camera is attached to the character it’s fol-lowing, you can’t move it around freely, but have to jiggle it around theinvisible character you’re following. This engine works well for fantasy,in all its varied forms. It’s also possible to do modern-day or sci-fi usingsome content on the ’Net.
Use Neverwinter Nights if you want to make a fantasy movie, you’re not tooconcerned about graphical quality, and you want more control and documen-tation than either NWN2 or World of Warcraft.
Neverwinter Nights 2The sequel to Neverwinter Nights came out in 2006, five years after the origi-nal. It’s early days for the NWN2 modding community yet, but there doesn’tseem to be the same frenzy of custom content creation as there was for theoriginal Neverwinter Nights.
The pros:
� Pretty: The graphics for NWN2 are considerably upgraded from the orig-inal. In particular, NWN2’s townscapes are lush, realistic, and convinc-ingly dirty.
88 Part II: Getting Serious
10_096918 ch05.qxp 7/20/07 11:10 AM Page 88

� Dungeon Master Client, Nice toolset, et al: NWN2 has many of the sameadvantages for Machinima as NWN1. It has retained the flexible Auroraeditor, has a very similar scripting language, and has a nascent DungeonMaster’s Client for Machinima directors to use and abuse.
The cons:
� In theory: The NWN2 toolset is, at time of writing (2007) a little incom-plete. Many engine features are not yet available to modders, as they’rebased on expensive ($10,000+) tools used by the developers.
� Buggy: At time of writing, more than a hundred bugs were listed on theofficial toolset bug list on the Neverwinter Nights 2 forums. Patches aredramatically improving the situation, but right now, creating contentusing NWN2 is hard.
� Unattractive heads: While some aspects of NWN2 look astonishinglycool, we’ve seen very few NWN2 character heads that didn’t look dis-tinctly odd. Thick brows and strong jawlines — on the women — may beironed out with better toolset usage, but currently the characters we’veseen don’t look great.
� Limited characters: Adding new character models is hard due to the ani-mation problems, but it’s not impossible.
� Fiddly camera mode: The in-game camera mode is still very fiddly.
Use Neverwinter Nights 2 if you want to make a fantasy movie, want more con-trol than World of Warcraft will give you, want better graphics than NWN1, andyou’re prepared to put up with or hack around bugs and arbitrary limitations.
Medieval II: Total WarThe Total War series of games has reached a pinnacle with Medieval II: TotalWar. In this game, you control armies of thousands of knights, peasants, can-noneers, and even elephants. We cover Medieval II: Total War, and its sophis-ticated Machinima creation tools, in Chapter 12.
If you want to re-create the massive battles of Lord of the Rings, this is theengine for you — and it’s really the only engine that can do that.
DooM 3DooM 3, the second sequel to the genre-defining DooM, was released in 2004.Its graphics were stunning, featuring real-time lighting and shadows, and
89Chapter 5: Engines, Engines Everywhere
10_096918 ch05.qxp 7/20/07 11:10 AM Page 89
monsters more realistic than anything we’d seen. But since then, virtually noMachinima work has been seen coming from DooM.
DooM 3’s pros include:
� Incredible graphics: DooM 3’s graphics are still state-of-the-art today.They’re dark, they’re involving, and they look fantastic. Full lipsynchingand sophisticated animation complete the package.
� Machinima production tool: Fountainhead Entertainment produced aMachinima tool called Machinimation for DooM 3. Only a beta versionwas ever made available, but it’s still out there and still usable.
� Very flexible: A lot of the DooM 3 engine is exposed for editing. It’sanother the-sky-is-the-limit engine.
� Fantastic custom characters: Imported custom characters can poten-tially look fantastic, but they’ll need to be of an equivalent detail level toHollywood 3D models.
For the cons:
� Really, really, really, really complicated: DooM 3 may be the mostarcane engine ever created. Even simple editing work requires hugeamounts of scripting, programming, and 3D art ability.
� Very limited game art: Unless you’re aiming to produce a movie aboutspace marines fighting demons, you’ll not get a lot of use out of theheavily muscled heroes and Geigeresque villains of DooM 3.
� Small community: There’s basically no one making DooM 3 Machinima.Some people are making mods for it, but again, information on theengine is quite limited.
DooM 3 works best for sci-fi featuring space marines or weird demonic aliensin a space station or Hell. If you want to do anything else, you’ll need to startcreating models, which is hard.
Use DooM 3 if you really want to use the graphics engine and are prepared todo a lot of work.
Grand Theft AutoHip, violent, and controversial, the Grand Theft Auto (GTA) series has beenone of the more visible game franchises of the last few years. If you’ve some-how missed hearing about GTA, the series is a collection of crime sims —sand-box cities where you can commit mayhem to your heart’s content.
90 Part II: Getting Serious
10_096918 ch05.qxp 7/20/07 11:10 AM Page 90

It’s extremely difficult to create Machinima using the tools built into Grand TheftAuto. Fortunately, one Machinima maker (Ceedj from pioneering GTA filmmak-ers Pawfect Films) has designed an entire toolset to allow more sophisticatedMachinima creation. You can download it from www.pawfectfilms.com.
The pros:
� Real-time puppetry: Using the Pawfect Films San Andreas Studios, youcan control an entire group of characters in real-time, giving you a fastand flexible Machinima production studio.
� Huge and cool: There’s a lot of content in San Andreas, and it’s all well-rendered in a slightly satirical style.
� Modern-day action: Car chases! Gunfights! Fisticuffs in buildings! GTAopens up a whole vista of potential action and adventure for yourMachinima.
� NC-17: With the exception of Second Life, most Machinima-capableengines tend to be a bit tame. Not so GTA — if you want guns, violence,and scantily clad women, this is the engine for you.
The cons:
� Very hacked: All the Machinima tools available are hacks, and their reli-ability and ease of use isn’t up there with professional packages.
� Limited setting: There’s no map editing or character creation in GTA.You’ll have to make films with what you can find.
� Still limited: Because you don’t have perfect (or even Pawfect) control,what you can do with GTA is still limited. You can create some prettycool stuff, but the control mechanisms you’ve got available will breakdown if you want to, say, re-create the famous “thousands of cop cars”chase at the end of Blues Brothers.
GTA is modern day, but within that limitation, it offers a pretty wide palette.You can shoot sitcoms, à la the series PEDS, or post-apocalyptic drama likeThe Days After. In many ways, Grand Theft Auto is one of the more flexiblegames available for Machinima.
However, keep the following points in mind:
� It’s very difficult to import custom animations or new models into thegame, although it can be done.
� You’ll need to SA Studios mod to create new characters on the fly, orcontrol more than one character.
� You make GTA into a multiplayer game with the SA Multiplayer mod,available from www.sa-mp.com.
91Chapter 5: Engines, Engines Everywhere
10_096918 ch05.qxp 7/20/07 11:10 AM Page 91
MoviestormMoviestorm is the new kid on the block — so new, in fact, that we only had abeta preview copy to play with while we were writing most of this book.Moviestorm isn’t a game: It’s a dedicated Machinima filmmaking package. Itallows for character creation, modelling of sets, camera scripting, and on-the-fly filming, as well as sound editing and post-production.
Chapter 17 covers Moviestorm in full detail, including sets, characters, andediting. Oh, and you can find a copy of Moviestorm on the DVD that accom-panies this book.
Use Moviestorm if you want to make a commercial Machinima production,you want to use a dedicated Machinima production kit without the hackinghassles of other engines, or just because it came on the DVD!
ICloneOne of the first professionally licensed Machinima toolkits on the market,IClone is now in version 2.0, with version 3.0 due some time in the monthsafter publication of this book. Billed as “accessible 3D animation”, IClone hasso far failed to attract a major following in the Machinima world.
Here are the pros:
� Very simple: It’s no exaggeration to say that you can create a moviewithin five minutes using IClone.
� Nice character customization: Sophisticated morphs and a great newgarment creation system mean you can quickly create attractive 3Dcharacters.
� Automatic lipsynching: It’s trivially simple to have a character in IClonelipsynch a line. Simply record the line live in IClone or attach a .wav file,and the program automatically animates the character’s face as theyspeak their lines.
� Built-in Motion Editor: While it’s very primitive, Iclone does ship with abuilt-in animation editor.
And the cons:
� Too simple: It’s very easy to create a simple scene in IClone, but it’s veryhard to go beyond the basics. You can’t adjust the lipsynch, there’s not alot of adjustment you can make to the animation, and you can’t control acharacter’s face beyond very basic expressions.
92 Part II: Getting Serious
10_096918 ch05.qxp 7/20/07 11:10 AM Page 92

� No AI: There’s no intelligence in IClone allowing you to simply tell acharacter to walk.
� No new sets: IClone doesn’t have a set editor beyond basic templates.You’ll need 3D Studio Max ($3,500) to create new sets.
IClone comes with a couple of basic characters, a dozen basic sets rangingfrom a fantasy temple to a newsroom, and about 20 props. It’s possible tomake a modern-day or fantasy film with these props, if you’re careful. UseIClone if you want very simple talking head characters, and you don’t needthem to walk or interact.
Second LifeThere’s a Chinese company called Anshe Chung Studios, Ltd, which currentlyemploys about 30 people. Its business is entirely conducted in the virtualworld of Second Life. This fact alone should give you some idea of how vastSecond Life is, and how much potential the game world provides for the mostdiverse of ventures. Machinima creators are migrating there in droves.
The pros:
� Great potential: You can create almost anything you can imagine usingSecond Life. The sheer scope and variety of locations, props, and char-acters within Second Life is staggering.
� Free to join: A basic Second Life account is free. You’re required to enteryour credit-card details, but you aren’t charged a dime unless youchoose to upgrade your account.
� Machinima-friendly: Linden Labs, the makers of the game, are bigMachinima fans and actively encourage its users to produce movieswithin the Second Life world.
� Commercial license: The default game license for Second Life allowsyou to record footage from the game and use it for commercial purposes.
� Active community: Machinima makers are very active in Second Life andmay be able to help you with land fees, casting, and technical support.
Linden Labs recently announced that it would make the server code forSecond Life open-source. That will change or make irrelevant a lot of the fol-lowing con points — notably the first, the second, and eventually the fourthand fifth — and make SL a much more attractive Machinima platform.
� Aargh! Our eyes, our beautiful eyes! A lot of the content in-world isvery adult. Your humble authors were shocked by some of the sexualimagery we found in the game — and we don’t shock easily. In our expe-rience, the in-game mature content filter isn’t very effective either.
93Chapter 5: Engines, Engines Everywhere
10_096918 ch05.qxp 7/20/07 11:10 AM Page 93

� It’ll cost you: Although a basic Second Life subscription is free, you’llneed to pay real-world money to buy in-game items and rent in-gameland. It would have cost Strange Company more than $7,000 to makeBloodSpell in Second Life. Most movies would cost less, but free it ain’t.
� Not all that pretty: Unfortunately, the graphics engine behind SecondLife is distinctly last-generation. It is being continually developed, butcurrently Half-Life 2, DooM 3, and later engines leave Second Life eatingtheir dust. In particular, there’s no lipsynching without NeverwinterNights-style hacks (see “Neverwinter Nights”, above).
� One player, one character: If you want a character in your movie, evenas an extra, even just propping up a bar, you’ll need an actual live personthere to control them. That can quickly become a major logistical problem.
� Lag: Second Life is very prone to slowdown or lag, and you can’t do tocontrol it unless you own your own server (Island), which is expensive.Half the art of SL Machinima is avoiding said lag.
Your imagination is your only limit with Second Life. Almost any genre can becatered for.
Here are a few more points to consider:
� The quality of created content within Second Life varies enormously, asdoes its visual quality.
� You need the separate software Poser ($250) to import new animations.
� Camera movements are scriptable, and your viewpoint character can govirtually anywhere.
� Second Life is a moving target even more than the rest of the engines inthis chapter. As we were finalizing this chapter, a major graphicalimprovement for SL’s lighting arrived in our inbox. You can keep on topof the latest improvements in SL at www.machinimafordummies.com.
Use Second Life if you need a commercial Machinima environment, you’vealready got a budget and plenty of contacts in Second Life, or you don’t wantto use third-party modeling tools.
World of WarcraftWorld of Warcraft is the biggest media property of all time, offering you theopportunity to become an Orc, a Troll, or a Night Elf in a sprawling fantasyworld inhabited by literally millions of other players (0.1 percent of the entireworld, according to some reports). World of Warcraft has also spawned amassive Machinima following. We cover Machinima creation in World ofWarcraft, including using third-party tools and organizing shoots in a virtualworld, in Chapter 11.
94 Part II: Getting Serious
10_096918 ch05.qxp 7/20/07 11:10 AM Page 94
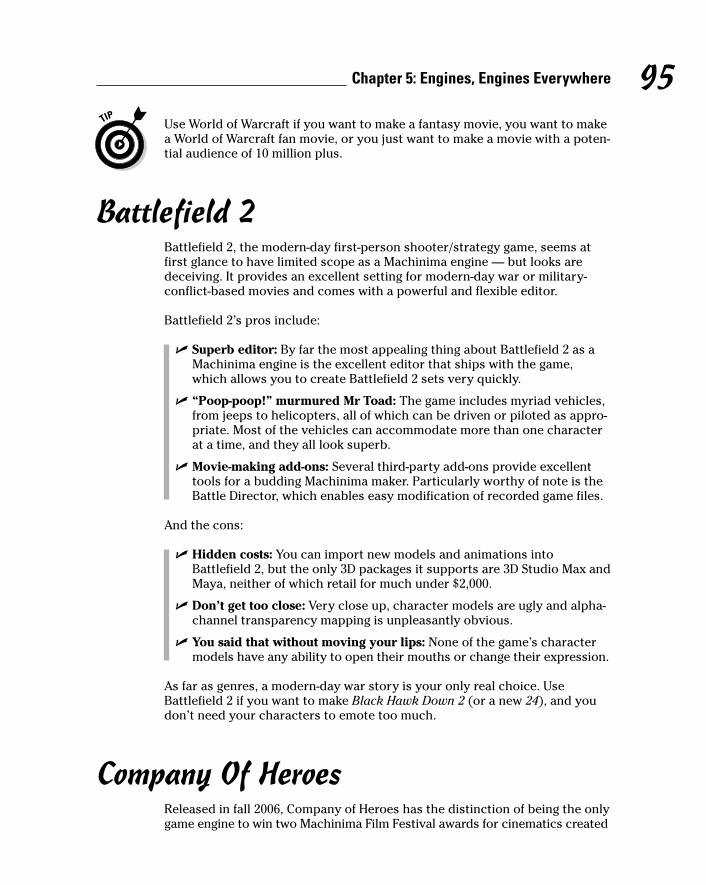
Use World of Warcraft if you want to make a fantasy movie, you want to makea World of Warcraft fan movie, or you just want to make a movie with a poten-tial audience of 10 million plus.
Battlefield 2Battlefield 2, the modern-day first-person shooter/strategy game, seems atfirst glance to have limited scope as a Machinima engine — but looks aredeceiving. It provides an excellent setting for modern-day war or military-conflict-based movies and comes with a powerful and flexible editor.
Battlefield 2’s pros include:
� Superb editor: By far the most appealing thing about Battlefield 2 as aMachinima engine is the excellent editor that ships with the game,which allows you to create Battlefield 2 sets very quickly.
� “Poop-poop!” murmured Mr Toad: The game includes myriad vehicles,from jeeps to helicopters, all of which can be driven or piloted as appro-priate. Most of the vehicles can accommodate more than one characterat a time, and they all look superb.
� Movie-making add-ons: Several third-party add-ons provide excellenttools for a budding Machinima maker. Particularly worthy of note is theBattle Director, which enables easy modification of recorded game files.
And the cons:
� Hidden costs: You can import new models and animations intoBattlefield 2, but the only 3D packages it supports are 3D Studio Max andMaya, neither of which retail for much under $2,000.
� Don’t get too close: Very close up, character models are ugly and alpha-channel transparency mapping is unpleasantly obvious.
� You said that without moving your lips: None of the game’s charactermodels have any ability to open their mouths or change their expression.
As far as genres, a modern-day war story is your only real choice. UseBattlefield 2 if you want to make Black Hawk Down 2 (or a new 24), and youdon’t need your characters to emote too much.
Company Of HeroesReleased in fall 2006, Company of Heroes has the distinction of being the onlygame engine to win two Machinima Film Festival awards for cinematics created
95Chapter 5: Engines, Engines Everywhere
10_096918 ch05.qxp 7/20/07 11:10 AM Page 95
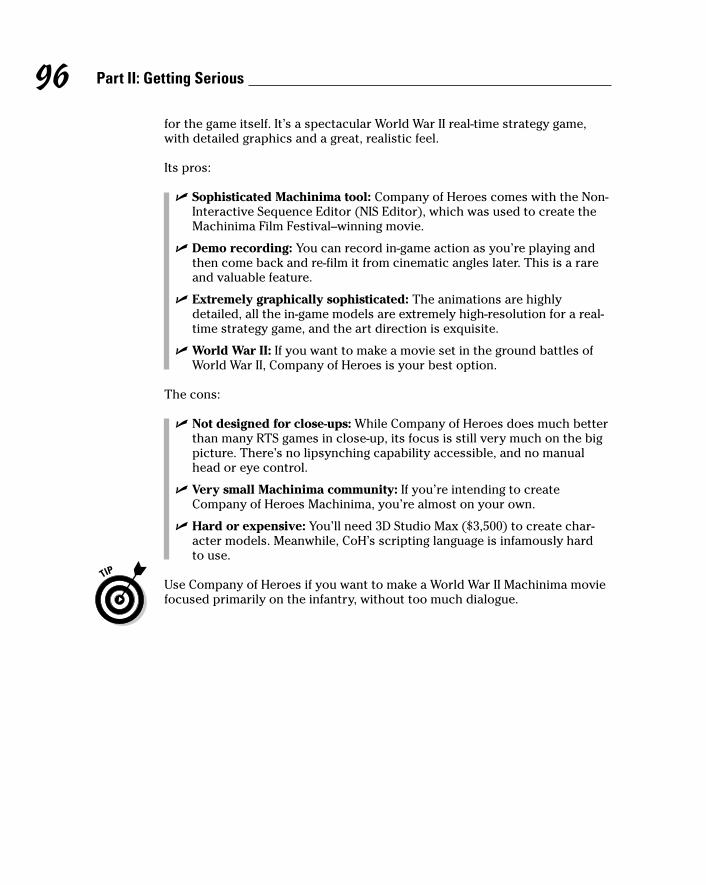
for the game itself. It’s a spectacular World War II real-time strategy game,with detailed graphics and a great, realistic feel.
Its pros:
� Sophisticated Machinima tool: Company of Heroes comes with the Non-Interactive Sequence Editor (NIS Editor), which was used to create theMachinima Film Festival–winning movie.
� Demo recording: You can record in-game action as you’re playing andthen come back and re-film it from cinematic angles later. This is a rareand valuable feature.
� Extremely graphically sophisticated: The animations are highlydetailed, all the in-game models are extremely high-resolution for a real-time strategy game, and the art direction is exquisite.
� World War II: If you want to make a movie set in the ground battles ofWorld War II, Company of Heroes is your best option.
The cons:
� Not designed for close-ups: While Company of Heroes does much betterthan many RTS games in close-up, its focus is still very much on the bigpicture. There’s no lipsynching capability accessible, and no manualhead or eye control.
� Very small Machinima community: If you’re intending to createCompany of Heroes Machinima, you’re almost on your own.
� Hard or expensive: You’ll need 3D Studio Max ($3,500) to create char-acter models. Meanwhile, CoH’s scripting language is infamously hard to use.
Use Company of Heroes if you want to make a World War II Machinima moviefocused primarily on the infantry, without too much dialogue.
96 Part II: Getting Serious
10_096918 ch05.qxp 7/20/07 11:10 AM Page 96

Chapter 6
Making Your World: Set Designand Texturing
In This Chapter� Discovering how you can use game level editors to make your set
� Making your first set in The Sims 2
� Polishing your set design skills
So you’ve written your story. You know how to shoot it. And you’ve chosenyour engine, set it up, and wasted a few days in playing — er, researching —
the game with which you’ll be getting scarily intimate. No, not that intimate.Put away the credit card and step away from the dodgy Web site.
Sets are really the hidden characters of a film. Think of any great film, fromLost In Translation to Aliens, and you think of the locations that made that film.Would Lost In Translation have worked if Bill Murray and Scarlett Johannsonhadn’t been flirting in such an empty, faux-hip hotel bar, or hadn’t been look-ing quite as confused in all the Japanese minimalism? Would Aliens have beenas scary with Doctor Who–level cardboard walls?
Since the days of DooM, back in the early 1990s, the majority of PC games haveshipped with a built-in set design tool. They don’t call it that, of course —they’ll call it a Map Editor, Mission Editor, or Level Editor — but that’s how weuse the design tool.
Knowing What Game Engines You Can Use
The following engines have sophisticated set design tools of the type we dis-cuss in this chapter. As you can see, that’s the vast majority of modern gamessuitable for Machinima.
11_096918 ch06.qxp 7/20/07 11:10 AM Page 97

� The Sims 2
� The Movies
� Half-Life 2
� Unreal Tournament (various iterations)
� Neverwinter Nights
� Neverwinter Nights 2
� Medieval Total War 2
� DooM 3
� Moviestorm
� IClone
IClone’s set editing is very limited in Version 2.0 of the package. Youneed a copy of 3D Studio Max ($3,500 approx) in order to substantiallyalter the template sets.
� Second Life
� Battlefield 2
� Company Of Heroes
World of Warcraft, Halo 2, and Grand Theft Auto have a very limited seteditor or no editor at all. You have to location scout in these engines for suit-able places to film rather than creating sets.
The Design PhaseBefore you touch your computer, you need to have a good idea what you’redesigning. Game set designers are fast and sophisticated, but they’re still notas fast or easy to use as a pen and paper. Grab your script, grab a piece ofpaper, and sketch a couple of quick designs for the set.
Your design doesn’t have to look sophisticated or artistic — Hugh’s set designscertainly don’t (see Figure 6-1) — they just need to get the key features of theroom across, to make sure that your design is practical before you spendtime on realizing it.
After you pick a favorite from your potential designs, grab your script and gothrough it line-by-line, checking that nothing in the script makes your designimpractical. Have you forgotten a significant static prop? Does the actionmove in such a way that your design can’t work? Will you end up unable toget a shot you’ve been visualizing since your story treatment?
Once you’re certain that your design will actually work in your movie, thenit’s time to open your set editor.
98 Part II: Getting Serious
11_096918 ch06.qxp 7/20/07 11:10 AM Page 98

Don’t skip this phase. It’s very tempting to just say “Oh, I know what I needfor this scene”, but there’s a huge chance you’ve forgotten something, or justnot thought about it. Pen-and-paper is a great tool to force you to thinkthrough your design before you spend days constructing it.
Creating a SetSo how are we going to create our set? You can visualize a 3D world in a vari-ety of ways, but every game engine we can think of has settled on a singlestandard: polygon modeling.
Polygons are two-dimensional shapes — triangles, squares, pentagons, hexa-gons, and so on. In the case of game engines, everything is eventually brokendown into triangles.
Those triangles are then placed into the game world and make up all theobjects you see — big triangles stacked up against each other to create walls,smaller triangles bent in funny patterns to make objects, furniture, and evencharacters. Sounds weird and implausible, right? But it’s the truth — that’sthe reason that, if you get up close to an item in the game, it will have lots ofhard edges and points. The pointy bits are where the triangles end.
Of course, a modern game world uses lots of polygons. Figure 6-2 gives you aquick look at the set from Strange Company’s Ozymandias, which is 7 yearsold now, in both its original and trianglized forms.
Figure 6-1:Hugh’s set
designswouldn’t
pass musterwith an
architect.
99Chapter 6: Making Your World: Set Design and Texturing
11_096918 ch06.qxp 7/20/07 11:10 AM Page 99

So we’ve got our polygons. Early virtual reality engines from the 1980s usedto just color those polygons a flat color, and that was your world. In theory,we could still do that and just model all the fine detail of the world from trian-gles — but that’s a horribly complex and processor-intensive way of working.Instead, nowadays, we fake all the fine detail by wallpapering our set with a2D image, called a texture. That image then provides the fine detail, which canbe anything from the wood grain on a door to the keys on a telephone. Ofcourse, those keys wouldn’t work, but they look great.
Some advanced engines, such as DooM 3, layer more complex textures on topof the basic texture layer. These extra textures provide additional informationfor the game engine:
� Bump maps: Information about the depth of the surface
� Specularity maps: Information about the shininess of the object
� Normal maps: Information about sub-geometry in the engine
� Environment maps: Information about objects reflected in the object
In the old days of 3D games, we designed our sets right out of the bare poly-gons. Editors had the ability to form simple 3D shapes — pyramids and cubes — from triangles, and we built our sets from them and then texturedthem manually, designing and assigning images to make our world.
Figure 6-2:A set from
Ozymandias,showing
underlyingpolygons.
100 Part II: Getting Serious
11_096918 ch06.qxp 7/20/07 11:10 AM Page 100

Strange Company’s Eschaton series was entirely produced using those tech-niques. But these days, we’ve become a lot more sophisticated, and the toolsthat you use to create your sets probably won’t go near a polygon editor.
So why do you need to know this stuff? Every object has a polygon count anda texture that it uses. Your graphics card can render a certain number ofpolygons, and it has space for a certain amount of textures. If you go overthose limits, things start to run slowly and jerkily. The closer to your hard-ware limits you get, the more pronounced this degradation can be. Of course,computers these days can render terrifying numbers of polygons, and fitridiculous numbers of textures onto their cards.
But still, if you’re trying to model Helm’s Deep from The Lord of the Rings orre-create the flight across the Death Star — or even just shoot a vista like thehills of Brokeback Mountain — you need to think carefully about how youspend your polygon budget.
Entering the Modern AgeIt didn’t take long for game designers to figure out that making endless gamelevels using polygon-modeling tools sucked (see preceding section).
Most game engines now treat creating world objects and placing them as sep-arate tasks. Modern set editors usually work from a mixture of precreatedworld items and simple design tools:
� Heightmaps: If you’ve played any of the Populous games, or The SimCity games, you’ll be right at home here — you start with a flat land-scape and then click it with your mouse to raise or lower sections of it,create harsh cliffs, gentle rolling hills, deep valleys, or whatever.
Sometimes the set editor automatically decides that a particularly harshslope must be a cliff and gives it a cliff texture, or that you’ve loweredyour land below water level so it fills a valley up with water; sometimes,you have to assign those things manually.
101Chapter 6: Making Your World: Set Design and Texturing
Other 3D ways?Other ways of visualizing 3D worlds includeVoxels, which are essentially 3D pixels thatmake up a world (mostly used in medical imag-ing) and NURBS, which are horrendously com-plex mathematical objects describing 3D curves.
It’s entirely possible that game engines mayswap to one of these methods in the future, butfor now, polygons are the way forward.
11_096918 ch06.qxp 7/20/07 11:10 AM Page 101

You can also paint features onto your landscape using your mouse likean airbrush — those things may be simple textures, like a road runningthrough your landscape, or they may be grass, trees, or even crowds ofpeople.
� Tiles: Alternatively, you can build parts of your world using pre-set tiles,equal-sized parts of a map that could be the floor of an inn or the streetsof a city.
Some map editors, mostly older ones, don’t use heightmaps, and yourworld is solely constructed of tiles. Other game engines, such as UnrealTournament, don’t use tiles at all. Yet others, such as The Sims 2, useboth.
� Placeables: You’ll do the majority of your world creation by simplyselecting items from a library in your set editor and dragging them intothe world. If you’re making a bedroom, you create a south-facing slopewith your heightmap and lay out the floor plan of the room with yourtiles. Now, you navigate through your menus, select a bed, and drag itaround in the world.
Some game engines use placeables for everything other than landscape.In other engines, placeables are mostly smaller objects, such as chairs,tables, telephones, or swords. You’re often able to set attributes onthese placeables, too — for example, you may be able to choose the tex-ture of a stained-glass window.
� Weird stuff: Most set editors will allow you to control other elements ofyour world. They can include the time of day in the game, the sky thatyou see above your world, or the ambient sounds in that set.
� In-game: Finally, a really good engine lets you change or add aspects ofyour set on the fly while you’re shooting. That’s an incredibly handy fea-ture. You may want a super-long shot on one character, but you need toremove a wall to get far enough out. In real life, a huge problem. InMachinima? No worries.
We’re generalizing. Specific game editors have specific features — UnrealTournament, for example, still includes old-style polygon-editing tools.
Creating a Set in The Sims 2The Sims 2 has one of the most feature-packed set editors of any game. Thefollowing steps demonstrate all the features of the engine’s set constructionby creating a classic Spooky House On The Hill. Legally, we’re not allowed tosay we’re basing this set on any film in particular, so let’s say this set is for
102 Part II: Getting Serious
11_096918 ch06.qxp 7/20/07 11:10 AM Page 102

an imaginary movie called, ooh, The Schining. Or perhaps Pschycho. Or TheTexas Schainsaw Schmasacre.
1. Start up The Sims 2 or the relevant expansion if you’ve got thatinstalled.
You see a series of amusing loading screen messages, which relieves usof the need to come up with a joke for this section. Then the Choose ANeighborhood To Play screen appears.
2. Click the arrow marked Next, and click Create Custom Neighborhood.
You see a confirmation message.
3. Click OK, and you’re on your way to the Choose Landscape screen.
You’re now given a choice of landscapes on which you can build yourneighborhood.
4. Select the landscape you want and click the Load Template button.
For this example, we chose Aridia as our landscape.
Now you can name your neighborhood whatever you want and changethe terrain type.
5. Select your terrain type and then click the check mark (shown to theleft in the margin) to Load Neighborhood.
We’re thinking Maine more than New Mexico, so we chose Lush.
If you’ve got Sims 2 Nightlife installed at this point, the game asks youwhether you want to associate a Downtown with this neighborhood.
6. (If you have any Sims 2 Expansion Packs) Click No when the gameasks if you want to create any other areas (Downtown and so on) toassociate with this neighborhood.
Now the game asks you whether you’d like to write a story for yourneighborhood. This answer has no effect on the game.
7. Click OK.
At this point, you’re looking at your brand-new landscape. You’ll only bebuilding on a small section of this landscape, so you need to find a suit-able “Lot” for your set here.
8. Right-click and drag on the set to move around.
You can only place your set near to a road, but other than this, yourplacement doesn’t actually affect the look of your set. Find somewheresuitable near a road.
9. Press F2 to go to the Lots And Houses menu.
103Chapter 6: Making Your World: Set Design and Texturing
11_096918 ch06.qxp 7/20/07 11:10 AM Page 103

10. Click the empty square below the House icon (it has the ToolTipEmpty Lots), select Huge Lot, and click your chosen section of groundto place that lot.
You see an overlay of the lot, which turns green when you position it in aspace the game likes.
Plan before you choose a lot. Larger lots are more demanding on yourcomputer. Strike a balance that works best for you. If you have a power-ful modern PC, you may not notice any degradation at all.
11. Click to set your lot down.
You see another dialog box, giving you a chance to name your lot.
12. Name your lot.
For this example, we named our lot the Shmates Motel.
13. Ignore the rest of this scene and click the check mark.
14. Left-click your lot and click Enter Lot.
15. Click No to disable game tips.
They’re very annoying. And, hey, presto! You can actually start building!
Landscaping for the WinAfter you create your lot (see preceding section), you can look around it bypressing Ctrl+right-click and dragging, or by holding down the middle mousebutton and moving the mouse. You can move around by right-clicking anddragging. You can zoom with the mousewheel if you want to get a closer look.
We start with a spot of landscaping; we create a mini-hill that leads to theback of the lot where you’ll build your house.
1. Press F3 to go to Build Mode.
The menu at the bottom changes.
2. Click the Terrain icon, which looks like a spade.
Now you can use the tools at the right of the menu to raise and loweryour terrain.
3. Use the Elevation tools to raise up a big, evil-looking hill on your lotand then use Level Terrain on the middle of that hill to flatten an areaof about 10 to 15 squares across.
This spot is where we build our house.
104 Part II: Getting Serious
11_096918 ch06.qxp 7/20/07 11:10 AM Page 104

You have four landscaping tools available to you under the Elevationcategory.
• Raise terrain: Left-click to raise the terrain under the cursor. Youcan hold down the mouse button to increase the effect. This toolallows you to choose three sizes of brushes with which to paintyour landscape, so use the largest brush to approximate the ter-rain you want and then refine with the smaller brushes.
• Lower terrain: Second verse, same as the first, except you’re low-ering the terrain.
• Level terrain: Left-click and drag to define a rectangular section ofterrain to be totally flattened. This tool is useful for ensuring thatyou have sufficient level ground on which to create buildings.
• Smooth terrain: Use this brush to smooth out areas in which theheight contrast is perhaps too harsh. Apply this brush in incre-ments and, using the small or medium brush size, create a muchmore realistic-looking landscape.
4. Add an idyllic-looking stream to your set by choosing the Terrainmenu and then clicking the Water tool. Click some of the terrain at thebottom of the hill, and hold down and drag to draw out a stream.
Of course, in traditional horror movie juxtaposition, the idyllic beauty ofthis babbling brook only serves to hide the horror that lies in wait.
5. Take a look at your creation from the ground.
To do so, press Tab to switch to Camera View and use Q to lower yourview and S to move backward to get a good view.
6. Press Tab again to escape from Camera View.
7. Use the Ground Cover tool to add a quaint little pathway leading up tothe house.
Click, drag — you know the drill by now.
8. Click Back and then press the Flooring tool to take a look at flooringchoices.
You probably won’t find any grimy cracked tiles that can almost makethe shape of a human face if you squint, so try Smitty’s DistressedFloorboards instead.
9. Select a floor texture.
10. Drag a generous covering onto the flat area at the top of the hill.
This step creates the main floor.
105Chapter 6: Making Your World: Set Design and Texturing
11_096918 ch06.qxp 7/20/07 11:10 AM Page 105

11. Make a small tiled entryway as well.
Slate For Days should do, under the Stone tab. Hey, we didn’t namethese textures.
Switch to the top-down view to place ground floor textures. It’s much easierto see what’s going on. When you come to place textures and items on theupper floors of your building, the top-down view is less useful.
Build Me Up, ButtercupIf you created a house, you need some walls, obviously, so the following stepsshow you how to make them.
1. Use the Walls tool to click and drag single walls into place, or use theBox tool to define entire rooms at once.
Ctrl+left-click removes a section if you make a mistake.
We need a second story for this crumbling edifice.
2. Click the Go Up A Floor button.
It’s just above your cash total in the bottom left-hand corner — the PageUp key also does the trick.
3. Place a floor and walls on the new floor — er, story.
Just click and drag to place floor tiles or walls. Any floor textures youplace now are placed on the next floor up. You can only build on areasthat have rooms underneath them on the ground floor. You also need toadd walls for this story, too.
4. To add a roof, click the Roofing tool, choose Roof Types, and pick anappropriate type; drag that out to cover the entire roof area and thenchoose a suitable roof pattern.
We went for the Mansard roof type with Stormy Slate tiles.
If you can’t see the roof, make sure that you’re viewing the very topstory of your building — keep pressing the Home key until you’vemoved up as far as you can.
5. Click Back and choose the Wall Coverings tool (the paint brush).
Now you’re ready to do some interior — well, exterior — design.
6. Choose whichever wall covering takes your fancy, and click and dragthat over all of your external walls.
We decided on Industrio Brick Wall for our spooky motel.
106 Part II: Getting Serious
11_096918 ch06.qxp 7/20/07 11:10 AM Page 106
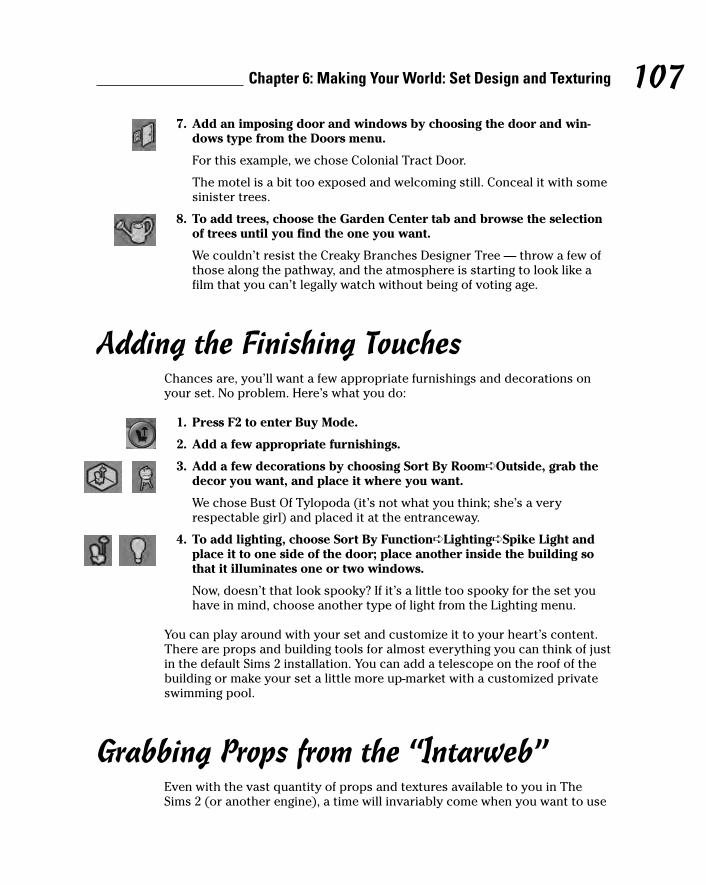
7. Add an imposing door and windows by choosing the door and win-dows type from the Doors menu.
For this example, we chose Colonial Tract Door.
The motel is a bit too exposed and welcoming still. Conceal it with somesinister trees.
8. To add trees, choose the Garden Center tab and browse the selectionof trees until you find the one you want.
We couldn’t resist the Creaky Branches Designer Tree — throw a few ofthose along the pathway, and the atmosphere is starting to look like afilm that you can’t legally watch without being of voting age.
Adding the Finishing TouchesChances are, you’ll want a few appropriate furnishings and decorations onyour set. No problem. Here’s what you do:
1. Press F2 to enter Buy Mode.
2. Add a few appropriate furnishings.
3. Add a few decorations by choosing Sort By Room➪Outside, grab thedecor you want, and place it where you want.
We chose Bust Of Tylopoda (it’s not what you think; she’s a veryrespectable girl) and placed it at the entranceway.
4. To add lighting, choose Sort By Function➪Lighting➪Spike Light andplace it to one side of the door; place another inside the building sothat it illuminates one or two windows.
Now, doesn’t that look spooky? If it’s a little too spooky for the set youhave in mind, choose another type of light from the Lighting menu.
You can play around with your set and customize it to your heart’s content.There are props and building tools for almost everything you can think of justin the default Sims 2 installation. You can add a telescope on the roof of thebuilding or make your set a little more up-market with a customized privateswimming pool.
Grabbing Props from the “Intarweb”Even with the vast quantity of props and textures available to you in TheSims 2 (or another engine), a time will invariably come when you want to use
107Chapter 6: Making Your World: Set Design and Texturing
11_096918 ch06.qxp 7/20/07 11:10 AM Page 107
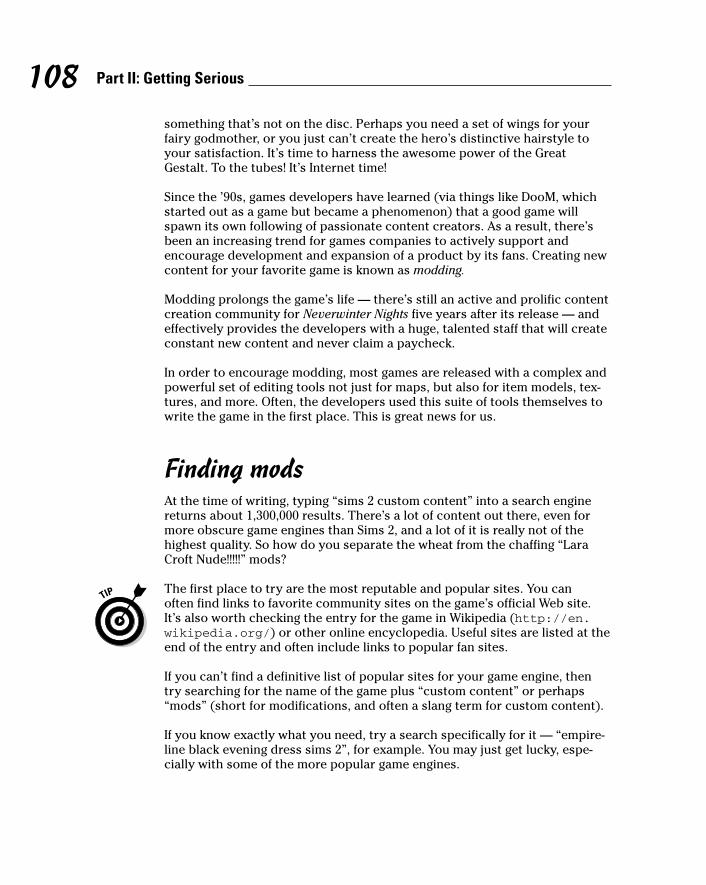
something that’s not on the disc. Perhaps you need a set of wings for yourfairy godmother, or you just can’t create the hero’s distinctive hairstyle toyour satisfaction. It’s time to harness the awesome power of the GreatGestalt. To the tubes! It’s Internet time!
Since the ’90s, games developers have learned (via things like DooM, whichstarted out as a game but became a phenomenon) that a good game willspawn its own following of passionate content creators. As a result, there’sbeen an increasing trend for games companies to actively support andencourage development and expansion of a product by its fans. Creating newcontent for your favorite game is known as modding.
Modding prolongs the game’s life — there’s still an active and prolific contentcreation community for Neverwinter Nights five years after its release — andeffectively provides the developers with a huge, talented staff that will createconstant new content and never claim a paycheck.
In order to encourage modding, most games are released with a complex andpowerful set of editing tools not just for maps, but also for item models, tex-tures, and more. Often, the developers used this suite of tools themselves towrite the game in the first place. This is great news for us.
Finding modsAt the time of writing, typing “sims 2 custom content” into a search enginereturns about 1,300,000 results. There’s a lot of content out there, even formore obscure game engines than Sims 2, and a lot of it is really not of thehighest quality. So how do you separate the wheat from the chaffing “LaraCroft Nude!!!!!” mods?
The first place to try are the most reputable and popular sites. You can often find links to favorite community sites on the game’s official Web site.It’s also worth checking the entry for the game in Wikipedia (http://en.wikipedia.org/) or other online encyclopedia. Useful sites are listed at theend of the entry and often include links to popular fan sites.
If you can’t find a definitive list of popular sites for your game engine, thentry searching for the name of the game plus “custom content” or perhaps“mods” (short for modifications, and often a slang term for custom content).
If you know exactly what you need, try a search specifically for it — “empire-line black evening dress sims 2”, for example. You may just get lucky, espe-cially with some of the more popular game engines.
108 Part II: Getting Serious
11_096918 ch06.qxp 7/20/07 11:10 AM Page 108
This stuff was created by individuals on the Internet. And we know what thatmeans — porn. You may well find, particularly with some of the more, ahem,intimacy-friendly engines like The Sims 2, that you run into some “naughty”material. Don’t worry — there’s probably nothing too bad on any vaguelyreputable site. But if you’re offended by nudity, or your parents/boss/SO arelikely to look over your shoulder at an inconvenient moment, surf with caution.
When you’ve found your perfect item, check it in the game to make sure thatit can do everything that you need it to. Some items may look great until youtry to use them. That perfect black evening dress is pretty useless if it warpsinto an explosive mess of bad polygons every time your character kneelsdown. Unless you’re sure that your character will never need to kneel down,of course, in which case you may just be able to get away with it.
Installing a modThe custom content installation process (and the complexity of it) variesbetween games. Often, you’re just required to uncompress a .zip file, andplace the compressed files into a specific folder within the game installation.If the game manual doesn’t tell you the process to follow, any decent customcontent Web site certainly will. Some even provide their own custom tools tomake the installation of additional content even easier (such as the Sims 2 Q-Xpress Installer, from www.q-xpressinstaller.com).
A piece of custom content may have specific requirements — in that case,look for a Readme file within the package that the mod comes in, usually a.zip or .rar file. It’ll tell you what to do.
We’re probably not the first people to tell you this, and we’re sure we won’tbe the last, but it bears repeating: Always run a virus-checking programbefore opening any files that you’ve downloaded from the Internet.
Making a Quality SetBut how do you make a good set, one that will get across what you intend itto? Originally, when drafting this book, we wrote a big, slightly pompous sec-tion here on color theory, and use of space, and other things we heard aboutwhile watching Changing Rooms reruns. But about half-way through writing it,we realized there was a big problem. We don’t really understand use of space.Or color theory. Or interior design. Sure, we’ve picked up some stuff, and weintegrate what we know into our films — if we remember. Or we think of it. Or
109Chapter 6: Making Your World: Set Design and Texturing
11_096918 ch06.qxp 7/20/07 11:10 AM Page 109
we’re not hung over. But if we tried to write an “expert” guide to any of thesethings, we’d be bluffing.
So, here’s a grab-bag list of things that helped us when we’ve been makingsets for films, all in the slightly disorganized, stream-of-consciousness waythat we tend to work. Welcome to Machinima.
ResearchIf you want a “feel” for an area that you’re not able to achieve, go find similarscenes in movies. Now watch for the things that are common over several dif-ferent examples of the scene.
When we were researching for BloodSpell, we noticed that several filmmakersused white rim lighting around dark rocks to give the impression of a spooky,underlit cave. We copied that trick, and it worked like a charm.
Here are a few other techniques to try:
� Take a test drive. Build several different simple versions of your set, notspending more than half an hour on each one, and then look at how theycome out in the game engine before you choose which one to developfurther.
� Use photo references. If you’re recreating something you’d see in thereal world, look at as many pictures of that thing as you can before youdesign. You’ll spot a lot of small details that you wouldn’t have other-wise thought of.
� But don’t get hung up on the details. You don’t need to exactly re-create the Oval Office if you’re only going to see it for a few moments.
Consider what elements are vital to convey the feel of the set. Think abouthow you can make your life easier and your set design quicker by eliminatingthings that aren’t vital. It’s the shots that are important, not the set itself.
Often what you will need isn’t a mass of detail, but one or two pivotal pointsof detail. These will focus the eye and give a sense of realism.
Color and lightAlthough it may not seem so at first, light and color are two of the most impor-tant tools in your arsenal. You can change the entire feel of a set simply bylowering the overall lighting value slightly or changing your dark brown wallsto a light pastel blue.
110 Part II: Getting Serious
11_096918 ch06.qxp 7/20/07 11:10 AM Page 110

Here are a few tips for working with light and color:
� Painting with light is easier than painting with paint. Lighting is theeasiest way to customize a set using standard game objects. Intelligentand attractive lighting can do more for the mood of your set than justabout any other technique, in terms of bang for time spent.
� Try to avoid lighting that can’t be moved. As you shoot, you’ll want tomove your lighting around for best effect. You need to re-light for actormovement or changes in mood. Try to avoid relying on lighting in the setthat you can’t change in-game.
On BloodSpell, we used dynamic lights spawned on invisible charactersfor most of our lighting and used very minimal lighting in the set itself.That way, if we needed to move the source of a light, we didn’t have togo back to our editor. We’d just tell our glowing invisible badger to moveout of the way.
� Avoid lighting soup. As any amateur painter knows, the more you mixcolors together, the more you head toward a nondescript brown. Keepyour lighting simple and elegant — a single color, or at most two colorsstrongly contrasting.
� Too dark is usually better than too bright. If in doubt, underlight yourset. It’s far better to have interesting shadows and suggestions of shapesthan horrible flat over-lighting.
This applies to sets only, not characters! It’s fine to have your hero’s facehalf in shadow. But as soon as the audience can’t figure out what’s goingon, they’ll tune out, and you’re lost.
� Painting with light and painting with dark. Imagine that black is one ofthe colors you’re lighting with. Manufacture interesting shadows andsuggestive dark spots as much as you manufacture points of light andinteresting shades. You can change the appearance of a set very rapidlywith clever usage of dark and shadow.
SpaceEven though your movie is going to be shot on an entirely virtual set, you stillneed to consider a few basic points about the use of space:
� Don’t supersize me. It’s very easy to create a huge set in Machinima, butthe bigger the set, the more work you’ll have to do to fill it. Your setsshould be as small as you can reasonably make them and still tell yourstory. If you’re making a living room, don’t make it the size of a wholehouse, unless you’ve got a very good reason.
111Chapter 6: Making Your World: Set Design and Texturing
11_096918 ch06.qxp 7/20/07 11:10 AM Page 111
� Peter Jackson had hobbits. If you’re creating a set at an immense scale,your audience needs to be able to tell what size it is. Make sure thatyou’ve got items that contrast with the size of the set and show just howlarge it is.
� Overclutter and then spring-clean. It’s very easy to underdetail yoursets. To avoid doing that, deliberately overdetail. Stick all the details youcan think of into the set.
After you do that, work with a couple of other people to figure outwhat’s not needed in there and slowly strip the set back until you’ve gota good balance. Everything that’s in there should be there for a reason.
� Scale is important. Make sure that everything you create is in scale toyour characters. That applies to chairs, tables, telephones, doors, andespecially rooms. It’s very easy to create a room in which your heroappears to be about the size of a large house cat.
� Vertical space is key. The hidden key to creating a set that “feels” rightis the vertical space. Make sure that your ceilings are appropriatelysized and well-modeled.
High ceilings will give a feeling of scale and awe. Very low ceilings makea space claustrophobic. Think vertical.
PracticalitiesLike it or not, you’re not working in the real world here — you’re workingwith a game engine.
� Always check in the engine. Don’t rely on your editor’s preview windowfor anything, be it lighting, draw distance, or field of view. Always checkyour set in the game itself. Otherwise, you may be setting yourself up fornasty surprises later.
� Minimize fiddly detail. Even with today’s processors and graphicscards, it’s depressingly easy to end up watching a slide-show becauseyou’ve tried to fit too much small detail into a scene.
� Dress rehearse. Start studying your set from the perspective of theshots you’re going to use as early as possible, with character models inplace. Until you get in there in the engine and try to set up shots as youwould with a camera, with characters in place, you’ll have no idea howusable your set will be. And that means you don’t know what you can doto improve it.
� Think about whether you could live there. How practical is the set forits alleged function? If it’s an evil cult’s meeting place, where do they
112 Part II: Getting Serious
11_096918 ch06.qxp 7/20/07 11:10 AM Page 112

hang up the robes? Do they scrub the floor? Is there enough space tostand around the mystic circle? Where’s the toilet? You don’t need tomodel the lavatory, but even a doorway off the meeting room increasesthe sense of realism.
� Think about whether the set fits its occupants and environment’sdescriptions. If you’re riffing off 24, where are the empty cigarette pack-ets and piles of briefing paper? If you’ve got a cave inhabited by wild ani-mals, are bones scattered around? Is the owner very neat (line up thepens, then) or obsessive and too busy (pizza boxes on the floor, ahoy)?
113Chapter 6: Making Your World: Set Design and Texturing
11_096918 ch06.qxp 7/20/07 11:10 AM Page 113

114 Part II: Getting Serious
11_096918 ch06.qxp 7/20/07 11:10 AM Page 114
Chapter 7
The Casting Couch: In-EngineCharacter Design in The Sims 2
In This Chapter� Understanding the theory of in-game character creation
� Creating a character in The Sims 2
� Improving your character design and creation
While sets are important for a film, the characters are really the mostvital element. (This message brought to you by Hugh’s secret super-
hero identity, Captain Obvious.)
In normal computer animation, characters are hard to create — brutally hard.They’re the most expensive element of any production, and so they tend tobe used sparingly and avoided whenever possible. You wondered why Pixar’sfirst film featured a bouncing desk lamp? That’s why.
In Machinima, by contrast, you’re working with technology specificallydesigned to allow you to throw characters around willy-nilly. In the last fewyears, that character technology has developed so that you can quickly andsimply design whole hosts of characters, each of them individual and hand-crafted. No armies of identical robots for you (unless you want them) — ifyou want background actors, you can design them in minutes, drop them intothe scene, and have your new guys drinking coffee in the background as easyas saying, “Call the MPAA. We’ve got a threat to our business model!”
And then you can have a giant robot break through the window and bloweveryone to bits.
How Do They Do That?A few years ago, game designers started to realize that their players enjoyedcustomizing their characters, and so they started incorporating techniques
12_096918 ch07.qxp 7/20/07 11:11 AM Page 115

for simple modification of a character’s look. From a few simple initialoptions — different colored hair, perhaps a few different faces — theseoptions rapidly extended into full-fledged human design studios.
You can model your character in-game in four simple steps:
1. Choose a base character model — male or female.
These days, every character starts with a simple, generic human shape,usually one for male and one for female.
2. Morph that model or choose different body parts until you’re happywith your actor’s appearance.
Morphs may include (but aren’t limited to):
• Longer or shorter nose
• Stronger or weaker jaw
• Heavier or lighter physique
Some games take a different approach, most commonly offering a varietyof body part meshes without morphs, but with very different physicalcharacteristics. For example, you may have a head with long, slightly’70s hair and a Dominic Monaghan jaw, and another one with a spikyhairstyle and a jaw that appears to have gone for an early lunch. Swapbetween the two, and do the same for torso, legs, and so on, and you canchange your character from looking like Johnnie to looking like Hugh.
3. Choose a texture and change its characteristics in the engine.
Next, a texture is overlaid onto the basic model. This simple 2D image,much like a digital photograph, is designed so that when it’s overlaidonto the mesh, just like wrapping paper onto a parcel, the image givesthe character details that aren’t in the basic 3D mesh — eyes, mouthand skin color, and so on. Some games use multiple textures for differentparts of the body — head, arms, hands, and so on. Usually, options arebuilt into the texture to change its characteristics — hair color, skincolor, eye color, and so on.
4. Add clothing parts to form a character outfit.
From there, you can then equip the character with a variety of clothingitems — some of these will simply be changes to the texture (for exam-ple, a unique T-shirt can be modeled just by changing the color of part ofthe texture), while others are 3D models overlaid onto the base model —a wristwatch, for example, or boots.
All these options are built into the game, or associated tools. You may bewondering what you can do with your particular engine. Table 7-1 lists thecapabilities of each engine.
116 Part II: Getting Serious
12_096918 ch07.qxp 7/20/07 11:11 AM Page 116

Table 7-1 Features Available in EnginesGame Features
The Sims 2 Full morphing character creation
The Movies Full morphing character creation
Neverwinter Nights 1 Multiple body part choices (no morphing)
Neverwinter Nights 2 Full morphing character creation
Moviestorm Full morphing character creation
IClone Full morphing character creation
SecondLife Full morphing character creation
World of Warcraft Multiple body part choices (no morphing)
Half-Life 2 Limited character customization
Halo 2 Limited character customization
Unreal Tournament Limited character customization
Medieval Total War 2 Limited character customization
Doom 3 Limited character customization
Grand Theft Auto Limited character customization
Battlefield 2 Limited character customization
Company of Heroes Limited character customization
117Chapter 7: The Casting Couch: In-Engine Character Design in The Sims 2
Using advanced character creation techniquesYou can get more advanced in character cre-ation and use two other approaches to edit yourcharacters:
� You can modify the texture for your charac-ter in an image editor — adding a tattoo, forexample.
� If you want to get really advanced, you canoften bring your character’s mesh or meshes
into a 3D modeling package and modify themon the level of the triangles themselves. Thisapproach is definitely for advanced usersonly, but it gives your character a reallyunique look. We’re not going to cover 3Dmodeling in more detail in this chapter, but ifyou really have a jones for polygons, head onover to Chapter 18.
12_096918 ch07.qxp 7/20/07 11:11 AM Page 117
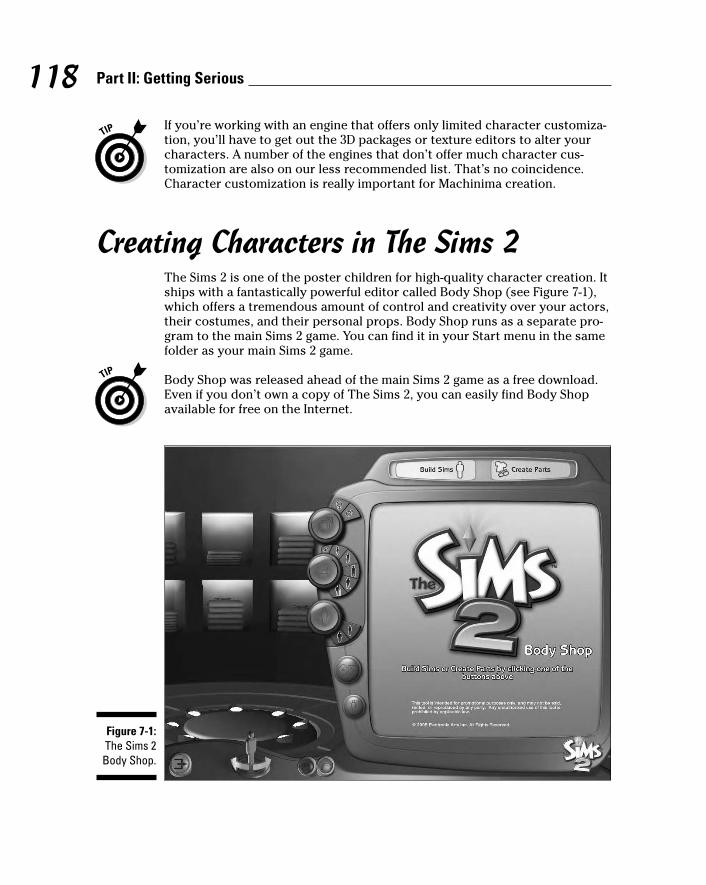
If you’re working with an engine that offers only limited character customiza-tion, you’ll have to get out the 3D packages or texture editors to alter yourcharacters. A number of the engines that don’t offer much character cus-tomization are also on our less recommended list. That’s no coincidence.Character customization is really important for Machinima creation.
Creating Characters in The Sims 2The Sims 2 is one of the poster children for high-quality character creation. Itships with a fantastically powerful editor called Body Shop (see Figure 7-1),which offers a tremendous amount of control and creativity over your actors,their costumes, and their personal props. Body Shop runs as a separate pro-gram to the main Sims 2 game. You can find it in your Start menu in the samefolder as your main Sims 2 game.
Body Shop was released ahead of the main Sims 2 game as a free download.Even if you don’t own a copy of The Sims 2, you can easily find Body Shopavailable for free on the Internet.
Figure 7-1:The Sims 2
Body Shop.
118 Part II: Getting Serious
12_096918 ch07.qxp 7/20/07 11:11 AM Page 118

Once Body Shop has loaded, you see a big, friendly Sims 2 logo on the rightside of the application, and an empty 3D room on the left side. When you’recreating or editing a Sim, you can see your changes in the left pane, modeledfor you by the Sim himself.
If you’ve installed any of The Sims 2 expansion packs, such as Nightlife, OpenFor Business, University, or Pets, each expansion pack has created a separatefolder for itself in your Start menu. Each folder contains a link to The Sims 2Body Shop. Be sure to run the copy of Body Shop associated with the mostrecent expansion pack you own. If, for example, you’ve installed The Sims 2and Nightlife, clicking the link to The Sims 2 Body Shop in Start➪Programs➪EA GAMES➪The Sims 2 results in a nasty error message and little else. Youshould instead choose Start➪Programs➪EA GAMES➪The Sims 2 Nightlife➪The Sims 2 Body Shop.
To make a new actor, follow these steps:
1. Click the Build Sims button at the top of the screen, on the right side.
Body Shop asks you whether you’d like to Build Or Clone Sims, orPackage Sims. Don’t worry about the Package Sims option for now.
2. Choose Build Or Clone Sims.
Well, look at that. You see a list that looks suspiciously like a big castingcall full of hopeful virtual actors. These are all the sample Sims includedwith the game. You may well be able to find a model suitable for yourlead character right here, without doing any editing at all. If so, just selectthe character, and click the green check. You don’t have to do any fur-ther editing.
But we know you better than that. You’re a perfectionist, and picking amodel from a pre-made selection just won’t do. It’s time to roll your own.
The first Sim in the list is nothing but a blue cross on a green back-ground. Don’t worry, he hasn’t got some sort of horrible disfiguring dis-ease. That’s the button to create a new Sim, and you’re going to click it.
3. Click the blue cross on the green background.
Even though you’ve edited nothing so far, you already have a Sim. Whatgives? Body Shop has automatically created a Sim for you to use as thebasis of your new creation. Everything about your new Sim, from skintone to choice of outfit to the length of his nose, has been randomlydetermined by Body Shop.
You can click the Randomize button (the dice icon) to generate anotherrandom set of values, and another randomly generated Sim appears. Be warned,though: some of the characters that the Random tool comes up with are
119Chapter 7: The Casting Couch: In-Engine Character Design in The Sims 2
12_096918 ch07.qxp 7/20/07 11:11 AM Page 119

strange and freaky-lookin’ indeed. These images may not be suitable for smallchildren.
Although the Randomize button changes most things, the sex and age of yourSim remain the same unless you choose to change it using the buttons justabove Randomize.
It’s important to have an idea in your head of the character you want to create.You may even like to have a couple of reference shots on hand of somebodywho resembles them. We often find it easiest to hit the Randomize button afew times until the random Sim bears a passing resemblance to the final char-acter that we’re after and then fine-edit from there.
Customizing Your CharacterAt the top of the panel on the right are five icons: Genetics; Faces; Modifiers;Facial Hair, Makeup, And Glasses; and Clothing. The following sections tackleeach icon in order.
Genetics: A new pair of genesClicking the Genetics buttons brings up a menu with three options: Skin Tone,Eye Color, and Hair. No bonus points will be awarded to those who can guesswhat each of these does. Go ahead and choose options from the menus below.You’ll see your changes updated automatically in the model on the right.
You can reverse your changes at any time with the Undo function in BodyShop. The Undo and Redo buttons appear at the bottom left of the window.
You may assume that any hats your character can wear will be availableunder the Clothing category somewhere, but actually hats are stored underthe Hair tab in the Genetics category. In fact, The Sims 2 game engine doesn’tknow the difference between a new hairstyle and a new hat; hence, bothappear under the same tab.
Faces: Tragedy, comedy, or chimpWhen you’re happy with your new actor’s skin tone, hair, and eye color, takea look at the next tab, Faces. You have six menus to choose from here: Face,
120 Part II: Getting Serious
12_096918 ch07.qxp 7/20/07 11:11 AM Page 120
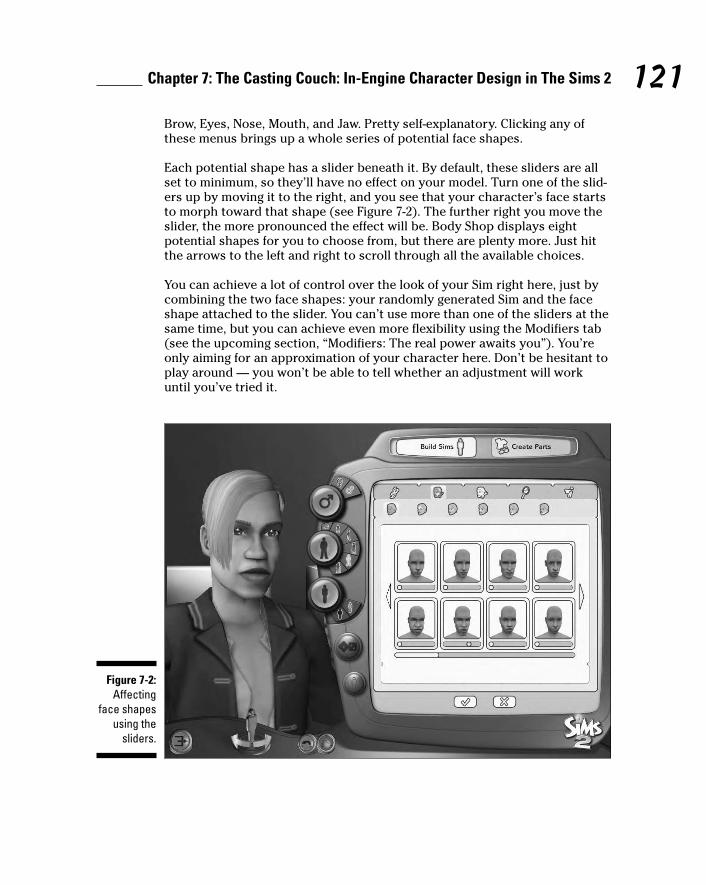
Brow, Eyes, Nose, Mouth, and Jaw. Pretty self-explanatory. Clicking any ofthese menus brings up a whole series of potential face shapes.
Each potential shape has a slider beneath it. By default, these sliders are allset to minimum, so they’ll have no effect on your model. Turn one of the slid-ers up by moving it to the right, and you see that your character’s face startsto morph toward that shape (see Figure 7-2). The further right you move theslider, the more pronounced the effect will be. Body Shop displays eightpotential shapes for you to choose from, but there are plenty more. Just hitthe arrows to the left and right to scroll through all the available choices.
You can achieve a lot of control over the look of your Sim right here, just bycombining the two face shapes: your randomly generated Sim and the faceshape attached to the slider. You can’t use more than one of the sliders at thesame time, but you can achieve even more flexibility using the Modifiers tab(see the upcoming section, “Modifiers: The real power awaits you”). You’reonly aiming for an approximation of your character here. Don’t be hesitant toplay around — you won’t be able to tell whether an adjustment will workuntil you’ve tried it.
Figure 7-2:Affecting
face shapesusing the
sliders.
121Chapter 7: The Casting Couch: In-Engine Character Design in The Sims 2
12_096918 ch07.qxp 7/20/07 11:11 AM Page 121

Modifiers: The real power awaits youThe Modifiers category is where the real power of Body Shop lies. At firstglance, you may not see the difference between Modifiers and Faces — afterall, they both have the same six categories. Explore a little more, though, andyou see that modifiers allow you control over one single aspect of your char-acter’s face at a time. Unlike Faces, you can combine these effects to yourheart’s content.
Theoretically, there’s nothing to stop you from modeling absolutely any facewith remarkable accuracy. Accurate modeling takes time and skill, and themore you invest the better the result.
You may be tempted to keep fiddling with your character model until it’sexactly, perfectly correct. Think before you spend a lot of time on this step.Resist the urge to spend hours on every character. The time soon adds up, andit’s time taken from other (perhaps more productive) aspects of your movie.
The trick to achieving good results with Modifiers is subtlety. Make a smallchange, take a look at the effects, and make another small change.
Facial hair, makeup, and glassesThe Facial Hair, Makeup, And Glasses category allows you to accessorizeyour new Sim to within an inch of his street-cred. You can choose the shapeof your character’s eyebrows here, as well as give him a fine Lincolnian beard(and all-over stubble at differing designer lengths, too, if you so wish). Beforeyou ask, no, you can’t easily give beards to your female Sims, so that greatidea for Badger Bristles: Confessions Of A Bearded Lady will have to wait.
You can give your Sim glasses in this section, as well as apply makeup andface paints in a variety of frightening shades. In a blatant display of sexism,your male Sims can wear whatever fabulous color of lipstick you choose,thereby proving once and for all that men have it easier in life.
Although the Eyebrows tab allows you to choose the shape of your character’seyebrows, it doesn’t determine their thickness (or lack thereof). There areseven different Modifiers for that, under the Modifiers➪Brow tab. Thoughtlesslyexcessive use of these modifiers can create a Buffy The Vampire Slayer bumpyforehead effect, so be careful — unless you’re trying to film a Buffy fan-film,that is, in which case your humble authors can always be thanked throughthe medium of alcohol.
If you can’t find that perfect item, you can always make your own. Onceagain, Body Shop makes this task easy. Load up the application and chooseCreate Parts rather than Build Sim.
122 Part II: Getting Serious
12_096918 ch07.qxp 7/20/07 11:11 AM Page 122

The three options you see — Create Genetics, Create Facial Hair, Makeup &Glasses, and Create Clothing — correspond to the three categories of thesame name in the Sim-building part of Body Shop. You can create new eyecolors, makeup, clothing, glasses, and so on.
Say, for example, that you want to give your character a distinctive tattoo:
1. Click Start a New Project and give your project a name.
2. Click Create Genetics.
3. Click the Skin Tone button, which is the first one on the lower row.
The description Skin Tone is something of a misnomer. What you’reactually going to be editing is the texture that gets applied to themodel’s skin, underneath any clothing and makeup he’s wearing.
4. Select the lightest of the four default skin tones and click ExportSelected Textures at the bottom of the screen.
Body Shop prompts you for a project name.
5. Name your project.
You can choose anything you like.
Body Shop exports all the textures used by the light skin tone to MyDocuments➪EA Games➪The Sims 2➪Projects, in a folder namedthe same as your project. You already knew that, though, because ahelpful message at the top of the Body Shop window tells you so.
6. Click Cancel in Body Shop.
You can reload this project after you’ve edited the image.
Take a look at what’s been exported. Yikes, that’s a lot of stuff. What youhave here are image files for every potential age, sex, and body shape,with separate images for faces. You’re only going to change one file, andthat’s the image for a standard adult female body. It has the catchy nameof afbodynormal~top~stdMatBaseTextureName.bmp.
7. Open the file in your favorite editor.
This file is just a standard bitmap image. Notice that the texture filemakes it seem that your character has been involved in some sort ofhorrific steam roller accident. That’s just because the texture has to beflattened to convert it from a 3D wrapped shape to a flat 2D texture. (Youcan find out more about this topic in Chapter 16.) You can see theapproximate position of your character’s shoulder.
8. Edit the image to add a tattoo at that spot.
123Chapter 7: The Casting Couch: In-Engine Character Design in The Sims 2
12_096918 ch07.qxp 7/20/07 11:11 AM Page 123

9. Save the altered image and reload the project in Body Shop.
Your changes appear on the model. If not, check that you edited theright image file, and that you’re displaying the new skin tone using amodel of the correct sex, age, and body type. If your edits aren’t quiteright, just cancel the project in Body Shop, re-edit your image(s), andopen the project again
10. After you’re happy with your edits, click Import To Game.
After a few moments, your new skin tone is imported into the game foryou to use in just the same way as the standard skin tones.
You need to edit your existing model in order to use this texture.
11. Choose Build Sims➪Build Or Clone Sims and select your character.
You can’t edit this model directly, so you need to create a clone and edit it.
12. Press the Clone Selected Sim button at the bottom right.
13. Change the Sim’s skin tone to your new skin tone, which you can nowfind under Genetics➪Skin Tone and save.
You’ve now got two, seemingly identical, Sims in your collection. Theone on the left is your new, fully tattooed, Lead Character Version 2.0,and she’s ready to start filming.
ClothingAfter you have a character model that you’re pretty happy with, it’s time tosend him off for a costume fitting. Click the Clothing button.
Clothing in The Sims is divided into six categories. Body Shop randomlypicked an outfit in each category for your Sim when you first generated him(see the section “Creating Characters in The Sims 2,” but you can choosesomething more appropriate here. The selection of clothes available is lim-ited by the sex of the Sim that you’re dressing, as well as his age. Most itemsof clothing can only be worn by Sims at a certain life stage.
You can edit as many of your characters outfits as you want, but only one ofthem will be saved along with your character when you exit Body Shop. Don’twaste time assigning six separate outfits to each character at this stage. Youcan assign more clothes later, when you come to actually import the charac-ter to the game.
124 Part II: Getting Serious
12_096918 ch07.qxp 7/20/07 11:11 AM Page 124

Going shopping on the WebIf you need a specific piece of clothing and can’t find it in Body Shop, yourfirst resource should be the wide-open seas of the Great Internet. There are alot (and we do mean a lot) of Web sites dedicated to custom content for theSims 2, and most of them are free to access.
Custom content is usually distributed as a .package file. To install a .package file and make it accessible in The Sims 2, simply place that file inyour My Documents/EA Games/The Sims 2/Downloads folder.
Custom content can also come as a .Sims2pack file. This is, essentially, aself-extracting archive of multiple .package files. If you have The Sims 2(with or without any of its expansion packs), double-clicking a .Sims2packfile automatically installs the custom content where it needs to go (after firstgiving you a list of items to confirm). When downloading custom content forThe Sims 2, make sure that you’ve downloaded the correct pieces. Sims 2Custom content can be composed of two parts: the mesh and the texture. Ifthe dress or hairstyle you download is simply a new color scheme for anexisting Sims 2 mesh, it’s called a recolor and typically will just be one Sims 2.package file.
If it’s an entirely new shape, then sometimes the mesh comes as one .package, and the recolor(s) will come as another. Sometimes these areavailable at the same location, other times they are not.
Always read carefully when downloading, looking for any references to otherfiles required to get your content to work. If you install a hair color for acustom mesh and neglect to download the mesh, the new hair color doesn’tshow up as a choice until its mesh is present.
Many pieces of custom content are distributed as compressed archive files,usually in the ZIP or RAR format. You have to uncompress these files beforeyou can access the content. If you’re using Microsoft Windows XP, you canread ZIP files already, but plenty of simple programs specifically designed toread archived files are available. We recommend 7-Zip, on the DVD.
Designing a Character’s LookThere’s a difference between knowing how to design a character and knowinghow to design your character. So, once you’ve written your script, breakdown,and story treatment, how do you translate the words on the page into a fin-ished character? Just follow these steps:
125Chapter 7: The Casting Couch: In-Engine Character Design in The Sims 2
12_096918 ch07.qxp 7/20/07 11:11 AM Page 125
1. Have a flexible idea for the character’s look, based on his role andpersonality.
Come to your character design with a vague idea of the character’s lookbut a firm grasp of his role and appearance in the story and experimentfrom there. By being willing to experiment with the strangest ideas andplay with the editor, you’ll come up with a much fresher look that playsto your engine’s strengths. (To find out why you shouldn’t know exactlyhow your character will look, see the nearby sidebar.)
2. Do your research, and scour the ’Net for the look you want.
Start your design process with unimportant extras and create your mostimportant characters last, to ensure that you’ve got a good grasp of thestrengths and weaknesses of your tool. You need to learn your tool beforeyou do your important work, and there’s no better way than to use it forless vital production design.
At the same time, scour every add-on site you can find for game modsthat can make your characters look better. If it looks even vaguely rele-vant to your character design process, download it and try it.
And keep a written journal of any add-ons or particular setups inside the character editor that may be useful for your main characters. If youdon’t write it down, you’ll forget it. Hugh has a piece of paper hangingdown from his monitor stand that he scrawls notes on whenever hespots something he likes.
3. Don’t create a look — create a range of looks.
When you’re ready to start designing your main character or characters,the first thing you should do is go through the editor and assemble apotential look for the character. Done that? Good. Now do it again. Andagain. Get as wild and crazy as you want — experiment with differentvisual styles. What would the character look like if the film used a ’40snoir style? What about if she could only wear orange?
126 Part II: Getting Serious
Perfect designs considered harmfulIf you know exactly how you want your charac-ter to look, you’re probably sunk. As soon as youget into character design, you’re into a processof compromise with the game engine and itsavailable assets.
If you come into the design process with avision of exactly how your character should
look, you’ll invariably be disappointed by theresults of your work. You won’t achieve thevision in your head, and if you keep aiming forthat, you’ll probably rule out other possibilitiesthat could have produced an even better result.
12_096918 ch07.qxp 7/20/07 11:11 AM Page 126
Once you’re running out of ideas — and it’s a good idea to work with some-one else on this stage to ensure that you don’t wear out your brains tooquickly — and you’ve got a bunch of outfits, it’s time to start winnowing.
4. Go over your designs with the whole team.
Get everyone working on your film, or a bunch of people you trustwho’ve read the script, together with a computer running your charac-ter editor. Now show them each of the designs for each of your charac-ters in turn. Discuss them. Edit as you’re talking. Perhaps you like theshoulders from one but the jacket from another? Try it. How would thehair look spiked? Try it. From this process, you should be able to narrowdown to a single design that you like, and you’ve got your character.
You’re the director during this process — and make sure that yourhelpers know that although you appreciate their input, you’re the visionkeeper for the film, and you have the final word. If everyone else hates alook, but you’re absolutely certain it’s the right one, then go for it.
5. Don’t be afraid to change later.
After you’ve been filming for a bit, or shooting a storyboard, it oftenbecomes obvious that a character’s look just doesn’t work in the story.At that point, the absolute worst thing you can do is to keep going withthe style you’ve chosen.
If there’s any way that you can go back and re-shoot the sections thatdon’t work, do it. Go back to Step 1 on this list and start developing thecharacter again, based on what worked from his/her last outfit.
Technology and mods have probably moved on since you started work,so check the latest character modifications. Then settle on a new look,and get on with the filming.
On BloodSpell, we changed our lead character’s appearance at the start offilming, after a year of filming our animatic. The process of re-designing Jeredwas a nightmare — it took a month and many iterations of his models, andnearly resulted in Hugh bouncing his head off his monitor a couple of times.But we look back on the animatic now and cringe. Jered looked like a totalidiot before we fixed him. And that’s how you’ll feel about your old characterdesigns after you’ve redesigned for a better look.
Mastering Visual Character DesignAs you experiment with Body Shop, or with any other character-editing tool,you’ll slowly gain an intuitive sense for what works and what doesn’t. Weguarantee that you’ll look back on your early attempts a little further on downthe line and wince. That’s okay, though — the best way to learn is by doing.
127Chapter 7: The Casting Couch: In-Engine Character Design in The Sims 2
12_096918 ch07.qxp 7/20/07 11:11 AM Page 127
Here are few tips for creating competent, striking, and well-designed charac-ters. You can apply most of these tips to character design using any engine,not just The Sims 2.
� Practice makes perfect. Your characters on your first film won’t look asgood as the characters on your fifth. That’s fine — just get on, do thebest you can, and don’t obsess on any one character. If she looks a bitropey now, you’ll probably figure out how to make her look better soonenough.
� Try to give your character a style. Notice how characters in your favoritetelevision show have a particular dress sense that is peculiar to them;that’s the costume designer doing a good job. Perhaps your charactertends to wear long, flowing skirts or always dresses in smart businessclothes.
� He’s like Blade, but he has two katanas. You don’t have to avoid cliché,but be aware that you’re using them and make sure that you’ve exploredother options. Does your brooding vampire hunter have to wear a blacktrench-coat? What about jeans and T-shirt? Or a business suit?
� Spend time on your textures. A few hours immersed in a image-editingprogram can often prove beneficial. As well as customizing your texturesto better suit the character, you may be able to improve on, and adddetail to, the texture that you’re using. If you’re using one of the defaultgame textures, chances are that the texture will already be of a very highstandard, but if the texture is from a third-party or fan-made add-on, thequality isn’t guaranteed.
� Place your character across a crowded room. Put your lead characterin a room with a dozen game extras. If she’s not so striking that you can’tfind her straight away, you need to do more work.
� The eyes have it. Your character’s eyes are extremely important. Wesubconsciously associate a lot of information from a person’s eyes.Make sure that the eyes are clean and detailed. You may think that yourcharacter’s eyes are so small as to not be worth worrying about, but younever know when you’re going to need an extreme close-up.
You can suggest innocence or trustfulness by subtly enlarging your char-acter’s eyes. (In the same way, contract or narrow the eyes slightly togive a villainous or untrustworthy look.)
� Do Deformed Rabbit; it’s my favorite. Your character will be more inter-esting and memorable if they make a good physical silhouette, whichalso helps to define them easily within a frame. The shape of your char-acter’s outline is of particular importance in Machinima, where a low-polygon game engine or character model can appear to consist ofnothing but harsh straight lines when viewed up close.
128 Part II: Getting Serious
12_096918 ch07.qxp 7/20/07 11:11 AM Page 128
� Think about yin and yang. Be aware that your character is going to beseen against other characters and against the backdrop and set thatyou’ve created. Make sure that the colors you’ve chosen are well-defined. Your character should contrast with the background of a typicalscene unless you’ve got a very definite reason for not doing so.
On BloodSpell, we had to drop an entire scene from the feature-lengthversion, because both the background and the outfits of the characterswere brown. Oops. Our bad.
� Define features. You’re working on what is basically a cartoon, so yourcharacters need to be immediately distinctive and possibly even slightlycaricatured. To make them memorable, ensure that your charactershave a single very distinctive feature — think Batman’s incredibly strongjaw, or Lex Luthor’s bald head.
� Be bold. Use bold colors for your character and try to avoid murkybrowns, grays, and dark purples. There are other ways to make yourcharacter look moody and angst-ridden, and these sort of colors rarelycome across well in Machinima. You can create a much stronger effectwith stronger and brighter colors like reds and blues. You can alwaysdarken these colors with lighting in your game engine. This tip is of pri-mary importance. Get it? Primary. Oh, never mind.
� Make it clear which Charmed sister is which. It’s equally important to make your characters distinct from one another. If all four of yourlead characters are blond-haired Caucasians wearing dark tops andjeans, you’re going to end up with a very confusing movie about a schiz-ophrenic who keeps changing his tie. Think Buffy versus Willow versusFaith, and you’ve got an idea of how to distinguish your characters visually.
Hair is a great way to make a character distinctive. Have it blond, have itred, have it not be there.
� Feel blue. Psychologists and interior decorators know that, in the west-ern world at least, we associate specific colors with certain emotions orcharacter traits. Black is death, the unknown, power, and corruption;blue is a sad color (but also calm and regal); and so on. This idea iscalled Emotive Color Theory, and it’s worth researching and following for your characters. You can find out the basics at Color Wheel Pro(www.color-wheel-pro.com/color-meaning.html) or Wikipedia(http://en.wikipedia.org/wiki/Color_Symbolism).
� Use the color wheel. The color wheel is a tool that has long been usedby artists and graphic designers in order to select complementarycolors. A circle is divided into three parts, one for each of the primarycolors (red, green, and blue for visual media). Each segment is then
129Chapter 7: The Casting Couch: In-Engine Character Design in The Sims 2
12_096918 ch07.qxp 7/20/07 11:11 AM Page 129

divided into two, which are then filled with the so-called secondarycolors, created by combining two of the primary colors.
The great thing about the color wheel is that, if you pick two colors thatsit opposite each other on the color wheel, you can be almost guaran-teed that they will complement each other and go together well. If, onthe other hand, you pick two colors that are adjacent on the colorwheel, your eyes will bleed at the ugliness.
130 Part II: Getting Serious
12_096918 ch07.qxp 7/20/07 11:11 AM Page 130
Chapter 8
Cut! Directing Machinima with The Sims 2
In This Chapter� Hacking the game to make it a movie studio
� Controlling the camera and setting up great shots
� Getting tips from Michelle of Brittanica Dreams
The Sims 2 — possibly the most popular computer game of all time. In TheSims, you control a family of little computer people, who have just moved
into a new house. Just like real people, they have aspirations in life, fears, andthe need to use the toilet (believe us, that’s a big part of the game). You get tocontrol them, direct them to fulfill themselves and their goals, buy goods andservices to improve their home, and hopefully avoid them dying of hunger orthirst, setting themselves or their house alight, or otherwise failing in theirlife’s aims.
As a Machinima maker, you can create almost anyone you can imagine, placethem in virtually any situation you can think of (from modern day to mer-maids), and film the results.
Making Movies in The Sims: The Advantages
The makers of The Sims were taken by surprise when players started usingtheir game to tell stories. Hence, when they were developing the secondgame, in full 3D, they decided to take these possibilities a step further, andincorporate tools to allow its users to make movies.
13_096918 ch08.qxp 7/20/07 11:11 AM Page 131

The Sims 2 is one of the most advanced Machinima toolsets available today:
� The Sims 2 boasts full camera control, including simple tracks and pans,as well as a pause mode to set up your perfect shot.
� Characters have a huge range of potential animations and reactions. Inparticular, for romantic or emotional films, The Sims 2 is way out in frontof any other engine for the average filmmaker.
� The game includes both set construction and a fantastic character cre-ation tool.
� The range of additional content for The Sims 2 on the Internet is huge.There are thousands of new sets, new characters, new props, and almostanything else you can imagine. (And, in some cases, things you reallydidn’t want to imagine, and now can’t scrub clean from your brain.)
� Many Machinima makers have also created add-ons for the game, and soyou can find lots of utilities and add-ons that make creating movies easier.
� Sites like www.sims99.com provide a community of people eager tohelp new Machinima makers.
Checking Out The Sims DisadvantagesWe have to tell you now that The Sims 2 has one honking, massive problemas a Machinima tool: The characters can’t talk. Or rather, they can’t lip synchto movie dialogue. They do talk, but in a weird, Sim-lish dialect.
Just before we went to press, a Sims 2 filmmaker named Decorgal released twogame hacks for The Sims 2, which give an amazing degree of control overspeech in the game. With a bit of work, you can use these tools to achieve prettyaccurate lipsynching. You can find these tools on the included DVD or onlineat http://decorgalinc.com/blog/?p=157 and http://decorgalinc.com/blog/?p-179.
The Sims 2 has a few other problems:
� Many animations are quite overblown, which can be a problem for lessmelodramatic films.
� The Sims 2 is best for nonviolent, or at least not action-packed, films.The game doesn’t really have a lot of facility for violence — romance,yes, violence no.
� The Sims is best for films set in the modern day. You can find content fornonmodern sets, particularly historical romances, but most availablecontent is for modern-day settings.
132 Part II: Getting Serious
13_096918 ch08.qxp 7/20/07 11:11 AM Page 132

� The game has a number of weird little flaws. For example, it’s nearlyimpossible to have a character interact with a door. You can’t have themopen it or close it on demand. Many of these problems have beenworked around by the community, but some — like the door thing —haven’t been, which can crop up to bite you unexpectedly.
� For very serious moviemakers, it’s worth noting that it’s very difficult toadd new animations to the game. So, if you want your characters to doanything normal Sims can’t, you’re out of luck.
If you really have to import a custom animation, take a look at Miche’s Sim’s body animation converter (www.jd-movies.com/animtutorial.php).
Preparing to Film with The SimsSeveral useful additions to The Sims’s movie-making capabilities were addedin the expansion pack, Sims 2: Nightlife. You’ll need that to make mostMachinima movies and to fully follow along with this chapter.
Getting started filming with The Sims 2 is relatively easy. Although the gamehas a few quirks as a Machinima platform, you’ll be able to set up your firstshot pretty quickly. In brief, the Sims 2 process of filming consists of the fol-lowing stages:
1. Create your cast in the Body Shop application and create your set inthe game itself.
For more information on the mechanics of Sims set design, see Chapter6. To find out how to create your cast, see Chapter 7.
2. Import your main cast into your main set, ready for filming, and yoursupporting cast into the neighborhood ready to be called in wheneveryou require them.
See the upcoming section “Getting Your Sims onto Your Lot.”
3. Configure The Sims 2 for Machinima creation.
See the upcoming section “Configuring The Sims 2 for Machinima.”
4. Shoot your film more or less live, telling your characters what to doand then freezing the game, setting up a shot, and watching as they dowhat you’ve told them.
The game exports this footage live as you shoot as AVI files.
5. Take these AVI files and edit them as a normal movie.
133Chapter 8: Cut! Directing Machinima with The Sims 2
13_096918 ch08.qxp 7/20/07 11:11 AM Page 133

Want to get a laugh out of a group of filmmakers? Say, “We’ll fix it in post-production.” It’s a truism in filmmaking that the earlier you get somethingright, the less time it will take you — or, to put it another way; screw it upnow, pay for it later. Hence, you should set up as much as possible before youactually start filming. It’s much more efficient to line everything up from thestart instead of fixing them during filming.
Getting Your Sims onto Your LotAfter you’ve designed your set, you need to set up your actors, ready for film-ing. Assuming that you’ve already created your actors in the Sims Bodyshop(see Chapter 7), here’s a simple procedure to get everyone ready for shooting:
1. Load The Sims 2 and then load your custom Machinima neighborhoodfrom the Choose A Neighborhood To Play screen.
If you haven’t created a custom neighborhood yet, see Chapter 6.
2. From your Neighborhood screen, press F1 to go to your Families tab andthen press the big Create New Family button at the bottom of the screen.
Yes, in The Sims 2, your actors really are one big happy family (seeFigure 8-1).
3. Give your family a name — the Machinimators, say — and then clickthe Create a Sim button.
4. Click the new button that appears (not the baby comforter).Confusingly, that button is also called Create a Sim.
5. Choose the appropriate age and sex for your sim (as you set them upin the Body Shop) and then click Choose Existing Sim.
The oh-so-hilarious Sim Bin appears. (Oy, Wright, we do the jokesaround here, not you!)
6. Select your pre-created sim for your first supporting character (seeChapter 7).
Don’t select your lead character/characters yet. The next step is thetime to choose additional costumes and outfits for your character. Eachcharacter will have been imported from Body Shop with only one set ofclothes, but you can add more here.
7. Click Step 5: Clothing (the number 5) and select additional clothingfrom the six tabs that appear.
If you only need one set of clothes for your actor (the one that heappears in by default), you can skip this stage. You can also only selectone of each type of clothing for your Sim (Everyday, Formal, Undies, PJs,Swimwear, and Athletic).
134 Part II: Getting Serious
13_096918 ch08.qxp 7/20/07 11:11 AM Page 134

If you want a character to change T-shirts, for example, during your film,you can either create two identical characters with different T-shirts, oryou can send your character to a Shop in the game to buy herself addi-tional clothing.
8. Name your first supporting character whatever you want and click thenumber 6.
9. Give your character an Aspiration (ooh, we think Romance), and twoTurn-ons and one Turn-off.
We leave those personal details up to you. They have no effect on film-ing, so choose anything you fancy.
10. Click the check box and add your first supporting character to yourfamily.
He appears next to a backdrop, facing a camera, ready for that lovelyfamily photo.
11. Repeat the preceding steps for each of your supporting characters andclick the check mark in the bottom-left corner to accept that family.
Now you need to set up a new family for your lead character(s). Yes,even in Machinima the stars get their own trailer.
12. Repeat the preceding steps, this time calling the family The Talent,and importing your lead characters.
Figure 8-1:The Add
Familyscreen.
135Chapter 8: Cut! Directing Machinima with The Sims 2
13_096918 ch08.qxp 7/20/07 11:11 AM Page 135

Sometimes it’s useful to create two versions of the same lead character inone family. Suppose, for example, that your movie calls for your character tohave two different hairstyles. Rather than constantly switching out to BodyShop, editing your lead character and re-importing, just create two copies ofthe character in Body Shop. Because the second character is a clone of thefirst, they’ll be identical. All you have to do now is to give one version a dif-ferent hairstyle. Now, when you come to create you Lead Character family,you can add both versions of this character. You can also have a characterchange outfits using this method.
After you have your two families set up — one with your lead character, theother with your extras — you need to move them into the neighborhoodready for filming.
1. On the Neighborhood screen, press Ctrl+Shift+C to bring up the CheatConsole.
It’s a lot easier to make money in The Sims 2 than it is in real life, somake all your actors millionaires. It’ll only take a second.
2. Enter the following line, substituting your family name for TheMachinimators if you chose a different name: familyfundsTheMachinimators 1000000.
Now your family has access to all the virtual money you could possibly need.
3. Do the same for your lead character family, The Talent.
Now you need to move your characters into their houses. Move the Talent,your leads, into the main set and put The Machinimators in a cheap lotnearby, ready for you to call them later.
Be sure to back up your set so that if something goes wrong, you can reload it later. If you’ve not created a set yet, now is a good time to go to Chapter 6and create one.
1. Press F2 or select Lots And Houses and click your set.
The For Sale dialog box appears.
2. Select the Package Lot icon from the left side of the pop-up dialog box.
The Package Lot dialog box appears.
3. Select the Package Lot To A File radio button and click the checkbutton to accept.
The Sims 2 pops up another helpful little dialog box to inform you where ithas saved your lot. Now, if you accidentally delete, burn down, or whateverelse your set, it’s trivial to re-create it. Take that, Real World filmmakers!
136 Part II: Getting Serious
13_096918 ch08.qxp 7/20/07 11:11 AM Page 136

Now you can create a cheap house for our Machinimators. Or a veryexpensive one. Darn these inflating Hollywood budgets.
4. Select a house from the pictures at the bottom of the screen.
The cursor changes to a picture of the house in question. It doesn’tmatter what house you pick; you’re not going to visit there.
5. Find a spot on the screen where you can place the house and click toplace it.
You can place the house next to a road on flat land. The picture of thehouse on your cursor turns green when it’s placeable.
The Rename This House dialog box appears.
6. Accept the default name and press F1 to move to the Families tab;click the picture of the Machinimators family.
If you’ve forgotten what they look like (extras, who can tell them apart?),you can hover over the pictures to see a pop-up of their name.
After you click them, your cursor changes to a picture of the family.
7. Click the house you just placed.
The Sims 2 asks you whether you want to move the family into that house.
8. Click Yes.
The Sims 2 loads up the lot. We don’t want to be here yet, so exit.
9. Press F5 to open the Options menu and then select the Neighbor-hood icon.
Now, you need to move your lead actors into the set where you’ll befilming.
10. Move your second family into your set rather than the Machinimator’shouse.
And you’re done! Now you can set your engine up for filming.
Whatever you do, don’t now move your leads out of the set again. If you do that, all their belongings — in other words, all the set-dressing you’vedone — will be deleted!
Configuring The Sims 2 for MachinimaAfter your characters are on the set, you still have some setup work to do.You need to modify a couple files that the game uses, which gives you moreflexibility in filming.
137Chapter 8: Cut! Directing Machinima with The Sims 2
13_096918 ch08.qxp 7/20/07 11:11 AM Page 137
The following steps may look intimidating, but they’re actually no harderthan opening a letter in a word processor.
1. Go to Program Files\EA GAMES\The Sims 2\TSData\Res\Config folder.
If you’ve got Nightlife installed, which is a really good idea for filmingpurposes, go to Program Files\EA GAMES\The Sims 2 Nightlife\TSData\Res\Config instead.
2. Make a copy of GlobalProps.xml.
This is one of the main Sims 2 configuration files.
3. Open the original file in Notepad and add the following line after
<AnyBoolean key=allowCustomContenttype=0xcba908e1>true</AnyBoolean> :
<AnyBoolean key=testingCheatsEnabledtype=0xcba908e1>true</AnyBoolean>
4. Start The Sims 2/The Sims 2 Nightlife.
You’re done with the config editing.
Adding a community add-onNext, you need to add a community add-on: The Sims 2 Studio, from PawfectFilms, which is pretty much a necessity for Sims 2 Machinima creation. Thisparticular add-on gives you access to a whole bunch of animations that are atotal nightmare to access by any other means. Here’s what you need to do:
1. Download from the add-on from www.modthesims2.com/showthread.php?t=100738.
2. Unzip the file into the following directory: My Documents\EA Games\The Sims 2\Downloads.
When you start the game, you’re asked whether you want to enable the add-on.
3. Click the radio button for Enable Custom Content and click OK.
Adding game cheatsYou also need to add a few cheats to your game of The Sims 2 to make yourlife easier. Game cheats are hidden ways to change the way that the game
138 Part II: Getting Serious
13_096918 ch08.qxp 7/20/07 11:11 AM Page 138
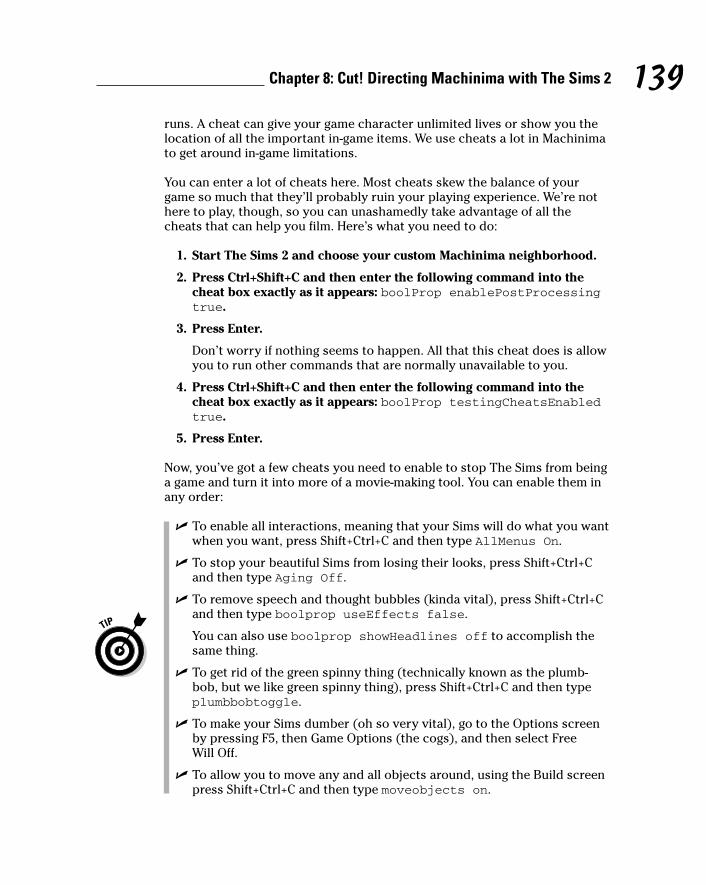
runs. A cheat can give your game character unlimited lives or show you thelocation of all the important in-game items. We use cheats a lot in Machinimato get around in-game limitations.
You can enter a lot of cheats here. Most cheats skew the balance of yourgame so much that they’ll probably ruin your playing experience. We’re nothere to play, though, so you can unashamedly take advantage of all thecheats that can help you film. Here’s what you need to do:
1. Start The Sims 2 and choose your custom Machinima neighborhood.
2. Press Ctrl+Shift+C and then enter the following command into thecheat box exactly as it appears: boolProp enablePostProcessingtrue.
3. Press Enter.
Don’t worry if nothing seems to happen. All that this cheat does is allowyou to run other commands that are normally unavailable to you.
4. Press Ctrl+Shift+C and then enter the following command into thecheat box exactly as it appears: boolProp testingCheatsEnabledtrue.
5. Press Enter.
Now, you’ve got a few cheats you need to enable to stop The Sims from beinga game and turn it into more of a movie-making tool. You can enable them inany order:
� To enable all interactions, meaning that your Sims will do what you wantwhen you want, press Shift+Ctrl+C and then type AllMenus On.
� To stop your beautiful Sims from losing their looks, press Shift+Ctrl+Cand then type Aging Off.
� To remove speech and thought bubbles (kinda vital), press Shift+Ctrl+Cand then type boolprop useEffects false.
You can also use boolprop showHeadlines off to accomplish thesame thing.
� To get rid of the green spinny thing (technically known as the plumb-bob, but we like green spinny thing), press Shift+Ctrl+C and then typeplumbbobtoggle.
� To make your Sims dumber (oh so very vital), go to the Options screenby pressing F5, then Game Options (the cogs), and then select Free Will Off.
� To allow you to move any and all objects around, using the Build screenpress Shift+Ctrl+C and then type moveobjects on.
139Chapter 8: Cut! Directing Machinima with The Sims 2
13_096918 ch08.qxp 7/20/07 11:11 AM Page 139

Only turn this cheat on when it is needed. Don’t leave it on during filming;bad things can happen. Turn it on when you need to move something ina particular way and then turn it off afterward by moveobjects off.
� To allow you to move any and all objects around, using the Build screen,press Shift+Ctrl+C and then type MaxMotives on.
� To allow you to move any and all objects around, using the Build screen,press Shift+Ctrl+C and then type motiveDecay off.
You’ve now totally ruined any chance that you could enjoy a nice game ofThe Sims with your character. On the upside, you can now make a movie withthem! Oh, choices, choices.
Starting to FilmTry a gentle start to your new life as a filmmaker. Fire up The Sims 2 and loadthe Lot that contains your main character’s house. (See the earlier section“Getting Your Sims Onto Your Lot.”) Once you’re in, you need to do a little bitof preparation to ensure that you’re filming in an optimal environment:
1. Click the Camera Settings button and make sure that you’ve disabledthe option that records sound along with video footage.
The game records much slower if you leave the sound-recording optionon. It’s always best to compose, layer, and add sound later, when you’recompositing your video footage together.
2. Set other Camera Options (see Figure 8-2), if necessary.
You can choose the size and quality of the footage you film here.Depending on the speed and power of your computer, you may need tolower these setting a little, but in most cases, you can film with VideoCapture Size set to large and Video Capture Quality set to high. Go aheadand make those changes now if you need to.
3. Within Options➪Graphics/Performance Options, set Object Hiding to Off.
4. Press Ctrl+Shift+C to get the cheats box up and then type letterbox 0.2.
If you didn’t enable the cheats in the section “Adding game cheats,” ear-lier in this chapter, you need to now. You’re going to be using them.
Now, that made a difference. You should see a black bar at the top andbottom of your screen, as if you’re watching a wide-screen movie on astandard TV screen. If you don’t, check that you’ve entered the twocheats exactly as they appear.
140 Part II: Getting Serious
13_096918 ch08.qxp 7/20/07 11:11 AM Page 140

This letterbox command allows you to adjust the aspect ratio of thefootage that you’re going to be recording. The number that follows ishow extreme this effect is. We’ve chosen 0.2 here in order to replicatethe wide-screen aspect ratio called Cinemascope, in which mostHollywood movies are filmed.
5. You can turn the letterbox on again later, but turn it off for now withthe command letterbox 0.0.
Great, you’re back to normal, and you can see what you’re doing a littlebetter.
Static shotsSo, this is The Sims 2. Have a look around. Try making your character inter-act with some of the objects in his house. When you’re ready to start filming,press Tab and get ready for your first shot.
We’re going through exactly the same procedure here that we would if wewere filming live footage on a conventional film set. You have to position your
Figure 8-2:Camera
Options inThe Sims 2.
141Chapter 8: Cut! Directing Machinima with The Sims 2
13_096918 ch08.qxp 7/20/07 11:11 AM Page 141

camera within your film space and then check the view through it. If it’s notquite right, you’ll adjust until you’re satisfied. The only difference is that ouractors, set, filming space, and even the camera itself all exist within a virtualspace that you can view on your computer monitor.
Notice that the view on your screen changes to Camera View when you pressTab. You’re now viewing the action through the lens of your virtual camera.You’ll be switching between this view and the standard game view a lot whileyou’re filming. What you see on-screen now is exactly what will be recorded ifyou start filming.
Before you start filming, you need to position your camera properly.
You can move the camera in Camera View using the keyboard, as describedin Table 8-1.
Table 8-1 Moving the Camera in The Sims 2Key Movement
W Forward
S Backward
A Slide Left
D Slide Right
< Turn left
> Turn Right
Z Zoom in
X Zoom out
Q Move up
E Move down
PgUp Raise walls
PgDn Lower walls
For your first shot, find something static you want to film — a plant, a piano,or even your house. Now zoom in until it fills your entire screen. This will beyour first camera position, so press Ctrl+4 to save it.
142 Part II: Getting Serious
13_096918 ch08.qxp 7/20/07 11:11 AM Page 142

The Sims 2 allows you to save six different camera positions and return tothem later. By pressing Ctrl+4, you’ve just assigned this camera position tothe 4 key. You can assign other camera positions to keys 5 through 9. (Keys 1,2, and 3 are out of bounds, as they’re already used by The Sims 2 to controlthe game speed.)
The Sims 2 remembers any camera positions that you save, even betweensessions of the game, which is a great timesaver. They’re saved with your lot.
Make sure that the walls of your house are displaying in full before you save acamera position. If you save a camera position with the walls down, The Sims2 switches back to that mode of display when you load that camera position,even if you’ve changed it.
After you save that first camera position, use the X key to zoom out a littleuntil you can clearly see some of the surrounding space. Now is a good timeto turn the letterbox effect on so that you can check that the shot still works.Shift+Ctrl+C and then type letterbox 0.2.
Assign this new camera position by pressing Ctrl+5. Now you can switchbetween the two camera positions by pressing 4 and 5. (Don’t hold down Ctrlthis time.)
Lights, camera, action!After you set up your camera (see preceding section), you’re ready to filmyour first shot:
1. Press the P key to pause the game and then press 4 to move thecamera to your first recorded position.
2. Press the V key.
The Sims 2’s built-in camera recorder begins, and the red border aroundthe screen turns yellow to indicate that the view on-screen is currentlybeing recorded.
You’ll probably find that everything starts moving really slowly. Thegame hasn’t gone wrong — The Sims 2 just slows the game down whileits recording to ensure that the quality of the recorded footage is asgood as possible. When you review the footage that you’re capturing atthe moment, it plays back at the correct speed.
143Chapter 8: Cut! Directing Machinima with The Sims 2
13_096918 ch08.qxp 7/20/07 11:11 AM Page 143

3. Press V again to stop recording.
The Sims 2 provides you with a helpful message about the location ofthe footage you just recorded.
Congratulations! You’ve just shot your first piece of Machinima footage inThe Sims 2. It’s sitting on your hard drive right now, just waiting for you toview it. Don’t do that just yet, though — after all, it’s a pretty boring shot onits own.
Even the highest-quality setting in The Sims 2 produces only 640x480 video.You’ll almost certainly want higher quality than that. To accomplish this, editVideocapture.ini in the My Documents/EA GAMES/The Sims 2/Config folder and change the Large Settings and High Quality Settings fieldsto change resolution and framerate, respectively. Ideally, you should be cap-turing at the same resolution you’re running The Sims 2 at, to minimize theimpact of resizing. Watch out: Changing these settings will make your videofiles much larger.
I like to move it — moving shotsIf you set up your camera in the section “Static shots,” earlier in this chapter,you can easily set up a transition for a nice pan or tracking shot. Just press 4to get to the first position and then press 5 — and you move!
Does that look a bit faster and jerkier than you’d hoped for? Us, too. We’dbetter fix that. Press Alt+Tab to leave The Sims 2 temporarily and return toWindows; you need to engage in some old-skool hacking:
1. Open up your My Documents folder and navigate to EA GAMES/The Sims 2/Cameras.
2. Open the file called FirstPersonCameras.txt in Notepad or yourfavorite text editor.
If you’re not used to editing and hacking game configuration files, youmay be feeling a little out of your depth here, but there’s no need topanic. Machinima is all about finding ingenious ways to make a game do what you want it to do, and you can always re-install if things dosomehow break. Get your hands dirty — this is what you signed up for, soldier!
You now see that you’ve got a whole bunch of settings and code in frontof you. You’re not concerned with most of these settings, and you can, infact, ignore most of them. You do need to change just a few, though.
144 Part II: Getting Serious
13_096918 ch08.qxp 7/20/07 11:11 AM Page 144

During the course of filming, you’ll probably need to make changes toonly nine of these lines. They are the lines that start with the following:
setparam orientationminchangesetparam orientationstepssetparam fovminchangesetparam fovstepssetparam velocityminchangesetparam velocitystepssetparam translationminchangesetparam translationstepssetparam ticklimit
For this first shot, make just two changes toFirstPersonCameras.txt.
145Chapter 8: Cut! Directing Machinima with The Sims 2
Camera parameters in The Sims 2The movement of your in-game camera is gov-erned by four separate types of parameter.
� The translation dictates the amount ofmovement between one location and thenext.
� The orientation dictates the direction inwhich the camera faces (and the changethereof).
� The velocity is the speed at which thecamera moves.
(Note to physics geeks and pedants: Yes, we know that technically ‘velocity’describes a directional vector as well as aspeed, but in this instance it’s much simplerto think of velocity as applying purely tospeed. Just trust us on this one. It is.)
� The Field Of View, or FOV, describes thecone which is visible to the camera at anyone time — wider FOV means that you cansee more in front of the camera, but it alsotends to exaggerate distances betweenobjects (see Chapter 3).
In The Sims 2, we have the option of specifyingtwo values for each of these parameters.
� Firstly, we can specify the number of steps,which dictates the number of individualchanges that the camera will implementduring the course of a single movement.Think of this as the number of frames in ananimation, or the number of pages in a flick-book comic.
� Secondly, we can specify the minchange,or minimum change. The minimum changetells The Sims 2 how large (or small) wewant each step to be. The larger the min-change, the more significant a change willbe performed with each step.
We think. No-one outside the developers of TheSims 2 is exactly sure what these features do —these explanations are our best guess based onobservation.
A lot of Machinima tends to function in muchthe same way — Machinima creators hack thegame and exploit features that the game devel-oper wasn’t really expecting to be exploited,and hence didn’t document.
13_096918 ch08.qxp 7/20/07 11:11 AM Page 145
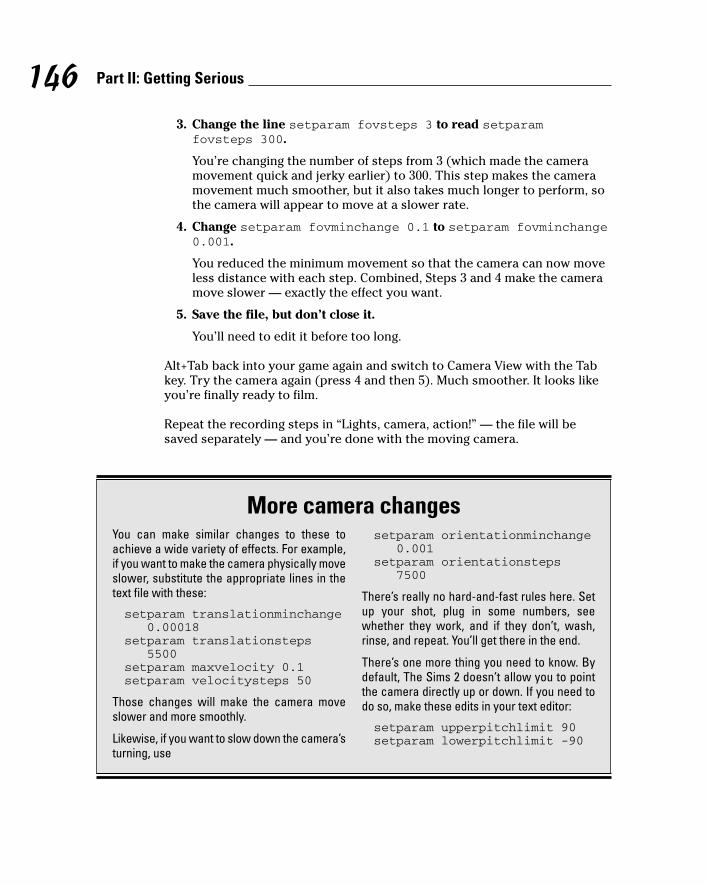
3. Change the line setparam fovsteps 3 to read setparamfovsteps 300.
You’re changing the number of steps from 3 (which made the cameramovement quick and jerky earlier) to 300. This step makes the cameramovement much smoother, but it also takes much longer to perform, sothe camera will appear to move at a slower rate.
4. Change setparam fovminchange 0.1 to setparam fovminchange0.001.
You reduced the minimum movement so that the camera can now moveless distance with each step. Combined, Steps 3 and 4 make the cameramove slower — exactly the effect you want.
5. Save the file, but don’t close it.
You’ll need to edit it before too long.
Alt+Tab back into your game again and switch to Camera View with the Tabkey. Try the camera again (press 4 and then 5). Much smoother. It looks likeyou’re finally ready to film.
Repeat the recording steps in “Lights, camera, action!” — the file will besaved separately — and you’re done with the moving camera.
146 Part II: Getting Serious
More camera changesYou can make similar changes to these toachieve a wide variety of effects. For example,if you want to make the camera physically moveslower, substitute the appropriate lines in thetext file with these:
setparam translationminchange0.00018
setparam translationsteps5500
setparam maxvelocity 0.1setparam velocitysteps 50
Those changes will make the camera moveslower and more smoothly.
Likewise, if you want to slow down the camera’sturning, use
setparam orientationminchange0.001
setparam orientationsteps7500
There’s really no hard-and-fast rules here. Setup your shot, plug in some numbers, seewhether they work, and if they don’t, wash,rinse, and repeat. You’ll get there in the end.
There’s one more thing you need to know. Bydefault, The Sims 2 doesn’t allow you to pointthe camera directly up or down. If you need todo so, make these edits in your text editor:
setparam upperpitchlimit 90setparam lowerpitchlimit -90
13_096918 ch08.qxp 7/20/07 11:11 AM Page 146

Diving in to Character FilmingCameras are all very fun, but you’re here to make films about people, right?Okay, then. Start your film with your lead character waking up from a nicenap. You’ll need a couch in your set.
With your lead as the active character, click the couch and choose Nap fromthe menu. All being well, your character curls up on the couch for somemuch needed R&R. If he doesn’t do so immediately, check that the path tothe couch is unobstructed. You may also want to turn his/her Energy valueright down.
If you’ve already enabled the boolProp Testing cheat (see the section“Adding game cheats,” earlier in this chapter), you can simply click theEnergy bar and drag it to the left.
If your character curls up on the couch, but faces the opposite direction thanwhat you want, tell him to get up and stand him directly in front of the couch.Whichever end of the couch he’s standing at is the end that his feet willoccupy, so if you want him to sleep the other way around, simply move himto stand at the other end of the couch.
Now, switch to Camera Mode and maneuver your camera until you have hisface centered on-screen. Doesn’t he look sweet when he’s sleeping? Save thisposition with Ctrl+6 and record it as in “Lights, camera, action!”
If your character is feeling particularly uncooperative, there’s a possibilitythat your lead character may go for a wander halfway through this shot. If hedoes, you can’t really do anything but shout a word that your mother doesn’tknow you know and retake the shot.
Although you can limit the amount of independent thought and behaviorexhibited by your sims, you can’t mute it entirely. Some days they just willnot do what you tell them. (This situation can be a problem with real actors,too, but at least you can fire them.)
Next, have your lead wake up:
1. Pull your camera back a bit so that you can see the character and thecouch (paying attention to the Rule of Thirds — see Chapter 3).
2. Pause the game with P.
You’ll be using this key a lot.
147Chapter 8: Cut! Directing Machinima with The Sims 2
13_096918 ch08.qxp 7/20/07 11:11 AM Page 147
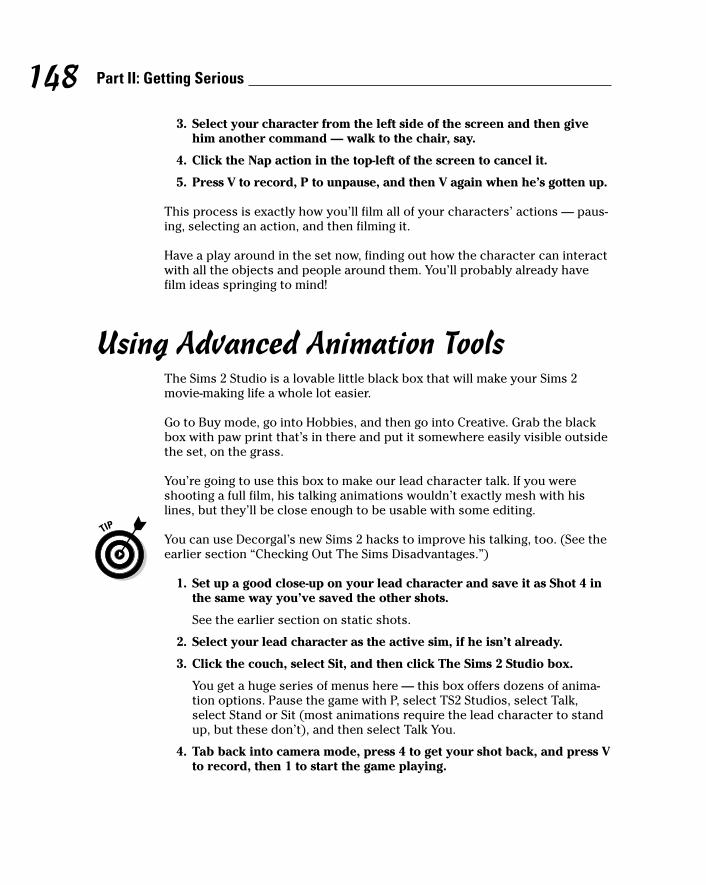
3. Select your character from the left side of the screen and then givehim another command — walk to the chair, say.
4. Click the Nap action in the top-left of the screen to cancel it.
5. Press V to record, P to unpause, and then V again when he’s gotten up.
This process is exactly how you’ll film all of your characters’ actions — paus-ing, selecting an action, and then filming it.
Have a play around in the set now, finding out how the character can interactwith all the objects and people around them. You’ll probably already havefilm ideas springing to mind!
Using Advanced Animation ToolsThe Sims 2 Studio is a lovable little black box that will make your Sims 2movie-making life a whole lot easier.
Go to Buy mode, go into Hobbies, and then go into Creative. Grab the blackbox with paw print that’s in there and put it somewhere easily visible outsidethe set, on the grass.
You’re going to use this box to make our lead character talk. If you wereshooting a full film, his talking animations wouldn’t exactly mesh with hislines, but they’ll be close enough to be usable with some editing.
You can use Decorgal’s new Sims 2 hacks to improve his talking, too. (See theearlier section “Checking Out The Sims Disadvantages.”)
1. Set up a good close-up on your lead character and save it as Shot 4 inthe same way you’ve saved the other shots.
See the earlier section on static shots.
2. Select your lead character as the active sim, if he isn’t already.
3. Click the couch, select Sit, and then click The Sims 2 Studio box.
You get a huge series of menus here — this box offers dozens of anima-tion options. Pause the game with P, select TS2 Studios, select Talk,select Stand or Sit (most animations require the lead character to standup, but these don’t), and then select Talk You.
4. Tab back into camera mode, press 4 to get your shot back, and press Vto record, then 1 to start the game playing.
148 Part II: Getting Serious
13_096918 ch08.qxp 7/20/07 11:11 AM Page 148

5. Watch the animation, give it another couple of seconds of the leadcharacter sitting there, and stop recording.
The Sims 2 Studio is an example of an add-on, downloaded from the Internet.A number of filming tools are available for The Sims 2, as well as hundreds of new sets, new characters, and new props. Check out a site like http://modthesims2.com to browse some of the vast selection available.
Creating Character InteractionWant your lead character to look over his shoulder, as though someone elseis knocking on his door? This is one of the tricks you can use as a Machinimafilmmaker to make your characters do your evil bidding.
For this interaction, you need another Sim for your character to look at. And,handily, for a film, you need to invite all your Sims over anyway.
1. Go to Build mode and create a box on the lot, with four walls and no door.
You’ll use this box to ensure that your extras can’t get away oncethey’ve arrived! Think of it as . . . you know . . . an unusually restrictivetrailer.
2. Shift+Click the mailbox and choose Invite All Neighbors.
Wait a little bit. All the neighbors will show up en masse — in this case,all your extras.
3. Go to Buy mode, enable the MoveObjects cheat (see “Adding gamecheats”) and drag all the extras apart from one into the Box Of NoEscape you created in Step 1.
They’ll be fine. Turn off the sound if their crying disturbs you. No, seriously.
4. Drag one of your extras into the set, Shift+Click on him, and thenchoose Make Selectable from the menu.
Sometimes this command is under “More” on the menu, for no apparentreason, so if you don’t see it on the first screen, don’t panic.
5. Click your extra’s portrait.
Bang! You’re controlling him, and his picture appears at the bottom ofthe screen.
149Chapter 8: Cut! Directing Machinima with The Sims 2
13_096918 ch08.qxp 7/20/07 11:11 AM Page 149

6. Click next to your lead character, sitting on the PC, and select Go To.
Your extra walks toward your lead character — but will remain out ofyour shot, with any luck — and your lead will look at him. However,there’s a problem.
7. Select Go To, skip into Camera mode with Tab, and press 4.
Your lead looks up — but he looks awfully happy about it. That’s great ifhe’s greeting someone he likes, but dammit, this is drama, and drama isabout conflict! We want him to look irritated. So, we need to irritate him.
8. Go back to Live Mode, click your lead while controlling your extra,select More, and then select — yes — Irritate.
9. Choose one of the options here and enjoy the fun.
Your extra will proceed to — well, irritate — your lead actor.
10. Repeat Steps 9 and 10 a few more times, and your star won’t be smil-ing any more when Mr. Extra comes a’visiting.
Machinima is all about using the features of the game in a creative way, and theshot described in the preceding steps is a perfect example of that. If you runinto a problem in Machinima filming, brainstorm as many ways as possiblearound it using the features of the game. Don’t be afraid to try silly ideas —they’re quite likely to work!
Case Study: The Snow WitchMichelle Pettit-Mee and Kheri Batal met face to face for the first time in 2006,in the online world of “The Sims Online.” By that time, they’d already beenworking together for three years, entirely online, and had quickly establishedthemselves as one of the most pioneering Sims 2 Machinima-making teams inthe world.
When the two started telling stories using The Sims 2, neither of them hadeven heard of Machinima. They had no professional film training and livedthousands of miles apart — Michelle in the UK and Kheri in the United States.
Under the name Brittanica Dreams, Kheri and Michelle have produced suc-cess after success, from the moving Highwayman to the beautiful Mermaid’sTale. But their most ambitious and arguably most successful production hasbeen the short film The Snow Witch, an interpretation of an old Japaneseghost story, which you can find on the DVD.
150 Part II: Getting Serious
13_096918 ch08.qxp 7/20/07 11:11 AM Page 150

Following are Kheri and Michelle’s top tips for The Sims 2:
� Don’t expect it be easy. Making a movie in The Sims 2 is a heavy techni-cal achievement.
� Use the game’s animations in nonstandard ways. To make the SnowWitch bend over, Kheri and Michelle used a custom mod to trigger thebrowse store shelves animation from the Sims 2 Open For Businessexpansion pack.
� It may not be cheap. Expect to splash out on a decent video-editing suitelike Vegas Video at the very minimum.
� Download high-quality skins to improve your film. Brittanica Dreamsused custom, high-detail skin textures for The Snow Witch, downloadedfrom Sims 2 mod sites like www.modthesims2.com, to add a sense ofrealism to their otherwise mildly cartoon-like appearance.
� Know the game inside-out. Learn all the animations and interactions.Kheri and Michelle played the game for several hours a day for almostnine months before they started making movies with it. Every time a newexpansion pack is released, they have to spend time learning that, too.
� Make use of the in-game cheats and hacks. In particular, don’t be afraidto use the boolprop cheat. You just won’t manage without it.
� Get really nit-picky about set building. You’ve got to spend some time onit — it’s a big part of the finished product. There’s nothing worse than amovie with a set the size of a football pitch, with nothing but a singlesofa right in the center.
� Use the lighting hacks available online and the Radiance lighting that’savailable.
� Watch as many Sims 2 movies as you can to see what other people havebeen able to achieve.
151Chapter 8: Cut! Directing Machinima with The Sims 2
13_096918 ch08.qxp 7/20/07 11:11 AM Page 151

152 Part II: Getting Serious
13_096918 ch08.qxp 7/20/07 11:11 AM Page 152
Chapter 9
Get Out the Scissors: Editing Machinima
In This Chapter� Using Vegas Video to edit your Machinima
� Importing clips
� Adding transitions and sound
� Exploring editing techniques
� Editing specific styles of scene
Your hard drive is straining at the screws with all the footage you’verecorded for your groundbreaking new Machinima movie. You’ve got at
least five different takes for each shot, and you also filmed a few seconds ofthe sun shining through the trees because the lens flare was so darn pretty.You’ve just got to put that in somewhere.
So, how do you take all this disparate footage and turn it into a slick, narra-tively coherent movie? It’s time to start editing.
In this chapter’s examples, we use Sony Vegas Movie Studio 6.0. You can finda trial version of this program on the book’s DVD, but the techniques wecover here are equally applicable to most similar video-editing packages.
Understanding What You’re Achieving with Your Edits
In its simplest form, editing is merely the process of stringing together all thebits of footage that you’ve recorded, thereby creating one long piece offootage that you can then call a movie. In practice, though, there’s far moreto video editing than that.
14_096918 ch09.qxp 7/20/07 11:12 AM Page 153

You’ll need to shorten some clips and outright discard others. You’ll bemaking pass after iterative pass over your video edit, tightening all the time.Eventually, you’ll use advanced editing techniques to tell part of your storypurely by composing and contrasting different clips in a specific order.
Most scenes have a similar structure. In general, you need to achieve the fol-lowing things in your edit.
� Tell the audience what’s going on and where. Obviously, this goal isvital. It’s easy to believe, as the filmmaker, that your audience will knowthe layout of your scene, just like you do. But that Just Ain’t True. Youneed to show details both large (epic, sweeping landscape) and small(gun in a desk drawer) at the appropriate time for the audience to followyour story.
� Show the audience cool stuff. Don’t underestimate this step. If you’vegot a fantastic visual, a great vista, a neat animation, or a tense moment,make sure that the audience sees it! Baz Luhrmann and Peter Jacksonare both masters of this sort of editing. But don’t let your visuals get inthe way of the story.
� Tell the audience what your characters are thinking. You need todirect your audience’s eye and suggest where your characters are look-ing, what they’re thinking, and what they’re aware of.
� Tell your audience what to expect. If something important is about tohappen, you must make sure that your audience is in the appropriatemindset for it — either expecting it, or really not expecting it!
� Control the movie’s pace. A movie is like a piece of music. No twopieces will have an identical tempo. Some will be fast and furious, someslow and melodic. But consciously controlling and crafting that tempo isone of the editor’s most vital functions. An audience will get bored witha random or monotonous pace to a movie.
� Tell the audience what the director thinks is important. To a consider-able extent, the edit and camerawork combine to form the editorial of afilm. It’s here that you can craft a theme or a mood, from David Lynch’ssparking electrics and deep woods to John Woo’s slow-motion doves.Think about what the style of the action in Aliens says compared to what Rambo’s style says about the director’s vision for what’s importantin his world.
� Don’t bore anyone! And this is the first and greatest commandment ofthe editor: Bore not the crap out of your audience. If you ever wonderwhat you’re doing here, just remember this: You’re here to put the shotsin the right order and cut out the boring bits.
If anything is boring, not vital, not adding anything to the movie, be it ahalf-second pause or a five-minute scene, chop it!
154 Part II: Getting Serious
14_096918 ch09.qxp 7/20/07 11:12 AM Page 154
Figuring Out How to EditEditing is a very intuitive process. If you’ve watched many films or much tele-vision, you’ll quickly pick up the process. Add some basic knowledge of filmlanguage, and you’ll have very few problems editing your movie together.
In general, the editing process for a Machinima film comprises five phases:
1. Assemble your footage.
When you start editing, you’re faced with an intimidating pile of footage.Your first task is, quite simply, to trim out all the obvious rubbish andput your shots in the right order.
Start at Shot 1, cut it down to size, drop it into the timeline, and on toShot 2. Try to cut as tight as possible, but don’t obsess over the rightsequence just yet.
2. Fine edit your movie.
Now you start from the beginning of the movie and preview it in yourediting package. Every time you see something that’s not perfect, stoppreviewing, go into the edit, tighten it or alter it to make it better, andthen watch it again.
When it’s perfect, or as close as possible, move on to the next part of thefilm. It’s at this point that you should be adding fades, dissolves, andnecessary effects.
It’s possible to simply stop after this stage — and many Machinima pro-ductions do. This is a huge mistake. The next few steps will make the dif-ference between an okay, slow film, and a great production.
3. Preview.
Find some friends who haven’t been involved in your film, preferablypeople who aren’t particularly familiar with Machinima and hence won’texcuse its limitations. Sit them down in front of a complete copy of yourfine edit. Now give them all paper and pencils and ask them to watch itand make notes about anything they don’t like, don’t understand, orthink can be improved.
Do the same yourself at the same time. We warn you now, you’ll sud-denly realize that your allegedly perfect edit is nothing of the kind.Collect their comments, then figure out how to fix the problems you find.
4. Pickup shots.
Some problems you’ve found in Step 3 will probably require new shotsto fix. Shoot these now.
155Chapter 9: Get Out the Scissors: Editing Machinima
14_096918 ch09.qxp 7/20/07 11:12 AM Page 155

5. Conduct a final edit.
Take your notes and your new shots and edit the film again. Dependingon how many problems you discovered in your fine edit, you may needto do another preview now and repeat Steps 3 through 5 again.Otherwise, congratulations. You’ve got a finished film!
Getting Started with Vegas VideoThe Vegas Video editing package (see Figure 9-1) is an excellent all-rounder.
To start a new project, follow these steps:
1. Run Vegas Video.
2. Close the dialog box and choose File➪New.
3. In the dialog box that appears, click the “Match Media Settings” button.
If you want your final movie to have the same settings as a file alreadyon your computer, you can just check this box and select this file in thenext dialog box; Vegas automatically sets up your project to match it.
Figure 9-1:VegasVideo.
156 Part II: Getting Serious
14_096918 ch09.qxp 7/20/07 11:12 AM Page 156

4. Give your project a name and choose a location on your hard drive tostore all the files that Vegas creates; then click Next.
5. Click OK.
Importing a ClipBefore you start editing, you need to have something to edit! Fortunately, youcan easily add a Machinima clip to your Vegas project. Simply choose File➪Import➪Media and, in the Import dialog box import the clips you want toedit. Once a clip has been added to the project, it appears in the ProjectMedia tab on the bottom half of the screen. You can use the clip multipletimes in different places, if you want.
Adding a Clip to the Video TrackTo start editing, you need to move a clip onto the main editing track. Thistrack is sequence of video clips, all timed to a single timeline above, whicheventually becomes your film.
Import a clip and drag it from Project Media to the main window. (If you’renot sure how to import a clip, see the preceding section.) Notice that theaudio from the imported clip is automatically added as a second track.
Trimming a ClipOne of the things that you’ll be doing most often during the editing process istrimming a clip: removing excess material from the start and the end of apiece of footage to leave just the essential parts.
There’s a very simple rule for all but the most expert editor: Once you’vechopped your scene down as tight as you think it can possibly go, it’ll beeven better if you cut another 10 percent.
There’s always junk in there.
Here are some prime candidates for the chopping block:
� Shoe-leather shots: Audiences are smart. If they see someone gettinginto a car, they can figure out how he got to the front door in the nextscene. In fact, they can figure it out if they just see him heading toward a
157Chapter 9: Get Out the Scissors: Editing Machinima
14_096918 ch09.qxp 7/20/07 11:12 AM Page 157

car. Anytime all you’re showing is how someone or something got from Ato B, you can cut it.
� Awkward pauses: Just because it sounded great in the recording studiodoesn’t mean it’ll sound good with visuals. Anytime the pace of a con-versation drags or a pause feels unnaturally long, cut it down.
� Nasty Machinima clunks: Your engine will have its own quirks. Someengines can’t have a character turn around without a second of foot-skating first. Perhaps your engine’s facial animation works like treaclefor the first second, or there’s a short delay before scripts run. Cut itout. Trim it, chop it, cut away from it. There’s no better way to make afilm feel like a game than to include all the clunky game animation.
� Dodgy script moments: If the script doesn’t feel right in the edit, trustthe edit, not the script. Lines, actions, even entire scenes can cheerfullycome out if they don’t work. A classic example is the zero-advance beat:If a script beat ends up with the situation not changing at all, you candrop it with no problems.
Fortunately, Vegas has a separate editing window for trimming clips, called(usefully) the Trimmer:
1. Right-click a clip on the Project Media tab and choose Open In Trimmer.
2. Click and drag the small yellow arrow at the top left of the trimmerwindow to define a selection.
You can click and drag the start or end of this section to the exact frameyou want — the preview window at the right updates to show the cur-rently selected frame.
3. Once you’ve highlighted the part of the clip that you want, just drag itto the timeline.
Notice that the original clip remains unchanged. You can reuse it (inwhole or in part) by performing exactly the same process.
Don’t be afraid to be ruthless when you’re trimming clips. The snappier yourfootage, the better your movie will flow.
Adding TransitionsOne of the things that will set your movie above the pack is good transitionediting. A transition is a change between one screen and another, or even justthe change from one shot to the next. Fades, dissolves, and more obvious(some would say cheesier) effects are all transitions.
158 Part II: Getting Serious
14_096918 ch09.qxp 7/20/07 11:12 AM Page 158

Inexperienced editors almost always overuse transitions. Only when you’reabsolutely certain you need a different transition should you use anything otherthan a simple cut. Here are the most common forms of transition and their uses:
� Cut: Used in 99 percent of all transitions. A cut from one camera angle toanother implies continued action, with no passing time between the lastshot and the current one, even if the cut is between two different sets.
Sometimes a cut will appear jarring, usually because there’s too small adifference between the shots, or because you’ve made a filmic mistake(see Chapter 4). This is referred to as a Jump cut and is sometimes usefulas a deliberate choice, but usually needs to be fixed with pickup shotsor an alternate edit.
� Fade: The next most common transition, usually a fade to and from ablack screen. A fade implies the passing of time; a fade-out followed by afade-in is usually used to signal the start of a new scene. In TV, a fade-outis also used before an ad break, and hence shows that were originally TVformat will sometimes fade out on a cliffhanger and then fade in again atthe same location.
� Dissolve: One shot dissolves straight into another. A dissolve forms abridge between two disparate shots; it can be used where it’s not obvi-ous that two shots are in the same location, to bridge time in the sameway as a fade, or to fix a jump cut.
� Wipe: One shot is very obviously wiped over another, either from a singledirection or in a geometric shape. George Lucas’s Star Wars uses wipesextensively to mimic the style of the ’30s pulps. A wipe is a very obvious,almost crass, transition and is usually used only to make a stylistic point.
� Invisible wipe: An object moving across the screen can signal an invisi-ble wipe, where what follows the object appears to be a continuation ofthe shot but is actually a different shot altogether. The West Wing andBuffy the Vampire Slayer both use the invisible wipe all the time. Thistechnique is handy for Machinima, but obviously requires two shotsspecifically set up with this goal in mind.
� Other transitions — 3D boxes, shaped dissolves, and all that nonsense:Editing packages generally come with a package of a hundred or so cutetransitions: expanding hearts, peeling pages, nifty 3D effects, and so on.You should only use them if you’re being ironic (à la Wayne’s World), if youhave a very specific idea that you’re absolutely certain about, if you’re afar more experienced editor than your humble authors, or if you wantyour film to look like a badly edited wedding video.
Vegas automates much of the transitioning process. If you add two clips to asingle track, for example, and move the right clip so that it overlaps the leftclip, Vegas automatically creates a dissolve transition for you.
159Chapter 9: Get Out the Scissors: Editing Machinima
14_096918 ch09.qxp 7/20/07 11:12 AM Page 159

You can also create a fade in or out for a single clip on the Vegas tracks:
1. Move your cursor to the top-left corner of the clip until the cursorchanges to an arc shape.
2. Click and drag to the right.
The further you drag, the longer your fade-in will last. You can see acurve appear to indicate the range of the transition.
3. Repeat this process at the end of the clip to create a fade-out.
With Vegas (and most similar editing packages), you can apply a fade toeither the video or the audio channel of a clip, which lets you treat eachaspect of the clip separately.
Try starting the audio of a clip a few frames before the visuals fade in. Thisteasing technique is good for grabbing the viewer’s attention for the first fewseconds of a new scene.
If your audience will notice a transition, then the transition is probably tooextreme. Tone it down or cut it altogether. Not all section changes need atransition to frame them.
160 Part II: Getting Serious
Creating other transitionsWe warned you, but you just couldn’t stay away,could you? Very well. It’s your movie. Before wego any further, though, we must insist that yousign this waver, solemnly swearing to only useyour powers of transition for good, and never toexploit an innocent piece of footage just for yourown selfish pleasures. Sign here. And here. Andinitial here. Thank you.
Without further ado, then, we present: HughAnd Johnnie’s Crazy Transition Show!
1. Position two clips that will feature thetransition on the track before applying thetransition.
Move the right clip so that it overlaps theother clip. Vegas automatically applies adissolve transition.
2. Click the Transitions tab at the bottom of the window and choose a fun-lookingtransition.
We particularly like Spin Away under 3d FlyIn/Out, but it’s up to you.
3. Drag the transition from the transitionwindow and position it over the dissolvethat Vegas created for you.
Your chosen transition replaces the cross-fade.
4. Close the Transition Editing window thatappears unless you want to make anychanges to the default transition.
There. See the damage you’ve done? Are youhappy now?
14_096918 ch09.qxp 7/20/07 11:12 AM Page 160

Working with SoundYou can add an audio track to your Vegas project in exactly the same waythat you added your movie clips. (See the section “Adding a Clip to the VideoTrack,” earlier in this chapter, for more information.) Simply choose File➪Import➪Media and choose an audio file. You can now add and adjust this clipindependently in the Vegas editing window.
If you import a video clip, chances are that it will provide its own audio track.When you drag the clip to the track, the audio will be imported onto one ofVegas’ audio tracks as well. You can’t just delete this audio — it’s groupedwith the video clip, so deleting one deletes both.
If you want to delete it, right-click either the audio or video clip and thenchoose Group➪Remove From (or press U). This action separates the audioand video, which you can then move or delete independently.
Speeding Up or Slowing Down a ClipTime-stretching, or slow motion, is a handy tactic that can add emphasis oremotive overtones to a sequence when used correctly.
A slo-mo effect (and we promise never to use that phrase again) can beachieved by artificially stretching a clip during the editing process. Vegasmakes stretching a clip a one-click process.
Hover your mouse cursor over the end of a clip and hold down the Ctrl key.The cursor changes to include a wave symbol. Click and drag the end of theclip to the right (while still holding down Ctrl). Voilá: A time-stretched clip.
161Chapter 9: Get Out the Scissors: Editing Machinima
Emo slo-moTry altering the speed of short but significantshots to increase the emotive impact: for exam-ple, slow a shot of the main characters walkingtoward the camera on their way to the final con-frontation; or the hero spotting a child crossing
the road but reacting too late to stop the car.Likewise, speed up some shots, like a charac-ter turning their head toward the sound of anoise, to increase urgency.
14_096918 ch09.qxp 7/20/07 11:12 AM Page 161

Adding Title Sequence or CreditsIf you want any credit for your project, want to thank other people, or evenwant your audience to know what your movie’s called, you need titles.
You can use the Media Generators tab at the bottom of the screen (see Figure9-2) to add text to your project.
Here are a couple of points to consider when adding text:
� Choose Text to add a single line of text as an overlay to the videofootage. You can use this to add X-Files–like location information or toadd subtitles to a piece of dialog that is spoken in a different language.Make sure that the track containing your text is on top of all your othertracks.
� You can add credits at the end of your movie by using Vegas’ Credit Rollplug-in. Select Credit Roll from the Media Generators tab. Drag one of thepreconfigured credit rolls to the end of your project. You can add textand credits one line at a time in the properties box that appears.
Figure 9-2:Using the
MediaGenerator in Vegas.
162 Part II: Getting Serious
14_096918 ch09.qxp 7/20/07 11:12 AM Page 162

Rendering VideoOnce your movie is ready, you’ll want to render it into a viewable format.Nobody can watch it right now unless they also have a copy of Vegas (orwhichever video editor you’ve used). Here’s what you need to do:
1. Choose File➪ Render As.
2. Make sure that Save As Type is set to Video For Windows (*.avi), andclick Custom.
The Project tab of the Custom Template Window appears.
3. From the template drop-down menu, select Default Template (uncompressed).
4. Turn off “Render loop region only” and click OK.
5. Give your movie file a name and click Save.
Vegas renders out your completed movie file. Be aware that this is anuncompressed video file, and as such, is very, very large (approximately1GB per minute for NTSC format). You’re done.
Obviously you can’t upload a multi-gigabyte video to YouTube! See Chapter10 to learn how to compress and distribute your movie.
Identifying New ShotsAfter editing, most directors find that they’re missing some shots that wouldenable them to polish their movie. If you’re shooting in real life, refilming is apain, as you’ve often lost your actors or have blown up the key props.
In Machinima, though, it’s not a problem. Whenever you’re editing, youshould be looking for new shots that would improve your edit. Trust yourgut: Any time you’re looking at a shot sequence and it’s disappointing, try toconsider what shots would make it better, smoother, or easier to follow.
Pick-up shots are particularly useful for clearing up confusing points in a film.An extra wide shot or a close-up of a character interacting with a prop canmake the meaning of a shot obvious.
163Chapter 9: Get Out the Scissors: Editing Machinima
14_096918 ch09.qxp 7/20/07 11:12 AM Page 163
Editing an Action SequenceAction sequences — anything from a fight to a chase sequence, where the keyelements are violent action and speed — are among the most challengingsequences to edit, particularly in Machinima, where you’ll often be coveringfor weaknesses in the engine or in the actors’ reactive abilities.
Remember these key points when you’re editing an action sequence:
� Keep the action coming. Action sequences are really, really fast. Makesure that you’ve cut your shots down to the bone, and there’s no waitingaround, no moments where the characters are bobbing up and downwaiting to do something, and generally no pauses. Shots will often be asecond long or even less.
� Tell a story within a story. A successful action sequence is a storywithin a story. Can Bond tackle the bad guy before he leaps off thecrane? Yes, but now he is hanging from his fingertips while the bad guystomps on him!
If there’s no story, there’s no interest. See Chapter 4 for more on story.
� Remember — action, then reaction. The edit for an action sequenceoften follows the pattern Action (wide), Action (close), Reaction from acharacter. Reaction shots humanize the sequence (so that we care aboutwhat’s happening to the characters) and allow you to slow the action fora moment as characters react to the latest development.
� Shoot wide, close, very close. Don’t sit in one distance of shot, eitherwide, which can make the action feel distant and static, or close, whichcan be confusing. A well-framed action sequence has an even mixture ofintense close-ups and jaw-dropping wide shots, so that the audience canboth feel a part of the action and see it clearly.
� Speed is your friend. Changes of speed are your friend in an actionsequence. Slow motion is almost vital, particularly during impacts, andsped-up footage can be helpful to tighten slow game engine animations.
� Reshoots happen. You’ll probably not get your action sequence right thefirst time you film it. Pickup shots are your friend — use them liberally.
Editing a ConversationConversational editing is a comparatively simple and pleasurable job as aneditor. If the script works and the actors are on-form, it should take vastlyless time to edit a conversation than a more visual sequence.
164 Part II: Getting Serious
14_096918 ch09.qxp 7/20/07 11:12 AM Page 164
� Trim mercilessly. Particularly in Machinima, pauses are your enemy.Once you’ve gone through your initial edit, watch it again with a criticaleye. Any time the sequence seems to drag even for a moment, cut some-thing. There will be lots of pauses that sounded great in the voicerecording session that now drag the film down. (For more on trimming,see the section “Trimming a Clip,” earlier in this chapter.)
� Don’t be afraid to edit the script. Video editing is, in many ways, thefinal phase of script editing. Kill any bits of your script that aren’t fittingor that are slowing the story down. If a line isn’t necessary, cut it. If thesequence would work better in a different order, try that order instead.
� Don’t use too many angles. In a conversational scene, the cameraworkshould be unobtrusive. You’ll probably use only three to four shots (onewide and either one medium or close for each actor, or perhaps a two-shot) for each stage of the conversation. If the camera jumps around,it’ll distract from the content.
� Your Machinima characters can’t act. Unlike a live film director, youcan’t really just let an actor’s performance carry the moment. Your audi-ence will get bored watching your characters, even in the tensest ofverbal confrontations. Cut to a wide shot or a reaction shot as needed.
� Don’t always watch the speaker. Just because a character is speakingdoesn’t mean that the camera has to be on them. Particularly if yourengine has good facial animation, cut to reaction shots and don’t cutaway for every quick interjection.
Play around with the times you cut in. Cut in on a significant phrase or cutaway to a reaction shot. Your editing will feel more organic and natural.
Editing a Romantic SequenceHoo, boy. You’re not going easy on yourself, are you? Romance is . . . how canwe put this? . . . nontrivial in Machinima. Our actors’ lack of expression makeromantic scenes hard, hard, hard. And not in a euphemistic way. Having saidthat, here are some tips that can make your scenes more slushy:
� Kuleshov is your friend. The Kuleshov effect is a vital part of Machinima,and no more so than in romantic scenes. Lev Kuleshov was one of the pio-neers of filmmaking, before World War I. He proved that an audience wouldattribute thoughts to a static character if shots of him were interleavedwith shots of other objects. Man followed by baby, tender thoughts; manfollowed by gun, violent thoughts. We can use this technique to get aroundour limitations in Machinima. Shots of roses, hands intertwining, and thenback to a shot of your protagonist’s face — all help imply emotion.
165Chapter 9: Get Out the Scissors: Editing Machinima
14_096918 ch09.qxp 7/20/07 11:12 AM Page 165

� Soft transitions. It’s a bit ’80s Meatloaf video, but cross-dissolves softenthe sequence. If a cut feels a bit brutal, try a dissolve instead.
� Take it slow. Most romantic scenes contain a good chunk of suspense.Take your time here. Cut back to a wide, cut to a shot of downcast eyes,but give yourself plenty of time. At the same time, be ruthless in cuttingout anything that reduces rather than contributes to the mood you’retrying to set.
Editing a Suspense SequenceThere are a lot more scenes that rely on suspense in most films, particularlyeven vaguely action films, than is immediately apparent. Look over your favoriteaction movie — Aliens, Lord of the Rings, Star Wars, The Matrix, whatever —and notice how much time is spent on people creeping around, people wait-ing for something to happen, slow zooms with violins playing.
Editing a suspense sequence is very visual, and quite difficult. These pointersshould help you out:
� No, you can give it longer. If you’ve become used to tightening yourvisuals on almost every other strand of editing, you’ll almost certainlynot leave enough time in your suspense sequences. Just keep cutting tomore build-up of suspense: hands on weapons, gritted teeth, reactionshots, shadows slowly creeping along the floor, whatever.
� Come in. Generally, you can build suspense by starting from a wide shotand getting gradually closer and more personal with each shot from thereon. Look at the classic Western shootout sequence to see how this tech-nique works.
� Focus group it. It’s very hard to tell whether you’ve gone far enough, notfar enough, or too far, particularly on a suspense sequence. Show it tosome people who aren’t involved with your project. They’ll give youmuch better feedback than you can give yourself.
166 Part II: Getting Serious
14_096918 ch09.qxp 7/20/07 11:12 AM Page 166
Chapter 10
Fifteen Minutes of Fame:Distributing Your Movie
In This Chapter� Encoding video for the Internet
� Distributing your movie online
� Making your movie available as streaming and downloadable video
After you make your movie, you’ll probably want to distribute it, proba-bly either via Internet downloads or DVDs. In this chapter, we tell you
everything you need to successfully distribute your masterpiece.
Codecs, Codecs Every . . . What?Isn’t a codec the thing the Pope carries around with him? No, no, wait, it’s abig book with laws in. No, it’s Superman!
Okay, for real now. Codec is a portmanteau word, compressed (appropriatelyenough) from Encoder/Decoder. It refers to a piece of software that com-presses or uncompresses audio or video content. A good codec compressesan audio or video file, making the file size noticeably smaller, without a per-ceptible loss of quality. It accomplishes this goal primarily by discardingexcess audio information in ranges that are almost undetectable to thehuman eye or ear. Probably the best-known codec of all is the MP3 audiocodec from Fraunhofer, beloved of music lovers everywhere (and when wesay music lovers, we mean, of course, “Yaarr! Run up the mainsail, you scurvydogs! Avast!”).
So, essentially, a codec is just a glorified Zip program. But because thesecodecs deal with specific types of data, and data that’ll be fed to a humanrather than a machine, they can achieve compressions vastly better than anynormal compression program — which is good, because video data, in partic-ular, is absolutely huge.
15_096918 ch10.qxp 7/20/07 11:12 AM Page 167
An uncompressed episode of Strange Company’s BloodSpell is about13,000MB. After we compress it with DivX, it’s down to 70MB with very littleperceptible loss in quality.
Why do you need to know all this stuff? Because you’re eventually going towant to distribute your movie, and to do that, you need to get it down to areasonable size, most likely for other people to download it, but perhaps toput it on a DVD.
Video FormatsVideos don’t just come in a variety of compression technologies; they alsocome in different video formats. Where a codec is a way of compressingvideo, a format is a way of saying how that video data is then stored and whatprograms can read it. Just like word processor files, different video formatsare readable in different programs — Word can’t read OpenOffice.org files(something our editor is no doubt cursing quite literally as we write), andWindows Media Player can’t read QuickTime files.
You need to be aware of three popular video formats: QuickTime, AVI, andWindows Media.
QuickTimeQuickTime is the oldest of the current video formats, initially released in May1991 by Apple. Since then, it has been the main Mac video codec, with somesupport on Windows via the Windows QuickTime player and most editingpackages. It’s the primary editing format for the Avid video editors in particu-lar. QuickTime files are also sometimes called MOV files, because the fileextension for QuickTime is .mov.
You can download the latest version of the QuickTime software , which youneed to play QuickTime files, from www.quicktime.com. If you’re on a Mac,you’ve probably got it already.
So, if you’re on a PC, why would you care about QuickTime? Well, there arethree reasons:
� Mac users have a real time of it trying to play any other video format. Asavvy Mac user can do it but it’s hard and requires them to use slightlyunreliable software. You’ll lose a lot of your Mac audience if you don’thave a downloadable QuickTime version available.
� At time of writing, QuickTime is winning the compression wars. The H.264codec offered in QuickTime 7 takes about half the age of the earth to
168 Part II: Getting Serious
15_096918 ch10.qxp 7/20/07 11:12 AM Page 168

encode, but offers the best quality for downloadable video currently outthere.
� QuickTime is the de facto standard for professional video. AVID andFinal Cut Pro, the two most used professional-editing packages, both useQuickTime. So if you end up working with TV, you’ll have to get used toit, just like you’ll need to get used to spiky gelled hair, ironic thick blackrims on glasses, and perky assistant producers called Debbie.
If you want to output QuickTime video, you probably need to invest inQuickTime Pro from Apple, for $30 — anyone who was wondering whyQuickTime isn’t as omnipresent as AVI or WMV, you now know why. A free,open-source alternative called FFMPEG (http://ffmpeg.mplayerhq.hu)can encode QuickTime, but it’s command-line based, quite limited, and defi-nitely not for beginners.
In QuickTime 7, by far the best choice for video compression is called H.264.It comes with two options — either fast encode, which is approximately com-parable in compression speed to DivX, or best quality, which is, uh, slower. Alot slower. We’re not talking put the kettle on here so much as prepare a three-course meal to Michelin standards. A five-minute BloodSpell episode takesapproximately three hours to encode at Best Quality on our MacBook Pro.
If you’re super-worried about compatibility, you can also encode withSorensen 3, another, older codec, but the quality will be noticeably worse andthe size noticeably larger.
AVIOriginally introduced by Microsoft in 1992 as a response to QuickTime, AudioVideo Interleave (AVI) is the main Windows video format, much as Microsoftwould like to change that. These days, Microsoft has moved on to WMV, andAVI is mostly supported and extended by third-party developers. It’s proba-bly the most widely used, hacked, and developed-for format in the world.
On a PC, Windows Media Player can play AVI by default. However, you willstill need to install the appropriate codec for the video you’re viewing. On aMac, you need to download VLC (www.videolan.org/vlc) to be able toplay AVI files.
To be honest, you may as well download it if you’re on a PC, too — VLC is across-platform piece of software that plays most common AVI codecs withoutneeding them to be installed separately, and many people prefer the userinterface to that of Windows Media Player.
AVI is by far the simplest video format to play on Linux. VLC comes in Linuxflavor, too, although plenty of other excellent media players are out there forthe Linux platform.
169Chapter 10: Fifteen Minutes of Fame: Distributing Your Movie
15_096918 ch10.qxp 7/20/07 11:12 AM Page 169

The chances are that any video you capture on a PC will be captured in AVIformat. Because all PCs can play AVI format, it’s really a no-brainer to have anAVI version available.
The absolute best tool for any kind of AVI encoding — and arguably the bestvideo-encoding tool available short of $500, anywhere — is VirtualDub, whichyou can download from www.virtualdub.org. This free, open-source, pow-erhouse of video-encoding potential allows you to resize, reformat, and gen-erally mess around with your video to your heart’s content.
All modern AVI codecs are developed by third parties and downloaded fromthe Internet. Windows comes with some older AVI codecs, but with theexception of Uncompressed Video, which isn’t really a codec at all, none ofthe standard Windows codecs are of any use these days.
The codec of choice for the modern downloader is DivX, available fromDivX.com. There’s a good chance that you’ve already heard of the DivX codecand perhaps installed it, as it’s the No. 1 codec for, ahem, redistributing videovia peer-to-peer programs like EMule and BitTorrent. (Hey, we’re not judging.Just remember that Piracy With Violence is still punishable by hanging in theUK, so whatever you do, don’t punch anyone while you’re BitTorrenting thelatest episode of Heroes.)
From our oh-so-legal point of view, many or most of your viewers will alreadyhave the DivX codec installed and can watch your video without having toinstall DivX first. Some won’t, though, which means that they’ll either have todownload DivX before they can watch your movie or watch an alternativeversion like WMV.
DivX is very definitely a commercial product these days, and the free versionis slightly limited. For most people, it will be fine, but if you need more powerwithout price, you can use an open-source equivalent called XVid, which youcan download ready-to-run for Windows from www.koepi.org/xvid.shtml.
WMVWindows Media Video (WMV) is the new(ish), more or less closed and pro-prietary Windows Media format for video. Technically, WMV video is actuallyvideo in Microsoft’s Advanced Systems Format (ASF) using WMV codecs, butfrankly, no one cares.
There are basically only two reasons for using WMV.
� It gives comparable compression to video formats like DivX, meaning it’sa decent video format for downloaded videos.
� Everyone with a PC running Windows XP or Vista can play it by default.
170 Part II: Getting Serious
15_096918 ch10.qxp 7/20/07 11:12 AM Page 170

The second reason’s the biggie. Unlike DivX or QuickTime, all modern WindowsPCs can play WMV with no additional software needed. Macs can play WMV,too, using the MS WMV Player, although it’s a headache to get it to work. (Ittook Hugh about an hour to get his MacBook Pro to play WMV, as opposed toabout five minutes for AVI.) Needless to say, because WMV is controlled byMicrosoft, it can be an absolute pain in the proverbial to play it under Linux.
You can create WMV files using the free Windows Media Encoder, download-able from www.microsoft.com/windows/windowsmedia/forpros/encoder/default.mspx. There’s no question of choosing codecs here —the WMV codec is the only one available — so it’s a fairly simple process toencode.
Thinking about BitratesAll the codecs mentioned in the preceding sections are based loosely on theMPEG-4 standard, developed by the Moving Picture Experts Group.
MPEG-4 controls the size of files produced by means of a single variable: thebitrate of the file. This single number represents the maximum number of bitsallowed per second of the video. It’s usually expressed in terms of kilobits ormegabits per second (Kbps or Mbps, like Internet connection speeds).
Now, as we’re sure you can dimly recall from years-old computer scienceclasses, 8 bits are in a byte, and 1,024 bytes are in a kilobyte, and so on. So,by remembering these numbers, you have a relatively simple way to controlthe size of your video: Choose the size you’d like your end file to be in bytes,multiply that number by 8, divide it by the length of your movie in seconds,and you’ve got your target bitrate.
Whether the movie is viewable or indeed identifiable at your chosen bitrateis another question, and this is where the black magic of bitrate estimationcomes in. You need to choose the smallest possible bitrate, based on yourcodec, format, and the size and content of your video, that will give anacceptable level of quality while keeping files as small as possible.
How do you do that? Well, here at Strange Company, we use a highly techni-cal process called ‘guessing’. No hard-and-fast rules allow you to determineyour optimal bitrate. You can start from a rough guess (for example, we knewthat around 1000 Kbps normal PAL video looks pretty good), but after that,the best way to find an optimal bitrate is as follows:
1. Find the ten-second clip of your movie that contains the most action,color contrast, and precise detail and export it as an uncompressedvideo.
171Chapter 10: Fifteen Minutes of Fame: Distributing Your Movie
15_096918 ch10.qxp 7/20/07 11:12 AM Page 171
2. Run this video off as one of your target formats (DivX AVI is usuallyfastest) at a variety of bitrates — say, 500 Kbps, 600 Kbps, and so onup to 1500 Kbps, as an example.
3. Watch the videos, from the lowest bitrate to the highest, and choosethe bitrate that gives the best balance of size and quality.
For the rest of the chapter, we use the standard BloodSpell bitrate, which is800 Kbps at 800x450 using 2006 video technology. But it’s really up to you todetermine the bitrate that will suit your movie, particularly if you’re releasingin high definition or something similar.
The good news is that bitrates don’t differ much across the various video for-mats. We used 800 Kbps for QuickTime, AVI, and WMV.
Encoding Your VideoAssuming that you’ve got your final movie available in uncompressed videoAVI format, and you’ve installed programs to encode either QuickTime, AVI,or WMV, the following sections walk you through encoding your video downto a final downloadable movie in each of the three main formats.
We recommend always making your movie available in each format. However,if you don’t want to pay $30 for QuickTime Pro, you can just do AVI and WMV.You may also want to consider making different sizes of movie available, but,in our testing of BloodSpell, we found that very few people would downloadanything but the highest-quality format!
QuickTimeYou need your version of QuickTime Pro installed. To encode your uncom-pressed video into a final downloadable movie:
1. In QuickTime, choose File➪Open File and open your AVI file.
2. Choose File➪Export and select a name and location for your finishedfile.
The Save Exported File As dialog box appears.
3. Select Movie To QuickTime Movie from the Export drop-down list
4. Click Options.
You see the Movie Settings dialog box, shown in Figure 10-1.
172 Part II: Getting Serious
15_096918 ch10.qxp 7/20/07 11:12 AM Page 172

5. Select both Video and Sound.
6. Click Settings.
The Standard Video Compression Settings dialog box appears, as shownin Figure 10-2.
7. From the Compression Type drop-down list, select H.264.
8. From the Frame Rate drop-down list, select Current.
Figure 10-2:The Stan-
dard VideoCompression
Settingsdialog box.
Figure 10-1:The Movie
Settingsdialog box.
173Chapter 10: Fifteen Minutes of Fame: Distributing Your Movie
15_096918 ch10.qxp 7/20/07 11:12 AM Page 173

9. Select the Restrict To radio button under Data Rate and set thenumber to 800.
This number is the bitrate of the finished movie.
10. Under Encoding, select Fast Encode and click OK.
Or, select Best Quality if you’re not doing anything for the next fewhours, or you really want the best possible quality (say, if you’re aboutto release your movie to the big wide world).
The Movie Settings dialog box reappears.
11. Click the Size button.
The Export Size Settings dialog box appears.
12. From the Dimensions drop-down list, select Current and then click OK.
The Movie Settings dialog box reappears. You’re nearly there!
13. In the Sounds area, click the Settings button.
The Sound Settings dialog box, shown in Figure 10-3, appears.
14. In the Format drop-down list, select AAC.
15. From the Channels drop-down list, select Stereo if you have stereosound on your video
16. From the rate drop-down list, select the maximum allowed and click OK.
The Movie Settings dialog box reappears for the last time.
Figure 10-3:The Sound
Settingsdialog box.
174 Part II: Getting Serious
15_096918 ch10.qxp 7/20/07 11:12 AM Page 174

17. If it’s checked, uncheck Optimize For Internet Streaming and thenclick OK.
The File dialog box appears.
18. Click Save.
A progress bar appears after a moment. When it’s done, you’re done, too!
AVITo encode your video in AVI format, you need to have VirtualDub installed,which is just a question of unzipping it into a folder. You can launch the pro-gram using Vdub.exe. You also need the latest version of DivX installed.
To encode your uncompressed video into a final downloadable movie:
1. In VirtualDub, choose File➪Open Video File and open your uncom-pressed AVI.
2. Choose Video➪Compression.
The Select Video Compression dialog box appears.
3. Select the DivX codec from the list on the left side of the dialog box.
It’s called something like DivX 6.4.0 Codec (1 logical CPU) depending onyour PC and the latest version of DivX when you read this book. If it’sgotten past DivX 10 by now, e-mail us and tell us to hurry up and writeMachinima For Dummies, 2nd Edition!
4. Click Configure.
The DivX Codec Properties dialog box, shown in Figure 10-4, appears.
It looks a bit frightening, but the good news is you can ignore most of it.
5. Set Bitrate to 800 and click OK to close the window.
6. Click OK again.
7. Choose Audio➪Full Processing Mode.
Many options under the Audio menu are now selectable.
8. Choose Audio➪Compression.
The Select Audio Compression dialog box appears.
175Chapter 10: Fifteen Minutes of Fame: Distributing Your Movie
15_096918 ch10.qxp 7/20/07 11:12 AM Page 175

9. Select MPEG Layer 3 from the left-hand window and then select 56kbit/s, 24000 Hz, Stereo from the right-hand side menu.
10. Click OK.
11. Choose File➪Save As AVI, choose a name and location, and click OK.
Your AVI starts to save.
If you want better audio compression, you can install the LAME MP3 codec,available from www.free-codecs.com/download/Lame_Encoder.htm.You can then select that from the Audio Compression dialog box in VirtualDub,and it allows you to select a huge variety of compression modes for youraudio. BloodSpell used LAME MP3 audio at 44 kHz and 128 Kbps.
WMVTo encode your video in WMV format, you need to have — you can guesswhat’s coming here — the Windows Media Encoder installed. To encode youruncompressed video into a final downloadable movie:
Figure 10-4:The DivX
CodecPropertiesdialog box
appears.
176 Part II: Getting Serious
15_096918 ch10.qxp 7/20/07 11:12 AM Page 176

1. Start Windows Media Encoder and choose Custom Session.
The Session Properties dialog box, shown in Figure 10-5, appears.
2. In the Source From area, select the File radio button.
3. Select Browse and find your uncompressed video file.
4. Click the Output tab.
5. Deselect Pull From Encoder (as professional video producers, we’rehere to tell you we have no idea what that does) and select Archive To File.
6. Click Browse next to File Name on this tab and select where you’d likeyour video to end up.
7. Click the Compression tab and then click Edit on that tab.
The Custom Encoding Settings dialog box, shown in Figure 10-6, appears.
Figure 10-5:The Session
Propertiesdialog box.
177Chapter 10: Fifteen Minutes of Fame: Distributing Your Movie
15_096918 ch10.qxp 7/20/07 11:12 AM Page 177

8. Click the tab marked something like 282 Kbps.
It’ll be a number followed by Kbps.
The Custom Encoding Settings dialog box now shows the 282 Kbps tab(see Figure 10-7).
9. Check Same As Video Input and then set the Frame Rate to the correctrate for your source footage.
That frame rate is 29.997 for NTSC and 25 for PAL.
10. Set the Video bitrate to 800K.
It’s very important you put the K at the end here, or the Encoder, in itsnear-infinite wisdom, will attempt to encode your movie at 800 bits persecond, which is, shall we say, a little low — a thousand times too low.
11. In the Audio Format drop-down list, select 128 Kbps, 44 kHz, CBRfrom the list and click OK.
You return to the Session Properties dialog box.
Tab name varies. Click to alter settings.
Figure 10-6:The Custom
EncodingSettings
dialog box.
178 Part II: Getting Serious
15_096918 ch10.qxp 7/20/07 11:12 AM Page 178

12. (Optional) Select the Attributes tab of the Session Properties dialogbox and fill out the attributes there: your name, the name of yourmovie, and so on.
13. Click Apply.
The Session Properties dialog box disappears, and you just see the mainWindows Media Encoder screen.
14. Click Start Encoding.
You’re encoding a Windows Media file!
Streaming VideoBy now, if you’re an experienced Internet user, you’re probably asking, “Whatabout streaming video? Why should my viewers download my movie? Can’tthey just watch it instantly, like on YouTube?”
Well, actually, yes, they can. Video that is streaming, as opposed to down-loading, plays across the Internet immediately, with no waiting for the file toarrive. High-quality streaming video has been the Holy Grail of Internet videofor the last ten years, and, like the Holy Grail, is probably a reinterpretationof earlier pagan myths of renewal and endless plenty.
Figure 10-7:The 282
Kbps tab ofthe Custom
EncodingSettings
dialog box.
179Chapter 10: Fifteen Minutes of Fame: Distributing Your Movie
15_096918 ch10.qxp 7/20/07 11:12 AM Page 179
No, wait, that second bit is actually a lie.
Flash, formerly known for rock band Web sites and incredibly annoying Website intro screens, has emerged from the shadows in the last three years tobecome the de facto leader in streaming video. Popularized by sites likeYouTube, Flash video is simple to create (with the appropriate tools), playson 95 percent of browsers, doesn’t require a separate download for 99.95 per-cent of the Web browsing population (an absolute killer for past streamingmedia standards), and looks reasonably good at encoding rates that mostInternet connections support.
You can make your movie instantly viewable on the Web in two ways: exter-nal hosting and personal hosting.
External hostingThe simplest way to get your video into streaming Flash Video is to upload itto one of the many, many video hosting sites currently available. The grand-daddy of them all is YouTube, www.youtube.com, which is viewed by millions of people daily. But many other options, including Google Video(http://video.google.com) and Lulu.tv (www.lulu.tv), are available.
The advantage with an external site is that uploading your movie is simplicityitself. Click on a Web link, wait a bit, and you’re live on the Interweb. In addition,these sites, particularly YouTube, offer you a potential audience of millions.
The price you pay for that convenience is control. Many filmmakers don’t likethe reduction in quality that almost always accompanies the automatedencoding process these sites use, which can vary from some grain to virtu-ally unwatchable. And by uploading to an external site, you’re relying onthem to support your movie — if they go bust or decide that your movie isn’tsuitable and remove it, you can’t do anything about it. You should also checkthe legal terms on any site to which you’re uploading — some sites, which wecan’t really name-and-shame here for legal reasons, demand a whole host ofrights over your video once it’s uploaded, essentially meaning that they canexploit your video however they choose, without sharing any potential prof-its. But if you’re willing to live with the quality loss, these sites are the fastestway to get your video immediately viewable live on the Net.
To achieve maximum quality on a video-streaming site, upload your video inas close as possible to its existing standard. For example, for YouTube, it ishighly recommended to use VirtualDub to create a 320 x 240 MPEG4 (DivX,Xvid) AVI and upload that. VirtualDub is much better at resizing your filmthan YouTube’s automatic process will be.
180 Part II: Getting Serious
15_096918 ch10.qxp 7/20/07 11:12 AM Page 180

If you can, encode your own Flash video and upload that. See the upcomingsection “Personal hosting.”
Among the best-regarded video sharing sites are
� YouTube: http://youtube.com/my_videos_upload
� Lulu.tv: https://www.lulu.tv/?submission=1
� Google Video: http://video.google.com/videouploadform?utm_campaign=gv-ww-hdr&utm_source=EM&utm_medium=link
� Revver: http://one.revver.com/video/new
� Stage 6: http://stage6.divx.com/users/login/register
Personal hostingAlternatively, you can encode, upload, and publish your streaming videoyourself, all with free tools. First, you need an encoder for your video to con-vert it into the FLV format that Flash plays. The free Riva Encoder, made by acompany specializing in Flash Video, is the best free solution for FLV encod-ing, although it’s also possible to use the Open-Source tool FFMPEG if you’refairly technically competent.
You can also use a combination of the two: the Riva Encoder simply authors a batch file that you can then use to run FFMPEG, which means you can addadditional functions that Riva doesn’t support. That’s particularly useful ifyou’re encoding in widescreen, and it’s the approach we used for BloodSpell’sstreaming video (www.bloodspell.com/film/list/).
Then, you need a player for that video, which you embed into your Web page.The Open-Source Flow Player is the best option here, providing a lot of fea-tures for a attractive cost of zero. You embed this Flash file, in SWF form, intoyour Web page using a little bit of HTML, and you’re ready to go.
Obviously, this process is a bit more complex than uploading to YouTube(see preceding section). You also need to make sure that you’re with a hostthat can take the bandwidth usage of a popular video file — as we write,Dreamhosts offer some of the best low-cost plans for this sort of usage, butgiven the high speed of change in the Web-hosting industry, there’s no guar-antee that will be true when you read this, so shop around.
On the plus side, however, using your own encoder and player gives you a lotmore control over the viewing experience. You can fit your video into yourWeb pages more neatly, which gives you a more professional look, and you’llalmost certainly achieve higher visual quality for your videos.
181Chapter 10: Fifteen Minutes of Fame: Distributing Your Movie
15_096918 ch10.qxp 7/20/07 11:12 AM Page 181
Here are some URLs you need:
� Riva Encoder: www.rivavx.com/index.php?encoder&L=3
� Flow Player: http://flowplayer.sourceforge.net
� Tutorial on Riva and Flow: www.boutell.com/newfaq/creating/video.html
� Dreamhosts: www.dreamhost.com
Getting Your Video Out ThereThere’s little point in spending whole days of your life filming and editingyour magnum opus if nobody can see it. Assuming that you’ve managed tovault the myriad legal hurdles, you’ll probably want to distribute your fin-ished movie to the great unwashed on the Internet. There are quite a fewways to go about this. Some are free, and some will cost you Real Life Cash(TM). You can follow any or all these routes, which are described in the fol-lowing sections. The more exposure your movie has, after all, the better.
Standard (paid) Web hostingStandard Web hosting is the one that will cost you money, unless you’re veryfortunate. It’s the most obvious and direct solution to the distribution prob-lem: Upload your file to your own Web server and then point people at it.
It’s quite likely that you already have some Web server space, although youmay not know about it. Most ISPs provide users with a small amount of verybasic Web server space as part of the customer’s ISP account. Unfortunately,free Web space such is rarely up to the task of distributing even a moderatelysuccessful movie.
Aside from the fact that you may well find that your movie is too large in filesize to fit on the Web server that your ISP has provided for you, it’s often thecase that the ISP will have pretty strict limits on the type of files that can beuploaded to your public space. In hosting a movie file, legal or not, you maywell be breaking the terms and conditions of your ISP account. Check first —it’ll be a far bigger problem further down the line.
So, your ISP’s free Web space is out. What’s left? Plenty, thankfully, althoughyou’re probably going to have to put your hand in your pocket.
Look at buying a basic starter package from a reputable hosting company.You can pick up these sort of packages for about $50 a year, or even less. It’s
182 Part II: Getting Serious
15_096918 ch10.qxp 7/20/07 11:12 AM Page 182

important to check what happens if you exceed the monthly bandwidth thatthe package provides. Some hosting companies have a retroactive charge perGB for additional monthly bandwidth — although watch out, because a reallypopular movie can rack up enormous bills. Other companies simply blockany Web traffic to your site until the next monthly period starts, effectivelyshutting down your site.
If your movie becomes staggeringly popular . . . sorry, sorry, we have totalconfidence in you . . . when your movie becomes staggeringly popular, checkthat you can upgrade your hosting package to one with a larger monthlybandwidth allowance.
Buy a domain name. Dedicated domain names are nowhere near as expensiveas you may expect. It’s worth looking into purchasing a domain name for yourmovie’s publicity Web site, even if you’re not planning to host the file yourself.The URL www.afistfulofmolars.com is much better and catchier than www.myisp.com/userspaces/johndoe123/machinimamovies/badwesterns/afistfulofmolars. A .com address is the most expensive, but you canpurchase domain names ending in .org, .org.uk, .co.uk, and so on for theequivalent of a handful of loose change if you shop around.
Internet ArchiveThe Internet Archive (www.archive.org) is a nonprofit organization run bya group of modern day heroes who are trying to preserve, archive, and docu-ment the ever-changing maelstrom that is the World Wide Web. Its flagshipapplication is the Wayback Machine, which grabs snapshots of Web sites areregular intervals, preserving them for all eternity, but the Archive also offersfree hosting for certain files.
Machinima movies are one of the things that the Internet Archive is inter-ested in preserving, so much so that it has a distinct Machinima section atwww.archive.org/details/machinima.
Uploading your movie to the Internet Archive is pretty easy, and you can takeadvantage of its blisteringly fast HTTP and FTP servers, which can take anytraffic you can throw at them without even blinking. Visit www.archive.org/create. You’re asked to register with the site if you haven’t done so alreadyand then follow the simple steps to upload your movie. You’re given a URL toyour file(s) at the end of the process.
Stop the press! If you upload your movie to the Archive, it’ll now also auto-matically encode and provide a streaming version, too!
183Chapter 10: Fifteen Minutes of Fame: Distributing Your Movie
15_096918 ch10.qxp 7/20/07 11:12 AM Page 183
Sounds great, right? Well, it is — so great that we use the Archive forBloodSpell’s hosting. But there’s one wrinkle to be aware of: In order to qualifyfor Archive hosting, your movie must be distributed under a Creative Commonslicense (see Chapter 15), which, at a minimum, allows your users to redistrib-ute it freely for noncommercial purposes. We can’t see why you’d have aproblem with that, but if for some reason you do, the Archive isn’t for you.
Web video sitesIn 2006, Google bought YouTube for a reputed $1.65 billion. Web video is bigbusiness, and if you can find the magic formula to tap into the constant demandfor new content, you’re on to a winner. When Phil Overman Rice released hisshort Male Restroom Etiquette, the snowball effect of video-sharing sites suchas YouTube quickly brought him over 1.5 million views within days of release.At the time of writing, the total traffic on YouTube alone has hit 3 million andclimbing. We’re not at all envious, really we’re not.
Peer-to-peer distributionAs we all know, peer-to-peer services (the most famous of which is, or ratherwas, Napster) are only used by pirates and terrorists. Honest. Unbelievableas it may seem, though, we’re about to propose a use for file sharing that is(a) legal, and (b) extremely useful.
A peer-to-peer file-sharing service, such as Kazaa, Limewire, or EMule, allowsyou to share files on your computer with other users of the same software.You can also download files from other people. In order to release your movieonto a file-sharing network, you just need to have the software installed (mostof them are freely downloadable) and then place your movie file in a shareddirectory on your hard drive. Easy.
184 Part II: Getting Serious
Why Male Restroom Etiquette workedPhil Rice was more astonished than anyone at Male Restroom Etiquette’s extraordinary success. His blog entry Why It Worked(http://z-studios.com/blog/2006/10/03/why-it-worked) is great readingand full of tips on how to market, publicize, andcapitalize on a movie’s release.
YouTube, Google Video, Daily Motion, and all theother video-sharing sites are free and easyways to get your movie out there. Users of thesesites tend to pass on great video finds to eachother. Effectively, these sites provide free, word-of-mouse publicity if your movie grabs the siteadmin’s attention.
15_096918 ch10.qxp 7/20/07 11:12 AM Page 184
Of course, your movie file is likely to be downloaded only by people who arespecifically searching for it already, or who stumble upon it by accident. There’snot really any way to publicize your file to other users of the network. If you’vegot other means of publicity in play, releasing your file onto file-sharing net-works is a useful alternative means of distribution. Just mention in your pub-licity that the file is available on Kazaa (or wherever), and let interested userssearch for it themselves.
There’s another form of peer-to-peer distribution, using a program calledBitTorrent (www.bittorrent.com), which mimics conventional download-ing but uses peer-to-peer techniques to share the load of downloading popu-lar files. Essentially, using BitTorrent, a popular file should be fast and easy todownload because all the downloaders assist in distributing it.
Releasing a file over BitTorrent is somewhat more complex than a standardpeer-to-peer solution. You need access to a tracker and a Web server for thetorrent. In the bad old days of the BitTorrent community, you had little choicebut to run and configure these items yourself. In our more enlightened times,many of the popular torrent sites provide a tracker for free public use; DownhillBattle’s Broadcast Machine (www.getdemocracy.com/broadcast/) is oneof the easier services to use.
Once you have your tracker details, you can create a torrent from the videofile that you want to share. Most BitTorrent clients enable you to do this fromwithin the program.
Once the torrent is created and running, you should announce it on some ofthe major BitTorrent search sites, such as bittorrent.com, torrentspy.com, and mininova.com, as well as provide a link to the torrent in any pub-licity you release. Remember, the more people accessing the torrent, thefaster it goes.
A downside to peer-to-peer (and torrent) distribution is, assuming that yourelease the file yourself, you need to leave your computer on, with the peer-to-peer or torrent software constantly running, until the file has been downloadedby enough users to sustain it. In the initial phase of the release, you’re the onlyprovider of this content, so absolutely everybody will be downloading from you.If your bandwidth isn’t up to the task, your potential audience will quickly growfrustrated and cancel the download. Speeds will increase exponentially with thepopularity of the file, though, particularly on BitTorrent, so keep at it.
Unlike peer-to-peer services, where each file is shared individually, a torrent cancontain several files. That means that, if your Machinima series has severalepisodes, you can release them all as part of the same torrent. It also means thatyou can include a small text file in the torrent with a link to your Web site or justgive yourself credit for all your hard work. It’s good etiquette to credit the sitethat’s providing your tracker, too, assuming that you’re not hosting it yourself.
185Chapter 10: Fifteen Minutes of Fame: Distributing Your Movie
15_096918 ch10.qxp 7/20/07 11:12 AM Page 185

Although the use of BitTorrent and peer-to-peer services is perfectly legal,many files available on these networks most certainly are not. Your ISP maywell impose limits or outright bans on the use of these services, partially toprotect themselves from legal liability and partially to prevent heavy down-load users from clogging up their networks for everyone else. We also can’tbe held responsible for any, erm, special-interest material that you may findon file-sharing networks. Apparently, some people use the Internet for access-ing and distributing pornography. We’re as shocked as you are. If you’reeasily offended, steer clear.
Publicizing Your MovieWho should you tell about your movie? Absolutely everybody. If your friendsand family aren’t thoroughly sick of hearing about Zombie Cheerleaders FromMars, then you’re not doing your job. Johnnie had a laptop screening a con-stantly looping showing of BloodSpell during his wedding. That’s the kind ofcommitment we’re looking for, soldier.
Specifically, though, you should announce your new movie on a few importantMachinima Web sites: mprem.com (Machinima Premiere), machinima.com,and Sims99.com.
It’s also worth targeting fan sites for the game engine you used, especially ifyour movie is set within the game world. If you’ve used World of Warcraft, forexample, then www.warcraftmovies.com is essential, but any game will havea fan site full of fanatical users. Join the forums well in advance of your movie’srelease and try to become a part of the community. After all, you’re hackingaway at their favorite game on a daily basis — you can probably offer helpfuladvice and information to regular users of the game. If the community alreadyknows you (and knows that you’re working on a Machinima movie), then it’llbe far more receptive when you eventually hit release day. Its members mayeven start publicizing the movie before release, simply out of expectation.
We’ve got an entire chapter full of more publicity tips. If you want to go thewhole hog, hie thee to Chapter 14.
186 Part II: Getting Serious
15_096918 ch10.qxp 7/20/07 11:12 AM Page 186

Part IIIAdvanced
MachinimaCreation
16_096918 pt03.qxp 7/20/07 11:12 AM Page 187
In this part . . .
We looked at The Lord of the Rings, and we said,“We want to do that.” Now we can. In this part, we
delve into advanced Machinima creation. We discuss howto organize a Hollywood-style film shoot in a world thatdoesn’t exist and how to combine different characters,sets, and special effects inside your editing package.
We also cover sound recording and editing, and why youshould aim to have Ian McKellan standing in a broomcloset. You also discover why marketing isn’t a dirty wordand how to sell your film to your audience without sellingout. And finally, we put on our rimless glasses and pretendwe’re wearing $5,000 suits as we look into the legal statusof Machinima.
16_096918 pt03.qxp 7/20/07 11:12 AM Page 188

Chapter 11
Massively MultiplayerMachinima: World
of WarcraftIn This Chapter� Filming in World of Warcraft
� Organizing a massively multiplayer film shoot
� Using the World of Warcraft Map and Model Viewers
� Video compositing and chroma-keying
The rise in Massively Multiplayer games over the last five years has beenone of the great changes in gaming, possibly the greatest since DooM.
More than 10 million people play World of Warcraft at the time of writing,which means that about 75 percent of our readers are skipping this sectionbecause they know it already. So hello, the other quarter of you.
The rise in MMO games (as they’re known) has been met by a correspondingrenaissance in Machinima created in those game engines. Why? First, it’s thefirst time ever that so many people have all been actively involved in playingthe same game — World of Warcraft, the most popular MMO by a huge margin.But it’s more than that. Massively Multiplayer games offer a unique opportu-nity for Machinima creators, a genuine alternate world, a place where youcan do everything from recruiting your cast to shooting your film.
Groups (called Guilds in the game) naturally form in these cooperativegames, which offer immediate ways to find people to help with your film. Thein-game community means that film-making can be much more social thanother, sometimes isolating, ways of making Machinima. And with thousandsof people online at any time, it’s actually possible to recruit a cast of hun-dreds to shoot truly epic scenes inside these non-existent worlds.
17_096918 ch11.qxp 7/20/07 11:12 AM Page 189

There’s an entire For Dummies book all about Massively Multiplayer Games,by the way. It’s called Massively Multiplayer Games For Dummies, written byScott Jennings, a.k.a. Lum the Mad. It’s a great intro to the genre if you fancyactually playing the games as well as making movies in them! (There you go,Scott. We’ll take our payment in U.S. dollars, pounds sterling, or stacks ofNetherweave.)
World of Warcrack — er, WarcraftWorld of Warcraft is a fantasy MMO, which owes a lot to the traditional fan-tasy staples of J. R. R. Tolkien et al, as well as current pulp fantasy writers.
In World of Warcraft (WoW), you play a hero (see Figure 11-1). In the batteredland of Azeroth, constant war rages between the smug, goody-two-shoesAlliance and the tribal warrior societies of the “We’re not Klingons, honest”Horde. You play a hero of one of these two factions. As well as choosing aside, you choose your race — elves, dwarves, orcs, and the undead are allavailable, along with several other choices — and your sex. Your hero alsohas a class — Warrior, Priest, Mage, Hunter — which is effectively a fightingstyle, be it with a sword, a bow, or a magic wand. Sometimes you get a petdinosaur, too. With all these choices made, you set out on your great adven-ture as a lowly first-level character: a newbie, or noob, in Warcraft-speak.
Although WoW, like all online games, has its fair share of idiots bouncingaround the servers just begging for a slap, it is, on the whole, a very friendlyand welcoming community. The game itself is pretty intuitive and leads youby the hand through the first few hours of game play.
Since its release in 2004, World of Warcraft has gained an unprecedented levelof popularity and is now hailed as the golden boy of the MMORPG revolution.It has also spawned a host of Machinima movies, including several award-winners in the Machinima Film Festival.
Figure 11-1:Some of thecharacters
of Warcraft.
190 Part III: Advanced Machinima Creation
17_096918 ch11.qxp 7/20/07 11:12 AM Page 190
World of Warcraft and MachinimaWorld of Warcraft is a great tool for Machinima. Nonetheless, it may not bethe ideal engine for your project. Here are a few good points to consider:
� My, Zeke, she’m purty! There’s no getting away from it: World ofWarcraft is just darned pretty. Even on the lowest graphical settings, thegame isn’t hard on the eyes. With graphical power turned up to maxi-mum, the astonishingly high-quality art direction in the game really doesbecome apparent. This abundance of visual quality lends itself to a veryvisual form of story-telling, and some seriously impressive movies.
� Are we done already? For all but the most complex and ambitiousshots, filming in World of Warcraft is easy and fast. You’ll probably takemost of your shots in-game while connected to one of the many liveservers provided by Blizzard Entertainment (the makers of the game).
If you need a shot of a character standing on a hill and pointing to thehorizon, go find a hill and get a friend to stand his in-game avatar on topof it. Then tell him to point. Done. For the more complicated shots, youcan use an external Model Viewer program (see the upcoming section“Model Viewer FTW!”) to generate static shots (or simple animations) ofany character (or monster) in the game, in any available costume andwith any available props. You can take this footage and insert it intoyour movie using a process called video compositing (see the upcomingsection “Mastering Post-Production Effects,” which you can easilyachieve with most movie editors).
� More than 7 million players worldwide. Far from being a world inhab-ited solely by stereotypical 14-year-old computer geeks, WoW playerscome in all shapes, sizes, ages, and sexes . This diversity provides youwith a huge swarm of people who already have a predisposition towardthe movie you’re making. People love to see movies that make cleveruse of locations that they’re familiar with, just as they love to seefootage of places within the game world that they haven’t yet visited.
� The only thing missing is a 20-sided die. WoW is classic, unashamedlyclichéd fantasy at its very best. It has elves, dwarves, and goblins. It hastreasure and dungeons. In short, it’s a world built for telling fantasy stories.
If your movie leans toward traditional fantasy or even pseudo-history inany way, a lot of your work has been done for you in WoW.
� You see that Massively bit? World of Warcraft was designed to accom-modate many players in the same area of the game world at the sametime. There’s technically no limit to the number of players who canoccupy the same area (although eventually the servers stop working!).
191Chapter 11: Massively Multiplayer Machinima: World of Warcraft
17_096918 ch11.qxp 7/20/07 11:12 AM Page 191

That means that big battles with dozens of protagonists on either sideare entirely feasible, if a little complicated to organize.
� Any high-level enchanters who can make my greatsword glow in thedark? Every player wants his character to look cool, or at least unique.World of Warcraft fulfills this need admirably — all sorts of different cloth-ing choices are available, from spiky demon armor to designer tuxedos.
There’s also a reasonable amount of customization available on yourcharacter himself. You can choose hair color and style, skin tone, andfacial features from a predefined range. As if that weren’t enough, withaccess to Darjk’s Model Viewer, you can spice up your movie with allsorts of weird and wonderful monsters, from a cast of literally thousands.
Of course, World of Warcraft does have some bad points when it comes tomaking Machinima:
� Can someone generate a new female Orc character with blue hair andrun her up to Ironforge? Er . . . try not to die, okay? Unless you’re usingthe Model Viewer or just outright cheating, every character in your castis controlled by a real-life person at the other end of a keyboard. Oneplayer, one character. The Rule of Committees states that the chances ofsomething going annoyingly wrong increases with the number of peopleinvolved, just as the chances of having everybody in the right place atthe right time decreases exponentially.
� No character scripting. Understandably enough, the creators of World ofWarcraft tend to look fairly harshly on people who attempt to automateany of their character’s actions. It’s therefore virtually impossible to pre-script anything other than the simplest actions for the character you’recontrolling. That means that if a take doesn’t go well, you’ve no optionbut to go through the whole scene again manually, just the way conven-tional filmmakers do. Sorry, but there are no shortcuts for this one.
� No third-party content. Blizzard releases new content for World ofWarcraft all the time. The game has all sorts of bizarre items, and you’llbe surprised at just what you can find. Nonetheless, if you absolutelypositively got to have an oversized ice-cream cone with two blue scoopsand one pink, you’re out of luck. If it’s not in the game, it’s not going tobe in your movie without a lot of clever post-production editing.
� No, UberkillR, you cannot do your special Leroy Jenkins dance in themiddle of this scene. The unfortunate fact is that, although most of thepeople you’ll meet and recruit within World of Warcraft are friendly, keen,and helpful, sooner or later you’re going to pick up your very own vil-lage idiot. There’s nothing you can do about it other than grit your teeth,smile, and try to politely dismiss them as soon as possible. Remember
192 Part III: Advanced Machinima Creation
17_096918 ch11.qxp 7/20/07 11:12 AM Page 192

that everybody is helping you out for little or no reward, out of theirown free time — don’t throw your weight around too much, or you’ll endup with no cast or crew at all.
� I’ll buy all the pink fishnet leggings you’ve got. Don’t ask why. Whenyou log in to World of Warcraft, you’re joining a world that’s being sharedby thousands of other players at the same time. It’s easy to understand,therefore, why you can’t just hack the game to make it do the things you need it to do or change your character to give it infinite financialresources to buy all your virtual props and costumes. If your actorshave to be wearing a specific piece of armor, you’ve no option but tovisit the auction house or the trade channel and give up some of yourhard-earned gold.
� I love the artistic way in which we only ever see the backs of yourcharacters’ heads in this movie. World of Warcraft suffers from a similarproblem to The Sims 2 — there’s no practical way to lip synch your char-acters to their lines of dialogue. It doesn’t have to be a show-stoppingproblem — clever editing and dialogue-light scripting can alleviate theglaring errors — but it’s something to bear in mind.
� The game doesn’t feature a laser-powered anti-gravity gun. We’vealready said that World of Warcraft is perfect for fantasy movies. Thereverse is also true. If you’re planning a movie that’s not fantasy inapproach, if not in actual genre, then you’ll find yourself heavily limitedby WoW’s iconic look and feel.
� Just let me hit my next level and then we’ll go back to filming, Ipromise. Here is your official warning: World of Warcraft is addictive.You may set out with the admirable intention of dedicating your time tofilming and nothing else, no matter what temptations may come yourway, but take our word for it: It takes a strong will indeed not to getsucked in.
Tools of the MMO tradeBefore you log in to WoW, you’ll need a few more toys if you want to get themost out of your moviemaking. Most of these tools are either free or prettydarn cheap, and they’ll come together to give you the Massively MultiplayerMovie-Making Experience of your dreams.
� FRAPS: FRAPS, shown in Figure 11-2, is the best tool around for record-ing video out of games that don’t have an in-game recorder (like WoW). Ifyou’ve got a fast dual-core CPU and a second hard drive, you can easilyrecord High-Def video from WoW at nearly cinema resolution.
193Chapter 11: Massively Multiplayer Machinima: World of Warcraft
17_096918 ch11.qxp 7/20/07 11:12 AM Page 193
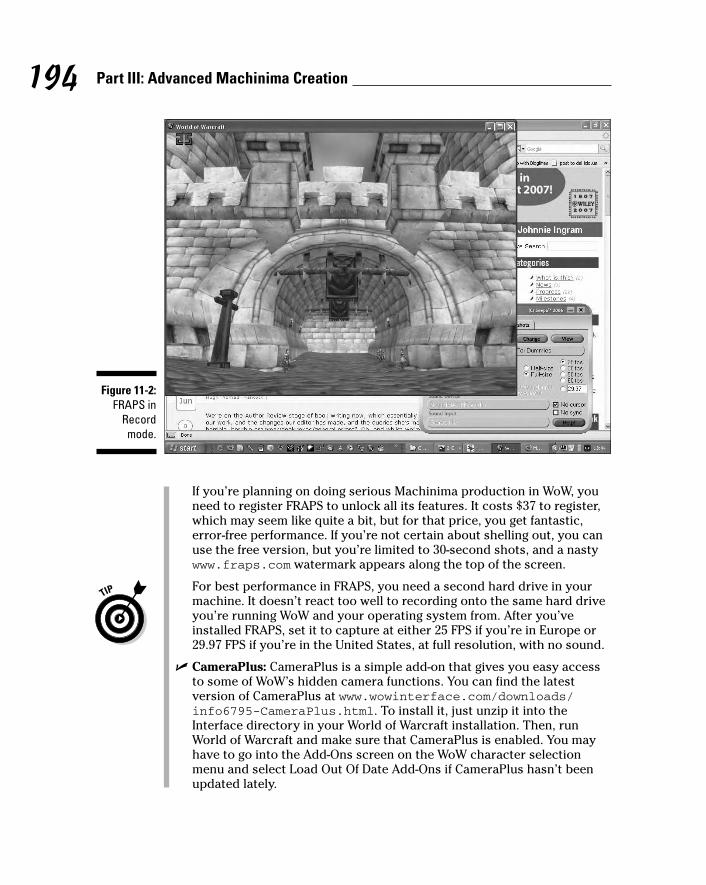
If you’re planning on doing serious Machinima production in WoW, youneed to register FRAPS to unlock all its features. It costs $37 to register,which may seem like quite a bit, but for that price, you get fantastic,error-free performance. If you’re not certain about shelling out, you canuse the free version, but you’re limited to 30-second shots, and a nastywww.fraps.com watermark appears along the top of the screen.
For best performance in FRAPS, you need a second hard drive in yourmachine. It doesn’t react too well to recording onto the same hard driveyou’re running WoW and your operating system from. After you’veinstalled FRAPS, set it to capture at either 25 FPS if you’re in Europe or29.97 FPS if you’re in the United States, at full resolution, with no sound.
� CameraPlus: CameraPlus is a simple add-on that gives you easy accessto some of WoW’s hidden camera functions. You can find the latest version of CameraPlus at www.wowinterface.com/downloads/info6795-CameraPlus.html. To install it, just unzip it into theInterface directory in your World of Warcraft installation. Then, runWorld of Warcraft and make sure that CameraPlus is enabled. You mayhave to go into the Add-Ons screen on the WoW character selectionmenu and select Load Out Of Date Add-Ons if CameraPlus hasn’t beenupdated lately.
Figure 11-2:FRAPS in
Recordmode.
194 Part III: Advanced Machinima Creation
17_096918 ch11.qxp 7/20/07 11:12 AM Page 194

Now you can configure CameraPlus’s various tools through the normalKey Bindings menu in World of Warcraft. It gives you control over thehorizontal and vertical speed of the in-game camera and allows you todefine a key to switch to Shooting Mode, where all in-game interface ele-ments are hidden.
� World of Warcraft Model Viewer: Need an Orc in a bikini and dungarees?Well, you could make a new Orc character, level them to 35 (taking abouttwo weeks), and go do the quest that gets you the [Dungarees of Power] —or you can just install the WoW Model Viewer and select ’em from a list.
The Model Viewer is a brilliantly clever piece of coding from John “Darjk”Steele and Zoltan Szego that allows you to browse every creature, charac-ter, item, and special effect available in WoW, place them, animate them,and then save video footage that you can later composite into your film.Nearly every successful World of Warcraft Machinima film, including mas-sive hits like The Return and Edge of Remorse, used the Model Viewerextensively. You can find the latest version at www.wowmodelviewer.org.
� World of Warcraft Map Viewer: From the team that brought you theWorld of Warcraft Model Viewer comes the Map Viewer. And yep, it letsyou view all the maps and areas in World of Warcraft. You’ll probablyfind you use this add-on less often than the Model Viewer; it’s a bit lessdeveloped, it doesn’t quite work in every situation, and frankly, it’seasier to get to an area in WoW than it is to acquire items. You can find itat the same place as the Model Viewer: www.wowmodelviewer.org.
� Voice communications: If you’re doing anything but the most trivial filming, you need to be in voice communication with your peons — er,valued crew members. Text is great, but it’s hard to communicate exacttimings or easily organize a milling group of 40-plus trained killers into asmoothly functioning unit. While the complexities of choosing voicecommunications software is a bit beyond the 100 words or so we’ve gothere, top packages include TeamSpeak (www.goteamspeak.com) andVentrillo (www.ventrilo.com).
Configuration for each package is different — some need a dedicatedserver, some don’t, some require a Ph.D. to set up, some are brain-deadsimple. Fortunately, many online guides show you how to set up theseprograms, and hey, it’s just possible that Massively Multiplayer GamesFor Dummies may have something about this topic, too.
As this book was going to press, Blizzard Entertainment announced thatthe next big World of Warcraft patch would include voice communica-tions built in. This should be in place by the time you read this and willmake communicating with your cast and crew much easier.
� Image editor: You’ll benefit from having access to a decent 2D imageeditor for WoW moviemaking, particularly if you’re getting with thehumor. It’s handy to be able to add in details to backplates you’ve cre-ated with the Map Viewer or add titles or zany captions.
195Chapter 11: Massively Multiplayer Machinima: World of Warcraft
17_096918 ch11.qxp 7/20/07 11:12 AM Page 195

� Some mates: That’s the sound of our poor editor bashing her head offthe desk you hear. So let us quickly clarify. By mates, we, in our quaintBritish fashion, mean pals. Buddies. Companions. Comrades, Associates.Acquaintances. Gentlepeople of your social circle. Men and women offine reputation and considerable influence. The very cream of society,and by that we don’t mean the thick and the rich. In a word, friends.
If you want to shoot a cast of thousands in-game, you’re going to needthousands of people behind their keyboards obeying your every com-mand. Fortunately, the setup of the game makes finding people easy, andit’s tons of fun to shoot this way.
Writing for WoWWriting for a World of Warcraft movie presents unique challenges. In someways, it’s much more like writing a conventional low-budget film than yourusual Machinima film. With World of Warcraft, you’ve got a strictly limitedpalette of locations, characters, and props, and your challenge is to tell thebest story you can within those constraints.
Before you start writing, you need to know exactly what you’ve got available.Investigate every location you can. Either go there physically with your in-game character or look at it using the Map Viewer (if you don’t mind spoiler-ing yourself for the game).
You need to know what you’ve got — from the medieval streets of Stormwind(which look a bit like Annecy in France, as it happens) to the sinister tunnelsof the Undercity, to the pastoral fields of Westfall. Essentially, what you’redoing here is location scouting, just as you would in a real-life film. As such,don’t just think about the large-scale elements of what you’re seeing. Notewhether you see an interesting feature or a particular view across a zone thatlooks cinematic.
It’s definitely worth doing this well before you’ve got a story in mind. One ofthe great things about working with such a well-designed and directed worldas WoW is that the locations and characters themselves suggest stories toyou. It’s hard for Hugh to look across the rolling plains of Mulgore withoutwanting to set a Clint Eastwood-style spaghetti Western there, for example(and you could do it!), or to wander around Stormwind without wanting tostart writing grimy political intrigue à la Game of Thrones.
Likewise, make sure that you know what the characters can look like — theModel Viewer’s definitely your best choice for this — and what items andspecial effects are available.
196 Part III: Advanced Machinima Creation
17_096918 ch11.qxp 7/20/07 11:12 AM Page 196
Decide what sort of story you want to tellYou can make three types of film in WoW, and all three options have advan-tages and disadvantages:
� Satire or other humor (either jokes based in-game, or using the gameto poke fun at something else). Humor tends to be both more popularand easier to pull off in Machinima.
� Drama set in the World of Warcraft (like the enormously popularReturn). In-game stories find a huge audience, and the background’srich enough to tell plenty of stories in, but many people find working inan existing canon limiting.
� Drama not set in the World of Warcraft, but using the art assets avail-able from the game to tell a different story. Nongame stories areharder to promote and write, but may have a wider potential audienceand greater apparent artistic value.
Watch other well-known Machinima movies to see what they’ve done, whatstories they have told, and how much success they’ve had, as well as howthey’ve done it.
Write your storyNow you can work just as you would for any film. Write down all the ideasyou’ve had, choose a story structure from them, and build a script just asyou would for any Machinima film. Just remember to keep a close eye on
197Chapter 11: Massively Multiplayer Machinima: World of Warcraft
Why BloodSpell isn’t made in WoWObviously, we didn’t make BloodSpell usingWorld of Warcraft, and one of the reasons wasthat we couldn’t achieve some of the locationswe wanted, like the huge steps that crossBloodSpell’s City.
But if we had been shooting in WoW, we wouldhave just had to think about the essential function
of that scene — it’s a dialogue sequencebetween our two characters, on their way to areligious ceremony. We could have easily re-setit walking through Stormwind’s streets and usedthe tiny alleys and hundreds of little features ofthe city to our advantage to create a very claus-trophobic, tense moment in the film.
17_096918 ch11.qxp 7/20/07 11:12 AM Page 197

what you can and can’t do in the engine. Where in other Machinima engines,some of the things you may be suggesting would be difficult, it’s entirely pos-sible that in WoW they’ll be totally impossible. Be flexible and be ready to re-set or re-cast shots if you have to.
LFG 3,745 More 4 Helm’s Deep PST!WoW Machinima filming is very, very similar to real-life shooting, even moreso than most Machinima. You’ve got to do everything you’d have to do in areal film: Break down the script, buy the props, hire the actors, clear the set,design costumes, the lot.
In other words, welcome to being a virtual Executive Producer. And AssistantProducer. And 1st Assistant Director. Yes, in order to organize a complexWoW shoot, you have to do all the jobs you’d have to do on a real set. If youforget that you need a posse of flowers for the next shot, you really will haveto send someone to go buy them from the flower seller in Stormwind. Ifyou’re shooting in Feathermoon, approximately 15 minutes’ gryphon flightaway from said vendor, that’ll really suck. And don’t forget that you’ll needthe money to buy them.
Bearing all this in mind, it’s worth reading a guide to real filmmaking if you’replanning to shoot in WoW, because a lot of the tasks are very similar, and youcan pick up good organizational tips.
The following sections offer a quick guide to some of the organizational rolesyou need to consider for your film.
Executive producerIn RealFilm, the executive producer does a lot of things, but the primary andprinciple one is this: He ponies up the cash or acts as a representative for thepeople who did. Bob and Harvey Weinstein, for example, crop up as execu-tive producers on a lot of films — because they run Miramax.
If you’re filming in-game and you need specific props, you’re going to have tobuy them. A lot of the time, you can cheat by using the WoW Model Viewer,but if you have a specific shot that you can’t use the Model Viewer for (a bigpan or a complex crowd sequence), you need your props. So you need toconsider how to get hold of the cash.
198 Part III: Advanced Machinima Creation
17_096918 ch11.qxp 7/20/07 11:12 AM Page 198

Most of the time, you can find low-level — cheap — items that will outfit yourcharacters appropriately. If you need the Destiny sword model, though, youneed to find a couple of hundred gold pieces. At that point, though it makesus feel dirty to say it, you may need to think about contacting a gold-sellingorganization.
For a more ethical alternative, consider asking one of the large raiding guildson your server to donate, in exchange for a mention in the filming. If you’vegot a really serious raiding guild on the server, they’ll be able to totally outfityour film out of small change — and may make excellent cast and crew forthe film, too!
Permissions agentIn RealFilm, you need to get in touch with the authorities in your town orcountry of choice to arrange permissions for shooting. You don’t have to dothat in WoW, thank goodness, but you do have to choose which country —which server — you’ll be shooting on.
Servers have a variety of properties. For starters, they’ve got a dominant lan-guage — we recommend you choose one that you actually speak — and thenthey come in several flavors: PvE, PvP, RP, and RP-PvP.
PvP means that Horde can attack Alliance characters at any time, and viceversa. Unless you’ve got very strong reasons to go to one of these servers,steer clear.
RP servers are meant to be servers where players act and talk as their charac-ters, role-playing them, rather than just talking as themselves. In practice,this doesn’t always happen, but RP servers do seem to attract a more matureand story-aware group of players. It’s worth inquiring on a realm’s forums(via www.worldofwarcraft.com or www.wow-europe.com) whether you’llbe welcome filming on that server. If you are, an RP server is likely to giveyou less grief and more interested players than normal PvE (Player versusEnvironment) servers.
Finally, you’ve got the population of the server to consider. Here you’ve got a balancing act to consider. The emptier the server, the less trouble you’llhave with unwanted players walking into your shot, but the more problemsyou’ll have recruiting assistance, as there are less players on the server tochoose from.
199Chapter 11: Massively Multiplayer Machinima: World of Warcraft
17_096918 ch11.qxp 7/20/07 11:12 AM Page 199

Casting agentWant a gigantic battle occurring on the Elwynn Forest road? Or an army ofOrcs streaming out of Blackrock Mountain? Then you’re gonna need warmbodies, and lots of them.
Fortunately, you’ve got some great tools available for recruiting. Start byposting on your chosen server’s forums, asking politely whether any individ-uals are interested in assisting you. Make your pitch well here — this is yourequivalent of the elevator pitch to Spielberg, so make sure that you paint apositive but accurate picture of the movie you want to make, and deploy allthe sales knowledge in your possession to persuade anyone reading to signup. Ask a few times, if you like, but be careful not to spam; more than once aweek is probably too much.
Ask politely in game, too. General chat in the cities is probably the best placeto do that. Remember, if you want both Horde and Alliance characters in yourmovie, you need a character on both sides to talk to them.
Finally, find the leaders of larger (and better behaved) guilds in your gameand privately ask them whether they’d be interested in helping, or if any oftheir guild members might be. People are usually flattered to be asked foradvice and assistance. Just remember to be polite and reasonable and takeno for an answer.
Costume departmentYou also need to assemble your costumes. Be warned: The more precise youare about costumes, the more gold it’ll cost you, and the more hassle it’ll be.But it’s far from impossible to persuade an entire guild to outfit themselvesidentically for a shoot — if you really need your line of identically dressedguards, you can do it. Do check that you can’t achieve the shot in ModelViewer before you shell out, though!
Your costume research will be easier if you can find someone who reallyknows his WoW kit already. Likewise, you’ll probably benefit from havingcrafters — in-game characters who can make items — on-side if you need a lotof a particular item or set. Ask around among your helpers or via the chan-nels we mention earlier in the section “Casting agent”.
A lot of high-end, expensive items look similar to cheaper, lower-level items.Make sure that you can’t find something similar for a quarter of the price.
200 Part III: Advanced Machinima Creation
17_096918 ch11.qxp 7/20/07 11:12 AM Page 200

Crowd controlHollywood has to hire security to stop inappropriate people getting onto itsfilm sets. So do we. Virtual crowd control in WoW takes two forms: control ofmonsters and control of players. Monsters are the more common and annoy-ing, but also the most easy to deal with — just enlist the assistance of a high-level player (preferably a Mage or someone else with effective Area of Effectdamage) to clear ’em out every time they reappear. Their corpses fade sec-onds after they’re looted, and then you’re able to shoot.
Player crowd control is harder, because just like in real life, you can’t kill ’em.Here, you probably need someone whose responsibility it is to message players who are getting into your shot and ask them politely if they wouldn’tmind moving, just until the shot is finished. The keywords here are polite,reasonable, and short term; don’t ask them to stay away from the area for an hour!
Obviously, try to avoid shooting in high-traffic areas, such as cities. If youabsolutely need to shoot a scene outside the bank in Stormwind, for example,you may have to wait for the Golden Hour — in other words, the time whenthe server is quietest — and shoot then. Bear in mind that’s likely to be about 7 a.m.!
Transport coordinatorTravel takes real time in WoW. Hence, you’ll want to have your shoot set up tominimize any travel time. Break down the scenes you’re shooting well beforeyou start and make a list of absolutely everything you’ll need for them —props, weapons, costumes, characters, the lot — on a scene-by-scene basis.Make sure that you know what shots you’re aiming for and where you’ll beshooting from. And make sure that everyone involved knows to be at theshooting location at least 10 minutes before shooting starts.
You may still need to have people run back to cities or other locations toretrieve items. It’ll help if you can enlist a high-level mage and make sure thathe’s got appropriate supplies to provide portals to any of the major cities. Ifyou’re shooting near or in a friendly town, have all your crew and cast settheir hearthstones — transporters they can use once an hour — to that loca-tion. And if you can, try to enlist a Warlock character, too, as he can summonyour crew to you, minimizing travel time.
201Chapter 11: Massively Multiplayer Machinima: World of Warcraft
17_096918 ch11.qxp 7/20/07 11:12 AM Page 201

Shooting in WoWThis, you’ll be pleased to know, will be a very short section. Once you’veinstalled all your tools, run WoW. You should see a frame-rate counter in thetop left of the screen — that’s FRAPS showing it’s alive.
1. Log your character in, zoom right in (or press the Home key on yourkeyboard repeatedly) so that you’re in first-person mode and youcan’t see your own character any more.
2. Set your resolution as high as you can while still keeping action onthe screen smooth.
It’s always better to have as high a resolution capture as possible.
3. Hit the FRAPS record key (default F9).
Watch the numbers at the top left. They’ll turn red, showing that you’rerecording. If they dip below 25 (for Europe) or 29 to 30 (United States),then you need to reduce your resolution a bit. Otherwise, you’re readyto go!
4. Press F9 again to stop recording.
5. Select your shot, press F9 once again, and press it again when youwant to stop shooting.
Record pans in WoWWoW has a really nice set of panning tools, complete with acceleration anddeceleration on the start and end. With CameraPlus, they’re really simple touse, too. You need to set up CameraPlus’s various key bindings first, whichyou can do through WoW’s main Key Bindings menu, off the main menu. Werecommend using the number pad on your keyboard for these keys.
1. Press the button you selected for CameraPlus’s setup menu.
2. Select a speed for vertical or horizontal movement.
This is a guesswork job: Select a number, save, try the next few steps,see whether they’re the right speed, if not adjust, and repeat. Obviously,low numbers mean slow, high means fast.
3. Close CameraPlus’s setup menu.
4. Check your camera speed by holding down the key for the directionyou want to pan
Up, down, left, right, and so on. If the speed’s too slow or too fast forwhat you want, go back and try a different number.
5. Start recording with F9, and when you’re ready, hold the appropriatekey down to pan; let go to stop when you’re where you want to be!
202 Part III: Advanced Machinima Creation
17_096918 ch11.qxp 7/20/07 11:12 AM Page 202

Record tracks in WoWIt’s a lot harder to zoom or track in WoW than it is to pan. The principle’ssimple enough, but it’s difficult to get right. Essentially, you track by movingyour character around while shooting. You can move faster by running orslower by walking, but there’s not a lot of fine control! Often it’s easier to fakea track in post-production (and it’s nearly always easier to fake a zoom thesame way) by moving footage around on-screen.
1. Point your character in the direction you want to track.
This doesn’t have to be the same direction you’ll be shooting in. Use theright mouse button to turn your character rather than your view.
2. Toggle walk/run to set your speed.
The default key to toggle these is Numpad /.
3. Point your camera in the direction you want to shoot.
You need to do this step with the left mouse button and hold that buttondown to keep your shot.
4. Start recording with F9
5. Press Forward to start moving.
That’s W in the default key bindings.
6. Press F9 again when you want to stop recording.
Shoot characters acting in WoWAll the other characters in your film are controlled by other players, just asthey normally would when playing the game. Make sure that they’re set towalk unless there’s a good reason they should be running and discouragethem from doing anything else odd, such as turning too fast, turning in theair, jumping around, or similar things. You’ll probably need to practice a fewtimes for each shot to make sure that they know where they’re meant to bewalking to, and what they’re meant to do when they get there.
They can trigger animations on their character via the slash emote system —see www.wow-europe.com/en/info/basics/emotes.html for the full,current list of emote commands. Some emotes are very useful, while othersare . . . very silly.
To have your character perform a talking animation, simply type somethingin the chat window — anything will do. WoW characters perform their talkinganimations while standing, sitting, walking, riding — wherever! Make surethat you, as cameraman, have checked the box on CameraPlus that readsHide Chat Bubbles before you start shooting.
203Chapter 11: Massively Multiplayer Machinima: World of Warcraft
17_096918 ch11.qxp 7/20/07 11:12 AM Page 203
Here are a few more tips on how to shoot well in WoW.
� Kneel, peon! If you want to shoot from a lower angle, have your camera-man sit down. Simple as that! If you want lower still, you’ll need to be anengineer using the Gnomish World Enlarger, or a druid in cat form, tomake yourself tiny. You can also create a few different characters to useas camera people for a range of heights.
� I want to be a tree. Shooting from a higher angle is harder. Taurens andDrenai are the tallest characters in the game. You can also get on a mountto get higher. We believe that you can get taller still by either using a Potionof Giant Growth or having a high-level healing Druid do the shooting andturn themselves into their tree form. Yes, tree form. Just go with it.
� Dum da da dum dum, dum da da.… Want to get higher still? Want thatLord of the Rings feeling? This one’ll be painful and slow, but if you reallyneed flying shots, you need a flying mount or a Druid with flight form —and that means that your cameraman needs to be level 68 minimum fora Druid, and level 70 for a regular guy. That’s about six months of work,minimum, if you’re starting from scratch, so you’re better off finding anaddicted friend who has already gotten there. Just be aware that you canonly shoot in-flight shots in the Outlands (from the expansion BurningCrusade).
� Mark your man. If you want to mark exactly where people need to standfor your shot, you’ve got a few options. Ideally, you’ll be a Hunter, inwhich case you can cast Flare on the place you want them to go. Ifyou’re a Mage, Flamestrike will do the same job. Engineers can placeTarget Dummies, but be aware that they’re quite short-ranged.
Model Viewer FTW!FTW means For The Win, just so you know. Nothing looms larger over thefield of WoW moviemaking than the Model Viewer tool (see Figure 11-3). Ithas enabled literally thousands of WoW movies — virtually no well-respectedmovie team doesn’t use it. From Edge of Remorse to Illegal Danish SuperSnacks, it’s the bee’s knees for the WoW filmmaker.
Handily, it’s also simplicity itself to use:
� File List: Here you can choose any model in the game to be displayedand animated. This area doesn’t choose clothes, weapons, or anythingelse — just the basic model.
� The model view window itself: If you’ve got FRAPS running, you’ll seethe numbers counting in the top left of the screen.
� Appearance Selection Frame: This window appears only if you chooseone of the character models rather than a Creature. Click through these
204 Part III: Advanced Machinima Creation
17_096918 ch11.qxp 7/20/07 11:12 AM Page 204
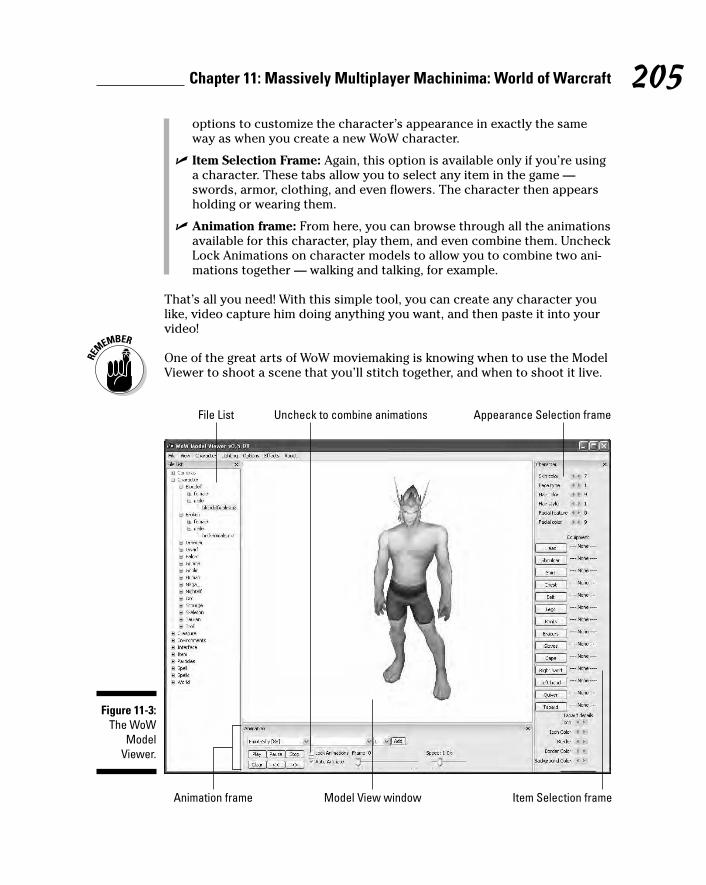
options to customize the character’s appearance in exactly the sameway as when you create a new WoW character.
� Item Selection Frame: Again, this option is available only if you’re usinga character. These tabs allow you to select any item in the game —swords, armor, clothing, and even flowers. The character then appearsholding or wearing them.
� Animation frame: From here, you can browse through all the animationsavailable for this character, play them, and even combine them. UncheckLock Animations on character models to allow you to combine two ani-mations together — walking and talking, for example.
That’s all you need! With this simple tool, you can create any character youlike, video capture him doing anything you want, and then paste it into yourvideo!
One of the great arts of WoW moviemaking is knowing when to use the ModelViewer to shoot a scene that you’ll stitch together, and when to shoot it live.
File List Uncheck to combine animations Appearance Selection frame
Item Selection frameAnimation frame Model View window
Figure 11-3:The WoW
ModelViewer.
205Chapter 11: Massively Multiplayer Machinima: World of Warcraft
17_096918 ch11.qxp 7/20/07 11:12 AM Page 205

In general, you should use the game when:
� It’s easy. If you need to shoot a character or couple of characters youhave easy access to in an area that’s not too overcrowded, do it in-game.
� You’re not planning on using post-processing effects. The only way toput depth of field on a shot, in particular, is to composite, and thatmeans Model Viewer.
� You need to shoot complex motion. If you’re planning a shot where 40characters run across an uneven field toward the camera while perform-ing other actions, it’s probably easier to shoot live.
� You want to use in-game pans. Compositing a character into a pan is anightmare without very expensive tools. It’s possible it will becomeeasier with future releases of Model Viewer, but for now, it’s live in thegame for you.
You should use Model Viewer and Map Viewer when:
� The shot is simple, but getting the kit isn’t. If you need a Night ElfWarrior in kit you can only acquire at Level 70, and your highest-level elfis Level 5, Model View it.
� You want a lot of characters onscreen, but standing still or walkingover simple surfaces. Remember those Helm’s Deep shots where there’sa horde of Elves all standing behind a battlement, not moving? PerfectModel Viewer shot.
� You want a shot that you just can’t get with your character. A classicexample would be a very high-angle shot from somewhere where youcan’t put a flying mount. At that point, rush off to your Map Viewer forthat high-angle goodness.
To capture video from the Model Viewer:
1. Load up Model Viewer.
2. Select a model from the File List.
We chose Character/Orc/Male/Orcmale.m2. You can select anycharacter model in the game. However, only models under Characterare customizable player models. If you select one of these models, theItem Selection Frame appears.
3. Click a body part in the Item Selection Frame.
You can go through the character parts in the Item Selection Frame andclothe your character. You can also customize your character’s facialappearance in this pane. If you click Legs, for example, the Legs dialogbox appears.
206 Part III: Advanced Machinima Creation
17_096918 ch11.qxp 7/20/07 11:12 AM Page 206
4. Type the name of the item you want into the Filter text field.
Otherwise, feel free to browse! In this case, we chose the Black TuxedoPants. We could have navigated through every different piece of clothing(and it’s an interesting exercise), but in this case we know what we want:We want dapper, and we want it now.
5. Choose clothing and held items from the rest of this pane.
6. Go to the Animation Frame and scroll down through the list of anima-tions; select an animation.
We chose one of the dance animations; they’re well known for lookinggreat. You can uncheck the Lock Animations check box and combine twoanimations here, too!
7. Change the view in the Model View Window by dragging with left orright mouse button held down.
Once you’ve got a good angle, stop.
8. Press F9.
FRAPS captures the model frame as a movie. It may also change yourcharacter’s appearance a bit. We can re-map the movie key in FRAPS toavoid that happening in the future
9. Press F9 again to stop capturing.
If you’re using the Model Viewer and one of your animations is a Walk, aWalk Backward, or a Run, hold down the forward or backward cursorkey to have the model walk or run forward or backward — in the ModelViewer, at the correct speed! This is an incredibly handy feature for cap-turing movement.
And Now, View That Map!WoW Map Viewer is a little less documented and slick than the WoW ModelViewer (see preceding section), but it’s still pretty darn Scooby, as we say in Scotland. To start it, use the Windowed.cmd item in the WoW MapViewer folder. You can edit this .cmd file in a text editor to change the res-olution it uses. Simply add the resolution after a dash at the end of the linewowmapview –w to make it, say, wowmapview -w -1400x1050. Sadly, it’llonly accept more common resolutions: 1,280x1,024, 1,600x1,200, 1,024x768,and a couple of others.
Once you’re in, you see a screen like the one in Figure 11-4. From here, youcan either choose one of the Instanced dungeons listed or the continents ofeither Azeroth or Kalimdor (or the expansion continents — the first one, forBurning Crusade, contains the Drenai and Blood Elf starting areas plus thehigh-level Outlands). In the latter case, you can then select your startingpoint from the map that appears immediately afterward.
207Chapter 11: Massively Multiplayer Machinima: World of Warcraft
17_096918 ch11.qxp 7/20/07 11:12 AM Page 207

Now you see a view of the map area you chose. You can move around in thisusing the W, A, S, and D keys as normal, plus Q and E to go up and down. Oand P change how fast you move, F4 removes the stats, and you can controlyour forward direction by clicking and dragging with the mouse.
Using the Map Viewer is simple: Select the area you want to shoot, set upyour movement speed (you can’t pan at the moment, to the best of ourknowledge), press F9 to start up FRAPS, and start moving! If you want to, thatis. Otherwise, just capture yourself a nice bit o’ landscape.
Do be aware that not everything will look identical in the game and the MapViewer. The Map Viewer is actually the product of reverse-engineering thegame’s map files. While the guys who developed it did a great job, somethings still don’t look quite the same.
Mastering Post-Production EffectsThanks to World of Warcraft’s rather brilliant art direction, your movie alreadylooks pretty good. There’s more that you can do, though. With a little effort
Figure 11-4:The WoW
MapViewer.
208 Part III: Advanced Machinima Creation
17_096918 ch11.qxp 7/20/07 11:12 AM Page 208

and a copy of Sony Vegas (or your equivalently capable editor of choice), youcan add clever effects to improve your film or just hide the ugly bits. Andusing the Model Viewer and Map Viewer, you can create hundreds of shotsthat you can’t create any other way.
LayeringLayers are a very simple but highly effective idea that first came to promi-nence in traditional hand-drawn animation. The basic idea is simple. Imagineyou have to animate a scene in which Snow White walks through a forest. It’sa couple of hundred frames long, and you have to draw each frame by hand.By about frame ten, you’re going to be sick of drawing the same three trees,in exactly the same position, looking exactly the same as they did in all theprevious frames. Why can’t you just draw the trees once and use that sameimage for each of the 200 frames? They’re not going to change, after all.
Good idea. Why not draw all the trees as one image and use that as back-ground? That way, if you can draw Snow White onto some sort of transparentsheet, you can place her on top of the trees to produce a complete frame. Forthe next frame, all you need to do is draw another Snow White layer, stillwalking — you can reuse the same trees. You’ve just increased your produc-tivity ten-fold and guaranteed yourself a nice pay raise at the next wage review.You’ve also invented a technique that is still used extensively in both digitaland traditional animation, as well as in photo manipulation and montage.
Most World of Warcraft movies use layered video files in one way or another —most often, to layer video from the Model Viewer with backgrounds from thegame or the Map Viewer. Edge of Remorse, winner of two Machinima FilmFestival awards in 2006, was created entirely using these techniques.
In principle, layering Model Viewer footage and background footage is simple.You shoot your Model Viewer character against a solid color background, makethat solid color transparent in your video editor, and place the image or videoyou want to use as your actual background behind it. It’s the same techniquethat news stations use to show a weather map behind the forecaster.
Compositing the Map and Model ViewerYou’ll need some footage from the Model Viewer and some footage from theMap Viewer.
1. Boot up Vegas and import your first clip: the background footage.
2. Drag your background footage clip into the Video Tracks Area.
3. Add the footage from the Model Viewer.
209Chapter 11: Massively Multiplayer Machinima: World of Warcraft
17_096918 ch11.qxp 7/20/07 11:12 AM Page 209

4. Drag your Model Viewer footage into the Video Tracks Area, abovethe background footage.
Vegas probably imported an empty audio track along with the videofootage; if so, you can safely delete it.
The preview window in the bottom right of the screen shows both clipscombined — but not very well. You can use a technique called Chroma-keying to fix this problem. A Chroma-key is a specific color that you spec-ify should be transparent. Whenever Vegas encounters this color, itshows the background through it instead.
5. Right-click your Model Viewer footage and choose Media FX from thedrop-down menu.
Vegas brings up the Media FX Plug-in Chooser. Unsurprisingly, you wantthe Sony Chroma Keyer plug-in.
6. Select the Chroma Keyer plug-in and click OK.
The Chroma-key settings page, shown in Figure 11-5, appears for thisclip. Fortunately, it’s nowhere near as complicated as it looks. All youhave to do is find the right color to set as the transparency color. To doso, first find the wrong color. Yes, you read that correctly.
7. Set the color to a garish pink or a lush green — anything other thanthe background color of your Model Viewer clip.
You can change the color by clicking anywhere in the rainbow-like colorbox in the center of the screen.
Figure 11-5:The
Chroma-keywindow.
210 Part III: Advanced Machinima Creation
17_096918 ch11.qxp 7/20/07 11:12 AM Page 210
8. Use the eye-dropper tool to select your background color.
It’s the tiny icon that looks like a pipette, just to the left of the colorpalette (above the letter R). You’ll know you’ve hit the right icon,because your cursor turns into a pipette.
9. Left-click the ugly background square in the preview window at thebottom right.
Move the Chroma-key window out of the way first, if necessary. As if bymagic, Vegas sets this color to be your new transparency color. Thingsshould be looking a lot better in the preview window now, but they stillaren’t quite right: You see little bits and pieces of color here and there.
10. Make small changes to the High threshold and Low threshold slidersuntil you’re happy.
The lower you can get these values, the better. Leave Blur amount set tozero unless you really need it; this blurs the edge of the image to get ridof any ugly borders. It’s a good cheat for when the basic Chroma-key fil-ters can’t get it right, but it does tend to lower the overall quality of theimage and leads to that glaring this-scene-has-been-chroma-keyed look.
11. You may have to tweak the color that the color picker pipette toolchose for you slightly.
The R, G, and B values below the color palette stand for Red, Green, andBlue and can be set to any value from 0 to 255.
12. When you’re happy with the effect, click the X at the top right to closethe Chroma-key window.
You can always bring back the window by right-clicking the clip onceagain and choosing Media FX.
Any parts of the image that match the Chroma-key color will be made trans-parent. Make sure your character isn’t wearing blue pants, or your finalfootage will look strange indeed. Change the background color in the ModelViewer options.
Hiding Snow White behind the trees: Layer maskingIf you want to achieve the opposite effect — you want to place a static ormostly static image over an animated background — you can use anothertechnique called masking. You need to use a separate image-editing programfor this. We recommend The GIMP (free and open-source, and on the DVD).
While working through these steps, keep an animated video file below yourmask so that you can see when it’s working!
211Chapter 11: Massively Multiplayer Machinima: World of Warcraft
17_096918 ch11.qxp 7/20/07 11:12 AM Page 211
1. Open a copy of the static image that you want to overlay.
Don’t use the original image. You’ll use it again later, so you’ll want tokeep it intact.
2. Use the tools in your image editor to fill the parts of the image thatyou want to be shown in solid white.
3. Fill the parts that you want to be transparent in solid black.
4. Open Vegas again if you’ve closed it; create a brand new track andadd the original image to it.
5. Add another track and this time add the image mask to it; move thistrack so that it’s above the original image’s track.
Now it gets a little complex. You need to make the layer containing theoriginal image a child of the layer with the black-and-white mask in it.
6. Click the Make Compositing Child button on the original image’s track.
It’s quite small and looks like a blue arrow pointing right and down.Notice that the track containing the original image appears slightlyindented from the mask image layer, which indicates that the mask layeris the parent of the original image layer.
7. Change the Compositing Mode on the mask layer from Source Alphato Multiply (Mask).
The Compositing Mode button is next to the Make Compositing Parentbutton. That’s masked out the original image, which is now only showingthe areas that you painted white.
Where’s the animated footage that you placed underneath, though? Evenif you’ve added it to a track below the other two images, you won’t beable to see it. The solution lies in adding another type of mask to themask layer.
8. Select Track FX from the buttons on the Mask track.
9. Select Mask Generator and close the Track FX windows.
The default settings should be fine; your animated background layershould now be visible behind the masked image.
Often, you use masking and chroma-keying in the same piece of footage. Forexample, in the Snow White example, the background image is a static shot oftrees in the background. Snow White herself is shot against blue and chroma-keyed into the video. Finally, a masked layer of foreground trees is laid inusing masking, behind which Snow White sometimes vanishes.
There aren’t any really hard-and-fast rules as to when you use masking andwhen you use chroma-keying. You just discover which technique to use bytrial, error, and practical examples.
212 Part III: Advanced Machinima Creation
17_096918 ch11.qxp 7/20/07 11:12 AM Page 212

Other compositing techniquesYou can do a lot more things with compositing in your video editor. Here area few common tricks:
� Depth of field: You can layer several images and then apply blurs tothem to simulate a camera moving in and out of focus on different partsof the image. This technique is powerful for achieving a filmic effect.
� Special effects: Using animated footage created elsewhere, or particleeffects in powerful video editors, you can add special effects — smoke,lightning bolts, anything you like! — that aren’t possible in World ofWarcraft or any other engine.
� Digital grading: Most video editors allow you to adjust the image prop-erties of your video — brightness, contrast, saturation, and more. Youcan use these changes to give more life to a dull image or evoke a spe-cific feel in your footage.
213Chapter 11: Massively Multiplayer Machinima: World of Warcraft
17_096918 ch11.qxp 7/20/07 11:12 AM Page 213

214 Part III: Advanced Machinima Creation
17_096918 ch11.qxp 7/20/07 11:12 AM Page 214

Chapter 12
Lord of the Rings on $50 — MassBattles with Medieval II:
Total WarIn This Chapter� Making epic historical battle movies using Medieval II: Total War
� Creating armies and landscapes
� Getting the most out of Medieval II: Total War’s Machinima features
Hugh is smug right now. He’s smug because he has, for about a decade,been predicting that Machinima will one day allow him to film battle
scenes on the scale of Zulu or Lord of the Rings. Last year, a little gameemerged into the market called Medieval II: Total War (MTW2, as we refer toit for the rest of the chapter). In April 2007, the makers of the Total Warseries, Creative Assembly, released a Machinima tool for it — with which,yes, you can create battles on the scale of Peter Jackson’s Lord of the Rings.
The Total War engine was used for the historical recreations in the televisionseries Time Commanders and Decisive Battles. With the release of the MTW2Machinima tool, it’s your turn. If you want to create a small, detailed lovestory à la Brief Encounter, this ain’t the chapter for you. We recommendChapters 6 through 8 or Chapter 17 for that sort of thing.
If, on the other hand, you want to create enormous, graphically detailedmedieval battle scenes, with tens of thousands of characters fighting it outfor king, cash, and country, read this chapter.
18_096918 ch12.qxp 7/20/07 11:13 AM Page 215

The Ups and Downs of Medieval II: Total War
MTW2 is a fantastic engine, but it’s highly focused on one purpose: really big fights.
Here are the pros:
� Huge battles: We really do mean huge. Its limits are somewhere upwardof 30,000 troops. We guarantee a Wow! moment within your first hour ofworking with the engine.
� Works well at close-up, too: The Machinima potential of the previousTotal War games was somewhat let down by the fact that, while theylooked great from a distance, the individual character models were quiteblocky and ugly. MTW2 has fixed that and fixed it good. Individual char-acters now move individually, play with their weapons, and shift theirfeet. Their individual fighting animations have to be seen to be believed.You can go in close, shoot an individual character being killed or theimpact of a cannon shot, and then zoom right out to see thousands ofcharacters fighting.
� Wow. No, really. Wow. The Total War games have always looked good,but MTW2, from a 2007 perspective, looks darned amazing. Your wideshots will feature sweeping vistas and rolling hills. Your medium andclose shots will show beautifully textured armor glinting in the morningsun. MTW2 is among the most graphically accomplished games we’veever seen.
� Great process and tools: The process of filming in MTW2 is both intu-itive and flexible. In Medieval, you make a set, you then control theaction in that set using the standard game controls, and that action isthen saved as a replay. You can then replay that footage as often andfrom as many angles as you want, and even add camerawork after thefact. This process used to be called recamming. It’s tremendously flexi-ble and is something offered by no other modern engine but Half-Life 2.
Of course, every game has its cons:
� No facial animation: It’s only when you get in really close that the flawsin the MTW2 graphics engine become slightly apparent. The individualunit models are fairly low resolution. This is most noticeable on thecharacter’s faces, which can’t emote at all. You’re not going to be able tomake your characters blink, let alone lip synch.
� Some bugs: The camera tools and map tools were designed to be usedby the game development team itself. We’re tremendously grateful they’vereleased them. However, that does mean that they’ve not undergone thelevel of testing that a consumer piece of software would have done.
216 Part III: Advanced Machinima Creation
18_096918 ch12.qxp 7/20/07 11:13 AM Page 216

We’re told by the designers that saving frequently is a good idea whileusing MTW2 as a Machinima tool. In addition, these tools aren’t supportedby the games publisher Sega — so please don’t call Sega if they break!
� No individual character control: The recording facility records the actionsthat you, as the player, take in directing your units, not the movements ofthe individual characters within those units. If you’ve got an inconve-niently positioned knight blocking your shot, you’ve got no choice but totake the shot from another angle. In this respect, filming in MTW2 isoften a lot more like documentary filming than conventional Hollywood-style work: You may have Total War, but you don’t have total control.
� Designed for the Big Screen: Once you start to work with the cameratools, you’ll be grateful for a really big monitor. We found our 19widescreen a little cramped when editing camerawork. Try to film on asmall monitor at, say, 1024x768 resolution, and you’ll soon be longing fora multiple-monitor setup.
� Medieval: That’s it. We say you could re-create Helm’s Deep. That’s true,but you’d have to create all the models yourself. Medieval II: Total Wardoes one thing and one thing well. It does war, which is often prettytotal, in a medieval setting. If you want to make Star Wars VIII: The ReallyBig Barney, you’ve got a lot of work ahead of you. Having said that, thecommunity for MTW2 was developing fast as we wrote this book, andsome truly fantastic modifications may be available now. See http://forums.totalwar.org/vb/forumdisplay.php?f=159 to get thestate of play.
The Filming Process in MTW2The process of filming in MTW2 is a bit different than that of any other engine:
1. Plan your film.
Because you don’t have total control, you can’t plan an MTW2 film downto a shot-by-shot level. Instead, you need a script and a general beat-level plan of the action (Cavalry charge. Pikemen get ready for impact.Cannon fires on cavalry).
2. Make a map.
You can model virtually any terrain you can think of using MTW2’s mapbuilder. As well as choosing the height, layout, and surface terrainacross your map, you can choose the weather and season. MTW2 alsoincludes quite a number of small terrain features, such as monoliths ortilled fields, as well as several enormous (and superbly detailed) castles.
3. Choose and place all the character units that you want to feature inyour movie, from cannoneers to a Highland Rabble.
217Chapter 12: Lord of the Rings on $50 — Mass Battles with Medieval II: Total War
18_096918 ch12.qxp 7/20/07 11:13 AM Page 217
4. Record a battle.
This is the fun bit. You take your pre-set armies and map and play thegame yourself. Either you and a friend or you and the computer take aside each and, using the normal game controls, order your troops intoaction. Cannon roar, knights charge. The game, meanwhile, recordseverything you do, ready to be played back and filmed.
5. Add cameras.
You take the battle you just recorded into MTW2’s Cinematics Editor.Here, you add key-framed cameras to any point of the battle, from giantsweeping helicopter shots to tight, close-in handheld-style shaky camera-work. Larger shots will probably come out as you’ve planned them, butyou’ll have to look carefully for individual action shots.
6. Render the scene.
Medieval includes a fantastic feature similar to (but rather better than)The Sims 2: A full renderer, which creates a graphically perfect versionof your film without the use of programs like FRAPS. It also, as an addedbonus, turns all your graphics settings up to maximum while it does this — and MTW2 on maximum graphic quality is a very pretty thingindeed.
7. Edit your movie.
Just like any other movie, once you’ve got your raw footage, you thenedit it together using a conventional video editor — and lo and behold,you’ll have a darn pretty movie.
Getting StartedWhen you’re ready to get on the MTW2 train to Carnage City, follow these steps:
1. Install Medieval II: Total War.
If you haven’t got this already, you can order a copy of the game throughthe link on the Machinima For Dummies Web site at www.machinimafordummies.com.
2. Download and install the latest patch.
You can find patches for the game at www.totalwar.com. You need atleast Update 2.
3. Navigate to the Medieval 2 folder on the book’s DVD and copy all thebatch files (files ending in .bat) to the root folder of your MTW2installation (C:/Program Files/MedievalTotalWar2 for a defaultinstallation).
218 Part III: Advanced Machinima Creation
18_096918 ch12.qxp 7/20/07 11:13 AM Page 218

4. Double-click 1editor.bat in your MTW2 folder to launch the game.
5. Click Options and then Battle Editor.
The Location Selection screen appears.
6. Choose a location in which to set your battle.
If you click the map, the Battle Editor tells you what type of terrainyou’re going to be editing.
7. Click Next.
You’re now looking at the Battle Editor.
Getting to Know the Battle EditorYou can navigate around the Battle Editor by using the number pad on yourkeyboard.
Table 12-1 clues you in on what each key does.
Table 12-1 Navigating in the Battle EditorKey Action
8 Move forward quickly
5 Move forward slowly
2 Move backward
4 Turn left
6 Turn right
1 Pan left
3 Pan right
* Move up
/ Move down
- Look down
+ Look up
219Chapter 12: Lord of the Rings on $50 — Mass Battles with Medieval II: Total War
18_096918 ch12.qxp 7/20/07 11:13 AM Page 219

Each button along the bottom of the Battle Editor, shown in Figure 12-1, dis-plays its name and function if you hover your mouse over it for a couple ofseconds. You can also find a useful summary of their functions at the top ofthe screen once you click them. Table 12-2 describes each button.
Table 12-2 The Battle Editor ButtonsButton Description
Edit Battle Details (1) Edit the details of the battle. You can choose froma single-player or a multiplayer map. You can alsoedit the weather and the time of day, both ofwhich have a huge effect on in-game graphics.The editor updates to reflect your changes whenyou click OK.
Create Army (2) Probably the first thing you should do. Create anarmy and select the faction to which it belongs.You can choose anything from Scotland to theHoly Roman Empire. Choose a name for yourcommander and turn his Command slider up tomaximum. You need to create at least two armies,or the battle will be quite dull! (Plus, the gamewill probably crash.)
Create/Edit Units (3) See the upcoming steps on adding units, later inthis section.
Figure 12-1:The Battle
Editorcontrols.
The BattleEditor alsocontains abig pile ofbuttons at
the bottom.
220 Part III: Advanced Machinima Creation
18_096918 ch12.qxp 7/20/07 11:13 AM Page 220

Button Description
Create Deployment Area (4) A deployment area must be set down for eacharmy before you can place any troops. Selectyour commander and then click the map to definethe corner points of your deployment area. Youcan deploy units only within this area. If you makea mistake, you can delete a point by right-clickingor move it by clicking and dragging. Don’t makeyour deployment area too small, or you’ll neverbe able to fit your unit of 200 elephants into it!
It can be a precision task selecting an individualpoint of a deployment zone in order to edit it. Theselectable area is actually at the base of thepoint, where it connects to the map.
Edit Landscape Heights (5) Click this button to display a new menu showingthe different brushes available to modify the ter-rain. This tool works just like an airbrush tool in apaint program; the editor allows for various dif-ferent sizes of brush, from tiny to enormous. Left-click and hold to raise the terrain. The longer youhold down the mouse button, the greater theeffect will be. Shift+click and hold to lower theterrain.
There is no tool to apply rivers; you’ll have to finda pre-existing map with a river if you want to useit in your film.
Smooth tool (6) Applying the Smooth tool to a section of terrainaverages out the height under the brush, effec-tively smoothing it down.
Plateau tool (7) Flattens the landscape level with the point youfirst click. It is much like the Smudge tool, exceptthat the Smudge tool will fall off as you get fur-ther from the point you first click.
Smudge tool (8) Using this tool, you can move mountains. Theeditor takes the height of the terrain at the pointyou start clicking and drags that height acrossthe areas you move your mouse, effectivelysmudging the terrain around the landscape.
(continued)
221Chapter 12: Lord of the Rings on $50 — Mass Battles with Medieval II: Total War
18_096918 ch12.qxp 7/20/07 11:13 AM Page 221
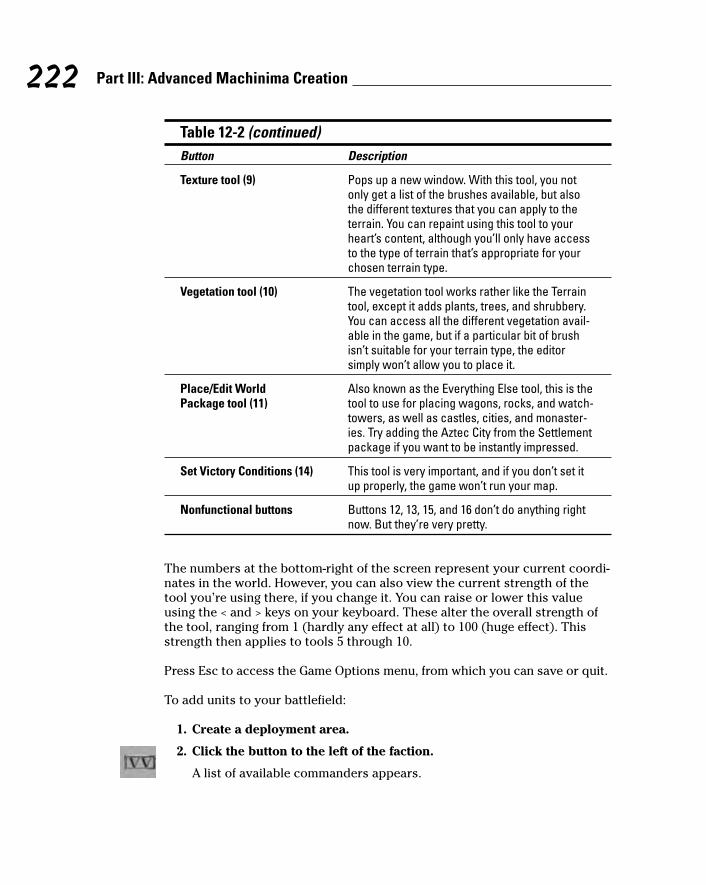
Table 12-2 (continued)Button Description
Texture tool (9) Pops up a new window. With this tool, you notonly get a list of the brushes available, but alsothe different textures that you can apply to theterrain. You can repaint using this tool to yourheart’s content, although you’ll only have accessto the type of terrain that’s appropriate for yourchosen terrain type.
Vegetation tool (10) The vegetation tool works rather like the Terraintool, except it adds plants, trees, and shrubbery.You can access all the different vegetation avail-able in the game, but if a particular bit of brushisn’t suitable for your terrain type, the editorsimply won’t allow you to place it.
Place/Edit World Also known as the Everything Else tool, this is the Package tool (11) tool to use for placing wagons, rocks, and watch-
towers, as well as castles, cities, and monaster-ies. Try adding the Aztec City from the Settlementpackage if you want to be instantly impressed.
Set Victory Conditions (14) This tool is very important, and if you don’t set itup properly, the game won’t run your map.
Nonfunctional buttons Buttons 12, 13, 15, and 16 don’t do anything rightnow. But they’re very pretty.
The numbers at the bottom-right of the screen represent your current coordi-nates in the world. However, you can also view the current strength of thetool you’re using there, if you change it. You can raise or lower this valueusing the < and > keys on your keyboard. These alter the overall strength ofthe tool, ranging from 1 (hardly any effect at all) to 100 (huge effect). Thisstrength then applies to tools 5 through 10.
Press Esc to access the Game Options menu, from which you can save or quit.
To add units to your battlefield:
1. Create a deployment area.
2. Click the button to the left of the faction.
A list of available commanders appears.
222 Part III: Advanced Machinima Creation
18_096918 ch12.qxp 7/20/07 11:13 AM Page 222

3. Click the commander’s name.
A new menu appears, with a list of all the available units that you cancreate under his command. The new menu will probably cover yourmain menu, so just click and drag to move it out of the way.
4. Place units by clicking your chosen unit to select it and then clickingand dragging across the map to define the unit’s facing and initial formation.
When you release the mouse button, the editor opens the Edit UnitDetails dialog box where you can edit the size of the unit, as well as itsequipment and general competence.
Once a unit has been placed, you’re unable to edit it with a right-click, andclicking just places another identical unit on the map. The trick is to click theunit with both the right and left mouse buttons simultaneously. Then you canchange its facing and deployment.
We can’t say it often enough. The MTW2 editor is great, but it’s not officiallysupported by the developers, and is still pretty buggy. Save regularly. You’llthank us.
Making a MapMTW2 is built primarily for outdoor scenes. Thus, it works entirely on a com-bination of height-mapped terrain and placeable objects, which range in sizefrom individual rocks to enormous castles. (See Chapter 6 for more on map-making techniques.)
At the same time as making your map, you’ll set up the initial positions of thearmies you intend to have clash. Often, when you’re making a more complexMedieval movie, you create several different maps, each of them with identi-cal terrain but with units set up representing different stages of the battle.
Here’s how to create your map and set up your armies’ initial positions:
1. Modify your terrain.
Using the various terrain and placeable tools in the Battle Editor, addhills, trees, cities, and farms to your heart’s content.
2. Click the Edit Battle Details and choose the weather and time of day.
Set the map as multiplayer if you’ll be directing with a friend, or single-player if not.
223Chapter 12: Lord of the Rings on $50 — Mass Battles with Medieval II: Total War
18_096918 ch12.qxp 7/20/07 11:13 AM Page 223

3. Move the camera around until you find a good spot to place your first army.
MTW2 maps are huge and can quickly get confusing. You’ll probably findit convenient to deploy your troops somewhere near the center of the map.It’ll be easier to find them when you eventually replay your recordings.
4. Click the Create Army button and select your faction.
We’re going for Scotland, obviously. Give your captain a good name.Scottish commanders can be called Hew, which is a fine name with anoble tradition of geekhood behind it.
5. Create a second army.
An English army under the command of Captain John would seem agood choice to be trampled by elephants.
6. Click the button next to Scotland and select Captain Hew (or whoeveryou chose).
Give him a nice deployment area using the Create Deployment Areas tool.
7. Create another deployment area for Captain John.
Make sure that you give him plenty of space and that the armies aren’ttoo far away from each other.
8. Click Create/Edit Units and lay down a few troops for each side.
Remember that you need to select the appropriate captain to place troopsunder his command. The most important — nay, essential — unit to placeis the General’s Bodyguard, without which the game won’t run. Other thanthat, go wild and place anything you fancy. We insist that you place a unitof Highland Rabble on the Scottish side, though. They remind Johnnie ofthe pub near his flat.
Don’t get too excited, but if you want to, you can choose some elephants.
9. Click Victory Conditions and set your home faction to Scotland (orwhatever you want your home faction to be).
You may want to paint half your face blue and recruit a famousAustralian actor to do a very bad Scottish accent.
10. Click the + button toward the top of the Victory Conditions windowtwice to add two Alliances.
Each row has two tick boxes available under the list of faction flags, aswell as a further four tick boxes at the end of the row.
11. Against Alliance No 0, place a tick beneath the Scottish flag (a whitecross on a blue background) or the appropriate flag if you’re notusing Scotland the Brave as one of your factions.
224 Part III: Advanced Machinima Creation
18_096918 ch12.qxp 7/20/07 11:13 AM Page 224

12. For Alliance 1, place a tick beneath the other flag — English, in our case.
Make sure that you get this bit right. If you make a mistake here, thegame will crash spectacularly when you try to run this map.
13. Set one of the factions as the attacker, by placing a tick in the Acolumn at the end of the row.
14. Set the slider next to Select Alliance to 0 and click the + button next toDestroy or rout enemy.
This step sets up the game in such a way that the first Alliance mustcompletely conquer its enemies to win. Several other alternative winconditions are available to you, but this default choice provides themost flexibility and the least chance for the battle to end unexpectedly.
15. Move the Select Alliance slider to 1 and again click the + button toadd a Destroy or rout enemy condition for the Bad Guys.
You should now have a screen that looks something like Figure 12-2.
16. Click the tick to accept your modifications.
17. Hit Escape to access the Save menu and save your map.
Hopefully, the editor doesn’t report any errors during its Sanity Check. Ifit does, you need to rectify them before you carry on.
18. Exit the program.
You can do so through the Escape menu.
Figure 12-2:The VictoryConditions
screen.
225Chapter 12: Lord of the Rings on $50 — Mass Battles with Medieval II: Total War
18_096918 ch12.qxp 7/20/07 11:13 AM Page 225

Recording the ActionAfter you create your map, you can dive in and shoot some action! For thefollowing steps, we’re assuming that you’re playing single player:
1. Open 2save_replay.preference.cfg from your main MTW2 direc-tory and search for [replay].
It’s just a text file, so you can open it in any text editor.
2. Edit the line file = C:\mtw2_release_F52\replays\MfD1.rpyand change the name MfD1 to whatever you want to call your firstreplay.
You can choose any name you like — just remember what you’vechosen.
3. Change the path to wherever you installed MTW2 — probablyC:\Program Files\SEGA\Medieval II.
4. Double-click 2save_replay.bat to start MTW2.
The game is ready to record whatever actions you take.
5. Select Single Player, then Historical Battle from the menu that appears,and choose the map you created earlier from the following menu.
6. Click Next and then choose which army you want to control by click-ing the appropriate flag.
7. Click Start.
8. Press P to pause the game as soon as it loads and take a look around.
9. It’s up to you now: Play the game as normal.
If, like us, you’ve barely considered that this is, in fact, a game, you maywant to quit and play a couple of the tutorials to get the hang of actually,er, playing.
If you do decide to go straight into playing, all the events of the battle aresaved. Don’t play for too long — a minute or so is fine. If you then exit, yourreplay is saved.
Shooting the CarnageAfter your glorious victory has been recorded for all eternity (see precedingsection), you can reload the saved game and replay the action. This time, youadd cameras and camera movements to create a cinematic story:
226 Part III: Advanced Machinima Creation
18_096918 ch12.qxp 7/20/07 11:13 AM Page 226
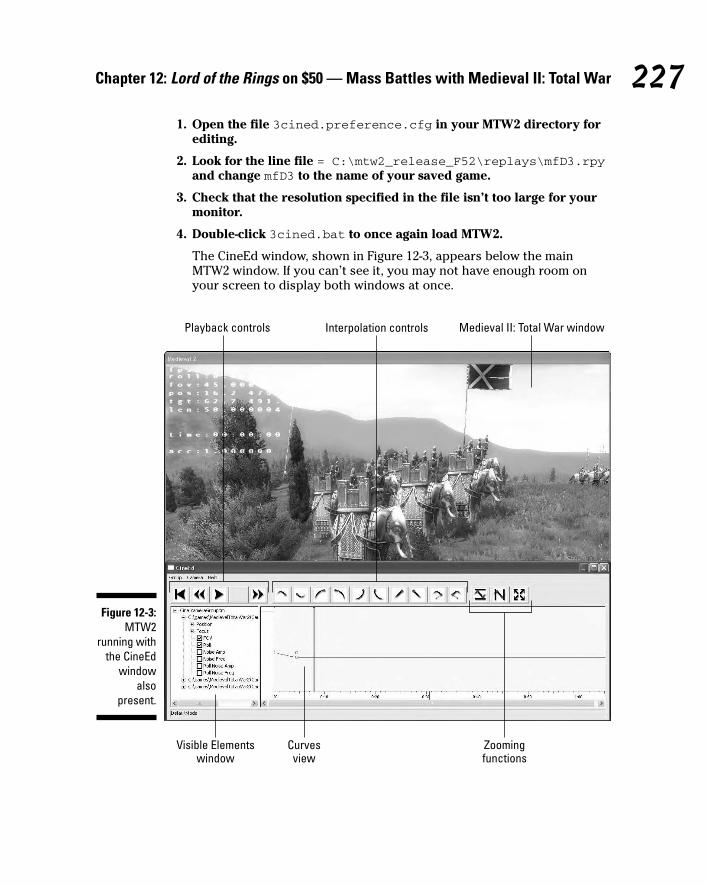
1. Open the file 3cined.preference.cfg in your MTW2 directory forediting.
2. Look for the line file = C:\mtw2_release_F52\replays\mfD3.rpyand change mfD3 to the name of your saved game.
3. Check that the resolution specified in the file isn’t too large for yourmonitor.
4. Double-click 3cined.bat to once again load MTW2.
The CineEd window, shown in Figure 12-3, appears below the mainMTW2 window. If you can’t see it, you may not have enough room onyour screen to display both windows at once.
Playback controls Medieval II: Total War window
Zoomingfunctions
Curvesview
Interpolation controls
Visible Elementswindow
Figure 12-3:MTW2
running withthe CineEd
windowalso
present.
227Chapter 12: Lord of the Rings on $50 — Mass Battles with Medieval II: Total War
18_096918 ch12.qxp 7/20/07 11:13 AM Page 227

The Cinematics Editor contains a few key tools and commands that you needto know to use it, as outlined in the following sections.
1: The Medieval II: Total War windowThe main game view is rendered in the MTW2 window. You can press Tab toswitch between a free view and a view through the current active camera. Inthis view, you can move around the map using the standard controls. If you’rein free view, you can press P to get a picture-in-picture view from your currentlyactive camera, and you can also see and move any cameras in the scene.
2: The Visible Elements windowThis window selects the elements of the current camera displayed in theCurves View. You need to expand the tree view here to see the available cam-eras. Then you can expand the tree for those cameras to select:
� Position (X, Y, and Z axis), which defines the camera’s position in 3D-space.
� Focus (X, Y, and Z axis), which defines the point at which the camera islooking. When you’re looking up and down using the keyboard controls,what you’re really doing is moving the focus point. Rarely will you needto manually edit the Position or Focus elements, because you’ll do mostof that through the MTW2 window.
� Field Of View, which you can modify only through the CineEd window.
� Roll, which governs the amount that the camera is tilted off-center.
� The four Noise controls, which you can use to add an element ofrandom movement to the camera (to simulate a hand-held shot, or theground shaking, for example).
3: The Curves ViewIn the Curves View, you see curves representing the value of all the cameraelements that you’ve changed over time. A green line represents the currentplayback point for the recording, and a red line represents the current timeon the active camera. Little white or red squares, known as keyframes, alsoappear at different points on the curves (see Figure 12-4). Keyframes repre-sent specific values that you’ve told MTW2 to assign to a certain camera ele-ment at a specific time.
228 Part III: Advanced Machinima Creation
18_096918 ch12.qxp 7/20/07 11:13 AM Page 228

If you were to place your camera at ground level and place a keyframe at 0seconds, that would mean your camera would start at the ground level at 0seconds. You’d see a keyframe on the camera position curve at 0 seconds,specifying ground level as the current camera height. Then, if you were toraise the camera up for 4 seconds (craning up to a nice high shot), you’d seeanother point for, say, 10 meters, appear on the position curve at 4 seconds.
Crucially, a curve or a line (which is just a flat curve) would be drawnbetween these two points, telling you that the camera moves from one posi-tion to the next. From that curve, you could tell, for example, that at 2 sec-onds into the movie, the camera will be about 5 meters off the ground —because that’s where the curve lies at the 2-second mark.
You can navigate between keyframes by pressing the left and right squarebracket keys ([ and ]) on your keyboard. You can only move the camera inthe MTW2 window when the red line is on a keyframe. That’s because CineEdneeds a keyframe in which to record the camera’s new position.
Here are a few more things to keep in mind:
� If you want to place a keyframe for the camera, you can do so by press-ing the Insert key. This action adds a keyframe at the current cameratime (the red line), on all tracks, whether visible or not.
� You can also double-click to place a keyframe at the point where youdouble-click. This only places a keyframe on visible curves.
� Left-click and drag in the Curves View to select multiple keyframes atonce.
� You can click and drag a keyframe to move it up or down, changing itsvalue. If you want to change its position in time, Shift+click and drag thekeyframe backward or forward along the timeline.
KeyframePlayback pointActive camera time
Figure 12-4:The Curves
View withkeyframes
shown.
229Chapter 12: Lord of the Rings on $50 — Mass Battles with Medieval II: Total War
18_096918 ch12.qxp 7/20/07 11:13 AM Page 229

� To delete a keyframe, select it and press Delete. Sometimes deletingkeyframes won’t work. If that happens, try de-selecting and re-selectingthem and then deleting again.
� Shift+right-click anywhere in this timeline to set a rewind point. On longfilms, you may not always want to rewind right the way back to the start.Setting a rewind point ensures that the film restarts from that point only.
4: The Playback controlsYou can use the Playback controls to move the action forward through timeor fast-forward if you’re impatient. You can also rewind the recorded footageto the very beginning. Unfortunately, there’s no way to rewind just a few sec-onds. It’s all or nothing, so if you miss the exact moment that you wanted tostart your camera move, you’ve no option but to rewind the battle to thestart and try again.
The replay can’t rewind because it is a series of orders, not a recording of unitpositions. So, in order to get back to the 2-minute mark on a recording, thegame has to quickly run through all the orders that happened up to that time.
You can playback any camera movements that you’ve defined by pressing theSpacebar. The camera moves, but the action of the battle remains paused.This technique is great for checking your camera paths without having torewind and re-edit every time.
Finally, if you’re working on a long replay, don’t forget you can create a rewindpoint by Shift+right-clicking in the Curves View so that you don’t have towatch through the entire battle.
5: The Interpolation controlsUse the Interpolation controls to decide how the camera moves during thetransition between two camera points (known as interpolation).
By default, camera changes use smooth interpolation, which usually gener-ates a nice smooth movement, but may result in your camera doing some-thing unexpected. If your camera decides to take a brief side trip betweentwo similar keyframes, for example, change your interpolation settings. Youcan apply these controls to curves other than position, too.
The various interpolation controls are
� Smooth in and smooth out, which give you a generally smooth cameramotion. Use these interpolation units by default unless they aren’t work-ing for you!
230 Part III: Advanced Machinima Creation
18_096918 ch12.qxp 7/20/07 11:13 AM Page 230

� Easy-in and easy-out, which tell the camera to accelerate and decelerategradually at the beginning and end of its path. Ease-in gives you a verysmooth start, which looks as though the camera is accelerating.
� Hard-in and hard-out, which causes the camera to accelerate to a verysudden stop (or vice versa). Useful for imitating a rough, warts-and-allhand-held style (think NYPD Blue, but with more elephants).
� Linear In and Linear Out, which you’ll mainly use for a smooth continu-ation. You’ll usually use only one of these on a keyframe, either in or out, depending on whether the shot follows another shot or leads intoanother shot. Linear In and Linear Out are useful particularly when twoadjacent keyframes are meant to be in very similar positions — if youuse other interpolation types, you may find the camera wanders.
� Bezier-in and Bezier-out. Theoretically, this should give you a verysmooth, yet highly editable, curve on your camera path. We don’t rec-ommend you use these interpolations unless you’re pretty familiar withBezier curves; they’re still quite bug-ridden.
6: Zooming functionsThese three buttons magnify (or zoom out on) your timeline view, enablingyou to concentrate on the specific part that you’re currently editing. In orderfrom left to right, the buttons are
� Vertical zoom, which zooms the timeline so that all the currentlyselected keyframes fit into the screen view vertically (by value).
� Horizontal zoom, which does the same for the other axis — that is tosay, it fits all the selected keyframes on-screen horizontally (by time).
� Show all, which zooms the Curves View as far out as it will go.
You can also use the < and > keys to zoom in and out on the timeline.
Creating Camera PathsHere’s how you can create a simple camera:
1. Select New from the Camera menu in the CineEd window.
2. Find a nice wide shot to use for your opening camera move.
3. Press the Enter key to start the replay playing.
The battle is played out on-screen just as it happened.
4. When you’ve reached an appropriate point for the end of your open-ing camera move, press Enter again to stop the action.
231Chapter 12: Lord of the Rings on $50 — Mass Battles with Medieval II: Total War
18_096918 ch12.qxp 7/20/07 11:13 AM Page 231

5. Press Insert to add a new keyframe at this point in the action.
Now you can move the camera to wherever you want it to end up — perhaps a slow pan in toward your assembled troops?
You can also insert a keyframe by double-clicking the timeline. This actionadds keyframes only on visible tracks.
Drag the timeline back and press the spacebar to play, and your cameramoves toward your troops.
Adding a zoomHere’s how to use the FOV feature to add a zoom in:
1. Expand the Visible Elements Window as far as it will go and tick thetick boxes for Position (all three controls), Focus (all three controls),and FOV.
2. Click Zoom Out.
You’ve got two sets of keyframes now on the window, and some linesgoing between them.
3. Deselect Position and Focus.
4. Double-click the remaining line (which represents Field of View, orFOV) at the point that the red playback line is currently placed.
A keyframe is added on this line. Try dragging it up and down, andnotice how the field of view changes. Drag it down a bit, to give you azoom in.
5. Double-click the FOV line about a second before the keyframe you justadded and drag this keyframe up to where the line originally was.
6. Select this keyframe and click Linear In.
This ensures the FOV stays constant before this keyframe. Now, if youright-click in the Curve View about 2 seconds before the first keyframeand then press space to play the camera, you see that you’ve got a fairlyquick zoom in.
7. On the CineEd menu, choose Camera➪Save and choose a name foryour camera.
You should be saving your cameras fairly regularly.
Click the Save button in the Windows dialog box with the mouse. Don’t pressEnter, or the recording will start playing. Also note that when you save yourcamera, its name changes in the Visible Elements window to whatever yousaved it as.
232 Part III: Advanced Machinima Creation
18_096918 ch12.qxp 7/20/07 11:13 AM Page 232

Creating a close-up hand-held cameraHere’s how to add a camera closer in to the action.
1. Choose Camera➪New, expand the Visible Elements window, andselect NoName in the Visible Elements window.
2. Press Tab twice, press Insert to add a keyframe, and move yourcamera closer to the action.
Find a nice shot on some cavalry, elephants, cannons, or something elsethat will make the ground shake a bit. You’re just going to use a staticshot here, but you’ll add some camera shake to it.
Sometimes, when you change cameras, CineEd gets a bit confused. Wepressed Tab twice here to remind CineEd which camera we’re using.
3. Go to the CineEd window and expand the Visible Elements on theNoName camera.
Just so we’re clear, that’s the Visible Elements window, not the VisibleElephants window. Depending on what you placed in your map, this maybe an easy mistake to make.
4. Save it as a new camera by choosing Camera➪Save.
You may notice we have a bit of a saving twitch here. You can avoidproblems by clicking OK on the Save dialog box instead of pressingEnter at any point.
5. Select Noise Amp and Noise Freq and double-click the horizontal linethat appears, about a second before where the red line is currentlyplaced; then double-click exactly where the red line is placed.
You see only one line here, despite the fact that you’ve selected twovalues, because both values are currently the same.
You’ve now created two keyframes for your noise. You can edit thelevels of the second one now, and you’ll get a nice ramp up from thelevels that the first one is set to, meaning the camera will start shaking.
6. Drag a box around the second keyframe (which is actually a set of twokeyframes) and then click them and drag them up a bit.
7. Now right-click just before the first set of keyframes and play back bypressing the spacebar.
How does that look? Like the camera’s being shaken, or like it’s on arolling sea? Try playing around with the settings on the second set ofkeyframes to see what happens.
We’ve set some keyframes to cause camera shake at the appropriatepoint. It’s unlikely that our camera would stay pointing perfectly forwardwhile it’s getting knocked around. We can add a bit of roll shake, too.
233Chapter 12: Lord of the Rings on $50 — Mass Battles with Medieval II: Total War
18_096918 ch12.qxp 7/20/07 11:13 AM Page 233

8. Deselect Noise Amp and Noise Freq and select Roll Noise Amp andRoll Noise Freq.
9. Create two sets of keyframes about a second apart, like you did inStep 5, with the keyframes at the same time you created the NoiseAmp and Noise Freq keyframes.
10. Drag a box around the second keyframes and try dragging them upand down, as you did in Step 6.
Play with this for a bit until you’ve got a camera that looks like it’s beingauthentically shaken around as the elephants (or whatever) charge past.Now to hold onto that rumble while everything goes past.
11. Select Noise Amp, Noise Freq, Roll Noise Amp, and Roll Noise Freq.
12. Move the play head to when you think the elephants (or whatever)will have gone past by right-clicking the Curve window; double-clickat that point to add another keyframe.
The line between the two keyframes isn’t flat. If you play the sequenceback from the second keyframe, you see that the noise changes in inten-sity, rather than staying the same. That’s no good.
13. Drag-select the second keyframes and click Linear Out at the top ofthe screen.
The line changes as you do this step. Now the line should be flat. If youadd more animation on the noise curves later on, you also need to givethe third keyframe a Linear In, to avoid it curving again.
Finally, go back to your original camera, change its duration, and get itready to render.
14. Choose Camera➪Save and save your second camera (over the file-name you already used).
You’ve now got some close-up shaky camerawork!
If you wanted to, you could add movement here, to simulate a cameramanmoving closer, or add any other camerawork element you like.
Rendering a cameraYou render each camera in turn to an AVI file. You’ll render the first camerahere, but rendering subsequent cameras works exactly the same way.
1. Deselect all the check boxes in the Visible Elements window and clickyour original camera.
The view changes to your first camera.
234 Part III: Advanced Machinima Creation
18_096918 ch12.qxp 7/20/07 11:13 AM Page 234

2. Click the Zoom Out button.
From now on, we’re assuming that you started your camera at the startof your recording and want to continue using it until a few seconds afterthe end of the camera move.
3. Press the Rewind button.
The scene reloads.
4. Press Tab to require your camera view and then press Enter to playback both camerawork and recording.
When your camera move finishes and you think you’ve gotten to the endof the usable footage for the first shot, press Enter again to stop.
5. Drag the black line from the end of the timeline window back to theposition of the replay head (the green line, which may currently becovered by the red camera playhead).
You’ve now told the game that you want to only use that section of therecording when you render this shot out.
6. Save your camera again and exit CineEd.
Rendering a ShotAfter you’ve set up a camera, you’re ready to render out the footage fromthat camera as an AVI file. MTW2 renders using the highest graphical settingsit can possibly manage, which makes your movie look really rather nice.
1. Open up 4render.preference.cfg in your main MTW2 directoryfor editing.
2. Edit the following lines in the replay section to point to your replayfile and your camera file:
file = C:\mtw2_release_F52\replays\mfD3.rpycamera = C:\mtw2_release_F52\Cameras\MfD_Cam06_render.cam
3. Edit the following lines in the cine section:
width = 800height = 600
4. Set these values to whatever resolution you’d like your footage to berendered as.
You can only choose standard OpenGL resolutions here, unfortunately —800x600, 1,024x768, 1,200x900, 1,600x1,200 and equivalent widescreenresolutions.
235Chapter 12: Lord of the Rings on $50 — Mass Battles with Medieval II: Total War
18_096918 ch12.qxp 7/20/07 11:13 AM Page 235
5. Edit the following line in the capture_tga section if you want a dif-ferent frames-per-second rate: fps = 60.
We recommend leaving this setting at 60 unless you have good reasonnot to. It’s double the rate you’ll eventually need, which means that it’llbe very easy to add fancy effects, such as slow-motion footage, in yourvideo-editing package.
6. Double-click 4render.bat and then do nothing at all.
This step is very important. MTW2 loads and starts to render yourfootage automatically. Unfortunately, it’s a little precious, so just let itrun; attempting any other task with your computer while the footage isrendering will probably cause your cavalry charge to be interruptedwith footage of you checking your e-mail or browsing certain specialistWeb sites.
Once the footage has finished rendering, an avi file appears in the capture_tga directory, under the MTW2 directory.
7. Edit this footage in your video editor of choice, and you’ve got apretty decent little movie.
If you import your footage into Premiere or another high-end video package,you may find that they appear completely black. That’s because MTW2’s ren-derer has a bug in the way it exports Alpha Channels. Tell your video editorto ignore alpha for that footage, and you’re away.
Getting the Scoop on Tips and TricksMedieval II: Total War can create some fantastic movies with very little effort,but you can improve your efforts even more with a few simple guidelines.Here are a few tips and tricks, direct from Peter Brophy at Creative Assembly,to help you make your MTW2 Machinima absolutely stunning.
� You can edit a lot of files in a text editor. Many MTW2 data files —camera files and map files, in particular — are plain text. Don’t be afraidto hack away at them. You can change camera duration, fix things you’vebroken, and more. Just remember to save a copy of the original in caseyour over-eager ministrations break the file beyond all repair.
� Swish pans. You can put together some great hand-held-style swishpans, à la NYPD Blue, using a hard in and a linear out. On a fast pan, thiseffect gives the handheld camera a jerking-around feel.
� Wait for a good kill. It’s impossible to predict when you’ll see a good fightor killing blow between two individual characters. Your best approach isto set up a lengthy fight in the recording and then play it back in CineEd,
236 Part III: Advanced Machinima Creation
18_096918 ch12.qxp 7/20/07 11:13 AM Page 236
looking for a good moment. You can turn on show fatality_markers =true in the 3cined.preference.cfg to have the game show a greenmarker above any unit about to perform a fatality.
� Take close-ups from two different angles. Remember that you canshoot the same piece of action several times, from several different cam-eras. Shoot any close-ups or action shots from at least two differentangles. You’ll be grateful for the choice of footage when you edit themovie together.
� Watch your angles! If you worry about nothing else while shootingMTW2 sequences, watch the line of action and the angles that charac-ters exit and enter a frame. Getting confused in a fight is easy; keep acareful eye on your technical camerawork to make sure that the viewerknows what’s going on and where he is.
� Watch out for popping trees. Occasionally, trees (or sometimes entireforests) spontaneously pop into existence during a camera movement.There’s no way to avoid this mishap, unfortunately, other than to choosea different shot.
� Avoid fights on slopes. MTW2 has an amazing engine, but sometimes itstill gets a bit confused. If two characters are fighting on a slope, they’llcarry on using the same animations they would use if they were on flatland, no matter how high they are standing respective to each other.That can look funny, but it rarely looks good.
� Vegetation, particularly long grass, looks great. MTW2 produces greatshots if the camera is low to the ground with some rocks or vegetationin the foreground. These shots also help maintain the illusion that theviewer is not simply watching a computer game.
� Make sure that everything’s a mini-story. Take a shot of a cannon firing,for example. You can cover the entire thing in a slow, wide shot — oryou can open with a wide shot, then cut to a shot of the cannoneer load-ing the cannon, cut to a close-up as he fires, cut back to the wide or to areaction shot of the cannoneer, cut to a shot of the ball in flight, andthen cut to a shot of it impacting and mud and stone flying everywhere.Which looks more dramatic?
� Tell that cameraman to stay still! Although it’s tempting to plot a com-plicated sweeping camera path complete with noise and zoom for everyshot, use these techniques sparingly. MTW2’s camera plotting is all themore effective if you don’t saturate your movie with it. A well-placedstatic camera is the best choice for almost every shot.
� Fill your frame with distances. MTW2 looks particularly great if you canemphasize the scale of your battlefield by contrasting foreground andbackground, near and distant. If you’ve got a close-up of a cannoneer,can you frame him with a castle looming in the background? If you’reshooting a long shot of a cavalry charge, can you crane down to rocks inthe foreground?
237Chapter 12: Lord of the Rings on $50 — Mass Battles with Medieval II: Total War
18_096918 ch12.qxp 7/20/07 11:13 AM Page 237

� Re-attach split files with VirtualDub. Footage rendered from MTW2 canget quite large — even a few seconds of uncompressed footage at 60FPScan take up hundreds of megabytes. MTW2 automatically splits the fileinto two or more parts if the size grows to greater than 1GB. VirtualDub(on the DVD for this book) can easily reattach these files and produceone single (huge) video file.
� Get with the handheld camerawork. Using noise, you can put togethersome fantastic handheld camera shots. As Lord of the Rings shows, thatsort of camerawork is just fantastic for convincing an audience thatwhat it sees is real.
� Refine your camerawork in several passes. You won’t get your cameraplacement and pathing exactly right the first time you try, and it can befrustrating to rewind the replay file every time you make a change. Thesolution is not to worry about it. Establish your cameras in approxi-mately the setup you want and then watch the sequence, noting theerrors. Now make another pass through, tweaking the cameras as appro-priate. Repeat this process until your cameras are perfect. You’ll expendfar less energy this way.
� Get rid of the flags! By default, all the MTW2 units have large flags float-ing above them. Up close, these look really dodgy. You can get rid of themby adding show_banners = 0 under [video] in the 4render.preference.cfg.
� You can’t really storyboard. Peter describes attempting to predictexactly what will happen in an MTW2 battle as like trying to storyboarda riot. You can plan, but the joy of MTW2 Machinima is finding and usingthe spontaneous moments that occur.
To find out more and get the latest updates on Total War and the Total Warmodding scene, visit the Total War forums at www.totalwarforums.com.
238 Part III: Advanced Machinima Creation
18_096918 ch12.qxp 7/20/07 11:13 AM Page 238

Chapter 13
Noise! Sound Design andRecording for a Great Film
In This Chapter� Figuring out why sound design is important
� Acquiring the recording equipment you need
� Recording, editing, and adding foley
� Finding music for your film
You can always tell the movies with great sound design: They’re the onesin which you don’t notice the sound. That’s the eternal irony of the sound
engineer. If he does his work properly, nobody will notice. If he does a terriblejob, you can be sure people will tell him so.
Sound design is one of the most important aspects of any Machinima production — it can give life to the story, help make your computer-generated world feel real, and even provide action and effects that you can’tachieve in your engine. The classic Machinima productions, without excep-tion, have great soundtracks.
A good soundscape is multilayered. It tells a story — audibly rather thanvisually, but a story nonetheless. A really good soundscape takes account ofabsolutely everything that’s happening at that point in the movie, on-screenand off, and adds one or more audio layers for each of those events. That mayseem like overkill. It certainly seems a bit too much like hard work, but if youwant your movie to be really great instead of just good, multilayered sound-scaping is something that has to be done.
We can easily fill this book with tips, tricks, and techniques for sound design,and you can easily spend years learning the craft. Unfortunately, we’ve justgot this chapter, and you probably want to get your movie finished beforeyour grandchildren graduate, so we limit it to a crash course for now.
19_096918 ch13.qxp 7/20/07 11:13 AM Page 239
Figuring Out What Sound You NeedA common mistake made by inexperienced filmmakers is to underestimatethe importance of sound in their movie. It’s all too easy to think of yourmovie’s sound and audio production as the icing on the cake, rather than theflour. Far too often, a movie of potentially excellent quality is let down byshoddy sound design. Think about the different categories of sound that amovie requires:
� Dialogue: Assuming that your movie contains spoken (or sung) words —and there’s no sacred law that says it should — you’ll need to record thisdialogue. It may not take up a large chunk of your movie — dependingon the lip syncing capabilities of your chosen engine, it may occupy aslittle space as possible — but there’s no denying its importance. It doesn’tmatter how cleverly you word your three minutes of heavy exposition ifthe audience can’t hear it.
� Foley sounds: If a tree falls in a forest, it needs to make a sound. A loud,crashing, tearing, swishing thump of a sound. More subtly, if a characterputs her purse down for a second, we need to hear it as it makes contactwith the table. Almost every action in your movie, no matter how smallor trivial, potentially requires an accompanying sound. These soundsare collectively known as the foley, after Hollywood sound designerJack Foley, a pioneer of sound design during the early days of thenew talkies.
� Ambient noise: The birds are chirping softly. In the distance, a streamgently trickles. The trees wave softly in the breeze. CUT TO: The myste-rious old house. All is dusty and still, except for the constant ponderousticking of the clock in the hall. It’s raining heavily outside and dropletsbegin to spatter onto the hardwood floor . . . As well as winning theclichéd movie-of-the-month award, those few sentences contain enoughambient and background noise to give a sound designer sleeplessnights. They won’t record themselves, and if they’re forgotten, theirabsence from the film will be painfully apparent.
� Woosh! Zap! Boom! If your film is a science-fiction tale, you’ll definitelyhave to add special sound effects to your arsenal, but even a romanticperiod drama can have occasion to call on some Ka-zow! Buzz! sounds.Any sound that is out of the ordinary, or that is meant to represent thesound of something that has never actually been heard (the dischargefrom a Martian anti-proton laser rifle, say), is a special effect.
� Musical soundtracks: Music underscoring a scene is a long-acceptedconvention. Despite the music being, in theory, heavily incongruous,audiences have grown so used to musical soundtracks to movies thatthe lack of one can actually make them feel quite uncomfortable.
240 Part III: Advanced Machinima Creation
19_096918 ch13.qxp 7/20/07 11:13 AM Page 240

Subconsciously, the film sounds unfinished. It’s always good advice todecide if your film will have a soundtrack or not early on in the process,and if so, what it will be. Of course, if you’re making a music video, thedecision is out of your hands.
Music also creates mood. It’s much harder to achieve any emotionalimpact in your film without a stirring soundtrack.
Winning a Losing BattleIn an ideal world, you’d record the sound for your movie on the same voicemike that you use for TeamSpeak, or by leaning over the built-in mike on yourlaptop and moving the FireWire cable out of the way. In an ideal world, itwould be that simple to record brilliant quality audio, and you’d never haveto worry about it. In an ideal world, your humble authors would be writingthis book from the beach house on their exclusive private island. Life justisn’t that kind.
However cleverly you go about it, and however many clever tools and tech-niques you employ, there’s one key fact that you just can’t get around: Anysound recording you make will be a digital approximation of a real-worldanalog sound. That’s bad news before you even start — you have to resignyourself to an inevitable loss of sound quality. One of your key tasks as asound designer is to keep this loss to a minimum.
Understanding the Basics of SoundWhen you record the sound for your movie, and later on, when you edit it,you’ll constantly have your eye on a few key aspects of the sound:
� Levels: The simplest way of think about levels is to think of them as thevolume (or lack of it), but sound levels are actually far more complexthan that. Sound exists at a number of different frequencies, some morenaturally audible to the human ear than others. (Audio compression for-mats such as OGG and MP3 work by discarding sounds from frequencylevels that are all but inaudible anyway.)
It’s trivial to artificially boost a sound to increase its overall volume, ordecrease it. By manipulating the volume of specific frequency brackets,you can gain far greater control of the final sound product. You canincrease the volume of the low bass rumble from that big explosion(or decrease it if it’s so bass-heavy that your speakers shake).
241Chapter 13: Noise! Sound Design and Recording for a Great Film
19_096918 ch13.qxp 7/20/07 11:13 AM Page 241

� Clipping: What happens if you amplify a sound further than your speakerscan accommodate or your chosen sound storage format can represent?The sound clips, artificially cutting off the highest and lowest frequencynoises (the top and the bottom of the audio wave). Clipping can have asignificant effect on the generated sound and is rarely desirable. The veryflat, dirty sound produced when an electric guitar is forced through anoverdriven amp is typical of a clipped sound. You should always watchfor clipping and try to avoid it as much as possible. Luckily, that’s com-paratively easy to do.
Extreme clipping is always detectable to even the most casual listener,but minor or moderate clipping — which is the really dangerous kind —can sometimes be difficult to notice when you first listen to a track.Most good audio-editing software packages include a graphical represen-tation of the sound waveform. Often, you can easily identify regions ofclipping by examining this image. Look for moments when the peaks ofthe sound curve flatten out, as if somebody’s sliced the top off a mountain(and vice versa for the troughs).
If you do find areas of clipping, the easiest (and best) way to deal withthem is to undo the last alteration that you made. If you just boosted theoverall gain (or volume) on the track, it may well have caused the clipping.A bit of trial and error will soon produce the optimum compromise.If the clipping isn’t the result of your manipulations, but is unavoidablypresent in the raw sound data, there’s less you can do, but small itera-tive alterations to the sound can often limit the damage caused by theclipped areas.
� Noise: Hold on. Isn’t noise exactly what you’re trying to record here?Well, yes it is, but in this case, the phrase noise is used to refer specificallyto unwanted audio artifacts within an otherwise pure sound. The hiss ofa low-quality microphone; your lead actor’s breath that makes every for w sound like a wind tunnel test; a car driving by outside — all thesethings are classified as noise and need to be eliminated.
The easiest way to do so, of course, is to ensure that the unwantednoise never makes it onto the audio track in the first place. Buy a good-quality microphone; tell Dave that his voice will be picked upjust fine even if his lips are further than 3mm from the mike; and find arecording environment that’s further from the main road (or at least setup your make-shift sound studio properly — see our tips later in thischapter).
Of course, exceptions can prove the rule. Sometimes the low quality and dis-tortion caused by noise or clipping is exactly what you need. A line of dia-logue supposedly heard over a walkie-talkie, or the inhuman roar of thehomicidal robot, both benefit from deliberate clipping. Don’t go overboard,though. Remember that every change you make is discarding sound data;and once it’s gone, it’s impossible to add it back in.
242 Part III: Advanced Machinima Creation
19_096918 ch13.qxp 7/20/07 11:13 AM Page 242

Getting the Kit — Recommendations forCheap Equipment and Free Software
Okay, no lies. You’re going to have to spend a bit of money to get good-qualitysound. Not that much — certainly not as much as you need to spend to get agood video-editing setup — but you do need to part with a bit of cash.
MicrophoneYou need a good microphone. It’s as simple as that. There is just no way thatyour $10 mike from Fry’s will do the job here.
Our recommendation is the Shure SM58 mike, which you can buy new for about$99, or on eBay for about $60. The SM58 is an industry classic whose design hasstayed the same for about ten years — and there’s a reason for that. It’s virtu-ally indestructable, very cheap (for a pro-grade microphone), and gives yousensational results — all of BloodSpell was recorded on these little beauties.
You should also pick up a mike stand when you buy the SM58, plus the appro-priate leads — which are XLR to Minijack leads if you’re going straight toyour PC. Stands aren’t optional — these mikes are, fairly obviously, very goodat picking up sounds, and you make a lot of sound when you’re holding one.
You also need a pop shield, which is a sheet of gauze or nylon that’s placedbetween the microphone and the actor. It doesn’t muzzle the audio quality atall, but it reduces the unpleasant artifacts from plosive sounds. (Peter Piperpicked a peck of pickled pepper, and the like.) You can buy pop shields for afew dollars from any decent audio equipment store.
Overall, smart buying should ensure that you don’t have to go above $120 orso for your kit. You can spend less — we don’t recommend shelling all thismoney out for your first-ever film — but if you’re doing anything serious, youreally need audio of this quality.
Mixing deskA mixing desk (or mixing console) is a clever device that allows you to com-bine several audio signals into one glorious whole. You can change the levels,tonality, and dynamics of each track before it’s added to the mix. You don’treally need a mixing desk unless you’re going to be recording more than oneperson at once — however, if you’re making a film with a lot of dialogue,
243Chapter 13: Noise! Sound Design and Recording for a Great Film
19_096918 ch13.qxp 7/20/07 11:13 AM Page 243

you’ll want to do just that. Bear in mind that you’ll need to buy another mike,stand, and pop shield for this approach, too! (For more on these items, seethe preceding section.)
However, if you’re recording multiple voices, you’ve got two choices availableto you — either buy a multitrack recorder, which usually hooks up to your PCor Mac via FireWire, or buy a mixing desk, which can go via FireWire or viaconventional audio cable.
The latter costs a lot less than the former — a 2-input multitrack from Presonussets you back about $250, whereas a Peavey 4-input mixer costs just $100 orso. Unless you’ve got a truly professional recording space, you can’t recordseparate tracks cleanly anyway, so a mixer is the best solution for you.
On BloodSpell, we went mad and bought an 8-input FirePod from Presonus. Itwas total overkill — if we were doing it again, we’d buy a simple mixing desk.Mixing desks also have the advantage that they output only a single track ofaudio, which makes the audio easier to edit and also widens the range of pro-grams you can use to record.
Mixing desk technology changes fast. Find your local sound/music supply shopand ask the employees what they recommend. In the UK, we recommend call-ing Dolphin Music (+44 870 840 9060 or www.dolphinmusic.co.uk) andasking its staff for a recommendation. In the United States, ZZounds (800-ZZOUNDS or 800-996-8637 and www.zzounds.com) is an excellent retailer foraudio equipment.
Don’t forget leads. If you’re using a mixing desk, you need XLR to XLR leadsto connect the mike to the desk and then an XLR or phono jack to minijack togo to the PC.
HeadphonesSorry, but your iPod headphones won’t quite cut it here. The good news isthat a decent pair of headphones really isn’t expensive. While you can easilyspend $300 on a pair, a $30 pair from a reputable manufacturer (Seinhausser,Shure, AKG, and Behringer) do just as well. Ask your friendly local audioshop for recommendations.
SoftwareIf you don’t want to spend money on software, you’re in luck. Audacity(http://audacity.sourceforge.net/) is one of the poster children fortop-quality open-source software, offering audio editing that’s on a par withlow-end professional systems.
244 Part III: Advanced Machinima Creation
19_096918 ch13.qxp 7/20/07 11:13 AM Page 244
If you do want to spend money, on the other hand, you have a wealth ofchoice. As comparative sound-editing neophytes, we recommend AdobeAudition, formerly Cool Edit Pro. It’s a great multitrack audio-editing package.Phil Rice, the sound design genius who produced the sound on BloodSpell inbetween authoring million-view films such as Male Restroom Etiquette, usesSteinberg’s Cubase SX, a package that’s primarily used for music, and doesgreat work.
Sound dampingYou need to damp out sound in your recording studio. Hard surfaces causereverberation (reverb, for short), which alters the sound of your recording,and noise can leak through from other locations.
Our recommended supplier for sound damping hardware is IKEA. Yes, IKEA,the Swedish home-decorating company that produces some excellent, andexceedingly cheap, duvets. Buy 4 or 5 (or 10 or 12, depending on the size ofyour room — more is better than less) of their cheapest, and you’ll be sortedfor things to thumbtack to walls to reduce sound bounce.
Setting Up a Recording Studio in Your Bedroom
You need somewhere to record your audio. Sure, you can just use the micro-phone that came bundled with your budget PC. Why not just record everythingonto a $30 Dictaphone and be done with it? If you want your movie to have anaudio track that’s actually audible, you need to spend a little time on yoursetup. Surprisingly, a minimum amount of effort can transform your own bedroom into a very passable recording studio.
You need to follow these steps as far as you can, whether you’re planning torecord spoken dialogue, foley, or anything else. Your aim is to record as muchof the sound you actually want as possible, while recording the minimum ofany other interfering sound.
1. Find a space.
The first thing to do is to choose a room. Unless you’re recording anentire chamber orchestra plus 300 voice choir, a small room is betterthan a large one. A large space can often absorb and reflect low to mid-end sound frequencies, leaving your recorded audio sounding flat anddampened, while echoing horribly. It’s important that the space you useisn’t too echo-ey or acoustically bizarre.
245Chapter 13: Noise! Sound Design and Recording for a Great Film
19_096918 ch13.qxp 7/20/07 11:13 AM Page 245

Don’t be afraid to do some test recordings first or to fall back on the oldfavorite of snapping your fingers, clapping your hands, and moaning, allthe while listening to the way the space treats the sound.
While you’re at it, contravene all fire-safety regulations; the ideal record-ing room is one with only a single door and no windows. Every door andevery window let in some extraneous sound from outside and changethe way the room’s acoustics act, probably for the worse. You can mini-mize the damage, though. You need your mom’s (SO’s/wife’s/children’s)best duvet.
2. Pin the duvet up over any windows or doors.
Wait, don’t put the book down. We’re serious. This technique works —we’ve done it ourselves many times. What you’re trying to do is reducethe amount of echo and delayed sound reflection in the room throughthe medium of quality winter bed coverage.
Come to think of it, maybe Mom’s best duvet wasn’t the best idea. Bettergrab the grubby old one from the storage cupboard instead. We need tofind a way to fix it securely over the window.
We say “we” — you’re the one who’s going to have to do the work. In thepast, we’ve used all sorts of techniques, from draping the quilt over thecurtain rail, to three full rolls of liberally applied gaffer tape, to simplynailing the darned thing to the wall with huge tacks. The solution youchoose probably depends on how much you value your wall, or (moreimportantly) if it actually is your wall.
If you can’t stick pins in your walls, you can always drape the duvet overyour actor’s head while recording. Doing so completely eliminates theroom from your recording.
3. Put something soft in the corners of your room, which are the pri-mary danger points for reverberation, and to break up any flat surface.
You don’t need to utterly cover flat walls and so on — just make surethat the middle of the wall is covered. Provided the wall’s at least halfduvet by the time you’ve finished, you’ll be fine.
4. Block up the edges of the doorframe.
Use bubble wrap, woolen scarves or even old T-shirts. If you can gethold of any spare duvets, all the better — pin them up to the other walls.It will isolate the sound even further. Call all your relatives and make upa story about a troupe of itinerant Bohemian finger puppeteers to whomyou’ve offered sleeping accommodation in return for the secret of themystical Pinky Finger Ballet.
5. Once you’ve padded out The Special Room so that you can’t hurtyourself, set up your mikes and your recording equipment and listento the output on a good-quality pair of headphones.
246 Part III: Advanced Machinima Creation
19_096918 ch13.qxp 7/20/07 11:13 AM Page 246

Makin’ Yer Aktual Recording!Fortunately, recording your actor or actors is fairly simple. For the followingsteps, we assume that you’re recording 2 actors, but the same process appliesfor 1, 2, or 75.
1. Set up mikes and pop shields to appropriate heights.
Make sure that your actors can talk comfortably into their mikes byadjusting the height and angle of your mike stands. Also, make sure thattheir pop shields are about 3 inches away from the mike, and in betweenthe mike and the actor!
2. Check that you can record!
Have each of your actors talk randomly into their mikes. A classic ques-tion to get them talking is, “So, what did you have for breakfast?” whileHugh likes to ask people to talk about what random words like koala andindigestion mean to them. Now, turn up levels on your mixer to reason-able numbers and press record on your audio equipment.
Are you hearing sound through your headphones? If not, it’s time to usea technical expression and mess around until they miraculously work.Check connections. Make sure that you’ve got the leads plugged into theright sockets (Hugh tends to plug microphones into headphone sockets,and hilarity then ensues).
3. Set levels.
Your actors will be getting sick of talking into their mikes by now. Hardluck. Have them continue to talk and adjust the levels on the mixingdesk until the levels meter on your sound software is showing that theirvolume is peaking at about 50 percent of maximum. Setting levels nowensures that you don’t get horrible clipping all through their otherwisebrilliant performance.
Make sure that you ask them to speak as loudly as they will in the sceneyou’re about to record. Hugh nearly blew out his sound designer’s earsduring the filming of Eschaton: Nightfall, as he moved from conversationto shouting at a huge demonic entity voice pitch.
4. Relax your actors.
Now that everything’s set up, take a little while to relax your actors. Chatto them about the scene. Do some kind of thespian warmup exercise. Feedthem vodka — whatever works to get them relaxed for the shoot to come.
5. Aaaand . . . action!
Start recording. Make sure that you wait a couple of seconds before youractors start speaking, to give yourself some pre-roll time and ensure thatyou don’t clip off anything important. And don’t be afraid to do multipletakes, until you think you’ve got what you need.
247Chapter 13: Noise! Sound Design and Recording for a Great Film
19_096918 ch13.qxp 7/20/07 11:13 AM Page 247

Recording from Different LocationsIn an ideal situation, all your actors would be located in the same part of theworld as you, enabling you to record their voices live in an environmentyou’ve created. The fast-moving world of Machinima being what it is, though,you may have a few cast members on the other side of the globe, communi-cating through this new-fangled Internet thingy. All is not lost.
You’ll have to trust them to record their own audio, though. That’s one of themany reasons that we don’t recommend this approach if you can possiblyavoid it. Most of the basic steps for setting up a recording environment canbe replicated in your actor’s bedroom four time zones away. (See the section“Setting Up a Recording Studio in Your Bedroom,” earlier in this chapter.) Andwhy not buy them a copy of this book? (Hey, we’ve got to eat, you know!)
At Strange Company, we’ve experimented with conducting a virtual audiorecording session using a Voice Over IP (VOIP) connection via Skype(www.skype.com). That let the director and sound designer (seated arounda bunch of computers in Edinburgh) listen to each take live and pass com-ments immediately to the actor (probably recording onto his laptop on a LosAngeles beach — you know what actors are like).
If you’re going to do this, you need to have two microphones at each end,unless you’re very, very clever. One (the good one) should be going to adecent audio recording package, while the other (the cruddy one, in all likeli-hood) should be going to your VOIP software.
We don’t recommend recording from different locations unless it’s absolutelyessential. It’s hard to direct an actor when she’s hundreds of miles away, andthe sound quality that you’ll achieve won’t be up to the standards of the restof your dialogue. The more elements you add into the equation, the morelikelihood there is of something going wrong.
Cleaning Up Voices and Balance LevelsAlthough you may have recorded your audio, the process is by no means fin-ished. Any audio file will benefit from optimization in an audio editor. In manycases, the improvement is dramatic. Here are some simple tips for processingaudio:
� Importing an audio file: You need to bring your audio file into your editorof choice. In Audacity (see Figure 13-1), it couldn’t be simpler. ChoosingFile➪Open allows you to locate the source audio file. You should thenimmediately save the file as an Audacity project — that way, your originalaudio source file remains intact, in case your editing goes horribly wrong.
248 Part III: Advanced Machinima Creation
19_096918 ch13.qxp 7/20/07 11:13 AM Page 248

� Checking current levels: The audio file is represented on screen as agraphical waveform. Although the waveform looks complicated, you cansee the basic rises and falls of volume as increases in the size of thewaveform (the blue colored block in Audacity). You can also see howwide a variation is in the track as a whole. If the overall track is tooquiet, you can boost it by choosing Effect➪Normalize and choosinga filter.
Be aware that normalization raises all levels in the track, including eventhe slightest background noise. Don’t rely on normalization for anythingother than fixing slight variances; try from the start to get good levelsduring recording.
� Isolating specific sections: To work on just a part of the track at a time,click and drag along from your chosen start point to the end point. Thehighlighted area is now being worked on. Any effects you apply aremade only on this section until you deselect it.
� Modifying overall levels: You can further adjust the amplitude levels ofthe track by choosing Effect➪Amplify filter. Contrary to the implicationin its name, this filter can lower the sound levels as well as raising them.
Overzealous use of amplification filters is a classic way to clip yourtrack. View the results of a transformation carefully and use a less inten-sive filter setting, if necessary
Figure 13-1:Normalized
waveform inAudacity.
249Chapter 13: Noise! Sound Design and Recording for a Great Film
19_096918 ch13.qxp 7/20/07 11:13 AM Page 249
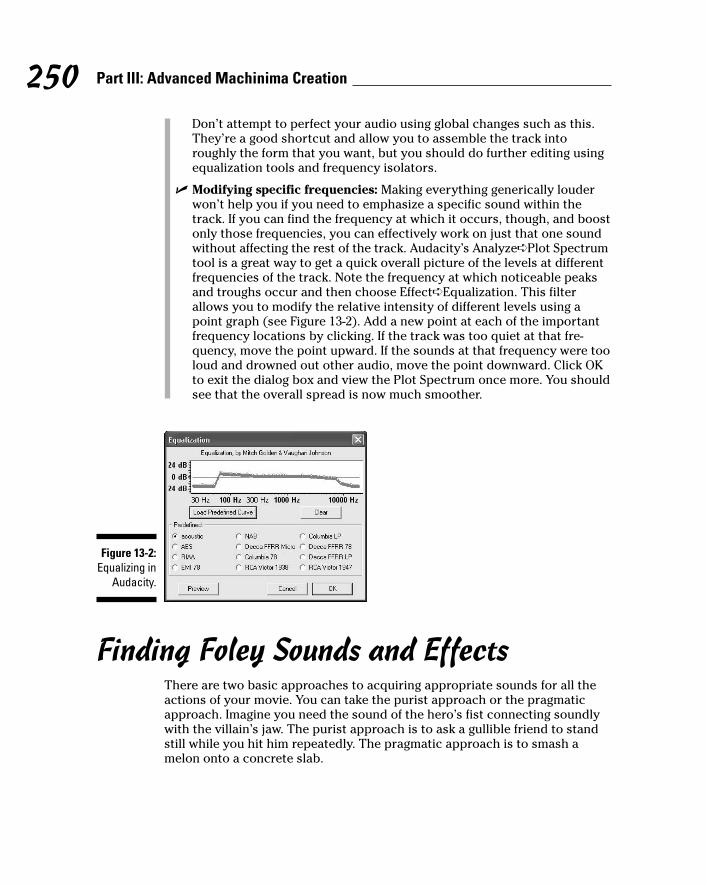
Don’t attempt to perfect your audio using global changes such as this.They’re a good shortcut and allow you to assemble the track intoroughly the form that you want, but you should do further editing usingequalization tools and frequency isolators.
� Modifying specific frequencies: Making everything generically louderwon’t help you if you need to emphasize a specific sound within thetrack. If you can find the frequency at which it occurs, though, and boostonly those frequencies, you can effectively work on just that one soundwithout affecting the rest of the track. Audacity’s Analyze➪Plot Spectrumtool is a great way to get a quick overall picture of the levels at differentfrequencies of the track. Note the frequency at which noticeable peaksand troughs occur and then choose Effect➪Equalization. This filterallows you to modify the relative intensity of different levels using apoint graph (see Figure 13-2). Add a new point at each of the importantfrequency locations by clicking. If the track was too quiet at that fre-quency, move the point upward. If the sounds at that frequency were tooloud and drowned out other audio, move the point downward. Click OKto exit the dialog box and view the Plot Spectrum once more. You shouldsee that the overall spread is now much smoother.
Finding Foley Sounds and EffectsThere are two basic approaches to acquiring appropriate sounds for all theactions of your movie. You can take the purist approach or the pragmaticapproach. Imagine you need the sound of the hero’s fist connecting soundlywith the villain’s jaw. The purist approach is to ask a gullible friend to standstill while you hit him repeatedly. The pragmatic approach is to smash amelon onto a concrete slab.
Figure 13-2:Equalizing in
Audacity.
250 Part III: Advanced Machinima Creation
19_096918 ch13.qxp 7/20/07 11:13 AM Page 250

That’s a silly example, but the idea of using completely unrelated objects toreplicate a specific sound is a good one, and it’s not new. The eponymousJack Foley did that sort of thing all the time, which is probably why theynamed the process after him.
The melon technique, by the way, works well enough to have been used inseveral major Hollywood action movies.
Acquiring foley sounds can be great fun. Undoubtedly, you’ll find yourselfstomping on peas, throwing eggs at a wall, or snapping pencils at two-secondintervals. The best tip we can give you is to experiment. Try as many bizarrethings as you can think of.
The sound you’re aiming for is one that automatically suggests the eventtaking place, even if the sound isn’t truly authentic. When somebody getspunched, for example, even by a professional pugilist, it doesn’t make thatdistinctive crunching smack sound at all, but that’s the sound we expect tohear. The real sound of a thrown punch is rather disappointing and justsounds wrong when used on film.
You can often capture other ambient sounds from their real-world equiva-lents. What better way to create the sound of a bustling market street than tovisit the market just down the road and hit Record? Be sure to record plentyof audio and make the recording from several different positions. You havevery little control over the sounds you record, so you have to spend a longtime editing, combining, and tweaking them to get the right result. At thatpoint, you’ll be grateful that you’ve got so much recorded audio to choosefrom. You should use this method only for ambient sound. Even after you’veedited it, the track will contain a lot of noise and intrusion. Let it play as ageneral backdrop to a scene, but be sure it doesn’t overwhelm it.
You’ve already got one great source of foley audio, of course — the gameyou’re using to make your film. All the game sound effects are available foryou to use, if you’re using game art anyway, and they’ll usually be of a veryhigh quality. You need to extract them from whatever format the game savesthem in, which can be a problem — ask around on the appropriate gamemodding forums and someone will soon point you to the appropriate tool:
� The Sims 2: SimPE, available from http://sims.ambertation.de
� World of Warcraft: MyWarcraftStudio, available from http://wow-en.curse-gaming.com/files/details/446/mywarcraftstudio
Finally, many sites, some free, offer foley effects for download. You can alsobuy a selection of sound effect libraries, with prices ranging from $100 to$5,000 or more. If you find a library that’s ideally suited to a major project,and it’s not too pricey, it may be a worthwhile investment.
251Chapter 13: Noise! Sound Design and Recording for a Great Film
19_096918 ch13.qxp 7/20/07 11:13 AM Page 251
Locating MusicIf you’re remarkably talented, you can write the soundtrack to your movieyourself, perform it (including both guitar and vocals), and record the wholething in your basement. A few irritatingly talented people like that are evenaround — did you know that Ezra Ferguson wrote and sang the song at thestart of The Return? If your musical talents extend only as far as the averageJoe, though, you’ll need to look for an alternative soundtrack.
If you’re just looking for a single song or musical piece to accompany onescene, you have plenty of options. The best idea is to explore the world ofcreative-commons licensed music at The Creative Commons Audio site(http://creativecommons.org/audio), and most of it is of a pretty highstandard.
You can find music that is licensed for you to include in your film, modify,and even make commercial use out of. You can find more creative commonslicensed audio at the Creative Commons Catalog (http://commoncontent.org), Magnatune (www.magnatune.com), and the Creative Commons AudioRemixes site (ccmixter.org).
It’s also worth approaching unsigned or local bands and asking whetherthey’d be okay for you to use one of their tracks if they received full credit.Almost all music that we featured in BloodSpell was by unsigned bands, andall the artists were happy to license their work under a creative-commonslicense. We found most of this music either through hip indie friends or theunbelievably massive garageband.com.
Larger and more commercially successful musicians are less likely to grantyou permission to use their work, and certainly not for free. There’s noreason not to try, but if you’ve got your heart set on one specific track, youmay well be disappointed. Many Machinima movies are music videos, a lot ofthe time set to the exact length of a full track from a commercial artist. Veryfew films obtain the appropriate permissions before using the track. You canavoid this step, and it may even be legal — but note the may even bit there. Ifyou want to be 100 percent sure that your film won’t get pulled from theInternet or, indeed, if you ever plan to show it anywhere other than the GreatWide Web, don’t skip getting permission. See Chapter 15 for more details.
You may be very lucky indeed and find somebody who’s willing to composemusic especially for your movie. Finding these saintly individuals is hard, butthey’re out there. Don’t just post on Machinima-related forums. Visit audio-lovers sites, as well as community sites for musicians and composers.You can also try your local music college, or find a contact within the localmusic scene. Many artists are striving to make themselves known anyway,
252 Part III: Advanced Machinima Creation
19_096918 ch13.qxp 7/20/07 11:13 AM Page 252

and the chance for their music to be heard by anyone in the world as part ofa global-released Machinima movie means that they’ll see it as a good dealfor both parties.
253Chapter 13: Noise! Sound Design and Recording for a Great Film
Phil Rice’s mixing tipsOnce you’ve assembled all your audio, you haveto take your music, dialogue, and audio and mixit together into a single soundtrack in yoursound editor of choice. Phil Rice, audio editoron BloodSpell and the technical reviewer onthis book, offers the following tips on mixingyour finished audio:
� Special effects added to sounds are a dis-tortion of the sound. All effects, be they EQ(equalization), reverb, even normalization,are distorting and corrupting the originalsound to achieve their effect. As such, onlyuse an effect if absolutely needed and thenonly in extreme moderation (unless the par-ticular situation calls for that distortion).
� If your film has dialogue, make sure —above all else — that the dialogue comesthrough clearly in your mix. It should be thetop priority in those scenes; everything elseis secondary.
� Minimize use of ambient and minor foley(for example, footsteps, clothing rustles)when musical score is present. Musicobscures the richest frequencies of thesebackground sounds anyway, and theireffect will likely be perceived as undesir-able noise. In most cases, you can dropbackground sounds entirely when music isplaying.
� Ideally, your audience should be able to setits volume at the beginning of watching yourfilm, and never have to touch that knobagain until it’s finished. It’s okay to havesome quiet and some loud parts, but makesure neither make it so that the averageuser would have to adjust his volume to
hear what is being said or to keep from sud-denly blowing his speakers.
� Make it a regular part of your mixing tech-nique to listen to your mix at a very lowvolume. At that low volume, do any soundsstick out? Can you still hear the dialogue orthe main sound effects? Does everythingseem balanced? Over the course of a mix,the natural tendency is to keep increasingthe volume as your ears get tired. Make adeliberate point to crank back the volumefrom time to time; it’s better on your ears, andyou’ll catch things you’d otherwise miss.
� Never rely on your headphones as your onlymixing monitor. Effects sound dryer thannormal in headphones, bass levels aredeceptive, and perhaps most importantly,your ears grow tired from long sessions ofheadphones use, and tired ears mean flawedmix — every time. If your ears becomefatigued enough, they’ll start to ache a bit. Ifthis happens, take a breather, go outside, andgive them time to recuperate. Your ears arean important Machinima asset.
� Test your sound mix on every conceivablepiece of audio equipment you have accessto. Listen to it in your car, on your iPod, onyour sister’s old boom box and make noteswith each listen. Sometimes a mix thatsounds good in your studio can sound reallybad elsewhere; ideally, you want to end upwith a mix that sounds decent whereveryou play it. Testing on various equipment isimportant, because your viewers will be lis-tening to the sound on a variety of speakerconfigurations on their computers.
19_096918 ch13.qxp 7/20/07 11:13 AM Page 253

254 Part III: Advanced Machinima Creation
19_096918 ch13.qxp 7/20/07 11:13 AM Page 254

Chapter 14
Get It Out There! Publicizing Your Movie
In This Chapter� Promoting your movie on- and offline
� Not being self-conscious
� Writing and using press releases
Imagine that we’ve imparted enough knowledge in your general directionthat you’ve managed to create a tolerable movie using this Machinima
thing. What now? Surely, you’re not going to rest on your (admittedly fine-looking) laurels? When you’re so close? Don’t give up now! You’re movie’sgreat, so tell a few people about it — everyone, for instance.
There’s No Such Thing as Bad PublicityIt’s an old and oft-touted adage, but the saying, “There’s no such thing as badpublicity” is true. There are exceptions to the rule, of course, but the principleis sound. The nail that this cliché hits soundly on the head is that publicity isall about making people talk.
The next time you see an ad break on TV, don’t grab a snack or answer thecall of nature: Sit and watch. Television advertisements seem designed to irri-tate and annoy. They also get stuck in your brain. If they raise your awarenessof the brand that the man in the chicken suit is singing about, they’ve donetheir job.
We’re not suggesting that you dress up in a chicken suit (although what youdo on your own time is your affair), but what we can’t overemphasis is thispoint: You need to make some noise!
20_096918 ch14.qxp 7/20/07 11:15 AM Page 255

All right, you don’t need to. You may be happy just showing your movie to afew friends, or just keeping it on your hard drive and never letting anyoneelse see it. If that’s as far as you want to take it, fair enough.
It seems a shame, though, after all that hard work. Why not tell other peopleabout it? You never know; they might like it.
There’s nothing like a random e-mail from a complete stranger extolling yourvirtues to give you an instant ego-boost.
Why You Should Always LieThe late, great stand-up comedian Bill Hicks once said, “If there’s anybody herewho’s in marketing or advertising, could you do me a favor? Kill yourselves.”
It’s true that a lot of publicity feels like coming as close to lying as possiblewithout actually getting sued. That isn’t really a bad thing.
Wait, hear us out.
You see, if you’re publicizing something that you created yourself, you’lloften find yourself being a little bit too honest. Of course, you can see thejoins and the ugly bits. You’ve been staring at that horrible two-shot that younever had a chance to fix for the last two weeks. To you, it’s so obvious thatyou assume that everybody else will immediately spot it as well.
In fact, they may not. They may be too busy watching the amazing actionsequence with the three dozen exploding alien helicopters. You know theone — that sequence that you finished editing a little while ago and thatyou’ve watched so much that any novelty value has long since been drainedout of it. What you don’t realize (or perhaps you’ve forgotten) is that the helicopter sequence is some genuinely impressive work, the sort of thingthat will make a first-time viewer mutter, “Whoa! That was cool!” under hisbreath.
The natural tendency when promoting your own work is to overemphasizethe bad parts and play down the really great parts. So, do the opposite —even if it feels like you’re lying a little bit. Plaster on a great big e-smile andtalk about how pleased you are with your huge exploding alien helicopterbattle. If you give the impression that you’ve achieved what you wanted toand you’re proud of your work, people will be curious to see what you’ve created.
256 Part III: Advanced Machinima Creation
20_096918 ch14.qxp 7/20/07 11:15 AM Page 256

Feeling self-conscious now? Maybe you’re thinking, “Well, I don’t know.Perhaps this film really isn’t that good!” But you’ve spent the time making it —that means that it has value to you. Just tell people why you liked the ideaenough to make it and why you’re happy enough with it that you’ve finishedit, and you’ve got a publicity drive.
Don’t actually lie. That’s a pretty obvious point. Saying “Yes, I’m very happywith the movie” isn’t really lying, because at some point your brain willresume normal function and you will be. However, do not make stuff up,claim people have liked your movie when they haven’t, or say anything obvi-ously untrue. It’s just a bad idea. Spin good, lying bad — and learning to tellthe difference is half the trick of the marketer’s trade.
SpinAh, spin. A word beloved of politicians everywhere, and liberally splashedover tabloid front pages as if there were a prize for the number of times itwas mentioned. The word has some pretty depressing connotations for mostpeople, but it’s not a negative concept in and of itself.
Putting the spin on a news story simply refers to the technique of altering theemphasis of the story to improve the way in which it is perceived. “I’ve justmade a marvelous Machinima movie!” is not a particularly interesting newsstory for the general public (although you’d get bonus points from certainpublications for alliteration). “Local filmmaker takes on Hollywood in hisspare room” is far more likely to attract attention.
It doesn’t really matter that the primary purpose of your movie isn’t actuallyto take on Hollywood from your spare room — just that you can argue thatthat’s what you’re doing. The purpose of adding an angle to the story is tocatch the attention of the journalist or editor assigned to vet the story forpublication, and eventually the public as a whole.
Though, the spin that you’re putting on your story must be both true andinteresting to readers or viewers; otherwise, it’ll just be ignored. Your goal isto talk about your movie; their goal is to read something interesting on theirlunch break. You have to satisfy both goals at once.
“Local Filmmaker Takes On Hollywood blah blah blah” is the oldest Machinima,and indeed filmmaking, spin in the book. It also still works, provided you’relocal enough. If you’re from somewhere that might genuinely get a bit of pridefrom a local boy/girl taking on the media moguls, go for it.
257Chapter 14: Get It Out There! Publicizing Your Movie
20_096918 ch14.qxp 7/20/07 11:15 AM Page 257

258 Part III: Advanced Machinima Creation
Johnnie and Hugh’s superlist of shameless spinsuggestions (stupid sibilance — sorry)
Think hard enough, and you can spot the per-fect spin for almost any story, but here are a few(Machinima-biased) ideas to get you started:
� Local Boy Competes with Hollywood. Achestnut so old that it’s now grown roots,sprouted shoots, and has a variety of wood-land creatures living happily in its branches.The old ones aren’t always the best, but it’sa good fall-back position if you really can’tfind anything better. You’re simultaneouslyplaying on David versus Goliath and localversus Everywhere Else with this spin.
� X provokes fury within Y. Controversy isalways good, and it’s the perfect opportu-nity to use any negative press you may havealready received to your advantage. Forexample, in early 2007, Strange Companyproduced a series of advertisements forFair Trade products. While most peoplegave us virtual back-slaps for our goodwork, our political message in a gameengine made a few Fair Trade dissentersquite angry, and comments on messageboards ensued. We were delighted by thisevent, as it gave us lots of free material forour next press release, titled Fair TradeMachinima Provokes Controversy WithinGaming World. Spin, spin, and more spin.
� Ten Ways To Do Z. What is it about thenumber ten? Comedy works in threes, butwhen imparting knowledge, ten seems to bethe number to go for. (Just see The Part ofTens of this book.) Whatever the reason, a
list of ten points feels concise but thoroughand immediately lends a feeling of authen-ticity. Why not offer to write an article for asuitable publication entitled Ten Ways toMake Machinima, or Ten Things I LearnedWhile Making My First Film? Just make surethat your movie’s URL is all over it. It’s notjust free publicity — if you’re lucky, theymight even pay you.
� You, Too, Could Have Your Own Jet-Pack.Anybody can make Machinima, you know.It’s fast, easy, and simple. Of course, if you’veread any part of this book, you know that’s notexactly true. That doesn’t stop it from beinga great angle to take, though. Heck, it’s howwe sold you the very book you’re holding.
� A New Type Of Movie-Making CalledMachinima. Diary Of A Camper, generallyreckoned to be the first Machinima movie,was released in 1996. We’ve been makingMachinima for quite a while now, butMachinima is still referred to as the “newway of making films on the Internet”. Well,let ’em. It’s a good angle, much as it maypain us to hear the same trite nonsenseconstantly repeated. A story pitched fromthis angle is basically aimed at your grand-mother. (No offense to any l33t grannieswho may be reading — we’re generalizingunforgivably here.) Certainly, the targetaudience are people for whom voice-over-IP is a new concept, rather than yourWarcraft guild-mates.
20_096918 ch14.qxp 7/20/07 11:15 AM Page 258

Word-of-Mouth and Word-of-MouseIf you’ve been on the Web for the last few years, you’ll probably have gottenthoroughly sick of the phrase viral marketing. The idea is that you create aproduct (or an advertisement for that product) that effectively publicizesitself. The reason it’s called viral is that each viewer has the potential to showthe advert or product to someone else — effectively passing on the infection.
Imagine, for example, that you’ve managed to create a very funny 60-secondvideo. It just so happens that the video advertises your new Machinimamovie, but primarily, it’s splutter-coffee-on-your-keyboard funny.
You put it up on YouTube, and it gets a few hits. Those people recommend itto their friends and put links to it on their blogs and their mySpace pages.Other people come across it, download it, and e-mail it to everyone in theiraddress books, because they think it’s funny and they want everyone theyknow to laugh at it, too. (There are the people who forward everything theyfind on the Internet to their entire address book, indiscriminately. Normallythese people are a curse on society and are the reason that the Internet is sodarned slow, but in this case, they’re your new best friends.) Now an army ofstrangers are voluntarily sending your publicity material to everyone theycan think of. You don’t have to pay them. What’s more, they’ll probablyrecruit another volunteer out of the people they contact. The potentialgrowth is, theoretically, exponential.
Most importantly of all, your movie is automatically given authenticity. You’remore likely to feel positively toward a product if it’s recommended by yourGreat Auntie Mavis than if you happen to see it on a random Weblog. And asif the benefits weren’t enough already, all this publicity is free. The only trickybit is setting the pebble rolling. Once you’ve managed that, you don’t need todo anything other than watch the landslide.
If you want your work to be publicized by total strangers, there’s somethingimportant you can do to help that process along. Ask them to do it. At theend of each episode you make, ask your viewers to tell their friends aboutyour series. Put a post on your forum asking people to publicize your movie.If someone is impressed by your movie, they’ll naturally assume that you’re atotal expert who’s got it all under control. Unless you actually ask for help, itmay never occur to your viewers that it would be useful.
259Chapter 14: Get It Out There! Publicizing Your Movie
20_096918 ch14.qxp 7/20/07 11:15 AM Page 259

Can I Get a Second Opinion, Doctor?Any publicity material you create, from an intricate two-minute video, to acarefully-worded written press release, to a hastily composed reply to aforum post, should be checked by somebody else. It’s not too importantwho — just get somebody else to give it the once-over before you release it tothe Great Intraweb. This small safety-check can save you a whole heap oftrouble. It’s all too easy for the intentions behind your words to be misinter-preted. What you meant as a throwaway comment may read as a personalattack to somebody else.
During the publicity drive for BloodSpell, Hugh gave an interview to Bioware(the creators of Neverwinter Nights), in which he tried to explain the profes-sional approach that we’d taken with the production of the movie, rather thanbeing — as he put it — two guys in a bedroom. Adam Freese & Tawmis Loguewere working on a series called Neverending Nights, which was made inNeverwinter Nights by, well, two guys in a bedroom. They got a little worriedthat Hugh was making a snide criticism of their series. We quickly reassuredthem that we meant no such criticism — we love Neverending Nights — but itjust goes to show how easy it is to misinterpret a statement. (Neverending Nights,incidentally, is well into its second season at the time of writing, and you canview it for free at www.neverendingnights.com. In a bedroom, if you want.)
Online: The Key SitesOnline publicity is crucial, especially for a Machinima movie. Almost yourentire audience is likely to be accessing your movie over the Internet, even ifthat’s not where they first came across it. In order to make people aware ofyour movie’s existence, you’re going to need to shout about it in the cyber-virtual-userspace of the Mighty Internetweb.
Here are some of the key sites that, as of 2007, you really need a good excusenot to include in your publicity targets list:
� Machinima sites (www.mprem.com): Machinima Premiere, Sims 99,Machinima.com, the Internet Archive and more — you should let all theprominent Machinima sites know of your film. See Chapter 22 for our toppicks from the Machinima world.
� Engine-specific sites: It’s always worth looking for prominent fan sitesfor the game engine, or engines, that you’ve used for your movie. If theengine is popular enough as a Machinima tool, there’ll be at least onesite specifically dedicated to Machinima movies made using that engine.
260 Part III: Advanced Machinima Creation
20_096918 ch14.qxp 7/20/07 11:15 AM Page 260

For World of Warcraft, for example, there’s www.warcraftmovies.com.The Movies has http://themoviesgame.com, and EA Games have agood listing of The Sims 2 movies on its site at http://thesims2.ea.com/community/movies.php. If you’re using a dedicated tool such asMoviestorm or IClone, the software’s official site is the way to go — it’llbe almost as keen to promote your movie as you are.
Cast your net widerAlthough hardcore geeks (such as Yours Jointly) may sometimes forget it,there are sites out there about subjects other than Machinima or computergames. If your movie addresses a specific theme or specific subject matter,be sure that you bring the movie to the attention of the type of people whoare interested in it.
Have you made a movie about two rival chess players? Find the top half-dozenchess community sites and make a post on each of their forums. Make surethat it’s polite — some people won’t be remotely interested in your movieand may well object to their forum being hijacked for what they view as anoff-topic discussion.
Be certain that you emphasis why you’re promoting your movie on this specificsite. It’s always a good idea to ask the forum members for their commentsand criticism. People are much more likely to watch your movie if they feelthat their professional opinion is being called upon. A slightly underhandtactic, we admit, but it works.
Incidentally, you should probably stay away from the “rival chess players”idea. Tim Rice and Abba already made a musical about it. Ah, Abba. We knowthem so well.
Other sitesYou can find a lot of Web sites that, even though they’re not in our list, wouldbe a good place to promote your film. Politeness is the key at all times here.Remember that you’re a stranger on their territory. The last thing you wantto do (or give the impression of doing) is to throw your weight around and bea general pain in the communal side of the site’s regulars.
Several sites are dedicated to independent films and short movies. TryIndie Film Spot (www.striketheset.com), IndependentFilm.com, orUndergroundFilm.org. There are plenty more examples.
261Chapter 14: Get It Out There! Publicizing Your Movie
20_096918 ch14.qxp 7/20/07 11:15 AM Page 261
Be aware that these sites tend to have pretty exacting standards. They don’toften feature animation of any sort, and — we have to be honest — can some-times look down on Machinima as a genre.
You should also make sure that your film is available from as many of thedozens of video-sharing sites as possible. YouTube, DailyMotion, Revver,and soon TheVideoBay.org are among the top sites at the moment, but theonline video world is changing fast right now. Also try some of the populargeek and tech sites. Being featured on BoingBoing.net, Digg.com, orSlashdot.org will give you so much traffic you’ll probably kill your Webserver. It’s not easy to make it onto sites like these, though. A basic “I’ve justreleased my first Machinima movie” isn’t newsworthy. You’ll need an interest-ing (preferably fascinating and unique) angle to the story — see the earliersection on spin.
Be sure that your movie is available and widely distributed online. SeeChapter 10 for more advice on how to properly distribute your movie.
Create an RSS feedFinally, ensure that you provide an RSS feed of your movies. An RSS feed isnothing more than a small text file attached to a Web site that providesdetails of the latest news from that site. By providing a RSS feed for your newMachinima series, your back catalog of Machinima films, or even just a singleenclosure of your new movie, you’re ensuring that your audience will alwaysbe up-to-date and will return to your site even if they’ve forgotten that itexists; they just need to subscribe to your RSS feed using a feed reader likeGoogle Reader.
If you’re reasonably technical, you can easily create your own RSS feedfrom scratch, but plenty of automated or semi-automated services are avail-able to do it for you, too. For example, if you’ve hosted your videos on thevideo-sharing site YouTube, an RSS feed is automatically created for you.Here’s a link to the RSS feed for Strange Company’s YouTube video page:http://feed://www.youtube.com/rss/user/strangecompany/videos.rss.
You should also ensure that your movies are listed on the Channel Guide atDemocracy Video (https://channelguide.participatoryculture.org). As well as enabling your videos to be listed on this popular site,your movies will be available to anybody using the fantastic DemocracyPlayer.
262 Part III: Advanced Machinima Creation
20_096918 ch14.qxp 7/20/07 11:15 AM Page 262

Offline MediaWeb sites are great, but if you really want to go for it publicity-wise, you needto be thinking about offline media, too, by which we mean newspapers, maga-zines, and television.
You need to adopt a different attitude for offline media. You’ll also have a lotmore luck with offline media sources if you’re willing to pick up the telephoneand call them: While you’ll still end up sending your press release out viae-mail, direct telephone contact with whoever you’re trying to pitch yourstory to will massively improve your chances. Politeness is the key here.
Bear in mind also that an offline media publication is, by its nature, less likelyto assume familiarity with Internet culture. If in doubt, define every unusualphrase, technique, technology, or terminology. You should certainly take careto define Machinima. At the time of writing, our genre is still a niche one, andit’s only just started to emerge from underground status. In all likelihood, thatwill continue to be the case for the near future.
There are two types of offline media, and your approach should be differentfor each.
� Technology savvy: A publication with a technologically aware reader-ship will probably be interested in the technical aspects of Machinimaproduction: the games you used, the difficulties you faced, the fact thatyou’re using the Internet as a primary distribution medium.
� Nontechnology savvy: Other publications will concentrate more on thehuman aspect of the story. Who are you, and why have you made thismovie? What’s the movie about, and why would it appeal to anyoneother than the most nerdy computer-game obsessive?
All these considerations apply to online media promotion as well, of course,but offline media still tends to have a wider range of styles and approaches.
A final consideration for an offline media promotion is that of locality. Such aspecification is effectively meaningless for an online promotion. The Internetis the Great Leveler when it comes to geographical location (as well as age,sex, and social status, to a lesser extent).
A printed publication, on the other hand, has a defined area of distribution.Your local free paper is distributed to a tiny percentage of the world’s popula-tion, but it’s an ideal target for a local-boy-makes-good story. A statewideor national publication has a much larger readership, but is still localized.You need to consider the localization of your target publication.
263Chapter 14: Get It Out There! Publicizing Your Movie
20_096918 ch14.qxp 7/20/07 11:15 AM Page 263

And how do you find offline media sources to target? A visit to your localnewsagent will do it. Write down the Web addresses of any promising maga-zines or newspapers, have a quick flick through a TV magazine for programsthat may find your work interesting, and then get home and start workingthrough your list!
Press ReleasesIf you’re just sending e-mails to Web sites, all you need is a good, short e-mail.But if you’re going to take the next step and talk to newspapers and magazines,you need a press release.
A press release has a limited number of objectives:
� Make the eventual reader aware of whatever it is that’s being promoted.
� Give the publication all the information it needs.
� Be interesting enough that it will make it to print.
� Convince the publication’s editors that the subject of the press releaseis totally relevant to the publication.
Anything that doesn’t fulfill one or more of these aims has no place in yourpress release. Rip it out. You should ensure that the press release statesclearly who you are, what you’re doing, and why. Remember to include yourcontact details.
Writing a press release is easy. Writing a good press release is harder. Writinga good press release that will grab an editor’s attention well enough to makeit into print (virtual or otherwise) — well, that’s the real trick.
Writing your own press releaseYour press release should start with a short headline, describing your story(this is Spin Central). From there, you should reiterate the key points in alonger, but still single, sentence, before going into the body of the text.
The closer to a publishable article you can make your press release, thebetter. Finally, remember to tailor the text to suit each specific publication.Will the publication want to hear about the technical details of your movie, oris it a magazine more concerned with the novelty factor of Machinima itself?
264 Part III: Advanced Machinima Creation
20_096918 ch14.qxp 7/20/07 11:15 AM Page 264

Oh, one more thing. Once you’ve written your press release, go through andruthlessly eradicate anything that looks like hyperbole. Adjectives such asrevolutionary, unique, or fantastic have no place in a press release and willjust annoy journalists.
To give you a better example, here’s a (by no means perfect) press releasefrom the early days of the BloodSpell publicity drive, whole and unedited.
FOR IMMEDIATE RELEASE
Indie film takes on Pixar — with the aid of an invisible badger.
Can one small film company compete with Pixar, with home PCs and nobudget? Only if their film is shot by an invisible badger.
Edinburgh-based Strange Company have released the first part of ‘BloodSpell’,a computer-animated feature film. Thanks to computer games technologyand ‘Machinima’, a new way of making animated films, they were able tocomplete their film in under three years, with a mostly-volunteer staff and abudget of less than £5,000.
‘BloodSpell’ is an action-adventure fantasy film, telling the story of a worldin which some people carry magic in their blood — when their blood isspilled the magic is released. It follows the adventures of Jered, a monk ofthe magic-hating Church of the Angels, as he discovers he is one of theBlooded and has to flee for his life into the bizarre magical underworld.
‘BloodSpell’ was shot using the visual technology of the computer game‘Neverwinter Nights’. Using the game’s graphics to create the visuals for thefilm, Strange Company were able to shoot their film for a fraction of themillions of pounds companies like Pixar and Dreamworks spend on theiranimated epics.
But in order to use the computer game as a film set, Strange Company’sExecutive Producer Hugh Hancock had to come up with some unusualworkarounds. If a character in BloodSpell looks around for a reaction shot,it is because there’s a dragon standing behind his co-star. If there’s a low-angle shot that needs to be taken, Hugh’s got the ideal cameraman — aninvisible badger.
“Modern computer games have immense graphical capabilities, whichwe’ve harnessed for BloodSpell,” says 28-year-old Hancock, who hasworked on ‘Machinima’ films for the BBC and Scottish Screen. “But they’renot really designed for filmmaking, so we have to find some bizarre ways toget the shots we need. If we need a low shot, for example, we use one of thein-game spells to make our cameraman into a badger, then turning himinvisible and film the scene from his perspective!”
265Chapter 14: Get It Out There! Publicizing Your Movie
20_096918 ch14.qxp 7/20/07 11:15 AM Page 265

Although it has only been available on the Internet for two weeks, ‘BloodSpell’has already attracted widespread attention, with articles in The Guardianand trendspotter Web site BoingBoing, and an appearance on CNN. Technologycommentator and science fiction author Cory Doctorow, one of the foundersof the BoingBoing Web site, said, “There’s some damned fine storytellingand editing/production work here -— Machinima is still finding its legs,discovering what it’s for, and the Strange Company folks are at the forefrontof using the medium for feature-length drama.”
Some of the attention BloodSpell is getting may be due to Hancock’scontroversial decision to release ‘BloodSpell’ for free under the ‘CreativeCommons’ project. At the same time that Hollywood is becoming increasinglydesperate to curb movie piracy, Hancock’s film is available free on theInternet for anyone to download — and under the ‘Creative Commons’mantle, downloaders can also freely share the film with their friends, via theInternet or in person. Over 30,000 people have viewed the first part so far.
“It just doesn’t make any sense for us to restrict what our viewers can dowith BloodSpell,” says Hancock.“ I’m not convinced that it makes sense foranyone to do that, in fact. But for a small filmmaker, the struggle to gainexposure is a far bigger problem than that of piracy. I know of larger, moreexpensive films than ours which have never even been released, and haveended up sitting in their maker’s basement. Thanks to our releasingBloodSpell free to download and share, that’s never going to happen to us.”
BloodSpell is available for free download from www.bloodspell.com.
Glossary:
Machinima: The technique of using computer games technology to createanimated films for a fraction of the cost of conventional animation. Now acult underground movement featured at the Sundance Film Festival and inthe New York Times. See: www.machinima.org
Creative Commons: Creative Commons is a nonprofit organization thatoffers flexible copyright licenses for creative works, offering alternatives tothe traditional all rights reserved copyright. Controversial aspects to thelicenses include the ability to freely distribute works offered under CreativeCommons, provided no commercial transaction takes place. See: www.creativecommons.org
Neverwinter Nights: Bestselling computer game produced by Canadiandevelopers Bioware. A fantasy adventure game, it achieved success partiallythrough the revolutionary tools distributed with the game, allowing playersto make their own games within the Neverwinter Nights ‘engine’. See: nwn.bioware.com
266 Part III: Advanced Machinima Creation
20_096918 ch14.qxp 7/20/07 11:15 AM Page 266

Contact:
Strange CompanyName: Johnnie IngramPosition: Media CoordinatorTelephone: 0131 555 ####Email: [email protected]: www.bloodspell.com
Johnnie isn’t the Strange Company Media Coordinator — we don’t even havesuch a person. Using a title like this just sounds more professional than “Guywho makes the coffee.”
Notice that we deliberately chose not to list Hugh as the contact — releasinga press release about yourself and listing yourself as the sole contact makesyou look amateur and suspiciously agenda-driven.
The press release starts with an attention-grabbing strapline (Indie film takeson Pixar — with the aid of an invisible badger), which begs further reading forclarification. It’s also worth noting that the strapline is one of those lies thatwe were talking about earlier in this chapter. We’re not really trying to takeon Pixar as such, but it’s an easily understood comparison and gets thereader into the right frame of mind.
BloodSpell wasn’t really entirely shot using invisible badgers, but we did usethat technique a couple of times — and it gives a great tag-line to invite ouraudience to read more. This is more hot spin action.
We list a contact in a prominent place and give details of how to contact usby telephone and by e-mail. We also give a short glossary at the end of thepress release, clarifying any terms that may not be familiar to the casualreader (and, more importantly, to the editor responsible for plowing throughour press release). Each item in the glossary is accompanied by a URL atwhich an interested reader (or editor) can find out more information.
The bulk of the press release reads as if Hugh’s being interviewed. He actuallywrote most of that section himself, with Johnnie acting as proofreader andidiocy-filter; phrasing it in this way means that it can be lifted verbatim andused in whatever publication we’ve sent it to. Less work for the editor orjournalist means more chance that your article will make the cut.
Whether your press release is aimed at a printed publication or an onlinesite, be prepared with a selection of high-resolution images from your movie.We offered a .zip file full of images to anyone who wanted them. Machinimais still a new concept for most people. First and foremost, they want to seewhat it looks like.
267Chapter 14: Get It Out There! Publicizing Your Movie
20_096918 ch14.qxp 7/20/07 11:15 AM Page 267
It’s an old saw that images sell a film, and that’s very true. Spend a lot of timechoosing the best images you can, as they may well make the differencebetween a full-page article and a boxout on page 37.
In general, limit your body text to short paragraphs of one or two sentenceseach. Each paragraph should cover a single point of information and no more.
This leads to the sort of prose that would make your old English teacherweep, with copious over-employment of paragraph breaks, but it’s easy toread, and that’s the important thing. Keep the whole thing quite short; underno circumstances should it spill over to more than two pages, and one pageonly is far more preferable. The BloodSpell press release is, to be honest, fartoo long.
It’s particularly important to check press releases such as this one thor-oughly. Check, double-check, triple-check, and then check once more just tobe sure. Nobody’s perfect — not even us. We made a slight mistake in thispress release, which we only spotted after re-printing it here. We’ve left it into show humility and to help us identify with the common man. Oh, and alsobecause we only spotted it when our editor very politely pointed it out.
Hiring a PR agencyA proper PR agency is, to be quite frank, probably outside your budget. Toget the likes of Bubble and Squeak in London to run your PR will cost you, atleast, a few thousand dollars, and probably more like $10,000 to $30,000 —peanuts for a million-dollar budget film, rather more of a problem for us.Having said that, it’s worth sitting down and chatting with a big-name PRagency anyway — you might get some good tips for the price of lunch, andyou never know when someone may take a liking to you and offer a discount!
Trying a PR distribution agencyA PR distribution agency, on the other hand, is a great deal. We recommendPRWeb (www.prweb.com). For $80, it gets your press release onto Yahoo!and Google News, as well as a whole bunch of lesser known places. A distrib-ution agency is a very random approach — you may get nothing out of it, oryou may get interest from a smaller or larger media organization. At the veryleast, though, an appearance on Google News is a good boasting point andsomething to link to from your Web site.
Don’t use services like these as a substitute for personal contact. Instead, usethem as a backup to hit publications and Web sites you’ve missed.
268 Part III: Advanced Machinima Creation
20_096918 ch14.qxp 7/20/07 11:15 AM Page 268
The Life-Cycle of the Lesser Spotted Publicity Machine
Publicity for any film usually follows a predictable path. Here are the differentstages of publicity, and a few suggestions as to what you should be doing ateach point:
Before you startIt’s counterproductive to send out a lot of publicity at the start of a project.By the time you release your movie, the chances are that anybody who readthis first batch of publicity will have forgotten about it.
The Web sites, magazines, and newspapers that you hit won’t have, though.They probably won’t give you any more column inches (or screen space),because to their minds you are now old news.
Online publicity is the only slight exception to this rule. Getting your ownWeb site up and running at the start of the project is a good idea. Keep thesite updated and let people know how the project is progressing. Invest alittle time each week into publicizing your Web site, but only hit those sitesthat you know will be interested. It may seem like a waste of time, but keep-ing your project publicity simmering quietly will pay off in the later stages, asyou get the reaction, “Ooh, I’ve heard of that,” from all the people you’vebeen quietly bugging up to now.
Don’t try anything too complicated. The only purpose of this sort of publicityis to make people aware of your project and keep them aware of it.
Right in the thick of itOnce your project is firmly underway, step up the publicity that you’ve beenemploying. Of course, the problem is that you’ll be working flat-out on yourproject. Finding time to keep up with this sort of publicity will feel like animpossible challenge.
Going into seclusion for a few months, effectively disappearing from the community, and then reappearing, blinking in the sunlight, with a finishedmovie under your arm is rarely a good plan. Aim to maintain a certain level ofvisibility — merely commenting on other people’s work or joining in onlinediscussion can serve as viable publicity.
269Chapter 14: Get It Out There! Publicizing Your Movie
20_096918 ch14.qxp 7/20/07 11:15 AM Page 269

Remember to mention your current project in your forum signature! And ifyou can find a keen marketing student from your local university who wantsto work as a marketing guy for your film, now’s the time to grab ’em.
Almost doneStart the countdown! When you enter the final furlong, and your movie isalmost ready for release, that’s the time to turn the publicity machine up to11. Ideally, by the time you actually release your movie, you want peoplebreaking down your virtual front door to get a peek at it. It’s unlikely thateven your mom will be quite that excited, but it’s still a good state to aim for.In these final stages, you should be releasing progress updates, teaser trail-ers, or press releases every single day. Yes, we mean it. Clusterbomb anyoneand everyone you can think of.
You’ll upset a few people with this technique — eventually, even you will besick of the sound of your own voice — but stick to your guns. Do be aware ofjust how annoying you’re being. If a couple of people get upset, that’s okay,but you want to dial it back before you annoy everyone.
The final furlong stage is the one most likely to cause the breakdown of yourmarriage, career, and mental health. The amount of work that you’ll have todo for even a medium-sized project is considerable. Remember that, as wellas flicking the Nitro switch on your publicity sports car (don’t judge us —we’re running short on metaphors), you’ve got the minor side issue of amovie to finish. Please, please, don’t work so hard that you damage yourself.We’ve both been there, and we can tell you: It ain’t pretty.
Release dayOr, as it’s known at Strange Company Towers, the Annual Bring-A-BuddySpamFest. The official release of your movie definitely warrants a dedicatedpress release, both on- and offline.
You’ll also want to make a prominent post on every relevant forum, submit tothe news page of any relevant site, and contact prominent reviewers andcommentators. Make sure that you’ve got a full list of reporters who may beinterested and get them on the phone.
270 Part III: Advanced Machinima Creation
20_096918 ch14.qxp 7/20/07 11:15 AM Page 270

Get your movie online and ready to download or stream the night before sothat you can just flick a switch to make it live. Dedicate the whole day to pub-licity. You’ll need it, and more besides.
About a month laterTo a certain extent, once your movie is released, it’s out of your hands.People either like it, or they don’t. It will either be viewed a lot, or it won’t.Now is the time that you can have a well-earned rest and remind your familyand friends what you look like. You do have one more round of publicity to gothrough, though.
When the movie’s been out for a little while, and you’ve accrued some feed-back (good and bad, in all likelihood), you’ll reach a moment when interest inyour movie will fade away quite rapidly. This is only to be expected. There’salways something new on the horizon, and your beloved audience is a ficklegestalt at heart.
You can get some extra mileage from your movie by creating publicity basedon the reaction to (and success of) your movie. Now is the time to write,“What I learned from making this movie”–type articles, as well as to tailorpress releases around any positive feedback and reactions you may havehad. Talk about whether the movie has had the reception you anticipated andabout what you plan to do next.
Scraping the bottom of the barrel“It’s two years to the day since we released Romeo & Juliet 2: Back From TheGrave!, and we’re celebrating with a competition to win your very ownElizabethan ruff!”
If you’ve still got some self-respect left after plowing through this chapterwe’re not doing our jobs properly. The horse may have shuffled off thismortal coil, run down the curtain, and joined the choir invisible, but that’sno reason not to flog it until your flogging equipment snaps.
Seriously, though, returning to an old movie after a little time can sometimesreap rewards. You can find a new audience, or at least remind people of whythey loved it in the first place.
271Chapter 14: Get It Out There! Publicizing Your Movie
20_096918 ch14.qxp 7/20/07 11:15 AM Page 271

272 Part III: Advanced Machinima Creation
20_096918 ch14.qxp 7/20/07 11:15 AM Page 272

Chapter 15
You’re Nicked, My Son:Machinima and the Law
In This Chapter� Thinking about copyright and Machinima
� Reading an End-User License Agreement
� Figuring out which engines are legally friendly to Machinima
� Making commercial Machinima without attracting the long arm of the law
Machinima has many strengths, but being legally uncomplicated isn’talways one of them. Technically, 90 percent of all the Machinima out
there could be considered illegal. It uses unlicensed music and unlicensedart, it breaks End-User License Agreements (EULAs), and it’s just plain wrong.
Of course, Mr. Common Sense interjects at this point, and fortunately, believeit or not, U.S. law and Mr. Common Sense are quite close buddies. There’s alot more protection for Machinima under U.S. law than most people think.
And in an even more amazing turn of events, most games companies are alsoon reasonably good terms with Mr. Sense (or the Guvnor as he’s knownaround these parts) and aren’t going to sue people who are creating workthat publicizes their game.
So, luckily, 90 percent of all Machinima creators will never really need to readthis chapter. But for those who do, get yer lawyerin’ hats on. We’re going in.
Using Moviestorm, Second Life, or IClone? You can pretty much skip thischapter. However, if you’re using Second Life props or anything similar created by other users in any game, be aware that your fellow gamers mayget upset if you film their buildings and clothes without permission.
21_096918 ch15.qxp 7/20/07 11:15 AM Page 273

The Lawyers Made Me Do ItBefore we get going, we need to make a few things clear:
� We’re not lawyers in any sense of the word. Our understanding of thissubject comes from practical experience and may be partial, erroneous,or just plain dumb. We don’t think so, but we’re wrong on a pretty regu-lar basis.
� None of this chapter should be construed as legal advice. If you haveany doubts over your legal status or questions about legal issues relatedto Machinima, you should speak to a lawyer — and we’ve got a couple ofcontacts later in this chapter.
� A lot of the advice in this chapter is specific to country and state lawand may vary according to your place of residence. We point that outwhere we can, but as we said, if in doubt, find a good lawyer.
� Please don’t sue us. We’re poor. And English.
Get ’im, Guvnor!So, do you even need to read this chapter? Well, obviously, we’d like you to,because we slaved away on it for literally hours. And by slaved away, we meandrank coffee, played World of Warcraft, and eventually got around to writing it.
But, as we said, 90 percent of all Machinima creators will never be within spit-ting distance of a lawsuit. The games companies are, to a man/woman/child,supportive of Machinima made in their engines. Even the mighty Microsofthas allowed the Halo 2 Machinima creation scene to flourish unchecked(although that company wasn’t so keen about Halo being written about inthis book. Oh, well.). And, frankly, the music companies generally have moreprofitable fish to dubiously sue.
This chapter applies to Machinima as it stands at the time of writing (mid-2007). These things may change suddenly as Machinima gets more popular,particularly if there’s one high-profile case. If you’re involved with Machinimaat all, keep an eye on the prevailing legal weather.
274 Part III: Advanced Machinima Creation
21_096918 ch15.qxp 7/20/07 11:15 AM Page 274
You should probably not worry about the legal implications if:
� You’re using an open-source or dedicated Machinima package, andyou’re using all your own art, sound, and music. You’re free andclear then.
� You’re using your own sound and music, you’re not making money,and you don’t think you’ll be an overnight hit — although watch out,because you may be wrong. But games companies don’t have a historyof prosecuting their fans – unlike some industries we could think of.
� You’re working for a games company, and they’re providing all yourassets. Duh.
You want to be aware of this stuff, and potentially have a free introductorychat with a lawyer, if:
� You’re using major-label music. At all. The major labels and the lovablepeople at the Recording Industry Association of America (RIAA) haven’tsued for the use of their work in Machinima yet, but they might. The goodnews is it isn’t an open-and-shut case under U.S. law thanks to transfor-mative use protections. The bad news is that the RIAA has more lawyersthan you. And even if it doesn’t sue you, RIAA can pepper hosting ser-vices with takedown notices that can effectively chase your film off theInternet.
� You’ve got an offer from a TV company, or a film festival, or a majoronline film promoter, or you think you might. Be aware that you canmove from “I don’t think this will be a hit” to “Please stop calling me,Miramax!” in a matter of days. In any event, you should always talk to alawyer before signing over your soul to any of these guys.
� You want to make money from your Machinima. At all. Making moneywith Machinima without knowing the law is risky, to say the least.
� Your film covers sensitive themes: sexual, political, religious, any ofthat stuff. Believe it or not, there have already been U.S. governmenthearings about some political Machinima. If you make Machinimathat defames or belittles the game in which it is made, makes strong religious or political statements, or would commonly be consideredpornographic in nature, in particular, make sure that you’ve got yourbases covered.
Fall into Category A? Then it’s off to The Final Frontier (Part IV) for you. Fallinto category B? Welcome to Machinima Law 101.
275Chapter 15: You’re Nicked, My Son: Machinima and the Law
21_096918 ch15.qxp 7/20/07 11:15 AM Page 275

Get Your Knickers On, Love — You’re Nicked
Machinima faces three obstacles on its course to legal freedom:
� The End-User License Agreement: Or Intensely Dodgy Shrink-wrapContract, as we like to call it — but IDSC is harder to pronounce thanEULA, so we’ll stick with that. The EULA is the agreement that by nowyou should know better than to just scroll through and sign, but you doanyway. It appears at the installation or registration phase of your software and sets out a whole bunch of things you can and can’t do.These limitations can include commercial usage (no cash for you!) andderivative works (technically, that means no Machinima at all, sonny!).There’s still a lot of debate over the legality of EULAs, particularly asthey become more and more abusive. Courts in several jurisdictionsappear willing to treat them as legally binding, so watch out, althoughthere have also been recent legal developments on this front. (See theupcoming section “EULA-reading: The fine print” for more details.)
� Copyright law: All the art inside your chosen game is copyright to some-one — usually the games developer or publisher. That means that youcan’t redistribute it without permission, and that any works you produceusing it are technically derivative works, which require the permissionof the original copyright holder to redistribute. In the U.S. there’s anexemption for transformative use, which may put Machinima in the clear(see the upcoming section “Copyright: It’s back”), be aware that if you’reusing the games companies’ art for all but the most transitional things,they can force you to stop distributing your film. (Again, see the upcom-ing section “Copyright: It’s back” for more details.)
� People: All the theory of the law is fine, but the fact remains that if youhave any legal trouble, it’ll be because a person decided that she didn’tlike your work. Hence, the most important aspect to navigating dodgylegal waters is to keep aware of the people involved. If you’re using aband’s work, ask first; if they’re cool, you’ll probably not have any trou-ble. If you want to do a big project in an engine, ask the developer nicely;we’ve had huge developers like EA and Bioware fully support our work.
EULA-reading: The fine printYes, the End-User License Agreement is a pretty scary piece of work, but it’s agood idea to read it. Some games have more disastrous consequences attachedto breaching the EULA than others.
276 Part III: Advanced Machinima Creation
21_096918 ch15.qxp 7/20/07 11:15 AM Page 276

Here are three phrases you should look for:
� Noncommercial usage or commercial usage: Usually attached to thephrase Only for and Not for respectively. World of Warcraft goes furtherby specifying noncommercial entertainment purposes only, which pre-sumably means that if you’re not enjoying the game any more, you’relegally obliged to stop playing.
Virtually every commercial, major publisher game will have theseclauses in its EULA. They’re designed to stop . . . well, pretty much any-thing that makes money. So, if your game includes these clauses in itsEULA, and you sell a DVD of your work, you’re in breach of contract andmay be sued.
� Create derivative works: Usually attached to the phrase You may not.Not all games have this clause in their EULA. For those that do, however,you’re essentially forbidden by contract from making Machinima at allusing that engine, unless you use none of the existing art, sound, ormusic assets.
A number of games seem to have put this phrase in their EULA and thenforgotten about it — notably Blizzard Entertainment, who has supporteda number of official Machinima contests despite having a clause banningMachinima production in its EULA!
If you see this clause in a EULA, therefore, you’re left in a quandary.You could contact the company and ask politely whether it, er, reallymeans it. Of course, that risks a “Don’t you dare” in response. After all,it’s easier for a company to ignore things than to give.
� The prevailing party in such litigation shall be entitled to recoverfrom the other party all the costs, attorneys’ fees, and other expensesincurred by such prevailing party in the litigation: This one won’talways be phrased quite like this — you’re looking for similar wordsmeaning the same thing. This is bad. Essentially, it means that if thegames company sues you and wins, it’s entitled to force you to pay allits expenses, which are likely to be reaching into the hundreds of thou-sands or even millions of dollars. That removes the option of having apro-bono organization, such as the Electronic Frontier Foundation, doyour legal work and thus save you legal costs — if you lose, you’ll still beon the hook for huge amounts of money. If a games company with thisclause in its EULA sues you, be aware that if it wins, you’ll be paying outa lot of money.
Otherwise, if you’ve got pro-bono legal representation (and it’s quitelikely you’d be able to find that for such a new, exciting cause asMachinima), you’ll have to pay only damages, which are likely to be a lot smaller assuming that you weren’t making millions off yourMachinima work.
277Chapter 15: You’re Nicked, My Son: Machinima and the Law
21_096918 ch15.qxp 7/20/07 11:15 AM Page 277
Looking around for these phrases in an EULA lets you know just how muchtrouble you could potentially be in.
Keep your eye on the legal EULA scene — it’s a moving target. As we weregoing to press, a federal court in Pennsylvania ruled that portions of theEULA for Second Life were “unconscionable” due to “lack of mutuality”. Theentire situation with shrink-wrap licenses could change dramatically.
Copyright: It’s backOkay, so you can’t use other people’s copyrighted works in your own, right?Well, no. It’s a bit more complex than that. Here’s what you need to know:
� Derivative works: In order to distribute — technically, in order to create —a work containing another artist’s work, you must obtain permission forthat usage from the artist. Pretty cut-and-dried so far. One point to note,though: The copyright owner or his representatives are the only oneswho can pursue you for that infringement. So if they don’t care, you ain’tgetting sued. But sometimes the artist is no longer the owner, so be surethat you’re getting permission from the right chap.
� Transformative Fair Use: U.S. laws contain exemptions for fair useof copyrighted materials. One criterion that weighs very heavily into the decision as to whether a use is fair use is whether a work istransformative — that is to say, if it transforms the works it uses into adifferent form. For example, a film that uses graphics from computergames is transformative.
These exemptions provide what the Electronic Frontier Foundationbelieves may be a suitable defense for a Machinima creator using copy-righted game assets or even major label music. Unfortunately, though,no one knows for sure until there’s a test case!
In more bad news, this exemption is only present in U.S. copyright law;UK copyright law, for example, has no such defense.
Watch out if you’re making a fan-film set in a popular universe. If you’remaking a film set in the world of Lord of The Rings, Star Trek, or Buffy TheVampire Slayer, you’re automatically making a derivative work, and themedia companies that own these franchises can be touchy about unau-thorized uses. Projects have been shut down for this reason in the past.
� Incidental use: Most copyright laws also provide protection for brief orincidental use of copyright items. Quite how brief this use has to be is amatter for the courts, but if you see game assets for only three or fourframes, or a few seconds in a longer film, you’re probably okay.
278 Part III: Advanced Machinima Creation
21_096918 ch15.qxp 7/20/07 11:15 AM Page 278
If You May Be Infringing . . .For whatever reason, you’ve created a work that may be infringing — you’vefollowed our chapter on World of Warcraft movie-making, for example! Whathappens now?
� Nothing. Most likely, you’ll be fine. Games developers and music produc-ers alike are busy people, and they all see the sense in not suing peoplewho love their games.
Even if you’re selling your film for hard cash, you may slip under theradar (although we really don’t recommend this!). Chances are you’ll geta slight sense of panic from reading this chapter, and then you’ll be fine.
� C&D. If you manage to draw the 1 in 100 short straw, and you’ve man-aged to upset someone, chances are she’ll open up with a Cease andDesist letter. This legal letter says, in essence, “Stop that right now, takeit all offline, or we sue you into a smoking pile in the ground.” These lettershave one function — to make you void your bowels in sheer legal terrorand do what they say.
If you’ve received a C&D, you need to go chat to a lawyer, right thissecond. We recommend talking to the Electronic Frontier Foundation(www.eff.org) as a first step. In the UK or Europe, you should go find alawyer recommended by TIGA (www.tiga.org). It’ll let you know if youcan ignore the letter, if you have the option of pro bono (For good —meaning free) legal defense, or if you should roll over and say Uncle.
If you really can’t be bothered or don’t care that much, just take the pro-ject down, and that’ll almost certainly be the end of it.
� DMCA Takedown Notice: If you’re in the United States and someone’sreally upset, she might serve your ISP or other hosting provider with atakedown notice under the US Digital Millennium Copyright Act (DMCA).That means that your video will likely be taken down immediately. Youthen have to file a counter-notice on your hosting provider to have yourmaterial put back up, assuming that the taker-down doesn’t start a law-suit. DMCA takedowns cost very little, meaning that they’re sometimesused by random individuals who want to censor information. Again, gosee a lawyer and ask him what to do now. You can file a counter-noticeto have your work put back up if the claims are not legitimate, and thisis both cheap and easy.
� Lawsuit: If you’ve managed to upset someone really ornery, or if hethinks he can make money out of suing you, then you may go straight tocourt. This scenario is, frankly, blisteringly unlikely unless a test casehappens between when we write this book and you read it. No one hasbeen sued for Machinima yet.
279Chapter 15: You’re Nicked, My Son: Machinima and the Law
21_096918 ch15.qxp 7/20/07 11:15 AM Page 279

Machinima is a very grey area legally right now. No one wants to walk into anexpensive lawsuit without knowing she’s going to win — particularly whenshe may be forced to pay damages and fees for both sides! Even the RIAA,busily suing file-sharers, has so far stayed clear of Machinima videos made toa RIAA piece of music. And most importantly, the games companies and pub-lishers have, thus far, not aimed any lawsuits at Machinima creators.
If you are hit with a lawsuit, hie thee to a good lawyer, once again, and dowhatever she says, basically. Good luck.
Finding a LawyerSo it’s all gone horribly wrong. How do you find a lawyer?
The first thing you need to know is that you need a lawyer with a very specificfield of knowledge. Your family lawyer will be quite literally worse than use-less if you’re getting sued over Intellectual Property (IP) issues in Machinima,unless he happens to also be an IP lawyer with a games background.
First port of call, more or less regardless of where you are, should probablybe the Electronic Frontier Foundation (www.eff.org). It can give you basicadvice and point you in the right direction. If you’re in the United States, itmay even be able to officially act as your attorney in any court case.
If you’re in the UK or Europe, TIGA (www.tiga.org) are the people to go to.Unlike the EFF, this group can’t offer pro-bono assistance, but it can pointyou to a good lawyer with the expertise you need. You should also considercontacting the Machinima community to see whether anyone with prior experience in this area can recommend anyone.
If you absolutely have to go looking for a lawyer yourself, you probably wantto look for someone with entertainment industry knowledge specializing inintellectual property issues if you’re being sued on copyright grounds, orsoftware contract law if you’re being sued under an EULA. That’s quite atough mix to find, and it may be expensive if you end up hiring this kind oflawyer.
Regardless, pretty much any lawyer should meet with you initially at no costto you. This is your chance to evaluate her and also your chance to get asmuch free information as possible! With any luck, you’ll never have to gobeyond the first free meeting into actual paid-for time until you’ve gotMachinima-related money coming in to pay for it!
280 Part III: Advanced Machinima Creation
21_096918 ch15.qxp 7/20/07 11:15 AM Page 280

Making Legal MachinimaWell, if you’re wondering how you make legal Machinima, it depends onyour goal:
� I just want to avoid being sued! This one’s simple. Don’t use big-nameband music, because the RIAA is by far the most unpredictable elementin this equation. Don’t set your film in a fictional world written by some-one other than you or the games company, because big-name IP holderssometimes shut people down, too. Don’t sell your film. And credit thegames company in your film. The chances of the games company gettingupset then are tiny, tiny, tiny. Oh, and if for some bizarre reason theyC&D you, shut your work down immediately and then write about it onChillingEffects.org.
� I need to be clear, but I don’t want to make money. You shouldcontact the games company that produces the game you intend to use —ideally through e-mail so that you have some kind of written record.Emphasize that you’re a fan, that you want to make a film on a nonprofitbasis using its game, and that you’re happy to promote the company inyour film, and ask whether that’s okay. If it’s okay with that, you shouldbe free and clear for most usages that don’t involve cash — althoughyou should probably contact the company if you’re going to Sundancewith the film, for example!
Other than that, don’t set your film in another world aside from thegame world and make sure that you’ve got permission in writing fromyour musicians and any other artists on the project, and you should,again, be fine.
� I want the moolah! This one’s harder. Your best bet is to use a dedicatedMachinima package, such as IClone, VirtualStage, or Moviestorm. All thesepackages are specifically licensed for you to make commercial Machinimawith them. A few games and virtual worlds have similar licenses — forexample, you can license the Torque engine for commercial use and usethe Second Life virtual world to make commercial Machinima.
Make sure that you’ve got permissions for your music, your sound, youractors, and your world background. All these permissions should be inwriting and preferably using a legally binding release form (which youcan find in a number of places online depending on your location).
If you really have to use a game engine that usually isn’t licensed forcommercial usage, put on your best sales voice and either e-mail or callthe company who develops it. Whoever is paying for you to make or distribute your film will require that you do this anyway, sooner or later.
281Chapter 15: You’re Nicked, My Son: Machinima and the Law
21_096918 ch15.qxp 7/20/07 11:15 AM Page 281
It’ll probably take some time to find the right person to speak to — ifyou know anyone who has done commercial work with that company,call her! Or, if you e-mail the Academy of Machinima Arts and Sciences, itwill try to put you on the right track.
You may be able to negotiate a license, or you may not. Some companieswill be fine with your work provided you’re not making a lot of money,some will have a prewritten contract for this sort of thing, and some willbe interested only if there’s a few thousand dollars minimum in it for them.
Checking into Creative CommonsYou need permissions for music, art, and so on, but you do have an alterna-tive: Look for an appropriately licensed piece of artwork or music sharedunder the Creative Commons license.
Creative Commons is an international charitable endeavor aiming to reducethe damage that existing copyright law is doing to the commons of creativematerial available. Artists can license their work under a variety of CreativeCommons licenses, which allow other users to redistribute, modify, or usetheir work under a set of guidelines aimed at being fair to all. You can find outmore at http://CreativeCommons.org.
From your point of view, Creative Commons-licensed material is a great wayto find fantastic music and art that isn’t tied up in restrictive copyright.
Here is a partial list of useful Creative Commons distribution sites. More sitesare appearing all the time as Creative Commons grows!
� Magnatune.com offers Creative Commons-licensed music from a varietyof really cool artists.
� Archive.org offers a huge range of Creative Commons-licensed work,from stock footage to music to Machinima!
� Flickr.com has a Creative Commons section with literally millions ofCreative Commons photographs.
� While it doesn’t have an official Creative Commons section, Deviantart.com has thousands of pieces of Creative Commons artwork.
If you’re using Creative Commons work, it’s only polite to release your ownwork under Creative Commons. In fact, we recommend that you release yourfilms under Creative Commons anyway, unless you’ve got a good reason notto. It’s a great way to free your fans from copyright worries, make yourselflook good, get some free publicity from all the Creative Commons sites outthere, and do some good at the same time!
282 Part III: Advanced Machinima Creation
21_096918 ch15.qxp 7/20/07 11:15 AM Page 282

Part IVThe Final Frontier:
Pro Machinima
22_096918 pt04.qxp 7/20/07 11:16 AM Page 283

In this part . . .
In Part IV, we look at ways that you can use 3D modelingpackages to create custom objects for your movie and
how to import these objects into your game of choice.You also explore Moviestorm — a self-contained Machinimaproduction toolkit. We show you how Moviestorm can doeverything from character and set design to filming andediting, all in one single software package. If your needsare individual enough that you’re still not satisfied, we dis-cuss how you can make your own custom tools.
22_096918 pt04.qxp 7/20/07 11:16 AM Page 284

Chapter 16
Making Things That Don’t Exist: 3D Modeling and Animation
In This Chapter� Understanding the principles of 3D modeling
� Making a 3D prop with Blender
� Adding models to game engines
� Learning the basics of 3D animation
Modern-day game engines rock, but they’re also constructed from a lim-ited palette. At some point, your imagination will outstrip the available
characters, sets, or props, and you’ll be forced to do one of two things:Change your story to fit the game or change the game to fit your story.
Creating 3D objects from scratch is time-consuming and difficult, both on atechnical and artistic level. To create anything sophisticated — a new charac-ter, say, or a complex piece of machinery like a train — you need skills as asculptor and fine artist, and teaching you those is really more than we can doin a chapter. We’re good, but we’re not that good.
But often you don’t need something complicated; you just need a differentpicture above the fireplace or a new statue on the mantelpiece. Those sortsof alterations are well within anyone’s capabilities.
In this chapter, we tell you how to perform simple 3D modeling tasks. Wealso show you how to get your 3D assets back into the game once you’vemodified them.
23_096918 ch16.qxp 7/20/07 11:16 AM Page 285

Figuring Out Whether You Need to Model3D modeling is a fascinating and rewarding artform, but it’s also a complexone. If you don’t have to change the 3D data in your game, don’t. And if youdo have to create a new model, alter an existing one if you can.
If, for example, your lead character doesn’t have a beard and he needs one,you may think about re-modeling his head. But there’s really no reason to dothat unless you’re working with some new, frighteningly high-detailed enginethat individually models character hairs. And if that’s the case, you’re readingthis in 2025 or something, and should go out and buy Machinima ForDummies, 14th Edition, in which we cover Holodeck technology.
There’s no real reason to remodel a character’s head to add a beard, unlessit’s an enormous, bushy thing. Instead, you can simply recolor the texture(see Chapter 7) and produce quite an acceptable beard texture. A shortbeard doesn’t change the shape of the character’s head enough to require afull retexture.
Strange Company did this for the Matrix 4x1 series, re-texturing the Half-LifeGMan model.
Likewise, many modern engines now allow users to make sophisticatedchanges to clothing by simply altering transparencies on textures and chang-ing colors. And you can add fairly large details — planks on walls, rafters onceilings — to sets with textures, particularly if your engine also supportsbump-mapping to enhance the effect.
Exploring 3D PackagesMost 3D engines (with Second Life an honorable exception) don’t include any3D modeling facilities. So, if you want to produce or edit 3D models for yourgames, you’ll need a 3D package with which to do it.
3D modeling software has a reputation for being horribly expensive. 3D StudioMax, the most commonly used 3D modeling package in the games world,retails for $3,495. However, a few products have started to come down toprices that Machinima creators can afford:
286 Part IV: The Final Frontier: Pro Machinima
23_096918 ch16.qxp 7/20/07 11:16 AM Page 286

BlenderOriginally a commercial product developed by Dutch animation studio NeoGeoand Not A Number Technologies, Blender was released as open-source in 2002,when NaN went bankrupt. Since then, the open-source community has devel-oped, extended, and improved Blender until it is now a viable competitor topro 3D packages.
At present, Blender is probably the most attractive option available toMachinima creators who want to create or modify 3D objects for their movie.For starters, it’s free.
Blender is a very full-featured application. It includes an extensive plug-inarchitecture, so exporters are available for many game engines, includingUnreal Tournament and Half-Life 2. And while Blender’s user interface is infamously difficult to learn, a wealth of documentation is available on theInternet. We use it in this chapter.
MilkshapeHugh remembers working with Milkshape back in 1999, just after the releaseof his second film, Eschaton: Nightfall. Originally developed for Quake II,Milkshape is the oldest of the successful, low-cost 3D packages for games,boasting support for an enormous range of games engines, from Quake II toThe Sims to Half-Life 2.
Currently, Milkshape retails for $25, as it has for the last 8 years. For that, youget a reasonably usable, but slightly basic, modeling package, which is primar-ily useful for conversion between 3D formats. If you’re doing your modelingor animation work in another package (Softimage, for example) Milkshape’san excellent way to get your 3D models into a game. As a stand-alone pack-age, you may find it a little limited for complex work.
GMaxGMax is essentially a cut-down version of 3D Studio Max, released for free.GMax is a very powerful modeling and animation package, with most of thefeatures of 3D Studio Max. It doesn’t have the manuals that 3D Studio ships
287Chapter 16: Making Things That Don’t Exist: 3D Modeling and Animation
23_096918 ch16.qxp 7/20/07 11:16 AM Page 287
with, meaning that learning the basics of the interface is an uphill struggle.It also doesn’t come with 3D Studio’s Character Studio, so its animation capa-bilities are slightly limited. GMax’s most severe restriction is an almost totallack of official exporters to game engines. Originally, GMax was released withthe intention that games developers would pay to write exporters for theirgames, in order to support their modding communities. It hasn’t quite workedout that way. Games developers don’t seem willing to pay out to support theirmodding communities in this way. Whilst various teams have hacked GMaxto export 3D data (notably to Neverwinter Nights and Doom 3), it’s a lot ofwork, and hence there are only a few engines to which it can send its data.
Getting Your Model into Your GameYou’ll probably be surprised to learn that the hardest part of making a 3Dmodel, at least the first time you do it, will be getting your model to appearinside your chosen game engine.
Game engines are huge, complex beasts, and their designers rarely give muchthought to simplifying the complexities of adding data to them.
In addition, a 3D game model is meant to represent some part of the worldand will have data attached to it, whether that data is artificial intelligence,hit points, or simply a reminder that the player can’t walk through it! Hence,you’ll have to find some way to add this data to the game, often using prettytechnical tools.
288 Part IV: The Final Frontier: Pro Machinima
Do the tools even exist?Before you can add a model, you need to findout if tools are even available to do such a thing.If you can’t find any information on these toolsafter a thorough search, chances are that theydon’t exist.
Unfortunately, no standard format exists for 3Dgame models; there’s no .doc equivalent formodelers. In order to add a model to a game, youneed an exporter that will take the 3D informationfrom your authoring package and translate it to
something the game you’re using will understand.If the game developers haven’t produced one,and the modding community hasn’t hacked one,then you’re basically out of luck.
Check Chapter 5 to find out whether the engineswe discuss there support model importing. Ifyou’re using a newer engine, try www.machinimafordummies.com; we’ll do ourbest to keep up with new engines as they comeout and update you on what you can and can’t do.
23_096918 ch16.qxp 7/20/07 11:16 AM Page 288
The simplest way to get a new or modified 3D object into a game is nearlyalways to simply overwrite an existing model. We don’t mean literally copy-ing over a file, but persuading the game that a new file you’ve added is areplacement for something that’s in the game.
That won’t always work. If you replace a model of a truck with a model of atoy truck, characters may still refuse to walk inside the original truck’s volume,or even be crushed by your toy truck as it moves! Here are the four stages togetting a model into a video game:
1. Figure out how you do it.
Getting a model into a game is invariably a highly idiosyncratic, slightlyodd, rather kludgy process — and that’s if the game is well-supported byits developers. Hence, before you even start working on your model, youshould spend a little time searching the Internet for information on howto add models to your game. (See the sidebar “Do the tools even exist?”before you start this search.)
Fortunately, exporting a model is one of the most common and popularpursuits for game modders. (Chapter 18 contains a list of modding sitesfor all the engines we cover in Chapter 5.)
You should always try to find at least two, and preferably three, differenttutorials or sources of information on adding models to your chosenengine. Internet tutorials are often incomplete, obscure, or badly writ-ten, and having several to compare means that you’ll have more luckgetting over the humps.
2. Add game information to the model.
The game needs to know a lot of things that may appear obvious, butaren’t. For example, if you’re creating a tree, the game engine may needto know the volume around the tree into which game characters can’twalk. If you’re making a gun or indeed a newspaper, the game will needto know how a character should hold it, which may be a single attach-ment point or an invisible hand (economists would love 3D modeling).
How you add this information will vary game to game. This is where you’llneed the exporting tools for your game, which usually include tools tomark up your model for the game engine you’re using. Normally, thisprocess involves adding modifiers to your various 3D objects, and some-times to the points or surfaces of the objects. It may also involve addingnull objects (invisible points) to the model to represent lights, specialeffects, or attachment points for characters or other in-game objects.
For example, in The Sims 2, objects that interact with characters requireanimation targets to tell the game where a character can sit, grab, orinteract with the object.
289Chapter 16: Making Things That Don’t Exist: 3D Modeling and Animation
23_096918 ch16.qxp 7/20/07 11:16 AM Page 289
3. Export the model.
Theoretically, after you’ve added all the information the game engineneeds about your model, you can simply click Export (or Save As, orwhatever your particular game engine requires), and the model isexported in a format the game engine can understand.
Once you press the button, the model either exports or doesn’t. If itdoesn’t, or your exporter throws out a whole pile of errors, or the entirescreen goes green and starts repeating an animation of a dancing duck,now’s the time to dive back into all the modding information you’ve found(see Step 1). Googling the error text, if any, is a good start. You’ll find thatmany game engines have very specific requirements for their modeling,and it’s easy to create a model in a 3D package that doesn’t fulfill thoserequirements. For example, the exporter to Half-Life 2 from SoftimageXSI fails if any textures have spaces in their names.
You can avoid a lot of problems by remembering to use simple tools inyour 3D package. Very few engines will handle a model made out of any-thing but simple polygons. Unless you know for sure that your enginesupports layered textures, use only single texture maps on surfaces.And try not to use Boolean tools (subtractions between one model andanother), as they’re infamous for causing up-all-night-with-a-debugger-and-Google problems.
4. Add the game data.
Now you’ll almost certainly have to provide the game with additionalinformation it needs to incorporate the model. Exactly what this gamedata consists of varies hugely between engines and between model types.
If you’re adding a model that you can place using the game’s editor,you’ll usually have to add it to a list of such models held somewhere inthe game’s data files. If you’re creating a new weapon model for a first-person shooter game, you may need to edit some game code to tell thegame to use this new model. (See Chapter 18 for more on editing gamecode.) In short, follow the tutorials that you’ve found for adding modelsto your games and edit the files they tell you to edit.
Finally, you’ll most likely package all the files you’ve created into a singlecollection file, in the game’s preferred format.
For most games, you can get away without packaging your model, butsimply leaving hundreds of files lying around on your hard drive with noindication of their purpose is a bad idea. Unless your movie is veryshort and simple, mod files can easily get out of control, and packagefiles are good ways to keep your movie in check.
Using Doom 3, you can simply package your file as a standard .zip file.Using Half-Life 2, you write a .qc file, which acts as a guide for theengine for each model you produce and references all the other modeland texture files you use for that model.
290 Part IV: The Final Frontier: Pro Machinima
23_096918 ch16.qxp 7/20/07 11:16 AM Page 290

Creating Your First ModelAssume that you’ve decided that you need a custom model. In fact, assumethat, for some reason best known to yourself, you’ve decided to use The Sims 2to make an advert for this very book. Hey, it could happen. But, for somereason, when Will Wright and his team crafted this multi-million selling game,they failed to include a framed picture of the Machinima For Dummies frontcover. How inconsiderate.
Working with BlenderYou can find a copy of Blender on the DVD. Install it now, run the program,and take a look around. Yikes. It’s safe to say that Blender, shown in Figure 16-1,looks a little intimidating. But really, it’s not as complicated as all that. Youwon’t be using most of its advanced features, which makes your job a wholelot simpler.
CubeView menu X Handle Work windowMode Selection
Don’t click this!
User bar
Move Scale
Rotate
Facing
Figure 16-1:The default
Blenderscreen.
291Chapter 16: Making Things That Don’t Exist: 3D Modeling and Animation
23_096918 ch16.qxp 7/20/07 11:16 AM Page 291

Here are the basics:
� Up at the top of the screen, you’ve got your user section, whichincludes all the menus you’d expect (Save, Load, and so on), as well asinformation on the existing scene (Fa:6, for example, means Faces: 6,meaning that your current scene contains six polygons) and shortcutsto add elements to the scene. At the top left, you’ve got a selector forthe type of menu shown here.
� The center of the screen contains your work window. Currently,Figure 16-1 just contains a simple cube right in the middle of the screen.The arrows are handles for that object. If you left-click and hold theright-facing arrow, you can move the cube left and right. The little axisat the bottom left of this window shows your facing. Try holding downyour middle mouse button and dragging to turn your view, and noticehow the axes change.
You select items in this window with the right mouse button. That’s verycounter-intuitive for most people.
� The line below the work window contains a bunch of modeling tools.For now, just try clicking on the circle next to the red triangle and noticehow your handles change. You’re now in rotation mode and can rotateyour cube by, again, clicking and dragging. Note that the View menu is inthe bottom right here.
� The bottom pane contains an enormous pile of additional tools. The sixbuttons over to the left change the mode of this pane. Because you’rejust using Blender to construct simple game objects, you won’t use mostof these functions, but an animator working with Blender can use thesesettings to assign sophisticated material functions, write logic functionsto make elements of the scene run automatically, animate his scene, andrender it to visual standards up there with Hollywood.
To get a clean scene, choose View➪Front. Right-click the cube, press theDelete key, and choose Erase Selected Objects.
Creating a simple cubeAfter you have a clean scene (see preceding section), you’re ready to createyour model. Here’s how you can create a simple cube.
1. Choose Add➪Mesh➪Cube.
A cube appears wherever your crosshairs are currently set.
2. Select the small blue cube (the Scale tool) next to the Rotate tool.
292 Part IV: The Final Frontier: Pro Machinima
23_096918 ch16.qxp 7/20/07 11:16 AM Page 292

3. Drag the two scale handles until you’ve got a larger rectangular shape(see Figure 16-2).
If you want a framed painting, for example, you need it to be rectangularand thin.
4. Choose View➪Top to view your object from the top.
5. Drag the green handle down to make it thinner, rotate the viewaround a bit to check that it’s the shape you want it to be, and thenchoose View➪Top.
So far, this is all pretty obvious stuff. We’ve been editing on what we call theprimitive level. By that, we don’t mean we’re editing like cavemen, althoughpeople have certainly made that statement about Hugh’s 3D modeling skills.We mean that we’re working with a primitive object — in this case, a cube.Nearly all modeling jobs start with one or more primitive objects, which youcan then rescale, deform, and generally craft like a potter works with clay.
Basic scaling tools let you do some of that, but in order to really mold your3D object to your will, we need to deal with the very building blocks of a 3Dmodel: its constructing points or vertexes.
Figure 16-2:Scaling
the cube.
293Chapter 16: Making Things That Don’t Exist: 3D Modeling and Animation
23_096918 ch16.qxp 7/20/07 11:16 AM Page 293
Editing model pointsIf you’ve read Chapter 6, you know that there we told you that all elements ina 3D world are created from 2D polygons. (If you’ve not read Chapter 6 yet,it’s a good basis for this chapter.)
Well, that’s true. But just like the little fleas and lesser fleas, polygons arethemselves constructed from lesser particles. And these subpolygon particlesare called vertexes. Sounds very technical, doesn’t it? Well, there’s a simplername for them: dots.
How do you create a polygon? You place a series of dots in 3D space and thentell the 3D engine to connect those dots using lines (called edges), until thoselines finally close up. Then you’ve got a 2D shape sitting in 3D space. And ifyou take, say, six square 2D shapes, all composed of the same eight dots, andput them together in the right order, you’ve then got a 3D cube. Essentially, themagic of the most complicated 3D scene boils down to a join-the-dots puzzle.
In the following steps, you’re going to grab one of the lines between the dotson your model and put a new dot halfway along it, which you can then use tochange the shape of your soon-to-be painting:
1. Choose View➪Front.
Your view changes so that you’re now viewing the front of your object.
2. Using the middle mouse button or Alt+click, rotate your view untilyou can see the top surface of your object.
You need to be in 3D space here so that you know which edge you’redealing with.
3. On the menu bar below the work window, select the line icon next tothe triangle.
This icon is the Edge Select tool. If you’re confused, hover your mousepointer over the icon until you find the Edge Select tool.
4. Select the back, top edge of the object
Remember, right-clicking selects.
5. Choose Mesh➪Edges➪Knife Subdivide➪Exact Line.
You’re going to chop this edge in half with your Knife tool, thus givingyou an extra point in the middle of this edge.
6. Left-click just above the middle of the selected edge and then left-clickjust below it.
294 Part IV: The Final Frontier: Pro Machinima
23_096918 ch16.qxp 7/20/07 11:16 AM Page 294

A line appears between these two points.
7. Press Enter.
You’ve now subdivided the edge into two halves. Notice that the Knifesubdivided only the edge you had selected, not every edge it intersected.
8. Switch to Vertex mode by pressing the Dots button next to the EdgeSelect tool; press A.
This step deselects everything on the screen (and selects everything, ifyou press it again). You now have a new dot in the middle of the edgethat you used the Knife tool on.
9. Select the new vertex, choose View➪Front, choose TranslateManipulator Mode (or the red triangle, as we like to call it) and dragthe vertex up using the handles to form a triangle shape.
If you turn your view with the middle mouse button, you see that yourshape now looks something like Figure 16-3.
10. If the point moves without changing the shape of the object, delete thevertex that you’re moving and re-do Steps 1 through 9.
Figure 16-3:After vertex
editing.
295Chapter 16: Making Things That Don’t Exist: 3D Modeling and Animation
23_096918 ch16.qxp 7/20/07 11:16 AM Page 295

The preceding steps walked you through changing the shape of an object bymoving a single vertex. But that’s very time-consuming if you’re editing ashape with a lot of vertexes. Fortunately, certain tools make this processeasier. In the following steps, you select the front face of the object andextrude it backward to create the surface that you’ll put your image on.
1. Select the Face mode by clicking the triangle next to the Edge Selecttool; right-click the front face of your object.
It should turn pink, indicating that you’ve now selected it.
2. Choose Mesh➪Extrude.
As your mouse moves, the front face of your object moves forward orbackward. Move it a little bit forward for now, so that it looks like theobject in Figure 16-4.
3. Left-click to finish extruding.
4. Select the Scale tool and rescale the selected face so that it’s slightlysmaller than the original face.
5. Select the red triangle (the Translate Manipulator Mode, which letsyou move things) and move the face you’re editing backward until it’ssunk into the object’s front.
You should end up with something like Figure 16-5.
Figure 16-4:Extrudingan object.
296 Part IV: The Final Frontier: Pro Machinima
23_096918 ch16.qxp 7/20/07 11:16 AM Page 296

You’ve done it! Or at least, you’ve done the first stage.
Adding texture to your modelTranslating a flat 2D image onto a 3D object is a hard problem, and it tookquite a few years for 3D modeling packages to settle on a standard approach.Nowadays, most game objects use an approach called UV mapping.
UV mapping makes perfect sense if you’ve ever assembled one of those card-board models that arrive flat and you then bend along the pre-applied linesand glue together to make a 3D object. Essentially, it’s the reverse process;rather than assembling a 3D model from a 2D skin, you’re unwrapping the3D model to a 2D representation, onto which you can then paint textures.This is a pretty hard concept to get your head around, but it becomes easieras you do it.
And why’s it called UV mapping? Well, because what you’re doing here isassigning 2D coordinates for each face, and you’re then applying the coordi-nates to the texture. So as not to confuse these coordinates with the 3D coor-dinates of the model, these 2D coordinates are referred to as U and V ratherX, Y, and Z.
Figure 16-5:The finished
model.
297Chapter 16: Making Things That Don’t Exist: 3D Modeling and Animation
23_096918 ch16.qxp 7/20/07 11:16 AM Page 297

First, you need two 3D windows for this process.
1. Move your mouse pointer below the work window until it becomes aWindows resize pointer; right-click and choose Split Area.
2. Click in the middle of the work window.
Lo and behold, you have two windows!
3. Click the Grid icon at the bottom left of the left work window.
A huge list of other window types appears.
4. Choose UV/Image Editor.
You now see a 2D grid in your left work window.
The actual UV unwrapping process is really simple because Blender does itautomatically! If you were super-advanced modeler types you’d do this manu-ally, but for now, automatic is fine.
To unwrap the 3D model:
1. In the right work window, where it says Edit Mode, click and chooseUV Face Select from the list of options.
2. Right-click anywhere on the model and press A twice.
This step selects all the faces of the model.
3. At the bottom of this window, choose Face➪Unwrap UVs.
A pop-up window appears.
4. Choose Unwrap (Smart Projections).
This step tells Blender to unwrap your model in the smartest way it can.The left window changes to show the UV Map that it unwraps.
You may see one more screen, giving more options. Just click OK. You mayalso find that your UV map doesn’t look like the one in Figure 16-6 —that’s fine!
What is this? Well, it’s a guide for you to create a 2D texture image. Eachpolygonal area on this image represents a face of the model. To see howthis works, press A again to de-select all the faces. Now, select one of thefaces of the model in the right work window. See how a single polygonalshape pops up on the left window? That’s the part of the unwrappedimage that represents that polygon. When you assign a texture to thismodel, Blender will wrap up the model again. The bit of the image that iswithin the area of that shape is the bit that will be assigned to the faceyou have selected.
298 Part IV: The Final Frontier: Pro Machinima
23_096918 ch16.qxp 7/20/07 11:16 AM Page 298

You can alter this UV map if you need to — for example, if you findthat an important face is really small (and hence won’t have room formuch texture detail), you can juggle the shape of the map to make thearea larger. You can play with that if you like, but you’ll notice it can bequite complicated to persuade the map to do exactly what you wantit to!
5. Select the rectangular sunken face you created with extrude andremember where this face is on the UV map.
That’s where you’re going to place your front cover image.
6. Press A twice to select all the faces; in the left work window, chooseUV➪Scripts➪Save UV Face Layout and click OK.
The lower pane turns into a file browser.
7. Change the filename to something you can remember and save theimage.
8. Load the image that you just saved into any image editor.
Figure 16-6:Unwrapped
UVs.
299Chapter 16: Making Things That Don’t Exist: 3D Modeling and Animation
23_096918 ch16.qxp 7/20/07 11:16 AM Page 299

9. Load the MfD.tga image from this book’s DVD and paste it onto yourUV image; move and scale it so that it fits on the area correspondingto your canvas.
That’s the area we asked you to remember in Step 5.
10. Save the resulting image as a PNG.
You can remove the black lines if you like, but for this rough work, wewon’t do that. If you want to remove those lines, texture the other poly-gons with a nice wood texture, or whatever you fancy, you can do thatnow, too!
11. In Blender, choose Image➪Open and open the image you just saved asa PNG.
And, as if by magic, the cover appears on the canvas of your painting, asshown in Figure 16-7.
And that’s it! That’s all you need to do to create a game-worthy basic model.
Figure 16-7:The finished
portrait.
300 Part IV: The Final Frontier: Pro Machinima
23_096918 ch16.qxp 7/20/07 11:16 AM Page 300

Importing into The Sims!The Sims 2 is a pretty complicated game, and getting objects to work with itis a pretty complex process. Fortunately, it’s made a lot easier with tools thatThe Sims 2 community have developed, notably the Package Editor, SimPE.You can find it on this book’s DVD. Install it now.
Cloning a packageRather than create a package from scratch (an intimidating task), the follow-ing steps show you how to copy an existing item and alter the properties andmodel file of the item for your own ends. This is the standard approach inThe Sims 2 community to creating a new object.
1. In SimPE, click the Object Workshop tab at the bottom of the screen.
2. Press Start.
SimPE loads all the existing Sims 2 objects, which may take a while.
3. From the tree list of objects, choose Decorative➪Wall➪In TheBeginning and click Next at the top of the pane.
4. Select Clone from the Task drop-down menu and select Next.
You’re cloning this painting and replacing it with your own.
5. Change the Title and Description to whatever you feel like — we choseMfD Picture — and set the price to 1 (so that you can easily afford toput it up in your Sims 2 set!).
6. Click Finish.
The Scenegraph Rename wizard appears.
7. Replace paintinghorizontalapplehead in the title withMfDPicture and click OK.
A Save dialog box appears.
8. Save the package in your My Documents/EA Games/The Sims2/Downloads directory.
You’ve now cloned the package.
301Chapter 16: Making Things That Don’t Exist: 3D Modeling and Animation
23_096918 ch16.qxp 7/20/07 11:16 AM Page 301
Checking the scaleAfter you clone the package, you need to check the scale of our model andexport it ready for importing to The Sims 2.
Scale is a big problem in 3D modeling. In general, you shouldn’t start model-ing without some kind of reference for the scale that the game uses, or you’llend up with telephones the size of houses and spaceships the size of mice.You need to check that your painting isn’t scaled insanely.
To check the scale:
1. Under the Resource Tree, select Geometric Data Container; in theResource List, select Paintinghorizontalapplehead.
We’re choosing an item that should be approximately the same sizeas the item we’re creating. If you were making something else, you’dchoose a different object — a food carton if you were making somethingsmall, for example, or a car if you were making something bigger.
2. At the bottom of the screen, click Plugin View.
You return to the standard SimPE view, which allows you to export andimport objects.
3. Click Export and save the object anywhere you want.
We’re exporting The Sims 2 model for reference so that we can see thatour painting is roughly the right size!
302 Part IV: The Final Frontier: Pro Machinima
Modeling onWhile we show you only a very basic bit of mod-eling in this chapter, you can use the same skillsto achieve some extremely complex results. Forexample, if you export a character model fromyour game, you can use the same vertex editingto heighten his cheekbones, make his jawstronger, or even, with a bit of time, change himfrom a man to a woman!
Animation is a different kettle of fish altogether.Only a few engines support new animations, andthere is an entire artform in just animating char-acters. If you want to work on new animations —and they are very useful in really making your
Machinima stand out — we recommend pick-ing up a book on the subject — 3D GameAnimation For Dummies by Kelly L. Murdock(Wiley Publishing) is a good place to start.
But even if you can’t change animation, you cando amazing things with modeling, lighting, tex-turing, and clever camerawork, from adding asimple prop to your scene to completely re-imagining your game in an alternate setting, asseveral people have done for The Sims 2. (SeeBritannica Dreams’ A Mermaid’s Tale, for exam-ple.) However you change your world, have fundoing it!
23_096918 ch16.qxp 7/20/07 11:16 AM Page 302

4. In Blender, choose File➪Import➪Wavefront (.obj) and then select theobject you just saved.
The object appears in your Blender scene. You’ll probably see thatyour painting is far larger than The Sims 2 painting (or whatever you’rechecking).
5. Change from UV Face Select to Object Mode in the right window andrescale your painting using the Scale and Move tools.
It should end up approximately the same size as the other painting,(although taller than it is wide) and at the same point in space.
To scale the object on all axes at once, select Scale mode, go to FaceSelect mode, select all faces, and then drag the white circle at the centerof the “handles”.
6. Right-click The Sims 2 object to select it and delete it.
7. Right-click your object to select it, choose File➪Export➪Wavefront(.obj)from the top menu, select a place to export it, and click OK.
We’re exporting using the *.obj format, which is one of the more stan-dard 3D formats for simple models. SimPE can export and import in thisformat, which is the only reason we’re using it.
8. On the screen which appears, click Normals and then click OK.
Normals tell The Sims 2 which way our object’s faces are pointing sothat the painting doesn’t end up inside-out!
Adding the model and texture to your gameAfter you check your model’s scale, you just need to add the model and itstexture to our package, and you’re done!
1. In SimPE, click Import and select the model you just saved.
2. On the following screen, under Group settings, change Add to Replaceand select the model you want to replace.
3. Click Commit to finalize the changes you just made.
4. Under Resource Tree, select Texture Image; under Resource List,select the top image.
A lovely painting of an apple-headed woman appears. You’ll be replacingthat, too.
5. At the bottom of the window, select Build.
303Chapter 16: Making Things That Don’t Exist: 3D Modeling and Animation
23_096918 ch16.qxp 7/20/07 11:16 AM Page 303
6. In the popup window that appears, set the dimensions listed to 512 x 512.
This is the size of the UV Map texture Blender creates.
Your texture doesn’t have to be this size, provided it’s these dimensions.If you wanted to create a higher-resolution texture, you could create a1,024x1,024 or even 2,048x2,048 texture and use that, provided everythingwas still in the same relative position on the texture. Make sure that youtell The Sims 2 the correct size for the image, or hilarity will ensue.
7. Select Image 512x512 from the list above Build, right-click the checker-board that appears, choose Import, and select the texture you createdfor your object.
8. Right-click the image when it appears and choose Update All Sizes.
We’re replacing the existing texture map for our object and convertingour image to The Sims 2 format.
9. Click Commit.
10. From the Resource Tree, select Object Data; in the Resource List,select the top resource.
Now you’ve got to input data that tells your game engine that this is aunique object and where it should be placed in the game.
11. Click Get GUID.
You have to create a custom ID for your object that’s different to anyother registered object. This ensures that your object will never conflictwith something else you’ve downloaded from the Internet. It’s reallyquite neat!
12. Make up a username and password and enter them in the pop-upwindow; click Register New User.
13. Click Register Object; in the main SimsPE screen, check the boxmarked Update All MMATs and click Update.
14. Choose File➪Save.
And you’re done! If you load up The Sims 2 and start a set (see Chapter 8),you’ll now see that there is a painting with a snowflake next to it in thedecorative Buy menu. If you place that on your lot, you’ll see your beau-tiful Machinima For Dummies picture for all your Sims to admire.
304 Part IV: The Final Frontier: Pro Machinima
23_096918 ch16.qxp 7/20/07 11:16 AM Page 304

Chapter 17
A Storm Is Brewing: MoviestormIn This Chapter� Introducing Moviestorm, the professional Machinima toolset
� Creating sets and characters
� Using Moviestorm’s Director tools to make a film
After a while of creating Machinima, you’ll start to get frustrated with thelimitations that are imposed upon you by your chosen game engine. We
guarantee this. You’ll get frustrated with the odd things that you can’t changein the engine, tired of the art assets that aren’t designed for close-up camera-work or wide-angle shooting, and depressed by the fact that you can’t sellyour work.
Now, for the first time in Machinima history, you have other options. You canuse game-type engines to make commercial work. There are tools specificallydesigned for Machinima. And there is Moviestorm, which creator Short Fuzedescribes as Photoshop for movies — a tool that will let anyone, anywhere,make the movie he wants to make, using Machinima technology without manyof the common Machinima frustrations.
Oh, yes. And Moviestorm is free. In fact, you can find a copy of it on the DVDthat comes with this book.
Using MoviestormIn many ways, Moviestorm is the sort of package that long-term Machinimacreators have longed for. In addition, the creators of Moviestorm are soreceptive to user comment that by the time you read any cons we list here,they may well have fixed them.
24_096918 ch17.qxp 7/20/07 11:17 AM Page 305

Pros:
� It’s a dedicated Machinima package. If you’re using Moviestorm, youwon’t have to make sure that your actors don’t get hungry and die.You won’t have to spend 15 minutes running through a game world toget to where you need to go. You won’t have to avoid irritating gamebehavior that just gets in the way when you’re making Machinima.Because Machinima is all Moviestorm does.
� It’s written by Machinima creators. Moviestorm’s development is led byexperienced Machinima creators, and they’ve hired from within theMachinima community. That means that, unlike other tools we’ve seenin the past, very few features look great but just aren’t useful in practice.
� It’s free. No, really. Free. No cash. In fact, you already own it — there’s afull version on the DVD inside the cover of this book. Yours to keep for-ever and ever. You really can make a film for nothing.
� You can sell your work. Moviestorm is commercially licensed, whichmeans that the glass ceiling of other Machinima engines isn’t a problemhere. Accidentally make a hit and get contacted by a big movie studio?Great. You don’t need a lawyer, you don’t need to know a lawyer. You nevereven need to see a lawyer, at least until Miramax dumps a contract aninch thick in front of you. At which point, you’re on your own.
Cons:
� Wide but shallow. Moviestorm has no specific genre or style. The settingof your movie is up to you, as are the costumes, props, and charactersthat you may want to use. Unfortunately, because Moviestorm is tryingto cover so many bases, Moviestorm may not include the exact propsyou want for any one setting. This limitation will become less of an issueas Moviestorm matures and the amount of content available increases,but it’s still an unavoidable side effect of such an ambitious platform.
� Add-on packs cost money. There’s no such thing as a free lunch —unless you work in marketing. The various Moviestorm add-on packs(of which many are planned) will indeed cost money. Probably not asmuch as a copy of any recent Machinima-capable game, but you’re stillgoing to have to spend money if you want content.
The default props and characters that are provided with Moviestorm forfree won’t last you forever. If you get serious about Moviestorm, expectto have to splash out on a couple of add-on packs at least.
� Money can’t buy you lovely costumes. At the time of writing, it’s veryearly days for Moviestorm. Only time will tell what success and longevity
306 Part IV: The Final Frontier: Pro Machinima
24_096918 ch17.qxp 7/20/07 11:17 AM Page 306

it will enjoy. Short Fuze is promising more add-on packs and additionalcontent than we can eat, eventually, and you can be sure that modderswill soon start to create their own content.
� It’s not finished. When we wrote this book, Moviestorm was still in test-ing. The version that’s current as you read these words will probably besubstantially improved from the version we used to compile this chapter(and Chapter 3 as well). At the moment, we can’t import models, thereare still a bunch of crash bugs, and a lot of features are “coming soon.”What we’ve seen is very encouraging, but there’s still a way to go.We’ll update news on Moviestorm as it develops on the MachinimaFor Dummies blog at www.machinimafordummies.com.
Movie-Making in Moviestorm: The Basic Principles
In many ways, movie-making in Moviestorm is like movie-making in The Sims 2,but much less annoying.
1. Write your movie script.
2. Design your set or sets by dragging out walls, floors, and ceilings andthen dropping in props from a huge library.
3. Create your cast in the Puppet Shop by choosing and modifying bodyparts and textures.
4. Block out your characters’ large-scale movements in the Director’s View.
5. Add gestures, lines of dialogue (complete with automatic lipsynch),and facial animation using the timeline in the Director’s View
6. Set up cameras and lights to cover the scene.
7. Use the Director’s View to set up cuts between cameras.
8. Render your movie, edit it, and produce the final movie.
If you need to change art in the movie, you can also use the built-in Modder’sWorkshop to alter whatever you fancy.
If you want to create models or animations, Moviestorm uses the cal3d modelformat, which will hopefully be supported by Blender (see Chapter 16) in thenear future.
307Chapter 17: A Storm Is Brewing: Moviestorm
24_096918 ch17.qxp 7/20/07 11:17 AM Page 307

Creating Your SetChapter 3 shows you how to create a Moviestorm movie using a pre-createdset. In this section, we show you how to create a new set in Moviestorm.For the following steps, we decided to create a Sherlock Holmes story inMoviestorm, using some of the old Sherlock Holmes radio plays fromwww.archive.org.
1. Install Moviestorm from the DVD, if you haven’t already; start it upand choose New.
Moviestorm opens the New Movie Wizard.
2. Choose a name for your movie.
3. Leave the other options as they are and click the check mark.
The Director’s View appears.
4. Move your mouse pointer to the top of the screen and click the SetWorkshop button.
The Set Workshop appears (see Figure 17-1.).
If you’d like to have a closer look at the set you’ve created, you canmove around by clicking, holding, and dragging the middle mousebutton; zooming in and out by using the mousewheel; or lookingaround by clicking, holding, and dragging the right mouse button.
Figure 17-1:Movie-
storm’s SetWorkshop.
308 Part IV: The Final Frontier: Pro Machinima
24_096918 ch17.qxp 7/20/07 11:17 AM Page 308

5. Start by putting down the basics: walls, doors and windows, andfloors and ceilings, in that order.
To add walls, click the Work On The Wall button on the menu. Click AddA New Wall from the menu that appears. Click a corner of one of theground squares and then drag. You see a wall drag itself out behind yourcursor — unlike The Sims 2 walls (see Chapter 7), you can place thiswall at any angle you want. For now, though, drag it out straight as theback wall of your set, for about 10 squares. Then drag out another threewalls to form a square.
There’s no need to keep your walls parallel to each other if you don’twant to. Moviestorm allows you to define a polygon of any number ofsides and any crazy internal angles you might want. Only do this if youreally need to, though.
To add a door, click the Work On The Wall button and then the Add ADoor To A Wall button and choose a doorway from the available choicesby left-clicking. Hover the cursor over a wall, and a doorway appears.Select where you’d like your doorway and left-click to place it.
To add windows, click the Work On The Wall button and then Add ADoor To A Wall button. The windows appear on the same panel as thedoors. Choose a window, select and place it in the same way as youplaced a doorway. Light shines through the windows and changes theshape of the shadows on the ground — nifty!
6. To paint a wall, click the Work On The Wall button, select Paint A Wallfrom the buttons that appear, choose a texture, and click a wall toplace the texture on it.
Depending on your particular screen set-up, you may find that the ToolTipfor some of the buttons is displayed below the bottom edge of your screen.If you’re in doubt, refer to the images we included in the margins.
There’s no need to add floors or ceilings. They’re already in place, butinvisible. If you want them to be visible, just paint on a floor texture or aceiling texture.
To create a floor or a ceiling, select Work On The Floor And Ceilingsfrom the left menu, select Paint The Floor or Paint The Ceiling from thebuttons that appear, and select a texture.
You can find more specific categories of floor texture by clicking thedrop-down arrow at the top right of the floor texture window. Click anddrag across the floor or ceiling to place the texture.
If the ceiling is getting in the way, you can temporarily hide it using the Hide Ceiling button on the Work On The Floor AndCeilings menu.
You can choose Edit The Lighting from the buttons that appear if youwant to alter the lighting in your set. In future versions of Moviestorm,Edit The Sky will allow you to choose different skies for your movies.
309Chapter 17: A Storm Is Brewing: Moviestorm
24_096918 ch17.qxp 7/20/07 11:17 AM Page 309

Making sets in Moviestorm is very fast. Once you’ve gone through theseprocesses a couple of times, you can probably create a simple room in lesstime than it took you to read this section.
Adding Props to Your SetAfter you create your set, you’ll want to add some props to fill it out.
1. Choose Add Objects To The Set from the left menu.
We bet you didn’t expect that! A huge menu of different types of propsappears. Browse around and see the sheer variety of things you candeploy in your movie.
If, for example, you want to add a chair to your set, from the drop-downlist at the top of the props window, select Seating, choose the type ofseating you want, and click the floor to place the item.
For this step, we chose the Antique Armchair. (Names of the propsappear when you mouse-over the pictures.)
2. Start by placing a couple of the overstuffed armchairs that Watsonalmost certainly has sitting around.
However, notice that the item always appears facing the same direction.
3. Once you have placed your prop, press Ctrl+click and hold onthe prop.
The cursor changes to a Rotation tool, and you can now drag to rotatethe prop. Unlike The Sims 2, you can rotate it to any angle you want.
4. Place another couple of props and rotate them as you like.
For this example, we placed one chair at the window and the thirdacross from the first chair we placed so that two old friends can sit andtalk while smoking a pipe. Or, preferably, two pipes. One for each.
There are lots of other props that you can add to decorate your set. Weadded a rug underneath our armchairs to give some detail to the room.
But what happens if you decide that that you’ve placed your prop too closeto the wall? Simply click the prop and hold. You can now drag the prop far-ther back. Repeat with other props if you feel so inclined.
310 Part IV: The Final Frontier: Pro Machinima
24_096918 ch17.qxp 7/20/07 11:17 AM Page 310
If you want to get rid of a prop altogether, click the Move/Rotate/Deletebutton (at the bottom left of the screen). Then click the Wrecking Ball iconfrom the buttons that appear. Now, you can click anything — wall, window, orprop — to delete it. You can tell what you’re about to demolish because it willhighlight as you move the mouse pointer over it. You can also add detail tothe walls — for example, we want to give Watson’s study the wallpapered-with-books feel we know from the movies and Hugh’s living room. Manuallyrotating everything against the walls is very time-consuming, but fortunately,you don’t have to do that. Just click the object you want to align to a wall(one of our armchairs, for example) and drag it against a wall. It will alignwith the wall automatically.
Once you’re happy with your set, move your mouse pointer to the top of thescreen and click Return To Director’s View. Save your movie file using theSave button on the top menu.
311Chapter 17: A Storm Is Brewing: Moviestorm
Fence it!Aligning several props to form a row (to createa line of fences, for example) can be quite atime-consuming process. Fortunately, there’s away to use wall alignment to make this sort ofwork very quick and easy.
Say that you want to place a hedge outside yourwindows, but running at an angle to the windowrather than straight on to it. Do you have to man-ually place and rotate each piece? You do not.Just follow these steps:
1. Click the Work On The Wall button on themain menu and select Add A New Wall;place this wall outside your window, view-able from the window, at a slight angle toyour existing wall.
2. Click the Add Objects To The Set button,select the Fence category, and then selectHedge — Very High.
3. Place the hedge next to your new, skewedwall.
It automagically aligns itself to the wall.
4. Repeat Steps 2 and 3 a few times, placinghedge parts next to each other.
Carry on placing hedges until you’ve reallygot that suburbia feel down.
5. Choose Move/Rotate/Delete from the mainmenu and then click the wrecking ballicon; hover the cursor over the wall next toyour hedges and click to delete it.
You’ve now placed a nicely aligned hedge,with no trouble at all!
6. Press Esc to get out of demolish modebefore you break anything!
24_096918 ch17.qxp 7/20/07 11:17 AM Page 311
Creating Characters in MoviestormThe Moviestorm character creation tool isn’t yet quite as flexible as that of,say, The Sims 2 (see Chapter 7). At the time of writing, character mesheswere not deformable through morphs — something that gives The Sims 2 amajor advantage over Moviestorm.
The morph facilities in The Sims 2 are the things that let you define theexact length of your character’s nose, or the shape of her chin. Moviestormallows you to choose from a number of predefined head shapes. After that,the only customization you can apply is in the skin texture that’s applied tothat mesh.
We’re assured that morph deformation is on the cards for Moviestorm even-tually. By the time you read this book, it may even be part of the softwarealready. For the time being, though, you’re limited.
The tools we do have give you a surprising amount of flexibility, though. Tworadically different skin textures applied over the same mesh can producetwo characters who — as far as the viewer is concerned — couldn’t be moredifferent. And you can add different hairstyles and accessories to further dis-tinguish your cast.
The following steps walk you through character creation in Moviestorm:
1. In Moviestorm, load your project and then, in the Director’s View,hover your mouse over the left side of the screen.
A blue menu appears. There are some very small buttons at the top.
2. Click the New Character button at the top right of the blue menu.
Moviestorm asks for a name for your character.
3. Name your character, and click the check mark.
For this example, we call our character Watson. Your character appears,as shown in Figure 17-2. There’s your character, in his (or her) elegantupper-class underwear.
You can put some clothes on him in a second, but first of all, take a lookat your character’s body. (Settle down at the back!)
You can rotate your character by dragging with any mouse button.
312 Part IV: The Final Frontier: Pro Machinima
24_096918 ch17.qxp 7/20/07 11:17 AM Page 312

4. Choose your character’s sex by clicking either the male or femalegender buttons.
These tabs have ToolTips of either Male01 or Female 01. Because we’replanning to be reasonably faithful to poor old Arthur Conan Doyle, wechose Male01 for this example.
5. Click Clothes and give your character some clothes.
For this example, we gave Watson a suit (closed). You can right-click thesuit on your character to choose from a number of different textures.We went for texture number 4, but you can choose any that seem appro-priate. Notice that you can choose a different texture for his jacket andfor his pants/shoes.
6. Click Face.
Moviestorm provides a few different heads for you to choose from. Wewent for Head (Euro01). He’s starting to look a little more like Holmes’faithful biographer, but there’s still a fair way to go.
7. Right-click your character’s face and choose an appropriate facial texture.
We chose texture number 12.
Figure 17-2:The
MoviestormPuppet
Shop.
313Chapter 17: A Storm Is Brewing: Moviestorm
24_096918 ch17.qxp 7/20/07 11:17 AM Page 313

8. Select Beard and select some facial hair.
We selected a big moustache. Now you’re getting somewhere. We canfeel his upper lip getting stiffer as time goes on.
9. Click Hair.
Another range of options appears. We left Watson bald, but you can addhair to your character if you prefer the full-pate look.
10. Pick your favorite hair texture.
11. Select Accessories.
All you have to choose from here is two pairs of equally inappropriatesunglasses. If you really want a cool Watson who’s down with the kids,then slap a pair of Aviator Glasses on him. We chose not to. We’re happywith Watson now.
12. Select Edit Character Sheet.
This is second from the left at the bottom of the window. The CharacterSheet appears. Now you can give him a few props to work with.
13. Choose the Inventory tab from the bottom of the character sheet.
14. Press the + button at the bottom right of the screen and select a propfrom the menu which appears.
The only prop available with the base Moviestorm installation is a cellu-lar (or mobile) phone. That’s not really appropriate for Watson, but youcan add it to your character now if you choose.
15. Close the Character Sheet and select Keep Changes (the green check).
You now go back to the Director’s View, ready to make a movie.
Creating a SceneMoviestorm allows you to create any number of scenes. A scene representsone segment of action, all of which takes place in the same location.
If you later want another scene in the same location, that’s not a problem.Each set can be assigned to as many scenes as you want. Here’s how tocreate a scene:
314 Part IV: The Final Frontier: Pro Machinima
24_096918 ch17.qxp 7/20/07 11:17 AM Page 314

1. In the Director’s View, hover your mouse pointer at the top of thewindow and click the Edit Script button.
The Director’s View is the view that appears when you start Moviestorm,or when you exit the Character or Set Creation Screens. When you clickEdit Script, the Script Editor window appears.
2. Right-click the highlighted Scene in the Script Editor window andchoose Rename; give the scene a descriptive name.
We chose Watson muses.
3. Click the check and then close the Script Editor window, and youreturn to the Director’s View.
If you’ve created a set already, you see the set in the Director’s View, butyou’re probably wondering, “Where the heck are the walls?” Relax,they’re still there. This is the Director’s View, which allows you to easilymove around your set and experiment. Moviestorm automatically hidesany walls that may get in your way while you’re in this view. After youadd a camera and start to view the set through it, the walls will be niceand solid once again.
To follow along with the rest of this section, you must have created a setand a character. See the earlier sections “Creating Your Set” and“Creating Characters in Moviestorm.”
4. Move your viewpoint so that you’re close to one of the comfy antiquechairs.
The camera controls here are just the same as in all the otherMoviestorm views.
5. Select your character from the left side of the screen.
6. Right-click the ground near the chair and select place here from The-Sims-2-like menu that appears.
Watson appears on set as if by magic, ready to muse at your command.
7. Move your mouse pointer over the chair.
A helpful blue hand appears over the chair, intimating that Dr Watsonmay, if he chooses, alight on this chair for his future repose.
8. Right-click the chair and choose Sit Down.
Watson moves to the chair and sits down.
315Chapter 17: A Storm Is Brewing: Moviestorm
24_096918 ch17.qxp 7/20/07 11:17 AM Page 315
Watson musing alone in his room may be very interesting, in a pretentiousart-housey way, but we’d really like to introduce another character, withwhom he can have a nice chat. The problem is that we forgot to create anyother characters. What to do? Well, as you have probably predicted,Moviestorm has a solution.
1. Navigate your viewpoint to outside the door.
2. Hover your mouse pointer over the left side of the window.
A panel with a blue background appears; this is the list of your characters.
3. Click the New Character button and name him what ever you want.
We called him the Narrator. Very Rocky Horror.
What do you know? You’re back at the Character Creation window.
4. Create a narrator for the scene; once you’re happy, click the KeepChanges button to return to the scene.
If you’re following along with our Dr. Watson example, make sure thatyour Narrator character has Hair (Medium). You can see why in theupcoming section “Changing A Texture.”
If you’re not sure how to create a character, see the section “CreatingCharacters in Moviestorm,” earlier in this chapter.
Your new narrator character is now selected on the Cast List panel,although he isn’t in the scene yet.
5. Right-click outside the door and select Place Here to introduce yourcharacter to the scene.
6. Right-click inside the room and select Move Here to tell the new char-acter to move into the room.
Don’t worry about the door; he’s clever enough to open it himself.
That was pretty easy. With just a few clicks, you’ve added a new character,positioned him in the scene, and given him his first bit of blocking. Your firstcharacter — Watson, for us — doesn’t seem to have noticed his visitor,though.
Blocking with the TimelineWhat we’re about to show you in this section is tremendously exciting. Well,it is for us, anyway. As professional Machinima creators, this next section hasus bouncing up and down in our chair making little squee! noises. Yes, ladiesand gentlemen, the rumors are true: Moviestorm has a fully editable timeline,shown in Figure 17-3.
316 Part IV: The Final Frontier: Pro Machinima
24_096918 ch17.qxp 7/20/07 11:17 AM Page 316

What’s a timeline? Well, if you’ve ever seen a history documentary, you probably know what we’re talking about. Put simply, a timeline is a list ofevents, organized in, well, a line, which represents a chronological order.On a history documentary, all you can do is look at the line. In Moviestorm,though, you can scroll your line of events back and forward and change anything you like, any time you like. All without a blue police box. (This timeline is very similar to the Medieval II: Total War Curve View — seeChapter 12.)
Once you’ve issued a command to one of your characters, that command isstored on the timeline at the scene time it was issued. Because the timeline iseditable, you can drag this action around to change its start time and dura-tion. You can also add new actions directly to the timeline:
1. Select your first character by clicking his icon at the left of screen.
The timeline changes, but that’s okay: Each character has his own per-sonal timeline.
2. Click and drag the time marker on the timeline.
It’s the vertical white bar with a dot on top. You’ll probably find it all theway over on the right side of the timeline.
If it won’t move, try using the Rewind button at the far right of the screento rewind to the start of the scene and then try dragging it again.
3. Drag it to the left.
Notice that time effectively rewinds as you do this step. In our example,Watson’s visitor walks backwards through the open door, closes itbehind him, and waits patiently outside. Stop the action there; don’trewind to the very beginning of the scene.
4. Right-click the new character and choose Look At to tell your firstcharacter to look up and around as the new character comes throughthe door.
A new-look-at action is added to the timeline. In our example, becausewe rewound to this specific point, Watson (or whoever) looks up ashis visitor walks through the door. Drag the time marker forward a bitto see.
Figure 17-3:The
Moviestormtimeline.
317Chapter 17: A Storm Is Brewing: Moviestorm
24_096918 ch17.qxp 7/20/07 11:17 AM Page 317

5. Click the Fast Forward button (at the right of the timeline window) tomove the position indicator right to the end of the scene.
A scene lasts only as long as the events within it. So, at the moment, thelast event in this scene is Watson looking around. The scene thereforefinishes once he’s completed that action. If you add any other actionsafter this one, the length of the scene is automatically adjusted to compensate.
Watson is a genial host and is unfailingly polite, so we’re going to havehim greet his visitor as he comes through the door.
6. Make sure that your first character is still selected, right-click him,and choose Say.
In our case, Watson is our first character. The Record Line dialog boxappears.
7. Click the Load Audio File button at the bottom of this window andload the watson01.wav audio file from the book’s DVD.
8. Click the Playback Audio File button to listen to Watson’s friendlytones.
If you’ve got an idea for a line for Watson, you can also record your ownline here, using the red Record button.
9. Type the line in the white box.
In our case, the line is “Ah, good evening. Horrible day to be out, I must say.”
10. Click the green check to accept the audio file.
If you move your viewpoint a little closer to Watson and press Play atthe right-hand side of the screen, you can see Watson’s lips move as hetalks. Notice how the narrator automatically turns his head to look atWatson when he speaks: Moviestorm always has listeners look at thespeaker in the room unless instructed otherwise.
Don’t be confused when two versions of Watson’s line appear on thetimeline, one above the other. One triggers the audio file itself. The otherrepresents Watson’s mouth movements.
11. Select the new character at the top left and move the timeline to theend of your character’s line.
12. Right-click the second character and choose Say to add another line.
This time, use the narrator01.wav file. This time the line is “Yeah, it’sa regular pea-souper, as you Londoners say.”
318 Part IV: The Final Frontier: Pro Machinima
24_096918 ch17.qxp 7/20/07 11:17 AM Page 318
13. Give the new character a command to look at the first character whenhe speaks his line.
Remember, you do this by right-clicking your original character andclicking Look At.
14. Play through the timeline a little, so that the narrator has spoken thefirst part of his line, and then give him a command to Sit Down in theother chair.
15. Right-click the narrator’s new movement action in the timeline andselect Sit Down and then Customize.
You can now choose different gaits and moods for the narrator to adoptwhile he’s walking from the window that appears.
Make sure that you know which character you have selected before youissue any commands. It’s all too easy to tell the wrong character tomove. Thankfully, Moviestorm makes rectifying these mistakes simple(you just delete the action from the timeline), but it can still get bothfrustrating and confusing.
16. Once he sits down, give your first character another line.
Throw watson02.wav in there with the Say command. Remember toselect Watson first! Watson’s line here is “Hmph, yes, quite. This remindsme of the Adventure of the Foggy Armadillo. It was a dark night, andHolmes had been quite ill at ease . . .” Watson is starting to wax lyricalnow, so give him a gesture to accompany his tale.
17. Move the timeline to the start of your original character’s second line,right-click him, and choose Gesture.
The Gesture window appears.
18. Give your gesture a name — we chose wag finger — and then clickthe Add Gesture button; choose Right Hand➪Wag Finger.
The Gesture window has a mini-timeline within it.
19. Move the Gesture window timeline to about halfway through the WagFinger animation and add another gesture by choosingHead➪Mouth➪Quick Smile.
20. Play through the animation to check that everything looks fine.
If not, you can move the Quick Smile animation back or forward alongthe Gesture window timeline. Watson should smile briefly about half waythrough wagging his finger.
21. Close the Gesture window.
319Chapter 17: A Storm Is Brewing: Moviestorm
24_096918 ch17.qxp 7/20/07 11:17 AM Page 319

You can layer different gestures on top of one another to create quite com-plex character behavior. Be sure to review the overall gesture each time youadd another animation; some of them can conflict with each other.
Creating CameraworkCameras — usually a good idea if you want to make a movie. Fortunately,Moviestorm lets you add cameras with gay abandon, which means that thischapter isn’t going to be cut summarily short.
1. Right-click the ground somewhere outside your set and choose PlaceCamera Here from the menu that appears.
Don’t worry about pixel-perfect accuracy. As you’d expect, you canmove the camera once it’s placed.
Moviestorm moves to the Camera View, at which point you’ll be lookingthrough the lens of your virtual camera.
2. Rewind to the start of the scene and click the Set Up A New Shotbutton at top of the left menu to create a new shot.
The New Shot screen appears. By default, Moviestorm creates this shotas a Free Shot. That’s fine for our purposes, so keep that.
3. Move the camera around now to get the perfect opening shot (seeFigure 17-4) through a window onto the scene you’ve been creating.
Right-click and drag to rotate, click the middle-mouse button and drag tomove the camera, and use the mouse-wheel to move up and down.
4. Drag the Lens To Use (field-of-view) slider left a little to pull the lensout; click the check mark to accept the shot when you’re happy with it.
The slider is just below the bottom of the center of the shot.
5. Drag the timeline to about three seconds after the start of the sceneand click Set Up A New Shot at the left of the camera view to addanother shot.
For our example, we dragged the timeline to just before Watson sitsdown. Now we’re going to set up a zooming camera.
6. Change the lens-length until you can just see the window frame at theedges of the shot (turn your camera if necessary) and click the checkmark to accept this second shot.
320 Part IV: The Final Frontier: Pro Machinima
24_096918 ch17.qxp 7/20/07 11:17 AM Page 320

7. Rewind and then play back your scene.
The camera slowly zooms in on the window. You can create a movingcamera in the same way.
Editing your shotWhen we played back our example from the earlier section “CreatingCamerawork,” we noticed that there’s a big section during which Watsonstands around looking useless. We don’t want that in your masterpiece. Toedit the shot we created in that section to better suit your purposes:
1. Click the first keyframe — it looks like a little flag — and drag it alongthe timeline until just before your first character starts to sit down.
2. Drag the second keyframe to a point after your first character sitsdown, thereby providing a nice establishing shot to start your movie.
3. Click the Back To Director’s View button to go back to Director’s View.
Figure 17-4:Our opening
shot.
321Chapter 17: A Storm Is Brewing: Moviestorm
24_096918 ch17.qxp 7/20/07 11:17 AM Page 321
Adding a camera on a characterTo add a camera on a character:
1. Drag the timeline along until just before your second character walksin the door.
Once you’ve created a camera, Moviestorm creates a small previewwindow at the bottom right of the Director’s View. You can checkthe view through your new camera here at all times, and the imageupdates as the timeline moves along — although not while it’s playingback. Believe us, you’ll be stunned at how useful this preview provesto be.
2. Make sure that your first character is selected and right-click him.
3. Choose Put A Camera On Me to set up a brand new camera pointingright at your character.
4. Click the Set Up A New Shot button.
You’re using a one-shot camera here. Whereas the free-shot cameraallows you to move your camera as you please, a one-shot camera isdesigned to always focus on one specific character, no matter where heor she moves. In our example, the focus is on Dr. John Watson of theUniversity of London Medical School. As you maneuver your camera,Moviestorm will always try to keep the focus on Watson.
You see two horizontal and one vertical blue line on-screen now. The tophorizontal line represents Watson’s eyeline: Move it higher, and his eyesare placed higher in the shot. The bottom horizontal line usually isfocused on Watson’s hips, but you can change this. By clicking the + or –buttons, you can move to a closer or more distant framing.
Roughly speaking, these lines move the focus of the bottom line fromWatson’s mouth, to his chest, then his hips, and finally his feet at themost distant framing. The vertical line controls the position of Watson’shead in frame (left or right).
You can rotate the view, as usual, by clicking and holding the rightmouse button. You can also rotate using the little blue triangles, one oneach side of the frame.
5. Adjust the shot until you have a nice close-up. Confirm it.
6. Return to Director’s View by clicking the Return To The Director’sView button.
322 Part IV: The Final Frontier: Pro Machinima
24_096918 ch17.qxp 7/20/07 11:17 AM Page 322
For this shot, you’ll probably want to pull the lens-length in quite a bit,to about 35 to 37, to give your shots a more filmic look.
You may want to continue through the timeline and set up another few shots.Use a mixture of Free Shots and One Shots. Remember, One Shots will turnto follow a character as he moves. After you have your shots set up, youcan switch to the master view and choose which camera you want to useand when.
Editing Camera Sequences with the Master Monitor
After you create your individual shots with Moviestorm, you need to set upthe cuts between them. Advanced users would probably render each cameraout separately and use an outside editing package, but it’s also possible toset up all your camera cuts within Moviestorm to render out a fully editedsequence. Here’s how:
1. Click the Moviestorm logo at the bottom right of the screen to switchto the Master Monitor.
2. Select Free cam 01 and rewind the timeline to just after your firstkeyframe.
3. Click the Insert A Cut To This Camera button to insert a cut to thiscamera at this point in the timeline.
Now, the movie starts with a view through this first camera.
4. Drag the timeline along until about three seconds before the firstcharacter looks around at the second character and use the button onthe top right to go back to the Director’s View.
5. Double-click the camera on the first character and, again, insert a cutto this camera.
6. Click the monitor in the bottom right of the screen. Rewind andpress Play.
The scene now cuts from the first camera to the close-up where youplaced your cut. You can now keep adding cuts to cameras to cover therest of the scene.
323Chapter 17: A Storm Is Brewing: Moviestorm
24_096918 ch17.qxp 7/20/07 11:17 AM Page 323

Adjusting Your Set While FilmingMoviestorm is pretty forgiving if you forget to add something or want tochange part of your scene halfway through filming. Here’s how to perform afew small adjustments:
1. Open your movie and scrub through the timeline in the MasterMonitor to find a shot that seems to need to some background detail.
We chose the shot of the narrator as he walks into the room; the wallbehind him was pretty bare in our set.
2. Switch to the Director’s View and then click the Set Workshop button(the hammer and spanner icon at the top of the screen).
You can now edit your set. Be careful here. You can delete the entire setif you really want to, so . . . don’t.
3. Find the wall that featured so unfortunately in your earlier shot,select the Work With Props button, and add something suitable.
Maybe a picture on the wall, or an interesting bookcase (see Figure 17-5)?
4. Move your mouse pointer to the top of the screen and click the moviecamera to take you straight back the Director’s View.
Figure 17-5:We added
this paintingafter we set
this shot.
324 Part IV: The Final Frontier: Pro Machinima
24_096918 ch17.qxp 7/20/07 11:17 AM Page 324

5. Click the preview of your shot (at the bottom right) to see whether it’simproved.
In our case, it has, most certainly.
Using a Matte BackdropThe view out of our window is pretty bare, but you can fix that. We’re goingto use a Real Filmmaker’s trick now and add a 2D background a little way out-side the window, on a 3D image, to give the impression that there’s somethingoutside the window. We chose a static image of a Victorian street, but youcan use whatever you like. It’ll be visible through the window that occasion-ally appears in shot (see Figure 17-6).
1. Open the set workshop again, click Add Objects To The Set and selectthe Simple category; place simple backdrop 02 about ten feet outsidethe window.
It looks like an ugly gray block at the moment, but that’s okay.
2. Right-click your backdrop.
A menu appears with a Scale slider.
Figure 17-6:Viewing
our mattethrough the
windows.
325Chapter 17: A Storm Is Brewing: Moviestorm
24_096918 ch17.qxp 7/20/07 11:17 AM Page 325

A number of props in Moviestorm are re-scaleable: trees, simple objectsand, outdoor objects, in particular.
3. Rescale your backdrop until it’s all that is visible from your windows.
Rotate the backdrop at this point so that it faces the window, if youneed to.
4. Go to the DVD and select backdrop.jpg from the Tutorial/Moviestormfolder.
Have a quick look at it in an image editor. It’s a (very) foggy street scenethat will be only just discernable outside Watson’s window — perfect forour movie.
If you want to use your own image, paste it into this backdrop and resizeit appropriately.
5. Go back to Moviestorm, right-click your simple backdrop and chooseChange Image.
6. Select backdrop.jpg from the DVD, exit the Set Workshop, and goback to the Director’s View.
If your backdrop appears to be unnaturally dark in Moviestorm, tryadjusting the scene’s default lighting position. You can find a slider forthat under Edit The Lighting Setup, in the Set Editor.
7. Create a new camera and use it to frame a shot containing at least onewindow, with something from the rest of the room (a chair or some-thing similar) in foreground.
Looks pretty good, doesn’t it?
You can use background images like this — known in the film industry asmattes — for all kinds of effects, particularly where you require a complexbackground shot. They can often save you days or weeks of modeling ascene in 3D.
Changing a TextureAs with most of the other game engines, Moviestorm includes tools that sup-port modification of the existing art. Unlike many engines, these tools areboth user-friendly and bundled with the game itself. (It’s worth noting thatthey’re still not officially supported by Moviestorm Ltd., so please don’tshout at them if they don’t work!)
326 Part IV: The Final Frontier: Pro Machinima
24_096918 ch17.qxp 7/20/07 11:17 AM Page 326
Say that you’re tired of your character’s hair. In our movie, it’s a big, floppyred haircut, and frankly it’s getting a bit much. We want to change it.
1. Save your project, close it with the button at the top right, and thenselect Go To Main Menu from the window that appears.
Go all the way back to the Moviestorm Start screen where you initiallycreated a movie.
2. Click Settings.
3. From the Settings window, select the tab marked Modder’s Workshop;read the scary warning, take a deep breath, and click Go To Workshop.
4. In the Select A Model window that appears, click Male01.
We make this selection because we want to alter an asset — in this case,some hair — that is normally used by the Male01 model.
5. From the drop-down box that currently says Tile Editor, select BodyParts.
Now you’re into hot body-part-editing action.
6. Scroll down the window with pictures of body parts until you find theone that looks like the hairstyle you selected for your narrator andclick it.
It will have the same name as it did in the Puppet Shop — in our case,Hair – Medium.
You see a whole bunch of information about this model, over on theright side of the window with the body parts in it. You could, for exam-ple, reassign this hair as a prop so that characters could carry it aroundlike a toupee! You can also change the 3D mesh here if you’ve made anew model (see Chapter 17 for more on 3D modeling). But right now,you’re going to alter the textures under Materials.
7. Drag the window you’re working on further down your screen.
Behind it, the model you currently have selected appears in the 3D view.
8. Click the Material listings until you find the hair color you used.
The 3D model changes as you select each color.
9. Click Edit Material below the Material listings.
Yikes! More information. Fortunately you need only one piece, and that’sthe name of the Diffuse material. (Diffuse Map is the term Real 3D Artistsuse to refer to the base texture map for an object.)
327Chapter 17: A Storm Is Brewing: Moviestorm
24_096918 ch17.qxp 7/20/07 11:17 AM Page 327
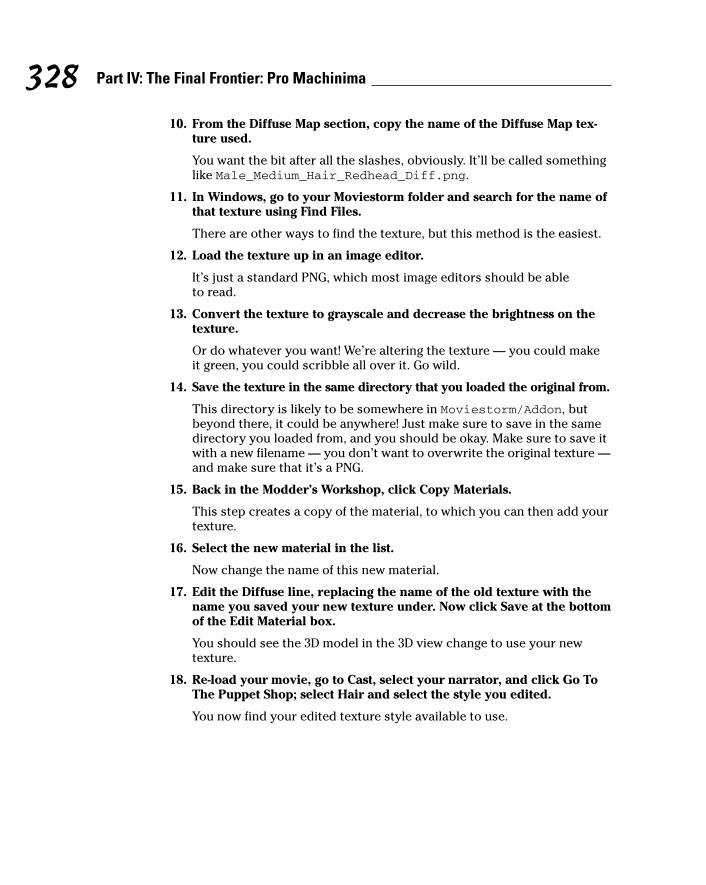
10. From the Diffuse Map section, copy the name of the Diffuse Map tex-ture used.
You want the bit after all the slashes, obviously. It’ll be called somethinglike Male_Medium_Hair_Redhead_Diff.png.
11. In Windows, go to your Moviestorm folder and search for the name ofthat texture using Find Files.
There are other ways to find the texture, but this method is the easiest.
12. Load the texture up in an image editor.
It’s just a standard PNG, which most image editors should be ableto read.
13. Convert the texture to grayscale and decrease the brightness on thetexture.
Or do whatever you want! We’re altering the texture — you could makeit green, you could scribble all over it. Go wild.
14. Save the texture in the same directory that you loaded the original from.
This directory is likely to be somewhere in Moviestorm/Addon, butbeyond there, it could be anywhere! Just make sure to save in the samedirectory you loaded from, and you should be okay. Make sure to save itwith a new filename — you don’t want to overwrite the original texture —and make sure that it’s a PNG.
15. Back in the Modder’s Workshop, click Copy Materials.
This step creates a copy of the material, to which you can then add yourtexture.
16. Select the new material in the list.
Now change the name of this new material.
17. Edit the Diffuse line, replacing the name of the old texture with thename you saved your new texture under. Now click Save at the bottomof the Edit Material box.
You should see the 3D model in the 3D view change to use your new texture.
18. Re-load your movie, go to Cast, select your narrator, and click Go ToThe Puppet Shop; select Hair and select the style you edited.
You now find your edited texture style available to use.
328 Part IV: The Final Frontier: Pro Machinima
24_096918 ch17.qxp 7/20/07 11:17 AM Page 328
Rendering Out the Final VersionAfter you’ve set up your movie, your characters, and all your cameras, aswell as tweaked every bit of the movie to your exact taste, it’s time to renderout the final version so that it can be enjoyed by everyone. Go on, send yourmom a copy. She’ll be so proud.
1. Go to the Director’s View and click Wrap And Render This Scene.
The Render Settings window appears.
2. Choose the directory you’d like to render to using the Browse buttonand then choose a filename to save your movie as.
3. Click the green check to start the rendering process.
Don’t move the window or do anything else with the computer, unlessyou want your e-mail memorialized in virtual celluloid.
The final version of the movie is rendered, and Moviestorm switchesbetween cameras as you’ve commanded it to. Depending on the speedof your computer and the length and complexity of your movie, thisprocess can take a few minutes — a progress bar keeps you updated.Put the kettle on. Black with no sugar for us — we are hackers, after all.
A shiny new video file appears in whichever directory you specified. You cannow edit that movie in whatever movie editor you please. Chop it together,delete the slow bits, slap some titles in, and you’re done, done, done!
Going FurtherWe think Moviestorm is going to be huge. And whilst we’ve covered many ofits features, we’ve really only scratched the surface of what it can do andwhat you can achieve with it.
If you want to find out more and interact with other Moviestorm users as everyone learns how to use and exploit this tremendously exciting tool,your best bet are the official Moviestorm Web pages and forums, atwww.moviestorm.co.uk.
329Chapter 17: A Storm Is Brewing: Moviestorm
24_096918 ch17.qxp 7/20/07 11:17 AM Page 329

330 Part IV: The Final Frontier: Pro Machinima
24_096918 ch17.qxp 7/20/07 11:17 AM Page 330

Chapter 18
Build a Better Mousetrap: GoingBeyond Engine Limitations
In This Chapter� Writing tools to assist in production
� Modifying game files to remove limitations
� Extending game engines
Machinima is great. (If you don’t agree, according to the invisible shrink-wrap license you signed when you opened this book, large men will now
be traveling to your door to do you injury.) But sometimes, you’ll just hit a brickwall: Either your chosen engine can’t do what you want, or there’s somethingabout it that’s just constantly irritating. Well, we’re here to relieve the irritation,like a brand-name nonprescription drug we can’t name for fear of a lawsuit.
There are a whole bunch of things you can do to improve your engine’s utilityfor Machinima. You can create new content for it, of course. You can alsowrite tools and extensions to make it a better Machinima platform. And, if allelse fails, you can pull on your elite, ninja black-hat outfit and hack the engineuntil it finally breaks and agrees, sobbing, to do your bidding.
Improving Your Engine’s UtilityThere are a lot fewer limitations on your Machinima creation than you maythink:
� New tools: You don’t know how much a new tool can improve yourMachinima production until you build one. No matter what task you’retrying to accomplish, the chances are that you can do something withyour engine to make it easier.
� New stuff: And by stuff, we mean actual, physical stuff. New, funky mice.New keyboards. New input devices. Entirely new PCs. All these thingscan make your Machinima work easier, at the cost of mere cash.
25_096918 ch18.qxp 7/20/07 11:17 AM Page 331

� New limits: Game developers have a tendency to hard-code certainlimits into their games — by hard-code, we mean include in the sourcecode for the game. But that’s not as insoluble a problem as you’d think.Want to make your camera go out further? Or reduce the size of a char-acter’s bounding box? You can (probably) do it.
� New angles: And there are more ways to skin a cat, Horatio, than aredreamt of in your philosophy. Or something. Your game isn’t runningin a vacuum: There’s a whole bunch of underlying code and hardware,from the operating system to the monitor, that makes it go. You can turnthese dependencies to your advantage.
But is it worth going to all this effort? It’s worth remembering that timeyou’re putting into hacking your engine, investigating obscure memoryexploits and coding new user interfaces, is time you’re not spending makingyour film.
In general, it’s probably not worth getting with the hackery if:
� You’re working on a very small project. If you’re only making a minute-long Machinima film, it’s not worth spending a week customizing thegame’s user interface.
� You’re hacking in expectation of likely needs. It’s easy to say “Oh, we’lldefinitely need lipsynching/larger characters/whatever”. Don’t hack untilyou’re sure.
It definitely, definitely is worth looking into hacking at your engine if:
� You’re losing time or patience to a problem. If there’s something that’ssignificantly slowing down your shooting, and if you’re going to bespending more than a few weeks on your movie, find a way to fix theproblem.
We said, “Oh, it doesn’t matter” many times on BloodSpell, We werewrong almost every time. Nearly every tool we created came as a hugerelief, a major morale boost, and a significant productivity improvement.See “Interpreting data” later in this chapter, for an example.
� It will make a huge difference to the end result — particularly if it’sgoing to meaningfully differentiate your movie from other Machinimawork. Visual quality and cool tricks are both excellent ways to getnoticed. It can be worth spending weeks or even months to achieve theextra 5-percent quality that will make the difference between a user-pageon YouTube and the front page of YouTube.
332 Part IV: The Final Frontier: Pro Machinima
25_096918 ch18.qxp 7/20/07 11:17 AM Page 332
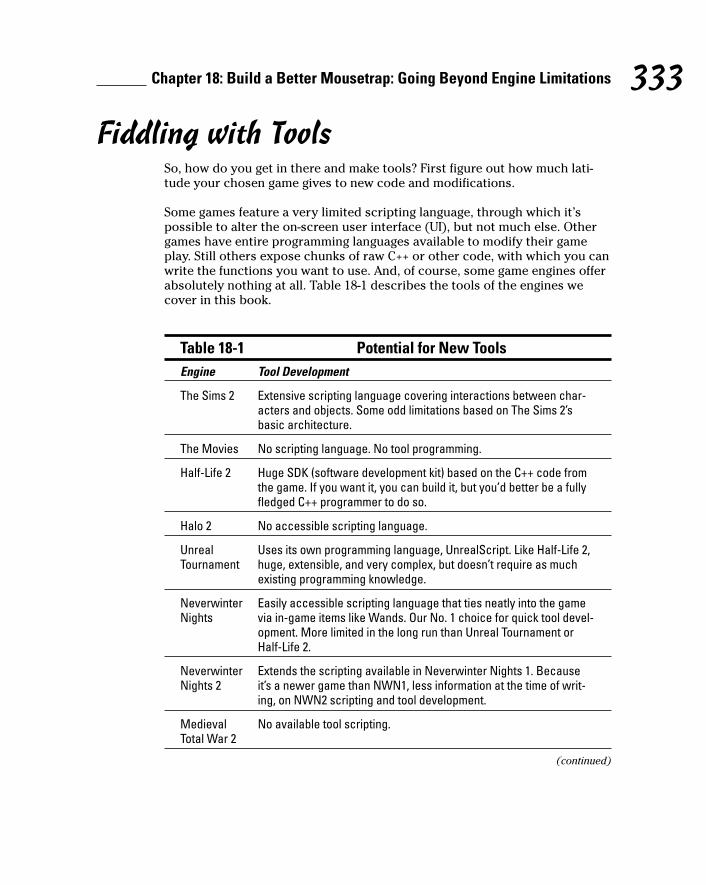
Fiddling with ToolsSo, how do you get in there and make tools? First figure out how much lati-tude your chosen game gives to new code and modifications.
Some games feature a very limited scripting language, through which it’s possible to alter the on-screen user interface (UI), but not much else. Othergames have entire programming languages available to modify their gameplay. Still others expose chunks of raw C++ or other code, with which you canwrite the functions you want to use. And, of course, some game engines offerabsolutely nothing at all. Table 18-1 describes the tools of the engines wecover in this book.
Table 18-1 Potential for New ToolsEngine Tool Development
The Sims 2 Extensive scripting language covering interactions between char-acters and objects. Some odd limitations based on The Sims 2’sbasic architecture.
The Movies No scripting language. No tool programming.
Half-Life 2 Huge SDK (software development kit) based on the C++ code fromthe game. If you want it, you can build it, but you’d better be a fullyfledged C++ programmer to do so.
Halo 2 No accessible scripting language.
Unreal Uses its own programming language, UnrealScript. Like Half-Life 2, Tournament huge, extensible, and very complex, but doesn’t require as much
existing programming knowledge.
Neverwinter Easily accessible scripting language that ties neatly into the game Nights via in-game items like Wands. Our No. 1 choice for quick tool devel-
opment. More limited in the long run than Unreal Tournament orHalf-Life 2.
Neverwinter Extends the scripting available in Neverwinter Nights 1. Because Nights 2 it’s a newer game than NWN1, less information at the time of writ-
ing, on NWN2 scripting and tool development.
Medieval No available tool scripting.Total War 2
(continued)
333Chapter 18: Build a Better Mousetrap: Going Beyond Engine Limitations
25_096918 ch18.qxp 7/20/07 11:17 AM Page 333
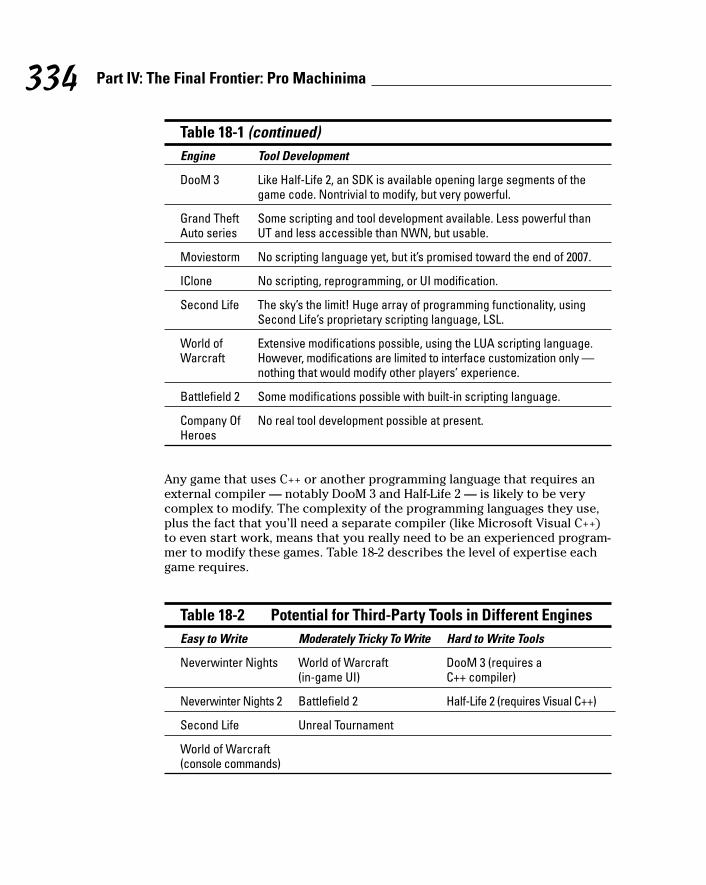
Table 18-1 (continued)Engine Tool Development
DooM 3 Like Half-Life 2, an SDK is available opening large segments of thegame code. Nontrivial to modify, but very powerful.
Grand Theft Some scripting and tool development available. Less powerful than Auto series UT and less accessible than NWN, but usable.
Moviestorm No scripting language yet, but it’s promised toward the end of 2007.
IClone No scripting, reprogramming, or UI modification.
Second Life The sky’s the limit! Huge array of programming functionality, usingSecond Life’s proprietary scripting language, LSL.
World of Extensive modifications possible, using the LUA scripting language. Warcraft However, modifications are limited to interface customization only —
nothing that would modify other players’ experience.
Battlefield 2 Some modifications possible with built-in scripting language.
Company Of No real tool development possible at present.Heroes
Any game that uses C++ or another programming language that requires anexternal compiler — notably DooM 3 and Half-Life 2 — is likely to be verycomplex to modify. The complexity of the programming languages they use,plus the fact that you’ll need a separate compiler (like Microsoft Visual C++)to even start work, means that you really need to be an experienced program-mer to modify these games. Table 18-2 describes the level of expertise eachgame requires.
Table 18-2 Potential for Third-Party Tools in Different EnginesEasy to Write Moderately Tricky To Write Hard to Write Tools
Neverwinter Nights World of Warcraft DooM 3 (requires a (in-game UI) C++ compiler)
Neverwinter Nights 2 Battlefield 2 Half-Life 2 (requires Visual C++)
Second Life Unreal Tournament
World of Warcraft (console commands)
334 Part IV: The Final Frontier: Pro Machinima
25_096918 ch18.qxp 7/20/07 11:17 AM Page 334
You can do some tool development in the editor of a game, without touchingcode. It’s possible to set up triggers, scripted sequences, camera moves, andspecial effects in the editors for Half-Life 2 and Unreal Tournament, in particu-lar, without ever having to touch a line of code.
What Can You Do with Tools?Most tools automate a task that you can do manually, but that would bewickedly hard, frighteningly repetitive, or both. Sometimes you’ll use a toolto access an aspect of the engine that you otherwise couldn’t. For example,you can trigger a special effect that’s normally played randomly or remove afeature that the game enables by default.
Here are a few tools that you can create for most engines:
� Store a character’s position and teleport him back to it.
� Store a character’s position and have him walk there.
� Store a camera location and orientation.
� Trigger an explosion special effect.
� Play a simple camera script, such as a circling shot or a zoom.
� Set up several characters in a formation and have them hold that forma-tion when walking.
� Have two characters fight.
� Have two characters walk to positions as if to fight — but then don’t —very, very useful.
� Make characters ignore in-game health rules — because there’s nothingmore annoying than spending ages setting up for a shot, only to haveone of your principal actors finally run out of hit points and die.
Some things aren’t possible in a game where you’re not allowed to modify theserver. In World of Warcraft, for example, you can’t make your character invul-nerable, for obvious reasons. And while you can make computer-controlledactors in Second Life, it’s not easy, and the people who run the game aren’tvery fond of you doing it!
The approach we’re taking here is, in some ways, very similar to the way thatyou can create scripted movies. Tools can indeed include Machinima scripts.If you need a particularly complex camera movement in Neverwinter Nights,for example, you can write it in a script and then cue it from a wand in-game.
335Chapter 18: Build a Better Mousetrap: Going Beyond Engine Limitations
25_096918 ch18.qxp 7/20/07 11:17 AM Page 335

You also need to choose how your tool is activated. Most games have threebasic options:
� Console command: The simplest way to trigger a tool, in most games, isby using the in-game console. Most games include a developer’s console,like a command prompt, originally intended for the game developers toinput commands to help them test and design the game. Adding com-mands to the console to do your evil bidding is usually pretty easy. Ifyou want an example of using console commands, check Chapter 9; weuse console commands in The Sims 2 to set up our filming environment.
� In-game item: You can tie a tool to an in-game item. Often, this optionallows you to select the thing you want the item to operate on, by shoot-ing it with a gun or clicking it as if you were going to cast a spell in thegame. You can even re-purpose existing items in the game that you’renot using for your film, which saves on the coding you’ll have to do.In Chapter 9, we use the Pawfect Films Sims 2 Studio item, which usesthe logic of Sims 2 items to do its work.
� UI: You can access the same tools that the game developers use to buildthe game’s user interface. The most user-friendly option, it’s also themost work. In Chapter 12, we use CameraPlus, a World of Warcraft add-on that extends the World of Warcraft UI.
Scripting in Your EngineWe can’t cover all the engines here, thanks to lack of space, but fortunatelywe don’t need to. Thousands of resources on the Internet can show you howto script add-ons for any game you care to mention. Table 18-3 provides aquick list of the top resources for the games covered in this book.
336 Part IV: The Final Frontier: Pro Machinima
What about World of Warcraft?World of Warcraft is clearly the odd engine out.You can’t control monsters, and you can’tchange the game, so what use are tools? Well,here are some things you can do:
� Set up tools to give smooth, pre-set cameramovements.
� Save your favorite shooting locations —even direct yourself back to them if you getlost!
� Set up commonly used chat commands(Ready . . . Action!) to use automatically.
� Track the locations of your cast and crew ina window so that you know when they’regoing to arrive for a shoot.
You can do less in World of Warcraft than othergames in which you have more control, but toolscripting is still useful.
25_096918 ch18.qxp 7/20/07 11:17 AM Page 336

Table 18-3 A Resource Guide to Scripting Add-OnsGame Site
Neverwinter http://nwvault.ign.com/dm/scripting/course. Nights Step-by-step guide to learning to code in NWN.
http://nwn.bioware.com/forums/viewforum.html?forum=47. The official NWN coding forums. If you havea question, chances are it’s been asked here.
Neverwinter http://nwn2forums.bioware.com/forums/Nights 2 viewforum.html?forum=114. The official NWN2 coding
forums. Still quite new, but filling up nicely.
Second Life In-game resources. Second Life itself includes extensive scriptingtutorials that can get you started on tool development in SL.
LSL Wiki at http://lslwiki.net/lslwiki/wakka.php?wakka=HomePage.
World of www.wowwiki.com/Interface_Customization. Every-Warcraft thing you possibly need to know about World of Warcraft scripting.
http://forums.worldofwarcraft.com/board.html?forumId=11114&sid=1. The official World of WarcraftUI development forums.
Battlefield 2 http://bfeditor.org/forums. Extensive discussions onBattlefield 2 modding.
Unreal http://udn.epicgames.com/Main/WebHome.html. Tournament The Epic Megagames guys love and support UT modding like doting
parents. There’s more info here on the various Unreal engines thanyou can shake the proverbial stick at.
http://wiki.beyondunreal.com/wiki/UnrealScript_Lessons. Part of the generally useful UnrealWiki; a series of lessons on UT scripting and development.
The Sims 2 www.modthesims2.com. The tutorials at MTS2 are fairly com-prehensive, beginner to advanced.
www.sims2wiki.info/wiki.php?title=Sims_2_Modding. Tons of specific info on all aspects of Sims 2 editing.
DooM 3 www.iddevnet.com/doom3. Not terribly organized, butchock-full of DooM 3 information.
Half-Life 2 http://developer.valvesoftware.com/wiki/SDK_Docs. A bit thin given the depth of the engine, but still agood resource for HL2 modding.
337Chapter 18: Build a Better Mousetrap: Going Beyond Engine Limitations
25_096918 ch18.qxp 7/20/07 11:17 AM Page 337

Many more resources are available than the ones we list, particularly for thepopular games. Google is your friend.
Developing Tools: An ExampleOn BloodSpell, we noticed that our shooting script featured a whole lot ofcharacters gushing blood for various reasons. However, there was no easyway to cause our characters to do that. A few experiments with hitting themwith sticks, swords, and broken bottles proved unsuccessful (no, we’re notjoking), so we decided to investigate the world of tool development.
Fortunately, we were working in Neverwinter Nights, which makes it easyto set up tools to control characters, using its in-built scripting language.Because Neverwinter Nights already has in-game items called wands, whichperform an effect on a target, we knew we would be creating this tool as aBlood Wand. We started by opening up the Neverwinter Nights Editor. Wewanted our wands to be available to us in-game as inventory items, so wecreated an item called Blood Wand (see Figure 18-1). Our investigation of theavailable item properties didn’t show us a way to link the item to a script, sowe Googled for how to tie wand to script nwn. The results from that search ledus to the Neverwinter Nights scripting forums. Posts there told us that wehad to give the item a Use Unique Power ability and a distinctive tag to trig-ger a script. We decided on a tag of bs_blood.
Figure 18-1:Creating an
item inNeverwinter
Nights.
338 Part IV: The Final Frontier: Pro Machinima
25_096918 ch18.qxp 7/20/07 11:17 AM Page 338

Then, we had to activate a script in OnActivateItem, according to http://nwn.bioware.com/forums/viewtopic.html?topic=81523&forum=47.We Googled the term OnActivateItem: The first result told us we neededsomething called tag-based scripting. Go go gadget Google!
The second Google result led us to a detailed explanation of what this mysticterm meant and how it worked (http://nwn.bioware.com/forums/viewtopic.html?topic=480881&forum=47). This forum post and itslinks told us to check that we had the script x2_mod_def_act set up forOnActivateItem (aha!). It turned out the script was set already, as was themodule variable another tutorial mentioned. The NWN editor had beenupdated since that tutorial was written and, handily, had set these things asdefaults!
Now all we had to do was to write a script, with the same name as the tag ofthe item. So, to the script editor we went. The script from that tutorial lookeda bit frightening, so we Googled around a bit more and found a NWN toolcalled LilacSoul’s Script Generator: Perfect for us.
We clicked through the Unique Item Script dialog options in LilacSoul’s tool.It all looked good, aside from the fact that it didn’t have the option to gener-ate a script that would spew blood — not a big surprise! But we figured, withconsiderable optimism, that we could adapt it easy enough, so we chosesomething that looked similar: the Add Effect script. The tool produced this:
/* Script generated byLilac Soul’s NWN Script Generator, v. 2.3
For download info, please visit:http://nwvault.ign.com/View.php?view=Other.Detail&id=4683&id=625*/
void main(){object oPC;
if ((GetObjectType(GetItemActivatedTarget())!=OBJECT_TYPE_CREATURE)){
return;}object oTarget;
oTarget = GetItemActivatedTarget();effect eEffect;
eEffect = EffectDeath();ApplyEffectToObject(DURATION_TYPE_TEMPORARY, eEffect, oTarget, 60.0f);
}
Then we had to figure out what we should change to make blood, not war. Anobvious candidate was the EffectDeath thing. We didn’t know what it did,exactly. Reading the script editor’s documentation, we learned there were abunch of Effect functions, including EffectVisualEffect, which appar-ently created a visual effect. That sounded like what we were looking for.
339Chapter 18: Build a Better Mousetrap: Going Beyond Engine Limitations
25_096918 ch18.qxp 7/20/07 11:17 AM Page 339

The text for that function talked about a Visual Effect ID. We didn’t know whatone of those was either, but a bit more Googling led us to believe that weneeded a special number from a VisualEffects.2da file, which is a datafile for Neverwinter Nights.
We opened a copy of VisualEffects.2da from our Neverwinter Nightsdirectory, and lo and behold, found a massive list of potential visual effects.Number 115, VFX_COM_BLOOD_CRT_RED sounded good — a Critical RedBlood effect. We modified eEffect = EffectDeath(); to read eEffect= EffectVisualEffect(115); and saved our set.
We loaded our game, created a Blood Wand, clicked a creature with it, and lo,did spurting of blood ensue.
As you can see, we didn’t know how to create our tool, or indeed any tool, inNWN, before we began. You can use a similar process with most games tocobble together some code into a tool you can use. Your code may not bepretty. It may be something real programmers would laugh at. But if it doesthe job, that’s all that matters.
Considering Hardware Add-OnsSurely a new mouse can’t improve your Machinima production? Well, actu-ally, yes, it can, if it gives you a smoother action for better camerawork, ormore buttons to fire actions easily. Table 18-4 describes a few add-ons thatcan improve your Machinima experience.
Table 18-4 Add-Ons to ConsiderAdd-On Description
Dual-Core If you’re using FRAPS or another real-time video capture solution, this CPU one’s a must. Essentially, it gives you two PCs in one box. With this
and a second hard drive, you can record video using FRAPS at up tohigh-definition quality.
Nostromo As used by the ILL Clan of New York for its live performance Machinima. keypad The Nostromo is a programmable, palm-sized keyboard replacement
designed for gaming, but very useful for Machinima, giving youdozens of commands at your fingertips.
340 Part IV: The Final Frontier: Pro Machinima
25_096918 ch18.qxp 7/20/07 11:17 AM Page 340

Add-On Description
Bigger One of the best investments you can make for your Machinima. A larger monitor monitor allows you to work faster and more efficiently when editing.
It also gives you a better view when filming, and if you buy a wide-screen model, you can easily shoot in 16:9 resolution.
Steering A lot of the time, a mouse is absolutely the worst input device for, say, wheel smooth camera movements. A lot of people automate or script their
pans, tracks, and so on for exactly this reason. But there’s anotherway: Control your pans exactly the same way that film cameramencontrol their cameras, by using a wheel. Tied to the appropriate con-trols, you can easily achieve smooth pans and tracks. Make sure thatyou get one with full rotation.
If you don’t want to shell out for a wheel, many Machinima creatorsalso swear by a good joystick for smooth camera control.
Another If you’re filming using a multiplayer game over a network, here’s a very PC simple rule: You want as many PCs available as possible. On BloodSpell,
we routinely worked with two PCs for each person in a two-mancrew, which allowed us to run a lot more characters simultaneously.With more PCs, you can run your game server (if it’s a game that has aserver) on a separate machine, giving you the best performance pos-sible, and if necessary control multiple characters at once.
External If you’re working on a project that takes you more than a few days, some storage kind of backup is not optional. Fortunately, you can buy huge external
hard drives for very little money these days: a 500 GB drive, at the timeof writing, sets you back about $200. Make sure to back up your footageusing a lossless codec (we use HuffYUV) every day after shooting.
Nintendo The Wii console has intriguing possibilities for Machinima. You can Wii adapt its motion-sensing controller (the Wiimote) to work with a PC
using standard Bluetooth drivers. Once you’ve done that, you’ve gotthe best possible controller for hand-held Machinima shooting and anexcellent controller for Machinima camerawork in general.
Motion Now we’re getting a bit futuristic. But, as the Wii shows, motion capture Capture is coming to the home, and it’s coming fast. You can already buy mocap-equipment capable cameras from NaturalPoint (www.naturalpoint.com)
for about $200 each, and they’re promising a full motion-capture solu-tion using these cameras by the end of 2007. You need to do quite a bitof processing with a 3D package to get the best use out of mocapright now, but the potential is absolutely fantastic.
341Chapter 18: Build a Better Mousetrap: Going Beyond Engine Limitations
25_096918 ch18.qxp 7/20/07 11:17 AM Page 341

Removing LimitationsIt will take you about, ooh, five or ten minutes to find some programmed limi-tation in your Machinima software that will really annoy you. Tops. Probablyless. Whether it’s a character who won’t quite turn his head far enough or adoorway that’s somehow mysteriously too small for your characters to getthrough, it’ll irritate the heck out of you.
Fortunately, you can investigate a whole pile of options to fix or remove yourproblems by changing data in the game:
� In-game menus: Before you go mad with the hacking tools, check thatthe thing that’s annoying you isn’t accessible through the in-game menus.In World of Warcraft, for example, the weather effects can really interferewith your filming. You can hunt for the shaders responsible inside theWorld of Warcraft data files, but it’s probably easier to just use the various sliders under Video Settings to turn them down.
� Key bindings: Make sure that a key isn’t already available that does whatyou want. Many games don’t list their keyboard commands anywherebut in their bind keys menu. For example, World of Warcraft’s keyboardbindings include Hide HUD (to hide all the in-game menus and just showthe 3D view), Sit/Stand, and Draw Weapons, all useful for Machinima.
� Console commands: Many games have a developer console hiddenwithin the game, from which you can access all sorts of useful options.The simplest way to find out what you can do with this console is likelyto be to Google “console commands *NAME OF GAME*”: ConsoleCommands Half-Life 2, for example.
Before you start filming with any new engine, find out whether yourengine has a console, and if so, what you can do with it. For example,Half-Life 2 has literally hundreds of console commands, allowing you tohide the HUD, hide your weapon to give a full-screen camera, execute anin-game script file, and more.
� Command-line options: Different to console commands, these commandsare given to the game at the time you run it. In general, they deal withsetting the game to a specific mode, such as developer mode, dungeonmaster mode, or a mode where intro movies aren’t played. You normallyadd a command-line option by editing the shortcut you use to run thegame and changing the program name or target from, say, C:\ProgramFiles\EA Games\Battlefield 2\BF2.exe to C:\ProgramFiles\EA Games\Battlefield 2\BF2.exe +menu 1 +szx 1280+szy 1024’.
For example, in Neverwinter Nights, you can run nwn.exe –dmc to startthe game up with the DM Client active.
342 Part IV: The Final Frontier: Pro Machinima
25_096918 ch18.qxp 7/20/07 11:17 AM Page 342
� Configuration files: Virtually every game has a series of configurationfiles in which the settings for that particular game are stored. These configuration files also often affect additional settings that you can’taccess from the game. You can most easily find out where and what theconfiguration files for your game are with a quick Google search, à laNeverwinter Nights 2 configuration files. You can also simply open yourgame’s folder and look for either directories or files named somethinglike Config or .cfg. For an extensive example of using configurationfiles in a game, see Chapter 9, where we use The Sims 2 config files tochange camera speeds.
� Data files: Ah, now we’re getting hardcore. All game engines have tostore a wide range of data about the game they’re currently running.This data may be model texture names, values for the size of collisiondetection boxes, or the maximum angle a character can turn his head.If you change this data, you can change the way your game engineworks — to the better for Machinima.
Again — and we’re sure you’re sick of us saying this — how you accessthis data depends on the game engine you’re using. Most likely the datawill be sorted in individual files, probably text files, packaged up inside alarger file called a package file. You need to find a program to let youextract these text files. (See the sidebar “Package extractors” for moreon this topic.)
Interpreting dataAfter you’ve extracted your files, you’ll probably be looking at a big pile ofdata in a text file. You’ll have to figure out what that data means! Searchthrough modding forums and sites for your game to see whether anyone hasalready decoded the format of these files.
Ideally, try searching on terms you find inside the files to get more informa-tion. Other than that, try making your best guess as to what any value is usedfor and then change it, run the game, and test to see whether the change youpredicted has occurred. This sounds like a painful process of trial and error,but the results can be hugely beneficial for your Machinima.
In BloodSpell, production was plagued for over a year by a blue halo thatappeared around any character over which a mouse pointer was hovering.As we discovered late in production, this apparently insoluble behavior wascontrolled by a single line in Neverwinter Nights’ appearance.2da file,which governs creature behavior. Five minutes with a text editor allowed usto eliminate a problem that had frustrated us for months.
343Chapter 18: Build a Better Mousetrap: Going Beyond Engine Limitations
25_096918 ch18.qxp 7/20/07 11:17 AM Page 343

Hex editingIf all else fails and you really want to change a specific detail in your game,and it has a number associated with it that you’re fairly sure of, then youhave one final option: Hex edit your game’s executable program file.
This approach is pretty technical. You take the compiled program that runsyour game and edit it at the machine-code level to change your chosenvalue to a different one. Don’t try this unless you’re reasonably comfortablewith code.
Hex editing is another trial-and-error process. You search through the hexcode of the program and change all the instances of your chosen numberuntil one works.
344 Part IV: The Final Frontier: Pro Machinima
Package extractorsHandily, uber programmers like to write pack-age extractors for the games they play. For the
games in this book, you can use the packageextractors described in the following table:
Game Package Extractor
The Sims 2 SimPE, available from http://sims.ambertation.de.
The Movies PakPoker, available from http://themovies.filefront.com/file/Pak_Poker;54205 (doesn’t work with downloaded versions of the game or expansion).
Half-Life 2 VTF Explorer, available from http://www.hl2source.com/?content=projects&id=vtftool.
Halo 2 Ch2r, available from http://sourceforge.net/projects/ch2r(Halo 2 is very unfriendly to edit, and so this isn’t a complete solution).
Unreal Doesn’t have an unpacker as such, although you can view most of the data Tournament files in the editor or online.2003/2004/2007
Neverwinter NWNExplorer, available from http://nwvault.ign.com/View.php?Nights view=Other.Detail&id=248.
Neverwinter NWN2Packer, available from http://nwvault.ign.com/View.php?Nights 2 view=NWN2Tools.Detail&id=9.
25_096918 ch18.qxp 7/20/07 11:17 AM Page 344

A huge number of hex editors are available on the Internet. We recommendHxD from http://mh-nexus.de/hxd (on the book’s DVD). It includes auseful Find/Replace function that automatically translates floating-point num-bers to and from hexadecimal notation.
To hex-edit your game into submission:
1. Find the number that you want to edit.
It is, practically speaking, only possible to change hard-coded singlenumbers or text strings using this process. Usually, you’re changingsomething like a camera constraint. We used this method to hex-editNeverwinter Nights to allow us to move a camera all the way above ourcharacters.
345Chapter 18: Build a Better Mousetrap: Going Beyond Engine Limitations
Game Package Extractor
Medieval Comes with an unpacker program, found in Medieval II Total War\Total War 2 tools\unpacker.
DooM 3 DooM 3 uses the .pk4 package format, which is identical to a .zip file.Use any .zip file extractor to extract files.
Grand Theft A selection of unpacking tools are available from www.thegtaplace.Auto series com/pafiledb.php?action=category&id=3.
Moviestorm No unpacking tool needed.
IClone No unpacking tool needed.
Second Life No unpacking tool needed.
World of MyWarcraftStudio, available from www.wowmodelviewer.org/index.Warcraft option=com_remository&Itemid=35&func=fileinfo&
id=12.
Battlefield 2 The Battlefield 2 Map Editor works in a similar way to an extractor —www.ea.com/official/battlefield/battlefield2/us/editorial.jsp?src=mod_editor.
Company Of The Company of Heroes Mod Studio, available from http://wiki.Heroes reliccommunity.com/Modding:Mod_Studio_Usage_Guide.
If you’re looking for an extracting tool for othergames, start by searching for something likeNAME_OF_GAME file extract. If thatdoesn’t work, search for NAME_OF_GAME
modding information and look for mod-ding utilities. These utilities usually includesome kind of file extractor.
25_096918 ch18.qxp 7/20/07 11:17 AM Page 345

2. Learn or guess the number that you need to change.
For example, we knew from patch notes from the game that the enginewas locked to 60 degrees above the horizontal.
3. Copy the main program file (almost always a .exe under windows)and save the copy somewhere safe.
You’ll be reverting to it if it all goes wrong.
4. Open the main .exe file for the game in your hex editor.
5. Open the Find/Replace function, find the first instance of the valueyou’re trying to change, and replace it with the value you’d like to use.
In this case, we replaced 60.0 with 90.0.
6. Run the game to see whether the value you were hoping to changehas indeed changed.
If it has, great! If not, go to Step 7.
7. If necessary, delete the .exe you modified, replace it with anothercopy of your pristine .exe file, and try the process again, this timeonly changing the second instance of that value.
If that doesn’t work, try the third instance. And so on.
As you can see, this technique is pretty limited. It also works better for moreunique values. Finding an instance of 69.5 inside an .exe should be fairlyeasy, but if you’re trying to change a value of 1 or 0, you’ll be there for a while.But sometimes it’s the only way to get the game to do what you want it to do.
Trying New AnglesYou can almost always make a game engine do what you want. It’s just a caseof how much time and effort you’re willing to spend and how creative youcan be.
Your game doesn’t run in a vacuum. It depends on a whole ecosystem ofother programs to function, from the OpenGL or DirectX drivers that runyour graphics card, to Windows or Linux’s network code, to the ultra-lowlevel programs that change a sound file into voltage in a wire. You canemploy all of these programs, if necessary, to make your game do whatyou want.
346 Part IV: The Final Frontier: Pro Machinima
25_096918 ch18.qxp 7/20/07 11:17 AM Page 346

Likewise, don’t forget that you have plenty of options after you’ve recordedyour footage. If you really need to, you can use all sorts of conventional videotricks to apparently break the rules of the game — see Chapter 12.
If you’ve got a problem, and you absolutely have to fix it, grab the best pro-grammer you can find and brainstorm ways around it.
Absolutely need a cast of dancing orcs inside World of Warcraft? Perhaps youcan intercept the network traffic from the game and convince your enginethat it’s seeing orcs where there should be none. Need a Terminator 2–stylemorphing shot in The Sims 2? Why not use a 3D-capture program to capture astatic frame of a close-up of your character, take that into a 3D modeling pro-gram, and morph it there?
The sky’s the limit — but only until you hex-edit a way to move your camerahigher than the default skyline.
347Chapter 18: Build a Better Mousetrap: Going Beyond Engine Limitations
TOGLFaces: Going beyond the engineOn Strange Company’s first feature film,BloodSpell, we were facing a critical problemearly in production. We needed our characters’lips to move when they talked, but NeverwinterNights didn’t have any such functionality. Thiswas a complex feature — not something wecould data- or hex-edit. So we turned our atten-tion to the stream of information that the gamesends to the video card via the OpenGL driveron the machine. This data includes names of the2D images that the game uses as textures.
We wrote a program called TOGLFaceS (TakeOver GL Face Streams). This program interceptedthe OpenGL calls Neverwinter Nights made to ourgraphics card, replacing the face textures of ourcharacters with different images. We then tieddifferent images to different keyboard functions,depending on whether we needed our charac-ters’ mouths to be open or closed. Finally, weinstructed TOGLFaceS to pass the modifiedOpenGL stream to the graphics card. And, thus,we were able to produce a lip-synched movieusing an engine with no such feature.
25_096918 ch18.qxp 7/20/07 11:17 AM Page 347

348 Part IV: The Final Frontier: Pro Machinima
25_096918 ch18.qxp 7/20/07 11:17 AM Page 348
Chapter 19
Pro Machinima?In This Chapter� Going pro with Machinima
� Getting a job as a Machinima developer for a games company
� Starting your own production company
You may be perfectly happy just making Machinima in your spare time — and that’s great! In fact, it’s what we’re most excited about:
Machinima as a way to make films without devoting your life to the process.
But you may enjoy Machinima so much that you want to make it your dayjob. A few years ago, that would have been virtually impossible, but thesedays, it’s possible, if still far from easy.
Even if you try, you may not succeed — there’s still not a lot of space for full-time Machinima creators. If you want to give it a try, then this chapteris for you.
Getting Hired by a Games CompanyIt used to be the case that finding a game with good cinematography or greatcut-scenes was a rare occurrence. These days, thankfully, most game devel-opers realize that a game is a story as much as a puzzle, and that having agood cinematographic vision can benefit their game immensely. Somebodyhas to be employed to create these cut-scenes. If you’re an experiencedMachinima creator, you’ve got the CV for the job.
26_096918 ch19.qxp 7/20/07 11:17 AM Page 349
A lot of top-class games companies have hired talented people from theMachinima community, often on a permanent basis. We know of Machinimaenthusiasts who have been hired by Bioware, Shiny, Blizzard, and otherprominent companies. Strange Company has contracted for games compa-nies at various times as well.
The competition is tough — no matter how talented you may be, we can’tguarantee you’ll get anything other than rejection upon rejection — but thispath can be a very rewarding way of getting paid to do what you love.
Making Machinima for a living has some obvious benefits:
� Job security: No job is 100-percent secure, obviously, but you can relyon employment by a major games company to pay the bills more reli-ably than the income from your self-financed short movie. Pay scalescan vary for this type of job, depending on your expertise and the exactnature of the work that you’re doing, but they’re usually pretty competi-tive. Also consider the added security that a regular, salaried job bringsin terms of benefits such as pensions, dental plans, and so on.
� Company car (or maybe not!): You probably won’t get a company car,actually, but you will get access to the kind of tools that you probablywouldn’t be able to afford otherwise. As well as an expensive PC work-station with a huge flat-screen monitor, you may even be lucky enoughto be allowed to play with things like motion capture suites, high-endanimation packages, and editing tools worth thousands of dollars.
� An opinion that matters: Your input counts and will affect the final prod-uct that you’re working on. Perhaps the only decision you get to make isthe color of the lead character’s socks, but you might find you can signif-icantly influence the areas you’re working on.
� Great colleagues: You’ll be working with other talented people, fromwhom you’re sure to garner inspiration. We can’t promise that you won’tfind yourself working with obnoxious idiots, but in general your workcolleagues are likely to think the same way as you and be able to teachyou lots of impressive things.
It’s not all roses, though:
� Not your baby: Whatever you’re asked to work on, you’ll be followingsomebody else’s directions and attempting to realize somebody else’svision. If you’re the sort of person who has to run the show, this job maynot be for you.
� Busman’s holiday: It’s 8:00 in the evening. You just got back from a hardday at the office, mainly spent trying to force a buggy and undocumentedgame engine to do what you want it to do. Do you really want to boot up
350 Part IV: The Final Frontier: Pro Machinima
26_096918 ch19.qxp 7/20/07 11:17 AM Page 350
your own computer and open the editor for a different, equally buggy,equally undocumented game? If you make Machinima all day, you’llprobably not want to make it all night as well. Expect your own projectsto suffer because of it.
� This isn’t what I signed up for: Even though your Machinima skills maybe the thing that gets you hired in the first place, don’t expect to beallowed to just make Machinima all day. You’re going to have to developother skill sets, too, especially in a smaller task force.
� Stick it to the man: If you’re making your own movie, you can prioritizeyour artistic vision over anything else. A company producing a game,though, has a bottom line and certain targets that it has to meet. You’ll beasked — nay, told — to make a lot of fairly hefty compromises; and youwon’t like many of them.
If, after reading the pros and cons, you still want to get a job working for acomputer games company, here are a few quick tips to increase your likeli-hood of success:
� Keep watching the skies. Keep an eye out for vacancies. Most gamescompanies have a page on their Web site dedicated to current job vacancies. Check them all regularly.
� Cold call. Don’t bother e-mailing identical begging letters to everygames company whose URL you can remember. They won’t evenbe opened. If you’re going to make unsolicited contact (and you probably should), treat every application as a separate project. Find out the name of the person responsible for hiring and do someresearch into the company itself — then contact him with your bestfoot forward.
� Here’s one I made earlier. If you’ve never made a Machinima movie,there’s no way you’ll be hired as the Machinima consultant for BlizzardEntertainment (or wherever). Get some experience under your belt,preferably as varied as possible, and then put together a portfolio.Virtually every Machinima maker hired by a games company waspicked up on the back of a movie he made.
� Make your presence known. If you want to convince your prospectivenew employers that you’re one of the world’s top Machinima makers,you’ll have to provide some evidence. Any employer worth his salt isprobably going to hit the Internet to see how much the rest of the com-munity respects your opinions and looks to you for advice. Anticipatethis action. Start a blog. Answer some of the newbie questions on yourfavorite forum. Post on other Machinima maker’s sites and try to startsome interesting discussion. The more times your name appears, thebetter your profile will look.
351Chapter 19: Pro Machinima?
26_096918 ch19.qxp 7/20/07 11:17 AM Page 351

Starting Your Own Machinima CompanyBut what about starting your own Machinima production company full-time,and following in the footsteps of Strange Company, the ILL Clan, RoosterTeeth, and, er. . . .
Well, that’s the thing. There aren’t a lot of professional Machinima productioncompanies out there, and there’s a reason for that. And the reason, basically,is that you’ve got to be a bit mad to try to turn this particular activity into afull-time profession right now.
Having said that, Hugh did it. And it’s certainly possible for other people todo the same thing.
Hugh thinks he has one of the best jobs in the world:
� If you’re running the company, you’re your own boss. No one can dictate what you’re working on. If you want to dedicate the next twoyears to making a Machinima feature film, for example, you can.
� If you’re the boss of the company, you get the profits. You’ll have to be smart and lucky, but being a business owner is basically theonly way for your company’s success and your success to be thesame thing.
� Want to lead? If you’re working for yourself, you have to stay ahead ofthe pack. Because you’re in charge of the schedule, you can start pro-jects purely to test new techniques and advance your Machinima.
Most of Hugh’s friends and relatives think Hugh’s a bit mad:
� Even if you’re Red vs Blue, there’s not a lot of money in Machinima.Rooster Teeth is probably the most profitable Machinima company right now (they’re not saying for certain), but even it isn’t making a lot ofcash — $100,000 a year or more may sound like a lot, but split betweenfour or five people, it doesn’t go very far.
� Running a Machinima company is very, very hard. In addition tothe huge range of skills you need just to be a Machinima director,you also need to be able to project manage, sell projects, handleinvestors, write presentations, do bookkeeping and financial projec-tions, meet with lawyers, argue with bank managers, chase bills, andmore. Hugh learned the hard way, and things went off the rails morethan once.
352 Part IV: The Final Frontier: Pro Machinima
26_096918 ch19.qxp 7/20/07 11:17 AM Page 352

� It’s very tricky to come up with a steady income. In addition to theusual problems facing any media company (which are tough, tough,tough — ask anyone in the comics industry), you’ve got the added legalhassles presented by Machinima. Strange Company has survived byspending very little money, pulling in some big contracts, and generallybeing fast and light on its feet.
If you want to go ahead and start your own company, you’re either mad orbrilliant. As Captain Jack Sparrow said, it’s remarkable how often those twotraits coincide.
� Don’t spend money. This is Rule No. 1 — if you’ve got $40,000 to start,you’ve either got 1 year to get things going at $40k a year, or 4 years at$10k a year. Certainly at the start, if you really want to jump in with bothfeet and go pro right away, you need to be prepared to live on Ramennoodles and baked beans.
� Don’t quit the day job. That applies doubly to Machinima. If you haveany minimum income that you must have, be very careful about startingup pro Machinima full-time. There’s nothing wrong at all with running abusiness part time, whether that’s two days a week or in the evenings.
� Talk to everyone. Absolutely everyone. We’ve not even begun toexplore the avenues that Machinima opens in terms of business yet —there are a huge number of potential clients for a Machinima company.Talk to estate agents and architects (3D walkthroughs), talk to trainingorganizations, and talk to universities.
� Make sure that you charge enough. At the beginning, in particular, it’svery tempting to charge the minimum you think you can get away with,to ensure business. Remember these two rules: People value what theypay highly for, and the project will always take three times as long asyou expect.
� Get paid. You will deal with slow payment, late payment, or completeabsence of payment on a frequent basis. Make sure that you have asigned contract specifying how much you’re being paid before you doany work at all, and don’t be afraid to send out lawyer’s letters if you’renot getting paid. No money coming in will kill a business for certain.Try to get the money by being nice first, but if you’re coming to 30 daysafter agreed payment, it’s time to talk to lawyers.
� Enjoy the experience. Very few people will have the guts to start a business like this. Very few people will ever experience the joy of doingwhat they love as their working day. Remember to have fun. Even if it allgoes horribly wrong, it’ll still be a great experience, and it’ll give youdinner-party stories for years to come.
353Chapter 19: Pro Machinima?
26_096918 ch19.qxp 7/20/07 11:17 AM Page 353

354 Part IV: The Final Frontier: Pro Machinima
26_096918 ch19.qxp 7/20/07 11:17 AM Page 354
Part VThe Part of Tens
27_096918 pt05.qxp 7/20/07 11:17 AM Page 355
In this part . . .
This part contains three chapters, and each chapter hasten sections in turn. It’s like little fleas and lesser fleas,
only without the Black Death.
Want to learn which Machinima films are at the top of thegame right now? Or what sites on the World Wide Webare the places to go to discover more about Machinima?Or why the top Machinima creators work in this artform?Then you’re in the right place.
27_096918 pt05.qxp 7/20/07 11:17 AM Page 356

Chapter 20
Ten Machinima Films You Must Watch
In This Chapter� Catching inspiring, must-watch movies
� Viewing the classics that made Machinima what it is today
You wouldn’t write a book without reading one. You wouldn’t join a rock band if you’d never listened to a band with long hair and guitars.
Likewise, if you want to get some serious inspiration for your own Machinimamovies, you can start by watching the classics that have gone before. Wethink the movies listed here represent the best that Machinima has to offer.Most of them have won awards, and all are state of the art, or as the casemay be, state of the Machinima.
Oh, and they’re also all really good fun to watch.
You can watch a lot of these movies straight from the DVD that comes withthis book. We also have links to all of these movies at www.machinimafordummies.com.
AnnaYou’ll probably find the movie Anna on the top-ten list of every prominentMachinima maker in the world.
Anna tells the story of a flower, from birth as a seed to growth as a floweringplant, and beyond. This leisurely, visual-led movie has a wonderful auralbackdrop and a richly detailed visual world that is entirely custom contentcreated by Fountainhead Entertainment, the team behind the movie.Astonishingly, the engine behind it is the aging Quake III.
28_096918 ch20.qxp 7/20/07 11:17 AM Page 357

Anna plays to the strengths of Machinima very well. With one very brief excep-tion, the move contains no human characters, so Fountainhead is free to imbueits central character with the emotive flexibility that a human game characteroften lacks. The fact that the central character is a flower doesn’t seem to deterthe company; Anna succeeds as a moving and an elegant fairytale.
When you’re picking a few sample Machinima films to show to the type ofpeople who ask you, “So, what is this mashy cinema thing, then?”, Anna hasgot to be on the list.
Hardly Workin’The ILL Clan, a New York improvisation comedy troupe with backgroundsin animation, programming, and music, turned to Machinima thanks to thegaming interests of several of its members. Back in 1998, the group released ariotously funny first Machinima film called Apartment Huntin’, which instantlyelevated the ILL Clan to the top rank of Quake Movie producers. Hardly Workin’,the hotly awaited sequel, is one of the two films on this list directed by Paul“ILLRobinson” Marino.
Hardly Workin’ was one of the first Machinima films to use entirely custom-created sets, textures, and character models. The movie tells the story ofLarry and Lenny the lumberjacks’ quest to find a job, but the plot isn’t reallythe point. The movie features the kind of physical and slightly surreal,entirely improvised humor that the ILL Clan love. Much of the filming wasshot live and in real-time.
Hardly Workin’ is a movie from the Good Old Days of Machinima’s infancy,and it showcases the potential of this emerging new medium (as many tech-nology journalists still insist on referring to it). If you want to see why thepotential of Machinima got people excited in the first place, Hardly Workin’ isthe movie to watch.
The Internet Is For Porn“Ready, normal people?”
“Let me hear it!”
“The Internet is for porn! The Internet is for porn. . . .”
358 Part V: The Part of Tens
28_096918 ch20.qxp 7/20/07 11:17 AM Page 358
We’re occasionally asked to give a talk or a lecture about Machinima to a groupof unsuspecting people. We’ve taken to finishing these talks with an audience-participation, sing-along version of The Internet Is For Porn, pantomime-style.We know all the lyrics, and it makes us laugh every time. And to think —we’re old enough to vote.
The Internet Is For Porn is a music video lovingly made in World of Warcraftto the song of the same name, which was originally written for the cultBroadway show Avenue Q. This version of the song, by Evilhoof & Flayed,spread across the video-sharing sites and the blogosphere like wildfire in2005 and is still a firm favorite in the Strange Company offices.
If you want to hear a distressingly catchy song in praise of pornography orsee how an incredibly simple idea, realized by first-time filmmakers inMachinima, can take the Internet by storm, give this movie a try. Just don’tshow it to your mom.
BloodSpellOkay, we made this one. Hugh directed, wrote, and produced BloodSpell,and Johnnie was 1st Assistant Director. And we’ve been talking about it allthrough this book. We have to admit to a slight degradation in our journal-istic impartiality at this point. But we’re told BloodSpell is important, sohere goes.
BloodSpell is a feature-length fantasy epic that tells the story of a worldwhere people are infected with magic in their blood. Three years in produc-tion, BloodSpell is probably the largest and most complex Machinima projectever, at approximately the scale of the first Star Wars film in terms of sets,characters, and action sequences.
We can’t really speak to its quality, but BloodSpell has been praised by someof the biggest names in Machinima, so it can’t completely suck. Taking a post-Buffy, punk attitude to heroic fantasy films, and scored not with orchestralmusic but with aggressive punk and some of the weirdest indie music outthere, it’s certainly a project that couldn’t have been made any other way.
If you want to watch some ambitious Machinima on an epic scale, or if youjust want to hear Hugh and Johnnie pretending to be, respectively, a mon-strous, squid-like butler and what one of our preview audience described as“a jelly-hatted pimp priest,” then watch BloodSpell.
359Chapter 20: Ten Machinima Films You Must Watch
28_096918 ch20.qxp 7/20/07 11:17 AM Page 359

The Snow WitchAnother movie in a fairytale style, The Snow Witch leans more toward thedark and sinister than Anna does. (See the section on Anna, earlier in thischapter.) Based on an old Japanese ghost story, The Snow Witch tells thestory of Minokichi the woodcutter’s encounter with a mysterious pale womanduring a snowstorm.
Britannica Dreams possess an uncanny ability to make The Sims 2 look fluid,high-resolution, and gorgeous; The Snow Witch is perhaps its most aestheticallybeautiful movie. Most of the dialogue is actually a narrator’s voice (therebycleverly avoiding the problem of lipsynching in The Sims 2). High-quality edit-ing and post-production work is apparent on this movie, and a number ofvideo composites and fades are used without becoming too intrusive.
The real highlight of the movie, though, is the set design. Many of the scenesare outdoor scenes, often featuring snow-covered forests and low sunlightbouncing off icy rivers. The attention to detail here is unsurpassed. Hoursupon hours must have been spent preparing these sets, and the eventualmovie is all the better for it.
The Snow Witch is a great example of a Machinima movie in which everyaspect is of painstakingly high quality.
Red vs BlueWhat can we say? It’s Red vs Blue, for pity’s sake! If you’re reading this sec-tion, there’s about a one in four chance it’s because of those wacky Texans.
Okay, for the, ooh, two of you who don’t know what the heck we’re talkingabout — Red vs Blue is the show that has done more to raise Machinima’sprofile than just about anything else. It’s a sitcom, set in the game Halo 2,made by production house Rooster Teeth. Our heroes bemoan their situa-tion, wonder about the illogicalities of their world, and engage in unsuccess-ful adventure.
Red vs Blue’s first episode is a simply superb piece of writing and would holdup against the finest work in television sitcoms. That’s doubly impressiveconsidering it was shot using totally vanilla Halo 2 — no mods, no nothing.
360 Part V: The Part of Tens
28_096918 ch20.qxp 7/20/07 11:17 AM Page 360

From there, the series has sprawled out to (at time of writing) four feature-length seasons, of slightly uneven quality. However, the team’s acting andproduction values are consistently superb, and this sitcom is a must-watchfor an example of how to exceed your limitations.
If you’re planning on making Machinima, or you’re at all interested in themedium, you really can’t afford to miss at least the first few episodes of thismost iconic Machinima production.
Still Seeing BreenPaul “ILLRobinson” Marino, president of the Academy of Machinima Arts andSciences, is, as you may gather, far, far too talented.
Not only was he one of the pioneers of Machinima. Not only is he a visualartist with a track record as long as your arm and an Emmy sitting on hisshelf. But when he makes a simple test film to learn a new engine, the so-called “test film” is so accomplished and successful that it’s subsequentlypicked up by MTV.
Still Seeing Breen matches Breaking Benjamin’s track “So Cold” with the visuals of the game Half-Life 2, juxtaposing the two to brilliantly head-banging effect. Its piece de resistance is the stunning lipsynch and facial animation work that let Paul cast the G-Man, a character from the game, aslead vocalist. (He makes a surprisingly good heavy-metal singer, suit and all.)But the hidden backup singer is the stunning editing work, distilling themost emotive moments from all of Half-Life 2 into a whole that has beendescribed as “the trailer Half-Life should have had.”
Paul originally created Breen to learn and test Half-Life 2’s facial animationsystems and released it onto the Internet with very little fanfare. Butwithin weeks, it had become an Internet sensation, and he received anoffer from MTV, who wanted to take his “test film” and screen it on its VideoMods show.
In a medium filled with attempts at music videos of varying quality, from poorto superb, Breen is head-and-shoulders the one to watch.
361Chapter 20: Ten Machinima Films You Must Watch
28_096918 ch20.qxp 7/20/07 11:17 AM Page 361

The JourneyWe’re looking down on a pencil-sketch scene, simple and abstract. A figure —it might be a man, might be a woman — walks with a crowd of hundreds ofothers down a scratchily painted valley. But this one figure, alone, steps awayfrom this crowd and sets out to explore the abstract, artistic world he inhab-its. Oh, yeah. And it’s made in Unreal Tournament.
Friedrich Kirschner, director of The Journey, may be one of the fewMachinima creators who can genuinely be described as a genius. Whereother filmmakers — and both Hugh and Johnnie would include themselvesin this description — use Machinima to mimic existing art forms, Friedrichcontinues to press forward to develop work that’s totally new.
The Journey isn’t just a technical exercise, although it brilliantly realizes astyle that’s almost impossible to differentiate from classical, pencil-drawn cel animation. It’s also a great film and a great story, with some genuinelymoving moments that make it one of the showcases for Machinima. If youwant to explain to an aged but artistic relative why you’re spending all thistime playing with computer games, show them The Journey.
Edge of RemorseEdge of Remorse, directed by Jason Choi, may be the most visually sophisti-cated Machinima production yet released. It’s made in World of Warcraft, orat least using World of Warcraft characters; in actual fact, the production wasa marvel of sophisticated compositing and 2D effects. But the story and styleowe less to Tolkien than Kurosawa.
The plot is simple. Two brothers love the same girl. One turns to good andwins the girl. The other turns to evil. Tragedy ensues. But the strength ofEdge of Remorse is in its beautiful cinematography, the sophistication of itswordless, interleaved storytelling, and the emotive power of its imagery.Several shots from the film — a brother’s face wreathed in shadow, the iconicdueling shots — seem destined to become classic images of the medium as awhole.
If you want to see an amateur filmmaker compete with the best art directorsof Hollywood, see Edge of Return now.
362 Part V: The Part of Tens
28_096918 ch20.qxp 7/20/07 11:17 AM Page 362
The Return“Today we fight! We fight! For those who have fallen, for those who welove, for the sons and daughters, mothers and fathers, who watch overus now!”
Machinima’s really unique, killer selling point is that it allows filmmakers withno money to compete on scale with the Peter Jacksons and George Lucasesof this world. But before 2005, there really weren’t any Machinima films thathad achieved both scale and quality. Enter The Return.
Made by the collective known as Rufus Cubed, The Return is a tale of aman returning from war to find that the same war has touched his home.It’s short, it’s near perfect in its filming and realization, and it boasts possiblythe best vocal performance ever in Machinima, from Ezra as Voldegar, thelead character.
We’ve been going on about how Machinima can let you compete with theLord of the Rings films. Want proof in five minutes? Go see The Return.
363Chapter 20: Ten Machinima Films You Must Watch
28_096918 ch20.qxp 7/20/07 11:17 AM Page 363

364 Part V: The Part of Tens
28_096918 ch20.qxp 7/20/07 11:17 AM Page 364

Chapter 21
Ten Ways to Ruin Your Machinima Movie
In This Chapter� Ensuring disaster with poor planning
� Sabotaging your movie by ignoring the details
What’s that you say? You’re allergic to success, and you’re determinedto make the worst Machinima movie in the history of the medium?
Well, that’s quite a challenge — there is some real junk out there — but we’rehere to help.
In this chapter, we give you a list of guaranteed death-blows for any Machinimamovie. Follow along, and your masterpiece will be a stinking disaster beforeyou know it.
Don’t Plan!You don’t want to lose that spark of impromptu creativity. All the greatestgeniuses winged it — why be different? After all, it’s not like Machinimarequires a whole bunch of different disciplines to come together at once, orthere’s a complex preproduction stage that you need to get right.
Don’t plan and don’t think about what you’ll need to do to make this movie,and you can guarantee that:
� You’ll discover your production is five times as hard as you thought it was.
� You needed that set finished yesterday, or you can’t do any work today,and the guy who’s making it is away in France for the weekend.
� Your volunteer crew is getting fed up making things that you send backbecause you didn’t plan what you really needed.
29_096918 ch21.qxp 7/20/07 11:18 AM Page 365

Distaining any form of contingency planning or forethought will probablydoom your venture to failure. Yay!
Don’t Spend Time on Your ScriptYou’re all enthused about making this Machinima stuff. You want to make thebest movie evar on the interwebz. You’re ready to get started!
Script? You don’t need a script. Sure, if you’ve got a dull story, characterswho don’t engage (or indeed exist), or accidental lines so bad that no one canlisten without laughing, your movie’s doomed from the start. Sure, no matterhow long you spend on your script, it’ll still be a tiny fraction of the time youspend on actually filming the piece of drivel you scribbled in five minutes.Sure, every Hollywood expert tells us that the script is the most importantpart of your movie.
The greatest filmmakers struggle to make something tolerable out of a direscript. Neither we, nor you, are as talented as they are. If your script stinks,you’ll spend weeks or months slaving to realize your original artistic vision,only to conclude that your original vision was a view out of the hotel windowonto an alley full of garbage cans.
Get Your Friends to ActMy friend Dan is so funny! He’ll be great in this movie!
Actually, Dan’s only funny when he’s hanging around with you and the rest ofyour clique, cracking jokes. Dan’s not an actor. He has terrible diction and anabsolute inability to emote. Anyone who doesn’t know him won’t be able tounderstand a word, let alone enjoy his performance.
You can find an actual actor— someone who will speak your carefully craftedlines well. Somebody who may actually be able to deliver comedy. Somebodywho’s spent several years training to do exactly this, and who is as passion-ate about being an actor as you are about being a filmmaker. Someone whocan deliver your script even better than you’d imagined.
Bad plan. You can count on Dan.
366 Part V: The Part of Tens
29_096918 ch21.qxp 7/20/07 11:18 AM Page 366

Ignore CameraworkThere’s a complex language of cinematography, and in order to use it prop-erly, you have to do a lot of learning. You have to watch a lot of movies, andyou have to do some brain-melting visualization of your finished movie. Infact, the best Hollywood cinematographers try to compose each and everyshot to look like an oil painting.
That sounds a bit like hard work; Machinima is supposed to be easy. Asidefrom the occasional funky flying camera shot to show off your cool set withthe sparkly bits, you’ve just got to make sure that your audience can see yourcharacters, right? No need for this camerawork nonsense.
Of course, if you don’t worry about camerawork, your movie will look really,really ugly, and your characters will just stand there and look like planks ofwood, but that was true of your high-school play, too, and your parents saidthat was wonderful.
Don’t Cut It Down to SizeFeature movies get more respect than little YouTube efforts — which provesthat when it comes to movies, longer is better. So, when you’re making yourmovie, just shoot it, string all the shots together, and call it a movie. Twenty-two minutes and eight seconds of the two leads walking down a corridor?Great plan! Gives the audience more time to watch their trench coats swish ina cool way.
Those small-minded, so-called “professional” filmmakers will insist on editingpass after editing pass. They’ll tell you that to get to a well-edited movie, youhave to keep cutting and juggling long after you think it’s as tight as it canpossibly be. You may even have to listen to some idiot scriptwriter pointingout the parts of your story that aren’t needed, or that just don’t make sense.
These morons will do their best to convince you to chop and rearrangeyour movie, then show it to other people and have them chop out bits too,until it’s a slick, fat-free ninja of a movie. Stick to your guns. What do theyknow, eh?
367Chapter 21: Ten Ways to Ruin Your Machinima Movie
29_096918 ch21.qxp 7/20/07 11:18 AM Page 367

Don’t Get HelpIf we wanted to talk to people, we’d be doing theater.
The great thing about Machinima is that you can do everything you need todo to make a movie by yourself. You can create the sets — you’re not anartist, but they look OK. You can make the characters — you don’t know any-thing about costume design, but they look all right. You can do the sound,find the music, and record your own voice. All this stuff is easy. It’s not likeanyone dedicates her life to one element of it.
It’s quite easy to find people who want to help with your movie. If you justplace a couple of adverts in the right place, they’ll practically come begging.And with more people helping, you can split the workload so that you don’thave to make 20 sets all by yourself. You’d have people to review work andbounce ideas against, and you’d be able to find people who are genuinelyexpert and passionate in the things you need. You’d also find it more funworking with people than sitting in your basement alone.
But that would involve talking to people. And we don’t want to do that.
Copy Existing Machinima MoviesWhen you start making movies, you’ll probably be doing it because you’reinspired by other movies and film-makers. Perhaps you saw that great Red vs Blue series and figured you could do the same thing, but starringyour friend Dan. (See Chapter 20 for more on Red vs Blue.)
Whatever you do, don’t analyze why you liked the thing that inspired you.Don’t think about how you can make something that has the same elementsas the movie you like, but is original in other ways. Absolutely do not thinkabout what the mechanics of that thing are, or why it works, and try to takethose lessons to another movie that reflects other things you like or careabout, too.
Just turn on your X-Box, sit down, and make another comedy about computergame characters saying funny things. Because that’s obviously what madethe original so successful.
368 Part V: The Part of Tens
29_096918 ch21.qxp 7/20/07 11:18 AM Page 368
Don’t Read About FilmmakingNo matter what mistake you’re about to make, some poor fool of a film-makerhas already made it. No matter how obscure the scene or how complex thesequence you’re about to attempt, someone’s done something similar andhas useful advice on how to make it better.
And what’s worse, not only have they done these things, but the evil, evilpeople have even written about it! They’ve written entire books full of mis-takes they made, and things they’ve learned about making better movies!Some of them have even written on the Internet so that you don’t even haveto spend money to learn from them!
Clearly, it’s vital that you don’t read this stuff. Use whatever excuse youlike. Say that you don’t believe you can learn to make “art.” Say that “old”moviemaking has nothing to teach the Internet generation. Just stick your fingers in your ears and go “la, la, la.”
Don’t Release Unless It’s PerfectThis movie is your masterpiece; it’s the visual personification of your heartand soul. This movie is like a lover to you. Just like a lover, you want tochange, fix, or just outright get rid of certain little irritating aspects. Until it’sabsolutely, exactly the movie you have in your head, there’ no way you’regoing to be seen in public with that on your arm, so lock it in the basementuntil it puts the lotion on its skin, or else it gets the hose again.
Your movie is never going to be perfect. The best thing to do is to keeptweaking it. Constantly. Unendingly. That way, there’s no danger thatanybody may ever get to see it.
Don’t Tell Anyone about ItIf you build it, they will come. A quiet, understated release is what’s called for.
How about just putting it up on your blog (three dedicated readers and eightpeople selling “V1agra”), and seeing what happens? Maybe you can e-mail afew friends? You know, the ones who helped with it anyway and already knowabout it. Send Dan an e-mail, for starters.
369Chapter 21: Ten Ways to Ruin Your Machinima Movie
29_096918 ch21.qxp 7/20/07 11:18 AM Page 369

Unless you let people know that you’ve made a movie, they won’t watch it.Not because they don’t want to, but because they don’t know it exists. So,don’t announce it on the major Machinima sites. Don’t upload it to any video-sharing sites. For goodness’ sake, don’t let anyone hear about it.
370 Part V: The Part of Tens
29_096918 ch21.qxp 7/20/07 11:18 AM Page 370

Chapter 22
Ten Machinima Sites to BookmarkIn This Chapter� Finding the best Machinima sites
� Connecting with the Machinima community
You’re not alone. Thousands of other Machinima creators are out there,discussing the topics in this book and much more. You can get help,
advice, criticism, and friendship if you know where to look.
Here’s a list of the top-ten Machinima sites, in our opinion, as of May 2007.
Machinima Premierewww.mprem.com
The premiere (no pun intended) Machinima community site, MachinimaPremiere, boasts active discussions and up-to-the-minute news covering awide range of Machinima-related issues. It’s a must-read and must-subscribe.
Sims99www.sims99.com
There’s a thriving community of Machinima makers using The Sims 2 as itsengine of choice, and Sims99 is the hub of all this activity. Machinima makersof all hues can benefit from a visit to this huge and informative site, whichcovers much more than just The Sims 2 Machinima. As of May 2007, Sims99listed more than 5,000 movies. Sims99 offers great forums, too.
30_096918 ch22.qxp 7/20/07 11:18 AM Page 371
Machinima.comwww.machinima.com
Over the last few years, Machinima.com changed hands, and its developmentsince has been the source of some controversy. Critics point to lack of devel-opment, a very limited community, frequent PR disasters, and slow updatesof anything other than movies. However, its advocates point out that it stillhas a massive archive of forum posts and articles, and one of the largest andmost actively updated archives of Machinima films on the Net. We debatedlong and hard about how and whether to include Machinima.com in this list,but in the end, we certainly recommend that you check it out and decide foryourself.
Machinima Film Festivalfestival.machinima.org
Machinima has its own film festival, you know. If you get a chance to attend,you absolutely must, but the Festival’s official site is a good place to get yourfix meanwhile. You can also get updates on the competition for the Mackies —Machinima’s equivalent of the Oscars. This site has links to all the nominatedmovies each year, too, for a quick peek at the best of Machinima.
Thinking Machinimawww.machinima.org/paul_blog
Paul Marino is the President of the Academy of Machinima Arts and Sciences.He’s one of the pioneers of Machinima. He directed two of the vids on ourtop-ten list in Chapter 20. Oh, and he won one of those Emmy things. Andnow, he’s blogging about Machinima. Go sit at his virtual feet and learn.
Machinima For Dummies Blogwww.machinimafordummies.com
372 Part V: The Part of Tens
30_096918 ch22.qxp 7/20/07 11:18 AM Page 372

This site is the blog for the book you’re currently holding. We’re already blog-ging extensively over there, adding more tips, comments, and any errata, aswell as freely downloadable content (also known as “all the stuff we couldn’tfit into the book but really wanted to”).
Machinifeedwww.machinifeed.com
We spent several months trying to decide which Machinima blog to mentionin this spot. Should we mention Peter Rasmussen’s Nanoflix blog? ShatteredKeyboard, known for insightful commentary and discussion? Well, we don’thave to choose. Machinifeed, maintained by Phil “Overman” Rice, is an aggre-gation of every blog feed on the Interweb relevant to Machinima. It’s a vitalresource for any Machinima filmmaker.
The Overcastwww.theovercast.com
Phil “Overman” Rice was a prominent figure in the early days of the Machinimascene and made a triumphant return to the scene in 2004. Phil writes andrecords a Machinima-themed podcast called The Overcast, which is simplyessential listening. He’s also the maintainer of the Machinifeed, the directorof Male Restroom Etiquette, the sound editor on BloodSpell, the general revieweron this book, and an inhuman robot of productivity. We mentioned he doesall this stuff in his spare time, right?
The Internet Archive Machinima Sectionwww.archive.org/machinima
In this world, you find very few out-and-out Good Guys. Brewster Kahle is oneof them — the guy who founded the Internet Archive, dedicated to, well,archiving everything from the Internet. The Archive runs a Machinima section, administrated by longtime Machinima supporter Henry Lowood,offering a huge and varied collection of Machinima videos.
373Chapter 22: Ten Machinima Sites to Bookmark
30_096918 ch22.qxp 7/20/07 11:18 AM Page 373

WarcraftMovies.comwww.warcraftmovies.com
In the UK, we have an expression stolen from a series of incredibly successfulads: “Does exactly what it says on the tin.” WarcraftMovies.com — well, it haslots of movies made in Warcraft or World of Warcraft. People talk there, too,about Warcraft and making movies in Warcraft. So if you want to make moviesusing World of Warcraft or watch movies in World of Warcraft, you want tovisit this site.
374 Part V: The Part of Tens
30_096918 ch22.qxp 7/20/07 11:18 AM Page 374
Appendix
About the DVDIn This Appendix� Checking into system requirements
� Using the DVD with Windows and Mac
� Knowing what you’ll find on the DVD
� Troubleshooting
In this appendix, you find out everything you need to know about the DVDthat accompanies this book.
System RequirementsMake sure that your computer meets the minimum system requirementsshown in the following list. If your computer doesn’t match up to most ofthese requirements, you may have problems using the software and files onthe DVD. For the latest and greatest information, please refer to the ReadMefile located at the root of the DVD-ROM.
� A PC running Windows 2000 or Windows XP. Windows Vista may haveproblems with some software.
� A Macintosh running Apple OS X or later will run some of these programs.
� A PC running a version of Linux with kernel 2.4 or greater will run someof these programs.
� A broadband Internet connection is required for some files
If you need more information on the basics, check out these books publishedby Wiley Publishing, Inc.: PCs For Dummies, by Dan Gookin; Macs For Dummies,9th Edition, by Edward C. Baig; iMac For Dummies, 4th Edition, by MarkChambers; Windows XP For Dummies and Windows Vista For Dummies, byAndy Rathbone.
31_096918 app.qxp 7/20/07 11:18 AM Page 375
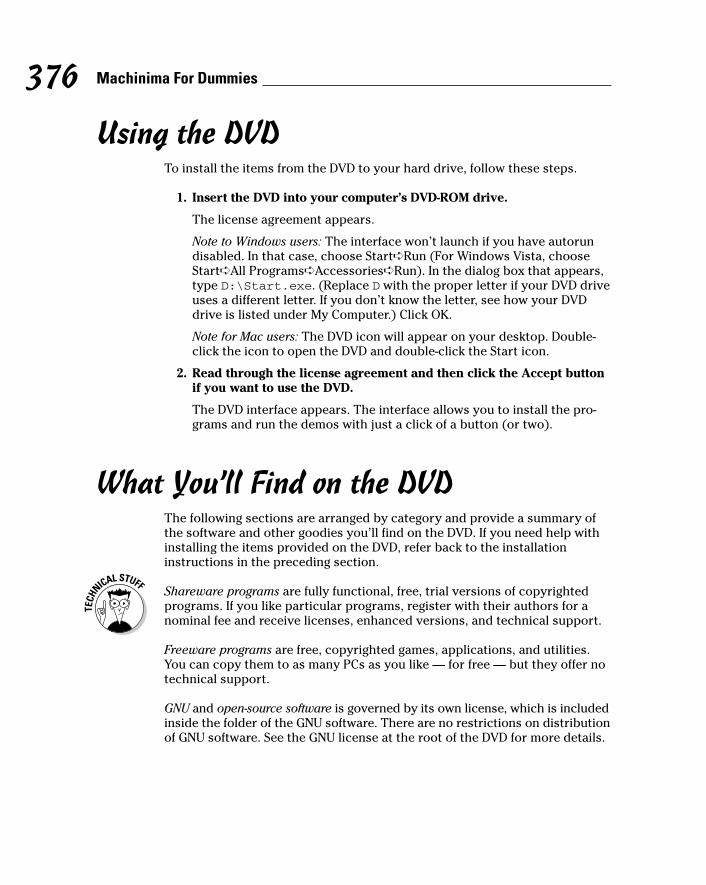
Using the DVDTo install the items from the DVD to your hard drive, follow these steps.
1. Insert the DVD into your computer’s DVD-ROM drive.
The license agreement appears.
Note to Windows users: The interface won’t launch if you have autorundisabled. In that case, choose Start➪Run (For Windows Vista, chooseStart➪All Programs➪Accessories➪Run). In the dialog box that appears,type D:\Start.exe. (Replace D with the proper letter if your DVD driveuses a different letter. If you don’t know the letter, see how your DVDdrive is listed under My Computer.) Click OK.
Note for Mac users: The DVD icon will appear on your desktop. Double-click the icon to open the DVD and double-click the Start icon.
2. Read through the license agreement and then click the Accept buttonif you want to use the DVD.
The DVD interface appears. The interface allows you to install the pro-grams and run the demos with just a click of a button (or two).
What You’ll Find on the DVDThe following sections are arranged by category and provide a summary ofthe software and other goodies you’ll find on the DVD. If you need help withinstalling the items provided on the DVD, refer back to the installationinstructions in the preceding section.
Shareware programs are fully functional, free, trial versions of copyrightedprograms. If you like particular programs, register with their authors for anominal fee and receive licenses, enhanced versions, and technical support.
Freeware programs are free, copyrighted games, applications, and utilities.You can copy them to as many PCs as you like — for free — but they offer notechnical support.
GNU and open-source software is governed by its own license, which is includedinside the folder of the GNU software. There are no restrictions on distributionof GNU software. See the GNU license at the root of the DVD for more details.
376 Machinima For Dummies
31_096918 app.qxp 7/20/07 11:18 AM Page 376

Trial, demo, or evaluation versions of software are usually limited either bytime or functionality (such as not letting you save a project after you create it).
Tutorial materialFreeware for Windows and Mac.
All the examples provided in this book are located in the Tutorial directoryon the DVD and work with the Machinima platforms listed in the book. Thesefiles are included:
� Tutorial/Medieval: Batch and configuration files for Medieval II: TotalWar
� Tutorial/FirstMovie: Files for Chapter 2
� Tutorial/Moviestorm: Files for Chapter 17
� Tutorial/MfD.tga: TGA file for Chapter 16
MoviestormFull software for Windows.
A fully-working copy of this dedicated Machinima tool. Any movies you makeusing this software are licensed for commercial distribution. You’ll also find abasic demonstration movie already assembled for you and ready to film —“your first Machinima movie.” See Chapter 2 for where and how to use this.The demonstration movie will be automatically installed when you installMoviestorm.
Our top filmsNot system- or software-specific.
As listed in Chapter 20, some of our top ten Machinima films are included onthe DVD. Sadly, we couldn’t include all of them on the DVD; but you can findlinks to the ones that are absent at www.machinimafordummies.com.
377Appendix: About the DVD
31_096918 app.qxp 7/20/07 11:18 AM Page 377

Open-source utilitiesThe following open-source utilities make your Machinima creation easier:
� VirtualDub: For Windows, an excellent AVI compression and processingpackage.
� Audacity: For Windows and Linux, one of the best audio-editing pro-grams available.
� Celtx: For Windows, an excellent scriptwriting tool. Not covered inthe book.
� GIMPShop: For Windows, a high-end art- and image-manipulation package.
� Blogbridge: For Windows, Mac, and Linux, an excellent RSS feed reader.
� Democracy Player: For Windows, Mac, and Linux, a revolutionary videoplayer.
� VLC: For Windows, Mac, and Linux, a powerful video player.
� Warcraft Model Viewer: For Windows, software to allow easy filming ofWorld of Warcraft character models and animations.
� Blender: For Windows, Mac, and Linux, full 3D modeling and animationpackage.
� SimPE: For Windows, the Sims 2 package explorer and editor.
� 7-Zip: For Windows, one of the best .zip and .rar compression anddecompression packages.
Freeware utilitiesThe following freeware utilities make your Machinima creation easier:
� Warcraft Map Viewer: For Windows, software to allow easy filming ofWorld of Warcraft maps.
� HxD: For Windows, a highly capable hex editor.
� HuffYUV codec: For Windows, an excellent lossless video codec.
� Decorgal’s Lipsynching Tools: For Windows and Mac, lipsynching toolsfor The Sims 2.
Trial softwareThe DVD also includes a trial version of FRAPS, video-capturing software forWindows.
378 Machinima For Dummies
31_096918 app.qxp 7/20/07 11:18 AM Page 378

Trial softwareThe DVD also includes a trial version of FRAPS, video-capturing software forWindows.
TroubleshootingWe tried our best to find programs that work on most computers with theminimum system requirements. Alas, your computer may differ, and someprograms may not work properly for some reason.
The two likeliest problems are that you don’t have enough memory (RAM)for the programs you want to use, or you have other programs runningthat are affecting installation or running of a program. If you get an error message such as Not enough memory or Setup cannot continue,try one or more of the following suggestions and then try using the softwareagain:
� Turn off any antivirus software running on your computer. Installationprograms sometimes mimic virus activity and may make your computerincorrectly believe that it’s being infected by a virus.
� Close all running programs. The more programs you have running, theless memory is available to other programs. Installation programs typi-cally update files and programs; so if you keep other programs running,installation may not work properly.
Obviously, if you’re using an add-on for a Machinima package, youshouldn’t close the main package!
� Have your local computer store add more RAM to your computer. Thisstep is, admittedly, drastic and somewhat expensive. However, addingmore memory can really help the speed of your computer and allowmore programs to run at the same time.
Customer Care: If you have trouble with the DVD, please call the Wiley ProductTechnical Support phone number at (800) 762-2974. Outside the UnitedStates, call (317) 572-3994. You can also contact Wiley Product TechnicalSupport at http://support.wiley.com. John Wiley & Sons will providetechnical support only for installation and other general quality controlitems. For technical support on the applications themselves, consult the program’s vendor or author.
To place additional orders or to request information about other Wiley prod-ucts, please call (877) 762-2974.
379Appendix: About the DVD
31_096918 app.qxp 7/20/07 11:18 AM Page 379

380 Machinima For Dummies
31_096918 app.qxp 7/20/07 11:18 AM Page 380
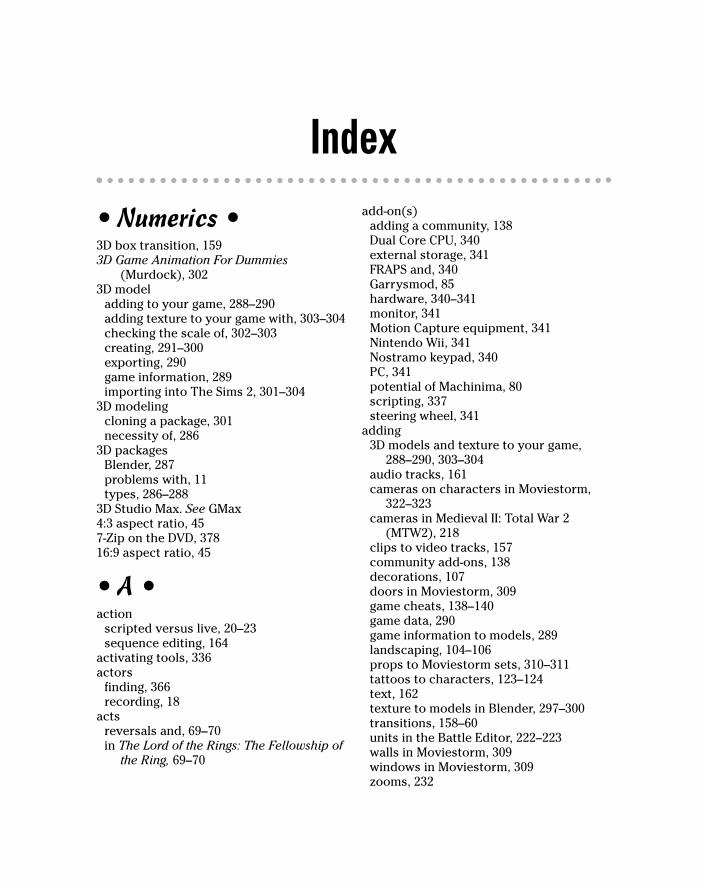
• Numerics •3D box transition, 1593D Game Animation For Dummies
(Murdock), 3023D model
adding to your game, 288–290adding texture to your game with, 303–304checking the scale of, 302–303creating, 291–300exporting, 290game information, 289importing into The Sims 2, 301–304
3D modelingcloning a package, 301necessity of, 286
3D packagesBlender, 287problems with, 11types, 286–288
3D Studio Max. See GMax4:3 aspect ratio, 457-Zip on the DVD, 37816:9 aspect ratio, 45
• A •action
scripted versus live, 20–23sequence editing, 164
activating tools, 336actors
finding, 366recording, 18
actsreversals and, 69–70in The Lord of the Rings: The Fellowship of
the Ring, 69–70
add-on(s)adding a community, 138Dual Core CPU, 340external storage, 341FRAPS and, 340Garrysmod, 85hardware, 340–341monitor, 341Motion Capture equipment, 341Nintendo Wii, 341Nostramo keypad, 340PC, 341potential of Machinima, 80scripting, 337steering wheel, 341
adding3D models and texture to your game,
288–290, 303–304audio tracks, 161cameras on characters in Moviestorm,
322–323cameras in Medieval II: Total War 2
(MTW2), 218clips to video tracks, 157community add-ons, 138decorations, 107doors in Moviestorm, 309game cheats, 138–140game data, 290game information to models, 289landscaping, 104–106props to Moviestorm sets, 310–311tattoos to characters, 123–124text, 162texture to models in Blender, 297–300transitions, 158–60units in the Battle Editor, 222–223walls in Moviestorm, 309windows in Moviestorm, 309zooms, 232
Index
32_096918 bindex.qxp 7/20/07 11:18 AM Page 381

Adobe Audition software, 245Adventures in the Screen Trade and Which
Lie Did I Tell? (Goldman), 77All The Presidents Men (Goldman), 77ambient noise, 240angles, tips on, 237animation
advanced tools, 148–149eyes, 80importing a new, 80interpreting, 37–38overview, 302
Anna, Machinima film, 357–358Archive.org Creative Commons
distribution site, 282aspect ratios
defined, 44types, 45
assembling footage, 155assigning camera positions, 143Audacity software
on the DVD, 378recommendation, 244
audiocategories, 240–241checking current levels, 249equipment retailers, 244file imports, 248–249Foley sounds and effects, 250–251modifying levels, 249processing tips, 248–250recording, 247–248
audio trackadding, 161isolating specific sections, 249
Audio Video Interleave (AVI)encoding video with, 175–176video format, 169–170
Aurora editor, Neverwinter Nights 2, 88, 89AVI (Audio Video Interleave)
encoding video with, 175–176video format, 169–170
• B •Babylon 5 (Straczynski), 77backdrop, using a matte, 325–326Baig, Edward, Macs For Dummies, 375Bailey, Anthony, Quake done Quick, 12balance levels, cleaning up, 248–250Batal, Kheri, The Snow Witch, 150–151Battle Editor
adding units in the, 222–223buttons, 220–222navigating in the, 219–220
Battlefield 2character creation features, 117engine, 95engine ratings, 82package extractor, 345scripting add-ons, 337tool development, 334
beatsdefined, 64reversals and, 64–67in The Lord of the Rings: The Fellowship of
the Ring, 65–66bitrates
finding optimal, 171–72overview, 171
BitTorrent peer-to-peer distributionprogram, 185
Blender3D package, 287adding texture to models, 297–300creating 3D models, 291–300creating simple cubes, 292–293on the DVD, 378editing model points, 294–297overview, 291–292
blocking scenes, 39–40Blogbridge on the DVD, 378Bloodspell (Hancock and Ingram)
downloading, 266equipment used for, 243–245, 341filming, 23, 44lead character appearance in, 127lighting, 111
382 Machinima For Dummies
32_096918 bindex.qxp 7/20/07 11:18 AM Page 382

Machinima film, 359making of, 11–12, 197music, 252press release, 265–267problems with, 343publicity, 260, 265–267removing limitations in, 347researching for, 110sample storyboard, 42screen shots, 50, 51, 53, 54size, 168speed of filming, 17tool development, 338–340
Body Shopeditor, 118–120Undo function, 120
bookconventions used in this, 4–5organization of this, 3–4overview of this, 1–3
Brittanica Dreams, The Snow Witch, 150–151Broadcast Machine, tracker, 185building walls, 106–107Bump maps, texture, 100Butch Cassidy and the Sundance Kid
(Goldman), 77
• C •C&D (Cease and Desist) letter,
receiving a, 279cal3d model, Moviestorm, 307camera
adding on characters in Moviestorm,322–323
adding in Medieval II: Total War 2(MTW2), 218
creating a close-up, hand-held, 233–234creating a simple, 231–232effects, 146mode, 80moving the, 142parameters, 145positioning for a scene, 40–41rendering, 234–235
camera movementscrane, 56dolly, 56handheld, 57–58pan, 56zoom, 56–57
camera paths, creating, 231–235camera positions, assigning, 143camera sequences, editing in
Moviestorm, 323CameraPlus MMO (Massively Multiplayer)
tool, 194–195camerawork
creating, 320–321handheld, 238importance, 367tips, 238
case study, The Snow Witch, 150–151cast creation, 18casting agent organizational role, 200Cease and Desist (C&D) letter,
receiving a, 279Celtx on the DVD, 378Ch2r package extractor, 344Chambers, Mark, iMac For Dummies, 375changing
clip speed, 16Field Of View (FOV), 47textures in Moviestorm, 326–328
characteradding a camera in Moviestorm, 322–323adding tattoos, 123–124advanced creation techniques, 117characterization versus, 71controlling more than one, 81creating interactions between, 149–150creating in Moviestorm, 312–314creating a new, 81creating in The Sims 2, 118–120customizing, 27–28, 120–125design tips, 128–130designing, 125–127developing, 70–73filming, 147–148filming in World of Warcraft (WoW),
203–204
383Index
32_096918 bindex.qxp 7/20/07 11:18 AM Page 383

character (continued)framing, 47giving a voice to, 28–30importance of opposition for, 70–71modeling in The Sims 2, 116positioning, 26–27, 30scripting in World of Warcraft (WoW), 192types in World of Warcraft (WoW), 190
character model, importing a new, 80characterization, character versus, 71Choi, Jason, Edge of Remorse, 209, 362Chroma-key, 210Chronicles of Thomas Covenant
(Donaldson), 71Cinemascope aspect ratio, 45Cinematics Editor
Curves View, 228–230Interpolation controls, 230–231Medieval II: Total War window, 228Playback controls, 230Visible Elements window, 228Zooming functions, 231
cleaningbalance levels, 248–250up voices, 248–250
clipadding to the video track, 157changing the speed of, 161fading, 160importing, 157sound, 242trimming, 157–158
clipping sound, 242cloning a 3D modeling package, 301close-ups
overview, 52–53tips for, 237
clothing character customization, 124–125codec
defined, 167DivX, 170HuffYUV, 378LAME MP3, 176overview, 167–168
colorColor Wheel Pro Web site, 129tips for using, 110–111wheel usage, 129–130
Color Wheel Pro Web site, 129The Complete Book of Scriptwriting
(Straczynski), 77command-line options, removing
limitations with, 342commands
console, 336, 342emote, 203
commercial license, Machinima enginesand, 81
community add-on, adding a, 138Company of Heroes
character creation features, 117engine, 95–96package extractor, 345tool development, 334
compositingthe Map Viewer and the Model Viewer,
209–211techniques, 213
composition, tips for improving shot,45–47
Configuration files, removing limitationswith, 343
configuring The Sims 2 for Machinima,137–140
console commandactivating tools with the, 336removing limitations with the, 342
conversation, editing a, 164–165Cool Edit Pro. See Adobe Auditioncopying existing Machinima movies, 368copyright
law, 276overview, 278
cost of Machinima, 14–15costume department organizational
role, 200crafters, 200craning, 56
384 Machinima For Dummies
32_096918 bindex.qxp 7/20/07 11:18 AM Page 384

creating3D models, 291–300camera paths, 231–235camerawork, 320–321casts, 18ceilings in Moviestorm, 309–310character interactions, 149–150characters, 81characters in Moviestorm, 312–314characters in The Sims 2, 118–120close-up, hand-held cameras, 233–234fences, 311floors in Moviestorm, 309–310legal Machinima, 281–282Machinima films, 13–14maps in Medieval II: Total War 2 (MTW2),
223–225moving shots, 144–146RSS feeds, 262scenes in Moviestorm, 314–316sets, 18, 99–101sets in Moviestorm, 308–310sets in The Sims 2, 102–104simple cameras, 231–232simple cubes with Blender, 292–293static shots, 141–143transitions, 160
Creative Commonsaudio site, 252catalog, 252distribution sites, 282overview, 266, 282Web site, 266
Creative Commons Audio Remixes,creative commons licensed audio, 252
Credit Roll plug-in, Vegas Video, 162crowd control organizational role, 201CubaseSX software, 245Curves View, Cinematics Editor, 228–230Custom Encoding Settings dialog box,
177–178customizing
characters, 27–28, 120–125sets, 80
cutJump, 159transition, 159
• D •data
adding game, 290interpreting, 343
data files, removing limitations with, 343decorations, adding, 107Decorgal
game hack tools by, 132lipsynching tools on the DVD by, 378
demo software, 376Democracy Player on the DVD, 378Democracy Video channel guide as a form
of publicity, 262depth of field compositing technique, 213derivative works, 278designing
characters, 125–127phase overview, 98–99tips for characters, 128–130tools, 101–102
Deviantart.com Creative Commonsdistribution site, 282
dialog boxCustom Encoding Settings, 177–178DivX Codec Properties, 175Edit Unit Details, 223Export Size Settings, 174File, 175For Sale, 136Movie Settings, 172–175Package Lot, 136Record Line, 29Save Exported File As, 172Select Audio Compression, 175–176Select Video Compression, 175Session Properties, 177–179Sound Settings, 174Standard Video Compression Settings, 173Windows, 232
385Index
32_096918 bindex.qxp 7/20/07 11:18 AM Page 385

dialogueoverview, 240writing natural, 75–76
Diffuse Map, 327digital grading compositing technique, 213Digital Millenium Copyright Act (DMCA), 279dissolve transition, 159DivX
codec installation, 170Codec Properties dialog box, 175on the DVD, 379
DMCA (Digital Millenium Copyright Act), 279
dollying, 56Dolphin Music audio equipment
retailer, 244domain name, purchasing, 183Donaldson, Stephen, Chronicles of Thomas
Covenant, 71DooM 3
character creation features, 117engine, 89–90engine ratings, 82graphics, 90package extractor, 345scripting add-ons, 337tool development, 334
downloadingBloodspell, 266FRAPS, 19VirtualDub codec, 170VLC, 169Windows Media Encoder, 171
Dreamhosts Web site, 182Dual Core CPU add-on, 340Dungeon Master tool, Neverwinter Nights
2, 87, 89DVD
7-Zip, 378Audacity software, 378Blender, 378Blogbridge, 378Celtx, 378contents, 376–379customer care, 380Democracy Player, 378DivX, 379
GIMPShop, 378installing, 376lipsynching tools, 378Making Machinima documentary, 17Moviestorm, 305, 377open-source utilities, 378SimPE, 378Sony Vegas Trial, 379system requirements, 375trial software, 279troubleshooting, 379using, 376VirtualDub codec, 378VLC, 378Warcraft Map Viewer, 378Warcraft Model Viewer, 378
• E •Edge of Remorse (Choi), Machinima film,
209, 362Edge Select tool, 294Edit Unit Details dialog box, 223Edit World Package tool, 222editing
action sequences, 164camera sequences in Moviestorm, 323conversations, 164–165defined, 153final, 156goals, 154Hex, 344–346in Medieval II: Total War 2 (MTW2), 218model points with Blender, 294–297overview, 19–20package in Vegas Video, 156–157process, 155–156romantic sequences, 165–166scripts, 75sets in IClone, 98shots in Moviestorm, 321suspense sequences, 166
effects, camera, 146Electronic Frontier Foundation Web site,
279, 280
386 Machinima For Dummies
32_096918 bindex.qxp 7/20/07 11:18 AM Page 386
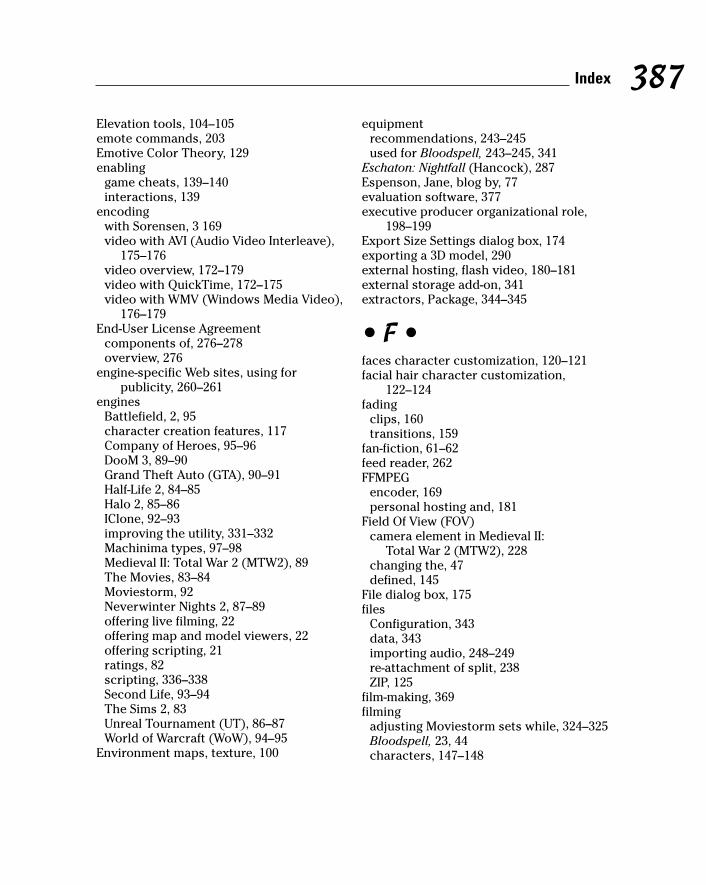
Elevation tools, 104–105emote commands, 203Emotive Color Theory, 129enabling
game cheats, 139–140interactions, 139
encodingwith Sorensen, 3 169video with AVI (Audio Video Interleave),
175–176video overview, 172–179video with QuickTime, 172–175video with WMV (Windows Media Video),
176–179End-User License Agreement
components of, 276–278overview, 276
engine-specific Web sites, using forpublicity, 260–261
enginesBattlefield, 2, 95character creation features, 117Company of Heroes, 95–96DooM 3, 89–90Grand Theft Auto (GTA), 90–91Half-Life 2, 84–85Halo 2, 85–86IClone, 92–93improving the utility, 331–332Machinima types, 97–98Medieval II: Total War 2 (MTW2), 89The Movies, 83–84Moviestorm, 92Neverwinter Nights 2, 87–89offering live filming, 22offering map and model viewers, 22offering scripting, 21ratings, 82scripting, 336–338Second Life, 93–94The Sims 2, 83Unreal Tournament (UT), 86–87World of Warcraft (WoW), 94–95
Environment maps, texture, 100
equipmentrecommendations, 243–245used for Bloodspell, 243–245, 341
Eschaton: Nightfall (Hancock), 287Espenson, Jane, blog by, 77evaluation software, 377executive producer organizational role,
198–199Export Size Settings dialog box, 174exporting a 3D model, 290external hosting, flash video, 180–181external storage add-on, 341extractors, Package, 344–345
• F •faces character customization, 120–121facial hair character customization,
122–124fading
clips, 160transitions, 159
fan-fiction, 61–62feed reader, 262FFMPEG
encoder, 169personal hosting and, 181
Field Of View (FOV)camera element in Medieval II:
Total War 2 (MTW2), 228changing the, 47defined, 145
File dialog box, 175files
Configuration, 343data, 343importing audio, 248–249re-attachment of split, 238ZIP, 125
film-making, 369filming
adjusting Moviestorm sets while, 324–325Bloodspell, 23, 44characters, 147–148
387Index
32_096918 bindex.qxp 7/20/07 11:18 AM Page 387
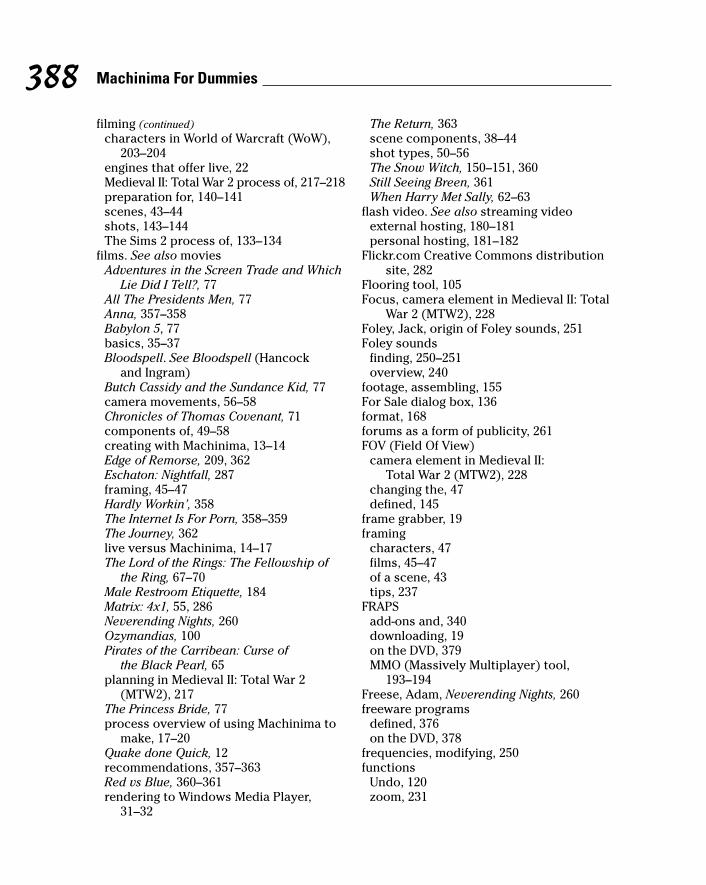
filming (continued)characters in World of Warcraft (WoW),
203–204engines that offer live, 22Medieval II: Total War 2 process of, 217–218preparation for, 140–141scenes, 43–44shots, 143–144The Sims 2 process of, 133–134
films. See also moviesAdventures in the Screen Trade and Which
Lie Did I Tell?, 77All The Presidents Men, 77Anna, 357–358Babylon 5, 77basics, 35–37Bloodspell. See Bloodspell (Hancock
and Ingram)Butch Cassidy and the Sundance Kid, 77camera movements, 56–58Chronicles of Thomas Covenant, 71components of, 49–58creating with Machinima, 13–14Edge of Remorse, 209, 362Eschaton: Nightfall, 287framing, 45–47Hardly Workin’, 358The Internet Is For Porn, 358–359The Journey, 362live versus Machinima, 14–17The Lord of the Rings: The Fellowship of
the Ring, 67–70Male Restroom Etiquette, 184Matrix: 4x1, 55, 286Neverending Nights, 260Ozymandias, 100Pirates of the Carribean: Curse of
the Black Pearl, 65planning in Medieval II: Total War 2
(MTW2), 217The Princess Bride, 77process overview of using Machinima to
make, 17–20Quake done Quick, 12recommendations, 357–363Red vs Blue, 360–361rendering to Windows Media Player,
31–32
The Return, 363scene components, 38–44shot types, 50–56The Snow Witch, 150–151, 360Still Seeing Breen, 361When Harry Met Sally, 62–63
flash video. See also streaming videoexternal hosting, 180–181personal hosting, 181–182
Flickr.com Creative Commons distributionsite, 282
Flooring tool, 105Focus, camera element in Medieval II: Total
War 2 (MTW2), 228Foley, Jack, origin of Foley sounds, 251Foley sounds
finding, 250–251overview, 240
footage, assembling, 155For Sale dialog box, 136format, 168forums as a form of publicity, 261FOV (Field Of View)
camera element in Medieval II: Total War 2 (MTW2), 228
changing the, 47defined, 145
frame grabber, 19framing
characters, 47films, 45–47of a scene, 43tips, 237
FRAPSadd-ons and, 340downloading, 19on the DVD, 379MMO (Massively Multiplayer) tool,
193–194Freese, Adam, Neverending Nights, 260freeware programs
defined, 376on the DVD, 378
frequencies, modifying, 250functions
Undo, 120zoom, 231
388 Machinima For Dummies
32_096918 bindex.qxp 7/20/07 11:18 AM Page 388

• G •game
data, 290hack tools, 132hex-edit, 345–346
game cheatsadding, 138–140defined, 138enabling, 139–140
Games Company, working for, 349–351games-licensing agreements, 17Garrysmod add-on, 85General Visual (GV) shot, 54genetics character customization, 120GIMPShop on the DVD, 378glasses character customization, 122–124GMax 3D package, 287–288GNU software, 376Goldman, William
Adventures in the Screen Trade and WhichLie Did I Tell?, 77
All The Presidents Men, 77Butch Cassidy and the Sundance Kid, 77The Princess Bride, 77
Google Reader, feed reader, 262Google Video, uploading to, 180–181Gookin, Dan, PCs For Dummies, 375The Grammar of the Shot (Thompson), 57Grand Theft Auto (GTA)
character creation features, 117engine, 90–91engine ratings, 82package extractor, 345tool development, 334
graphics, in DooM 3, 90GTA (Grand Theft Auto)
character creation features, 117engine, 90–91package extractor, 345tool development, 334
The Guerilla Film-maker’s Handbook (Jonesand Joliffe), 57
Guilds, 189GV (General Visual) shot, 54
• H •Half-Life 2
character creation features, 117engine, 84–85engine ratings, 82package extractor, 344scripting add-ons, 337tool development, 333
Halo 2character creation features, 117engine, 85–86engine ratings, 82package extractor, 344tool development, 333
Hancock, HughBloodspell, 265–267coining of the term Machinima by, 12–13contact information for, 267Eschaton: Nightfall, 287Matrix: 4x1, 55, 286
handheldcamerawork, 238defined, 57–58
hard-code, 332Hardly Workin’ (Marino), Machinima
film, 358hardware add-ons, 340–341head movement, manual, 80headphone recommendations, 244heartstones, 201heightmaps, 101–102help, finding, 368Hex editing
defined, 344a game, 345–346
Hollywood Camerawork (Holmes), 57Holmes, Per, Hollywood Camerawork, 57hosting
FFMPEG and personal, 181flash video and personal, 181–182Open-Source Flow Player and personal,
181–182Riva Encoder and, 181–182
HuffYUV codec on the DVD, 378HxD
on the DVD, 378hex editor, 345
389Index
32_096918 bindex.qxp 7/20/07 11:18 AM Page 389

• I •IClone
character creation features, 117engine, 92–93engine ratings, 82package extractor, 345set editing, 98tool development, 334
icons, used in this book, 5iMac For Dummies (Chambers), 375image editor, MMO (Massively Multiplayer)
tool, 195importing
3D models into The Sims 2, 301–304animations, 80audio files, 248–249character models, 80clips, 157prop models, 80
improvingengine utility, 331–332shot composition, 45–47
in-game item, activating tools with an, 336in-game menus, removing limitations
with, 342Incidental Use, 278IndependentFilm.com as a form of
publicity, 261Indie Film Spot as a form of publicity, 261infringement, results of, 279–280Ingram, Johnnie
Bloodspell, 265–267contact information, 267Matrix: 4x1, 55, 286
insert shot, 55–56installing
DivX codec, 170the DVD, 376LAME MP3 codec, 176Medieval II: Total War 2 (MTW2), 218–219mods, 109Moviestorm, 25–26
The Internet Archive Machinima SectionWeb site, 373
The Internet Is For Porn, Machinima film,358–359
interactionscreating character, 149–150enabling, 139
InternetArchive video publishing, 183–184obtaining props from the, 107–109, 125
interpolationcontrols on Cinematics Editor, 230–231defined, 230
invisible wipe transition, 159
• J •Jennings, Scott, Massively Multiplayer
Games For Dummies, 190, 195Joliffe, Genevive, The Guerilla Film-maker’s
Handbook, 57Jones, Chris, The Guerilla Film-maker’s
Handbook, 57The Journey (Kirschner), Machinima
film, 362Jump cut, 159
• K •key bindings, removing limitations
with, 342keyframes
defined, 228working with, 229–230
Kirschner, Friederich, The Journey, 362Kuleshov, Les, and the Kuleshov effect, 165
• L •LAME MP3 codec installation, 176landscaping, 104–106lawsuit, 279–280lawyer, finding a, 280layers
defined, 209importance of using, 72masking, 211–212overview, 209
390 Machinima For Dummies
32_096918 bindex.qxp 7/20/07 11:18 AM Page 390

legalityof creating Machinima, 273–275obstacles to, 276–278
levels, sound, 241light
basics of, 37tips for using, 110–111usage in Bloodspell, 111
limitationsof Bloodspell, 347removing, 342–346removing with command-line
options, 342removing with Configuration files, 343removing with console command, 342removing with data files, 343removing with In-game menus, 342removing with key bindings, 342
lineof action defined, 36importance of the, 49
live action, 20–23live filming, versus scripting, 23live recording. See live actionLogue, Tawmis, Neverending Nights, 260The Lord of the Rings: The Fellowship of the
Ringacts in, 69–70beats in, 65–66scenes in, 67–68
Lulu.tv, uploading to, 180–181
• M •Mac users of the DVD, 376Machinema. See MachinimaMachinifeed Web site, 373Machinima
advantages of using, 14–15beginnings, 9–12company startup, 352–353configuring The Sims 2 for, 137–140copying existing, 368cost, 14–15, 16
defined, 10disadvantages of using, 15–17features, 80–82Film Festival Web site, 372legality of creating, 273–275, 281–282named by Hugh Hancock, 12–13overview, 266Premiere Web site, 371process overview of making a film with,
17–20publicity Web sites, 260removing limitations in, 342–346speed, 15versus live film, 14–17Web sites, 186, 266, 371–374
Machinima Engines. See enginesMachinima films
Anna, 357–358Babylon 5, 77Bloodspell. See Bloodspell (Hancock and
Ingram)Chronicles of Thomas Covenant, 71on the DVD, 377Edge of Remorse, 209, 362Eschaton: Nightfall, 287Hardly Workin’, 358The Internet Is For Porn, 358–359The Journey, 362Male Restroom Etiquette, 184Matrix: 4x1, 55, 286Neverending Nights, 260Ozymandias, 100Quake done Quick, 12recommended, 357–363Red vs Blue, 360–361The Return, 363The Snow Witch, 150–151, 360Still Seeing Breen, 361ways to ruin, 365–370
Machinima For Dummiesblog Web site, 372–373Web site, 79, 218
Machinima.com Web site, 372Macs For Dummies (Baig), 375
391Index
32_096918 bindex.qxp 7/20/07 11:18 AM Page 391

MagnatuneCreative Commons distribution site, 282Creative Commons licensed audio, 252
makeup character customization, 122–124Making Machinima documentary on the
DVD, 17Male Restroom Etiquette (Rice), 184Map Viewer
compositing the Model Viewer and the,209–211
engines that offer, 22using, 22–23, 207–208
mapping UV, 297maps
Bump, 100creating in Medieval II: Total War 2
(MTW2), 217, 223–225Diffuse, 327Environment, 100Normal, 100Specularity, 100
Marino, PaulHardly Workin’, 358Still Seeing Breen, 361
masking layers, 211–212Massively Multiplayer Games For Dummies
(Jennings), 190, 195Massively Multiplayer (MMO)
games popularity, 189TeamSpeak, 195tools and FRAPS, 193–194tools for using, 193–196Ventrillo, 195Voice Communications, 195World of Warcraft Map Viewer, 195World of Warcraft Model Viewer, 195
Master Monitorediting camera sequences with, 323Moviestorm, 323
Matrix: 4x1 (Hancock and Ingram) screenshots, 55, 286
matte backdrop, 325–326McKee, Robert, Story, 63, 77media, offline, 263–264Media Generator, Vegas Video, 162Medieval II: Total War 2 (MTW2)
advantages of using, 216Battle Editor, 219–223
character creation features, 117Cinematics Editor, 228–231creating maps, 223–225disadvantages of using, 216–217editing, 218engine, 89engine ratings, 82filming process, 217–218installing, 218–219package extractor, 345patches, 218recording action, 226replaying action, 226–227tips and tricks, 236–238tool development, 333
medium shot, 53–54Miche Sim’s body animation converter, 133micro-flow of a scene, 41–42microphone, recommendations, 243Milkshape 3D package, 287minchange, 145mixing
desk recommendations, 243–244sound tips, 253
mixing console. See mixing, deskrecommendations
MMO (Massively Multiplayer)games popularity, 189tools and FRAPS, 193–194tools for using, 193–196Ventrillo, 195Voice Communications, 195World of Warcraft Map Viewer, 195World of Warcraft Model Viewer, 195
MMO (Massively Multiplayer) TeamSpeak, 195
Modding. See also modsdefined, 108
modecamera, 80pause, 81
model. See also 3D modeladding game information to, 289exporting, 290importing a new character, 80morphing, 116
392 Machinima For Dummies
32_096918 bindex.qxp 7/20/07 11:18 AM Page 392

Model Viewercapturing video from, 206–207compositing the Map Viewer and,
209–211engines that offer, 22tool, 22, 204–207
modeling character, 116Modifiers character customization, 122modifying
audio levels, 249frequencies, 250
mods. See also moddingfinding, 108–109installing, 109
monitor add-on, 341morph facilities, 312morphing models, 116Motion Capture equipment add-on, 341The Movies
character creation features in, 117engine, 83–84engine ratings, 82package extractor, 344publicity Web site, 261tool development, 333
Movie Settings dialog box, 172–175movies. See also films
copying an existing Machinima, 368fine editing, 155planning, 365–366previewing, 155release, 369
Moviestormadding cameras on characters, 322–323adding props to sets, 310–311adding walls, doors and windows, 309adjusting your set while filming in,
324–325advantages of using, 306basic movie-making principles, 307cal3d model, 307changing a texture, 326–328character creation features, 117creating camerawork, 320–321creating characters, 312–314creating fences, 311
creating floors or ceilings, 309–310creating scenes, 314–316creating sets, 308–310disadvantages of using, 306–307on the DVD, 305, 377editing camera sequences, 323editing shots, 321engine, 92engine ratings, 82installing, 25–26Master Monitor, 323package extractor, 345painting walls, 309rendering from, 329timeline, 316–320tool development, 334using matte backdrops, 325–326Web pages and forums, 329
movingcameras, 142objects, 139–140shots, 144–146viewpoints, 27
MTW2 (Medieval II: Total War 2)advantages of using, 216Battle Editor, 219–223character creation features, 117Cinematics Editor, 228–231creating maps, 223–225disadvantages of using, 216–217editing, 218engine, 89filming process, 217–218installing, 218–219package extractor, 345patches, 218recording action, 226replaying action, 226–227tips and tricks, 236–238tool development, 333
multiplayer feature, 81music
for Bloodspell, 252locating, 252–253
musical soundtracks, 240
393Index
32_096918 bindex.qxp 7/20/07 11:18 AM Page 393
• N •narrative of a story, 74–75natural dialogue, writing, 75–76NaturalPoint Motion Capture
equipment, 341navigating, in the Battle Editor, 219–220Neverending Nights (Freese and
Logue), 260Neverwinter Nights 2. See also Neverwinter
Nights (NWN)Aurora editor, 89character creation features, 117Dungeon Master tool, 87, 89engine, 88–89engine ratings, 82package extractor, 344scripting add-ons, 337third-party tools, 334tool development, 333
Neverwinter Nights (NWN). See alsoNeverwinter Nights 2
Aurora editor, 88character creation features, 117Dungeon master tool, 87engine, 87–88engine ratings, 82overview, 266package extractor, 344scripting add-ons, 337third-party tools, 334tool development, 333Web site, 266
Nightlife expansion pack, 119Nintendo Wii add-on, 341noise
controls in Medieval II: Total War 2(MTW2), 228
overview, 242Normal maps, texture, 100Nostromo keypad add-on, 340NURBS, 101NWN2Packer package extractor, 344NWNExplorer package extractor, 344
• O •objects, moving, 139–140offline media as a form of publicity,
263–264online publicity, 260–262Open For Business expansion pack, 119Open-Source Flow Player, personal hosting
and the, 181–182open-source software, 376open-source utilities on the DVD, 378organizational roles
casting agent, 200costume department, 200crowd control, 201executive producer, 198–199permissions agent, 199transport coordinator, 201
orientation, 145outlining the form of a story, 62–63The Overcast Web site, 373over-the-shoulder shot, 51Ozymandias (Strange Company) set, 100
• P •package
cloning, 301extractors, 344–345
Package Lot dialog box, 136PakPoker package extractor, 344pans
defined, 56recording in World of Warcraft
(WoW), 202swish, 236tips, 236
parameters, camera, 145patches, Medieval II: Total War 2
(MTW2), 218pause mode, 81Pawfect Films toolset, 91PC add-on, 341
394 Machinima For Dummies
32_096918 bindex.qxp 7/20/07 11:18 AM Page 394

PCs For Dummies (Gookin), 375peer-to-peer distribution for video
publishing, 184–186permissions agent organizational role, 199personal hosting
FFMPEG, 181flash video, 181–182Open-Source Flow Player, 181–182Riva Encoder, 181–182
Pets expansion pack, 119Pettit-Mee, Michelle, The Snow Witch,
150–151pick-up shots, 155, 163Pirates of the Carribean: Curse of the Black
Pearl, beats in, 65pitch, for a story, 73–74Place World Package tool, 222placeables, 102planning
in Medieval II: Total War 2 (MTW2), 217for your movie, 365–366
Plateau tool, 221Playback controls, Cinematics Editor, 230plug-in, Credit Roll, 162plumbbob, removing the, 139Point Of View (POV) shots, 52polygon
defined, 99modeling usage, 99–101
pop shield, 243Position, camera element in Medieval II:
Total War 2 (MTW2), 228positioning
cameras, 40–41characters, 26–27, 30
PR agency as a form of publicity, 268PR distribution agency as a form of
publicity, 268practicalities, tips, 112–113press release
Bloodspell, 265–267as a form of publicity, 264–268writing, 264–268
The Princess Bride (Goldman), 77programs, shareware, 376
prop models, importing new, 80props
adding to sets in Moviestorm, 310–311obtaining from the Internet, 107–109, 125
PRWeb PR distribution agency, 268publicity
for Bloodspell, 260, 265–267importance of pre-checking, 260life-cycle, 269–271offline media, 263–264online, 260–262overview, 255–257PR agencies, 268press releases, 264–268spin, 257–258types of, 257–268Web sites, 260–262word-of-mouth, 259for your movie, 369–370
publishing video, 182–186purchasing domain names, 183PvP server, 199
• Q •Q-Xpress Installer custom tool, 109Quake done Quick (Bailey), 12QuickTime
encoding video with, 172–175video format, 168–169
QuickTime 7 video compression, 169QuickTime Pro, purchasing, 169
• R •Randomize button, 119–120Rathbone, Andy
Windows Vista For Dummies, 375Windows XP For Dummies, 375
ratings, engine, 82recolor, 125recommendations, for software and
equipment, 243–245Record Line dialog box, 29
395Index
32_096918 bindex.qxp 7/20/07 11:18 AM Page 395

recordingaction in Medieval II: Total War 2
(MTW2), 226actors, 18audio, 247–248in Medieval II: Total War 2 (MTW2), 218overview, 19pans in World of Warcraft (WoW), 202sound setup, 245–246tracks in World of Warcraft (WoW), 203
recording studio. See audio; soundRed vs Blue, Machinima film, 360–361release, 20removing
limitations, 342–346plumbbobs, 139speech, 139thought bubbles, 139
renderingcameras, 234–235film to Windows Media Player, 31–32from Moviestorm, 329scenes in Medieval II: Total War 2
(MTW2), 218shots, 235–236video, 163
research techniques, 110The Return (Rufus Cubed), Machinima
film, 363retailers, audio equipment, 244reveal shot, 55reversals
acts and, 69–70beats and, 64–67overview, 63–64scenes and, 67–69
reversedefined, 52shot overview, 51–52
Revver, uploading to, 181Rice, Phil
Male Restroom Etiquette, 184, 245mixing tips from, 253
Riva Encoder, personal hosting and the,181–182
Roll, camera element in Medieval II: TotalWar 2 (MTW2), 228
romantic sequence, editing a, 165–166Roofing tool, 106Rotate tool, 293RP servers, 199RSS feed as a form of publicity, 262Rufus Cubed, The Return, 363Rule of Thirds, framing and the, 46RvB. See Red vs Blue
• S •SA Multiplayer mod Web site, 91Save Exported File As dialog box, 172scale checking on 3D models, 302–303Scale tool, 292, 296scenes
blocking, 39–40components, 38–44creating in Moviestorm, 314–316defined, 67framing, 43micro-flow, 41–42rendering in Medieval II: Total War 2
(MTW2), 218reversals and, 67–69in The Lord of the Rings: The Fellowship
of the Ring, 67–68tips for fight, 237
scriptcomponents, 73–75defined, 19, 20, 62editing, 75format, 76–78time expenditure, 366writing, 17–18
scripted action, 20–21, 23scripted sequences. See scripted actionscripting
add-ons, 337characters in World of Warcraft, 192engines, 21, 336–338versus live filming, 23
396 Machinima For Dummies
32_096918 bindex.qxp 7/20/07 11:18 AM Page 396

Second Lifecharacter creation features, 117engine, 93–94engine ratings, 82package extractor, 345scripting add-ons, 337third–party tools, 334tool development, 334
Select Audio Compression dialog box,175–176
Select Video Compression dialog box, 175servers, types of, 199Session Properties dialog box, 177–179set
adding props in a Moviestorm, 310–311adjusting while filming in Moviestorm,
324–325creating, 18, 99–101creating in Moviestorm, 308–310creating in The Sims, 2, 102–104customizing, 80editing in IClone, 98Ozymandias screen shot, 100
set designadding props, 107–108building walls, 106–107color, 110–111creating a set, 99–101creating a set in The Sims 2, 102–104decorating, 107design phase, 98–99landscaping, 104–106light, 110–111modernizing, 101–102mods, 108–109practicalities, 112–113research, 110space, 111–112
7–Zip on the DVD, 378shaped dissolve transition, 159shareware programs, 376shoe-leather shots, 157–158shooting
characters in World of Warcraft (WoW),203–204
tips in World of Warcraft (WoW), 204
Shot by Shot (Katz), 57shots
close-up, 52–53composition tips, 45–47editing in Moviestorm, 321establishing the function of, 50–51filming, 143–144General Visual (GV), 54identifying, 163insert, 55–56mastering the flow of, 47–48medium, 53–54moving, 144–146over-the-shoulder, 51pick-up, 155, 163Point Of View (POV), 52rendering, 235–236reveal, 55reverse, 51–52shoe-leather, 157–158static, 141–143two-shot, 51wide, 50
Shure SM58 microphone, 243The Sims 2
adding a community add-on, 138adding game cheats, 138–140adding Sims, 134–137advanced animation tools, 148–149advantages of using, 131–132camera changes, 146camera parameters, 145case study, 150–151character creation features, 117character filming, 147–148configuring for Machinima, 137–140creating character interaction, 149–150creating characters, 118–120creating sets, 102–104disadvantages of using, 132–133engine, 83engine ratings, 82expansion packs, 119filming process, 133–134, 140–146importing 3D models into, 301–304in-engine character modeling, 116
397Index
32_096918 bindex.qxp 7/20/07 11:18 AM Page 397

The Sims 2 (continued)moving the camera, 142moving shots, 144–146package extractor, 344publicity Web sites for, 261scripting add-ons, 337static shots, 141–143tips for using, 151tool development, 333using sound effects from, 251
SimPEon the DVD, 378package extractor, 344
Sims, adding to your set, 134–137Sims99 Web site, 371sites. See Web sitessize
of Bloodspell, 168constraints, 367
skeleton story, 74Skype, 248slo-mo. See slow motionslow motion, 161Smooth tool, 221Smudge tool, 221The Snow Witch (Batal and Pettit-Mee)
case study, 150–151Machinima film, 360
softwareAdobe Audition, 245Audacity, 244CubaseSX, 245demo, 376evaluation, 377open-source, 376recommendations, 243–245trial, 377, 379versions, 377
Sony Vegas Trial on the DVD, 379Sorensen 3, encoding with, 169sound. See also audio; audio track
basics, 241–242clipping, 242damping recommendations, 245
levels, 241mixing tips, 253quality, 241
sound effectsfinding, 250–251from games, 251overview, 240The Sims 2, 251
Sound Settings dialog box, 174soundtrack
locating music for, 252–253overview, 240
space, tips on, 111–112special effects compositing technique, 213Specularity maps, texture, 100speech, removing, 139speed
changing in a clip, 161of filming Bloodspell, 17
spin as a form of publicity, 257–258Stage 6, uploading to, 181Standard Video Compression Settings
dialog box, 173Standard Web hosting, 182–183static shots, creating, 141–143steering wheel, 341Steven, Katz, Shot by Shot, 57Still Seeing Breen (Marino), Machinima
film, 361story
defined, 62outlining the form of, 62–63pitch, 73–74skeleton, 74tips, 237writing, 17–18writing in World of Warcraft (WoW),
197–198Story (McKee), 63, 77storyboard, 42
sample from Bloodspell, 42tips, 238
storytelling myths, 59–62
398 Machinima For Dummies
32_096918 bindex.qxp 7/20/07 11:18 AM Page 398

Straczynski, J. MichaelBabylon 5, 77The Complete Book of Scriptwriting, 77
Strange Companycontact information for, 267Ozymandias, 100press release for Bloodspell, 265–267RSS feed for, 262
streaming video, 179–182style of a scene, 38–39suspense sequence, editing, 166swish pans, 236system requirements, DVD, 375
• T •Takedown Notice from the Digital
Millenium Copyright Act (DMCA), 279tattoo, adding to a character, 123–124TeamSpeak MMO (Massively Multiplayer)
tool, 195text
adding, 162editor tips, 236
textureadding to your model in Blender, 297–300Bump maps, 100changing in Moviestorm, 326–328defined, 100Environment maps, 100Normal maps, 100Specularity maps, 100types of, 100
Texture tool, 222The Complete Book of Scriptwriting
(Straczynski), 77The Grammar of the Shot (Thompson), 57The Guerilla Film-maker’s Handbook (Jones
and Joliffe), 57The Internet Is For Porn, Machinima
film, 358–359The Journey (Kirschner), Machinima
film, 362
The Lord of the Rings: The Fellowship of the Ring
acts in, 69–70beats in, 65–66scenes in, 67–68
The Moviescharacter creation features, 117engine, 83–84engine ratings, 82package extractor, 344publicity Web site for, 261tool development, 333
The Overcast Web site, 373The Princess Bride (Goldman), 77The Return (Rufus Cubed), Machinima
film, 363The Snow Witch (Batal and Pettit-Mee)
case study, 150–151Machinima film, 360
Thinking Machinima Web site, 372third-party content in World of
Warcraft, 192third-party tools potential, 334Thompson, Roy, The Grammar of the
Shot, 57thought bubbles, removing, 1393D box transition, 1593D Game Animation For Dummies
(Murdock), 3023D model
adding game information to, 289adding to your game with texture,
303–304checking the scale of, 302–303creating, 291–300exporting, 290
3D modelingcloning a package, 301necessity of, 286
3D modelsgetting into your game, 288–290importing into The Sims 2, 301–304
3D packagesBlender, 287problems with, 11types, 286–288
399Index
32_096918 bindex.qxp 7/20/07 11:18 AM Page 399

3D Studio Max. See GMaxTIGA Web site, 279, 280tiles, 102time marker, 28timeline
defined, 27, 317Moviestorm, 316–320
tipsangles, 237audio processing, 248–250camerawork, 238character design, 128–130close-ups, 237color, 110–111composition, 45–47fight scenes, 237framing, 237for getting a job with a Games
Company, 351light, 110–111Medieval II: Total War 2 (MTW2), 236–238pans, 236practicalities, 112–113shot composition, 45–47sound mixing, 253space, 111–112story, 237storyboard, 238text editor, 236The Sims 2, 151World of Warcraft, 204
titles, adding, 162tools
activating, 336advanced animation, 148–149basic, 335designing, 101–102development, 333–334development in Bloodspell, 338–340Dungeon Master, 87, 89Edge Select, 294Elevation, 104–105Flooring, 105game hack, 132
lipsynching, 378Massively Multiplayer (MMO), 193–195Model Viewer, 22, 204–207Place/Edit World Package, 222Plateau, 221potential for new, 333–334potential for third–party, 334Q-Xpress Installer, 109Roofing, 106Rotate, 293Scale, 292, 296Smooth, 221Smudge, 221Texture, 222third-party, 334Vegetation, 222Wall Coverings, 106Walls, 106Water, 105
tracks, recording in World of Warcraft(WoW), 203
Transformativedefined, 278Fair Use, 278
transitionsadding, 158–160creating, 160defined, 158types, 159
translation, 145transport coordinator organizational role,
201trial software
defined, 377on the DVD, 379
Trimmer, in Vegas Video, 158trimming
clips, 157–158defined, 157
troubleshooting, DVD, 379–380tutorial material on the DVD, 377two-shot
close-up defined, 53overview, 51
400 Machinima For Dummies
32_096918 bindex.qxp 7/20/07 11:18 AM Page 400

• U •UI (User Interface), activating tools with
the, 336UndergroundFilm.org as a form of
publicity, 261Undo function, Body Shop, 120University expansion pack, 119Unreal Tournament (UT)
character creation features, 117engine, 86–87engine ratings, 82scripting add-ons, 337tool development, 333
uploadingto Google Video, 180–181to Lulu.tv, 180–181to Revver, 181to Stage, 6, 181to YouTube, 180–181
US Digital Millenium Copyright Act(DMCA), 279
User Interface (UI), activating tools withthe, 336
UT (Unreal Tournament)character creation features, 117engine, 86–87scripting add-ons, 337tool development, 333
utilitiesfreeware, 378open-source, 378
UV mappingoverview, 297process of, 297–298
UV unwrapping process, 298
• V •Vegas Video
Credit Roll plug-in, 162editing package, 156–157Media Generator, 162Trimmer, 158
Vegetation tool, 222
velocity, 145Ventrillo MMO (Massively Multiplayer)
tool, 195vertexes, 294video
capturing from the Model Viewer, 206–207encoding, 172–179encoding with AVI (Audio Video
Interleave), 175–176encoding with QuickTime, 172–175encoding with WMV (Windows Media
Video), 176–179formats, 168–171publicizing your, 186publishing your, 182–186rendering, 163streaming, 179–182
video publishingInternet Archive, 183–184peer-to-peer distribution, 184–186Standard Web hosting, 182–183Web video sites, 184
video-sharing Web sites as a form ofpublicity, 262
video track, adding a clip to the, 157viewpoints, moving, 27viral marketing as a form of publicity, 259virtual puppeteering. See also live action
defined, 22VirtualDub
codec download, 170on the DVD, 378re-attaching split files with, 238YouTube and, 180
Visible Elements window, CinematicsEditor, 228
VLCdownloading, 169on the DVD, 378
Voice Communications MMO (MassivelyMultiplayer) tool, 195
Voice Over IP (VOIP), 248voices, cleaning up, 248–250Voxels, 101VTF Explorer package extractor, 344
401Index
32_096918 bindex.qxp 7/20/07 11:18 AM Page 401

• W •Wall Coverings tool, 106walls
building, 106–107painting in Moviestorm, 309
Walls tool, 106Warcraft Map Viewer on the DVD, 378Warcraft Model Viewer on the DVD, 378WarcraftMovies.com Web site, 374Water tool, 105waveform, 249Web hosting, Standard, 182–183Web sites
CameraPlus, 194Creative Commons, 266Dreamhosts, 182Electronic Frontier Foundation, 279–280engine-specific, 260–261The Internet Archive Machinima
Section, 373Machinifeed, 373Machinima, 186, 266, 371–374Machinima Film Festival, 372Machinima For Dummies, 79, 218Machinima For Dummies blog, 372–373Machinima Premiere, 371The Movies publicity, 261Neverwinter Nights, 266The Overcast, 373publicity, 260, 260–262SA Multiplayer mod, 91Sims99, 371Thinking Machinima, 372TIGA, 279, 280Wikipedia, 108, 129World of Warcraft Model Viewer, 195
Web video sites for video publishing, 184When Harry Met Sally, story in, 62–63wide shot
overview, 50using a, 30–31
Wikipedia Web site, 108, 129Windows dialog box, 232
Windows Media Encoder, downloading the, 171
Windows Media Player, rendering a film to, 31–32
Windows Media Video (WMV)encoding video with, 176–179video format, 170–171
Windows users of the DVD, 376Windows Vista For Dummies
(Rathbone), 375Windows XP For Dummies (Rathbone), 375wipe transition, 159WMV (Windows Media Video)
encoding video with, 176–179video format, 170–171
word-of-mouth as a form of publicity, 259World of Warcraft Map Viewer MMO
(Massively Multiplayer) tool, 195World of Warcraft Model Viewer MMO
(Massively Multiplayer) tool, 195World of Warcraft (WoW)
advantages of using, 191–192character creation features, 117character scripting, 192characters, 190disadvantages of using, 192–193emote commands, 203engine, 94–95engine ratings, 82Map Viewer, 207–208Model Viewer tool, 204–207Model Viewer Web site, 195organizational roles for filming, 198–201overview, 190package extractor, 345post-production effects, 208–213publicity Web site, 261recording pans, 202recording tracks, 203scripting add-ons, 337shooting, 202–204shooting characters, 203–204third-party content, 192third-party tools, 334tips for shooting, 204
402 Machinima For Dummies
32_096918 bindex.qxp 7/20/07 11:18 AM Page 402

tool development, 334tools, 336types of film available, 197using sound effects from, 251writing for, 196–198
writingnatural dialogue, 75–76press releases, 264–268scripts, 17–18in World of Warcraft (WoW), 197–198
• Y •YouTube
RSS feeds and, 262uploading to, 180–181
• Z •ZIP files, reading, 125zoom
adding, 232defined, 56–57functions in Cinematics Editor, 231
Zornhau, on storytelling, 63ZZounds, audio equipment retailer, 244
403Index
32_096918 bindex.qxp 7/20/07 11:18 AM Page 403

Notes____________________________________________________________________________________________________________________________________________________________________________________________________________________________________________________________________________________________________________________________________________________________________________________________________________________________________________________________________________________________________________________________________________________________________________________________________________________________________________________________________________________________________________________________________________________________________________________________________________________________________________________________________________________________________________________________________________________________________________________________________________________________
32_096918 bindex.qxp 7/20/07 11:18 AM Page 404

BUSINESS, CAREERS & PERSONAL FINANCE
Also available:Business Plans Kit For Dummies 0-7645-9794-9Economics For Dummies 0-7645-5726-2Grant Writing For Dummies0-7645-8416-2Home Buying For Dummies 0-7645-5331-3Managing For Dummies 0-7645-1771-6Marketing For Dummies 0-7645-5600-2
Personal Finance For Dummies 0-7645-2590-5*Resumes For Dummies 0-7645-5471-9Selling For Dummies 0-7645-5363-1Six Sigma For Dummies 0-7645-6798-5Small Business Kit For Dummies 0-7645-5984-2Starting an eBay Business For Dummies 0-7645-6924-4Your Dream Career For Dummies 0-7645-9795-7
0-7645-9847-3 0-7645-2431-3
Also available:Candy Making For Dummies0-7645-9734-5Card Games For Dummies 0-7645-9910-0Crocheting For Dummies 0-7645-4151-XDog Training For Dummies 0-7645-8418-9Healthy Carb Cookbook For Dummies 0-7645-8476-6Home Maintenance For Dummies 0-7645-5215-5
Horses For Dummies 0-7645-9797-3Jewelry Making & Beading For Dummies 0-7645-2571-9Orchids For Dummies 0-7645-6759-4Puppies For Dummies 0-7645-5255-4Rock Guitar For Dummies 0-7645-5356-9Sewing For Dummies 0-7645-6847-7Singing For Dummies 0-7645-2475-5
FOOD, HOME, GARDEN, HOBBIES, MUSIC & PETS
0-7645-8404-9 0-7645-9904-6
Available wherever books are sold. For more information or to order direct: U.S. customers visit www.dummies.com or call 1-877-762-2974. U.K. customers visit www.wileyeurope.com or call 0800 243407. Canadian customers visit www.wiley.ca or call 1-800-567-4797.
HOME & BUSINESS COMPUTER BASICS
Also available:Cleaning Windows Vista For Dummies 0-471-78293-9Excel 2007 For Dummies0-470-03737-7Mac OS X Tiger For Dummies 0-7645-7675-5MacBook For Dummies 0-470-04859-XMacs For Dummies 0-470-04849-2Office 2007 For Dummies0-470-00923-3
Outlook 2007 For Dummies0-470-03830-6PCs For Dummies 0-7645-8958-XSalesforce.com For Dummies 0-470-04893-XUpgrading & Fixing Laptops For Dummies 0-7645-8959-8Word 2007 For Dummies 0-470-03658-3Quicken 2007 For Dummies 0-470-04600-7
0-470-05432-8 0-471-75421-8
Also available:Blogging For Dummies 0-471-77084-1Digital Photography For Dummies0-7645-9802-3Digital Photography All-in-One Desk Reference For Dummies0-470-03743-1Digital SLR Cameras and Photography For Dummies0-7645-9803-1eBay Business All-in-One Desk Reference For Dummies0-7645-8438-3HDTV For Dummies 0-470-09673-X
Home Entertainment PCs For Dummies 0-470-05523-5MySpace For Dummies 0-470-09529-6Search Engine Optimization For Dummies0-471-97998-8Skype For Dummies 0-470-04891-3The Internet For Dummies 0-7645-8996-2Wiring Your Digital Home For Dummies 0-471-91830-X
INTERNET & DIGITAL MEDIA
0-470-04529-9 0-470-04894-8
* Separate Canadian edition also available† Separate U.K. edition also available
33_096918 bob.qxp 7/20/07 11:18 AM Page 405

Also available:3D Game Animation For Dummies 0-7645-8789-7AutoCAD 2006 For Dummies 0-7645-8925-3Building a Web Site For Dummies 0-7645-7144-3Creating Web Pages For Dummies 0-470-08030-2Creating Web Pages All-in-One Desk Reference For Dummies 0-7645-4345-8Dreamweaver 8 For Dummies 0-7645-9649-7
InDesign CS2 For Dummies 0-7645-9572-5Macromedia Flash 8 For Dummies 0-7645-9691-8Photoshop CS2 and Digital Photography For Dummies 0-7645-9580-6Photoshop Elements 4 For Dummies 0-471-77483-9Syndicating Web Sites with RSS Feeds For Dummies 0-7645-8848-6Yahoo! SiteBuilder For Dummies 0-7645-9800-7
SPORTS, FITNESS, PARENTING, RELIGION & SPIRITUALITY
Also available:Catholicism For Dummies 0-7645-5391-7Exercise Balls For Dummies 0-7645-5623-1Fitness For Dummies 0-7645-7851-0Football For Dummies 0-7645-3936-1Judaism For Dummies 0-7645-5299-6Potty Training For Dummies 0-7645-5417-4Buddhism For Dummies 0-7645-5359-3
Pregnancy For Dummies 0-7645-4483-7 †Ten Minute Tone-Ups For Dummies 0-7645-7207-5NASCAR For Dummies 0-7645-7681-XReligion For Dummies 0-7645-5264-3Soccer For Dummies 0-7645-5229-5Women in the Bible For Dummies 0-7645-8475-8
Also available:Alaska For Dummies 0-7645-7746-8Cruise Vacations For Dummies 0-7645-6941-4England For Dummies 0-7645-4276-1Europe For Dummies 0-7645-7529-5Germany For Dummies 0-7645-7823-5Hawaii For Dummies 0-7645-7402-7
Italy For Dummies 0-7645-7386-1Las Vegas For Dummies 0-7645-7382-9London For Dummies 0-7645-4277-XParis For Dummies 0-7645-7630-5RV Vacations For Dummies 0-7645-4442-XWalt Disney World & Orlando For Dummies 0-7645-9660-8
TRAVEL
GRAPHICS, DESIGN & WEB DEVELOPMENT
0-471-76871-5 0-7645-7841-3
0-7645-7749-2 0-7645-6945-7
0-7645-8815-X 0-7645-9571-7
Also available:Access 2007 For Dummies 0-470-04612-0ASP.NET 2 For Dummies 0-7645-7907-XC# 2005 For Dummies 0-7645-9704-3Hacking For Dummies 0-470-05235-XHacking Wireless Networks For Dummies 0-7645-9730-2Java For Dummies 0-470-08716-1
Microsoft SQL Server 2005 For Dummies 0-7645-7755-7Networking All-in-One Desk Reference For Dummies 0-7645-9939-9Preventing Identity Theft For Dummies 0-7645-7336-5Telecom For Dummies 0-471-77085-XVisual Studio 2005 All-in-One Desk Reference For Dummies 0-7645-9775-2XML For Dummies 0-7645-8845-1
NETWORKING, SECURITY, PROGRAMMING & DATABASES
0-7645-7728-X 0-471-74940-0
33_096918 bob.qxp 7/20/07 11:18 AM Page 406

Available wherever books are sold. For more information or to order direct: U.S. customers visit www.dummies.com or call 1-877-762-2974. U.K. customers visit www.wileyeurope.com or call 0800 243407. Canadian customers visit www.wiley.ca or call 1-800-567-4797.
Get smart @ dummies.com®• Find a full list of Dummies titles
• Look into loads of FREE on-site articles
• Sign up for FREE eTips e-mailed to you weekly
• See what other products carry the Dummies name
• Shop directly from the Dummies bookstore
• Enter to win new prizes every month!
Also available:Bipolar Disorder For Dummies 0-7645-8451-0Chemotherapy and Radiation For Dummies 0-7645-7832-4Controlling Cholesterol For Dummies 0-7645-5440-9Diabetes For Dummies 0-7645-6820-5* † Divorce For Dummies 0-7645-8417-0 †
Fibromyalgia For Dummies 0-7645-5441-7Low-Calorie Dieting For Dummies 0-7645-9905-4Meditation For Dummies 0-471-77774-9Osteoporosis For Dummies 0-7645-7621-6Overcoming Anxiety For Dummies 0-7645-5447-6Reiki For Dummies 0-7645-9907-0Stress Management For Dummies 0-7645-5144-2
HEALTH & SELF-HELP
0-7645-8450-2 0-7645-4149-8
Also available:The ACT For Dummies 0-7645-9652-7Algebra For Dummies 0-7645-5325-9Algebra Workbook For Dummies 0-7645-8467-7Astronomy For Dummies 0-7645-8465-0Calculus For Dummies 0-7645-2498-4Chemistry For Dummies 0-7645-5430-1Forensics For Dummies 0-7645-5580-4
Freemasons For Dummies 0-7645-9796-5French For Dummies 0-7645-5193-0Geometry For Dummies 0-7645-5324-0Organic Chemistry I For Dummies 0-7645-6902-3The SAT I For Dummies 0-7645-7193-1Spanish For Dummies 0-7645-5194-9Statistics For Dummies 0-7645-5423-9
EDUCATION, HISTORY, REFERENCE & TEST PREPARATION
0-7645-8381-6 0-7645-9554-7
* Separate Canadian edition also available† Separate U.K. edition also available
33_096918 bob.qxp 7/20/07 11:18 AM Page 407

Check out the Dummies Specialty Shop at www.dummies.com for more information!
Do More with Dummies
Instructional DVDs • Music Compilations Games & Novelties • Culinary Kits Crafts & Sewing PatternsHome Improvement/DIY Kits • and more!
33_096918 bob.qxp 7/20/07 11:18 AM Page 408
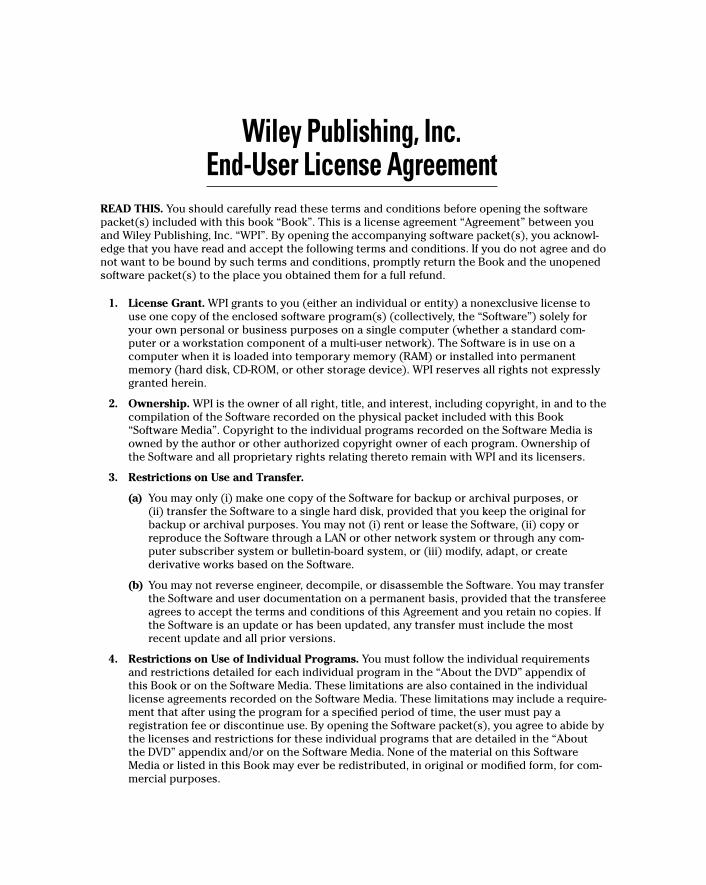
Wiley Publishing, Inc.End-User License Agreement
READ THIS. You should carefully read these terms and conditions before opening the softwarepacket(s) included with this book “Book”. This is a license agreement “Agreement” between youand Wiley Publishing, Inc. “WPI”. By opening the accompanying software packet(s), you acknowl-edge that you have read and accept the following terms and conditions. If you do not agree and donot want to be bound by such terms and conditions, promptly return the Book and the unopenedsoftware packet(s) to the place you obtained them for a full refund.
1. License Grant. WPI grants to you (either an individual or entity) a nonexclusive license touse one copy of the enclosed software program(s) (collectively, the “Software”) solely foryour own personal or business purposes on a single computer (whether a standard com-puter or a workstation component of a multi-user network). The Software is in use on acomputer when it is loaded into temporary memory (RAM) or installed into permanentmemory (hard disk, CD-ROM, or other storage device). WPI reserves all rights not expresslygranted herein.
2. Ownership. WPI is the owner of all right, title, and interest, including copyright, in and to thecompilation of the Software recorded on the physical packet included with this Book“Software Media”. Copyright to the individual programs recorded on the Software Media isowned by the author or other authorized copyright owner of each program. Ownership ofthe Software and all proprietary rights relating thereto remain with WPI and its licensers.
3. Restrictions on Use and Transfer.
(a) You may only (i) make one copy of the Software for backup or archival purposes, or (ii) transfer the Software to a single hard disk, provided that you keep the original forbackup or archival purposes. You may not (i) rent or lease the Software, (ii) copy orreproduce the Software through a LAN or other network system or through any com-puter subscriber system or bulletin-board system, or (iii) modify, adapt, or createderivative works based on the Software.
(b) You may not reverse engineer, decompile, or disassemble the Software. You may transferthe Software and user documentation on a permanent basis, provided that the transfereeagrees to accept the terms and conditions of this Agreement and you retain no copies. Ifthe Software is an update or has been updated, any transfer must include the mostrecent update and all prior versions.
4. Restrictions on Use of Individual Programs. You must follow the individual requirementsand restrictions detailed for each individual program in the “About the DVD” appendix ofthis Book or on the Software Media. These limitations are also contained in the individuallicense agreements recorded on the Software Media. These limitations may include a require-ment that after using the program for a specified period of time, the user must pay aregistration fee or discontinue use. By opening the Software packet(s), you agree to abide bythe licenses and restrictions for these individual programs that are detailed in the “Aboutthe DVD” appendix and/or on the Software Media. None of the material on this SoftwareMedia or listed in this Book may ever be redistributed, in original or modified form, for com-mercial purposes.
34_096918 eula.qxp 7/20/07 11:19 AM Page 409

5. Limited Warranty.
(a) WPI warrants that the Software and Software Media are free from defects in materialsand workmanship under normal use for a period of sixty (60) days from the date of pur-chase of this Book. If WPI receives notification within the warranty period of defects inmaterials or workmanship, WPI will replace the defective Software Media.
(b) WPI AND THE AUTHOR(S) OF THE BOOK DISCLAIM ALL OTHER WARRANTIES, EXPRESS OR IMPLIED, INCLUDING WITHOUT LIMITATION IMPLIED WARRANTIES OFMERCHANTABILITY AND FITNESS FOR A PARTICULAR PURPOSE, WITH RESPECT TO THE SOFTWARE, THE PROGRAMS, THE SOURCE CODE CONTAINED THEREIN, AND/ORTHE TECHNIQUES DESCRIBED IN THIS BOOK. WPI DOES NOT WARRANT THAT THEFUNCTIONS CONTAINED IN THE SOFTWARE WILL MEET YOUR REQUIREMENTS ORTHAT THE OPERATION OF THE SOFTWARE WILL BE ERROR FREE.
(c) This limited warranty gives you specific legal rights, and you may have other rights thatvary from jurisdiction to jurisdiction.
6. Remedies.
(a) WPI’s entire liability and your exclusive remedy for defects in materials and workman-ship shall be limited to replacement of the Software Media, which may be returned toWPI with a copy of your receipt at the following address: Software Media FulfillmentDepartment, Attn.: Machinima For Dummies, Wiley Publishing, Inc., 10475 CrosspointBlvd., Indianapolis, IN 46256, or call 1-800-762-2974. Please allow four to six weeks fordelivery. This Limited Warranty is void if failure of the Software Media has resulted fromaccident, abuse, or misapplication. Any replacement Software Media will be warrantedfor the remainder of the original warranty period or thirty (30) days, whichever is longer.
(b) In no event shall WPI or the author be liable for any damages whatsoever (includingwithout limitation damages for loss of business profits, business interruption, loss ofbusiness information, or any other pecuniary loss) arising from the use of or inability touse the Book or the Software, even if WPI has been advised of the possibility of suchdamages.
(c) Because some jurisdictions do not allow the exclusion or limitation of liability for conse-quential or incidental damages, the above limitation or exclusion may not apply to you.
7. U.S. Government Restricted Rights. Use, duplication, or disclosure of the Software for or onbehalf of the United States of America, its agencies and/or instrumentalities “U.S.Government” is subject to restrictions as stated in paragraph (c)(1)(ii) of the Rights inTechnical Data and Computer Software clause of DFARS 252.227-7013, or subparagraphs (c) (1) and (2) of the Commercial Computer Software - Restricted Rights clause at FAR52.227-19, and in similar clauses in the NASA FAR supplement, as applicable.
8. General. This Agreement constitutes the entire understanding of the parties and revokesand supersedes all prior agreements, oral or written, between them and may not be modifiedor amended except in a writing signed by both parties hereto that specifically refers to thisAgreement. This Agreement shall take precedence over any other documents that may be inconflict herewith. If any one or more provisions contained in this Agreement are held by anycourt or tribunal to be invalid, illegal, or otherwise unenforceable, each and every other pro-vision shall remain in full force and effect.
34_096918 eula.qxp 7/20/07 11:19 AM Page 410