Embed Size (px)
Citation preview
Machinery Cleaning Guide - Wheel Loader
Biosecurity
Publication series
April 2016
Biosecurity
Department of Agriculture and Water Resources 1 Wheel Loader
DISCLAIMER
The information provided in this guide merely aims to assist machinery importers meeting the
import conditions. This guide is not exhaustive and the Department of Agriculture and Water
Resources makes no warranties or representations with respect to the accuracy or completeness
of that information and will bear no liability with respect to that information. Importers must
satisfy all biosecurity concerns and comply with biosecurity conditions applicable at the time of
entry. The Commonwealth through the department is not liable for any costs arising from or
associated with decisions of importers to import based on conditions presented here which are
not current at the time of importation. It is the importer’s responsibility to verify the accuracy
and completeness of the information at the time of importation.
Inquiries regarding this document should be directed to:
Department of Agriculture and Water Resources
Machinery Team
PO Box 222
Hamilton QLD 4007
Within Australia Phone: 1800 900 090
Outside Australia Phone: +61 7 3246 8706
Email: [email protected]
© April 2016
The Department of Agriculture and Water Resources
This work is copyright. Apart from any use as permitted under the Copyright Act 1968, no part
may be reproduced by any process without written permission from the First Assistant Secretary,
Compliance Division, Department of Agriculture and Water Resources.
Information in this document is correct at time of publishing. Biosecurity conditions may change
without notice. Please contact the Department of Agriculture and Water Resources to confirm
details.
Biosecurity
Department of Agriculture and Water Resources 2 Wheel Loader
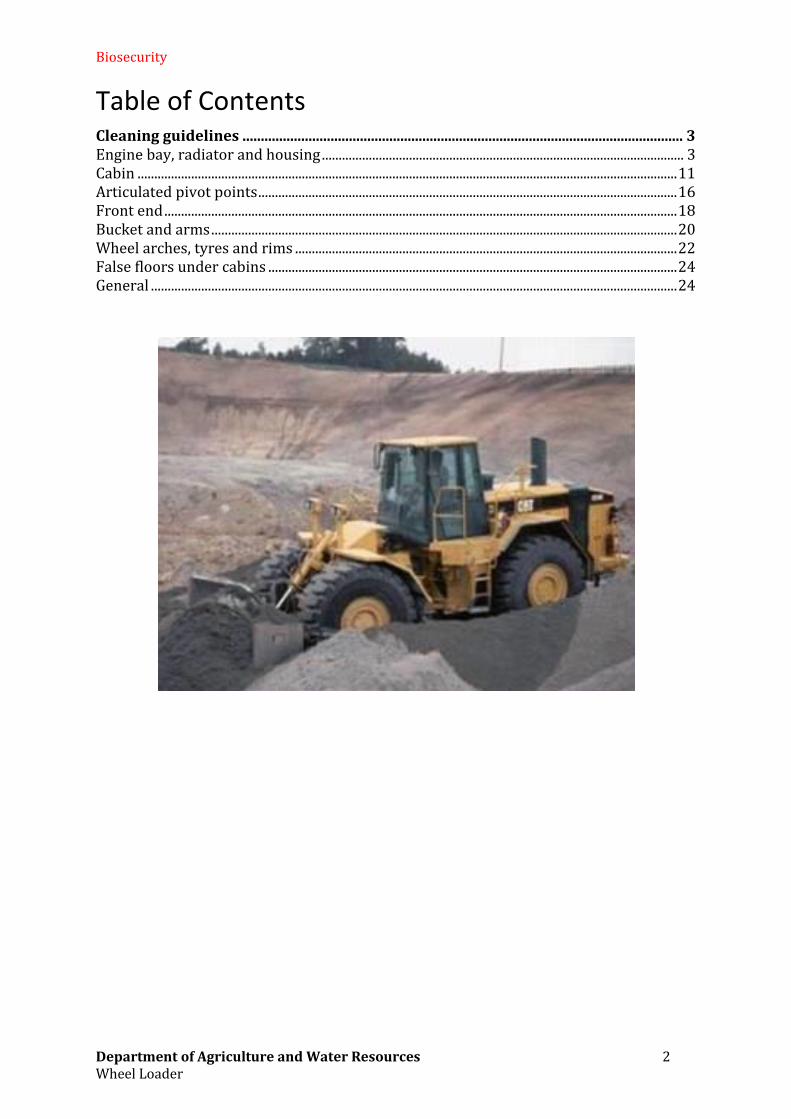
Table of Contents Cleaning guidelines ........................................................................................................................ 3
Engine bay, radiator and housing ............................................................................................................ 3
Cabin ................................................................................................................................................................. 11
Articulated pivot points ............................................................................................................................. 16
Front end ......................................................................................................................................................... 18
Bucket and arms ........................................................................................................................................... 20
Wheel arches, tyres and rims .................................................................................................................. 22
False floors under cabins .......................................................................................................................... 24
General ............................................................................................................................................................. 24
Biosecurity
Department of Agriculture and Water Resources 3 Wheel Loader
Cleaning guidelines
Engine bay, radiator and housing
Description Images
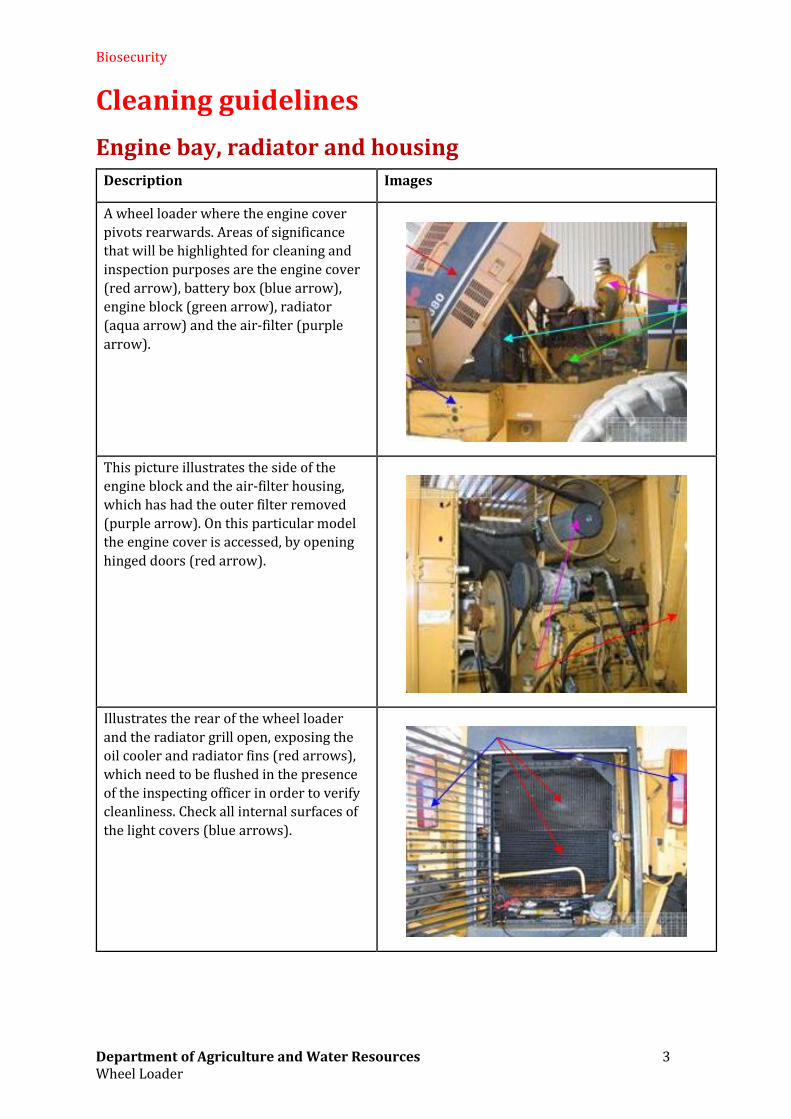
A wheel loader where the engine cover
pivots rearwards. Areas of significance
that will be highlighted for cleaning and
inspection purposes are the engine cover
(red arrow), battery box (blue arrow),
engine block (green arrow), radiator
(aqua arrow) and the air-filter (purple
arrow).
This picture illustrates the side of the
engine block and the air-filter housing,
which has had the outer filter removed
(purple arrow). On this particular model
the engine cover is accessed, by opening
hinged doors (red arrow).
Illustrates the rear of the wheel loader
and the radiator grill open, exposing the
oil cooler and radiator fins (red arrows),
which need to be flushed in the presence
of the inspecting officer in order to verify
cleanliness. Check all internal surfaces of
the light covers (blue arrows).
Biosecurity
Department of Agriculture and Water Resources 4 Wheel Loader
Description Images
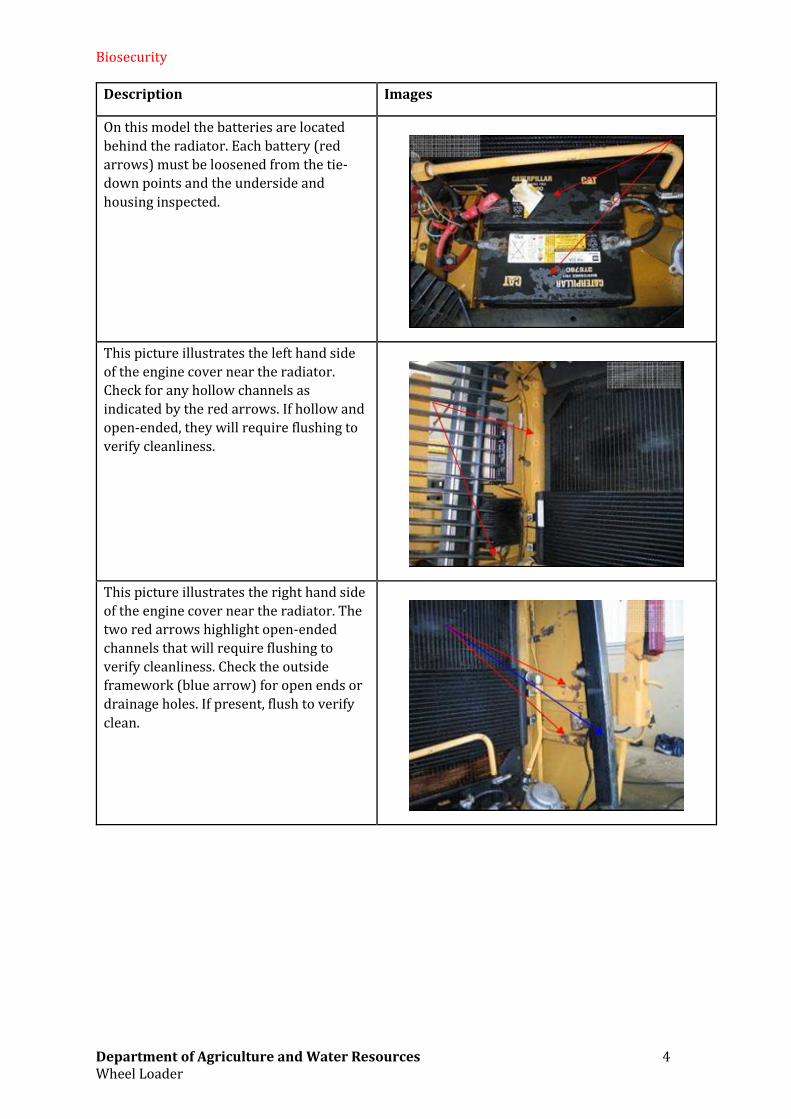
On this model the batteries are located
behind the radiator. Each battery (red
arrows) must be loosened from the tie-
down points and the underside and
housing inspected.
This picture illustrates the left hand side
of the engine cover near the radiator.
Check for any hollow channels as
indicated by the red arrows. If hollow and
open-ended, they will require flushing to
verify cleanliness.
This picture illustrates the right hand side
of the engine cover near the radiator. The
two red arrows highlight open-ended
channels that will require flushing to
verify cleanliness. Check the outside
framework (blue arrow) for open ends or
drainage holes. If present, flush to verify
clean.
Biosecurity
Department of Agriculture and Water Resources 5 Wheel Loader
Description Images
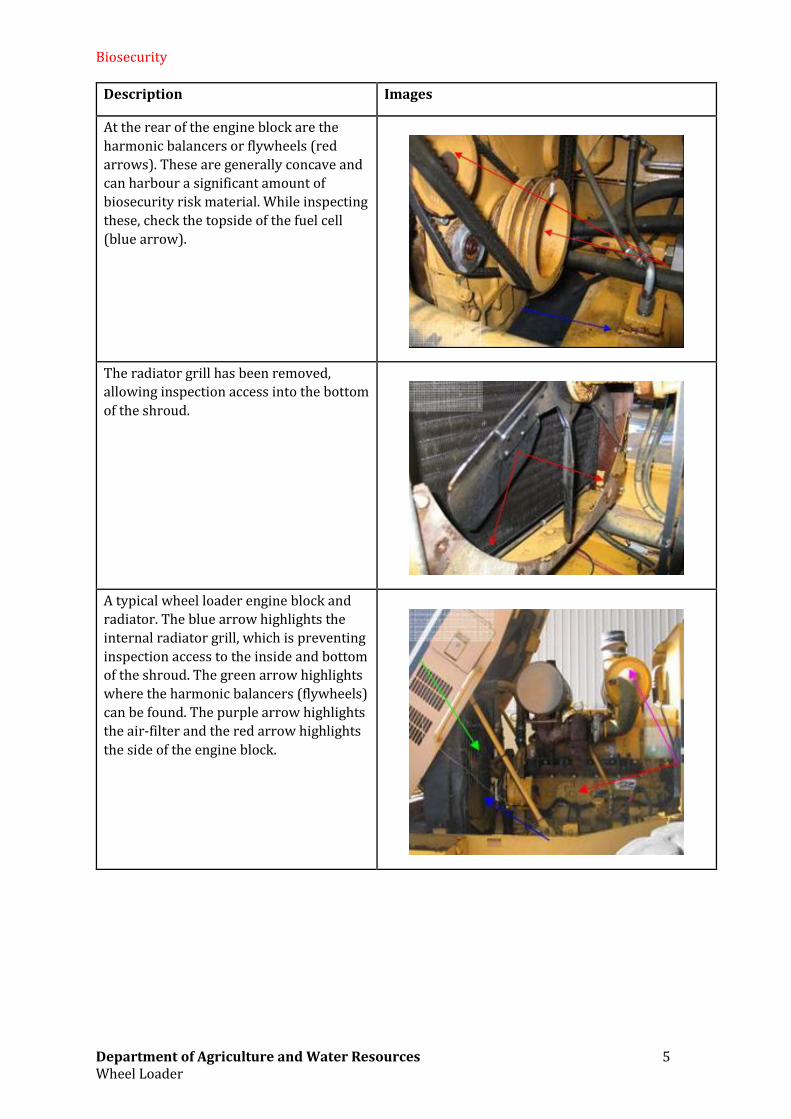
At the rear of the engine block are the
harmonic balancers or flywheels (red
arrows). These are generally concave and
can harbour a significant amount of
biosecurity risk material. While inspecting
these, check the topside of the fuel cell
(blue arrow).
The radiator grill has been removed,
allowing inspection access into the bottom
of the shroud.
A typical wheel loader engine block and
radiator. The blue arrow highlights the
internal radiator grill, which is preventing
inspection access to the inside and bottom
of the shroud. The green arrow highlights
where the harmonic balancers (flywheels)
can be found. The purple arrow highlights
the air-filter and the red arrow highlights
the side of the engine block.
Biosecurity
Department of Agriculture and Water Resources 6 Wheel Loader
Description Images
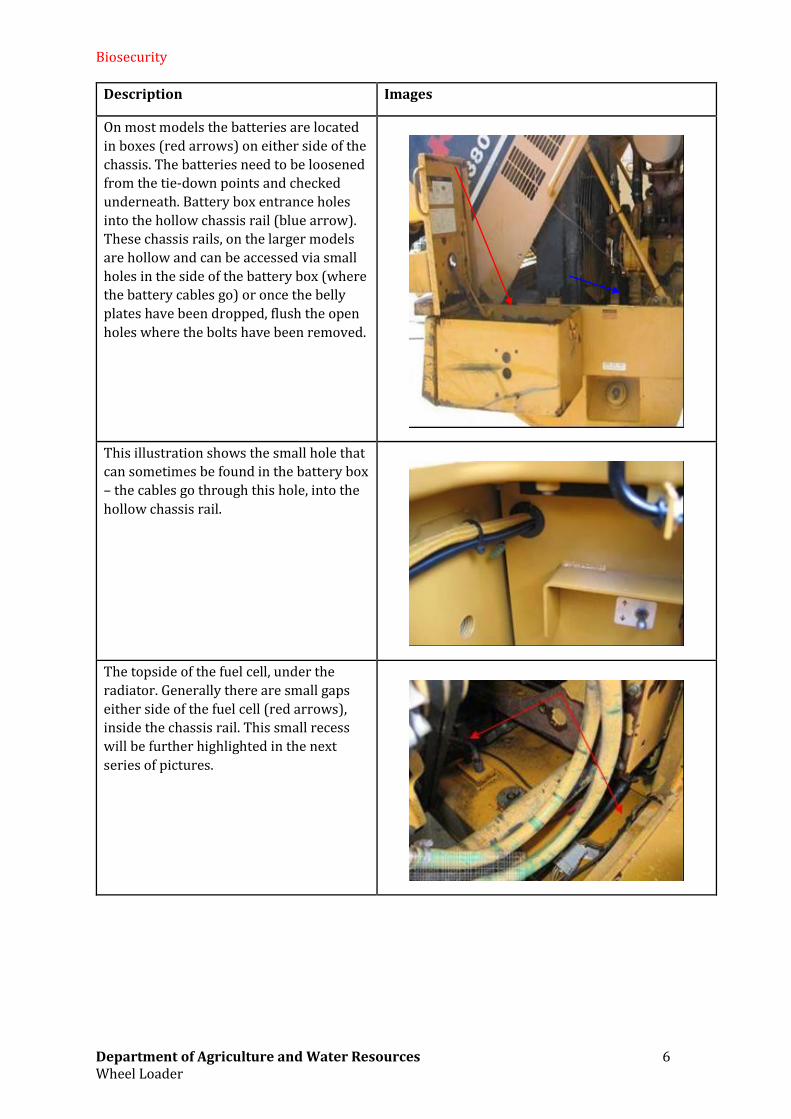
On most models the batteries are located
in boxes (red arrows) on either side of the
chassis. The batteries need to be loosened
from the tie-down points and checked
underneath. Battery box entrance holes
into the hollow chassis rail (blue arrow).
These chassis rails, on the larger models
are hollow and can be accessed via small
holes in the side of the battery box (where
the battery cables go) or once the belly
plates have been dropped, flush the open
holes where the bolts have been removed.
This illustration shows the small hole that
can sometimes be found in the battery box
– the cables go through this hole, into the
hollow chassis rail.
The topside of the fuel cell, under the
radiator. Generally there are small gaps
either side of the fuel cell (red arrows),
inside the chassis rail. This small recess
will be further highlighted in the next
series of pictures.
Biosecurity
Department of Agriculture and Water Resources 7 Wheel Loader
Description Images
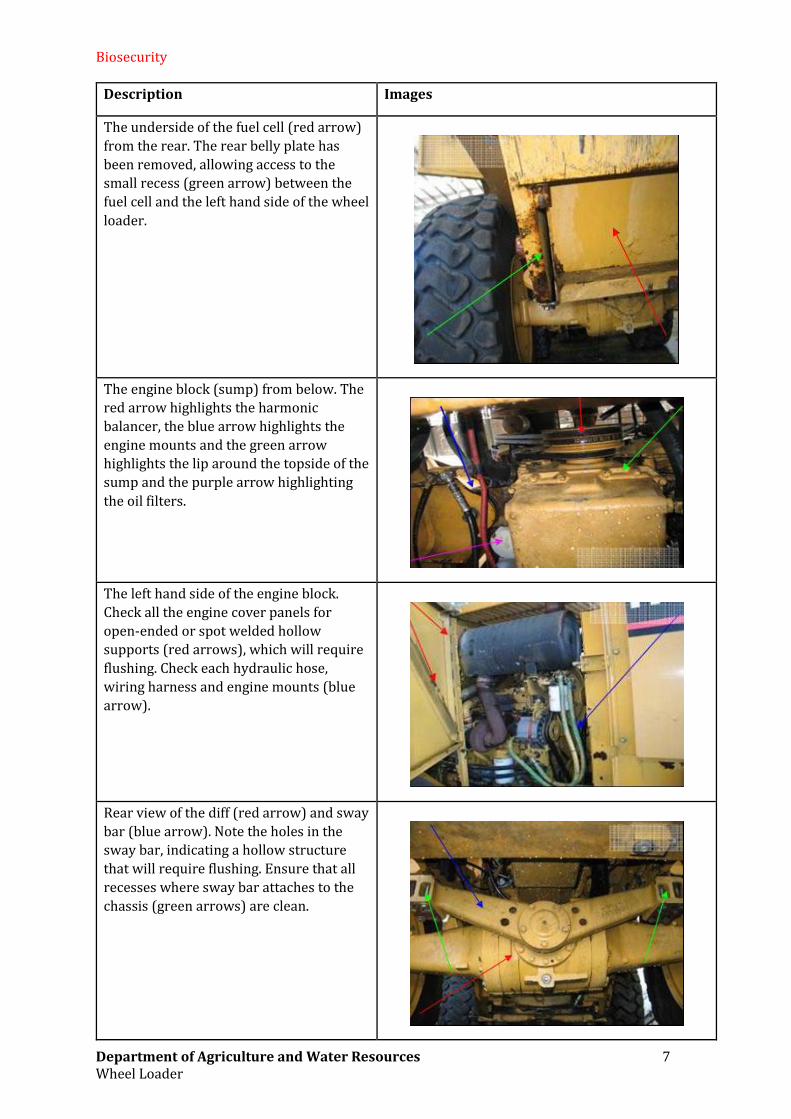
The underside of the fuel cell (red arrow)
from the rear. The rear belly plate has
been removed, allowing access to the
small recess (green arrow) between the
fuel cell and the left hand side of the wheel
loader.
The engine block (sump) from below. The
red arrow highlights the harmonic
balancer, the blue arrow highlights the
engine mounts and the green arrow
highlights the lip around the topside of the
sump and the purple arrow highlighting
the oil filters.
The left hand side of the engine block.
Check all the engine cover panels for
open-ended or spot welded hollow
supports (red arrows), which will require
flushing. Check each hydraulic hose,
wiring harness and engine mounts (blue
arrow).
Rear view of the diff (red arrow) and sway
bar (blue arrow). Note the holes in the
sway bar, indicating a hollow structure
that will require flushing. Ensure that all
recesses where sway bar attaches to the
chassis (green arrows) are clean.
Biosecurity
Department of Agriculture and Water Resources 8 Wheel Loader
Description Images
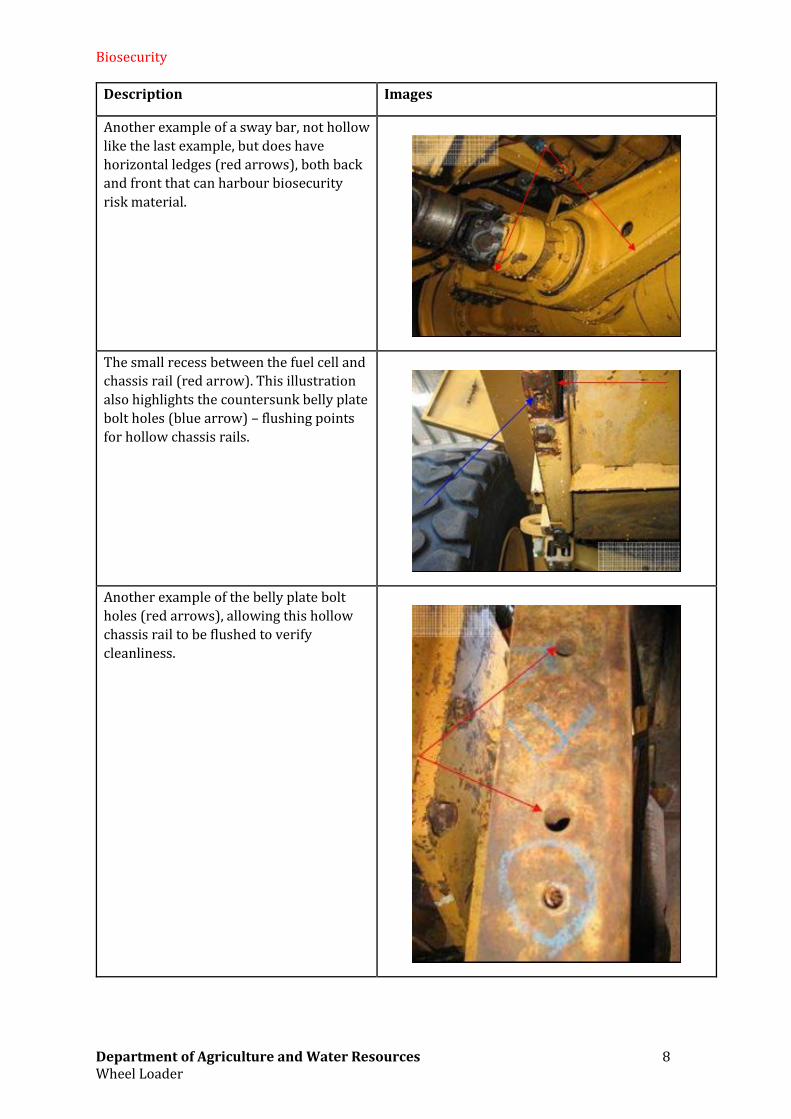
Another example of a sway bar, not hollow
like the last example, but does have
horizontal ledges (red arrows), both back
and front that can harbour biosecurity
risk material.
The small recess between the fuel cell and
chassis rail (red arrow). This illustration
also highlights the countersunk belly plate
bolt holes (blue arrow) – flushing points
for hollow chassis rails.
Another example of the belly plate bolt
holes (red arrows), allowing this hollow
chassis rail to be flushed to verify
cleanliness.
Biosecurity
Department of Agriculture and Water Resources 9 Wheel Loader
Description Images
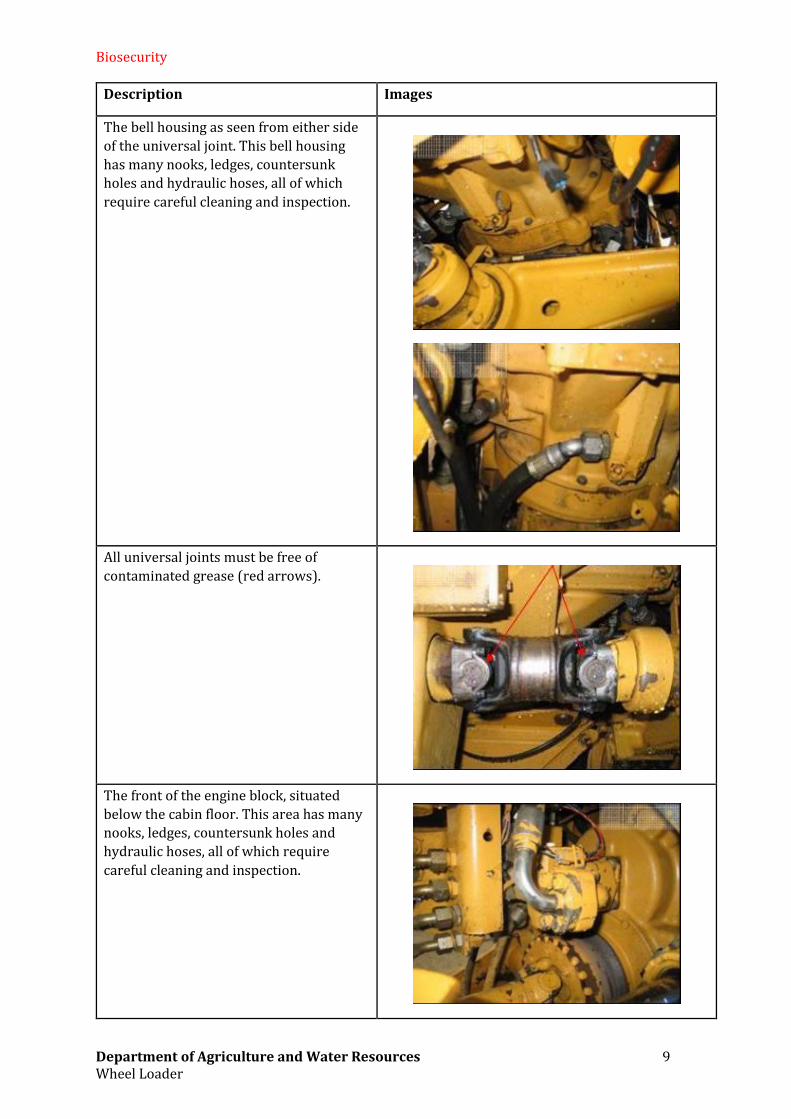
The bell housing as seen from either side
of the universal joint. This bell housing
has many nooks, ledges, countersunk
holes and hydraulic hoses, all of which
require careful cleaning and inspection.
All universal joints must be free of
contaminated grease (red arrows).
The front of the engine block, situated
below the cabin floor. This area has many
nooks, ledges, countersunk holes and
hydraulic hoses, all of which require
careful cleaning and inspection.
Biosecurity
Department of Agriculture and Water Resources 10 Wheel Loader
Description Images
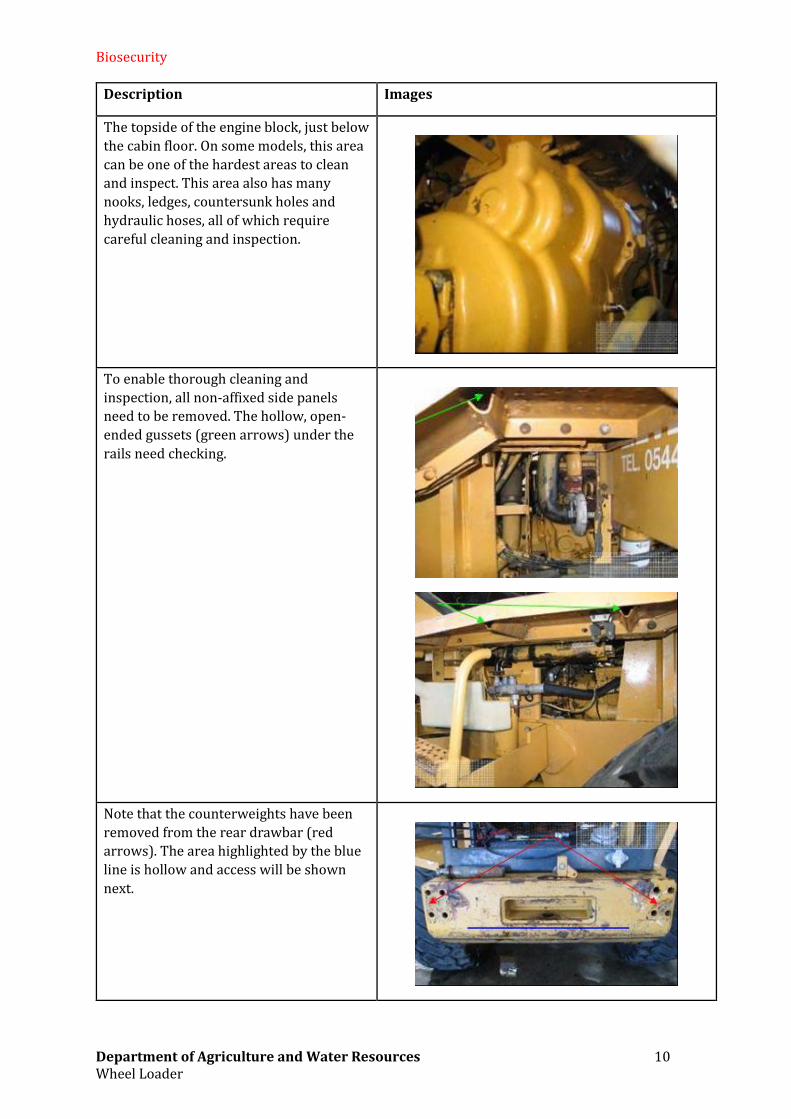
The topside of the engine block, just below
the cabin floor. On some models, this area
can be one of the hardest areas to clean
and inspect. This area also has many
nooks, ledges, countersunk holes and
hydraulic hoses, all of which require
careful cleaning and inspection.
To enable thorough cleaning and
inspection, all non-affixed side panels
need to be removed. The hollow, open-
ended gussets (green arrows) under the
rails need checking.
Note that the counterweights have been
removed from the rear drawbar (red
arrows). The area highlighted by the blue
line is hollow and access will be shown
next.
Biosecurity
Department of Agriculture and Water Resources 11 Wheel Loader
Description Images
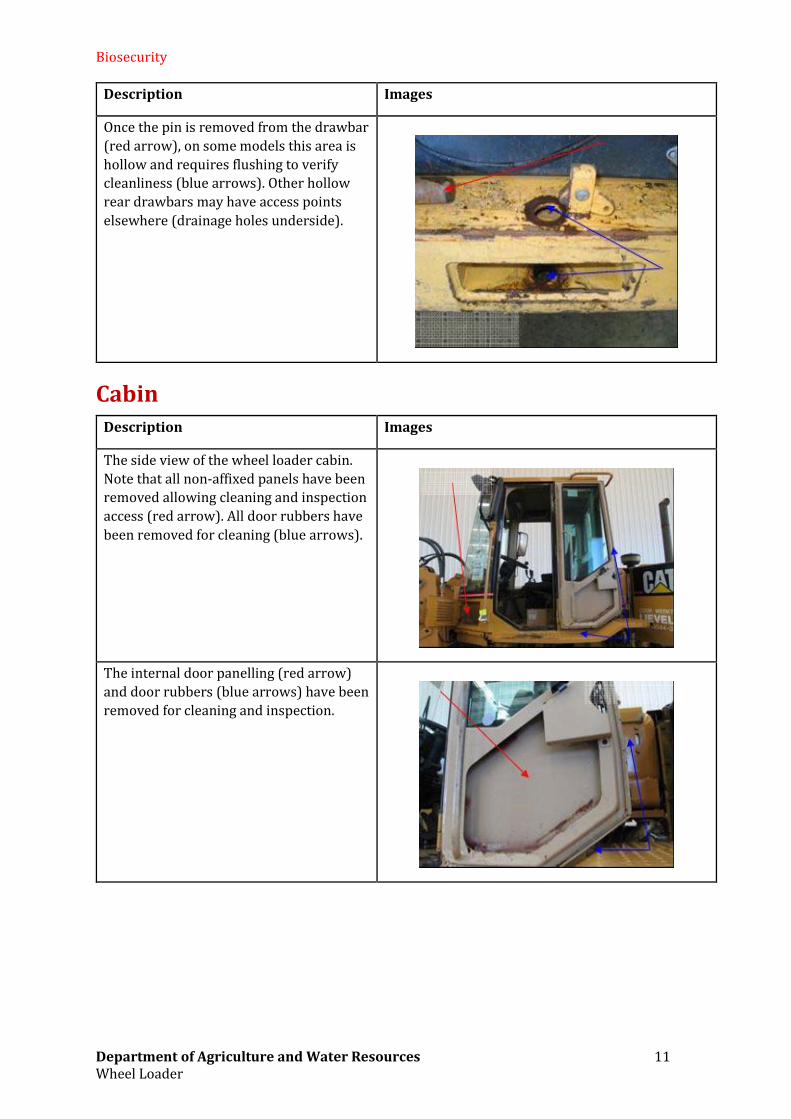
Once the pin is removed from the drawbar
(red arrow), on some models this area is
hollow and requires flushing to verify
cleanliness (blue arrows). Other hollow
rear drawbars may have access points
elsewhere (drainage holes underside).
Cabin
Description Images
The side view of the wheel loader cabin.
Note that all non-affixed panels have been
removed allowing cleaning and inspection
access (red arrow). All door rubbers have
been removed for cleaning (blue arrows).
The internal door panelling (red arrow)
and door rubbers (blue arrows) have been
removed for cleaning and inspection.
Biosecurity
Department of Agriculture and Water Resources 12 Wheel Loader
Description Images
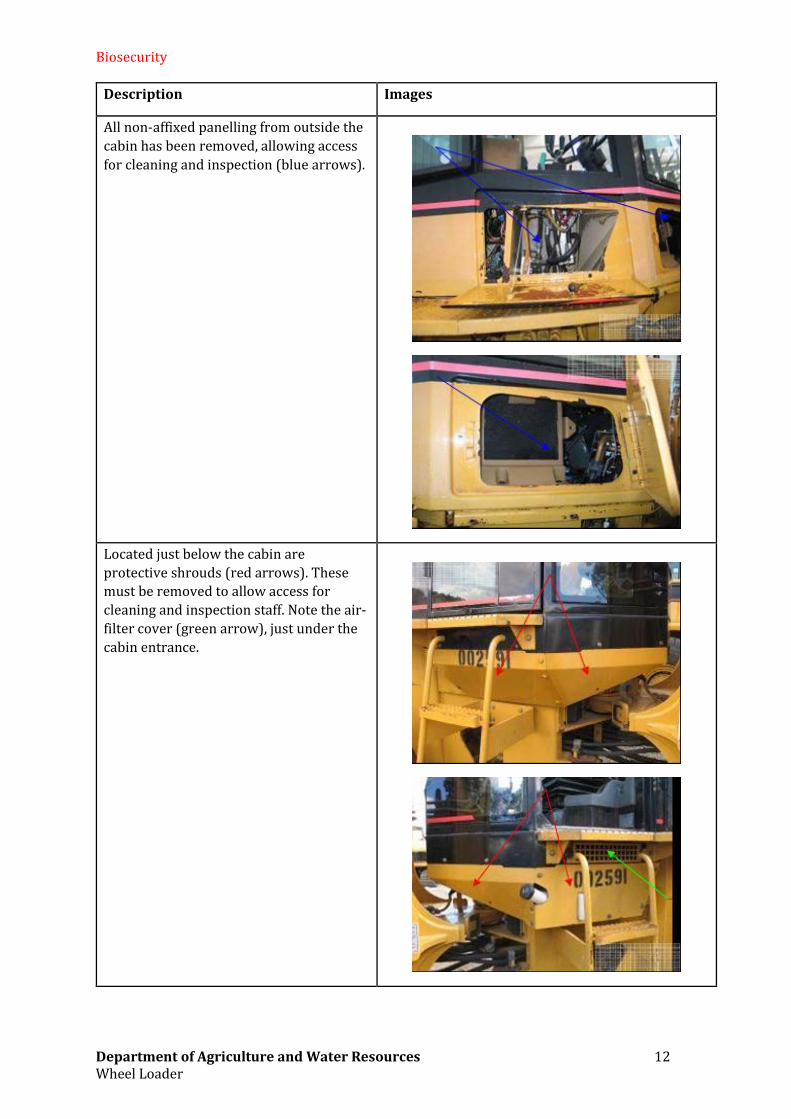
All non-affixed panelling from outside the
cabin has been removed, allowing access
for cleaning and inspection (blue arrows).
Located just below the cabin are
protective shrouds (red arrows). These
must be removed to allow access for
cleaning and inspection staff. Note the air-
filter cover (green arrow), just under the
cabin entrance.
Biosecurity
Department of Agriculture and Water Resources 13 Wheel Loader
Description Images
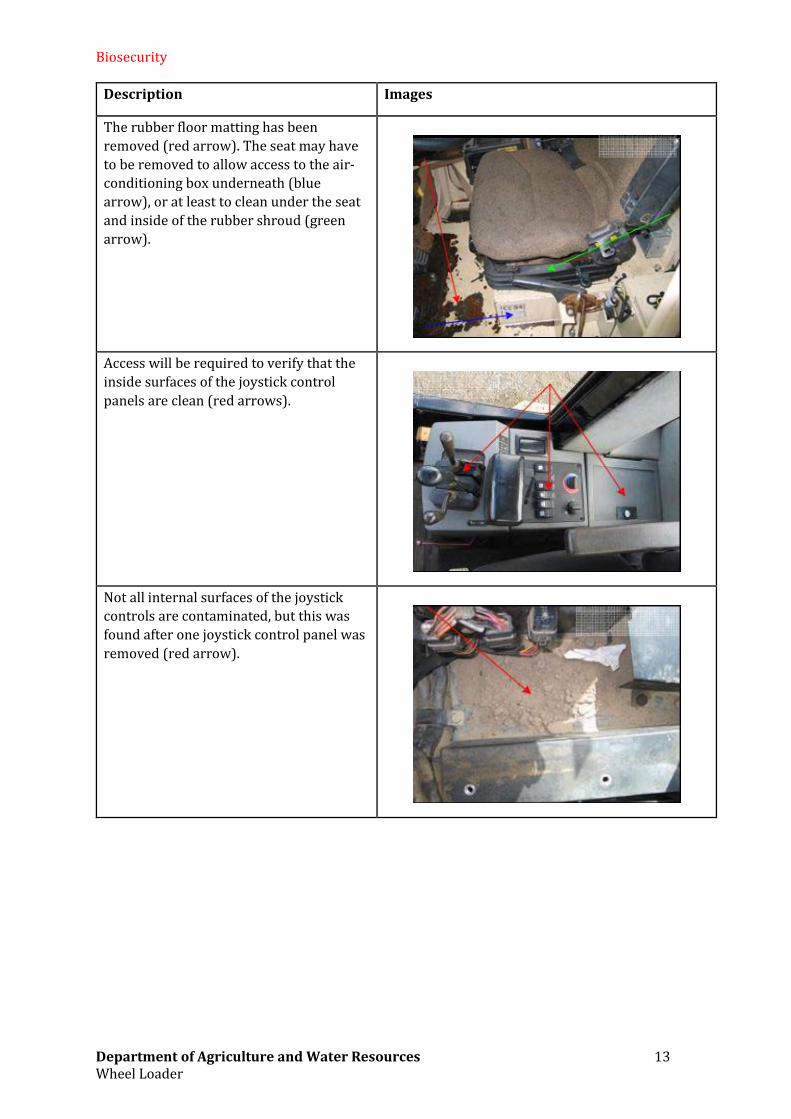
The rubber floor matting has been
removed (red arrow). The seat may have
to be removed to allow access to the air-
conditioning box underneath (blue
arrow), or at least to clean under the seat
and inside of the rubber shroud (green
arrow).
Access will be required to verify that the
inside surfaces of the joystick control
panels are clean (red arrows).
Not all internal surfaces of the joystick
controls are contaminated, but this was
found after one joystick control panel was
removed (red arrow).
Biosecurity
Department of Agriculture and Water Resources 14 Wheel Loader
Description Images
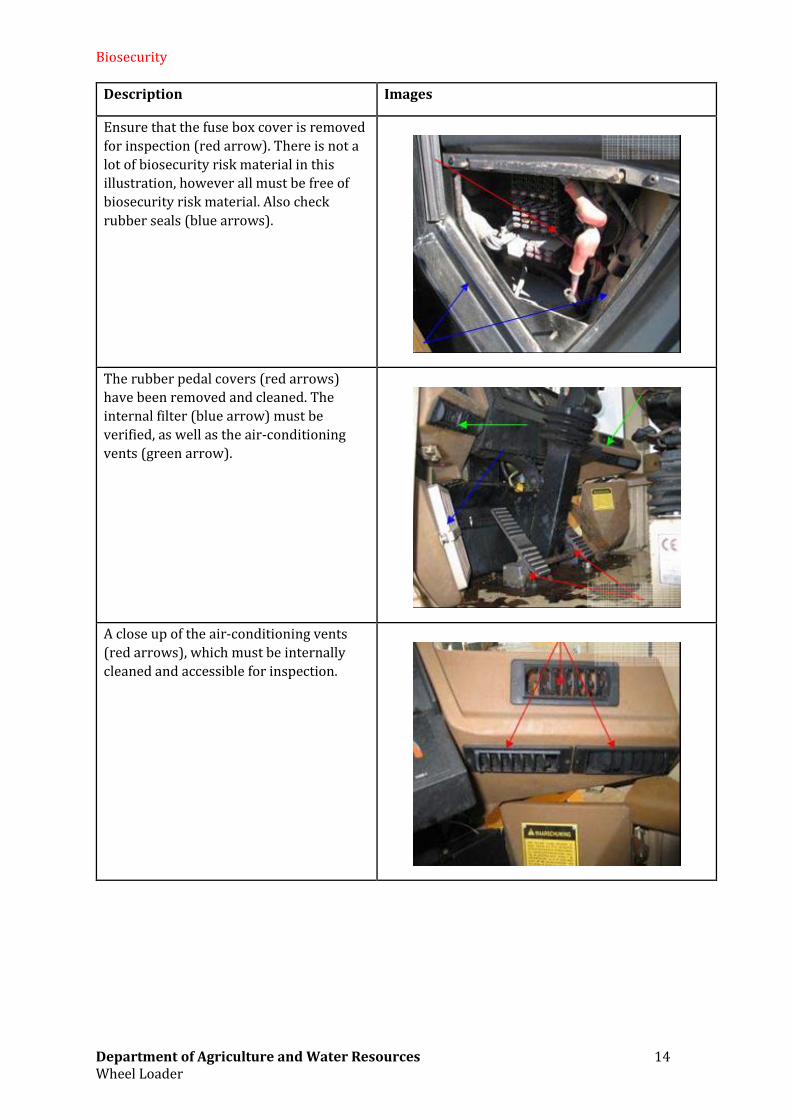
Ensure that the fuse box cover is removed
for inspection (red arrow). There is not a
lot of biosecurity risk material in this
illustration, however all must be free of
biosecurity risk material. Also check
rubber seals (blue arrows).
The rubber pedal covers (red arrows)
have been removed and cleaned. The
internal filter (blue arrow) must be
verified, as well as the air-conditioning
vents (green arrow).
A close up of the air-conditioning vents
(red arrows), which must be internally
cleaned and accessible for inspection.

Biosecurity
Department of Agriculture and Water Resources 15 Wheel Loader
Description Images
The air-conditioning vents behind the seat
(red arrows). These areas must be cleaned
and accessible for inspection.
On some models a handbrake set-up such
as this may be found. The air-conditioning
grill (red arrow) is directly underneath
and access for cleaning and inspection will
be required.
On some models, this non-affixed panel
over the windscreen wiper motor must be
removed for inspection (red arrow).
On some models, under the cabin there
may be box channels such as the one
highlighted in this picture (blue arrow).
Note the small drainage holes on the
bottom (green arrows). This area must be
flushed to verify cleanliness.
Biosecurity
Department of Agriculture and Water Resources 16 Wheel Loader
Articulated pivot points
Description Images
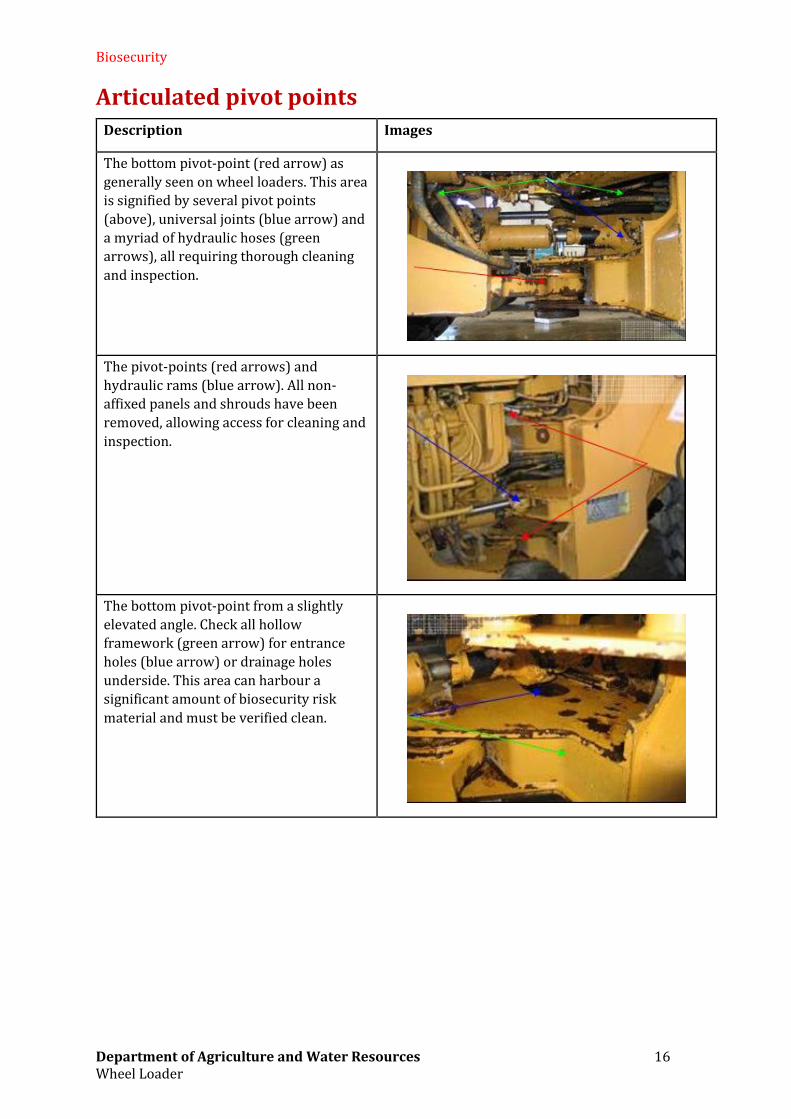
The bottom pivot-point (red arrow) as
generally seen on wheel loaders. This area
is signified by several pivot points
(above), universal joints (blue arrow) and
a myriad of hydraulic hoses (green
arrows), all requiring thorough cleaning
and inspection.
The pivot-points (red arrows) and
hydraulic rams (blue arrow). All non-
affixed panels and shrouds have been
removed, allowing access for cleaning and
inspection.
The bottom pivot-point from a slightly
elevated angle. Check all hollow
framework (green arrow) for entrance
holes (blue arrow) or drainage holes
underside. This area can harbour a
significant amount of biosecurity risk
material and must be verified clean.
Biosecurity
Department of Agriculture and Water Resources 17 Wheel Loader
Description Images
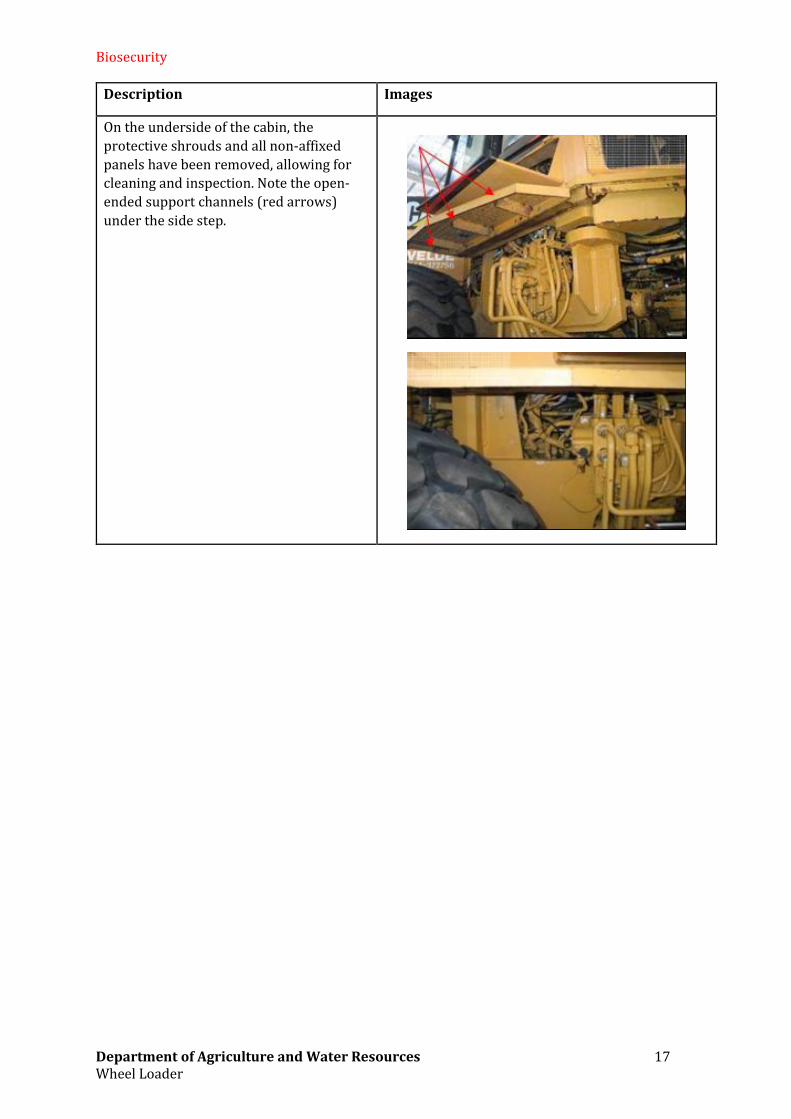
On the underside of the cabin, the
protective shrouds and all non-affixed
panels have been removed, allowing for
cleaning and inspection. Note the open-
ended support channels (red arrows)
under the side step.

Biosecurity
Department of Agriculture and Water Resources 18 Wheel Loader
Front end
Description Images
The front views of a typical wheel loader
showing the non-affixed panel (red arrow)
that needs to be removed to facilitate the
cleaning and inspection process. The
pivot-points on the bucket arms (blue
arrows) must be thoroughly cleaned,
removing all contaminated grease.
The front differential (red arrow) as seen
from the underside. Check all surfaces,
especially topside (red arrows). Also
check that all countersunk holes (blue
arrow) are clean inside.
Biosecurity
Department of Agriculture and Water Resources 19 Wheel Loader
Description Images
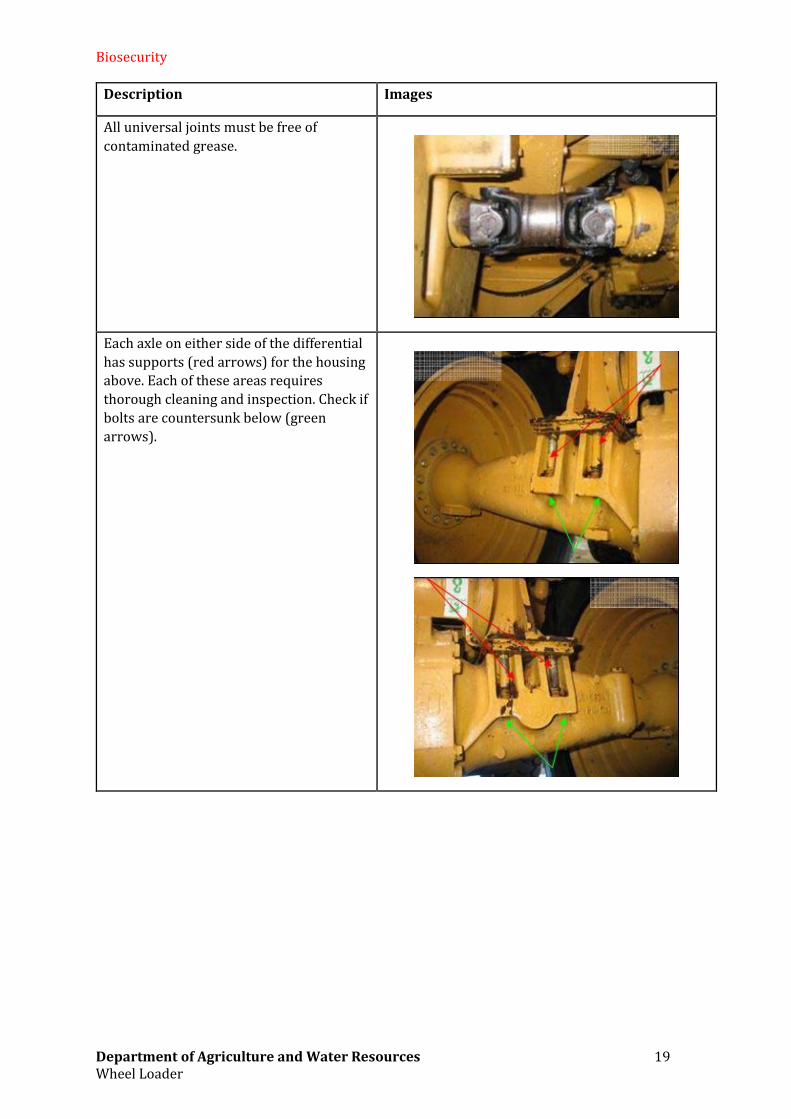
All universal joints must be free of
contaminated grease.
Each axle on either side of the differential
has supports (red arrows) for the housing
above. Each of these areas requires
thorough cleaning and inspection. Check if
bolts are countersunk below (green
arrows).
Biosecurity
Department of Agriculture and Water Resources 20 Wheel Loader
Description Images
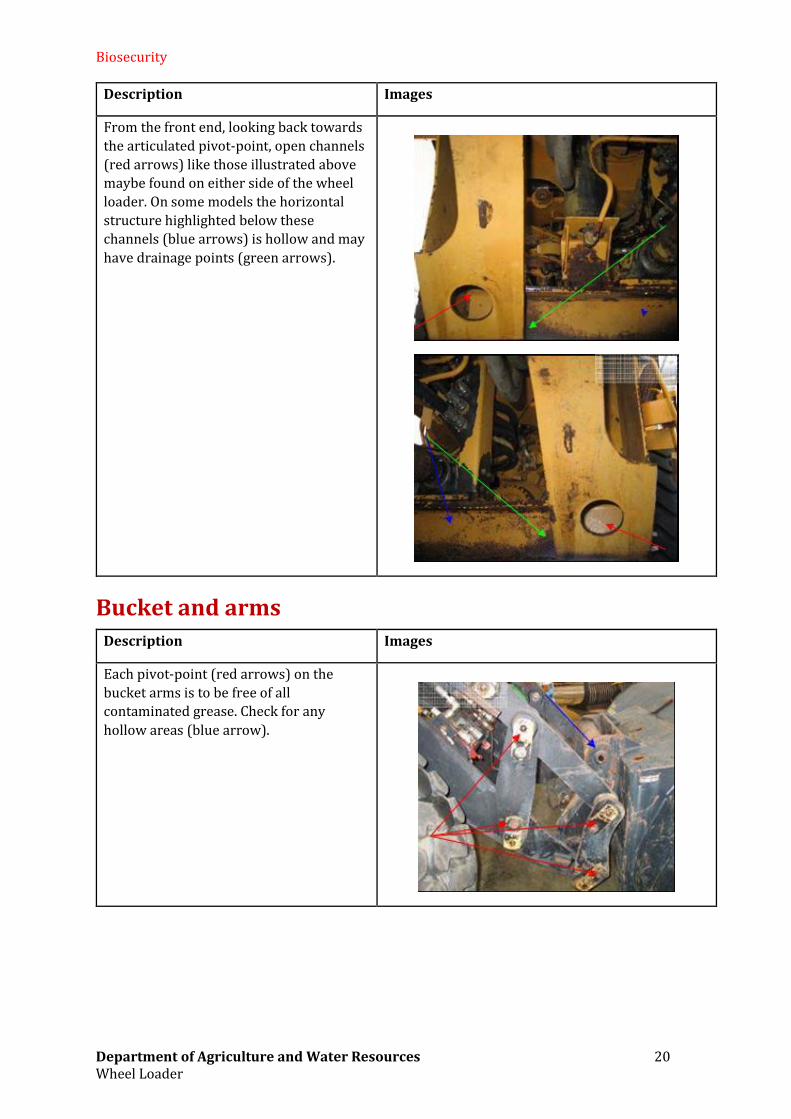
From the front end, looking back towards
the articulated pivot-point, open channels
(red arrows) like those illustrated above
maybe found on either side of the wheel
loader. On some models the horizontal
structure highlighted below these
channels (blue arrows) is hollow and may
have drainage points (green arrows).
Bucket and arms
Description Images
Each pivot-point (red arrows) on the
bucket arms is to be free of all
contaminated grease. Check for any
hollow areas (blue arrow).
Biosecurity
Department of Agriculture and Water Resources 21 Wheel Loader
Description Images
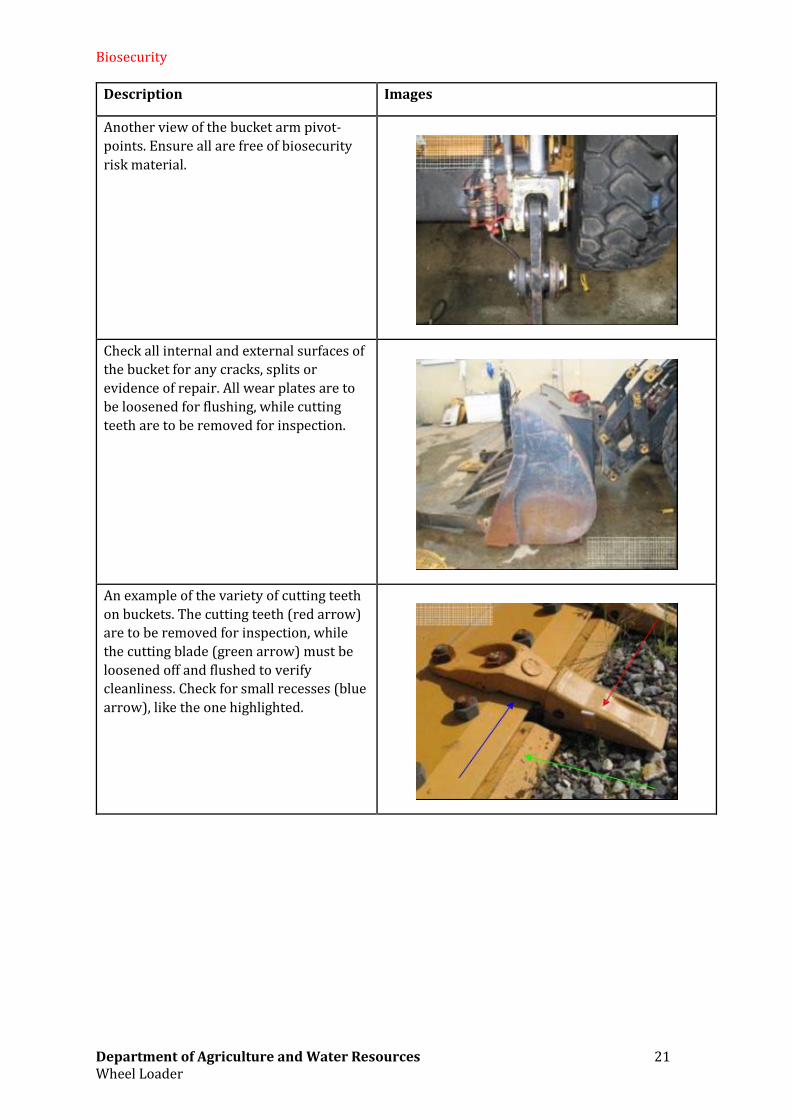
Another view of the bucket arm pivot-
points. Ensure all are free of biosecurity
risk material.
Check all internal and external surfaces of
the bucket for any cracks, splits or
evidence of repair. All wear plates are to
be loosened for flushing, while cutting
teeth are to be removed for inspection.
An example of the variety of cutting teeth
on buckets. The cutting teeth (red arrow)
are to be removed for inspection, while
the cutting blade (green arrow) must be
loosened off and flushed to verify
cleanliness. Check for small recesses (blue
arrow), like the one highlighted.
Biosecurity
Department of Agriculture and Water Resources 22 Wheel Loader
Wheel arches, tyres and rims
Description Images
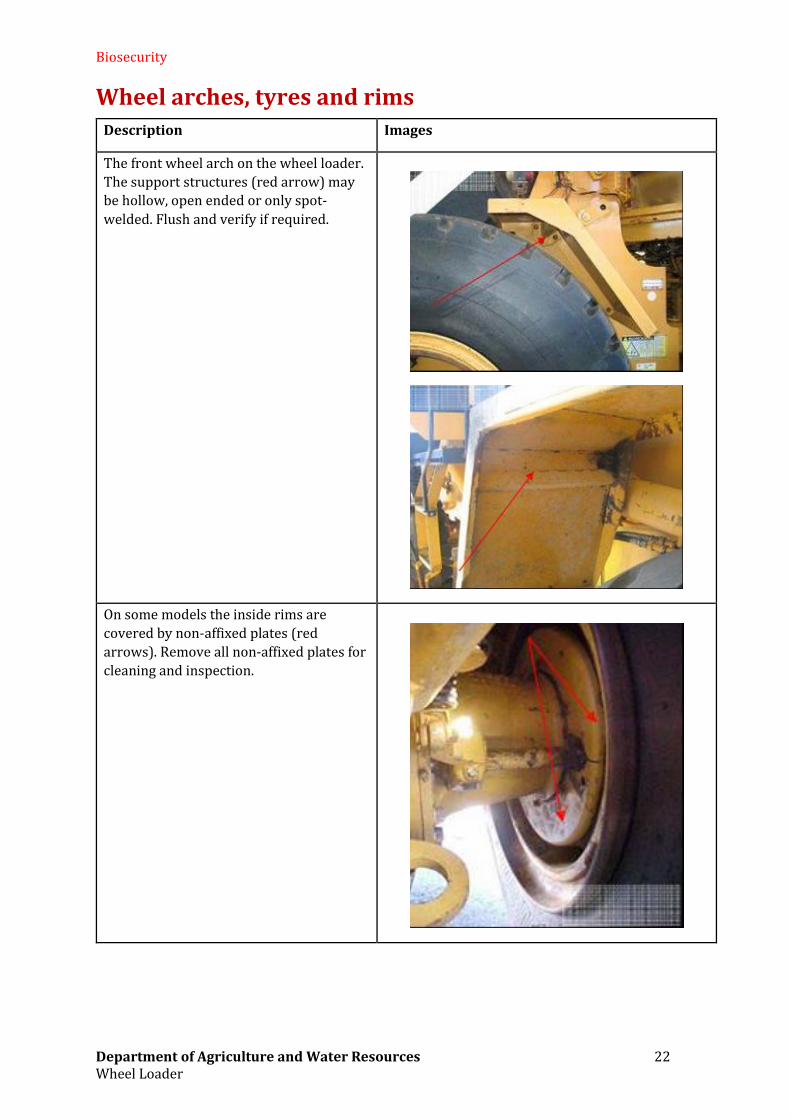
The front wheel arch on the wheel loader.
The support structures (red arrow) may
be hollow, open ended or only spot-
welded. Flush and verify if required.
On some models the inside rims are
covered by non-affixed plates (red
arrows). Remove all non-affixed plates for
cleaning and inspection.
Biosecurity
Department of Agriculture and Water Resources 23 Wheel Loader
Description Images
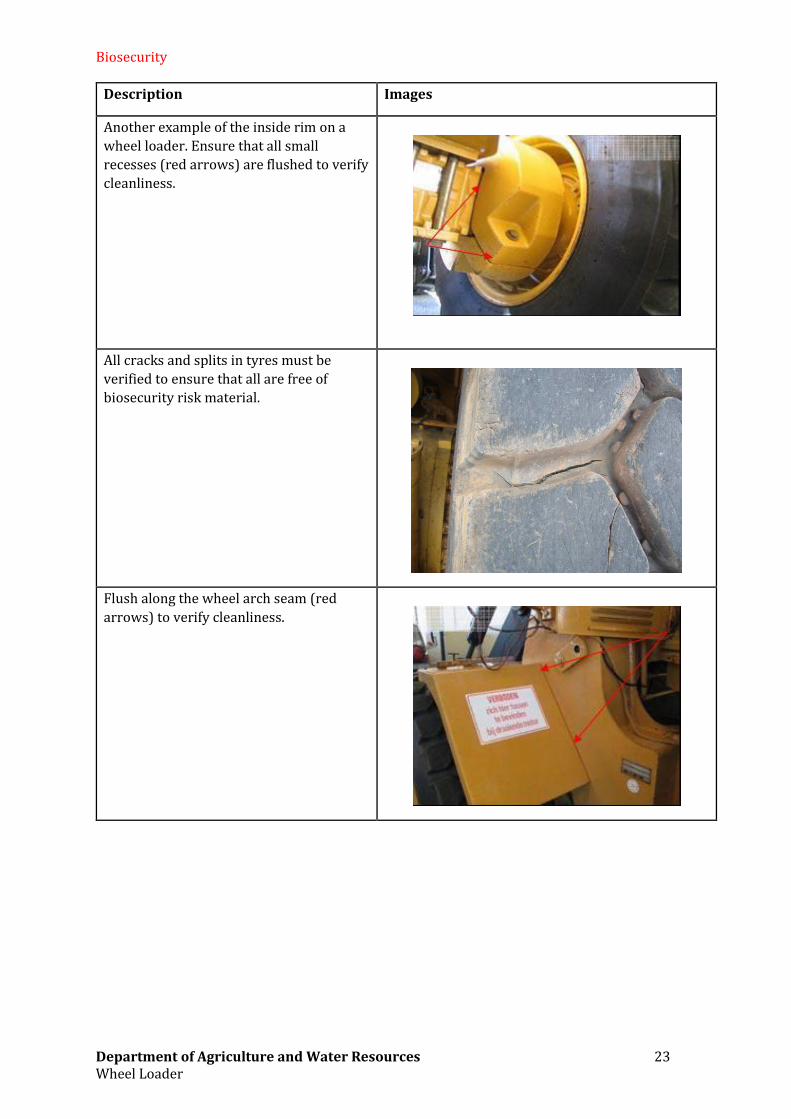
Another example of the inside rim on a
wheel loader. Ensure that all small
recesses (red arrows) are flushed to verify
cleanliness.
All cracks and splits in tyres must be
verified to ensure that all are free of
biosecurity risk material.
Flush along the wheel arch seam (red
arrows) to verify cleanliness.
Biosecurity
Department of Agriculture and Water Resources 24 Wheel Loader
False floors under cabins
Description Images
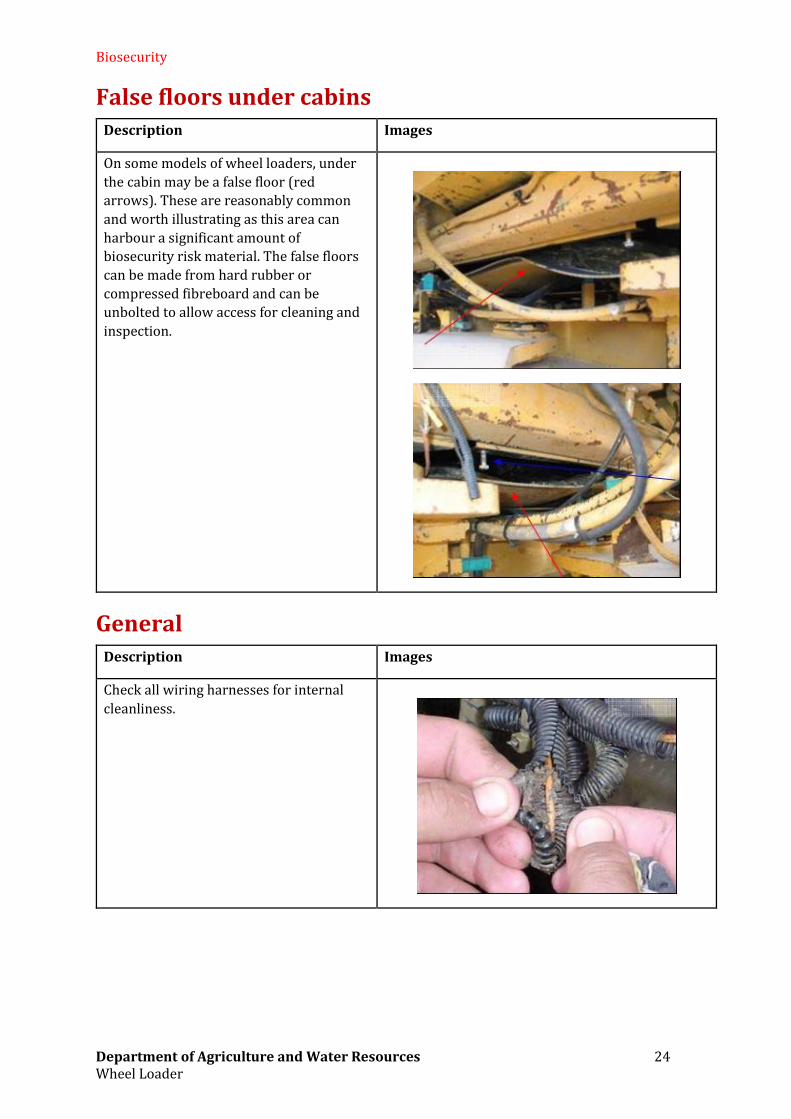
On some models of wheel loaders, under
the cabin may be a false floor (red
arrows). These are reasonably common
and worth illustrating as this area can
harbour a significant amount of
biosecurity risk material. The false floors
can be made from hard rubber or
compressed fibreboard and can be
unbolted to allow access for cleaning and
inspection.
General
Description Images
Check all wiring harnesses for internal
cleanliness.
Biosecurity
Department of Agriculture and Water Resources 25 Wheel Loader
Description Images
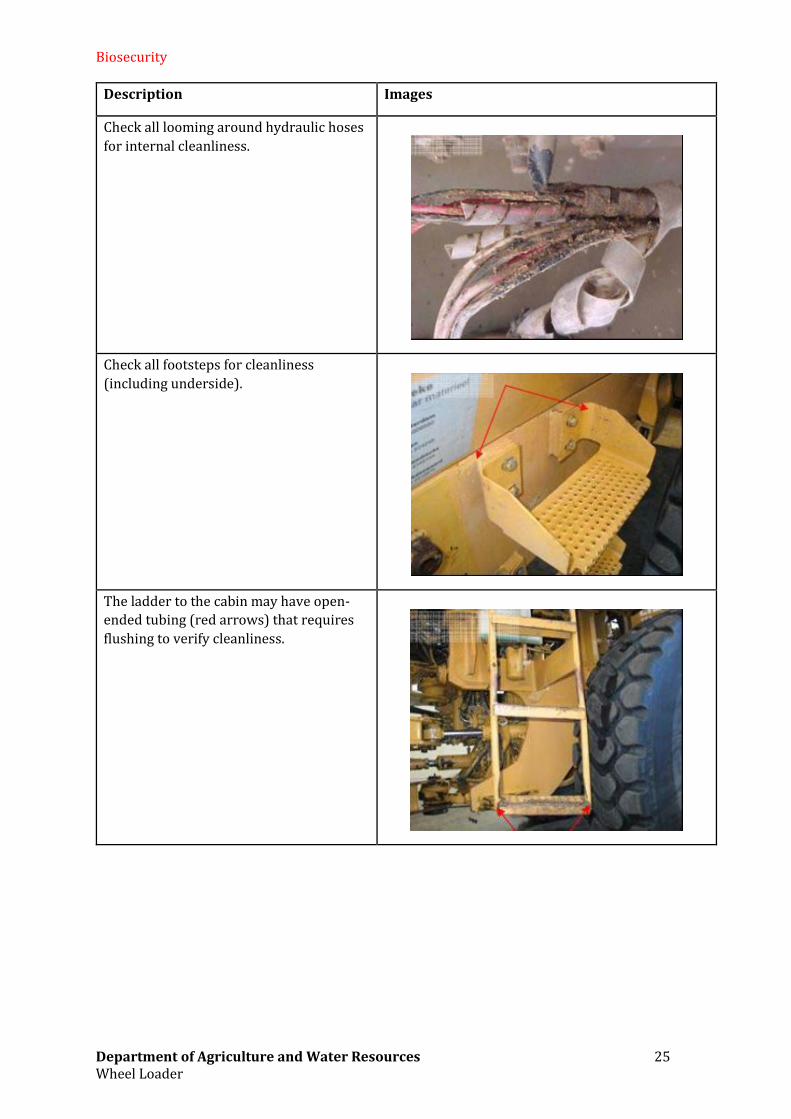
Check all looming around hydraulic hoses
for internal cleanliness.
Check all footsteps for cleanliness
(including underside).
The ladder to the cabin may have open-
ended tubing (red arrows) that requires
flushing to verify cleanliness.
Biosecurity
Department of Agriculture and Water Resources 26 Wheel Loader
Description Images
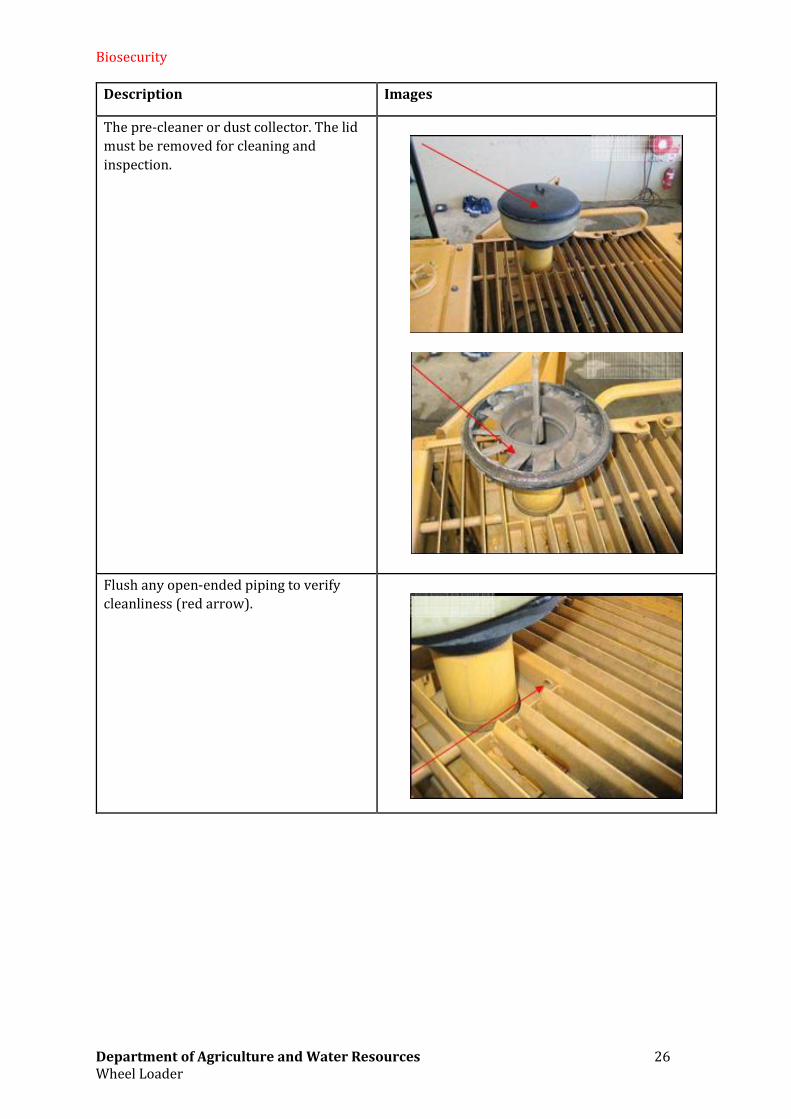
The pre-cleaner or dust collector. The lid
must be removed for cleaning and
inspection.
Flush any open-ended piping to verify
cleanliness (red arrow).
Biosecurity
Department of Agriculture and Water Resources 27 Wheel Loader
Description Images
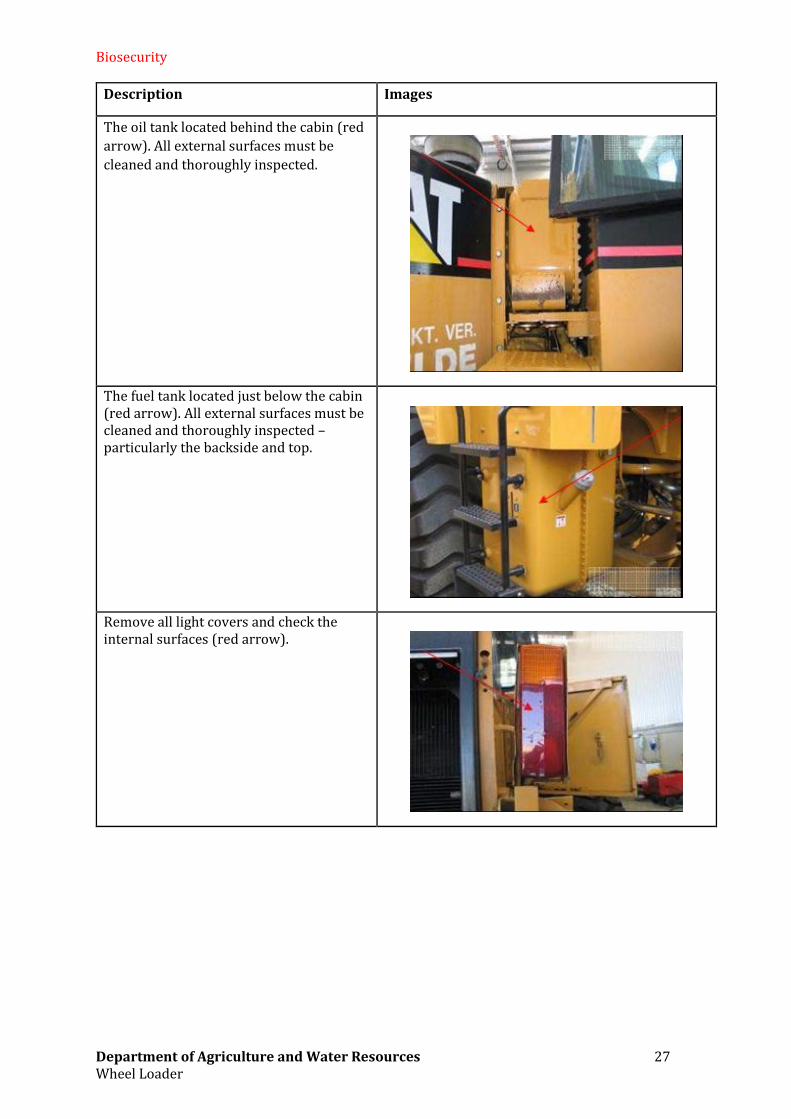
The oil tank located behind the cabin (red
arrow). All external surfaces must be
cleaned and thoroughly inspected.
The fuel tank located just below the cabin (red arrow). All external surfaces must be cleaned and thoroughly inspected – particularly the backside and top.
Remove all light covers and check the internal surfaces (red arrow).
Biosecurity
Department of Agriculture and Water Resources 28 Wheel Loader
Description Images
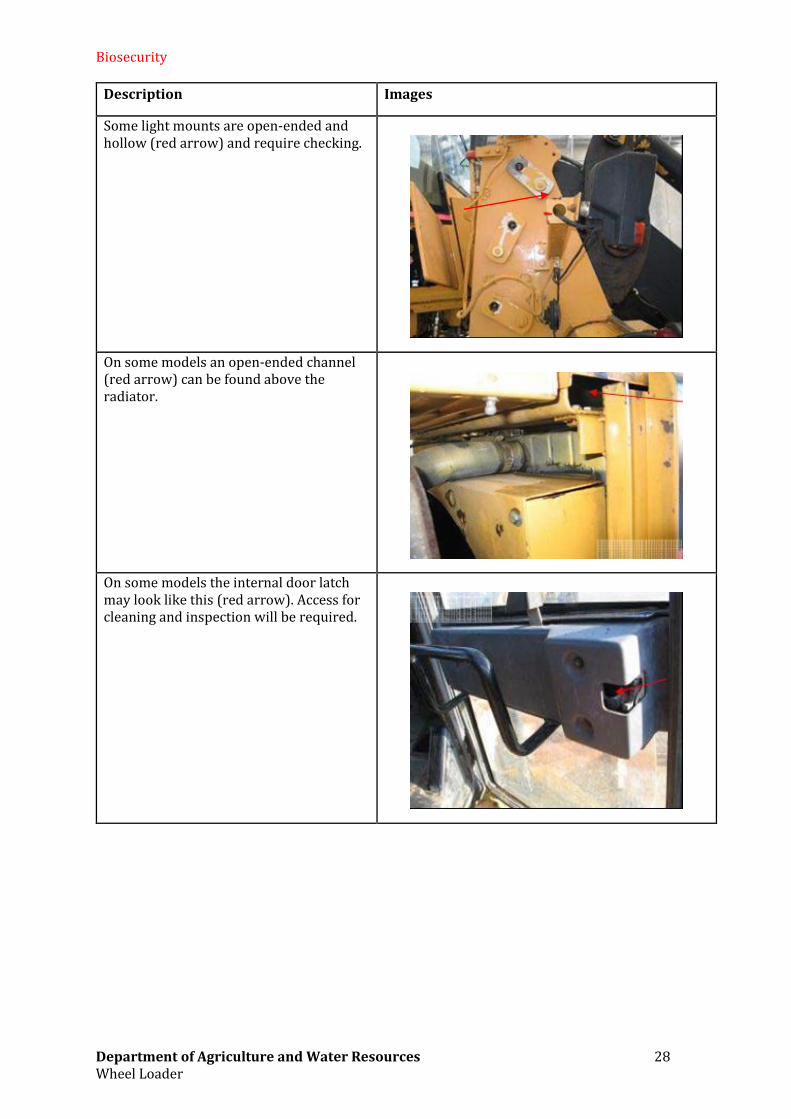
Some light mounts are open-ended and hollow (red arrow) and require checking.
On some models an open-ended channel (red arrow) can be found above the radiator.
On some models the internal door latch may look like this (red arrow). Access for cleaning and inspection will be required.
Biosecurity
Department of Agriculture and Water Resources 29 Wheel Loader
Description Images
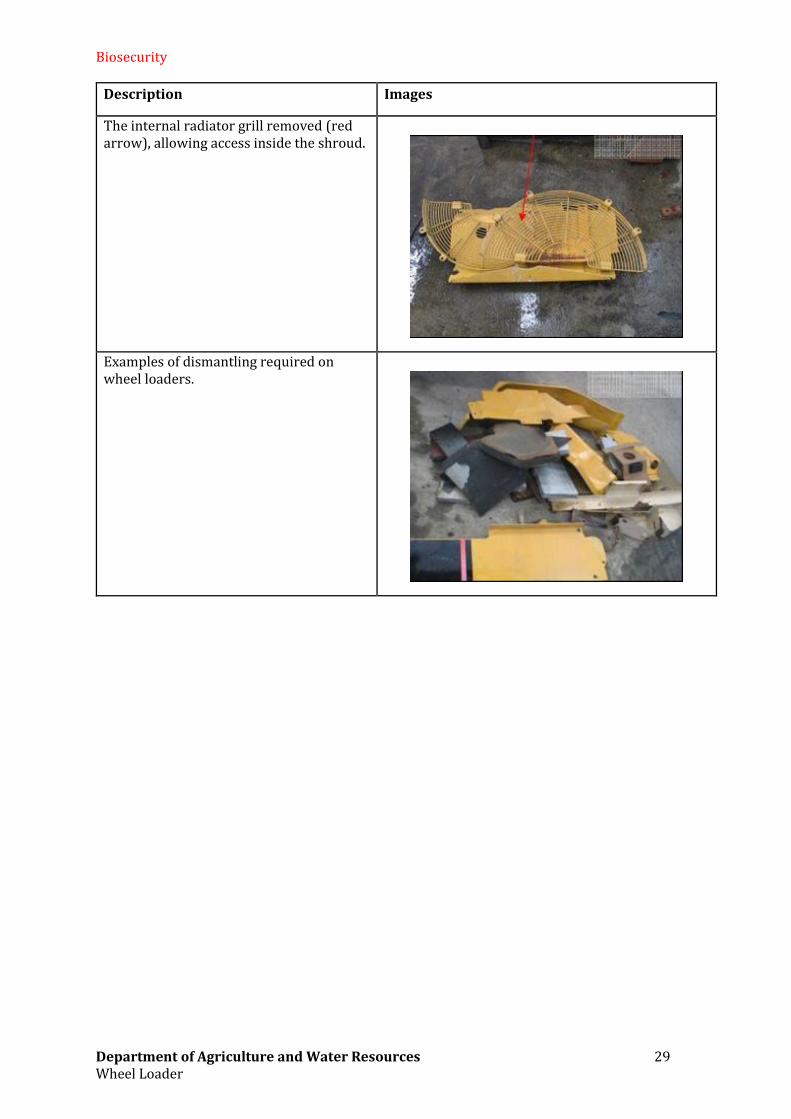
The internal radiator grill removed (red arrow), allowing access inside the shroud.
Examples of dismantling required on wheel loaders.