Embed Size (px)
Citation preview
Machine Shop Orientation and Safety Training
Safety First! July 12, 2016 Page 1 of 15
Machine Shop Orientation and Safety Training
Machine Shop Orientation and Safety Training
Safety First! July 12, 2016 Page 2 of 15
Machine Shop Rules
1. Safety glasses must be worn at all times. 2. Proper attire must be worn at all times. (Loose or dangling clothing, hair, or jewelry and open-toed shoes
are not allowed.) 3. Students must complete orientation and safety training before they will be allowed in the Machine Shop 4. Students may not work alone in the Machine Shop. 5. Students may only use machines and power tools for which they have received training. 6. Absolutely, positively no horseplay is allowed in the Machine Shop. 7. Students have access to the Machine Shop Monday through Friday from 8:30am to 4:30pm. 8. Students may only use the Machine Shop to work on projects related to courses they are taking at Trinity
College. 9. Students may not take tools out of the Machine Shop without the permission of the department
Technician. 10. Students must clean up any mess they make and put away any tools they use before they leave the
Machine Shop. 11. The compressed air hose may not be used to blow chips from a work piece or during the cleaning
process. 12. Machine Shop doors must remain closed at all times. 13. Food and beverages are not allowed in the Machine Shop. 14. Students failing to comply with these rules will lose the PRIVILEGE of using the Machine Shop.
Machine Shop Orientation and Safety Training
Safety First! July 12, 2016 Page 3 of 15
Training Overview: Machine Shop Orientation and Safety Training is intended to:
Familiarize students with the Machine Shop and its resources
Introduce students to the machines and power tools they are most likely to use, the: 1. horizontal band saw 2. vertical band saw 3. drill press 4. corded power hand drill 5. bench grinder 6. belt and disc sander 7. Bridgeport vertical milling machine
Demonstrate how to use those machines and power tools safely
Give students hands-on experience in operating those machines and power tools safely Students may only use machines and power tools for which they have received training!
Students wishing to use other machines and power tools present in the Machine Shop must first schedule additional training with the department Technician.
Safety First!!!
The most important to remember when working with machines and tools of any kind is Safety first! Accidents happen quickly, and they can result in serious injury and even death. That is why it is absolutely essential that anyone using machines and power tools respects all that they can do: both the good and the bad. So remember, whenever you are in the Machine Shop, your primary focus should always be:
Safety first!
Machine Shop Orientation and Safety Training
Safety First! July 12, 2016 Page 4 of 15
Best Practices for Safety
Do not rush – Always work in a slow, thoughtful, and careful manner.
Always maintain your balance – Physically, that means maintain an athletic, well balanced stance that allows you to react quickly. Mentally, that means never work in the Machine Shop when you are angry, upset, or distracted.
Keep the shop clean – It reduces the chances of accidents occurring.
Beware of coolants or lubricants spilled or dripped on the floor – If you see any, clean them up…whether you did it or not.
Use brushes to clear chips (not your fingers)
Never leave a running machine
If anything unusual happens – e.g. weird sounds, weird smells, weird events – turn off the machine immediately and find the department Technician or your instructor
If you do not remember or do not know how to do something, ask the department Technician – Never hesitate to ask a question. I want you to be safe, and I want you to be successful. SO, IF YOU HAVE QUESTIONS, PLEASE ASK.
If an Accident Occurs in the Machine Shop If an accident occurs in the Machine Shop, a First Aid Kit, fire extinguisher, and campus telephone are located to the left of doors as you leave the room. In the event of an emergency, call Campus Safety at x2222. Students are required to report all accidents and near-misses to the department Technician and their instructor.
Machine Shop Orientation and Safety Training
Safety First! July 12, 2016 Page 5 of 15
A Quick Tour of the Machine Shop Machines and Workbenches To be discussed during the hands-on portion of this training. Grey Tool Cabinet, Shelves and Toolboxes The grey tool cabinet contains measuring instruments, accessories and tools used with the Bridgeport vertical milling machine, the corded power hand drill, drill bits, tap and die sets, and other miscellaneous items. The shelves next to the grey tool cabinet contain tools and accessories used with the lathe, fasteners, cutting fluids, lubricants, and other miscellaneous items. The black rolling tool box, the brown tool box, and the blue rolling cabinet contain various hand tools. Measuring Stone The measuring stone stored on the workbench in the far rear corner by the wall is a precise (and expensive) measuring tool. It is only to be used with the Vernier Height Gage for the purpose of making precise measurements. When it is not in use, it must be covered and stored in the far back corner of the workbench. Do not stack things on it. Waste Cans Three waste disposal bins are located under the workbench by the door:
gray metal trash can – for solid pieces of scrap metal only
red, lidded waste can – for rags used to clean up oil and other flammable items only
yellow trash can – for everything else, including metal shavings Ear Plugs and Hand Soap Disposable ear plugs are available for student use and may be found with the safety glasses. If you decide to wear ear plugs, it is suggested that you put them in when you first enter the shop, before your fingers get dirty or oily. Gojo Natural Orange Pumice Hand Cleaner is available for student use and may be found on the sink in the ME Lab (MCEC 19).
Clean up Before leaving the Machine Shop, students are required to put away all of the tools they have used and to clean up any mess they have made. Brooms and dust pans have been provided for this purpose. Students who do not clean up after themselves will lose Machine Shop privileges.
Machine Shop Orientation and Safety Training
Safety First! July 12, 2016 Page 6 of 15
General Information (Portions of the material in this section were taken from Introduction to the Trinity Engineering Machine Shop by Professor J. Palladino (September 2007).)
What is “Machining”? Machining is the process of separating the “work piece” (the part you want to produce) from the “chips” (the unwanted material surrounding the part you want to produce). This requires:
A securely held, sharp tool
A securely held work piece
Sufficient force applied to the tool to produce chip separation
The continuous removal of newly formed chips (allowing the formation of subsequent chips)
The prevention of overheating of the tool and / or work piece Coolants and Lubricants Cutting tools and work pieces will heat up during machining. Coolants, such as the Kool Mist used with the Bridgeport vertical milling machine and Dayton horizontal band saw, reduce heat build-up by flowing over the surfaces of the cutting tool and work piece, picking up some of their heat, and carrying it away. Lubricants – such as Kool Mist, Relton A-9 Aluminum Cutting Fluid, and Rapid Tap Heavy Duty Cutting Fluid – reduce friction and clear space for the formation of new chips. They do so by lubricating newly formed chips, allowing them to slide away more efficiently and by flushing out chips that tend to stick in confined spaces. Use of coolants and lubricants prolongs tool life, improves results, and allows faster cutting speeds. A Word on Metal Selection Use the type of metal your design requires. However, if your design does not specify a specific type of metal, it is suggested that students consider using aluminum. Aluminum is lighter, easier to work, and easier on the machines than steel or iron. Useful, Non-Powered Tools in the Machine Shop Measuring tools:
Tape measure, yard sticks, and rulers
6-inch Machinist’s Rule
Digital Calipers Layout tools:
Red and blue layout dye
Scribes
Layout kits
Vernier Height Gage and Measuring Stone
Machine Shop Orientation and Safety Training
Safety First! July 12, 2016 Page 7 of 15
Other tools:
Hacksaws – Good for cutting perforated angle iron, certain cylindrical stock (e.g. – metal dowels, EFT, etc.), and general cutting
Hand files – Often a good alternative to using the Bench Grinder or Belt and Disc Sander
Tin snips – Good for cutting sheet metal
Bending brake – Good for bending sheet metal
Tapping Holes and Using Dies Often, your motivation for drilling a hole will be that you want to screw a fastener directly into it. To do that, you need to “tap” the hole – cut internal threads into to the wall of the hole to receive the external threads on the fastener. The process for tapping holes is:
1. BEFORE YOU DRILL YOUR HOLE, decide what type and size threads you want:
English (Unified National) or Metric?
Coarse or Fine?
It is strongly suggested that you select English, Coarse threads. The shop has the best and the most taps, drills, and fasteners of this type of screw.
2. Select the proper drill bit from the Tap and Drill Index 3. Drill the hole 4. Tap the hole
Technician Demonstration & Student Questions
The shop also contains the tools, dies, needed to cut external threads on a rod. However, since the need to do this arises so rarely and since threaded rod can be purchase quite cheaply, we will not be covering it in this training. Should your project require you to use dies, see the Technician, and he will provide you with one-on-one training.
Machine Shop Orientation and Safety Training
Safety First! July 12, 2016 Page 8 of 15
Machine Shop Tell-Show-Do Since time limitations do not allow us to fully examine all their possible uses and applications, we will examine each machine and power tool in the context of how students are most likely to use them in their Engineering course work at Trinity College.
Bench Grinder Most Likely Student Uses
Wire brush wheel – polishing and / or deburring a work piece
Grinding wheel – making MINOR alterations to the shape a work piece
Bench Grinder Safety
1. Never grind a soft material like aluminum. Soft materials can coat the wheel: A. Preventing the abrasive from working properly, and B. Potentially leading to excessive heat build-up in the wheel causing it to explode.
2. Never grind on the side of the wheel 3. Beware of heat build-up in the work piece when using the grinding wheel 4. Maintain proper orientation of the work piece to the wheel to prevent the work piece from being thrown 5. Do not use on Plexiglas, fiber glass, or printed circuit boards (PCB boards)
Technician Demonstration & Student Questions
Student Hands-On Experience
Concerning Band Saw Precision Our band saws should not be considered “precision” cutting instruments. They produce good quality “rough” cuts that are more than adequate for most student projects. However, if you need your finished product to have highly precise dimensions, start by rough cutting your work piece with a band saw to a slightly larger size than you want your finished piece to be. Then, use the Bridgeport vertical milling machine to remove the remaining material.
Vertical Band Saw Most Likely Student Uses
Cutting thin pieces metal
Making curved cuts
Making angled cuts
Cutting Plexiglas
Machine Shop Orientation and Safety Training
Safety First! July 12, 2016 Page 9 of 15
Vertical Band Saw Safety
1. Do not use cutting fluid 2. Feed the work piece into the blade at a slow and steady pace 3. Keeping your fingers well away from the blade at all times 4. Keep the blade guard as low as possible 5. Brush the chips off the cutting table between cuts 6. Do not allow chips to accumulate on the floor around the band saw
Speed This is a variable speed saw with four gears. The speed has been conservatively set in slowest gear. Do not change the speed setting.
Technician Demonstration & Student Questions Student Hands-On Experience
Horizontal Band Saw Most Likely Student Uses
Cutting thick pieces of metal
Making angled cuts Horizontal Band Saw Safety
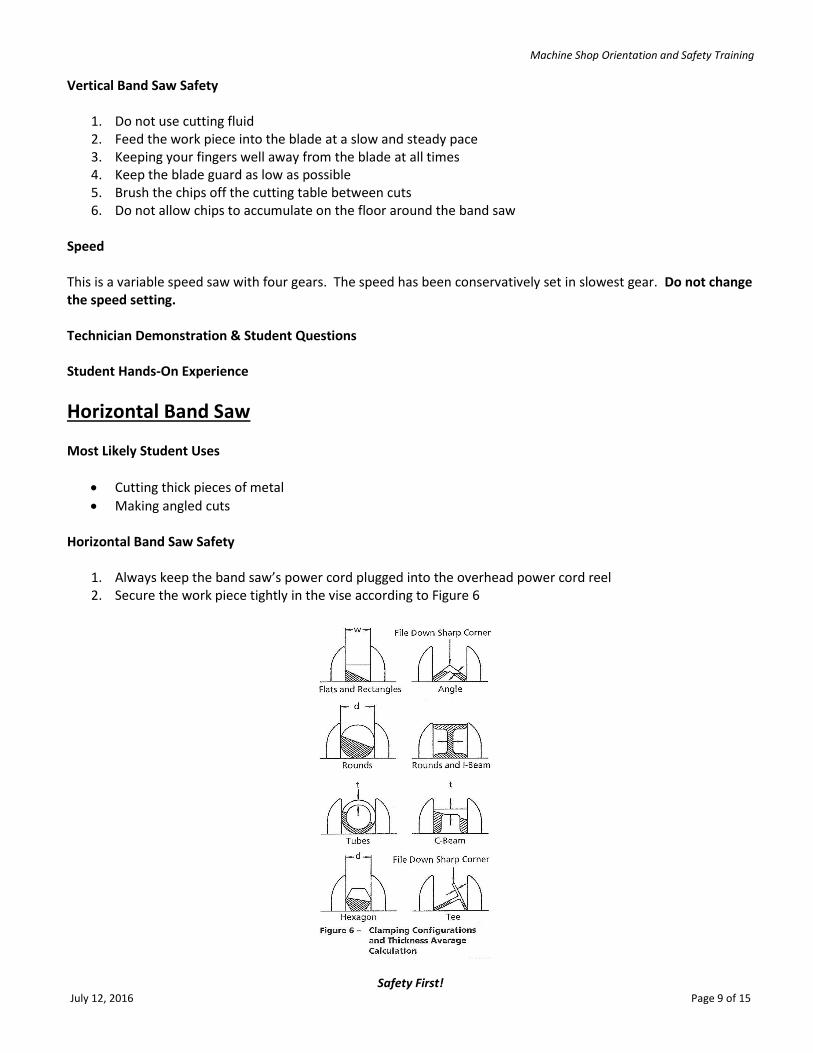
1. Always keep the band saw’s power cord plugged into the overhead power cord reel 2. Secure the work piece tightly in the vise according to Figure 6
Machine Shop Orientation and Safety Training
Safety First! July 12, 2016 Page 10 of 15
3. Do NOT cut slotted or perforated angle iron with the horizontal band saw 4. Maintain a dry, safe work environment at all times. When wet cutting, dry the floor around the band saw
between cuts. 5. If the blade jams in the work piece, lift up on the head of the saw to free the blade. If you cannot lift up the
head, turn off the power to the saw and try again. If you still cannot lift up the head, ask the Department Technician for assistance.
Speed This is a variable speed saw with three gears. The speed has been conservatively set in slowest gear. Do not change the speed setting. Feed Pressure This is a variable feed pressure saw. Feed pressure is the force with which the blade is applied to the work piece, and it is supplied by the weight of the head. The feed pressure has been conservatively set. Do not change the feed pressure setting. Dry Cutting vs. Wet Cutting The horizontal band saw is equipped with a coolant tank and pump. Different power switches control the saw blade and the coolant pump. That gives the saw operator the option of making dry cuts (without coolant) or wet cuts (with coolant). Wet cutting provides the benefits of cooling the blade & work piece and lubricating the cut. However, the coolant that gets sprayed and dripped on the floor creates a slip-trip-and-fall hazard, and not all cuts require the use of coolant. Consequently, students are instructed to:
1. Cut aluminum dry (without coolant) 2. Cut steel and other very hard metals wet (with coolant) 3. When wet cutting, maintain a safe and dry work environment at all times.
Dry up any coolant on the floor between cuts. Technician Demonstration & Student Questions Dry Cutting Procedure
1. Raise the head to lift the blade just above the height of the work piece 2. Push the lever on the gold piping assembly down to the 9 o’clock position to freeze the head in place 3. Place the work piece in the vise and tighten it securely 4. Start the blade 5. Release the head by raising the lever on the gold pipe assembly to the 12 o’clock position 6. The saw will shut off automatically at the end of the cut
Machine Shop Orientation and Safety Training
Safety First! July 12, 2016 Page 11 of 15
Wet Cutting Procedure
1. Check the coolant level in the coolant tank
Coolant should be just above the bottom of the tank’s white plastic mesh strainer
If it is not, ask the Department Technician to add coolant before proceeding 2. Raise the head to lift the blade just above the height of the work piece 3. Push the lever on the gold piping assembly down to the 9 o’clock position to freeze the head in place 4. Place the work piece in the vise and tighten it securely 5. Start the blade 6. Start the coolant
The coolant pump is started and stopped by a toggle switch
Coolant flow is started, adjusted, and stopped by the red-handled ball valve at the end of the coolant tubing
Set coolant flow so that coolant slowly drips along the moving blade
This minimizes the amount of coolant that sprays / drips onto the floor 7. Release the head by raising the lever on the gold pipe assembly to the 12 o’clock position 8. The blade will stop automatically at the end of the cut 9. Stop the coolant:
Close the ball valve, then
Turn off the toggle switch 10. Dry up any coolant on the floor before making your next cut
Student Hands-On Experience
Belt and Disc Sander Most Likely Student Uses
Polishing and / or deburring a work piece
Making MINOR alterations to the shape a work piece
Belt and Disc Sander Safety
1. Never operate a sander with a torn belt or loose disc 2. Do not use on Plexiglas, fiber glass, or printed circuit boards (PCB boards) 3. When using the Disc Sander, note the direction of rotation and place work piece accordingly
Technician Demonstration & Student Questions Student Hands-On Experience
Machine Shop Orientation and Safety Training
Safety First! July 12, 2016 Page 12 of 15
Drill Press
Most Likely Student Uses
Drilling holes
Drill Press Safety
1. Never leave the chuck wrench in the chuck 2. If you are not sure you can hold the work piece, clamp it or put it in a vice 3. Hold small work pieces in a vice
Technician Demonstration & Student Questions
Student Hands-On Experience
Corded Power Hand Drill
Most Likely Student Uses
Drilling holes in things that cannot fit or do not fit easily on the drill press table
Corded Power Hand Drill Safety
1. Make sure the work piece is firmly secured 2. Hold small work pieces in a vice
Technician Demonstration & Student Questions
Student Hands-On Experience
Machine Shop Orientation and Safety Training
Safety First! July 12, 2016 Page 13 of 15
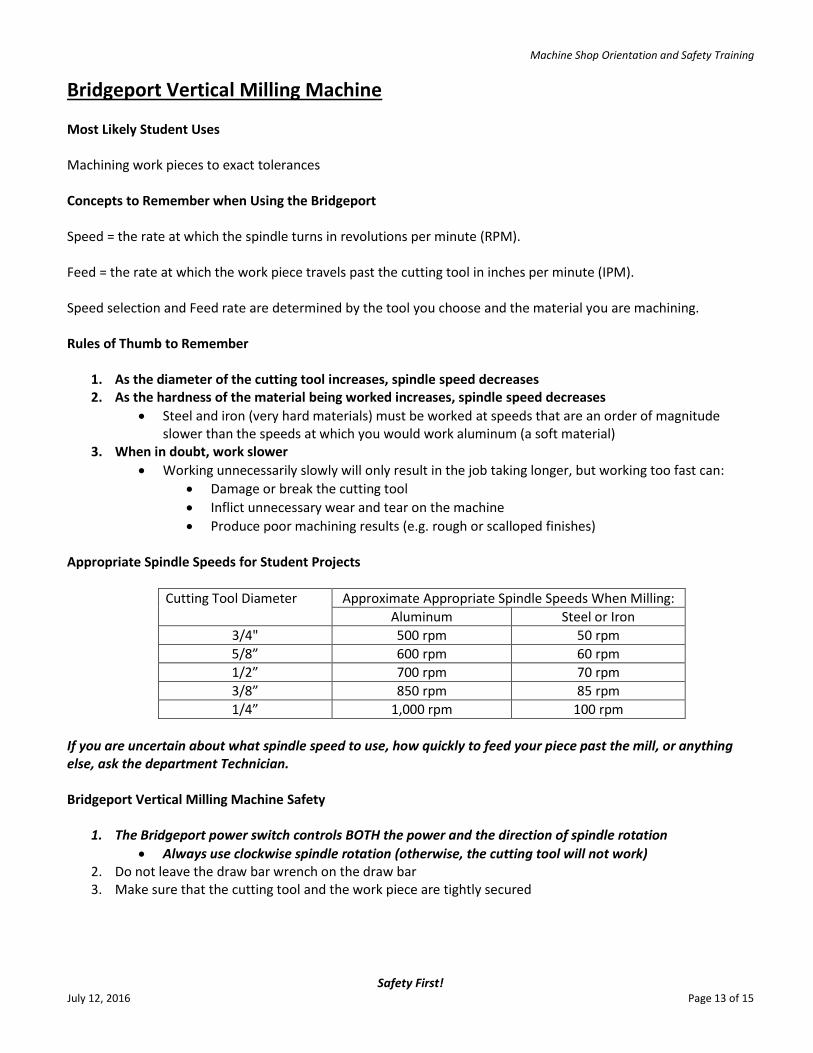
Bridgeport Vertical Milling Machine Most Likely Student Uses
Machining work pieces to exact tolerances
Concepts to Remember when Using the Bridgeport
Speed = the rate at which the spindle turns in revolutions per minute (RPM). Feed = the rate at which the work piece travels past the cutting tool in inches per minute (IPM). Speed selection and Feed rate are determined by the tool you choose and the material you are machining. Rules of Thumb to Remember
1. As the diameter of the cutting tool increases, spindle speed decreases 2. As the hardness of the material being worked increases, spindle speed decreases
Steel and iron (very hard materials) must be worked at speeds that are an order of magnitude slower than the speeds at which you would work aluminum (a soft material)
3. When in doubt, work slower
Working unnecessarily slowly will only result in the job taking longer, but working too fast can:
Damage or break the cutting tool
Inflict unnecessary wear and tear on the machine
Produce poor machining results (e.g. rough or scalloped finishes) Appropriate Spindle Speeds for Student Projects
Cutting Tool Diameter Approximate Appropriate Spindle Speeds When Milling:
Aluminum Steel or Iron
3/4" 500 rpm 50 rpm
5/8” 600 rpm 60 rpm
1/2” 700 rpm 70 rpm
3/8” 850 rpm 85 rpm
1/4” 1,000 rpm 100 rpm
If you are uncertain about what spindle speed to use, how quickly to feed your piece past the mill, or anything else, ask the department Technician. Bridgeport Vertical Milling Machine Safety
1. The Bridgeport power switch controls BOTH the power and the direction of spindle rotation
Always use clockwise spindle rotation (otherwise, the cutting tool will not work) 2. Do not leave the draw bar wrench on the draw bar 3. Make sure that the cutting tool and the work piece are tightly secured
Machine Shop Orientation and Safety Training
Safety First! July 12, 2016 Page 14 of 15
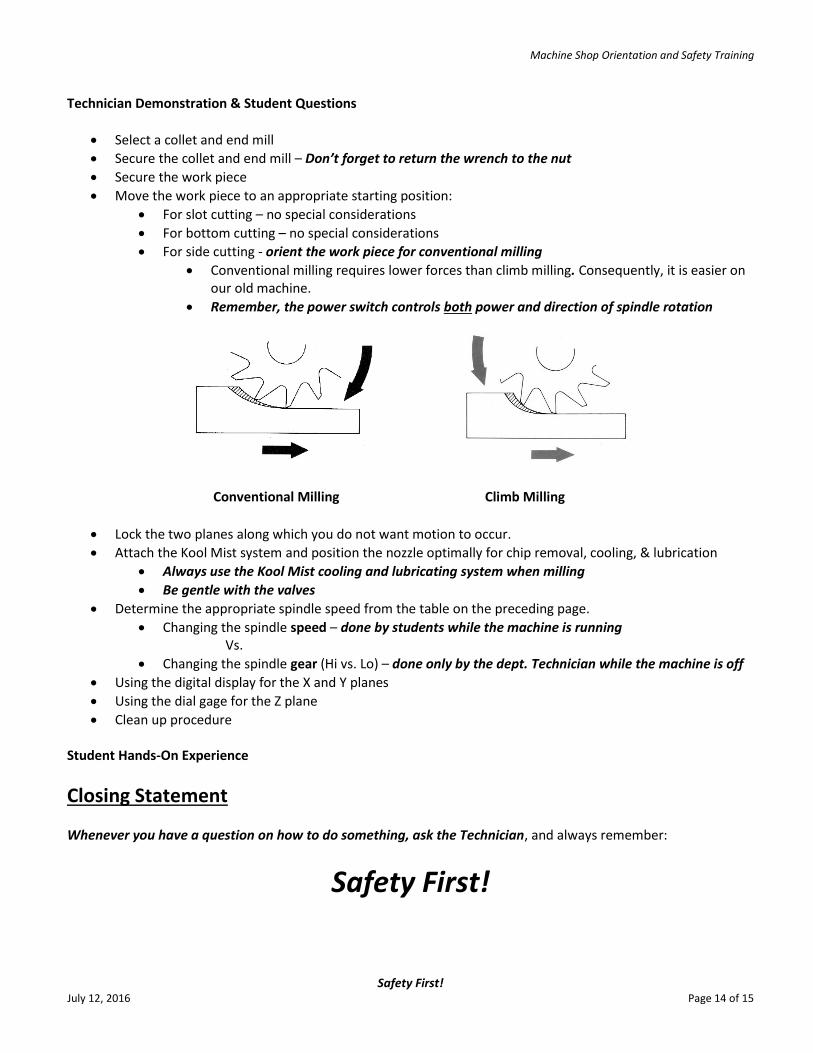
Technician Demonstration & Student Questions
Select a collet and end mill
Secure the collet and end mill – Don’t forget to return the wrench to the nut
Secure the work piece
Move the work piece to an appropriate starting position:
For slot cutting – no special considerations
For bottom cutting – no special considerations
For side cutting - orient the work piece for conventional milling
Conventional milling requires lower forces than climb milling. Consequently, it is easier on our old machine.
Remember, the power switch controls both power and direction of spindle rotation
Conventional Milling Climb Milling
Lock the two planes along which you do not want motion to occur.
Attach the Kool Mist system and position the nozzle optimally for chip removal, cooling, & lubrication
Always use the Kool Mist cooling and lubricating system when milling
Be gentle with the valves
Determine the appropriate spindle speed from the table on the preceding page.
Changing the spindle speed – done by students while the machine is running Vs.
Changing the spindle gear (Hi vs. Lo) – done only by the dept. Technician while the machine is off
Using the digital display for the X and Y planes
Using the dial gage for the Z plane
Clean up procedure Student Hands-On Experience
Closing Statement Whenever you have a question on how to do something, ask the Technician, and always remember:
Safety First!
Machine Shop Orientation and Safety Training
Safety First! July 12, 2016 Page 15 of 15
Engineering Department Machine Shop Student User Agreement I understand that use of the Trinity College Engineering Department Machine Shop is a privilege, not a right. I understand that the Engineering Department grants student access to its Machine Shop solely at its discretion. If allowed access to the Machine Shop, I promise to obey the Machine Shop Rules at all times.
Machine Shop Rules 1. Safety glasses must be worn at all times.
2. Proper attire must be worn at all times. (Loose or dangling clothing, hair, or jewelry and open-toed shoes are not allowed.)
3. Students must complete orientation and safety training before they will be allowed in the Machine Shop
4. Students may not work alone in the Machine Shop.
5. Students may only use machines and power tools for which they have received training.
6. Absolutely, positively no horseplay is allowed in the Machine Shop.
7. Students have access to the Machine Shop Monday through Friday from 8:30am to 4:30pm.
8. Students may only use the Machine Shop to work on projects related to courses they are taking at Trinity College.
9. Students may not take tools out of the Machine Shop without the permission of the department Technician.
10. Students must clean up any mess they make and put away any tools they use before they leave the Machine Shop.
11. The compressed air hose may not be used to blow chips from a work piece or during the cleaning process.
12. Machine Shop doors must remain closed at all times.
13. Food and beverages are not allowed in the Machine Shop.
14. Students failing to comply with these rules will lose the privilege of using the Machine Shop.
I understand that if I violate Machine Shop Rules or behave in an unacceptable manner, the Engineering Department may revoke my access to the Machine Shop. Student Name (please print legibly) Student Signature Date