Embed Size (px)
Citation preview
Machine Cut Through Dovetails
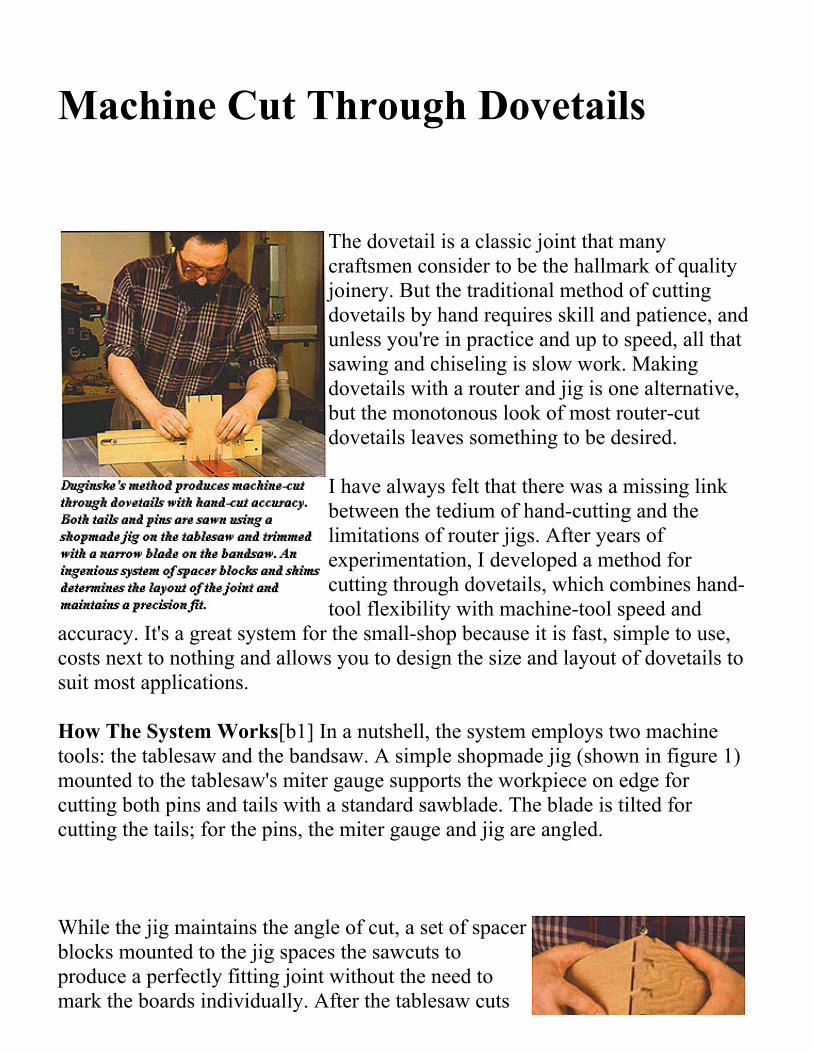
The dovetail is a classic joint that manycraftsmen consider to be the hallmark of qualityjoinery. But the traditional method of cuttingdovetails by hand requires skill and patience, andunless you're in practice and up to speed, all thatsawing and chiseling is slow work. Makingdovetails with a router and jig is one alternative,but the monotonous look of most routercutdovetails leaves something to be desired.
I have always felt that there was a missing linkbetween the tedium of handcutting and thelimitations of router jigs. After years ofexperimentation, I developed a method forcutting through dovetails, which combines handtool flexibility with machinetool speed and
accuracy. It's a great system for the smallshop because it is fast, simple to use,costs next to nothing and allows you to design the size and layout of dovetails tosuit most applications.
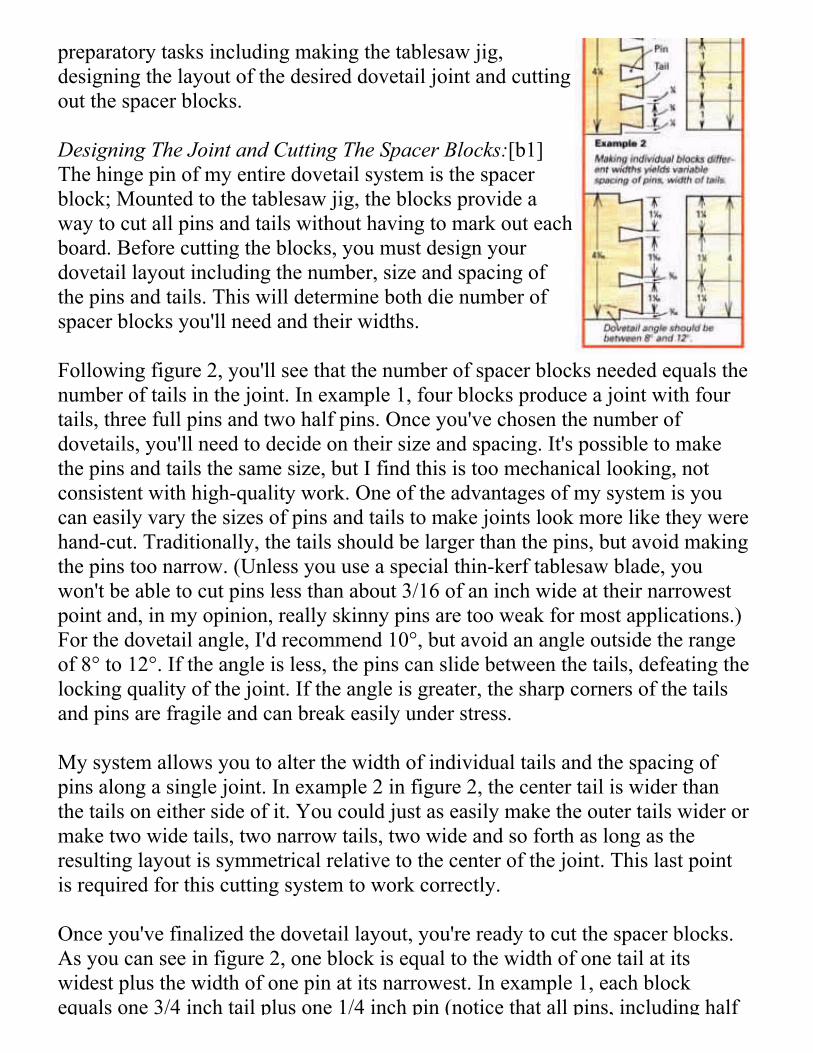
How The System Works[b1] In a nutshell, the system employs two machinetools: the tablesaw and the bandsaw. A simple shopmade jig (shown in figure 1)mounted to the tablesaw's miter gauge supports the workpiece on edge forcutting both pins and tails with a standard sawblade. The blade is tilted forcutting the tails; for the pins, the miter gauge and jig are angled.
While the jig maintains the angle of cut, a set of spacerblocks mounted to the jig spaces the sawcuts toproduce a perfectly fitting joint without the need tomark the boards individually. After the tablesaw cutsare made, the waste is removed with a 1 inch wide
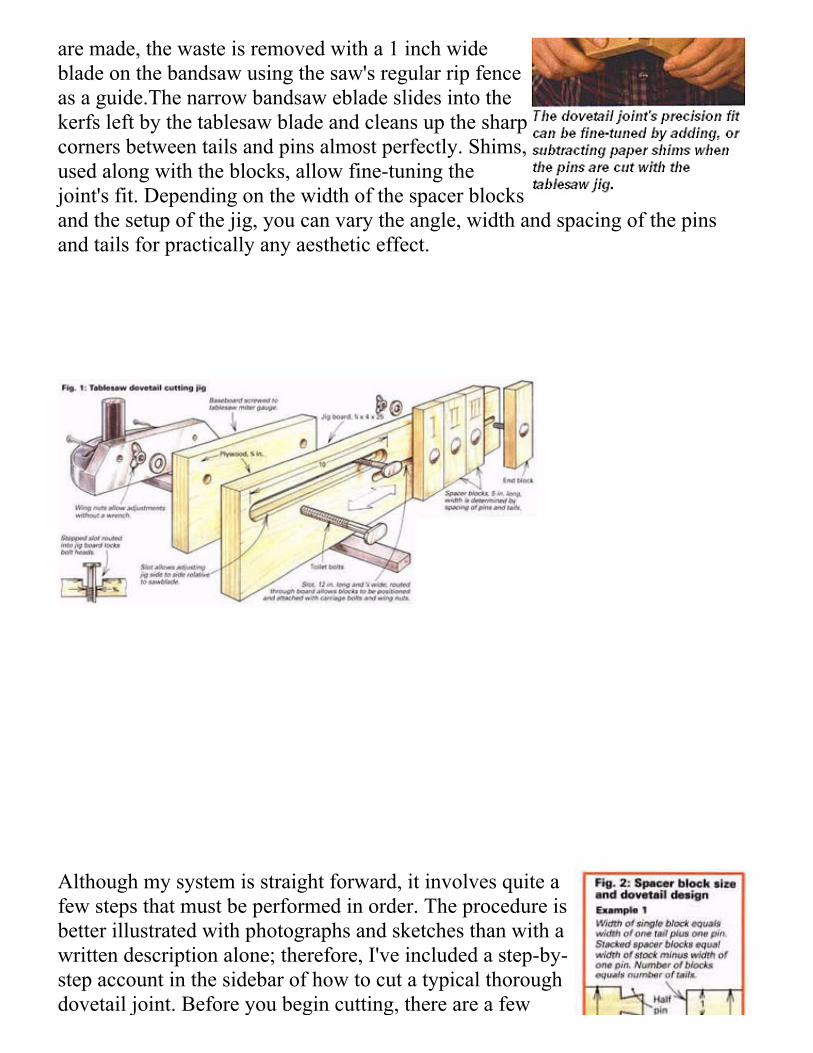
are made, the waste is removed with a 1 inch wideblade on the bandsaw using the saw's regular rip fenceas a guide.The narrow bandsaw eblade slides into thekerfs left by the tablesaw blade and cleans up the sharpcorners between tails and pins almost perfectly. Shims,used along with the blocks, allow finetuning thejoint's fit. Depending on the width of the spacer blocksand the setup of the jig, you can vary the angle, width and spacing of the pinsand tails for practically any aesthetic effect.
Although my system is straight forward, it involves quite afew steps that must be performed in order. The procedure isbetter illustrated with photographs and sketches than with awritten description alone; therefore, I've included a stepbystep account in the sidebar of how to cut a typical thoroughdovetail joint. Before you begin cutting, there are a few
preparatory tasks including making the tablesaw jig,designing the layout of the desired dovetail joint and cuttingout the spacer blocks.
Designing The Joint and Cutting The Spacer Blocks:[b1]The hinge pin of my entire dovetail system is the spacerblock; Mounted to the tablesaw jig, the blocks provide away to cut all pins and tails without having to mark out eachboard. Before cutting the blocks, you must design yourdovetail layout including the number, size and spacing ofthe pins and tails. This will determine both die number ofspacer blocks you'll need and their widths.
Following figure 2, you'll see that the number of spacer blocks needed equals thenumber of tails in the joint. In example 1, four blocks produce a joint with fourtails, three full pins and two half pins. Once you've chosen the number ofdovetails, you'll need to decide on their size and spacing. It's possible to makethe pins and tails the same size, but I find this is too mechanical looking, notconsistent with highquality work. One of the advantages of my system is youcan easily vary the sizes of pins and tails to make joints look more like they werehandcut. Traditionally, the tails should be larger than the pins, but avoid makingthe pins too narrow. (Unless you use a special thinkerf tablesaw blade, youwon't be able to cut pins less than about 3/16 of an inch wide at their narrowestpoint and, in my opinion, really skinny pins are too weak for most applications.)For the dovetail angle, I'd recommend 10°, but avoid an angle outside the rangeof 8° to 12°. If the angle is less, the pins can slide between the tails, defeating thelocking quality of the joint. If the angle is greater, the sharp corners of the tailsand pins are fragile and can break easily under stress.
My system allows you to alter the width of individual tails and the spacing ofpins along a single joint. In example 2 in figure 2, the center tail is wider thanthe tails on either side of it. You could just as easily make the outer tails wider ormake two wide tails, two narrow tails, two wide and so forth as long as theresulting layout is symmetrical relative to the center of the joint. This last pointis required for this cutting system to work correctly.
Once you've finalized the dovetail layout, you're ready to cut the spacer blocks.As you can see in figure 2, one block is equal to the width of one tail at itswidest plus the width of one pin at its narrowest. In example 1, each blockequals one 3/4 inch tail plus one 1/4 inch pin (notice that all pins, including half
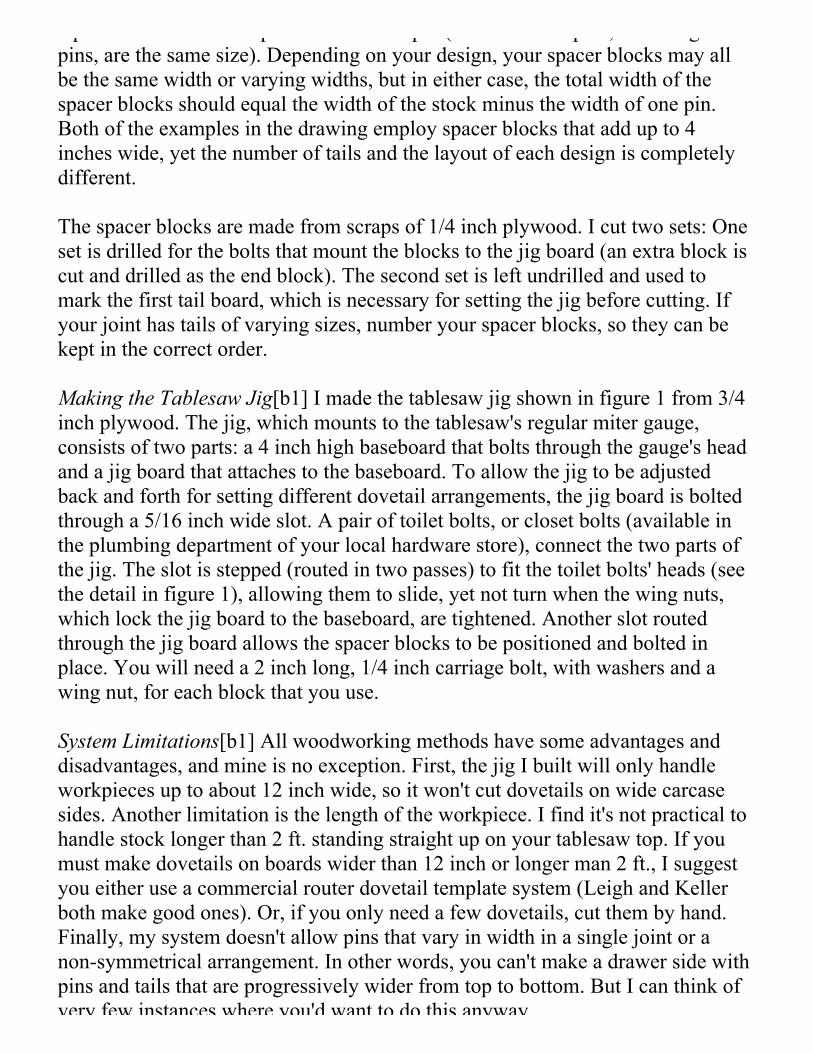
equals one 3/4 inch tail plus one 1/4 inch pin (notice that all pins, including halfpins, are the same size). Depending on your design, your spacer blocks may allbe the same width or varying widths, but in either case, the total width of thespacer blocks should equal the width of the stock minus the width of one pin.Both of the examples in the drawing employ spacer blocks that add up to 4inches wide, yet the number of tails and the layout of each design is completelydifferent.
The spacer blocks are made from scraps of 1/4 inch plywood. I cut two sets: Oneset is drilled for the bolts that mount the blocks to the jig board (an extra block iscut and drilled as the end block). The second set is left undrilled and used tomark the first tail board, which is necessary for setting the jig before cutting. Ifyour joint has tails of varying sizes, number your spacer blocks, so they can bekept in the correct order.
Making the Tablesaw Jig[b1] I made the tablesaw jig shown in figure 1 from 3/4inch plywood. The jig, which mounts to the tablesaw's regular miter gauge,consists of two parts: a 4 inch high baseboard that bolts through the gauge's headand a jig board that attaches to the baseboard. To allow the jig to be adjustedback and forth for setting different dovetail arrangements, the jig board is boltedthrough a 5/16 inch wide slot. A pair of toilet bolts, or closet bolts (available inthe plumbing department of your local hardware store), connect the two parts ofthe jig. The slot is stepped (routed in two passes) to fit the toilet bolts' heads (seethe detail in figure 1), allowing them to slide, yet not turn when the wing nuts,which lock the jig board to the baseboard, are tightened. Another slot routedthrough the jig board allows the spacer blocks to be positioned and bolted inplace. You will need a 2 inch long, 1/4 inch carriage bolt, with washers and awing nut, for each block that you use.
System Limitations[b1] All woodworking methods have some advantages anddisadvantages, and mine is no exception. First, the jig I built will only handleworkpieces up to about 12 inch wide, so it won't cut dovetails on wide carcasesides. Another limitation is the length of the workpiece. I find it's not practical tohandle stock longer than 2 ft. standing straight up on your tablesaw top. If youmust make dovetails on boards wider than 12 inch or longer man 2 ft., I suggestyou either use a commercial router dovetail template system (Leigh and Kellerboth make good ones). Or, if you only need a few dovetails, cut them by hand.Finally, my system doesn't allow pins that vary in width in a single joint or anonsymmetrical arrangement. In other words, you can't make a drawer side withpins and tails that are progressively wider from top to bottom. But I can think ofvery few instances where you'd want to do this anyway.
very few instances where you'd want to do this anyway.
It'll probably take some study and experimentation for you to master the process,so don't plan to make drawers from your precious stash of bird'seye maple thefirst couple of times that you try the system. I am a real believer in practicemakes perfect. The more you use this system, the better you will get at it.
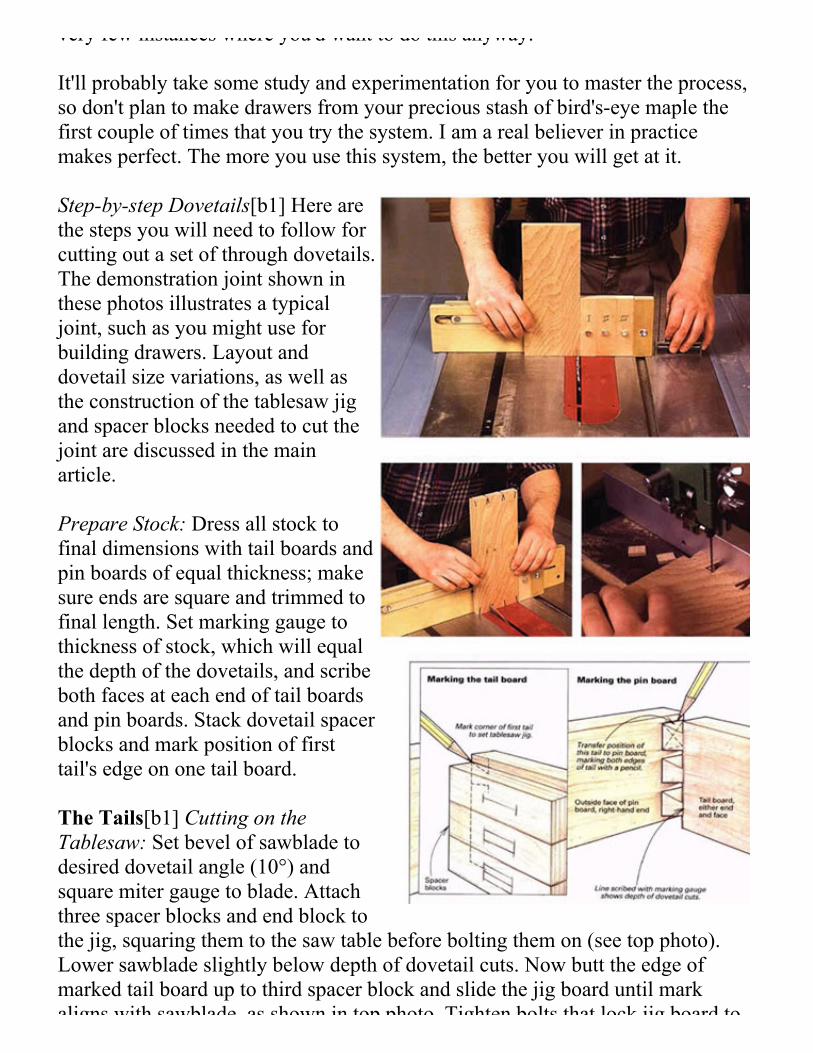
Stepbystep Dovetails[b1] Here arethe steps you will need to follow forcutting out a set of through dovetails.The demonstration joint shown inthese photos illustrates a typicaljoint, such as you might use forbuilding drawers. Layout anddovetail size variations, as well asthe construction of the tablesaw jigand spacer blocks needed to cut thejoint are discussed in the mainarticle.
Prepare Stock: Dress all stock tofinal dimensions with tail boards andpin boards of equal thickness; makesure ends are square and trimmed tofinal length. Set marking gauge tothickness of stock, which will equalthe depth of the dovetails, and scribeboth faces at each end of tail boardsand pin boards. Stack dovetail spacerblocks and mark position of firsttail's edge on one tail board.
The Tails[b1] Cutting on theTablesaw: Set bevel of sawblade todesired dovetail angle (10°) andsquare miter gauge to blade. Attachthree spacer blocks and end block tothe jig, squaring them to the saw table before bolting them on (see top photo).Lower sawblade slightly below depth of dovetail cuts. Now butt the edge ofmarked tail board up to third spacer block and slide the jig board until markaligns with sawblade, as shown in top photo. Tighten bolts that lock jig board to
aligns with sawblade, as shown in top photo. Tighten bolts that lock jig board tobaseboard.
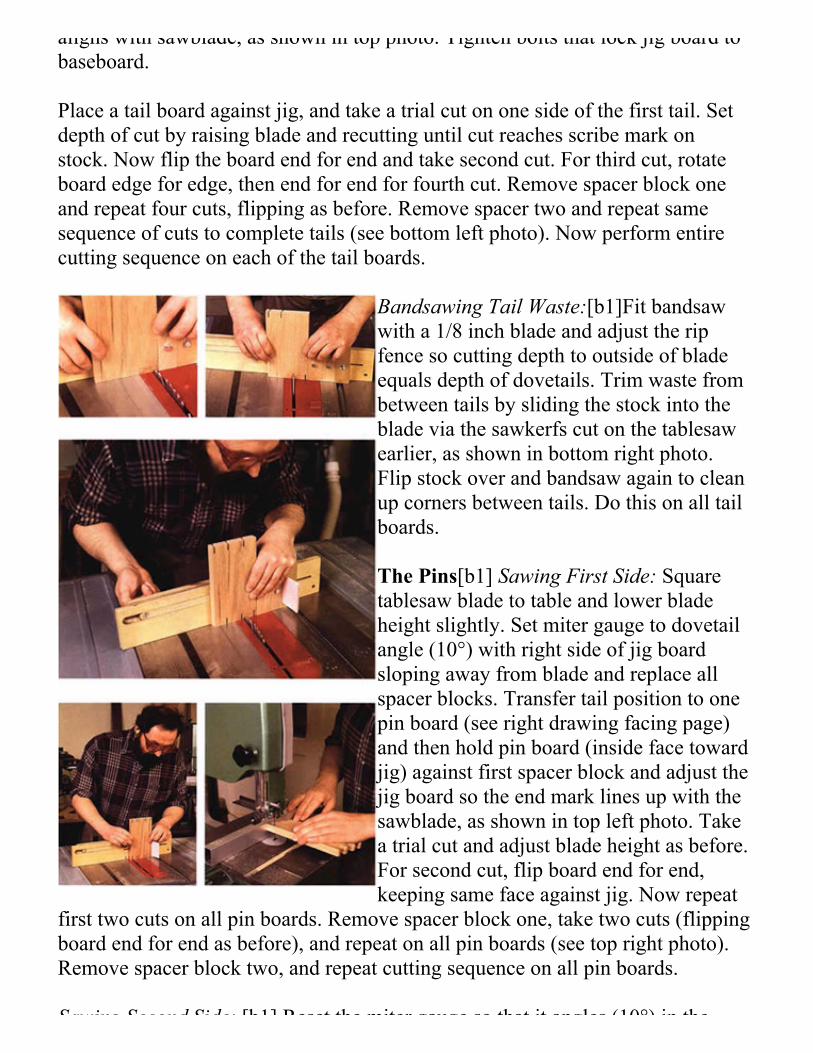
Place a tail board against jig, and take a trial cut on one side of the first tail. Setdepth of cut by raising blade and recutting until cut reaches scribe mark onstock. Now flip the board end for end and take second cut. For third cut, rotateboard edge for edge, then end for end for fourth cut. Remove spacer block oneand repeat four cuts, flipping as before. Remove spacer two and repeat samesequence of cuts to complete tails (see bottom left photo). Now perform entirecutting sequence on each of the tail boards.
Bandsawing Tail Waste:[b1]Fit bandsawwith a 1/8 inch blade and adjust the ripfence so cutting depth to outside of bladeequals depth of dovetails. Trim waste frombetween tails by sliding the stock into theblade via the sawkerfs cut on the tablesawearlier, as shown in bottom right photo.Flip stock over and bandsaw again to cleanup corners between tails. Do this on all tailboards.
The Pins[b1] Sawing First Side: Squaretablesaw blade to table and lower bladeheight slightly. Set miter gauge to dovetailangle (10°) with right side of jig boardsloping away from blade and replace allspacer blocks. Transfer tail position to onepin board (see right drawing facing page)and then hold pin board (inside face towardjig) against first spacer block and adjust thejig board so the end mark lines up with thesawblade, as shown in top left photo. Takea trial cut and adjust blade height as before.For second cut, flip board end for end,keeping same face against jig. Now repeat
first two cuts on all pin boards. Remove spacer block one, take two cuts (flippingboard end for end as before), and repeat on all pin boards (see top right photo).Remove spacer block two, and repeat cutting sequence on all pin boards.
Sawing Second Side: [b1] Reset the miter gauge so that it angles (10°) in the
Sawing Second Side: [b1] Reset the miter gauge so that it angles (10°) in theother direction. Reattach spacer block two, but before bolting, slip a stack of adozen or more paper shims between end block and spacer three. Align mark toblade and set jig board, as shown in photo at right. Cut only the marked pinboard (keeping its inside face against the jig), and follow the sequence of takingtwo cuts, flipping board between cuts, removing a spacer block and cutting againuntil you've removed all three spacer blocks.
Bandsawing Pin Waste:With the same bandsaw ripfence setting as before,carefully tilt pin board at necessary angle and slip blade into a sawkerf; thenlower board flat onto table and cut away waste.
Hold the board securely as the blade will want to grab and pull the board downas you begin each cut. After sawing each pin waste, move the small waste blocksaway from the blade with the eraser end of a pencil, for safety sake. Repeat tosaw away waste on first pin board. Now trial fit a pin board with a tail board. Ifthe fit is too tight, remove as many paper shims as necessary, replace spacerblocks two and three, and recut trial pin board. Recheck joint fit and removemore shims if needed until dovetail joint slides snuggly together. Retaining thisshim arrangement, cut and trim all remaining pin boards as you did with the trialboard. —M.D.


![LAB 6 EDM WIRE CUTportal.unimap.edu.my/portal/page/portal30/Lecture... · Describe briefly the working principle of CNC EDM Wire Cut Machine. [5 marks] [How machine CNC EDM Wire Cut](https://img.pdfslide.us/doc/110x75/5e6e273c79924e48b5072be7/lab-6-edm-wire-describe-briefly-the-working-principle-of-cnc-edm-wire-cut-machine.jpg)