Embed Size (px)
Citation preview

MINI DIGITAL SYNTHESIZEROwner’s Manual
MACCHIATo

2
MACCHIATO MINI-SYNTH DIGITAL SYNTHESIZERQuick Start Guide and Reference Manual
© 2017 ZEPPELIN DESIGN LABS. NO PART OF THIS DOCUMENT MAY BE REPRODUCED WITHOUT WRITTEN PERMISSION FROM THE AUTHOR. ZEPPELIN DESIGN LABS TAKES
NO RESPONSIBILITY FOR ANY DAMAGE OR HARM THAT MAY COME TO ANYONE OR ANYTHING THROUGH THEIR PRODUCTS. THE MACCHIATO SOFTWARE IS UNDER THE
CREATIvE COMMONS SHARE-ALIKE LICENSE, WHICH MEANS YOU ARE FREE TO ADD OR BUILD UPON THIS SOFTWARE IN ANY WAY YOUR CREATIvITY ALLOWS, BUT ANY
DERIvATIvES MUST BE SHARED USING THE SAME LICENSE.
181120
QUICK START GUIDE ................................................................................................ 3
REFERENCE MANUAL ............................................................................................... 5
INTRODUCTION ................................................................................................. 5
FEATURE LIST ...................................................................................................... 6
REAR PANEL FEATURES ........................................................................................ 8
TOP PANEL FEATURES ........................................................................................ 10
PROGRAMMING THE MACCHIATO MINI-SYNTH ...................................................... 17
PRESETS................................................................................................................. 18
SCHEMATIC ........................................................................................................... 19

3
QUICK START GUIDELook for the companion demo video at http://zeppelindesignlabs.com/product/macchiato/.
1. POWER UP Use a 9v DC power supply or a battery.
• 9v DC power supply (“wall wart”, strongly recommended): Must be rated for 200mA minimum, with center-negative polarity. Look for this graphic on the power supply. Your synth won’t work with a center-positive power supply. Simply plug the cable into the back of your synth under the “9v” label.
• 9v battery: Use a high-quality alkaline battery, like Energizer. (Don’t waste your money on cheap batteries!) Open your cabinet; insert the battery into its holder; snap the contacts into place; and then push down to snap the battery into the holder.
2. PLUG IN A LISTENING DEVICE Plug in headphones or powered desktop speakers into the AUDIO OUT jack on the back of the synth; or run a cable to the LINE IN on your computer, or the AUX IN on your stereo. In a pinch, you can monitor the synth with the little on-board speaker, but this will gobble up batteries a lot faster and will not sound as good.
3. TURN ALL THE KNOBS TO THE LEFT except OCTAvE and CUTOFF. Turn these all the way to the right.
4. TURN IT ON Press the red power button on the back of the synth. If you built a cardboard case, be careful how you squeeze your synth; you don’t want to crush the cabinet.
5. TURN IT UP Tap some keys while you slowly turn up the VOLUME Knob #9 at the far right. CAUTION: ALWAYS TURN THE vOLUME DOWN BEFORE YOU PLUG IN HEADPHONES! The signal may be louder than you expect and could hurt your ears or damage your headphones.
6. SHAPE YOUR SOUND The first four controls on the left affect the basic sound of the synth:
• WAVE SHAPE Turn to choose between Sine, Triangle, Saw and Square.
• OCTAVE Turn to move up through four octaves, from high (4) to low (1) and back.
• ATTACK Turn slowly while tapping the keys to increase the time it takes for a note to fade in.
• RELEASE Turn slowly while tapping the keys to increase the time it takes for a note to fade out.
7. SHAPE YOUR FILTER The next four controls affect the LOW FREQUENCY OSCILLATOR (LFO), which affects the LOW PASS FILTER (LPF), which in turn applies all sorts of effects to your note.
• Turn CUTOFF left and right while playing. It acts like a tone control. Full left cuts off more of the high frequencies for a soft, warm, muffled sound. Full right gives a bright, crisp sound. This effect is most noticeable when playing a Square Wave, and least noticeable with a Sine wave.
OUTER BARREL POSTIVE
CENTER PINNEGATIVE
200mA MINIMUM
+ -

4
• Turn RATE and DEPTH up halfway. Your synth now has a distinct “wawawawawah” sound.
• Slowly turn RATE back and forth to control the rate at which the LFO oscillates. At full left, the speed is zero, and the LFO effect freezes.
• Turn DEPTH right to increase the effect of the LFO, and left to decrease it down to no effect at all.
• LFO SHAPE Turn to choose between Sine, Saw, Ramp (which is a backwards Saw) and Square. Note the distinct effect each shape produces.

5
REFERENCE MANUAL
INTRODUCTION
The Macchiato Mini Synth by Zeppelin Design Labs is a versatile little synthesizer you can build and mod yourself. This guide contains detailed information about each of its many features, and instructions for modding the source code or uploading software updates.
The Macchiato’s brain is a little computer chip, called a microcontroller. It is an ATmega644PA by Atmel. On the printed circuit board, just to the right of the serial number is a little port into which you can plug a special cable. This allows your computer to communicate with your Macchiato. We wrote the Macchiato’s software in the Arduino development environment. If you are familiar with Arduino programming, you can re-write the source code and customize the performance of your synth.
Arduino does not deal well with audio, and neither does the ATmega micro! To harness the tremendous computing power of microcontrollers, and take advantage of Arduino’s ease-of-use, Tim Barrass developed the Mozzi Sound Synthesis Library for Arduino. This is a free, open-source collection of software tools that you add to your Arduino installation. It uses “wave-table” technology and pulse-width modulation to produce fabulous 8-bit waveforms.
The software in the Macchiato was developed by Zeppelin Design Labs. It incorporates elements of the Mozzi library by Tim Barrass. Both are covered by the Creative Commons Share Alike / Attribution / Non-Commercial license. You are free to modify and redistribute the Macchiato code, as long as you give attribution to its creators, and do not sell your work without talking to us about it first.

6
FEATURE LIST
TOP PANEL
1. Wave Shape Select: Sine, Triangle, Saw, Square2. Octave Select: 1 (C2-C3) through 4 (C5-C6)3. Attack: 28 ms – 2500 ms4. Release: 25 ms – 3000 ms5. LFO Shape Select: Sine, Saw, Ramp, Square6. LFO Rate: 0 Hz – 20 Hz7. LPF Cutoff Frequency: Approximately 220 Hz – 1440 Hz8. LFO Depth: Ranges from 0% (no effect) to 100% (LFO modulates Cutoff frequency down to 220
Hz, maximum effect)9. Output volume10. LED Power Indicator11. Speaker12. Capacitive Touch Keyboard, 13 keys, 2-note polyphony

7
REAR PANEL
1. Audio Out (accepts 3.5mm TRS or TRRS male jack)2. 9v DC Power Input3. Power On / Off4. MIDI IN
ON THE PCB
1. Battery Holder (upper left)2. ISP Header (directly right of serial number sticker)

8
The following paragraphs are keyed to the above Feature List, and contain detailed information about how each feature works and how you can use it to best advantage.
REAR PANEL FEATURES
1. AUDIO OUT
This is a line-level Audio Out. It accepts a typical 3.5mm headphone jack, TRS. TRS = Tip-Ring-Sleeve, a stereo jack with three segments. (The Macchiato Mini-Synth is a monaural device.) The earbuds used with smartphones are sometimes TRRS style (Tip-Ring-Ring-Sleeve, 4 segments). These will work fine too.
The Macchiato can easily drive your headphones. It sounds great played through powered desktop speakers. It should sound fine plugged in to the AUX or LINE IN input of any stereo system. It should sound good when you plug it into the LINE IN jack on your computer.
NOTE: Computer sound cards use a variety of voltages as “line level”; there are multiple standards in use. Consequently, your Macchiato Mini-Synth may sound “hot”, that is, really loud and maybe distorted when plugged into your PC. Just keep the volume knob vERY LOW.
CAUTION: ALWAYS turn the volume knob ALL THE WAY DOWN when plugging anything in to the Audio Out jack. The output signal may be louder than you expect and could hurt your ears or damage your audio gear.
NOTE: The capacitive-touch keyboard will behave more reliably when there is something plugged in to the Audio Out jack.
2. 9v DC POWER INPUT
We recommend use of a 9v DC power supply (“wall wart”) rated for at least 200mA, with center-negative polarity, such as the one offered by Zeppelin Design Labs as an accessory to your Macchiato. This is similar to a typical guitar pedal power supply. Your synth will not work with a center-positive power supply. If you obtain your power supply from a source other than Zeppelin Design Labs, examine the symbol shown here, and compare it to your power supply. The barrel needs to be 5.5mm in diameter with a 2.1mm diameter pin. Check for center-negative polarity before you buy!
Besides providing stable, robust power and saving you the expense of batteries, using a power supply expands and solidifies the ground plane of the Macchiato, which will make the capacitive touch keyboard more responsive and reliable.
Plugging in a power supply disconnects the battery. Your best power arrangement is to install a decent battery as a backup, and then use a power supply instead.
For battery selection and installation, see “On the PCB: Battery Holder”, below.
OUTER BARREL POSTIVE
CENTER PINNEGATIVE
200mA MINIMUM
+ -

9
3. POWER ON/OFF
Push the button in to turn the synth on. The red LED on top of the synth will light up. Push the button again to turn the synth off. The LED will go out.
Be careful how you hold the synth when turning it on and off. If you built a cardboard case for it, take care not to squash it.
4. MIDI IN
You can control your Macchiato Mini-Synth with any MIDI controller device. Just run a standard 5-pin DIN MIDI cable from the MIDI OUT of your controller to the MIDI IN of the Macchiato. That’s it. You can now play any note from any register on the controller and your Macchiato will happily respond. You can play the capacitive touch keyboard simultaneously with the MIDI, though the synth is still limited to its two-note polyphony.
On November 20, 2018 Macchiato began shipping with software version 1.2.2 which enables selection of MIDI receive channel. If your Macchiato shipped prior to that date, it is set to receive on channel 1 only. To update the software, help yourself to a free copy of ZDL Updater, a simple PC app that uploads software updates to your synth or other Zeppelin device. You will also need a USB-Tiny Programmer, a little piece of hardware that connects your PC to your synth.
Macchiato (software v1.2.2 & higher) defaults to OMNI mode upon startup: it will respond to MIDI data sent on any channel. To limit Macchiato to respond to data on just one channel, do the following:
1. Set your MIDI controller to Transmit on the same channel on which you wish the Macchiato to receive, and connect its MIDI OUT to the Macchiato MIDI IN.
2. Turn off the Macchiato.
3. Turn all the Macchiato’s knobs full right, except volume. Leave volume wherever you like.
4. Turn the Macchiato on.
5. Play a note, bend a wheel or twist a knob on the controller to send a Note On or any CC message to the Macchiato. The Macchiato reads the channel number from the first MDI event it sees, and permanently sets itself to receive only on that channel henceforth. This setting remains in place until such time as you change it again.
6. To return the Macchiato to OMNI mode, perform steps 2-4, then turn it off again and twist a few knobs away from the magic all-right positiion. Upon power-up, your Macchiato should be back in OMNI mode.
The Macchiato responds to Note On/Off, velocity, Pitch Bend, Modulation, Channel volume, Portamento On/Off, and Portamento Time messages. It uses “velocity not equal to zero” to turn a note on, and “velocity equals zero” to turn a note off. Modulation data is used to manipulate the LFO DEPTH.

10
TOP PANEL FEATURES
WAvEFORM CONTROLS
The first four knobs to the left on top of your synth control the waveform and amplitude envelope of the notes you play. These controls establish the basic sound of the synth.
1. Wave Shape Select
Rotate clockwise to select Sine wave, Triangle wave, Sawtooth wave, or Square wave. These names reflect the actual shape of the waveform as viewed on an oscilloscope. Note the little icons on the label, and the figure below. Each wave shape has a distinctive sound. The Macchiato’s sine waveform has no harmonics (overtones) added to it. What you hear is the fundamental: one pure, single frequency. As you move around the dial, the waveforms add more and more harmonics (overtones), for a fuller, richer more complex sound. The higher-order waveforms are more responsive to the filtering controls (knobs 5-8) because they have more harmonics available to be filtered.
You will find each waveform has an octave in which it sounds best.
2.
SINE
SAWTOOTH
TRIANGLE
SQUARE
Octave Select
Rotate clockwise to select the octave. The Macchiato will play through four octaves, from C2 (65.4 Hz) through C6 (1046 Hz). You can press and hold a note, and then change to a different octave. The original note will continue to sound as a drone while you play a melody over it in another register. The synth only has 2-note polyphony though: if you touch two keys simultaneously with your melody-hand, you will lose your drone. See “Capacitive Touch Keyboard”, below.
You can access more notes by using a MIDI controller with your Macchiato. See MIDI IN, above.

11
3. attack
Set the Attack phase of the amplitude envelope. The Amplitude Envelope defines how loud a note sounds over the course of its existence. Phases include Attack-Decay-Sustain-Release, or ADSR for short.
ATTACK DECAY SUSTAIN RELEASE
KEY PRESSED KEY RELEASED
When the knob is at full left, the attack is 28 milliseconds long, which is actually very short. This gives a percussive “instant-on” sound. (We chose to set the minimum Attack to 28 instead of zero because at zero the synth produces an undesirable click. We set the minimum attack to eliminate the click.)
At full right, the attack is 2.5 seconds, longer than you are likely to need in most cases.
The Decay phase is preset. It is very short, and it does not actually decay; the amplitude remains constant during the Decay phase. You can edit this! See “Programming The Macchiato Mini-Synth” below.
4. ReleaSe
At full left, the Release is set to 25 milliseconds for a snappy, “instant-off” sound. (We set minimum Release to 25 ms instead of zero because at zero, an unpleasant click is audible.) At full right, the maximum release is 3.0 seconds for a luscious, airy fade-away feel.
Between Attack and Release is the Sustain phase. This is what is happening when you simply hold a key down. Your Macchiato is programmed for an unchanging amplitude while you hold the key. The note will continue to sound at full volume for several minutes and then spontaneously enter the Release phase. You can edit this behavior! See “Programming The Macchiato Mini-Synth” below.
The Macchiato exhibits an unusual playback characteristic when using long attack and release settings. With the synth at rest, the first and second notes you play will always fade in from silence, as you would expect. Subsequent notes will usually begin the attack phase using the amplitude value of the previous note at that moment. Therefore, if you set up a sound with both a lengthy attack and release, then by the time your finger plays the third note, the second will have faded away only a little bit; the third will start at near-full volume. Release all notes and the behavior starts over. This can make the Macchiato surprisingly expressive. A phrase may open with a slow attack, but the subsequent melody is much more articulate than expected. Try it!

12
LOW FREQUENCY OSCILLATOR CONTROLS
The fifth through eighth knobs on top of your synth control the LOW FREQUENCY OSCILLATOR (LFO), which influences the LOW PASS FILTER (LPF) which in turn applies all sorts of effects to your basic note.
5. lFO Shape Select
The Low Frequency Oscillator is a signal that oscillates slowly, from zero to a few dozen times per second. This signal might have any shape, just like the audio waveform. But the LFO is not used to make a sound; it is used to alter a sound. As the LFO changes through time, your Macchiato uses it to alter the Cutoff frequency as described below. This is used by the Low Pass Filter (LPF) to affect the sound of the note you are playing.
Different LFO wave shapes affect the sound you hear in dramatic ways. Rotate the knob clockwise to select Sine wave, Sawtooth wave, Ramp wave (which is backwards sawtooth) or Square wave. Slow down the Rate, increase the Depth, and move between the four shapes. Look at the little graphics on the label, and the figure below, and listen carefully until you hear what the LFO shapes look like.
SINE
SAWTOOTH
RAMP
SQUARE
6. lFO Rate
At full left, the LFO Rate is zero: the oscillator stops oscillating and the LFO no longer has any audible effect. However, if the LFO happened to be at the bottom of its “sweep” when you froze it, it will still have a static effect on the Cutoff frequency. This effect is only significant at high Depth settings.
At full right, the LFO Rate is about 20 Hz, which sounds like a fast trill. In between you can create a very expressive range of tremolo-like effects.
Note that if Knob #8 Depth is set to full-left (zero), you will hear no LFO effects. Move Depth to about the 12 o’clock position while experimenting with Rate.

13
7. cutOFF
This knob adjusts the Low Pass Filter Cutoff Frequency. A Low Pass Filter (LPF) allows all overtones below a specified cutoff frequency to pass through. Thus as you adjust the filter to a lower and lower cutoff frequency, you cut off more of the high-frequency harmonics (overtones), making the sound darker, lower, rounder, and more muffled. Of the four tone wave shapes (knob #1), the Square wave has the most overtone frequencies. This gives the LPF something to work with, so the filter has the most dramatic effect on square wave tones. The Sine wave theoretically has no overtones at all, and the LPF has very little effect except at the most extreme settings.
220 Hz 1440 Hz
ALL THESE FREQUENCIES ARE AUDIBLE
CUTOFF SET AT 100%
220 Hz 1440 Hz
ALL THESE FREQUENCIES ARE AUDIBLE
CUTOFF SET AT 0%
Turn Knob #1 full right to select the Square wave shape. Turn Knob #8 Depth full left (zero depth = no LFO). With Knob #7 Cutoff at full-right, the cutoff frequency is approximately 1440 Hz, which allows most of the overtones to pass through unaffected, and you hear full, bright sound. As you turn the knob left, the Cutoff goes down to about 220 Hz, which allows only a very dark, spooky sound to pass through.
14
8. lFO Depth
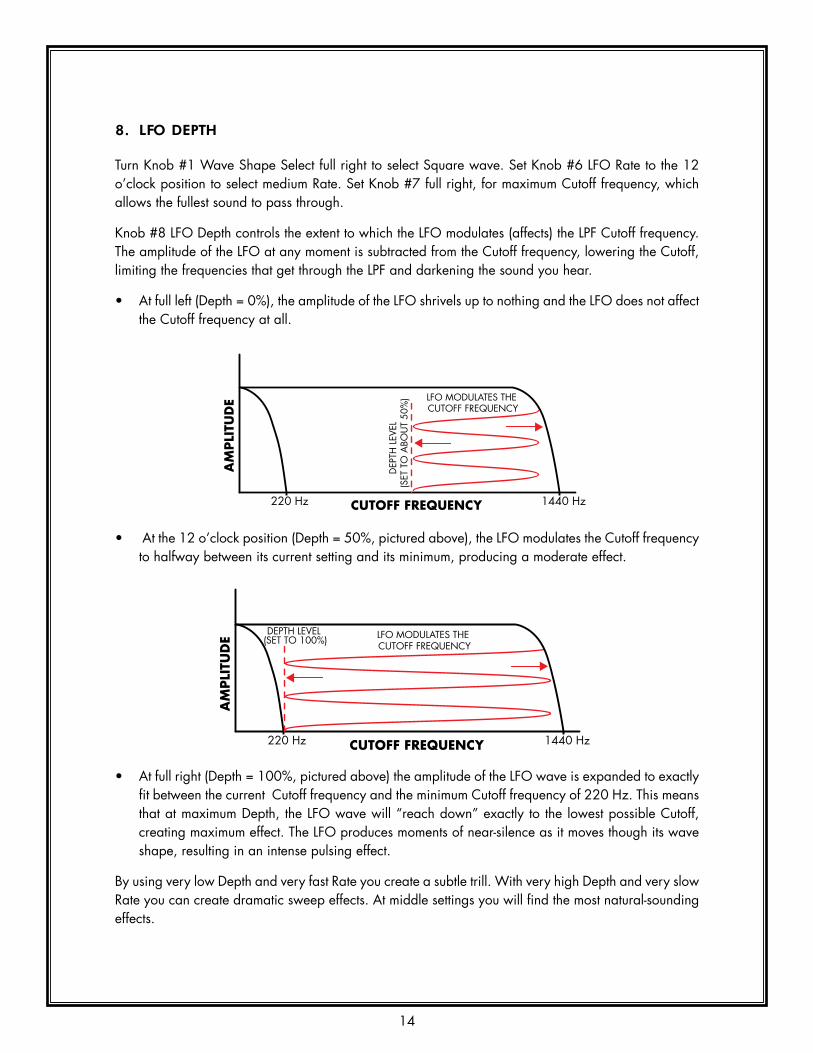
Turn Knob #1 Wave Shape Select full right to select Square wave. Set Knob #6 LFO Rate to the 12 o’clock position to select medium Rate. Set Knob #7 full right, for maximum Cutoff frequency, which allows the fullest sound to pass through.
Knob #8 LFO Depth controls the extent to which the LFO modulates (affects) the LPF Cutoff frequency. The amplitude of the LFO at any moment is subtracted from the Cutoff frequency, lowering the Cutoff, limiting the frequencies that get through the LPF and darkening the sound you hear.
• At full left (Depth = 0%), the amplitude of the LFO shrivels up to nothing and the LFO does not affect the Cutoff frequency at all.
•
220 Hz 1440 Hz
LFO MODULATES THE CUTOFF FREQUENCY
DEP
TH L
EVEL
(SET
TO
ABO
UT
50%
)
At the 12 o’clock position (Depth = 50%, pictured above), the LFO modulates the Cutoff frequency to halfway between its current setting and its minimum, producing a moderate effect.
•
220 Hz 1440 Hz
LFO MODULATES THE CUTOFF FREQUENCY
DEPTH LEVEL(SET TO 100%)
At full right (Depth = 100%, pictured above) the amplitude of the LFO wave is expanded to exactly fit between the current Cutoff frequency and the minimum Cutoff frequency of 220 Hz. This means that at maximum Depth, the LFO wave will “reach down” exactly to the lowest possible Cutoff, creating maximum effect. The LFO produces moments of near-silence as it moves though its wave shape, resulting in an intense pulsing effect.
By using very low Depth and very fast Rate you create a subtle trill. With very high Depth and very slow Rate you can create dramatic sweep effects. At middle settings you will find the most natural-sounding effects.

15
OTHER TOP PANEL FEATURES
9. Output vOlume
Turn to the right for more volume. CAUTION: Always turn down the volume before you plug ANYTHING into the Audio Out jack! The on-board speaker is not very loud, and you will tend to turn the volume way up. The signal out of the Audio Out jack, on the other hand, is pretty “hot”, meaning your headphones or desktop speakers will seem A LOT LOUDER at the same volume setting. You could hurt your ears or damage your gear (or annoy your parents) if you start with the volume up too loud.
10. leD pOWeR InDIcatOR
The LED glows red when there is power to the synth. It will get dimmer as your battery wears out.
11. SpeakeR
The on-board speaker is not very loud, and will deplete your batteries quickly. It is there as a convenience for monitoring your Mini-Synth when external speakers or headphones are not available.
12. capacItIve tOuch keybOaRD
The Macchiato Mini-Synth features two-note polyphony. (We may expand this to more notes in future software releases. Sign up for our newsletter at www.zeppelindesignlabs.com to receive product release notices.) Two-note polyphony means the synth can sound up to two different notes simultaneously. A third note will knock out one of the earlier notes. This makes it possible to play fluid, expressive melodies, or sustained diads (pairs of notes). You cannot play three- or four-note chords. When you play accidentals (black keys), your finger is in a neighborhood where three keys meet. If your finger lands at that junction, the results will be unpredictable; therefore to play well with the capacitive touch keyboard you must learn just the right touch. The Macchiato is a real musical instrument and it will take a little practice to learn to play it well.
The capacitive touch keys work best when the synth has something plugged in to either the Power In jack, the Audio Out jack, or both. If you power the Macchiato with a battery, and listen via the on-board speaker, you may find the keyboard becomes a little unreliable. It will behave itself if you keep a finger on the blue surface beyond the keys, at far left or right. Try it.
Here are some performance tips:
You can hold down one note, usually a low one, as a drone and then play an accompanying melody above it. This is possible, but if you play at all legato -- slurring one note into the next -- you will likely lose your drone. Therefore, try to play staccato, and pulse the drone every measure or two. Set a long decay to simulate a legato sound.
You can set the synth to a low octave, trigger and hold a low note, then turn the octave knob to a higher octave and play a melody in a higher register! This is nifty, but the moment you lose or drop the low drone, it will come back in the current, higher register. If you like to play this way a lot, you should use a MIDI controller keyboard, which will give you total access to all registers, even beyond the four octaves native to the Macchiato.
16
FEATURES ON THE PCB
There are a few features on the printed circuit board (PCB) that you can only access with the cabinet lid removed; so open it up and take a look inside.
1. batteRy hOlDeR; InStallIng the batteRy
We recommend you power your Macchiato Mini-Synth with a 9v DC power supply (“wall wart”; see above), but you can install a 9v battery for backup power or mobile use. When a power supply is plugged in, the battery is disconnected. Do not waste your money on cheap batteries! You will regret it. We recommend Energizer alkaline batteries. The on-board speaker will drain your battery a lot faster than headphones will. When the battery gets low, the LED will grow dim and your synth will start to go haywire. Replace the battery immediately, or better, switch to a 9v DC power supply.
Do not store your Macchiato for an extended period with a battery installed! The battery will eventually leak and could damage your synth.
To install a battery:
a. Turn off the Mini-Synth.
b. Lift the lid up and off of the plastic cabinet, or open the front tabs of your cardstock cabinet.
c. Insert the battery into the battery holder until the contacts engage and snap together.
d. Carefully push the battery bottom down into the battery holder until it snaps into place.
To remove the battery, you might need to pry the holder away from the battery bottom.
2. ISp heaDeR; FlaShIng neW pROgRamS
See that cluster of six pins sticking up to the right of the Zeppelin serial number? These are the In-System Programming (ISP) header pins that allow you to communicate with the microcontroller that runs your synth. You use an inexpensive device called a programmer that connects the ISP header to a USB port on your computer. Then, you can download new synthesizer programs from Zeppelin Design Labs as we publish them from time to time and upload (“flash”) them to your synth!
We host the Macchiato source code and all supporting files at www.Github.com/zeppelindesignlabs. Please go to the Macchiato Mini-Synth repository page now and read the README.md file for detailed, current instructions on obtaining and flashing new programs.

17
PROGRAMMING THE MACCHIATO MINI-SYNTHThe Macchiato Mini-Synth incorporates the Mozzi Sound Synthesis Library for Arduino by Tim Barrass. Mozzi and Macchiato are both covered by the Creative Commons / Attribution / Non-Commercial license. You are free to modify and redistribute the Macchiato software as long as you give proper credit to the contributing creators, and do not sell your work without talking to us about it first.
We host the Macchiato source code and all supporting files on Github at www.Github.com/zeppelindesignlabs. Please go to the Macchiato Mini-Synth repository page now and read the README.md file for detailed, current instructions on obtaining and modifying the Macchiato source code. Look for the section PROGRAMMING THE MACCHIATO.
We have published several significant software upgrades since the Macchiato was first released. Updating your software is easy! Get the free ZDL Updater, a simple PC app that makes updates a snap. You will also need a USB-Tiny Programmer, a little piece of hardware that connects your PC to your mini-synth or other Zeppelin product. Install ZDL Updater, following the instructions on its web page. Click the “?” button to open the Help file. Read it to see just how easy it is to upgrade your synth.
If you get stuck, please contact us by email at [email protected], or consult our forum at http://zeppelindesignlabs.com/forums/

18
MA
CC
HIA
TO
PR
ESET
SW
AV
E SH
APE
OCTA
VE
ATT
ACK
REL
EASE
LFO
SH
APE
RA
TECU
TOFF
DEP
TH
BA
SS
SYN
TH B
ASS
ON
E O
F TH
ESE
DA
YS
FLU
TE
PO
GO
STI
X
SAW
SW
EEP
DEA
TH K
NEL
L
TUBA
SQU
ARE
LEA
D
SQU
ARE
SWEE
P
PIT
TER P
AT
PRESETS