Embed Size (px)
Citation preview

Mac OS X ServerDeploying Mac OS X Computers for K–12 EducationFor Version 10.4 or Later
Apple Computer, Inc.© 2005 Apple Computer, Inc. All rights reserved.
The owner or authorized user of a valid copy of Mac OS X Server software may reproduce this publication for the purpose of learning to use such software. No part of this publication may be reproduced or transmitted for commercial purposes, such as selling copies of this publication or for providing paid-for support services.
Every effort has been made to ensure that the information in this manual is accurate. Apple Computer, Inc., is not responsible for printing or clerical errors.
Apple1 Infinite LoopCupertino CA 95014-2084www.apple.com
The Apple logo is a trademark of Apple Computer, Inc., registered in the U.S. and other countries. Use of the “keyboard” Apple logo (Option-Shift-K) for commercial purposes without the prior written consent of Apple may constitute trademark infringement and unfair competition in violation of federal and state laws.
Apple, the Apple logo, AppleTalk, Mac, and Macintosh are trademarks of Apple Computer, Inc., registered in the U.S. and other countries. Finder is a trademark of Apple Computer, Inc.
Other company and product names mentioned herein are trademarks of their respective companies. Mention of third-party products is for informational purposes only and constitutes neither an endorsement nor a recommendation. Apple assumes no responsibility with regard to the performance or use of these products.
019-0545/10-03-2005
3
1
Contents
5 Deploying Mac OS X Computers for K–12 Education5
Introduction
7
Centralized Information and Resources
7
Directory Services
9
Network-Visible Resources
11
Managing Student and Teacher Work Environments
12
The Power of Preferences
13
Levels of Control
15
Designing the Login Experience
16
Degrees of Permanence
17
Caching Preferences
17
Using Mobile Accounts
19
Using Images to Install Software and Start Up Computers
20
Simplifying Initial Computer Setup
20
Keeping Student Systems Up to Date
20
Refreshing Lab Systems
21
Deploying Images
21
Using Apple Software Restore to Deploy Network Install Disk Images
22
Using NetBoot Service to Deploy Network Install Images
22
Deploying Images Without Using a Network
23
Remote Administration
23
Student Work Environment Administration
27
System Image Administration
28
Day-to-Day Student Computer Administration
29
Introducing the Scenarios
30
Scenario 1: Using a Wired Lab or Classroom
30
Introducing the Scenario
32
Setting Up the Scenario
47
Scenario 2: Using One-to-One Mobile Computers
47
Introducing the Scenario
49
Setting Up the Scenario
54
Scenario 3: Using NetBoot in a Wired Lab
54
Introducing the Scenario
4
55
Setting Up the Scenario
58
Planning Your Own Mac OS X Deployment
58
Where to Start
59
Identifying Computer Management Goals
59
Determining Server and Storage Requirements
60
Assessing Imaging Requirements
60
Deciding Between Using Wired and Wireless Networks
61
Deploying Your School’s Network Within a District-Wide Network
61
Choosing Accounts Types for Your Users
62
Organizing User Information
63
Defining Groups
63
Defining Computer Lists
63
Defining Workgroup Access to Computers
63
Picking Preferences to Manage
64
Defining Shared Folders
64
Blank Forms
75 Glossary
5
1
Deploying Mac OS X Computers for K–12 Education
Introduction
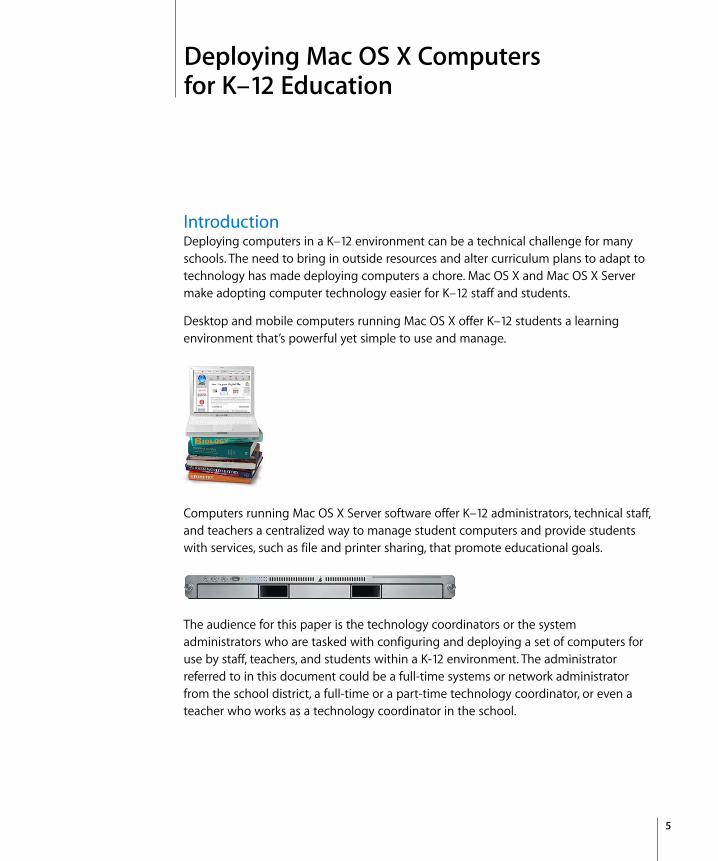
Deploying computers in a K–12 environment can be a technical challenge for many schools. The need to bring in outside resources and alter curriculum plans to adapt to technology has made deploying computers a chore. Mac OS X and Mac OS X Server make adopting computer technology easier for K–12 staff and students.
Desktop and mobile computers running Mac OS X offer K–12 students a learning environment that’s powerful yet simple to use and manage.
Computers running Mac OS X Server software offer K–12 administrators, technical staff, and teachers a centralized way to manage student computers and provide students with services, such as file and printer sharing, that promote educational goals.
The audience for this paper is the technology coordinators or the system administrators who are tasked with configuring and deploying a set of computers for use by staff, teachers, and students within a K-12 environment. The administrator referred to in this document could be a full-time systems or network administrator from the school district, a full-time or a part-time technology coordinator, or even a teacher who works as a technology coordinator in the school.
6
This paper begins by highlighting some of the ways that Mac OS X and Mac OS X Server streamline setting up student computer environments that offer day-to-day support for specific classroom and lab activities and objectives:Â
Centralized information and resources
(page 7). Administrators generally deploy student computers either as systems that are shared by students, or as one-to-one systems that are designated for use by a single student. Mac OS X Server provides the tools for centrally managing student information and computer settings for both deployment scenarios.
Â
Managing student work environments
(page 11). System administrators can simplify, customize, and control the student computer environment that takes effect when a student logs in. The login environment complements the learning context—for example, biology class, a publishing lab, or first grade. And teachers and students are able to exchange information electronically.
Â
Installing software and starting up computers over the network
(page 19). Initial configuration of student systems is simple when you use a server-based NetBoot or Network Install image. Student computers install or start up from the centralized image, which can include particular applications and preconfigured desktop settings.
Â
Remote administration
(page 23). Graphical administration applications help K–12 staff set up and manage server and student computers remotely—while working from their own computers.
Next, the paper focuses on three example scenarios, using a step-by-step approach to illustrate ways to set up and manage various K–12 learning environments:Â
Scenario 1: using a wired lab or classroom
(page 30). Students use desktop computers that are connected to a local area network.
Â
Scenario 2: using one-to-one mobile computers
(page 47). Students use mobile computers that they carry back and forth between home and school.
Â
Scenario 3: using NetBoot in a wired lab
(page 54). Students use a lab in which desktop computers are refreshed to complement specific lab exercises.
A closing section (page 58) provides guidelines and tips for planning your own K–12 Mac OS X deployment.
7
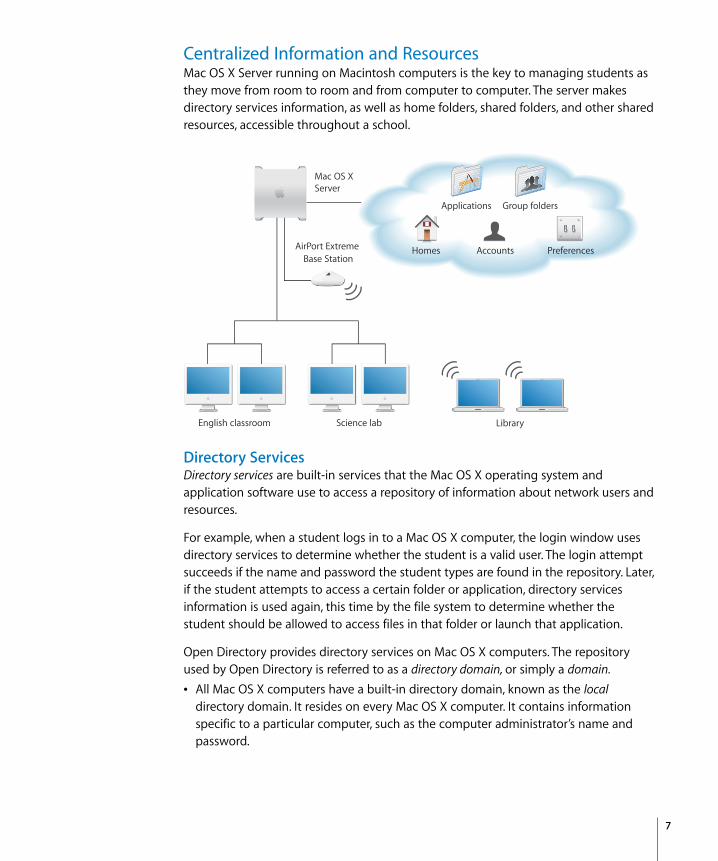
Centralized Information and Resources
Mac OS X Server running on Macintosh computers is the key to managing students as they move from room to room and from computer to computer. The server makes directory services information, as well as home folders, shared folders, and other shared resources, accessible throughout a school.
Directory Services
Directory services
are built-in services that the Mac OS X operating system and application software use to access a repository of information about network users and resources.
For example, when a student logs in to a Mac OS X computer, the login window uses directory services to determine whether the student is a valid user. The login attempt succeeds if the name and password the student types are found in the repository. Later, if the student attempts to access a certain folder or application, directory services information is used again, this time by the file system to determine whether the student should be allowed to access files in that folder or launch that application.
Open Directory provides directory services on Mac OS X computers. The repository used by Open Directory is referred to as a
directory domain,
or simply a
domain.Â
All Mac OS X computers have a built-in directory domain, known as the
local
directory domain. It resides on every Mac OS X computer. It contains information specific to a particular computer, such as the computer administrator’s name and password.
English classroom Science lab Library
Accounts Preferences
Group foldersApplications
Mac OS XServer
AirPort Extreme Base Station
Homes
8
Â
With Mac OS X Server, you can set up a
shared
Open Directory domain. The shared directory domain resides on the server. Other computers access the shared directory domain through the network, so this directory domain is also called a network directory domain. It contains information you want many student computers to be able to access. When you set up a shared directory domain, student computers find it automatically, thanks to a few simple settings you make when you set up the student computers.
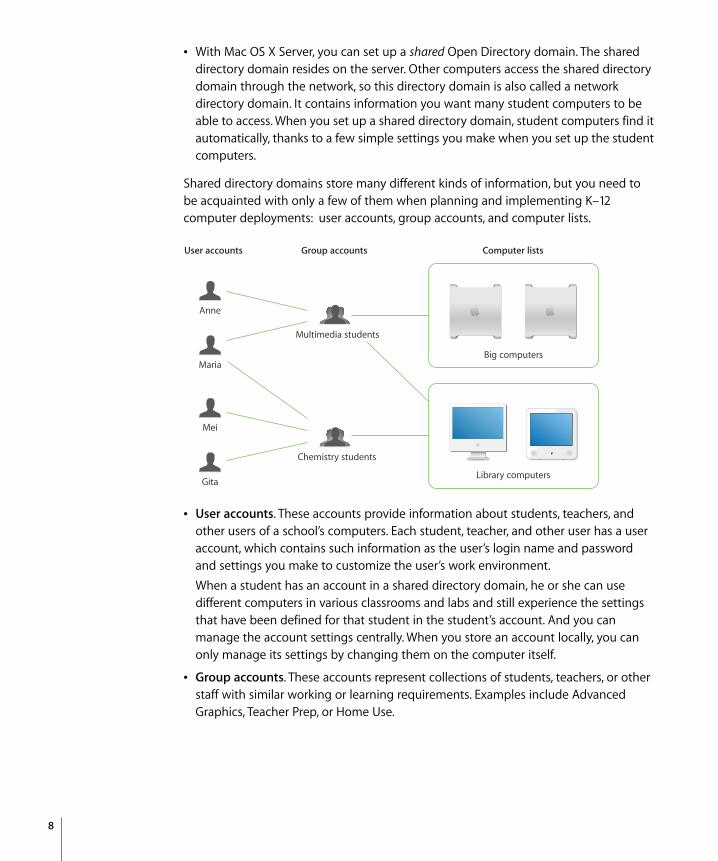
Shared directory domains store many different kinds of information, but you need to be acquainted with only a few of them when planning and implementing K–12 computer deployments: user accounts, group accounts, and computer lists.
Â
User accounts
. These accounts provide information about students, teachers, and other users of a school’s computers. Each student, teacher, and other user has a user account, which contains such information as the user’s login name and password and settings you make to customize the user’s work environment.When a student has an account in a shared directory domain, he or she can use different computers in various classrooms and labs and still experience the settings that have been defined for that student in the student’s account. And you can manage the account settings centrally. When you store an account locally, you can only manage its settings by changing them on the computer itself.
Â
Group accounts
. These accounts represent collections of students, teachers, or other staff with similar working or learning requirements. Examples include Advanced Graphics, Teacher Prep, or Home Use.
Multimedia students
Chemistry students
Anne
Maria
Mei
GitaLibrary computers
Big computers
User accounts Group accounts Computer lists
9
While group accounts play a key role in controlling file system access to specific folders and files, one of their main functions is to provide the ability to manage group work environments. By defining preferences, you can set up group-specific application access, shared folders, printers, systems settings, and so forth. Groups with managed preferences are called
workgroups.
By using workgroups, you set up curriculum-specific or workflow-specific environments. For example, a language arts workgroup may use a folder for homework assignments and a hand-in folder for each project, and have access to only the applications a teacher considers appropriate.
See page 11 for more information about defining preferences to manage work environments.
Â
Computer lists
. Computer lists offer a way to manage collections of computers. For example, you can use a computer list to reserve high-capacity computers for film students who use Final Cut Pro. You’d assign film students to a group, then set up a computer list for computers you want to reserve for that group’s use. A student who is not a film student can’t log in to one of those computers.
Network-Visible Resources
You can use Mac OS X Server to make various resources visible throughout your school network, so students can move from computer to computer and room to room and still access them.
There are several key network-visible resources.Â
Network home folder
. A
home folder,
often referred to as a
home directory
or simply
home,
is a place for each Mac OS X user to keep personal files. Users with accounts in a shared directory domain may have home folders that reside on the network, often on the same server where the user account resides. Users with accounts in a shared directory domain may also have a home folder created on the local system. These accounts are referred to as “mobile accounts.” For more information on mobile accounts, see “Using Mobile Accounts” on page 17.
10
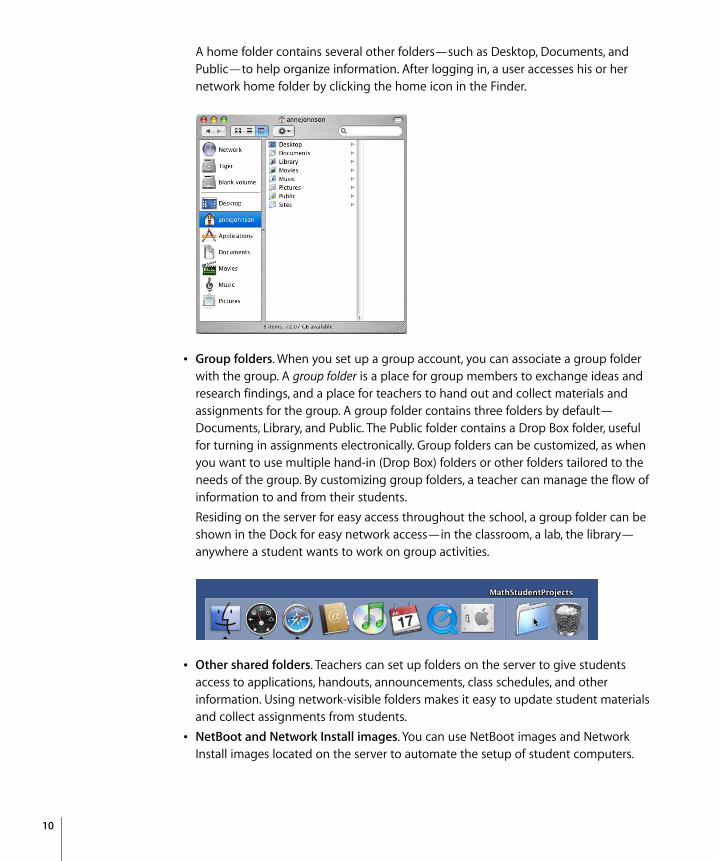
A home folder contains several other folders—such as Desktop, Documents, and Public—to help organize information. After logging in, a user accesses his or her network home folder by clicking the home icon in the Finder.
Â
Group folders
. When you set up a group account, you can associate a group folder with the group. A
group folder
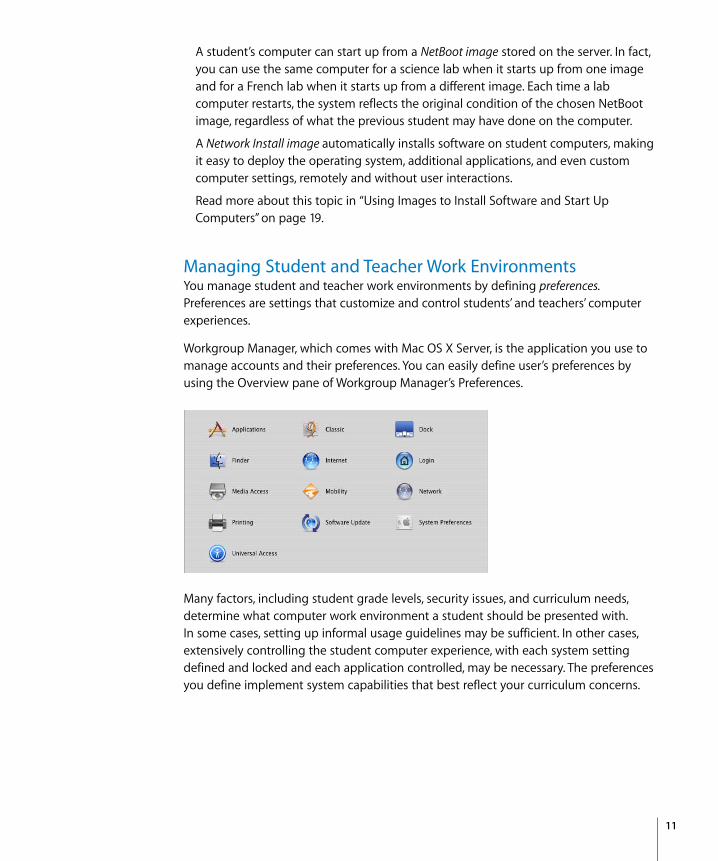
is a place for group members to exchange ideas and research findings, and a place for teachers to hand out and collect materials and assignments for the group. A group folder contains three folders by default—Documents, Library, and Public. The Public folder contains a Drop Box folder, useful for turning in assignments electronically. Group folders can be customized, as when you want to use multiple hand-in (Drop Box) folders or other folders tailored to the needs of the group. By customizing group folders, a teacher can manage the flow of information to and from their students.Residing on the server for easy access throughout the school, a group folder can be shown in the Dock for easy network access—in the classroom, a lab, the library—anywhere a student wants to work on group activities.
Â
Other shared folders
. Teachers can set up folders on the server to give students access to applications, handouts, announcements, class schedules, and other information. Using network-visible folders makes it easy to update student materials and collect assignments from students.
Â
NetBoot and Network Install images
. You can use NetBoot images and Network Install images located on the server to automate the setup of student computers.
11
A student’s computer can start up from a
NetBoot image
stored on the server. In fact, you can use the same computer for a science lab when it starts up from one image and for a French lab when it starts up from a different image. Each time a lab computer restarts, the system reflects the original condition of the chosen NetBoot image, regardless of what the previous student may have done on the computer.
A
Network Install image
automatically installs software on student computers, making it easy to deploy the operating system, additional applications, and even custom computer settings, remotely and without user interactions.
Read more about this topic in “Using Images to Install Software and Start Up Computers” on page 19.
Managing Student and Teacher Work Environments
You manage student and teacher work environments by defining
preferences.
Preferences are settings that customize and control students’ and teachers’ computer experiences.
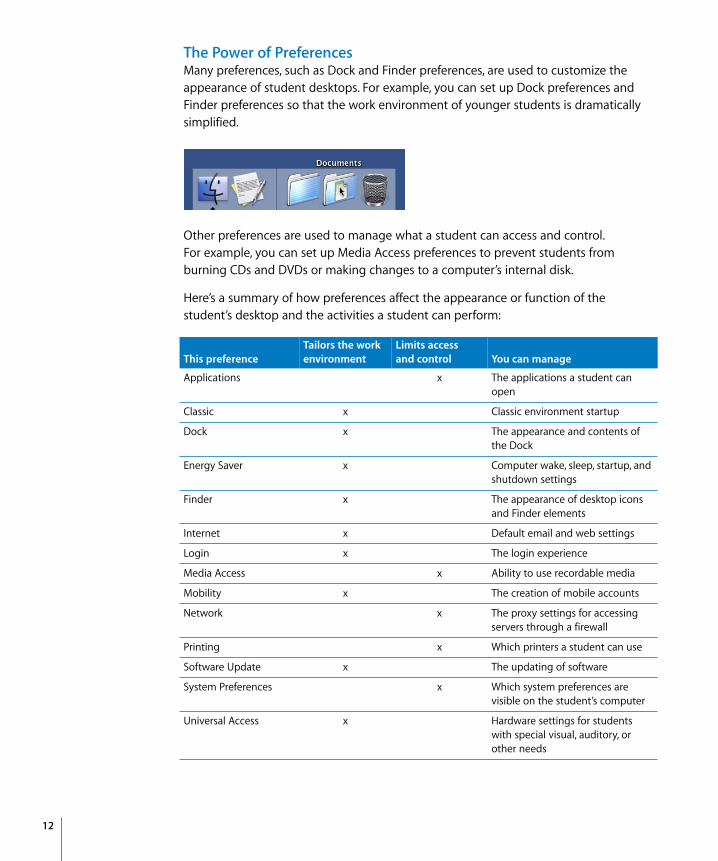
Workgroup Manager, which comes with Mac OS X Server, is the application you use to manage accounts and their preferences. You can easily define user’s preferences by using the Overview pane of Workgroup Manager’s Preferences.
Many factors, including student grade levels, security issues, and curriculum needs, determine what computer work environment a student should be presented with. In some cases, setting up informal usage guidelines may be sufficient. In other cases, extensively controlling the student computer experience, with each system setting defined and locked and each application controlled, may be necessary. The preferences you define implement system capabilities that best reflect your curriculum concerns.
12
The Power of Preferences
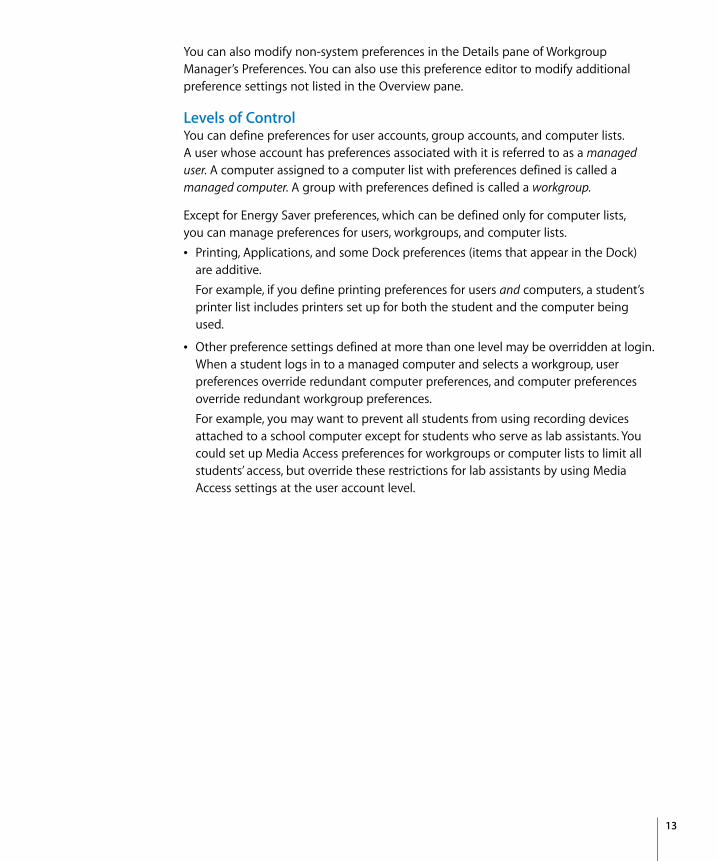
Many preferences, such as Dock and Finder preferences, are used to customize the appearance of student desktops. For example, you can set up Dock preferences and Finder preferences so that the work environment of younger students is dramatically simplified.
Other preferences are used to manage what a student can access and control. For example, you can set up Media Access preferences to prevent students from burning CDs and DVDs or making changes to a computer’s internal disk.
Here’s a summary of how preferences affect the appearance or function of the student’s desktop and the activities a student can perform:
This preferenceTailors the work environment
Limits access and control You can manage
Applications x The applications a student can open
Classic x Classic environment startup
Dock x The appearance and contents of the Dock
Energy Saver x Computer wake, sleep, startup, and shutdown settings
Finder x The appearance of desktop icons and Finder elements
Internet x Default email and web settings
Login x The login experience
Media Access x Ability to use recordable media
Mobility x The creation of mobile accounts
Network x The proxy settings for accessing servers through a firewall
Printing x Which printers a student can use
Software Update x The updating of software
System Preferences x Which system preferences are visible on the student’s computer
Universal Access x Hardware settings for students with special visual, auditory, or other needs
13
You can also modify non-system preferences in the Details pane of Workgroup Manager’s Preferences. You can also use this preference editor to modify additional preference settings not listed in the Overview pane.
Levels of Control
You can define preferences for user accounts, group accounts, and computer lists. A user whose account has preferences associated with it is referred to as a
managed user.
A computer assigned to a computer list with preferences defined is called a
managed computer.
A group with preferences defined is called a
workgroup.
Except for Energy Saver preferences, which can be defined only for computer lists, you can manage preferences for users, workgroups, and computer lists. Printing, Applications, and some Dock preferences (items that appear in the Dock)
are additive. For example, if you define printing preferences for users and computers, a student’s printer list includes printers set up for both the student and the computer being used.
 Other preference settings defined at more than one level may be overridden at login. When a student logs in to a managed computer and selects a workgroup, user preferences override redundant computer preferences, and computer preferences override redundant workgroup preferences.For example, you may want to prevent all students from using recording devices attached to a school computer except for students who serve as lab assistants. You could set up Media Access preferences for workgroups or computer lists to limit all students’ access, but override these restrictions for lab assistants by using Media Access settings at the user account level.
14
Most of the time you’ll use workgroup-level and computer-level preferences. Â Workgroup preferences are most useful if you want to customize the work
environment (such as application visibility) for specific subjects and student levels, or if you want to use group folders. For example, a student may belong to a group called “Class of 2011” for administrative purposes and to a workgroup called “Students” to limit application choices and provide a group shared folder for turning in homework. Another workgroup may be “Teacher Prep,” used to provide faculty members access to folders and applications for their use only.
 Computer-level preferences are useful when you want to manage preferences for students regardless of their workgroup associations. At the computer level, you typically want to limit access to System Preferences, manage Energy Saver settings, list particular users in the login window, and prevent saving files and applications to removable media.Computer preferences also offer a way to manage preferences of students who don’t have a network account but who can log in to a Mac OS X computer using a local account. (The local account, defined using the Accounts pane of System Preferences, resides on the student’s computer.) You’d set up a computer list that supports local-only accounts. Preferences associated with the computer list, and with any workgroup a student selects after login, would then take effect. More about managing the login experience appears next.
15
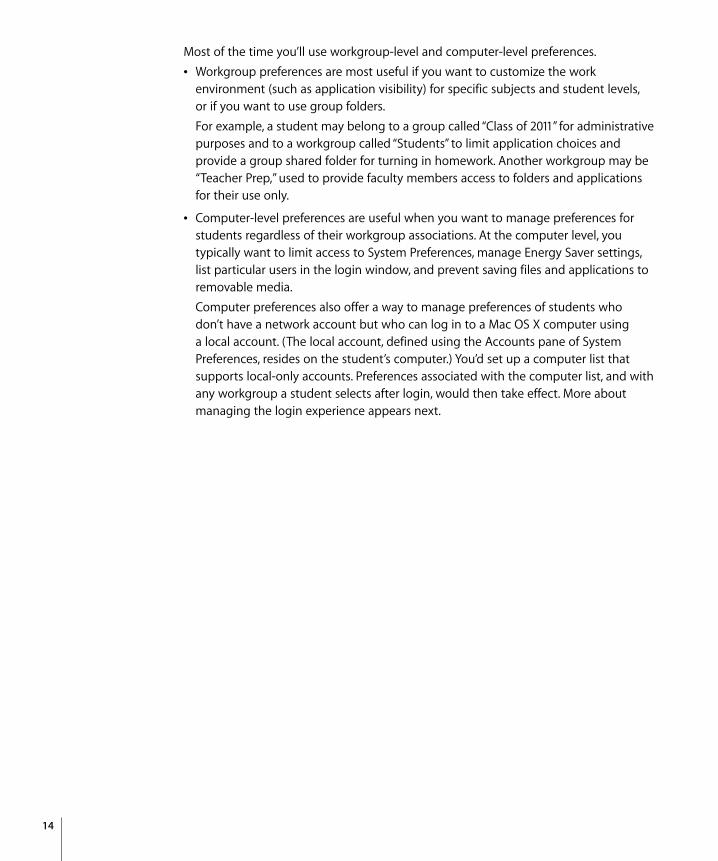
Designing the Login ExperienceYou can set up Login preferences for computer lists to control the appearance of the login window. These login options
result in a login window that looks like this:
The first user is the local computer administrator. The next two are generic student and teacher accounts that reside on the server. The last is a specific user who has a mobile account, which you’ll learn about shortly.
16
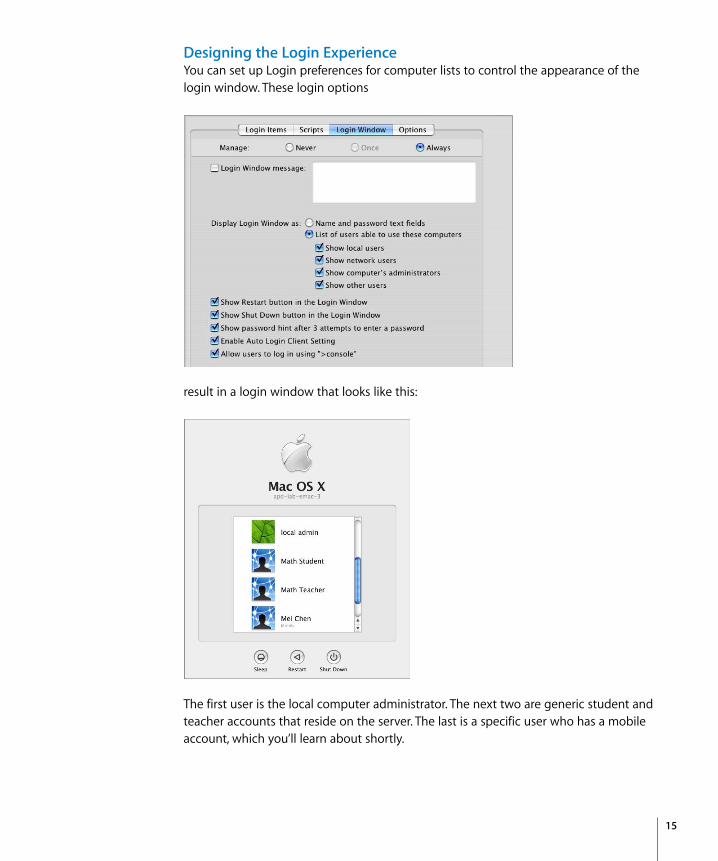
To log in, a student selects his or her login name in the list, then types a password when prompted. If the student belongs to more than one workgroup, a list of workgroups appears so the student can select the environment of interest. Note that it’s possible for a student to belong to a group that doesn’t appear in the list; only workgroups (groups with managed preferences) are listed.
You can limit access to a computer to only specific workgroups. You can also enable to local-only users to select any of those workgroups.
Any preferences that are associated with the student, the chosen workgroup, and the computer being used take effect automatically.
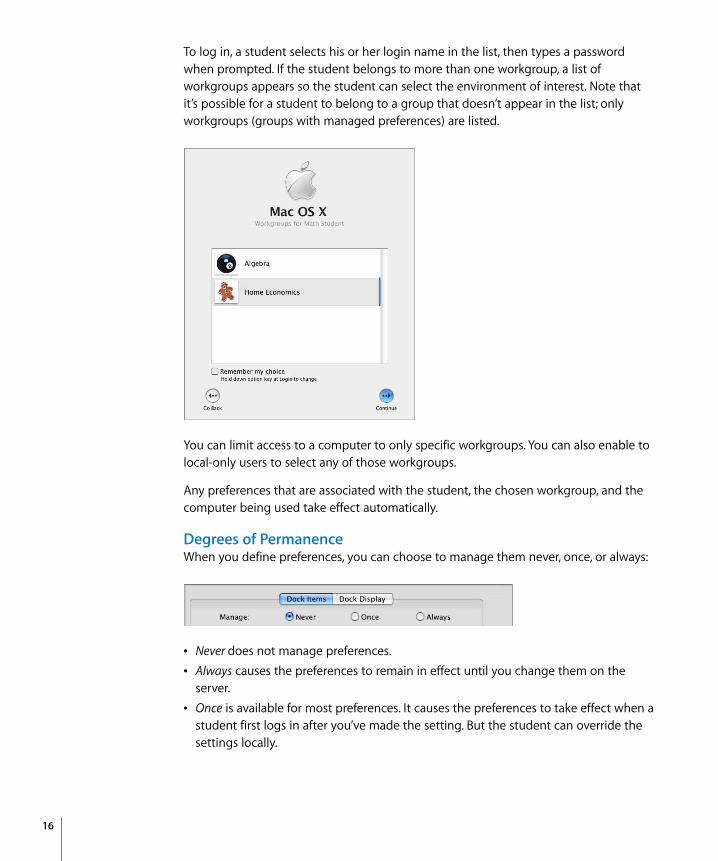
Degrees of PermanenceWhen you define preferences, you can choose to manage them never, once, or always:
 Never does not manage preferences. Always causes the preferences to remain in effect until you change them on the
server. Â Once is available for most preferences. It causes the preferences to take effect when a
student first logs in after you’ve made the setting. But the student can override the settings locally.
17
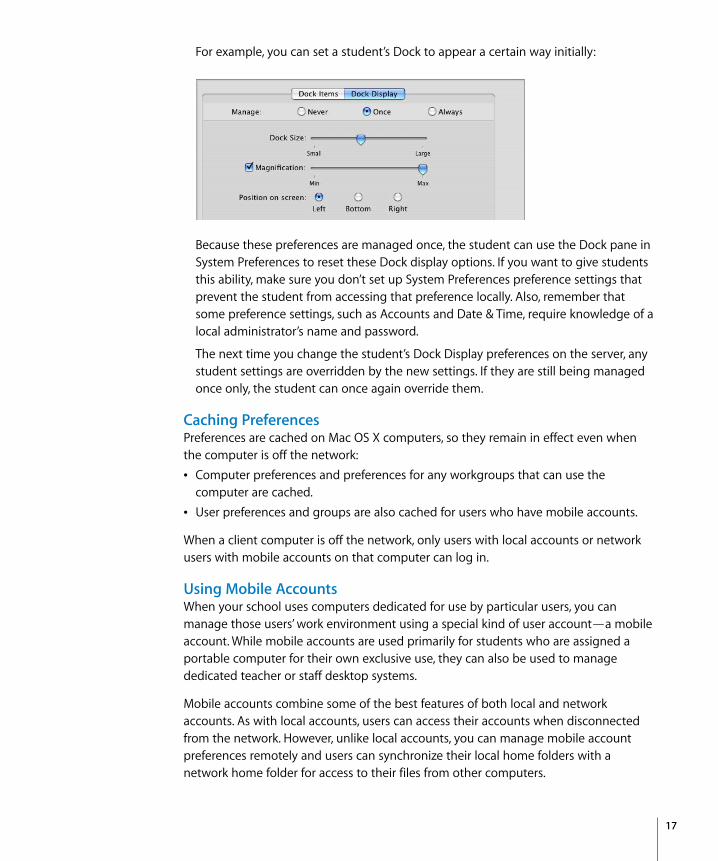
For example, you can set a student’s Dock to appear a certain way initially:
Because these preferences are managed once, the student can use the Dock pane in System Preferences to reset these Dock display options. If you want to give students this ability, make sure you don’t set up System Preferences preference settings that prevent the student from accessing that preference locally. Also, remember that some preference settings, such as Accounts and Date & Time, require knowledge of a local administrator’s name and password.
The next time you change the student’s Dock Display preferences on the server, any student settings are overridden by the new settings. If they are still being managed once only, the student can once again override them.
Caching PreferencesPreferences are cached on Mac OS X computers, so they remain in effect even when the computer is off the network:Â Computer preferences and preferences for any workgroups that can use the
computer are cached. User preferences and groups are also cached for users who have mobile accounts.
When a client computer is off the network, only users with local accounts or network users with mobile accounts on that computer can log in.
Using Mobile AccountsWhen your school uses computers dedicated for use by particular users, you can manage those users’ work environment using a special kind of user account—a mobile account. While mobile accounts are used primarily for students who are assigned a portable computer for their own exclusive use, they can also be used to manage dedicated teacher or staff desktop systems.
Mobile accounts combine some of the best features of both local and network accounts. As with local accounts, users can access their accounts when disconnected from the network. However, unlike local accounts, you can manage mobile account preferences remotely and users can synchronize their local home folders with a network home folder for access to their files from other computers.
18
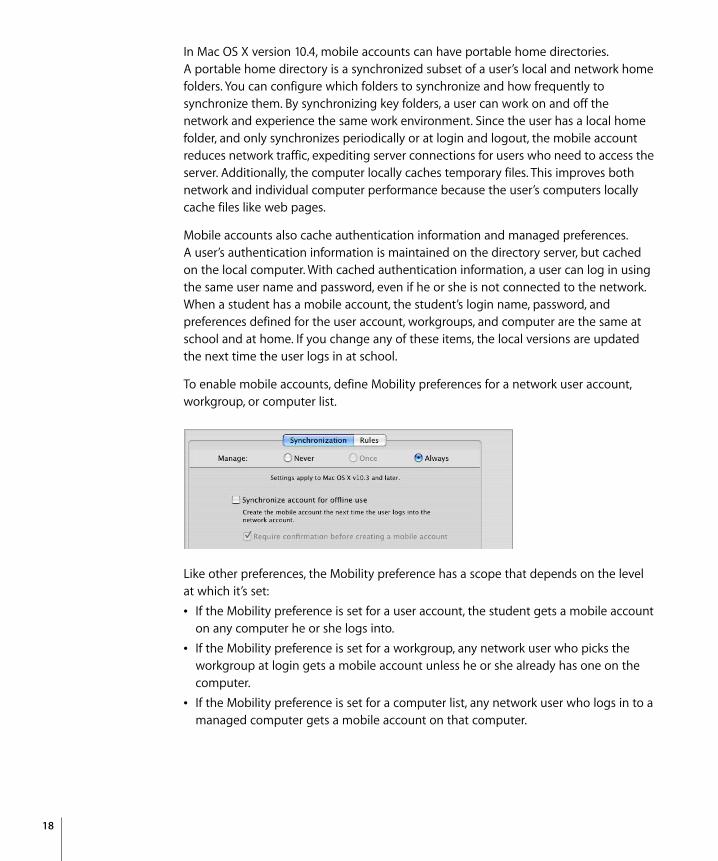
In Mac OS X version 10.4, mobile accounts can have portable home directories. A portable home directory is a synchronized subset of a user’s local and network home folders. You can configure which folders to synchronize and how frequently to synchronize them. By synchronizing key folders, a user can work on and off the network and experience the same work environment. Since the user has a local home folder, and only synchronizes periodically or at login and logout, the mobile account reduces network traffic, expediting server connections for users who need to access the server. Additionally, the computer locally caches temporary files. This improves both network and individual computer performance because the user’s computers locally cache files like web pages.
Mobile accounts also cache authentication information and managed preferences. A user’s authentication information is maintained on the directory server, but cached on the local computer. With cached authentication information, a user can log in using the same user name and password, even if he or she is not connected to the network. When a student has a mobile account, the student’s login name, password, and preferences defined for the user account, workgroups, and computer are the same at school and at home. If you change any of these items, the local versions are updated the next time the user logs in at school.
To enable mobile accounts, define Mobility preferences for a network user account, workgroup, or computer list.
Like other preferences, the Mobility preference has a scope that depends on the level at which it’s set:Â If the Mobility preference is set for a user account, the student gets a mobile account
on any computer he or she logs into. If the Mobility preference is set for a workgroup, any network user who picks the
workgroup at login gets a mobile account unless he or she already has one on the computer.
 If the Mobility preference is set for a computer list, any network user who logs in to a managed computer gets a mobile account on that computer.
19
These methods offer considerable flexibility. For example, you might create a computer list for teacher desktops, iBooks, and graphics lab computers with the mobile account preference active. When any user logs in to one of those systems, a mobile account and local home folder are created for that user. On the other hand, you can set the mobile account preference to be active only for a select set of user accounts, so any computer those users log in to will have a mobile account and local home folder for the users.
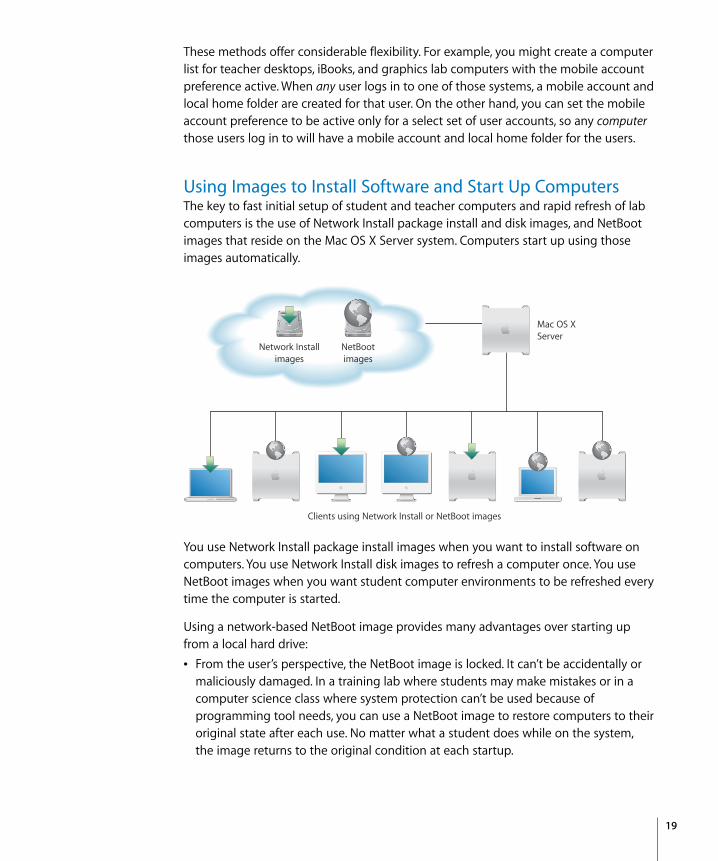
Using Images to Install Software and Start Up ComputersThe key to fast initial setup of student and teacher computers and rapid refresh of lab computers is the use of Network Install package install and disk images, and NetBoot images that reside on the Mac OS X Server system. Computers start up using those images automatically.
You use Network Install package install images when you want to install software on computers. You use Network Install disk images to refresh a computer once. You use NetBoot images when you want student computer environments to be refreshed every time the computer is started.
Using a network-based NetBoot image provides many advantages over starting up from a local hard drive:Â From the user’s perspective, the NetBoot image is locked. It can’t be accidentally or
maliciously damaged. In a training lab where students may make mistakes or in a computer science class where system protection can’t be used because of programming tool needs, you can use a NetBoot image to restore computers to their original state after each use. No matter what a student does while on the system, the image returns to the original condition at each startup.
Clients using Network Install or NetBoot images
Mac OS XServer
Network Installimages
NetBootimages
20
 A network administrator who needs to perform maintenance doesn’t need to carry a case full of diagnostic CDs. Instead, he or she can start up a system using a network image that contains all of the diagnostic and repair tools.
 Multiple images can be provided on the network from a single server, and multiple servers can provide a single image for optimum throughput. The server can host as many as 25 different images, so you can maintain a collection of customized software configurations for different workgroups and computers. For example, one image can be used for installing the latest applications needed by particular students, and another image can be used for starting up computers in particular classrooms or labs.
The system imaging and software update administration guide provides full details about using System Image Utility to create images.
Simplifying Initial Computer SetupSetting up computers individually from installation media is a time-consuming activity that requires the presence and supervision of the network administrator. Instead, you can create a Network Install disk image to automate the installation and initial setup of computers.
For every type of computer, you need to set up only one prototype computer, test it to make sure it works as intended, then clone the system into a Network Install image stored on the server. You remotely identify which computers you want to use the image, and the computers automatically discover it and install its contents onto their hard drive.
The prototype computer should have the same hardware configuration as the computers you are deploying. Create multiple images as needed, based on user type and computer usage—for example, you might want individual images for students with iBooks and teachers with iMacs, or for AV labs and for library kiosks.
Keeping Student Systems Up to DateNetwork Install is also useful when you need to update the operating system on student computers or upgrade their applications.
You make an package install image that contains only the new software and set student computers to start up to this updater image. The computers then install the package install image, and restart to normal operation.
Refreshing Lab SystemsLab computers are easy to refresh when they start up using NetBoot images that reside on Mac OS X Server instead of using software stored on their own hard drives.
21
You can use NetBoot images to reset computers to a clean, known state for each new student who uses them. They make it easy to use the same computer for a science lab, a graphics lab—any environment that you want to customize for the duration of the lab.
You can use the local hard drive for certain classes but make it unavailable for other classes, such as in a lab dedicated to adminstering exams. If you require total control of the NetBoot image, you can use NetBoot in diskless mode. Diskless mode prevents viewing or modifying a lab computer’s hard drive after starting up, and prevents data from being stored, even temporarily, on it.
Deploying ImagesWhen you deploy images onto computers, choose a method that will work in your environment. If your computers are connected through a wired network, you have many deployment options. In a wired network, you can use Apple Software Restore (ASR) to deploy Network Install disk images. You can use NetBoot service to deploy Network Install disk and package install images. If your computers are not connected to a wired network, you can only deploy images using FireWire drives or DVD install images. If your computers are not connected through a wired network, consider temporarily connecting them to a wired network so that you can quickly deploy images on all of them.
You use NetBoot service to deploy NetBoot images.
Using Apple Software Restore to Deploy Network Install Disk ImagesApple Software Restore (ASR) can run on any computer with Mac OS X version 10.4 or later installed. Apple Software Restore can deploy disk images that were created using the Network Install pane of System Image Utility or by using Disk Utility. Apple Software Restore can be much more efficient than using NetBoot service to deploy disk images, especially when refreshing computers simultaneously.
You can configure Apple Software Restore to continually send out a stream of networking data over the network. This is called multicast ASR. Multiple computers can connect to this stream of data simultaneously. Computers can connect to the same stream of data at any time. Since all computers are refreshed using the same stream of data, and not a separate stream for each computer, the server and the network are not as heavily strained as when deploying with NetBoot service.
It is possible to overload the network when using a multicast ASR server, reducing available bandwidth for other services. If you improperly configure the Apple Software Restore data rate option, it can create a denial of service situation. asr is a command-line tool; for more information on asr options, see the asr man page.
22
Using NetBoot Service to Deploy Network Install ImagesYou can use NetBoot service to deploy Network Install disk and package install images. Use Server Admin to configure NetBoot service.
When choosing between using disk images or package install images, choose based on if you are deploying to many different kinds of computers. Disk images require that the image be based on a prototype computer of the same model and hardware configuration of those that the image will be deployed on. For example, your iBooks and iMacs would require separate images, one for each computer model.
The key advantage to using disk images is that it takes much less time than using package install images to refresh individual systems. There are also options available to make deployed images unique. The biggest disadvantage of using NetBoot service for deploying disk images is that unlike Apple Software Restore, it can heavily reduce your available network bandwidth if you are deploying many images simultaneously.
Unlike disk images, package install images do not require using a prototype computer to create the image. You can create the package install image using the original Mac OS X installer discs and any additional packages for custom software. This allows you to install packages on any computer regardless of the hardware type. To customize systems after using package install images, you might have to run post-installation scripts. Deploying package install images is also much slower than deploying disk images through Apple Software Restore or NetBoot service.
For more information on using NetBoot service to deploy Network Install disk images and package installs, see the system imaging and software update administration guide.
Deploying Images Without Using a NetworkDeploying images by using FireWire drives is a slow process that requires you to connect a FireWire drive to every deployed computer. The FireWire drive will include Disk Utility so you can restore the FireWire volume. If you have a limited number of FireWire drives, you have to wait for computers to complete installation before you can reuse those FireWire drives. Although this is a slow process, it takes less time than using a DVD for a single computer.
Using DVDs to deploy images is cheaper than using multiple FireWire drives. For a single computer, using a DVD takes longer to refresh a system than using a FireWire drive. It also takes longer to burn a DVD than to copy to a FireWire drive. Because DVDs are cheaper to produce, you can deploy more images simultaneously. When creating a prototype image for a DVD distribution, the prototype image’s size is limited to approximately 2.2 gigabytes. This limitation is because you must also be able to start up using the DVD.
23
Remote AdministrationMac OS X Server administration software is designed to be run remotely, across large and small networks. Administrators don’t need physical access to a server to change user, group, and computer settings.
This section surveys the applications you use to manage accounts, preferences, sharing, and system imaging, and to provide day-to-day student support.
Student Work Environment AdministrationYou can use Workgroup Manager to configure sharing. With sharing, you can set up folders containing files and applications so students can access them from anywhere on the school network.
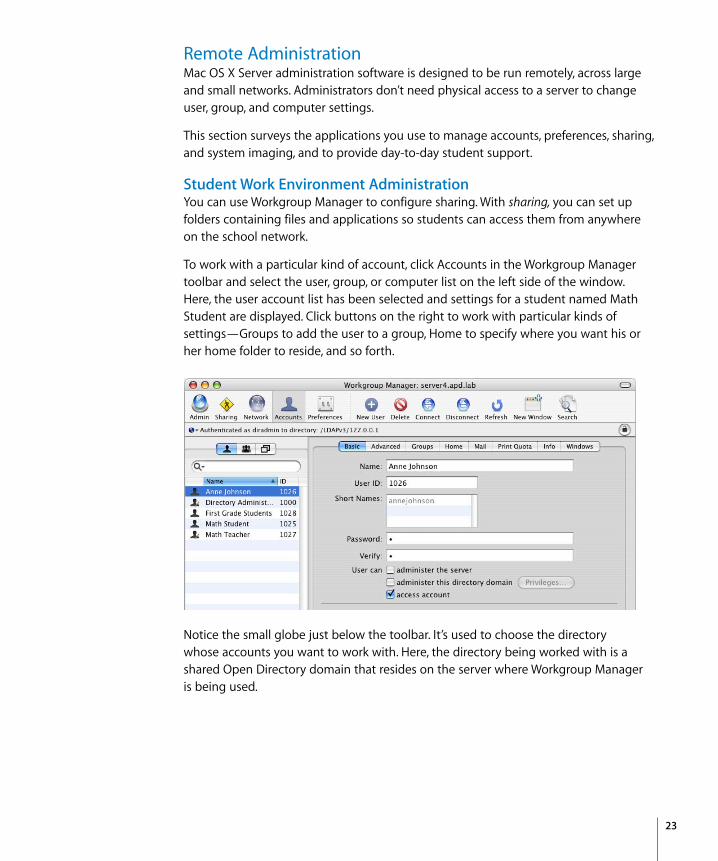
To work with a particular kind of account, click Accounts in the Workgroup Manager toolbar and select the user, group, or computer list on the left side of the window. Here, the user account list has been selected and settings for a student named Math Student are displayed. Click buttons on the right to work with particular kinds of settings—Groups to add the user to a group, Home to specify where you want his or her home folder to reside, and so forth.
Notice the small globe just below the toolbar. It’s used to choose the directory whose accounts you want to work with. Here, the directory being worked with is a shared Open Directory domain that resides on the server where Workgroup Manager is being used.
24
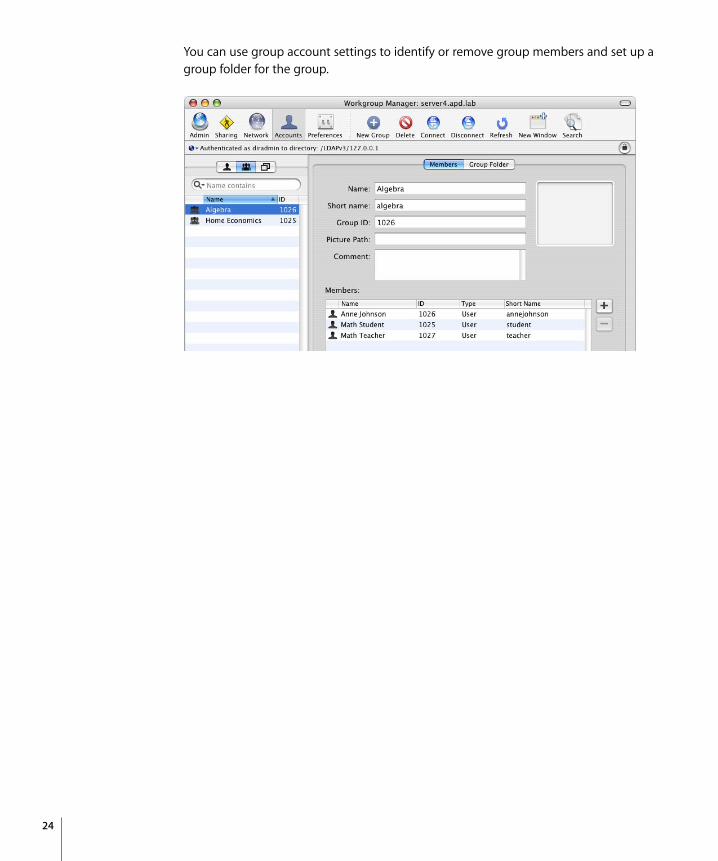
You can use group account settings to identify or remove group members and set up a group folder for the group.
25
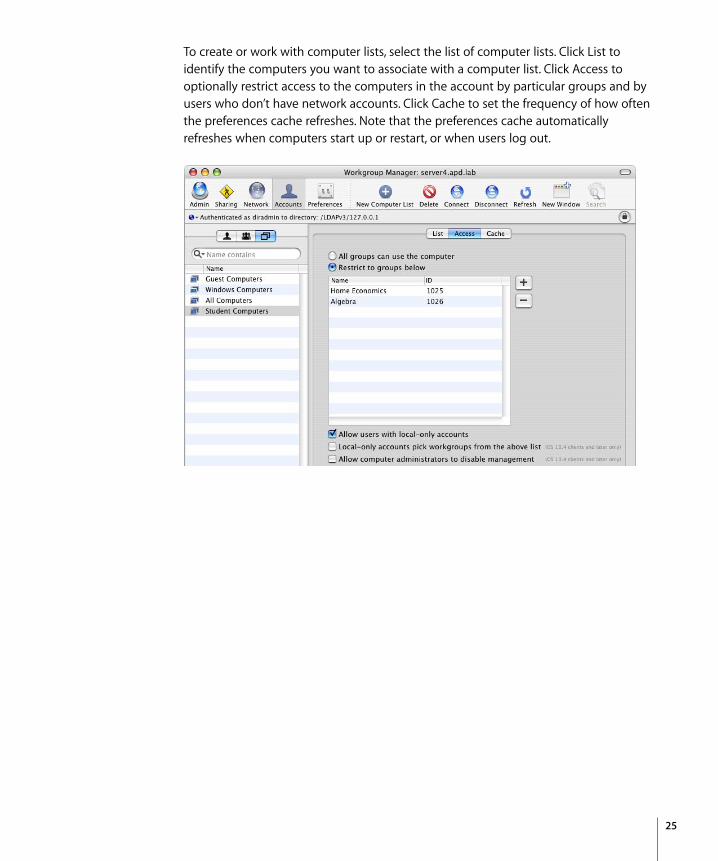
To create or work with computer lists, select the list of computer lists. Click List to identify the computers you want to associate with a computer list. Click Access to optionally restrict access to the computers in the account by particular groups and by users who don’t have network accounts. Click Cache to set the frequency of how often the preferences cache refreshes. Note that the preferences cache automatically refreshes when computers start up or restart, or when users log out.
26
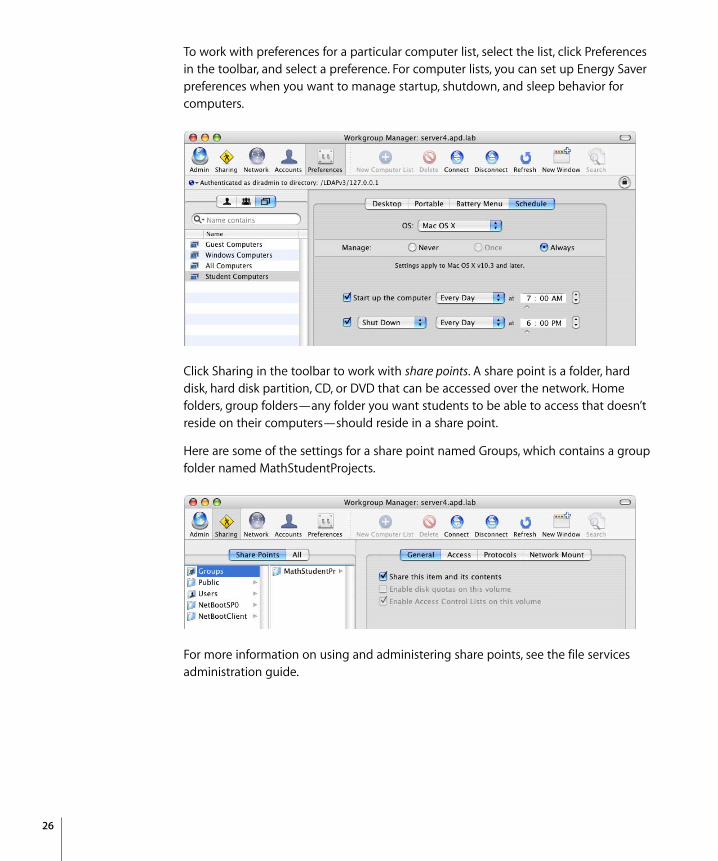
To work with preferences for a particular computer list, select the list, click Preferences in the toolbar, and select a preference. For computer lists, you can set up Energy Saver preferences when you want to manage startup, shutdown, and sleep behavior for computers.
Click Sharing in the toolbar to work with share points. A share point is a folder, hard disk, hard disk partition, CD, or DVD that can be accessed over the network. Home folders, group folders—any folder you want students to be able to access that doesn’t reside on their computers—should reside in a share point.
Here are some of the settings for a share point named Groups, which contains a group folder named MathStudentProjects.
For more information on using and administering share points, see the file services administration guide.
27
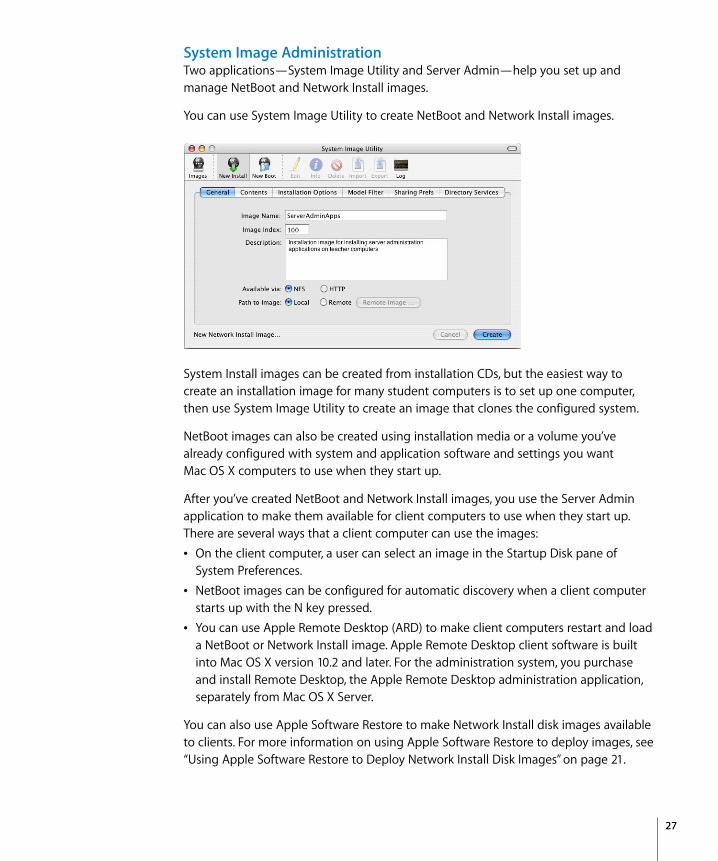
System Image AdministrationTwo applications—System Image Utility and Server Admin—help you set up and manage NetBoot and Network Install images.
You can use System Image Utility to create NetBoot and Network Install images.
System Install images can be created from installation CDs, but the easiest way to create an installation image for many student computers is to set up one computer, then use System Image Utility to create an image that clones the configured system.
NetBoot images can also be created using installation media or a volume you’ve already configured with system and application software and settings you want Mac OS X computers to use when they start up.
After you’ve created NetBoot and Network Install images, you use the Server Admin application to make them available for client computers to use when they start up. There are several ways that a client computer can use the images:Â On the client computer, a user can select an image in the Startup Disk pane of
System Preferences. Â NetBoot images can be configured for automatic discovery when a client computer
starts up with the N key pressed. You can use Apple Remote Desktop (ARD) to make client computers restart and load
a NetBoot or Network Install image. Apple Remote Desktop client software is built into Mac OS X version 10.2 and later. For the administration system, you purchase and install Remote Desktop, the Apple Remote Desktop administration application, separately from Mac OS X Server.
You can also use Apple Software Restore to make Network Install disk images available to clients. For more information on using Apple Software Restore to deploy images, see “Using Apple Software Restore to Deploy Network Install Disk Images” on page 21.
28
Day-to-Day Student Computer AdministrationAdministering networked computers also requires recordkeeping, help desk operations, and minor updates while users are logged in and working. To accomplish these and other day-to-day tasks, you use Apple Remote Desktop. It provides a remote management environment that simplifies student computer setup, monitoring, and maintenance:Â Screen observation. View student computer screens on your computer to monitor
student activities or assess how well they’re able to perform a particular task. Screen control. Show students how to perform tasks by controlling their screens
from your computer. Screen sharing. Display your screen or a student’s screen on student computers for
training and demonstration purposes. Screen locking. Prevent students from using their computers when you want them
to focus on other activities. Text communications. Exchange messages with one or more students, and host
questions and requests from individual students. Hardware and software management. Audit hardware information and software
that’s installed. Search for specific files and folders on student systems. Software distribution and startup. Identify NetBoot or Network Install images for
student computers to use. Initiate network installations and student computer shutdown and startup. Use Apple Remote Desktop to deploy application packages or new system updates instead of running Software Update on individual computers.
 Troubleshooting. Perform basic network troubleshooting by checking network traffic performance for all your workstations and servers.
29
Introducing the ScenariosThe next three sections present scenarios that illustrate ways to deploy Mac OS X inK–12 environments:Â Scenario 1: using a wired lab or classroom (page 30). Students use desktop
computers that are connected to a local area network. Scenario 2: using one-to-one mobile computers (page 47). Students use mobile
computers that they carry back and forth between home and school. Scenario 3: using NetBoot in a wired lab (page 54). Students use a lab in which
desktop computers are refreshed to complement specific lab exercises by using NetBoot and Network Install images.
The major steps you might perform to set up each scenario are identified. The scenarios don’t provide all the details for every step. Instead, they give you a sense of the sequence of activities you might use to implement similar scenarios in your own school and tell you where to find details if you need them.
While the scenarios feature using one Mac OS X Server system, most of the time a school will have several servers, depending on the number of students and the services needed. For some guidelines to help determine how many servers you need, see page 59.
Actual implementation of any scenario is a team effort that requires both technical and instructional expertise:Â Technology coordinators or system administrators would set up the school network
so that the servers and client computers can communicate. They’d configure servers to provide core services (such as DNS and DHCP). And they’d configure student and teacher computers, using Network Install and NetBoot images to expedite the setup of numerous computers.Complete details about how to use Mac OS X Server applications to perform these tasks are in various documents available online at www.apple.com/server/documentation/.
 Administrators would create accounts and preferences. They could also set up home folders, group folders, and other folders for sharing information among students.
 Teachers would manage group accounts and preferences. They could create and manage group folders to create a workflow for students. They could also create workgroups and manage their preferences.Instructions for these activities are in the user management guide.
Many of the steps required to deploy a particular scenario are common to most scenarios. For example, you always need to set up one or more servers and configure core services. You need to define accounts, set up preferences, and create Network Install images for setting up client computers. Information for these common tasks is provided in scenario 1, and referenced in scenarios 2 and 3.
30
Scenario 1: Using a Wired Lab or Classroom This scenario features a lab or classroom in which students and a lab coordinator or teacher use Mac OS X desktop computers connected to an Ethernet local area network. The use of shared, networked computers is one of the most common K–12 deployment scenarios.
The user accounts are stored in a shared Open Directory domain, and all computers are available for use by any user. Students and teachers have network home folders that reside on the server, so all their documents and personal information are accessible no matter which computer they log in to.
An advantage of this scenario is that the user experience is independent of the computer itself. If one of the computers breaks down, it can be replaced without affecting any of a user’s documents or personal settings. The limitation of this scenario is that it does not support offline use of the computers, since all key account information and files are kept in a centralized network location.
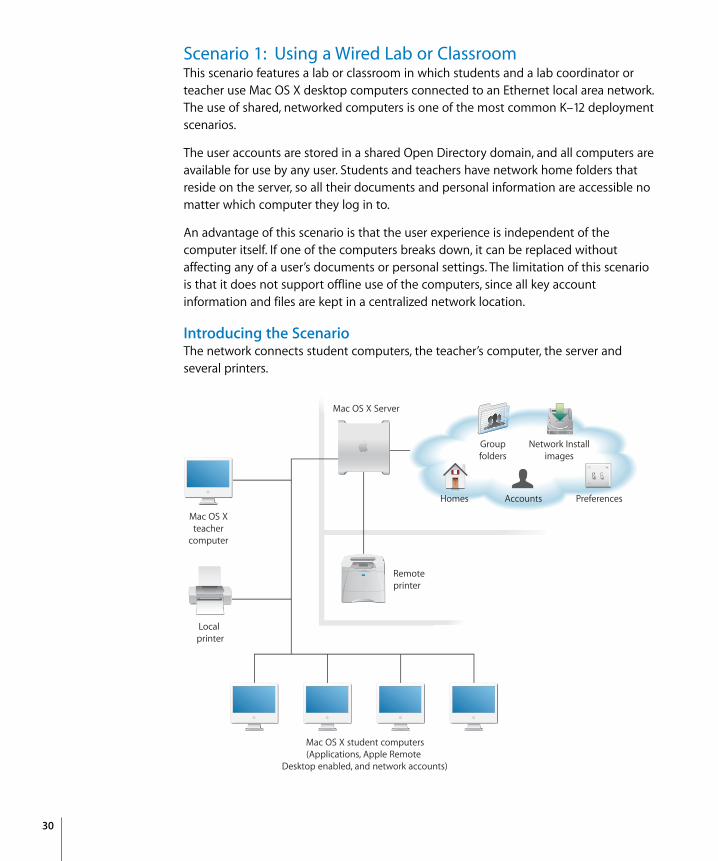
Introducing the ScenarioThe network connects student computers, the teacher’s computer, the server and several printers.
Accounts
Groupfolders
Remoteprinter
Local printer
Mac OS X Server
Mac OS Xteacher
computer
Network Installimages
Mac OS X student computers(Applications, Apple Remote
Desktop enabled, and network accounts)
PreferencesHomes
31
 Students can print to a printer in the classroom or lab, as well as to a high-capacity printer that resides in a remote location accessible to most students, perhaps the library.
 The data needed for authenticating students who use the computers and managing their computer work environments is stored on the server, which is also kept in a remote location. A shared Open Directory domain on the server stores user accounts, group accounts, and computer lists and their associated preferences.
 The server contains student home and group folders as well as Network Install images.
 A Network Install image is used to set up the student computers with Mac OS X, some additional applications, and settings enabling the teacher to use Remote Desktop to manage the student computers.
 The teacher’s computer contains server administration applications that enable remote management of data residing on the server. Most of the time the teacher uses Workgroup Manager, the primary application for managing server-based accounts, preferences, and shared folders. The teacher’s computer also has Apple Remote Desktop administration software installed. Using Remote Desktop, the teacher can manage student computers: delete files and empty the Trash, restart computers, open applications and documents, and so forth. By using screen sharing and remote control, the teacher can give presentations and demonstrations. The full range of Remote Desktop features is useful in this scenario.
 Computer list preferences are used to shut down student computers at the end of each day, put computers to sleep after a particular period of inactivity, control the login window appearance, provide access to printers, and prevent students from copying files to removable media or changing System Preferences.
 Younger students, such as first graders, might be set up to log in using the same generic account. The user name might be “First Grade” and the password very simple (none, or simply “1”). To simplify their environment, the teacher can give them no home folder, and set user preferences to configure a Dock with very few items and a very simple Finder.
 More advanced students have individual accounts and home folders. Disk quotas are used to limit the total amount of server storage a student’s files can occupy.The work environment of the advanced students is managed using workgroup-level preferences: A group folder for each workgroup, which appears in the Dock, offers a place for
teachers and students to share files for a particular subject.  Applications preferences enable access to workgroup-specific applications.  Dock preferences place icons for common applications in the Dock. Internet preferences designate a location for files downloaded with Safari.
32
Setting Up the ScenarioHere is the sequence of steps that could be used to set up this scenario.
Step 1: Connect student and teacher computers, the server, and the local printer.This scenario places moderate to heavy demands on the network:Â Using Network Install images to set up student computers places a heavy load on the
network, but this activity happens only periodically, perhaps once each semester. Putting student home folders and group folders on the server results in significant
day-to-day network traffic, especially when files are saved, read, or copied.
To avoid noticeable slowdowns, you’ll need:Â A 100 megabit or gigabit Ethernet hub or switch with enough ports to connect the
student and teacher computers, the server, and the printer Category 5 (often marked “CAT 5”) Ethernet cables with connectors for connecting
each computer and printer to the hub or switch
Take into account the local electrical and safety codes when you route the network and power cables. Before you begin, ask your facilities representative for assistance.
To connect the computers and printer:1 Make sure the server is in a secure location. Except during installation and initial server
setup, you probably won’t need access to the server on a daily basis. All the applications you’ll need for managing students and their computers using the server are installed on the teacher’s computer in a later step.
2 Put the student computers where the students will be using them. Put the printer in an easily accessible location.
3 Put the Ethernet hub or switch near an electrical outlet where the cables from the student computers, server, and printer can reach it.
4 Use category 5 Ethernet cables to connect the computers and printer to the hub or switch. Plug one end of each cable into the Ethernet port on the computer and the other into an available port on the hub or switch.
5 Connect the printer to the hub or switch. If the printer does not have a built-in Ethernet port, you’ll need to connect a small Ethernet transceiver to the printer and connect the Ethernet cable from the hub to the transceiver.
6 If you already have an in-house network for Internet access, use an Ethernet cable to connect the uplink port on the hub or switch to the network.
33
Step 2: Set up the server.If you purchased a new server, Mac OS X Server software is already installed. All you need to do to perform initial server setup is start up the computer and answer the questions posed by Server Assistant.
If you need to install Mac OS X Server software, use the getting started guide to understand system requirements and installation options, and then use Server Assistant after the server restarts to perform initial server setup. Server Assistant is located in /Applications/Server/.
To perform initial server setup:1 Make sure the server is connected to the network.
2 Open Server Assistant and proceed through the panes, entering appropriate information as you go. Be sure you:
 Have a valid server serial number. Enter a fixed IP address for the server, either static or using DHCP with a manual
address. Identify a DNS server, if one is accessible, in the TCP/IP Connection pane for the
Ethernet interface. A DNS server is required to provide a fully qualified domain name for the server. If a DNS server isn’t available, leave the DNS server field blank; you can set one up in the next step.
 In the Directory Usage pane, make the server an Open Directory master so that it can host network accounts and other network-visible information.
 Start the AFP and NetBoot services so they are available for immediate use.During day-to-day use, AFP should always be available, since it’s the protocol this scenario uses for accessing home and group folders and other shared folders. You can turn NetBoot on and off as needed to meet the need of school users for NetBoot and Network Install images.
3 Restart the server.
34
Step 3: Set up and start core services.Required core services are DNS, DHCP, Open Directory, AFP, and NetBoot. Using Server Assistant in the previous step, you already started AFP and NetBoot. AFP and NetBoot services require no additional setup. The remaining services may require setup.
To set up core services on the server: 1 If you don’t have an existing DNS server on your network, you can set one up on the
server. DNS provides name resolution services for the server, the printers, and any local area network device that has a static IP address. DNS service enables users to connect to a network resource, such as a web or file server, by specifying a host name (such as server.apple.com) rather than an IP address (such as 192.168.11.12).
See the network services administration guide for instructions for setting up and starting DNS service. In addition to receiving DNS service from a server on your school network or from running your own DNS server, an Internet Service Provider (ISP) can also provide DNS service. However, all client DNS lookups for local servers must be done from the same subnet where the server resides, or from the same side of a firewall.
2 Each computer must have a valid IP address, which can be set manually or provided by a DHCP server.
Decide on an IP addressing scheme for your lab or classroom. If you are not connected to a larger school network, you can choose all of your addresses from one of the following private ranges:Â 10.x.x.x with a subnet mask of 255.0.0.0Â 172.16.x.x with a subnet mask of 255.240.0.0Â 192.168.x.x with a subnet mask of 255.255.0.0
You probably need to set up DHCP service so that IP addresses are assigned dynamically by your server to each lab or classroom computer. From a block of IP addresses that you define, your server locates an unused address and “leases” it to client computers as needed. When you set up DHCP, configure it to identify the DNS server when it provides IP addresses to clients.
You may also want to set up Network Address Translation (NAT) service. NAT is a method of connecting multiple computers to the Internet (or any other IP network) using one public IP address. NAT converts the private IP addresses you assign to computers on your private, internal network into one legitimate public IP address for Internet communications.
Warning: Before setting up any services, make sure that you coordinate with fellow network administrators so that you do not unnecessarily duplicate existing services. If you are setting up a school-wide network, coordinate with your school district to ensure your network properly uses their provided resources.
35
See the network services administration guide for information about setting up and starting DHCP and NAT services. As in the case of DNS, you can also use an ISP to provide DHCP service.
3 Configure an Open Directory master to provide password policy management and Kerberos authentication. See the Open Directory administration guide for details.
Other services are optional, but useful:Â Print service, documented in the print service administration guide, can be used to
centrally manage print jobs and print quotas. Collaboration services such as mail and file service, documented in the collaboration
services administration guide, can be set up for internal school use only. A school-wide email server can facilitate email training or provide a mechanism for internal communications that is free of spam and the distractions of external messaging. With file services, you can create share points so that users can share files over the network.
 Web services, documented in the web technologies administration guide, can be used to provide help desk information, host student information, post homework, publish information about school events and science fairs, and so forth.
 Firewall and NAT services, documented in the network services administration guide, can be used to isolate internal school networks from the Internet when the school is directly connected to the Internet.
 Windows services, documented in the Windows services administration guide, provide Windows domain services for NT-compatible Windows clients, including Windows NT-compatible domain login and home folders, file service, print service, Windows domain browsing, and Windows name resolution.
Step 4: Set up the teacher computer.The teacher’s computer can be just like the student computers with the addition of remote server administration applications (and teacher-specific applications such as gradebooks) installed. Teachers can use remote administration applications to take care of routine administrative tasks such as adding student accounts to workgroups and setting up shared folders without having to visit the server. Unlike administrators who create and manage user accounts, teachers primarily manage their own workgroups.
To set up the teacher computer:1 If it’s not already installed, install Mac OS X version 10.4.
2 Use the Administration Tools disc from the Mac OS X Server package to install the server administration tools.
3 Install Remote Desktop, the Apple Remote Desktop administration application, from its installation disc (purchased separately).
36
You can also create a Network Install image for setting up multiple teacher computers. A later step demonstrates how to use Network Install images to set up student computers.
Before the teacher can create accounts in the shared directory domain and perform other activities with the server administration applications, he or she needs a user account in the shared directory domain and the proper administrator privileges.
To set up the teacher account:1 On the administrator computer, open Workgroup Manager, selecting the server to
connect to and authenticate as the administrator user created during initial server setup.
2 Click Accounts.
3 Access the shared directory domain by clicking the small globe beneath the toolbar.
4 To authenticate, click the lock.
5 Click New User.
6 Click Basic and provide basic information for the teacher including a password. Make sure you select “administer the server” and “administer this directory domain.”
7 Click Save.
The remaining steps can be conducted by the teacher from the teacher computer. Although the teacher can perform these steps, typically administrators will set up share points and user accounts, and work with teachers to create prototype student computers.
Step 5: Set up the home folder share point.Home folders for accounts stored in shared directory domains can reside in a share point that the student’s computer can access. This share point must be automountable—it must have a network mount record in the shared Open Directory domain where the user account resides.
An automountable share point ensures that the home folder is visible in /Network/Servers/ automatically when a student logs in to a Mac OS X computer configured to access the shared domain. It also enables other users to access the home folder using the ~user-short-name shortcut.
Although you can set up and use any share point you like, for this scenario we’ll use the predefined Users share point, which is already set up. You only need to create a network mount record for it in the shared Open Directory domain.
37
To prepare a home folder share point:1 On the teacher computer, open Workgroup Manager, connecting to the server where
you want to host the share point, and authenticate as the teacher user created during the previous step.
2 Click Sharing.
3 Click Share Points, and then select a share point or make a new share point by clicking the Create folder button.
4 Click General and select “Share this item and its contents,” then click Save.
5 Click Protocols, choose Apple File Settings from the pop-up menu, and select “Share this item using AFP” and “Allow AFP guest access”.
6 Click Network Mount, then click the lock to authenticate as an administrator of the shared directory domain. Choose the folder from the Where pop-up menu.
7 Select “Enable network mounting of this share point” and “Use for User Home Directories.”
8 Click Save.
9 Make sure that AFP is running.
Open Server Admin, select the server in the Computers & Services list, and click AFP. If AFP is not running, click Start Service in the toolbar.
Now you can create a network home folder for the teacher in the share point you just configured.
To create a network home folder for the teacher:1 In Workgroup Manager, click Accounts.
2 Access the shared directory domain by clicking the small globe beneath the toolbar.
3 To authenticate, click the lock.
4 Select the teacher in the user list.
5 Click Home. In the share points list, select the Users share point.
6 Click Create Home Now, then click Save.
7 Restart the teacher computer so that the share point is visible on it.
See the user management guide for complete information about setting up and using home folder share points.
38
Step 6: Set up student accounts.Now you can set up student user accounts and create home folders for them in the Users share point.
To set up your student accounts:1 In Workgroup Manager, click Accounts.
2 Access the shared directory domain by clicking the small globe beneath the toolbar.
3 To authenticate, click the lock.
4 Click New User.
5 Click Basic and provide basic information for the student including a password. Click Save when you are finished.
6 Click Home to create the student’s network home folder.
In the share points list, select an automounted share point, Users in this scenario. Click Create Home Now, then click Save.
7 You can also specify a disk quota to limit the amount of disk space the student can use on the partition where his or her home folder is located.
The quota doesn’t apply to the home folder share point or to the home folder. It applies to the entire volume on which the home folder share point and the home folder are located.
To specify a disk quota, click Sharing, click All, and select the partition where the home folder share point is located. Click General and select “Enable disk quotas on this volume.” Then click Accounts, select the student in the user list, click Home, use the Disk Quota field to specify a disk quota, and click Save.
8 Repeat steps 3 through 6 for each student.
Instead of interactively entering information for each student, you can use a batch approach, selecting multiple accounts and specifying settings they all have in common. You can also type student information into a file and import the file using Workgroup Manager. You can also use a preset to avoid reentering data that applies to many students. See the user management guide for details about these techniques.
Step 7: Set up a prototype student computer.Instead of visiting each student computer to install and configure Mac OS X and applications, you’ll use the Network Install feature of the NetBoot service.
39
An easy way to prepare the student install image is to set up a computer exactly as you want your students to see it, then create an install image from that computer. You can install applications on and configure this prototype computer, make sure everything works as you expect, then use System Image Utility to prepare an image that the NetBoot service can install on the remaining student computers. The system imaging and software update administration guide provides full details about creating and using Network Install images.
In this step, you’ll start with a basic Mac OS X version 10.4 installation, install student applications, configure the directory services to use the shared Open Directory domain, and enable Apple Remote Desktop management from the teacher’s computer.
What you’ll need:Â A student computer that can run Mac OS X version 10.4Â The Mac OS X version 10.4 installation discs
To set up the prototype student computer:1 Make sure the computer is connected to the network.
2 If it is not already installed, install Mac OS X version 10.4 on the student computer. Use an administrator name and password for the first user. You’ll need the administrator name and password for Apple Remote Desktop administration and other computer administration activities.
3 Update the computer to the latest version of Mac OS X version 10.4 using the Software Update pane of System Preferences. You can also use installation discs of the latest version if they are available.
4 Install the applications that the students will need. You may want to copy some of the application icons into the Dock. You may also want to remove applications that you don’t want the students to use, or you can control application access later by managing preferences and unchecking “Merge with user’s dock”.
5 Open Directory Access (located in /Applications/Utilities/) so you can configure the search policy of the computer to connect to the Open Directory master server.
Click Services then click the lock to authenticate as an administrator of the computer. Select LDAPv3, and click Configure. Click New, enter the server name or IP address of the Open Directory master, and click Continue. Ignore directory binding and click Continue, then click OK. Click OK and click Apply.
It is also possible to set up a DHCP server to automatically identify the LDAP server that provides the shared Open Directory domain. See the Open Directory administration guide for more information about the behavior and setup of search policies.
6 Enable the monitoring and controlling of the computer from the teacher’s computer using Remote Desktop.
40
Open System Preferences, click Sharing, and select Apple Remote Desktop. Select “Show status in menu bar” if you want students to be able to send attention requests to the teacher.
7 Test the computer to make sure it works as you intend.
Log in as one of the students whose accounts you created earlier. Click the home icon in the Finder to make sure the home folder mounts. Make sure the Dock contains the items you want it to contain and that the applications you installed can be opened.
Step 8: Create the student computer install Image.After you set up your prototype student computer, you can use the System Image Utility (located in /Applications/Server/) to create an install image of that computer.
What you’ll need: A FireWire cable. System Image Utility (install from the Administration Tools disc). Free space equal to twice the size of the space used on the prototype computer. Use
the Get Info command on the hard drive of the prototype computer to note the space used, ignoring free space.
To create the Network Install image:1 Start up the prototype computer into FireWire target disk mode by holding down the T
key on its keyboard before pushing the power button. Once the computer starts up, use a FireWire cable to connect the computer to the server or to an administrator computer with System Image Utility installed. The prototype computer’s hard drive will appear as a FireWire volume on the desktop of the administrator computer or server.
2 Open System Image Utility and create a new install image.
To automate installation, click Installation Options and select “Enable automated installation.” Click Options and select “Install on volume” and type the common internal disk name for the student computers. (This works only if the drives all have the same name. On systems with a different volume name, you’ll have to interact with the installer at those computers.) Also select “Erase the target volume before installing” and “Restart the client computer after installing.”
Click Contents and choose the internal drive of the student computer in the Image Source pop-up menu. Click Create and choose either the NetBootSPn folder on the server or a temporary storage location in the Where pop-up menu.
3 Eject the FireWire volume. Disconnect the FireWire cable from the server or administrator computer.
4 Once the .nbi folder is created, if necessary, copy the image to your server into the /Library/NetBoot/NetBootSPn folder.
For detailed instructions on how to create install images, see the system imaging and software update administration guide.
41
Step 9: Set up other student computers.You use Server Admin to configure NetBoot service, so that you can use the Network Install image you just created to set up other student computers.
To use the Network Install image:1 On the server or the administrator computer, open Server Admin (located in
/Applications/Server/) and connect to the server.
2 Select the server in the Computers & Services list.
3 Select the NetBoot service, then click Settings.
4 Click General and make sure NetBoot is enabled on the Ethernet port that connects the server to the student computers.
5 Click Images and make sure the image you created from the prototype computer and copied to the server is enabled.
6 Start the NetBoot service.
7 Start up each student computer using NetBoot.
You have three ways to do so. Set each computer’s Startup Disk preferences to the Network Install image.  Start each computer while holding down the Option key and choose the Network
Install image. Â Start each computer while holding down the N key. For subsequent installs, if they are necessary, you’ll be able to set the Startup Disk pane of System Preferences remotely using Remote Desktop.
Step 10: Set up student user account preferences.Most of the preferences in this scenario are managed at the workgroup or computer level. However, there are times you’ll find user-level preferences convenient, as when you use a generic account for lower-grade students.
This step tells you how to create a generic user for first-grade students. The account uses no home folder, and it has preferences associated with it that create a very simple Dock and Finder.
To set up an account and preferences for first graders:1 In Workgroup Manager, click Accounts.
2 Access the shared directory domain by clicking the small globe beneath the toolbar.
3 To authenticate, click the lock.
4 Click New User.
5 Enter “First Grade Students” in the Name field and “first” in the Short Names field.
6 Enter 1 in the Password and Verify fields, then click Save.
7 Set up user preferences that simplify the Finder.
42
Select First Grade Students in the user list, click Preferences, and click Finder. Select Always, then select “Use Simple Finder.” Click Apply Now.
8 Set up user preferences that simplify the Dock.
Click Preferences, then click Dock. Select Always. Use the lists and their related Add and Remove buttons to indicate which applications and which documents and folders you want to appear in the students’ Dock. If you want to prevent students from adding applications to the dock, deselect “Merge with user’s dock.”
When you are done, click Apply Now.
9 Restart and log in to one of the student computers as a first grader. Notice that clicking the Finder icon in the Dock has no effect, and that the Finder menu basically limits the student’s activities to logging out. The Dock should contain the Trash icon, the Finder icon, and any applications, folders, or documents you specified using Dock preferences.
Step 11: Set up group accounts and folders.In this scenario, you would set up several groups in order to provide a group folder for group-specific information exchange and provide the basis for workgroups, groups with preferences defined.
This step sets up groups and group folders, and the next one describes making the groups into workgroups so they have managed preferences.
To set up groups and group folders:1 In Workgroup Manager, click Accounts.
2 Access the shared directory domain by clicking the small globe beneath the toolbar.
3 To authenticate, click the lock.
4 Click the Groups button (on the left), and click New Group.
5 Click Members, give the group a name and assign students to it, and click Save.
6 Click Sharing to define a share point for the group folder.
Click Share Points and select the folder you want to use as a group folder share point. You can use the predefined Groups folder, or create a folder of your own by clicking the Create folder button.
Click Access. Set the Group permissions to Read & Write and the Group name to admin. Set Everyone permissions to Read Only.
Click Protocols and make sure AFP is enabled for sharing.
7 Define the group folder attributes.
Click Accounts, select the group in the group list, and click Group Folder. You’ll use the Groups share point in the list as a starting point for identifying the group folder share point.
43
Select the Groups share point in the list and click Duplicate. In the dialog box, edit the URL and path to reflect where you want to locate the group folder. Use the Path field to indicate the path from the share point (Groups) to the group folder, including the group folder but excluding the share point. For example, if the full path to the group folder will be Groups/MathStudentProjects, enter only MathStudentProjects. When you are done, click OK.
Specify the teacher as the group folder owner name, then click Save. The teacher can post handouts, collect turned-in work, and modify the group folder as needed.
8 Create the group folder.
On the server, open Terminal, and type “sudo CreateGroupFolder”. Type the password for the root user when prompted. A successful response looks like this:
Successfully created group home directory for group 1027 at
/Group Folders/MathStudentProjects
If you cannot physically access the server, use the SSH command to log in. See the command-line administration guide for instructions on using SSH. You can also use Remote Desktop to send the CreateGroupFolder command to the server.
9 Make sure the group folder permissions are correct for the group.
In Workgroup Manager, click Sharing, select the group folder share point, select the group folder, and click Access. Change permissions to the group folder if needed. The group folder administrator should be the owner, with Read & Write permissions. The group name should appear in the Group field. Group permissions are usually set to Read & Write, but you can change them. For example, you can set the group permissions to Read Only if you want to prevent group members from saving directly into the group folder.
Click Save.
10 Repeat steps 3 through 8 as required for additional groups.
Step 12: Set up workgroups.Now you can set up preferences for the student groups, making them into workgroups.
In this step, you’ll use group preferences to make a group folder visible in the Dock of students who are group members. You’ll also set a few more preferences to manage application visibility and storage of files downloaded using Safari.
To set up workgroups:1 In Workgroup Manager, click Preferences.
2 Access the shared directory domain by clicking the small globe beneath the toolbar.
3 To authenticate, click the lock.
4 Make the group folder visible in the Dock.
44
Click the Groups button, and select a group. Click Login. In Login Items, select Always and “Add group share point.” Select the group share point in the list and select Hide. Make sure that “Mount item with user’s name and password” is selected. Click Apply Now.
Click Preferences, then click Dock. Select Always and “Add group folder.” Click Apply Now.
5 Set up the workgroup application access so that the application environment on the student computers complements the purpose of the group.
Because the path to an application is saved when you select an application, make sure that the application resides on student computers in the same location as on the computer you’re using to set up application preferences.
Click Preferences, then click Applications. Select Always. Use the list to identify which applications workgroup users can open. Deselect “User can also open all applications on local volumes” so that workgroup users to can only open specified applications and then click Apply Now.
Click Preferences, then click Dock. Use the Dock Items Applications list to indicate which applications you want to appear in the Dock. Be sure you include only applications that the workgroup has access to given the Applications preferences you’ve defined. When you’re finished, click Apply Now.
6 Use Internet preferences to designate a folder in the group folder (Public) for storing files downloaded using Safari. Using Remote Desktop, the teacher could delete files from this folder if required.
Click Preferences, click Internet, and click Web. Select Always. Here are some sample entries for the fields:
Default Web Browser: /Applications/Safari.app
Home Page: http://www.example.com
Search Page: leave blank
Download Files To: /Volumes/Groups/MathStudentProjects/Public
Click Apply Now.
45
Step 13: Set up computer lists and preferences.In this scenario, computer-level preferences are used to manage every student computer, regardless of who uses it and which workgroup is selected after login.
To set up computer-level management:1 In Workgroup Manager, click Accounts.
2 Access the shared directory domain by clicking the small globe beneath the toolbar.
3 To authenticate, click the lock.
4 Click the Computer List button.
5 Click New Computer List to create a computer list that manages all the student computers in the classroom or lab.
6 Click List and name the list and identify each computer.
To quickly add computers to the list, click the Browse (...) button and connect to the computers you want to add.
Click Save when you are done.
7 If you want to restrict use of these computers to certain groups or allow students who don’t have network accounts to use the computers, click Access.
In this scenario, you won’t change the default setting, “All groups can use the computer,” which includes local-only users.
8 To automate student computer shutdown at the end of each day, click Preferences and click Energy Saver, click Schedule, select Always, select Shut Down, select Every Day, specify a time of day, and click Apply Now.
9 To set up the appearance of the login window, click Preferences, click Login, click Login Items, and select Always. Select the items you want to appear in the login window and other optional login behaviors. When you are done, click Apply Now.
10 To provide printer access, click Preferences, click Printing, and select Always. Click Printer List and add the local and remote printers to the User’s Printer List, then click Apply Now.
While you won’t in this scenario, you could click Access and identify a default printer and require administrator privileges to access a printer.
11 To prevent students from copying files to recordable discs, CDs, and CD-ROMs, click Preferences and click Media Access. Select Always. Click Disk Media and deselect all recording options. Click Apply Now.
12 To prevent students from changing System Preferences settings, click Preferences, click System Preferences, and select Always. Use the Show setting to indicate which preferences you want to make accessible to students using the computers, then click Apply Now.
46
Step 14: Perform day-to-day and periodic management activities.Now all the classroom or lab computers are ready for daily student use. Day-to-day monitoring, management, and maintenance activities can be done from the teacher’s computer:Â As students and computers come and go and as curriculum needs dictate, continue
using Workgroup Manager to keep accounts, preferences, and shared folders up to date.
 When you need to update the operating system or add applications to student computers, use Network Install images and Remote Desktop.
 Use Remote Desktop for such activities as deleting files and folders and emptying the Trash on student computers, and restarting computers.
 Provide remote assistance to students with Remote Desktop by sharing your screen with students or controlling their screens, answering ad hoc questions, and monitoring student screens. When you don’t want students to use their computers, use Remote Desktop to lock their screens.
 Remote Desktop generates hardware and software profiles useful when you need to conduct computer inventories.
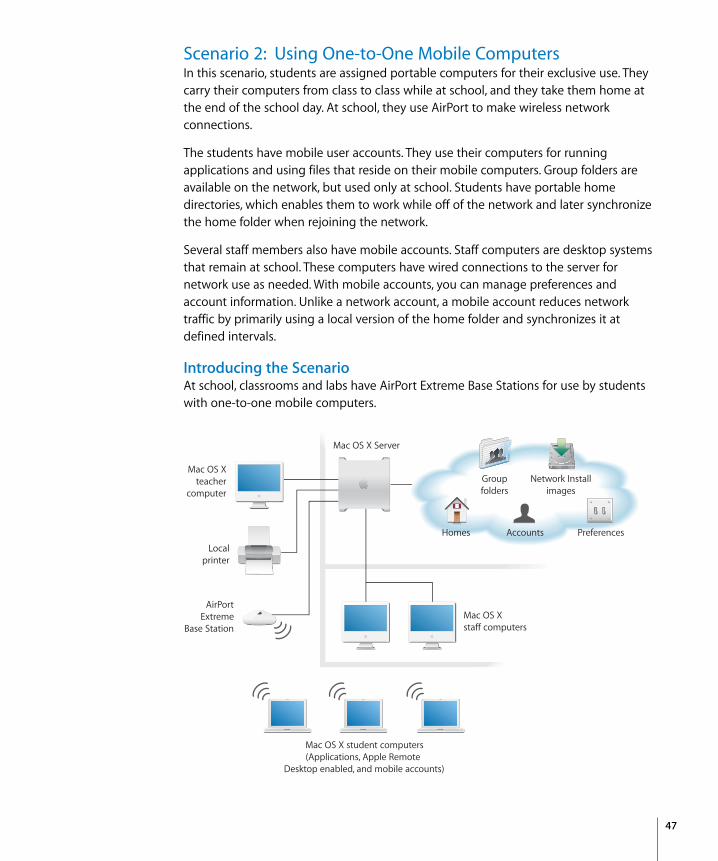
47
Scenario 2: Using One-to-One Mobile Computers In this scenario, students are assigned portable computers for their exclusive use. They carry their computers from class to class while at school, and they take them home at the end of the school day. At school, they use AirPort to make wireless network connections.
The students have mobile user accounts. They use their computers for running applications and using files that reside on their mobile computers. Group folders are available on the network, but used only at school. Students have portable home directories, which enables them to work while off of the network and later synchronize the home folder when rejoining the network.
Several staff members also have mobile accounts. Staff computers are desktop systems that remain at school. These computers have wired connections to the server for network use as needed. With mobile accounts, you can manage preferences and account information. Unlike a network account, a mobile account reduces network traffic by primarily using a local version of the home folder and synchronizes it at defined intervals.
Introducing the ScenarioAt school, classrooms and labs have AirPort Extreme Base Stations for use by students with one-to-one mobile computers.
Mac OS Xteacher
computer
Mac OS X staff computers
Mac OS X student computers(Applications, Apple Remote
Desktop enabled, and mobile accounts)
Accounts
Groupfolders
Network Installimages
Preferences
Localprinter
AirPortExtreme
Base Station
Mac OS X Server
Homes
48
The only time student computers need to be physically attached to the network is when using NetBoot to install Network Install images for initial computer setup. However, users are authenticated using the network server whenever they are using the network over AirPort, and they receive updated user, group, and computer settings if the settings have changed since the last network login:Â A Network Install image sets up student computers with Mac OS X, some additional
applications (including anti-virus software), and settings that enable Apple Remote Desktop so that the teacher can manage the computers.
 As in scenario 1, the teacher’s computer has server administration applications and Remote Desktop installed.
 The students and staff have mobile user accounts. When a user has a mobile account, his or her authentication information and preferences are maintained in the shared Open Directory domain, but cached on the local computer. A student’s login name and password as well as the preferences defined at the user, workgroup, or computer level are the same at school and at home. If you change any of these items, the cached versions are updated the next time the user logs in at school.
When the user is on the network, he or she is authenticated using the network account on the server. When off the network, the user is authenticated using a cached version of the network credentials.
 The primary home folder of a mobile account user resides on the local computer. Each mobile account user in this scenario also has a network home folder, which is automatically synchronized with the local home folder.
 To create mobile accounts, you use the Mobility preference, usually at the user or computer-level. You’d use user-level settings when mobile account users need to use different computers. When the user logs in to any computer on the network, the user would get a mobile account after enabling the his or her portable home directory.
When mobile account users have dedicated computers, as in this scenario, computer-level settings are useful. When the user first logs in to the computer, a mobile account and a local home folder for the user’s portable home directory are created on it. Any other network user who logs in to the computer also gets a mobile account and portable home directory.
You could also set the Mobility preference for a workgroup. Any network user who picks the workgroup at login gets a mobile account on the computer unless he or she already has one on it.
 When a student logs in at school to a client computer on which the student has enabled his or her portable home directory, the network version of the account is used to authenticate the student, but the student uses the local home folder located on the client computer. This minimizes network traffic in a wireless situation.
49
When the student logs in to a client computer on which he or she has not enabled his or her mobile account and the Mobility preference isn’t managed for that computer, the student uses a network home folder.
 In this scenario, workgroups are also used to regulate access to group folders on the network. Preferences at the workgroup level make network folder access easy and deny access to local applications. They also set up school printer access that’s appropriate for the group.You can set up workgroups for individual classes and labs or for larger groupings of students.
 One computer list covers all the student computers. The computer list is set up to give all workgroups access to its computers, minimizing the need to change settings when students need to use new workgroups.A separate computer list is set up for the staff computers, so different computer-level preferences can be used if needed.
 In this scenario, we’ll enable mobile account creation at the computer level. Other computer-level preferences for student computers look like this: Energy Saver preferences display the battery status of mobile computers in the
student computer menu bar. Media Access and System Preferences settings restrict use of recordable media and
changes to basic computer settings. Login options display local users, which include users with mobile accounts.
 Using Apple Remote Desktop in a wireless environment is faster when you follow the guidelines in the documentation, available at www.apple.com/remotedesktop/.
Setting Up the ScenarioHere’s the sequence of steps that could be used to set up this scenario.
Step 1: Connect staff and teacher computers, the server, the AirPort Extreme Base Station, and the printer.The printer, teacher and staff desktop computers, and the AirPort Extreme Base Station are directly connected to the school network using Ethernet.
What you need and the steps you use are explained in step 1 on page 32. The only difference is the student computers aren’t connected to the network. Instead, the AirPort Extreme Base Station is plugged into the network.
Step 2: Set up the server.See step 2 on page 33 for instructions.
Step 3: Set up core services and the base station.See step 3 on page 34 for information about setting up core services of Mac OS X Server.
50
See Designing AirPort Extreme Networks (accessible at www.apple.com/airportextreme/) for AirPort Extreme Base Station setup instructions. You’ll set up the AirPort Extreme Base Station to bridge between the network’s wireless and wired computers. With bridging turned on, AirPort computers have access to all services on the Ethernet network, including DHCP.
Step 4: Set up the teacher’s computer.See step 4 on page 35 for instructions.
Step 5: Set up the home folder share point.Mobile account users have both local and network home folders. By setting up a home folder share point, users can synchronize files between their local and network home folders.
See step 5 on page 36 for instructions.
Step 6: Set up student accounts.See step 6 on page 38 for instructions.
Step 7: Set up a prototype student computer.See step 7 on page 38 for instructions. Also configure the computer to use AirPort.
To set up the computer for wireless AirPort connections:1 Make sure the computer has an AirPort Card.
2 In the Network pane of System Preferences, choose Network Port Configurations from the Show pop-up menu. Make sure the AirPort box is checked. Click Apply Now if you make a change.
3 Choose AirPort from the Show pop-up menu, and click TCP/IP. In the Configure IPv4 pop-up menu, choose the method in the Configure IPv4 pop-up menu by which the computer will receive an IP address from the base station, usually “Using DHCP.”
4 Click AirPort to configure the default network.
In the “By default join” pop-up menu, click “Preferred networks.” Use the network list’s Add button to add your school’s network to the list. When adding your school’s wireless network to the list, choose your wireless network’s security protocol in the “Wireless Security” pop-up menu.
Step 8: Create the student computer install image.See step 8 on page 40 for instructions.
Step 9: Set up other student computers.See step 9 on page 41 for instructions. Before using a Network Install image to start up student computers: Make sure they all have AirPort cards. Directly connect the computers to the Ethernet network.

51
Step 10: Set up student user account preferences.Most of the preferences in this scenario are managed at the workgroup or computer level. However, you can optionally set up a user’s preferences so that a local mobile account is created on any computer the user logs in to.
To set up user-level mobile account preferences:1 In Workgroup Manager, click Preferences.
2 Access the shared directory domain by clicking the small globe beneath the toolbar.
3 To authenticate, click the lock.
4 In the user list, select one or more users.
5 Click Mobility, and select Always.
6 Select “Synchronize account for offline use.” Optionally, select “Require confirmation before creating a mobile account.”
7 Click Rules, click Login & Logout Sync, and select Always. Add folders to the “Synchronize at login and logout” list to synchronize the selected folders when students log into and log off of the computer.
Step 11: Set up student group accounts and folders.Create several kinds of student groups: Groups for individual classes and labs A group for use when no network connection is needed
See step 11 on page 42 for instructions. Create group folders only for groups that support individual classes and labs.
Warning: If you select “Require confirmation before creating a mobile account,” users can choose to never enable their mobile accounts. The user’s account is effectively reduced to a network account for this computer.

52
Step 12: Set up workgroups.Set up preferences at the workgroup level for each student group to facilitate network folder access.
To set up a classroom or lab workgroup:1 In Workgroup Manager, click Preferences.
2 Access the shared directory domain by clicking the small globe beneath the toolbar.
3 To authenticate, click the lock.
4 In the group list, select a classroom or lab student group.
5 Make the group folder visible in the Dock.
Click Preferences, then click Login. In the Login Items settings, select Always and “Add group share point.” Select the group share point in the list and select Hide. Make sure that “Mount item with user’s name and password” is selected. Click Apply Now.
Click Preferences, then click Dock. Select Always and “Add group folder.” Click Apply Now.
6 Set up Applications preferences so students can’t run local applications when using this workgroup.
Click Preferences, then click Applications. Select Always. Select “User can open all applications except these” to deny student access to applications listed. Deselect “User can also open all applications on local volumes” to deny student access to other local applications. Click Apply Now.
7 Set up Printing preferences so students can access school and personal printers.
Click Preferences, click Printing, click Printer List, and select Always. Add networked printers to the User’s Printer List so that students can print from these printers. Deselect “Allow user to modify the printer list” to disallow students from changing the selected network printers. Select “Allow printers that connect directly to user’s computer” so that students can print using personal printers when off of the network. Click Apply Now.
Step 13: Set up computer lists and preferences.Define a computer list and associated preferences for student computers and another one for staff computers.
To set up computer-level management of student mobile computers:1 In Workgroup Manager, click Accounts.
2 Access the shared directory domain by clicking the small globe beneath the toolbar.
3 To authenticate, click the lock.
4 Click the Computer List button (on the left).
5 Click New Computer List to create a computer list that manages all the student computers in the classroom or lab.
53
6 Click List and name the list and identify each computer. Click Save when you are finished.
To quickly add computers to the list, click the Browse (...) button and connect to the computers you want to add.
Click Save when you are done.
7 To display the status of the mobile computer battery in each computer’s menu bar, click Preferences and click Energy Saver, click Battery Menu, select Always, select “Show battery status in the menu bar,” and click Apply Now.
8 To set up the appearance of the login window so that it lists all local users, including mobile accounts, click Preferences, click Login, and click Login Window. Select “Show local users,” then click Apply Now.
9 To prevent students from copying files to recordable discs, CDs, and CD-ROMs, click Preferences and click Media Access. Select Always. Click Disk Media and deselect all of the options. Click Apply Now.
10 To prevent students from changing System Preferences settings, click Preferences, click System Preferences, and select Always. Use the Show setting to indicate which preferences you want to make accessible to students using the computers, then click Apply Now.
Step 14: Perform day-to-day and periodic management activities.Now you are ready to give the mobile computers to the students.
You can do day-to-day monitoring, management, and maintenance activities from the teacher’s computer:Â As students and computers come and go and as curriculum needs dictate, continue
using Workgroup Manager to keep accounts, preferences, and shared folders up to date.
 When you need to update the operating system or add applications to student computers, use Network Install images and Remote Desktop. Students need to plug their computers into the school network when using Network Install images.
 You can use Remote Desktop, but follow instructions in the documentation available at www.apple.com/remotedesktop/ to ensure adequate performance and correct behavior in a wireless AirPort environment.
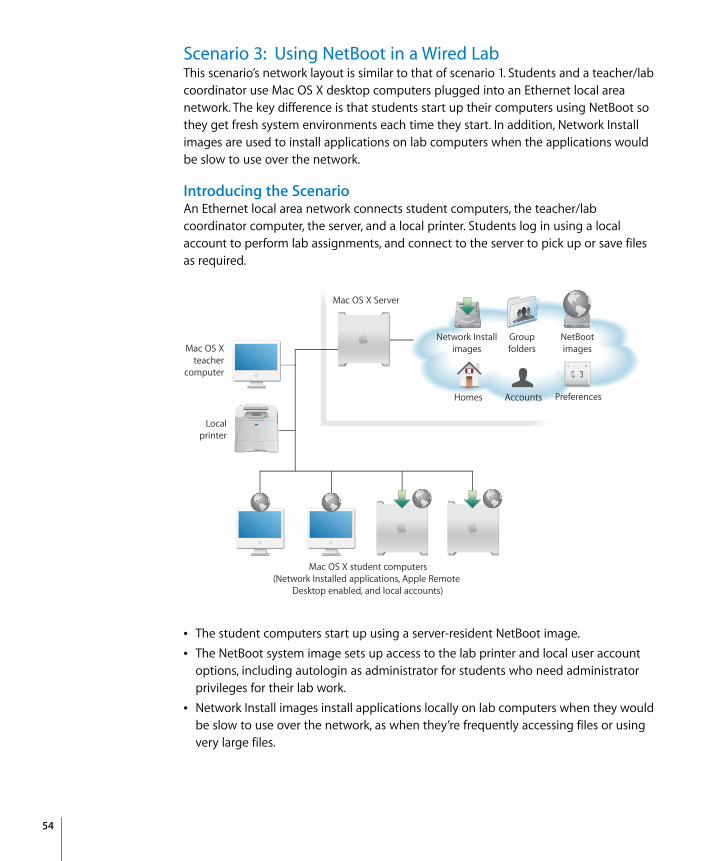
54
Scenario 3: Using NetBoot in a Wired Lab This scenario’s network layout is similar to that of scenario 1. Students and a teacher/lab coordinator use Mac OS X desktop computers plugged into an Ethernet local area network. The key difference is that students start up their computers using NetBoot so they get fresh system environments each time they start. In addition, Network Install images are used to install applications on lab computers when the applications would be slow to use over the network.
Introducing the ScenarioAn Ethernet local area network connects student computers, the teacher/lab coordinator computer, the server, and a local printer. Students log in using a local account to perform lab assignments, and connect to the server to pick up or save files as required.
 The student computers start up using a server-resident NetBoot image.  The NetBoot system image sets up access to the lab printer and local user account
options, including autologin as administrator for students who need administrator privileges for their lab work.
 Network Install images install applications locally on lab computers when they would be slow to use over the network, as when they’re frequently accessing files or using very large files.
Accounts
Groupfolders
Network Installimages
NetBootimages
Localprinter
Mac OS Xteacher
computer
Mac OS X student computers(Network Installed applications, Apple Remote
Desktop enabled, and local accounts)
Preferences
Mac OS X Server
Homes
55
 Students use local accounts for lab work, and connect to the server (using Go > Connect to Server) and authenticate using their network user account to copy files from or save files to group folders or home folders.
 Teachers and administrators use Remote Desktop to control student computer restarts, observe lab activities, demonstrate tasks, and so forth.
Setting Up the ScenarioHere is the sequence of steps that could be used to set up this scenario.
Step 1: Connect student and teacher computers, the server, and the local printer.For instructions, see step 1 on page 32.
Step 2: Set up the server.For instructions, see step 2 on page 33.
Step 3: Set up core services.For instructions, see step 3 on page 34.
Step 4: Set up the teacher/lab coordinator computer.For instructions, see step 4 on page 35.
Step 5: Set up the home folder share point.See step 5 on page 36 for instructions.
Step 6: Set up student accounts.See step 6 on page 38 for instructions.
Step 7: Set up a prototype student computer.Instead of visiting each lab computer to install and configure software, you’ll use the NetBoot service to start computers from a single image. In this step, you set up a prototype student computer that has the image you want to use to start up other lab computers.
To set up a prototype student computer:1 Make sure the computer is connected to the network.
2 If it is not already installed, install Mac OS X version 10.4 on the student computer. Use an administrator name and password for the first user. You’ll need the administrator name and password for Apple Remote Desktop administration and other computer administration activities.
3 Update the computer to the latest version of Mac OS X version 10.4 using the Software Update pane of System Preferences or install discs.
4 Install applications that students can run over the network without reducing network performance. You can also remove applications you don’t want students to use.
56
5 Open Directory Access (located in /Applications/Utilities/) so you can configure the search policy of the computer to use the local directory only. Click Authentication, click the lock to authenticate as an administrator of the computer, then choose “Local directory” from the Search pop-up menu.
6 Enable the monitoring and controlling of the computer from the administrator computer using Remote Desktop.
Open System Preferences, click Sharing, and select the Apple Remote Desktop checkbox. Select “Show status in menu bar” if you want students to be able to send attention requests to the teacher.
Click Access Privileges and configure the settings to enable administration and control of the computer remotely. To give a teacher full control over the computers, select the On checkbox next to the teacher and select all of the allowed actions.
7 Use the Accounts pane of System Preferences to create one or more local accounts for lab student use.
For students who need administrator privileges on the computer, enable autologin as an administrator. Students who use the autologin account won’t know the administrator password, so won’t be able to enter it to make certain changes on the computer. In the Accounts pane, select the student account, click Login Options, and choose the administrator user from the “Automatically log in as” pop-up menu.
8 Set up access to the lab printer using the Print & Fax pane of System Preferences.
9 Test the computer to make sure it works as you intend.
Step 8: Create the NetBoot image.After you set up your prototype student computer, you can use the System Image Utility (located in /Applications/Server/) to create a NetBoot image of that computer’s startup disk.
What you’ll need:Â An external FireWire hard drive that you can start up from, the System Image Utility,
and 5 GB of free space on the target computer
To create the NetBoot image:1 Connect the external drive to the server or the teacher’s computer. Place a copy of the
System Image Utility on the external drive.
2 Connect the external drive to the prototype computer and restart from the external drive. (You can’t make an image of the volume that a computer uses to start up.)
3 Open System Image Utility and create a new NetBoot image. In the Contents pane, choose the internal drive of the student computer in the Image Source pop-up menu. After clicking Create, choose the external drive in the Where pop-up menu.
4 Turn off the prototype computer or restart it from its internal drive. Then connect the external drive to the server.

57
5 Copy the image folder (.nbi) from the external drive into/Library/NetBoot/NetBootSPn/.
Step 9: Prepare an application install image.Now you’ll create a Network Install image for installing applications that you don’t want to run over the network.
To create a Network Install image:1 Copy installation packages for the applications to the server.
2 Open System Image Utility on the server and create a new install image.
3 In the Contents pane, add the application install packages to the Other Items list. Choose Custom Package Install from the Image Source pop-up menu.
To automate installation, select “Enable automated installation.” Select “Install on volume” and type the common internal disk name for the student computers. (This only works if the drives all have the same name. On systems with a different volume name, you’ll have to interact with the installer at those computers.) Unless you are installing Mac OS X, disable “Erase the target volume before installing” and “Restart the client computer after installing.”
4 Save the image in the NetBootSPn share point on the server.
Step 10: Set up other lab computers.Use Server Admin to configure NetBoot service, so that you can use the images you just created to set up other lab computers.
To use the NetBoot and Network Install images:1 On the server or the administrator’s computer, open Server Admin and connect to the
server.
2 Click NetBoot, then click Settings.
3 Click General and make sure NetBoot is enabled on the Ethernet port that connects the server to the lab computers.
4 Click Images and make sure both the Mac OS X NetBoot image you created from the prototype computer and the application install image are enabled.
5 Set the NetBoot image as the default image.
6 Start NetBoot service.
7 Start up each student computer using NetBoot or Network Install images.
To start up a computer using a non-default NetBoot or Network Install image, set the Startup Disk preferences to the NetBoot or Network Install image. To start up a computer using the default NetBoot or Network Install image, start each computer while holding down the N key or while holding down the Option key and then choosing the NetBoot or Network Install image.
58
Step 11: Set up group accounts and folders.Group folders offer a way to provide students with lab-specific instructions and files and collect finished files when exercises are completed.
For instructions, see step 11 on page 42.
Planning Your Own Mac OS X DeploymentThis final section contains a few pointers you may find useful when planning your own Mac OS X computer rollout.
For more planning guidelines, see the documents online at www.apple.com/server/documentation/:Â The getting started guide has a chapter titled “Before You Begin.” It advises you on
planning and preparing for setup and installation of Mac OS X Server. Administration guides for individual services provide service-specific planning
guidelines. For example, the Open Directory administration guide has a chapter called “Open Directory Planning.”
Also see the documents for AirPort and Apple Remote Desktop, available online: For AirPort, see www.apple.com/airportextreme/. For Apple Remote Desktop, see www.apple.com/remotedesktop/.
Where to StartYou generally don’t plan deployment for a single lab or classroom. You usually start planning at the building level.
For example, a common wired school would contain:Â A wiring closet that contains:
 A connection to the Internet or a wide area network that belongs to the district and interconnects various schools over a router or switch. This connection is often configured by an ISP or by a network coordinator for the school district, rather than by building-level staff.
 A wiring rack containing switches that cross-connect all the computers in the building. The building itself might be wired with gigabit fiber connections to each classroom and 100 MB category 5 Ethernet connections to each computer.
 One or more servers, the number of which is based on the number of computer systems to be supported and the services to be provided. Some services are best provided using a dedicated server, while other services can share a computer. See “Determining Server and Storage Requirements” on page 59.
 A lab with more than ten student computers and a teacher computer.
59
 Classrooms with computers. Classrooms often have fewer student computers, perhaps two or three, plus a teacher computer (for assignment tracking, grades, and so forth). Some classrooms have more, some fewer computers, but most have at least one.
Identifying Computer Management GoalsAnswering questions such as these helps you understand the tasks you’ll need to accomplish: How will students and staff use computers? What services should be set up on the server? What account information and folders are best maintained centrally on the server? What levels and depth of preference management are desirable? Will mobile computers and mobile accounts be used? Which computers should students and staff have access to? Why? Do you need to implement a password policy?
Determining Server and Storage RequirementsThese requirements vary with the number of users and the available storage space on the server. For example, if your network has less than 350 users, one server is adequate for
account management and authentication, home folders, and group folders. This guideline assumes 1 GB/user of storage space per drive module, in an Xserve computer with 400 GB of storage. More storage can be provided with additional drive modules and/or RAID.
 For more than 350 users, you should separate your home folder and group folder server from your account management and authentication server. You’ll need one home folder and group folder server for every 350 users; the server should provide about 400 GB of storage. If you are using servers with less storage capacity, scale down the number of home folders hosted on the server.You will ideally have several servers to allocate network services across. One server acts as the Open Directory master; this server could also host primary services such as DNS, DHCP, NTP, firewall, and web as needed. You could also have a server host an Open Directory replica, which provides failover protection. If additional dedicated services are needed, explore using servers specifically for those tasks, such as QuickTime streaming or software update. By starting services on dedicated servers, you can more easily isolate and troubleshoot issues with specific services. If a hardware failure occurs, it will only disrupt the one service and not the rest of the network.
60
By hosting collaboration services such as mail, iChat, and weblog on internal servers, you can control access to these services. These services are unique in that they can be used by teachers to communicate with their students on a private network. You can configure these services to allow communication only within the school.
Group folders are often shared among many computers at the same time. Avoid more than 150–300 concurrent connections to a group folder by establishing multiple workgroups and distributing users into more than one workgroup.
 Do not use more than six automountable share points per server. Consider combining automountable share points to reduce the total number of share points.
Assessing Imaging RequirementsFor Network Install images, determine how many different images you’ll need. Often this decision is affected by the extent to which you manage preferences:Â One option is to create distinct Network Install images for different kinds of users
(teachers, students, staff ). Distinct images physically limit the characteristics of a computer. If it’s set up for a student, a computer wouldn’t support the special application needs of teachers or staff members.
 Alternatively, you can create some general-purpose images and use preferences to manage which components on the computer are accessible to different kinds of users.
Staff computers, used by administrators, accountants, and other school staff, have special requirements and may be less amenable to preference management. Other special cases include student computers used in labs for advanced graphics or programming students. Special-purpose computers may require individual handling.
If you need to use NetBoot or Network Install images frequently, you’ll probably want to devote a server to image serving. On the other hand, if you can limit system image usage to installing software during student breaks, you can use an existing server, turning NetBoot service on and off as required.
Deciding Between Using Wired and Wireless NetworksWhen you are deciding between using wired or wireless networks, you usually choose which to use based on the environment and purpose of the computers: choose wired networks for desktop computers, and wireless networks for mobile computers. Your decision then forms the groundwork for future decisions about what kind of accounts you will give users, how to configure those accounts, and how to configure those computers.
61
Only wired networks can use NetBoot. NetBoot enables computers to start up from a standardized Mac OS configuration. Because the NetBoot image is stored on a NetBoot server, users cannot permanently change the local computer’s settings. Using NetBoot also eases updating client computers: you can update a group of client computers by updating one NetBoot image.
Wired networks typically have more available network bandwidth. If your students edit large video files with Final Cut Pro, a wired network is better suited than a wireless network. When you deploy wireless computers, carefully manage their bandwidth usage. You can give users mobile accounts with portable home directories, which allow you to configure synchronization settings. You can choose to synchronize their documents folders but not their folders containing video files. Your students would have to manually transfer video files to their wireless computers from their network home folder. By not synchronizing video folders, the wireless computers no longer regularly transfer video files, saving bandwidth.
Deploying Your School’s Network Within a District-Wide NetworkBefore configuring any servers, make sure that you know what services are provided by your school district and by any other external sources. For example, your district might provide centralized DHCP and DNS service, in which case you may not need to run DHCP and DNS servers. This decision depends on the network backbone from the district and whether that can support your expected Internet traffic. Before deploying your own network, carefully coordinate with your district to ensure you duplicate available services only when necessary.
Choosing Accounts Types for Your UsersWhen you assign account types, you should consider who the users are, what level of control you want over their computer use, and who else uses particular computers. If you create generic local or network accounts, you cannot track the usage of specific users. Generic accounts also make it more difficult for individual users to maintain personal copies of their own documents and files. If you create local accounts for each user, managing multiple computers becomes arduous.
Assigning network accounts with network-based home folders allows each user to maintain their own set of documents and files while allowing you to easily manage accounts. Network accounts with only network-based home folders require heavy bandwidth when working with large files.
62
You can assign mobile accounts, enabling users to work on files stored in a local home folder that is synchronized with a network home folder. When using mobile accounts, you should carefully plan your synchronization settings. For example, configure folders containing video files to synchronize in the background and configure folders containing smaller documents to synchronize at login and logout. This reduces the amount of time required to log out because the computer has already synchronized the larger files in the background, and synchronizes only the smaller files at logout.
If you assign mobile accounts to users, you should use seating charts and require users to always use the same workstations. When users change workstations, they create new local home folders when enabling their portable home directories. You may then use a logout script that removes the created local home folder to stop excessive home folder proliferation.
For both network accounts and mobile accounts, create a password policy appropriate for the educational level of your users. For example, first-grade students might not require passwords of any specific length or complexity, while 12th-grade students and teachers may require complex passwords. For more information about account types, see the user management guide.
Organizing User InformationEstablish conventions for various account elements:Â For names, use characters that are URL compliant: A-Z, a-z, 0-9, -, _. See the user
management guide for complete information about valid names and recommended conventions.
 UIDs should be unique throughout the network. Don’t assign students IDs that are the same for multiple students. UIDs can range from 501 to 2,147,483,648. Part of the UID can be set up so it identifies particular kinds of students. For example, UIDs for students in the class of 2011 might all start with 2011.
Take into account how long a student will be in the system. If a student’s ID needs to be good for only 2 years, you have more numbers available than in a scenario where the ID needs to last 8 years.
 Passwords shouldn’t be easy to guess. You can force users to change their passwords regularly, to make them more secure. See the user management guide for ideas.
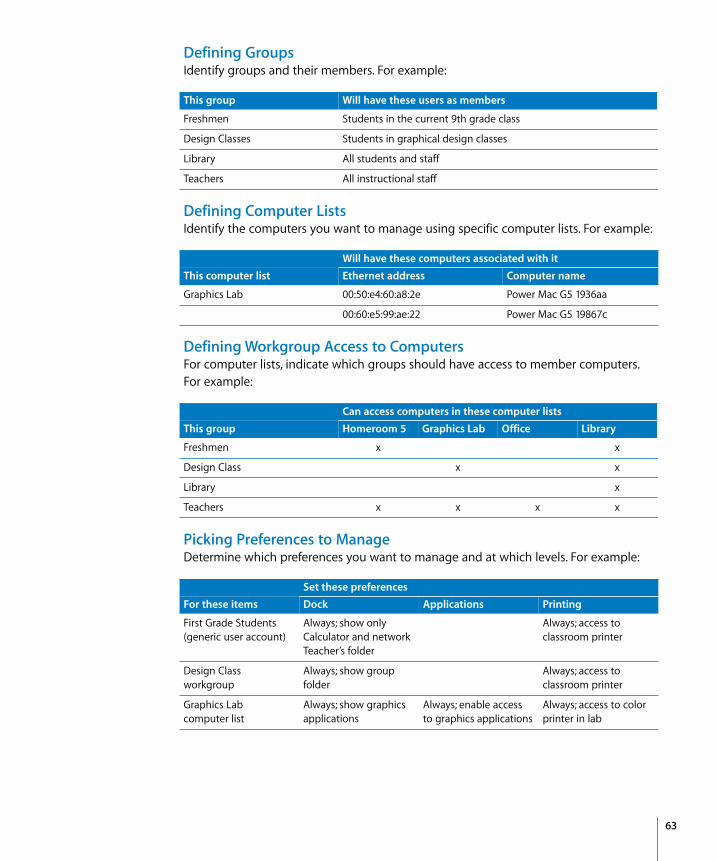
63
Defining GroupsIdentify groups and their members. For example:
Defining Computer ListsIdentify the computers you want to manage using specific computer lists. For example:
Defining Workgroup Access to ComputersFor computer lists, indicate which groups should have access to member computers. For example:
Picking Preferences to ManageDetermine which preferences you want to manage and at which levels. For example:
This group Will have these users as members
Freshmen Students in the current 9th grade class
Design Classes Students in graphical design classes
Library All students and staff
Teachers All instructional staff
Will have these computers associated with it
This computer list Ethernet address Computer name
Graphics Lab 00:50:e4:60:a8:2e Power Mac G5 1936aa
00:60:e5:99:ae:22 Power Mac G5 19867c
Can access computers in these computer lists
This group Homeroom 5 Graphics Lab Office Library
Freshmen x x
Design Class x x
Library x
Teachers x x x x
Set these preferences
For these items Dock Applications Printing
First Grade Students (generic user account)
Always; show only Calculator and network Teacher’s folder
Always; access to classroom printer
Design Class workgroup
Always; show group folder
Always; access to classroom printer
Graphics Lab computer list
Always; show graphics applications
Always; enable access to graphics applications
Always; access to color printer in lab
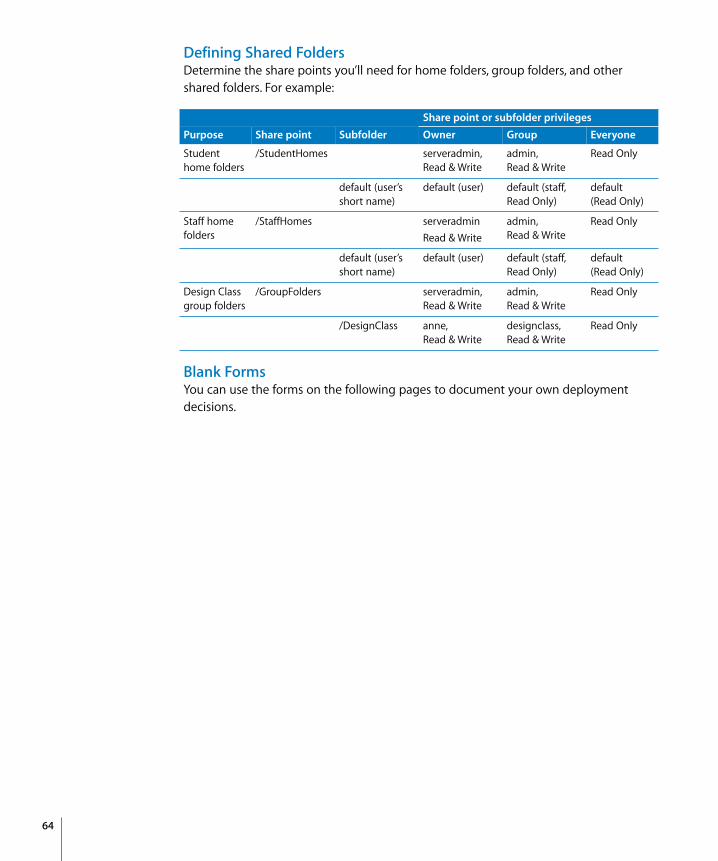
64
Defining Shared FoldersDetermine the share points you’ll need for home folders, group folders, and other shared folders. For example:
Blank FormsYou can use the forms on the following pages to document your own deployment decisions.
Share point or subfolder privileges
Purpose Share point Subfolder Owner Group Everyone
Student home folders
/StudentHomes serveradmin, Read & Write
admin, Read & Write
Read Only
default (user’s short name)
default (user) default (staff, Read Only)
default (Read Only)
Staff home folders
/StaffHomes serveradminRead & Write
admin, Read & Write
Read Only
default (user’s short name)
default (user) default (staff, Read Only)
default (Read Only)
Design Class group folders
/GroupFolders serveradmin, Read & Write
admin,Read & Write
Read Only
/DesignClass anne, Read & Write
designclass, Read & Write
Read Only

65
Groups
This group Will have these users as members

66
Computer Lists
Will have these computers associated with it
This computer list Ethernet address Computer name

67
Workgroup Access to Computers
This group Can access computers in these computer lists

68
Preferences to Manage (1 of 5)
Set these preferences
For these items Applications Classic Dock

69
Preferences to Manage (2 of 5)
Set these preferences
For these items Energy Saver Finder Internet

70
Preferences to Manage (3 of 5)
Set these preferences
For these items Login Media Access Mobility

71
Preferences to Manage (4 of 5)
Set these preferences
For these items Network Printing Software Update

72
Preferences to Manage (5 of 5)
Set these preferences
For these items System Preferences Universal Access

73
Shared Folders
Share point or subfolder privileges
Purpose Share point Subfolder Owner Group Everyone

74
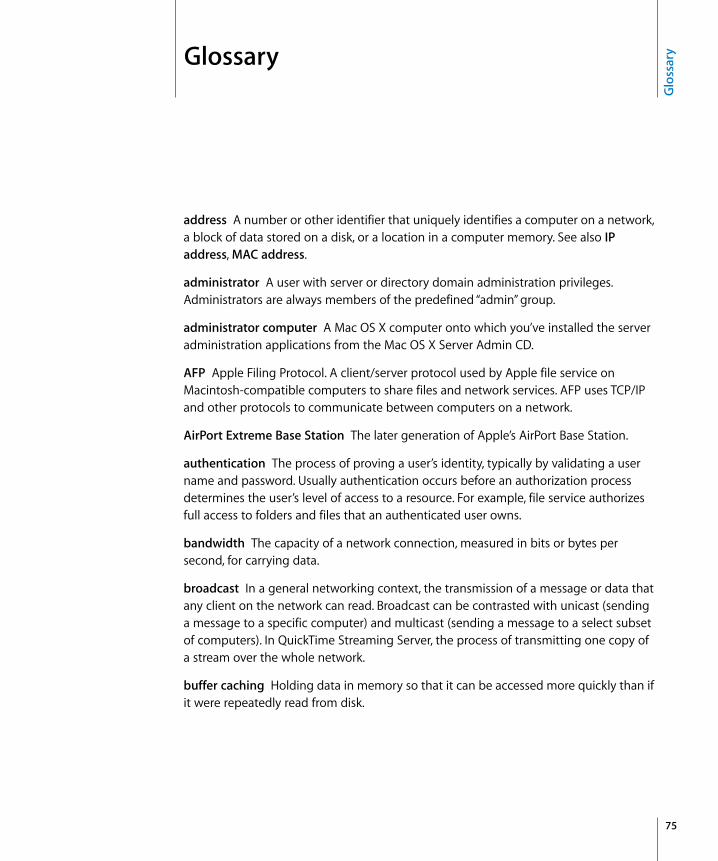
75
Glo
ssar
yGlossary
address A number or other identifier that uniquely identifies a computer on a network, a block of data stored on a disk, or a location in a computer memory. See also IP address, MAC address.
administrator A user with server or directory domain administration privileges. Administrators are always members of the predefined “admin” group.
administrator computer A Mac OS X computer onto which you’ve installed the server administration applications from the Mac OS X Server Admin CD.
AFP Apple Filing Protocol. A client/server protocol used by Apple file service on Macintosh-compatible computers to share files and network services. AFP uses TCP/IP and other protocols to communicate between computers on a network.
AirPort Extreme Base Station The later generation of Apple’s AirPort Base Station.
authentication The process of proving a user’s identity, typically by validating a user name and password. Usually authentication occurs before an authorization process determines the user’s level of access to a resource. For example, file service authorizes full access to folders and files that an authenticated user owns.
bandwidth The capacity of a network connection, measured in bits or bytes per second, for carrying data.
broadcast In a general networking context, the transmission of a message or data that any client on the network can read. Broadcast can be contrasted with unicast (sending a message to a specific computer) and multicast (sending a message to a select subset of computers). In QuickTime Streaming Server, the process of transmitting one copy of a stream over the whole network.
buffer caching Holding data in memory so that it can be accessed more quickly than if it were repeatedly read from disk.
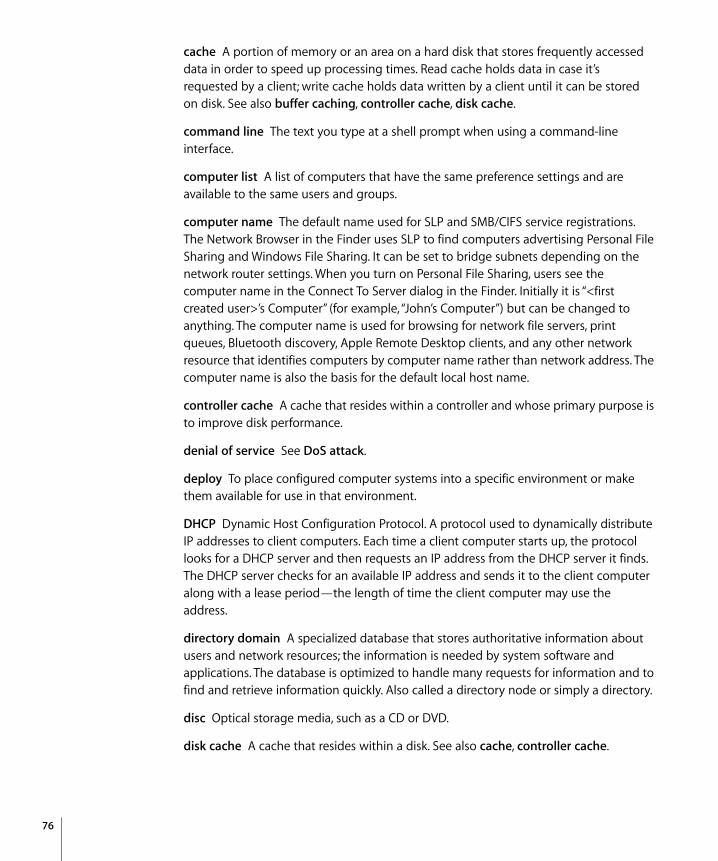
76
cache A portion of memory or an area on a hard disk that stores frequently accessed data in order to speed up processing times. Read cache holds data in case it’s requested by a client; write cache holds data written by a client until it can be stored on disk. See also buffer caching, controller cache, disk cache.
command line The text you type at a shell prompt when using a command-line interface.
computer list A list of computers that have the same preference settings and are available to the same users and groups.
computer name The default name used for SLP and SMB/CIFS service registrations. The Network Browser in the Finder uses SLP to find computers advertising Personal File Sharing and Windows File Sharing. It can be set to bridge subnets depending on the network router settings. When you turn on Personal File Sharing, users see the computer name in the Connect To Server dialog in the Finder. Initially it is “<first created user>’s Computer” (for example, “John’s Computer”) but can be changed to anything. The computer name is used for browsing for network file servers, print queues, Bluetooth discovery, Apple Remote Desktop clients, and any other network resource that identifies computers by computer name rather than network address. The computer name is also the basis for the default local host name.
controller cache A cache that resides within a controller and whose primary purpose is to improve disk performance.
denial of service See DoS attack.
deploy To place configured computer systems into a specific environment or make them available for use in that environment.
DHCP Dynamic Host Configuration Protocol. A protocol used to dynamically distribute IP addresses to client computers. Each time a client computer starts up, the protocol looks for a DHCP server and then requests an IP address from the DHCP server it finds. The DHCP server checks for an available IP address and sends it to the client computer along with a lease period—the length of time the client computer may use the address.
directory domain A specialized database that stores authoritative information about users and network resources; the information is needed by system software and applications. The database is optimized to handle many requests for information and to find and retrieve information quickly. Also called a directory node or simply a directory.
disc Optical storage media, such as a CD or DVD.
disk cache A cache that resides within a disk. See also cache, controller cache.
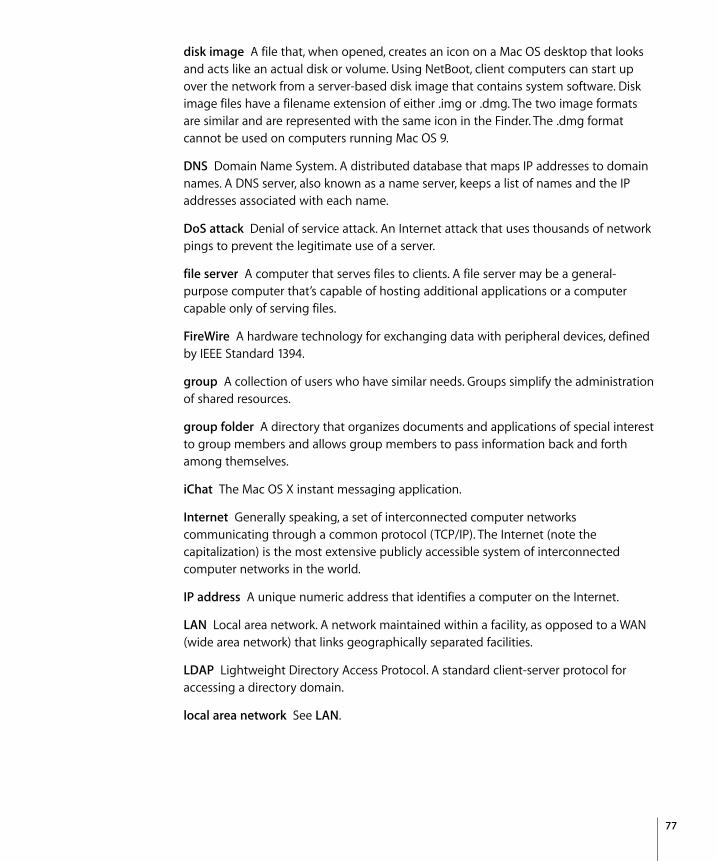
77
disk image A file that, when opened, creates an icon on a Mac OS desktop that looks and acts like an actual disk or volume. Using NetBoot, client computers can start up over the network from a server-based disk image that contains system software. Disk image files have a filename extension of either .img or .dmg. The two image formats are similar and are represented with the same icon in the Finder. The .dmg format cannot be used on computers running Mac OS 9.
DNS Domain Name System. A distributed database that maps IP addresses to domain names. A DNS server, also known as a name server, keeps a list of names and the IP addresses associated with each name.
DoS attack Denial of service attack. An Internet attack that uses thousands of network pings to prevent the legitimate use of a server.
file server A computer that serves files to clients. A file server may be a general-purpose computer that’s capable of hosting additional applications or a computer capable only of serving files.
FireWire A hardware technology for exchanging data with peripheral devices, defined by IEEE Standard 1394.
group A collection of users who have similar needs. Groups simplify the administration of shared resources.
group folder A directory that organizes documents and applications of special interest to group members and allows group members to pass information back and forth among themselves.
iChat The Mac OS X instant messaging application.
Internet Generally speaking, a set of interconnected computer networks communicating through a common protocol (TCP/IP). The Internet (note the capitalization) is the most extensive publicly accessible system of interconnected computer networks in the world.
IP address A unique numeric address that identifies a computer on the Internet.
LAN Local area network. A network maintained within a facility, as opposed to a WAN (wide area network) that links geographically separated facilities.
LDAP Lightweight Directory Access Protocol. A standard client-server protocol for accessing a directory domain.
local area network See LAN.
78
log in (verb) The act of starting a session with a system (often by authenticating as a user with an account on the system) in order to obtain services or access files. Note that logging in is separate from connecting, which merely entails establishing a physical link with the system.
MAC address Media access control address. A hardware address that uniquely identifies each node on a network. For AirPort devices, the MAC address is called the AirPort ID.
Mac OS X The latest version of the Apple operating system. Mac OS X combines the reliability of UNIX with the ease of use of Macintosh.
Mac OS X Server An industrial-strength server platform that supports Mac, Windows, UNIX, and Linux clients out of the box and provides a suite of scalable workgroup and network services plus advanced remote management tools.
managed preferences System or application preferences that are under administrative control. Workgroup Manager allows administrators to control settings for certain system preferences for Mac OS X managed clients.
multicast In general, the simultaneous transmission of a message to a specific subset of computers on a network. See also broadcast, unicast. In QuickTime streaming, an efficient, one-to-many form of streaming. Users can join or leave a multicast but cannot otherwise interact with it.
NAT Network Address Translation. A method of connecting multiple computers to the Internet (or any other IP network) using one IP address. NAT converts the IP addresses you assign to computers on your private, internal network into one legitimate IP address for Internet communications.
NetBoot server A Mac OS X server on which you’ve installed NetBoot software and have configured to allow clients to start up from disk images on the server.
NTP Network time protocol. A network protocol used to synchronize the clocks of computers across a network to some time reference clock. NTP is used to ensure that all the computers on a network are reporting the same time.
Open Directory The Apple directory services architecture, which can access authoritative information about users and network resources from directory domains that use LDAP, NetInfo, or Active Directory protocols; BSD configuration files; and network services.
Open Directory master A server that provides LDAP directory service, Kerberos authentication service, and Open Directory Password Server.

79
package install image A file that you can use to install packages. Using NetBoot, client computers can start up over the network using this image to install software. Unlike block copy disk images, you can use same package install image for different hardware configurations.
password policy A set of rules that regulate the composition and validity of a user’s password.
root An account on a system that has no protections or restrictions. System administrators use this account to make changes to the system’s configuration.
server A computer that provides services (such as file service, mail service, or web service) to other computers or network devices.
share point A folder, hard disk (or hard disk partition), or CD that’s accessible over the network. A share point is the point of access at the top level of a group of shared items. Share points can be shared using AFP, Windows SMB, NFS (an “export”), or FTP protocols.
short name An abbreviated name for a user. The short name is used by Mac OS X for home directories, authentication, and email addresses.
static IP address An IP address that’s assigned to a computer or device once and is never changed.
streaming Delivery of video or audio data over a network in real time, as a stream of packets instead of a single file download.
UID User ID. A number that uniquely identifies a user within a file system. Mac OS X computers use the UID to keep track of a user’s directory and file ownership.
unicast The transmission of data to a single recipient or client. If a movie is unicast to a user using RSTP, the user can move freely from point to point in an on-demand movie.
URL Uniform Resource Locator. The address of a computer, file, or resource that can be accessed on a local network or the Internet. The URL is made up of the name of the protocol needed to access the resource, a domain name that identifies a specific computer on the Internet, and a hierarchical description of a file location on the computer.
user name The long name for a user, sometimes referred to as the user’s “real” name. See also short name.
weblog A webpage that hosts chronologically ordered entries. It functions as an electronic journal or newsletter. Weblog service lets you create weblogs that are owned by individual users or by all members of a group.

80
workgroup A set of users for whom you define preferences and privileges as a group. Any preferences you define for a group are stored in the group account.